Cakewalk Score Writer © ™ Getting Startedsynthmanuals.com/manuals/cakewalk/scorewriter/... ·...
32
Cakewalk Score Writer Getting Started © ™
Transcript of Cakewalk Score Writer © ™ Getting Startedsynthmanuals.com/manuals/cakewalk/scorewriter/... ·...
Cakewalk Score WriterGetting Started
© ™
Copyright Information
Information in this document is subject to change without notice and does not represent a commitment on the part of Twelve Tone Systems, Inc. The software described in this document is furnished under a license agreement or nondisclosure agreement. The software may be used or copied only in accordance of the terms of the agreement. It is against the law to copy this software on any medium except as specifically allowed in the agreement. No part of this document may be reproduced or transmitted in any form or by any means, electronic or mechanical, including photocopying and recording, for any purpose without the express written permission of Twelve Tone Systems, Inc.
Copyright © 1998 Twelve Tone Systems, Inc. All rights reserved.
Program Copyright © 1998 Twelve Tone Systems, Inc. All rights reserved.
Cakewalk is a registered trademark of Twelve Tone Systems, Inc. Cakewalk Pro Audio, Cakewalk Professional, Cakewalk Home Studio, Cakewalk Guitar Studio, Cakewalk Overture, Cakewalk Score Writer, Cakewalk Audio FX, Cakewalk Metro, Virtual Jukebox, Virtual Piano, CFX, StudioWare, and the Cakewalk logo are trademarks of Twelve Tone Systems, Inc. Other company and product names are trademarks of their respective owners.
Table of Contents
Introduction ................................................................... 1
Score Writer ...............................................................................1Learning Score Writer ................................................................1On-line Help ...............................................................................2Score Writer Windows ...............................................................2
Writing Your First Score ............................................... 3
Starting Score Writer .................................................................3Assigning Instruments ...........................................................4
Opening the Tutorial File ...........................................................5Preparing The Score ...................................................................5Entering Notes ...........................................................................6Editing Notes .............................................................................8
Changing Pitch or Duration ..................................................8Erasing ..................................................................................9
Adding a Pickup Measure ..........................................................9Adding a Slur ...........................................................................11Entering Symbols .....................................................................11
Dynamics ............................................................................12Ornaments and Articulations ..............................................13
Adding Voices .........................................................................13Changing Stem Directions .......................................................15Cursor Toggle ..........................................................................16Saving ......................................................................................16
Beyond the Basics ....................................................... 17
Adding Staves ..........................................................................17Setting Up Staves .....................................................................19Setting Up MIDI ......................................................................20Recording MIDI .......................................................................21
iv
Metronome ......................................................................... 21Record Options ................................................................... 21Transcription Quantize ....................................................... 22
Linking Staves to MIDI Devices ............................................. 22Recording ................................................................................ 23Setting up Step Record ............................................................ 24Adding Chords ........................................................................ 26Adding Lyrics .......................................................................... 27Printing .................................................................................... 28
Setting up the Score ............................................................ 28Printing ............................................................................... 28
Templates ................................................................................ 28
Introduction
Score Writer
Score Writer is fun to learn and easy to use. You can write music and hear the results immediately.
Score Writer runs on almost any Windows 95 or 98 computer. You can install and set it up in just a few minutes. Then you can create piano, band, orchestral, choral, and lead sheet notation and print your arrangements of up to sixteen instruments.
Learning Score Writer
Cakewalk provides two learning tools for Score Writer:
Cakewalk Score Writer: Getting Started
. This guide contains step-by-step tutorials designed to introduce you to Score WriterÕs basic features. Work through the tutorials to get up and running quickly.
Cakewalk Score Writer: On-line Help.
Descriptions of every toolbar, button, palette, tool, menu, command, window, and dialog box in Score Writer. Procedures to show you how to use everything and get your job done. Consult help when you need to understand any feature in greater depth.
1
2 Chapter 1: Introduction
On-line Help
To see on-line help about a particular topic:
The Help key.
Press F1 to get context-sensitive help about highlighted commands, about active dialog boxes and their parts, and about active windows.
The Help button.
Click the help button in any dialog box to get help about that dialog box.
The Help menu.
Choose
Help>Contents
(the Contents command in the Help menu)
to see the entire on-line help system. You can navigate it by contents, by topic, and by index.
Score Writer Windows
Score Window.
The score window displays a traditional music score. Use it to enter, view and modify your musical score.
Tool Bar.
The tool barÕs buttons open all of Score WriterÕs tool palettes. Use the tool bar to select tools for writing and modifying music in the score window.
Transport Window.
Use the transport window to control MIDI recording and playback, and to select the MIDI thru instrument.
Tracks Window.
Use the tracks window to work with tracks: to specify how many voices they have, and whether notes in each voice should automatically ßip stems up or down when you enter them. You also determine which tracks play and which are silent, and which MIDI playback devices, programs, channels and transpositions belong to which tracks.
Chords Window.
The chords window contains a list of possible chord sufÞxes, as well as root and bass names. Use the chords window to insert chord names into your score with the mouse.
Lyrics Window.
Use the lyrics window to type or change lyrics and assign them to notes in the score.
Step Input Window.
Use the step input window to build a score by recording notes, rests, rhythmic and slash notation, and chords, one step at a time.
Writ
ing a
Score
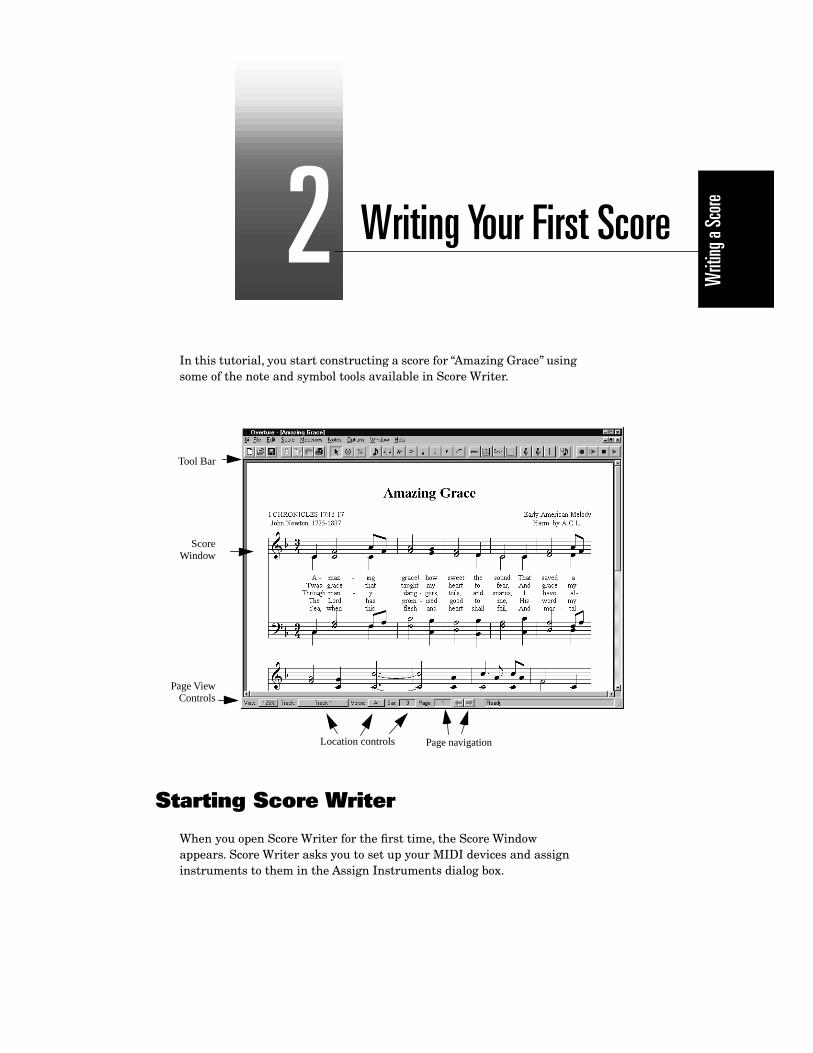
Writing Your First Score
In this tutorial, you start constructing a score for ÒAmazing GraceÓ using some of the note and symbol tools available in Score Writer.
Starting Score Writer
When you open Score Writer for the Þrst time, the Score Window appears. Score Writer asks you to set up your MIDI devices and assign instruments to them in the Assign Instruments dialog box.
Location controls Page navigation
Tool Bar
ScoreWindow
Page ViewControls
2
4 Chapter 2: Writing Your First Score
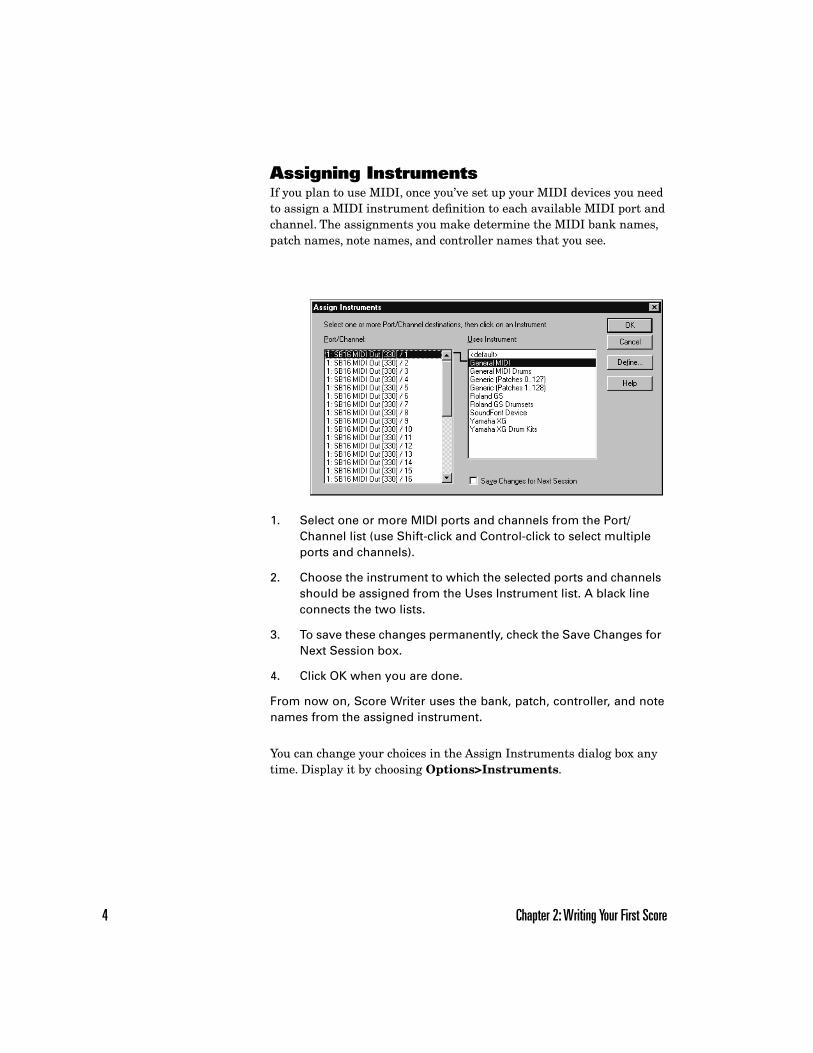
Assigning Instruments
If you plan to use MIDI, once youÕve set up your MIDI devices you need to assign a MIDI instrument deÞnition to each available MIDI port and channel. The assignments you make determine the MIDI bank names, patch names, note names, and controller names that you see.
You can change your choices in the Assign Instruments dialog box any time. Display it by choosing
Options>Instruments
.
1. Select one or more MIDI ports and channels from the Port/Channel list (use Shift-click and Control-click to select multiple ports and channels).
2. Choose the instrument to which the selected ports and channels should be assigned from the Uses Instrument list. A black line connects the two lists.
3. To save these changes permanently, check the Save Changes for Next Session box.
4. Click OK when you are done.
From now on, Score Writer uses the bank, patch, controller, and notenames from the assigned instrument.
Writ
ing a
Score
Chapter 2: Writing Your First Score 5
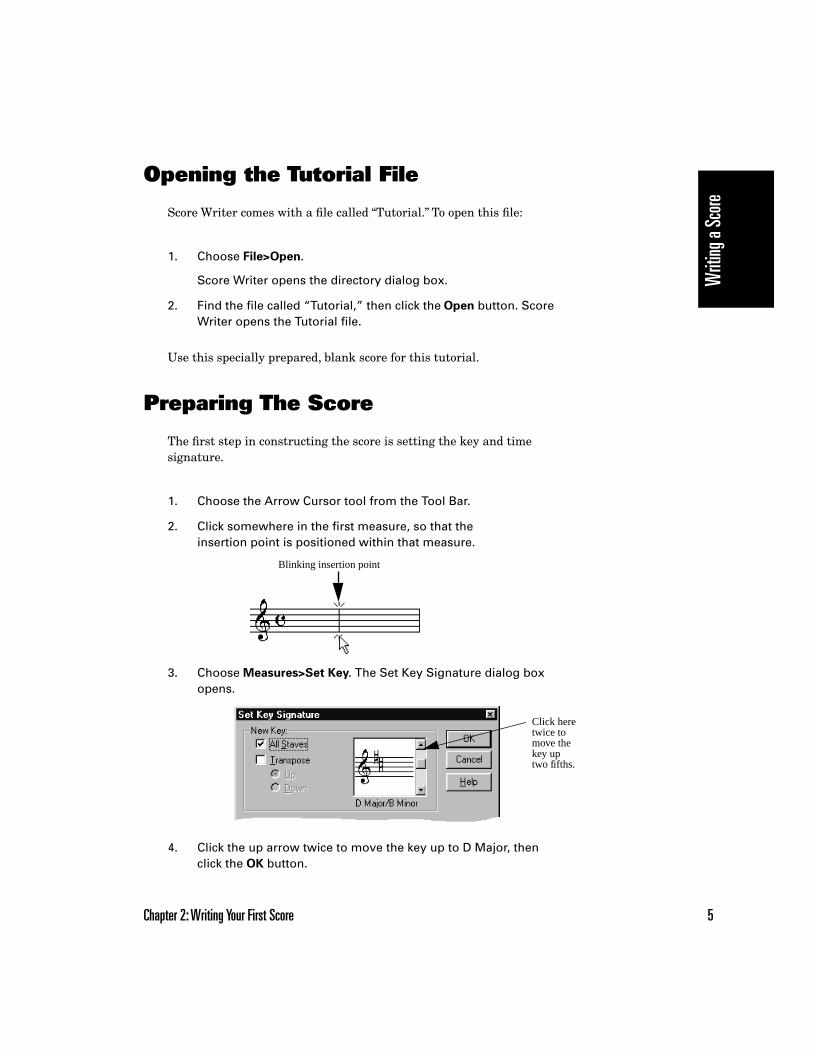
Opening the Tutorial File
Score Writer comes with a Þle called ÒTutorial.Ó To open this Þle:
Use this specially prepared, blank score for this tutorial.
Preparing The Score
The Þrst step in constructing the score is setting the key and time signature.
1. Choose
File>Open
.
Score Writer opens the directory dialog box.
2. Find the file called “Tutorial,” then click the
Open
button. Score Writer opens the Tutorial file.
1. Choose the Arrow Cursor tool from the Tool Bar.
2. Click somewhere in the first measure, so that the insertion point is positioned within that measure.
3. Choose
Measures>Set Key
. The Set Key Signature dialog box opens.
4. Click the up arrow twice to move the key up to D Major, then click the
OK
button.
Blinking insertion point
Click heretwice tomove thekey uptwo fifths.
6 Chapter 2: Writing Your First Score
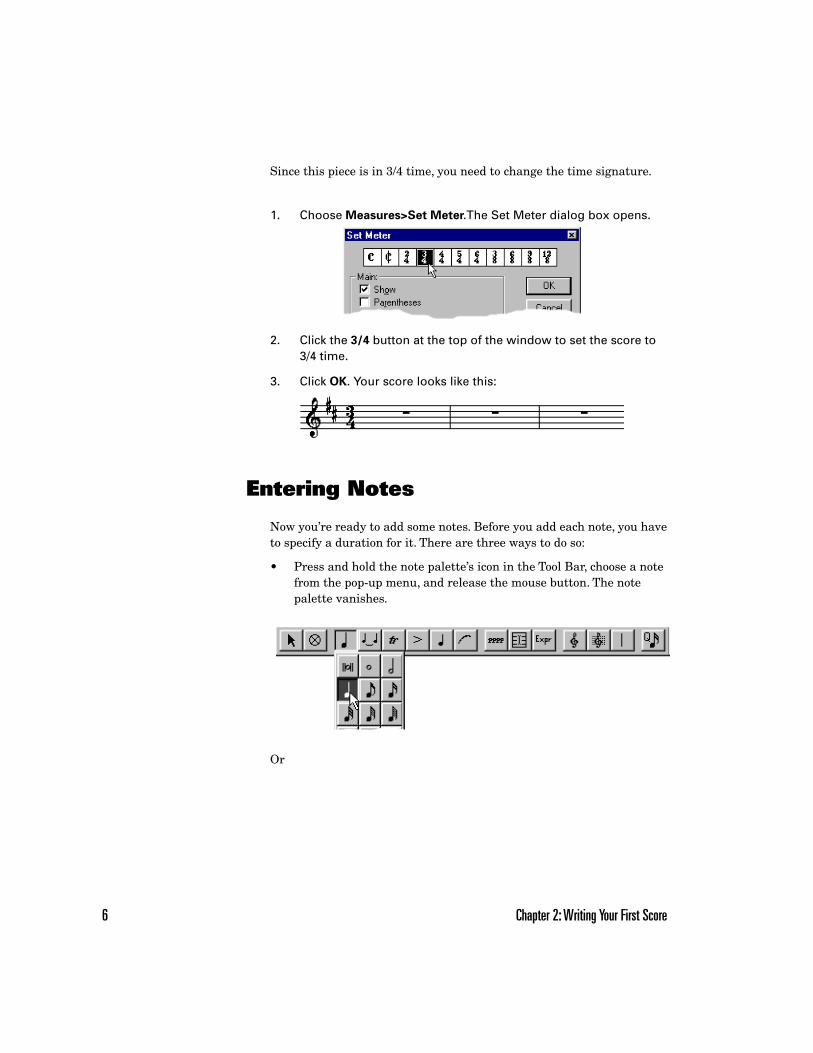
Since this piece is in 3/4 time, you need to change the time signature.
Entering Notes
Now youÕre ready to add some notes. Before you add each note, you have to specify a duration for it. There are three ways to do so:
¥ Press and hold the note paletteÕs icon in the Tool Bar, choose a note from the pop-up menu, and release the mouse button. The note palette vanishes.
Or
1. Choose
Measures>Set Meter
.The Set Meter dialog box opens.
2. Click the
3/4
button at the top of the window to set the score to 3/4 time.
3. Click
OK
. Your score looks like this:
Writ
ing a
Score
Chapter 2: Writing Your First Score 7
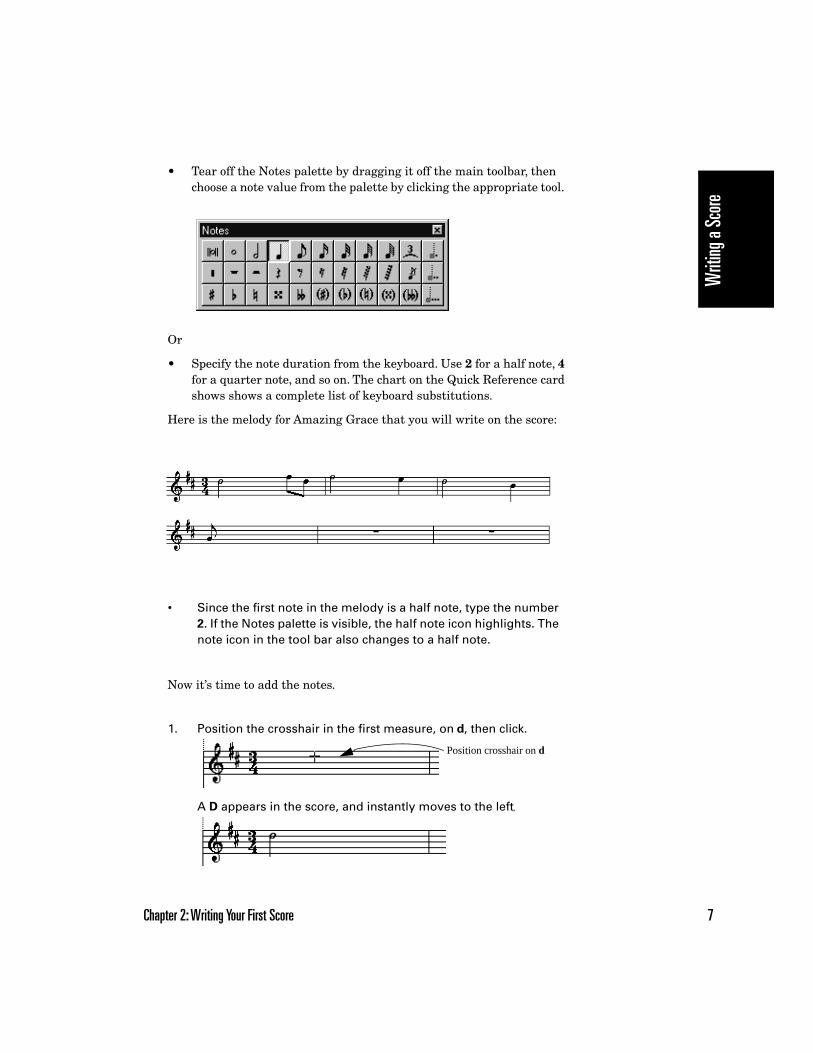
¥ Tear off the Notes palette by dragging it off the main toolbar, then choose a note value from the palette by clicking the appropriate tool.
Or
¥ Specify the note duration from the keyboard. Use
2
for a half note,
4
for a quarter note, and so on. The chart on the Quick Reference card shows shows a complete list of keyboard substitutions.
Here is the melody for Amazing Grace that you will write on the score:
Now itÕs time to add the notes.
• Since the first note in the melody is a half note, type the number
2
. If the Notes palette is visible, the half note icon highlights. The note icon in the tool bar also changes to a half note.
1. Position the crosshair in the first measure, on
d
, then click.
A
D
appears in the score, and instantly moves to the left
,
Position crosshair on d
8 Chapter 2: Writing Your First Score
Repeat the steps of selecting the duration and placing notes on the score until your window looks like the melody on page 7.
Editing Notes
Score Writer has many tools for adjusting score elements. In many instances, it is not necessary to specially select them; you can just move the pointer over the element and the pointer will change shape to let you know that you can now edit the element.
You may notice that the last note in the melody on page 7 is the wrong pitch and duration. This section shows you how to Þx it.
Changing Pitch or Duration
The eighth note
G
in the last measure of the score should actually be a half note
A
. To change pitch, drag a note up and down or select it, then press the up or down arrow keys. To change its duration, select it, then type the keyboard equivalent for the correct value
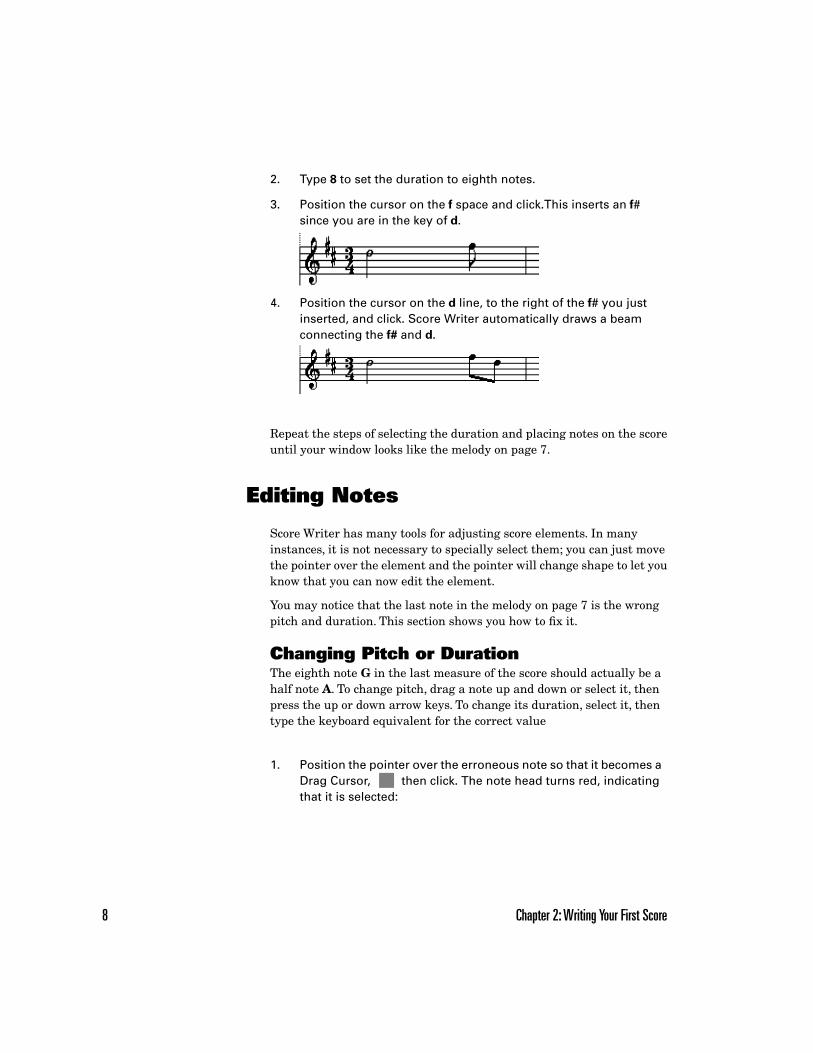
2. Type
8
to set the duration to eighth notes.
3. Position the cursor on the
f
space and click.This inserts an
f
# since you are in the key of
d
.
4. Position the cursor on the
d
line, to the right of the
f
# you just inserted, and click. Score Writer automatically draws a beam connecting the
f#
and
d
.
1. Position the pointer over the erroneous note so that it becomes a Drag Cursor, then click. The note head turns red, indicating that it is selected:
Writ
ing a
Score
Chapter 2: Writing Your First Score 9
Score Writer lets you edit multiple notes simultaneously. Select multiple notes by shift-clicking them or by dragging a box around them. Any edit operation affects all selected notes.
Erasing
To erase any item from the score, select the eraser cursor from the tool bar (or type
e
). Position the cursor over the note or symbol you wish to delete and click.
Adding a Pickup Measure
You may have noticed that the initial pickup note is missing from the score. To add new measures and change their lengths:
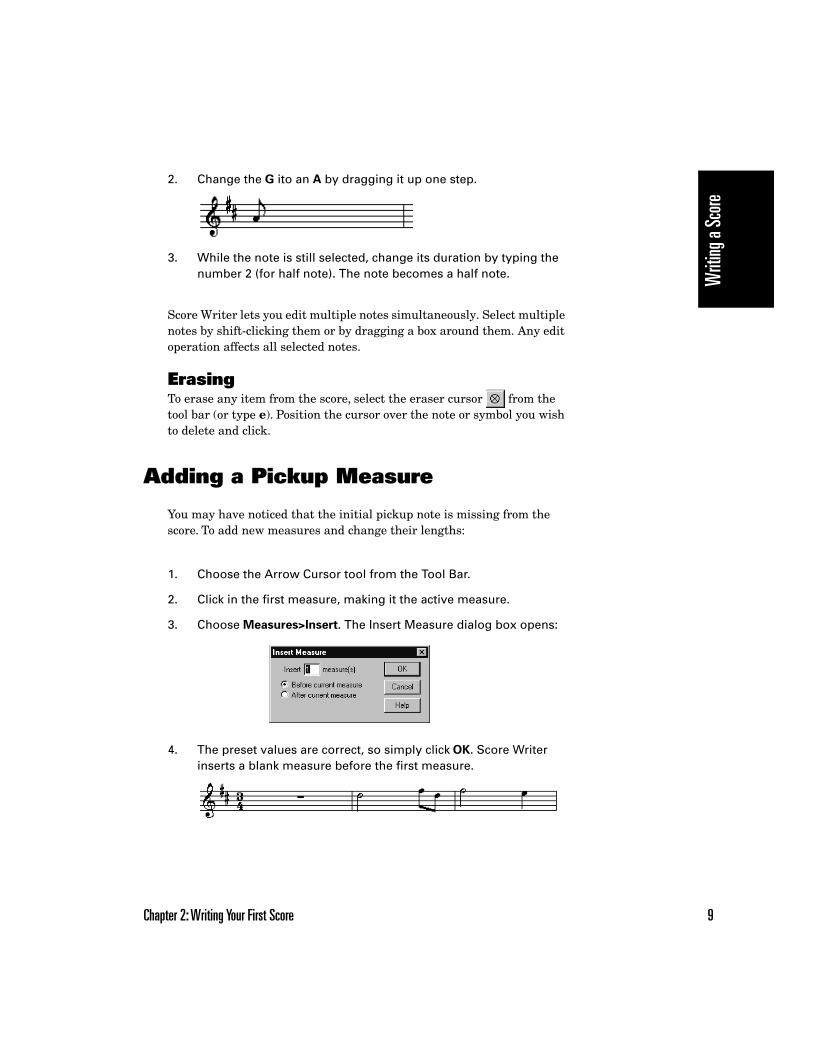
2. Change the
G
ito an
A
by dragging it up one step.
3. While the note is still selected, change its duration by typing the number 2 (for half note). The note becomes a half note.
1. Choose the Arrow Cursor tool from the Tool Bar.
2. Click in the first measure, making it the active measure.
3. Choose
Measures>Insert
. The Insert Measure dialog box opens:
4. The preset values are correct, so simply click
OK
. Score Writer inserts a blank measure before the first measure.

10 Chapter 2: Writing Your First Score
Now tell Score Writer that itÕs a pickup measure.
Use what you learned earlier to put a quarter-note
a
in the measure.
To move the barline to the left, reducing the space used by the measure:
1. Click in the first measure to make it the active measure.
2. Choose
Measures>Set Meter to open the Set Meter dialog box
.
3. Click the
Is Pickup
check box.
4. Click
OK
.
1. Make sure that the Arrow Cursor tool is selected.
2. Choose
Options>Show>Handles
.
Handles
(small boxes for manipulating objects) appear.
3. To move the barline, drag its handle to the left. Adjust it so that it looks good to you.
4.
Choose
Options>Show>Handles
again to hide the handles. You can use handles even when they’re invisible, if you prefer not to see them.
Click here to indicate that the currently active measure is a pickup measure.
Handles

Writ
ing a
Score
Chapter 2: Writing Your First Score 11
Adding a Slur
Now add a slur to the eighth notes in the second measure:
Entering Symbols
The tool bar has a number of palettes whose tools are called symbols. These are the ornaments, articulations, noteheads, dynamics, expressions, text and clefs palettes. This section introduces you to the basics of placing and moving symbols on the score.
1. Select the slur tool from the Groups palette.
The groups palette has a number of tools for marking multiple note, like ties, slurs, and ottava signs.
2. Drag a rectangle around the notes that you want to group.
When you release the mouse button, a slur appears.
To alter the shape of the slur, either drag the slur or click it to display shaping handles. Try dragging handles now to see how the slur changes.
12 Chapter 2: Writing Your First Score
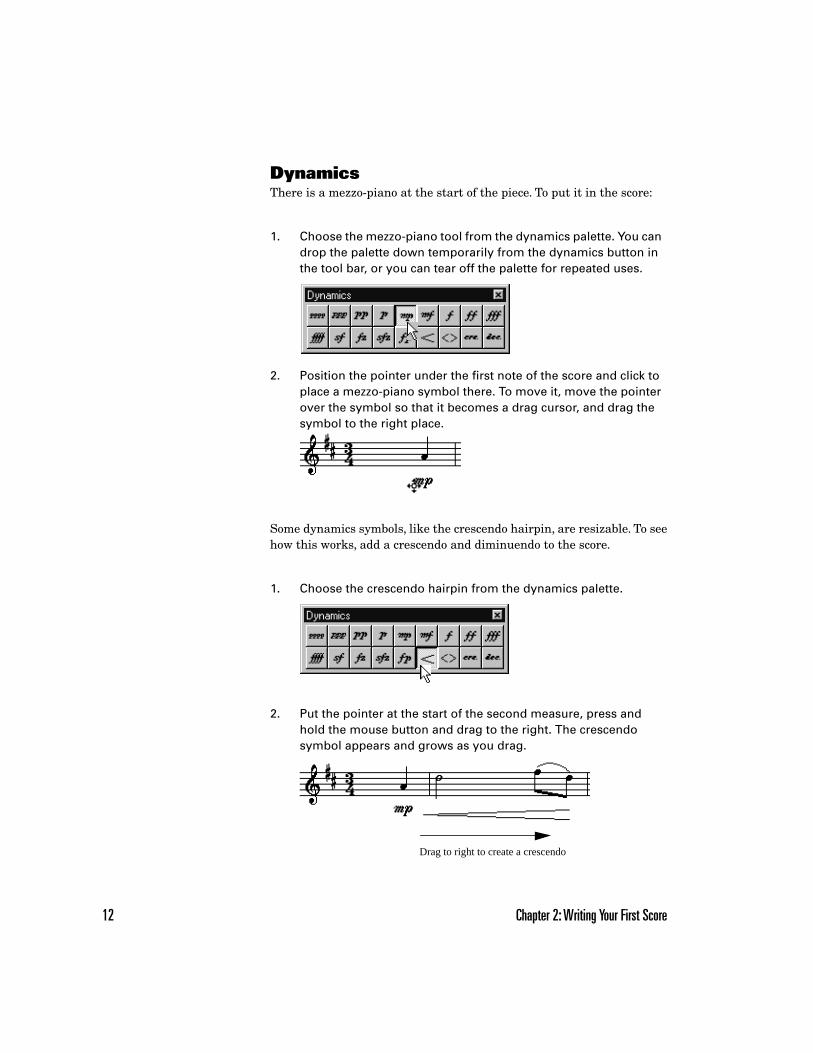
DynamicsThere is a mezzo-piano at the start of the piece. To put it in the score:
Some dynamics symbols, like the crescendo hairpin, are resizable. To see how this works, add a crescendo and diminuendo to the score.
1. Choose the mezzo-piano tool from the dynamics palette. You can drop the palette down temporarily from the dynamics button in the tool bar, or you can tear off the palette for repeated uses.
2. Position the pointer under the first note of the score and click to place a mezzo-piano symbol there. To move it, move the pointer over the symbol so that it becomes a drag cursor, and drag the symbol to the right place.
1. Choose the crescendo hairpin from the dynamics palette.
2. Put the pointer at the start of the second measure, press and hold the mouse button and drag to the right. The crescendo symbol appears and grows as you drag.
Drag to right to create a crescendo

Writ
ing a
Score
Chapter 2: Writing Your First Score 13
Now add a diminuendo in the third measure, using what you learned above. Drag from right to left, using the same open hairpin symbol.
Ornaments and ArticulationsAdd ornaments (like Þngerings) and articulations (like staccato marks) to the score just as you add dynamics. To add the same ornament or articulation to many notes, drag a box around them with the ornament tool.
You can, if you wish, attach ornaments to speciÞc notes. To do so click the note or select a group of notes to ornament. You can drag an attached ornament wherever you please, but it remains attached to the original note for playback purposes.
Adding Voices
Now itÕs time to add a second voice to the score. A voice is a single melodic line in a track. Each track may have up to four voices. For further explanation of voices, consult ÒTermsÓ in on-line help.
1. Choose the dotted half note in the note palette. Click the half note, then the augmentation dot to add a dot to the half note.
Drag to left to create a diminuendo
Half note
Augmentation dot
14 Chapter 2: Writing Your First Score
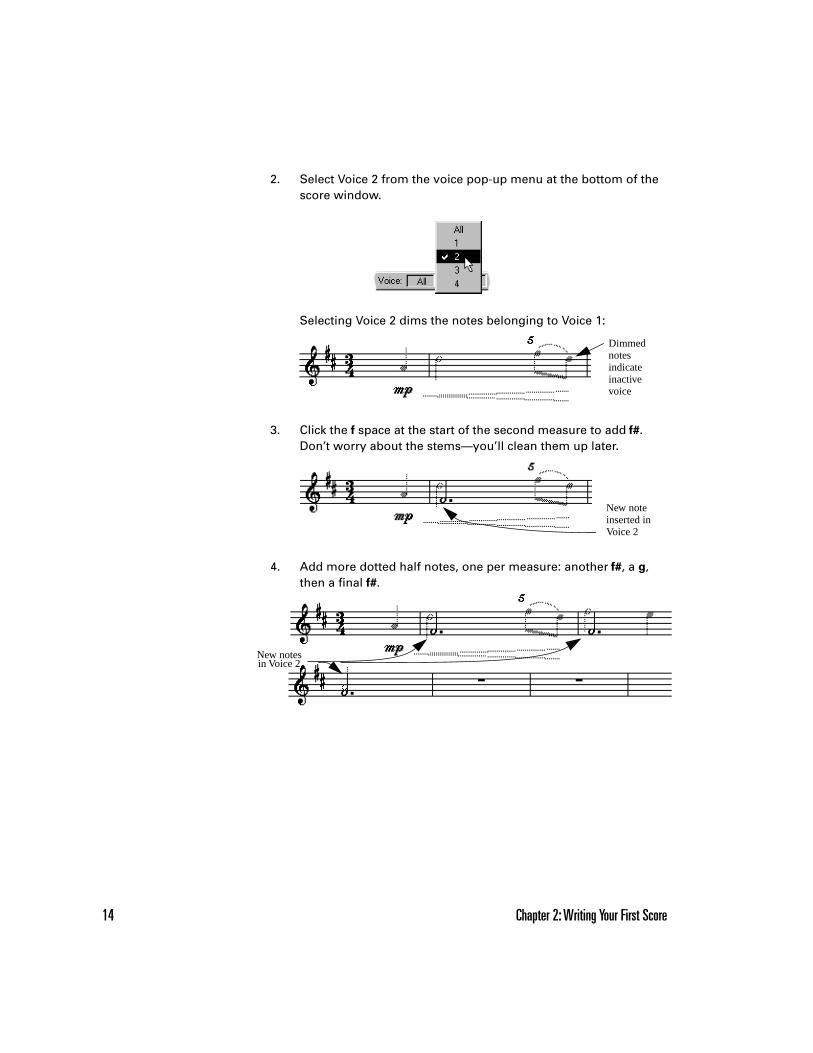
2. Select Voice 2 from the voice pop-up menu at the bottom of the score window.
Selecting Voice 2 dims the notes belonging to Voice 1:
3. Click the f space at the start of the second measure to add f#. Don’t worry about the stems—you’ll clean them up later.
4. Add more dotted half notes, one per measure: another f#, a g, then a final f#.
Dimmed notes indicate inactive voice
New note inserted in Voice 2
New notesin Voice 2
Writ
ing a
Score
Chapter 2: Writing Your First Score 15
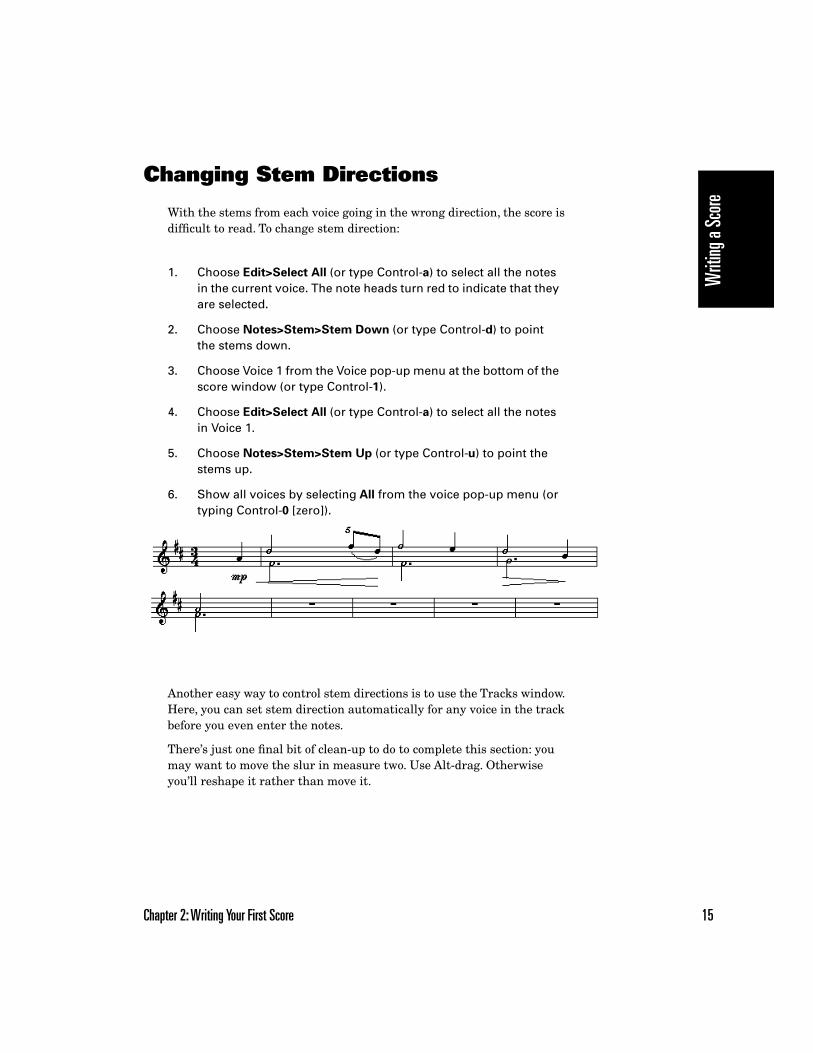
Changing Stem Directions
With the stems from each voice going in the wrong direction, the score is difÞcult to read. To change stem direction:
Another easy way to control stem directions is to use the Tracks window. Here, you can set stem direction automatically for any voice in the track before you even enter the notes.
ThereÕs just one Þnal bit of clean-up to do to complete this section: you may want to move the slur in measure two. Use Alt-drag. Otherwise youÕll reshape it rather than move it.
1. Choose Edit>Select All (or type Control-a) to select all the notes in the current voice. The note heads turn red to indicate that they are selected.
2. Choose Notes>Stem>Stem Down (or type Control-d) to point the stems down.
3. Choose Voice 1 from the Voice pop-up menu at the bottom of the score window (or type Control-1).
4. Choose Edit>Select All (or type Control-a) to select all the notes in Voice 1.
5. Choose Notes>Stem>Stem Up (or type Control-u) to point the stems up.
6. Show all voices by selecting All from the voice pop-up menu (or typing Control-0 [zero]).
16 Chapter 2: Writing Your First Score
Cursor Toggle
Type c to toggle between the Arrow Cursor and the most recently used palette tool. This is a great way to switch between tools, letting you keep your mouse near your score.
Saving
The File>Save and File>Save As commands save your score to disk.
Now is a good time to save your work before proceeding with the next part of the tutorial. Choose any name you wish, like ÒMy Amazing Grace.scw.Ó
Beyo
nd th
e Bas
ics
Beyond the Basics
This chapter teaches you how to create systems (groups of staves played together), assign instrument names, and set up some features of tracks.
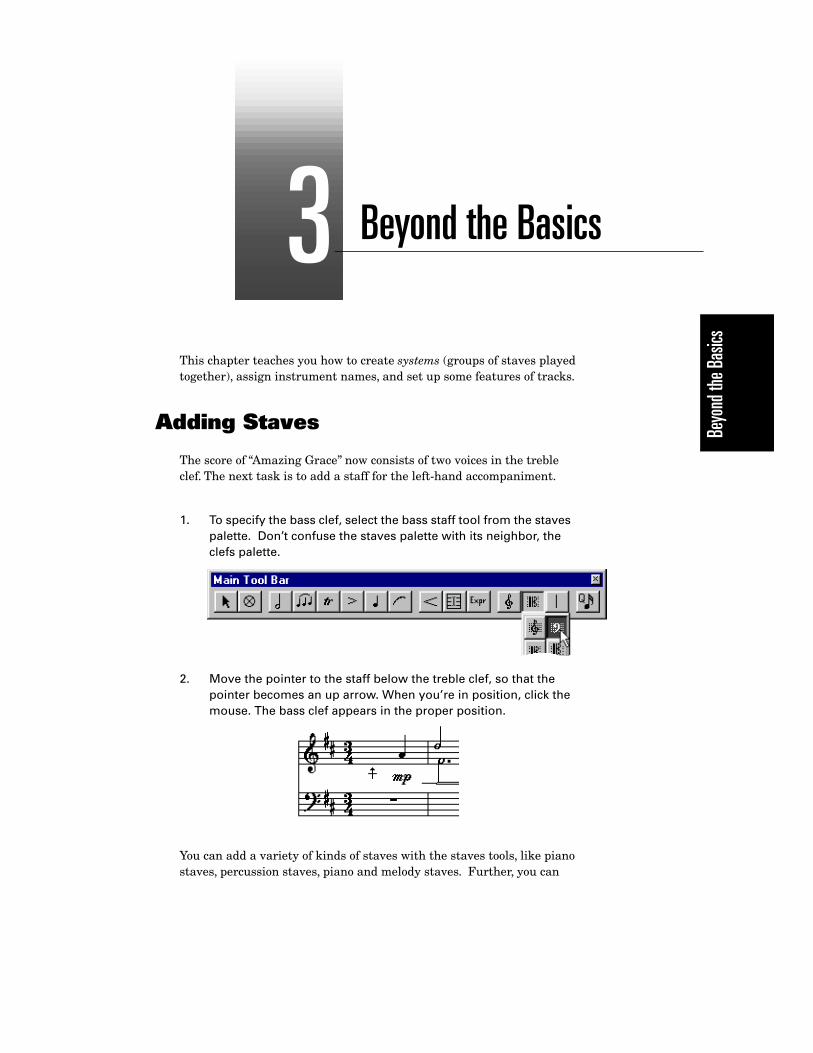
Adding Staves
The score of ÒAmazing GraceÓ now consists of two voices in the treble clef. The next task is to add a staff for the left-hand accompaniment.
You can add a variety of kinds of staves with the staves tools, like piano staves, percussion staves, piano and melody staves. Further, you can
1. To specify the bass clef, select the bass staff tool from the staves palette. Don’t confuse the staves palette with its neighbor, the clefs palette.
2. Move the pointer to the staff below the treble clef, so that the pointer becomes an up arrow. When you’re in position, click the mouse. The bass clef appears in the proper position.
3

18 Chapter 3: Beyond the Basics
add a number of symbols that affect multiple staves, like braces, brackets, and cross-staff barlines.
To delete a staff, click its handle (just to the left of the middle line) with the eraser cursor.
Now add a brace so the staves appear as a grand staff (conventional left-hand/right-hand piano notation).
All that remains is to add a barline through the system.
1. Select the brace tool from the staves palette.
2. Drag a box that spans the two staves.
When you release the button, the brace appears.
1. Select the Cross-Staff Barlines tool from the Staves palette.
Beyo
nd th
e Bas
ics
Chapter 3: Beyond the Basics 19
Score Writer has many features that can affect all the staves or measures in a system at once. See "The Score Window" in help for full details (press F1 in the score window).
Setting Up Staves
In this tutorial, you specify that the staves are piano parts.
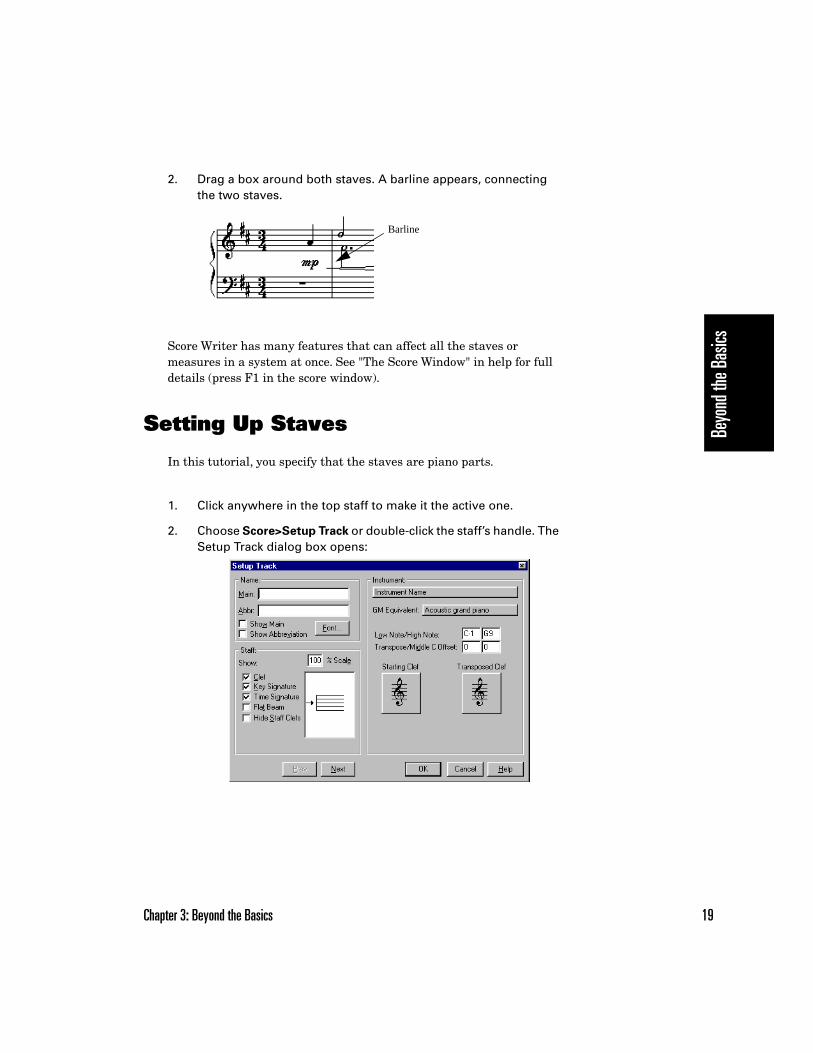
2. Drag a box around both staves. A barline appears, connecting the two staves.
1. Click anywhere in the top staff to make it the active one.
2. Choose Score>Setup Track or double-click the staff’s handle. The Setup Track dialog box opens:
Barline
20 Chapter 3: Beyond the Basics
Use the Setup Track dialog box to change many properties of each track, including
¥ which lines of the staff are displayed
¥ which elements of the staff are displayed
¥ scale of entire staff (greater or less than 100%)
¥ transposition if different from concert key
The next several tutorials discuss Score WriterÕs MIDI functions. If you arenÕt using a MIDI device with Score Writer, skip to ÒAdding LyricsÓ on page 27.
Setting Up MIDI
To record with MIDI, you must have a MIDI interface connected to your computer and a MIDI keyboard connected to the interface. A detailed explanation of these procedures is beyond the scope of this tutorial, so if you havenÕt yet set yourself up, read the manuals that come with your MIDI keyboard(s) and interface(s) and get set up.
You wonÕt be able to proceed with this tutorial until you have done this.
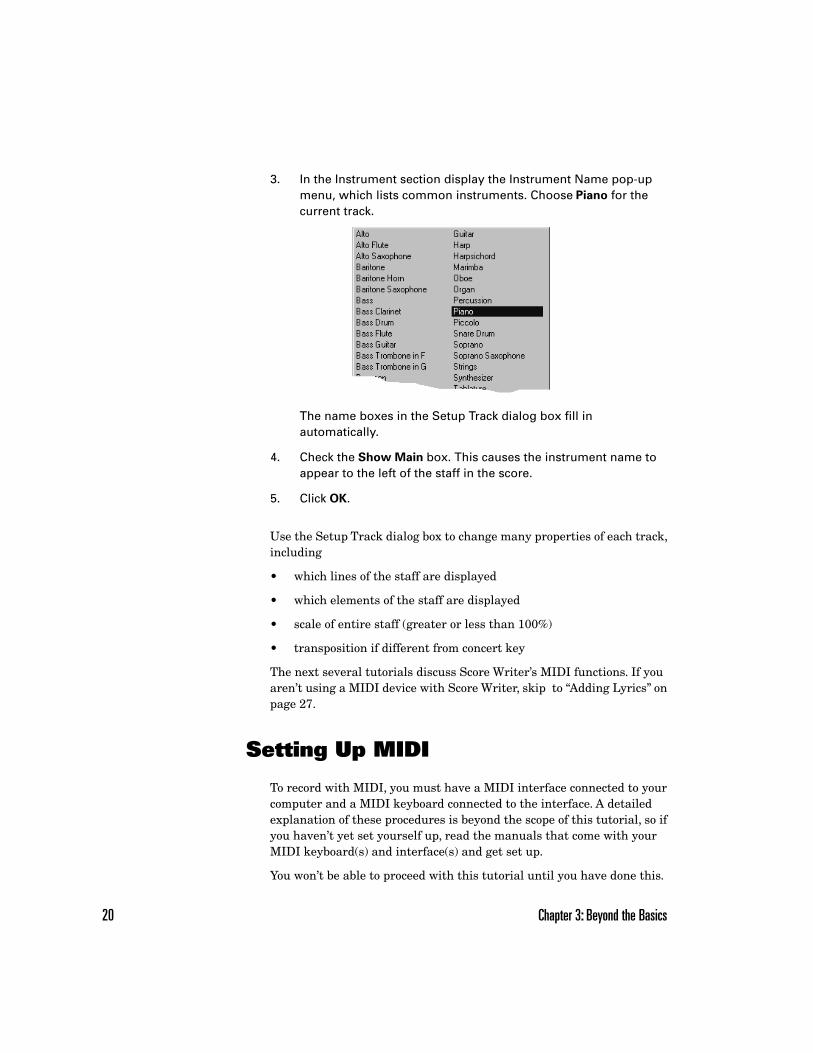
3. In the Instrument section display the Instrument Name pop-up menu, which lists common instruments. Choose Piano for the current track.
The name boxes in the Setup Track dialog box fill in automatically.
4. Check the Show Main box. This causes the instrument name to appear to the left of the staff in the score.
5. Click OK.
Beyo
nd th
e Bas
ics
Chapter 3: Beyond the Basics 21
Recording MIDI
There are a few program options to set up before you can start recording.
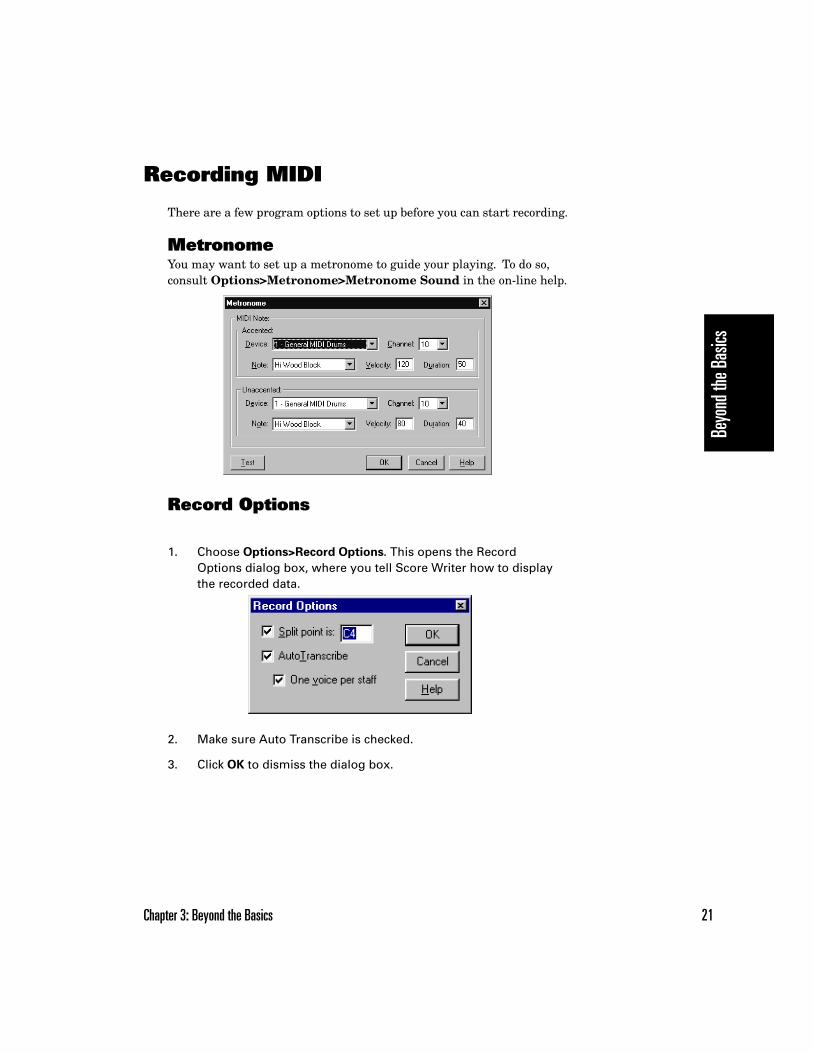
MetronomeYou may want to set up a metronome to guide your playing. To do so, consult Options>Metronome>Metronome Sound in the on-line help.
Record Options
1. Choose Options>Record Options. This opens the Record Options dialog box, where you tell Score Writer how to display the recorded data.
2. Make sure Auto Transcribe is checked.
3. Click OK to dismiss the dialog box.

22 Chapter 3: Beyond the Basics
Transcription QuantizeScore Writer records data from MIDI devices with great rhythmic sensitivity. Often you donÕt want such an accurate transcription. Say youÕre only interested in entering quarter notes. Unless you play with computer precision, you could wind up with something like this:
To Þx this, use the Transcription Quantize Amount button to round up anything smaller than a quarter note. Choose quarter note resolution.
Now whatever you play in transcribes as quarter notes or longer.
Linking Staves to MIDI Devices
To play on the proper devices, you need to specify where to send the data:
1. Click anywhere in the treble clef, so that it becomes active.
2. Choose Windows>Tracks.
Each line in this window represents a staff in the score. If you have a multi-timbral synthesizer (one that plays more than one note at a time), you can play each staff over a different synthesizer sound, that is, with a unique device and channel. For simplicity’s sake, assign both staves to the same sound.
Beyo
nd th
e Bas
ics
Chapter 3: Beyond the Basics 23
Recording
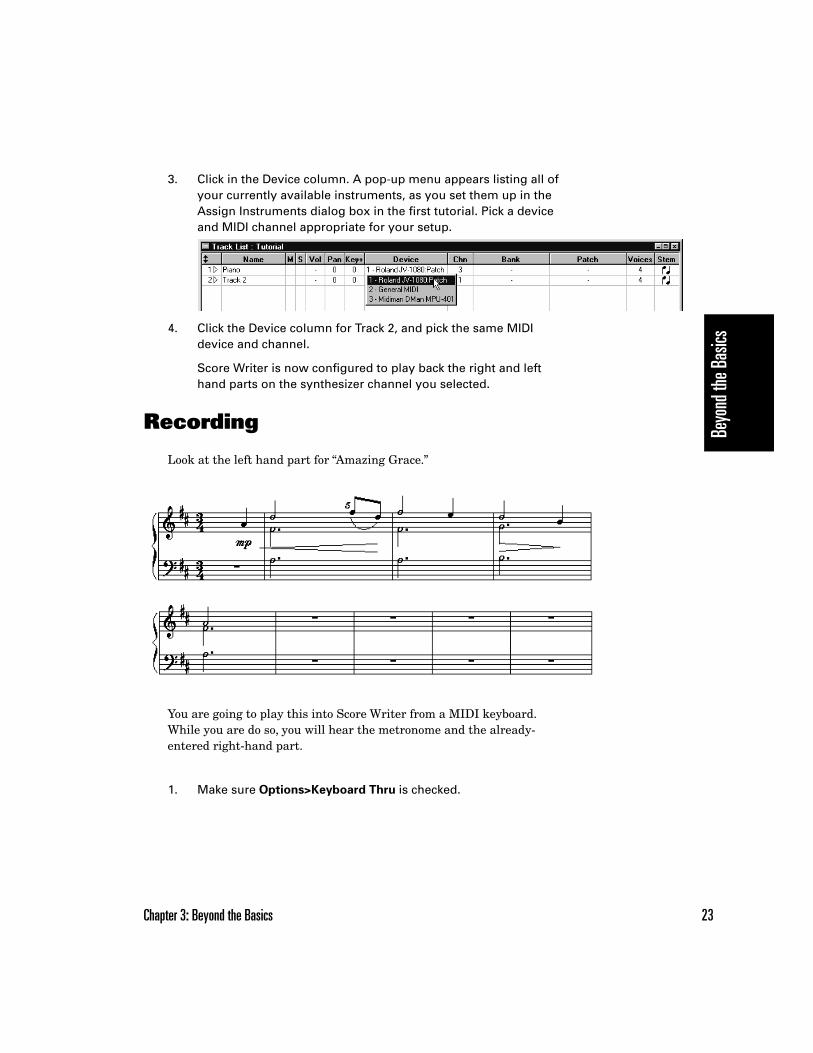
Look at the left hand part for ÒAmazing Grace.Ó
You are going to play this into Score Writer from a MIDI keyboard. While you are do so, you will hear the metronome and the already-entered right-hand part.
3. Click in the Device column. A pop-up menu appears listing all of your currently available instruments, as you set them up in the Assign Instruments dialog box in the first tutorial. Pick a device and MIDI channel appropriate for your setup.
4. Click the Device column for Track 2, and pick the same MIDI device and channel.
Score Writer is now configured to play back the right and left hand parts on the synthesizer channel you selected.
1. Make sure Options>Keyboard Thru is checked.
24 Chapter 3: Beyond the Basics
When you Þnish, your score should look like the one on page 23. To clean up any mistakes use the editing techniques introduced earlier.
To hear what you played, click the Play button or press the space bar. Score Writer plays back your notes. Click the Stop button or press space to stop playing.
Setting up Step Record
This tutorial introduces you to Score WriterÕs step entry features. It assumes you have set up your MIDI devices and interfaces properly.
Step entry lets you enter notes very quickly from a MIDI device, one at a time. It assigns them the value, size, duration, and velocity you specify in the Step Input window, regardless of how you play them.
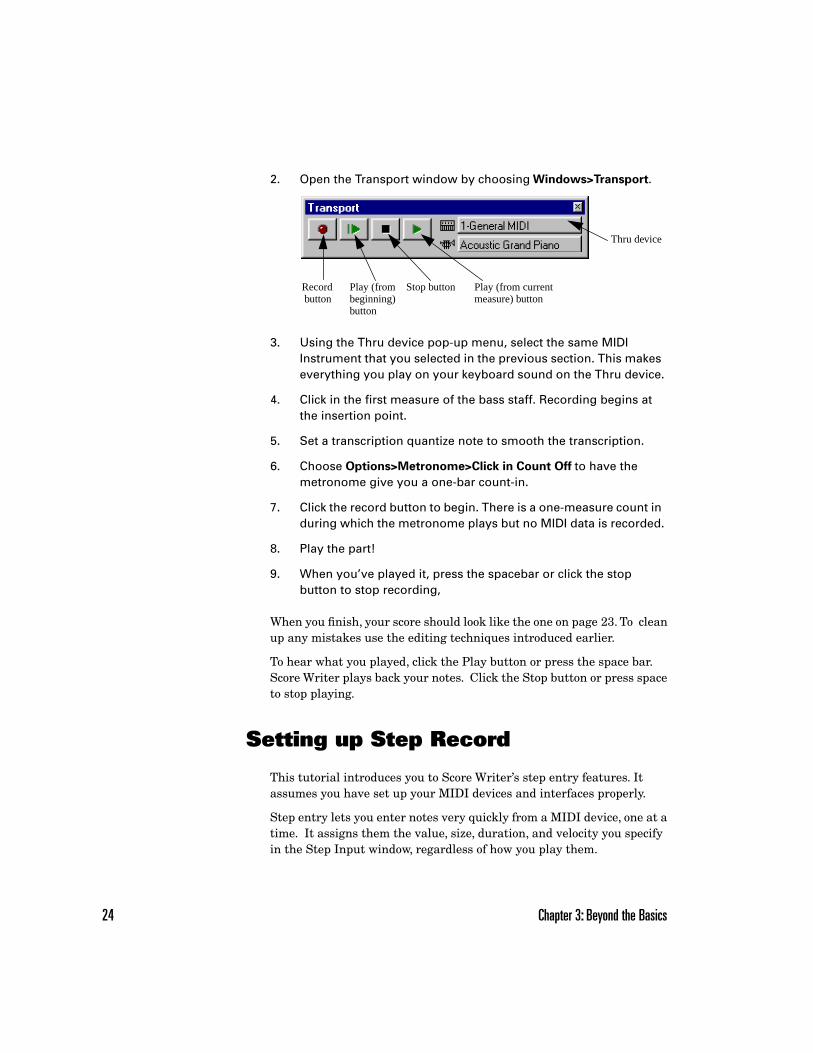
2. Open the Transport window by choosing Windows>Transport.
3. Using the Thru device pop-up menu, select the same MIDI Instrument that you selected in the previous section. This makes everything you play on your keyboard sound on the Thru device.
4. Click in the first measure of the bass staff. Recording begins at the insertion point.
5. Set a transcription quantize note to smooth the transcription.
6. Choose Options>Metronome>Click in Count Off to have the metronome give you a one-bar count-in.
7. Click the record button to begin. There is a one-measure count in during which the metronome plays but no MIDI data is recorded.
8. Play the part!
9. When you’ve played it, press the spacebar or click the stop button to stop recording,
Thru device
Stop buttonPlay (from beginning) button
Record button
Play (from current measure) button
Beyo
nd th
e Bas
ics
Chapter 3: Beyond the Basics 25
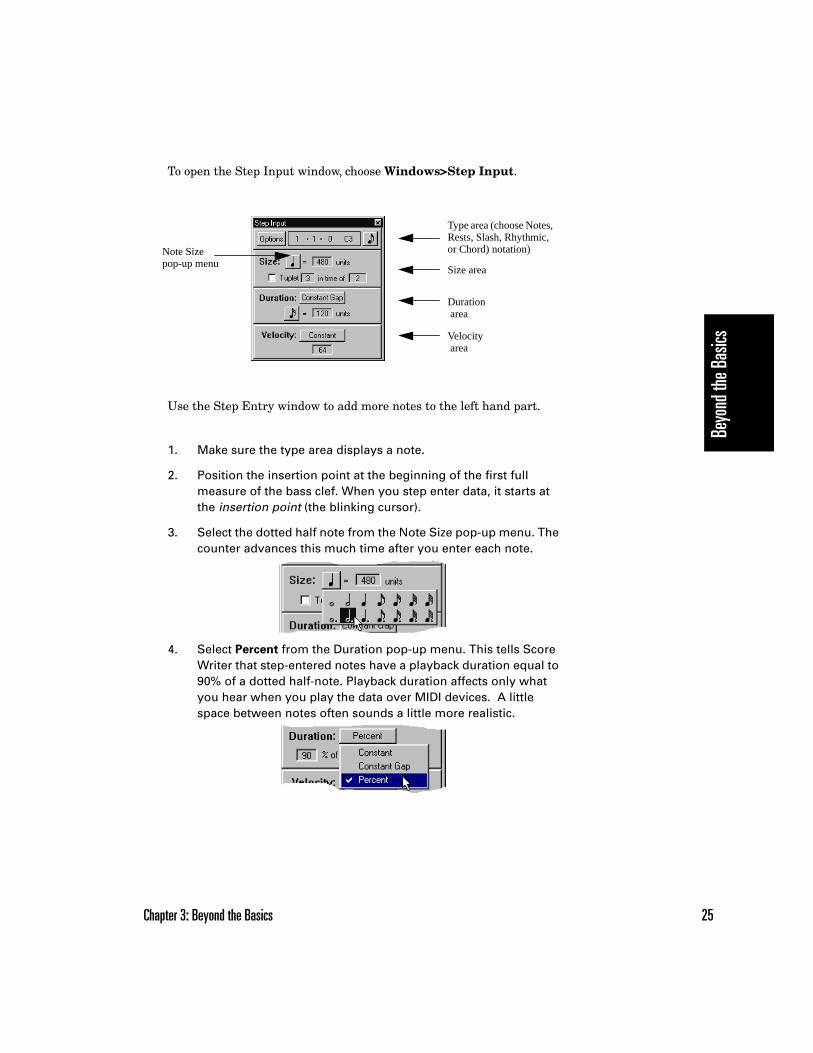
To open the Step Input window, choose Windows>Step Input.
Use the Step Entry window to add more notes to the left hand part.
1. Make sure the type area displays a note.
2. Position the insertion point at the beginning of the first full measure of the bass clef. When you step enter data, it starts at the insertion point (the blinking cursor).
3. Select the dotted half note from the Note Size pop-up menu. The counter advances this much time after you enter each note.
4. Select Percent from the Duration pop-up menu. This tells Score Writer that step-entered notes have a playback duration equal to 90% of a dotted half-note. Playback duration affects only what you hear when you play the data over MIDI devices. A little space between notes often sounds a little more realistic.
Type area (choose Notes, Rests, Slash, Rhythmic, or Chord) notation)
Size area
Duration area
Velocity area
Note Sizepop-up menu
26 Chapter 3: Beyond the Basics
You can, of course, enter rests and chords, as well as rhythmic and slash notes. See ÒThe Step Input WindowÓ in on-line help.
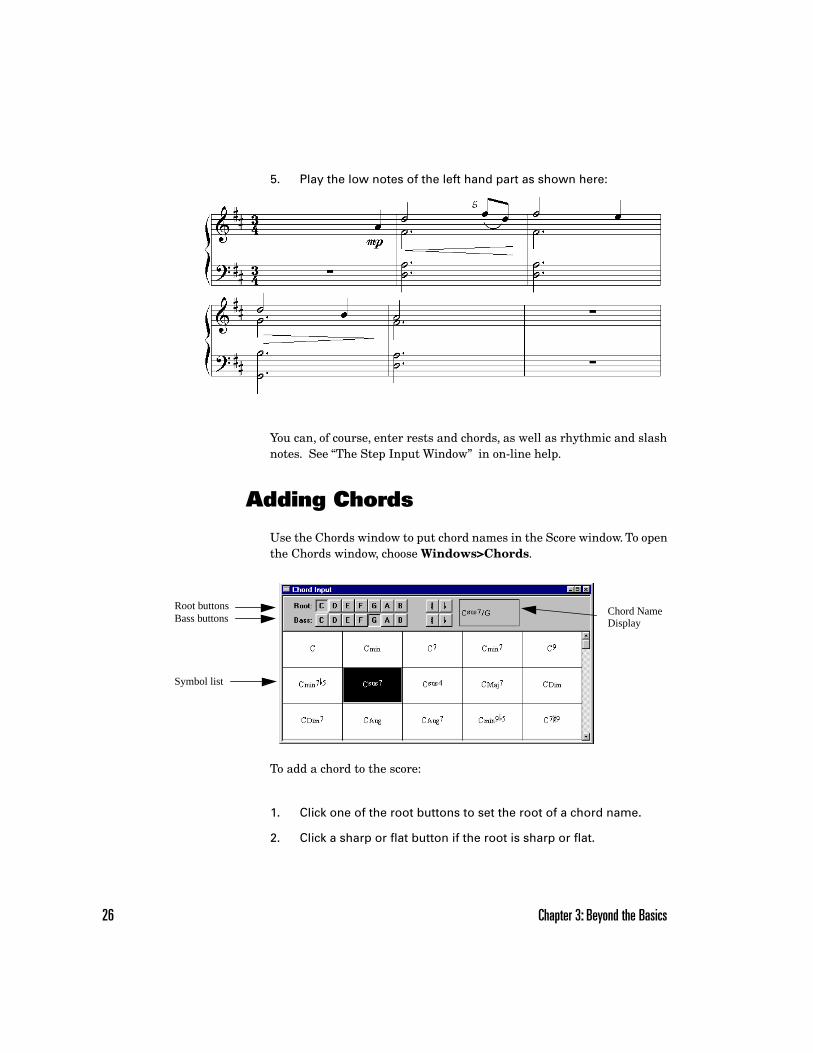
Adding Chords
Use the Chords window to put chord names in the Score window. To open the Chords window, choose Windows>Chords.
To add a chord to the score:
5. Play the low notes of the left hand part as shown here:
1. Click one of the root buttons to set the root of a chord name.
2. Click a sharp or flat button if the root is sharp or flat.
Root buttonsBass buttons
Symbol list
Chord NameDisplay
Beyo
nd th
e Bas
ics
Chapter 3: Beyond the Basics 27
For more information about adding chords, see "The Chords Window" in the on-line help.
Adding Lyrics
To add a lyric to a score that currently contains no lyrics:
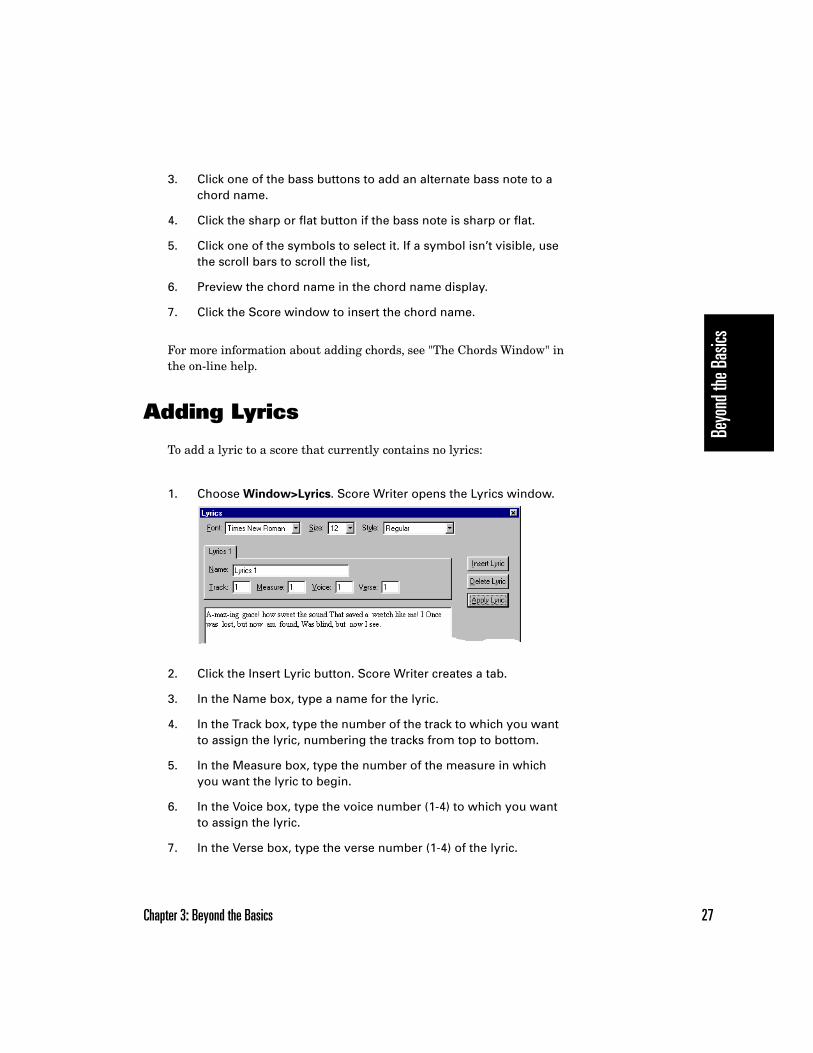
3. Click one of the bass buttons to add an alternate bass note to a chord name.
4. Click the sharp or flat button if the bass note is sharp or flat.
5. Click one of the symbols to select it. If a symbol isn’t visible, use the scroll bars to scroll the list,
6. Preview the chord name in the chord name display.
7. Click the Score window to insert the chord name.
1. Choose Window>Lyrics. Score Writer opens the Lyrics window.
2. Click the Insert Lyric button. Score Writer creates a tab.
3. In the Name box, type a name for the lyric.
4. In the Track box, type the number of the track to which you want to assign the lyric, numbering the tracks from top to bottom.
5. In the Measure box, type the number of the measure in which you want the lyric to begin.
6. In the Voice box, type the voice number (1-4) to which you want to assign the lyric.
7. In the Verse box, type the verse number (1-4) of the lyric.
28 Chapter 3: Beyond the Basics
See "Lyric Window" in the on-line help for details about adding lyrics.
Printing
YouÕre ready for the Þnal stepÑputting your score on paper.
Setting up the ScoreBefore printing, you need to set margins and page size. Choose Score>Page Dimensions to open the Page Dimensions dialog box.
To add titles, composer, author of lyrics, copyright, and other textual information, use the Page Text dialog box. Choose Score>Title Page. You can specify font, size, style, location, and whatever text you want to appear. Drag page text on the score to reposition it.
To move a stave on the page, press and drag its handles, located at the left and right edges of of each staff on the middle line. If you prefer, you can make the staff handles visible by choosing Options>Show>Handles. See "Arranging Staves and Systems" in the on-line help for more information.
Score Writer has many facilites for making your score look just as you want it to. Try, for example, Measures>Wrap Left, Measures>Wrap Right, Measures>Justify, Score>Respace Staves, Score>Recalc Layout. For more information on these commands, see the on-line help.
PrintingWhen everything is perfect, choose File>Print. In the standard print dialog box, set everything properly for your printer and click OK.
Templates
In the Score Writer Templates folder are a number of templates using different formats. Open them and look at the staff and page settings to get a feel for their design. You can create your own templates, too. One of the best ways to learn is by example, so donÕt be shy!
8. Type the lyric in the Lyric editing area. Use spaces to separate words, and hyphens to separate syllables you want attached to different notes.
9. Click the Apply Lyric button. Score Writer assigns each word to an individual note automatically, adjusting for hyphens and spaces.


![[Free Scores.com] Debussy Claude Golliwog 039 Cakewalk 17063](https://static.fdocuments.net/doc/165x107/544b56c7af79599c438b5099/free-scorescom-debussy-claude-golliwog-039-cakewalk-17063.jpg)