
c SiFive, Inc. January 22, 2018 · Switching workspaces is accomplished by ... together which are...
27
SiFive Freedom Studio Manual c SiFive, Inc. January 22, 2018
Transcript of c SiFive, Inc. January 22, 2018 · Switching workspaces is accomplished by ... together which are...
SiFive Freedom Studio Manual
c© SiFive, Inc.
January 22, 2018
SiFive Freedom Studio Manual
Copyright NoticeCopyright c© 2016-2018, SiFive Inc. All rights reserved.
Information in this document is provided as is, with all faults.
SiFive expressly disclaims all warranties, representations and conditions of any kind, whether ex-press or implied, including, but not limited to, the implied warranties or conditions of merchantabil-ity, fitness for a particular purpose and non-infringement.
SiFive does not assume any liability rising out of the application or use of any product or circuit, andspecifically disclaims any and all liability, including without limitation indirect, incidental, special,exemplary, or consequential damages.
SiFive reserves the right to make changes without further notice to any products herein.
Release Information
Version Date Changesv1p3 January 1, 2018 Updated Eclipse and plugin versionsv1p2 June 16, 2017 Change doc name to from Quick Start Guide to Manual
Updated plugin versionsDocumentation now matches new ilg pluginsAdded Known Issues SectionTroubleshooting section changed to OS Specific Board Setup Appendix
v1p0 May 6, 2017 N/A
i

Contents
SiFive Freedom Studio Manual i
1 Introduction 1
1.1 Freedom Studio Introduction . . . . . . . . . . . . . . . . . . . . . . . . . . . . . . . 1
1.2 Product Overview . . . . . . . . . . . . . . . . . . . . . . . . . . . . . . . . . . . . . 1
1.2.1 Eclipse . . . . . . . . . . . . . . . . . . . . . . . . . . . . . . . . . . . . . . . 1
1.2.2 RISC-V GCC . . . . . . . . . . . . . . . . . . . . . . . . . . . . . . . . . . . . 2
1.2.3 OpenOCD . . . . . . . . . . . . . . . . . . . . . . . . . . . . . . . . . . . . . . 2
2 Freedom Studio Set Up 3
2.1 Download and Install . . . . . . . . . . . . . . . . . . . . . . . . . . . . . . . . . . . . 3
2.1.1 Windows Installation . . . . . . . . . . . . . . . . . . . . . . . . . . . . . . . . 3
2.1.2 MacOS Installation . . . . . . . . . . . . . . . . . . . . . . . . . . . . . . . . . 3
2.1.3 Linux Installation . . . . . . . . . . . . . . . . . . . . . . . . . . . . . . . . . . 4
2.2 Freedom Studio Contents . . . . . . . . . . . . . . . . . . . . . . . . . . . . . . . . . 5
2.3 Tools Setup . . . . . . . . . . . . . . . . . . . . . . . . . . . . . . . . . . . . . . . . . 5
3 Freedom Studio Environment 8
3.1 Workspace . . . . . . . . . . . . . . . . . . . . . . . . . . . . . . . . . . . . . . . . . 8
3.2 Eclipse Perspectives . . . . . . . . . . . . . . . . . . . . . . . . . . . . . . . . . . . . 8
3.3 The SiFive Perspective . . . . . . . . . . . . . . . . . . . . . . . . . . . . . . . . . . . 9
3.3.1 Project Explorer . . . . . . . . . . . . . . . . . . . . . . . . . . . . . . . . . . 10
3.3.2 Editor, Outline, Disassembly . . . . . . . . . . . . . . . . . . . . . . . . . . . 10
3.3.3 Terminal . . . . . . . . . . . . . . . . . . . . . . . . . . . . . . . . . . . . . . . 11
3.3.4 Breakpoints . . . . . . . . . . . . . . . . . . . . . . . . . . . . . . . . . . . . . 12
3.3.5 Registers . . . . . . . . . . . . . . . . . . . . . . . . . . . . . . . . . . . . . . 12
3.3.6 Peripheral and Memory . . . . . . . . . . . . . . . . . . . . . . . . . . . . . . 12
ii
Copyright c© 2017, SiFive Inc. All rights reserved. iii
3.3.7 Expressions . . . . . . . . . . . . . . . . . . . . . . . . . . . . . . . . . . . . . 13
4 Getting Started 14
4.1 Import the Bundled Examples . . . . . . . . . . . . . . . . . . . . . . . . . . . . . . . 14
4.1.1 Bundled Examples Step by Step . . . . . . . . . . . . . . . . . . . . . . . . . 14
4.2 Import Freedom-E-SDK Examples . . . . . . . . . . . . . . . . . . . . . . . . . . . . 15
4.2.1 Cloning Freedom-E-SDK . . . . . . . . . . . . . . . . . . . . . . . . . . . . . 16
4.2.2 Freedom-E-SDK Examples Step by Step . . . . . . . . . . . . . . . . . . . . 17
4.3 Creating a New Project From Scratch . . . . . . . . . . . . . . . . . . . . . . . . . . 18
4.4 Debug Configurations . . . . . . . . . . . . . . . . . . . . . . . . . . . . . . . . . . . 18
5 Known Issues 19
A Windows Board Setup 20
A.1 Hardware Setup . . . . . . . . . . . . . . . . . . . . . . . . . . . . . . . . . . . . . . 20
B macOS Board Setup 21
B.1 Hardware Setup . . . . . . . . . . . . . . . . . . . . . . . . . . . . . . . . . . . . . . 21
C Linux OS Board Setup 22
C.1 Hardware Setup . . . . . . . . . . . . . . . . . . . . . . . . . . . . . . . . . . . . . . 22

Chapter 1
Introduction
1.1 Freedom Studio IntroductionFreedom Studio is an integrated developer environment which can be used to write and debugsoftware targeting SiFive based processors. Freedom Studio is based on the industry standardEclipse platform and is bundled with a pre-built RISC-V GCC Toolchain, OpenOCD, example pro-grams, and documentation.
1.2 Product OverviewThis section will describe the individual components used in Freedom Studio release Beta3.
1.2.1 EclipseThe major versions of the Eclipse feature plugins are as follows:
• Eclipse - Oxygen.2 (4.7.2)
• Eclipse C/C++ Development Tools - 9.4.0
• Git Integration for Eclipse - 4.9.2
1

Copyright c© 2017, SiFive Inc. All rights reserved. 2
• Terminal View Core - 4.3.0
• GNU MCU Eclipse RISC-V Cross Compiler - 2.6.1
• GNU MCU Eclipse OpenOCD Debugging- 4.2.1
• GNU MCU Eclipse J-LINK Debugging- 4.2.1
• GNU MCU Eclipse SiFive Project Template - 1.1.1
1.2.2 RISC-V GCCRISC-V GCC was built from source using the following repository and commit hash:
• Repository:https://github.com/riscv/riscv-gnu-toolchain/releases/tag/v20171231
• Commit hash: d66c792dfe701c63a8df2028598174fbeee4e8f1
This build of GCC is able to target RV32 and RV64 based processors.
1.2.3 OpenOCDFreedom Studio uses OpenOCD for hardware debug. OpenOCD was built from source using thefollowing repository and commit hash:
• Repository:https://github.com/riscv/riscv-openocd/releases/tag/v20171231
• Commit hash: ab5a98663ea50439ab4a6e40adfe0899cf95828f
Chapter 2
Freedom Studio Set Up
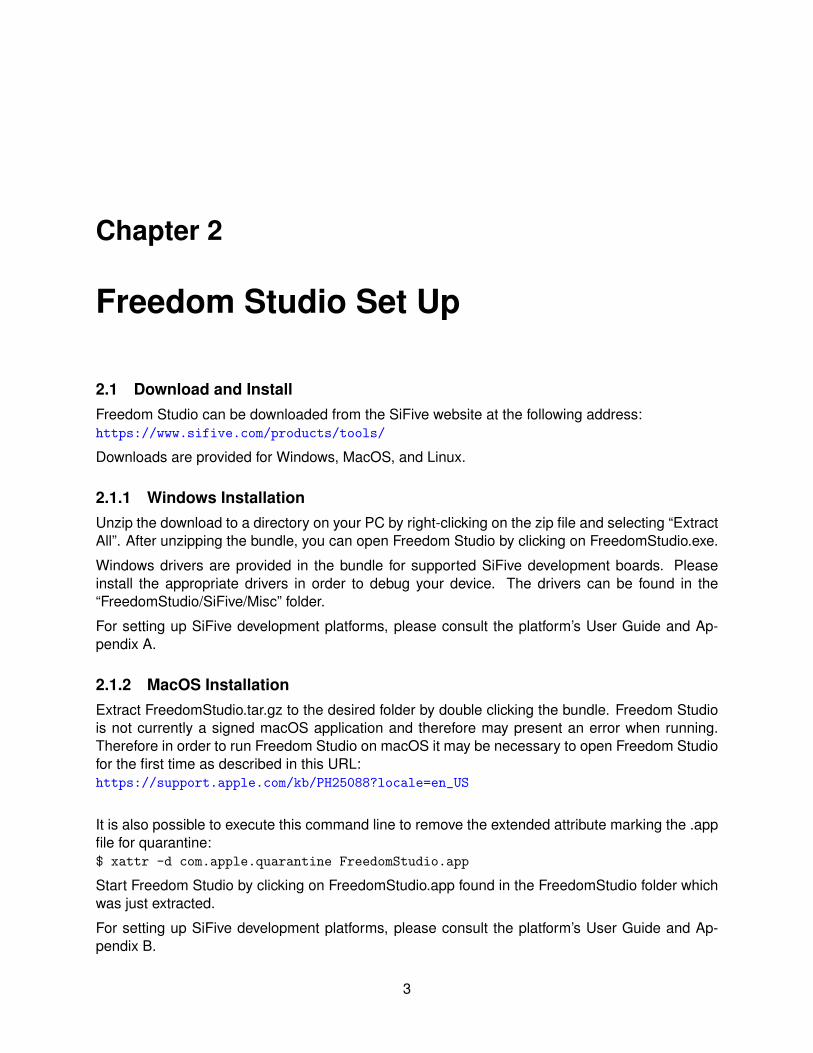
2.1 Download and InstallFreedom Studio can be downloaded from the SiFive website at the following address:https://www.sifive.com/products/tools/
Downloads are provided for Windows, MacOS, and Linux.
2.1.1 Windows InstallationUnzip the download to a directory on your PC by right-clicking on the zip file and selecting “ExtractAll”. After unzipping the bundle, you can open Freedom Studio by clicking on FreedomStudio.exe.
Windows drivers are provided in the bundle for supported SiFive development boards. Pleaseinstall the appropriate drivers in order to debug your device. The drivers can be found in the“FreedomStudio/SiFive/Misc” folder.
For setting up SiFive development platforms, please consult the platform’s User Guide and Ap-pendix A.
2.1.2 MacOS InstallationExtract FreedomStudio.tar.gz to the desired folder by double clicking the bundle. Freedom Studiois not currently a signed macOS application and therefore may present an error when running.Therefore in order to run Freedom Studio on macOS it may be necessary to open Freedom Studiofor the first time as described in this URL:https://support.apple.com/kb/PH25088?locale=en_US
It is also possible to execute this command line to remove the extended attribute marking the .appfile for quarantine:$ xattr -d com.apple.quarantine FreedomStudio.app
Start Freedom Studio by clicking on FreedomStudio.app found in the FreedomStudio folder whichwas just extracted.
For setting up SiFive development platforms, please consult the platform’s User Guide and Ap-pendix B.
3

Copyright c© 2017, SiFive Inc. All rights reserved. 4
2.1.3 Linux InstallationExtract FreedomStudio.tar.gz to the desired folder using the following command:tar -xf /path/to/FreedomStudio.tar.gz
For setting up SiFive development platforms, please consult the platform’s User Guide and Ap-pendix C.

Copyright c© 2017, SiFive Inc. All rights reserved. 5
2.2 Freedom Studio ContentsThe Freedom Studio directory contents are as follows:
• FreedomStudio - Root directory
– FreedomStudio(.exe)(.app) - OS specific executable to open Freedom Studio– eclipse (Windows and Linux only)- Directory containing the eclipse environment. On
macOS the eclipse is located under the FreedomStudio.app bundle.– SiFive - SiFive files
∗ Documentation - documentation delivered with Freedom Studio.∗ Examples - Zip files containing example projects for a given board.∗ Licenses - Open Source Licenses.∗ Misc - Directory containing miscellaneous files such as OpenOCD config files,
XSVD files, drivers, and Linux OpenOCD udev rules∗ riscv-openocd* - Directory containing the OpenOCD build described in Section 1.2.∗ riscv64-unknown-elf-gcc* - Directory containing the RISC-V GCC build described
in Section 1.2.– Build Tools (Windows Only) - Tools which allow eclipse CDT to function in a Windows
environment such as make, echo, etc...– jre (Windows and Linux Only) - The Java Run Time Environment (JRE). On macOS the
JRE is located under the FreedomStudio.app bundle.
2.3 Tools SetupFreedom Studio will automatically detect its installation path on the first run and configure itself touse the bundled tools described in Section 2.2. If, for any reason, Freedom Studio was not ableto detect the bundled tools, it will prompt the user to enter the tool paths directly with the dialogshown in Figure 2.1. If prompted, be sure to select the “bin” directory which contains the toolbinaries. These paths will set the global defaults used by Freedom Studio.

Copyright c© 2017, SiFive Inc. All rights reserved. 6
Figure 2.1: Toolchain Selection Dialog
The tool paths can be changed at anytime, via the dialog shown in Figure 2.2, by clicking thefollowing:
• Windows and Linux - Window – Preferences – MCU• MacOS - Freedom Studio – Preferences – MCU• Global RISC-V Toolchain Paths - for SiFive toolchains, select the default toolchain RISC-V
GCC/Newlib and use the browse button to select the toolchain directory• Global OpenOCD Paths - for SiFive OpenOCD distributions, set the OpenOCD executable
to “openocd” and use the browse button to select the OpenOCD directory
The tool path preferences can be set at 3 different scopes: Global, Workspace, and Project.Global scope sets the default for the installation and is the lowest priority. Workspace scopeallows you to set the toolchain preferences specific a a given Workspace, and will override theGlobal setting. Project scope, which can be set by right clicking a project in your workspace andselecting Properties – MCU, allows you to set preferences on a per project basis. Project scopealways takes priority over Global and Workspace.
This flexibility allows the user to easily work with a number of different tools installed on the samesystem, such as one built from source using Freedom-E-SDK, while still maintaining project porta-bility.

Copyright c© 2017, SiFive Inc. All rights reserved. 7
Figure 2.2: Toolchain Preferences

Chapter 3
Freedom Studio Environment
3.1 WorkspaceEclipse uses workspaces to group together a set of related projects. Eclipse workspaces allowfor a lot of flexibility in how one organizes their projects. For example, it is possible to have aworkspace which contains only a single project. It is also possible to have a workspace whichcontains multiple related projects such as a library project and an application which depends onthat library.
Switching workspaces is accomplished by selecting File – Switch Workspace.
When starting Freedom Studio, Eclipse will prompt the user to select a workspace. FreedomStudio will remember the locations of previously selected workspaces.
3.2 Eclipse PerspectivesEclipse uses perspectives to group windows together which are collectively useful for a given task.
Freedom Studio ships with its own SiFive perspective which can is useful for both programmingand debugging. Please see Section 3.3 for a detailed description of the SiFive Eclipse perspective.
Freedom Studio also ships with the standard Eclipse perspectives: C/C++ , Debug, and Git. FromEclipse, you can change perspectives by clicking Window – Perspectives – Open Perspective.
Perspectives are user customizable and persistent to a workspace.
8
Copyright c© 2017, SiFive Inc. All rights reserved. 9
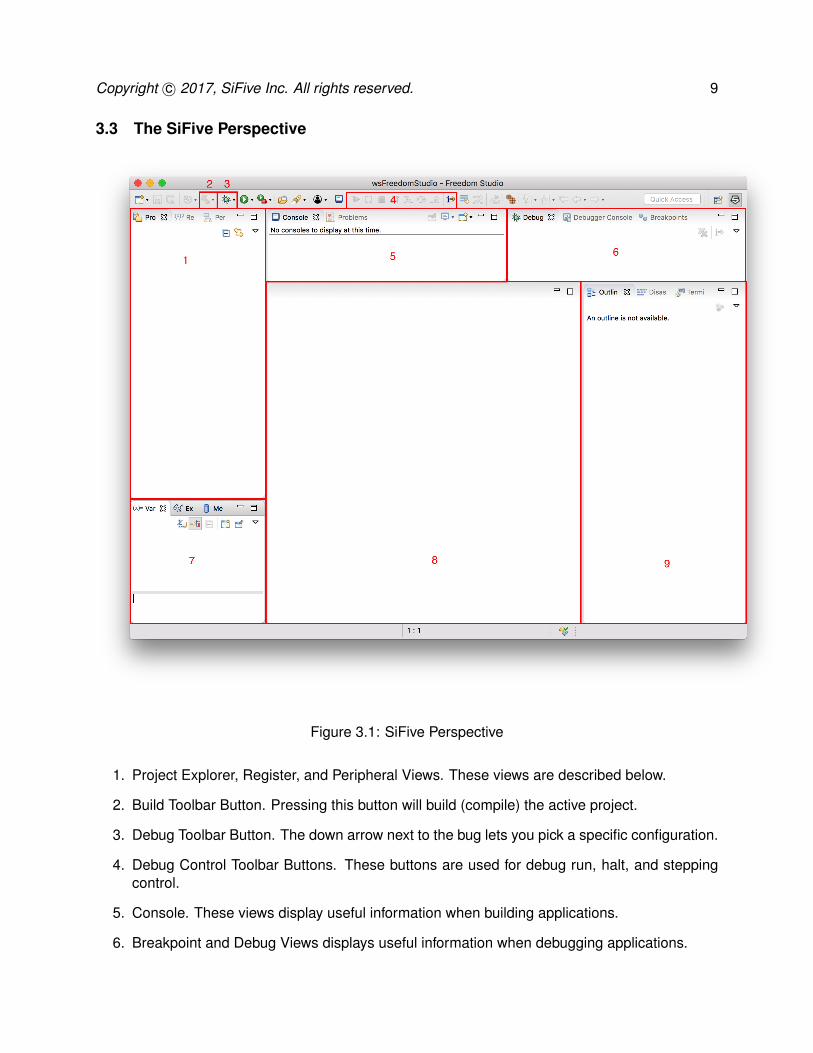
3.3 The SiFive Perspective
Figure 3.1: SiFive Perspective
1. Project Explorer, Register, and Peripheral Views. These views are described below.
2. Build Toolbar Button. Pressing this button will build (compile) the active project.
3. Debug Toolbar Button. The down arrow next to the bug lets you pick a specific configuration.
4. Debug Control Toolbar Buttons. These buttons are used for debug run, halt, and steppingcontrol.
5. Console. These views display useful information when building applications.
6. Breakpoint and Debug Views displays useful information when debugging applications.
Copyright c© 2017, SiFive Inc. All rights reserved. 10
7. Variable, Expression, and Memory Views. These views are described below.
8. Editor View is used to edit source code.
9. Outline, Disassembly, and Terminal Views are described below.
3.3.1 Project Explorer
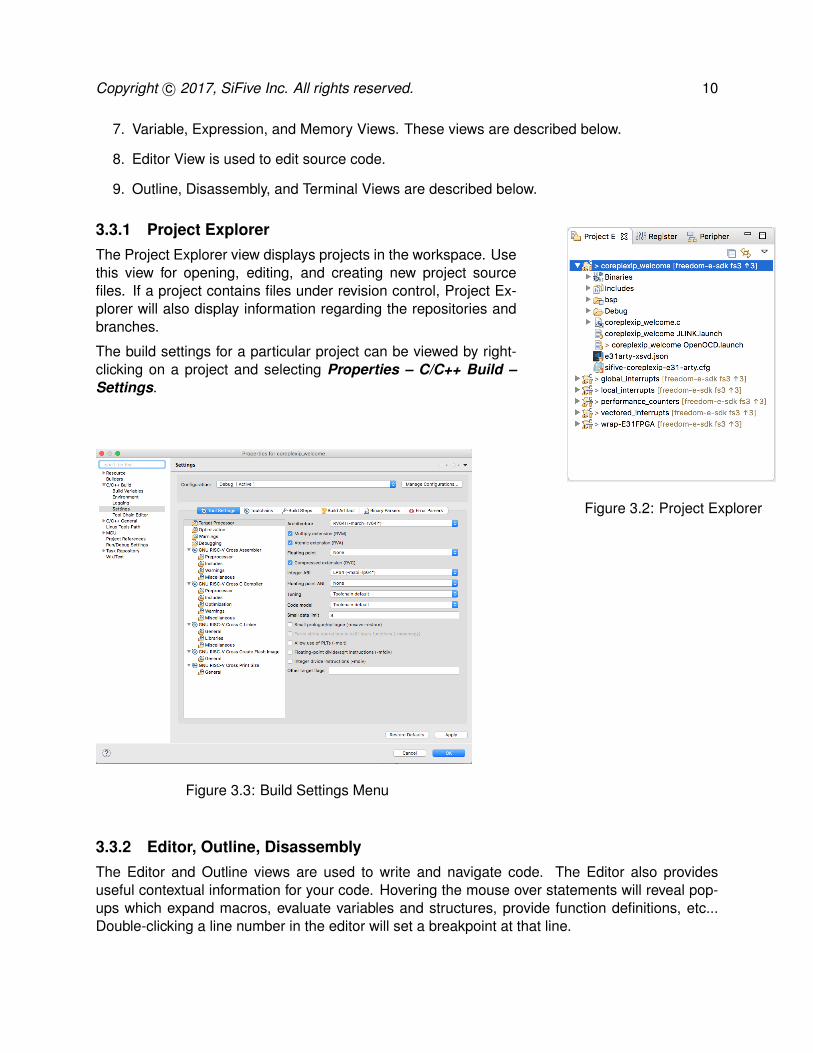
Figure 3.2: Project Explorer
The Project Explorer view displays projects in the workspace. Usethis view for opening, editing, and creating new project sourcefiles. If a project contains files under revision control, Project Ex-plorer will also display information regarding the repositories andbranches.
The build settings for a particular project can be viewed by right-clicking on a project and selecting Properties – C/C++ Build –Settings.
Figure 3.3: Build Settings Menu
3.3.2 Editor, Outline, DisassemblyThe Editor and Outline views are used to write and navigate code. The Editor also providesuseful contextual information for your code. Hovering the mouse over statements will reveal pop-ups which expand macros, evaluate variables and structures, provide function definitions, etc...Double-clicking a line number in the editor will set a breakpoint at that line.

Copyright c© 2017, SiFive Inc. All rights reserved. 11
Figure 3.4: Outline View
The Outline view, shown in Figure 3.4, gives a “top-level” view ofthe active file in the editor including classes, methods, functions,types, constants, etc... Clicking on an item in the Outline view willtake you to that items location in the source code.
3.3.3 TerminalThe Terminal view, shown in Figure 3.5, can be used to displaya local terminal, a serial terminal, or ssh into a remote machine.The serial terminal allows the user to view serial output, such asthat from a SiFive development board, without leaving the devel-opment environment. On Windows platforms this view negatesthe need for an external serial terminal program. On MacOS andLinux platforms, it is possible to open serial port directly, or open alocal terminal and run GNU Screen.
To open a serial terminal, open the Terminal view and selectthe “Launch Terminal” button which resembles a screen. In theChoose Terminal menu, select Serial Terminal. It is then possi-ble to select the desired serial settings such as baud rate and encodings.
Figure 3.5: Terminal ViewLauncher
If the text in the serial terminal is displayed incorrectly, makesure that the correct baud rate is selected. SiFive exampleprojects default to 115200 baud. Changing the encoding toUTF-8 might also help.
Figure 3.6: Terminal View Running

Copyright c© 2017, SiFive Inc. All rights reserved. 12
3.3.4 BreakpointsThe Breakpoints view allows for creating, enabling, and disabling of breakpoints. You can seta breakpoints properties by right-clicking on a breakpoint and selecting “Properties”. From theproperties menu, you can set properties such as breakpoint type (hard, soft), and ignore count.
3.3.5 Registers
Figure 3.7: Register View
The Registers view displays the integer and floating point reg-ister files. It is possible to write to registers by double-clickingtheir value field. While stepping through code, the Registersview will highlight registers as they change.
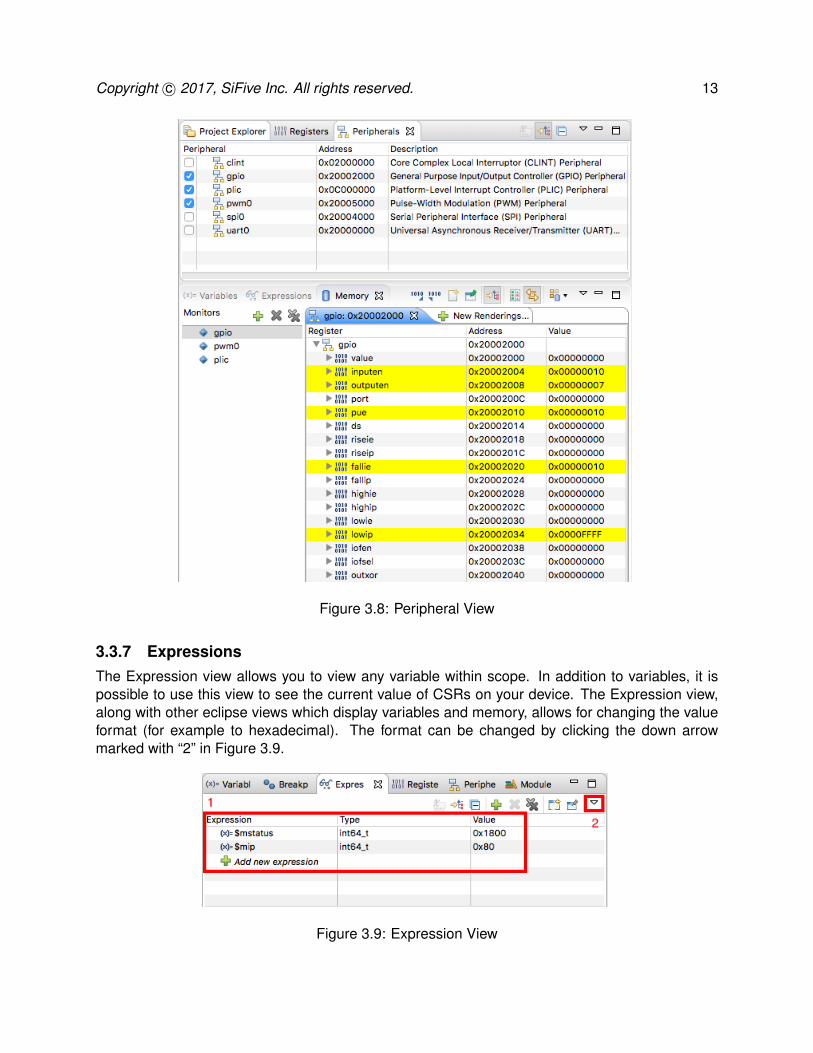
3.3.6 Peripheral and MemoryThe Peripheral view works in conjunction with the Memory viewto display registers and bit fields for a given peripheral. Thisview can be particularly useful while learning how a new pe-ripheral works. Selecting a peripheral will open that peripheralsview in the Memory view. From the Memory view, it is thenpossible to read and write peripheral registers.
Example peripheral description files are available for SiFive de-vices in the example projects and in the Freedom Studio bundlein the “SiFive/Misc” folder. The peripheral description files usethe XSVD format defined by the GNU-MCU-Eclipse project.
Copyright c© 2017, SiFive Inc. All rights reserved. 13
Figure 3.8: Peripheral View
3.3.7 ExpressionsThe Expression view allows you to view any variable within scope. In addition to variables, it ispossible to use this view to see the current value of CSRs on your device. The Expression view,along with other eclipse views which display variables and memory, allows for changing the valueformat (for example to hexadecimal). The format can be changed by clicking the down arrowmarked with “2” in Figure 3.9.
Figure 3.9: Expression View

Chapter 4
Getting Started
4.1 Import the Bundled ExamplesFreedom Studio bundles examples for SiFive development platform.
4.1.1 Bundled Examples Step by StepAfter opening Freedom Studio and selecting a workspace (any location is OK):
• From Freedom Studio click File – Import.
• General – Existing Projects into Workspace.
• Select Archive File.
• Browse to the FreedomStudio/SiFive/Examples directory and select the zip file for your plat-form.
• Select the desired projects and click Finish.
14
Copyright c© 2017, SiFive Inc. All rights reserved. 15
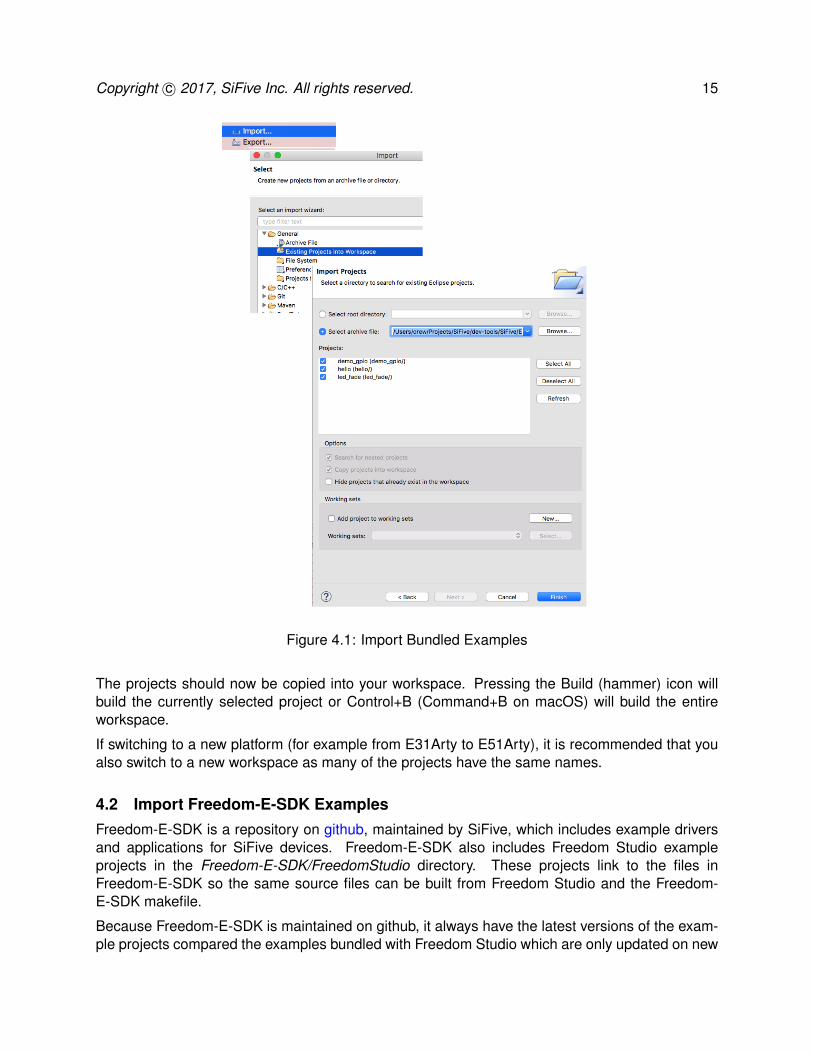
Figure 4.1: Import Bundled Examples
The projects should now be copied into your workspace. Pressing the Build (hammer) icon willbuild the currently selected project or Control+B (Command+B on macOS) will build the entireworkspace.
If switching to a new platform (for example from E31Arty to E51Arty), it is recommended that youalso switch to a new workspace as many of the projects have the same names.
4.2 Import Freedom-E-SDK ExamplesFreedom-E-SDK is a repository on github, maintained by SiFive, which includes example driversand applications for SiFive devices. Freedom-E-SDK also includes Freedom Studio exampleprojects in the Freedom-E-SDK/FreedomStudio directory. These projects link to the files inFreedom-E-SDK so the same source files can be built from Freedom Studio and the Freedom-E-SDK makefile.
Because Freedom-E-SDK is maintained on github, it always have the latest versions of the exam-ple projects compared the examples bundled with Freedom Studio which are only updated on new

Copyright c© 2017, SiFive Inc. All rights reserved. 16
releases.
4.2.1 Cloning Freedom-E-SDKIn order to obtain a local copy of Freedom-E-SDK, it is first necessary to clone the repository.Freedom-E-SDK is located on github at the following URL:https://github.com/sifive/freedom-e-sdk.
Clone the repository to the desired directory by typing the following in a command line prompt:git clone [email protected]:sifive/freedom-e-sdk.git
Note that, when using Freedom Studio it is not necessary to recursively clone Freedom-E-SDK asa pre-built toolchain is bundled with Freedom Studio.
Alternatively, it is possible to use the git functionality included in Freedom Studio to clone therepository. To do so, open the Git perspective (Window – Perspective – Git), and select Clonea git repository in the Git Repository view. Enter the following URL and select Next :https://github.com/sifive/freedom-e-sdk
The second screen selects the branches in the repository to clone. “Master” is considered to bethe stable branch.
The third screen sets the local directory where the repository will be cloned to.
Figure 4.2: Cloning Freedom-E-SDK
Once Freedom-E-SDK has been cloned, follow the steps in Section 4.2.2 to import and build.

Copyright c© 2017, SiFive Inc. All rights reserved. 17
4.2.2 Freedom-E-SDK Examples Step by StepAfter opening Freedom Studio and selecting a workspace (any location is OK):
• From Freedom Studio click File – Import.
• General – Existing Projects into Workspace.
• Select Root Directory.
• Browse to freedom-e-sdk/FreedomStudio directory and select the folder which matches yourplatform.
• Make sure that “Copy projects into workspace” is not checked, and click Finish.
Figure 4.3: Import Freedom-E-SDK Examples
The projects are now imported into the workspace. Note that the actual source files for the projectremain in the Freedom-E-SDK folder, and any modifications made to them will modify the originalFreedom-E-SDK files.
If switching to a new platform (for example from E31FPGA to E51FPGA), it is recommended thatyou also switch to a new workspace as many of the projects have the same names.

Copyright c© 2017, SiFive Inc. All rights reserved. 18
4.3 Creating a New Project From ScratchTo create a new SiFive project from scratch:
• Open Freedom Studioand select File – New
• Select the Project Type: C, C++
• Under Project Type select Executable or Shared Library, and select SiFive C/C++
• Give the project a name and select Next
• Select the appropriate Project options and click Finish
This will create a new project which is already configured for the SiFive platform chosen. Note thatprojects created this way use a BSP created by the GNU-MCU-Eclipse project which differs fromthe BSP used by the SiFive examples.
It is also possible to create a completely empty project without supporting BSP code.
• Open Freedom Studioand select File – New
• Select the Project Type: C, C++
• Under Project Type select Executable or Shared Library, and select Empty
• Select the toolchain RISC-V Cross GCC
• Give the project a name and select Next.
• Fill in basic project information and build configurations selecting Next twice.
• Select the desired toolchain. If there is a global default it will be filled in automatically. ClickFinish
After creating the empty project, the toolchain needs to be configured for the device. Toolchainsettings can be found by right-clicking on the project and selecting Properties – C/C++ Build –Settings as described in Section 3.3.1.
4.4 Debug ConfigurationsAll of the examples include launch files which tell Freedom Studio how to start a debug connectionwith the target platform. All launch configurations are set to load the program into the address towhich they were linked (defined in the linker file), and to halt execution at the main function.
To launch a debug session, click Run – Debug Configurations and then GDB OpenOCD followedby the desired program. It is also possible to quickly launch debug sessions by clicking the downarrow next to the “bug” toolbar button shown in Figure 3.1(box 3). Previous launched debugsessions will show up in this menu.

Chapter 5
Known Issues
Freedom Studio is still considered Beta software and as such there are a number of known, butminor, issues which are described below.
If you come across other issues not reported here, please let us know on our forum: https:
//forums.sifive.com/.
When the debugger first connects I receive message saying “No source available for ad-dress”This occurs when instructing the debugger to halt immediately after connecting to the target. It issafe to ignore this message. Stepping/Running the target will work as expected from this point.
Upon starting a debug connection, the Console prints out a lot of text regarding CSRs inred fontWhile red font can be scary, it is generally benign debugging output. This issue will be addressedin a future release.
19

Appendix A
Windows Board Setup
This section will describe how to connect SiFive development boards to your Windows computer.
A.1 Hardware SetupBy default, Windows has the standard FTDI driver installed while OpenOCD expects to com-municate over USB using libusb. In order to allow OpenOCD to communicate with the SiFivedevelopment boards, it is necessary to instruct Windows to load the libusb driver.
In the Windows Freedom Studio bundle there are drivers included to do this. Install the drivers bynavigating to the FreedomStudio/SiFive/Misc folder and double-clicking the appropriate driver foryour board.
Note: This is a permanent change and the drivers must be uninstalled in order return to the originalfunctionality. This can be done through Windows Add/Remove programs.
20
Appendix B
macOS Board Setup
This section will describe how to connect SiFive development boards to your macOS computer.
B.1 Hardware SetupBy default, macOS has the standard FTDI driver installed while OpenOCD expects to communi-cate over USB using libusb. In order to allow OpenOCD to communicate with the SiFive develop-ment boards, it is necessary to unload the FTDI driver from macOS.
• Open Applications/Utilities/Terminal
• Paste in the following command:sudo kextunload -p -b com.apple.driver.AppleUSBFTDI
• Paste in the following command:sudo kextutil -b com.apple.driver.AppleUSBFTDI -p AppleUSBEFTDI-6010-1
Note: This is not a permanent solution and after logging out of you computer it is necessary toissue the above commands above.
To avoid having to issue these commands on every log-in, it is possible to add the above com-mands to your user’s ∼/.bash profile. By doing so, the above commands will be issued automati-cally every time your user logs in.
21

Appendix C
Linux OS Board Setup
This section will describe how to connect SiFive development boards to your Linux computer.
C.1 Hardware SetupBy default, most Linux distributions do not give users permissions to access USB devices. Oneeither needs root access or to be given the appropriate permissions.
Below are steps you can follow to access your development kit without sudo permissions:
1. With your board’s debug interface connected, make sure your device shows up with thelsusb command:
> lsusb
...
Bus XXX Device XXX: ID 0403:6010 Future Technology Devices
International, Ltd FT2232C Dual USB-UART/FIFO IC
2. Set the udev rules to allow the device to be accessed by the plugdev group:
For your convenience the 99-openocd.rules file is included with Freedom Studio in the Free-domStudio/SiFive/Misc directory.
> sudo cp 99-openocd.rules /etc/udev/rules.d/
3. See if your board shows up as a serial device belonging to the plugdev group:
> ls /dev/ttyUSB*
/dev/ttyUSB0 /dev/ttyUSB1
(If you have other serial devices or multiple boards attached, you may have more deviceslisted). For serial communication with the UART, you will always want to select the highernumber of the pair, in this example /dev/ttyUSB1.
22

Copyright c© 2017, SiFive Inc. All rights reserved. 23
> ls -l /dev/ttyUSB1
crw-rw-r-- 1 root plugdev 188, 1 Nov 28 12:53 /dev/ttyUSB1
4. Add yourself to the plugdev group. You can use the whoami command to determine youruser name.
> whoami your user name > sudo usermod -a -G plugdev your user name
5. Log out and log back in, then check that you’re now a member of the plugdev group:
> groups
... plugdev ...
If you are not part of the plugdev group, perform a full reset.
Now you should be able to access the serial (UART) and debug interface without sudo permis-sions.


