By Hemamalini Elumalai Splendor Garden Quilt … Hemamalini Elumalai Splendor Garden Quilt Tutorial...
58
By Hemamalini Elumalai Splendor Garden Quilt Tutorial Page 1 of 58 http://www.malinisquilts.com(c) http://www.rileyblakedesigns.com/cutting-corners/2014/07/15/flower-garden-quilt/ Hello, this Hema from Malini's Quilts blog with the Splendor Flower Garden quilt made from Lila Tueller's Splendor fabric collections. This collection has beautiful big prints and this pattern will showcase those big prints.
Transcript of By Hemamalini Elumalai Splendor Garden Quilt … Hemamalini Elumalai Splendor Garden Quilt Tutorial...

By Hemamalini Elumalai
Splendor Garden Quilt Tutorial
Page 1 of 58
http://www.malinisquilts.com(c)
http://www.rileyblakedesigns.com/cutting-corners/2014/07/15/flower-garden-quilt/
Hello, this Hema from Malini's Quilts blog with the Splendor Flower Garden quilt made from Lila Tueller's Splendor fabric collections. This collection has
beautiful big prints and this pattern will showcase those big prints.

By Hemamalini Elumalai
Splendor Garden Quilt Tutorial
Page 2 of 58
http://www.malinisquilts.com(c)
http://www.rileyblakedesigns.com/cutting-corners/2014/07/15/flower-garden-quilt/
Fabrics and Tools Required:
Splendor Fat Quarter Bundle 1
Cotton Shades Snow - 4.5 yards for background
Splendor Stripes White - 3/4 yards for binding
Splendor or other Yardage - 5 yards for backing
12" 60 degree Triangle Ruler
8.5 inch x 24.5 inch ruler
6.5 inch square up ruler

By Hemamalini Elumalai
Splendor Garden Quilt Tutorial
Page 3 of 58
http://www.malinisquilts.com(c)
http://www.rileyblakedesigns.com/cutting-corners/2014/07/15/flower-garden-quilt/
Cutting Instructions
Background fabric
Tip: I put a new blade in my rotary cutter since I am cutting through 4 to 6
layers of fabrics at a time.
Cut 20 strips 6.5" x WOF, sub-cut into six 6.5" squares from each strip a
total of 120 squares.
Cut 12 strips 1" x WOF
Cut 40 strips 1.5" x WOF

By Hemamalini Elumalai
Splendor Garden Quilt Tutorial
Page 4 of 58
http://www.malinisquilts.com(c)
http://www.rileyblakedesigns.com/cutting-corners/2014/07/15/flower-garden-quilt/
Cut the 6.5 inch strips into 6.5 squares. I am aligning my fabrics with the
markings on the mat and then aligning the rulers to cut all 3 set of strips at the same time. This is a big time saver but you have make sure the
alignments are correct before cutting the squares.

By Hemamalini Elumalai
Splendor Garden Quilt Tutorial
Page 5 of 58
http://www.malinisquilts.com(c)
http://www.rileyblakedesigns.com/cutting-corners/2014/07/15/flower-garden-quilt/
By Hemamalini Elumalai
Splendor Garden Quilt Tutorial
Page 6 of 58
http://www.malinisquilts.com(c)
http://www.rileyblakedesigns.com/cutting-corners/2014/07/15/flower-garden-quilt/
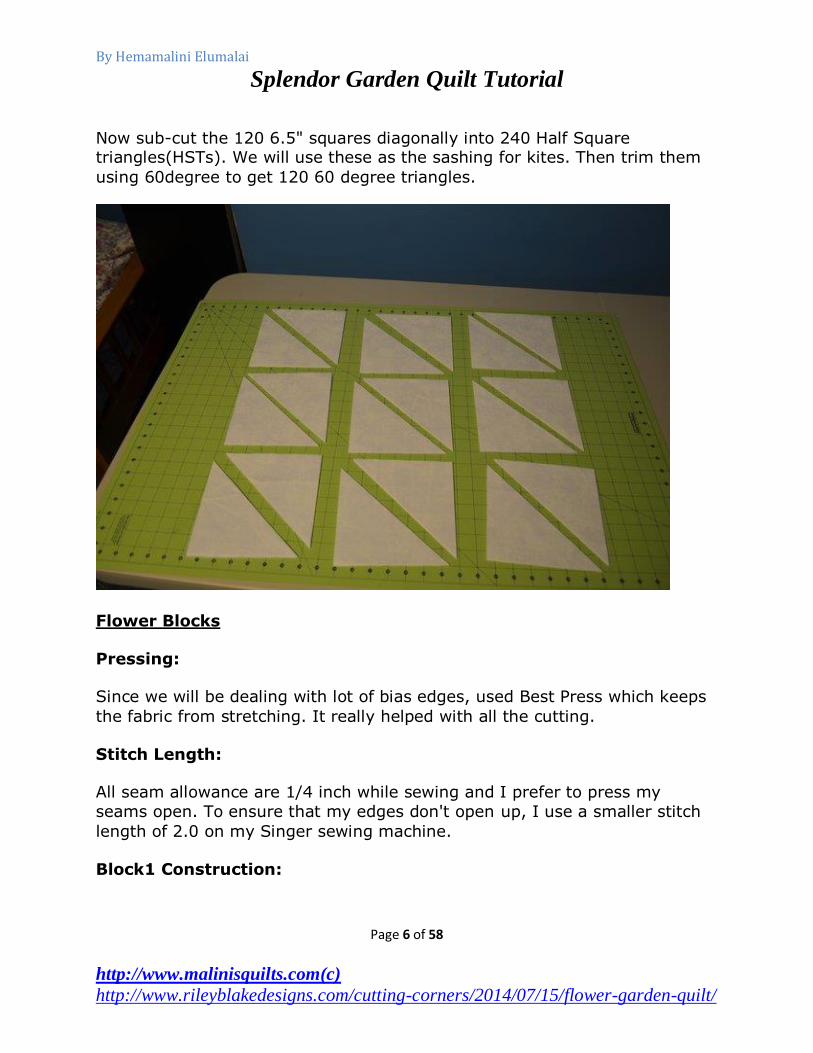
Now sub-cut the 120 6.5" squares diagonally into 240 Half Square triangles(HSTs). We will use these as the sashing for kites. Then trim them
using 60degree to get 120 60 degree triangles.
Flower Blocks
Pressing:
Since we will be dealing with lot of bias edges, used Best Press which keeps
the fabric from stretching. It really helped with all the cutting.
Stitch Length:
All seam allowance are 1/4 inch while sewing and I prefer to press my
seams open. To ensure that my edges don't open up, I use a smaller stitch
length of 2.0 on my Singer sewing machine.
Block1 Construction:

By Hemamalini Elumalai
Splendor Garden Quilt Tutorial
Page 7 of 58
http://www.malinisquilts.com(c)
http://www.rileyblakedesigns.com/cutting-corners/2014/07/15/flower-garden-quilt/
I am using 4 big prints from each colorway to make kites for this set of
flower blocks. Each flower block is made out of six 60 degree kites.
I also used Best Press before cutting the fabric and ironed them to take any
creases off.
Cut 2 strips of 6 inch x 21 inch from each fat quarter. Sub cut them into six
6 inch squares. You can save the rest for another project.
Now cut 6 kites for each block from the squares, I used the measurement of
8 1/4 from tip of the kite to bottom of the kite on the 60 degree triangle
ruler as shown in the picture below:

By Hemamalini Elumalai
Splendor Garden Quilt Tutorial
Page 8 of 58
http://www.malinisquilts.com(c)
http://www.rileyblakedesigns.com/cutting-corners/2014/07/15/flower-garden-quilt/

By Hemamalini Elumalai
Splendor Garden Quilt Tutorial
Page 9 of 58
http://www.malinisquilts.com(c)
http://www.rileyblakedesigns.com/cutting-corners/2014/07/15/flower-garden-quilt/
You only need six 6 inch squares from each FQ with big print. Each colorway
has 4 big prints. Total squares cut for Block 1 set would be 72.
Now cut the kites from the 6 inch print squares.

By Hemamalini Elumalai
Splendor Garden Quilt Tutorial
Page 10 of 58
http://www.malinisquilts.com(c)
http://www.rileyblakedesigns.com/cutting-corners/2014/07/15/flower-garden-quilt/

By Hemamalini Elumalai
Splendor Garden Quilt Tutorial
Page 11 of 58
http://www.malinisquilts.com(c)
http://www.rileyblakedesigns.com/cutting-corners/2014/07/15/flower-garden-quilt/
Each flower will have 6 kites/petals.
Here is a finished Block#1 from Layout 3, which includes a shashing around
each kite/petal. More details about the sashing can be found under Layout3
below.

By Hemamalini Elumalai
Splendor Garden Quilt Tutorial
Page 12 of 58
http://www.malinisquilts.com(c)
http://www.rileyblakedesigns.com/cutting-corners/2014/07/15/flower-garden-quilt/
Block #2 Construction
3 - 2.5 inch strips cut on the bias from the stripped fabrics
10 - 1 inch x WOF cut for sashing of the small or inner kites
3.5 x 5.5 inch rectangle cut from 6 different fabrics - 48 total
3.5 x 2.5 inch rectangle cut from 6 different fabrics - 48 total

By Hemamalini Elumalai
Splendor Garden Quilt Tutorial
Page 13 of 58
http://www.malinisquilts.com(c)
http://www.rileyblakedesigns.com/cutting-corners/2014/07/15/flower-garden-quilt/

By Hemamalini Elumalai
Splendor Garden Quilt Tutorial
Page 14 of 58
http://www.malinisquilts.com(c)
http://www.rileyblakedesigns.com/cutting-corners/2014/07/15/flower-garden-quilt/
We need a total of 3 bias strips, then sub cut into 24 2.5" squares with lines
going straight with the direction of kites.

By Hemamalini Elumalai
Splendor Garden Quilt Tutorial
Page 15 of 58
http://www.malinisquilts.com(c)
http://www.rileyblakedesigns.com/cutting-corners/2014/07/15/flower-garden-quilt/
From each Stripped fabric( 3 in this collection) - Sub cut them into 18 2.5
inch squares for the small kites. This set will make 3 #2 block centers.

By Hemamalini Elumalai
Splendor Garden Quilt Tutorial
Page 16 of 58
http://www.malinisquilts.com(c)
http://www.rileyblakedesigns.com/cutting-corners/2014/07/15/flower-garden-quilt/

By Hemamalini Elumalai
Splendor Garden Quilt Tutorial
Page 17 of 58
http://www.malinisquilts.com(c)
http://www.rileyblakedesigns.com/cutting-corners/2014/07/15/flower-garden-quilt/
Align the two tip(top & bottom) of the squares with stripes parallel to the center line of the triangle ruler.
Trim the excess fabric away.

By Hemamalini Elumalai
Splendor Garden Quilt Tutorial
Page 18 of 58
http://www.malinisquilts.com(c)
http://www.rileyblakedesigns.com/cutting-corners/2014/07/15/flower-garden-quilt/
We need 6 kites for center of one flower block.

By Hemamalini Elumalai
Splendor Garden Quilt Tutorial
Page 19 of 58
http://www.malinisquilts.com(c)
http://www.rileyblakedesigns.com/cutting-corners/2014/07/15/flower-garden-quilt/
Sash the small center kites
We need a total of 10 1"x WOF(42 inches) strips for sashing all the kites. We will use two other striped fabric from different colorway. We only need to
make 8 #2 blocks for Layout 2 and Layout3.
Note:- If all your small print FQs are 21 inches long. You can make a total of
12 #2 blocks. But some of mine were smaller, so I limited myself to just
making 8 blocks.
Let the chain piecing begin.
You can scissor trim each kite and then trim them to size.

By Hemamalini Elumalai
Splendor Garden Quilt Tutorial
Page 20 of 58
http://www.malinisquilts.com(c)
http://www.rileyblakedesigns.com/cutting-corners/2014/07/15/flower-garden-quilt/

By Hemamalini Elumalai
Splendor Garden Quilt Tutorial
Page 21 of 58
http://www.malinisquilts.com(c)
http://www.rileyblakedesigns.com/cutting-corners/2014/07/15/flower-garden-quilt/
Now chain piece the other side of sashing to the small kites.

By Hemamalini Elumalai
Splendor Garden Quilt Tutorial
Page 22 of 58
http://www.malinisquilts.com(c)
http://www.rileyblakedesigns.com/cutting-corners/2014/07/15/flower-garden-quilt/
Trim the right angles of each kite. You can leave the 60 degree side for
trimming later.

By Hemamalini Elumalai
Splendor Garden Quilt Tutorial
Page 23 of 58
http://www.malinisquilts.com(c)
http://www.rileyblakedesigns.com/cutting-corners/2014/07/15/flower-garden-quilt/
By Hemamalini Elumalai
Splendor Garden Quilt Tutorial
Page 24 of 58
http://www.malinisquilts.com(c)
http://www.rileyblakedesigns.com/cutting-corners/2014/07/15/flower-garden-quilt/
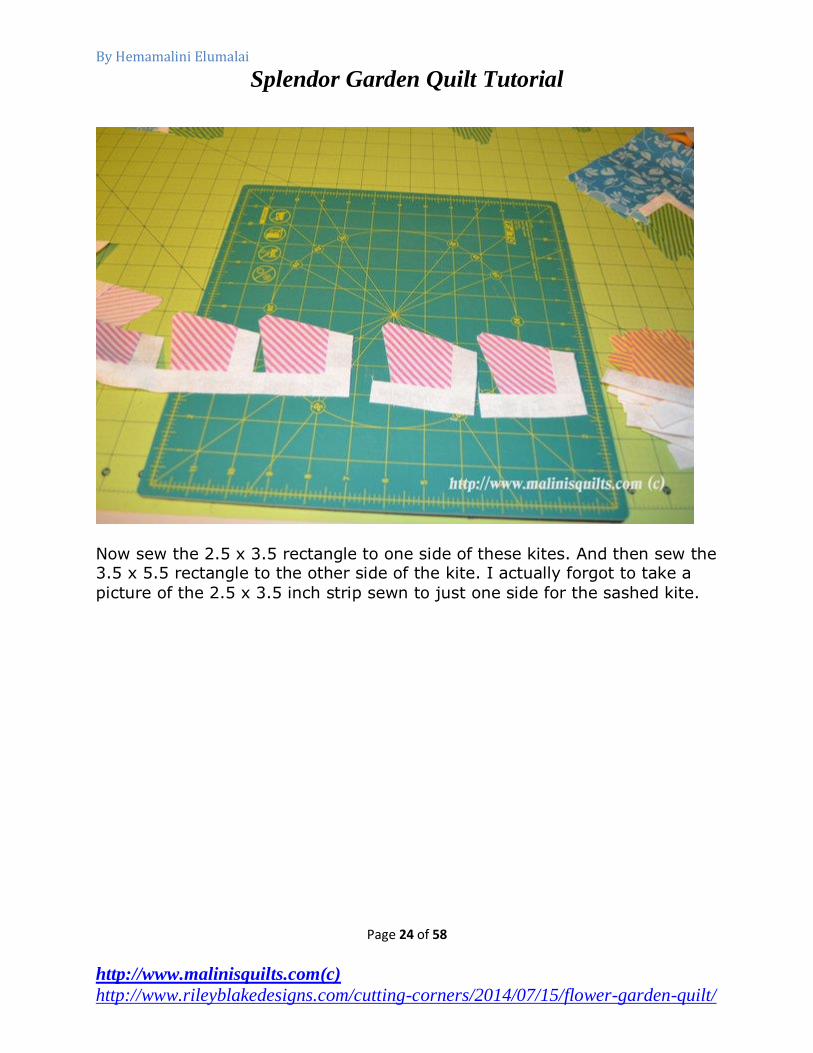
Now sew the 2.5 x 3.5 rectangle to one side of these kites. And then sew the 3.5 x 5.5 rectangle to the other side of the kite. I actually forgot to take a
picture of the 2.5 x 3.5 inch strip sewn to just one side for the sashed kite.

By Hemamalini Elumalai
Splendor Garden Quilt Tutorial
Page 25 of 58
http://www.malinisquilts.com(c)
http://www.rileyblakedesigns.com/cutting-corners/2014/07/15/flower-garden-quilt/
While pressing I used "Mary Ellen's Best Press" to hold the seams in place.
This was really helpful for the block to stay flat.

By Hemamalini Elumalai
Splendor Garden Quilt Tutorial
Page 26 of 58
http://www.malinisquilts.com(c)
http://www.rileyblakedesigns.com/cutting-corners/2014/07/15/flower-garden-quilt/
Trim using 60 degree triangle ruler to make kites for Block#2.

By Hemamalini Elumalai
Splendor Garden Quilt Tutorial
Page 27 of 58
http://www.malinisquilts.com(c)
http://www.rileyblakedesigns.com/cutting-corners/2014/07/15/flower-garden-quilt/
Trimmed Kite.

By Hemamalini Elumalai
Splendor Garden Quilt Tutorial
Page 28 of 58
http://www.malinisquilts.com(c)
http://www.rileyblakedesigns.com/cutting-corners/2014/07/15/flower-garden-quilt/
We need 6 kites/petals to make one #2 flower block:

By Hemamalini Elumalai
Splendor Garden Quilt Tutorial
Page 29 of 58
http://www.malinisquilts.com(c)
http://www.rileyblakedesigns.com/cutting-corners/2014/07/15/flower-garden-quilt/
We need a total of 48 kites to make 8 pieced flower blocks.
Here is a finished Block#2 from Layout 3, which includes a shashing around
each kite/petal. More details about the sashing can be found under Layout3
below.

By Hemamalini Elumalai
Splendor Garden Quilt Tutorial
Page 30 of 58
http://www.malinisquilts.com(c)
http://www.rileyblakedesigns.com/cutting-corners/2014/07/15/flower-garden-quilt/
How to make 60 degree Triangles for each petal/kite?
All fabrics are now ready to make the 60 degree triangles.

By Hemamalini Elumalai
Splendor Garden Quilt Tutorial
Page 31 of 58
http://www.malinisquilts.com(c)
http://www.rileyblakedesigns.com/cutting-corners/2014/07/15/flower-garden-quilt/
We cut a total of 240 HST. Out of that pick 120 and we will trim them to get
ready for chain piecing.

By Hemamalini Elumalai
Splendor Garden Quilt Tutorial
Page 32 of 58
http://www.malinisquilts.com(c)
http://www.rileyblakedesigns.com/cutting-corners/2014/07/15/flower-garden-quilt/
We will use 6.5 inch square up ruler and align one edge of the HST with 4.5
inch marking on the ruler as shown below:

By Hemamalini Elumalai
Splendor Garden Quilt Tutorial
Page 33 of 58
http://www.malinisquilts.com(c)
http://www.rileyblakedesigns.com/cutting-corners/2014/07/15/flower-garden-quilt/
Chain Piecing
Now chain piece all kites from both Block 1 and Block 2 sets.

By Hemamalini Elumalai
Splendor Garden Quilt Tutorial
Page 34 of 58
http://www.malinisquilts.com(c)
http://www.rileyblakedesigns.com/cutting-corners/2014/07/15/flower-garden-quilt/
To speed up the process we just finger press and sew the other HST on
other side of the kite.

By Hemamalini Elumalai
Splendor Garden Quilt Tutorial
Page 35 of 58
http://www.malinisquilts.com(c)
http://www.rileyblakedesigns.com/cutting-corners/2014/07/15/flower-garden-quilt/

By Hemamalini Elumalai
Splendor Garden Quilt Tutorial
Page 36 of 58
http://www.malinisquilts.com(c)
http://www.rileyblakedesigns.com/cutting-corners/2014/07/15/flower-garden-quilt/
Let the chain piecing being for all Kites from Block 1 and Block 2 sets.
Notice that the tip of the second HST is offset my 1/4inch and the needle
should be in the valley between the two pieces as shown above.
Now Press all seams open as shown below:

By Hemamalini Elumalai
Splendor Garden Quilt Tutorial
Page 37 of 58
http://www.malinisquilts.com(c)
http://www.rileyblakedesigns.com/cutting-corners/2014/07/15/flower-garden-quilt/
Trimming:
Let the trimming begin using the 60 degree triangle ruler as shown below.
My final triangles would be 9 1/4 inches tall.

By Hemamalini Elumalai
Splendor Garden Quilt Tutorial
Page 38 of 58
http://www.malinisquilts.com(c)
http://www.rileyblakedesigns.com/cutting-corners/2014/07/15/flower-garden-quilt/

By Hemamalini Elumalai
Splendor Garden Quilt Tutorial
Page 39 of 58
http://www.malinisquilts.com(c)
http://www.rileyblakedesigns.com/cutting-corners/2014/07/15/flower-garden-quilt/
In the picture above I used the 1/4 marking right below the 3" marked from the
top of the rulers. This will ensure that finished triangles are 9 1/4 tall.
All triangles trimmed and ready for design wall.

By Hemamalini Elumalai
Splendor Garden Quilt Tutorial
Page 40 of 58
http://www.malinisquilts.com(c)
http://www.rileyblakedesigns.com/cutting-corners/2014/07/15/flower-garden-quilt/
Playing with the Design

By Hemamalini Elumalai
Splendor Garden Quilt Tutorial
Page 41 of 58
http://www.malinisquilts.com(c)
http://www.rileyblakedesigns.com/cutting-corners/2014/07/15/flower-garden-quilt/
Layout 1 (Made with just Block1):

By Hemamalini Elumalai
Splendor Garden Quilt Tutorial
Page 42 of 58
http://www.malinisquilts.com(c)
http://www.rileyblakedesigns.com/cutting-corners/2014/07/15/flower-garden-quilt/
The layout one using just Block1 with 12 FQs. A total of 10 full flowers and 4
half flowers.
To finish these triangles sew triangles in each row together and join the
rows.
Layout 2:
This layout uses both block#1(kites cut from squares without piecing) and
block#2(pieced kites). I used all 20 blocks below. I am referring to each
hexagon flower as a hexagon block.

By Hemamalini Elumalai
Splendor Garden Quilt Tutorial
Page 43 of 58
http://www.malinisquilts.com(c)
http://www.rileyblakedesigns.com/cutting-corners/2014/07/15/flower-garden-quilt/
To finish these triangles sew triangles in each row together and join the
rows.
Layout 3 - Adding sashing to the flower blocks
I added sashing in the layout 3. You need an additional 2.5 yards of the
background fabric for this layout.
Cutting sashing for flower block center
Sub-cut the 1.5 inch strips from the background fabric into 13.5 inch strips.
We will use these for sashing the flowers.
Cutting sashing between half hexagon/flower rows
Also you would need seven 1.5 x 95 inch strip for adding sashing between
the half hexagon flowers/half rows. I had extra yardage to I cut length wise.
But if you are using 1.5x WOF(42 inches). You would need to piece 3 strips
to form 95 inches long.
Chain Piecing

By Hemamalini Elumalai
Splendor Garden Quilt Tutorial
Page 44 of 58
http://www.malinisquilts.com(c)
http://www.rileyblakedesigns.com/cutting-corners/2014/07/15/flower-garden-quilt/
Chain piece the first sashing strip to all triangles.

By Hemamalini Elumalai
Splendor Garden Quilt Tutorial
Page 45 of 58
http://www.malinisquilts.com(c)
http://www.rileyblakedesigns.com/cutting-corners/2014/07/15/flower-garden-quilt/
Triangle after sashing has been added to both sides.

By Hemamalini Elumalai
Splendor Garden Quilt Tutorial
Page 46 of 58
http://www.malinisquilts.com(c)
http://www.rileyblakedesigns.com/cutting-corners/2014/07/15/flower-garden-quilt/
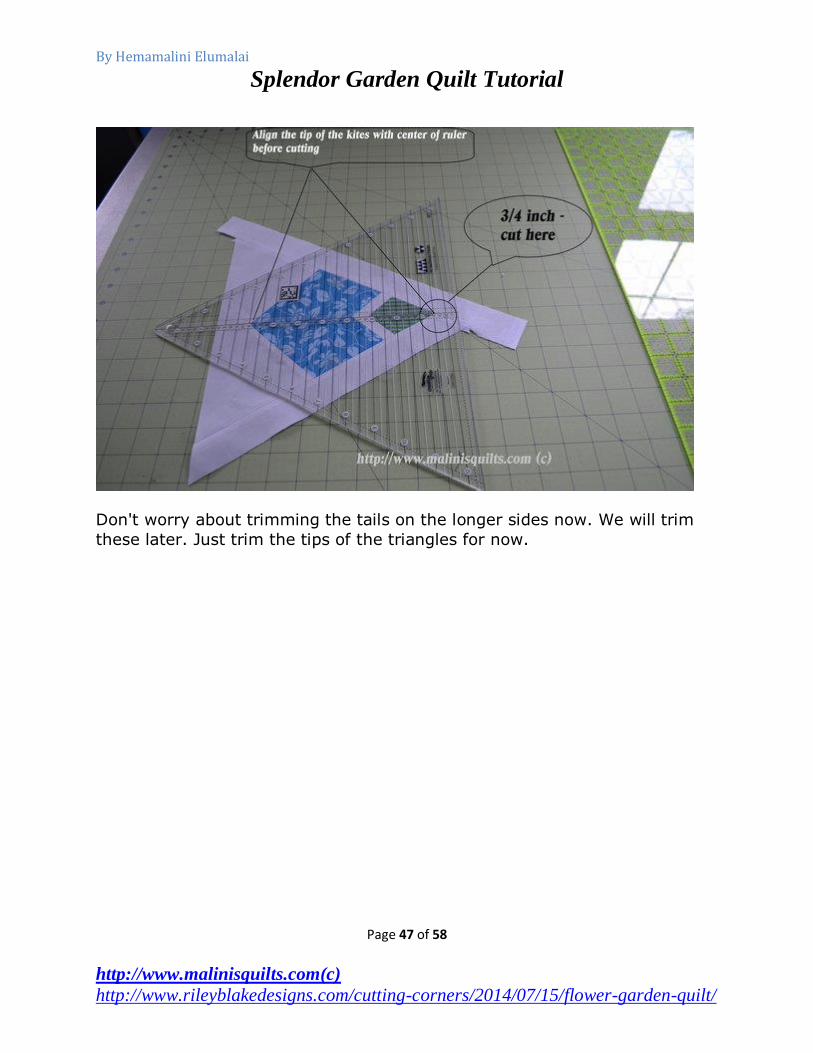
Sashing all done.
We will trim the tip of the triangle 3/4 inch from the tip of the kite. When the 2 side triangles are added to the sashed triangle the alignment would just
work perfect.
By Hemamalini Elumalai
Splendor Garden Quilt Tutorial
Page 47 of 58
http://www.malinisquilts.com(c)
http://www.rileyblakedesigns.com/cutting-corners/2014/07/15/flower-garden-quilt/
Don't worry about trimming the tails on the longer sides now. We will trim
these later. Just trim the tips of the triangles for now.

By Hemamalini Elumalai
Splendor Garden Quilt Tutorial
Page 48 of 58
http://www.malinisquilts.com(c)
http://www.rileyblakedesigns.com/cutting-corners/2014/07/15/flower-garden-quilt/
Chain piece the first side triangle to all the flower center triangles. You will
have two center triangles per flower block.

By Hemamalini Elumalai
Splendor Garden Quilt Tutorial
Page 49 of 58
http://www.malinisquilts.com(c)
http://www.rileyblakedesigns.com/cutting-corners/2014/07/15/flower-garden-quilt/
I took a picture of my layout with just the center triangles gone. Then, I
paired up one side for each triangle together make two sets for either side of
the sashed triangle. Also for chain piecing I had all my center triangles in
order and the 2 sets of side triangles to go with them. Organizing ahead of
time makes it really easy for chain piecing.

By Hemamalini Elumalai
Splendor Garden Quilt Tutorial
Page 50 of 58
http://www.malinisquilts.com(c)
http://www.rileyblakedesigns.com/cutting-corners/2014/07/15/flower-garden-quilt/
While chain piecing, make sure you're joining the correct side triangles to
the center sashed triangle.
Here is how I organized them by rows and 2 sets for each sashed triangle.

By Hemamalini Elumalai
Splendor Garden Quilt Tutorial
Page 51 of 58
http://www.malinisquilts.com(c)
http://www.rileyblakedesigns.com/cutting-corners/2014/07/15/flower-garden-quilt/
We will start making half hexagons first and then join them to form the half
row.

By Hemamalini Elumalai
Splendor Garden Quilt Tutorial
Page 52 of 58
http://www.malinisquilts.com(c)
http://www.rileyblakedesigns.com/cutting-corners/2014/07/15/flower-garden-quilt/
Here I am aligning the longer side of the hexagon with the cutting mat (9
1/4 inch) and then trimming the excess off.
You can also use the 12" triangle ruler for trimming. I forgot to take a
picture of that. But that worked better than aligning it with the mat and a
straight ruler. Just for reference I have shown the above picture, trimming
the excess off from the half hexagon. The finished height of half hexagon
measures 9 1/4 inches.

By Hemamalini Elumalai
Splendor Garden Quilt Tutorial
Page 53 of 58
http://www.malinisquilts.com(c)
http://www.rileyblakedesigns.com/cutting-corners/2014/07/15/flower-garden-quilt/
Once you have made 2 half rows join the two using 1.5 strip by 95 inch
strip.
Tip: I extra yardage for the background fabric, so I cut my strip length wise
to avoid the stretch due to bias. You could cut these strips at the beginning
and use the rest of the fabric to cut squares and other strips.

By Hemamalini Elumalai
Splendor Garden Quilt Tutorial
Page 54 of 58
http://www.malinisquilts.com(c)
http://www.rileyblakedesigns.com/cutting-corners/2014/07/15/flower-garden-quilt/

By Hemamalini Elumalai
Splendor Garden Quilt Tutorial
Page 55 of 58
http://www.malinisquilts.com(c)
http://www.rileyblakedesigns.com/cutting-corners/2014/07/15/flower-garden-quilt/
Pin the half hexie rows together as shown below:
Take a peak by opening up the half rows to make sure flower centers are
aligned correctly. There is some stretch, so you can adjust them if needed.

By Hemamalini Elumalai
Splendor Garden Quilt Tutorial
Page 56 of 58
http://www.malinisquilts.com(c)
http://www.rileyblakedesigns.com/cutting-corners/2014/07/15/flower-garden-quilt/
Half hexie rows sewn together to make one complete hexie row. We have 3
more to make repeat the process for each row.

By Hemamalini Elumalai
Splendor Garden Quilt Tutorial
Page 57 of 58
http://www.malinisquilts.com(c)
http://www.rileyblakedesigns.com/cutting-corners/2014/07/15/flower-garden-quilt/
Splendor Garden Quilt Top
The finished quilt top measures 80/90 x 77 inches.
Other size options You can add one more row of hexagon flower to make a Queen size quilt
80/90(hexagon side) x 96 inches. Each hexagon row is made out of 5 flower
blocks, 3 full flower blocks and 4 half flower blocks.
Now make a quilt sandwich with your favorite batting and backing. And quilt
and bind as desired.
I hope you enjoyed this tutorial as much as I enjoyed making this quilt. It
was lot of work but was fun too.
I would like to see the pictures if you decide to make one, so please post
pictures on my Flickr Group, Facebook, instagram, twitter and pinterest.
Happy Quilting!
Hema

By Hemamalini Elumalai
Splendor Garden Quilt Tutorial
Page 58 of 58
http://www.malinisquilts.com(c)
http://www.rileyblakedesigns.com/cutting-corners/2014/07/15/flower-garden-quilt/
(a.k.a Malini)
http://www.malinisquilts.com