Bullalgo Trading Systems, Inc. Orion Swing User Manual ... · PDF fileBullalgo Trading...
63
Bullalgo Trading Systems, Inc. Orion Swing User Manual Version 1.0 Manual Revision 20151020
Transcript of Bullalgo Trading Systems, Inc. Orion Swing User Manual ... · PDF fileBullalgo Trading...

Bullalgo Trading Systems, Inc. Orion Swing User Manual
Version 1.0 Manual Revision 20151020

ORION SWING
"Redefining automated trading systems for everyone! Not just for the select few any longer..."
Orion Swing is a professional Automated Strategy Building tool that is used to create overnight interval chart Swing trading strategies. This strategy builder is extremely versatile and completely customizable. Orion Swing allows the end user the opportunity to design his/her own professional, robust trading strategies by having a multitude of Bullalgo engineered products at their fingertips. At Bullalgo, we do not believe in holding our end users into set preformatted hidden inputs like other automated strategies on the market. We give our clients the freedom to build what they want, how they want. Preformatted strategies show the tendency to "fade out" or become stagnant over time. The system software Bullalgo Trading Systems, Inc. has developed allows the user freedom and flexibility to make in-depth strategic input setting changes to coincide with the moods of various markets. Orion Swing is not a strategy in and of itself; it's way more. It is a complete package designed to build strategies. This is not simply a signup and use "as is" type system. Orion Swing was designed with the novice, as well as seasoned automated traders, accredited professional traders, and powerhouse hedge funds in mind. We at Bullalgo use Orion Swing, and it's add-on indicators/studies to develop our own personal strategies every day. (Professional Versions only) When Orion Swing downloads into your TradeStation platform, you will see two charts in one workspace. The top chart is Orion Swing, and the bottom chart is "Orion Chop Killer" ("OCK"). OCK is Orion's proprietary system for trading in sideways markets and can be used anytime the user would like. Switching between Orion Swing and OCK is as easy as turning off Orion Swing and turning on OCK manually in the "Format Strategies" Input dialog box. OCK is only one of the many amazing features that the Bullalgo team has in store for you with an Orion Swing subscription. We have developed our own proprietary indicators/studies that are available as paid add-on supplements and we have created an online forum called the "The War Room." These forums are designed for Orion users so they can work together to discuss strategies, tactics, settings, and overall Bullalgo product uses. The War Room can be found at www.bullalgotradingsystems.com. Orion Swing functions with all bar types, such as, Momentum, Range, Renko, Tick, Volume, and Regular bars 30-minute intervals and up. All Session Types are available to be used within Orion Swing as well. These include Regular Session, 24-Hour, Pre and Post Market, and Custom Sessions. I would like to welcome you to the power, features, and support of Orion & Bullalgo Trading Systems, Inc.
Ryan Fuda
President/Developer Bullalgo Trading Systems, Inc. www.bullalgotradingsystems.com

ORION SWING
*Please be advised: Due to the many customizable options available in Orion, it will take time to design and test strategy theories for
robustness. Trading can be a very lucrative business when you possess powerful tools such as Orion. However, you must invest the time, have
patience, and do your proper due diligence to become consistently successful. Visit us in our "War Room" forums at
www.bullalgotradingsystems.com to meet other Orion users just like yourself.
**Orion Basic & Intermediate versions do not have all of the same open Input functionality as our Professional versions. This manual was
written with Orion's Professional versions in mind. However, the rules and functionality herein can be applied to our Orion Basic &
Intermediate versions. Users of Orion Basic & Intermediate products, please pay attention to the inputs that apply to you. If you like what you
see, you can always upgrade to our Professional version to unlock all of Orion's potential. See you all in the War Room!

1
Getting Acquainted with Orion Swing
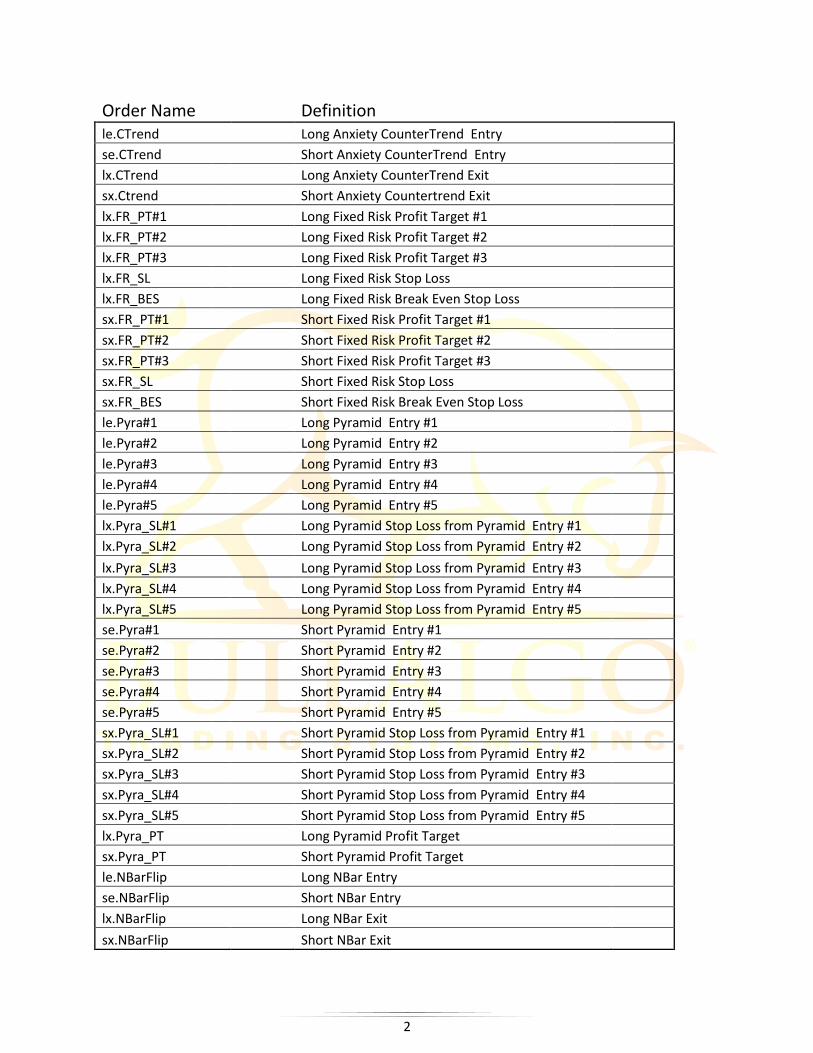
Chart Order Name Labels
le = Long Entry PT = Profit Target
se = Short Entry SL = Stop Loss lx = Long Exit sx = Short Exit *Below are the Orion Order Names/Definitions you will see taking place within an active chart.
Order Name
Definition le.Betelgeuse Long Main Entry
se.Betelgeuse Short Main Entry
lx.Betelgeuse.PT Long Main Profit Target
lx.Betelgeuse.SL Long Main Stop Loss
sx.Betelgeuse.PT Short Main Profit Target
sx.Betelgeuse.SL Short Main Stop Loss
le.Recalibration Long re-Entry
se.Recalibration Short re-Entry
lx.Recalibration.PT Long re-Entry Profit Target
lx.Recalibration.SL Long re-Entry Stop Loss
sx.Recalibration.PT Short re-Entry Profit Target
sx.Recalibration.SL Short re-Entry Stop Loss
lx.Bellatrix.PT Long non Bar of Entry Profit Target
lx.Bellatrix.SL Long non Bar of Entry Stop Loss
sx.Bellatrix.PT Short non Bar of Entry Profit Target
sx.Bellatrix.SL Short non Bar of Entry Stop Loss
lx.FinalExit Long Position end of Session Exit
sx.FinalExit Short Position end of Session Exit
lx.BB Flat Long Bollinger Band Flat Market Exit
sx.BB Flat Short Bollinger Band Flat Market Exit
le.Retaliation Long Retaliation Entry
se.Retaliation Short Retaliation Entry
lx.Retaliation Long Retaliation Exit - 01 Exit Retaliation
lx.Retaliation.PT Long Retaliation Profit Target - 02 Reverse Retaliation
lx.Retaliation.SL Long Retaliation Stop Loss - 02 Reverse Retaliation
sx.Retaliation Short Retaliation exit - 01 Exit Retaliation
sx.Retaliation.PT Short Retaliation Profit Target -02 Reverse Retaliation
sx.Retaliation.SL Short Retaliation Stop Loss -02 Reverse Retaliation
lx.ProfitShield Long Anxiety Exit
sx.ProfitShield Short Anxiety Exit
lx.StopLossShield Long Anxiety Stop Loss Exit
sx.StopLossShield Short Anxiety Stop Loss Exit
2
Order Name Definition
le.CTrend Long Anxiety CounterTrend Entry
se.CTrend Short Anxiety CounterTrend Entry
lx.CTrend Long Anxiety CounterTrend Exit
sx.Ctrend Short Anxiety Countertrend Exit
lx.FR_PT#1 Long Fixed Risk Profit Target #1
lx.FR_PT#2 Long Fixed Risk Profit Target #2
lx.FR_PT#3 Long Fixed Risk Profit Target #3
lx.FR_SL Long Fixed Risk Stop Loss
lx.FR_BES Long Fixed Risk Break Even Stop Loss
sx.FR_PT#1 Short Fixed Risk Profit Target #1
sx.FR_PT#2 Short Fixed Risk Profit Target #2
sx.FR_PT#3 Short Fixed Risk Profit Target #3
sx.FR_SL Short Fixed Risk Stop Loss
sx.FR_BES Short Fixed Risk Break Even Stop Loss
le.Pyra#1 Long Pyramid Entry #1
le.Pyra#2 Long Pyramid Entry #2
le.Pyra#3 Long Pyramid Entry #3
le.Pyra#4 Long Pyramid Entry #4
le.Pyra#5 Long Pyramid Entry #5
lx.Pyra_SL#1 Long Pyramid Stop Loss from Pyramid Entry #1
lx.Pyra_SL#2 Long Pyramid Stop Loss from Pyramid Entry #2
lx.Pyra_SL#3 Long Pyramid Stop Loss from Pyramid Entry #3
lx.Pyra_SL#4 Long Pyramid Stop Loss from Pyramid Entry #4
lx.Pyra_SL#5 Long Pyramid Stop Loss from Pyramid Entry #5
se.Pyra#1 Short Pyramid Entry #1
se.Pyra#2 Short Pyramid Entry #2
se.Pyra#3 Short Pyramid Entry #3
se.Pyra#4 Short Pyramid Entry #4
se.Pyra#5 Short Pyramid Entry #5
sx.Pyra_SL#1 Short Pyramid Stop Loss from Pyramid Entry #1
sx.Pyra_SL#2 Short Pyramid Stop Loss from Pyramid Entry #2
sx.Pyra_SL#3 Short Pyramid Stop Loss from Pyramid Entry #3
sx.Pyra_SL#4 Short Pyramid Stop Loss from Pyramid Entry #4
sx.Pyra_SL#5 Short Pyramid Stop Loss from Pyramid Entry #5
lx.Pyra_PT Long Pyramid Profit Target
sx.Pyra_PT Short Pyramid Profit Target
le.NBarFlip Long NBar Entry
se.NBarFlip Short NBar Entry
lx.NBarFlip Long NBar Exit
sx.NBarFlip Short NBar Exit
3
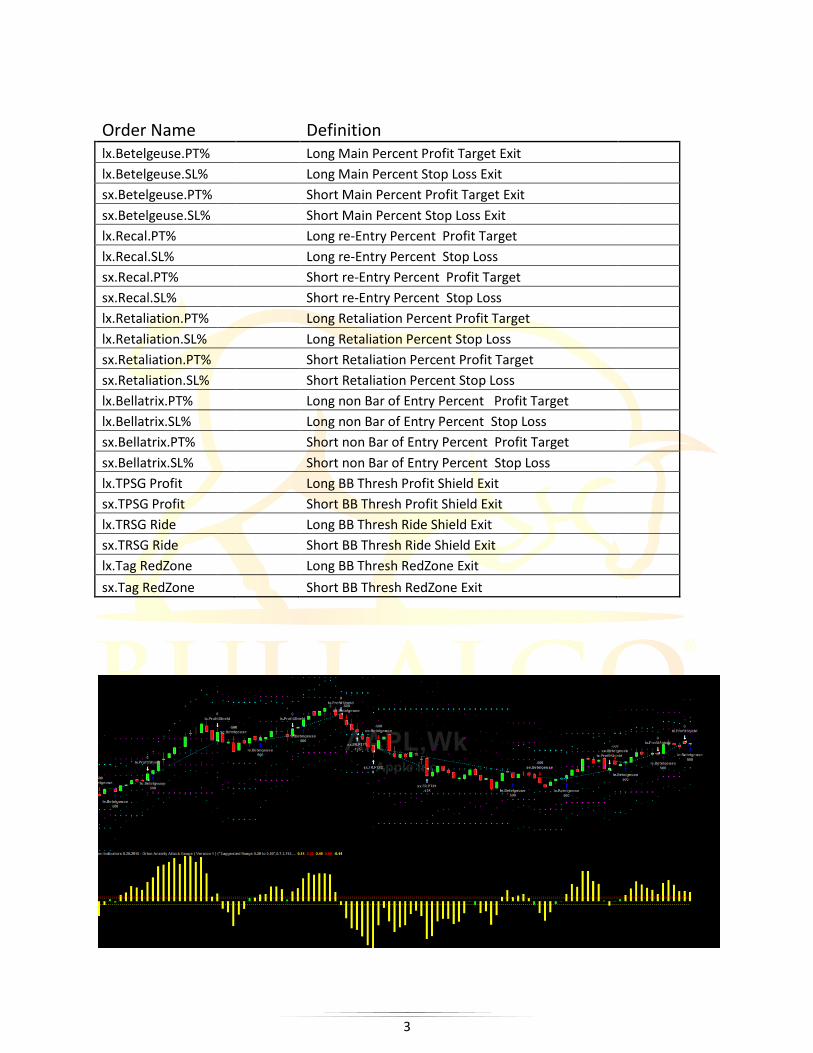
Order Name Definition
lx.Betelgeuse.PT% Long Main Percent Profit Target Exit
lx.Betelgeuse.SL% Long Main Percent Stop Loss Exit
sx.Betelgeuse.PT% Short Main Percent Profit Target Exit
sx.Betelgeuse.SL% Short Main Percent Stop Loss Exit
lx.Recal.PT% Long re-Entry Percent Profit Target
lx.Recal.SL% Long re-Entry Percent Stop Loss
sx.Recal.PT% Short re-Entry Percent Profit Target
sx.Recal.SL% Short re-Entry Percent Stop Loss
lx.Retaliation.PT% Long Retaliation Percent Profit Target
lx.Retaliation.SL% Long Retaliation Percent Stop Loss
sx.Retaliation.PT% Short Retaliation Percent Profit Target
sx.Retaliation.SL% Short Retaliation Percent Stop Loss
lx.Bellatrix.PT%
Long non Bar of Entry Percent Profit Target
lx.Bellatrix.SL% Long non Bar of Entry Percent Stop Loss
sx.Bellatrix.PT% Short non Bar of Entry Percent Profit Target
sx.Bellatrix.SL% Short non Bar of Entry Percent Stop Loss
lx.TPSG Profit Long BB Thresh Profit Shield Exit
sx.TPSG Profit Short BB Thresh Profit Shield Exit
lx.TRSG Ride Long BB Thresh Ride Shield Exit
sx.TRSG Ride Short BB Thresh Ride Shield Exit
lx.Tag RedZone Long BB Thresh RedZone Exit
sx.Tag RedZone Short BB Thresh RedZone Exit

4
Major Input Root Names To find the Input Dialogue Box in Orion, right click on any Chart that has Orion installed > Format Strategies > Format > Inputs. To organize the multitude of inputs in Orion, Bullalgo Trading Systems, Inc. added sections, headings, and notes within the Input Dialogue Box within TradeStation. This allows for quick and easy reference. We also labeled the inputs with extensions where applicable to let the user know what value types should be entered. See the list of extension definitions below. "***xxx***" = Indicates a Major Section Heading "**xxx**" = Indicates a Subsection of a Major Section Heading "*xxx*" = Indicates a Subsection of the current Subsection of a Major Section Heading Study = Indicator/Study that accompanies the Orion section being used Dec = Enter as a Decimal. Example = .03 Tiks = Enter as an Integer or Tick value. Example = 3 Pcnt = Enter as a Percent value. Example: 50 = 50% Bars = Number of Bars on chart Shares = Share Count to trade Contracts = Contract Count to trade Mult = Multiple value. Explained in detail in the Manual. nMethod = Number*Method le(x) = Long Entry or Long (Exit) se(x) = Short Entry or Short (Exit) "Shares", "Contracts", "Lots", and "Units" singular or plural, are synonymous and interchangeable within Orion.
Note 1: It is not uncommon in building automated trading strategies to have a Stop Loss input setting higher than a Profit Target input setting. This depends on the type of strategy being designed by the user. Note 2: Be sure to only use the specific sections of inputs inside of Orion that you would like to while building a strategy. There are many combinations and styles and trading techniques available to you and it is absolutely not necessary to use every section available within Orion within one build. Would you try to use a hammer or a screw driver from your tool box to cut wood? Stay tuned, more tools will be on the way as Bullalgo grows.

5
Plan of Attack Inputs
Input Name Input Ranges AttackSetting Input 1 for Orion; 2 for Orion Chop Killer
AttackMode "-01 trade only short; 0 both; 1 trade only long"
Alnitak See inputs thorough definitions in manual
Mintaka See inputs thorough definitions in manual
EntryDir_Bars See inputs thorough definitions in manual
en_MinMove_Dec See inputs thorough definitions in manual
en_MaxMove_Dec See inputs thorough definitions in manual
le_MinMove_Dec Long minimum points for entry
le_MaxMove_Dec Long maximum points for entry
se_MinMove_Dec Short minimum points for entry
se_MaxMove_Dec Short maximum points for entry
Recalibration Used for trend reentry
le_Recalibration_Tiks Used to attempt better fills for long entries
se_Recalibration_Tiks Used to attempt better fills for short entries
Entry_StartTime#1 See inputs thorough definitions in manual
Entry_EndTime#1 See inputs thorough definitions in manual
Entry_StartTime#2 See inputs thorough definitions in manual
Entry_EndTime#2 See inputs thorough definitions in manual
FinalExit See inputs thorough definitions in manual
Exit_StopTime See inputs thorough definitions in manual
Exit_StartTime See inputs thorough definitions in manual
BacktestDateStart See inputs thorough definitions in manual
BacktestDateEnd See inputs thorough definitions in manual
Inputs window in TradeStation

6
Risk and Money Management Inputs
Input Name Input Definition NumberOfShares Share Count to trade with
DailyProfitTarget $ figure Input E.g. = $1500 Daily Profit then no new trades
DailyLossTolerance $ figure Input E.g.: = $1000 Daily Loss then no new trades
ex_ProfitTarget_Tiks Inputs described inside the Manual
ex_StopLoss_Tiks Inputs described inside the Manual
lx_ProfitTarget_Tiks Long Profit Target
lx_StopLoss_Tiks Long Stop Loss
sx_ProfitTarget_Tiks Short Profit Target
sx_StopLoss_Tiks Short Stop Loss
lx_ProfitTarget_Pcnt Long Percent Profit Target
lx_StopLoss_Pcnt Long Percent Stop Loss
sx_ProfitTarget_Pcnt Short Percent Profit Target
sx_StopLoss_Pcnt Short Percent Stop Loss
Fixed_Risk_Master_Off_On Fixed Risk Master "Off/On" Switch
FR_EquityAt Risk$ Fixed Risk = Amount of $ to Risk
FR_MaxPosition_Shares Fixed Risk Max Share or Contract Cap for Position Sizing
FR_Method Fixed Risk "Method" choice for calculations
FR_Method_Length Fixed Risk Period Length of Method chosen
FR_SL_PS_Meth_Mult Fixed Risk Stop Loss/Position Sizing "Method Multiple"
FR_BES_Off_On Fixed Risk "Break Even Stop" (BES) after 1st Profit Target hit
FR_GaugeBrake_Off_On Fixed Risk GaugeBrake "Off/On" Switch
FR_MethodGauge_Pcnt See Fixed Risk Section in Manual
FR_MethodBrake_Pcnt See Fixed Risk Section in Manual
FR_PT#1_Off_On Fixed Risk PT#1 "Off/On" Switch
FR_PT#1_Mult Fixed Risk Multiple of Method chosen for PT#1
FR_PT#1_Pcnt Fixed Risk reduce Shares or Contracts by % in Decimal
FR_PT#2_Off_On Fixed Risk PT#2 "Off/On" Switch
FR_PT#2_Mult Fixed Risk Multiple of Method chosen for PT#2
FR_PT#2_Pcnt Fixed Risk reduce Shares or Contracts by % in Decimal
FR_PT#3_Off_On Fixed Risk PT#3 "Off/On" Switch
FR_PT#3_Mult Fixed Risk Multiple of Method chosen for PT#3
FR_PT#3_Pcnt Fixed Risk reduce Shares or Contracts by % in Decimal

7
Risk and Money Management Inputs (continued)
Input Name Input Definitions Pyramid_Master_Off_On Pyramid Master "Off/On" Switch
Pyramid_Attack_Mode Pyramid Mode Attack Setting
Pyramid_Method Pyramid Method choice for calculations
Pyra_Method_Length Pyramid Period Length of Method chosen
Pyra_GaugeBrake_Off_On Pyramid GaugeBrake "Off/On" Switch
Pyra_MethodGauge_Pcnt See Pyramid Section in Manual
Pyra_MethodBrake_Pcnt See Pyramid Section in Manual
Pyra_Anxiety_Off_On Anxiety "Off/On" Switch
Pyramid#1_Mode Pyramid #1 Mode Switch
Pyra#1_NumOfShares Pyramid 1st set of additional Shares or Contracts to add
Pyra#1_FloorMult Pyramid Multiple of Method chosen for Floor #1 Level
Pyra#1_Retrace_Pcnt Pyramid Multiple of Method Retrace for #1 Target Entry
Pyra#1_StopLoss_Pcnt Pyramid adjusted Stop Loss after Pyramid #1 Level Breach
Pyramid#2_Mode Pyramid #2 Mode Switch
Pyra#2_NumOfShares Pyramid 2nd set of additional Shares or Contracts to add
Pyra#2_FloorMult Pyramid Multiple of Method chosen for Floor #2 Level Setting
Pyra#2_Retrace_Pcnt Pyramid Multiple of Method Retrace for #2 Target Entry
Pyra#2_StopLoss_Pcnt Pyramid adjusted Stop Loss after Pyramid #2 Level Breach
Pyramid#3_Mode Pyramid #3 Mode Switch
Pyra#3_NumOfShares Pyramid 3rd set of additional Shares or Contracts to add
Pyra#3_FloorMult Pyramid Multiple of Method chosen for Floor #3 Level Setting
Pyra#3_Retrace_Pcnt Pyramid Multiple of Method Retrace for #3 Target Entry
Pyra#3_StopLoss_Pcnt Pyramid adjusted Stop Loss after Pyramid #3 Level Breach
Pyramid#4_Mode Pyramid #4 Mode Switch
Pyra#4_NumOfShares Pyramid 4th set of additional Shares or Contracts to add
Pyra#4_FloorMult Pyramid Multiple of Method chosen for Floor #4 Level Setting
Pyra#4_Retrace_Pcnt Pyramid Multiple of Method Retrace for #4 Target Entry
Pyra#4_StopLoss_Pcnt Pyramid adjusted Stop Loss after Pyramid #4 Level Breach
Pyramid#5_Mode Pyramid #5 Mode Switch
Pyra#5_NumOfShares Pyramid 5th set of additional Shares or Contracts to add
Pyra#5_FloorMult Pyramid Multiple of Method chosen for Floor #5 Level Setting
Pyra#5_RetracePcnt Pyramid Multiple of Method Retrace for #5 Target Entry
Pyra#5_StopLoss_Pcnt Pyramid adjusted Stop Loss after Pyramid #5 Level Breach
Pyramid_PT_Off_On Pyramid Profit Target "Off/On" Switch
Pyra_ProfTarg_Mult Pyramid Multiple of Method overall Profit Target to conclude all Pyramid Trades

8
Defense Inputs
Input Name Input Definition Retaliation_Mode Select your desired "Retaliation Mode"
Retaliation_Bars Only effective when 1 or 2 are selected
Anxiety_Master_Off_On Anxiety Master "Off/On" Switch
Fear_Attack_Filter Input desired Anxiety Attack Filter Mode
RedZone_Attack_Filter Input desired Anxiety Attack Filter Mode
RedZone_Bypass_Off_On Prevents all Exits inside the "Red Zone" when turned 1=On
Fear_HighThresh_Dec Long "Entry Fear" Upper Threshold Filter
Fear_LowThresh_Dec Short "Entry Fear" Lower Threshold Filter
RedZone_HighThresh_Dec Long "Entry Fear" upper Mid Threshold Filter
RedZone_LowThresh_Dec Short "Entry Fear" lower Mid Threshold Filter
CounterTrend_Mode CounterTrend Mode Setting
lex_CTrend_Bars Long Entry or Exit Anxiety CounterTrend # of Bars
sex_CTrend_Bars Short Entry or Exit Anxiety CounterTrend # of Bars
lx_ProfitShield_Dec Long Exit "Anxiety ProfitShield"
sx_ProfitShield_Dec Short Exit "Anxiety ProfitShield"
lx_StopLossShield_Dec Long Exit "Anxiety StopLossShield"
sx_StopLossShield_Dec Short Exit "Anxiety StopLossShield"
lx_AnxietyRun_Bars Long Exit "Anxiety Runner Bars"
sx_AnxietyRun_Bars Short Exit "Anxiety Runner Bars"
lx_AnxietyRun_PT_NoExit_Off_On Long Exit Anxiety Runner all other Exits "Off/On" Switch
sx_AnxietyRun_PT_NoExit_Off_On Short Exit Anxiety Runner all other Exits "Off/On" Switch

9
Defense Inputs (continued)
Input Name Input Definition BB_Thresh_Master_Off_On BB Thresh Master "Off/On" Switch
BB_RedZone_Attack_Filter Select desired Filter Mode
BB_TAG_Length A Bollinger Band Length
BB_TAG_Devs_Up A Bollinger Band Deviation Up
BB_TAG_Devs_Dn A Bollinger Band Deviation Down
BBRedZone_Bypass_Off_On Prevents all Exits inside the Red Zone when turned 1=On
BBRedZone_HighThresh_Int Long Entry BBRedZone Upper Threshold Filter
BBRedZone_LowThresh_Int Short Entry BBRedZone Lower Threshold Filter
BB_TPSG_Length A Bollinger Band Length
BB_TPSG_Devs_Up A Bollinger Band Deviation Up
BB_TPSG_Devs_Dn A Bollinger Band Deviation Down
lx_BB_ProfitShield_Int Long Exit Upper Threshold Setting
sx_BB_ProfitShield_Int Short Exit Lower Threshold Setting
BB_TRSG_Length A Bollinger Band Length
BB_TRSG_Devs_Up A Bollinger Band Deviation up
BB_TRSG_Devs_Dn A Bollinger Band Deviation down
lx_BB_RideShield_Int Long Exit "BB Ride" Upper Threshold Setting
sx_BB_RideShield_Int Short Exit "BB Ride" Upper Threshold Setting
lx_BB_RideBars_Int Long Exit BB "Ride Number of Bars" to make Ride = True
sx_BB_RideBars_Int Short Exit BB "Ride number of Bars" to make Ride = True
lx_BB_RideNoExit_Off_On Long Exit BB Ride all other Exits "Off/On" Switch
sx_BB_RideNoExit_Off_On Short Exit BB Ride all other Exits "Off/On" Switch
BB_Flat_Master_Off_On BB Flat Master "Off/On" Switch
BB_Flat_Length A Bollinger Band Length
BB_Flat_Devs_Up A Bollinger Band Deviation Up
BB_Flat_Devs_Dn A Bollinger Band Deviation Down
BB_Keltner_Off_On Adds an additional Filter to the "Flat Market" test.
lx_BB_Off_On Controls (activates) the Long Exit Orders
sx_BB_Off_On Controls (activates) the Short Exit Orders
lx_BB_Tiks Amount added for a Sell Limit Order
sx_BB_Tiks Amount subtracted for a Buy to Cover Order
BB_SumBars_Int Summation of Diff over SumBars
BB_Min_Dec Less than this Cap or Limit triggers a "Flat Market" prediction
"Redefining automated trading systems for everyone! Not just for the select few any longer..."

10
Filters Inputs
Input Name Input Ranges BarMult_Int N-Bar Multiple of Interval
Fast_Length Fast Length EMA (Exponential Moving Average)
Slow_Length Slow Length EMA
Bull_Increase Used to verify a Bullish Crossover
Bear_Decrease Used to verify a Bearish Crossover
Session_Type Chose Session Type for NBar
NBar_Flip_Mode 0=Off; 1=Exit; 2=Reverse - NBar Exit or Entry modes
Trade_Monday Trade Monday "Off/On"
Trade_Tuesday Trade Tuesday "Off/On"
Trade_Wednesday Trade Wednesday "Off/On"
Trade_Thursday Trade Thursday "Off/On"
Trade_Friday Trade Friday "Off/On"
VHF_Length Vertical Horizontal Filter Period Length
VHF_LowValue Sets the Low Value of VHF
VHF_HighValue Sets the High Value of VHF
Inputs -Thorough Definitions
The following is the list of inputs that we at Bullalgo Trading Systems, Inc. feel need clarification.
Please remember, there is no need to attempt to use every section within Orion when building a
strategy. Selectively choosing the components that you want is essential. When it comes to automated
trading strategy building, using fewer tools in Orion is often easier to manage and helps to ensure the
passing of Walk-Forward & Walk-Backward Testing. The Orion inputs sections used in a build
completely depends on the type of trading techniques and theories that the user intends to construct.
As there are countless concepts available, we suggest using the KISS philosophy (Keep It Simple Stupid).

11
"***Plan of Attack***"
AttackMode = This input tells the Orion strategy build to take only Short Positions (-01), both Long and
Short Positions (00), or to take only Long Positions (+01).
Alnitak & Mintaka = These two inputs are proprietary to Bullalgo Trading Systems, Inc. We assist in
guiding how to optimize Alnitak & Mintaka by pre-installing a range within the Alnitak & Mintaka
optimization input pop-up window. These can be used as a beginning default testing range. Feel free to
test a wide range with both of these inputs. Doing so will create dramatic differences in the way a
symbol/ticker trades. A good way to get acquainted with Alnitak & Mintaka is to optimize them
together and use Walk Forward/Walk Backward testing congruently. Try different values in these inputs
along the way. Alnitak & Mintaka are the essential core inputs when first starting to build any strategy.
It is a good idea to optimize these two inputs together to find the best starting build settings for in-
sample results and as a base for your build.
Alnitak Note = Entering a value between (.20 -.80) in Alnitak builds trend strategies while a
value of 1.05 and higher will build reversion type strategies. Values closer to and greater than
1.05 will be a mix of trend and reversion strategy builds. The greater the value above an Alnitak
of 1.05 the greater the reversion style build.
Mintaka Note = Optimizing a value set between (2-14) by an increment of.25 is a good starting
point. Ranges can and will vary while optimizing Mintaka.
EntryDir_Bars = EntryDir_Bars is the number of Bars in a chart heading in the same direction to
determine whether or not to take a Long or Short Entry Position. This input helps to enter a trade
position that is trending (building momentum) in favor of the trade by determining the number of bars
headed in the direction of the trade.
EntryDir_Bars Note: Negative input values are the same as a 0 value. There is no need to
optimize a negative value in this input.
en_MinMove_Dec & en_MaxMove_Dec = These inputs can be optimized to discover a median
optimizing range for Orion's le and se "MinMove" and "MaxMove" Decimal inputs (See Below).
en_MinMove_Dec & en_MaxMove_Dec are optional inputs to use and MUST be set back to "0" when
not in use for the proper function of le and se MinMove and MaxMove use.
"Redefining automated trading systems for everyone! Not just for the select few any longer..."

12
These Next 2 Inputs are Very Important!
le_MinMove_Dec & se_MinMove_Dec = When our Bullalgo team was in the initial construction phase
of developing Orion, these two inputs were designed to be set to values of 0 or a very small positive
Decimal. Via in-depth testing we have discovered that using negative values in these two inputs can
dramatically increase profitable trading within Orion strategy builds. Using negative values in the
le_MinMove_Dec & se_MinMove_Dec increases risk exposure. However, sometimes by adding more
risk to a strategy build the user can gain more reward. Please use these inputs according to the risk
management style best suited for your needs.
Orion add-on Indicator: The "Orion MinMove Warning Indicator "helps to manage the risks of
MinMove negative usage by showing where there are greater instances of risk inherent in the
trade. This useful indicator is explained later in the manual and will prove to be helpful for
those who are risk averse and decide to use le_MinMove_Dec & se_MinMove_Dec.
le_MaxMove_Dec & se_MaxMove_Dec = These inputs are used to prohibit a trade from occurring
outside of the Decimal parameters entered and avoid trades from occurring in an Overbought or
Oversold scenario.
le_Recalibration_Tiks & se_Recalibration_Tiks = These two inputs are used to assist Orion with creating
re-Entry orders after a Betelgeuse Exit (lx/sx.Betelgeuse). They do this by working to achieve a better
priced position entry in a way that allows re-Entry orders to be filled while not chasing price action in
expectation of obtaining a re-Entry. Recalibration Entries are very important when building strategies
that are designed to capture strong trend moves. Flipping the Recalibration switch on ("1=On") by itself
will activate these re-Entries. Adding le_Recalibration_Tiks & se_Recalibration_Tiks values will instruct
Orion to attempt achieving better-priced re-Entry orders after a pull-Back from profit taking.
There are three modes to chose from within the le_Recalibration_Tiks & se_Recalibration_Tiks inputs:
"0=Off" - Turns Recalibration Off
"1=On" - Turns Recalibration On. Note: Recalibrations are regular Limit Orders that are filled by
attempting to achieve better price re-Entry. le_Recalibration_Tiks & se_Recalibration_Tiks
inputs are used to help adjust the internal settings.
"2=Trailing " - Using this trailing setting will keep Orion from attempting (le/se) Recalibration's
as price action continues to move in favor of Orion's re-Entry attempt. This trailing technique
moves it's Orders with price action to prepare for the best re-Entry possible. The goal is to time
re-Entries from pull-backs due to profit taking in an up or down trend. Using the Trailing option
will not allow re-Entry price attempts to go lower than the prior attempt that was unable to get
filled. It scales up with price action to try to catch those big moves that can be missed when a
chart is moving in one direction quickly. The Trailing option moves Limit Orders up each attempt
and never lower than the previous attempt.

13
Entry_StartTime#1; Entry_EndTime#1; Entry_StartTime#2; Entry_EndTime#2 = These inputs create the
option to run Orion strategies during two different time periods within a single trading day.
(It is recommended to set TradeStation's "Format Symbol" window settings to Time Zone "Exchange" and "Session Hours" For Bar building.)
Examples below are in Military Eastern Standard Time (EST): Entry_StartTime#1 = 0930 Entry_EndTime#1 = 1200 Entry_StartTime#2 = 1400 Entry_EndTime#2 = 1555 By using the settings above, the Orion strategy build will run live from 9:30am - 12:00pm, then take a trade entry break from 12:00pm - 2:00pm and will finally resume live trading from 2:00pm - 3:55pm. This is a great feature for traders who do not wish to trade during the slow afternoon hours. These times control Start and End Times of position entries only and will not force Orion to Exit a strategy position during the life of a trade. Entry_EndTime in Orion will always be 4:00pm (1600) minus the interval chart that the users build is created in this version of Orion or can be set to whenever new entry orders are no longer desired to be filled. EndTime Example:
5min chart = FinalEntry will be 1555 7min chart = FinalEntry will be 1553 FinalExit = This is a final exit for the day to close a position prior to the closing bell. To close a position at the end of the trading day properly, this input must correspond correctly to the chart interval the user selected for his/her strategy build. Therefore, a 10-minute interval chart must have a FinalExit time of 1550 to close the position correctly at the Close of the bar before the final closing bell. For protection, programmed within Orion is a forced final exit at the open of the last bar of the interval being traded to protect from overnight holdings occurring. When the markets close down for half days, Orion must be manually shut down by the user. Exit_StopTime & Exit_StartTime = These inputs set when to stop and start exiting positions. Very useful and much needed when using an extended hours chart. Without these inputs, exits will be taken during the extended market hour periods of low volume and erratic swings if your chart is setup with extended hours. These inputs only function on Intervals below Daily Bars. BacktestDateStart & BacktestDateEnd = Enter dates in the MMDDYYYY format. -1 if unused. These inputs are used to aid the user during the optimization process. They are designed to start any interval selected to the same start date for more accurate results while comparing intervals during testing. Without the use of these inputs, if "maximum number of bars study will reference" (MaxBarsBack) is set to 50 bars then backtesting in TradeStation will need to use 50 bars of the chosen interval chart for analysis before showing actual historical "in sample" data in a chart. Therefore, when comparing a 5-minute chart to a 30-minute chart, the 30-minute chart will start visually showing trade data a day later than the 5-minute chart due to the need for data to analyze. These inputs resolve this issue by starting historical trading on the same day while using the correct off chart data for analysis. BacktestDateEnd can be used to reserve a portion of the data set as a final walk-forward validation after the optimization process. Enter the desired back date in this input and from that time in the chart forward the user will be able to review visually "out of sample" trades in the chart going from that date forward.

14
"***Money & Risk Management***" DailyProfitTarget & DailyLossTolerance (DailyRiskManagement) = The DailyProfitTarget &
DailyLossTolerance inputs allow the user to create parameters for better management of their money by
setting a daily goal Profit Target and/or a daily Loss Tolerance. Once either one of these thresholds is
breached then Orion will automatically stop trading on a closed trade basis for the rest of the day.
DailyProfitTarget & DailyLossTolerance Note: Caution must be taken here: If a loss tolerance of $500.00 is set and after the last trade the user is at a - $495.00 loss, Orion will not stop running its strategy until the next trade is completed, once the full $500 loss has been closed. Please understand that more money can be lost than anticipated using the DailyLossTolerance. -1 disables the DailyProfitTarget & DailyLossTolerance inputs. ex_ProfitTarget_Tiks & ex_StopLoss_Tiks = These two optional user inputs (ex_ProfitTarget_Tiks & ex_StopLoss_Tiks) are designed to assist during the optimization of the lx_ProfitTarget_Tiks; lx_StopLoss_Tiks & sx_ProfitTarget_Tiks; sx_StopLoss_Tiks inputs. They can both be optimized together as a way to find a median place to begin optimizing the lx_ProfitTarget_Tiks; lx_StopLoss_Tiks & sx_ProfitTarget_Tiks; sx_StopLoss_Tiks inputs. Much like en_MinMove_Dec & en_MaxMove_Dec. "Ticks" are used for Profit Target and Stop Loss values not Point or Decimal values. Example: 27=.27 for Equities. ex_ProfitTarget_Tiks & ex_StopLoss_Tiks: Example After ex_ optimizations have been run:
ex_ProfitTarget_Tiks = 27
ex_StopLoss_Tiks = 43
It is now known for the user to start optimizing lx_ProfitTarget_Tiks and sx_ProfitTarget_Tiks inputs near the 27 range (maybe 22 through 32). The same would be true for using a range around 43 with the lx_StopLoss_Tiks and sx_StopLoss_Tiks inputs. Knowing this is very helpful for fine-tuning Profit Target and Stop Loss optimizations to prevent having to enter a wide range of values during optimizing. (ex. 15 through 75). When the user has completed using the ex_ProfitTarget_Tiks & ex_StopLoss_Tiks inputs, it is recommended to set them back to 0 when finished so that the "ex_" inputs are no longer active. Another way to use "ex_" is to leave the optimized values in these inputs and optimize lx/sx Pt and SL in smaller increments. Example: -5;5;1. The code will use the two values: ex_ ProfitTarget_Tiks + lx_ProfitTarget_Tiks and ex_ProfitTarget_Tiks + sx_ProfitTarget_Tiks. The same for the Stop Loss inputs.
lx_ProfitTarget_Pcnt; lx_StopLoss_Pcnt;
sx_ProfitTarget_Pcnt; sx_StopLoss_Pcnt = These Percent Profit Targets and Stop Losses are available to
use % moves in system builds. They are exceptionally useful in conjunction with TradeStation's Excursion
Graphs. See % Stop Losses and Adverse Excursion Graphs in the manual.
Fixed Risk = See Fixed Risk section in Manual Pyramiding = See Pyramiding section in Manual

15
"***Plan of Defense***" Retaliation_Mode & Retaliation_Bars (Exit Direction Bars) = These inputs are used when a trade is
turning against you. It gives the user the option to Reverse or Exit a position that can be used as an
emergency safeguard in the case of a losing position.
00 = Off 01 = Exit the position 02 = Reverse position (Reverse from a Short to a Long position or a Long to a Short position)
Retaliation_Bars are the number of bars in a chart turning against a trade in conjunction with other
Orion processes to determine a retaliation trigger. Negative input values are the same as a 0 value.
There is no need to optimize a negative value in this Input.
Anxiety_Section = See Anxiety_Section in Manual
BB_Thresh_Section = See BB_Thresh_Section in Manual
BB_Flat_Section = See BB_Flat_Section in Manual
Filters Section
NBar Filter = See NBar Filter section in the manual.
DayOfWeek _Filter = Gives the option to select which days of the week to trade. This is very useful after
Walk Forward Optimizations or while reading an optimization report to select which days historically
perform better than others. (0 = Disable Day; 1 = Allow Day)
VHF_Filter = See VHF_Filter_Section in manual.
"Redefining automated trading systems for everyone! Not just for the select few any longer..."

16
Bullalgo Suggested Input Optimization Ranges
Below are some suggested Orion optimization ranges to start the building process. These suggestions
are by no means the full scope of Orion's capability. Try using half points instead of whole points,
extend out Decimals to the thousandths, use negative values, etc. The possibilities within Orion's
settings are endless. We strongly suggest that in order to see the Orion strategy build settings in action
correctly, you should subscribe to Orion's add-on indicators. Our indicators are creations of our own to
assist in the visualization of Orion's specific input values. Being able to see these will absolutely help
avoid curve fitting and will let the user see exactly how the strategy build functions. These indicators
will quickly become necessary as you grow with Orion.
The ranges we suggest seem appropriate for Equities/Futures that do not have much spread between
the bid and ask prices in day trading specifically. Be creative as you learn what each setting does. Have
fun, ask for help, and by all means visit us in The War Room at www.bullalgotradingsystems.com. Entry
into the War Room is free with all Bullalgo Subscriptions!
"Tactical team building is smart building!"
www.bullalgotradingsystems.com

17
Plan of Attack Optimization Suggestions
Input Name Optimization Ranges AttackSetting "*1=Orion; 2=OrionChopKiller*"
AttackMode "*-1=Short; 0=All; +1=Long*"
EntryDir_Bars (0;4;01)
Alnitak (.20;.80;.005 )
Mintaka (2;14;.25) - (Test wider ranges)
en_MinMove_Dec Optional use to simplify optimizations
en_MaxMove_Dec Optional use to simplify optimizations
le_MinMove_Dec (-.03;.04;.01)
le_MaxMove_Dec (.10;.60;.01)
se_MinMove_Dec (-.03;.04;.01)
se_MaxMove_Dec (.10;.60;.01)
Recalibration (0;2;01)
le_Recalibration_Tiks (-100;100;01)
se_Recalibration_Tiks (-100;100;01)
StartTime#1 (0800;1200;0100)
EndTime#1 (1200;1600;0100)
StartTime#2 Discretionary to User
EndTime#2 Discretionary to User
FinalExit Discretionary to User
Exit_StopTime (1400;1600;0100) -Functions on Intervals below Daily Bars
Exit_StartTime (0930;1100;0100) -Functions on Intervals below Daily Bars
BacktestDateStart Enter Start Date of Optimization
BacktestDateEnd Enter End Date of Optimization
"Making Trading Dreams a Reality"

18
Risk and Money Management Optimization Suggestions
Input Name Optimization Ranges NumberOfShares Share Count to trade
DailyProfitTarget Discretionary to User
DailyLossTolerance Discretionary to User
ex_ProfitTarget_Tiks Optional to use to simplify optimizations
ex_StopLoss_Tiks Optional to use to simplify optimizations
lx_ProfitTarget_Tiks 100;400;01 -equities 0;100;01-futures
lx_StopLoss_Tiks 100;200;01 -equities 0;50;01-futures
sx_ProfitTarget_Tiks 100;400;01 -equities 0;100;01-futures
sx_StopLoss_Tiks 100;400;01 -equities 0;50;01-futures
lx_PT_Percent Discretionary to User; input as decimal of percent
lx_SL_Percent Discretionary to User; input as decimal of percent
sx_PT_Percent Discretionary to User; input as decimal of percent
sx_SL_Percent Discretionary to User; input as decimal of percent
FR_Off_On Discretionary to User
FR_EquityAt Risk_Dollars Discretionary to User
FR_MaxPosition_Shares Discretionary to User
FR_Method Discretionary to User
FR_Method_Length Discretionary to User
FR_GaugeBrake_Off_On Discretionary to User
FR_MethodGauge_Dec Discretionary to User
FR_MethodBrake_Dec Discretionary to User
FR_Method_Multiple Discretionary to User
FR_BES_Off_On Discretionary to User
FR_PT#1_Used Discretionary to User
FR_PT#1_Mult Discretionary to User
FR_PT#1_Pcnt Discretionary to User
FR_PT#2_Used Discretionary to User
FR_PT#2_Mult Discretionary to User
FR_PT#2_Pcnt Discretionary to User
FR_PT#3_Used Discretionary to User
FR_PT#3_Mult Discretionary to User
FR_PT#3_Pcnt Discretionary to User
"Redefining automated trading systems for everyone! Not just for the select few any longer..."

19
Risk and Money Management Optimization Suggestions (Cont.)
Input Name Optimization Ranges Pyramid_Off_On Discretionary to User
Pyramid_Attack_Mode Discretionary to User
Pyramid_Method Discretionary to User
Pyra_Method_Length Discretionary to User
Pyra_GaugeBrake_Off_On Discretionary to User
Pyra_MethodGauge_Dec Discretionary to User
Pyra_MethodBrake_Dec Discretionary to User
Pyra_Anxiety_Off_On Discretionary to User
Pyramid#1_Mode Discretionary to User
Pyra#1_NumOfShares Discretionary to User
Pyra#1_Floor_nMethod Discretionary to User
Pyra#1_Retrace_nMethod Discretionary to User
Pyra#1_StopLoss_Pcnt Discretionary to User
Pyramid#2_Mode Discretionary to User
Pyra#2_NumOfShares Discretionary to User
Pyra#2_Floor_nMethod Discretionary to User
Pyra#2_Retrace_nMethod Discretionary to User
Pyra#2_StopLoss_Pcnt Discretionary to User
Pyramid#3_Mode Discretionary to User
Pyra#3_NumOfShares Discretionary to User
Pyra#3_Floor_nMethod Discretionary to User
Pyra#3_Retrace_nMethod Discretionary to User
Pyra#3_StopLoss_Pcnt Discretionary to User
Pyramid#4_Mode Discretionary to User
Pyra#4_NumOfShares Discretionary to User
Pyra#4_Floor_nMethod Discretionary to User
Pyra#4_Retrace_nMethod Discretionary to User
Pyra#4_StopLoss_Pcnt Discretionary to User
Pyramid#5_Mode Discretionary to User
Pyra#5_NumOfShares Discretionary to User
Pyra#5_Floor_nMethod Discretionary to User
Pyra#5_Retrace_nMethod Discretionary to User
Pyra#5_StopLoss_Pcnt Discretionary to User
Pyramid_PT_Off_On Discretionary to User
Pyra_ProfTarg_nMethod Discretionary to User

20
Plan of Defense Optimization Suggestions
Input Name Optimization Ranges Retaliation_Mode (0; 2; 01)
Retaliation_Bars (0; 4; 01)
AnxietyCounterAttack_Mode (0; 2; 01)
le_FearGauge_Dec (0; .75; .01)
le_PainShield_Dec (0; .30; .01)
se_PainGauge_Dec (0; .75; .01)
se_FearShield_Dec (0; .30; .01)
AnxietyDefense_Mode (0 ;2; 01)
lx_FearGauge_Dec (0; .75; .01)
lx_PainShield_Dec (0; .30; .01)
sx_PainGauge_Dec (0; .75; .01)
sx_FearShield_Dec (0; .30; .01)
AnxietyCounterTrend_Mode (0; 2; 1)
lex_Anxiety_CTrend_Bars (0; 20; 01)
sex_Anxiety_CTrend_Bars (0; 20; 01)
BB_Length (10; 30; 01)
BB_Devs_Up (.5; 4; -.25)
BB_Devs_Down (-4; -.5; .5)
BB_Keltner_Off_On (0; 1;1)
lx_BB_Off_On (0; 01; 01)
sx_BB_Off_On (0; 01; 01)
lx_BB_Ticks (0; 40; .01)
sx_BB_Ticks (0; 40; .01)
BB_SumBars_Int (0; 15; 01)
BB_Min_Dec (0; .30; .01)
"Making Trading Dreams a Reality"

21
Filters Optimization Suggestions
Input Name Optimization Ranges Nbar_Bypass_Off_On 0;1;01
Nbar_IntervalMultiple 0;100;01
Fast_Length 1;5;01
Slow_Length 6;20;01
Bull_Increase 0;1;.005
Bear_Decrease 0;1;.005
Session_Type 0;1;01
Nbar_Flip_Mode 0;3;01
Trade_Monday 0;1;01
Trade_Tuesday 0;1;02
Trade_Wednesday 0;1;03
Trade_Thursday 0;1;04
Trade_Friday 0;1;05
VHF_Length 0;21;01
VHF_LowValue .20;.40;01
VHF_HighValue .50;.75;.01
22
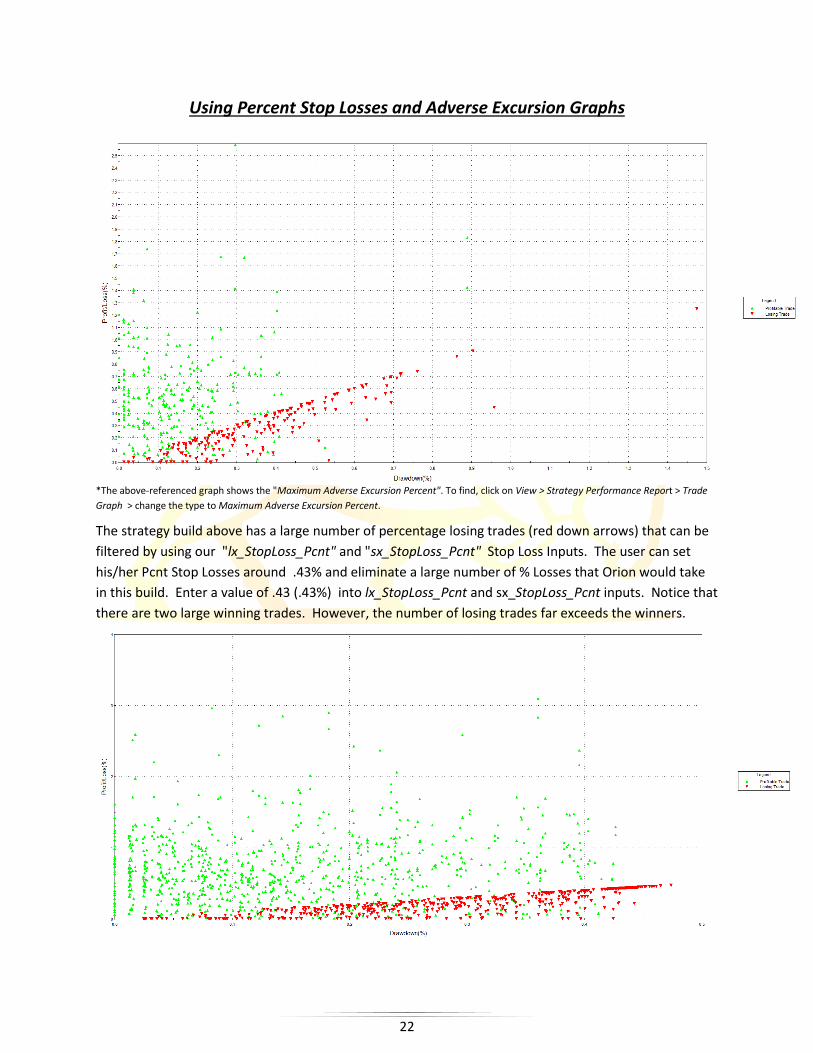
Using Percent Stop Losses and Adverse Excursion Graphs
*The above-referenced graph shows the "Maximum Adverse Excursion Percent". To find, click on View > Strategy Performance Report > Trade
Graph > change the type to Maximum Adverse Excursion Percent.
The strategy build above has a large number of percentage losing trades (red down arrows) that can be
filtered by using our "lx_StopLoss_Pcnt" and "sx_StopLoss_Pcnt" Stop Loss Inputs. The user can set
his/her Pcnt Stop Losses around .43% and eliminate a large number of % Losses that Orion would take
in this build. Enter a value of .43 (.43%) into lx_StopLoss_Pcnt and sx_StopLoss_Pcnt inputs. Notice that
there are two large winning trades. However, the number of losing trades far exceeds the winners.
23
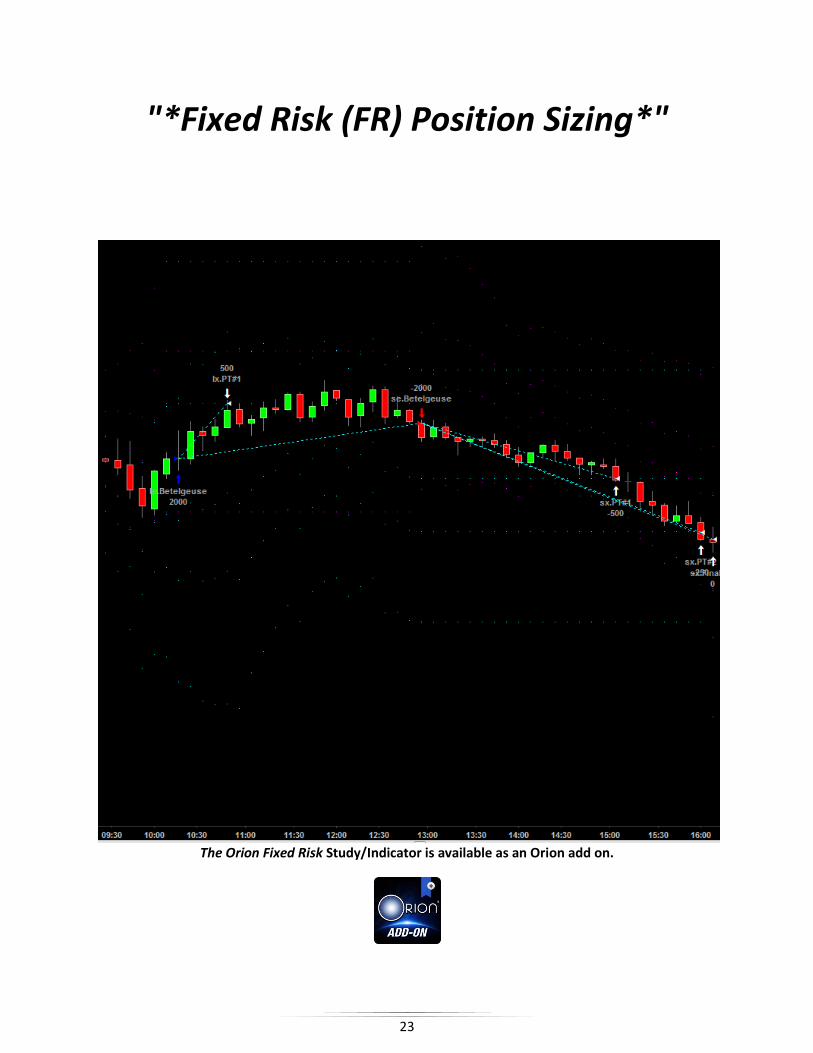
"*Fixed Risk (FR) Position Sizing*"
The Orion Fixed Risk Study/Indicator is available as an Orion add on.
24
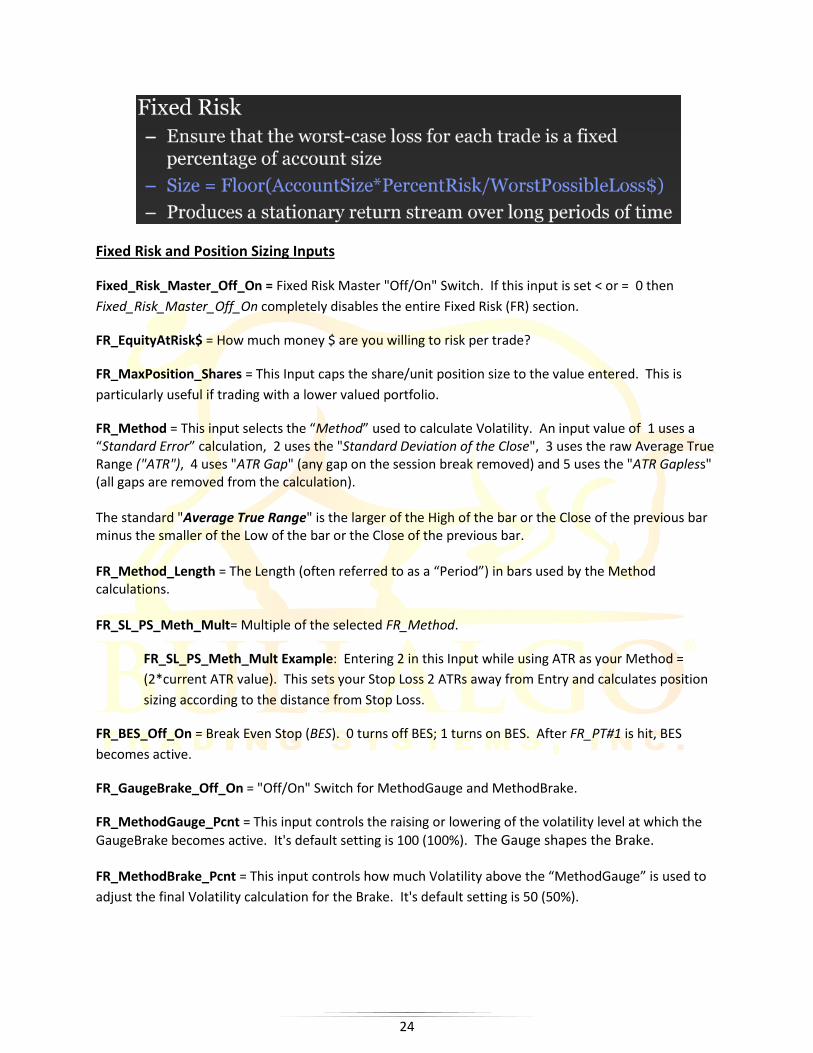
Fixed Risk and Position Sizing Inputs
Fixed_Risk_Master_Off_On = Fixed Risk Master "Off/On" Switch. If this input is set < or = 0 then
Fixed_Risk_Master_Off_On completely disables the entire Fixed Risk (FR) section.
FR_EquityAtRisk$ = How much money $ are you willing to risk per trade?
FR_MaxPosition_Shares = This Input caps the share/unit position size to the value entered. This is
particularly useful if trading with a lower valued portfolio.
FR_Method = This input selects the “Method” used to calculate Volatility. An input value of 1 uses a “Standard Error” calculation, 2 uses the "Standard Deviation of the Close", 3 uses the raw Average True Range ("ATR"), 4 uses "ATR Gap" (any gap on the session break removed) and 5 uses the "ATR Gapless" (all gaps are removed from the calculation). The standard "Average True Range" is the larger of the High of the bar or the Close of the previous bar minus the smaller of the Low of the bar or the Close of the previous bar. FR_Method_Length = The Length (often referred to as a “Period”) in bars used by the Method calculations. FR_SL_PS_Meth_Mult= Multiple of the selected FR_Method.
FR_SL_PS_Meth_Mult Example: Entering 2 in this Input while using ATR as your Method =
(2*current ATR value). This sets your Stop Loss 2 ATRs away from Entry and calculates position
sizing according to the distance from Stop Loss.
FR_BES_Off_On = Break Even Stop (BES). 0 turns off BES; 1 turns on BES. After FR_PT#1 is hit, BES
becomes active.
FR_GaugeBrake_Off_On = "Off/On" Switch for MethodGauge and MethodBrake.
FR_MethodGauge_Pcnt = This input controls the raising or lowering of the volatility level at which the
GaugeBrake becomes active. It's default setting is 100 (100%). The Gauge shapes the Brake. FR_MethodBrake_Pcnt = This input controls how much Volatility above the “MethodGauge” is used to
adjust the final Volatility calculation for the Brake. It's default setting is 50 (50%).

25
FR_PT#1_Off_On = Fixed Risk Profit Target #1. 0=Off; 1=On.
FR_PT#1_Mult = Multiple of Method being used. Entering 2 using ATR as your method = 2*current ATR
value - sets Profit Target #1, 2 ATR values away.
FR_PT#1_Pcnt = Enter in Decimal amount of percentage the amount of position to be sold once Profit
Target is hit. Example: 50 = 50% of position.
FR_PT#2_Off_On = Fixed Risk Profit Target #2. 0=Off; 1=On.
FR_PT#2_Mult = Multiple of the Method being used. Entering 3 using ATR as your method = 3*current
ATR value - sets Profit Target #2, 3 ATR values away from the initial Entry position.
FR_PT#2_Pcnt = Enter the Decimal value for the percentage of the position to be sold once the Profit
Target is hit. Example: 25 = 25% of remainder of position.
FR_PT#3_Off_On = Fixed Risk Profit Target #3. 0=Off; 1=On.
FR_PT#3_Mult = Multiple of Method being used. Entering 4 using ATR as your method = 4*current ATR
value - sets Profit Target #3, 4 ATR values away from the initial Entry position.
FR_PT#3_Pcnt = Enter the Decimal value for the percentage of the position to be sold once the Profit
Target is hit. 100 = 100% of the remainder of position that closes out the complete trade.
The Bullalgo Volatility Gauge/Brake Indicator is available as an Orion add-on.

26
"*Pyramid Section*"
Pyramiding is a strategy in which a trader increases the size of his/her position by buying/shorting
additional shares throughout the life of a trade. This is done to capitalize fully on a trade that is
performing well. Although additional shares are purchased at a higher premium due to the fact that
there is an increase in price action since the initial trade entry, the ultimate goal is to increase the
overall return the user expects over the full life of his/her trade. This type of trading strategy is
considered lower risk due to the scaling in of an existing trade versus the taking on of a full position all at
one time. In Bullalgo Trading Systems Pyramiding, there is the option to average down by entering -1
into the selected " Pyramid_Attack_Mode ". This is a higher risk approach to Pyramiding and it is
advisable to proceed with caution if choosing to do so.
Throughout the life of a Pyramid trade (including initial entry), the Stop Loss orders are adjusted each
time a new Pyramid threshold "Floor" is breached. This helps control risk and capture profits to protect
assets. If price action moves through a given pyramid Floor and into the next Pyramid Level, then the
new level will become active to ensure that the user does not miss their future entries.

27
Getting Acquainted with the Pyramid Matrix
*To permit TradeStation to allow Pyramiding follow these NECESSARY steps:
Setup = Format>Properties for All>General Tab>Position Limits>Chose the option for desired
pyramiding.
Pyramid Input Definitions
Pyramid_Master_Off_On = Pyramid Master Off/On Switch. "0=Off; 1=On". If this input is < or = 0 then
Pyramid_Master_Off_On completely disables the entire Pyramid section. The Pyramid strategy section
is enabled if the input value is > or = 1.
Pyramid_Attack_Mode = -1 = "Short" take Short positions only; 0 = "All" take both Long and Short
positions; 1 = "Long" take long positions only.
Pyramid Method = This input selects the “Method” used to calculate Volatility. An input value of 1 uses a “Standard Error” calculation, 2 uses the "Standard Deviation of the Close", 3 uses the raw Average True Range ("ATR"), 4 uses "ATR Gap" (any gap on the session break removed) and 5 uses the "ATR Gapless (all gaps are removed from the calculation). The standard "Average True Range" is the larger of the High of the bar or the Close of the previous bar minus the smaller of the Low of the bar or the Close of the previous bar. Pyra_Method_Length = The Length (often referred to as “Period”) in bars used by Method calculations. Pyra_GaugeBrake_Off_On = If this input = 0 then the “GaugeBrake” calculation is Disabled. If > or = 1 then the GaugeBrake is enabled and will reduce soaring volatility controlled by the next two inputs (MethodGauge and MethodBrake). Be sure to use the Bullalgo Trading Systems Volatility Gauge indicator to monitor the Pyra_GaugeBrake.

28
Pyra_MethodGauge_Pcnt = This input controls the raising or lowering of the volatility level at which the
GaugeBrake becomes active. It's default setting is 100 (100%).
Pyra_MethodBrake_Pcnt = This input controls how much volatility above the “MethodGauge” is used to
adjust the final volatility calculation for the Brake. It's default setting is 50 (50%).
Pyra_Anxiety_Off_On = Gives the user the option to turn the Anxiety section of Orion "Off/On". This
Switch is only affective in the Pyramid section. Pyramiding Entries are not blocked if Anxiety is On in
Main Orion.
Pyramid#1_Mode= The 1st Pyramiding level that adds to the Initial Trade Entry. -1=Average Down;
0=Off; 1=Scale Up. -1=Average Down is to add shares/units to a negative position. 1=Scale Up is to add
shares/units to a positive position.
Pyra#1_NumOfShares = The number of shares that Pyra#1 will add to an existing Initial Trade Position.
Pyra#1_FloorMult = This input uses the Pyramid Method chosen from above to calculate a "Pyra#1" Floor setting. The input value chosen here is multiplied by the Pyramid Method to create the threshold that price action must break through to activate the Pyra#1 level. A FloorMult value of 2 would be 200% (Pyramid Method x 2). Pyra#1_FloorMult Example: If you are using the ATR Pyramid Method and choose FloorMult = 2
then Price must move 2 ATRs from the Initial Position Entry and touch or break the 2 ATR
threshold Floor to activate this Pyra level.
Pyra#1_Retrace_Pcnt = Retrace_Pcnt is an input that is used to subtract a percentage amount from the
Pyra#1 Floor to create a "Floor Breach Pullback Entry".
Pyra#1_Retrace_Pcnt Example: An input value of 25 here is a 25% retracement of the
volatility method subtracted from the Pyra#1 floor. When price action falls from the Pyra#1
Floor by 25% of the volatility method selected then the Pyramid Matrix will fill an le.Pyra#1
Entry Order.
Pyra#1_StopLoss_Pcnt = This StopLoss_Pcnt is an input that is used to subtract a percentage amount
from the Pyra#1 Entry to create a Stop Loss.
Pyra#1_StopLoss_Pcnt Example: An input value of 25 here is a 25% retracement back from the
Pyra#1 Entry toward the Initial Entry before Pyra#1 takes an lx or sx Pyra.SL#1 exit. The
distance between the Initial Entry to the Pyra#1 Entry = 100 or 100% StopLoss_Pcnt. When price
action falls from the Pyra#1 Entry by 25% of the distance back to the Initial Entry then the
Pyramid Matrix will Stop Loss Exit the entire trade position.
Pyramid#2_Mode = The 2nd Pyramid Level that adds to the Initial Trade Entry and Pyra#1 position.
-1=Average Down; 0=Off; 1=Scale Up. -1=Average Down is to add shares/units to a negative position.
1=Scale Up is to add shares/units to a positive position.

29
Pyra#2_NumOfShares = The number of shares that Pyra#2 will add to the Initial Trade Entry and
Pyramid#1 positions.
Pyra#2_FloorMult = This input uses the Pyramid Method chosen from above to calculate a "Pyra#2" Floor setting. The input value chosen here is multiplied by the Pyramid Method to create the threshold that price action must break through to activate the Pyra#2 level. A FloorMult value of 2 would be 200% (Pyramid Method x 2). Pyra#2_FloorMult Example: If you are using the ATR Pyramid Method and choose FloorMult = 2
then price action must move 2 ATRs from the Initial Trade Entry and touch or break the Floor to
activate this Pyra level.
Pyra#2_Retrace_Pcnt = Retrace_Pcnt is an input that is used to subtract a percentage amount from the
Pyra#2 Floor to create a "Floor Breach Pullback Entry".
Pyra#2_Retrace_Pcnt Example: An input value of 25 here is a 25% retracement of the
volatility method subtracted from the Pyra#2 floor. When price action falls from the Pyra#2
Floor by 25% of the volatility method selected then the Pyramid Matrix will fill an le.Pyra#2
Entry Order.
Pyra#2_StopLoss_Pcnt = This StopLoss_Pcnt is an input that is used to subtract a percentage amount
from the Pyra#2 Entry to create a Stop Loss.
Pyra#2_StopLoss_Pcnt Example: An input value of 25 here is a 25% retracement back from the
Pyra#2 Entry toward the Pyra#1 Entry before Pyra#2 takes an lx or sx Pyra.SL#2 exit. The
distance between the Pyra#1 Entry to the Pyra#2 Entry = 100 or 100% StopLoss_Pcnt. When
price action falls from the Pyra#2 Entry by 25% of the distance back to the Pyra#1 Entry then the
Pyramid Matrix will Stop Loss Exit the entire trade position.
Pyramid#3_Mode = The 3rd Pyramid Level that adds to the Initial Trade Entry, Pyra#1, and Pyra#2
position. -1=Average Down; 0=Off; 1=Scale Up. -1=Average Down is to add shares/units to a negative
position. 1=Scale Up is to add shares/units to a positive position.
Pyra#3_NumOfShares = The number of shares that Pyra#3 will add to the Initial Trade Entry, Pyramid#1,
and Pyramid#2 positions.
Pyra#3_FloorMult = This input uses the Pyramid Method chosen from above to calculate a "Pyra#3" Floor setting. The input value chosen here is multiplied by the Pyramid Method to create the threshold that price action must break through to activate the Pyra#3 level. A FloorMult value of 2 would be 200% (Pyramid Method x 2). Pyra#3_FloorMult Example: If you are using the ATR Pyramid Method and choose FloorMult = 3
then price action must move 3 ATRs from the Initial Position Entry and touch or break the
Floor to activate this Pyra level.

30
Pyra#3_Retrace_Pcnt = Retrace_Pcnt is an input that is used to subtract a percentage amount from the
Pyra#3 Floor to create a "Floor Breach Pullback Entry".
Pyra#3_Retrace_Pcnt Example: An input value of 25 here is a 25% retracement of the
volatility method subtracted from the Pyra#3 floor. When price action falls from the Pyra#3
Floor by 25% of the volatility method selected then the Pyramid Matrix will fill an le.Pyra#3
Entry Order.
Pyra#3_StopLoss_Pcnt = This StopLoss_Pcnt is an input that is used to subtract a percentage amount
from the Pyra#3 Entry to create a Stop Loss.
Pyra#3_StopLoss_Pcnt Example: An input value of 25 here is a 25% retracement back from the
Pyra#3 Entry toward the Pyra#2 Entry before Pyra#3 takes an lx or sx Pyra.SL#3 exit. The
distance between the Pyra#2 Entry to the Pyra#3 Entry = 100 or 100% StopLoss_Pcnt. When
price action falls from Pyra#3 Entry by 25% of the distance back to the Pyra#2 Entry then the
Pyramid Matrix will Stop Loss Exit the entire trade position.
Pyramid#4_Mode = The 4th Pyramid Level that adds to the Initial Trade Entry, Pyra#1, Pyra#2 and
Pyra#3 position. -1=Average Down; 0=Off; 1=Scale Up. -1=Average Down is to add shares/units to a
negative position. 1=Scale Up is to add shares/units to a positive position.
Pyra#4_NumOfShares = The number of shares that Pyra#4 will add to the Initial Trade Entry Pyramid#1,
Pyramid#2, and Pyramid#3 positions.
Pyra#4_FloorMult = This input uses the Pyramid Method chosen from above to calculate a "Pyra#4" Floor setting. The input value chosen here is multiplied by the Pyramid Method to create the threshold that price action must break through to activate the Pyra#4 level. A FloorMult value of 2 would be 200% (Pyramid Method x 2). Pyra#4_FloorMult Example: If you are using the ATR Pyramid Method and choose FloorMult = 4
then price action must move 4 ATRs from the Initial Position Entry and touch or break the
Floor to activate this Pyra level.
Pyra#4_Retrace_Pcnt = Retrace_Pcnt is an input that is used to subtract a percentage amount from the
Pyra#4 Floor to create a "Floor Breach Pullback Entry".
Pyra#4_Retrace_Pcnt Example: An input value of 25 here is a 25% retracement of the
volatility method subtracted from the Pyra#4 floor. When price action falls from the Pyra#4
Floor by 25% of the volatility method selected then the Pyramid Matrix will fill an le.Pyra#4
Entry Order.

31
Pyra#4_StopLoss_Pcnt = This StopLoss_Pcnt is an input that is used to subtract a percentage amount
from the Pyra#4 Entry to create a Stop Loss.
Pyra#4_StopLoss_Pcnt Example: An input value of 25 here is a 25% retracement back from the
Pyra#4 Entry toward the Pyra#3 Entry before Pyra#4 takes an lx or sx Pyra.SL#4 exit. The
distance between the Pyra#3 Entry to the Pyra#4 Entry = 100 or 100% StopLoss_Pcnt. When
price action falls from the Pyra#4 Entry by 25% of the distance back to the Pyra#3 Entry then the
Pyramid Matrix will Stop Loss Exit the entire trade position.
Pyramid#5_Mode = The 5th Pyramid Level that adds to the Initial Trade Entry, Pyra#1, Pyra#2, Pyra#3,
and Pyra#4 position. -1=Average Down; 0=Off; 1=Scale Up. -1=Average Down is to add shares/units to a
negative position. 1=Scale Up is to add shares/units to a positive position.
Pyra#5_NumOfShares = The number of shares that Pyra#5 will add to the Initial Trade Entry Pyramid#1,
Pyramid#2, Pyramid#3, and Pyramid#4 positions.
Pyra#5_FloorMult = This input uses the Pyramid Method chosen from above to calculate a "Pyra#5" Floor setting. The input value chosen here is multiplied by the Pyramid Method to create the threshold that price action must break through to activate the Pyra#5 level. A FloorMult value of 2 would be 200% (Pyramid Method x 2). Pyra#5_FloorMult Example: If you are using the ATR Pyramid Method and choose FloorMult = 5
then price action must move 5 ATRs from the Initial Position Entry and touch or break the
Floor to activate this Pyra level.
Pyra#5_Retrace_Pcnt = Retrace_Pcnt is an input that is used to subtract a percentage amount from the
Pyra#5 Floor to create a "Floor Breach Pullback Entry".
Pyra#5_Retrace_Pcnt Example: An input value of 25 here is a 25% retracement of the
volatility method subtracted from the Pyra#5 floor. When price action falls from the Pyra#5
Floor by 25% of the volatility method selected then the Pyramid Matrix will fill an le.Pyra#5
Entry Order.
Pyra#5_StopLoss_Pcnt = StopLoss_Pcnt is an input that is used to subtract a percentage amount from
the Pyra#5 Entry to create a Stop Loss.
Pyra#5_StopLoss_Pcnt Example: An input value of 25 here is a 25% retracement back from the
Pyra#5 Entry toward the Pyra#4 Entry before Pyra#5 takes an lx or sx Pyra.SL#5 exit. The
distance between the Pyra#4 Entry to the Pyra#5 Entry = 100 or 100% StopLoss_Pcnt. When
price action falls from the Pyra#5 Entry by 25% of the distance back to the Pyra#4 Entry then the
Pyramid Matrix will Stop Loss Exit the entire trade position.

32
Pyramid_PT_Off_On = Pyramid Profit Target Off/On switch. 0=Off; 1=On. 0 disables Exit, 1 enables Exit.
Pyra_ProfTarg_Mult = Enter an overall Profit Target multiple for all pyramiding to conclude based on
the multiple of the method chosen.
The Bullalgo Pyramid Matrix Study/Indicator is available as an Orion add on.

33
Orion Chop Killer
Orion Chop Killer (OCK) is a very powerful Orion feature that allows for profitable trading during
choppy/sideways markets. OCK is capable of trading a strategy in sideways markets effectively as seen
in the chart above. This trading technique is designed to work well when trading larger share/contract
counts.
Reminder: The workspace initially provided during the download and unpacking of Orion
software will have Orion turned on in the top chart and OCK turned off in the bottom chart.
To turn OCK on in a workspace chart:
Click any chart with Orion inserted and active then Right Click the chart>Format Strategies on the main
toolbar>Format>Turn the AttackSetting to (2) OrionChopKiller. This will turn Orion off and OCK on. To
Automate the OCK chart, follow the automation prompts at the bottom of TradeStation's "Format
Analysis Techniques & Strategies" window.
OCK is a new addition to Orion. Currently, there exists only the manual option to turn off and on OCK
for live trading. User savvy technical analysis must be used to determine when the chart being traded is
sideways/choppy, and extreme caution must be used when activating OCK.
Please keep in mind that OCK is only to be used during choppy/sideways chart patterns. Performance
reports from optimizations that are not choppy/sideways will result in overall bad reports because OCK
is designed to trade choppy/sideways chart patterns specifically. Performance reports can be helpful in
finding patterns of sideways trading action.
To practice using OCK, take an Orion build chart, copy/paste it, leave Orion on in one chart and then
turn OCK on in the other.

34
Orion MinMove Warning Indicator
The Orion MinMove Warning Indicator is available as an Orion add-on.
The Orion MinMove Warning Indicator is designed to give the user a safe warning signal when using
negative values in the MinMove inputs. Using negative MinMove values in Orion may lead to Orion not
being able to set itself up correctly to change direction in a trade from Long to Short or Short to Long
where it would normally with the MinMove inputs set to 0 or a positive value. In a negative MinMove
scenario, Orion may then hold a position until a Stop Loss or a Profit Target is hit. Retaliation is a
possible solution to this issue, however, holding on to a long drawn out trade with no proper signal may
turn out for the better. Sometimes it is better to hold a trade rather than being flip-flopped up and
down loss after loss. This is why negative MinMove points are riskier yet can bring higher rewards. This
indicator works on a two color scheme for points of reference, Magenta, and Cyan Points. This
indicator was built to use when an end user chooses to push Orion into unchartered territories by using
negative MinMove values. Doing so can be very profitable, however, it does present added risk.
MinMove Warning Indicator Example: When an Orion strategy build receives a Long order fill and then
a Magenta point appears within the next few bars, the strategy build is now in the "MinMove Safe
Zone". This means that Orion is now able to flip to a Short position if a Short signal order occurs. This is
also true for Cyan points when in a short position. When an Orion strategy build receives a Short order
fill and then a Cyan point appears within the next few bars, the strategy build is now in the "MinMove
Safe Zone". This means that Orion is now able to flip to a Long position if a Long signal order occurs.
Magenta points = Long positions are now able to be flipped Short if needed.
Cyan points = Short positions are now able to be flipped Long if needed.
These two points are "MinMove Safe Zone" signals and to be acknowledged when using negative
MinMoves.

35
"*Anxiety Section*"
Anxiety = Fear Levels
"Redefining automated trading systems for everyone! Not just for the select few any longer..."

36
Anxiety Attack Plan "[Orion Anxiety Attack Gauge]" Indicator Important Note: The Anxiety Section uses positive(+) and negative(-) values. Anything above the zero line in the Anxiety indicators is entered as a positive value. Anything below the zero line in the Anxiety indicators is entered as a negative value. Anxiety_Master_Off_On = Anxiety Master Off/On Switch. "0=Off; 1=On". If this input is < or = 0, then
Anxiety_Master_Off_On completely disables the entire Anxiety section. The Anxiety strategy section is
enabled if the input value is > or = 1.
Anxiety Attack Filters = Fear_Attack_Filter and RedZone_Attack_Filter - Prevents new Entries from being
executed when Anxiety thresholds have been breached.
0=Filter Off - Allows all Entries to be executed when "Orion Anxiety Attack Gauge" (indicator name) thresholds have been breached. (Turns Off the Orion Anxiety Attack Gauge). 1=Filter Betel. - Prevents only Betelgeuse Entries from being executed when Orion Anxiety Attack Gauge thresholds have been breached. 2=Filter Recal. - Prevents only Recalibration Entries from being executed when Orion Anxiety Attack Gauge thresholds have been breached. 3= Filter All - Prevents all Entries from being executed when Orion Anxiety Attack Gauge thresholds have been breached. (E.g. Betelgeuse, Recalibration, etc.)
Fear_Attack_Filter = Enter desired Anxiety Attack Filter mode. RedZone_Attack_Filter = Enter desired Anxiety Attack Filter mode. RedZone_Bypass_Off_On = Prevents all Exits within the Red Zone when turned on. 1=On. Fear_HighThresh_Dec = This sets the Yellow upper threshold of the Orion Anxiety Attack Gauge Indicator for a Long position. Once this user defined threshold is breached to the upside the Fear_Attack_Filter mode setting becomes active. (0 = Input Off). Fear_LowThresh_Dec = This sets the Yellow lower threshold of the Orion Anxiety Attack Gauge Indicator for a Short position. Once this user defined threshold is breached to the downside, the Fear_Attack_Filter mode setting becomes active. (0 = Input Off). RedZone_HighThresh_Dec = This input sets the Red upper mid threshold line in the Orion Anxiety Attack Gauge Indicator. Once this user defined threshold is entered the RedZone_ Attack_Filter mode setting becomes active, and trades will not be taken according to the above settings. The "Anxiety RedZone" is used to define a flat market to turn off strategy Entries (0 = Input Off). RedZone_LowThresh_Dec = This input sets the Red lower mid threshold line in the Orion Anxiety Attack Gauge Indicator. Once this user defined threshold is entered the RedZone_Attack_Filter mode setting becomes active, and trades will not be taken according to the above settings. The "Anxiety RedZone" is used to define a flat market to turn off strategy Entries (0 = Input Off).

37
Example: RedZone -No new Entries.
The Orion Anxiety Attack Gauge Indicator is available as an Orion add-on.
CounterTrend_Mode = 3 modes are available within Anxiety CounterTrend_Mode.
"0=Off; 1=Exit Only; 2=Entry"
0 = CounterTrend turned Off 1 = CounterTrend Exits a position when all rules are met 2 = CounterTrend Enters a position when all rules are met lex_CTrend_Bars = This input is designed to enter into a counter Long position if CounterTrend_Mode
(2) is selected after:
Rule #1 - The number of user defined Orion Anxiety Attack Gauge Bars are outside the Bottom
threshold has been met. This is designated by the lex_CTrend_ Bar Input.
Rule #2 - The Orion Anxiety Attack Gauge has had 1 Indicator Attack Bar that has closed back
inside of the bottom threshold. This Entry Order will be generated on the Open of the next Bar.
38
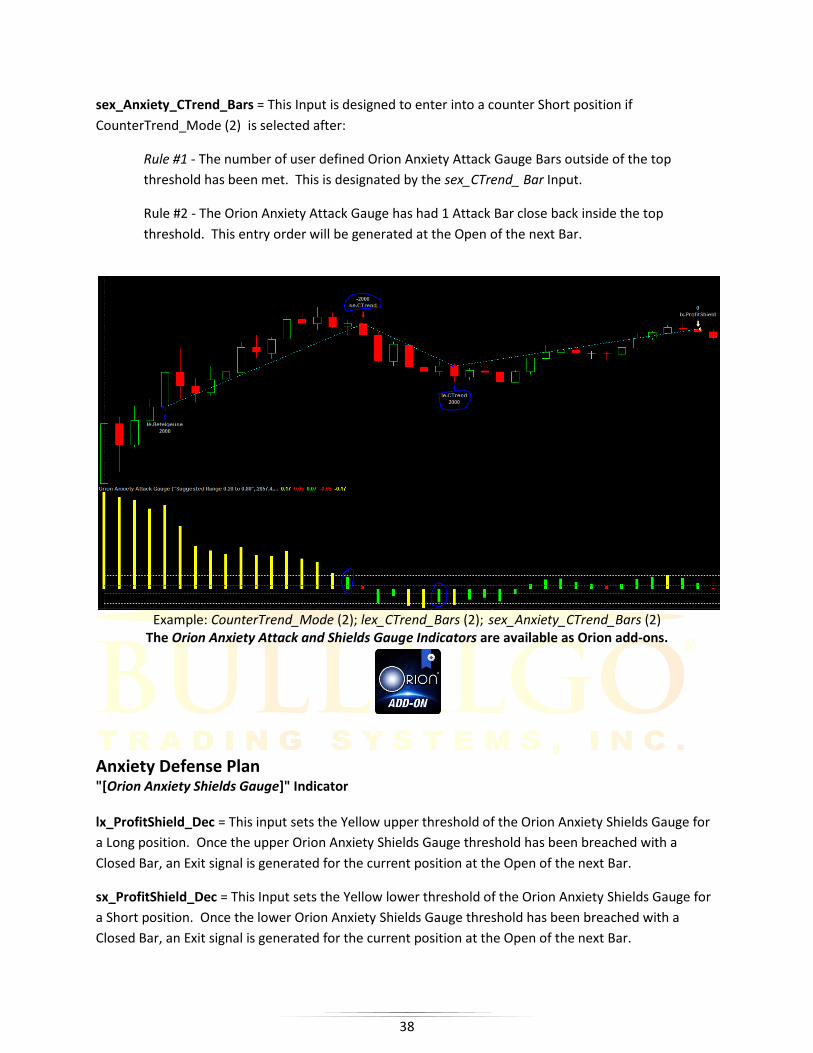
sex_Anxiety_CTrend_Bars = This Input is designed to enter into a counter Short position if
CounterTrend_Mode (2) is selected after:
Rule #1 - The number of user defined Orion Anxiety Attack Gauge Bars outside of the top
threshold has been met. This is designated by the sex_CTrend_ Bar Input.
Rule #2 - The Orion Anxiety Attack Gauge has had 1 Attack Bar close back inside the top
threshold. This entry order will be generated at the Open of the next Bar.
Example: CounterTrend_Mode (2); lex_CTrend_Bars (2); sex_Anxiety_CTrend_Bars (2)
The Orion Anxiety Attack and Shields Gauge Indicators are available as Orion add-ons.
Anxiety Defense Plan "[Orion Anxiety Shields Gauge]" Indicator lx_ProfitShield_Dec = This input sets the Yellow upper threshold of the Orion Anxiety Shields Gauge for
a Long position. Once the upper Orion Anxiety Shields Gauge threshold has been breached with a
Closed Bar, an Exit signal is generated for the current position at the Open of the next Bar.
sx_ProfitShield_Dec = This Input sets the Yellow lower threshold of the Orion Anxiety Shields Gauge for
a Short position. Once the lower Orion Anxiety Shields Gauge threshold has been breached with a
Closed Bar, an Exit signal is generated for the current position at the Open of the next Bar.

39
lx_StopLossShield_Dec = This sets the Magenta upper threshold of the Orion Anxiety Shields Gauge
indicator for a Long position. Once this user defined threshold is breached to the downside, an Exit
signal is generated for the current position at the Open of the next Bar. (0 = Input Off).
sx_StopLossShield_Dec = This sets the Magenta lower threshold of the Orion Anxiety Shields Gauge
indicator for a Short position. Once this user defined threshold is breached to the upside, an Exit signal
is generated for the current position at the Open of the next Bar. (0 = Input Off).
lx_AnxietyRun_Bars = If this input is turned 1=On Orion will hold a Long position until the Orion Anxiety Shields Gauge Indicator closes back below the upper Yellow threshold. When this input is turned on, Orion will override lx_ProfitShield_Dec. However, lx_ProfitShield_Dec will still set the upper Shields Gauge threshold as needed. sx_AnxietyRun_Bars = If this input is turned 1=On Orion will hold a Short position until the Orion Anxiety Shields Gauge indicator closes back above the lower Yellow threshold. Also, when this input is turned on, it will override sx_ProfitShield_Dec. However, sx_ProfitShield_Dec will still set the lower Shields Gauge threshold. Run_Bars Note: If a new entry signal is generated and filled before an AnxietyRun_Bars Exit occurs, the prior AnxietyRun_Bars Exit will be negated and the AnxietyRun_Bars rules will begin again. lx_AnxietyRun_PT_NoExit_Off_On = When this is turned On=1 this Input "Off/On" Switch will turn Off all Long Profit Target Exits when the Long position AnxietyRun has become active and true. By doing this, AnxietyRun will have a chance to hold a position into a large move to maximize profit potential. sx_AnxietyRun_PT_NoExit_Off_On = When this is turned On=1 this Input "Off/On" Switch will turn Off all Short Profit Target Exits when the Short position AnxietyRun has become active and true. By doing this, AnxietyRun will have a chance to hold a position into a large move to maximize profit potential.
Example of a lx_StopLossShield_Dec and sx_StopLossShield_Dec in action.

40
Example: lx_ProfitShield_Dec & sx_ProfitShield_Dec
The Orion Anxiety Shields Gauge Indicator is available as an Orion add-on
The Orion Anxiety Shields Gauge Indicator is available as an Orion add-on.

41
"*Bollinger Band Threshold Defense*" The Bollinger Band Threshold Defense section filters Orion by using Bollinger Bands to control Entries
and Exits. This section is split into two subsections, one for Entries and the other for Exits.
Important Note: The Bollinger Band Threshold Defense section uses positive (+) and negative (-) values. Anything above the zero line in the indicator is entered as a positive value. Anything below the zero line in the indicator is entered as a negative value. BB_Thresh_Master_Off_On = BB Threshold Defense Master Off/On Switch. "0=Off; 1=On". If this input
is set < or = 0 then BB_Thresh_Master_Off_On completely disables the entire BB_Tresh section.
BB_Tresh is enabled if the input value is > or = 1.
Orion BB Threshold Attack Gauge Indicator - Filters Entries.
BBThreshAttack Filter & BBRedZone_Attack_Filter - The BBThreshAttack Filter &
BBRedZone_Attack_Filter - Stop new Entries from being executed when Anxiety thresholds have been
breached.
0=Filter Off - Allows all Entries to be executed when "Orion BB Threshold Attack Gauge" thresholds have been breached. (Turns off the Orion BB Threshold Attack Gauge). 1=Filter Betel. - Prevents only Betelgeuse Entries from being executed when Orion BB Threshold Attack Gauge thresholds have been breached. 2=Filter Recal. - Prevents only Recalibration Entries from being executed when Orion BB Threshold Attack Gauge thresholds have been breached. 3= Filter All - Prevents all Entries from being executed when Orion BB Thresh Attack Gauge thresholds have been breached. (E.g. Betelgeuse, Recalibration, etc.) BB_TAG_Length = Bollinger Band Length.
BB_TAG_Devs_Up = Bollinger Band deviations up.
BB_TAG_Devs_Dn = Bollinger Band deviations down.
BBRedZone_Bypass_Off_On = Prevents all Exits inside the BB_Thresh RedZone when turned 1=On . BBRedZone_HighThresh_Int = This input sets the Red upper threshold line in the Orion BB Threshold
Attack Gauge Indicator for a Long position. Once this user defined threshold is breached and inside both
of the Red thresholds then the Attack_Filter_Mode setting becomes active. (0 = Input is Off).
BBRedZone_LowThresh_Int = This sets the Red lower threshold line in the Orion BB Threshold Attack
Gauge Indicator for a Short position. Once this user defined threshold is breached and inside both of
the Red thresholds then the Attack_Filter_Mode setting becomes active. (0 = Input is Off).

42
Orion BB Threshold Profit Shield "PS" Gauge Indicator -Bollinger Band Extreme Threshold Exits
BB_TPSG_Length = Bollinger Band Length.
BB_TPSG_Devs_Up = Bollinger Band deviations up.
BB_TPSG_Devs_Dn = Bollinger Band deviations down.
lx_BB_ProfitShield_Int = This input sets the upper threshold of the Orion BB Threshold PS Gauge for a
Long position. Once the upper Orion BB Threshold PS Gauge threshold has been breached with a Closed
bar, an Exit signal is generated for the current position at the Open of the next Bar.
sx_BB_ProfitShield_Int = This input sets the lower threshold of the Orion BB Threshold PS Gauge for a
Short position. Once the lower Orion BB Threshold PS Gauge threshold has been breached with a Closed
bar, an Exit signal is generated for the current position at the Open of the next Bar.
Orion BB Threshold Ride Shield "RS" Gauge Indicator -Bollinger Band Ride Threshold Exits
BB_TRSG_Length = Bollinger Band Length.
BB_TRSG_Devs_Up = Bollinger Band deviations up.
BB_TRSG_Devs_Dn = Bollinger Band deviations down.
lx_BB_RideShield_Int = This Input is designed to ride a Bollinger Band Long position move. ("Riding the
Bands"). It will hold a Long position until the Green upper threshold is breached from above the
threshold down and inside of the threshold on a Closed Bar basis.
sx_BB_RideShield_Int = This Input is designed to ride a Bollinger Band Short position move. ("Riding the
Bands"). It will hold a Short position until the Green lower threshold has been breached from below the
threshold up and inside of the threshold on a closed bar basis.
lx_BB_RideBars_Int = Enter how many Cyan indicator Bars outside of the lx_BB_RideShield_Int
threshold (top Green dotted line) are to be breached for a Long TSG Ride Exit.
lx_BB_RideBars_Int Example: Entering 2 in the input - After 2 bars have closed above the top
dotted Green threshold the lx.TSG Ride Exit becomes active. Orion will then Exit the trade after
a closed Cyan indicator Bar has taken place back within the top dotted Green threshold of the
indicator.
sx_BB_RideBars_Int = Enter how many Cyan indicator bars outside of the sx_BB_RideShield_Int
threshold (bottom Green dotted line) are to be breached for a Short TSG Ride Exit.
sx_BB_RideBars_Int Example: Entering 2 in the input - After 2 bars have closed below the
bottom dotted Green threshold the sx.TSG Ride Exit becomes active. Orion will then Exit the
trade after a closed Cyan indicator Bar has taken place back within the bottom dotted Green
threshold of the indicator.

43
lx_BB_RideNoExit_Off_On = When this input is turned 1=On , it turns off all other Long Exits in Orion
except lx_BB_ProfitShield_Int to allow for a full ride of the Bollinger Band to maximize profit potential.
sx_BB_RideNoExit_Off_On = When this Input is turned 1=On , it turns off all other Short Exits in Orion
except sx_BB_ProfitShield_Int to allow for a full ride of the Bollinger Band to maximize profit potential.
The Orion BB Threshold Profit Shield Gauge Indicator is available as an Orion add-on. The Orion BB Threshold Ride Shield Gauge Indicator is available as an Orion add-on.
The Orion BB Threshold Attack Gauge Indicator is available as an Orion add-on.

44
"*Bollinger Band Flat Defense*"
The Orion BB Flat Market Indicator is available as an Orion add-on.
The BB_Flat Defense section is designed to determine flat market cycles/price action in charts according
to input parameters. This strategy generates Exit Orders when "flat" market conditions are found to
prevent Orion from being in a position that has no direction. There are other inputs in Orion that need
to be considered when using BB_Flatshield. (E.g. Recalibration). If Recalibration is turned on, Orion can
generate new orders immediately after a BB_Flatshield Exit occurs. When designing a strategy with
Orion, all inputs need to be considered.
BB_Flat_Master_Off_On = BB Flat Defense Master switch. "0=Off; 1=On". If this input is set < or = 0
then BB_Flat_Master_Off_On completely disables the entire BB_Flat section. The BB_Flat strategy
section is enabled if this input value is > or = 1.
BB_Flat_Length = Bollinger Band Length.
BB_Flat_Devs_Up = Bollinger Band deviations up.
BB_Flat_Devs_Dn = Bollinger Band deviations down.
BB_Keltner_Off_On = Adds an additional Filter to the "Flat Market" test. Keltner Bands are perhaps a little less well known than Bollinger Bands. However, they are very similar. They are different in that Keltner Bands use multiples of the True Range rather than Standard Deviations. Orion uses the same inputs (Length, Deviations Up and Deviations Down) for Bollinger Bands and Keltner Bands. By adding Keltner options, Orion Exits will be taken when price action is in a more traditionally flat period within a chart. The use of Keltner to find BB_Flat Exits can lead to creative ways of using Flat market trade Exits. lx_BB_Off_On = Activates Long Exit Orders. Exits are active only when "Flat Market" conditions are detected.

45
sx_BB_Off_On = Activates Short Exit Orders. Exits are active only when "Flat Market" conditions are detected. lx_BB_Tiks = Long Exit number of ticks added to the Upper Bollinger Band for a Sell Limit Exit order to take place. sx_BB_Tiks = Short Exit number of ticks subtracted from the Lower Bollinger Band for a Buy to Cover Limit Exit order to take place.
BB_SumBars_Int = This "Sum" is the Summation of Difference (Diff) over SumBars. Diff is the StdDev of a Bar minus the StdDev of one bar ago. This counts the number of bars back to calculate to determine if there is flat movement in a chart. BB_SumBars_Int Example: Entering 3 = 3 bars of calculation to determine a flat signal. BB_Min_Dec = Level of Absolute Value of change capped to consider the Absolute Value of the Sum "Flat". Less than this cap or limit triggers a "Flat Market" prediction. These Bollinger Band Exits are active only when this strategy section has detected a condition considered a Flat Market. To detect a Flat Market condition, the first thing to check is if the Keltner test is enabled and that Bollinger Bands are inside the Keltner Bands. Assuming this test is TRUE, or the Keltner test is disabled, the net change of the bands is summed over "BB_SumBars_Int" Bars of data. If the Absolute Value of this Sum is less than the "BB_Min_Dec" value, then it is considered to be a Flat Market.
Please note: When optimizing BB_Flat_Length, Bullalgo Trading Systems, Inc. recommends not setting these inputs to a range
greater than 50. If you chose to enter a value greater than 50, the user would then need to adjust "Maximum number of bars
study will reference" in the TradeStation Properties for All window to a larger than 50 value. If the user enters a value greater
than 50 in this input with Maxbarsback set to 50 Orion will be turned off automatically and an error message will be displayed
in TradeStation.
"Making Trading Dreams a Reality"

46
"*NBar Multiple Filter*"
The Orion NBar Crossover Indicator is available as an Orion add-on.
Orion's NBar Filter cuts choppiness from shorter term interval chart builds by using longer term less
noisy interval charts to signal when a strategy is to take Long or Short positions. All of Orion's other
settings are controlled by the shorter interval chart the user built in his/her Orion strategy.
NBar_Bypass_Off_On = This input prevents lx/sx.Betelgeuse Exits when NBar is turned on, and Orion is trying to flip its position direction. (1) = On. NBar_IntervalDataType = Select the interval of data desired to apply the NBar multiples.
0 = Auto Detect. Uses the same interval that the user's strategy build chart is set to. E.g. Build on a 5-minute chart - Auto Detect will use 5-minute multiples. 1 = Minute. Minute multiples. 2 = Day. Daily multiples. 3 = Week. Weekly multiples. 4 = Month. Monthly multiples.

47
NBar_IntervalMultiple = Example: If the user enters 3 here with the main chart build using a 5-minute
interval, the Orion strategy build will only be given Long or Short signals from a 15-minute (data 2)
interval chart (NBar_Interval of 3 x 5-minute interval chart = 15min chart). Setting this input to 5 will
give Orion Long and Short signals from a 25-minute (data 2) interval. Entering ("0 or 1") here will
generate signals from the 5-minute interval based on the example given.
Fast Length and Slow Length = EMAs (Exponential Moving Averages) on the Multiple Interval selected
for BarMult_Int.
Bull_Increase = le_Trend = Fast_Value > Slow_Value + Bull_Increase. To call a "Bullish Market" the
Fast N-Bar XAverage needs to be at least "+ Bull_Increase" above the Slow N-Bar XAverage. This
crossover is displayed with a Cyan Cross on the Orion NBar Crossover Indicator.
Bear_ Decrease = se_Trend = Fast_Value < Slow_Value - Bear_Decrease. To call a "Bearish Market" the Fast N-Bar XAverage needs to be at least "- Bear_Decrease" below the Slow N-Bar XAverage. This crossover is displayed with a Magenta Cross in the Orion NBar Crossover Indicator. Session Type: 0 = AutoDetect = Automatically detects the Session Type from the main strategy build's session
(regular, pre and post, 24hr, etc.) and sets the N-Bar Session Type to the same.
1 = Regular Session = Sets the NBar session to Regular Session time.
NBar_Flip_Mode = "0=Off; 1=Exit; 2=Reverse" This Input has 3 optional modes. When the Orion NBar
Crossover indicator EMA'S crossover, there is the option to Exit a current losing trade (1), reverse from a
losing trade into an Entry of the opposite direction (2), or let the current trade play out until Orion
signals an Exit from other input parameters (0).
"Redefining automated trading systems for everyone! Not just for the select few any longer..."

48
The Orion NBar Crossover Strategy is available as an Orion add-on.
The separate Orion NBar Crossover Strategy is a tool that can be used to show the NBar Multiple chart
bare bone trading performance. It comes with optional user defined Start Entry & Final Exit times for
control. This add-on Strategy is helpful in locating profitable, consistent NBar intervals to use to create
NBar Filters. After the Final Exit each day, Long or Short positions are still in effect until a new
Bull_Increase Cyan Cross or Bear_Increase Magenta Cross appears signaling a reversal of trade direction.
This strategy is to be used for Performance Report statistics and the visualization of how the NBar will
decide between long or short Entries in the main Orion system build. Applying the correct NBar Filter to
an Orion build can dramatically change Performance Report results in an Orion strategy build.
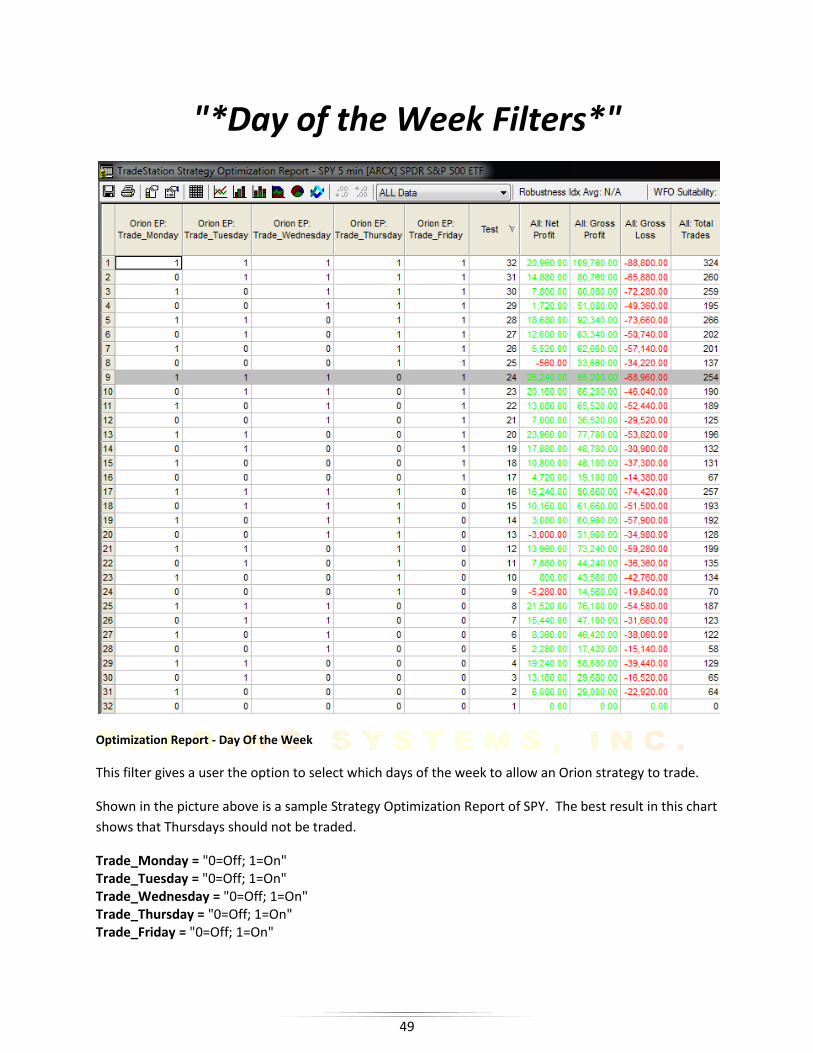
49
"*Day of the Week Filters*"
Optimization Report - Day Of the Week
This filter gives a user the option to select which days of the week to allow an Orion strategy to trade.
Shown in the picture above is a sample Strategy Optimization Report of SPY. The best result in this chart
shows that Thursdays should not be traded.
Trade_Monday = "0=Off; 1=On" Trade_Tuesday = "0=Off; 1=On" Trade_Wednesday = "0=Off; 1=On" Trade_Thursday = "0=Off; 1=On" Trade_Friday = "0=Off; 1=On"
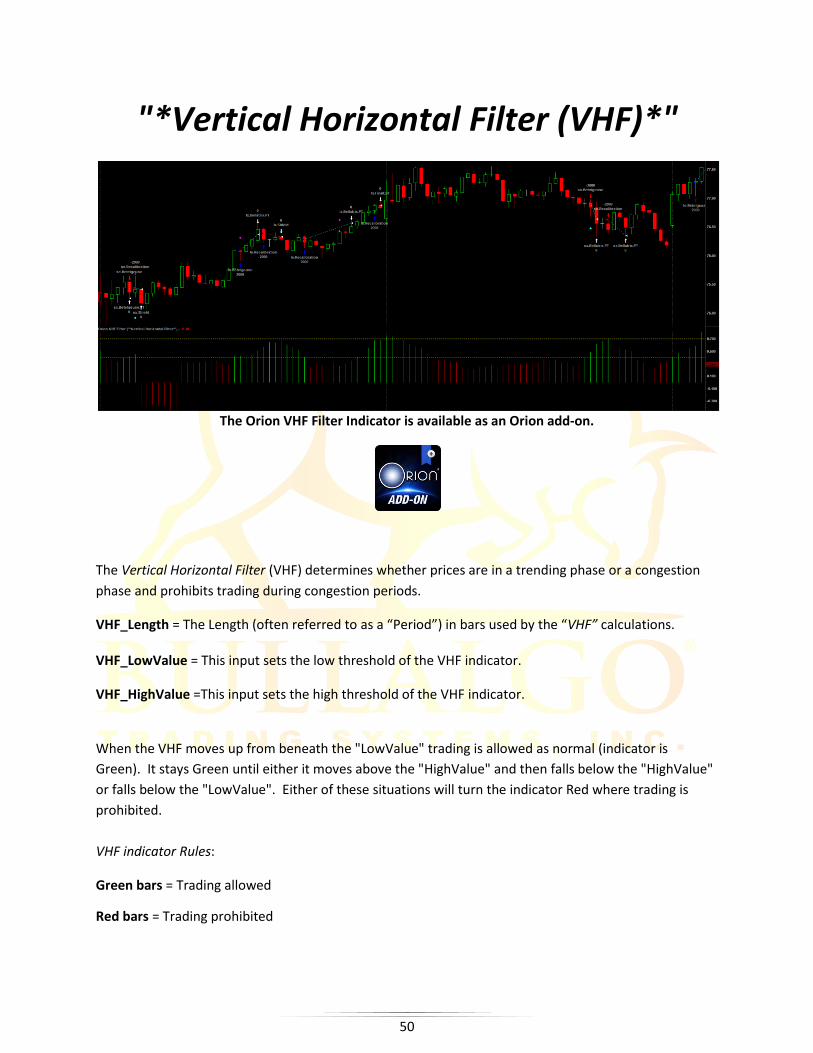
50
"*Vertical Horizontal Filter (VHF)*"
The Orion VHF Filter Indicator is available as an Orion add-on.
The Vertical Horizontal Filter (VHF) determines whether prices are in a trending phase or a congestion
phase and prohibits trading during congestion periods.
VHF_Length = The Length (often referred to as a “Period”) in bars used by the “VHF” calculations. VHF_LowValue = This input sets the low threshold of the VHF indicator.
VHF_HighValue =This input sets the high threshold of the VHF indicator.
When the VHF moves up from beneath the "LowValue" trading is allowed as normal (indicator is
Green). It stays Green until either it moves above the "HighValue" and then falls below the "HighValue"
or falls below the "LowValue". Either of these situations will turn the indicator Red where trading is
prohibited.
VHF indicator Rules:
Green bars = Trading allowed
Red bars = Trading prohibited

51
Bullalgo Analysis Commentary
All Bullalgo products come equipped with programmed Analysis Commentary for visual play by play
action of the product being used. At the bottom of any Bullalgo Trading Systems, Inc. product input list
the user may set Analysis Commentary to "True" or "On". Then click the Analysis Commentary icon on
the toolbar in TradeStation (pictured above). Next, click any bar in a chart and the Analysis Commentary
window will display important information including what Entries or Exits are coming soon, Stop Losses
approaching, Custom Indicator Parameters and so much more.

52
Properties For All Set-Up
The screenshot above is a Properties for All window taken from TradeStation 9.5 (Update 10). Based on a $4.99 flat commission rate; 2000 share count = .002495 per share. Maximum shares/contracts/units per position = a higher number than actual share count to trade (E.g.65,000).
Trade size = Bullalgo Trading Systems, Inc. recommends using the Fixed Shares/Contracts/Units then
type in the share count you plan on trading to sync with the Orion NumberOfShares Input. In the
example above 2000 shares was used. However, programmed within Orion, the
NumberOfShares/Contracts input overrides this. Fixed Shares/Contracts/Units can be used as a
safeguard.
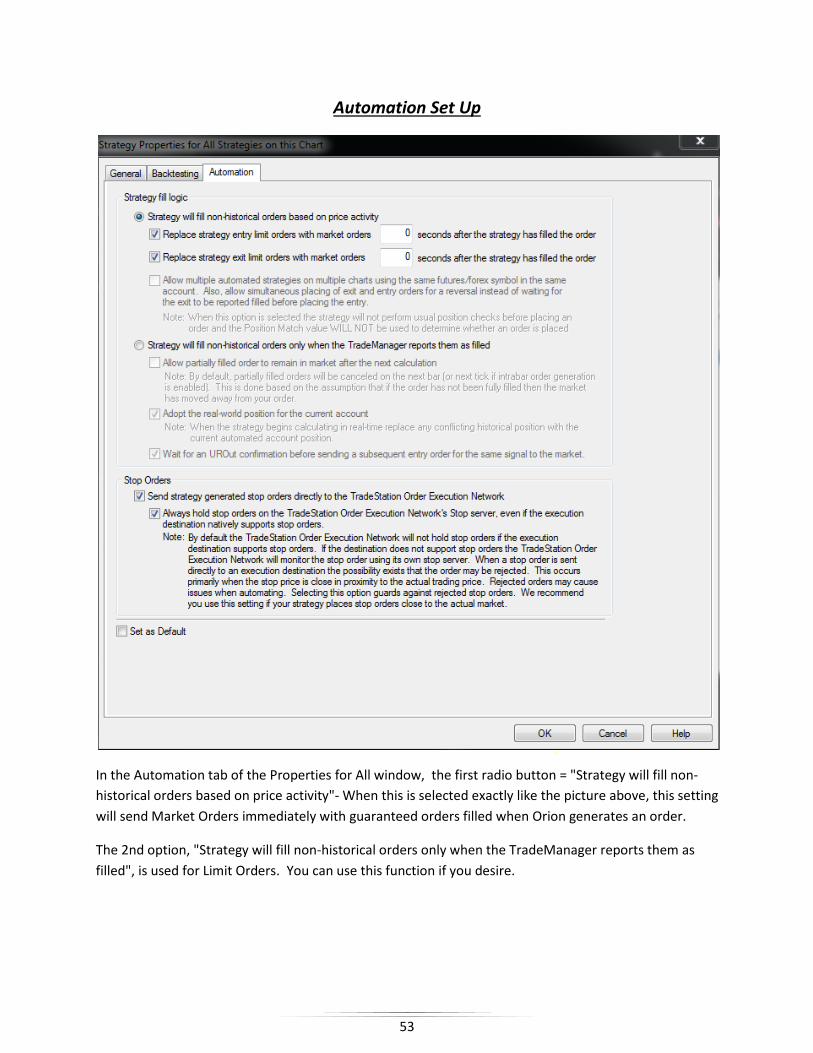
53
Automation Set Up
In the Automation tab of the Properties for All window, the first radio button = "Strategy will fill non-
historical orders based on price activity"- When this is selected exactly like the picture above, this setting
will send Market Orders immediately with guaranteed orders filled when Orion generates an order.
The 2nd option, "Strategy will fill non-historical orders only when the TradeManager reports them as
filled", is used for Limit Orders. You can use this function if you desire.

54
There are drawbacks to both of these strategy fill logics. If you use the Limit Order option, you take the
risk of only getting a partial fill or no fill at all. Using the Market Order option you will be guaranteed to
be filled completely, however, this introduces the possibility of slippage and broken up orders when
using the flat commission rate structure.
Very Important Note:
Unfortunately, TradeStation does not offer the Adopt real world position and Wait for an URout
confirmation to the Market Order option in automation just yet. This can cause a couple different issues
for the user.
1. A re-Entry order can be sent before you are completely filled on a current Exit order. This is literally
milliseconds and hopefully a fix is coming soon from TradeStation.
2. The strategy can fall out of sync with live positions. We haven't seen this happen very often.
However, it is still possible.
3. When setup with a flat fee commission structure with TradeStation, Orion can send an order of 2000
shares and get broken lot fill orders to get the 2000 share trade completely filled.
Example:
2000 buy order sent at $4.99 flat commission structure
Filled:
100 shares @$4.99 300 shares @$4.99 500 shares @$4.99 100 shares @$4.99 1000 shares @$4.99
*Notice you are paying $4.99 for each broken fill to get to 2000 shares.
The fix to broken fills when you see them in the TradeManager:
1. Immediately following the entire broken buy order being filled, cancel all open Exit Orders manually.
It is preferred to use the Cxl All button in chart trading:

55
2. Once all open Exit Orders have been cancelled, select "Do NOT Close Position" in the pop-up window.
3. Click the trading chart and press "Ctrl +R" to refresh the chart and Orion, or turn the strategy off, then
back on again to have only 1 Exit order thus only one $4.99 commission fee for the position.
The user should always watch the Orders tab in TradeStation's TradeManager to be sure that orders are
Entering and Exiting one order per position.
*These are issues within TradeStation and apply to all strategies. Hopefully, TradeStation will be fixing
these issues very soon. Please be aware that the above situations are not problems within Orion.
Bullalgo Trading Systems, Inc. has tried to work around them. However, the drawbacks to other
segments within Orion were compromised too greatly for us to apply automated fixes at this time.
** Please pay special attention to the spreads in many equities between the Bid and Ask price when
using Market Orders. Remember that when using Market Orders, trade fills are at the Ask price, not the
current price of the particular ticker/symbol you are trading.

56
Optimizing with Orion Swing
Optimization 1a:
This looks amazing, doesn't it?! $190,000 in 1 year, trading only one symbol/ticker continuously!
Although the performance graph above looks stellar, it is unfortunately unrealistic in most cases.
This is a classic example of curve fitting an optimization. Squeezing all historical in-sample data and
making it fit your strategy build perfectly. Orion can produce these kinds of optimizations all the time if
preferred. However, the best thing to do is to study your build through proper optimizing, walk-forward
testing, and curve fitting processes. Google them. Once you learn how to do these things and how to
read an optimization report correctly, you will find consistent success with automated trading and
Orion.
Depending on the strategy build the user develops within Orion, the user may find that the desired
settings are not in the market every minute of the day. Orion is designed to trade in the market when
the strategy finds suitable and profitable parameters. There will be strategy builds developed with
Orion that pick and choose specific trade patterns that may or may not be in the market continuously.

57
Optimization 1b:
This is an out of sample Manual Walk Forward optimization of the picture on the previous page. It can
be seen that around trade number 1800, the in-sample optimization ends and since that point forward,
the graph peaks a few more times and then performance goes flat out of sample (oos) for months.
The point to be made here is that the user must learn how to back-test and walk-forward test Orion
correctly. Do not search for the holy grail strategy. Instead, setup a strategy build correctly with back-
tests, walk-forward tests, and visual setups that will remain consistently profitable at a more gradual,
sensible pace.
Imagine being able to run five or more Orion strategy builds at one time with the proper sensible testing
completed. By building a proper portfolio using Bullalgo Trading Systems, Inc. Orion, Orion Swing, and
all other Bullalgo products, you can then work to become a very successful, confident and highly
profitable trader.
Be sure to visit us in the "The War Room" forums where users can work together to discuss strategies,
tactics, settings, and overall Bullalgo product uses at www.bullalgotradingsystems.com.
Planning, strategizing, doing your homework, and hard work will pay off. Trading is not easy, and no
existing systems or strategies can be turned on and left unsupervised with no effort by the user.
Automated trading is automated. However, it takes a lot of work every day to be successful. Orion is a
very powerful and versatile strategy builder. It is up to you to find your way and make it work to match
your trading style and needs.

58
"Making Trading Dreams a Reality"

59
Past trading results are not indicative of future results. Past price patterns may not
repeat in precisely the same way and subsequently trading systems may not achieve
profits/losses similar to past actual or hypothetical results. There are just too many
variables in the markets to accurately forecast future results for any system or trader.
CFTC DISCLAIMER
HYPOTHETICAL PERFORMANCE RESULTS HAVE MANY INHERENT LIMITATIONS, SOME OF WHICH ARE DESCRIBED BELOW. NO REPRESENTATION IS BEING MADE THAT ANY ACCOUNT WILL OR IS LIKELY TO ACHIEVE PROFITS OR LOSSES SIMILAR TO THOSE SHOWN. IN FACT, THERE ARE FREQUENTLY SHARP DIFFERENCES BETWEEN HYPOTHETICAL PERFORMANCE RESULTS AND THE ACTUAL RESULTS SUBSEQUENTLY ACHIEVED BY ANY PARTICULAR TRADING PROGRAM.
ONE OF THE LIMITATIONS OF HYPOTHETICAL PERFORMANCE RESULTS IS THAT THEY ARE GENERALLY PREPARED WITH THE BENEFIT OF HINDSIGHT. IN ADDITION, HYPOTHETICAL TRADING DOES NOT INVOLVE FINANCIAL RISK, AND NO HYPOTHETICAL TRADING RECORD CAN COMPLETELY ACCOUNT FOR THE IMPACT OF FINANCIAL RISK IN ACTUAL TRADING CONDITIONS. IN ADDITION THE ABILITY TO WITH STAND LOSSES OR TO ADHERE TOA PARTICULAR TRADING PROGRAM IN SPITE OF TRADING LOSSES ARE MATERIAL POINTS WHICH CAN ALSO ADVERSELY AFFECT ACTUAL TRADING RESULTS. THERE ARE MANY OTHER FACTORS RELATED TO THE FINANCIAL MARKETS IN GENERAL OR TO THE IMPLEMENTATION OF ANY SPECIFIC TRADING PROGRAM WHICH CANNOT BE FULLY ACCOUNTED FOR IN THE PREPARATION OF HYPOTHETICAL PERFORMANCE RESULTS, ALL OF WHICH CAN ADVERSELY AFFECT ACTUAL TRADING RESULTS.
THE RISK OF LOSS IN TRADING FUTURES, OPTIONS, COMMODITIES, AND STOCKS CAN BE SUBSTANTIAL. YOU SHOULD THEREFORE CAREFULLY CONSIDER WHETHER SUCH TRADING IS SUITABLE FOR YOU IN LIGHT OF YOUR FINANCIAL CONDITION. IN CONSIDERING WHETHER TO TRADE OR TO AUTHORIZE SOMEONE ELSE TO TRADE FOR YOU, YOU SHOULD BE AWARE OF THE FOLLOWING: IF YOU PURCHASE OR SELL A FUTURE, OPTION, YOU MAY SUSTAIN A TOTAL LOSS OF THE INITIAL MARGIN FUNDS AND ANY ADDITIONAL FUNDS THAT YOU DEPOSIT WITH YOUR BROKER TO ESTABLISH OR MAINTAIN YOUR POSITION. IF THE MARKET MOVES AGAINST YOUR POSITION, YOU MAYBE CALLED UPON YOUR BROKER TO DEPOSIT A SUBSTANTIAL AMOUNT OF ADDITIONAL MARGIN FUNDS, ON SHORT NOTICE. IF YOU DO NOT PROVIDE THE REQUIRED FUNDS WITHIN THE PRESCRIBED TIME, YOUR POSITION MAY BE LIQUIDATED AT A LOSS, AND YOU WILL BE LIABLE FOR ANY RESULTING DEFICIT IN YOU ACCOUNT. THE PLACEMENT OF CONTINGENT ORDERS BY YOU OR YOUR TRADING ADVISOR, SUCH AS A "STOP LOSS" OR "STOP LIMIT" ORDER, WILL NOT NECESSARILY LIMIT YOUR LOSSES TO THE INTENDED AMOUNTS, SINCE MARKET CONDITIONS MAY MAKE IT IMPOSSIBLE TO EXECUTE SUCH ORDERS.
THE HIGH DEGREE OF LEVERAGE THAT IS OFTEN OBTAINABLE IN FUTURES AND OPTIONS MARKETS CAN WORK AGAINST YOU, AS WELL AS FOR YOU. THE USE OF LEVERAGE CAN LEAD TO LARGE LOSSES AS WELL AS GAINS. THIS BRIEF STATEMENT CANNOT DISCLOSE ALL THE RISK AND OTHER SIGNIFICANT ASPECTS OF THE FINANCIAL MARKETS.

60
LEGAL DISCLAIMER
Bullalgo Trading Systems, Inc. software and documentation are provided without warranty of
any kind. Bullalgo Trading Systems, Inc. does not warranty, guarantee or make any
representations regarding the use, or the results of the use of the strategy or written
documentation in terms of correctness, accuracy, reliability, currentness or otherwise. The entire
risk as to the results and performance of the strategy is assumed by the Licensee/user.
In no event shall Bullalgo Trading Systems, Inc. be liable in any respect for any claims, loss,
indirect, special or consequential damages or lost profits, resulting from use of or reliance on
Bullalgo Trading Systems, Inc. software or documentation.
Bullalgo Trading Systems, Inc. software & documentation is presented solely for training or informational purposes. No offer or solicitation to buy or sell securities or securities derivative products of any kind, or any type of investment or trading advice or strategy, is made, given or in any manner endorsed by Bullalgo Trading Systems, Inc. or its affiliates.
Bullalgo Trading Systems, Inc. software has not been developed based on knowledge of or with reference to your particular circumstances such as financial position, goals, risk-reward preferences, tax situation, brokerage arrangement, investment or trading experience, and so forth. Hence no content or model published by Bullalgo Trading Systems, Inc. constitutes a recommendation that any particular security, portfolio of securities, transaction, or investment strategy is suitable for any specific person.
You are fully responsible for any investment or trading decisions you make, and such decisions should be based solely on your evaluation of your financial circumstances, investment or trading objectives, risk tolerance and liquidity needs. For advice that is specifically addressed to your needs, you should personally consult an appropriate professional (e.g. registered investment advisor, attorney, financial planner, tax professional, etc.) regarding your specific situation.
Trade executions and system response and performance may be adversely affected, including delays and failures, as a result of: market volatility; high share volume; other market fluctuations; illiquidity; other market conditions and risks; quote delays; system and software errors; Internet system problems relating to Internet traffic volume and capacity or other causes; and other factors. One or more of these factors may occur before or after you place a trade, resulting in delayed or failed order placement, order cancellation, trade execution and/or acknowledgement of any of those actions. Solely you assume those risks.
BULLALGO TRADING SYSTEMS, INC. SHALL NOT BE LIABLE TO THE USER OR TO
ANY OTHER ENTITY OR INDIVIDUAL FOR ANY LOSS OF PROFITS, REVENUES, TRADES, DATA OR FOR ANY INDIRECT, SPECIAL, PUNITIVE, CONSEQUENTIAL OR INCIDENTAL LOSS OR DAMAGE OF ANY NATURE ARISING FROM ANY CAUSE WHATSOEVER. UNLESS DUE TO WILLFUL TORTIOUS MISCONDUCT OR GROSS NEGLIGENCE,
BULLALGO TRADING SYSTEMS, INC. (AND AFFILIATES) SHALL HAVE NO LIABILITY
IN TORT, CONTRACT OR OTHERWISE TO THE USER AND/ OR ANY THIRD PARTY.