Building a Stewart MacDonald Ukulele Kit · PDF fileBuilding a Stewart MacDonald Ukulele Kit...
10
Building a StewMac Uke Kit Page 1 Building a Stewart MacDonald Ukulele Kit Richard Gibson [email protected] I’ve built a few wooden objects in the past…including some boats that have stayed afloat….so I thought I’d give the Stewart MacDonald (StewMac) soprano uke kit a try. Thanks to Trent for a picture of what the kit uke should look like when it is finished. Go here for more information on the kit: http://www.stewmac.com/shop/Kits/Ukulele_Kits/1/Ukulele_Kit.html I ordered the kit on Saturday August 30 2008 and it was delivered (in Adelaide, Australia) on 15 September 2008. I had chosen the slower airmail option given by StewMac for delivery. First, Make Your Jig: The first step in making a StewMac kit uke is to make a jig. Comprehensive instructions are given in the printed material available on the StewMac website and supplied with the kit. I followed the advice of John Colter and made a mould for the uke. John’s advice information on the kit is at http://www.ukuke.co.uk/magazine.htm#StewMac (scroll down the page to item headed “Supplementary Advice For Stewart MacDonald Ukulele Kit Construction” – the jump link does not seem to work). My mould is made in four parts – a flat base sheet, a mould sheet (from which the outline of the uke is cut with a jig saw) and two end pieces. The end pieces are attached to the mould sheet. The mould sheet is then attached to the base with screws. Compensation must be made for height measurements of the end pieces depending on the thickness of timber used. The uke outline is provided in the instruction sheets. Beware of the problem found by a Japanese builder – if you are printing from the instructions on the net, make sure that the page scaling is correct…otherwise the uke outline is not the right size! I made my mould from pine sheet I had lying around. This is how it looked before and after attachment to the base: In the second picture, nails have been placed around the edge of the base. These are used to anchor the rubber bands used for clamping (the bands are supplied with the kit). Note the centreline marks on the jig.
Transcript of Building a Stewart MacDonald Ukulele Kit · PDF fileBuilding a Stewart MacDonald Ukulele Kit...

Building a StewMac Uke Kit Page 1
Building a Stewart MacDonald Ukulele Kit Richard Gibson [email protected]
I’ve built a few wooden objects in the past…including some boats that have stayed afloat….so I thought I’d give the Stewart MacDonald (StewMac) soprano uke kit a try.
Thanks to Trent for a picture of what the kit uke should look like when it is finished.
Go here for more information on the kit:
http://www.stewmac.com/shop/Kits/Ukulele_Kits/1/Ukulele_Kit.html
I ordered the kit on Saturday August 30 2008 and it was delivered (in Adelaide, Australia) on 15 September 2008. I had chosen the slower airmail option given by StewMac for delivery.
First, Make Your Jig:
The first step in making a StewMac kit uke is to make a jig. Comprehensive instructions are given in the printed material available on the StewMac website and supplied with the kit. I followed the advice of John Colter and made a mould for the uke. John’s advice information on the kit is at http://www.ukuke.co.uk/magazine.htm#StewMac (scroll down the page to item headed “Supplementary Advice For Stewart MacDonald Ukulele Kit Construction” – the jump link does not seem to work).
My mould is made in four parts – a flat base sheet, a mould sheet (from which the outline of the uke is cut with a jig saw) and two end pieces. The end pieces are attached to the mould sheet. The mould sheet is then attached to the base with screws. Compensation must be made for height measurements of the end pieces depending on the thickness of timber used. The uke outline is provided in the instruction sheets. Beware of the problem found by a Japanese builder – if you are printing from the instructions on the net, make sure that the page scaling is correct…otherwise the uke outline is not the right size!
I made my mould from pine sheet I had lying around. This is how it looked before and after attachment to the base:
In the second picture, nails have been placed around the edge of the base. These are used to anchor the rubber bands used for clamping (the bands are supplied with the kit). Note the centreline marks on the jig.

Building a StewMac Uke Kit Page 2
After completing the mould, I placed cling wrap over it to prevent gluing the uke to the mould.
The mould took me about two hours to design and make. If the uke from it turns out OK, I’ll be very happy to loan it to anyone in Adelaide to use in the future.
Before the kit arrives, buy your glue….Franklin Titebond, available from Fretco, Gilbert St Adelaide.
Gluing in the Neck and Heel Blocks:
Place the uke sides in the mould. Line the butted ends of the sides up with the centreline on the mould. Sand the neck and heel blocks to remove splinter and any residue from the masking tape that is used to hold the kit pieces together in transit. Mark a centreline on the blocks, and place them in the mould. Dry clamp the assembly. Make sure that there is no cling wrap caught between the butted ends of the sides and that the sides are pushed right down into the mould. Remove the clamps and blocks, spread glue on the right surfaces and clamp the blocks in, lining up the centreline on
the blocks with the centreline of the jig. Quickly clean up any excess glue with a damp cloth.
Gluing In the Linings:
Once the block glue has set, the linings for the back of the uke are glued in. Trimming them to size is easy with a coping saw. The mighty strong clamps used to glue in the linings are a marvel! After building boats, this uke stuff feels like model time. I’m not sure how it will float with that big hole in the top, though. The pictures show the sides and blocks after gluing, and one side of the back linings glued in with the other one waiting its turn. Be careful to clean up excess glue from the underside of the linings (with the uke face down, as in these pictures) using a damp cloth, as this surface will be visible through the sound hole later and should be kept tidy.
After the back linings are glued in, flip the uke over in the mould and glue in the linings for the soundboard (top).
When all the glue has set, it is time to trim the sides.

Building a StewMac Uke Kit Page 3
Trimming the Sides:
The sides must be trimmed down to the back linings as the uke has a taper. I thought that it would be easier to trim the linings with the uke in the mould as it would not move about or deform. And I also thought that it would help if the uke sat a little proud of the end blocks during this process. So I made a uke‐shaped sheet insert to sit in the mould under the uke to raise it during this process. The mould timber is 19 mm thick, and the sheet insert is 8 mm thick, so it raises the top of the uke 8 mm proud of the blocks. The uke‐shaped sheet insert can be seen in the picture on the left.
I seem to have spent more time making the mould than the uke, but it might get used again, so it is worth doing right!
After all that, I was able to get on with trimming. I used a razor blade and found that I had little difficulty paring the side timber down close to the lining. I then used sandpaper on a sanding block to pretty much get the sides right down to the linings.
The plans call for the use of turnbuckle between the ends of the uke to keep it stretched out, so to speak. I didn’t have a turnbuckle lying around, but I had plenty of pieces of dowelling, so I cut a piece that just fits end to end. The picture shows the uke raised up in the mould, the razor blade caught mid‐trim and the dowel stretching out the uke.
Sanding the Sides and Linings:
The tops of the sides and linings must be sanded flat to get a good fit between the sides and the soundboard and the uke back. I pinned a sheet of 120 grit sandpaper to a piece of board I had (conveniently, exactly the right size). But then….I found a problem.
The uke body was twisting slightly in the mould, so that the sides near the waist were bowed upwards. I looked at fixing it with brackets on the outside of the body (as the Stewmac instructions recommend), but they didn’t work. So…..I invented a fix. I made a cross piece to fit across the waist and hook onto the top of the bottom linings. I then tossed away the dowel (hey it did OK for a while) and replaced it with a piece of flat timber with a block at each end to spread the uke end to end. Then I drilled a hole through both pieces where they crossed and screwed them down to the base of the mould, using just enough pressure to pull the bottom down flat. This pulled the twist out of the sides. If you use this technique, make sure that the screw sits under the sound hole…..mine did, the second time!
I also made up a new insert for the mould, just 4 mm thick. This raises the body enough to sand, but keeps it well within the mould. I also screwed the whole mould and base to my workbench, to stop the uke slipping around while I sanded it. Do not try this if you are building the uke on the kitchen table!!

Building a StewMac Uke Kit Page 4
With the body completely flat I went to work with my sanding sheet. It was reasonably easy to tell when to stop – I had left the linings and sides a little proud of the neck and heel blocks, and when I could see that I was sanding the tops of the blocks I knew I was close to finished.
Gluing the Top:
The first task is to mark a centre line on the top. I did this by putting a screw at each end of the mould, on the centreline, and running a string line
between them. I measured the diameter of the sound hole at 1 7/8 inches (as the kit had come from the US, I stuck with imperial measurements!!). I placed the top on the body under the string line, and placed my steel rule on the top parallel with the end of the mould so that I had 15/16 inches either side of a unit measure, with the 15/16 marks lining up with the edge of the sound hole. I then lined the unit measure up with the string line, made sure that I had overhang each side and checked that the grain was straight up and down on the face (not slanted). I then marked the top at the base and neck directly under the string line. From these two marks, I drew a centre line on the top.
Making sure that the top centre line aligned with the centrelines at both ends of the mould, I held the top down with one hand and ran a pencil around the underside of the top. I then took out the
top, turned it upside down on a flat wooden surface and trimmed it close to the line with a sharp knife, using a straight edge to make sure that the knife did not slip
After that, I was ready to glue the top. I decided not to use the rubber bands after all. I like gravity clamps, also known as bricks! I put glue on the tops of the sides and lining and placed the top on the sides (with centre line aligned to the mould). I then put my 8 mm insert on top of the top and four gravity clamps. I was pleased to see uniform glue ooze out the sides, indicating an even joint.
Gluing the Back Braces:
The back braces were a little agricultural as received so I sanded them smooth. I then glued them onto the back using a spring clamp at each end (more grunt than the pegs recommended in the instructions) and a gravity clamp in the middle, with the back supported down the centre (I used a handy piece of aluminium, but wood could be used). The middle clamping is definitely needed to get good contact of the braces all the way across the back. There is a piece of wood under the brick to ensure that the pressure is applied to the middle of the brace.

Building a StewMac Uke Kit Page 5
Gluing the Soundboard Braces and Bridge Plate:
After the top glue has dried, remove the bricks, undo the screw holding the bracing neck to heel and side to side (through the soundhole) and remove the uke and cross bracing from the mould. The bottom of the uke will spring enough to remove the side to side bracing, and then the neck to heel bracing can be removed.
The soundboard braces and bridge plate were also a little agricultural so I sanded them (even though they won’t be seen). Trimming the braces to fit and tapering them is quite straightforward. When ready, apply glue to the braces and bridge plate, place them in the uke at the marked spots and apply gravity clamps. I signed and dated the bridge plate just for fun. The picture shows the braces and bridge plate in position, awaiting imminent application of gravity clamps.
I spent a bit of time today making a fret press from odds and ends lying around my workshop, but I won’t boast about that until I know it works!!
Label the Uke:
Every uke needs a label, and it seems that every newbie luthier spends as much time designing a label as building the first uke. I whipped mine up quickly and printed 10 or so on a sheet – enough for a few years!
Install the Sound Hole Rosette:
OK, so men don’t read instructions. I found that this step would be easier in some ways to do before gluing the top to the uke. The issue is that the pressure needed to push the rosette into the groove on the uke is quite high, so it is best done with the top on a flat supporting surface. I put my mind to a fix for this, and came up with a block of wood that supported the top of the uke. The top of
the block can be seen through the sound hole in the picture above. Ignore the piece of ply for a minute!
I took a tip from Steve Miklos (see http://www.carrotcreek.com/ukulele/ukulele_draft.htm) and superglued one set of ends of the rosette plastic strips together, making sure that they were flat on one side (the strips have varying heights). I cut the strips to give a vertical end and tried to fit the strips in the groove. Two issues – the glued end had swelled slightly, and I did not have enough fingers to hold it all down and cut the other end of the strips accurately.
The swelling was addressed by a light sand either side to reduce the width of the glued strips. To decrease the number of fingers needed to hold the rosette, I made a spider affair (from a plywood scrap – just happened to be a good design!) and fastened it to the block under the sound hole with a screw. Tightening the screw pulls down the ply and keeps the rosette where it ought to be. In the earlier picture, the piece of ply is sitting on the uke top but has not yet been screwed into the

Building a StewMac Uke Kit Page 6
support block.
I was able to cut the strips in situ with a sharp knife to get a mating join. Then out came the rosette, some gel superglue went into the groove and the strips went back in. I put cling wrap under the ply and screwed it down firm to clamp the strips in until the glue set. Voila – a rosette.
Sand the Top:
The next step was to trim and sand the overhang of the top. After that, I sanded the rosette flat. The plastic sands easily and I found that trimming was not needed.
Fitting the Back:
Fitting the back looked a little tricky, as the braces have to be trimmed to the right length to fit inside the liner. I placed the body over the back and marked in pencil where the outer side of the body crossed the braces. From that, I moved in the width of the side wood and liner, approximately 3 mm and cut the
braces carefully with a sharp knife. I took care to clean away brace wood and glue residue from the ply. I then tried to fit the back (note that I had also marked on the uke sides where the braces should be located). At first it wouldn’t go, but with a very fine trim to the ends of both braces it went home with a satisfying click. After that, I carved the braces down at the ends with a sharp knife and sanded them clean.
Gluing the Back:
The back has a curve in it, due to curves in the back braces. So – gravity clamps will not work so well. I used the rubber bands supplied with the kit. On went the trusty Titebond, the rubber bands were applied and the back was glued on.
Next is fretting……hmm, seems like the easy bits are over....
Fretting:
Well, before I start on detail, I have to say I found that installing the frets was easier than it looks! I mentioned earlier that I built a fret press. It didn’t work. I used a hammer to put the frets in…..and I could have fretted 3 ukes in the time that it took me to make the press. Such is life.
Before fretting, I followed Pete Howlett’s advice and used a triangular file to open up the top of the fret slots (see http://www.youtube.com/watch?v=s_Kwq3FeBLY). I then simply cut the fret wire, trimmed the tangs as Pete recommends and then hit (OK, tapped) them in with a steel faced hammer. I checked my progress using a magnifying glass. The steel hammer did no damage at all to the top of the frets – but I was very careful to bring it down square. It is essential to have a heavy hard surface to rest the fretboard on while
tapping in the frets – I used a circle of 1” steel plate that came out of my dear dad’s workshop.

Building a StewMac Uke Kit Page 7
The machine that cut this circle out of such thick steel plate must have been a monster. I always like to think that it was a cut out for a porthole in a battleship…….
Filing the Frets:
After all the frets were installed I filed the ends flat and then angled the fret ends using a flat file followed by sandpaper. The picture shows the sort of jig I made up by clamping a block of timber and the file to make it easier.
Gluing the Fretboard:
Looks simple, is….a little complex. First, I sanded the top of the neck a little to remove splinter (and glue residue left by Stewmac). Easy. Then ‐ I made the mistake of using too much glue. The fretboard wants to slip
and slide all over the place. I had to wait until the glue tacked a little and then clamped it hard, as can be seen in the picture. I got the beast under control!
Finishing the Body:
I spent a few pleasant minutes trimming and sanding the back of the uke to get me a perfect body….without any trips
to the gym! Amazing! I’m very pleased with the way it looks.
Fitting the Neck:
An important prep is to remove any glue residue that may have oozed out of the join between the fretboard and neck. I used a sharp blade. Then I taped sandpaper to the body and scribbled pencil on the neck gluing face of the neck, and worked the neck back and forth until most of the pencil marks had gone, indicating a flush fit.
The next step was to find the right alignment for the neck. The sides of the fretboard are angled and it is very difficult to use them as a sighting line. The fret board dots are in the middle of
the fretboard but are not easy to see when sighting along the face of the uke. I measured half way across the nut end of the fretboard and inserted a fine nail, which stuck up and provided
a centre sight line to get the neck alignment straight. The nut will hide the hole left when the nail is taken out.
Once the neck was in the right position, I drew a pencil line either side and around the end of the fretboard and masked the area. After that, I applied glue to the neck and clamped it on with a screw clamp and rubber bands. This was
Building a StewMac Uke Kit Page 8
not an easy exercise, with much checking to ensure that the neck had pulled in against the body. The final result was fair....the next one will be better.
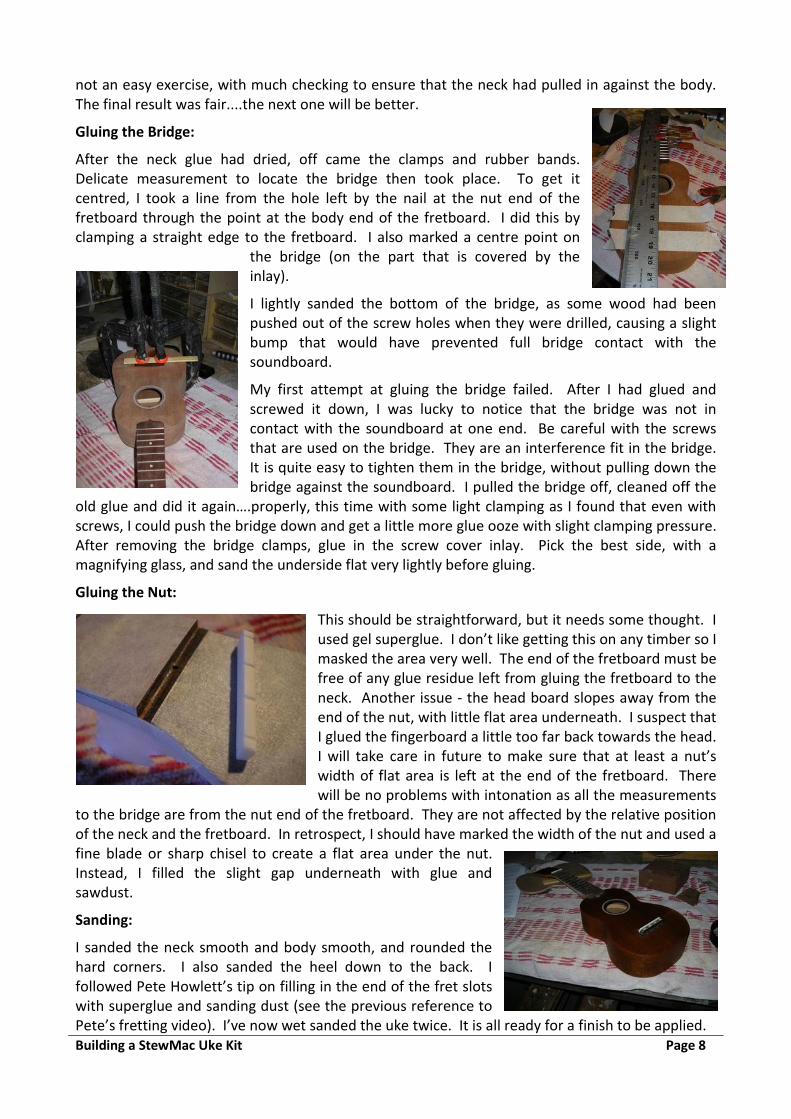
Gluing the Bridge:
After the neck glue had dried, off came the clamps and rubber bands. Delicate measurement to locate the bridge then took place. To get it centred, I took a line from the hole left by the nail at the nut end of the fretboard through the point at the body end of the fretboard. I did this by clamping a straight edge to the fretboard. I also marked a centre point on
the bridge (on the part that is covered by the inlay).
I lightly sanded the bottom of the bridge, as some wood had been pushed out of the screw holes when they were drilled, causing a slight bump that would have prevented full bridge contact with the soundboard.
My first attempt at gluing the bridge failed. After I had glued and screwed it down, I was lucky to notice that the bridge was not in contact with the soundboard at one end. Be careful with the screws that are used on the bridge. They are an interference fit in the bridge. It is quite easy to tighten them in the bridge, without pulling down the bridge against the soundboard. I pulled the bridge off, cleaned off the
old glue and did it again….properly, this time with some light clamping as I found that even with screws, I could push the bridge down and get a little more glue ooze with slight clamping pressure. After removing the bridge clamps, glue in the screw cover inlay. Pick the best side, with a magnifying glass, and sand the underside flat very lightly before gluing.
Gluing the Nut:
This should be straightforward, but it needs some thought. I used gel superglue. I don’t like getting this on any timber so I masked the area very well. The end of the fretboard must be free of any glue residue left from gluing the fretboard to the neck. Another issue ‐ the head board slopes away from the end of the nut, with little flat area underneath. I suspect that I glued the fingerboard a little too far back towards the head. I will take care in future to make sure that at least a nut’s width of flat area is left at the end of the fretboard. There will be no problems with intonation as all the measurements
to the bridge are from the nut end of the fretboard. They are not affected by the relative position of the neck and the fretboard. In retrospect, I should have marked the width of the nut and used a fine blade or sharp chisel to create a flat area under the nut. Instead, I filled the slight gap underneath with glue and sawdust.
Sanding:
I sanded the neck smooth and body smooth, and rounded the hard corners. I also sanded the heel down to the back. I followed Pete Howlett’s tip on filling in the end of the fret slots with superglue and sanding dust (see the previous reference to Pete’s fretting video). I’ve now wet sanded the uke twice. It is all ready for a finish to be applied.

Building a StewMac Uke Kit Page 9
I’ve been working on the uke for six days, and it is basically finished. What am I going to do for fun now??
Grain Filling:
After thinking the uke was ready for a finish, I decided to fill the grain. This involved smearing a light coating of water soluble mahogany filler over the uke, and sanding it off smooth. The more you put on, the more you have to sand off. I sanded the uke very thoroughly again, making sure that any glue residues were removed ‐ the magnifying glass helped here.
Applying the Finish:
First, I masked fretboard and bridge. I selected a satin finish from a Mirotone spray can purchased from Fretco in Gilbert St Adelaide. It is a breeze to apply and dries quickly. Build it up with light coats. I let it dry solid after 3 coats and did a wet rub with 2000 wet and dry, and then sprayed a final coat.
Oiling the Fretboard and Bridge:
After removing the masking tape, I applied some lemon oil to the fretboard and bridge, darkening them up in great contrast with the uke top.
Installing the Tuners:
A simple task with a Phillips head screwdriver.
Stringing Up:
I put a set of Aquilas on the uke and got it into some sort of tune – it will be better soon when the strings stretch. A quick check of the intonation was OK, but there is a fret buzz on the E and A strings at fret 4 – perhaps fret 5 is a little high on one side. The string geometry needs some work – the strings are too high in the nut and the saddle is too low, making the strings virtually parallel to the uke top. I’ll fix it once the strings settle down.
Summary:
I can thoroughly recommend building a uke from the StewMac kit. The bits that I thought would be most challenging – fretting and applying the finish – turned out to be straightforward. The uke looks great and, when the strings are set up and a little more attention is paid to one fret, it will play well too, I am sure.
The uke has taken me just under a week to complete. There are a few things I will change when I build my next one, but….only a few things. For example, I’d love to have a go at bindings next time!
I have learned a lot through reading other people’s accounts of their uke building experiences on the net, and I thank them all for recounting their stories. May be my uke building tales will inspire one or two more budding luthiers to take the plunge.
If you’ve made it through to here, thanks for reading and order your kit now!!

Building a StewMac Uke Kit Page 10
After Reflection – Things to Note:
1. I will put a small plastic cap on the heel of the neck in future builds. The heel is made from two parts glued together. The join line is off centre, giving the heel an asymmetric look.
2. The saddle provided is too low. There is little relief on the neck. I have now put in a bone saddle. This has to be filed/sanded down to get it to fit in the saddle slot. In future, I will make the groove in the bridge wide enough to take a normal width saddle before I glue the bridge on.
3. The nut is way too high if it is placed flush with the neck. I ended up taking the nut off, filing a recess in the neck for it and reattaching it. The string grooves still needed to be deepened a little to reduce the string height. I did this with a hacksaw blade….single cut is the right size for G and A, wiggle it around for C and E.
4. The cover piece for the bridge screws needs to be sanded on the edges to reduce the width so that it fits neatly in the slot provided for it.
The uke has now had two public performances and is playing very well after attention to the string geometry. I am going to replace the tuners as well (with Grovers that I had ordered), but the kit ones are OK.
Return to www.scorpex.net/uke.htm Richard G’s Ukulele Songbook