Build a Poker Table
15
10-Person Poker Table- 96” x 48” These are step by step instructions for building a poker table. The table will measure 48" x 96" and have a 4" wide rail. This will provide adequate seating for 10 players. These instructions use pine boards for the legs and frame, because these are painted. If you prefer to stain you ta- ble, you may want to substitute for a different species of wood. You may also want to purchase foldable banquet table legs to use as the legs on your table. Materials • 3 - 4'x8' Sheet of ¾ " MDF • 10 - 8' 1x4 Select Pine Boards • 1 - 6' 1x10 Select Pine Board • 4 - Black Strap Hinges • 4 - Table Leg Braces • Quality Wood Glue • 1 can - 3M Hi-Strength 90 Spray Adhesive (green can) • 1 qt. of Paint • 1 qt. of Polyurethane • 8 - 2" Bolts with Tee Nuts • 1 - Box of 1 ¼ " Black Drywall Screws • 16 - 4" Black Drywall Screws • Wood Filler • ¼" Closed Cell Foam 96"x48" • 22’ 1’ Thick Rail Foam - 3# Firmness • Vinyl 55" x 108" • Table Cloth 55" x 108" Optional - 2 Foldable Banquet Table Legs (Remove 7 - 8' 1x4 Select Pine Boards) Tools • Jig Saw • Miter Saw with Finish Blade • Belt Sander with 120 grit sand paper • Orbital Sander with 180 grit sand paper • Router • ¼ " Roundover with bearing" Router Bit • Drill • Drill Bits (3/4" Spade, 1/8" wood, ¼ " wood, 5/16" wood) • Countersink • Clamps • Utility Knife • Hammer • Staple Gun • Staples • Paint Brush or Sprayer
-
Upload
patrick-akers -
Category
Documents
-
view
218 -
download
0
Transcript of Build a Poker Table
8/6/2019 Build a Poker Table
http://slidepdf.com/reader/full/build-a-poker-table 1/14
10-Person Poker Table- 96” x 48”
These are step by step instructions for building a poker table. The table will measure 48" x 96" and have a 4" wide
rail. This will provide adequate seating for 10 players.
These instructions use pine boards for the legs and frame, because these are painted. If you prefer to stain you ta-
ble, you may want to substitute for a different species of wood. You may also want to purchase foldable banquet
table legs to use as the legs on your table.
Materials
• 3 - 4'x8' Sheet of ¾ " MDF
• 10 - 8' 1x4 Select Pine Boards
• 1 - 6' 1x10 Select Pine Board
• 4 - Black Strap Hinges
• 4 - Table Leg Braces
• Quality Wood Glue
• 1 can - 3M Hi-Strength 90 Spray Adhesive (green can)
• 1 qt. of Paint
• 1 qt. of Polyurethane
• 8 - 2" Bolts with Tee Nuts
• 1 - Box of 1 ¼ " Black Drywall Screws
• 16 - 4" Black Drywall Screws
• Wood Filler
• ¼" Closed Cell Foam 96"x48"
• 22’ 1’ Thick Rail Foam - 3# Firmness
• Vinyl 55" x 108"
• Table Cloth 55" x 108"
Optional - 2 Foldable Banquet Table Legs (Remove 7 - 8' 1x4 Select Pine Boards)
Tools
• Jig Saw
• Miter Saw with Finish Blade
• Belt Sander with 120 grit sand paper
• Orbital Sander with 180 grit sand paper
• Router
• ¼ " Roundover with bearing" Router Bit
• Drill
• Drill Bits (3/4" Spade, 1/8" wood, ¼ " wood, 5/16" wood)
• Countersink
• Clamps
• Utility Knife
• Hammer
• Staple Gun
• Staples
• Paint Brush or Sprayer
8/6/2019 Build a Poker Table
http://slidepdf.com/reader/full/build-a-poker-table 2/14
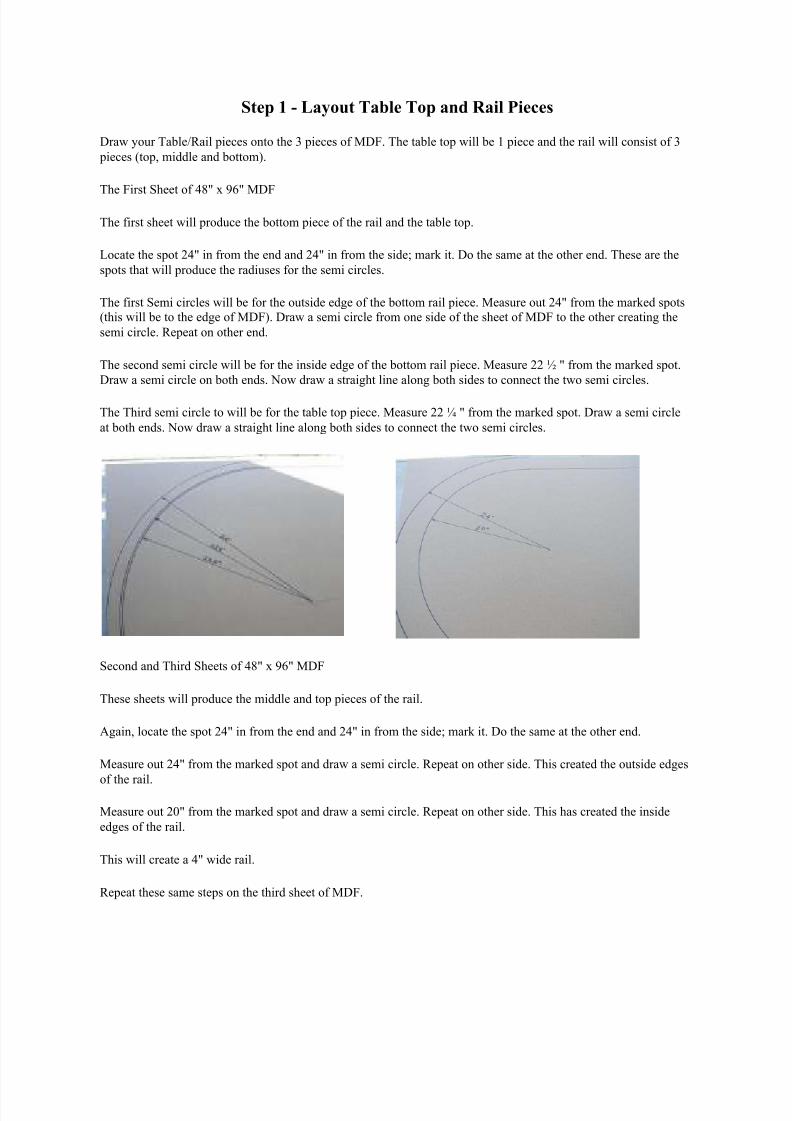
Step 1 - Layout Table Top and Rail Pieces
Draw your Table/Rail pieces onto the 3 pieces of MDF. The table top will be 1 piece and the rail will consist of 3
pieces (top, middle and bottom).
The First Sheet of 48" x 96" MDF
The first sheet will produce the bottom piece of the rail and the table top.
Locate the spot 24" in from the end and 24" in from the side; mark it. Do the same at the other end. These are the
spots that will produce the radiuses for the semi circles.
The first Semi circles will be for the outside edge of the bottom rail piece. Measure out 24" from the marked spots
(this will be to the edge of MDF). Draw a semi circle from one side of the sheet of MDF to the other creating the
semi circle. Repeat on other end.
The second semi circle will be for the inside edge of the bottom rail piece. Measure 22 ½ " from the marked spot.
Draw a semi circle on both ends. Now draw a straight line along both sides to connect the two semi circles.
The Third semi circle to will be for the table top piece. Measure 22 ¼ " from the marked spot. Draw a semi circle
at both ends. Now draw a straight line along both sides to connect the two semi circles.
Second and Third Sheets of 48" x 96" MDF
These sheets will produce the middle and top pieces of the rail.
Again, locate the spot 24" in from the end and 24" in from the side; mark it. Do the same at the other end.
Measure out 24" from the marked spot and draw a semi circle. Repeat on other side. This created the outside edges
of the rail.
Measure out 20" from the marked spot and draw a semi circle. Repeat on other side. This has created the inside
edges of the rail.
This will create a 4" wide rail.
Repeat these same steps on the third sheet of MDF.
8/6/2019 Build a Poker Table
http://slidepdf.com/reader/full/build-a-poker-table 3/14
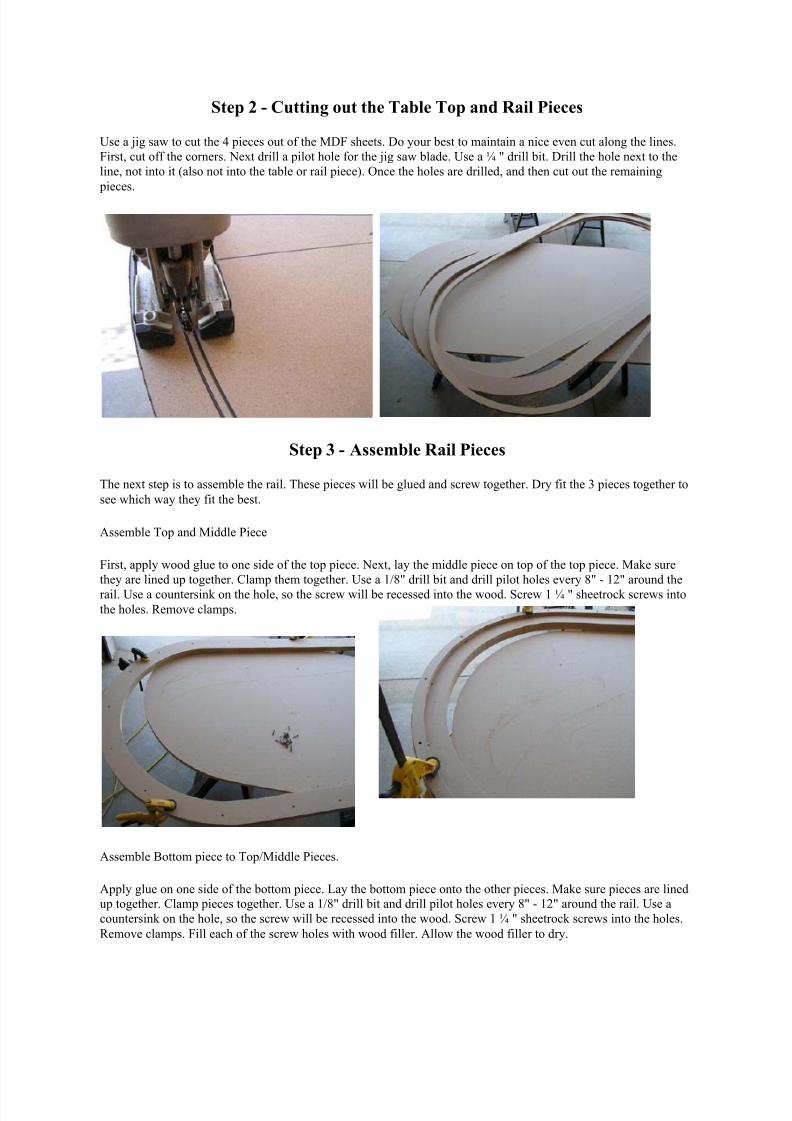
Step 2 - Cutting out the Table Top and Rail Pieces
Use a jig saw to cut the 4 pieces out of the MDF sheets. Do your best to maintain a nice even cut along the lines.
First, cut off the corners. Next drill a pilot hole for the jig saw blade. Use a ¼ " drill bit. Drill the hole next to the
line, not into it (also not into the table or rail piece). Once the holes are drilled, and then cut out the remaining
pieces.
Step 3 - Assemble Rail Pieces
The next step is to assemble the rail. These pieces will be glued and screw together. Dry fit the 3 pieces together to
see which way they fit the best.
Assemble Top and Middle Piece
First, apply wood glue to one side of the top piece. Next, lay the middle piece on top of the top piece. Make sure
they are lined up together. Clamp them together. Use a 1/8" drill bit and drill pilot holes every 8" - 12" around the
rail. Use a countersink on the hole, so the screw will be recessed into the wood. Screw 1 ¼ " sheetrock screws into
the holes. Remove clamps.
Assemble Bottom piece to Top/Middle Pieces.
Apply glue on one side of the bottom piece. Lay the bottom piece onto the other pieces. Make sure pieces are lined
up together. Clamp pieces together. Use a 1/8" drill bit and drill pilot holes every 8" - 12" around the rail. Use a
countersink on the hole, so the screw will be recessed into the wood. Screw 1 ¼ " sheetrock screws into the holes.
Remove clamps. Fill each of the screw holes with wood filler. Allow the wood filler to dry.
8/6/2019 Build a Poker Table
http://slidepdf.com/reader/full/build-a-poker-table 4/14
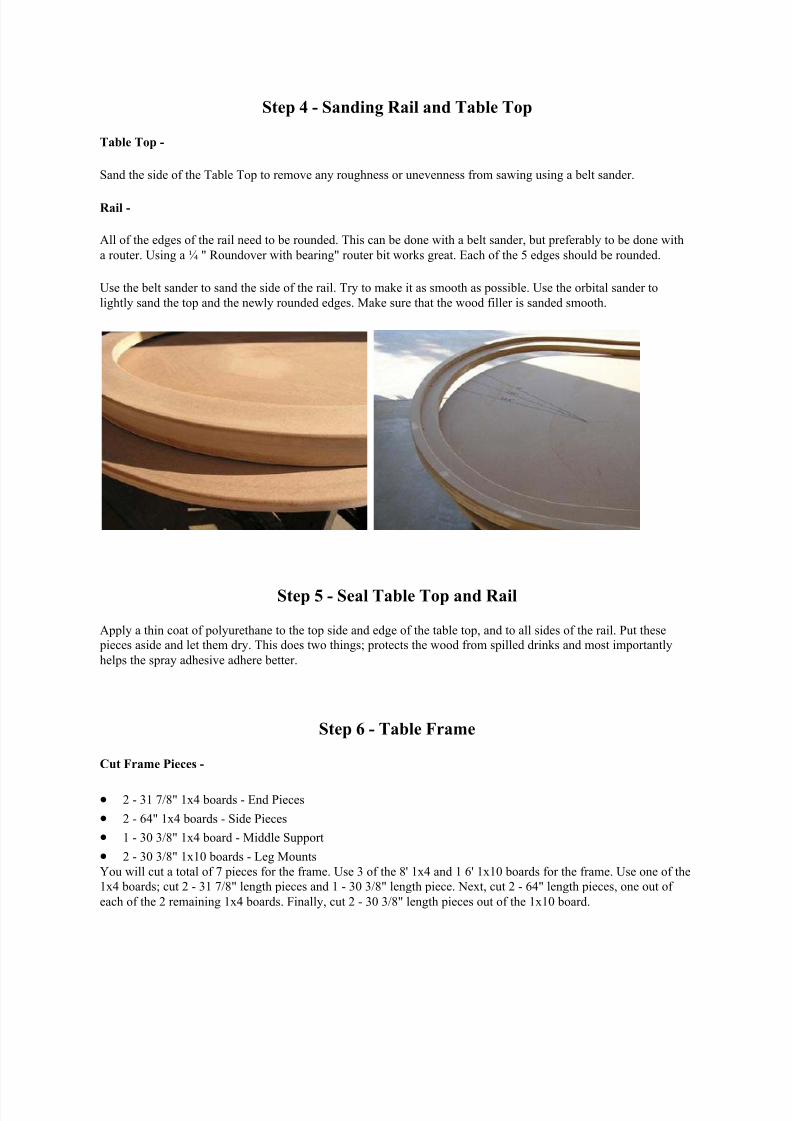
Step 4 - Sanding Rail and Table Top
Table Top -
Sand the side of the Table Top to remove any roughness or unevenness from sawing using a belt sander.
Rail -
All of the edges of the rail need to be rounded. This can be done with a belt sander, but preferably to be done with
a router. Using a ¼ " Roundover with bearing" router bit works great. Each of the 5 edges should be rounded.
Use the belt sander to sand the side of the rail. Try to make it as smooth as possible. Use the orbital sander to
lightly sand the top and the newly rounded edges. Make sure that the wood filler is sanded smooth.
Step 5 - Seal Table Top and Rail
Apply a thin coat of polyurethane to the top side and edge of the table top, and to all sides of the rail. Put these
pieces aside and let them dry. This does two things; protects the wood from spilled drinks and most importantly
helps the spray adhesive adhere better.
Step 6 - Table Frame
Cut Frame Pieces -
• 2 - 31 7/8" 1x4 boards - End Pieces
• 2 - 64" 1x4 boards - Side Pieces
• 1 - 30 3/8" 1x4 board - Middle Support
• 2 - 30 3/8" 1x10 boards - Leg Mounts
You will cut a total of 7 pieces for the frame. Use 3 of the 8' 1x4 and 1 6' 1x10 boards for the frame. Use one of the
1x4 boards; cut 2 - 31 7/8" length pieces and 1 - 30 3/8" length piece. Next, cut 2 - 64" length pieces, one out of
each of the 2 remaining 1x4 boards. Finally, cut 2 - 30 3/8" length pieces out of the 1x10 board.
8/6/2019 Build a Poker Table
http://slidepdf.com/reader/full/build-a-poker-table 5/14
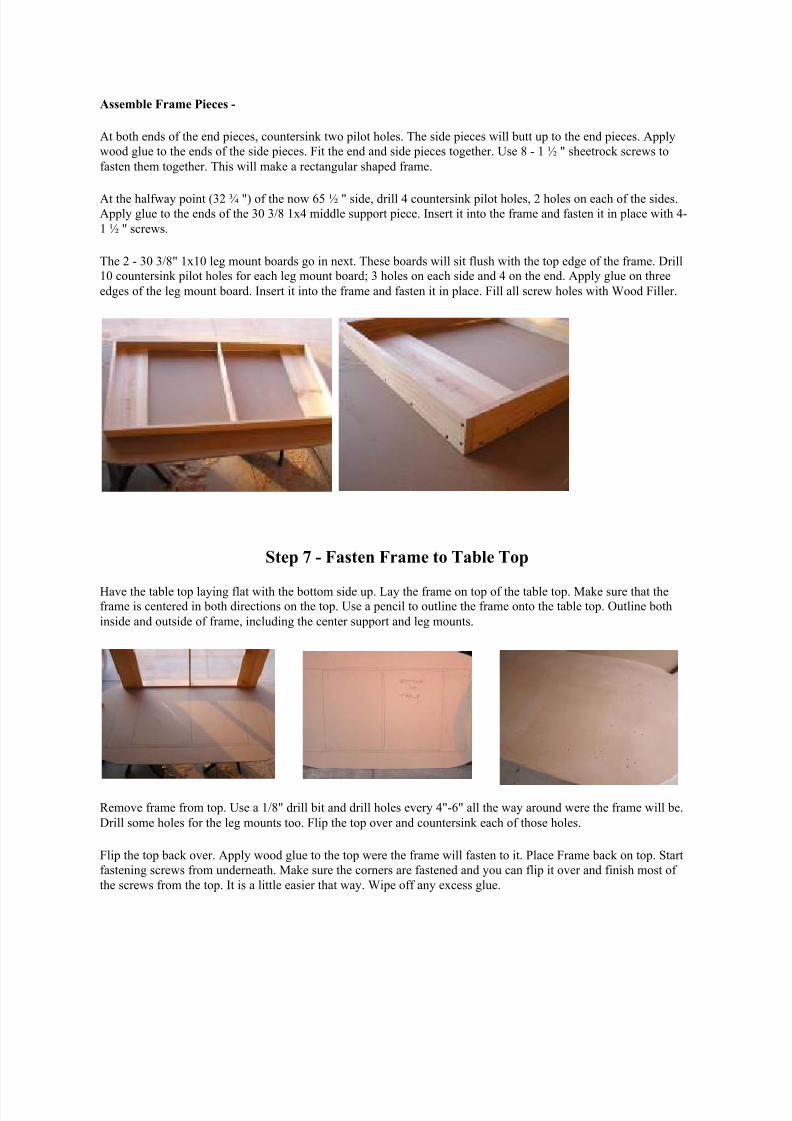
Assemble Frame Pieces -
At both ends of the end pieces, countersink two pilot holes. The side pieces will butt up to the end pieces. Apply
wood glue to the ends of the side pieces. Fit the end and side pieces together. Use 8 - 1 ½ " sheetrock screws to
fasten them together. This will make a rectangular shaped frame.
At the halfway point (32 ¾ ") of the now 65 ½ " side, drill 4 countersink pilot holes, 2 holes on each of the sides.Apply glue to the ends of the 30 3/8 1x4 middle support piece. Insert it into the frame and fasten it in place with 4-
1 ½ " screws.
The 2 - 30 3/8" 1x10 leg mount boards go in next. These boards will sit flush with the top edge of the frame. Drill
10 countersink pilot holes for each leg mount board; 3 holes on each side and 4 on the end. Apply glue on three
edges of the leg mount board. Insert it into the frame and fasten it in place. Fill all screw holes with Wood Filler.
Step 7 - Fasten Frame to Table Top
Have the table top laying flat with the bottom side up. Lay the frame on top of the table top. Make sure that theframe is centered in both directions on the top. Use a pencil to outline the frame onto the table top. Outline both
inside and outside of frame, including the center support and leg mounts.
Remove frame from top. Use a 1/8" drill bit and drill holes every 4"-6" all the way around were the frame will be.
Drill some holes for the leg mounts too. Flip the top over and countersink each of those holes.
Flip the top back over. Apply wood glue to the top were the frame will fasten to it. Place Frame back on top. Start
fastening screws from underneath. Make sure the corners are fastened and you can flip it over and finish most of
the screws from the top. It is a little easier that way. Wipe off any excess glue.
8/6/2019 Build a Poker Table
http://slidepdf.com/reader/full/build-a-poker-table 6/14
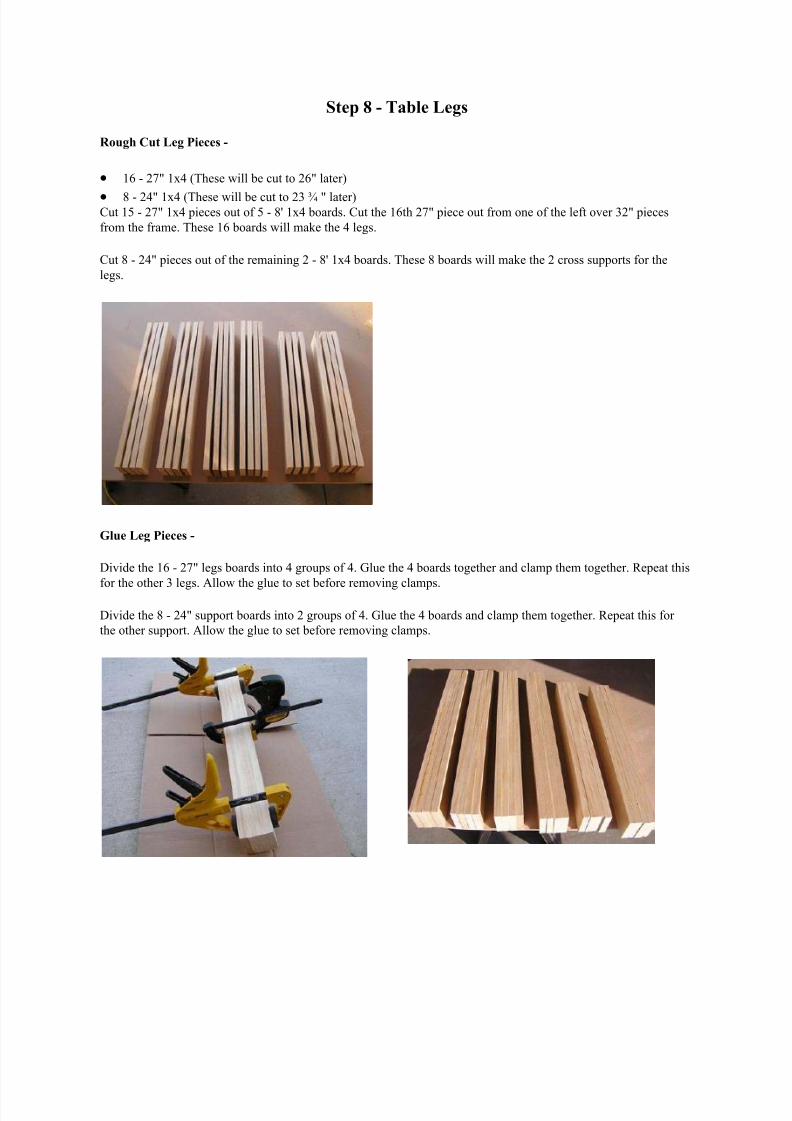
Step 8 - Table Legs
Rough Cut Leg Pieces -
• 16 - 27" 1x4 (These will be cut to 26" later)
• 8 - 24" 1x4 (These will be cut to 23 ¾ " later)Cut 15 - 27" 1x4 pieces out of 5 - 8' 1x4 boards. Cut the 16th 27" piece out from one of the left over 32" pieces
from the frame. These 16 boards will make the 4 legs.
Cut 8 - 24" pieces out of the remaining 2 - 8' 1x4 boards. These 8 boards will make the 2 cross supports for the
legs.
Glue Leg Pieces -
Divide the 16 - 27" legs boards into 4 groups of 4. Glue the 4 boards together and clamp them together. Repeat this
for the other 3 legs. Allow the glue to set before removing clamps.
Divide the 8 - 24" support boards into 2 groups of 4. Glue the 4 boards and clamp them together. Repeat this for
the other support. Allow the glue to set before removing clamps.
8/6/2019 Build a Poker Table
http://slidepdf.com/reader/full/build-a-poker-table 7/14
Sanding Leg Pieces -
Use a belt sander and sand the leg and support pieces smooth. Only sand the joint side of these pieces. Next, use
the router with the ¼ " Roundover with bearing" bit and round the corners of the legs and support pieces. Use the
orbital sander to sand the pieces to a nice smooth finish.
Finish Cut Leg Pieces -
Finish cut each leg to 26 ½ ". Cut off a portion of each end of each leg to ensure that both ends of the leg have a
finished cut. Light sand with the orbital sander.
Finish cut each Support to 23 ¾ ". Cut off a portion of each end of each support to ensure that both ends of the
support have a finished cut. Light sand with the orbital sander.
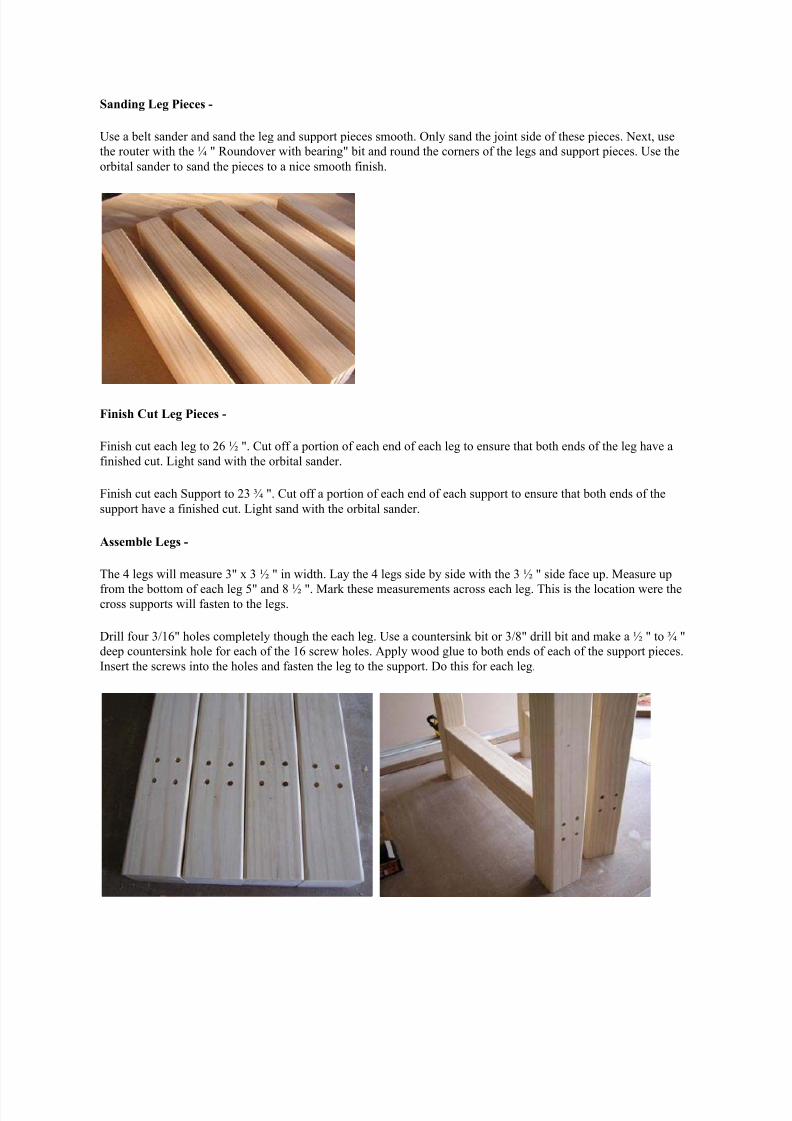
Assemble Legs -
The 4 legs will measure 3" x 3 ½ " in width. Lay the 4 legs side by side with the 3 ½ " side face up. Measure up
from the bottom of each leg 5" and 8 ½ ". Mark these measurements across each leg. This is the location were thecross supports will fasten to the legs.
Drill four 3/16" holes completely though the each leg. Use a countersink bit or 3/8" drill bit and make a ½ " to ¾ "
deep countersink hole for each of the 16 screw holes. Apply wood glue to both ends of each of the support pieces.
Insert the screws into the holes and fasten the leg to the support. Do this for each leg.
8/6/2019 Build a Poker Table
http://slidepdf.com/reader/full/build-a-poker-table 8/14
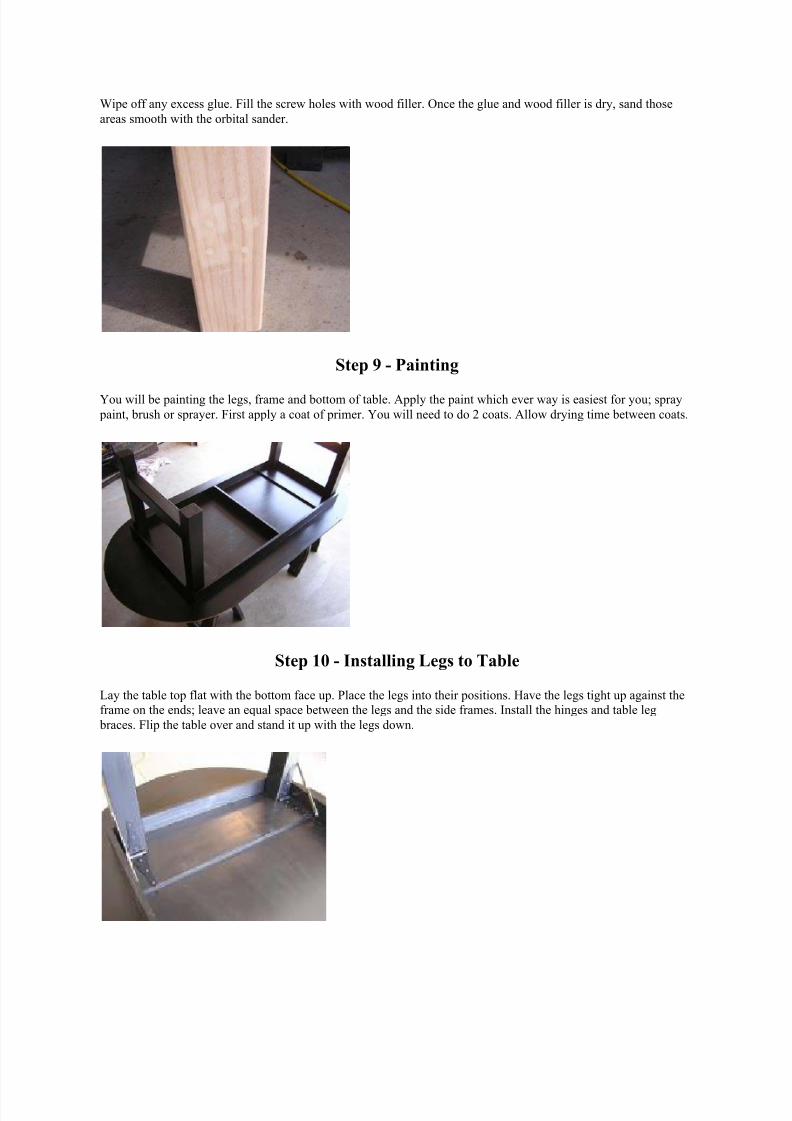
Wipe off any excess glue. Fill the screw holes with wood filler. Once the glue and wood filler is dry, sand those
areas smooth with the orbital sander.
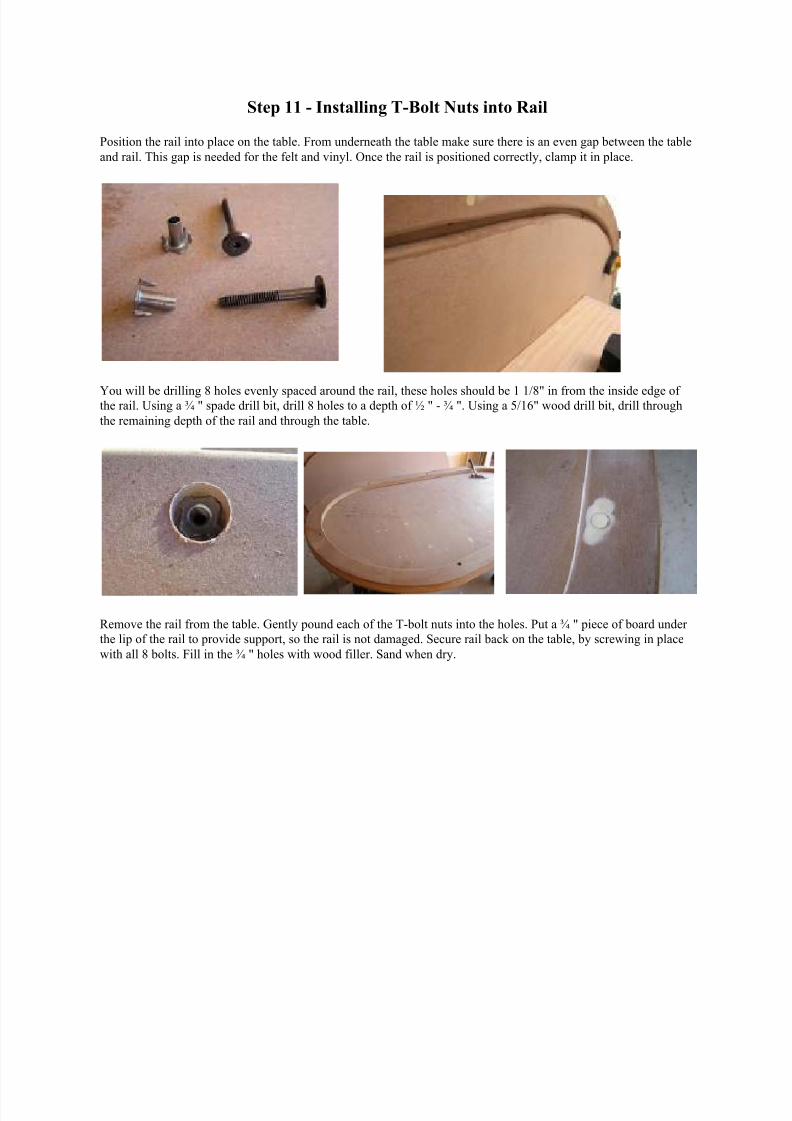
Step 9 - Painting
You will be painting the legs, frame and bottom of table. Apply the paint which ever way is easiest for you; spray
paint, brush or sprayer. First apply a coat of primer. You will need to do 2 coats. Allow drying time between coats.
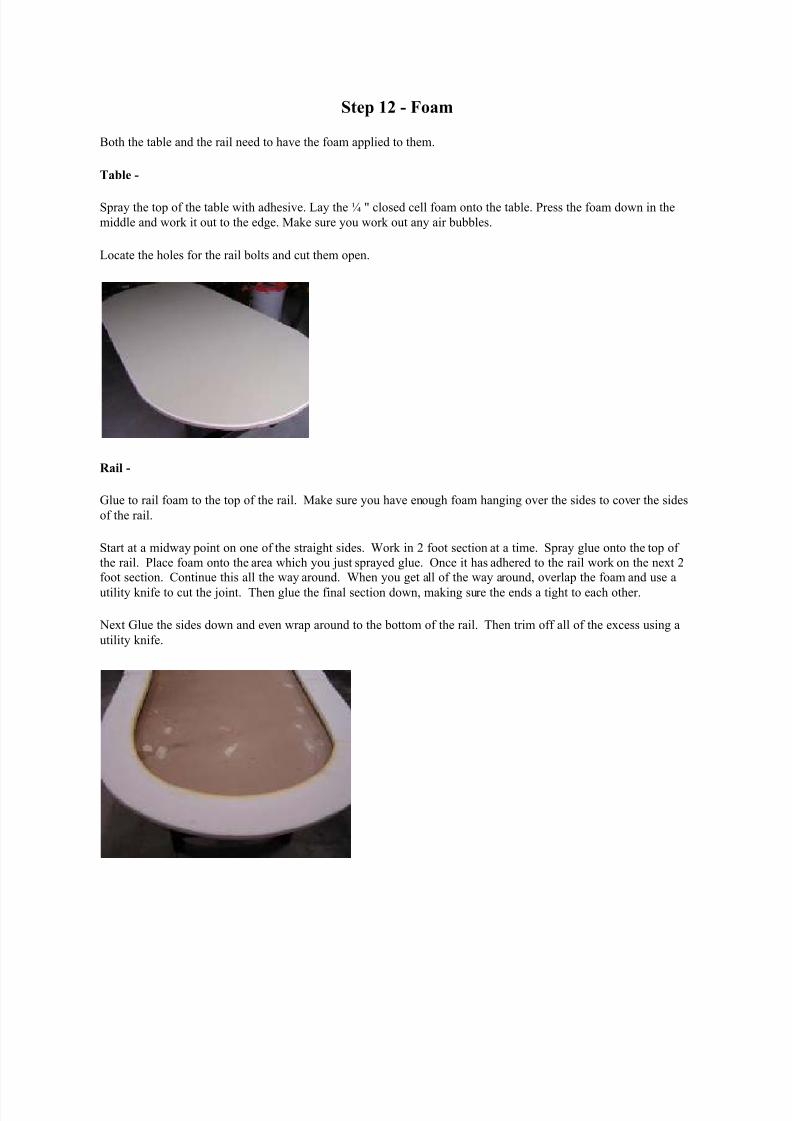
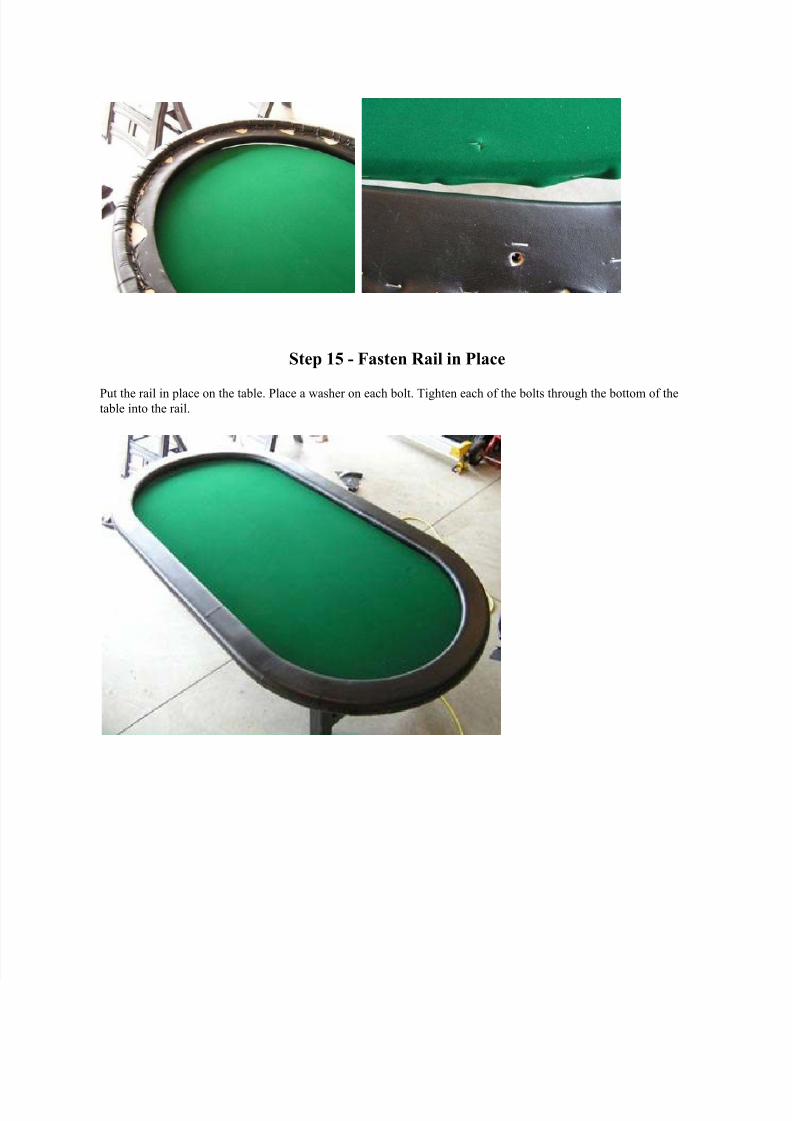
Step 10 - Installing Legs to Table
Lay the table top flat with the bottom face up. Place the legs into their positions. Have the legs tight up against the
frame on the ends; leave an equal space between the legs and the side frames. Install the hinges and table leg
braces. Flip the table over and stand it up with the legs down.
8/6/2019 Build a Poker Table
http://slidepdf.com/reader/full/build-a-poker-table 9/14
Step 11 - Installing T-Bolt Nuts into Rail
Position the rail into place on the table. From underneath the table make sure there is an even gap between the table
and rail. This gap is needed for the felt and vinyl. Once the rail is positioned correctly, clamp it in place.
You will be drilling 8 holes evenly spaced around the rail, these holes should be 1 1/8" in from the inside edge of the rail. Using a ¾ " spade drill bit, drill 8 holes to a depth of ½ " - ¾ ". Using a 5/16" wood drill bit, drill through
the remaining depth of the rail and through the table.
Remove the rail from the table. Gently pound each of the T-bolt nuts into the holes. Put a ¾ " piece of board under
the lip of the rail to provide support, so the rail is not damaged. Secure rail back on the table, by screwing in place
with all 8 bolts. Fill in the ¾ " holes with wood filler. Sand when dry.
8/6/2019 Build a Poker Table
http://slidepdf.com/reader/full/build-a-poker-table 10/14
Step 12 - Foam
Both the table and the rail need to have the foam applied to them.
Table -
Spray the top of the table with adhesive. Lay the ¼ " closed cell foam onto the table. Press the foam down in the
middle and work it out to the edge. Make sure you work out any air bubbles.
Locate the holes for the rail bolts and cut them open.
Rail -
Glue to rail foam to the top of the rail. Make sure you have enough foam hanging over the sides to cover the sides
of the rail.
Start at a midway point on one of the straight sides. Work in 2 foot section at a time. Spray glue onto the top of
the rail. Place foam onto the area which you just sprayed glue. Once it has adhered to the rail work on the next 2
foot section. Continue this all the way around. When you get all of the way around, overlap the foam and use a
utility knife to cut the joint. Then glue the final section down, making sure the ends a tight to each other.
Next Glue the sides down and even wrap around to the bottom of the rail. Then trim off all of the excess using a
utility knife.
8/6/2019 Build a Poker Table
http://slidepdf.com/reader/full/build-a-poker-table 11/14
Step 13 - Table Felt
Lay the Felt out on the table with an even amount over hanging on the sides. Use a staple gun to fasten the felt to
the table. You will be stapling the felt into the edge of the table.
Start at the middle of one of the long sides. Put in 1 staple. Go to other side and pull the felt tight. Put one staple in.
Go to one of the round ends. Pull the felt tight and put 1 staple in. Go to other end and pull it tight and put 1 staple
in. Go halfway between two of the staple and pull it tight and put in 1 staple. Then go to other side and repeat.
Continue doing this until the whole piece of felt is tight and in place. Staples should be 3" - 4" apart.
Use a utility knife and cut off all the excess felt. Cut it off even with the bottom surface of the table. Use a hammer
to gently pound in any staples that are not completely in.
Locate the holes for the rail bolts and cut them open.
8/6/2019 Build a Poker Table
http://slidepdf.com/reader/full/build-a-poker-table 12/14
Step 14 - Rail Vinyl
View Products
This can be a tricky part of the job, especially if you are using vinyl that does not stretch very well. The vinyl we
have for sale at this site stretches very nicely making this part a little easier.
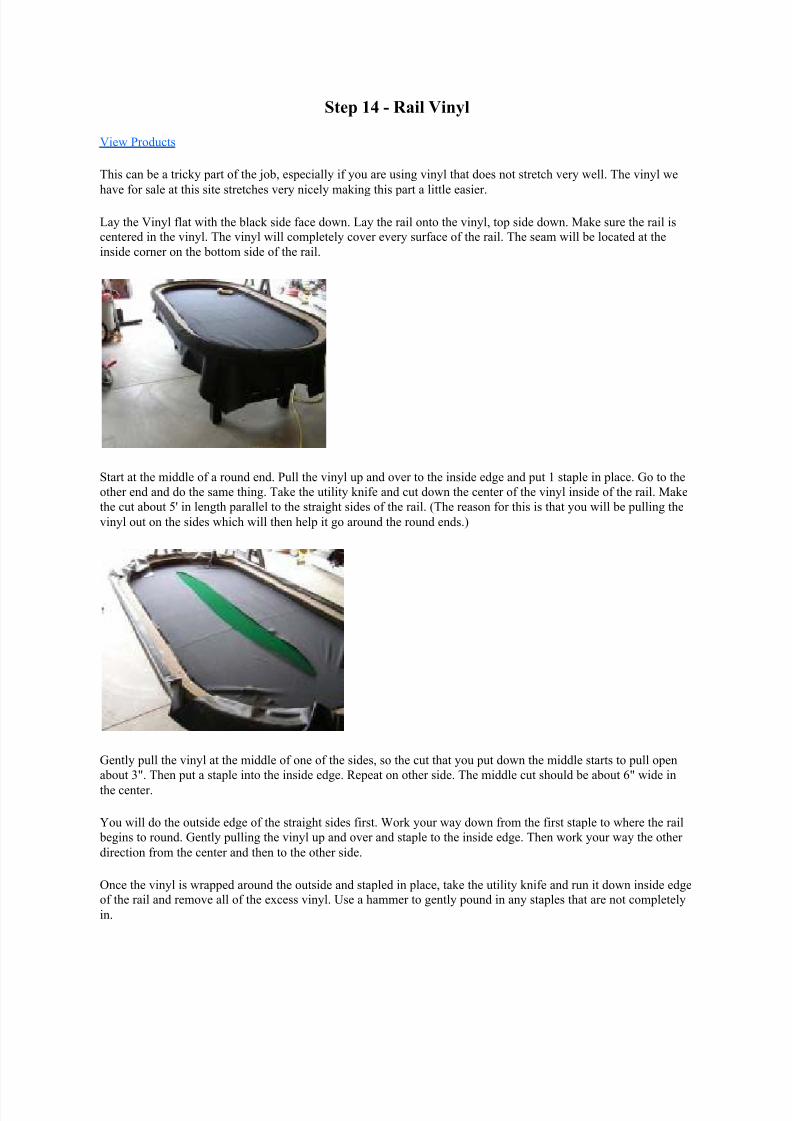
Lay the Vinyl flat with the black side face down. Lay the rail onto the vinyl, top side down. Make sure the rail is
centered in the vinyl. The vinyl will completely cover every surface of the rail. The seam will be located at the
inside corner on the bottom side of the rail.
Start at the middle of a round end. Pull the vinyl up and over to the inside edge and put 1 staple in place. Go to the
other end and do the same thing. Take the utility knife and cut down the center of the vinyl inside of the rail. Make
the cut about 5' in length parallel to the straight sides of the rail. (The reason for this is that you will be pulling the
vinyl out on the sides which will then help it go around the round ends.)
Gently pull the vinyl at the middle of one of the sides, so the cut that you put down the middle starts to pull open
about 3". Then put a staple into the inside edge. Repeat on other side. The middle cut should be about 6" wide in
the center.
You will do the outside edge of the straight sides first. Work your way down from the first staple to where the rail
begins to round. Gently pulling the vinyl up and over and staple to the inside edge. Then work your way the other
direction from the center and then to the other side.
Once the vinyl is wrapped around the outside and stapled in place, take the utility knife and run it down inside edge
of the rail and remove all of the excess vinyl. Use a hammer to gently pound in any staples that are not completely
in.
8/6/2019 Build a Poker Table
http://slidepdf.com/reader/full/build-a-poker-table 13/14
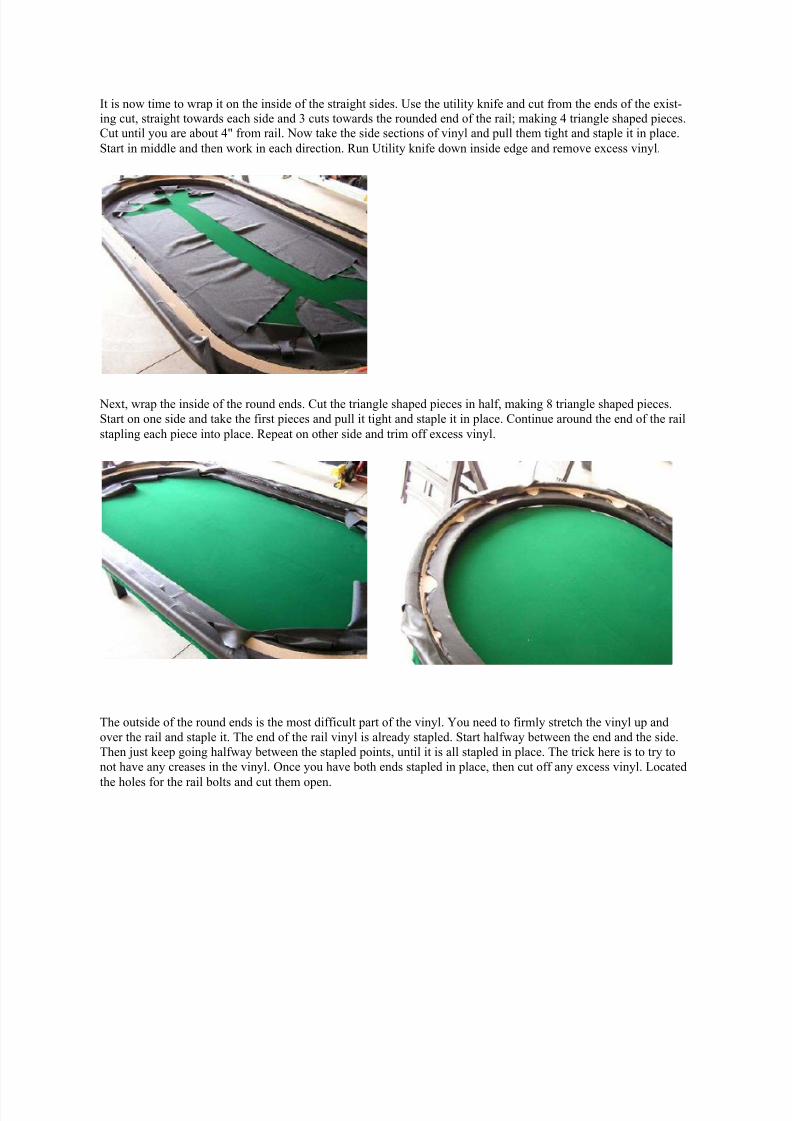
It is now time to wrap it on the inside of the straight sides. Use the utility knife and cut from the ends of the exist-
ing cut, straight towards each side and 3 cuts towards the rounded end of the rail; making 4 triangle shaped pieces.
Cut until you are about 4" from rail. Now take the side sections of vinyl and pull them tight and staple it in place.
Start in middle and then work in each direction. Run Utility knife down inside edge and remove excess vinyl.
Next, wrap the inside of the round ends. Cut the triangle shaped pieces in half, making 8 triangle shaped pieces.
Start on one side and take the first pieces and pull it tight and staple it in place. Continue around the end of the rail
stapling each piece into place. Repeat on other side and trim off excess vinyl.
The outside of the round ends is the most difficult part of the vinyl. You need to firmly stretch the vinyl up and
over the rail and staple it. The end of the rail vinyl is already stapled. Start halfway between the end and the side.
Then just keep going halfway between the stapled points, until it is all stapled in place. The trick here is to try to
not have any creases in the vinyl. Once you have both ends stapled in place, then cut off any excess vinyl. Located
the holes for the rail bolts and cut them open.
8/6/2019 Build a Poker Table
http://slidepdf.com/reader/full/build-a-poker-table 14/14