Build a C++ ODBC Driver in 5 Days - Simba...
51
SimbaEngine SDK 9.5 Build a C++ ODBC Driver in 5 Days Last Revised: May 2015 Simba Technologies Inc.
Transcript of Build a C++ ODBC Driver in 5 Days - Simba...

SimbaEngine SDK 9.5
Build a C++ ODBC Driver in 5 Days
Last Revised: May 2015
Simba Technologies Inc.

SimbaEngine SDK 9.5 Build a C++ ODBC Driver in 5 Days
Copyright ©2015 Simba Technologies Inc. All Rights Reserved.
Information in this document is subject to change without notice. Companies, names and data used in examples herein are fictitious unless otherwise noted. No part of this publication, or the software it describes, may be reproduced, transmitted, transcribed, stored in a retrieval system, decompiled, disassembled, reverse-engineered, or translated into any language in any form by any means for any purpose without the express written permission of Simba Technologies Inc.
Trademarks
Simba, the Simba logo, SimbaEngine, SimbaEngine C/S, SimbaExpress and SimbaLib are registered trademarks of Simba Technologies Inc. All other trademarks and/or servicemarks are the property of their respective owners.
Contact Us
Simba Technologies Inc. 938 West 8th Avenue Vancouver, BC Canada V5Z 1E5
www.simba.com
Telephone +1 (604) 633-0008 sales: extension 2, support: extension 3 Fax +1 (604) 633-0004
Information and product sales: [email protected]
Technical support: [email protected]
Follow us on Twitter:
@simbatech
Printed in Canada
www.simba.com i

SimbaEngine SDK 9.5 Build a C++ ODBC Driver in 5 Days
Table of Contents SimbaEngine SDK 9.5 ...................................................................................................... i
Build a C++ ODBC Driver in 5 Days ................................................................................. i
Last Revised: May 2015 ................................................................................................... i
Simba Technologies Inc. .................................................................................................. i
Introduction ..................................................................................................................... 1 About the SimbaEngine SDK ...................................................................................... 1 About the Quickstart Sample Driver ............................................................................ 1 Overview .................................................................................................................... 3
Day One – Windows Instructions..................................................................................... 3 Installing SimbaEngine SDK ....................................................................................... 4 Building the Quickstart Sample Driver ........................................................................ 4 Examining Windows Registry Keys ............................................................................. 4 Viewing DSNs Using ODBC Data Source Administrator ............................................. 6 Connecting to the Data Source ................................................................................... 6 Setting Up a Customizable Project ............................................................................. 7 Building Your Customizable Project ............................................................................ 8 Updating the Windows Registry .................................................................................. 9 Viewing Your DSNs Using ODBC Data Source Administrator ................................... 10 Connecting to the Data Source Using Your Customizable Driver .............................. 10 Summary – Day One ................................................................................................ 11
Day One – Linux Instructions ........................................................................................ 12 Installing SimbaEngine SDK ..................................................................................... 12 Building the Quickstart Sample Driver ...................................................................... 12 Configuring the Driver and Data Source ................................................................... 13 Connecting to the Data Source ................................................................................. 16 Setting Up a Customizable Project ........................................................................... 17 Configuring Your Driver and Data Source ................................................................. 17 Connecting to the Data Source Using Your Customizable Driver .............................. 19 Summary – Day One ................................................................................................ 19
Day One – Mac OS X Instructions ................................................................................. 19 Installing SimbaEngine SDK ..................................................................................... 20 Building the Quickstart Sample Driver ...................................................................... 20 Configuring the Driver and Data Source ................................................................... 21 Connecting to the Data Source ................................................................................. 24 Setting Up a Customizable Project ........................................................................... 25 Configuring Your Driver and Data Source ................................................................. 25 Connecting to the Data Source Using Your Customizable Driver .............................. 26 Summary – Day One ................................................................................................ 27
Day Two ........................................................................................................................ 27 Constructing a Driver Singleton ................................................................................ 27 Setting Driver Properties ........................................................................................... 28 Setting Logging Details ............................................................................................. 28 Checking Connection Settings .................................................................................. 29 Establishing a Connection ........................................................................................ 30
Day Three ..................................................................................................................... 30
www.simba.com ii

SimbaEngine SDK 9.5 Build a C++ ODBC Driver in 5 Days
Creating and Return Metadata Sources .................................................................... 30
Day Four ....................................................................................................................... 32 Enabling Data Retrieval ............................................................................................ 32
Day Five ........................................................................................................................ 34 Configuring Error Messages ..................................................................................... 34 Adding Finishing Touches ........................................................................................ 35
Conclusion .................................................................................................................... 35
Appendix A: ODBC Data Source Administrator on Windows 32-Bit vs. 64-Bit ............. 36
Appendix B: Bitness and the Windows Registry .......................................................... 37 The ODBCINST.INI Subkey ...................................................................................... 37 The ODBC.INI Subkey .............................................................................................. 37
Appendix C: Data Retrieval ......................................................................................... 39 SqlData Types .......................................................................................................... 40
Appendix D: How to Add Schema Support ................................................................. 43 Handling DSI_SCHEMAONLY_METADATA ............................................................ 43
Appendix E: C++ Server Configuration ....................................................................... 44
Third Party Trademarks ................................................................................................. 45
www.simba.com iii

SimbaEngine SDK 9.5 Build a C++ ODBC Driver in 5 Days
Introduction The Build a C++ ODBC Driver in 5 Days guide demonstrates how to create a custom ODBC driver using SimbaEngine SDK. Procedures in the guide explain how to modify and customize the Quickstart sample driver included with the SDK.
At the end of five days, you will have a read-only driver that connects to your data store.
About the SimbaEngine SDK ODBC is one of the most established and widely supported APIs for connecting to and working with databases. The ODBC specification provides a standard interface to which any ODBC-enabled application can connect. At the heart of ODBC technology is the driver, which connects an application to a data store.
The SimbaEngine SDK is a complete implementation of the ODBC specification. The libraries of the SimbaEngine SDK hide the complexity of error checking, session management, data conversions and other low-level implementation details, exposing a simple API called the Data Store Interface API (DSI API) that defines the operations needed to access a data store.
You use the SimbaEngine SDK to create an executable file that common reporting applications access when connecting to your data store in the process of executing an SQL statement. The executable file can be a Windows DLL; a Linux, Unix or Mac OS X shared object; a stand-alone server; or, some other form of executable. First, you create a DSI implementation (DSII) customized as needed to connect to your data source. Then, you create the executable by linking libraries from SimbaEngine SDK with your custom DSI implementation. The project files or make files link in the appropriate SimbaODBC and SimbaEngine libraries to complete the driver. In the final executable, the components from SimbaEngine SDK take responsibility for meeting the data access standards while your custom DSI implementation takes responsibility for accessing your data store and translating it to the DSI API.
Note: For a brief description of the ODBC standard, see http://www.simba.com/resources/data-access-standards-library#!odbc. For complete information on the ODBC 3.80 specification, see the ODBC Programmer's Reference at http://msdn.microsoft.com/en-us/library/ms714177(v=vs.85).aspx. For full documentation on SimbaEngine SDK, see http://www.simba.com/products/simba-engine-sdk.
About the Quickstart Sample Driver The SimbaEngine SDK includes sample drivers that you can use as a starting point for customizing your own driver. The Quickstart driver is a sample DSI implementation of an ODBC driver written in C++ that reads files in tabbed Unicode text format. The Simba SQLEngine component is required to perform the necessary SQL processing in the implementation because text files are not a SQL-aware data source.
Using the Quickstart sample driver to prototype a DSI implementation for your own data store helps you learn how the SimbaEngine SDK works. If you remove the shortcuts and simplifications implemented in the Quickstart driver, you can also use the driver as the
www.simba.com 1

SimbaEngine SDK 9.5 Build a C++ ODBC Driver in 5 Days
foundation for a commercial DSI implementation. Using the Quickstart sample driver is a fast and effective way to prepare a data access solution for your customers.
The UML diagram in Figure 1 shows a typical design pattern for a DSI implementation.
Figure 1: Design Pattern for a DSI Implementation
Notice the circular pattern of class relationships, headed by iResult and anchored by QSUtilities. The iResult class is responsible for retrieving column data and maintaining a cursor across result rows. The QSUtilities class contains platform-specific utility functions.
To implement data retrieval, your Reader class interacts directly with your data store to retrieve data, and then deliver the data to the QSTable class on demand. The Reader class should manage caching, buffering, paging and all the other techniques to speed data access.
As a starting point, to make your driver work properly with Microsoft Excel you can add metadata access by implementing the QSTypeInfoMetadataSource class and using the
www.simba.com 2

SimbaEngine SDK 9.5 Build a C++ ODBC Driver in 5 Days
DSIExtMetadataHelper class. The DSIExtMetadataHelper class is responsible for iterating through tables and stored procedures so the engine can generate catalog function metadata.
Overview To implement a working DSI with your data store, you need to:
1. Set up the development environment
2. Make a connection to the data store
3. Retrieve metadata
4. Work with columns
5. Retrieve data
In the Quickstart sample driver, you can identify areas of the code requiring modification by referring to pragma messages containing sequentially numbered TODO labels and a brief description.
Some areas of code you need to modify relate to retrieving data and metadata from your data store into the Simba SQLEngine. The Quickstart sample driver includes the classes and code to access the example data store. You need to modify the sample code to access your data store.
Some modifications you may make to Quickstart sample driver code relate to productization, including:
• Naming the driver
• Setting configuration properties for the driver
• Naming the XML error file and log files
Day One – Windows Instructions To set up and prepare your development environment to create a driver based on the Quickstart sample driver:
1. Install SimbaEngine SDK.
2. Build the Quickstart sample driver.
3. Review the keys that the Quickstart sample driver adds to the Windows Registry.
4. In the ODBC Data Source Administrator, review the DSNs that the Quickstart sample driver creates.
5. Using the Quickstart sample driver, read the tabbed Unicode text format sample data.
6. Create a customizable driver project based on the Quickstart sample driver.
7. Test your customizable driver project by reading the tabbed Unicode text format Quickstart sample data.
Detailed instructions for each step appear below.
www.simba.com 3

SimbaEngine SDK 9.5 Build a C++ ODBC Driver in 5 Days
Installing SimbaEngine SDK To install SimbaEngine SDK:
1. Uninstall any previous versions of SimbaEngine SDK installed on your computer.
2. Close Visual Studio.
3. Double-click to run the SimbaEngine SDK setup executable that corresponds to your version of Visual Studio, and then follow the instructions provided in the installation wizard.
Important: The SimbaEngine SDK environment variables are defined only for the user that ran the installation. If you install the SDK as a regular user and then run Visual Studio as an administrator, the SDK will not work properly.
In the Build a C++ ODBC Driver in 5 Days guide, the directory where you install the SimbaEngine SDK is referred to using the placeholder InstallDir. The default installation directory is C:\Simba Technologies. When working through procedures, ensure that you replace the InstallDir placeholder with the appropriate file path.
Building the Quickstart Sample Driver To build the Quickstart sample driver:
1. In Microsoft Visual Studio 2012, click the File menu, then click Open, and then click Project/Solution
2. In the Open Project dialog, navigate to the folder InstallDir\SimbaEngineSDK\9.5\ Examples\Source\Quickstart\Source, then select the file named QuickstartDSII_vs2012.vcxproj, and then click Open
3. Click the Build menu, and then click Configuration Manager. Click the drop-down arrow next to the Active Solution Configuration field, then select Debug_MTDLL, and then click Close
4. Click the Build menu, and then click Build Solution
OR
Press F7
For 32-bit drivers, the build appears in the folder InstallDir\SimbaEngineSDK\9.5\Examples\ Source\Quickstart\Bin\Win32\Debug_MTDLL
For 64-bit drivers, the build appears in the folder InstallDir\SimbaEngineSDK\9.5\Examples\ Source\Quickstart\Bin\x64\Debug_MTDLL
Examining Windows Registry Keys Installing the SimbaEngine SDK adds or updates keys in the Windows Registry to define the sample drivers included with the SDK, as well as Data Source Names (DSNs) using the sample drivers.
www.simba.com 4

SimbaEngine SDK 9.5 Build a C++ ODBC Driver in 5 Days
Note: For details on information in the Windows Registry related to ODBC drivers, see Appendix A: ODBC Data Source Administrator on Windows 32-Bit vs. 64-Bit on page 36 and Appendix B: Bitness and the Windows Registry on page 37.
To view the Registry keys related to the Quickstart sample driver: 1. Click the Start button, then type regedit.exe in the Search Programs and Files field, and
then press ENTER
2. In the Registry Editor, to view the key defining the 32-bit driver on 32-bit Windows or the 64-bit driver on 64-bit Windows, browse to HKEY_LOCAL_MACHINE/SOFTWARE/ ODBC/ODBCINST.INI/QuickstartDSIIDriver and HKEY_LOCAL_MACHINE/ SOFTWARE/ODBC/ODBCINST.INI/ODBC Drivers
OR
To view the key defining the 32-bit driver on 64-bit Windows, browse to HKEY_LOCAL_MACHINE/SOFTWARE/WOW6432NODE/ODBC/ODBCINST.INI/ QuickstartDSIIDriver and HKEY_LOCAL_MACHINE/SOFTWARE/WOW6432NODE/ ODBC/ODBCINST.INI/ODBC Drivers
3. To view the key defining the DSN using the 32-bit driver on 32-bit Windows or the 64-bit driver on 64-bit Windows, browse to HKEY_LOCAL_MACHINE/SOFTWARE/ODBC/ ODBC.INI/QuickstartDSII
OR
To view the key defining the DSN using the 32-bit driver on 64-bit Windows, browse to HKEY_LOCAL_MACHINE/SOFTWARE/WOW6432NODE/ODBC/ODBC.INI/ QuickstartDSII
Observe the following values set in the QuickstartDSIIDriver subkey for the 32-bit driver:
• Driver—InstallDir\Examples\Builds\Bin\Win32\Release_MTDLL\ QuickstartDSII_MTDLL.dll
• Setup—InstallDir\Examples\Builds\Bin\Win32\Release_MTDLL\ QuickstartDSII_MTDLL.dll
• Description—Sample 32-bit SimbaEngine Quickstart DSII
Observe the following values set in the QuickstartDSIIDriver subkey for the 64-bit driver:
• Driver—InstallDir\Examples\Builds\Bin\x64\Release_MTDLL\ QuickstartDSII_MTDLL.dll
• Setup—InstallDir\Examples\Builds\Bin\x64\Release_MTDLL\ QuickstartDSII_MTDLL.dll
• Description—Sample 64-bit SimbaEngine Quickstart DSII
Also in the ODBCINST.INI subkey, a string value named QuickstartDSIIDriver and having the value Installed appears in the ODBC Drivers subkey.
Observe the following values set in the QuickstartDSII subkey for the 32-bit driver:
• Driver—QuickStartDSIIDriver
• DBF—InstallDir\Examples\Databases\Quickstart
• Description—Sample 32-bit SimbaEngine Quickstart DSII
www.simba.com 5

SimbaEngine SDK 9.5 Build a C++ ODBC Driver in 5 Days
Observe the following values set in the QuickstartDSII subkey for the 64-bit driver:
• Driver—QuickStartDSIIDriver
• DBF—InstallDir\Examples\Databases\Quickstart
• Description—Sample 64-bit SimbaEngine Quickstart DSII
Also in the ODBC.INI subkey, a string value named QuickstartDSII having the value QuickstartDSIIDriver appears in the ODBC Data Sources subkey.
Viewing DSNs Using ODBC Data Source Administrator Familiarize yourself with the DSNs related to the Quickstart sample driver using the ODBC Data Source Administrator.
To view Quickstart DSNs in the ODBC Data Source Administrator: 1. Run the Windows ODBC Data Source Administrator.
For 32-bit drivers on 32-bit Windows and 64-bit drivers on 64-bit Windows, open the Control Panel, select Administrative Tools, and then select Data Sources (ODBC). If your Control Panel is set to view by category, then Administrative Tools is located under System and Security. For 32-bit drivers on 64-bit Windows, you must use the 32-bit ODBC Data Source Administrator. You cannot access the 32-bit ODBC Data Source Administrator from the start menu or control panel on 64-bit Windows. Only the 64-bit ODBC Data Source Administrator is accessible from the start menu or control panel. On 64-bit Windows, to launch the 32-bit ODBC Data Source Administrator you must run C:\WINDOWS\SysWOW64\odbcad32.exe. See Appendix A: ODBC Data Source Administrator on Windows 32-Bit vs. 64-Bit on page 36 for details.
2. In the ODBC Data Source Administrator, click the System DSN tab.
3. Scroll through the list of System Data Sources, select QuickstartDSII and then click Configure. The Data Source Configuration window opens and displays the data source name, description and the data directory.
4. Now that you have looked at the configuration information for the driver, click Cancel to close the Data Source Configuration window.
Connecting to the Data Source To test connecting to the data source using the Quickstart sample driver, you can use any ODBC application, such as Microsoft Excel, Microsoft Access or ODBCTest. In this section, we will use the ODBCTest tool, which is included in the Microsoft Data Access (MDAC) 2.8 Software Development Kit (SDK) available for download from http://www.microsoft.com/downloads/details.aspx?FamilyID=5067faf8-0db4-429a-b502-de4329c8c850&displaylang=en
www.simba.com 6

SimbaEngine SDK 9.5 Build a C++ ODBC Driver in 5 Days
To test connecting to the data source using the Quickstart sample driver: 1. Start the ODBC Test tool. By default, the ODBC Test application is installed in the
following folder: C:\Program Files (x86)\Microsoft Data Access SDK 2.8\Tools\
Navigate to the folder that corresponds to your machine’s architecture (amd64, ia64 or x86) and then click odbcte32.exe to launch the ANSI version or click odbct32w.exe to launch the Unicode version.
Note: It is important to run the correct version of the ODBC Test tool for ANSI or Unicode and 32-bit or 64-bit.
2. In the ODBC Test tool, click the Conn menu, and then click Full Connect The Full Connect window opens.
3. In the Full Connect dialog, select the QuickstartDSII data source from the list of data sources, and then click OK
Note: If you do not see your data source in the list, ensure that you are running the version of the ODBCTest tool that corresponds to the version of the data source that you created. For example, if you created a 32-bit data source then you need to use the 32-bit version of the ODBCTest tool.
A new window opens displaying a message that you successfully connected to the data source.
Setting Up a Customizable Project Now that you have built the example driver, you are ready to set up a development project to create a custom ODBC driver.
Important: Customizing the Quickstart sample driver project directly is not recommended. At times, referring to the original Quickstart sample driver project may help you debug your custom driver. Also, if you customize the Quickstart sample driver project, then your changes may be lost when you upgrade to a new release of SimbaEngine SDK in the future.
To set up a customizable project based on the Quickstart sample driver: 1. In your Windows Explorer window, copy the [INSTALL_DIRECTORY]\SimbaEngineSDK\
9.5\Examples\Source\Quickstart directory and paste it to the same location. This will create a new directory called "Quickstart - Copy". Rename the directory to something that is meaningful to you. This will be the top-level directory for your new project and DSI implementation files. For the rest of this tutorial, when you see <YourProjectName> in the instructions, replace this with the name you choose for this directory which is also the name of your project.
2. Open your new directory then open the Source directory and rename the QuickstartDSII_VS2012.vcproj file in it to <YourProjectName>.vcproj file where you replace <YourProjectName> with the name of your project. This will be the project file for your new ODBC driver.
3. Rename the .sln file. This new <YourProjectName>.sln file is the solution file for your new ODBC driver.
www.simba.com 7

SimbaEngine SDK 9.5 Build a C++ ODBC Driver in 5 Days
4. Using a text editor, open the project file (.vcproj) and replace every instance of “QuickstartDSII” in the source code with the name of your new ODBC driver. Then save and close the file.
5. Using a text editor, open the solution file (.sln) and replace every instance of “QuickstartDSII” in the source code with the name of your new ODBC driver. In addition, the name of the project file must be updated to match the <YourProjectName>.vcproj project file that you renamed. Then, save and close the file.
Building Your Customizable Project To build your customizable ODBC driver project based on the Quickstart sample driver project:
1. Launch Microsoft Visual Studio 2012.
2. Click File > Open > Project/Solution.
3. Navigate to [INSTALL_DIRECTORY]\SimbaEngineSDK\9.5\Examples\Source\<YourProjectName>\ Source and then open the <YourProjectName>.vcproj file.
4. Click Build > Configuration Manager and make sure that the active solution configuration is “Debug_MTDLL” and then click Close.
5. Click Build > Build Solution or press F7 to build the driver. This will build the Debug_MTDLL version of the driver and place it in the location: [INSTALL_DIRECTORY]\SimbaEngineSDK\9.5\Examples\Source\<YourProjectName>\ Bin\Win32\Debug_MTDLL.
6. When you build your new project, “TODO” messages appear in the Output window along with the build information. If the Output window is not displayed automatically, you can open it by selecting Debug > Windows > Output.
TODO #1: Construct driver singleton.
TODO #2: Set the driver properties.
TODO #3: Set the driver-wide logging details.
TODO #4: Set the connection-wide logging details.
TODO #5: Check Connection Settings.
TODO #6: Establish A Connection.
TODO #7: Create and return your Metadata Sources.
TODO #8: Open A Table.
TODO #9: Register Messages xml file for handling by DSIMessageSource.
TODO #10: Set the vendor name, which will be prepended to error messages.
Over the next four days, you will be visiting each “TODO” and modifying the source code.
www.simba.com 8

SimbaEngine SDK 9.5 Build a C++ ODBC Driver in 5 Days
Updating the Windows Registry When you set up a project to create a custom driver based on a sample driver provided with SimbaEngine SDK, you need to create keys in the Windows Registry similar to the keys that the sample driver uses to define the driver as well as DSNs for connecting the driver to your data source. To create keys, SimbaEngine SDK includes .REG files that you can customize and import into the Registry.
To create Registry keys for your custom driver project based on the Quickstart sample driver:
1. In Microsoft Visual Studio 2012, click File > Open > File and navigate to [INSTALL_DIRECTORY]\SimbaEngineSDK\9.5\Examples\Source\<YourProjectName>\ Source.
2. For 32-bit Windows, open SetupMyQuickstartDSII-32on32.reg. For a 32-bit ODBC driver on 64-bit Windows, open SetupMyQuickstartDSII-32on64.reg. For a 64-bit ODBC driver on 64-bit Windows, open SetupMyQuickstartDSII-64on64.reg.
3. In the file, replace [INSTALL_DIRECTORY] with the path to the installation directory. In the path, you must enter double backslashes. For example, by default, the samples are installed to “C:\Simba Technologies” so in that case, you would replace all instances of [INSTALL_DIRECTORY] with C:\\Simba Technologies.
4. Next, update the ODBC Data Sources section to add your new data source. Under the [HKEY_LOCAL_MACHINE\SOFTWARE\ODBC\ODBC.INI\ODBC Data Sources] section, change "MyQuickstartDSII"="MyQuickstartDSIIDriver" to the name of your new data source and new driver. For example, "<YourProjectName>DSII"="<YourProjectName>DSIIDriver"
5. Then, modify the data source definition for that data source. Change the line that says [HKEY_LOCAL_MACHINE\SOFTWARE\ODBC\ODBC.INI\MyQuickstartDSII] so that it contains your new data source name. For example, [HKEY_LOCAL_MACHINE\SOFTWARE\ODBC\ODBC.INI\<YourProjectName>DSII]
6. Beside the line that starts with "Driver"= enter the path to the driver dll file.
7. Update the ODBC Drivers section to add your new driver. Under the [HKEY_LOCAL_MACHINE\SOFTWARE\ODBC\ODBCINST.INI\ODBC Drivers] section, change "MyQuickstartDSIIDriver"="Installed" to match the name of your new driver. For example, "<YourProjectName>DSIIDriver"="Installed"
8. Modify the driver definition for that driver. Change the line that says [HKEY_LOCAL_MACHINE\SOFTWARE\ODBC\ODBCINST.INI\MyQuickstartDSIIDriver] so that it contains your new driver name. For example, [HKEY_LOCAL_MACHINE\SOFTWARE\ODBC\ODBCINST.INI\<YourProjectName>DSIIDriver]
9. Beside the line that starts with “Setup” and the line that starts with “Driver”, update the path to the dll file.
www.simba.com 9

SimbaEngine SDK 9.5 Build a C++ ODBC Driver in 5 Days
10. Click Edit > Find and Replace > Quick Replace. Then, replace “Quickstart” in the whole file with the name of your new ODBC driver.
11. Click Save and then close the file.
12. In the Registry Editor (regedit.exe), click File > Import, navigate to the registry file that you just modified and then click Open. A message is displayed that says that the keys and values have been successfully added to the registry.
Viewing Your DSNs Using ODBC Data Source Administrator To view the DSNs you created in the Windows Registry for your custom driver project:
1. Run the Windows ODBC Data Source Administrator. For 32-bit drivers on 32-bit Windows and 64-bit drivers on 64-bit Windows, open the Control Panel, select Administrative Tools, and then select Data Sources (ODBC). If your Control Panel is set to view by category, then Administrative Tools is located under System and Security. For 32-bit drivers on 64-bit Windows, you must use the 32-bit ODBC Data Source Administrator. You cannot access the 32-bit ODBC Data Source Administrator from the start menu or control panel on 64-bit Windows. Only the 64-bit ODBC Data Source Administrator is accessible from the start menu or control panel. On 64-bit Windows, to launch the 32-bit ODBC Data Source Administrator you must run C:\WINDOWS\SysWOW64\odbcad32.exe. See Appendix A: ODBC Data Source Administrator on Windows 32-Bit vs. 64-Bit on page 36 for details.
2. In the ODBC Data Source Administrator, click the System DSN tab.
3. Scroll through the list of System Data Sources, select <YourProjectName>DSII and then click Configure. The Data Source Configuration window opens and displays the data source name, description and the data directory.
4. Now that you have looked at the configuration information for your new driver, click Cancel to close the Data Source Configuration window.
Connecting to the Data Source Using Your Customizable Driver
To test your customizable driver using ODBCTest:
1. Start the ODBC Test tool. By default, the ODBC Test application is installed in the following folder: C:\Program Files (x86)\Microsoft Data Access SDK 2.8\Tools\
Navigate to the folder that corresponds to your driver’s architecture (amd64, ia64 or x86) and then click odbcte32.exe to launch the ANSI version or click odbct32w.exe to launch the Unicode version. It is important to run the correct version of the ODBCTest tool for ANSI or Unicode and 32-bit or 64-bit.
www.simba.com 10

SimbaEngine SDK 9.5 Build a C++ ODBC Driver in 5 Days
2. Attach Visual Studio to the ODBC Test process. To do this, go to Microsoft Visual Studio and then click Debug > Attach to Process.
3. In the Attach to Process window, select the ODBC Test process and then click Attach. The process name will be either odbc32.exe or odbct32w.exe.
4. Add a breakpoint in Main_Windows.cpp, on the function DSIDriverFactory(). This function runs as soon as the Driver Manager loads the ODBC driver.
5. In the ODBC Test tool, select Conn > Full Connect. The Full Connect window opens.
6. Select your Data Source from the list of data sources and then click OK. If you do not see your data source in the list, make sure that you are running the version of the ODBC Test tool that corresponds to the version of the data source that you created. In other words, if you created a 32-bit data source then you should be using the 32-bit version of the ODBC Test tool.
7. You should hit the breakpoint you created and focus should switch to Visual Studio.
8. To continue running the program, select Debug > Continue. The focus returns to the ODBC Test window.
Summary – Day One So far, the following tasks are complete:
• Installing the SimbaEngine SDK and building the Quickstart sample driver included with the SDK
• Learning how to create new driver definitions and Data Source Names in the Windows Registry
• Viewing DSNs using the ODBC Data Source Administrator
• Testing drivers using an ODBC-enabled application
• Setting up a new project for customization based on sample driver projects included in SimbaEngine SDK
www.simba.com 11

SimbaEngine SDK 9.5 Build a C++ ODBC Driver in 5 Days
Day One – Linux Instructions Today's tasks help you set up and test your development environment for building and testing ODBC drivers using SimbaEngine SDK.
Installing SimbaEngine SDK On Linux and UNIX platforms, the SimbaEngine SDK is provided as a single file consisting of the SimbaEngineSDK*.tar.gz file, a tar format archive that has been compressed using the gzip tool. The asterisk (*) in the file name represents a string of characters that represent the build number and platform. For example, the file name might look something like this: SimbaEngineSDK_Release_Linux-x86_9.5.0.1000.tar.gz
Note: If you have a previous version of the SimbaEngine SDK installed, then uninstall the previous version prior to installing the new version.
To install SimbaEngine SDK: 1. Open a command prompt.
2. Navigate to the directory where you want to install the SimbaEngine SDK.
Note: In the Build a C++ ODBC Driver in 5 Days guide, the directory where you install the SimbaEngine SDK is referred to using the placeholder <installdir>. When working through procedures, ensure that you replace <installdir> using the appropriate file path.
3. Copy the SimbaEngineSDK*.tar.gz file to the directory where you want to install the SimbaEngine SDK.
4. To uncompress the file, type gunzip SimbaEngineSDK*.tar.gz at the command line.
5. To extract the tar file, type tar -xvf SimbaEngineSDK*.tar
Building the Quickstart Sample Driver On Linux and UNIX platforms, the sample drivers include makefiles instead of Visual Studio solution files. After you install SimbaEngine SDK, sample drivers appear in the folder <installdir>/SimbaEngineSDK/9.5/Examples. The process for building each sample driver is similar on Linux and UNIX platforms.
The process for building sample drivers The exact process depends on whether you are using 32-bit or 64-bit Linux.
To determine the version of Linux you are using: At the command line, type uname -m
To build the SimbaEngine Quickstart sample driver: 1. Set the SIMBAENGINE_DIR environment variable by typing:
export SIMBAENGINE_DIR=<installdir>/SimbaEngineSDK/9.5/ DataAccessComponents
www.simba.com 12

SimbaEngine SDK 9.5 Build a C++ ODBC Driver in 5 Days
Note: In the command above, replace <installdir> with the directory where you installed the SimbaEngine SDK files.
2. Set the SIMBAENGINE_THIRDPARTY_DIR environment variable by typing: export SIMBAENGINE_THIRDPARTY_DIR=<installdir>/SimbaEngineSDK/9.5/ DataAccessComponents/ThirdParty
3. Change to the following directory: <installdir>/SimbaEngineSDK/9.5/Examples/Source/Quickstart/Makefiles
4. Type make –f Quickstart.mak debug to run the makefile for the debug target. Note that, optionally, other options can be specified on the command line. For more information about the options and build configurations, refer to the SimbaEngine SDK Developer Guide.
Configuring the Driver and Data Source SimbaEngine SDK supports using the iODBC or unixODBC Driver Managers on Linux platforms. iODBC and unixODBC use configuration files to define and configure ODBC data sources and drivers. The odbc.ini file is used to define ODBC data sources and the odbcinst.ini file is used to define ODBC drivers.
Locating ODBC Configuration Files
The value of the $ODBCINI environment variable specifies the location of the odbc.ini file, including the file name, for iODBC and unixODBC. The value of the $ODBCINSTINI environment variable specifies the location of the odbcinst.ini file, including the file name, for iODBC. The value of the $ODBCSYSINI environment variable specifies the directory containing the odbcinst.ini file for unixODBC. If the environment variables are not set, then the driver manager assumes that the configuration files exist in the user’s home directory using the default file names (.odbc.ini and .odbcinst.ini).
Optionally, if you decide to put the configuration files somewhere other than the user’s home directory, then set the environment variables using the command line. For example: export ODBCINI=/usr/local/odbc/myodbc.ini export ODBCINSTINI=/usr/local/odbc/myodbcinst.ini export ODBCSYSINI=/usr/local/odbc/
Samples of the configuration files are provided in the following directory: <installdir>/SimbaEngineSDK/9.5/Documentation/Setup
Configuring an ODBC Data Source
ODBC Data Sources are defined in the .odbc.ini configuration file.
To configure a data source:
1. To see if the .odbc.ini file already exists in your home directory, type the following command: ls –al ~ | grep .odbc.ini
www.simba.com 13

SimbaEngine SDK 9.5 Build a C++ ODBC Driver in 5 Days
If the file exists, you will see something like this: -rw-rw-r-- 1 employee employee 1379 Oct 23 14:56 .odbc.ini If the file doesn’t exist, then the command will not return anything. In this case, copy the odbc.ini file from the samples directory by typing: cp <installdir>/SimbaEngineSDK/9.5/Documentation/Setup/odbc.ini ~/.odbc.ini
2. Open the ~/.odbc.ini configuration file in a text editor. To open the file, you may need to configure your text editor to show hidden files.
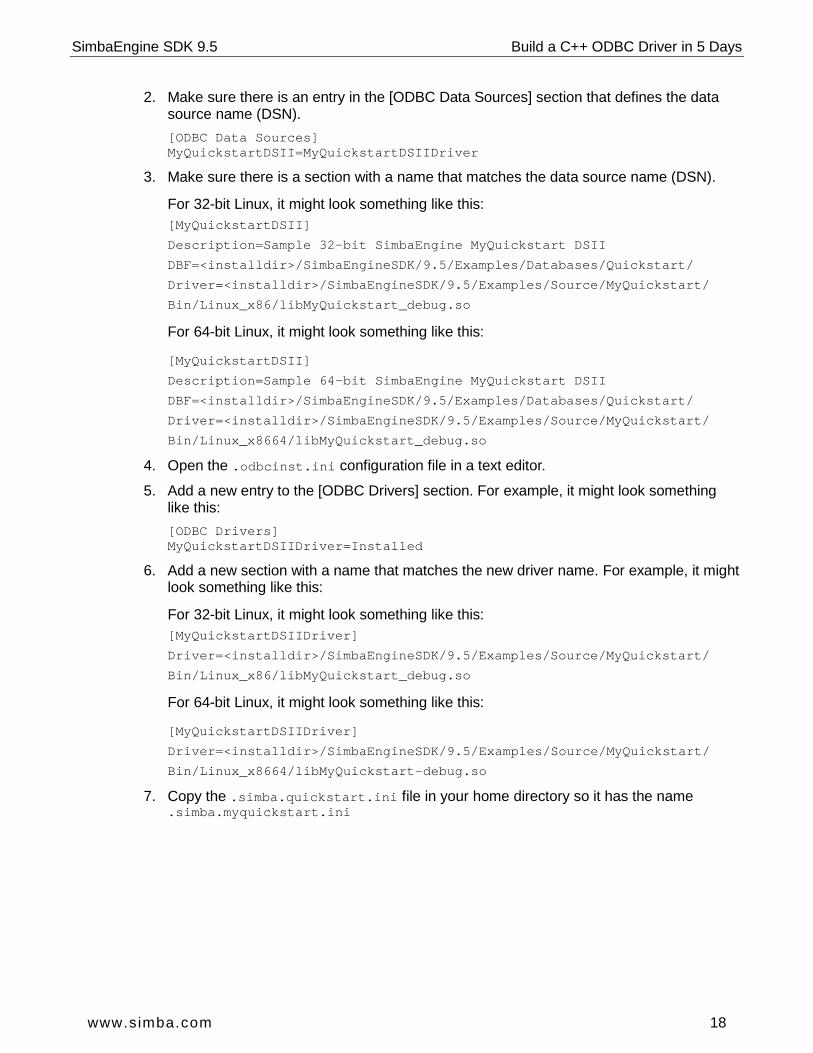
3. Make sure there is an entry in the [ODBC Data Sources] section that defines the data source name (DSN). The [ODBC Data Sources] section is used to specify the available data sources. [ODBC Data Sources] QuickstartDSII=QuickstartDSIIDriver
4. Make sure there is a section with a name that matches the data source name (DSN). This section will contain the configuration options. They are specified as key-value pairs.
For 32-bit Linux, it might look something like this:
[QuickstartDSII] Description=Sample 32-bit SimbaEngine Quickstart DSII DBF=<installdir>/SimbaEngineSDK/9.5/Examples/Databases/Quickstart/ Driver=<installdir>/SimbaEngineSDK/9.5/Examples/Source/Quickstart/Bin/
Linux_x86/libQuickstart_debug.so
For 64-bit Linux, it might look something like this:
[QuickstartDSII] Description=Sample 64-bit SimbaEngine Quickstart DSII DBF=<installdir>/SimbaEngineSDK/9.5/Examples/Databases/Quickstart/ Driver=<installdir>/SimbaEngineSDK/9.5/Examples/Source/Quickstart/Bin/
Linux_x8664/libQuickstart_debug.so
Defining an ODBC Driver
ODBC Drivers are defined in the .odbcinst.ini configuration file. This configuration is optional because drivers can be specified directly in the .odbc.ini configuration file as discussed in the previous section.
To define a driver: 1. To see if the .odbcinst.ini file exists in your home directory, type the following command:
ls –al ~ | grep .odbcinst.ini If the file exists, you will see something like this: -rw-rw-r-- 1 employee employee 2272 Oct 23 15:30 .odbcinst.ini If the file doesn’t exist, then the command will not return anything. In this case, copy the odbc.ini file from the samples directory by typing: cp <installdir>/SimbaEngineSDK/9.5/Documentation/Setup/odbcinst.ini ~/.odbcinst.ini
www.simba.com 14

SimbaEngine SDK 9.5 Build a C++ ODBC Driver in 5 Days
2. Open the ~/.odbcinst.ini configuration file in a text editor.
3. Add a new entry to the [ODBC Drivers] section. The [ODBC Drivers] section is used to specify the available drivers. Type driver name and the value “Installed”. This driver name should be used for the “Driver” value in the data source definition instead of the driver shared library name. For example, it might look something like this: [ODBC Drivers] QuickstartDSIIDriver=Installed
4. Add a new section with a name that matches the new driver name. This section will contain the configuration options. They are specified as key-value pairs.
For 32-bit Linux, it might look something like this: [QuickstartDSIIDriver] Driver=<installdir>/SimbaEngineSDK/9.5/Examples/Source/Quickstart/Bin/
Linux_x86/libQuickstart_debug.so
For 64-bit Linux, it might look something like this: [QuickstartDSIIDriver] Driver=<installdir>/SimbaEngineSDK/9.5/Examples/Source/Quickstart/Bin/ Linux_x8664/libQuickstart-debug.so
Configuring the Simba Quickstart Sample Driver
Configuration options for drivers created using SimbaEngine SDK appear in an .INI file. In order, SimbaEngine SDK searches for the .INI file in the following locations:
1. The path, including the file name, specified using the SIMBAINI environment variable
2. The driver directory, as a non-hidden .INI file
3. In $HOME, as a hidden .INI file
4. In /etc/ as a non-hidden .INI file
Procedures in the Build a C++ ODBC Driver in 5 Days guide assume that the .INI file exists in the user’s home directory.
To configure the Simba Quickstart ODBC Driver: 1. To see if the .simba.quickstart.ini file already exists in your home directory, type
the following command: ls -al ~ | grep .simba.quickstart.ini
2. If the file doesn’t exist, then the command will not return anything. In this case, copy the file from the samples directory by typing: cp <installdir>/SimbaEngineSDK/9.5/Documentation/Setup/.simba.quickstart.ini ~/.simba.quickstart.ini
3. Open the ~/.simba.quickstart.ini configuration file in a text editor.
4. Edit the DriverManagerEncoding setting. If you are using the “iODBC” ODBC Driver Manager set the DriverManagerEncoding setting to UTF-32. -or-
www.simba.com 15

SimbaEngine SDK 9.5 Build a C++ ODBC Driver in 5 Days
If you are using the “unixODBC” ODBC Driver Manager, you will need to check which setting to use. Type odbc_config –-cflags at a command prompt. If you see the “DSQL_WCHART_CONVERT” flag, then set the DriverManagerEncoding setting to UTF-32. Otherwise, set it to UTF-16. For more information about your ODBC driver manager, consult your system administrator or your ODBC Driver Manager documentation.
5. Edit the ErrorMessagesPath setting to replace [INSTALLDIR] with your install directory.
6. Set the ODBCInstLib to the absolute path of the ODBCInst library for the Driver Manager that you are using. For example, for the iODBC Driver Manager this would look something like this: ODBCInstLib=<driver manager dir>/lib/libiodbcinst.so (notice the ‘i’ after the lib) For unixODBC this would be: ODBCInstLib=<driver manager dir>/lib/libodbcinst.so
7. Save the file.
For more information about how to configure data sources under Linux, Unix and MacOSX, please refer to the SimbaEngine SDK Developer Guide.
Connecting to the Data Source In order for the Quickstart sample driver to connect to the sample database successfully, the LD_LIBRARY_PATH environment variable must include references to the following libraries:
• International Components for Unicode (ICU)
• OpenSSL
To add the 32-bit ICU and OpenSSL libraries: Type the following at the command line:
export LD_LIBRARY_PATH=$LD_LIBRARY_PATH:[INSTALLDIR]/SimbaEngineSDK/9.5 /DataAccessComponents/ThirdParty/icu/53.1/centos5/gcc4_4/release32/lib: [INSTALLDIR]/SimbaEngineSDK/9.5/DataAccessComponents/ThirdParty/openssl/1.0.1/centos5/gcc4_4/release32/lib
To add the 64-bit ICU and OpenSSL libraries: Type the following at the command line:
export LD_LIBRARY_PATH=$LD_LIBRARY_PATH:[INSTALLDIR]/SimbaEngineSDK/9.5 /DataAccessComponents/ThirdParty/icu/53.1/centos5/gcc4_4/release64/lib: [INSTALLDIR]/SimbaEngineSDK/9.5/DataAccessComponents/ThirdParty/openssl/1.0.1/centos5/gcc4_4/release64/lib
Also, you must have a driver manager such as iODBC or unixODBC installed.
Note: For more details on driver managers and testing, refer to the SimbaEngine SDK Developer Guide.
The following procedure uses the iodbctest utility included with the iODBC driver manager to test connecting to the data source that the Quickstart sample driver uses.
www.simba.com 16

SimbaEngine SDK 9.5 Build a C++ ODBC Driver in 5 Days
To test connecting the Quickstart sample driver to the sample data source: 1. At the command prompt, type: iodbctest
2. At the prompt that says “Enter ODBC connect string”, type ? to show the list of DSNs and Drivers.
3. In the list, you should see your QuickstartDSII DSN.
4. To connect to your data source, type: DSN=QuickstartDSII A prompt that says “SQL>” appears.
5. Type a SQL command to query your database. For example, SELECT * FROM PRODUCT.
If there were no problems with the example drivers you built, you are now ready to set up a development project based on the Quickstart sample driver project that you can customize to develop your own ODBC driver.
Setting Up a Customizable Project Now you are ready to set up a separate project for customization based on the Quickstart sample driver.
Important: Creating a separate project to customize is helpful because you can compare your project to the Quickstart sample driver when debugging, for example.
To create a customizable project based on the Quickstart sample driver: 1. Copy the Quickstart directory to a new directory that will be the top-level directory for
your new project and DSI implementation files. For example, you could do it like this:
cp –R <installdir>/SimbaEngineSDK/9.5/Examples/Source/Quickstart
<installdir>/SimbaEngineSDK/9.5/Examples/Source/MyQuickstart
2. Open your new directory, then open the Makefiles directory and rename the Quickstart.mak file in it. For example, you could type mv Quickstart.mak MyQuickstart.mak.
3. Then, rename the .depend file that is located in the Makedepend directory.
4. Open your new directory then open the Source directory. Open the Makefile file and replace “Quickstart” project name in the source code with the name of your new ODBC driver. Then save and close the file.
5. Change to the following directory: <installdir>/SimbaEngineSDK/9.5/Examples/Source/MyQuickstart/Makefiles
6. Type make –f MyQuickstart.mak debug to run the makefile for the debug target.
Configuring Your Driver and Data Source To configure your driver and data source:
1. Open the .odbc.ini configuration file in a text editor.
www.simba.com 17
SimbaEngine SDK 9.5 Build a C++ ODBC Driver in 5 Days
2. Make sure there is an entry in the [ODBC Data Sources] section that defines the data source name (DSN). [ODBC Data Sources] MyQuickstartDSII=MyQuickstartDSIIDriver
3. Make sure there is a section with a name that matches the data source name (DSN).
For 32-bit Linux, it might look something like this: [MyQuickstartDSII] Description=Sample 32-bit SimbaEngine MyQuickstart DSII DBF=<installdir>/SimbaEngineSDK/9.5/Examples/Databases/Quickstart/ Driver=<installdir>/SimbaEngineSDK/9.5/Examples/Source/MyQuickstart/
Bin/Linux_x86/libMyQuickstart_debug.so
For 64-bit Linux, it might look something like this:
[MyQuickstartDSII] Description=Sample 64-bit SimbaEngine MyQuickstart DSII DBF=<installdir>/SimbaEngineSDK/9.5/Examples/Databases/Quickstart/ Driver=<installdir>/SimbaEngineSDK/9.5/Examples/Source/MyQuickstart/
Bin/Linux_x8664/libMyQuickstart_debug.so
4. Open the .odbcinst.ini configuration file in a text editor.
5. Add a new entry to the [ODBC Drivers] section. For example, it might look something like this: [ODBC Drivers] MyQuickstartDSIIDriver=Installed
6. Add a new section with a name that matches the new driver name. For example, it might look something like this:
For 32-bit Linux, it might look something like this: [MyQuickstartDSIIDriver] Driver=<installdir>/SimbaEngineSDK/9.5/Examples/Source/MyQuickstart/
Bin/Linux_x86/libMyQuickstart_debug.so
For 64-bit Linux, it might look something like this:
[MyQuickstartDSIIDriver] Driver=<installdir>/SimbaEngineSDK/9.5/Examples/Source/MyQuickstart/
Bin/Linux_x8664/libMyQuickstart-debug.so
7. Copy the .simba.quickstart.ini file in your home directory so it has the name .simba.myquickstart.ini
www.simba.com 18

SimbaEngine SDK 9.5 Build a C++ ODBC Driver in 5 Days
Connecting to the Data Source Using Your Customizable Driver
To test connecting your customizable driver to the Quickstart sample data source using iodbctest:
1. At the command prompt, type: iodbctest.
2. At the prompt that says “Enter ODBC connect string”, type ? to show the list of DSNs and Drivers.
3. In the list, you should see your MyQuickstartDSII DSN.
4. To connect to your data source, type: DSN=MyQuickstartDSII. A prompt that says “SQL>” appears.
5. Type a SQL command to query your database. For example, SELECT * FROM PRODUCT.
6. To quit iodbctest, at the prompt, type quit
You can also use a debugger, such as gdb, with the iodbctest utility.
To use gdb test your driver and hit a breakpoint: 1. To start the debugger, type gdb iodbctest
2. Type break Simba::DSI::DSIDriverFactory This will set a breakpoint at the DSIDriverFactory()function at line 31 in the Main_Unix.cpp file. This is a good breakpoint to start with because this function runs as soon as the Driver Manager loads the ODBC driver. If you would rather set a different breakpoint, you can view the source code in this directory: <installdir>/SimbaEngineSDK/9.5/Examples/Source/MyQuickstart/Source
3. Type run DSN=MyQuickstartDSII The program runs until the breakpoint is encountered.
Note: When using the gdb debugger with an application, your ODBC driver is not loaded until the application is running and you make a connection. This means that you can set breakpoints before it is loaded or after, depending on which breakpoint you want to hit.
Summary – Day One So far, the following tasks are complete:
Building and testing the Quickstart sample driver to ensure that your SimbaEngine SDK and development environment are installed and configured correctly
Creating, building and testing a copy of the Quickstart sample driver that you can customize to connect to a different data source
Day One – Mac OS X Instructions Today's task is to set up and test the development environment. By the end of the day, you will have compiled and tested your first ODBC driver.
www.simba.com 19

SimbaEngine SDK 9.5 Build a C++ ODBC Driver in 5 Days
Note: The following instructions for setting up your environment assume that you are using Xcode 6.1. If you are using a different version, modify the paths accordingly. For example, if a path contains the xcode6_1 directory, modify the path to use the xcode5_1 directory instead.
Installing SimbaEngine SDK On the Mac OS X platform, the SimbaEngine SDK is provided as a single file consisting of the SimbaEngineSDK*.tar.gz file, a tar format archive that has been compressed using the gzip tool. The asterisk (*) in the file name represents a string of characters that represent the build number and platform. For example, the file name might look something like this: SimbaEngineSDK_Release_Darwin-universal_clang_9.5.0.1000.tar.gz
Note: If you have a previous version of the SimbaEngine SDK installed, then uninstall the previous version prior to installing the new version.
To install SimbaEngine SDK: 1. Open a command prompt.
2. Navigate to the directory where you want to install the SimbaEngine SDK.
Note: In the Build a C++ ODBC Driver in 5 Days guide, the directory where you install the SimbaEngine SDK is referred to using the placeholder <installdir>. When working through procedures, ensure that you replace <installdir> using the appropriate file path.
3. Copy the SimbaEngineSDK*.tar.gz file to the directory where you want to install the SimbaEngine SDK.
4. To uncompress the file, type: gunzip SimbaEngineSDK*.tar.gz
5. To extract the tar file, type: tar -xvf SimbaEngineSDK*.tar
Building the Quickstart Sample Driver On the Mac OS X platform, the sample drivers include makefiles instead of Visual Studio solution files. The process to build each of the sample drivers is similar.
To build the SimbaEngine Quickstart sample driver: 1. Set the SIMBAENGINE_DIR environment variable by typing:
export SIMBAENGINE_DIR=<installdir>/SimbaEngineSDK/9.5/ DataAccessComponents
In the command above, replace <installdir> with the directory where you installed the SimbaEngine SDK files.
2. Set the SIMBAENGINE_THIRDPARTY_DIR environment variable by typing: export SIMBAENGINE_THIRDPARTY_DIR=<installdir>/SimbaEngineSDK/9.5/ DataAccessComponents/ThirdParty
3. Change to the following directory: <installdir>/SimbaEngineSDK/9.5/Examples/Source/Quickstart/Makefiles
www.simba.com 20
SimbaEngine SDK 9.5 Build a C++ ODBC Driver in 5 Days
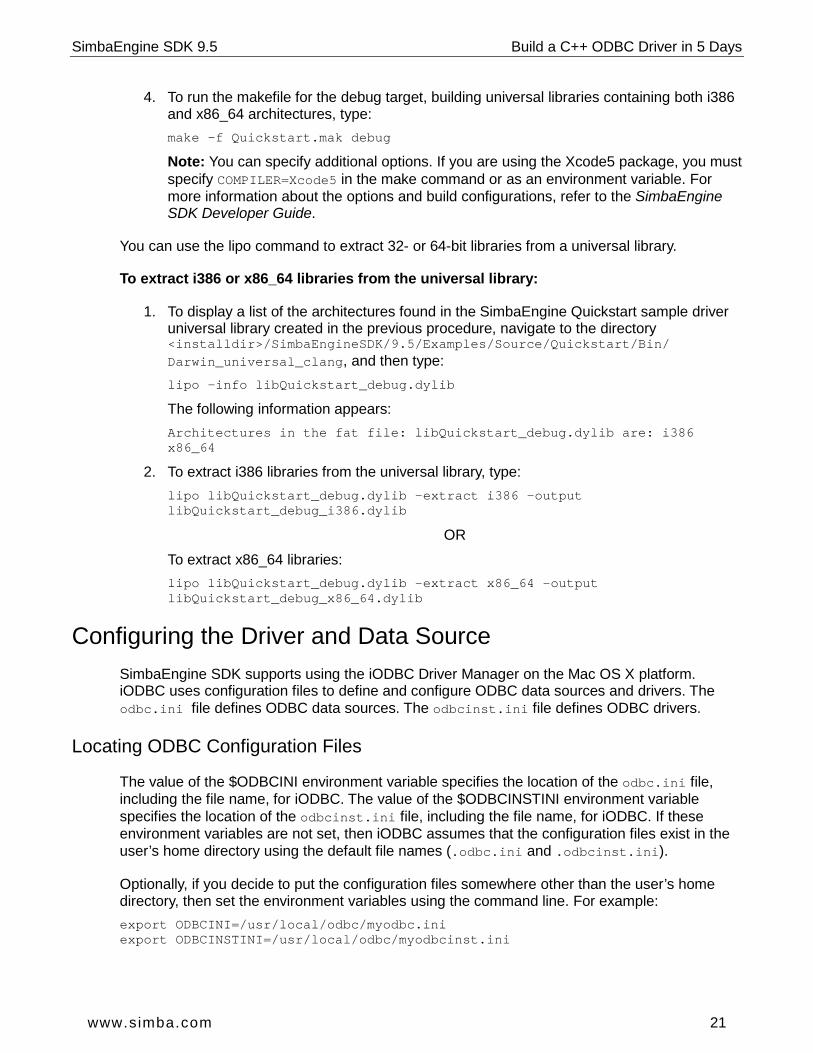
4. To run the makefile for the debug target, building universal libraries containing both i386 and x86_64 architectures, type: make –f Quickstart.mak debug
Note: You can specify additional options. If you are using the Xcode5 package, you must specify COMPILER=Xcode5 in the make command or as an environment variable. For more information about the options and build configurations, refer to the SimbaEngine SDK Developer Guide.
You can use the lipo command to extract 32- or 64-bit libraries from a universal library.
To extract i386 or x86_64 libraries from the universal library:
1. To display a list of the architectures found in the SimbaEngine Quickstart sample driver universal library created in the previous procedure, navigate to the directory <installdir>/SimbaEngineSDK/9.5/Examples/Source/Quickstart/Bin/ Darwin_universal_clang, and then type: lipo -info libQuickstart_debug.dylib
The following information appears: Architectures in the fat file: libQuickstart_debug.dylib are: i386 x86_64
2. To extract i386 libraries from the universal library, type: lipo libQuickstart_debug.dylib -extract i386 -output libQuickstart_debug_i386.dylib
OR
To extract x86_64 libraries: lipo libQuickstart_debug.dylib -extract x86_64 -output libQuickstart_debug_x86_64.dylib
Configuring the Driver and Data Source SimbaEngine SDK supports using the iODBC Driver Manager on the Mac OS X platform. iODBC uses configuration files to define and configure ODBC data sources and drivers. The odbc.ini file defines ODBC data sources. The odbcinst.ini file defines ODBC drivers.
Locating ODBC Configuration Files
The value of the $ODBCINI environment variable specifies the location of the odbc.ini file, including the file name, for iODBC. The value of the $ODBCINSTINI environment variable specifies the location of the odbcinst.ini file, including the file name, for iODBC. If these environment variables are not set, then iODBC assumes that the configuration files exist in the user’s home directory using the default file names (.odbc.ini and .odbcinst.ini).
Optionally, if you decide to put the configuration files somewhere other than the user’s home directory, then set the environment variables using the command line. For example: export ODBCINI=/usr/local/odbc/myodbc.ini export ODBCINSTINI=/usr/local/odbc/myodbcinst.ini
www.simba.com 21

SimbaEngine SDK 9.5 Build a C++ ODBC Driver in 5 Days
For sample configuration files, see the following directory: <installdir>/SimbaEngineSDK/9.5/Documentation/Setup
Configuring an ODBC Data Source
The .odbc.ini configuration file defines ODBC Data Sources.
To configure a data source: 1. To see if the .odbc.ini file already exists in your home directory, type the following
command: ls –al ~ | grep .odbc.ini
If the file exists, then details of the file appear. For example: -rw-rw-r-- 1 employee employee 1379 Oct 23 14:56 .odbc.ini
If the file does not exist, then nothing is returned at the command prompt.
2. If the file does not exist, then copy the sample odbc.ini file to the user’s home directory by typing: cp <installdir>/SimbaEngineSDK/9.5/Documentation/Setup/odbc.ini ~/.odbc.ini
3. Using a text editor, open the ~/.odbc.ini configuration file.
Note: To open the file, you may need to configure your text editor to show hidden files.
4. Ensure that an entry appears in the [ODBC Data Sources] section to define the Data Source Name (DSN). [ODBC Data Sources] QuickstartDSII=QuickstartDSIIDriver
Note: The [ODBC Data Sources] section specifies available data sources.
5. Ensure that a section having a name matching the data source name (DSN) exists in ~/.odbc.ini to contain configuration options. Configuration options are specified as key-value pairs. For example: [QuickstartDSII] Description=Sample SimbaEngine Quickstart DSII DBF=[INSTALLDIR]SimbaEngineSDK/9.5/Examples/Databases/Quickstart/ Driver=[INSTALLDIR]SimbaEngineSDK/9.5/Examples/Builds/Bin/ Darwin_universal_clang/libQuickstart.dylib Locale=en-US
Defining an ODBC Driver
ODBC Drivers are defined in the .odbcinst.ini configuration file. The .odbcinst.ini file is optional because you can specify drivers directly in the .odbc.ini configuration file.
To define a driver: 1. To see if the .odbcinst.ini file exists in your home directory, type the following
command: ls –al ~ | grep .odbcinst.ini
www.simba.com 22

SimbaEngine SDK 9.5 Build a C++ ODBC Driver in 5 Days
If the file exists, then details of the file appear. For example: -rw-rw-r-- 1 employee employee 2272 Oct 23 15:30 .odbcinst.ini
If the file does not exist, then nothing is returned at the command prompt.
2. If the file does not exist, then copy the sample odbcinst.ini file to the user’s home directory by typing: cp <installdir>/SimbaEngineSDK/9.5/Documentation/Setup/odbcinst.ini ~/.odbcinst.ini
3. Using a text editor, open the ~/.odbcinst.ini file.
4. Add a new entry to the [ODBC Drivers] section. Type driver name and the value “Installed”. Here is a sample entry [ODBC Drivers] section: [ODBC Drivers] QuickstartDSIIDriver=Installed
Note: The [ODBC Drivers] section specifies available drivers. The driver name is used for the “Driver” value in the data source definition instead of the driver shared library name.
5. Add a new section with a name matching the new driver name. The section contains configuration options. Configuration options are specified as key-value pairs. For example: [QuickstartDSIIDriver] APILevel=1 ConnectFunctions=YYY Description=Sample SimbaEngine Quickstart DSII Driver=[INSTALLDIR]SimbaEngineSDK/9.5/Examples/Builds/Bin/ Darwin_universal_clang/libQuickstart.dylib DriverODBCVer=03.80 SQLLevel=1
Configuring the Simba Quickstart Sample Driver
Configuration options for drivers created using SimbaEngine SDK appear in an .INI file. In order, SimbaEngine SDK searches for the .INI file in the following locations:
1. The path, including the file name, specified using the SIMBAINI environment variable
2. The driver directory, as a non-hidden .INI file
3. In $HOME, as a hidden .INI file
4. In /etc/ as a non-hidden .INI file
Procedures in the Build a C++ ODBC Driver in 5 Days guide assume that the .INI file exists in the user’s home directory.
To configure the Simba Quickstart ODBC Driver: 1. To see if the .simba.quickstart.ini file already exists in your home directory, type
the following command: ls -al ~ | grep .simba.quickstart.ini
If the file does not exist, then nothing is returned at the command prompt.
www.simba.com 23
SimbaEngine SDK 9.5 Build a C++ ODBC Driver in 5 Days
2. If the file does not exist, then copy the sample file to the user’s home directory by typing: cp <installdir>/SimbaEngineSDK/9.5/Documentation/Setup/ .simba.quickstart.ini ~/.simba.quickstart.ini
3. Using a text editor, open the ~/.simba.quickstart.ini file.
4. Set the value of DriverManagerEncoding to UTF-32
Note: For more information about your ODBC Driver Manager, consult your system administrator or refer to the documentation provided with the Driver Manager.
5. In the value for the ErrorMessagesPath property, replace [INSTALLDIR] with the path to your installation of SimbaEngine SDK.
Set the ODBCInstLib property to the absolute path of the ODBCInst library for the iODBC Driver Manager. For example: ODBCInstLib=<driver manager dir>/lib/libiodbcinst.dylib
6. Save the file.
For more information about how to configure data sources, please refer to the SimbaEngine SDK Developer Guide.
Connecting to the Data Source In order for the Quickstart sample driver to connect to the sample database successfully, the LD_LIBRARY_PATH environment variable must include references to the following libraries:
• International Components for Unicode (ICU)
• OpenSSL
To add the ICU and OpenSSL libraries:
Type the following at the command line: export DYLD_LIBRARY_PATH=DYLD_LIBRARY_PATH:[INSTALLDIR]/SimbaEngineSDK/9.5 /DataAccessComponents/ThirdParty/icu/53.1/osx10_9/xcode6_1/release3264/lib:[INSTALLDIR]/SimbaEngineSDK/9.5/DataAccessComponents/ThirdParty/ openssl/1.0.1/osx10_9/xcode6_1/release3264/lib
Also, you must have the iODBC Driver Manager installed.
Note: For more details on the iODBC Driver Manager and testing, please see the SimbaEngine SDK Developer Guide.
The following procedure uses the iodbctest utility included with the iODBC Driver Manager to test connecting to the data source that the Quickstart sample driver uses.
To test connecting the Quickstart sample driver to the sample data source: 1. At the command prompt, type:
iodbctest
www.simba.com 24

SimbaEngine SDK 9.5 Build a C++ ODBC Driver in 5 Days
2. At the prompt says “Enter ODBC connect string”, type ? to show the list of DSNs and Drivers.
3. The list of DSNs should include a DSN named QuickstartDSII. To connect, type: DSN=QuickstartDSII
4. If you connect successfully, then a prompt that says “SQL>” appears. Type a SQL command to query your database. For example, type: SELECT * FROM PRODUCT
If there were no problems with the example drivers you built, you are now ready to set up a development project to start building your own ODBC driver.
Setting Up a Customizable Project Now you are ready to set up a separate project for customization based on the Quickstart sample driver.
Important: Creating a separate project to customize is helpful becaue you can compare your project to the Quickstart sample driver when debugging, for example.
To create a customizable project based on the Quickstart sample driver: 1. Copy the Quickstart directory to a new directory that will be the top-level directory for
your new project and DSI implementation files. For example, at the command line type: cp –R <installdir>/SimbaEngineSDK/9.5/Examples/Source/Quickstart <installdir>/SimbaEngineSDK/9.5/Examples/Source/MyQuickstart
2. Browse to the /Makefiles subdirectory in the copy of the Quickstart project that you created in step 1, and then rename the Quickstart.mak file. For example, type: mv Quickstart.mak MyQuickstart.mak
3. Then, rename the .depend file that is located in the Makedepend directory.
4. Browse to the /Source subdirectory in the copy of the Quickstart project that you created in step 1. Open the file named Makefile, and then replace the “Quickstart” project name in the source code with the name of your new ODBC driver. Save and close the file.
5. Navigate to the following directory: <installdir>/SimbaEngineSDK/9.5/Examples/Source/MyQuickstart/Makefiles
6. Type make –f MyQuickstart.mak debug to run the makefile for the debug target.
Configuring Your Driver and Data Source To configure your driver and data source:
1. Open the .odbc.ini configuration file in a text editor.
2. Make sure there is an entry in the [ODBC Data Sources] section that defines the data source name (DSN).
www.simba.com 25
SimbaEngine SDK 9.5 Build a C++ ODBC Driver in 5 Days
[ODBC Data Sources] MyQuickstartDSII=MyQuickstartDSIIDriver
3. Make sure there is a section with a name that matches the data source name (DSN). For example: [MyQuickstartDSII] Description=Sample SimbaEngine Quickstart DSII DBF=[INSTALLDIR]SimbaEngineSDK/9.5/Examples/Databases/Quickstart/ Driver=[INSTALLDIR]SimbaEngineSDK/9.5/Examples/Source/MyQuickstart/Bin/ Darwin_universal_clang/libMyQuickstart_debug.dylib Locale=en-US
4. Open the .odbcinst.ini configuration file in a text editor.
5. Add a new entry to the [ODBC Drivers] section. For example: [ODBC Drivers] MyQuickstartDSIIDriver=Installed
6. Add a new section with a name that matches the new driver name. For example: [MyQuickstartDSIIDriver] Driver=[INSTALLDIR]SimbaEngineSDK/9.5/Examples/Source/MyQuickstart/Bin/ Darwin_universal_clang/libMyQuickstart_debug.dylib
7. Copy the .simba.quickstart.ini file in your home directory so it has the name .simba.myquickstart.ini
Connecting to the Data Source Using Your Customizable Driver
One way to test your data source is using the iodbctest utility included with the iODBC Driver Manager.
To test your data source using iodbctest: 1. At the command prompt, type:
iodbctest
2. At the prompt that says “Enter ODBC connect string”, type ? to show the list of DSNs and Drivers.
3. In the list, you should see your MyQuickstartDSII DSN. To connect to your data source, type: DSN=MyQuickstartDSII
4. If you connect successfully, then a prompt that says “SQL>” appears. Type a SQL command to query your database. For example, type:
SELECT * FROM PRODUCT.
5. To exit iodbctest, at the prompt, type: quit
www.simba.com 26

SimbaEngine SDK 9.5 Build a C++ ODBC Driver in 5 Days
You can also use the LLDB debugger with the iodbctest utility.
To use LLDB to test your driver and hit a breakpoint:
1. Type lldb iodbctest to start the debugger.
2. Type b Simba::DSI::DSIDriverFactory to set a breakpoint at the DSIDriverFactory()function in the Main_Unix.cpp file. DSIDriverFactory() runs as soon as the Driver Manager loads the ODBC driver. If you prefer to set a different breakpoint, then review the source code in the <installdir>/SimbaEngineSDK/9.5/ Examples/Source/MyQuickstart/Source directory as needed.
Note: When using the LLDB debugger with an application, your ODBC driver is not loaded until the application is running and you make a connection. This means that you can set breakpoints before the driver is loaded or after, depending on the breakpoint you want to hit. LLDB may display a message that the breakpoint cannot be resolved to any actual location because the driver is not loaded yet. Proceed to step 3.
3. To load and run the driver until the breakpoint is encountered, type: run DSN=MyQuickstartDSII;UID=<YourUserName>;PWD=<YourPassword>
Summary – Day One So far, the following tasks are complete:
• Building and testing the Quickstart sample driver to ensure that SimbaEngine SDK and development environment are installed and configured correctly
• Creating, building and testing a copy of the Quickstart sample driver that you can customize to connect to a different data source
Day Two Today's goal is to customize your driver, enable logging and establish a connection to your data store. To accomplish this you will visit TODO items 1 to 6.
Remember that when you build the project, you will see the TODO messages in the Output window. To rebuild the whole solution, select Build > Rebuild Solution. If the Output window is not open, then select Debug > Windows > Output. Double click a TODO message to jump to the relevant section of code.
Constructing a Driver Singleton TODO #1: Construct driver singleton.
The DSIDriverFactory() implementation in Main_Windows.cpp is the main hook that is called from Simba’s ODBC layer to create an instance of your DSI implementation. This method is called as soon as the Driver Manager calls LoadLibrary() on your ODBC driver DLL.
www.simba.com 27

SimbaEngine SDK 9.5 Build a C++ ODBC Driver in 5 Days
To construct the driver singleton: 1. Launch Microsoft Visual Studio 2012.
2. Click File > Open > Project/Solution.
3. Navigate to [INSTALL_DIRECTORY]\SimbaEngineSDK\9.5\Examples\Source\ <YourProjectName>\Source, and then open the <YourProjectName>_VS2012.vcproj file.
4. Rebuild your solution, and then double click the TODO #1 message to jump to the relevant section of code. The Main_Windows.cpp file opens.
5. Look at the DSIDriverFactory() implementation.
6. Next, specify the location that will be used when reading driver settings from the registry. This change is related to rebranding. Replace “Simba” with your company name and change “Quickstart” to the name of your driver in the following line: SimbaSettingReader::SetConfigurationBranding("Simba\\Quickstart");
7. You may want to add processing at this point if you are building a commercial driver.
8. Click Save
On Linux and UNIX platforms, DSIDriverFactory()is implemented in Main_Unix.cpp.
Setting Driver Properties TODO #2: Set the driver properties.
To set driver properties: 1. Double click the TODO #2 message to jump to the relevant section of code. The
QSDriver.cpp file opens. Look at SetDriverPropertyValues()where you will set up the general properties for your driver.
2. Change the DSI_DRIVER_DRIVER_NAME setting. Set this to the name of your driver. (The same name you used to replace “QuickstartDSII” in Day One).
3. Depending on the character sets or Unicode encoding used on your data store, you may want to change the following settings:
• DSI_DRIVER_STRING_DATA_ENCODING – The encoding of char data within the data store. The default value is ENC_UTF8.
• DSI_DRIVER_WIDE_STRING_DATA_ENCODING – The encoding of wide character data within the data store. The default is ENC_UTF16_LE.
Setting Logging Details TODO #3: Set the driver-wide logging details.
TODO #4: Set the connection-wide logging details.
www.simba.com 28

SimbaEngine SDK 9.5 Build a C++ ODBC Driver in 5 Days
To set logging details: 1. Double click the TODO #3 message to jump to the relevant section of code.
2. Change the driver log’s file name.
3. Double click the TODO #4 message to jump to the relevant section of code.
4. Change the connection log’s file name.
5. Click Save All
Note: By default, the SimbaEngine Quickstart Driver maintains two kinds of log files: one for all driver-based calls and one for each connection created. Update these TODO’s if you do not require such fine granularity in logging.
For more information about how to enable logging, refer to the SimbaEngine SDK Developer Guide.
Checking Connection Settings TODO #5: Check Connection Settings.
When the Simba ODBC layer is given a connection string from an ODBC-enabled application, the Simba ODBC layer parses the connection string into key-value pairs. Then, the entries in the connection string and the DSN are sent to the QSConnection::UpdateConnectionSettings() function for validation.
To verify connection settings: 1. Double click the TODO #5 message to jump to the relevant section of code.
2. The UpdateConnectionSettings() function should validate that the key-value pairs in in_connectionSettings are sufficient to create a connection. Use the VerifyRequiredSetting() or VerifyOptionalSetting() utility functions to do this. If any of the values received are invalid, then you should throw an ErrorException seeded with DIAG_INVALID_AUTH_SPEC
For example, the Quickstart driver verifies that the entries within in_connectionSettings are sufficient to create a connection by using the following code: VerifyRequiredSetting(QS_DBF_KEY, in_connectionSettings, out_connectionSettings);
The Quickstart driver requires a single key in the DSN, "DBF" which represents the file location to be searched. This “QS_DBF_KEY” is the connection key to use when looking up the DBF path in the connection string.
If the entries within in_connectionSettings are not sufficient to create a connection, then you can ask for additional information from the ODBC-enabled application by specifying the additional, required settings to out_connectionSettings. If there are no further entries required, simply leave out_connectionSettings empty.
www.simba.com 29

SimbaEngine SDK 9.5 Build a C++ ODBC Driver in 5 Days
Establishing a Connection TODO #6: Establish A Connection.
Once QSConnection::UpdateConnectionSettings() returns out_connectionSettings without any required settings—if there are only optional settings, a connection can still occur—then the Simba ODBC layer calls QSConnection::Connect() passing in all the connection settings received from the application.
To establish a connection: Double click the TODO #6 message to jump to the relevant section of code. Look at the
code that authenticates the user against your data store using the information provided within the in_connectionSettings parameter. The sample code uses the utility functions GetRequiredSetting() and GetOptionalSetting(). Alternatively, if authentication fails, you can choose to throw an ErrorException seeded with DIAG_INVALID_AUTH_SPEC
You have now authenticated the user against your data store.
Day Three Today’s goal is to return the data used to pass catalog information back to the ODBC-enabled application. Almost all ODBC-enabled applications require the following ODBC catalog functions:
• SQLGetTypeInfo
• SQLTables (CATALOG_ONLY)
• SQLTables (TABLE_TYPE_ONLY)
• SQLTables
• SQLColumns
Creating and Return Metadata Sources
TODO #7: Create and return your Metadata Sources.
QSDataEngine::MakeNewMetadataTable() is responsible for creating the sources to be used to return data to the ODBC-enabled application for the various ODBC catalog functions. Each ODBC catalog function is mapped to a unique DSIMetadataTableId, which is then mapped to an underlying MetadataSource that you will implement and return. Each MetadataSource instance is responsible for three things:
1. Creating a data structure that holds the data relevant for your data store: Constructor
2. Navigating the structure on a row-by-row basis: Move()
3. Retrieving data: GetData() (See Data Retrieval, below for a brief overview of data retrieval).
www.simba.com 30

SimbaEngine SDK 9.5 Build a C++ ODBC Driver in 5 Days
Handling DSI_TYPE_INFO_METADATA
The underlying ODBC catalog function SQLGetTypeInfo is handled as follows:
1. When called with DSI_TYPE_INFO_METADATA, QSDataEngine::MakeNewMetadataTable() will return an instance of QSTypeInfoMetadataSource().
2. The SimbaEngine Quickstart Driver example exposes support for all data types, but due to its underlying file format, it is constrained to support only the following types:
SQL_BIGINT SQL_BIT SQL_CHAR
SQL_DECIMAL SQL_DOUBLE SQL_INTEGER
SQL_LONGVARCHAR SQL_LONGWVARCHAR SQL_NUMERIC
SQL_REAL SQL_SMALLINT SQL_TINYINT
SQL_TYPE_DATE SQL_TYPE_TIME SQL_TYPE_TIMESTAMP
SQL_VARCHAR SQL_WCHAR SQL_WVARCHAR
3. For your driver, you may need to change the types returned and the parameters for the types in QSTypeInfoMetadataSource::PrepareType(). You change the passed in SqlTypeInfo object to modify the parameters of the types that are supported.
Handling the other MetadataSources
The other ODBC catalog functions (including SQLTables (CATALOG_ONLY), SQLTables (TABLE_TYPE_ONLY), SQLTables (SCHEMA_ONLY), SQLTables and SQLColumns) are handled automatically by the metadata helper class, as follows:
1. When called with any other DSIMetadataTableId, QSDataEngine::MakeNewMetadataTable() should return NULL. Returning NULL will signal SimbaEngine SDK that it should use the metadata helper class returned via QSDataEngine::CreateMetadataHelper() along with some default MetadataSources to create the data source metadata. You can also choose to return a DSIMetadataSource if you don’t want to use the metadata helper.
2. You will need to change:
• QSMetadataHelper::QSMetadataHelper() The example constructor retrieves a list of the tables in the data source. You should modify this method to load the tables defined within your data store.
• QSMetadataHelper::GetNextTable() In the SimbaEngine Quickstart Driver, this method returns the next table in the data source. You should modify this method to retrieve the next table from your data store.
• The DSIExtMetadataHelper class works by retrieving the identifying information for each table and then opening the table via QSDataEngine::OpenTable(). Once you have implemented QSTable, the correct metadata will be returned for all of the tables and columns in your data source.
www.simba.com 31

SimbaEngine SDK 9.5 Build a C++ ODBC Driver in 5 Days
You can now retrieve type metadata from within your data store.
On Linux and UNIX platforms, this metadata is also available using the datatypes command in the iodbctest utility.
Day Four Today’s goal is to enable data retrieval from within the driver. We will discuss:
• Opening a table defined within your data store
• Retrieving the column information for the table
• Retrieving data
Enabling Data Retrieval TODO #8: Open A Table.
QSDataEngine::OpenTable() is the entry point where Simba SQL Engine requests that tables involved in the query be opened.
QSTable is an implementation of DSIExtSimpleResultSet, an abstract class provided by Simba that provides for basic forward-only result set traversal. The main role of QSTable is to translate the stored data from your native data format into SQL Data types.
The Quickstart sample driver is implemented for Tabbed Unicode Files. The sample driver translates the text from UTF16-LE strings into the SQL Data types defined for each column within the configuration dialog.
In the Quickstart driver, QSTable uses a TabbedUnicodeFileReader, which provides an interface to navigate between lines within a Unicode text file. This class preprocesses each row in the file to determine the starting file offset of each column in the row. Its GetData method takes a columnIndex and uses it to calculate the exact position in the file where the column’s data resides. The method repositions the file and retrieves the data as if from a byte-buffer. See Appendix C: Data Retrieval for a brief overview of data retrieval.
To enable data retrieval: 1. Modify the QSDataEngine::OpenTable method to check that the supplied catalog,
schema and table names are valid and correspond to a table defined in your data store. If they are not, you should return null to indicate that the table does not exist. If the inputs are valid, then a new instance of QSTable is returned.
2. Make the following changes to QSTable for it to work with your data store:
a) To return the catalog, schema and table names for your table:
• QSTable::QSTable(): The constructor must be modified to take in the catalog, schema and table names and save them in member variables.
• QSTable::GetCatalogName(): Returns QS_CATALOG;
www.simba.com 32

SimbaEngine SDK 9.5 Build a C++ ODBC Driver in 5 Days
• QSTable::GetSchemaName(): Returns simba_wstring() (because it does not support schemas);
• QSTable::GetTableName(): Returns m_tableName;
b) To return the columns defined for your table:
• QSTable::InitializeColumns(): Modify the method so that, for each column defined in the table, you define a DSIResultSetColumn in terms of SQL types. Here is an example of pseudo code for the new method: AutoPtr<DSIResultSetColumns> columns; Get all column information from your data store for the table For Each Defined Column { AutoPtr<DSIColumnMetadata> columnMetadata( new DSIColumnMetadata()); columnMetadata->m_catalogName = m_catalogName; columnMetadata->m_schemaName = m_schemaName; columnMetadata->m_tableName = m_tableName; columnMetadata->m_name = //column name columnMetadata->m_label = //localized column name columnMetadata->m_unnamed = false; columnMetadata->m_charOrBinarySize = //the length in bytes columnMetadata->m_nullable = DSI_NULLABLE; // Change the first parameter of this method to the SQL // type that maps to your data store type. SqlTypeMetadata* sqlTypeMetadata = SqlTypeMetadataFactory::MakeNewSqlTypeMetadata( SQL_WVARCHAR, TDW_BUFFER_OWNED); columns->AddColumn( new DSIResultSetColumn( sqlTypeMetadata, columnMetadata.Detach())); } m_columns.Attach(columns.Detach());
c) Modify the following three methods. The methods are responsible for navigating a data structure containing information about one table in the data store and retrieving data from the table:
• QSTable::MoveToBeforeFirstRow()
• QSTable::MoveToNextRow()
• QSTable::GetData()
In your class:
• Implementing a streaming interface for the data in the table within your data store is best.
• Provide the ability to navigate forward from one table row to the next.
www.simba.com 33

SimbaEngine SDK 9.5 Build a C++ ODBC Driver in 5 Days
• Provide the ability to navigate across columns within the row.
• Provide the ability to read the data associated with the current row and column combination.
d) Modify QSTable::DoCloseCursor(). This is a callback method called from Simba SQL Engine to indicate that data retrieval has completed and that you may now do any tasks related to closing the connection to your data store.
You can now retrieve data and see the rest of the metadata from your data store. You should be able to:
• Run SQLTables() and SQLColumns() from within ODBCTest32.exe (Unicode) and see the correct metadata returned.
• Execute queries from any ODBC-enabled application such as Microsoft Excel, Microsoft Access, Microsoft SQL Server or Crystal Reports and see the results returned from your data store.
On Linux and UNIX platforms, lists of catalogs, schemas, tables and types are available using the qualifiers, owners, tables and types commands in the iodbctest utility.
Day Five Today’s goal is to start productizing your driver. Additionally, you can also start localizing your driver error messages. Refer to SimbaEngine SDK Developer Guide for more details.
Configuring Error Messages TODO #9: Register Messages xml file for handling by DSIMessageSource.
All the error messages used within your DSI implementation are stored in a file called QSMessages.xml
To configure error messages: 1. Rename the QSMessages.xml file to something appropriate to your data store.
2. Double click the TODO #9 message to jump to the relevant section of code.
3. Update the line associated with the TODO to match the new name of the file.
4. Open the QSMessages.xml file and change all instances of the following items:
• The letters “QS” to a two letter abbreviation of your choice
• The word “Quickstart” to a name relating to your driver
5. When you are done, you should revisit each exception thrown within your DSI implementation and change the parameters to match as well. This will rebrand your converted SimbaEngine Quickstart Driver for your organization.
TODO #10: Set the vendor name, which will be prepended to error messages.
www.simba.com 34

SimbaEngine SDK 9.5 Build a C++ ODBC Driver in 5 Days
The vendor name is prepended to all error messages that are visible to applications. The default vendor name is Simba.
To set the vendor name: 1. Double click the TODO #10 message to jump to the relevant section of code.
2. Set the vendor name as shown in the commented code.
Adding Finishing Touches You have now completed all TODO’s in the project. However, there are still a couple of final steps before you have a fully functioning driver.
To add finishing touches: 1. Rename all files and classes in the project to have the two-letter abbreviation you chose
as part of TODO #9.
2. Create a driver configuration dialog. This dialog is presented to the user when they use the ODBC Data Source Administrator to create a new ODBC DSN or configure an existing one. The C++ SimbaEngine Quickstart Driver project contains an example ODBC configuration dialog that you can look at, as an example. You can find the source under the Setup folder within the SimbaEngine Quickstart Driver project.
3. To see the driver configuration dialog that you created, run the ODBC Data Source Administrator, open the Control Panel, select Administrative Tools, and then select Data Sources (ODBC). If your Control Panel is set to view by category, then Administrative Tools is located under System and Security.
IMPORTANT: If you are using 64-bit Windows with 32-bit applications, you must use the 32-bit ODBC Data Source Administrator. You cannot access the 32-bit ODBC Data Source Administrator from the start menu or control panel in 64-bit Windows. Only the 64-bit ODBC Data Source Administrator is accessible from the start menu or control panel. On 64-bit Windows, to launch the 32-bit ODBC Data Source Administrator you must run C:\WINDOWS\SysWOW64\odbcad32.exe. See Appendix A: ODBC Data Source Administrator on Windows 32-Bit vs. 64-Bit on page 36 for details.
On Linux and UNIX platforms, creating a driver configuration dialog is possible. However, the Quickstart sample driver for Linux and UNIX platforms does not include a configuration dialog.
Conclusion By modifying the Quickstart sample driver included with the SimbaEngine SDK, you have created your own read-only ODBC driver that connects to your data store.
www.simba.com 35

SimbaEngine SDK 9.5 Build a C++ ODBC Driver in 5 Days
Appendix A: ODBC Data Source Administrator on Windows 32-Bit vs. 64-Bit
On a 64-bit Windows system, you can execute 64-bit and 32-bit applications transparently. Currently, many applications are available in 32-bit versions only. Running 32-bit applications on 64-bit operating systems is common.
Note: Microsoft Excel is available in 32-bit and 64-bit versions.
In a single running process, all of the code must be either 64-bit or 32-bit. 64-bit applications can only load 64-bit ODBC drivers and 32-bit applications can only load 32-bit ODBC drivers.
On a 64-bit Windows system, the ODBC Data Source Administrator that you access through the Control Panel by default configures data sources for 64-bit applications. However, you must use the 32-bit version of the ODBC Data Source Administrator to configure data sources for 32-bit applications.
PROBLEM: You cannot access the 32-bit ODBC Data Source Administrator from the Start menu or Control Panel in 64-bit Windows.
SOLUTION: To create new 32-bit data sources or modify existing ones on 64-bit Windows you must run C:\WINDOWS\SysWOW64\odbcad32.exe. Create a shortcut to the 32-bit ODBC Data Source Administrator on your Desktop or Start menu if you configure 32-bit data sources frequently.
www.simba.com 36

SimbaEngine SDK 9.5 Build a C++ ODBC Driver in 5 Days
Appendix B: Bitness and the Windows Registry A 64-bit application cannot use a 32-bit ODBC driver, and vice versa. In the Registry on computers running 64-bit Windows operating systems, system-wide information about 64-bit ODBC drivers is stored in the HKEY_LOCAL_MACHINE/SOFTWARE/ODBC subkey and system-wide information about 32-bit ODBC drivers is stored in the HKEY_LOCAL_MACHINE/ SOFTWARE/WOW6432NODE/ODBC subkey.
Note: For 32-bit applications running on a 64-bit computer, 32-bit data sources appear the same as if the application was running on a 32-bit computer.
On computers running 32-bit Windows operating systems, system-wide information about ODBC drivers is stored in the HKEY_LOCAL_MACHINE/SOFTWARE/ODBC subkey. 32-bit Windows operating systems cannot run 64-bit applications or drivers.
32- and 64-bit ODBC Data Source Administrators—discussed in Appendix A: ODBC Data Source Administrator on Windows 32-Bit vs. 64-Bit on page 36—use information about drivers stored in the respective Windows Registry keys.
The ODBCINST.INI Subkey To define a name and set the location of drivers, the ODBC Data Source Administrator matching the bitness of the operating system uses definitions in the subkey HKEY_LOCAL_MACHINE/SOFTWARE/ODBC/ODBCINST.INI and the 32-bit ODBC Data Source Administrator on 64-bit Windows uses Registry keys created in HKEY_LOCAL_MACHINE/SOFTWARE/WOW6432NODE/ODBC/ODBCINST.INI
The ODBCINST.INI subkey contains a subkey for each driver. The subkey for each driver includes the following string values:
• Driver provides the path to the driver DLL
• Setup provides the location of the driver setup DLL
• Description briefly describes the driver
The ODBCINST.INI subkey also contains a subkey named ODBC Drivers that contains string values to match the name of each driver subkey. Each string value is the text Installed
Note: For more details on information in the Windows Registry contained in the ODBCINST.INI subkey, see the MSDN topic Registry Entries for ODBC Components at https://msdn.microsoft.com/en-us/library/ms714818%28v=vs.85%29.aspx.
The ODBC.INI Subkey To connect a driver to a database, the ODBC Data Source Administrator matching the bitness of the operating system uses definitions in the subkey HKEY_LOCAL_MACHINE/SOFTWARE/ ODBC/ODBC.INI and the 32-bit ODBC Data Source Administrator on 64-bit Windows uses Registry keys created in HKEY_LOCAL_MACHINE/SOFTWARE/WOW6432NODE/ODBC/ ODBC.INI
www.simba.com 37

SimbaEngine SDK 9.5 Build a C++ ODBC Driver in 5 Days
The ODBC.INI subkey contains a subkey for each Data Source Name (DSN). The subkey for each DSN includes the following string values:
• Driver defines the name of the driver to use for connecting to the database, as set in the ODBCINST.INI subkey.
Note: The Driver value can also set a file path to the driver DLL.
• DBF defines the path to the database to which the DSN creates a connection.
• Description briefly describes the DSN.
The ODBC.INI subkey also contains a subkey named ODBC Data Sources that contains string values to match the name of each DSN subkey. Each string value is the name of the driver that the DSN uses.
Note: For more details on information in the Windows Registry contained in the ODBC.INI subkey, see the MSDN topic Registry Entries for Data Sources at https://msdn.microsoft.com/en-us/library/ms712603%28v=vs.85%29.aspx.
www.simba.com 38

SimbaEngine SDK 9.5 Build a C++ ODBC Driver in 5 Days
Appendix C: Data Retrieval In the Data Store Interface (DSI), the following two methods actually perform the task of retrieving data from your data store:
• Each MetadataSource implementation of GetMetadata()
• QSTable::GetData()
Both methods will provide a way to identify a column within the current row uniquely. For MetadataSource, the Simba SQL Engine will pass in a unique column tag (see DSIOutputMetadataColumnTag). For QSTable, the Simba SQL Engine will pass in the column index.
In addition, both methods accept the following three parameters:
• in_data The SQLData into which you must copy the value of your cell. This class is a wrapper around a buffer managed by the Simba SQL Engine. To access the buffer, you call its GetBuffer() method. The data you copy into the buffer must be formatted as a SQL Type (see https://msdn.microsoft.com/en-us/library/ms710150%28VS.85%29.aspx for a list of data types and definitions). Therefore, if your data is not stored as SQL Types, you will need to write code to convert from your native format. The type of this parameter is governed by the metadata for the column that is returned by the class. Thus, if you set the SQL Type of column 1 in QSTable:: InitializeColumns() to SQL_INTEGER, then when QSTable::GetData() is called for column 1, you will be passed a SQLData that wraps an int data type. For MetadataSource, the type is associated with the column tag (see DSIOutputMetadataColumnTag.h). For character or binary data you must call SetLength() before calling GetBuffer(). Not doing so may result in a heap violation. See QSTypeUtilities.h for an example on how to handle character or binary data.
• in_offset Character, wide character and binary data types can be retrieved in parts. This value specifies where, in the current column, the value should be copied from. The value is usually 0
• in_maxSize The maximum size (in bytes) that can be copied into the in_data parameter. For character or binary data, copying data that is greater than this size can result in a data truncation warning or a heap violation.
www.simba.com 39

SimbaEngine SDK 9.5 Build a C++ ODBC Driver in 5 Days
SqlData Types SqlData objects represent the SQL types and encapsulate the data in a buffer. When you have a SqlData object and would like to know what data type it is representing, you can use GetMetadata()->GetSqlType() to retrieve the associated SQL_* type.
For information on how SQL types map to C++ types, see Appendix G Data Types in the SimbaEngine SDK Developer Guide.
Fixed Length Types
The structures used to store the fixed-length data types represented by SqlData objects are: SQL_BIT SQL_DECIMAL SQL_DOUBLE SQL_FLOAT SQL_INTERVAL_DAY SQL_INTERVAL_DAY_TO_HOUR SQL_INTERVAL_DAY_TO_MINUTE SQL_INTERVAL_DAY_TO_SECOND SQL_INTERVAL_HOUR SQL_INTERVAL_HOUR_TO_MINUTE SQL_INTERVAL_HOUR_TO_SECOND SQL_INTERVAL_MINUTE SQL_INTERVAL_MINUTE_TO_SECOND SQL_INTERVAL_SECOND SQL_INTERVAL_MONTH SQL_INTERVAL_YEAR SQL_INTERVAL_MONTH_TO_YEAR SQL_NUMERIC SQL_REAL SQL_SBIGINT SQL_SINTEGER SQL_SSMALLINT SQL_STINYINT SQL_TYPE_DATE SQL_TYPE_TIME SQL_TYPE_TIMESTAMP SQL_UBIGINT SQL_UINTEGER SQL_USMALLINT SQL_UTINYINT
More Information on Date, Time and DateTime Types
The associated SQL types for date, time, and datetime are SQL_TYPE_DATE, SQL_TYPE_TIME, and SQL_TYPE_TIMESTAMP respectively.
Important: The SQL_DATE, SQL_TIME and SQL_TIMESTAMP are ODBC 2.x types while the SQL_TYPE_* types are ODBC 3.x types. Since you are developing an ODBC 3.x driver, use the SQL_TYPE_* types.
www.simba.com 40

SimbaEngine SDK 9.5 Build a C++ ODBC Driver in 5 Days
Simple Fixed-Length Data Example
For a SQL_INTEGER, the SQLData will contain a simba_int32 into which you must copy your integer value. The example below illustrates how this might be achieved.
switch (in_data->GetMetadata()->GetSqlType()) { case SQL_INTEGER: { simba_int32 value = 1234; *reinterpret_cast<simba_int32*>(in_data->GetBuffer()) = value; } }
Variable Length Types
The following variable-length data types are stored in buffers and represented by SqlData objects:
SQL_BINARY SQL_CHAR SQL_LONGVARBINARY SQL_LONGVARCHAR SQL_VARBINARY SQL_VARCHAR SQL_WCHAR SQL_WLONGVARCHAR SQL_WVARCHAR
Note: You may find that the DSITypeUtilities::OutputWVarCharStringData and OutputVarCharStringData are useful for setting character data.
Simple Variable-Length Data Example
The SQL_CHAR example below illustrates how the type utilities might be used while the SQL_VARCHAR example shows a simple example using memcpy. In practise, SQL_CHAR, SQL_VARCHAR and SQL_LONGVARCHAR will not require separate cases. Also, there will be other considerations such as having to deal with offsets into the data.
switch (in_data->GetMetadata()->GetSqlType()) { case SQL_CHAR: { simba_string stdString(“Hello”); return DSITypeUtilities::OutputVarCharStringData( &stdString, in_data, in_offset, in_maxSize); } case SQL_VARCHAR: { simba_string stdString("Hello"); simba_uint32 size = stdString.size(); in_data->SetLength(size);
www.simba.com 41

SimbaEngine SDK 9.5 Build a C++ ODBC Driver in 5 Days
memcpy(in_data->GetBuffer(), stdString, size); return false; } }
Data Conversion in Practice
In the SimbaEngine Quickstart example, when GetData() is called the values are read from the tabbed Unicode file (in TabbedUnicodeFileReader::GetData), converted to simba_wstrings (in QSTable::ReadWholeColumnAsString) and then converted to the requested SQL data type (in QSTable::ConvertData). This works well because the data source is a text file and a good cross-platform example.
For your data source, if you’re already getting data of the correct type—integers, for example—then ideally you should skip the conversion to strings so you can achieve better performance. Be aware of which data types map to which SQL Types, as well as how to represent them in the expected format. Then you can set the buffer in an appropriate manner.
NULL Values
To represent a null value, directly set the SqlData object as null:
in_data->SetNull(true);
www.simba.com 42

SimbaEngine SDK 9.5 Build a C++ ODBC Driver in 5 Days
Appendix D: How to Add Schema Support Microsoft Excel does not require schema support to work properly with your new driver. However, some other applications require schema support. If your data store supports schemas, then you might want to provide access to them for your users. The following instructions describe how to add schema support to your ODBC driver.
Handling DSI_SCHEMAONLY_METADATA 1. By default, QSConnnection::SetConnectionPropertyValues()disables schema
support via DSIPropertyUtilities::SetSchemaSupport(). Change this value to true to enable schema support.
2. You will also need to change:
a. QSMetadataHelper:: GetNextTable() In the SimbaEngine Quickstart sample driver, a blank schema is returned because schema support is not enabled by default. The schema will need to be returned in the Identifier to allow SimbaEngine SDK to open the correct table.
b. QSDataEngine::OpenTable() Modify this method to verify the given schema and return the correct table for the given catalog, schema and table name.
c. QSTable::GetSchemaName() Modify this method to return the schema to which the table belongs.
www.simba.com 43

SimbaEngine SDK 9.5 Build a C++ ODBC Driver in 5 Days
Appendix E: C++ Server Configuration To establish a connection, the connection settings for the driver are normally retrieved directly from the ODBC DSN. However, when the driver is a server, the settings cannot be retrieved directly because the DSN refers to the client instead of a specific driver. In addition, there would also be security concerns if a given client has control over server-specific settings. Therefore, to establish a connection when a driver is a server, the connection settings need to be augmented.
Important: Windows Registry keys listed below apply to 32-Bit Windows and 64-bit Windows when running 64-bit applications. If you are using 64-bit Windows with 32-bit applications, then adjust the paths as described in Appendix B: Bitness and the Windows Registry on page 37.
For the Quickstart sample driver, the registry entries under HKEY_LOCAL_MACHINE/SOFTWARE/ SIMBA/QUICKSTART/SERVER are used to enable this server-specific behavior. The settings augment the connection settings that are passed in during a connection.
On Linux and UNIX platforms, the configuration entries are located in the .simbaserver.quickstart.ini file.
To set up the Quickstart sample driver as a server: 1. Build the Quickstart solution using a server configuration (i.e. Debug_Server or
Release_Server). This will build the server executable.
2. In the Windows Registry, navigate to the key HKEY_LOCAL_MACHINE/SOFTWARE/SIMBA/ QUICKSTART/SERVER, and then add the following string value: DBF=[INSTALL_DIRECTORY]\Examples\Databases\Text
3. Additonal server settings are located under sub-nodes of HKEY_LOCAL_MACHINE/ SOFTWARE/SIMBA/QUICKSTART/SERVER. For full list of possible server configuration parameters, see the SimbaClientServer User Guide.
On Linux and UNIX platforms, to set the Quickstart sample driver up as a server you need to:
1. Build Quickstart using the debug (or release) server configuration: BUILDSERVER=exe make –f Quickstart.mak debug
2. Add the DBF value to the [Server] section of the .simbaserver.quickstart.ini file: DBF=[INSTALL_DIRECTORY]/Examples/Databases/Text
3. Configure the server as required in the other sections of the .simbaserver.quickstart.ini file.
For further details on setting up a connection between a client and server, please see the SimbaClientServer User Guide. After configuring the client and server, you should be able to connect to your data source.
www.simba.com 44
SimbaEngine SDK 9.5 Build a C++ ODBC Driver in 5 Days
Third Party Trademarks ICU License - ICU 1.8.1 and later
COPYRIGHT AND PERMISSION NOTICE
Copyright (c) 1995-2014 International Business Machines Corporation and others
All rights reserved.
Permission is hereby granted, free of charge, to any person obtaining a copy of this software and associated documentation files (the "Software"), to deal in the Software without restriction, including without limitation the rights to use, copy, modify, merge, publish, distribute, and/or sell copies of the Software, and to permit persons to whom the Software is furnished to do so, provided that the above copyright notice(s) and this permission notice appear in all copies of the Software and that both the above copyright notice(s) and this permission notice appear in supporting documentation.
THE SOFTWARE IS PROVIDED "AS IS", WITHOUT WARRANTY OF ANY KIND, EXPRESS OR IMPLIED, INCLUDING BUT NOT LIMITED TO THE WARRANTIES OF MERCHANTABILITY, FITNESS FOR A PARTICULAR PURPOSE AND NONINFRINGEMENT OF THIRD PARTY RIGHTS. IN NO EVENT SHALL THE COPYRIGHT HOLDER OR HOLDERS INCLUDED IN THIS NOTICE BE LIABLE FOR ANY CLAIM, OR ANY SPECIAL INDIRECT OR CONSEQUENTIAL DAMAGES, OR ANY DAMAGES WHATSOEVER RESULTING FROM LOSS OF USE, DATA OR PROFITS, WHETHER IN AN ACTION OF CONTRACT, NEGLIGENCE OR OTHER TORTIOUS ACTION, ARISING OUT OF OR IN CONNECTION WITH THE USE OR PERFORMANCE OF THIS SOFTWARE.
Except as contained in this notice, the name of a copyright holder shall not be used in advertising or otherwise to promote the sale, use or other dealings in this Software without prior written authorization of the copyright holder.
All trademarks and registered trademarks mentioned herein are the property of their respective owners.
OpenSSL License
Copyright (c) 1998-2011 The OpenSSL Project. All rights reserved.
Redistribution and use in source and binary forms, with or without modification, are permitted provided that the following conditions are met:
1. Redistributions of source code must retain the above copyright notice, this list of conditions and the following disclaimer.
2. Redistributions in binary form must reproduce the above copyright notice, this list of conditions and the following disclaimer in the documentation and/or other materials provided with the distribution.
3. All advertising materials mentioning features or use of this software must display the following acknowledgment:
"This product includes software developed by the OpenSSL Project for use in the OpenSSL Toolkit. (http://www.openssl.org/)"
4. The names "OpenSSL Toolkit" and "OpenSSL Project" must not be used to endorse or promote products derived from this software without prior written permission. For written permission, please contact [email protected].
5. Products derived from this software may not be called "OpenSSL" nor may "OpenSSL" appear in their names without prior written permission of the OpenSSL Project.
6. Redistributions of any form whatsoever must retain the following acknowledgment:
"This product includes software developed by the OpenSSL Project for use in the OpenSSL Toolkit (http://www.openssl.org/)"
THIS SOFTWARE IS PROVIDED BY THE OpenSSL PROJECT ``AS IS'' AND ANY EXPRESSED OR IMPLIED WARRANTIES, INCLUDING, BUT NOT LIMITED TO, THE IMPLIED WARRANTIES OF MERCHANTABILITY AND FITNESS FOR A PARTICULAR PURPOSE ARE DISCLAIMED. IN NO EVENT SHALL THE OpenSSL PROJECT OR ITS CONTRIBUTORS BE LIABLE FOR ANY DIRECT, INDIRECT, INCIDENTAL, SPECIAL, EXEMPLARY, OR CONSEQUENTIAL DAMAGES (INCLUDING, BUT NOT LIMITED TO, PROCUREMENT OF SUBSTITUTE GOODS OR SERVICES; LOSS OF USE, DATA, OR PROFITS; OR BUSINESS INTERRUPTION) HOWEVER CAUSED AND ON ANY THEORY OF LIABILITY, WHETHER IN CONTRACT, STRICT LIABILITY, OR TORT (INCLUDING NEGLIGENCE OR OTHERWISE) ARISING IN ANY WAY OUT OF THE USE OF THIS SOFTWARE, EVEN IF ADVISED OF THE POSSIBILITY OF SUCH DAMAGE.
This product includes cryptographic software written by Eric Young([email protected]). This product includes software written by Tim Hudson ([email protected]).
www.simba.com 45

SimbaEngine SDK 9.5 Build a C++ ODBC Driver in 5 Days
Original SSLeay License
Copyright (C) 1995-1998 Eric Young ([email protected])
All rights reserved.
This package is an SSL implementation written by Eric Young ([email protected]). The implementation was written so as to conform with Netscapes SSL.
This library is free for commercial and non-commercial use as long as the following conditions are aheared to. The following conditions apply to all code found in this distribution, be it the RC4, RSA, lhash, DES, etc., code; not just the SSL code. The SSL documentation included with this distribution is covered by the same copyright terms except that the holder is Tim Hudson ([email protected]).
Copyright remains Eric Young's, and as such any Copyright notices in the code are not to be removed. If this package is used in a product, Eric Young should be given attribution as the author of the parts of the library used. This can be in the form of a textual message at program startup or in documentation (online or textual) provided with the package.
Redistribution and use in source and binary forms, with or without modification, are permitted provided that the following conditions are met:
1. Redistributions of source code must retain the copyright notice, this list of conditions and the following disclaimer.
2. Redistributions in binary form must reproduce the above copyright notice, this list of conditions and the following disclaimer in the documentation and/or other materials provided with the distribution.
3. All advertising materials mentioning features or use of this software must display the following acknowledgement:
"This product includes cryptographic software written by Eric Young ([email protected])"
The word 'cryptographic' can be left out if the rouines from the library being used are not cryptographic related :-).
4. If you include any Windows specific code (or a derivative thereof) from the apps directory (application code) you must include an acknowledgement:
"This product includes software written by Tim Hudson ([email protected])"
THIS SOFTWARE IS PROVIDED BY ERIC YOUNG ``AS IS'' AND ANY EXPRESS OR IMPLIED WARRANTIES, INCLUDING, BUT NOT LIMITED TO, THE IMPLIED WARRANTIES OF MERCHANTABILITY AND FITNESS FOR A PARTICULAR PURPOSE ARE DISCLAIMED. IN NO EVENT SHALL THE AUTHOR OR CONTRIBUTORS BE LIABLE FOR ANY DIRECT, INDIRECT, INCIDENTAL, SPECIAL, EXEMPLARY, OR CONSEQUENTIAL DAMAGES (INCLUDING, BUT NOT LIMITED TO, PROCUREMENT OF SUBSTITUTE GOODS OR SERVICES; LOSS OF USE, DATA, OR PROFITS; OR BUSINESS INTERRUPTION) HOWEVER CAUSED AND ON ANY THEORY OF LIABILITY, WHETHER IN CONTRACT, STRICT LIABILITY, OR TORT (INCLUDING NEGLIGENCE OR OTHERWISE) ARISING IN ANY WAY OUT OF THE USE OF THIS SOFTWARE, EVEN IF ADVISED OF THE POSSIBILITY OF SUCH DAMAGE.
The licence and distribution terms for any publically available version or derivative of this code cannot be changed. i.e. this code cannot simply be copied and put under another distribution licence [including the GNU Public Licence.]
Expat License
"Copyright (c) 1998, 1999, 2000 Thai Open Source Software Center Ltd
Permission is hereby granted, free of charge, to any person obtaining a copy of this software and associated documentation files (the ""Software""), to deal in the Software without restriction, including without limitation the rights to use, copy, modify, merge, publish, distribute, sublicense, and/or sell copies of the Software, and to permit persons to whom the Software is furnished to do so, subject to the following conditions:
The above copyright notice and this permission notice shall be included in all copies or substantial portions of the Software.
THE SOFTWARE IS PROVIDED ""AS IS"", WITHOUT WARRANTY OF ANY KIND, EXPRESS OR IMPLIED, INCLUDING BUT NOT LIMITED TO THE WARRANTIES OF MERCHANTABILITY, FITNESS FOR A PARTICULAR PURPOSE AND NOINFRINGEMENT. IN NO EVENT SHALL THE AUTHORS OR COPYRIGHT HOLDERS BE LIABLE FOR ANY CLAIM, DAMAGES OR OTHER LIABILITY, WHETHER IN AN ACTION OF CONTRACT, TORT OR OTHERWISE, ARISING FROM, OUT OF OR IN CONNECTION WITH THE SOFTWARE OR THE USE OR OTHER DEALINGS IN THE SOFTWARE."
Stringencoders License
Copyright 2005, 2006, 2007
www.simba.com 46

SimbaEngine SDK 9.5 Build a C++ ODBC Driver in 5 Days
Nick Galbreath -- nickg [at] modp [dot] com
All rights reserved.
Redistribution and use in source and binary forms, with or without modification, are permitted provided that the following conditions are met:
Redistributions of source code must retain the above copyright notice, this list of conditions and the following disclaimer.
Redistributions in binary form must reproduce the above copyright notice, this list of conditions and the following disclaimer in the documentation and/or other materials provided with the distribution.
Neither the name of the modp.com nor the names of its contributors may be used to endorse or promote products derived from this software without specific prior written permission.
THIS SOFTWARE IS PROVIDED BY THE COPYRIGHT HOLDERS AND CONTRIBUTORS "AS IS" AND ANY EXPRESS OR IMPLIED WARRANTIES, INCLUDING, BUT NOT LIMITED TO, THE IMPLIED WARRANTIES OF MERCHANTABILITY AND FITNESS FOR A PARTICULAR PURPOSE ARE DISCLAIMED. IN NO EVENT SHALL THE COPYRIGHT OWNER OR CONTRIBUTORS BE LIABLE FOR ANY DIRECT, INDIRECT, INCIDENTAL, SPECIAL, EXEMPLARY, OR CONSEQUENTIAL DAMAGES (INCLUDING, BUT NOT LIMITED TO, PROCUREMENT OF SUBSTITUTE GOODS OR SERVICES; LOSS OF USE, DATA, OR PROFITS; OR BUSINESS INTERRUPTION) HOWEVER CAUSED AND ON ANY THEORY OF LIABILITY, WHETHER IN CONTRACT, STRICT LIABILITY, OR TORT (INCLUDING NEGLIGENCE OR OTHERWISE) ARISING IN ANY WAY OUT OF THE USE OF THIS SOFTWARE, EVEN IF ADVISED OF THE POSSIBILITY OF SUCH DAMAGE.
This is the standard "new" BSD license:
http://www.opensource.org/licenses/bsd-license.php
dtoa License
The author of this software is David M. Gay.
Copyright (c) 1991, 2000, 2001 by Lucent Technologies.
Permission to use, copy, modify, and distribute this software for any purpose without fee is hereby granted, provided that this entire notice is included in all copies of any software which is or includes a copy or modification of this software and in all copies of the supporting documentation for such software.
THIS SOFTWARE IS BEING PROVIDED "AS IS", WITHOUT ANY EXPRESS OR IMPLIED WARRANTY. IN PARTICULAR, NEITHER THE AUTHOR NOR LUCENT MAKES ANY REPRESENTATION OR WARRANTY OF ANY KIND CONCERNING THE MERCHANTABILITY OF THIS SOFTWARE OR ITS FITNESS FOR ANY PARTICULAR PURPOSE.
www.simba.com 47