Budget Line by Department Detail Total Department...
13
Budget Line by Department Detail Total Department Flex This report shows your filled employees and positions and distributed vacant positions by the employees home department giving you the distribution chartfield string, percentage distributed, earnings amount, total benefit amount, and total amount distributed at the total departmental flex level. Log into Hyperion using the following navigation: PeopleSoft > Main Menu > Budgeting > UF Hyperion Budgeting Once in Hyperion if you have the HomePage set to default you can get to the reports from the Workspace Pages box by clicking on the Reports Folder. The Explore tab will automatically open with the reports available.
Transcript of Budget Line by Department Detail Total Department...

Budget Line by Department Detail Total Department Flex
This report shows your filled employees and positions and distributed vacant positions by the employees
home department giving you the distribution chartfield string, percentage distributed, earnings amount, total
benefit amount, and total amount distributed at the total departmental flex level.
Log into Hyperion using the following navigation: PeopleSoft > Main Menu > Budgeting > UF Hyperion
Budgeting
Once in Hyperion if you have the HomePage set to default you can get to the reports from the Workspace
Pages box by clicking on the Reports Folder. The Explore tab will automatically open with the reports
available.

If you have the application (UBO_PSPB) set to default you can get to the reports from the Explore Link then
find Shared Workspace Pages in the left hand column and click the plus sign to open where you will find the
Reports folder which you will then click to get the reports.
Double Click on the Budget_Line_By_Dept_TotalDeptFlex report.

The report will open and prompt you for your Entity, Employee, and Position. It is important that you only
search for your specific criteria and you remove the default selections. If you do not remove the default
selections you will be running the report for the entire university and the report will fail.
There are two ways to search on this screen. The first way is the manually type your search options. When
using this option you need to remember to use the correct search options. We will start with Entity below.
When searching for Entity you need to first click the Edit Member Names option.
Then you need to highlight and delete Unspecified Entity and type your search criteria. It is important that
you always remember to do HR_ XX(XXXX). Depending on the number of employees that are in a department
you will either search at the 2 digit, 4 digit, or 6 digit department id. In this example we will select the
Graduate School which is HR_12.

To search for your employee you will want to click the Edit Member Names highlight Employee delete and
search by the employees’ home department. All search options should start with EMP_XX(XXXX). Depending
on the number of employees that are in a department you will either search at the 2 digit, 4 digit, or 6 digit
department id. Please note if Employee A has one job in the Graduate School and is paid from the Graduate
School and Fine Arts the employee belongs to the Graduate School only. In this case you would only need to
search by EMP_12 because Employee A only belongs to the Graduate School. The Graduate School will see
both of the distributions but, Fine Arts will not see Employee A because the employee is not their employee;
they just pay a portion of their salary. However, if Employee B has two different jobs, one job in the Graduate
School and one job in Health and Human Performance, Employee B can only be located in one area within
Hyperion. For this case the employees’ home department is HHP so if you are the Graduate School you would
need to search by EMP_12 and EMP_33 in order to ensure that you are seeing all of your employees. When
searching for multiple options please add a comma in between criteria.
Now you will want to search for your positions. Click the Edit Member Names under Position highlight the
Position and delete and search for your positions. All search options should start with POS_XX(XXXX).
Depending on the number of employees that are in a department you will either search at the 2 digit, 4 digit,
or 6 digit department id.
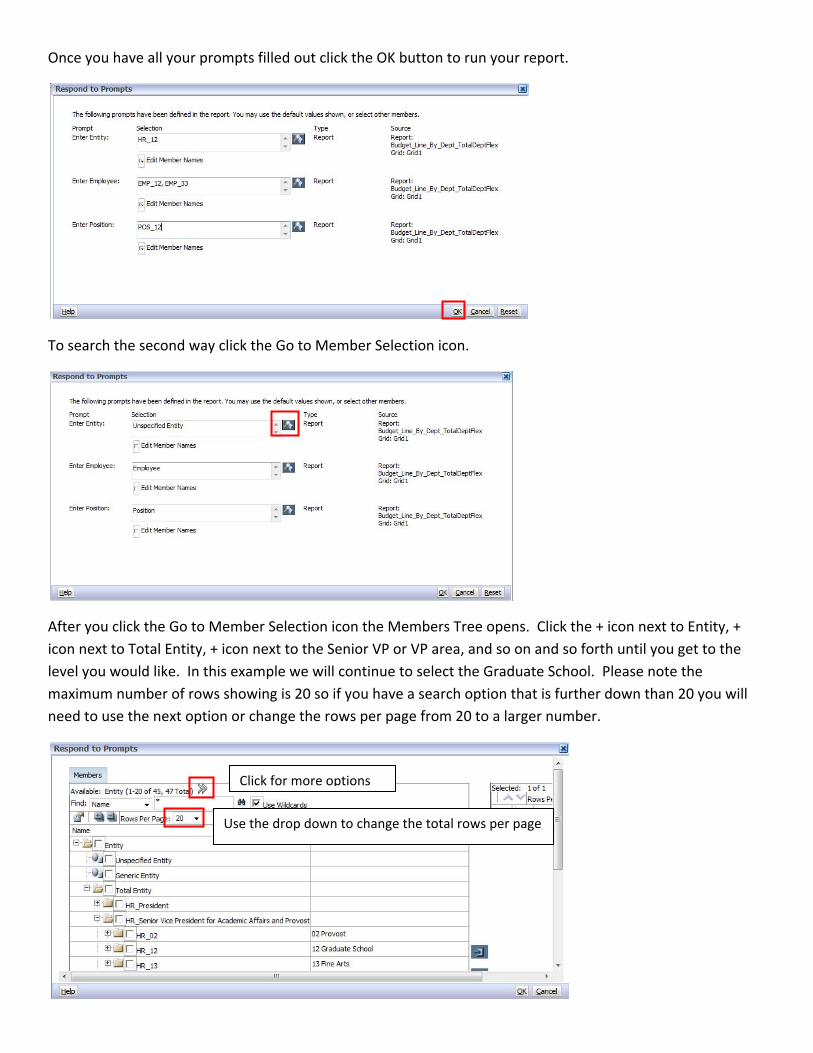
Once you have all your prompts filled out click the OK button to run your report.
To search the second way click the Go to Member Selection icon.
After you click the Go to Member Selection icon the Members Tree opens. Click the + icon next to Entity, +
icon next to Total Entity, + icon next to the Senior VP or VP area, and so on and so forth until you get to the
level you would like. In this example we will continue to select the Graduate School. Please note the
maximum number of rows showing is 20 so if you have a search option that is further down than 20 you will
need to use the next option or change the rows per page from 20 to a larger number.
Click for more options
Use the drop down to change the total rows per page

We want to choose HR_12 for the Graduate School and send it over to the selected area by clicking on the
right facing arrow.
You will now see the Graduate School has been selected along with Unspecified Entity, you may need to scroll
to the right to see this.

You will want to move the Unspecified Entity back over to the member selection. Select Unspecified Entity
scroll down and click the left facing arrow.
You will now see that you only HR_12 the Graduate School Selected. You can now click the OK button to
move on to the next prompt option.
Now you need to follow the same process as above to make your selection for your Employee. Click the
Member Selection icon.

Change your Rows per page and choose EMP_12 for the Graduate School.
Scroll down and choose EMP_33 for Health and Human Performance.

Scroll up and click the right facing arrow.
You will now see that you have Employee EMP_12 and EMP_33 in your selection box. You will want to
remove Employee by selecting Employee and scrolling down to the left facing arrow.

Once you see that you have just EMP_12 and EMP_13 click the OK button.
Now to choose our Position, click on the Member Selection Icon.
Click the + icon next to Position, + icon All Positions, + icon Total Existing Positions, so on and so forth until you
make your selection and click the right facing arrow to move it to your selections..

You will want to remove position and send it back to the members’ area. Select position and click the left
facing arrow and then click the OK button.
Finally, now that you have your search options click the OK button to run your report.
It will process and your report will open.

Note: UFID’s and Earnings Amount blocked out for security purposes.
You can also export this report into Excel. Once your report has opened go to File > Export > Excel.
The report will open in Excel and may open as a popup window behind Hyperion so please keep an eye out for
it on your task bar.

When you go back into Hyperion you will notice that you now have a blank tab with the heading
Budget_Line_By_Dept_TotalDeptFlex. You can close this blank tab by clicking on the x in the upper right hand
corner of the tab.