
BTFP02040 AIR COMPRESSOR OPERATION AND...
16
BEFORE OPERATING THIS COMPRESSOR, THE USER SHOULD STUDY THIS MANUAL TO UNDERSTAND AND FOLLOW THE SAFETY WARNINGS AND INSTRUCTIONS. KEEP THESE INSTRUCTIONS WITH THE COMPRESSOR FOR FUTURE REFERENCE. IF YOU HAVE ANY QUESTIONS, CONTACT YOUR BOSTITCH REPRESENTATIVE OR DISTRIBUTOR. N202452 07/12 BTFP02040 AIR COMPRESSOR OPERATION AND MAINTENANCE MANUAL BOSTITCH FASTENING SYSTEMS
Transcript of BTFP02040 AIR COMPRESSOR OPERATION AND...
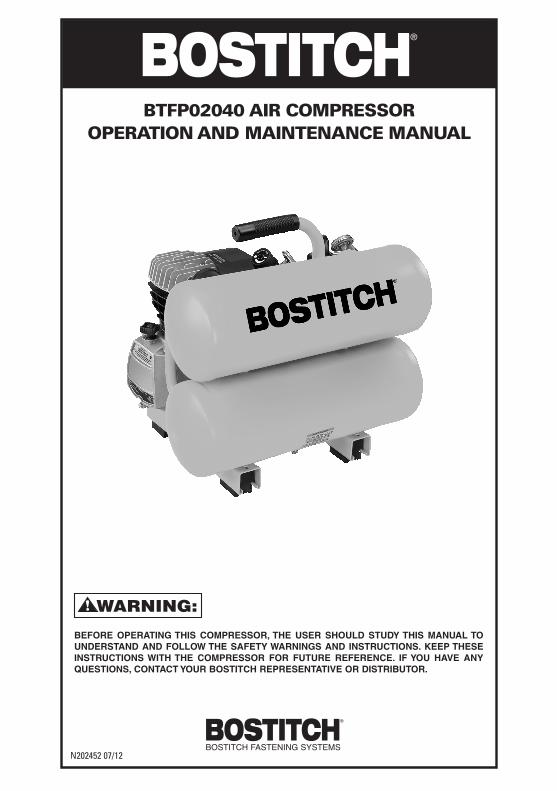
BEFORE OPERATING THIS COMPRESSOR, THE USER SHOULD STUDY THIS MANUAL TO UNDERSTAND AND FOLLOW THE SAFETY WARNINGS AND INSTRUCTIONS. KEEP THESE INSTRUCTIONS WITH THE COMPRESSOR FOR FUTURE REFERENCE. IF YOU HAVE ANY QUESTIONS, CONTACT YOUR BOSTITCH REPRESENTATIVE OR DISTRIBUTOR.
N202452 07/12
BTFP02040 AIR COMPRESSOROPERATION AND MAINTENANCE MANUAL
BOSTITCH FASTENING SYSTEMS
2 3
INTRODUCTION
Congratulations on your purchase of a High Performance BOSTITCH Portable Air Compressor. This compressor has been designed to provide compressed air to power various pneumatic tools - including pneumatic fastening tools.
Before assembling, operating or maintaining this air compressor, users must read and understand the information contained in this operation and maintenance manual. Carefully review the Rules for Safe Operation section in this operation and maintenance manual and fully understand all warnings and instructions.
Danger indicates an imminently hazardous situation which, if not avoided, WILL result in death or serious injury.
Warnings indicate a potentially hazardous situation which, if not avoided,could result in death or serious bodily injury.
NOTICE!: Notice indicates important information that if not followed correctly could result in damage to equipment.
INDEX
Rules for Safe Operation .............................................................................................................3 - 4Electrical Grounding Instructions ............................................................................................4 - 5Specifications ......................................................................................................................................5Features .................................................................................................................................................6Operation Instructions .................................................................................................................7 - 9Maintenance ..................................................................................................................................... 10Trouble Shooting guide .................................................................................................................. 11Warranty..................................................................................................................................... 12 - 13
NOTE:
Bostitch compressors have been engineered to provide excellent customer satisfaction and are designed to achieve maximum performance.
RULES FOR SAFE OPERATION
Be Educated:All users must read and fully understand all information contained in this operation and maintenance manual before assembling, operating, or maintaining this air compressor.
Avoid Moving Parts:When the compressor is plugged into an electrical source and the pressure switch is in the “ON” position, this compressor will turn on automatically. • Nevertouchanymovingparts. • Keepallbodyparts,hair,clothing,andjewelryawayfrommovingparts. • Neveroperatetheaircompressorwithoutallguardsandshroudsinplace. • Neverstandonthecompressor.

2 3
RULES FOR SAFE OPERATION (continued)
Attachments and Accessories:For any attachment or accessory you will be using with this compressor, the maximum allowable recommended pressure should be clearly marked on the product or should be clearly noted within the operations manual. Exceeding the pressure rating of these attachments (including, but not limited to: air tools, air operated accessories, spray guns, air hose, air hose connections, tires and other inflatables) could cause them to fly apart or explode and could result in serious injury. • Never exceed the maximum allowable pressure recommended by the manufacturer of any attachment or accessory you use with this compressor.
Personal Protection:The employer and/or user must ensure that proper eye protection is worn. Eye protection equipment must conform to the requirements with the applicable parts of AS/NZS 1337.1:2010 and AS/NZS 1337.6:2007. NOTICE!: Non-side shielded spectacles and face shields alone do not provide adequate protection.
Additional Safety Protection will be required in some environments. For example, the working area may include exposure to noise level which can lead to hearing damage. The employer and user must ensure that any necessary hearing protection is provided and used by the operator and others in the work area. Some environments will require the use of head protection equipment. When required, the employer and user must ensure that head protection conforming to the applicable parts of AS 1800 and AS/NZS 1801:1998. • Alwaysweareyeprotection. • Wearproperhearingandheadprotection. • Compressedairblastmustneverbeaimedatanyone.Compressedaircancausebodily injury and can propel loose particles and small objects at high speed. • Keepchildrenawayfromareaofoperation. • This appliance is not intended for use by persons (including children) with reduced physical, sensory or mental capabilities, or lack of experience and knowledge, unless they have been given supervision or instruction concerning use of the appliance by a person responsible for their safety. • Childrenshouldbesupervisedtoensurethattheydonotplaywiththeappliance.
Transporting:Always disconnect the air compressor before transporting. Use the handle to move the compressor. Do not drag or pull the compressor by the power cord or air hose.
Air Tank:Due to condensation associated with the process of compressing air, moisture will build up inside your compressor’s air tank. Drain tank of moisture daily (See General Maintenance). Failure to drain moisture from the tank properly could lead to the formation of rust and thinning of the steel tank.
FAILURE TO REGULARLY DRAIN TANK MAY CAUSE TANK CORROSION ANDRISKOFTANKEXPLOSION,RESULTINGINSERIOUSINJURY.TOAVOIDRISKOFTANKFAILUREDURING USE, DRAIN TANK AFTER EACH USE OR EVERY FOUR HOURS OF OPERATION TOPREVENTCONDENSATIONBUILD-UPANDTANKCORROSION.
4 5
RULES FOR SAFE OPERATION (continued)
DONOTPERFORMWELDINGORREPAIROPERATIONSONTHEAIRTANKOFTHIS COMPRESSOR. WELDING ON THE AIR COMPRESSOR TANK CAN SEVERELY IMPAIRTANKSTRENGTHANDCAUSEANEXTREMELYHAZARDOUSCONDITION.WELDINGONTHETANKINANYMANNERWILLVOIDTHEWARRANTY.
Ventilation:RISK OF FIRE OR EXPLOSION - DO NOT SPRAY FLAMMABLE LIQUID IN A
CONFINED AREA. SPRAY AREA MUST BE WELL VENTILATED. DO NOT SMOKE WHILESPRAYINGANDDONOTSPRAYWHERESPARKORFLAMEISPRESENT.KEEPCOMPRESSORSAS FAR FROM SPRAYING AREA AS POSSIBLE.
Risk of Burns:All air compressors generate heat, even operating under normal conditions. Bostitch compressors have been designed to reduce the risk of burns by limiting access to tubes and cylinder head parts. In areas where tubes are exposed, a protective sheathing has been added to the tubes to reduce risk; however, risk of burns does exist. •Toavoidseriousburns,nevertouchthecylinderheadpartsortubingduringor immediately after operation.
ELECTRICAL GROUNDING INSTRUCTIONS:
This product should be electrically grounded. In the event of an electrical short circuit, grounding reduces the risk of electrical shock by providing an escape wire for electrical current. This product is equipped with a cord having a grounding wire with an appropriate grounding plug. The plug must be plugged into an outlet that is properly installed and grounded in accordance with all local codes and ordinances.
IMPROPER INSTALLATION OF THE GROUNDING PLUG CAN RESULT IN A RISKOFELECTRICSHOCK.Ifarepairorreplacementcordisnecessary,donotconnectthegrounding wire to either flat blade terminal. Check with a qualified electrician or serviceman, if the grounding instructions are not completely understood or if there is doubt as to whether this product is properly grounded. Do not modify the plug provided. If the supplied plug does not fit the outlet, have the proper outlet installed by a qualified electrician.
This product is shipped for use on a nominal 240-volt. The motor of this compressor has a thermal overload protector. If the motor should overheat, the overload protector will shut the motor off. If this occurs, turn the compressor off and allow the motor to cool. When the temperature returns to normal, reset the motor protector manually and turn the compressor on.
NOTICE! Do not stop the compressor by pulling out the plug. Use only the On/Off switch, which operates a pressure relief valve on the compressor. If the compressor is plugged in with the switch in the “On” position, the compressor may have trouble restarting against the high pressure which could cause excessive heat build up and could damage the motor.
Safety Valve:This compressor is equipped with a safety valve that is set to avoid over-pressurization of the air tanks. This valve is factory pre-set and will not function unless tank pressure reaches this pressure. DO NOT ATTEMPT TO ADJUST OR ELIMINATE THIS SAFETY DEVICE. ANYADJUSTMENTS TO THIS VALVE COULD CAUSE SERIOUS INJURY. If this device requiresservice or maintenance, see an Authorized BOSTITCH Service Center.

4 5
ELECTRICAL GROUNDING INSTRUCTIONS: (continued)Duty Cycle:To avoid overheating of the electric motor, this compressor is designed for the intermittent operation as indicated on the dataplate: S3-75 means 7.5 minutes ON and 2.5 minutes OFF. If this air compressor pumps air more than the duty cycle, then the compressor’s capability is less than the air delivery required by the application. Always match the air volume requirements of the attachment or accessory with the air volume delivery of the compressor.
NOTICE!: BOSTITCH does not recommend the use of extension cords with compressors. The use of an extension cord can result in the loss of voltage supplied to the compressor which could prevent the compressor from starting. For optimum performance, plug the compressor directly into an outlet and increase the length of airline as needed.
If an extension cord must be used, use these guidelines: Distance Needed Recommended Gauge Less than 10 meters 1 mm² @ 10 A 10-15 meters 1.5 mm² @ 15 A Greater than 15 meters Not Recommended
NOTICE!: If the supply cord is damaged, it must be replaced by the manufacturer, its serviceagent or similarly qualified persons in order to avoid a hazard.
BTFP02040 SPECIFICATIONSMotor: 1.1 running HP 240V1ph/50HzDuty Rating: S3 75% (7.5min ON, 2.5min OFF) Fuse Requirements: 10 Amps minimumOperating Pressure: 0 – 8.6 BAR (0-125 PSI)SafetyValveSetting: 10BAR(145PSI)Air Delivery: 133.9 LTR/MIN @ 6.2 BAR 4.7 CFM @ 90 PSIAir Displacement 235 l/minSound Level per ISO 3744 @ 4 meters 76 dB(A)Maximum Amps at Working Pressure: 7.0Tank Size: 14 Liters (4 gallons)Air Outlet: 6.35 mm (1/4") NPT with Nitto fittingPressure Switch Settings: On @ 7 BAR (100 PSI) Off @ 8.6 BAR (125 PSI)Weight: 27.3 kg (60 lbs.)Insulation Class: FMax AMB. Temp.: 40° C / 104° F
LTR/MIN = Liters Per MinutePSI = Pounds Per Square Inch
Code Certification: Products that bear one or more of the following marks: , have been evaluatedby NATA certified independent safety laboratories and meet the applicable AS/NZS Standards for Safety

6 7
FEATURES OF THE BOSTITCH BTFP02040A. On/Off SwitchB. Air Tank Pressure Gauge: The tank pressure gauge indicates the air pressure that is present in the tank in PSI (lbs/sq. in.) and BAR.C. Regulated Pressure Gauge: The regulated pressure gauge indicates the amount of pressurethatisallowedintothedischargeline/Quickconnect(I)accordingtothesetting of the regulator.D. Pressure RegulatorE. Motor ResetF. Check ValveG. Safety ValveH. Air Tank Drain Valve: A drain valve is located on each tank for draining condensation to help prevent tank corrosion.I. Air Outlet with Quick CouplerJ. Pressure Switch: The pressure switch is the activation mechanism that is used to start and stop the compressor. When the switch is turn on the “ON” position, the motor and pump will compress air until tank pressure reaches the upper limit of the factory set operating pressure. When tank pressure falls below the factory set “cut in” pressure, the compressor will again automatically turn on and start to compress air.K. Pump Oil DipstickL. Site GlassM. Pump Oil Drain PlugN. Air Intake Filter
H
G
J
D
B C
A
I
E
K
ML
F
N
6 7
OPERATION
Pre-Start Procedures:1. Inspect the compressor for any damaged components Do not operate if compressor is damaged.
2. Verifythatthetankshavebeendrainedandareclearofanymoistureordirt. (See “Draining Tank”).
3. INSTALLING THE DIPSTICK To prevent oil from spilling during shipping, the air compressor has a plug installed in the oil fill hole. Before using the unit the first time, replace the plug with the oil fill dipstick and check the oil level. • Removetheplugfromtheoilfillhole. • Insertthedipstickintotheoilfillhole. • Removethedipstickandchecktheoillevel,makingsuretheoilregistersbetweenthe MINandMAXreferencelevelsonthedipstick.Iftheleveldoesnotregisterbetween those areas, refer to Checking the Oil in the Operation section of this manual. • Replacethedipstick.
4. BREAKING IN THE PUMP Perform the following steps to break in the pump before using the air compressor for the first time. • Makesuretheplugintheoilfillholehasbeenreplacedwiththedipstickandtheoillevel fallswithintheMINandMAXrange. • Turnthepressureregulatorknobfullyclockwisetoopentheairflow. Lift the knob to adjust the air flow, and push down to lock. • PlacetheswitchintheOFF (O) position. • Openbothdrainvalvescompletely.
NOTE: The air compressor has two separate tanks: an upper tank and a lower tank. Be sure to open drain valves for both.
• Connecttheaircompressortoapowersupply. • PlacetheswitchintheON ( I ) POSITION and run the air compressor for 10 minutes to break in pump parts. • PlacetheswitchintheOFF (O) position. • Closethedrainvalves.
5. ATTACHING A HOSE (Not Supplied) • Makesuretheaircompressorisoffandunplugged. • Rotatepressureregulatorknobfullycounterclockwise. • AttachhosewithmaleconnectortoNittofittingonaircompressor.
Do not attach any tools to the open end of the hose until start-up has been completed.
8 9
OPERATION (CONTINUED)
1. CHECKING THE OIL The compressor is supplied with 354 ml of ISO100/SAE 40 Non-Detergent Oil for filling the pump crank case before operation. It is necessary to check the oil level before each use, and add oil if needed.NOTE: Always check the oil when the unit is sitting on a level surface. • Insertthedipstickintotheoilfillholeuntilitstops.Removethedipstickandchecktheoillevel. • MakesurethereadingisbetweentheMINandMAXreferencelevelsonthedipstick.NOTE: Never let the oil drop to a level lower than MIN. Maximum level is reached when the oil reachestheMAXlevelreferenceonthedipstick. • Reinsert the dipstick securely into the oil fill hole.To add oil: • Remove the dipstick. • Using a funnel, carefully pour oil into the oil fill hole. Refill only with ISO100/SAE 40 Non-Detergent Oil or Equivalent. NOTE: Avoid using too much oil. Ensure that the level of the oil does not exceed the maximum reference level on the dipstick. • Reinsert the dipstick securely into the oil fill hole.
2. USING THE AIR COMPRESSOR • EnsurepowerswitchisintheOFF (O) position and air compressor is unplugged. • Ifnotalreadyinstalled,attachhose(notsupplied)tocompressoraspreviouslyinstructed. • Attachhosefittingtoaccessoryortoolyouintendtouse.
Always ensure the switch is in the OFF (O) position and the regulator pressure gauge reads zero before changing air tools or disconnecting the hose from the air outlet. Failure to do so could result in possible serious personal injury. • Connect the power cord to the power supply. • Turn the switch ON ( l ). • Pullandrotatepressureregulatorknobtodesiredlinepressure.Turningtheknobclockwise increases air pressure at the outlet; turning counterclockwise reduces air pressure at the outlet. When you have regulated the pressure, push the regulator knob. • Following all safety precautions in this manual and the manufacturer’s instructions in the air tool manual, you may now proceed to use your air-powered tool.
Your tool may require more air consumption than this air compressor is capable of providing. Check the tool manual to avoid damage to the tool or risk of personal injury. • Controltheamountofairflowwiththepressureregulatorknob.Turningtheknobfully counterclockwise will completely stop the flow of air. NOTE: Always use the minimum amount of pressure necessary for your application. Using a higher pressure than needed will drain air from the tank more rapidly and cause the unit to turn on more frequently. • When finished, always drain the tank and unplug the unit. Never leave the unit plugged in and/or running unattended.
8 9
OPERATION (CONTINUED)
3. COLD WEATHER STARTING • TurntheswitchtotheOFF (O) position. • Turnthetankdrainvalvescounterclockwisetoopen.NOTE: The air compressor has two tanks. Be sure to open both tank drain valves. • TurntheswitchouttotheON ( l ) position and run the compressor for 1 - 2 minutes. • TurntheswitchtotheOFF (O) position. • Turnthetankdrainvalvesclockwisetoclose.NOTE: The air compressor has two tanks. Be sure to close both tank drain valves. • Follownormaloperatingprocedures.
4. DRAINING THE TANKSTo help prevent tank corrosion and keep moisture out of the air used, the air tanks of the compressor should be drained daily. NOTE: The air compressor has two separate tanks: an upper tank and a lower tank. Be sure to open drain valves for both and perform this operation for both tanks.
To drain: • Rotatedrainvalvescounterclockwisetoopen. • Tilttodrainmoisturefromtanksintoasuitablecontainer.NOTE: Condensate is a polluting material and should be disposed of in compliance with local regulations. • Ifdrainvalvesareclogged,releaseallairpressure,removeandcleanvalves,thenreinstall.
Unplug the air compressor and release all air from the tanks before servicing. Failure to depressurize tanks before attempting to remove valve may cause serious personal injury. • Rotate drain valves clockwise until tightly closed.
5. CHECKING THE SAFETY VALVE
Do not attempt to tamper with the safety valve. Anything loosened from this device could fly up and hit you. Failure to heed this warning could result in death or serious personal injury.
The safety valve will automatically release air if the air receiver pressure exceeds the preset maximum. The valve should be checked before each day of use by pulling the ring by hand. • Turntheaircompressoronandallowthetankstofill.Thecompressorwillshutoffwhen the pressure reaches the preset maximum. • Turntheaircompressoroff. • Pulltheringonthesafetyvalvetoreleaseairfortwentyseconds. • Releasethering.Airwillstopescapingwhentheringisreleasedatapproximately20PSI. Any continued loss of air after releasing the safety valve ring indicates a problem with the safety valve. Discontinue use and seek service before continued use of the air compressor.
If air leaks below 1.5 BAR (20 PSI) after the ring has been released, or if the valve is stuck and cannot be actuated by the ring, Do not use the air compressor until the safety valve has been replaced. Use of the air compressor in this condition could result in serious personal injury.
10
MAINTENANCE
Service and Maintenance:Prior to performing service and maintenance to the compressor, always disconnect all accessories and attachments from the unit, and disconnect the compressor from the electrical source. When replacing parts, only use Genuine BOSTITCH replacement parts.
1. REPLACING THE AIR FILTER If you notice a reduction in performance of the air compressor, and the air delivery is lower than desired, it may be necessary to replace the air filter. A clogged air filter reduces performance and can cause increased wear. • Unplugtheaircompressor.Allowtheunittocoolforfiveminutesifneeded. • Toremovetheoldairfilter,removethetwophillipsheadscrewsfromtheblackplastic air filter cover. • Usingaclean,drycloth,wipeawayanyloosedirtordebrisbeforereinstallingthenewfilter. • Insertthenewairfilterandreassemblethefiltercoverbeingcarefulnottoovertighten the screws.
2. CHANGING THE OIL Replace the oil after the first 100 hours of operation and every 300 hours following the first oil change. • Place a suitable container underneath the drain to collect used oil. • Remove the drain plug with a 7/16 in. hex key. • When the used oil has drained, reinstall the drain plug and tighten with the wrench. • Remove the dipstick. • To refill, use a funnel to pour oil into the fill hole. Refill only with ISO100/SAE 40 Non- Detergent Oil or Equivalent.
NOTE: Avoid refilling with too much oil. Ensure that the level of the oil does not exceed the maximum reference level on the dipstick. The recommended amount of oil for refilling is 240 ml (8 oz.). • Reinsert the dipstick securely into the oil fill hole.
ANY OTHER SERVICE SHOULD ONLY BE PERFORMED BY AN AUTHORIZED BOSTITCH SERVICE CENTER
The Stanley Works Pty Ltd Consolidated Warranty TermsThis warranty is provided by The Stanley Works Pty Ltd (Stanley Australia)Warranty related enquiries and claims may be directed to:
Stanley Black & Decker Pty Ltd82TarynDrive,Epping,Victoria3076Australia Hotline: 1 800-338-002New Zealand Hotline: 09 269 [email protected]

10 11
TROUBLESHOOTING
PROBLEM POSSIBLE CAUSE SOLUTION
Compressor will not run
1) Loss of power or overheating2) No electrical power
3) Blown shop/house fuse4) Shop/house breaker open
5) Thermal overload open6) Pressure switch bad7) Tank is full of air
1) Check for proper use of extension cord2) Check to be sure unit is plugged in. Check fuse/breaker or motor overload3) Replace shop/house blown fuse4) Reset shop/house breaker, determin ing why problem happened5) Motor will restart when cool6) Take compressor to service center7) Compressor will turn on when tank pressure drops to cut-in pressure
Motor hums but cannot run or runs slowly
1) Low voltage2) Wrong gauge wire or length of extension cord3) Shorted or open motor winding4) Defective check valve or unloader
1) Check with voltmeter2) Check for proper gauge wire and cord length3) Take compressor to service center
4) Take compressor to service center
Fuses blow/circuit breaker trips repeatedly
1) Incorrect size fuse, circuit overload2) Wrong gauge wire or length of extension cord3) Defective check valve or under loader
1) Check for proper fuse, use time-delay fuse, disconnect other electrical appli ances from circuit or operate compressor on its own branch circuit
2) Check for proper gauge wire andcord length
3) Take compressor to service center
Thermal overload protector cuts out repeatedly
1) Low voltage2) Lack of proper ventilation room temperature too high3) Wrong gauge wire or length of extension cord
1) Check with voltmeter2) Move compressor to well- ventilated area3) Check for proper gauge wire and cord length
Air receiver pressure drops when compressor shuts off
1) Loose connections (fittings, tubing, etc.)2) Loose drain valve
1) Take compressor to service center2) Tighten drain valveDo not disassemble check valve tank drain valves or safety relief valve with air in tank - bleed tank.
Excessive moisture in discharge air
1) Excessive water in air tank2) High humidity
1) Drain tank2) Move to area of less humidity; use air line filter
Compressor runs continuously
1) Defective pressure switch2) Excessive air usage
1) Take compressor to service center2) Decrease air usage; compressor not large enough for tool’s requirement
Compressor vibrates 1) Loose mounting bolts 1) Tighten mounting bolts
Air output lower than normal 1) Broken inlet valves 1) Take compressor to service center
12
LIMITED WARRANTY
Our goods come with guarantees that cannot be excluded under Australian Consumer Law. You are entitled to a replacement or refund for a major failure and compensation for any other reasonably foreseeable loss or damage. You are also entitled to have the goods repaired or replaced if the goods fail to be of acceptable quality and the failure does not amount to a major failure.
1. General Limited Warranty against Defects1.1 (Applicable brands) Stanley Australia manufactures and markets a range of premium quality professional hand tools and accessories, under the Stanley, Sidchrome, Bostitch, Proto (including products marketed as "by Proto"), Facom and ABW brands (Stanley Products).1.2 (Warranty against defects) Under this warranty, Stanley Australia warrants that, subject to the limitations and conditions in this document, each Stanley Product will be free from defects in workmanship and materials for the applicable warranty term (set out below) and will be repaired or replaced free of charge if the applicable conditions of this warranty are met. You may have additional rights in relation to Stanley Products under the Australian Consumer Law.1.3 (Limitations on express warranty) This warranty is offered to you only if you are the original purchaser of the Stanley Product in addition to all statutory rights conferred on you. Claims under this warranty are limited to the cost of repairing or replacing the product. You may be able to claim for other forms of loss or damage under the Australian Consumer Law.1.4 (Term of warranty) Stanley Australia offers this warranty for the term of the useful life of all Stanley Products, with the following exceptions: (a) The warranty against defects in materials and workmanship for Stanley Products with electrical or electronic components is twelve (12) months; (b) Sidchrome and Facom airtools are warranted for two (2) years from the date of purchase, excluding normally wearing parts such as vanes, gaskets and o-rings; (c) Sidchrome and Facom electronic instruments are warranted for six (6) months from the date of purchase; (d) Sidchrome and Facom testing instruments are warranted for twelve (12) months from the date of purchase; (e) Sidchrome, Proto and Facom torque wrenches, torque multipliers and torque testers are warranted for twelve (12) months, except for calibration which is warranted for ninety (90) days from the date of purchase (torque products are precise measuring devices that require care in handling. Stanley Australia recommends that all torque wrenches be recalibrated at least once per year, depending on usage); (f) Bostitch branded pneumatic staplers or nailers are warranted for a period of seven (7) years from the date of purchase; and (g) Bostitch compressors and tools used in production applications are warranted for twelve (12) months from the date of purchase.Under this warranty where more than one of the above exceptions applies, the shortest warranty period is the applicable period.1.5 (Express exclusions from warranty) Unless otherwise specified, this warranty does not cover: (a) Modified, abused, neglected, accidentally damaged or excessively worn products, or products that have become damaged or defective as a result of improper use; (b) Repairs attempted or made by other than our regional repair centre or authorised warranty service centre; (c) Conditions or malfunctions caused by the reasonable effects of fair wear and tear or the malfunction of normally wearing parts, which include but are not limited to: vanes, gaskets, o-rings, driver blades, bumpers, pistons and piston rings; (d) Consumable items, such as batteries, trimming knives, drill points, surform blades, hacksaw blades, hole saws, staples or nails, if they have been used;
12 13
(e) Universal sockets, universal joints, thin-wall impact sockets, adapters and retaining rings; (f) Facom products that are not distributed through Stanley Australia's authorised Distributors and resellers; and (g) Ultrasonic measuring tools.1.6 (Products capable of repair) For certain Stanley Products that are found to be defective but repairable, it may only be necessary to replace a particular part. Where this is applicable, only replacement of the defective, required part will be free of charge. Items which Stanley Australia may consider repairable include, but are not limited to, socket ratchets, flexbars, torque wrenches, bit braces, hand drills, air tools, planes & laser levels.1.7 (Non-warranty repairs at customers cost) For the avoidance of doubt, parts of socket ratchets and other repairable items that are merely experiencing the reasonable effects of fair wear and tear are not covered by this warranty but Stanley may provide replacement parts or a replacement product at your cost.1.8 (Warranty non-transferrable) This warranty is not transferrable beyond the original purchaser.2. How to make a warranty claimUnless otherwise specified by Stanley Australia, the process for making a warranty claim is as follows: (a) Any product subject to a warranty claim should be returned to the place of purchase for assessment by a Stanley Australia distributor or representative. You are responsible for returning the product to the place of purchase unless the cost of returning, removing or transporting the product is significant, in which case you should contact Stanley Australia to make alternative arrangements. (b) You must present proof of purchase when making a warranty claim. (c) The claim under this warranty (you may have additional rights under the Australian
Consumer Law) will be assessed by a Stanley Australia distributor or representative on the basis of their product knowledge and reasonable judgment and will be accepted if: (i) a relevant defect is found; (ii) the warranty claim is made during the relevant warranty period set out in cl 1.4 of this warranty; (iii) none of the exclusions in cl 1.5 of this warranty apply. (d) Upon acceptance of a claim under this warranty, Stanley Australia will send you a replacement product or arrange for your product to be repaired free of charge. (e) Any warranty related enquiries or claims may be directed to Stanley Australia at the address or contact details listed above.3. Repair noticesGoods presented for repair may be replaced by refurbished goods of the same type rather than being repaired. Refurbished parts may be used to repair the goods.
The repair of your goods may result in the loss of any user-generated data. Please ensure that you have made a copy of any data saved on your goods.

11
NOTES:
14

11
NOTES:
15

13
(e) Universal sockets, universal joints, thin-wall impact sockets, adapters and retaining rings;
(f) Facom products that are not distributed through Stanley Australia's authorised
Distributors and resellers; and
(g) Ultrasonic measuring tools.
1.6 (Products capable of repair) For certain Stanley Products that are found to be defective but
repairable, it may only be necessary to replace a particular part. Where this is applicable, only
replacement of the defective, required part will be free of charge. Items which Stanley Australia
may consider repairable include, but are not limited to, socket ratchets, flexbars, torque wrenches,
bit braces, hand drills, air tools, planes & laser levels.
1.7 (Non-warranty repairs at customers cost) For the avoidance of doubt, parts of socket ratchets
and other repairable items that are merely experiencing the reasonable effects of fair wear and
tear are not covered by this warranty but Stanley may provide replacement parts or a replacement
product at your cost.
1.8 (Warranty non-transferrable) This warranty is not transferrable beyond the original purchaser.
2. How to make a warranty claimUnless otherwise specified by Stanley Australia, the process for making a warranty claim is as
follows:
(a) Any product subject to a warranty claim should be returned to the place of purchase
for assessment by a Stanley Australia distributor or representative. You are
responsible for returning the product to the place of purchase unless the cost
of returning, removing or transporting the product is significant, in which case you
should contact Stanley Australia to make alternative arrangements.
(b) You must present proof of purchase when making a warranty claim.
(c) The claim under this warranty (you may have additional rights under the Australian
Consumer Law) will be assessed by a Stanley Australia distributor or representative on
the basis of their product knowledge and reasonable judgment and will be accepted if:
(i) a relevant defect is found;
(ii) the warranty claim is made during the relevant warranty period set out in cl 1.4 of
this warranty;
(iii) none of the exclusions in cl 1.5 of this warranty apply.
(d) Upon acceptance of a claim under this warranty, Stanley Australia will send you a
replacement product or arrange for your product to be repaired free of charge.
(e) Any warranty related enquiries or claims may be directed to Stanley Australia at the
address or contact details listed above.
3. Repair noticesGoods presented for repair may be replaced by refurbished goods of the same type rather than
being repaired. Refurbished parts may be used to repair the goods.
The repair of your goods may result in the loss of any user-generated data. Please ensure that you
have made a copy of any data saved on your goods.
9039960/B
16