BROWNING NEVER CARRY YOUR AIR RIFLE WHILE …cdn.pyramydair.com/site/manuals/Browning Gold...
2
AIR RIFLE OPERATION STEPS STEP 1. OPERATING THE SAFETY When the airgun is cocked it is automatically put “ON SAFE”. Browning Gold Air Rifles have the safety as shown in illustration 2. The air rifle is automatically put “ON SAFE” when it is cocked. To put “OFF SAFE”, push the safety up. It can be put back “ON SAFE” by pushing the safety down (see illustration 2). WARNING: BE SURE THE AIRGUN IS ALWAYS POINTED IN A SAFE DIRECTION. NEVER POINT THE AIRGUN AT ANY PERSON EVEN IF IT IS UNCOCKED AND UNLOADED. NEVER POINT THE AIRGUN AT ANYTHING YOU DO NOT INTEND TO SHOOT. ALWAYS ASSUME AND HANDLE THE AIRGUN AS IF IT WERE LOADED AND READY TO FIRE. STEP 2. COCKING YOUR AIR RIFLE With one hand grasp stock firmly behind trigger guard, avoiding contact with the trigger, and brace the butt end of the stock against your thigh. Grasp the barrel near the stock and depress the barrel break assist to break the barrel open slightly (see illustration 3A). Slide your hand down the barrel behind the front sight and pull downward until it comes to a solid stop. You will hear a click indicating that the spring piston has been locked into position (see illustration 3B). WARNING: WHEN COCKING THE AIR RIFLE DO NOT PLACE YOUR HAND OVER OR IN FRONT OF THE MUZZLE. DON’T ALLOW THE MUZZLE TO POINT TOWARD YOU OR ANYONE ELSE DURING COCKING. ALWAYS KEEP THE MUZZLE POINTED IN A SAFE DIRECTION. ATTENTION: BEFORE YOU PUT YOUR AIR RIFLE “OFF SAFE”, BE ABSOLUTELY CERTAIN THAT YOUR AIR RIFLE IS POINTED IN A SAFE DIRECTION AND THAT YOU ARE READY TO FIRE. STEP 3. LOADING YOUR AIR RIFLE Insert the correct caliber lead pellet carefully into the chamber of the breech end which is exposed when you cock the air rifle (see illustration 4). Be sure to seat the pellet flush with the breech. Avoid damaging the pellet skirt. STEP 4. CLOSING THE BARREL Firmly grasp the barrel behind the front sight, return the barrel to its original closed and latched position. CAUTION: BE CAREFUL TO KEEP FINGERS CLEAR OF COCKING MECHANISM (SEE “PINCH POINTS”, ILLUSTRATION 5). KEEP A FIRM GRASP ON THE BARREL AS YOU COCK, LOAD AND CLOSE IT TO PREVENT IT FROM SNAPPING BACK AND POSSIBLY CAUSING INJURY. STEP 5. AIM AT A SAFE TARGET Always aim your air rifle in a SAFE DIRECTION. Always choose your target carefully. It is best to shoot at a paper bullseye target which is attached to a safe backstop. A heavy blanket should be hung behind the target backstop to prevent ricochet should you miss the backstop. Think about what you will hit if you miss the target. Your air rifle has open sights. Air rifles with this type of sight are correctly aimed when the front post is positioned exactly in the notch of the rear sight. The top of the front post should be in line with the top of the rear sight. The bullseye should appear to rest on the top of the front post (see illustration 6). illustration 5 CAUTION: YOUR BACKSTOP SHOULD BE INSPECTED FOR WEAR BEFORE AND AFTER EACH USE. DISCONTINUE USE IF THE BACKSTOP SURFACE SHOWS SIGNS OF FAILURE. ALWAYS PLACE THE BACKSTOP IN A LOCATION THAT WILL BE SAFE SHOULD THE BACKSTOP FAIL. DISCONTINUE THE USE OF A BACKSTOP IF THE PROJECTILE REBOUNDS OR RICOCHETS. WARNING: NEVER CARRY YOUR AIR RIFLE WHILE COCKED AND/OR WHILE LOADED. IT IS BEST TO COCK THE AIR RIFLE ONLY BEFORE SHOOTING. UNDER NO CIRCUMSTANCES SHOULD YOUR AIR RIFLE BE CARRIED COCKED AND LOADED. UNLOADING A PELLET Fire the pellet at a SAFE TARGET to unload the airgun. If this is not practical, put the air rifle “ON SAFE”, break open the barrel slightly, and push the pellet from the chamber by running a cleaning rod through the muzzle end. REMOVING A JAMMED PELLET If a pellet is jammed in the barrel, DO NOT reload the air rifle. 1. Cock the air rifle (see STEP 2. COCKING YOUR AIR RIFLE), point the air rifle in a SAFE DIRECTION, put the air rifle in the “OFF SAFE” position and squeeze the trigger to fire. 2. Break the barrel open slightly (without pulling the barrel all the way down to the point that it cocks) and look down the breech to see if the air rifle is jammed (see illustration 7). NEVER LOOK DOWN THE MUZZLE. 3. If the air rifle is still jammed, insert the correct caliber ramrod into the muzzle and push the jammed pellet out of the breech. Do not try to reuse that pellet. If you are not able to unjam your air rifle, contact Umarex USA’s Service Department. WARNING: IF A PELLET DOES NOT FIRE AFTER COMPLETING THE OPERATION STEPS, THE AIRGUN MAY BE JAMMED. AN UNFIRED PROJECTILE IN THE BARREL CAN BE A DANGEROUS SITUATION. KEEP THE AIRGUN POINTED IN A SAFE DIRECTION AND REPEAT ALL OPERATION STEPS EXCEPT STEP 3. IF A PROJECTILE STILL DOES NOT FIRE, DO THE FOLLOWING: 1. Put in “ON SAFE” position (see illustration 2). 2. Break the barrel open slightly, but do NOT cock the rifle fully. Leave the barrel open with the safety in the “ON SAFE” position. 3. Clear barrel by using a cleaning rod (see CARE AND MAINTENANCE). 4. Repeat operation steps. CAUTION: DO NOT ATTEMPT TO REUSE FIRED PELLETS OR PELLETS WHICH ARE DEFORMED. PROJECTILES SUCH AS STEEL SHOT (BBS) AND DARTS MAY DAMAGE YOUR AIR RIFLE AND CAUSE INJURY TO YOURSELF OR BYSTANDERS DUE TO RICOCHETING. DO NOT MODIFY YOUR AIR RIFLE CAUTION: THE COMPONENTS OF YOUR AIRGUN WERE ENGINEERED AND MANUFACTURED TO DELIVER OPTIMUM PERFORMANCE. ANY MODIFICATION OR TAMPERING WITH YOUR AIRGUN MAY CAUSE A MALFUNCTION, WILL VOID YOUR WARRANTY, AND MAY MAKE IT UNSAFE TO USE. ANY CHANGE IN PERFORMANCE (SUCH AS A LOWERED TRIGGER PULL FORCE AND SHORTENED TRIGGER TRAVEL), INDICATES POSSIBLE MODIFICATION, TAMPERING, AND/OR WEAR. SUCH AIRGUN SHOULD BE INSPECTED, REPLACED, OR PROPERLY REPAIRED BY ONLY QUALIFIED UMAREX USA PERSONNEL. ANY AIRGUN THAT HAS BEEN DROPPED SHOULD BE CHECKED BY QUALIFIED PERSONNEL TO ENSURE THAT ITS FUNCTION HAS NOT BEEN AFFECTED. ATTEMPTING TO OR REMOVING THE MUZZLEBRAKE WILL VOID THE WARRANTY. AMMUNITION Your air rifle is designed to fire .177 or .22 caliber lead pellets only. The correct caliber is marked on the rifle. We recommend the use of RWS Pellets because of their superb accuracy and dimensional uniformity. The correct caliber is clearly stamped on the barrel near the breech block or on the breech block. NEVER DRY FIRE YOUR AIR RIFLE If the air rifle is fired without a lead pellet or RWS Cleaning Pellet in the breech, it will cause the piston to bottom out in the cylinder which can permanently damage the air rifle. CARE AND MAINTENANCE CAUTION: BEFORE ANY CARE, CLEANING, OR MAINTENANCE, ALWAYS BE SURE YOUR AIR RIFLE IS “ON SAFE”, UNLOADED AND UNCOCKED. KEEP IT POINTED IN A SAFE DIRECTION. IT IS IMPORTANT TO MAINTAIN YOUR AIRGUN PROPERLY. WORKING PARTS: The working parts (piston and mainspring) require very little lubrication. Two(2) drops of RWS Air Chamber Lube every 1000 shots will suffice. It is easily applied through the compression chamber port with a 3 1/2" applicator needle (see illustration 11). Keep the buttsock on your thigh and a firm grip on the barrel when applying oil to the chamber. The wearing surfaces at the barrel hinge, the cocking arm, and the trigger mechanism should be lubricated with RWS Spring Cylinder Oil (see illustration 12a). Mainsprings should be oiled every 1000 shots with six (6) drops of RWS Spring Cylinder Oil (see illustration 12b). Remember, a little is good—a lot is not better. Note: To access the mainspring, remove the stock. To remove the stock remove the three stock screws—two on either side of the fore end and one at the rear of the trigger guard (see illustration 13). WARNING: AN AIRGUN THAT IS NOT OPERATING PROPERLY MAY BE DANGEROUS. IT SHOULD BE KEPT SAFELY FROM USE BY ANYONE UNTIL REPAIRED OR DESTROYED. DO NOT TRY TO TAKE THE AIRGUN APART. IT IS DIFFICULT TO REASSEMBLE AND IMPROPER DISASSEMBLY OR REASSEMBLY CAN CAUSE SERIOUS INJURY OR DEATH. 7700 Chad Colley Boulevard, Fort Smith, Arkansas 72916 USA Phone: 1-479-646-4210 www.UmarexUSA.com BREAK BARREL illustration 11 illustration 12a Under side of airgun illustration 12b CAUTION: CHECK THE TIGHTNESS OF THE FRONT AND REAR TRIGGER GUARD AND STOCK SCREWS BETWEEN, DURING, AND AFTER SHOOTING ACTIVITY. LOOSE SCREWS MAY CAUSE INJURY OR DEATH. 03R11 illustration 6 Perfect Too High Too Low STEP 6. PUT “OFF SAFE” When you are absolutely sure your air rifle is aimed at a safe target and you are ready to fire, put your air rifle “OFF SAFE” (see STEP 1. OPERATING THE SAFETY). STEP 7. FIRING YOUR AIR RIFLE Squeeze the trigger. WARNING: NOT A TOY. ADULT SUPERVISION REQUIRED. MISUSE OR CARELESS USE MAY CAUSE SERIOUS INJURY OR DEATH. MAY BE DANGEROUS UP TO 650 YARDS (594 METERS). THIS IS A HIGH POWERED AIRGUN FOR USE BY THOSE 16 YEARS OF AGE OR OLDER. READ ALL INSTRUCTIONS BEFORE USING. THE PURCHASER AND USER MUST CONFORM TO ALL LAWS GOVERNING THE PURCHASE, USE AND OWNERSHIP OF AIRGUNS. Read this owner’s operation manual completely. This airgun is not a toy. Treat it with the same respect you would a firearm. Always carefully follow the safety instructions found in this owner’s manual and keep this manual in a safe place for future use. This air rifle is recommended for persons that are at least 16 years of age. Adult supervision is required. ADJUSTING THE SIGHTS Elevation Settings—The settings for elevation are marked by the numbers 0-9 on the elevation adjustment screw(1) (see illustration 8). If the rifle shoots high: turn the knob clockwise. If the rifle shoots low: turn the knob counterclockwise. Note: the numbers 0-9 are reference numbers only and are not calibrated to distance. Windage Settings—Windage settings are controlled by turning the knob(2) on the side (see illustration 8). If the air rifle shoots to the right: adjust counterclockwise. If it shoots to the left: adjust clockwise. ADJUSTING THE TRIGGER 1. Make sure gun is unloaded and uncocked. 2. Turn the adjustment screw clockwise until it stops. 3. Turn the adjustment screw counterclockwise no more than 5 revolutions. NOTE: Clockwise adjustment will decrease the weight of pull. Counter-clockwise adjustment will increase weight of pull. IMPORTANT: DO NOT COMPLETELY BACK SCREW OUT OF THE TRIGGER. ADJUSTING THE STOCK SYSTEM To adjust the length of pull, loosen the two screws in the recoil pad with a Phillips head screw driver. Remove the recoil pad. Place the desired number of spacers onto the rear of the stock as shown (see illustration 10). Replace the recoil pad and tighten the two screws. CAUTION: NEVER FIRE WITH THE BARREL OPEN. THIS WILL RESULT IN A BENT BARREL AND/OR CRACKED STOCK AND WILL VOID YOUR WARRANTY. WARRANTY AND REPAIR Browning Air Rifles have a One (1) Year Limited Warranty. A copy of the original purchase receipt is required for warranty repairs. ONE YEAR LIMITED WARRANTY This product is warranted to the retail consumer for one (1) year from date of purchase against defects in material and workmanship and is not transferable. WHAT IS COVERED—Replacement parts and labor. WHAT IS NOT COVERED—Shipping charges to Umarex USA for defective product and damages caused by abuse or failure to perform normal maintenance as well as any other expense. Consequential damages, or incidental expenses, including damage to property. Some states do not allow the exclusion or limitation of incidental or consequential damages, so the above limitation or exclusion may not apply to you. WARRANTY CLAIMS—Warranty Claims and Repair for U.S. and Canadian customers only. Call Umarex USA (479)-646-4210 and ask for the Service Department. If it is determined a return is necessary, you will be issued a Return Authorization Number. Write this number boldly on the box and return the product prepaid to Umarex USA. (Canadian customers will be provided with the address of an authorized Canadian Repair Facility). Your name, address, phone number and a note explaining the defect found must be included in the package. A copy of the original purchase receipt must accompany the return. U.S. customers, include a check made to Umarex USA in the amount provided by Umarex USA’s service department to cover shipping and handling. IMPLIED WARRANTIES–Any implied warranties, including the implied warranties of merchantability and fitness for a particular purpose, are limited in duration to one (1) year from date of retail purchase. SOME STATES DO NOT ALLOW LIMITATIONS ON HOW LONG AN IMPLIED WARRANTY LASTS, SO THE ABOVE LIMITATIONS MAY NOT APPLY TO YOU. TO THE EXTENT ANY PROVISION OF THIS WARRANTY IS PROHIBITED BY FEDERAL, STATE, OR MUNICIPAL LAW WHICH CANNOT BE PREEMPTED, IT SHALL NOT BE APPLICABLE. THIS WARRANTY GIVES YOU SPECIFIC LEGAL RIGHTS, AND YOU MAY ALSO HAVE OTHER RIGHTS WHICH VARY FROM STATE TO STATE AND COUNTRY TO COUNTRY. TO VALIDATE THIS WARRANTY–Send in the registration card within 30 days to: Umarex USA, 7700 Chad Colley Boulevard, Fort Smith, Arkansas 72916 or Register online at www.UmarexUSA.com. We reserve the right to make changes or modifications. A copy of the Owner's Operations Manual is available FREE from: Browning ® trademarks licensed from Browning. BROWNING GOLD SPRING OPERATED BREAK-BARREL AIR RIFLE SHOOTS LEAD PELLETS OWNER'S OPERATION MANUAL AGES 16+ Browning ® Model Caliber Velocity Danger Distance GOLD (Synthetic) .177 1000 fps (305 m/s) 650 yds GOLD (Synthetic) .22 800 fps (244 m/s) 594 yds GOLD (Wood) .177 1000 fps (305 m/s) 650 yds GOLD (Wood) .22 800 fps (244 m/s) 594 yds GOLD-C (Synthetic) .177 490 fps (150 m/s) 375 yds illustration 8 (1) (2) illustration 4 Airguns differ in their operation and you are never ready to fire any airgun until you are thoroughly familiar with it. Read the following operating instructions thoroughly prior to operating. CAUTION: YOU AND OTHERS WITH YOU MUST WEAR SHOOTING GLASSES TO PROTECT YOUR EYES. IF YOU WEAR READING GLASSES, YOU MUST WEAR SAFETY GLASSES INTENDED FOR USE OVER NORMAL OPTICAL READING GLASSES. WARNING: THIS AIRGUN CAN CAUSE SERIOUS INJURY OR DEATH. READ AND FOLLOW THE INSTRUCTIONS CAREFULLY. DO NOT LOAD A PELLET INTO THE AIRGUN UNTIL YOU ARE READY TO SHOOT. IF YOU DO LOAD A PELLET AND THEN DECIDE NOT TO SHOOT, REMOVE IT EITHER MANUALLY OR BY SHOOTING THE AIRGUN AT A SAFE TARGET. AN UNLOADED, UNCOCKED AIRGUN IS SAFEST. ACCIDENTS HAPPEN FAST. PLEASE SHOOT SAFELY. illustration 2 “ON SAFE” “OFF SAFE” illustration 10 STORING YOUR AIR RIFLE NEVER STORE A LOADED OR COCKED AIRGUN. Unload pellet from the airgun. Keep air rifle away from children and untrained shooters. Store pellets separately from the air rifle to keep them from untrained shooters. Protect your air rifle from moisture and dirt; clean gun and wrap it in a smooth, dry cloth. If you are going to store your airgun for an extended length of time be sure the barrel is protected. This can be accomplished by coating the bore with RWS Spring Cylinder Oil. Always use a soft cloth and insert the cleaning rod from the breech end on break barrel rifles. Remove the oil completely before the next use. REMEMBER: Always check to make sure the airgun is unloaded and "ON SAFE" when getting it from storage or another person. illustration 3A 1. illustration 3B 2. Ramrod illustration 7 Breech Muzzle BARREL: In day to day use, very little dirt or residue will accumulate in the bore. This can be removed by using RWS Cleaning Pellets. Note: High quality RWS Lead Pellets not only increase accuracy, they help to reduce lead deposit. During periods of regular use the bore of the barrel should be cleaned periodically by means of a felt wad or cleaning rod with wool mop. Wire brushes should not be used. Insert rod from breech end. SURFACE: The exposed metal parts (receiver, screw heads, etc.) are a gun blue finish and MUST be wiped clean using a slightly oiled cloth after handling to prevent rust. Use light acid free and resin free oil. RWS Spring Cylinder Oil is excellent for this. CAUTION: OILS THAT CONTAIN ACID OR RESIN CAN DAMAGE THE BREECH SEAL, COMPRESSION SEAL, AND POSSIBLY THE FINISH OF THE STOCK. illustration 13 1 2 3 WARNING: DO NOT BRANDISH OR DISPLAY THIS PRODUCT IN PUBLIC – IT MAY CONFUSE PEOPLE AND MAY BE A CRIME. POLICE AND OTHERS MAY THINK IT IS A FIREARM. DO NOT CHANGE THE COLORATION AND MARKINGS TO MAKE IT LOOK MORE LIKE A FIREARM. THAT IS DANGEROUS AND MAY BE A CRIME. illustration 1 BREECH SAFETY TRIGGER GUARD TRIGGER ADJUSTABLE STOCK SYSTEM BARREL MUZZLE FRONT SIGHT REAR SIGHT STOCK illustration 9
Transcript of BROWNING NEVER CARRY YOUR AIR RIFLE WHILE …cdn.pyramydair.com/site/manuals/Browning Gold...
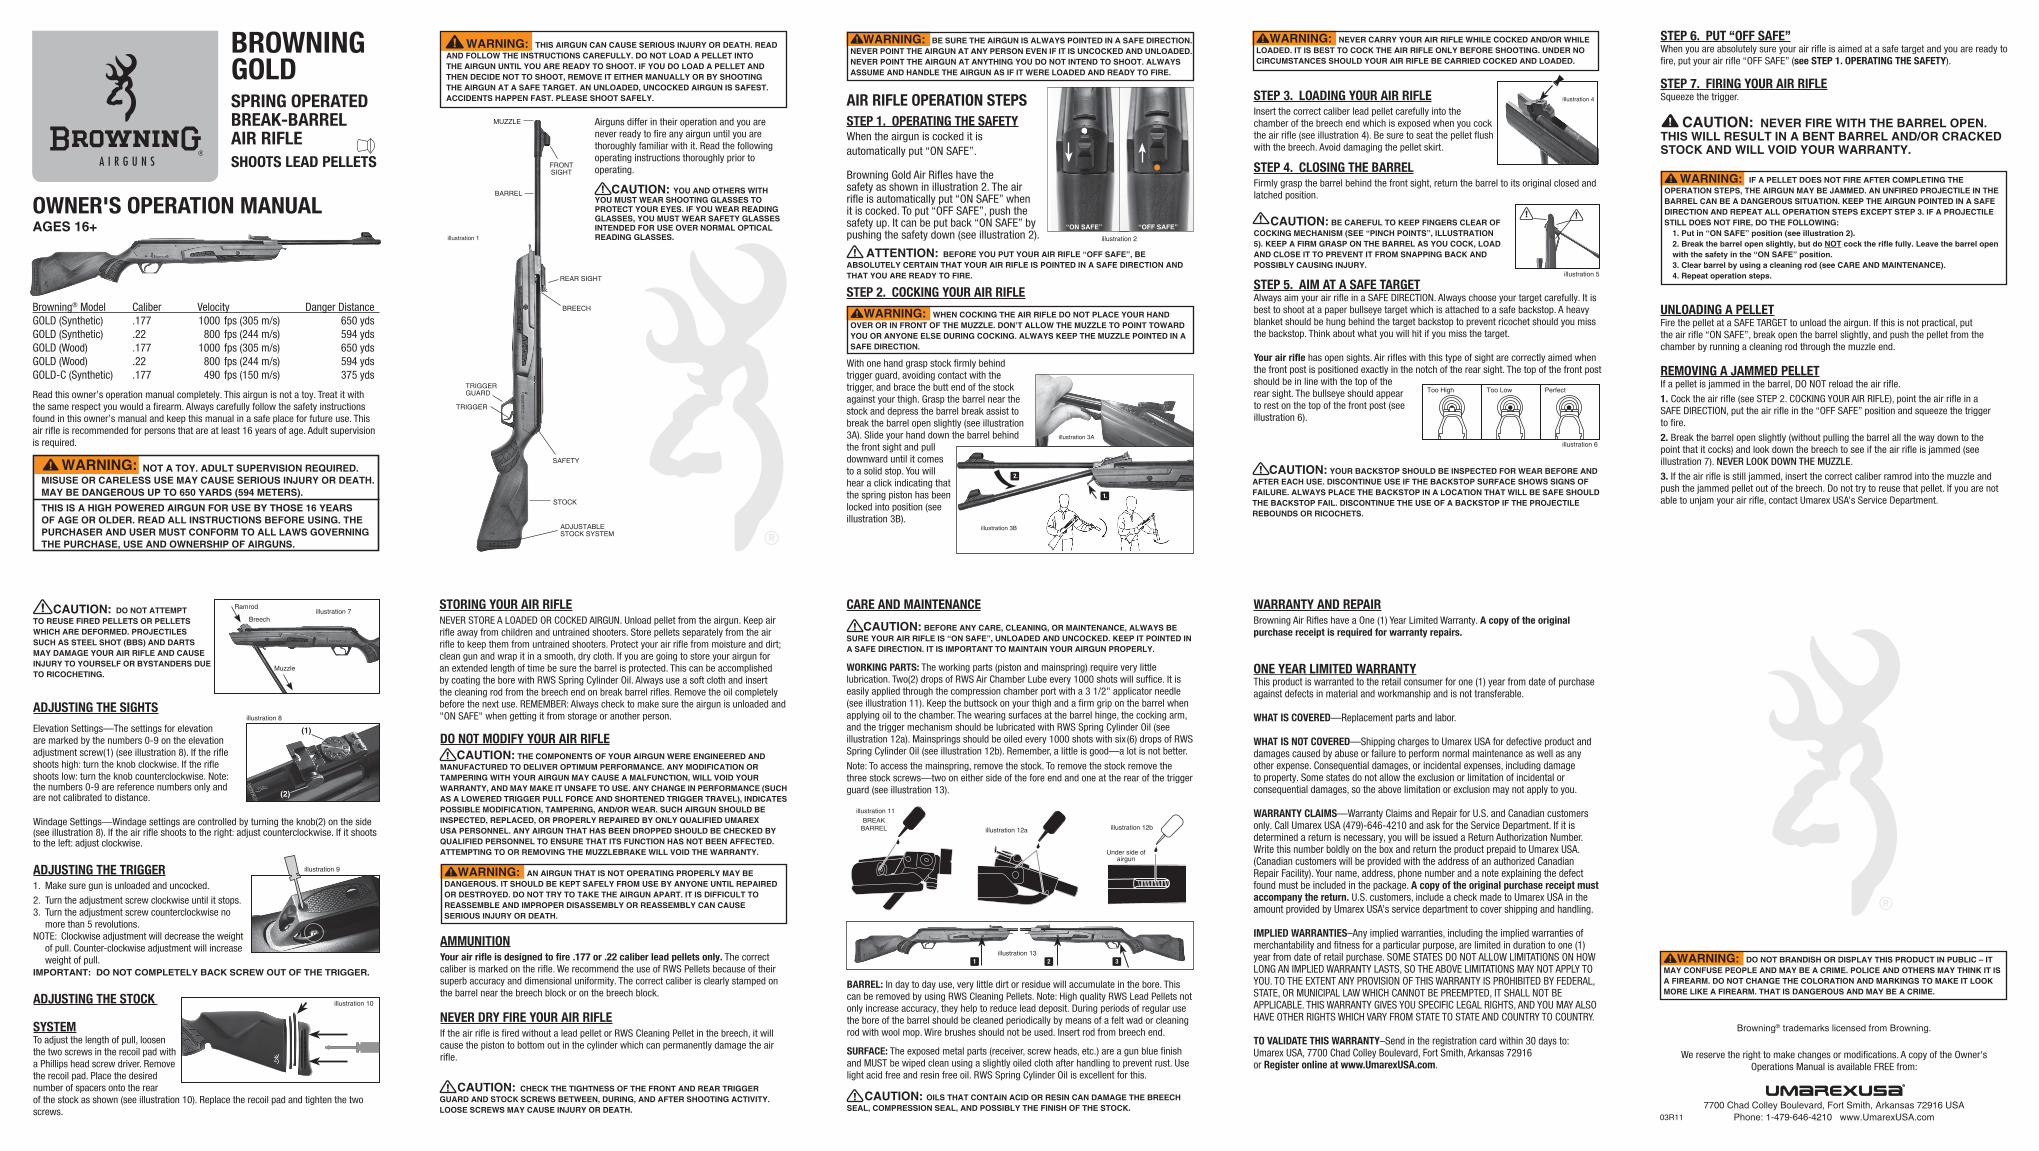
AIR RIFLE OPERATION STEPSSTEP 1. OPERATING THE SAFETYWhen the airgun is cocked it is automatically put “ON SAFE”. Browning Gold Air Rifles have the safety as shown in illustration 2. The air rifle is automatically put “ON SAFE” when it is cocked. To put “OFF SAFE”, push the safety up. It can be put back “ON SAFE” by pushing the safety down (see illustration 2).
WARNING: BE SURE THE AIRGUN IS ALWAYS POINTED IN A SAFE DIRECTION. NEVER POINT THE AIRGUN AT ANY PERSON EVEN IF IT IS UNCOCKED AND UNLOADED. NEVER POINT THE AIRGUN AT ANYTHING YOU DO NOT INTEND TO SHOOT. ALWAYS ASSUME AND HANDLE THE AIRGUN AS IF IT WERE LOADED AND READY TO FIRE.
STEP 2. COCKING YOUR AIR RIFLE
With one hand grasp stock firmly behind trigger guard, avoiding contact with the trigger, and brace the butt end of the stock against your thigh. Grasp the barrel near the stock and depress the barrel break assist to break the barrel open slightly (see illustration 3A). Slide your hand down the barrel behind the front sight and pull downward until it comes to a solid stop. You will hear a click indicating that the spring piston has been locked into position (see illustration 3B).
WARNING: WHEN COCKING THE AIR RIFLE DO NOT PLACE YOUR HAND OVER OR IN FRONT OF THE MUZZLE. DON’T ALLOW THE MUZZLE TO POINT TOWARD YOU OR ANYONE ELSE DURING COCKING. ALWAYS KEEP THE MUZZLE POINTED IN A SAFE DIRECTION.
ATTENTION: BEFORE YOU PUT YOUR AIR RIFLE “OFF SAFE”, BE ABSOLUTELY CERTAIN THAT YOUR AIR RIFLE IS POINTED IN A SAFE DIRECTION AND THAT YOU ARE READY TO FIRE.
STEP 3. LOADING YOUR AIR RIFLEInsert the correct caliber lead pellet carefully into the chamber of the breech end which is exposed when you cock the air rifle (see illustration 4). Be sure to seat the pellet flush with the breech. Avoid damaging the pellet skirt.
STEP 4. CLOSING THE BARRELFirmly grasp the barrel behind the front sight, return the barrel to its original closed and latched position.
CAUTION: BE CAREFUL TO KEEP FINGERS CLEAR OF COCKING MECHANISM (SEE “PINCH POINTS”, ILLUSTRATION 5). KEEP A FIRM GRASP ON THE BARREL AS YOU COCK, LOAD AND CLOSE IT TO PREVENT IT FROM SNAPPING BACK AND POSSIBLY CAUSING INJURY.
STEP 5. AIM AT A SAFE TARGETAlways aim your air rifle in a SAFE DIRECTION. Always choose your target carefully. It is best to shoot at a paper bullseye target which is attached to a safe backstop. A heavy blanket should be hung behind the target backstop to prevent ricochet should you miss the backstop. Think about what you will hit if you miss the target.
Your air rifle has open sights. Air rifles with this type of sight are correctly aimed when the front post is positioned exactly in the notch of the rear sight. The top of the front post should be in line with the top of the rear sight. The bullseye should appear to rest on the top of the front post (see illustration 6).
illustration 5
CAUTION: YOUR BACKSTOP SHOULD BE INSPECTED FOR WEAR BEFORE AND AFTER EACH USE. DISCONTINUE USE IF THE BACKSTOP SURFACE SHOWS SIGNS OF FAILURE. ALWAYS PLACE THE BACKSTOP IN A LOCATION THAT WILL BE SAFE SHOULD THE BACKSTOP FAIL. DISCONTINUE THE USE OF A BACKSTOP IF THE PROJECTILE REBOUNDS OR RICOCHETS.
WARNING: NEVER CARRY YOUR AIR RIFLE WHILE COCKED AND/OR WHILE LOADED. IT IS BEST TO COCK THE AIR RIFLE ONLY BEFORE SHOOTING. UNDER NO CIRCUMSTANCES SHOULD YOUR AIR RIFLE BE CARRIED COCKED AND LOADED.
UNLOADING A PELLETFire the pellet at a SAFE TARGET to unload the airgun. If this is not practical, put the air rifle “ON SAFE”, break open the barrel slightly, and push the pellet from the chamber by running a cleaning rod through the muzzle end.
REMOVING A JAMMED PELLETIf a pellet is jammed in the barrel, DO NOT reload the air rifle.
1. Cock the air rifle (see STEP 2. COCKING YOUR AIR RIFLE), point the air rifle in a SAFE DIRECTION, put the air rifle in the “OFF SAFE” position and squeeze the trigger to fire.
2. Break the barrel open slightly (without pulling the barrel all the way down to the point that it cocks) and look down the breech to see if the air rifle is jammed (see illustration 7). NEVER LOOK DOWN THE MUZZLE.
3. If the air rifle is still jammed, insert the correct caliber ramrod into the muzzle and push the jammed pellet out of the breech. Do not try to reuse that pellet. If you are not able to unjam your air rifle, contact Umarex USA’s Service Department.
WARNING: IF A PELLET DOES NOT FIRE AFTER COMPLETING THE OPERATION STEPS, THE AIRGUN MAY BE JAMMED. AN UNFIRED PROJECTILE IN THE BARREL CAN BE A DANGEROUS SITUATION. KEEP THE AIRGUN POINTED IN A SAFE DIRECTION AND REPEAT ALL OPERATION STEPS EXCEPT STEP 3. IF A PROJECTILE STILL DOES NOT FIRE, DO THE FOLLOWING:
1. Put in “ON SAFE” position (see illustration 2).2. Break the barrel open slightly, but do NOT cock the rifle fully. Leave the barrel open with the safety in the “ON SAFE” position.3. Clear barrel by using a cleaning rod (see CARE AND MAINTENANCE).4. Repeat operation steps.
CAUTION: DO NOT ATTEMPT TO REUSE FIRED PELLETS OR PELLETS WHICH ARE DEFORMED. PROJECTILES SUCH AS STEEL SHOT (BBS) AND DARTS MAY DAMAGE YOUR AIR RIFLE AND CAUSE INJURY TO YOURSELF OR BYSTANDERS DUE TO RICOCHETING.
DO NOT MODIFY YOUR AIR RIFLE CAUTION: THE COMPONENTS OF YOUR AIRGUN WERE ENGINEERED AND MANUFACTURED TO DELIVER OPTIMUM PERFORMANCE. ANY MODIFICATION OR TAMPERING WITH YOUR AIRGUN MAY CAUSE A MALFUNCTION, WILL VOID YOUR WARRANTY, AND MAY MAKE IT UNSAFE TO USE. ANY CHANGE IN PERFORMANCE (SUCH AS A LOWERED TRIGGER PULL FORCE AND SHORTENED TRIGGER TRAVEL), INDICATES POSSIBLE MODIFICATION, TAMPERING, AND/OR WEAR. SUCH AIRGUN SHOULD BE INSPECTED, REPLACED, OR PROPERLY REPAIRED BY ONLY QUALIFIED UMAREX USA PERSONNEL. ANY AIRGUN THAT HAS BEEN DROPPED SHOULD BE CHECKED BY QUALIFIED PERSONNEL TO ENSURE THAT ITS FUNCTION HAS NOT BEEN AFFECTED.ATTEMPTING TO OR REMOVING THE MUZZLEBRAKE WILL VOID THE WARRANTY.
AMMUNITIONYour air rifle is designed to fire .177 or .22 caliber lead pellets only. The correct caliber is marked on the rifle. We recommend the use of RWS Pellets because of their superb accuracy and dimensional uniformity. The correct caliber is clearly stamped on the barrel near the breech block or on the breech block.
NEVER DRY FIRE YOUR AIR RIFLEIf the air rifle is fired without a lead pellet or RWS Cleaning Pellet in the breech, it will cause the piston to bottom out in the cylinder which can permanently damage the air rifle.
CARE AND MAINTENANCE
CAUTION: BEFORE ANY CARE, CLEANING, OR MAINTENANCE, ALWAYS BE SURE YOUR AIR RIFLE IS “ON SAFE”, UNLOADED AND UNCOCKED. KEEP IT POINTED IN A SAFE DIRECTION. IT IS IMPORTANT TO MAINTAIN YOUR AIRGUN PROPERLY.
WORKING PARTS: The working parts (piston and mainspring) require very little lubrication. Two(2) drops of RWS Air Chamber Lube every 1000 shots will suffice. It is easily applied through the compression chamber port with a 3 1/2" applicator needle (see illustration 11). Keep the buttsock on your thigh and a firm grip on the barrel when applying oil to the chamber. The wearing surfaces at the barrel hinge, the cocking arm, and the trigger mechanism should be lubricated with RWS Spring Cylinder Oil (see illustration 12a). Mainsprings should be oiled every 1000 shots with six (6) drops of RWS Spring Cylinder Oil (see illustration 12b). Remember, a little is good—a lot is not better.
Note: To access the mainspring, remove the stock. To remove the stock remove the three stock screws—two on either side of the fore end and one at the rear of the trigger guard (see illustration 13).
WARNING: AN AIRGUN THAT IS NOT OPERATING PROPERLY MAY BE DANGEROUS. IT SHOULD BE KEPT SAFELY FROM USE BY ANYONE UNTIL REPAIRED OR DESTROYED. DO NOT TRY TO TAKE THE AIRGUN APART. IT IS DIFFICULT TO REASSEMBLE AND IMPROPER DISASSEMBLY OR REASSEMBLY CAN CAUSE SERIOUS INJURY OR DEATH.
7700 Chad Colley Boulevard, Fort Smith, Arkansas 72916 USAPhone: 1-479-646-4210 www.UmarexUSA.com
BREAKBARREL
illustration 11
illustration 12a
Under side of airgun
illustration 12b
CAUTION: CHECK THE TIGHTNESS OF THE FRONT AND REAR TRIGGER GUARD AND STOCK SCREWS BETWEEN, DURING, AND AFTER SHOOTING ACTIVITY. LOOSE SCREWS MAY CAUSE INJURY OR DEATH.
03R11
illustration 6
PerfectToo High Too Low
STEP 6. PUT “OFF SAFE”When you are absolutely sure your air rifle is aimed at a safe target and you are ready to fire, put your air rifle “OFF SAFE” (see STEP 1. OPERATING THE SAFETY).
STEP 7. FIRING YOUR AIR RIFLESqueeze the trigger.
WARNING: NOT A TOY. ADULT SUPERVISION REQUIRED. MISUSE OR CARELESS USE MAY CAUSE SERIOUS INJURY OR DEATH. MAY BE DANGEROUS UP TO 650 YARDS (594 METERS).
THIS IS A HIGH POWERED AIRGUN FOR USE BY THOSE 16 YEARS OF AGE OR OLDER. READ ALL INSTRUCTIONS BEFORE USING. THE PURCHASER AND USER MUST CONFORM TO ALL LAWS GOVERNING THE PURCHASE, USE AND OWNERSHIP OF AIRGUNS.
Read this owner’s operation manual completely. This airgun is not a toy. Treat it with the same respect you would a firearm. Always carefully follow the safety instructions found in this owner’s manual and keep this manual in a safe place for future use. This air rifle is recommended for persons that are at least 16 years of age. Adult supervision is required.
ADJUSTING THE SIGHTSElevation Settings—The settings for elevation are marked by the numbers 0-9 on the elevation adjustment screw(1) (see illustration 8). If the rifle shoots high: turn the knob clockwise. If the rifle shoots low: turn the knob counterclockwise. Note: the numbers 0-9 are reference numbers only and are not calibrated to distance.
Windage Settings—Windage settings are controlled by turning the knob(2) on the side (see illustration 8). If the air rifle shoots to the right: adjust counterclockwise. If it shoots to the left: adjust clockwise.
ADJUSTING THE TRIGGER1. Make sure gun is unloaded and uncocked.
2. Turn the adjustment screw clockwise until it stops.3. Turn the adjustment screw counterclockwise no more than 5 revolutions.NOTE: Clockwise adjustment will decrease the weight of pull. Counter-clockwise adjustment will increase weight of pull.IMPORTANT: DO NOT COMPLETELY BACK SCREW OUT OF THE TRIGGER.
ADJUSTING THE STOCK
SYSTEMTo adjust the length of pull, loosen the two screws in the recoil pad with a Phillips head screw driver. Remove the recoil pad. Place the desired number of spacers onto the rear of the stock as shown (see illustration 10). Replace the recoil pad and tighten the two screws.
CAUTION: NEVER FIRE WITH THE BARREL OPEN. THIS WILL RESULT IN A BENT BARREL AND/OR CRACKED STOCK AND WILL VOID YOUR WARRANTY.
WARRANTY AND REPAIRBrowning Air Rifles have a One (1) Year Limited Warranty. A copy of the original purchase receipt is required for warranty repairs.
ONE YEAR LIMITED WARRANTYThis product is warranted to the retail consumer for one (1) year from date of purchase against defects in material and workmanship and is not transferable.
WHAT IS COVERED—Replacement parts and labor.
WHAT IS NOT COVERED—Shipping charges to Umarex USA for defective product and damages caused by abuse or failure to perform normal maintenance as well as any other expense. Consequential damages, or incidental expenses, including damage to property. Some states do not allow the exclusion or limitation of incidental or consequential damages, so the above limitation or exclusion may not apply to you.
WARRANTY CLAIMS—Warranty Claims and Repair for U.S. and Canadian customers only. Call Umarex USA (479)-646-4210 and ask for the Service Department. If it is determined a return is necessary, you will be issued a Return Authorization Number. Write this number boldly on the box and return the product prepaid to Umarex USA. (Canadian customers will be provided with the address of an authorized Canadian Repair Facility). Your name, address, phone number and a note explaining the defect found must be included in the package. A copy of the original purchase receipt must accompany the return. U.S. customers, include a check made to Umarex USA in the amount provided by Umarex USA’s service department to cover shipping and handling.
IMPLIED WARRANTIES–Any implied warranties, including the implied warranties of merchantability and fitness for a particular purpose, are limited in duration to one (1) year from date of retail purchase. SOME STATES DO NOT ALLOW LIMITATIONS ON HOW LONG AN IMPLIED WARRANTY LASTS, SO THE ABOVE LIMITATIONS MAY NOT APPLY TO YOU. TO THE EXTENT ANY PROVISION OF THIS WARRANTY IS PROHIBITED BY FEDERAL, STATE, OR MUNICIPAL LAW WHICH CANNOT BE PREEMPTED, IT SHALL NOT BE APPLICABLE. THIS WARRANTY GIVES YOU SPECIFIC LEGAL RIGHTS, AND YOU MAY ALSO HAVE OTHER RIGHTS WHICH VARY FROM STATE TO STATE AND COUNTRY TO COUNTRY.
TO VALIDATE THIS WARRANTY–Send in the registration card within 30 days to:Umarex USA, 7700 Chad Colley Boulevard, Fort Smith, Arkansas 72916or Register online at www.UmarexUSA.com.
We reserve the right to make changes or modifications. A copy of the Owner's Operations Manual is available FREE from:
Browning® trademarks licensed from Browning.
BROWNING GOLDSPRING OPERATED BREAK-BARRELAIR RIFLESHOOTS LEAD PELLETS
OWNER'S OPERATION MANUALAGES 16+
Browning® Model Caliber Velocity Danger DistanceGOLD (Synthetic) .177 1000 fps (305 m/s) 650 ydsGOLD (Synthetic) .22 800 fps (244 m/s) 594 ydsGOLD (Wood) .177 1000 fps (305 m/s) 650 ydsGOLD (Wood) .22 800 fps (244 m/s) 594 ydsGOLD-C (Synthetic) .177 490 fps (150 m/s) 375 yds
illustration 8
(1)
(2)
illustration 4
Airguns differ in their operation and you are never ready to fire any airgun until you are thoroughly familiar with it. Read the following operating instructions thoroughly prior to operating.
CAUTION: YOU AND OTHERS WITH YOU MUST WEAR SHOOTING GLASSES TO PROTECT YOUR EYES. IF YOU WEAR READING GLASSES, YOU MUST WEAR SAFETY GLASSES INTENDED FOR USE OVER NORMAL OPTICAL READING GLASSES.
WARNING: THIS AIRGUN CAN CAUSE SERIOUS INJURY OR DEATH. READ AND FOLLOW THE INSTRUCTIONS CAREFULLY. DO NOT LOAD A PELLET INTO THE AIRGUN UNTIL YOU ARE READY TO SHOOT. IF YOU DO LOAD A PELLET AND THEN DECIDE NOT TO SHOOT, REMOVE IT EITHER MANUALLY OR BY SHOOTING THE AIRGUN AT A SAFE TARGET. AN UNLOADED, UNCOCKED AIRGUN IS SAFEST. ACCIDENTS HAPPEN FAST. PLEASE SHOOT SAFELY.
illustration 2
“ON SAFE” “OFF SAFE”
illustration 10
STORING YOUR AIR RIFLENEVER STORE A LOADED OR COCKED AIRGUN. Unload pellet from the airgun. Keep air rifle away from children and untrained shooters. Store pellets separately from the air rifle to keep them from untrained shooters. Protect your air rifle from moisture and dirt; clean gun and wrap it in a smooth, dry cloth. If you are going to store your airgun for an extended length of time be sure the barrel is protected. This can be accomplished by coating the bore with RWS Spring Cylinder Oil. Always use a soft cloth and insert the cleaning rod from the breech end on break barrel rifles. Remove the oil completely before the next use. REMEMBER: Always check to make sure the airgun is unloaded and "ON SAFE" when getting it from storage or another person.
illustration 3A
1.
illustration 3B
2.
Ramrodillustration 7
Breech
Muzzle
BARREL: In day to day use, very little dirt or residue will accumulate in the bore. This can be removed by using RWS Cleaning Pellets. Note: High quality RWS Lead Pellets not only increase accuracy, they help to reduce lead deposit. During periods of regular use the bore of the barrel should be cleaned periodically by means of a felt wad or cleaning rod with wool mop. Wire brushes should not be used. Insert rod from breech end.
SURFACE: The exposed metal parts (receiver, screw heads, etc.) are a gun blue finish and MUST be wiped clean using a slightly oiled cloth after handling to prevent rust. Use light acid free and resin free oil. RWS Spring Cylinder Oil is excellent for this.
CAUTION: OILS THAT CONTAIN ACID OR RESIN CAN DAMAGE THE BREECH SEAL, COMPRESSION SEAL, AND POSSIBLY THE FINISH OF THE STOCK.
illustration 131 2 3 WARNING: DO NOT BRANDISH OR DISPLAY THIS PRODUCT IN PUBLIC – IT
MAY CONFUSE PEOPLE AND MAY BE A CRIME. POLICE AND OTHERS MAY THINK IT IS A FIREARM. DO NOT CHANGE THE COLORATION AND MARKINGS TO MAKE IT LOOK MORE LIKE A FIREARM. THAT IS DANGEROUS AND MAY BE A CRIME.
illustration 1
BREECH
SAFETY
TRIGGERGUARD
TRIGGER
ADJUSTABLE STOCK SYSTEM
BARREL
MUZZLE
FRONTSIGHT
REAR SIGHT
STOCK
illustration 9
BROWNING GOLD
AGES 16+
MANUEL DE L’UTILISATEUR
Fonctionnement à ressort carabine à canon basculant pour projectiles en plombTire des projectiles de plomb
illustration 2
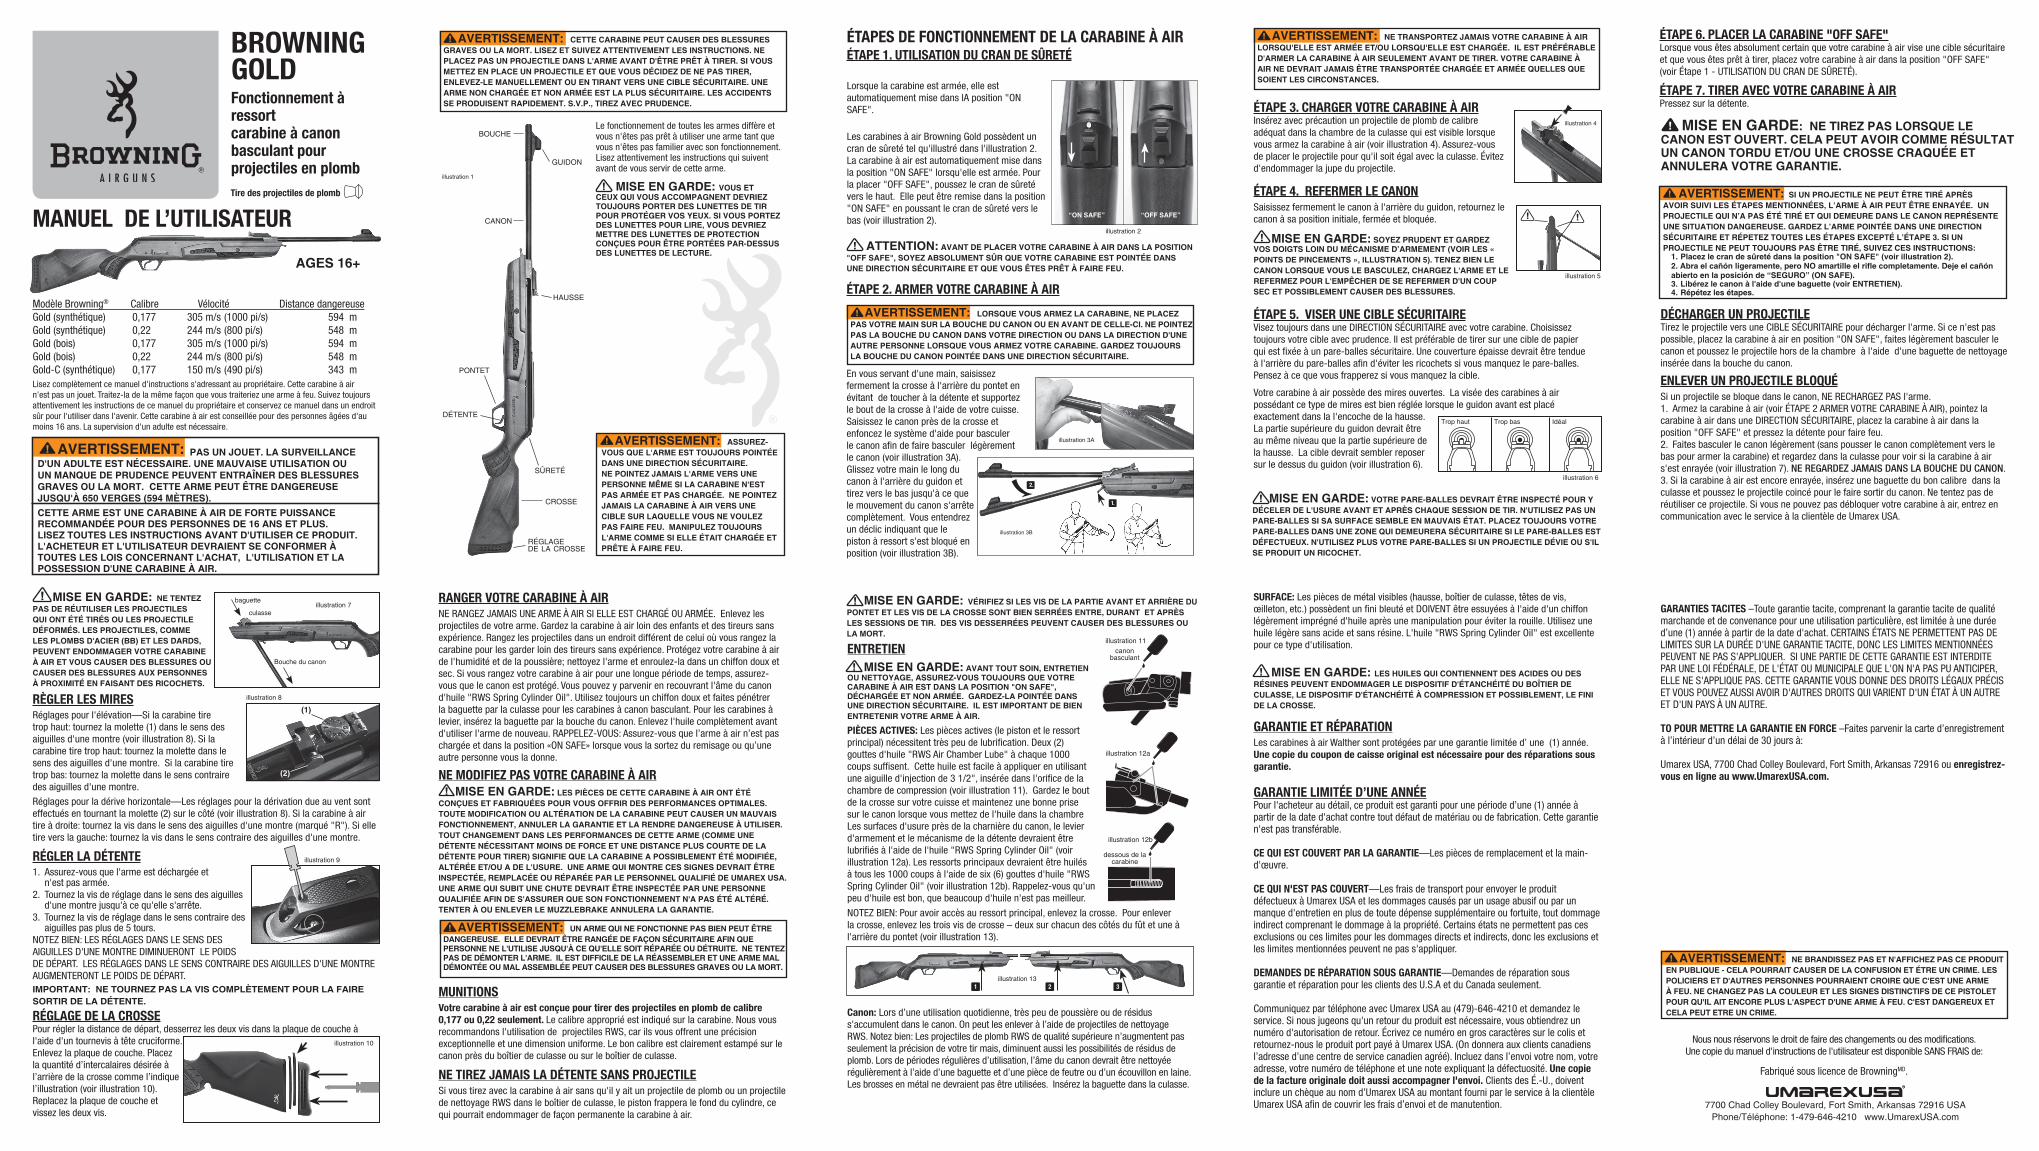
ÉTAPES DE FONCTIONNEMENT DE LA CARABINE À AIRÉTAPE 1. UTILISATION DU CRAN DE SÛRETÉ
Lorsque la carabine est armée, elle est automatiquement mise dans lA position "ON SAFE".
Les carabines à air Browning Gold possèdent un cran de sûreté tel qu'illustré dans l'illustration 2. La carabine à air est automatiquement mise dans la position "ON SAFE" lorsqu'elle est armée. Pour la placer "OFF SAFE", poussez le cran de sûreté vers le haut. Elle peut être remise dans la position "ON SAFE" en poussant le cran de sûreté vers le bas (voir illustration 2).
“ON SAFE” “OFF SAFE”
illustration 3A
1.
illustration 3B
2.
Fabriqué sous licence de BrowningMD.
illustration 131 2 3
Lisez complètement ce manuel d'instructions s'adressant au propriétaire. Cette carabine à air n'est pas un jouet. Traitez-la de la même façon que vous traiteriez une arme à feu. Suivez toujours attentivement les instructions de ce manuel du propriétaire et conservez ce manuel dans un endroit sûr pour l'utiliser dans l'avenir. Cette carabine à air est conseillée pour des personnes âgées d'au moins 16 ans. La supervision d'un adulte est nécessaire.
SURFACE: Les pièces de métal visibles (hausse, boîtier de culasse, têtes de vis, œilleton, etc.) possèdent un fini bleuté et DOIVENT être essuyées à l'aide d'un chiffon légèrement imprégné d'huile après une manipulation pour éviter la rouille. Utilisez une huile légère sans acide et sans résine. L'huile "RWS Spring Cylinder Oil" est excellente pour ce type d'utilisation.
MISE EN GARDE: LES HUILES QUI CONTIENNENT DES ACIDES OU DES RÉSINES PEUVENT ENDOMMAGER LE DISPOSITIF D'ÉTANCHÉITÉ DU BOÎTIER DE CULASSE, LE DISPOSITIF D'ÉTANCHÉITÉ À COMPRESSION ET POSSIBLEMENT, LE FINI DE LA CROSSE.
GARANTIE ET RÉPARATIONLes carabines à air Walther sont protégées par une garantie limitée d’ une (1) année. Une copie du coupon de caisse original est nécessaire pour des réparations sous garantie.
GARANTIE LIMITÉE D’UNE ANNÉEPour l'acheteur au détail, ce produit est garanti pour une période d’une (1) année à partir de la date d'achat contre tout défaut de matériau ou de fabrication. Cette garantie n'est pas transférable.
CE QUI EST COUVERT PAR LA GARANTIE—Les pièces de remplacement et la main-d'œuvre.
CE QUI N'EST PAS COUVERT—Les frais de transport pour envoyer le produit défectueux à Umarex USA et les dommages causés par un usage abusif ou par un manque d'entretien en plus de toute dépense supplémentaire ou fortuite, tout dommage indirect comprenant le dommage à la propriété. Certains états ne permettent pas ces exclusions ou ces limites pour les dommages directs et indirects, donc les exclusions et les limites mentionnées peuvent ne pas s'appliquer.
DEMANDES DE RÉPARATION SOUS GARANTIE—Demandes de réparation sous garantie et réparation pour les clients des U.S.A et du Canada seulement.
Communiquez par téléphone avec Umarex USA au (479)-646-4210 et demandez le service. Si nous jugeons qu'un retour du produit est nécessaire, vous obtiendrez un numéro d'autorisation de retour. Écrivez ce numéro en gros caractères sur le colis et retournez-nous le produit port payé à Umarex USA. (On donnera aux clients canadiens l’adresse d’une centre de service canadien agréé). Incluez dans l’envoi votre nom, votre adresse, votre numéro de téléphone et une note expliquant la défectuosité. Une copie de la facture originale doit aussi accompagner l'envoi. Clients des É.-U., doivent inclure un chèque au nom d’Umarex USA au montant fourni par le service à la clientèle Umarex USA afin de couvrir les frais d’envoi et de manutention.
ÉTAPE 2. ARMER VOTRE CARABINE À AIR
En vous servant d'une main, saisissez fermement la crosse à l'arrière du pontet en évitant de toucher à la détente et supportez le bout de la crosse à l'aide de votre cuisse. Saisissez le canon près de la crosse et enfoncez le système d'aide pour basculer le canon afin de faire basculer légèrement le canon (voir illustration 3A). Glissez votre main le long du canon à l'arrière du guidon et tirez vers le bas jusqu'à ce que le mouvement du canon s'arrête complètement. Vous entendrez un déclic indiquant que le piston à ressort s'est bloqué en position (voir illustration 3B).
AVERTISSEMENT: LORSQUE VOUS ARMEZ LA CARABINE, NE PLACEZ PAS VOTRE MAIN SUR LA BOUCHE DU CANON OU EN AVANT DE CELLE-CI. NE POINTEZ PAS LA BOUCHE DU CANON DANS VOTRE DIRECTION OU DANS LA DIRECTION D'UNE AUTRE PERSONNE LORSQUE VOUS ARMEZ VOTRE CARABINE. GARDEZ TOUJOURS LA BOUCHE DU CANON POINTÉE DANS UNE DIRECTION SÉCURITAIRE.
ATTENTION: AVANT DE PLACER VOTRE CARABINE À AIR DANS LA POSITION "OFF SAFE", SOYEZ ABSOLUMENT SÛR QUE VOTRE CARABINE EST POINTÉE DANS UNE DIRECTION SÉCURITAIRE ET QUE VOUS ÊTES PRÊT À FAIRE FEU.
ÉTAPE 3. CHARGER VOTRE CARABINE À AIRInsérez avec précaution un projectile de plomb de calibre adéquat dans la chambre de la culasse qui est visible lorsque vous armez la carabine à air (voir illustration 4). Assurez-vous de placer le projectile pour qu'il soit égal avec la culasse. Évitez d'endommager la jupe du projectile.
ÉTAPE 4. REFERMER LE CANONSaisissez fermement le canon à l'arrière du guidon, retournez le canon à sa position initiale, fermée et bloquée.
MISE EN GARDE: SOYEZ PRUDENT ET GARDEZ VOS DOIGTS LOIN DU MÉCANISME D’ARMEMENT (VOIR LES « POINTS DE PINCEMENTS », ILLUSTRATION 5). TENEZ BIEN LE CANON LORSQUE VOUS LE BASCULEZ, CHARGEZ L'ARME ET LE REFERMEZ POUR L'EMPÊCHER DE SE REFERMER D'UN COUP SEC ET POSSIBLEMENT CAUSER DES BLESSURES.
ÉTAPE 5. VISER UNE CIBLE SÉCURITAIREVisez toujours dans une DIRECTION SÉCURITAIRE avec votre carabine. Choisissez toujours votre cible avec prudence. Il est préférable de tirer sur une cible de papier qui est fixée à un pare-balles sécuritaire. Une couverture épaisse devrait être tendue à l'arrière du pare-balles afin d'éviter les ricochets si vous manquez le pare-balles. Pensez à ce que vous frapperez si vous manquez la cible.
Votre carabine à air possède des mires ouvertes. La visée des carabines à air possédant ce type de mires est bien réglée lorsque le guidon avant est placé exactement dans la l'encoche de la hausse. La partie supérieure du guidon devrait être au même niveau que la partie supérieure de la hausse. La cible devrait sembler reposer sur le dessus du guidon (voir illustration 6).
AVERTISSEMENT: NE TRANSPORTEZ JAMAIS VOTRE CARABINE À AIR LORSQU'ELLE EST ARMÉE ET/OU LORSQU'ELLE EST CHARGÉE. IL EST PRÉFÉRABLE D'ARMER LA CARABINE À AIR SEULEMENT AVANT DE TIRER. VOTRE CARABINE À AIR NE DEVRAIT JAMAIS ÊTRE TRANSPORTÉE CHARGÉE ET ARMÉE QUELLES QUE SOIENT LES CIRCONSTANCES.
AVERTISSEMENT: CETTE CARABINE PEUT CAUSER DES BLESSURES GRAVES OU LA MORT. LISEZ ET SUIVEZ ATTENTIVEMENT LES INSTRUCTIONS. NE PLACEZ PAS UN PROJECTILE DANS L'ARME AVANT D'ÊTRE PRÊT À TIRER. SI VOUS METTEZ EN PLACE UN PROJECTILE ET QUE VOUS DÉCIDEZ DE NE PAS TIRER, ENLEVEZ-LE MANUELLEMENT OU EN TIRANT VERS UNE CIBLE SÉCURITAIRE. UNE ARME NON CHARGÉE ET NON ARMÉE EST LA PLUS SÉCURITAIRE. LES ACCIDENTS SE PRODUISENT RAPIDEMENT. S.V.P., TIREZ AVEC PRUDENCE.
MISE EN GARDE: NE TENTEZ PAS DE RÉUTILISER LES PROJECTILES QUI ONT ÉTÉ TIRÉS OU LES PROJECTILE DÉFORMÉS. LES PROJECTILES, COMME LES PLOMBS D'ACIER (BB) ET LES DARDS, PEUVENT ENDOMMAGER VOTRE CARABINE À AIR ET VOUS CAUSER DES BLESSURES OU CAUSER DES BLESSURES AUX PERSONNES À PROXIMITÉ EN FAISANT DES RICOCHETS.
ÉTAPE 6. PLACER LA CARABINE "OFF SAFE"Lorsque vous êtes absolument certain que votre carabine à air vise une cible sécuritaire et que vous êtes prêt à tirer, placez votre carabine à air dans la position "OFF SAFE" (voir Étape 1 - UTILISATION DU CRAN DE SÛRETÉ).
ÉTAPE 7. TIRER AVEC VOTRE CARABINE À AIRPressez sur la détente.
RANGER VOTRE CARABINE À AIRNE RANGEZ JAMAIS UNE ARME À AIR SI ELLE EST CHARGÉ OU ARMÉE. Enlevez les projectiles de votre arme. Gardez la carabine à air loin des enfants et des tireurs sans expérience. Rangez les projectiles dans un endroit différent de celui où vous rangez la carabine pour les garder loin des tireurs sans expérience. Protégez votre carabine à air de l'humidité et de la poussière; nettoyez l'arme et enroulez-la dans un chiffon doux et sec. Si vous rangez votre carabine à air pour une longue période de temps, assurez-vous que le canon est protégé. Vous pouvez y parvenir en recouvrant l'âme du canon d'huile "RWS Spring Cylinder Oil". Utilisez toujours un chiffon doux et faites pénétrer la baguette par la culasse pour les carabines à canon basculant. Pour les carabines à levier, insérez la baguette par la bouche du canon. Enlevez l'huile complètement avant d'utiliser l'arme de nouveau. RAPPELEZ-VOUS: Assurez-vous que l’arme à air n’est pas chargée et dans la position «ON SAFE» lorsque vous la sortez du remisage ou qu’une autre personne vous la donne.
NE MODIFIEZ PAS VOTRE CARABINE À AIR MISE EN GARDE: LES PIÈCES DE CETTE CARABINE À AIR ONT ÉTÉ CONÇUES ET FABRIQUÉES POUR VOUS OFFRIR DES PERFORMANCES OPTIMALES. TOUTE MODIFICATION OU ALTÉRATION DE LA CARABINE PEUT CAUSER UN MAUVAIS FONCTIONNEMENT, ANNULER LA GARANTIE ET LA RENDRE DANGEREUSE À UTILISER. TOUT CHANGEMENT DANS LES PERFORMANCES DE CETTE ARME (COMME UNE DÉTENTE NÉCESSITANT MOINS DE FORCE ET UNE DISTANCE PLUS COURTE DE LA DÉTENTE POUR TIRER) SIGNIFIE QUE LA CARABINE A POSSIBLEMENT ÉTÉ MODIFIÉE, ALTÉRÉE ET/OU A DE L'USURE. UNE ARME QUI MONTRE CES SIGNES DEVRAIT ÊTRE INSPECTÉE, REMPLACÉE OU RÉPARÉE PAR LE PERSONNEL QUALIFIÉ DE UMAREX USA. UNE ARME QUI SUBIT UNE CHUTE DEVRAIT ÊTRE INSPECTÉE PAR UNE PERSONNE QUALIFIÉE AFIN DE S'ASSURER QUE SON FONCTIONNEMENT N'A PAS ÉTÉ ALTÉRÉ.TENTER À OU ENLEVER LE MUZZLEBRAKE ANNULERA LA GARANTIE.
MUNITIONSVotre carabine à air est conçue pour tirer des projectiles en plomb de calibre 0,177 ou 0,22 seulement. Le calibre approprié est indiqué sur la carabine. Nous vous recommandons l'utilisation de projectiles RWS, car ils vous offrent une précision exceptionnelle et une dimension uniforme. Le bon calibre est clairement estampé sur le canon près du boîtier de culasse ou sur le boîtier de culasse.
NE TIREZ JAMAIS LA DÉTENTE SANS PROJECTILESi vous tirez avec la carabine à air sans qu'il y ait un projectile de plomb ou un projectile de nettoyage RWS dans le boîtier de culasse, le piston frappera le fond du cylindre, ce qui pourrait endommager de façon permanente la carabine à air.
AVERTISSEMENT: ASSUREZ-VOUS QUE L'ARME EST TOUJOURS POINTÉE DANS UNE DIRECTION SÉCURITAIRE. NE POINTEZ JAMAIS L'ARME VERS UNE PERSONNE MÊME SI LA CARABINE N'EST PAS ARMÉE ET PAS CHARGÉE. NE POINTEZ JAMAIS LA CARABINE À AIR VERS UNE CIBLE SUR LAQUELLE VOUS NE VOULEZ PAS FAIRE FEU. MANIPULEZ TOUJOURS L'ARME COMME SI ELLE ÉTAIT CHARGÉE ET PRÊTE À FAIRE FEU.
ENTRETIEN MISE EN GARDE: AVANT TOUT SOIN, ENTRETIEN OU NETTOYAGE, ASSUREZ-VOUS TOUJOURS QUE VOTRE CARABINE À AIR EST DANS LA POSITION "ON SAFE", DÉCHARGÉE ET NON ARMÉE. GARDEZ-LA POINTÉE DANS UNE DIRECTION SÉCURITAIRE. IL EST IMPORTANT DE BIEN ENTRETENIR VOTRE ARME À AIR.
PIÈCES ACTIVES: Les pièces actives (le piston et le ressort principal) nécessitent très peu de lubrification. Deux (2) gouttes d'huile "RWS Air Chamber Lube" à chaque 1000 coups suffisent. Cette huile est facile à appliquer en utilisant une aiguille d'injection de 3 1/2", insérée dans l'orifice de la chambre de compression (voir illustration 11). Gardez le bout de la crosse sur votre cuisse et maintenez une bonne prise sur le canon lorsque vous mettez de l'huile dans la chambre Les surfaces d'usure près de la charnière du canon, le levier d'armement et le mécanisme de la détente devraient être lubrifiés à l'aide de l'huile "RWS Spring Cylinder Oil" (voir illustration 12a). Les ressorts principaux devraient être huilés à tous les 1000 coups à l'aide de six (6) gouttes d'huile "RWS Spring Cylinder Oil" (voir illustration 12b). Rappelez-vous qu'un peu d'huile est bon, que beaucoup d'huile n'est pas meilleur.
NOTEZ BIEN: Pour avoir accès au ressort principal, enlevez la crosse. Pour enlever la crosse, enlevez les trois vis de crosse – deux sur chacun des côtés du fût et une à l'arrière du pontet (voir illustration 13).
Canon: Lors d’une utilisation quotidienne, très peu de poussière ou de résidus s’accumulent dans le canon. On peut les enlever à l’aide de projectiles de nettoyage RWS. Notez bien: Les projectiles de plomb RWS de qualité supérieure n’augmentent pas seulement la précision de votre tir mais, diminuent aussi les possibilités de résidus de plomb. Lors de périodes régulières d’utilisation, l’âme du canon devrait être nettoyée régulièrement à l’aide d’une baguette et d’une pièce de feutre ou d’un écouvillon en laine. Les brosses en métal ne devraient pas être utilisées. Insérez la baguette dans la culasse.
AVERTISSEMENT: UN ARME QUI NE FONCTIONNE PAS BIEN PEUT ÊTRE DANGEREUSE. ELLE DEVRAIT ÊTRE RANGÉE DE FAÇON SÉCURITAIRE AFIN QUE PERSONNE NE L'UTILISE JUSQU'À CE QU'ELLE SOIT RÉPARÉE OU DÉTRUITE. NE TENTEZ PAS DE DÉMONTER L'ARME. IL EST DIFFICILE DE LA RÉASSEMBLER ET UNE ARME MAL DÉMONTÉE OU MAL ASSEMBLÉE PEUT CAUSER DES BLESSURES GRAVES OU LA MORT.
DÉCHARGER UN PROJECTILETirez le projectile vers une CIBLE SÉCURITAIRE pour décharger l'arme. Si ce n'est pas possible, placez la carabine à air en position "ON SAFE", faites légèrement basculer le canon et poussez le projectile hors de la chambre à l'aide d'une baguette de nettoyage insérée dans la bouche du canon.
ENLEVER UN PROJECTILE BLOQUÉSi un projectile se bloque dans le canon, NE RECHARGEZ PAS l'arme. 1. Armez la carabine à air (voir ÉTAPE 2 ARMER VOTRE CARABINE À AIR), pointez la carabine à air dans une DIRECTION SÉCURITAIRE, placez la carabine à air dans la position "OFF SAFE" et pressez la détente pour faire feu. 2. Faites basculer le canon légèrement (sans pousser le canon complètement vers le bas pour armer la carabine) et regardez dans la culasse pour voir si la carabine à air s'est enrayée (voir illustration 7). NE REGARDEZ JAMAIS DANS LA BOUCHE DU CANON. 3. Si la carabine à air est encore enrayée, insérez une baguette du bon calibre dans la culasse et poussez le projectile coincé pour le faire sortir du canon. Ne tentez pas de réutiliser ce projectile. Si vous ne pouvez pas débloquer votre carabine à air, entrez en communication avec le service à la clientèle de Umarex USA.
7700 Chad Colley Boulevard, Fort Smith, Arkansas 72916 USAPhone/Téléphone: 1-479-646-4210 www.UmarexUSA.com
illustration 6
IdéalTrop basTrop haut
AVERTISSEMENT: PAS UN JOUET. LA SURVEILLANCE D'UN ADULTE EST NÉCESSAIRE. UNE MAUVAISE UTILISATION OU UN MANQUE DE PRUDENCE PEUVENT ENTRAÎNER DES BLESSURES GRAVES OU LA MORT. CETTE ARME PEUT ÊTRE DANGEREUSE JUSQU'À 650 VERGES (594 MÈTRES).
CETTE ARME EST UNE CARABINE À AIR DE FORTE PUISSANCE RECOMMANDÉE POUR DES PERSONNES DE 16 ANS ET PLUS. LISEZ TOUTES LES INSTRUCTIONS AVANT D'UTILISER CE PRODUIT. L'ACHETEUR ET L'UTILISATEUR DEVRAIENT SE CONFORMER À TOUTES LES LOIS CONCERNANT L'ACHAT, L'UTILISATION ET LA POSSESSION D'UNE CARABINE À AIR.
Modèle Browning® Calibre Vélocité Distance dangereuseGold (synthétique) 0,177 305 m/s (1000 pi/s) 594 mGold (synthétique) 0,22 244 m/s (800 pi/s) 548 mGold (bois) 0,177 305 m/s (1000 pi/s) 594 mGold (bois) 0,22 244 m/s (800 pi/s) 548 mGold-C (synthétique) 0,177 150 m/s (490 pi/s) 343 m
illustration 5
MISE EN GARDE: VOTRE PARE-BALLES DEVRAIT ÊTRE INSPECTÉ POUR Y DÉCELER DE L'USURE AVANT ET APRÈS CHAQUE SESSION DE TIR. N'UTILISEZ PAS UN PARE-BALLES SI SA SURFACE SEMBLE EN MAUVAIS ÉTAT. PLACEZ TOUJOURS VOTRE PARE-BALLES DANS UNE ZONE QUI DEMEURERA SÉCURITAIRE SI LE PARE-BALLES EST DÉFECTUEUX. N'UTILISEZ PLUS VOTRE PARE-BALLES SI UN PROJECTILE DÉVIE OU S'IL SE PRODUIT UN RICOCHET.
AVERTISSEMENT: NE BRANDISSEZ PAS ET N'AFFICHEZ PAS CE PRODUIT EN PUBLIQUE - CELA POURRAIT CAUSER DE LA CONFUSION ET ÉTRE UN CRIME. LES POLICIERS ET D'AUTRES PERSONNES POURRAIENT CROIRE QUE C'EST UNE ARME À FEU. NE CHANGEZ PAS LA COULEUR ET LES SIGNES DISTINCTIFS DE CE PISTOLET POUR QU'IL AIT ENCORE PLUS L'ASPECT D'UNE ARME À FEU. C'EST DANGEREUX ET CELA PEUT ETRE UN CRIME.
RÈGLER LES MIRESRéglages pour l'élévation—Si la carabine tire trop haut: tournez la molette (1) dans le sens des aiguilles d'une montre (voir illustration 8). Si la carabine tire trop haut: tournez la molette dans le sens des aiguilles d'une montre. Si la carabine tire trop bas: tournez la molette dans le sens contraire des aiguilles d'une montre.
Réglages pour la dérive horizontale—Les réglages pour la dérivation due au vent sont effectués en tournant la molette (2) sur le côté (voir illustration 8). Si la carabine à air tire à droite: tournez la vis dans le sens des aiguilles d'une montre (marqué "R"). Si elle tire vers la gauche: tournez la vis dans le sens contraire des aiguilles d'une montre.
RÉGLER LA DÉTENTE1. Assurez-vous que l'arme est déchargée et n'est pas armée.2. Tournez la vis de réglage dans le sens des aiguilles d'une montre jusqu'à ce qu'elle s'arrête.3. Tournez la vis de réglage dans le sens contraire des aiguilles pas plus de 5 tours.NOTEZ BIEN: LES RÉGLAGES DANS LE SENS DES AIGUILLES D'UNE MONTRE DIMINUERONT LE POIDS DE DÉPART. LES RÉGLAGES DANS LE SENS CONTRAIRE DES AIGUILLES D'UNE MONTRE AUGMENTERONT LE POIDS DE DÉPART.IMPORTANT: NE TOURNEZ PAS LA VIS COMPLÈTEMENT POUR LA FAIRE SORTIR DE LA DÉTENTE.
RÉGLAGE DE LA CROSSEPour régler la distance de départ, desserrez les deux vis dans la plaque de couche à l'aide d'un tournevis à tête cruciforme. Enlevez la plaque de couche. Placez la quantité d’intercalaires désirée à l’arrière de la crosse comme l’indique l’illustration (voir illustration 10). Replacez la plaque de couche et vissez les deux vis.
Le fonctionnement de toutes les armes diffère et vous n'êtes pas prêt à utiliser une arme tant que vous n'êtes pas familier avec son fonctionnement. Lisez attentivement les instructions qui suivent avant de vous servir de cette arme.
MISE EN GARDE: VOUS ET CEUX QUI VOUS ACCOMPAGNENT DEVRIEZ TOUJOURS PORTER DES LUNETTES DE TIR POUR PROTÉGER VOS YEUX. SI VOUS PORTEZ DES LUNETTES POUR LIRE, VOUS DEVRIEZ METTRE DES LUNETTES DE PROTECTION CONÇUES POUR ÊTRE PORTÉES PAR-DESSUS DES LUNETTES DE LECTURE.
illustration 1
sûreté
pontet
détente
réglage de la crosse
canon
bouche
guidon
hausse
crosse
AVERTISSEMENT: SI UN PROJECTILE NE PEUT ÊTRE TIRÉ APRÈS AVOIR SUIVI LES ÉTAPES MENTIONNÉES, L’ARME À AIR PEUT ÊTRE ENRAYÉE. UN PROJECTILE QUI N’A PAS ÉTÉ TIRÉ ET QUI DEMEURE DANS LE CANON REPRÉSENTE UNE SITUATION DANGEREUSE. GARDEZ L’ARME POINTÉE DANS UNE DIRECTION SÉCURITAIRE ET RÉPETEZ TOUTES LES ÉTAPES EXCEPTÉ L’ÉTAPE 3. SI UN PROJECTILE NE PEUT TOUJOURS PAS ÊTRE TIRÉ, SUIVEZ CES INSTRUCTIONS:
1. Placez le cran de sûreté dans la position "ON SAFE" (voir illustration 2).2. Abra el cañón ligeramente, pero NO amartille el rifle completamente. Deje el cañón abierto en la posición de “SEGURO” (ON SAFE).3. Libérez le canon à l'aide d'une baguette (voir ENTRETIEN).4. Répétez les étapes.
GARANTIES TACITES –Toute garantie tacite, comprenant la garantie tacite de qualité marchande et de convenance pour une utilisation particulière, est limitée à une durée d’une (1) année à partir de la date d'achat. CERTAINS ÉTATS NE PERMETTENT PAS DE LIMITES SUR LA DURÉE D'UNE GARANTIE TACITE, DONC LES LIMITES MENTIONNÉES PEUVENT NE PAS S'APPLIQUER. SI UNE PARTIE DE CETTE GARANTIE EST INTERDITE PAR UNE LOI FÉDÉRALE, DE L'ÉTAT OU MUNICIPALE QUE L'ON N'A PAS PU ANTICIPER, ELLE NE S'APPLIQUE PAS. CETTE GARANTIE VOUS DONNE DES DROITS LÉGAUX PRÉCIS ET VOUS POUVEZ AUSSI AVOIR D'AUTRES DROITS QUI VARIENT D'UN ÉTAT À UN AUTRE ET D'UN PAYS À UN AUTRE.
TO POUR METTRE LA GARANTIE EN FORCE –Faites parvenir la carte d’enregistrement à l’intérieur d’un délai de 30 jours à:
Umarex USA, 7700 Chad Colley Boulevard, Fort Smith, Arkansas 72916 ou enregistrez-vous en ligne au www.UmarexUSA.com.
Nous nous réservons le droit de faire des changements ou des modifications.Une copie du manuel d'instructions de l'utilisateur est disponible SANS FRAIS de:
MISE EN GARDE: NE TIREZ PAS LORSQUE LE CANON EST OUVERT. CELA PEUT AVOIR COMME RÉSULTAT UN CANON TORDU ET/OU UNE CROSSE CRAQUÉE ET ANNULERA VOTRE GARANTIE.
baguetteillustration 7
culasse
Bouche du canon
illustration 10
MISE EN GARDE: VÉRIFIEZ SI LES VIS DE LA PARTIE AVANT ET ARRIÈRE DU PONTET ET LES VIS DE LA CROSSE SONT BIEN SERRÉES ENTRE, DURANT ET APRÈS LES SESSIONS DE TIR. DES VIS DESSERRÉES PEUVENT CAUSER DES BLESSURES OU LA MORT.
illustration 8
(1)
(2)
canonbasculant
illustration 11
illustration 12a
dessous de la carabine
illustration 12b
illustration 9
illustration 4