Bridge to Splice Presser 710-BSPmultimedia.3m.com/mws/media/310795O/3mtm-710-system-bridge-to... ·...
6
November 2004 78-8135-2810-2-B Bridge to Splice Presser 710-BSP Instructions
-
Upload
truongkiet -
Category
Documents
-
view
224 -
download
1
Transcript of Bridge to Splice Presser 710-BSPmultimedia.3m.com/mws/media/310795O/3mtm-710-system-bridge-to... ·...

November 200478-8135-2810-2-B
Bridge to Splice Presser 710-BSP
Instructions

2 78-8135-2810-2-B
1.0 General
1.1 The 3M™ Bridge to Splice Presser 710-BSP is a hand tool used to press 3M™ Bridge Modules 710 and 3M™ Splice or Half-Tap Modules together, and to press caps onto 710 Modules. It cannot be used to terminate and cut wires in 710 modules.
1.2 The 710-BSP hand tool is the only hand tool approved for pressing 710 bridge modules and 710 splice or half-tap modules together, or for pressing caps onto 710 modules.
Lower Jaw
Height Adjustment Nut
Upper Jaw
Torque Handle
Adjustment Guide Grooves
2.0 Applications
2.1 The 710-BSP hand tool can be used for pressing the following product combinations together: 710 bridge module to 710 splice module 710 bridge module to 710 half-tap module 710 cap to 710 splice module 710 cap to 710 half-tap module
378-8135-2810-2-B
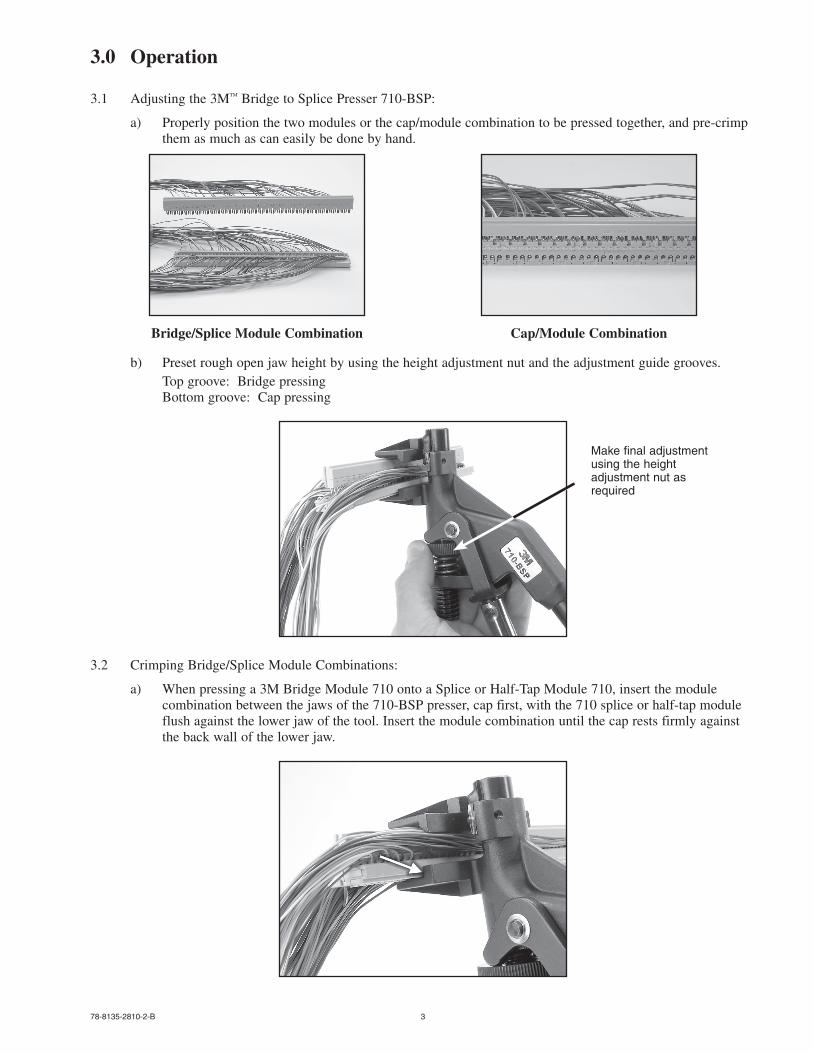
3.0 Operation
3.1 Adjusting the 3M™ Bridge to Splice Presser 710-BSP:
a) Properly position the two modules or the cap/module combination to be pressed together, and pre-crimp them as much as can easily be done by hand.
Bridge/Splice Module Combination Cap/Module Combination
b) Preset rough open jaw height by using the height adjustment nut and the adjustment guide grooves. Top groove: Bridge pressing
Bottom groove: Cap pressing
3.2 Crimping Bridge/Splice Module Combinations:
a) When pressing a 3M Bridge Module 710 onto a Splice or Half-Tap Module 710, insert the module combination between the jaws of the 710-BSP presser, cap first, with the 710 splice or half-tap module flush against the lower jaw of the tool. Insert the module combination until the cap rests firmly against the back wall of the lower jaw.
Make final adjustment using the height adjustment nut as required

4 78-8135-2810-2-B
b) Crimp the module combination together by squeezing the handles of the 3M™ Bridge to Splice Presser 710-BSP together until the factory-set torque handle “clicks,” indicating a complete crimp. This must be done three times, first in the center of the module combination, and then sequentially once on each end.
Note: If you don’t hear or feel the factory set torque handle click while squeezing the handles, the crimp may not be complete. Reduce the height of the presser jaws by turning the height adjustment nut and repeat the crimping sequence.
c) Check visually to confirm complete pressing of the bridge module onto the splice or half-tap module. If necessary, complete the assembly using additional crimps.
3.3 Crimping Cap/Module Combinations
a) When pressing a cap onto a 3M™ Splice or Half-Tap Module 710, insert the module between the jaws so the upper jaw will press directly against the cap. Insert the module until its leading surface rests firmly against the back wall of the lower jaw.
b) Crimp the cap/module combination together by squeezing the handles of the bridge to splice presser together until the factory-set torque handle “clicks,” indicating a complete crimp. This must be done five times, first in the center of the module, and then progressively closer to each end.
Note: If you don’t hear or feel the factory set torque handle click while squeezing the handles, the crimp may not be complete. Reduce the height of the presser jaws by turning the height adjustment nut and repeat the crimping sequence.
c) Check visually to confirm complete pressing of the cap onto the module. If necessary, complete the assembly using additional crimps.

578-8135-2810-2-B
4.0 Maintenance
4.1 Cleaning:
a) If the tool becomes dirty or contaminated with cable filling compound or other foreign materials, flush with high pressure water or an approved solvent. Avoid getting solvents on the foam hand grip.
Note: Follow health, safety, and disposal information on the label or the Material Safety Data Sheet for the solvent being used.
b) Remove any remaining solvent residue or other foreign matter with compressed air.
4.2 Lubricate the hinge pin and the jaw shaft with a light weight oil. Wipe a thin coating of oil over exposed metal surfaces of the tool.
Lubricate
Lubricate

Communication Markets Division 3M Telecommunications6801 River Place Blvd.Austin, TX 78726-90001-800-462-8688www.3MTelecommunications.com
Recycled paper40% pre-consumer 10% post-consumer
Litho in USA© 3M 2004 78-8135-2810-2-B
3M is a trademark of 3M Company.
Important NoticeAll statements, technical information, and recommendations related to 3M’s products are based on information believed to be reliable, but the accuracy or completeness is not guaranteed. Before using this product, you must evaluate it and determine if it is suitable for your intended application. You assume all risks and liability associated with such use. Any statements related to the product which are not contained in 3M’s current publications, or any contrary statements contained on your purchase order shall have no force or effect unless expressly agreed upon, in writing, by an authorized officer of 3M.
Warranty; Limited Remedy; Limited Liability. This product will be free from defects in material and manufacture for a period of one (1) year from the time of purchase. 3M MAKES NO OTHER WARRANTIES INCLUDING, BUT NOT LIMITED TO, ANY IMPLIED WARRANTY OF MERCHANTABILITY OR FITNESS FOR A PARTICULAR PURPOSE. If this product is defective within the warranty period stated above, your exclusive remedy shall be, at 3M’s option, to replace or repair the 3M product or refund the purchase price of the 3M product. Except where prohibited by law, 3M will not be liable for any indirect, special, incidental or consequential loss or damage arising from this 3M product, regardless of the legal theory asserted.