Brava Select Slate - Brava Roof Tile · Brava Select Slate should be installed with two corrosion...
20
Phone: 319-338-5706 Fax: 319-343-1038 www.bravarooftile.com Brava Select Slate Installation Guide
Transcript of Brava Select Slate - Brava Roof Tile · Brava Select Slate should be installed with two corrosion...

Brava Tile
Phone: 319-338-5706
Fax: 319-343-1038
www.bravarooftile.com
Brava Select Slate
Installation Guide
This document includes the recommended and suggested installation procedures for
Brava Select Slate roofing material.
Brava Roof Tile is the manufacturer of Brava Select Slate and all other related roofing
products.
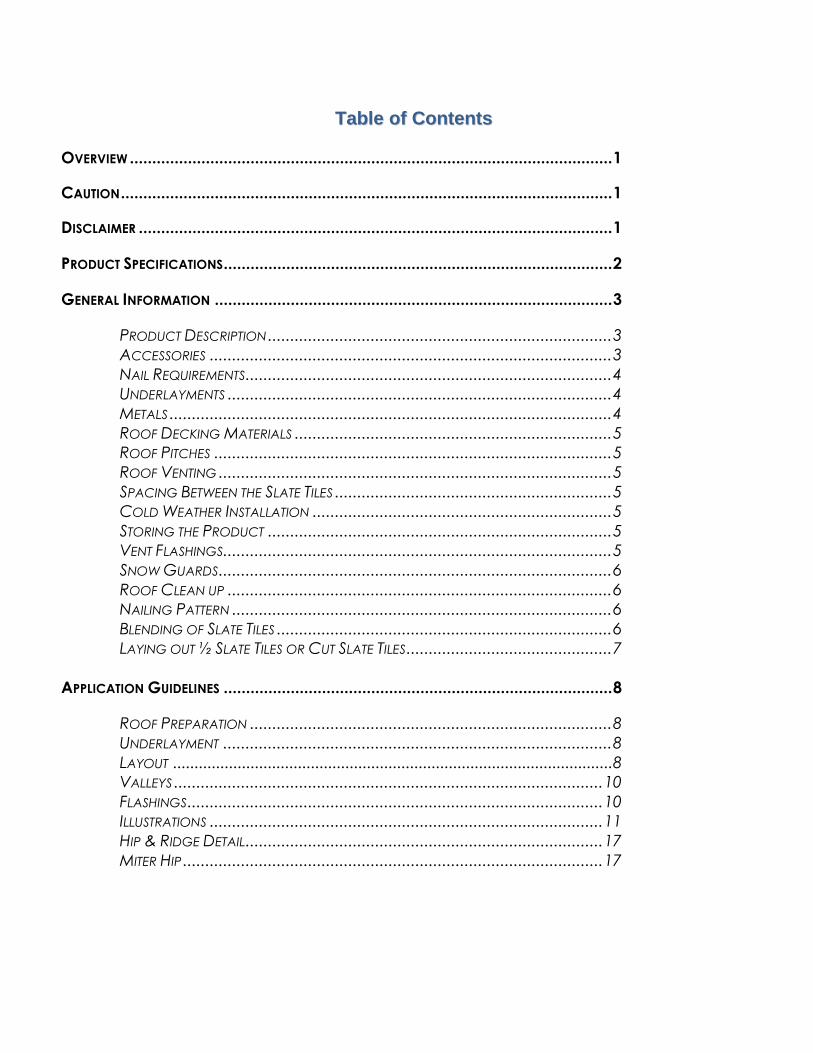
Table of Contents
TTaabbllee ooff CCoonntteennttss
OVERVIEW ............................................................................................................ 1
CAUTION .............................................................................................................. 1
DISCLAIMER .......................................................................................................... 1
PRODUCT SPECIFICATIONS ....................................................................................... 2
GENERAL INFORMATION ......................................................................................... 3
PRODUCT DESCRIPTION ............................................................................. 3
ACCESSORIES .......................................................................................... 3
NAIL REQUIREMENTS .................................................................................. 4
UNDERLAYMENTS ...................................................................................... 4
METALS ................................................................................................... 4
ROOF DECKING MATERIALS ....................................................................... 5
ROOF PITCHES ......................................................................................... 5
ROOF VENTING ........................................................................................ 5
SPACING BETWEEN THE SLATE TILES .............................................................. 5
COLD WEATHER INSTALLATION ................................................................... 5
STORING THE PRODUCT ............................................................................. 5
VENT FLASHINGS ....................................................................................... 5
SNOW GUARDS ........................................................................................ 6
ROOF CLEAN UP ...................................................................................... 6
NAILING PATTERN ..................................................................................... 6
BLENDING OF SLATE TILES ........................................................................... 6
LAYING OUT ½ SLATE TILES OR CUT SLATE TILES .............................................. 7
APPLICATION GUIDELINES ....................................................................................... 8
ROOF PREPARATION ................................................................................. 8
UNDERLAYMENT ....................................................................................... 8
LAYOUT ...................................................................................................... 8
VALLEYS ................................................................................................ 10
FLASHINGS ............................................................................................. 10
ILLUSTRATIONS ........................................................................................ 11
HIP & RIDGE DETAIL ................................................................................ 17
MITER HIP .............................................................................................. 17
Overview
1
OVERVIEW
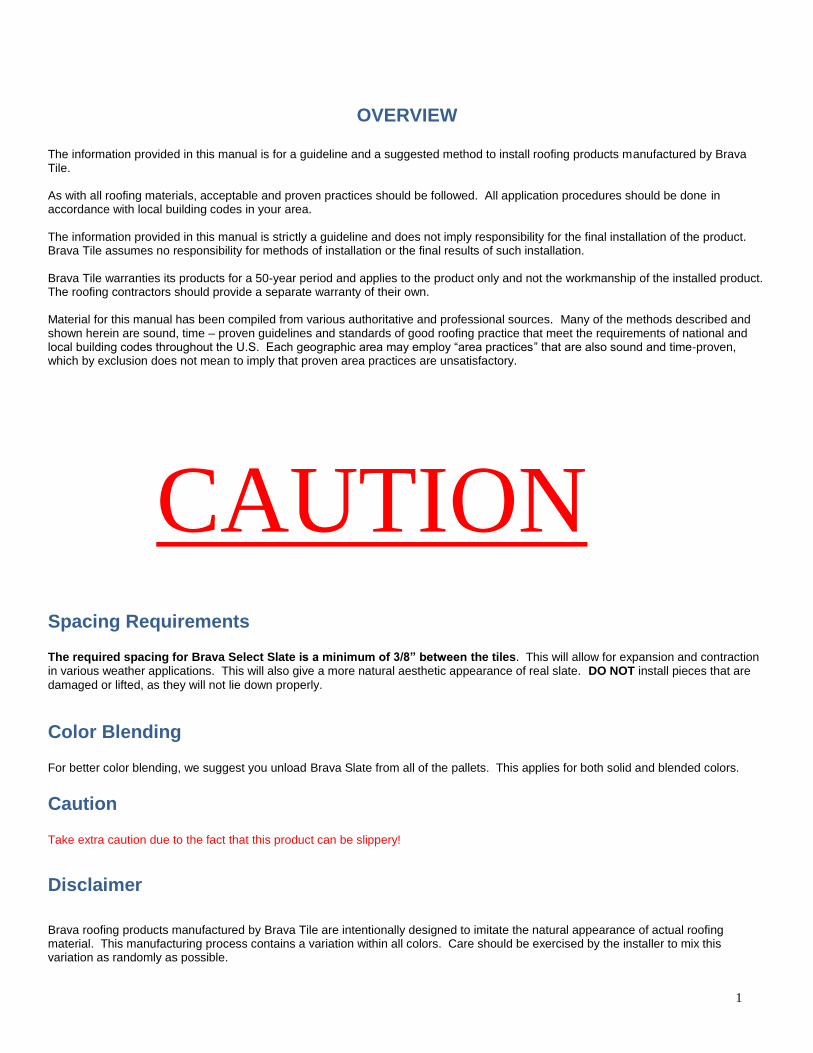
The information provided in this manual is for a guideline and a suggested method to install roofing products manufactured by Brava Tile. As with all roofing materials, acceptable and proven practices should be followed. All application procedures should be done in accordance with local building codes in your area. The information provided in this manual is strictly a guideline and does not imply responsibility for the final installation of the product. Brava Tile assumes no responsibility for methods of installation or the final results of such installation. Brava Tile warranties its products for a 50-year period and applies to the product only and not the workmanship of the installed product. The roofing contractors should provide a separate warranty of their own. Material for this manual has been compiled from various authoritative and professional sources. Many of the methods described and shown herein are sound, time – proven guidelines and standards of good roofing practice that meet the requirements of national and local building codes throughout the U.S. Each geographic area may employ “area practices” that are also sound and time-proven, which by exclusion does not mean to imply that proven area practices are unsatisfactory.
Spacing Requirements The required spacing for Brava Select Slate is a minimum of 3/8” between the tiles. This will allow for expansion and contraction in various weather applications. This will also give a more natural aesthetic appearance of real slate. DO NOT install pieces that are
damaged or lifted, as they will not lie down properly.
Color Blending For better color blending, we suggest you unload Brava Slate from all of the pallets. This applies for both solid and blended colors.
Caution Take extra caution due to the fact that this product can be slippery!
Disclaimer Brava roofing products manufactured by Brava Tile are intentionally designed to imitate the natural appearance of actual roofing material. This manufacturing process contains a variation within all colors. Care should be exercised by the installer to mix this variation as randomly as possible.
CAUTION
General Information
2
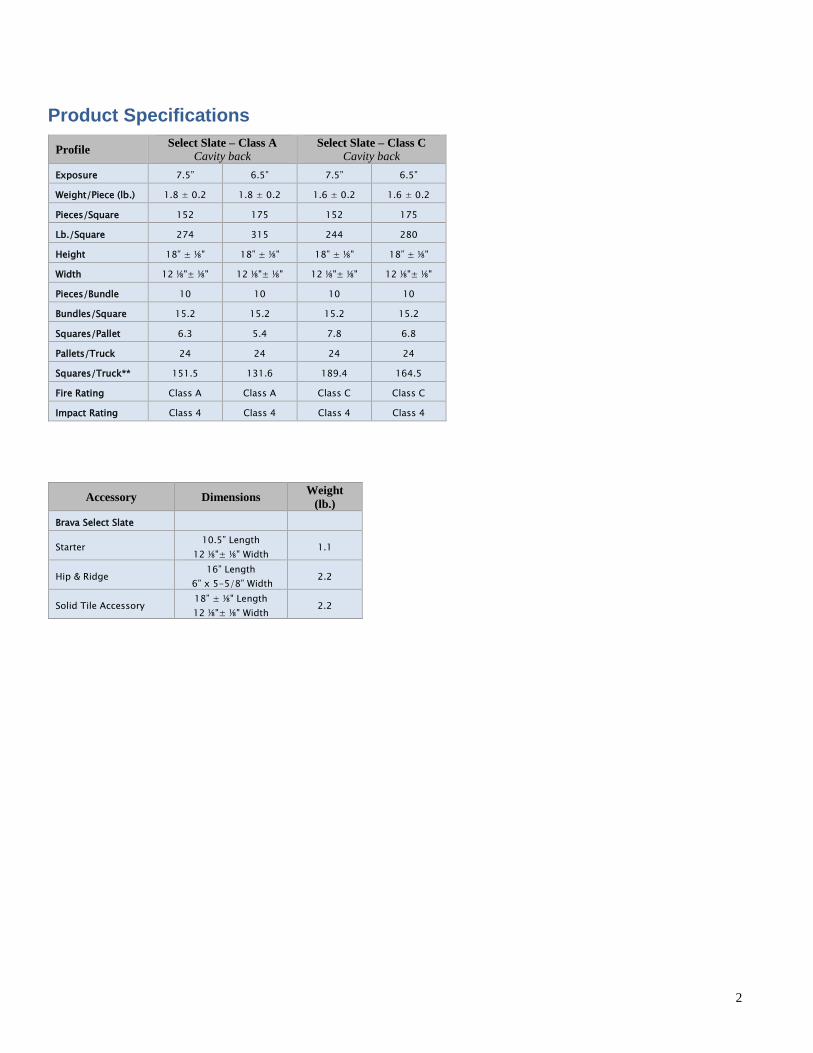
Product Specifications
Profile Select Slate – Class A
Cavity back Select Slate – Class C
Cavity back
Exposure 7.5” 6.5” 7.5” 6.5”
Weight/Piece (lb.) 1.8 ± 0.2 1.8 ± 0.2 1.6 ± 0.2 1.6 ± 0.2
Pieces/Square 152 175 152 175
Lb./Square 274 315 244 280
Height 18” ± ⅛" 18” ± ⅛" 18” ± ⅛" 18” ± ⅛"
Width 12 ⅛"± ⅛" 12 ⅛"± ⅛" 12 ⅛"± ⅛" 12 ⅛"± ⅛"
Pieces/Bundle 10 10 10 10
Bundles/Square 15.2 15.2 15.2 15.2
Squares/Pallet 6.3 5.4 7.8 6.8
Pallets/Truck 24 24 24 24
Squares/Truck** 151.5 131.6 189.4 164.5
Fire Rating Class A Class A Class C Class C
Impact Rating Class 4 Class 4 Class 4 Class 4
Accessory Dimensions Weight
(lb.)
Brava Select Slate
Starter 10.5” Length
12 ⅛"± ⅛" Width 1.1
Hip & Ridge 16” Length
6” x 5-5/8” Width 2.2
Solid Tile Accessory 18” ± ⅛" Length
12 ⅛"± ⅛" Width 2.2
General Information
3
Exposure Lines
Nail Mark
18”
6.5
7.5 6.5
7.5
7.5
6.5 7.5
6.5
Texture
12”
Nail Mark
Nail Mark
6” 3”
10 ½”
12⅛” ± ⅛”
Exposure Lines
Nail Mark
18”
6.5
7.5 6.5
7.5 7.5
6.5 7.5
6.5
Texture
12 ⅛”
Nail Mark
Nail Mark
6” 3”
General Information No special tools required
Slate tiles can be hand nailed or nailed with a pneumatic nail gun
Slate tiles can be cut with a standard skill saw
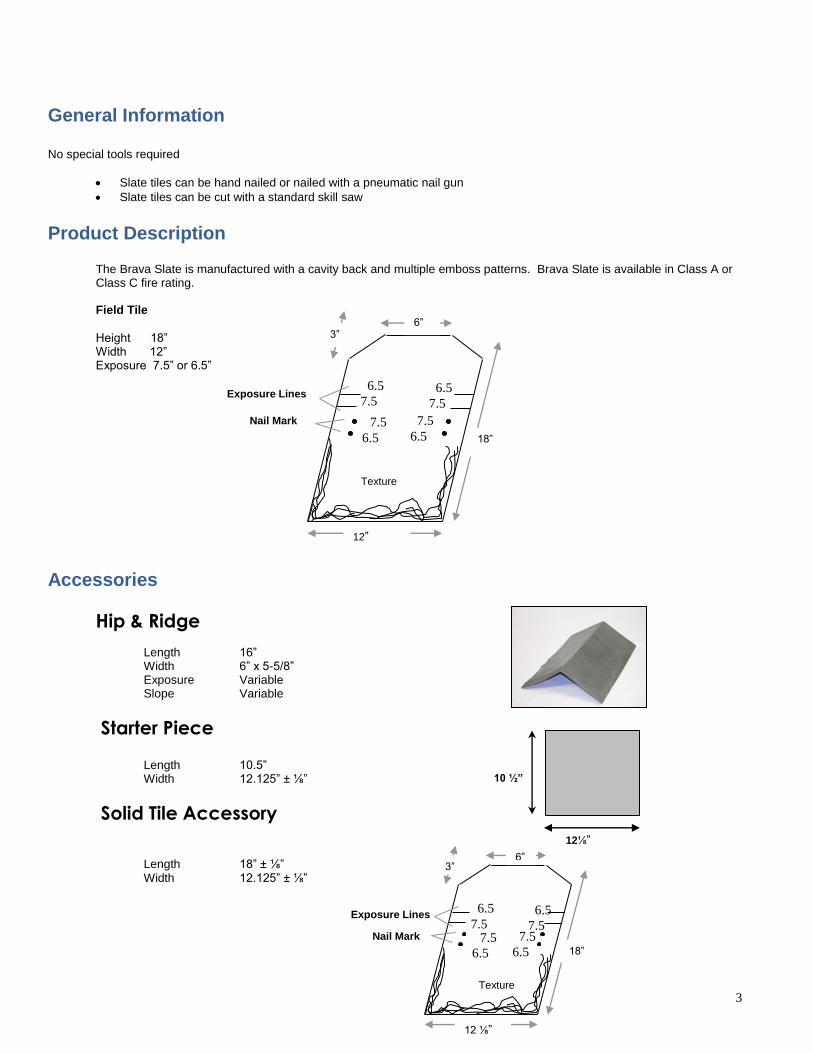
Product Description
The Brava Slate is manufactured with a cavity back and multiple emboss patterns. Brava Slate is available in Class A or Class C fire rating. Field Tile
Height 18” Width 12” Exposure 7.5” or 6.5”
Accessories
Hip & Ridge Length 16” Width 6” x 5-5/8” Exposure Variable Slope Variable
Starter Piece
Length 10.5” Width 12.125” ± ⅛”
Solid Tile Accessory
Length 18” ± ⅛” Width 12.125” ± ⅛”
General Information
4
Fastener Requirements
Brava Select Slate
Brava Select Slate should be installed with two corrosion resistant fasteners, such as stainless-steel type (304 or 316), hot-dipped zinc coated, copper, aluminum or corrosion resistant pneumatic roofing nails with a 3/8” diameter head and long enough to penetrate the sheathing ½”.
Caution should always be used to insure against over/under penetration. In areas that experience high humidity or other
severe climatic conditions, consideration should be given to using stainless steel fasteners and higher-grade accessories.
Underlayments
Ice and Water Shield
Single layer of 36 mil rubberized asphalt on 4 mil polyethylene carrier sheet
A 36" wide sheet in all valleys is recommended
1 row of 36" wide along all eaves, lap end joints 6" and side joints 3" extended 3' inside the plate line
Apply around all dormers, roof projections, skylights, etc.
Always refer to your local building codes
NOTE: Ice and water shield should not be installed over the felt.
Felts
Asphalt saturated felt
Meets requirements of ASTM D226
Referred to as 30 LB. felt and without perforations
Secured with 3/4" long galvanized roofing nail
NOTE: Minimum requirement on a solid deck is one layer of 30 LB. To insure better performance one may choose to use a
higher performance underlayment. If you have questions regarding high performance underlayments, please call Brava Tile @ 319-338-5706. When installing over a solid tongue and groove deck, 43 lb. felt is the suggested minimum.
Metals
Valleys
Minimum recommendations
o 16 oz. Copper
o 26 ga. Corrosion resistant metal Stainless Steel Color Clad Steel Color Clad Aluminum
Eaves, gables
o Eave Drip Starter Strips
o Gable Edge Strips
General Information
5
Roof Decking Materials
Solid Deck
Minimum of 15/32" CDX plywood deck or equal
Minimum 1" tongue and groove wood decking
Roof Slope
4:12 and above recommended
For roof pitches greater than 4:12
o Use 7.5” exposure
For roof pitches of less than 4:12
o Special consideration should be taken for sub roof installation o Use 6.5” exposure
Roof Venting
For every 300 feet of attic floor space, you will need one (1) square foot opening in the roof. Fifty percent (50%) of this needs to be at the eave line. Venting is important and needs to be thought out thoroughly. NOTE: If screening is involved, opening areas should be doubled.
Spacing Between Slate
A spacing of 3/8” minimum between slate tiles is required. This will allow for any movement of the roof deck and expansion/contraction of the materials.
Cold Weather Installation
It is recommended that the Brava Slate not be installed in temperatures below 20 F. Special consideration should be given for cold weather installation regarding items such as ice and water shield and felt underlayment. Be sure to follow the manufacturer’s installation requirements for all other applications and to refer to local building code requirements. Note of Caution: The tiles can be slick and safety methods need to be enforced.
Storing the Product
For better and easier installation, the slate needs to be stored on a flat surface. The slate can become twisted or bent when stored on an uneven surface. Twisted or bent slate can cause an initial appearance concern and a possible problem with
blowing snow and rain, and therefore should NOT be installed.
General Information
6
Vent Flashings
Normal type of roof jacks or flashings can be used. A lead jack for plumbing pipes is recommended. Permanent types of materials should always be used.
Snow Guards
Due to the smooth surface of the slate, snow will slide off rather easily. The need for snow guards will increase in areas with above average snowfall. Be sure to follow the snow guard manufacturer’s installation specifications for the correct spacing, and always refer to local building code requirements.
Roof Clean Up
In areas of hips and valleys where there will be a greater cutting of slate tiles, it is recommended that these areas are swept off and the cuttings removed from the roof surface. This is for safety reasons and to keep the cuttings from stopping up the gutters and down spouts.
Nailing Pattern
All slate tiles will be nailed with two nails, as per Brava’s instructions. Two nails will be used on the pre-marked nail hole indicators for either a 6 ½” exposure or a 7 ½” exposure.
Blending of Slate
It is recommended for both solid and multi-colored patterns, that the installer load the roof with slate out of all pallets, rather than from a single pallet. Good blending is the responsibility of the installer.
General Information
7
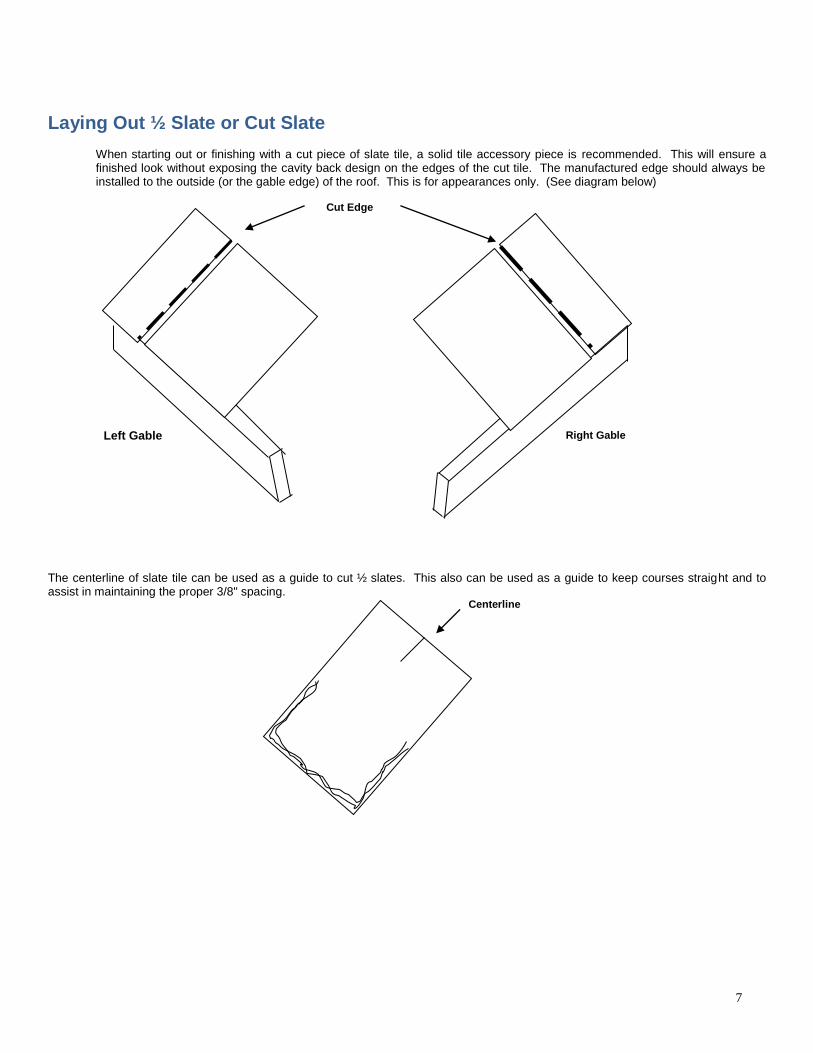
Laying Out ½ Slate or Cut Slate
When starting out or finishing with a cut piece of slate tile, a solid tile accessory piece is recommended. This will ensure a finished look without exposing the cavity back design on the edges of the cut tile. The manufactured edge should always be installed to the outside (or the gable edge) of the roof. This is for appearances only. (See diagram below)
The centerline of slate tile can be used as a guide to cut ½ slates. This also can be used as a guide to keep courses straight and to assist in maintaining the proper 3/8" spacing. Centerline
Right Gable Left Gable
Cut Edge
Application Guidelines
8
Roof Preparation Inspect all areas of the roof to be tiled to assure that:
1) Surface area is uniform, smooth, sound, clean and free of irregularities. 2) Even though metal flashing and other specialty flashings may not be the responsibility of the roofer, these must be in
place prior to the installation.
3) Work by other trades, which penetrate the roof plane, is completed.
Underlayment
1) Install Ice and Water Shield at all eaves, valleys and around projections that are greater than 12"x 12" in lieu of any felt underlayment.
2) Felt underlayment should not be placed under the ice and water shield but should overlap the ice and water shield no less
than 2".
3) Install Type 30 felt beginning at the eave and overlapping fascia board or metal roof edging if installed and laid parallel to eave. Cover the roof deck with felt maintaining a 2" headlap and 6" end laps. Hips and ridges should be lapped 6". Secure underlayment with 3/4" galvanized roofing nails at 9" on center along all laps and 12" on center down the center line of each row of felt.
NOTE: In designated high wind areas or when the structure is more than 40' above the ground, install Type 43 lb. coated base
felt or greater in lieu of the Type 30. If the roof pitch is less than 4:12, a double layer of Type 30 or heavier, unperforated felt either set in mastic or hot asphalt is recommended to insure a watertight roof.
Layout
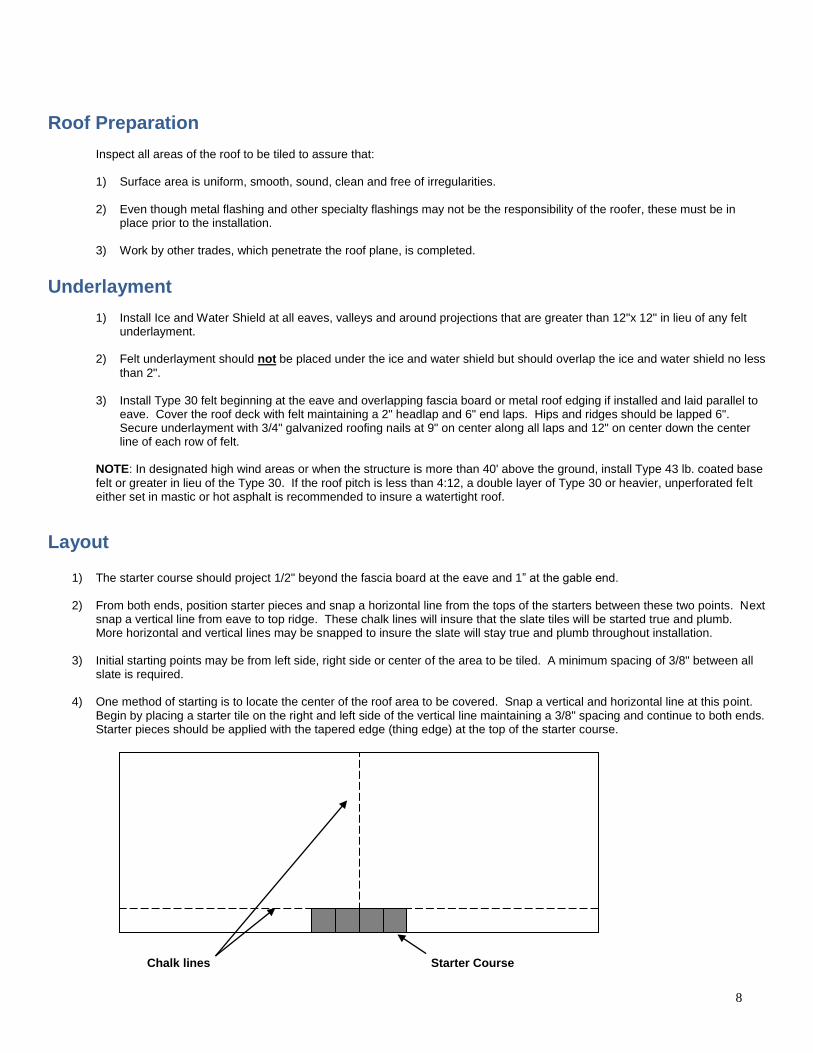
1) The starter course should project 1/2" beyond the fascia board at the eave and 1” at the gable end.
2) From both ends, position starter pieces and snap a horizontal line from the tops of the starters between these two points. Next snap a vertical line from eave to top ridge. These chalk lines will insure that the slate tiles will be started true and plumb. More horizontal and vertical lines may be snapped to insure the slate will stay true and plumb throughout installation.
3) Initial starting points may be from left side, right side or center of the area to be tiled. A minimum spacing of 3/8" between all
slate is required.
4) One method of starting is to locate the center of the roof area to be covered. Snap a vertical and horizontal line at this point. Begin by placing a starter tile on the right and left side of the vertical line maintaining a 3/8" spacing and continue to both ends. Starter pieces should be applied with the tapered edge (thing edge) at the top of the starter course.
Chalk
Chalk lines Starter Course
Application Guidelines
9
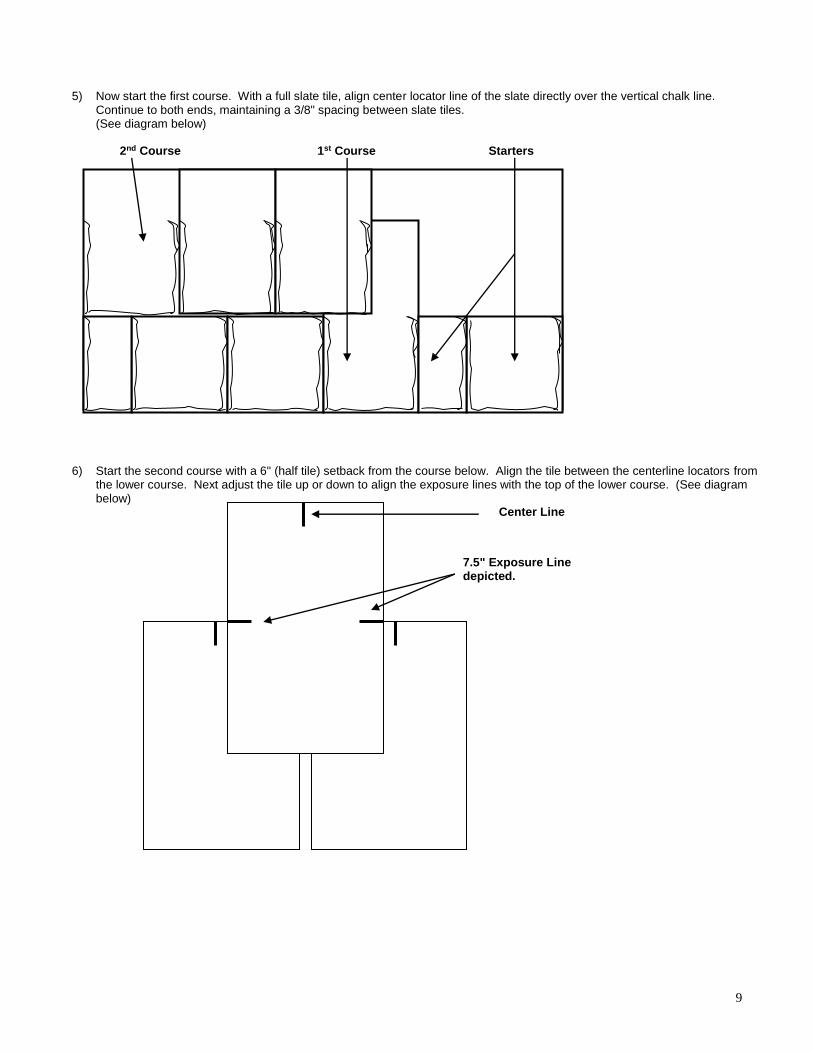
5) Now start the first course. With a full slate tile, align center locator line of the slate directly over the vertical chalk line. Continue to both ends, maintaining a 3/8" spacing between slate tiles. (See diagram below)
2nd Course 1st Course Starters
6) Start the second course with a 6" (half tile) setback from the course below. Align the tile between the centerline locators from
the lower course. Next adjust the tile up or down to align the exposure lines with the top of the lower course. (See diagram below)
Center Line
7.5" Exposure Line depicted.
Application Guidelines
10
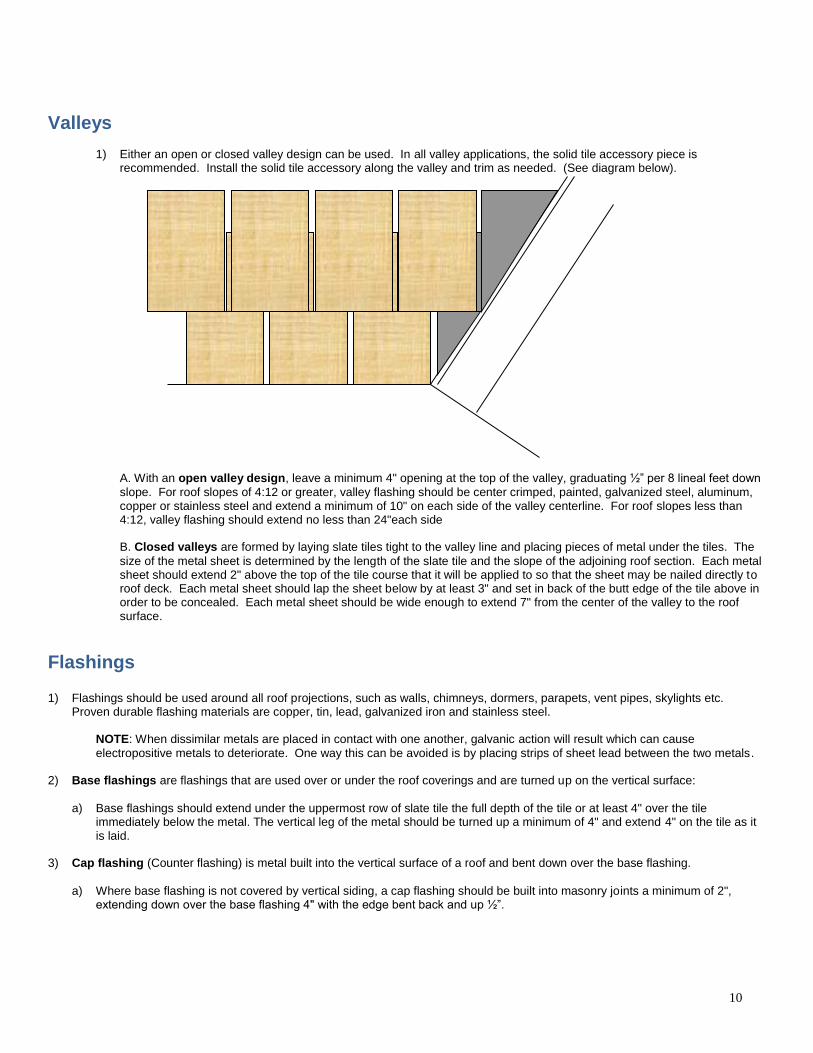
Valleys
1) Either an open or closed valley design can be used. In all valley applications, the solid tile accessory piece is recommended. Install the solid tile accessory along the valley and trim as needed. (See diagram below).
A. With an open valley design, leave a minimum 4" opening at the top of the valley, graduating ½” per 8 lineal feet down
slope. For roof slopes of 4:12 or greater, valley flashing should be center crimped, painted, galvanized steel, aluminum, copper or stainless steel and extend a minimum of 10" on each side of the valley centerline. For roof slopes less than 4:12, valley flashing should extend no less than 24"each side B. Closed valleys are formed by laying slate tiles tight to the valley line and placing pieces of metal under the tiles. The
size of the metal sheet is determined by the length of the slate tile and the slope of the adjoining roof section. Each metal sheet should extend 2" above the top of the tile course that it will be applied to so that the sheet may be nailed directly to roof deck. Each metal sheet should lap the sheet below by at least 3" and set in back of the butt edge of the tile above in order to be concealed. Each metal sheet should be wide enough to extend 7" from the center of the valley to the roof surface.
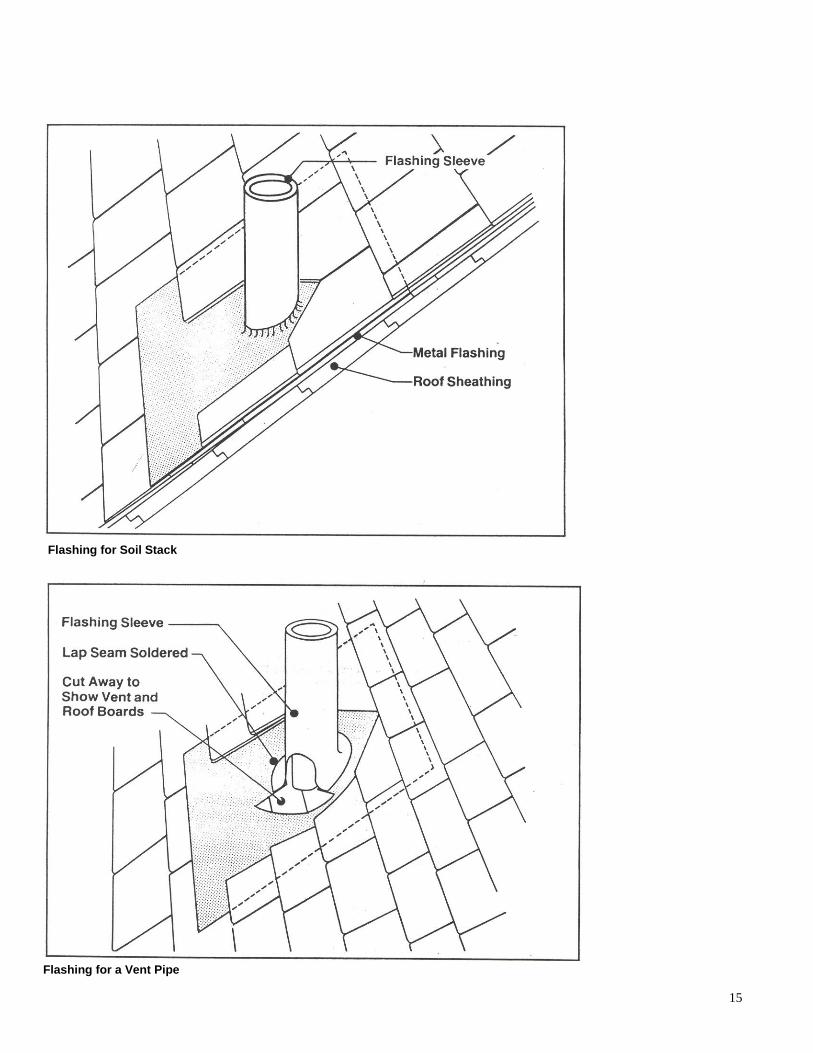
Flashings 1) Flashings should be used around all roof projections, such as walls, chimneys, dormers, parapets, vent pipes, skylights etc.
Proven durable flashing materials are copper, tin, lead, galvanized iron and stainless steel.
NOTE: When dissimilar metals are placed in contact with one another, galvanic action will result which can cause
electropositive metals to deteriorate. One way this can be avoided is by placing strips of sheet lead between the two metals.
2) Base flashings are flashings that are used over or under the roof coverings and are turned up on the vertical surface:
a) Base flashings should extend under the uppermost row of slate tile the full depth of the tile or at least 4" over the tile
immediately below the metal. The vertical leg of the metal should be turned up a minimum of 4" and extend 4" on the tile as it is laid.
3) Cap flashing (Counter flashing) is metal built into the vertical surface of a roof and bent down over the base flashing.
a) Where base flashing is not covered by vertical siding, a cap flashing should be built into masonry joints a minimum of 2",
extending down over the base flashing 4" with the edge bent back and up ½”.
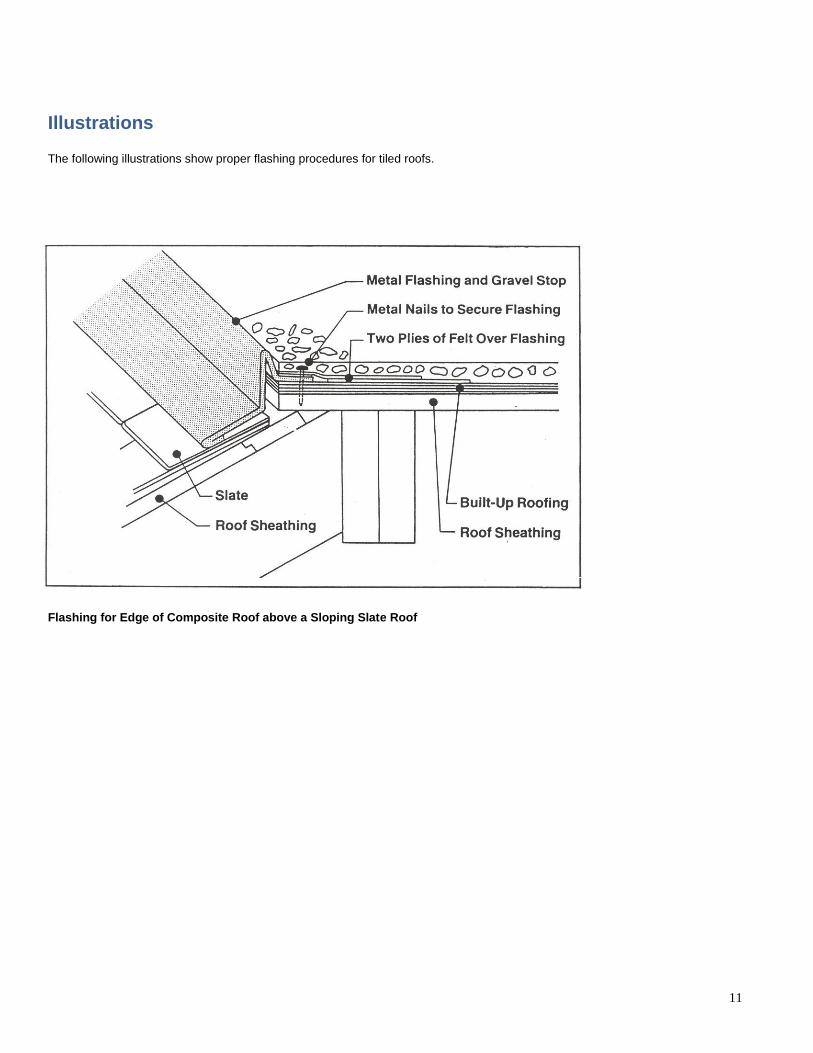
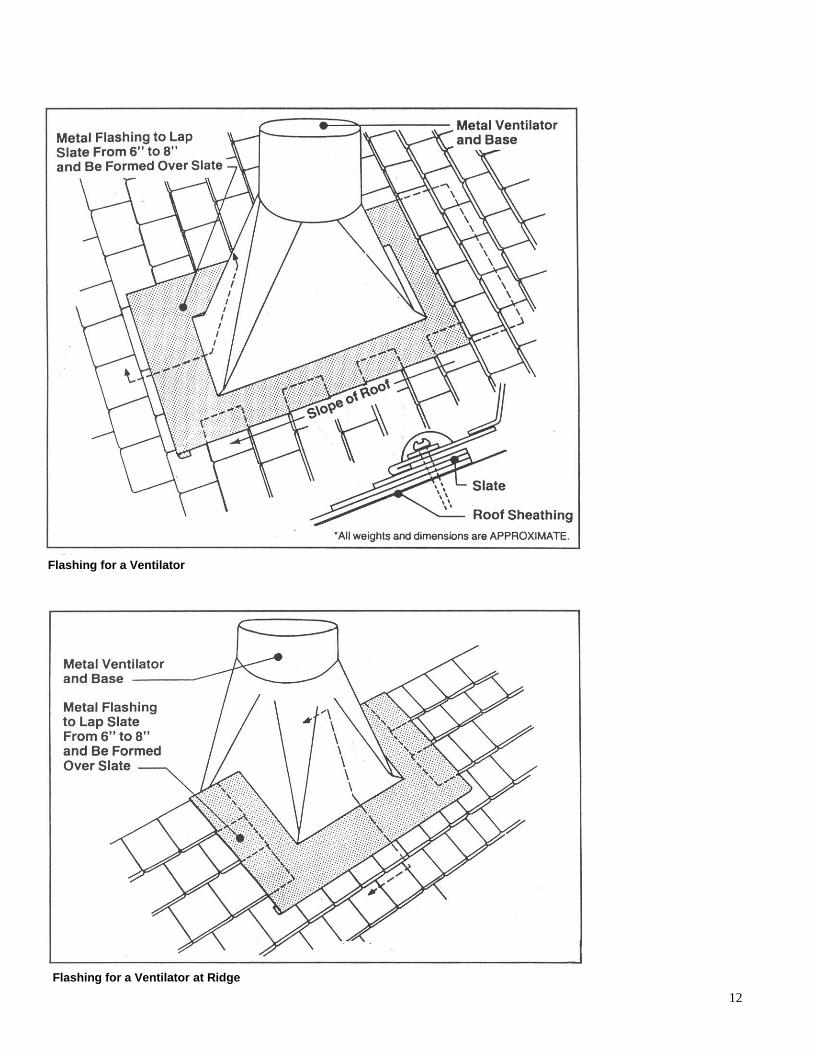
Application Guidelines
11
Illustrations The following illustrations show proper flashing procedures for tiled roofs.
Flashing for Edge of Composite Roof above a Sloping Slate Roof
Application Guidelines
12
Flashing for a Ventilator
Flashing for a Ventilator at Ridge
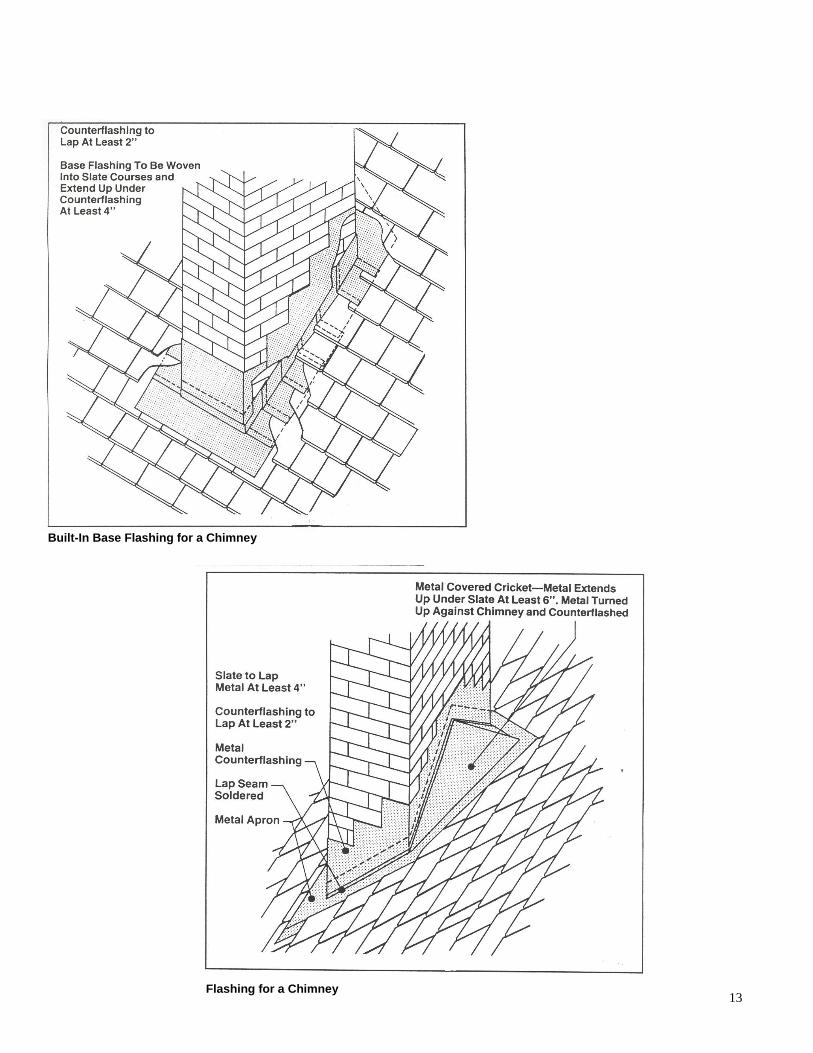
Application Guidelines
13
Built-In Base Flashing for a Chimney
Flashing for a Chimney
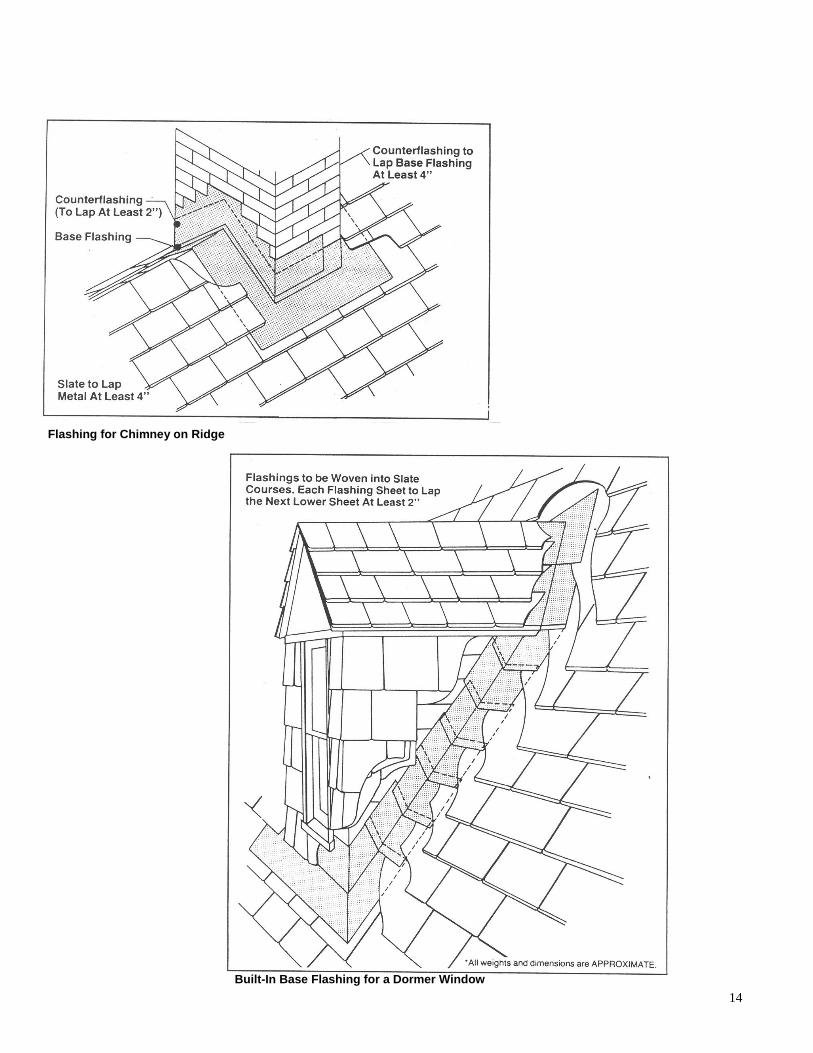
Application Guidelines
14
Flashing for Chimney on Ridge
Built-In Base Flashing for a Dormer Window
Application Guidelines
15
Flashing for Soil Stack
Flashing for a Vent Pipe
Application Guidelines
16
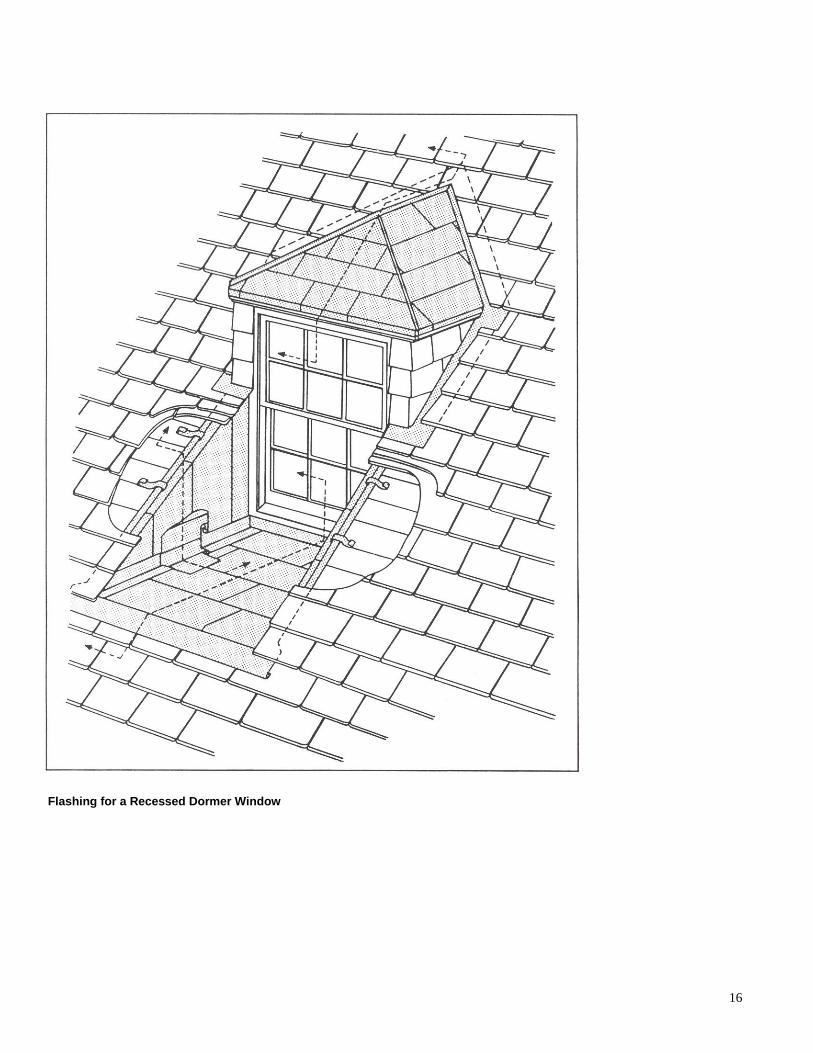
Flashing for a Recessed Dormer Window
Application Guidelines
17
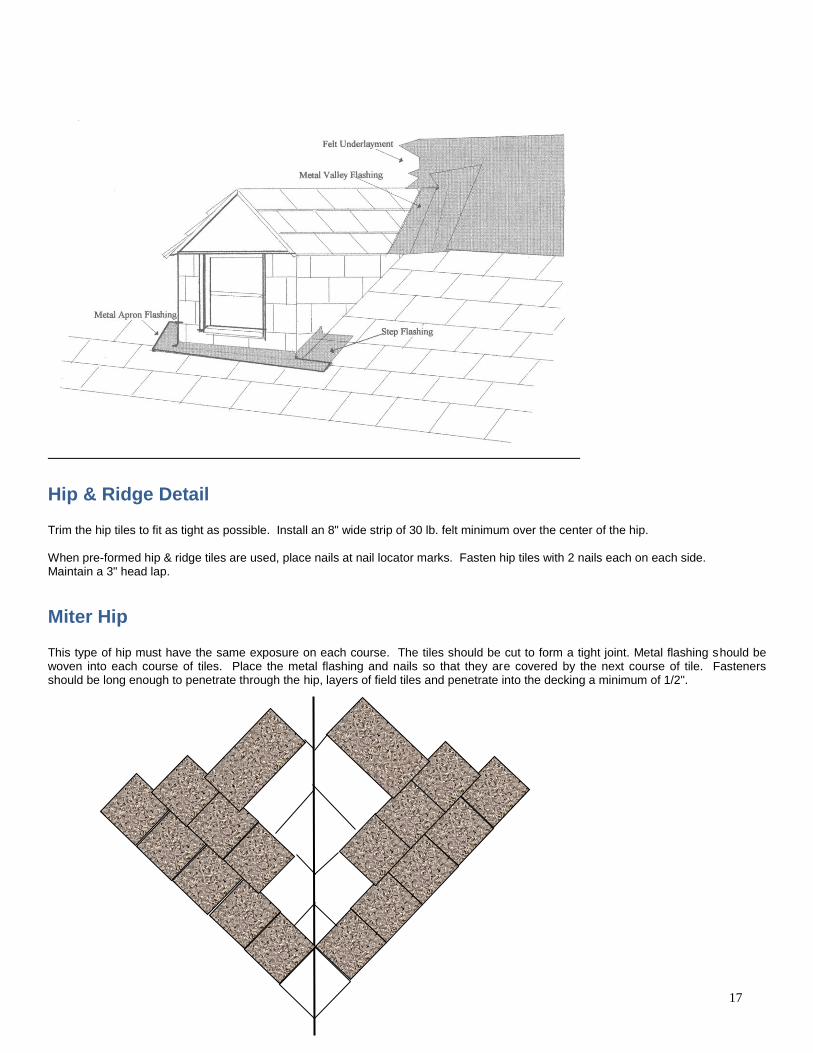
Hip & Ridge Detail Trim the hip tiles to fit as tight as possible. Install an 8" wide strip of 30 lb. felt minimum over the center of the hip. When pre-formed hip & ridge tiles are used, place nails at nail locator marks. Fasten hip tiles with 2 nails each on each side. Maintain a 3" head lap.
Miter Hip This type of hip must have the same exposure on each course. The tiles should be cut to form a tight joint. Metal flashing should be woven into each course of tiles. Place the metal flashing and nails so that they are covered by the next course of tile. Fasteners should be long enough to penetrate through the hip, layers of field tiles and penetrate into the decking a minimum of 1/2".