Brand Mobiliser Development Manual - Sybase
158
Brand Mobiliser Development Manual www.sybase.com [ PRODUCT D OCUMENTATION ]
Transcript of Brand Mobiliser Development Manual - Sybase

Brand Mobiliser Development Manual
www.sybase.com
[PRODU CT DOCU MENTAT ION]


Brand Mobiliser Development Manual
Version 1.2 - September 2011 i
Contents:
1 Introduction ........................................................................................................................................ 1
1.1 References ................................................................................................................................................... 1
2 States and Applications ....................................................................................................................... 2
2.1 State Machine .............................................................................................................................................. 2 2.2 Base States ................................................................................................................................................... 8 2.3 Subscriber States ......................................................................................................................................... 8 2.4 Mobiliser States ........................................................................................................................................... 9 2.5 3
rd Party States ........................................................................................................................................... 14
3 Developing with the Application Composer ..................................................................................... 16
3.1 State Layout ............................................................................................................................................... 16 3.2 State Editor ................................................................................................................................................ 22
4 Example Application .......................................................................................................................... 30
4.1 Cash Out Process ....................................................................................................................................... 30 4.2 Workflow ................................................................................................................................................... 32 4.3 State Layout ............................................................................................................................................... 33 4.4 State Editor ................................................................................................................................................ 34
5 How to Test Applications .................................................................................................................. 35
5.1 Using the Application Simulator ................................................................................................................ 35
6 Importing/Exporting Applications ..................................................................................................... 41
6.1 Export a Single Application ........................................................................................................................ 41 6.2 Export a Group of Applications .................................................................................................................. 43 6.3 Importing Applications .............................................................................................................................. 43 6.4 Quick Start Templates ................................................................................................................................ 44
A. Appendix – States Catalog................................................................................................................. 47
B. Appendix – Mobiliser Web Service Lookup Values ......................................................................... 147
ii
Brand Mobiliser Development Manual Version 1.2 - September 2011
Principal Author
Sybase Mobiliser Group
Revision History
Version 1.2 - September 2011
Version 1.1 - March 2011
Brand Mobiliser Development Manual
Version 1.2 - September 2011 1
1 Introduction
Brand Mobiliser makes it very easy for companies to mobilise all aspects of their businesses, including: brand awareness, CRM, mobile banking and financial, mobile payment, commerce, and much more. Brand Mobiliser fulfills the increasing demand of mobile customers for more interactions with their mobile applications.
For partners, Brand Mobiliser provides a plug-in mechanism to develop components to enrich the Mobile Interactive Application experiences even more, allowing integration of any 3
rd party systems.
The basis of Brand Mobilisers web interface is the tools to visually compose, modify and test these conversational services, known as interactive applications. These applications are then fulfilled by the Brand Mobiliser processing engine, which allows for high-throughput session management for customer interaction with these applications.
This document describes the steps and parts of the Brand Mobiliser Web Interface called Application Composer that allows development of applications.
To do this, in the following chapters we introduce and describe;
States and Applications
The Application Composer state layout view.
The Application Composer state editor popup.
A complete example large application.
How to test applications.
How to import and export applications between installations.
1.1 References
1. Brand Mobiliser User Manual; Version 1.2 – September 2011
2. Brand Mobiliser State Developers Guide; Version 1.2 – September 2011
2
Brand Mobiliser Development Manual Version 1.2 - September 2011
2 States and Applications
In Brand Mobiliser, states are the basic building blocks with a specific capability and they can be linked sequentially to model a process flow called Applications. Using the Service Oriented Architecture (SOA) terminology, states are well-defined and self-contained functionality. States capability can be implemented natively (“stand-alone state”) or it can be a “proxy” to another web service or aggregated web services that are exposed through an SOA layer (“service state”).
Brand Mobiliser provides a number of basic stand-alone states including: states for composing workflow that are referred to as “Base State”, and states for performing operations on the Subscriber storage known as the “Subscriber State”. In addition, service states for integrating with the Money Mobiliser platform are also included by default. Additional custom states can be easily developed using the provided State SDK to meet any customer specific requirements. These custom states can be added dynamically using the plug-in mechanism enabled by the OSGi™ Services Registry. Please consult the reference “Brand Mobiliser – State Developers Guide” on how to develop and deploy plug-in states for use within the Brand Mobiliser.
There are two types of application: “Interactive” and “Event”, differ by how they are used and invoked. Interactive application is used for providing a rich user interactive mobile service. This type of application is typically invoke by mobile customers sending a keyword to a pre-assigned short code. The Event application is designed for workflow or batch processing. The workflow or batch type of application is typically invoked by event, such as: scheduled time(s), system trigger or external trigger events. So, unlike the interactive application, the event application is not associated with keyword(s). Applications are composed using the Application Composer. Most of the states in Application Composer are accompanied by a short description of their functionality under Notes.
In general, most states can be used by either application types. However, there are few states that are available to specific application types only because they relies on mechanisms that work for the application types. For example, the “Process Subscriber” state can be used for the event application only because it relies on the built-in callback mechanism provided by the processing engine to the event type application only; the “Application Call” and “Application Call Return” states can be used for the interactive application only because it is currently not supporting the callback mechanism. The follow-up selector filters out the states that are not intended for the application type.
2.1 State Machine
A state is an element of a system referred to as a state machine. A state machine defines the flow of processes in an application for runtime execution. In development, the process flow is composed visually using the Application Composer. When the application is activated, the process flow is converted to the state machine.
An application usually has many states and can include different types of state. A state usually has a previous state and a following state unless it is the initial state or the final state. There can only be one initial state, but many final states are possible depending on the interaction with the user.
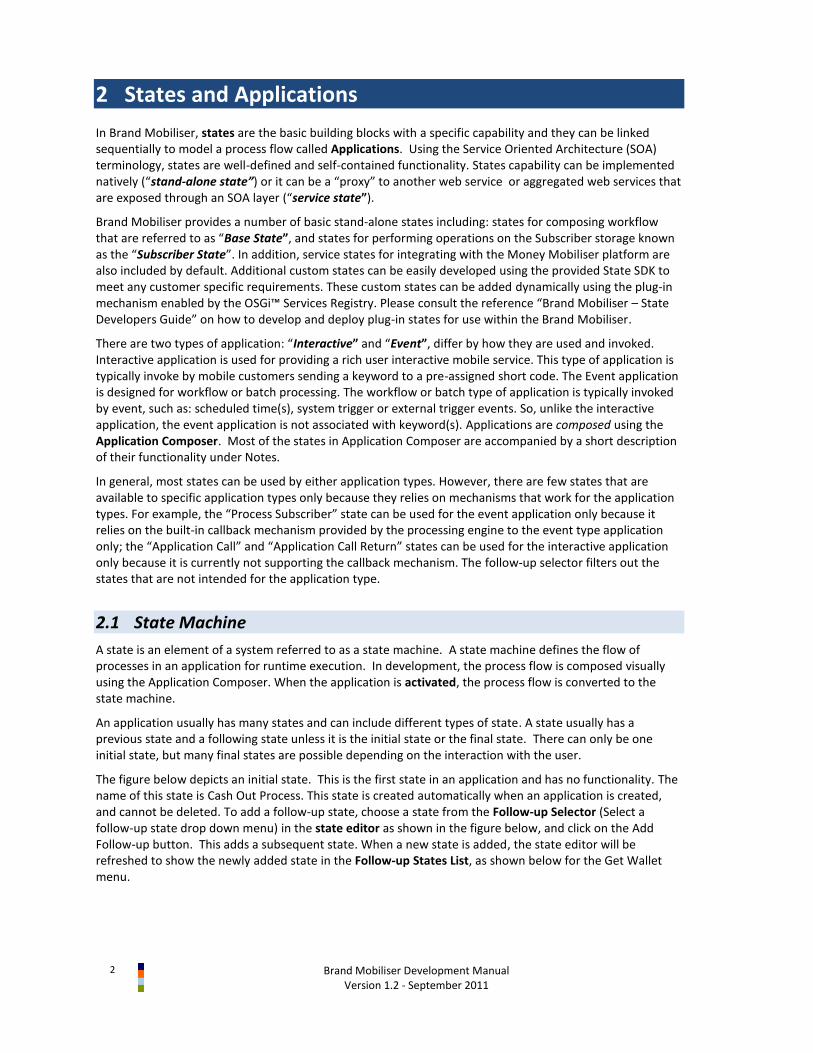
The figure below depicts an initial state. This is the first state in an application and has no functionality. The name of this state is Cash Out Process. This state is created automatically when an application is created, and cannot be deleted. To add a follow-up state, choose a state from the Follow-up Selector (Select a follow-up state drop down menu) in the state editor as shown in the figure below, and click on the Add Follow-up button. This adds a subsequent state. When a new state is added, the state editor will be refreshed to show the newly added state in the Follow-up States List, as shown below for the Get Wallet menu.
Brand Mobiliser Development Manual
Version 1.2 - September 2011 3
Figure 1. Example Initial State
2.1.1 Keywords and Variables
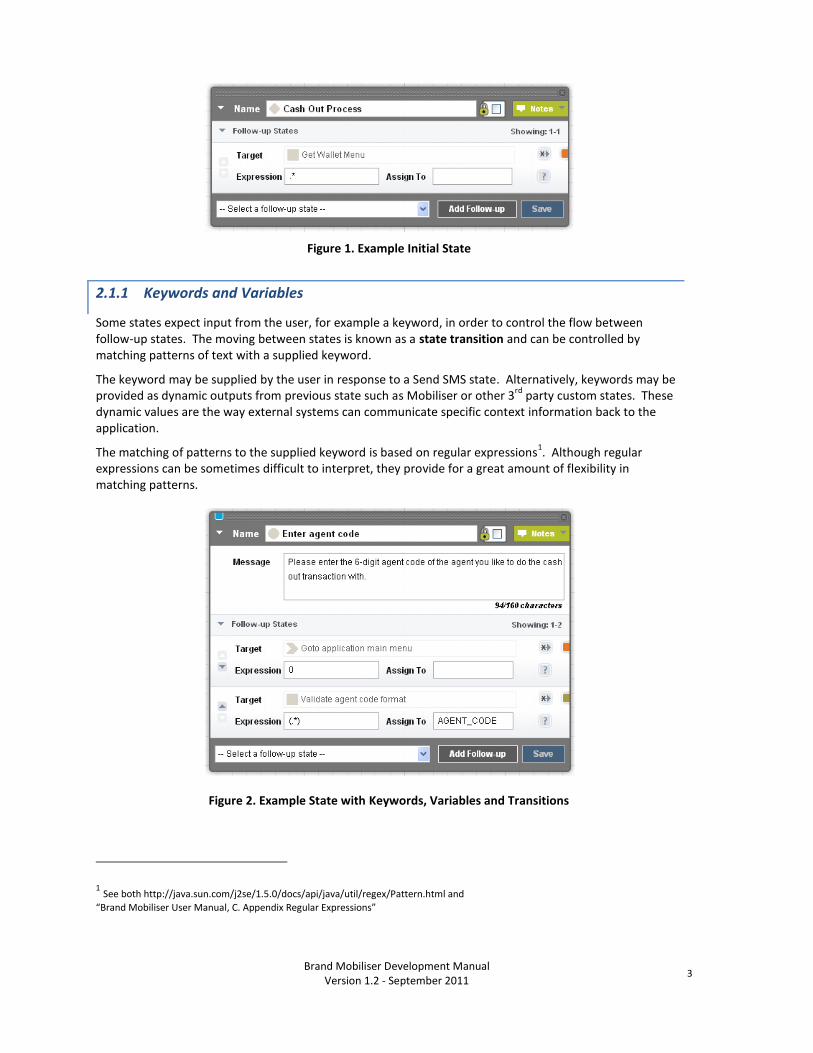
Some states expect input from the user, for example a keyword, in order to control the flow between follow-up states. The moving between states is known as a state transition and can be controlled by matching patterns of text with a supplied keyword.
The keyword may be supplied by the user in response to a Send SMS state. Alternatively, keywords may be provided as dynamic outputs from previous state such as Mobiliser or other 3
rd party custom states. These
dynamic values are the way external systems can communicate specific context information back to the application.
The matching of patterns to the supplied keyword is based on regular expressions1. Although regular
expressions can be sometimes difficult to interpret, they provide for a great amount of flexibility in matching patterns.
Figure 2. Example State with Keywords, Variables and Transitions
1 See both http://java.sun.com/j2se/1.5.0/docs/api/java/util/regex/Pattern.html and
“Brand Mobiliser User Manual, C. Appendix Regular Expressions”
4
Brand Mobiliser Development Manual Version 1.2 - September 2011
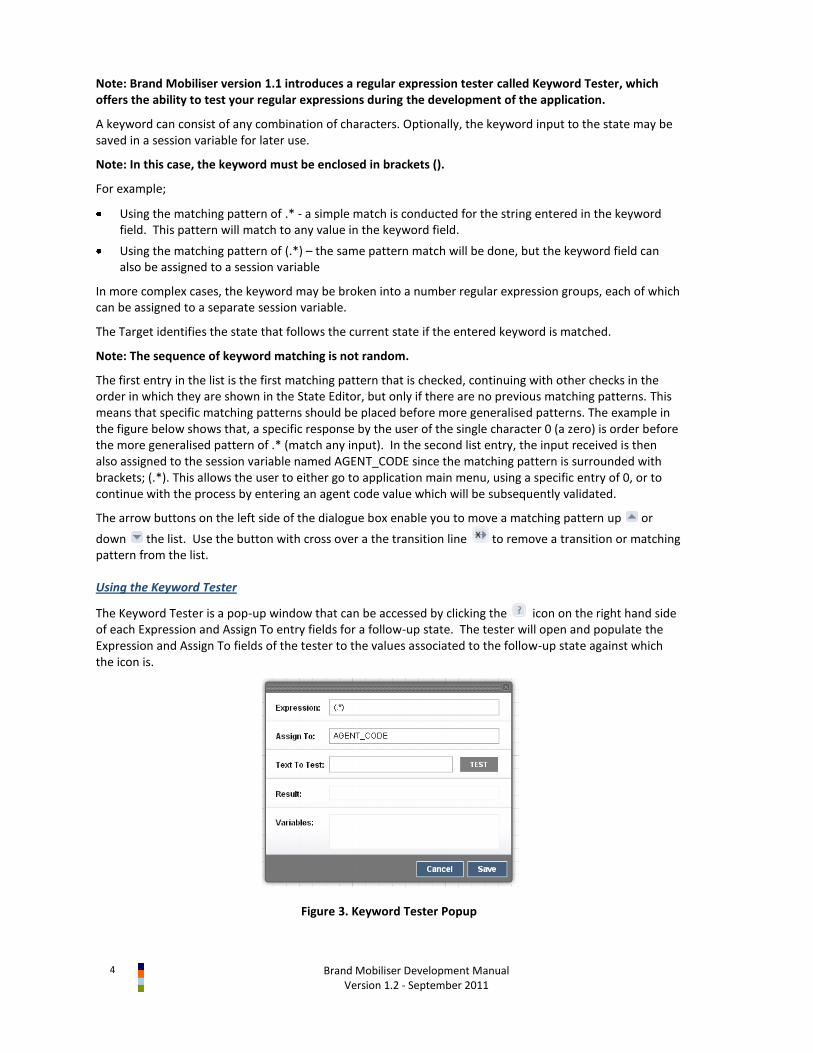
Note: Brand Mobiliser version 1.1 introduces a regular expression tester called Keyword Tester, which offers the ability to test your regular expressions during the development of the application.
A keyword can consist of any combination of characters. Optionally, the keyword input to the state may be saved in a session variable for later use.
Note: In this case, the keyword must be enclosed in brackets ().
For example;
Using the matching pattern of .* - a simple match is conducted for the string entered in the keyword field. This pattern will match to any value in the keyword field.
Using the matching pattern of (.*) – the same pattern match will be done, but the keyword field can also be assigned to a session variable
In more complex cases, the keyword may be broken into a number regular expression groups, each of which can be assigned to a separate session variable.
The Target identifies the state that follows the current state if the entered keyword is matched.
Note: The sequence of keyword matching is not random.
The first entry in the list is the first matching pattern that is checked, continuing with other checks in the order in which they are shown in the State Editor, but only if there are no previous matching patterns. This means that specific matching patterns should be placed before more generalised patterns. The example in the figure below shows that, a specific response by the user of the single character 0 (a zero) is order before the more generalised pattern of .* (match any input). In the second list entry, the input received is then also assigned to the session variable named AGENT_CODE since the matching pattern is surrounded with brackets; (.*). This allows the user to either go to application main menu, using a specific entry of 0, or to continue with the process by entering an agent code value which will be subsequently validated.
The arrow buttons on the left side of the dialogue box enable you to move a matching pattern up or
down the list. Use the button with cross over a the transition line to remove a transition or matching pattern from the list.
Using the Keyword Tester
The Keyword Tester is a pop-up window that can be accessed by clicking the icon on the right hand side of each Expression and Assign To entry fields for a follow-up state. The tester will open and populate the Expression and Assign To fields of the tester to the values associated to the follow-up state against which the icon is.
Figure 3. Keyword Tester Popup
Brand Mobiliser Development Manual
Version 1.2 - September 2011 5
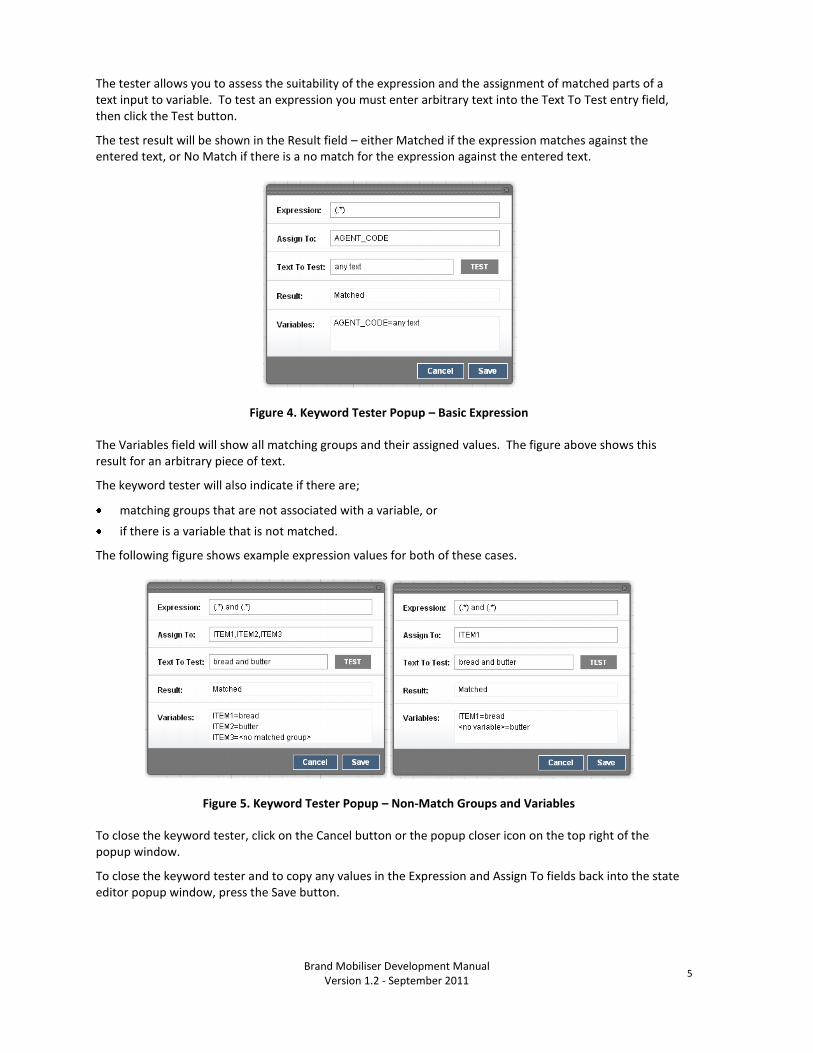
The tester allows you to assess the suitability of the expression and the assignment of matched parts of a text input to variable. To test an expression you must enter arbitrary text into the Text To Test entry field, then click the Test button.
The test result will be shown in the Result field – either Matched if the expression matches against the entered text, or No Match if there is a no match for the expression against the entered text.
Figure 4. Keyword Tester Popup – Basic Expression
The Variables field will show all matching groups and their assigned values. The figure above shows this result for an arbitrary piece of text.
The keyword tester will also indicate if there are;
matching groups that are not associated with a variable, or
if there is a variable that is not matched.
The following figure shows example expression values for both of these cases.
Figure 5. Keyword Tester Popup – Non-Match Groups and Variables
To close the keyword tester, click on the Cancel button or the popup closer icon on the top right of the popup window.
To close the keyword tester and to copy any values in the Expression and Assign To fields back into the state editor popup window, press the Save button.
6
Brand Mobiliser Development Manual Version 1.2 - September 2011
2.1.2 Input / Output Parameters
Some states, such as: Mobiliser and 3rd
Party custom states, may optionally have input and output parameters.
The input variables allow these states to receive input from the user or from another state or application.
The output variables allow these states to save a parameter in session variables that can be used by another state or to another application.
Input Parameters
Input parameters are the information a state requires to perform its task.
All input variables may be based on constant values or taken from a variable in the current users session. For each input variable there is as follows;
Checkbox: If the checkbox for an input variable is ticked, the text entry field expects the input of a session variable that has to be retrieved. If it is not ticked, the input value will be constant value as written in the field.
For example, if you want to pass the value of a session variable named CURRENCY, write the variable name CURRENCY in the variable entry field and ensure the checkbox is ticked. In this case, whatever value the session variable CURRENCY has at the point this state is reached is passed into this states processing.
Entry Field: Field for the input of a variable name or a constant value (as determined by the checkbox).
Description: A short description of the input type.
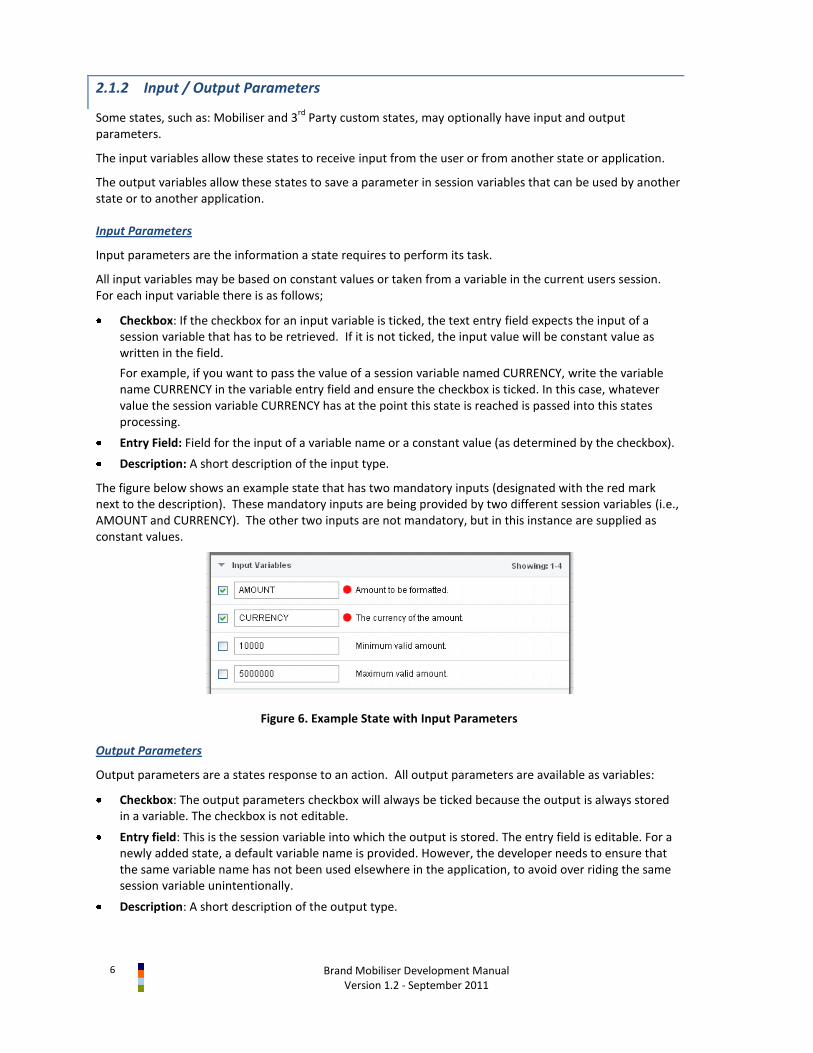
The figure below shows an example state that has two mandatory inputs (designated with the red mark next to the description). These mandatory inputs are being provided by two different session variables (i.e., AMOUNT and CURRENCY). The other two inputs are not mandatory, but in this instance are supplied as constant values.
Figure 6. Example State with Input Parameters
Output Parameters
Output parameters are a states response to an action. All output parameters are available as variables:
Checkbox: The output parameters checkbox will always be ticked because the output is always stored in a variable. The checkbox is not editable.
Entry field: This is the session variable into which the output is stored. The entry field is editable. For a newly added state, a default variable name is provided. However, the developer needs to ensure that the same variable name has not been used elsewhere in the application, to avoid over riding the same session variable unintentionally.
Description: A short description of the output type.
Brand Mobiliser Development Manual
Version 1.2 - September 2011 7
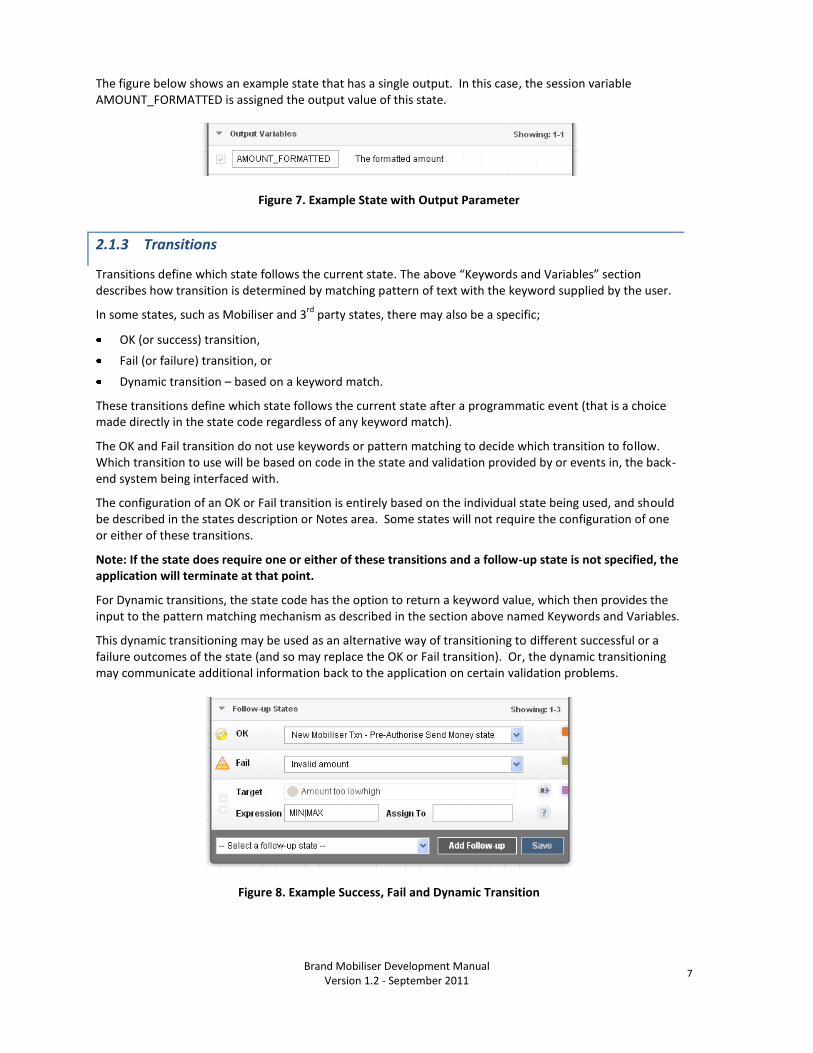
The figure below shows an example state that has a single output. In this case, the session variable AMOUNT_FORMATTED is assigned the output value of this state.
Figure 7. Example State with Output Parameter
2.1.3 Transitions
Transitions define which state follows the current state. The above “Keywords and Variables” section describes how transition is determined by matching pattern of text with the keyword supplied by the user.
In some states, such as Mobiliser and 3rd
party states, there may also be a specific;
OK (or success) transition,
Fail (or failure) transition, or
Dynamic transition – based on a keyword match.
These transitions define which state follows the current state after a programmatic event (that is a choice made directly in the state code regardless of any keyword match).
The OK and Fail transition do not use keywords or pattern matching to decide which transition to follow. Which transition to use will be based on code in the state and validation provided by or events in, the back-end system being interfaced with.
The configuration of an OK or Fail transition is entirely based on the individual state being used, and should be described in the states description or Notes area. Some states will not require the configuration of one or either of these transitions.
Note: If the state does require one or either of these transitions and a follow-up state is not specified, the application will terminate at that point.
For Dynamic transitions, the state code has the option to return a keyword value, which then provides the input to the pattern matching mechanism as described in the section above named Keywords and Variables.
This dynamic transitioning may be used as an alternative way of transitioning to different successful or a failure outcomes of the state (and so may replace the OK or Fail transition). Or, the dynamic transitioning may communicate additional information back to the application on certain validation problems.
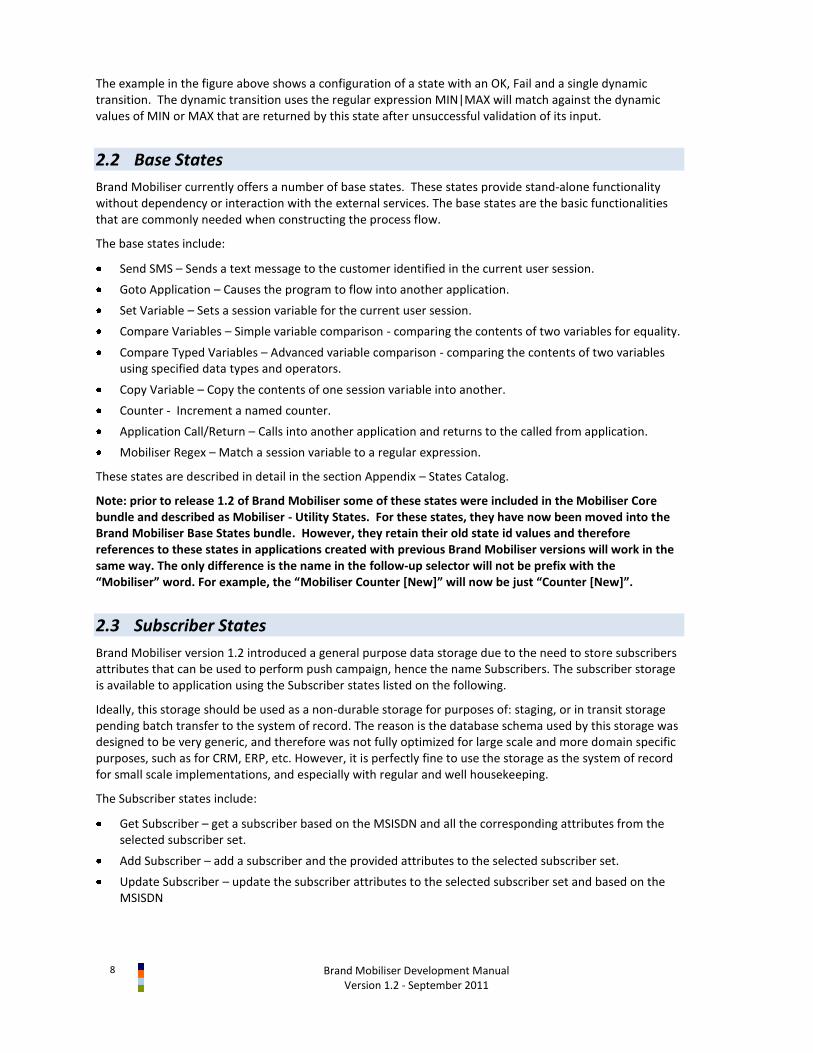
Figure 8. Example Success, Fail and Dynamic Transition
8
Brand Mobiliser Development Manual Version 1.2 - September 2011
The example in the figure above shows a configuration of a state with an OK, Fail and a single dynamic transition. The dynamic transition uses the regular expression MIN|MAX will match against the dynamic values of MIN or MAX that are returned by this state after unsuccessful validation of its input.
2.2 Base States
Brand Mobiliser currently offers a number of base states. These states provide stand-alone functionality without dependency or interaction with the external services. The base states are the basic functionalities that are commonly needed when constructing the process flow.
The base states include:
Send SMS – Sends a text message to the customer identified in the current user session.
Goto Application – Causes the program to flow into another application.
Set Variable – Sets a session variable for the current user session.
Compare Variables – Simple variable comparison - comparing the contents of two variables for equality.
Compare Typed Variables – Advanced variable comparison - comparing the contents of two variables using specified data types and operators.
Copy Variable – Copy the contents of one session variable into another.
Counter - Increment a named counter.
Application Call/Return – Calls into another application and returns to the called from application.
Mobiliser Regex – Match a session variable to a regular expression.
These states are described in detail in the section Appendix – States Catalog.
Note: prior to release 1.2 of Brand Mobiliser some of these states were included in the Mobiliser Core bundle and described as Mobiliser - Utility States. For these states, they have now been moved into the Brand Mobiliser Base States bundle. However, they retain their old state id values and therefore references to these states in applications created with previous Brand Mobiliser versions will work in the same way. The only difference is the name in the follow-up selector will not be prefix with the “Mobiliser” word. For example, the “Mobiliser Counter [New]” will now be just “Counter [New]”.
2.3 Subscriber States
Brand Mobiliser version 1.2 introduced a general purpose data storage due to the need to store subscribers attributes that can be used to perform push campaign, hence the name Subscribers. The subscriber storage is available to application using the Subscriber states listed on the following.
Ideally, this storage should be used as a non-durable storage for purposes of: staging, or in transit storage pending batch transfer to the system of record. The reason is the database schema used by this storage was designed to be very generic, and therefore was not fully optimized for large scale and more domain specific purposes, such as for CRM, ERP, etc. However, it is perfectly fine to use the storage as the system of record for small scale implementations, and especially with regular and well housekeeping.
The Subscriber states include:
Get Subscriber – get a subscriber based on the MSISDN and all the corresponding attributes from the selected subscriber set.
Add Subscriber – add a subscriber and the provided attributes to the selected subscriber set.
Update Subscriber – update the subscriber attributes to the selected subscriber set and based on the MSISDN
Brand Mobiliser Development Manual
Version 1.2 - September 2011 9
Process Subscriber – process the selected subscriber set; This state can be used in the event application only because it relies on the processing engine callback mechanism that is currently available to event application only.
These states are described in detail in the section Appendix – States Catalog.
2.4 Mobiliser States
The Mobiliser States are domain specific states that consume the web services from the Money Mobiliser platform. Typically, the Brand Mobiliser applications provide the user interaction with the mobile subscriber to gather necessary information that will be sent to the web services, or provide the business orchestration and integration layer.
2.4.1 Money Mobiliser Overview
The Money Mobiliser platform provides functionalities such as: person to person money transfer, top-up, pre-paid, recharged, remittance, view balance, view transaction history, etc. These functionalities are available to the Brand Mobiliser application using the Mobiliser States. A good understanding of the Money Mobiliser business domain models enables the application developers in composing advanced mobile Commerce, mobile Money or mobile Payment applications.
The Money Mobiliser platform provides the state-of-the-art money transaction capabilities and ease of integrations to other financial institutions. The core is based on a sophisticated and extensible Customer and Transaction models, and customizable business and validation rules. In additions, it is a highly extensible platform based on the dynamic component architecture based on OSGi™.
The following sections provides a high-level overview of the Customer and Transaction models that should provide sufficient information in understanding the mobiliser states and how to use them in composing applications.
2.4.2 Customer Models
Customers are represented through the following features in the Mobiliser:
Identifications: each customer can be identified through a number of unique identification attributes, such as MSISDN, username, email, IMEI, IMSI, card number passport ID – the list is easily extensible
Credentials: each customer can have one or multiple credentials, such as PIN, password, etc.
Addresses: One main address and a number of secondary addresses (e.g. delivery address) can be store with each customer
Privileges: to customize the user management, user-roles and privileges can be attached to customers. Together with the scope of each privilege the abilities of each single customer in the Core can be customized
Roles: customers can have one or multiple Roles in the Mobiliser system. Standard Roles are: Money Customer, Money Merchant, Topup Merchant, System Agent. Depending on the Role the system stores additional data
Consumer is an extension of the Core Customer entity. Beside administrative data the most important extension is the Wallet.

10
Brand Mobiliser Development Manual Version 1.2 - September 2011
Merchant is an extension to the Core Customer entity. Similar to Consumer the Merchant also can have a Wallet with multiple payment instruments. However, usually the Merchant only has one payment instrument, a bank account which is cleared on a regular basis (daily, weekly, monthly …).
Wallet stores all available Payment Instruments for a Consumer and a Merchant. The customers can prioritize the payment instruments in the Wallet. There is a wide support for all kinds of payment instruments: Credit Cards, Bank Accounts, SVA, External Accounts. Payment instruments can be added to multiple wallets. There can be a Limit (daily, monthly, absolute) on a customer, on a payment instrument, and on the combination of both (e.g. a father can assign one of his payment instruments to his son and determine how much money can be spend on a daily or monthly basis, independently of the overall limit of the payment instrument). Usually the correct payment instrument is selected by the system during the time of transaction based on the wallet priority.
PI is classified into types and classes. Example of PI types include: Consumer, Merchant, etc. Each types can have the following PI classes such as: credit card, bank account, SVA, etc. Both types has unique ID.
Wallet has an assigned Primary Payment Instrument, that can be modified by the wallet owner. In addition, the primary PI can be further assigned as the Primary Debit PI and/or Primary Credit PI.
The following diagram provides a simplified overview of the customer centric part of the DB model:
The following statements describe the customer related DB schema:
One Customer can have multiple Identifications
Each Identification is unique in the system
One Customer can have multiple Credentials
One Customer can have multiple Addresses
One Customer can have multiple Privileges (direct are assigned through Roles)
One Customer can have a financial Limit

Brand Mobiliser Development Manual
Version 1.2 - September 2011 11
One Customer can have multiple Wallet Entries
Each Wallet Entry links a Customer with a Payment Instrument
A Customer can use a Payment Instrument if it is linked into her/his Wallet
There can be a financial Limit on a Wallet Entry
Each Payment Instrument has one owner (Customer)
There can be a financial Limit on a Payment Instrument
A Payment Instrument can be of type: SVA, Voucher, Bank Account, Credit/Debit Card, External Account (generic)
2.4.3 Consumer Network Models
Money Mobiliser supports consumer networking using the Network model. Consumer Network is the network of related consumers using hierarchy relationships. A consumer is related to other consumer either as a “Parent” or a “Child”. The relationship can also be categorized by a type (i.e., network type) of, for example, Friends and Family.
2.4.4 Invoice Models
To support bill payment capabilities, Money Mobiliser uses the Invoice models. A consumer can be issued invoices, that can be retrieved using, for example, the “Get Invoice” state. The followings are the characteristics of Invoice:
Invoice has a “Status” that is configurable with a unique name.
Invoice can have additional “Attributes” that are also configurable.
Invoice has invoice details called “Configuration” that include: Issued to Consumer, Invoice Reference, Billing Cycle, Auto Pay delay, Payment Instrument, Authorized Threshold amount, Last and Next Invoice, Invoice Status, Total Amount, Maximum Allowable delay, etc.
The Configuration can be retrieved using the “Get Invoice Configuration” state.
Invoice has “Type” that reflects the following information: Active status, default Payment Instrument, Invoice Type Group, Use Case, default Billing Cycle, default Auto Pay Delay, default Initial Delay, default Currency, default Fetch Cycle, flags indicating who add the invoice, etc.
2.4.5 Transaction Models
Transactions are only handled very basically in the Core system, because they tend to be very specific to the product:
Transaction Status, Transaction Type, Error Code: these attributes are common to all transactions
Participants: lists all customers together with the appropriate role that participate in a transaction
Money Transactions store all relevant data for financial transactions this is: amount, currency, payer, payee, involved payment instruments. Each activity on a transaction is stored as a Money Sub Transaction with status information, fee, and reference information. Such activities are:
- Authorization – money is authorized from the payment instrument

12
Brand Mobiliser Development Manual Version 1.2 - September 2011
- Capture – money is captured at the payment instrument, transaction is ready for settlement
- AuthorizationCancel – an open Authorization gets cancelled within the system
- CaptureCancel – an already captured transaction gets cancelled (reversed)
The Use Case of a Money Transaction determines the fees, the type of authentication, and which velocity checks apply.
The following diagram provides a highly simplified overview of the financial Transaction centric part of the DB model:
All entities are tagged with timestamps and users for their creation and modification.
2.4.6 Use Cases
The Money Mobiliser transactions are fully configurable and these configurations are captured as business Use Case with unique IDs. The use case model contains the following configurable attributes:
1. Define the role of the payer (for example, 0=Agent; 1=TopUp Merchant; 2=Money Consumer; 3=Money merchant; 5=TopUp co-user; 6=Voucher Issuer; 7=Money Voucher agent; 8=Money Merchant agent; 9=Money Beneficiary; 99=System USSD gateway)
2. Define the role of the payee
3. Setting the actor is the payee
4. Setting the disabled limit checks and adaptions (Y/N)
5. Setting usage to be public (Y/N=internal only)
6. Setting to allow the capture to be different amount than the authorized amount(Y/N)
7. Setting to allow payer and payee to be identical (Y/N)
8. Passive participant can be created on the fly (if unknown in the system) with BLR set (Y/N)
MONEY_TRANSACTION
PK ID_TXN
FK1 ID_PAYER
FK2 ID_PAYEE
FK3 ID_PAYER_PI
FK4 ID_PAYEE_PI
Use Case
Status, Error Code
CUSTOMER
PK ID_CUSTOMER
PAYMENT_INSTRUMENT
PK ID_PI
MONEY_SUB_TRANSACTION
PK ID_TXN
FK1 ID_REF_TXN
Amount, Reference
Status, Error Code
FEE
PK ID_FEE
FK1 ID_TXN

Brand Mobiliser Development Manual
Version 1.2 - September 2011 13
The sample of pre-defined use cases are listed on the following tables with the attribute settings.
UseCase ID Name F1 F2 F3 F4 F5 F6 F7 F8
100 Safeguard Backstop null null Y N N N Y N
101 Escrow Backstop Push 3 null N Y N N N N
102 Escrow Backstop Pull null 3 Y Y N N N N
171 Standard Cash-In 3 2 N N Y N N N
172 Standard Cash-Out 2 3 Y N Y N N N
177 Standard Micro Payment 3 2 N Y N Y N N
186 Standard Subscription Pull 2 3 Y Y Y Y N N
184 Standard Self-TopUp 2 3 Y N N N N N
191 Standard C2B Push 2 3 N N Y Y N N
193 Peer 2 Peer 2 2 N N Y Y Y N
194 Standard C2C Pull 2 2 Y N Y Y N N
195 Standard B2B Push 3 3 N N Y Y N N
197 Anonymous Push 2 2 N N Y Y N N
198 Standard B2C Push 3 2 N N Y Y N N
199 Standard B2C Pull 2 3 Y N Y Y N N
2.4.7 Money Mobiliser Web Services
The services on the Mobiliser Money platform can be grouped into the following functional categories:
Mobile Consumer Registration
Security (Authentication, Authorization & Blacklist)
Mobile Accounts Management
Mobile Consumers Management
Money Transaction Services
Mobile Consumer Registration Mobile Security (AA & Blacklist)
Registration Login
Check Identification
Check Credential – PIN
14
Brand Mobiliser Development Manual Version 1.2 - September 2011
Set Identity
Change Credential
Set Blacklist Reason
Block Until
Delete Network Entry
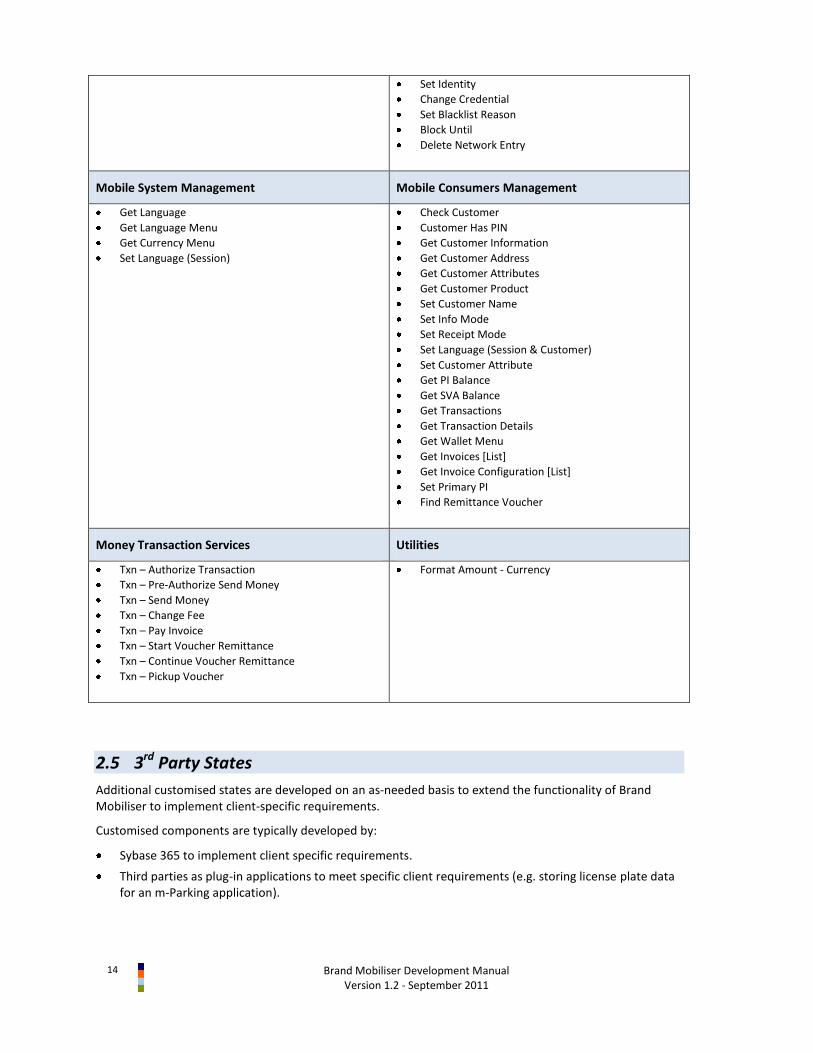
Mobile System Management Mobile Consumers Management
Get Language
Get Language Menu
Get Currency Menu
Set Language (Session)
Check Customer
Customer Has PIN
Get Customer Information
Get Customer Address
Get Customer Attributes
Get Customer Product
Set Customer Name
Set Info Mode
Set Receipt Mode
Set Language (Session & Customer)
Set Customer Attribute
Get PI Balance
Get SVA Balance
Get Transactions
Get Transaction Details
Get Wallet Menu
Get Invoices [List]
Get Invoice Configuration [List]
Set Primary PI
Find Remittance Voucher
Money Transaction Services Utilities
Txn – Authorize Transaction
Txn – Pre-Authorize Send Money
Txn – Send Money
Txn – Change Fee
Txn – Pay Invoice
Txn – Start Voucher Remittance
Txn – Continue Voucher Remittance
Txn – Pickup Voucher
Format Amount - Currency
2.5 3rd Party States
Additional customised states are developed on an as-needed basis to extend the functionality of Brand Mobiliser to implement client-specific requirements.
Customised components are typically developed by:
Sybase 365 to implement client specific requirements.
Third parties as plug-in applications to meet specific client requirements (e.g. storing license plate data for an m-Parking application).

Brand Mobiliser Development Manual
Version 1.2 - September 2011 15
To integrate new custom states requires Java development to a provided API and customisation of the product to include new states package. This customisation is described in a separate document called Brand Mobiliser State Developers Guide.

16
Brand Mobiliser Development Manual Version 1.2 - September 2011
3 Developing with the Application Composer
The key to effective development of Brand Mobiliser applications is the easy-to-use visualisation of the workflows involved in orchestrating the user interaction or the business processes that are to be mobilised. This is the primary purpose of the web-based user interface also known as Application Composer.
3.1 State Layout
The Application Composer state layout view is the primary way of visualising the processing steps of the application workflow, by visualising the states and drawing the transitions between these states. Much as a generalised visual workflow tool would do, the Application Composer allows the application designer the ability to;
visualise states in the application using an automatic layout,
dragging and dropping of states to re-arrange layout and to persist the modified layout,
highlight the context and dependencies, the transitions of states, and
zooming in and out of the application composer view to see a complete or partial application layout.
The Application Composer also provides complete facilities to traverse through the workflow through a state editor popup window. The state editor popups purpose is to allow configuration of the states settings and values. This is described separately in the next section.
3.1.1 Visualising States
The example in the figure below shows the layout of an existing simple application, called Mobiliser Counter. This application uses a counter to increment a session variable, which is shown to the user who responds with an instruction to repeat or to go back to a menu.
Each step in the application, or state, is shown as an image on the canvas, tagged with its name. The canvas has gridlines displayed to show where a state may be located. States are described in more detail in the next section.
The state icon shows;
the name of this state instance centered on the icon,
the type of the state in the bottom bar of the icon, and
a watermark pattern to also help signify the type of the state.
Figure 9. Example Application Composer View
Brand Mobiliser Development Manual
Version 1.2 - September 2011 17
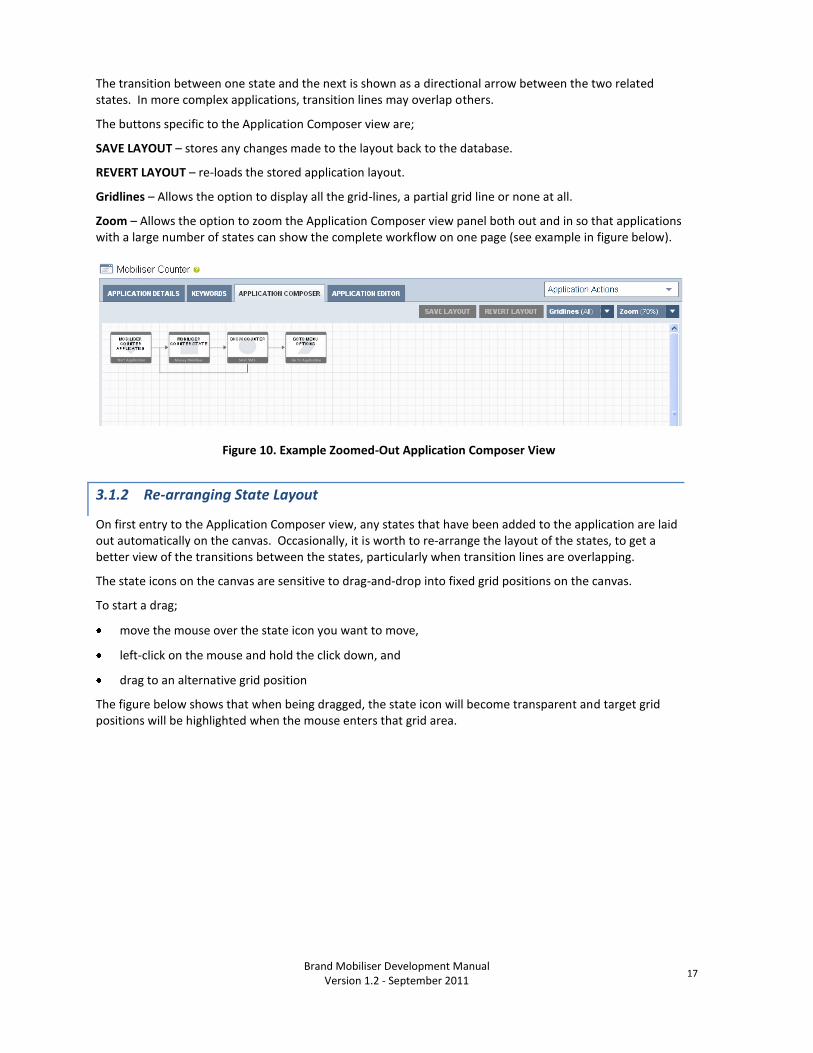
The transition between one state and the next is shown as a directional arrow between the two related states. In more complex applications, transition lines may overlap others.
The buttons specific to the Application Composer view are;
SAVE LAYOUT – stores any changes made to the layout back to the database.
REVERT LAYOUT – re-loads the stored application layout.
Gridlines – Allows the option to display all the grid-lines, a partial grid line or none at all.
Zoom – Allows the option to zoom the Application Composer view panel both out and in so that applications with a large number of states can show the complete workflow on one page (see example in figure below).
Figure 10. Example Zoomed-Out Application Composer View
3.1.2 Re-arranging State Layout
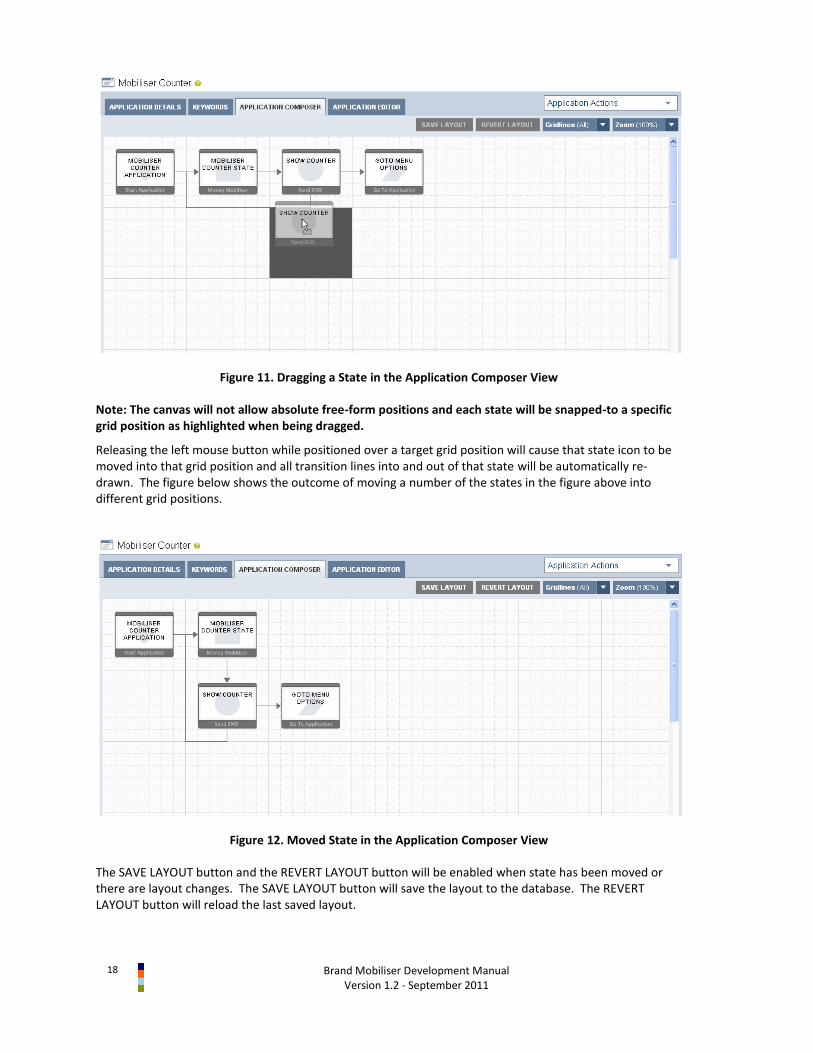
On first entry to the Application Composer view, any states that have been added to the application are laid out automatically on the canvas. Occasionally, it is worth to re-arrange the layout of the states, to get a better view of the transitions between the states, particularly when transition lines are overlapping.
The state icons on the canvas are sensitive to drag-and-drop into fixed grid positions on the canvas.
To start a drag;
move the mouse over the state icon you want to move,
left-click on the mouse and hold the click down, and
drag to an alternative grid position
The figure below shows that when being dragged, the state icon will become transparent and target grid positions will be highlighted when the mouse enters that grid area.
18
Brand Mobiliser Development Manual Version 1.2 - September 2011
Figure 11. Dragging a State in the Application Composer View
Note: The canvas will not allow absolute free-form positions and each state will be snapped-to a specific grid position as highlighted when being dragged.
Releasing the left mouse button while positioned over a target grid position will cause that state icon to be moved into that grid position and all transition lines into and out of that state will be automatically re-drawn. The figure below shows the outcome of moving a number of the states in the figure above into different grid positions.
Figure 12. Moved State in the Application Composer View
The SAVE LAYOUT button and the REVERT LAYOUT button will be enabled when state has been moved or there are layout changes. The SAVE LAYOUT button will save the layout to the database. The REVERT LAYOUT button will reload the last saved layout.
Brand Mobiliser Development Manual
Version 1.2 - September 2011 19
Note:
Currently, the transition lines are always automatically positioned and there is no way to move a transition line itself.
To ensure that the current layout change is stored, you must click on the SAVE LAYOUT button to persist the change to the database. The layout change will be lost if not saved and you move off of the Application Composer view. This includes selecting a different tab for the same application.
If you have zoomed out from the default 100% view, you must reset the zoom level back to 100% before making any layout changes.
3.1.3 Context and Dependency Highlighting
As described previously, states are linked in the application through directional transition lines. In simple cases, these lines clearly show the linked states; the state from which the transition is from and to. However, in many instances there will be a series of lines coming out of and going into a single state
To get a better sense of the context and dependencies of an individual state, any state can be highlighted. Highlighting a state allows all of its transition lines, that go to it and go from it, to also be highlighted along with the states they come from or go to. It also opens the state editor popup for this state.
To highlight any states;
move the mouse over the state icon you want to move, and
left-click on the mouse and release.
The dependent states and transition lines are then highlighted in different colours:
The highlighted state is shown with a dark grey surround.
Any states that transition TO the highlighted state have a blue surround, with the transition line emboldened in blue.
Any states that are transitioned FROM the highlighted state have an orange surround, with the transition line emboldened in orange.
In some cases, a state has both a transition FROM and a transition TO another state. In this case the highlighted state have a part blue/part orange surround, with associated transition lines coloured blue or orange.
The example below shows the simplest case where the Start Application state is highlighted, and is shown with a dark grey surround. In this case, there are no states that transition back to the start state. However, the Mobiliser Counter State is transitioned TO, and so is displayed with an orange surround and the transition line is emboldened in orange.
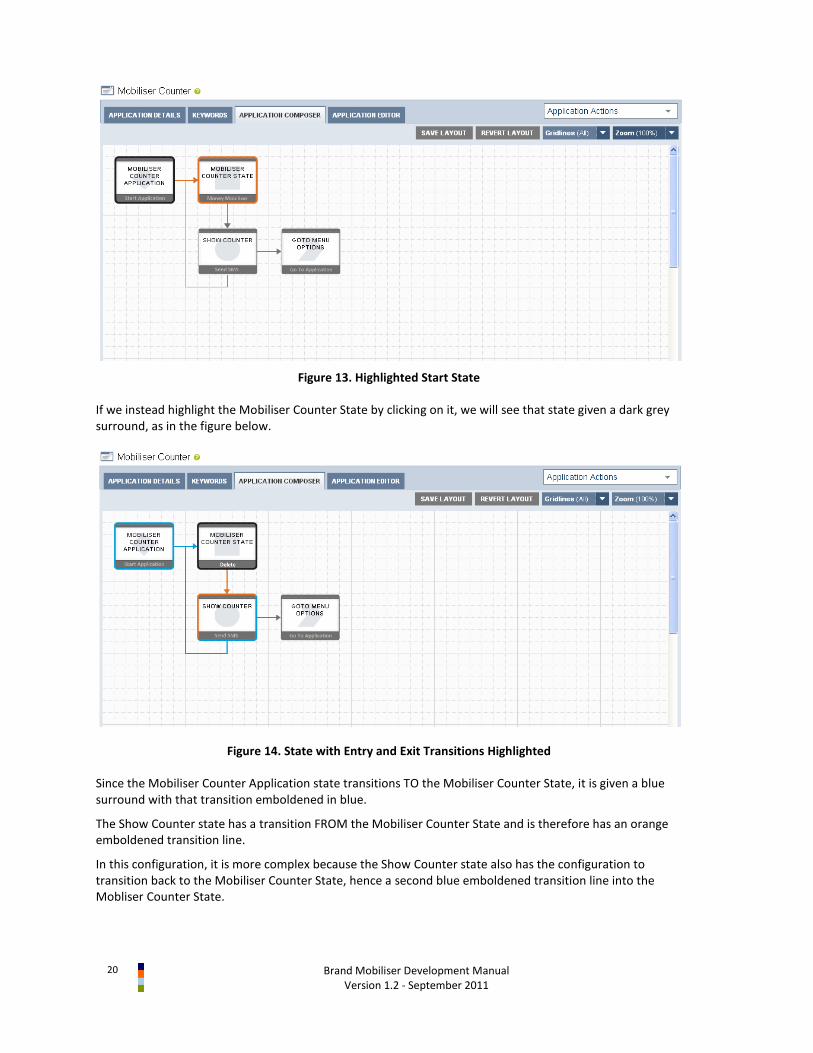
20
Brand Mobiliser Development Manual Version 1.2 - September 2011
Figure 13. Highlighted Start State
If we instead highlight the Mobiliser Counter State by clicking on it, we will see that state given a dark grey surround, as in the figure below.
Figure 14. State with Entry and Exit Transitions Highlighted
Since the Mobiliser Counter Application state transitions TO the Mobiliser Counter State, it is given a blue surround with that transition emboldened in blue.
The Show Counter state has a transition FROM the Mobiliser Counter State and is therefore has an orange emboldened transition line.
In this configuration, it is more complex because the Show Counter state also has the configuration to transition back to the Mobiliser Counter State, hence a second blue emboldened transition line into the Mobliser Counter State.
Brand Mobiliser Development Manual
Version 1.2 - September 2011 21
So, because the Show Counter state is both a transition TO and a transition FROM state for Mobiliser Counter State we show a part orange/part blue surround. Transition TO lines are always drawn to the left or top of a state, hence the orange part surround in that area. Transition FROM lines are always drawn from the bottom or the right of a state, hence the blue part surround in that area.
Note: To remove all the highlight, surrounds and bold transition lines, click again on the highlighted state.
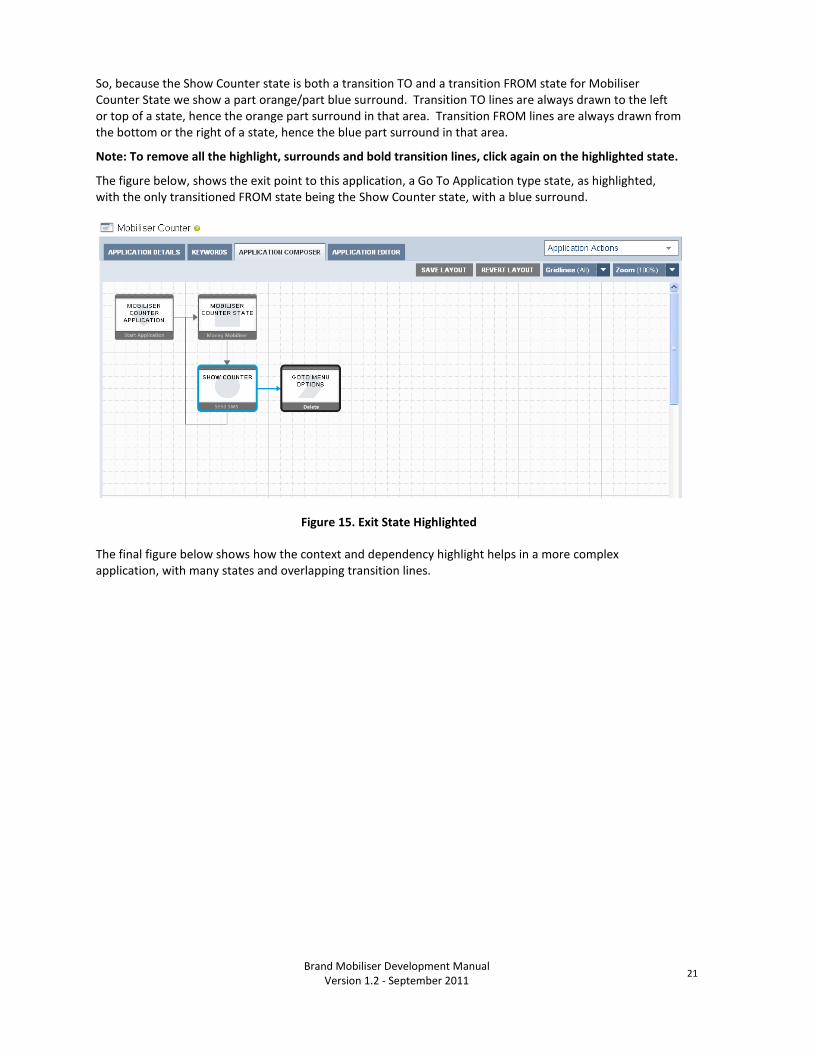
The figure below, shows the exit point to this application, a Go To Application type state, as highlighted, with the only transitioned FROM state being the Show Counter state, with a blue surround.
Figure 15. Exit State Highlighted
The final figure below shows how the context and dependency highlight helps in a more complex application, with many states and overlapping transition lines.
22
Brand Mobiliser Development Manual Version 1.2 - September 2011
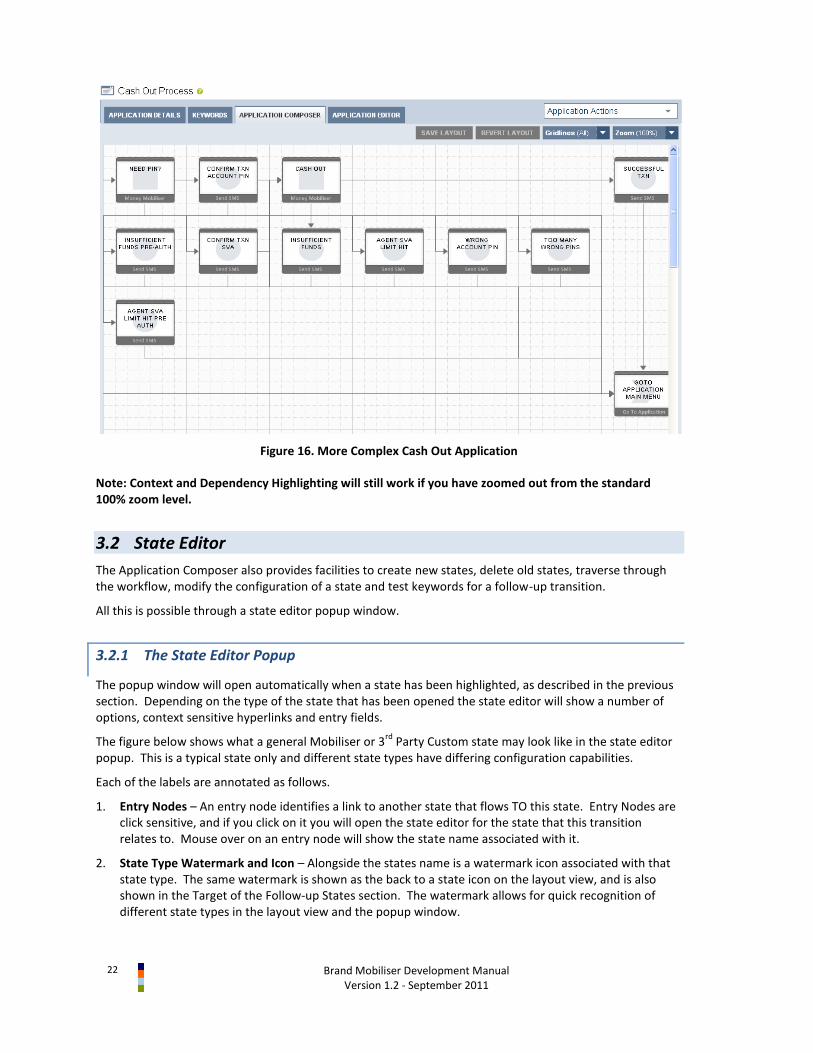
Figure 16. More Complex Cash Out Application
Note: Context and Dependency Highlighting will still work if you have zoomed out from the standard 100% zoom level.
3.2 State Editor
The Application Composer also provides facilities to create new states, delete old states, traverse through the workflow, modify the configuration of a state and test keywords for a follow-up transition.
All this is possible through a state editor popup window.
3.2.1 The State Editor Popup
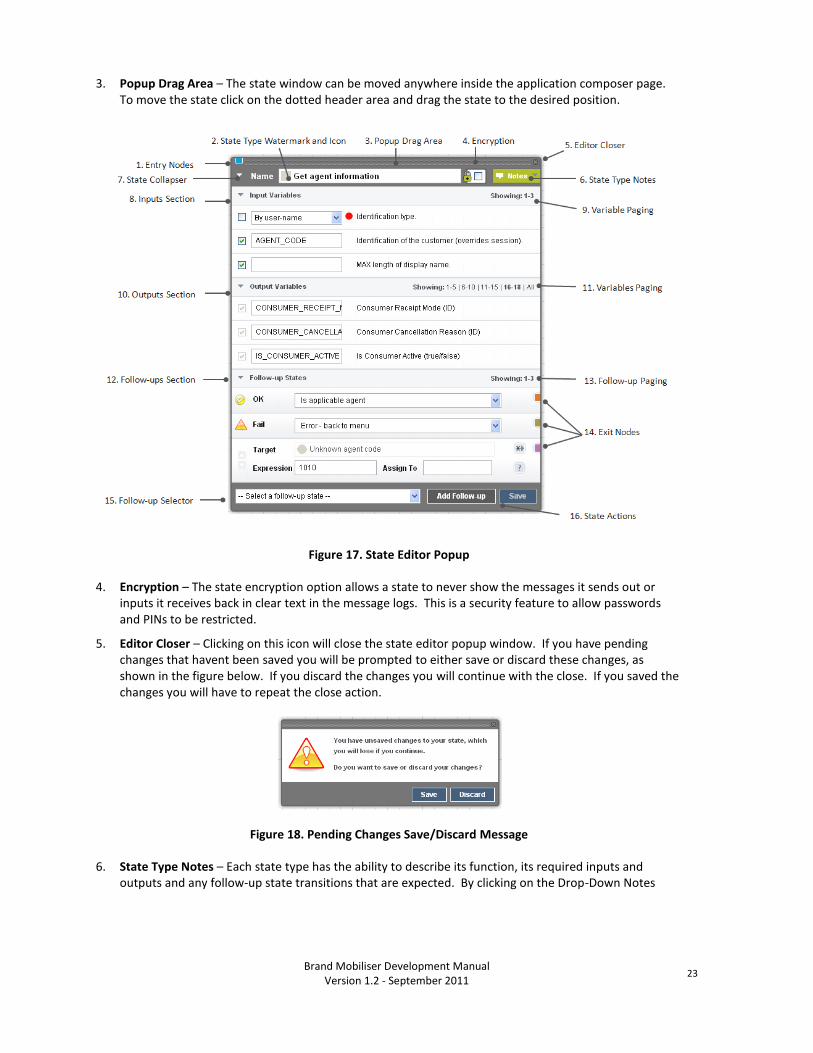
The popup window will open automatically when a state has been highlighted, as described in the previous section. Depending on the type of the state that has been opened the state editor will show a number of options, context sensitive hyperlinks and entry fields.
The figure below shows what a general Mobiliser or 3rd
Party Custom state may look like in the state editor popup. This is a typical state only and different state types have differing configuration capabilities.
Each of the labels are annotated as follows.
1. Entry Nodes – An entry node identifies a link to another state that flows TO this state. Entry Nodes are click sensitive, and if you click on it you will open the state editor for the state that this transition relates to. Mouse over on an entry node will show the state name associated with it.
2. State Type Watermark and Icon – Alongside the states name is a watermark icon associated with that state type. The same watermark is shown as the back to a state icon on the layout view, and is also shown in the Target of the Follow-up States section. The watermark allows for quick recognition of different state types in the layout view and the popup window.
Brand Mobiliser Development Manual
Version 1.2 - September 2011 23
3. Popup Drag Area – The state window can be moved anywhere inside the application composer page. To move the state click on the dotted header area and drag the state to the desired position.
Figure 17. State Editor Popup
4. Encryption – The state encryption option allows a state to never show the messages it sends out or inputs it receives back in clear text in the message logs. This is a security feature to allow passwords and PINs to be restricted.
5. Editor Closer – Clicking on this icon will close the state editor popup window. If you have pending changes that havent been saved you will be prompted to either save or discard these changes, as shown in the figure below. If you discard the changes you will continue with the close. If you saved the changes you will have to repeat the close action.
Figure 18. Pending Changes Save/Discard Message
6. State Type Notes – Each state type has the ability to describe its function, its required inputs and outputs and any follow-up state transitions that are expected. By clicking on the Drop-Down Notes
24
Brand Mobiliser Development Manual Version 1.2 - September 2011
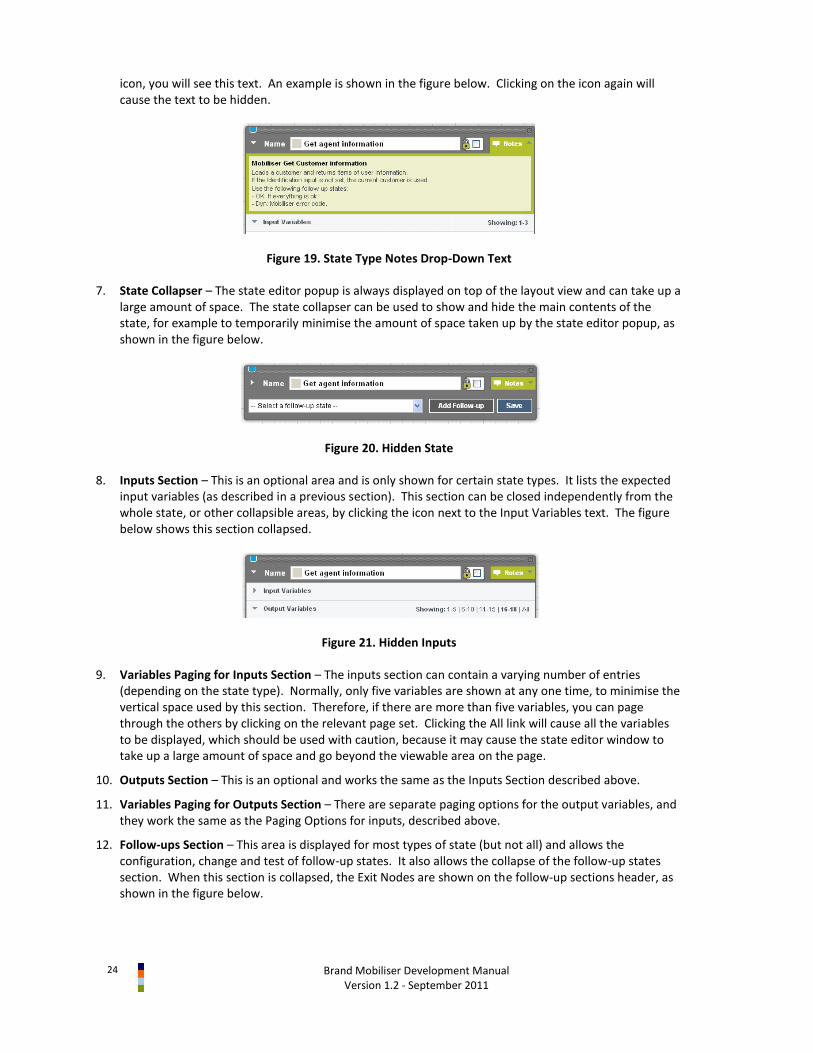
icon, you will see this text. An example is shown in the figure below. Clicking on the icon again will cause the text to be hidden.
Figure 19. State Type Notes Drop-Down Text
7. State Collapser – The state editor popup is always displayed on top of the layout view and can take up a large amount of space. The state collapser can be used to show and hide the main contents of the state, for example to temporarily minimise the amount of space taken up by the state editor popup, as shown in the figure below.
Figure 20. Hidden State
8. Inputs Section – This is an optional area and is only shown for certain state types. It lists the expected input variables (as described in a previous section). This section can be closed independently from the whole state, or other collapsible areas, by clicking the icon next to the Input Variables text. The figure below shows this section collapsed.
Figure 21. Hidden Inputs
9. Variables Paging for Inputs Section – The inputs section can contain a varying number of entries (depending on the state type). Normally, only five variables are shown at any one time, to minimise the vertical space used by this section. Therefore, if there are more than five variables, you can page through the others by clicking on the relevant page set. Clicking the All link will cause all the variables to be displayed, which should be used with caution, because it may cause the state editor window to take up a large amount of space and go beyond the viewable area on the page.
10. Outputs Section – This is an optional and works the same as the Inputs Section described above.
11. Variables Paging for Outputs Section – There are separate paging options for the output variables, and they work the same as the Paging Options for inputs, described above.
12. Follow-ups Section – This area is displayed for most types of state (but not all) and allows the configuration, change and test of follow-up states. It also allows the collapse of the follow-up states section. When this section is collapsed, the Exit Nodes are shown on the follow-up sections header, as shown in the figure below.
Brand Mobiliser Development Manual
Version 1.2 - September 2011 25
Figure 22. Collapsed Follow-up States and Exit Nodes
13. Follow-up Paging – Paging through the follow-up states works the same as the Inputs and Outputs paging, except there are only three follow-up states shown per page, because of the amount of additional vertical space used by Follow-up state Expression and Assign To fields.
14. Exit Nodes – An exit node identifies a link to another state that flows FROM this state. Exit Nodes are click sensitive, and if you click on it you will open the state editor for the state that this transition relates to. Mouse over on an exit node will show the state name associated with it.
15. Follow-up Selector – All states, except the Go To Application state, allow adding a follow-up state. All possible follow-up states are available from this selector.
16. State Actions – The available actions for a state are shown here, normally Add Follow-up and Save. The Save button is only enabled when there are changes that have been made to the state configuration.
3.2.2 Adding States
After creation of a new application, there will always be the Start Application as the initial state.
New states are always added from the state editor of existing states, therefore the initial state acts as the seed point of the application. The figure below shows the Application Composer view for a new application, after the My First Application state has been clicked, and hence highlighted and the state editor has been opened.
Figure 23. Start Application State
This state allows for two main actions, identified by the icons on the state;
Remove this state.
Note: The delete icon will appear once the state is selected by clicking on it. The delete icon is not shown in the figure above because you cannot remove a Start Application state, but it will shown on any other type of state.

26
Brand Mobiliser Development Manual Version 1.2 - September 2011
Add a follow-up state, as selected from the follow-up selector to the left of the button.
To add a transition from the Start Application state (i.e., My First Application), choose a state from the follow-up selector, and then click the Add Follow-up button. The figure below shows all the available follow up states.
Figure 24. Choose Next State
Note: For a new application, you can add new instances of states. When you have created some states, you can instead add a follow-up to an existing state. This will result in the applications control-of-flow going to the point of that existing state.
The following figure shows the Application Composer view, after adding a new Send SMS state.
Brand Mobiliser Development Manual
Version 1.2 - September 2011 27
Figure 25. New State Added
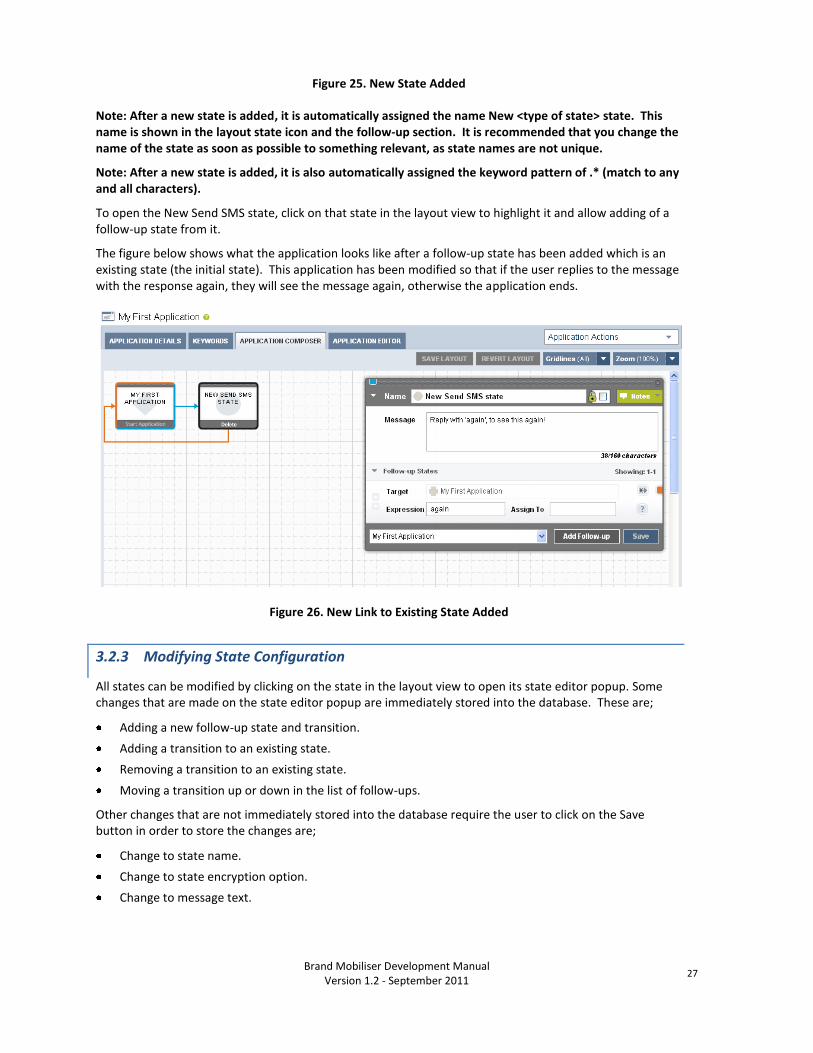
Note: After a new state is added, it is automatically assigned the name New <type of state> state. This name is shown in the layout state icon and the follow-up section. It is recommended that you change the name of the state as soon as possible to something relevant, as state names are not unique.
Note: After a new state is added, it is also automatically assigned the keyword pattern of .* (match to any and all characters).
To open the New Send SMS state, click on that state in the layout view to highlight it and allow adding of a follow-up state from it.
The figure below shows what the application looks like after a follow-up state has been added which is an existing state (the initial state). This application has been modified so that if the user replies to the message with the response again, they will see the message again, otherwise the application ends.
Figure 26. New Link to Existing State Added
3.2.3 Modifying State Configuration
All states can be modified by clicking on the state in the layout view to open its state editor popup. Some changes that are made on the state editor popup are immediately stored into the database. These are;
Adding a new follow-up state and transition.
Adding a transition to an existing state.
Removing a transition to an existing state.
Moving a transition up or down in the list of follow-ups.
Other changes that are not immediately stored into the database require the user to click on the Save button in order to store the changes are;
Change to state name.
Change to state encryption option.
Change to message text.

28
Brand Mobiliser Development Manual Version 1.2 - September 2011
Changes to input variables.
Changes to output variables.
Changes to follow-up state Expression and Assign To values.
3.2.4 Removing States and Transitions
To change any state configuration you click on the state in the layout view to highlight that state and open the state editor popup.
Applications may have states and transitions removed from them. It is important to understand the different implications of removing either a state or a transition, and the resulting changes made to application.
Removing a State
Removing a state will permanently delete that state and any transitions that were associated with it. To remove a state click on the area of the state icon in the layout view that is marked as Delete. You are prompted to ensure you know the implications of deleting the state, and can continue or cancel the delete action.
Figure 27. Delete State and Confirmation
- States that transitioned INTO the deleted state will have effected transitions.
Note: Deleting a state that had its own follow-up transitions may also then detach that portion of the application from the application flow itself.
A portion of the application that is detached is not shown in the Application Composer but still exists in the system. Detached portions of the application are never reachable by the customer through the application flow. To re-attach that portion into the application you can add a new state or add a transition that flows into a state in the detached portion.
Removing a Follow-up Transition
Removing a transition will permanently delete that transition, but will not remove the follow-up state that it was associated with. To re-attach the follow-up state into the application add a new transition using the follow-up selector.
Brand Mobiliser Development Manual
Version 1.2 - September 2011 29
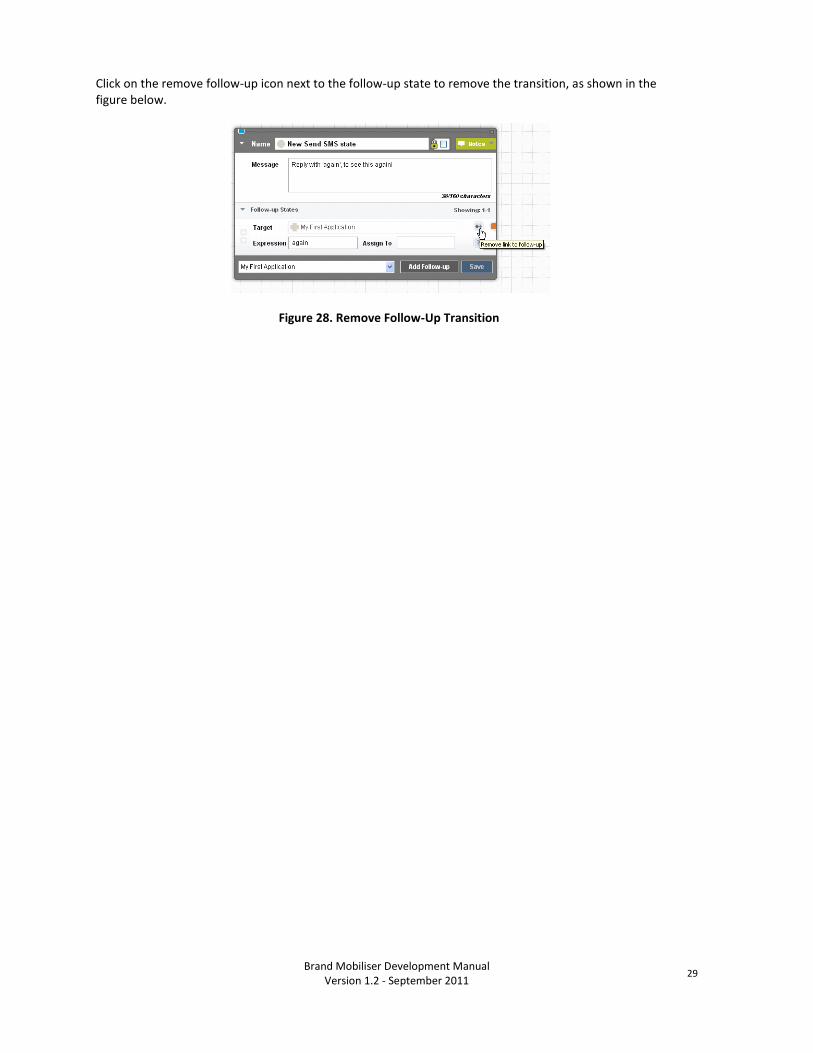
Click on the remove follow-up icon next to the follow-up state to remove the transition, as shown in the figure below.
Figure 28. Remove Follow-Up Transition

30
Brand Mobiliser Development Manual Version 1.2 - September 2011
4 Example Application
Brand Mobiliser offers a unique and highly personalised, cashless way to manage financial services more efficiently. It allows customers to conveniently redeem vouchers on any phone, remit money domestically, pay bills automatically, manage their accounts remotely, and enjoy financial benefits and other incentives as reward for their continued usage.
An example of one such financial service would be a Cash Out service. This service is provided through a specialised mBanking and mPayment service that enables mobile subscribers to pay bills or services through any mobile phone.
The Cash Out service transfers money from the customers Money Mobiliser account to a Money Mobiliser representatives account. The Money Mobiliser representative then pays this money, as cash, to the customer.
4.1 Cash Out Process
The Cash Out process is similar to many financial oriented processes that can be implemented easily using SMS (or in USSD, a kind of session-based SMS).
Brand Mobiliser manages a unique user session throughout the process that maintains the context of the conversation the user is having with the application.
This Cash Out process would be one sub-process provided through a number of interactive applications. The applications are linked by either Goto Application states, where the flow-of-control moves to the referenced interactive application, or a Mobiliser Method Call state, where the flow-of-control moves temporarily to the referenced interactive application, before returning back to the application that called it.
A complete mobile service is a formed from a number of interactive applications that are normally fronted by a PIN or password entry stage, so that we can somehow identify or validate the MSISDN of the customer. Although there is no internal customer list held in Brand Mobiliser, it is expected the back-end systems, such as Money Mobiliser will do that validation of customer through the Mobiliser or other 3
rd party states. This
Cash Out process assumes we already have a validated customer session on entry to this application.
After successful customer validation it is normal to offer a series of menus through SMS, where the user can choose from the options available to them. In this case, Cash Out would be one menu option related to the mobile financial services that may be offered to them. Again, this Cash Out process assumes we enter the process from an option on a menu, and if there are problems, or if the user wants to finish the process, or at the end after a successful transaction, we will revert back to the menu applications.
Brand Mobiliser Development Manual
Version 1.2 - September 2011 31
Brand Mobiliser enables you to configure the workflow of any application, like the Cash Out process, by creating a sequence of successive states. You can create these states with just a few clicks and without any knowledge of programming. However, a knowledge of both the business process, potential outcomes and how the states work to provide their individual functions, is required.
The Cash Out process is a series of simple steps:
1. Customer chooses an account to cash out from.
2. Enter the agent code who the customer wants to perform the transaction with.
3. Enter the transaction amount.
4. Validate and pre-authorise the transaction by checking for sufficient funds in customer account, the amount is between limits and the agents SVA is correct.
5. Customer enters their account PIN, if required, or confirms the transaction.
6. Perform the send money transaction from the customer to the agent.
7. Respond to other validation problems if the transaction then failed.
What follows in this section is;
an overview of the service using generalised workflow notation to visual the process, and
how the Application Composer allows visualising of this service directly in the web user interface (after the application has been created, or during the process of creating it).

32
Brand Mobiliser Development Manual Version 1.2 - September 2011
4.2 Workflow
The figure below shows the schematic workflow of the Cash Out process.
This workflow is typical of a single service, or application, that Brand Mobiliser can provide, with many validations, entries and actions to perform.
.*
Please select the source account:1. SVA2. Current3. Savings
Is selection Valid?
Please enter the 6-digit agent code of the agent you like to do the cash out transaction with.
yes
Main Menu
no
OK
Please enter the KSh amount you like to cash out.
Validated OK
We are sorry. We are experiencing technical difficulties. Press 0 to return to the main menu.
Validate agent code format
Get agent information
The agent code you entered does not have the correct format. Please re-enter the 6-digit agent code of the agent you like to do the cash out transaction with
Validation Failed
Is applicableAgent?
Format Amount
PreAuth Cash Out
The entered Ksh amount is not between KSh 100 and Ksh 50,000. Please re-enter the KSh amount you like to cash out or press 0 to return the main menu.
Below Min/Above Max
The entered KSh amount is not valid. Please re-enter the KSh amount you like to cash out or press 0 to return to the main menu.
The agent code you entered is not valid. Please re-enter the 6-digit agent code of the agent you like to do the cash out transaction with.
UnknownAgent
The KSh amount you entered exceeds your current mobile account balance. Please check your current balance and enter a lower KSh amount or press 0 to return to the main menu.
Insufficient Funds
InvalidFormat
Amount OK
The transaction could not be processed at this time. Please call customer support {HOTLINE-#} to get more information. Press 0 to return to the main menu.
Agent SVA Pre-Auth Limit Hit
Need Account PIN?
No
OK
Yes
Please confirm the transaction of KSh {AMOUNT_FORMATTED} to agent {AGENT_CODE} by entering your PIN for your account.
Cash Out
Success
You successfully transferred KSh {AMOUNT_FORMATTED} to agent {AGENT_CODE}.Ref. #: {AUTH_CODE}Press 0 to return to main menu.
The KSh amount you entered exceeds your current mobile account balance. Please check your current balance and enter a lower KSh amount or press 0 to return to the main menu.
Insufficient Funds
The KSh amount you entered exceeds your current mobile account balance. Please check your current balance and enter a lower KSh amount or press 0 to return to the main menu.
Agent SVA Limit Hit
The account PIN you entered was not correct. Please re-enter your PIN for your account {SENDER_ACCOUNT_NUMBER} or press 0 to return to the main menu.
Wrong Account PIN
The account PIN you entered was not correct and you account has been blocked. Please call customer support {HOTLINE-#} to get more information. Press 0 to return to the main menu.
Too Many Times Wrong Account PIN
Figure 29. Workflow Schematic for Cash Out Process

Brand Mobiliser Development Manual
Version 1.2 - September 2011 33
4.3 State Layout
The figure below shows the state layout of the Cash Out application as shown in the Application Composer. This view is zoomed to 70%, to show all the states on one page.
Figure 30. Application Composer View of Cash Out Process
34
Brand Mobiliser Development Manual Version 1.2 - September 2011
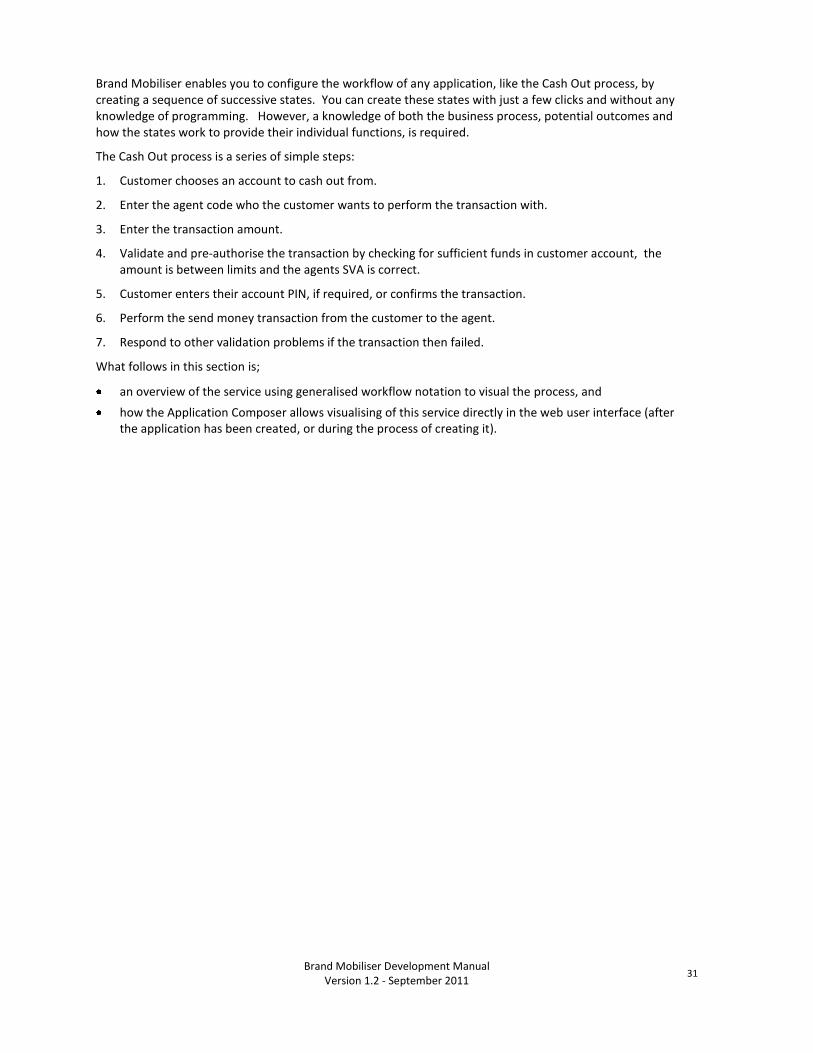
4.4 State Editor
The figure below shows the first portion of the Application Composer view of the Cash Out application.
Figure 31. Application Composer View of Cash Out Process
Brand Mobiliser Development Manual
Version 1.2 - September 2011 35
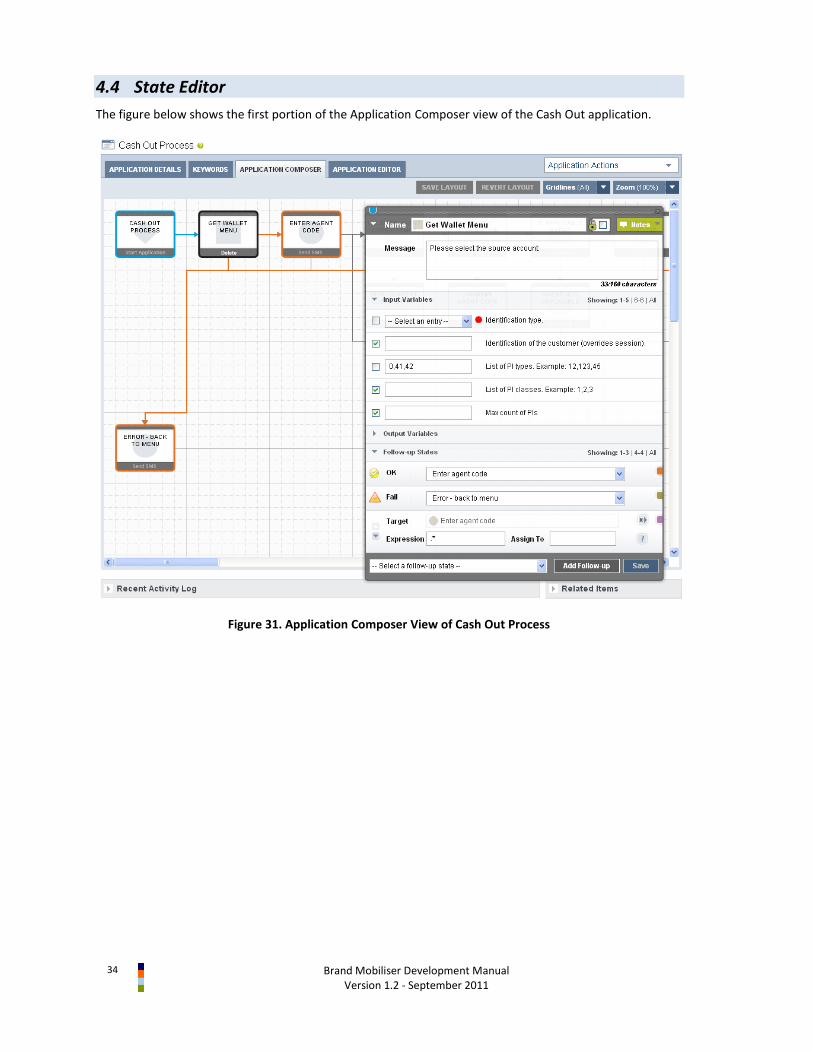
5 How to Test Applications
It is possible to test applications you have constructed in Brand Mobiliser in a number of different ways.
Using the built-in application simulator that is part of the Brand Mobiliser Web UI.
Using an SMPP test harness or a JMS test harness. These methods are more suited for state plugin developers or advanced system administrators, and as such are not described in this document.
5.1 Using the Application Simulator
This section describes how to test your applications using the built-in application simulator.
To access the Application Simulator page, choose the item on the drop-down list titled Actions on the right hand side of the page header. Alternatively, when viewing the details of an application, choose the item on the drop-down list titled Application Actions.
On entry to the application simulator you must enter a test Customer MSISDN and choose an already defined client MSISDN or short-code which identifies the workspace under which your application should be created, as shown in the figure below. (If you havent created a client or default MSISDN refer to the Brand Mobiliser User Manual for more information.) The Customer MSISDN must be entered because Brand Mobiliser uses it to find the session. If the application being tested has states that interface with back-end systems, such as Money Mobiliser for example, it may be necessary to use an MSISDN that identifies a customer in those systems.
Figure 32. Application Simulator

36
Brand Mobiliser Development Manual Version 1.2 - September 2011
To test the application, you will only use button to Send to Brand Mobiliser and can ignore the Message Encoding drop-downs and the Send to CUSTOMER button.
The button labeled Refresh Message Log allows all messages into and out of Brand Mobiliser for the entered Customer MSISDN to be displayed in the list below it. You have to manually click this button after sending a message into Brand Mobiliser to see any response message returned.
The figure below shows a sequence of interactions using a series of applications that demonstrate integration with Money Mobiliser. The message log shows messages in, using a green arrows, and messages out, using red arrows. In this case, the customer has logged into the test system by entering their credentials and is then presented with a series of menus.
Figure 33. Application Simulator With Interaction
One of the menu options is the Mobiliser Counter application as described in a previous section and is visualised in the figure below.
Brand Mobiliser Development Manual
Version 1.2 - September 2011 37
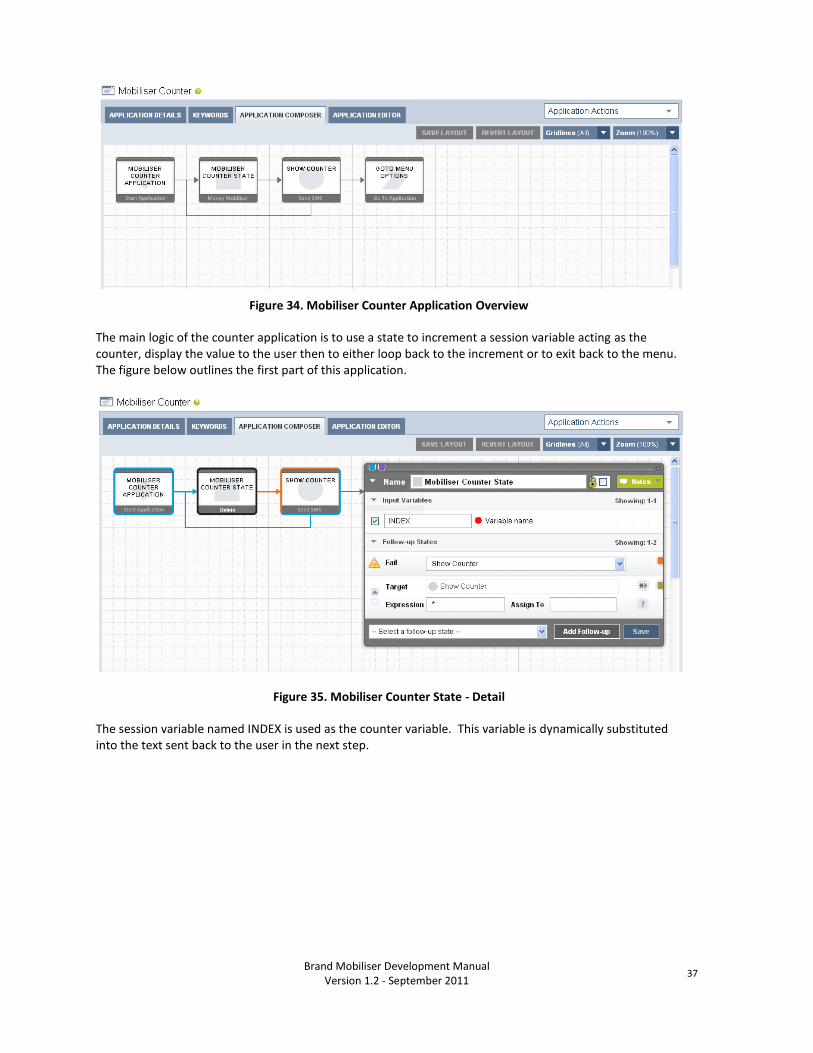
Figure 34. Mobiliser Counter Application Overview
The main logic of the counter application is to use a state to increment a session variable acting as the counter, display the value to the user then to either loop back to the increment or to exit back to the menu. The figure below outlines the first part of this application.
Figure 35. Mobiliser Counter State - Detail
The session variable named INDEX is used as the counter variable. This variable is dynamically substituted into the text sent back to the user in the next step.
38
Brand Mobiliser Development Manual Version 1.2 - September 2011
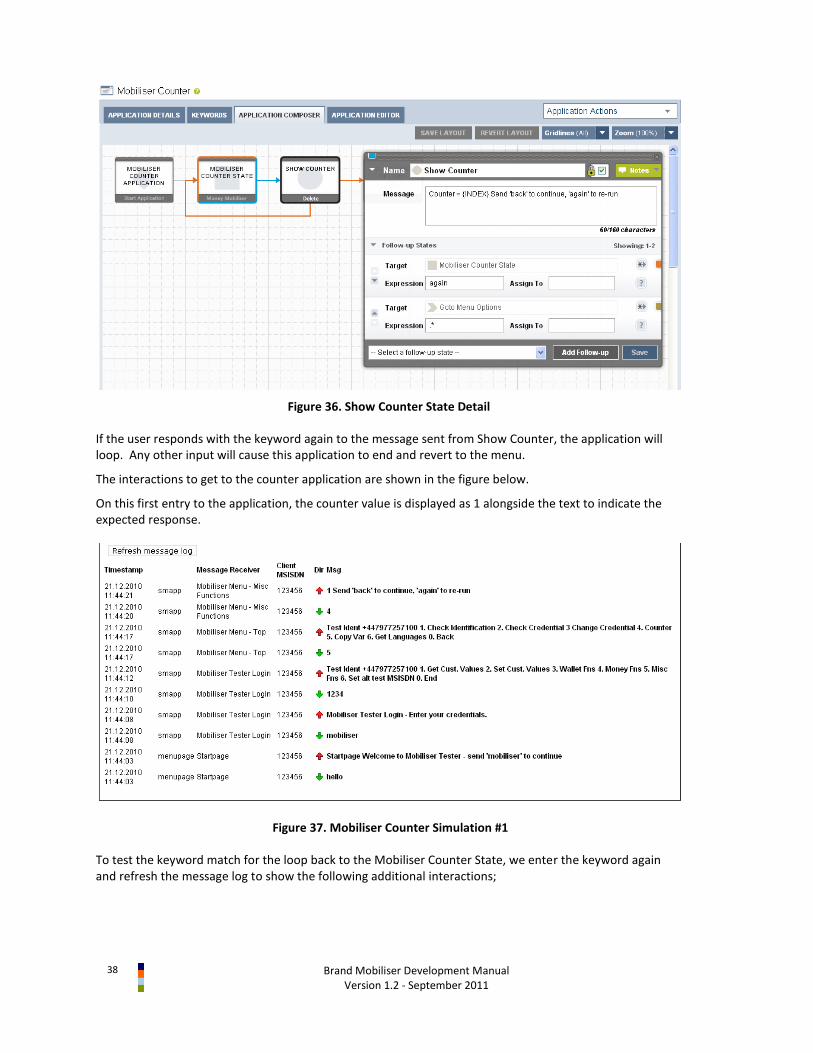
Figure 36. Show Counter State Detail
If the user responds with the keyword again to the message sent from Show Counter, the application will loop. Any other input will cause this application to end and revert to the menu.
The interactions to get to the counter application are shown in the figure below.
On this first entry to the application, the counter value is displayed as 1 alongside the text to indicate the expected response.
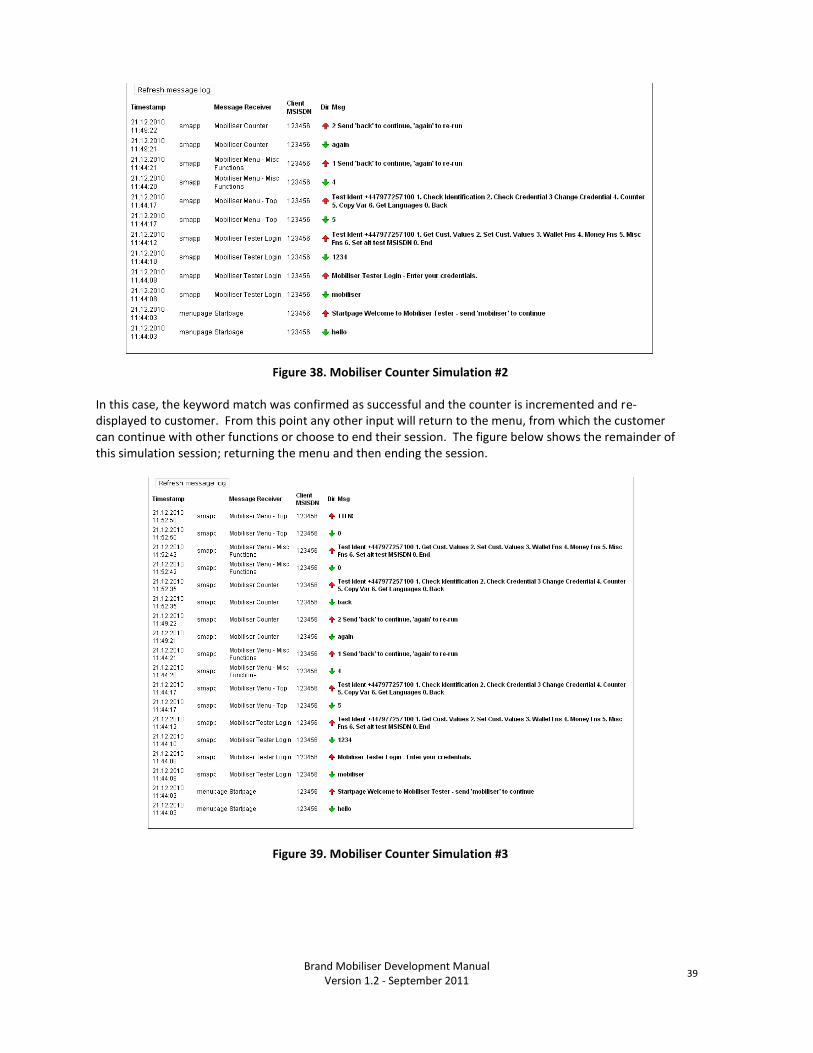
Figure 37. Mobiliser Counter Simulation #1
To test the keyword match for the loop back to the Mobiliser Counter State, we enter the keyword again and refresh the message log to show the following additional interactions;
Brand Mobiliser Development Manual
Version 1.2 - September 2011 39
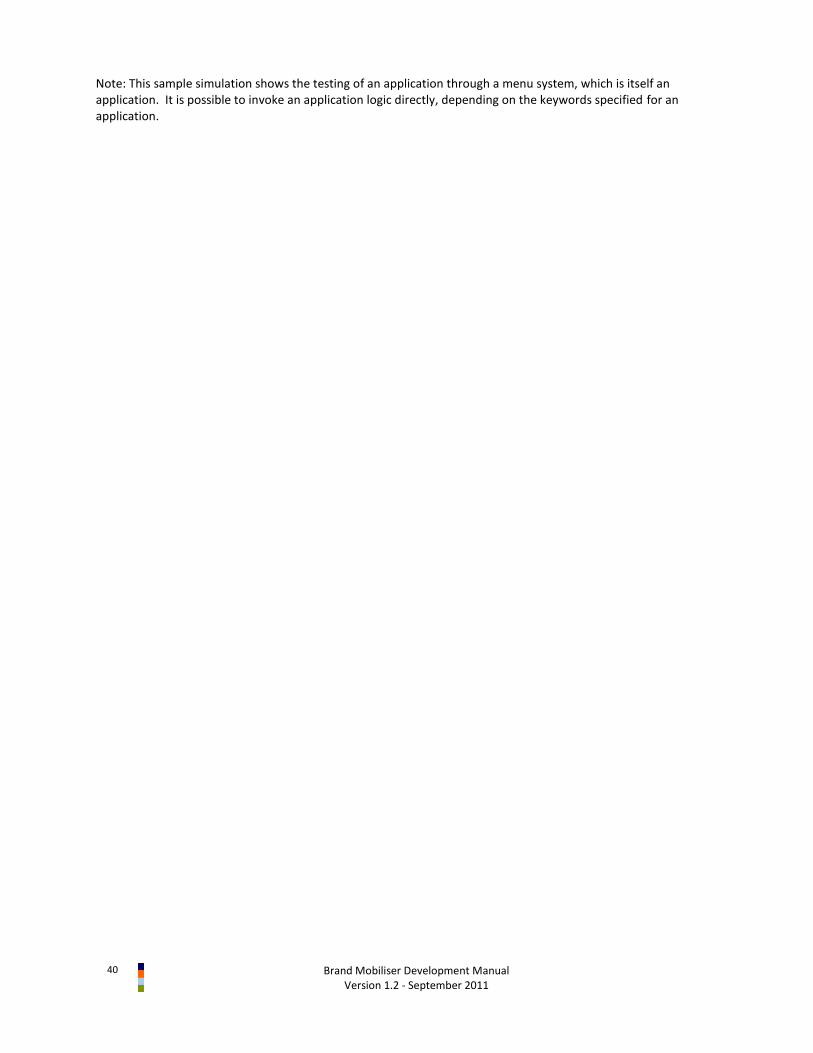
Figure 38. Mobiliser Counter Simulation #2
In this case, the keyword match was confirmed as successful and the counter is incremented and re-displayed to customer. From this point any other input will return to the menu, from which the customer can continue with other functions or choose to end their session. The figure below shows the remainder of this simulation session; returning the menu and then ending the session.
Figure 39. Mobiliser Counter Simulation #3
40
Brand Mobiliser Development Manual Version 1.2 - September 2011
Note: This sample simulation shows the testing of an application through a menu system, which is itself an application. It is possible to invoke an application logic directly, depending on the keywords specified for an application.
Brand Mobiliser Development Manual
Version 1.2 - September 2011 41
6 Importing/Exporting Applications
Brand Mobiliser provides the ability to create an exported copy of an applications configuration. This is useful in order to;
Move an application between instances of Brand Mobiliser installations.
Make a back-up copy of an individual application.
6.1 Export a Single Application
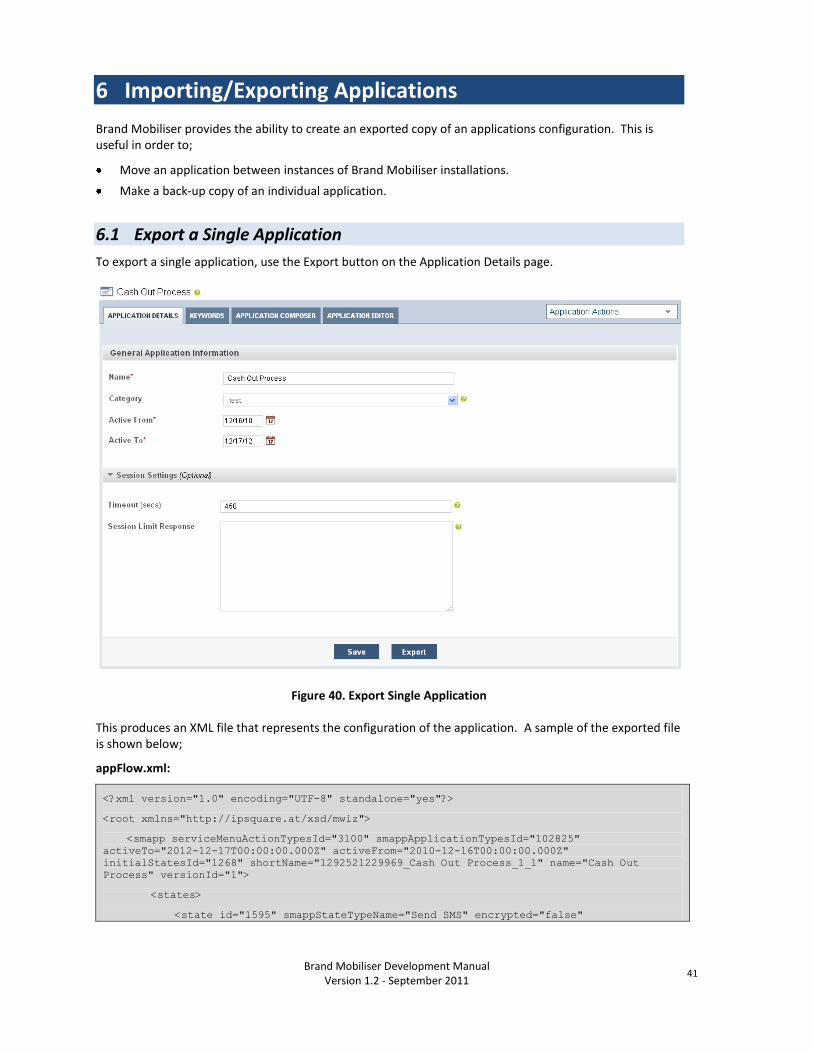
To export a single application, use the Export button on the Application Details page.
Figure 40. Export Single Application
This produces an XML file that represents the configuration of the application. A sample of the exported file is shown below;
appFlow.xml:
<?xml version="1.0" encoding="UTF-8" standalone="yes"?>
<root xmlns="http://ipsquare.at/xsd/mwiz">
<smapp serviceMenuActionTypesId="3100" smappApplicationTypesId="102825"
activeTo="2012-12-17T00:00:00.000Z" activeFrom="2010-12-16T00:00:00.000Z"
initialStatesId="1268" shortName="1292521229969_Cash Out Process_1_1" name="Cash Out
Process" versionId="1">
<states>
<state id="1595" smappStateTypeName="Send SMS" encrypted="false"
42
Brand Mobiliser Development Manual Version 1.2 - September 2011
mtChargingItemsFkId="0" moChargingItemsFkId="0" chargingItemsFkId="0"
smappAuctionTypesId="0" subscribeAFriend="false" forwardMessageReceiversId="0"
sendIntermediateResult="false" last="0" mmsSmilMessagesId="0" smappStateTypesId="1901"
name="Wrong account PIN" versionId="1">
<smappStateLang smsText="The account PIN you entered was not correct.
Please re-enter your PIN for your account {SENDER_ACCOUNT_NUMBER} or press 0 to return to
main menu." versionId="1">
<language unicode="false" default2="true" description="englisch"
name="EN"/>
</smappStateLang>
<smappStateAttribute key="gridposx" versionId="1">
<intValue>13</intValue>
</smappStateAttribute>
<smappStateAttribute key="gridposy" versionId="1">
<intValue>1</intValue>
</smappStateAttribute>
</state>
...
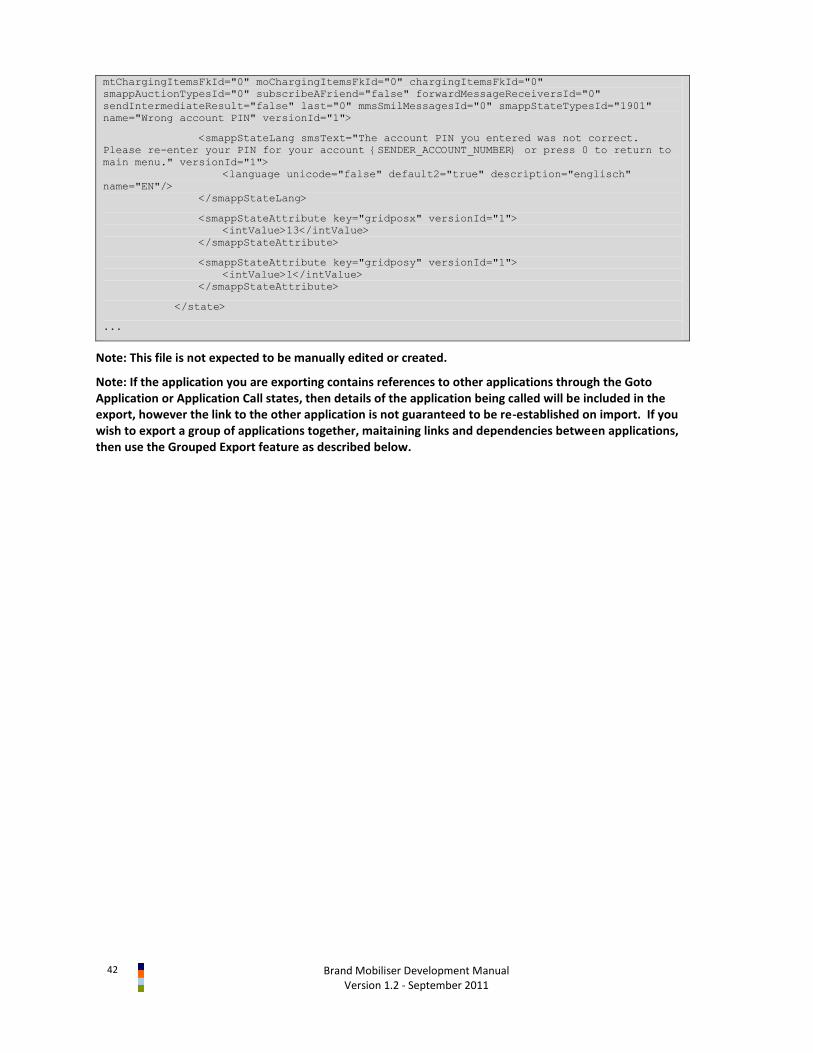
Note: This file is not expected to be manually edited or created.
Note: If the application you are exporting contains references to other applications through the Goto Application or Application Call states, then details of the application being called will be included in the export, however the link to the other application is not guaranteed to be re-established on import. If you wish to export a group of applications together, maitaining links and dependencies between applications, then use the Grouped Export feature as described below.

Brand Mobiliser Development Manual
Version 1.2 - September 2011 43
6.2 Export a Group of Applications
To export a series of application, you must use the Assets page to select which applications are to be included, then use the Group Export Applications button to export all the applications into a single export file.
The example screen shot below shows a number of applications that have been selected, but using the checkbox next to the application name. On clicking the Group Export Applications button an export file will be created and downloaded containing the definitions of each of selected applications.
Figure 41. Group Export Applications
6.3 Importing Applications
To import an application or a group of applications, using the Upload button on the New application/Add an asset page.
Note: The import process can produce duplicate named applications.

44
Brand Mobiliser Development Manual Version 1.2 - September 2011
Figure 42. Import a Single Application
Note: Importing single applications that have states that link to other applications require the applications linked to be created prior to the import in order for the import process to resolve the links. For example, a Go To Application state will require that the application being linked to exists prior to the import.
For example, If there are circular references, which are common in menu-based systems, the application being imported will still be imported, but a manual process of re-linking applications is required before the application can be used.
For instances where a system is comprised of a number of dependent applications, it is recommended to use the Group Export Applications feature, as described above, to export all the dependent applications into one export file, so that they can be imported together. When they are imported from a single export file, all inter-dependent references in states in these applications will be maintained after the import, therefore not requiring any manual intervention to re-link the applications.
Figure 43. Import a Group of Applications
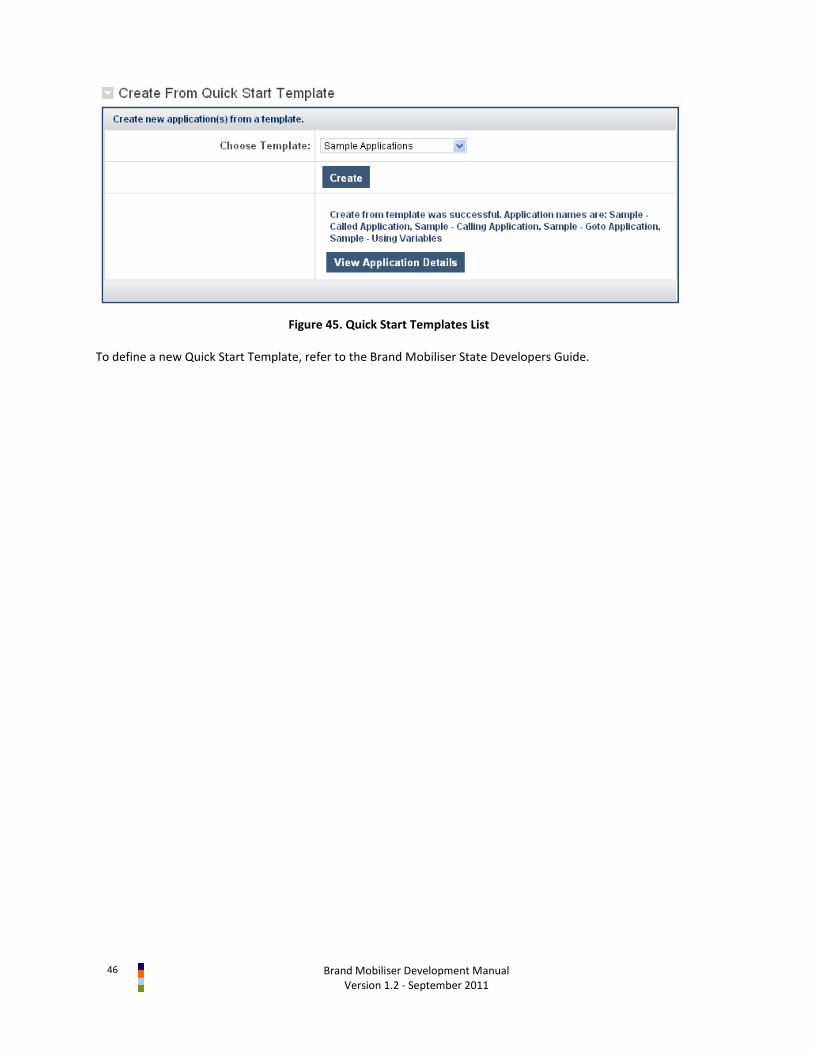
6.4 Quick Start Templates
Brand Mobiliser also provides the ability to create new applications from a pre-defined quick start template. The template is defined by the system configuration and effectively allows the import of a new system of applications by name.

Brand Mobiliser Development Manual
Version 1.2 - September 2011 45
Brand Mobiliser contains a number of sample Quick Start Templates to demonstrate behaviour of the standard states and a basic Money Mobiliser test system. These templates are shown on the Dashboard page on the right hand side of the page, as shown below.
Figure 44. Quick Start Templates List
Clicking on any of these template names, will take you to the Add Asset page, where you can choose which template you wish to import.
46
Brand Mobiliser Development Manual Version 1.2 - September 2011
Figure 45. Quick Start Templates List
To define a new Quick Start Template, refer to the Brand Mobiliser State Developers Guide.
Brand Mobiliser Development Manual
Version 1.2 - September 2011 47
A. Appendix – States Catalog
This appendix section lists and describes the states that are available by default in Brand Mobiliser in the following order: base states, subscriber states and money states. They are presented in the catalog format so that they can be printed out and used as reference cards.
48
Brand Mobiliser Development Manual Version 1.2 - September 2011
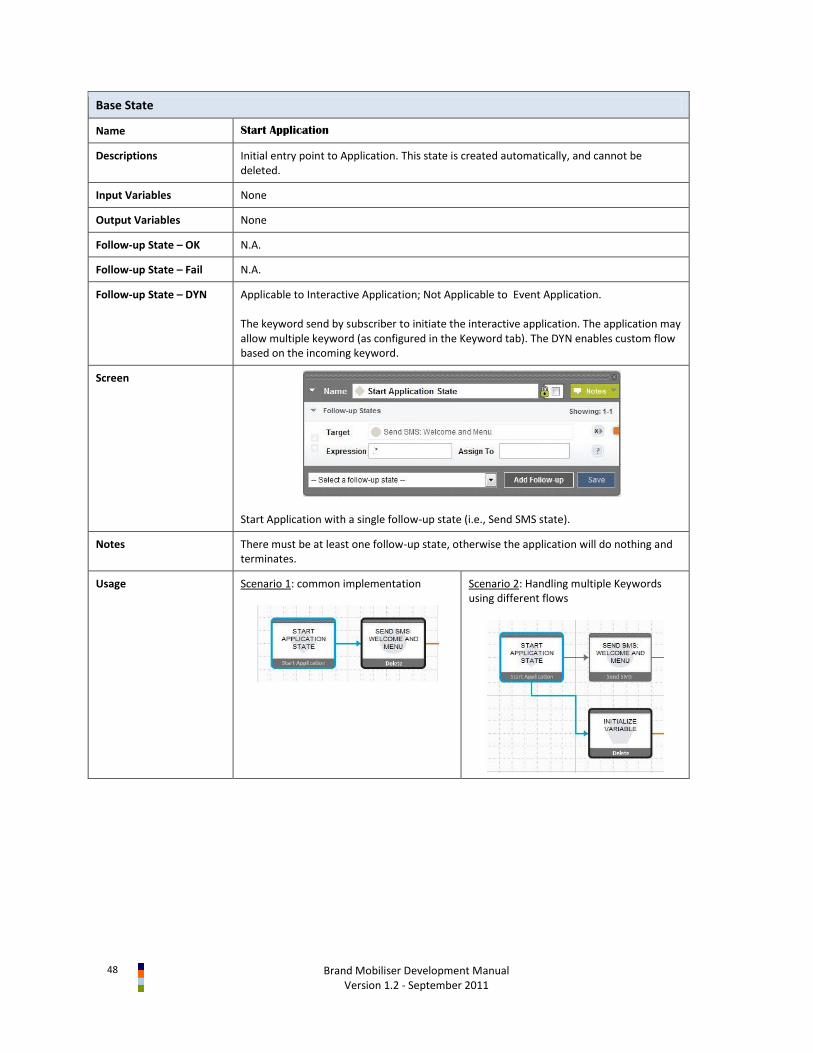
Base State
Name Start Application
Descriptions Initial entry point to Application. This state is created automatically, and cannot be deleted.
Input Variables None
Output Variables None
Follow-up State – OK N.A.
Follow-up State – Fail N.A.
Follow-up State – DYN Applicable to Interactive Application; Not Applicable to Event Application. The keyword send by subscriber to initiate the interactive application. The application may allow multiple keyword (as configured in the Keyword tab). The DYN enables custom flow based on the incoming keyword.
Screen
Start Application with a single follow-up state (i.e., Send SMS state).
Notes There must be at least one follow-up state, otherwise the application will do nothing and terminates.
Usage Scenario 1: common implementation
Scenario 2: Handling multiple Keywords using different flows

Brand Mobiliser Development Manual
Version 1.2 - September 2011 49
Base State
Name Send SMS
Descriptions Used whenever text is to be sent to the mobile subscriber via SMS. Example: welcome message, menu list, or instructions. Send the message, and do one of the followings:
If there is at least one follow-up state then pause the workflow to wait for response from the subscriber;
Otherwise, terminate the application.
Input Variables Message - the text to be sent via SMS. If the length of the text exceeds 160 characters, the text is truncated and multiple messages are sent. To embed the value of a session variable into the text enter the name of the variable surrounded by { and }. For example, the text The value of the counter is {INDEX}, would replace the text {INDEX} with the value of the session variable INDEX. If no variable with that name exists, the text is sent as-is, including the text {INDEX} NOTE: When the “Send SMS” state is used in Event Application, the “Request SMPP Acknowledgement” flag is shown, enabling acknowledgement request from the SMPP gateway.
Output Variables None
Follow-up State – OK N.A.
Follow-up State – Fail N.A.
Follow-up State – DYN Continue the application when a response from subscriber is received; Match the response to the follow-up states “Expression” to determine the follow-up state.
Screen
One follow-up state is specified; The expression means “any response from subscriber will match”; Also, assign the response to the “NEW_CRED” session variable so that it can be used later in the workflow.
Notes It may not be possible to determine the exact number of characters in the message prior to run-time, if session variable values are embedded into the message.
During runtime, the Send SMS state results in a temporary suspension of the application flow to wait for the users response. By default, the wait (also known as session timeout) lasts for 7.5 minutes (450 seconds). Once the session timeout, the users response to continue the application flow will not be honored. Depending on the setup, the user may be presented with a guidance message or main menu. The session timeout can be adjusted for each application using the Application Details screen.
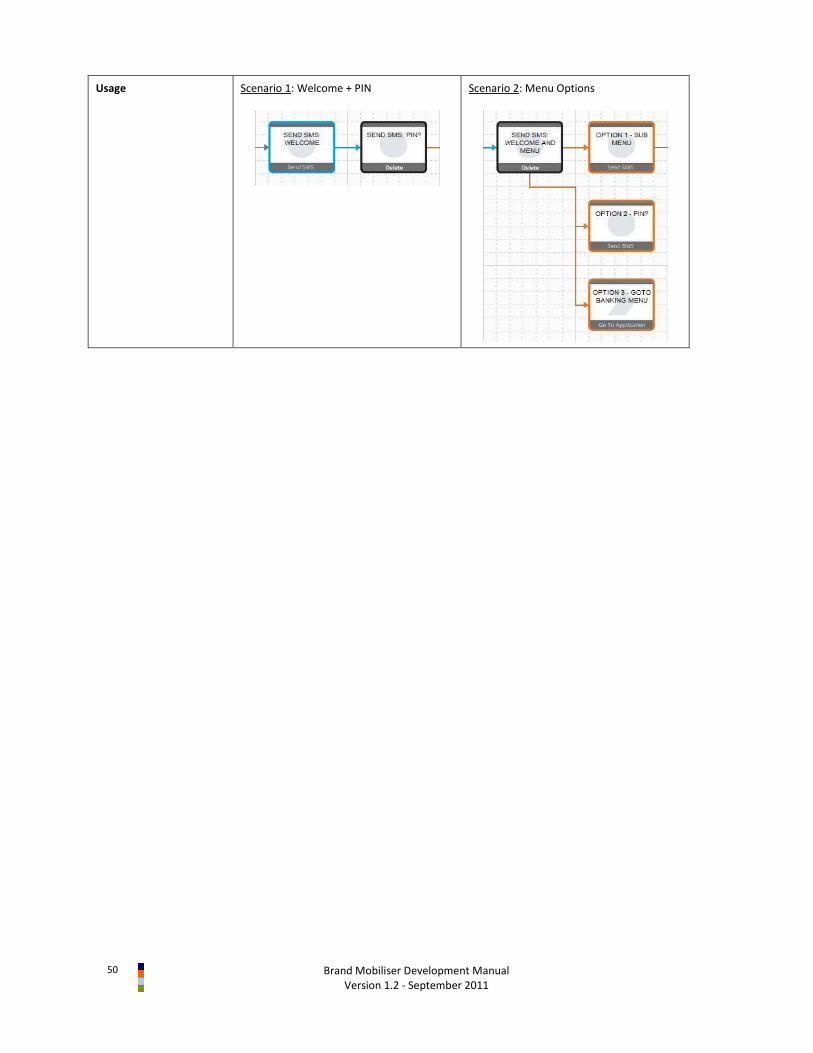
50
Brand Mobiliser Development Manual Version 1.2 - September 2011
Usage Scenario 1: Welcome + PIN
Scenario 2: Menu Options
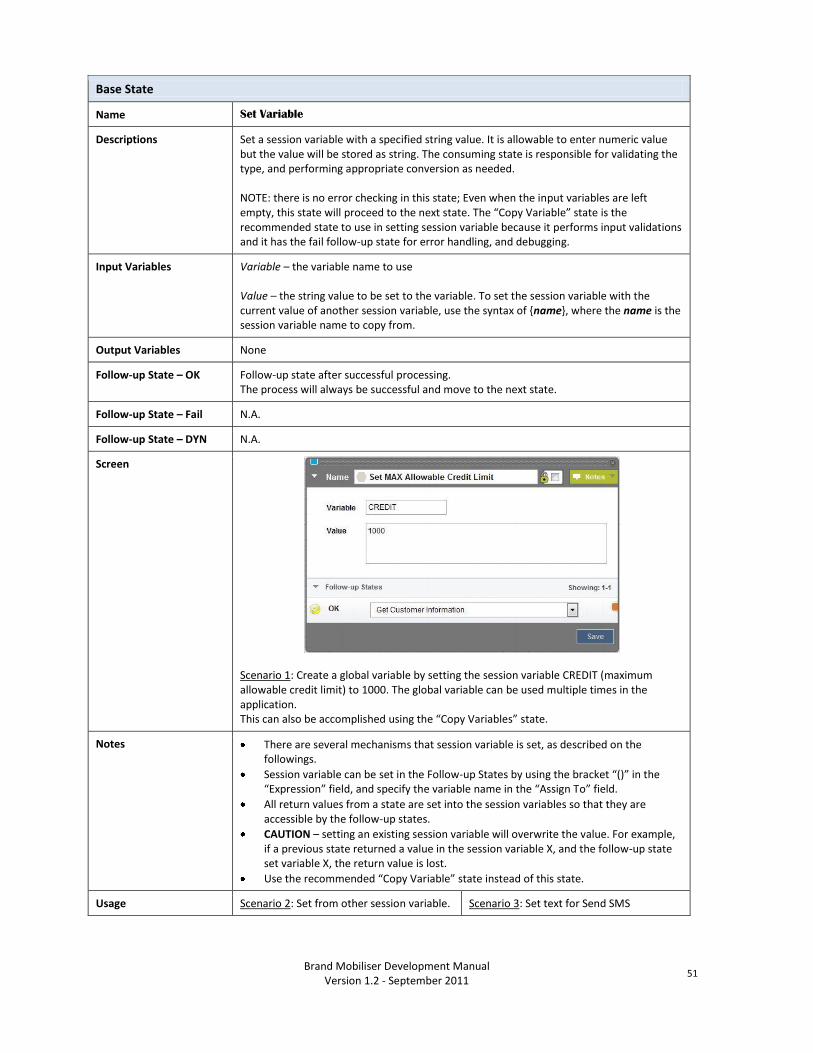
Brand Mobiliser Development Manual
Version 1.2 - September 2011 51
Base State
Name Set Variable
Descriptions Set a session variable with a specified string value. It is allowable to enter numeric value but the value will be stored as string. The consuming state is responsible for validating the type, and performing appropriate conversion as needed. NOTE: there is no error checking in this state; Even when the input variables are left empty, this state will proceed to the next state. The “Copy Variable” state is the recommended state to use in setting session variable because it performs input validations and it has the fail follow-up state for error handling, and debugging.
Input Variables Variable – the variable name to use Value – the string value to be set to the variable. To set the session variable with the current value of another session variable, use the syntax of {name}, where the name is the session variable name to copy from.
Output Variables None
Follow-up State – OK Follow-up state after successful processing. The process will always be successful and move to the next state.
Follow-up State – Fail N.A.
Follow-up State – DYN N.A.
Screen
Scenario 1: Create a global variable by setting the session variable CREDIT (maximum allowable credit limit) to 1000. The global variable can be used multiple times in the application. This can also be accomplished using the “Copy Variables” state.
Notes There are several mechanisms that session variable is set, as described on the followings.
Session variable can be set in the Follow-up States by using the bracket “()” in the “Expression” field, and specify the variable name in the “Assign To” field.
All return values from a state are set into the session variables so that they are accessible by the follow-up states.
CAUTION – setting an existing session variable will overwrite the value. For example, if a previous state returned a value in the session variable X, and the follow-up state set variable X, the return value is lost.
Use the recommended “Copy Variable” state instead of this state.
Usage Scenario 2: Set from other session variable. Scenario 3: Set text for Send SMS
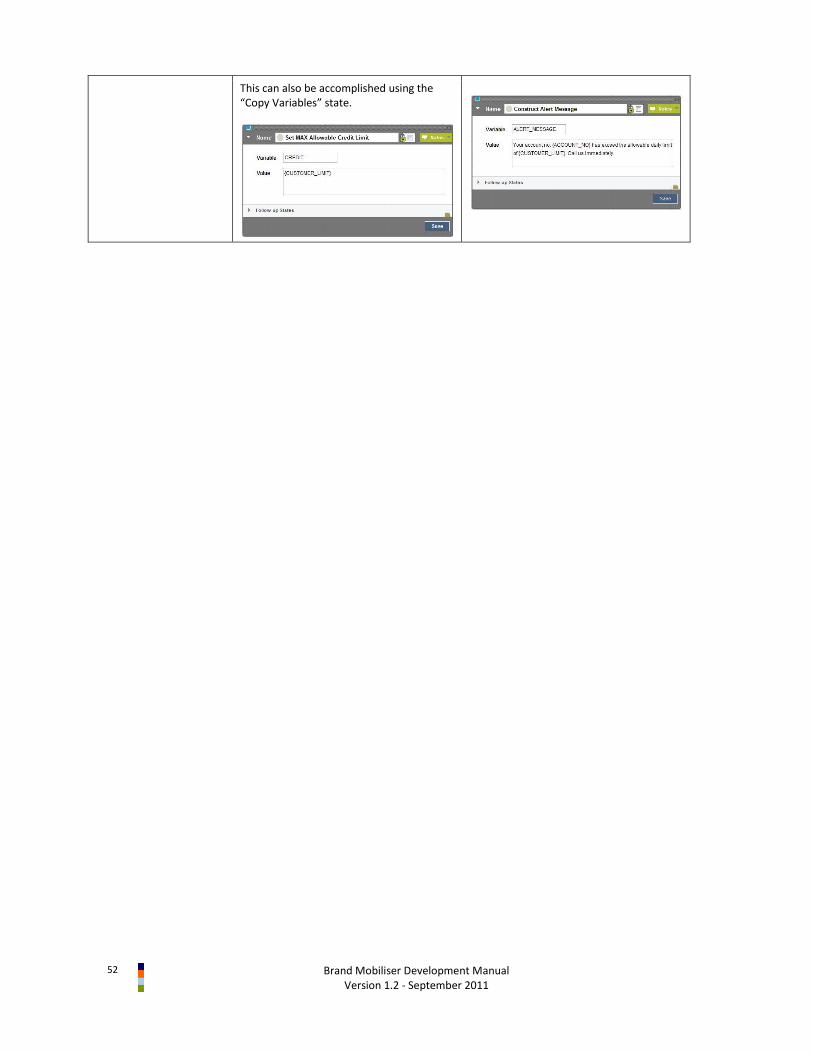
52
Brand Mobiliser Development Manual Version 1.2 - September 2011
This can also be accomplished using the “Copy Variables” state.

Brand Mobiliser Development Manual
Version 1.2 - September 2011 53
Base State
Name Copy Variables
Descriptions Copies the value of a source variable (or constant) to a destination variable.
Input Variables Source – the source to copy from; If checkbox is ticked, the source entry is the name of session variable that needs to be retrieved from. If it is not ticked, the input value will be constant value as written in the field. NOTE: Please ensure that the session variable exists, otherwise the state will fail.
Output Variables Destination – the destination session variable name; The destination variable may or may not exist. If it does not exist, it will be created. Otherwise, an existing variable will be overwritten.
Follow-up State – OK Successfully copy the source to destination variables
Follow-up State – Fail Failed to copy the source to destination variables. Most likely the failure will be due to non-existence of the source variable.
Follow-up State – DYN N.A.
Screen
Storing customer balance prior performing remittance. The pre and post remittance balance will be sent to the customer after the transaction. See scenario 1 below for details.
Notes Fail follow-up state will most likely occur due to non-existence of the source variable. This allows the application to retry in setting the source variable.
There are several mechanisms that session variable is set, as described on the followings.
Session variable can be set in the Follow-up States by using the bracket “()” in the “Expression” field, and specify the variable name in the “Assign To” field.
All return values from a state are set into the session variables so that they are accessible by the follow-up states.
CAUTION – setting an existing session variable will overwrite the value. For example, if a previous state returned a value in the session variable X, and the follow-up state set variable X, the return value is lost.
Usage Scenario 1: The “Get Balance” state will be called twice in the application: pre-transaction and post-transaction. The customer balance is returned by a “Get Balance” state and stored in the session variable called “balance”. To avoid the pre-transaction balance be overwritten by the post-transaction balance, we need to copy it into another session
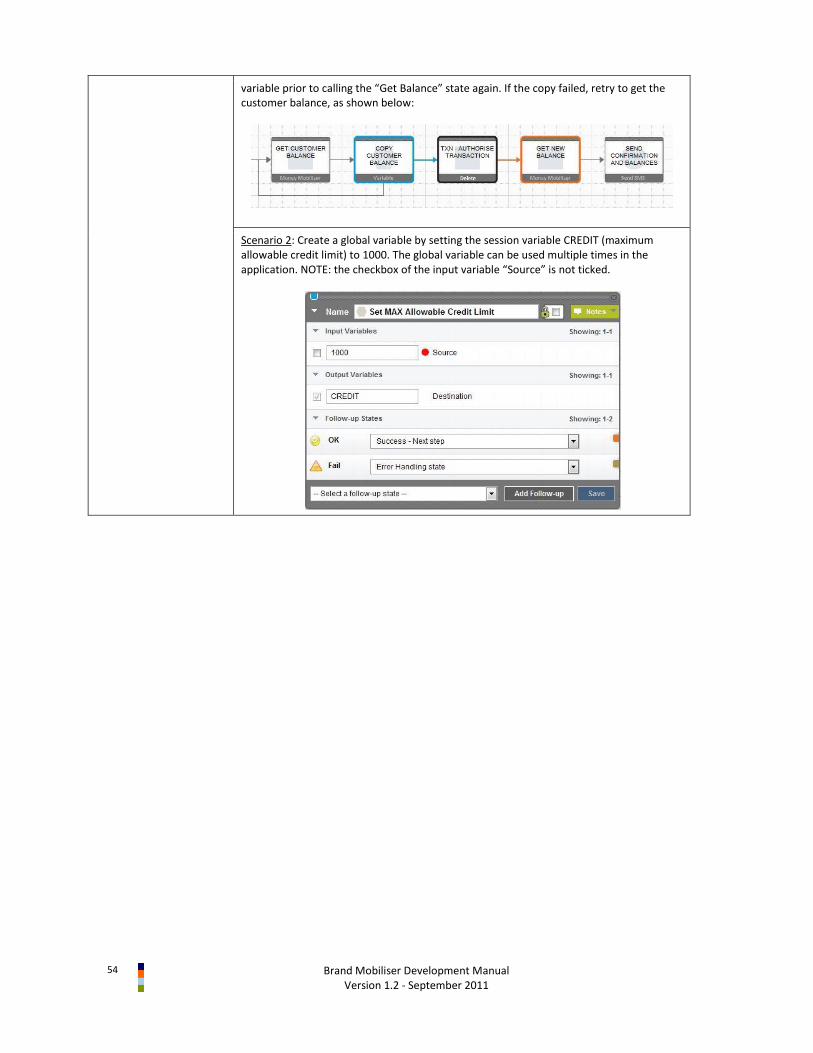
54
Brand Mobiliser Development Manual Version 1.2 - September 2011
variable prior to calling the “Get Balance” state again. If the copy failed, retry to get the customer balance, as shown below:
Scenario 2: Create a global variable by setting the session variable CREDIT (maximum allowable credit limit) to 1000. The global variable can be used multiple times in the application. NOTE: the checkbox of the input variable “Source” is not ticked.

Brand Mobiliser Development Manual
Version 1.2 - September 2011 55
Base State
Name Compare Variables
Descriptions Compares, for string equality, the value of session variable 1 (or constant value 2) to the value of session variable 2 (or constant value 2).
Input Variables Name of variable 1 – variable 1 Name of variable 2 – variable 2 For both variables, if checkbox is ticked, the source entry is the name of session variable that needs to be retrieved from. If it is not ticked, the input value will be constant value as written in the field. NOTE: Please ensure that both session variables exist, otherwise the state will fail.
Output Variables N.A.
Follow-up State – OK Variable 1 and Variable 2 are equal
Follow-up State – Fail Variable 1 and Variable 2 are NOT equal; or Variable 1 or Variable 2 is the name of a session variable to retrieve value from, but the session variable does not exist.
Follow-up State – DYN N.A.
Screen
Scenario 1: Comparing the value of two session variables: TEMP and VAR2. If the values are equal, proceed to the “Send Variable Values – Equal” state; Otherwise, proceed to the “Send Variable Values – Not Equal” state. Also, if TEMP or VAR2 do not exist, proceed to the “Send Variable Values – Not Equal” state.
Notes This state compare for string equality only. For comparing other types, use “Compare Typed Variables” state listed below.
Usage Scenario 2: compare the value of a session variable to a constant string, ACCOUNT to “saving”, respectively. If the values are equal, proceed to the “Send Variable Values – Equal” state; Otherwise, proceed to the “Send Variable Values – Not Equal” state. Also, if ACCOUNT does not exist, proceed to the “Send Variable Values – Not Equal” state. NOTE: the checkbox of variable 2 is not ticked.

56
Brand Mobiliser Development Manual Version 1.2 - September 2011
Scenario 3: in scenario 2 above, when the workflow proceeds to the fail follow-up state, it is possible to determine the cause (if needed) using the “Copy Variable” state by copying the ACCOUNT session variable to a “dummy” session variable. If the copy fails, then the ACCOUNT does not exist.
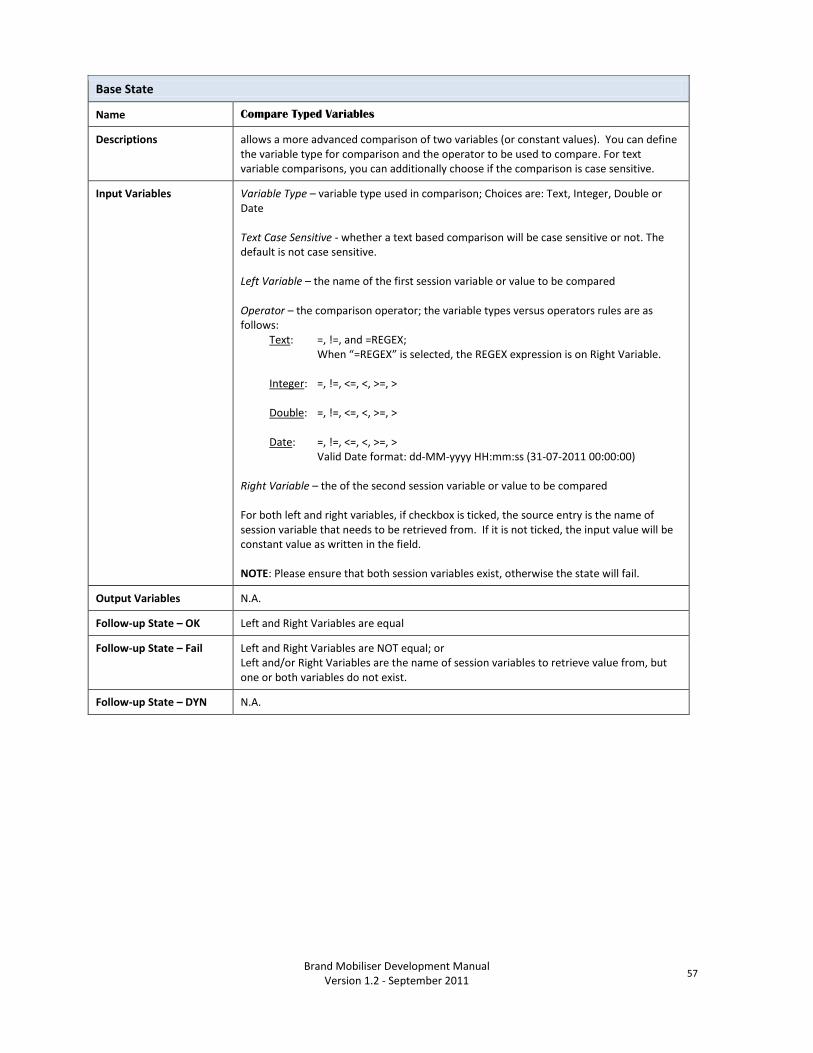
Brand Mobiliser Development Manual
Version 1.2 - September 2011 57
Base State
Name Compare Typed Variables
Descriptions allows a more advanced comparison of two variables (or constant values). You can define the variable type for comparison and the operator to be used to compare. For text variable comparisons, you can additionally choose if the comparison is case sensitive.
Input Variables Variable Type – variable type used in comparison; Choices are: Text, Integer, Double or Date Text Case Sensitive - whether a text based comparison will be case sensitive or not. The default is not case sensitive. Left Variable – the name of the first session variable or value to be compared Operator – the comparison operator; the variable types versus operators rules are as follows:
Text: =, !=, and =REGEX; When “=REGEX” is selected, the REGEX expression is on Right Variable. Integer: =, !=, <=, <, >=, > Double: =, !=, <=, <, >=, > Date: =, !=, <=, <, >=, > Valid Date format: dd-MM-yyyy HH:mm:ss (31-07-2011 00:00:00)
Right Variable – the of the second session variable or value to be compared For both left and right variables, if checkbox is ticked, the source entry is the name of session variable that needs to be retrieved from. If it is not ticked, the input value will be constant value as written in the field. NOTE: Please ensure that both session variables exist, otherwise the state will fail.
Output Variables N.A.
Follow-up State – OK Left and Right Variables are equal
Follow-up State – Fail Left and Right Variables are NOT equal; or Left and/or Right Variables are the name of session variables to retrieve value from, but one or both variables do not exist.
Follow-up State – DYN N.A.
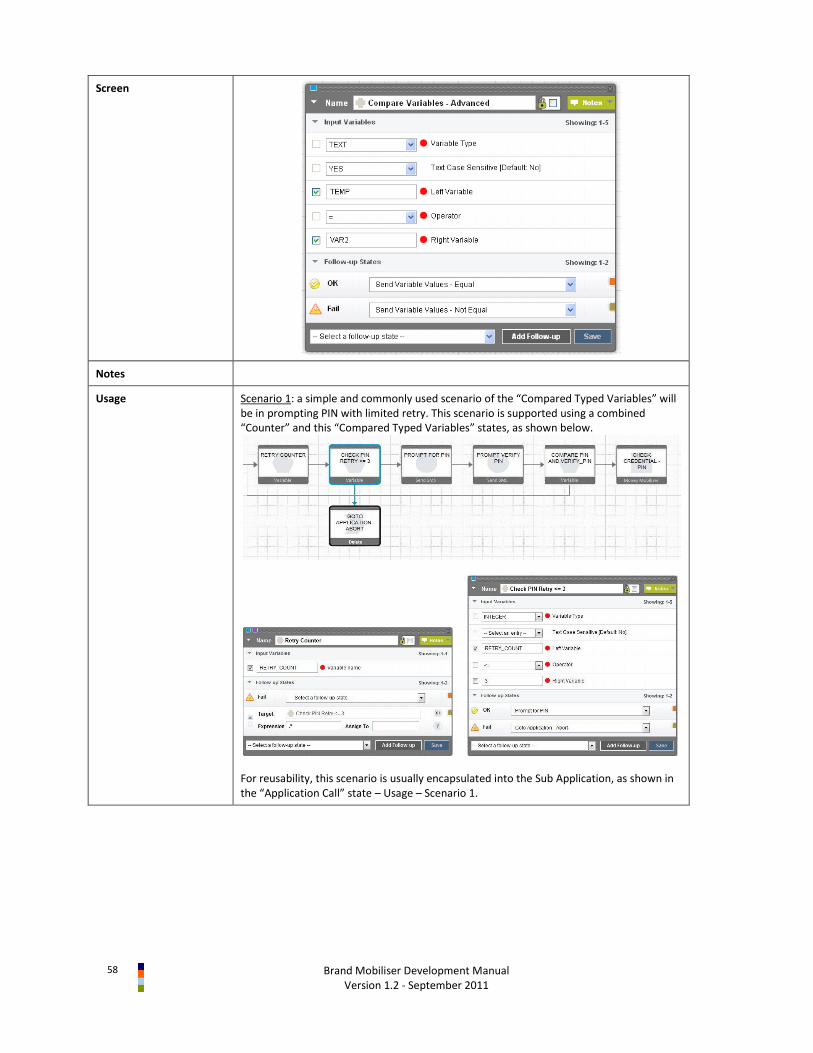
58
Brand Mobiliser Development Manual Version 1.2 - September 2011
Screen
Notes
Usage Scenario 1: a simple and commonly used scenario of the “Compared Typed Variables” will be in prompting PIN with limited retry. This scenario is supported using a combined “Counter” and this “Compared Typed Variables” states, as shown below.
For reusability, this scenario is usually encapsulated into the Sub Application, as shown in the “Application Call” state – Usage – Scenario 1.
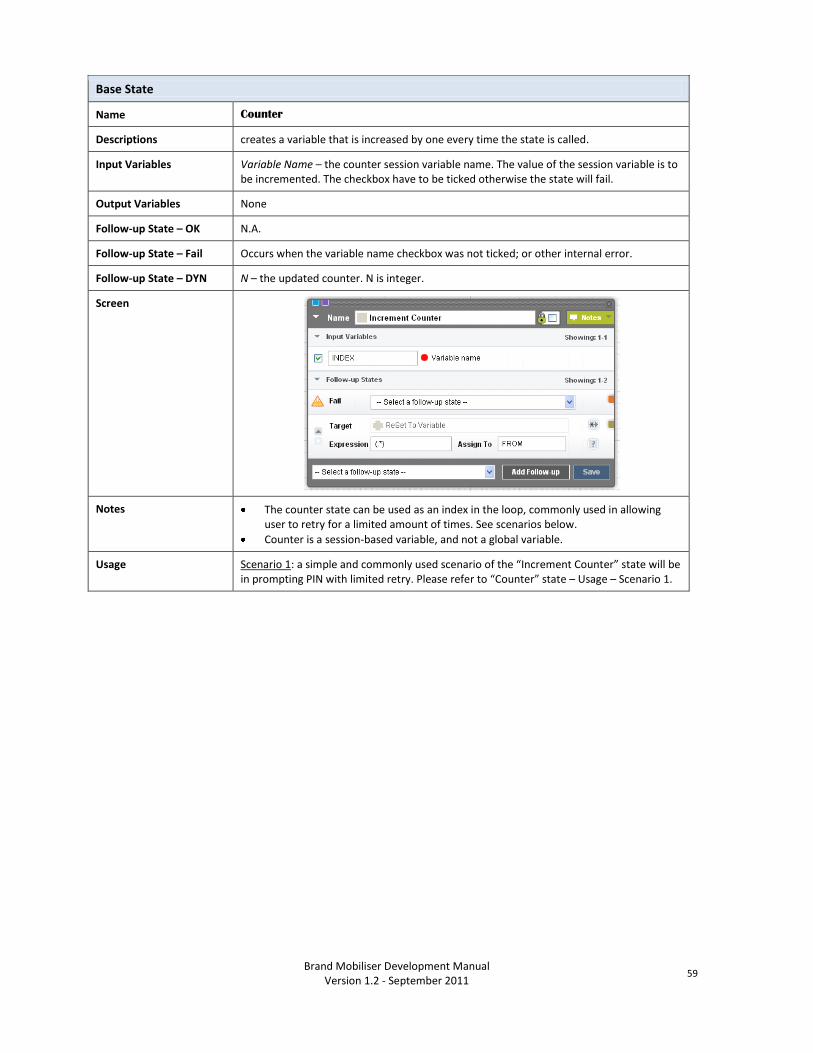
Brand Mobiliser Development Manual
Version 1.2 - September 2011 59
Base State
Name Counter
Descriptions creates a variable that is increased by one every time the state is called.
Input Variables Variable Name – the counter session variable name. The value of the session variable is to be incremented. The checkbox have to be ticked otherwise the state will fail.
Output Variables None
Follow-up State – OK N.A.
Follow-up State – Fail Occurs when the variable name checkbox was not ticked; or other internal error.
Follow-up State – DYN N – the updated counter. N is integer.
Screen
Notes The counter state can be used as an index in the loop, commonly used in allowing user to retry for a limited amount of times. See scenarios below.
Counter is a session-based variable, and not a global variable.
Usage Scenario 1: a simple and commonly used scenario of the “Increment Counter” state will be in prompting PIN with limited retry. Please refer to “Counter” state – Usage – Scenario 1.
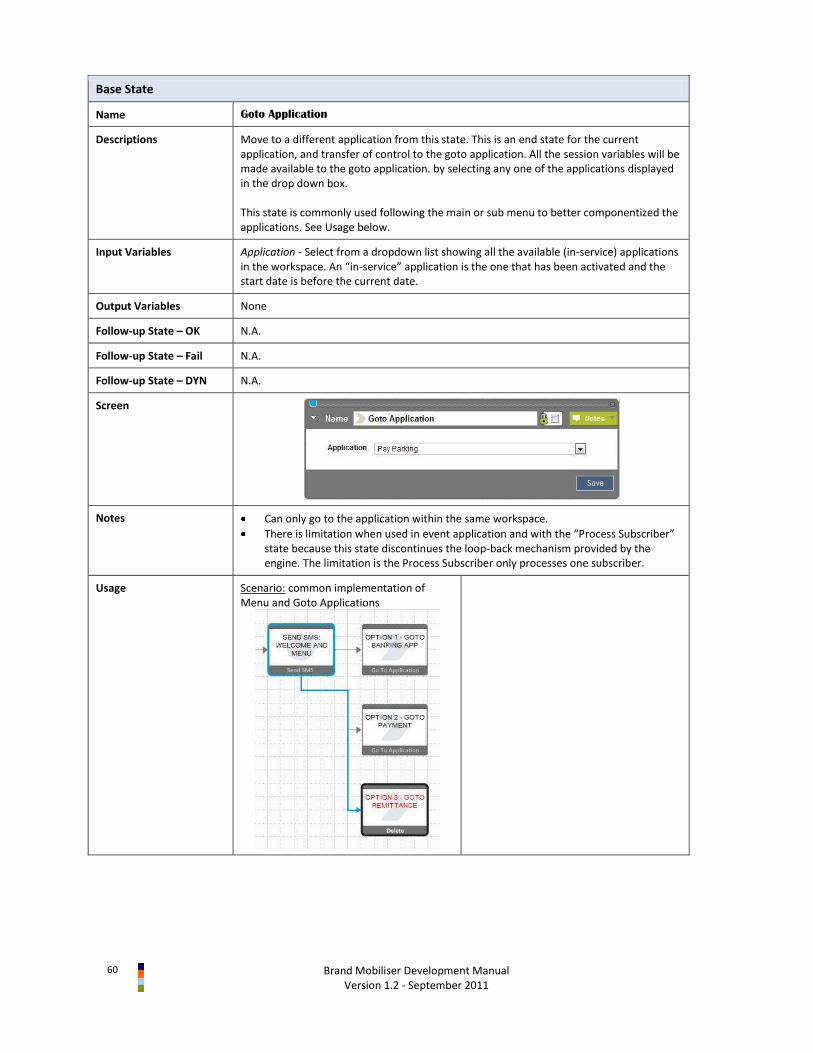
60
Brand Mobiliser Development Manual Version 1.2 - September 2011
Base State
Name Goto Application
Descriptions Move to a different application from this state. This is an end state for the current application, and transfer of control to the goto application. All the session variables will be made available to the goto application. by selecting any one of the applications displayed in the drop down box. This state is commonly used following the main or sub menu to better componentized the applications. See Usage below.
Input Variables Application - Select from a dropdown list showing all the available (in-service) applications in the workspace. An “in-service” application is the one that has been activated and the start date is before the current date.
Output Variables None
Follow-up State – OK N.A.
Follow-up State – Fail N.A.
Follow-up State – DYN N.A.
Screen
Notes Can only go to the application within the same workspace.
There is limitation when used in event application and with the “Process Subscriber” state because this state discontinues the loop-back mechanism provided by the engine. The limitation is the Process Subscriber only processes one subscriber.
Usage Scenario: common implementation of Menu and Goto Applications
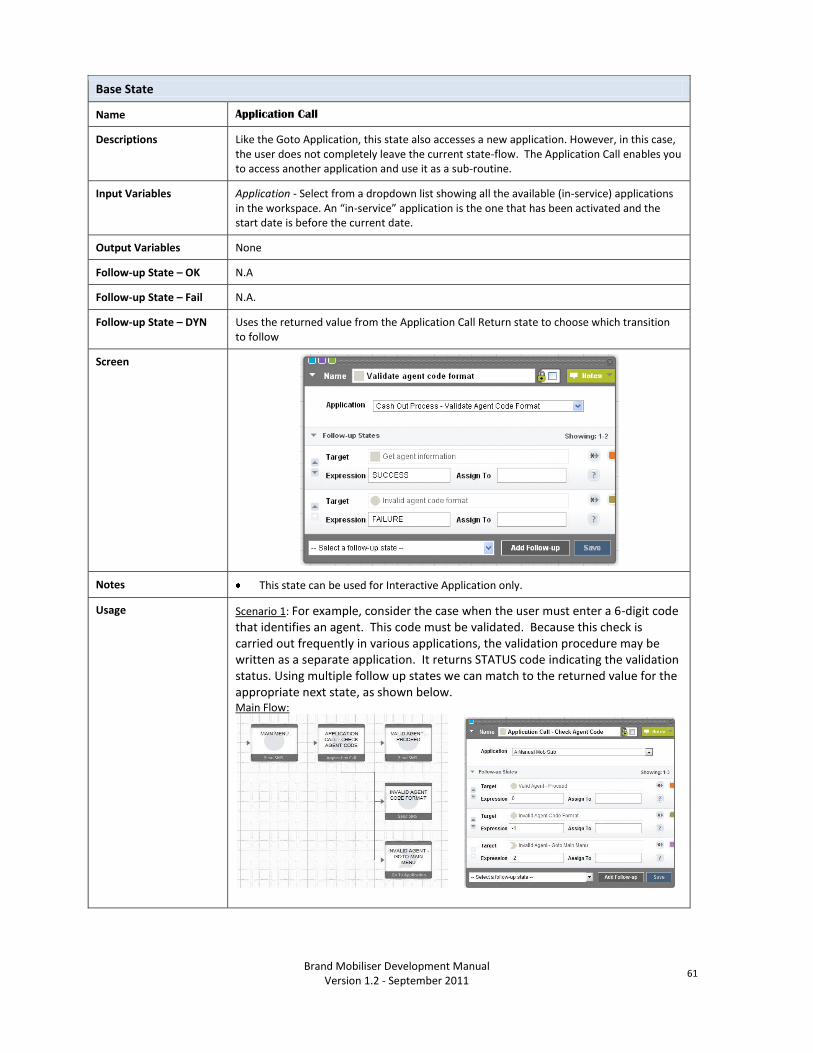
Brand Mobiliser Development Manual
Version 1.2 - September 2011 61
Base State
Name Application Call
Descriptions Like the Goto Application, this state also accesses a new application. However, in this case, the user does not completely leave the current state-flow. The Application Call enables you to access another application and use it as a sub-routine.
Input Variables Application - Select from a dropdown list showing all the available (in-service) applications in the workspace. An “in-service” application is the one that has been activated and the start date is before the current date.
Output Variables None
Follow-up State – OK N.A
Follow-up State – Fail N.A.
Follow-up State – DYN Uses the returned value from the Application Call Return state to choose which transition to follow
Screen
Notes This state can be used for Interactive Application only.
Usage Scenario 1: For example, consider the case when the user must enter a 6-digit code that identifies an agent. This code must be validated. Because this check is carried out frequently in various applications, the validation procedure may be written as a separate application. It returns STATUS code indicating the validation status. Using multiple follow up states we can match to the returned value for the appropriate next state, as shown below. Main Flow:

62
Brand Mobiliser Development Manual Version 1.2 - September 2011
Agent Code Check – Sub Flow
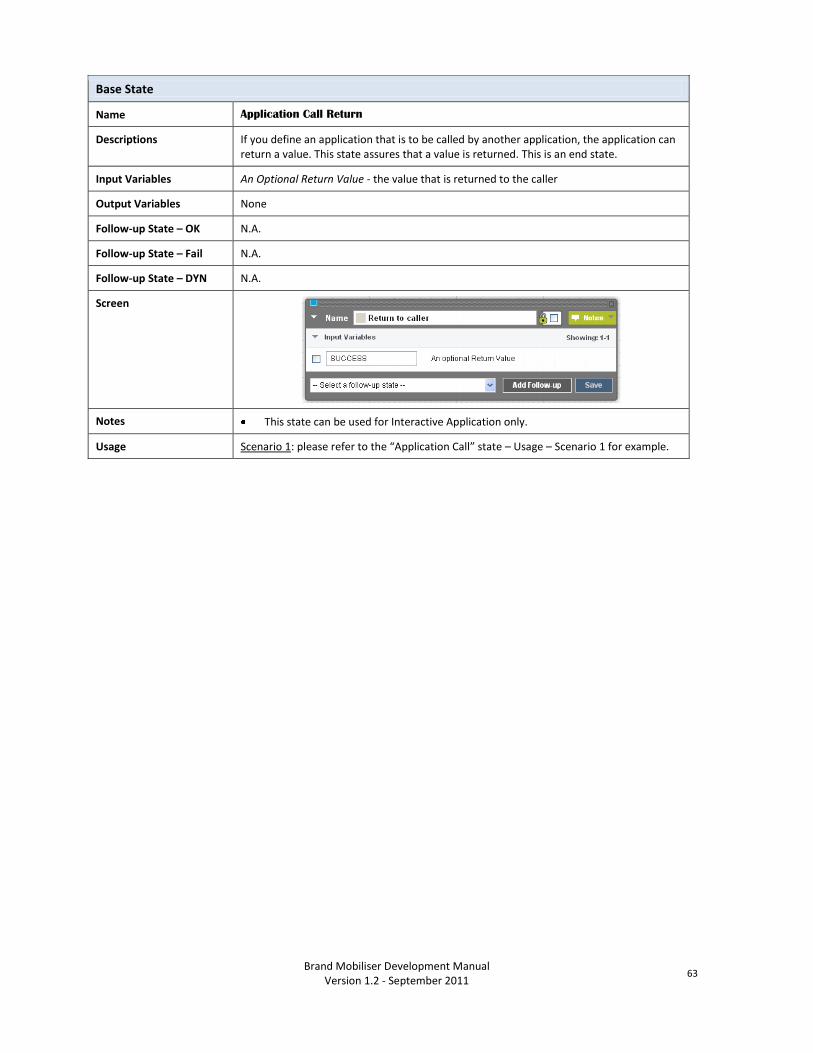
Brand Mobiliser Development Manual
Version 1.2 - September 2011 63
Base State
Name Application Call Return
Descriptions If you define an application that is to be called by another application, the application can return a value. This state assures that a value is returned. This is an end state.
Input Variables An Optional Return Value - the value that is returned to the caller
Output Variables None
Follow-up State – OK N.A.
Follow-up State – Fail N.A.
Follow-up State – DYN N.A.
Screen
Notes This state can be used for Interactive Application only.
Usage Scenario 1: please refer to the “Application Call” state – Usage – Scenario 1 for example.

64
Brand Mobiliser Development Manual Version 1.2 - September 2011
Subscriber State
Name Process Subscriber
Descriptions This state is used in Event Applications to retrieve the next subscriber from a subscriber list and assigns that subscriber as the effective MSISDN for the application. The application will then continue, for example, send a message to the MSISDN, and then will most likely return to this state in order to get the next subscriber, or to end the Event Application.
Input Variables Subscriber Set – the subscriber set to use. The drop down list presents the subscribers in the workspace
Output Variables None
Follow-up State – OK A subscriber is available to be processed for this event
Follow-up State – Fail This event window processing has finished with error with the following possible reasons:??????
Follow-up State – DYN END - The end date for the window has been reached. FINISH - Event window processing has completed due to window finish. COMPLETE - There are no more subscribers returned from the subscription finder service. NOTE: If the END, FINISH, COMPLETE dynamic transitions are not handled, they behave the same as the OK transition.
Screen
Notes Applicable to event application only
When the “Send SMS” state is used in Event Application, the “Request SMPP Acknowledgement” flag is shown, enabling acknowledgement request from the SMPP gateway.
Usage Scenario 1: static message push campaign. Assuming “Subscriber” set exists.
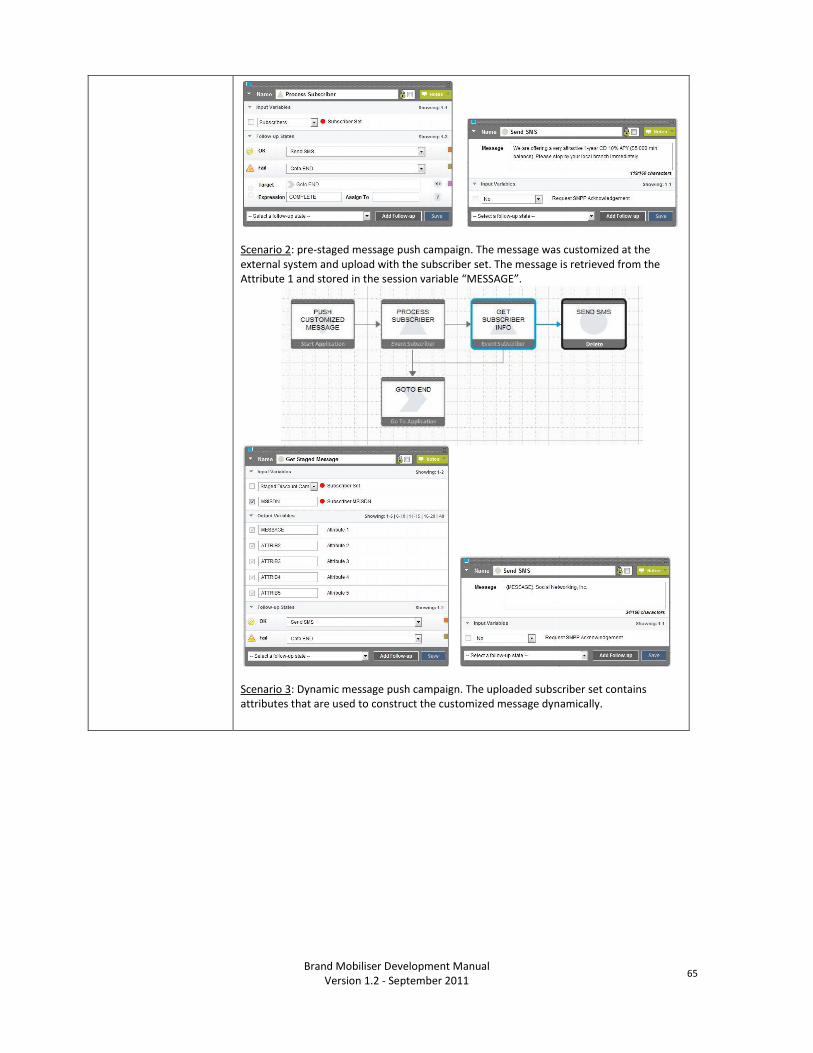
Brand Mobiliser Development Manual
Version 1.2 - September 2011 65
Scenario 2: pre-staged message push campaign. The message was customized at the external system and upload with the subscriber set. The message is retrieved from the Attribute 1 and stored in the session variable “MESSAGE”.
Scenario 3: Dynamic message push campaign. The uploaded subscriber set contains attributes that are used to construct the customized message dynamically.
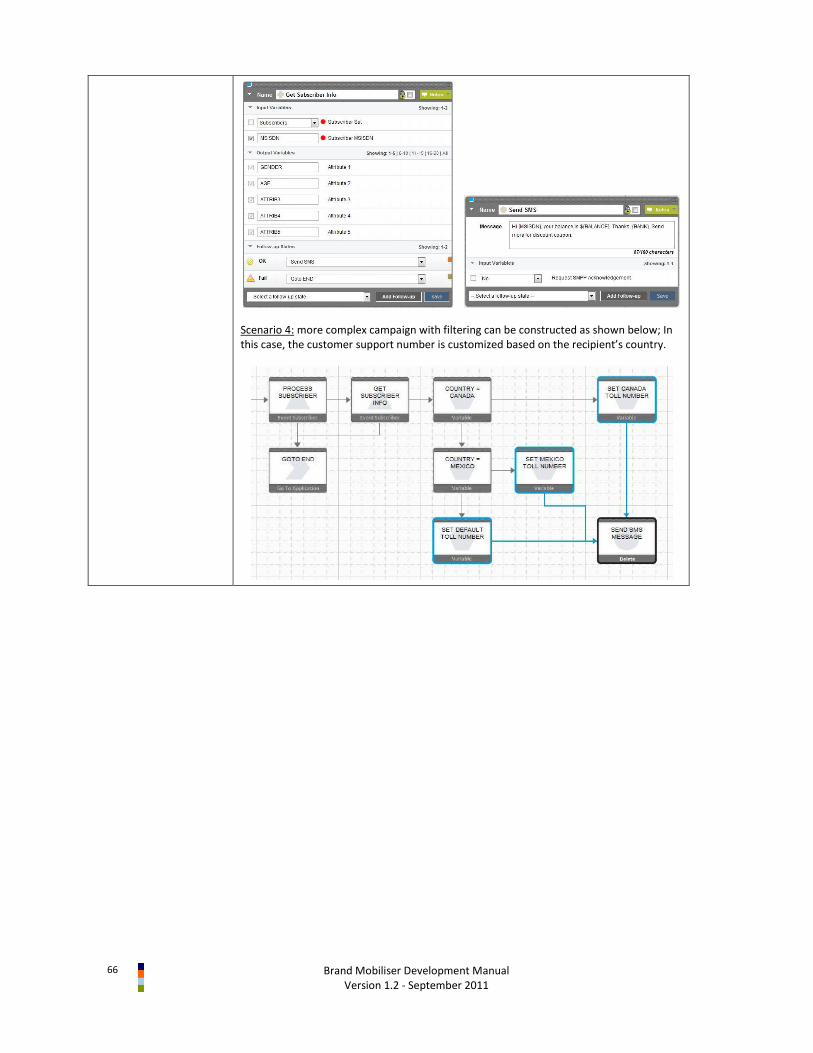
66
Brand Mobiliser Development Manual Version 1.2 - September 2011
Scenario 4: more complex campaign with filtering can be constructed as shown below; In this case, the customer support number is customized based on the recipient’s country.
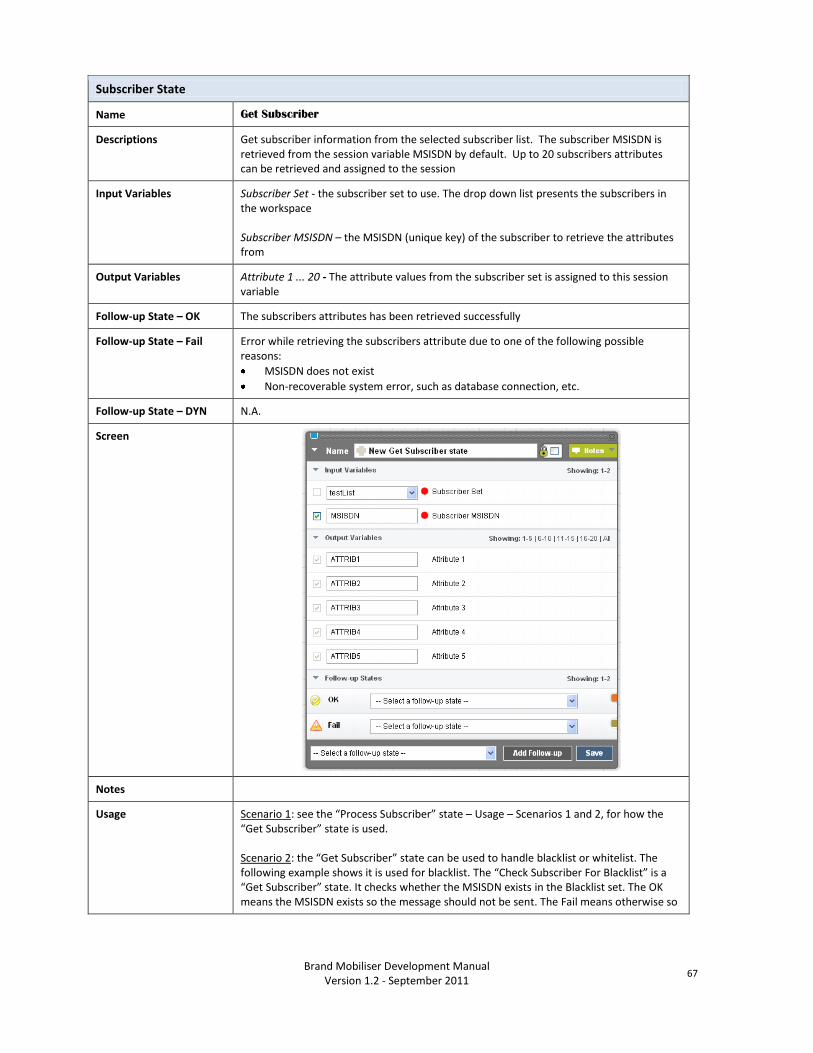
Brand Mobiliser Development Manual
Version 1.2 - September 2011 67
Subscriber State
Name Get Subscriber
Descriptions Get subscriber information from the selected subscriber list. The subscriber MSISDN is retrieved from the session variable MSISDN by default. Up to 20 subscribers attributes can be retrieved and assigned to the session
Input Variables Subscriber Set - the subscriber set to use. The drop down list presents the subscribers in the workspace Subscriber MSISDN – the MSISDN (unique key) of the subscriber to retrieve the attributes from
Output Variables Attribute 1 ... 20 - The attribute values from the subscriber set is assigned to this session variable
Follow-up State – OK The subscribers attributes has been retrieved successfully
Follow-up State – Fail Error while retrieving the subscribers attribute due to one of the following possible reasons:
MSISDN does not exist
Non-recoverable system error, such as database connection, etc.
Follow-up State – DYN N.A.
Screen
Notes
Usage Scenario 1: see the “Process Subscriber” state – Usage – Scenarios 1 and 2, for how the “Get Subscriber” state is used. Scenario 2: the “Get Subscriber” state can be used to handle blacklist or whitelist. The following example shows it is used for blacklist. The “Check Subscriber For Blacklist” is a “Get Subscriber” state. It checks whether the MSISDN exists in the Blacklist set. The OK means the MSISDN exists so the message should not be sent. The Fail means otherwise so
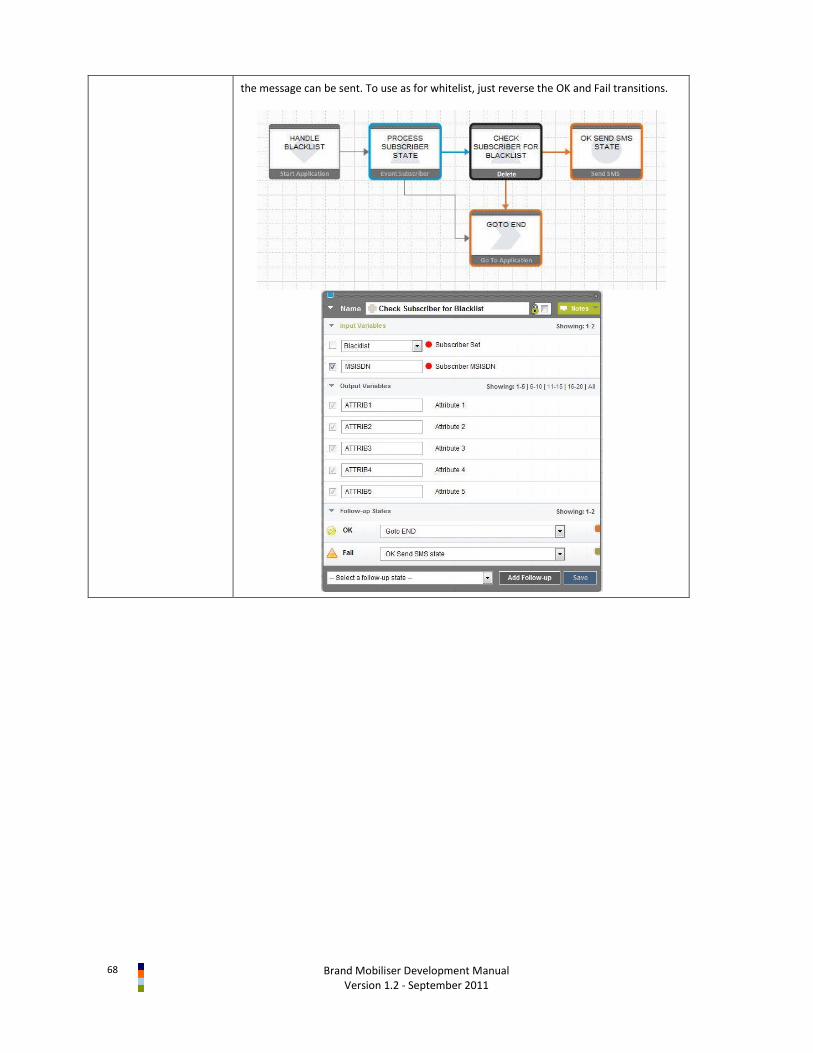
68
Brand Mobiliser Development Manual Version 1.2 - September 2011
the message can be sent. To use as for whitelist, just reverse the OK and Fail transitions.
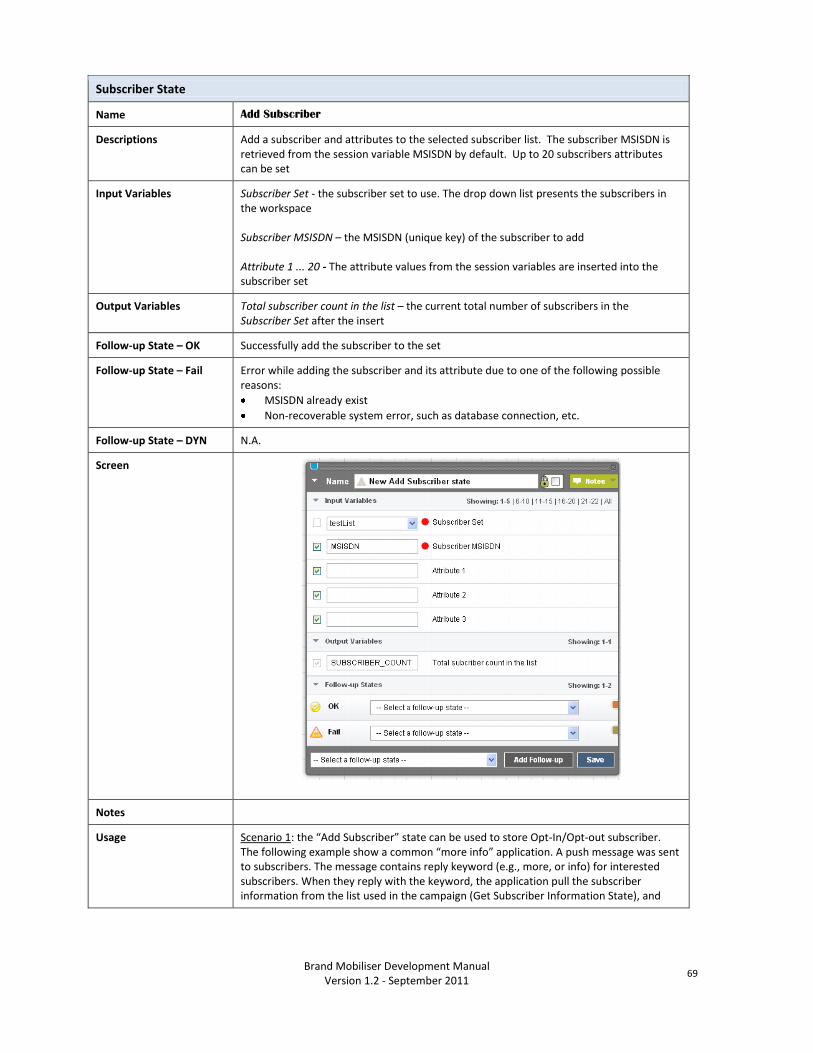
Brand Mobiliser Development Manual
Version 1.2 - September 2011 69
Subscriber State
Name Add Subscriber
Descriptions Add a subscriber and attributes to the selected subscriber list. The subscriber MSISDN is retrieved from the session variable MSISDN by default. Up to 20 subscribers attributes can be set
Input Variables Subscriber Set - the subscriber set to use. The drop down list presents the subscribers in the workspace Subscriber MSISDN – the MSISDN (unique key) of the subscriber to add Attribute 1 ... 20 - The attribute values from the session variables are inserted into the subscriber set
Output Variables Total subscriber count in the list – the current total number of subscribers in the Subscriber Set after the insert
Follow-up State – OK Successfully add the subscriber to the set
Follow-up State – Fail Error while adding the subscriber and its attribute due to one of the following possible reasons:
MSISDN already exist
Non-recoverable system error, such as database connection, etc.
Follow-up State – DYN N.A.
Screen
Notes
Usage Scenario 1: the “Add Subscriber” state can be used to store Opt-In/Opt-out subscriber. The following example show a common “more info” application. A push message was sent to subscribers. The message contains reply keyword (e.g., more, or info) for interested subscribers. When they reply with the keyword, the application pull the subscriber information from the list used in the campaign (Get Subscriber Information State), and
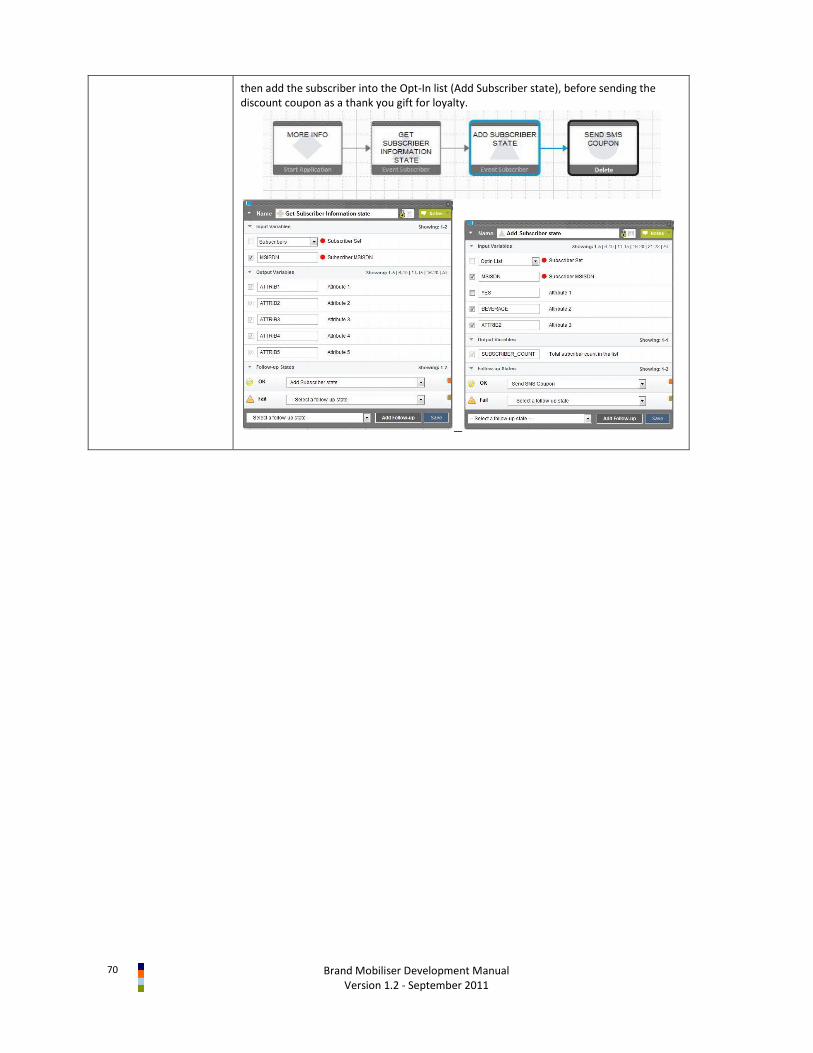
70
Brand Mobiliser Development Manual Version 1.2 - September 2011
then add the subscriber into the Opt-In list (Add Subscriber state), before sending the discount coupon as a thank you gift for loyalty.
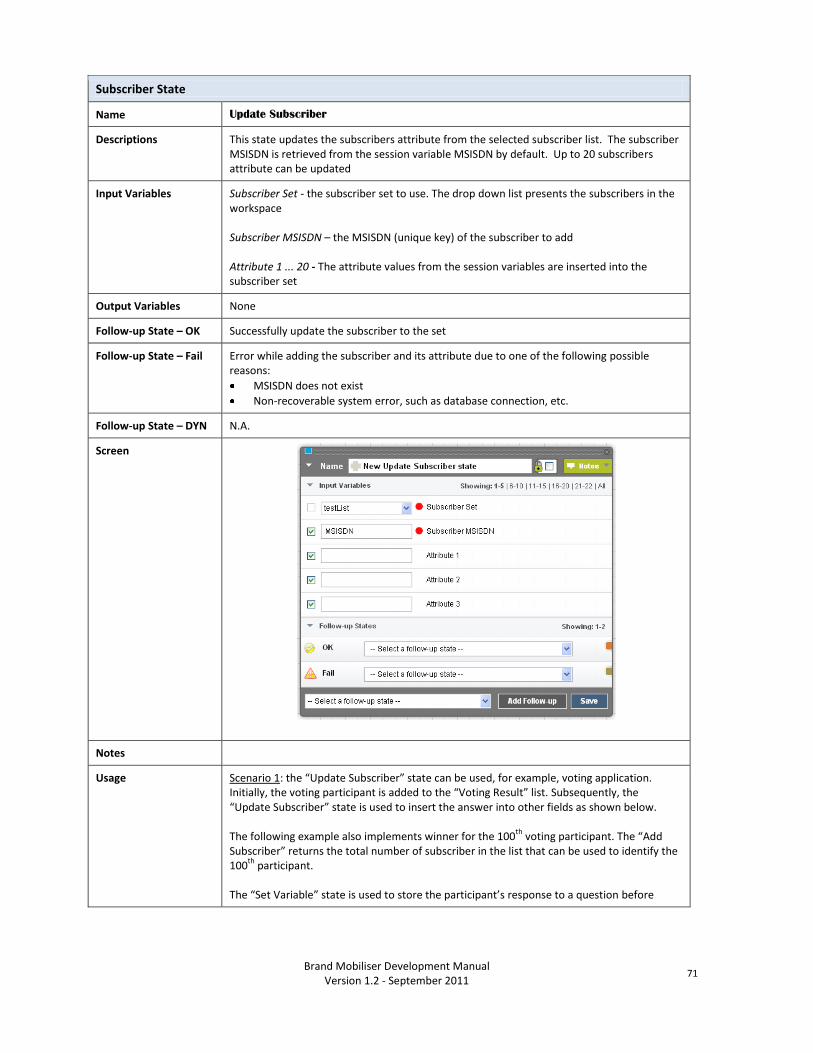
Brand Mobiliser Development Manual
Version 1.2 - September 2011 71
Subscriber State
Name Update Subscriber
Descriptions This state updates the subscribers attribute from the selected subscriber list. The subscriber MSISDN is retrieved from the session variable MSISDN by default. Up to 20 subscribers attribute can be updated
Input Variables Subscriber Set - the subscriber set to use. The drop down list presents the subscribers in the workspace Subscriber MSISDN – the MSISDN (unique key) of the subscriber to add Attribute 1 ... 20 - The attribute values from the session variables are inserted into the subscriber set
Output Variables None
Follow-up State – OK Successfully update the subscriber to the set
Follow-up State – Fail Error while adding the subscriber and its attribute due to one of the following possible reasons:
MSISDN does not exist
Non-recoverable system error, such as database connection, etc.
Follow-up State – DYN N.A.
Screen
Notes
Usage Scenario 1: the “Update Subscriber” state can be used, for example, voting application. Initially, the voting participant is added to the “Voting Result” list. Subsequently, the “Update Subscriber” state is used to insert the answer into other fields as shown below. The following example also implements winner for the 100
th voting participant. The “Add
Subscriber” returns the total number of subscriber in the list that can be used to identify the 100
th participant.
The “Set Variable” state is used to store the participant’s response to a question before

72
Brand Mobiliser Development Manual Version 1.2 - September 2011
updating the “Voting Result” list.
Brand Mobiliser Development Manual
Version 1.2 - September 2011 73
Money Mobiliser State – Registration
Name Customer Registration
Descriptions Register a new mobile consumer using the basic registration information. The registration includes the creation of the following basic account features for the consumer:
Stored Value Account (SVA)
Setting the PIN This state can also be used to update the basic information of an existing consumer, but all the required input variables must to be provided.
Input Variables Identification type – Not used. To be removed.
Identification of the consumer – Not used. To be removed.
NOTE: the consumer identification value is forced to the consumer MSISDN obtained from the incoming message.
Currency for new consumer – Currency value.
Country of new consumer – Country value.
Organizational unit of new consumer – Organization unit value.
Credit limit to assign to new consumer – Credit limit value.
Name of new customer – Customer name.
Language of new customer – Language code value.
Passport no. of new customer – Passport number or other unique id for customer (e.g. social security no.)
PIN for new customer – PIN value.
Output Variables None
Follow-up State – OK Registration completed successfully.
Follow-up State – Fail Possible reasons:
Registration Error: all transactions were rolled back
System Error: Web Service internal error
Follow-up State – DYN N.A.
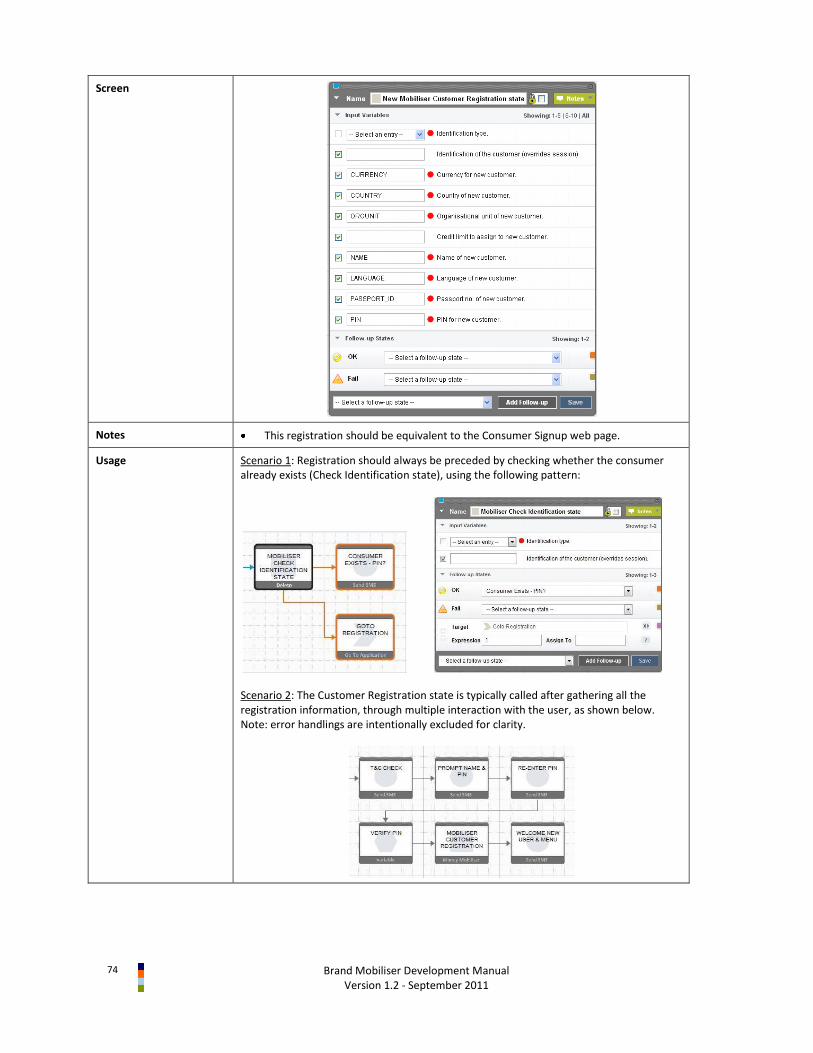
74
Brand Mobiliser Development Manual Version 1.2 - September 2011
Screen
Notes This registration should be equivalent to the Consumer Signup web page.
Usage Scenario 1: Registration should always be preceded by checking whether the consumer already exists (Check Identification state), using the following pattern:
Scenario 2: The Customer Registration state is typically called after gathering all the registration information, through multiple interaction with the user, as shown below. Note: error handlings are intentionally excluded for clarity.

Brand Mobiliser Development Manual
Version 1.2 - September 2011 75
Money Mobiliser State – Security (AA & Blacklist)
Name Login
Descriptions Perform additional verification based on the customer PIN and the identification value. This is an extra security verification in addition to the MSISDN. The PIN number was set by the customer during the signup process. Also see the “Check Credential” state, that performs the same function, and is the recommended state to use instead of this Login state.
Input Variables Identification type - The type of customer identification to use; The choices are: by mobile-no (MSISDN), by customer id, or by username. The default, when leaving the field empty (i.e., --Select an entry--), is the same as the by mobile-no option. NOTE: even though the variable is shown as a required field but leaving it empty will not cause an error.
Identification of the customer – The customer identification value. If not set the current customer MSISDN is used.
NOTE: the customer identification value is determined based on the combined setup of the “Identification type” and “Identification of the customer” fields, listed above.
If the “Identification type” is empty or by mobile-no, the “Identification of the customer” is optional. If the “Identification type” is by customer id or by username, the “Identification of the customer” is mandatory.
PIN - The PIN of the customer, chosen during the registration.
Output Variables None
Follow-up State – OK Successful login
Follow-up State – Fail Possible reasons are:
System Error: Unexpected Internal Error
Follow-up State – DYN 1010 - System Error: Invalid session ID; 1121 - Credential has expired 9935 - System Error: Unexpected Internal Error
Screen
Notes Use the “Check Credential” state instead of this “Login” state.
Usage Scenario 1: use to challenge the customer with the PIN for extra security. This can be done once at the beginning of the workflow, or repeat anywhere in the workflow as necessary prior to performing sensitive action, such as: money transfer, etc.

76
Brand Mobiliser Development Manual Version 1.2 - September 2011
Scenario 2: allowing PIN retry on fail login
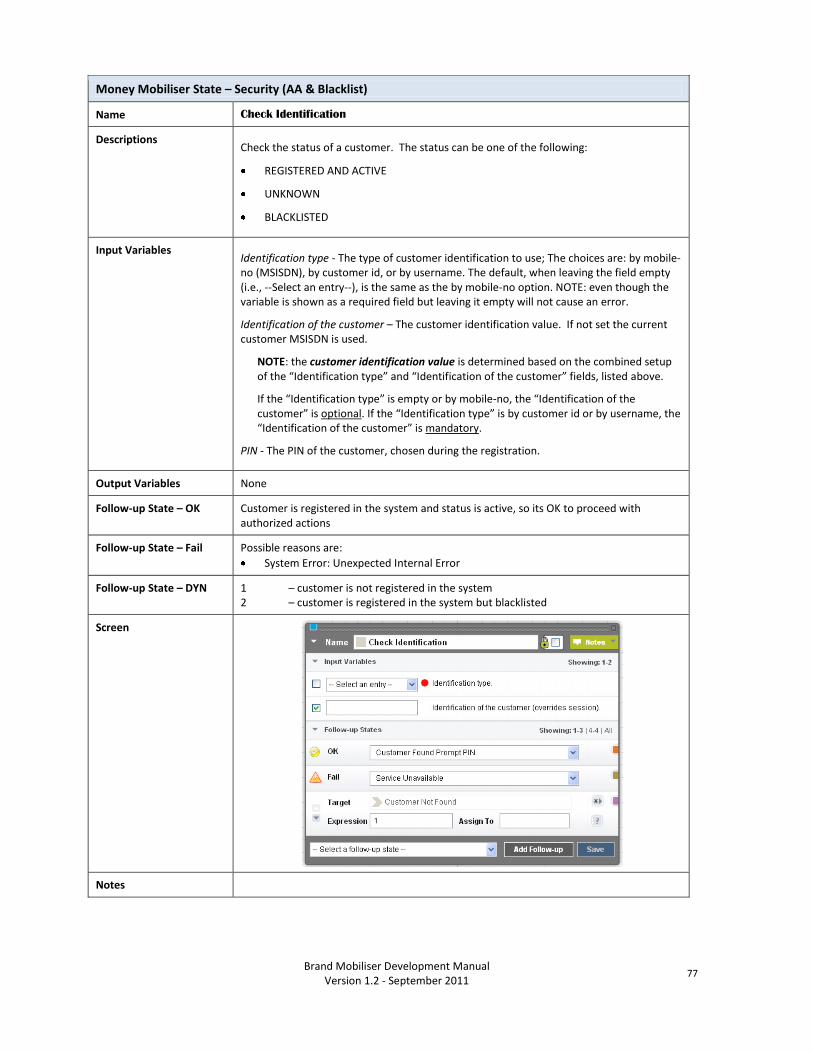
Brand Mobiliser Development Manual
Version 1.2 - September 2011 77
Money Mobiliser State – Security (AA & Blacklist)
Name Check Identification
Descriptions Check the status of a customer. The status can be one of the following:
REGISTERED AND ACTIVE
UNKNOWN
BLACKLISTED
Input Variables Identification type - The type of customer identification to use; The choices are: by mobile-no (MSISDN), by customer id, or by username. The default, when leaving the field empty (i.e., --Select an entry--), is the same as the by mobile-no option. NOTE: even though the variable is shown as a required field but leaving it empty will not cause an error.
Identification of the customer – The customer identification value. If not set the current customer MSISDN is used.
NOTE: the customer identification value is determined based on the combined setup of the “Identification type” and “Identification of the customer” fields, listed above.
If the “Identification type” is empty or by mobile-no, the “Identification of the customer” is optional. If the “Identification type” is by customer id or by username, the “Identification of the customer” is mandatory.
PIN - The PIN of the customer, chosen during the registration.
Output Variables None
Follow-up State – OK Customer is registered in the system and status is active, so its OK to proceed with authorized actions
Follow-up State – Fail Possible reasons are:
System Error: Unexpected Internal Error
Follow-up State – DYN 1 – customer is not registered in the system 2 – customer is registered in the system but blacklisted
Screen
Notes
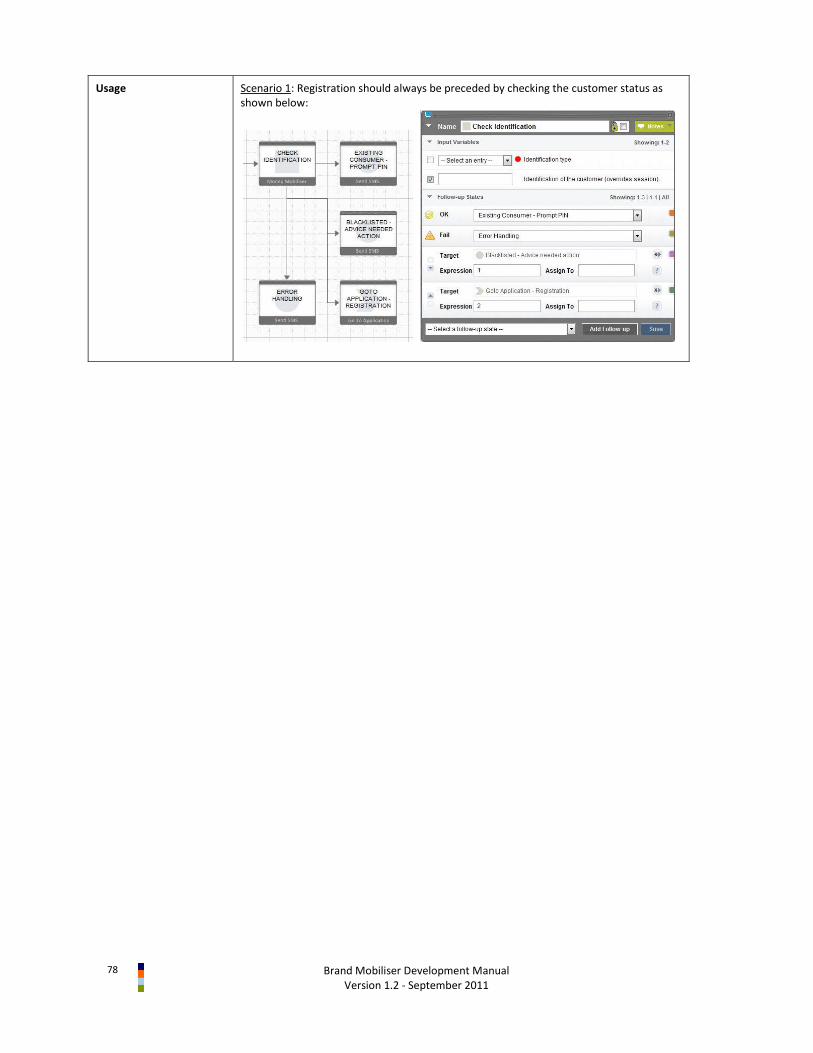
78
Brand Mobiliser Development Manual Version 1.2 - September 2011
Usage Scenario 1: Registration should always be preceded by checking the customer status as shown below:

Brand Mobiliser Development Manual
Version 1.2 - September 2011 79
Money Mobiliser State – Security (AA & Blacklist)
Name Check Credential
Descriptions Perform additional verification based on the customer PIN and the identification value. This is an extra security verification in addition to the MSISDN. The PIN number was set by the customer during the signup process. Also see the “Login” state, that performs the same function. We recommend to use this state instead of the Login state.
Input Variables Identification type - The type of customer identification to use; The choices are: by mobile-no (MSISDN), by customer id, or by username. The default, when leaving the field empty (i.e., --Select an entry--), is the same as the by mobile-no option. NOTE: even though the variable is shown as a required field but leaving it empty will not cause an error.
Identification of the customer – The customer identification value. If not set the current customer MSISDN is used.
NOTE: the customer identification value is determined based on the combined setup of the “Identification type” and “Identification of the customer” fields, listed above.
If the “Identification type” is empty or by mobile-no, the “Identification of the customer” is optional. If the “Identification type” is by customer id or by username, the “Identification of the customer” is mandatory.
Credential Type – Currently not supported. Only PIN credential is supported.
Credential - The PIN credential value of the customer, chosen during the registration.
Output Variables None
Follow-up State – OK Valid credential
Follow-up State – Fail Possible reasons are:
System Error: Unexpected Internal Error
Follow-up State – DYN 101 - Security policies have not been defined for customer yet 1301 - System error: Maximum number of allowed sessions reached 9935 - System Error: Unexpected Internal Error
Screen
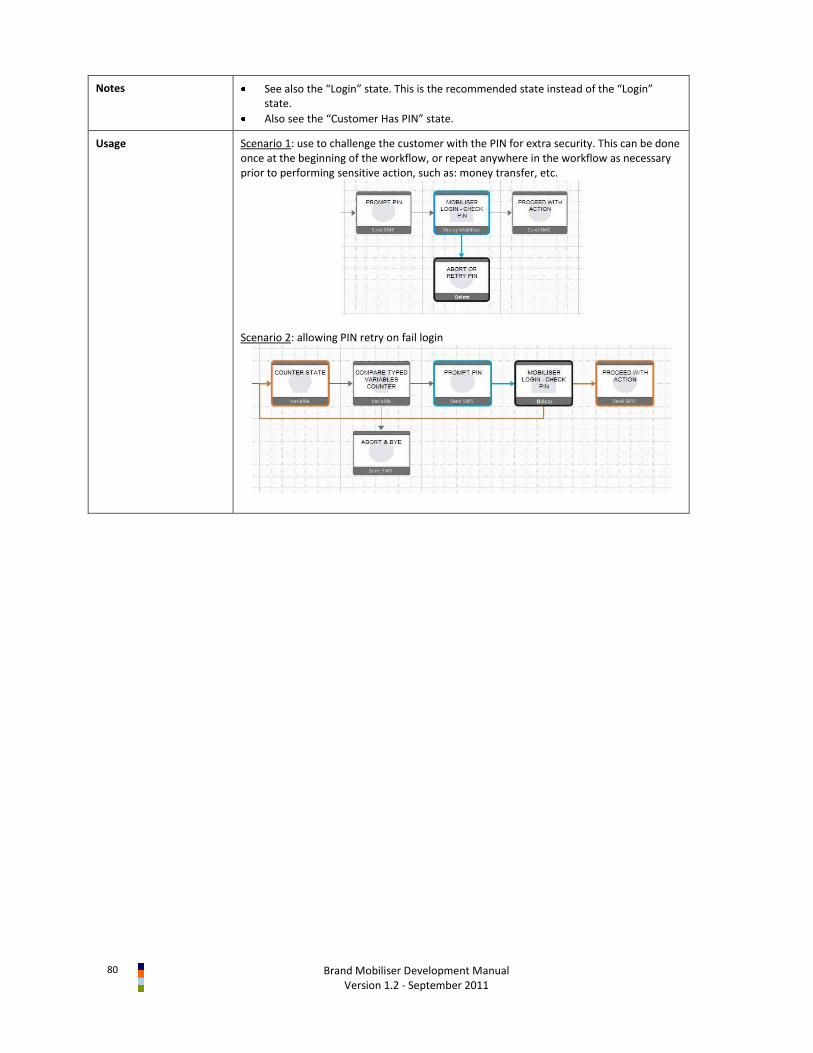
80
Brand Mobiliser Development Manual Version 1.2 - September 2011
Notes See also the “Login” state. This is the recommended state instead of the “Login” state.
Also see the “Customer Has PIN” state.
Usage Scenario 1: use to challenge the customer with the PIN for extra security. This can be done once at the beginning of the workflow, or repeat anywhere in the workflow as necessary prior to performing sensitive action, such as: money transfer, etc.
Scenario 2: allowing PIN retry on fail login

Brand Mobiliser Development Manual
Version 1.2 - September 2011 81
Money Mobiliser State – Security (AA & Blacklist)
Name Set Identity
Descriptions Create a new or update an existing Identity of the current customer. Identity is also known as Identification.
Input Variables Identity type - The identity type ID (integer). The default preconfigured IDs are listed in Appendix B5. Additional identity types may be added during customization. Please check the customization specification document.
Identification – The string value of the identity type to set
Output Variables None
Follow-up State – OK New identity has been added, or update is successful.
Follow-up State – Fail Possible reasons are:
Unable to find the current customer or customers existing identities in the system
Unable to create or update identity
System Error: Unexpected Internal Error
Follow-up State – DYN N.A.
Screen
Notes The default preconfigured IDs are listed in Appendix B5. Additional identity types may be added during customization. Please check the customization specification document.
Usage Scenario 1: typically in the application flow, start with presenting the types of identification (in menu list form) supported by the system or approved by the business. There will be one “Set Identity” state per types.
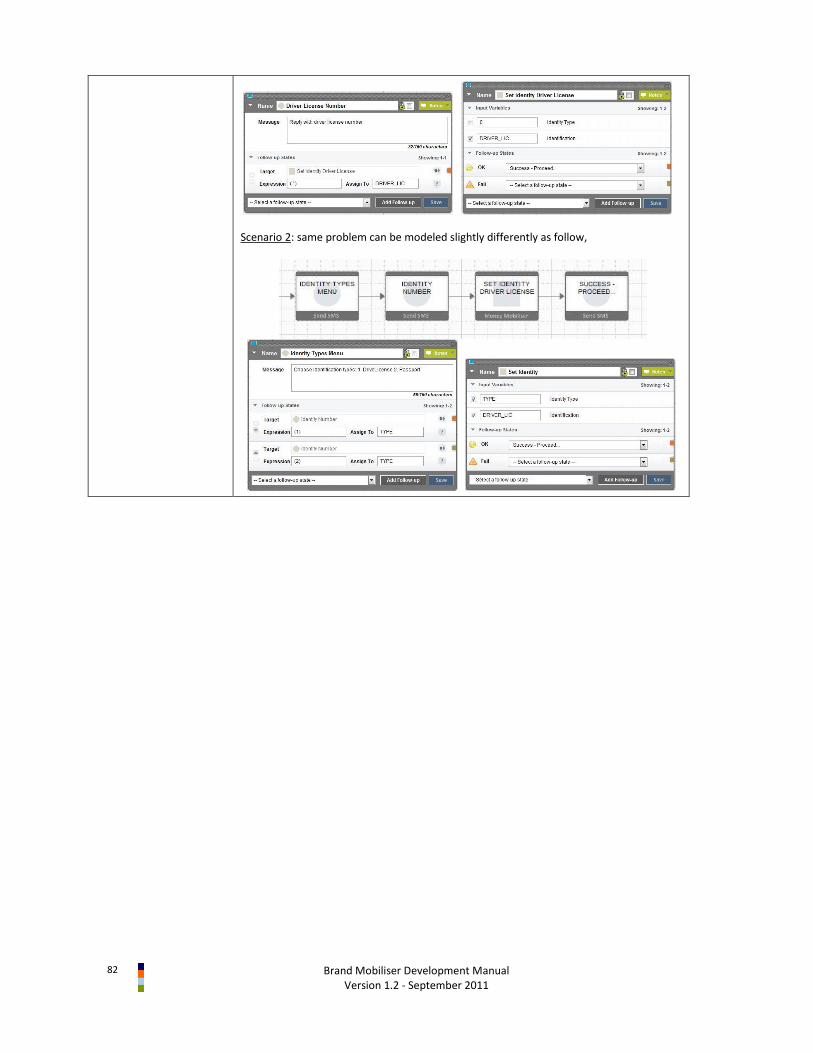
82
Brand Mobiliser Development Manual Version 1.2 - September 2011
Scenario 2: same problem can be modeled slightly differently as follow,
Brand Mobiliser Development Manual
Version 1.2 - September 2011 83
Money Mobiliser State – Security (AA & Blacklist)
Name Change Credential
Descriptions Change the credential of a customer. Two types of credential are supported: PIN or Password. The customer credential is validated prior to changing the credential.
Input Variables Identification type - The type of customer identification to use; The choices are: by mobile-no (MSISDN), by customer id, or by username. The default, when leaving the field empty (i.e., --Select an entry--), is the same as the by mobile-no option. NOTE: even though the variable is shown as a required field but leaving it empty will not cause an error.
Identification of the customer – The customer identification value. If not set the current customer MSISDN is used.
NOTE: the customer identification value is determined based on the combined setup of the “Identification type” and “Identification of the customer” fields, listed above.
If the “Identification type” is empty or by mobile-no, the “Identification of the customer” is optional. If the “Identification type” is by customer id or by username, the “Identification of the customer” is mandatory.
Credential Type – credential type; Supported types are: “Credential is a PIN”, or “Credential is a Password”.
Old Credential Value - The old credential value of the customer, chosen during the registration.
New Credential Value - The new credential value of the customer, chosen during the registration.
Output Variables None
Follow-up State – OK Customer credential changed successfully.
Follow-up State – Fail Possible reasons are:
Invalid credential or customer is not registered in the system
Web service internal error
Follow-up State – DYN 101 - Security policies have not been defined for customer yet 204 - Credential does not meet the required security policy 1010 - Customer not found 1011 - Customer is not unique 1098 - Access to customer is not allowed for the current agent 1221 - Agent object not found 1301 - System error: Maximum number of allowed sessions reached 1303 - System error: Session not found 1304 - System error: Session has timeout 9935 - System Error: Unexpected Internal Error

84
Brand Mobiliser Development Manual Version 1.2 - September 2011
Screen
Notes
Usage Scenario 1: change credential is typically started by checking the exiting credential, followed by prompting the new credential, and the re-prompt for the credential again for verification, prior to submitting to the “Change Credential” state, as shown below.
The “Application Call – Check Credential” is calling the sub-application, kind of subroutine to promote reusability. See the base states, “Application Call” and “Application Call (Return)” for description on how to use these states. For the purpose of the discussion here, the “Application Call – Check Credential” returns a value that is stored in “OLD_CRED” variable. This variable is used in the “Change Credential” state, as shown below.
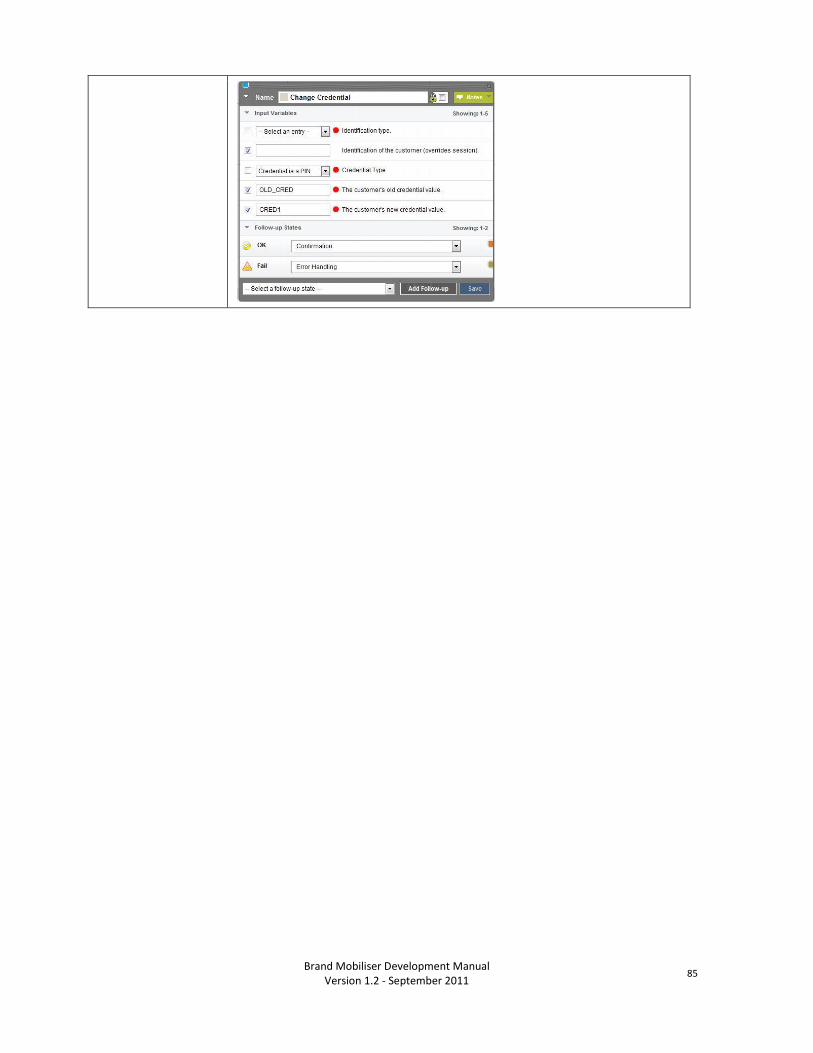
Brand Mobiliser Development Manual
Version 1.2 - September 2011 85
86
Brand Mobiliser Development Manual Version 1.2 - September 2011
Money Mobiliser State – Security (AA & Blacklist)
Name Set Blacklist Reason
Descriptions Blacklist the current customer and provide the blacklist reason. See also the “Block Until” state for temporary blocking of customer.
Input Variables Identification type - The type of customer identification to use; The choices are: by mobile-no (MSISDN), by customer id, or by username. The default, when leaving the field empty (i.e., --Select an entry--), is the same as the by mobile-no option. NOTE: even though the variable is shown as a required field but leaving it empty will not cause an error.
Identification of the customer – The customer identification value. If not set the current customer MSISDN is used.
NOTE: the customer identification value is determined based on the combined setup of the “Identification type” and “Identification of the customer” fields, listed above.
If the “Identification type” is empty or by mobile-no, the “Identification of the customer” is optional. If the “Identification type” is by customer id or by username, the “Identification of the customer” is mandatory.
ID of the blacklist reason - The ID of the blacklist reason. The default preconfigured IDs are listed in Appendix B1. Additional reasons may be added during customization. Please check the customization specification document.
PIN from the MSISDN – Not used.
Output Variables None
Follow-up State – OK Customer has been blacklisted with the given reason. Use the Customer Support Tool to remove customer from the blacklist.
Follow-up State – Fail Possible reasons are:
Attempt to blacklist the customer failed.
Web service internal error
Follow-up State – DYN N.A.
Screen
Notes The default preconfigured blacklist reason IDs are listed in Appendix B1. Additional reasons may be added during customization. Please check the customization specification document.
Brand Mobiliser Development Manual
Version 1.2 - September 2011 87
Usage Scenario 1: The most common usage of the “Set Blacklist Reason” state is when the retry of providing password or PIN exceeds the maximum allowable limit, as shown below. The blacklist can also be set by the Money Mobiliser platform.
88
Brand Mobiliser Development Manual Version 1.2 - September 2011
Money Mobiliser State – Security (AA & Blacklist)
Name Block Until
Descriptions This state is used to block the customer. Define the time for which the customer should be blocked. If you wish to inform the customer of the block, you can provide this information using the Contact Notification textbox.
Input Variables Identification type - The type of customer identification to use; The choices are: by mobile-no (MSISDN), by customer id, or by username. The default, when leaving the field empty (i.e., --Select an entry--), is the same as the by mobile-no option. NOTE: even though the variable is shown as a required field but leaving it empty will not cause an error.
Identification of the customer – The customer identification value. If not set the current customer MSISDN is used.
NOTE: the customer identification value is determined based on the combined setup of the “Identification type” and “Identification of the customer” fields, listed above.
If the “Identification type” is empty or by mobile-no, the “Identification of the customer” is optional. If the “Identification type” is by customer id or by username, the “Identification of the customer” is mandatory.
Time to block customer in minutes - The term for which the customer should be blocked in minutes.
Contact Notification - The text that is sent to the customer.
Output Variables None
Follow-up State – OK Successfully block the customer
Follow-up State – Fail Possible reasons are:
Unsuccessfully block the customer or adding note for the customer
Web service internal error
Follow-up State – DYN 101 - Security policies have not been defined for customer yet 1303 - System error: Session not found 1304 - System error: Session has timeout 1010 - Customer not found 1011 - Customer is not unique 1098 - Access to customer is not allowed for the current agent 1221 - Agent object not found
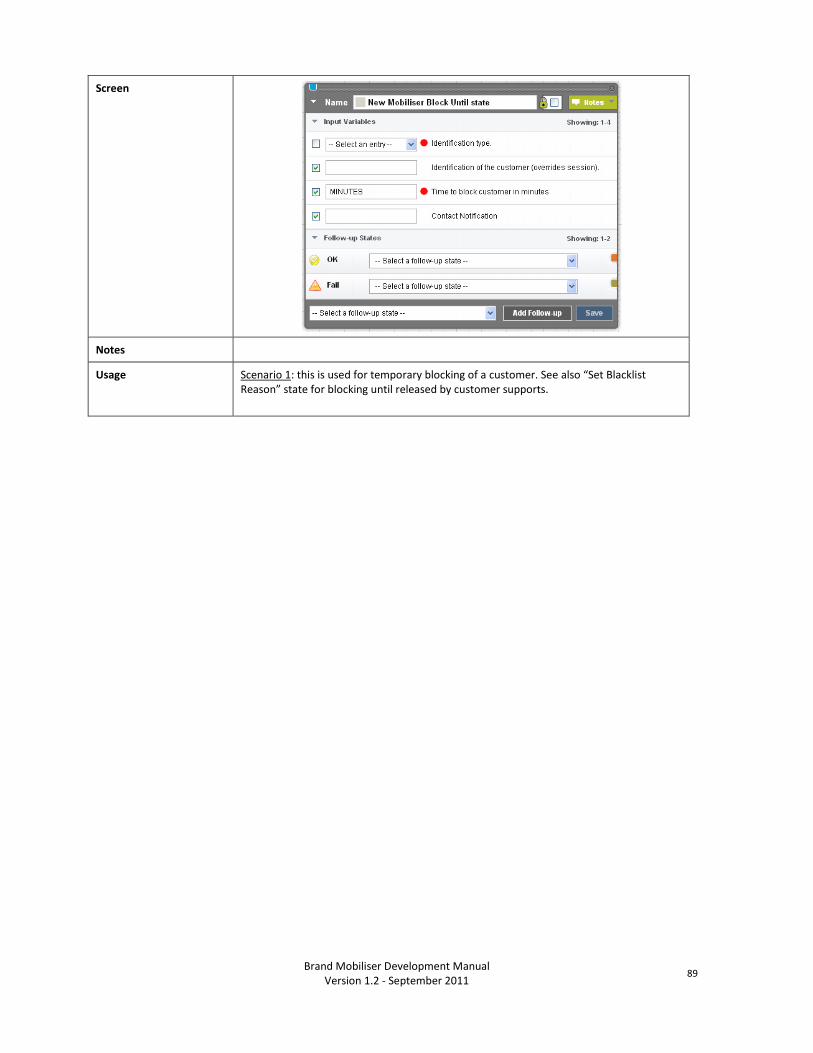
Brand Mobiliser Development Manual
Version 1.2 - September 2011 89
Screen
Notes
Usage Scenario 1: this is used for temporary blocking of a customer. See also “Set Blacklist Reason” state for blocking until released by customer supports.
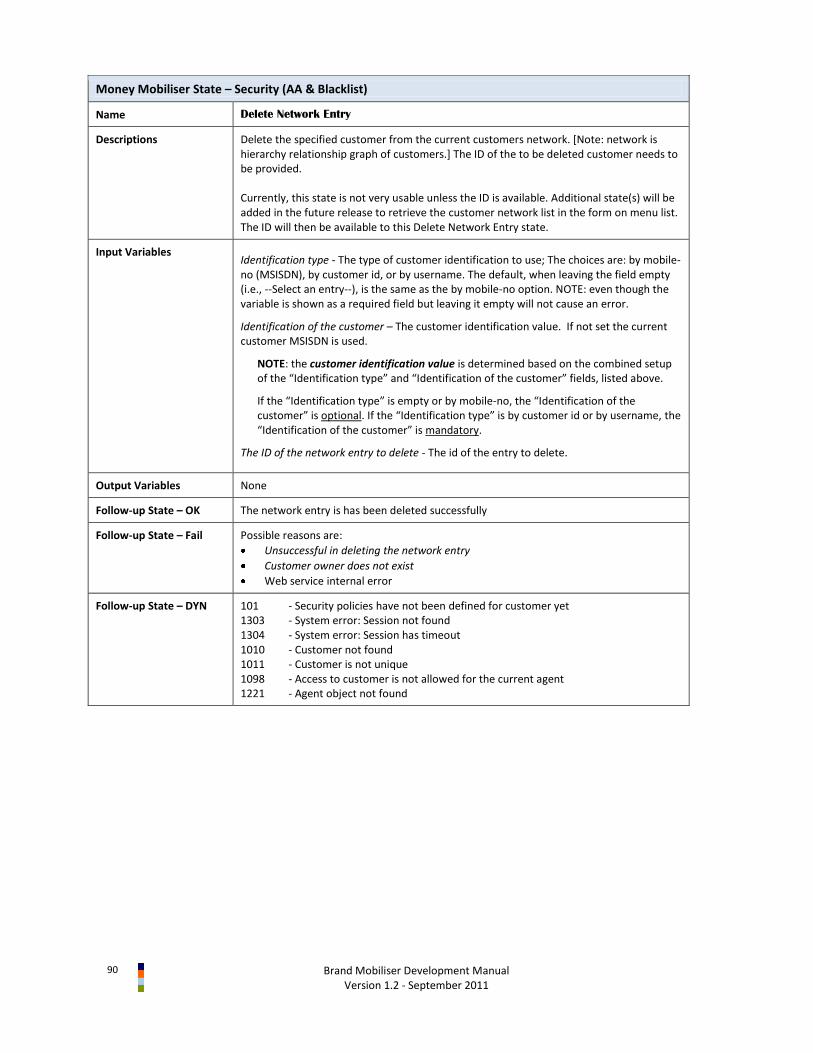
90
Brand Mobiliser Development Manual Version 1.2 - September 2011
Money Mobiliser State – Security (AA & Blacklist)
Name Delete Network Entry
Descriptions Delete the specified customer from the current customers network. [Note: network is hierarchy relationship graph of customers.] The ID of the to be deleted customer needs to be provided. Currently, this state is not very usable unless the ID is available. Additional state(s) will be added in the future release to retrieve the customer network list in the form on menu list. The ID will then be available to this Delete Network Entry state.
Input Variables Identification type - The type of customer identification to use; The choices are: by mobile-no (MSISDN), by customer id, or by username. The default, when leaving the field empty (i.e., --Select an entry--), is the same as the by mobile-no option. NOTE: even though the variable is shown as a required field but leaving it empty will not cause an error.
Identification of the customer – The customer identification value. If not set the current customer MSISDN is used.
NOTE: the customer identification value is determined based on the combined setup of the “Identification type” and “Identification of the customer” fields, listed above.
If the “Identification type” is empty or by mobile-no, the “Identification of the customer” is optional. If the “Identification type” is by customer id or by username, the “Identification of the customer” is mandatory.
The ID of the network entry to delete - The id of the entry to delete.
Output Variables None
Follow-up State – OK The network entry is has been deleted successfully
Follow-up State – Fail Possible reasons are:
Unsuccessful in deleting the network entry
Customer owner does not exist
Web service internal error
Follow-up State – DYN 101 - Security policies have not been defined for customer yet 1303 - System error: Session not found 1304 - System error: Session has timeout 1010 - Customer not found 1011 - Customer is not unique 1098 - Access to customer is not allowed for the current agent 1221 - Agent object not found

Brand Mobiliser Development Manual
Version 1.2 - September 2011 91
Screen
Notes
Usage

92
Brand Mobiliser Development Manual Version 1.2 - September 2011
Money Mobiliser State – System Management
Name Get Languages
Descriptions Get a list of available languages supported by the system. Also see the more advanced “Get Language Menu” for automatic sending of the language list to the customer as a menu list, and facilitating the menu list paging interaction, and proceed to the follow-up states after the customer selects a Language from the menu list. NOTE: need additional Brand Mobiliser setup to be able to use this state. See the notes below for how to setup the languages in the Brand Mobiliser system.
Input Variables Identification type – Not used.
Identification of the customer – Not used.
Output Variables List of Language – list of languages in the following format:
1:englisch 2:B.Indonesia 3:B.M.
Follow-up State – OK Successfully retrieve the list of languages.
Follow-up State – Fail Possible reasons are:
Web service internal error
Follow-up State – DYN N.A.
Screen
Notes For more advanced menu list, please use the “Get Language Menu” state.
Languages are setup in Brand Mobiliser M_LANGUAGES table. Currently, setup is performed using DB script only. Brand Mobiliser needs to be restarted to the changes to be available.
Usage
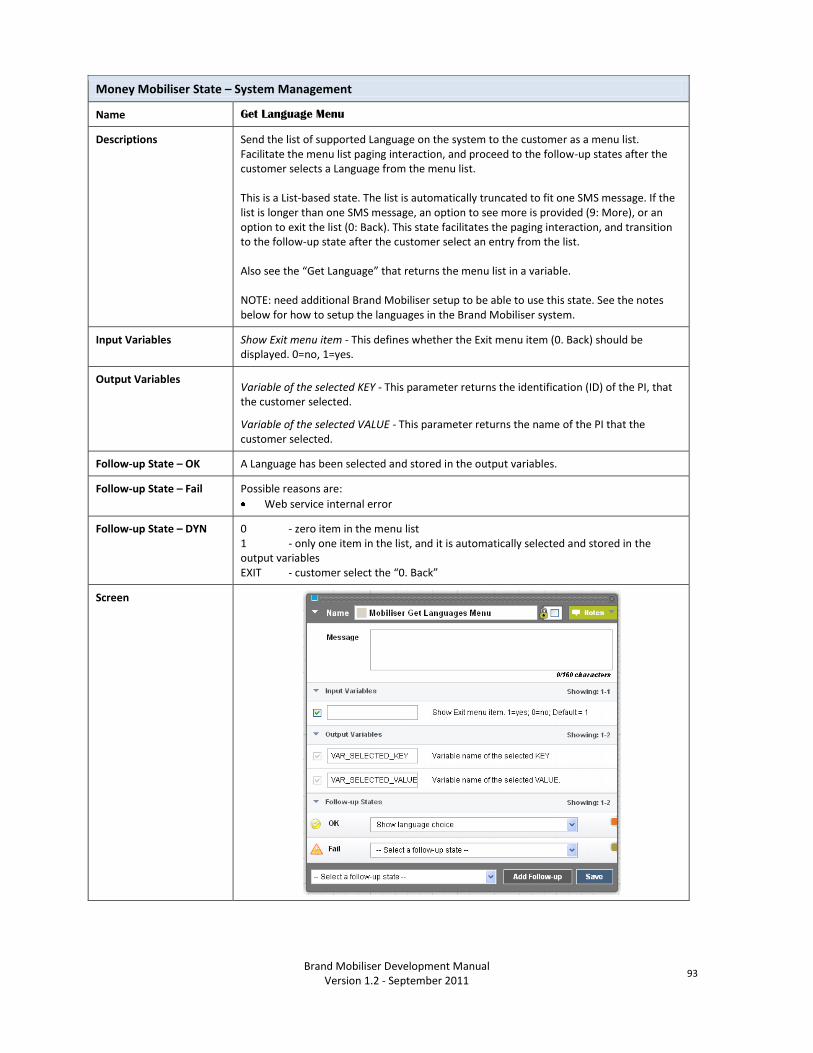
Brand Mobiliser Development Manual
Version 1.2 - September 2011 93
Money Mobiliser State – System Management
Name Get Language Menu
Descriptions Send the list of supported Language on the system to the customer as a menu list. Facilitate the menu list paging interaction, and proceed to the follow-up states after the customer selects a Language from the menu list. This is a List-based state. The list is automatically truncated to fit one SMS message. If the list is longer than one SMS message, an option to see more is provided (9: More), or an option to exit the list (0: Back). This state facilitates the paging interaction, and transition to the follow-up state after the customer select an entry from the list. Also see the “Get Language” that returns the menu list in a variable. NOTE: need additional Brand Mobiliser setup to be able to use this state. See the notes below for how to setup the languages in the Brand Mobiliser system.
Input Variables Show Exit menu item - This defines whether the Exit menu item (0. Back) should be displayed. 0=no, 1=yes.
Output Variables Variable of the selected KEY - This parameter returns the identification (ID) of the PI, that the customer selected.
Variable of the selected VALUE - This parameter returns the name of the PI that the customer selected.
Follow-up State – OK A Language has been selected and stored in the output variables.
Follow-up State – Fail Possible reasons are:
Web service internal error
Follow-up State – DYN 0 - zero item in the menu list 1 - only one item in the list, and it is automatically selected and stored in the output variables EXIT - customer select the “0. Back”
Screen

94
Brand Mobiliser Development Manual Version 1.2 - September 2011
Notes Also see the “Get Languages” state
Languages are setup in Brand Mobiliser M_LANGUAGES table. Currently, setup is performed using DB script only. Brand Mobiliser needs to be restarted to the changes to be available.
Usage Scenario 1: a typical and minimal required implementation of the menu list state like this one requires to implement the follow-up states for both DYN=0 and 1 (i.e., empty list and single item list, respectively), because the menu list will be skipped in these two cases and immediately transition to the follow-up state. Otherwise the application will just terminate. See “Get Wallet Menu” state – Scenario 1.
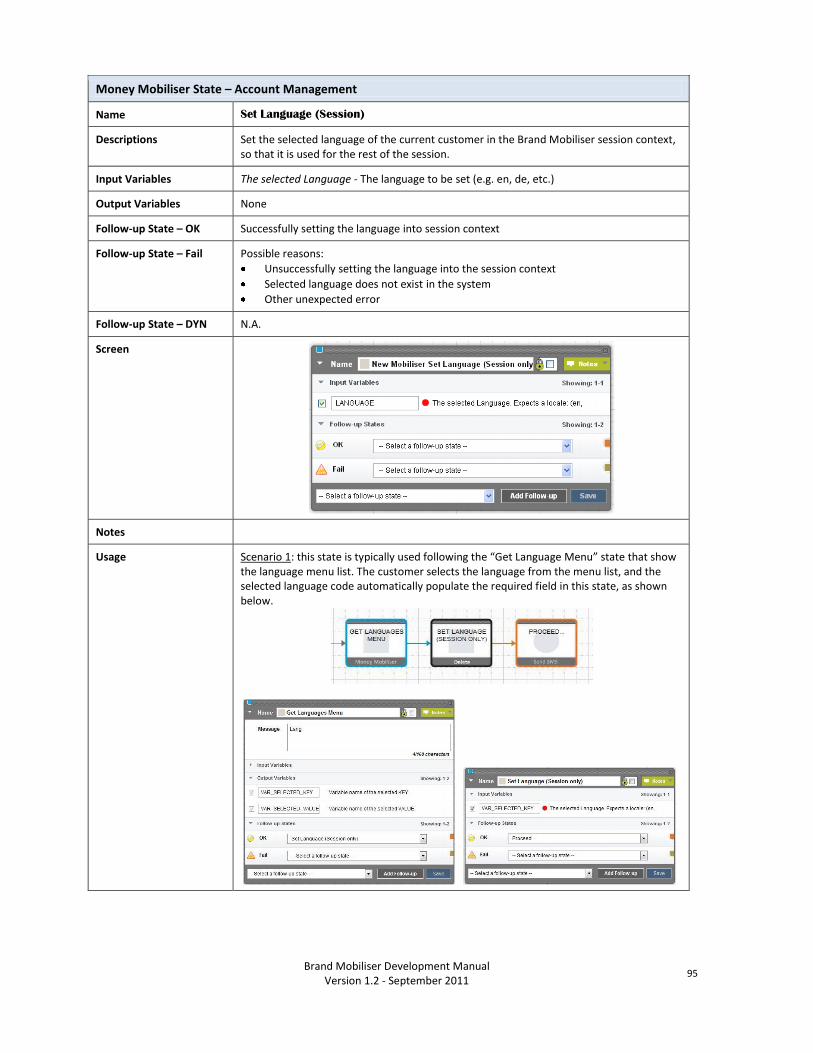
Brand Mobiliser Development Manual
Version 1.2 - September 2011 95
Money Mobiliser State – Account Management
Name Set Language (Session)
Descriptions Set the selected language of the current customer in the Brand Mobiliser session context, so that it is used for the rest of the session.
Input Variables The selected Language - The language to be set (e.g. en, de, etc.)
Output Variables None
Follow-up State – OK Successfully setting the language into session context
Follow-up State – Fail Possible reasons:
Unsuccessfully setting the language into the session context
Selected language does not exist in the system
Other unexpected error
Follow-up State – DYN N.A.
Screen
Notes
Usage Scenario 1: this state is typically used following the “Get Language Menu” state that show the language menu list. The customer selects the language from the menu list, and the selected language code automatically populate the required field in this state, as shown below.
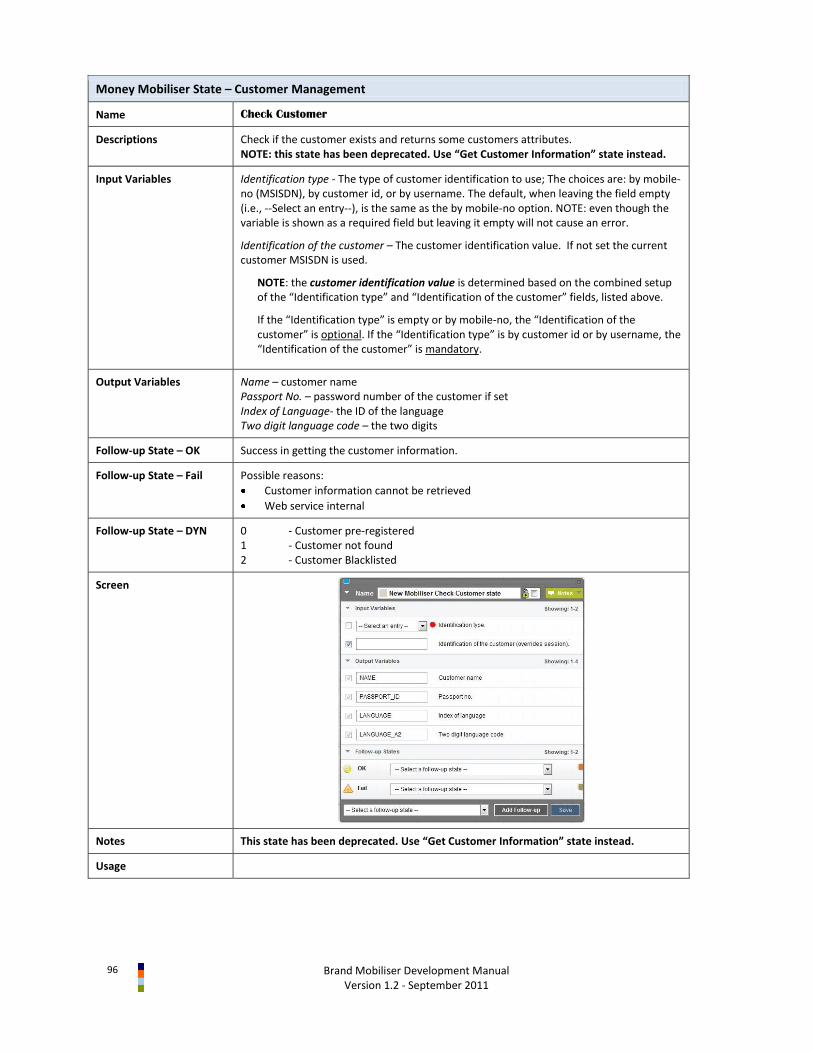
96
Brand Mobiliser Development Manual Version 1.2 - September 2011
Money Mobiliser State – Customer Management
Name Check Customer
Descriptions Check if the customer exists and returns some customers attributes. NOTE: this state has been deprecated. Use “Get Customer Information” state instead.
Input Variables Identification type - The type of customer identification to use; The choices are: by mobile-no (MSISDN), by customer id, or by username. The default, when leaving the field empty (i.e., --Select an entry--), is the same as the by mobile-no option. NOTE: even though the variable is shown as a required field but leaving it empty will not cause an error.
Identification of the customer – The customer identification value. If not set the current customer MSISDN is used.
NOTE: the customer identification value is determined based on the combined setup of the “Identification type” and “Identification of the customer” fields, listed above.
If the “Identification type” is empty or by mobile-no, the “Identification of the customer” is optional. If the “Identification type” is by customer id or by username, the “Identification of the customer” is mandatory.
Output Variables Name – customer name Passport No. – password number of the customer if set Index of Language- the ID of the language Two digit language code – the two digits
Follow-up State – OK Success in getting the customer information.
Follow-up State – Fail Possible reasons:
Customer information cannot be retrieved
Web service internal
Follow-up State – DYN 0 - Customer pre-registered 1 - Customer not found 2 - Customer Blacklisted
Screen
Notes This state has been deprecated. Use “Get Customer Information” state instead.
Usage
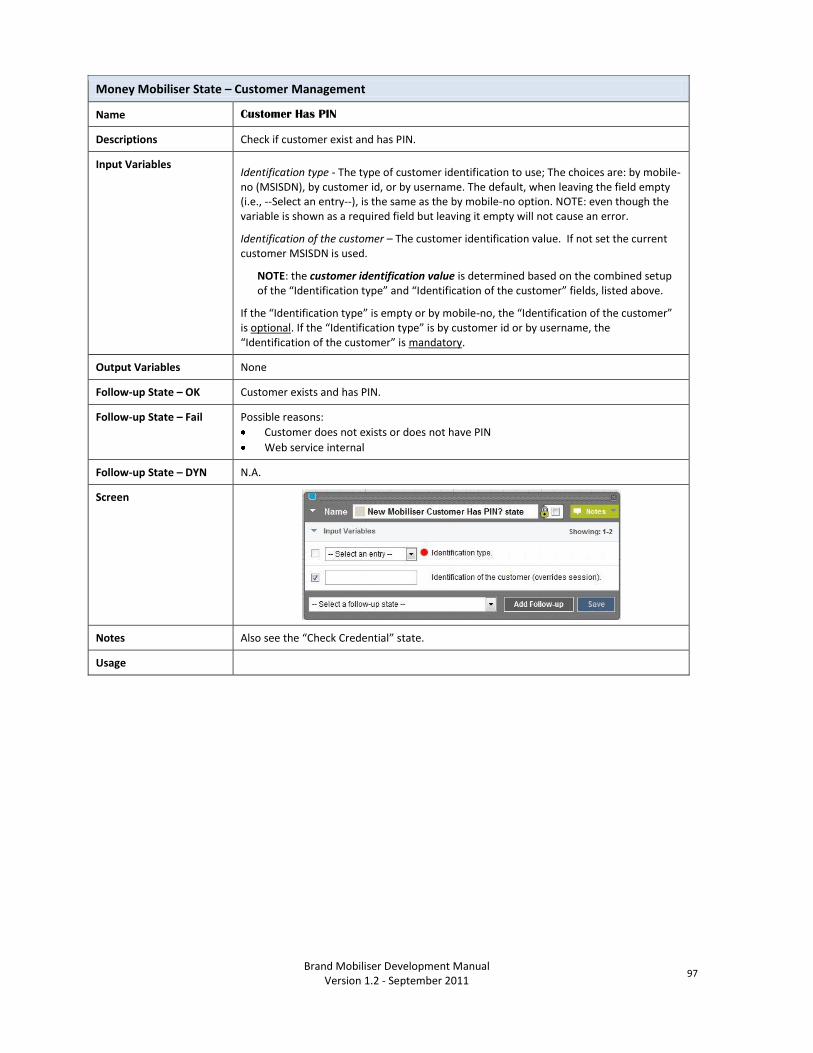
Brand Mobiliser Development Manual
Version 1.2 - September 2011 97
Money Mobiliser State – Customer Management
Name Customer Has PIN
Descriptions Check if customer exist and has PIN.
Input Variables Identification type - The type of customer identification to use; The choices are: by mobile-no (MSISDN), by customer id, or by username. The default, when leaving the field empty (i.e., --Select an entry--), is the same as the by mobile-no option. NOTE: even though the variable is shown as a required field but leaving it empty will not cause an error.
Identification of the customer – The customer identification value. If not set the current customer MSISDN is used.
NOTE: the customer identification value is determined based on the combined setup of the “Identification type” and “Identification of the customer” fields, listed above.
If the “Identification type” is empty or by mobile-no, the “Identification of the customer” is optional. If the “Identification type” is by customer id or by username, the “Identification of the customer” is mandatory.
Output Variables None
Follow-up State – OK Customer exists and has PIN.
Follow-up State – Fail Possible reasons:
Customer does not exists or does not have PIN
Web service internal
Follow-up State – DYN N.A.
Screen
Notes Also see the “Check Credential” state.
Usage
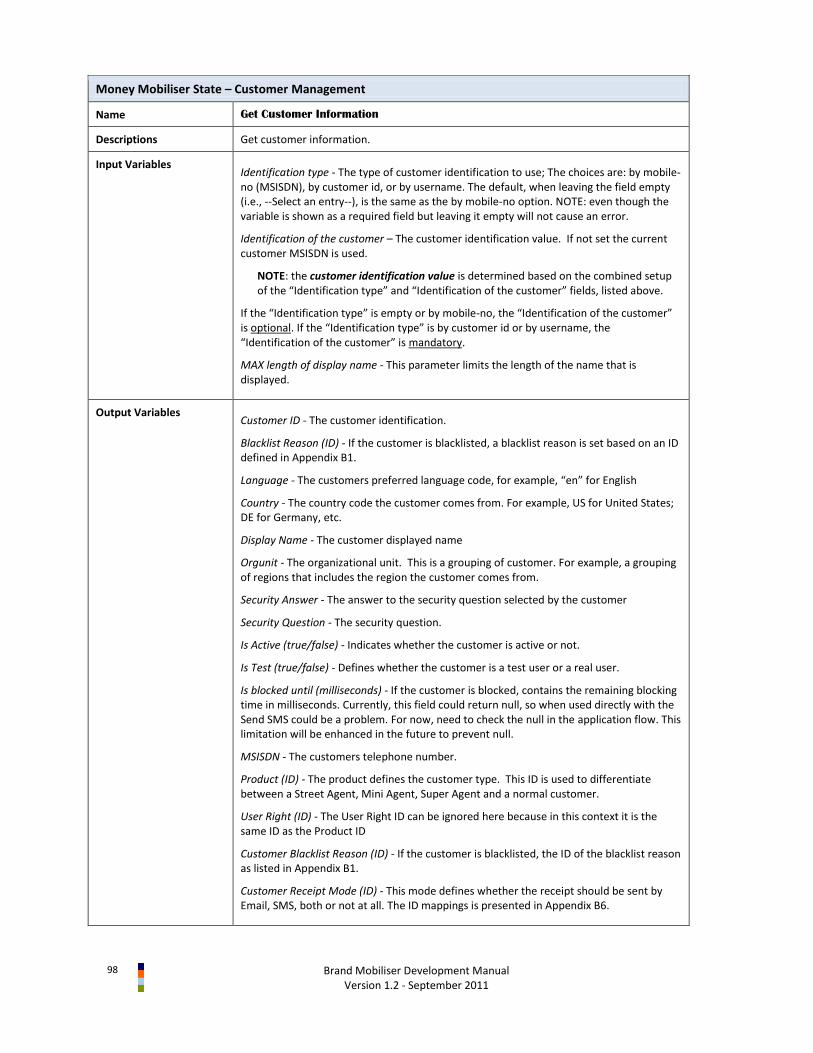
98
Brand Mobiliser Development Manual Version 1.2 - September 2011
Money Mobiliser State – Customer Management
Name Get Customer Information
Descriptions Get customer information.
Input Variables Identification type - The type of customer identification to use; The choices are: by mobile-no (MSISDN), by customer id, or by username. The default, when leaving the field empty (i.e., --Select an entry--), is the same as the by mobile-no option. NOTE: even though the variable is shown as a required field but leaving it empty will not cause an error.
Identification of the customer – The customer identification value. If not set the current customer MSISDN is used.
NOTE: the customer identification value is determined based on the combined setup of the “Identification type” and “Identification of the customer” fields, listed above.
If the “Identification type” is empty or by mobile-no, the “Identification of the customer” is optional. If the “Identification type” is by customer id or by username, the “Identification of the customer” is mandatory.
MAX length of display name - This parameter limits the length of the name that is displayed.
Output Variables Customer ID - The customer identification.
Blacklist Reason (ID) - If the customer is blacklisted, a blacklist reason is set based on an ID defined in Appendix B1.
Language - The customers preferred language code, for example, “en” for English
Country - The country code the customer comes from. For example, US for United States; DE for Germany, etc.
Display Name - The customer displayed name
Orgunit - The organizational unit. This is a grouping of customer. For example, a grouping of regions that includes the region the customer comes from.
Security Answer - The answer to the security question selected by the customer
Security Question - The security question.
Is Active (true/false) - Indicates whether the customer is active or not.
Is Test (true/false) - Defines whether the customer is a test user or a real user.
Is blocked until (milliseconds) - If the customer is blocked, contains the remaining blocking time in milliseconds. Currently, this field could return null, so when used directly with the Send SMS could be a problem. For now, need to check the null in the application flow. This limitation will be enhanced in the future to prevent null.
MSISDN - The customers telephone number.
Product (ID) - The product defines the customer type. This ID is used to differentiate between a Street Agent, Mini Agent, Super Agent and a normal customer.
User Right (ID) - The User Right ID can be ignored here because in this context it is the same ID as the Product ID
Customer Blacklist Reason (ID) - If the customer is blacklisted, the ID of the blacklist reason as listed in Appendix B1.
Customer Receipt Mode (ID) - This mode defines whether the receipt should be sent by Email, SMS, both or not at all. The ID mappings is presented in Appendix B6.
Brand Mobiliser Development Manual
Version 1.2 - September 2011 99
Customer Cancellation Reason (ID) - The reason why a customer was cancelled. In this state, this can be ignored.
Is Customer Active (true/false) - Indicates whether the customer is active or not. This flag can be used to filter the menu.
Follow-up State – OK Customer information was retrieved successfully
Follow-up State – Fail N.A.
Follow-up State – DYN 101 - Security policies have not been defined for customer yet 1303 - System error: Session not found 1304 - System error: Session has timeout 1010 - Customer not found 1011 - Customer is not unique 1098 - Access to customer is not allowed for the current agent 1221 - Agent object not found
Screen
Notes This state does not return all the customer information.
See the “Get Customer Address” state for the customer main address
See the “Get Customer Attributes” for a specific customer attribute
See the “Get Customer Product” state for the customer product ID
Usage
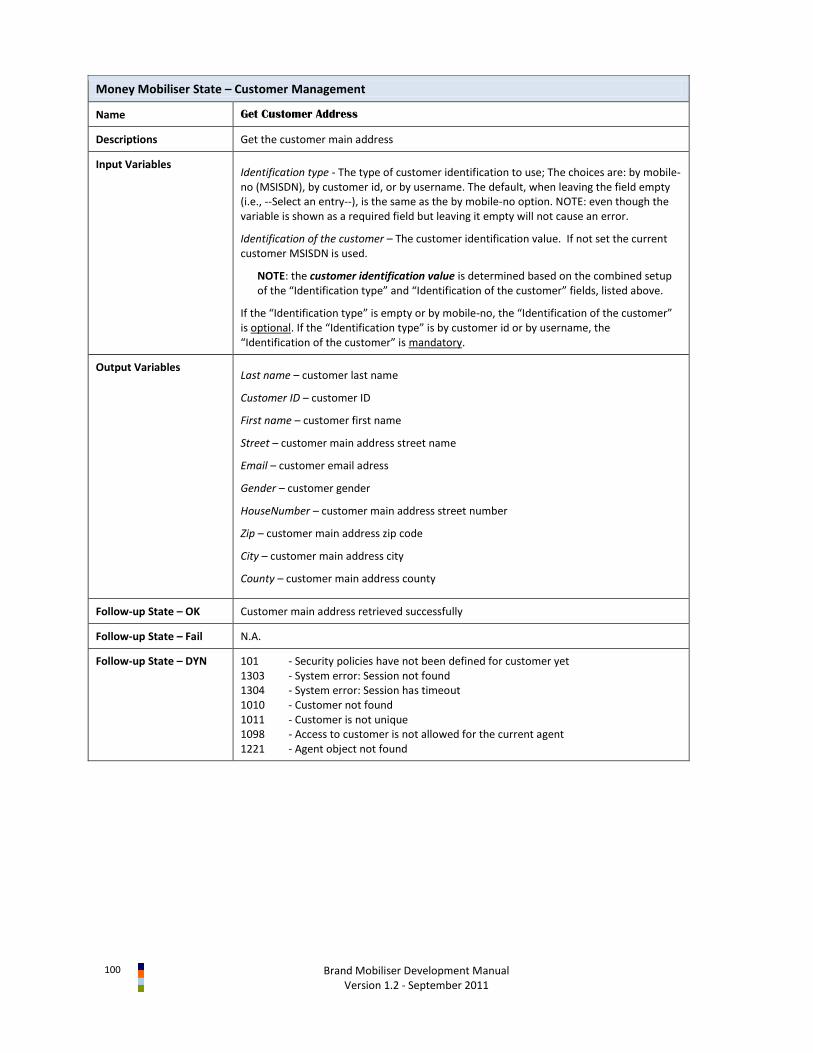
100
Brand Mobiliser Development Manual Version 1.2 - September 2011
Money Mobiliser State – Customer Management
Name Get Customer Address
Descriptions Get the customer main address
Input Variables Identification type - The type of customer identification to use; The choices are: by mobile-no (MSISDN), by customer id, or by username. The default, when leaving the field empty (i.e., --Select an entry--), is the same as the by mobile-no option. NOTE: even though the variable is shown as a required field but leaving it empty will not cause an error.
Identification of the customer – The customer identification value. If not set the current customer MSISDN is used.
NOTE: the customer identification value is determined based on the combined setup of the “Identification type” and “Identification of the customer” fields, listed above.
If the “Identification type” is empty or by mobile-no, the “Identification of the customer” is optional. If the “Identification type” is by customer id or by username, the “Identification of the customer” is mandatory.
Output Variables Last name – customer last name
Customer ID – customer ID
First name – customer first name
Street – customer main address street name
Email – customer email adress
Gender – customer gender
HouseNumber – customer main address street number
Zip – customer main address zip code
City – customer main address city
County – customer main address county
Follow-up State – OK Customer main address retrieved successfully
Follow-up State – Fail N.A.
Follow-up State – DYN 101 - Security policies have not been defined for customer yet 1303 - System error: Session not found 1304 - System error: Session has timeout 1010 - Customer not found 1011 - Customer is not unique 1098 - Access to customer is not allowed for the current agent 1221 - Agent object not found
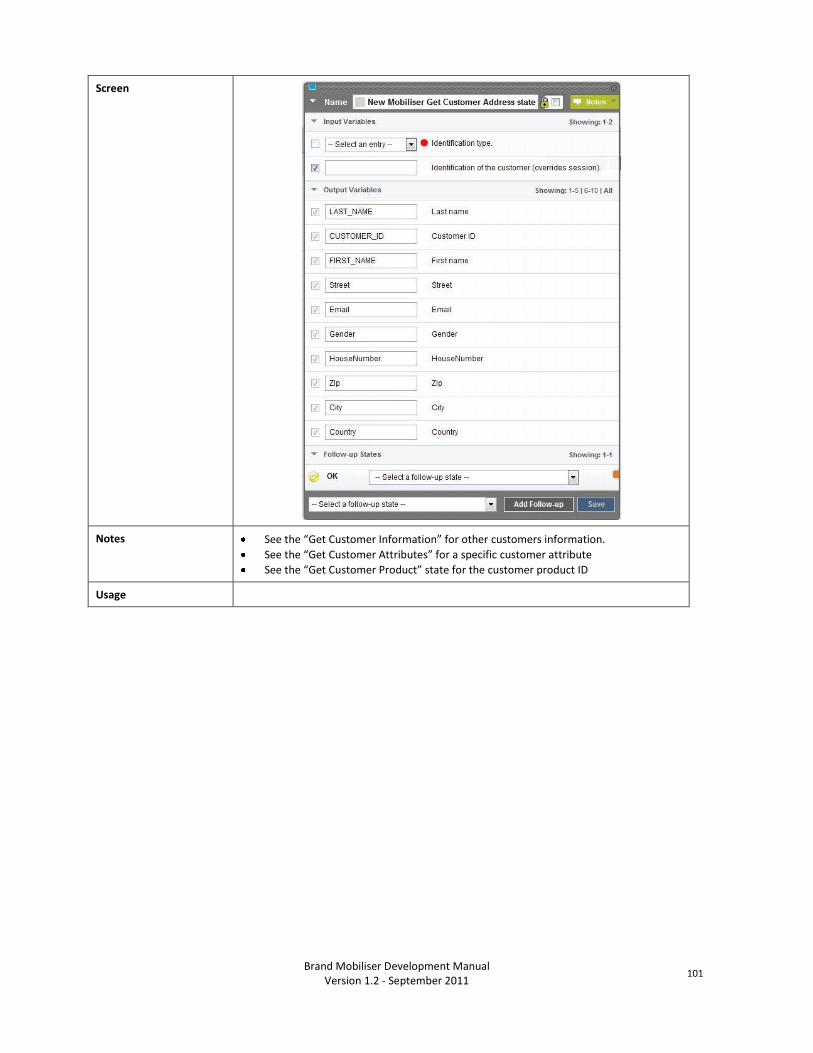
Brand Mobiliser Development Manual
Version 1.2 - September 2011 101
Screen
Notes See the “Get Customer Information” for other customers information.
See the “Get Customer Attributes” for a specific customer attribute
See the “Get Customer Product” state for the customer product ID
Usage

102
Brand Mobiliser Development Manual Version 1.2 - September 2011
Money Mobiliser State – Customer Management
Name Get Customer Attributes
Descriptions Loads a customer and returns an attribute value for a specified attribute id.
Input Variables Identification type - The type of customer identification to use; The choices are: by mobile-no (MSISDN), by customer id, or by username. The default, when leaving the field empty (i.e., --Select an entry--), is the same as the by mobile-no option. NOTE: even though the variable is shown as a required field but leaving it empty will not cause an error.
Identification of the customer – The customer identification value. If not set the current customer MSISDN is used.
NOTE: the customer identification value is determined based on the combined setup of the “Identification type” and “Identification of the customer” fields, listed above.
If the “Identification type” is empty or by mobile-no, the “Identification of the customer” is optional. If the “Identification type” is by customer id or by username, the “Identification of the customer” is mandatory.
Attribute ID – attribute id; Attribute ID needs to be obtained from the configurations, customization or specifications documents.
Output Variables Customer ID – customer ID
Attribute value – the variable name to store the retrieved attribute value
Follow-up State – OK The attribute is retrieved successfully and stored in the variable name specified in the Output variables - “Attribute Value” field.
Follow-up State – Fail N.A.
Follow-up State – DYN 1010_ATTRIBUTE – Attribute not found 101 - Security policies have not been defined for customer yet 1303 - System error: Session not found 1304 - System error: Session has timeout 1010 - Customer not found 1011 - Customer is not unique 1098 - Access to customer is not allowed for the current agent 1221 - Agent object not found

Brand Mobiliser Development Manual
Version 1.2 - September 2011 103
Screen
Notes See the “Get Customer Information” for other customers information.
See the “Get Customer Address” state for the customer main address
See the “Get Customer Product” state for the customer product ID
Usage
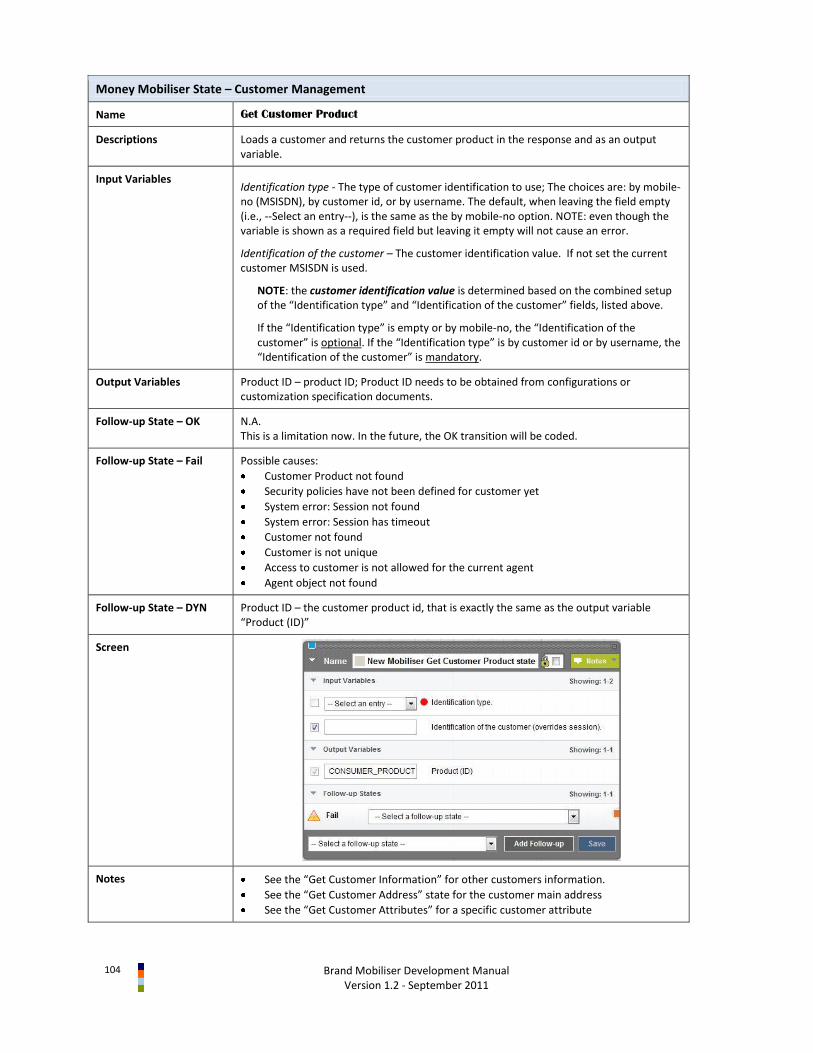
104
Brand Mobiliser Development Manual Version 1.2 - September 2011
Money Mobiliser State – Customer Management
Name Get Customer Product
Descriptions Loads a customer and returns the customer product in the response and as an output variable.
Input Variables Identification type - The type of customer identification to use; The choices are: by mobile-no (MSISDN), by customer id, or by username. The default, when leaving the field empty (i.e., --Select an entry--), is the same as the by mobile-no option. NOTE: even though the variable is shown as a required field but leaving it empty will not cause an error.
Identification of the customer – The customer identification value. If not set the current customer MSISDN is used.
NOTE: the customer identification value is determined based on the combined setup of the “Identification type” and “Identification of the customer” fields, listed above.
If the “Identification type” is empty or by mobile-no, the “Identification of the customer” is optional. If the “Identification type” is by customer id or by username, the “Identification of the customer” is mandatory.
Output Variables Product ID – product ID; Product ID needs to be obtained from configurations or customization specification documents.
Follow-up State – OK N.A. This is a limitation now. In the future, the OK transition will be coded.
Follow-up State – Fail Possible causes:
Customer Product not found
Security policies have not been defined for customer yet
System error: Session not found
System error: Session has timeout
Customer not found
Customer is not unique
Access to customer is not allowed for the current agent
Agent object not found
Follow-up State – DYN Product ID – the customer product id, that is exactly the same as the output variable “Product (ID)”
Screen
Notes See the “Get Customer Information” for other customers information.
See the “Get Customer Address” state for the customer main address
See the “Get Customer Attributes” for a specific customer attribute
Brand Mobiliser Development Manual
Version 1.2 - September 2011 105
Usage
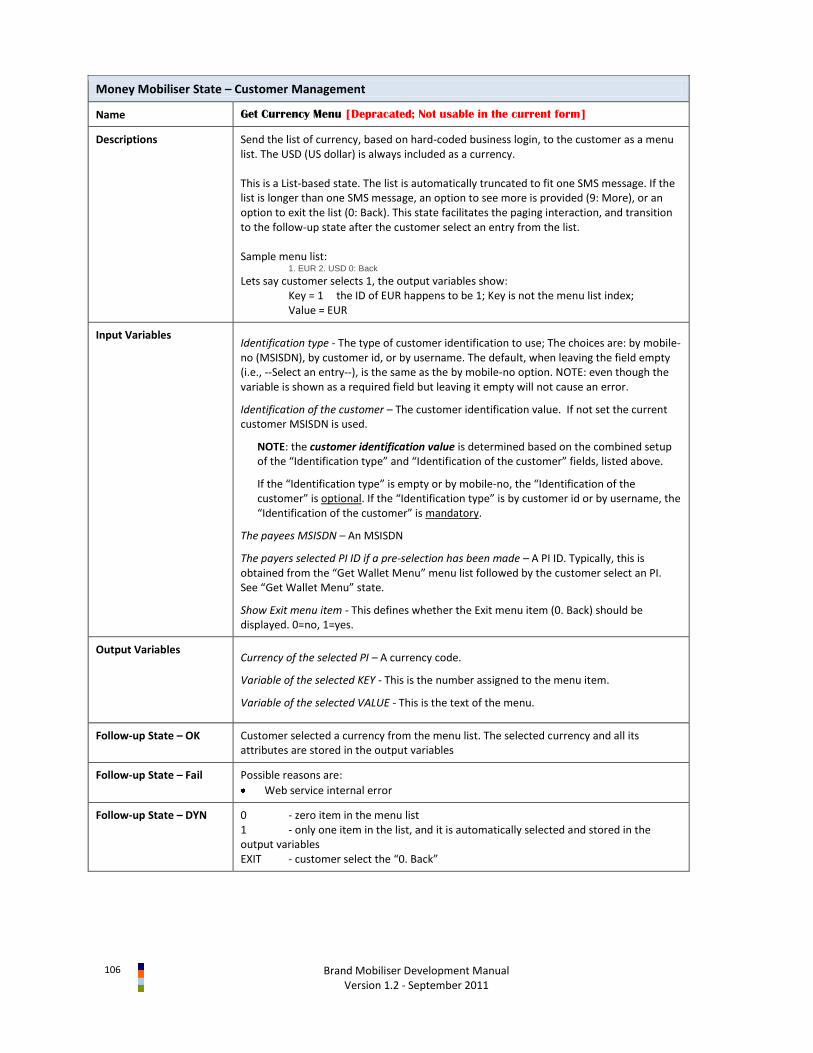
106
Brand Mobiliser Development Manual Version 1.2 - September 2011
Money Mobiliser State – Customer Management
Name Get Currency Menu [Depracated; Not usable in the current form]
Descriptions Send the list of currency, based on hard-coded business login, to the customer as a menu list. The USD (US dollar) is always included as a currency. This is a List-based state. The list is automatically truncated to fit one SMS message. If the list is longer than one SMS message, an option to see more is provided (9: More), or an option to exit the list (0: Back). This state facilitates the paging interaction, and transition to the follow-up state after the customer select an entry from the list. Sample menu list:
1. EUR 2. USD 0: Back Lets say customer selects 1, the output variables show:
Key = 1 the ID of EUR happens to be 1; Key is not the menu list index; Value = EUR
Input Variables Identification type - The type of customer identification to use; The choices are: by mobile-no (MSISDN), by customer id, or by username. The default, when leaving the field empty (i.e., --Select an entry--), is the same as the by mobile-no option. NOTE: even though the variable is shown as a required field but leaving it empty will not cause an error.
Identification of the customer – The customer identification value. If not set the current customer MSISDN is used.
NOTE: the customer identification value is determined based on the combined setup of the “Identification type” and “Identification of the customer” fields, listed above.
If the “Identification type” is empty or by mobile-no, the “Identification of the customer” is optional. If the “Identification type” is by customer id or by username, the “Identification of the customer” is mandatory.
The payees MSISDN – An MSISDN
The payers selected PI ID if a pre-selection has been made – A PI ID. Typically, this is obtained from the “Get Wallet Menu” menu list followed by the customer select an PI. See “Get Wallet Menu” state.
Show Exit menu item - This defines whether the Exit menu item (0. Back) should be displayed. 0=no, 1=yes.
Output Variables Currency of the selected PI – A currency code.
Variable of the selected KEY - This is the number assigned to the menu item.
Variable of the selected VALUE - This is the text of the menu.
Follow-up State – OK Customer selected a currency from the menu list. The selected currency and all its attributes are stored in the output variables
Follow-up State – Fail Possible reasons are:
Web service internal error
Follow-up State – DYN 0 - zero item in the menu list 1 - only one item in the list, and it is automatically selected and stored in the output variables EXIT - customer select the “0. Back”
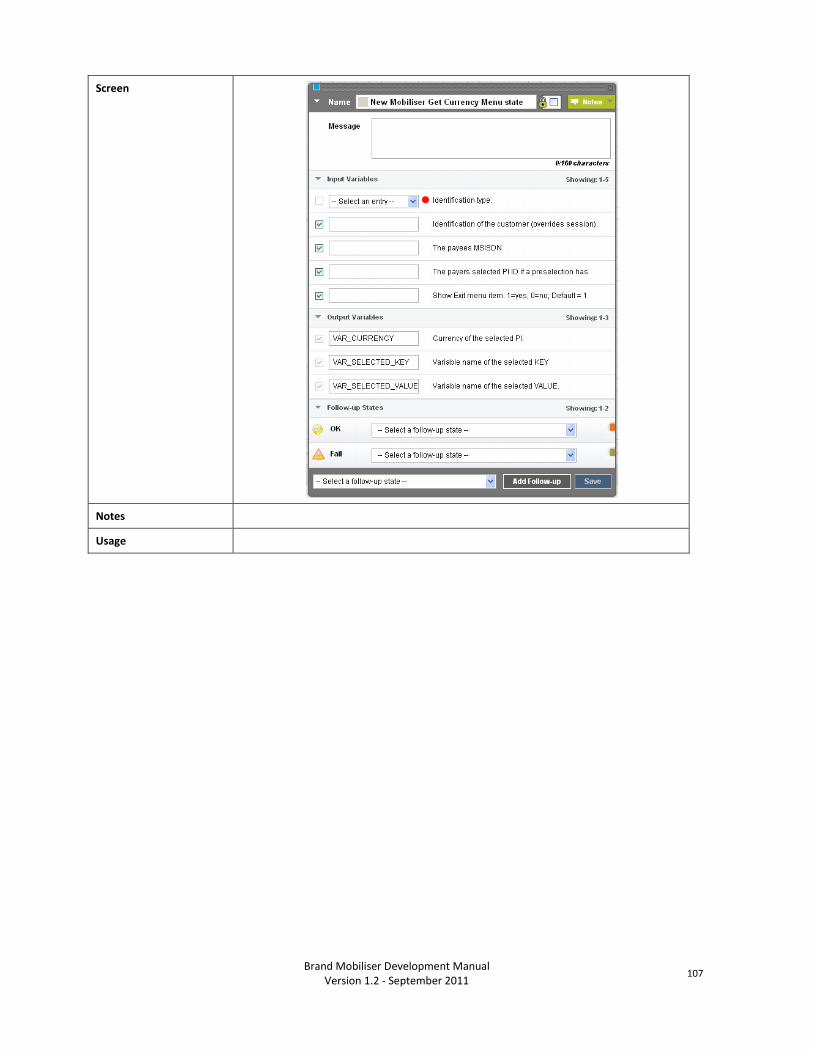
Brand Mobiliser Development Manual
Version 1.2 - September 2011 107
Screen
Notes
Usage
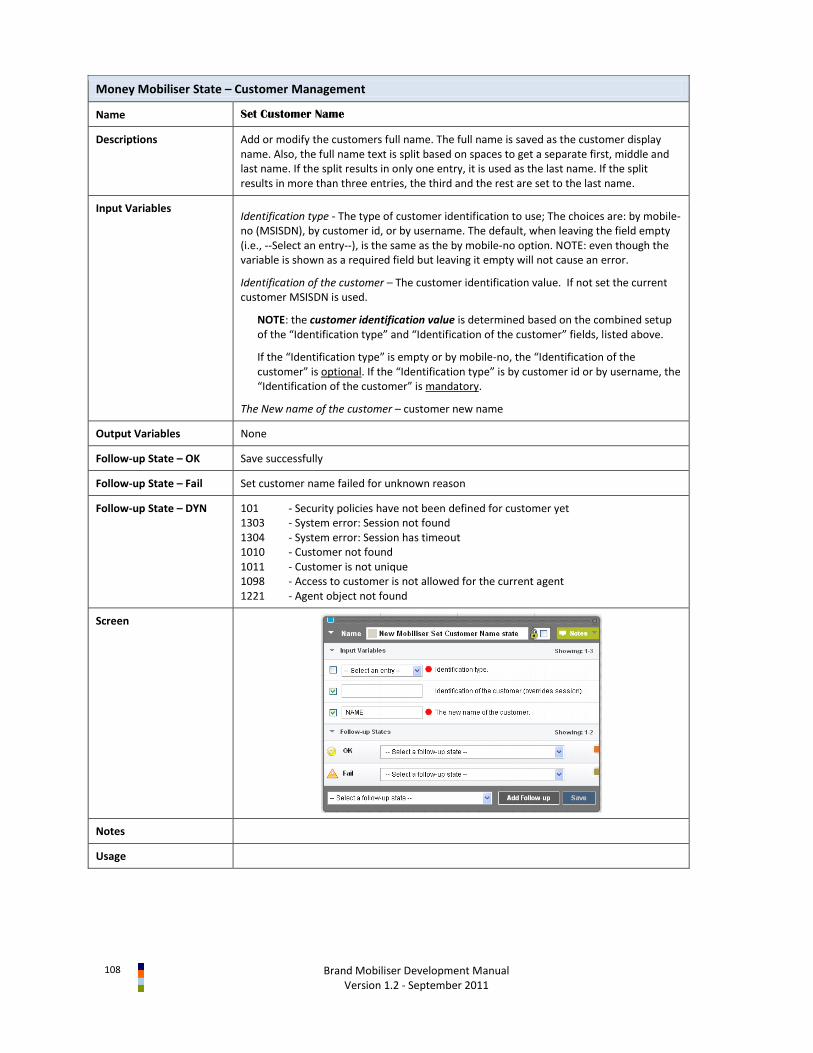
108
Brand Mobiliser Development Manual Version 1.2 - September 2011
Money Mobiliser State – Customer Management
Name Set Customer Name
Descriptions Add or modify the customers full name. The full name is saved as the customer display name. Also, the full name text is split based on spaces to get a separate first, middle and last name. If the split results in only one entry, it is used as the last name. If the split results in more than three entries, the third and the rest are set to the last name.
Input Variables Identification type - The type of customer identification to use; The choices are: by mobile-no (MSISDN), by customer id, or by username. The default, when leaving the field empty (i.e., --Select an entry--), is the same as the by mobile-no option. NOTE: even though the variable is shown as a required field but leaving it empty will not cause an error.
Identification of the customer – The customer identification value. If not set the current customer MSISDN is used.
NOTE: the customer identification value is determined based on the combined setup of the “Identification type” and “Identification of the customer” fields, listed above.
If the “Identification type” is empty or by mobile-no, the “Identification of the customer” is optional. If the “Identification type” is by customer id or by username, the “Identification of the customer” is mandatory.
The New name of the customer – customer new name
Output Variables None
Follow-up State – OK Save successfully
Follow-up State – Fail Set customer name failed for unknown reason
Follow-up State – DYN 101 - Security policies have not been defined for customer yet 1303 - System error: Session not found 1304 - System error: Session has timeout 1010 - Customer not found 1011 - Customer is not unique 1098 - Access to customer is not allowed for the current agent 1221 - Agent object not found
Screen
Notes
Usage

Brand Mobiliser Development Manual
Version 1.2 - September 2011 109
Money Mobiliser State – Customer Management
Name Set Customer Attribute
Descriptions Add or modify a specific customers attribute value
Input Variables Identification type - The type of customer identification to use; The choices are: by mobile-no (MSISDN), by customer id, or by username. The default, when leaving the field empty (i.e., --Select an entry--), is the same as the by mobile-no option. NOTE: even though the variable is shown as a required field but leaving it empty will not cause an error.
Identification of the customer – The customer identification value. If not set the current customer MSISDN is used.
NOTE: the customer identification value is determined based on the combined setup of the “Identification type” and “Identification of the customer” fields, listed above.
If the “Identification type” is empty or by mobile-no, the “Identification of the customer” is optional. If the “Identification type” is by customer id or by username, the “Identification of the customer” is mandatory.
Attribute ID – customer attribute ID. This ID needs to be obtained from the configuration or customization specifications or documents.
Attribute Value – customer attribute value
Output Variables None
Follow-up State – OK Successful save
Follow-up State – Fail N.A.
Follow-up State – DYN 101 - Security policies have not been defined for customer yet 1303 - System error: Session not found 1304 - System error: Session has timeout 1010 - Customer not found 1011 - Customer is not unique 1098 - Access to customer is not allowed for the current agent 1221 - Agent object not found 9935 - System Error: DB Error or Invalid Attribute ID
Screen
Notes
Usage

110
Brand Mobiliser Development Manual Version 1.2 - September 2011
Money Mobiliser State – Customer Management
Name Set Language (Session & Customer)
Descriptions Set the selected language of the customer in the Brand Mobiliser session context, so that it is used for the rest of the session, and update the Customer database.
Input Variables Identification type - The type of customer identification to use; The choices are: by mobile-no (MSISDN), by customer id, or by username. The default, when leaving the field empty (i.e., --Select an entry--), is the same as the by mobile-no option. NOTE: even though the variable is shown as a required field but leaving it empty will not cause an error.
Identification of the customer – The customer identification value. If not set the current customer MSISDN is used.
NOTE: the customer identification value is determined based on the combined setup of the “Identification type” and “Identification of the customer” fields, listed above.
If the “Identification type” is empty or by mobile-no, the “Identification of the customer” is optional. If the “Identification type” is by customer id or by username, the “Identification of the customer” is mandatory.
The selected Language - The language to be set (e.g. en, de, etc.)
Output Variables None
Follow-up State – OK Successfully setting the language into session context and the Customer database.
Follow-up State – Fail Possible reasons:
Unsuccessfully setting the language into the session context
Selected language does not exist in the system
Other unexpected error
Web service internal error while updating customer
Follow-up State – DYN N.A.
Screen
Notes
Usage Scenario 1: this state is typically used following the “Get Language Menu” state that show the language menu list. The customer selects the language from the menu list, and the selected language code automatically populate the required field in this state, as shown below. See the usage of the “Set Language (Session)” state for example.
Money Mobiliser State – Customer Management

Brand Mobiliser Development Manual
Version 1.2 - September 2011 111
Name Set Info Mode
Descriptions Set the mode of how the customer opts in to receive the information message, such as newsletter, etc.
Input Variables Identification type - The type of customer identification to use; The choices are: by mobile-no (MSISDN), by customer id, or by username. The default, when leaving the field empty (i.e., --Select an entry--), is the same as the by mobile-no option. NOTE: even though the variable is shown as a required field but leaving it empty will not cause an error.
Identification of the customer – The customer identification value. If not set the current customer MSISDN is used.
NOTE: the customer identification value is determined based on the combined setup of the “Identification type” and “Identification of the customer” fields, listed above.
If the “Identification type” is empty or by mobile-no, the “Identification of the customer” is optional. If the “Identification type” is by customer id or by username, the “Identification of the customer” is mandatory.
Info Mode - The chosen mode. The dropdown list choices are: None, SMS, Email, SMS and Email.
Output Variables None
Follow-up State – OK The opted choice have been updated.
Follow-up State – Fail Possible reasons are:
Update failure
Web service internal error
Web service connection error
Follow-up State – DYN N.A.
Screen
Notes Not commonly used.
Usage
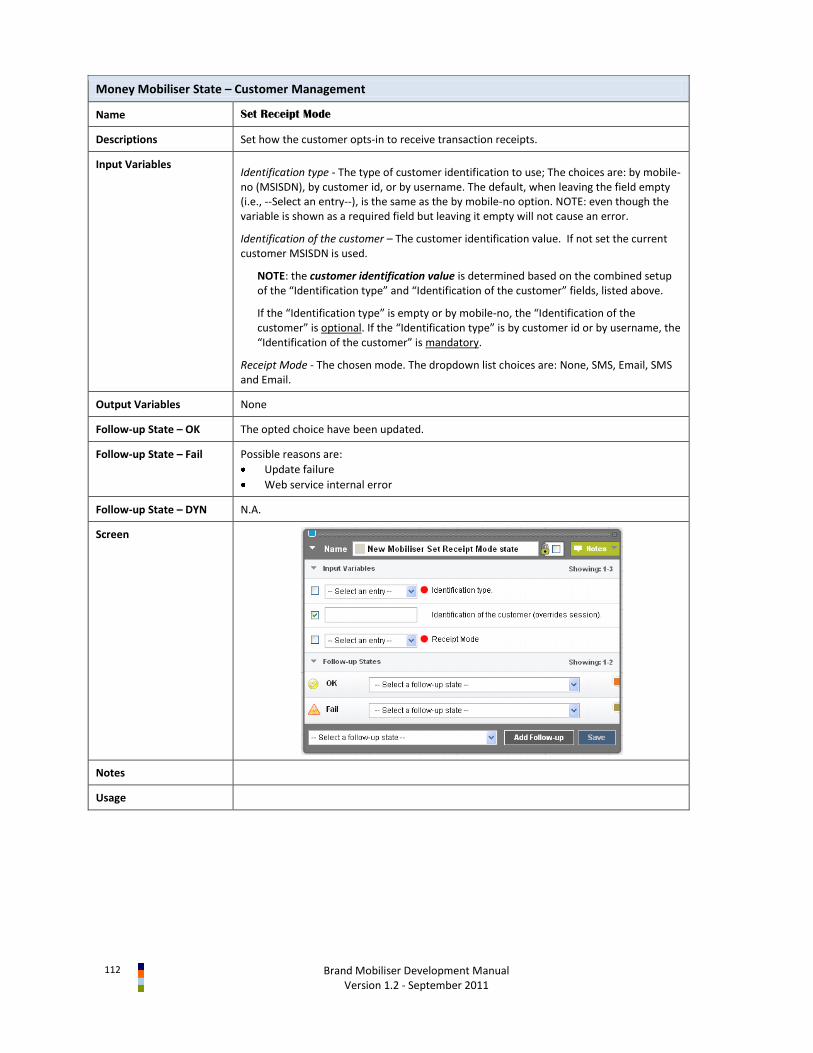
112
Brand Mobiliser Development Manual Version 1.2 - September 2011
Money Mobiliser State – Customer Management
Name Set Receipt Mode
Descriptions Set how the customer opts-in to receive transaction receipts.
Input Variables Identification type - The type of customer identification to use; The choices are: by mobile-no (MSISDN), by customer id, or by username. The default, when leaving the field empty (i.e., --Select an entry--), is the same as the by mobile-no option. NOTE: even though the variable is shown as a required field but leaving it empty will not cause an error.
Identification of the customer – The customer identification value. If not set the current customer MSISDN is used.
NOTE: the customer identification value is determined based on the combined setup of the “Identification type” and “Identification of the customer” fields, listed above.
If the “Identification type” is empty or by mobile-no, the “Identification of the customer” is optional. If the “Identification type” is by customer id or by username, the “Identification of the customer” is mandatory.
Receipt Mode - The chosen mode. The dropdown list choices are: None, SMS, Email, SMS and Email.
Output Variables None
Follow-up State – OK The opted choice have been updated.
Follow-up State – Fail Possible reasons are:
Update failure
Web service internal error
Follow-up State – DYN N.A.
Screen
Notes
Usage
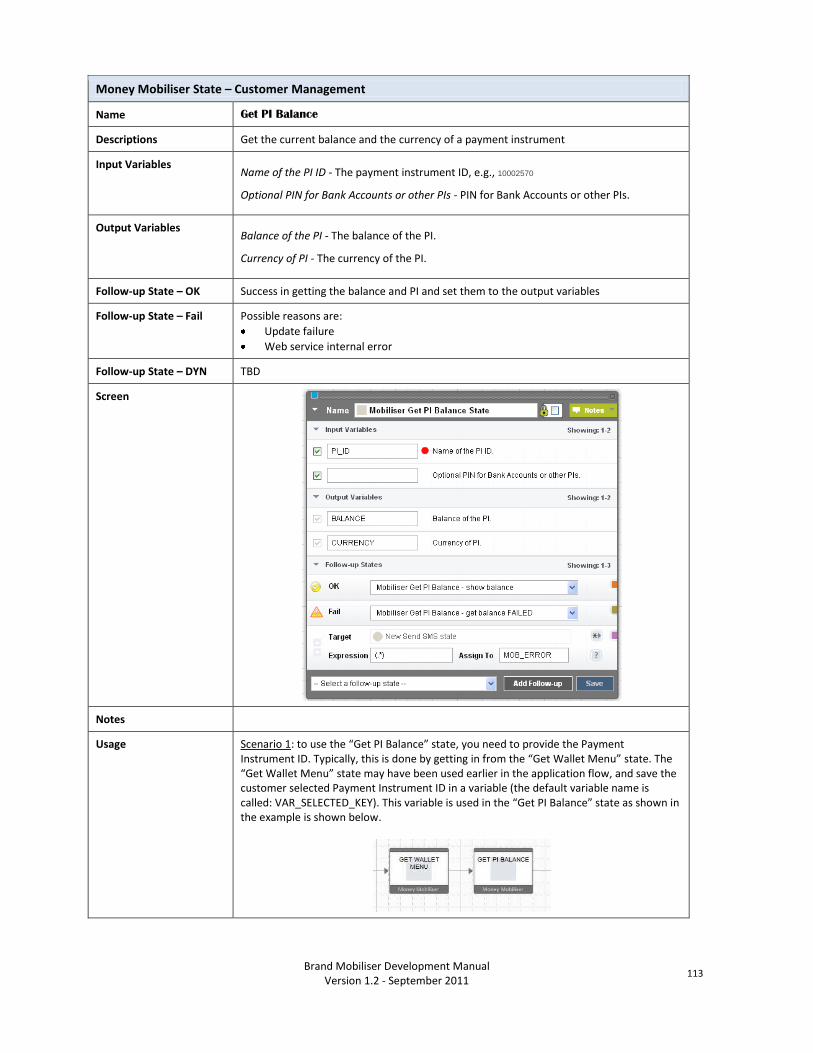
Brand Mobiliser Development Manual
Version 1.2 - September 2011 113
Money Mobiliser State – Customer Management
Name Get PI Balance
Descriptions Get the current balance and the currency of a payment instrument
Input Variables Name of the PI ID - The payment instrument ID, e.g., 10002570
Optional PIN for Bank Accounts or other PIs - PIN for Bank Accounts or other PIs.
Output Variables Balance of the PI - The balance of the PI.
Currency of PI - The currency of the PI.
Follow-up State – OK Success in getting the balance and PI and set them to the output variables
Follow-up State – Fail Possible reasons are:
Update failure
Web service internal error
Follow-up State – DYN TBD
Screen
Notes
Usage Scenario 1: to use the “Get PI Balance” state, you need to provide the Payment Instrument ID. Typically, this is done by getting in from the “Get Wallet Menu” state. The “Get Wallet Menu” state may have been used earlier in the application flow, and save the customer selected Payment Instrument ID in a variable (the default variable name is called: VAR_SELECTED_KEY). This variable is used in the “Get PI Balance” state as shown in the example is shown below.
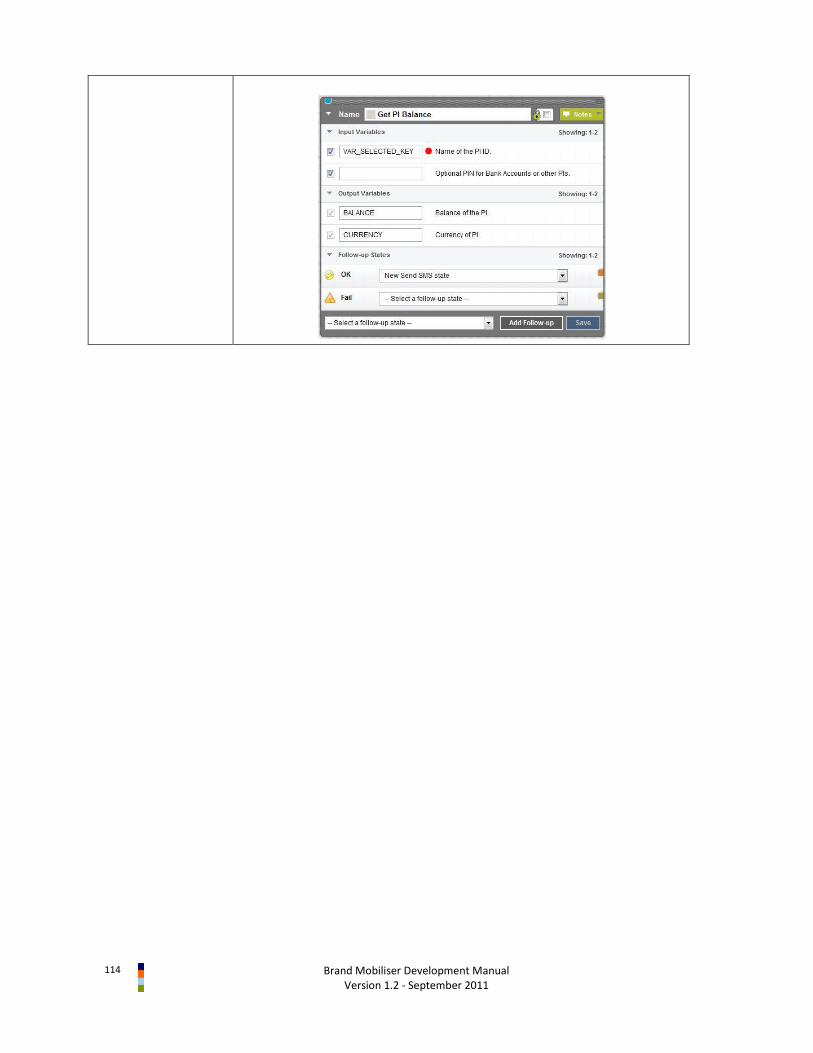
114
Brand Mobiliser Development Manual Version 1.2 - September 2011

Brand Mobiliser Development Manual
Version 1.2 - September 2011 115
Money Mobiliser State – Customer Management
Name Get SVA Balance
Descriptions Retrieve the balance of the SVA type Payment Instrument of the customer. This is sort of the shortcut of the “Get PI Balance” state because the Payment Instrument ID is not needed for input. The system will find the SVA type, if available. Otherwise, DYN=0 will be returned. Also see the “Get PI Balance” state.
Input Variables Identification type - The type of customer identification to use; The choices are: by mobile-no (MSISDN), by customer id, or by username. The default, when leaving the field empty (i.e., --Select an entry--), is the same as the by mobile-no option. NOTE: even though the variable is shown as a required field but leaving it empty will not cause an error.
Identification of the customer – The customer identification value. If not set the current customer MSISDN is used.
NOTE: the customer identification value is determined based on the combined setup of the “Identification type” and “Identification of the customer” fields, listed above.
If the “Identification type” is empty or by mobile-no, the “Identification of the customer” is optional. If the “Identification type” is by customer id or by username, the “Identification of the customer” is mandatory.
Currency associated with SVA – currency
Use Case id of fee to be applied – use case id
Output Variables Balance
Follow-up State – OK Success in retrieving the balance
Follow-up State – Fail Possible causes:
Security policies have not been defined for customer yet
System error: Session not found
System error: Session has timeout
Customer not found
Customer is not unique
Access to customer is not allowed for the current agent
Agent object not found
Unexpected error
Follow-up State – DYN 0 – No SVA balance found
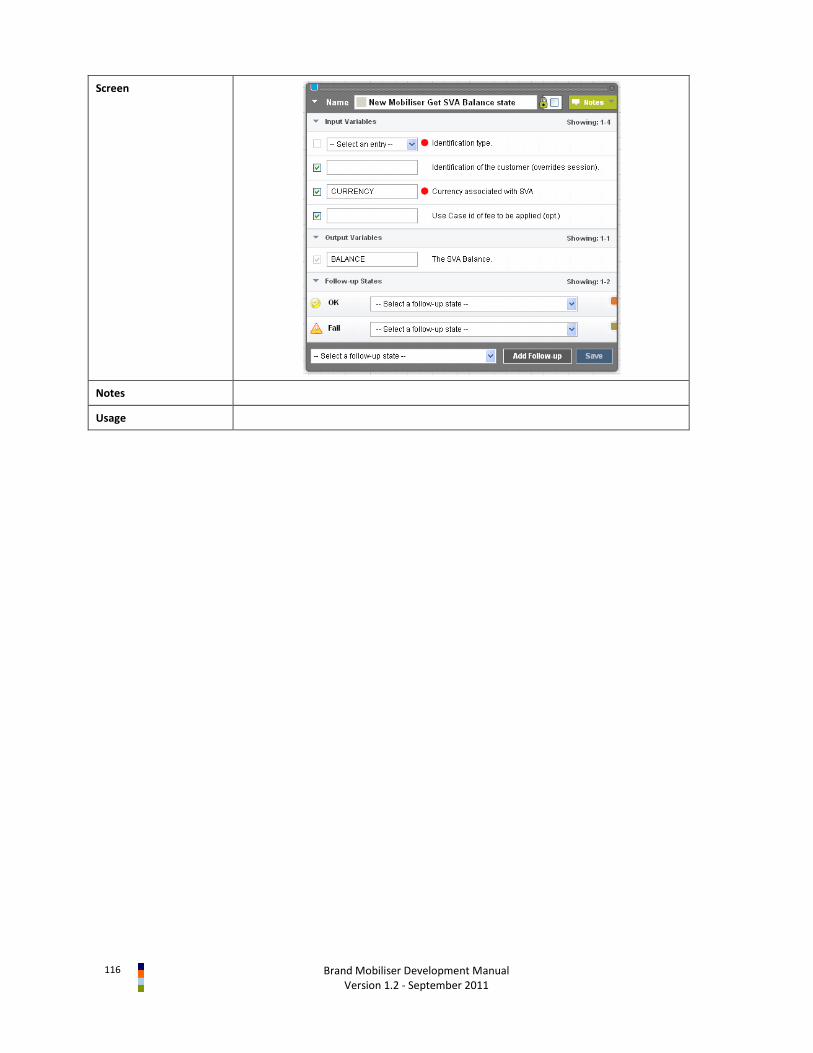
116
Brand Mobiliser Development Manual Version 1.2 - September 2011
Screen
Notes
Usage

Brand Mobiliser Development Manual
Version 1.2 - September 2011 117
Money Mobiliser State – Customer Management
Name Get Wallet Menu
Descriptions Send the list of Payment Instrument (PI) that are available in the customer Wallet to the customer as a menu list. Example:
1. SVA 2. BCard 0: Back This is a List-based state. The list is automatically truncated to fit one SMS message. If the list is longer than one SMS message, an option to see more is provided (9: More), or an option to exit the list (0: Back). This state facilitates the paging interaction, and transition to the follow-up state after the customer select an entry from the list. The PI has types and class. Example of PI types include: Personal PI, Merchant PI, etc. Example of PI classes include: credit card, bank account, SVA, etc. Both types has unique ID.
Input Variables Identification type - The type of customer identification to use; The choices are: by mobile-no (MSISDN), by customer id, or by username. The default, when leaving the field empty (i.e., --Select an entry--), is the same as the by mobile-no option. NOTE: even though the variable is shown as a required field but leaving it empty will not cause an error.
Identification of the customer – The customer identification value. If not set the current customer MSISDN is used.
NOTE: the customer identification value is determined based on the combined setup of the “Identification type” and “Identification of the customer” fields, listed above.
If the “Identification type” is empty or by mobile-no, the “Identification of the customer” is optional. If the “Identification type” is by customer id or by username, the “Identification of the customer” is mandatory.
List of PI types - The PI types to be excluded from the customer wallet PI list. This is a comma separated list of PI IDs (e.g., 23,45,33)
List of PI classes - The PI classes to be excluded from the customer wallet PI list. This is a comma separated PI class IDs
Max count of PIs - The maximum number of PIs to retrieve
Show Exit menu item - This defines whether the Exit menu item (0. Back) should be displayed. 0=no, 1=yes.
Output Variables Currency of the selected PI - The currency of the selected PI.
PI Type - The type of the selected PI.
PI Class - The class of the selected PI.
PI Status - The status of the selected PI.
Variable of the selected KEY - This parameter returns the identification (ID) of the PI, that the customer selected. For example, 10000634
Variable of the selected VALUE - This parameter returns the name of the PI that the customer selected. For example, My Bank.
Follow-up State – OK Customer selected a PI from the menu list. The selected PI and all the PI attributes are stored in the output variables
Follow-up State – Fail Possible reasons are:
Web service internal error
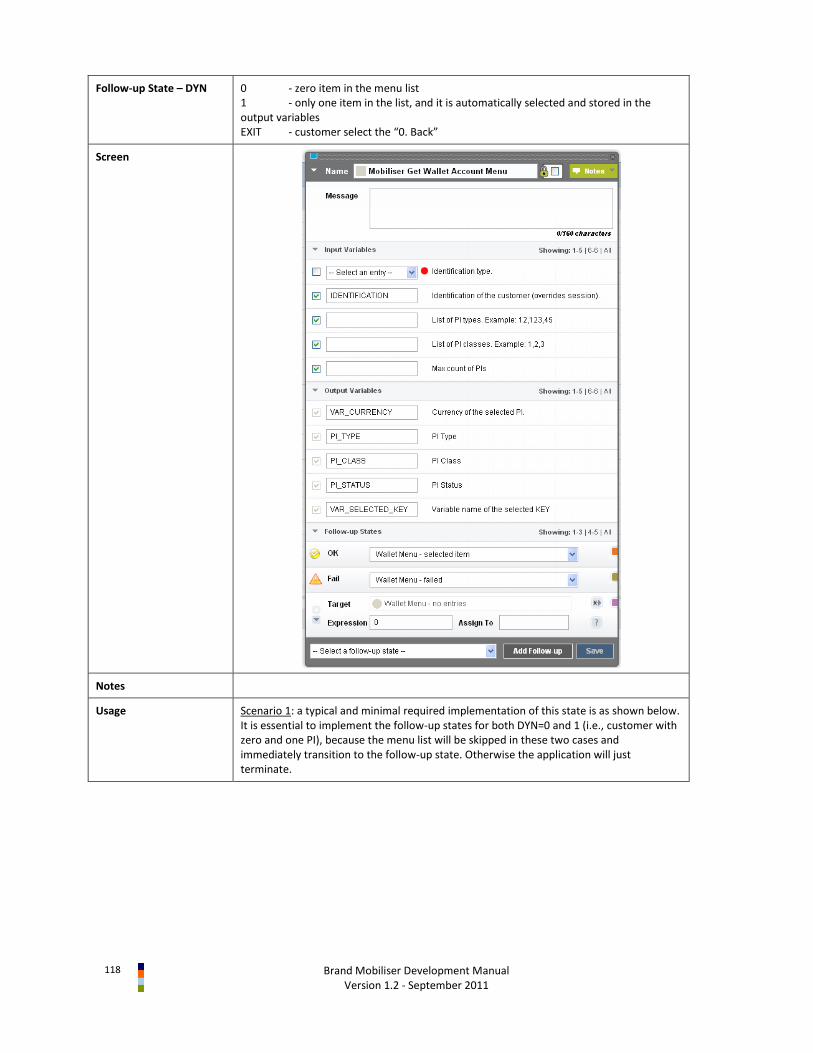
118
Brand Mobiliser Development Manual Version 1.2 - September 2011
Follow-up State – DYN 0 - zero item in the menu list 1 - only one item in the list, and it is automatically selected and stored in the output variables EXIT - customer select the “0. Back”
Screen
Notes
Usage Scenario 1: a typical and minimal required implementation of this state is as shown below. It is essential to implement the follow-up states for both DYN=0 and 1 (i.e., customer with zero and one PI), because the menu list will be skipped in these two cases and immediately transition to the follow-up state. Otherwise the application will just terminate.

Brand Mobiliser Development Manual
Version 1.2 - September 2011 119
Scenario 2: show how to use the filter for the list of PI types and List of PI class; For example, transfer from PI to another PI. When showing the menu list for the “to” PI, need to filter the “from” PI, to prevent transfer to the same PI

120
Brand Mobiliser Development Manual Version 1.2 - September 2011
Money Mobiliser State – Customer Management
Name Get Transactions
Descriptions Retrieves all transactions that belong to the customer. To limit the results, the number of transactions must be specified. Example of the transaction list: 11/07 17:05 10046966 EUR-10.00 P2P 11/07 17:04 10046938 EUR-10.00 P2P 19/04 16:10 10021857 EUR-200.00 P2P The format is: date time TransactionID Currency-Amount TransactionName There are three transactions shown above.
Input Variables Identification type - The type of customer identification to use; The choices are: by mobile-no (MSISDN), by customer id, or by username. The default, when leaving the field empty (i.e., --Select an entry--), is the same as the by mobile-no option. NOTE: even though the variable is shown as a required field but leaving it empty will not cause an error.
Identification of the customer – The customer identification value. If not set the current customer MSISDN is used.
NOTE: the customer identification value is determined based on the combined setup of the “Identification type” and “Identification of the customer” fields, listed above.
If the “Identification type” is empty or by mobile-no, the “Identification of the customer” is optional. If the “Identification type” is by customer id or by username, the “Identification of the customer” is mandatory.
Number of transactions – the number of the last transactions must be specified to limit the results
Use case id of fee to be applied – use case id
Output Variables The list of transactions – list of transactions in string format
Follow-up State – OK N.A.
Follow-up State – Fail Possible causes:
Security policies have not been defined for customer yet
System error: Session not found
System error: Session has timeout
Customer not found
Customer is not unique
Access to customer is not allowed for the current agent
Agent object not found
Unexpected error
Follow-up State – DYN 0 – No transaction found
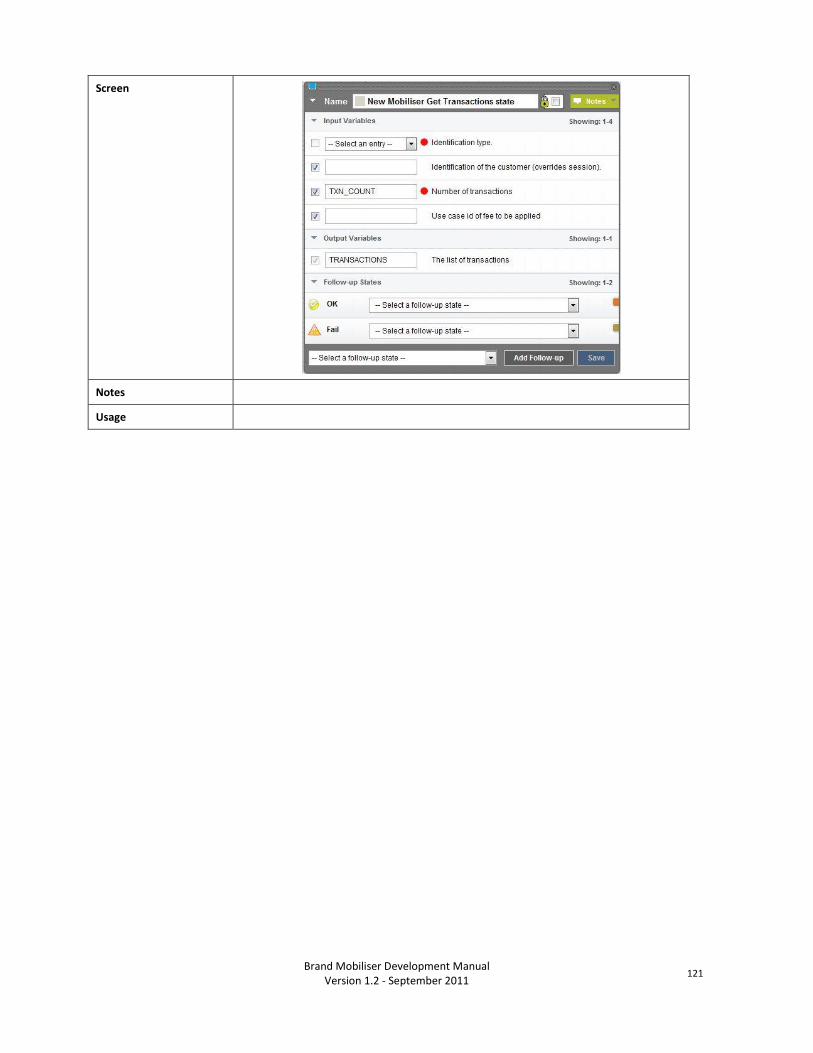
Brand Mobiliser Development Manual
Version 1.2 - September 2011 121
Screen
Notes
Usage

122
Brand Mobiliser Development Manual Version 1.2 - September 2011
Money Mobiliser State – Customer Management
Name Get Transaction Details
Descriptions Retrieves details of a transaction given the transaction ID that belongs to the customer
Input Variables Identification type - The type of customer identification to use; The choices are: by mobile-no (MSISDN), by customer id, or by username. The default, when leaving the field empty (i.e., --Select an entry--), is the same as the by mobile-no option. NOTE: even though the variable is shown as a required field but leaving it empty will not cause an error.
Identification of the customer – The customer identification value. If not set the current customer MSISDN is used.
NOTE: the customer identification value is determined based on the combined setup of the “Identification type” and “Identification of the customer” fields, listed above.
If the “Identification type” is empty or by mobile-no, the “Identification of the customer” is optional. If the “Identification type” is by customer id or by username, the “Identification of the customer” is mandatory.
Transaction ID – transaction id
Output Variables Amount - The amount of the transaction.
Currency - The currency of the transaction.
Authcode - The authorisation code of the transaction.
Error Code - The error code of the transaction.
Status Code - The status code of the transaction.
Type - The type of the transaction.
Payee Name - The name of the payee of the transaction.
Payer Name - The name of the payer of the transaction.
Payee ID - The ID of the payee of the transaction.
Payer ID - The ID of the payer of the transaction.
Text - The text of the transaction. (E.g. reference)
Payer Fee [Amount] - The fee that is defined for the payer of the transaction.
Payee Fee [Amount] - The fee that is defined for the payee of the transaction.
Follow-up State – OK Success in getting the transaction details and stored in the output variables
Follow-up State – Fail Possible causes:
Fail to get the transaction details
Security policies have not been defined for customer yet
System error: Session not found
System error: Session has timeout
Customer not found
Customer is not unique
Access to customer is not allowed for the current agent
Agent object not found
Unexpected error
Follow-up State – DYN N.A.
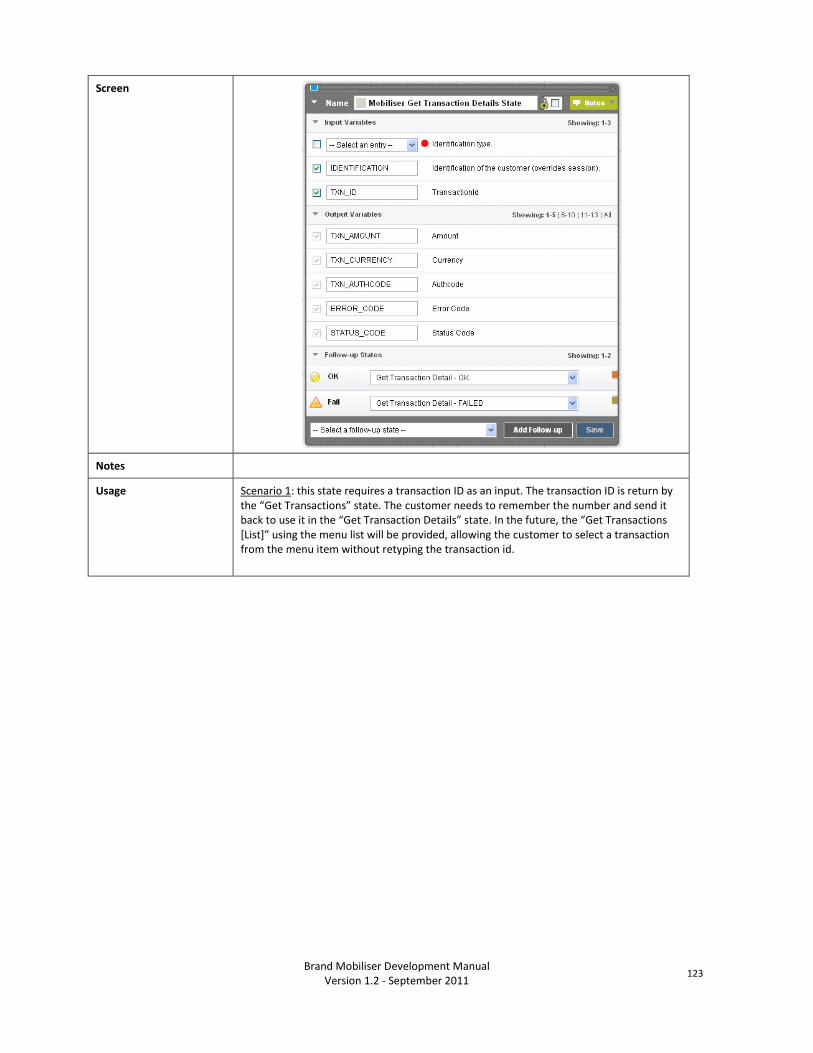
Brand Mobiliser Development Manual
Version 1.2 - September 2011 123
Screen
Notes
Usage Scenario 1: this state requires a transaction ID as an input. The transaction ID is return by the “Get Transactions” state. The customer needs to remember the number and send it back to use it in the “Get Transaction Details” state. In the future, the “Get Transactions *List+” using the menu list will be provided, allowing the customer to select a transaction from the menu item without retyping the transaction id.
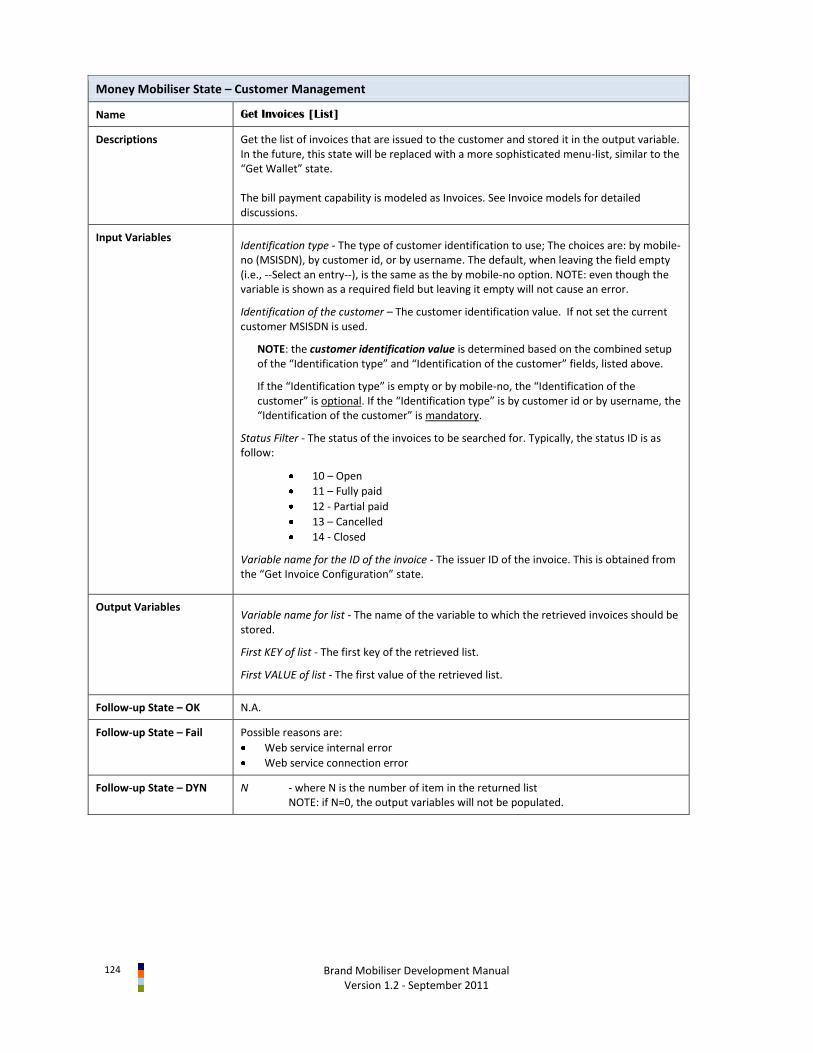
124
Brand Mobiliser Development Manual Version 1.2 - September 2011
Money Mobiliser State – Customer Management
Name Get Invoices [List]
Descriptions Get the list of invoices that are issued to the customer and stored it in the output variable. In the future, this state will be replaced with a more sophisticated menu-list, similar to the “Get Wallet” state. The bill payment capability is modeled as Invoices. See Invoice models for detailed discussions.
Input Variables Identification type - The type of customer identification to use; The choices are: by mobile-no (MSISDN), by customer id, or by username. The default, when leaving the field empty (i.e., --Select an entry--), is the same as the by mobile-no option. NOTE: even though the variable is shown as a required field but leaving it empty will not cause an error.
Identification of the customer – The customer identification value. If not set the current customer MSISDN is used.
NOTE: the customer identification value is determined based on the combined setup of the “Identification type” and “Identification of the customer” fields, listed above.
If the “Identification type” is empty or by mobile-no, the “Identification of the customer” is optional. If the “Identification type” is by customer id or by username, the “Identification of the customer” is mandatory.
Status Filter - The status of the invoices to be searched for. Typically, the status ID is as follow:
10 – Open
11 – Fully paid
12 - Partial paid
13 – Cancelled
14 - Closed
Variable name for the ID of the invoice - The issuer ID of the invoice. This is obtained from the “Get Invoice Configuration” state.
Output Variables Variable name for list - The name of the variable to which the retrieved invoices should be stored.
First KEY of list - The first key of the retrieved list.
First VALUE of list - The first value of the retrieved list.
Follow-up State – OK N.A.
Follow-up State – Fail Possible reasons are:
Web service internal error
Web service connection error
Follow-up State – DYN N - where N is the number of item in the returned list NOTE: if N=0, the output variables will not be populated.
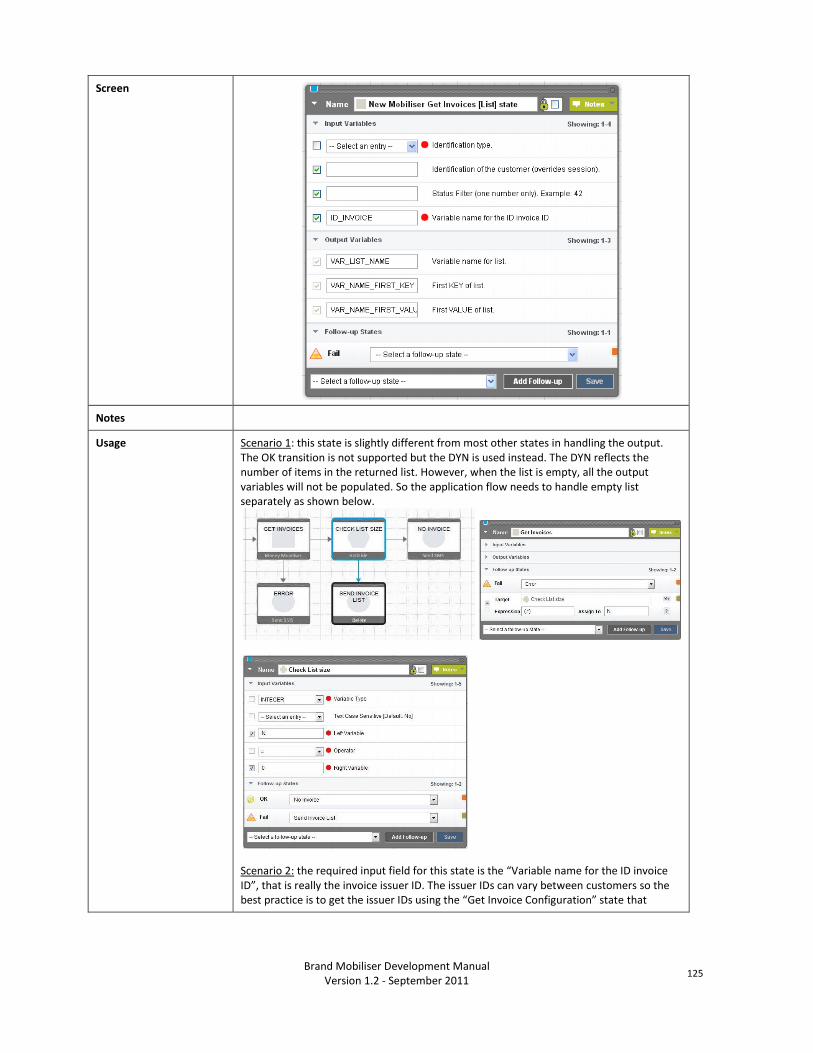
Brand Mobiliser Development Manual
Version 1.2 - September 2011 125
Screen
Notes
Usage Scenario 1: this state is slightly different from most other states in handling the output. The OK transition is not supported but the DYN is used instead. The DYN reflects the number of items in the returned list. However, when the list is empty, all the output variables will not be populated. So the application flow needs to handle empty list separately as shown below.
Scenario 2: the required input field for this state is the “Variable name for the ID invoice ID”, that is really the invoice issuer ID. The issuer IDs can vary between customers so the best practice is to get the issuer IDs using the “Get Invoice Configuration” state that
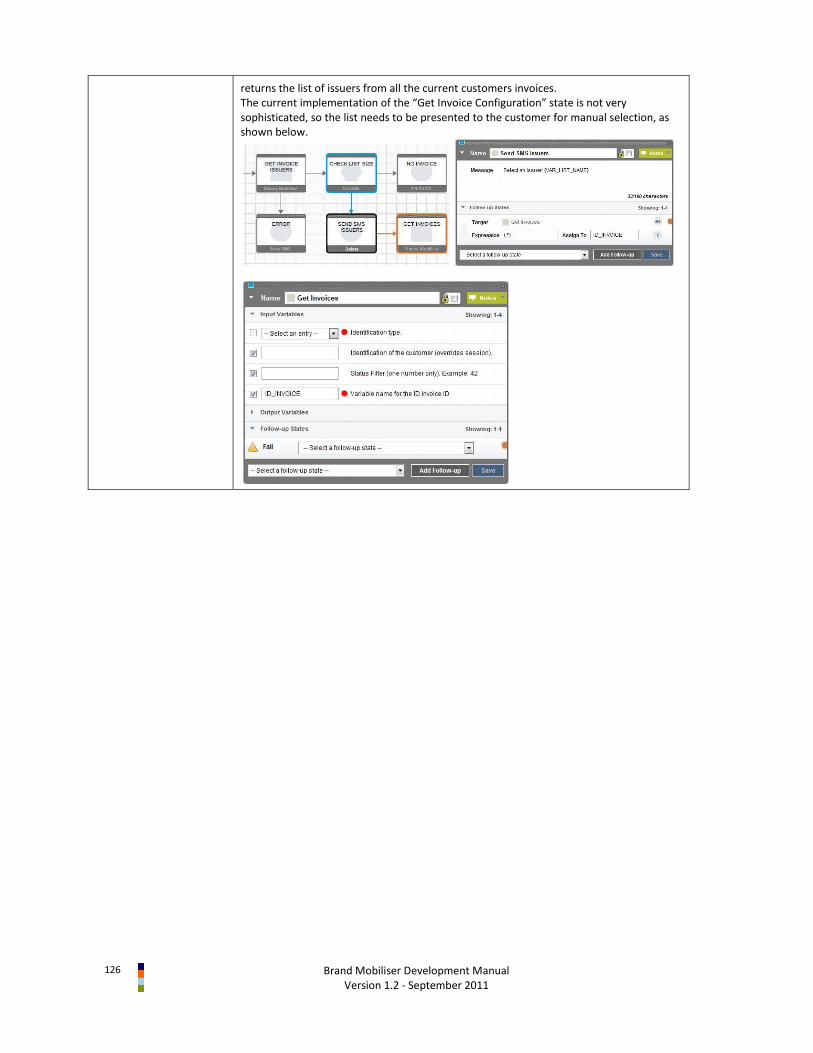
126
Brand Mobiliser Development Manual Version 1.2 - September 2011
returns the list of issuers from all the current customers invoices. The current implementation of the “Get Invoice Configuration” state is not very sophisticated, so the list needs to be presented to the customer for manual selection, as shown below.
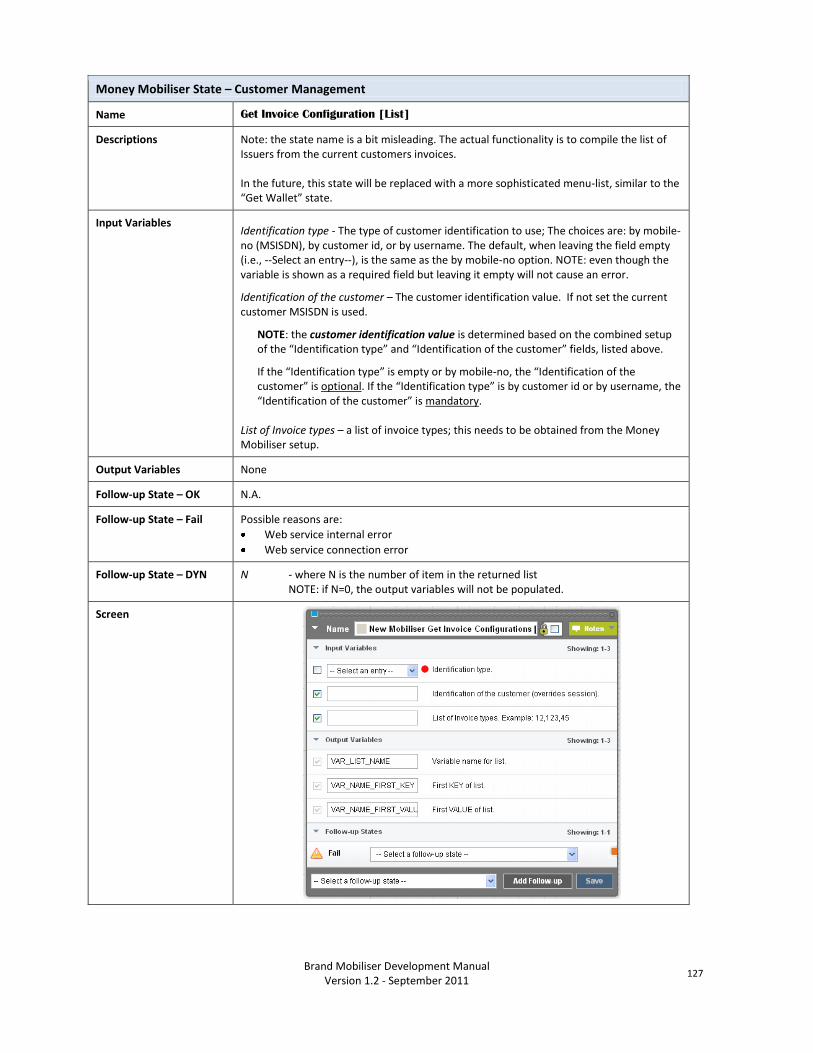
Brand Mobiliser Development Manual
Version 1.2 - September 2011 127
Money Mobiliser State – Customer Management
Name Get Invoice Configuration [List]
Descriptions Note: the state name is a bit misleading. The actual functionality is to compile the list of Issuers from the current customers invoices. In the future, this state will be replaced with a more sophisticated menu-list, similar to the “Get Wallet” state.
Input Variables Identification type - The type of customer identification to use; The choices are: by mobile-no (MSISDN), by customer id, or by username. The default, when leaving the field empty (i.e., --Select an entry--), is the same as the by mobile-no option. NOTE: even though the variable is shown as a required field but leaving it empty will not cause an error.
Identification of the customer – The customer identification value. If not set the current customer MSISDN is used.
NOTE: the customer identification value is determined based on the combined setup of the “Identification type” and “Identification of the customer” fields, listed above.
If the “Identification type” is empty or by mobile-no, the “Identification of the customer” is optional. If the “Identification type” is by customer id or by username, the “Identification of the customer” is mandatory.
List of Invoice types – a list of invoice types; this needs to be obtained from the Money Mobiliser setup.
Output Variables None
Follow-up State – OK N.A.
Follow-up State – Fail Possible reasons are:
Web service internal error
Web service connection error
Follow-up State – DYN N - where N is the number of item in the returned list NOTE: if N=0, the output variables will not be populated.
Screen
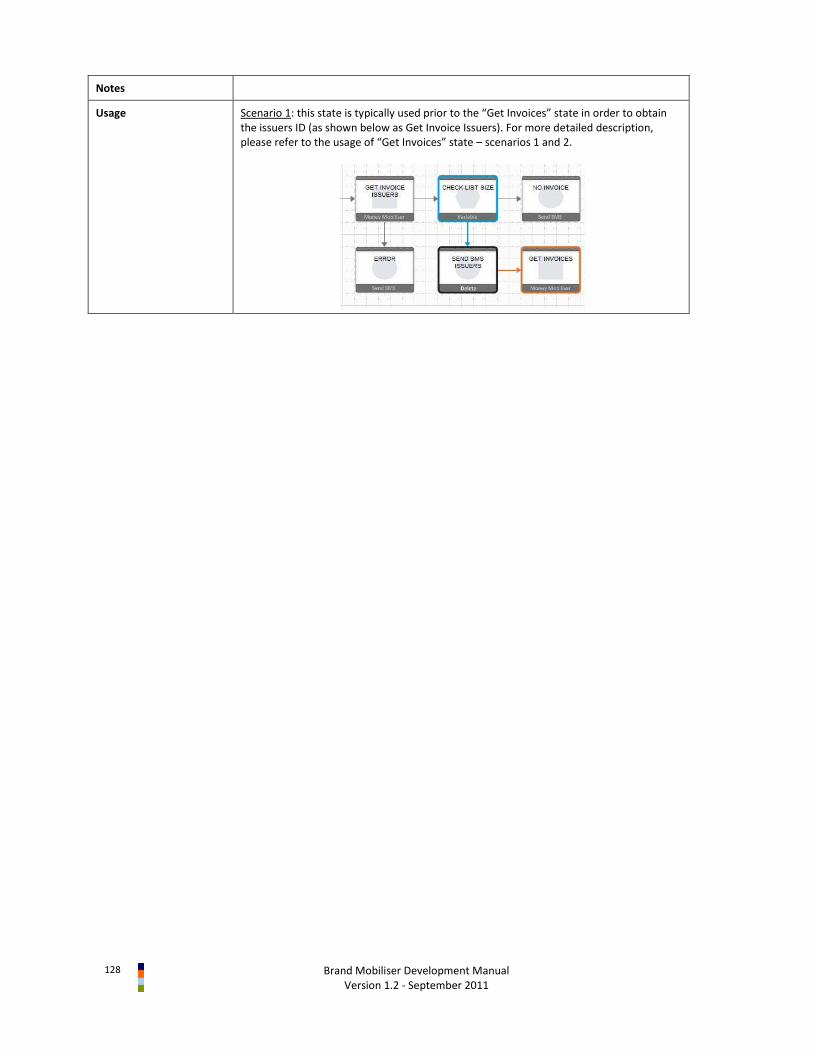
128
Brand Mobiliser Development Manual Version 1.2 - September 2011
Notes
Usage Scenario 1: this state is typically used prior to the “Get Invoices” state in order to obtain the issuers ID (as shown below as Get Invoice Issuers). For more detailed description, please refer to the usage of “Get Invoices” state – scenarios 1 and 2.
Brand Mobiliser Development Manual
Version 1.2 - September 2011 129
Money Mobiliser State – Customer Management
Name Set Primary PI
Descriptions Set the wallets Primary Payment Instrument of the current customer, and also set the same primary PI to be used Primary debit and/or Primary Credit
Input Variables Identification type - The type of customer identification to use; The choices are: by mobile-no (MSISDN), by customer id, or by username. The default, when leaving the field empty (i.e., --Select an entry--), is the same as the by mobile-no option. NOTE: even though the variable is shown as a required field but leaving it empty will not cause an error.
Identification of the customer – The customer identification value. If not set the current customer MSISDN is used.
NOTE: the customer identification value is determined based on the combined setup of the “Identification type” and “Identification of the customer” fields, listed above.
If the “Identification type” is empty or by mobile-no, the “Identification of the customer” is optional. If the “Identification type” is by customer id or by username, the “Identification of the customer” is mandatory.
Payment Instrument ID - The ID of the payment instrument.
Is Primary Debit - Defines whether the payment instrument should be used for primary debit.
Is Primary Credit - Defines whether the payment instrument should be used for primary credit.
Output Variables None
Follow-up State – OK Successfully setting the Primary PI
Follow-up State – Fail Possible reasons:
No PI in the customer wallet
Security policies have not been defined for customer yet
System error: Session not found
System error: Session has timeout
Customer not found
Customer is not unique
Access to customer is not allowed for the current agent
Agent object not found
Unexpected error
Follow-up State – DYN N.A.

130
Brand Mobiliser Development Manual Version 1.2 - September 2011
Screen
Notes
Usage Scenario 1: the Set Primary PI should be preceded by the “Get Wallet Menu” that lists all the available PIs that the customer can choose from. The “Get Wallet Menu” state returns the selected IS of the PI that can then be set to the “Payment Instrument ID” of this state. So, the payment instrument ID is typically not hard-coded in this state.

Brand Mobiliser Development Manual
Version 1.2 - September 2011 131
Money Mobiliser State – Transaction Service
Name Find Remittance Voucher
Descriptions searches for a remittance voucher for a customer by the pickup code. It returns the vouchers processing instrument ID, amount and currency
Input Variables Identification type - The type of customer identification to use; The choices are: by mobile-no (MSISDN), by customer id, or by username. The default, when leaving the field empty (i.e., --Select an entry--), is the same as the by mobile-no option. NOTE: even though the variable is shown as a required field but leaving it empty will not cause an error.
Identification of the customer – The customer identification value. If not set the current customer MSISDN is used.
NOTE: the customer identification value is determined based on the combined setup of the “Identification type” and “Identification of the customer” fields, listed above.
If the “Identification type” is empty or by mobile-no, the “Identification of the customer” is optional. If the “Identification type” is by customer id or by username, the “Identification of the customer” is mandatory.
The pickup code for the Voucher – Pickup code.
Output Variables The PI Id of the Voucher – The Processing Instrument ID of the Voucher.
The vouchers currency – The currency of the voucher.
The vouchers amount – The amount of the voucher.
Follow-up State – OK The specified voucher is found and the vouchers attributes are set in the output variables
Follow-up State – Fail Possible reasons:
Security policies have not been defined for customer yet
System error: Session not found
System error: Session has timeout
Customer not found
Customer is not unique
Access to customer is not allowed for the current agent
Agent object not found
Unexpected error
Follow-up State – DYN 0 – Voucher with the specified Pickup code is not found
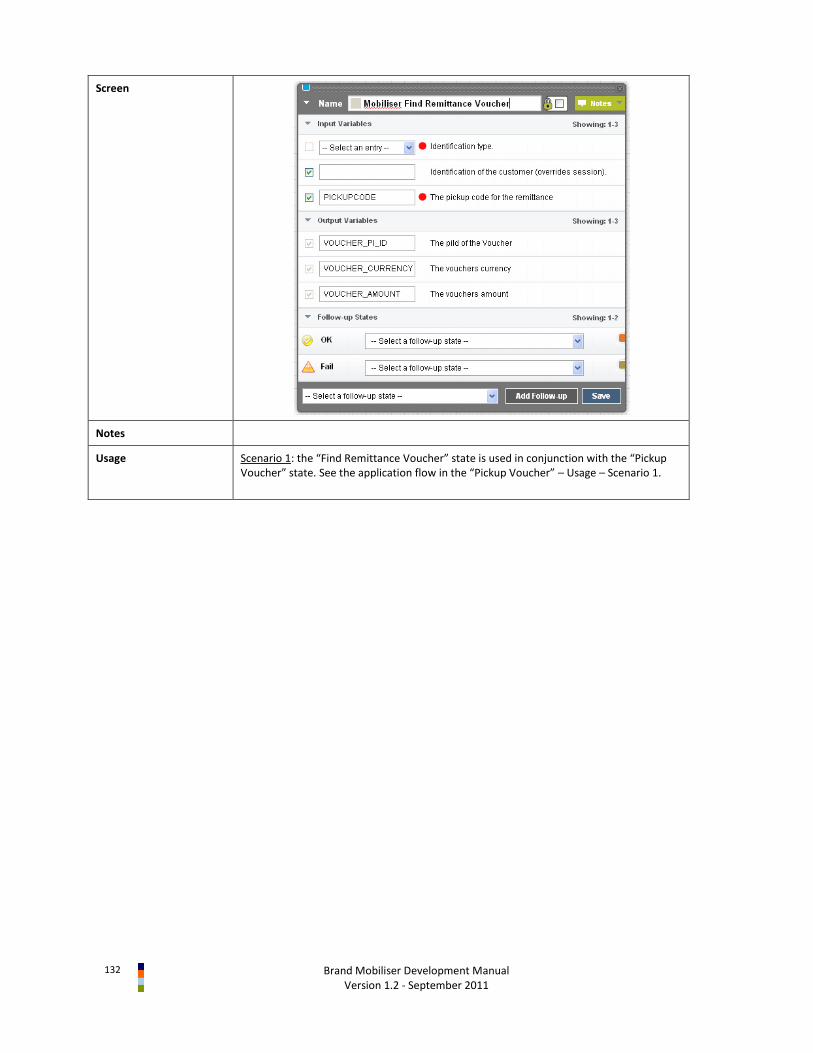
132
Brand Mobiliser Development Manual Version 1.2 - September 2011
Screen
Notes
Usage Scenario 1: the “Find Remittance Voucher” state is used in conjunction with the “Pickup Voucher” state. See the application flow in the “Pickup Voucher” – Usage – Scenario 1.

Brand Mobiliser Development Manual
Version 1.2 - September 2011 133
Money Mobiliser State – Transaction Service
Name Authorize Transaction [Depracated; Not usable in the current form]
Descriptions Not usable in the current form; Please do not use this state.
Input Variables Identification type - The type of customer identification to use; The choices are: by mobile-no (MSISDN), by customer id, or by username. The default, when leaving the field empty (i.e., --Select an entry--), is the same as the by mobile-no option. NOTE: even though the variable is shown as a required field but leaving it empty will not cause an error.
Identification of the customer – The customer identification value. If not set the current customer MSISDN is used.
NOTE: the customer identification value is determined based on the combined setup of the “Identification type” and “Identification of the customer” fields, listed above.
If the “Identification type” is empty or by mobile-no, the “Identification of the customer” is optional. If the “Identification type” is by customer id or by username, the “Identification of the customer” is mandatory.
Text to be evaluated - This text is used for reference.
Output Variables None
Follow-up State – OK N.A.
Follow-up State – Fail N.A.
Follow-up State – DYN N.A.
Screen
Notes
Usage

134
Brand Mobiliser Development Manual Version 1.2 - September 2011
Money Mobiliser State – Transaction Service
Name Pre-Authorize Send Money
Descriptions Send money transaction should be conducted using a two-step transaction involving: Pre-Authorization and Commit, as follows:
Pre-Authorization - checks whether there is enough money available for the transaction, followed by reserving the money so that it is not accessible for other transactions. The Pre-Authorization also retrieves the fees that will be charged to perform the transaction. The fees are modeled using different Use Case IDs that are implemented in Money Mobiliser. The Pre-Authorization is performed using this state.
Commit – proceed the actual transaction of debiting the money and fees
This state is used in conjunction with the “Send Money” state.
Input Variables Currency of transaction - The currency for the transaction
Use Case ID - The Use Case ID identifies the type of transaction. For a CashOut transaction, the Use Case ID is 1005.
Amount - The amount of the transaction
Payer Identification Type - The identification type of the payer. This can be either by mobile No., by customer-id or by user-name.
Payer Identification - The payer identification. Normally this is retrieved through the mobile No. so this field can be left blank.
Payer PI ID - The payment instrument used by the payer is identified here.
Payer PI class - The class of the payment instrument used by the payer. This could be Stored Value Account, Bank Account, Credit Card or External Account.
Payee Identification Type - The identification type of the payee. This can be by mobile No., by customer ID and by user name.
Payee Identification - The identification of the payee.
Payee PI ID - The identification of the payment instrument for the payee.
Payee PI class - The class of the payment instrument used for the payee. This could be Stored Value Account, Bank Account, Credit Card or External Account.
Output Variables The fee for the payer - This fee is debited to the payer.
The fee for the payee - This fee is the commission paid to the agent for the Cash Out service.
The name of the payee - The name of the payee.
Follow-up State – OK Pre-Authorization is successful and the information are stored in the output variables
Follow-up State – Fail Possible reasons:
Missing Payer and/or Payee Identifications
Web Service Connection Error
Web Service Unknown error
Follow-up State – DYN Error Codes – See Appendix B9 Money Error codes.
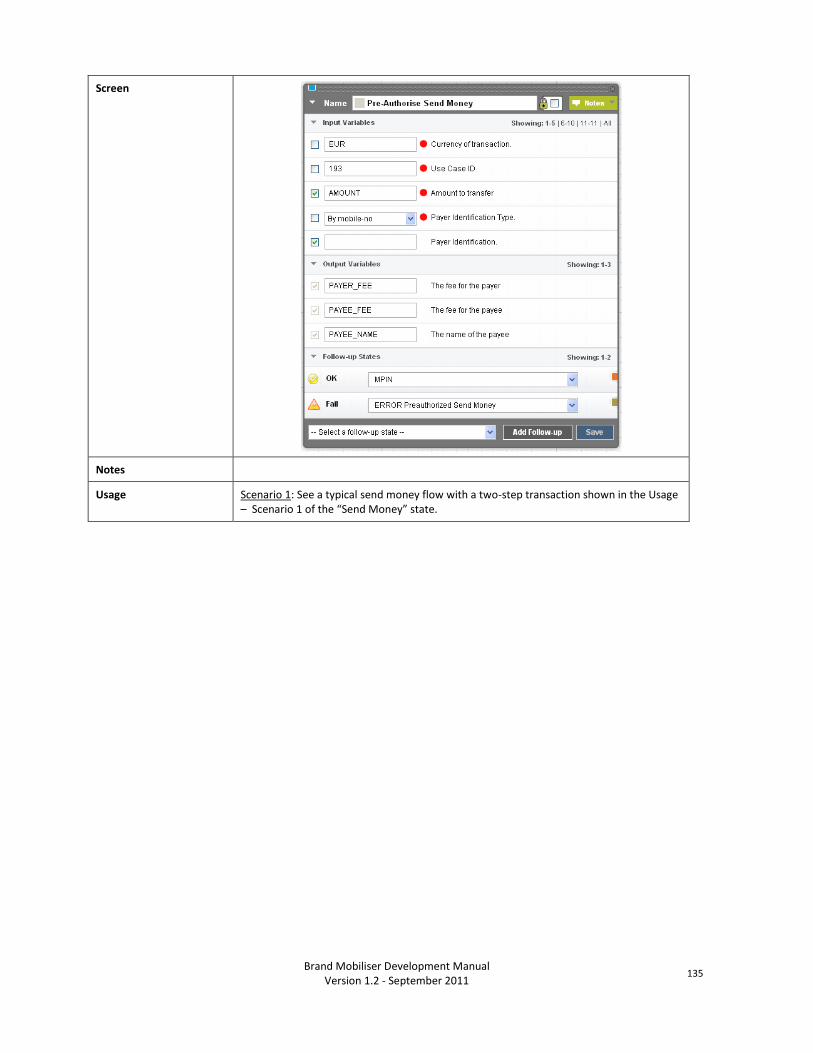
Brand Mobiliser Development Manual
Version 1.2 - September 2011 135
Screen
Notes
Usage Scenario 1: See a typical send money flow with a two-step transaction shown in the Usage – Scenario 1 of the “Send Money” state.

136
Brand Mobiliser Development Manual Version 1.2 - September 2011
Money Mobiliser State – Transaction Service
Name Send Money
Descriptions Send money transaction should be conducted using a two-step transaction involving: Pre-Authorization and Commit, as follows:
Pre-Authorization - checks whether there is enough money available for the transaction, followed by reserving the money so that it is not accessible for other transactions.
Commit – proceed the actual transaction of debiting the money and fees. The fees are modeled using different Use Case IDs that are implemented in Money Mobiliser. The Commit is performed using this state.
This state is used in conjunction with the “Pre-Authorized Send Money” state.
Input Variables Currency of transaction - The currency for the transaction
Use Case ID - The Use Case ID identifies the type of transaction. The Use Case for a CashOut transaction is 1005.
Amount - The Amount for the transaction
Optional PIN for Bank Accounts or other PIs - If money is debited from a bank account, the customer must enter the pin for the respective bank account.
Payer Identification Type - The identification type of the payer. This can be “by mobile No.”, “by customer ID” or “by user name”.
Payer Identification - The payer is identified here. Normally, this ID is retrieved through the mobile number. so this field can be left blank.
Payer PI ID - The identification of the payment instrument used by the payer.
Payer PI class - The class of the payment instrument used by the payer. This could be “Stored Value Account”, “Bank Account”, “Credit Card” or “External Account”.
Payee Identification Type - The identification type of the payee. This could be “by mobile No.”, “by customer ID” or “by user name”.
Payee Identification - The identification of the payee.
Payee PI ID - The identification of the payment instrument for the payee.
Payee PI class - The class of the payment instrument used for the payee. This could be “Stored Value Account”, “Bank Account”, “Credit Card” or “External Account”.
Output Variables Transaction ID - Internal system reference number that identifies the transaction.
Authorisation code - This code identifies the transaction. It is the customers reference to the transaction in the system and appears on the receipt. The customer can use this code to track the transaction and request assistance from customer support if there are any problems.
Follow-up State – OK Send Money completed successfully.
Follow-up State – Fail Possible reasons:
Missing Payer and/or Payee Identifications
Unknown Web service error
Web service connection error
Follow-up State – DYN Error Codes – See Appendix B9 Money Error codes.
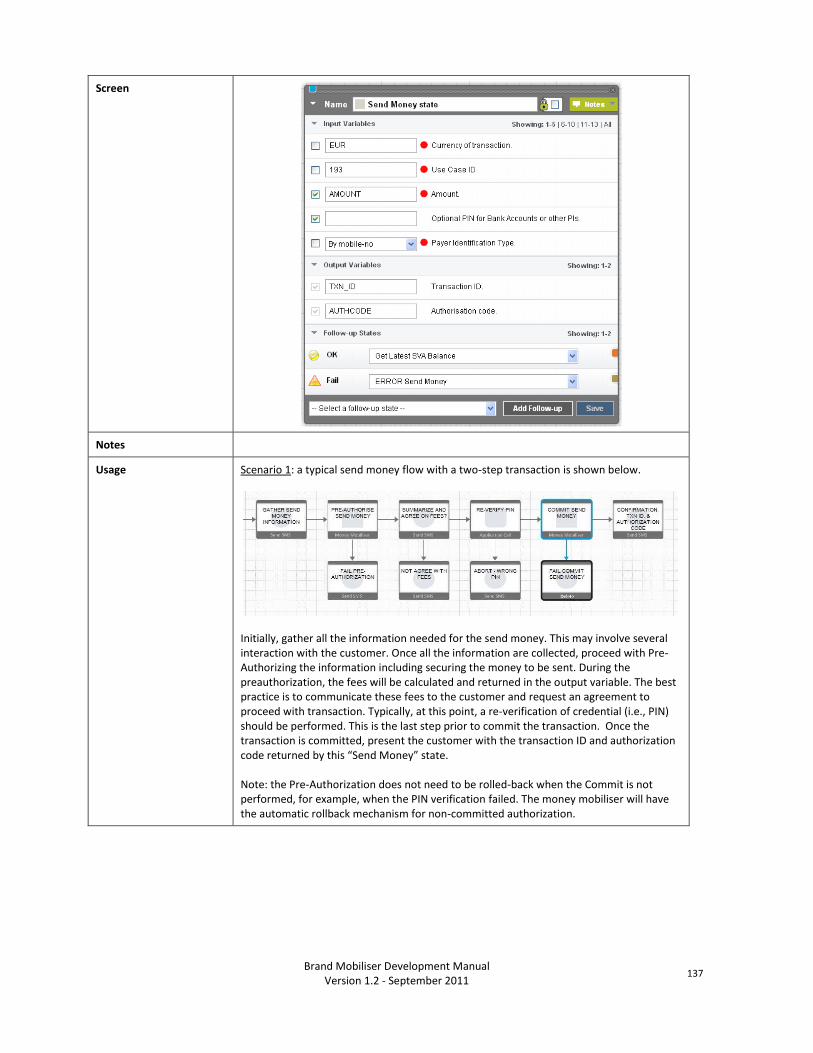
Brand Mobiliser Development Manual
Version 1.2 - September 2011 137
Screen
Notes
Usage Scenario 1: a typical send money flow with a two-step transaction is shown below.
Initially, gather all the information needed for the send money. This may involve several interaction with the customer. Once all the information are collected, proceed with Pre-Authorizing the information including securing the money to be sent. During the preauthorization, the fees will be calculated and returned in the output variable. The best practice is to communicate these fees to the customer and request an agreement to proceed with transaction. Typically, at this point, a re-verification of credential (i.e., PIN) should be performed. This is the last step prior to commit the transaction. Once the transaction is committed, present the customer with the transaction ID and authorization code returned by this “Send Money” state. Note: the Pre-Authorization does not need to be rolled-back when the Commit is not performed, for example, when the PIN verification failed. The money mobiliser will have the automatic rollback mechanism for non-committed authorization.

138
Brand Mobiliser Development Manual Version 1.2 - September 2011
Money Mobiliser State – Transaction Service
Name Charge Fee
Descriptions Provides a mechanism to charge fees to the customer for non-financial transaction, e.g. request account balance, etc. The fees to be charged is based on the pre-configured Use Case IDs that are implemented on the Money Mobiliser.
Input Variables Use Case ID - The ID of the use case, in which the fee is defined.
Currency - The currency of the transaction.
PaymentInstrument ID – Identifies the payment instrument that has the fee charged to it.
Output Variables Transaction ID - The ID of the transaction.
Follow-up State – OK Fee charge transaction is successful. The transactional ID is stored in the output variable.
Follow-up State – Fail N.A.
Follow-up State – DYN Error Codes – See Appendix B9 Money Error codes.
Screen
Notes
Usage Scenario 1: a simple mechanism to charge for non-transactional service, such as balance or transaction history, can be done using the “Charge Fee” state, as shown below. The fee structure is in the specified Use Case ID that is configured and implemented by Money Mobiliser (for example, 160).
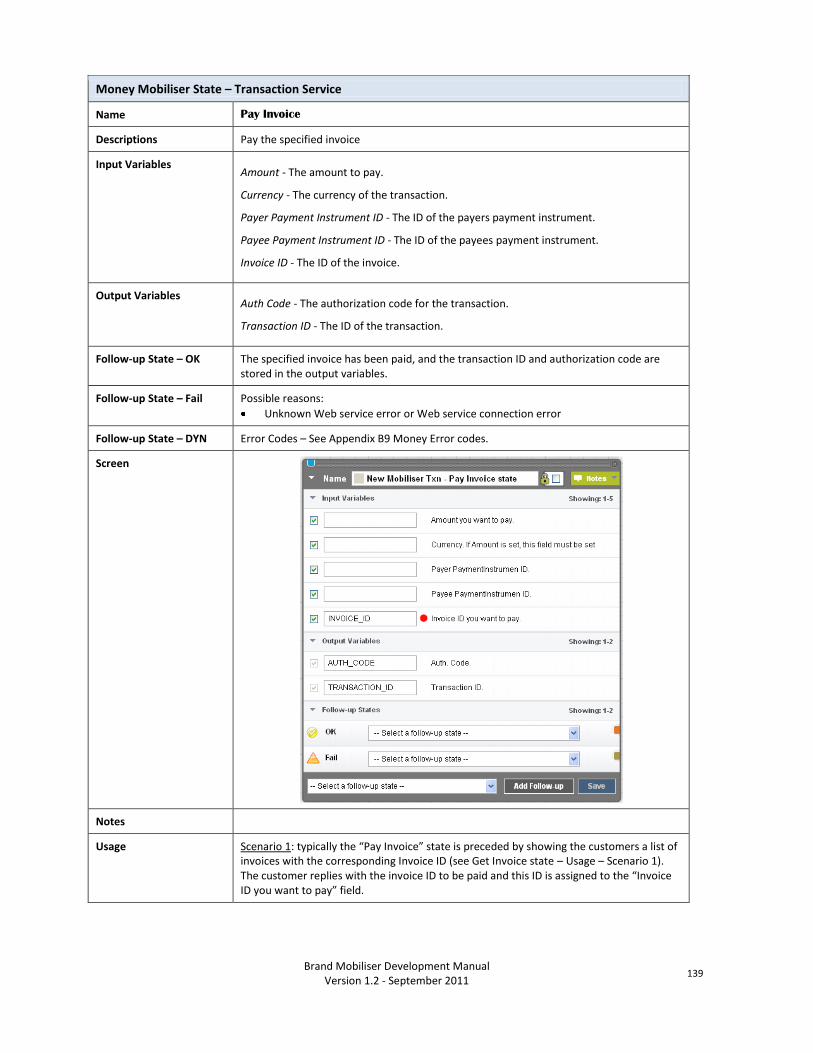
Brand Mobiliser Development Manual
Version 1.2 - September 2011 139
Money Mobiliser State – Transaction Service
Name Pay Invoice
Descriptions Pay the specified invoice
Input Variables Amount - The amount to pay.
Currency - The currency of the transaction.
Payer Payment Instrument ID - The ID of the payers payment instrument.
Payee Payment Instrument ID - The ID of the payees payment instrument.
Invoice ID - The ID of the invoice.
Output Variables Auth Code - The authorization code for the transaction.
Transaction ID - The ID of the transaction.
Follow-up State – OK The specified invoice has been paid, and the transaction ID and authorization code are stored in the output variables.
Follow-up State – Fail Possible reasons:
Unknown Web service error or Web service connection error
Follow-up State – DYN Error Codes – See Appendix B9 Money Error codes.
Screen
Notes
Usage Scenario 1: typically the “Pay Invoice” state is preceded by showing the customers a list of invoices with the corresponding Invoice ID (see Get Invoice state – Usage – Scenario 1). The customer replies with the invoice ID to be paid and this ID is assigned to the “Invoice ID you want to pay” field.

140
Brand Mobiliser Development Manual Version 1.2 - September 2011

Brand Mobiliser Development Manual
Version 1.2 - September 2011 141
Money Mobiliser State – Transaction Service
Name Start Voucher Remittance
Descriptions Starts a voucher remittance, if the receiving customer does not exist it is created. This is a two-step transaction process for remittance, and should be used in conjunction with the “Continue Voucher Remittance” state, as shown in the Usage – Scenario 1 below. This is similar to the “Pre-Authorize Send Money” state.
Input Variables Currency of transaction - The currency for the transaction
Use Case ID - The Use Case ID identifies the type of transaction.
Amount to transfer - The Amount for the transaction
Payer Identification Type - The identification type of the payer. This can be “by mobile No.”, “by customer ID” or “by user name”.
Payer Identification - The payer is identified here. Normally, this ID is retrieved through the mobile number. so this field can be left blank.
Payer PI ID - The identification of the payment instrument used by the payer.
Payer PI class - The class of the payment instrument used by the payer. This could be “Stored Value Account”, “Bank Account”, “Credit Card” or “External Account”.
Payee Identification Type - The identification type of the payee. This could be “by mobile No.”, “by customer ID” or “by user name”.
Payee Identification - The identification of the payee.
Payee PI ID - The identification of the payment instrument for the payee.
Payee PI class - The class of the payment instrument used for the payee. This could be “Stored Value Account”, “Bank Account”, “Credit Card” or “External Account”.
Output Variables The fee for the payer - This fee is debited to the payer.
The fee for the payee - This fee is the commission paid to the agent for the Cash Out service.
The id of the pre-Authorisation txn – the ID generated for the pre-Authorisation
The amount for the payer – the total amount charge to the payer, including: the actual remittance amount, the fee, and converted the payer currency
The currency of the payer – the currency used by the payer
Follow-up State – OK Voucher remittance has been pre-authorized with all the authorized information stored in the output variables.
Follow-up State – Fail Possible reasons:
Unknown Web service error or Web service connection error
Follow-up State – DYN Error Codes – See Appendix B9 Money Error codes.
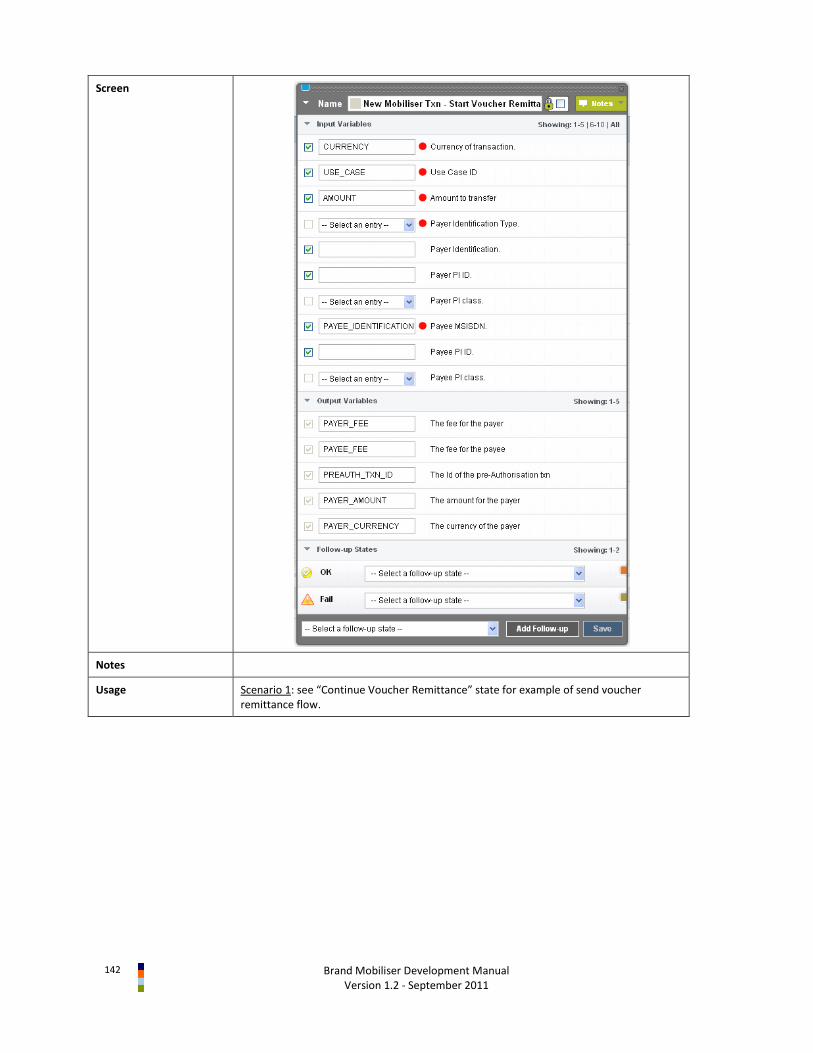
142
Brand Mobiliser Development Manual Version 1.2 - September 2011
Screen
Notes
Usage Scenario 1: see “Continue Voucher Remittance” state for example of send voucher remittance flow.
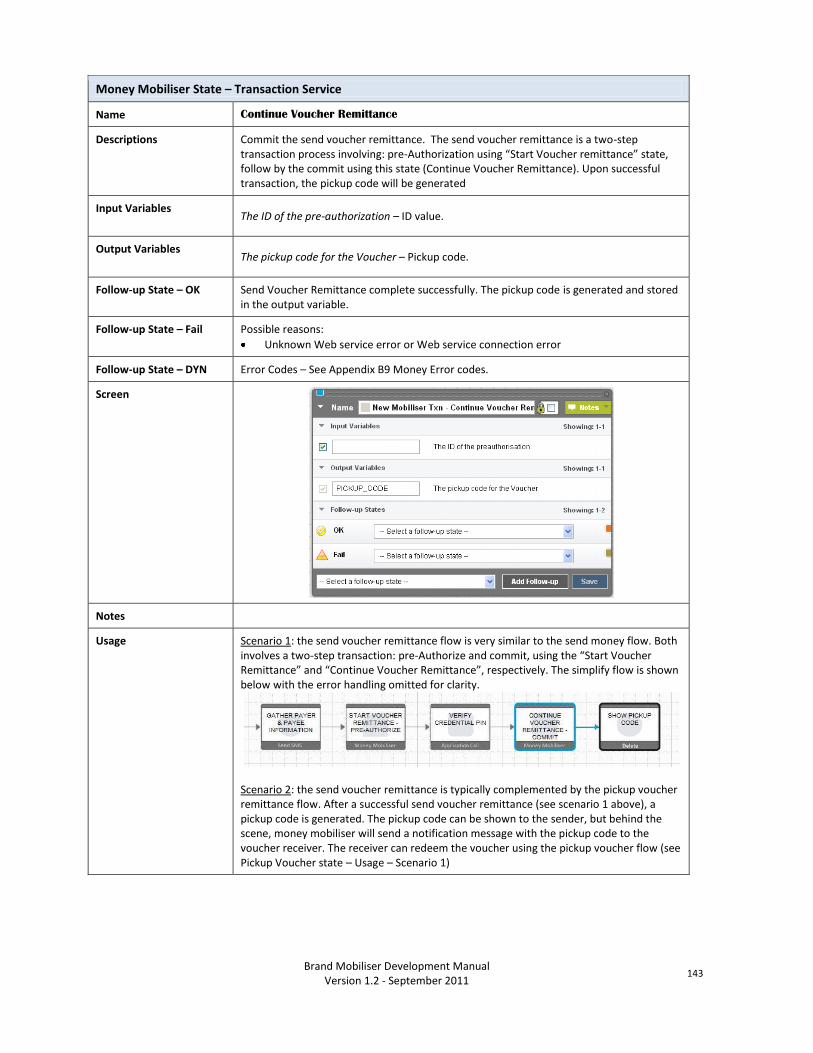
Brand Mobiliser Development Manual
Version 1.2 - September 2011 143
Money Mobiliser State – Transaction Service
Name Continue Voucher Remittance
Descriptions Commit the send voucher remittance. The send voucher remittance is a two-step transaction process involving: pre-Authorization using “Start Voucher remittance” state, follow by the commit using this state (Continue Voucher Remittance). Upon successful transaction, the pickup code will be generated
Input Variables The ID of the pre-authorization – ID value.
Output Variables The pickup code for the Voucher – Pickup code.
Follow-up State – OK Send Voucher Remittance complete successfully. The pickup code is generated and stored in the output variable.
Follow-up State – Fail Possible reasons:
Unknown Web service error or Web service connection error
Follow-up State – DYN Error Codes – See Appendix B9 Money Error codes.
Screen
Notes
Usage Scenario 1: the send voucher remittance flow is very similar to the send money flow. Both involves a two-step transaction: pre-Authorize and commit, using the “Start Voucher Remittance” and “Continue Voucher Remittance”, respectively. The simplify flow is shown below with the error handling omitted for clarity.
Scenario 2: the send voucher remittance is typically complemented by the pickup voucher remittance flow. After a successful send voucher remittance (see scenario 1 above), a pickup code is generated. The pickup code can be shown to the sender, but behind the scene, money mobiliser will send a notification message with the pickup code to the voucher receiver. The receiver can redeem the voucher using the pickup voucher flow (see Pickup Voucher state – Usage – Scenario 1)
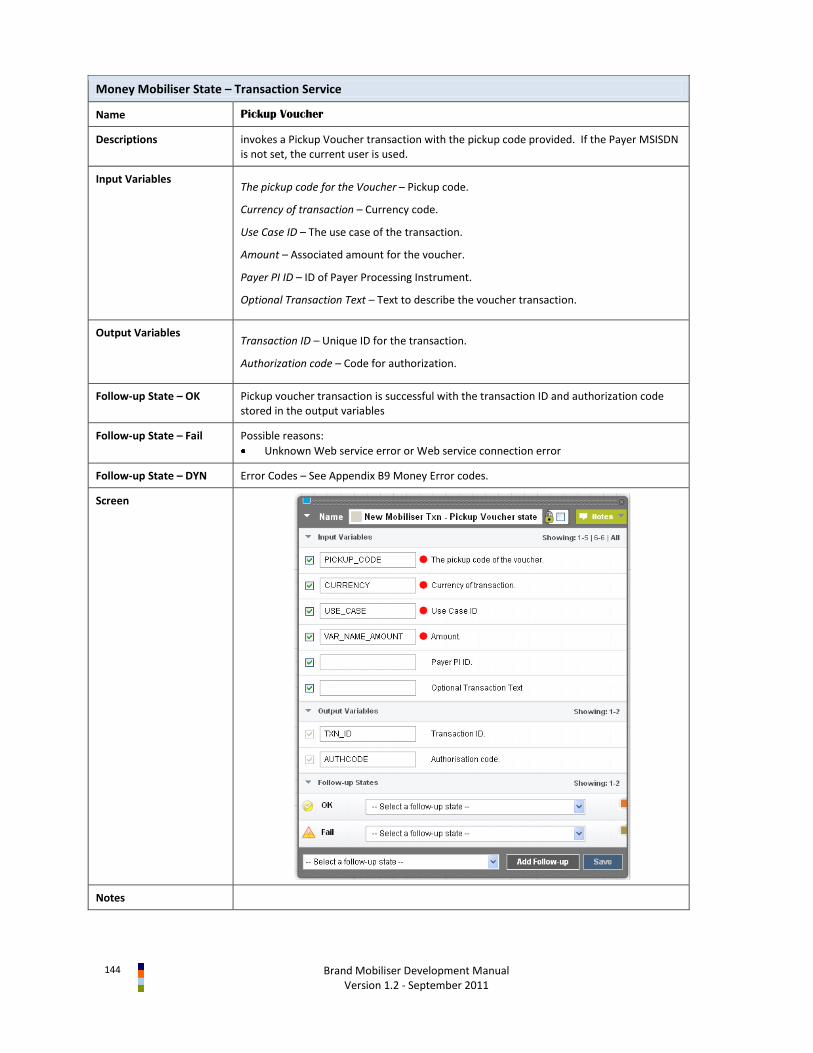
144
Brand Mobiliser Development Manual Version 1.2 - September 2011
Money Mobiliser State – Transaction Service
Name Pickup Voucher
Descriptions invokes a Pickup Voucher transaction with the pickup code provided. If the Payer MSISDN is not set, the current user is used.
Input Variables The pickup code for the Voucher – Pickup code.
Currency of transaction – Currency code.
Use Case ID – The use case of the transaction.
Amount – Associated amount for the voucher.
Payer PI ID – ID of Payer Processing Instrument.
Optional Transaction Text – Text to describe the voucher transaction.
Output Variables Transaction ID – Unique ID for the transaction.
Authorization code – Code for authorization.
Follow-up State – OK Pickup voucher transaction is successful with the transaction ID and authorization code stored in the output variables
Follow-up State – Fail Possible reasons:
Unknown Web service error or Web service connection error
Follow-up State – DYN Error Codes – See Appendix B9 Money Error codes.
Screen
Notes
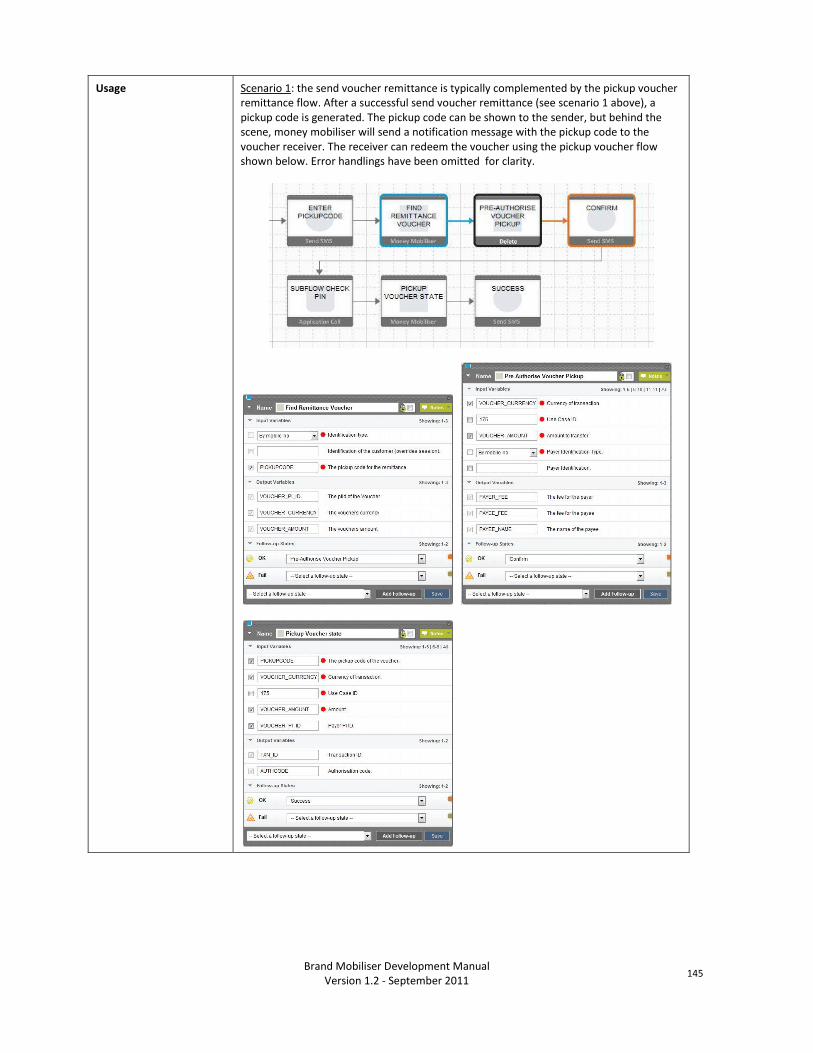
Brand Mobiliser Development Manual
Version 1.2 - September 2011 145
Usage Scenario 1: the send voucher remittance is typically complemented by the pickup voucher remittance flow. After a successful send voucher remittance (see scenario 1 above), a pickup code is generated. The pickup code can be shown to the sender, but behind the scene, money mobiliser will send a notification message with the pickup code to the voucher receiver. The receiver can redeem the voucher using the pickup voucher flow shown below. Error handlings have been omitted for clarity.

146
Brand Mobiliser Development Manual Version 1.2 - September 2011
Money Mobiliser State – Utility
Name Format Amount – Currency
Descriptions Formats the entered amount of a given currency. It checks the validity of the entered amount and returns it in formatted form. The amount is reformatted to comply with the number of decimal places specified for the respective currency and rounded off if necessary
Input Variables Amount to be formatted - The value of the amount to be formatted.
The currency of the amount - The currency of the amount to be formatted.
Minimum valid amount - The minimum valid value of the amount.
Maximum valid amount - The maximum valid value of the amount.
Output Variables The formatted amount - The reformatted amount is returned here.
Follow-up State – OK The “amount to be formatted” has been formatted and stored in the output variable.
Follow-up State – Fail N.A.
Follow-up State – DYN MIN – the value of “amount to be formatted” is less than the “minimum valid amount” MAX– the value of “amount to be formatted” is larger than the “maximum valid amount”
Screen
Notes
Usage

Brand Mobiliser Development Manual
Version 1.2 - September 2011 147
B. Appendix – Mobiliser Web Service Lookup Values
This appendix section references lists of static values that are returned by the Mobiliser Web Services and the Mobiliser Web Service States.
B.1 Blacklist Reason
ID Description
0 OK
1 Wrong PIN or password entered 3 times
2 Device lost
3 Payment dispute
4 Fraud suspicion
5 Registration pending
6 Rejected by third party scoring
10 Third party scoring failed
99 OFAC
B.2 Card Types
ID Description
1 Visa
2 MasterCard
3 American Express
B.3 Customer Cancellation Reasons
ID Description
0 Not cancelled
1 Double customer

148
Brand Mobiliser Development Manual Version 1.2 - September 2011
B.4 Identification Types
ID Description
0 MSISDN, in international format, e.g. +14155551234, +491701234567
1 Customer ID
2 IMEI
4 Foreign customer ID
5 Username
7 Email
B.5 Identity Types
ID Description
0 Generic, see Issuer of identity
1 Citizenship Card
2 Identity Card
3 Foreigner Card
4 Personal Tax ID Number
B.6 Info Mode & Receipt Mode
ID Description
0 None
1 SMS
2 Email
3 Email & SMS
B.7 User Rights/Product ID
ID Description
2002 Mini Agent
2003 Super Agent

Brand Mobiliser Development Manual
Version 1.2 - September 2011 149
B.8 Errors
ID Description
106 Wrong FI account PIN entered too many times (3 times)
116 Insufficient funds in FI account
117 Wrong FI account PIN
126 Wrong FI account PIN
127 Wrong FI account PIN
128 Wrong FI account PIN
206 Too many times wrong FI account PIN
1010 Entity not found
2611 Insufficient funds
2711 Agent SVA limit hit
B.9 Errors
ID TYPE Description
101 ERROR CONFIGURATION_CUSTOMER_INVALID: Indicates that a customer is set up invalid or incomplete.
191 FATAL LICENSING
199 FATAL DATABASE INCONSISTENCY: Indicates that some prerequisites on the database side are not fulfilled.
201 INFO MINIMUM CREDENTIAL LENGTH: Indicates that the credential (to create or update, presumably) exceeds
the minimum credential length.
202 INFO MAXIMUM CREDENTIAL LENGTH: Indicates that the credential (to create or update, presumably) exceeds
the maximum credential length.
203 INFO CREDENTIAL REPEAT: Indicates that the credential (to create or update, presumably) is the same as any of
the n previously used credentials.
204 INFO CREDENTIAL WEAK ASCENDING: Indicates that the credential (to create or update, presumably) contains a
block of ascending characters.
205 INFO CREDENTIAL WEAK EQUALITY: Indicates that the credential (to create or update, presumably) contains a
block of equal characters.
206 INFO CREDENTIAL WEAK DESCENDING: Indicates that the credential (to create or update, presumably) contains a
block of descending characters.
207 INFO CREDENTIAL EQUALS IDENTIFICATION: Indicates that the specified credential is the same as one of the
customers identifications.
208 INFO CREDENTIAL REGEX MATCH: Indicates that the credential does or does not match one of the security
poilicies regular expressions and thus is invalid.
209 WARN INVALID CREDENTIAL TYPE: Indicates that the type of the credential (to create or update, presumably) is
invalid, i.e. the customer is not allowed to have a credential of that type.
1001 ERROR INVALID REQUEST: Indicates that the request is either incomplete or invalid.
1002 INFO INVALID MSISDN: Indicates that (one of) the specified MSISDN(s) is invalid. MSISDNs always have to specified as +countryCodenetCodenumber
1003 INFO UNKNOWN TRANSACTION: Indicates that the (or a) transaction specified in the request does not exist.
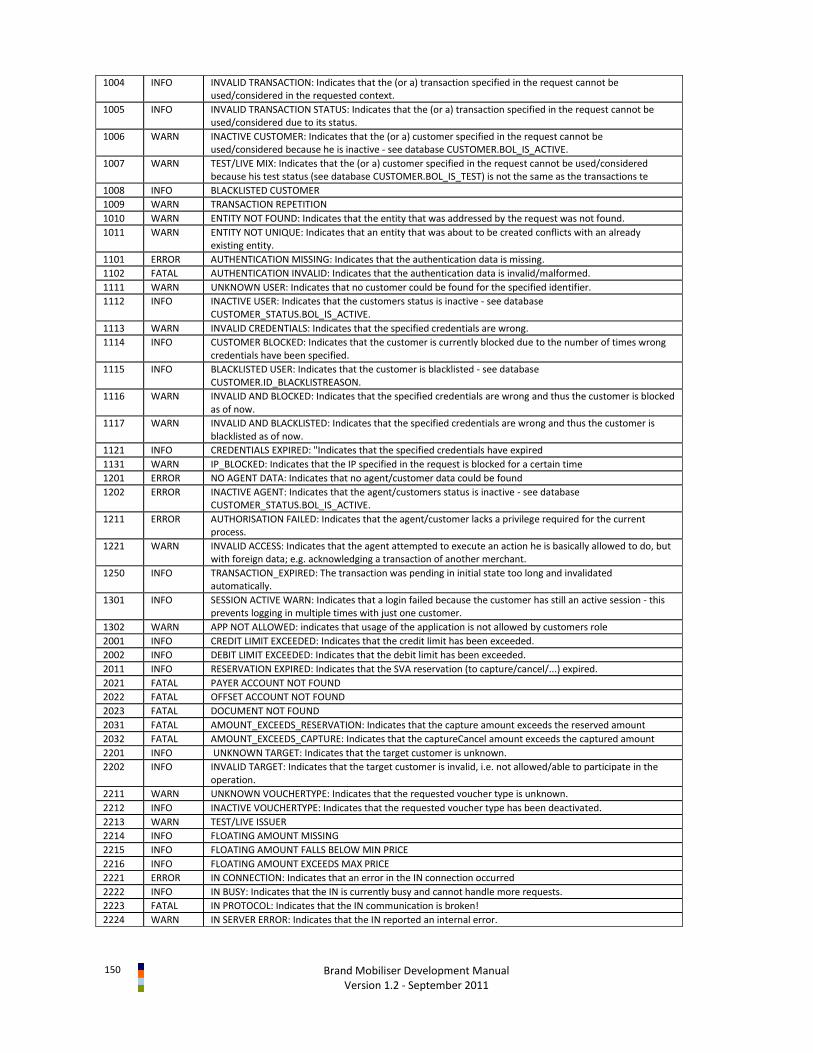
150
Brand Mobiliser Development Manual Version 1.2 - September 2011
1004 INFO INVALID TRANSACTION: Indicates that the (or a) transaction specified in the request cannot be used/considered in the requested context.
1005 INFO INVALID TRANSACTION STATUS: Indicates that the (or a) transaction specified in the request cannot be used/considered due to its status.
1006 WARN INACTIVE CUSTOMER: Indicates that the (or a) customer specified in the request cannot be used/considered because he is inactive - see database CUSTOMER.BOL_IS_ACTIVE.
1007 WARN TEST/LIVE MIX: Indicates that the (or a) customer specified in the request cannot be used/considered because his test status (see database CUSTOMER.BOL_IS_TEST) is not the same as the transactions te
1008 INFO BLACKLISTED CUSTOMER
1009 WARN TRANSACTION REPETITION
1010 WARN ENTITY NOT FOUND: Indicates that the entity that was addressed by the request was not found.
1011 WARN ENTITY NOT UNIQUE: Indicates that an entity that was about to be created conflicts with an already existing entity.
1101 ERROR AUTHENTICATION MISSING: Indicates that the authentication data is missing.
1102 FATAL AUTHENTICATION INVALID: Indicates that the authentication data is invalid/malformed.
1111 WARN UNKNOWN USER: Indicates that no customer could be found for the specified identifier.
1112 INFO INACTIVE USER: Indicates that the customers status is inactive - see database CUSTOMER_STATUS.BOL_IS_ACTIVE.
1113 WARN INVALID CREDENTIALS: Indicates that the specified credentials are wrong.
1114 INFO CUSTOMER BLOCKED: Indicates that the customer is currently blocked due to the number of times wrong credentials have been specified.
1115 INFO BLACKLISTED USER: Indicates that the customer is blacklisted - see database CUSTOMER.ID_BLACKLISTREASON.
1116 WARN INVALID AND BLOCKED: Indicates that the specified credentials are wrong and thus the customer is blocked as of now.
1117 WARN INVALID AND BLACKLISTED: Indicates that the specified credentials are wrong and thus the customer is blacklisted as of now.
1121 INFO CREDENTIALS EXPIRED: "Indicates that the specified credentials have expired
1131 WARN IP_BLOCKED: Indicates that the IP specified in the request is blocked for a certain time
1201 ERROR NO AGENT DATA: Indicates that no agent/customer data could be found
1202 ERROR INACTIVE AGENT: Indicates that the agent/customers status is inactive - see database CUSTOMER_STATUS.BOL_IS_ACTIVE.
1211 ERROR AUTHORISATION FAILED: Indicates that the agent/customer lacks a privilege required for the current process.
1221 WARN INVALID ACCESS: Indicates that the agent attempted to execute an action he is basically allowed to do, but with foreign data; e.g. acknowledging a transaction of another merchant.
1250 INFO TRANSACTION_EXPIRED: The transaction was pending in initial state too long and invalidated automatically.
1301 INFO SESSION ACTIVE WARN: Indicates that a login failed because the customer has still an active session - this prevents logging in multiple times with just one customer.
1302 WARN APP NOT ALLOWED: indicates that usage of the application is not allowed by customers role
2001 INFO CREDIT LIMIT EXCEEDED: Indicates that the credit limit has been exceeded.
2002 INFO DEBIT LIMIT EXCEEDED: Indicates that the debit limit has been exceeded.
2011 INFO RESERVATION EXPIRED: Indicates that the SVA reservation (to capture/cancel/...) expired.
2021 FATAL PAYER ACCOUNT NOT FOUND
2022 FATAL OFFSET ACCOUNT NOT FOUND
2023 FATAL DOCUMENT NOT FOUND
2031 FATAL AMOUNT_EXCEEDS_RESERVATION: Indicates that the capture amount exceeds the reserved amount
2032 FATAL AMOUNT_EXCEEDS_CAPTURE: Indicates that the captureCancel amount exceeds the captured amount
2201 INFO UNKNOWN TARGET: Indicates that the target customer is unknown.
2202 INFO INVALID TARGET: Indicates that the target customer is invalid, i.e. not allowed/able to participate in the operation.
2211 WARN UNKNOWN VOUCHERTYPE: Indicates that the requested voucher type is unknown.
2212 INFO INACTIVE VOUCHERTYPE: Indicates that the requested voucher type has been deactivated.
2213 WARN TEST/LIVE ISSUER
2214 INFO FLOATING AMOUNT MISSING
2215 INFO FLOATING AMOUNT FALLS BELOW MIN PRICE
2216 INFO FLOATING AMOUNT EXCEEDS MAX PRICE
2221 ERROR IN CONNECTION: Indicates that an error in the IN connection occurred
2222 INFO IN BUSY: Indicates that the IN is currently busy and cannot handle more requests.
2223 FATAL IN PROTOCOL: Indicates that the IN communication is broken!
2224 WARN IN SERVER ERROR: Indicates that the IN reported an internal error.
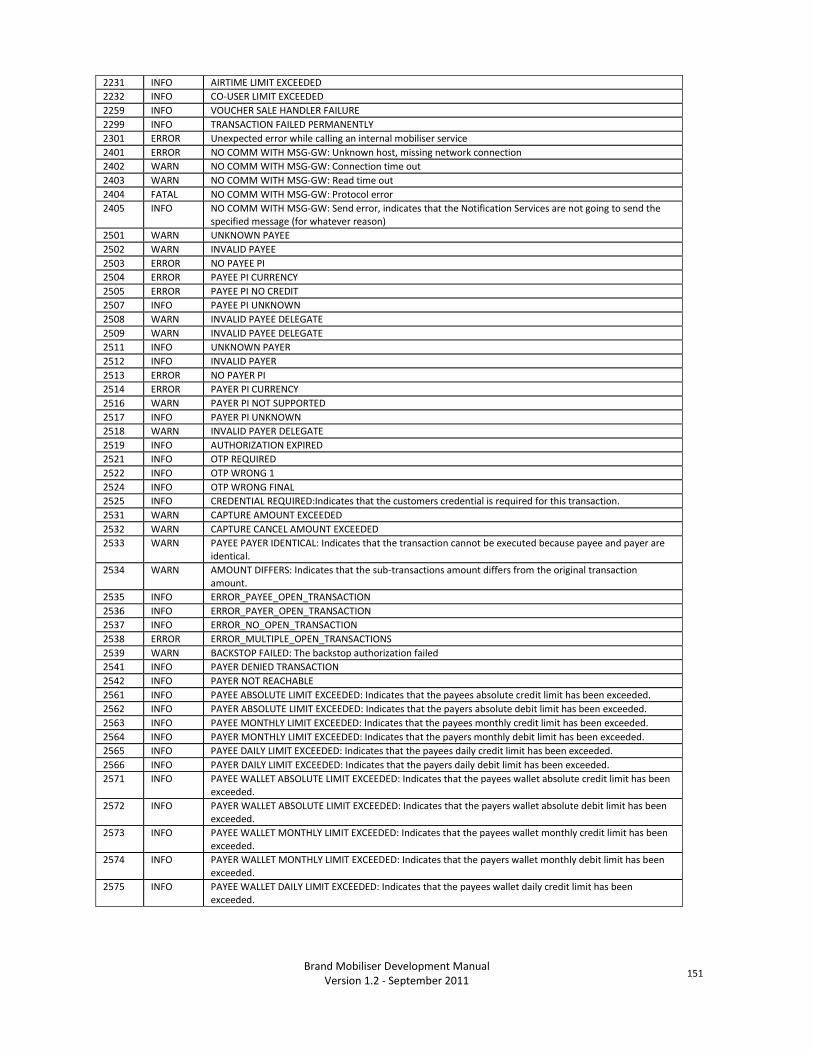
Brand Mobiliser Development Manual
Version 1.2 - September 2011 151
2231 INFO AIRTIME LIMIT EXCEEDED
2232 INFO CO-USER LIMIT EXCEEDED
2259 INFO VOUCHER SALE HANDLER FAILURE
2299 INFO TRANSACTION FAILED PERMANENTLY
2301 ERROR Unexpected error while calling an internal mobiliser service
2401 ERROR NO COMM WITH MSG-GW: Unknown host, missing network connection
2402 WARN NO COMM WITH MSG-GW: Connection time out
2403 WARN NO COMM WITH MSG-GW: Read time out
2404 FATAL NO COMM WITH MSG-GW: Protocol error
2405 INFO NO COMM WITH MSG-GW: Send error, indicates that the Notification Services are not going to send the specified message (for whatever reason)
2501 WARN UNKNOWN PAYEE
2502 WARN INVALID PAYEE
2503 ERROR NO PAYEE PI
2504 ERROR PAYEE PI CURRENCY
2505 ERROR PAYEE PI NO CREDIT
2507 INFO PAYEE PI UNKNOWN
2508 WARN INVALID PAYEE DELEGATE
2509 WARN INVALID PAYEE DELEGATE
2511 INFO UNKNOWN PAYER
2512 INFO INVALID PAYER
2513 ERROR NO PAYER PI
2514 ERROR PAYER PI CURRENCY
2516 WARN PAYER PI NOT SUPPORTED
2517 INFO PAYER PI UNKNOWN
2518 WARN INVALID PAYER DELEGATE
2519 INFO AUTHORIZATION EXPIRED
2521 INFO OTP REQUIRED
2522 INFO OTP WRONG 1
2524 INFO OTP WRONG FINAL
2525 INFO CREDENTIAL REQUIRED:Indicates that the customers credential is required for this transaction.
2531 WARN CAPTURE AMOUNT EXCEEDED
2532 WARN CAPTURE CANCEL AMOUNT EXCEEDED
2533 WARN PAYEE PAYER IDENTICAL: Indicates that the transaction cannot be executed because payee and payer are identical.
2534 WARN AMOUNT DIFFERS: Indicates that the sub-transactions amount differs from the original transaction amount.
2535 INFO ERROR_PAYEE_OPEN_TRANSACTION
2536 INFO ERROR_PAYER_OPEN_TRANSACTION
2537 INFO ERROR_NO_OPEN_TRANSACTION
2538 ERROR ERROR_MULTIPLE_OPEN_TRANSACTIONS
2539 WARN BACKSTOP FAILED: The backstop authorization failed
2541 INFO PAYER DENIED TRANSACTION
2542 INFO PAYER NOT REACHABLE
2561 INFO PAYEE ABSOLUTE LIMIT EXCEEDED: Indicates that the payees absolute credit limit has been exceeded.
2562 INFO PAYER ABSOLUTE LIMIT EXCEEDED: Indicates that the payers absolute debit limit has been exceeded.
2563 INFO PAYEE MONTHLY LIMIT EXCEEDED: Indicates that the payees monthly credit limit has been exceeded.
2564 INFO PAYER MONTHLY LIMIT EXCEEDED: Indicates that the payers monthly debit limit has been exceeded.
2565 INFO PAYEE DAILY LIMIT EXCEEDED: Indicates that the payees daily credit limit has been exceeded.
2566 INFO PAYER DAILY LIMIT EXCEEDED: Indicates that the payers daily debit limit has been exceeded.
2571 INFO PAYEE WALLET ABSOLUTE LIMIT EXCEEDED: Indicates that the payees wallet absolute credit limit has been exceeded.
2572 INFO PAYER WALLET ABSOLUTE LIMIT EXCEEDED: Indicates that the payers wallet absolute debit limit has been exceeded.
2573 INFO PAYEE WALLET MONTHLY LIMIT EXCEEDED: Indicates that the payees wallet monthly credit limit has been exceeded.
2574 INFO PAYER WALLET MONTHLY LIMIT EXCEEDED: Indicates that the payers wallet monthly debit limit has been exceeded.
2575 INFO PAYEE WALLET DAILY LIMIT EXCEEDED: Indicates that the payees wallet daily credit limit has been exceeded.
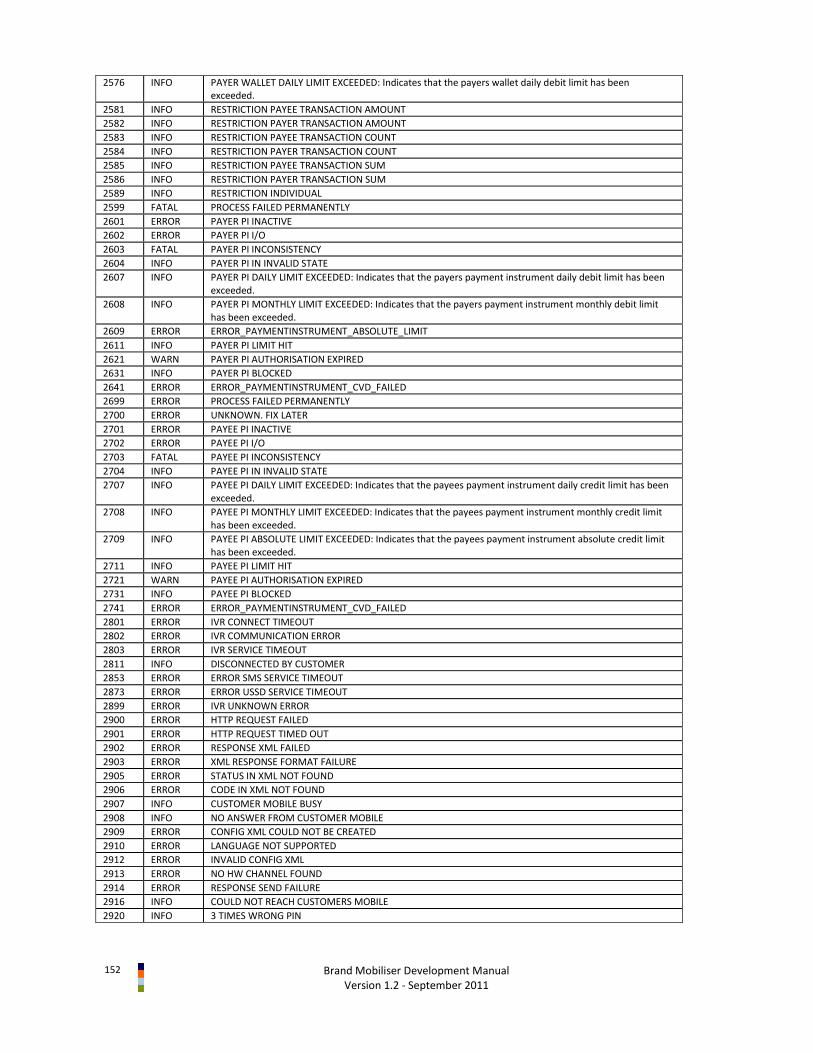
152
Brand Mobiliser Development Manual Version 1.2 - September 2011
2576 INFO PAYER WALLET DAILY LIMIT EXCEEDED: Indicates that the payers wallet daily debit limit has been exceeded.
2581 INFO RESTRICTION PAYEE TRANSACTION AMOUNT
2582 INFO RESTRICTION PAYER TRANSACTION AMOUNT
2583 INFO RESTRICTION PAYEE TRANSACTION COUNT
2584 INFO RESTRICTION PAYER TRANSACTION COUNT
2585 INFO RESTRICTION PAYEE TRANSACTION SUM
2586 INFO RESTRICTION PAYER TRANSACTION SUM
2589 INFO RESTRICTION INDIVIDUAL
2599 FATAL PROCESS FAILED PERMANENTLY
2601 ERROR PAYER PI INACTIVE
2602 ERROR PAYER PI I/O
2603 FATAL PAYER PI INCONSISTENCY
2604 INFO PAYER PI IN INVALID STATE
2607 INFO PAYER PI DAILY LIMIT EXCEEDED: Indicates that the payers payment instrument daily debit limit has been exceeded.
2608 INFO PAYER PI MONTHLY LIMIT EXCEEDED: Indicates that the payers payment instrument monthly debit limit has been exceeded.
2609 ERROR ERROR_PAYMENTINSTRUMENT_ABSOLUTE_LIMIT
2611 INFO PAYER PI LIMIT HIT
2621 WARN PAYER PI AUTHORISATION EXPIRED
2631 INFO PAYER PI BLOCKED
2641 ERROR ERROR_PAYMENTINSTRUMENT_CVD_FAILED
2699 ERROR PROCESS FAILED PERMANENTLY
2700 ERROR UNKNOWN. FIX LATER
2701 ERROR PAYEE PI INACTIVE
2702 ERROR PAYEE PI I/O
2703 FATAL PAYEE PI INCONSISTENCY
2704 INFO PAYEE PI IN INVALID STATE
2707 INFO PAYEE PI DAILY LIMIT EXCEEDED: Indicates that the payees payment instrument daily credit limit has been exceeded.
2708 INFO PAYEE PI MONTHLY LIMIT EXCEEDED: Indicates that the payees payment instrument monthly credit limit has been exceeded.
2709 INFO PAYEE PI ABSOLUTE LIMIT EXCEEDED: Indicates that the payees payment instrument absolute credit limit has been exceeded.
2711 INFO PAYEE PI LIMIT HIT
2721 WARN PAYEE PI AUTHORISATION EXPIRED
2731 INFO PAYEE PI BLOCKED
2741 ERROR ERROR_PAYMENTINSTRUMENT_CVD_FAILED
2801 ERROR IVR CONNECT TIMEOUT
2802 ERROR IVR COMMUNICATION ERROR
2803 ERROR IVR SERVICE TIMEOUT
2811 INFO DISCONNECTED BY CUSTOMER
2853 ERROR ERROR SMS SERVICE TIMEOUT
2873 ERROR ERROR USSD SERVICE TIMEOUT
2899 ERROR IVR UNKNOWN ERROR
2900 ERROR HTTP REQUEST FAILED
2901 ERROR HTTP REQUEST TIMED OUT
2902 ERROR RESPONSE XML FAILED
2903 ERROR XML RESPONSE FORMAT FAILURE
2905 ERROR STATUS IN XML NOT FOUND
2906 ERROR CODE IN XML NOT FOUND
2907 INFO CUSTOMER MOBILE BUSY
2908 INFO NO ANSWER FROM CUSTOMER MOBILE
2909 ERROR CONFIG XML COULD NOT BE CREATED
2910 ERROR LANGUAGE NOT SUPPORTED
2912 ERROR INVALID CONFIG XML
2913 ERROR NO HW CHANNEL FOUND
2914 ERROR RESPONSE SEND FAILURE
2916 INFO COULD NOT REACH CUSTOMERS MOBILE
2920 INFO 3 TIMES WRONG PIN

Brand Mobiliser Development Manual
Version 1.2 - September 2011 153
2921 INFO 3 TIMES NO RESPONSE
2933 ERROR TRANSACTIONTYPE WITHOUT OUTBOUNDTYPE
2935 ERROR IVR DATABASE ERROR
2943 INFO WRONG OR INVALID PIN
2945 INFO AUTHENTICATION DECLINED
2949 ERROR INVALID MOBILE NUMBER
2969 ERROR EMPTY PLAY LIST
9901 WARN R E M O V E !! COPIED TO 1311 !! NO COMM WITH MSG-GW: The error code indicates a problem that occurred in the communication with msg-gw
9935 ERROR UNKNOWN DB ERROR: An unknown database error occurred. Please contact support.
9999 ERROR UNKNOWN ERROR: An unknown error occurred. Please contact support.
11001 ERROR CUSTOMER CONFIGURATION INVALID : A customer setup is incomplete or invalid.
154
Brand Mobiliser Development Manual Version 1.2 - September 2011
SYBASE, INC. WORLDWIDE HEADQUARTERS ONE SYBASE DRIVE DUBLIN, CA 94568-7902 USA Tel: 1 800 8 SYBASE www.sybase.com
DOCUMENT ID: DC01690-01-0120-01 LAST REVISED: September 2011 Copyright © 2011 Sybase, an SAP company. All rights reserved. Unpublished rights reserved under U.S. copyright laws. Sybase, and the Sybase logo, are trademarks of Sybase, Inc. or its subsidiaries. ® indicates registration in the United States of America. SAP and the SAP logo, are trademarks or registered trademarks of SAP AG in Germany and in several other countries. All other trademarks are the property of their respective owners.