book for digital photographers KELBY SCOTT KELBY The Adobe Photoshop Lightroom CC Book for Digital...
31
the Adobe ® Photoshop ® book for digital photographers Scott Kelby
Transcript of book for digital photographers KELBY SCOTT KELBY The Adobe Photoshop Lightroom CC Book for Digital...

the Adobe® Photoshop®
book for digital photographers
Scott Kelby
Table of Contents viii
chapter 2 59
▼ LIBRARYHOW TO ORGANIZE YOUR PHOTOS
Folders and Why I Don’t Mess with Them (This Is Really Important!). . . . . . . . . . . . . . . . . . . .60
Sorting Your Photos Using Collections . . . . . . . . . . . . . . . . . . . . . . . .64
Organizing Multiple Shoots Using Collection Sets . . . . . . . . . . . . . . . . . . . . . . . . .76
Using Smart Collections for Automatic Organization . . . . . . . . . . . . . . . . . . . .78
Keeping Things Tidy Using Stacks . . . . . . . . . . . . . . .80
When to Use a Quick Collection Instead . . . . . . . . . . . .84
Using Target Collections (and Why They’re So Handy) . . . . . . . . . . . . . . . . . .86
Adding Specific Keywords for Advanced Searching . . . . . . . . . . . . . . . . . . . . . .88
Face Tagging to Find People Fast . . . . . . . . . . . . . . . .92
Renaming Photos Already in Lightroom . . . . . . . . . . . .99
Adding Copyright Info, Captions, and Other Metadata . . . . . . . . . . . . . . . . . . . . . 100
If Your Camera Supports GPS, Prepare to Amaze Your Friends . . . . . . . . . . . . . . . . . . . . . 103
Organizing Your Photos on a World Map . . . . . . . . . . . 105
Finding Photos Fast! . . . . . . . . . . . . . . . . . . . . . 111
Creating and Using Multiple Catalogs . . . . . . . . . . . . 115
From Laptop to Desktop: Syncing Catalogs on Two Computers. . . . . . . . . . . . . 117
Backing Up Your Catalog (This Is VERY Important) . . . . . . . . . . . . . . . . . . . 120
Relinking Missing Photos . . . . . . . . . . . . . . . . . . . 122
Dealing with Disasters (Troubleshooting) . . . . . . . . . . . . . . . . . . . . . . 124
Lightroom Killer Tips . . . . . . . . . . . . . . . . . . . . . 127
chapter 1 1
▼ IMPORTINGGETTING YOUR PHOTOS INTO LIGHTROOM
Before You Do Anything, Choose Where to Store Your Photos . . . . . . . . . . . . . . 2
Now Choose Your Backup Strategy . . . . . . . . . . . . . . . 3
My Method for Getting Your Photos Organized Before You Get Into Lightroom . . . . . . . . . . . 4
Getting Photos from Your Camera Into Lightroom (for New Lightroom Users) . . . . . . . . . . . . . . . . . . . 8
Getting Photos from Your Camera Into Lightroom (for More Advanced Users) . . . . . . . . . . . . . . . . . . . 12
Using Lightroom with a Laptop? You’ll Love Smart Previews . . . . . . . . . . . . . . . . . . .23
Save Time Importing Using Import Presets (and a Compact View) . . . . . . . . . . . . . . . . . . . . .25
Importing Video from Your DSLR . . . . . . . . . . . . . . . .27
Shooting Tethered (Go Straight from Your Camera, Right Into Lightroom) . . . . . . . . . . . . . .29
Using Image Overlay to See if Your Images Fit Your Layout . . . . . . . . . . . . . . . . . . . . . . . . .33
Creating Your Own Custom File Naming Templates. . . . . . . . . . . . . . . . .37
Choosing Your Preferences for Importing Photos . . . . . . . . . . . . . . . . . . . . . . 41
The Adobe DNG File Format Advantage . . . . . . . . . . . .44
Creating Your Own Custom Meta data (Copyright) Templates . . . . . . . . . . . . . . . . . . . . .45
Four Things You’ll Want to Know Now About Getting Around Lightroom . . . . . . . . . . . . . . .47
Viewing Your Imported Photos . . . . . . . . . . . . . . . . .49
Using Lights Dim, Lights Out, and Other Viewing Modes . . . . . . . . . . . . . . . . . . .51
Seeing a Real Full-Screen View . . . . . . . . . . . . . . . . .53
Using Guides and the Resizable Grid Overlays . . . . . . . . . . . . . . . . . . . . . . . . . .54
Lightroom Killer Tips . . . . . . . . . . . . . . . . . . . . . .55
TABLE of CONTENTS
The Adobe Photoshop Lightroom CC Book for Digital Photographers
Table of Contents ix
Applying Changes Made to One Photo to Other Photos . . . . . . . . . . . . . . . . . . . . . . . 180
Auto Sync: Perfect for Editing a Bunch of Photos at Once . . . . . . . . . . . . . . . . . . . 182
Using the Library Module’s Quick Develop Panel . . . . . . . . . . . . . . . . . . . . . 183
The “Previous” Button (and Why It Rocks!) . . . . . . . . . . 185
Putting It All Together (Doing a Start-to-Finish Tweak) . . . . . . . . . . . . . . . . 187
Lightroom Killer Tips . . . . . . . . . . . . . . . . . . . . . 189
chapter 5 191
▼ LOCAL ADJUSTMENTSHOW TO EDIT JUST PART OF YOUR IMAGES
Dodging, Burning, and Adjusting Individual Areas of Your Photo . . . . . . . . . . . . . . . . 192
Five More Things You Should Know About Lightroom’s Adjustment Brush . . . . . . . . . . . . 199
Selectively Fixing White Balance, Dark Shadows, and Noise Issues . . . . . . . . . . . . . . . 200
Retouching Portraits . . . . . . . . . . . . . . . . . . . . . 202
Fixing Skies (and Other Stuff) with a Gradient Filter . . . . . . . . . . . . . . . . . . . . . . . 206
Custom Vignettes & Spotlight Effects Using the Radial Filter . . . . . . . . . . . . . . . . . . . . 209
Lightroom Killer Tips . . . . . . . . . . . . . . . . . . . . . 213
chapter 6 217
▼ SPECIAL EFFECTSMAKING STUFF LOOK…WELL…SPECIAL!
Virtual Copies—The “No Risk” Way to Experiment . . . . . . . . . . . . . . . . . . . . . . . . 218
Two Really Handy Uses for RGB Curves . . . . . . . . . . . . 220
Changing Individual Colors. . . . . . . . . . . . . . . . . . 222
How to Add Vignette Effects . . . . . . . . . . . . . . . . . 224
Getting That Trendy High-Contrast Look . . . . . . . . . . . 227
Creating Black-and-White Images . . . . . . . . . . . . . . 230
Getting Great Duotones (and Split Tones) . . . . . . . . . . 234
http://kelbyone.com
chapter 3 131
▼ CUSTOMIZINGHOW TO SET THINGS UP YOUR WAY
Choosing What You See in Loupe View. . . . . . . . . . . . 132
Choosing What You See in Grid View . . . . . . . . . . . . . 134
Make Working with Panels Faster & Easier . . . . . . . . . . 138
Using Two Monitors with Lightroom . . . . . . . . . . . . . 139
Choosing What the Filmstrip Displays . . . . . . . . . . . . 143
Adding Your Studio’s Name or Logo for a Custom Look . . . . . . . . . . . . . . . . . . . . . . 144
Lightroom Killer Tips . . . . . . . . . . . . . . . . . . . . . 148
chapter 4 151
▼ EDITING ESSENTIALSHOW TO DEVELOP YOUR PHOTOS
Making Your RAW Photos Look More Like JPEGs . . . . . . . . . . . . . . . . . . . . . . . 152
Setting the White Balance . . . . . . . . . . . . . . . . . . 154
Setting Your White Balance Live While Shooting Tethered . . . . . . . . . . . . . . . . . . . 158
Seeing Befores and Afters . . . . . . . . . . . . . . . . . . 160
My Editing Your Images Cheat Sheet . . . . . . . . . . . . . 161
Controlling Overall Brightness Using the Exposure Slider . . . . . . . . . . . . . . . . . . 162
Automatically Matching Exposures . . . . . . . . . . . . . . 164
60 Seconds on the Histogram (& Which Slider Controls Which Part) . . . . . . . . . . . . . 166
Auto Tone (Having Lightroom Do the Work for You) . . . . . . . . . . . . . . . . . . . . . 167
Dealing With Highlight Problems (Clipping) . . . . . . . . . 168
Opening Up the Shadows (Like “Fill Light” on a Slider) . . . . . . . . . . . . . . . . . . 170
Setting Your White Point and Black Point . . . . . . . . . . . 171
Adding “Punch” to Your Images Using Clarity . . . . . . . . 173
Making Your Colors More Vibrant . . . . . . . . . . . . . . 174
Adding Contrast (and How to Use the Tone Curve)— This Is Important Stuff! . . . . . . . . . . . . . . . . . . . . 175
Library Develop Map Book Slideshow Print Web
Table of Contents x
Fixing Edge Vignetting . . . . . . . . . . . . . . . . . . . . 316
Sharpening Your Photos . . . . . . . . . . . . . . . . . . . 318
Fixing Chromatic Aberrations (a.k.a. That Annoying Color Fringe) . . . . . . . . . . . . . . 323
Basic Camera Calibration in Lightroom . . . . . . . . . . . . 324
Lightroom Killer Tips . . . . . . . . . . . . . . . . . . . . . 326
chapter 9 329
▼ EXPORTING IMAGESSAVING JPEGS, TIFFS, AND MORE
Saving Your Photos as JPEGs . . . . . . . . . . . . . . . . . 330
Adding a Watermark to Your Images . . . . . . . . . . . . . 338
Emailing Photos from Lightroom . . . . . . . . . . . . . . . 342
Exporting Your Original RAW Photo . . . . . . . . . . . . . 344
Publish Your Images with Just Two Clicks. . . . . . . . . . . 346
Lightroom Killer Tips . . . . . . . . . . . . . . . . . . . . . 352
chapter 10 355
▼ JUMPING TO PHOTOSHOPHOW AND WHEN TO DO IT
Choosing How Your Files Are Sent to Photoshop . . . . . . . . . . . . . . . . . . . . 356
How to Jump Over to Photoshop, and How to Jump Back . . . . . . . . . . . . . . . . . . . . . . 357
Adding Photoshop Automation to Your Lightroom Workflow . . . . . . . . . . . . . . . . . . 365
Lightroom Killer Tips . . . . . . . . . . . . . . . . . . . . . 371
chapter 11 373
▼ BOOK OF LOVECREATING PHOTO BOOKS
Before You Make Your First Book . . . . . . . . . . . . . . . 374
Building Your First Book from Scratch . . . . . . . . . . . . 376
Adding Text and Captions to Your Photo Book . . . . . . . . 388
Adding and Customizing Page Numbers . . . . . . . . . . . 392
Four Things You’ll Want to Know About Layout Templates . . . . . . . . . . . . . . . . . . . 394
Using One-Click Presets (and Making Your Own!). . . . . . . 236
Stitching Panoramas Right in Lightroom . . . . . . . . . . . 240
Creating 32-bit HDR Images in Lightroom . . . . . . . . . . 244
Making Streets & Cobblestones Look Wet . . . . . . . . . . 249
Lightroom Killer Tips . . . . . . . . . . . . . . . . . . . . . 251
chapter 7 253
▼ LIGHTROOM FOR MOBILEUSING THE MOBILE APP
Four Really Cool Things About Lightroom on Your Mobile Device . . . . . . . . . . . . . . . . . . . . 254
Setting Up Lightroom on Your Mobile Device . . . . . . . . 256
Getting Images Into Lightroom on Your Device (and Working with Collections) . . . . . . . . . 258
Flagging, Rating, and Sorting Your Images . . . . . . . . . . 266
Editing Your Images in Lightroom on Your Device (Its Version of the Basic Panel) . . . . . . . . . . 268
Cropping & Rotating . . . . . . . . . . . . . . . . . . . . . 274
Client Proofing Using Lightroom on Your Mobile Device. . . . . . . . . . . . . . . . . . . . . . 276
Four Last Things You’ll Want to Know (and They’re All Pretty Cool) . . . . . . . . . . . . . . . . . 282
chapter 8 287
▼ PROBLEM PHOTOSFIXING COMMON PROBLEMS
Fixing Backlit Photos . . . . . . . . . . . . . . . . . . . . . 288
Reducing Noise. . . . . . . . . . . . . . . . . . . . . . . . 290
Undoing Changes Made in Lightroom . . . . . . . . . . . . 292
Cropping Photos . . . . . . . . . . . . . . . . . . . . . . . 294
Lights Out Cropping Rocks!. . . . . . . . . . . . . . . . . . 297
Straightening Crooked Photos . . . . . . . . . . . . . . . . 298
Finding Spots and Specks the Easy Way . . . . . . . . . . . 300
Removing Stuff with the Spot Removal Tool . . . . . . . . . . . . . . . . . . . . . . 303
Removing Red Eye . . . . . . . . . . . . . . . . . . . . . . 306
Fixing Lens Distortion Problems . . . . . . . . . . . . . . . 307
TABLE of CONTENTS
The Adobe Photoshop Lightroom CC Book for Digital Photographers
Table of Contents xi
Saving Your Page Layout as a JPEG . . . . . . . . . . . . . . 477
Adding Custom Borders to Your Prints . . . . . . . . . . . . 479
Lightroom Killer Tips . . . . . . . . . . . . . . . . . . . . . 482
chapter 14 485
▼ THE LAYOUTCREATING COOL LAYOUTS FOR WEB & PRINT
Here Are Some of My Layouts for You to Use . . . . . . . . . . . . . . . . . . . . . . . . 486
chapter 15 501
▼ DSLR: THE MOVIEWORKING WITH VIDEO SHOT ON YOUR DSLR
Working with Videos . . . . . . . . . . . . . . . . . . . . . 502
chapter 16 513
▼ MY PORTRAIT WORKFLOWMY STEP-BY-STEP PROCESS FROM THE SHOOT TO THE FINAL PRINT
Workflow Step One: It All Starts with the Shoot . . . . . . . . . . . . . . . . . . . . . . . . 514
Workflow Step Two: Right After the Shoot, Do This First . . . . . . . . . . . . . . . . . . . . . . . . . 515
If I Didn’t Shoot Tethered, Here’s Importing from a Memory Card . . . . . . . . . . . . . . . . . . . . . 516
Workflow Step Three: Finding Your Picks & Making a Collection. . . . . . . . . . . 517
Workflow Step Four: A Quick Retouch for Your Selects . . . . . . . . . . . . . . . 520
Workflow Step Five: Emailing Your Clients the Proofs . . . . . . . . . . . . . . . 522
Workflow Step Six: Making the Final Tweaks & Working with Photoshop. . . . . 524
Workflow Step Seven: Delivering the Finished Image(s) . . . . . . . . . . . . . . . 529
10 Important Bits of Advice for New Lightroom Users . . . . 531
Want to Learn More? . . . . . . . . . . . . . . . . . . . . . 537
Index . . . . . . . . . . . . . . . . . . . . . . . . . . . . . 541
Creating & Saving Your Own Custom Layouts . . . . . . . . 396
Creating Cover Text. . . . . . . . . . . . . . . . . . . . . . 399
Custom Template Workaround . . . . . . . . . . . . . . . . 402
Lightroom Killer Tips . . . . . . . . . . . . . . . . . . . . . 404
chapter 12 407
▼ SLIDESHOWCREATING PRESENTATIONS OF YOUR WORK
Creating a Quick, Basic Slide Show . . . . . . . . . . . . . . 408
Customizing the Look of Your Slide Show . . . . . . . . . . 412
Adding Video to Your Slide Show. . . . . . . . . . . . . . . 418
Getting Creative with Photo Backgrounds . . . . . . . . . . 420
Working with Drop Shadows and Strokes . . . . . . . . . . 426
Adding Additional Lines of Text and Watermarking . . . . . . . . . . . . . . . . . . . . . . 427
Adding Opening and Closing Title Slides . . . . . . . . . . . 428
Adding Background Music . . . . . . . . . . . . . . . . . . 430
Choosing Your Slide Duration and Fade Length . . . . . . . 432
Sharing Your Slide Show . . . . . . . . . . . . . . . . . . . 433
Lightroom Killer Tips . . . . . . . . . . . . . . . . . . . . . 435
chapter 13 437
▼ THE BIG PRINTPRINTING YOUR PHOTOS
Printing Individual Photos . . . . . . . . . . . . . . . . . . 438
Creating Multi-Photo Contact Sheets. . . . . . . . . . . . . 442
Creating Custom Layouts Any Way You Want Them. . . . . . . . . . . . . . . . . . . 450
Adding Text to Your Print Layouts . . . . . . . . . . . . . . 454
Printing Multiple Photos on One Page . . . . . . . . . . . . 456
Saving Your Custom Layouts as Templates . . . . . . . . . . 461
Having Lightroom Remember Your Printing Layouts. . . . . . . . . . . . . . . . . . . . . 462
Creating Backscreened Prints. . . . . . . . . . . . . . . . . 463
The Final Print and Color Management Settings . . . . . . . 466
http://kelbyone.com
Library Develop Map Book Slideshow Print Web
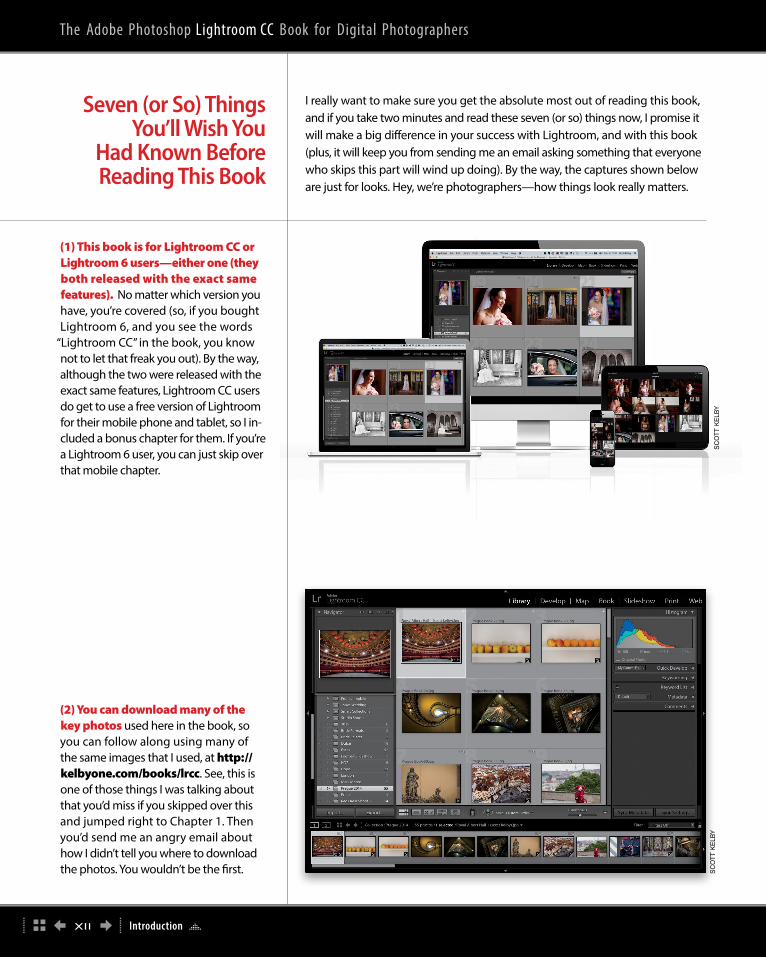
I really want to make sure you get the absolute most out of reading this book, and if you take two minutes and read these seven (or so) things now, I promise it will make a big difference in your success with Lightroom, and with this book (plus, it will keep you from sending me an email asking something that everyone who skips this part will wind up doing). By the way, the captures shown below are just for looks. Hey, we’re photographers—how things look really matters.
(1) This book is for Lightroom CC or Lightroom 6 users—either one (they both released with the exact same features). No matter which version you have, you’re covered (so, if you bought Lightroom 6, and you see the words
“Lightroom CC” in the book, you know not to let that freak you out). By the way, although the two were released with the exact same features, Lightroom CC users do get to use a free version of Lightroom for their mobile phone and tablet, so I in-cluded a bonus chapter for them. If you’re a Lightroom 6 user, you can just skip over that mobile chapter.
(2) You can download many of the key photos used here in the book, so you can follow along using many of the same images that I used, at http://kelbyone.com/books/lrcc. See, this is one of those things I was talking about that you’d miss if you skipped over this and jumped right to Chapter 1. Then you’d send me an angry email about how I didn’t tell you where to download the photos. You wouldn’t be the first.
Seven (or So) Things You’ll Wish You
Had Known Before Reading This Book
SC
OT
T K
ELB
YS
CO
TT
KE
LBY
The Adobe Photoshop Lightroom CC Book for Digital Photographers
Introduction xii

(3) If you’ve read my other books, you know they’re usually “jump in anywhere” books, but with Lightroom, I wrote the book in the order you’ll probably wind up using the program, so if you’re new to Lightroom, I would really recommend you start with Chapter 1 and go through the book in order. But hey—it’s your book—if you decide to just hollow out the insides and store your valuables in there, I’ll never know. Also, make sure you read the open -ing to each project, up at the top of the page. Those actually have information you’ll want to know, so don’t skip over them.
(4) The official name of the software is “Adobe Photoshop Lightroom CC” because it’s part of the Photoshop family, but if every time I referred to it throughout the book, I called it “Adobe Photoshop Lightroom CC,” you’d eventually want to strangle me (or the person sitting nearest you), so from here on out, I usually just refer to it as “Lightroom” or “Lightroom CC” Just so you know.
(5) The intro page at the beginning of each chapter is designed to give you a quick mental break, and honestly, they have little to do with the chapter. In fact, they have little to do with anything, but writing these quirky chapter intros is kind of a tradition of mine (I do this in all my books, and I even released a book of just the best chapter intros from all of my books. I am not making this up), but if you’re one of those really “serious” types, you can skip them, because they’ll just get on your nerves.
SC
OT
T K
ELB
YS
CO
TT
KE
LBY
Library Develop Map Book Slideshow Print Web
Introduction xiii
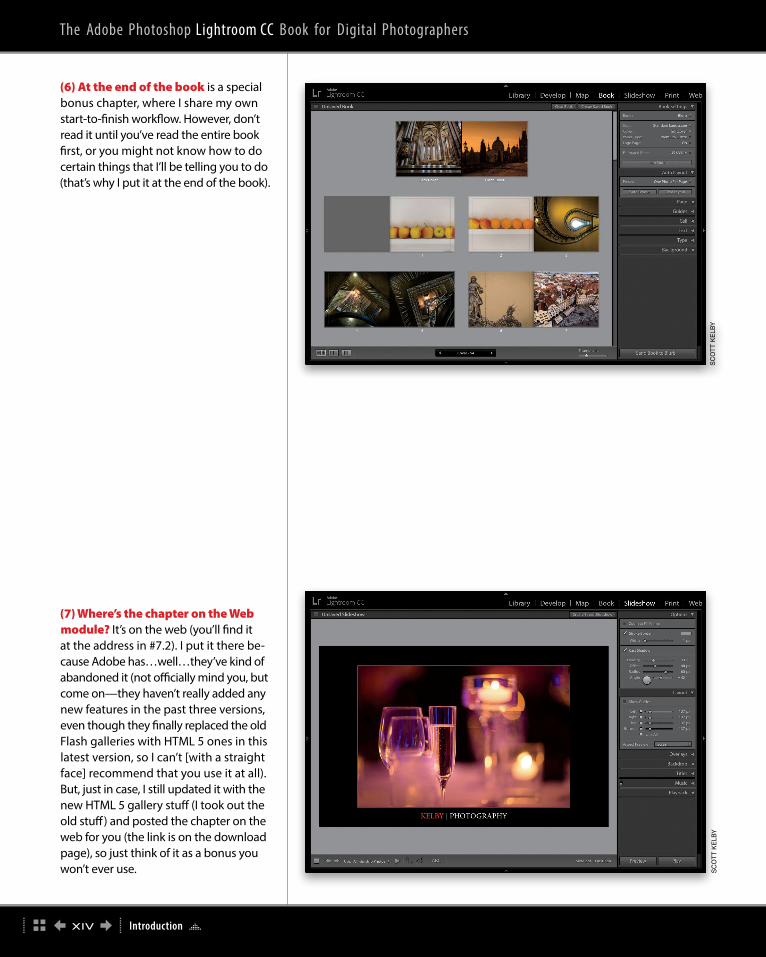
(6) At the end of the book is a special bonus chapter, where I share my own start-to-finish workflow. However, don’t read it until you’ve read the entire book first, or you might not know how to do certain things that I’ll be telling you to do (that’s why I put it at the end of the book).
(7) Where’s the chapter on the Web module? It’s on the web (you’ll find it at the address in #7.2). I put it there be-cause Adobe has…well…they’ve kind of abandoned it (not officially mind you, but come on—they haven’t really added any new features in the past three versions, even though they finally replaced the old Flash galleries with HTML 5 ones in this latest version, so I can’t [with a straight face] recommend that you use it at all). But, just in case, I still updated it with the new HTML 5 gallery stuff (I took out the old stuff) and posted the chapter on the web for you (the link is on the download page), so just think of it as a bonus you won’t ever use.
SC
OT
T K
ELB
YS
CO
TT
KE
LBY
The Adobe Photoshop Lightroom CC Book for Digital Photographers
Introduction xiv
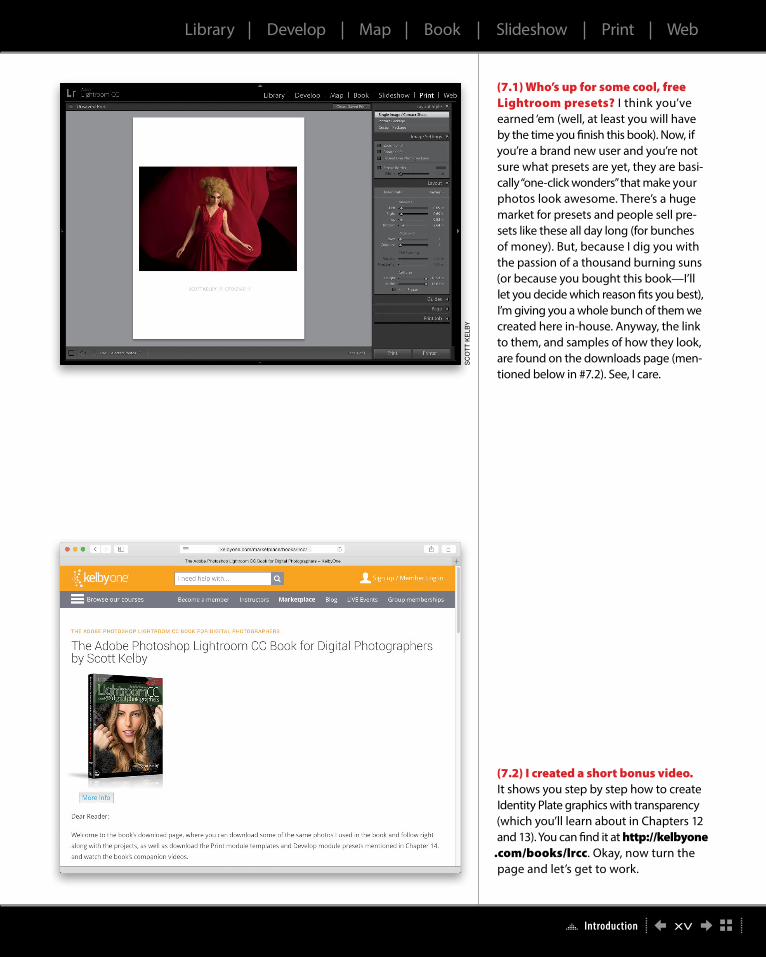
(7.1) Who’s up for some cool, free Lightroom presets? I think you’ve earned ‘em (well, at least you will have by the time you finish this book). Now, if you’re a brand new user and you’re not sure what presets are yet, they are basi-cally “one-click wonders” that make your photos look awesome. There’s a huge market for presets and people sell pre-sets like these all day long (for bunches of money). But, because I dig you with the passion of a thousand burning suns (or because you bought this book—I’ll let you decide which reason fits you best), I’m giving you a whole bunch of them we created here in-house. Anyway, the link to them, and samples of how they look, are found on the downloads page (men-tioned below in #7.2). See, I care.
(7.2) I created a short bonus video. It shows you step by step how to create Identity Plate graphics with transparency (which you’ll learn about in Chapters 12 and 13). You can find it at http://kelbyone
.com/books/lrcc. Okay, now turn the page and let’s get to work.
SC
OT
T K
ELB
Y
Library Develop Map Book Slideshow Print Web
Introduction xv
1
CHAPTER 1
Okay, if you’re reading this chapter intro,
then it’s safe to assume that you read my
brief warning (given just a page earlier), that
these chapter intros have little, if anything, to
do with what’s actually in the chapter ahead.
These are here strictly to give you a quick
mental break from all the learning. Of course
where it kind of falls apart is right here at the
beginning of the book, because…well…you
haven’t really learned anything at this point,
so you probably don’t need a mental break
quite yet. Of course, this concerns me, but
clearly not enough to actually skip having
a chapter intro for Chapter One, because
then this page would be blank, and if there’s
one thing I’ve learned—people don’t like
blank pages. That’s why in some books
when you see a blank page, it says, “This
page inten tionally left blank.” This fascinates
me, partly because they never tell you why
it’s intentionally left blank and partly because,
since they’ve printed the sentence “This page
intentionally left blank,” the page isn’t actual-
ly blank anymore. So really, the whole thing’s
a big blank page scam, but if you call them on
it, they start talking about “printers’ spreads”
and “pagination for press” and “propaganda
spread by subversive anti-government organi-
zations” and a dozen other technical reasons
why sometimes a page has to be left blank.
Well, I don’t want you to think that this page
was a part of their larger conspiracy, so even
though you didn’t actually need a mental
break at this point (but probably do now),
you’re still getting one. In the publishing
world, this is called “paying it forward.” By
the way, that’s not what it’s really called, but
what it’s really called can only be included on
pages that were intentionally left blank. (Hey,
I warned you these intros would be like this.)
IMPORTINGgetting your photos into lightroom
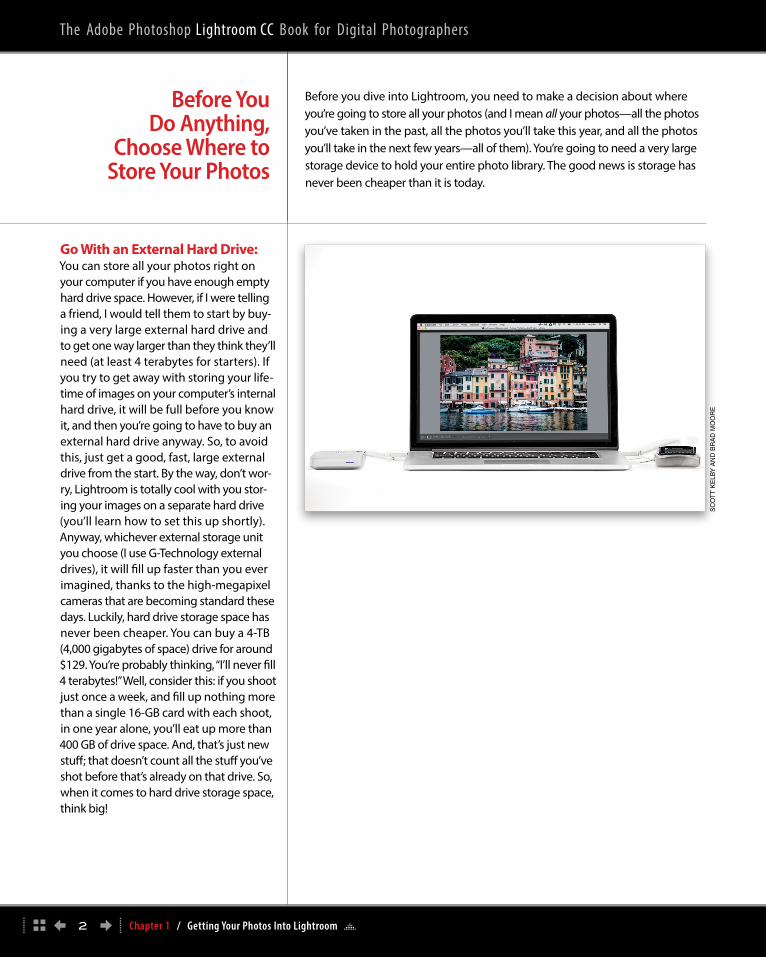
Go With an External Hard Drive:You can store all your photos right on your computer if you have enough empty hard drive space. However, if I were telling a friend, I would tell them to start by buy-ing a very large external hard drive and to get one way larger than they think they’ll need (at least 4 terabytes for starters). If you try to get away with storing your life-time of images on your computer’s internal hard drive, it will be full before you know it, and then you’re going to have to buy an external hard drive anyway. So, to avoid this, just get a good, fast, large external drive from the start. By the way, don’t wor-ry, Lightroom is totally cool with you stor-ing your images on a separate hard drive (you’ll learn how to set this up shortly). Any way, whichever external storage unit you choose (I use G-Technology external drives), it will fill up faster than you ever imagined, thanks to the high-megapixel cameras that are becoming standard these days. Luckily, hard drive storage space has never been cheaper. You can buy a 4-TB (4,000 gigabytes of space) drive for around $129. You’re probably thinking, “I’ll never fill 4 terabytes!” Well, consider this: if you shoot just once a week, and fill up nothing more than a single 16-GB card with each shoot, in one year alone, you’ll eat up more than 400 GB of drive space. And, that’s just new stuff; that doesn’t count all the stuff you’ve shot before that’s already on that drive. So, when it comes to hard drive storage space, think big!
Before you dive into Lightroom, you need to make a decision about where you’re going to store all your photos (and I mean all your photos—all the photos you’ve taken in the past, all the photos you’ll take this year, and all the photos you’ll take in the next few years—all of them). You’re going to need a very large storage device to hold your entire photo library. The good news is storage has never been cheaper than it is today.
Before You Do Anything,
Choose Where to Store Your Photos
SC
OT
T K
ELB
Y A
ND
BR
AD
MO
OR
E
Chapter 1 / Getting Your Photos Into Lightroom 2
The Adobe Photoshop Lightroom CC Book for Digital Photographers
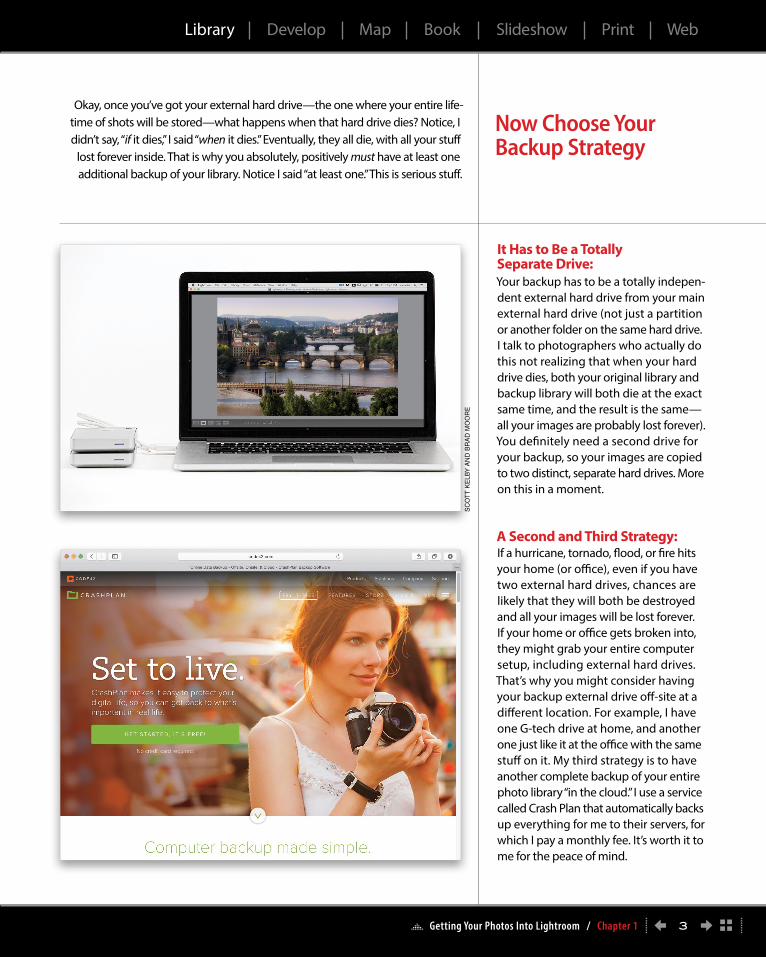
Okay, once you’ve got your external hard drive—the one where your entire life-time of shots will be stored—what happens when that hard drive dies? Notice, I didn’t say, “if it dies,” I said “when it dies.” Eventually, they all die, with all your stuff
lost forever inside. That is why you absolutely, positively must have at least one additional backup of your library. Notice I said “at least one.” This is serious stuff.
Now Choose Your Backup Strategy
It Has to Be a Totally Separate Drive:Your backup has to be a totally indepen-dent external hard drive from your main external hard drive (not just a partition or another folder on the same hard drive. I talk to photographers who actually do this not realizing that when your hard drive dies, both your original library and backup library will both die at the exact same time, and the result is the same— all your images are probably lost forever). You definitely need a second drive for your backup, so your images are copied to two distinct, separate hard drives. More on this in a moment.
A Second and Third Strategy:If a hurricane, tornado, flood, or fire hits your home (or office), even if you have two external hard drives, chances are likely that they will both be destroyed and all your images will be lost forever. If your home or office gets broken into, they might grab your entire computer setup, including external hard drives. That’s why you might consider having your backup external drive off-site at a different location. For example, I have one G-tech drive at home, and another one just like it at the office with the same stuff on it. My third strategy is to have another complete backup of your entire photo library “in the cloud.” I use a service called Crash Plan that automatically backs up everything for me to their servers, for which I pay a monthly fee. It’s worth it to me for the peace of mind.
SC
OT
T K
ELB
Y A
ND
BR
AD
MO
OR
E
Getting Your Photos Into Lightroom / Chapter 1 3
Library Develop Map Book Slideshow Print Web
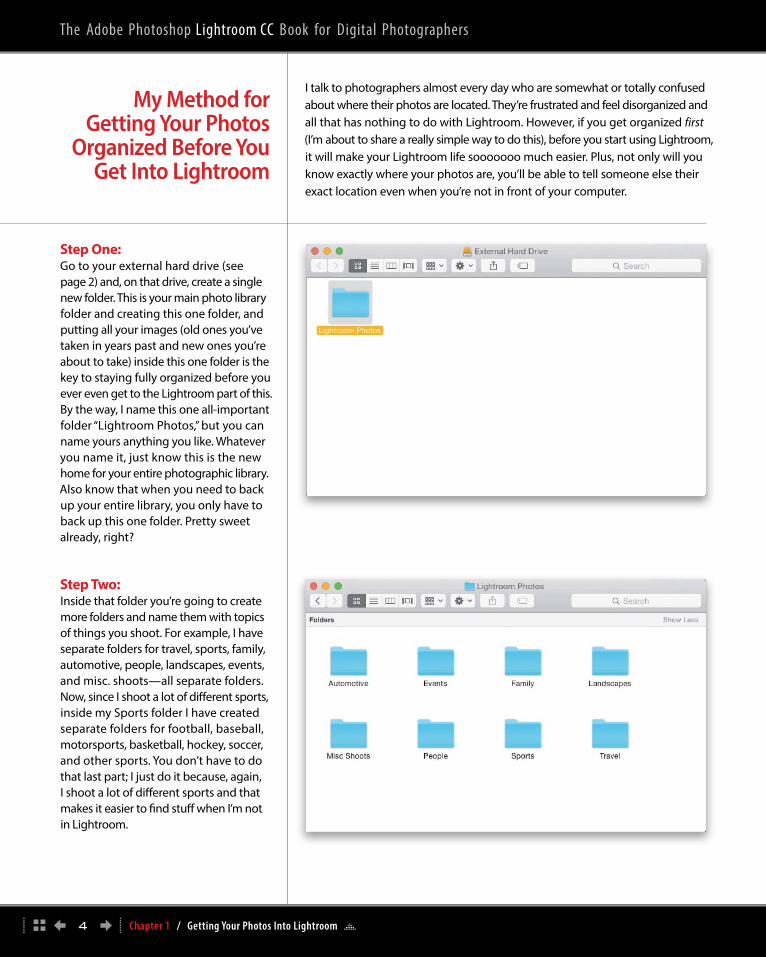
Step One:Go to your external hard drive (see page 2) and, on that drive, create a single new folder. This is your main photo library folder and creating this one folder, and putting all your images (old ones you’ve taken in years past and new ones you’re about to take) inside this one folder is the key to staying fully organized before you ever even get to the Lightroom part of this. By the way, I name this one all-important folder “Light room Photos,” but you can name yours anything you like. Whatever you name it, just know this is the new home for your entire photographic library. Also know that when you need to back up your entire library, you only have to back up this one folder. Pretty sweet already, right?
Step Two:Inside that folder you’re going to create more folders and name them with topics of things you shoot. For example, I have separate folders for travel, sports, family, automotive, people, landscapes, events, and misc. shoots—all separate folders. Now, since I shoot a lot of different sports, inside my Sports folder I have created separate folders for football, baseball, motorsports, basketball, hockey, soccer, and other sports. You don’t have to do that last part; I just do it because, again, I shoot a lot of different sports and that makes it easier to find stuff when I’m not in Lightroom.
I talk to photographers almost every day who are somewhat or totally confused about where their photos are located. They’re frustrated and feel disorganized and all that has nothing to do with Lightroom. However, if you get organized first (I’m about to share a really simple way to do this), before you start using Lightroom, it will make your Lightroom life sooooooo much easier. Plus, not only will you know exactly where your photos are, you’ll be able to tell someone else their exact location even when you’re not in front of your computer.
My Method for Getting Your Photos
Organized Before You Get Into Lightroom
Chapter 1 / Getting Your Photos Into Lightroom 4
The Adobe Photoshop Lightroom CC Book for Digital Photographers
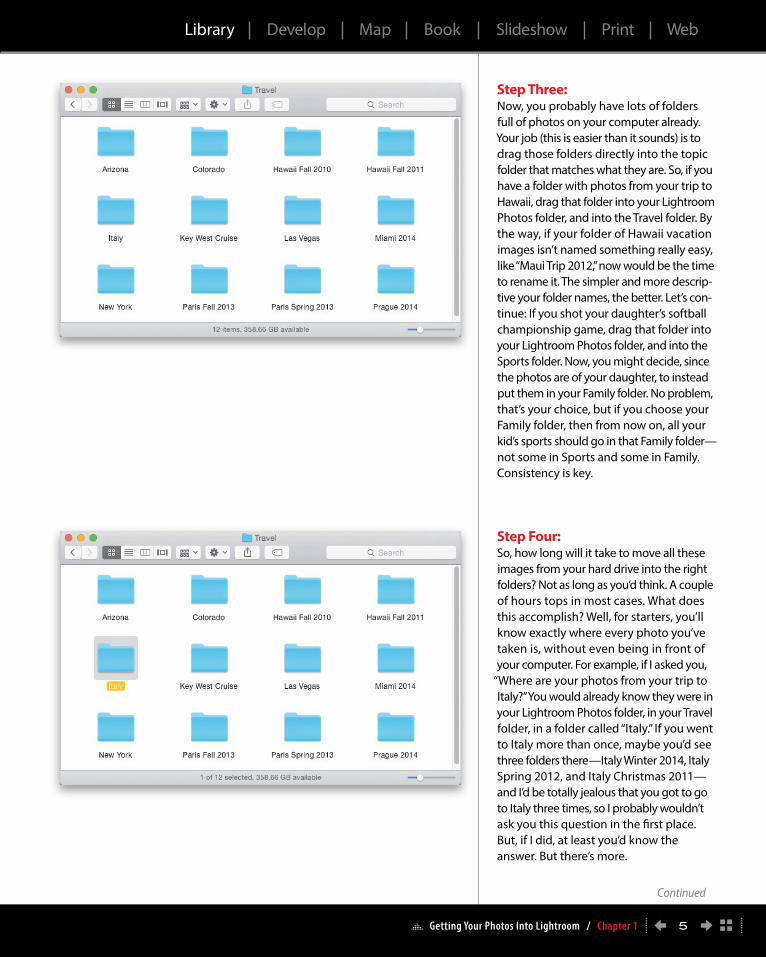
Step Three:Now, you probably have lots of folders full of photos on your computer already. Your job (this is easier than it sounds) is to drag those folders directly into the topic folder that matches what they are. So, if you have a folder with photos from your trip to Hawaii, drag that folder into your Lightroom Photos folder, and into the Travel folder. By the way, if your folder of Hawaii vacation images isn’t named something really easy, like “Maui Trip 2012,” now would be the time to rename it. The simpler and more descrip-tive your folder names, the better. Let’s con-tinue: If you shot your daughter’s softball championship game, drag that folder into your Lightroom Photos folder, and into the Sports folder. Now, you might decide, since the photos are of your daughter, to instead put them in your Family folder. No problem, that’s your choice, but if you choose your Family folder, then from now on, all your kid’s sports should go in that Family folder—not some in Sports and some in Family. Consistency is key.
Step Four:So, how long will it take to move all these images from your hard drive into the right folders? Not as long as you’d think. A couple of hours tops in most cases. What does this accomplish? Well, for starters, you’ll know exactly where every photo you’ve taken is, without even being in front of your computer. For example, if I asked you,
“Where are your photos from your trip to Italy?” You would already know they were in your Lightroom Photos folder, in your Travel folder, in a folder called “Italy.” If you went to Italy more than once, maybe you’d see three folders there—Italy Winter 2014, Italy Spring 2012, and Italy Christ mas 2011—and I’d be totally jealous that you got to go to Italy three times, so I probably wouldn’t ask you this question in the first place. But, if I did, at least you’d know the answer. But there’s more.
5
Continued
Getting Your Photos Into Lightroom / Chapter 1
Library Develop Map Book Slideshow Print Web
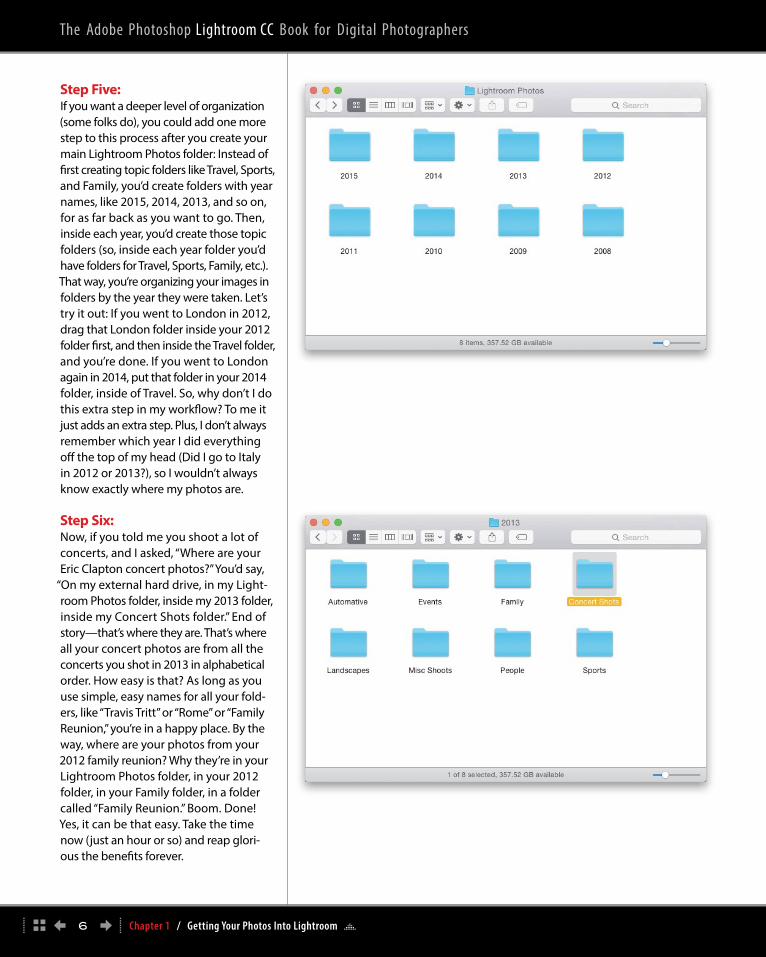
Step Five:If you want a deeper level of organization (some folks do), you could add one more step to this process after you create your main Lightroom Photos folder: Instead of first creating topic folders like Travel, Sports, and Family, you’d create folders with year names, like 2015, 2014, 2013, and so on, for as far back as you want to go. Then, inside each year, you’d create those topic folders (so, inside each year folder you’d have folders for Travel, Sports, Family, etc.). That way, you’re organizing your images in folders by the year they were taken. Let’s try it out: If you went to London in 2012, drag that London folder inside your 2012 folder first, and then inside the Travel folder, and you’re done. If you went to London again in 2014, put that folder in your 2014 folder, inside of Travel. So, why don’t I do this extra step in my workflow? To me it just adds an extra step. Plus, I don’t always remember which year I did everything off the top of my head (Did I go to Italy in 2012 or 2013?), so I wouldn’t always know exactly where my photos are.
Step Six:Now, if you told me you shoot a lot of con certs, and I asked, “Where are your Eric Clapton concert photos?” You’d say,
“On my external hard drive, in my Light-room Photos folder, inside my 2013 folder, inside my Concert Shots folder.” End of story—that’s where they are. That’s where all your concert photos are from all the con certs you shot in 2013 in alphabetical order. How easy is that? As long as you use simple, easy names for all your fold-ers, like “Travis Tritt” or “Rome” or “Family Reunion,” you’re in a happy place. By the way, where are your photos from your 2012 family reunion? Why they’re in your Lightroom Photos folder, in your 2012 folder, in your Family folder, in a folder called “Family Reunion.” Boom. Done! Yes, it can be that easy. Take the time now (just an hour or so) and reap glori-ous the benefits forever.
6
The Adobe Photoshop Lightroom CC Book for Digital Photographers
Chapter 1 / Getting Your Photos Into Lightroom
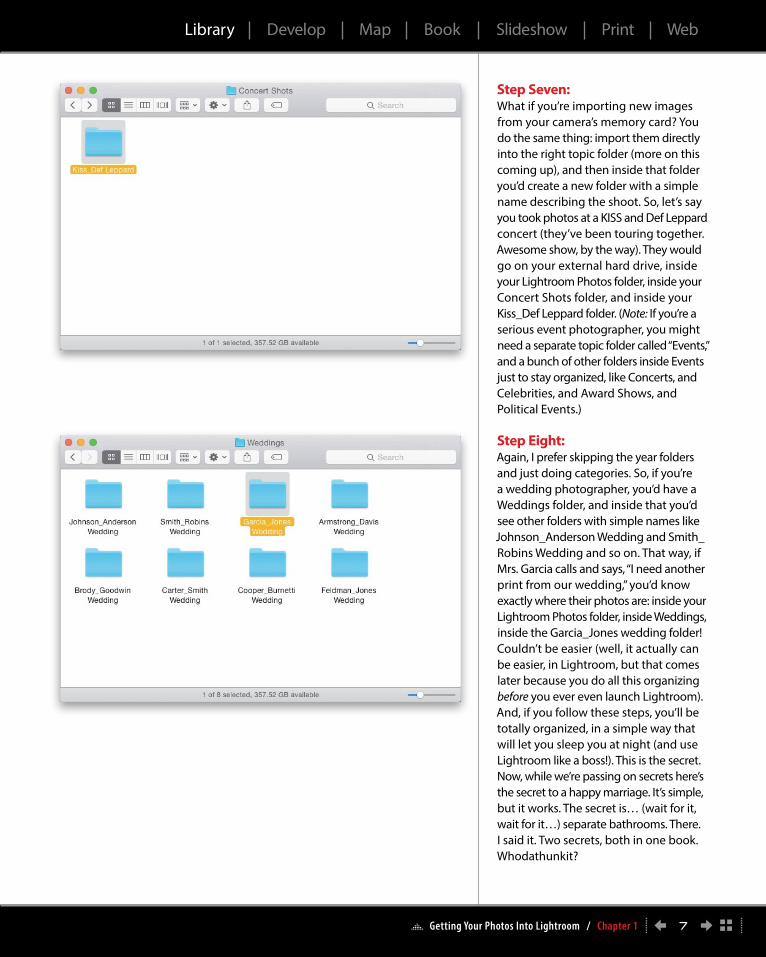
Step Seven:What if you’re importing new images from your camera’s memory card? You do the same thing: im port them directly into the right topic folder (more on this coming up), and then inside that folder you’d create a new folder with a simple name describing the shoot. So, let’s say you took photos at a KISS and Def Leppard concert (they’ve been touring together. Awesome show, by the way). They would go on your external hard drive, inside your Lightroom Photos folder, inside your Concert Shots folder, and inside your Kiss_Def Leppard folder. (Note: If you’re a serious event photographer, you might need a separate topic folder called “Events,” and a bunch of other folders inside Events just to stay organized, like Concerts, and Celebrities, and Award Shows, and Political Events.)
Step Eight:Again, I prefer skipping the year folders and just doing categories. So, if you’re a wedding photographer, you’d have a Weddings folder, and inside that you’d see other folders with simple names like Johnson_Anderson Wedding and Smith_Robins Wedding and so on. That way, if Mrs. Garcia calls and says, “I need another print from our wedding,” you’d know exactly where their photos are: inside your Lightroom Photos folder, inside Weddings, inside the Garcia_Jones wedding folder! Couldn’t be easier (well, it actually can be easier, in Lightroom, but that comes later because you do all this organizing before you ever even launch Lightroom). And, if you follow these steps, you’ll be totally organized, in a simple way that will let you sleep you at night (and use Lightroom like a boss!). This is the secret. Now, while we’re passing on secrets here’s the secret to a happy marriage. It’s simple, but it works. The secret is… (wait for it, wait for it…) separate bathrooms. There. I said it. Two secrets, both in one book. Whodathunkit?
7 Getting Your Photos Into Lightroom / Chapter 1
Library Develop Map Book Slideshow Print Web
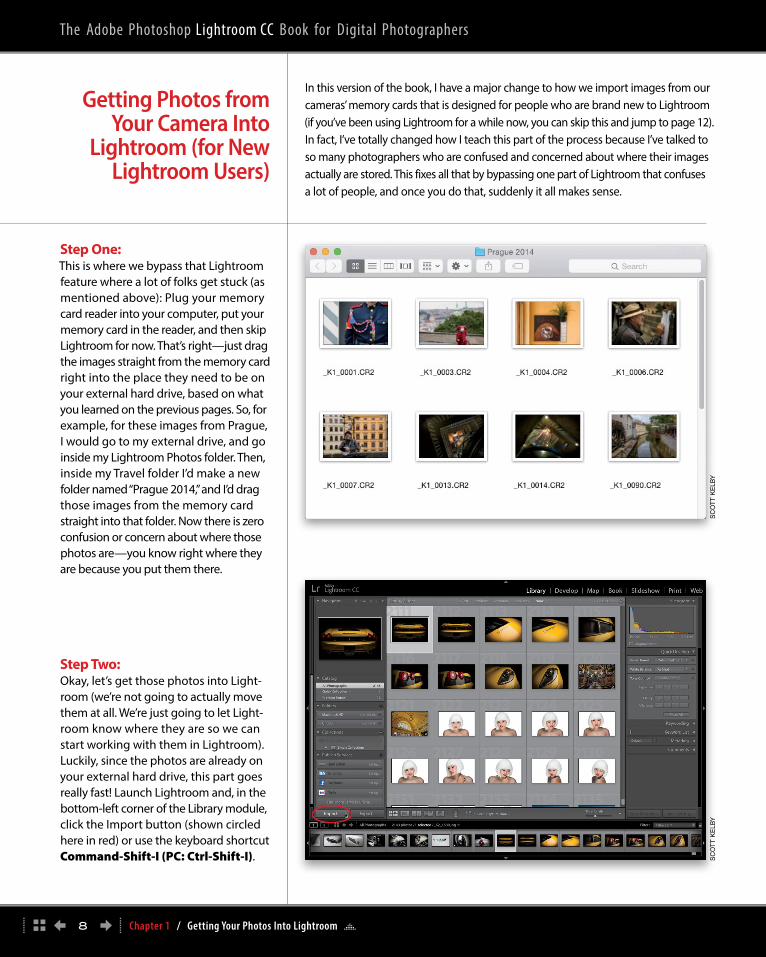
Step One:This is where we bypass that Lightroom feature where a lot of folks get stuck (as mentioned above): Plug your memory card reader into your computer, put your memory card in the reader, and then skip Lightroom for now. That’s right—just drag the images straight from the memory card right into the place they need to be on your external hard drive, based on what you learned on the previous pages. So, for example, for these images from Prague, I would go to my external drive, and go inside my Lightroom Photos folder. Then, inside my Travel folder I’d make a new folder named “Prague 2014,” and I’d drag those images from the memory card straight into that folder. Now there is zero confusion or concern about where those photos are—you know right where they are because you put them there.
Step Two:Okay, let’s get those photos into Light-room (we’re not going to actually move them at all. We’re just going to let Light-room know where they are so we can start working with them in Lightroom). Luckily, since the photos are already on your external hard drive, this part goes really fast! Launch Lightroom and, in the bottom-left corner of the Library module, click the Import button (shown circled here in red) or use the keyboard shortcut Command-Shift-I (PC: Ctrl-Shift-I).
In this version of the book, I have a major change to how we import images from our cameras’ memory cards that is designed for people who are brand new to Lightroom (if you’ve been using Lightroom for a while now, you can skip this and jump to page 12). In fact, I’ve totally changed how I teach this part of the process because I’ve talked to so many photographers who are confused and concerned about where their images actually are stored. This fixes all that by bypassing one part of Lightroom that confuses a lot of people, and once you do that, suddenly it all makes sense.
Getting Photos from Your Camera Into
Lightroom (for New Lightroom Users)
Chapter 1 / Getting Your Photos Into Lightroom 8
The Adobe Photoshop Lightroom CC Book for Digital Photographers
SC
OT
T K
ELB
YS
CO
TT
KE
LBY
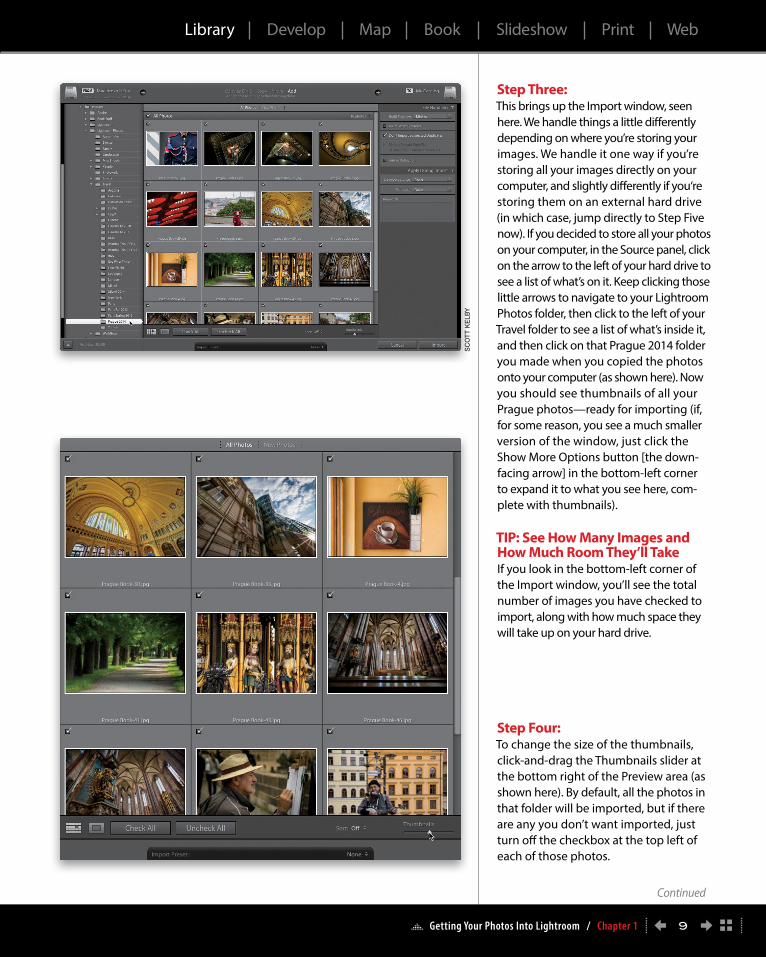
Step Three:This brings up the Import window, seen here. We handle things a little differently depending on where you’re storing your images. We handle it one way if you’re storing all your images directly on your computer, and slightly differently if you‘re storing them on an external hard drive (in which case, jump directly to Step Five now). If you decided to store all your photos on your computer, in the Source panel, click on the arrow to the left of your hard drive to see a list of what’s on it. Keep clicking those little arrows to navigate to your Lightroom Photos folder, then click to the left of your Travel folder to see a list of what’s inside it, and then click on that Prague 2014 folder you made when you copied the photos onto your computer (as shown here). Now you should see thumbnails of all your Prague photos—ready for import ing (if, for some reason, you see a much smaller version of the window, just click the Show More Options button [the down-facing arrow] in the bottom-left corner to expand it to what you see here, com-plete with thumbnails).
TIP: See How Many Images and How Much Room They’ll TakeIf you look in the bottom-left corner of the Import window, you’ll see the total number of images you have checked to import, along with how much space they will take up on your hard drive.
Step Four:To change the size of the thumbnails, click-and-drag the Thumbnails slider at the bottom right of the Preview area (as shown here). By default, all the photos in that folder will be imported, but if there are any you don’t want imported, just turn off the checkbox at the top left of each of those photos.
9
Continued
Getting Your Photos Into Lightroom / Chapter 1
Library Develop Map Book Slideshow Print Web
SC
OT
T K
ELB
Y
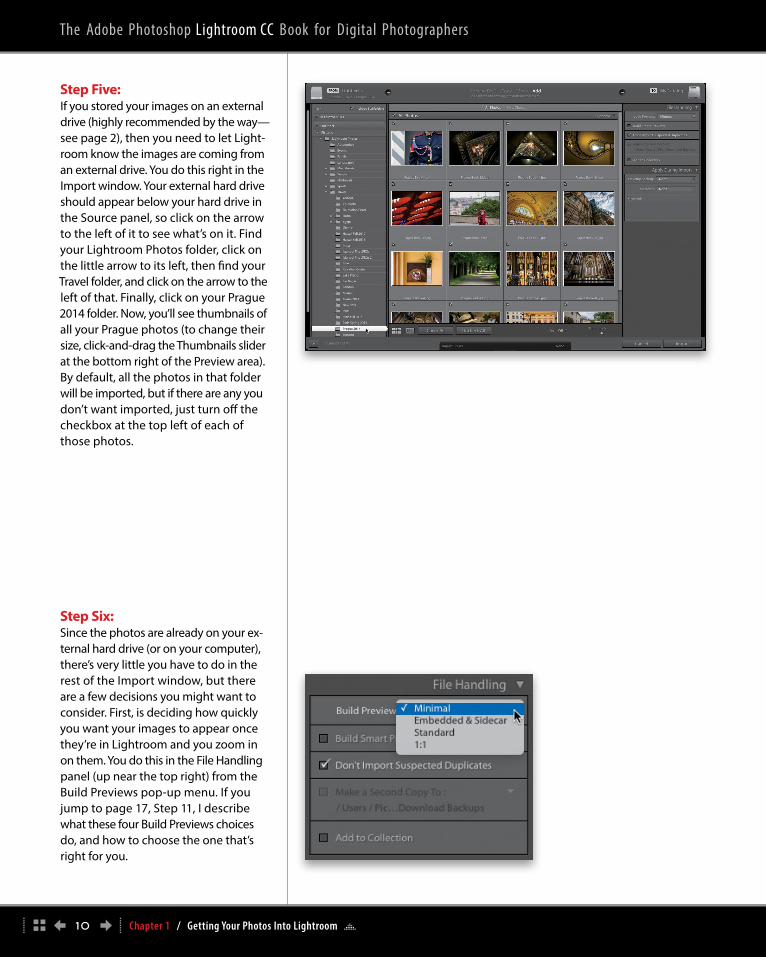
Step Five: If you stored your images on an external drive (highly recommended by the way—see page 2), then you need to let Light-room know the images are coming from an external drive. You do this right in the Import window. Your external hard drive should appear below your hard drive in the Source panel, so click on the arrow to the left of it to see what’s on it. Find your Lightroom Photos folder, click on the little arrow to its left, then find your Travel folder, and click on the arrow to the left of that. Finally, click on your Prague 2014 folder. Now, you’ll see thumbnails of all your Prague photos (to change their size, click-and-drag the Thumbnails slider at the bottom right of the Preview area). By default, all the photos in that folder will be imported, but if there are any you don’t want imported, just turn off the checkbox at the top left of each of those photos.
Step Six:Since the photos are already on your ex-ternal hard drive (or on your computer), there’s very little you have to do in the rest of the Import window, but there are a few decisions you might want to consider. First, is deciding how quickly you want your images to appear once they’re in Lightroom and you zoom in on them. You do this in the File Handling panel (up near the top right) from the Build Previews pop-up menu. If you jump to page 17, Step 11, I describe what these four Build Previews choices do, and how to choose the one that’s right for you.
10
The Adobe Photoshop Lightroom CC Book for Digital Photographers
Chapter 1 / Getting Your Photos Into Lightroom

Step Seven:Right below that is the Build Smart Pre-views checkbox. You turn this checkbox on only if you want the ability to edit these images in the Develop module (adjusting Exposure and Vibrance and stuff like that) when your external hard drive is dis connected from your com puter (Smart Pre-views are for people working on a lap top. If you don’t work on a laptop, you’d always leave this turned off. See page 23 for more about Smart Previews). Also, I recommend leaving the checkbox turned on for Don’t Import Suspected Duplicates, just so you don’t accidentally import two copies of the same image (this is probably only likely to happen when you import multiple times from the same memory card). You’ll know they’re duplicates because their thumb-nails will be grayed out. If all the images are duplicate, the Import button will also be grayed out. If you want your imported images to appear inside a collection (this saves you a step if you were planning on doing it later anyway), then turn on the Add to Collection checkbox. That brings up a list of your existing collections. Just click on the one you want these images added to, or click on the plus sign icon to the right of the checkbox to create a new collection, and Lightroom will take care of the rest. Now, if you’re new to Lightroom and you’re asking yourself, “What’s a collection?” just skip this whole Add to Collection thing for now. It will come in handy after you’ve read Chapter 2.
Step Eight:There’s one other set of options you need to know about: the Apply During Import panel settings (also on the right side of the window). I explain these on page 20, start-ing in Step 14, so jump over there, check those out, make your choices, and that’s about it—you’re ready to hit the Import button and start working with those im-ages you took in Prague, in Lightroom.
11 Getting Your Photos Into Lightroom / Chapter 1
Library Develop Map Book Slideshow Print Web
Getting Photos from Your Camera Into
Lightroom (for More Advanced Users)
If you’ve been using Lightroom for a while now, and you’re totally comfortable with where your photos are stored—you know exactly where they are and have zero amount of stress over where your images reside—then this is for you. I’m going to make you a Ninja Master Fourth Level Mage (or something like that) on the importing process and the options you have in the Import window. However, if you are brand new to Lightroom or already have photos on your drive, I absolutely do not recommend this workflow—jump back to page 8. You’ll thank me.
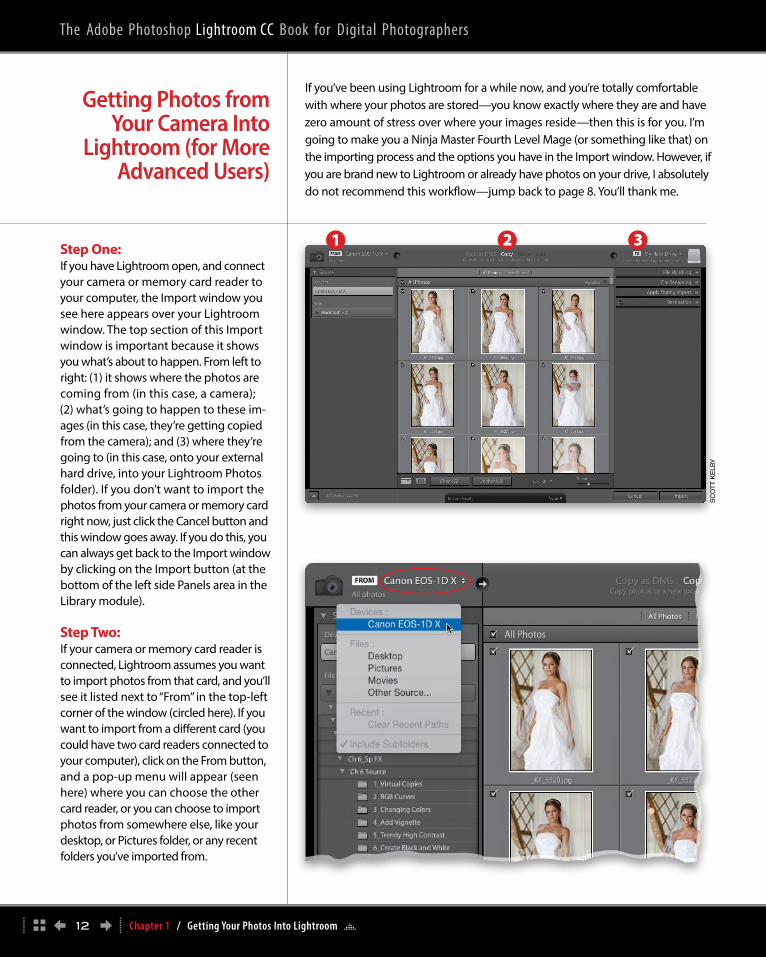
Step One:If you have Lightroom open, and connect your camera or memory card reader to your computer, the Import window you see here appears over your Lightroom window. The top section of this Import window is important because it shows you what’s about to happen. From left to right: (1) it shows where the photos are coming from (in this case, a camera); (2) what’s going to happen to these im-ages (in this case, they’re getting copied from the camera); and (3) where they’re going to (in this case, onto your external hard drive, into your Lightroom Photos folder). If you don’t want to import the photos from your camera or memory card right now, just click the Cancel button and this window goes away. If you do this, you can always get back to the Import window by clicking on the Import button (at the bottom of the left side Panels area in the Library module).
Step Two:If your camera or memory card reader is connected, Lightroom assumes you want to import photos from that card, and you’ll see it listed next to “From” in the top-left corner of the window (circled here). If you want to import from a different card (you could have two card readers connected to your computer), click on the From button, and a pop-up menu will appear (seen here) where you can choose the other card reader, or you can choose to import photos from somewhere else, like your desktop, or Pictures folder, or any recent folders you’ve imported from.
SC
OT
T K
ELB
Y
Chapter 1 / Getting Your Photos Into Lightroom 12
The Adobe Photoshop Lightroom CC Book for Digital Photographers
1 2 3
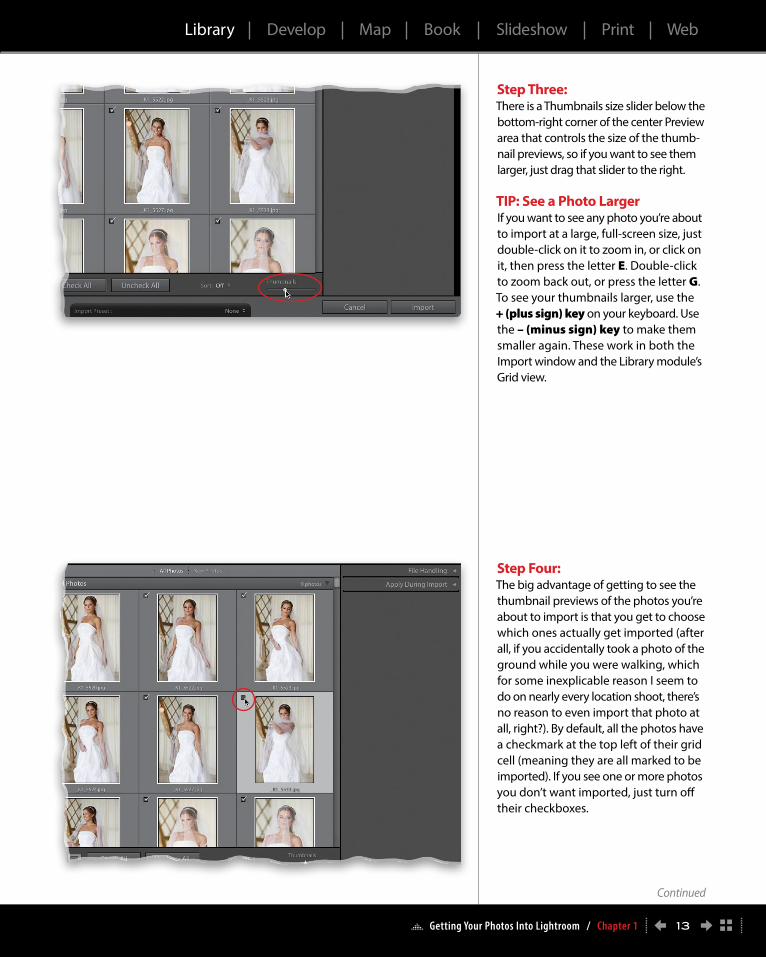
Step Three:There is a Thumbnails size slider below the bottom-right corner of the center Preview area that controls the size of the thumb-nail previews, so if you want to see them larger, just drag that slider to the right.
TIP: See a Photo LargerIf you want to see any photo you’re about to import at a large, full-screen size, just double-click on it to zoom in, or click on it, then press the letter E. Double-click to zoom back out, or press the letter G. To see your thumbnails larger, use the + (plus sign) key on your keyboard. Use the – (minus sign) key to make them smaller again. These work in both the Import window and the Library module’s Grid view.
Step Four:The big advantage of getting to see the thumbnail previews of the photos you’re about to import is that you get to choose which ones actually get imported (after all, if you accidentally took a photo of the ground while you were walking, which for some inexplicable reason I seem to do on nearly every location shoot, there’s no reason to even import that photo at all, right?). By default, all the photos have a checkmark at the top left of their grid cell (meaning they are all marked to be imported). If you see one or more photos you don’t want imported, just turn off their checkboxes.
13
Continued
Getting Your Photos Into Lightroom / Chapter 1
Library Develop Map Book Slideshow Print Web
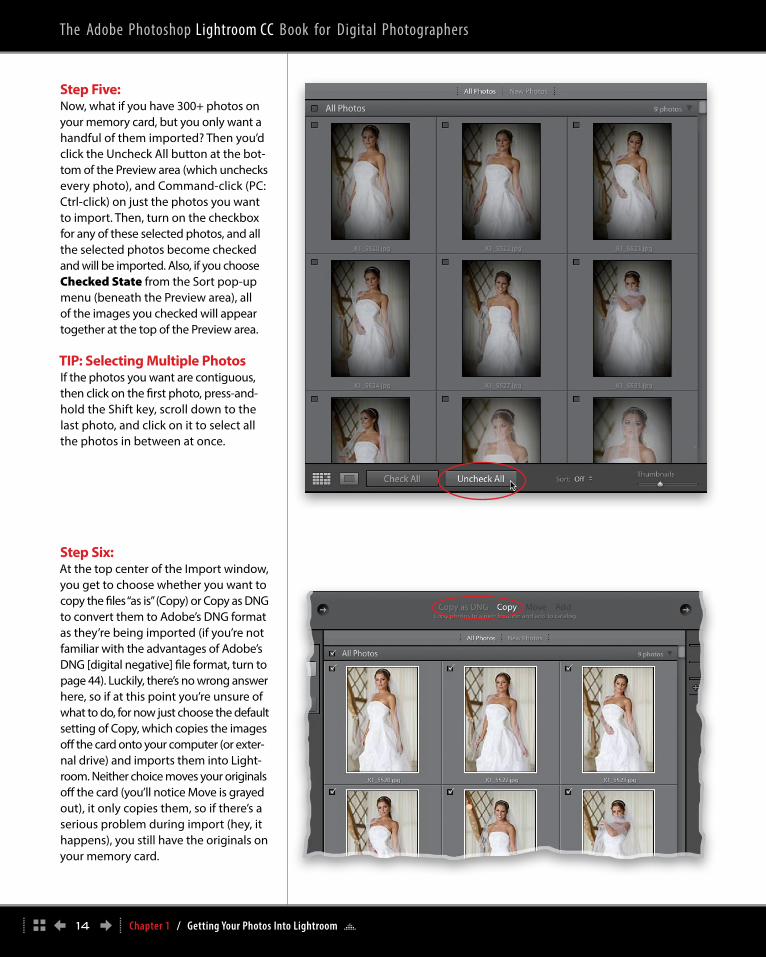
Step Five:Now, what if you have 300+ photos on your memory card, but you only want a handful of them imported? Then you’d click the Uncheck All button at the bot-tom of the Preview area (which unchecks every photo), and Command-click (PC: Ctrl-click) on just the photos you want to import. Then, turn on the checkbox for any of these selected photos, and all the selected photos become checked and will be imported. Also, if you choose Checked State from the Sort pop-up menu (beneath the Preview area), all of the images you checked will appear together at the top of the Preview area.
TIP: Selecting Multiple PhotosIf the photos you want are contiguous, then click on the first photo, press-and-hold the Shift key, scroll down to the last photo, and click on it to select all the photos in between at once.
Step Six:At the top center of the Import window, you get to choose whether you want to copy the files “as is” (Copy) or Copy as DNG to convert them to Adobe’s DNG format as they’re being imported (if you’re not familiar with the advantages of Adobe’s DNG [digital negative] file format, turn to page 44). Luck ily, there’s no wrong answer here, so if at this point you’re unsure of what to do, for now just choose the de fault setting of Copy, which copies the images off the card onto your computer (or exter-nal drive) and imports them into Light-room. Neither choice moves your originals off the card (you’ll notice Move is grayed out), it only copies them, so if there’s a serious problem during import (hey, it happens), you still have the originals on your memory card.
14
The Adobe Photoshop Lightroom CC Book for Digital Photographers
Chapter 1 / Getting Your Photos Into Lightroom
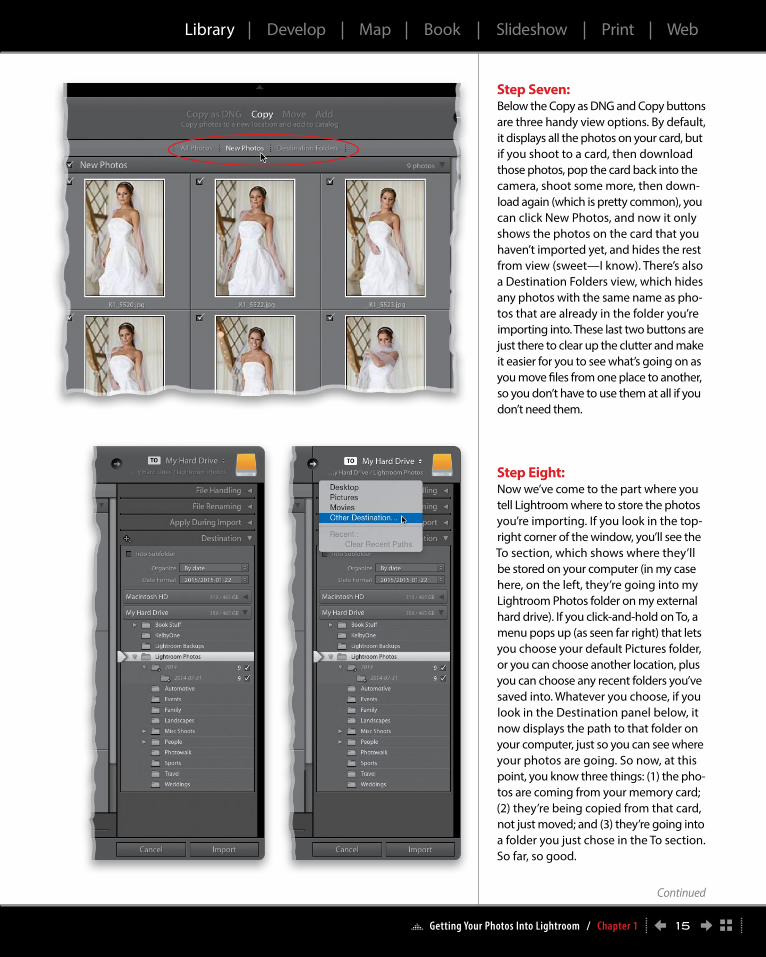
Step Seven:Below the Copy as DNG and Copy buttons are three handy view options. By default, it displays all the photos on your card, but if you shoot to a card, then download those photos, pop the card back into the camera, shoot some more, then down-load again (which is pretty common), you can click New Photos, and now it only shows the photos on the card that you haven’t imported yet, and hides the rest from view (sweet—I know). There’s also a Destination Folders view, which hides any photos with the same name as pho-tos that are already in the folder you’re importing into. These last two buttons are just there to clear up the clutter and make it easier for you to see what’s going on as you move files from one place to another, so you don’t have to use them at all if you don’t need them.
Step Eight:Now we’ve come to the part where you tell Lightroom where to store the photos you’re importing. If you look in the top-right corner of the window, you’ll see the To section, which shows where they’ll be stored on your computer (in my case here, on the left, they’re going into my Lightroom Photos folder on my external hard drive). If you click-and-hold on To, a menu pops up (as seen far right) that lets you choose your default Pictures folder, or you can choose another location, plus you can choose any recent folders you’ve saved into. Whatever you choose, if you look in the Destination panel below, it now displays the path to that folder on your computer, just so you can see where your photos are going. So now, at this point, you know three things: (1) the pho-tos are coming from your memory card; (2) they’re being copied from that card, not just moved; and (3) they’re going into a folder you just chose in the To section. So far, so good.
15
Continued
Getting Your Photos Into Lightroom / Chapter 1
Library Develop Map Book Slideshow Print Web
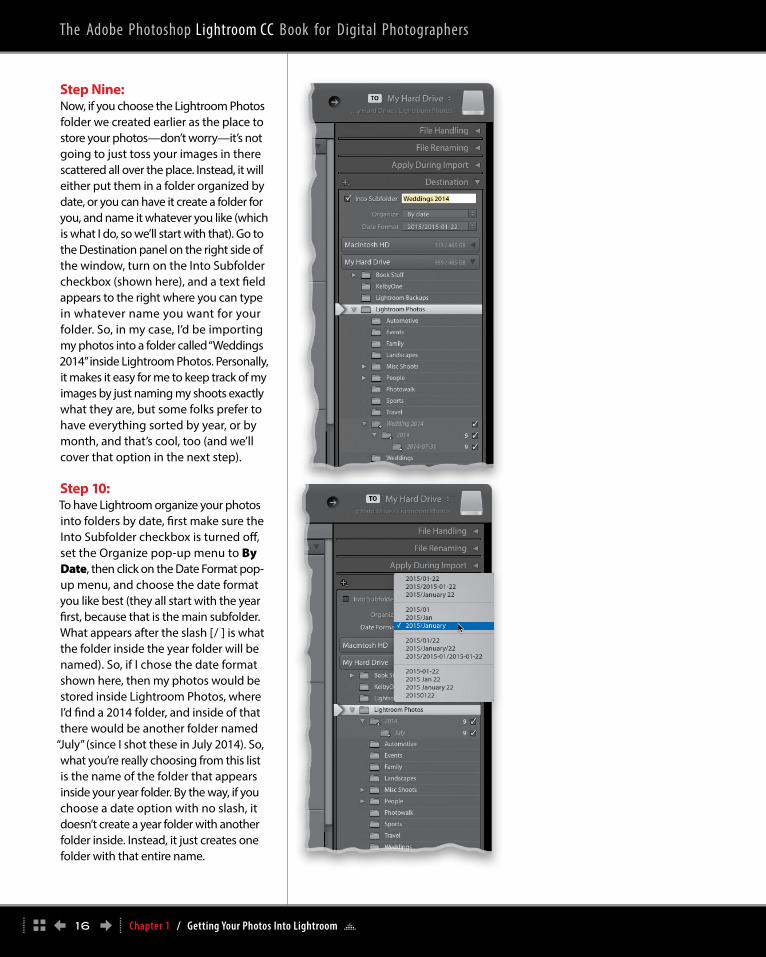
Step Nine:Now, if you choose the Lightroom Photos folder we created earlier as the place to store your photos—don’t worry—it’s not going to just toss your images in there scattered all over the place. Instead, it will either put them in a folder organized by date, or you can have it create a folder for you, and name it whatever you like (which is what I do, so we’ll start with that). Go to the Destination panel on the right side of the window, turn on the Into Sub folder checkbox (shown here), and a text field appears to the right where you can type in whatever name you want for your folder. So, in my case, I’d be importing my photos into a folder called “Weddings 2014” inside Lightroom Photos. Personally, it makes it easy for me to keep track of my images by just naming my shoots exactly what they are, but some folks prefer to have everything sorted by year, or by month, and that’s cool, too (and we’ll cover that option in the next step).
Step 10:To have Lightroom organize your photos into folders by date, first make sure the Into Subfolder checkbox is turned off, set the Organize pop-up menu to By Date, then click on the Date Format pop-up menu, and choose the date format you like best (they all start with the year first, because that is the main subfolder. What appears after the slash [/ ] is what the folder inside the year folder will be named). So, if I chose the date format shown here, then my photos would be stored inside Lightroom Photos, where I’d find a 2014 folder, and inside of that there would be another folder named
“July” (since I shot these in July 2014). So, what you’re really choosing from this list is the name of the folder that appears inside your year folder. By the way, if you choose a date option with no slash, it doesn’t create a year folder with another folder inside. Instead, it just creates one folder with that entire name.
16
The Adobe Photoshop Lightroom CC Book for Digital Photographers
Chapter 1 / Getting Your Photos Into Lightroom
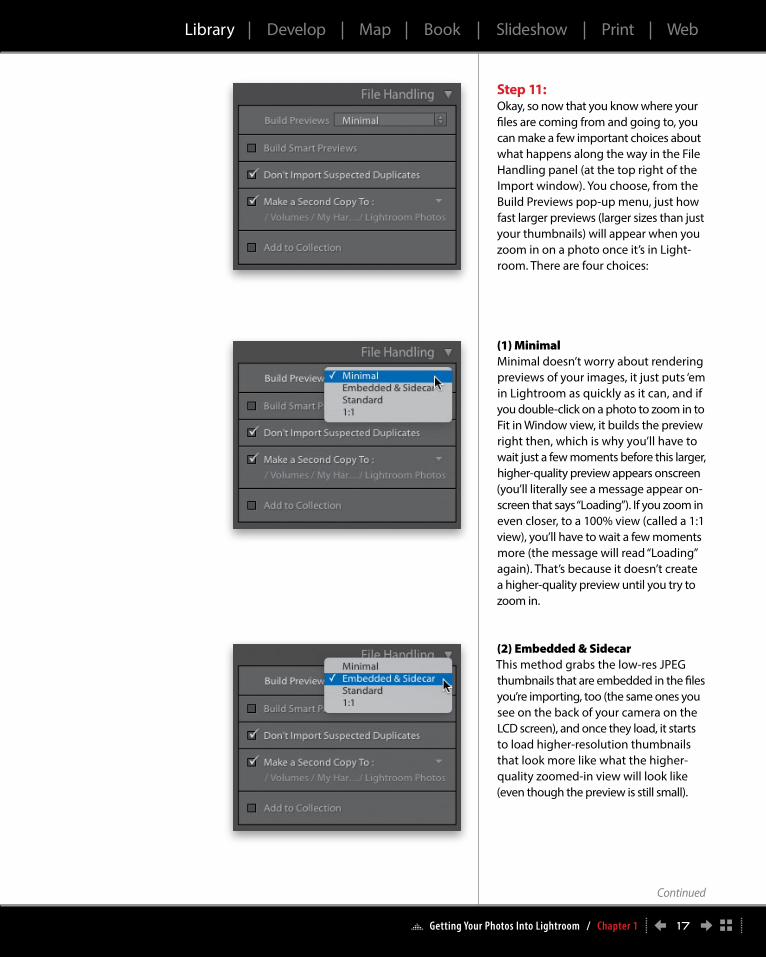
Step 11:Okay, so now that you know where your files are coming from and going to, you can make a few important choices about what happens along the way in the File Handling panel (at the top right of the Import window). You choose, from the Build Previews pop-up menu, just how fast larger previews (larger sizes than just your thumbnails) will appear when you zoom in on a photo once it’s in Light-room. There are four choices:
(1) MinimalMinimal doesn’t worry about rendering previews of your images, it just puts ‘em in Lightroom as quickly as it can, and if you double-click on a photo to zoom in to Fit in Window view, it builds the preview right then, which is why you’ll have to wait just a few moments before this larger, higher-quality preview appears onscreen (you’ll literally see a message appear on-screen that says “Loading”). If you zoom in even closer, to a 100% view (called a 1:1 view), you’ll have to wait a few moments more (the message will read “Loading” again). That’s because it doesn’t create a higher-quality preview until you try to zoom in.
(2) Embedded & SidecarThis method grabs the low-res JPEG thumb nails that are embedded in the files you’re importing, too (the same ones you see on the back of your camera on the LCD screen), and once they load, it starts to load higher-resolution thumb nails that look more like what the higher-quality zoomed-in view will look like (even though the preview is still small).
17
Continued
Getting Your Photos Into Lightroom / Chapter 1
Library Develop Map Book Slideshow Print Web
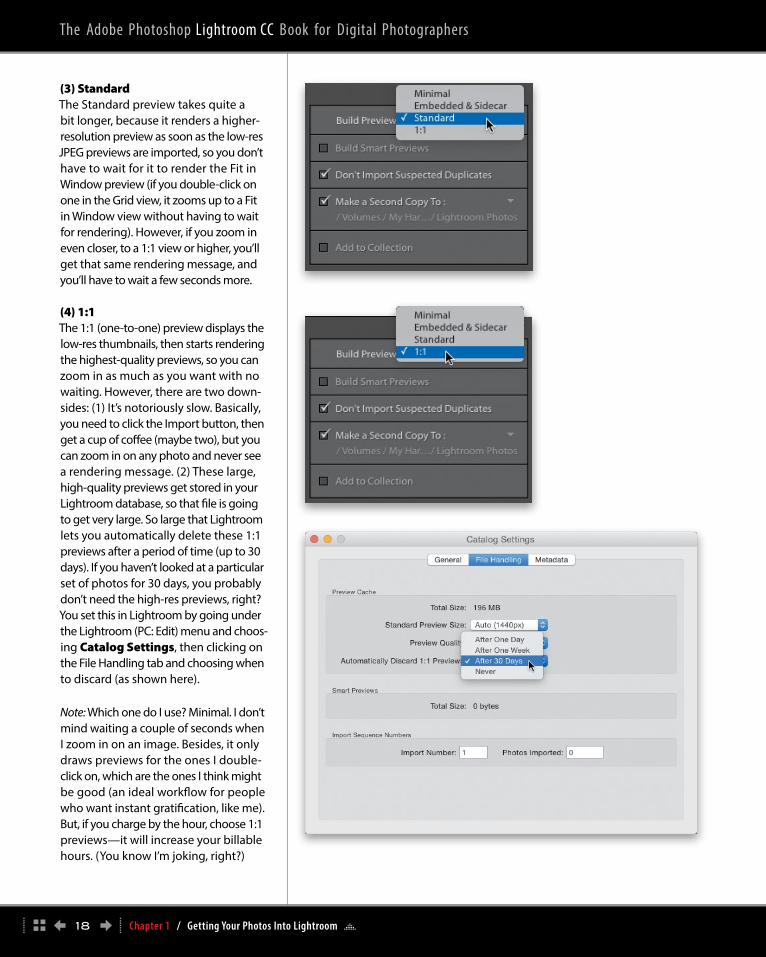
(3) StandardThe Standard preview takes quite a bit longer, because it renders a higher-resolution preview as soon as the low-res JPEG pre views are imported, so you don’t have to wait for it to render the Fit in Window preview (if you double-click on one in the Grid view, it zooms up to a Fit in Window view without having to wait for rendering). However, if you zoom in even closer, to a 1:1 view or higher, you’ll get that same rendering message, and you’ll have to wait a few seconds more.
(4) 1:1The 1:1 (one-to-one) preview displays the low-res thumbnails, then starts rendering the highest-quality previews, so you can zoom in as much as you want with no waiting. However, there are two down-sides: (1) It’s notoriously slow. Basically, you need to click the Import button, then get a cup of coffee (maybe two), but you can zoom in on any photo and never see a rendering message. (2) These large, high-quality previews get stored in your Lightroom database, so that file is going to get very large. So large that Lightroom lets you automatically delete these 1:1 previews after a period of time (up to 30 days). If you haven’t looked at a particular set of photos for 30 days, you probably don’t need the high-res previews, right? You set this in Lightroom by going under the Lightroom (PC: Edit) menu and choos-ing Catalog Settings, then clicking on the File Handling tab and choosing when to discard (as shown here).
Note: Which one do I use? Minimal. I don’t mind waiting a couple of seconds when I zoom in on an image. Besides, it only draws previews for the ones I double-click on, which are the ones I think might be good (an ideal workflow for people who want instant gratification, like me). But, if you charge by the hour, choose 1:1 previews—it will increase your billable hours. (You know I’m joking, right?)
18
The Adobe Photoshop Lightroom CC Book for Digital Photographers
Chapter 1 / Getting Your Photos Into Lightroom

Step 12:Below the Build Previews pop-up menu (and below Build Smart Previews; more on this coming up next) is a checkbox you should turn on to keep you from accidentally importing duplicates (files with the same name), but right below that is a checkbox that I feel is the most important one: Make a Second Copy To, which makes a backup copy of the photos you’re importing on a separate hard drive. That way, you have a working set of photos on your computer (or external drive) that you can experiment with, change, and edit, knowing that you have the untouched originals (the digital negatives) backed up on a separate drive. I just can’t tell you how important it is to have more than one copy of your photos. In fact, I won’t erase my camera’s memory card until I have at least two copies of my photos (one on my computer/external drive and one on my backup drive). Once you turn on the checkbox, click right below it and choose where you want your backup copies saved (or click the down-facing arrow on the right to choose a recent location).
Step 13:The next panel down is File Renaming, which you use if you want to have your photos renamed automatically as they’re imported. I always do this, giving my files a name that makes sense (in this case, something like Andrews Wedding, which makes more sense to me than _DSC0399 .NEF, especially if I have to search for them). If you turn on the Rename Files checkbox, there’s a pop-up menu with lots of differ-ent choices. I like to give my files a name, followed by a sequence of numbers (like Andrews Wedding 001, Andrews Wedding 002, etc.), so I choose Custom Name - Sequence, as seen here. Just by looking at the list, you can see how it will rename your files, so choose whichever one you like best, or create your own by choosing Edit at the bottom of the menu (I take you through that whole process on page 37).
SC
OT
T K
ELB
Y A
ND
BR
AD
MO
OR
E
19
Continued
Getting Your Photos Into Lightroom / Chapter 1
Library Develop Map Book Slideshow Print Web

Step 14: Right below that is a panel called Apply During Import, which is where you can apply three things to your images as they’re imported. Let’s start at the top. The Develop Settings pop-up menu lets you apply special effects or corrections auto matically as your photos are import-ed. For example, you could have all your photos appear in Lightroom already converted to black and white, or they could all already be adjusted to be more red, or blue, or… whatever. If you click on the Develop Settings pop-up menu, you’ll see a list of built-in presets that come with Lightroom and if you choose one, that look gets applied to your images as they’re imported (you’ll learn more about these, along with how to create your own cus-tom Develop presets in Chapter 6, so for now, just leave the Develop Settings set to None, but at least you know what it does).
Step 15:The next pop-up menu, Metadata, is where you can embed your own personal copyright and contact info, usage rights, captions, and loads of other information right into each file as it’s imported. You do this by first entering all your info into a template (called a metadata template), and then when you save your template, it appears in the Metadata pop-up menu (as shown here). You’re not limited to just one template—you can have different ones for different reasons if you like (like one of just your copyright info, and another with all your contact info, as well). I show you, step by step, how to create a metadata template on page 45 of this chapter, so go ahead and jump over there now and create your first metadata template, then come right back here and choose your copyright template from this pop-up menu. Go ahead. I’ll wait for you. Really, it’s no bother. (Note: I embed my copyright info into every photo [well, at least the ones I actually shot] using a metadata template like this while importing.)
20
The Adobe Photoshop Lightroom CC Book for Digital Photographers
Chapter 1 / Getting Your Photos Into Lightroom
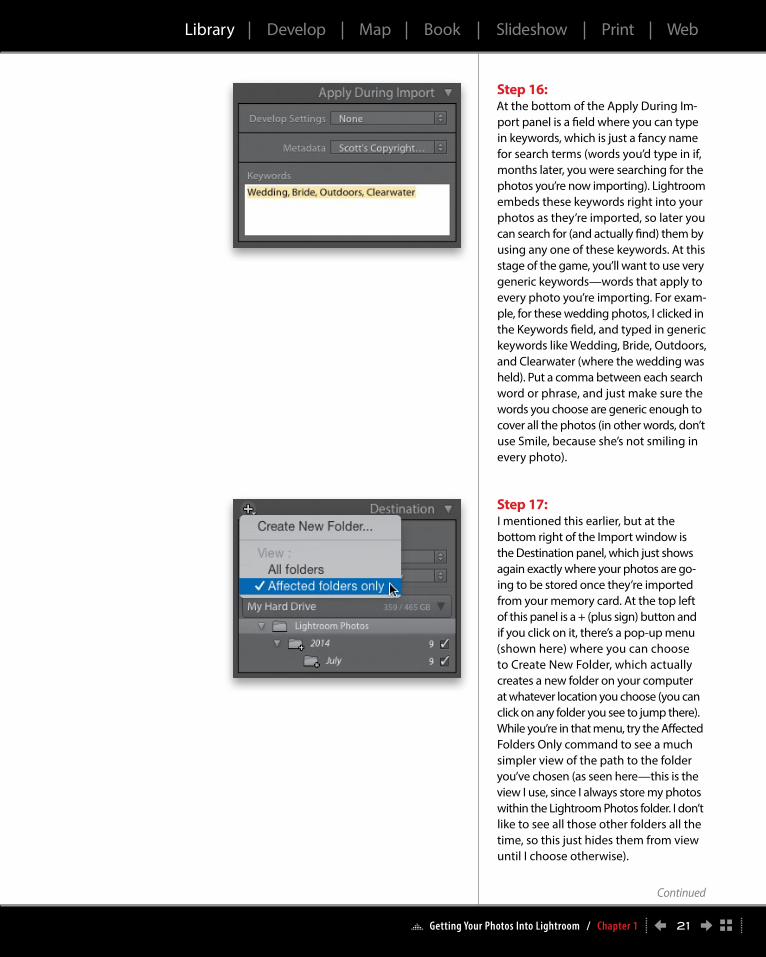
Step 16:At the bottom of the Apply During Im-port panel is a field where you can type in key words, which is just a fancy name for search terms (words you’d type in if, months later, you were searching for the photos you’re now importing). Lightroom embeds these keywords right into your photos as they’re imported, so later you can search for (and actually find) them by using any one of these keywords. At this stage of the game, you’ll want to use very generic keywords—words that apply to every photo you’re importing. For exam-ple, for these wedding photos, I clicked in the Keywords field, and typed in generic keywords like Wedding, Bride, Outdoors, and Clearwater (where the wedding was held). Put a comma between each search word or phrase, and just make sure the words you choose are generic enough to cover all the photos (in other words, don’t use Smile, because she’s not smiling in every photo).
Step 17:I mentioned this earlier, but at the bottom right of the Import window is the Destina tion panel, which just shows again exactly where your photos are go-ing to be stored once they’re imported from your memory card. At the top left of this panel is a + (plus sign) button and if you click on it, there’s a pop-up menu (shown here) where you can choose to Create New Folder, which actually creates a new folder on your computer at whatever location you choose (you can click on any folder you see to jump there). While you’re in that menu, try the Affected Folders Only command to see a much simpler view of the path to the folder you’ve chosen (as seen here—this is the view I use, since I always store my photos within the Lightroom Photos folder. I don’t like to see all those other folders all the time, so this just hides them from view until I choose otherwise).
21
Continued
Getting Your Photos Into Lightroom / Chapter 1
Library Develop Map Book Slideshow Print Web
TIP: Organize Multiple Shoots by Date
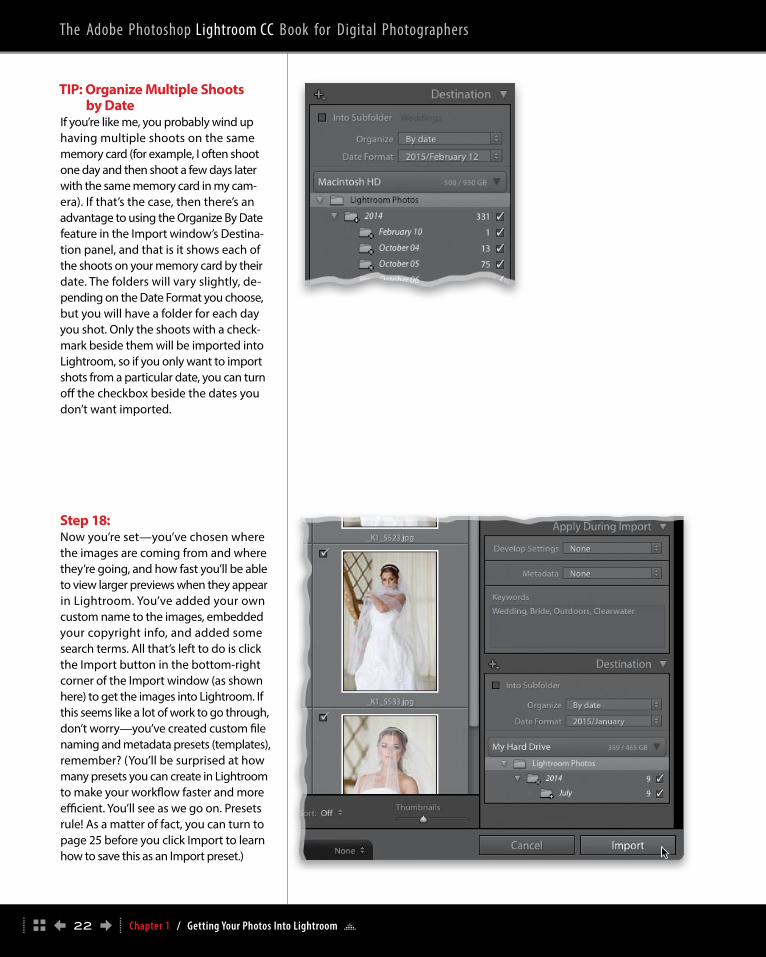
If you’re like me, you probably wind up having multiple shoots on the same memory card (for example, I often shoot one day and then shoot a few days later with the same memory card in my cam-era). If that’s the case, then there’s an advantage to using the Organize By Date feature in the Import window’s Destina-tion panel, and that is it shows each of the shoots on your memory card by their date. The folders will vary slightly, de-pending on the Date Format you choose, but you will have a folder for each day you shot. Only the shoots with a check-mark beside them will be import ed into Lightroom, so if you only want to import shots from a particular date, you can turn off the checkbox beside the dates you don’t want imported.
Step 18:Now you’re set—you’ve chosen where the images are coming from and where they’re going, and how fast you’ll be able to view larger previews when they appear in Lightroom. You’ve added your own custom name to the images, embedded your copyright info, and added some search terms. All that’s left to do is click the Import button in the bottom-right corner of the Import window (as shown here) to get the images into Lightroom. If this seems like a lot of work to go through, don’t worry—you’ve created custom file naming and metadata presets (templates), remember? (You’ll be surprised at how many presets you can create in Lightroom to make your workflow faster and more efficient. You’ll see as we go on. Presets rule! As a matter of fact, you can turn to page 25 before you click Import to learn how to save this as an Import preset.)
22
The Adobe Photoshop Lightroom CC Book for Digital Photographers
Chapter 1 / Getting Your Photos Into Lightroom