BokSmart - Fitness Testing and the Physical Profiling of Players
47
Fitness testing and the physical profiling of players 0 Copyright BokSmart © 2009 Page Heading MAIN HEADING Sub Headings Body Copy Body Copy + Bold Body Copy + Bold Body Copy + Bold Body Copy + Bold Body Copy + Bold + Italic Body Copy + Bold + Italic Body Copy + Bold + Italic Body Copy + Bold + Italic Body Copy + Normal + Italic • Bullets 1. MCL • Posterior medial capsul Style Body for tables STYLE HEADING FOR TABLES FITNESS TESTING AND THE PHYSICAL PROFILING OF PLAYERS Justin Durandt BSc (med)(Hons) Exercise Science(Biokinetics) Sport Science Institute of South Africa Private bag X5, Newlands, 7725 Tel. +27 21-659 5640, Email:[email protected] Fax: +27 21-659 5601
-
Upload
ryan-gibney -
Category
Documents
-
view
33 -
download
3
description
springbok fitness guide
Transcript of BokSmart - Fitness Testing and the Physical Profiling of Players

Fitness testing and the physical profiling of players
0 Copyright BokSmart © 2009
Page Heading
MAIN HEADING
Sub Headings
Body Copy
Body Copy + BoldBody Copy + BoldBody Copy + BoldBody Copy + Bold
Body Copy + Bold + ItalicBody Copy + Bold + ItalicBody Copy + Bold + ItalicBody Copy + Bold + Italic
Body Copy + Normal + Italic
• Bullets
1. MCL
• Posterior medial capsul
Style Body for tables
STYLE HEADING FOR TABLES
FITNESS TESTING AND THE
PHYSICAL PROFILING OF
PLAYERS Justin Durandt BSc (med)(Hons) Exercise Science(Biokinetics) Sport Science Institute of South Africa Private bag X5, Newlands, 7725 Tel. +27 21-659 5640, Email:[email protected] Fax: +27 21-659 5601

Fitness testing and the physical profiling of players
1 Copyright BokSmart © 2009
INTRODUCTION
The physical demands of rugby vary depending on the playing position. For example, forwards require
more strength and size to enable them to contest for the ball while backline players need to be more
agile and have speed to carry the ball past the opposition (Duthie et al, 2003). Forwards spend more time
competing for the ball while backs spend more time involved in intense running (Duthie et al, 2003). A
variety of tests have been designed to test the range of fitness characteristics of the different playing
positions. Knowledge of the performance in these various tests serves several purposes:
• Goals can be set for the players
• Weaknesses can be identified in the fitness profile of each player
• Talent identification
• Fitness trends accompanying the development of the game can be monitored
• Risk of injury can be identified
The next section shows an example of a consent form which the players should complete before they
are involved in any testing programme, followed by a detailed description of the tests.
REFERENCES
Duthie, G., Payne, D and Hooper, S. (2003). Applied Physiology and the Game Analysis of Rugby Union.
Sports Med 33(13): 973 – 991

Fitness testing and the physical profiling of players
2 Copyright BokSmart © 2009
CONSENT FORM
I (print name) ______________________________ hereby consent to participating in the physiological
assessment on the following terms:
I have been informed about the physiological assessment procedures and understand what I will be
required to do.
I understand that I will be partaking in physical exercise, some of which is at maximal intensity. I
understand that there is always a risk of injury associated with high-intensity exercise.
I understand that I can withdraw my consent, freely and without prejudice, at any time.
I have told the testing personnel about any illness or physical defect I have that may contribute to the
level of risk.
I understand that the information obtained from the test will be treated confidentially, with my right to
privacy assured. However, the information obtained may be used for statistical analysis or scientific
purpose with my right to privacy retained.
I release the testing personnel from any liability for any injury or illness that I may suffer while undertaking
the physical assessment, or subsequently occurring in connection with the assessment, or that is to any
extent contributed to by it.
I accept however that the testing personnel will take every precaution to ensure that no incidents will
occur.
Participant signature___________________Date______________________________________
Parent/Guardian name (if under the age of 18)_______________________________________
Parent/Guardian signature____________________________Date________________________
Witness _____________________________Date______________________________________

Fitness testing and the physical profiling of players
3 Copyright BokSmart © 2009
PRACTICAL GUIDELINES FOR FITNESS TESTING
Only qualified personnel should test players. The testing should be planned well in advance, so that it can
be structured into the player’s training programme. The player must not undertake any intensive training
or competition for 48 hours prior to testing.
The order in which the tests are conducted should be standardised and recorded as a reference for
future testing. The players need to become familiar with the protocols and the prescribed tests. The
players should not be expected to train on the same day as they are being tested. Some of the tests
require a maximal effort and therefore training after a full testing session may lead to excessive fatigue or
an increased risk of injury. The protocol below is designed in a specific order. It is important to adhere to
this order and to do the tests exactly as they are described. Failure to do so will increase the player’s risk
of injury and also decrease the accuracy of the results.
1.1.1.1. All players should be interviewed during a consultation prior to being tested, in order to All players should be interviewed during a consultation prior to being tested, in order to All players should be interviewed during a consultation prior to being tested, in order to All players should be interviewed during a consultation prior to being tested, in order to
achieve the foachieve the foachieve the foachieve the following:llowing:llowing:llowing:
a. To establish whether the player has an injury that could prohibit him from being tested,
or which could be aggravated by testing.
b. To establish whether they are familiar with the testing protocol. A player that is not
familiar with the testing protocol may underperform in a test.
c. To establish the periodisation scheme of the player. One may need to be selective about
which tests to perform, depending on the stage of training and when the player will next
compete.
d. To establish which tests the player has previously completed and to explain why the
current tests may provide further information.
e. To gather information about the player’s current training regime in order to compile a
new training programme.
2.2.2.2. Which tests in the protocol should be used and in Which tests in the protocol should be used and in Which tests in the protocol should be used and in Which tests in the protocol should be used and in what order?what order?what order?what order?
a. The protocols act as a guideline for testing procedure and testing order. All tests
described in the protocol need not be performed. The tests performed will depend on
the information gathered by the tester during the consultation.
b. The order in which the tests are performed is important for validity and reliability
reasons, as well as to reduce the risk of injury.
Fitness testing and the physical profiling of players
4 Copyright BokSmart © 2009
3.3.3.3. Guidelines for the ordering of tests:Guidelines for the ordering of tests:Guidelines for the ordering of tests:Guidelines for the ordering of tests:
a. Consultation:Consultation:Consultation:Consultation: This is always the first step in the process and it empowers the tester to
make the correct decision about which tests to complete. It also allows the tester to
inform the group or individual on the process to be followed. The players must
understand why they are being tested and what the testing involves.
b. Anthropometry:Anthropometry:Anthropometry:Anthropometry: The player should not perform any physical activity prior to the
measurements of body composition. This test should always take place first, and
directly after the consultation.
c. Flexibiltiy:Flexibiltiy:Flexibiltiy:Flexibiltiy: The flexibility tests described are all performed in a “cold” state. Therefore,
these tests, if they are to be performed, should be done after anthropometry. Please
note that when a player stretches “cold”, they stretch until the muscle is tight, and not
until they feel pain.
d. Speed/power:Speed/power:Speed/power:Speed/power: Power tests are usually performed first, followed by speed, agility,
strength, muscle endurance and, finally, cardiorespiratory or repeat sprint tests. A speed
test, for example, should be performed after a thorough warm-up but it should not be
performed after a multistage shuttle run (bleep) test. If an athlete completes the
multistage shuttle run prior to the speed test, then his speed performance will be
negatively affected. The vertical jump test may be performed prior to the sprint test.
e. Muscle strength:Muscle strength:Muscle strength:Muscle strength: Muscle strength (1-10RM) tests are always completed prior to muscle
endurance tests but after the speed and power tests. A minimum break of 5 minutes is
recommended between muscle strength and muscle endurance tests.
f. CardiorespiratoryCardiorespiratoryCardiorespiratoryCardiorespiratory endurance/Repeat sprint ability: The bleep test or the 5m repeat
sprint test are usually completed at the end of a test battery. A player should not
complete both these tests on the same day. Both tests are maximal and exhausting and
therefore may cause muscle fatigue, which lasts for several hours. If one completes both
tests on the same day, the risk of injury is increased.
4.4.4.4. What tests are performed on different age groups?What tests are performed on different age groups?What tests are performed on different age groups?What tests are performed on different age groups?
The following table has been set up to provide general guidelines for which tests are safe to be
performed with different age groups. These are only guidelines and each professional needs to
assess the players and use discretion to decide on the appropriate testing battery. It is not necessary
to complete all the tests in the battery, but only the tests that are appropriate. For example, one
would not complete a 1RM and 10RM bench press, as one is able to predict 1RM from a 10RM
performance. Certain players, depending on their levels of experience and injury status, may not be
able to perform one or more of the tests, even if the tests are age-appropriate.

Fitness testing and the physical profiling of players
5 Copyright BokSmart © 2009
ANTHROPOMETRIC EVALUATION
Definition
Anthropometry is the science of measuring the physical parameters of the human body. Anthropometry
is often used to evaluate a player’s size, shape, body proportions, body composition and degree of
asymmetry between the dominant and non-dominant limbs. This information can be useful in designing
intervention programmes as well as tracking progress. It is important that the anthropometrical
measurements are completed according to the specified descriptions. A qualified person needs to
TYPE OF TEST 12-13
Years
14-15
Years
16-17
Years
18+
Years
ANTHROPOMETRYANTHROPOMETRYANTHROPOMETRYANTHROPOMETRY b b b b
FLEXIBILITYFLEXIBILITYFLEXIBILITYFLEXIBILITY b b b b
SPEEDSPEEDSPEEDSPEED b b b b
AGILITYAGILITYAGILITYAGILITY b b b b
POWERPOWERPOWERPOWER
• Vertical jump b b b b
• Broad jump b b b b
STRENGTHSTRENGTHSTRENGTHSTRENGTH
• 1 RM Bench press b b
• 5-10 RM Bench press b b b
• 1 RM Parallel squat b
• 5-10 RM Parallel squat b
MUSCLE ENDURANCEMUSCLE ENDURANCEMUSCLE ENDURANCEMUSCLE ENDURANCE
• Pull ups (with movement) b b b
• Flexed arm hang (isometric
hold)
b
• Push ups b b b b
• Sit ups (2min) b b b
• Sit ups (1min) b
Cardiorespiratory fitnessCardiorespiratory fitnessCardiorespiratory fitnessCardiorespiratory fitness
• Multi-stage shuttle run
(bleep test)
b b b b
• 3 km time trial b b b b
Repeat sprint abilityRepeat sprint abilityRepeat sprint abilityRepeat sprint ability
• 5m shuttle run b b b b

Fitness testing and the physical profiling of players
6 Copyright BokSmart © 2009
perform the measurements and these should be completed by the same person during successive
measurements to ensure repeatability.
Description of measurements
The aim of this section is to describe each procedure in sufficient detail, including the calculation of the
derived values, to ensure a high degree of consistency between measurers.
BODY MASS
Purpose:Purpose:Purpose:Purpose:
Body mass is an important variable as it gives an indication of the player’s appropriateness for a
particular playing position and also indicates whether or not a player is adapting to a training programme.
Furthermore, interpreted in the context of the other variables body mass can also be useful for talent
identification.
Equipment:Equipment:Equipment:Equipment:
Body mass should be recorded on a calibrated scale able to record to the nearest 100g.
Procedure:Procedure:Procedure:Procedure:
The player should be weighed in underpants and without shoes, preferably before a large meal. Players
tested regularly should be weighed at the same time of day for each test.
Scoring:Scoring:Scoring:Scoring:
Body mass should be recorded to the nearest 100g.

Fitness testing and the physical profiling of players
7 Copyright BokSmart © 2009
STATURE (HEIGHT)
Purpose:Purpose:Purpose:Purpose:
This measurement is recorded as the height from the floor to the vertex of the head. The vertex is defined
as the highest point on the skull when an imaginary line between the lower margin of the eye socket and
the upper margin of the zygomatic bone is parallel to the ground.
Equipment:
StadiometerStadiometerStadiometerStadiometer
Procedure:Procedure:Procedure:Procedure:
The player should stand barefoot with the arms at the sides. The heels, buttocks, upper back and head
should be in contact with the wall. Prior to measurement, the subject should be instructed to look ahead
and take a deep breath.
Scoring:Scoring:Scoring:Scoring:
The measurement should be recorded to the nearest mm.
(Measuring error for standing height < 2 mm)
SKINFOLD THICKNESS
MethodMethodMethodMethod
The skinfold-calliper reading is a measurement of the compressed thickness of a double layer of skin and
the underlying subcutaneous tissue, which is assumed to be adipose tissue. The skinfold thickness is
measured by grasping a fold of skin and the underlying subcutaneous tissue between the thumb and
forefinger, 1 – 2 cm above the site that is to be measured. The fold is pulled away from the underlying
muscle and the jaws of the callipers are placed on either side of the site, at a depth of approximately 1
cm. The skinfold is held firmly throughout the application of the calliper and the reading is taken when the
needle becomes steady after the full pressure of the calliper jaws has been applied. The callipers must be

Fitness testing and the physical profiling of players
8 Copyright BokSmart © 2009
applied at right angles to the fold at all times. All measurements are recorded on the player's right side
except for the abdominal skinfold, which is recorded on the player’s left side. The measurement is
recorded in millimetres.
(Measuring error for skinfold thickness < 1.5 mm)
SKINFOLD SITES
Triceps Triceps Triceps Triceps
Measured from the back on the posterior surface of the arm, midway between the top of the shoulder
(acromion process) and the elbow (olecranon process). The upper limb should hang loosely at the side,
with the player in a standing position.
Biceps Biceps Biceps Biceps
Measured from the front on the anterior surface of the arm, midway between the top of the shoulder and
the elbow. The player stands in the same position as for the triceps measurement.
Subscapular Subscapular Subscapular Subscapular
Measured just below the inferior angle of the scapula, with the fold in an oblique plane descending
laterally (outwards) and downwards at an angle of approximately 45° to the horizontal.

Fitness testing and the physical profiling of players
9 Copyright BokSmart © 2009
SupraSupraSupraSupra----iliac iliac iliac iliac
Measured 5 cm above the iliac crest with the fold oblique, descending medially (inwards) and downwards
at an angle of about 45° to the horizontal. The player should stand erect with the upper limbs at the sides
and the abdominal muscles relaxed.
CalfCalfCalfCalf
Measured on the medial surface of the calf at the level of the greatest calf circumference. The player’s
weight must be placed on the opposite leg.

Fitness testing and the physical profiling of players
10 Copyright BokSmart © 2009
ThighThighThighThigh
Measured at the mid-point on the anterior surface of the thigh, with the fold parallel to the long axis of the
thigh. The player’s weight should be on the opposite leg so that the knee joint of the measured leg forms
an angle of approximately 120°. The mid thigh point can be established by measuring the distance
between the gluteal fold and the lateral epicondyl. This distance is the halved to establish the distance up
the anterior surface thigh, where the measurement is taken.
Abdominal Abdominal Abdominal Abdominal
Measured in a vertical plane 5 cm to the left of the subject’s umbilicus
Fitness testing and the physical profiling of players
11 Copyright BokSmart © 2009
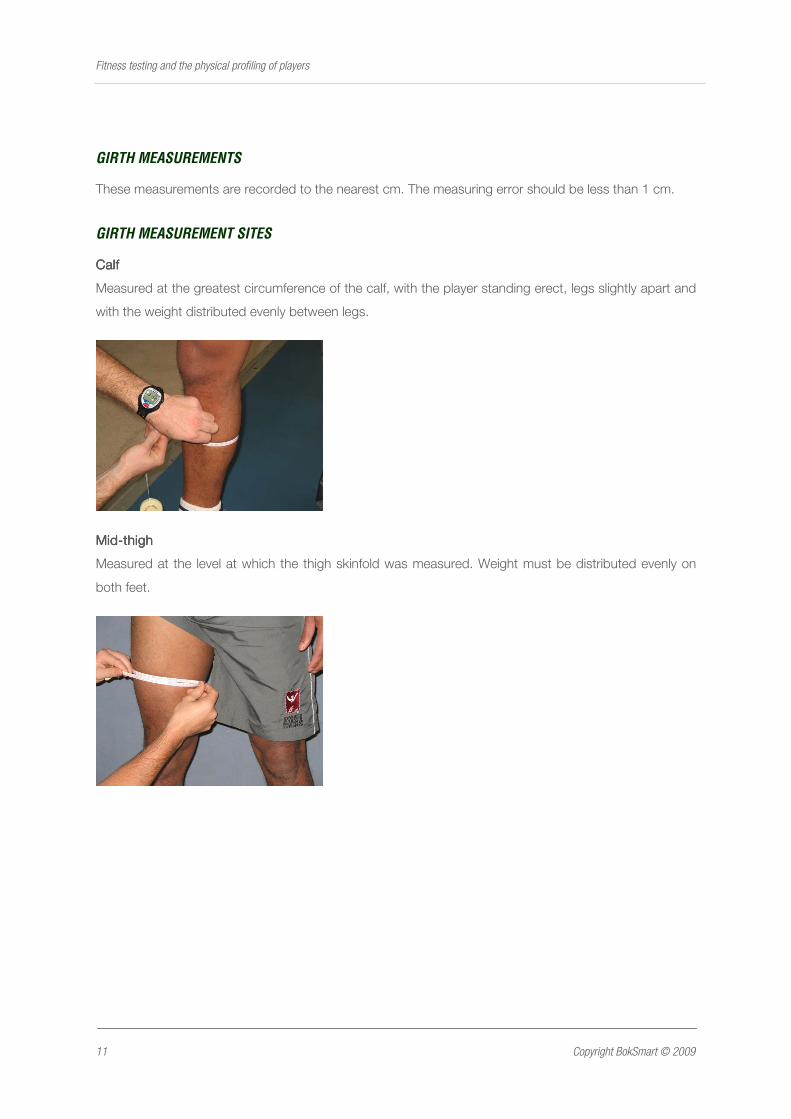
GIRTH MEASUREMENTS
These measurements are recorded to the nearest cm. The measuring error should be less than 1 cm.
GIRTH MEASUREMENT SITES
CalfCalfCalfCalf
Measured at the greatest circumference of the calf, with the player standing erect, legs slightly apart and
with the weight distributed evenly between legs.
MidMidMidMid----thighthighthighthigh
Measured at the level at which the thigh skinfold was measured. Weight must be distributed evenly on
both feet.

Fitness testing and the physical profiling of players
12 Copyright BokSmart © 2009
ForearmForearmForearmForearm
Measured at the maximal girth of the forearm when the arm is hanging relaxed at the side.
BODY FAT
There is a tendency in laboratories around the world to move away from expressing body fat as a
percentage, and towards expressing body fat as a sum of skinfolds (mm). This is because the use of
skinfold thicknesses to predict body fat percentage is a "doubly-indirect" procedure (Martin and
Drinkwater, 1991) and therefore has inherent inaccuracies. For example, there are many assumptions
associated with measuring skinfolds and it is assumed that the densities of the fat and fat-free mass are
constant. These assumptions are not always met. It is recommended that the sum of skinfolds (7 sites)
be used if the players are going to be monitored on a regular basis throughout the season. Sum of
skinfolds and body fat percentage can be measured if the assessment is done on one occasion, or if it is
necessary to calculate the target mass of the athlete.
SUM OF SKINFOLDS
Body fat is described as the sum of the following skinfolds:
• biceps
• triceps
• subscapular
• suprailiac
• abdominal
• thigh
• medial calf

Fitness testing and the physical profiling of players
13 Copyright BokSmart © 2009
BODY FAT PERCENTAGE
The Durnin and Womersley technique should be used to estimate body fat percentage (Durnin and
Womersley, 1974). This is a general equation with limited population specificity since it was developed
from a heterogeneous group of varying ages (n = 481). This technique does however seem to over-
estimate body fat percentage in physically active individuals who are older than 30 years. To prevent an
overinterpretation of results, the body fat percentages should always be expressed to a rounded whole
number and as a value ± 1%.
The calculation of body fat % involves measuring 4 skinfold sites: triceps, biceps, subscapular and
suprailiac.
Measure the 4 skinfold thicknesses (biceps, triceps, subscapular and suprailiac), and substitute the log of
their sum into one of the following equations:
MaMaMaMalelelelessss
Age (yrs)
- 17 D = 1.1533 - (0.0643 X L)
17 - 19 D = 1.1620 - (0.0630 X L)
20 - 29 D = 1.1631 - (0.0632 X L)
30 - 39 D = 1.1422 - (0.0544 X L)
40 -49 D = 1.1620 - (0.0700 X L)
50 + D = 1.1715 - (0.0779 X L)
FemalesFemalesFemalesFemales
Age (yrs)
- 16 D = 1.1369 - (0.0598 X L)
16 - 19 D = 1.1549 - (0.0678 X L)
20 - 29 D = 1.1599 - (0.0717 X L)
30 - 39 D = 1.1423 - (0.0632 X L)
40 - 49 D = 1.1333 - (0.0612 X L)
50 + D = 1.1339 - (0.0645 X L)
WWWWherehereherehere
D = predicted density of the body (g/ml)
L = log of the total of the 4 skinfolds (mm)

Fitness testing and the physical profiling of players
14 Copyright BokSmart © 2009
Then calculate the predicted percent body fat by substituting into the following formula (Brozek et al,
1963):
Predicted % body fatPredicted % body fatPredicted % body fatPredicted % body fat ==== 100(4.570/D 100(4.570/D 100(4.570/D 100(4.570/D ---- 4.142)4.142)4.142)4.142)
FURTHER DERIVATIONS INVOLVING BODY FAT
Fat mass (kg) = body mass (kg) X %fat
Fat-free mass (kg) = (Body mass (kg)) - (fat mass (kg))
Target mass (kg) = FatFatFatFat----free massfree massfree massfree mass
/((100-TF%)/100)
where TF% = target % body fat
� this should be used with caution because of the many assumptions associated with the
calculation.
MUSCLE MASS
The following measurements are needed for the anthropomeThe following measurements are needed for the anthropomeThe following measurements are needed for the anthropomeThe following measurements are needed for the anthropometric assessment of muscle mass tric assessment of muscle mass tric assessment of muscle mass tric assessment of muscle mass
(Martin et al, 1990):(Martin et al, 1990):(Martin et al, 1990):(Martin et al, 1990):
• stature (cm)stature (cm)stature (cm)stature (cm)
• midmidmidmid----thigh girth (cm)thigh girth (cm)thigh girth (cm)thigh girth (cm)
• midmidmidmid----thigh skinfold (mm)thigh skinfold (mm)thigh skinfold (mm)thigh skinfold (mm)
• calf girth (cm)calf girth (cm)calf girth (cm)calf girth (cm)
• calf skinfold (cm)calf skinfold (cm)calf skinfold (cm)calf skinfold (cm)
• foreforeforeforearm girth (cm)arm girth (cm)arm girth (cm)arm girth (cm)
The technique was developed from measurements conducted on cadavers.
The equation is as follows:
Muscle mass (g) = S(0.0553CTG² + 0.0987FG² + 0.0331CCG²) - 2445
Where:
S = stature CCG = corrected calf girth
CTG = corrected mid-thigh girth CTG = TG - π(mid-thigh skinfold/10)
FG = forearm girth CCG = CG - π(calf skinfold/10)

Fitness testing and the physical profiling of players
15 Copyright BokSmart © 2009
REFERENCES
Brozek, J., Grande, F., Anderson, J.T. and Keys, A. (1963). Densitometric analysis of body composition:
revision of some quantitative assumptions. Annuls New York Academy of Sciences, 110, 113-140.
Durnin, J.V.G.A. and Womersley, J. (1974). Body fat assessed from the total body density and its
estimation from skinfold thickness: measurements on 481 men and women aged from 16 to 72 years.
British Journal of Nutrition, 32, 77-97.
Martin, A.D., Spenst, L.F., Drinkwater, D.T. and Clarys, J.P. (1990) Anthropometric estimation of muscle
mass in men. Medicine and Science in Sports and Exercise, 22, 729-733.
Martin, A.D. and Drinkwater, D.T. (1991). Variability in the measures of body fat: assumptions or
technique? Sports Medicine ,11, 277-288.
Measurement Body
fat %
Sum of
skinfolds
Muscle
mass
Mass a
Stature a Age a
Skinfolds
Triceps a a
Biceps a a
Subscap a a
Suprail a a
Calf a a Thigh a a Abdomen a
Girths
Calf a Mid-thigh a Forearm a
Measurements for body composition procedures

Fitness testing and the physical profiling of players
16 Copyright BokSmart © 2009
FLEXIBILITY
Definition
The term flexibility is used to describe the range of motion around a joint, or series of joints (Maud and
Cortez – Cooper, 1995). The purpose of this section is to provide range of motion (ROM) tests that use
static evaluation techniques . Flexibility is not a specific performance-related variable, but may be
important in injury-prevention.
Rules for the measurement of flexibility
• Ensure that the player’s body position during testing is according to the position specified in the
different protocols. A slight change in the position of the knee or pelvis may increase scores by
20 – 30%.
• The clothing worn by the player should allow freedom of movement. In addition, the tester must
be able to observe all anatomical landmarks during movement.
• Repeat testing must be performed at the same time of day to avoid the effects of circadian
variations on flexibility (Reilly, 1981).
• A player should not be warmed up prior to stretching. This is to standardise the procedure.
When a player stretches, he should only stretch until the muscle is tight and not until he feels
pain.
Description of measurement
SIT AND REACH TEST
Purpose:
The sit and reach test is used to determine the joint range of motion and flexibility of the muscles around
the hip joint (the test simultaneously examines the flexibility of the lower back and hamstrings). The
reliability of the test has been documented previously (Johnson and Nelson, 1979).
Equipment:
A sit and reach box is required. The “zero” point of the box should be at 26 cm.
Procedure:
For this test, the player sits on the floor with knees extended (straight), ankles flexed and bare feet
against the vertical edge of the sit and reach box. The player then flexes (bends) at the hip and reaches
forward, with both hands together, towards his toes. The player is encouraged to flex maximally at the

Fitness testing and the physical profiling of players
17 Copyright BokSmart © 2009
hip joint without flexing the extended knees. The furthermost point reached by both index fingers along a
ruler fixed along the top of a box, is taken as the score. The best of three attempts is recorded as the
score in centimetres (cm).
Scoring:
The point directly above the vertical edge that the foot is resting against is recorded as zero cm. The sit
and reach box must have the zero point set at 26 cm on the ruler that runs along the top of the box.
Figure 1.1Figure 1.1Figure 1.1Figure 1.1 Sit and reach initial test position
Figure 1.2.Figure 1.2.Figure 1.2.Figure 1.2. Player reaches forward, his legs must remain straight
STRAIGHT LEG RAISE TEST (HAMSTRING FLEXIBILITY)
Purpose:
The purpose of this test is to measure the player’s hamstring flexibility in both limbs.
Equipment:
Goniometer and plinth
Procedure:

Fitness testing and the physical profiling of players
18 Copyright BokSmart © 2009
The player lies supine on a bed, while one leg is passively rotated about the hip joint as far as possible
with the knee fully extended. This test requires two testers. One tester extends the leg and the other
tester measures the angle reached, using a goniometer. The tester moving the leg needs to place one
hand in front, but slightly below the knee, and the other at the base of the ankle (heel), forcing the leg into
full extension prior to lifting the leg (the leg must be kept in full extension, without the pelvis lifting off the
plinth, throughout the movement).
The fulcrum of the goniometer is held over the greater trochanter, while the moving arm is aligned with
the midline of the femur, using the lateral epicondyle as a reference point. The stationary arm of the
goniometer is aligned with the lateral midline of the pelvis (adapted from Maud and Cortez-Cooper,1995).
Measure the angle of displacement from the horizontal. The opposite leg is held firmly by a separate
tester or by using a strap, so that there is no flexion at the hip joint. The procedure is repeated for both
legs.
Scoring:
Two separate trials are performed with the mean of the two recorded as the hip flexion score. The angle
of displacement from the horizontal is measured by the goniometer.
Illustration showing aIllustration showing aIllustration showing aIllustration showing athlete and tester positioning for the Straight leg raise test thlete and tester positioning for the Straight leg raise test thlete and tester positioning for the Straight leg raise test thlete and tester positioning for the Straight leg raise test (Hamstring flexibility)
Figure 2.1Figure 2.1Figure 2.1Figure 2.1 Straight leg raise test position Figure 2.2.Figure 2.2.Figure 2.2.Figure 2.2. Placement of goniometer

Fitness testing and the physical profiling of players
19 Copyright BokSmart © 2009
MODIFIED THOMAS TEST
Purpose:
The modified Thomas test is used to obtain measures of flexibility for the iliopsoas and quadriceps
(Harvey,1998).
Equipment:
Goniometer and plinth
Procedure:
For the modified Thomas test, the player sits on the end of the plinth. The player then rolls back onto the
plinth while pulling both knees to the chest. This is to ensure that the lumbar spine is flat on the plinth
and the pelvis is posteriorly rotated. The player then holds the contra-lateral hip in maximum flexion with
the arms, while the limb to be tested is lowered towards the floor
Two angles are measured (using a goniometer) for each limb:
The length of the iliopsoas is determined by measuring the angle of hip flexion. The stationary arm of the
goniometer is aligned with the lateral midline of the pelvis. The moving arm is aligned with the midline of
the femur using the lateral epicondyle as a reference point (Fig 3.1).
The length of the quadriceps is determined by measuring the knee flexion angle. The stationary arm of
the goniometer is aligned with the lateral midline of the thigh, using the greater trochanter as a reference
point. The fulcrum is placed over the lateral epicondyle of the femur. The moving arm is aligned with the
lateral midline of the fibula, using the lateral malleolus as a reference point (Fig.3.2).
Scoring:
The largest angles of displacement are measured by the goniometer.

Fitness testing and the physical profiling of players
20 Copyright BokSmart © 2009
BODY POSITION FOR THE MODIFIED THOMAS TEST
Illiopsoas measurementIlliopsoas measurementIlliopsoas measurementIlliopsoas measurement
FigurFigurFigurFigure 3.1e 3.1e 3.1e 3.1 Illiopsoas measurement during Modified Thomas test
Rectus femoris measurementRectus femoris measurementRectus femoris measurementRectus femoris measurement
Figure 3.2.Figure 3.2.Figure 3.2.Figure 3.2. Quadriceps flexibility measurement during Modified Thomas Test

Fitness testing and the physical profiling of players
21 Copyright BokSmart © 2009
REFERENCES
Harvey, D. (1998). Assessment of the Flexibility of elite athletes using the modified Thomas test. British
Journal of Sports Medicine. 32, 68-70.
Johnson BL and Nelson JK. (1979) Practical measurements for evaluation in physical education.
Burgess, Minneapolis. 78-79.
Maud, P.J. and Cortez-Cooper, M. (1995). Static techniques for the evaluation of joint range of motion. In
Physiological Assessment of Human Fitness. (Ed. Maud P.J and Foster C) Champaign, Illinois. Human
Kinetics.
Reilly, T. (1981). The concept, measurement and development of flexibility in sports fitness and sports
injuries.(Reilly,T.,ed) Faber and Faber London.
SPEED
Definition
Speed is displacement per unit time. The aim is to measure the time it takes a subject to complete a
specified distance.
Description of measurements
SPEED (10M AND 40M SPEED)
Purpose:
The purpose of these tests is to determine the player’s maximum sprint speed and the ability to
accelerate from a stationary position.
Equipment:
Photo-electric sensors, electronic sprint timer, marking cones and tape measure.
Procedure:
Players must warm up thoroughly before this test, as they are required to produce an all-out effort. It is
strongly recommended that each player performs a minimum of 10 minutes of sub-maximal running,
followed by an appropriate stretching regimen, and some acceleration sprints, building up to full pace.
For this test, an electronic sprint timer, with photo-electric sensors, is set at chest height and placed at
10m and 40m intervals from the start line. The player is instructed to position himself, in a crouched start

Fitness testing and the physical profiling of players
22 Copyright BokSmart © 2009
position, 30 cm from the start line (this line must be clearly marked). The first set of light sensors are
placed at the start line, the second at 10m and the third at 40m. The player sprints maximally for 40m
through the sensors. The player completes two maximal effort runs separated by a minimum of 5
minutes’ recovery period. If photo-electric cells are unavailable then a hand-held timer should be used.
Scoring:
Record times for 10m and 40m .

Fitness testing and the physical profiling of players
23 Copyright BokSmart © 2009
AGILITY
Definition
Agility can best be described as the ability to accelerate, decelerate and change direction at maximal
speed.
Description of measurements
ILLINOIS-TEST
Purpose
The purpose of this test is to measure the player’s speed and agility. The test is set up as shown below:
Finish lineFinish lineFinish lineFinish line 2m2m2m2m 2m2m2m2m Starting lineStarting lineStarting lineStarting line
3m3m3m3m
3m3m3m3m
3m3m3m3m
2m2m2m2m 2m2m2m2m
Figure 5Figure 5Figure 5Figure 5.... Illinois Agility Test (Adapted from Getchell, 1979)

Fitness testing and the physical profiling of players
24 Copyright BokSmart © 2009
Equipment
Cones, whistle, tape-measure and photocells if possible, otherwise hand timing will suffice.
Procedure
The player lies in the prone position with his chin touching the surface of the starting line. The first light
sensor is placed at the start line, 50 cm above the ground. The light sensor will be activated as the
subject moves from the prone position. The second light sensor is placed at the finish line. A whistle sets
off the player, who jumps up and accelerates towards and around the opposite cone. He then runs
towards the starting line’s middle cone, zig-zags through the cones downward and again upwards,
sprints to the last cone on the far side and finishes at the finish line. If a player is tested on a grass
surface then boots must be used. No starting blocks are allowed. If indoor testing is completed then
running shoes should be used. If photo-electric cells are unavailable then a hand-held timer should be
used.
Scoring
The player gets two chances, with the faster time taken and recorded in seconds.
REFERENCES
Getchell,B.(1979). Physical fitness: A way of life, 2nd ed. John Wiley and sons, Inc. USA.
POWER
Definition
Power is the ability to complete maximal work in the shortest amount of time. Measurements of power
attempt to describe a player’s explosiveness.
Description of measurements
VERTICAL JUMP
Purpose
This test measures the player’s leg power.

Fitness testing and the physical profiling of players
25 Copyright BokSmart © 2009
Equipment
• A smooth wall with a ceiling high enough to measure maximum jump height.
• Measuring device, e.g. stick, tape measure
• Chalk
Procedure
The first step is to measure the player’s standing height. The player stands side on with the dominant
shoulder facing the wall. The player then reaches up with the dominant arm and the standing height is
measured at the point of their fingertips. The athlete is then ready to attempt the first jump attempt. The
player is allowed to bend (flex) the knees and swing the arms prior to the jump. The player is not allowed
a run up or do a shuffle step prior to the jump. The player is allowed a maximum of two efforts after a
thorough warm-up. At the highest point of the jump the player reaches up and touches the wall, making
a chalk mark. The player’s vertical jump score is measured as the distance between the standing height
and the jump height.
Scoring
The standing height is subtracted from the jump height and recorded as the vertical jump score. The
highest value (cm) is recorded.
Figure 6.1Figure 6.1Figure 6.1Figure 6.1 Standing height is measured first

Fitness testing and the physical profiling of players
26 Copyright BokSmart © 2009
Figure 6.2.Figure 6.2.Figure 6.2.Figure 6.2. The player flexes the knees in preparation to jump
Figure 6.3.Figure 6.3.Figure 6.3.Figure 6.3. The player jumps, touching the wall
STANDING BROAD JUMP
Purpose
This test measures explosive leg power over a horizontal distance. The player jumps forward from a two-
footed take-off position, flexing at the hip, knee and ankle joints prior to take-off. The aim of the jump is
to obtain as much horizontal distance as possible. The better of two jumps is recorded. Protective shoes
(trainers) should be worn if a hard surface is used.

Fitness testing and the physical profiling of players
27 Copyright BokSmart © 2009
Procedure
The player stands with his feet comfortably apart, behind a demarcated line. The player is allowed to
bend (flex) the knees and swing the arms prior to the jump. The player is not allowed a run-up or a shuffle
step prior to the jump. The player is allowed a maximum of two efforts after a thorough warm-up.
Equipment
• Straight line/rope
• Measuring tape and a suitable area for the execution of the test.
Scoring
The maximum distance (cm) from the take-off line to the back of the heel closest to the take-off line is
recorded.
FiFiFiFigure 7.1gure 7.1gure 7.1gure 7.1. The player flexes his knees, ankles and hips in preparation to take off. The player is also
allowed to swing his arms.

Fitness testing and the physical profiling of players
28 Copyright BokSmart © 2009
Figure 7.3.Figure 7.3.Figure 7.3.Figure 7.3. Landing
MUSCLE STRENGTH
Definition
Testing of muscle strength refers to the external force that can be generated by a specific muscle or
group of muscles.
Description of measurements
The testing of muscle strength involves movement of the muscles within the body to produce a force
against an external load or object. When completing strength tests, a player must be familiar with the
equipment and procedures. A player must have performed the specific lift on several occasions and
trained with the lifting technique prior to attempting a maximum lift. One of the most common measures
of strength involves lifting the heaviest weight possible and completing up to 10 repetitions. The weight
and number of repetitions can then predict the 1 repetition maximum (1 RM). This value is useful in
prescribing loads for training and for evaluating changes in strength.
A formula to predict a 1RM for the squat and bench press was created by Wathan (1994). A table for
predicting 1RM and training loads is presented in appendix A. The equation is as follows:
1RM = 100 x Weight lifted/(48.8+53.8 x EXP(-0.075 x Number of repetitions performed)).
Maximal strength tests, if performed incorrectly, carry a high risk of injury. The predicted 1RM from 3-10
repetitions has a lower risk of injury than a measured 1RM. A spotter is required for all 1-10 RM tests.

Fitness testing and the physical profiling of players
29 Copyright BokSmart © 2009
The following steps should be followed for The following steps should be followed for The following steps should be followed for The following steps should be followed for 1 RM testing:1 RM testing:1 RM testing:1 RM testing:
1. Complete a light warm-up set of 10 repetitions at 40 – 50 % of the player’s estimated 1 RM
2. Complete a 4-minute light stretching routine
3. Increase the weight to 70-80% of the estimated 1RM, completing three repetitions
4. Complete a 4-minute rest period before the resistance is again increased to a 100% estimate of
his 1 RM
5. If step 4 was successful, complete a minimum 4-minute rest period before increasing the
resistance (used in step 4) by 2.5-5%. If step 4 is not successful, decrease the weight used in
the unsuccessful attempt by 2.5-5% and let the player rest for a minimum of 4 minutes, prior to
attempting a lesser weight.
6. The maximum weight lifted is recorded as the 1 RM.
The following steps should be followed for 3The following steps should be followed for 3The following steps should be followed for 3The following steps should be followed for 3----10 RM testing: 10 RM testing: 10 RM testing: 10 RM testing:
1. Complete a light warm-up set of 6 repetitions at 40 – 50 % of the player’s estimated 1 RM
2. Complete a 4-minute light stretching routine
3. Increase the weight to 70-80% of the estimated 3-10 RM, completing three repetitions
4. Complete a 4-minute rest period before the resistance is again increased to a 100% estimate of
his 10 RM
5. If step 4 was successful, complete a minimum 4-minute rest period before increasing the
resistance (used in step 4) by 2.5-5%. If step 4 is not successful, decrease the weight used in
the unsuccessful attempt by 2.5-5% and let the player rest for a minimum of 4 minutes, prior to
attempting a lesser weight.
6. The maximum weight lifted is recorded as the 3-10 RM.
Note:Note:Note:Note: The software program will automatically calculate 1RM values for a 3-10 RM test.
BENCH PRESS
Purpose:
The purpose of these tests is to determine the player’s maximal muscle strength of the upper body.
Equipment:
• Olympic bar
• Weights
• Bench press bench

Fitness testing and the physical profiling of players
30 Copyright BokSmart © 2009
• Three testing personnel for spotting
Procedure:
For this exercise, the player lies supine on a bench with his/her feet flat on the floor and his/her hips and
shoulders in contact with the bench. Hand spacing is usually 1.5 times the player’s biacromial width. The
player starts this lift by lowering the bar, in a controlled manner, to the centre of the chest, touching the
chest lightly (no bouncing the bar on the chest) and then extending upwards until the arms are in a fully
locked position. The player is advised to inhale when lowering the bar and to exhale when pressing it. A
player should never complete a maximum lift without a spotter.
There are several reasons for disqualifying a lift, and these include:
• Lifting the buttocks off the bench during the movement
• Bouncing the bar off the chest
• Uneven extension of the arms
• Touching of the bar by the spotter.
Scoring:
The maximum amount of weight that can be lifted for 1-10 repetitions.
1-10 RM Bench press (absolute) – (kg)
The 1-10 RM Bench press (relative) is calculated as: 1RM/(bodyweight0.57) (the athlete with the largest
numerical index is considered the strongest body mass-adjusted lifter) (Dooman and Vanderburgh, 2000)
Figure 8.1Figure 8.1Figure 8.1Figure 8.1. Bench Press test start position (note position of spotter)

Fitness testing and the physical profiling of players
31 Copyright BokSmart © 2009
Figure 8.2.Figure 8.2.Figure 8.2.Figure 8.2. The bar is lowered to the chest (note position of spotter)
PARALLEL SQUAT
Purpose:
To assess the maximum muscular strength of the leg musculature.
Equipment:
• Squat rack
• Olympic bar
• Weights
Procedure:
For this test, the player stands erect with feet placed 5-10 cm wider than shoulder width and toes
pointing slightly outwards. The bar is allowed to rest on the middle of the trapezius muscle of the upper
back while the player grips the bar with both hands positioned 10-15 cm from the shoulders. The player
then performs a controlled squat until an angle of 90 degrees is reached at the knee joints. The player
then extends the knees to fully return to the starting position. Players are instructed to keep their heads
up in the neutral position throughout the entire movement. The maximum weight pushed for a 1-10 RM
must be established. A player should never complete a lift without a spotter.
There are several reason for disqualification of a lift, including:There are several reason for disqualification of a lift, including:There are several reason for disqualification of a lift, including:There are several reason for disqualification of a lift, including:
• More than one recovery attempt
• Touching of the bar by the spotter
• Shifting or movement of the feet or hands during the lift
Scoring:
The amount of weight for the 1-10 RM is recorded

Fitness testing and the physical profiling of players
32 Copyright BokSmart © 2009
1-10 RM parallel squat (absolute) – (kg)
1-10 RM full parallel (relative) – 1RM/(bodyweight0.60) (the athlete with the largest numerical index is
considered the strongest body mass-adjusted lifter) (Dooman and Vanderburgh, 2000)
Figure 9.Figure 9.Figure 9.Figure 9.1111.... The player descends to 90 degrees (note position of spotter). A squat rack is required to
perform this test safely
REFERENCES
Dooman,C.S and Vanderburgh,P.M. (2000). Allometric modeling of the bench press and squat: who is
the strongest regardless of bodymass? Journal of Strength and Conditioning research, 14, 32-36.
Wathan, D. Load assignment. In: Essentials of strength training and Conditioning. (1994) . T.R. Baechle,
ed. Champaign, IL: Human kinetics, pp. 435-439.

Fitness testing and the physical profiling of players
33 Copyright BokSmart © 2009
MUSCLE ENDURANCE
Definition
Muscle endurance is the ability of a specific muscle group to contract repetitively or to hold a single
contraction to fatigue.
Description of measurements
PULL UPS (MAXIMUM NUMBER)
Purpose:
The objective of this test is to measure the player’s upper body endurance. This test is applicable to
those players who are 14 years and older. Players younger than 14 are advised to complete the flexed
arm hang (isometric hold) version of the test.
Equipment:
• Pull-up bar
• Rubber gripping/towel to ensure a secure grip on the bar
Procedure:
An underhand grip is used with hands placed 10-15 cm apart. The player must start from a hanging
position (arms fully extended). The player’s chin must reach above the bar on the ascent with arms fully
extending (straightening) on the descent. A repetition is not valid if these requirements are not fulfilled.
The player must pull his knees up in front (of the body) during the movement in order to avoid arching the
back. This is a maximal effort test with the player continuing until he can no longer lift his chin to the bar.
Scoring:
The maximal amount of valid pull-ups completed from an extended arm position to where the chin
touches the bar and back down.

Fitness testing and the physical profiling of players
34 Copyright BokSmart © 2009
Starting position Upward movement
Figure Figure Figure Figure 10.10.10.10. Underhand pull-ups
FLEXED ARM HANG (MAXIMUM ISOMETRIC HOLD) 12-13 YEAR OLDS
Purpose:
The objective of this test is to measure the athlete’s upper body endurance.
Equipment:
• Pull-up bar
• Rubber gripping/towel to ensure a secure grip on the bar
• Stopwatch
Procedure:
An underhand grip is used with hands placed 10-15 cm apart. The player must start from a hanging
position, from where they are helped into a position where the elbows are flexed to 90 degrees. The test
starts when the tester releases the player. The aim of test is to see how long the player can maintain a
90-degree elbow position. The test ends (timer is stopped) when the player can no longer maintain a 90-
degree angle at the elbow joint. A maximal 10 degrees of error movement is allowed.

Fitness testing and the physical profiling of players
35 Copyright BokSmart © 2009
Hold position
Figure 11.Figure 11.Figure 11.Figure 11. 90-degree elbow flexion position for the maximal isometric hold
Scoring:
Record the number of seconds that the athlete can maintain 90 degrees of flexion of the elbow joint.
PUSH UP TEST (1 MINUTE)
Purpose:
The aim of this test is to measure the player’s upper body strength and endurance
Equipment:
• Stopwatch
• Gymnastic mat
Procedure:
The player assumes a position where his thumbs are 0-5 cm wider than shoulder width. Keeping the
back and body straight, the player descends to the tester’s fist, placed below the sternum and then
ascend until elbows are fully extended (straightened). If the player does not adhere to these
specifications, the repetition is not counted.
Scoring:
The number of push-ups performed in one minute is recorded.

Fitness testing and the physical profiling of players
36 Copyright BokSmart © 2009
Starting position Finishing position
Figure 12.Figure 12.Figure 12.Figure 12. Push-up Test
SIT-UPS (1-2 MINUTES)
Purpose:
To assess the muscular endurance of the abdominal muscles and hip flexors.
Equipment:
• Stopwatch
• Gymnastic mat
Procedure:
Sit-ups are performed with knees bent, feet fixed (on sit-up bench or held by partner). The hands should
touch the ears and elbows should touch the knees at the end of the curl up. The player should then
descend in a controlled manner. The tester’s hand is placed palm side up on the bench, such that the
wrist makes contact with the player’s spine in line with the inferior border (bottom) of the scapulae
(shoulder blade).
If the hands are taken off the ears, the elbows do not touch the knees, or the back does not touch the
tester’s hand, the sit up is not counted.
Scoring:
The duration of the test depends on the age of the player. Players between the ages of 12-13 years
complete sit ups for 1 minute, whereas players 14 years and older complete sit-ups for 2 minutes. The
player may rest within the 1-2 minute period as desired. The time is not paused during a rest.

Fitness testing and the physical profiling of players
37 Copyright BokSmart © 2009
Start Finish
Figure 13.Figure 13.Figure 13.Figure 13. Sit-ups
CARDIORESPIRATORY FITNESS
Definition
Cardiorespiratory fitness is the ability to perform continuous exercise, using large muscle groups. The
intensity of this exercise may be moderate to high for a prolonged period. This type of activity places
demands on the respiratory, cardiovascular and skeletal muscle systems. Cardiorespirotary fitness is
important for health and sports performance.
Description of measurements
20M MULTISTAGE SHUTTLE RUN
Purpose:
To assess the cardiorespiratory (running) capacity of the player.
Equipment:
• Audiocassette, portable cassette/CD player
• 20m marked distance on a flat surface (tape measure)
• Cones
Procedure:
This progressive multistage shuttle run is based on the protocol of Lèger et al. (1988). A 20 m distance is
measured out and marked on the floor. The player runs between these two lines. The player should
attempt to complete each 20 m distance (lap) and turn according to the pace determined by the

Fitness testing and the physical profiling of players
38 Copyright BokSmart © 2009
recorded sound signal. One foot must touch the marked line by the time the signal sounds. Players may
not run wide circles; each player must place one foot just over the line and then turn immediately to face
the opposite direction. The timing between signals starts off slowly but becomes progressively faster with
each passing minute. The player is allowed to voluntary withdraw when he is unable to maintain the pace
dictated by the sound. The player can also be withdrawn from the test if he fails to complete the 20m
distances in time for 2 consecutive laps. The score is taken at the last completed lap.
Scoring:
Measured as number of successfully completed shuttles of 20 m. This can be converted to give an
approximation of the player’s VO2 max.
3 KM TIME TRIAL
Purpose:
To assess the cardiorespiratory (running) capacity of the player.
Equipment:
• Stopwatch
• Track, field or measured road run
Procedure:
The players start the test on the signal of the tester and complete the 3km as quickly as possible. Players
are allowed to walk but the objective of the test is to finish the distance as quickly as possible.
Scoring:
The time is recorded in minutes and seconds.
REFERENCES
Lèger, L.A., Mercier, Gadovry and Lambert J. (1988). The Multistage 20 m shuttle run test for aerobic
fitness. Journal of Sports Sciences 6, 93 - 101.

Fitness testing and the physical profiling of players
39 Copyright BokSmart © 2009
REPEAT SPRINT ABILITY
Definition
Fitness in sports such as rugby, soccer and hockey is determined by the player’s ability to resist fatigue
in short duration, high-intensity (>90% maximum heart rate) and intermittent (rest of 30 seconds)
exercise. The 5 m shuttle run test simulates this type of exercise. This test also measures the local
muscle endurance of the legs and lower back, as well as agility.
Description of measurements
5M SHUTTLE RUN
Purpose:
The purpose of this test is to measure the player’s repeat sprint ability, local muscle endurance of the
legs and lower back, as well as agility.
Equipment
Six cones, tape measure, non-slippery surface, 2 stopwatches, whistle. Two testing persons are required
for this test and the ratio of participants at any one time to tester should be no more than 2:1. Therefore,
if six players perform the test simultaneously, at least 3 testing personnel are required to make accurate
assessments of distance covered by individuals.
0m 5m 10m 15m 20m 25m
0000 1111 2222 3333 4444 5555
Figure 12.Figure 12.Figure 12.Figure 12. Repeated sprint test
Procedure:
Mark out the running course as shown above in 5m intervals. In addition, place down smaller markers
every 2.5m to increase the accuracy of recording the distance reached during each shuttle. The player
starts the test at point 0, and upon an auditory signal (whistle), sprints to cone 1, touching the base of
the cone with the hand and, returning to point 0, touching the base, and then sprinting to point 2. The
player continues in this manner, sprinting to the remaining beacons (3, 4 and 5) and making sure to
return to the beacon (0) between each outward shuttle. A whistle is blown after 30 seconds, indicating

Fitness testing and the physical profiling of players
40 Copyright BokSmart © 2009
the end of the first repetition. The player is then allowed 35 seconds’ rest, while the player’s distance is
recorded. The distance measured is taken from the position of the front foot of the player as the whistle
is blown.
During the recovery period, the players make their way back to the starting point (0) and upon
completion of the 35th second they begin the next set of shuttles. They need to complete six 30-second
runs, with the distance for each run recorded. The aim of the test is to cover as much distance as
possible in the six runs. Each run should be completed at about 90% pace. Any player who has a history
of lower back pain or injury should not complete this test.
The following parameters are measured:
• The maximum distance (m) covered by the player during any single shuttle-run
• The total distance (m) covered in six repetitions
Scoring:
See Appendix C for a data collection and reference score sheet
AUTHOR’S BIOGRAPHY
Justin Durandt is currently the manager of the Discovery High Performance Centre at the Sport Science
Institute of South Africa. Justin has had the privilege of being the conditioning specialist for the national
cricket, soccer, Hockey and Olympic teams. In addition he has trained the WP Currie cup team and the
SAU19 rugby team at three world cups.
REFERENCES
Boddington, M.K., Lambert, M.I., St Clair-Gibson, A and Noakes, T.D. (2001) Reliability of a 5-m shuttle
test. Journal of Sports Sciences, 19, 223 – 228.

Fitness testing and the physical profiling of players
41 Copyright BokSmart © 2009
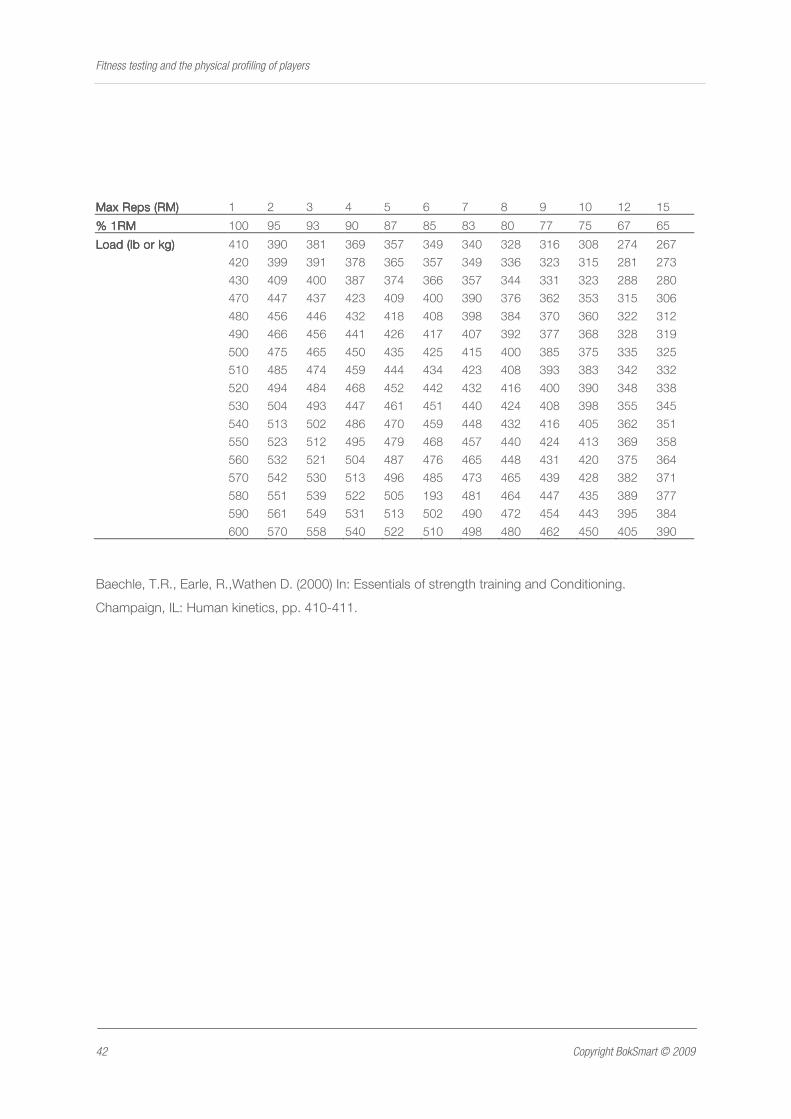
APPENDIX A
Table for estimating training loads and 1RM
Max Reps (RM)Max Reps (RM)Max Reps (RM)Max Reps (RM) 1 2 3 4 5 6 7 8 9 10 12 15
% 1RM% 1RM% 1RM% 1RM 100 95 93 90 87 85 83 80 77 75 67 65
Load (lb or kg)Load (lb or kg)Load (lb or kg)Load (lb or kg) 10 10 9 9 9 9 8 8 8 8 7 7
20 19 19 18 17 17 17 16 15 15 13 13
30 29 28 27 26 26 25 24 23 23 20 20
40 38 37 36 35 34 33 32 31 30 27 26
50 48 47 45 44 43 42 40 39 38 34 33
60 57 56 54 52 51 50 48 46 45 40 39
70 67 65 63 61 60 58 56 54 53 47 46
80 76 74 72 70 68 66 64 62 60 54 52
90 86 84 81 78 77 75 72 69 68 60 59
100 95 93 90 87 85 83 80 77 75 67 65
110 105 102 99 96 94 91 88 85 83 74 72
120 114 112 108 104 102 100 96 92 90 80 78
130 124 121 117 113 111 108 104 100 98 87 85
140 133 130 126 122 119 116 112 108 105 91 92
150 143 140 135 131 158 125 120 116 113 101 98
160 152 149 144 139 136 133 128 123 120 107 104
170 162 158 153 148 145 141 136 131 128 114 111
180 171 167 162 157 153 149 144 139 135 121 117
190 181 177 171 165 162 158 152 146 143 127 124
200 190 186 180 174 170 166 160 154 150 134 130
210 200 195 189 183 179 174 168 162 158 141 137
220 209 205 198 191 187 183 176 169 165 147 143
230 219 214 207 200 196 191 184 177 173 154 150
240 228 223 216 209 204 199 192 185 180 161 156
250 238 233 225 218 213 208 200 193 188 168 163
260 247 242 234 226 221 206 208 200 195 174 169
270 257 251 243 235 230 224 216 208 203 181 176
280 266 260 252 244 238 232 224 216 210 188 182
290 276 270 261 252 247 241 232 223 218 194 189
300 285 279 270 261 255 249 240 231 225 201 195
310 295 288 279 270 264 257 248 239 233 208 202
320 304 298 288 278 272 266 256 246 240 218 208
330 314 307 297 287 281 274 264 254 248 221 215
340 323 316 306 296 289 282 272 262 255 228 221
350 333 326 315 305 298 291 280 270 263 235 228
360 342 335 324 313 306 299 288 277 270 241 234
370 352 344 333 322 315 307 296 285 278 248 241
380 361 353 342 331 323 315 304 293 285 255 247
390 371 363 351 339 332 324 312 300 293 261 254
400 380 372 360 348 340 332 320 308 300 268 260
Fitness testing and the physical profiling of players
42 Copyright BokSmart © 2009
Max Reps (RM)Max Reps (RM)Max Reps (RM)Max Reps (RM) 1 2 3 4 5 6 7 8 9 10 12 15
% 1RM% 1RM% 1RM% 1RM 100 95 93 90 87 85 83 80 77 75 67 65
Load (lb or kg)Load (lb or kg)Load (lb or kg)Load (lb or kg) 410 390 381 369 357 349 340 328 316 308 274 267
420 399 391 378 365 357 349 336 323 315 281 273
430 409 400 387 374 366 357 344 331 323 288 280
470 447 437 423 409 400 390 376 362 353 315 306
480 456 446 432 418 408 398 384 370 360 322 312
490 466 456 441 426 417 407 392 377 368 328 319
500 475 465 450 435 425 415 400 385 375 335 325
510 485 474 459 444 434 423 408 393 383 342 332
520 494 484 468 452 442 432 416 400 390 348 338
530 504 493 447 461 451 440 424 408 398 355 345
540 513 502 486 470 459 448 432 416 405 362 351
550 523 512 495 479 468 457 440 424 413 369 358
560 532 521 504 487 476 465 448 431 420 375 364
570 542 530 513 496 485 473 465 439 428 382 371
580 551 539 522 505 193 481 464 447 435 389 377
590 561 549 531 513 502 490 472 454 443 395 384
600 570 558 540 522 510 498 480 462 450 405 390
Baechle, T.R., Earle, R.,Wathen D. (2000) In: Essentials of strength training and Conditioning.
Champaign, IL: Human kinetics, pp. 410-411.

Fitness testing and the physical profiling of players
43 Copyright BokSmart © 2009
APPENDIX B
Table for estimating the VO2 Max from the modified shuttle run test
LevelLevelLevelLevel
ShuttleShuttleShuttleShuttle
PredictedPredictedPredictedPredicted
VOVOVOVO2222 MaxMaxMaxMax
Ind ShuttleInd ShuttleInd ShuttleInd Shuttle
CountCountCountCount
LevelLevelLevelLevel
ShuttleShuttleShuttleShuttle
PredictedPredictedPredictedPredicted
VOVOVOVO2222 MaxMaxMaxMax
Ind ShuttleInd ShuttleInd ShuttleInd Shuttle
CountCountCountCount
4 2 26.8 25 11 2 50.8 94
4 4 27.6 27 11 4 51.4 96
4 6 28.3 29 11 6 51.9 98
4 9 29.5 32 11 8 52.5 100
5 2 30.2 34 11 12 53.7 104
5 6 31.8 38 12 2 54.3 106
5 9 32.9 41 12 4 54.8 108
6 2 33.6 43 12 8 56.0 112
6 4 34.3 45 12 10 56.5 114
6 6 35.0 47 12 12 57.1 116
6 9 36.4 50 13 2 57.6 118
7 2 37.1 52 13 6 58.7 122
7 4 37.8 54 13 8 59.3 134
7 6 38.5 56 13 10 59.8 126
7 8 39.2 58 13 13 60.6 129
8 2 40.5 62 14 4 61.7 133
8 4 41.1 64 14 6 62.2 135
8 6 41.8 66 14 8 62.7 137
8 8 42.4 68 14 10 63.2 139
8 10 43.3 70 14 13 64.0 142
9 2 43.9 72 15 2 64.6 144
9 4 44.5 74 15 4 65.1 146
9 6 45.2 76 15 6 65.6 148
9 8 45.8 78 15 8 66.2 150
9 11 46.8 81 15 10 66.7 152
10 4 48.0 85 16 2 68.0 157
10 6 48.7 87 16 4 68.5 159
10 8 49.3 89 16 6 69.0 161
10 11 50.2 92 16 8 69.5 163
16 10 69.9 165
16 12 70.5 167
16 14 70.9 169

Fitness testing and the physical profiling of players
44 Copyright BokSmart © 2009
APPENDIX C
Data collection and reference score sheet for the 5m shuttle run
1. Data collection sheet (example)
Name Run 1 Run 2 Run 3 Run 4 Run 5 Run 6 Total
Distance
Dalton 5B2 5 5 5B4½ 4F4 4F3
135.0 m 125.0 m 125.0 m 122.5 m 120.0 m 115.0 m 742.5m
2. Score sheet
0000 5m5m5m5m 10m10m10m10m 15m15m15m15m 20m20m20m20m 25m25m25m25m
0000 ↔↔↔↔ 1111 ↔↔↔↔ 2222 ↔↔↔↔ 3333 ↔↔↔↔ 4444 ↔↔↔↔ 5555
EXAMPLES:
1. Reference number = 5B2
Where:
5 = Beacon number
B = Turned back
2 = Number of beacons passed after turning back
Distance = 135 m
2. Reference number = 4F4
Where:
Beacon number = 4
F = has reached beacon 4, turned and reached beacon 0, turned and
4 = reached beacon 4

Fitness testing and the physical profiling of players
45 Copyright BokSmart © 2009
m Reference
5 1
10 1B1
15 1F1
20 2
25 2B1
30 2B2 (Reached beacon 2, turned and made it back to beacon 0.)
35 2F1
40 2F2
45 3
50 3B1
55 3B2
60 3B3
65 3F1
70 3F2 (Reached beacon 3 , turned and made it back to beacon 0, turned and was at beacon 2 on
the blow of the whistle.)
75 3F3
80 4
85 4B1
90 4B2
95 4B3
4B4
105 4F1
110 4F2
115 4F3
120 4F4
125 5
130 5B1
135 5B2
140 5B3
145 5B4

Fitness testing and the physical profiling of players
46 Copyright BokSmart © 2009
APPENDIX D
Individual score sheets
APPENDIX E
Team score sheets