Bob Hook Chevrolet 2011 Chevy Volt Owners Manual
516
2011 Chevrolet Volt Owner Manual M In Brief ........................ 1-1 Instrument Panel .............. 1-2 Initial Drive Information ........ 1-4 Vehicle Features ............. 1-15 Battery and Efficiency ........ 1-18 Performance and Maintenance ................ 1-23 Keys, Doors and Windows ... 2-1 Keys and Locks ............... 2-2 Doors ........................ 2-12 Vehicle Security .............. 2-13 Exterior Mirrors ............... 2-15 Interior Mirrors ................ 2-16 Windows ..................... 2-16 Seats and Restraints ......... 3-1 Head Restraints ............... 3-2 Front Seats .................... 3-4 Rear Seats .................... 3-8 Safety Belts .................. 3-10 Airbag System ................ 3-25 Child Restraints .............. 3-41 Storage ....................... 4-1 Storage Compartments ........ 4-1 Additional Storage Features . . . 4-2 Instruments and Controls .... 5-1 Instrument Panel Overview .... 5-4 Controls ....................... 5-6 Warning Lights, Gauges, and Indicators .................... 5-9 Information Displays .......... 5-31 Vehicle Messages ............ 5-45 Vehicle Personalization ....... 5-53 Universal Remote System .... 5-60 Lighting ....................... 6-1 Exterior Lighting ............... 6-1 Interior Lighting ................ 6-5 Lighting Features .............. 6-5 Infotainment System ......... 7-1 Introduction .................... 7-2 Radio ......................... 7-10 Audio Players ................ 7-18 Navigation .................... 7-39 Voice Recognition ............ 7-77 Phone ........................ 7-85 Climate Controls ............. 8-1 Climate Control Systems .... . . 8-1 Air Vents ....................... 8-9 Driving and Operating ........ 9-1 Driving Information ............. 9-2 Starting and Operating ....... 9-18 Electric Vehicle Operating Modes ...................... 9-24 Engine Exhaust .............. 9-30 Electric Drive Unit ............ 9-32 Brakes ....................... 9-33 Ride Control Systems ........ 9-37 Cruise Control ................ 9-40 Object Detection Systems .... 9-43 Charging ..................... 9-49 Fuel .......................... 9-57 Towing ....................... 9-62 Conversions and Add-Ons . . . 9-63
Transcript of Bob Hook Chevrolet 2011 Chevy Volt Owners Manual

Black plate (1,1)Chevrolet Volt Owner Manual - 2011
2011 Chevrolet Volt Owner Manual M
In Brief . . . . . . . . . . . . . . . . . . . . . . . . 1-1Instrument Panel . . . . . . . . . . . . . . 1-2Initial Drive Information . . . . . . . . 1-4Vehicle Features . . . . . . . . . . . . . 1-15Battery and Efficiency. . . . . . . . 1-18Performance andMaintenance . . . . . . . . . . . . . . . . 1-23
Keys, Doors and Windows . . . 2-1Keys and Locks . . . . . . . . . . . . . . . 2-2Doors . . . . . . . . . . . . . . . . . . . . . . . . 2-12Vehicle Security. . . . . . . . . . . . . . 2-13Exterior Mirrors . . . . . . . . . . . . . . . 2-15Interior Mirrors . . . . . . . . . . . . . . . . 2-16Windows . . . . . . . . . . . . . . . . . . . . . 2-16
Seats and Restraints . . . . . . . . . 3-1Head Restraints . . . . . . . . . . . . . . . 3-2Front Seats . . . . . . . . . . . . . . . . . . . . 3-4Rear Seats . . . . . . . . . . . . . . . . . . . . 3-8Safety Belts . . . . . . . . . . . . . . . . . . 3-10Airbag System . . . . . . . . . . . . . . . . 3-25Child Restraints . . . . . . . . . . . . . . 3-41
Storage . . . . . . . . . . . . . . . . . . . . . . . 4-1Storage Compartments . . . . . . . . 4-1Additional Storage Features . . . 4-2
Instruments and Controls . . . . 5-1Instrument Panel Overview. . . . 5-4Controls . . . . . . . . . . . . . . . . . . . . . . . 5-6Warning Lights, Gauges, andIndicators . . . . . . . . . . . . . . . . . . . . 5-9
Information Displays . . . . . . . . . . 5-31Vehicle Messages . . . . . . . . . . . . 5-45Vehicle Personalization . . . . . . . 5-53Universal Remote System . . . . 5-60
Lighting . . . . . . . . . . . . . . . . . . . . . . . 6-1Exterior Lighting . . . . . . . . . . . . . . . 6-1Interior Lighting . . . . . . . . . . . . . . . . 6-5Lighting Features . . . . . . . . . . . . . . 6-5
Infotainment System . . . . . . . . . 7-1Introduction . . . . . . . . . . . . . . . . . . . . 7-2Radio . . . . . . . . . . . . . . . . . . . . . . . . . 7-10Audio Players . . . . . . . . . . . . . . . . 7-18
Navigation . . . . . . . . . . . . . . . . . . . . 7-39Voice Recognition . . . . . . . . . . . . 7-77Phone . . . . . . . . . . . . . . . . . . . . . . . . 7-85
Climate Controls . . . . . . . . . . . . . 8-1Climate Control Systems . . . . . . 8-1Air Vents . . . . . . . . . . . . . . . . . . . . . . . 8-9
Driving and Operating . . . . . . . . 9-1Driving Information . . . . . . . . . . . . . 9-2Starting and Operating . . . . . . . 9-18Electric Vehicle OperatingModes . . . . . . . . . . . . . . . . . . . . . . 9-24
Engine Exhaust . . . . . . . . . . . . . . 9-30Electric Drive Unit . . . . . . . . . . . . 9-32Brakes . . . . . . . . . . . . . . . . . . . . . . . 9-33Ride Control Systems . . . . . . . . 9-37Cruise Control . . . . . . . . . . . . . . . . 9-40Object Detection Systems . . . . 9-43Charging . . . . . . . . . . . . . . . . . . . . . 9-49Fuel . . . . . . . . . . . . . . . . . . . . . . . . . . 9-57Towing . . . . . . . . . . . . . . . . . . . . . . . 9-62Conversions and Add-Ons . . . 9-63

Black plate (2,1)Chevrolet Volt Owner Manual - 2011
2011 Chevrolet Volt Owner Manual M
Vehicle Care . . . . . . . . . . . . . . . . . 10-1General Information . . . . . . . . . . 10-3Vehicle Checks . . . . . . . . . . . . . . . 10-8Headlamp Aiming . . . . . . . . . . . 10-32Bulb Replacement . . . . . . . . . . 10-34Electrical System . . . . . . . . . . . . 10-37Wheels and Tires . . . . . . . . . . . 10-48Jump Starting . . . . . . . . . . . . . . . 10-79Towing . . . . . . . . . . . . . . . . . . . . . . 10-84Appearance Care . . . . . . . . . . . 10-89
Service and Maintenance . . . 11-1General Information . . . . . . . . . . 11-1Scheduled Maintenance . . . . . . 11-2Recommended Fluids,Lubricants, and Parts . . . . . . . 11-6
Maintenance Records . . . . . . . . 11-8
Technical Data . . . . . . . . . . . . . . . 12-1Vehicle Identification . . . . . . . . . 12-1Vehicle Data . . . . . . . . . . . . . . . . . . 12-2
Customer Information . . . . . . . 13-1Customer Information . . . . . . . . 13-1Reporting Safety Defects . . . . 13-24Vehicle Data Recording andPrivacy. . . . . . . . . . . . . . . . . . . . 13-26
Index . . . . . . . . . . . . . . . . . . . . . i-1

Black plate (3,1)Chevrolet Volt Owner Manual - 2011
Introduction iii
The names, logos, emblems,slogans, vehicle model names,and vehicle body designs appearingin this manual including, butnot limited to, GM, the GM logo,CHEVROLET, the CHEVROLETEmblem, VOLT, and the VOLTlogo are trademarks and/or servicemarks of General Motors LLC, itssubsidiaries, affiliates, or licensors.
This manual describes features thatmay or may not be on your specificvehicle either because they areoptions that you did not purchaseor due to changes subsequent tothe printing of this owner manual.Please refer to the purchasedocumentation relating to yourspecific vehicle to confirm eachof the features found on yourvehicle. For vehicles first soldin Canada, substitute the name“General Motors of Canada Limited”for Chevrolet Motor Divisionwherever it appears in this manual.
Keep this manual in the vehicle forquick reference.
Canadian Vehicle Owners
Propriétaires Canadiens
A French language copy of thismanual can be obtained from yourdealer or from:
On peut obtenir un exemplaire dece guide en français auprès duconcessionnaire ou à l'adressesuivante:
Helm, IncorporatedP.O. Box 07130Detroit, MI 48207
1-800-551-4123Numéro de poste 6438de langue françaisewww.helminc.com
Litho in U.S.A.Part No. 20819514 B Second Printing ©2010 General Motors LLC. All Rights Reserved.

Black plate (4,1)Chevrolet Volt Owner Manual - 2011
iv Introduction
Using this ManualTo quickly locate informationabout the vehicle, use the Indexin the back of the manual. It is analphabetical list of what is in themanual and the page numberwhere it can be found.
Danger, Warnings, andCautionsWarning messages found on vehiclelabels and in this manual describehazards and what to do to avoid orreduce them.
Danger indicates a hazard with ahigh level of risk which will result inserious injury or death.
Warning or Caution indicates ahazard that could result in injury ordeath.
{ WARNING
These mean there is somethingthat could hurt you or otherpeople.
Notice: This means there issomething that could resultin property or vehicle damage.This would not be covered bythe vehicle's warranty.
A circle with a slash through itis a safety symbol which means“Do Not,” “Do not do this,” or“Do not let this happen.”
SymbolsThe vehicle has components andlabels that use symbols instead oftext. Symbols are shown along withthe text describing the operation orinformation relating to a specificcomponent, control, message,gauge, or indicator.
M : This symbol is shownwhen you need to see your ownermanual for additional instructionsor information.
* : This symbol is shown whenyou need to see a service manualfor additional instructions orinformation.

Black plate (5,1)Chevrolet Volt Owner Manual - 2011
Introduction v
Vehicle Symbol Chart
Here are some additional symbolsthat may be found on the vehicleand what they mean. For moreinformation on the symbol, referto the Index.
9 : Airbag Readiness Light
# : Air Conditioning
! : Antilock Brake System (ABS)
b g : Audio Steering WheelControls or OnStar®
I : Brake System WarningLight
A : Charge Port Door
" : Charging System(12‐Volt Battery)
I : Cruise Control
f : Electric Parking Brake
d : Electronic StabilityControl (ESC)
B : Engine Coolant Temperature
O : Exterior Lamps
y : Fault
g : First Responder
. : Fuel Gauge
+ : Fuses
3 : Headlamp High/Low-BeamChanger
_ : High Voltage
j : LATCH System ChildRestraints
[ : Leaf
* : Malfunction Indicator Lamp
: : Oil Pressure
O : Power
B : Remote Vehicle Start
> : Safety Belt Reminders
7 : Tire Pressure Monitor
M : Windshield Washer Fluid

Black plate (6,1)Chevrolet Volt Owner Manual - 2011
vi Introduction
2 NOTES

Black plate (1,1)Chevrolet Volt Owner Manual - 2011
In Brief 1-1
In Brief
Instrument PanelInstrument Panel . . . . . . . . . . . . . . 1-2
Initial Drive InformationInitial Drive Information . . . . . . . . 1-4Remote Keyless Entry (RKE)System . . . . . . . . . . . . . . . . . . . . . . 1-4
Remote Start . . . . . . . . . . . . . . . . . . 1-5Door Locks . . . . . . . . . . . . . . . . . . . 1-5Windows . . . . . . . . . . . . . . . . . . . . . . 1-6Seat Adjustment . . . . . . . . . . . . . . 1-6Heated Seats . . . . . . . . . . . . . . . . . 1-8Head Restraint Adjustment . . . . 1-9Safety Belts . . . . . . . . . . . . . . . . . . . 1-9Sensing System forPassenger Airbag . . . . . . . . . . 1-10
Mirror Adjustment . . . . . . . . . . . . 1-10Steering WheelAdjustment . . . . . . . . . . . . . . . . . 1-11
Interior Lighting . . . . . . . . . . . . . . 1-11Exterior Lighting . . . . . . . . . . . . . 1-11Windshield Wiper/Washer . . . . 1-12Climate Controls . . . . . . . . . . . . . 1-13
Vehicle FeaturesRadio(s) . . . . . . . . . . . . . . . . . . . . . 1-15Satellite Radio . . . . . . . . . . . . . . . 1-15Portable Audio Devices . . . . . . 1-15Bluetooth® . . . . . . . . . . . . . . . . . . . 1-16Steering Wheel Controls . . . . . 1-16Cruise Control . . . . . . . . . . . . . . . 1-17Navigation System . . . . . . . . . . . 1-17Power Outlets . . . . . . . . . . . . . . . 1-17
Battery and EfficiencyHigh Voltage SafetyInformation . . . . . . . . . . . . . . . . . 1-18
Charging . . . . . . . . . . . . . . . . . . . . . 1-18Fueling . . . . . . . . . . . . . . . . . . . . . . 1-21Total Vehicle Range . . . . . . . . . 1-22Regenerative Braking . . . . . . . . 1-22Service . . . . . . . . . . . . . . . . . . . . . . 1-23
Performance and MaintenanceTraction ControlSystem (TCS) . . . . . . . . . . . . . . 1-23
Electronic StabilityControl (ESC) . . . . . . . . . . . . . . 1-23
Tire Pressure Monitor . . . . . . . . 1-23Tire Sealant andCompressor Kit . . . . . . . . . . . . . 1-24
Engine Oil Life System . . . . . . 1-24Driving for Better EnergyEfficiency . . . . . . . . . . . . . . . . . . . 1-25
Roadside AssistanceProgram . . . . . . . . . . . . . . . . . . . . 1-27
OnStar® . . . . . . . . . . . . . . . . . . . . . 1-27

Black plate (2,1)Chevrolet Volt Owner Manual - 2011
1-2 In Brief
Instrument Panel

Black plate (3,1)Chevrolet Volt Owner Manual - 2011
In Brief 1-3
A. Air Vents on page 8‑9.
B. Turn and Lane‐Change Lever.See Turn and Lane-ChangeSignals on page 6‑4.
Exterior Lamp Controls onpage 6‑1.
Pedestrian Friendly Alert onpage 6‑2.
C. Instrument Cluster on page 5‑9.
Driver Information Center (DIC)Display. See Driver InformationCenter (DIC) on page 5‑43.
D. Windshield Wiper/Washer onpage 5‑7.
E. Heated Front Seats on page 3‑6(If Equipped).
F. Center Stack Display onpage 5‑31.
G. Charging Status Indicator.See Charging Status Feedbackon page 9‑52.
H. Light Sensor. See DaytimeRunning Lamps (DRL) onpage 6‑3.
I. Instrument Panel Storage onpage 4‑1.
J. Automatic Climate ControlSystem on page 8‑1.
K. Driver Information Center (DIC)Controls. See Driver InformationCenter (DIC) on page 5‑43.
L. Instrument Panel IlluminationControl on page 6‑5.
M. Data Link Connector (DLC)(Out of View). See MalfunctionIndicator Lamp on page 5‑21.
N. Cruise Control on page 9‑40.
O. Steering Wheel Adjustment onpage 5‑6.
P. Horn on page 5‑7.
Q. Steering Wheel Controls onpage 5‑6 (If Equipped).
R. Leaf Button. See Center StackDisplay on page 5‑31.
S. DRIVE MODE Button.See Driver Selected OperatingModes on page 9‑26.
T. Power Button on page 9‑18.
U. Shift Lever. See Electric DriveUnit on page 9‑32.
V. Infotainment on page 7‑2.
Navigation System. See Usingthe Navigation System onpage 7‑39.
W. Electric Parking Brake onpage 9‑35.
X. Power Door Locks onpage 2‑11.
Y. Hazard Warning Flashers onpage 6‑4.
Z. Glove Box on page 4‑1.

Black plate (4,1)Chevrolet Volt Owner Manual - 2011
1-4 In Brief
Initial DriveInformationThis section provides a briefoverview about some of theimportant features that mayor may not be on your specificvehicle.
For more detailed information, referto each of the features which can befound later in this owner manual.
Remote KeylessEntry (RKE) SystemThe Remote Keyless Entry (RKE)transmitter will work up to 60 m(195 ft) away from the vehicle.
Press the key release button toextend the key. The key can beused for all locks.
K : Press once to unlock the driverdoor. Press a second time withinfive seconds to unlock all doors.
Q : Press to lock all doors.
Lock and unlock feedback canbe personalized. See VehiclePersonalization on page 5‑53.
7 : Press and release to locatethe vehicle. Press and hold forthree seconds to sound the panicalarm. Press again to cancel thepanic alarm.
B : Press Q and then press andhold B within five seconds tostart the vehicle's heating or airconditioning systems and rearwindow defogger from outside thevehicle using the RKE transmitter.See Remote Start on page 2‑8 formore information.
A : Press to open the chargeport door. See Plug-In Charging onpage 9‑49 for more information.
See Keys on page 2‑2 and RemoteKeyless Entry (RKE) SystemOperation on page 2‑3.

Black plate (5,1)Chevrolet Volt Owner Manual - 2011
In Brief 1-5
Remote StartThis feature starts the heating orair conditioning systems and rearwindow defogger from outside thevehicle. Normal operation of thesystem will return after the vehiclehas been turned on. The enginemay start to support the climatecontrol operation.
Activating the Remote Start
1. Aim the RKE transmitter at thevehicle.
2. Press Q on the RKE transmitter;the doors will lock.
3. Within five seconds, press andhold B until the turn signallamps flash or for approximatelyfour seconds. Pressing B againduring a remote start will turn thefeature off.
After entering the vehicle during aremote start, press the POWER Obutton on the center stack with thebrake pedal applied to operate asnormal.
Canceling Remote Start
To cancel a remote start, do any ofthe following:. Aim the RKE transmitter at the
vehicle and press and hold Buntil the parking lamps turn off.
. Turn on the hazard warningflashers.
. Press the POWER O button onthe center stack, with the brakepedal applied, then press thePOWER O button again to turnthe vehicle off.
See Remote Start on page 2‑8.
Door LocksTo lock or unlock the door, usethe Remote Keyless Entry (RKE)transmitter or the key from outsidethe vehicle. Use the door lock knobor switch from inside the vehicle.
See Door Locks on page 2‑10.
Power Door Locks
The power door lock switches areon the center stack.
K : Press to unlock the doors.
Q : Press to lock the doors.

Black plate (6,1)Chevrolet Volt Owner Manual - 2011
1-6 In Brief
See Power Door Locks onpage 2‑11.
Hatch
To open the hatch, with all doorsunlocked, press the button on theunderside of the hatch and lift up.
Always close the hatch beforedriving. Do not press the buttonwhile closing the hatch; it will unlockit again.
See Hatch on page 2‑12.
Windows
The power window switchesare on the driver door armrest.Each passenger door has a switchthat controls only that window.
Press the front of the switch to lowerthe window. Pull the switch up toraise it.
The driver and passenger windowshave an express-down feature andthe driver window has express-up.
See Power Windows on page 2‑17.
Seat Adjustment
Seat Position
To adjust the seat position:
1. Pull the handle at the front of theseat cushion to unlock it.
2. Move the seat forward orrearward and release thehandle.
3. Try to move the seat back andforth to be sure it is locked inplace.
See Seat Adjustment on page 3‑4.
Black plate (7,1)Chevrolet Volt Owner Manual - 2011
In Brief 1-7
Height Adjustment
Move the lever up or down to raiseor lower the seat.
See “Seat Height Adjuster” underSeat Adjustment on page 3‑4.
Reclining Seatbacks
To recline the seatback:
1. Lift the lever.
2. Move the seatback to thedesired position, and thenrelease the lever to lock theseatback in place.
3. Push and pull on the seatback tomake sure it is locked.
To return the seatback to the uprightposition:
1. Lift the lever fully withoutapplying pressure to theseatback, and the seatback willreturn to the upright position.
2. Push and pull on the seatback tomake sure it is locked.
See Reclining Seatbacks onpage 3‑4.

Black plate (8,1)Chevrolet Volt Owner Manual - 2011
1-8 In Brief
Heated Seats
If available, the controls are on thecenter stack. To operate, the vehiclemust be on.
Press M or L to heat the driveror passenger seat cushion andseatback.
Press the button once for thehighest setting. With each pressof the button, the heated seat willchange to the next lower setting,and then the off setting. Three lightsindicate the highest setting and onelight the lowest.
See Heated Front Seats onpage 3‑6 for more information.
Auto Heated Seats
If available, the controls can beaccessed while the vehicle is on bypressing the CLIMATE button on thecenter stack.

Black plate (9,1)Chevrolet Volt Owner Manual - 2011
In Brief 1-9
Press the touch screen M AUTO orL AUTO button. The button colorwill change to green when thisfeature is on.
When the vehicle is on, this featurewill automatically activate theheated seats at the level requiredby the vehicle's interior temperature.The active high, medium, low, or offheated seat level will be indicatedby the manual heated seat buttonlights on the center stack. Use thetouch screen buttons or the manualheated seat buttons on the centerstack to turn auto heated seats off.
See Heated Front Seats onpage 3‑6 for more information.
The heated seats can also beprogrammed to come on during aremote start. See “Remote StartAuto Heat Seats” under VehiclePersonalization on page 5‑53 formore information.
Head RestraintAdjustmentDo not drive until the head restraintsfor all occupants are installed andadjusted properly.
To achieve a comfortable seatingposition, change the seatbackrecline angle as little as necessarywhile keeping the seat and thehead restraint height in the properposition.
For more information see HeadRestraints on page 3‑2 and SeatAdjustment on page 3‑4.
Safety Belts
Refer to the following sections forimportant information on how to usesafety belts properly.. Safety Belts on page 3‑10.. How to Wear Safety Belts
Properly on page 3‑13.. Lap-Shoulder Belt on page 3‑19.. Lower Anchors and Tethers for
Children (LATCH System) onpage 3‑49.

Black plate (10,1)Chevrolet Volt Owner Manual - 2011
1-10 In Brief
Sensing System forPassenger Airbag
The passenger sensing system willturn off the right front passengerfrontal airbag and passenger kneeairbag under certain conditions.The driver airbags, seat‐mountedside impact airbags, and roof‐railairbags are not affected by thepassenger sensing system. SeePassenger Sensing System onpage 3‑33 for more information.
The passenger airbag statusindicator will be visible on theoverhead console when the vehicleis started. See Passenger AirbagStatus Indicator on page 5‑20.
Mirror Adjustment
Exterior
Mirrors can be folded inward towardthe vehicle to prevent damage whengoing through an automatic carwash. Push the mirror outward toreturn it to the original position.
See Folding Mirrors on page 2‑16.
Controls for the outside powermirrors are on the driver door.
To adjust a mirror:
1. Move the selector switch toL (left) or R (right) to choosethe driver or passenger mirror.
2. Press the arrows on the controlpad to move each mirror in thedesired direction.
3. Return the selector switch to thecenter position.
See Power Mirrors on page 2‑15.
When the rear window defoggeris activated, the heated mirriors,if equipped, will also come on.See Heated Mirrors on page 2‑16.
Interior
The vehicle has an automaticdimming inside rearview mirror.Automatic dimming reduces theglare from the headlamps of thevehicle behind you. The dimmingfeature and the indicator light comeon each time the vehicle is started.Hold the mirror in the center toadjust it. See Automatic DimmingRearview Mirror on page 2‑16.

Black plate (11,1)Chevrolet Volt Owner Manual - 2011
In Brief 1-11
Steering WheelAdjustment
To adjust the steering wheel:
1. Pull the lever (A) down.
2. Move the steering wheel upor down.
3. Pull or push the steering wheelcloser or away from you.
4. Pull the lever (A) up to lock thesteering wheel in place.
Do not adjust the steering wheelwhile driving.
Interior LightingDome Lamps
The dome lamp controls are in theoverhead console.
To operate, press the followingbuttons:
+ : Press to turn on the domelamps.
1 : Press to turn the lampson automatically when a door isopened.
* : Press to turn the lamps off,even when a door is open.
Reading Lamps
The front reading lamps are in theoverhead console.
#$ : Press to turn each lamp onor off.
For more information on interiorlighting, see Instrument PanelIllumination Control on page 6‑5.
Exterior Lighting
The exterior lamp control is on theturn signal/lane change lever.
O : Turn to operate the exteriorlamps.
O : Turns the exterior lamps off.
AUTO: Turns the exterior lamps onand off automatically depending onthe exterior light.

Black plate (12,1)Chevrolet Volt Owner Manual - 2011
1-12 In Brief
; : Turns on the parking lamps,together with the sidemarker lamps,taillamps, license plate lamps, andinstrument panel lights.
5 : Turns on the headlamps,together with the parking lamps,sidemarker lamps, taillamps, licenseplate lamps, and instrument panellights.
For more information, see:. Exterior Lamp Controls on
page 6‑1.. Turn and Lane-Change Signals
on page 6‑4.. Headlamp High/Low-Beam
Changer on page 6‑2.
Windshield Wiper/Washer
The windshield wiper lever ison the side of the steering column.With the vehicle on, move thewindshield wiper lever to selectthe wiper speed.
2: Move the lever up to 2 for fastwipes.
1: Move the lever up to 1 for slowwipes.
G : Move the lever up toG foradjustable interval wipes, then turnthe band up for more frequent wipesor down for less frequent wipes.
9 : Use to turn the windshieldwipers off.
3 : For a single wipe, briefly movethe wiper lever down. For severalwipes, hold the wiper lever down.
Windshield Washer
Pull the windshield wiper levertoward you to spray windshieldwasher fluid and activate the wipers.
See Windshield Wiper/Washer onpage 5‑7.
Black plate (13,1)Chevrolet Volt Owner Manual - 2011
In Brief 1-13
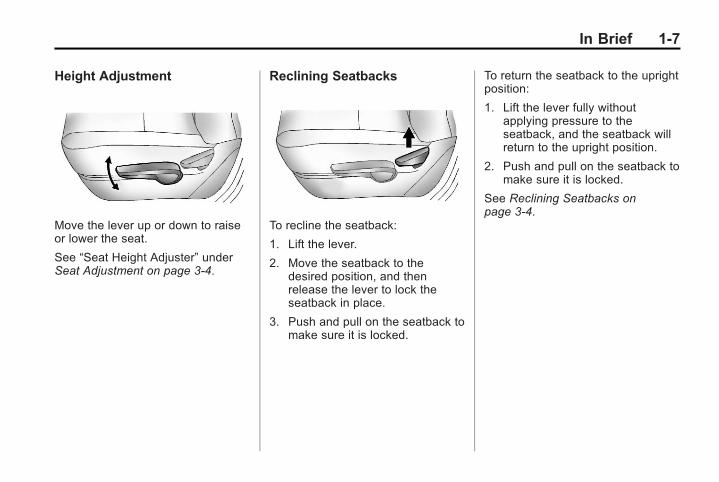
Climate ControlsHeating, cooling, and ventilation can be controlled by using the climatecontrol buttons and the climate touch screen.
Climate Control Buttons
A. Temperature Control
B. Driver and Passenger HeatedSeats
C. Defrost
D. Climate
E. Auto (Automatic Operation)
F. Rear Window Defogger
G. Manual Fan Control

Black plate (14,1)Chevrolet Volt Owner Manual - 2011
1-14 In Brief
Climate Touch Screen Controls
A. Driver and Passenger AutoHeated Seats
B. Air Delivery Mode Controls
C. Auto Recirculation
D. Manual Recirculation
E. Outside Air TemperatureDisplay
F. Climate Modes: Fan Only, ECO,Comfort
G. Climate Power Gauge
H. Manual Fan Control
I. Temperature Setting Display
J. Air Conditioning Indicator
K. Heat Status Indicator
See Automatic Climate ControlSystem on page 8‑1.
Auto Heated Seats are selectedusing the climate control touchscreen. See Heated Front Seats onpage 3‑6.

Black plate (15,1)Chevrolet Volt Owner Manual - 2011
In Brief 1-15
Vehicle Features
Radio(s)This vehicle's radio is part of thenavigation system. See Infotainmenton page 7‑2.
Satellite RadioVehicles with an XM™ SatelliteRadio tuner and a valid XM SatelliteRadio subscription can receive XMprogramming.
XM Satellite Radio Service
XM is a satellite radio service basedin the 48 contiguous United Statesand 10 Canadian provinces. XMSatellite Radio has a wide variety ofprogramming and commercial-freemusic, coast to coast, and indigital-quality sound. A fee isrequired to receive the XM service.
For more information refer to:. www.xmradio.com or call
1-800-929-2100 (U.S.).. www.xmradio.ca or call
1-877-438-9677 (Canada).
For more information, see SatelliteRadio on page 7‑16.
Portable Audio DevicesThis vehicle has a 3.5 mm (1/8 in)auxiliary input and a USB portlocated in the center stack.External devices such as iPods®,laptop computers, MP3 players, CDchangers, and USB storage devicesmay be connected, depending onthe audio system.
For more information, see AuxiliaryDevices on page 7‑38.

Black plate (16,1)Chevrolet Volt Owner Manual - 2011
1-16 In Brief
Bluetooth®
The Bluetooth system allows userswith a Bluetooth-enabled cell phoneto make and receive hands-freecalls using the vehicle audiosystem, microphone, and controls.
The Bluetooth-enabled cell phonemust be paired with the in-vehicleBluetooth system before it can beused in the vehicle. Not all phoneswill support all functions.
See Bluetooth on page 7‑85.
Steering Wheel Controls
For vehicles with audio steeringwheel controls, some audio controlscan be adjusted at the steeringwheel.
b / g : Press to interact withthe available Bluetooth, OnStar,or navigation system.
$ /i : Press to silence thevehicle speakers only. Press againto turn the sound on. For vehicleswith OnStar or Bluetooth systems,press to reject an incoming call,or to end a current call.
_ SRC ^ : Turn _ or ^ to select aradio band or audio source.
Turn _ or ^ to select the next orprevious favorite radio station, CD,or MP3 track.
Press SRC to change betweenradio and CD or DVD.
+ x −: Press + to increase or − todecrease the volume.
For more information, see SteeringWheel Controls on page 5‑6.

Black plate (17,1)Chevrolet Volt Owner Manual - 2011
In Brief 1-17
Cruise Control
The cruise control buttons are onthe steering wheel.
1 : Press to turn the cruise controlsystem on and off. An indicator lightwill turn on or off in the instrumentcluster.
* : Press to disengage cruisecontrol without erasing the setspeed from memory.
RES/+ : Move the thumbwheel upto resume to a previously set speedor to accelerate.
SET/− : Move the thumbwheeldown to set a speed and activatecruise control or to make the vehicledecelerate.
See Cruise Control on page 9‑40.
Navigation SystemThe vehicle has a navigation systemthat includes information about theradio, audio players, and navigationsystem.
The navigation system providesdetailed maps of most majorfreeways and roads. After adestination has been set, thesystem provides turn-by-turninstructions for reaching thedestination. In addition, the systemcan help locate a variety of POIs(Points of Interest), such as banks,airports, restaurants, and more.
See Infotainment on page 7‑2 formore information.
Power OutletsThe accessory power outlets can beused to plug in electrical equipment,such as a cell phone or MP3 player.
There are three accessory poweroutlets:. Inside the front of the center
floor console.. On the rear of the center floor
console.. Inside the instrument panel
storage area.
The power outlets supply powerwhile the vehicle is on, or if thevehicle is in Retained AccessoryPower (RAP). See RetainedAccessory Power (RAP) onpage 9‑22.
Remove the cover to access andreplace when not in use.
See Power Outlets on page 5‑8.

Black plate (18,1)Chevrolet Volt Owner Manual - 2011
1-18 In Brief
Battery and Efficiency
High Voltage SafetyInformation
{ WARNING
Exposure to high voltagecan cause shock, burns, andeven death. The high voltagecomponents in the vehicle canonly be serviced by technicianswith special training.
High voltage components areidentified by labels. Do notremove, open, take apart,or modify these components.High voltage cable or wiring hasorange covering. Do not probe,tamper with, cut, or modify highvoltage cable or wiring.
This vehicle has a high voltagebattery and a standard 12‐voltbattery.
If the vehicle is in a crash, thesensing system may shut downthe high voltage system. When thisoccurs, the high voltage battery isdisconnected and the vehicle willnot start. The SERVICE VEHICLESOON message in the DriverInformation Center (DIC) will bedisplayed. Before the vehicle canbe operated again, it must beserviced at your dealer.
See Battery on page 10‑28 forimportant safety information. If anairbag has inflated, see What WillYou See after an Airbag Inflates? onpage 3‑31.
Only a trained service technicianwith the proper knowledge andtools should inspect, test, or replacethe high voltage battery. See yourdealer if the high voltage batteryneeds service.
See Battery on page 10‑28.
ChargingThe high voltage battery canbe charged using a householdelectrical outlet. There are threeways to program how the vehicleis charged. See Charging onpage 5‑33 for more information.
This section explains the processfor charging the high voltage battery.Do not allow the vehicle to remainin temperature extremes for longperiods without being driven orplugged in. It is recommended thatthe vehicle be plugged in whentemperatures are below 0°C (32°F)and above 32°C (90°F) to maximizehigh voltage battery life.
The charging system may run fansand pumps that result in soundsfrom the vehicle while it is turnedoff. Additional unexpected clickingsounds may be experienced causedby the electrical devices used whilecharging.
Black plate (19,1)Chevrolet Volt Owner Manual - 2011
In Brief 1-19
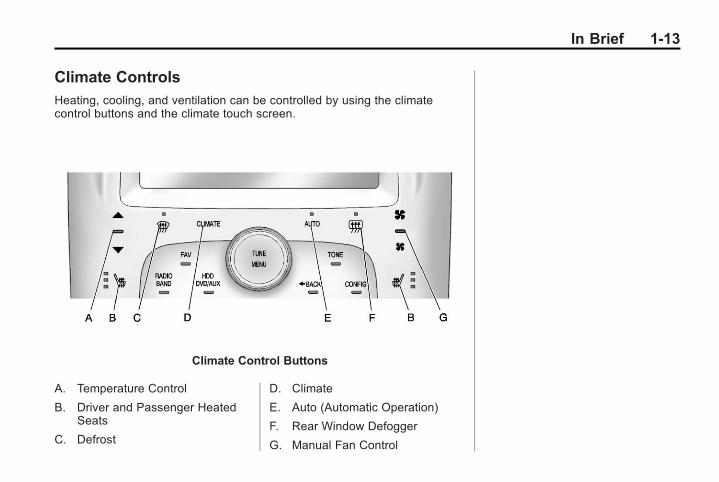
Charging
Start Charge
1. The charge port door releasebutton is on the driver door innertrim panel. With the vehicle inP (Park), press the button forone second and release to openthe charge port door. The chargeport door can also be openedusing the RKE transmitter.See Remote Keyless Entry(RKE) System Operation onpage 2‑3.
In cold weather conditions, icemay form around the charge portdoor. The charge port door maynot open on the first attempt.Remove ice from the area andrepeat attempting to open thecharge port door.
2. Open the rear hatch, lift the loadsupport floor covering (A), andremove the charge cord (D).
It is located near the tire sealantand compressor kit (C). Pull upon the charge cord handle (D)to release it from the handleclip (E). Lift the charge cord upand rearward to remove it fromthe vehicle. The vehicle plug (B)is stored as shown.
3. Plug the charge cord into theelectrical outlet. See ElectricalRequirements for BatteryCharging on page 9‑56. Verifythat the charge cord statusindicators are both green.See Charge Cord on page 9‑54for more information.
Black plate (20,1)Chevrolet Volt Owner Manual - 2011
1-20 In Brief
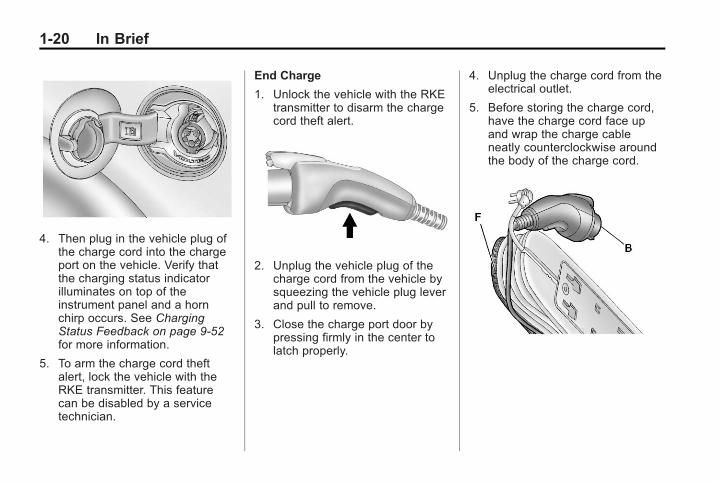
4. Then plug in the vehicle plug ofthe charge cord into the chargeport on the vehicle. Verify thatthe charging status indicatorilluminates on top of theinstrument panel and a hornchirp occurs. See ChargingStatus Feedback on page 9‑52for more information.
5. To arm the charge cord theftalert, lock the vehicle with theRKE transmitter. This featurecan be disabled by a servicetechnician.
End Charge
1. Unlock the vehicle with the RKEtransmitter to disarm the chargecord theft alert.
2. Unplug the vehicle plug of thecharge cord from the vehicle bysqueezing the vehicle plug leverand pull to remove.
3. Close the charge port door bypressing firmly in the center tolatch properly.
4. Unplug the charge cord from theelectrical outlet.
5. Before storing the charge cord,have the charge cord face upand wrap the charge cableneatly counterclockwise aroundthe body of the charge cord.

Black plate (21,1)Chevrolet Volt Owner Manual - 2011
In Brief 1-21
6. Place the charge cord,face down, into the storagecompartment with the frontedge (F) of the charge cordbody under the clips (G) locatedin the front of the storagecompartment. The vehicleplug (B) should be on theright side of the charge cord.
7. Push the charge cord handledown until it locks into thehandle clip at the rear of thestorage compartment.
While the charge cord is pluggedinto the vehicle, the vehicle cannotbe driven.
FuelingThe fuel system on this vehiclerequires a refueling process tocontrol evaporative emissions.To refuel the vehicle:
1. Press the fuel door button onthe driver door for one second.A WAIT TO REFUEL messagedisplays on the DriverInformation Center.
2. When the READY TO REFUELmessage displays, the fuel dooron the passenger side willunlock. Push the rearward edgeof the fuel door in and release toopen the door.

Black plate (22,1)Chevrolet Volt Owner Manual - 2011
1-22 In Brief
3. Turn the fuel capcounterclockwise to remove.While refueling, hang the fuelcap tether from the hook onthe inside of the fuel door.Complete refueling within30 minutes of pushing thefuel door button found on thedriver side door. If refuelingmore than 30 minutes, pushthe fuel door button again.
4. After refueling, reinstall the fuelcap by turning it clockwise until itclicks. Close the fuel door.
See Filling the Tank on page 9‑60.
Total Vehicle Range
Total vehicle range is the remainingdistance the vehicle can be drivencombining the electric range andfuel range.
See Driving for Better EnergyEfficiency on page 9‑2.
Regenerative BrakingRegenerative braking takes some ofthe energy from the moving vehicleand turns it back into electricalenergy. This energy is then storedback into the high voltage batterysystem, contributing to increasedenergy efficiency.
See Regenerative Braking onpage 9‑37.
Black plate (23,1)Chevrolet Volt Owner Manual - 2011
In Brief 1-23
Service
{ WARNING
Never try to do your own serviceon high voltage components.You can be injured and thevehicle can be damaged if youtry to do your own service work.Service and repair of these highvoltage components shouldonly be performed by a trainedservice technician with the properknowledge and tools. See DoingYour Own Service Work onpage 10‑8.
Performance andMaintenance
Traction ControlSystem (TCS)The Traction Control System limitswheel spin. The system turns onautomatically every time the vehicleis on and cannot be turned off.
For more information, see TractionControl System (TCS) onpage 9‑37.
Electronic StabilityControl (ESC)Electronic Stability Control assistswith directional control of thevehicle in difficult driving conditions.The system turns on automaticallyevery time the vehicle is on andcannot be turned off.
For more information, see ElectronicStability Control (ESC) onpage 9‑39.
Tire Pressure MonitorThis vehicle may have a TirePressure Monitor System (TPMS).
The TPMS warning light alerts youto a significant loss in pressure ofone of the vehicle's tires. If thewarning light comes on, stop assoon as possible and inflate thetires to the recommended pressureshown on the Tire and LoadingInformation label. See Vehicle LoadLimits on page 9‑14. The warninglight will remain on until the tirepressure is corrected.

Black plate (24,1)Chevrolet Volt Owner Manual - 2011
1-24 In Brief
During cooler conditions, the low tirepressure warning light may appearwhen the vehicle is first started andthen turn off. This may be an earlyindicator that the tire pressures aregetting low and the tires need to beinflated to the proper pressure.
The TPMS does not replace normalmonthly tire maintenance. It is thedriver’s responsibility to maintaincorrect tire pressures.
See Tire Pressure Monitor Systemon page 10‑55.
Tire Sealant andCompressor KitThis vehicle may have a tire sealantand compressor kit that can be usedto seal small punctures in the treadarea of the tire. Significant sidewalldamage will require the tire to bereplaced.
See Tire Sealant and CompressorKit on page 10‑71 for completeoperating information.
Engine Oil Life SystemThe engine oil life system calculatesengine oil life based on vehicle useand displays the CHANGE ENGINEOIL SOON message when it is timeto change the engine oil and filter.The oil life system should be resetto 100% only following an oilchange.
Resetting the Oil Life System
1. Use the SELECT knob to selectOIL LIFE on the DIC menu.
2. Press SELECT to start theOIL LIFE reset procedure.
3. The DIC menu will display “Areyou sure that you want to reset?”Use SELECT to choose YES toreset oil life or NO to exit andreturn to the previous menu.
4. If YES is selected, the DIC menuwill display RESET OIL LIFE fora short time and then 100% OILLIFE will be displayed whenOIL LIFE is successfully reset.
See Engine Oil Life System onpage 10‑15.

Black plate (25,1)Chevrolet Volt Owner Manual - 2011
In Brief 1-25
Driving for Better EnergyEfficiencyUse the following tips to helpmaximize energy efficiency andrange.
Driving Style
Efficiency Gauge(Instrument Cluster)
The ball indicator should be keptgreen and in the center of thegauge.
Inefficient acceleration is indicatedwhen the ball turns yellow andtravels above the center of thegauge.
Aggressive braking is indicatedwhen the ball turns yellow andtravels below the center of thegauge.
Acceleration/Braking/Coasting
Avoid unnecessary rapidaccelerations and decelerations.
Electric range is maximized at80 km/h (50 mph) and below. Higherspeeds use more energy and cansignificantly reduce electric range.
Use cruise control whenappropriate.
Plan ahead for decelerationsand coast whenever possible.For example, do not rush to trafficsignals.
Do not shift to N (Neutral) to coast.The vehicle recovers energy whilecoasting and braking in D (Drive)or L (Low).
Drive Mode and PRNDL Selection
Use Normal Mode when possible.
Sport Mode provides moreresponsive acceleration thanNormal Mode but can reduceefficiency.
Use Mountain Mode prior toclimbing long, steep grades inmountainous areas. Be sure toengage Mountain Mode beforestarting to climb. Mountain Modereduces electric range and powerbut may be needed to maintainspeeds above 96 km/h (60 mph)when climbing grades of 5% orgreater.
Use L (Low) in heavy stop‐and‐gotraffic or when traveling downhill.L (Low) requires less brakepedal application and providesa controlled, efficient way toslow the vehicle down.

Black plate (26,1)Chevrolet Volt Owner Manual - 2011
1-26 In Brief
Climate Setting
Using the heat and air conditioningsystems decreases the energyavailable for electric driving.
Optimal energy efficiency isachieved with the heat, airconditioning, and fan turned off.
Less energy is used at low fanspeeds. When using the fan:. Fan Only is the most energy
efficient climate setting as longas0 is not selected.
. ECO is for moderate airconditioning and heateroperation and is the next mostenergy efficient setting as longas0 is not selected.
. Comfort provides the mostcomfort but is the least energyefficient.
Use the auto heated seat featureinstead of climate settings. Heatingthe seat uses less energy thanheating the vehicle interior.
Use remote start to heat or coolthe interior when the vehicle isplugged in to maximize the electricrange by utilizing electricity from theelectrical outlet.
In hot weather, avoid parking indirect sunlight or use sunshadesinside the vehicle.
Turn off the front and rear windowdefog/defrost when they are nolonger needed.
Avoid driving with the windows openat highway speeds.
Vehicle Charging/Maintenance
Charging
Keep the vehicle plugged in, evenwhen fully charged, to keep thebattery temperature ready for thenext drive. This is important whenoutside temperatures are extremelyhot or cold.
Maintenance
Always keep the tires properlyinflated and the vehicle properlyaligned.
The weight of excess cargo in thevehicle affects efficiency and range.Avoid carrying more than is needed.
If fuel is not regularly used, considerkeeping the fuel tank only one‐thirdfull. Excess fuel weight impactsefficiency and range.
Use premium fuel.
Avoid unnecessary use of electricalaccessories. Power used forfunctions other than propelling thevehicle will reduce EV range.
Using a rooftop carrier will reduceefficiency due to additional weightand drag.

Black plate (27,1)Chevrolet Volt Owner Manual - 2011
In Brief 1-27
Roadside AssistanceProgramU.S.: 1-888-811-1926
TTY Users: 1-888-889-2438
Canada: 1-800-268-6800
As the owner of a new Chevrolet,you are automatically enrolled inthe Roadside Assistance program.This program provides securityand convenience in the event ofan on-road failure or emergencysituation. Service is provided24 hours a day, 365 days a year forthe 5 year/160 000 km (100,000 mi)coverage period.
See Roadside Assistance Programon page 13‑6 for more information.
Roadside Assistance and OnStar
If you have an active OnStarsubscription, press theQ buttonand the current GPS location willbe sent to an OnStar advisor whowill assess your problem, contactRoadside Assistance, and relayyour exact location to get the helpyou need.
Online Owner Center
The Online Owner Center is acomplimentary service that includesonline service reminders, vehiclemaintenance tips, online ownermanual, special privileges,and more.
Sign up today at:www.chevyownercenter.com(U.S.) or www.gm.ca (Canada).
OnStar®
For vehicles with an active OnStarsubscription, OnStar uses severalinnovative technologies and liveAdvisors to provide a wide rangeof safety, security, navigation,diagnostics, and calling services.
Automatic Crash Response
In a crash, built‐in sensorsautomatically alert an OnStarAdvisor who is immediatelyconnected to the vehicle tosee if you need help.

Black plate (28,1)Chevrolet Volt Owner Manual - 2011
1-28 In Brief
How OnStar Service Works
Q : Push this blue button toconnect to a specially trainedOnStar Advisor to verify youraccount information and toanswer questions.
] : Push this red emergencybutton to get priority help fromspecially trained OnStar EmergencyAdvisors.
X : Push this button for hands‐free,voice‐activated calling and to givevoice commands for Hands‐FreeCalling and Turn‐by‐TurnNavigation.
Automatic Crash Response,Emergency Services, Crisis Assist,Stolen Vehicle Assistance, VehicleDiagnostics, Remote Door Unlock,Roadside Assistance, Turn‐by‐TurnNavigation, and Hands‐Free Callingare available on most vehicles. Notall OnStar services are available onall vehicles. For more informationsee the OnStar Owner's Guideor visit www.onstar.com (U.S.) orwww.onstar.ca (Canada), contact
OnStar at 1-888-4-ONSTAR(1‐888‐466‐7827) or TTY1‐877‐248‐2080, or pushtheQ button to speak with anOnStar Advisor 24 hours a day,seven days a week.
For a full description of OnStarservices and system limitations,see the OnStar Owner's Guide inthe glove box.
OnStar service is subject to theOnStar Terms and Conditionsincluded in the OnStar GloveBox Kit.
OnStar service requires wirelesscommunication networks and theGlobal Positioning System (GPS)satellite network. Not all OnStarservices are available everywhereor on all vehicles at all times.
OnStar service cannot work unlessyour vehicle is in a place whereOnStar has an agreement witha wireless service provider forservice in that area, and thewireless service provider hascoverage, network capacity,
reception, and technologycompatible with OnStar service.Service involving locationinformation about your vehiclecannot work unless GPS signalsare available, unobstructed,and compatible with the OnStarhardware. The vehicle must havea working electrical system andadequate 12‐volt battery power forthe OnStar equipment to operate.OnStar service may not work if theOnStar equipment is not properlyinstalled or you have not maintainedit even if your vehicle is in goodworking order and in compliancewith all government regulations.If you try to add, connect, or modifyany equipment or software in yourvehicle, OnStar service may notwork. Other problems beyondOnStar's control may preventservice to you, such as hills,tall buildings, tunnels, weather,electrical system design andarchitecture of your vehicle, damageto important parts of your vehiclein a crash, or wireless phonenetwork congestion or jamming.
Black plate (29,1)Chevrolet Volt Owner Manual - 2011
In Brief 1-29
See Radio FrequencyStatement on page 13‑28 forinformation regarding Part 15of the Federal CommunicationsCommission (FCC) rules andIndustry Canada StandardsRSS-210/220/310.
OnStar Steering WheelControls
This vehicle may have talk andmute buttons that can be used tointeract with OnStar Hands-FreeCalling. See Steering WheelControls on page 5‑6 for moreinformation.
On some vehicles, the mute buttoncan be used to dial numbers intovoice mail systems, or to dial phoneextensions. See the OnStar Owner'sGuide for more information.
Your Responsibility
Increase the volume of the radioif the OnStar Advisor cannot beheard.
If the light next to the OnStarbuttons is red, the system maynot be functioning properly.PushQ and request a vehiclediagnostic check. If the lightappears clear or no light appears,your OnStar subscription hasexpired and all services have beendeactivated. PushQ to confirm thatthe OnStar equipment is active.
OnStar®
If the vehicle is equipped withan active OnStar system, thatsystem may also record data incrash or near crash-like situations.The OnStar Terms and Conditionsprovides information on datacollection and use and is availablein the OnStar Glove Box Kit,at www.onstar.com (U.S.) orwww.onstar.ca (Canada), or bypushingQ and speaking to anAdvisor.

Black plate (30,1)Chevrolet Volt Owner Manual - 2011
1-30 In Brief
2 NOTES

Black plate (1,1)Chevrolet Volt Owner Manual - 2011
Keys, Doors and Windows 2-1
Keys, Doors andWindows
Keys and LocksKeys . . . . . . . . . . . . . . . . . . . . . . . . . . 2-2Remote Keyless Entry (RKE)System . . . . . . . . . . . . . . . . . . . . . . 2-3
Remote Keyless Entry (RKE)System Operation . . . . . . . . . . . 2-3
Remote Start . . . . . . . . . . . . . . . . . . 2-8Door Locks . . . . . . . . . . . . . . . . . . 2-10Power Door Locks . . . . . . . . . . . 2-11Delayed Locking . . . . . . . . . . . . . 2-11Automatic Door Locks . . . . . . . 2-11Lockout Protection . . . . . . . . . . . 2-11Safety Locks . . . . . . . . . . . . . . . . . 2-12
DoorsHatch . . . . . . . . . . . . . . . . . . . . . . . . 2-12
Vehicle SecurityVehicle Security . . . . . . . . . . . . . . 2-13Anti-theft Alarm System . . . . . . 2-13Immobilizer . . . . . . . . . . . . . . . . . . 2-14Immobilizer Operation . . . . . . . 2-14
Exterior MirrorsConvex Mirrors . . . . . . . . . . . . . . 2-15Power Mirrors . . . . . . . . . . . . . . . . 2-15Folding Mirrors . . . . . . . . . . . . . . . 2-16Heated Mirrors . . . . . . . . . . . . . . . 2-16
Interior MirrorsAutomatic Dimming RearviewMirror . . . . . . . . . . . . . . . . . . . . . . . 2-16
WindowsWindows . . . . . . . . . . . . . . . . . . . . . 2-16Power Windows . . . . . . . . . . . . . 2-17Sun Visors . . . . . . . . . . . . . . . . . . . 2-19
Black plate (2,1)Chevrolet Volt Owner Manual - 2011
2-2 Keys, Doors and Windows
Keys and Locks
Keys
{ WARNING
Leaving children in a vehicle withthe Remote Keyless Entry (RKE)transmitter is dangerous for manyreasons; children or others couldbe badly injured or even killed.They could operate the powerwindows or other controls oreven make the vehicle move.The windows will function withthe RKE transmitter in the vehicleand they could be seriouslyinjured or killed if caught inthe path of a closing window.Do not leave the RKE transmitterin a vehicle with children.
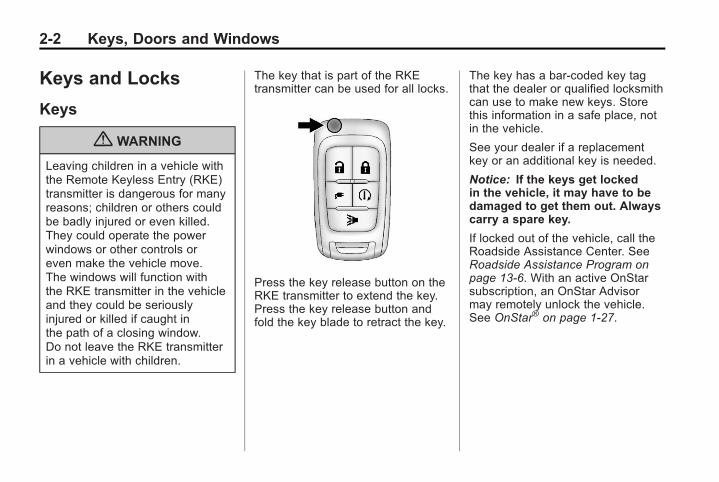
The key that is part of the RKEtransmitter can be used for all locks.
Press the key release button on theRKE transmitter to extend the key.Press the key release button andfold the key blade to retract the key.
The key has a bar-coded key tagthat the dealer or qualified locksmithcan use to make new keys. Storethis information in a safe place, notin the vehicle.
See your dealer if a replacementkey or an additional key is needed.
Notice: If the keys get lockedin the vehicle, it may have to bedamaged to get them out. Alwayscarry a spare key.
If locked out of the vehicle, call theRoadside Assistance Center. SeeRoadside Assistance Program onpage 13‑6. With an active OnStarsubscription, an OnStar Advisormay remotely unlock the vehicle.See OnStar® on page 1‑27.

Black plate (3,1)Chevrolet Volt Owner Manual - 2011
Keys, Doors and Windows 2-3
Remote KeylessEntry (RKE) SystemSee Radio FrequencyStatement on page 13‑28 forinformation regarding Part 15of the Federal CommunicationsCommission (FCC) rules andIndustry Canada StandardsRSS-210/220/310.
If there is a decrease in the RKEoperating range:. Check the distance.
The transmitter may betoo far from the vehicle.
. Check the location. Othervehicles or objects may beblocking the signal.
. Check the transmitter's battery.See “Battery Replacement” laterin this section.
. If the transmitter is still notworking correctly, see yourdealer or a qualified technicianfor service.
Remote Keyless Entry(RKE) System OperationThe RKE transmitter functions willwork up to 60 m (195 ft) away fromthe vehicle.
Keep in mind that other conditions,such as those previously stated,can impact the performance of thetransmitter.
K (Unlock): Press once to unlockthe driver door. Press a second timewithin five seconds to unlock alldoors.
The hazard warning lamps willflash twice each time the buttonis pressed and the anti-theftalarm system will be disarmed.See Anti-theft Alarm System onpage 2‑13.
Q (Lock): Press to lock all doors.The hazard warning lamps will flashonce and the anti-theft alarm systemwill be armed. See Anti-theft AlarmSystem on page 2‑13.
If the driver door is open when Q ispressed, all doors lock and thenthe driver door will unlock if theUnlocked Door Anti Lock Outfeature is enabled throughthe vehicle personalization.See “Unlocked Door Anti LockOut Feature” under VehiclePersonalization on page 5‑53 formore information. This may varybased on vehicle personalization.

Black plate (4,1)Chevrolet Volt Owner Manual - 2011
2-4 Keys, Doors and Windows
7 (Panic Alarm): Press andrelease one time to locate thevehicle. The exterior lamps flashand the horn chirps three times.Press and hold for three secondsto sound the panic alarm. The hornsounds and the turn signals flash for30 seconds. Press again to cancelthe panic alarm.
B (Remote Start): Press Q andthen press and hold B withinfive seconds to start the vehicle'sheating or air conditioning systemsand rear window defogger fromoutside the vehicle using the RKEtransmitter. See Remote Start onpage 2‑8 for more information.
The auto heated seats, if equipped,can be programmed to comeon when the vehicle is remotelystarted. See Vehicle Personalizationon page 5‑53 for more information.Also see “Auto Heated Seats” underHeated Front Seats on page 3‑6.
A (Charge Port Door): Pressto open the charge port door.See Plug-In Charging on page 9‑49for more information.
Programming Transmitters tothe Vehicle
Only RKE transmittersprogrammed to this vehiclewill work. If a transmitter is lostor stolen, a replacement can bepurchased and programmed throughyour dealer. When the replacementtransmitter is programmed to thisvehicle, all remaining transmittersmust also be reprogrammed.Any lost or stolen transmitterswill no longer work once thenew transmitter is programmed.Each vehicle can have up tofive transmitters matched to it.
Programming with a RecognizedTransmitter
A new transmitter can beprogrammed to the vehiclewhen there is one recognizedtransmitter. For vehicles soldin Canada, two recognizedtransmitters are required to programa new transmitter. To program,the vehicle must be off and allof the transmitters, both currentlyrecognized and new, must be inthe vehicle.
1. Place the recognizedtransmitter(s) in the cupholder.
2. Insert the vehicle key of the newtransmitter into the key lockcylinder on the outside of thedriver door and turn the key tothe unlock position five timeswithin 10 seconds.
The Driver Information Center(DIC) displays READY FORREMOTE #2, 3, 4 OR 5.

Black plate (5,1)Chevrolet Volt Owner Manual - 2011
Keys, Doors and Windows 2-5
3. Remove the rubber mat inthe instrument panel storage.Extend the key blade on the newtransmitter and insert the keyblade into the transmitter slot.
4. Press and hold the POWER Obutton on the center stackfor two seconds. When thetransmitter is programmed, theDIC will show that it is ready toprogram the next transmitter.
5. Remove the transmitter from thetransmitter slot and press K onthe transmitter.
To program additionaltransmitters, repeat Steps 3through 5.
When all additional transmittersare programmed, press andhold the POWER O buttonfor 10 seconds to exitprogramming mode.
Programming without aRecognized Transmitter
Non-Canadian (U.S.) ownersare permitted to program anew transmitter to their vehiclewhen a recognized transmitteris not available. The Canadianregulations require that Canadianowners see their dealer forprogramming new transmitterswhen two recognized transmittersare not available. If there are nocurrently recognized transmittersavailable, follow this procedure toprogram up to five transmitters.

Black plate (6,1)Chevrolet Volt Owner Manual - 2011
2-6 Keys, Doors and Windows
This procedure will takeapproximately 30 minutes tocomplete. The vehicle must beoff and all of the transmittersmust be in the vehicle.
1. Insert the vehicle key of thetransmitter into the key lockcylinder on the outside of thedriver door and turn the key tothe unlock position five timeswithin 10 seconds.
The Driver Information Center(DIC) displays REMOTE LEARNPENDING, PLEASE WAIT.
2. Wait for 10 minutes until theDIC displays PRESS STARTBUTTON TO LEARN and thenpress the POWER O button onthe center stack.
The DIC display will again showREMOTE LEARN PENDING,PLEASE WAIT.
3. Repeat Step 2 two more times.After the third time, all previouslyknown transmitters will no longerwork with the vehicle. Remainingtransmitters can be programmedduring the next steps.
The DIC display shouldnow show READY FORREMOTE # 1.
4. Remove the rubber mat inthe instrument panel storage.Extend the key blade on the newtransmitter and insert the keyblade into the transmitter slot.
5. Press and hold the POWER Obutton for two seconds. Whenthe transmitter is programmed,the DIC will show that it is readyto program the next transmitter.
6. Remove the transmitter from thetransmitter slot and press K onthe transmitter.
To program additionaltransmitters, repeat Steps 4through 6.
When all additional transmittersare programmed, press andhold the POWER O buttonfor 10 seconds to exitprogramming mode.

Black plate (7,1)Chevrolet Volt Owner Manual - 2011
Keys, Doors and Windows 2-7
Starting the Vehicle with a LowTransmitter Battery
If the transmitter battery is weak,the DIC may display NO REMOTEDETECTED when you try tostart the vehicle. The REPLACEBATTERY IN REMOTE KEYmessage may also be displayedat this time.
To start the vehicle:
1. Open the instrument panelstorage and remove therubber mat.
2. Extend the key blade and placethe blade into the slot.
3. With the vehicle in P (Park) orN (Neutral), press the brakepedal and the POWER O buttonon the center stack. See PowerButton on page 9‑18 foradditional information.
Replace the transmitter battery assoon as possible.
Battery Replacement
Notice: When replacing thebattery, do not touch any ofthe circuitry on the transmitter.Static from your body coulddamage the transmitter.
To replace the battery:
1. Extend the key blade and openthe battery cover on the back ofthe unit.
2. Remove the used battery.Avoid touching the circuit boardto other components.
3. Insert the new battery, positiveside facing down towardthe base.
4. Reassemble the battery cover.
5. Check the operation of thetransmitter with the vehicle.

Black plate (8,1)Chevrolet Volt Owner Manual - 2011
2-8 Keys, Doors and Windows
Remote StartThis feature starts the heating orair conditioning systems and rearwindow defogger from outside thevehicle. Use remote start to heat orcool the interior when the vehicleplugged in to maximize the electricrange by utilizing electricity from theelectrical outlet. Normal operationof the system will return after thevehicle has been turned on.
B (Remote Start): This button ison the RKE transmitter.
During remote start:. The climate control system
will typically default to the lastclimate settings. If Fan Off orFan Only were selected, theair conditioning or heat will turnon as needed. See AutomaticClimate Control System onpage 8‑1 for more information.
. If the vehicle has heatedseats, and this feature hasbeen enabled through vehiclepersonalization, the heatedseats will turn on duringcolder outside temperatures.See “Remote Start HeatedSeats” under Heated FrontSeats on page 3‑6 and VehiclePersonalization on page 5‑53for additional information.
. The rear defogger will turnon during colder outsidetemperatures.
. Selecting1 during colderoutside temperatures beforeshutting the vehicle off willhelp windshield clearing.
. Shutting the vehicle off in ECOMode without1 selected willminimize the impact to electricrange. Shutting the vehicle offin other modes will maximizeheating or air conditioning.
. The engine may start to provideenergy for heating and cooling,independent of the vehicle beingplugged in or completelycharged.
. Vehicle range may decreaseif the vehicle is not pluggedinto an electrical outlet. If thevehicle is plugged in, much ofthe energy needed to supportthis feature will be provided fromthe utility, not from the highvoltage battery.
Laws in some communitiesmay restrict the use of featuresthat remotely start the engine.For example, some laws mayrequire a person using the remotestart feature to have the vehicle inview when doing so. Check localregulations for any requirementson remote starting of vehicles.

Black plate (9,1)Chevrolet Volt Owner Manual - 2011
Keys, Doors and Windows 2-9
With the remote start feature, theRKE transmitter functions will havean increased range of operation.However, the range may be lesswhile the vehicle is running.
Other conditions can affect theperformance of the transmitter.See Remote Keyless Entry (RKE)System on page 2‑3 for additionalinformation.
Activating the Remote Start
To heat or cool the passengercompartment using remote start:
1. Aim the RKE transmitter at thevehicle.
2. Press Q on the RKE transmitter;the doors will lock.
3. Within five seconds press andhold B until the turn signallamps flash or for approximatelyfour seconds. Pressing B againduring a remote start will turn thefeature off.
Remote start will automatically shutoff after 10 minutes unless a timeextension is done.
While the remote start is active,the parking lamps will turn on andremain on.
After entering the vehicle during aremote start, press the POWER Obutton on the center stack with thebrake pedal applied to operate asnormal.
The remote start can be initiatedtwo separate times betweendriving. For each remote start, thepassenger compartment will beheated or cooled for 10 minutes.
Extending the Time
To extend the time of the firstremote start, repeat the steps foractivating remote start. Remotestart can only be extended onetime between driving.
Canceling Remote Start
To cancel a remote start, do any ofthe following:. Aim the RKE transmitter at the
vehicle and press and hold Buntil the parking lamps turn off.
. Turn on the hazard warningflashers.
. Press the POWER O button onthe center stack, with the brakepedal applied, then press thePOWER O button again to turnthe vehicle off.

Black plate (10,1)Chevrolet Volt Owner Manual - 2011
2-10 Keys, Doors and Windows
Conditions in Which RemoteStart May Not Work
Conditions in which a remote startmay not occur include:. An open hood.. Vehicle propulsion system
fault conditions, including anemission control systemmalfunction.
. High voltage battery faultconditions.
A second remote start or extensionwill not occur if the fuel level is low.
During a remote start, conditionsin which a remote start may becanceled include:. Vehicle propulsion system
or high voltage battery faultconditions.
. Low engine oil pressure.
. Engine coolant temperature thatis too high.
Door Locks
{ WARNING
Unlocked doors can bedangerous.
. Passengers, especiallychildren, can easily open thedoors and fall out of a movingvehicle. The chance of beingthrown out of the vehicle ina crash is increased if thedoors are not locked. So, allpassengers should wearsafety belts properly andthe doors should be lockedwhenever the vehicle isdriven.
(Continued)
WARNING (Continued)
. Young children who get intounlocked vehicles may beunable to get out. A child canbe overcome by extreme heatand can suffer permanentinjuries or even death fromheat stroke. Always lock thevehicle whenever leaving it.
. Outsiders can easily enterthrough an unlocked doorwhen slowing or stoppingthe vehicle. Lock the doorsto help prevent this fromhappening.
To lock or unlock the door, usethe Remote Keyless Entry (RKE)transmitter or the key from outsidethe vehicle. Use the door lock knobor switch from inside the vehicle.

Black plate (11,1)Chevrolet Volt Owner Manual - 2011
Keys, Doors and Windows 2-11
Power Door Locks
The power door lock switches areon the center stack.
Q (Lock): Press to lock the doors.
K (Unlock): Press to unlock thedoors.
Delayed LockingThis vehicle may have a delayedlocking feature. If delayed lockingis enabled, a chime will sound toindicate a door or hatch is openwhen the doors are locked with thepower door lock switch. The doorswill automatically lock and thetheft-deterrent system will armafter all doors are closed andfive seconds have passed. Pressthe lock button again to make thedoors lock immediately. Press theunlock switch to cancel the delayedlock operation. To enable thisfeature, see “Power Door Locks”in Vehicle Personalization onpage 5‑53. To arm and disarm thetheft-deterrent system, see Anti-theftAlarm System on page 2‑13.
Automatic Door Locks
Automatic Door Lock
The doors are programmed toautomatically lock when the shiftlever is moved out of P (Park).
The automatic door lock featurecannot be disabled.
Automatic Door Unlock
The doors can be programmedto automatically unlock when theshift lever is moved into P (Park).See “Power Door Locks” in VehiclePersonalization on page 5‑53.
Lockout ProtectionIf the power door lock switch ispressed when the driver door isopen and the vehicle is on, all thedoors will lock and then the driverdoor will unlock.
This feature can also be enabled tofunction when the vehicle is off. Toenable this feature, see “UnlockedDoor Anti Lock Out” in VehiclePersonalization on page 5‑53.

Black plate (12,1)Chevrolet Volt Owner Manual - 2011
2-12 Keys, Doors and Windows
Safety Locks
The rear door safety locks preventpassengers from opening the reardoors from inside the vehicle.
Presso { to activate the rear doorsafety locks. The LED light (A)comes on when activated.
Presso { again to deactivate thesafety locks.
Doors
Hatch
{ WARNING
Exhaust gases can enter thevehicle if it is driven in ExtendedRange Mode with the hatchopen, or with any objectsthat pass through the sealbetween the body and the hatch.Engine exhaust contains CarbonMonoxide (CO) which cannot beseen or smelled. It can causeunconsciousness and even death.
(Continued)
WARNING (Continued)
If the vehicle must be driven inExtended Range Mode with thehatch open:
. Do not operate in MountainMode if driving with thehatch open.
. Close all of the windows.
. Fully open the air outlets onthe instrument panel.
. Adjust the Climate Controlsystem to a setting thatbrings in only outside airand set the fan speedto the highest setting.See Automatic ClimateControl System on page 8‑1.
For more information aboutcarbon monoxide, see EngineExhaust on page 9‑30.

Black plate (13,1)Chevrolet Volt Owner Manual - 2011
Keys, Doors and Windows 2-13
To open the hatch, with all doorsunlocked, press the button on theunderside of the hatch and lift up.
Use the inside pull handle to lowerand close the hatch.
Always close the hatch beforedriving. Do not press the buttonwhile closing the hatch; it will unlockagain.
Vehicle SecurityThis vehicle has theft-deterrentfeatures; however, they do not makeit impossible to steal.
Anti-theft Alarm SystemThis vehicle has an anti-theft alarmsystem.
Arming the System
To arm the system, close all of thewindows and doors and then:
. Press Q on the RKE transmitter.
. Or, lock the vehicle using thepower door lock switch in thecenter stack if Unlocked DoorAnti Lock Out is turned off. See“Unlocked Door Anti Lock Out”under Vehicle Personalization onpage 5‑53 for more information.
The alarm automatically arms afterabout 30 seconds.

Black plate (14,1)Chevrolet Volt Owner Manual - 2011
2-14 Keys, Doors and Windows
Pressing Q on the RKE transmittera second time will bypass the30-second delay and immediatelyarm the system.
Disarming the System
To disarm the system, press K onthe RKE transmitter.
Turning off the System Alarm
If there is an attempt to open thedoors, hatch, or hood without firstpressing K on the RKE transmitter,the system alarm will be activated.The exterior lamps will flash andthe horn will sound for about30 seconds.
To turn off the system alarm:
. Press K on the RKE transmitter.
. Or, start the vehicle by pressingPOWER O on the center stackwith the brake pedal appliedand the RKE transmitter in thevehicle.
Charge Cord Theft Alert
To arm or disarm the charge cordtheft alert, lock or unlock the vehiclewith the RKE transmitter.
If there is an attempt to removethe charge cord while the vehicleis locked, the system alarm will beactivated. To turn off the systemalarm, press K on the RKEtransmitter.
ImmobilizerSee Radio FrequencyStatement on page 13‑28 forinformation regarding Part 15of the Federal CommunicationsCommission (FCC) rules andIndustry Canada StandardsRSS-210/220/310.
Immobilizer OperationThis vehicle has a passivetheft-deterrent system.The system does not have to bemanually armed or disarmed.
The vehicle is automaticallyimmobilized when the vehicleis turned off.
The system is automaticallydisarmed when the vehicle isstarted with a valid RKE transmitterin the vehicle. The RKE transmitteruses electronic coding that matchesan immobilizer control unit inthe vehicle and automaticallydisarms the system. Only acorrect transmitter can beused to turn the vehicle on.

Black plate (15,1)Chevrolet Volt Owner Manual - 2011
Keys, Doors and Windows 2-15
The security light in the instrumentcluster comes on if there is aproblem with arming or disarmingthe theft-deterrent system.
When trying to start the vehicle, thesecurity light comes on briefly whenthe vehicle is turned on.
If the vehicle does not start and thesecurity light stays on, there is aproblem with the system. Attempt toturn the vehicle off and try it again.
Do not leave the RKE transmitter inthe vehicle.
Exterior Mirrors
Convex Mirrors
{ WARNING
A convex mirror can make things,like other vehicles, look fartheraway than they really are. If youcut too sharply into the right lane,you could hit a vehicle on theright. Check the inside mirror orglance over your shoulder beforechanging lanes.
The passenger side mirror is convexshaped. A convex mirror's surface iscurved so more can be seen fromthe driver seat.
Power Mirrors
Controls for the outside powermirrors are on the driver door.
To adjust a mirror:
1. Move the selector switch toL (left) or R (right) to choosethe driver or passenger mirror.
2. Press the arrows on the controlpad to move each mirror in thedesired direction.
3. Return the selector switch to thecenter position.

Black plate (16,1)Chevrolet Volt Owner Manual - 2011
2-16 Keys, Doors and Windows
Folding Mirrors
Manual Foldaway Mirrors
The mirrors can be folded inwardtoward the vehicle to preventdamage when going through anautomatic car wash. Push themirror outward to return it to theoriginal position.
Heated MirrorsThe vehicle may have heatedmirrors.
= (Rear Window Defogger):Press to heat the outside rearviewmirrors. See “Rear WindowDefogger” under Automatic ClimateControl System on page 8‑1 formore information.
Interior Mirrors
Automatic DimmingRearview MirrorThe vehicle has an automaticdimming inside rearview mirror.Automatic dimming reduces theglare from the headlamps of thevehicle behind you. The dimmingfeature and the indicator light comeon each time the vehicle is started.Hold the mirror in the center toadjust it.
Cleaning the Mirror
Do not spray glass cleaner directlyon the mirror. Use a soft toweldampened with water.
Windows
{ WARNING
Leaving children, helplessadults, or pets in a vehiclewith the windows closed isdangerous. They can beovercome by the extreme heatand suffer permanent injuriesor even death from heat stroke.Never leave a child, a helplessadult, or a pet alone in a vehicle,especially with the windowsclosed in warm or hot weather.

Black plate (17,1)Chevrolet Volt Owner Manual - 2011
Keys, Doors and Windows 2-17
The vehicle aerodynamics aredesigned to improve fuel economyperformance. This may result ina pulsing sound when either rearwindow is down and the frontwindows are up. To reduce thesound, open either a front windowor the sunroof (if equipped).
Power Windows
{ WARNING
Leaving children in a vehiclewith the RKE transmitter isdangerous for many reasons;children or others could be badlyinjured or even killed. They couldoperate the power windows orother controls or even make thevehicle move. The windows willfunction with the RKE transmitterin the vehicle and they could beseriously injured or killed if caughtin the path of a closing window.Do not leave the RKE transmitterin a vehicle with children.
When there are children in therear seat, use the window lockoutbutton to prevent unintentionaloperation of the windows.
The window switches on the driverdoor control all windows in thevehicle. Each passenger doorhas a switch that controls onlythat window.
Press the front of the switch to openthe window. Pull the switch up toclose it.
The power windows work when thevehicle is on, or when RetainedAccessory Power (RAP) is active.See Retained Accessory Power(RAP) on page 9‑22.

Black plate (18,1)Chevrolet Volt Owner Manual - 2011
2-18 Keys, Doors and Windows
Express‐Down/Up Windows
Windows with an express-downor up feature allow the windowto be lowered or raised withoutholding the switch. The driverwindow has express-down and up;the passenger and rear windowshave only express-down.
Pull a window switch up or pushit down all the way, release it,and the window goes up or downautomatically. Stop the windowby pushing or pulling the switch.
Express Window Anti-PinchFeature
If any object is in the path of thewindow when the express-up isactive, the window will stop at theobstruction and auto-reverse to a
preset factory position. Weatherconditions such as severe icingmay also cause the window toauto-reverse. The window willreturn to normal operation once theobstruction or condition is removed.
Express Window Anti-PinchOverride
In an emergency, the anti-pinchfeature can be overridden in asupervised mode. Hold the windowswitch all the way up to the secondposition. The window will rise foras long as the switch is held. Oncethe switch is released, the expressmode is re-activated.
In this mode, the window can stillclose on an object in its path. Usecare when using the override mode.
Programming the PowerWindows
Programming the power windowsmay be necessary if the 12-voltbattery has been disconnected ordischarged.
To program the window:
1. Close all doors with thevehicle on, or when RetainedAccessory Power (RAP) isactive. See Retained AccessoryPower (RAP) on page 9‑22.
2. Pull the window switch tocompletely close the window.Continue to hold the windowswitch two seconds after thewindow is closed.
3. Repeat for each window.

Black plate (19,1)Chevrolet Volt Owner Manual - 2011
Keys, Doors and Windows 2-19
Window Lockout
The rear window lockout switchis on the driver door. This featureprevents the rear passengerwindows from operating, exceptfrom the driver position.
Presso { to activate the rearwindow lockout switch. The LEDlight (A) comes on when activated.
Presso { again to deactivate thelockout switch.
Sun Visors
Pull the sun visor down to blockglare. Detach the sun visor fromthe center mount to pivot to the sidewindow, or to extend along the rod,if available.

Black plate (20,1)Chevrolet Volt Owner Manual - 2011
2-20 Keys, Doors and Windows
2 NOTES

Black plate (1,1)Chevrolet Volt Owner Manual - 2011
Seats and Restraints 3-1
Seats andRestraints
Head RestraintsHead Restraints . . . . . . . . . . . . . . . 3-2
Front SeatsSeat Adjustment . . . . . . . . . . . . . . 3-4Reclining Seatbacks . . . . . . . . . . 3-4Heated Front Seats . . . . . . . . . . . 3-6
Rear SeatsRear Seats . . . . . . . . . . . . . . . . . . . . 3-8
Safety BeltsSafety Belts . . . . . . . . . . . . . . . . . . 3-10How to Wear Safety BeltsProperly . . . . . . . . . . . . . . . . . . . . 3-13
Lap-Shoulder Belt . . . . . . . . . . . 3-19Safety Belt Use DuringPregnancy . . . . . . . . . . . . . . . . . . 3-23
Safety Belt Extender . . . . . . . . . 3-23Safety System Check . . . . . . . . 3-23Safety Belt Care . . . . . . . . . . . . . 3-24Replacing Safety Belt SystemParts after a Crash . . . . . . . . . 3-24
Airbag SystemAirbag System . . . . . . . . . . . . . . . 3-25Where Are the Airbags? . . . . . 3-27When Should an AirbagInflate? . . . . . . . . . . . . . . . . . . . . . 3-28
What Makes an AirbagInflate? . . . . . . . . . . . . . . . . . . . . . 3-30
How Does an AirbagRestrain? . . . . . . . . . . . . . . . . . . . 3-30
What Will You See after anAirbag Inflates? . . . . . . . . . . . . 3-31
Passenger SensingSystem . . . . . . . . . . . . . . . . . . . . . 3-33
Servicing the Airbag-EquippedVehicle . . . . . . . . . . . . . . . . . . . . . 3-38
Adding Equipment to theAirbag-Equipped Vehicle . . . 3-38
Airbag System Check . . . . . . . . 3-40Replacing Airbag SystemParts after a Crash . . . . . . . . . 3-40
Child RestraintsOlder Children . . . . . . . . . . . . . . . 3-41Infants and YoungChildren . . . . . . . . . . . . . . . . . . . . 3-43
Child Restraint Systems . . . . . 3-45Where to Put the Restraint . . . 3-47Lower Anchors and Tethersfor Children (LATCHSystem) . . . . . . . . . . . . . . . . . . . . 3-49
Replacing LATCH SystemParts After a Crash . . . . . . . . . 3-57
Securing Child Restraints(Rear Seat) . . . . . . . . . . . . . . . . . 3-57
Securing Child Restraints(Front Passenger Seat) . . . . 3-60

Black plate (2,1)Chevrolet Volt Owner Manual - 2011
3-2 Seats and Restraints
Head Restraints
{ WARNING
With head restraints that arenot installed and adjustedproperly, there is a greaterchance that occupants will suffera neck/spinal injury in a crash.Do not drive until the headrestraints for all occupants areinstalled and adjusted properly.
Front Seats
The vehicle's front seats haveadjustable head restraints in theoutboard seating positions.
Adjust the head restraint so that thetop of the restraint is at the sameheight as the top of the occupant'shead. This position reduces thechance of a neck injury in a crash.
To raise or lower the head restraint,press the button located on the sideof the head restraint and pull up orpush the head restraint down andrelease the button.

Black plate (3,1)Chevrolet Volt Owner Manual - 2011
Seats and Restraints 3-3
Pull and push on the head restraintafter the button is released to makesure that it is locked in place.
The front seat outboard headrestraints are not designed to beremoved.
Rear Seats
The vehicle's rear seats haveadjustable head restraints in theoutboard seating positions.
The height of the head restraint canbe adjusted. Pull the head restraintup to raise it. Try to move the headrestraint to make sure that it islocked in place.
To lower the head restraint, pressthe button, located on the top ofthe seatback, and push the headrestraint down. Try to move thehead restraint after the button isreleased to make sure that it islocked in place.
If you are installing a child restraintin the rear seat, see “Securing aChild Restraint Designed for theLATCH System” under LowerAnchors and Tethers for Children(LATCH System) on page 3‑49.

Black plate (4,1)Chevrolet Volt Owner Manual - 2011
3-4 Seats and Restraints
Front Seats
Seat Adjustment
{ WARNING
You can lose control of thevehicle if you try to adjust amanual driver seat while thevehicle is moving. The suddenmovement could startle andconfuse you, or make you pusha pedal when you do not want to.Adjust the driver seat only whenthe vehicle is not moving.
To adjust the seat position:
1. Pull the handle at the front of theseat cushion to unlock it.
2. Move the seat forward orrearward and release thehandle.
3. Try to move the seat back andforth to be sure it is locked inplace.
Seat Height Adjuster
Move the lever up or down to raiseor lower the seat.
Reclining Seatbacks
{ WARNING
You can lose control of thevehicle if you try to adjust amanual driver seat while thevehicle is moving. The suddenmovement could startle andconfuse you, or make you push apedal when you do not want to.Adjust the driver seat only whenthe vehicle is not moving.
{ WARNING
If either seatback is not locked, itcould move forward in a suddenstop or crash. That could causeinjury to the person sitting there.Always push and pull on theseatbacks to be sure they arelocked.

Black plate (5,1)Chevrolet Volt Owner Manual - 2011
Seats and Restraints 3-5
To recline the seatback:
1. Lift the lever.
2. Move the seatback to thedesired position, and thenrelease the lever to lock theseatback in place.
3. Push and pull on the seatback tomake sure it is locked.
To return the seatback to the uprightposition:
1. Lift the lever fully withoutapplying pressure to theseatback, and the seatbackreturns to the upright position.
2. Push and pull on the seatback tomake sure it is locked.
{ WARNING
Sitting in a reclined position whenthe vehicle is in motion can bedangerous. Even when buckledup, the safety belts cannot dotheir job when reclined like this.
The shoulder belt cannot do itsjob because it will not be againstyour body. Instead, it will be infront of you. In a crash, you couldgo into it, receiving neck or otherinjuries.
The lap belt cannot do its jobeither. In a crash, the belt couldgo up over your abdomen.The belt forces would bethere, not at your pelvic bones.This could cause serious internalinjuries.
For proper protection when thevehicle is in motion, have theseatback upright. Then sit wellback in the seat and wear thesafety belt properly.
Do not have a seatback reclined ifthe vehicle is moving.
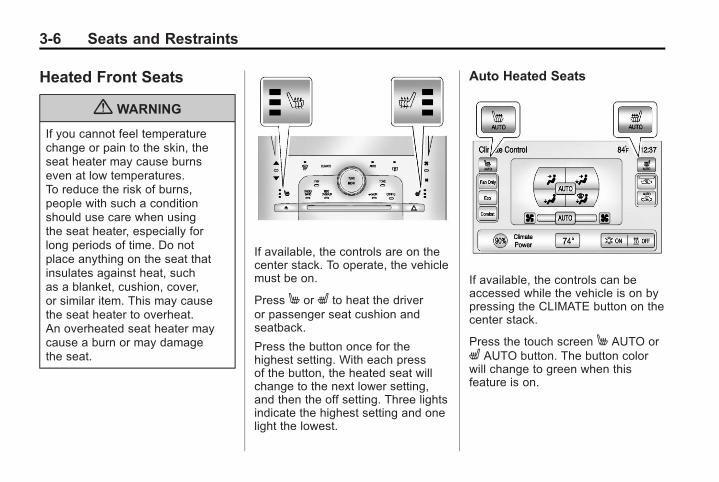
Black plate (6,1)Chevrolet Volt Owner Manual - 2011
3-6 Seats and Restraints
Heated Front Seats
{ WARNING
If you cannot feel temperaturechange or pain to the skin, theseat heater may cause burnseven at low temperatures.To reduce the risk of burns,people with such a conditionshould use care when usingthe seat heater, especially forlong periods of time. Do notplace anything on the seat thatinsulates against heat, suchas a blanket, cushion, cover,or similar item. This may causethe seat heater to overheat.An overheated seat heater maycause a burn or may damagethe seat.
If available, the controls are on thecenter stack. To operate, the vehiclemust be on.
Press M or L to heat the driveror passenger seat cushion andseatback.
Press the button once for thehighest setting. With each pressof the button, the heated seat willchange to the next lower setting,and then the off setting. Three lightsindicate the highest setting and onelight the lowest.
Auto Heated Seats
If available, the controls can beaccessed while the vehicle is on bypressing the CLIMATE button on thecenter stack.
Press the touch screen M AUTO orL AUTO button. The button colorwill change to green when thisfeature is on.

Black plate (7,1)Chevrolet Volt Owner Manual - 2011
Seats and Restraints 3-7
When the vehicle is on, this featurewill automatically activate theheated seats at the level requiredby the vehicle's interior temperature.The active high, medium, low, or offheated seat level will be indicatedby the manual heated seat buttonlights on the center stack. Use thetouch screen buttons or the manualheated seat buttons on the centerstack to turn auto heated seats off.
If the passenger seat is unoccupied,the auto heated seats feature willnot activate that seat.
The auto heated seats featurecan be programmed to always beenabled when the vehicle is on.See “Auto Heated Seats” underVehicle Personalization onpage 5‑53 for more information.
Remote Start Heated Seats
When it is cold outside, the heatedseats can be programmed to turnon automatically during a remotevehicle start. Unless the autoheated seats feature is availableand enabled, the heated seats willbe canceled when the vehicle isturned on. If the vehicle has autoheated seats and the feature isenabled, the seat heating level willautomatically change to the levelrequired by the vehicle's interiortemperature when the vehicle isturned on.
The indicator lights on the heatedseat buttons do not turn on during aremote start.
The temperature performance of anunoccupied seat may be reduced.This is normal.
The heated seats will not turn onduring a remote start unless theheated seats feature is enabled inthe vehicle personalization menu.See “Remote Start Auto Heat Seats”under Vehicle Personalization onpage 5‑53 for more information.

Black plate (8,1)Chevrolet Volt Owner Manual - 2011
3-8 Seats and Restraints
Rear SeatsFolding the Seatback
{ WARNING
If either seatback is not locked, itcould move forward in a suddenstop or crash. That could causeinjury to the person sitting there.Always push and pull on theseatbacks to be sure they arelocked.
{ WARNING
A safety belt that is improperlyrouted, not properly attached,or twisted will not provide theprotection needed in a crash.The person wearing the belt couldbe seriously injured. After raisingthe rear seatback, always checkto be sure that the safety beltsare properly routed and attached,and are not twisted.
To fold the seatback down:
Notice: Folding a rear seat withthe safety belts still fastened maycause damage to the seat or thesafety belts. Always unbuckle thesafety belts and return them totheir normal stowed positionbefore folding a rear seat.
A. Safety Belt Guide
B. Safety Belt Storage Clip
1. Remove the safety belt from thesafety belt guide (A) and place itin the storage clip (B).
The safety belt should remainin the storage clip while theseatback is in the foldedposition.

Black plate (9,1)Chevrolet Volt Owner Manual - 2011
Seats and Restraints 3-9
2. Pull the seatback release leverto unlock the seatback.
A tab near the lever raises whenthe seatback is unlocked.
3. Fold the seatback forward.
Raising the Seatback
Notice: Damage to the safety beltor rear seat locking mechanismcan occur if the safety belt iscaught between the rear seatbackand the seat locking mechanism.The safety belt must be out of theway when the rear seat is raisedto the upright, locked position.If the safety belt is damaged, seeyour dealer and have it replaced.
To raise the seatback:
A. Seatback Locking Mechanism
B. Safety Belt Storage Clip
1. Make sure the safety belt isin the storage clip (B) beforeraising the seatback.
The safety belt should notcross the seatback lockingmechanism (A) when raisingthe seatback.
2. Raise the seatback and push itrearward to lock it into place.
A tab near the seatback releaselever retracts when the seatbackis locked.
3. Push and pull the top of theseatback to be sure it is lockedinto position.
4. Return the safety belt to thesafety belt guide after raising theseatback.
Keep the seat in the upright, lockedposition when not in use.

Black plate (10,1)Chevrolet Volt Owner Manual - 2011
3-10 Seats and Restraints
Safety BeltsThis section of the manualdescribes how to use safety beltsproperly. It also describes somethings not to do with safety belts.
{ WARNING
Do not let anyone ride wherea safety belt cannot be wornproperly. In a crash, if you oryour passenger(s) are notwearing safety belts, the injuriescan be much worse. You can hitthings inside the vehicle harderor be ejected from the vehicle.You and your passenger(s) canbe seriously injured or killed.In the same crash, you mightnot be, if you are buckled up.Always fasten your safety belt,and check that your passenger(s)are restrained properly too.
{ WARNING
It is extremely dangerous to ridein a cargo area, inside or outsideof a vehicle. In a collision, peopleriding in these areas are morelikely to be seriously injured orkilled. Do not allow people to ridein any area of your vehicle thatis not equipped with seats andsafety belts. Be sure everyonein the vehicle is in a seat andusing a safety belt properly.
This vehicle has indicators as areminder to buckle the safety belts.See Safety Belt Reminders onpage 5‑18 for additional information.
In most states and in all Canadianprovinces, the law requires wearingsafety belts. Here is why:
You never know if you will be ina crash. If you do have a crash,you do not know if it will be aserious one.
A few crashes are mild, and somecrashes can be so serious that evenbuckled up, a person would notsurvive. But most crashes are inbetween. In many of them, peoplewho buckle up can survive andsometimes walk away. Withoutsafety belts they could have beenbadly hurt or killed.
After more than 40 years of safetybelts in vehicles, the facts are clear.In most crashes buckling up doesmatter ... a lot!

Black plate (11,1)Chevrolet Volt Owner Manual - 2011
Seats and Restraints 3-11
Why Safety Belts Work
When you ride in or on anything,you go as fast as it goes.
Take the simplest vehicle. Supposeit is just a seat on wheels.
Put someone on it. Get it up to speed. Then stop thevehicle. The rider does not stop.

Black plate (12,1)Chevrolet Volt Owner Manual - 2011
3-12 Seats and Restraints
The person keeps going untilstopped by something. In a realvehicle, it could be the windshield...
or the instrument panel... or the safety belts!
With safety belts, you slow downas the vehicle does. You get moretime to stop. You stop over moredistance, and your strongest bonestake the forces. That is why safetybelts make such good sense.

Black plate (13,1)Chevrolet Volt Owner Manual - 2011
Seats and Restraints 3-13
Questions and Answers AboutSafety Belts
Q: Will I be trapped in the vehicleafter a crash if I am wearing asafety belt?
A: You could be — whether youare wearing a safety belt ornot. But your chance of beingconscious during and after anaccident, so you can unbuckleand get out, is much greater ifyou are belted. And you canunbuckle a safety belt, even ifyou are upside down.
Q: If my vehicle has airbags, whyshould I have to wear safetybelts?
A: Airbags are supplementalsystems only; so they workwith safety belts — not insteadof them. Whether or not anairbag is provided, all occupantsstill have to buckle up to getthe most protection. That istrue not only in frontal collisions,but especially in side and othercollisions.
Q: If I am a good driver, and Inever drive far from home,why should I wear safetybelts?
A: You may be an excellent driver,but if you are in a crash — evenone that is not your fault — youand your passenger(s) can behurt. Being a good driver doesnot protect you from thingsbeyond your control, suchas bad drivers.
Most accidents occur within40 km (25mi) of home.And the greatest number ofserious injuries and deathsoccur at speeds of less than65 km/h (40 mph).
Safety belts are for everyone.
How to Wear Safety BeltsProperlyThis section is only for people ofadult size.
Be aware that there are specialthings to know about safetybelts and children. And there aredifferent rules for smaller childrenand infants. If a child will be ridingin the vehicle, see Older Children onpage 3‑41 or Infants and YoungChildren on page 3‑43. Follow thoserules for everyone's protection.
It is very important for all occupantsto buckle up. Statistics show thatunbelted people are hurt more oftenin crashes than those who arewearing safety belts.
Occupants who are not buckled upcan be thrown out of the vehicle in acrash. And they can strike others inthe vehicle who are wearing safetybelts.

Black plate (14,1)Chevrolet Volt Owner Manual - 2011
3-14 Seats and Restraints
First, before you or yourpassenger(s) wear a safety belt,there is important information youshould know.
Sit up straight and always keepyour feet on the floor in front of you.The lap part of the belt should be
worn low and snug on the hips, justtouching the thighs. In a crash, thisapplies force to the strong pelvicbones and you would be less likelyto slide under the lap belt. If youslid under it, the belt would applyforce on your abdomen. This couldcause serious or even fatal injuries.The shoulder belt should go overthe shoulder and across the chest.These parts of the body are bestable to take belt restraining forces.
The shoulder belt locks if there is asudden stop or crash.
Q: What is wrong with this?
A: The shoulder belt is too loose.It will not give as muchprotection this way.

Black plate (15,1)Chevrolet Volt Owner Manual - 2011
Seats and Restraints 3-15
{ WARNING
You can be seriously hurt if theshoulder belt is too loose. In acrash, you would move forwardtoo much, which could increaseinjury. The shoulder belt shouldfit snugly against your body.
Q: What is wrong with this?
A: The lap belt is too loose.It will not give nearly as muchprotection this way.
{ WARNING
You can be seriously hurt if thelap belt is too loose. In a crash,you could slide under the lapbelt and apply force on yourabdomen. This could causeserious or even fatal injuries.The lap belt should be wornlow and snug on the hips,just touching the thighs.

Black plate (16,1)Chevrolet Volt Owner Manual - 2011
3-16 Seats and Restraints
Q: What is wrong with this?
A: The belt is buckled in the wrongbuckle.
{ WARNING
You can be seriously injured ifthe belt is buckled in the wrongplace like this. In a crash, thebelt would go up over yourabdomen. The belt forces wouldbe there, not on the pelvic bones.This could cause serious internalinjuries. Always buckle the beltinto the buckle nearest you.
Q: What is wrong with this?
A: The belt is over an armrest.

Black plate (17,1)Chevrolet Volt Owner Manual - 2011
Seats and Restraints 3-17
{ WARNING
You can be seriously injured if thebelt goes over an armrest likethis. The belt would be much toohigh. In a crash, you can slideunder the belt. The belt forcewould then be applied on theabdomen, not on the pelvicbones, and that could causeserious or fatal injuries. Be surethe belt goes under the armrests.
Q: What is wrong with this?
A: The shoulder belt is worn underthe arm. It should be worn overthe shoulder at all times.
{ WARNING
You can be seriously injuredif you wear the shoulder beltunder your arm. In a crash, yourbody would move too far forward,which would increase the chanceof head and neck injury. Also,the belt would apply too muchforce to the ribs, which are notas strong as shoulder bones.You could also severely injureinternal organs like your liver orspleen. The shoulder belt shouldgo over the shoulder and acrossthe chest.

Black plate (18,1)Chevrolet Volt Owner Manual - 2011
3-18 Seats and Restraints
Q: What is wrong with this?
A: The belt is behind the body.
{ WARNING
You can be seriously injuredby not wearing the lap-shoulderbelt properly. In a crash, youwould not be restrained by theshoulder belt. Your body couldmove too far forward increasingthe chance of head and neckinjury. You might also slideunder the lap belt. The beltforce would then be applied righton the abdomen. That couldcause serious or fatal injuries.The shoulder belt should go overthe shoulder and across thechest.
Q: What is wrong with this?
A: The belt is twisted acrossthe body.

Black plate (19,1)Chevrolet Volt Owner Manual - 2011
Seats and Restraints 3-19
{ WARNING
You can be seriously injured by atwisted belt. In a crash, you wouldnot have the full width of the beltto spread impact forces. If a beltis twisted, make it straight so itcan work properly, or ask yourdealer to fix it.
Lap-Shoulder BeltAll seating positions in the vehiclehave a lap-shoulder belt.
The following instructions explainhow to wear a lap-shoulder beltproperly.
1. If the seat has a safety beltguide, and the safety belt is notrouted through the guide, slidethe edge of the belt webbingthrough the opening on theguide. Be sure the belt is nottwisted.
2. Adjust the seat, if the seat isadjustable, so you can sit upstraight. To see how, see “Seats”in the Index.
3. Pick up the latch plate and pullthe belt across you. Do not let itget twisted.
The lap-shoulder belt may lock ifyou pull the belt across you veryquickly. If this happens, let thebelt go back slightly to unlock it.Then pull the belt across youmore slowly.
If the shoulder portion of apassenger belt is pulled outall the way, the child restraintlocking feature may be engaged.If this happens, let the belt goback all the way and start again.
4. Push the latch plate into thebuckle until it clicks.
Pull up on the latch plate tomake sure it is secure. If the beltis not long enough, see SafetyBelt Extender on page 3‑23.
Position the release button onthe buckle so that the safety beltcould be quickly unbuckled ifnecessary.

Black plate (20,1)Chevrolet Volt Owner Manual - 2011
3-20 Seats and Restraints
5. To make the lap part tight, pullup on the shoulder belt.
It may be necessary to pullstitching on the safety beltthrough the latch plate to fullytighten the lap belt on smalleroccupants.
To unlatch the belt, push the buttonon the buckle. The belt shouldreturn to its stowed position.
Before a door is closed, be surethe safety belt is out of the way. If adoor is slammed against a safetybelt, damage can occur to both thesafety belt and the vehicle.
Safety Belt Pretensioners
This vehicle has safety beltpretensioners for front outboardoccupants. Although the safetybelt pretensioners cannot be seen,they are part of the safety beltassembly. They can help tightenthe safety belts during the earlystages of a moderate to severefrontal, near frontal, or rear crashif the threshold conditions forpretensioner activation are met.
And, if the vehicle has side impactairbags, safety belt pretensionerscan help tighten the safety belts ina side crash or a rollover event.
Pretensioners work only once.If the pretensioners activate in acrash, they need to be replaced,and other new parts for the vehicle'ssafety belt system may be required.See Replacing Safety Belt SystemParts after a Crash on page 3‑24.

Black plate (21,1)Chevrolet Volt Owner Manual - 2011
Seats and Restraints 3-21
Rear Safety Belt ComfortGuides
This vehicle may have rear safetybelt comfort guides. If not, theyare available through your dealer.The guides may provide addedsafety belt comfort for older childrenwho have outgrown booster seatsand for some adults. When installedand properly adjusted, the comfortguide positions the belt away fromthe neck and head.
There is one guide, if equipped, foreach outside passenger positionin the rear seat. When using acomfort guide, remove the safetybelt from the seat‐mounted guide
before using the comfort guide.To install a comfort guide to thesafety belt:
1. Remove the guide from itsstorage clip on the interior bodytrim next to the rear seat.
2. Place the guide over the belt,and insert the two edges of thebelt into the slots of the guide.

Black plate (22,1)Chevrolet Volt Owner Manual - 2011
3-22 Seats and Restraints
3. The belt should not be twistedand it should lie flat. The elasticcord must be under the belt andthe guide on top.
{ WARNING
A safety belt that is not properlyworn may not provide theprotection needed in a crash.The person wearing the belt couldbe seriously injured. The shoulderbelt should go over the shoulderand across the chest. These partsof the body are best able to takebelt restraining forces.
4. Buckle, position, and releasethe safety belt as describedpreviously in this section.Make sure that the shoulderbelt crosses the shoulder.
To remove and store the comfortguide, squeeze the belt edgestogether so that the safety belt canbe removed from the guide. Slidethe guide back into its storage cliplocated on the interior body trimnext to the side of the seatback.

Black plate (23,1)Chevrolet Volt Owner Manual - 2011
Seats and Restraints 3-23
Safety Belt Use DuringPregnancySafety belts work for everyone,including pregnant women. Like alloccupants, they are more likely tobe seriously injured if they do notwear safety belts.
A pregnant woman should weara lap-shoulder belt, and the lapportion should be worn as low aspossible, below the rounding,throughout the pregnancy.
The best way to protect the fetus isto protect the mother. When a safetybelt is worn properly, it is more likelythat the fetus will not be hurt in acrash. For pregnant women, as foranyone, the key to making safetybelts effective is wearing themproperly.
Safety Belt ExtenderIf the vehicle's safety belt will fastenaround you, you should use it.
But if a safety belt is not longenough, your dealer will order youan extender. When you go in toorder it, take the heaviest coat youwill wear, so the extender will belong enough for you. To help avoidpersonal injury, do not let someoneelse use it, and use it only for theseat it is made to fit. The extenderhas been designed for adults.Never use it for securing child seats.To wear it, attach it to the regularsafety belt. For more information,see the instruction sheet that comeswith the extender.
Safety System CheckNow and then, check that thesafety belt reminder light, safetybelts, buckles, latch plates,retractors, and anchorages areworking properly. Look for anyother loose or damaged safety beltsystem parts that might keep asafety belt system from doing itsjob. See your dealer to have itrepaired. Torn or frayed safety beltsmay not protect you in a crash.They can rip apart under impactforces. If a belt is torn or frayed,get a new one right away.
Make sure the safety belt reminderlight is working. See Safety BeltReminders on page 5‑18 for moreinformation.
Keep safety belts clean and dry.See Safety Belt Care on page 3‑24.

Black plate (24,1)Chevrolet Volt Owner Manual - 2011
3-24 Seats and Restraints
Safety Belt CareKeep belts clean and dry.
{ WARNING
Do not bleach or dye safety belts.It may severely weaken them.In a crash, they might not be ableto provide adequate protection.Clean safety belts only with mildsoap and lukewarm water.
Replacing Safety BeltSystem Parts after aCrash
{ WARNING
A crash can damage the safetybelt system in the vehicle.A damaged safety belt systemmay not properly protect theperson using it, resulting inserious injury or even death ina crash. To help make sure thesafety belt systems are workingproperly after a crash, have theminspected and any necessaryreplacements made as soon aspossible.
After a minor crash, replacement ofsafety belts may not be necessary.But the safety belt assemblies thatwere used during any crash mayhave been stressed or damaged.See your dealer to have the safetybelt assemblies inspected orreplaced.
New parts and repairs may benecessary even if the safety beltsystem was not being used at thetime of the crash.
Have the safety belt pretensionerschecked if the vehicle has been in acrash, or if the airbag readiness lightstays on after you start the vehicleor while you are driving. See AirbagReadiness Light on page 5‑19.

Black plate (25,1)Chevrolet Volt Owner Manual - 2011
Seats and Restraints 3-25
Airbag SystemThe vehicle has the followingairbags:. A frontal airbag for the driver.. A frontal airbag for the right front
passenger.. A knee airbag for the driver.. A knee airbag for the front
passenger.. A seat-mounted side impact
airbag for the driver.. A seat-mounted side impact
airbag for the right frontpassenger.
. A roof-rail airbag for the driverand the passenger seateddirectly behind the driver.
. A roof-rail airbag for theright front passenger and thepassenger seated directlybehind the right front passenger.
All of the airbags in the vehicle willhave the word AIRBAG embossedin the trim or on an attached labelnear the deployment opening.
For frontal airbags, the wordAIRBAG will appear on the middlepart of the steering wheel for thedriver and on the instrument panelfor the right front passenger.
With knee airbags, the wordAIRBAG will appear on the lowerportion of the instrument panel.
With seat-mounted side impactairbags, the word AIRBAG willappear on the side of the seatbackclosest to the door.
With roof-rail airbags, the wordAIRBAG will appear along theheadliner or trim.
Airbags are designed to supplementthe protection provided by safetybelts. Even though today's airbagsare also designed to help reducethe risk of injury from the force of aninflating bag, all airbags must inflatevery quickly to do their job.
Here are the most important thingsto know about the airbag system:
{ WARNING
You can be severely injured orkilled in a crash if you are notwearing a safety belt— even ifthe vehicle has airbags. Airbagsare designed to work with safetybelts, but do not replace them.Also, airbags are not designed todeploy in every crash. In somecrashes safety belts are the onlyrestraint. See When Should anAirbag Inflate? on page 3‑28.
Wearing a safety belt during acrash helps reduce your chanceof hitting things inside the vehicleor being ejected from it. Airbagsare “supplemental restraints” tothe safety belts. Everyone in thevehicle should wear a safety beltproperly—whether or not there isan airbag for that person.

Black plate (26,1)Chevrolet Volt Owner Manual - 2011
3-26 Seats and Restraints
{ WARNING
Airbags inflate with great force,faster than the blink of an eye.Anyone who is up against, orvery close to, any airbag when itinflates can be seriously injuredor killed. Do not sit unnecessarilyclose to any airbag, as you wouldbe if you were sitting on the edgeof the seat or leaning forward.Safety belts help keep you inposition before and during acrash. Always wear a safety belt,even with airbags. The drivershould sit as far back as possiblewhile still maintaining control ofthe vehicle.
Occupants should not lean on orsleep against the door or sidewindows in seating positions withseat-mounted side impact airbagsand/or roof-rail airbags.
{ WARNING
Children who are up against,or very close to, any airbagwhen it inflates can be seriouslyinjured or killed. Airbags pluslap-shoulder belts offer protectionfor adults and older children, butnot for young children and infants.Neither the vehicle's safety beltsystem nor its airbag systemis designed for them. Youngchildren and infants need theprotection that a child restraintsystem can provide. Alwayssecure children properly inthe vehicle. To read how, seeOlder Children on page 3‑41 orInfants and Young Children onpage 3‑43.
There is an airbag readinesslight on the instrument cluster,which shows the airbag symbol.The system checks the airbagelectrical system for malfunctions.The light tells you if there is anelectrical problem. See AirbagReadiness Light on page 5‑19for more information.

Black plate (27,1)Chevrolet Volt Owner Manual - 2011
Seats and Restraints 3-27
Where Are the Airbags?
The driver frontal airbag is in themiddle of the steering wheel.
The right front passenger frontalairbag is in the instrument panel onthe passenger side.
The driver knee airbag is belowthe steering column. The right frontpassenger knee airbag is below theglove box.
Driver Side Shown,Passenger Side Similar
The seat-mounted side impactairbags for the driver and right frontpassenger are in the side of theseatbacks closest to the door.

Black plate (28,1)Chevrolet Volt Owner Manual - 2011
3-28 Seats and Restraints
Driver Side Shown,Passenger Side Similar
The roof-rail airbags for the driver,right front passenger, and secondrow outboard passengers are in theceiling above the side windows.
{ WARNING
If something is between anoccupant and an airbag, theairbag might not inflate properlyor it might force the object intothat person causing severe injury
(Continued)
WARNING (Continued)
or even death. The path of aninflating airbag must be keptclear. Do not put anythingbetween an occupant and anairbag, and do not attach orput anything on the steeringwheel hub or on or near anyother airbag covering.
Do not use seat accessoriesthat block the inflation path of aseat-mounted side impact airbag.
Never secure anything to the roofof a vehicle with roof-rail airbagsby routing a rope or tie‐downthrough any door or windowopening. If you do, the pathof an inflating roof-rail airbagwill be blocked.
When Should an AirbagInflate?Frontal airbags are designedto inflate in moderate to severefrontal or near frontal crashesto help reduce the potential forsevere injuries mainly to the driver'sor right front passenger's headand chest. However, they areonly designed to inflate if theimpact exceeds a predetermineddeployment threshold. Deploymentthresholds are used to predict howsevere a crash is likely to be in timefor the airbags to inflate and helprestrain the occupants.
Whether the frontal airbags willor should deploy is not based onhow fast your vehicle is traveling.It depends largely on what you hit,the direction of the impact, and howquickly your vehicle slows down.

Black plate (29,1)Chevrolet Volt Owner Manual - 2011
Seats and Restraints 3-29
Frontal airbags may inflateat different crash speeds.For example:. If the vehicle hits a stationary
object, the airbags could inflateat a different crash speed than ifthe vehicle hits a moving object.
. If the vehicle hits an object thatdeforms, the airbags couldinflate at a different crash speedthan if the vehicle hits an objectthat does not deform.
. If the vehicle hits a narrow object(like a pole), the airbags couldinflate at a different crash speedthan if the vehicle hits a wideobject (like a wall).
. If the vehicle goes into an objectat an angle, the airbags couldinflate at a different crash speedthan if the vehicle goes straightinto the object.
Thresholds can also vary withspecific vehicle design.
Frontal airbags are not intended toinflate during vehicle rollovers, rearimpacts, or in many side impacts.
In addition the vehicle hasdual‐stage frontal airbags.Dual‐stage airbags adjust therestraint according to crashseverity.
Frontal knee airbags are designedto inflate in moderate to severefrontal or near frontal impactsthat exceed a predetermineddeployment threshold.
The vehicle has electronic frontalsensors, which help the sensingsystem distinguish between amoderate frontal impact and amore severe frontal impact.For moderate frontal impacts,dual-stage airbags inflate at alevel less than full deployment.For more severe frontal impacts,full deployment occurs.
The vehicle has seat-mounted sideimpact airbags and roof-rail airbags.See Airbag System on page 3‑25.Seat-mounted side impact androof-rail airbags are intended toinflate in moderate to severe sidecrashes. In addition, these roof‐railairbags are intended to inflateduring a rollover or in a severefrontal impact. Seat-mounted sideimpact and roof-rail airbags willinflate if the crash severity is abovethe system's designed thresholdlevel. The threshold level can varywith specific vehicle design.
Roof-rail airbags are notintended to inflate in rear impacts.A seat‐mounted side impact airbagis intended to deploy on the sideof the vehicle that is struck. Bothroof‐rail airbags will deploy wheneither side of the vehicle is struck orif the sensing system predicts thatthe vehicle is about to roll over, orin a severe frontal impact.

Black plate (30,1)Chevrolet Volt Owner Manual - 2011
3-30 Seats and Restraints
In any particular crash, no onecan say whether an airbag shouldhave inflated simply because ofthe damage to a vehicle or becauseof what the repair costs were.For frontal airbags, inflation isdetermined by what the vehicle hits,the angle of the impact, and howquickly the vehicle slows down.For seat-mounted side impact androof-rail airbags, deployment isdetermined by the location andseverity of the side impact.
In a rollover event, roof‐rail airbagdeployment is determined by thedirection of the roll.
What Makes an AirbagInflate?In a deployment event, the sensingsystem sends an electrical signaltriggering a release of gas from theinflator. Gas from the inflator fills theairbag causing the bag to break outof the cover and deploy. The inflator,the airbag, and related hardware areall part of the airbag module.
Frontal airbag modules are locatedinside the steering wheel andinstrument panel. For vehicleswith knee airbags, there areairbag modules below the steeringcolumn and below the glove box.For vehicles with seat-mounted sideimpact airbags, there are airbagmodules in the side of the frontseatbacks closest to the door.For vehicles with roof-rail airbags,there are airbag modules in theceiling of the vehicle, near theside windows that have occupantseating positions.
How Does an AirbagRestrain?In moderate to severe frontal ornear frontal collisions, even beltedoccupants can contact the steeringwheel or the instrument panel.In moderate to severe sidecollisions, even belted occupantscan contact the inside of thevehicle.
Airbags supplement the protectionprovided by safety belts. Frontalairbags with knee airbags distributethe force of the impact more evenlyover the occupant's body, stoppingthe occupant more gradually.Seat-mounted side impact androof-rail airbags distribute theforce of the impact more evenlyover the occupant's upper body.

Black plate (31,1)Chevrolet Volt Owner Manual - 2011
Seats and Restraints 3-31
Rollover capable roof‐rail airbagsare designed to help contain thehead and chest of occupants inthe outboard seating positionsin the first and second rows.The rollover capable roof‐railairbags are designed to helpreduce the risk of full or partialejection in rollover events, althoughno system can prevent all suchejections.
But airbags would not help inmany types of collisions, primarilybecause the occupant's motionis not toward those airbags. SeeWhen Should an Airbag Inflate? onpage 3‑28 for more information.
Airbags should never be regardedas anything more than a supplementto safety belts.
What Will You See afteran Airbag Inflates?After the frontal airbags andseat-mounted side impact airbagsinflate, they quickly deflate, soquickly that some people may noteven realize an airbag inflated.Roof-rail airbags may still be at leastpartially inflated for some time afterthey deploy. Some components ofthe airbag module may be hot forseveral minutes. For location of theairbag modules, see What Makesan Airbag Inflate? on page 3‑30.
The parts of the airbag that comeinto contact with you may be warm,but not too hot to touch. There maybe some smoke and dust comingfrom the vents in the deflatedairbags. Airbag inflation does notprevent the driver from seeing outof the windshield or being able tosteer the vehicle, nor does it preventpeople from leaving the vehicle.
{ WARNING
When an airbag inflates, theremay be dust in the air. This dustcould cause breathing problemsfor people with a history ofasthma or other breathing trouble.To avoid this, everyone in thevehicle should get out as soonas it is safe to do so. If you havebreathing problems but cannotget out of the vehicle after anairbag inflates, then get fresh airby opening a window or a door.If you experience breathingproblems following an airbagdeployment, you should seekmedical attention.
The vehicle has a feature that mayautomatically unlock the doors, turnon the interior lamps and hazardwarning flashers, and shut off thefuel system after the airbags inflate.
Black plate (32,1)Chevrolet Volt Owner Manual - 2011
3-32 Seats and Restraints
You can lock the doors, turn off theinterior lamps and hazard warningflashers by using the controls forthose features.
{ WARNING
A crash severe enough toinflate the airbags may havealso damaged important functionsin the vehicle, such as the fuelsystem, brake and steeringsystems, etc. Even if the vehicleappears to be drivable after amoderate crash, there may beconcealed damage that couldmake it difficult to safely operatethe vehicle.
Use caution if attempting torestart the vehicle after a crashhas occurred.
In many crashes severe enough toinflate the airbag, windshields arebroken by vehicle deformation.Additional windshield breakagemay also occur from the rightfront passenger airbag.. Airbags are designed to inflate
only once. After an airbaginflates, you will need somenew parts for the airbag system.If you do not get them, theairbag system will not be thereto help protect you in anothercrash. A new system will includeairbag modules and possiblyother parts. The service manualfor your vehicle covers the needto replace other parts.
. The vehicle has a crashsensing and diagnostic modulewhich records informationafter a crash. See Vehicle DataRecording and Privacy onpage 13‑26 and Event DataRecorders on page 13‑26.
. Let only qualified technicianswork on the airbag systems.Improper service can mean thatan airbag system will not workproperly. See your dealer forservice.

Black plate (33,1)Chevrolet Volt Owner Manual - 2011
Seats and Restraints 3-33
Passenger SensingSystemThe vehicle has a passengersensing system for the right frontpassenger position. The passengerairbag status indicator will be visibleon the overhead console when thevehicle is started.
The words ON and OFF are visibleduring the system check. When thesystem check is complete, eitherthe word ON or OFF will be visible.See Passenger Airbag StatusIndicator on page 5‑20.
The passenger sensing systemturns off the right front passengerfrontal airbag and the knee airbagon the passenger side, undercertain conditions. The driverairbag, the driver knee airbag, theseat-mounted side impact airbags,and the roof-rail airbags are notaffected by the passenger sensingsystem.
The passenger sensing systemworks with sensors that are partof the right front passenger seat.The sensors are designed to detectthe presence of a properly seatedoccupant and determine if the rightfront passenger frontal airbag andpassenger knee airbag should beenabled (may inflate) or not.
According to accident statistics,children are safer when properlysecured in a rear seat in a correctchild restraint for their weightand size.
We recommend that children besecured in a rear seat, including:an infant or a child riding in arear-facing child restraint; a childriding in a forward-facing child seat;an older child riding in a boosterseat; and children, who are largeenough, using safety belts.
A label on the sun visor says,“Never put a rear-facing child seatin the front.” This is because the riskto the rear-facing child is so great,if the airbag deploys.

Black plate (34,1)Chevrolet Volt Owner Manual - 2011
3-34 Seats and Restraints
{ WARNING
A child in a rear-facing childrestraint can be seriouslyinjured or killed if the rightfront passenger airbag inflates.This is because the back of therear-facing child restraint wouldbe very close to the inflatingairbag. A child in a forward-facingchild restraint can be seriouslyinjured or killed if the right frontpassenger airbag inflates and thepassenger seat is in a forwardposition.
Even if the passenger sensingsystem has turned off the rightfront passenger airbag(s), nosystem is fail-safe. No one canguarantee that an airbag will notdeploy under some unusualcircumstance, even thoughthe airbag(s) are turned off.
(Continued)
WARNING (Continued)
Secure rear-facing child restraintsin a rear seat, even if theairbag(s) are off. If you secure aforward-facing child restraint inthe right front seat, always movethe front passenger seat as farback as it will go. It is better tosecure the child restraint in arear seat.
The passenger sensing system isdesigned to turn off the right frontpassenger airbag and passengerknee airbag if:. The right front passenger seat is
unoccupied.. The system determines that
an infant is present in a childrestraint.
. A right front passenger takeshis/her weight off of the seat fora period of time.
. Or, if there is a critical problemwith the airbag system or thepassenger sensing system.
When the passenger sensingsystem has turned off the rightfront passenger frontal airbag andpassenger knee airbag, the offindicator will light and stay lit toremind you that the airbags areoff. See Passenger Airbag StatusIndicator on page 5‑20.
The passenger sensing system isdesigned to turn on (may inflate) theright front passenger frontal airbagand passenger knee airbag anytimethe system senses that a person ofadult size is sitting properly in theright front passenger seat.
When the passenger sensingsystem has allowed the airbags tobe enabled, the on indicator will lightand stay lit to remind you that theairbags are active.

Black plate (35,1)Chevrolet Volt Owner Manual - 2011
Seats and Restraints 3-35
For some children, includingchildren in child restraints,and for very small adults, thepassenger sensing system mayor may not turn off the right frontpassenger frontal airbag andpassenger knee airbag, dependingupon the person’s seating postureand body build. Everyone in thevehicle who has outgrown childrestraints should wear a safetybelt properly — whether or notthere is an airbag for that person.
{ WARNING
If the airbag readiness light evercomes on and stays on, it meansthat something may be wrongwith the airbag system. To helpavoid injury to yourself or others,have the vehicle serviced rightaway. See Airbag ReadinessLight on page 5‑19 for moreinformation, including importantsafety information.
If the On Indicator is Lit for aChild Restraint
If a child restraint has been installedand the on indicator is lit:
1. Turn the vehicle off.
2. Remove the child restraint fromthe vehicle.
3. Remove any additional itemsfrom the seat such as blankets,cushions, seat covers, seatheaters, or seat massagers.
4. Reinstall the child restraintfollowing the directionsprovided by the child restraintmanufacturer and refer toSecuring Child Restraints(Rear Seat) on page 3‑57 orSecuring Child Restraints (FrontPassenger Seat) on page 3‑60.
5. If, after reinstalling the childrestraint and restarting thevehicle, the on indicator isstill lit, turn the vehicle off.Then slightly recline the vehicleseatback and adjust the seatcushion, if adjustable, to makesure that the vehicle seatbackis not pushing the child restraintinto the seat cushion.
Also make sure the childrestraint is not trapped underthe vehicle head restraint.If this happens, adjust the headrestraint. See Head Restraintson page 3‑2.
6. Restart the vehicle.
The passenger sensing systemmay or may not turn off theairbags for a child in a childrestraint depending upon thechild's seating posture and bodybuild. It is better to secure achild restraint in a rear seat.
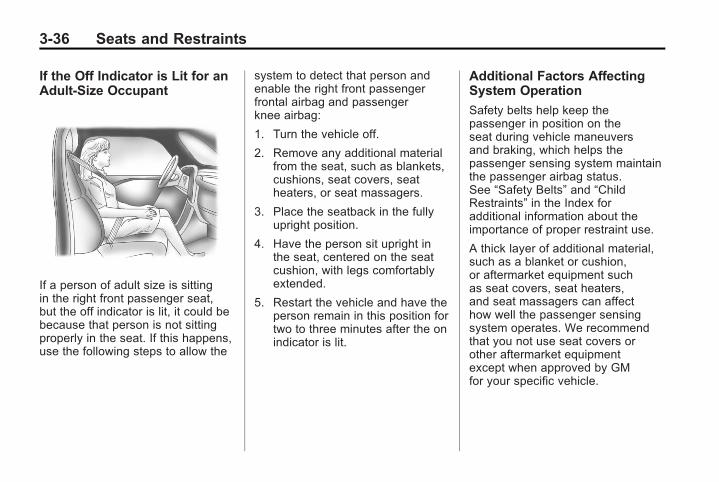
Black plate (36,1)Chevrolet Volt Owner Manual - 2011
3-36 Seats and Restraints
If the Off Indicator is Lit for anAdult-Size Occupant
If a person of adult size is sittingin the right front passenger seat,but the off indicator is lit, it could bebecause that person is not sittingproperly in the seat. If this happens,use the following steps to allow the
system to detect that person andenable the right front passengerfrontal airbag and passengerknee airbag:
1. Turn the vehicle off.
2. Remove any additional materialfrom the seat, such as blankets,cushions, seat covers, seatheaters, or seat massagers.
3. Place the seatback in the fullyupright position.
4. Have the person sit upright inthe seat, centered on the seatcushion, with legs comfortablyextended.
5. Restart the vehicle and have theperson remain in this position fortwo to three minutes after the onindicator is lit.
Additional Factors AffectingSystem Operation
Safety belts help keep thepassenger in position on theseat during vehicle maneuversand braking, which helps thepassenger sensing system maintainthe passenger airbag status.See “Safety Belts” and “ChildRestraints” in the Index foradditional information about theimportance of proper restraint use.
A thick layer of additional material,such as a blanket or cushion,or aftermarket equipment suchas seat covers, seat heaters,and seat massagers can affecthow well the passenger sensingsystem operates. We recommendthat you not use seat covers orother aftermarket equipmentexcept when approved by GMfor your specific vehicle.

Black plate (37,1)Chevrolet Volt Owner Manual - 2011
Seats and Restraints 3-37
See Adding Equipment to theAirbag-Equipped Vehicle onpage 3‑38 for more informationabout modifications that can affecthow the system operates.
A wet seat can affect theperformance of the passengersensing system. Here is how:. The passenger sensing system
may turn off the passengerfrontal airbag and passengerknee airbag when liquid issoaked into the seat. If thishappens, the off indicator willbe lit, and the airbag readinesslight on the instrument panelwill also be lit.
. Liquid pooled on the seat thathas not soaked in may make itmore likely that the passengersensing system will enable(turn on) the passenger frontalairbag and passenger kneeairbag while a child restraint orchild occupant is on the seat.If the passenger frontal airbagand passenger knee airbag areturned on, the on indicator willbe lit.
If the passenger seat gets wet, drythe seat immediately. If the airbagreadiness light is lit, do not installa child restraint or allow anyoneto occupy the seat. See AirbagReadiness Light on page 5‑19for important safety information.
The on indicator may be lit ifan object, such as a briefcase,handbag, grocery bag, laptop orother electronic device, is put onan unoccupied seat. If this is notdesired remove the object fromthe seat.
{ WARNING
Stowing of articles under thepassenger seat or between thepassenger seat cushion andseatback may interfere with theproper operation of the passengersensing system.

Black plate (38,1)Chevrolet Volt Owner Manual - 2011
3-38 Seats and Restraints
Servicing theAirbag-Equipped VehicleAirbags affect how the vehicleshould be serviced. There areparts of the airbag system inseveral places around the vehicle.Your dealer and the service manualhave information about servicingthe vehicle and the airbag system.To purchase a service manual,see Service Publications OrderingInformation on page 13‑12.
{ WARNING
For up to 10 seconds after thevehicle is turned off and the12‐volt battery is disconnected,an airbag can still inflate duringimproper service. You can beinjured if you are close to anairbag when it inflates. Avoidyellow connectors. They areprobably part of the airbagsystem. Be sure to follow properservice procedures, and makesure the person performing workfor you is qualified to do so.
Adding Equipment to theAirbag-Equipped VehicleQ: Is there anything I might add
to or change about the vehiclethat could keep the airbagsfrom working properly?
A: Yes. If you add things thatchange the vehicle's frame,bumper system, height, front endor side sheet metal, they maykeep the airbag system fromworking properly. Changing ormoving any parts of the frontseats, safety belts, the airbagsensing and diagnostic module,steering wheel, instrumentpanel, roof-rail airbag modules,ceiling headliner or pillar garnishtrim, overhead console, frontsensors, side impact sensors,rollover sensor module, or airbagwiring can affect the operation ofthe airbag system.

Black plate (39,1)Chevrolet Volt Owner Manual - 2011
Seats and Restraints 3-39
In addition, the vehicle has apassenger sensing systemfor the right front passengerposition, which includes sensorsthat are part of the passengerseat. The passenger sensingsystem may not operate properlyif the original seat trim isreplaced with non-GM covers,upholstery or trim, or withGM covers, upholstery ortrim designed for a differentvehicle. Any object, such asan aftermarket seat heateror a comfort enhancing pador device, installed under or ontop of the seat fabric, could alsointerfere with the operation ofthe passenger sensing system.This could either prevent properdeployment of the passenger
airbag(s) or prevent thepassenger sensing systemfrom properly turning offthe passenger airbag(s).See Passenger SensingSystem on page 3‑33.
If you have questions,call Customer Assistance.The phone numbers andaddresses for CustomerAssistance are in Step Twoof the Customer SatisfactionProcedure in this manual.See Customer SatisfactionProcedure on page 13‑1.
If the vehicle has rolloverroof‐rail airbags, see DifferentSize Tires and Wheels onpage 10‑65 for additionalimportant information.
Q: Because I have a disability,I have to get my vehiclemodified. How can I find outwhether this will affect myairbag system?
A: If you have questions,call Customer Assistance.The phone numbers andaddresses for CustomerAssistance are in Step Twoof the Customer SatisfactionProcedure in this manual.See Customer SatisfactionProcedure on page 13‑1.
In addition, the dealer and theservice manual have informationabout the location of the airbagsensors, sensing and diagnosticmodule, and airbag wiring.

Black plate (40,1)Chevrolet Volt Owner Manual - 2011
3-40 Seats and Restraints
Airbag System CheckThe airbag system does not needregularly scheduled maintenanceor replacement. Make sure theairbag readiness light is working.See Airbag Readiness Light onpage 5‑19 for more information.
Notice: If an airbag covering isdamaged, opened, or broken,the airbag may not work properly.Do not open or break the airbagcoverings. If there are anyopened or broken airbag covers,have the airbag covering and/orairbag module replaced. For thelocation of the airbag modules,see What Makes an AirbagInflate? on page 3‑30. See yourdealer for service.
Replacing Airbag SystemParts after a Crash
{ WARNING
A crash can damage theairbag systems in the vehicle.A damaged airbag systemmay not work properly andmay not protect you and yourpassenger(s) in a crash, resultingin serious injury or even death.To help make sure the airbagsystems are working properlyafter a crash, have theminspected and any necessaryreplacements made as soonas possible.
If an airbag inflates, you will needto replace airbag system parts.See your dealer for service.
If the airbag readiness light stays onafter the vehicle is started or comeson when you are driving, the airbagsystem may not work properly.Have the vehicle serviced rightaway. See Airbag Readiness Lighton page 5‑19 for more information.

Black plate (41,1)Chevrolet Volt Owner Manual - 2011
Seats and Restraints 3-41
Child Restraints
Older Children
Older children who have outgrownbooster seats should wear thevehicle safety belts.
The manufacturer's instructions thatcome with the booster seat state theweight and height limitations for thatbooster. Use a booster seat with alap-shoulder belt until the childpasses the fit test below:. Sit all the way back on the seat.
Do the knees bend at the seatedge? If yes, continue. If no,return to the booster seat.
. Buckle the lap-shoulder belt.Does the shoulder belt rest onthe shoulder? If yes, continue.If no, try using the rear safetybelt comfort guide. See “RearSafety Belt Comfort Guides”under Lap-Shoulder Belt onpage 3‑19 for more information.If the shoulder belt still does notrest on the shoulder, then returnto the booster seat.
. Does the lap belt fit low andsnug on the hips, touching thethighs? If yes, continue. If no,return to the booster seat.
. Can proper safety belt fit bemaintained for the length of thetrip? If yes, continue. If no,return to the booster seat.
Q: What is the proper way towear safety belts?
A: An older child should wear alap-shoulder belt and get theadditional restraint a shoulderbelt can provide. The shoulderbelt should not cross the faceor neck. The lap belt shouldfit snugly below the hips, justtouching the top of the thighs.This applies belt force to thechild's pelvic bones in a crash.It should never be worn over theabdomen, which could causesevere or even fatal internalinjuries in a crash.
Also see “Rear Safety Belt ComfortGuides” under Lap-Shoulder Belt onpage 3‑19.

Black plate (42,1)Chevrolet Volt Owner Manual - 2011
3-42 Seats and Restraints
According to accident statistics,children and infants are saferwhen properly restrained in a childrestraint system or infant restraintsystem secured in a rear seatingposition.
In a crash, children who are notbuckled up can strike other peoplewho are buckled up, or can bethrown out of the vehicle. Olderchildren need to use safety beltsproperly.
{ WARNING
Never do this.
Never allow two children to wearthe same safety belt. The safetybelt cannot properly spread theimpact forces. In a crash, the twochildren can be crushed togetherand seriously injured. A safetybelt must be used by only oneperson at a time.
{ WARNING
Never do this.
Never allow a child to wear thesafety belt with the shoulder beltbehind their back. A child can beseriously injured by not wearingthe lap-shoulder belt properly.In a crash, the child would not berestrained by the shoulder belt.The child could move too farforward increasing the chance of
(Continued)
WARNING (Continued)
head and neck injury. The childmight also slide under the lapbelt. The belt force would thenbe applied right on the abdomen.That could cause serious or fatalinjuries. The shoulder belt shouldgo over the shoulder and acrossthe chest.

Black plate (43,1)Chevrolet Volt Owner Manual - 2011
Seats and Restraints 3-43
Infants and YoungChildrenEveryone in a vehicle needsprotection! This includes infantsand all other children. Neither thedistance traveled nor the age andsize of the traveler changes theneed, for everyone, to use safetyrestraints. In fact, the law in everystate in the United States and inevery Canadian province sayschildren up to some age must berestrained while in a vehicle.
{ WARNING
Children can be seriously injuredor strangled if a shoulder beltis wrapped around their neckand the safety belt continues totighten. Never leave childrenunattended in a vehicle andnever allow children to playwith the safety belts.
Airbags plus lap‐shoulder beltsoffer protection for adults and olderchildren, but not for young childrenand infants. Neither the vehicle'ssafety belt system nor its airbagsystem is designed for them. Everytime infants and young children ridein vehicles, they should have theprotection provided by appropriatechild restraints.
Children who are not restrainedproperly can strike other people,or can be thrown out of the vehicle.
{ WARNING
Never do this.
Never hold an infant or a childwhile riding in a vehicle. Due tocrash forces, an infant or a childwill become so heavy it is notpossible to hold it during a crash.For example, in a crash at only
(Continued)
WARNING (Continued)
40 km/h (25 mph), a 5.5 kg (12 lb)infant will suddenly become a110 kg (240 lb) force on a person'sarms. An infant should besecured in an appropriaterestraint.

Black plate (44,1)Chevrolet Volt Owner Manual - 2011
3-44 Seats and Restraints
{ WARNING
Never do this.
Children who are up against,or very close to, any airbag whenit inflates can be seriously injuredor killed. Never put a rear-facingchild restraint in the right frontseat. Secure a rear-facing childrestraint in a rear seat. It is alsobetter to secure a forward-facingchild restraint in a rear seat. If youmust secure a forward-facingchild restraint in the right frontseat, always move the frontpassenger seat as far backas it will go.
Q: What are the different types ofadd-on child restraints?
A: Add-on child restraints, whichare purchased by the vehicleowner, are available in fourbasic types. Selection of aparticular restraint should takeinto consideration not only thechild's weight, height, and agebut also whether or not therestraint will be compatible withthe motor vehicle in which it willbe used.
For most basic types of childrestraints, there are manydifferent models available.When purchasing a childrestraint, be sure it is designedto be used in a motor vehicle.If it is, the restraint will have alabel saying that it meets federalmotor vehicle safety standards.
The restraint manufacturer'sinstructions that come with therestraint state the weight andheight limitations for a particularchild restraint. In addition, thereare many kinds of restraintsavailable for children withspecial needs.

Black plate (45,1)Chevrolet Volt Owner Manual - 2011
Seats and Restraints 3-45
{ WARNING
To reduce the risk of neck andhead injury during a crash, infantsneed complete support. This isbecause an infant's neck is notfully developed and its headweighs so much compared withthe rest of its body. In a crash,an infant in a rear-facing childrestraint settles into the restraint,so the crash forces can bedistributed across the strongestpart of an infant's body, the backand shoulders. Infants shouldalways be secured in rear-facingchild restraints.
{ WARNING
A young child's hip bones are stillso small that the vehicle's regularsafety belt may not remain lowon the hip bones, as it should.Instead, it may settle up aroundthe child's abdomen. In a crash,the belt would apply force on abody area that is unprotected byany bony structure. This alonecould cause serious or fatalinjuries. To reduce the risk ofserious or fatal injuries duringa crash, young children shouldalways be secured in appropriatechild restraints.
Child Restraint Systems
(A) Rear‐Facing Infant Seat
A rear-facing infant seat (A)provides restraint with the seatingsurface against the back of theinfant.
The harness system holds the infantin place and, in a crash, acts tokeep the infant positioned in therestraint.

Black plate (46,1)Chevrolet Volt Owner Manual - 2011
3-46 Seats and Restraints
(B) Forward-Facing Child Seat
A forward-facing child seat (B)provides restraint for the child'sbody with the harness.
(C) Booster Seats
A booster seat (C) is a childrestraint designed to improve the fitof the vehicle's safety belt system.A booster seat can also help a childto see out the window.
Securing an Add-On ChildRestraint in the Vehicle
{ WARNING
A child can be seriously injuredor killed in a crash if the childrestraint is not properly securedin the vehicle. Secure the childrestraint properly in the vehicleusing the vehicle safety belt orLATCH system, following theinstructions that came with thatchild restraint and the instructionsin this manual.
To help reduce the chance ofinjury, the child restraint mustbe secured in the vehicle. Childrestraint systems must be securedin vehicle seats by lap belts or thelap belt portion of a lap-shoulderbelt, or by the LATCH system.

Black plate (47,1)Chevrolet Volt Owner Manual - 2011
Seats and Restraints 3-47
See Lower Anchors and Tethersfor Children (LATCH System) onpage 3‑49 for more information.Children can be endangered in acrash if the child restraint is notproperly secured in the vehicle.
When securing an add-on childrestraint, refer to the instructionsthat come with the restraint whichmay be on the restraint itself or in abooklet, or both, and to this manual.The child restraint instructionsare important, so if they are notavailable, obtain a replacementcopy from the manufacturer.
Keep in mind that an unsecuredchild restraint can move around in acollision or sudden stop and injurepeople in the vehicle. Be sure toproperly secure any child restraint inthe vehicle — even when no child isin it.
In some areas, Certified ChildPassenger Safety Technicians(CPSTs) are available to inspectand demonstrate how to correctlyuse and install child restraints.In the U.S., refer to the NationalHighway Traffic SafetyAdministration (NHTSA) websiteto locate the nearest child safetyseat inspection station. For CPSTavailability in Canada, check withTransport Canada or the ProvincialMinistry of Transportation office.
Securing the Child within theChild Restraint
{ WARNING
A child can be seriously injuredor killed in a crash if the childis not properly secured in thechild restraint. Secure the childproperly following the instructionsthat came with that child restraint.
Where to Put theRestraintAccording to accident statistics,children and infants are saferwhen properly restrained in a childrestraint system or infant restraintsystem secured in a rear seatingposition.
We recommend that children andchild restraints be secured in a rearseat, including: an infant or a childriding in a rear-facing child restraint;a child riding in a forward-facingchild seat; an older child riding in abooster seat; and children, who arelarge enough, using safety belts.
A label on the sun visor says,“Never put a rear-facing childrestraint in the front.” This isbecause the risk to the rear-facingchild is so great, if the airbagdeploys.

Black plate (48,1)Chevrolet Volt Owner Manual - 2011
3-48 Seats and Restraints
{ WARNING
A child in a rear-facing childrestraint can be seriouslyinjured or killed if the rightfront passenger airbag inflates.This is because the back of therear-facing child restraint wouldbe very close to the inflatingairbag. A child in a forward-facingchild restraint can be seriouslyinjured or killed if the right frontpassenger airbag inflates and thepassenger seat is in a forwardposition.
Even if the passenger sensingsystem has turned off the rightfront passenger airbag(s), nosystem is fail-safe. No one canguarantee that an airbag will notdeploy under some unusualcircumstance, even thoughthe airbag(s) are turned off.
(Continued)
WARNING (Continued)
Secure rear-facing child restraintsin a rear seat, even if theairbag(s) are off. If you secure aforward-facing child restraint inthe right front seat, always movethe front passenger seat as farback as it will go. It is better tosecure the child restraint in arear seat.
See Passenger Sensing Systemon page 3‑33 for additionalinformation.
When securing a child restraint ina rear seating position, study theinstructions that came with thechild restraint to make sure it iscompatible with this vehicle.
Child restraints and booster seatsvary considerably in size, and somemay fit in certain seating positionsbetter than others. Always makesure the child restraint is properlysecured.
Depending on where you placethe child restraint and the sizeof the child restraint, you maynot be able to access adjacentsafety belt assemblies or LATCHanchors for additional passengersor child restraints. Adjacent seatingpositions should not be used if thechild restraint prevents access toor interferes with the routing of thesafety belt.
Wherever a child restraint isinstalled, be sure to secure thechild restraint properly.
Keep in mind that an unsecuredchild restraint can move around in acollision or sudden stop and injurepeople in the vehicle. Be sure toproperly secure any child restraint inthe vehicle — even when no child isin it.

Black plate (49,1)Chevrolet Volt Owner Manual - 2011
Seats and Restraints 3-49
Lower Anchors andTethers for Children(LATCH System)The LATCH system holds a childrestraint during driving or in a crash.This system is designed to makeinstallation of a child restraint easier.The LATCH system uses anchors inthe vehicle and attachments on thechild restraint that are made for usewith the LATCH system.
Make sure that a LATCH-compatiblechild restraint is properly installedusing the anchors, or use thevehicle's safety belts to secure therestraint, following the instructionsthat came with that restraint, andalso the instructions in this manual.When installing a child restraint with
a top tether, you must also useeither the lower anchors or thesafety belts to properly secure thechild restraint. A child restraint mustnever be attached using only thetop tether and anchor.
In order to use the LATCH systemin your vehicle, you need achild restraint that has LATCHattachments. The child restraintmanufacturer will provide you withinstructions on how to use thechild restraint and its attachments.The following explains how toattach a child restraint with theseattachments in the vehicle.
Not all vehicle seating positions orchild restraints have lower anchorsand attachments or top tetheranchors and attachments.
Lower Anchors
Lower anchors (A) are metalbars built into the vehicle.There are two lower anchors foreach LATCH seating position thatwill accommodate a child restraintwith lower attachments (B).
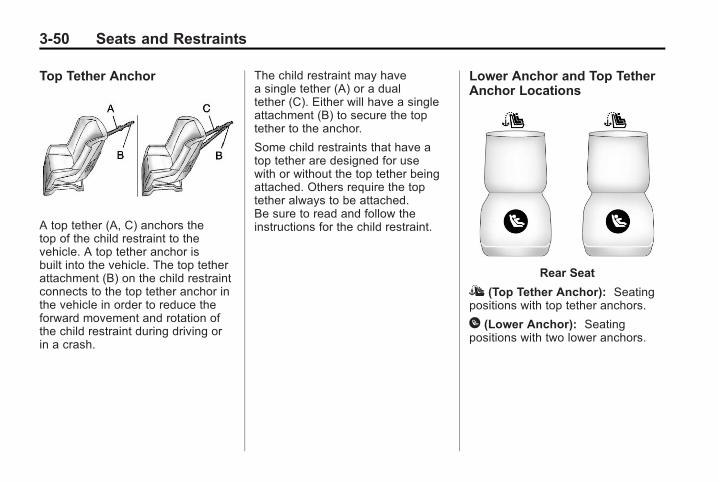
Black plate (50,1)Chevrolet Volt Owner Manual - 2011
3-50 Seats and Restraints
Top Tether Anchor
A top tether (A, C) anchors thetop of the child restraint to thevehicle. A top tether anchor isbuilt into the vehicle. The top tetherattachment (B) on the child restraintconnects to the top tether anchor inthe vehicle in order to reduce theforward movement and rotation ofthe child restraint during driving orin a crash.
The child restraint may havea single tether (A) or a dualtether (C). Either will have a singleattachment (B) to secure the toptether to the anchor.
Some child restraints that have atop tether are designed for usewith or without the top tether beingattached. Others require the toptether always to be attached.Be sure to read and follow theinstructions for the child restraint.
Lower Anchor and Top TetherAnchor Locations
Rear Seat
I (Top Tether Anchor): Seatingpositions with top tether anchors.
H (Lower Anchor): Seatingpositions with two lower anchors.

Black plate (51,1)Chevrolet Volt Owner Manual - 2011
Seats and Restraints 3-51
To assist you in locating the loweranchors, each seating position withlower anchors has two labels, nearthe crease between the seatbackand the seat cushion.
To assist you in locating the toptether anchors, the top tether anchorsymbol is located near the top tetheranchor.
Top Tether Anchors
The top tether anchors for outboardrear seating positions are locatedon the back of the rear seatback.Be sure to use an anchor locatedon the same side of the vehicle asthe seating position where the childrestraint will be placed.
Do not secure a child restraint in aposition without a top tether anchorif a national or local law requiresthat the top tether be attached, or ifthe instructions that come with thechild restraint say that the top tethermust be attached.
According to accident statistics,children and infants are safer whenproperly restrained in a childrestraint system or infant restraintsystem secured in a rear seatingposition. See Where to Put theRestraint on page 3‑47 foradditional information.
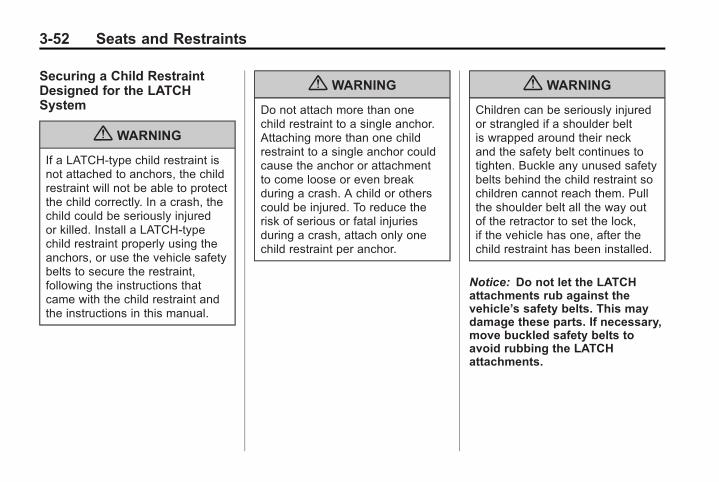
Black plate (52,1)Chevrolet Volt Owner Manual - 2011
3-52 Seats and Restraints
Securing a Child RestraintDesigned for the LATCHSystem
{ WARNING
If a LATCH-type child restraint isnot attached to anchors, the childrestraint will not be able to protectthe child correctly. In a crash, thechild could be seriously injuredor killed. Install a LATCH-typechild restraint properly using theanchors, or use the vehicle safetybelts to secure the restraint,following the instructions thatcame with the child restraint andthe instructions in this manual.
{ WARNING
Do not attach more than onechild restraint to a single anchor.Attaching more than one childrestraint to a single anchor couldcause the anchor or attachmentto come loose or even breakduring a crash. A child or otherscould be injured. To reduce therisk of serious or fatal injuriesduring a crash, attach only onechild restraint per anchor.
{ WARNING
Children can be seriously injuredor strangled if a shoulder beltis wrapped around their neckand the safety belt continues totighten. Buckle any unused safetybelts behind the child restraint sochildren cannot reach them. Pullthe shoulder belt all the way outof the retractor to set the lock,if the vehicle has one, after thechild restraint has been installed.
Notice: Do not let the LATCHattachments rub against thevehicle’s safety belts. This maydamage these parts. If necessary,move buckled safety belts toavoid rubbing the LATCHattachments.

Black plate (53,1)Chevrolet Volt Owner Manual - 2011
Seats and Restraints 3-53
Do not fold the empty rearseat with a safety belt buckled.This could damage the safetybelt or the seat. Unbuckle andreturn the safety belt to itsstowed position, before foldingthe seat.
Make sure to attach the childrestraint at the proper anchorlocation.
This system is designed to makeinstallation of child restraints easier.When using lower anchors, donot use the vehicle's safety belts.Instead use the vehicle's anchorsand child restraint attachmentsto secure the restraints. Somerestraints also use another vehicleanchor to secure a top tether.
1. Attach and tighten the lowerattachments to the loweranchors. If the child restraintdoes not have lower
attachments or the desiredseating position does not havelower anchors, secure the childrestraint with the top tether andthe safety belts. Refer to yourchild restraint manufacturerinstructions and the instructionsin this manual.
1.1. Find the lower anchorsfor the desired seatingposition.
1.2. Put the child restraint onthe seat.
If the head restraintinterferes with the properinstallation of the childrestraint, the head restraintmay be removed. See“Head Restraint Removaland Reinstallation” at theend of this section.
1.3. Attach and tighten the lowerattachments on the childrestraint to the loweranchors.
2. If the child restraint manufacturerrecommends that the top tetherbe attached, attach and tightenthe top tether to the top tetheranchor, if equipped. Refer to thechild restraint instructions andthe following steps:
2.1. Find the top tether anchoron the back of the rearseatback.
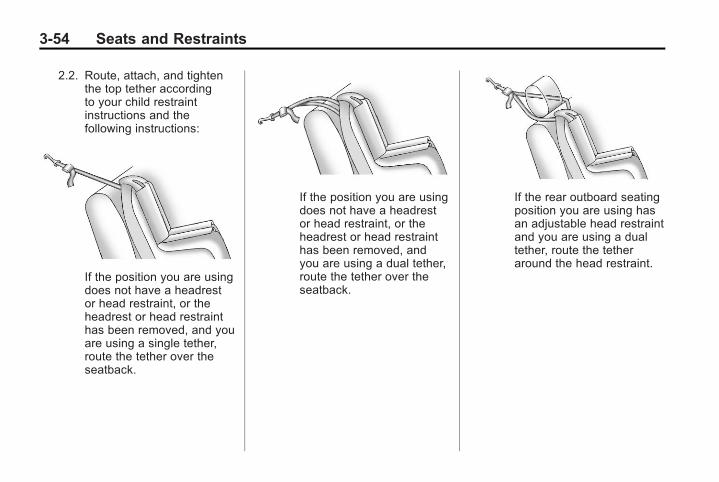
Black plate (54,1)Chevrolet Volt Owner Manual - 2011
3-54 Seats and Restraints
2.2. Route, attach, and tightenthe top tether accordingto your child restraintinstructions and thefollowing instructions:
If the position you are usingdoes not have a headrestor head restraint, or theheadrest or head restrainthas been removed, and youare using a single tether,route the tether over theseatback.
If the position you are usingdoes not have a headrestor head restraint, or theheadrest or head restrainthas been removed, andyou are using a dual tether,route the tether over theseatback.
If the rear outboard seatingposition you are using hasan adjustable head restraintand you are using a dualtether, route the tetheraround the head restraint.

Black plate (55,1)Chevrolet Volt Owner Manual - 2011
Seats and Restraints 3-55
If the rear outboard seatingposition you are usinghas an adjustable headrestraint and you are usinga single tether, raise thehead restraint and routethe tether under the headrestraint and in betweenthe head restraint posts.
3. Before placing a child in thechild restraint, make sureit is securely held in place.To check, grasp the childrestraint at the LATCH pathand attempt to move it sideto side and back and forth.There should be no morethan 2.5 cm (1 in) of movementfor proper installation.
Head Restraint Removal andReinstallation
The rear outboard head restraintscan be removed if they interfere withthe proper installation of the childrestraint.
To remove the head restraint:
1. Partially fold the seatbackforward. See Rear Seats onpage 3‑8 for additionalinformation.
2. Press both buttons on thehead restraint posts at the sametime, and pull up on the headrestraint.
3. Store the head restraint in thecargo area of the vehicle.

Black plate (56,1)Chevrolet Volt Owner Manual - 2011
3-56 Seats and Restraints
4. When the child restraint isremoved, reinstall the headrestraint before the seatingposition is used.
{ WARNING
With head restraints that arenot installed and adjustedproperly, there is a greaterchance that occupants will suffera neck/spinal injury in a crash.Do not drive until the headrestraints for all occupants areinstalled and adjusted properly.
To reinstall the head restraint:
1. Insert the head restraint postsinto the holes in the top of theseatback. The notches (A) onthe posts must face the driverside of the vehicle.
2. Push the head restraint down.
If necessary, press the heightadjustment release button tofurther lower the head restraint.See Head Restraints onpage 3‑2.
3. Try to move the head restraintto make sure that it is locked inplace.

Black plate (57,1)Chevrolet Volt Owner Manual - 2011
Seats and Restraints 3-57
Replacing LATCH SystemParts After a Crash
{ WARNING
A crash can damage theLATCH system in the vehicle.A damaged LATCH system maynot properly secure the childrestraint, resulting in seriousinjury or even death in a crash.To help make sure the LATCHsystem is working properly aftera crash, see your dealer to havethe system inspected and anynecessary replacements madeas soon as possible.
If the vehicle has the LATCH systemand it was being used during acrash, new LATCH system partsmay be needed.
New parts and repairs may benecessary even if the LATCHsystem was not being used atthe time of the crash.
Securing Child Restraints(Rear Seat)When securing a child restraint ina rear seating position, study theinstructions that came with thechild restraint to make sure it iscompatible with this vehicle.
If the child restraint has the LATCHsystem, see Lower Anchors andTethers for Children (LATCHSystem) on page 3‑49 for how andwhere to install the child restraintusing LATCH. If a child restraintis secured in the vehicle using asafety belt and it uses a top tether,see Lower Anchors and Tethersfor Children (LATCH System) onpage 3‑49 for top tether anchorlocations.
Do not secure a child seat in aposition without a top tether anchorif a national or local law requiresthat the top tether be anchored, or ifthe instructions that come with thechild restraint say that the top strapmust be anchored.
If the child restraint does not havethe LATCH system, you will beusing the safety belt to securethe child restraint in this position.Be sure to follow the instructionsthat came with the child restraint.Secure the child in the child restraintwhen and as the instructions say.
If more than one child restraintneeds to be installed in the rearseat, be sure to read Where toPut the Restraint on page 3‑47.
1. Put the child restraint onthe seat.
If the head restraint interfereswith the proper installationof the child restraint, the headrestraint may be removed.See “Head Restraint Removaland Reinstallation” underLower Anchors and Tethers forChildren (LATCH System) onpage 3‑49.

Black plate (58,1)Chevrolet Volt Owner Manual - 2011
3-58 Seats and Restraints
2. Remove the safety belt from theguide on the seatback by slidingthe webbing through the openingon the guide. Do not secure thechild restraint with the safety beltrouted through the guide.
3. Pick up the latch plate, and runthe lap and shoulder portions ofthe vehicle's safety belt throughor around the restraint. The childrestraint instructions will showyou how.
4. Push the latch plate into thebuckle until it clicks.
Position the release button onthe buckle so that the safety beltcould be quickly unbuckled ifnecessary.
5. Pull the shoulder belt all the wayout of the retractor to set thelock. When the retractor lock isset, the belt can be tightened butnot pulled out of the retractor.

Black plate (59,1)Chevrolet Volt Owner Manual - 2011
Seats and Restraints 3-59
6. To tighten the belt, push downon the child restraint, pull theshoulder portion of the belt totighten the lap portion of the belt,and feed the shoulder belt backinto the retractor. When installinga forward-facing child restraint,it may be helpful to use yourknee to push down on the childrestraint as you tighten the belt.
Try to pull the belt out of theretractor to make sure theretractor is locked. If theretractor is not locked,repeat Steps 5 and 6.
7. If the child restraint has a toptether, follow the child restraintmanufacturer's instructionsregarding the use of the toptether. See Lower Anchors andTethers for Children (LATCHSystem) on page 3‑49 for moreinformation.
8. Before placing a child in thechild restraint, make sure it issecurely held in place. To check,grasp the child restraint at thesafety belt path and attempt tomove it side to side and backand forth. When the childrestraint is properly installed,there should be no more than2.5 cm (1 in) of movement.
To remove the child restraint,unbuckle the vehicle safety beltand let it return to the stowedposition. If the top tether isattached to a top tether anchor,disconnect it. If the head restraintwas removed, reinstall it beforethe seating position is used.See “Head Restraint Removal andReinstallation” under Lower Anchorsand Tethers for Children (LATCHSystem) on page 3‑49 for additionalinformation on installing the headrestraint properly.
If the seat has a safety belt guide,return the safety belt into the guideon the seatback by sliding thewebbing through the openingon the guide.

Black plate (60,1)Chevrolet Volt Owner Manual - 2011
3-60 Seats and Restraints
Securing Child Restraints(Front Passenger Seat)This vehicle has airbags. A rearseat is a safer place to securea forward-facing child restraint.See Where to Put the Restraint onpage 3‑47.
In addition, the vehicle has apassenger sensing system whichis designed to turn off the rightfront passenger frontal airbagand passenger knee airbag undercertain conditions. See PassengerSensing System on page 3‑33 andPassenger Airbag Status Indicatoron page 5‑20 for more information,including important safetyinformation.
A label on the sun visor says,“Never put a rear-facing child seatin the front.” This is because the riskto the rear-facing child is so great,if the airbag deploys.
{ WARNING
A child in a rear-facing childrestraint can be seriouslyinjured or killed if the rightfront passenger airbag inflates.This is because the back of therear-facing child restraint wouldbe very close to the inflatingairbag. A child in a forward-facingchild restraint can be seriouslyinjured or killed if the right frontpassenger airbag inflates and thepassenger seat is in a forwardposition.
(Continued)
WARNING (Continued)
Even if the passenger sensingsystem has turned off the rightfront passenger airbag(s), nosystem is fail-safe. No one canguarantee that an airbag willnot deploy under some unusualcircumstance, even though theairbag(s) are turned off.
Secure rear-facing childrestraints in a rear seat, even ifthe airbag(s) are off. If you securea forward-facing child restraint inthe right front seat, always movethe front passenger seat as farback as it will go. It is better tosecure the child restraint in arear seat.
See Passenger Sensing Systemon page 3‑33 for additionalinformation.

Black plate (61,1)Chevrolet Volt Owner Manual - 2011
Seats and Restraints 3-61
If the child restraint has the LATCHsystem, see Lower Anchors andTethers for Children (LATCHSystem) on page 3‑49 for how andwhere to install the child restraintusing LATCH. If a child restraint issecured using a safety belt andit uses a top tether, see LowerAnchors and Tethers for Children(LATCH System) on page 3‑49for top tether anchor locations.
Do not secure a child seat in aposition without a top tether anchorif a national or local law requiresthat the top tether be anchored, or ifthe instructions that come with thechild restraint say that the top strapmust be anchored.
In Canada, the law requires thatforward-facing child restraints havea top tether, and that the tether beattached.
You will be using the lap-shoulderbelt to secure the child restraint inthis position. Follow the instructionsthat came with the child restraint.
1. Move the seat as far back asit will go before securing theforward-facing child restraint.
When the passenger sensingsystem has turned off the rightfront passenger frontal airbagand passenger knee airbag, theoff indicator on the passengerairbag status indicator shouldlight and stay lit when you startthe vehicle. See PassengerAirbag Status Indicator onpage 5‑20.
2. Put the child restraint onthe seat.
3. Pick up the latch plate, and runthe lap and shoulder portions ofthe vehicle's safety belt throughor around the restraint. The childrestraint instructions will showyou how.
4. Push the latch plate into thebuckle until it clicks.
Position the release button onthe buckle so that the safety beltcould be quickly unbuckled ifnecessary.

Black plate (62,1)Chevrolet Volt Owner Manual - 2011
3-62 Seats and Restraints
5. Pull the shoulder belt all the wayout of the retractor to set thelock. When the retractor lock isset, the belt can be tightened butnot pulled out of the retractor.
6. To tighten the belt, push downon the child restraint, pull theshoulder portion of the belt totighten the lap portion of the belt,and feed the shoulder belt backinto the retractor. When installinga forward-facing child restraint,it may be helpful to use yourknee to push down on the childrestraint as you tighten the belt.
Try to pull the belt out of theretractor to make sure theretractor is locked. If theretractor is not locked,repeat Steps 5 and 6.
7. Before placing a child in thechild restraint, make sure it issecurely held in place. To check,grasp the child restraint at thesafety belt path and attempt tomove it side to side and backand forth. When the childrestraint is properly installed,there should be no more than2.5 cm (1 in) of movement.
If the airbags are off, the offindicator in the passenger airbagstatus indicator will come on andstay on when the vehicle is started.
If a child restraint has been installedand the on indicator is lit, see“If the On Indicator is Lit for a ChildRestraint” under Passenger SensingSystem on page 3‑33 for moreinformation.
To remove the child restraint,unbuckle the vehicle safety belt andlet it return to the stowed position.

Black plate (1,1)Chevrolet Volt Owner Manual - 2011
Storage 4-1
Storage
Storage CompartmentsInstrument Panel Storage . . . . 4-1Glove Box . . . . . . . . . . . . . . . . . . . . 4-1Floor Console Storage . . . . . . . . 4-1Umbrella Storage . . . . . . . . . . . . . 4-2
Additional Storage FeaturesCargo Cover . . . . . . . . . . . . . . . . . . 4-2
StorageCompartments
Instrument Panel Storage
There is a storage compartmenton top of the instrument panel thatincludes an auxiliary power outlet.
Inside is a transmitter slot for theRemote Keyless Entry (RKE)transmitter. See Remote KeylessEntry (RKE) System Operation onpage 2‑3.
Glove BoxOpen the glove box by lifting up onthe lever.
Floor Console Storage
Inside the front of the floor consoleis an auxiliary power outlet (C)and a jack for auxiliary inputdevices (B). Cords can be routedin the pass‐thru (A). See AuxiliaryDevices on page 7‑38.
The console has cupholders and astorage area.

Black plate (2,1)Chevrolet Volt Owner Manual - 2011
4-2 Storage
The rear console has open storagewith an auxiliary power outlet andcupholders.
Umbrella Storage
Slide an umbrella into the openingon either the driver or passengerdoors.
Additional StorageFeatures
Cargo Cover
There is a cover for the rear cargoarea. Use the four cargo coverloops to hook the cover to theside panels.

Black plate (1,1)Chevrolet Volt Owner Manual - 2011
Instruments and Controls 5-1
Instruments andControls
Instrument Panel OverviewInstrument Panel Overview . . . . 5-4
ControlsSteering Wheel Adjustment . . . 5-6Steering Wheel Controls . . . . . . 5-6Horn . . . . . . . . . . . . . . . . . . . . . . . . . . 5-7Windshield Wiper/Washer . . . . . 5-7Power Outlets . . . . . . . . . . . . . . . . . 5-8
Warning Lights, Gauges, andIndicatorsWarning Lights, Gauges, andIndicators . . . . . . . . . . . . . . . . . . . . 5-9
Instrument Cluster . . . . . . . . . . . . 5-9Speedometer . . . . . . . . . . . . . . . . 5-15Odometer . . . . . . . . . . . . . . . . . . . . 5-15Trip Odometer . . . . . . . . . . . . . . . 5-15Compass . . . . . . . . . . . . . . . . . . . . 5-16
Battery Gauge (HighVoltage) . . . . . . . . . . . . . . . . . . . . 5-16
Fuel Gauge . . . . . . . . . . . . . . . . . . 5-16Driver Efficiency Gauge . . . . . . 5-17Total Vehicle Range . . . . . . . . . 5-17Safety Belt Reminders . . . . . . . 5-18Airbag Readiness Light . . . . . . 5-19Passenger Airbag StatusIndicator . . . . . . . . . . . . . . . . . . . . 5-20
Charging System Light(12-Volt Battery) . . . . . . . . . . . . 5-21
MalfunctionIndicator Lamp . . . . . . . . . . . . . 5-21
Brake System WarningLight . . . . . . . . . . . . . . . . . . . . . . . 5-24
Electric Parking BrakeLight . . . . . . . . . . . . . . . . . . . . . . . 5-25
Service Electric Parking BrakeLight . . . . . . . . . . . . . . . . . . . . . . . 5-25
Antilock Brake System (ABS)Warning Light . . . . . . . . . . . . . . 5-26
Sport Mode Light . . . . . . . . . . . . 5-26Mountain Mode Light . . . . . . . . 5-26
Traction Control System(TCS)/StabiliTrak® Light . . . . 5-27
Engine Coolant TemperatureWarning Light . . . . . . . . . . . . . . 5-27
Tire Pressure Light . . . . . . . . . . 5-27Engine Oil Pressure Light . . . . 5-28Low Fuel Warning Light . . . . . . 5-28Security Light . . . . . . . . . . . . . . . . 5-29High-Beam On Light . . . . . . . . . 5-29Lamps On Reminder . . . . . . . . . 5-29Cruise Control Light . . . . . . . . . 5-29Door, Hood, or Hatch OpenLight . . . . . . . . . . . . . . . . . . . . . . . 5-30
Information DisplaysCenter Stack Display . . . . . . . . 5-31Power Flows . . . . . . . . . . . . . . . . . 5-31Charging . . . . . . . . . . . . . . . . . . . . . 5-33Energy Information . . . . . . . . . . 5-41Clock . . . . . . . . . . . . . . . . . . . . . . . . 5-42Driver InformationCenter (DIC) . . . . . . . . . . . . . . . 5-43

Black plate (2,1)Chevrolet Volt Owner Manual - 2011
5-2 Instruments and Controls
Vehicle MessagesVehicle Messages . . . . . . . . . . . 5-45Battery and ChargingMessages . . . . . . . . . . . . . . . . . . 5-45
Brake System Messages . . . . 5-46Cruise Control Messages . . . . 5-46Door Ajar Messages . . . . . . . . . 5-46Drive Mode Messages . . . . . . . 5-47Electric Drive UnitMessages . . . . . . . . . . . . . . . . . . 5-47
Engine Cooling SystemMessages . . . . . . . . . . . . . . . . . . 5-47
Engine Oil Messages . . . . . . . . 5-48Fuel System Messages . . . . . . 5-48Key and Lock Messages . . . . . 5-48Lamp Messages . . . . . . . . . . . . . 5-49Object Detection SystemMessages . . . . . . . . . . . . . . . . . . 5-49
Propulsion PowerMessages . . . . . . . . . . . . . . . . . . 5-50
Ride Control SystemMessages . . . . . . . . . . . . . . . . . . 5-50
Airbag System Messages . . . . 5-51Anti-theft Alarm SystemMessages . . . . . . . . . . . . . . . . . . 5-51
Service Vehicle Messages . . . 5-51Starting the VehicleMessages . . . . . . . . . . . . . . . . . . 5-52
Tire Messages . . . . . . . . . . . . . . . 5-52Vehicle Speed Messages . . . . 5-53Washer Fluid Messages . . . . . 5-53
Vehicle PersonalizationVehicle Personalization . . . . . . 5-53
Universal Remote SystemUniversal Remote System . . . 5-60Universal Remote SystemProgramming . . . . . . . . . . . . . . . 5-60
Universal Remote SystemOperation . . . . . . . . . . . . . . . . . . 5-63

Black plate (3,1)Chevrolet Volt Owner Manual - 2011
Instruments and Controls 5-3
2 NOTES

Black plate (4,1)Chevrolet Volt Owner Manual - 2011
5-4 Instruments and Controls
Instrument Panel Overview

Black plate (5,1)Chevrolet Volt Owner Manual - 2011
Instruments and Controls 5-5
A. Air Vents on page 8‑9.
B. Turn and Lane‐Change Lever.See Turn and Lane-ChangeSignals on page 6‑4.
Exterior Lamp Controls onpage 6‑1.
Pedestrian Friendly Alert onpage 6‑2.
C. Instrument Cluster on page 5‑9.
Driver Information Center (DIC)Display. See Driver InformationCenter (DIC) on page 5‑43.
D. Windshield Wiper/Washer onpage 5‑7.
E. Heated Front Seats on page 3‑6(If Equipped).
F. Center Stack Display onpage 5‑31.
G. Charging Status Indicator.See Charging Status Feedbackon page 9‑52.
H. Light Sensor. See DaytimeRunning Lamps (DRL) onpage 6‑3.
I. Instrument Panel Storage onpage 4‑1.
J. Automatic Climate ControlSystem on page 8‑1.
K. Driver Information Center (DIC)Controls. See Driver InformationCenter (DIC) on page 5‑43.
L. Instrument Panel IlluminationControl on page 6‑5.
M. Data Link Connector (DLC)(Out of View). See MalfunctionIndicator Lamp on page 5‑21.
N. Cruise Control on page 9‑40.
O. Steering Wheel Adjustment onpage 5‑6.
P. Horn on page 5‑7.
Q. Steering Wheel Controls onpage 5‑6 (If Equipped).
R. Leaf Button. See Center StackDisplay on page 5‑31.
S. DRIVE MODE Button.See Driver Selected OperatingModes on page 9‑26.
T. Power Button on page 9‑18.
U. Shift Lever. See Electric DriveUnit on page 9‑32.
V. Infotainment on page 7‑2.
Navigation System. See Usingthe Navigation System onpage 7‑39.
W. Electric Parking Brake onpage 9‑35.
X. Power Door Locks onpage 2‑11.
Y. Hazard Warning Flashers onpage 6‑4.
Z. Glove Box on page 4‑1.

Black plate (6,1)Chevrolet Volt Owner Manual - 2011
5-6 Instruments and Controls
Controls
Steering WheelAdjustment
To adjust the steering wheel:
1. Pull the lever (A) down.
2. Move the steering wheel upor down.
3. Pull or push the steering wheelcloser or away from you.
4. Pull the lever (A) up to lock thesteering wheel in place.
Do not adjust the steering wheelwhile driving.
Steering Wheel Controls
For vehicles with audio steeringwheel controls, some audio controlscan be adjusted at the steeringwheel.
b / g (Push to Talk): For vehicleswith an OnStar, Bluetooth,or navigation system, pressto interact with those systems.See Bluetooth on page 7‑85 andthe OnStar Glove Box Kit for moreinformation.
$ /i (End Call/Mute): Pressto silence the vehicle speakersonly. Press again to turn the soundon. For vehicles with OnStar orBluetooth systems, press to rejectan incoming call, or to end acurrent call.
_ SRC ^ (Rotary Control): Press_ or ^ to select a radio band oraudio source.
Press _ or ^ to select the next orprevious favorite radio station,CD track, DVD track/chapter,or MP3 track.
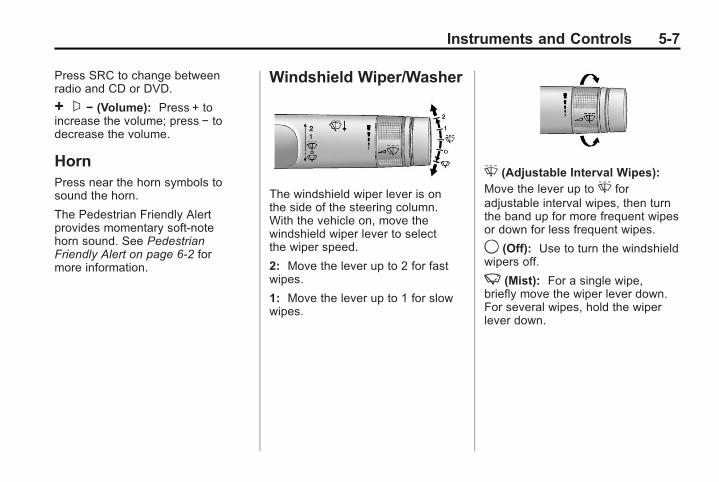
Black plate (7,1)Chevrolet Volt Owner Manual - 2011
Instruments and Controls 5-7
Press SRC to change betweenradio and CD or DVD.
+ x − (Volume): Press + toincrease the volume; press − todecrease the volume.
HornPress near the horn symbols tosound the horn.
The Pedestrian Friendly Alertprovides momentary soft‐notehorn sound. See PedestrianFriendly Alert on page 6‑2 formore information.
Windshield Wiper/Washer
The windshield wiper lever is onthe side of the steering column.With the vehicle on, move thewindshield wiper lever to selectthe wiper speed.
2: Move the lever up to 2 for fastwipes.
1: Move the lever up to 1 for slowwipes.
G (Adjustable Interval Wipes):Move the lever up toG foradjustable interval wipes, then turnthe band up for more frequent wipesor down for less frequent wipes.
9 (Off): Use to turn the windshieldwipers off.
3 (Mist): For a single wipe,briefly move the wiper lever down.For several wipes, hold the wiperlever down.

Black plate (8,1)Chevrolet Volt Owner Manual - 2011
5-8 Instruments and Controls
Clear ice and snow from the wiperblades before using them. If frozento the windshield, carefully loosen orthaw them. Damaged wiper bladesshould be replaced. See WiperBlade Replacement on page 10‑31.
Heavy snow or ice can overload thewipers. If the wiper motor overheats,the windshield wipers will stop untilthe motor cools and the wipercontrol is turned off. See ElectricalSystem Overload on page 10‑37.
Wipe Parking
If the vehicle is turned off, while thewipers are on 1, 2, orG, they willstop immediately.
If the windshield wiper lever is thenmoved to off before the driver dooris opened or within 10 minutes, thewipers will restart and move to thebase of the windshield.
If the vehicle is turned off during awindshield wash, the wipers willstop when they reach the base ofthe windshield.
Windshield Washer
Pull the windshield wiper levertoward you to spray windshieldwasher fluid and activate the wipers.
The washer and wipers will continueuntil the lever is released or themaximum wash time is reached.
When the windshield wiper leveris released, additional wipes mayoccur depending on how longthe windshield washer had beenactivated. See Washer Fluid onpage 10‑24 for information onfilling the windshield washer fluidreservoir.
{ WARNING
In freezing weather, do not usethe washer until the windshield iswarmed. Otherwise the washerfluid can form ice on thewindshield, blocking your vision.
Power OutletsThe accessory power outlets can beused to plug in electrical equipment,such as a cell phone or MP3 player.
There are three accessory poweroutlets:. Inside the front of the center
floor console.. On the rear of the center floor
console.. Inside the instrument panel
storage area.
The power outlets supply powerwhile the vehicle is on, or if thevehicle is in Retained AccessoryPower (RAP). See RetainedAccessory Power (RAP) onpage 9‑22.

Black plate (9,1)Chevrolet Volt Owner Manual - 2011
Instruments and Controls 5-9
Remove the cover to access andreplace when not in use.
Certain accessory plugs maynot be compatible with theaccessory power outlet andcould overload vehicle or adapterfuses. If a problem is experienced,see your dealer.
When adding electrical equipment,be sure to follow the installationinstructions included with theequipment. See Add-On ElectricalEquipment on page 9‑63.
Notice: Hanging heavyequipment from the poweroutlet can cause damage notcovered by the vehicle warranty.The power outlets are designedfor accessory power plugs only,such as cell phone charge cords.
Warning Lights,Gauges, andIndicatorsWarning lights and gauges cansignal that something is wrongbefore it becomes serious enoughto cause an expensive repair orreplacement. Paying attention tothe warning lights and gaugescould prevent injury.
Warning lights come on when therecould be a problem with a vehiclefunction. Some warning lights comeon briefly when the propulsionsystem is started to indicate theyare working.
Gauges can indicate when therecould be a problem with a vehiclefunction. Often gauges and warninglights work together to indicate aproblem with the vehicle.
When one of the warning lightscomes on and stays on whiledriving, or when one of the gaugesshows there may be a problem,check the section that explains whatto do. Waiting to do repairs can becostly and even dangerous.
Instrument ClusterThe instrument cluster displays apreview of information that includeselectric range, charging, odometer,and battery status. This happensupon entry when the driver door isopened, and following the welcomeanimation, before starting thevehicle.
A CHARGING OVERRIDE/INTERRUPTION OCCURREDmessage may display on the lowerleft of the screen. This indicates thatan override of the charge settingsby the owner via OnStar hasoccurred.

Black plate (10,1)Chevrolet Volt Owner Manual - 2011
5-10 Instruments and Controls
The following screens may appear,depending on the status.
This screen indicates that thecharge cord is not connected.Plug the charge cord in to chargethe vehicle.
This screen indicates that thecharge cord is connected andthe charging is complete.
This screen indicates that chargingis active and the estimated chargecompletion time is 10:00 a.m.

Black plate (11,1)Chevrolet Volt Owner Manual - 2011
Instruments and Controls 5-11
This screen indicates that chargingis programmed to be delayed withan estimated completion time of7:00 a.m.
This screen indicates that thevehicle is fully charged and thecharge cord is not connected.
This screen indicates that thecharge cord is connected, but thevehicle cannot be charged.

Black plate (12,1)Chevrolet Volt Owner Manual - 2011
5-12 Instruments and Controls
Complete Cluster with Enhanced Configuration in Electric Mode

Black plate (13,1)Chevrolet Volt Owner Manual - 2011
Instruments and Controls 5-13
A. Brake System Warning Light onpage 5‑24.
B. Battery Gauge (High Voltage)on page 5‑16.
C. Fuel Gauge on page 5‑16.
D. Service Electric Parking BrakeLight on page 5‑25.
E. Security Light on page 5‑29.
F. Engine Coolant TemperatureWarning Light on page 5‑27.
G. Charging System Light(12-Volt Battery) on page 5‑21.
H. Engine Oil Pressure Light onpage 5‑28.
I. High-Beam On Light onpage 5‑29.
J. Second Row Passenger SafetyBelt Reminder Light. See SafetyBelt Reminders on page 5‑18.
K. Turn and Lane-Change Signalson page 6‑4.
L. Compass on page 5‑16.
M. Speedometer on page 5‑15.
N. Cruise Control Light onpage 5‑29.
O. Electric Parking Brake Light onpage 5‑25.
P. Door, Hood, or Hatch OpenLight on page 5‑30.
Q. Low Fuel Warning Light onpage 5‑28.
R. Antilock Brake System (ABS)Warning Light on page 5‑26.
S. Electric Drive Unit Positions.See Electric Drive Unit onpage 9‑32.
T. Driver Efficiency Gauge onpage 5‑17.
U. Tire Pressure Light onpage 5‑27.
V. Traction Control System (TCS)/StabiliTrak® Light on page 5‑27.
W. Malfunction Indicator Lamp onpage 5‑21.
X. Odometer on page 5‑15.
Y. Lamps On Reminder onpage 5‑29.
Z. Sport Mode Light on page 5‑26and Mountain Mode Light onpage 5‑26.
AA. Driver Information Center (DIC)on page 5‑43.
AB. Total Vehicle Range onpage 5‑17.
AC. Airbag Readiness Light onpage 5‑19.
AD. Driver Safety Belt ReminderLight. See Safety BeltReminders on page 5‑18.

Black plate (14,1)Chevrolet Volt Owner Manual - 2011
5-14 Instruments and Controls
Instrument Cluster DisplayConfigurations
There are two instrument clusterdisplay configurations to choosefrom. Press CONFIG located leftof the steering wheel to changethe configuration. See DriverInformation Center (DIC) onpage 5‑43 for more information.
Choose either the Simple orEnhanced Configuration display.
Simple Configurationin Electric Mode
Simple Configuration in ExtendedRange Mode
The Enhanced Configurationdisplays the Driver EfficiencyGauge.

Black plate (15,1)Chevrolet Volt Owner Manual - 2011
Instruments and Controls 5-15
Enhanced Configurationin Electric Mode
Enhanced Configurationin Extended Range Mode
SpeedometerThe speedometer shows thevehicle speed in both kilometersper hour (km/h) and miles perhour (mph). The DIC menu canbe used to change the units.
See Driver Information Center (DIC)on page 5‑43.
OdometerThe odometer shows how far thevehicle has been driven, in eitherkilometers or miles.
Trip OdometerThe trip odometer is withinthe Driver Information Center.See Driver Information Center (DIC)on page 5‑43 for more information.

Black plate (16,1)Chevrolet Volt Owner Manual - 2011
5-16 Instruments and Controls
CompassThe vehicle has a compass displayin the instrument cluster abovethe speedometer. The compassreceives its heading and otherinformation from the GlobalPositioning System (GPS) antennaand vehicle speed information.
The compass system has automaticcalibration and zone adjustmentfeatures.
Avoid covering the GPS antennafor long periods of time with objectsthat may interfere with the antenna'sability to receive a satellite signal.See Multi-Band Antenna onpage 7‑18 for the location of thevehicle's antenna. The compasssystem is designed to operate for acertain number of miles or degreesof turn before needing a signal fromthe GPS satellites. The compasssystem will automatically determinewhen a GPS signal is restored andprovide a heading.
Battery Gauge(High Voltage)
This indicator displays the highvoltage battery charge level.
When this indicator is displayedin the foreground, the vehicleis operating in Electric Mode.The number next to the indicatordisplays an estimate of how farthe vehicle can be driven whilein this mode.
See Electric Mode on page 9‑25.
Fuel Gauge
This indicator displays the fuellevel. When this indicator is in theforeground, the vehicle is operatingin Extended Range Mode.
The number next to the indicatordisplays an estimate of how farthe vehicle can be driven whilein this mode.
See Extended Range Mode onpage 9‑25.

Black plate (17,1)Chevrolet Volt Owner Manual - 2011
Instruments and Controls 5-17
Driver Efficiency Gauge
This gauge is a guide to driving inan efficient manner by keeping theball green and in the center of thegauge. The leaves stop spinningwhen the vehicle stops or when theball travels away from the center ofthe gauge.
See Driving for Better EnergyEfficiency on page 9‑2.
accel: If the ball turns yellowand travels above the centerof the gauge, acceleration is tooaggressive to optimize efficiency.
brake: If the ball turns yellowand travels below the center of thegauge, braking is too aggressive tooptimize efficiency.
Total Vehicle Range
Total vehicle range is the remainingdistance the vehicle can be drivencombining the electric range andfuel range.
See Driving for Better EnergyEfficiency on page 9‑2.

Black plate (18,1)Chevrolet Volt Owner Manual - 2011
5-18 Instruments and Controls
Safety Belt Reminders
Driver Safety Belt ReminderLight
When the vehicle is started, thislight flashes and a chime may comeon to remind the driver to fastentheir safety belt. The light stayson solid until the belt is buckled.
This cycle may continue severaltimes if the driver remains orbecomes unbuckled during drivingwhile the vehicle is moving.
If the driver safety belt is alreadybuckled, neither the light nor thechime comes on.
Passenger Safety BeltReminder Light
When the vehicle is started, thislight flashes and a chime may comeon to remind the passenger tofasten their safety belt. The lightstays on solid until the belt isbuckled.
This cycle may continue severaltimes if the passenger remainsor becomes unbuckled while thevehicle is moving.
If the passenger safety belt isbuckled, neither the chime northe light comes on.
The front passenger safety beltreminder light and chime may turnon if an object is put on the seatsuch as a briefcase, handbag,grocery bag, laptop, or otherelectronic device. To turn offthe reminder light and/or chime,remove the object from the seator buckle the safety belt.

Black plate (19,1)Chevrolet Volt Owner Manual - 2011
Instruments and Controls 5-19
Second Row Passenger SafetyBelt Reminder Light
Second row seating positionsmonitored for safety belt useare represented by a coloredsymbol indicating safety beltstatus. When the vehicle is started,two safety belt symbols come onand stay on for several seconds in
the instrument cluster to alert thedriver that passengers may need tofasten their safety belts. After thepassenger safety belt is buckled,the corresponding safety beltsymbol in the instrument clusterturns green. If a safety belt is notinitially buckled, the instrumentcluster displays a red safety beltsymbol. While the vehicle is moving,if a second row passenger thatwas previously buckled becomesunbuckled, the corresponding safetybelt symbol will change to flashingred for several seconds and a chimemay sound.
Airbag Readiness LightThis light shows if there is anelectrical problem. The systemcheck includes the airbag sensor,the pretensioners, the airbagmodules, the wiring, and the crashsensing and diagnostic module.For more information on the airbagsystem, see Airbag System onpage 3‑25.
The airbag readiness light comes onand stays on for several secondswhen the vehicle is started.Then the light goes out.

Black plate (20,1)Chevrolet Volt Owner Manual - 2011
5-20 Instruments and Controls
A message may also display in theDriver Information Center (DIC).
See Airbag System Messages onpage 5‑51 for more information.
{ WARNING
If the airbag readiness light stayson after the vehicle is started orcomes on while driving, it meansthe airbag system might not beworking properly. The airbags inthe vehicle might not inflate in acrash, or they could even inflatewithout a crash. To help avoidinjury, have the vehicle servicedright away.
Passenger Airbag StatusIndicatorThe vehicle has a passengersensing system. See PassengerSensing System on page 3‑33for important safety information.The passenger airbag statusindicator is in the overhead console.
When the vehicle is started, thepassenger airbag status indicatorwill light ON and OFF for severalseconds as a system check.
Then, after several more seconds,the status indicator will light eitherON or OFF to let you know thestatus of the right front passengerfrontal airbag and the passengerknee airbag.
If the word ON is lit on thepassenger airbag status indicator, itmeans that the right front passengerfrontal airbag and the passengerknee airbag are enabled and mayinflate.
If the word OFF is lit on the airbagstatus indicator, it means that thepassenger sensing system hasturned off the right front passengerfrontal airbag and the passengerknee airbag.
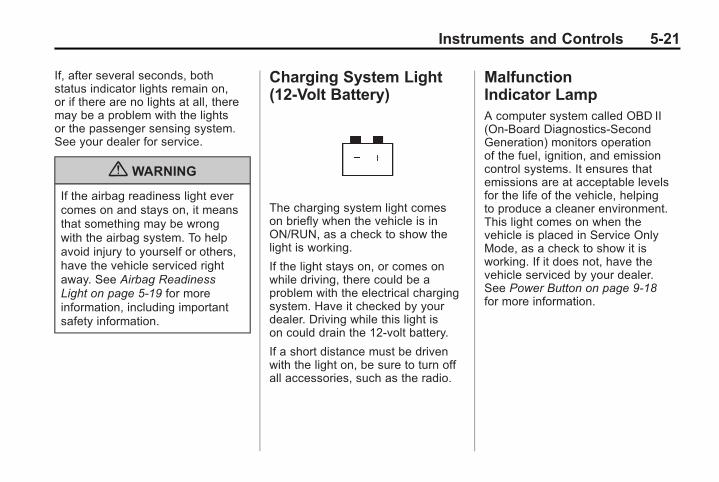
Black plate (21,1)Chevrolet Volt Owner Manual - 2011
Instruments and Controls 5-21
If, after several seconds, bothstatus indicator lights remain on,or if there are no lights at all, theremay be a problem with the lightsor the passenger sensing system.See your dealer for service.
{ WARNING
If the airbag readiness light evercomes on and stays on, it meansthat something may be wrongwith the airbag system. To helpavoid injury to yourself or others,have the vehicle serviced rightaway. See Airbag ReadinessLight on page 5‑19 for moreinformation, including importantsafety information.
Charging System Light(12-Volt Battery)
The charging system light comeson briefly when the vehicle is inON/RUN, as a check to show thelight is working.
If the light stays on, or comes onwhile driving, there could be aproblem with the electrical chargingsystem. Have it checked by yourdealer. Driving while this light ison could drain the 12‐volt battery.
If a short distance must be drivenwith the light on, be sure to turn offall accessories, such as the radio.
MalfunctionIndicator LampA computer system called OBD II(On-Board Diagnostics-SecondGeneration) monitors operationof the fuel, ignition, and emissioncontrol systems. It ensures thatemissions are at acceptable levelsfor the life of the vehicle, helpingto produce a cleaner environment.This light comes on when thevehicle is placed in Service OnlyMode, as a check to show it isworking. If it does not, have thevehicle serviced by your dealer.See Power Button on page 9‑18for more information.
Black plate (22,1)Chevrolet Volt Owner Manual - 2011
5-22 Instruments and Controls
If the malfunction indicator lampcomes on and stays on, while thevehicle is in ON/RUN, this indicatesthat there is an OBD II problem andservice is required.
Malfunctions often are indicated bythe system before any problem isapparent. Being aware of the lightcan prevent more serious damageto the vehicle. This system assiststhe service technician in correctlydiagnosing any malfunction.
Notice: If the vehicle iscontinually driven with this lighton, the emission controls mightnot work as well, the vehicle fueleconomy might not be as good,and the engine might not runas smoothly. This could lead tocostly repairs that might not becovered by the vehicle warranty.
Notice: Modifications madeto the engine, electric drive unit,exhaust, intake, or fuel systemof the vehicle or the replacementof the original tires with otherthan those of the same TirePerformance Criteria (TPC)can affect the vehicle emissioncontrols and can cause thislight to come on. Modificationsto these systems could lead tocostly repairs not covered bythe vehicle warranty. This couldalso result in a failure topass a required EmissionInspection/Maintenancetest. See Accessories andModifications on page 10‑4.
This light comes on during amalfunction in one of two ways:
Light Flashing: A misfire conditionhas been detected. A misfireincreases vehicle emissions andcould damage the emission controlsystem on the vehicle. Diagnosisand service might be required.
The following can prevent moreserious damage to the vehicle:. Reduce vehicle speed.. Avoid hard accelerations.. Avoid steep uphill grades.
If the light continues to flash, whenit is safe to do so, stop the vehicle.Find a safe place to park thevehicle. Turn the vehicle off, wait atleast 10 seconds, and restart thevehicle. If the light is still flashing,follow the previous steps and seeyour dealer for service as soon aspossible.

Black plate (23,1)Chevrolet Volt Owner Manual - 2011
Instruments and Controls 5-23
Light On Steady: An emissioncontrol system malfunction hasbeen detected on the vehicle.Diagnosis and service might berequired.
The following may correct anemission system malfunction:. Check that the fuel cap is fully
installed. The diagnostic systemcan determine if the fuel caphas been left off or improperlyinstalled. A loose or missing fuelcap allows fuel to evaporate intothe atmosphere. A few drivingtrips with the cap properlyinstalled should turn the light off.
. Check that the electrical systemis not wet. The system couldbe wet if the vehicle wasdriven through a deep puddle ofwater. The condition is usuallycorrected when the electricalsystem dries out. A few drivingtrips should turn the light off.
. Check that good quality fuelis used. Poor fuel qualitycauses the engine not to runas efficiently as designed andmay cause stalling after start-upor misfiring. These conditionsmight go away once the engineis warmed up.
If one or more of theseconditions occurs, change thefuel brand used. It will require atleast one full tank of the properfuel to turn the light off.
If none of the above have madethe light turn off, your dealer cancheck the vehicle. The dealerhas the proper test equipmentand diagnostic tools to fix anymechanical or electrical problemsthat might have developed.
Emissions Inspection andMaintenance Programs
Some state and local governmentshave or might begin programsto inspect the emission controlequipment on the vehicle. Failure topass this inspection could preventgetting a vehicle registration.
Here are some things to know tohelp the vehicle pass an inspection:. The vehicle will not pass this
inspection if the malfunctionindicator lamp is on while thevehicle is in ON/RUN, or if thevehicle is placed in ServiceOnly Mode and the malfunctionindicator lamp does not comeon. See your dealer forassistance in verifying properoperation of the malfunctionindicator lamp.

Black plate (24,1)Chevrolet Volt Owner Manual - 2011
5-24 Instruments and Controls
. The vehicle will not passthis inspection if the OBD II(On-Board Diagnostic) systemdetermines that critical emissioncontrol systems have not beencompletely diagnosed by thesystem. The vehicle wouldbe considered not ready forinspection. This can happenif the 12‐volt battery hasrecently been replaced orif the 12‐volt battery has rundown. The diagnostic systemis designed to evaluate criticalemission control systems duringnormal driving. This can takeseveral days of routine driving.If this has been done and thevehicle still does not pass theinspection for lack of OBD IIsystem readiness, your dealercan prepare the vehicle forinspection.
Brake System WarningLightThe vehicle brake systemconsists of two hydraulic circuits.If one circuit is not working, theremaining circuit can still work tostop the vehicle. For normal brakingperformance, both circuits need tobe working.
If the warning light comes on, thereis a brake problem. Have the brakesystem inspected right away.
This light comes on briefly whenthe vehicle is turned on. If it doesnot come on then, have it fixed soit will be ready to warn if there is aproblem.
If the light comes on and stays on,there is a base brake problem.
{ WARNING
The brake system might not beworking properly if the brakesystem warning light is on.Driving with the brake systemwarning light on can lead to acrash. If the light is still on afterthe vehicle has been pulled offthe road and carefully stopped,have the vehicle towed forservice.

Black plate (25,1)Chevrolet Volt Owner Manual - 2011
Instruments and Controls 5-25
Electric Parking BrakeLight
This status light comes on whenthe parking brake is applied. If thelight flashes and stays on after theparking brake is released, or whiledriving, there is a problem with theElectric Parking Brake system.
If the light does not come on,or remains flashing, see your dealer.
See Electric Parking Brake onpage 9‑35 for more information.
Service Electric ParkingBrake Light
The Service Electric Parking Brakelight should come on briefly whenthe vehicle is in ON/RUN. If it doesnot come on, have it fixed so itwill be ready to warn if there is aproblem.
If this light stays on, there is aproblem with a system on thevehicle that is causing the parkingbrake system to work at a reducedlevel. The vehicle can still be driven,but should be taken to a dealeras soon as possible. See ElectricParking Brake on page 9‑35 formore information. If a messagedisplays in the Driver InformationCenter (DIC), see Brake SystemMessages on page 5‑46 for moreinformation.

Black plate (26,1)Chevrolet Volt Owner Manual - 2011
5-26 Instruments and Controls
Antilock Brake System(ABS) Warning Light
This light should come on brieflywhen the vehicle is in ON/RUN. If itdoes not come on, have the vehicleserviced by your dealer.
If the ABS warning light stays onlonger than a few seconds after thevehicle is in ON/RUN, or comeson and stays on while driving, tryresetting the system. To reset thesystem:
1. While driving, pull over when it issafe to do so.
2. Place the vehicle in P (Park).
3. Turn the vehicle off.
4. Restart the vehicle.
If the ABS warning light remains onafter resetting the system or comeson again while driving, the vehicleneeds service. If the ABS warninglight is on, but the regular brakesystem warning light is not on, theantilock brakes are not workingproperly, but the regular brakes arestill functioning. Have the vehicleserviced right away. If both brakelights are on, the vehicle does nothave antilock brakes, and there isa problem with the regular brakesas well. Have the vehicle towed forservice. See Towing the Vehicle onpage 10‑84.
Sport Mode Light
This light comes on when SportMode is selected. See “Sport Mode”in Driver Selected Operating Modeson page 9‑26 for more information.
Mountain Mode Light
This light comes on when MountainMode is selected. See “MountainMode” in Driver Selected OperatingModes on page 9‑26 for moreinformation.

Black plate (27,1)Chevrolet Volt Owner Manual - 2011
Instruments and Controls 5-27
Traction Control System(TCS)/StabiliTrak® Light
This light comes on briefly whilestarting the vehicle.
If it does not, have the vehicleserviced by your dealer. If thesystem is working normally theindicator light then goes off.
If the light comes on and stayson while driving, there could be aproblem with the TCS/StabiliTraksystem and the vehicle might needservice. When this warning light ison, the TCS/StabiliTrak system isoff and does not limit wheel spin.
The light flashes if the system isactive and is working to assist thedriver with directional control of thevehicle in difficult driving conditions.
Engine CoolantTemperature WarningLight
The engine coolant temperaturewarning light comes on briefly whenthe vehicle is started.
If it does not, have the vehicleserviced by your dealer. If thesystem is working normally theindicator light then goes off.
If the light comes on and stayson while driving, the vehicle mayhave a problem with the coolingsystem. Stop and turn off thevehicle to avoid damage to theengine. A warning chime soundswhen this light is on.
See Engine Overheating onpage 10‑23 for more information.
Tire Pressure Light
For vehicles with the Tire PressureMonitor System (TPMS), this lightcomes on briefly when the vehicle isin ON/RUN. It provides informationabout tire pressures and the TPMS.
When the Light is On Steady
This indicates that one or moreof the tires are significantlyunderinflated.
A message in the Driver InformationCenter (DIC) may also display.See Tire Messages on page 5‑52for more information. Stop as soonas possible, and inflate the tires tothe pressure value shown on theTire and Loading Information Label.See Tires on page 10‑48 for moreinformation.

Black plate (28,1)Chevrolet Volt Owner Manual - 2011
5-28 Instruments and Controls
When the Light Flashes First andThen is On Steady
This indicates that there may bea problem with the Tire PressureMonitor System. The light flashesfor about one minute and stays onsteady until the vehicle is in OFF.This sequence repeats each timethe vehicle is in ON/RUN. See TirePressure Monitor System onpage 10‑55 for more information.
Engine Oil Pressure Light
{ WARNING
Do not keep driving if the oilpressure is low. The engine canbecome so hot that it catchesfire. Someone could be burned.Check the oil as soon as possibleand have the vehicle serviced.
Notice: Lack of proper engineoil maintenance can damage theengine. The repairs would not becovered by the vehicle warranty.Always follow the maintenanceschedule for changing engine oil.
The oil pressure light should comeon briefly as the vehicle is started.If it does not come on have thevehicle serviced by your dealer.
If the light comes on and stays on, itmeans that oil is not flowing throughthe engine properly. The vehiclecould be low on oil and mighthave some other system problem.See your dealer.
Low Fuel Warning Light
The low fuel warning light comes onbriefly when the vehicle is started.
This light also comes on when thefuel level is low. When fuel is added,the light should go off. If it does not,have the vehicle serviced.

Black plate (29,1)Chevrolet Volt Owner Manual - 2011
Instruments and Controls 5-29
Security Light
This light comes on briefly when thevehicle is started.
If the light remains on while driving,there is a problem with the securitysystem. See your dealer for service.
For more information, see VehicleSecurity on page 2‑13.
High-Beam On Light
The high-beam on light comes onwhen the high-beam headlamps arein use.
See Headlamp High/Low-BeamChanger on page 6‑2 for moreinformation.
Lamps On Reminder
This light comes on when theparking lamps, headlamps,or taillamps are on.
Cruise Control Light
The cruise control light comes onwhen the cruise control is turned onand turns green when cruise controlis engaged.
See Cruise Control on page 9‑40 formore information.

Black plate (30,1)Chevrolet Volt Owner Manual - 2011
5-30 Instruments and Controls
Door, Hood, or HatchOpen LightIf a door, hood, or hatch is notcompletely closed, a light comes ontogether with a graphic in the DriverInformation Center (DIC).
Door(s) Open
Hood Open Hatch Open
The DIC indicates when a door, thehood, or the hatch is open. The lightdisplays the open area as shaded.
The DIC and the light both displaywhen the vehicle is moving. Onlythe light displays if the vehicle isstopped.

Black plate (31,1)Chevrolet Volt Owner Manual - 2011
Instruments and Controls 5-31
Information Displays
Center Stack DisplayThe center stack screen displaysCharging, Power Flow, and EnergyInformation. See the information thatfollows.
The Climate Control, Infotainment,and Vehicle Personalization alsodisplay information in this screen.For more information on thesesystems, see:. Automatic Climate Control
System on page 8‑1.. Infotainment on page 7‑2.. Vehicle Personalization on
page 5‑53.
The center stack controls only needa light touch to operate and workbest with bare hands. The controlswill work with most gloves althoughthey may take longer to respond.
Use the finger pad rather than thefinger tip to minimize response time.If the controls are not responding,remove the gloves.
To view the Power Flow, Charging,and Energy Information, pressthe[ button on the center stack.
Power FlowsTo view the Power Flow screens,press the[ button on thecenter stack and then press thePower Flow button at the top ofthe touch screen. The Power Flowscreens indicate the current systemoperating condition. The screensshow the energy flow between theengine, electric drive unit, and highvoltage battery. These componentswill be highlighted when they areactive.
Battery Power ‐ Battery is activewith energy flowing to the wheels.
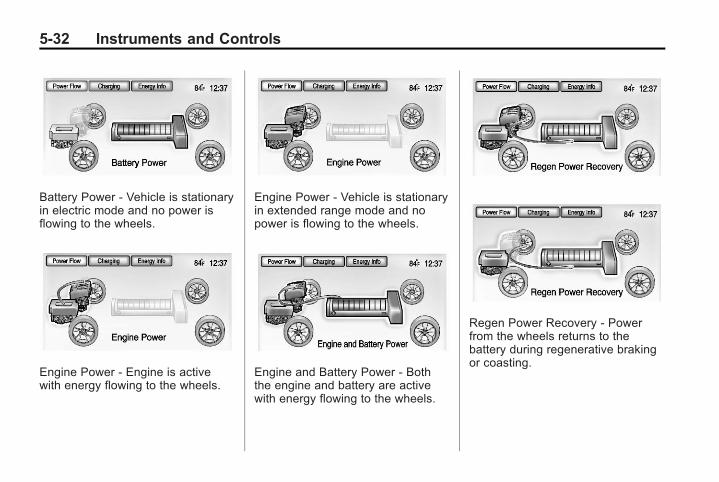
Black plate (32,1)Chevrolet Volt Owner Manual - 2011
5-32 Instruments and Controls
Battery Power ‐ Vehicle is stationaryin electric mode and no power isflowing to the wheels.
Engine Power ‐ Engine is activewith energy flowing to the wheels.
Engine Power ‐ Vehicle is stationaryin extended range mode and nopower is flowing to the wheels.
Engine and Battery Power ‐ Boththe engine and battery are activewith energy flowing to the wheels.
Regen Power Recovery ‐ Powerfrom the wheels returns to thebattery during regenerative brakingor coasting.

Black plate (33,1)Chevrolet Volt Owner Manual - 2011
Instruments and Controls 5-33
Power Off ‐ No power is flowing tothe wheels.
Charging
Programmable Charging
This vehicle has threeprogrammable charge modes.To view the current charge modestatus in the center stack display,press the[ button on the centerstack and then press the Chargingbutton at the top of the touchscreen.
The current charge mode statuscan also be viewed in a temporarypop-up in the center stack displayby pressing the charge port doorrelease button on the driver door.
The Charge Start and ChargeComplete time estimations arealso displayed on the screen.These estimations are mostaccurate when the vehicle isplugged in and in moderatetemperature conditions.
Charge Mode Status
Immediately: The vehicle startscharging as soon as it is connectedto an electrical outlet. See Plug-InCharging on page 9‑49.

Black plate (34,1)Chevrolet Volt Owner Manual - 2011
5-34 Instruments and Controls
Delayed Departure Time: Thevehicle estimates the charging starttime considering the programmed
departure time for the current dayof the week. Charging begins at thestart time and is complete by thedeparture time only if sufficient timeis allowed after the charge cord isplugged in. The vehicle uses aninternal clock for programmablecharging, not the clock in thecenter stack.
Delayed Rate and DepartureTime: The vehicle estimates thecharging start time based on theutility rate schedule, utility ratepreference, and the programmeddeparture time for the current day ofthe week. The vehicle will chargeduring the least expensive rateperiods to achieve a full batterycharge by the departure time.Electrical rate information from theutility company for the charginglocation is required for this mode.

Black plate (35,1)Chevrolet Volt Owner Manual - 2011
Instruments and Controls 5-35
Charge Mode Selection
From the Charge Mode Statusscreen, press ChangeCharge Mode.
Select one option:. Immediately upon plug in.. Delayed based on
departure time.. Delayed based on electric
rates & departure time.
Departure Time Entry
From the Delayed Charge ModeStatus screen, press Edit to changethe departure time for each day ofthe week to match your personalschedule.
1. Press the day to change.
2. Press + or − to change the hoursand minutes.
3. Press + or − to change AMor PM.
4. Press Back to store changesand return to the previousscreen.
Charge Rate Selection
From the Delayed Rate andDeparture Time Charge ModeStatus screen, press Edit.
Select one of the following:. Edit Electric Rate Schedule.. Edit Departure Time Schedule.
See “Departure Time Entry.”. Select Charge Rate Preference.

Black plate (36,1)Chevrolet Volt Owner Manual - 2011
5-36 Instruments and Controls
Charge Rate Preference Selection
From the Departure Time & RateInformation screen, press SelectCharge Rate Preference.
Press one of the following options toselect the Charge Rate Preference.. Charge during Peak, Mid‐Peak,
and Off‐Peak Rates: The vehiclewill charge during any rateperiod and will select when tocharge to minimize the totalcost of the charge.
. Charge during Mid‐Peak andOff‐Peak Rates: The vehicle willcharge during Off-Peak and/orMid-Peak rate periods only andwill select when to charge tominimize the total cost of thecharge.
. Charge during Off‐Peak Rates:The vehicle will only chargeduring Off-Peak rate periods.
Charging begins at the start timeand is complete by the departuretime only if sufficient time is allowedafter the charge cord is pluggedin. For example, if the vehicle isplugged in for only one hour priorto the departure time, and thebattery is completely discharged,the vehicle will not be fully chargedby the departure time regardless ofthe rate selection.
Electric Rate Plan Selection
Electric rates, or cost per unit,may vary based on time, weekday/weekend, and season. During theday when the demand for electricityis high, the rates are usually higherand called Peak rates. At nightwhen the demand for electricityis low, the rates are usually lowerand called Off-Peak rates. In someareas, a Mid-Peak rate is offered.
Contact the utility company to obtainthe rate schedule for your area.The summer and winter start datesmust be established to use asummer/winter schedule.
From the Departure Time & RateInformation screen, press EditElectric Rate Schedule.
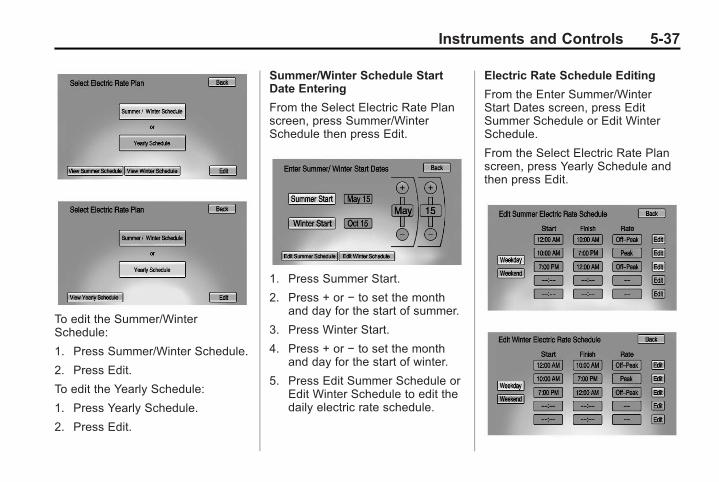
Black plate (37,1)Chevrolet Volt Owner Manual - 2011
Instruments and Controls 5-37
To edit the Summer/WinterSchedule:
1. Press Summer/Winter Schedule.
2. Press Edit.
To edit the Yearly Schedule:
1. Press Yearly Schedule.
2. Press Edit.
Summer/Winter Schedule StartDate Entering
From the Select Electric Rate Planscreen, press Summer/WinterSchedule then press Edit.
1. Press Summer Start.
2. Press + or − to set the monthand day for the start of summer.
3. Press Winter Start.
4. Press + or − to set the monthand day for the start of winter.
5. Press Edit Summer Schedule orEdit Winter Schedule to edit thedaily electric rate schedule.
Electric Rate Schedule Editing
From the Enter Summer/WinterStart Dates screen, press EditSummer Schedule or Edit WinterSchedule.
From the Select Electric Rate Planscreen, press Yearly Schedule andthen press Edit.

Black plate (38,1)Chevrolet Volt Owner Manual - 2011
5-38 Instruments and Controls
1. Press Weekday or Weekend.
2. Press Edit next to the row to bechanged.. Weekdays are Monday
through Friday and usethe same rate schedule.
. Weekends are Saturdayand Sunday and use thesame rate schedule.
Both weekday and weekendschedules must be set. The rateschedule only applies for a 24-hourperiod, starting at 12:00 AM andending at 12:00 AM. There can befive rate changes for each day;not all must be used.
The finish times must beconsecutive. If a finish time doesnot follow a start time, the errormessage displays “An invalid entrywas found in the data entered.Please re‐enter data.”
Electric Rate Finish Time Editing
From the Edit (Summer, Winter,or Yearly) Electric Rate Schedulescreen, press Edit next to the rowto change.
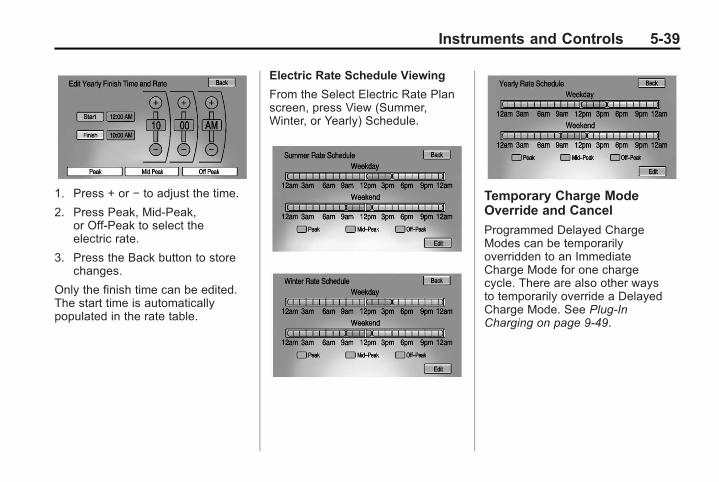
Black plate (39,1)Chevrolet Volt Owner Manual - 2011
Instruments and Controls 5-39
1. Press + or − to adjust the time.
2. Press Peak, Mid-Peak,or Off-Peak to select theelectric rate.
3. Press the Back button to storechanges.
Only the finish time can be edited.The start time is automaticallypopulated in the rate table.
Electric Rate Schedule Viewing
From the Select Electric Rate Planscreen, press View (Summer,Winter, or Yearly) Schedule.
Temporary Charge ModeOverride and Cancel
Programmed Delayed ChargeModes can be temporarilyoverridden to an ImmediateCharge Mode for one chargecycle. There are also other waysto temporarily override a DelayedCharge Mode. See Plug-InCharging on page 9‑49.

Black plate (40,1)Chevrolet Volt Owner Manual - 2011
5-40 Instruments and Controls
To temporarily override a DelayedCharge Mode from inside thevehicle:
1. Press the charge port doorrelease button on the driverdoor to view the Charge ModeStatus pop-up in the centerstack display.
2. Press Charge Immediately UponPlug In.
The new Temporary ChargeMode Status screen willautomatically display therevised charge complete time.
To cancel the temporary overridefrom the Temporary Charge ModeStatus screen or pop-up, pressCancel Temporary Charge Modeon the bottom of the touch screen.
The vehicle will reinstate theprogrammed delayed chargemode settings.
Programmable ChargingDisabled
When the Programmable Chargingsystem is disabled, the DefaultCharge Mode Status screen andthe pop-up will display “- -:- -”for the Charge Complete Time.

Black plate (41,1)Chevrolet Volt Owner Manual - 2011
Instruments and Controls 5-41
The Programmable Chargingsystem will be disabled if theCharge Complete Time cannotbe confidently estimated. If theProgrammable Charging systemis consistently disabled, see yourdealer for details.
Energy InformationTo view the Energy Usage, EnergyEfficiency, and Efficiency Tips, pressthe[ button on the center stackand then press the Energy Infobutton at the top of the touchscreen.
Energy Usage
The Energy Usage screen displaysinformation for the total of all thedrive cycles since the last timethe high voltage battery was fullycharged. This includes distancetraveled in Electric Mode, distancetraveled in Extended Range Mode,total distance traveled, total fuelused, and average fuel economy.
There are maximum limits to someof the values that can be displayed.When these values are replacedwith dashes, the value limits havebeen reached. To reset thesevalues, the high voltage batterywill need to be fully recharged.The circle graph also representsthe percentage of distancetraveled using Electric Modeversus Extended Range Mode.The Lifetime Fuel Economy is atotal over the life of the vehicle andcan only be reset by the dealer.

Black plate (42,1)Chevrolet Volt Owner Manual - 2011
5-42 Instruments and Controls
The Energy Usage informationwill also appear automatically onpower off when Retained AccessoryPower is active. This automaticpop-up can be disabled throughthe vehicle personalization.See “Energy Summary Exit Pop-up”under Vehicle Personalization onpage 5‑53.
Energy Efficiency
The Energy Efficiency screen isaccessed by pressing EnergyEfficiency on the Energy Usagescreen. This screen displays theenergy efficiency over the drivecycle based on driving style andclimate settings. Driving in a moreefficient manner will result in ahigher percentage displayed fordriving style. Minimizing the useof the climate control system willresult in a higher percentagedisplayed for climate setting.
Efficiency Tips
The Efficiency Tips screen isaccessed by pressing EfficiencyTips from the Energy Usageor Energy Efficiency screen.This screen provides a guide onhow to improve energy usage toincrease fuel economy and range.
ClockThe clock is in the center stackdisplay. To set the time, see “Settingthe Clock” under Configure Menu onpage 7‑66 for more information.

Black plate (43,1)Chevrolet Volt Owner Manual - 2011
Instruments and Controls 5-43
Driver InformationCenter (DIC)
The Driver Information Center (DIC)display is in the instrument cluster.The DIC displays information aboutthe vehicle. It also displays warningmessages if a system problem isdetected. See Vehicle Messages onpage 5‑45 for more information.
DIC Operation and Displays
View the DIC displays by pressingthe DIC buttons located to theleft of the steering wheel. The DICdisplays trip, fuel, and warningmessages if a system problemis detected.
DIC Controls
CONFIG: Press to select either theSimple or Enhanced instrumentcluster configuration display.
} BACK: Press to return to theprevious screen, exit a screen,or return to the main menu.Press } BACK to minimizethe DIC menu display.
SELECT: Press the center of theknob to select the highlighted item.Turn the knob to scroll through themenu items.
DIC Menu Items
At the main DIC menu:
1. Turn the SELECT knob to scrollthrough the possible DIC menus.
2. Press the center of the SELECTknob when a menu item ishighlighted to enter that menu.
3. Continue to turn and press theSELECT knob to scroll throughand select the available menuitems:
} : Trip A
x : Trip B
: : Oil Life
v : Tire Pressure
{ : Vehicle Messages
z : Units
y : Tutorial Mode

Black plate (44,1)Chevrolet Volt Owner Manual - 2011
5-44 Instruments and Controls
Trip A and Trip B
The trip displays show fuel used,average fuel economy, and distancetraveled since the last trip reset.
Reset the trip data by pressing andholding the SELECT button wheneither Trip A or Trip B is displayed.
Oil Life
This displays the percentageof remaining oil life. The lowerthe percentage, the closer thevehicle is to needing an oil change.
When the oil life is depleted, theCHANGE ENGINE OIL SOONmessage displays. Change the oilas soon as possible. Additionalmaintenance is also recommendedin the Maintenance Schedule.See Scheduled Maintenance onpage 11‑2 and Engine Oil onpage 10‑12.
The oil life must be reset aftereach oil change. Avoid accidentalresetting of the Engine Oil LifeSystem. It cannot be resetaccurately until the next oil change.To reset the Engine Oil Life System,see Engine Oil Life System onpage 10‑15. The system is resetwhen 100% displays.
Tire Pressure
The display will show a vehicle withthe approximate pressures of allfour tires. Tire pressure is displayedin either kilopascals (kPa) or inpounds per square inch (psi).
If a low or high tire pressure isdetected, a message is displayedadvising to check the tire pressurein the specified tire. See TirePressure on page 10‑54 and TireMessages on page 5‑52 for moreinformation.
If the tire pressure display showsdashes instead of a value, theremay be a problem with the vehicle.See your dealer for service.
Vehicle Messages
Turn the SELECT knob to scrollthrough any active warningmessages. Press SELECTto review the messages.
Units
Turn the SELECT knob to changethe unit display to METRIC or USwhen the display is active. PressSELECT to confirm the setting.This will change the displays onthe cluster and DIC to either metricor English (US) measurements.
Tutorial Mode
Select this menu item to view ascreen that explains some of theunique features of the cluster.
Tutorial mode is only available whenthe vehicle is in P (Park).

Black plate (45,1)Chevrolet Volt Owner Manual - 2011
Instruments and Controls 5-45
Vehicle MessagesMessages displayed in the DICindicate the status of the vehicleor some action that may be neededto correct a condition. Multiplemessages may display one afterthe other.
Messages that do not requireimmediate action can beacknowledged and cleared bypressing the SELECT knob.The messages requiring immediateaction cannot be cleared until thataction is performed. All messagesshould be taken seriously. Clearingthe messages does not correct theproblem.
Battery and ChargingMessages
BATTERY SAVER ACTIVE
This message displays when thevehicle has detected that the 12-voltbattery voltage has dropped andvehicle features are being disabled.The 12-volt battery saver systemstarts reducing certain featurestrying to save the charge of the12-volt battery. Turn off unnecessaryfeatures to allow the battery torecharge.
BATTERY TOO COLD, PLUG INTO WARM
This message displays duringextremely cold temperatures,when the vehicle will not startuntil the high voltage battery iswarm enough.
Plug the vehicle in to allow thecharging system to warm the highvoltage battery, then the vehiclecan be started.
CHARGE CORD CONNECTED
This message displays when thecharge cord is connected to thevehicle. The vehicle cannot beshifted out of P (Park) with thecharge cord connected.
CHARGE DOOR OPEN
This message displays when thecharge door is open and the vehicleis shifted out of P (Park).
LOW BATTERY
This message displays whenthe 12-volt battery voltage is low.See Battery on page 10‑28 formore information.
SERVICE BATTERYCHARGING SYSTEM
This message displays when thereis a fault in the 12-volt batterycharging system. Take the vehicleto your dealer for service.

Black plate (46,1)Chevrolet Volt Owner Manual - 2011
5-46 Instruments and Controls
SERVICE HIGH VOLTAGECHARGING SYSTEM
This message displays when thereis a problem with the high voltagecharging system. See your dealerfor service.
Brake System Messages
BRAKE FLUID LOW
This message displays when thebrake fluid level is low. See BrakeFluid on page 10‑26.
RELEASE PARKING BRAKE
This message displays if the electricparking brake is on while the vehicleis in motion. Release it beforeattempting to drive. See ElectricParking Brake on page 9‑35 formore information.
SERVICE BRAKE ASSIST
This message displays when thereis a problem with the brake boostassist system. When this messagedisplays, the brake boost assistmotor might be heard operatingand a pulsation may be felt in thebrake pedal. Take the vehicle toyour dealer for service.
SERVICE PARKING BRAKE
This message displays when thereis a problem with the parking brake.Take the vehicle to your dealer forservice.
STEP ON BRAKE TORELEASE PARK BRAKE
This message displays whenattempting to release the electricparking brake without the brakepedal applied. See Electric ParkingBrake on page 9‑35 for moreinformation.
Cruise Control Messages
CRUISE SET TO XXX
This message displays when thecruise control is set and shows thespeed it was set to. See CruiseControl on page 9‑40 for moreinformation.
Door Ajar Messages
DOOR(S) OPEN, HOOD OPEN,HATCH OPEN
A symbol will appear on the displayshowing the area that is open.See Door, Hood, or Hatch OpenLight on page 5‑30.

Black plate (47,1)Chevrolet Volt Owner Manual - 2011
Instruments and Controls 5-47
Drive Mode Messages
MOUNTAIN MODE NOTAVAILABLE
This message displays whenin Mountain Mode and themode becomes unavailable.See “Mountain Mode” underDriver Selected OperatingModes on page 9‑26.
SPORT MODE NOTAVAILABLE
This message displays when inSport Mode and the mode becomesunavailable. See “Sport Mode”under Driver Selected OperatingModes on page 9‑26.
Electric Drive UnitMessages
SHIFT TO PARK
This message displays whenthe vehicle should be shifted toP (Park). This may appear whenattempting to turn off the vehiclewhen it is not in P (Park).
Engine Cooling SystemMessages
ENGINE OVERHEATED —REDUCE SPEED
This message displays when theengine coolant temperature orengine oil is too hot. Reduce speedand allow the vehicle to cool down.
ENGINE OVERHEATED —TURN VEHICLE OFF
This message displays and acontinuous chime sounds if theengine cooling system reachesunsafe temperatures for operation.Stop and turn off the vehicle assoon as it is safe to do so to avoidsevere damage. This messageclears when the engine has cooledto a safe operating temperature.
ENGINE RUNNING DUE TOTEMPERATURE
This message displays when thehigh voltage battery is charged butthe engine has to come on becauseof the outside temperature or highvoltage battery temperature.

Black plate (48,1)Chevrolet Volt Owner Manual - 2011
5-48 Instruments and Controls
Engine Oil Messages
CHANGE ENGINE OIL SOON
This message displays when theengine oil needs to be changed.After changing the engine oil,the Engine Oil Life System mustbe reset. See Engine Oil LifeSystem on page 10‑15 andDriver Information Center (DIC) onpage 5‑43 for information on howto reset the system. See EngineOil on page 10‑12 and ScheduledMaintenance on page 11‑2 formore information.
OIL PRESSURE LOW — TURNVEHICLE OFF
This message displays if low oilpressure levels occur. Stop thevehicle as soon as safely possibleand do not operate it until the causeof the low oil pressure has beencorrected. Check the oil as soonas possible and have the vehicleserviced by your dealer.
Fuel System Messages
CLOSE FUEL DOOR
This message displays when thefuel door is open and the vehicle ismoving.
ENGINE NOT AVAILABLEADD FUEL
This message displays whenthe engine is not available due torunning out of fuel. The vehicle cancontinue to be driven in ElectricMode until the battery is depleted,but will have reduced acceleration.When this message is displayed,refuel the vehicle. See Out of Fuel/Engine Unavailable on page 9‑28.
FUEL LEVEL LOW
This message displays when thevehicle is low on fuel. Refuel assoon as possible.
READY TO REFUEL
This message displays when thefuel system is depressurized andthe vehicle can be refueled.
TIGHTEN GAS CAP
This message displays when thefuel cap is not on tight. Tighten thefuel cap.
WAIT TO REFUEL
This message displays when thefuel system is pressurized and youmust to wait to refuel the vehicle.
Key and Lock MessagesWhen programming new RemoteKeyless Entry (RKE) transmitters,DIC messages display. See RemoteKeyless Entry (RKE) SystemOperation on page 2‑3 for moreinformation.

Black plate (49,1)Chevrolet Volt Owner Manual - 2011
Instruments and Controls 5-49
NO REMOTE DETECTED
This message displays when theRKE transmitter is not detectedwhile attempting to start the vehicle.The transmitter battery may beweak. See “Starting the Vehiclewith a Low Transmitter Battery”under Remote Keyless Entry (RKE)System Operation on page 2‑3 formore information.
NO REMOTE DETECTED,PRESS BRAKE TO RESTART
This message displays if the RKEtransmitter is no longer detectedin the vehicle. Press the brakepedal and the POWER O buttonto restart the vehicle, or press thePOWER O button without pressingthe brake pedal to turn the vehicleoff. If the vehicle is turned off anda valid transmitter is not available,the vehicle will not restart.
REMINDER: KEY LEFT INVEHICLE
This message displays whenleaving the vehicle with the RKEtransmitter still inside.
REPLACE BATTERY INREMOTE KEY
This message displays when thebattery in the RKE transmitter needsto be replaced.
SERVICE KEYLESS STARTSYSTEM
This message displays when thekeyless start system needs service.Take the vehicle to your dealer.
Lamp Messages
AUTOMATIC LIGHT CONTROLON OR OFF
A message will display when theautomatic light control has beenturned on or off.
CHECK LAMP or LAMPFAILURE
Depending on the lamp, one ofthese messages may display.See Bulb Replacement onpage 10‑34.
TURN SIGNAL ON
This message displays if the turnsignal has been left on. Turn off theturn signal.
Object Detection SystemMessages
PARK ASSIST OFF
This message displays when thepark assist system has been turnedoff. See Ultrasonic Parking Assiston page 9‑43.
SERVICE PARKING ASSIST
This message displays if there is aproblem with the park assist system.Take the vehicle to your dealer forservice.

Black plate (50,1)Chevrolet Volt Owner Manual - 2011
5-50 Instruments and Controls
Propulsion PowerMessages
PROPULSION POWER ISREDUCED
This message displays when thepropulsion power is reduced andcan affect the ability to accelerate.If this message is on, but thereis no reduction in performance,proceed to your destination.The performance may be reducedthe next time the vehicle is driven.The vehicle may be driven at areduced speed while this messageis on, but maximum accelerationand speed may be reduced.If this message stays on whenthe malfunction indicator lamp ison, the vehicle should be taken toyour dealer for service as soon aspossible.
This message can display whendriving in mountainous terrainwithout using Mountain Mode or bynot entering Mountain Mode soonenough to build a sufficient batterycharge reserve before climbingsteep grades. This is normaloperation to protect the highvoltage battery. Only if boththe PROPULSION POWER ISREDUCED message and themalfunction indicator lamp areon should the vehicle be takento the dealer for service.
While climbing the grade with thismessage displayed, the vehiclespeed may be reduced until theengine can recover the batterystate of charge to a normal level.See “Mountain Mode” under DriverSelected Operating Modes onpage 9‑26.
Ride Control SystemMessages
LOW TRACTION
This message displays when theAntilock Brake System (ABS) isactive and is working to assist thedriver with control of the vehicle indifficult driving conditions.
SERVICE STABILITRAK
This message displays whenthere is a problem detected withthe StabiliTrak system. The vehicleis safe to drive, but the StabiliTraksystem is not operational.See Electronic Stability Control(ESC) on page 9‑39 for informationon resetting the system.

Black plate (51,1)Chevrolet Volt Owner Manual - 2011
Instruments and Controls 5-51
SERVICE TRACTIONCONTROL
This message displays when thereis a problem detected with theTraction Control System (TCS).The vehicle is safe to drive, but theTCS is not operational. See TractionControl System (TCS) on page 9‑37for information on resetting thesystem.
Airbag System Messages
SERVICE AIRBAG
This message displays if there isa problem with the airbag system.Take the vehicle to your dealer forservice.
Anti-theft Alarm SystemMessages
SERVICE THEFT ALARM
This message displays if there is aproblem with the alarm. See yourdealer for service.
SERVICE THEFT DETERRENTSYSTEM
This message displays if there isa problem with the theft-deterrentsystem. See your dealer for service.
Service Vehicle Messages
ENGINE MAINTENANCE XXX%COMPLETE
This message displays whenthe Engine Maintenance Mode isrunning. See “Engine MaintenanceMode” under Maintenance Modeson page 9‑28.
ENGINE NOT AVAILABLESERVICE SOON
This message displays when theengine is not available due to amalfunction that will not allow theengine to start. The vehicle cancontinue to be driven in ElectricMode until the battery is depleted,but will have reduced acceleration.When this message is displayed,the vehicle should be taken toyour dealer for service as soon aspossible. See Out of Fuel/EngineUnavailable on page 9‑28.
SERVICE AC SYSTEM
This message displays if there is aproblem with the air conditioningsystem. Take the vehicle to yourdealer for service.
SERVICE HEATER SOON
This message displays if there isa problem with the heater system.Take the vehicle to your dealer forservice.

Black plate (52,1)Chevrolet Volt Owner Manual - 2011
5-52 Instruments and Controls
SERVICE POWER STEERING
This message displays if there is aproblem with the power steeringsystem. Take the vehicle to yourdealer for service.
SERVICE VEHICLE SOON
This message displays if there is aproblem with the vehicle. Take thevehicle to your dealer for service.Depending on the severity of acrash, this message may comeon along with the airbag readinesslight.
Starting the VehicleMessages
PRESS BRAKE TO STARTVEHICLE
This message displays whenattempting to start the vehiclewithout first pressing the brakepedal.
PRESS BUTTON AGAIN TOTURN OFF
This message displays as areminder to press the POWER Obutton to turn the vehicle off whenan attempt is made to turn off thevehicle while it is in motion.
Tire Messages
SERVICE TIRE MONITORSYSTEM
This message displays if there isa problem with the Tire PressureMonitor System (TPMS). See TirePressure Monitor Operation onpage 10‑57 for more information.
TIRE LEARNING ACTIVE
This message displays whenthe system is learning new tires.See Tire Pressure MonitorOperation on page 10‑57 formore information.
TIRE LOW ADD AIR TO TIRE
This message displays when thepressure in one or more of the tiresis low.
This message also displaysLEFT FRONT, RIGHT FRONT,LEFT REAR, or RIGHT REAR toindicate the location of the low tire.
The low tire pressure warninglight will also come on. See TirePressure Light on page 5‑27.
If a tire pressure message appearson the DIC, stop as soon as youcan. Inflate the tires by adding airuntil the tire pressure is equal tothe values shown on the Tire andLoading Information label. See Tireson page 10‑48, Vehicle Load Limitson page 9‑14, and Tire Pressure onpage 10‑54.
You can receive more than onetire pressure message at a time.The DIC also shows the tirepressure values. See DriverInformation Center (DIC) onpage 5‑43.

Black plate (53,1)Chevrolet Volt Owner Manual - 2011
Instruments and Controls 5-53
Vehicle Speed Messages
SPEED LIMITED TO XXX
This message displays when thevehicle speed is limited.
Washer Fluid Messages
WASHER FLUID LOW ADDFLUID
This message displays whenthe washer fluid level is low.For information on filling thewasher fluid, see Washer Fluid onpage 10‑24.
VehiclePersonalizationThe Vehicle Personalizationfeatures can be accessed by usingeither the infotainment controls orthe touch screen in the center stackdisplay. See Overview on page 7‑3under “Infotainment System” formore information.
Using the InfotainmentControls
Use the CONFIG, TUNE/MENUknob, and } BACK buttonson the center stack to selectpersonalization features.
CONFIG (Configuration): Press toscroll through the available menusacross the top of the touch screendisplay.
TUNE/MENU Knob. Press to enter, select, or activate
a highlighted menu option.. Turn to highlight a menu option.. Press to turn a system setting on
or off.
} BACK
. Press to exit a menu.
. Press to return to a previousscreen.
Submenus
An arrow on the right‐hand edgeof the menu indicates that it has asubmenu with other options.
Selecting a Menu Option
1. Turn the TUNE/MENU knob tohighlight the function.
2. Press the TUNE/MENU knobto select the highlighted option.A checkmark next to the optionindicates the selected option.

Black plate (54,1)Chevrolet Volt Owner Manual - 2011
5-54 Instruments and Controls
Turning a Function On or Off
1. Turn the TUNE/MENU knob tohighlight the function.
2. Press the TUNE/MENU knobto turn the function on or off.A checkmark next to the functionindicates that the function is on.
Using the Touch Screen
Use the touch screen icons andmenus on the center stack displayto select personalization features.
w : Touch to scroll up.
x : Touch to scroll down.
Back: Touch Back in the upperright corner of the display to returnto the previous menu.
Submenus
An arrow on the right‐hand edgeof the menu indicates that it has asubmenu with other options.
Selecting a Menu Option
Touch any one of the availablemenu options on the touch screento select the option. A checkmarknext to the option indicates theselected option.
Turning a Function On or Off
Touch the screen where theavailable function is listed to turn iton or off. A checkmark next to thefunction indicates that the functionis on.
Entering thePersonalization Menu
Press Vehicle menu on the touchscreen.
The Vehicle menu features mayinclude:. Climate and Air Quality. Comfort and Convenience. Languages. Lighting. Power Door Locks. Remote Locking, Unlocking,
Starting. Return to Factory Settings

Black plate (55,1)Chevrolet Volt Owner Manual - 2011
Instruments and Controls 5-55
Climate and Air Quality
Select the Climate and Air Qualitymenu to display:. Auto Fan Speed. Auto Heated Seats. Remote Start Auto Heat Seats. Auto Defog
Auto Fan Speed
This feature sets the automaticfan speed to maintain the desiredinterior tempurature. This selectionis available on vehicles with theAutomatic Climate Control system.Choose a blower setting:
High: Increased speed.
Medium: Moderate speed.
Low: Reduced speed.
To select the auto fan speed:
1. Press the Vehicle menu.
2. Select Climate and Air Quality.
3. Select Auto Fan Speed.
4. Select the fan speed.
5. Press Back to return to theprevious menu.
Auto Heated Seats
When enabled, the auto heatedseat buttons on the touch screenwill be highlighted. This feature willautomatically activate heated seatsat the level required by the interiortemperature. The auto heated seatscan be turned off by using theheated seat buttons on the centerstack.
To turn the auto heated seats onor off:
1. Press the Vehicle menu.
2. Select Climate and Air Quality.
3. Turn the auto heated seatsfeature on or off.
4. Press Back to return to theprevious menu.
Remote Start Auto Heat Seats
When on, this feature will turn theheated seats on when using remotestart.
To turn the remote start auto heatseats on or off:
1. Press the Vehicle menu.
2. Select Climate and Air Quality.
3. Turn the remote start auto heatseats feature on or off.
4. Press Back to return to theprevious menu.
Auto Defog
When on and high humidity isdetected, the Climate Controlsystem will adjust the outside air,air conditioner, or heat to decreasefogging. The fan speed mayincrease. When high humidity isno longer detected, the systemwill return to previous operation.

Black plate (56,1)Chevrolet Volt Owner Manual - 2011
5-56 Instruments and Controls
To turn the auto defog on or off:
1. Press the Vehicle menu.
2. Select Climate and Air Quality.
3. Turn the auto defog feature onor off.
4. Press Back to return to theprevious menu.
Comfort and Convenience
Select the Comfort andConvenience menu and thefollowing will be displayed:. Chime Volume. Button Chime. Energy Summary Exit Pop‐up
Chime Volume
This allows the selection of thechime volume level to be eithernormal or high.
To select the chime volume level:
1. Press the Vehicle menu.
2. Select Comfort andConvenience.
3. Select Chime Volume.
4. Select the volume level.
5. Press Back to return to theprevious menu.
Button Chime
This allows a tone to be heardwhen a selection is made usingthe infotainment system.
To turn the button chime on or off:
1. Press the Vehicle menu.
2. Select Comfort andConvenience.
3. Turn the button chime feature onor off.
4. Press Back to return to theprevious menu.
Energy Summary Exit Pop‐up
This allows the energy summaryexit pop‐up to be turned on or off:
1. Press the Vehicle menu.
2. Select Comfort andConvenience.
3. Turn the energy summary exitpop‐up feature on or off.
4. Press Back to return to theprevious menu.

Black plate (57,1)Chevrolet Volt Owner Manual - 2011
Instruments and Controls 5-57
Languages
This allows the selection of alanguage:
1. Press the Vehicle menu.
2. Select Languages.
3. Select English, French,or Spanish.
4. Press Back to return to theprevious menu.
Lighting
Select the Lighting menu and thefollowing will be displayed:. Exit Lighting. Vehicle Locator Lights
Exit Lighting
This allows the selection of howlong the exterior headlamps stay onwhen leaving the vehicle and it isdark outside.
The available options are:. OFF. 30 seconds. 1 minute. 2 minutes
To select the length of time theexterior lamps will remain on:
1. Press the Vehicle menu.
2. Select Lighting.
3. Select Exit Lighting.
4. Select the length of time theexterior lamps will remain on.
5. Press Back to return to theprevious menu.
Vehicle Locator Lights
This allows the vehicle locator lightsto be turned on or off. When on, theheadlamps, parklamps, taillamps,license plate lamps, and back-uplamps will illuminate when K ispressed on the RKE transmitter.
To turn the vehicle locator lights onor off:
1. Press the Vehicle menu.
2. Select Lighting.
3. Turn the vehicle locator lights onor off.
4. Press Back to return to theprevious menu.
Power Door Locks
Select Power Door Locks and thefollowing will be displayed:. Auto Door Unlock. Unlocked Door Anti Lock Out. Delayed Door Lock
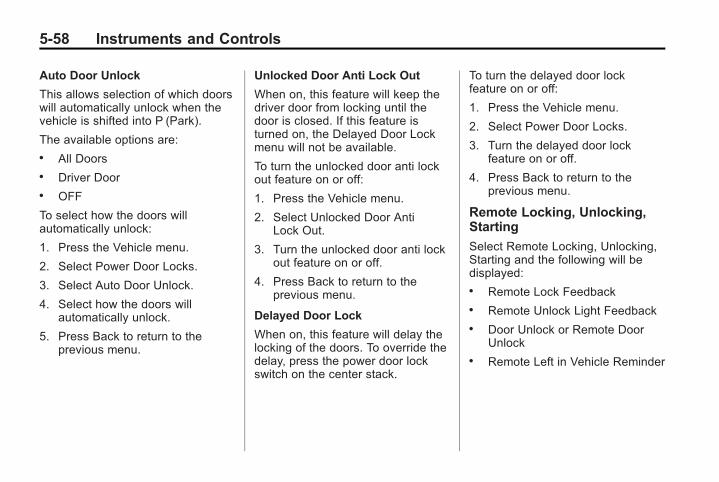
Black plate (58,1)Chevrolet Volt Owner Manual - 2011
5-58 Instruments and Controls
Auto Door Unlock
This allows selection of which doorswill automatically unlock when thevehicle is shifted into P (Park).
The available options are:. All Doors. Driver Door. OFF
To select how the doors willautomatically unlock:
1. Press the Vehicle menu.
2. Select Power Door Locks.
3. Select Auto Door Unlock.
4. Select how the doors willautomatically unlock.
5. Press Back to return to theprevious menu.
Unlocked Door Anti Lock Out
When on, this feature will keep thedriver door from locking until thedoor is closed. If this feature isturned on, the Delayed Door Lockmenu will not be available.
To turn the unlocked door anti lockout feature on or off:
1. Press the Vehicle menu.
2. Select Unlocked Door AntiLock Out.
3. Turn the unlocked door anti lockout feature on or off.
4. Press Back to return to theprevious menu.
Delayed Door Lock
When on, this feature will delay thelocking of the doors. To override thedelay, press the power door lockswitch on the center stack.
To turn the delayed door lockfeature on or off:
1. Press the Vehicle menu.
2. Select Power Door Locks.
3. Turn the delayed door lockfeature on or off.
4. Press Back to return to theprevious menu.
Remote Locking, Unlocking,Starting
Select Remote Locking, Unlocking,Starting and the following will bedisplayed:. Remote Lock Feedback. Remote Unlock Light Feedback. Door Unlock or Remote Door
Unlock. Remote Left in Vehicle Reminder

Black plate (59,1)Chevrolet Volt Owner Manual - 2011
Instruments and Controls 5-59
Remote Lock Feedback
This allows selection of whatfeedback is provided whenunlocking the vehicle withthe RKE transmitter.
The available options are:. Lights and Horn. Lights Only. Horn Only. OFF
To select the remote lock feedback:
1. Press the Vehicle menu.
2. Select Remote Locking,Unlocking, Starting.
3. Select Remote Lock Feedback.
4. Select the remote feedback.
5. Press Back to return to theprevious menu.
Remote Unlock Light Feedback
When on, the exterior lamps willflash when unlocking the vehiclewith the RKE transmitter.
To turn the remote unlock lightfeedback feature on or off:
1. Press the Vehicle menu.
2. Select Remote Locking,Unlocking, Starting.
3. Turn the remote unlock lightfeedback feature on or off.
4. Press Back to return to theprevious menu.
Door Unlock or Remote DoorUnlock
This allows selection of which doorswill unlock when pressing K on theRKE transmitter.
The available options are:. All Doors. Driver Door
If All Doors is selected, all doors willbe unlocked.
If Driver Door is selected, only thedriver door will be unlocked on thefirst press of K. All doors will beunlocked on the second pressof K within five seconds of theprior press.
To select how the doors will unlockwith the RKE transmitter:
1. Press the Vehicle menu.
2. Select Remote Locking,Unlocking, Starting.
3. Select Door Unlock or RemoteDoor Unlock.
4. Select how the doors will unlock.
5. Press Back to return to theprevious menu.

Black plate (60,1)Chevrolet Volt Owner Manual - 2011
5-60 Instruments and Controls
Remote Left in Vehicle Reminder
When on, the horn will chirp rapidlythree times if an RKE transmitter isleft in the vehicle.
To turn the remote left in vehiclereminder feature on or off:
1. Press the Vehicle menu.
2. Select Remote Locking,Unlocking, Starting.
3. Turn the remote left in vehiclereminder feature on or off.
4. Press Back to return to theprevious menu.
Return to Factory Settings
This returns all of the vehiclepersonalization settings to thefactory settings.
1. Press the Vehicle menu.
2. Select Return to FactorySettings.
3. Select Yes or No.
4. Press Back to return to theprevious menu.
Universal RemoteSystemSee Radio FrequencyStatement on page 13‑28 forinformation regarding Part 15of the Federal CommunicationsCommission (FCC) rules andIndustry Canada StandardsRSS-210/220/310.
Universal Remote SystemProgramming
If the vehicle has this feature, youwill see these buttons with oneLED indicator next to them in theoverhead console.
This system provides a way toreplace up to three remote controltransmitters used to activatedevices such as garage dooropeners, security systems, andhome automation devices.
Do not use the Universal Remotesystem with any garage door openerthat does not have the stop andreverse feature. This includesany garage door opener modelmanufactured before April 1,1982.
Read the instructions completelybefore attempting to programthe Universal Remote system.Because of the steps involved, itmay be helpful to have anotherperson available to assist withprogramming the UniversalRemote system.

Black plate (61,1)Chevrolet Volt Owner Manual - 2011
Instruments and Controls 5-61
Keep the original hand-heldtransmitter for use in other vehiclesas well as for future UniversalRemote system programming.It is also recommended thatupon the sale of the vehicle, theprogrammed Universal Remotesystem buttons be erased forsecurity purposes. See “ErasingUniversal Remote System Buttons”later in this section.
When programming a garage door,park outside of the garage. Parkdirectly in line with and facing thegarage door opener motor-heador gate motor-head. Be sure thatpeople and objects are clear ofthe garage door or gate beingprogrammed.
It is recommended that a newbattery be installed in the hand-heldtransmitter for quicker and moreaccurate transmission of theradio-frequency signal.
Programming the UniversalRemote System
For questions or help programmingthe Universal Remote system,call 1‐800‐355‐3515 or go towww.homelink.com.
Programming a garage door openerinvolves time-sensitive actions, soread the entire procedure beforestarting. Otherwise, the device willtime out and the procedure will haveto be repeated.
To program up to three devices:
1. Hold the end of the hand-heldtransmitter about 3 to 8 cm(1 to 3 in) away from theUniversal Remote systembuttons while keepingthe indicator light in view.The hand-held transmitter wassupplied by the manufacturerof the garage door openerreceiver (motor-head unit).
2. At the same time, pressand hold both the hand-heldtransmitter button and oneof the three Universal Remotesystem buttons to be used tooperate the garage door. Do notrelease the Universal Remotesystem button or the hand-heldtransmitter button until theindicator light changes from aslowly to a rapidly flashing light.You now may release bothbuttons.
Some entry gates and garagedoor openers may requiresubstitution of Step 2 withthe procedure noted in “GateOperator and CanadianProgramming” later in thissection.

Black plate (62,1)Chevrolet Volt Owner Manual - 2011
5-62 Instruments and Controls
3. Press and hold for five secondsthe newly trained UniversalRemote system button (thebutton selected in Step 2) whileobserving the indicator light andgarage door activation.. If the indicator light stays on
continuously or the garagedoor starts to move whenthe Universal Remotesystem button is pressedand released, then theprogramming is complete.There is no need tocontinue programmingSteps 4 through 6.
. If the Universal Remotesystem indicator light blinksrapidly for two seconds,then turns to a constantlight and the garage doordoes not move, continuewith programming Steps 4through 6.
It may be helpful to haveanother person assist withthe remaining Steps 4through 6.
“Learn” or “Smart” Buttons
4. After Steps 1 through 3 havebeen completed, locate the“Learn” or “Smart” button insidethe garage on the garage dooropener receiver (motor-headunit). The name and colorof the button may vary bymanufacturer.
5. Firmly press and release the“Learn” or “Smart” button. Afteryou press this button, you willhave 30 seconds to completeStep 6.
6. Immediately return to thevehicle. Firmly press and holdfor two seconds the UniversalRemote system button, selectedin Step 2 to control the garagedoor, and then release it. If thegarage door does not move orthe lamp on the garage dooropener receiver (motor-headunit) does not flash, press andhold the same button a secondtime for two seconds, and thenrelease it. Again, if the doordoes not move or the garagedoor lamp does not flash, pressand hold the same button a thirdtime for two seconds, and thenrelease.
The Universal Remote systemshould now activate thegarage door.
To program the remaining twoUniversal Remote system buttons,begin with Step 1 of “Programmingthe Universal Remote System.”

Black plate (63,1)Chevrolet Volt Owner Manual - 2011
Instruments and Controls 5-63
Gate Operator and CanadianProgramming
If you have questions or need helpprogramming the Universal Remotesystem, call 1‐800‐355‐3515 or goto www.homelink.com.
Canadian radio-frequency lawsrequire transmitter signals to timeout or quit after several seconds oftransmission. This may not be longenough for the Universal Remotesystem to pick up the signal duringprogramming. Similarly, some U.S.gate operators are manufactured totime out in the same manner.
If you live in Canada, or you arehaving difficulty programming agate operator or garage dooropener by using the “Programmingthe Universal Remote System”procedures, regardless of whereyou live, replace Step 2 under“Programming the Universal RemoteSystem” with the following:
Continue to press and holdthe Universal Remote systembutton while you press andrelease every two seconds (cycle)the hand-held transmitter buttonuntil the frequency signal hasbeen successfully accepted bythe Universal Remote system.The Universal Remote systemindicator light will flash slowly atfirst and then rapidly. Proceed withStep 3 under “Programming theUniversal Remote System” tocomplete.
Universal Remote SystemOperation
Using the Universal RemoteSystem
Press and hold the appropriateUniversal Remote systembutton for at least half of a second.The indicator light will come onwhile the signal is being transmitted.
Erasing Universal RemoteSystem Buttons
All programmed buttons should beerased when the vehicle is sold orthe lease ends.
To erase all programmed buttonson the Universal Remote systemdevice:
1. Press and hold down thetwo outside buttons until theindicator light begins to flash.This should take about10 seconds.
2. Release both buttons.
Black plate (64,1)Chevrolet Volt Owner Manual - 2011
5-64 Instruments and Controls
Reprogramming a SingleUniversal Remote SystemButton
To reprogram any of the threeUniversal Remote system buttons:
1. Press and hold the desiredUniversal Remote systembutton. Do not release thebutton.
2. The indicator light will begin toflash after 20 seconds. Withoutreleasing the button, proceedwith Step 1 of the section“Programming the UniversalRemote System.”
If you have questions or need helpprogramming the Universal Remotesystem, call 1‐800‐355‐3515 or goto www.homelink.com. You mayalso call the customer assistancephone number under CustomerAssistance Offices on page 13‑3.

Black plate (1,1)Chevrolet Volt Owner Manual - 2011
Lighting 6-1
Lighting
Exterior LightingExterior Lamp Controls . . . . . . . . 6-1Headlamp High/Low-BeamChanger . . . . . . . . . . . . . . . . . . . . . 6-2
Flash-to-Pass . . . . . . . . . . . . . . . . . 6-2Pedestrian Friendly Alert . . . . . . 6-2Daytime RunningLamps (DRL) . . . . . . . . . . . . . . . . 6-3
Hazard Warning Flashers . . . . . 6-4Turn and Lane-ChangeSignals . . . . . . . . . . . . . . . . . . . . . . 6-4
Interior LightingInstrument Panel IlluminationControl . . . . . . . . . . . . . . . . . . . . . . 6-5
Dome Lamps . . . . . . . . . . . . . . . . . 6-5Reading Lamps . . . . . . . . . . . . . . . 6-5
Lighting FeaturesEntry Lighting . . . . . . . . . . . . . . . . . 6-5Exit Lighting . . . . . . . . . . . . . . . . . . . 6-6Battery Power Protection . . . . . . 6-6
Exterior Lighting
Exterior Lamp Controls
The exterior lamp control is on theturn signal/lane change lever.
O (Exterior Lamp Control):Operates the exterior lamps. Turn toone of the following positions:
O (Off): Turns the exteriorlamps off.
AUTO (Automatic Headlamps):Turns the exterior lamps on and offautomatically depending on theexterior light.
; (Parking Lamps): Turns onthe parking lamps together with thefollowing:. Sidemarker Lamps. Taillamps. License Plate Lamps. Instrument Panel Lights
5 (Headlamps): Turns on theheadlamps, together with thepreviously listed lamps and lights.
Black plate (2,1)Chevrolet Volt Owner Manual - 2011
6-2 Lighting
Headlamp High/Low-Beam Changer23 Headlamp High/Low‐BeamChanger: Push the turn signal/lanechange lever away from you andrelease, to turn the high beams on.To return to low beams, push thelever again or pull it toward youand release.
This indicator light turns on inthe instrument cluster when thehigh‐beam headlamps are on.
Flash-to-PassThe flash‐to‐pass feature works withthe low beams or Daytime RunningLamps (DRL) on or off.
To flash the high beams, pull theturn signal/lane change lever towardyou momentarily and then release it.The Pedestrian Friendly Alert willalso sound if the vehicle is movingless than 64 km/h (40 mph).
Pedestrian Friendly AlertWhile driving at low speeds, suchas in parking lots, use this featureto alert people who may not hearyour vehicle approaching.
The pedestrian alert is onlyavailable when the vehicle ismoving at less than 64 km/h(40 mph) or is stopped and isnot in P (Park).
To use the pedestrian friendly alert:
Pull the turn signal/lane changelever all the way toward youmomentarily. See ExteriorLamp Controls on page 6‑1 andHeadlamp High/Low-Beam Changeron page 6‑2. The high‐beamheadlamps and indicator lightwill turn on, and a soft‐notealert will momentarily sound.
When the turn signal/lane changelever is released, the high‐beamheadlamps and indicator light willturn off.
Repeat for additional activations ofthe pedestrian friendly alert.

Black plate (3,1)Chevrolet Volt Owner Manual - 2011
Lighting 6-3
Daytime RunningLamps (DRL)The Daytime Running Lamps (DRL)system comes on in daylight whenthe following conditions are met:. The vehicle is on.. The exterior lamp control is in
the automatic position.. The electric drive unit is not in
P (Park).. The light sensor determines it is
daytime.A light sensor on top of theinstrument panel makes the DRLwork, so be sure it is not covered.
Fully functional DRL are required onall vehicles first sold in Canada.
When the DRL are on, the taillamps,sidemarker lamps, instrument panellights, and other lamps will not beon. The instrument cluster will be lit.
When the exterior lamp control bandis turned to the headlamp position,the low-beam headlamps come on.The other lamps that come on withthe headlamps will also come on.
When the vehicle is on and you arestopped, the DRL can be turned offby moving the shift lever to P (Park).The DRL will stay off until the shiftlever is moved out of the P (Park)position.
The regular headlamp systemshould be turned on when needed.

Black plate (4,1)Chevrolet Volt Owner Manual - 2011
6-4 Lighting
Hazard Warning Flashers
| (Hazard Warning Flasher):Press this button, on the centerstack, to make the front and rearturn signal lamps flash on and off.This warns others that you arehaving trouble.
Press| again to turn theflashers off.
Turn and Lane-ChangeSignals
An arrow on the instrument clusterwill flash in the direction of the turnor lane change.
Move the lever all the way up ordown to signal a turn.
Raise or lower the lever until thearrow starts to flash to signal a lanechange. Hold it there until the lanechange is complete. If the lever ismoved momentarily to the lanechange position, the arrow willflash three times.
The lever returns to its startingposition when it is released.
If a turn signal arrow flashes rapidlyor does not come on, a signal bulbmay need to be replaced. See BulbReplacement on page 10‑34.

Black plate (5,1)Chevrolet Volt Owner Manual - 2011
Lighting 6-5
Interior Lighting
Instrument PanelIllumination Control
The brightness of the instrumentpanel cluster display, infotainmentdisplay and controls, steering wheelcontrols, and all other illuminatedcontrols, as well as feature statusindicators can be adjusted.
The thumbwheel is on theinstrument panel to the leftof the steering column.
Move the thumbwheel up or down tobrighten or dim the lights.
Dome LampsThe dome lamp controls are in theoverhead console.
To operate, press the followingbuttons:
+ (On): Press to turn on thedome lamps.
1 (Door): Press to turn the lampson automatically when a door isopened.
* (Off): Press to turn the lampsoff, even when a door is open.
Reading LampsThe front reading lamps are in theoverhead console.
#$ : Press to turn each lamp onor off.
Lighting Features
Entry LightingThe headlamps, parking lamps,taillamps, back‐up lamps, and theinterior lights turn on briefly, whenthe Remote Keyless Entry (RKE)transmitter K is pressed. The lightsturn off immediately when thePOWER O button is pressed orautomatically after a brief period.

Black plate (6,1)Chevrolet Volt Owner Manual - 2011
6-6 Lighting
Exit LightingThe headlamps, parking lamps,taillamps, back‐up lamps, andlicense plate lamps come onwhen the vehicle is turned off.Some interior lights also comeon when the vehicle is turned off.The exterior lamps and interiorlights remain on after the dooris closed for a brief period andthen turn off.
The exit lighting featurecan be changed. See VehiclePersonalization on page 5‑53.
Battery Power ProtectionThe battery saver feature isdesigned to protect the vehicle's12‐volt battery.
If the exterior lamps or any interiorlamp is left on and the vehicle isturned off, the battery rundownprotection system automaticallyturns the lamps off after about10 minutes.

Black plate (1,1)Chevrolet Volt Owner Manual - 2011
Infotainment System 7-1
InfotainmentSystem
IntroductionInfotainment . . . . . . . . . . . . . . . . . . . 7-2Theft-Deterrent Feature . . . . . . . 7-3Overview . . . . . . . . . . . . . . . . . . . . . . 7-3
RadioAM-FM Radio . . . . . . . . . . . . . . . . 7-10Satellite Radio . . . . . . . . . . . . . . . 7-16Radio Reception . . . . . . . . . . . . . 7-17Multi-Band Antenna . . . . . . . . . . 7-18
Audio PlayersCD/DVD Player . . . . . . . . . . . . . . 7-18MP3 . . . . . . . . . . . . . . . . . . . . . . . . . 7-23Hard Drive Device (HDD) . . . . 7-26Auxiliary Devices . . . . . . . . . . . . 7-38
NavigationUsing the NavigationSystem . . . . . . . . . . . . . . . . . . . . . 7-39
Maps . . . . . . . . . . . . . . . . . . . . . . . . 7-44Navigation Symbols . . . . . . . . . 7-47Destination . . . . . . . . . . . . . . . . . . 7-51OnStar® DestinationDownload . . . . . . . . . . . . . . . . . . 7-64
Configure Menu . . . . . . . . . . . . . 7-66Global PositioningSystem (GPS) . . . . . . . . . . . . . . 7-74
Vehicle Positioning . . . . . . . . . . 7-75Problems with RouteGuidance . . . . . . . . . . . . . . . . . . . 7-76
If the System NeedsService . . . . . . . . . . . . . . . . . . . . . 7-76
Ordering Map DVDs . . . . . . . . . 7-76Database CoverageExplanations . . . . . . . . . . . . . . . 7-77
Voice RecognitionVoice Recognition . . . . . . . . . . . 7-77
PhoneBluetooth . . . . . . . . . . . . . . . . . . . . 7-85

Black plate (2,1)Chevrolet Volt Owner Manual - 2011
7-2 Infotainment System
Introduction
InfotainmentThe vehicle has a navigation systemwith an AM-FM radio. Read thefollowing pages to become familiarwith its features.
{ WARNING
Taking your eyes off the roadfor extended periods couldcause a crash resulting ininjury or death to you or others.Do not give extended attention toentertainment tasks while driving.
This system provides access tomany audio and non‐audio listings.
To minimize taking your eyes off theroad while driving, do the followingwhile the vehicle is parked:. Become familiar with the
operation and controls ofthe audio system.
. Set up the tone, speakeradjustments, and presetradio stations.
For more information, see DefensiveDriving on page 9‑4.
Notice: Contact your dealerbefore adding any equipment.
Adding audio or communicationequipment could interfere withthe operation of the engine,radio, or other systems, andcould damage them. Followfederal rules covering mobileradio and telephone equipment.
The vehicle has RetainedAccessory Power (RAP). With RAP,the audio system can be playedeven after the vehicle is turned off.See Retained Accessory Power(RAP) on page 9‑22 for moreinformation.

Black plate (3,1)Chevrolet Volt Owner Manual - 2011
Infotainment System 7-3
Theft-Deterrent FeatureThe theft-deterrent feature worksby learning a portion of theVehicle Identification Number(VIN) to the infotainment system.The infotainment system does notoperate if it is stolen or moved toa different vehicle.
OverviewWhen the navigation system isturned on, a screen may appear thatmust be read and acknowledged.
If the Caution screen appears,press OK. If either the NAV or DESTbuttons are pressed, this Caution
screen appears and OK must bepressed to access the NAV andDEST functions. See instructionslater in this section.
To get started, set your preferencesor delete information in thenavigation system using variousoptions.
Navigation System Overview
See “Navigation Buttons” underUsing the Navigation System onpage 7‑39 for more information.
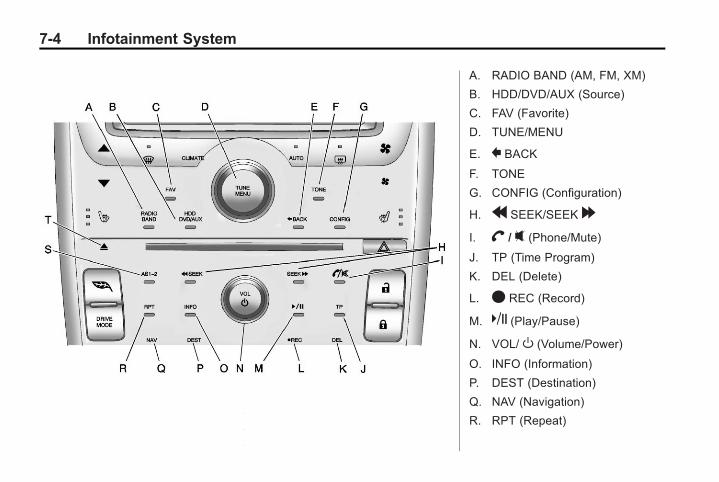
Black plate (4,1)Chevrolet Volt Owner Manual - 2011
7-4 Infotainment System
A. RADIO BAND (AM, FM, XM)
B. HDD/DVD/AUX (Source)
C. FAV (Favorite)
D. TUNE/MENU
E. } BACK
F. TONE
G. CONFIG (Configuration)
H. r SEEK/SEEK[
I. V / 0 (Phone/Mute)
J. TP (Time Program)
K. DEL (Delete)
L. O REC (Record)
M. k (Play/Pause)
N. VOL/ O (Volume/Power)
O. INFO (Information)
P. DEST (Destination)
Q. NAV (Navigation)
R. RPT (Repeat)

Black plate (5,1)Chevrolet Volt Owner Manual - 2011
Infotainment System 7-5
S. AS1-2 (Autostore)
T. X (Eject)
NAV (Navigation) Menu
Use the Navigation Menu screento access the navigation systemsettings. See Using the NavigationSystem on page 7‑39 for moreinformation.
. Press the NAV button to viewthe navigation map screen.The map and the currentvehicle location display.
. Press the NAV button to changebetween a map/audio split viewor a full map view.
Config Setup Menu
Press the CONFIG button to displaythe Config Menu. The Config Menuis used for changing the settings forthe audio, navigation display, phone,vehicle configuration, and timefeatures.
Turn the TUNE/MENU knob to scrollthrough the available setup features.Once the desired feature displays,press the TUNE/MENU knob orpress the desired feature on thescreen, to display more optionswithin that feature.

Black plate (6,1)Chevrolet Volt Owner Manual - 2011
7-6 Infotainment System
Languages
To change the display language,see Vehicle Personalization onpage 5‑53 for more information.
The vehicle supports English,French Canadian, and Spanish.The default language is English.
English and Metric UnitConversion
To change the display readingsbetween English and metric units,see Driver Information Center (DIC)on page 5‑43 for more information.
Deleting Personal Information
The navigation system can recordand store destinations and personalinformation such as names andaddresses.
It is recommended that thisinformation be deleted whenselling or disposing of the vehicle:. Previous Destinations. Address Book, Fav Route,
Preset Destinations, and HDDMusic Files
Storing Radio Station Presets
Up to 36 preset stations canbe stored. AM, FM, and XM,if equipped, can be mixed.To store presets:
1. Press VOL/ O to turn thesystem on.
If viewing a map screen, pressthe RADIO BAND button.
2. Select the band.
3. Seek or tune to the desiredstation to select it.
4. Press and hold one of the presetscreen buttons for more thantwo seconds.
5. Repeat the steps for eachpreset.
To change the number of presetpages, see “Mixed-Band Presets”under AM-FM Radio on page 7‑10for more information.
Black plate (7,1)Chevrolet Volt Owner Manual - 2011
Infotainment System 7-7
Entering an Address and Pointof Interest, and Storing PresetDestinations
The vehicle must be in P (Park) toperform these operations.
Entering an Address
To more easily find a city or astreet name:. Enter the street name first
instead of the city name,or vice versa.
. Enter more characters or reducethe number of characters toreduce or expand the availableoptions.
To set a destination by entering astreet name:
1. Press the DEST button.
2. Press the Address Entry buttonon the touch screen.
3. Select the street name field.Enter the street name. Do notenter directional informationor street type. Use the spacescreen button between streetand city names. Use thebackspace q screen button todelete an incorrect character.
A list displays if four or fewernames are available. If thereare more than four, there is amatch counter with a numberof available streets. Press theList screen button to view thelist and select the street.
4. Press the state/provincename field on the touch screento change it. The last state/province name is automaticallyrecalled.
5. Select the city from the list orenter the city name.
6. Enter the house number.This field is automaticallyselected.
7. Press the OK screen button.The address information screendisplays the address entered.
8. Press the Go screen button ifcorrect. The route will calculate.
9. Select the route preference forFastest, Shortest, or Easiest.See “Navigation Settings” underUsing the Navigation System onpage 7‑39 for more information.
10. Press the Start Guidancescreen button and the routeis calculated.
See “Address Entry” underDestination on page 7‑51 for moreinformation.

Black plate (8,1)Chevrolet Volt Owner Manual - 2011
7-8 Infotainment System
Entering a Point of Interest (POI)
To set a destination by entering aPoint of Interest (POI):
1. Press VOL/ O to turn thesystem on.
2. A caution could appear.Press OK to proceed.
3. Press the DEST button.
4. Press the Point of Interestscreen button.
5. Enter the specific title of thePOI in the POI name space(e.g., Washington Monument).
If four or fewer names areavailable, a list displays. If morethan four are available, there is amatch counter with a number init, representing the number ofavailable POI names. Press theList screen button to view thelist. Select the POI.
6. Press the Go screen button.The system calculates the route.
7. Select the route preference forFastest, Shortest, or Easiest.The system highlights the route.
8. Press the Start Guidance screenbutton. The route is now readyto be started.
See Destination on page 7‑51 formore information on how to entera POI.
Storing Preset Destinations
1. Press VOL/ O to turn thesystem on.
2. If a caution appears, press theOK screen button to proceed.
3. Press the DEST button.
4. Enter a destination.See Destination on page 7‑51for information on how toenter a destination.
5. Press Save from the mapscreen to add the current finaldestination to the address book.
6. Press the Edit screen buttonand then press the ChangeName field on the screen.An alpha-keyboard displays.Enter the name.
7. Press and hold one of thescreen buttons at the bottomof the screen until the text inthe button changes.
The address book entryname appears in that presetdestination screen button andis now available to select fromthe Select Destination screen.See “Using the Stored PresetDestinations” following to selectit as a destination.
See Destination on page 7‑51for more information on how toadd preset destinations.

Black plate (9,1)Chevrolet Volt Owner Manual - 2011
Infotainment System 7-9
Using the Stored PresetDestinations
These destinations are available forselection while driving.
1. Press VOL/ O to turn thesystem on.
2. A caution could appear.Press the OK screen buttonto proceed.
3. Press the DEST button.
4. Press one of the availablepreset destination screenbuttons. The system calculatesthe route.
5. Select the route preference forFastest, Shortest, or Easiest.The system highlights the route.
6. Press the Start Guidance screenbutton. The route is now readyto be started.
See “Preset Destinations” underDestination on page 7‑51 for moreinformation.
Canceling Guidance
Guidance is canceled at the finaldestination. To cancel guidanceprior to reaching the finaldestination:
1. Press the DEST button.
2. Press the Cancel Guidancescreen button.
3. Press the Yes screen button toconfirm cancellation.
Voice Guidance
To adjust the volume of voiceguidance prompts:
1. Press the CONFIG button toenter the menu features. Turnthe TUNE/MENU knob until Navdisplays. Press the TUNE/MENUknob to select Nav or press theNav screen button to displaymore options within that feature.
2. Press Voice Prompt.
3. Press Voice Volume.
4. Press the + or – screen buttonsto increase or to decrease thevolume of the voice prompts.
See Using the Navigation Systemon page 7‑39 for more information.
Cleaning the Display
If the center stack or the display isstained, wipe it with a dry, soft cloth.
Notice: Using abrasive cleanerswhen cleaning glass surfaces,could scratch the glass. Whencleaning the glass, use only asoft cloth and do not spraycleaner directly on the system.
Do not wipe the center stack witha hard cloth or use a volatile liquidsuch as paint thinner; it couldscratch the surface or erasethe characters on the buttons.

Black plate (10,1)Chevrolet Volt Owner Manual - 2011
7-10 Infotainment System
Radio
AM-FM Radio
Playing the Radio
Audio Source Menu
VOL/ O (Volume/Power):
1. Press to turn the radio on or off.
2. Turn to increase or decreasethe volume. The volume isadjusted for the current audiosource, active navigation voiceguidance, voice prompts,or audio cues.
The steering wheel controls canalso be used to adjust the volume.See Steering Wheel Controls onpage 5‑6 for more information.
TUNE/MENU: Turn to changethe radio station. See “Finding aStation” in this section for moreinformation.
RADIO BAND: Press to select theAM, FM, and XM (if equipped) band.
The audio sources can also bechanged by using the steeringwheel controls. See SteeringWheel Controls on page 5‑6for more information.
HDD/DVD/AUX: Change to theHard Drive, CD, DVD, USB, or AUXby pressing the HDD/DVD/AUXbutton until the desired source isselected.
If the audio source is on whileviewing a map screen, a sourceindicator button displays at thetop of the map screen.
Press the source indicator buttonto display the current audio sourcescreen. The display shows a splitscreen with the audio source screenon the left side and the map orguidance screen on the right side.Press the Full Map button to exit thesplit screen.

Black plate (11,1)Chevrolet Volt Owner Manual - 2011
Infotainment System 7-11
Navigation Audio System
Sound Menu
To access the Sound menu, pressthe TONE button.
Use the Sound menu to adjust thefollowing features:. Setting the Tone. Adjusting the Speakers
Setting the Tone
To adjust the tone using theSound menu:. Treble: Press + or − to change
the level.. Mid (Midrange): Press + or − to
change the level.. Bass: Press + or − to change
the level.
Adjusting the Speakers
To adjust the speaker balance usingthe Sound menu:. Press and hold the left arrow
for more sound from the leftspeakers or the right arrowfor more sound from the rightspeakers. The middle positionbalances the sound betweenthe left and right speakers.
To adjust the speaker fade:. Press and hold the front arrow
for more sound from the frontspeakers and the rear arrowfor more sound from the rearspeakers. The middle positionbalances the sound betweenthe front and rear speakers.
EQ Settings
EQ (Equalization): The EQsettings are selected throughthe Sound menu. If the vehicle isequipped with the Bose® EnergyEfficient Series sound system,EQ provides a choice of Manualor Talk settings.

Black plate (12,1)Chevrolet Volt Owner Manual - 2011
7-12 Infotainment System
Radio Menu
There are two ways to access theRadio menu:
. Press the CONFIG button, thenpress the Radio screen button.
. Turn the TUNE/MENU knobuntil Radio displays. Press theTUNE/MENU knob to selectRadio or press the Radio screenbutton to display more optionswithin that feature.
Audio Cue Options
This menu allows changes to theAudio Cue features.
Audio Cue Options are used towelcome the driver to the car aswell as indicate when the vehicleis ready to drive or when the vehicleis no longer ready to drive.
Audio Cue Volume: Press the + or− screen buttons to adjust the audiocue volume. The audio cue volumehas a minimum volume. A “LimitReached” pop-up will display whenthe volume has been changed toless than the minimum volume.
Press the Audio Cue Volume screenbutton to hear the selected soundlevel.
The audio cues can also bechanged by adjusting theTUNE/MENU knob.
Audio Cues: Press to turn theaudio cues on or off. A checkmarkindicates the audio cues are on.
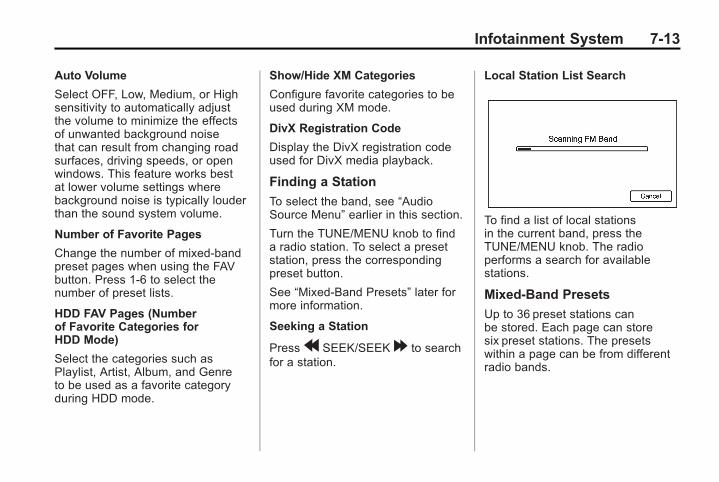
Black plate (13,1)Chevrolet Volt Owner Manual - 2011
Infotainment System 7-13
Auto Volume
Select OFF, Low, Medium, or Highsensitivity to automatically adjustthe volume to minimize the effectsof unwanted background noisethat can result from changing roadsurfaces, driving speeds, or openwindows. This feature works bestat lower volume settings wherebackground noise is typically louderthan the sound system volume.
Number of Favorite Pages
Change the number of mixed-bandpreset pages when using the FAVbutton. Press 1-6 to select thenumber of preset lists.
HDD FAV Pages (Numberof Favorite Categories forHDD Mode)
Select the categories such asPlaylist, Artist, Album, and Genreto be used as a favorite categoryduring HDD mode.
Show/Hide XM Categories
Configure favorite categories to beused during XM mode.
DivX Registration Code
Display the DivX registration codeused for DivX media playback.
Finding a Station
To select the band, see “AudioSource Menu” earlier in this section.
Turn the TUNE/MENU knob to finda radio station. To select a presetstation, press the correspondingpreset button.
See “Mixed-Band Presets” later formore information.
Seeking a Station
Pressr SEEK/SEEK[ to searchfor a station.
Local Station List Search
To find a list of local stationsin the current band, press theTUNE/MENU knob. The radioperforms a search for availablestations.
Mixed-Band Presets
Up to 36 preset stations canbe stored. Each page can storesix preset stations. The presetswithin a page can be from differentradio bands.

Black plate (14,1)Chevrolet Volt Owner Manual - 2011
7-14 Infotainment System
To scroll through the pages, pressthe FAV button. The current pagenumber displays above the presetbuttons. The stored stations foreach list display on the presetbuttons at the bottom of the screen.The number of preset FAV lists canbe changed.
To store a radio station to amixed-band preset list:
1. Press the RADIO BAND button,then press AM, FM, or XM,if equipped, to select thedesired band.
2. Tune to the station.
3. Press the FAV button to scroll tothe list.
4. Press and hold one of thepreset buttons for more thantwo seconds. The stationfrequency appears on thepreset button at the bottomof the display.
5. Repeat the steps for each presetin each page.
To recall a preset station from aFAV page:
1. Press the FAV button to scroll tothe page.
2. Press the preset button.The stored preset stationis recalled.
Timeshift
The timeshift feature automaticallybegins recording the audio whenlistening to the radio.
The recording allows playback ofcontent that was missed.
Timeshift stores up to 20 minutesof content. After 20 minutes, itremoves the oldest content andcontinues recording new content.
While listening to the radio, pressk (Play/Pause) to stop hearing theinformation through the speaker.During this paused time, timeshiftkeeps recording. A status bardisplays the length of the recording.

Black plate (15,1)Chevrolet Volt Owner Manual - 2011
Infotainment System 7-15
To resume listening to the broadcastat the point left off, pressk again.
Timeshift stops recording anderases the buffer when the vehicleis turned off or the station or sourceis changed.
Before turning the vehicle off, pressk so that timeshift keeps recordingfor 20 minutes. If the vehicle is stilloff after 20 minutes, the systemstops recording and all informationis lost. If a low 12-volt batterycondition occurs, timeshift stopsrecording and all information iserased.
Radio Data System (RDS)
The audio system has a RadioData System (RDS). RDS featuresare available for use only onFM stations that broadcastRDS information. With RDS,the radio can:. Seek to stations broadcasting
the selected type ofprogramming.
. Receive announcementsconcerning local and nationalemergencies.
. Display messages from radiostations.
This system relies on receivingspecific information from thesestations and only works whenthe information is available.In rare cases, a radio station couldbroadcast incorrect informationthat causes the radio features towork improperly. If this happens,contact the radio station.
The RDS system is always on.When information is broadcast fromthe current FM station, the stationname or call letters display on theaudio screen. RDS can provide aprogram type (PTY) for currentprogramming and the name ofthe program being broadcasted.
Black plate (16,1)Chevrolet Volt Owner Manual - 2011
7-16 Infotainment System
Satellite Radio
XM™ Satellite Radio Service
Vehicles with an XM satellite radiotuner and an XM satellite radiosubscription can receive XMprogramming.
XM is a satellite radio service basedin the 48 contiguous United Statesand 10 Canadian provinces. XMsatellite radio has a wide variety ofprogramming and commercial-freemusic, coast to coast, and indigital-quality sound. A servicefee is required to receive the XMservice. For more information,see www.xmradio.com or call1-800-929-2100 in the U.S.In Canada, see www.xmradio.caor call 1-877-438-9677.
When XM is active, the channelname and number, category name,song title, and artist display on thescreen.
XM Categories
XM stations are organized incategories.
Removing or Adding Categories
1. Press the CONFIG button.Turn the TUNE/MENU knobuntil Radio displays. Press theTUNE/MENU knob or pressRadio to display the radiosettings menu.
2. Select the Show/Hide XMCategories screen button.
3. Press the category buttons onthe screen to show or hide thecategory.
XM Messages
XL (Explicit LanguageChannels): These channels, or anyothers, can be blocked by request,by calling 1-800-929-2100 in theU.S., and 1-877-438-9677 inCanada.
XM Updating: The encryption codein the receiver is being updated.No action is required. This processshould take no longer than30 seconds.
Loading XM: The audio systemis acquiring and processing audioand text data. No action is needed.This message should disappearshortly.
Channel Off Air: This channel isnot currently in service. Tune in toanother channel.
Channel Unauth: This channel isblocked or cannot be received withyour XM subscription package.
Channel Unavailable: Thispreviously assigned channel isno longer assigned. Tune toanother station.
No Artist Info: The systemis working properly. No artistinformation is available at thistime on this channel.
Black plate (17,1)Chevrolet Volt Owner Manual - 2011
Infotainment System 7-17
No Title Info: The system isworking properly. No song titleinformation is available at thistime on this channel.
No CAT Info: The system isworking properly. No categoryinformation is available at thistime on this channel.
No Information: The systemis working properly. No text orinformational messages areavailable at this time on thischannel.
No XM Signal: The system isworking properly. The vehicle maybe in a location where the XM signalis being blocked. When the vehicleis moved into an open area, thesignal should return.
CAT Not Found: The system isworking properly. There are nochannels available for the selectedcategory.
XM Radio ID: If tuned to channel 0,this message alternates with theXM radio eight‐digit radio ID label.This label is needed to activate theservice.
Unknown: If this message isreceived when tuned to channel 0,there could be a receiver fault.Consult with your dealer.
Check Antenna: If this messagedoes not clear within a short periodof time, the receiver could have afault. Consult with your dealer.
XM Not Available: If this messagedoes not clear within a short periodof time, the receiver could have afault. Consult with your dealer.
Radio ReceptionFrequency interference and staticcan occur during normal radioreception if items such as cell phonechargers, vehicle convenienceaccessories, and external electronicdevices are plugged into theaccessory power outlet. If there isinterference or static, unplug theitem from the accessory poweroutlet.
FM
FM signals only reach about 16 to65 km (10 to 40 mi). Although theradio has a built-in electronic circuitthat automatically works to reduceinterference, some static can occur,especially around tall buildings orhills, causing the sound to fade inand out.

Black plate (18,1)Chevrolet Volt Owner Manual - 2011
7-18 Infotainment System
AM
The range for most AM stations isgreater than for FM, especially atnight. The longer range can causestation frequencies to interfere witheach other. Static can occur whenthings like storms and power linesinterfere with radio reception. Whenthis happens, try reducing the trebleon the radio.
XM™ Satellite Radio Service
XM Satellite Radio Service givesdigital radio reception from coastto coast in the 48 contiguousUnited States, and in Canada.Just as with FM, tall buildings orhills can interfere with satellite radiosignals, causing the sound to fadein and out. In addition, travelingor standing under heavy foliage,bridges, garages, or tunnels maycause loss of the XM signal for aperiod of time.
Cellular Phone Usage
Cellular phone usage can causeinterference with the vehicle's radio.
Multi-Band AntennaThe multi-band antenna is on theroof of the vehicle. The antennais used for the AM‐FM radio,OnStar, the XM Satellite RadioService System, and GPS (GlobalPositioning System), if the vehiclehas these features. Keep theantenna clear of obstructionsfor clear reception.
Audio Players
CD/DVD PlayerThe player can be used for CD,MP3, and DVD audio, and as aDVD video player.
With the vehicle on, insert aCD/DVD into the slot, label sideup. The player pulls it in andbegins playing. While playing,the navigation system is available.
The vehicle must be in P (Park) forvideo to display.
The DVD player is only compatiblewith DVDs of the appropriate regioncode printed on the jacket ofmost DVDs.

Black plate (19,1)Chevrolet Volt Owner Manual - 2011
Infotainment System 7-19
The system is capable of playing:. Most audio CDs. CD-R. CD-RW. MP3 or unprotected WMA
formats. DVD-Video. DVD-Audio. DVD-R/RW. DVD+R/RW
When playing any compatiblerecordable disc, the sound qualitycan be reduced due to disc quality,the method of recording, the qualityof the music or video that has beenrecorded, or the way the disc hasbeen handled.
There can be increased skipping,difficulty in recording tracks,difficulty in finding tracks/chapters,and/or difficulty in loading andejecting. If these problems occur,check the disc for damage or trya known good disc.
To avoid damage to the CD/DVDplayer:. Do not use scratched or
damaged discs.. Do not apply labels to discs.
The labels could get caughtin the player.
. Insert only one disc at a time.
. Keep the loading slot free offoreign materials, liquids,and debris.
. Use a marking pen to label thetop of the disc.
Loading and Ejecting Discs
To load a disc:
1. Turn the vehicle on.
2. Insert a disc into the slot, labelside up. The player pulls it inthe rest of the way. If the disc isdamaged or improperly loaded,there is an error and the discejects.
The disc automatically plays onceloaded.
PressX to eject a disc from theCD/DVD player.
Playing a CD/DVD
A disc must be loaded to select thesource.
When a disc is loaded, the disc icondisplays.

Black plate (20,1)Chevrolet Volt Owner Manual - 2011
7-20 Infotainment System
There are two ways to play aCD/DVD:. Insert the disc and play starts
automatically.. Press the HDD/DVD/AUX
button, then press the discscreen button.
Playing an Audio CD
A track number displays at thebeginning of each track. Song,Artist, and Album informationdisplays when available.
Use the following controls to playthe disc:
k (Play/Pause): Use to start,pause, or resume play.
SEEK[ :
. Press to seek to the next track.
. Press and hold to fast forwardthrough a track. Release thebutton to return to playingspeed. Elapsed time displays.
r SEEK:. Press to seek to the beginning
of the current or previous track.If the track has been playing forless than five seconds, it seeksthe previous track. If longer thanfive seconds, the current trackstarts from the beginning.
. Press and hold to fast reversethrough a track. Release thebutton to return to playingspeed. Elapsed time displays.
TUNE/MENU: Turn to the right orleft to display the track list. Turnit again to cycle through the list.Press this knob to select the track.The system plays the selected trackand returns to the CD screen.
CD Menu
Press the CD Menu screen buttonto display the CD Menu.
Shuffle: Press to play thetracks randomly rather than insequence. Press again to stopshuffle. A checkmark indicatesshuffle is on.
Track List: Press to display the listof tracks on the disc. Select a trackfrom the list. The selected trackplays and the CD screen displays.

Black plate (21,1)Chevrolet Volt Owner Manual - 2011
Infotainment System 7-21
Playing an Audio andVideo DVD
To view the DVD video, the vehiclemust be in P (Park) or the parkingbrake must be engaged.
After the DVD is loaded, the menuoptions display on the DVD screen.The menu options time out anda full screen appears after about10 seconds. Press anywhere onthe navigation system screen orpress the FAV, HDD/DVD/AUX,or } BACK button to view themenu screen again.
Use the preset keys or press screenbuttons to operate the DVD options.
There are two pages of DVDoptions. Press the arrow screenbutton, in the bottom right cornerof the screen, to access the otherpage. Only the highlighted functionsare available for use. Some menuoptions are only available when thedisc is not playing.
DVD Options
Full Screen:
1. Press to hide the DVD optionsand display the full video image.
2. Press anywhere on thenavigation system screen orpress the FAV, HDD/DVD/AUX,or } BACK button to display thesource screen buttons over thevideo image.
Cursor: Press this buttonto access the Cursor menu.The arrows and other cursoroptions allow navigation of theDVD menu options. The Cursormenu options are only availableif a DVD has a menu.
q, Q , r , R (Arrow Buttons):Use these arrow screen buttons tonavigate through the DVD menu.
k (Play/Pause): Use to start,pause, or resume play.
SEEK[ :
1. Press to seek to the nextchapter.
2. Press more than once tocontinue moving forward throughthe disc.
3. Press and hold to fast forwardthrough a disc. When fastforward is active, press againto change the speed. Elapsedtime displays.
4. Pressk to resume playing.

Black plate (22,1)Chevrolet Volt Owner Manual - 2011
7-22 Infotainment System
r SEEK:
1. Press to seek to the beginning ofthe current or previous chapter.If the chapter has played forless than five seconds, it goesto the previous chapter. If thechapter has played longer thanfive seconds, the current chapteris restarted. More than onepress continues moving backthrough the disc.
2. Press and hold to fast reversethrough a disc. When fastreverse is active, press againto change the speed. Elapsedtime displays.
3. Pressk to resume playing.
TUNE/MENU: Pressr SEEK/
SEEK[ to go to the next orprevious chapter. You can alsochange chapters by turning theTUNE/MENU knob after touchingthe screen.
Stop:
1. Press on the display screento show the available buttons.Press the stop button to stopthe DVD.
2. To resume playing the DVD fromwhere it stopped, pressk.
3. Pressk twice to start the DVDfrom the beginning.
Z (Shuffle):
1. Press to play the tracksrandomly rather than insequence.
2. Press again to play sequentially.This button is available for DVDaudio discs.
Top Menu: Press to display thefirst menu of the DVD. Availabilityof this feature is dependent onthe DVD.
Menu: Press to display the menufor the part of the DVD currentlyplaying. Availability of this featureis dependent on the DVD and isnot available for audio DVDs.
Keypad: Press to display andsearch through the chapter, track,or menu number screen. On thekeypad, enter the title/chapternumber or the group/track number.
Search: Press to perform a titlesearch.
Angle: Press to adjust the viewingangle of the DVD, depending onthe DVD, while the DVD is playing.Continue pressing to cycle throughthe viewing angles.
Audio: Press to change the audiostream and the audio languageheard, while the DVD is playing.Continue pressing to cycle throughthe available audio streams orlanguages, depending on the DVD.

Black plate (23,1)Chevrolet Volt Owner Manual - 2011
Infotainment System 7-23
Subtitle: Press while a DVD isplaying to view with subtitles onor off or to change the language ofthe subtitles. Continue pressing tocycle through the available subtitlelanguages and to turn subtitles off,depending on the DVD playing.
Pan Scan: Pan Scan is a methodof adjusting widescreen film imagesso that they can be proportioned tofit the DVD screen display. Pressthis screen button to turn onPan Scan.
Error Messages
If Disc Read Error displays and/orthe disc comes out, it could be forone of the following reasons:. The disc has an invalid or
unknown format.. The disc is not from a correct
region.
. The disc is very hot. Try the discagain when the temperaturereturns to normal.
. The road is very rough. Try thedisc again when the road issmoother.
. The disc is dirty, scratched, wet,or upside down.
. The air is very humid. Try thedisc again later.
. There was a problem whileburning the disc.
. The label is caught in theCD/DVD player.
If the CD or DVD is not playingcorrectly, for any other reason,try a known good CD or DVD.
If any error continues, contact yourdealer.
MP3
Playing an MP3 CD and DVD
The following guidelines must bemet when creating an MP3 disc,otherwise the CD might not play:. Sampling rate: 8 kHz, 16 kHz,
22.05 kHz, 24 kHz, 32 kHz,44.1 kHz, and 48 kHz.
. Bit rates supported: 8, 16, 24,32, 40, 48, 56, 64, 80, 96, 112,128, 144, 160, 192, 224, 256,and 320 kbps.
. Maximum number of folders: 255with a maximum hierarchy ofeight folders.
. Maximum of 1,024 files ona disc.
. Recorded on a CD-R or CD-RWwith a maximum capacity of700 MB.
. DVD-Dual Layer discs shouldnot be used.

Black plate (24,1)Chevrolet Volt Owner Manual - 2011
7-24 Infotainment System
. The Artist/Album/Song Titles/Genre information requires aCD to be fully scanned beforethe music navigator works withthese menus. Disc scanningdoes not occur when the discis being played.
When an MP3 is loaded in theplayer, MP3 displays.
If a disc is already loaded, but youare currently on a map screen orlistening to a different audio source,press the HDD/DVD/AUX button toswitch to the disc source. A tracknumber appears on the displaywhen each track starts to play.
To play a disc:
k (Play/Pause): Use to start,pause, or resume play of aloaded disc.
SEEK[ :
1. Press to seek to the next track.
2. Press again to continue movingforward through the disc.
3. Press and hold to advancequickly through playback.
4. Release the button to return toplaying speed. Elapsed timedisplays.
r SEEK:
1. Press to seek to the beginningof the current or previous track.If the track has played for lessthan five seconds, it goes to theprevious track. If longer thanfive seconds, the current trackrestarts.
2. Press again to continue movingback through the disc.
3. Press and hold this buttonto reverse quickly throughplayback.
4. Release the button to return toplaying speed. Elapsed timedisplays.
TUNE/MENU:
1. Turn to the right or left to displaythe track list.
2. Turn it again to cycle throughthe list.
3. Press TUNE/MENU to selectthe track. The system plays theselected track and returns to theCD screen.
MP3 Music Menu
Press the Disc Menu screen buttonor press the TUNE/MENU knobon the faceplate while on the discaudio screen to display the MP3Music Menu.

Black plate (25,1)Chevrolet Volt Owner Manual - 2011
Infotainment System 7-25
Press any of the following categorybuttons on the MP3 Music Menu todisplay the corresponding categoryscreen:. Folders/Playlists
Press to view the folders storedon the disc. Select a folder toview the list of all songs in thatfolder. There might be a delaybefore the list displays. Selectthe song from the list and itbegins to play.
. Track List (All Songs)
Press to view a list of all songson the disc. There might be adelay before the list displays.Select a song from the list andit begins to play. Songs aredisplayed based on the CDburning application folderand file structure used.
. Artists
Press to view the list of artistsstored on the disc. Select anartist name to view a list ofall songs by the artist. Theremight be a delay before the listdisplays. Select the desiredsong from the list and it beginsto play.
. Albums
Press to view the albums on thedisc. Select the album to viewa list of all songs on the album.There might be a delay beforethe list displays. Select a songfrom the list and it begins to play.
. Genres
Press to view the genres on thedisc. Select a genre to view alist of all songs of that genre.There might be a delay beforethe list displays. Select a songfrom the list and it begins to play.
. Song Titles
Press to display a list of allsongs on the disc. There mightbe a delay before the listdisplays. Select a song from thelist and it begins to play. Songsare displayed in alphabeticalorder based on the Song TitleID3 tag, if available.
Root Directory
The root directory is treatedas a folder. All files containeddirectly under the root directory areaccessed prior to any root directoryfolders.

Black plate (26,1)Chevrolet Volt Owner Manual - 2011
7-26 Infotainment System
Empty Directory or Folder
If a root directory or folder is emptyor contains only folders, the playeradvances to the next folder inthe file structure that contains acompressed audio file. The emptyfolder(s) are not displayed ornumbered.
No Folder
When the CD only containscompressed audio files withoutany folders or playlists, all filesare under the root folder.
File System and Naming
The displayed song title is takenfrom the file's ID3 tag. If a songtitle is not present in the ID3 tag,the radio displays the file nameas the track name.
Preprogrammed Playlists
The radio recognizespreprogrammed playlists;however, there is no editingcapability. These playlists aretreated as special folders containingcompressed audio song files.
Hard Drive Device (HDD)With a Hard Drive Device (HDD),songs can be recorded.
The types of formats supported bythe HDD are:. MP3. MP3-Pro. WMA. Audible.com. M4A
Songs can be recorded froma CD player or a mass mediastorage device connected by aUSB connector. The hard drive has30 GB memory capacity for storageof media files.
For optimal recording performance,make sure the disc is clean withno damage; otherwise the systemmight partially record the track.
To select the hard drive audiosource:
Press the HDD/DVD/AUX button;cycle through the available audiosources until the HDD sourcedisplays or press the HDD/DVD/AUX button once, and then pressthe HDD source button.
Black plate (27,1)Chevrolet Volt Owner Manual - 2011
Infotainment System 7-27
Recording from a CD to theHard Drive
The speed of the recordingincreases if you are listening toanother source while recording.
To record all tracks from the disc:
1. Load a CD or press theHDD/DVD/AUX button untilthe Disc screen displays.
2. Press theO REC button.
3. A confirmation displays.
4. Select All Songs to record alltracks. A progress bar displays.
To record selected tracks fromthe disc:
1. Load a CD or press theHDD/DVD/AUX button untilthe Disc screen displays.
2. Pressr SEEK/SEEK[ or theCD/MP3 Music Menu to select asong for recording.
3. Press theO REC button.
4. A confirmation displays.
5. Select the song name to record.A progress bar displays.
Recording from a USB Deviceto the Hard Drive
To copy all tracks from the USBdevice:
1. Connect a USB device or pressthe HDD/DVD/AUX button untilthe disc screen displays theUSB screen.
2. Press theO REC button.
3. A confirmation displays.
4. Select All Songs to copy alltracks. A progress bar displays.
To record selected tracks:
1. Connect a USB device or pressthe HDD/DVD/AUX button untilthe disc screen displays theUSB screen.
2. Use ther SEEK/SEEK[ orthe Music Menu to select a songfor recording.
3. Press theO REC button.
4. A confirmation displays.
5. Select the song name to record.A progress bar displays.

Black plate (28,1)Chevrolet Volt Owner Manual - 2011
7-28 Infotainment System
Duplicate Content
When the record function starts,there is a check to verify that thecontent does not already exist onthe hard drive. If the entire contentof the CD exists on the hard drive,it will not record the content.
If it is determined that some or noneof the content exists, then only thatmissing content will be copied to thehard drive.
If the same file is recorded from theUSB and CD, it is possible to haveduplicate tracks.
CD Eject
If the CD ejects before the recordingprocess completes, only tracks thathave been completely recorded arestored to the hard drive. Incompletetracks are discarded.
Power Mode
If the system is turned off duringa CD or USB recording process,it stops. When the radio is turnedback on, the recording processdoes not resume automatically.
Playing Hard Disc DriveContent
To operate hard drive functionswhile the HDD source is active,use the following buttons ortouch-sensitive buttons:
k (Play/Pause): Press to start,pause, or resume play of the currentmedia source.
SEEK[ :
1. Press to seek to the next track.
2. Press and hold to advancequickly through playback.
3. Release the button to return toplaying speed. Elapsed timedisplays.
r SEEK:
1. Press to seek to the beginningof the current or previous track.If the track has been playingfor less than five seconds, theprevious track plays. If longerthan five seconds, the currenttrack restarts.
2. Press and hold this buttonto reverse quickly throughplayback.
3. Release the button to return toplaying speed. Elapsed timedisplays.

Black plate (29,1)Chevrolet Volt Owner Manual - 2011
Infotainment System 7-29
TUNE/MENU:
1. Turn to the right or left to displayAll Songs.
2. Turn it again to cycle throughthe list.
3. Press the TUNE/MENU knob toselect the song. The systemplays the selected song andreturns to the CD screen.
DEL (Delete):
1. Select the song from the HDDMusic Menu screen to delete.
2. Press the DEL button.
To delete an entire list of Artists,Albums, or Genres, select thecategory from the HDD Music Menuscreen. Press the DEL button.
HDD Music Menu
From the HDD screen, press theHDD Menu screen button on theHDD screen to display the HDDMusic Menu.
Press any of the following buttonson the HDD Music Menu:
Shuffle: Press to play the tracksrandomly rather than in sequence.
More Like This: Press to useGracenote® music recognitiontechnology and related data togenerate a list of songs similar tothe current song. Select a songfrom the list.
This feature is only available withsongs recorded to the HDD fromaudio CDs, not MP3s and othercompressed audio.
When recording CDs to the HDD,there might be delays to build thelist until all files are compressed.
Playlists:
1. Press to view the playlists on thehard drive.
2. Select a playlist to view a list ofall songs in the playlist.
3. Select a song from the list. Onceselected, Playlist Mode displays.
Artists:
1. Press to view the artists on thehard drive.
2. Select an artist to view a list ofall songs by that artist.
3. Select a song from the list. Onceselected, Artist Mode displays.
Albums:
1. Press to view the albums on thehard drive.
2. Select an album to view a list ofall songs on the album.
3. Select a song from the list. Onceselected, Album Mode displays.

Black plate (30,1)Chevrolet Volt Owner Manual - 2011
7-30 Infotainment System
All Songs:
1. Press to view a list of all songson the hard drive.
2. Select a song from the list.Once selected, All Songs Modedisplays.
Genres:
1. Press to view the genres on thehard drive.
2. Select a genre to view a list ofall songs of that genre.
3. Select a song from the list. Onceselected, Genre Mode displays.
Recently Saved: Press to view alist of the 50 most recently savedsongs to the HDD. Once selected,Recently Saved Mode displays.
Saving HDD Favorites
During HDD playback, to save thecurrent song playing to a categorypreset:
1. Press the FAV button until theFAV playlist category displays.
2. Press and hold a preset buttonon the bottom of the screen untilthe Saved to Favorites messagedisplays.
To save an entire Artist, Album,or Genre to a FAV category preset:
1. Press the FAV button until thecorrect FAV category appears.
2. Press and hold a preset buttonon the bottom of the screen.
Playing HDD Favorites
Favorites can be played twodifferent ways:. Press the FAV button until the
appropriate FAV HDD categorydisplays. Press a preset buttonat the bottom of the FAV HDDscreen.
. Select FAV from the HDDMusic Menu. Favorite Artist,Album, and Genre are in thecorresponding list.
Black plate (31,1)Chevrolet Volt Owner Manual - 2011
Infotainment System 7-31
USB-Supported Devices
The USB connector uses thefollowing:. USB 2.0.. USB flash sticks or pen drives.. Portable USB Hard Drives.
Special care needs to be takenrelated to the power sourceof these devices (USB buspowered vs. external power).
. Portable media adapters thatsupport SD Flash, CompactFlash, or SD Micro.
Depending on the USB massstorage device, some devicesmight not be recognized.
Music can be played directly fromthe USB device and controlledthrough the MP3 control functionsand menu.
Playing from a USB
A USB mass storage device can beconnected to the USB port to copycompressed audio files onto thehard drive. Content can also beplayed directly from the USBdevice.
The USB port is in the centerconsole.
The USB icon displays when theUSB device is connected.
To play a USB device:
1. Connect the USB and it beginsto play.
2. Press the HDD/DVD/AUXbutton, then press the USBscreen button.
While the USB source is active,use the following to operate USBfunction:
k (Play/Pause): Press to start,pause, or resume play of the currentmedia source.
SEEK[ :
1. Press to seek to the next track.
2. Press and hold to advancequickly through playback.Release the button to returnto playing speed. Elapsedtime displays.

Black plate (32,1)Chevrolet Volt Owner Manual - 2011
7-32 Infotainment System
r SEEK:
1. Press to seek to the beginningof the current or previous track.If the track has been playingfor less than five seconds, theprevious track plays. If playinglonger than five seconds, thecurrent track restarts.
2. Press and hold to reversequickly through playback.
3. Release the button to return toplaying speed. Elapsed timedisplays.
TUNE/MENU:
1. Turn to the right or left to displaythe track list.
2. Turn it again to cycle throughthe list.
3. Press the TUNE/MENU knobto select the track. The systemplays the selected track andreturns to the USB screen.
USB Music Menu
Press the USB Menu screen buttonor press the TUNE/MENU knobwhile on the USB Audio screento display the USB Music Menu.
Select any of the following buttonson the USB Music Menu:
Shuffle: Press to play the tracksrandomly rather than in sequence.Select again to stop this function.
Folders/Playlists: Select to viewthe playlists stored on the USB.Select a folder/playlist to view a listof all songs in the folder/playlist.Select a song from the list. Onceselected, Folder/Playlist Modedisplays.
Track List: Press to view a list ofsongs and what track the songs arestored on.
Artists: Press to view the artistsstored on the USB. Select an artistto view a list of all songs by theartist. Select a song from the list.Once selected, Artist Modedisplays.
Albums: Press to view the albumsstored on the USB. Select an albumto view a list of all songs on thealbum. Select a song from the list.Once selected, Album Modedisplays.
All Songs: Press to view a list ofall songs stored on the USB. Selecta song from the list. Once selected,All Songs Mode displays.
Genres: Press to view the genresstored on the USB. Select a genreto view a list of all songs of thatgenre. Select a song from the list.Once selected, Genre Modedisplays.

Black plate (33,1)Chevrolet Volt Owner Manual - 2011
Infotainment System 7-33
Eject USB: Press when the USBis to be removed. If the USB isdisconnected without selectingEject USB, the files could becomecorrupted.
Playing from an iPod®
This feature supports the followingiPod models:. iPod (fifth generation or later). iPod nano (first, second, third,
fourth, and fifth generation). iPod classic. iPod touch (first and second
generation)
For proper operation, make surethe iPod has the latest firmwarefrom Apple®. iPod firmware can beupdated using the latest iTunes®
application. For more information,visit www.apple.com/itunes.
Recording from the iPod to theHDD is not supported. Media mustbe recorded using a USB massstorage device.
To connect and control an iPod,connect one end of the standardiPod USB cable to the iPod's dockconnector. Connect the other end tothe USB port in the center console.
iPod music information displayson the radio’s display and beginsplaying through the vehicle’s audiosystem.
The iPod battery rechargesautomatically while the vehicleis on. When the vehicle is off whilean iPod is connected using the iPodUSB cable, the iPod battery stopscharging and the iPod automaticallyturns off.
If the iPod is an unsupportedmodel, it can still be listened toin the vehicle by connecting tothe auxiliary input jack using astandard 3.5 mm (1/8 in) stereocable. See Auxiliary Devices onpage 7‑38 for more information.
iPod Music Menu
Press any of the following buttonson the iPod Music Menu to displaythe corresponding screen:
Shuffle:
1. Press to play the tracksrandomly rather than insequence.
2. Press the button again to stopthis function.

Black plate (34,1)Chevrolet Volt Owner Manual - 2011
7-34 Infotainment System
Playlists:
1. Press to view the playlists storedon the iPod.
2. Select a playlist name to view alist of all songs in the playlist.
3. Select the desired song fromthe list. Once a song has beenselected, Playlist Mode appearson the iPod main screen.
Artists:
1. Press to view the artists storedon the iPod.
2. Select an artist name to view alist of all songs by the artist.
3. Select the desired song fromthe list. Once a song has beenselected, Artist Mode appearson the iPod main screen.
Albums:
1. Press to view the albums storedon the iPod.
2. Select an album name to view alist of all songs on the album.
3. Select the desired song fromthe list. Once a song has beenselected, Album Mode appearson the iPod main screen.
All Songs:
1. Press to view a list of all songsstored on the iPod.
2. Select the desired song fromthe list. Once a song has beenselected, All Songs Modeappears on the iPod mainscreen.
Genres:
1. Press to view the genres storedon the iPod.
2. Select a genre name to view alist of all songs of that genre.
3. Select the desired song fromthe list. Once a song has beenselected, Genre Mode appearson the iPod main screen.
Composers:
1. Press to view the composersstored on the iPod.
2. Select a composer name toview a list of all songs by thatcomposer.
3. Select the desired song fromthe list. Once a song has beenselected, Composer Modeappears on the iPod mainscreen.

Black plate (35,1)Chevrolet Volt Owner Manual - 2011
Infotainment System 7-35
Audio Books:
1. Press to view the audio booksstored on the iPod.
2. Select the audio book from thelist. Once an audio book hasbeen selected, Audio BookMode appears on the iPodmain screen.
Podcasts appear with the generalmusic. They do not have their owncategory. Like the other music files,they are searchable by title, artist,and album.
Eject iPod: Press to remove theiPod. If the iPod is disconnectedwithout selecting this button, thefiles on the iPod could be corrupted.
Audio Book
The system can play back audiobook content downloaded fromAudible.com by either burning itto a CD or recording it to a USBstorage device.
Audible.com is a provider ofspoken word audio entertainment,information, and educationalprogramming. The use of theAudible.com playback featurerequires that the Audible.comaccount be activated with the radio.For more information on creatingan account or how to activate theradio with an existing account,visit www.audible.com/caraudio.The activation process requires theVehicle Identification Number (VIN)of the vehicle.
Once activated, files can betransferred by burning them to a CDor by using a USB storage device.
After inserting the USB or CDstorage media, the followingscreen displays:
Press the All recording screenbutton to record all available audiobooks. A specific audio book torecord can be selected by pressingthe Select Book screen button.
After the files have been recorded,eject the CD/USB external media.

Black plate (36,1)Chevrolet Volt Owner Manual - 2011
7-36 Infotainment System
Playing Audio Book Content
After activating and transferringwww.audible.com files to thesystem, play the files:
1. Press the HDD/DVD/AUX buttonuntil the HDD source is selected.
2. Press the HDD Menu.The HDD Music Menu displays.Scroll down to the Audio Bookoption and select.
3. The Audio Book screendisplays a list of the availableaudio books for playback.Select a book.
4. Select a chapter to startplayback.
5. The audio book beginsplayback.

Black plate (37,1)Chevrolet Volt Owner Manual - 2011
Infotainment System 7-37
Selecting Another Audio Book
To play a different audio book fromthe one selected, return to the AudioBook menu options.
To change the audio book currentlyplaying:
1. Press the TUNE/MENU knobor press the HDD Menu screenbutton. The HDD Music Menudisplays. Scroll down to theAudio Book option.
2. The Audio Book screendisplays a list of the availableaudio books for playback.Select a book.
3. Select a chapter to startplayback.
4. The audio book beginsplayback.

Black plate (38,1)Chevrolet Volt Owner Manual - 2011
7-38 Infotainment System
Changing Chapters within anAudio Book
To change chapters within anaudio book:
While the audio book is playing,turn the TUNE/MENU knob.The chapter list of the current bookdisplays. Select a chapter from thelist. To return to the current chapterbeing played, select the chapterwith the checkmark at the right.
Auxiliary DevicesThis vehicle may have an auxiliaryinput jack in the center console.Possible auxiliary audio sourcesinclude:. Laptop computer. MP3 player. Tape player
This jack is not an audio output.Do not plug headphones into theauxiliary input jack. Drivers areencouraged to set up any auxiliarydevice while the vehicle is inP (Park).
Connect a 3.5 mm (1/8 in) cablefrom the auxiliary device to theauxiliary input jack. When adevice is connected, the systemautomatically begins playing audiofrom the device over the vehiclespeakers.
If an auxiliary device has alreadybeen connected, but a differentsource is currently active, do eitherof the following to switch back to theauxiliary source:. Press the HDD/DVD/AUX button
repeatedly to cycle through allof the available audio sourcescreens, until the AUX sourcescreen is selected.
. Press the HDD/DVD/AUX buttononce, then press the AUXsource screen button.

Black plate (39,1)Chevrolet Volt Owner Manual - 2011
Infotainment System 7-39
Navigation
Using the NavigationSystemRead this section thoroughly tobecome familiar with how thenavigation system operates.
Keeping your eyes on the road andyour mind on driving is important forsafe driving. The navigation systemhas built-in features intended tohelp do this. Some features may bedisabled while driving. A grayed-outfunction indicates it is not availablewhen the vehicle is moving.
All functions are available when thevehicle is parked. Do the followingbefore driving:. Become familiar with the
navigation system operation,buttons on the faceplate, andtouch-sensitive screen buttonsof the navigation system.
. Set up the audio by presettingfavorite stations, setting thetone, and adjusting thespeakers.
. Set up the navigation featuresbefore beginning to drive, suchas entering an address or apreset destination.
. For vehicles equipped withphone capability, set up phonenumbers in advance so theycan be called with the pressof a single button or a singlevoice command.
{ WARNING
Taking your eyes off the road toolong or too often while using thenavigation system could cause acrash resulting in injury or deathto you or others. Focus yourattention on driving.
{ WARNING
Avoid looking too long or toooften at the moving map on thenavigation screen. This couldcause a crash and you or otherscan be injured or killed. Use theturn-by-turn voice guidancedirections whenever possible.
Use the navigation system to:. Plan a route by selecting a
destination using the variousmethods and choices.
. Follow turn-by-turn instructionsand map guidance with voiceprompts, when permitted bytraffic laws, controls, andconditions.
. Receive RDS broadcastannouncements.

Black plate (40,1)Chevrolet Volt Owner Manual - 2011
7-40 Infotainment System
Always be alert and obey trafficand roadway laws and instructions,regardless of the guidance fromthe navigation system. Becausethe navigation system uses streetmap information that does notinclude all traffic restrictions orthe latest road changes, it maysuggest using a road that is nowclosed for construction or a turnthat is prohibited by signs at theintersection. Because the systemuses limited information, alwaysevaluate whether following thesystem's directions is safe andlegal for the current conditions.
Use the buttons on the navigationsystem and the available screenbuttons on the navigation screen tooperate the system. See Overviewon page 7‑3.
Various functions are disabled whenthe vehicle is moving.
Infotainment Control Buttons
The buttons on the faceplate areused to start primary functionswhile using the infotainment system.See Overview on page 7‑3. Thesebuttons are:
RADIO BAND: Press to select AM,FM, or XM, if equipped.
HDD/DVD/AUX (Source): Changeto the Hard Drive, CD, DVD, USB,or AUX by pressing the HDD/DVD/AUX button until the desired sourceis selected.
The audio sources can also bechanged by using the steeringwheel controls. See Steering WheelControls on page 5‑6 for moreinformation.
FAV (Favorites): Press to displaythe current page number above thepreset buttons. The stored stationsfor each list display on the presetbuttons at the bottom of the touchscreen. The number of preset FAVlists can be changed.
TUNE/MENU: Turn to highlighta feature. Press to activate thehighlighted feature.
} BACK: Press to return tothe previous screen in a menu.The } BACK button does not workin primary screens, such as themap, audio, leaf, or climate screens.
TONE: Press to open the tonemenu for sound adjustment.
CONFIG (Configure): Press toadjust features for radio, navigation,display, phone, vehicle, and time.See Configure Menu on page 7‑66for more information.
SEEK[ :
1. Press to seek to the next trackor chapter.
2. Press and hold to advancequickly through playback.
3. Release the button to return toplaying speed. Elapsed timedisplays.

Black plate (41,1)Chevrolet Volt Owner Manual - 2011
Infotainment System 7-41
r SEEK:
1. Press to seek to the beginning ofthe current or previous track orchapter. If the track or chapterhas been playing for less thanfive seconds, the previous trackor chapter plays. If playinglonger than five seconds, thecurrent track or chapter restarts.
2. Press and hold to reversequickly through playback.Release the button to returnto playing speed. Elapsedtime displays.
V / 0 (Phone): See Bluetooth onpage 7‑85 for more information.
k (Play/Pause): Press to start,pause, or resume play of the currentmedia source.
TP (Time Program): Pressto display the Time settings.This button can be pressed toquickly go to the Time menu insteadof pathing through the Configmenu and the TUNE/MENU knob.
Adjust the time as needed. SeeConfigure Menu on page 7‑66 laterin this section.
O REC (Record): Press to recordfrom a CD player or a mass mediastorage device connected by a USBconnector.
DEL (Delete): Press to delete XMcategories and information from thehard drive.
VOL/ O (Volume/Power): Press toturn the system on and off. Turn thisknob to adjust the volume for theaudio, OnStar, voice guidance, andvoice recognition voice prompts.
DEST (Destination): Press toplan a route through the SelectDestination menu. If route guidanceis active, press to access theRoute menu. See Destination onpage 7‑51 for more information.
NAV (Navigation): Press to viewthe vehicle's current position onthe map screen. Continue pressingto cycle through the full map andsplit screen. Full Map displays thescreen in full view; Split Screendisplays both map and audioinformation.
INFO (Information): Press forweather information, if equipped,and climate control displays,if equipped.
RPT (Navigation Repeat): Pressto repeat the last voice guidanceprompt.
AS1–2 (Autostore): The stationsthat can be received best in an AMor FM band can be searched forand stored automatically through theautostore function. Each band hastwo autostore lists (AS 1, AS 2), ineach of which six stations can bestored. To update station list pressand hold AS 1-2 button for morethan two seconds.
X (CD/DVD Eject): Press to ejecta CD or a DVD.

Black plate (42,1)Chevrolet Volt Owner Manual - 2011
7-42 Infotainment System
Touch Screen Buttons
Touch screen buttons are on thescreen and are highlighted when afeature is available. Some screenbuttons highlight when active andgrey out when inactive.
Alpha-Numeric Keyboard
Letters of the alphabet, symbols,punctuation, and numbers, whenavailable, display on the navigationscreen as an alpha or numerickeyboard. The alpha keyboarddisplays when data needs to beentered.
All characters are touch screenbuttons. Touch to select.
À -Ý (Accent Alphabet): To selectletters with accent symbols.
A-Z (Alphabet): To select lettersfrom the alphabet.
Symbols: To select symbols.
U (Space): To enter a spacebetween characters or the wordsof a name.
q (Backspace): To delete anincorrect character that has beenselected.
To make name selection easier,the system highlights onlycharacters that are available afterthe previously entered one.
If a name does not display afterentry, try entering it differently.The map database may not containall information.
Navigation Settings
The Config Menu screen accessesthe navigation system settings.
To access:
1. Press the CONFIG button todisplay the Setup menu.
2. Turn the TUNE/MENU knobto scroll through the availablesetup features. Press the TUNE/MENU knob or press the Navscreen button to display otheroptions within that feature.
3. Select the navigation setting tochange.

Black plate (43,1)Chevrolet Volt Owner Manual - 2011
Infotainment System 7-43
Voice Prompt
This menu allows changes to thevoice features.
The touch screen buttonsavailable are:
Voice Volume: Adjust the voicevolume for guidance and voicerecognition prompts by pressingthe − or + screen buttons or byturning the VOL/ O knob onthe infotainment system. PressGuidance Volume to previewthe selected sound level.
Voice Guidance: Press toenable or disable voice guidance.A checkmark indicates on.
Speech ConfirmationFeedback: Press to turn thespeech confirmation feedback onor off. A checkmark indicates on.
Traffic Voice Prompt: Pressto enable or disable traffic voiceprompts. If the voice prompts are onand an Alert for Approaching Trafficdisplays, the related voice prompt isprovided. A checkmark indicates on.
Route Preference
Press the Route Preference screenbutton to change route optionswhen a route is calculated.
Avoid Freeway: Major roads areavoided.
Avoid Toll Road: Toll roads areavoided.
Avoid Ferry: Ferries are avoided.
Avoid Time and SeasonalRestricted Roads: Time restrictedand seasonal roads are avoided.

Black plate (44,1)Chevrolet Volt Owner Manual - 2011
7-44 Infotainment System
Back Track
Press the Back Track screenbutton to turn on, off, or deletethe recording and displaying ofthe traveled path.
Display Back Tracks: Whenactive, the traveled path displays.
Record Back Track Points: Whenactive, the traveled path is recorded.
Delete Back Track Points:The recorded path is deleted.
Map Database Information
Displays map database versioninformation.
Press the Coverage buttonto view the major metropolitancoverage area.
Low Fuel Warning
When selected, a pop-up screendisplays gas station icons on themap or lists the five nearest gasstations.
Back Track Mode
When selected, the back trackfeature is on. See “Back Track”earlier in this section.
Off-Road Mode
When selected, the off-road featureis on. When the off-road mode isturned on, the navigation system willshow the path being traveled by thevehicle when not on a marked road.
Weather Warning (If Equipped)
When selected, a pop-up screendisplays weather warnings.
Show 3-D Landmark
When selected, 3-D landmarksdisplay on the map screen.
MapsThis section includes basicinformation about the mapdatabase.
Map Coverage
The navigation maps are stored onthe hard drive.
For more information on mapcoverage, see “Navigation Settings”earlier in this section.

Black plate (45,1)Chevrolet Volt Owner Manual - 2011
Infotainment System 7-45
Installing the DVD Map Disc
Your dealer installs the mapdatabase information on the HDD.
An updated map disc can beused to update the map databaseinformation. See Ordering MapDVDs on page 7‑76.
Before updating the map databaseon the HDD, read the followingsteps:
1. Turn the vehicle on.
2. Press VOL/ O to turn thesystem on.
3. Insert the map update disc intothe slot, label side up.
4. Press the Update screen buttonwhen the Update Confirmationscreen displays.
5. Enter the Authentication Code,then press Enter.
6. If the correct code is entered,the system starts updating andthe status bar displays.
7. PressX after the mapdatabase update is completed.
If the application update file isincluded in the disc, the applicationupdate is also done.
Handling the DVD Map Disc. Handle the disc very carefully to
avoid contamination or flaws.Signals might not read outproperly.
. Use a soft cloth if the disc getssoiled and gently wipe it from thecenter of the disc to the outside.Do not use cleaners or solvents.
. Do not use the disc to rest onwhile writing or drawing with anywriting utensil or attach a seal toany of the sides of the disc.
. Do not keep the disc in directsunlight, high temperatures,or humidity.
. Place the disc back into theoriginal case after use.

Black plate (46,1)Chevrolet Volt Owner Manual - 2011
7-46 Infotainment System
Map Adjustments
The scale of view on the map canbe adjusted.
Map Scales
There are twomethods to changethe map scale:. Turn the TUNE/MENU knob
clockwise or counterclockwiseto zoom out or in.
. Press the Map Scale button onthe left bottom corner of the mapscreen to change the zoomlevel.
The map scale bar times out ifthe zoom level is not changedwithin a few seconds.
The scale ranges from 100 m(150 ft) to 400 km (250 mi).To change from metric to English,see Driver Information Center (DIC)on page 5‑43 for more information.
Scroll Features
. To scroll within the map, touchanywhere on the map screenand the scroll symbol displays.
. Tap the map to center thatlocation on the screen.
. Press the screen in any directionoutside the scroll symbol toscroll the map in that direction.
. Scroll speed increases whentouching closer to the edge ofthe screen.
. Press NAV on the faceplate toexit map scrolling and return tothe current vehicle location onthe map.
. While scrolling the map, thissymbol can display the distanceto the crosshair area.
For example, this shows that themap has been scrolled 160 m(0.1 mi) away from the currentvehicle position.

Black plate (47,1)Chevrolet Volt Owner Manual - 2011
Infotainment System 7-47
Navigation SymbolsFollowing are the most commonsymbols that appear on a mapscreen.
The vehicle symbol indicatesthe current position and headingdirection of the vehicle on the map.
The destination symbol marks thefinal destination after a route hasbeen planned.
The waypoint symbol marksa set waypoint and is numbereddepending on how many havebeen set.
A waypoint is a stopover destinationpoint added to the planned route.
If waypoints have been addedto the current route, each waypointdestination displays estimated timeand distance to the destination.
This symbol indicates that the mapview is North-up: North-up displaysNorth at the top of the map screenregardless of the direction thevehicle is traveling. Select thisscreen symbol to change theview to Heading-up or 3-D.
This symbol indicates that the mapview is Heading-up.
Heading-up view displays thedirection the vehicle is travelingat the top of the map screen.The shaded triangle indicates North.

Black plate (48,1)Chevrolet Volt Owner Manual - 2011
7-48 Infotainment System
Press this screen symbol to changeto 3‐D mode.
The 3-D symbol is the same as theHeading-up symbol, but the map isin 3-D.
The No GPS symbol appearswhen there is no Global PositioningSystem (GPS) satellite signal.
The upper symbol indicates theinformation can be displayed onthe right side of the map. The lowersymbol indicates the informationcan be hidden to show a full screenmap view.
This symbol indicates that a menuis available and displays on theleft side of the screen. Press thissymbol or the TUNE/MENU knobto access the screen menu.
Driving on a Route
While driving on a route, the nextmaneuver the map screen displaysis either an urgent maneuver or anon-urgent maneuver.

Black plate (49,1)Chevrolet Volt Owner Manual - 2011
Infotainment System 7-49
Urgent Maneuver
An urgent maneuver is displayedwhen the next maneuver is lessthan or equal to 0.8 km (0.5 mi)away on a residential road or lessthan or equal to 1.5 km (2 mi) awayon a highway.
Driving on a Highway
Driving on a Residential Road
Non-Urgent Maneuver
A non-urgent maneuver is whenthe distance to the next maneuveris greater than 0.8 km (0.5 mi)when driving on a residentialroad or greater than 1.5 km (2 mi)when driving on a highway. Thisis indicated by a small arrow inthe top right corner of the screen.
Map Screen Options
While on route, several options areavailable while viewing the mapscreen. To access this menu:
Press the TUNE/MENU knob todisplay the menu on the left side.
See Navigation Symbols onpage 7‑47 to learn how to changethe map view to North-up,Heading-up, or 3-D view.

Black plate (50,1)Chevrolet Volt Owner Manual - 2011
7-50 Infotainment System
When this symbol is selected, thedistance and time remaining fromthe current vehicle position to thefirst waypoint displays.
This menu displays if the symboland waypoints are entered. Selectthe main map view to display the
distance and time remaining fromthe current vehicle position to anyof the set waypoints or finaldestination.
Save: Press to save a specificlocation to the address book.
Show POI: Press to view POIinformation nearby and on route.
There are several Preset options onthe bottom of the screen.
Edit: Press to display a list of POIicons.
1. Select the POI icon to edit.The POI icon is replaced byanother icon that is selectedfrom the next menu.

Black plate (51,1)Chevrolet Volt Owner Manual - 2011
Infotainment System 7-51
2. Select the new POI icon.
3. The new icon is on the ShowPOI Icons menu.
List: Displays all available POIs.
Clear: Clears all selected POIs.
Nearby: Displays up to 200 of theselected POIs within 32 km (20 mi)of the current vehicle position.The POIs can be sorted bydistance, icon, or type.
Hide: Press to hide the POIs fromview on the map. To display, go tothe Map menu, press the Show POIIcons menu and press the Showoption. See “Map Screen Options”earlier for more information onshowing the POIs.
Press this button to change the fullmap screen to the half map screenand half exit information.
Traffic: Press to provide nearbytraffic information and traffic eventson the planned route.
Whole Route: Press to chooseoptions for the entire route.
Cancel Guidance: Press to cancelguidance of the current route.
DestinationWhile destination is not set, pressthe DEST button to access theSelect Destination screen. Severaloptions can be selected to plan aroute by entering destinations.
Address Entry
Set a route by entering thestate/province name, city name,street name, and house number.
State/Province: Enter astate/province name.
City: Enter a city name.
Street Name: Enter a street name.
House #: Enter a valid addressnumber.

Black plate (52,1)Chevrolet Volt Owner Manual - 2011
7-52 Infotainment System
Cross Street Name: Enter a streetname that intersects with theselected street.
A checkmark displays on theright side when the field has beenselected and the destination canbe entered. After an entry step iscompleted, the checkmark movesto the next item.
Entering the city name first:
1. Press the DEST button.
2. If necessary, enter thestate/province name. The laststate/province is automaticallyrecalled.
3. Enter the city name. The cityfield is automatically selected.
4. Enter the street name. This fieldis automatically selected. Do notenter directional informationor street type. Use the spacescreen button between streetand city names. Use thebackspace q screen button todelete an incorrectly enteredcharacter.
A list displays if four or fewernames are available. If thereare more than four, there is amatch counter with a numberof available streets. Press theList screen button to view thelist and select the street.
5. Enter the house number.This field is automaticallyselected.
6. Press the OK screen button.The address information screendisplays the address entered.
7. Press Go located on theconfirmation screen if theinformation is correct.The route is calculated.
8. Select the route preference forFastest, Shortest, or Easiest.The chosen route preferencehighlights. See “Entering anAddress and Point of Interest,and Storing Preset Destinations”under Overview on page 7‑3 formore information.
9. Press the Start Guidancescreen button and the routeis calculated.
Entering the street name first:
1. Press the DEST button.
2. If necessary, enter thestate/province name.The last state/provincename is automaticallyrecalled.

Black plate (53,1)Chevrolet Volt Owner Manual - 2011
Infotainment System 7-53
3. Select the street name field.Enter the street name. Do notenter directional informationor street type. Use the spacescreen button between streetand city names. Use thebackspace q screen button todelete an incorrect character.
A list displays if four or fewernames are available. If thereare more than four, there is amatch counter with a numberof available streets. Press theList screen button to view thelist and select the street.
4. Select the city from the list orenter the city name.
5. Enter the house number.This field is automaticallyselected.
6. Press the OK screen button.
7. Press Go located on theconfirmation screen if theinformation is correct.The route is calculated.
8. Select the route preference forFastest, Shortest, or Easiest.The chosen route preferencehighlights. See “Entering anAddress and Point of Interest,and Storing Preset Destinations”under Overview on page 7‑3 formore information.
9. Press the Start Guidancescreen button and the routeis calculated.
Point of Interest
The POI destination entry allowsselection of a destination byproviding the POI name or cityname, or selecting from the POI list.
Entering by POI name/phonenumber:
1. Press the DEST button.
2. Select Point of Interest.
3. Enter the name or select byphone number.

Black plate (54,1)Chevrolet Volt Owner Manual - 2011
7-54 Infotainment System
A list displays if four or fewernames are available. If thereare more than four, there is amatch counter with a numberof available POI names. Pressthe List screen button to viewthe list.
4. Select the POI name fromthe list.
5. Press Go located on theconfirmation screen if theinformation is correct.
6. Select the route preference forFastest, Shortest, or Easiest.
7. Press the Start Guidance screenbutton and start the route.
Entering a POI by city name:
1. Press the DEST button.
2. Select Point of Interest.
3. Press the Browse screen button.
4. Select the Change Locationscreen button.
5. Enter the new state and city.
6. Select a category, then asub-category.
The available POI names willdisplay.
7. Select the POI name.
8. If the POI is correct, press theGo screen button. The route iscalculated.
9. Select the route preference forFastest, Shortest, or Easiest.
10. Press the Start Guidancescreen button and start theroute.
Selecting from a POI Category:
1. Press the DEST button.
2. Select Point of Interest.
3. Press the Browse screen button.
4. Select a category, then asub-category.
The available POI namesdisplay.
5. Select the POI name.
6. If the POI is correct, press theGo screen button. The route iscalculated.
7. Select the route preference forFastest, Shortest, or Easiest.
8. Press the Start Guidance screenbutton and start the route.
Black plate (55,1)Chevrolet Volt Owner Manual - 2011
Infotainment System 7-55
Previous Destination
Select a destination from a listof previous destinations. Up to15 points that have been previouslyentered can be recalled. If the listis full, the oldest destinations areautomatically deleted once thenewest destinations are added.
1. Press the DEST button.
2. Press Previous Destination.A list displays the previousdestinations.
3. Select the destination.
4. Press Go located on theconfirmation screen if theinformation is correct.The route is calculated.
5. Select the route preference forFastest, Shortest, or Easiest.See “Entering an Address andPoint of Interest, and StoringPreset Destinations” underOverview on page 7‑3 formore information.
6. Press the Start Guidance screenbutton and start the route.
Address Book
Choose a destination by selectingan address that has been stored inthe address book.
1. Press the DEST button.
2. Press Address Book. A listdisplays the address bookentries.

Black plate (56,1)Chevrolet Volt Owner Manual - 2011
7-56 Infotainment System
3. Select the destination fromthe list.
4. Press Go on the confirmationscreen if the information iscorrect. The route calculates.
5. Select the route preference forFastest, Shortest, or Easiest.See “Entering an Address andPoint of Interest, and StoringPreset Destinations” underOverview on page 7‑3 formore information.
6. Press the Start Guidance screenbutton and start the route.
Pick From Map
Select a destination by scrolling onthe map.
1. Press the DEST button.
2. Press the Pick From Map screenbutton. A map screen with ascroll symbol displays.
3. Press the Zoom in/out arrowkey on the screen and press themap to locate the destination toselect. Press and hold a fingeron the map to activate fastscrolling.
4. Press Go on the confirmationscreen if the information iscorrect. The route calculates.
5. Select the route preference forFastest, Shortest, or Easiest.See “Entering an Address andPoint of Interest, and StoringPreset Destinations” underOverview on page 7‑3 formore information.
6. Press the Start Guidance screenbutton and start the route.
Lat/Long Coordinates
Choose a destination basedon latitudinal and longitudinalcoordinates.
Enter the location as coordinates,latitude and longitude.
1. Press the DEST button.
2. Press the Lat/Long screenbutton.

Black plate (57,1)Chevrolet Volt Owner Manual - 2011
Infotainment System 7-57
3. Enter the coordinates for thedestination in degrees, minutes,and seconds.
4. Press Go on the confirmationscreen if the information iscorrect. The route calculates.
5. Select the route preference forFastest, Shortest, or Easiest.See “Entering an Address andPoint of Interest, and StoringPreset Destinations” underOverview on page 7‑3 formore information.
6. Press the Start Guidance screenbutton and start the route.
Preset Destinations
Set a destination by selectingfrom one of six previously storeddestinations. If a destination is notset for one of the screen buttons,the button dims and is not available
to use. See “Entering an Addressand Point of Interest, and StoringPreset Destinations” underOverview on page 7‑3 formore information.
1. Press the DEST button.
2. Select one of the availablepreset destination screenbuttons. The screen buttonswere stored with the nameselected. The route iscalculated.
3. Select the route preference forFastest, Shortest, or Easiest.See “Entering an Address andPoint of Interest, and StoringPreset Destinations” underOverview on page 7‑3 formore information.
4. Press the Start Guidance screenbutton and start the route.
Getting Started on the Route
Several functions can be performedafter a destination has beenentered. Press the DEST button toaccess the Route Menu screen.
Cancel Guidance
From the Route Menu screen,press Cancel Guidance to cancelthe current route. Press Yes on theconfirmation screen to cancel or Noto continue the guidance.

Black plate (58,1)Chevrolet Volt Owner Manual - 2011
7-58 Infotainment System
Voice Prompt
Select Voice Volume to change thevolume of voice prompts and voicerecognition.
Select the Voice Guidance, SpeechConfirmation Feedback, or TrafficVoice Prompt screen buttons to turnvoice prompts on or off for eachcategory. See “Navigation Settings”under Using the Navigation Systemon page 7‑39 for more information.
Detour
While on the surface streets,select a detour around the currentroute, select the Route screen,then select to detour 2, 5, or10 km (1, 3, or 5 mi). Whileon the highway, select to detour2, 5, or 10 km (5, 15, or 25 mi).Select Whole Route to detour theentire route. This is only availablewhile driving on a route.
Turn List
To view the list of maneuvers for theentire route, select Turn List fromthe Route Menu screen.
Waypoints
Up to three waypoints can be addedto the current route, between thestart point and final destination.The waypoints can be edited ordeleted.
To add a waypoint:
1. Press the DEST button.
2. Press the Add Waypoint screenbutton. This button is onlyavailable if the route has beencalculated.

Black plate (59,1)Chevrolet Volt Owner Manual - 2011
Infotainment System 7-59
3. Enter the waypoint by any of theadd destination methods. SeeDestination on page 7‑51 formore information. The systemcalculates and highlights theroute and the route can bestarted.
4. To add more waypoints, pressthe DEST button. Press theAdd Waypoint screen buttonto add the waypoint in theorder desired on the route.The system calculates andhighlights the route and theroute can be started.
To delete a waypoint:
1. Press the DEST button.
2. Press the Delete Waypointscreen button.
3. Select the waypoint to bedeleted by touching the screen.
4. A confirmation messagedisplays. Press the Yesscreen button to delete thewaypoint; press No to cancelthis operation. The systemcalculates and highlights theroute and the route can bestarted.
Route Preview
Preview the entire route in eitherdirection.
s t (Reverse or Forward Skip):. Press the reverse skip arrow to
go to the start point.. Press the forward skip arrow to
go to the final destination.

Black plate (60,1)Chevrolet Volt Owner Manual - 2011
7-60 Infotainment System
uv (Fast Reverse or ForwardScroll):. Press the fast reverse scroll
arrow to go to the start point.. Press the fast forward
scroll arrow to go to the finaldestination. These buttonsdisplay once the reverse/forwardscroll button has been selected.
S T (Reverse or Forward Scroll):. Press the reverse scroll arrow to
go to the start point.. Press the forward scroll arrow to
go to the final destination.
j (Pause): Pauses the routepreview, while in reverse, fastreverse, forward, or fast forwardscroll.
Suspend/Resume Guidance
Press the Suspend/ResumeGuidance screen button to suspendor resume guidance on the currentroute.
Previous Destinations —Deleting
To delete all previous destinationsfrom the system:
1. Press the DEST button.
2. Press the Previous Destinationscreen button.
3. Press the Clear All screenbutton.
4. Press OK to Clear All PreviousDestinations, or press theCancel screen button tocancel this operation.
Address Book
Options for saving to theaddress book:. Scrolling on map or Pick from
Map in the Dest Menu: Scrollto the location. Press theTUNE/MENU knob on thefaceplate. A menu displayson the left side of the screen.Press the Save screen buttonand the location is saved.
. Address Entry: Enter adestination through theAddress Entry menu. Press theGo screen button. The Savescreen button displays at thebottom of the screen. Press theSave screen button to save thislocation to the address book.
. POI Menu: Select a POI. PressSave located at the bottom ofthe information page display.
. Previous Destination: Fromthe Previous Destination Menu,select the destination to save.Press Save located at thebottom of the information page.
To change the map icon of anaddress book entry:
1. Press the DEST button.
2. Press the Address Book screenbutton. A list displays theaddress book entries.
3. Select the address book entry tobe changed.
4. Press Edit, located on thebottom of the screen.

Black plate (61,1)Chevrolet Volt Owner Manual - 2011
Infotainment System 7-61
5. Press Change Icon.
6. Select an icon from the list.
7. Press the OK screen button tosave the changes.
To edit the name of anaddress book:
1. Press the DEST button.
2. Press the Address Bookscreen button. A list displaysthe address book entries.
3. Select the address book entry tobe changed.
4. Press Edit, located on thebottom of the screen.
5. Press the Change Name option.
6. Use the alpha keyboard to enterthe name.
7. Press the OK screen button tosave the changes.
To add or change the phone numberof an address book entry:
1. Press the DEST button.
2. Press the Address Book screenbutton. A list of address bookentries displays.
3. Select the address book entry tobe changed.
4. Press Edit, located on thebottom of the screen.
5. Press the Change PhoneNumber option.
6. Use the numeric keyboard toenter or change the phonenumber.
7. Press the OK screen button tosave the changes.
To add a voice tag to an addressbook entry:
1. Press the DEST button.
2. Press the Address Book screenbutton. A list displays theaddress book entries.
3. Select the address book entry tobe changed.
4. Press Edit, located on thebottom of the screen.
5. Press the Add Voice Tag screenbutton.
6. Speak the name after thebeep and within four seconds.The name is repeated back.
To delete an address book entry:
1. Press the DEST button.
2. Press the Address Book screenbutton. A list displays theaddress book entries.

Black plate (62,1)Chevrolet Volt Owner Manual - 2011
7-62 Infotainment System
3. Select the address book entry tobe deleted.
4. Press the Delete Entry screenbutton. A confirmation messagedisplays.
To add a preset destination from theaddress book:
1. Press the DEST button.
2. Press the Address Book screenbutton.
3. Select the address book entry toadd as a preset. The AddressBook Information screendisplays.
4. Press Edit, located on thebottom of the screen.
5. Press and hold one of thesix screen buttons at the bottomof the screen until the text withinthe button changes.
6. The name appears in that presetdestination screen button andcan be selected from the SelectDestination screen.
Favorite Route
1. After the route has beenplanned, press the NAV buttonuntil the full map screen isshown.
2. Press the TUNE/MENU knob.A menu displays.
3. Scroll down and select WholeRoute. The whole route mapscreen displays.
4. Press the Add Route screenbutton. The route is stored asa favorite.
To change the route name, add avoice tag, or delete a favorite route:
1. Press the DEST button.
2. Press the Fav Route screenbutton.
3. Select the route.
4. Press Edit, located on thebottom of the screen.
5. Select from: Change RouteName, Add Voice Tag, or DeleteFavorite Route.
To change the route name:
1. Select Change Route Name.
2. Using the keypad, enterthe name.
3. Select the Favorite Route entryto be edited.
4. Press the OK screen button.The new name will be in theFavorite Route Menu.
To add a voice tag:
1. Press the Add Voice Tag screenbutton.
2. Speak the name after the beepwithin four seconds. The name isrepeated back.
To delete a favorite route:
1. Press Delete Favorite Route.The confirmation screendisplays.
2. Press the Yes screen button todelete the route or press No tocancel from deleting the route.

Black plate (63,1)Chevrolet Volt Owner Manual - 2011
Infotainment System 7-63
Menu Screen Button
Various navigation system settingsare available through the Menuscreen button. Some options areonly available after a route isplanned.
1. Press the NAV button to viewthe Map screen.
2. Press the Menu screen buttonor the TUNE/MENU knob on thefaceplate.
Map Heading
Press to change the view toNorth-up, Heading-up, or 3-D mode.See Navigation Symbols onpage 7‑47 for more information.
Traffic: Press to view the TrafficInformation screen. See ConfigureMenu on page 7‑66 for moreinformation.
Save: Press to save a location tothe address book.
Show POI: Press to displayPOI icons to be shown onthe map. Select from a listof six pre-programmed POIsub-categories. Scroll througha list of categories, or selectnearby and on route options.
Press this screen button to minimizethe guidance window and expandthe map window.
Whole Route: Press to view theentire route from starting point todestination on the map.
Cancel Guidance: Press to stopthe current route.

Black plate (64,1)Chevrolet Volt Owner Manual - 2011
7-64 Infotainment System
OnStar® DestinationDownloadThe OnStar Destination Downloadlets an OnStar subscriber askan OnStar Advisor to downloada destination to the navigationsystem. OnStar will send addressinformation and location coordinatesof the destination into the navigationsystem.
OnStar Destination DownloadScreen
Using Destination Download
The navigation system displays a“Please wait” as the address issearched within the map database.
If the address is not found within themap database, the system may uselatitude and longitude coordinates tolocate the destination.
In this case, “Using Coordinates”displays on the downloaded screen.
If the system is unable to locate theaddress, the Destination Not Foundscreen displays.

Black plate (65,1)Chevrolet Volt Owner Manual - 2011
Infotainment System 7-65
Route Guidance Not Active
If an OnStar destination isdownloaded while route guidanceis not active, the navigation systemdisplays a pop-up screen and thefollowing available screen functions:. Press the Go screen button; the
navigation system starts routecalculation to the destination(s)received.
. Press the Map screen button;the navigation system displaysthe Destination Map screen.
. Press the Call screen button;the navigation system initiatesa call with Bluetooth Phone(if available) or OnStarHands-Free Calling.
. Press the Save screen button;the navigation system copiesthe downloaded destination tothe address book and displaysthe new address book entry.The destination saves thisdownload even if it is onlypartial information such asa phone number.
. Press the Back screen button;the navigation system cancelsOnStar Destination Downloadand returns to the previousscreen. The downloadedaddress is not added tothe previous destinations.
Route Guidance Active
If an OnStar destination isdownloaded while route guidance isalready active, the system displaysa pop-up screen and the followingavailable screen functions:. Press the Go screen button;
the navigation system adds thedownloaded destination beforethe next waypoint of the existingroute (closest to the currentvehicle position).
. All other buttons on the pop-upscreen operate as describedunder “Route Guidance NotActive.”

Black plate (66,1)Chevrolet Volt Owner Manual - 2011
7-66 Infotainment System
Previous Destinations
Previously downloaded OnStardestinations are saved underPrevious Destinations in thenavigation system where theycan be accessed or saved tothe address book.
Map Destination Screen Functions
Destination Map Screen
If the map screen is used to showdestination, it has map screencapabilities such as Go, Save,Zoom, Scroll, etc. The address isshown at the top of the screen.
Configure MenuAdjust features and preferencesthrough the Configure Menu.The last selected menu screendisplays. Adjust features for Sound,Radio, Nav (navigation), Display,or Time.
Radio
Press the CONFIG button toenter the Menu options. Turn theTUNE/MENU knob to scroll throughthe available menu options. Pressthe TUNE/MENU knob or pressRadio to display the radio settings.Press this feature to make changesfor radio information displayed,preset pages, Auto Volume, AudioCue Options, and XM CategoriesRestore. See Satellite Radio onpage 7‑16 for more information.
Nav (Navigation)
Press the CONFIG button toenter the Menu options. Turn theTUNE/MENU knob to scroll throughthe available menu options. Pressthe TUNE/MENU knob or press theNav screen button.
XM NavTraffic® (if equipped)
The navigation system mighthave an XM NavTraffic receiver.It is a subscription service providedthrough XM Satellite Radio.A service fee is required toreceive the XM NavTraffic service.Real-time traffic information isprovided to fully integrate thenavigation system to displaycurrent traffic conditions forthe chosen route.
A screen displays to indicate if theXM NavTraffic subscription is notactivated.

Black plate (67,1)Chevrolet Volt Owner Manual - 2011
Infotainment System 7-67
If activated, traffic informationdisplays:. Unscheduled traffic incident
data, such as accidents anddisabled vehicles.
. Scheduled traffic incident data,such as road construction androad closures.
. Traffic flow information (rate ofspeed data). Flow data might notbe available in all markets.
Traffic information is delivered to thevehicle by the XM Radio satellites.XM NavTraffic provides continuouslyupdated traffic information.
XM NavTraffic currently broadcaststhe traffic information for manymarkets nationally. The service maybe available in more cities in thefuture. Visit www.xmnavtraffic.comfor more details on local coverage.
To turn XM NavTraffic on or off:
1. Press the CONFIG button toenter the menu options. Turnthe TUNE/MENU knob to scrollthrough the available menuoptions. Press the TUNE/MENUknob or press the Nav screenbutton to display the othernavigation settings.
2. Press the Traffic Informationbutton.
3. Press the Traffic screen button.This button highlights and acheckmark displays when active.
Selecting Alert for ApproachingTraffic Events displays a screento notify of possible traffic eventsahead.
Traffic Icon
When traffic conditions are foundin the local area, the Traffic Iconappears in the lower left side ofthe map.
The Traffic Icon has three differentcondition displays. These are:. No icon displays if there is no
XM NavTraffic subscription orthere are no traffic events.
. A single car icon displays ifthere are traffic events in thearea, but none are on route.
. A multiple car icon displays ifthere are traffic events on theroute.

Black plate (68,1)Chevrolet Volt Owner Manual - 2011
7-68 Infotainment System
It could take some time to sort thereceived information. The list oftraffic conditions displays in theorder of distance from the vehicle,for up to approximately 125 km(75 mi). With a route planned,traffic events display on the route.Not all traffic conditions may display.
To view the traffic condition locationand information on the map:
1. Press NAV to show the map,then press the TUNE/MENUknob for the map menu.
2. Scroll down and press the Trafficscreen button. A list of trafficconditions with distance fromthe vehicle’s current positiondisplays.
An arrow may appear before thedistance. The arrow indicatesthe distance is a straight linedistance and the direction of theevent from the vehicle’s currentposition. If no arrow appears, thedistance indicates how far theevent is ahead on current route.No more than three pages oftraffic events may be viewedwhile the vehicle is moving.
3. Select a traffic condition to getmore detailed information.
Select Options. A Traffic Optionsmenu displays. Select thetraffic-related option.

Black plate (69,1)Chevrolet Volt Owner Manual - 2011
Infotainment System 7-69
Traffic: Press to enable or disablethe traffic function.
Show Traffic ICONs: Press todisplay traffic icons on the mapscreen. Also, select what trafficinformation displays.
Traffic Flow Status — Enables ordisables the green, yellow, red, andblack arrows that display beside theroads and shows the traffic flow orextent of a traffic event.. Black indicates a closed road
segment.. Red indicates significantly
impaired traffic flow withaverage speed of less than40 km/h (25 mph).
. Yellow indicates slightlyimpaired traffic flow with averagespeed between 40 km and73 km/h (25 and 45 mph).
. Green indicates normal trafficflow with average speed above73 km/h (45 mph).
Traffic flow data arrows displayon the map when scaled up toeight miles. For Closed Road, TrafficDelays, Incidents, and Advisories,select the traffic event icon thatappears on the map screens.
Alert For Approaching TrafficEvents: When On, if anapproaching traffic event is withinthe alert range, one of two trafficalerts displays:. With no route planned, while on
expressways, the ApproachingTraffic Event without Avoidscreen displays.
. With a route planned, the TrafficEvent on Route screen displays.If the Alert For ApproachingTraffic Events is Off, the alertdoes not display.

Black plate (70,1)Chevrolet Volt Owner Manual - 2011
7-70 Infotainment System
On Route
Press the On Route screen buttonto display all events ahead onthe current active route. No trafficevents reported on route displaysif there are none to report.
Name
Press the Name screen button todisplay traffic events in alphabeticalorder.
Distance
Press the Distance screen buttonto display traffic events in order ofdistance with the closest eventshown first.
Scrolling to Traffic Events onthe Map
While scrolling the map, the trafficevent icons can appear indicating atraffic event within 125 km (75 mi)from current position. To receiveinformation about the traffic event,place the crosshairs over thetraffic condition icon. Traffic eventsbeyond 125 km (75 mi) from currentposition will not be displayed.
Press the Info. button to display thetype of traffic, the street name, anda description of the traffic event.
Traffic Event Display Categories
The following are traffic eventcategories and symbols thatcan appear on the display:
q (Road Closed): Road and/orramps closed.
o (Stopped Traffic): Trafficstopped, stop-and-go traffic,delayed and congested traffic.
p (Alert): Object on the roadway,disabled vehicle, or dangerous roadconditions.
t (Accident): Roadway obstructeddue to accident.
s (Road Work): Delayed trafficdue to construction.
j / r (Road Condition): Delayedor stopped traffic, lane blocked orclosed due to a road condition.
k (Weather): Heavy rain, snow,or fog weather condition.
m (Parking): Availableparking area.
l (Information): Special event,general information, or warning.

Black plate (71,1)Chevrolet Volt Owner Manual - 2011
Infotainment System 7-71
Traffic Event Information
Use to display additional detailsof a traffic event. This screen candisplay when:. Scrolling to an event on the map
and then pressing Info.. Selecting a traffic event listed on
the Traffic Event List screen.. Approaching a traffic event.
Back, Map, More, and Avoid
These buttons have commonfunctions across all DetailedTraffic Event screens.
Back: Return to the previousscreen.
Map: Display related traffic eventson the map if available.
More: View more information forthe traffic event.
Avoid: Avoid the location of anevent on the route and calculatea new route. The full map screenshows the new route. The Avoidbutton is only available if the eventis on the route ahead.
Traffic Voice Prompts
The traffic voice prompt can beturned on and off by selecting TrafficVoice Prompt in Voice Prompt onthe CONFIG Nav screen.
If the voice prompts are on andan Alert for Approaching Trafficdisplays, the related voice promptis provided.
The RPT (Repeat) button doesnot repeat traffic prompts, onlynavigation traffic maneuvers.The current prompt playbackcancels if RPT is pressed duringa traffic voice prompt.
Traffic prompts are disabled duringOnStar or Voice Recognition activity.

Black plate (72,1)Chevrolet Volt Owner Manual - 2011
7-72 Infotainment System
Alternate Route
When Alternate Route Availabledisplays, a possible quicker routeis available and can be selected todetour around the traffic condition.Press the Yes screen button and thenew route is calculated. This optionis only available when the multiplecar icon appears.
XM NavTraffic information might notbe provided for the alternate route,depending on what type of road thevehicle is traveling on.
Traffic Condition Symbols
The following traffic conditionsymbols may display:
Stopped Traffic Traffic Jam
Accident Road Closed
Lane Narrows RoadConstruction
Alert Road Condition
Road Visibility Other

Black plate (73,1)Chevrolet Volt Owner Manual - 2011
Infotainment System 7-73
XM™ Weather(where available)
Press INFO, then press it againuntil the Weather screen buttonis selected or press the Weatherscreen button.
Current Condition
Press INFO until the Weatherscreen button is selected to showthe current weather condition in thecity of the vehicle’s current position.
Allow up to 15 minutes for thecurrent weather in the area todisplay.
Extended Forecast
Enter the weather menu by pressingthe TUNE/MENU knob or pressthe Menu button on the screen.From this screen, press ExtendedForecast.
Weather Along the Route
If a destination is set, there is theoption to view weather conditionsfor up to three locations alongthe route:. Current vehicle position.. Midway point from current
position to final destination.. Current weather condition of the
destination city.
From the XM Weather MenuScreen, press Along the Route:
Weather Alerts
From the XM Weather Menu, pressWeather Alerts to display anycurrent weather advisory warningsin effect near the current position.

Black plate (74,1)Chevrolet Volt Owner Manual - 2011
7-74 Infotainment System
Display
Press the CONFIG button toenter the menu options. Turn theTUNE/MENU knob to scroll throughthe available setup features. Pressthe TUNE/MENU knob or press theDisplay screen button to displayother options within that feature.
Dimming Mode
Auto (Automatic): The screenbackground automatically adjustsdepending on exterior lightingconditions.
Day: The map backgroundbrightens.
Night: The map backgrounddarkens.
To change the overall brightnesssetting for the display, use thevehicle interior lighting dimmingcontrol.
Setting the Clock
To set the time:
1. Press the TP (Time Program)button to go directly to thetime setting page or press theCONFIG button and selectTime from the list.
2. Press + or – to decrease orincrease the Hours and Minutesdisplayed on the clock.
12/24 HR Format: Press the 12 HRscreen button for standard time;press the 24 HR screen button formilitary time.
Day + or Day –: Press the day + orday – display buttons to increase ordecrease the day.
Display: Press Display to turn thedisplay of the time on the screen onor off.
Global PositioningSystem (GPS)The position of the vehicle isdetermined by using satellitesignals, various vehicle signals,and map data.
At times, other interferences suchas the satellite condition, roadconfiguration, the condition of thevehicle, and/or other circumstancescan interfere with the navigationsystem's ability to determine theaccurate position of the vehicle.
The GPS shows the current positionof the vehicle using signals sent bythe GPS Satellites of the UnitedStates Department of Defense.

Black plate (75,1)Chevrolet Volt Owner Manual - 2011
Infotainment System 7-75
When the vehicle is not receivingsignals from the satellites, a symbolappears on the map screen. SeeNavigation Symbols on page 7‑47.
This system might not be availableor interferences can occur if any ofthe following is true:. Signals are obstructed by tall
buildings, trees, large trucks,or a tunnel.
. Satellites are being repaired orimproved.
For more information if the GPSis not functioning properly, see“If the System Needs Service” and“Problems with Route Guidance.”
Vehicle PositioningAt times, the position of the vehicleon the map could be inaccuratedue to one or more of the followingreasons:. The road system has changed.. The vehicle is driving on slippery
road surfaces such as in sand,gravel, and/or snow.
. The vehicle is traveling onwinding roads or long straightroads.
. Approaching a tall building or alarge vehicle.
. The surface streets run parallelto a freeway.
. The vehicle has been transferredby a vehicle carrier or a ferry.
. The current position calibrationis set incorrectly.
. The vehicle is traveling at highspeed.
. The vehicle changes directionsmore than once, or the vehicleis turning on a turn table in aparking lot.
. The vehicle is entering and/orexiting a parking lot, garage,or a lot with a roof.
. The GPS signal is not received.
. A roof carrier is installed on thevehicle.
. Tire chains have been installed.
. The tires are replaced or worn.
. The tire pressure for the tires isincorrect.
. This is the first navigation useafter the map data is updated.
. The 12-volt battery isdisconnected for several days.
. The vehicle is driving in heavytraffic where driving is at lowspeeds, and the vehicle isstopped and started repeatedly.

Black plate (76,1)Chevrolet Volt Owner Manual - 2011
7-76 Infotainment System
Problems with RouteGuidanceInappropriate route guidance canoccur under one or more of thefollowing conditions:. The turn was not made on the
road indicated.. Route guidance might not be
available when using automaticrerouting for the next right orleft turn.
. The route might not be changedwhen using automatic rerouting.
. There is no route guidance whenturning at an intersection.
. Plural names of places might beannounced occasionally.
. It could take a long time tooperate automatic reroutingduring high-speed driving.
. Automatic rerouting mightdisplay a route returning to theset waypoint if heading for adestination without passingthrough a set waypoint.
. The route prohibits the entryof a vehicle due to a regulationby time or season or any otherregulation which may be given.
. Some routes might not besearched.
. The route to the destinationmight not be shown if thereare new roads, if roads haverecently changed, or if certainroads are not listed in the mapdata. See Maps on page 7‑44for more information.
To recalibrate the vehicle's positionon the map, park with the vehicleon for two to five minutes, until thevehicle position updates.
If the System NeedsServiceIf the navigation system needsservice and the steps listed herehave been followed but there arestill problems, see your dealer forassistance.
Ordering Map DVDsThe map data in the vehicle isthe most up-to-date informationavailable when the vehicle wasproduced. The map data is updatedperiodically, provided that the mapinformation has changed.
For questions about the operation ofthe navigation system or the updateprocess, contact the GM Nav DiscCenter toll‐free phone number,1‐877‐NAV‐DISC (1‐877‐628‐3472)or go to the center's website,www.gmnavdisc.com. If updatesare needed, call the GM Nav DiscCenter or order a new disc online.To order a disc, have the vehicle'sVehicle Identification Number (VIN)available. See “Vehicle IdentificationNumber (VIN).”
After receiving the updated disc,see “Installing the DVD Map Disc”under Maps on page 7‑44 for moreinformation.

Black plate (77,1)Chevrolet Volt Owner Manual - 2011
Infotainment System 7-77
Database CoverageExplanationsCoverage areas vary with respect tothe level of map detail available forany given area. Some areas featuregreater levels of detail than others.If this happens, it does not meanthere is a problem with the system.As the map data is updated, moredetail can become available forareas which previously had limiteddetail. See Ordering Map DVDs onpage 7‑76 for more information.
Voice RecognitionThe navigation system's voicerecognition allows for hands-freeoperation of the navigation systemand the audio system features.Voice recognition only works if themap database is installed in thesystem.
If the radio is off, the onlycommands would be HandsFree and Help.
Navigation voice commands are notavailable until the I Agree buttonhas been selected.
Voice recognition can be used whenthe vehicle is on or when RetainedAccessory Power (RAP) is active.See Retained Accessory Power(RAP) on page 9‑22 for moreinformation.
Using Voice Recognition
1. Press and release the b gsteering wheel button. The audiosystem mutes, and a beep isheard. A voice prompt stating,“Please start speaking after thebeep” might be heard.
If there is no beep, make surethat the voice volume setting isnot turned down. See ConfigureMenu on page 7‑66 for moreinformation.
While voice recognition is active,the system displays a g symbol.
2. Clearly speak one of thecommands listed later in thissection.

Black plate (78,1)Chevrolet Volt Owner Manual - 2011
7-78 Infotainment System
Canceling Voice Recognition
1. Press and release the $isteering wheel button to cancela command, or if the systemresponse does not match theverbal command.
2. The system replies, “Voicerecognition canceled.”
Pressing any other radio orsteering wheel control, otherthan the volume knob or thevolume steering wheel buttoncancels the session.
3. Press and release the b gsteering wheel button to restartthe voice recognition session.
Helpful Hints for SpeakingCommands. When multiple commands are
available, choose the commandthat best works for you.
. Words that are in brackets areoptional. For example, for thecommand “Radio (band) FM,”saying “Radio FM” or “RadioBand FM” are both validcommands.
. Words separated by a ( / ) meanthere is a choice of using aword on either side of the slash.For example, for the command(CD/DVD/Disc) (help), you cansay “CD (help)” or “DVD (help)”or “Disc (help).”
. When the system recognizes thecommand, the system will eitherperform the function or ask toconfirm the choice by clearlysaying “yes” or “no.”
. When the system does notrecognize the command,the system issues an errormessage such as “pardon”or “command not recognized.”The system could also say,“voice recognition canceled.”
. If experiencing difficulty with thesystem recognizing a command,confirm that the command iscorrect. Try saying the commandclearly or wait for a brief momentafter the beep.
. Background noise such as aclimate control fan positionedon high, open windows, andvery loud outside noises, evenif the windows are closed, cancause voice commands to bemisunderstood.

Black plate (79,1)Chevrolet Volt Owner Manual - 2011
Infotainment System 7-79
. This system is able to recognizecommands in differentlanguages, such as English,French Canadian, and Spanish.The system only recognizescommands based on thelanguage selected.
. To increase or decrease thevoice volume during a voicerecognition session, turnthe volume knob of the radio,or press the volume steeringwheel buttons. If the volumeis adjusted during a voicerecognition session, a VoiceVolume bar appears on thescreen showing the voicevolume level as it is beingadjusted. This also changesthe volume of the guidanceprompts.
Voice Recognition Help
To enter the help playback session,clearly speak one of the helpcommands.
Help: The system plays backmore specific help commands(such as Radio Help, Display Help,Navigation Help) for the user tochoose from.
Radio (help): The system playsback helpful advice about radiocommands, and some commonradio commands which areavailable. Use this commandto learn about how to select aband (AM, FM, or XM), and howto change radio stations (byspeaking frequency numbers).
(CD/DVD/Disc) (help): The systemplays back helpful advice aboutdisc commands, and some commondisc commands which are available.Use this command to learn abouthow to select Disc mode playback,and how to change track numbers.
Display (help): The system playsback helpful advice about displaycommands, and some commondisplay commands which areavailable to adjust the displaysetting.
Navigation (help): The systemplays back helpful advice aboutnavigation commands, and somecommon navigation commandswhich are available.
Voice Recognition Commands
The following list shows thevoice commands available forthe navigation system with a briefdescription of each. The commandsare listed with the optional wordsin brackets. To use the voicecommands, see the instructionslisted previously.

Black plate (80,1)Chevrolet Volt Owner Manual - 2011
7-80 Infotainment System
Display Commands
Display (set) day (mode),display (select) day (mode):This command instructs the systemto switch the display to day mode.
Display (set) night (mode),display (select) night (mode):This command instructs the systemto switch the display to night mode.
Display (set) auto (mode),display (select) auto (mode):This command instructs the systemto switch the display to auto mode.
Display (help): This commandinstructs the system to play backhelpful advice about displaycommands, and some commondisplay commands which areavailable to adjust the displaysetting.
Radio Commands
Radio AM, radio (band) AM,radio FM, radio (band) FM,radio XM, radio (band) XM:These commands instruct thesystem to go to either the AM,FM, or XM radio bands.
Radio select (frequency) AM,radio select (frequency) FM:These commands instruct thesystem to go to a specific frequencyon either the AM or FM band.For example, radio select ninetyseven point one FM or radio selectten forty AM.
Radio select (channel) XM:This command instructs thesystem to go to a specific channelon the XM band (if equipped).For example, radio select onefifty one XM.
Radio (help): This commandinstructs the system to play backsome helpful advice about radiocommands, and some commonradio commands which are availableto the user.
CD/DVD/Disc Commands
The following commands are onlyavailable when a CD, MP3, or DVDis loaded:
Radio CD, radio DVD, radio disc:These commands instruct thesystem to go to Disc mode.
Radio CD select (track number),radio DVD select (track number),radio disc select (track number):These commands instruct thesystem to play a specific track onthe disc. For example, radio discselect ten. This command supportsup to 254 tracks.
CD (help), DVD (help), disc(help): This command instructsthe system to play back helpfuladvice about disc commands, andsome common disc commandswhich are available.

Black plate (81,1)Chevrolet Volt Owner Manual - 2011
Infotainment System 7-81
General Navigation Commands
Feedback on, feedback off:This command instructs thesystem to turn on and off thevoice recognition feedback.When feedback is ON, the systemresponds to commands with a talkback phrase. When feedback isOFF, the system responds tocommands with a chime.
Navigation voice (guidance) on,navigation voice (guidance) off:This command instructs the systemto turn on and off voice guidanceprompts during route guidance.
Cancel: This instructs the systemto cancel the command.
Point of Interest (POI)Commands
The following is a list of POIcommands. POIs only display onthe map screen if the map scaleis 800 m (0.50 mi) or less. If POIsdisplay on a map with the wrongscale, the system reminds that thiscannot be done. The available POIcommands are:
Navigation show gas station(s),navigation show gas, navigationhide gas station(s), navigationhide gas: These commandsinstruct the system to display andhide gas station POIs on the mapscreen.
Navigation show restaurant(s),navigation show dining,navigation hide restaurant(s),navigation hide dining: Thesecommands instruct the system todisplay and hide restaurant POIson the map screen.
Navigation show ATM(s),navigation hide ATM(s): Thesecommands instruct the system todisplay and hide ATM POIs on themap screen.
Navigation show hotel(s),navigation hide hotel(s): Thesecommands instruct the system todisplay and hide hotel POIs on themap screen.
Navigation show airport(s),navigation hide airport(s): Thesecommands instruct the system todisplay and hide airport POIs on themap screen.
Navigation show shop(s),navigation show shopping,navigation hide shop(s),navigation hide shopping: Thesecommands instruct the system todisplay and hide shopping POIs onthe map screen.

Black plate (82,1)Chevrolet Volt Owner Manual - 2011
7-82 Infotainment System
Destination and GuidanceCommands
Navigation (go to) presetdestination (number) (one, two,three, four, five, or six): Thesecommands instruct the system toset one of the preset destinationsone through six as the newdestination.
Navigation delete: This commandinstructs the system to delete thedestination, route, or next waypoint.The system requests a confirmationof which item should be deleted(destination, route, or nextwaypoint).
Destination (available for Englishlanguage only): This commandinstructs the system that theuser wants to enter a destinationusing voice recognition. After thiscommand is stated, the systemdisplays a state abbreviation(such as NY for New York).
If the destination to be entered is inthe displayed state, then say thedesired city name. Otherwise, say“Change State” and say the statename the search should take placein. Then, say the desired city namewhen prompted, and say the desiredstreet name and house numberwhen prompted.
To set a destination using voicerecognition:
1. Press and release the b gsteering wheel control.The audio system mutes,and a beep is heard.
2. Say the command “Destination.”The system replies with “Pleasesay city name or change state,”and the system shows a pop-upbanner of an abbreviated statename, such as NY for New York.If the state is correct, then go toStep 4. Otherwise, say “ChangeState.”
For example, if the desireddestination is in Ohio, but thesystem shows New York (NY)in the pop-up banner, say“Change State.”
3. After saying “Change State,” thesystem replies with “Please saystate name.” Say the correctstate.

Black plate (83,1)Chevrolet Volt Owner Manual - 2011
Infotainment System 7-83
The state name displays.In some cases the radio showsa candidate list with the closestmatches to the spoken statename. The system asks theuser to select an item from thecandidate list either by pressingthe desired choice, or by sayingthe list number of the desiredchoice.
4. The system asks the userto say the city name. As shownearlier, the radio can display acandidate list with the closestmatches to the spoken cityname. Say the correctcity name.
5. Reply with the street nameincluding the suffix (Blvd, Ave,Rd, etc.), when prompted.The radio might display acandidate list with the closestmatches to the spoken streetname. Say the correctstreet name.
6. Reply with the house numberwhen prompted. The radio mightdisplay a candidate list with theclosest matches to the spokenhouse number. Say the housenumber as a single digit.
7. Confirm the correct address isdisplayed, then reply with yesor no, when prompted.
8. This address is now set asthe destination. Select theStart screen button to begindestination guidance.
Voice Tag Commands
Voice tags are recorded phrasesthat can be stored in the navigationsystem. These voice tags areassociated with address bookentries, and once these voice tagsare stored, they can be used aspart of a voice recognition commandthat sets the particular address bookentry as a destination. See “AddressBook” earlier in this manual forinformation about instructions onhow to store a voice tag in thesystem.
Navigation (go to) (voice tag):This command allows selection of adestination saved under the storedvoice tag. The system plays backthe voice tag and asks to confirmby saying yes or no.
If a destination is set to “Home,” say“Navigation go to Home.” After thesystem plays back the voice tagand it is confirmed, the systemsets “Home” as the destination.

Black plate (84,1)Chevrolet Volt Owner Manual - 2011
7-84 Infotainment System
OnStar (if equipped) Command
Hands Free: This commandinstructs the system to enter theOnStar voice recognition system.See “Hands-Free Calling” in theOnStar Owner's Guide for moreinformation.
Help CommandsHelpRadio (help)CD (help), DVD (help),Disc (help)Display (help)Navigation (help)
Display CommandsDisplay (set/select) day (mode)Display (set/select) night (mode)Display (set/select) auto (mode)
Radio Commands(radio/radio band) AM(radio/radio band) FM(radio/radio band) XMRadio select <frequency> AMRadio select <frequency> FMRadio select <frequency> XM
CD/DVD/Disc CommandsRadio (CD/DVD/Disc)Radio (CD/DVD/Disc) select<track number>
General Navigation CommandsFeedback OnFeedback OffNavigation voice (guidance) onNavigation voice (guidance) off(cancel/goodbye/quit)
Point of Interest (POI) CommandsNavigation show(gas/gas station/gas stations)Navigation show(dining/restaurant/restaurants)Navigation show (ATM/ATMs)Navigation show (hotel/hotels)Navigation show(airport/airports)Navigation show(shop/shops/shopping)Navigation hide(gas/gas station/gas stations)
Navigation hide(dining/restaurant/restaurants)Navigation hide (ATM/ATMs)Navigation hide (hotel/hotels)Navigation hide (airport/airports)Navigation hide(shop/shops/shopping)
Destination and GuidanceCommands
Navigation (go to) presetdestination (number) oneNavigation (go to) presetdestination (number) twoNavigation (go to) presetdestination (number) threeNavigation (go to) presetdestination (number) fourNavigation (go to) presetdestination (number) fiveNavigation (go to) presetdestination (number) sixNavigation delete (destination/route/next waypoint)

Black plate (85,1)Chevrolet Volt Owner Manual - 2011
Infotainment System 7-85
Route (used in conjunction withanother command)Next waypoint(used in conjunction withanother command)Add to waypoint(used in conjunction withanother command)Replace destination(used in conjunction withanother command)Yes (used in conjunction withanother command)No (used in conjunction withanother command)Destination (used forDestination VR entry, availablein English language only)
Voice Tag CommandsNavigation (go to) <Voice Tag>
OnStar CommandHands Free
Phone
BluetoothFor vehicles equipped withBluetooth capability, the systemcan interact with many cell phones,allowing:. Placement and receipt of calls in
a hands-free mode.. Sharing of the cell phone’s
address book or contact listwith the vehicle.
To minimize driver distraction,before driving, and with the vehicleparked:. Become familiar with the
features of the cell phone.Organize the phone book andcontact lists clearly and deleteduplicate or rarely used entries.If possible, program speed dialor other shortcuts.
. Review the controls andoperation of the infotainmentand navigation system.
. Pair cell phone(s) to the vehicle.The system may not work withall cell phones. See “Pairing aPhone” in this section for moreinformation.
. If the cell phone has voicedialing capability, learn to usethat feature to access theaddress book or contact list.See “Voice Pass-Thru” in thissection for more information.
. See “Storing and Deleting PhoneNumbers” in this section formore information.
{ WARNING
When using a cell phone, it canbe distracting to look too longor too often at the screen ofthe phone or the infotainment(navigation) system. Takingyour eyes off the road too longor too often could cause a crashresulting in injury or death.Focus your attention on driving.

Black plate (86,1)Chevrolet Volt Owner Manual - 2011
7-86 Infotainment System
Using Voice Recognition
To use voice recognition, press theb g button on the steering wheel.
The system responds with a tone.After the tone say “Hands Free” touse the Bluetooth voice recognitionsystem. The system then respondswith “Ready,” followed by a tone.After the tone, say a command.
For additional information say“Help” while you are in a voicerecognition menu.
Pairing a Phone
1. Press b g. Say “Hands Free”after the tone.
2. Say “Bluetooth.”
3. Say “Pair.” The system respondswith instructions and a four‐digitPersonal Identification Number(PIN). The PIN is used in Step 5.
4. Start the pairing process on thecell phone that you want to pair.For help with this process, seeyour cell phone manufacturer'suser guide.
5. Locate the device named “YourVehicle” in the list on the cellphone. Follow the instructionson the cell phone to enter thePIN that was provided in Step 3.After the PIN is successfullyentered, the system prompts youto provide a name for the pairedcell phone. This name will beused to indicate which phonesare paired and connected to thevehicle. See “Listing All Pairedand Connected Phones” later inthis section for more information.
6. Repeat Steps 1 through 5 to pairadditional phones.
Listing All Paired and ConnectedPhones
The system can list all cell phonespaired to it. If a paired cell phone isalso connected to the vehicle, thesystem responds with “is connected”after that phone name.
1. Press b g. Say “Hands Free”after the tone.
2. Say “Bluetooth.”
3. Say “List.”
Deleting a Paired Phone
If the phone name you want todelete is unknown, see “Listing AllPaired and Connected Phones.”
1. Press b g. Say “Hands Free”after the tone.
2. Say “Bluetooth.”
3. Say “Delete.” The system asksfor which phone to delete.
4. Say the name of the phone youwant to delete.

Black plate (87,1)Chevrolet Volt Owner Manual - 2011
Infotainment System 7-87
Connecting to a Different Phone
To connect to a different cell phone,the Bluetooth system looks for thenext available cell phone in theorder in which all available cellphones were paired. Dependingon which cell phone you want toconnect to, you may have to usethis command several times.
1. Press b g. Say “Hands Free”after the tone.
2. Say “Bluetooth.”
3. Say “Change phone.”. If another cell phone is
found, the response willbe “<Phone name> is nowconnected.”
. If another cell phone is notfound, the original phoneremains connected.
Storing and Deleting PhoneNumbers
The system can store up to30 phone numbers as name tagsin the Hands-Free Directory that isshared between the Bluetooth andOnStar systems.
The following commands are usedto delete and store phone numbers.
Store: This command will storea phone number, or a group ofnumbers as a name tag.
Digit Store: This command allowsa phone number to be stored as aname tag by entering the digits oneat a time.
Delete: This command is used todelete individual name tags.
Delete All Name Tags: Thiscommand deletes all storedname tags in the Hands-FreeCalling Directory and the OnStarTurn-by-Turn Destinations Directory.
Using the “Store” Command
1. Press b g. Say “Hands Free”after the tone.
2. Say “Store.”
3. Say the phone number or groupof numbers to store all at oncewith no pauses, then follow thedirections given by the system tosave a name tag for this number.
Using the “Digit Store” Command
If an unwanted number isrecognized by the system, say“Clear” at any time to clear thelast number.
To hear all of the numbersrecognized by the system,say “Verify” at any time.
1. Press b g. Say “Hands Free”after the tone.
2. Say “Digit Store.”

Black plate (88,1)Chevrolet Volt Owner Manual - 2011
7-88 Infotainment System
3. One at a time, say each numberto store. After each number isentered, the system repeatsback the number it heardfollowed by a tone. After thelast number has been entered,say “Store,” and then follow thedirections given by the system tosave a name tag for this number.
Using the “Delete” Command
1. Press b g. Say “Hands Free”after the tone.
2. Say “Delete.”
3. Say the name tag you want todelete.
Using the “Delete All Name Tags”Command
This command deletes all storedname tags in the Hands-FreeCalling Directory and the OnStarTurn-by-Turn Destinations Directory.
To delete all name tags:
1. Press b g. Say “Hands Free”after the tone.
2. Say “Delete all name tags.”
Listing Stored Numbers
The list command will list all thestored numbers and name tags.
Using the “List” Command
1. Press b g. Say “Hands Free”after the tone.
2. Say “Directory.”
3. Say “Hands-Free Calling.”
4. Say “List.”
Making a Call
Calls can be made using thefollowing commands:
Dial or Call: The dial orcall command can be usedinterchangeably to dial a phonenumber or a stored name tag.
Digit Dial: This command allowsa phone number to be dialed byentering the digits one at a time.
Re‐dial: This command is used todial the last number used on the cellphone.
Using the “Dial” or “Call”Command
1. Press b g. Say “Hands Free”after the tone.
2. Say “Dial” or “Call.”
3. Say the entire number withoutpausing or say the name tag.
Once connected, the person calledwill be heard through the audiospeakers.
Black plate (89,1)Chevrolet Volt Owner Manual - 2011
Infotainment System 7-89
Using the “Digit Dial” Command
The digit dial command allows aphone number to be dialed byentering the number one at a time.After each number is entered, thesystem repeats back the number itheard followed by a tone.
If an unwanted number isrecognized by the system, say“Clear” at any time to clear thelast number.
To hear all of the numbersrecognized by the system, say“Verify” at any time.
1. Press b g. Say “Hands Free”after the tone.
2. Say “Digit Dial.”
3. Say each digit, one at a time,that you want to dial. After eachdigit is entered, the systemrepeats back the digit it heardfollowed by a tone. After thelast digit has been entered,say “Dial.”
Once connected, the person calledwill be heard through the audiospeakers.
Using the “Re‐dial” Command
1. Press b g. Say “Hands Free”after the tone.
2. After the tone, say “Re‐dial.”
Once connected, the person calledwill be heard through the audiospeakers.
Receiving a Call
When an incoming call is received,the audio system mutes and a ringtone is heard in the vehicle.
. Press b g to answer the call.
. Press $i to ignore a call.
Call Waiting
Call waiting must be supported onthe cell phone and enabled by thewireless service carrier.
. Press b g to answer anincoming call when another callis active. The original call isplaced on hold.
. Press b g again to return to theoriginal call.
. To ignore the incoming call, noaction is required.
. Press $i to disconnect thecurrent call and switch to the callon hold.

Black plate (90,1)Chevrolet Volt Owner Manual - 2011
7-90 Infotainment System
Three‐Way Calling
Three‐way calling must besupported on the cell phoneand enabled by the wirelessservice carrier.
1. While on a call, press b g.2. Say “Three‐way call.”
3. Use the dial or call command todial the number of the third partyto be called.
4. Once the call is connected,press b g to link all callerstogether.
Ending a Call
Press $i to end a call.
Muting a Call
During a call, all sounds from insidethe vehicle can be muted so that theperson on the other end of the callcannot hear them.
To mute a call, press b g, and thensay “Mute Call.”
To cancel mute, press b g, andthen say “Un‐mute Call.”
Transferring a Call
Audio can be transferred betweenthe Bluetooth system and the cellphone.
The cell phone must be pairedand connected with the Bluetoothsystem before a call can betransferred. The connection processcan take up to two minutes afterthe vehicle is started.
To Transfer Audio from theBluetooth System to a Cell Phone
During a call with the audio in thevehicle:
1. Press b g.2. Say “Transfer Call.”
To Transfer Audio to the BluetoothSystem from a Cell Phone
During a call with the audio on thecell phone, press b g. The audiotransfers to the vehicle. If the audiodoes not transfer to the vehicle,use the audio transfer feature onthe cell phone. See your cell phonemanufacturer's user guide for moreinformation.

Black plate (91,1)Chevrolet Volt Owner Manual - 2011
Infotainment System 7-91
Voice Pass-Thru
Voice pass‐thru allows access tothe voice recognition commands onthe cell phone. See your cell phonemanufacturer's user guide to see ifthe cell phone supports this feature.
To access contacts stored in the cellphone:
1. Press b g. Say “Hands Free”after the tone.
2. Say “Bluetooth.” The systemresponds “Bluetooth ready,”followed by a tone.
3. Say “Voice.” The systemresponds “OK, accessing<phone name>.”
The cell phone's normal promptmessages will go through theircycle according to the phone'soperating instructions.
Dual Tone Multi-Frequency(DTMF) Tones
The Bluetooth system can sendnumbers and numbers stored asname tags during a call. Use thisfeature when calling a menu-drivenphone system. Account numberscan also be stored for use.
Sending a Number or Name TagDuring a Call
1. Press b g. The systemresponds “Ready,” followedby a tone.
2. Say “Dial.”
3. Say the number or name tagto send.
Clearing the System
Unless information is deleted outof the in‐vehicle Bluetooth system,it will be retained indefinitely.This includes all saved name tags inthe phone book and phone pairinginformation. For information on howto delete this information, see theprevious sections on “Deleting aPaired Phone” and “Storing andDeleting Phone Numbers.”

Black plate (92,1)Chevrolet Volt Owner Manual - 2011
7-92 Infotainment System
Pairing a Phone Using theInfotainment System
The pairing process can be startedby using the controls on theinfotainment system.
1. Press the CONFIG button.Turn the TUNE/MENU knobuntil the Phone menu displays.Press the TUNE/MENU knob orpress the Phone screen buttonto display other options.
2. Turn the TUNE/MENU knobuntil Bluetooth displays. Pressthe TUNE/MENU knob or pressthe Bluetooth screen button todisplay other options.
3. Select “Add new Phone.”The pairing process will beginsearching for Bluetooth deviceson the cell phone. See the cellphone manufacturer's user guidefor information on this process.
On the cell phone, locate thedevice named “Your Vehicle.”Follow the instructions given onthe cell phone or follow the voiceprompts, to enter the four-digitPersonal Identification Number(PIN) that has been provided.
4. The system voice promptrequests a name for the phonebeing paired. Use a namethat best describes the phone.The system voice prompt thenrepeats the name you providedfor confirmation; say “Yes.”
5. The system responds with“phone name has beensuccessfully paired” after thepairing process is complete.

Black plate (93,1)Chevrolet Volt Owner Manual - 2011
Infotainment System 7-93
Listing All Paired and ConnectedPhones
1. Press the CONFIG button.Turn the TUNE/MENU knobuntil the Phone menu displays.Press the TUNE/MENU knob orpress the Phone screen buttonto display other options.
2. Turn the TUNE/MENU knobuntil Bluetooth displays. Pressthe TUNE/MENU knob or pressthe Bluetooth screen button todisplay other options.
3. Turn the TUNE/MENU knob untilDevice List displays. Press theTUNE/MENU knob or press theDevice List screen button todisplay other options.
A list of all previously pairedphones will be displayed. If thereis a currently connected phone,a checkmark will appear on theright side of the phone name.

Black plate (94,1)Chevrolet Volt Owner Manual - 2011
7-94 Infotainment System
Deleting a Paired Phone
1. Press the CONFIG button.Turn the TUNE/MENU knobuntil the Phone menu displays.Press the MENU knob or pressthe Phone screen button todisplay other options.
2. Turn the TUNE/MENU knobuntil Bluetooth displays. Pressthe TUNE/MENU knob or pressthe Bluetooth screen button todisplay other options.
3. Turn the TUNE/MENU knob untilDevice List displays. Press theTUNE/MENU knob or press theDevice List screen button todisplay other options.

Black plate (95,1)Chevrolet Volt Owner Manual - 2011
Infotainment System 7-95
4. Turn the TUNE/MENU knob,then press it to select thephone to be deleted. Followthe on-screen prompts to deletethe device from the system.
5. Once a phone has been deleted,the only way to connect back tothat phone is to pair the phoneagain.
Linking to a Different Phone
To link to a different phone, thenew phone must be in the vehicleand available to be connected tothe Bluetooth system before theprocess is started.
1. Press the CONFIG button.Turn the TUNE/MENU knobuntil the Phone menu displays.Press the TUNE/MENU knob orpress the Phone screen buttonto display other options.
2. Turn the TUNE/MENU knob untilBluetooth displays. Press theTUNE/MENU knob or pressthe Bluetooth screen buttonto display other options.

Black plate (96,1)Chevrolet Volt Owner Manual - 2011
7-96 Infotainment System
3. Turn the TUNE/MENU knob untilDevice List displays. Press theTUNE/MENU knob or press theDevice List screen button todisplay other options.
4. Select the phone to be linkedand then follow the on-screenprompts.
5. The Phone menu will bedisplayed with the nameof the phone linked.

Black plate (97,1)Chevrolet Volt Owner Manual - 2011
Infotainment System 7-97
Making a Call
PressV / 0 on the infotainmentsystem, to access the Phone Menu.
Enter Number
Use this option to enter a phonenumber and make a call.
1. Turn the TUNE/MENU knob,then press it to select EnterNumber selection. A dial paddisplays.
2. Enter the phone number bypressing the numbers on thekeypad.
3. Press the Call button on thescreen to make the call.
Phone Book
The phone book can be accessedby pressing the Phone Bookselection on the Phone Menuscreen.
Turn the TUNE/MENU knob toselect the person or place to call.Press the TUNE/MENU knob orpress the desired person or placeto display the number. Press theTUNE/MENU knob or press thenumber to make the call.

Black plate (98,1)Chevrolet Volt Owner Manual - 2011
7-98 Infotainment System
The Phone Book feature also has asearch menu that can be accessedby pressing that option screenbutton. Once the Search menudisplays, turn the TUNE/MENUknob to scroll through the list, thenpress the TUNE/MENU button toselect the desired list item. Theselists are saved in alphabetical order.
Press the TUNE/MENU knob orpress the appropriate search lineto obtain the numbers of the listedpersons or places that have beensaved.
Call Lists
The Call Lists selection from thePhone Menu screen can be usedto show a list of incoming calls,outgoing calls, and missed calls.
1. Press the CONFIG button.Turn the TUNE/MENU knobuntil Phone displays. Press theMENU knob or press the Phonescreen button to display otheroptions.

Black plate (99,1)Chevrolet Volt Owner Manual - 2011
Infotainment System 7-99
2. Turn the TUNE/MENU knob,then press this knob or presseither Incoming Calls, OutgoingCalls, or Missed Calls.
Once one of these options has beenselected, a pop-up menu displays.A list of persons and places willdisplay for the selected option.
Turn the TUNE/MENU knob,then press this knob or pressthe appropriate screen button toselect someone on that list. A menudisplays showing the phone numberfor that person.
Accepting or Declining anIncoming Call
When an incoming call is received,the audio is muted and a ring tonesounds.
Accepting a Call
Press the appropriate screen buttonfor the Answer option on the screento answer the call.
Declining a Call
Select the Decline option on thescreen.

Black plate (100,1)Chevrolet Volt Owner Manual - 2011
7-100 Infotainment System
Call Waiting
Call waiting must be supported onthe Bluetooth phone and enabled bythe wireless service carrier to work.
Switching Calls (Only Availablewith Call Waiting)
This feature allows switchingbetween calls, making one callactive, and placing the otheron hold.
Switch Call: Turn or press theTUNE/MENU knob to Switch Calland press Enter or press the SwitchCall option.
Conference Calling
Conference and three-way callingmust be supported on the Bluetoothphone and enabled by the wirelessservice carrier to work.
To start a conference while in acurrent call:
1. PressV / 0 on the infotainmentsystem until the Phone mainscreen is shown with the currentactive call.
2. Select Enter Number on thescreen.
3. Make another call. The firstcall will be placed on hold whilethe second call is dialing andconnected.
4. To make a conference call,select Merge Calls andboth calls merge into oneconference call.
5. To add more callers to theconference call, repeat Steps 2through 4. The number of callersthat can be added is limited byyour wireless service carrier.

Black plate (101,1)Chevrolet Volt Owner Manual - 2011
Infotainment System 7-101
Ending a Call
To end a call:
1. PressV / 0.
2. Select Hang Up.
Mute or UnMute a Call
1. PressV / 0.
2. Select Mute Call.
3. Select Mute Call again tounmute the call.
Dual Tone Multi-Frequency(DTMF) Tones
The in-vehicle Bluetooth system cansend numbers during a call. This isused when calling a menu-drivenphone system.
1. PressV / 0.
2. Turn the TUNE/MENU knob,then press this knob or press theEnter Number option and enterthe number sequence.
The DTMF Tones will be generatedon the network as you enter eachnumber.

Black plate (102,1)Chevrolet Volt Owner Manual - 2011
7-102 Infotainment System
2 NOTES

Black plate (1,1)Chevrolet Volt Owner Manual - 2011
Climate Controls 8-1
Climate Controls
Climate Control SystemsAutomatic Climate ControlSystem . . . . . . . . . . . . . . . . . . . . . . 8-1
Air VentsAir Vents . . . . . . . . . . . . . . . . . . . . . . 8-9
Climate ControlSystems
Automatic ClimateControl SystemThe climate control buttons and thetouch screen are used to adjust theheating, cooling, and ventilation.
The vehicle may require theuse of an auxiliary heat sourceunder certain cold conditions.
This provides additional heatingand defrost capability obtainedby running the engine, even if thehigh voltage battery is adequatelycharged. Under these conditions,the engine will start and use fuel.Make sure there is fuel in the tank.
Do not allow the vehicle to remainin extreme temperatures for longperiods without being driven orbeing plugged in.

Black plate (2,1)Chevrolet Volt Owner Manual - 2011
8-2 Climate Controls
Climate Control Buttons
A. Temperature Control
B. Driver and Passenger HeatedSeats
C. Defrost
D. Climate
E. Auto (Automatic Operation)
F. Rear Window Defogger
G. Manual Fan Control

Black plate (3,1)Chevrolet Volt Owner Manual - 2011
Climate Controls 8-3
Climate Touch Screen Controls
A. Driver and Passenger AutoHeated Seats
B. Air Delivery Mode Controls
C. Auto Recirculation
D. Manual Recirculation
E. Outside Air TemperatureDisplay
F. Climate Modes: Fan Only, ECO,Comfort
G. Climate Power Gauge
H. Manual Fan Control
I. Temperature Setting Display
J. Air Conditioning Indicator
K. Heat Status Indicator
Climate Control Touch Screen
The climate mode, fan, air delivery,recirculation, and auto heatedseats are controlled by pressingthe CLIMATE button on the centerstack and viewing information inthe center stack display.
Climate Mode Operation
There are three climate modesettings: Fan Only, ECO, andComfort. These settings adjust theimpact the climate control systemhas on the vehicle's electric rangeor fuel economy.
To select a climate mode:
1. Press CLIMATE on the centerstack.
2. Press the climate mode buttonon the touch screen. The climatemode will be lit.

Black plate (4,1)Chevrolet Volt Owner Manual - 2011
8-4 Climate Controls
Fan Only Mode: The airconditioning and electric heat areturned off. As long as0 is notselected, the climate control settingsmay not have a noticeable effecton the vehicle electric range andfuel economy.
When in Fan Only mode, theAUTO indicator light will be off.When AUTO is selected in FanOnly mode, the mode will changeto either ECO or Comfort.
When in Fan Only mode, the airconditioning system may turn onautomatically if the high voltagebattery is being cooled. The climatecontrol system could blow cold air.
This is normal. To prevent cold airfrom blowing into the interior, turnoff the fan control and select thevent mode and manual recirculationmode, and close the air vents.
When in Fan Only mode,if Auto Defog is enabled, the airconditioning and electric heatmay turn on when high humidityconditions exist. See “Climateand Air Quality” under VehiclePersonalization on page 5‑53for more information on theAuto Defog selection. The airconditioning may also runif0 is selected.
ECO Mode: The vehicle airconditioning and electric heat arecontrolled to balance comfort withfuel economy. As long as0 is notselected, the vehicle electric rangeor fuel economy will decrease lessthan in Comfort mode, but will resultin moderate comfort.
Comfort Mode: The vehicle airconditioning and electric heat arecontrolled to reach the best comfortlevel based on the temperaturesetting selected. In this mode,vehicle electric range or fueleconomy will decrease dependingon the amount of energy requiredto reach the best comfort levels.
Climate Power Gauge
When the climate mode is changed,the Climate Power gauge displaysthe impact that user setting changeshave on energy consumption.The higher the reading, the moreenergy is being used.
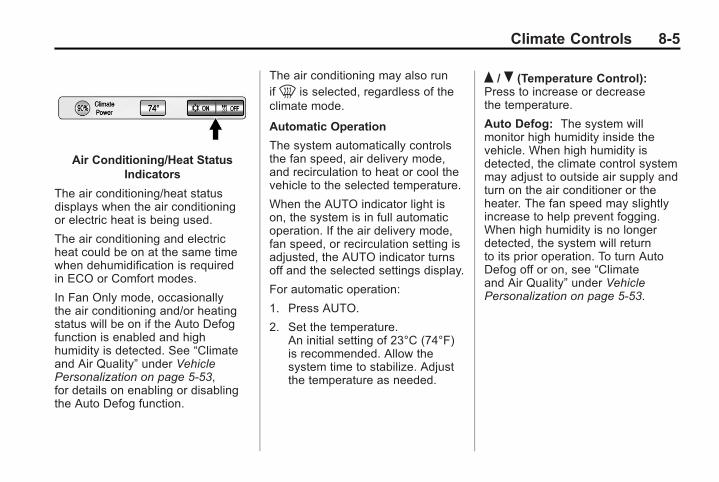
Black plate (5,1)Chevrolet Volt Owner Manual - 2011
Climate Controls 8-5
Air Conditioning/Heat StatusIndicators
The air conditioning/heat statusdisplays when the air conditioningor electric heat is being used.
The air conditioning and electricheat could be on at the same timewhen dehumidification is requiredin ECO or Comfort modes.
In Fan Only mode, occasionallythe air conditioning and/or heatingstatus will be on if the Auto Defogfunction is enabled and highhumidity is detected. See “Climateand Air Quality” under VehiclePersonalization on page 5‑53,for details on enabling or disablingthe Auto Defog function.
The air conditioning may also runif0 is selected, regardless of theclimate mode.
Automatic Operation
The system automatically controlsthe fan speed, air delivery mode,and recirculation to heat or cool thevehicle to the selected temperature.
When the AUTO indicator light ison, the system is in full automaticoperation. If the air delivery mode,fan speed, or recirculation setting isadjusted, the AUTO indicator turnsoff and the selected settings display.
For automatic operation:
1. Press AUTO.
2. Set the temperature.An initial setting of 23°C (74°F)is recommended. Allow thesystem time to stabilize. Adjustthe temperature as needed.
Q / R (Temperature Control):Press to increase or decreasethe temperature.
Auto Defog: The system willmonitor high humidity inside thevehicle. When high humidity isdetected, the climate control systemmay adjust to outside air supply andturn on the air conditioner or theheater. The fan speed may slightlyincrease to help prevent fogging.When high humidity is no longerdetected, the system will returnto its prior operation. To turn AutoDefog off or on, see “Climateand Air Quality” under VehiclePersonalization on page 5‑53.
Black plate (6,1)Chevrolet Volt Owner Manual - 2011
8-6 Climate Controls
Manual Operation
A (Fan Control): Press thefan control buttons or the touchscreen fan control, to increase ordecrease the fan speed. The fanspeed setting displays. Pressingeither button cancels automaticfan control and the fan can becontrolled manually. Press AUTOto return to automatic operation.Press the fan down buttonrepeatedly to turn off the fanand the climate control system.
If the fan is manually turned offwhile in ECO or Comfort mode,the display will automatically changeto Fan Only mode. When the fan isturned back on either by manuallyincreasing fan speed or pressingthe AUTO button, the climatemode will revert back to ECOor Comfort mode.
Air Delivery Mode Control:Press CLIMATE to select theClimate touch screen. Press theair delivery mode touch screenbutton to change the direction ofthe airflow. The selected air deliverymode button is lit. Pressing anyof the air delivery buttons cancelsautomatic air delivery control andthe direction of the airflow can becontrolled manually. Press AUTOto return to automatic operation.
To change the current mode,select one of the following:
Y (Vent): Air is directed to theinstrument panel outlets.
\ (Bi-Level): Air is dividedbetween the instrument paneloutlets and the floor outlets.
[ (Floor): Air is directed to thefloor outlets.
- (Defog): Air is directed to thewindshield and floor outlets. Clearsthe windows of fog or moisture.
0 (Defrost): Air is directed tothe windshield. The windshield iscleared of fog or frost more quickly.Selecting0 will disable automaticcontrol and the AUTO buttonindicator will not be lit.
Selecting0 again will return to theprevious climate settings.
For best results, clear all snow andice from the windshield beforedefrosting.
If0 is selected in Fan Only orECO mode, air conditioning orelectric heat may turn on and havea noticeable effect on vehicleelectric range and fuel economy.
Black plate (7,1)Chevrolet Volt Owner Manual - 2011
Climate Controls 8-7
AUTOh (Auto Recirculation):Press to allow the system toautomatically choose the airsupply mode for best performancein terms of comfort, efficiency,and defogging. Air is recirculatedor outside air is pulled into thevehicle. The touch screen buttonis lit.
h (Manual Recirculation):Press to alternate betweenrecirculating air inside thevehicle or pulling in outside air.When selected, the touch screenbutton lights up to indicate thatair is being recirculated. This helpsto quickly cool the air inside thevehicle or prevent outside airand odors from entering.
Pressing this button cancelsautomatic recirculation. PressAUTO or AUTOh to return toautomatic operation; recirculationruns automatically as needed.
Manual recirculation mode is notavailable when in Defrost or Defogmodes.
M / L (Manual Heated Seats):If available, the controls are on thecenter stack. To operate, the vehiclemust be on.
Press M or L to heat the driveror passenger seat cushion andseatback. For more information,see Heated Front Seats onpage 3‑6.
M AUTO/ L AUTO (Auto HeatedSeats): If available, the controlsare on the touch screen on thecenter stack.
Press the touch screen L AUTO orM AUTO button. The button colorwill change to green when thisfeature is on. When the vehicle ison, this feature will automaticallyactivate the heated seats at thelevel required by the vehicle'sinterior temperature. The activehigh, medium, low, or off heatedseat level will be indicated by themanual heated seat button lightson the center stack. Use the touchscreen buttons or the manualheated seat buttons on the centerstack to turn auto heated seats off.For more information, see HeatedFront Seats on page 3‑6.

Black plate (8,1)Chevrolet Volt Owner Manual - 2011
8-8 Climate Controls
Rear Window Defogger
= (Rear Window Defogger):Press to turn the rear windowdefogger on or off.
The rear window defoggerturns off automatically after aboutfive minutes. If turned on again,it runs for about five minutesbefore turning off. The defoggercan also be turned off by turningthe vehicle off.
For vehicles with heated outsiderearview mirrors, they turn on whenthe rear window defogger buttonis on and help to clear fog or frostfrom the surface of the mirror.See Heated Mirrors on page 2‑16.
Notice: Do not try to clear frostor other material from the insideof the front windshield and rearwindow with a razor blade oranything else that is sharp.This may damage the rearwindow defogger grid and affectthe radio's ability to pick upstations clearly. The repairswouldn't be covered by thevehicle warranty.
Remote Start: For vehicles withthis feature, the climate controlsystem may be started by usingthe Remote Keyless Entry (RKE)transmitter. The climate controlsystem will default to an appropriateheating or cooling mode.See Remote Start on page 2‑8.
The rear window defogger turns onif it is cold outside.
Compressor
The vehicle has an electric poweredair conditioning compressor.This allows for continuous airconditioning and/or high voltagebattery cooling operation, withoutrunning the engine.
The compressor operating speedis not tied to the engine speed, sosome noise may be heard from thecompressor, especially when airconditioning use is high and theengine has turned off. This isnormal.

Black plate (9,1)Chevrolet Volt Owner Manual - 2011
Climate Controls 8-9
Sensors
Solar Sensor
The solar sensor is located on topof the instrument panel, near thewindshield, where it monitors solarintensity.
The climate control systemuses the sensor information toadjust the temperature, fan speed,recirculation, and air deliverymode for best comfort.
Do not cover the sensor; otherwisethe automatic climate control systemmay not work properly.
Humidity Sensor
The humidity sensor is near thebase of the inside rearview mirror.The climate control system usesthe sensor information to adjust thetemperature and recirculation forbest comfort.
Outside Air Temperature Sensor
The outside air temperature sensoris located behind the front grilleof the vehicle. The vehicle usesthe sensor information to displayoutside air temperature. The climatecontrol system uses the informationto adjust the climate systemoperation.
Air VentsUse the louvers on the air vents tochange the direction of the airflow.
Use the thumbwheels near eachvent to open and close off theairflow.
Operation Tips. Keep all outlets open whenever
possible for best systemperformance.
. Keep the path under all seatsclear of objects to help circulatethe air inside the vehicle moreeffectively.
. Use of non-GM approved hooddeflectors can adversely affectthe performance of the system.

Black plate (10,1)Chevrolet Volt Owner Manual - 2011
8-10 Climate Controls
2 NOTES

Black plate (1,1)Chevrolet Volt Owner Manual - 2011
Driving and Operating 9-1
Driving andOperating
Driving InformationDriving for Better EnergyEfficiency . . . . . . . . . . . . . . . . . . . . 9-2
Defensive Driving . . . . . . . . . . . . . 9-4Drunk Driving . . . . . . . . . . . . . . . . . 9-4Control of a Vehicle . . . . . . . . . . . 9-5Braking . . . . . . . . . . . . . . . . . . . . . . . 9-5Steering . . . . . . . . . . . . . . . . . . . . . . . 9-6Off-Road Recovery . . . . . . . . . . . . 9-8Loss of Control . . . . . . . . . . . . . . . . 9-8Driving on Wet Roads . . . . . . . . . 9-9Highway Hypnosis . . . . . . . . . . . 9-10Hill and Mountain Roads . . . . . 9-10Winter Driving . . . . . . . . . . . . . . . . 9-11If the Vehicle Is Stuck . . . . . . . . 9-13Vehicle Load Limits . . . . . . . . . . 9-14
Starting and OperatingNew Vehicle Break-In . . . . . . . . 9-18Power Button . . . . . . . . . . . . . . . . 9-18Starting and Stopping theVehicle . . . . . . . . . . . . . . . . . . . . . 9-20
Retained AccessoryPower (RAP) . . . . . . . . . . . . . . . 9-22
Shifting Into Park . . . . . . . . . . . . 9-22Shifting out of Park . . . . . . . . . . 9-23Parking over ThingsThat Burn . . . . . . . . . . . . . . . . . . 9-24
Electric Vehicle OperatingModesSystem Operation . . . . . . . . . . . 9-24Electric Mode . . . . . . . . . . . . . . . . 9-25Extended Range Mode . . . . . . 9-25Driver Selected OperatingModes . . . . . . . . . . . . . . . . . . . . . . 9-26
Out of Fuel/EngineUnavailable . . . . . . . . . . . . . . . . 9-28
Maintenance Modes . . . . . . . . . 9-28
Engine ExhaustEngine Exhaust . . . . . . . . . . . . . . 9-30Running the Vehicle WhileParked . . . . . . . . . . . . . . . . . . . . . 9-31
Electric Drive UnitElectric Drive Unit . . . . . . . . . . . 9-32
BrakesAntilock BrakeSystem (ABS) . . . . . . . . . . . . . . 9-33
Electric Parking Brake . . . . . . . 9-35Regenerative Braking . . . . . . . . 9-37
Ride Control SystemsTraction ControlSystem (TCS) . . . . . . . . . . . . . . 9-37
Electronic StabilityControl (ESC) . . . . . . . . . . . . . . 9-39
Cruise ControlCruise Control . . . . . . . . . . . . . . . 9-40
Object Detection SystemsUltrasonic Parking Assist . . . . 9-43Rear VisionCamera (RVC) . . . . . . . . . . . . . 9-46
ChargingPlug-In Charging . . . . . . . . . . . . . 9-49Delayed ChargingOverride . . . . . . . . . . . . . . . . . . . . 9-52
Charging StatusFeedback . . . . . . . . . . . . . . . . . . 9-52
Charge Cord . . . . . . . . . . . . . . . . . 9-54Electrical Requirements forBattery Charging . . . . . . . . . . . 9-56

Black plate (2,1)Chevrolet Volt Owner Manual - 2011
9-2 Driving and Operating
FuelFuel . . . . . . . . . . . . . . . . . . . . . . . . . 9-57Gasoline Specifications (U.S.and Canada Only) . . . . . . . . . . 9-58
California FuelRequirements . . . . . . . . . . . . . . 9-58
Fuels in Foreign Countries . . . 9-58Fuel Additives . . . . . . . . . . . . . . . 9-59Filling the Tank . . . . . . . . . . . . . . 9-60Filling a Portable FuelContainer . . . . . . . . . . . . . . . . . . . 9-62
TowingGeneral TowingInformation . . . . . . . . . . . . . . . . . 9-62
Conversions and Add-OnsAdd-On ElectricalEquipment . . . . . . . . . . . . . . . . . 9-63
Driving Information
Driving for Better EnergyEfficiencyUse the following tips to helpmaximize energy efficiencyand range.
Driving Style
Efficiency Gauge(Instrument Cluster)
The ball indicator should be keptgreen and in the center of thegauge.
Inefficient acceleration is indicatedwhen the ball turns yellow andtravels above the center of thegauge.
Aggressive braking is indicatedwhen the ball turns yellow andtravels below the center of thegauge.
Acceleration/Braking/Coasting
Avoid unnecessary rapidaccelerations and decelerations.
Electric range is maximized at80 km/h (50 mph) and below.Higher speeds use more energyand can significantly reduceelectric range.
Use cruise control whenappropriate.
Plan ahead for decelerationsand coast whenever possible.For example, do not rush totraffic signals.
Do not shift to N (Neutral) to coast.The vehicle recovers energy whilecoasting and braking in D (Drive)or L (Low).
Black plate (3,1)Chevrolet Volt Owner Manual - 2011
Driving and Operating 9-3
Drive Mode and PRNDL Selection
Use Normal Mode when possible.
Sport Mode provides moreresponsive acceleration thanNormal Mode but can reduceefficiency.
Use Mountain Mode prior toclimbing long, steep grades inmountainous areas. Be sure toengage Mountain Mode beforestarting to climb. Mountain Modereduces electric range and powerbut may be needed to maintainspeeds above 96 km/h (60 mph)when climbing grades of 5% orgreater.
Use L (Low) in heavy stop‐and‐gotraffic or when traveling downhill.L (Low) requires less brakepedal application and providesa controlled, efficient way toslow the vehicle down.
Climate Setting
Using the heat and air conditioningsystems decreases the energyavailable for electric driving.
Optimal energy efficiency isachieved with the heat, airconditioning, and fan turned off.
Less energy is used at low fanspeeds. When using the fan:. Fan Only is the most energy
efficient climate setting as longas0 is not selected.
. ECO is for moderate airconditioning and heateroperation and is the nextmost energy efficient setting aslong as0 is not selected.
. Comfort provides the mostcomfort but is the least energyefficient.
Use the auto heated seat featureinstead of climate settings. Heatingthe seat uses less energy thanheating the vehicle interior.
Use remote start to heat or cool theinterior when the vehicle is pluggedin to maximize the electric range byutilizing electricity from the electricaloutlet.
In hot weather, avoid parking indirect sunlight or use sunshadesinside the vehicle.
Turn off the front and rear windowdefog/defrost when they are nolonger needed.
Avoid driving with the windows openat highway speeds.
Vehicle Charging/Maintenance
Charging
Keep the vehicle plugged in, evenwhen fully charged, to keep thebattery temperature ready for thenext drive. This is important whenoutside temperatures are extremelyhot or cold.

Black plate (4,1)Chevrolet Volt Owner Manual - 2011
9-4 Driving and Operating
Maintenance
Always keep the tires properlyinflated and the vehicle properlyaligned.
The weight of excess cargo in thevehicle affects efficiency and range.Avoid carrying more than is needed.
If fuel is not regularly used, considerkeeping the fuel tank only one‐thirdfull. Excess fuel weight impactsefficiency and range.
Use premium fuel.
Avoid unnecessary use of electricalaccessories. Power used forfunctions other than propellingthe vehicle will reduce EV range.
Using a rooftop carrier will reduceefficiency due to additional weightand drag.
Defensive DrivingDefensive driving means “alwaysexpect the unexpected.” The firststep in driving defensively is to wearthe safety belt. See Safety Belts onpage 3‑10.
{ WARNING
Assume that other road users(pedestrians, bicyclists, and otherdrivers) are going to be carelessand make mistakes. Anticipatewhat they might do and be ready.In addition:
. Allow enough followingdistance between you andthe driver in front of you.
. Focus on the task of driving.
Driver distraction can causecollisions resulting in injury orpossible death. These simpledefensive driving techniquescould save your life.
Drunk Driving
{ WARNING
Drinking and then driving isvery dangerous. Your reflexes,perceptions, attentiveness, andjudgment can be affected byeven a small amount of alcohol.You can have a serious — oreven fatal — collision if youdrive after drinking.
Do not drink and drive or ride witha driver who has been drinking.Ride home in a cab; or if you arewith a group, designate a driverwho will not drink.
Death and injury associated withdrinking and driving is a globaltragedy.

Black plate (5,1)Chevrolet Volt Owner Manual - 2011
Driving and Operating 9-5
Alcohol affects four things thatanyone needs to drive a vehicle:judgment, muscular coordination,vision, and attentiveness.
Police records show thatalmost 40 percent of all motorvehicle-related deaths involvealcohol. In most cases, thesedeaths are the result of someonewho was drinking and driving.In recent years, more than17,000 annual motor vehicle-relateddeaths have been associated withthe use of alcohol, with about250,000 people injured.
For persons under 21, it is againstthe law in every U.S. state to drinkalcohol. There are good medical,psychological, and developmentalreasons for these laws.
The obvious way to eliminate theleading highway safety problem isfor people never to drink alcoholand then drive.
Medical research shows thatalcohol in a person's systemcan make crash injuries worse,especially injuries to the brain,spinal cord, or heart. This meansthat when anyone who has beendrinking — driver or passenger — isin a crash, that person's chance ofbeing killed or permanently disabledis higher than if the person had notbeen drinking.
Control of a VehicleThe following three systemshelp to control the vehicle whiledriving — brakes, steering, andaccelerator. At times, as whendriving on snow or ice, it is easy toask more of those control systemsthan the tires and road can provide.Meaning, you can lose control of thevehicle.
Adding non‐dealer accessoriescan affect vehicle performance.See Accessories and Modificationson page 10‑4.
BrakingSee Brake System Warning Light onpage 5‑24.
Braking action involves perceptiontime and reaction time. Deciding topush the brake pedal is perceptiontime. Actually doing it isreaction time.
Average reaction time is aboutthree‐fourths of a second. But thatis only an average. It might be lesswith one driver and as long as twoor three seconds or more withanother. Age, physical condition,alertness, coordination, andeyesight all play a part. So doalcohol, drugs, and frustration.But even in three‐fourths of asecond, a vehicle moving at100 km/h (60 mph) travels 20 m(66 ft). That could be a lot ofdistance in an emergency, sokeeping enough space betweenthe vehicle and others is important.

Black plate (6,1)Chevrolet Volt Owner Manual - 2011
9-6 Driving and Operating
And, of course, actual stoppingdistances vary greatly with thesurface of the road, whether it ispavement or gravel; the conditionof the road, whether it is wet, dry,or icy; tire tread; the condition of thebrakes; the weight of the vehicle;and the amount of brake forceapplied.
Avoid needless heavybraking. Some people drive inspurts — heavy accelerationfollowed by heavy braking — ratherthan keeping pace with traffic.This is a mistake. The brakesmight not have time to cool betweenhard stops. The brakes will wearout much faster with a lot of heavy
braking. Keeping pace with thetraffic and allowing realistic followingdistances eliminates a lot ofunnecessary braking. That meansbetter braking and longer brake life.
If propulsion is disabled whilethe vehicle is being driven, brakenormally but do not pump thebrakes. If the brakes are pumped,the pedal could get harder to pushdown. If propulsion stops, therewill still be some power brake assistbut it will be used when the brakeis applied. Once the power assist isused up, it can take longer to stopand the brake pedal will be harderto push.
Steering
Electric Power Steering
If propulsion is disabled, the powersteering assist system may continueto operate until you are able to stopthe vehicle. If power steering assistis lost because the electric powersteering system is not functioning,the vehicle can be steered but itwill take more effort.
The electric power steeringsystem does not require regularmaintenance. If you suspectsteering system problems and/orthe SERVICE POWER STEERINGmessage comes on, contact yourdealer for service. See ServiceVehicle Messages on page 5‑51.

Black plate (7,1)Chevrolet Volt Owner Manual - 2011
Driving and Operating 9-7
Steering Tips
It is important to take curves at areasonable speed.
Traction in a curve depends on thecondition of the tires and the roadsurface, the angle at which thecurve is banked, and vehicle speed.While in a curve, speed is the onefactor that can be controlled.
If there is a need to reduce speed,do it before entering the curve, whilethe front wheels are straight.
Try to adjust the speed so you candrive through the curve. Maintain areasonable, steady speed. Wait toaccelerate until out of the curve,and then accelerate gently into thestraightaway.
Steering in Emergencies
There are times when steering canbe more effective than braking.For example, you come over a hilland find a truck stopped in yourlane, or a car suddenly pulls outfrom nowhere, or a child darts outfrom between parked cars and stopsright in front of you. These problemscan be avoided by braking— if youcan stop in time. But sometimesyou cannot stop in time becausethere is no room. That is the timefor evasive action— steeringaround the problem.
The vehicle can perform verywell in emergencies like these.First apply the brakes. See Brakingon page 9‑5. It is better to removeas much speed as possible froma collision. Then steer aroundthe problem, to the left or rightdepending on the space available.
An emergency like this requiresclose attention and a quick decision.If holding the steering wheel atthe recommended 9 and 3 o'clockpositions, it can be turned a full180 degrees very quickly withoutremoving either hand. But you haveto act fast, steer quickly, and justas quickly straighten the wheelonce you have avoided the object.
The fact that such emergencysituations are always possible is agood reason to practice defensivedriving at all times and wear safetybelts properly.

Black plate (8,1)Chevrolet Volt Owner Manual - 2011
9-8 Driving and Operating
Off-Road RecoveryThe vehicle's right wheels can dropoff the edge of a road onto theshoulder while driving.
If the level of the shoulder isonly slightly below the pavement,recovery should be fairly easy.Ease off the accelerator andthen, if there is nothing in the way,steer so that the vehicle straddlesthe edge of the pavement.
Turn the steering wheel 8 to 13 cm(3 to 5 in), about one-eighth turn,until the right front tire contactsthe pavement edge. Then turn thesteering wheel to go straight downthe roadway.
Loss of ControlLet us review what driving expertssay about what happens when thethree control systems— brakes,steering, and acceleration— do nothave enough friction where the tiresmeet the road to do what the driverhas asked.
In any emergency, do not give up.Keep trying to steer and constantlyseek an escape route or area ofless danger.
Skidding
In a skid, a driver can lose control ofthe vehicle. Defensive drivers avoidmost skids by taking reasonablecare suited to existing conditions,and by not overdriving thoseconditions. But skids are alwayspossible.
The three types of skids correspondto the vehicle's three controlsystems. In the braking skid,the wheels are not rolling. In thesteering or cornering skid, too muchspeed or steering in a curve causestires to slip and lose cornering force.And in the acceleration skid, toomuch throttle causes the drivingwheels to spin.
If the vehicle starts to slide, easeyour foot off the accelerator pedaland quickly steer the way youwant the vehicle to go. If you startsteering quickly enough, the vehiclemay straighten out. Always be readyfor a second skid if it occurs.

Black plate (9,1)Chevrolet Volt Owner Manual - 2011
Driving and Operating 9-9
Of course, traction is reduced whenwater, snow, ice, gravel, or othermaterial is on the road. For safety,slow down and adjust your drivingto these conditions. It is importantto slow down on slippery surfacesbecause stopping distance is longerand vehicle control more limited.
While driving on a surface withreduced traction, try to avoidsudden steering, acceleration,or braking, including reducingvehicle speed by shifting to a lowergear. Any sudden changes couldcause the tires to slide. You mightnot realize the surface is slipperyuntil the vehicle is skidding. Learnto recognize warning clues— suchas enough water, ice, or packedsnow on the road to make amirrored surface— and slowdown when you have any doubt.
Remember: Antilock brakes helpavoid only the braking skid.
Driving on Wet RoadsRain and wet roads can reducevehicle traction and affect yourability to stop and accelerate.Always drive slower in these typesof driving conditions and avoiddriving through large puddles anddeep‐standing or flowing water.
{ WARNING
Wet brakes can cause crashes.They might not work as well ina quick stop and could causepulling to one side. You couldlose control of the vehicle.
After driving through a largepuddle of water or a car/vehiclewash, lightly apply the brakepedal until the brakes worknormally.
(Continued)
WARNING (Continued)
Flowing or rushing water createsstrong forces. Driving throughflowing water could cause thevehicle to be carried away. If thishappens, you and other vehicleoccupants could drown. Do notignore police warnings and bevery cautious about trying todrive through flowing water.
Hydroplaning
Hydroplaning is dangerous. Watercan build up under the vehicle'stires so they actually ride on thewater. This can happen if the roadis wet enough and you are goingfast enough. When the vehicle ishydroplaning, it has little or nocontact with the road.
There is no hard and fast rule abouthydroplaning. The best advice is toslow down when the road is wet.
Black plate (10,1)Chevrolet Volt Owner Manual - 2011
9-10 Driving and Operating
Other Rainy Weather Tips
Besides slowing down, other wetweather driving tips include:. Allow extra following distance.. Pass with caution.. Keep windshield wiping
equipment in good shape.. Keep the windshield washer fluid
reservoir filled.. Have good tires with proper
tread depth. See Tires onpage 10‑48.
. Turn off cruise control.
Highway HypnosisAlways be alert and pay attentionto your surroundings while driving.If you become tired or sleepy, finda safe place to park the vehicleand rest.
Other driving tips include:. Keep the vehicle well ventilated.. Keep interior temperature cool.. Keep your eyes moving — scan
the road ahead and to the sides.. Check the rearview mirror and
vehicle instruments often.
Hill and Mountain RoadsDriving on steep hills or throughmountains is different thandriving on flat or rolling terrain.See “Mountain Mode” under DriverSelected Operating Modes onpage 9‑26. Tips for driving inthese conditions include:. Keep the vehicle serviced and in
good shape.. Check all fluid levels and brakes,
tires, cooling system, andelectric drive unit.
. Keep the vehicle in gear whengoing down steep or long hills.
{ WARNING
Coasting downhill in N (Neutral)or with the vehicle turned off isdangerous. The brakes will haveto do all the work of slowing downthe vehicle and could become toohot. Hot brakes may not be able
(Continued)

Black plate (11,1)Chevrolet Volt Owner Manual - 2011
Driving and Operating 9-11
WARNING (Continued)
to slow the vehicle enough tomaintain speed and control.You could crash. Always havethe vehicle running and in gear(preferably LOW range) whengoing downhill. This will allowthe electric drive unit to assist inslowing and maintaining speed.
. Stay in your own lane. Do notswing wide or cut across thecenter of the road. Drive atspeeds that let you stay inyour own lane.
. Top of hills: Bealert — something couldbe in your lane (stalled car,accident).
. Pay attention to special roadsigns (falling rocks area, windingroads, long grades, passing orno-passing zones) and takeappropriate action.
Winter Driving
Driving on Snow or Ice
Drive carefully when there issnow or ice between the tiresand the road, creating less tractionor grip. Wet ice can occur at about0°C (32°F) when freezing rainbegins to fall, resulting in even lesstraction. Avoid driving on wet ice orin freezing rain until roads can betreated with salt or sand.
Drive with caution, whatever thecondition. Accelerate gently sotraction is not lost. Acceleratingtoo quickly causes the wheels tospin and makes the surface underthe tires slick, so there is even lesstraction.
Try not to break the fragile traction.If you accelerate too fast, the drivewheels will spin and polish thesurface under the tires even more.
The Antilock Brake System (ABS)improves vehicle stability duringhard stops on slippery roads, butapply the brakes sooner than whenon dry pavement.
Allow greater following distanceon any slippery road and watchfor slippery spots. Icy patches canoccur on otherwise clear roads inshaded areas. The surface of acurve or an overpass can remainicy when the surrounding roadsare clear. Avoid sudden steeringmaneuvers and braking whileon ice.
Turn off cruise control on slipperysurfaces.

Black plate (12,1)Chevrolet Volt Owner Manual - 2011
9-12 Driving and Operating
Blizzard Conditions
Being stuck in snow can bea serious situation. Stay withthe vehicle unless there is helpnearby. If possible, use theRoadside Assistance Program.To get help and keep everyonein the vehicle safe:. Turn on the hazard warning
flashers.. Tie a red cloth to an outside
mirror.
{ WARNING
Snow can trap engine exhaustunder the vehicle. This maycause exhaust gases to getinside. Engine exhaust containsCarbon Monoxide (CO) whichcannot be seen or smelled. It cancause unconsciousness and evendeath.
(Continued)
WARNING (Continued)
If the vehicle is stuck in the snow:. Clear away snow fromaround the base of thevehicle, especially any thatis blocking the exhaust pipe.
. Check again from time totime to be sure snow doesnot collect there.
. Open a window about 5 cm(2 in) on the side of thevehicle that is away fromthe wind to bring in fresh air.
. Fully open the air outletson or under the instrumentpanel.
. Adjust the climate controlsystem to a setting thatcirculates the air insidethe vehicle and set the fanspeed to the highest setting.See Climate Control Systemsin the Index.
(Continued)
WARNING (Continued)
For more information aboutcarbon monoxide, see EngineExhaust on page 9‑30.
To conserve energy, run thevehicle for only short periods asneeded to warm the vehicle andthen shut the vehicle off and closethe window most of the way tosave heat. Repeat this until helparrives but only when you feel reallyuncomfortable from the cold. Movingabout to keep warm also helps.
If it takes some time for help toarrive, start the vehicle. The enginemay start to charge the 12‐voltbattery. Turn off unnecessaryaccessories to conserve energy.

Black plate (13,1)Chevrolet Volt Owner Manual - 2011
Driving and Operating 9-13
If the Vehicle Is StuckSlowly and cautiously spin thewheels to free the vehicle whenstuck in sand, mud, ice, or snow.
Shifting the vehicle into L will allowthe driver to achieve more wheelspin. The wheel spin will still belimited by the traction controlsystem to prevent any drivelinedamage. The increase in allowablewheel spin is only active at lowspeeds.
{ WARNING
If the vehicle's tires spin at highspeed, they can explode, andyou or others could be injured.The vehicle can overheat,causing an engine compartmentfire or other damage. Spin thewheels as little as possible andavoid going above 55 km/h(35 mph).
For information about using tirechains on the vehicle, see TireChains on page 10‑69.
Rocking the Vehicle to Getit Out
Turn the steering wheel left andright to clear the area around thefront wheels. Shift back and forthbetween R (Reverse) and a forwardgear, spinning the wheels as littleas possible. The Traction ControlSystem prevents the tires fromspinning at high speeds. To preventelectric drive unit wear, wait until thewheels stop spinning before shiftinggears. Release the acceleratorpedal while shifting, and presslightly on the accelerator pedalwhen the electric drive unit is ingear. Slowly spinning the wheels inthe forward and reverse directionscauses a rocking motion that couldfree the vehicle. If that does not getthe vehicle out after a few tries, itmight need to be towed out. If thevehicle does need to be towed out,see Towing the Vehicle onpage 10‑84.

Black plate (14,1)Chevrolet Volt Owner Manual - 2011
9-14 Driving and Operating
Vehicle Load LimitsIt is very important to knowhow much weight the vehiclecan carry. This weight is calledthe vehicle capacity weightand includes the weight ofall occupants, cargo, and allnonfactory‐installed options.Two labels on the vehicleshow how much weight it wasdesigned to carry, the Tire andLoading Information label andthe Certification label.
{ WARNING
Do not load the vehicleany heavier than theGross Vehicle WeightRating (GVWR), or either themaximum front or rear GrossAxle Weight Rating (GAWR).This can cause systems tobreak and change the way thevehicle handles. This couldcause loss of control and acrash. Overloading can alsoshorten the life of the vehicle.
Tire and Loading InformationLabel
Label Example
A vehicle-specific Tire andLoading Information label isattached to the center pillar(B-pillar). With the driver dooropen, the label is attachedbelow the door lock post.

Black plate (15,1)Chevrolet Volt Owner Manual - 2011
Driving and Operating 9-15
The Tire and LoadingInformation label shows thenumber of occupant seatingpositions (A), and the maximumvehicle capacity weight (B) inkilograms and pounds.
The Tire and LoadingInformation label also showsthe tire size of the originalequipment tires (C) and therecommended cold tire inflationpressures (D). For moreinformation on tires and inflationsee Tires on page 10‑48 andTire Pressure on page 10‑54.
There is also important loadinginformation on the Certificationlabel. It tells you the GrossVehicle Weight Rating (GVWR)and the Gross Axle WeightRating (GAWR) for the frontand rear axle; see “CertificationLabel” later in this section.
Steps for Determining CorrectLoad Limit
1. Locate the statement“The combined weight ofoccupants and cargo shouldnever exceed XXX kg orXXX lbs” on your vehicle'splacard.
2. Determine the combinedweight of the driver andpassengers that will beriding in your vehicle.
3. Subtract the combinedweight of the driver andpassengers from XXX kgor XXX lbs.
4. The resulting figure equalsthe available amount of cargoand luggage load capacity.For example, if the “XXX”amount equals 1400 lbsand there will be five 150 lb
passengers in your vehicle,the amount of available cargoand luggage load capacityis 650 lbs (1400 − 750(5 x 150) = 650 lbs).
5. Determine the combinedweight of luggage and cargobeing loaded on the vehicle.That weight may not safelyexceed the available cargoand luggage load capacitycalculated in Step 4.
6. If your vehicle will be towinga trailer, the load from yourtrailer will be transferred toyour vehicle. Consult thismanual to determine how thisreduces the available cargoand luggage load capacityof your vehicle.
The vehicle is neither designednor intended to tow a trailer.

Black plate (16,1)Chevrolet Volt Owner Manual - 2011
9-16 Driving and Operating
Example 1
A. Vehicle Capacity Weightfor Example 1 = 453 kg(1,000 lbs).
B. Subtract Occupant Weight@ 68 kg (150 lbs) × 2 =136 kg (300 lbs).
C. Available Occupant andCargo Weight = 317 kg(700 lbs).
Example 2
A. Vehicle Capacity Weightfor Example 2 = 453 kg(1,000 lbs).
B. Subtract Occupant Weight@ 68 kg (150 lbs) × 5 =340 kg (750 lbs).
C. Available CargoWeight = 113 kg (250 lbs).
Example 3
A. Vehicle Capacity Weightfor Example 3 = 453 kg(1,000 lbs).
B. Subtract Occupant Weight@ 91 kg (200 lbs) × 5 =453 kg (1,000 lbs).
C. Available CargoWeight = 0 kg (0 lbs).

Black plate (17,1)Chevrolet Volt Owner Manual - 2011
Driving and Operating 9-17
Refer to the vehicle's Tire andLoading Information label forspecific information about thevehicle's capacity weight andseating positions. The combinedweight of the driver, passengers,and cargo should never exceedthe vehicle's capacity weight.
Certification Label
Label Example
A vehicle-specific Certificationlabel is found on the centerpillar (B-pillar). The label showsthe gross weight capacity ofthe vehicle. This is the GrossVehicle Weight Rating (GVWR)and includes the weight of thevehicle, all occupants, fuel, andcargo. Never exceed the GVWR
for the vehicle, or the GrossAxle Weight Rating (GAWR)for either the front or rear axle.
Spread out heavy loads equallyon both sides of the vehicle.See “Steps for DeterminingCorrect Load Limit” earlierin this section.
{ WARNING
Do not load the vehicleany heavier than theGross Vehicle WeightRating (GVWR), or either themaximum front or rear GrossAxle Weight Rating (GAWR).This can cause systems tobreak and change the way thevehicle handles. This couldcause loss of control and acrash. Overloading can alsoshorten the life of the vehicle.
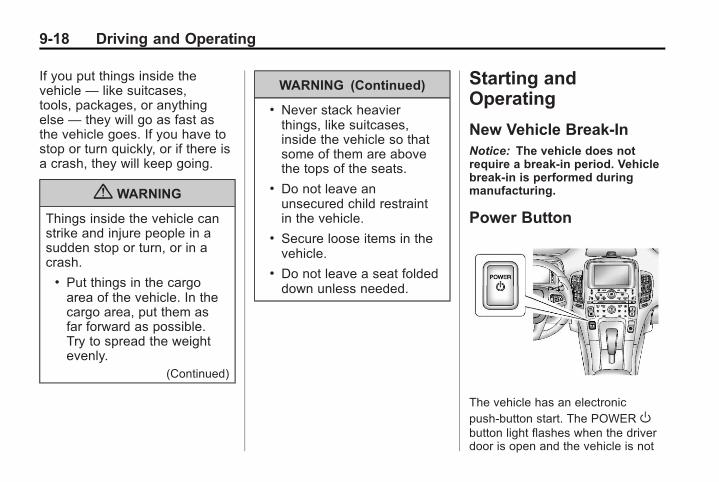
Black plate (18,1)Chevrolet Volt Owner Manual - 2011
9-18 Driving and Operating
If you put things inside thevehicle — like suitcases,tools, packages, or anythingelse — they will go as fast asthe vehicle goes. If you have tostop or turn quickly, or if there isa crash, they will keep going.
{ WARNING
Things inside the vehicle canstrike and injure people in asudden stop or turn, or in acrash.
. Put things in the cargoarea of the vehicle. In thecargo area, put them asfar forward as possible.Try to spread the weightevenly.
(Continued)
WARNING (Continued)
. Never stack heavierthings, like suitcases,inside the vehicle so thatsome of them are abovethe tops of the seats.
. Do not leave anunsecured child restraintin the vehicle.
. Secure loose items in thevehicle.
. Do not leave a seat foldeddown unless needed.
Starting andOperating
New Vehicle Break-InNotice: The vehicle does notrequire a break-in period. Vehiclebreak‐in is performed duringmanufacturing.
Power Button
The vehicle has an electronicpush‐button start. The POWER Obutton light flashes when the driverdoor is open and the vehicle is not
Black plate (19,1)Chevrolet Volt Owner Manual - 2011
Driving and Operating 9-19
on. The flashing light will eventuallytime out. The POWER O buttonlight is on steady when in ON/RUNpower mode. When the vehicle isturned off, the POWER O buttonlight will turn off.
The Remote Keyless Entry (RKE)transmitter must be in the vehiclefor the system to operate. If thevehicle will not start, place the RKEtransmitter in the transmitter slot.See Remote Keyless Entry (RKE)System Operation on page 2‑3.
ON/RUN: This position is fordriving and starting. With the vehicleoff, and the brake pedal applied,pressing the POWER O button oncewill place the vehicle in ON/RUN.The instrument cluster displays anactive fuel or battery gauge, alongwith an audio startup cue, whenthe vehicle is ready to be driven.This could take up to 15 secondsat extremely cold temperatures.
The engine will only start if needed.If the vehicle did not start, theinstrument cluster will display ascreen with inactive fuel and batterygauges. See Starting and Stoppingthe Vehicle on page 9‑20.
Service Only Mode
This power mode is available forservice and diagnostics, and toverify the proper operation ofthe MIL as may be required foremission inspection purposes.With the vehicle off, and the brakepedal not applied, pressing andholding the POWER O button formore than 5 seconds will placethe vehicle in Service Only Mode.The instruments and audio systemswill operate as they do in ON/RUN,but the vehicle will not be able to bedriven. The propulsion system willnot start in Service Only Mode.
STOPPING THE VEHICLE/OFF:To turn the vehicle off, push thePOWER O button with the vehiclein P (Park). Retained AccessoryPower (RAP) will remain activeuntil the driver door is opened.See Retained Accessory Power(RAP) on page 9‑22. When turningoff the vehicle, if the vehicle is notin P (Park), the vehicle will go toACC/ACCESSORY and display themessage SHIFT TO PARK in theDriver Information Center (DIC).See Electric Drive Unit Messageson page 5‑47.
In an emergency, if the vehicle mustbe stopped while driving:
1. Brake using a firm and steadypressure. Do not pump thebrakes repeatedly. This maydeplete power assist, requiringincreased brake pedal force.

Black plate (20,1)Chevrolet Volt Owner Manual - 2011
9-20 Driving and Operating
2. Shift the vehicle to N (Neutral).This can be done while thevehicle is moving. After shiftingto N (Neutral), firmly apply thebrakes and steer the vehicleto a safe location.
3. Come to a complete stop,shift to P (Park), and turn thevehicle to OFF by pushing thePOWER O button.
4. Set the parking brake.See Electric Parking Brake onpage 9‑35.
{ WARNING
Turning off the vehicle whilemoving may disable the airbags.While driving, only shut thepropulsion system off in anemergency.
5. If the vehicle must be stoppedwhile driving, press and holdthe POWER O button foreither longer than two seconds,or press twice in five seconds.
Starting and Stopping theVehicle
Starting Procedure
Move the shift lever to P (Park) orN (Neutral). The propulsion systemwill not start in any other position.
Notice: Do not try to shift toP (Park) if the vehicle is movingor the electric drive unit could bedamaged. Shift to P (Park) onlywhen the vehicle is stopped.
Notice: The vehicle is designedto work with the electronics inthe vehicle. If you add electricalparts or accessories, you couldchange the way the vehicleoperates. Before adding electricalequipment, check with yourdealer. If you do not, the vehiclemight not perform properly. Anyresulting damage would not becovered by the vehicle warranty.

Black plate (21,1)Chevrolet Volt Owner Manual - 2011
Driving and Operating 9-21
The Remote Keyless Entry (RKE)transmitter must be in the vehicle.Press the brake pedal and pushand release the POWER O button.
If the RKE transmitter is not in thevehicle or something is interferingwith the transmitter, a messagedisplays in the Driver InformationCenter (DIC). See Key and LockMessages on page 5‑48.
If the vehicle will not start dueto a low RKE transmitter battery,the vehicle can still be driven.See “Starting the Vehicle witha Low Transmitter Battery” inRemote Keyless Entry (RKE)System Operation on page 2‑3.
A Welcome, Ready, and Good‐byeaudio message will be heard inthe vehicle and animated on theinstrument cluster when openingthe driver door upon entry, whenthe vehicle is ready to be driven,and when the vehicle is turned off.
The instrument cluster displays anactive fuel or battery gauge, alongwith an audio startup cue, whenthe vehicle is ready to be driven.This could take up to 15 secondsat extremely cold temperatures.The engine will only start if needed.If the vehicle did not start, theinstrument cluster will displaya screen with inactive fuel andbattery gauges. See Starting andStopping the Vehicle on page 9‑20.

Black plate (22,1)Chevrolet Volt Owner Manual - 2011
9-22 Driving and Operating
Restarting Procedure
If the vehicle must be restartedwhile it is still moving, move theshift lever to N (Neutral) andpress the POWER O button twicewithout pressing the brake pedal.The propulsion system will notrestart in any other position.
Computers determine when theengine needs to run. The enginemay start, if required, when thepropulsion system is on. Somevehicle conditions that force theengine to run are:. Cold ambient temperatures.. The hood is open or not
completely latched.. The high voltage battery has a
low charge.. The engine is needed to
maintain the high voltagebattery temperature.
. The engine needs to run formaintenance.
See Maintenance Modes onpage 9‑28.
A chime will sound if the driverdoor is opened while the vehicleis in ON/RUN. Always press thePOWER O button to turn thevehicle off before exiting.
Stopping Procedure
For information on how to turn thevehicle off, see Power Button onpage 9‑18.
Retained AccessoryPower (RAP)The following features will operatefor up to 10 minutes or until thedriver door is opened:. Audio System. Power Windows. Accessory Power Outlets
Shifting Into Park
{ WARNING
It can be dangerous to get out ofthe vehicle if the shift lever is notfully in P (Park) with the parkingbrake firmly set. The vehicle canroll. If you have left the propulsionsystem on, the vehicle can movesuddenly. You or others could beinjured. To be sure the vehicle willnot move, even when you are onfairly level ground, use the stepsthat follow.
1. Hold the brake pedal down andset the parking brake.
See Electric Parking Brake onpage 9‑35 for more information.
2. Move the shift lever into P (Park)by pushing the lever all the waytoward the front of the vehicle.
3. Turn the vehicle off.

Black plate (23,1)Chevrolet Volt Owner Manual - 2011
Driving and Operating 9-23
Leaving the Vehicle with thePropulsion System On
{ WARNING
It can be dangerous to leavethe vehicle with the propulsionsystem on. The vehicle couldmove suddenly if the shift leveris not fully in P (Park) with theparking brake firmly set. And,if you leave the vehicle with thepropulsion system on, it couldoverheat and even catch fire.You or others could be injured.Do not leave the vehicle withthe propulsion system on.
If you have to leave the vehicle withthe propulsion system on, be surethe vehicle is in P (Park) and theparking brake is firmly set beforeyou leave it. After you have moved
the shift lever into P (Park), holddown the regular brake pedal.See if you can move the shift leveraway from P (Park) without firstpulling it toward you. If you can,it means that the shift lever wasnot fully locked into P (Park).
Torque Lock
Torque lock is when the weight ofthe vehicle puts too much force onthe parking pawl in the electric driveunit. This happens when parkingon a hill and shifting the electricdrive unit into P (Park) is not doneproperly and then it is difficult toshift out of P (Park). To preventtorque lock, set the parking brakeand then shift into P (Park).
If torque lock does occur, yourvehicle may need to be pusheduphill by another vehicle to relievethe parking pawl pressure, so youcan shift out of P (Park).
Shifting out of ParkTo shift out of P (Park), the vehiclemust be in ON/RUN, the brakepedal must be applied, and thecharge cord must be unplugged.
The vehicle has an electronic shiftlock release system. The shift lockrelease is designed to:. Prevent the vehicle from turning
off unless the shift lever is inP (Park).
. Prevent moving the shift leverout of P (Park), unless thevehicle is in ON/RUN, the brakepedal is applied, and the chargecord is unplugged.
The shift lock is always functionalexcept in the case of an unchargedor low charged 12‐volt battery(less than 9 volts).
If the vehicle has an uncharged12‐volt battery or a 12‐volt batterywith low voltage, try charging orjump starting the 12‐volt battery.See Jump Starting on page 10‑79.

Black plate (24,1)Chevrolet Volt Owner Manual - 2011
9-24 Driving and Operating
If the console shift lever cannot bemoved out of P (Park):
1. Apply and maintain the regularbrakes.
2. Turn the vehicle on using thePOWER O button. See PowerButton on page 9‑18.
3. Let up on the shift lever andmake sure the shift lever ispushed all the way into P (Park).
4. Press the shift lever button.
5. Move the shift lever into thedesired gear.
If you still cannot move the shiftlever from P (Park), see your dealeror a professional towing service.
Parking over ThingsThat Burn
{ WARNING
Things that can burn could touchhot exhaust parts under thevehicle and ignite. Do not parkover papers, leaves, dry grass,or other things that can burn.
Electric VehicleOperating Modes
System OperationThis vehicle is an Extended RangeElectric Vehicle (EREV). It uses anelectric propulsion system to drivethe vehicle at all times. Electricityis the vehicle's primary source ofenergy, while gasoline is thesecondary source.
The vehicle has two modes ofoperation: Electric and ExtendedRange. In both modes, the vehicleis propelled by its electric drive unit.It converts electrical energy intomechanical energy to drive thewheels. The vehicle's performanceremains the same in either mode.See Driving for Better EnergyEfficiency on page 9‑2.

Black plate (25,1)Chevrolet Volt Owner Manual - 2011
Driving and Operating 9-25
Electric ModeIn Electric Mode, the vehicle doesnot use fuel or produce tailpipeemissions. During this primarymode, the vehicle is poweredby electrical energy stored in thehigh voltage battery. The vehiclecan operate in this mode until thebattery has reached a low charge.
There are some conditions whenthe battery charge is high enoughto provide Electric Mode operation,but the engine still runs. They are:. Cold ambient temperatures.. Hot or cold high voltage battery
temperatures.. The hood being open or not
completely closed and latched.. Certain high voltage battery fault
conditions.. Engine Maintenance Mode
or Fuel Maintenance Modebeing run.
Extended Range ModeWhen the vehicle reaches the endof its electric range, it switchesto Extended Range Mode (ERM).In this secondary mode, electricityis produced by the fuel‐poweredengine. This secondary source ofelectric power extends the vehiclerange. Operation will continuein ERM until the vehicle can beplugged in to recharge the highvoltage battery and restoreElectric Mode.
The high voltage battery willcontinue to provide some powerand work together with the engineto provide peak performance whenit is required, such as driving up asteep incline or for high accelerationmaneuvers. The battery will not becharged nor will electric vehiclerange be restored by the engine.
In either Electric Mode or ExtendedRange Mode, when the hood isopen, the engine will run withoutturning off if the vehicle is on.The high voltage battery is neithercharged nor discharged when thisoccurs.
In either Electric Mode or ExtendedRange Mode, if there is a highvoltage battery fault, the enginemay run without turning off togenerate needed electricity.The Malfunction Indicator Lampwill turn on. See MalfunctionIndicator Lamp on page 5‑21.

Black plate (26,1)Chevrolet Volt Owner Manual - 2011
9-26 Driving and Operating
Driver Selected OperatingModesWhile driving in Electric or ExtendedRange Mode, additional operatingmodes can be selected.
Press the DRIVE MODE button todisplay selectable drive modes inthe Driver Information Center (DIC).Continue pressing to scroll throughthe modes.
Highlight either the Mountainor Sport Mode, then releasethe DRIVE MODE button.After three seconds, the newdrive mode will become active.
Pressing the DRIVE MODEbutton again will return to NormalMode, and become active afterthree seconds.
At next start, the vehicle will defaultto the Normal Mode. Drive modescan then be selected again asdesired.
During some conditions, certaindrive modes may be unavailable.The unavailable mode is grayedout in the DIC menu and cannotbe selected.
If in Sport or Mountain Mode,either may become unavailable andthe vehicle will return to NormalMode. The indicator light goesoff and a DIC message displays.See Propulsion Power Messages onpage 5‑50.

Black plate (27,1)Chevrolet Volt Owner Manual - 2011
Driving and Operating 9-27
Sport Mode
Sport Mode provides moreresponsive acceleration thanNormal Mode, but can reduceefficiency. Use Normal Modewhenever possible.
Press the DRIVE MODE button toselect Sport Mode.
Press the DRIVE MODE buttonagain to return to Normal Modeand it becomes active afterthree seconds.
The Sport light comes on whenSport Mode is selected. See SportMode Light on page 5‑26.
Each time the vehicle is started,it will return to Normal Mode.
Mountain Mode
Mountain Mode should be selectedat the beginning of a trip beforeclimbing steep, uphill grades andwhen expecting to drive in veryhilly or mountainous terrain.This mode maintains a reserveelectrical charge of the high voltagebattery to provide better gradeclimbing performance. While drivingin Mountain Mode, the vehicle willhave less responsive acceleration.
Mountain Mode will not changenormal vehicle braking performancefor steep downhill grades. See Hilland Mountain Roads on page 9‑10and Electric Drive Unit onpage 9‑32.
Press the DRIVE MODE buttonto select Mountain Mode. If steephill driving is expected, it isrecommended to select MountainMode at least 20 minutes beforedriving on steep grades. This willallow the vehicle time to build asufficient battery charge reserve.
The engine may run when MountainMode is selected. If MountainMode is entered before four barsof battery charge, the engine willrun at a higher speed to buildbattery charge reserve. If MountainMode is entered above four barsof battery charge reserve, theestimated electric range willadjust accordingly.

Black plate (28,1)Chevrolet Volt Owner Manual - 2011
9-28 Driving and Operating
Press the Drive Mode button againto return to Normal Mode and itbecomes active in three seconds.
If Mountain Mode is not selectedfor these conditions, propulsionpower may be reduced and theengine speed may increase. SeePropulsion Power Messages onpage 5‑50.
The vehicle returns to Normal Modeat each start to maintain a smallerbattery charge reserve for normaldriving.
Out of Fuel/EngineUnavailableIf the vehicle runs out of fuel,or the engine will not start dueto a malfunction, the vehicle cancontinue to be driven in ElectricMode. The vehicle will haveless responsive acceleration.
DIC messages indicate reducedpropulsion power, that the engineis not available, and the need forfuel or service.
Once the vehicle is refueled, or themalfunction is corrected, the enginewill start the next time the vehicle isturned on to perform a self test, andDIC messages will not be displayed.Once the engine starts successfully,normal operation will continue ineither Electric or Extended RangeMode. The engine will stop runningafter the self test is completed,and based on the current modeof operation. See Fuel SystemMessages on page 5‑48 andService Vehicle Messages onpage 5‑51.
Maintenance ModesEngine Maintenance Mode (EMM)
Engine Maintenance Mode(EMM) runs the engine to keepit in good working condition afterapproximately six weeks of no orvery limited engine operation. EMMwill force the engine to run, evenif there is a charge to power thevehicle. When EMM is needed,the EMM Request screen appearson the center stack display atvehicle start.
If Yes is selected, EMM will begin.The engine will run for a setamount of time without turning off.

Black plate (29,1)Chevrolet Volt Owner Manual - 2011
Driving and Operating 9-29
During EMM, a DIC messagedisplays to show theEMM percentage complete.
If No is selected, the EMM Requestscreen will appear when the vehicleis next started. The EMM requestcan be delayed for only one day.
If the EMM request was delayedfor one day, EMM will automaticallystart the engine at the next vehiclestart. An EMM Notification screenwill appear in the center stackdisplay.
If the vehicle shuts off during EMM,it will restart the next time thevehicle is driven. A messagedisplays to indicate that EMMis active.
If EMM is required and the fuel levelis low, EMM may eventually emptythe fuel tank if fuel is not added.This will result in reduced, or nopower. An adequate fuel level mustbe maintained in the vehicle to keepit operational. See Propulsion PowerMessages on page 5‑50.
Fuel Maintenance Mode (FMM)
Fuel Maintenance Mode (FMM)tracks average fuel age. Oldfuel can cause engine problems.If low engine usage causes averagefuel age to exceed approximatelyone year, FMM will run the engine touse up the old fuel. The engine willrun until enough fresh fuel is addedto bring the average fuel age intoan acceptable range. Allowing moreold fuel to be used up by FMM andadding a larger amount of fresh fuelwill maximize the length of timebefore another fuel maintenancemode is needed. During FMM theengine may turn on and off.

Black plate (30,1)Chevrolet Volt Owner Manual - 2011
9-30 Driving and Operating
When FMM is needed, the FMMRequest screen appears on thecenter stack display at vehicle start.
If Yes is selected, FMM will begin.FMM will automatically continue ateach vehicle start until fresh fuel isadded.
If No is selected, the FMM Requestscreen will appear when the vehicleis next started. The FMM requestcan be delayed for only one day.
If the FMM request was delayed forone day, FMM will start at the nextvehicle start and display the FMMNotification screen on the centerstack display.
If FMM is required and the fuel levelis low, FMM may eventually emptythe fuel tank if fuel is not added.This will result in reduced, or nopower. An adequate fuel level mustbe maintained in the vehicle to keepit operational. See Propulsion PowerMessages on page 5‑50.
Engine Exhaust
{ WARNING
Engine exhaust contains CarbonMonoxide (CO) which cannot beseen or smelled. Exposure to COcan cause unconsciousness andeven death.
Exhaust may enter the vehicle if:. The engine is running inExtended Range Mode inareas with poor ventilation(parking garages, tunnels,or deep snow that may blockunderbody airflow or tailpipes).
. The exhaust smells orsounds strange or different.
. The exhaust system leaksdue to corrosion or damage.
. The vehicle exhaust systemhas been modified, damaged,or improperly repaired.
(Continued)

Black plate (31,1)Chevrolet Volt Owner Manual - 2011
Driving and Operating 9-31
WARNING (Continued)
. There are holes or openingsin the vehicle body fromdamage or aftermarketmodifications that are notcompletely sealed.
If unusual fumes are detected orif it is suspected that exhaust iscoming into the vehicle:
. Drive it only with the windowscompletely down.
. Have the vehicle repairedimmediately.
Never park with the enginerunning in Extended Range Modein an enclosed area such as agarage or a building that has nofresh air ventilation.
Running the VehicleWhile ParkedIt is better not to park with thepropulsion system on. But if youever have to, here are some thingsto know.
{ WARNING
Leaving the engine runningin Extended Range Modein an enclosed area with poorventilation is dangerous. Engineexhaust may enter the vehicle.Engine exhaust contains CarbonMonoxide (CO) which cannot beseen or smelled. It can causeunconsciousness and evendeath. Never run the enginein an enclosed area that has nofresh air ventilation. For moreinformation, see Engine Exhauston page 9‑30.
{ WARNING
It can be dangerous to get out ofthe vehicle if the electric drive unitshift lever is not fully in P (Park)with the parking brake firmly set.The vehicle can roll. Do not leavethe vehicle with the propulsionsystem on unless you have to.If you have left the propulsionsystem on, the vehicle can movesuddenly. You or others could beinjured. To be sure the vehiclewill not move, even when you areon level ground, always set theparking brake and move the shiftlever to P (Park).
Follow the proper steps tobe sure the vehicle will not move.See Shifting Into Park onpage 9‑22.

Black plate (32,1)Chevrolet Volt Owner Manual - 2011
9-32 Driving and Operating
Electric Drive UnitThe vehicle uses an electric driveunit. The shift lever is on theconsole between the seats.
P (Park): This position locks thefront wheels. It is the best positionto use when starting the propulsionsystem because the vehicle cannotmove easily.
{ WARNING
It is dangerous to get out of thevehicle if the shift lever is not fullyin P (Park) with the parking brakefirmly set. The vehicle can roll.
Do not leave the vehicle whenthe propulsion system is runningunless you have to. If you haveleft the propulsion systemrunning, the vehicle can movesuddenly. You or others could beinjured. To be sure the vehicle willnot move, even when you are onfairly level ground, always set theparking brake and move the shiftlever to P (Park). See Shifting IntoPark on page 9‑22.
Make sure the shift lever is fullyin P (Park) before starting thepropulsion system. The vehiclehas an electric drive unit shift lockcontrol system. The regular brake
must be fully applied first and thenthe shift lever button pressed beforeshifting from P (Park) when thevehicle is in ON/RUN. If you cannotshift out of P (Park), ease pressureon the shift lever, then push the shiftlever all the way into P (Park) asyou maintain brake application.Then press the shift lever buttonand move the shift lever intoanother gear. See Shifting outof Park on page 9‑23.
R (Reverse): Use this gear toback up.
Notice: Shifting to R (Reverse)while the vehicle is movingforward could damage the electricdrive unit. The repairs wouldnot be covered by the vehiclewarranty. Shift to R (Reverse)only after the vehicle is stopped.
To rock the vehicle back and forth toget out of snow, ice, or sand withoutdamaging the electric drive unit, seeIf the Vehicle Is Stuck on page 9‑13.
Black plate (33,1)Chevrolet Volt Owner Manual - 2011
Driving and Operating 9-33
N (Neutral): In this position, thepropulsion system does not connectwith the wheels.
D (Drive): This position is fornormal driving. It provides thebest fuel economy. If more poweris needed for passing, and thevehicle is:. Going less than 56 km/h
(35 mph), push the acceleratorpedal about halfway down.
. Going about 56 km/h (35 mph)or more, push the acceleratorall the way down.
Notice: If the vehicle seems toaccelerate slowly or not respondwhen you go faster, and youcontinue to drive the vehiclethat way, you could damagethe electric drive unit. Have thevehicle serviced right away.
L (Low): This position reducesvehicle speed without using thebrakes. You can use L (Low) onhills. It can help control vehiclespeed going down steep mountainroads along with using the brakesoff and on. You can use L (Low)on very steep hills, in deep snow,or in mud.
Notice: Spinning the tires orholding the vehicle in oneplace on a hill using only theaccelerator pedal may damagethe electric drive unit. The repairwill not be covered by the vehiclewarranty. If you are stuck, do notspin the tires. When stopping ona hill, use the brakes to hold thevehicle in place.
Brakes
Antilock BrakeSystem (ABS)This vehicle has the AntilockBrake System (ABS), an advancedelectronic braking system that helpsprevent a braking skid.
When propulsion is active andthe vehicle begins to drive away,ABS checks itself. A momentarymotor or clicking noise might beheard while this test is going on,and it might even be noticed thatthe brake pedal moves a little.This is normal.

Black plate (34,1)Chevrolet Volt Owner Manual - 2011
9-34 Driving and Operating
If there is a problem with ABS, thiswarning light stays on. See AntilockBrake System (ABS) Warning Lighton page 5‑26.
If driving safely on a wet roadand it becomes necessary toslam on the brakes and continuebraking to avoid a sudden obstacle,a computer senses that the wheelsare slowing down. If one of thewheels is about to stop rolling, thecomputer will separately work thebrakes at each wheel.
ABS can change the brake pressureto each wheel, as required, fasterthan any driver could. This can helpthe driver steer around the obstaclewhile braking hard.
As the brakes are applied, thecomputer keeps receiving updateson wheel speed and controlsbraking pressure accordingly.
Remember: ABS does not changethe time needed to get a foot up tothe brake pedal or always decreasestopping distance. If you get tooclose to the vehicle in front of you,there will not be enough time toapply the brakes if that vehiclesuddenly slows or stops. Alwaysleave enough room up ahead tostop, even with ABS.
Using ABS
Do not pump the brakes. Just holdthe brake pedal down firmly and letABS work. You might hear the ABSpump or motor operating and feelthe brake pedal pulsate, but this isnormal.
Braking in Emergencies
ABS allows the driver to steer andbrake at the same time. In manyemergencies, steering can helpmore than even the very bestbraking.

Black plate (35,1)Chevrolet Volt Owner Manual - 2011
Driving and Operating 9-35
Electric Parking Brake
The vehicle has an Electric ParkingBrake (EPB). TheY switch ison the center stack. The EPB canalways be activated, even if thevehicle is off. To prevent drainingthe 12‐volt battery, avoid repeatedcycles of the EPB system whenthe vehicle is off.
In case of insufficient electricalpower, the EPB cannot be appliedor released.
Before leaving the vehicle, checkthe Electric Parking Brake Light toensure the parking brake is applied.
EPB Apply
The EPB can be applied anytimethe vehicle is stopped. The EPB isapplied by momentarily lifting up ontheY switch. Once fully applied,the Electric Parking Brake Light willbe on. While the brake is beingapplied, the Electric Parking BrakeLight will flash until full apply isreached. If the light does not comeon, or remains flashing, have thevehicle serviced. Do not drive thevehicle if the Electric Parking BrakeLight is flashing. See your dealer.
If the EPB is applied while thevehicle is in motion, a chime willsound, and the DIC messageRELEASE PARKING BRAKEwill be displayed. The vehiclewill decelerate as long as theswitch is held in the up position.
Releasing theY switch during thedeceleration will release the parkingbrake. If theY switch is held inthe up position until the vehiclecomes to a stop, the EPB willremain applied.
If the Electric Parking Brake Lightflashes continuously, the EPB isonly partially applied or released,or there is a problem with the EPB.The DIC message SERVICEPARKING BRAKE will be displayed.If this light flashes continuously,release the EPB, and attempt toapply it again. If this light continuesto flash, do not drive the vehicle.See your dealer.
If the Service Electric Parking BrakeLight is on, the EPB has detected asystem problem and is operatingwith reduced functionality.
Black plate (36,1)Chevrolet Volt Owner Manual - 2011
9-36 Driving and Operating
To apply the EPB when thislight is on, lift up on theY switchand hold it in the up position.Full application of the parking brakeby the EPB system may take alonger period of time than normalwhen this light is on. Continue tohold theY switch until the ElectricParking Brake Light remains on.If the Service Electric ParkingBrake Light is on, see your dealer.
If the EPB fails to apply, the rearwheels should be blocked toprevent vehicle movement.
For maximum EPB force whenparking on a hill, pull the EPBswitch twice.
EPB Release
To release the EPB, place thevehicle in ON/RUN, apply and holdthe brake pedal, and push downmomentarily on theY switch.If attempting to release the EPBwithout the brake pedal applied,a chime will sound, and the DICmessage STEP ON BRAKE TORELEASE PARK BRAKE will bedisplayed. The EPB is releasedwhen the Electric Parking BrakeLight is off.
If the Service Electric ParkingBrake Light is on, the EPB hasdetected a system problem, and isoperating with reduced functionality.To release the EPB when this lightis on, push down on theY switchand hold it in the down position.EPB release may take a longerperiod of time than normal whenthis light is on. Continue to holdtheY switch until the ElectricParking Brake Light is off. If thelight is on, see your dealer.
Notice: Driving with the parkingbrake on can overheat the brakesystem and cause prematurewear or damage to brake systemparts. Make sure that the parkingbrake is fully released and theElectric Parking Brake Light isoff before driving.
Automatic EPB Release
The EPB will automatically releaseif the vehicle is running, placedinto gear, and an attempt ismade to drive away. Avoid rapidacceleration when the EPB isapplied, to preserve parkingbrake lining life.
See Electric Parking Brake Light onpage 5‑25, Service Electric ParkingBrake Light on page 5‑25, andBrake System Messages onpage 5‑46.

Black plate (37,1)Chevrolet Volt Owner Manual - 2011
Driving and Operating 9-37
Regenerative BrakingRegenerative braking takes some ofthe energy from the moving vehicleand turns it back into electricalenergy. This energy is then storedback into the high voltage batterysystem, contributing to increasedenergy efficiency.
The hydraulic disc brakes work withthe regenerative braking to ensureeffective braking, such as when ahigh braking demand is requested.
The braking system iscomputer controlled andblends the regenerative brakingwith the conventional hydraulic discbrakes to meet any requirementsfor deceleration. The controller
interprets the braking requestand uses regenerative braking,conventional hydraulic braking, or acombination of both as necessary.Because the controller applies thehydraulic brakes through its highpressure accumulator, you mayoccasionally hear the motor‐drivenpump when it recharges the system.This is normal.
See Warning Lights, Gauges,and Indicators on page 5‑9 andDriver Information Center (DIC) onpage 5‑43. In the event of acontroller problem, the brake pedalmay be harder to push and thestopping distance may be longer.
Ride Control Systems
Traction ControlSystem (TCS)The vehicle has a Traction ControlSystem (TCS) that limits wheelspin. The system operates if itsenses that one or both of the drivewheels are spinning or beginning tolose traction. When this happens,the system brakes the spinningwheel(s) and/or reduces powerto limit wheel spin.
The system may be heard or feltwhile it is working, but this isnormal.
To assist with directional controlof the vehicle, TCS comes onautomatically whenever the vehicleis started and cannot be turned off.

Black plate (38,1)Chevrolet Volt Owner Manual - 2011
9-38 Driving and Operating
When the vehicle is startedand begins to move, the systemperforms several diagnostic checksto ensure there are no problems.The system may be heard orfelt while it is working. This isnormal and does not mean thereis a problem with the vehicle.The system should initializebefore the vehicle reaches 32 km/h(20 mph). In some cases, it maytake approximately 3.2 km (2 mi) ofdriving before the system initializes.
The Traction Control System mayactivate on dry or rough roads orunder conditions such as heavyacceleration while turning or abruptchanges in output from the electricdrive unit. When this happens,a reduction in acceleration maybe noticed, or a noise or vibrationmay be heard. This is normal.
The TCS/StabiliTrak warning lightwill flash to indicate that the tractioncontrol system is active.
If there is a problem detected, theSERVICE TRACTION CONTROLmessage displays in the DIC.See Ride Control System Messageson page 5‑50. When this messageis displayed and d comes on andstays on, the vehicle is safe to drivebut the system is not operational.
If d comes on and stays on, resetthe system:
1. Stop the vehicle.
2. Turn the vehicle off and wait15 seconds.
3. Start the vehicle.
If d still comes on and stays on,the vehicle needs service.
Adding non‐GM accessoriescan affect vehicle performance.See Accessories and Modificationson page 10‑4 for more information.

Black plate (39,1)Chevrolet Volt Owner Manual - 2011
Driving and Operating 9-39
Electronic StabilityControl (ESC)The vehicle has an ElectronicStability Control system calledStabiliTrak. It is an advancedcomputer‐controlled system thatassists with directional control of thevehicle in difficult driving conditions.
StabiliTrak comes on automaticallywhenever the vehicle is started andcannot be turned off.
The system may be heard or feltwhile it is working, but this isnormal.
StabiliTrak activates when thecomputer senses a differencebetween the intended path andthe direction the vehicle is actuallytraveling. StabiliTrak selectivelyapplies braking pressure to helpsteer the vehicle in the intendeddirection.
When the vehicle is startedand begins to move, the systemperforms several diagnostic checksto ensure there are no problems.The system may be heard orfelt while it is working. This isnormal and does not mean thereis a problem with the vehicle.The system should initializebefore the vehicle reaches 32 km/h(20 mph). In some cases, it maytake approximately 3.2 km (2 mi) ofdriving before the system initializes.
When the stability control systemactivates, the Traction ControlSystem (TCS)/StabiliTrak lightflashes on the instrument cluster.This also occurs when tractioncontrol is activated. This is normal.Continue to steer the vehicle in theintended direction.
If there is a problem detected,the SERVICE STABILITRAKmessage displays in the DIC.When this message is displayedand the StabiliTrak light comeson and stays on, the vehicle issafe to drive but the system isnot operational. See Ride ControlSystem Messages on page 5‑50.

Black plate (40,1)Chevrolet Volt Owner Manual - 2011
9-40 Driving and Operating
If d comes on and stays on, resetthe system:
1. Stop the vehicle.
2. Turn the vehicle off and wait15 seconds.
3. Start the vehicle.
If d still comes on and stays on,the vehicle needs service.
If cruise control is being used whenStabiliTrak activates, the cruisecontrol will automatically disengage.Press the cruise control button toreengage when road conditionsallow. See Cruise Control onpage 9‑40 for more information.
Cruise ControlThe cruise control lets the vehiclemaintain a speed of about 40 km/h(25 mph) or more without keepingyour foot on the accelerator. Cruisecontrol does not work at speedsbelow 40 km/h (25 mph).
With the Traction ControlSystem (TCS) or ElectronicStability Control (ESC), the systemmay begin to limit wheel spinwhile you are using cruise control.If this happens, the cruise controlwill automatically disengage.See Traction Control System (TCS)on page 9‑37 or Electronic StabilityControl (ESC) on page 9‑39.
{ WARNING
Cruise control can be dangerouswhere you cannot drive safely ata steady speed. So, do not usethe cruise control on windingroads or in heavy traffic.
Cruise control can be dangerouson slippery roads. On such roads,fast changes in tire traction cancause excessive wheel slip, andyou could lose control. Do not usecruise control on slippery roads.

Black plate (41,1)Chevrolet Volt Owner Manual - 2011
Driving and Operating 9-41
The cruise control buttons are onthe steering wheel.
1 (On/Off): Press to turn thecruise control system on and off.An indicator light will turn on oroff in the instrument cluster.
* (Cancel): Press to disengagecruise control without erasing theset speed from memory.
RES/+ (Resume/Accel): Movethe thumbwheel up to resumeto a previously set speed or toaccelerate.
SET/− (Set/Coast): Move thethumbwheel down to set a speedand activate cruise control or tomake the vehicle decelerate.
Setting Cruise Control
If the cruise button is on when not inuse, it could get bumped and go intocruise when not desired. Keep thecruise control button off when cruiseis not being used.
To set a speed:
1. Press 1 to turn cruisecontrol on.
2. Get up to the speed desired.
3. Move the thumbwheel downtoward SET/− and release it.The desired set speed brieflyappears in the instrumentcluster.
4. Take your foot off the acceleratorpedal.
When the brakes are applied, thecruise control shuts off.
Resuming a Set Speed
If the cruise control is set at adesired speed and then thebrakes are applied, the cruisecontrol is disengaged withouterasing the set speed from memory.Once the vehicle speed is about40 km/h (25 mph) or greater,move the thumbwheel up towardRES/+ briefly and then release it.The vehicle returns to the previouslyset speed and stays there.

Black plate (42,1)Chevrolet Volt Owner Manual - 2011
9-42 Driving and Operating
Increasing Speed While UsingCruise Control
If the cruise control system isalready activated:. Move the thumbwheel up
toward RES/+ and hold it untilthe vehicle accelerates to thedesired speed, then release it.
. To increase the speed in smallamounts, move the thumbwheelup toward RES/+ briefly andthen release it. Each time thisis done, the vehicle goes about1.6 km/h (1 mph) faster.
Reducing Speed While UsingCruise Control
If the cruise control system isalready activated:. Move the thumbwheel toward
SET/− and hold until the desiredlower speed is reached, thenrelease it.
. To slow down in very smallamounts, move the thumbwheeltoward SET/− briefly. Each timethis is done, the vehicle goesabout 1.6 km/h (1 mph) slower.
Passing Another Vehicle WhileUsing Cruise Control
Use the accelerator pedal toincrease vehicle speed. Whenyou take your foot off the pedal,the vehicle will slow down to thepreviously set cruise control speed.
Using Cruise Control on Hills
How well the cruise control workson hills depends upon the vehiclespeed, load, and the steepnessof the hills. When going up steephills, you might have to step onthe accelerator pedal to maintainthe vehicle speed. When goingdownhill, you might have to brakeor shift to a lower gear to maintainthe vehicle speed. When the brakesare applied the cruise control isdisengaged.

Black plate (43,1)Chevrolet Volt Owner Manual - 2011
Driving and Operating 9-43
Ending Cruise Control
There are three ways to end cruisecontrol:. Step lightly on the brake pedal;
when cruise control disengages,the indicator light will not be lit.
. Press*.
. Press 1 to turn the cruisecontrol system off completely.The cruise control cannot beresumed.
Erasing Speed Memory
The cruise control set speedis erased from memory bypressing 1 or if the vehicleis turned off.
Object DetectionSystems
Ultrasonic Parking AssistFor vehicles with the UltrasonicFront and Rear Parking Assist(UFRPA) system, it assists thedriver with parking and avoidingobjects. UFRPA operates atspeeds less than 8 km/h (5 mph).The sensors on the front and rearbumper detect objects up to 1.2 m(4 ft) in front of the vehicle, 2.5 m(8 ft) behind the vehicle, and atleast 25.4 cm (10 in) off the ground.
{ WARNING
The Ultrasonic Front and RearParking Assist (UFRPA) systemdoes not replace driver vision.It cannot detect:
. Objects that are below thebumper, underneath thevehicle, or if they are tooclose or far from the vehicle.
. Children, pedestrians,bicyclists, or pets.
If you do not use proper carebefore moving forward and whilebacking; vehicle damage, injury,or death could occur. Even withUFRPA, always check in front ofthe vehicle before moving forwardand behind the vehicle beforebacking up. While moving forwardand backing, be sure to look forobjects and check the vehiclemirrors.

Black plate (44,1)Chevrolet Volt Owner Manual - 2011
9-44 Driving and Operating
How the System Works
UFRPA comes on automaticallywhen the shift lever is moved intoR (Reverse). The front and rearsensors are automatically turned on.After the vehicle is shifted out ofR (Reverse), the rear sensors areturned off and the front sensorsstay on until the vehicle is above aspeed of 8 km/h (5 mph). The frontsensors may also be turned on bypressing the park assist buttonin the overhead console withoutshifting into R (Reverse) while thevehicle is traveling at a low speed.See “Turning the System On andOff” later in this section.
When the vehicle is in N (Neutral),the system may be active. If thevehicle is in a car wash, the sensorsmay detect objects in the car wash.See “Turning the System On andOff” later in this section to turn thesystem off.
High-toned beeps from the frontspeakers are for objects detectednear the front bumper. Low-tonedbeeps from the rear speakers arefor objects detected near the rearbumper. The interval between thebeeps becomes shorter as thevehicle gets closer to the obstacle.When the distance is less than30 cm (12 in) the beeps arecontinuous.
To be detected, objects must be atleast 25.4 cm (10 in) off the groundand below hood or hatch level.Objects must also be within1.2 m (4 ft) in front of the vehicleand 2.5 m (8 ft) from the rearbumper. This distance may be lessduring warmer or humid weather.
PARK ASSIST OFF displays onthe Driver Information Center (DIC)to indicate that UFRPA is off.The message disappears aftera short period of time.
Objects Detected by Both theFront and Rear Sensors
If objects are detected at thesame time near both the front andrear bumpers while backing up,the beeps only sound to indicatethat objects are close to the rearbumper.
If an object comes within 0.3 m (1 ft)of the front bumper while the vehicleis backing up and at the same timethere is another object further than0.3 m (1 ft) from the rear bumper,then the beeps only sound toindicate the object that is closerto the front bumper.

Black plate (45,1)Chevrolet Volt Owner Manual - 2011
Driving and Operating 9-45
Turning the System On and Off
The UFRPA system can be turnedon and off by pressing the parkassist button in the overheadconsole.
The park assist button lights upwhen the system is on and turnsoff when it has been disabled.
When the System Does NotSeem to Work Properly
If UFRPA does not turn on due to atemporary condition, the messagePARK ASSIST OFF displays on theDIC, and the light on the park assistbutton turns off. This can occurunder the following conditions:. The ultrasonic sensors are not
clean. Keep the sensors free ofmud, dirt, snow, ice, and slush.For cleaning instructions, seeExterior Care on page 10‑89.
. The vehicle was washed in coldweather. This may cause frostor ice to form in the park assistsensors. Keep the sensors freeof frost or ice.
. An object was hanging out of thehatch during the last drive cycle.Once the attached object isremoved, UFRPA will return tonormal operation.
. The bumper is damaged.Take the vehicle to yourdealer to repair the system.
. Other conditions may affectsystem performance, such asvibrations from a jackhammer orthe compression of air brakeson a very large truck.

Black plate (46,1)Chevrolet Volt Owner Manual - 2011
9-46 Driving and Operating
Rear VisionCamera (RVC)The vehicle may have a Rear VisionCamera (RVC) system. Read thisentire section before using it.
The RVC system can assistthe driver when backing up bydisplaying a view of the areabehind the vehicle.
{ WARNING
The Rear Vision Camera (RVC)system does not replace drivervision. RVC does not:
. Detect objects that areoutside the camera's fieldof view, below the bumper,or underneath the vehicle.
. Detect children, pedestrians,bicyclists, or pets.
(Continued)
WARNING (Continued)
Do not back the vehicle by onlylooking at the RVC screen, or usethe screen during longer, higherspeed backing maneuvers orwhere there could be cross-traffic.Your judged distances using thescreen will differ from actualdistances.
If you do not use proper carebefore backing up, you couldhit a vehicle, child, pedestrian,bicyclist, or pet, resulting invehicle damage, injury, or death.Even though the vehicle hasthe RVC system, always checkcarefully before backing up bychecking behind and around thevehicle.
How the System Works
When the vehicle is shiftedinto R (Reverse), the imageof the area behind the vehicleappears in the center stackdisplay with the message CHECKSURROUNDINGS FOR SAFETY.The previous screen displayswhen the vehicle is shifted out ofR (Reverse) after approximately10 seconds.
To cancel the delay, do one of thefollowing:. Press a button on the
infotainment system.. Shift into P (Park).. Reach a vehicle speed of
8 km/h (5 mph).

Black plate (47,1)Chevrolet Volt Owner Manual - 2011
Driving and Operating 9-47
Turning the Rear Vision CameraSystem On or Off
To turn the RVC system on or off:
1. Shift into P (Park).
2. Press the CONFIG button on thecenter stack.
3. Select Display.
4. Select Camera. When acheckmark appears next toCamera, then the RVC systemis on.
Symbols
The navigation system may havea feature that lets the driver viewsymbols on the navigation screenwhile using the RVC. The UltrasonicFront and Rear Parking Assist(UFRPA) system must not bedisabled to use the caution symbols.
The error message REAR PARKINGASSIST SYMBOLS UNAVAILABLEmay display if UFRPA has beendisabled and the symbols havebeen turned on. See UltrasonicParking Assist on page 9‑43.
The symbols appear and maycover an object when viewing thenavigation screen when an objectis detected by the UFRPA system.
To turn the symbols on or off:
1. Shift into P (Park).
2. Press the CONFIG button on thecenter stack.
3. Select Display.
4. Select Symbols. When acheckmark appears next toSymbols, symbols will appear.
Guidelines
The RVC system has a guidelineoverlay that can help the driver alignthe vehicle when backing into aparking spot.
To turn the guidelines on or off:
1. Shift into P (Park).
2. Press the CONFIG button on thecenter stack.
3. Select Display.
4. Select Guidelines. When acheckmark appears next toGuidelines, guidelines willappear.

Black plate (48,1)Chevrolet Volt Owner Manual - 2011
9-48 Driving and Operating
Rear Vision Camera ErrorMessages
SERVICE REAR VISION CAMERASYSTEM: If this message appearsin the center stack display, thesystem is not receiving information itrequires from other vehicle systems.
If any other problem occurs or if aproblem persists, see your dealer.
Rear Vision Camera Location
The RVC is located above thelicense plate.
The area displayed by the camera islimited.
It does not display objects thatare close to either corner orunder the bumper and can varydepending on vehicle orientation orroad conditions. The distance of theimage that appears on the screen isdifferent from the actual distance.
The following illustration showsthe field of view that the cameraprovides.
A. View displayed by the camera.
B. Corner of the rear bumper.

Black plate (49,1)Chevrolet Volt Owner Manual - 2011
Driving and Operating 9-49
When the System Does NotSeem To Work Properly
The RVC system may not workproperly or display a clear image if:. The RVC is turned off.
See “Turning the Rear VisionCamera System On or Off”earlier in this section.
. It is dark.
. The sun or the beam ofheadlamps is shining directlyinto the camera lens.
. Ice, snow, mud, or anything elsehas built up on the camera lens.Clean the lens, rinse it withwater, and wipe it with a softcloth.
. The back of the vehicle was inan accident. The position andmounting angle of the cameracan change or the camera canbe affected. Be sure to havethe camera and its position andmounting angle checked at yourdealer.
Charging
Plug-In ChargingThis section explains the processfor charging the vehicle's highvoltage battery. Do not allow thevehicle to remain in temperatureextremes for long periods withoutbeing driven or plugged in. It isrecommended that the vehiclebe plugged in when temperaturesare below 0°C (32°F) and above32°C (90°F) to maximize highvoltage battery life.
The charging system may run fansand pumps that result in soundsfrom the vehicle while it is turnedoff. Additional unexpected clickingsounds may be experienced causedby the electrical devices used whilecharging.
Charging
Start Charge
1. The charge port door releasebutton is on the driver door innertrim panel. With the vehicle inP (Park), press the button forone second and release to openthe charge port door. The chargeport door can also be openedusing the RKE transmitter.See Remote Keyless Entry(RKE) System Operation onpage 2‑3.

Black plate (50,1)Chevrolet Volt Owner Manual - 2011
9-50 Driving and Operating
In cold weather conditions, icemay form around the charge portdoor. The charge port door maynot open on the first attempt.Remove ice from the area andrepeat attempting to open thecharge port door.
2. Open the rear hatch, lift the loadsupport floor covering (A), andremove the charge cord (D).
It is located near the tire sealantand compressor kit (C). Pull upon the charge cord handle (D)to release it from the handleclip (E). Lift the charge cord upand rearward to remove it fromthe vehicle. The vehicle plug (B)is stored as shown.
3. Plug the charge cord into theelectrical outlet. See ElectricalRequirements for BatteryCharging on page 9‑56.Verify that the charge cordstatus indicators are both green.See Charge Cord on page 9‑54for more information.
4. Then plug in the vehicle plugof the charge cord into thecharge port on the vehicle.Verify that the charging statusindicator illuminates on top ofthe instrument panel and a hornchirp occurs. See ChargingStatus Feedback on page 9‑52for more information.
5. To arm the charge cord theftalert, lock the vehicle with theRKE transmitter. This featurecan be disabled by a servicetechnician.

Black plate (51,1)Chevrolet Volt Owner Manual - 2011
Driving and Operating 9-51
End Charge
1. Unlock the vehicle with the RKEtransmitter to disarm the chargecord theft alert.
2. Unplug the vehicle plug of thecharge cord from the vehicle bysqueezing the vehicle plug leverand pull to remove.
3. Close the charge port door bypressing firmly in the center tolatch properly.
4. Unplug the charge cord from theelectrical outlet.
5. Before storing the charge cord,have the charge cord face upand wrap the charge cableneatly counterclockwise aroundthe body of the charge cord.
6. Place the charge cord,face down, into the storagecompartment with the frontedge (F) of the charge cordbody under the clips (G) locatedin the front of the storagecompartment. The vehicleplug (B) should be on theright side of the charge cord.
7. Push the charge cord handledown until it locks into thehandle clip at the rear ofthe storage compartment.
While the charge cord is pluggedinto the vehicle, the vehicle cannotbe driven.

Black plate (52,1)Chevrolet Volt Owner Manual - 2011
9-52 Driving and Operating
Delayed ChargingOverrideTo temporarily override a delayedcharge event, unplug the chargecord from the charge port and thenplug it back in within five seconds.A single horn chirp will sound andcharging will begin immediately.
To cancel a temporary override,unplug the charge cord, wait for10 seconds, and then plug thecharge cord back in. A double hornchirp will sound and charging willbe delayed.
See “Programmable Charging” inCharging on page 5‑33 for advancecharge scheduling options.
Charging StatusFeedback
The vehicle has a ChargingStatus Indicator (CSI) at thecenter of the instrument panel near
the windshield. When the vehicle isplugged in and the vehicle power isoff, the CSI indicates the following:. Solid Green – Vehicle is plugged
in. Battery is not fully charged.Battery is charging.
. Long Flashing Green – Vehicleis plugged in. Battery is not fullycharged. Battery charging isdelayed.
. Short Flashing Green – Vehicleis plugged in. Battery is fullycharged.
. Solid Yellow – Vehicle is pluggedin. It is normal for the CSI toturn yellow for a few secondsafter plugging in a compatiblecharge cord. Otherwise,charging system has detecteda fault and will not charge thebattery. See “Charge CordStatus Indicators” later inthis section.

Black plate (53,1)Chevrolet Volt Owner Manual - 2011
Driving and Operating 9-53
The system may be thermallyconditioning the battery duringany of the states above, requiringelectrical energy to be transferredto the vehicle.
If the vehicle is plugged in andvehicle power is on, the CSI will beon solid green. The same is trueduring a remote start if the vehicleis plugged in.
If the vehicle is plugged in and theCSI is off, a charging fault has beendetected. See “Charge Cord StatusIndicators” later in this section.
This chart indicates vehiclefeedback when the charge cordis plugged in.
Charging StatusIndicator
Sound Action/Reason
Solid Green One horn chirp Charging has begun.
Long FlashingGreen
Two horn chirpsCharging is delayed,scheduled to begin later.
Short FlashingGreen
None Charging is complete.
Yellow(Upon Plug‐in)
NoneCharge cord is okayand vehicle is not yetcharging.
Yellow(For Extended TimePeriod after Plug‐in)
None
Charge cord is okay, butvehicle is not charging.See Malfunction IndicatorLamp on page 5‑21.
Solid Green or LongFlashing Green
Four horn chirpsInsufficient timeto fully charge bydeparture time.
None (Upon Plug‐in) NoneCharge cord connectionshould be checked.

Black plate (54,1)Chevrolet Volt Owner Manual - 2011
9-54 Driving and Operating
Charging StatusIndicator
Sound Action/Reason
None (After Greenor Yellow CSI
Indication Observed)None
Charge cord connectionshould be checked.See Malfunction IndicatorLamp on page 5‑21.
None
Repeated horn chirpsThis feature can bedisabled by a servicetechnician.
To stop this alert, do oneof the following:. Unplug the
charge cord.. Press Unlock symbol
on the RKE.. Press and hold the
Panic Alarm symbolon the RKE, thenpress again to stopthe panic alarm.
. Press the horn pad.
Electricity wasinterrupted beforecharging was complete.
Charge CordSee Radio FrequencyStatement on page 13‑28 forinformation regarding Part 15of the Federal CommunicationsCommission (FCC) rules andIndustry Canada StandardsRSS-210/220/310.
A. Charge Level Button
B. Charge Level Indicators
C. Charge Cord Status Indicators
D. Vehicle Plug
E. Wall Plug

Black plate (55,1)Chevrolet Volt Owner Manual - 2011
Driving and Operating 9-55
A portable charge cord used tocharge the vehicle high voltagebattery is stored under the rearluggage compartment.
The charge cord used to charge thevehicle is a high‐powered electricaldevice. During normal operation, theAC wall plug of the charge cord mayfeel warm. The AC wall plug must fittightly into an AC outlet that is ingood condition.
{ WARNING
Using the charge cord with aworn or damaged AC outletmay cause burns or start a fire.Periodically, check the AC wallplug and charge cord while thevehicle is charging. If the AC wallplug feels hot, unplug the chargecord and have the AC outletreplaced by a qualified electrician.Replace the charge cord if the ACwall plug or cord are damaged.Do not use an AC outlet that isworn or damaged.
{ WARNING
An extension cord should notbe used to charge the vehicle.Use of an extension cord mayincrease the risk of electricshock or other hazards.
If an extension cord is usedbecause of limited accessto 120V AC power, use thefollowing safeguards:
The 120V AC outlet should beGFCI protected.
The extension cord should be:. GFCI protected.. 12 or 14 gage, 3 conductor.. Rated for outdoor.
Charge Cord Status Indicators
The charge cord status indicatorsilluminate green or flashing red toidentify the charge cord status.When both indicators are green,the vehicle can be charged. If anyindicators are flashing red, thecharge cord will not permit vehiclecharging.
A flashing red AC PRESENT (A)indicates the AC voltage is out ofrange.
Flashing red AC PRESENT (A) andFAULT (B) indicate the AC outletdoes not have a proper safetyground. Charging is not permittedfor safety reasons. The AC outletmust be repaired or another outletsource should be used.

Black plate (56,1)Chevrolet Volt Owner Manual - 2011
9-56 Driving and Operating
A flashing red FAULT (B) indicates acharge cord fault. The charge cordwill attempt to reset automatically.If the flashing red FAULT (B)continues for more than30 seconds, unplug the chargecord from the wall to reset. If thefault remains, see your dealer forservice.
Charge Level Button
Two charge levels are available bypressing the charge level button.Select reduced or normal level.
The charge level cannot bechanged when the vehicle plug isplugged into the charge port on thevehicle. If the charge level buttonis pressed while the vehicle plug isplugged into the charge port on thevehicle, the charge level indicators
will flash briefly. To change thecharge level, unplug the vehicleplug from the charge port on thevehicle and select the desiredcharge level.
Normal Level: This level isrecommended. All four chargelevel indicators will be lit.
Reduced Level: Use when theelectrical current is limited. Twocharge level indicators will be lit.
Vehicle Plug
The vehicle plug attaches to thecharge port on the vehicle. Thereis a flashlight built into the vehicleplug that can be used by squeezingthe vehicle plug lever. The flashlightwill turn off when the connection iscomplete and the lever is released.
Electrical Requirementsfor Battery ChargingThe AC outlet must have agrounded, dedicated, 15 amp orgreater, three‐prong wall plug.That means there should be noother major appliances connectedto the same circuit. If it is not adedicated circuit, the current ratingof the outlet circuit breaker couldbe exceeded and cause it to tripor open. The vehicle can becharged in the reduced level mode.See “Charge Level Button” in thissection. Reduced level mode allowsa non‐dedicated circuit to be usedbut increases the charging time.
This vehicle is capable of beingcharged with a variety of standardvehicle charging equipment.

Black plate (57,1)Chevrolet Volt Owner Manual - 2011
Driving and Operating 9-57
The following are the minimumrequirements for circuits used tocharge this vehicle:. 120V/15Amp. 240V/20Amp
Charging equipment with arating of at least 240V/20Ampwill provide the fastest chargingtime to recharge the high voltagebattery. 240V/40Amp circuitsprovide flexibility for future vehiclecharging needs. Contact yourdealer for more information.
Do not use non‐grounded electricalplug adapters.
Notice: Do not use portable orstationary backup generatingequipment to charge the vehicle.This may cause damage to thevehicle's charging system. Onlycharge the vehicle from utilitysupplied power.
FuelUse of the recommended fuelis an important part of the propermaintenance of this vehicle.To help keep the engine cleanand maintain optimum vehicleperformance, we recommendthe use of gasoline advertised asTOP TIER Detergent Gasoline.
Look for the TOP TIER label onthe fuel pump to ensure gasolinemeets enhanced detergencystandards developed by autocompanies. A list of marketersproviding TOP TIER DetergentGasoline can be found atwww.toptiergas.com.
Use premium unleaded gasolinewith a posted octane rating of 91or higher. If the octane is less than91, you could damage the engine.If heavy knocking is heard whenusing gasoline rated at 91 octaneor higher, the engine needs service.

Black plate (58,1)Chevrolet Volt Owner Manual - 2011
9-58 Driving and Operating
Gasoline Specifications(U.S. and Canada Only)At a minimum, gasoline shouldmeet ASTM specificationD 4814 in the United States orCAN/CGSB‐3.5 or 3.511 in Canada.Some gasolines contain anoctane-enhancing additive calledmethylcyclopentadienyl manganesetricarbonyl (MMT). We recommendagainst the use of gasolinescontaining MMT. See Fuel Additiveson page 9‑59 for additionalinformation.
California FuelRequirementsIf the vehicle is certified to meetCalifornia Emissions Standards,it is designed to operate on fuelsthat meet California specifications.See the underhood emission controllabel. If this fuel is not available instates adopting California EmissionsStandards, the vehicle will operatesatisfactorily on fuels meetingfederal specifications, but emissioncontrol system performance mightbe affected. The malfunctionindicator lamp could turn on and thevehicle might fail a smog‐check test.See Malfunction Indicator Lamp onpage 5‑21. If this occurs, return toyour authorized dealer for diagnosis.If it is determined that the conditionis caused by the type of fuel used,repairs might not be covered by thevehicle warranty.
Fuels in ForeignCountriesNever use leaded gasoline or anyother fuel not recommended in theprevious text on fuel. Costly repairscaused by use of improper fuelwould not be covered by the vehiclewarranty.
To check the fuel availability, askan auto club, or contact a major oilcompany that does business in thecountry where you will be driving.

Black plate (59,1)Chevrolet Volt Owner Manual - 2011
Driving and Operating 9-59
Fuel AdditivesTo provide cleaner air, all gasolinesin the United States are nowrequired to contain additives thathelp prevent engine and fuel systemdeposits from forming, allowing theemission control system to workproperly. In most cases, nothingshould have to be added to the fuel.However, some gasolines containonly the minimum amount ofadditive required to meet U.S.Environmental Protection Agencyregulations. To help keep fuelinjectors and intake valves cleanand avoid problems due to dirtyinjectors or valves, look for gasolinethat is advertised as TOP TIER
Detergent Gasoline. Look for theTOP TIER label on the fuel pumpto ensure gasoline meets enhanceddetergency standards developedby the auto companies. A list ofmarketers providing TOP TIERDetergent Gasoline can be foundat www.toptiergas.com.
For customers who do not useTOP TIER Detergent Gasolineregularly, one bottle of GM FuelSystem Treatment PLUS, addedto the fuel tank at every engine oilchange, can help clean depositsfrom fuel injectors and intakevalves. GM Fuel System TreatmentPLUS is the only gasoline additiverecommended by General Motors.It is available at your dealer.
Gasolines containing oxygenates,such as ethers and ethanol,and reformulated gasolinesmight be available in your area.We recommend that you use thesegasolines, if they comply with thespecifications described earlier.However, E85 (85% ethanol) andother fuels containing more than10% ethanol must not be used invehicles that were not designedfor those fuels.
Notice: This vehicle was notdesigned for fuel that containsmethanol. Do not use fuelcontaining methanol. It cancorrode metal parts in the fuelsystem and also damage plasticand rubber parts. That damagewould not be covered under thevehicle warranty.

Black plate (60,1)Chevrolet Volt Owner Manual - 2011
9-60 Driving and Operating
Some gasolines that arenot reformulated for lowemissions can contain anoctane-enhancing additivecalled methylcyclopentadienylmanganese tricarbonyl (MMT);ask the attendant where you buygasoline whether the fuel containsMMT. We recommend againstthe use of such gasolines. Fuelscontaining MMT can reduce sparkplug life and affect emissioncontrol system performance.The malfunction indicator lampmight turn on. If this occurs,return to your dealer for service.
Filling the Tank
{ WARNING
Fuel vapor burns violently and afuel fire can cause bad injuries.To help avoid injuries to you andothers, read and follow all theinstructions on the fuel pumpisland. Turn off the vehicle whenrefueling. Do not smoke nearfuel or when refueling the vehicle.Do not use cellular phones.Keep sparks, flames, andsmoking materials away fromfuel. Do not leave the fuel pumpunattended when refueling thevehicle. This is against the lawin some places. Do not re-enterthe vehicle while pumping fuel.Keep children away from thefuel pump; never let childrenpump fuel.
The fuel system on this vehiclerequires a refueling process tocontrol evaporative emissions.To refuel the vehicle:
1. Press the fuel door button onthe driver door for one second.A WAIT TO REFUEL messagedisplays on the DriverInformation Center.

Black plate (61,1)Chevrolet Volt Owner Manual - 2011
Driving and Operating 9-61
2. When the READY TO REFUELmessage displays, the fueldoor on the passenger side willunlock. Push the rearward edgeof the fuel door in and releaseto open the door.
3. Turn the fuel capcounterclockwise to remove.While refueling, hang the fuelcap tether from the hook onthe inside of the fuel door.Complete refueling within30 minutes of pushing thefuel door button found on thedriver side door. If refuelingmore than 30 minutes, pushthe fuel door button again.
4. After refueling, reinstall the fuelcap by turning it clockwise until itclicks. Close the fuel door.
{ WARNING
Fuel can spray out on youif you open the fuel cap tooquickly. If you spill fuel and thensomething ignites it, you couldbe badly burned. This spray canhappen if the tank is nearly full,and is more likely in hot weather.Open the fuel cap slowly andwait for any hiss noise to stop.Then unscrew the cap all the way.
Do not top off or overfill the tank andwait a few seconds before removingthe nozzle. Clean fuel from paintedsurfaces as soon as possible.See Exterior Care on page 10‑89.
{ WARNING
If a fire starts while you arerefueling, do not remove thenozzle. Shut off the flow of fuelby shutting off the pump or bynotifying the station attendant.Leave the area immediately.
Notice: If a new fuel cap isneeded, be sure to get the righttype of cap from your dealer.The wrong type of fuel cap mightnot fit properly, might causethe malfunction indicator lampto light, and could damage thefuel tank and emissions system.See Malfunction Indicator Lampon page 5‑21.

Black plate (62,1)Chevrolet Volt Owner Manual - 2011
9-62 Driving and Operating
Filling a Portable FuelContainer
{ WARNING
Never fill a portable fuelcontainer while it is in the vehicle.Static electricity discharge fromthe container can ignite the fuelvapor. You can be badly burnedand the vehicle damaged if thisoccurs. To help avoid injury toyou and others:
. Dispense fuel only intoapproved containers.
. Do not fill a container whileit is inside a vehicle, in avehicle's trunk, pickup bed,or on any surface other thanthe ground.
(Continued)
WARNING (Continued)
. Bring the fill nozzle in contactwith the inside of the fillopening before operating thenozzle. Contact should bemaintained until the fillingis complete.
. Do not smoke whilepumping fuel.
. Do not use a cellular phonewhile pumping fuel.
Towing
General TowingInformationThe vehicle is neither designed norintended to tow a trailer or anothervehicle.
For information on towing a disabledvehicle, see Towing the Vehicle onpage 10‑84. For information ontowing the vehicle behind anothervehicle such as a motor home,see Recreational Vehicle Towing onpage 10‑87.

Black plate (63,1)Chevrolet Volt Owner Manual - 2011
Driving and Operating 9-63
Conversions andAdd-Ons
Add-On ElectricalEquipmentNotice: Do not add anythingelectrical to the vehicle unlessyou check with your dealer first.Some electrical equipment candamage the vehicle and thedamage would not be coveredby the vehicle's warranty. Someadd-on electrical equipment cankeep other components fromworking as they should.
Add-on equipment can drain thevehicle's 12‐volt battery, even if thevehicle is not operating.
The vehicle has an airbag system.Before attempting to add anythingelectrical to the vehicle, seeServicing the Airbag-EquippedVehicle on page 3‑38 and AddingEquipment to the Airbag-EquippedVehicle on page 3‑38.
Black plate (64,1)Chevrolet Volt Owner Manual - 2011
9-64 Driving and Operating
2 NOTES

Black plate (1,1)Chevrolet Volt Owner Manual - 2011
Vehicle Care 10-1
Vehicle Care
General InformationGeneral Information . . . . . . . . . . 10-3California Proposition65 Warning . . . . . . . . . . . . . . . . . 10-3
California PerchlorateMaterials Requirements . . . . 10-3
Accessories andModifications . . . . . . . . . . . . . . . 10-4
Lifting the Vehicle . . . . . . . . . . . . 10-5
Vehicle ChecksDoing Your OwnService Work . . . . . . . . . . . . . . . 10-8
Hood . . . . . . . . . . . . . . . . . . . . . . . . 10-9Engine CompartmentOverview . . . . . . . . . . . . . . . . . . 10-10
Engine Oil . . . . . . . . . . . . . . . . . . 10-12Engine Oil Life System . . . . . 10-15Engine Air Cleaner/Filter . . . . 10-16
Cooling System (Engine) . . . 10-18Cooling System (HighVoltage Battery) . . . . . . . . . . . 10-19
Cooling System (PowerElectronics and ChargerModules) . . . . . . . . . . . . . . . . . . 10-20
Engine Coolant . . . . . . . . . . . . . 10-21Engine Overheating . . . . . . . . 10-23Power Steering Fluid . . . . . . . 10-24Washer Fluid . . . . . . . . . . . . . . . 10-24Brakes . . . . . . . . . . . . . . . . . . . . . 10-25Brake Fluid . . . . . . . . . . . . . . . . . 10-26Battery . . . . . . . . . . . . . . . . . . . . . 10-28Propulsion System StartCheck . . . . . . . . . . . . . . . . . . . . . 10-29
Electrical Drive Unit ShiftLock Control FunctionCheck . . . . . . . . . . . . . . . . . . . . . 10-30
Park Brake and P (Park)Mechanism Check . . . . . . . . 10-30
Wiper BladeReplacement . . . . . . . . . . . . . . 10-31
Headlamp AimingHeadlamp Aiming . . . . . . . . . . 10-32
Bulb ReplacementBulb Replacement . . . . . . . . . . 10-34Halogen Bulbs . . . . . . . . . . . . . . 10-34Headlamps . . . . . . . . . . . . . . . . . 10-34Back-Up Lamps . . . . . . . . . . . . 10-35License Plate Lamp . . . . . . . . 10-36Replacement Bulbs . . . . . . . . . 10-37
Electrical SystemHigh Voltage Devices andWiring . . . . . . . . . . . . . . . . . . . . . 10-37
Electrical SystemOverload . . . . . . . . . . . . . . . . . . 10-37
Engine Compartment FuseBlock . . . . . . . . . . . . . . . . . . . . . 10-38
Instrument Panel Fuse Block(Left Side) . . . . . . . . . . . . . . . . 10-42
Instrument Panel Fuse Block(Right Side) . . . . . . . . . . . . . . . 10-43
Rear Compartment FuseBlock . . . . . . . . . . . . . . . . . . . . . 10-45
Black plate (2,1)Chevrolet Volt Owner Manual - 2011
10-2 Vehicle Care
Wheels and TiresTires . . . . . . . . . . . . . . . . . . . . . . . . 10-48Winter Tires . . . . . . . . . . . . . . . . 10-49Tire Sidewall Labeling . . . . . . 10-49Tire Designations . . . . . . . . . . . 10-50Tire Terminology andDefinitions . . . . . . . . . . . . . . . . 10-51
Tire Pressure . . . . . . . . . . . . . . . 10-54Tire Pressure MonitorSystem . . . . . . . . . . . . . . . . . . . 10-55
Tire Pressure MonitorOperation . . . . . . . . . . . . . . . . . 10-57
Tire Inspection . . . . . . . . . . . . . . 10-61Tire Rotation . . . . . . . . . . . . . . . 10-61When It Is Time for NewTires . . . . . . . . . . . . . . . . . . . . . . 10-62
Buying New Tires . . . . . . . . . . . 10-63Different Size Tires andWheels . . . . . . . . . . . . . . . . . . . 10-65
Uniform Tire QualityGrading . . . . . . . . . . . . . . . . . . . 10-65
Wheel Alignment and TireBalance . . . . . . . . . . . . . . . . . . . 10-67
Wheel Replacement . . . . . . . . 10-67Tire Chains . . . . . . . . . . . . . . . . . 10-69If a Tire Goes Flat . . . . . . . . . . 10-69Tire Sealant andCompressor Kit . . . . . . . . . . . 10-71
Storing the Tire Sealant andCompressor Kit . . . . . . . . . . . 10-78
Jump StartingJump Starting . . . . . . . . . . . . . . 10-79
TowingTowing the Vehicle . . . . . . . . . 10-84Recreational VehicleTowing . . . . . . . . . . . . . . . . . . . . 10-87
Appearance CareExterior Care . . . . . . . . . . . . . . . 10-89Interior Care . . . . . . . . . . . . . . . . 10-93Floor Mats . . . . . . . . . . . . . . . . . . 10-96

Black plate (3,1)Chevrolet Volt Owner Manual - 2011
Vehicle Care 10-3
General InformationFor service and parts needs,visit your dealer. You will receivegenuine GM parts and GM-trainedand supported service people.
Genuine GM parts have one ofthese marks:
California Proposition65 WarningMost motor vehicles, including thisone, contain and/or emit chemicalsknown to the State of California tocause cancer and birth defects orother reproductive harm. Engineexhaust, many parts and systems,many fluids, and some componentwear by-products contain and/oremit these chemicals.
California PerchlorateMaterials RequirementsCertain types of automotiveapplications, such as airbaginitiators, seat belt pretensioners,and lithium batteries contained inRemote Keyless Entry transmitters,may contain perchlorate materials.Special handling may be necessary.For additional information, seewww.dtsc.ca.gov/hazardouswaste/perchlorate.

Black plate (4,1)Chevrolet Volt Owner Manual - 2011
10-4 Vehicle Care
Accessories andModificationsAdding non‐dealer accessories ormaking modifications to the vehiclecan affect vehicle performance andsafety, including such things asairbags, braking, stability, rideand handling, emissions systems,aerodynamics, durability, andelectronic systems like antilockbrakes, traction control, and stabilitycontrol. These accessories ormodifications could even causemalfunction or damage notcovered by the vehicle warranty.
Damage to vehicle componentsresulting from modifications orthe installation or use of non‐GMcertified parts, including controlmodule or software modifications,is not covered under the terms ofthe vehicle warranty and may affectremaining warranty coverage foraffected parts.
GM Accessories are designed tocomplement and function with othersystems on the vehicle. Your GMdealer can accessorize the vehicleusing genuine GM Accessories.
When you go to your GM dealerand ask for GM Accessories,you will know that GM-trained andsupported service technicians willperform the work using genuineGM Accessories.
Also, see Adding Equipment tothe Airbag-Equipped Vehicle onpage 3‑38.

Black plate (5,1)Chevrolet Volt Owner Manual - 2011
Vehicle Care 10-5
Lifting the VehicleThis vehicle can be lifted with ahoist or a service jack. Do not useany other type of jack to lift thevehicle.
Lifting the Vehicle with a Hoist
This vehicle can be lifted witha hoist at the four locations,as illustrated.
Notice: Lifting the vehicleimproperly can damage thevehicle and result in costlyrepairs not covered by thewarranty.
The front lifting points can beaccessed from either side of thevehicle, behind the front tires.
The rear lifting points can beaccessed from either side of thevehicle, in front of the rear tires.
Lifting the Vehicle with aService Jack
{ WARNING
Lifting a vehicle can causean injury. The vehicle can slipoff the jack and roll over you orother people. You and they couldbe badly injured. Find a levelplace to lift your vehicle. To helpprevent the vehicle from moving:
1. Set the parking brake firmly.
2. Put the shift lever inP (Park).
3. Turn off the vehicle.
To be even more certain thevehicle will not move, put blocksin front of and behind the wheels.

Black plate (6,1)Chevrolet Volt Owner Manual - 2011
10-6 Vehicle Care
{ WARNING
Getting under a vehicle when itis jacked up is dangerous. If thevehicle slips off the jack, youcould be badly injured or killed.Never get under a vehicle whenit is supported only by a jack.
{ WARNING
Raising the vehicle with thejack improperly positioned candamage the vehicle or the vehiclemay fall and cause you or othersinjury.
When using a jack to lift the vehicle,follow the instructions that camewith the jack and be sure to usethe correct lifting points to avoiddamaging the vehicle.
Notice: Lifting the vehicleimproperly can cause damageand result in costly repairs notcovered by the warranty. To liftthe vehicle properly, use thisprocedure.
For additional information,see your dealer and the servicemanual.

Black plate (7,1)Chevrolet Volt Owner Manual - 2011
Vehicle Care 10-7
There are four points wherethe vehicle can be lifted with aservice jack.
When lifting the vehicle from therear, place the service jack directlyunder the spring seat.
When lifting the vehicle from thefront, place the service jack directlyunder the cradle mount. Ramps maybe needed under the front tires toprovide the necessary clearance forcertain service jacks in this location.
For more information, see DoingYour Own Service Work onpage 10‑8.

Black plate (8,1)Chevrolet Volt Owner Manual - 2011
10-8 Vehicle Care
Vehicle Checks
Doing Your OwnService Work
{ WARNING
Never try to do your ownservice on high voltage batterycomponents. You can be injuredand the vehicle can be damagedif you try to do your own servicework. Service and repair of thesehigh voltage battery componentsshould only be performed by atrained service technician withthe proper knowledge and tools.
Exposure to high voltagecan cause shock, burns, andeven death. The high voltagecomponents in the vehicle canonly be serviced by technicianswith special training.
(Continued)
WARNING (Continued)
High voltage components areidentified by labels. Do notremove, open, take apart,or modify these components.High voltage cable or wiring hasorange covering. Do not probe,tamper with, cut, or modify highvoltage cable or wiring.
{ WARNING
You can be injured and thevehicle could be damaged if youtry to do service work on a vehiclewithout knowing enough about it.
. Be sure you have sufficientknowledge, experience,the proper replacementparts, and tools beforeattempting any vehiclemaintenance task.
(Continued)
WARNING (Continued)
. Be sure to use the propernuts, bolts, and otherfasteners. Metric andEnglish fasteners can beeasily confused. If the wrongfasteners are used, partscan later break or fall off.You could be hurt.
If doing some of your own servicework, use the proper servicemanual. It tells you much moreabout how to service the vehiclethan this manual can. To order theproper service manual, see ServicePublications Ordering Informationon page 13‑12.
This vehicle has an airbag system.Before attempting to do your ownservice work, see Airbag SystemCheck on page 3‑40.

Black plate (9,1)Chevrolet Volt Owner Manual - 2011
Vehicle Care 10-9
Keep a record with all parts receiptsand list the mileage and the dateof any service work performed.See Maintenance Records onpage 11‑8.
HoodTo open the hood:
1. Turn the vehicle off beforeopening the hood. If thevehicle is on, the engine willstart when the hood is opened.See Electric Mode on page 9‑25and Extended Range Mode onpage 9‑25.
2. Pull the release handle withthis symbol. It is below theinstrument panel to the leftof the steering wheel.
3. Go to the front of the vehicle andlocate the secondary releaselever under the front center ofthe hood. Push the secondaryhood release lever to the rightto disengage.
4. Lift the hood and release thehood prop rod from its retainerabove the radiator support.Place the prop rod securely intothe slotted retainer in the hood.
To close the hood:
1. Before closing the hood, checkthat all filler caps are properlyinstalled. Then, lift the hoodto relieve pressure on thehood prop.
2. Remove the hood prop fromthe slotted retainer in the hoodand return it to its retainer abovethe radiator support. The proprod must lock into place whenreturning it to the retainer toprevent hood damage.
3. Lower the hood 20 cm (8 in)above the vehicle and releaseit so it fully latches. Check tomake sure the hood is firmlyclosed. Repeat the process ifnecessary.

Black plate (10,1)Chevrolet Volt Owner Manual - 2011
10-10 Vehicle Care
Engine Compartment Overview

Black plate (11,1)Chevrolet Volt Owner Manual - 2011
Vehicle Care 10-11
A. Engine Coolant Surge Tankand Pressure Cap. See EngineCoolant on page 10‑21.
B. Engine Air Cleaner/Filter onpage 10‑16.
C. Engine Oil Dipstick. See EngineOil on page 10‑12.
D. High Voltage Battery CoolantReservoir and Pressure Cap.See Cooling System (Engine)on page 10‑18 or CoolingSystem (High Voltage Battery)on page 10‑19 or CoolingSystem (Power Electronicsand Charger Modules) onpage 10‑20.
E. Engine Cover.
F. Engine Oil Fill Cap. See EngineOil on page 10‑12.
G. Power Electronics CoolantReservoir and Pressure Cap.See Cooling System (Engine)on page 10‑18 or CoolingSystem (High Voltage Battery)on page 10‑19 or CoolingSystem (Power Electronicsand Charger Modules) onpage 10‑20.
H. Brake Fluid Reservoir.See “Brake Fluid” underBrakes on page 10‑25.
I. High Voltage Cables(Orange Color).
J. Remote Positive (+) Terminal.See Jump Starting onpage 10‑79.
K. Power Electronics Module.
L. Windshield Washer FluidReservoir. See “Adding WasherFluid” under Washer Fluid onpage 10‑24.
M. Remote Negative (−) Terminal.See Jump Starting onpage 10‑79.
N. Engine Compartment FuseBlock on page 10‑38.
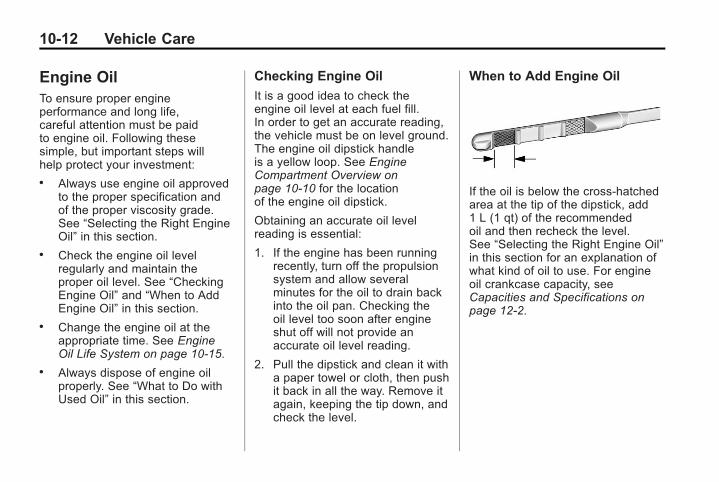
Black plate (12,1)Chevrolet Volt Owner Manual - 2011
10-12 Vehicle Care
Engine OilTo ensure proper engineperformance and long life,careful attention must be paidto engine oil. Following thesesimple, but important steps willhelp protect your investment:. Always use engine oil approved
to the proper specification andof the proper viscosity grade.See “Selecting the Right EngineOil” in this section.
. Check the engine oil levelregularly and maintain theproper oil level. See “CheckingEngine Oil” and “When to AddEngine Oil” in this section.
. Change the engine oil at theappropriate time. See EngineOil Life System on page 10‑15.
. Always dispose of engine oilproperly. See “What to Do withUsed Oil” in this section.
Checking Engine Oil
It is a good idea to check theengine oil level at each fuel fill.In order to get an accurate reading,the vehicle must be on level ground.The engine oil dipstick handleis a yellow loop. See EngineCompartment Overview onpage 10‑10 for the locationof the engine oil dipstick.
Obtaining an accurate oil levelreading is essential:
1. If the engine has been runningrecently, turn off the propulsionsystem and allow severalminutes for the oil to drain backinto the oil pan. Checking theoil level too soon after engineshut off will not provide anaccurate oil level reading.
2. Pull the dipstick and clean it witha paper towel or cloth, then pushit back in all the way. Remove itagain, keeping the tip down, andcheck the level.
When to Add Engine Oil
If the oil is below the cross-hatchedarea at the tip of the dipstick, add1 L (1 qt) of the recommendedoil and then recheck the level.See “Selecting the Right Engine Oil”in this section for an explanation ofwhat kind of oil to use. For engineoil crankcase capacity, seeCapacities and Specifications onpage 12‑2.

Black plate (13,1)Chevrolet Volt Owner Manual - 2011
Vehicle Care 10-13
Notice: Do not add too muchoil. Oil levels above or belowthe acceptable operating rangeshown on the dipstick are harmfulto the engine. If you find thatyou have an oil level above theoperating range, i.e., the enginehas so much oil that the oil levelgets above the cross-hatchedarea that shows the properoperating range, the enginecould be damaged. You shoulddrain out the excess oil or limitdriving of the vehicle and seek aservice professional to removethe excess amount of oil.
See Engine Compartment Overviewon page 10‑10 for the location of theengine oil fill cap.
Add enough oil to put the levelsomewhere in the proper operatingrange. Push the dipstick all the wayback in when through.
Selecting the Right Engine Oil
Selecting the right engine oildepends on both the proper oilspecification and viscosity grade:
Specification
Use and ask for engine oils withthe dexos™ certification mark.Oils meeting the requirements ofthe vehicle should have the dexoscertification mark on the container.This certification mark indicates thatthe oil has been approved to thedexos specification.
This vehicle was filled at the factorywith dexos‐approved engine oil.
Notice: Use only engine oilthat is approved to the dexosspecification or an equivalentengine oil of the appropriateviscosity grade. Engineoils approved to the dexosspecification will show thedexos symbol on the container.Failure to use the recommendedengine oil or equivalent canresult in engine damage notcovered by the vehicle warranty.If you are unsure whether theoil is approved to the dexosspecification, ask your serviceprovider.

Black plate (14,1)Chevrolet Volt Owner Manual - 2011
10-14 Vehicle Care
Use of Substitute Engine Oils ifdexos is unavailable: In the eventthat dexos‐approved engine oil isnot available at an oil change orfor maintaining proper oil level,you may use substitute engine oildisplaying the API Starburst symboland of SAE 5W-30 viscosity grade.Use of oils that do not meet thedexos specification, however,may result in reduced performanceunder certain circumstances.
Viscosity Grade
SAE 5W-30 is the best viscositygrade for the vehicle. Do notuse other viscosity oils such asSAE 10W‐30, 10W‐40, or 20W-50.
Cold Temperature Operation:In an area of extreme cold,where the temperature fallsbelow −29°C (−20°F), anSAE 0W-30 oil should be used.An oil of this viscosity gradewill provide easier cold startingfor the engine at extremely lowtemperatures. When selecting an oilof the appropriate viscosity grade,be sure to always select an oil thatmeets the required specification,dexos. See “Specification” earlierin this section for more information.

Black plate (15,1)Chevrolet Volt Owner Manual - 2011
Vehicle Care 10-15
Engine Oil Additives/EngineOil Flushes
Do not add anything to the oil.The recommended oils with thedexos specification and displayingthe dexos certification mark are allthat is needed for good performanceand engine protection.
Engine oil system flushes are notrecommended and could causeengine damage not covered bythe vehicle warranty.
What to Do with Used Oil
Used engine oil contains certainelements that can be unhealthy foryour skin and could even causecancer. Do not let used oil stay onyour skin for very long. Clean yourskin and nails with soap and water,or a good hand cleaner. Wash orproperly dispose of clothing or ragscontaining used engine oil. See themanufacturer's warnings about theuse and disposal of oil products.
Used oil can be a threat to theenvironment. If you change yourown oil, be sure to drain all theoil from the filter before disposal.Never dispose of oil by puttingit in the trash or pouring it on theground, into sewers, or into streamsor bodies of water. Recycle it bytaking it to a place that collectsused oil.
Engine Oil Life System
When to Change Engine Oil
This vehicle has a computer systemthat indicates when to change theengine oil and filter. This is basedon a combination of factors whichinclude engine revolutions, enginetemperature, and miles driven.Based on driving conditions, themileage at which an oil change isindicated can vary considerably.For the oil life system to workproperly, the system must be resetevery time the oil is changed.

Black plate (16,1)Chevrolet Volt Owner Manual - 2011
10-16 Vehicle Care
When the system has calculatedthat oil life has been diminished,it indicates that an oil change isnecessary. A CHANGE ENGINEOIL SOON message comes on.Change the oil as soon as possiblewithin the next 1 000 km (600 mi).It is possible that, if driving underthe best conditions, the oil lifesystem might indicate that an oilchange is not necessary for upto two years. The engine oil andfilter must be changed at leastonce every two years and, at thistime, the system must be reset.Your dealer has trained servicepeople who will perform this workand reset the system. It is alsoimportant to check the oil regularlyover the course of an oil draininterval and keep it at the properlevel.
If the system is ever resetaccidentally, the oil must bechanged at 5 000 km (3,000 mi)since the last oil change.Remember to reset the oil lifesystem whenever the oil is changed.
How to Reset the Engine OilLife System
Reset the system whenever theengine oil is changed so that thesystem can calculate the nextengine oil change. To reset thesystem:
1. Use the SELECT knob to selectOIL LIFE on the DIC menu.
2. Press SELECT to start theOIL LIFE reset procedure.
3. The DIC menu will display “Areyou sure that you want to reset?”Use SELECT to choose YES toreset oil life or NO to exit andreturn to the previous menu.
4. If YES is selected, the DIC menuwill display RESET OIL LIFE fora short time and then 100% OILLIFE will be displayed whenOIL LIFE is successfully reset.
If the CHANGE ENGINE OIL SOONmessage comes back on when thevehicle is started, the engine oil lifesystem has not reset. Repeat theprocedure.
Engine Air Cleaner/FilterSee Engine Compartment Overviewon page 10‑10 for the location of theengine air cleaner/filter.
When to Inspect the Engine AirFilter
Inspect the air filter at the scheduledmaintenance intervals and replaceit at the first oil change after each80 000 km (50,000 mi) interval.See Scheduled Maintenance onpage 11‑2 for more information.If driving in dusty/dirty conditions,inspect the air filter at each engineoil change.
How to Inspect the Engine AirFilter
To inspect the air filter, remove itfrom the engine air cleaner/filterassembly and lightly shake torelease loose dust and dirt. If theair filter remains covered with dirt,a new air filter is required.

Black plate (17,1)Chevrolet Volt Owner Manual - 2011
Vehicle Care 10-17
To inspect or replace the air filter:
1. Open the hood. See Hood onpage 10‑9.
2. Locate the engine air cleaner/filter assembly on the passengerside of the engine compartment.See Engine CompartmentOverview on page 10‑10.
A. Retaining Clips
B. Air Duct Clamp
C. Electrical Connector
3. Disconnect the air duct byloosening the air duct clamp (B).
4. Disconnect the electricalconnector (C).
5. Lift the retaining clips (A) fromthe engine air cleaner/filterassembly.
6. Turn and tilt the air cleaner coverslightly upward and slide it out.Remove the air filter.
How to Reinstall the EngineAir Filter
1. Install the air filter into theengine air cleaner/filterassembly. The outer air filterseal must be fitted properlyin the engine air cleaner/filterassembly.
2. Replace the air cleaner cover bylowering it to meet the bottomof the engine air cleaner/filterassembly. Place the retainingclips (A) on the engine aircleaner/filter assembly andsecure. The rear tabs must besecured into the lower portionof the air cleaner.
3. Reconnect the air duct andtighten the air duct clamp (B).
4. Reconnect the electricalconnector (C).
{ WARNING
Operating the engine with the aircleaner/filter off can cause youor others to be burned. The aircleaner not only cleans the air;it helps to stop flames if theengine backfires. Use cautionwhen working on the engineand do not drive with the aircleaner/filter off.
Notice: If the air cleaner/filter isoff, dirt can easily get into theengine, which could damage it.Always have the air cleaner/filterin place when you are driving.
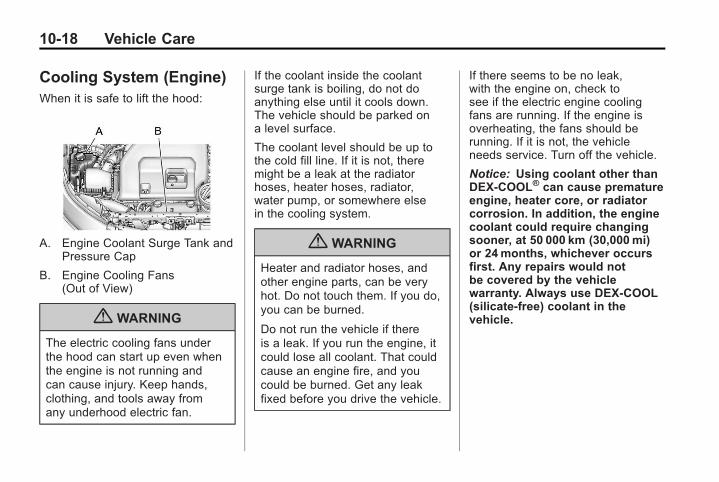
Black plate (18,1)Chevrolet Volt Owner Manual - 2011
10-18 Vehicle Care
Cooling System (Engine)When it is safe to lift the hood:
A. Engine Coolant Surge Tank andPressure Cap
B. Engine Cooling Fans(Out of View)
{ WARNING
The electric cooling fans underthe hood can start up even whenthe engine is not running andcan cause injury. Keep hands,clothing, and tools away fromany underhood electric fan.
If the coolant inside the coolantsurge tank is boiling, do not doanything else until it cools down.The vehicle should be parked ona level surface.
The coolant level should be up tothe cold fill line. If it is not, theremight be a leak at the radiatorhoses, heater hoses, radiator,water pump, or somewhere elsein the cooling system.
{ WARNING
Heater and radiator hoses, andother engine parts, can be veryhot. Do not touch them. If you do,you can be burned.
Do not run the vehicle if thereis a leak. If you run the engine, itcould lose all coolant. That couldcause an engine fire, and youcould be burned. Get any leakfixed before you drive the vehicle.
If there seems to be no leak,with the engine on, check tosee if the electric engine coolingfans are running. If the engine isoverheating, the fans should berunning. If it is not, the vehicleneeds service. Turn off the vehicle.
Notice: Using coolant other thanDEX-COOL® can cause prematureengine, heater core, or radiatorcorrosion. In addition, the enginecoolant could require changingsooner, at 50 000 km (30,000mi)or 24months, whichever occursfirst. Any repairs would notbe covered by the vehiclewarranty. Always use DEX-COOL(silicate-free) coolant in thevehicle.

Black plate (19,1)Chevrolet Volt Owner Manual - 2011
Vehicle Care 10-19
Cooling System(High Voltage Battery)During vehicle operation andalso during charging, the highvoltage battery cells in thevehicle are kept within a normaloperating temperature range.If the temperature rises above thistemperature, the battery coolingsystem turns on the air conditioningcompressor and cools the coolantuntil the correct temperature isreached. If the temperature fallsbelow this temperature, a highvoltage heater, located in thebattery, heats the coolant until thecorrect temperature is reached.
What to Use
The high voltage battery coolantreservoir in the vehicle is filledwith a 50/50 mixture of DEX-COOLengine coolant and deionized water.If using this mixture, nothing elseneeds to be added.
Checking Coolant
The vehicle must be on a levelsurface when checking the coolantlevel.
The high voltage batterycoolant reservoir is locatedon the passenger side of theengine compartment. See EngineCompartment Overview onpage 10‑10 for more informationon location.
Check to see if coolant is visiblein the high voltage battery coolantreservoir. If coolant is visible but thecoolant level is below the cold fillline, there could be a leak in thecooling system.
The high voltage battery coolantshould only be serviced by aqualified technician.

Black plate (20,1)Chevrolet Volt Owner Manual - 2011
10-20 Vehicle Care
Cooling System(Power Electronics andCharger Modules)The power electronics and chargermodules are cooled using the samecoolant loop.
The power electronics and chargermodules in the vehicle are keptbelow a maximum temperature.If the temperature rises abovethis temperature, the electricengine cooling fans will turnon and cool the coolant until thecorrect temperature is reached.
What to Use
The power electronics and chargermodules coolant reservoir in thevehicle is filled with a 50/50 mixtureof DEX-COOL engine coolantand deionized water. If using thismixture, nothing else needs tobe added.
Checking Coolant
The vehicle must be on a levelsurface when checking the coolantlevel.
The power electronics andcharger modules coolant reservoiris located on the driver side of theengine compartment. See EngineCompartment Overview onpage 10‑10 for more informationon location.
Check to see if coolant is visible inthe power electronics and chargermodules coolant reservoir. If coolantis visible but the coolant level isbelow the cold fill line, there couldbe a leak in the cooling system.
The power electronics and chargermodules coolant should only beserviced by a qualified technician.

Black plate (21,1)Chevrolet Volt Owner Manual - 2011
Vehicle Care 10-21
Engine CoolantThe engine cooling system in thevehicle is filled with DEX-COOLengine coolant. This coolant isdesigned to remain in the vehicle for5 years or 240 000 km (150,000 mi),whichever occurs first.
The following explains the coolingsystem and how to check and addcoolant when it is low. If there is aproblem with engine overheating,see Engine Overheating onpage 10‑23.
What to Use
{ WARNING
Adding only plain water or someother liquid to the cooling systemcan be dangerous. Plain waterand other liquids, can boil beforethe proper coolant mixture will.The coolant warning system isset for the proper coolant mixture.
(Continued)
WARNING (Continued)
With plain water or the wrongmixture, the engine could get toohot but you would not get theoverheat warning. The enginecould catch fire and you orothers could be burned. Use a50/50 mixture of clean, drinkablewater and DEX-COOL coolant.
Use a 50/50 mixture of clean,drinkable water and DEX-COOLcoolant. If using this mixture,nothing else needs to be added.This mixture:. Gives freezing protection down
to −37°C (−34°F), outsidetemperature.
. Gives boiling protection upto 129°C (265°F), enginetemperature.
. Protects against rust andcorrosion.
. Will not damage aluminum parts.
. Helps keep the proper enginetemperature.
Notice: If an improper coolantmixture is used, the engine couldoverheat and be badly damaged.The repair cost would not becovered by the vehicle warranty.Too much water in the mixturecan freeze and crack the engine,radiator, heater core, and otherparts.
Never dispose of engine coolantby putting it in the trash, pouringit on the ground, or into sewers,streams, or bodies of water.Have the coolant changed by anauthorized service center, familiarwith legal requirements regardingused coolant disposal. This will helpprotect the environment and yourhealth.

Black plate (22,1)Chevrolet Volt Owner Manual - 2011
10-22 Vehicle Care
Checking Coolant
The vehicle must be on a levelsurface when checking the coolantlevel.
Check to see if coolant is visiblein the coolant surge tank. If thecoolant inside the coolant surgetank is boiling, do not do anythingelse until it cools down. If coolantis visible but the coolant level is notat or above the cold fill mark, adda 50/50 mixture of clean, drinkablewater and DEX-COOL coolant at thecoolant surge tank, but be sure thecooling system is cool before this isdone. See Engine Overheating onpage 10‑23 for more information.
The coolant reservoir is locatedon the passenger side of theengine compartment. See EngineCompartment Overview onpage 10‑10 for more informationon location.
The coolant level should be ator above the cold fill line on thecoolant surge tank. If it is not,there could be a leak in thecooling system.
How to Add Coolant to theCoolant Surge Tank
{ WARNING
You can be burned if you spillcoolant on hot engine parts.Coolant contains ethylene glycoland it will burn if the engine partsare hot enough. Do not spillcoolant on a hot engine.
Notice: This vehicle has aspecific coolant fill procedure.Failure to follow this procedurecould cause the engine tooverheat and be severelydamaged.
{ WARNING
The electric cooling fans underthe hood can start up even whenthe engine is not running andcan cause injury. Keep hands,clothing, and tools away fromany underhood electric fan.
{ WARNING
Steam and scalding liquids from ahot cooling system can blow outand burn you badly. They areunder pressure, and if youturn the surge tank pressurecap— even a little— they cancome out at high speed. Neverturn the cap when the coolingsystem, including the surge tankpressure cap, is hot. Wait for thecooling system and surge tankpressure cap to cool if you everhave to turn the pressure cap.

Black plate (23,1)Chevrolet Volt Owner Manual - 2011
Vehicle Care 10-23
If coolant is needed, add the properDEX-COOL coolant mixture at thecoolant surge tank.
The coolant surge tank pressurecap can be removed when thecooling system, including thesurge tank pressure cap and upperradiator hose, is no longer hot.
1. Turn the pressure cap slowlycounterclockwise. If a hiss isheard, wait for that to stop.A hiss means there is stillsome pressure left.
2. Keep turning the cap andremove it.
3. Fill the coolant surge tank withthe proper mixture to the coldfill line.
4. Replace the pressure cap.Be sure the pressure cap ishand‐tight and fully seated.
Notice: If the pressure cap isnot tightly installed, coolant lossand possible engine damage mayoccur. Be sure the cap is properlyand tightly secured.
Engine OverheatingThe vehicle has an indicator to warnof engine overheating.
If the decision is made not tolift the hood when this warningappears, get service help rightaway. See Roadside AssistanceProgram on page 13‑6.
If the decision is made to lift thehood, make sure the vehicle isparked on a level surface.
Then check to see if the enginecooling fans are running. If theengine is overheating, the fansshould be running. If they are not,do not continue to run the vehicleand have the vehicle serviced.
Notice: Engine damage fromrunning the engine withoutcoolant is not covered by thewarranty.

Black plate (24,1)Chevrolet Volt Owner Manual - 2011
10-24 Vehicle Care
Power Steering FluidThe vehicle is equipped with anelectric power steering system.No fluid or general maintenanceis required.
Washer Fluid
What to Use
When adding windshield washerfluid to the vehicle, be sure to readthe manufacturer's instructionsbefore use. If operating the vehiclein an area where the temperaturemay fall below freezing, use a fluidthat has sufficient protection againstfreezing.
Adding Washer Fluid
The WASHER FLUID LOW ADDFLUID message will appear onthe Driver Information Center(DIC) when the fluid level is low.See Driver Information Center (DIC)on page 5‑43 for more information.
Open the cap with the washersymbol on it. Add washer fluiduntil the tank is full. See EngineCompartment Overview onpage 10‑10 for reservoir location.
Notice. When using concentratedwasher fluid, follow themanufacturer's instructionsfor adding water.
. Do not mix water withready-to-use washer fluid.Water can cause the solutionto freeze and damage thewasher fluid tank and otherparts of the washer system.Also, water does not cleanas well as washer fluid.
. Fill the washer fluid tankonly three-quarters fullwhen it is very cold. Thisallows for fluid expansionif freezing occurs, whichcould damage the tank ifit is completely full.
. Do not use engine coolant(antifreeze) in the windshieldwasher. It can damage thewindshield washer systemand paint.

Black plate (25,1)Chevrolet Volt Owner Manual - 2011
Vehicle Care 10-25
BrakesThis vehicle has disc brakes.Disc brake pads have built-in wearindicators that make a high-pitchedwarning sound when the brake padsare worn and new pads are needed.The sound can come and go or beheard all the time the vehicle ismoving, except when applyingthe brake pedal firmly.
{ WARNING
The brake wear warning soundmeans that soon the brakes willnot work well. That could lead toa crash. When the brake wearwarning sound is heard, havethe vehicle serviced.
Notice: Continuing to drive withworn-out brake pads could resultin costly brake repair.
Some driving conditions or climatescan cause a brake squeal whenthe brakes are first applied orlightly applied. This does not meansomething is wrong with the brakes.
Properly torqued wheel nuts arenecessary to help prevent brakepulsation. When tires are rotated,inspect brake pads for wear andevenly tighten wheel nuts inthe proper sequence to torquespecifications in Capacities andSpecifications on page 12‑2.
Brake linings should always bereplaced as complete axle sets.
Brake Pedal Travel
See your dealer if the brake pedaldoes not return to normal height,or if there is a rapid increasein pedal travel. This could bea sign that brake service mightbe required.
Brake Adjustment
Every time the brakes are applied,with or without the vehicle moving,the brakes adjust for wear.
Replacing Brake System Parts
The braking system on a vehicle iscomplex. Its many parts have to beof top quality and work well togetherif the vehicle is to have really goodbraking. The vehicle was designedand tested with top-quality brakeparts. When parts of the brakingsystem are replaced, be sure to getnew, approved replacement parts.If this is not done, the brakes mightnot work properly. For example,installing disc brake pads that arewrong for the vehicle, can changethe balance between the frontand rear brakes — for the worse.The braking performance expectedcan change in many other ways ifthe wrong replacement brake partsare installed.

Black plate (26,1)Chevrolet Volt Owner Manual - 2011
10-26 Vehicle Care
Brake Fluid
The brake master cylinder reservoiris filled with DOT 3 brake fluid asindicated on the reservoir cap.See Engine Compartment Overviewon page 10‑10 for the location of thereservoir.
There are only two reasons whythe brake fluid level in the reservoirmight go down:. The brake fluid level goes down
because of normal brake liningwear. When new linings areinstalled, the fluid level goesback up.
. A fluid leak in the brakehydraulic system can alsocause a low fluid level. Havethe brake hydraulic system fixed,since a leak means that sooneror later the brakes will notwork well.
Do not top off the brake fluid.Adding fluid does not correct aleak. If fluid is added when thelinings are worn, there will be toomuch fluid when new brake liningsare installed. Add or remove brakefluid, as necessary, only when workis done on the brake hydraulicsystem.
{ WARNING
If too much brake fluid is added,it can spill on the engineand burn, if the engine is hotenough. You or others could beburned, and the vehicle could bedamaged. Add brake fluid onlywhen work is done on the brakehydraulic system.
When the brake fluid falls to a lowlevel, the brake warning light comeson. See Brake System WarningLight on page 5‑24.

Black plate (27,1)Chevrolet Volt Owner Manual - 2011
Vehicle Care 10-27
Checking Brake Fluid
Check brake fluid by looking at thebrake fluid reservoir. See EngineCompartment Overview onpage 10‑10.
With the vehicle not running for atleast one minute, the maximum fluidlevel (A) is at the top of the reservoirbody. With the vehicle running, thefluid level should be in the properoperating range (B) between theMIN and MAX marks. If it is not,have the brake hydraulic systemchecked to see if there is a leak.
After work is done on the brakehydraulic system, make sure thelevel, with the vehicle running, isin the proper operating range (B)between the MIN and MAX marks.
What to Add
Use only new DOT 3 brakefluid from a sealed container.See Recommended Fluids andLubricants on page 11‑6.
Always clean the brake fluidreservoir cap and the areaaround the cap before removing it.This helps keep dirt from enteringthe reservoir.
{ WARNING
With the wrong kind of fluid inthe brake hydraulic system,the brakes might not work well.This could cause a crash. Alwaysuse the proper brake fluid.
Notice. Using the wrong fluidcan badly damage brakehydraulic system parts.For example, just a fewdrops of mineral-based oil,such as engine oil, in thebrake hydraulic system candamage brake hydraulicsystem parts so badly thatthey will have to be replaced.Do not let someone put inthe wrong kind of fluid.
. If brake fluid is spilled on thevehicle's painted surfaces,the paint finish can bedamaged. Be careful notto spill brake fluid on thevehicle. If you do, washit off immediately.

Black plate (28,1)Chevrolet Volt Owner Manual - 2011
10-28 Vehicle Care
BatteryThis vehicle has a high voltagebattery and a standard 12‐voltbattery.
If the vehicle is in a crash, thesensing system may shut downthe high voltage system. When thisoccurs, the high voltage battery isdisconnected and the vehicle willnot start. The SERVICE VEHICLESOON message in the DriverInformation Center (DIC), will bedisplayed. Before the vehicle canbe operated again, it must beserviced at your dealer.
See “If a Crash Occurs” underCollision Damage Repair onpage 13‑10 for additionalinformation. If an airbag hasinflated, see What Will You Seeafter an Airbag Inflates? onpage 3‑31.
Only a trained service technicianwith the proper knowledge andtools should inspect, test, or replacethe high voltage battery. See yourdealer if the high voltage batteryneeds service. The dealer hasinformation on how to recyclethe high voltage battery. Thereis also information available athttp://www.recyclemybattery.com.
Keep the vehicle plugged in, evenwhen fully charged, to keep the highvoltage battery temperature readyfor the next drive. This is importantwhen outside temperatures areextremely hot or cold.
A vehicle cover, which can reducesun loading on the vehicle andimprove high voltage battery life,is available from your dealer.
Refer to the replacement numbershown on the original battery labelwhen a new 12‐volt battery isneeded.
{ DANGER
Battery posts, terminals, andrelated accessories contain leadand lead compounds, chemicalsknown to the State of Californiato cause cancer and reproductiveharm. Wash hands after handling.
Vehicle Storage
{ WARNING
12‐volt batteries have acid thatcan burn you and gas that canexplode. You can be badly hurtif you are not careful. See JumpStarting on page 10‑79 for tips onworking around a battery withoutgetting hurt.

Black plate (29,1)Chevrolet Volt Owner Manual - 2011
Vehicle Care 10-29
Extended Storage
Remove the 12‐volt battery black,negative (−) cable from the batteryto keep the 12‐volt battery fromrunning down or use a batterytrickle charger.
In addition, to avoid potentialdamage to the high voltage battery,perform the following recommendedsteps:. Store the high voltage battery
with 1/2 charge or less.. Always store the vehicle in an
environment between −10°C(14°F) and 30°C (86°F).
. Vehicle storage at extremetemperatures can cause damageto the high voltage battery.
Remember to reconnect the 12‐voltbattery when ready to drive thevehicle.
Propulsion System StartCheck
{ WARNING
When you are doing thisinspection, the vehicle couldmove suddenly. If the vehiclemoves, you or others could beinjured.
1. Before starting this check, besure there is enough roomaround the vehicle.
2. Firmly apply both the electricparking brake and the regularbrake. See Electric ParkingBrake on page 9‑35.
Do not use the acceleratorpedal, and be ready to turnoff the propulsion systemimmediately if it starts.
3. Try to start the propulsionsystem in each gear. The vehicleshould start only in P (Park) orN (Neutral). If the vehicle startsin any other position, contactyour dealer for service.
Black plate (30,1)Chevrolet Volt Owner Manual - 2011
10-30 Vehicle Care
Electrical Drive Unit ShiftLock Control FunctionCheck
{ WARNING
When you are doing thisinspection, the vehicle couldmove suddenly. If the vehiclemoves, you or others could beinjured.
1. Before starting this check,be sure there is enough roomaround the vehicle. It shouldbe parked on a level surface.
2. Firmly apply the parking brake.See Electric Parking Brake onpage 9‑35.
Be ready to apply the regularbrake immediately if the vehiclebegins to move.
3. With the vehicle off and thebrake not applied, push thepower button to ON/RUN withoutstarting the vehicle. See PowerButton on page 9‑18. Withoutapplying the regular brake, tryto move the shift lever out ofP (Park) with normal effort. If theshift lever moves out of P (Park),contact your dealer for service.
Park Brake and P (Park)Mechanism Check
{ WARNING
When you are doing this check,the vehicle could begin to move.You or others could be injuredand property could be damaged.Make sure there is room in frontof the vehicle in case it begins toroll. Be ready to apply the regularbrake at once should the vehiclebegin to move.

Black plate (31,1)Chevrolet Volt Owner Manual - 2011
Vehicle Care 10-31
Park on a fairly steep hill, with thevehicle facing downhill. Keepingyour foot on the regular brake,set the electric parking brake.. To check the electric parking
brake's holding ability: With thepropulsion system active and theelectric drive unit in N (Neutral),slowly remove foot pressurefrom the regular brake pedal.Do this until the vehicle isheld by the electric parkingbrake only.
. To check the P (Park)mechanism's holding ability:With the propulsion systemactive, shift to P (Park).Then release the electricparking brake followed bythe regular brake.
Contact your dealer if service isrequired.
Wiper Blade ReplacementWindshield wiper blades should beinspected for wear and cracking.See Scheduled Maintenance onpage 11‑2 for more information.
Replacement blades come indifferent types and are removedin different ways. For proper typeand length, see MaintenanceReplacement Parts on page 11‑7.
Notice: Allowing the wiper bladearm to touch the windshieldwhen no wiper blade is installedcould damage the windshield.Any damage that occurs wouldnot be covered by your warranty.Do not allow the wiper blade armto touch the windshield.
To replace the windshield wiperblade:
1. Pull the windshield wiperassembly away from thewindshield.
2. Press the button in the middle ofthe wiper arm connector, andpull the wiper blade away fromthe arm connector.
3. Remove the wiper blade.
4. Reverse Steps 1 through 3 forwiper blade replacement.

Black plate (32,1)Chevrolet Volt Owner Manual - 2011
10-32 Vehicle Care
Headlamp AimingThe headlamp aiming system hasbeen preset at the factory.
If the vehicle is damaged in anaccident, the aim of the headlampsmay be affected and adjustmentmay be necessary.
It is recommended that a dealeradjust the headlamps. To re-aimthe headlamps yourself, use thefollowing procedure.
The vehicle should be properlyprepared as follows:. The vehicle should be placed so
the headlamps are 7.6 m (25 ft)from a light‐colored wall.
. The vehicle must have all fourtires on a level surface which islevel all the way to the wall.
. The vehicle should be placed soit is perpendicular to the wall orother flat surface.
. The vehicle should not have anysnow, ice, or mud on it.
. The vehicle should be fullyassembled and all other workstopped while headlamp aimingis being performed.
. The vehicle should be normallyloaded with a full tank of fuel andone person or 75 kg (160 lbs)sitting on the driver seat.
. Tires should be properly inflated.
Headlamp aiming is done with thevehicle's low-beam headlamps.The high-beam headlamps will becorrectly aimed if the low-beamheadlamps are aimed properly.
To adjust the vertical aim:
1. Open the hood. See Hood onpage 10‑9 for more information.
2. Locate the aim dot on the lens ofthe low‐beam headlamp.
3. Measure the distance from theground to the aim dot on thelow‐beam headlamp. Recordthe distance.

Black plate (33,1)Chevrolet Volt Owner Manual - 2011
Vehicle Care 10-33
4. At the wall, measure fromthe ground upward (A) tothe recorded distance fromStep 3 and mark it.
5. Draw or tape a horizontal line (B)on the wall the width of thevehicle at the height of themark in Step 4.
Notice: Do not cover a headlampto improve beam cut-off whenaiming. Covering a headlamp maycause excessive heat build-upwhich may cause damage tothe headlamp.
6. Turn on the low-beamheadlamps and place apiece of cardboard or somethingequivalent in front of theheadlamp not being adjusted.This allows only the beam oflight from the headlamp beingadjusted to be seen on the flatsurface.
7. Locate the vertical headlampaiming screws, which are underthe hood near each headlampassembly.
8. Turn the vertical aiming screwuntil the headlamp beamis aimed to the horizontaltape line. Turn it clockwise orcounterclockwise to raise orlower the angle of the beam.
9. Make sure that the light from theheadlamp is positioned at thebottom edge of the horizontaltape line. The lamp on theleft (A) shows the correctheadlamp aim. The lampon the right (B) shows theincorrect headlamp aim.
10. Repeat Steps 7 through 9 forthe opposite headlamp.
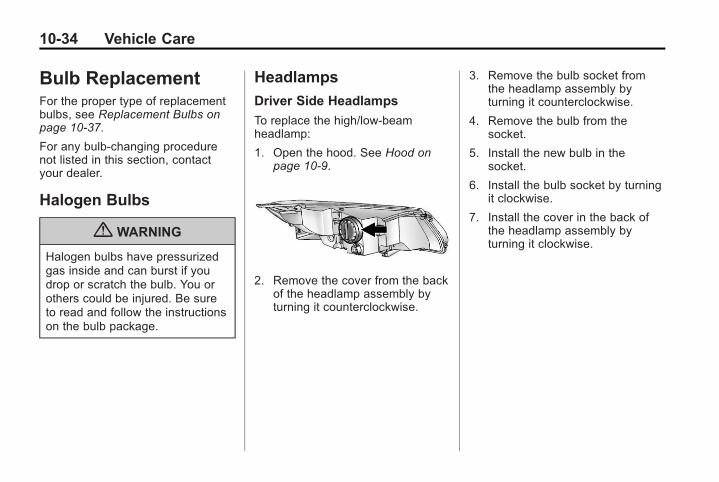
Black plate (34,1)Chevrolet Volt Owner Manual - 2011
10-34 Vehicle Care
Bulb ReplacementFor the proper type of replacementbulbs, see Replacement Bulbs onpage 10‑37.
For any bulb‐changing procedurenot listed in this section, contactyour dealer.
Halogen Bulbs
{ WARNING
Halogen bulbs have pressurizedgas inside and can burst if youdrop or scratch the bulb. You orothers could be injured. Be sureto read and follow the instructionson the bulb package.
Headlamps
Driver Side Headlamps
To replace the high/low‐beamheadlamp:
1. Open the hood. See Hood onpage 10‑9.
2. Remove the cover from the backof the headlamp assembly byturning it counterclockwise.
3. Remove the bulb socket fromthe headlamp assembly byturning it counterclockwise.
4. Remove the bulb from thesocket.
5. Install the new bulb in thesocket.
6. Install the bulb socket by turningit clockwise.
7. Install the cover in the back ofthe headlamp assembly byturning it clockwise.

Black plate (35,1)Chevrolet Volt Owner Manual - 2011
Vehicle Care 10-35
Passenger Side Headlamps
To replace the high/low‐beamheadlamp:
1. Open the hood. See Hood onpage 10‑9.
2. Remove the air cleaner cover.See Engine Air Cleaner/Filter onpage 10‑16.
3. Remove the air cleanerassembly by pulling up torelease the rear two retentionposts from the securinggrommets. Then pull it forward toremove the remaining retentionpost from the securing grommet.
4. Remove the cover from the backof the headlamp assembly byturning it counterclockwise.
5. Remove the bulb from theheadlamp assembly by turningit counterclockwise.
6. Disconnect the bulb from thewiring harness connector.
7. Install the new bulb in theheadlamp assembly by turningit clockwise.
8. Reconnect the wiring harnessconnector.
9. Install the cover on the backof the headlamp assembly byturning it clockwise.
10. Install the air cleaner assemblyby lowering the three retentionposts into the grommets.
11. Install the engine aircleaner/filter assembly cover.See Engine Air Cleaner/Filteron page 10‑16.
Back-Up Lamps
The back-up lamp is in the rearfascia.
To replace a bulb:
1. Remove the two inboard screwsfrom the aero panel locatedunder the rear fascia.
2. Push up on the aero panel tolocate the bulb socket.

Black plate (36,1)Chevrolet Volt Owner Manual - 2011
10-36 Vehicle Care
3. Turn the bulb socketcounterclockwise to remove itfrom the bulb assembly.
4. Pull the bulb from the bulbsocket.
5. Push a new bulb straight into thebulb socket.
6. Reinstall the bulb socket bylining up the tabs in the lampassembly and turn it clockwiseto lock it into place.
7. Replace the two inboard screwsfrom the aero panel.
License Plate LampTo replace one of these bulbs:
Passenger Side Shown,Driver Side Similar
1. Press the spring clip on the rightend of the lamp assembly to theleft to unlock the lamp assembly.
2. Pull down on the lamp assemblyto remove it from the fascia.
A. Bulb Socket
B. Bulb
C. Lamp Assembly
3. Turn the bulb socket (A)counterclockwise to remove itfrom the lamp assembly (C).
4. Pull the bulb (B) straight out ofthe bulb socket (A).
5. Push the replacement bulbstraight into the bulb socket (A)and turn the bulb socket (A)clockwise to install into thelamp assembly (C).
Black plate (37,1)Chevrolet Volt Owner Manual - 2011
Vehicle Care 10-37
6. Reinstall the lamp assembly (C)into the fascia by inserting theleft side first.
7. Push the spring clip side intoplace.
Replacement Bulbs
Exterior LampBulb
Number
Back-Up Lamps 3157K
High/Low‐BeamHeadlamps
HIR2 (9012)
License PlateLamps
168LL(W5W)
For replacement bulbs not listedhere, contact your dealer.
Electrical System
High Voltage Devices andWiring
{ WARNING
Exposure to high voltagecan cause shock, burns, andeven death. The high voltagecomponents in the vehicle canonly be serviced by technicianswith special training.
High voltage components areidentified by labels. Do notremove, open, take apart,or modify these components.High voltage cable or wiring hasorange covering. Do not probe,tamper with, cut, or modify highvoltage cable or wiring.
Electrical SystemOverloadThe vehicle has fuses and circuitbreakers to protect against anelectrical system overload.
When the current electrical load istoo heavy, the circuit breaker opensand closes, protecting the circuituntil the current load returns tonormal or the problem is fixed.This greatly reduces the chanceof circuit overload and fire causedby electrical problems.
Fuses and circuit breakers protectthe following in the vehicle:. Headlamp Wiring. Windshield Wiper Motor. Power Windows and other
Power Accessories
Replace a bad fuse with a new oneof the identical size and rating.

Black plate (38,1)Chevrolet Volt Owner Manual - 2011
10-38 Vehicle Care
If there is a problem on the roadand a fuse needs to be replaced,the same amperage fuse can beborrowed. Choose some feature ofthe vehicle that is not needed to useand replace it as soon as possible.
Headlamp Wiring
An electrical overload may causethe lamps to go on and off, or insome cases to remain off. Havethe headlamp wiring checked rightaway if the lamps go on and off orremain off.
Windshield Wipers
If the wiper motor overheats due toheavy snow or ice, the windshieldwipers will stop until the motor coolsand the wiper control is turned off.After removal of the blockage,the wiper motor will restart whenthe control is then moved to thedesired operating position.
Although the circuit is protectedfrom electrical overload, overloaddue to heavy snow or ice, maycause wiper linkage damage.Always clear ice and heavy snowfrom the windshield before usingthe windshield wipers.
If the overload is caused by anelectrical problem and not snowor ice, be sure to get it fixed.
Engine CompartmentFuse Block
To open the fuse block cover, pressthe clips at the front and back androtate the cover up to the side.
Notice: Spilling liquid on anyelectrical component on thevehicle may damage it. Alwayskeep the covers on any electricalcomponent.

Black plate (39,1)Chevrolet Volt Owner Manual - 2011
Vehicle Care 10-39
Engine Compartment Fuse Block
A fuse puller is located in the enginecompartment fuse block.
The vehicle may not be equippedwith all of the fuses, relays, andfeatures shown.
Mini Fuses Usage
1Engine ControlModule – SwitchedPower
2 Emissions
3 Not Used
Mini Fuses Usage
4 IgnitionCoils/Injectors
5 Empty
6a Empty
6bRear Defogger(Lower Grid)
7 Empty
8 Empty
9 Heated Mirrors
10Air ConditioningControl Module
11TractionPower InverterModule – Battery
12Cabin Heater Pumpand Valve
13 Empty
14 Empty

Black plate (40,1)Chevrolet Volt Owner Manual - 2011
10-40 Vehicle Care
Mini Fuses Usage
15
Traction PowerInverter Moduleand TransmissionControlModule – Battery
17Engine ControlModule – Battery
22Left High‐BeamHeadlamp
24 Empty
25 Empty
26 Empty
31
RechargeableEnergy StorageSystem (HighVoltage Battery)Coolant Pump
32Sensing DiagnosticModule – Run/Crank
Mini Fuses Usage
33
Run/Crank for FuelSystem ControlModule/VehicleIntegration ControlModule
34VehicleIntegration ControlModule – Battery
35Power ElectronicsCoolant Pump
36 Empty
37 Cabin HeaterControl Module
38 Empty
39
RechargeableEnergy StorageSystem (HighVoltage Battery)Control Module
Mini Fuses Usage
40 Front WindshieldWasher
41Right High‐BeamHeadlamp
46 Empty
47 Empty
49 Empty
50Rear VisionCamera – Run/Crank (If Equipped)
51
Run/Crank forABS/RechargeableEnergy StorageSystem (HighVoltage Battery)/Charger
52
EngineControl Module/TransmissionControlModule – Run/Crank

Black plate (41,1)Chevrolet Volt Owner Manual - 2011
Vehicle Care 10-41
Mini Fuses Usage
53TractionPower InverterModule – Run/Crank
54
Run/Crank for AirConditioning ControlModule/InstrumentCluster/PassengerAirbag Display/Accessory PowerModule
J‐CaseFuses
Usage
16 Empty
18 Empty
19PowerWindow – Front
20 Empty
21Antilock BrakeSystem ElectronicControl Unit
J‐CaseFuses
Usage
23 Charge Port Door
27 Empty
28 Empty
29 Empty
30Antilock BrakeSystem Motor
42 Cooling Fan – Right
43 Front Wipers
44 Charger
45 Empty
48 Cooling Fan – Left
Mini Relays Usage
3 Powertrain
4Rear Defog (LowerGrid)/Heated Mirrors
7 Empty
Mini Relays Usage
9 Empty
11 Empty
12 Empty
13 Empty
14 Run/Crank
MicroRelays
Usage
1 Empty
2 Empty
6 Empty
8 Empty
10 Empty
Ultra MicroRelays
Usage
5 Charge Port Door

Black plate (42,1)Chevrolet Volt Owner Manual - 2011
10-42 Vehicle Care
Instrument Panel FuseBlock (Left Side)The instrument panel fuse blockis on the driver side end of theinstrument panel. To access thefuses, open the fuse panel doorby pulling out.
To reinstall the door, insert thebottom tab first, then push thedoor back into its original location.
Instrument Panel Fuse Block
A fuse puller is located in the enginecompartment fuse block.
The vehicle may not be equippedwith all of the fuses, relays, andfeatures shown.
Fuses Usage
F1Power Outlet – Topof IP Storage Bin
F2 Radio
F3 Instrument Cluster
F4 Infotainment Display
Fuses Usage
F5
Heating, Ventilation& Air Conditioning/Integrated CenterStack Switches
F6
Airbag (SensingDiagnostic Module/Passenger SensingModule)
F7Data LinkConnector 1/DataLink Connector 2
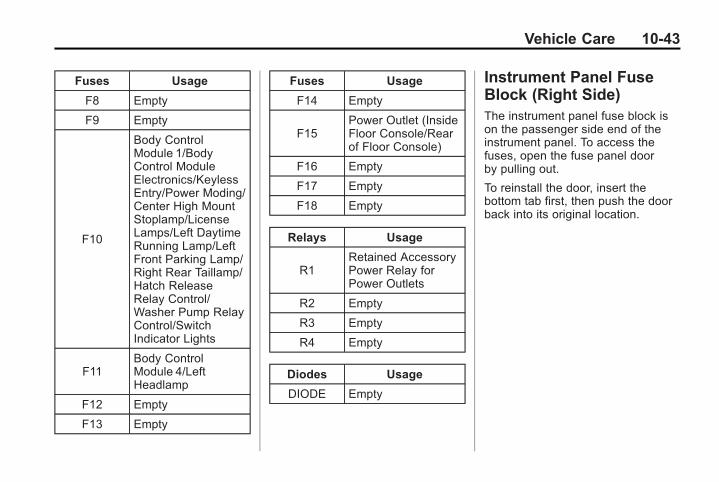
Black plate (43,1)Chevrolet Volt Owner Manual - 2011
Vehicle Care 10-43
Fuses Usage
F8 Empty
F9 Empty
F10
Body ControlModule 1/BodyControl ModuleElectronics/KeylessEntry/Power Moding/Center High MountStoplamp/LicenseLamps/Left DaytimeRunning Lamp/LeftFront Parking Lamp/Right Rear Taillamp/Hatch ReleaseRelay Control/Washer Pump RelayControl/SwitchIndicator Lights
F11Body ControlModule 4/LeftHeadlamp
F12 Empty
F13 Empty
Fuses Usage
F14 Empty
F15Power Outlet (InsideFloor Console/Rearof Floor Console)
F16 Empty
F17 Empty
F18 Empty
Relays Usage
R1Retained AccessoryPower Relay forPower Outlets
R2 Empty
R3 Empty
R4 Empty
Diodes Usage
DIODE Empty
Instrument Panel FuseBlock (Right Side)The instrument panel fuse block ison the passenger side end of theinstrument panel. To access thefuses, open the fuse panel doorby pulling out.
To reinstall the door, insert thebottom tab first, then push the doorback into its original location.

Black plate (44,1)Chevrolet Volt Owner Manual - 2011
10-44 Vehicle Care
Instrument Panel Fuse Block
A fuse puller is located in the enginecompartment fuse block.
The vehicle may not be equippedwith all of the fuses, relays, andfeatures shown.
Fuses Usage
F1 Steering WheelSwitch Backlighting
F2 Empty
F3 Empty
F4Body ControlModule 3/RightHeadlamp
Fuses Usage
F5
Body ControlModule 2/BodyControl ModuleElectronics/HatchLamp/Right DaytimeRunning Lamp/Shifter Lock/SwitchBacklighting
F6
Body ControlModule 5/RetainedAccessory PowerRelay Control/RightFront Turn SignalLamp/Left Rear Stopand Turn SignalLamp/Right FrontParking Lamp/LeftRear Taillamp
F7
Body ControlModule 6/Map Lights/Courtesy Lights/Back – up Lamp

Black plate (45,1)Chevrolet Volt Owner Manual - 2011
Vehicle Care 10-45
Fuses Usage
F8
Body ControlModule 7/Left FrontTurn Signal/RightRear Stop and TurnSignal Lamp/ChildSecurity Lock RelayControl
F9Body ControlModule 8/Locks
F10 OnStar®
F11Universal GarageDoor Opener(If Equipped)
F12 Blower Motor
Fuses Usage
F13 Empty
F14 Empty
F15 Empty
F16 Empty
F17 Empty
F18 Empty
Relays Usage
R1 Empty
R2 Empty
Relays Usage
R3 Empty
R4 Empty
Diodes Usage
DIODE Empty
Rear Compartment FuseBlockThe rear compartment fuseblock is on the left side of the rearcompartment behind a removablecover. Open the latch to remove thecover and access the fuse block.

Black plate (46,1)Chevrolet Volt Owner Manual - 2011
10-46 Vehicle Care
A fuse puller is located in the enginecompartment fuse block.
The vehicle may not have all of thefuses, relays, and features shown.
Fuses Usage
F1 Empty
F2Fuel System ControlModule
Fuses Usage
F3 Passive StartModule
F4Heated Seats(If Equipped)
F5
Driver DoorSwitches (OutsideRearview Mirror/Charge Port DoorRelease/RefuelRequest/DriverWindow Switch)
F6Fuel (DiurnalValve and Evap.Leak Check Module)
F7Accessory PowerModule Cooling Fan
F8Amplifier(If Equipped)
F9 Empty

Black plate (47,1)Chevrolet Volt Owner Manual - 2011
Vehicle Care 10-47
Fuses Usage
F10
Regulated VoltageControl/UltrasonicFront and RearParking Assist(If Equipped)
F11 Horn
F12Rear PowerWindows
F13Electric ParkingBrake
F14Rear Defog(Upper Grid)
Fuses Usage
F15 Empty
F16 Hatch Release
F17 Empty
F18 Empty
Relays Usage
R1Rear Defog(Upper Grid)
R2 Hatch Release
R3 Empty
Relays Usage
R4 Empty
R5 Empty
R6 Empty
R7 Empty
R8 Horn
Diodes Usage
DIODE Empty

Black plate (48,1)Chevrolet Volt Owner Manual - 2011
10-48 Vehicle Care
Wheels and Tires
TiresEvery new GM vehicle hashigh-quality tires made bya leading tire manufacturer.See the warranty manualfor information regardingthe tire warranty and whereto get service. For additionalinformation refer to the tiremanufacturer.
{ WARNING
. Poorly maintained andimproperly used tires aredangerous.
(Continued)
WARNING (Continued)
. Overloading the tires cancause overheating as aresult of too much flexing.There could be a blowout anda serious crash. See VehicleLoad Limits on page 9‑14.
. Underinflated tires pose thesame danger as overloadedtires. The resulting crashcould cause serious injury.Check all tires frequently tomaintain the recommendedpressure. Tire pressureshould be checked whenthe tires are cold.
. Overinflated tires are morelikely to be cut, punctured,or broken by a suddenimpact — such as whenhitting a pothole. Keeptires at the recommendedpressure.
(Continued)
WARNING (Continued)
. Worn or old tires can causea crash. If the tread is badlyworn, replace them.
. Replace any tires that havebeen damaged by impactswith potholes, curbs, etc.
. Improperly repaired tirescan cause a crash. Only thedealer or an authorized tireservice center should repair,replace, dismount, and mountthe tires.
. Do not spin the tires inexcess of 55 km/h (35 mph)on slippery surfaces suchas snow, mud, ice, etc.Excessive spinning maycause the tires to explode.

Black plate (49,1)Chevrolet Volt Owner Manual - 2011
Vehicle Care 10-49
Winter TiresConsider installing winter tireson the vehicle if frequent drivingon snow or ice covered roads isexpected. All season tires providegood overall performance on mostsurfaces, but they may not offerthe traction or the same level ofperformance as winter tires onsnow or ice covered roads.
Winter tires, in general, aredesigned for increased tractionon snow and ice covered roads.With winter tires, there may bedecreased dry road traction,increased road noise, and shortertread life. After changing to wintertires, be alert for changes invehicle handling and braking.
See your dealer for detailsregarding winter tire availabilityand proper tire selection. Also, seeBuying New Tires on page 10‑63.
If using snow tires:. Use tires of the same brand and
tread type on all four wheelpositions.
. Use only radial ply tires of thesame size, load range, andspeed rating as the originalequipment tires.
Winter tires with the same speedrating as the original equipment tiresmay not be available for H, V, W, Y,and ZR speed rated tires. If wintertires with a lower speed rating arechosen, never exceed the tire'smaximum speed capability.
Tire Sidewall LabelingUseful information about atire is molded into its sidewall.The examples show a typicalpassenger tire sidewall.
Passenger (P‐Metric) Tire Example
(A) Tire Size: The tire sizeis a combination of lettersand numbers used to define aparticular tire's width, height,aspect ratio, construction type,and service description. See the“Tire Size” illustration later in thissection for more detail.

Black plate (50,1)Chevrolet Volt Owner Manual - 2011
10-50 Vehicle Care
(B) TPC Spec (TirePerformance CriteriaSpecification): Originalequipment tires designed toGM's specific tire performancecriteria have a TPC specificationcode molded onto the sidewall.GM's TPC specifications meetor exceed all federal safetyguidelines.
(C) DOT (Departmentof Transportation):The Department ofTransportation (DOT) codeindicates that the tire is incompliance with the U.S.Department of TransportationMotor Vehicle Safety Standards.
(D) Tire Identification Number(TIN): The letters and numbersfollowing the DOT code arethe Tire Identification Number(TIN). The TIN shows the
manufacturer and plant code,tire size, and date the tirewas manufactured. The TIN ismolded onto both sides of thetire, although only one side mayhave the date of manufacture.
(E) Tire Ply Material: The typeof cord and number of plies inthe sidewall and under the tread.
(F) Uniform Tire QualityGrading (UTQG): Tiremanufacturers are requiredto grade tires based on threeperformance factors: treadwear,traction, and temperatureresistance. For more informationsee Uniform Tire QualityGrading on page 10‑65.
(G) Maximum Cold InflationLoad Limit: Maximum loadthat can be carried and themaximum pressure neededto support that load.
Tire Designations
Tire Size
The following is an exampleof a typical passenger vehicletire size.
(A) Passenger (P‐Metric) Tire:The United States version ofa metric tire sizing system.The letter P as the firstcharacter in the tire sizemeans a passenger vehicletire engineered to standardsset by the U.S. Tire and RimAssociation.
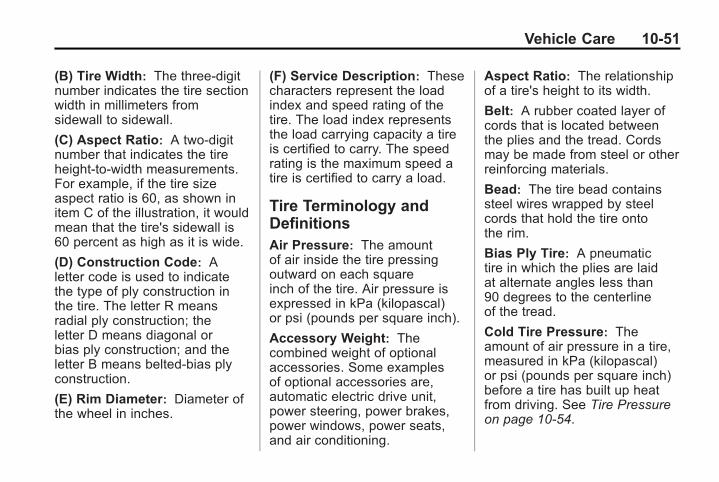
Black plate (51,1)Chevrolet Volt Owner Manual - 2011
Vehicle Care 10-51
(B) Tire Width: The three‐digitnumber indicates the tire sectionwidth in millimeters fromsidewall to sidewall.
(C) Aspect Ratio: A two‐digitnumber that indicates the tireheight‐to‐width measurements.For example, if the tire sizeaspect ratio is 60, as shown initem C of the illustration, it wouldmean that the tire's sidewall is60 percent as high as it is wide.
(D) Construction Code: Aletter code is used to indicatethe type of ply construction inthe tire. The letter R meansradial ply construction; theletter D means diagonal orbias ply construction; and theletter B means belted‐bias plyconstruction.
(E) Rim Diameter: Diameter ofthe wheel in inches.
(F) Service Description: Thesecharacters represent the loadindex and speed rating of thetire. The load index representsthe load carrying capacity a tireis certified to carry. The speedrating is the maximum speed atire is certified to carry a load.
Tire Terminology andDefinitionsAir Pressure: The amountof air inside the tire pressingoutward on each squareinch of the tire. Air pressure isexpressed in kPa (kilopascal)or psi (pounds per square inch).
Accessory Weight: Thecombined weight of optionalaccessories. Some examplesof optional accessories are,automatic electric drive unit,power steering, power brakes,power windows, power seats,and air conditioning.
Aspect Ratio: The relationshipof a tire's height to its width.
Belt: A rubber coated layer ofcords that is located betweenthe plies and the tread. Cordsmay be made from steel or otherreinforcing materials.
Bead: The tire bead containssteel wires wrapped by steelcords that hold the tire ontothe rim.
Bias Ply Tire: A pneumatictire in which the plies are laidat alternate angles less than90 degrees to the centerlineof the tread.
Cold Tire Pressure: Theamount of air pressure in a tire,measured in kPa (kilopascal)or psi (pounds per square inch)before a tire has built up heatfrom driving. See Tire Pressureon page 10‑54.

Black plate (52,1)Chevrolet Volt Owner Manual - 2011
10-52 Vehicle Care
Curb Weight: The weight of amotor vehicle with standard andoptional equipment including themaximum capacity of fuel, oil,and coolant, but withoutpassengers and cargo.
DOT Markings: A codemolded into the sidewall ofa tire signifying that the tireis in compliance with the U.S.Department of Transportation(DOT) Motor Vehicle SafetyStandards. The DOT codeincludes the Tire IdentificationNumber (TIN), an alphanumericdesignator which can alsoidentify the tire manufacturer,production plant, brand, anddate of production.
GVWR: Gross Vehicle WeightRating. See Vehicle Load Limitson page 9‑14.
GAWR FRT: Gross AxleWeight Rating for the front axle.See Vehicle Load Limits onpage 9‑14.
GAWR RR: Gross AxleWeight Rating for the rear axle.See Vehicle Load Limits onpage 9‑14.
Intended Outboard Sidewall:The side of an asymmetrical tire,that must always face outwardwhen mounted on a vehicle.
Kilopascal (kPa): The metricunit for air pressure.
Light Truck (LT‐Metric) Tire: Atire used on light duty trucks andsome multipurpose passengervehicles.
Load Index: An assignednumber ranging from 1 to 279that corresponds to the loadcarrying capacity of a tire.
Maximum Inflation Pressure:The maximum air pressure towhich a cold tire can be inflated.The maximum air pressure ismolded onto the sidewall.
Maximum Load Rating:The load rating for a tire at themaximum permissible inflationpressure for that tire.
Maximum Loaded VehicleWeight: The sum of curbweight, accessory weight,vehicle capacity weight, andproduction options weight.
Normal Occupant Weight:The number of occupants avehicle is designed to seatmultiplied by 68 kg (150 lbs).See Vehicle Load Limits onpage 9‑14.
Occupant Distribution:Designated seating positions.

Black plate (53,1)Chevrolet Volt Owner Manual - 2011
Vehicle Care 10-53
Outward Facing Sidewall:The side of an asymmetrical tirethat has a particular side thatfaces outward when mountedon a vehicle. The side of thetire that contains a whitewall,bears white lettering, or bearsmanufacturer, brand, and/ormodel name molding that ishigher or deeper than the samemoldings on the other sidewallof the tire.
Passenger (P-Metric) Tire:A tire used on passenger carsand some light duty trucks andmultipurpose vehicles.
Recommended InflationPressure: Vehiclemanufacturer's recommendedtire inflation pressure asshown on the tire placard.See Tire Pressure onpage 10‑54 and VehicleLoad Limits on page 9‑14.
Radial Ply Tire: A pneumatictire in which the ply cords thatextend to the beads are laid at90 degrees to the centerline ofthe tread.
Rim: A metal support for a tireand upon which the tire beadsare seated.
Sidewall: The portion of a tirebetween the tread and the bead.
Speed Rating: Analphanumeric code assigned toa tire indicating the maximumspeed at which a tire canoperate.
Traction: The friction betweenthe tire and the road surface.The amount of grip provided.
Tread: The portion of a tirethat comes into contact withthe road.
Treadwear Indicators: Narrowbands, sometimes called wearbars, that show across thetread of a tire when only 1.6 mm(1/16 in) of tread remains.See When It Is Time for NewTires on page 10‑62.
UTQGS (Uniform TireQuality Grading Standards):A tire information systemthat provides consumers withratings for a tire's traction,temperature, and treadwear.Ratings are determinedby tire manufacturers usinggovernment testing procedures.The ratings are molded intothe sidewall of the tire.See Uniform Tire QualityGrading on page 10‑65.

Black plate (54,1)Chevrolet Volt Owner Manual - 2011
10-54 Vehicle Care
Vehicle Capacity Weight:The number of designatedseating positions multiplied by68 kg (150 lbs) plus the ratedcargo load. See Vehicle LoadLimits on page 9‑14.
Vehicle Maximum Load on theTire: Load on an individual tiredue to curb weight, accessoryweight, occupant weight, andcargo weight.
Vehicle Placard: A labelpermanently attached to avehicle showing the vehicle'scapacity weight and theoriginal equipment tire sizeand recommended inflationpressure. See “Tire and LoadingInformation Label” under VehicleLoad Limits on page 9‑14.
Tire PressureTires need the correct amountof air pressure to operateeffectively.
Notice: Neither tireunderinflation noroverinflation is good.Underinflated tires, ortires that do not haveenough air, can result in:. Tire overloading andoverheating which couldlead to a blowout.
. Premature orirregular wear.
. Poor handling.
. Reduced fuel economy.
Overinflated tires, or tiresthat have too much air, canresult in:. Unusual wear.. Poor handling.. Rough ride.. Needless damage fromroad hazards.
The Tire and LoadingInformation label on thevehicle indicates the originalequipment tires and the correctcold tire inflation pressures.The recommended pressureis the minimum air pressureneeded to support the vehicle'smaximum load carrying capacity.

Black plate (55,1)Chevrolet Volt Owner Manual - 2011
Vehicle Care 10-55
For additional informationregarding how much weightthe vehicle can carry, and anexample of the Tire and LoadingInformation label, see VehicleLoad Limits on page 9‑14.How the vehicle is loadedaffects vehicle handling andride comfort. Never load thevehicle with more weight thanit was designed to carry.
When to Check
Check the tires once a monthor more.
How to Check
Use a good quality pocket-typegauge to check tire pressure.Proper tire inflation cannot bedetermined by looking at the tire.Check the tire inflation pressurewhen the tires are cold, meaning
the vehicle has not been drivenfor at least three hours or nomore than 1.6 km (1 mi).
Remove the valve cap from thetire valve stem. Press the tiregauge firmly onto the valve toget a pressure measurement.If the cold tire inflation pressurematches the recommendedpressure on the Tire andLoading Information label, nofurther action is necessary.
If the inflation pressure is low,add air until the recommendedpressure is reached. If theinflation pressure is high, pressthe metal stem in the centerof the tire valve to release air.Re‐check the tire pressurewith the tire gauge.
Return the valve caps on thevalve stems to prevent leaksand keep out dirt and moisture.
Tire Pressure MonitorSystemThe Tire Pressure Monitor System(TPMS) uses radio and sensortechnology to check tire pressurelevels. The TPMS sensors monitorthe air pressure in your tires andtransmit tire pressure readings toa receiver located in the vehicle.
Each tire, including the spare(if provided), should be checkedmonthly when cold and inflated tothe inflation pressure recommendedby the vehicle manufacturer onthe vehicle placard or tire inflationpressure label. (If your vehicle hastires of a different size than the sizeindicated on the vehicle placard ortire inflation pressure label, youshould determine the proper tireinflation pressure for those tires.)

Black plate (56,1)Chevrolet Volt Owner Manual - 2011
10-56 Vehicle Care
As an added safety feature, yourvehicle has been equipped with atire pressure monitoring system(TPMS) that illuminates a lowtire pressure telltale when one ormore of your tires is significantlyunder‐inflated.
Accordingly, when the low tirepressure telltale illuminates, youshould stop and check your tires assoon as possible, and inflate themto the proper pressure. Driving ona significantly under‐inflated tirecauses the tire to overheat and canlead to tire failure. Under‐inflationalso reduces fuel efficiency andtire tread life, and may affect thevehicle's handling and stoppingability.
Please note that the TPMS isnot a substitute for proper tiremaintenance, and it is the driver'sresponsibility to maintain correcttire pressure, even if under‐inflation
has not reached the level to triggerillumination of the TPMS low tirepressure telltale.
Your vehicle has also beenequipped with a TPMS malfunctionindicator to indicate when thesystem is not operating properly.The TPMS malfunction indicator iscombined with the low tire pressuretelltale. When the system detects amalfunction, the telltale will flash forapproximately one minute and thenremain continuously illuminated.This sequence will continue uponsubsequent vehicle start‐ups aslong as the malfunction exists.
When the malfunction indicatoris illuminated, the system maynot be able to detect or signal lowtire pressure as intended. TPMSmalfunctions may occur for a varietyof reasons, including the installationof replacement or alternate tires orwheels on the vehicle that preventthe TPMS from functioning properly.
Always check the TPMS malfunctiontelltale after replacing one or moretires or wheels on your vehicle toensure that the replacement oralternate tires and wheels allowthe TPMS to continue to functionproperly.
See Tire Pressure MonitorOperation on page 10‑57 foradditional information.
Federal CommunicationsCommission (FCC) andIndustry Canada
See Radio FrequencyStatement on page 13‑28 forinformation regarding Part 15of the Federal CommunicationsCommission (FCC) rules andIndustry Canada StandardsRSS-210/220/310.

Black plate (57,1)Chevrolet Volt Owner Manual - 2011
Vehicle Care 10-57
Tire Pressure MonitorOperationThis vehicle may have a TirePressure Monitor System (TPMS).The TPMS is designed to warnthe driver when a low tire pressurecondition exists. TPMS sensorsare mounted onto each tire andwheel assembly. The TPMS sensorsmonitor the air pressure in thetires and transmit the tire pressurereadings to a receiver located inthe vehicle.
When a low tire pressure conditionis detected, the TPMS illuminatesthe low tire pressure warning lightlocated on the instrument cluster.If the warning light comes on, stopas soon as possible and inflate thetires to the recommended pressureshown on the Tire Loading andInformation label. See VehicleLoad Limits on page 9‑14.
A message to check the pressure ina specific tire displays in the DriverInformation Center (DIC). The lowtire pressure warning light and theDIC warning message come onat each drive cycle until the tiresare inflated to the correct inflationpressure. Using the DIC, tirepressure levels can be viewed.For additional information anddetails about the DIC operationand displays see Driver InformationCenter (DIC) on page 5‑43.
The low tire pressure warning lightmay come on in cool weather whenthe vehicle is first started, and thenturn off as the vehicle is driven.

Black plate (58,1)Chevrolet Volt Owner Manual - 2011
10-58 Vehicle Care
This could be an early indicator thatthe air pressure is getting low andneeds to be inflated to the properpressure.
A Tire and Loading Informationlabel shows the size of the originalequipment tires and the correctinflation pressure for the tires whenthey are cold. See Vehicle LoadLimits on page 9‑14, for an exampleof the Tire and Loading Informationlabel and its location. Also see TirePressure on page 10‑54.
The TPMS can warn abouta low tire pressure condition butit does not replace normal tiremaintenance. See Tire Inspectionon page 10‑61, Tire Rotation onpage 10‑61, and Tires onpage 10‑48.
Notice: Tire sealant materials arenot all the same. A non-approvedtire sealant could damage theTPMS sensors. TPMS sensordamage caused by usingan incorrect tire sealant isnot covered by the vehiclewarranty. Always use onlythe GM-approved tire sealantavailable through your dealeror included in the vehicle.
Factory-installed Tire Inflator Kitsuse a GM-approved liquid tiresealant. Using non-approved tiresealants could damage the TPMSsensors. See Tire Sealant andCompressor Kit on page 10‑71 forinformation regarding the inflatorkit materials and instructions.
TPMS Malfunction Light andMessage
The TPMS will not function properlyif one or more of the TPMS sensorsare missing or inoperable. Whenthe system detects a malfunction,the low tire pressure warning lightflashes for about one minute andthen stays on for the remainderof the vehicle on/off cycle. A DICwarning message also displays.The malfunction light and DICwarning message come on ateach vehicle on/off cycle until theproblem is corrected. Some of theconditions that can cause these tocome on are:. One of the road tires has
been replaced with the sparetire, if the vehicle has one.The spare tire does nothave a TPMS sensor.

Black plate (59,1)Chevrolet Volt Owner Manual - 2011
Vehicle Care 10-59
The malfunction light and DICmessage should go off afterthe road tire is replaced andthe sensor matching processis performed successfully.See "TPMS Sensor MatchingProcess" later in this section.
. The TPMS sensor matchingprocess was started but notcompleted or not completedsuccessfully after rotating thetires. The DIC message andmalfunction light should gooff once the TPMS sensormatching process is performedsuccessfully. See “TPMS SensorMatching Process” later in thissection.
. One or more TPMS sensors aremissing or damaged. The DICmessage and the malfunctionlight should go off when theTPMS sensors are installed andthe sensor matching processis performed successfully.See your dealer for service.
. Replacement tires or wheels donot match the original equipmenttires or wheels. Tires and wheelsother than those recommendedcould prevent the TPMS fromfunctioning properly. See BuyingNew Tires on page 10‑63.
. Operating electronic devices orbeing near facilities using radiowave frequencies similar to theTPMS could cause the TPMSsensors to malfunction.
If the TPMS is not functioningproperly , it cannot detect or signal alow tire condition. See your dealerfor service if the TPMS malfunctionlight and DIC message come onand stay on.
TPMS Sensor MatchingProcess
Each TPMS sensor has a uniqueidentification code. The identificationcode needs to be matched to anew tire/wheel position after rotatingthe vehicle’s tires or replacingone or more of the TPMS sensors.Also, the TPMS sensor matchingprocess should be performed afterreplacing a spare tire with a roadtire containing the TPMS sensor.The malfunction light and theDIC message should go off at thenext drive cycle. The sensors arematched to the tire/wheel positions,using a TPMS relearn tool, in thefollowing order: driver side front tire,passenger side front tire, passengerside rear tire, and driver side rear.See your dealer for service or topurchase a relearn tool.

Black plate (60,1)Chevrolet Volt Owner Manual - 2011
10-60 Vehicle Care
There are two minutes to matchthe first tire/wheel position, andfive minutes overall to match allfour tire/wheel positions. If it takeslonger, the matching process stopsand must be restarted.
Follow the TPMS sensor matchingprocess:
1. Set the parking brake.
2. Put the vehicle in ON/RUN andplace the vehicle in P (Park).
3. If the DIC display is minimized,press the SELECT knob tomaximize it.
4. Use the SELECT knob to scrollto the Tire Pressure displayscreen.
5. Press and hold the SELECTknob for five seconds to beginthe sensor matching process.
A message displays confirmingto begin the process.
6. Use the SELECT knob toselect YES with the highlightedselection, and press theSELECT knob again toconfirm the selection.
The horn sounds twice to signalthe receiver is in relearn modeand the TIRE LEARNINGACTIVE message displayson the DIC screen.
7. Start with the driver sidefront tire.
8. Place the relearn tool againstthe tire sidewall, near the valvestem. Then press the buttonto activate the TPMS sensor.A horn chirp confirms that thesensor identification code hasbeen matched to this tire andwheel position.
9. Proceed to the passengerside front tire, and repeat theprocedure in Step 8.
10. Proceed to the passengerside rear tire, and repeat theprocedure in Step 8.
11. Proceed to the driver side reartire, and repeat the procedurein Step 8. The horn sounds twotimes to indicate the sensoridentification code has beenmatched to the driver siderear tire, and the TPMS sensormatching process is no longeractive. The TIRE LEARNINGACTIVE message on the DICdisplay screen goes off.
12. Turn the vehicle off.
13. Set all four tires to therecommended air pressurelevel as indicated on the Tireand Loading Information label.

Black plate (61,1)Chevrolet Volt Owner Manual - 2011
Vehicle Care 10-61
Tire InspectionGM recommends that thetires, including the spare, beinspected for signs of wear ordamage at least once a month.
Replace the tire if:. The indicators at three or
more places around the tirecan be seen.
. There is cord or fabricshowing through the tire'srubber.
. The tread or sidewall iscracked, cut, or snaggeddeep enough to show cordor fabric.
. The tire has a bump, bulge,or split.
. The tire has a puncture, cut,or other damage that cannotbe repaired well because ofthe size or location of thedamage.
Tire RotationTires should be rotated every12 000 km (7,500 mi). The firstrotation is the most important.See Scheduled Maintenance onpage 11‑2.
Tires are rotated to achieve amore uniform wear for all tires.
Any time unusual wear isnoticed, rotate the tires assoon as possible, andcheck the wheel alignment.See When It Is Time for NewTires on page 10‑62 and WheelReplacement on page 10‑67.
Use this rotation pattern whenrotating the tires.
Adjust the front and rear tiresto the recommended inflationpressure on the Tire andLoading Information labelafter the tires have beenrotated. See Tire Pressure onpage 10‑54 and Vehicle LoadLimits on page 9‑14.
Reset the Tire Pressure MonitorSystem. See Tire PressureMonitor Operation onpage 10‑57.

Black plate (62,1)Chevrolet Volt Owner Manual - 2011
10-62 Vehicle Care
Check that all wheel nuts areproperly tightened. See “WheelNut Torque” under Capacitiesand Specifications onpage 12‑2.
{ WARNING
Rust or dirt on a wheel,or on the parts to which it isfastened, can make wheelnuts become loose after atime. The wheel could comeoff and cause a crash. Whenchanging a wheel, removeany rust or dirt from placeswhere the wheel attaches tothe vehicle. In an emergency,a cloth or a paper towel canbe used, however, use ascraper or wire brush toremove all rust or dirt.
Lightly coat the center of thewheel hub with wheel bearinggrease after a wheel changeor tire rotation to preventcorrosion or rust build-up.Do not get grease on the flatwheel mounting surface oron the wheel nuts or bolts.
When It Is Time for NewTiresFactors, such as maintenance,temperatures, driving speeds,vehicle loading, and road conditionsaffect the wear rate of the tires.
Treadwear indicators are one wayto tell when it is time for new tires.Treadwear indicators appear whenthe tires have only 1.6 mm (1/16 in)or less of tread remaining. See TireInspection on page 10‑61 andTire Rotation on page 10‑61for additional information.

Black plate (63,1)Chevrolet Volt Owner Manual - 2011
Vehicle Care 10-63
The rubber in tires ages over time.This also applies to the spare tire,if the vehicle has one, even if it isnever used. Multiple conditionsincluding temperatures, loadingconditions, and inflation pressuremaintenance affect how fast agingtakes place. Tires will typicallyneed to be replaced due to wearbefore they may need to bereplaced due to age. Consult the tiremanufacturer for more informationon when tires should be replaced.
Vehicle Storage
Tires age when stored normallymounted on a parked vehicle.Park a vehicle that will be storedfor at least a month in a cool, dry,clean area away from direct sunlightto slow aging. This area should befree of grease, gasoline, or othersubstances that can deterioraterubber.
Parking for an extended periodcan cause flat spots on the tiresthat may result in vibrations whiledriving. When storing a vehicle forat least a month, remove the tiresor raise the vehicle to reduce theweight from the tires.
Buying New TiresGM has developed and matchedspecific tires for the vehicle.The original equipment tiresinstalled on the vehicle, whenit was new, were designed to meetGeneral Motors Tire PerformanceCriteria Specification (TPC Spec)system rating. When replacementtires are needed, GM stronglyrecommends buying tires with thesame TPC Spec rating. This way,the vehicle will continue to havetires that are designed to give thesame performance and vehiclesafety, during normal use, as theoriginal tires.

Black plate (64,1)Chevrolet Volt Owner Manual - 2011
10-64 Vehicle Care
GM's exclusive TPC Specsystem considers over a dozencritical specifications that impactthe overall performance of thevehicle, including brake systemperformance, ride and handling,traction control, and tire pressuremonitoring performance. GM's TPCSpec number is molded onto thetire's sidewall near the tire size.If the tires have an all‐seasontread design, the TPC spec numberwill be followed by MS, for mudand snow. See Tire SidewallLabeling on page 10‑49 foradditional information.
GM recommends replacing all thetires at the same time. Uniformtread depth on all tires will helpto maintain the performance ofthe vehicle. Braking and handlingperformance may be adverselyaffected if all the tires are notreplaced at the same time.See Tire Inspection on page 10‑61and Tire Rotation on page 10‑61 forinformation on proper tire rotation.
{ WARNING
Tires could explode duringimproper service. Attempting tomount or dismount a tire couldcause injury or death. Only yourdealer or authorized tire servicecenter should mount or dismountthe tires.
{ WARNING
Mixing tires of different sizes,brands, or types may causeloss of control of the vehicle,resulting in a crash or othervehicle damage. Use thecorrect size, brand, and typeof tire on all wheels.
{ WARNING
Using bias-ply tires on thevehicle may cause the wheelrim flanges to develop cracksafter many miles of driving.A tire and/or wheel could failsuddenly and cause a crash.Use only radial-ply tires withthe wheels on the vehicle.
If the vehicle tires must be replacedwith a tire that does not have a TPCSpec number, make sure they arethe same size, load range, speedrating, and construction (radial) asthe original tires.
Vehicles that have a tire pressuremonitoring system could give aninaccurate low‐pressure warningif non‐TPC Spec rated tires areinstalled. See Tire Pressure MonitorSystem on page 10‑55.

Black plate (65,1)Chevrolet Volt Owner Manual - 2011
Vehicle Care 10-65
The Tire and Loading InformationLabel indicates the originalequipment tires on the vehicle.See Vehicle Load Limits onpage 9‑14, for the label locationand more information about theTire and Loading Information label.
Different Size Tires andWheelsIf wheels or tires are installed thatare a different size than the originalequipment wheels and tires, vehicleperformance, including its braking,ride and handling characteristics,stability, and resistance to rollovermay be affected. If the vehicle haselectronic systems such as antilockbrakes, rollover airbags, tractioncontrol, and electronic stabilitycontrol, the performance of thesesystems can also be affected.
{ WARNING
If different sized wheels are used,there may not be an acceptablelevel of performance and safetyif tires not recommended forthose wheels are selected.This increases the chanceof a crash and serious injury.Only use GM specific wheeland tire systems developedfor the vehicle, and have themproperly installed by a GMcertified technician.
See Buying New Tires onpage 10‑63 and Accessoriesand Modifications on page 10‑4for additional information.
Uniform Tire QualityGradingQuality grades can be foundwhere applicable on the tiresidewall between tread shoulderand maximum section width.For example:
Treadwear 200 Traction AATemperature A
The following information relatesto the system developed by theUnited States National HighwayTraffic Safety Administration(NHTSA), which grades tiresby treadwear, traction, andtemperature performance.This applies only to vehiclessold in the United States.
Black plate (66,1)Chevrolet Volt Owner Manual - 2011
10-66 Vehicle Care
The grades are molded on thesidewalls of most passengercar tires. The Uniform TireQuality Grading (UTQG)system does not apply to deeptread, winter-type snow tires,space-saver, or temporary usespare tires, tires with nominalrim diameters of 10 to 12 inches(25 to 30 cm), or to somelimited-production tires.
While the tires available onGeneral Motors passengercars and light trucks may varywith respect to these grades,they must also conform tofederal safety requirements andadditional General Motors TirePerformance Criteria (TPC)standards.
All Passenger Car Tires MustConform to Federal SafetyRequirements In AdditionTo These Grades.
Treadwear
The treadwear grade is acomparative rating basedon the wear rate of the tirewhen tested under controlledconditions on a specifiedgovernment test course.For example, a tire graded150 would wear one and ahalf (1½) times as well onthe government course asa tire graded 100. The relativeperformance of tires dependsupon the actual conditions oftheir use, however, and maydepart significantly from thenorm due to variations indriving habits, service practicesand differences in roadcharacteristics and climate.
Traction – AA, A, B, C
The traction grades, fromhighest to lowest, are AA, A, B,and C. Those grades representthe tire's ability to stop onwet pavement as measuredunder controlled conditionson specified governmenttest surfaces of asphalt andconcrete. A tire marked C mayhave poor traction performance.Warning: The traction gradeassigned to this tire is basedon straight-ahead brakingtraction tests, and does notinclude acceleration, cornering,hydroplaning, or peak tractioncharacteristics.

Black plate (67,1)Chevrolet Volt Owner Manual - 2011
Vehicle Care 10-67
Temperature – A, B, C
The temperature gradesare A (the highest), B, and C,representing the tire's resistanceto the generation of heat andits ability to dissipate heatwhen tested under controlledconditions on a specified indoorlaboratory test wheel. Sustainedhigh temperature can causethe material of the tire todegenerate and reduce tire life,and excessive temperaturecan lead to sudden tire failure.The grade C corresponds to alevel of performance which allpassenger car tires must meetunder the Federal Motor SafetyStandard No. 109. Grades Band A represent higher levels ofperformance on the laboratorytest wheel than the minimumrequired by law. Warning: The
temperature grade for this tireis established for a tire thatis properly inflated and notoverloaded. Excessive speed,underinflation, or excessiveloading, either separately or incombination, can cause heatbuildup and possible tire failure.
Wheel Alignment and TireBalanceThe tires and wheels werealigned and balanced at thefactory to provide the longest tirelife and best overall performance.Adjustments to wheel alignment andtire balancing will not be necessaryon a regular basis. However, checkthe alignment if there is unusual tirewear or the vehicle is pulling to oneside or the other. If the vehicle isvibrating when driving on a smoothroad, the tires and wheels may needto be rebalanced. See your dealerfor proper diagnosis.
Wheel ReplacementReplace any wheel that is bent,cracked, or badly rusted orcorroded. If wheel nuts keep comingloose, the wheel, wheel bolts andwheel nuts should be replaced.If the wheel leaks air, replace it.Some aluminum wheels can berepaired. See your dealer if anyof these conditions exist.
Your dealer will know the kind ofwheel that is needed.
Each new wheel should havethe same load-carrying capacity,diameter, width, offset and bemounted the same way as theone it replaces.

Black plate (68,1)Chevrolet Volt Owner Manual - 2011
10-68 Vehicle Care
Replace wheels, wheel bolts,wheel nuts, or Tire Pressure MonitorSystem (TPMS) sensors with newGM original equipment parts.
{ WARNING
Using the wrong replacementwheels, wheel bolts, or wheelnuts can be dangerous. It couldaffect the braking and handlingof the vehicle. Tires can lose air,and cause loss of control, causinga crash. Always use the correctwheel, wheel bolts, and wheelnuts for replacement.
Notice: The wrong wheelcan also cause problems withbearing life, brake cooling,speedometer or odometercalibration, headlamp aim,bumper height, vehicle groundclearance, and tire clearanceto the body and chassis.
{ WARNING
Rust or dirt on a wheel,or on the parts to which it isfastened, can make wheelnuts become loose after atime. The wheel could comeoff and cause a crash. Whenchanging a wheel, removeany rust or dirt from placeswhere the wheel attaches tothe vehicle. In an emergency,a cloth or a paper towel canbe used, however, use ascraper or wire brush toremove all rust or dirt.
{ WARNING
Never use oil or grease on studsor the threads of the wheel nuts.The wheel nuts might come looseand the wheel could fall off,causing a crash.
{ WARNING
Incorrect wheel nuts or improperlytightened wheel nuts can causethe wheel to become loose andeven come off. This could leadto a crash. Be sure to use thecorrect wheel nuts. If you haveto replace them, be sure to getnew GM original equipmentwheel nuts.
Notice: Improperly tightenedwheel nuts can lead to brakepulsation and rotor damage.To avoid expensive brake repairs,evenly tighten the wheel nuts inthe proper sequence and to theproper torque specification.

Black plate (69,1)Chevrolet Volt Owner Manual - 2011
Vehicle Care 10-69
Used Replacement Wheels
{ WARNING
Replacing a wheel with a usedone is dangerous. How it hasbeen used or how far it has beendriven may be unknown. It couldfail suddenly and cause a crash.When replacing wheels, use anew GM original equipmentwheel.
Tire Chains
{ WARNING
Do not use tire chains. There isnot enough clearance. Tire chainsused on a vehicle without theproper amount of clearance cancause damage to the brakes,suspension or other vehicle
(Continued)
WARNING (Continued)
parts. The area damaged bythe tire chains could causeloss of control and a crash.
Use another type of tractiondevice only if its manufacturerrecommends it for the vehicle'stire size combination androad conditions. Follow thatmanufacturer's instructions.To avoid vehicle damage, driveslow and readjust or remove thetraction device if it contacts thevehicle. Do not spin the wheels.If traction devices are used,install them on the front tires.
If a Tire Goes FlatThis vehicle has a tire sealant andcompressor kit. See Tire Sealantand Compressor Kit on page 10‑71.There is no spare tire, no tirechanging equipment, and noplace to store a tire.
To properly lift this vehicle, seeLifting the Vehicle on page 10‑5.
It is unusual for a tire to blowoutwhile driving, especially if thetires are maintained properly.See Tires on page 10‑48.If air goes out of a tire, it is muchmore likely to leak out slowly.

Black plate (70,1)Chevrolet Volt Owner Manual - 2011
10-70 Vehicle Care
But if there ever is a blowout, hereare a few tips about what to expectand what to do:
If a front tire fails, the flat tire willcreate a drag that pulls the vehicletoward that side. Take your footoff the accelerator pedal and gripthe steering wheel firmly. Steer tomaintain lane position, and thengently brake to a stop, well offthe road, if possible.
A rear blowout, particularly on acurve, acts much like a skid andmay require the same correctionas used in a skid. Stop pressingthe accelerator pedal and steer tostraighten the vehicle. It may bevery bumpy and noisy. Gentlybrake to a stop, well off the road,if possible.
{ WARNING
Driving on a flat tire will causepermanent damage to the tire.Re-inflating a tire after it hasbeen driven on while severelyunderinflated or flat may causea blowout and a serious crash.Never attempt to re-inflate a tirethat has been driven on whileseverely underinflated or flat.Have your dealer or an authorizedtire service center repair orreplace the flat tire as soonas possible.
If a tire goes flat, avoid further tireand wheel damage by driving slowlyto a level place and stopping, welloff the road, if possible.
1. Turn on the hazard warningflashers. See Hazard WarningFlashers on page 6‑4.
2. Set the parking brake firmly.
3. Put the shift lever in P (Park).See Shifting Into Park onpage 9‑22.
4. Turn off the engine.
5. Inspect the flat tire.
If the tire has been separated fromthe wheel, has damaged sidewalls,or has a puncture larger than6 mm (¼ in), the tire is too severelydamaged for the tire sealant andcompressor kit to be effective.See Roadside Assistance Programon page 13‑6.
If the tire has a puncture lessthan 6 mm (¼ in) in the tread areaof the tire, see Tire Sealant andCompressor Kit on page 10‑71.

Black plate (71,1)Chevrolet Volt Owner Manual - 2011
Vehicle Care 10-71
Tire Sealant andCompressor Kit
{ WARNING
Running the engine in ExtendedRange Mode in an enclosedarea with poor ventilation isdangerous. Engine exhaust mayenter the vehicle. Engine exhaustcontains Carbon Monoxide (CO)which cannot be seen or smelled.It can cause unconsciousnessand even death. Never run theengine in Extended Range Modein an enclosed area that has nofresh air ventilation. For moreinformation, see Engine Exhauston page 9‑30.
{ WARNING
Overinflating a tire could causethe tire to rupture and you orothers could be injured. Be sureto read and follow the tiresealant and compressor kitinstructions and inflate the tireto its recommended pressure.Do not exceed the recommendedpressure.
{ WARNING
Storing the tire sealantand compressor kit or otherequipment in the passengercompartment of the vehicle couldcause injury. In a sudden stop orcollision, loose equipment couldstrike someone. Store the tiresealant and compressor kit inits original location.
If this vehicle has a tire sealant andcompressor kit, there may not be aspare tire, tire changing equipment,and on some vehicles there may notbe a place to store a tire.
The tire sealant and compressorcan be used to temporarily sealpunctures up to 6 mm (¼ in) in thetread area of the tire. It can also beused to inflate an underinflated tire.
If the tire has been separated fromthe wheel, has damaged sidewalls,or has a large puncture, the tire istoo severely damaged for the tiresealant and compressor kit to beeffective. See Roadside AssistanceProgram on page 13‑6.
Read and follow all of the tiresealant and compressor kitinstructions.
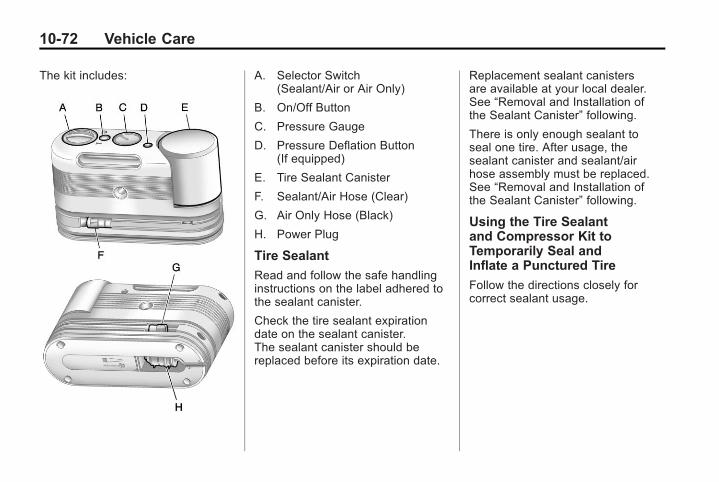
Black plate (72,1)Chevrolet Volt Owner Manual - 2011
10-72 Vehicle Care
The kit includes: A. Selector Switch(Sealant/Air or Air Only)
B. On/Off Button
C. Pressure Gauge
D. Pressure Deflation Button(If equipped)
E. Tire Sealant Canister
F. Sealant/Air Hose (Clear)
G. Air Only Hose (Black)
H. Power Plug
Tire Sealant
Read and follow the safe handlinginstructions on the label adhered tothe sealant canister.
Check the tire sealant expirationdate on the sealant canister.The sealant canister should bereplaced before its expiration date.
Replacement sealant canistersare available at your local dealer.See “Removal and Installation ofthe Sealant Canister” following.
There is only enough sealant toseal one tire. After usage, thesealant canister and sealant/airhose assembly must be replaced.See “Removal and Installation ofthe Sealant Canister” following.
Using the Tire Sealantand Compressor Kit toTemporarily Seal andInflate a Punctured Tire
Follow the directions closely forcorrect sealant usage.

Black plate (73,1)Chevrolet Volt Owner Manual - 2011
Vehicle Care 10-73
When using the tire sealantand compressor kit during coldtemperatures, warm the kit in aheated environment for five minutes.This will help to inflate the tirefaster.
If a tire goes flat, avoid further tireand wheel damage by driving slowlyto a level place. Turn on the hazardwarning flashers. See HazardWarning Flashers on page 6‑4.
See If a Tire Goes Flat onpage 10‑69 for other importantsafety warnings.
Do not remove any objects thathave penetrated the tire.
1. Remove the tire sealant andcompressor kit from its storagelocation. See Storing the TireSealant and Compressor Kit onpage 10‑78.
2. Unwrap the sealant/air hose (F)and the power plug (H).
3. Place the kit on the ground.
Make sure the tire valve stem ispositioned close to the groundso the hose will reach it.
4. Remove the valve stem capfrom the flat tire by turning itcounterclockwise.
5. Attach the sealant/air hose (F)onto the tire valve stem. Turn itclockwise until it is tight.

Black plate (74,1)Chevrolet Volt Owner Manual - 2011
10-74 Vehicle Care
6. Plug the power plug (H) into theaccessory power outlet in thevehicle. Unplug all items fromother accessory power outlets.See Power Outlets on page 5‑8.
If the vehicle has an accessorypower outlet, do not use thecigarette lighter.
If the vehicle only has a cigarettelighter, use the cigarette lighter.
Do not pinch the power plugcord in the door or window.
7. Start the vehicle. The vehiclemust be running while using theair compressor.
8. Turn the selector switch (A)counterclockwise to the Sealant+ Air position.
9. Press the on/off button (B)to turn the tire sealant andcompressor kit on.
The compressor will injectsealant and air into the tire.
The pressure gauge (C) willinitially show a high pressurewhile the compressor pushes thesealant into the tire. Once thesealant is completely dispersedinto the tire, the pressure willquickly drop and start to riseagain as the tire inflates withair only.
10. Inflate the tire to therecommended inflationpressure using the pressuregauge (C). The recommendedinflation pressure can befound on the Tire and LoadingInformation label. See TirePressure on page 10‑54.
The pressure gauge (C) mayread higher than the actual tirepressure while the compressoris on. Turn the compressor offto get an accurate pressurereading. The compressormay be turned on/off until thecorrect pressure is reached.
Notice: If the recommendedpressure cannot be reachedafter approximately 25 minutes,the vehicle should not be drivenfarther. The tire is too severelydamaged and the tire sealant andcompressor kit cannot inflate thetire. Remove the power plug fromthe accessory power outlet andunscrew the inflating hose fromthe tire valve. See RoadsideAssistance Program onpage 13‑6.

Black plate (75,1)Chevrolet Volt Owner Manual - 2011
Vehicle Care 10-75
11. Press the on/off button (B)to turn the tire sealant andcompressor kit off.
The tire is not sealed andwill continue to leak air untilthe vehicle is driven and thesealant is distributed in the tire;therefore, Steps 12 through18 must be done immediatelyafter Step 11.
Be careful while handling thetire sealant and compressorkit as it could be warm afterusage.
12. Unplug the power plug (H) fromthe accessory power outlet inthe vehicle.
13. Turn the sealant/air hose (F)counterclockwise to remove itfrom the tire valve stem.
14. Replace the tire valvestem cap.
15. Replace the sealant/airhose (F), and the powerplug (H) back in their originallocation.
16. If the flat tire was able toinflate to the recommendedinflation pressure, remove themaximum speed label from thesealant canister (E) and placeit in a highly visible location.The label is a reminder not toexceed 90 km/h (55 mph) untilthe damaged tire is repaired orreplaced.
17. Return the equipment to itsoriginal storage location in thevehicle.
18. Immediately drive the vehicle8 km (5 mi) to distribute thesealant in the tire.
19. Stop at a safe location andcheck the tire pressure.Refer to Steps 1 through 11under “Using the Tire Sealantand Compressor Kit withoutSealant to Inflate a Tire(Not Punctured).”
If the tire pressure has fallenmore than 68 kPa (10 psi)below the recommendedinflation pressure, stop drivingthe vehicle. The tire is tooseverely damaged and the tiresealant cannot seal the tire.See Roadside AssistanceProgram on page 13‑6.
If the tire pressure has notdropped more than 68 kPa(10 psi) from the recommendedinflation pressure, inflate thetire to the recommendedinflation pressure.

Black plate (76,1)Chevrolet Volt Owner Manual - 2011
10-76 Vehicle Care
20. Wipe off any sealant from thewheel, tire, and vehicle.
21. Dispose of the used sealantcanister (E) and sealant/airhose (F) assembly at a localdealer or in accordance withlocal state codes and practices.
22. Replace it with a new canisteravailable from your dealer.
23. After temporarily sealinga tire using the tire sealantand compressor kit, take thevehicle to an authorized dealerwithin a 161 km (100 mi) ofdriving to have the tire repairedor replaced.
Using the Tire Sealant andCompressor Kit withoutSealant to Inflate a Tire(Not Punctured)
To use the air compressor to inflatea tire with air only and not sealant:
If a tire goes flat, avoid further tireand wheel damage by driving slowlyto a level place. Turn on the hazardwarning flashers. See HazardWarning Flashers on page 6‑4.
See If a Tire Goes Flat onpage 10‑69 for other importantsafety warnings.
1. Remove the tire sealant andcompressor kit from its storagelocation. See Storing the TireSealant and Compressor Kit onpage 10‑78.
2. Unwrap the air only hose (G)and the power plug (H).
3. Place the kit on the ground.
Make sure the tire valve stem ispositioned close to the groundso the hose will reach it.
4. Remove the tire valve stem capfrom the flat tire by turning itcounterclockwise.
5. Attach the air only hose (G) ontothe tire valve stem by turning itclockwise until it is tight.

Black plate (77,1)Chevrolet Volt Owner Manual - 2011
Vehicle Care 10-77
6. Plug the power plug (H) into theaccessory power outlet in thevehicle. Unplug all items fromother accessory power outlets.See Power Outlets on page 5‑8.
If the vehicle has an accessorypower outlet, do not use thecigarette lighter.
If the vehicle only has a cigarettelighter, use the cigarette lighter.
Do not pinch the power plugcord in the door or window.
7. Start the vehicle. The vehiclemust be running while using theair compressor.
8. Turn the selector switch (A)clockwise to the Air Onlyposition.
9. Press the on/off (B) button toturn the compressor on.
The compressor will inflate thetire with air only.
10. Inflate the tire to therecommended inflationpressure using the pressuregauge (C). The recommendedinflation pressure can befound on the Tire and LoadingInformation label. See TirePressure on page 10‑54.
The pressure gauge (C) mayread higher than the actual tirepressure while the compressoris on. Turn the compressoroff to get an accurate reading.The compressor may be turnedon/off until the correct pressureis reached.
If you inflate the tire higherthan the recommendedpressure you can adjustthe excess pressure bypressing the pressure deflationbutton (D), if equipped, untilthe proper pressure reading isreached. This option is onlyfunctional when using the aironly hose (G).
11. Press the on/off button (B)to turn the tire sealant andcompressor kit off.
Be careful while handling thetire sealant and compressorkit as it could be warm afterusage.
12. Unplug the power plug (H) fromthe accessory power outlet inthe vehicle.
13. Disconnect the air onlyhose (G) from the tirevalve stem by turning itcounterclockwise, and replacethe tire valve stem cap.
14. Replace the air only hose (G)and the power plug (H) andcord back in their originallocations.
15. Place the equipment in theoriginal storage location in thevehicle.

Black plate (78,1)Chevrolet Volt Owner Manual - 2011
10-78 Vehicle Care
The tire sealant and compressor kithas an accessory adapter located ina compartment on the bottom of itshousing that may be used to inflateair mattresses, balls, etc.
Removal and Installation of theSealant Canister
To remove the sealant canister:
1. Unwrap the sealant hose.
2. Press the canister releasebutton.
3. Pull up and remove the canister.
4. Replace with a new canisterwhich is available from yourdealer.
5. Push the new canister intoplace.
Storing the Tire Sealantand Compressor KitTo access the tire sealant andcompressor kit:
1. Open the hatch. See Hatch onpage 2‑12.
2. Lift the cover.
3. Remove the tire sealant andcompressor kit.
To store the tire sealant andcompressor kit, reverse the steps.

Black plate (79,1)Chevrolet Volt Owner Manual - 2011
Vehicle Care 10-79
Jump StartingJump starting is connecting jumpercables between the two vehicles toenable vehicle starting. If the Voltor another vehicle has a run‐down12‐volt battery, it can be jumpstarted using good conditionjumper cables. There are differentprocedures depending on if the Volthas a run‐down battery or anothervehicle has a run‐down battery.Read the appropriate proceduresthat follow.
{ WARNING
The high voltage batterycannot be jump started eitherwith another vehicle or batterycharger. Personal injury, death,or damage to the vehicle couldresult.
{ WARNING
Batteries are dangerous and cancause injury. Batteries containacid and can explode or ignite.They contain electricity that canburn. Follow the exact stepsprovided or injuries could occur.
Using an open flame near abattery can cause battery gasto explode; you or others couldbe hurt. Battery acid can causeblindness.
Be sure the battery in the othervehicle has enough water.Add water if the level is low.A low water level could causeexplosive gas to be present.
Battery fluid contains acid thatcan burn. If battery fluid gets ineyes or on skin; flush with waterand get medical help immediately.
{ WARNING
Electric fans can start upeven when the engine is notrunning and can cause injury.Keep hands, clothing, and toolsaway from any underhoodelectric fans.
Notice: Ignoring these stepscould result in costly damageto the vehicle that would not becovered by the warranty.
Trying to start the vehicle bypushing or pulling it will notwork, and it could damage thevehicle.

Black plate (80,1)Chevrolet Volt Owner Manual - 2011
10-80 Vehicle Care
Jump Starting the Volt
If the Volt won't start, the 12‐voltbattery may be run down. To jumpstart the Volt use the underhoodremote positive (+) and negative (−)terminals.
1. The other vehicle used to jumpstart the Volt must have a 12‐voltbattery with a negative groundsystem.
Notice: Only use a vehiclethat has a 12-volt system witha negative ground for jumpstarting. If the other vehicle doesnot have a 12-volt system with anegative ground, both vehiclescan be damaged.
2. Park both vehicles close enoughso that the jumper cables canreach both vehicles' positive (+)and negative (−) terminals.The vehicles must not toucheach other. It could cause anunwanted ground connectionthat could damage both vehicles'electrical systems.
Put both vehicles in P (Park) foran automatic transmission orelectric drive unit. For a manualtransmission, place the vehiclein N (Neutral) and set theparking brake.
Notice: If the radio or otheraccessories are left on duringthe jump starting procedure, theycould be damaged. The repairswould not be covered by thewarranty. Always turn off theradio and other accessorieswhen jump starting the vehicle.
3. Turn off the ignition on theother vehicle. Turn off the radio,all lamps, and accessories thatare not needed in both vehicles.Unplug accessories from thecigarette lighter or the accessorypower outlets. This avoidssparks and helps save bothbatteries and accessories.
4. Locate the positive (+) andnegative (−) terminals on theother vehicle.
5. Open the hood to locate thepositive (+) and negative (−)terminals on your Volt. Open theaccess cover (A) for the remotepositive (+) terminal. The remotenegative terminal (B) for the Voltis a stud marked GND (−) onthe driver side of the enginecompartment.

Black plate (81,1)Chevrolet Volt Owner Manual - 2011
Vehicle Care 10-81
6. Check that the jumper cablesdo not have loose or missinginsulation or a shock couldresult and the vehicles couldbe damaged.
Before connecting the jumpercables, here are some basicthings to know. Positive (+)jumper cable goes to positive (+)battery terminal or a remotepositive (+) terminal if available.Negative (−) jumper cable goesto negative (−) battery terminalor a remote negative (−) terminalif available. Do not connectpositive (+) to negative (−) orthere will be a short that maydamage the battery and otherparts of the vehicle.
Notice: If the jumper cablesare connected or removed inthe wrong order, electricalshorting may occur and damagethe vehicle. The repairs wouldnot be covered by the vehiclewarranty. Always connect andremove the jumper cables in thecorrect order, making sure thatthe cables do not touch eachother or other metal.
Connecting the Jumper Cables
1. Connect the red positive (+)jumper cable to the remotepositive (+) terminal (A) of yourVolt. Do not let the other endof the cable touch metal.
2. Connect the other end of the redpositive (+) jumper cable to thepositive (+) terminal of the othervehicle.
3. Connect the black negative (−)jumper cable to the negative (−)battery terminal of the othervehicle battery. Do not let theother end touch anything untilthe next step.
4. Connect the other end of theblack negative (−) jumper cableto the remote negative (−)terminal of your Volt.
5. Push the POWER O buttonto start. This will wake up theelectronics on the Volt. After theinstrument cluster initializes,the Volt will use power fromthe high voltage battery tocharge the 12‐volt battery.The jumper cables can thenbe disconnected. If the Voltdoes not start, call your dealeror Roadside Assistance.See Roadside AssistanceProgram on page 13‑6.

Black plate (82,1)Chevrolet Volt Owner Manual - 2011
10-82 Vehicle Care
Disconnecting the Jumper Cables
1. Disconnect the blacknegative (−) jumper cablefrom the Volt. Do not let theother end of the cable touchanything until after the next step.
2. Disconnect the blacknegative (−) jumper cablefrom the other vehicle withthe good battery.
3. Disconnect the red positive (+)jumper cable from the othervehicle. Do not let the otherend of the cable touch anythinguntil after the next step.
4. Disconnect the red positive (+)jumper cable from the Volt.
5. Return the positive (+) andnegative (−) terminal coversto their original positions.
Jump Starting Another Vehicle
When using the Volt to jumpstart another vehicle with arun‐down battery, jumper cablesare connected directly to thepositive (+) and negative (−)terminals on the 12‐volt battery inthe rear cargo area. Do not use theremote terminals under the hood.This could cause a fuse to overloadin the Volt.
1. Check the other vehicle. It musthave a 12‐volt battery with anegative ground system.
Notice: Only use a vehiclethat has a 12-volt system witha negative ground for jumpstarting. If the other vehicle doesnot have a 12-volt system with anegative ground, both vehiclescan be damaged.
2. Park both vehicles close enoughso that the jumper cables canreach both vehicles' positive (+)and negative (−) terminals.The vehicles must not toucheach other. It could cause an
unwanted ground connectionthat could damage both vehicles'electrical systems.
Put both vehicles in P (Park) foran automatic transmission orelectric drive unit. For a manualtransmission, place the vehiclein N (Neutral) and set theparking brake.
Notice: If the radio or otheraccessories are left on duringthe jump starting procedure, theycould be damaged. The repairswould not be covered by thewarranty. Always turn off theradio and other accessorieswhen jump starting the vehicle.
3. Turn off both vehicles.Turn off the radio, all lamps,and accessories that are notneeded in both vehicles. Unplugaccessories from the cigarettelighter or the accessory poweroutlets. This avoids sparks andhelps save both batteries andaccessories.

Black plate (83,1)Chevrolet Volt Owner Manual - 2011
Vehicle Care 10-83
4. Locate the positive (+) andnegative (−) terminals on thevehicle with the run‐downbattery.
5. Locate the positive (+) andnegative (−) battery terminalson the Volt. The access coveris under the load floor accesscover in the rear cargo area.Open the access cover for thepositive (+) terminal cover (A)and the negative (−) terminalcover (B).
6. Check that the jumper cablesdo not have loose or missinginsulation or a shock couldresult and the vehicles couldbe damaged.
Before connecting the jumpercables, here are some basicthings to know. Positive (+)jumper cable goes to positive (+)battery terminal or a remotepositive (+) terminal if available.Negative (−) jumper cable goesto remote negative (−) terminal ifavailable, or a heavy, unpaintedmetal engine part or a solidengine ground on the vehiclewith the run‐down battery.
Do not connect positive (+) tonegative (−) or there will be ashort that may damage thebattery or other parts of thevehicle. Do not connect thenegative (−) cable to thenegative (−) terminal on therun‐down battery becausethis can cause sparks.
Notice: If the jumper cables areconnected or removed in thewrong order, electrical shortingmay occur and damage thevehicle. The repairs would notbe covered by the vehiclewarranty. Always connect andremove the jumper cables in thecorrect order, making sure thatthe cables do not touch eachother or other metal.
Connecting the Jumper Cables
1. Connect the red positive (+)jumper cable to the positive (+)terminal of the other vehiclewith the run‐down battery. Usea remote positive (+) terminal ifavailable. Do not let the otherend touch metal.
2. Connect the other end of the redpositive (+) jumper cable to thepositive (+) battery terminal ofthe Volt.

Black plate (84,1)Chevrolet Volt Owner Manual - 2011
10-84 Vehicle Care
3. Connect the black negative (−)jumper cable to the negative (−)battery terminal of the Volt.Do not let the other end touchanything until the next step.
4. Make the final connection to aheavy, unpainted metal enginepart or to the remote negative (−)terminal on the other vehiclewith the run‐down battery.
5. Press the POWER O buttonto start the Volt. This will wakeup the electronics on the Volt.The engine will only start if it isneeded.
6. Try to start the other vehiclethat had the run‐down battery.If it will not start after a few tries,it probably needs service.
Disconnecting the Jumper Cables
1. Disconnect the blacknegative (−) jumper cablefrom the other vehicle that hadthe run‐down battery. Do not letthe other end of the cable touchanything until after the next step.
2. Disconnect the blacknegative (−) jumper cablefrom the Volt.
3. Disconnect the red positive (+)jumper cable from the Volt.Do not let the other end of thecable touch anything until afterthe next step.
4. Disconnect the red positive (+)jumper cable from the othervehicle.
5. Return the positive (+) andnegative (−) terminal coversto their original positions.
Towing
Towing the VehicleNotice: Incorrectly towinga disabled vehicle maycause damage to the vehicle.The disabled vehicle should betowed on a flatbed car carrier.Use care when there is lowground clearance and/orspecial equipment.
Attempting to pull the vehicleonto a flatbed without followingthe proper steps could damagethe vehicle.
Consult your dealer or aprofessional towing service if thedisabled vehicle must be towed.See Roadside Assistance Programon page 13‑6.

Black plate (85,1)Chevrolet Volt Owner Manual - 2011
Vehicle Care 10-85
To load a vehicle onto a flatbedcarrier:
1. The vehicle must be on a flatsurface.
2. The front tires must be properlyinflated. If necessary, move arear tire to the front to replace aflat or damaged tire.
3. Place the tow chain hooks (B)into one of the torque boxopenings (A) behind the frontwheels.
4. Place a 1.2 m (4 ft) X 102 mm(4 in) X 102 mm (4 in) woodbeam (D) under the front cradlecrossmember (C), and on topof both tow chains (E) to ensurethe tow chains do not come intocontact with the front fascia (A).
Try to minimize the contact ofthe chains with the flexibleair dam (B).
5. Ramps (B) are required forthe front fascia (C) to clear theflatbed (A). The ramp heightshould be approximately 102 mm(4 in). Lower the flatbed onto theset of ramps.
Notice: If ramps are not used, thefront fascia will come into contactwith the flatbed and may causedamage. Always use ramps.
6. After the front tires are on theflatbed adjust the flatbed upwardto provide additional clearancebetween the air dam, fascia,and flatbed.

Black plate (86,1)Chevrolet Volt Owner Manual - 2011
10-86 Vehicle Care
7. When the fascia has enoughclearance to clear the flatbed,lower the flatbed, and finishpulling the vehicle onto theflatbed.
8. Secure the vehicle to theflatbed (B) using nonabrasivestraps (A) through all four wheelopenings and secure the strapsto the flatbed (B).
If the vehicle is parked off theshoulder of the road, at an anglethat it cannot be pulled onto aflatbed, a hook/chain can be placedinto either of the front torque boxopenings to pull the vehicle ontoa flat surface. Make sure that thechains do not come in contact withthe rocker panel (A) or the frontfascia (B).
Notice: When using tow straps tomove the vehicle, damage mayoccur if the tow straps contactthe rear fascia. Do not let the towstraps contact the rear fascia.
If you cannot access the fronttorque box openings, wrap a towstrap through one, or both of therear trailing arms (A) between thebushing and torque tube, and pullthe vehicle onto a flat surface.Do not wrap the tow strap aroundthe rear torque tube (B).

Black plate (87,1)Chevrolet Volt Owner Manual - 2011
Vehicle Care 10-87
Recreational VehicleTowingRecreational vehicle towing refers totowing the vehicle behind anothervehicle such as a motor home.The two most common types ofrecreational vehicle towing areknown as dinghy towing and dollytowing. Dinghy towing is towing thevehicle with all four wheels on theground. Dolly towing is towing thevehicle with two wheels on theground and two wheels up ona device known as a dolly.
Here are some important things toconsider before recreational vehicletowing:. The towing capacity of the
towing vehicle. Read thetow vehicle manufacturer'srecommendations.
. How far the vehicle can betowed. Some vehicles haverestrictions on how far andhow long they can tow.
. Does the vehicle have theproper towing equipment.See your dealer or traileringprofessional for additionaladvice and equipmentrecommendations.
. Is the vehicle ready to be towed.Just as preparing the vehiclefor a long trip, make sure thevehicle is prepared to be towed.
Dinghy Towing
Notice: If the vehicle is towedwith all four wheels on theground, the drive unit could bedamaged. Repairs would not becovered by the vehicle warranty.Do not tow the vehicle with allfour wheels on the ground.
The vehicle was not designed tobe towed with all four wheels onthe ground. If the vehicle mustbe towed, a dolly should be used.See “Dolly Towing” that follows formore information.

Black plate (88,1)Chevrolet Volt Owner Manual - 2011
10-88 Vehicle Care
Dolly Towing from the Front
The vehicle can be towed fromthe front using a dolly. To tow thevehicle using a dolly, follow thesesteps:
1. Attach the dolly to the towvehicle following the dollymanufacturer's instructions.
2. Drive the front wheels ontothe dolly.
3. Put the shift lever in P (Park).
4. Set the parking brake andremove the key.
5. Clamp the steering wheel in astraight-ahead position with aclamping device designed fortowing.
6. Secure the vehicle to the dolly.
7. Release the parking brake.
8. Check for adequate rear fasciato ground clearance.
Dolly Towing from the Rear
Notice: Towing the vehicle fromthe rear, with the front wheelson the ground, could damagethe drive unit, and front fascia.Do not tow the vehicle from therear with the front wheels on theground.

Black plate (89,1)Chevrolet Volt Owner Manual - 2011
Vehicle Care 10-89
Appearance Care
Exterior Care
Cleaning ExteriorLamps/Lenses
Use only lukewarm or cold water, asoft cloth, and a car washing soapto clean exterior lamps and lenses.Follow instructions under “Washingthe Vehicle” later in this section.
Finish Care
Occasional waxing or mild polishingof the vehicle by hand may benecessary to remove residue fromthe paint finish. Approved cleaningproducts can be obtained from yourdealer.
If the vehicle has a basecoat/clearcoat paint finish, the clearcoatgives more depth and gloss to thecolored basecoat.
Notice: Machine compoundingor aggressive polishing on abasecoat/clearcoat paint finishmay damage it. Use onlynon-abrasive waxes and polishesthat are made for a basecoat/clearcoat paint finish on thevehicle.
Foreign materials such as calciumchloride and other salts, ice meltingagents, road oil and tar, tree sap,bird droppings, chemicals fromindustrial chimneys, etc., candamage the finish if they remain onpainted surfaces. Wash the vehicleas soon as possible. If necessary,use non-abrasive cleaners that aremarked safe for painted surfaces toremove foreign matter.
Exterior painted surfaces aresubject to aging, weather, andchemical fallout that can take theirtoll over a period of years. To keepthe paint finish looking new, keepthe vehicle garaged or coveredwhenever possible.
Protecting Exterior Bright MetalParts
Bright metal parts should becleaned regularly to keep theirluster. Wash with water or usechrome polish on chrome orstainless steel trim, if necessary.
Use special care with aluminumtrim. To avoid damaging protectivetrim, never use auto or chromepolish, steam, or caustic soapto clean aluminum. A coatingof wax, rubbed to high polish,is recommended for all brightmetal parts.

Black plate (90,1)Chevrolet Volt Owner Manual - 2011
10-90 Vehicle Care
Front Air Deflector
A. Outer Air Deflector
B. Inner Air Deflector
C. Tab
D. Slot
The front air deflector allows air toflow cleaner under the vehicle.
Should the front air deflectorbecome detached, insert Tab C intoSlot D. Repeat for the other side.
Washing the Vehicle
To preserve the finish, keep it cleanby washing it often.
Do not wash the vehicle indirect sunlight and use a carwashing soap.
Notice: Do not use cleaningagents that are petroleum basedor that contain acid or abrasives,as they can damage the paint,metal, or plastic on the vehicle.Approved cleaning productscan be obtained from yourdealer. Follow all manufacturerdirections regarding correctproduct usage, necessary safetyprecautions, and appropriatedisposal of any vehicle careproduct. Certain cleaners containchemicals that can damage theemblems or nameplates on thevehicle. Check the cleaningproduct label. If it states that itshould not be used on plasticparts, do not use it on the vehicle
or damage may occur and itwould not be covered by thewarranty.
Follow all manufacturer directionsregarding correct product usage,necessary safety precautions, andappropriate disposal of any vehiclecare product.
Rinse the vehicle well, beforewashing and after, to remove allcleaning agents completely. If theyare allowed to dry on the surface,they could stain.
Dry the finish with a soft, cleanchamois or an all-cotton towel toavoid surface scratches and waterspotting.
High pressure car washes couldcause water to enter the vehicle.Avoid using high pressure washescloser than 30 cm (12 in) to thesurface of the vehicle. Use of powerwashers exceeding 8,274 kPa(1,200 psi) can result in damageor removal of paint and decals.

Black plate (91,1)Chevrolet Volt Owner Manual - 2011
Vehicle Care 10-91
Notice: Conveyor systems onsome automatic car washes coulddamage the vehicle. There maynot be enough clearance for theundercarriage. Check with the carwash manager before using theautomatic car wash.
Weatherstrips
Silicone grease on weatherstripswill make them last longer, sealbetter, and not stick or squeak.Apply silicone grease with a cleancloth. During very cold, dampweather frequent application maybe required. See RecommendedFluids and Lubricants on page 11‑6.
Wheels and Trim—Aluminumor Chrome
The vehicle may have eitheraluminum or chrome-plated wheels.
Keep the wheels clean using asoft, clean cloth with mild soapand water. Rinse with clean water.After rinsing thoroughly, dry with asoft, clean towel. A wax may thenbe applied.
Notice: Chrome wheels and otherchrome trim may be damaged ifthe vehicle is not washed afterdriving on roads that have beensprayed with magnesium, calciumor sodium chloride. Thesechlorides are used on roads forconditions such as ice and dust.Always wash the chrome withsoap and water after exposure.
Notice: Do not use strong soaps,chemicals, abrasive polishes,cleaners, brushes, or cleanersthat contain acid on aluminum orchrome-plated wheels, becausethe surface could be damaged.The repairs would not be coveredby the vehicle warranty. Use onlyapproved cleaners on aluminumor chrome-plated wheels.
Notice: Never drive a vehicle thathas aluminum or chrome-platedwheels through an automatic carwash that uses silicone carbidetire cleaning brushes, as thiscould cause damage. The repairswould not be covered by thevehicle warranty.
Windshield and Wiper Blades
Clean the outside of the windshieldwith glass cleaner.
Clean the rubber blades using alint‐free cloth or paper towel soakedwith windshield washer fluid or amild detergent. Wash the windshieldthoroughly when cleaning theblades. Bugs, road grime, sap,and a buildup of vehicle wash/wax treatments may cause wiperstreaking. Replace the wiper bladesif they are worn or damaged.
Wipers can be damaged by:. Extreme dusty conditions.. Sand and salt.. Heat and sun.. Snow and ice, without proper
removal.

Black plate (92,1)Chevrolet Volt Owner Manual - 2011
10-92 Vehicle Care
Tires
Use a stiff brush with tire cleaner toclean the tires.
Notice: Using petroleum-basedtire dressing products on thevehicle may damage the paintfinish and/or tires. When applyinga tire dressing, always wipe offany overspray from all paintedsurfaces on the vehicle.
Sheet Metal Damage
If the vehicle is damaged andrequires sheet metal repair orreplacement, make sure the bodyrepair shop applies anti-corrosionmaterial to parts repaired orreplaced to restore corrosionprotection.
Original manufacturer replacementparts will provide the corrosionprotection while maintaining thevehicle warranty.
Finish Damage
Any stone chips, fractures, or deepscratches in the finish should berepaired right away. Bare metal willcorrode quickly and may developinto a major repair expense.
Minor chips and scratches can berepaired with touch-up materialsavailable from your dealer. Largerareas of finish damage can becorrected in your dealer's bodyand paint shop.
Underbody Maintenance
Chemicals used for ice and snowremoval and dust control can collecton the underbody. If these are notremoved, corrosion and rust candevelop on the underbody partssuch as fuel lines, frame, floor pan,and exhaust system even thoughthey have corrosion protection.
At least every spring, flush thesematerials from the underbodywith plain water. Clean any areaswhere mud and debris can collect.Dirt packed in close areas of theframe should be loosened beforebeing flushed. Your dealer or anunderbody car washing systemcan do this.
Chemical Paint Spotting
Some weather and atmosphericconditions can create a chemicalfallout. Airborne pollutants can fallupon and attack painted surfaceson the vehicle. This damage cantake two forms: blotchy, ring-shapeddiscolorations, and small, irregulardark spots etched into the paintsurface.

Black plate (93,1)Chevrolet Volt Owner Manual - 2011
Vehicle Care 10-93
Interior CareThe interior will continue to lookits best if it is cleaned often.Dust and dirt can accumulateon the upholstery and causedamage to the carpet, fabric,leather, and plastic surfaces.Stains should be removed quicklyas extreme heat could causethem to set rapidly.
Lighter colored interiors mayrequire more frequent cleaning.Newspapers and garments that cantransfer color to home furnishingscan also transfer color to theinterior.
Remove dust from small buttonsand knobs with a small brush withsoft bristles.
Your dealer has products forcleaning the interior. When cleaningthe interior, only use cleanersspecifically designed for thesurfaces that are being cleaned.
Permanent damage can resultfrom using cleaners on surfacesfor which they were not intended.Apply the cleaner directly to thecleaning cloth to prevent over-spray.Remove any accidental over-sprayfrom other surfaces immediately.
Notice: Using abrasive cleanerswhen cleaning glass surfaceson the vehicle, could scratch theglass and/or cause damage tothe rear window defogger. Whencleaning the glass on the vehicle,use only a soft cloth and glasscleaner.
Cleaners can contain solvents thatcan become concentrated in theinterior. Before using cleaners,read and adhere to all safetyinstructions on the label. Whilecleaning the interior, maintainadequate ventilation by openingthe doors and windows.
Do not clean the interior using thefollowing cleaners or techniques:. Never use a knife or any other
sharp object to remove a soilfrom any interior surface.
. Never use a stiff brush. It cancause damage.
. Never apply heavy pressure orrub aggressively with a cleaningcloth. Use of heavy pressure candamage the interior and doesnot improve the effectivenessof soil removal.
. Avoid laundry detergentsor dishwashing soaps withdegreasers. Using too muchsoap will leave a residue thatleaves streaks and attractsdirt. For liquid cleaners, about20 drops per 3.78 L (1 gal) ofwater is a good guide. Use onlymild, neutral-pH soaps.
. Do not heavily saturate theupholstery while cleaning.
. Cleaners that contain solventscan damage the interior.

Black plate (94,1)Chevrolet Volt Owner Manual - 2011
10-94 Vehicle Care
Fabric/Carpet
Use a vacuum cleaner with a softbrush attachment to remove dustand loose dirt. A canister vacuumwith rotating brushes in the nozzlemay only be used on floor carpetand carpeted floor mats. For soils,always try to remove them first withplain water or club soda. Beforecleaning, gently remove as much ofthe soil as possible using one of thefollowing techniques:. For liquids: gently blot the
remaining soil with a papertowel. Allow the soil to absorbinto the paper towel until nomore can be removed.
. For solid dry soils: remove asmuch as possible and thenvacuum.
To clean:
1. Saturate a lint-free, clean whitecloth with water or club soda.
2. Remove excess moisture.
3. Start on the outside edge of thesoil and gently rub toward thecenter. Continue cleaning, usinga clean area of the cloth eachtime it becomes soiled.
4. Continue to gently rub thesoiled area.
5. If the soil is not completelyremoved, use a mild soapsolution and repeat the cleaningprocess with plain water.
If any of the soil remains, acommercial fabric cleaner or spotlifter may be necessary. Test a smallhidden area for colorfastness beforeusing a commercial upholsterycleaner or spot lifter. If the locallycleaned area gives any impressionthat a ring formation may result,clean the entire surface.
A paper towel can be used to blotexcess moisture from the fabric orcarpet after the cleaning process.
Leather
Leather, and lighter colored leatherin particular, will need more frequentcleaning to prevent the buildup ofdust, dirt, and colors transferredfrom other items so that these donot become permanent stains.
To remove dust, a soft clothdampened with water can beused. If a more thorough cleaning isnecessary, a soft cloth dampenedwith a mild soap solution canbe used. Your dealer has a GMapproved leather cleaner availablethat provides superior cleaningperformance when used regularlyon finished automotive leathers.Allow the leather to dry naturally.Do not use heat, steam, spot liftersor spot removers, or shoe polish onleather. Many commercial leathercleaners and coatings that aresold to preserve and protect leathermay permanently change theappearance and feel of the leatherand are not recommended.

Black plate (95,1)Chevrolet Volt Owner Manual - 2011
Vehicle Care 10-95
Do not use silicone or wax-basedproducts, or those containingorganic solvents to clean theinterior because they can alterthe appearance by increasing thegloss in a non-uniform manner.
Instrument Panel, Vinyl, andOther Plastic Surfaces
To remove dust, a soft clothdampened with water can beused. If a more thorough cleaningis necessary, a clean soft clothdampened with a mild soap solutioncan be used to gently removedust and dirt. Never use spot liftersor removers on plastic surfaces.Many commercial cleaners andcoatings that are sold to preserveand protect soft plastic surfacesmay permanently change theappearance and feel of the interiorand are not recommended. Do notuse silicone or wax-based products,or those containing organic solvents
to clean the interior becausethey can alter the appearanceby increasing the gloss in anon-uniform manner.
Some commercial products mayincrease gloss on the instrumentpanel. The increase in gloss maycause annoying reflections in thewindshield and even make it difficultto see through the windshield undercertain conditions.
Notice: Air fresheners containsolvents that may cause damageto plastics and painted surfaces.Follow the manufacturer’sinstructions when using airfresheners in the vehicle. If airfreshener comes in contact withpaint or a plastic surface, blotimmediately with a soft cloth.Damage caused by using airfresheners would not be coveredby the vehicle warranty.
Care of Safety Belts
Keep belts clean and dry.
{ WARNING
Do not bleach or dye safety belts.It may severely weaken them.In a crash, they might not be ableto provide adequate protection.Clean safety belts only with mildsoap and lukewarm water.
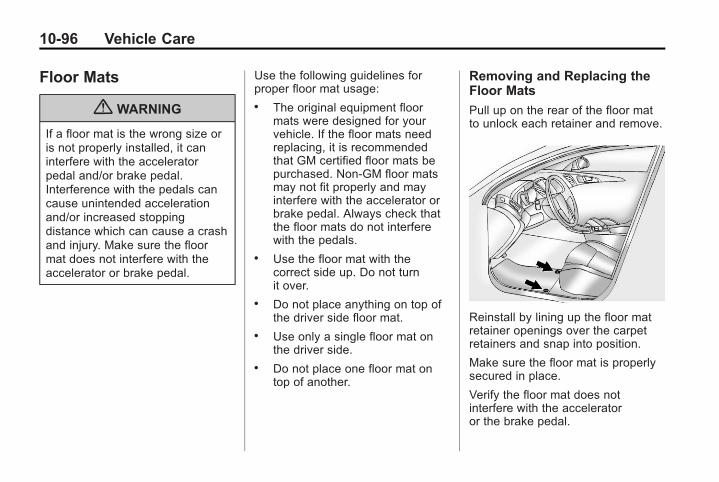
Black plate (96,1)Chevrolet Volt Owner Manual - 2011
10-96 Vehicle Care
Floor Mats
{ WARNING
If a floor mat is the wrong size oris not properly installed, it caninterfere with the acceleratorpedal and/or brake pedal.Interference with the pedals cancause unintended accelerationand/or increased stoppingdistance which can cause a crashand injury. Make sure the floormat does not interfere with theaccelerator or brake pedal.
Use the following guidelines forproper floor mat usage:. The original equipment floor
mats were designed for yourvehicle. If the floor mats needreplacing, it is recommendedthat GM certified floor mats bepurchased. Non-GM floor matsmay not fit properly and mayinterfere with the accelerator orbrake pedal. Always check thatthe floor mats do not interferewith the pedals.
. Use the floor mat with thecorrect side up. Do not turnit over.
. Do not place anything on top ofthe driver side floor mat.
. Use only a single floor mat onthe driver side.
. Do not place one floor mat ontop of another.
Removing and Replacing theFloor Mats
Pull up on the rear of the floor matto unlock each retainer and remove.
Reinstall by lining up the floor matretainer openings over the carpetretainers and snap into position.
Make sure the floor mat is properlysecured in place.
Verify the floor mat does notinterfere with the acceleratoror the brake pedal.

Black plate (1,1)Chevrolet Volt Owner Manual - 2011
Service and Maintenance 11-1
Service andMaintenance
General InformationGeneral Information . . . . . . . . . . 11-1
Scheduled MaintenanceScheduled Maintenance . . . . . 11-2
Recommended Fluids,Lubricants, and PartsRecommended Fluids andLubricants . . . . . . . . . . . . . . . . . . 11-6
Maintenance ReplacementParts . . . . . . . . . . . . . . . . . . . . . . . 11-7
Maintenance RecordsMaintenance Records . . . . . . . . 11-8
General InformationNotice: Maintenanceintervals, checks, inspections,recommended fluids, andlubricants are necessary tokeep this vehicle in goodworking condition. Damagecaused by failure to followscheduled maintenance mightnot be covered by the vehiclewarranty.
As the vehicle owner, you areresponsible for the scheduledmaintenance in this section.We recommend having yourdealer perform these services.Proper vehicle maintenance helpsto keep the vehicle in good workingcondition, improves fuel economy,and reduces vehicle emissions forbetter air quality.
Because of all the different wayspeople use vehicles, maintenanceneeds vary. The vehicle might needmore frequent checks and services.Please read the information underScheduled Maintenance. To keepthe vehicle in good condition,see your dealer.
The maintenance schedule is forvehicles that:. Carry passengers and cargo
within recommended limits onthe Tire and Loading Informationlabel. See Vehicle Load Limitson page 9‑14.
. Are driven on reasonable roadsurfaces within legal drivinglimits.
. Use the required fuel. See Fuelon page 9‑57.

Black plate (2,1)Chevrolet Volt Owner Manual - 2011
11-2 Service and Maintenance
{ WARNING
Performing maintenance work canbe dangerous. Some jobs cancause serious injury. Performmaintenance work only if youhave the required know-how andthe proper tools and equipment.If in doubt, see your dealer tohave a qualified technician dothe work. See Doing Your OwnService Work on page 10‑8.
At your dealer, you can becertain that you will receive thehighest level of service available.Your dealer has specially trainedservice technicians, uses genuinereplacement parts, as well as,up‐to‐date tools and equipmentto ensure fast and accuratediagnostics.
The proper replacement parts,fluids, and lubricants to use arelisted in Recommended Fluidsand Lubricants on page 11‑6 andMaintenance Replacement Parts onpage 11‑7. We recommend the useof genuine parts from your dealer.
Rotation of New Tires
To maintain ride, handling, andperformance of the vehicle, it isimportant that the first rotationservice for new tires be performed.Tires should be rotated every12 000 km/7,500 mi. See TireRotation on page 10‑61.
ScheduledMaintenanceRequired Services
Every Month. Engine oil level check.
See Engine Oil on page 10‑12.. Engine, power electronics,
and high voltage batterypack coolant level checks.See Cooling System (Engine) onpage 10‑18 or Cooling System(High Voltage Battery) onpage 10‑19 or Cooling System(Power Electronics and ChargerModules) on page 10‑20 formore information.
. Fluids visual leak check. A leakin any system must be repairedand the fluid level checked.

Black plate (3,1)Chevrolet Volt Owner Manual - 2011
Service and Maintenance 11-3
. Windshield washer fluid levelcheck. See Washer Fluid onpage 10‑24.
. Tire inflation check. See TirePressure on page 10‑54.
. Tire wear inspection. See TireInspection on page 10‑61.
Every 12 000 km/7,500mi. Rotate tires. See Tire Rotation
on page 10‑61.
Every 24 000 km/15,000mi. Check the engine oil filter for
corrosion if driving in a corrosiveenvironment, such as areas ofhigh humidity, along an oceancoast, and/or areas that applyroad salt during winter.
Have the engine oil and filterchanged if the filter shows signsof corrosion. After each oil andfilter change, the oil life systemmust be reset. See Engine OilLife System on page 10‑15.
. Cooling systems inspection.Visually inspect the hoses,pipes, fittings, and clamps.Replace, if needed.
. Windshield wiper bladeinspection for wear, cracking,or contamination and windshieldand wiper blade cleaning,if contaminated. See ExteriorCare on page 10‑89. Wornor damaged wiper bladereplacement. See Wiper BladeReplacement on page 10‑31.
. Engine air cleaner filterinspection. See Engine AirCleaner/Filter on page 10‑16.
. Brake system inspection.See your dealer.
. Steering and suspensioninspection. Visual inspectionfor damaged, loose, or missingparts or signs of wear.
. Body hinges and latches andkey lock cylinders lubrication.See Recommended Fluidsand Lubricants on page 11‑6.More frequent lubrication maybe required when the vehicleis exposed to a corrosiveenvironment, such as areas ofhigh humidity, along an oceancoast, and/or areas that applyroad salt during winter. Applyingsilicone grease on weatherstripswith a clean cloth makes themlast longer, seal better, and notstick or squeak.
. Restraint system componentcheck. See Safety SystemCheck on page 3‑23.
. Fuel system inspection fordamage or leaks.

Black plate (4,1)Chevrolet Volt Owner Manual - 2011
11-4 Service and Maintenance
. Exhaust system and nearby heatshields inspection for loose ordamaged components.
. See Propulsion System StartCheck on page 10‑29.
. See Electrical Drive Unit ShiftLock Control Function Check onpage 10‑30.
. See Park Brake and P (Park)Mechanism Check onpage 10‑30.
. Cooling systems check.See Cooling System (Engine) onpage 10‑18 or Cooling System(High Voltage Battery) onpage 10‑19 or Cooling System(Power Electronics and ChargerModules) on page 10‑20.
. Accelerator pedal check fordamage, high effort, or binding.Replace if needed.
. Check the sealant expirationdate printed on the instructionlabel of the tire sealant andcompressor kit. See TireSealant and CompressorKit on page 10‑71.
. Hood/Decklid/Liftgate SupportGas Strut Service: Visuallyinspect gas strut, if equipped, forsigns of wear, cracks, or otherdamage. Check the hold openability of the gas strut. Contactyour dealer if service is required.
Every 24 Months or When theChange Engine Oil Soon MessageDisplays. Every 24 months or when the
CHANGE ENGINE OIL SOONmessage displays, change theengine oil and filter as soonas possible, within the next1 000 km/600 mi. The engine oiland filter must be changed atleast once every 24 months.After each oil and filter change,the oil life system must be reset.See Engine Oil Life System onpage 10‑15. More frequentchanges may be required whenthe vehicle is exposed to acorrosive environment, such asareas of high humidity, along anocean coast, and/or areas thatapply road salt during winter.
Black plate (5,1)Chevrolet Volt Owner Manual - 2011
Service and Maintenance 11-5
Your dealer has trained servicetechnicians who will performthis work and reset the system.If the engine oil life system isreset accidentally, service thevehicle within 5 000 km/3,000 misince the last service. Reset theoil life system whenever the oil ischanged.
Every 80 000 km/50,000mi. Engine air cleaner filter
replacement.. Evaporative control system
inspection. Check all fuel andvapor lines and hoses for properhook‐up, routing, and condition.Check that the purge valve,if the vehicle has one, worksproperly. Replace as needed.
An Emission Control Service.The U.S. EnvironmentalProtection Agency or theCalifornia Air Resources Boardhas determined that the failureto perform this maintenanceitem will not nullify the emissionwarranty or limit recall liabilityprior to the completion ofthe vehicle's useful life.We, however, urge that allrecommended maintenanceservices be performed at theindicated intervals and themaintenance be recorded.
Every 160 000 km/100,000mi. Spark plug replacement.
An Emission Control Service.
Every 240 000 km/150,000mi orevery 5 years, whichever occursfirst. Engine cooling system drain,
flush, and refill (or every fiveyears, whichever occurs first).See Cooling System (Engine) onpage 10‑18 or Cooling System(High Voltage Battery) onpage 10‑19 or Cooling System(Power Electronics and ChargerModules) on page 10‑20.An Emission Control Service.
Every 240 000 km/150,000mi orevery 10 years, whichever occursfirst. Engine drive belt inspection
for fraying, excessive cracks,or obvious damage. Replace,if needed.
Every 10 Years. Air conditioning system flush
and refill and desiccantreplacement.

Black plate (6,1)Chevrolet Volt Owner Manual - 2011
11-6 Service and Maintenance
Recommended Fluids, Lubricants, and Parts
Recommended Fluids and Lubricants
Usage Fluid/Lubricant
Engine Oil
The engine requires engine oil approved to the dexos specification.Oils meeting this specification can be identified with the dexos certificationmark. Look for and use only an engine oil that displays the dexoscertification mark of the proper viscosity grade. See Engine Oil onpage 10‑12.
Engine Cooling System50/50 mixture of clean, drinkable water and use only DEX-COOL Coolant.See Engine Coolant on page 10‑21.
High Voltage Battery Cooling SystemAlways use the pre‐mixed 50/50 mixture of deionized water andDEX-COOL Coolant available at your dealer.
Power Electronics Cooling SystemAlways use the pre‐mixed 50/50 mixture of deionized water andDEX-COOL Coolant available at your dealer.
Hydraulic Brake SystemDOT 3 Hydraulic Brake Fluid (GM Part No. 88863461,in Canada 88863462).
Windshield Washer Optikleen® Washer Solvent.
Parking Brake Cable GuidesChassis Lubricant (GM Part No. 12377985, in Canada 88901242) orlubricant meeting requirements of NLGI #2, Category LB or GC‐LB.
Electric Drive Unit DEXRON®-VI Automatic Transmission Fluid

Black plate (7,1)Chevrolet Volt Owner Manual - 2011
Service and Maintenance 11-7
Usage Fluid/Lubricant
Key Lock Cylinders Multi-Purpose Lubricant, Superlube (GM Part No. 12346241,in Canada 10953474).
Hood and Hatch HingesMulti-Purpose Lubricant, Superlube (GM Part No. 12346241,in Canada 10953474).
Weatherstrip ConditioningWeatherstrip Lubricant (GM Part No. 3634770, in Canada 10953518) orDielectric Silicone Grease (GM Part No. 12345579, in Canada 992887).
Maintenance Replacement PartsReplacement parts identified below by name, part number, or specification can be obtained from your dealer.
Part GM Part Number ACDelco Part Number
Engine Air Cleaner/Filter 20871244 A3148C
Engine Oil Filter 55352643 —
Spark Plugs 55564962 —
Wiper Blades
Driver – 65 cm (25.6 in) 22742323 —
Passenger – 65 cm (25.6 in) 22742324 —

Black plate (8,1)Chevrolet Volt Owner Manual - 2011
11-8 Service and Maintenance
Maintenance RecordsAfter the scheduled services are performed, record the date, odometer reading, who performed the service, and thetype of services performed in the boxes provided. Retain all maintenance receipts.
Maintenance Record
DateOdometerReading
Serviced By Services Performed

Black plate (9,1)Chevrolet Volt Owner Manual - 2011
Service and Maintenance 11-9
Maintenance Record (cont.)
Date OdometerReading
Serviced By Services Performed

Black plate (10,1)Chevrolet Volt Owner Manual - 2011
11-10 Service and Maintenance
Maintenance Record (cont.)
Date OdometerReading
Serviced By Services Performed

Black plate (1,1)Chevrolet Volt Owner Manual - 2011
Technical Data 12-1
Technical Data
Vehicle IdentificationVehicle IdentificationNumber (VIN) . . . . . . . . . . . . . . 12-1
Service Parts IdentificationLabel . . . . . . . . . . . . . . . . . . . . . . . 12-1
Vehicle DataCapacities andSpecifications . . . . . . . . . . . . . . 12-2
Engine Drive Belt Routing . . . 12-3
Vehicle Identification
Vehicle IdentificationNumber (VIN)
This legal identifier is in the frontcorner of the instrument panel, onthe left side of the vehicle. It can beseen through the windshield fromoutside. The VIN also appears onthe Vehicle Certification and ServiceParts labels and certificates of titleand registration.
Engine Identification
The eighth character in the VINis the engine code. This codeidentifies the vehicle's engine,specifications, and replacementparts. See “Engine Specifications”under Capacities and Specificationson page 12‑2 for the vehicle'sengine code.
Service PartsIdentification LabelThe label is inside the right rearcargo storage door and has thefollowing information:. Vehicle Identification
Number (VIN).. Model designation.. Paint information.. Production options and special
equipment.
Do not remove this label from thevehicle.

Black plate (2,1)Chevrolet Volt Owner Manual - 2011
12-2 Technical Data
Vehicle Data
Capacities and SpecificationsThe following approximate capacities are given in metric and English conversions. Refer to Recommended Fluidsand Lubricants on page 11‑6 for more information.
ApplicationCapacities
Metric English
Air Conditioning Refrigerant R134aFor the air conditioning system refrigerant chargeamount, see the refrigerant label under the hood.
See your dealer for more information.
Cooling Systems
Engine 6.3 L 6.7 qt
High Voltage Battery 6.0 L 6.3 qt
Power Electronics 3.0 L 3.2 qt
Engine Oil with Filter 3.5 L 3.7 qt
Fuel Tank 35.2 L 9.3 gal
Electric Drive Unit 8.45 L 8.93 qt
Wheel Nut Torque 140Y 100 lb ft
All capacities are approximate. When adding, be sure to fill to the approximate level, as recommended in thismanual.

Black plate (3,1)Chevrolet Volt Owner Manual - 2011
Technical Data 12-3
Engine Specifications
Engine VIN Code Electric Drive Unit Spark Plug Gap
1.4 L L4 4 Automatic 0.7 mm (0.027 in)
Engine Drive Belt Routing

Black plate (4,1)Chevrolet Volt Owner Manual - 2011
12-4 Technical Data
2 NOTES

Black plate (1,1)Chevrolet Volt Owner Manual - 2011
Customer Information 13-1
CustomerInformation
Customer InformationCustomer SatisfactionProcedure . . . . . . . . . . . . . . . . . . 13-1
Customer AssistanceOffices . . . . . . . . . . . . . . . . . . . . . 13-3
Customer Assistance for TextTelephone (TTY) Users . . . . . 13-4
Online Owner Center . . . . . . . . 13-4GM Mobility ReimbursementProgram . . . . . . . . . . . . . . . . . . . . 13-5
Roadside AssistanceProgram . . . . . . . . . . . . . . . . . . . . 13-6
Scheduling ServiceAppointments . . . . . . . . . . . . . . 13-8
Courtesy TransportationProgram . . . . . . . . . . . . . . . . . . . . 13-8
Collision Damage Repair . . . 13-10Service PublicationsOrdering Information . . . . . . 13-12
Trademarks and LicenseAgreements . . . . . . . . . . . . . . . 13-13
Open Source Information . . . 13-24
Reporting Safety DefectsReporting Safety Defects tothe United StatesGovernment . . . . . . . . . . . . . . . 13-24
Reporting Safety Defects tothe CanadianGovernment . . . . . . . . . . . . . . . 13-25
Reporting Safety Defects toGeneral Motors . . . . . . . . . . . 13-25
Vehicle Data Recording andPrivacyVehicle Data Recording andPrivacy . . . . . . . . . . . . . . . . . . . . 13-26
Event Data Recorders . . . . . . 13-26OnStar® . . . . . . . . . . . . . . . . . . . . 13-27Navigation System . . . . . . . . . 13-27Radio FrequencyIdentification (RFID) . . . . . . . 13-27
Radio FrequencyStatement . . . . . . . . . . . . . . . . . 13-28
Customer Information
Customer SatisfactionProcedureYour satisfaction and goodwill areimportant to your dealer and toChevrolet. Normally, any concernswith the sales transaction or theoperation of the vehicle will beresolved by your dealer's sales orservice departments. Sometimes,however, despite the best intentionsof all concerned, misunderstandingscan occur. If your concern has notbeen resolved to your satisfaction,the following steps should be taken:
STEP ONE: Discuss your concernwith a member of dealershipmanagement. Normally, concernscan be quickly resolved at that level.If the matter has already beenreviewed with the sales, service,or parts manager, contact the ownerof your dealership or the generalmanager.
Black plate (2,1)Chevrolet Volt Owner Manual - 2011
13-2 Customer Information
STEP TWO: If after contacting amember of dealership management,it appears your concern cannotbe resolved by your dealershipwithout further help, in the U.S.,call the Chevrolet CustomerAssistance Center at1-877‐486‐5846 (1‐877‐4‐Volt Info).In Canada, call General Motors ofCanada Customer CommunicationCentre at 1-800-263-3777 (English),or 1-800-263-7854 (French).
We encourage you to call thetoll-free number in order to give theinquiry prompt attention. Have thefollowing information available togive the Customer Assistancerepresentative:. Vehicle Identification Number
(VIN). This is available fromthe vehicle registration or title,or the plate at the top left of theinstrument panel and visiblethrough the windshield.
. Dealership name and location.
. Vehicle delivery date andpresent mileage.
When contacting Chevrolet,remember that your concern willlikely be resolved at a dealer'sfacility. That is why we suggestfollowing Step One first.
STEP THREE — U.S. Owners:Both General Motors and yourdealer are committed to makingsure you are completely satisfiedwith the new vehicle. However,if you continue to remain unsatisfiedafter following the procedureoutlined in Steps One and Two,you can file with the Better BusinessBureau (BBB) Auto Line® Programto enforce your rights.
The BBB Auto Line Program is anout-of-court program administeredby the Council of Better BusinessBureaus to settle automotivedisputes regarding vehicle repairs orthe interpretation of the New VehicleLimited Warranty. Although you maybe required to resort to this informaldispute resolution program priorto filing a court action, use of theprogram is free of charge and your
case will generally be heard within40 days. If you do not agree withthe decision given in your case,you may reject it and proceed withany other venue for relief availableto you.
You may contact the BBB AutoLine Program using the toll-freetelephone number or write themat the following address:
BBB Auto Line ProgramCouncil of Better BusinessBureaus, Inc.4200 Wilson BoulevardSuite 800Arlington, VA 22203-1838
Telephone: 1-800-955-5100www.dr.bbb.org/goauto
This program is available inall 50 states and the District ofColumbia. Eligibility is limited byvehicle age, mileage, and otherfactors. General Motors reservesthe right to change eligibilitylimitations and/or discontinueits participation in this program.

Black plate (3,1)Chevrolet Volt Owner Manual - 2011
Customer Information 13-3
STEP THREE — CanadianOwners: In the event that youdo not feel your concerns havebeen addressed after following theprocedure outlined in Steps Oneand Two, General Motors of CanadaLimited wants you to be awareof its participation in a no-chargeMediation/Arbitration Program.General Motors of Canada Limitedhas committed to binding arbitrationof owner disputes involvingfactory-related vehicle serviceclaims. The program provides forthe review of the facts involved byan impartial third party arbiter, andmay include an informal hearingbefore the arbiter. The program isdesigned so that the entire disputesettlement process, from the timeyou file your complaint to the finaldecision, should be completed inabout 70 days. We believe ourimpartial program offers advantagesover courts in most jurisdictionsbecause it is informal, quick,and free of charge.
For further information concerningeligibility in the Canadian MotorVehicle Arbitration Plan (CAMVAP),call toll-free 1-800-207-0685,or call the General MotorsCustomer Communication Centre,1-800-263-3777 (English),1-800-263-7854 (French),or write to:
The Mediation/Arbitration Programc/o Customer CommunicationCentreGeneral Motors of Canada LimitedMail Code: CA1-163-0051908 Colonel Sam DriveOshawa, Ontario L1H 8P7
The inquiry should be accompaniedby the Vehicle IdentificationNumber (VIN).
Customer AssistanceOfficesChevrolet encourages customersto call the toll-free number forassistance. However, if a customerwishes to write or e-mail Chevrolet,the letter should be addressed to:
United States
Chevrolet Motor DivisionChevrolet Customer AssistanceCenterP.O. Box 33170Detroit, MI 48232-5170www.Chevrolet.com
1-877-486-5846 (1-877-4-Volt Info)1-800-833-2438 (For TextTelephone Devices (TTYs))Roadside Assistance:1-888-811-1926
From Puerto Rico:
1-800-496-9992 (English)1-800-496-9993 (Spanish)
From U.S. Virgin Islands:
1-800-496-9994

Black plate (4,1)Chevrolet Volt Owner Manual - 2011
13-4 Customer Information
Canada
General Motors of Canada LimitedCustomer Communication Centre,Mail Code: CA1-163-0051908 Colonel Sam DriveOshawa, Ontario L1H 8P7www.gm.ca
1-800-263-3777 (English)1-800-263-7854 (French)1-800-263-3830 (For TextTelephone devices (TTYs))Roadside Assistance:1-800-268-6800
Overseas
Please contact the localGeneral Motors Business Unit.
Mexico, Central America, andCaribbean Islands/Countries(Except Puerto Rico andU.S. Virgin Islands)
General Motors de Mexico,S. de R.L. de C.V.Customer Assistance CenterAv. Ejercito Nacional #843Col. GranadaC.P. 11520, Mexico, D.F.
01-800-466-0800Long Distance: 011-52-53 29 0800
Customer Assistance forText Telephone (TTY)UsersTo assist customers who are deaf,hard of hearing, or speech-impairedand who use Text Telephones(TTYs), Chevrolet has TTYequipment available at its CustomerAssistance Center. Any TTYuser in the U.S. can communicatewith Chevrolet by dialing:1-800-833-2438. TTY users inCanada can dial 1-800-263-3830.
Online Owner Center
Chevrolet Owner Center (U.S.)www.chevyownercenter.com
Information and servicescustomized for your specificvehicle — all in one convenientplace.. Digital owner manual, warranty
information, and more.. Storage for online service and
maintenance records.. Chevrolet dealer locator for
service nationwide.. Exclusive privileges and offers.. Recall notices for your specific
vehicle.. OnStar and GM Cardmember
Services Earnings summaries.

Black plate (5,1)Chevrolet Volt Owner Manual - 2011
Customer Information 13-5
Other Helpful Links
Chevrolet — www.chevrolet.com
Chevrolet Merchandise —www.chevymall.com
Help Center — www.chevrolet.com/pages/mds/helpcenter/faq.do. FAQ. Contact Us
My GM Canada www.gm.ca
My GM Canada is apassword-protected sectionof www.gm.ca where you cansave information on GM vehicles,get personalized offers, and usehandy tools and forms withgreater ease.
Here are a few of the valuabletools and services you will haveaccess to:. My Showroom: Find and save
information on vehicles andcurrent offers in your area.
. My Dealers: Save details suchas address and phone numberfor each of your preferred GMdealers.
. My Driveway: Access quicklinks to parts and serviceestimates, check trade-invalues, or schedule a serviceappointment by adding thevehicles you own to yourdriveway profile.
. My Preferences: Manage yourprofile and use tools and formswith greater ease.
To sign up, visit the My GM.casection within www.gm.ca.
GM MobilityReimbursement Program
This program is available toqualified applicants for costreimbursement of eligibleaftermarket adaptive equipmentrequired for the vehicle, such ashand controls or a wheelchair/scooter lift for the vehicle.
For more information on the limitedoffer, visit www.gmmobility.com orcall the GM Mobility AssistanceCenter at 1-800-323-9935.Text Telephone (TTY) users,call 1-800-833-9935.
General Motors of Canadaalso has a Mobility Program.Call 1-800-GM-DRIVE (463-7483)for details. TTY users call1-800-263-3830.

Black plate (6,1)Chevrolet Volt Owner Manual - 2011
13-6 Customer Information
Roadside AssistanceProgramFrom the U.S., call 1‐888‐811‐1926;(Text Telephone (TTY):1‐888‐889‐2438).
From Canada, call 1-800-268-6800.
Service is available 24 hours a day,365 days a year.
Calling for Assistance
When calling Roadside Assistance,have the following informationready:. Your name, home address, and
home telephone number.. Telephone number of your
location.. Location of the vehicle.. Model, year, color, and license
plate number of the vehicle.. Odometer reading, Vehicle
Identification Number (VIN),and delivery date of the vehicle.
. Description of the problem.
Coverage
Services are provided up to 5 years/160 000 km (100,000mi), whichevercomes first.
In the U.S., anyone driving thevehicle is covered. In Canada, aperson driving the vehicle withoutpermission from the owner is notcovered.
Roadside Assistance is not a part ofthe New Vehicle Limited Warranty.Chevrolet and General Motors ofCanada Limited reserve the right tomake any changes or discontinuethe Roadside Assistance programat any time without notification.
Chevrolet and General Motors ofCanada Limited reserve the rightto limit services or payment to anowner or driver if they decide theclaims are made too often, or thesame type of claim is made manytimes.
Services Provided. Emergency Fuel Delivery:
Delivery of enough fuel for thevehicle to get to the nearestservice station.
. Lock‐Out Service: Serviceto unlock the vehicle if you arelocked out. A remote unlock maybe available if you have OnStar.For security reasons, the drivermust present identificationbefore this service is given.
. Emergency Tow from a PublicRoad or Highway: Tow to thenearest Chevrolet dealer forwarranty service, or if the vehiclewas in a crash and cannot bedriven. Assistance is also givenwhen the vehicle is stuck in thesand, mud, or snow.

Black plate (7,1)Chevrolet Volt Owner Manual - 2011
Customer Information 13-7
. Flat Tire Change: Service tochange a flat tire with the tiresealant and compressor kit.If the tire has been separatedfrom the wheel, has damagedsidewalls, or has a largepuncture, the tire is too severelydamaged for the tire sealant andcompressor kit to be effective.It is the owner's responsibility forthe repair or replacement of thetire if it is not covered by thewarranty.
. Battery Jump Start: Service tojump start a dead battery.
Services Not Included inRoadside Assistance. Impound towing caused by
violation of any laws.. Legal fines.. Mounting, dismounting,
or changing of snow tires,chains, or other traction devices.
. Towing or services for vehiclesdriven on a non-public road orhighway.
Services Specific to CanadianVehicles. Fuel Delivery: Reimbursement
is approximately $5 Canadian.Diesel fuel delivery may berestricted. Propane and otherfuels are not provided throughthis service.
. Lock-Out Service: Vehicleregistration is required.
. Trip Routing Service: Detailedmaps of North America areprovided when requested eitherwith the most direct route or themost scenic route. There is alimit of six requests per year.Additional travel informationis also available. Allow threeweeks for delivery.
. Trip Interruption Benefitsand Assistance: Must beover 250 km (150 mi) fromwhere the trip was started toqualify. General Motors ofCanada Limited requires
pre-authorization, originaldetailed receipts, and a copyof the repair orders. Onceauthorization has been received,the Roadside Assistance advisorwill help to make arrangementsand explain how to receivepayment.
. Alternative Service:If assistance cannot beprovided right away, theRoadside Assistance advisormay give permission to getlocal emergency road service.You will receive payment, up to$100, after sending the originalreceipt to Roadside Assistance.Mechanical failures may becovered, however any cost forparts and labor for repairs notcovered by the warranty arethe owner's responsibility.
Black plate (8,1)Chevrolet Volt Owner Manual - 2011
13-8 Customer Information
Scheduling ServiceAppointmentsWhen the vehicle requireswarranty service, contactyour dealer and request anappointment. By schedulinga service appointment andadvising the service consultantof your transportation needs,your dealer can help minimizeyour inconvenience.
If the vehicle cannot be scheduledinto the service departmentimmediately, keep driving it untilit can be scheduled for service,unless, of course, the problem issafety related. If it is, please callyour dealership, let them know this,and ask for instructions.
If your dealer requests you to bringthe vehicle for service, you areurged to do so as early in the workday as possible to allow for thesame-day repair.
Courtesy TransportationProgramTo enhance your ownershipexperience, we and our participatingdealers are proud to offer CourtesyTransportation, a customer supportprogram for vehicles with theBumper-to-Bumper (Base WarrantyCoverage period in Canada) andextended powertrain warrantiesin both the U.S. and Canada.
Several Courtesy Transportationoptions are available to assist inreducing inconvenience whenwarranty repairs are required.
Courtesy Transportation is not apart of the New Vehicle LimitedWarranty. A separate bookletentitled “Warranty and OwnerAssistance Information” furnishedwith each new vehicle providesdetailed warranty coverageinformation.
Transportation Options
Warranty service can generally becompleted while you wait. However,if you are unable to wait, GM helpsto minimize inconvenience byproviding several transportationoptions. Depending on thecircumstances, your dealercan offer one of the following:
Shuttle Service
Shuttle service is the preferredmeans of offering CourtesyTransportation. Dealers may provideshuttle service to get you to yourdestination with minimal interruptionof your daily schedule. This includesone‐way or round‐trip shuttle servicewithin reasonable time and distanceparameters of your dealer's area.

Black plate (9,1)Chevrolet Volt Owner Manual - 2011
Customer Information 13-9
Public Transportation or FuelReimbursement
If the vehicle requires overnightwarranty repairs, and publictransportation is used insteadof your dealer's shuttle service,the expense must be supportedby original receipts and can onlybe up to the maximum amountallowed by GM for shuttle service.In addition, for U.S. customers,should you arrange transportationthrough a friend or relative, limitedreimbursement for reasonablefuel expenses may be available.Claim amounts should reflectactual costs and be supported byoriginal receipts. See your dealer forinformation regarding the allowanceamounts for reimbursement of fuelor other transportation costs.
Courtesy Rental Vehicle
Your dealer may arrange to provideyou with a courtesy rental vehicleor reimburse you for a rental vehiclethat you obtain if the vehicle is keptfor an overnight warranty repair.Rental reimbursement will be limitedand must be supported by originalreceipts. This requires that you signand complete a rental agreementand meet state/provincial, local, andrental vehicle provider requirements.Requirements vary and mayinclude minimum age requirements,insurance coverage, credit card,etc. You are responsible for fuelusage charges and may also beresponsible for taxes, levies, usagefees, excessive mileage, or rentalusage beyond the completion ofthe repair.
It may not be possible to provide alike vehicle as a courtesy rental.
Additional ProgramInformation
All program options, such asshuttle service, may not be availableat every dealer. Please contactyour dealer for specific informationabout availability. All CourtesyTransportation arrangements willbe administered by appropriatedealer personnel.
General Motors reserves theright to unilaterally modify,change, or discontinue CourtesyTransportation at any time andto resolve all questions of claimeligibility pursuant to the termsand conditions described hereinat its sole discretion.

Black plate (10,1)Chevrolet Volt Owner Manual - 2011
13-10 Customer Information
Collision Damage RepairIf the vehicle is involved in acollision and it is damaged,have the damage repaired by aqualified technician using the properequipment and quality replacementparts. Poorly performed collisionrepairs diminish the vehicle resalevalue, and safety performance canbe compromised in subsequentcollisions.
Collision Parts
Genuine GM Collision parts arenew parts made with the samematerials and construction methodsas the parts with which the vehiclewas originally built. Genuine GMCollision parts are the best choice toensure that the vehicle's designedappearance, durability, and safetyare preserved. The use of GenuineGM parts can help maintain theGM New Vehicle Limited Warranty.
Recycled original equipment partsmay also be used for repair. Theseparts are typically removed from
vehicles that were total lossesin prior crashes. In most cases,the parts being recycled are fromundamaged sections of the vehicle.A recycled original equipment GMpart may be an acceptable choiceto maintain the vehicle's originallydesigned appearance and safetyperformance; however, the historyof these parts is not known. Suchparts are not covered by the GMNew Vehicle Limited Warranty, andany related failures are not coveredby that warranty.
Aftermarket collision parts arealso available. These are madeby companies other than GM andmay not have been tested for thevehicle. As a result, these partsmay fit poorly, exhibit prematuredurability/corrosion problems,and may not perform properly insubsequent collisions. Aftermarketparts are not covered by the GMNew Vehicle Limited Warranty,and any vehicle failure related tosuch parts is not covered by thatwarranty.
Repair Facility
GM also recommends that youchoose a collision repair facility thatmeets your needs before you everneed collision repairs. Your dealermay have a collision repair centerwith GM-trained technicians andstate‐of‐the‐art equipment, or beable to recommend a collisionrepair center that has GM-trainedtechnicians and comparableequipment.
Insuring the Vehicle
Protect your investment in theGM vehicle with comprehensiveand collision insurance coverage.There are significant differencesin the quality of coverage affordedby various insurance policy terms.Many insurance policies providereduced protection to the GMvehicle by limiting compensationfor damage repairs by usingaftermarket collision parts.

Black plate (11,1)Chevrolet Volt Owner Manual - 2011
Customer Information 13-11
Some insurance companies willnot specify aftermarket collisionparts. When purchasing insurance,we recommend that you ensure thatthe vehicle will be repaired with GMoriginal equipment collision parts.If such insurance coverage isnot available from your currentinsurance carrier, consider switchingto another insurance carrier.
If the vehicle is leased, the leasingcompany may require you to haveinsurance that ensures repairs withGenuine GM Original EquipmentManufacturer (OEM) parts orGenuine Manufacturer replacementparts. Read the lease carefully, asyou may be charged at the end ofthe lease for poor quality repairs.
If a Crash Occurs
If there has been an injury, callemergency services for help. Do notleave the scene of a crash until allmatters have been taken care of.Move the vehicle only if its positionputs you in danger, or you areinstructed to move it by a policeofficer.
Give only the necessary informationto police and other parties involvedin the crash.
For emergency towing seeRoadside Assistance Program onpage 13‑6.
Gather the following information:. Driver name, address, and
telephone number.. Driver license number.. Owner name, address, and
telephone number.
. Vehicle license plate number.
. Vehicle make, model, andmodel year.
. Vehicle IdentificationNumber (VIN).
. Insurance company and policynumber.
. General description of thedamage to the other vehicle.
Choose a reputable repair facilitythat uses quality replacement parts.See “Collision Parts” earlier in thissection.
In a crash, the sensing system mayshut down the high voltage system.See Battery on page 10‑28 forimportant safety information. If anairbag has inflated, see What WillYou See after an Airbag Inflates? onpage 3‑31.

Black plate (12,1)Chevrolet Volt Owner Manual - 2011
13-12 Customer Information
Managing the Vehicle DamageRepair Process
In the event that the vehicle requiresdamage repairs, GM recommendsthat you take an active role in itsrepair. If you have a pre-determinedrepair facility of choice, take thevehicle there, or have it towedthere. Specify to the facility that anyrequired replacement collision partsbe original equipment parts, eithernew Genuine GM parts or recycledoriginal GM parts. Remember,recycled parts will not be coveredby the GM vehicle warranty.
Insurance pays the bill for the repair,but you must live with the repair.Depending on your policy limits,your insurance company may
initially value the repair usingaftermarket parts. Discuss this withthe repair professional, and insiston Genuine GM parts. Remember,if the vehicle is leased, you maybe obligated to have the vehiclerepaired with Genuine GM parts,even if your insurance coveragedoes not pay the full cost.
If another party's insurancecompany is paying for the repairs,you are not obligated to accepta repair valuation based on thatinsurance company's collisionpolicy repair limits, as you have nocontractual limits with that company.In such cases, you can have controlof the repair and parts choices aslong as the cost stays withinreasonable limits.
Service PublicationsOrdering Information
Service Manuals
Service Manuals have the diagnosisand repair information on theengines, electric drive unit, axle,suspension, brakes, electrical,steering, body, etc.
Service Bulletins
Service Bulletins give additionaltechnical service informationneeded to knowledgeably serviceGeneral Motors cars and trucks.Each bulletin contains instructionsto assist in the diagnosis andservice of the vehicle.

Black plate (13,1)Chevrolet Volt Owner Manual - 2011
Customer Information 13-13
Owner Information
Owner publications are writtenspecifically for owners and intendedto provide basic operationalinformation about the vehicle.The Owner Manual includes theMaintenance Schedule for allmodels.
In-Portfolio: Includes a Portfolio,Owner Manual, and WarrantyBooklet.
RETAIL SELL PRICE:$35.00 (U.S.) plus handlingand shipping fees.
Without Portfolio: OwnerManual only.
RETAIL SELL PRICE:$25.00 (U.S.) plus handlingand shipping fees.
Current and Past Models
Technical Service Bulletins andManuals are available for currentand past model GM vehicles.
ORDER TOLL FREE:1-800-551-4123 Monday - Friday8:00 AM - 6:00 PM Eastern Time
For Credit Card Orders Only(VISA-MasterCard-Discover), visitHelm, Inc. at: www.helminc.com
Or write to:
Helm, IncorporatedP.O. Box 07130Detroit, MI 48207
Prices are subject to changewithout notice and without incurringobligation. Allow ample time fordelivery.
All listed prices are quoted inU.S. funds. Make checks payablein U.S. funds.
Trademarks and LicenseAgreements
Manufactured under licenseunder U.S. Patent #'s: 5,451,942;5,956,674; 5,974,380; 5,978,762;6,487,535 & other U.S. andworldwide patents issued &pending. DTS and the Symbolare registered trademarks andDTS Digital Surround and the DTSlogos are trademarks of DTS, Inc.Product includes software. © DTS,Inc. All Rights Reserved.

Black plate (14,1)Chevrolet Volt Owner Manual - 2011
13-14 Customer Information
Manufactured under license fromDolby Laboratories. Dolby and thedouble-D symbol are trademarksof Dolby Laboratories.
MP3PRO audio decodingtechnology licensed from CodingTechnologies, Fraunhofer IIS andThompson.
DivX®, DivX Certified® andassociated logos are registeredtrademarks of DivX, Inc. and areused under license.
About DivX video: DivX® is a digitalvideo format created by DivX, Inc.This is an official DivX Certifieddevice that plays DivX video. Visitwww.divx.com for more informationand software tools to convert yourfiles into DivX video.
About DivX Video-On-Demand:This DivX Certified® device mustbe registered in order to play DivXVideo-On-Demand (VOD) content.To generate the registration code,locate the DivX VOD section inthe device setup menu. Go to
www.vod.divx.com with this code tocomplete the registration processand learn more about DivX VOD.
“Made for iPod” means that anelectronic accessory has beendesigned to connect specificallyto iPod and has been certifiedby the developer to meet Appleperformance standards. Apple isnot responsible for the operation ofthis device or its compliance withsafety and regulatory standards.
iPod, iPod classic, iPod nano, andiPod touch are trademarks of AppleInc., registered in the U.S. and othercountries.

Black plate (15,1)Chevrolet Volt Owner Manual - 2011
Customer Information 13-15
Fees and Taxes: Subscription fee,taxes, one time activation fee, andother fees may apply. Subscriptionfee is consumer only. All feesand programming subject tochange. Subscriptions subject toCustomer Agreement available atwww.xmradio.com. XM™ serviceonly available in the 48 contiguousUnited States and Canada.
In Canada: Some deteriorationof service may occur in extremenorthern latitudes. This is beyondthe control of XM™ Satellite Radio.
Explicit Language Notice: Channelswith frequent explicit language areindicated with an “XL” preceding thechannel name. Channel blocking isavailable for XM Satellite Radioreceivers by notifying XM at:. USA Customers — Visit
www.xmradio.com orcall 1-800-xmradio(1-800-967-2346).
. Canadian Customers — Visitwww.xmradio.ca or call1-877-438-9677.
It is prohibited to copy, decompile,disassemble, reverse engineer,hack, manipulate, or otherwisemake available any technology orsoftware incorporated in receiverscompatible with the XM™ SatelliteRadio System or that support theXM website, the Online Service or
any of its content. Furthermore, theAMBER voice compression softwareincluded in this product is protectedby intellectual property rightsincluding patent rights, copyrights,and trade secrets of Digital VoiceSystems, Inc.
General Requirements:
1. A License Agreement from XM™is required for any product thatincorporates XM Technologyand/or for use of any of theXM marks to be manufactured,distributed or marketed in theXM Service Area.
2. For products to be distributed,marketed and/or sold inCanada, a separate agreementis required with CanadianSatellite Radio Inc. (operatingas XM Canada).

Black plate (16,1)Chevrolet Volt Owner Manual - 2011
13-16 Customer Information
This product incorporates copyrightprotection technology that isprotected by U.S. patents and otherintellectual property rights of RoviCorporation. Reverse engineeringor disassrmbly is prohibited.
This product uses the sourcecode of T-Kernel under T-Licensegranted by the T-Engine Forum(www.t-engine.org).
Music and video recognitiontechnology and related dataare provided by Gracenote®.Gracenote is the industry standardin music recognition technologyand related content delivery.For more information, visitwww.gracenote.com.
CD, DVD, Blu-ray Disc, andmusic and video-related data fromGracenote, Inc., copyright © 2000to present Gracenote. One ormore patents owned by Gracenoteapply to this product and service.
See the Gracenote website for anon-exhaustive list of applicableGracenote patents. Gracenote andCDDB, MusicID, Media VOCS, theGracenote logo and logotype, andthe “Powered by Gracenote” logoare either registered trademarksor trademarks of Gracenote inthe United States and/or othercountries.
If you require more informationregarding the use of the GracenoteService, visit: www.gracenote.com/corporate.
For the data provided byGracenote® Music RecognitionService, the content is notnecessarily guaranteed 100%.
Regarding the use of GracenoteMusic Recognition Service, whenthis product is used, it is necessaryto agree to the following articles.

Black plate (17,1)Chevrolet Volt Owner Manual - 2011
Customer Information 13-17
Gracenote® End User License
This application or device containssoftware from Gracenote, Inc. ofEmeryville, California (“Gracenote”).The software from Gracenote(the “Gracenote Software”) enablesthis application to perform discand/or file identification andobtain music-related information,including name, artist, track, andtitle information (“Gracenote Data”)from online servers or embeddeddatabases (collectively, “GracenoteServers”) and to perform otherfunctions. You may use GracenoteData only by means of the intendedEnd-User functions of thisapplication or device. You agreethat you will use Gracenote Data,the Gracenote Software, andGracenote Servers for your ownpersonal non-commercial use only.You agree not to assign, copy,transfer or transmit the GracenoteSoftware or any Gracenote Datato any third party.
YOU AGREE NOT TO USE OREXPLOIT GRACENOTE DATA,THE GRACENOTE SOFTWARE,OR GRACENOTE SERVERS,EXCEPT AS EXPRESSLYPERMITTED HEREIN. You agreethat your non-exclusive licenseto use the Gracenote Data, theGracenote Software, and GracenoteServers will terminate if you violatethese restrictions. If your licenseterminates, you agree to cease anyand all use of the Gracenote Data,the Gracenote Software, andGracenote Servers.
Gracenote reserves all rights inGracenote Data, the GracenoteSoftware, and the GracenoteServers, including all ownershiprights.
Under no circumstances willGracenote become liable for anypayment to you for any informationthat you provide. You agree thatGracenote, Inc. may enforce itsrights under this Agreement againstyou directly in its own name.
The Gracenote service uses aunique identifier to track queriesfor statistical purposes.
The purpose of a randomlyassigned numeric identifier is toallow the Gracenote service tocount queries without knowinganything about who you are.For more information, see the webpage for the Gracenote PrivacyPolicy for the Gracenote service.
The Gracenote Software and eachitem of Gracenote Data are licensedto you “AS IS.” Gracenote makesno representations or warranties,express or implied, regarding theaccuracy of any Gracenote Datafrom in the Gracenote Servers.
Gracenote reserves the right todelete data from the GracenoteServers or to change datacategories for any cause thatGracenote deems sufficient.

Black plate (18,1)Chevrolet Volt Owner Manual - 2011
13-18 Customer Information
No warranty is made that theGracenote Software or GracenoteServers are error-free or thatfunctioning of Gracenote Softwareor Gracenote Servers will beuninterrupted.
Gracenote is not obligated toprovide you with new enhanced oradditional data types or categoriesthat Gracenote may provide in thefuture and is free to discontinue itsservices at any time.
Gracenote disclaims all warrantiesexpress or implied, including, butnot limited to, implied warrantiesof merchantability, fitness fora particular purpose, title, andnon-infringement. Gracenotedoes not warrant the results thatwill be obtained by your use ofthe gracenote software or anygracenote server. In no casewill gracenote be liable for anyconsequential or incidentaldamages or for any lost profitsor lost revenues.
© Gracenote, Inc. 2010
Map End User LicenseAgreement
© 2010 Tele Atlas North America,Inc. All rights reserved.
This material is proprietary and thesubject of copyright protection andother intellectual property rightsowned by or licensed to Tele AtlasNorth America, Inc.
The use of this material is subject tothe terms of a license agreement.You will be held liable for anyunauthorized copying or disclosureof this material.
Data by infoUSA Copyright © 2010,All Rights Reserved.
© 2010 VISA Corporation
© CoStar Realty Information, Inc.
The Bullseye Design is a registeredtrademark of Target Brands, Inc.
END USER LICENSE AGREEMENT
PLEASE READ THIS AGREEMENTCAREFULLY BEFORE USING THENAVIGATION SYSTEM. THIS ISA LICENSE AGREEMENT FORYOUR COPY OF THE SPATIALMAP DATABASE, INCLUDINGLOCATION CODES AND RELATEDPRODUCTS (COLLECTIVELY,THE "DATABASE"), USED IN THENAVIGATION SYSTEM. BY USINGTHE NAVIGATION SYSTEM ANDTHE DATABASE, YOU ACCEPTAND AGREE TO BE BOUND BYALL TERMS AND CONDITIONSSET FORTH BELOW.

Black plate (19,1)Chevrolet Volt Owner Manual - 2011
Customer Information 13-19
LICENSE GRANT
DENSO CORPORATION(“DENSO”), as a licensed distributorof the DATABASE, grants to youa non-exclusive, non-perpetuallicense to use your copy of theDATABASE for your personal useor for your use in your business'internal operations and not forany other purpose. This licensedoes not include the right to grantsub-licenses.
OWNERSHIP
The DATABASE and the copyrightsand intellectual property andneighboring rights therein areowned by Tele Atlas North America,Inc. (“TANA”) and its licensors.This Agreement does not transferany title or interest in the
DATABASE, except for thelicense to use the DATABASEaccording and subject to theterms and conditions of thisAgreement. You shall not alter,obscure or remove any copyrightnotices, trademark notices orother restrictive legends relatingto the DATABASE.
The DATABASE comprisesconfidential and proprietaryinformation and materials ofTANA. Accordingly, you shall holdthe DATABASE in confidence andtrust. You shall take reasonablesteps to protect the DATABASEfrom misappropriation or misuse.You shall not extract stand-alonedata from or publish any part of theDATABASE without the prior writtenconsent of TANA and its licensors.
LIMITATIONS ON USE
The DATABASE is restricted for usein the specific system for which itwas created. Except to the extentexplicitly permitted by mandatorylaws, you may not extract orreutilize any portion of the contentsof the DATABASE, nor reproduce,copy, duplicate, modify, adapt,translate, disassemble, decompile,or reverse engineer any portion ofthe DATABASE.
TRANSFER
You many not transfer theDATABASE to third parties,except together with the system forwhich it was created, provided thatyou do not retain any copy of theDATABASE, and provided that thetransferee agrees to all terms andconditions of this AGREEMENT.

Black plate (20,1)Chevrolet Volt Owner Manual - 2011
13-20 Customer Information
DISCLAIMER OF WARRANTY
THE DATABASE IS PROVIDEDON AN “AS IS” AND “WITH ALLFAULTS BASIS” AND DENSO ANDTANA (AND THEIR LICENSORSAND SUPPLIERS) EXPRESSLYDISCLAIM ALL OTHERWARRANTIES, EXPRESSOR IMPLIED, INCLUDINGBUT NOT LIMITED TO, THEIMPLIED WARRANTIESOF NON-INFRINGEMENT,MERCHANTABILITY,SATISFACTORY QUALITY,ACCURACY, TITLE AND FITNESSFOR A PARTICULAR PURPOSE.NO ORAL OR WRITTEN ADVICEOR INFORMATION PROVIDED BYDENSO OR TANA (OR ANY OFTHEIR LICENSORS, AGENTS,EMPLOYEES OR THIRD PARTYPROVIDERS) SHALL CREATEA WARRANTY, AND YOU ARENOT ENTITLED TO RELYON ANY SUCH ADVICEOR INFORMATION.
THIS DISCLAIMER OFWARRANTIES IS AN ESSENTIALCONDITION OF THISAGREEMENT.
LIMITATION OF LIABILITY
IN NO EVENT SHALL DENSO ORTANA (OR THEIR LICENSORS ORSUPPLIERS) BE LIABLE FOR ANYINCIDENTAL, CONSEQUENTIAL,SPECIAL, INDIRECT OREXEMPLARY DAMAGES ARISINGOUT OF THIS AGREEMENT ORYOUR USE OF THE DATABASE,INCLUDING, WITHOUTLIMITATION, LOST PROFITS ORCOSTS OF COVER, LOSS OF USEOR BUSINESS INTERRUPTIONOR THE LIKE, REGARDLESSOF WHETHER THE PARTY WASADVISED OF THE POSSIBILITYOF SUCH DAMAGES.
IN NO EVENT WILL THE TOTALLIABILITY OF DENSO OR TANA(OR THEIR LICENSORS ORSUPPLIERS) EXCEED THEAMOUNTS PAID BY YOUFOR THE DATABASE.
WARNINGS
The DATABASE comprises factsand information from governmentand other sources reflectingcircumstances in existence beforeyou received the DATABASE, whichmay contain errors and omissions.Accordingly, the DATABASE maycontain inaccurate or incompleteinformation due to the passageof time, changing circumstances,and due to the nature of thesources used. The DATABASEdoes not include or reflectinformation relating to, amongother things, neighborhood safety;law enforcement; emergencyassistance; construction work; roador lane closures; vehicle or speedrestrictions; road slope or grade;bridge height, weight or other limits;road or traffic conditions; specialevents; traffic congestion; ortravel time.

Black plate (21,1)Chevrolet Volt Owner Manual - 2011
Customer Information 13-21
U.S. GOVERNMENT RIGHTS
If you are an agency, department,or other entity of the United StatesGovernment, or funded in wholeor in part by the United StatesGovernment, then use, duplication,reproduction, release, modification,disclosure or transfer of thiscommercial product andaccompanying documentation,is restricted in accordance withthe LIMITED or RESTRICTEDrights as described in DFARS252.227-7014(a)(1) (JUN 1995)(DOD commercial computersoftware definition), DFARS227.7202-1 (DOD policy oncommercial computer software),FAR 52.227-19 (JUN 1987)(commercial computer softwareclause for civilian agencies),DFARS 252.227-7015 (NOV 1995)(DOD technical data – commercialitems clause); FAR 52.227-14Alternates I, II, and III (JUN 1987)(civilian agency technical data andnoncommercial computer softwareclause); and/or FAR 12.211 and
FAR 12.212 (commercial itemacquisitions), as applicable. In caseof conflict between any of theFAR and DFARS provisions listedherein and this Agreement, theconstruction that provides greaterlimitations on the Government’srights shall control. Contractor/manufacturer is Tele Atlas NorthAmerica, Inc., 11 Lafayette Street,Lebanon, NH 03766-1445. Phone:(603) 643-0330. The DATABASE is©1984-2010 by Tele Atlas NorthAmerica, Inc. ALL RIGHTSRESERVED. For purpose of anypublic disclosure provision underany federal, state or local law, it isagreed that the DATABASE is atrade secret and a proprietarycommercial product and notsubject to disclosure.
If you are an agency, department,or other entity of any Stategovernment, the United StatesGovernment or any other publicentity or funded in whole or in partby the United States Government,then you hereby agree to protect the
DATABASE from public disclosureand to consider the DATABASEexempt from any statute, law,regulation, or code, including anySunshine Act, Public RecordsAct, Freedom of Information Act,or equivalent, which permits publicaccess and/or reproduction or useof the Licensed Products. In theevent that such exemption ischallenged under any such laws,this Agreement shall be consideredbreached and any and all right toretain any copies or to use of theDATABASE shall be terminated andconsidered immediately null andvoid. Any copies of the DATABASEheld by you shall immediately bedestroyed. If any court of competentjurisdiction considers this clausevoid and unenforceable, in wholeor in part, for any reason, thisAgreement shall be consideredterminated and null and void, in itsentirety, and any and all copies ofthe DATABASE shall immediatelybe destroyed.
BTV.461060.2

Black plate (22,1)Chevrolet Volt Owner Manual - 2011
13-22 Customer Information
END USER NOTICE
PLEASE READ THIS NOTICECAREFULLY BEFORE USINGTHIS NAVIGATION SYSTEM.
The Point Of Interest Data(“POI” Data) in the navigationsystem is in part provided byinfoUSA Inc. (“infoUSA”). By usingthe POI Data, you accept and agreeto all terms and conditions set forthbelow.
1. Ownership
All rights, title and interest tothe infoUSA POI Data shall beretained by infoUSA.
2. Limitations on Use
Except to the extent explicitlypermitted by mandatory laws,you may not extract or re-utilizeany portion of the contents ofthe POI Data, nor reproduce,copy, modify, adapt, translate,disassemble, decompile,or reverse engineer anyportion of the POI Data.
3. Transfer
You may not transfer the POIData to third parties, excepttogether with the system forwhich it was created, providedthat you do not retain any copyof the POI Data.
4. Disclaimer of Warranty
EXCEPT AS STATEDHEREIN, INFOUSA MAKESNO EXPRESS OR IMPLIEDWARRANTIES, INCLUDING,WITHOUT LIMITATION,ANY EXPRESS OR IMPLIEDWARRANTY OF FITNESSFOR A PARTICULARPURPOSE OR WARRANTYOF MERCHANTABILITY.
5. Limitation of Liability
EITHER INFOUSA ORSUPPLIER OF POI DATASHALL NOT BE LIABLEFOR ANY INDIRECT,CONSEQUENTIAL ORINCIDENTAL DAMAGESMADE OR ALLEGED INCONNECTION WITH YOURUSE OF THE POI DATA.

Black plate (23,1)Chevrolet Volt Owner Manual - 2011
Customer Information 13-23
END USER LICENSE AGREEMENT
Personal Use Only — You agreeto use this information for solelypersonal, non commercial purposes,and not for service bureau, timesharing or other similar purposes.You may not modify the informationor remove any copyright noticesthat appear on the information inany way. You may not decompile,disassemble or reverse engineerany portion of this information, andmay not transfer or distribute it inany form, for any purpose. Withoutlimiting the foregoing, you maynot use this information with anyproducts, systems, or applicationsinstalled or otherwise connected toor in communication with vehicles,capable of vehicle navigation,positioning, dispatch, real timeroute guidance, fleet managementor similar applications.
No Warranty — This informationis provided to you “as is,” and youagree to use it at your own risk.DENSO and its licensors (and theirlicensors and suppliers, collectively“DENSO”) make no guarantees,representations or warranties ofany kind, express or implied,arising by law or otherwise,including but not limited to, andDENSO expressly disclaimsany warranties regarding content,quality, accuracy, completeness,effectiveness, reliability, fitnessfor a particular purpose, noninfringement, usefulness, use orresults to be obtained from thisinformation, or that the informationor server will be uninterrupted orerror free. Some states, territoriesand countries do not allow certainwarranty exclusions, so to thatextent, the above exclusion maynot apply to you.
Disclaimer of Liability: DENSOSHALL NOT BE LIABLE TO YOUFOR ANY CLAIM, DEMAND ORACTION, IRRESPECTIVE OFITS NATURE, ALLEGING ANYLOSS, INJURY OR DAMAGES,WHETHER DIRECT, INDIRECT,INCIDENTAL, SPECIAL ORCONSEQUENTIAL DAMAGES,INCLUDING ANY LOSS OFPROFIT, REVENUE ORCONTRACTS ARISING OUTOF YOUR POSSESSION, USEOF OR INABILITY TO USE THISINFORMATION, ANY DEFECTIN THE INFORMATION, OR THEBREACH OF THESE TERMS ORCONDITIONS, WHETHER IN ANACTION IN CONTRACT OR TORTOR BASED ON A WARRANTY,EVEN IF DENSO OR ITSLICENSORS HAVE BEENADVISED OF THE POSSIBILITYOF SUCH DAMAGES. Some states,territories and countries do notallow certain liability exclusionsor damages limitations, so to thatextent the above may not applyto you.

Black plate (24,1)Chevrolet Volt Owner Manual - 2011
13-24 Customer Information
Indemnity — You agree toindemnify, defend and holdDENSO and its licensors (includingtheir respective licensors, suppliers,assignees, subsidiaries, affiliatedcompanies, and the respectiveofficers, directors, employees,shareholders, agents andrepresentatives of each of them)free and harmless from and againstany liability, loss, injury (includinginjuries resulting in death), demand,action, cost, expense, or claim ofany kind or character, includingbut not limited to attorney’s fees,arising out of or in connection withany use or possession by you ofthis information.
END USER NOTICE
The marks of companies displayedby this product to indicate businesslocations are the marks of theirrespective owners. The use ofsuch marks in this product does notimply any sponsorship, approval,or endorsement by such companiesof this product.
Open Source InformationThis vehicle contains opensource software, including withoutlimitation, software distributedand/or modified under the GNUGeneral Public License, Version 2,June 1991, and the GNU LesserGeneral Public License, Version 2.1,February 1999.
See www.oss.gm.com for additionalinformation and to downloadrelated materials, including withoutlimitation, the previous referredto licenses and software.
Reporting SafetyDefects
Reporting Safety Defectsto the United StatesGovernmentIf you believe that your vehiclehas a defect which could causea crash or could cause injury ordeath, you should immediatelyinform the National HighwayTraffic Safety Administration(NHTSA) in addition to notifyingGeneral Motors.
If NHTSA receives similarcomplaints, it may open aninvestigation, and if it findsthat a safety defect exists in agroup of vehicles, it may ordera recall and remedy campaign.
Black plate (25,1)Chevrolet Volt Owner Manual - 2011
Customer Information 13-25
However, NHTSA cannotbecome involved in individualproblems between you, yourdealer, or General Motors.
To contact NHTSA, you maycall the Vehicle Safety Hotlinetoll-free at 1-888-327-4236(TTY: 1-800-424-9153);go to http://www.safercar.gov; orwrite to:
Administrator, NHTSA1200 New Jersey Avenue, S.E.Washington, D.C. 20590
You can also obtain otherinformation about motorvehicle safety fromhttp://www.safercar.gov.
Reporting Safety Defectsto the CanadianGovernmentIf you live in Canada, and youbelieve that the vehicle has asafety defect, notify TransportCanada immediately, and notifyGeneral Motors of Canada Limited.Call them at 1-800-333-0510 orwrite to:
Transport CanadaRoad Safety Branch2780 Sheffield RoadOttawa, Ontario K1B 3V9
Reporting Safety Defectsto General MotorsIn addition to notifying NHTSA(or Transport Canada) in a situationlike this, notify General Motors.
Call 1-800-222-1020, or write:
Chevrolet Motor DivisionChevrolet Customer AssistanceCenterP.O. Box 33170Detroit, MI 48232-5170
In Canada, call 1-800-263-3777(English) or 1-800-263-7854(French), or write:
General Motors of Canada LimitedCustomer Communication Centre,Mail Code: CA1-163-0051908 Colonel Sam DriveOshawa, Ontario L1H 8P7

Black plate (26,1)Chevrolet Volt Owner Manual - 2011
13-26 Customer Information
Vehicle DataRecording andPrivacyThis GM vehicle has a number ofsophisticated computers that recordinformation about the vehicle’sperformance and how it is driven.For example, the vehicle usescomputer modules to monitor andcontrol engine and electric driveunit performance, to monitor theconditions for airbag deploymentand to deploy airbags in a crash,and to provide antilock braking tohelp the driver control the vehicle.These modules may store data tohelp your dealer technician servicethe vehicle. Some modules mayalso store data about how youoperate the vehicle, such as rate offuel consumption or average speed.These modules may also retain theowner’s personal preferences, suchas radio pre-sets, seat positions,and temperature settings.
Event Data RecordersThis vehicle has an Event DataRecorder (EDR). The main purposeof an EDR is to record, in certaincrash or near crash-like situations,such as an airbag deployment orhitting a road obstacle, data thatwill assist in understanding howa vehicle's systems performed.The EDR is designed to record datarelated to vehicle dynamics andsafety systems for a short period oftime, typically 30 seconds or less.The EDR in this vehicle is designedto record such data as:. How various systems in the
vehicle were operating.. Whether or not the driver and
passenger safety belts werebuckled/fastened.
. How far, if at all, the driver waspressing the accelerator and/orbrake pedal.
. How fast the vehicle wastraveling.
This data can help provide a betterunderstanding of the circumstancesin which crashes and injuries occur.
Important: EDR data is recordedby the vehicle only if a non-trivialcrash situation occurs; no data isrecorded by the EDR under normaldriving conditions and no personaldata (e.g., name, gender, age,and crash location) is recorded.However, other parties, such aslaw enforcement, could combinethe EDR data with the type ofpersonally identifying dataroutinely acquired during acrash investigation.
To read data recorded by an EDR,special equipment is required, andaccess to the vehicle or the EDR isneeded. In addition to the vehiclemanufacturer, other parties, suchas law enforcement, that have thespecial equipment, can read theinformation if they have access tothe vehicle or the EDR.

Black plate (27,1)Chevrolet Volt Owner Manual - 2011
Customer Information 13-27
GM will not access this data orshare it with others except: with theconsent of the vehicle owner or,if the vehicle is leased, with theconsent of the lessee; in responseto an official request by police orsimilar government office; as part ofGM's defense of litigation throughthe discovery process; or, asrequired by law. Data that GMcollects or receives may also beused for GM research needs ormay be made available to others forresearch purposes, where a need isshown and the data is not tied to aspecific vehicle or vehicle owner.
OnStar®
If the vehicle is equipped with anactive OnStar system, that systemmay also record data in crashor near crash‐like situations.The OnStar Terms and Conditionsprovides information on datacollection and use and is availablein the OnStar glove box kit,at www.onstar.com (U.S.) orwww.onstar.ca (Canada), orby pressing theQ button andspeaking to an advisor.
Navigation SystemIf the vehicle has a navigationsystem, use of the system mayresult in the storage of destinations,addresses, telephone numbers, andother trip information. See Using theNavigation System on page 7‑39 forinformation on stored data and fordeletion instructions.
Radio FrequencyIdentification (RFID)RFID technology is used in somevehicles for functions such as tirepressure monitoring and ignitionsystem security, as well as inconnection with conveniencessuch as key fobs for remote doorlocking/unlocking and starting, andin-vehicle transmitters for garagedoor openers. RFID technology inGM vehicles does not use or recordpersonal information or link withany other GM system containingpersonal information.

Black plate (28,1)Chevrolet Volt Owner Manual - 2011
13-28 Customer Information
Radio FrequencyStatementThis vehicle has systems thatoperate on a radio frequency thatcomply with Part 15 of the FederalCommunications Commission (FCC)rules and with Industry CanadaStandards RSS‐210/220/310.
Operation is subject to the followingtwo conditions:
1. The device may not causeinterference.
2. The device must accept anyinterference received, includinginterference that may causeundesired operation of thedevice.
Changes or modifications to anyof these systems by other than anauthorized service facility could voidauthorization to use this equipment.

Black plate (1,1)Chevrolet Volt Owner Manual - 2011
INDEX i-1
AAccessories andModifications . . . . . . . . . . . . . . . . . 10-4
Accessory Power . . . . . . . . . . . . . . 9-22Add-On ElectricalEquipment . . . . . . . . . . . . . . . . . . . 9-63
Air Cleaner/Filter, Engine . . . . . 10-16Air Conditioning . . . . . . . . . . . . . . . . 8-1Air Vents . . . . . . . . . . . . . . . . . . . . . . . 8-9AirbagAdding Equipment to theVehicle . . . . . . . . . . . . . . . . . . . . . .3-38
Airbag SystemCheck . . . . . . . . . . . . . . . . . . . . . . . .3-40How Does an AirbagRestrain? . . . . . . . . . . . . . . . . . . .3-30
Passenger SensingSystem . . . . . . . . . . . . . . . . . . . . . .3-33
What Makes an AirbagInflate? . . . . . . . . . . . . . . . . . . . . . .3-30
What Will You See after anAirbag Inflates? . . . . . . . . . . . . .3-31
When Should an AirbagInflate? . . . . . . . . . . . . . . . . . . . . . .3-28
Where Are the Airbags? . . . . . .3-27
AirbagsPassenger Status Indicator . . .5-20Readiness Light . . . . . . . . . . . . . .5-19Servicing Airbag-EquippedVehicles . . . . . . . . . . . . . . . . . . . . .3-38
System Check . . . . . . . . . . . . . . . .3-25Alarm SystemAnti-theft . . . . . . . . . . . . . . . . . . . . . .2-13
AlertPedestrian Friendly . . . . . . . . . . . . 6-2
AM-FM Radio . . . . . . . . . . . . . . . . . . 7-10AntennaMulti-band . . . . . . . . . . . . . . . . . . . .7-18
Anti-theftAlarm System . . . . . . . . . . . . . . . .2-13Alarm System Messages . . . . .5-51
Antilock BrakeSystem (ABS) . . . . . . . . . . . . . . . . 9-33Warning Light . . . . . . . . . . . . . . . . .5-26
Appearance CareExterior . . . . . . . . . . . . . . . . . . . . . 10-89Interior . . . . . . . . . . . . . . . . . . . . . . 10-93
Assistance Program,Roadside . . . . . . . . . . . . . . . . . . . . . 13-6
Audio PlayersCD/DVD . . . . . . . . . . . . . . . . . . . . . .7-18MP3 . . . . . . . . . . . . . . . . . . . . . . . . . .7-23
Audio SystemHard Drive Device (HDD) . . . . .7-26Radio Reception . . . . . . . . . . . . . .7-17Theft-Deterrent Feature . . . . . . . . 7-3
AutomaticClimate Control System . . . . . . . . 8-1Door Locks . . . . . . . . . . . . . . . . . . . 2-11
Auxiliary Devices . . . . . . . . . . . . . . 7-38
BBattery . . . . . . . . . . . . . . . . . . . . . . . 10-28Gauge . . . . . . . . . . . . . . . . . . . . . . . .5-16High Voltage . . . . . . . . . . . . . . . . . .5-16Jump Starting . . . . . . . . . . . . . . . 10-79Power Protection . . . . . . . . . . . . . . 6-6
Battery and ChargingMessages. . . . . . . . . . . . . . . . . . . . 5-45
Blade Replacement, Wiper . . . 10-31Bluetooth . . . . . . . . . . . . . . . . . . . . . . 7-85BrakeParking, Electric . . . . . . . . . . . . . .9-35

Black plate (2,1)Chevrolet Volt Owner Manual - 2011
i-2 INDEX
Brake System Warning Light . . . 5-24Brakes . . . . . . . . . . . . . . . . . . . . . . . . 10-25Antilock . . . . . . . . . . . . . . . . . . . . . . .9-33Fluid . . . . . . . . . . . . . . . . . . . . . . . . 10-26Regenerative Braking . . . . . . . . .9-37System Messages . . . . . . . . . . . .5-46
Braking . . . . . . . . . . . . . . . . . . . . . . . . . 9-5Break-In, New Vehicle . . . . . . . . . 9-18Bulb Replacement . . . . . . . . . . . . 10-37Back-up Lamps . . . . . . . . . . . . . 10-35Halogen Bulbs . . . . . . . . . . . . . . 10-34Headlamp Aiming . . . . . . . . . . . 10-32Headlamps . . . . . . . . . . . . . . . . . 10-34License Plate Lamps . . . . . . . 10-36
Buying New Tires . . . . . . . . . . . . . 10-63
CCalibration . . . . . . . . . . . . . . . . . . . . . 5-16CaliforniaFuel Requirements . . . . . . . . . . .9-58Perchlorate MaterialsRequirements . . . . . . . . . . . . . . .10-3
Warning . . . . . . . . . . . . . . . . . . . . . .10-3
Camera, Rear Vision . . . . . . . . . . 9-46Canadian Vehicle Owners . . . . . . . . iiiCapacities andSpecifications . . . . . . . . . . . . . . . . 12-2
Carbon MonoxideEngine Exhaust . . . . . . . . . . . . . . .9-30Hatch . . . . . . . . . . . . . . . . . . . . . . . . .2-12Winter Driving . . . . . . . . . . . . . . . . 9-11
CargoCover . . . . . . . . . . . . . . . . . . . . . . . . . . 4-2
Cautions, Danger, andWarnings . . . . . . . . . . . . . . . . . . . . . . . . iv
CD/DVD Player . . . . . . . . . . . . . . . . 7-18Chains, Tire . . . . . . . . . . . . . . . . . . 10-69Charge Cord . . . . . . . . . . . . . . . . . . . 9-54Charging . . . . . . . . . . . . . . . . . . . . . . 5-33Delay Override . . . . . . . . . . . . . . .9-52Electrical Requirements . . . . . .9-56Plug-In . . . . . . . . . . . . . . . . . . . . . . .9-49
Charging Status Screens . . . . . . 9-52Charging System Light . . . . . . . . 5-21CheckEngine Light . . . . . . . . . . . . . . . . . .5-21
Child RestraintsInfants and YoungChildren . . . . . . . . . . . . . . . . . . . . .3-43
Lower Anchors andTethers for Children . . . . . . . . .3-49
Older Children . . . . . . . . . . . . . . . .3-41Securing . . . . . . . . . . . . . . . .3-57, 3-60Systems . . . . . . . . . . . . . . . . . . . . . .3-45
CleaningExterior Care . . . . . . . . . . . . . . . 10-89Interior Care . . . . . . . . . . . . . . . . 10-93
Climate Control SystemsAutomatic . . . . . . . . . . . . . . . . . . . . . . 8-1
Clock . . . . . . . . . . . . . . . . . . . . . . . . . . 5-42Cluster, Instrument . . . . . . . . . . . . . 5-9Collision Damage Repair . . . . . 13-10Compass . . . . . . . . . . . . . . . . . . . . . . 5-16Compressor Kit, TireSealant . . . . . . . . . . . . . . . . . . . . . . 10-71
Configure Menu . . . . . . . . . . . . . . . 7-66Control of a Vehicle . . . . . . . . . . . . . 9-5Convex Mirrors . . . . . . . . . . . . . . . . 2-15

Black plate (3,1)Chevrolet Volt Owner Manual - 2011
INDEX i-3
CoolantEngine . . . . . . . . . . . . . . . . . . . . . . 10-21Engine TemperatureWarning Light . . . . . . . . . . . . . . .5-27
Cooling System . . . . . . . .10-18, 10-20Engine Messages . . . . . . . . . . . .5-47
Courtesy TransportationProgram . . . . . . . . . . . . . . . . . . . . . . 13-8
CoverCargo . . . . . . . . . . . . . . . . . . . . . . . . . . 4-2
Cruise Control . . . . . . . . . . . . . . . . . 9-40Light . . . . . . . . . . . . . . . . . . . . . . . . . .5-29Messages . . . . . . . . . . . . . . . . . . . .5-46
Customer Assistance . . . . . . . . . . 13-4Offices . . . . . . . . . . . . . . . . . . . . . . . .13-3Text Telephone (TTY)Users . . . . . . . . . . . . . . . . . . . . . . .13-4
Customer InformationService PublicationsOrdering Information . . . . . . 13-12
Customer SatisfactionProcedure . . . . . . . . . . . . . . . . . . . . 13-1
DDamage Repair, Collision . . . . . 13-10Danger, Warnings, andCautions . . . . . . . . . . . . . . . . . . . . . . . . iv
Data Recorders, Event . . . . . . . 13-26Database CoverageExplanations . . . . . . . . . . . . . . . . . 7-77
Daytime RunningLamps (DRL) . . . . . . . . . . . . . . . . . . 6-3
Defensive Driving . . . . . . . . . . . . . . . 9-4Delayed Charging Override . . . . 9-52Delayed Locking . . . . . . . . . . . . . . . 2-11Destination, Navigation . . . . . . . . 7-51Devices, Auxiliary . . . . . . . . . . . . . 7-38Dome Lamps . . . . . . . . . . . . . . . . . . . 6-5DoorAjar Messages . . . . . . . . . . . . . . .5-46Delayed Locking . . . . . . . . . . . . . . 2-11Locks . . . . . . . . . . . . . . . . . . . . . . . . .2-10Power Locks . . . . . . . . . . . . . . . . . . 2-11
Drive Belt Routing, Engine . . . . . 12-3Drive Mode Messages . . . . . . . . . 5-47
Drive UnitElectric . . . . . . . . . . . . . . . . . . . . . . .9-32
Driver Efficiency Gauge . . . . . . . 5-17Driver InformationCenter (DIC) . . . . . . . . . . . . . . . . . 5-43
Driver Selected OperatingModes . . . . . . . . . . . . . . . . . . . . . . . 9-26
DrivingDefensive . . . . . . . . . . . . . . . . . . . . . . 9-4Drunk . . . . . . . . . . . . . . . . . . . . . . . . . . 9-4Highway Hypnosis . . . . . . . . . . . .9-10Hill and Mountain Roads . . . . . .9-10If the Vehicle is Stuck . . . . . . . . .9-13Loss of Control . . . . . . . . . . . . . . . . 9-8Off-Road Recovery . . . . . . . . . . . . 9-8Vehicle Load Limits . . . . . . . . . . .9-14Wet Roads . . . . . . . . . . . . . . . . . . . . 9-9Winter . . . . . . . . . . . . . . . . . . . . . . . . 9-11
Driving for BetterEnergy Efficiency . . . . . . . 1-25, 9-2
DVD/CD Player . . . . . . . . . . . . . . . . 7-18

Black plate (4,1)Chevrolet Volt Owner Manual - 2011
i-4 INDEX
EElectric Drive Unit . . . . . . . . . . . . . 9-32Electric Drive UnitMessages . . . . . . . . . . . . . . . . . . . . 5-47
Electric Drive Unit ShiftLock Control FunctionCheck . . . . . . . . . . . . . . . . . . . . . . . 10-30
Electric Mode . . . . . . . . . . . . . . . . . . 9-25Electric Parking Brake . . . . . . . . . 9-35Electric Parking Brake Light . . . 5-25Electrical Equipment,Add-On . . . . . . . . . . . . . . . . . . . . . . 9-63
Electrical Requirements forBattery Charging . . . . . . . . . . . . . 9-56
Electrical SystemEngine CompartmentFuse Block . . . . . . . . . . . . . . . . 10-38
Instrument PanelFuse Block . . . . . . . . . 10-42, 10-43
Overload . . . . . . . . . . . . . . . . . . . 10-37Rear Compartment FuseBlock . . . . . . . . . . . . . . . . . . . . . . 10-45
Electronic Stability Control . . . . . 9-39Energy EfficiencyDriving . . . . . . . . . . . . . . . . . . . 1-25, 9-2
Energy Information . . . . . . . . . . . . 5-41
EngineAir Cleaner/Filter . . . . . . . . . . . 10-16Check and Service EngineSoon Light . . . . . . . . . . . . . . . . . .5-21
Compartment Overview . . . . . 10-10Coolant . . . . . . . . . . . . . . . . . . . . . 10-21Coolant TemperatureWarning Light . . . . . . . . . . . . . . .5-27
Cooling System . . . . . . 10-18, 10-20Cooling System Messages . . .5-47Drive Belt Routing . . . . . . . . . . . .12-3Exhaust . . . . . . . . . . . . . . . . . . . . . .9-30Overheating . . . . . . . . . . . . . . . . 10-23Pressure Light . . . . . . . . . . . . . . . .5-28Running While Parked . . . . . . . .9-31
Engine OilLife System . . . . . . . . . . . . . . . . . 10-15Messages . . . . . . . . . . . . . . . . . . . .5-48
Engine UnavailableOut of Fuel . . . . . . . . . . . . . . . . . . .9-28
Entry Lighting . . . . . . . . . . . . . . . . . . . 6-5Event Data Recorders . . . . . . . . 13-26Exit Lighting . . . . . . . . . . . . . . . . . . . . 6-6Extended Range Mode . . . . . . . . 9-25Extender, Safety Belt . . . . . . . . . . 3-23Exterior Lamp Controls . . . . . . . . . 6-1
FFilter,Engine Air Cleaner . . . . . . . . . 10-16
Flash-to-Pass . . . . . . . . . . . . . . . . . . . 6-2Flashers, Hazard Warning . . . . . . 6-4Flat Tire . . . . . . . . . . . . . . . . . . . . . . 10-69Floor Console Storage . . . . . . . . . . 4-1Floor Mats . . . . . . . . . . . . . . . . . . . . 10-96FluidBrakes . . . . . . . . . . . . . . . . . . . . . . 10-26Power Steering . . . . . . . . . . . . . 10-24Washer . . . . . . . . . . . . . . . . . . . . . 10-24
Folding Mirrors . . . . . . . . . . . . . . . . 2-16Front SeatsAdjustment . . . . . . . . . . . . . . . . . . . . 3-4Heated . . . . . . . . . . . . . . . . . . . . . . . . 3-6
Fuel . . . . . . . . . . . . . . . . . . . . . . . . . . . 9-57Additives . . . . . . . . . . . . . . . . . . . . .9-59Filling a Portable FuelContainer . . . . . . . . . . . . . . . . . . .9-62
Filling the Tank . . . . . . . . . . . . . . .9-60Fuels in Foreign Countries . . . .9-58Gasoline Specifications . . . . . . .9-58Gauge . . . . . . . . . . . . . . . . . . . . . . . .5-16
Black plate (5,1)Chevrolet Volt Owner Manual - 2011
INDEX i-5
Fuel (cont.)Low Fuel Warning Light . . . . . . .5-28Requirements, California . . . . .9-58System Messages . . . . . . . . . . . .5-48
Function CheckElectric Drive Unit ShiftLock Control . . . . . . . . . . . . . . 10-30
FusesEngine CompartmentFuse Block . . . . . . . . . . . . . . . . 10-38
Instrument PanelFuse Block . . . . . . . . . 10-42, 10-43
Rear Compartment FuseBlock . . . . . . . . . . . . . . . . . . . . . . 10-45
GGarage Door Opener . . . . . . . . . . 5-60Programming . . . . . . . . . . . . . . . . .5-60
GasolineSpecifications . . . . . . . . . . . . . . . . .9-58
GaugesBattery . . . . . . . . . . . . . . . . . . . . . . .5-16Driver Efficiency . . . . . . . . . . . . . .5-17Fuel . . . . . . . . . . . . . . . . . . . . . . . . . .5-16Odometer . . . . . . . . . . . . . . . . . . . . .5-15
Gauges (cont.)Speedometer . . . . . . . . . . . . . . . . .5-15Trip Odometer . . . . . . . . . . . . . . . .5-15Warning Lights andIndicators . . . . . . . . . . . . . . . . . . . . 5-9
General InformationService and Maintenance . . . . . 11-1Towing . . . . . . . . . . . . . . . . . . . . . . . .9-62Vehicle Care . . . . . . . . . . . . . . . . . .10-3
Global PositioningSystem (GPS) . . . . . . . . . . . . . . . . 7-74
Glove Box . . . . . . . . . . . . . . . . . . . . . . 4-1GM Mobility ReimbursementProgram . . . . . . . . . . . . . . . . . . . . . . 13-5
HHalogen Bulbs . . . . . . . . . . . . . . . . 10-34Hard Drive Device (HDD) . . . . . . 7-26Hatch . . . . . . . . . . . . . . . . . . . . . . . . . . 2-12Hazard Warning Flashers . . . . . . . 6-4Head Restraints . . . . . . . . . . . . . . . . 3-2Headlamps . . . . . . . . . . . . . . . . . . . 10-34Aiming . . . . . . . . . . . . . . . . . . . . . . 10-32Bulb Replacement . . . . . . . . . . 10-34Daytime RunningLamps (DRL) . . . . . . . . . . . . . . . . . 6-3
Headlamps (cont.)Flash-to-Pass . . . . . . . . . . . . . . . . . . 6-2High-Beam On Light . . . . . . . . . .5-29High/Low Beam Changer . . . . . . 6-2Lamps On Reminder . . . . . . . . .5-29
Heated Front Seats . . . . . . . . . . . . . 3-6Heated Mirrors . . . . . . . . . . . . . . . . . 2-16Heating and Air Conditioning . . . 8-1High Voltage Battery Gauge . . . 5-16High Voltage Devices andWiring . . . . . . . . . . . . . . . . . . . . . . . 10-37
High-Beam On Light . . . . . . . . . . . 5-29Highway Hypnosis . . . . . . . . . . . . . 9-10Hill and Mountain Roads . . . . . . . 9-10Hood . . . . . . . . . . . . . . . . . . . . . . . . . . 10-9Hood, Door, Hatch OpenLight . . . . . . . . . . . . . . . . . . . . . . . . . 5-30
Horn . . . . . . . . . . . . . . . . . . . . . . . . . . . . 5-7How to Wear Safety BeltsProperly . . . . . . . . . . . . . . . . . . . . . . 3-13

Black plate (6,1)Chevrolet Volt Owner Manual - 2011
i-6 INDEX
IImmobilizer . . . . . . . . . . . . . . . . . . . . 2-14Infants and Young Children,Restraints . . . . . . . . . . . . . . . . . . . . 3-43
InformationEnergy . . . . . . . . . . . . . . . . . . . . . . .5-41Open Source . . . . . . . . . . . . . . . 13-24
Infotainment . . . . . . . . . . . . . . . . . . . . 7-2Instrument Cluster . . . . . . . . . . . . . . 5-9Instrument PanelStorage Area . . . . . . . . . . . . . . . . . . 4-1
Introduction . . . . . . . . . . . . . . . . . . . . . . . iii
JJump Starting . . . . . . . . . . . . . . . . . 10-79
KKey and Lock Messages . . . . . . . 5-48Keyless EntryRemote (RKE) System . . . . . . . . 2-3
Keys . . . . . . . . . . . . . . . . . . . . . . . . . . . . 2-2
LLabeling, Tire Sidewall . . . . . . . . 10-49Lamp Messages . . . . . . . . . . . . . . . 5-49LampsDaytime Running (DRL) . . . . . . . 6-3Dome . . . . . . . . . . . . . . . . . . . . . . . . . . 6-5Exterior Controls . . . . . . . . . . . . . . . 6-1License Plate . . . . . . . . . . . . . . . 10-36Malfunction Indicator . . . . . . . . .5-21On Reminder . . . . . . . . . . . . . . . . .5-29Reading . . . . . . . . . . . . . . . . . . . . . . . 6-5
Lap-Shoulder Belt . . . . . . . . . . . . . 3-19LATCH SystemReplacing Parts after aCrash . . . . . . . . . . . . . . . . . . . . . . .3-57
LATCH, Lower Anchors andTethers for Children . . . . . . . . . . 3-49
Lifting the Vehicle, Tires . . . . . . . 10-5LightingEntry . . . . . . . . . . . . . . . . . . . . . . . . . . 6-5Exit . . . . . . . . . . . . . . . . . . . . . . . . . . . . 6-6Illumination Control . . . . . . . . . . . . 6-5
LightsAirbag Readiness . . . . . . . . . . . . .5-19Antilock Brake System(ABS) Warning . . . . . . . . . . . . . .5-26
Brake System Warning . . . . . . .5-24Charging System . . . . . . . . . . . . .5-21Cruise Control . . . . . . . . . . . . . . . .5-29Electric Parking Brake . . . . . . . .5-25Engine CoolantTemperature Warning . . . . . . .5-27
Engine Oil Pressure . . . . . . . . . .5-28Flash-to-Pass . . . . . . . . . . . . . . . . . . 6-2High-Beam On . . . . . . . . . . . . . . . .5-29High/Low Beam Changer . . . . . . 6-2Hood, Door, Hatch Open . . . . .5-30Low Fuel Warning . . . . . . . . . . . .5-28Mountain Mode . . . . . . . . . . . . . . .5-26Safety Belt Reminders . . . . . . . .5-18Security . . . . . . . . . . . . . . . . . . . . . .5-29Service Electric ParkingBrake . . . . . . . . . . . . . . . . . . . . . . .5-25
Sport Mode . . . . . . . . . . . . . . . . . . .5-26Tire Pressure . . . . . . . . . . . . . . . . .5-27Traction Control System(TCS)/StabiliTrak® . . . . . . . . . .5-27
Black plate (7,1)Chevrolet Volt Owner Manual - 2011
INDEX i-7
LocksAutomatic Door . . . . . . . . . . . . . . . 2-11Delayed Locking . . . . . . . . . . . . . . 2-11Door . . . . . . . . . . . . . . . . . . . . . . . . . .2-10Lockout Protection . . . . . . . . . . . . 2-11Power Door . . . . . . . . . . . . . . . . . . . 2-11Safety . . . . . . . . . . . . . . . . . . . . . . . .2-12
Loss of Control . . . . . . . . . . . . . . . . . 9-8Low Fuel Warning Light . . . . . . . . 5-28Lower Anchors andTethers for Children(LATCH System) . . . . . . . . . . . . . 3-49
MMaintenanceRecords . . . . . . . . . . . . . . . . . . . . . . 11-8
Maintenance Modes . . . . . . . . . . . 9-28Maintenance ScheduleRecommended Fluids andLubricants . . . . . . . . . . . . . . . . . . . 11-6
Scheduled Maintenance . . . . . . 11-2Malfunction Indicator Lamp . . . . 5-21Maps . . . . . . . . . . . . . . . . . . . . . . . . . . 7-44
MenuConfigure . . . . . . . . . . . . . . . . . . . . .7-66
MessagesAirbag System . . . . . . . . . . . . . . . .5-51Anti-theft Alarm System . . . . . . .5-51Brake System . . . . . . . . . . . . . . . .5-46Door Ajar . . . . . . . . . . . . . . . . . . . . .5-46Drive Mode . . . . . . . . . . . . . . . . . . .5-47Electric Drive Unit . . . . . . . . . . . .5-47Engine Cooling System . . . . . . .5-47Engine Oil . . . . . . . . . . . . . . . . . . . .5-48Fuel System . . . . . . . . . . . . . . . . . .5-48Key and Lock . . . . . . . . . . . . . . . . .5-48Lamp . . . . . . . . . . . . . . . . . . . . . . . . .5-49Object Detection System . . . . .5-49Propulsion Power . . . . . . . . . . . . .5-50Ride Control System . . . . . . . . . .5-50Service Vehicle . . . . . . . . . . . . . . .5-51Starting the Vehicle . . . . . . . . . . .5-52Tire . . . . . . . . . . . . . . . . . . . . . . . . . . .5-52Vehicle . . . . . . . . . . . . . . . . . . . . . . .5-45Vehicle Speed . . . . . . . . . . . . . . . .5-53Washer Fluid . . . . . . . . . . . . . . . . .5-53
MirrorsAutomatic DimmingRearview . . . . . . . . . . . . . . . . . . . .2-16
Convex . . . . . . . . . . . . . . . . . . . . . . .2-15Folding . . . . . . . . . . . . . . . . . . . . . . .2-16Heated . . . . . . . . . . . . . . . . . . . . . . .2-16Power . . . . . . . . . . . . . . . . . . . . . . . .2-15
ModeElectric . . . . . . . . . . . . . . . . . . . . . . .9-25Extended Range . . . . . . . . . . . . . .9-25
ModesDriver Selected . . . . . . . . . . . . . . .9-26Maintenance . . . . . . . . . . . . . . . . . .9-28
Monitor System, TirePressure . . . . . . . . . . . . . . . . . . . . 10-55
Mountain Mode Light . . . . . . . . . . 5-26MP3 . . . . . . . . . . . . . . . . . . . . . . . . . . . 7-23Multi-band Antenna . . . . . . . . . . . . 7-18

Black plate (8,1)Chevrolet Volt Owner Manual - 2011
i-8 INDEX
NNavigationDestination . . . . . . . . . . . . . . . . . . .7-51Symbols . . . . . . . . . . . . . . . . . . . . . .7-47Using the System . . . . . . . . . . . . .7-39Vehicle Data Recordingand Privacy . . . . . . . . . . . . . . . 13-27
New Vehicle Break-In . . . . . . . . . . 9-18
OObject Detection SystemMessages . . . . . . . . . . . . . . . . . . . . 5-49
Odometer . . . . . . . . . . . . . . . . . . . . . . 5-15Trip . . . . . . . . . . . . . . . . . . . . . . . . . . .5-15
Off-RoadRecovery . . . . . . . . . . . . . . . . . . . . . . 9-8
OilEngine . . . . . . . . . . . . . . . . . . . . . . 10-12Engine Oil Life System . . . . . 10-15Messages . . . . . . . . . . . . . . . . . . . .5-48Pressure Light . . . . . . . . . . . . . . . .5-28
Older Children, Restraints . . . . . 3-41Online Owner Center . . . . . . . . . . 13-4OnStar® System . . . . . . . . . . . . . . . 1-27Open Source Information . . . . . 13-24
OrderingMap DVDs . . . . . . . . . . . . . . . . . . . .7-76Service Publications . . . . . . . . 13-12
Out of Fuel/EngineUnavailable . . . . . . . . . . . . . . . . . . 9-28
OutletsPower . . . . . . . . . . . . . . . . . . . . . . . . . 5-8
Overheating, Engine . . . . . . . . . . 10-23Overview, InfotainmentSystem . . . . . . . . . . . . . . . . . . . . . . . . 7-3
PParkShifting into . . . . . . . . . . . . . . . . . . .9-22Shifting out of . . . . . . . . . . . . . . . . .9-23
ParkingAssist, Ultrasonic . . . . . . . . . . . . .9-43Brake and P (Park)Mechanism Check . . . . . . . . 10-30
Over Things That Burn . . . . . . .9-24Passenger Airbag StatusIndicator . . . . . . . . . . . . . . . . . . . . . 5-20
Passenger Sensing System . . . 3-33Pedestrian Friendly Alert . . . . . . . 6-2Perchlorate MaterialsRequirements, California . . . . . 10-3
PersonalizationVehicle . . . . . . . . . . . . . . . . . . . . . . .5-53
PhoneBluetooth . . . . . . . . . . . . . . . . . . . . .7-85
Plug-In Charging . . . . . . . . . . . . . . 9-49PowerButton . . . . . . . . . . . . . . . . . . . . . . . .9-18Door Locks . . . . . . . . . . . . . . . . . . . 2-11Flows . . . . . . . . . . . . . . . . . . . . . . . . .5-31Mirrors . . . . . . . . . . . . . . . . . . . . . . . .2-15Outlets . . . . . . . . . . . . . . . . . . . . . . . . 5-8Protection, Battery . . . . . . . . . . . . . 6-6Retained Accessory (RAP) . . .9-22Steering Fluid . . . . . . . . . . . . . . . 10-24Windows . . . . . . . . . . . . . . . . . . . . .2-17
Pregnancy, Using SafetyBelts . . . . . . . . . . . . . . . . . . . . . . . . . 3-23
PrivacyRadio FrequencyIdentification (RFID) . . . . . . . 13-27
Problems with RouteGuidance . . . . . . . . . . . . . . . . . . . . 7-76
ProgramCourtesy Transportation . . . . . .13-8

Black plate (9,1)Chevrolet Volt Owner Manual - 2011
INDEX i-9
Proposition 65 Warning,California . . . . . . . . . . . . . . . . . . . . . 10-3
Propulsion PowerMessages . . . . . . . . . . . . . . . . . . . . 5-50
Propulsion System StartCheck . . . . . . . . . . . . . . . . . . . . . . . 10-29
RRadio FrequencyIdentification (RFID) . . . . . . . . 13-27Statement . . . . . . . . . . . . . . . . . . 13-28
RadiosAM-FM Radio . . . . . . . . . . . . . . . . .7-10CD/DVD Player . . . . . . . . . . . . . . .7-18Reception . . . . . . . . . . . . . . . . . . . .7-17Satellite . . . . . . . . . . . . . . . . . . . . . . .7-16
Reading Lamps . . . . . . . . . . . . . . . . . 6-5Rear Seats . . . . . . . . . . . . . . . . . . . . . 3-8Rear Vision Camera (RVC) . . . . 9-46Rearview MirrorAutomatic Dimming . . . . . . . . . . .2-16
Reclining Seatbacks . . . . . . . . . . . . 3-4Recommended Fluids andLubricants . . . . . . . . . . . . . . . . . . . . 11-6
RecordsMaintenance . . . . . . . . . . . . . . . . . . 11-8
Recreational VehicleTowing . . . . . . . . . . . . . . . . . . . . . . 10-87
Regenerative Braking . . . . . . . . . . 9-37Reimbursement Program,GM Mobility . . . . . . . . . . . . . . . . . . 13-5
Remote Keyless Entry (RKE)System . . . . . . . . . . . . . . . . . . . . . . . . 2-3
Remote Start . . . . . . . . . . . . . . . . . . . 2-8Replacement Bulbs . . . . . . . . . . . 10-37Replacement PartsAirbags . . . . . . . . . . . . . . . . . . . . . . .3-40Maintenance . . . . . . . . . . . . . . . . . . 11-7
Replacing Airbag System . . . . . . 3-40Replacing LATCH SystemParts after a Crash . . . . . . . . . . . 3-57
Replacing Safety BeltSystem Parts after a Crash . . . 3-24
Reporting Safety DefectsCanadian Government . . . . . . 13-25General Motors . . . . . . . . . . . . . 13-25U.S. Government . . . . . . . . . . . 13-24
RequirementsElectrical Battery Charging . . .9-56
RestraintsWhere to Put . . . . . . . . . . . . . . . . .3-47
Retained AccessoryPower (RAP) . . . . . . . . . . . . . . . . . 9-22
Ride Control Systems . . . . . . . . . 9-39Electronic Stability (ESC) . . . . .9-39Messages . . . . . . . . . . . . . . . . . . . .5-50
RoadsDriving, Wet . . . . . . . . . . . . . . . . . . . 9-9
Roadside AssistanceProgram . . . . . . . . . . . . . . . . . . . . . . 13-6
Rotation, Tires . . . . . . . . . . . . . . . . 10-61Routing, Engine Drive Belt . . . . . 12-3Running the Vehicle WhileParked . . . . . . . . . . . . . . . . . . . . . . . 9-31
SSafety Belts . . . . . . . . . . . . . . . . . . . 3-10Care . . . . . . . . . . . . . . . . . . . . . . . . . .3-24Extender . . . . . . . . . . . . . . . . . . . . . .3-23How to Wear Safety BeltsProperly . . . . . . . . . . . . . . . . . . . . .3-13
Lap-Shoulder Belt . . . . . . . . . . . .3-19Reminders . . . . . . . . . . . . . . . . . . . .5-18Replacing after a Crash . . . . . .3-24Use During Pregnancy . . . . . . . .3-23

Black plate (10,1)Chevrolet Volt Owner Manual - 2011
i-10 INDEX
Safety Defects ReportingCanadian Government . . . . . . 13-25General Motors . . . . . . . . . . . . . 13-25U.S. Government . . . . . . . . . . . 13-24
Safety Locks . . . . . . . . . . . . . . . . . . . 2-12Safety System Check . . . . . . . . . . 3-23Satellite Radio . . . . . . . . . . . . . . . . . 7-16Scheduled Maintenance . . . . . . . 11-2Scheduling Appointments . . . . . . 13-8Sealant Kit, Tire . . . . . . . . . . . . . . 10-71SeatsAdjustment, Front . . . . . . . . . . . . . . 3-4Head Restraints . . . . . . . . . . . . . . . 3-2Heated Front . . . . . . . . . . . . . . . . . . 3-6Rear . . . . . . . . . . . . . . . . . . . . . . . . . . . 3-8Reclining Seatbacks . . . . . . . . . . . 3-4
Securing ChildRestraints . . . . . . . . . . . . . . 3-57, 3-60
SecurityLight . . . . . . . . . . . . . . . . . . . . . . . . . .5-29Vehicle . . . . . . . . . . . . . . . . . . . . . . .2-13
ServiceAccessories andModifications . . . . . . . . . . . . . . . .10-4
Doing Your Own Work . . . . . . . .10-8Engine Soon Light . . . . . . . . . . . .5-21
Service (cont.)Maintenance Records . . . . . . . . 11-8Maintenance, GeneralInformation . . . . . . . . . . . . . . . . . . 11-1
Parts Identification Label . . . . .12-1Publications OrderingInformation . . . . . . . . . . . . . . . . 13-12
Scheduling Appointments . . . . .13-8Vehicle Messages . . . . . . . . . . . .5-51
Service Electric ParkingBrake Light . . . . . . . . . . . . . . . . . . . 5-25
Servicing the Airbag . . . . . . . . . . . 3-38ShiftingInto Park . . . . . . . . . . . . . . . . . . . . . .9-22Out of Park . . . . . . . . . . . . . . . . . . .9-23
Signals, Turn andLane-Change . . . . . . . . . . . . . . . . . 6-4
Specifications andCapacities . . . . . . . . . . . . . . . . . . . . 12-2
Speedometer . . . . . . . . . . . . . . . . . . 5-15Sport Mode Light . . . . . . . . . . . . . . 5-26StartCheck PropulsionSystem . . . . . . . . . . . . . . . . . . . . 10-29
Remote . . . . . . . . . . . . . . . . . . . . . . . . 2-8Starting and Stopping theVehicle . . . . . . . . . . . . . . . . . . . . . . . 9-20
Starting the VehicleMesssages . . . . . . . . . . . . . . . . . . . 5-52
Status ScreensCharging . . . . . . . . . . . . . . . . . . . . .9-52
Steering . . . . . . . . . . . . . . . . . . . . . . . . 9-6Fluid, Power . . . . . . . . . . . . . . . . 10-24Wheel Adjustment . . . . . . . . . . . . . 5-6Wheel Controls . . . . . . . . . . . . . . . . 5-6
Storage AreasCargo Cover . . . . . . . . . . . . . . . . . . . 4-2Floor Console . . . . . . . . . . . . . . . . . 4-1Glove Box . . . . . . . . . . . . . . . . . . . . . 4-1Instrument Panel . . . . . . . . . . . . . . 4-1Umbrella . . . . . . . . . . . . . . . . . . . . . . . 4-2
Storing the Tire Sealantand Compressor Kit . . . . . . . . . 10-78
Stuck Vehicle . . . . . . . . . . . . . . . . . . 9-13Sun Visors . . . . . . . . . . . . . . . . . . . . . 2-19Symbols . . . . . . . . . . . . . . . . . . . . . . . . . . ivSymbols, Navigation . . . . . . . . . . . 7-47SystemInfotainment . . . . . . . . . . . . . . . . . . . 7-2
System Needs Service, If . . . . . . 7-76System Operation . . . . . . . . . . . . . 9-24

Black plate (11,1)Chevrolet Volt Owner Manual - 2011
INDEX i-11
TText Telephone (TTY) Users . . . 13-4Theft-Deterrent Systems . . . . . . . 2-14Immobilizer . . . . . . . . . . . . . . . . . . .2-14
Time . . . . . . . . . . . . . . . . . . . . . . . . . . . 5-42TiresBuying New Tires . . . . . . . . . . . 10-63Chains . . . . . . . . . . . . . . . . . . . . . . 10-69Designations . . . . . . . . . . . . . . . 10-50Different Size . . . . . . . . . . . . . . . 10-65If a Tire Goes Flat . . . . . . . . . . 10-69Inflation Monitor System . . . . 10-57Inspection . . . . . . . . . . . . . . . . . . 10-61Lifting the Vehicle . . . . . . . . . . . . .10-5Messages . . . . . . . . . . . . . . . . . . . .5-52Pressure Light . . . . . . . . . . . . . . . .5-27Pressure Monitor System . . . 10-55Rotation . . . . . . . . . . . . . . . . . . . . 10-61Sealant andCompressor Kit . . . . . . . . . . . 10-71
Sealant and CompressorKit, Storing . . . . . . . . . . . . . . . . 10-78
Sidewall Labeling . . . . . . . . . . . 10-49Terminology andDefinitions . . . . . . . . . . . . . . . . . 10-51
Tires (cont.)Uniform Tire QualityGrading . . . . . . . . . . . . . . . . . . . 10-65
Wheel Alignment and TireBalance . . . . . . . . . . . . . . . . . . . 10-67
Wheel Replacement . . . . . . . . 10-67When It Is Time for NewTires . . . . . . . . . . . . . . . . . . . . . . 10-62
Winter . . . . . . . . . . . . . . . . . . . . . . 10-49Total Vehicle Range . . . . . . . . . . . 5-17TowingGeneral Information . . . . . . . . . .9-62Recreational Vehicle . . . . . . . . 10-87Vehicle . . . . . . . . . . . . . . . . . . . . . 10-84
TractionControl System (TCS) . . . . . . . .9-37Control System (TCS)/StabiliTrak® Light . . . . . . . . . . . .5-27
Transportation Program,Courtesy . . . . . . . . . . . . . . . . . . . . . 13-8
Trip Odometer . . . . . . . . . . . . . . . . . 5-15Turn and Lane-ChangeSignals . . . . . . . . . . . . . . . . . . . . . . . . 6-4
UUltrasonic Parking Assist . . . . . . 9-43Umbrella Storage . . . . . . . . . . . . . . . 4-2Uniform Tire QualityGrading . . . . . . . . . . . . . . . . . . . . . 10-65
Universal Remote System . . . . . 5-60Operation . . . . . . . . . . . . . . . . . . . . .5-63Programming . . . . . . . . . . . . . . . . .5-60
Using This Manual . . . . . . . . . . . . . . . . iv
VVehicleCanadian Owners . . . . . . . . . . . . . . . iiiControl . . . . . . . . . . . . . . . . . . . . . . . . 9-5IdentificationNumber (VIN) . . . . . . . . . . . . . . .12-1
Load Limits . . . . . . . . . . . . . . . . . . .9-14Messages . . . . . . . . . . . . . . . . . . . .5-45Personalization . . . . . . . . . . . . . . .5-53Positioning . . . . . . . . . . . . . . . . . . .7-75Security . . . . . . . . . . . . . . . . . . . . . .2-13Speed Messages . . . . . . . . . . . . .5-53Starting and Stopping . . . . . . . . .9-20Total Range . . . . . . . . . . . . . . . . . .5-17Towing . . . . . . . . . . . . . . . . . . . . . . 10-84

Black plate (12,1)Chevrolet Volt Owner Manual - 2011
i-12 INDEX
Vehicle CareStoring the Tire Sealantand Compressor Kit . . . . . . . 10-78
Tire Pressure . . . . . . . . . . . . . . . 10-54Vehicle IdentificationService Parts IdentificationLabel . . . . . . . . . . . . . . . . . . . . . . . .12-1
Ventilation, Air . . . . . . . . . . . . . . . . . . 8-9Visors . . . . . . . . . . . . . . . . . . . . . . . . . 2-19Voice Recognition . . . . . . . . . . . . . 7-77Voltage Devices andWiring . . . . . . . . . . . . . . . . . . . . . . . 10-37
WWarningBrake System Light . . . . . . . . . . .5-24
Warning Lights, Gauges, andIndicators . . . . . . . . . . . . . . . . . . . . . 5-9
Warnings . . . . . . . . . . . . . . . . . . . . . . . . . ivCautions and Danger . . . . . . . . . . . .ivHazard Flashers . . . . . . . . . . . . . . . 6-4
Washer Fluid . . . . . . . . . . . . . . . . . 10-24Washer Fluid Messages . . . . . . . 5-53
WheelsAlignment and TireBalance . . . . . . . . . . . . . . . . . . . 10-67
Different Size . . . . . . . . . . . . . . . 10-65Replacement . . . . . . . . . . . . . . . 10-67
When It Is Time for NewTires . . . . . . . . . . . . . . . . . . . . . . . . 10-62
Where to Put the Restraint . . . . 3-47Windows . . . . . . . . . . . . . . . . . . . . . . 2-16Power . . . . . . . . . . . . . . . . . . . . . . . .2-17
WindshieldWiper/Washer . . . . . . . . . . . . . . . . . 5-7
WinterDriving . . . . . . . . . . . . . . . . . . . . . . . . 9-11
Winter Tires . . . . . . . . . . . . . . . . . . 10-49Wiper Blade Replacement . . . . 10-31Wiring, High VoltageDevices . . . . . . . . . . . . . . . . . . . . . 10-37