BoardPro Quick Tips
59
Quick Tips BoardPro iPhone
Transcript of BoardPro Quick Tips

Quick TipsBoardPro
iPhone

Support >
Community Blog >
Video Tutorials >

00: Hand Gestures
01: Start a New Board
02: Your Boards
03: Basic Controls
04: Adding Images
05: Grids & Backgrounds
06: Layers
07: Image Toolbar
08: Products Library
09: Your Custom Library
10: Pinterest
11: Ava (Automated Visual Assembly)
12: AR Furniture
13: Presentation Mode
14: Export
Select any chapter below to begin.
Morpholio Quick TipsBoardPro iPhone

00: Hand Gestures
One Finger Tap
One Finger Press & Hold One Finger Swipe
One Finger Press & Drag Two Finger Pinch
Product SelectionTool SelectionEdit Board or Library Title
Move Layer Position Organize Library FoldersDelete Library Folders
Move Image on BoardPan Board
ZoomScale Images
Basic Hand Gestures
Enjoy these intuitive gestures to work with ease.
How to video >

Back to Top
00: Hand Gestures
Two Finger Tap
Three Finger Tap
Undo Last Action
Redo Last Action
AdvancedHandGesturesWork like a pro with these advanced gestures to enhance and simplify your mood-boarding experience!
Two Finger Press & DragMove & Resize ImagesRotate ImagesPan Board

Back to Top
01: Start a New Board
Blank
Sample
Import
Start with a completely blank board.
Start with an inspiration board curated by Morpholio.
Import a .morpholioboard file from cloud storage.

Back to Top
01: Start a New Board
FoldersCreate a new folder.
You can organize boards by placing them inside folders. Folders can also be placed inside folders.
Note: Learn more about folders in Your Boards section.

Back to Top
02: Your Boards
Board Management ModeTap “Select” to enter Edit Mode. Tap “Done” when finished. In this mode, you can duplicate, copy, paste, group, or delete your boards.

Back to Top
02: Your Boards
Arrange Projects
Change Project Title
Press and hold boards to rearrange.
Tap the project title to rename your board.

Back to Top
02: Your Boards
Exit Board Management
Select Multiple Boards
Edit Boards
Tap “Done” to close project management.
Tap the circle to select single or multiple boards to manage.
Export, Copy, paste, group, or delete boards.

Back to Top
02: Your Boards
Move Boards BackPress and hold, then drag board to “Back to ...” to move board to outside folder.
Return to Outside FolderTap to return to the outside folder.
Back to Top
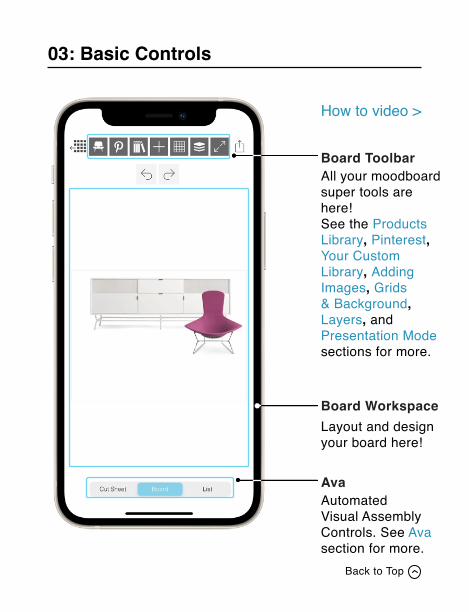
03: Basic Controls
Board Toolbar
Ava
Board Workspace
All your moodboard super tools are here! See the Products Library, Pinterest, Your Custom Library, Adding Images, Grids & Background, Layers, and Presentation Mode sections for more.
Automated Visual Assembly Controls. See Ava section for more.
Layout and design your board here!
How to video >

Back to Top
03: Basic Controls
Resize ImagesResize your image using the corner and side nodes or rotate it using the rotation antenna.

Back to Top
03: Basic Controls
Multi-SelectToggle Multi-Select on to move, copy, scale, rotate, or delete multiple items at the same time.
When you’re done editing multiple items, tap Single-Select to only chose one item at a time.

Back to Top
03: Basic Controls
Export
Return to Project Page
Save and share your boards, cut sheets, and lists. See Export section for more.
Exit current Board and return to the project page.

Back to Top
04: Adding Images
Add ItemsAdd images from your Photos Library, Camera Cloud Drives, or use the Web Clipper.
You can also add Swatches, Drawings, and Text!
Graphics How to video >Drawing How to video >

Back to Top
04: Adding Images
Image SourcesAdd images from your Photos Library, Device Camera, or Cloud Drives.
Use the Web Clipper to crop images from any website!
Add Swatches, Text, Drawing, and Entourage to your Boards.

Back to Top
04: Adding Images
Activate Web Clipper
Clip Website Image
Tap red crop icon to activate clipping mode.
Tap the red check again to insert your web clip into your board!
Press and drag red dots to select the area to clip.

Back to Top
04: Adding Images
Add Swatch
Change Swatch Shape
Swatch Label
Color Selector
Insert swatch into board.
Swipe or tap arrows to switch shapes.
Select RGB, CMYK, or Hex code to add to swatch.
Choose a color for your swatch.

Back to Top
04: Adding Images
Input Text
Edit Text Appearance
Add titles, comments, and descriptions to your board!
Edit text color and font.
When you’re done, tap the check to confirm your text!

Back to Top
04: Adding Images
Sketch!
Clip Website Image
Use Apple Pencil or one finger to press & drag to sketch over your board.
Edit the color, line weight, and line type of your lines.
You can also undo or redo your drawing. When you’re done sketching, tap the check to insert your sketch into your board.

Back to Top
04: Adding Images
EntourageChoose from Morpholio-designed graphics to add to your board including people, arrows, shapes, and numbers.

Back to Top
05: Grids & Backgrounds
Canvas & Grid SettingsTap to edit the canvas size, background, and grid lines for your board.
How to video >

Back to Top
05: Grids & Backgrounds
Custom Sizes
Background
Standard Sizes
Adjust crop marks to a perfectly desired size.
Select from a variety of textures, surfaces & colors.
Adjust crop marks to a perfectly desired size.

Back to Top
05: Grids & Backgrounds
Grid Spacing X & Y
Accept or Reject
Adjust your grid as desired in horizontal or vertical lines.
Confirm or cancel changes made to your grid.

Back to Top
06: Layers
Layer ManagerTap to show or hide your layer manager.
Note: Each image on your board is stored as a layer.
How to video >

Back to Top
06: Layers
Layer Visibility
Location Lock
Organize Layers
Toggle individual layer visibility on and off.
Lock or unlock the location of each layer.
Press & hold to pop up layer. Then drag up or down to desired location.

Back to Top
07: Image Toolbar
Activate Image Toolbar
Image Toolbar
Tap on an image to activate the Image Toolbar.
How to video >

Back to Top
Delete
Duplicate
Change Image Order
Crop Image
Delete the selected image.
Create a copy of the selected image.
Move the selected image above or below other images on your board.
Edit the boundaries of the selected image.
07: Image Toolbar
Back to Top
07: Image Toolbar
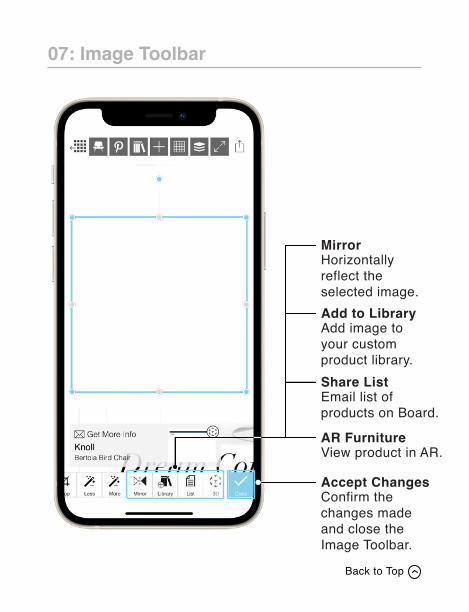
Share List
AR Furniture
Mirror
Add to Library
Accept Changes
Email list of products on Board.
View product in AR.
Horizontally reflect the selected image.
Add image to your custom product library.
Confirm the changes made and close the Image Toolbar.

Back to Top
07: Image Toolbar
Magic WandTap to remove white background or to return to original image.

Back to Top
08: Products Library
Open Products LibraryTap to discover a large selection of products specially curated by Morpholio Board.
How to video >
Back to Top
08: Products Library
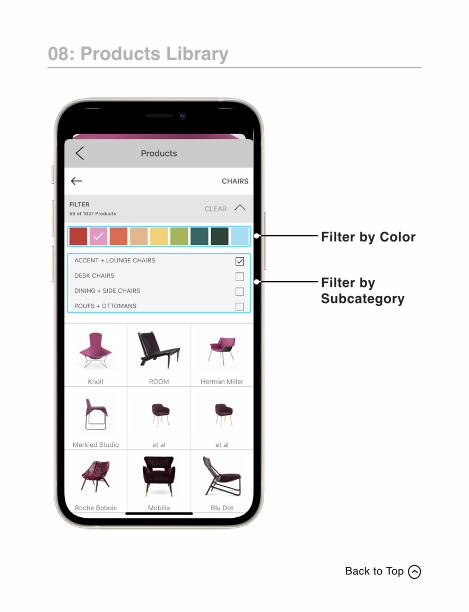
Filter by Color
Filter by Subcategory

Back to Top
08: Products Library
Product Info
Actions
Tap product to popup product info.
Directly add product to board or library, pin, get a quote & visit the product website.

Back to Top
09: Your Custom Library
Open Your Custom Library
Add Products to Library
You can save, group, and organize your favorite products for easy access.
Tap to add selected product to your custom library.
How to video >

Back to Top
09: Your Custom Library
Move or Delete Swipe left on the collection title. Then, tap arrows to move the collection up & down. Tap the “x” to delete collection.
Tap to create a new group of products.
New Collection

Back to Top
09: Your Custom Library
Change Collection Title
Arrange Products
Tap the text to name or rename any collection.
Press & hold, then drag products to rearrange the order.
Hint: You can also drag the product over to the Pinterest icon to add the image to your Pinterest.

Back to Top
10: Pinterest
Pinterest PortalTap to view your Pinterest pins and add pins to your board in Morpholio Board.
How to video >

Back to Top
10: Pinterest
Login + Go to Pins Log in to Pinterest using your account info.
Note: If you do not see your “Secret Boards” after refreshing, please Logout, then...Login again. Remember to accept the permissions in order to access your “Secret Boards.”

Back to Top
10: Pinterest
Boards and Pins
Refresh
Navigate through your Pinterest Boards and Pins including your Secret Boards.
When you are inside your “Boards,” pull down to REFRESH! You will see a red scroll indicating that Board is retrieving the latest changes to your Pinterest account and making your boards viewable.

Back to Top
10: Pinterest
Add to Board or Your LibraryAdd your pins to your Board or your custom library.

Back to Top
11: Ava (Automated Visual Assembly)
Board Mode
List Mode
Cut Sheet Mode
Use this mode for the majority of your design and editing. You can delete products in Board mode.
Use this mode to send a list of Board products including web addresses and notes to clients, contractors or teams.
Use this mode to send a book of Board products including web addresses and notes to clients, contractors or teams.

Back to Top
Tap to hide or show products in cut sheets. Note: Hidden products will be moved to the bottom.
11: Ava (Automated Visual Assembly)
Layout Options
Data Controls
Product Visibility
Use these buttons to view single cut sheets or grid layouts.
Use these buttons to hide or show the data you need.
Cut Sheet How to video >

Back to Top
11: Ava (Automated Visual Assembly)
Export Cut SheetsSee Export section for more.
Organize Cut Sheets
Cut Sheet Information
Press and hold to pop up product. Then drag up or down to desired location.
Tap on text or text box to modify, add or remove product information.
Back to Top
11: Ava (Automated Visual Assembly)
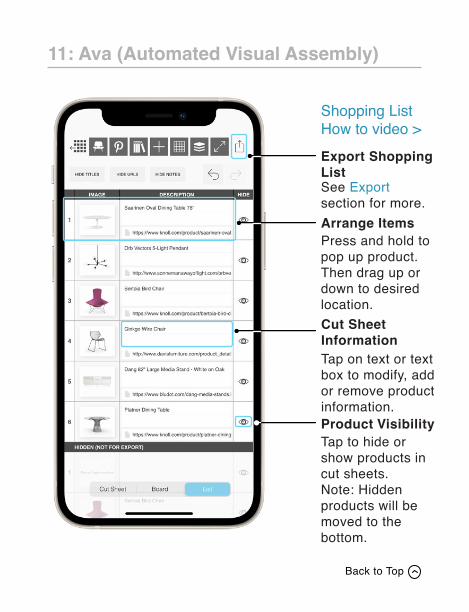
Arrange Items
Cut Sheet Information
Press and hold to pop up product. Then drag up or down to desired location.
Tap on text or text box to modify, add or remove product information.
Export Shopping ListSee Export section for more.
Tap to hide or show products in cut sheets. Note: Hidden products will be moved to the bottom.
Product Visibility
Shopping ListHow to video >

Back to Top
12: AR Furniture
How to video >
Launch AR FurnitureTap AR icon on selected products to activate AR Furniture mode.
*Note: Camera Permissions must be turned on for Board Pro in your Device Settings App for AR Furniture to work.

Back to Top
Exit AR Furniture Mode.
12: AR Furniture
View AR Furniture
Object Mode
Exit
Press & drag one finger to rotate object. Press & drag two fingers to pan. Pinch with two fingers to zoom in and out.
Hint: Notice the incredible detail of the fabric and material texture!
View AR Products in white space.

Back to Top
12: AR Furniture
AR Furniture
AR Mode
Step 1: Pan camera back and forth to locate ground plane.
Step 2: Tap screen to lock object in place.
Tap AR to view AR Furniture in place.

Back to Top
12: AR Furniture
AR FurnitureStep 3: Press & drag one finger to move object along the ground plane. Press & twist two fingers to rotate object until it is in the desired position.
Now you can walk around and see the product in your space!

Back to Top
13: Presentation Mode
How to video >
Board Mode
Board Presentation
Tap arrows for presentation mode. This will hide all toolbars and functionality.
Back to Top
13: Presentation Mode
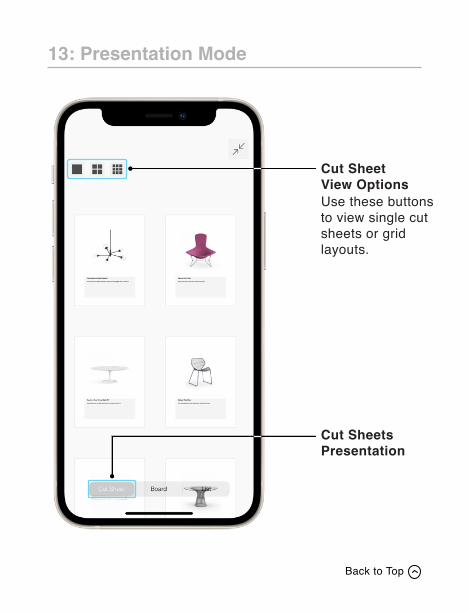
Cut Sheet View Options
Cut Sheets Presentation
Use these buttons to view single cut sheets or grid layouts.

Back to Top
13: Presentation Mode
Shopping List Presentation

Back to Top
14: Export
01. Select/Done
02. Select Boards
03. ExportYou can export your Boards as .morpholioboardfiles that can be opened and edited on any Apple device!
Tap “Select” to pick which boards you want to export.
Tap board that you want to export.
Export Editable Files

Back to Top
14: Export
How to video >
Export
Export ModeYour current mode will determine your export options.
Tap this button to export your Board, Cut Sheets, or Shopping List.

Back to Top
14: Export
Export BoardExport with 4K for High Resolution.
Share or export your board as a JPG or PSD to Photos, iCloud, cloud storage, Mail, or AirDrop to another device.

Back to Top
14: Export
Export Cut SheetsShare or export your cut sheets as an PDF to iCloud, cloud storage, Mail, or AirDrop to another device.

Back to Top
14: Export
Export ListShare or export your product list as an Excel file to iCloud, cloud storage, Mail, or AirDrop to another device.

Instagram >
YouTube >
Pinterest >
Quick TipsBoardPro
Thank you.