
BNB-SB0114
5
Bead&Button Online Project 1 © 2013 Kalmbach Publishing Co. This material may not be reproduced in any form without permission from the publisher. by Connie Whittaker The 2014 Bead&Button Show commemorative bead takes center stage in this easy and oh-so-wearable necklace. MODIFIED RIGHT-ANGLE WEAVE Necklace Everyday elegance
Transcript of BNB-SB0114

8/9/2019 BNB-SB0114
http://slidepdf.com/reader/full/bnb-sb0114 1/4Bead&Button Online Project 1
© 2013 Kalmbach Publishing Co. This material may not bereproduced in any form without permission from the publisher.
by Connie Whittaker
The 2014 Bead&Button Show commemorativebead takes center stage in this easy andoh-so-wearable necklace.
MODIFIED RIGHT-ANGLE WEAVE
Necklace
Everyday elegance
8/9/2019 BNB-SB0114
http://slidepdf.com/reader/full/bnb-sb0114 2/4
a
b
c
a
b
c
d
e
f
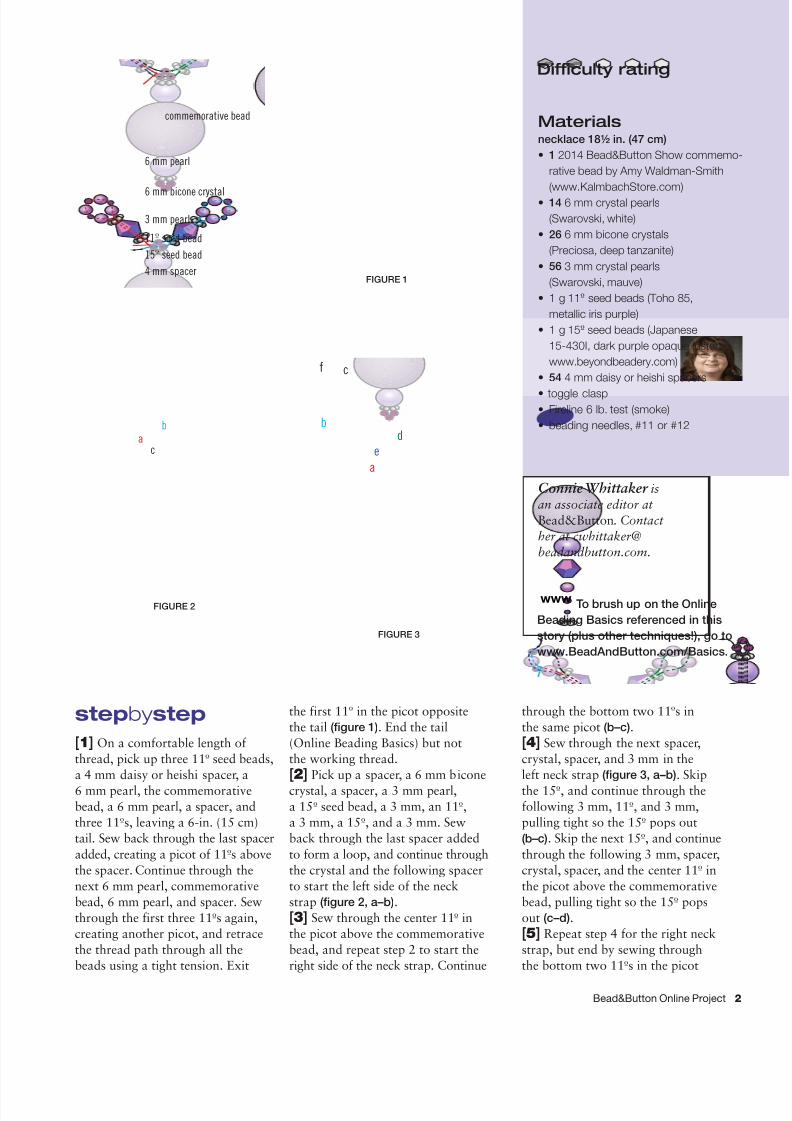
commemorative bead
6 mm pearl
6 mm bicone crystal
3 mm pearl
110 seed bead
150 seed bead
4 mm spacer
Difficulty rating
Bead&Button Online Project 2
Materialsnecklace 18½ in. (47 cm)
• 1 2014 Bead&Button Show commemo-
rative bead by Amy Waldman-Smith
(www.KalmbachStore.com)
• 14 6 mm crystal pearls
(Swarovski, white)
• 26 6 mm bicone crystals
(Preciosa, deep tanzanite)
• 56 3 mm crystal pearls
(Swarovski, mauve)
• 1 g 110 seed beads (Toho 85,
metallic iris purple)
• 1 g 150 seed beads (Japanese
15-430I, dark purple opaque luster;
www.beyondbeadery.com)
• 54 4 mm daisy or heishi spacers
• toggle clasp• Fireline 6 lb. test (smoke)
• beading needles, #11 or #12
Connie Whittaker is
an associate editor at
Bead&Button. Contact
her at cwhittaker@
beadandbutton.com.
stepby step
[1] On a comfortable length of
thread, pick up three 110 seed beads,
a 4 mm daisy or heishi spacer, a
6 mm pearl, the commemorativebead, a 6 mm pearl, a spacer, and
three 110s, leaving a 6-in. (15 cm)
tail. Sew back through the last spacer
added, creating a picot of 110s above
the spacer. Continue through the
next 6 mm pearl, commemorative
bead, 6 mm pearl, and spacer. Sew
through the first three 110s again,
creating another picot, and retrace
the thread path through all the
beads using a tight tension. Exit
the first 110 in the picot opposite
the tail (figure 1). End the tail
(Online Beading Basics) but not
the working thread.
[2] Pick up a spacer, a 6 mm bicone
crystal, a spacer, a 3 mm pearl,a 150 seed bead, a 3 mm, an 110,
a 3 mm, a 150, and a 3 mm. Sew
back through the last spacer added
to form a loop, and continue through
the crystal and the following spacer
to start the left side of the neck
strap (figure 2, a–b).
[3] Sew through the center 110 in
the picot above the commemorative
bead, and repeat step 2 to start the
right side of the neck strap. Continue
www To brush up on the Online
Beading Basics referenced in this
story (plus other techniques!), go to
www.BeadAndButton.com/Basics.
FIGURE 2
FIGURE 3
FIGURE 1
through the bottom two 110s in
the same picot (b–c).
[4] Sew through the next spacer,
crystal, spacer, and 3 mm in the
left neck strap (figure 3, a–b). Skip
the 150, and continue through thefollowing 3 mm, 110, and 3 mm,
pulling tight so the 150 pops out
(b–c). Skip the next 150, and continue
through the following 3 mm, spacer,
crystal, spacer, and the center 110 in
the picot above the commemorative
bead, pulling tight so the 150 pops
out (c–d).
[5] Repeat step 4 for the right neck
strap, but end by sewing through
the bottom two 110s in the picot

8/9/2019 BNB-SB0114
http://slidepdf.com/reader/full/bnb-sb0114 3/4
a
b
c
Bead&Button Online Project 3
above the commemorative bead
(d–e). Sew through the beadwork
to exit the center 110 in the loop
on the left neck strap (e–f).
[6] Pick up two 110s, and sew
through the 110 your thread exitedat the start of this step. Retrace the
thread path, and continue through
the first 110 added (figure 4).
[7] Pick up a spacer, a crystal,
a spacer, a 6 mm pearl, a spacer,
a crystal, a spacer, and three 110s.
Sew back through the spacer,
creating a picot of 110s. Continue
through the next crystal, spacer,
6 mm pearl, spacer, crystal, spacer,
and the 110 adjacent to the 110 your
thread exited at the start of this step.Sew through the following two 110s
(figure 5), and pull tight. Retrace the
thread path, and exit the center 110
in the picot added in this step.
[8] Pick up a 3 mm, a 150, a 3 mm,
an 110, a 3 mm, a 150, and a 3 mm,
and sew through the 110 your thread
exited at the start of this step to
form a loop (figure 6, a–b).
[9] Retrace the thread path through
the loop, skipping the 150s and
pulling tight so the 150s pop out.
Continue through the beadwork toexit the center 110 in the loop (b–c).
[10] Repeat steps 6–9 for the
remainder of the neck strap, ending
with a loop as in steps 8 and 9.
End and add thread (Online Basics)
as needed. Our neck strap has a
total of seven loops on each side.
Do not end the working thread.
[11] Add a comfortable length of
thread to the right side of the neck
strap, and exit the center 110 in the
FIGURE 4
FIGURE 5
FIGURE 6
3 questions with Amy Waldman-Smith
Q: I understand you usually name your beads – does this one have a name?
A: This bead is part of my current series of work, which is entitled “Ottoman
Beads.” This bead in particular is called “Purple Lupine Ottoman Bead.”
Q: What was the inspiration for this bead?
A: My Ottoman series is strongly influenced by Moorish architecture, ceramics,
and nature. I am drawn to the recurring motifs of arches, flowers, and calligraphyfound in Moorish traditions; the flowing lines and intersections of color and
pattern in ceramics; and the intricate patterns found in the blossom of a flower.
More specifically, both the purple color
and the shapes used in this bead remind
me of one of my favorite flowers – the
purple lupine.
Q: What was the hardest aspect
of making this bead?
A: The most difficult aspect of making
this bead is in making it again and again.
I am very particular and want the first
10 beads to be as exact and perfect as
the last 10 beads. It is a totally different
mind-set for me to create the same
bead so many times because I am used
to creating one-of-a-kind beads. It has
been a wonderful experience for me.
To see more of Amy’s work, visit her
website, www.amywaldmansmith.com.
end loop. Repeat steps 6–10 for this
neck strap.
[12] With the working thread from
a neck strap, pick up three 110s,
half of the clasp, and three 110s.
Sew through the 110 your threadis exiting. Add additional 110s if
needed to allow the toggle bar to
slide easily through the toggle ring.
Retrace the thread path several
times, and end the thread. Repeat
this step to attach the other half
of the clasp. w
Amy Waldman-Smith

8/9/2019 BNB-SB0114
http://slidepdf.com/reader/full/bnb-sb0114 4/4
Get Over 100 New
Projects This Year
Subscribe to Bead&Button Today
Subscribe today to...• Learn new techniques!
• Expand your beading skills!
• Get scores of projects rangingfrom basic to advanced!
Projects use a variety of stitches,including peyote, herringbone,ladder, bead crochet, and more.
All projects are fully tested andinclude instructions you cancount on!
Plus, subscribers have exclusiveonline access! Post photos ofyour work in the SubscriberGallery and download freeprojects and patterns.
Bead&Buttonmagazine is your complete
beading resource.
CIR-ADH-09X1598RH
Visit www.BeadAndButton.com/promoEnter promotional code: IK87D
Or call 1-800-533-6644Mon. – Fri., 8:30am – 4:30pm Central Time. Outside the U.S. and Canada, call 262-796-8776, x661.