Chefsache Risikomanagement BMC Baumann Management Consulting, München BMC.
Upload
chanoc5000Category
view
391download
8
www.bmc.com
BMC Impact Solutions
Service Modeling and Publishing Guide
Supporting
BMC Impact Service Model Editor 7.3BMC Impact Publishing Server 7.3
February 2009

Contacting BMC Software
You can access the BMC Software website at http://www.bmc.com. From this website, you can obtain information about the company, its products, corporate offices, special events, and career opportunities.
United States and Canada
Address BMC SOFTWARE INC2101 CITYWEST BLVDHOUSTON TX 77042-2827 USA
Telephone 713 918 8800 or800 841 2031
Fax 713 918 8000
Outside United States and Canada
Telephone (01) 713 918 8800 Fax (01) 713 918 8000
© Copyright 2009 BMC Software, Inc.
BMC, BMC Software, and the BMC Software logo are the exclusive properties of BMC Software, Inc., are registered with the U.S. Patent and Trademark Office, and may be registered or pending registration in other countries. All other BMC trademarks, service marks, and logos may be registered or pending registration in the U.S. or in other countries. All other trademarks or registered trademarks are the property of their respective owners.
Oracle is a registered trademark of Oracle Corporation.
All other trademarks belong to their respective companies.
BMC Software considers information included in this documentation to be proprietary and confidential. Your use of this information is subject to the terms and conditions of the applicable End User License Agreement for the product and the proprietary and restricted rights notices included in this documentation.
Restricted rights legend
U.S. Government Restricted Rights to Computer Software. UNPUBLISHED -- RIGHTS RESERVED UNDER THE COPYRIGHT LAWS OF THE UNITED STATES. Use, duplication, or disclosure of any data and computer software by the U.S. Government is subject to restrictions, as applicable, set forth in FAR Section 52.227-14, DFARS 252.227-7013, DFARS 252.227-7014, DFARS 252.227-7015, and DFARS 252.227-7025, as amended from time to time. Contractor/Manufacturer is BMC SOFTWARE INC, 2101 CITYWEST BLVD, HOUSTON TX 77042-2827, USA. Any contract notices should be sent to this address.

iii
Customer support
You can obtain technical support by using the BMC Software Customer Support website or by contacting Customer Support by telephone or e-mail. To expedite your inquiry, see “Before contacting BMC.”
Support website
You can obtain technical support from BMC 24 hours a day, 7 days a week at http://www.bmc.com/support_home. From this website, you can
■ read overviews about support services and programs that BMC offers■ find the most current information about BMC products■ search a database for issues similar to yours and possible solutions■ order or download product documentation■ download products and maintenance■ report an issue or ask a question■ subscribe to receive proactive e-mail alerts when new product notices are released■ find worldwide BMC support center locations and contact information, including e-mail addresses, fax numbers, and
telephone numbers
Support by telephone or e-mail
In the United States and Canada, if you need technical support and do not have access to the web, call 800 537 1813 or send an e-mail message to [email protected]. (In the subject line, enter SupID:<yourSupportContractID>, such as SupID:12345). Outside the United States and Canada, contact your local support center for assistance.
Before contacting BMC
Have the following information available so that Customer Support can begin working on your issue immediately:
■ product information
— product name— product version (release number)— license number and password (trial or permanent)
■ operating system and environment information
— machine type— operating system type, version, and service pack or other maintenance level such as PUT or PTF— system hardware configuration— serial numbers— related software (database, application, and communication) including type, version, and service pack or
maintenance level
■ sequence of events leading to the issue
■ commands and options that you used
■ messages received (and the time and date that you received them)
— product error messages— messages from the operating system, such as file system full— messages from related software

iv BMC Impact Solutions Service Modeling and Publishing Guide

ContentsChapter 1 Designing a service model 1
Service model design process. . . . . . . . . . . . . . . . . . . . . . . . . . . . . . . . . . . . . . . . . . . . . . . . 2Defining business goals for the service model . . . . . . . . . . . . . . . . . . . . . . . . . . . . . . . . . 3Decomposing a business service . . . . . . . . . . . . . . . . . . . . . . . . . . . . . . . . . . . . . . . . . . . . . 4Defining the service catalog . . . . . . . . . . . . . . . . . . . . . . . . . . . . . . . . . . . . . . . . . . . . . . . . . 6Defining the service model . . . . . . . . . . . . . . . . . . . . . . . . . . . . . . . . . . . . . . . . . . . . . . . . . . 7
Defining a component instance . . . . . . . . . . . . . . . . . . . . . . . . . . . . . . . . . . . . . . . . . . . 7Defining a new component class for a component type . . . . . . . . . . . . . . . . . . . . . . 8Analyzing a component’s critical failures . . . . . . . . . . . . . . . . . . . . . . . . . . . . . . . . . . 8Determining a component’s relationship and dependencies . . . . . . . . . . . . . . . . . 10Determining the organization of the modeled relationships . . . . . . . . . . . . . . . . . 10Identifying a component’s critical events and their sources. . . . . . . . . . . . . . . . . . 11Displaying business key performance indicators (KPIs) . . . . . . . . . . . . . . . . . . . . . 13
Service model design considerations . . . . . . . . . . . . . . . . . . . . . . . . . . . . . . . . . . . . . . . . 14Determining cell topology for the service model . . . . . . . . . . . . . . . . . . . . . . . . . . . 14Component property updates . . . . . . . . . . . . . . . . . . . . . . . . . . . . . . . . . . . . . . . . . . . 15
Chapter 2 Understanding a service model 17
Sources of objects in a service model . . . . . . . . . . . . . . . . . . . . . . . . . . . . . . . . . . . . . . . . 18Rules for service model data modification and deletion . . . . . . . . . . . . . . . . . . . . . 20Using the BMC Atrium CMDB as a source of service model data. . . . . . . . . . . . . 20Using BMC Performance Manager . . . . . . . . . . . . . . . . . . . . . . . . . . . . . . . . . . . . . . . 21Using Direct Feed . . . . . . . . . . . . . . . . . . . . . . . . . . . . . . . . . . . . . . . . . . . . . . . . . . . . . 21Precedences . . . . . . . . . . . . . . . . . . . . . . . . . . . . . . . . . . . . . . . . . . . . . . . . . . . . . . . . . . 22
Service components . . . . . . . . . . . . . . . . . . . . . . . . . . . . . . . . . . . . . . . . . . . . . . . . . . . . . . . 22Component classes and types . . . . . . . . . . . . . . . . . . . . . . . . . . . . . . . . . . . . . . . . . . . 23Service component instances . . . . . . . . . . . . . . . . . . . . . . . . . . . . . . . . . . . . . . . . . . . . 23Component status and substatus . . . . . . . . . . . . . . . . . . . . . . . . . . . . . . . . . . . . . . . . 24Component status computation . . . . . . . . . . . . . . . . . . . . . . . . . . . . . . . . . . . . . . . . . 25
Service model component types . . . . . . . . . . . . . . . . . . . . . . . . . . . . . . . . . . . . . . . . . . . . 26Component relationships . . . . . . . . . . . . . . . . . . . . . . . . . . . . . . . . . . . . . . . . . . . . . . . . . . 33
Service consumers and providers . . . . . . . . . . . . . . . . . . . . . . . . . . . . . . . . . . . . . . . . 33Status propagation in relationships . . . . . . . . . . . . . . . . . . . . . . . . . . . . . . . . . . . . . . 35Relationship states. . . . . . . . . . . . . . . . . . . . . . . . . . . . . . . . . . . . . . . . . . . . . . . . . . . . . 35Relationship control . . . . . . . . . . . . . . . . . . . . . . . . . . . . . . . . . . . . . . . . . . . . . . . . . . . 36Dynamic status mapping . . . . . . . . . . . . . . . . . . . . . . . . . . . . . . . . . . . . . . . . . . . . . . . 37
Event associations . . . . . . . . . . . . . . . . . . . . . . . . . . . . . . . . . . . . . . . . . . . . . . . . . . . . . . . . 38Bringing events from the resource into the cell . . . . . . . . . . . . . . . . . . . . . . . . . . . . 39Component aliases . . . . . . . . . . . . . . . . . . . . . . . . . . . . . . . . . . . . . . . . . . . . . . . . . . . . 39
Contents v

Event alias associations. . . . . . . . . . . . . . . . . . . . . . . . . . . . . . . . . . . . . . . . . . . . . . . . . 40Service schedules . . . . . . . . . . . . . . . . . . . . . . . . . . . . . . . . . . . . . . . . . . . . . . . . . . . . . . . . . 42
Timeframes . . . . . . . . . . . . . . . . . . . . . . . . . . . . . . . . . . . . . . . . . . . . . . . . . . . . . . . . . . . 43Service schedules example with exceptions . . . . . . . . . . . . . . . . . . . . . . . . . . . . . . . 43
Chapter 3 Understanding a service model created in BMC Impact Service Model Editor 45
Role of the BMC Atrium CMDB in service modeling. . . . . . . . . . . . . . . . . . . . . . . . . . . 46Service model and the Common Data Model . . . . . . . . . . . . . . . . . . . . . . . . . . . . . . 46
Sandboxes . . . . . . . . . . . . . . . . . . . . . . . . . . . . . . . . . . . . . . . . . . . . . . . . . . . . . . . . . . . . . . . 51Datasets . . . . . . . . . . . . . . . . . . . . . . . . . . . . . . . . . . . . . . . . . . . . . . . . . . . . . . . . . . . . . . . . . 52Testing . . . . . . . . . . . . . . . . . . . . . . . . . . . . . . . . . . . . . . . . . . . . . . . . . . . . . . . . . . . . . . . . . . 52Promotion . . . . . . . . . . . . . . . . . . . . . . . . . . . . . . . . . . . . . . . . . . . . . . . . . . . . . . . . . . . . . . . 52Service model publishing . . . . . . . . . . . . . . . . . . . . . . . . . . . . . . . . . . . . . . . . . . . . . . . . . . 53Service model execution on cells . . . . . . . . . . . . . . . . . . . . . . . . . . . . . . . . . . . . . . . . . . . . 54In-model and not-in-model component instances . . . . . . . . . . . . . . . . . . . . . . . . . . . . . 54Importing Business Time Segments from BMC Remedy AR System . . . . . . . . . . . . . 55
Chapter 4 Building a service model in BMC Impact Service Model Editor 57
Service model creation process . . . . . . . . . . . . . . . . . . . . . . . . . . . . . . . . . . . . . . . . . . . . . 59Launching BMC Impact Service Model Editor . . . . . . . . . . . . . . . . . . . . . . . . . . . . . . . . 59Working with service component instances . . . . . . . . . . . . . . . . . . . . . . . . . . . . . . . . . . 60
Creating service component instances in BMC Impact Service Model Editor . . . 60Switching sandbox View modes . . . . . . . . . . . . . . . . . . . . . . . . . . . . . . . . . . . . . . . . . 65Viewing properties for a component instance . . . . . . . . . . . . . . . . . . . . . . . . . . . . . 65Editing component instances. . . . . . . . . . . . . . . . . . . . . . . . . . . . . . . . . . . . . . . . . . . . 66Performing actions on multiple objects . . . . . . . . . . . . . . . . . . . . . . . . . . . . . . . . . . . 67Copying component instances. . . . . . . . . . . . . . . . . . . . . . . . . . . . . . . . . . . . . . . . . . . 69Hiding a component instance . . . . . . . . . . . . . . . . . . . . . . . . . . . . . . . . . . . . . . . . . . . 69Deleting a component instance . . . . . . . . . . . . . . . . . . . . . . . . . . . . . . . . . . . . . . . . . . 70Finding component instances . . . . . . . . . . . . . . . . . . . . . . . . . . . . . . . . . . . . . . . . . . . 71
Defining relationships between component instances . . . . . . . . . . . . . . . . . . . . . . . . . . 78Creating a component relationship in BMC Impact Service Model Editor . . . . . 79Assigning related component instances to cells . . . . . . . . . . . . . . . . . . . . . . . . . . . . 83Updating relationships . . . . . . . . . . . . . . . . . . . . . . . . . . . . . . . . . . . . . . . . . . . . . . . . . 84Deleting relationships . . . . . . . . . . . . . . . . . . . . . . . . . . . . . . . . . . . . . . . . . . . . . . . . . . 85
Associating events with a component instance . . . . . . . . . . . . . . . . . . . . . . . . . . . . . . . . 86Working with timeframes and service schedules . . . . . . . . . . . . . . . . . . . . . . . . . . . . . . 91
Icons used in the service schedule and timeframes editors . . . . . . . . . . . . . . . . . . 92Working with timeframes . . . . . . . . . . . . . . . . . . . . . . . . . . . . . . . . . . . . . . . . . . . . . . 92Working with service schedules . . . . . . . . . . . . . . . . . . . . . . . . . . . . . . . . . . . . . . . . . 95Assigning components to service schedules . . . . . . . . . . . . . . . . . . . . . . . . . . . . . . . 99
Granting access to service model objects . . . . . . . . . . . . . . . . . . . . . . . . . . . . . . . . . . . . 100Granting permissions to individual service model objects . . . . . . . . . . . . . . . . . . . . . 100Testing the service model . . . . . . . . . . . . . . . . . . . . . . . . . . . . . . . . . . . . . . . . . . . . . . . . . 102
Testing component relationships . . . . . . . . . . . . . . . . . . . . . . . . . . . . . . . . . . . . . . . 102Testing event associations . . . . . . . . . . . . . . . . . . . . . . . . . . . . . . . . . . . . . . . . . . . . . 102
Promoting the service model . . . . . . . . . . . . . . . . . . . . . . . . . . . . . . . . . . . . . . . . . . . . . . 103
Contents vi

About the publishing process . . . . . . . . . . . . . . . . . . . . . . . . . . . . . . . . . . . . . . . . . . 103Before you promote. . . . . . . . . . . . . . . . . . . . . . . . . . . . . . . . . . . . . . . . . . . . . . . . . . . 104Submitting a promotion . . . . . . . . . . . . . . . . . . . . . . . . . . . . . . . . . . . . . . . . . . . . . . . 104Verifying promotion status . . . . . . . . . . . . . . . . . . . . . . . . . . . . . . . . . . . . . . . . . . . . 107Working with publication logs . . . . . . . . . . . . . . . . . . . . . . . . . . . . . . . . . . . . . . . . . 108
Modifying and deleting service model data . . . . . . . . . . . . . . . . . . . . . . . . . . . . . . . . . 110Organizing service component instances for monitoring . . . . . . . . . . . . . . . . . . . . . . 110Working with BMC Impact Service Model Editor Views . . . . . . . . . . . . . . . . . . . . . . 114
Saving, opening, renaming, and deleting Views . . . . . . . . . . . . . . . . . . . . . . . . . . 115Understanding visual cues in a View. . . . . . . . . . . . . . . . . . . . . . . . . . . . . . . . . . . . 117Repositioning objects in a View. . . . . . . . . . . . . . . . . . . . . . . . . . . . . . . . . . . . . . . . . 118Controlling what you see in a View . . . . . . . . . . . . . . . . . . . . . . . . . . . . . . . . . . . . . 118Exploring consumer and provider paths . . . . . . . . . . . . . . . . . . . . . . . . . . . . . . . . . 120Refreshing the View . . . . . . . . . . . . . . . . . . . . . . . . . . . . . . . . . . . . . . . . . . . . . . . . . . 121Repositioning the dockable windows . . . . . . . . . . . . . . . . . . . . . . . . . . . . . . . . . . . 122Showing topology views . . . . . . . . . . . . . . . . . . . . . . . . . . . . . . . . . . . . . . . . . . . . . . 122
Exporting and importing service model data . . . . . . . . . . . . . . . . . . . . . . . . . . . . . . . . 123Exporting class definitions from the BMC Atrium CMDB to a cells . . . . . . . . . . . . . 124
Chapter 5 Component and relationship status propagation 125
About component and relationship status . . . . . . . . . . . . . . . . . . . . . . . . . . . . . . . . . . . 125How component status computation works . . . . . . . . . . . . . . . . . . . . . . . . . . . . . . . . . 126
Status computation functions . . . . . . . . . . . . . . . . . . . . . . . . . . . . . . . . . . . . . . . . . . 126Status computation algorithms . . . . . . . . . . . . . . . . . . . . . . . . . . . . . . . . . . . . . . . . . 127How status computation algorithms work . . . . . . . . . . . . . . . . . . . . . . . . . . . . . . . 128About status computation models . . . . . . . . . . . . . . . . . . . . . . . . . . . . . . . . . . . . . . 128Anatomy of a status computation model. . . . . . . . . . . . . . . . . . . . . . . . . . . . . . . . . 129The internal status NONE . . . . . . . . . . . . . . . . . . . . . . . . . . . . . . . . . . . . . . . . . . . . . 129Quorum algorithm examples. . . . . . . . . . . . . . . . . . . . . . . . . . . . . . . . . . . . . . . . . . . 130
Relationship status propagation concepts . . . . . . . . . . . . . . . . . . . . . . . . . . . . . . . . . . . 132How status propagation works . . . . . . . . . . . . . . . . . . . . . . . . . . . . . . . . . . . . . . . . . 132Status propagation models. . . . . . . . . . . . . . . . . . . . . . . . . . . . . . . . . . . . . . . . . . . . . 133Default status propagation models. . . . . . . . . . . . . . . . . . . . . . . . . . . . . . . . . . . . . . 133What is a valid status propagation model? . . . . . . . . . . . . . . . . . . . . . . . . . . . . . . . 135
Important service components. . . . . . . . . . . . . . . . . . . . . . . . . . . . . . . . . . . . . . . . . . . . . 135Dynamic prioritization . . . . . . . . . . . . . . . . . . . . . . . . . . . . . . . . . . . . . . . . . . . . . . . . . . . 136
Self priority . . . . . . . . . . . . . . . . . . . . . . . . . . . . . . . . . . . . . . . . . . . . . . . . . . . . . . . . . . 137Impacts priority . . . . . . . . . . . . . . . . . . . . . . . . . . . . . . . . . . . . . . . . . . . . . . . . . . . . . . 146Determination of final priority . . . . . . . . . . . . . . . . . . . . . . . . . . . . . . . . . . . . . . . . . 147How cost impact is calculated . . . . . . . . . . . . . . . . . . . . . . . . . . . . . . . . . . . . . . . . . . 149How SLA impact is calculated. . . . . . . . . . . . . . . . . . . . . . . . . . . . . . . . . . . . . . . . . . 149
Chapter 6 Managing BMC Impact Service Model Editor 151
Setting BMC Impact Service Model Editor options . . . . . . . . . . . . . . . . . . . . . . . . . . . 152Configuring the topology view in BMC Impact Service Model Editor . . . . . . . . . . . 156Adding new classes to the BMC Atrium CMDB . . . . . . . . . . . . . . . . . . . . . . . . . . . . . . 157
Making your changes visible to applications . . . . . . . . . . . . . . . . . . . . . . . . . . . . . 157Creating a new service model component class in the BMC Atrium CMDB. . . 159
Contents vii

Associating a custom icon with a service model component . . . . . . . . . . . . . . . . 159Documenting your extensions . . . . . . . . . . . . . . . . . . . . . . . . . . . . . . . . . . . . . . . . . . 163
smeserver properties file and parameters. . . . . . . . . . . . . . . . . . . . . . . . . . . . . . . . . . . . 163
Chapter 7 Creating a service model by importing HP OVO data 167
Overview . . . . . . . . . . . . . . . . . . . . . . . . . . . . . . . . . . . . . . . . . . . . . . . . . . . . . . . . . . . . . . . 168Atrium and non-Atrium environments . . . . . . . . . . . . . . . . . . . . . . . . . . . . . . . . . . . . . 168Installing the integration with HP OVO . . . . . . . . . . . . . . . . . . . . . . . . . . . . . . . . . . . . . 168
Installation. . . . . . . . . . . . . . . . . . . . . . . . . . . . . . . . . . . . . . . . . . . . . . . . . . . . . . . . . . . 168Configuration . . . . . . . . . . . . . . . . . . . . . . . . . . . . . . . . . . . . . . . . . . . . . . . . . . . . . . . . 169
Importing HP OVO data to create a service model . . . . . . . . . . . . . . . . . . . . . . . . . . . . 172High-level data flow . . . . . . . . . . . . . . . . . . . . . . . . . . . . . . . . . . . . . . . . . . . . . . . . . . 172Steps to import HP OVO data to create a service model . . . . . . . . . . . . . . . . . . . . 172Scheduling a fetch to import HP OVO data. . . . . . . . . . . . . . . . . . . . . . . . . . . . . . . 174
Chapter 8 Managing BMC Impact Publishing Server 175
Working with publication logs . . . . . . . . . . . . . . . . . . . . . . . . . . . . . . . . . . . . . . . . . . . . . 177Viewing publication history . . . . . . . . . . . . . . . . . . . . . . . . . . . . . . . . . . . . . . . . . . . . 177Viewing publication history details . . . . . . . . . . . . . . . . . . . . . . . . . . . . . . . . . . . . . 178
Sharing a single log directory between two Publishing Servers . . . . . . . . . . . . . . . . . 179Specifying a port for Service Model Manager . . . . . . . . . . . . . . . . . . . . . . . . . . . . . . . . 180High availability and BMC Impact Publishing Server . . . . . . . . . . . . . . . . . . . . . . . . . 180Monitoring BMC Impact Publishing Server with BMC Impact Manager events . . . 181
Modifying the generation of events . . . . . . . . . . . . . . . . . . . . . . . . . . . . . . . . . . . . . 181Understanding classes and slots for BMC Impact Publishing Server events . . . 183
About SIM management data. . . . . . . . . . . . . . . . . . . . . . . . . . . . . . . . . . . . . . . . . . . . . . 191Understanding publish environments . . . . . . . . . . . . . . . . . . . . . . . . . . . . . . . . . . . . . . 192
About publish environments . . . . . . . . . . . . . . . . . . . . . . . . . . . . . . . . . . . . . . . . . . . 192About home cell, home cell alias, and cell alias. . . . . . . . . . . . . . . . . . . . . . . . . . . . 193
Publishing to a BEM cell . . . . . . . . . . . . . . . . . . . . . . . . . . . . . . . . . . . . . . . . . . . . . . . . . . 194Publishing from the BMC Atrium CMDB. . . . . . . . . . . . . . . . . . . . . . . . . . . . . . . . . . . . 194
Enabling AtriumCMDB Publish publishing . . . . . . . . . . . . . . . . . . . . . . . . . . . . . . 195Using BMC Impact Service Model Editor . . . . . . . . . . . . . . . . . . . . . . . . . . . . . . . . 195Creating advanced publish environments . . . . . . . . . . . . . . . . . . . . . . . . . . . . . . . . 199Examples of advanced environments . . . . . . . . . . . . . . . . . . . . . . . . . . . . . . . . . . . . 200Defining BMC Atrium CMDB classes for SIM . . . . . . . . . . . . . . . . . . . . . . . . . . . . 202Defining BMC Atrium CMDB attributes for SIM . . . . . . . . . . . . . . . . . . . . . . . . . . 202ServiceModelSet attribute for components and management data . . . . . . . . . . . 203ServiceModelSet attribute for impact relationships . . . . . . . . . . . . . . . . . . . . . . . . 204Initializing the BMC Atrium CMDB with SIM data . . . . . . . . . . . . . . . . . . . . . . . . 205Initializing a cell . . . . . . . . . . . . . . . . . . . . . . . . . . . . . . . . . . . . . . . . . . . . . . . . . . . . . . 209Example—creating SIM data in BMC Atrium CMDB from BAROC files . . . . . . 211Purging and deleting service model objects . . . . . . . . . . . . . . . . . . . . . . . . . . . . . . 212Publishing in automated or manual mode. . . . . . . . . . . . . . . . . . . . . . . . . . . . . . . . 213
Publishing from a Direct Publish source. . . . . . . . . . . . . . . . . . . . . . . . . . . . . . . . . . . . . 215About home cell and cell alias . . . . . . . . . . . . . . . . . . . . . . . . . . . . . . . . . . . . . . . . . . 216About class and slot data . . . . . . . . . . . . . . . . . . . . . . . . . . . . . . . . . . . . . . . . . . . . . . 218Enabling Direct Publish publishing . . . . . . . . . . . . . . . . . . . . . . . . . . . . . . . . . . . . . 218
viii BMC Impact Solutions Service Modeling and Publishing Guide

Creating an environment for component instances and relationships . . . . . . . . 219Modifying home cell and cell aliases . . . . . . . . . . . . . . . . . . . . . . . . . . . . . . . . . . . . 219Initializing a cell from a Direct Publish environment . . . . . . . . . . . . . . . . . . . . . . 220Examples—using cell aliases for Direct Publish publishing . . . . . . . . . . . . . . . . . 220
Securing publish environments . . . . . . . . . . . . . . . . . . . . . . . . . . . . . . . . . . . . . . . . . . . . 222pserver.conf file and parameters . . . . . . . . . . . . . . . . . . . . . . . . . . . . . . . . . . . . . . . . . . . 224Configuring the Notify ARDBC plug-in. . . . . . . . . . . . . . . . . . . . . . . . . . . . . . . . . . . . . 229Configuring the Notify plug-in for AR server groups . . . . . . . . . . . . . . . . . . . . . . . . . 231
Chapter 9 BMC Impact Publishing Server CLIs 233
Configuring BMC Impact Publishing Server CLIs . . . . . . . . . . . . . . . . . . . . . . . . . . . . 234Configuration file and parameters for CLIs . . . . . . . . . . . . . . . . . . . . . . . . . . . . . . 235Changing the time-out values for all the CLI commands . . . . . . . . . . . . . . . . . . . 240Setting the configuration for a specific CLI command . . . . . . . . . . . . . . . . . . . . . 241Configuring trace for CLIs . . . . . . . . . . . . . . . . . . . . . . . . . . . . . . . . . . . . . . . . . . . . 241
Understanding common command options for CLIs. . . . . . . . . . . . . . . . . . . . . . . . . . 241Understanding return codes for CLIs . . . . . . . . . . . . . . . . . . . . . . . . . . . . . . . . . . . . . . . 243
Return codes for pserver . . . . . . . . . . . . . . . . . . . . . . . . . . . . . . . . . . . . . . . . . . . . . . 246Using CLI commands . . . . . . . . . . . . . . . . . . . . . . . . . . . . . . . . . . . . . . . . . . . . . . . . . . . . 247
Summary of CLI commands for BMC Impact Publishing Server . . . . . . . . . . . . 247pclassinfo—Comparing service model classes on cells with class definitions in
the BMC Atrium CMDB . . . . . . . . . . . . . . . . . . . . . . . . . . . . . . . . . . . . . . . . . . . . 249penv—Managing publish environments . . . . . . . . . . . . . . . . . . . . . . . . . . . . . . . . . 252pinit—Initializing a cell with service model data . . . . . . . . . . . . . . . . . . . . . . . . . . 261plog—Obtaining the XML log for a request . . . . . . . . . . . . . . . . . . . . . . . . . . . . . . 265plogdisplay—Converting the XML log for a request to text format . . . . . . . . . . 266pposter—Sending service model objects to a cell . . . . . . . . . . . . . . . . . . . . . . . . . . 268pscontrol—Sending a command to BMC Impact Publishing Server. . . . . . . . . . 278pserver—Starting the BMC Impact Publishing Server service . . . . . . . . . . . . . . . 280pshowlog—Obtaining the XML log in user-friendly format . . . . . . . . . . . . . . . . 281psstat—Displaying status of BMC Impact Publishing Server . . . . . . . . . . . . . . . 282publish—Publishing a service model or viewing instances to be published . . . 283 . . . . . . . . . . . . . . . . . . . . . . . . . . . . . . . . . . . . . . . . . . . . . . . . . . . . . . . . . . . . . . . . . . . . 285
Appendix A Troubleshooting 287
BMC Impact Service Model Editor . . . . . . . . . . . . . . . . . . . . . . . . . . . . . . . . . . . . . . . . . 288Using the BMC Impact Service Model Editor log. . . . . . . . . . . . . . . . . . . . . . . . . . 288Other BMC Impact Service Model Editor Troubleshooting Options . . . . . . . . . 292
BMC Impact Publishing Server . . . . . . . . . . . . . . . . . . . . . . . . . . . . . . . . . . . . . . . . . . . . 292Verifying that BMC Impact Publishing Server is running . . . . . . . . . . . . . . . . . . 293Using trace files . . . . . . . . . . . . . . . . . . . . . . . . . . . . . . . . . . . . . . . . . . . . . . . . . . . . . . 293Stopping BMC Impact Publishing Server when JMS is not running. . . . . . . . . . 293Publishing large service models . . . . . . . . . . . . . . . . . . . . . . . . . . . . . . . . . . . . . . . . 293Publishing failures and reattempts . . . . . . . . . . . . . . . . . . . . . . . . . . . . . . . . . . . . . . 295BMC Impact Publishing Server service or daemon fails to start . . . . . . . . . . . . . 296No publication after successful promotion . . . . . . . . . . . . . . . . . . . . . . . . . . . . . . . 296Reconciliation jobs hang . . . . . . . . . . . . . . . . . . . . . . . . . . . . . . . . . . . . . . . . . . . . . . . 297BMC Impact Publishing Server does not reply to requests. . . . . . . . . . . . . . . . . . 297
Contents ix

Diagnosing publication failures. . . . . . . . . . . . . . . . . . . . . . . . . . . . . . . . . . . . . . . . . 298Another publish request is ongoing . . . . . . . . . . . . . . . . . . . . . . . . . . . . . . . . . . . . . 302Using dynamic ports with the ARDBC Notify plug-in . . . . . . . . . . . . . . . . . . . . . 303
BMC Impact Service Model Integration with HP OVO . . . . . . . . . . . . . . . . . . . . . . . . 303Avoiding duplicate CIs . . . . . . . . . . . . . . . . . . . . . . . . . . . . . . . . . . . . . . . . . . . . . . . . 303Automated publication after reconciling reconciliation failure . . . . . . . . . . . . . . 304Limiting HP OVO fetcher trace file growth . . . . . . . . . . . . . . . . . . . . . . . . . . . . . . . 304
Appendix B Default service model data classes 305
Service model data structures. . . . . . . . . . . . . . . . . . . . . . . . . . . . . . . . . . . . . . . . . . . . . . 306Service model data class overview . . . . . . . . . . . . . . . . . . . . . . . . . . . . . . . . . . . . . . 306Service model data class files . . . . . . . . . . . . . . . . . . . . . . . . . . . . . . . . . . . . . . . . . . . 306
Service model component data classes . . . . . . . . . . . . . . . . . . . . . . . . . . . . . . . . . . . . . . 307BMC_BaseElement data class. . . . . . . . . . . . . . . . . . . . . . . . . . . . . . . . . . . . . . . . . . . 307BMC_Impact data class . . . . . . . . . . . . . . . . . . . . . . . . . . . . . . . . . . . . . . . . . . . . . . . . 313BMC_DOWNTIME_STATUS_CONFIG data class. . . . . . . . . . . . . . . . . . . . . . . . . 316BMC_STATUS_COMPUTATION data class . . . . . . . . . . . . . . . . . . . . . . . . . . . . . . 317BMC_STATUS_PROPAGATION data class . . . . . . . . . . . . . . . . . . . . . . . . . . . . . . 319BMC_PROPAGATION_MAP data class . . . . . . . . . . . . . . . . . . . . . . . . . . . . . . . . . 321
SIM data class descriptions . . . . . . . . . . . . . . . . . . . . . . . . . . . . . . . . . . . . . . . . . . . . . . . . 322BMC_SEVERITY_TO_STATUS data class . . . . . . . . . . . . . . . . . . . . . . . . . . . . . . . . 322BMC_SIM_MATCH_TABLE data class . . . . . . . . . . . . . . . . . . . . . . . . . . . . . . . . . . 323BMC_SIM_ALIAS data class . . . . . . . . . . . . . . . . . . . . . . . . . . . . . . . . . . . . . . . . . . . 323BMC_SLOT_FORMULAS data class. . . . . . . . . . . . . . . . . . . . . . . . . . . . . . . . . . . . . 324BMC_TIME_SCHEDULE data class . . . . . . . . . . . . . . . . . . . . . . . . . . . . . . . . . . . . . 324BMC_TIME_FRAME_TO_SCHEDULE data class . . . . . . . . . . . . . . . . . . . . . . . . . 325BMC_SELF_PRIORITY_MAPPING data class . . . . . . . . . . . . . . . . . . . . . . . . . . . . 325BMC_SERVICE_SCHEDULE_CONFIG data class . . . . . . . . . . . . . . . . . . . . . . . . . 326BMC_STATUS_TO_SEVERITY data class . . . . . . . . . . . . . . . . . . . . . . . . . . . . . . . . 326SIM_TIME_FRAME class . . . . . . . . . . . . . . . . . . . . . . . . . . . . . . . . . . . . . . . . . . . . . . 327SIM_CellAlias class . . . . . . . . . . . . . . . . . . . . . . . . . . . . . . . . . . . . . . . . . . . . . . . . . . . 327SIM_CellInformation class . . . . . . . . . . . . . . . . . . . . . . . . . . . . . . . . . . . . . . . . . . . . . 327BMC_PROMOTION_LOG class . . . . . . . . . . . . . . . . . . . . . . . . . . . . . . . . . . . . . . . . 327
Service model event classes. . . . . . . . . . . . . . . . . . . . . . . . . . . . . . . . . . . . . . . . . . . . . . . . 328CORE_EVENT base class . . . . . . . . . . . . . . . . . . . . . . . . . . . . . . . . . . . . . . . . . . . . . . 328Root event class . . . . . . . . . . . . . . . . . . . . . . . . . . . . . . . . . . . . . . . . . . . . . . . . . . . . . . 330History event class . . . . . . . . . . . . . . . . . . . . . . . . . . . . . . . . . . . . . . . . . . . . . . . . . . . . 330Impact event class . . . . . . . . . . . . . . . . . . . . . . . . . . . . . . . . . . . . . . . . . . . . . . . . . . . . 331
Index 333
x BMC Impact Solutions Service Modeling and Publishing Guide

FiguresExample of a service model . . . . . . . . . . . . . . . . . . . . . . . . . . . . . . . . . . . . . . . . . . . . . . . . . 2Inserting KPI data into the business_slot with an action . . . . . . . . . . . . . . . . . . . . . . . 13Updating KPI data with a rule . . . . . . . . . . . . . . . . . . . . . . . . . . . . . . . . . . . . . . . . . . . . . 14Impact (status) propagation in relationships . . . . . . . . . . . . . . . . . . . . . . . . . . . . . . . . . 34Parts of a simple alias formula . . . . . . . . . . . . . . . . . . . . . . . . . . . . . . . . . . . . . . . . . . . . . 40Find Component dialog box . . . . . . . . . . . . . . . . . . . . . . . . . . . . . . . . . . . . . . . . . . . . . . . 72Advanced Find dialog box . . . . . . . . . . . . . . . . . . . . . . . . . . . . . . . . . . . . . . . . . . . . . . . . . 74Using Conditional Find . . . . . . . . . . . . . . . . . . . . . . . . . . . . . . . . . . . . . . . . . . . . . . . . . . . 76Create Relationship dialog box . . . . . . . . . . . . . . . . . . . . . . . . . . . . . . . . . . . . . . . . . . . . . 81Drawing relationships . . . . . . . . . . . . . . . . . . . . . . . . . . . . . . . . . . . . . . . . . . . . . . . . . . . . 83Creating an alias association . . . . . . . . . . . . . . . . . . . . . . . . . . . . . . . . . . . . . . . . . . . . . . . 87Defining the events to be processed by the alias formula . . . . . . . . . . . . . . . . . . . . . . . 88Example of match attributes . . . . . . . . . . . . . . . . . . . . . . . . . . . . . . . . . . . . . . . . . . . . . . . 89Timeframe Edit dialog box . . . . . . . . . . . . . . . . . . . . . . . . . . . . . . . . . . . . . . . . . . . . . . . . 93Schedule Edit dialog box . . . . . . . . . . . . . . . . . . . . . . . . . . . . . . . . . . . . . . . . . . . . . . . . . . 96Schedules Editor section of Edit Component Properties dialog box . . . . . . . . . . . . . . 99Changing access for an individual component instance . . . . . . . . . . . . . . . . . . . . . . . 101Propagation paths between root cause and important components . . . . . . . . . . . . . 136Self priority determination . . . . . . . . . . . . . . . . . . . . . . . . . . . . . . . . . . . . . . . . . . . . . . . 137Cost priority method of priority determination . . . . . . . . . . . . . . . . . . . . . . . . . . . . . . 141Worst SLA method of priority determination . . . . . . . . . . . . . . . . . . . . . . . . . . . . . . . 145Impacts priority determination . . . . . . . . . . . . . . . . . . . . . . . . . . . . . . . . . . . . . . . . . . . . 146Final priority determination . . . . . . . . . . . . . . . . . . . . . . . . . . . . . . . . . . . . . . . . . . . . . . 148Default value for com.bmc.sms.sme.topoviews parameter . . . . . . . . . . . . . . . . . . . . 156Graph definition format . . . . . . . . . . . . . . . . . . . . . . . . . . . . . . . . . . . . . . . . . . . . . . . . . . 157Example of a graph definition . . . . . . . . . . . . . . . . . . . . . . . . . . . . . . . . . . . . . . . . . . . . . 157BMC_BaseElement default icon image . . . . . . . . . . . . . . . . . . . . . . . . . . . . . . . . . . . . . 162Adapter cell group . . . . . . . . . . . . . . . . . . . . . . . . . . . . . . . . . . . . . . . . . . . . . . . . . . . . . . 169pscontrol stop example . . . . . . . . . . . . . . . . . . . . . . . . . . . . . . . . . . . . . . . . . . . . . . . . . . 279pscontrol automated example . . . . . . . . . . . . . . . . . . . . . . . . . . . . . . . . . . . . . . . . . . . . . 279pscontrol automated -u example . . . . . . . . . . . . . . . . . . . . . . . . . . . . . . . . . . . . . . . . . . 279pscontrol manual example . . . . . . . . . . . . . . . . . . . . . . . . . . . . . . . . . . . . . . . . . . . . . . . . 280BMC Impact Service Model Editor log . . . . . . . . . . . . . . . . . . . . . . . . . . . . . . . . . . . . . 288BMC_BaseElement definitions . . . . . . . . . . . . . . . . . . . . . . . . . . . . . . . . . . . . . . . . . . . . 308MC_SM_COMPONENT definition . . . . . . . . . . . . . . . . . . . . . . . . . . . . . . . . . . . . . . . . 309MC_SM_DATA definition . . . . . . . . . . . . . . . . . . . . . . . . . . . . . . . . . . . . . . . . . . . . . . . . 309CORE_DATA definition . . . . . . . . . . . . . . . . . . . . . . . . . . . . . . . . . . . . . . . . . . . . . . . . . 310BMC_Impact definition . . . . . . . . . . . . . . . . . . . . . . . . . . . . . . . . . . . . . . . . . . . . . . . . . . 314MC_SM_RELATIONSHIP definition . . . . . . . . . . . . . . . . . . . . . . . . . . . . . . . . . . . . . . . 314MC_SM_DATA definition . . . . . . . . . . . . . . . . . . . . . . . . . . . . . . . . . . . . . . . . . . . . . . . . 314
Figures xi

CORE_DATA definition . . . . . . . . . . . . . . . . . . . . . . . . . . . . . . . . . . . . . . . . . . . . . . . . . . 315BMC_DOWNTIME_STATUS_CONFIG definition . . . . . . . . . . . . . . . . . . . . . . . . . . . 317BMC_SIM_DATA definition . . . . . . . . . . . . . . . . . . . . . . . . . . . . . . . . . . . . . . . . . . . . . . 317BMC_STATUS_COMPUTATION definition . . . . . . . . . . . . . . . . . . . . . . . . . . . . . . . . 318BMC_SIM_DATA definition . . . . . . . . . . . . . . . . . . . . . . . . . . . . . . . . . . . . . . . . . . . . . . 318BMC_STATUS_PROPAGATION definition . . . . . . . . . . . . . . . . . . . . . . . . . . . . . . . . . 320BMC_SIM_DATA definition . . . . . . . . . . . . . . . . . . . . . . . . . . . . . . . . . . . . . . . . . . . . . . 320BMC_PROPAGATION_MAP definition . . . . . . . . . . . . . . . . . . . . . . . . . . . . . . . . . . . . 321BMC_SIM_DATA definition . . . . . . . . . . . . . . . . . . . . . . . . . . . . . . . . . . . . . . . . . . . . . . 321SEVERITY_TO_STATUS definition . . . . . . . . . . . . . . . . . . . . . . . . . . . . . . . . . . . . . . . . 323BMC_SIM_MATCH_TABLE definition . . . . . . . . . . . . . . . . . . . . . . . . . . . . . . . . . . . . . 323BMC_SIM_ALIAS definition . . . . . . . . . . . . . . . . . . . . . . . . . . . . . . . . . . . . . . . . . . . . . . 324BMC_SLOT_FORMULAS definition . . . . . . . . . . . . . . . . . . . . . . . . . . . . . . . . . . . . . . . 324BMC_TIME_SCHEDULE definition . . . . . . . . . . . . . . . . . . . . . . . . . . . . . . . . . . . . . . . . 325BMC_TIME_FRAME_TO_SCHEDULE definition . . . . . . . . . . . . . . . . . . . . . . . . . . . . 325BMC_SELF_PRIORITY_MAPPING definition . . . . . . . . . . . . . . . . . . . . . . . . . . . . . . . 326BMC_SERVICE_SCHEDULE_CONFIG definition . . . . . . . . . . . . . . . . . . . . . . . . . . . 326BMC_STATUS_TO_SEVERITY definition . . . . . . . . . . . . . . . . . . . . . . . . . . . . . . . . . . . 326SIM_TIME_FRAME definition . . . . . . . . . . . . . . . . . . . . . . . . . . . . . . . . . . . . . . . . . . . . 327Partial CORE_EVENT definition . . . . . . . . . . . . . . . . . . . . . . . . . . . . . . . . . . . . . . . . . . . 329MC_SMC_ROOT definition . . . . . . . . . . . . . . . . . . . . . . . . . . . . . . . . . . . . . . . . . . . . . . . 330SMC_STATE_CHANGE definition . . . . . . . . . . . . . . . . . . . . . . . . . . . . . . . . . . . . . . . . 330MC_SMC_EVENT definition . . . . . . . . . . . . . . . . . . . . . . . . . . . . . . . . . . . . . . . . . . . . . . 331
xii BMC Impact Solutions Service Modeling and Publishing Guide

TablesExample business service model spreadsheet . . . . . . . . . . . . . . . . . . . . . . . . . . . . . . . . . 5BMC Impact Service Model Editor values for IT service Sales Logix . . . . . . . . . . . . . . 6Severity level index . . . . . . . . . . . . . . . . . . . . . . . . . . . . . . . . . . . . . . . . . . . . . . . . . . . . . . . . 9Occurrence level index . . . . . . . . . . . . . . . . . . . . . . . . . . . . . . . . . . . . . . . . . . . . . . . . . . . . . 9How service model objects get to a SIM cell . . . . . . . . . . . . . . . . . . . . . . . . . . . . . . . . . . 18Advantages and disadvantages of different object sources . . . . . . . . . . . . . . . . . . . . . 19Service component status definitions . . . . . . . . . . . . . . . . . . . . . . . . . . . . . . . . . . . . . . . 24Service model component types . . . . . . . . . . . . . . . . . . . . . . . . . . . . . . . . . . . . . . . . . . . . 26Main relationship classes . . . . . . . . . . . . . . . . . . . . . . . . . . . . . . . . . . . . . . . . . . . . . . . . . . 33How an event alias association works . . . . . . . . . . . . . . . . . . . . . . . . . . . . . . . . . . . . . . . 41Global and Local timeframe differences . . . . . . . . . . . . . . . . . . . . . . . . . . . . . . . . . . . . . 43SIM-qualified subclasses of BMC_Collection . . . . . . . . . . . . . . . . . . . . . . . . . . . . . . . . . 47SIM-qualified subclasses of BMC_LogicalEntity . . . . . . . . . . . . . . . . . . . . . . . . . . . . . . 47SIM-qualified subclasses of BMC_System . . . . . . . . . . . . . . . . . . . . . . . . . . . . . . . . . . . . 48SIM-qualified subclasses of BMC_SystemComponent . . . . . . . . . . . . . . . . . . . . . . . . . 48SIM-qualified subclasses of BMC_Software . . . . . . . . . . . . . . . . . . . . . . . . . . . . . . . . . . 48SIM-qualified subclass of BMC_SystemService . . . . . . . . . . . . . . . . . . . . . . . . . . . . . . . 49SIM-qualified attributes . . . . . . . . . . . . . . . . . . . . . . . . . . . . . . . . . . . . . . . . . . . . . . . . . . . 50View mode switch icons . . . . . . . . . . . . . . . . . . . . . . . . . . . . . . . . . . . . . . . . . . . . . . . . . . 65Default component properties . . . . . . . . . . . . . . . . . . . . . . . . . . . . . . . . . . . . . . . . . . . . . 66Description of additional search criteria . . . . . . . . . . . . . . . . . . . . . . . . . . . . . . . . . . . . . 75Definition of relational operators . . . . . . . . . . . . . . . . . . . . . . . . . . . . . . . . . . . . . . . . . . . 77Description of conditional operators . . . . . . . . . . . . . . . . . . . . . . . . . . . . . . . . . . . . . . . . 88Service schedule and timeframes editors icons . . . . . . . . . . . . . . . . . . . . . . . . . . . . . . . 92Timeframe Edit field descriptions . . . . . . . . . . . . . . . . . . . . . . . . . . . . . . . . . . . . . . . . . . 93Schedule Edit field descriptions . . . . . . . . . . . . . . . . . . . . . . . . . . . . . . . . . . . . . . . . . . . . 96Default user groups and rights for BMC Impact Service Model Editor . . . . . . . . . . 100Icons in Objects-to-be-Published pane . . . . . . . . . . . . . . . . . . . . . . . . . . . . . . . . . . . . . . 105Topics covered in this section . . . . . . . . . . . . . . . . . . . . . . . . . . . . . . . . . . . . . . . . . . . . . 115Visual cues in a View . . . . . . . . . . . . . . . . . . . . . . . . . . . . . . . . . . . . . . . . . . . . . . . . . . . . 117Adjusting the graphical view . . . . . . . . . . . . . . . . . . . . . . . . . . . . . . . . . . . . . . . . . . . . . 118Understanding expansion handles . . . . . . . . . . . . . . . . . . . . . . . . . . . . . . . . . . . . . . . . . 121Status computation functions and computed component statuses . . . . . . . . . . . . . . 127What a function returns when using an available algorithm . . . . . . . . . . . . . . . . . . . 128Description of predefined status computation models . . . . . . . . . . . . . . . . . . . . . . . . 129How status propagation models work in relationships . . . . . . . . . . . . . . . . . . . . . . . 134smeserver.properties file . . . . . . . . . . . . . . . . . . . . . . . . . . . . . . . . . . . . . . . . . . . . . . . . . 163Integration with HP OVO configuration files . . . . . . . . . . . . . . . . . . . . . . . . . . . . . . . . 170BMC Impact Publishing Server event generation . . . . . . . . . . . . . . . . . . . . . . . . . . . . 182Common Event Model (CEM) slots . . . . . . . . . . . . . . . . . . . . . . . . . . . . . . . . . . . . . . . . 184
Tables xiii

IPS_START slots . . . . . . . . . . . . . . . . . . . . . . . . . . . . . . . . . . . . . . . . . . . . . . . . . . . . . . . . 185IPS_STOP slots . . . . . . . . . . . . . . . . . . . . . . . . . . . . . . . . . . . . . . . . . . . . . . . . . . . . . . . . . . 186IPS_CONFIG slots . . . . . . . . . . . . . . . . . . . . . . . . . . . . . . . . . . . . . . . . . . . . . . . . . . . . . . . 186IPS_CONNECT slots . . . . . . . . . . . . . . . . . . . . . . . . . . . . . . . . . . . . . . . . . . . . . . . . . . . . . 187IPS_IM_CONNECT slots . . . . . . . . . . . . . . . . . . . . . . . . . . . . . . . . . . . . . . . . . . . . . . . . . 188IPS_REQUEST slots . . . . . . . . . . . . . . . . . . . . . . . . . . . . . . . . . . . . . . . . . . . . . . . . . . . . . . 188IPS_PUBLISH slots . . . . . . . . . . . . . . . . . . . . . . . . . . . . . . . . . . . . . . . . . . . . . . . . . . . . . . 190IPS_CLASSINFO slots . . . . . . . . . . . . . . . . . . . . . . . . . . . . . . . . . . . . . . . . . . . . . . . . . . . . 190IPS_ERROR slots . . . . . . . . . . . . . . . . . . . . . . . . . . . . . . . . . . . . . . . . . . . . . . . . . . . . . . . . 191IPS_ENV slots . . . . . . . . . . . . . . . . . . . . . . . . . . . . . . . . . . . . . . . . . . . . . . . . . . . . . . . . . . . 191Basic steps to create advanced test environments . . . . . . . . . . . . . . . . . . . . . . . . . . . . 199ServiceModelSet attribute values . . . . . . . . . . . . . . . . . . . . . . . . . . . . . . . . . . . . . . . . . . 203Determination of ServiceModelSet value for an impact relationship . . . . . . . . . . . . 204Parameters in the pclient.conf file for initializing the BMC Atrium CMDB . . . . . . . 206InitEffectivelyMgmtData parameter values and results . . . . . . . . . . . . . . . . . . . . . . . 207InitEffectivelyServiceModel parameter settings and results . . . . . . . . . . . . . . . . . . . . 208Basic process of publishing from a Direct Publish source . . . . . . . . . . . . . . . . . . . . . . 215Valid parameters for a Direct Publish environment . . . . . . . . . . . . . . . . . . . . . . . . . . 216pserver.conf file . . . . . . . . . . . . . . . . . . . . . . . . . . . . . . . . . . . . . . . . . . . . . . . . . . . . . . . . . 225ar.cfg file parameter descriptions . . . . . . . . . . . . . . . . . . . . . . . . . . . . . . . . . . . . . . . . . . 230pclient.conf parameters . . . . . . . . . . . . . . . . . . . . . . . . . . . . . . . . . . . . . . . . . . . . . . . . . . . 235BMC Impact Publishing Server CLI common command options . . . . . . . . . . . . . . . 242BMC Impact Publishing Server CLI error exit codes . . . . . . . . . . . . . . . . . . . . . . . . . . 243pserver error exit codes . . . . . . . . . . . . . . . . . . . . . . . . . . . . . . . . . . . . . . . . . . . . . . . . . . . 246BMC Impact Publishing Server CLI command descriptions . . . . . . . . . . . . . . . . . . . 248pclassinfo options . . . . . . . . . . . . . . . . . . . . . . . . . . . . . . . . . . . . . . . . . . . . . . . . . . . . . . . 249penv options . . . . . . . . . . . . . . . . . . . . . . . . . . . . . . . . . . . . . . . . . . . . . . . . . . . . . . . . . . . . 253 Actions commands . . . . . . . . . . . . . . . . . . . . . . . . . . . . . . . . . . . . . . . . . . . . . . . . . . . . . . 254Valid parameters for a BMC Atrium CMDB publish environment . . . . . . . . . . . . . . 256Valid parameters for a Direct Publish environment . . . . . . . . . . . . . . . . . . . . . . . . . . 258pinit options . . . . . . . . . . . . . . . . . . . . . . . . . . . . . . . . . . . . . . . . . . . . . . . . . . . . . . . . . . . . 262plog options . . . . . . . . . . . . . . . . . . . . . . . . . . . . . . . . . . . . . . . . . . . . . . . . . . . . . . . . . . . . 265plogdisplay options . . . . . . . . . . . . . . . . . . . . . . . . . . . . . . . . . . . . . . . . . . . . . . . . . . . . . . 267plogdisplay return codes . . . . . . . . . . . . . . . . . . . . . . . . . . . . . . . . . . . . . . . . . . . . . . . . . 268pposter options . . . . . . . . . . . . . . . . . . . . . . . . . . . . . . . . . . . . . . . . . . . . . . . . . . . . . . . . . 269pposter return codes . . . . . . . . . . . . . . . . . . . . . . . . . . . . . . . . . . . . . . . . . . . . . . . . . . . . . 277pscontrol command options . . . . . . . . . . . . . . . . . . . . . . . . . . . . . . . . . . . . . . . . . . . . . . 278pserver command options . . . . . . . . . . . . . . . . . . . . . . . . . . . . . . . . . . . . . . . . . . . . . . . . 280pshowlog options . . . . . . . . . . . . . . . . . . . . . . . . . . . . . . . . . . . . . . . . . . . . . . . . . . . . . . . 281psstat command options . . . . . . . . . . . . . . . . . . . . . . . . . . . . . . . . . . . . . . . . . . . . . . . . . . 282publish command options . . . . . . . . . . . . . . . . . . . . . . . . . . . . . . . . . . . . . . . . . . . . . . . . 284BMC Impact Publishing Server request failure messages . . . . . . . . . . . . . . . . . . . . . . 298Service management data class files . . . . . . . . . . . . . . . . . . . . . . . . . . . . . . . . . . . . . . . . 307Slots that define component instances . . . . . . . . . . . . . . . . . . . . . . . . . . . . . . . . . . . . . . 310BMC_Impact slot definitions in alphabetical order . . . . . . . . . . . . . . . . . . . . . . . . . . . 315BMC_DOWNTIME_STATUS_CONFIG slot . . . . . . . . . . . . . . . . . . . . . . . . . . . . . . . . . 317BMC_STATUS_COMPUTATION slots in alphabetical order . . . . . . . . . . . . . . . . . . 319Status propagation slots in alphabetical order . . . . . . . . . . . . . . . . . . . . . . . . . . . . . . . 320BMC_PROPAGATION_MAP slot definitions . . . . . . . . . . . . . . . . . . . . . . . . . . . . . . . 322
xiv BMC Impact Solutions Service Modeling and Publishing Guide

C h a p t e r 1
1 Designing a service modelThis book provides detailed information about designing, developing, publishing, and maintaining service models that enable you to manage your IT resources from the perspective of the business services that they provide.
This chapter covers the following topics:
Service model design process. . . . . . . . . . . . . . . . . . . . . . . . . . . . . . . . . . . . . . . . . . . . . . . . 2Defining business goals for the service model . . . . . . . . . . . . . . . . . . . . . . . . . . . . . . . . . 3Decomposing a business service . . . . . . . . . . . . . . . . . . . . . . . . . . . . . . . . . . . . . . . . . . . . . 4Defining the service catalog . . . . . . . . . . . . . . . . . . . . . . . . . . . . . . . . . . . . . . . . . . . . . . . . . 6Defining the service model . . . . . . . . . . . . . . . . . . . . . . . . . . . . . . . . . . . . . . . . . . . . . . . . . . 7
Defining a component instance . . . . . . . . . . . . . . . . . . . . . . . . . . . . . . . . . . . . . . . . . . . 7Defining a new component class for a component type . . . . . . . . . . . . . . . . . . . . . . 8Analyzing a component’s critical failures . . . . . . . . . . . . . . . . . . . . . . . . . . . . . . . . . . 8Determining a component’s relationship and dependencies . . . . . . . . . . . . . . . . . 10Determining the organization of the modeled relationships . . . . . . . . . . . . . . . . . 10Identifying a component’s critical events and their sources. . . . . . . . . . . . . . . . . . 11
Service model design considerations . . . . . . . . . . . . . . . . . . . . . . . . . . . . . . . . . . . . . . . . 14Determining cell topology for the service model . . . . . . . . . . . . . . . . . . . . . . . . . . . 14Component property updates . . . . . . . . . . . . . . . . . . . . . . . . . . . . . . . . . . . . . . . . . . . 15
Chapter 1 Designing a service model 1

Service model design process
Service model design processThe best service models are enterprise-specific, achieving the organization’s business availability goals. The IT environment, its organization, and its operational constraints vary significantly among enterprises.
A cost-effective strategy when you begin the process of building a service model is to select one critical business process/service, decompose it to identify all aspects of the service, and build a complete service model for that part of your enterprise.
Figure 1 shows an example of a generic service model as it appears in BMC Impact Service Model Editor with business users, services, and IT structure layers. The lines between the component instances represent the provider/consumer relationships.
Figure 1 Example of a service model
business consumers
service layer
IT infrastructure
2 BMC Impact Solutions Service Modeling and Publishing Guide

Defining business goals for the service model
The following factors determine how a service impact management solution should be designed and implemented:
■ the diversity of IT resources and how they are monitored■ the location of resources and how the management responsibilities for them are
distributed within and among IT or information services (IS) groups ■ the relative importance of various resources in the delivery of business services■ the need for change management■ the maintainability of the service model over time
The service modeling process involves:
■ identifying sources of event information■ gaining familiarity with the structure and content of events■ identifying core competencies within the organization■ identifying critical business processes■ identifying IT services and their components■ finding relationships and dependencies between IT services■ building the necessary database of information (asset inventory, service catalog,
and so on)■ building the service model
Defining business goals for the service modelThe most basic step involved in defining a service model is defining the specific business goals you hope to achieve with the model.
To do so, the IT or IS group must engage the business managers in defining short-term, mid-term, and long-term goals for service impact management for the enterprise. These goals guide the design and development of deliverables for all service model development phases and define the amount of time and effort required for development and implementation.
Some possible goals for service impact management are:
TIP For basic, conceptual information regarding service models and publishing, see the BMC Impact Solutions Concepts Guide.
Chapter 1 Designing a service model 3

Decomposing a business service
■ operational efficiency—This type of implementation is run by and for the IT or IS group. It consists of a thin layer of logical groups on top of a large number of IT resources, ranging from applications and systems to hard disks and other hardware components. Services are just logical groupings that provide a convenient way of classifying the technical resources.
■ business-focused operational efficiency—This type of implementation is likely to involve various populations and centers of management in the enterprise. It consists of a balanced representation of the operational environment, encompassing the IT components, such as systems and applications, and the logical components, such as services, user groups, and other business objects.
■ business continuity and service availability—This type of implementation is driven from the top and ensures that IT or IS is delivering their services as agreed. It consists of a business-centric model in which business processes, services, and SLAs rely on a small number of vital IT components that measure the pulse of the underlying environment.
Decomposing a business serviceThe purpose of decomposing a business service is to identify and document business processes, identify the IT services that support them, and identify IT components and assets that provide the IT services. For example, a hardware manufacturing organization may identify a business function as microprocessor procurement, a supporting IT service as procurement information storage, and the supporting IT assets as servers, databases, and related hardware and software systems.
On a high level, a service model is a collection of components that represent a business service. A business service can have one or more business processes. Each business process can contain several functional applications, each of which can have multiple IT components. A service model will contain the processes, show how the components are interconnected, and show how component failures propagate and impact the upstream services.
The following steps facilitate the process of creating a service model.
1 Identify business services.
Sources of information include business unit managers, business process managers, and staff personnel knowledgeable about the business services. Company organization charts might be helpful in identifying the relevant people.
4 BMC Impact Solutions Service Modeling and Publishing Guide

Decomposing a business service
The process involves interviewing the managers and identifying the following information:
■ business processes—Identify key business processes such as Market Research, Product Planning, Response Management, or Case Management. There can be multiple levels of business processes, starting with higher level core competencies and business functions, to specific sub-business processes.
■ functional applications—Identify the business applications that support the business processes. Map the business processes to the functional apps.
Map the functional applications to IT service components to create the business service models.
2 Identify IT services.
Sources of information include IT managers and staff. Disaster recovery plans, help desk documents, and purchase orders might be useful in identifying IT components and the business processes that they support.
The process involves identifying the list of IT assets (components). Interview the IT management and staff, or utilize an asset/configuration management database as resources:
■ Create a list of IT services (service catalog); discover what IT services are offered to business units through use of IT assets. Examples of IT services include customer support and customer call monitoring.
■ For each IT service, identify the IT assets that support the service. ■ Identify the interdependencies among the IT components and formulate a
topology map. Consider the relationships and dependencies between IT components.
3 Build a business service model, and link the business processes to the IT services you have identified.
Table 1 Example business service model spreadsheet
Core competenciesBusiness functions
Business processes IT services IT component
Plan and develop products
Marketing Market research
Research and development
product planning
Manager customer relations
Front office sales
Response management
Customer support
Support service requests
FTP Server: FTP
Chapter 1 Designing a service model 5

Defining the service catalog
Defining the service catalogA service catalog is a list of IT services, logical assets, and physical assets that support business processes for a company.
The service catalog should list all of the IT services with a summary of their characteristics, including values for the fields shown in Table 2.
For the Sales Logix IT service example shown in Table 1 on page 5, the detailed IT component information (except for Alias and Alias formula) that are required by BMC Impact Service Model Editor is shown in Table 2.
Sprint Server: Walrus
Sales Logix Database: SALLOGApplications: Sales LogixUser group: Tech Support deptServers: Antelope
Table 2 BMC Impact Service Model Editor values for IT service Sales Logix
Component type
Component name
Component description
Cell name
In/out model
Status computation model
Relationship Policy
Provider instancesthat impact
Consumer instances depending on
business process
Support service requests
Business function is Customer support
bogart in direct Tech Support Analysts
user community
Tech Support Analysts
Techs supporting service requests
bogart in standard direct Sales Logix v6.01
Support service requests
application
Sales Logix v6.01
Sales Logix application, v 6.01
bogart in standard increasing Sales Logix server
Tech Support Analysts
application server
Sales Logix server
Sales Logix server
bogart in standard increasing Sales Logix DB software
Sales Logix v6.01Tech Support Analysts
Table 1 Example business service model spreadsheet
Core competenciesBusiness functions
Business processes IT services IT component
6 BMC Impact Solutions Service Modeling and Publishing Guide

Defining the service model
Defining the service modelAfter you have decided on a business goal for service impact management, decomposed your business processes, and created a service catalog, you are ready to define the actual service model.
Defining the service model involves establishing a list of all the IT resources that should be represented in the service model. This information should include:
■ each resource’s name or component identification pattern ■ its location or site
You use this information later in the design phase and when creating service model components.
The first step in developing a service model is to design its logical architecture. To do this, you must analyze the IT environment to
■ identify the resources that make up the service model■ identify the event sources for the resources and their characteristics■ determine the functional relationships and dependencies between various
resources that can affect services
Defining a component instance
In decomposing your business services, you have identified the basic building blocks of a service model—its assets or components. In the BMC service model, each individual resource is represented by a component instance.
database Sales Logix DB software
Sales Logic database software v6.0
bogart in standard direct SALLOG Sales Logix applicationTech Support Analysts
database server
SALLOG Sales Logix database server
bogart in standard direct Sales Logix db softwareTech Support Analysts
Table 2 BMC Impact Service Model Editor values for IT service Sales Logix
Component type
Component name
Component description
Cell name
In/out model
Status computation model
Relationship Policy
Provider instancesthat impact
Consumer instances depending on
Chapter 1 Designing a service model 7
Defining a new component class for a component type
Component instances are created as a single instance of a class type that is defined in the BMC Atrium CMDB. Classes may identify such physical components as servers or databases, and such logical components as user groups. Component instances are created through BMC Impact Service Model Editor.
The order in which you create related physical components is unimportant. You can create an IT system component before or after an application component that runs on it.
Defining a new component class for a component type
Component instances represent an individual occurrence of a component type, or class. Component classes are displayed in BMC Impact Service Model Editor as templates from which you can create new component types. They are created and maintained in the BMC Atrium CMDB.
In order to maintain service model consistency, when you make a change to the SIM classes in the BMC Atrium CMDB, you must distribute the changes to all of the SIM BMC Impact Manager instances (cells) and recompile them.
Analyzing a component’s critical failures
After service components and associated functions are identified, you need to monitor their status to analyze their effects and watch for failures. To do so:
■ identify the cause of failures and degraded performances for the service component
■ categorize the failures into availability, performance, capacity■ identify the effects of the failures■ assign a severity level to each failure
Severity level values are listed in Table 3.
8 BMC Impact Solutions Service Modeling and Publishing Guide

Analyzing a component’s critical failures
■ assign a frequency or occurrence level to each failure
Occurrence level index values are listed in Table 4.
Sample of failure modes effects and analysis
■ Component—Message Transfer Agent (MTA)■ Function—routes and convert messages■ Point of failure—queue length size growing■ Issue type—performance■ Cause of failure—network connection failure, receiving MTA failure, problem on
sending or receiving machine■ Effect of failure—remote recipients will not receive e-mail while MTA down■ Severity—significant■ Occurrence—slight■ Prevention—monitoring of the system, network, and exchange services■ Detection—PATROL NT and Exchange parameters related to the issue
Table 3 Severity level index
Severity level Definition
severe Permanently disabling
significant critical end user dissatisfaction
moderate causes degradation of service
minor causes inconvenience to end user
slight caused annoyance for customer
minimal not noticeable by end user
Table 4 Occurrence level index
Occurrence level Definition
high high change of occurrence and needs immediate attention
frequent frequent change to happen and needs attention
moderate moderate change to consider prevention
occasional occasionally might happen
slight slight chance to happen
remote unlikely to happen
Chapter 1 Designing a service model 9
Determining a component’s relationship and dependencies
Determining a component’s relationship and dependencies
To understand the impact of different components and their status on a service, you identify the underlying dependencies and relationships within the IT Systems.
■ consider relationships and dependencies within the IT service; for example, within email service, or call support’s dependency on email
■ consider dependencies on other services; for example, web services and email services
■ consider how the same IT components might support more than one service; for example, one server hosting multiple applications
■ consider the dependencies of several business processes on the same service; for example, email used by all
■ consider the relationship between IT services and business processes (the link called business service)
Map business processes to each system. The grouping of IT systems becomes the IT services, so that only one IT service would exist for each business process.
Identify the relationships and dependencies among the IT components and the logical components to one another. The direction of the relationship is important. If a system component is to be linked to a hardware component, the hardware component must be the provider and the system component the consumer.
Examine how the various resources combine to deliver a service on a particular host. Define the resources that are providers and the resources that consume their services in the service delivery stream.
Determining the organization of the modeled relationships
How you organize service model components depends on the goals that your organization wants to attain through service impact management. You can organize your service model components using one of these basic organizational strategies:
■ The IT resource management strategy is to create a thin layer of logical groupings on top of a large number of IT resources, ranging from applications and systems to hard disks and other hardware components. This type of implementation is run by and for the IT or IS group. Services are just logical groupings that provide convenient way of classifying the technical resources. The driving force behind this model is operational efficiency.
10 BMC Impact Solutions Service Modeling and Publishing Guide
Identifying a component’s critical events and their sources
■ The business-focused operational efficiency strategy is to create a balanced representation of the operational environment, encompassing the IT components, such as systems and applications, and the logical components, such as services, user groups, and other business objects. This type of implementation is likely to involve various populations and loci of management in the enterprise. The driving force is operational efficiency, but with a balanced business perspective.
■ The business continuity and service availability strategy is to implement a business-centric model in which business processes and services rely on a small number of vital IT components to give a status overview of the underlying environment. This type of implementation is driven from the top, ensuring that IT or IS is delivering their services as agreed. The driving force is business continuity and availability. This strategy is similar to BMC Software’s BSM Strategy that is called a Business Service Impact Model.
Although these strategies are only briefly outlined here, they are helpful in understanding that each implementation probably has a different focus, favoring some types of components and having more or less granularity in some branches of the component hierarchy. The strategy that you choose also affects the amount of time and effort required for its development and implementation.
Identifying a component’s critical events and their sources
Even the most complete service model provides little value if there is not a consistent flow of events into the model to maintain the real-time status of its components. Event associations provide the mechanism for a component’s real-time status to reflect the health of the actual resource that it represents.
To create the event associations for a component, you must
■ identify the event classes that will be associated with the component ■ establish a naming convention for the logical ID (a key value) so that the same
identification string can be derived from each event class to be associated with the component
You perform event analysis to achieve these goals.
Assuming that there is enough event data consistently available to understand the state of IT resources, perform the following actions:
1 Analyze the event flow of each real IT resource or group of resources that are instrumented in the same way to identify:
■ events that provide no value to the service model
Chapter 1 Designing a service model 11

Identifying a component’s critical events and their sources
Not all events received by a cell provide valuable information to the service model. Identify the events that are of no value and should be ignored, either by not sending them to a cell or by filtering them out when they reach the first cell.
■ events that provide valuable information about the service environment and must be retained by the cell, such as:
— events that must be changed or adapted either at the source or in the event adapter that collects them to be usable by the model
— events that must be enriched by the cell so that they contain the required information; events can be enriched using Refine and New rules
— events that must be processed (using a Regulate rule) so that only the appropriate occurrences reach the service model
— events that should be combined through abstraction, correlation, or through New rule updates before entering the service model
This includes events that are best represented by a single higher-order event that represents their net effect or represented by event pairs, such as UP/DOWN.
■ missing events or events that cannot be processed
Some situations that you may want to include in your model are not traced by events in the real environment, or the events produced cannot be associated with the IT resource.
2 For each significant event, determine whether the event should be associated only with a component or whether it should also participate in the status computation.
For example, a cause event E1 is associated with the component C1, and a consequence event E2 is associated with the component C2. While it may appear reasonable to elect E1 so that its severity value contributes to the status of C1, electing E2 may be of no use if a relationship propagates the impact of event E1 from component C1 to component C2.
3 Consider how the monitoring tool, such as an agent, adapter, or script, reports the state of the service’s IT resources.
■ Does the monitoring tool send alerts only when something goes wrong?
If so, does it close the alerts automatically?
If the monitoring tool does not close alerts automatically, you may need to automate their closure through rules containing the appropriate cycle and conditions.
12 BMC Impact Solutions Service Modeling and Publishing Guide
Displaying business key performance indicators (KPIs)
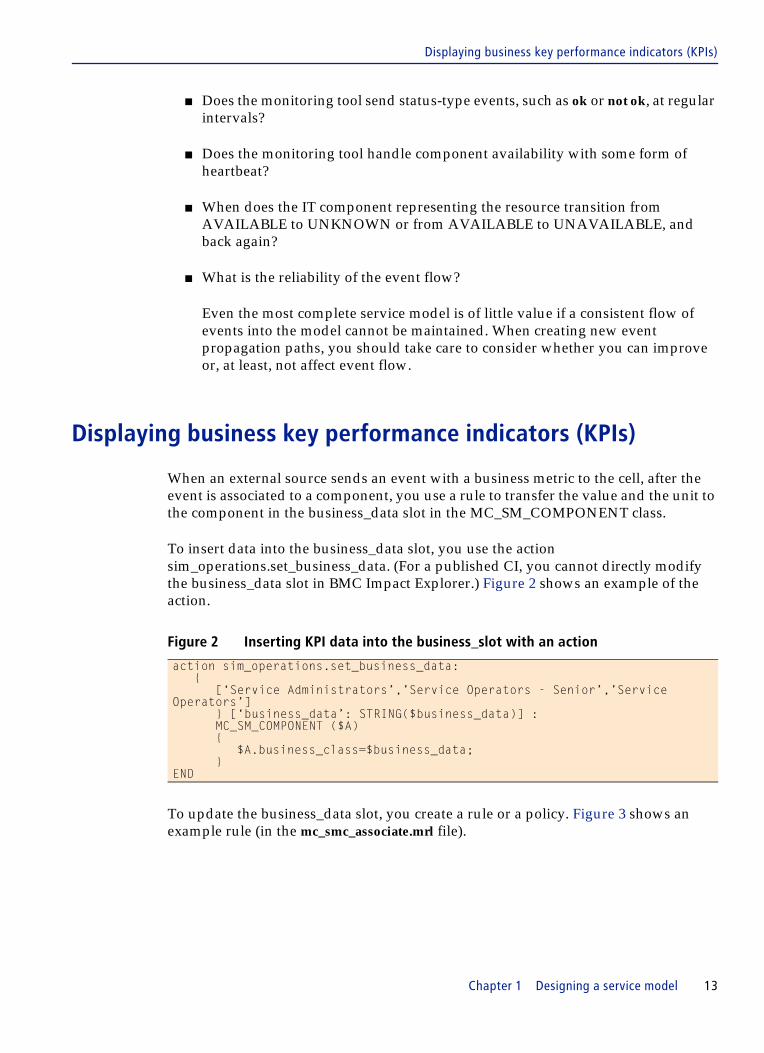
■ Does the monitoring tool send status-type events, such as ok or not ok, at regular intervals?
■ Does the monitoring tool handle component availability with some form of heartbeat?
■ When does the IT component representing the resource transition from AVAILABLE to UNKNOWN or from AVAILABLE to UNAVAILABLE, and back again?
■ What is the reliability of the event flow?
Even the most complete service model is of little value if a consistent flow of events into the model cannot be maintained. When creating new event propagation paths, you should take care to consider whether you can improve or, at least, not affect event flow.
Displaying business key performance indicators (KPIs)
When an external source sends an event with a business metric to the cell, after the event is associated to a component, you use a rule to transfer the value and the unit to the component in the business_data slot in the MC_SM_COMPONENT class.
To insert data into the business_data slot, you use the action sim_operations.set_business_data. (For a published CI, you cannot directly modify the business_data slot in BMC Impact Explorer.) Figure 2 shows an example of the action.
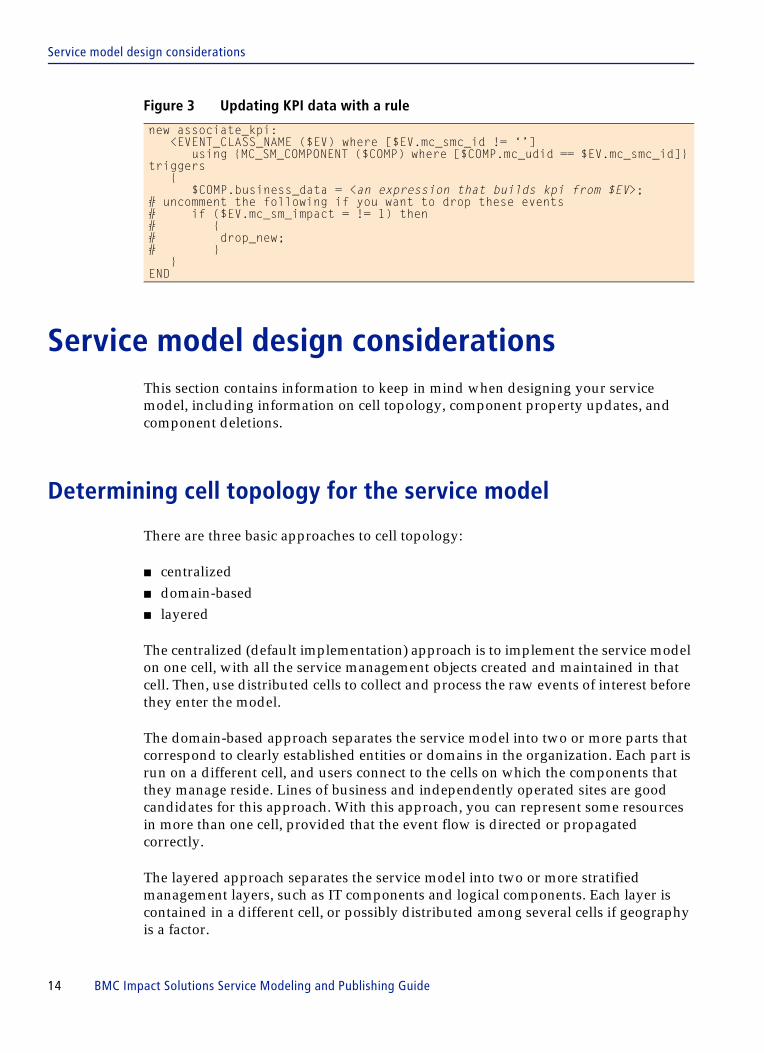
To update the business_data slot, you create a rule or a policy. Figure 3 shows an example rule (in the mc_smc_associate.mrl file).
Figure 2 Inserting KPI data into the business_slot with an action
action sim_operations.set_business_data:{
[‘Service Administrators’,’Service Operators - Senior’,’Service Operators’]
} [‘business_data’: STRING($business_data)] :MC_SM_COMPONENT ($A){
$A.business_class=$business_data;}
END
Chapter 1 Designing a service model 13
Service model design considerations
Service model design considerationsThis section contains information to keep in mind when designing your service model, including information on cell topology, component property updates, and component deletions.
Determining cell topology for the service model
There are three basic approaches to cell topology:
■ centralized■ domain-based■ layered
The centralized (default implementation) approach is to implement the service model on one cell, with all the service management objects created and maintained in that cell. Then, use distributed cells to collect and process the raw events of interest before they enter the model.
The domain-based approach separates the service model into two or more parts that correspond to clearly established entities or domains in the organization. Each part is run on a different cell, and users connect to the cells on which the components that they manage reside. Lines of business and independently operated sites are good candidates for this approach. With this approach, you can represent some resources in more than one cell, provided that the event flow is directed or propagated correctly.
The layered approach separates the service model into two or more stratified management layers, such as IT components and logical components. Each layer is contained in a different cell, or possibly distributed among several cells if geography is a factor.
Figure 3 Updating KPI data with a rule
new associate_kpi:<EVENT_CLASS_NAME ($EV) where [$EV.mc_smc_id != ‘’]
using {MC_SM_COMPONENT ($COMP) where [$COMP.mc_udid == $EV.mc_smc_id]} triggers
{$COMP.business_data = <an expression that builds kpi from $EV>;
# uncomment the following if you want to drop these events# if ($EV.mc_sm_impact = != 1) then# {# drop_new;# }
}END
14 BMC Impact Solutions Service Modeling and Publishing Guide

Component property updates
If you are assigning different components of the same service model across multiple cells, first determine which components are related. Then assign related components to appropriate cells until you assign all components of the service model.
To determine related component instances
This topic addresses the publication of different components of a service model to multiple cells: for example, publishing component 1 to cell A, component 2 to cell B, and so forth, until all components of the service model have an assigned cell.
You determine related component instances based on your interpretation of the service model. For example, you might group instances based on geographic proximity, network connectivity, similarity of function, provider-to-consumer relation, and so forth.
You can assign different component instances to different cells to distribute the processing load, or you can make the assignment based on the proximity of the cell to the instance it is monitoring. See “Assigning related component instances to cells” on page 83.
After you publish the service model, you can view the entire model from a single Impact Explorer console, as long as all the cells are registered with the BMC Impact Portal.
Component property updates
The cell updates the status of a component as new events are received or when an impact from other components occurs.
However, other component properties that can change over time are not maintained by the cell. You can update these properties automatically only if the new values arrive in an event or are added in a data table. You must create a few simple rules to implement this mechanism.
Chapter 1 Designing a service model 15

Component property updates
16 BMC Impact Solutions Service Modeling and Publishing Guide

C h a p t e r 2
2 Understanding a service modelA BMC impact service model is made up of
■ data classes that describe the various types of physical and logical IT resources that make up an enterprise’s business
■ corresponding data classes in the SIM KB of cells■ event classes associated with specific resources■ component instances that represent the unique physical and the logical
configuration items that deliver business services■ impact relationships■ management data instances
This chapter presents the following topics:
Sources of objects in a service model . . . . . . . . . . . . . . . . . . . . . . . . . . . . . . . . . . . . . . . . 18Rules for service model data modification and deletion . . . . . . . . . . . . . . . . . . . . . 20Using the BMC Atrium CMDB as a source of service model data. . . . . . . . . . . . . 20Using BMC Performance Manager . . . . . . . . . . . . . . . . . . . . . . . . . . . . . . . . . . . . . . . 21Using Direct Feed . . . . . . . . . . . . . . . . . . . . . . . . . . . . . . . . . . . . . . . . . . . . . . . . . . . . . 21Precedences . . . . . . . . . . . . . . . . . . . . . . . . . . . . . . . . . . . . . . . . . . . . . . . . . . . . . . . . . . 22
Service components . . . . . . . . . . . . . . . . . . . . . . . . . . . . . . . . . . . . . . . . . . . . . . . . . . . . . . . 22Component classes and types . . . . . . . . . . . . . . . . . . . . . . . . . . . . . . . . . . . . . . . . . . . 23Service component instances . . . . . . . . . . . . . . . . . . . . . . . . . . . . . . . . . . . . . . . . . . . . 23Component status and substatus . . . . . . . . . . . . . . . . . . . . . . . . . . . . . . . . . . . . . . . . 24Component status computation . . . . . . . . . . . . . . . . . . . . . . . . . . . . . . . . . . . . . . . . . 25
Service model component types . . . . . . . . . . . . . . . . . . . . . . . . . . . . . . . . . . . . . . . . . . . . 26Component relationships . . . . . . . . . . . . . . . . . . . . . . . . . . . . . . . . . . . . . . . . . . . . . . . . . . 33
Service consumers and providers . . . . . . . . . . . . . . . . . . . . . . . . . . . . . . . . . . . . . . . . 33Relationship states. . . . . . . . . . . . . . . . . . . . . . . . . . . . . . . . . . . . . . . . . . . . . . . . . . . . . 35Status propagation in relationships . . . . . . . . . . . . . . . . . . . . . . . . . . . . . . . . . . . . . . 35Relationship control . . . . . . . . . . . . . . . . . . . . . . . . . . . . . . . . . . . . . . . . . . . . . . . . . . . 36Dynamic status mapping . . . . . . . . . . . . . . . . . . . . . . . . . . . . . . . . . . . . . . . . . . . . . . . 37
Event associations . . . . . . . . . . . . . . . . . . . . . . . . . . . . . . . . . . . . . . . . . . . . . . . . . . . . . . . . 38Bringing events from the resource into the cell . . . . . . . . . . . . . . . . . . . . . . . . . . . . 39Event alias associations. . . . . . . . . . . . . . . . . . . . . . . . . . . . . . . . . . . . . . . . . . . . . . . . . 40
Chapter 2 Understanding a service model 17

Sources of objects in a service model
Service schedules . . . . . . . . . . . . . . . . . . . . . . . . . . . . . . . . . . . . . . . . . . . . . . . . . . . . . . . . . 42Timeframes . . . . . . . . . . . . . . . . . . . . . . . . . . . . . . . . . . . . . . . . . . . . . . . . . . . . . . . . . . . 43Service schedules example with exceptions. . . . . . . . . . . . . . . . . . . . . . . . . . . . . . . . 43
Sources of objects in a service modelA service model can contain objects (components and relationships) from different sources. In addition, the service model objects in a single cell can originate from multiple sources. So, you can mix different sources of data in a SIM cell. For example, you may have the bulk of your service model objects come from the BMC Atrium CMDB, and then add special objects manually using a BAROC file. It is also possible to track very dynamically occurring objects, with MRL rules, for example.
Data that you send from any given environment must be updated and deleted in the context of that environment.
Sources for service model objects in a SIM cell are
■ BMC Atrium CMDB■ BMC Impact Explorer■ CLI commands pposter and mposter
■ Master Rule Language (MRL)■ third-party repository
The source of the service model data determines the method of delivery into the cell, as described in Table 5.
Table 5 How service model objects get to a SIM cell
Source for service model objects How objects are delivered to a cell Delivery method name
BMC Atrium CMDB objects are discovered using discovery tools or you create them in the BMC Impact Service Model Editor component; they are reconciled by the BMC Atrium CMDB Reconciliation Engine, and then automatically published to the cell using BMC Impact Publishing Server
Atrium Publish Feed
BAROC source file you create a BAROC source file of object data and send it to the cell using the CLI command pposter, which publishes the data to the cell using BMC Impact Publishing Server
Direct Publish Feed
you create a BAROC source file of object data and send it to the cell using the CLI command mposter
source Direct Feed
18 BMC Impact Solutions Service Modeling and Publishing Guide

Sources of objects in a service model
Table 6 describes some of the advantages and disadvantages of the different sources for service model data.
BMC Impact Explorer you create components, relationships, or both in BMC Impact Explorer using the Edit => Create Component menu command; when the objects are saved, they are sent directly to the cell
source Direct Feed
MRL rule you create a rule that adds objects to the cell on receipt of a trigger event
tool direct feed
BMC Performance Manager you configure BMC Performance Manager to handle Direct Service Model integration
source direct feed
Table 6 Advantages and disadvantages of different object sources
Object source Advantages Disadvantages
BMC Atrium CMDB ■ handles large, complex service models
■ accepts objects from discovery tools
■ sophisticated features, such as BMC Impact Service Model Editor GUI to create, edit, and delete objects, and dynamic prioritization
■ data is protected from uncontrolled edits
■ customizable permissions are available
■ complex to implement■ time factor to discover or
create, reconcile, and publish objects
BAROC file with pposter CLI command
■ easy to set up a simple service model quickly
■ managed by BMC Impact Publishing Server, so data is protected from uncontrolled edits
■ useful only for small, simple models
■ BAROC file must be created to exact standards
■ requires knowledge of CLIs
BMC Impact Explorer ■ user interface to create and edit components and relationships
■ you can add data to complement other sources
■ may not build complete model
■ not as protected from uncontrolled edits
■ no primary copy in external datastore
Table 5 How service model objects get to a SIM cell
Source for service model objects How objects are delivered to a cell Delivery method name
Chapter 2 Understanding a service model 19

Rules for service model data modification and deletion
Rules for service model data modification and deletion
For published service model data, changes and deletions are restricted to the original source of the data. Objects delivered to the SIM cell from BMC Atrium CMDB must be edited and deleted in BMC Impact Service Model Editor (or BMC Atrium CMDB) and objects from the CLI command pposter must be changed and deleted using a BAROC source file and pposter.
Published data is protected from modification or deletion by any form of Direct Feed. In other words, while published components are visible in BMC Impact Explorer, you cannot change or delete them in BMC Impact Explorer, nor with a rule, or the mposter command.
If you first create a CI via a pposter and later publish that CI (same ComponentAlias) from BMC Atrium CMDB, then the DirectPublish CI is replaced by a AtriumCMDB CI. If you first create a CI from publish from BMC Atrium CMDB then try to modify it via pposter, this fails because the DirectPublish environment is not the source of the CI.
Using the BMC Atrium CMDB as a source of service model data
When service model component and relationship data is stored in BMC Atrium CMDB, you use these products from BMC Impact Solutions to create and manage service models:
■ BMC Impact Service Model Editor■ BMC Impact Publishing Server
MRL rule ■ handles highly dynamic changes
■ only practical for special circumstances
■ may not build complete model
■ no primary copy in external datastore
Direct Publish Feed ■ validation of the service model is off-loaded from the cell, preventing cell processing performance degradation
■
Table 6 Advantages and disadvantages of different object sources
Object source Advantages Disadvantages
20 BMC Impact Solutions Service Modeling and Publishing Guide

Using BMC Performance Manager
In the BMC Impact Service Model Editor, you build and maintain a service model with component objects, and manage your service model environment
In the BMC Impact Publishing Server, you publish service model data to the cells and manage publish environments.
Your service model can come solely from BMC Atrium CMDB or you can add objects to it from other sources.
For more information about creating service models using BMC Atrium CMDB, see Chapter 3, “Understanding a service model created in BMC Impact Service Model Editor” and Chapter 4, “Building a service model in BMC Impact Service Model Editor”.
Using BMC Performance Manager
With both BMC Impact Portal and BMC Performance Manager installed, you can send service model components from BMC Performance Manager directly to the cell.
Service model objects that originate from BMC Performance Manager may be missing relationships, making the service model incomplete. In BMC Impact Explorer, you can create an impact relationship between the two components.
For information about this, see BMC Performance Manager Portal Monitoring and Management Guide.
Using Direct Feed
A direct feed source of service model data is any application, executable, script, or rule that sends service model data directly to the cell.
Sending service model data to the cell from BMC Impact Explorer, the CLI command mposter, or MRL rules is enabled by default. This is controlled in the mcell.conf configuration file by the ServiceModelDirectFeed parameter, which is set to Y (yes) by default. To disable Direct Feed, change this parameter setting to N (no).
For more information about creating and editing service model components in BMC Impact Explorer, see BMC Impact Solutions Service Impact Management Guide.
Since Direct Feed is enabled by default, when a cell starts, the service management data is loaded.
Chapter 2 Understanding a service model 21

Precedences
Management data that comes from DirectFeed cannot be referred to by a service model that is published. Publication will fail if the referred management data is not published.
Precedences
Data published from BMC Atrium CMDB automatically overwrites Direct Publish data and Direct Feed data. Between Direct Publish and Direct Feed data, Direct Publish data has a higher precedence and hence overwrites Direct Feed data. Events that are attached to lower precedence CIs are automatically reattached to overwriting CIs of higher precedence.
Data overrides other data with a lower precedence if
■ it has the same key slots or ■ in the case of a MC_SM_COMPONENT, when it has the same alias
Different system sources like BMC Impact Explorer, pposter, BMC Performance Manager, and BMC Atrium CMDB must not create data with the same mc_udid.
Overriding rules
When data X, for example, has precedence pX with key slot values that collide with existing data Y with precedence pY, such that pY < pX, then Y is deleted; otherwise the addition of X fails.
These key slot collision rules apply to SIM data and relationships (the keys of a relationships are the provider_id and consumer_id). Do not modify key slots.
Data modification or deletion is allowed only when the publish environment ID of the requester matches the publish_env_id of the data. In addition to these rules, extra operations are performed when overriding, modifying, or deleting CIs to ensure the uniqueness of each alias and to avoid (local) relationships with dangling ends.
Service componentsThis section contains overview information about components classes and types, types of service component instances, and component statuses.
22 BMC Impact Solutions Service Modeling and Publishing Guide
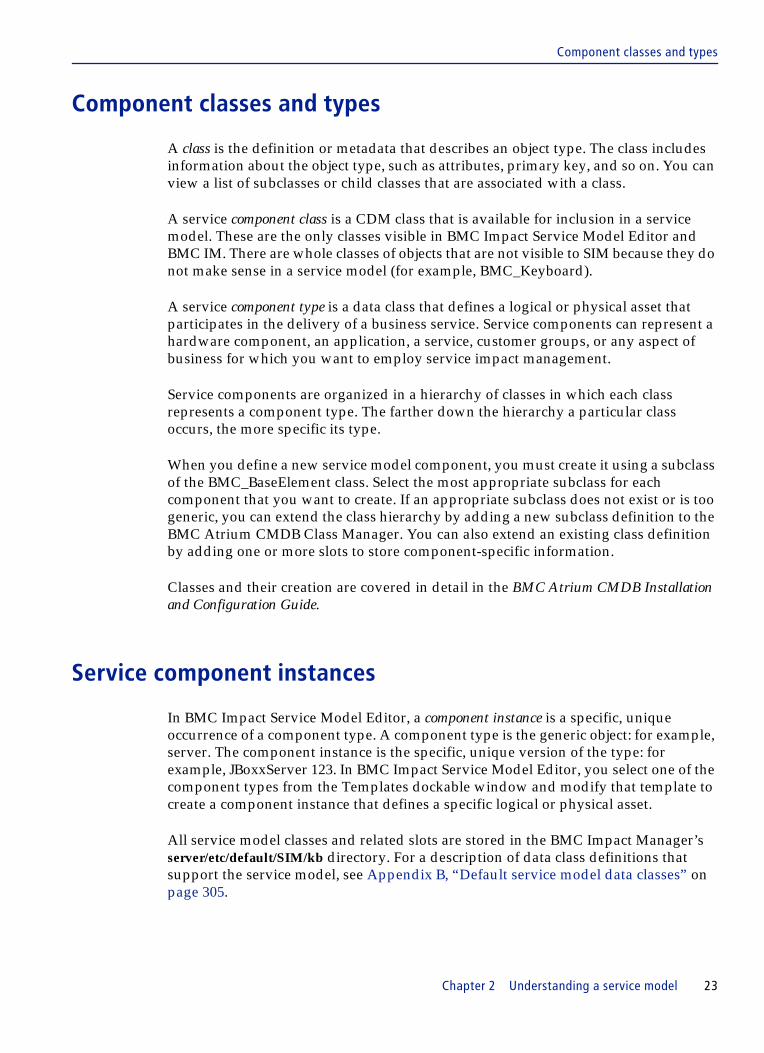
Component classes and types
Component classes and types
A class is the definition or metadata that describes an object type. The class includes information about the object type, such as attributes, primary key, and so on. You can view a list of subclasses or child classes that are associated with a class.
A service component class is a CDM class that is available for inclusion in a service model. These are the only classes visible in BMC Impact Service Model Editor and BMC IM. There are whole classes of objects that are not visible to SIM because they do not make sense in a service model (for example, BMC_Keyboard).
A service component type is a data class that defines a logical or physical asset that participates in the delivery of a business service. Service components can represent a hardware component, an application, a service, customer groups, or any aspect of business for which you want to employ service impact management.
Service components are organized in a hierarchy of classes in which each class represents a component type. The farther down the hierarchy a particular class occurs, the more specific its type.
When you define a new service model component, you must create it using a subclass of the BMC_BaseElement class. Select the most appropriate subclass for each component that you want to create. If an appropriate subclass does not exist or is too generic, you can extend the class hierarchy by adding a new subclass definition to the BMC Atrium CMDB Class Manager. You can also extend an existing class definition by adding one or more slots to store component-specific information.
Classes and their creation are covered in detail in the BMC Atrium CMDB Installation and Configuration Guide.
Service component instances
In BMC Impact Service Model Editor, a component instance is a specific, unique occurrence of a component type. A component type is the generic object: for example, server. The component instance is the specific, unique version of the type: for example, JBoxxServer 123. In BMC Impact Service Model Editor, you select one of the component types from the Templates dockable window and modify that template to create a component instance that defines a specific logical or physical asset.
All service model classes and related slots are stored in the BMC Impact Manager’s server/etc/default/SIM/kb directory. For a description of data class definitions that support the service model, see Appendix B, “Default service model data classes” on page 305.
Chapter 2 Understanding a service model 23

Component status and substatus
Component status and substatus
A service component instance is characterized by its status, which is indicated by the color of the component’s icon in BMC Impact Explorer and BMC Impact Portal.
Information about the status of a component instance is stored in the cell in the instance’s status slot. The initial status of a service component instance, just after its creation, is determined by the default value of its class-level status slot (usually this value is green or OK).
Table 7 defines the default service component status values that are available in BMC Impact Explorer.
Table 7 Service component status definitions
Service component status Meaning
Default color value Enumeration
Equivalent BAROC status
01 NONE (no substatus)
BLACKOUT monitoring of the component is suspended for a scheduled period
dark gray 10 BLACKOUT
UNKNOWN status of the component has not yet or cannot be determined
light gray 20 UNKNOWN
OK nothing has occurred that affects the component’s normal delivery of service
green 30 OK
INFORMATION awaiting information on the component
medium blue 40 INFO
WARNING component is delivering services normally, but some problem may effect it
yellow 50 WARNING
MINOR IMPACT component’s delivery of service is slightly affected
light orange 60 MINOR
IMPACTED component’s delivery of service is affected
orange 70 MAJOR
UNAVAILABLE component has a failure and is unable to deliver service
red 80 CRITICAL
NOTE Do not confuse the MC_SM_COMPONENT_STATUS enumeration with the STATUS enumeration that defines event status values, such as OPEN or ACK.
24 BMC Impact Solutions Service Modeling and Publishing Guide

Component status computation
Component status computation
The status of a component instance is computed automatically by the cell when new conditions occur, such as
■ a new event is received that has a direct impact on the component■ the severity of an event impacting a component changes■ another component’s status change is propagated to the component
Whether the status of a component is influenced directly by events, by other components’ status changes, or both, depends on the component’s type and its relative position in a particular service infrastructure. For example, the status of an IT component usually reflects the associated resource events that directly impact its status. In contrast, logical components such as applications or business groups rely on their relationships to IT components to provide their current status.
The cell computes a component’s status using a status computation model that you assign to the component instance in the StatusModel attribute. Based on the specific status computation model, the cell uses an algorithm to calculate the
■ status values propagated by inbound relationships■ severities of direct events associated with the service component instance■ impact status and service component self-status
The predefined status computation models available are Standard, Cluster, Weighted Cluster, and Self-Preferred.
The Weighted Cluster status computation model uses the Status Weight attribute of the BMC_Impact object. Status Weight is used in impact relationships to determine how much importance (numerically weighted) to give to each provider relationship that impacts a consumer instance. The higher the number, the greater the importance.
You select the status computation model for each component instance in the Create (or Edit) Component dialog box, on the Status and Alias tab, in the Status Computation box. BMC Impact Service Model Editor ensures that each component instance is associated with a valid status computation model. See “Creating service component instances in BMC Impact Service Model Editor” on page 60.
For more information about component status computation and status computation models, see Chapter 5, “Component and relationship status propagation” on page 17.
NOTE Whether and how the status of a provider component is propagated through a relationship is controlled by the relationship policy assigned to the component instance. For more information about selecting a relationship policy for a component, see Chapter 4, “Building a service model in BMC Impact Service Model Editor” on page 17.
Chapter 2 Understanding a service model 25

Service model component types
Service model component typesTable 8 lists the component types, the superclass of the component, the icon that represents the component in BMC Impact Service Model Editor and in the consoles, and the class of the component as defined in the data model. These classes are derived from the class BMC_BaseElement.
Table 8 Service model component types (part 1 of 7)
Component superclass Icon Component type Component class
Logical Entity BMC_LogicalEntity
Activity BMC_Activity
Activity Decision BMC_ActivityActivityType=ActivityDecision
Activity End BMC_ActivityActivityType=ActivityEnd
Activity Interaction BMC_ActivityActivityType=ActivityInteraction
Activity Manual BMC_ActivityActivityType=ActivityManual
Activity Start BMC_ActivityActivityType=ActivityStart
Business Process BMC_BusinessProcess
Business Service BMC_BusinessService
Database BMC_DataBase
26 BMC Impact Solutions Service Modeling and Publishing Guide

Service model component types
Collection BMC_Collection
User Community BMC_UserCommunity
Connectivity Collection BMC_ConnectivityCollection
IP Connectivity Subnet BMC_IPConnectivitySubnet
IPX Connectivity Network BMC_IPXConnectivityNetwork
BMC_LNsCollection BMC_LNsCollection
LAN Network BMC_LAN
WAN Network BMC_WAN
Organization BMC_Organization
System BMC_System
Access Server BMC_ComputerSystem PrimaryCapability=Access Server
Application BMC_Application
Application Infrastructure BMC_ApplicationInfrastructure
Application System BMC_ApplicationSystem
Cluster BMC_Cluster
Table 8 Service model component types (part 2 of 7)
Component superclass Icon Component type Component class
Chapter 2 Understanding a service model 27

Service model component types
System BMC_System
Communication Server BMC_SoftwareServer SoftwareServerType=Communication Server
Computer System BMC_ComputerSystem
Configuration Management Agent
BMC_SoftwareServer SoftwareServerType=ConfigMgmtAgent
Database Server BMC_SoftwareServer SoftwareServerType=DataBaseServer
DNS Server BMC_SoftwareServer SoftwareServerType=DNSServer
File Server BMC_ComputerSystem PrimaryCapability=File Server
Firewall BMC_ComputerSystem PrimaryCapability=Firewall
FTP Server BMC_SoftwareServer SoftwareServerType=FTPServer
Gateway BMC_ComputerSystem PrimaryCapability=Gateway
Hub BMC_ComputerSystem PrimaryCapability=Hub
Input/Output Device BMC_ComputerSystem PrimaryCapability
JBOD (Just a Bunch Of Disks) BMC_ComputerSystem PrimaryCapability=JBOD
Layer 3 Switch BMC_ComputerSystem PrimaryCapability=Layer 3 Switch
Table 8 Service model component types (part 3 of 7)
Component superclass Icon Component type Component class
�
��
28 BMC Impact Solutions Service Modeling and Publishing Guide

Service model component types
System BMC_System
LDAP Server BMC_SoftwareServer SoftwareServerType=LDAPServer
Load Balancer BMC_ComputerSystem PrimaryCapability=LoadBalancer
Mail Server BMC_SoftwareServer SoftwareServerType=MailServer
Mainframe BMC_Mainframe
Message Server BMC_SoftwareServer SoftwareServerType=MessageServer
Mobile User Device (a hand-held personal data assistant (PDA))
BMC_ComputerSystem PrimaryCapability=Mobile User Device
Monitor BMC_Monitor
Print Server BMC_ComputerSystem PrimaryCapability=Print
Print Server BMC_SoftwareServer SoftwareServerType=PrintServer
RAID Storage Device BMC_ComputerSystem PrimaryCapability=RAIDStorageDevice
Resource Server BMC_SoftwareServer SoftwareServerType=ResourceServer
Router BMC_ComputerSystem PrimaryCapability=Router
SAN Bridge BMC_ComputerSystem PrimaryCapability=SANBridge
Table 8 Service model component types (part 4 of 7)
Component superclass Icon Component type Component class
Chapter 2 Understanding a service model 29

Service model component types
System BMC_System
SAN Director BMC_ComputerSystem PrimaryCapability=SANDirector
SAN Hub BMC_ComputerSystem PrimaryCapability=SANHub
SAN Router BMC_ComputerSystem PrimaryCapability=SANRouter
SAN Switch BMC_ComputerSystem PrimaryCapability=SANSwitch
Security Server BMC_SoftwareServer SoftwareServerType=SecurityServer
Server BMC_ComputerSystem PrimaryCapability=Server
Software Server BMC_SoftwareServer
Storage BMC_ComputerSystem PrimaryCapability=Storage
Switch BMC_ComputerSystem PrimaryCapability=Switch
Tape Library BMC_ComputerSystem PrimaryCapability=TapeLibrary
Telnet Server BMC_SoftwareServer SoftwareServerType=TelnetServer
Transaction Server BMC_SoftwareServer SoftwareServerType=TransactionServer
UDDI Server BMC_SoftwareServer SoftwareServerType=UDDIServer
Table 8 Service model component types (part 5 of 7)
Component superclass Icon Component type Component class
�
30 BMC Impact Solutions Service Modeling and Publishing Guide

Service model component types
System BMC_System
Virtual System BMC_VirtualSystem (deprecated as of BMC Atrium CMDB version 7.5.00)
Web Cache BMC_ComputerSystem PrimaryCapability=Web Caching
Web Server BMC_SoftwareServer SoftwareServerType=WebServer
System Service BMC_SystemService
Application Service BMC_ApplicationService
System Component BMC_SystemComponent
Hardware System Component BMC_HardwareSystemComponent
Media BMC_Media
CD ROM Drive BMC_CDROMDrive
Disk Drive BMC_DiskDrive
Floppy Drive BMC_FloppyDrive
Tape Drive BMC_TapeDrive
Uninterruptible Power Supply (UPS)
BMC_UPS
Table 8 Service model component types (part 6 of 7)
Component superclass Icon Component type Component class
Chapter 2 Understanding a service model 31

Service model component types
System Component BMC_SystemComponent
Logical System Component BMC_LogicalSystemComponent
File System BMC_FileSystem
Database Storage BMC_DataBaseStorage
Local File System BMC_LocalFileSystem
Remote File System BMC_RemoteFileSystem
Disk Partition BMC_DiskPartition
Software BMC_Software
System Software BMC_SystemSoftware
Operating System BMC_OperatingSystem
Virtual System Enabler BMC_VirtualSystemEnabler
VMware BMC_VMWare (deprecated as of BMC Atrium CMDB version 7.5.00)
System Resource BMC_SystemResource
Table 8 Service model component types (part 7 of 7)
Component superclass Icon Component type Component class
32 BMC Impact Solutions Service Modeling and Publishing Guide

Component relationships
Component relationshipsService management relationships are impact relationships.
Table 9 lists the main relationship classes derived from BMC_BaseRelationship, of which only BMC_Impact defines impact relationships for a service model.
Service consumers and providers
A service model relationship is a link between a component that provides a service and the components that consume that service. In a provider/consumer relationship, the provider status naturally impacts the consumer status. When you define relationships in a service model, you make it possible to know, for example, which business services are affected if Router C fails.
NOTE Only BMC_Impact relationships are considered, or used, by SIM.
Table 9 Main relationship classes
Class name Class description
BMC_Impact The BMC_Impact relationship, and the subclasses that derive from this class are used to define service impact relationships between component instances.
BMC_Dependency BMC_Dependency describes component relationships that are dependent on each other. This is different from impact relationships in that a dependency can be at a lower direct level, while an impact is often at a higher, more indirect level.
BMC_Component BMC_Component is used to define composite objects. One key component relationship in the CMD is between the system and system component classes. This relationship defines a composite computer system, which is made up of a computer system instance, and subinstances of disk drives, monitors, software, network cards, and so on.
BMC_MemberOfCollection BMC_MemberOfCollection is used to define groupings of instances in a logical manner. It is used to define the network topology, or to define the set of component instances that make up a business process or service.
BMC_ElementLocation BMC_ElementLocation ElementLocation associates a ManagedElement with a Location for positioning, inventory, maintenance and similar purposes.
Chapter 2 Understanding a service model 33

Service consumers and providers
The concepts of provider and consumer are relative to the relationship being considered. In Figure 4, Component B is a provider in one relationship and a consumer in another.
Figure 4 Impact (status) propagation in relationships
The service model enables a component instance to be related to another component instance by defining the relationship in the BMC_Impact class. Such a relationship states that a component instance is impacted if something happens to the component instances to which it is related. For example, a group of people responsible for accounting will be impacted when the accounting database server is down.
Service model relationships are organized in a hierarchy of data classes in which each class represents a relationship type.
The parent class for component relationships is BMC_Relationship. All service model relationship classes are defined in the BMC Atrium CMDB as a subclass of BMC_Relationship.
Important components
Some components can be considered “important” components and can be set to propagate their priority back to their provider. For more information about priority propagators, see “Impacts priority” on page 146.
34 BMC Impact Solutions Service Modeling and Publishing Guide

Status propagation in relationships
Status propagation in relationships
Status propagation is the passing of a status or a modified status from one component instance to another through a relationship. Depending on the status propagation model assigned to the relationship, the cell can automatically propagate the status of a provider component through its outbound impact relationships as new conditions occur, such as
■ the component’s status changes■ the state of an outbound impact relationship changes, altering the status
propagation from the provider component
This status can then be propagated to subsequent components within the service model.
The service model ensures that each impact relationship instance is associated to a valid status propagation model.
For more information about status propagation and status propagation models, see Chapter 5, “Component and relationship status propagation” on page 125.
Relationship states
Just as a component is characterized by its status, a relationship is characterized by its state. Relationship state values are defined internally in the cell as the enumeration MC_SM_RELATIONSHIP_STATE.
A relationship can be either active or inactive, as shown in the following table:
In status propagation models, the state of a relationship determines whether the provider’s status or a modification of it is passed to the consumer service component.
Relationship state value Meaning
ACTIVE The consumer component depends on its provider. An impact relationship exists.
INACTIVE The consumer does not have a dependency, or the dependency is unimportant. No impact relationship exists.
Chapter 2 Understanding a service model 35

Relationship control
Status propagation models
A propagation model defines how the status of a provider component must be propagated in an impact relationship, based on
■ the current state of the relationship (active or inactive)■ the current value of the provider’s status
Status propagation models are used only by impact relationships. The role of the BMC_STATUS_PROPAGATION class instance is to restrict the use of a propagation model to consumer and provider relationships.
Status propagation models serve these purposes:
■ relationship control—Propagation models enforce logical rules in new component relationships so that only valid relationships are created.
dynamic status mapping—Propagation models translate the computed status of the provider component into a propagated status for input into the impact_function slot of the related consumer component.
Relationship control
Relationship control is the enforcement of logical rules in creating new service model relationships. The BMC_STATUS_PROPAGATION table defines the valid pairs of component types whose instances can participate in a specific type of relationship.
Each time an impact relationship instance is submitted for creation, the cell seeks an BMC_STATUS_PROPAGATION instance that matches
■ the name of the propagation model used by the component relationship■ the component type of the provider in the relationship■ the component type of the consumer in the relationship
During this process, the cell uses the component’s class hierarchy to interpret the component types in the BMC_STATUS_PROPAGATION instances. If there is a matching BMC_STATUS_PROPAGATION instance, the relationship is valid. Otherwise, the creation process is blocked.
36 BMC Impact Solutions Service Modeling and Publishing Guide

Dynamic status mapping
Dynamic status mapping
Dynamic status mapping translates the main status of the provider component into a propagated status for input into the impact function of the consumer component in a relationship, as described in the following process:
1. bringing the events from the monitoring application into the cell
For physical resources, most of which are or can be instrumented, you can obtain status information by actively monitoring the resource’s variables, parsing its log files, or capturing the SNMP traps that it sends. This information can be formatted into events that a cell can process.
The cell can accept event instances from a variety of sources:
■ Events can be manually obtained directly through adapters and the msend and mposter commands.
■ Cells also provide events through propagation rules.■ Other sources include third-party products that can be integrated with BMC IM.
2. associating those events with the service model component instance that represents the resource
You can associate events from a resource with the component instance that represents it by using the alias key. The actual association is done using a slot-mapping data table, which stores all the slot-mapping formulas for event classes. The arrival of an event invokes a unique predefined rule that generates a value for the event’s mc_smc_alias slot and searches for the matching service component in the alias table.
With this process in place, incoming events can alter the status of the component directly in real time. For example, an event with a severity of CRITICAL could turn the status of the associated component to UNAVAILABLE by using a severity-to-status mapping table.
The BMC_PROPAGATION_MAP table defines the status-mapping instances for the relationships. A group of BMC_PROPAGATION_MAP instances sharing the same name form a propagation map that is uniquely bound to the status propagation model with the same name.
When two components participate in an impact relationship and the status of the provider changes, the new status must be propagated to a consumer component. First, the cell seeks the BMC_PROPAGATION_MAP instance in which the following value matches occur:
Chapter 2 Understanding a service model 37

Event associations
Then, the cell obtains the appropriate propagated_status value to propagate, depending on the current state of the relationship (ACTIVE or INACTIVE). The cell propagates this value to the consumer component for input to the consumer’s status computation.
For example, consider an impact relationship with service component named XService that is a consumer of an IT component, DBsoftware. The relationship is active and the propagation model assigned to it is INCREASING.
When the cell needs to propagate DBsoftware’s current status (IMPACTED) to its consumer component, XService, it searches the INCREASING propagation map to find the instance corresponding to a provider status of IMPACTED. To obtain the appropriate propagated_status value, it matches the corresponding relationship state (ACTIVE), which is a value of UNAVAILABLE in this instance. Finally, the cell propagates the appropriate changed status to the consumer component.
Propagation maps affect only the way in which the main status of the provider is propagated in the relationship. They do not affect how the substatus is propagated from the provider to the consumer.
Event associationsA production service model requires that the incoming events that contain information about the state of a IT asset be associated with the appropriate service model component instance. This event association provides the mechanism for keeping a component instance’s status up-to-date, so that it reflects the real-time health of the actual resource that it represents. Event association uses the aliases that you assign to service components and event alias associations that you create in BMC Impact Service Model Editor.
To set up an event association, you must
■ bring events from the resource into the cell
BMC_PROPAGATION_MAP instance slot value Matching class instance Matching value
name relationship propagation_model slot value
relationship_state relationship state slot value
provider_status provider component status slot value
38 BMC Impact Solutions Service Modeling and Publishing Guide

Bringing events from the resource into the cell
■ associate the events with the service model component instance that represents the resource
— enter an alias in the Alias attribute of the component instance— create an appropriate event alias association for the component instance
■ verify that the event association works correctly
Bringing events from the resource into the cell
To bring events to a cell, you configure the event sources for the resource, such as a log file or an SNMP trap file, to provide the necessary information about its status.
You can use a BMC Impact Event adapter, a BMC Impact Integration product, a third-party product, or another utility to produce BMC Impact Manager events.
Component aliases
You designate a component instance as participating in alias activity by entering a value in the Alias attribute when you create or edit a component instance in BMC Impact Service Model Editor.
An alias identifies a specific component instance. When an event arrives at the cell, the cell constructs an alias using data in the event’s slots plus any other elements specified in the alias formula. An alias formula defines the content and format of the alias.
A service component instance can have several different aliases so that different event types can be easily associated with it. Service component aliases are stored in the BMC Atrium CMDB and are associated with the relevant service component by the component’s universal data identifier (udid).
An alias formula is an object published to the cell; it is not associated with any object in the service model; it is management data supporting the service model.
For information about entering component aliases in a component instance, see “Creating service component instances in BMC Impact Service Model Editor” on page 60.
Chapter 2 Understanding a service model 39

Event alias associations
Event alias associations
You set up the dynamic association of events with a component instance by using the Tools => Alias Formulas menu command in BMC Impact Service Model Editor.
When you set up the dynamic association of events with a component instance, you must specify two elements:
■ an event class■ an alias formula
The event class identifies which incoming events may affect the status of the component instance. For example, for an application component instance, you want events of a particular category, such as SYSTEM_EVENT, APPLICATION_EVENT, DATABASE_EVENT, to be considered by the cell.
After the cell has constructed the event’s alias, it searches each component instance to see if the value in its ComponentAlias attribute matches the alias constructed from values in the event. If it matches, the event is associated with the component instance in the BMC_SIM_ALIAS class and can change the component instance’s status, depending on the component instance’s status propagation model.
The alias formula must have a syntax that can be read by the cell. It consists of sprintf format specifications (which specify the format for the output) followed by expressions that specify event slots and functions involved in the construction of the alias. An example of a simple alias formula is
The order of the sprintf format specifications corresponds to the order of the expressions, as shown in Figure 5.
Figure 5 Parts of a simple alias formula
EXAMPLE [‘sprintf("%s/%s", [$1.mc_object,$1.mc_host])']
['sprintf("%s/%s",[$1.mc_object/$1.mc_host])']
sprintf format specifications expressions
40 BMC Impact Solutions Service Modeling and Publishing Guide

Event alias associations
In Figure 5, %s/%s is the data type of the output and $1.mc_object $1.mc_host are variable expressions. The first format specification, %s (a string), corresponds to the first variable expression $1.mc_object (which is the value in the mc_object slot of the event, with $1 representing the event ID). The second format specification %s (a string), corresponds to the second variable expression, $1.mc_host.
Table 10 shows the event data, the alias formula, the alias that was computed from the data in the event and the alias formula, and the alias stored in the component instance, which in this example matches the computed alias from the event data.
When the cell finds a match, an entry is created in the BMC_SIM_ALIAS class, as shown in this example:
The alias links the event DATABASE DOWN to the component instance with the component ID 1234.
Other examples of alias formulas:
Table 10 How an event alias association works
Event Alias Formula Alias Component instance alias
DATABASE DOWN;mc_host='dcsrv02.store.com';mc_object_class='Central Database';mc_object='SALES';msg='Database is down';END
[‘sprintf("%s/%s", [$1.mc_object/
$1.mc_host])’]
The values in mc_object and
mc_host are output as string values,
with a slash between them.
SALES/dcsrv02.store.com
EXAMPLE BMC_SIM_ALIAS;ComponentAlias='SALES/dcsrv02.megastore.com';ComponentID='1234';END
NOTE The BMC_SIM_ALIAS object is part of the SIM management data. It is not visible in BMC Impact Service Model Editor.
Chapter 2 Understanding a service model 41

Service schedules
Precedence rules for alias formulas
The most specific matching entry is selected.
Since there can be more than one matching entry, precedence rules determine the entry that is used:
■ a match for element nth has precedence over a match for element (nth + 1)
■ for matches on the same element, precedence is based on the conditional operator in the formula, in the following order:
— equals,— has_prefix,— has_suffix,— contains,— any
■ for multiple has_prefix matches on the same element, the longest prefix wins
■ for multiple has_suffix matches on the same element, the longest suffix wins
■ for multiple contains matches on the same element, the longest contains wins
■ for multiple contains matches on the same element and with the same length, the contains that has its match closer to the beginning of the string wins
Service schedulesService schedules are a combination of a defined schedule with a specific service model component that indicates when the component must meet availability or performance goals. Each component is assigned a service schedule (but it can be a schedule shared with other components).
■ Periods when a component instance is in high demand, or when it must meet its availability and performance goals, are called During Schedule.
EXAMPLE [‘sprintf(%s,strextract($1.mc_object,1,6))’]
[‘sprintf(Mail@robot%s,strextract($1.mc_object,(len($1.mc_object)),1)’]
['sprintf("%s%s%s",[$1.date,$1.mc_ueid,$1.adapter_host])']
42 BMC Impact Solutions Service Modeling and Publishing Guide

Timeframes
■ Periods when a component instance is in low demand, or when the component’s s availability and performance are less important, are called Off Schedule. Also, any undefined time is considered Off Schedule.
■ Periods within During Schedule in which a component is considered to be Off Schedule are called Exceptions Within During Schedule.
Component attributes such as cost or base priority might have different values depending on whether the component is in high demand (a During Schedule period) or in low demand (an Off Schedule period). These priority changes are discussed in more detail in “Dynamic prioritization” on page 136.
Timeframes
Service schedules are built of timeframes. Timeframes are blocks of time that specify the times that are During Schedule or Exceptions Within During Schedule. Two types of timeframes exist: Global and Local.
■ Global timeframes are created in the BMC Impact Service Model Editor, stored in the BMC Atrium CMDB and are available to all cells within an environment. You create global timeframes and use them in both BMC Impact Service Model Editor and the BMC Impact Explorer.
■ Local timeframes are stored in a single cell and are only available to the event management policies within that cell. You create local timeframes and use them only in the BMC Impact Explorer schedules editor.
Table 11 illustrates the differences between Global timeframes and Local timeframes.
Service schedules example with exceptions
Consider a component that is expected to meet its performance goals from 8 A.M. to 5 P.M. each day. This period is would be considered During Schedule. The same component, if not needed from 5 P.M. to 8 A.M. each day, would be Off Schedule during that time.
Table 11 Global and Local timeframe differences
Timeframe type Created in Stored in Available to
Global BMC Impact Service Model Editor
BMC Atrium CMDB all cells
Local BMC Impact Explorer a single cell event management policies within a single cell
Chapter 2 Understanding a service model 43

Service schedules example with exceptions
Within the During Schedule period, if the component is scheduled to be taken offline every day from noon to 1 P.M., instead of creating two different During Schedule timeframes (one for 8 A.M. to noon, and another from 1 P.M. to 5 P.M.), you could create an Exceptions Within During Schedule timeframe.
44 BMC Impact Solutions Service Modeling and Publishing Guide

C h a p t e r 3
3 Understanding a service model created in BMC Impact Service Model EditorThis chapter presents the following topics:
Role of the BMC Atrium CMDB in service modeling. . . . . . . . . . . . . . . . . . . . . . . . . . . 46Service model and the Common Data Model . . . . . . . . . . . . . . . . . . . . . . . . . . . . . . 46
Sandboxes . . . . . . . . . . . . . . . . . . . . . . . . . . . . . . . . . . . . . . . . . . . . . . . . . . . . . . . . . . . . . . . 51Datasets . . . . . . . . . . . . . . . . . . . . . . . . . . . . . . . . . . . . . . . . . . . . . . . . . . . . . . . . . . . . . . . . . 52Testing . . . . . . . . . . . . . . . . . . . . . . . . . . . . . . . . . . . . . . . . . . . . . . . . . . . . . . . . . . . . . . . . . . 52Promotion . . . . . . . . . . . . . . . . . . . . . . . . . . . . . . . . . . . . . . . . . . . . . . . . . . . . . . . . . . . . . . . 52Service model publishing . . . . . . . . . . . . . . . . . . . . . . . . . . . . . . . . . . . . . . . . . . . . . . . . . . 53Service model execution on cells . . . . . . . . . . . . . . . . . . . . . . . . . . . . . . . . . . . . . . . . . . . . 54In-model and not-in-model component instances . . . . . . . . . . . . . . . . . . . . . . . . . . . . . 54Importing Business Time Segments from BMC Remedy AR System . . . . . . . . . . . . . 55
Chapter 3 Understanding a service model created in BMC Impact Service Model Editor 45

Role of the BMC Atrium CMDB in service modeling
Role of the BMC Atrium CMDB in service modeling
The BMC Atrium Configuration Management Database (BMC Atrium CMDB) is a multi-component that enables applications to store and share data. Service model developers and administrators use the BMC Atrium CMDB Configuration Console and BMC Atrium CMDB Class manager APIs to build and modify the Common Data Model (CDM).
With the BMC Atrium CMDB you can divide your configuration data into partitions called datasets, each containing component instances and relationships for a given purpose. This makes it possible for the same component or relationship instances to exist in more than one dataset.
Datasets provide a mechanism for storing raw data from multiple resources in discrete locations. Then the reconciliation process takes that data and merges it appropriately to create a composite set of unique data instances that includes information from each source, based on what each source is proficient at obtaining. The ability to capture the raw data from various sources and reconcile it to a controlled dataset enables the interaction between various automation tools.
Service model and the Common Data Model
The Common Data Model (CDM) is an extensible class schema that represents configuration items and their relationships to each other in an IT enterprise. It is designed to store asset data (as hardware, service management, and user information) and to provide a mechanism for linking that information to provide a complete view of how all elements of a company are connected and can affect each other.
All service component types (classes) are defined in the BMC Atrium CMDB as part of the CDM. A class is the definition or metadata that describes an object type. The class includes information about the object type, such as attributes, primary key, and so on.
SIM classes
BMC Impact Solutions extends the BMC Atrium CMDB CDM with a predefined set of SIM-enabled classes. The asset information you use to define the service model is a subset of all of the configuration data in the CDM. The BMC SIM CMDB Extensions also define attributes that are used only for SIM, such as StatusModel and ImpactCostPerSec.
46 BMC Impact Solutions Service Modeling and Publishing Guide
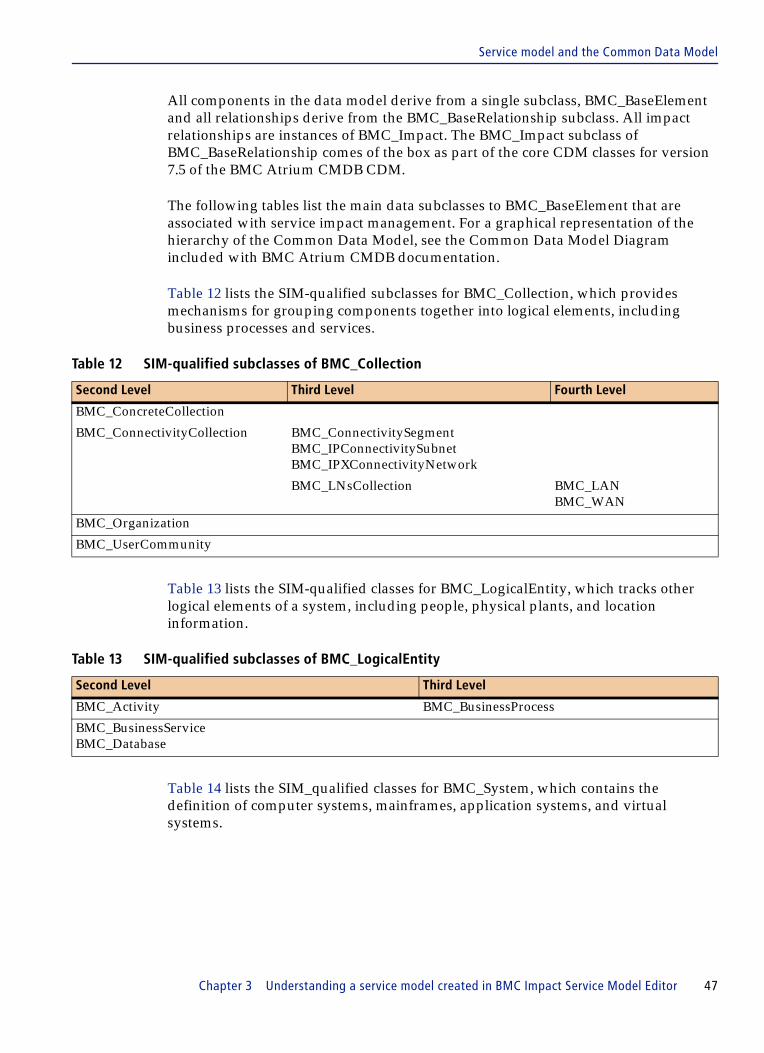
Service model and the Common Data Model
All components in the data model derive from a single subclass, BMC_BaseElement and all relationships derive from the BMC_BaseRelationship subclass. All impact relationships are instances of BMC_Impact. The BMC_Impact subclass of BMC_BaseRelationship comes of the box as part of the core CDM classes for version 7.5 of the BMC Atrium CMDB CDM.
The following tables list the main data subclasses to BMC_BaseElement that are associated with service impact management. For a graphical representation of the hierarchy of the Common Data Model, see the Common Data Model Diagram included with BMC Atrium CMDB documentation.
Table 12 lists the SIM-qualified subclasses for BMC_Collection, which provides mechanisms for grouping components together into logical elements, including business processes and services.
Table 12 SIM-qualified subclasses of BMC_Collection
Table 13 lists the SIM-qualified classes for BMC_LogicalEntity, which tracks other logical elements of a system, including people, physical plants, and location information.
Table 13 SIM-qualified subclasses of BMC_LogicalEntity
Table 14 lists the SIM_qualified classes for BMC_System, which contains the definition of computer systems, mainframes, application systems, and virtual systems.
Second Level Third Level Fourth Level
BMC_ConcreteCollection
BMC_ConnectivityCollection BMC_ConnectivitySegmentBMC_IPConnectivitySubnetBMC_IPXConnectivityNetwork
BMC_LNsCollection BMC_LANBMC_WAN
BMC_Organization
BMC_UserCommunity
Second Level Third Level
BMC_Activity BMC_BusinessProcess
BMC_BusinessServiceBMC_Database
Chapter 3 Understanding a service model created in BMC Impact Service Model Editor 47

Service model and the Common Data Model
Table 14 SIM-qualified subclasses of BMC_System
Table 15 lists the SIM-qualified classes for BMC_SystemComponent, which stores information on the components that comprise the system. This includes physical components like disk drives and monitors; applications like Microsoft Word; and other soft elements like network drives and file shares. The attributes for BMC_SystemComponent are SystemClassId and SystemName.
Table 15 SIM-qualified subclasses of BMC_SystemComponent
Table 16 lists the SIM-qualified classes for BMC_SystemSoftware, a continuation of the BMC_SystemSoftware entry in Table 15.
Table 16 SIM-qualified subclasses of BMC_Software
Second Level Third Level
BMC_ApplicationSystem BMC_ApplicationBMC_ApplicationInfrastructureBMC_SoftwareServer
BMC_Cluster
BMC_ComputerSystem BMC_MainframePrinterBMC_VirtualSystem
Second Level Third Level Fourth Level
LogicalSystemComponent BMC_ Software BMC_SystemSoftware
BMC_DiskPartitionBMC_SystemResource
BMC_FileSystem BMC_DataBaseStorageBMC_LocalFileSystemBMC_RemoteFileSystem
HardwareSystemComponent BMC_UPS
BMC_Media BMC_CDROMDriveBMC_DiskDriveBMC_FloppyDriveBMC_TapeDrive
Fifth Level Sixth Level Seventh Level
BMC_SystemSoftware BMC_OperatingSystemBMC_VirtualSystemEnabler
BMC_VMWare
48 BMC Impact Solutions Service Modeling and Publishing Guide

Service model and the Common Data Model
Table 17 lists the SIM-qualified class for BMC_SystemService, which tracks the services used by systems. The most common services are those used by J2EE application systems, such as J2EE modules. The data model also provides a set of classes for defining relationships among configuration items. The attributes for BMC_SystemService are SystemClassId and SystemName.
Table 17 SIM-qualified subclass of BMC_SystemService
Second Level
BMC_ApplicationService
Chapter 3 Understanding a service model created in BMC Impact Service Model Editor 49

Service model and the Common Data Model
SIM attributes
SIM qualifiers have been added to the attributes listed in Table 18.
Table 18 SIM-qualified attributes
Class Namespace Attributes
BMC_BaseElement BMC.CORE AccountID [SIM]Category [SIM, SME_Read, SME_ReadWrite]ClassId [SME_Read, SME_ReadWrite]CMDBRowLevelSecurity [SME_Read, SME_ReadWrite]CMDBWriteSecurity [SME_Read, SME_ReadWrite]DatasetId [SIM, SME_Read, SME_ReadWrite]Description [SIM, SME_Read, SME_ReadWrite]InstanceId [SIM, SME_Read, SME_ReadWrite]Item [SIM, SME_Read, SME_ReadWrite]ManufacturerName [SIM, SME_Read, SME_ReadWrite]MarkAsDeleted [SME_Read, SME_ReadWrite]Model [SIM, SME_Read, SME_ReadWrite]Name [SIM, SME_Read, SME_ReadWrite]Notes [SIM, SME_Read, SME_ReadWrite]OwnerContact [SIM, SME_Read, SME_ReadWrite]OwnerName [SIM, SME_Read, SME_ReadWrite]Priority [SIM, SME_Read, SME_ReadWrite]ReconciliationIdentity [SME_Read, SME_ReadWrite]ShortDescription [SIM, SME_Read, SME_ReadWrite]Type [SIM, SME_Read, SME_ReadWrite]VersionNumber [SIM, SME_Read, SME_ReadWrite]
BMC.AM Site [SIM, SME_ReadWrite]Company [SIM, SME_ReadWrite]Department [SIM, SME_ReadWrite]Floor [SIM, SME_ReadWrite]Region [SIM, SME_ReadWrite]Room [SIM, SME_ReadWrite]SiteGroup [SIM, SME_ReadWrite]
BMC.SIM ReadSecurity [SIM]WriteSecurity [SIM]ComponentAliases [SIM, SME_ReadWrite]ImpactCostPerSec [SIM, SME_ReadWrite]ImpactCostUnit [SIM, SME_ReadWrite]ImpactCostPerSecOut [SIM, SME_ReadWrite]HomeCellAlias [SME_ReadWrite]PriorityWatchdog [SIM, SME_ReadWrite]PriorityOut [SIM, SME_ReadWrite]ScheduleId [SIM, SME_ReadWrite]StatusModel [SIM, SME_ReadWrite]
BMC_Cluster BMC.CORE ClusterType [SIM, SME_Read, SME_ReadWrite]Interconnect [SIM, SME_Read, SME_ReadWrite]InterconnectAddress [SIM, SME_Read, SME_ReadWrite]MaxNumberOfNodes [SIM, SME_Read, SME_ReadWrite]Types [SIM, SME_Read, SME_ReadWrite]
50 BMC Impact Solutions Service Modeling and Publishing Guide
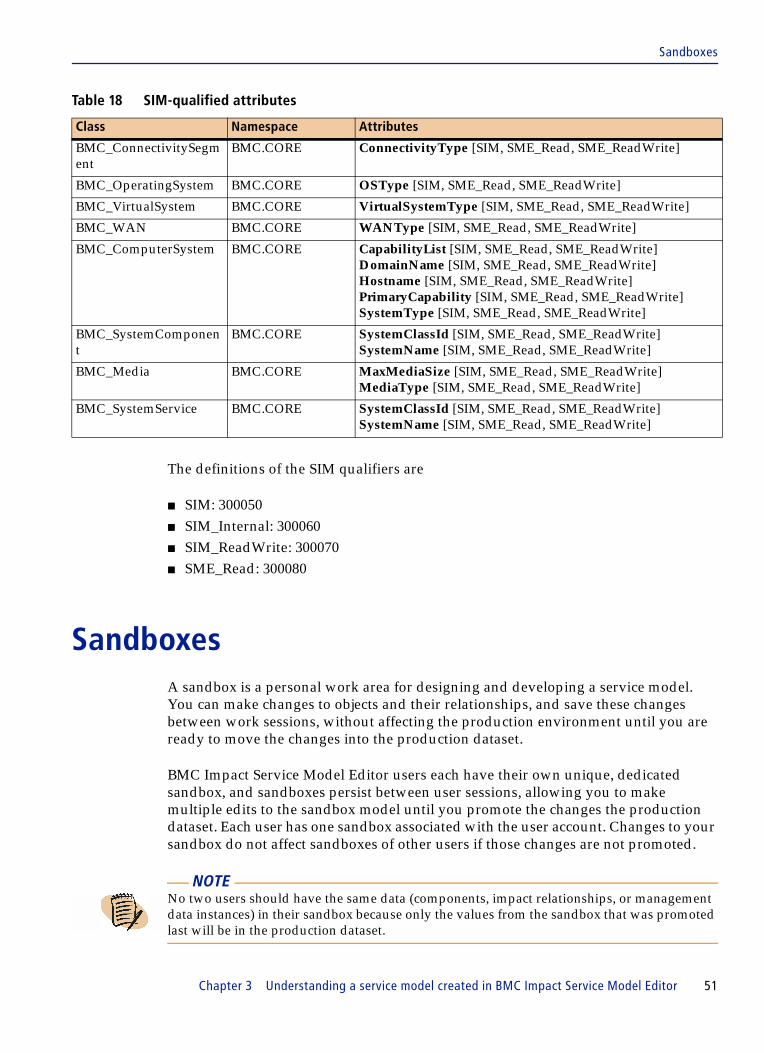
Sandboxes
The definitions of the SIM qualifiers are
■ SIM: 300050■ SIM_Internal: 300060■ SIM_ReadWrite: 300070■ SME_Read: 300080
SandboxesA sandbox is a personal work area for designing and developing a service model. You can make changes to objects and their relationships, and save these changes between work sessions, without affecting the production environment until you are ready to move the changes into the production dataset.
BMC Impact Service Model Editor users each have their own unique, dedicated sandbox, and sandboxes persist between user sessions, allowing you to make multiple edits to the sandbox model until you promote the changes the production dataset. Each user has one sandbox associated with the user account. Changes to your sandbox do not affect sandboxes of other users if those changes are not promoted.
BMC_ConnectivitySegment
BMC.CORE ConnectivityType [SIM, SME_Read, SME_ReadWrite]
BMC_OperatingSystem BMC.CORE OSType [SIM, SME_Read, SME_ReadWrite]
BMC_VirtualSystem BMC.CORE VirtualSystemType [SIM, SME_Read, SME_ReadWrite]
BMC_WAN BMC.CORE WANType [SIM, SME_Read, SME_ReadWrite]
BMC_ComputerSystem BMC.CORE CapabilityList [SIM, SME_Read, SME_ReadWrite]DomainName [SIM, SME_Read, SME_ReadWrite] Hostname [SIM, SME_Read, SME_ReadWrite]PrimaryCapability [SIM, SME_Read, SME_ReadWrite]SystemType [SIM, SME_Read, SME_ReadWrite]
BMC_SystemComponent
BMC.CORE SystemClassId [SIM, SME_Read, SME_ReadWrite]SystemName [SIM, SME_Read, SME_ReadWrite]
BMC_Media BMC.CORE MaxMediaSize [SIM, SME_Read, SME_ReadWrite]MediaType [SIM, SME_Read, SME_ReadWrite]
BMC_SystemService BMC.CORE SystemClassId [SIM, SME_Read, SME_ReadWrite]SystemName [SIM, SME_Read, SME_ReadWrite]
NOTE No two users should have the same data (components, impact relationships, or management data instances) in their sandbox because only the values from the sandbox that was promoted last will be in the production dataset.
Table 18 SIM-qualified attributes
Class Namespace Attributes
Chapter 3 Understanding a service model created in BMC Impact Service Model Editor 51

Datasets
DatasetsThe production dataset is the reference dataset, or logical partition of data in the BMC Atrium CMDB, shared by SIM and ITSM applications. Objects contained in the production dataset are components, relationships, and management data. The production dataset is not limited to objects that are in-model. Many of these objects can be out-of-model (they are not yet in BMC Impact Manager cells).
When working with objects in a sandbox, users are making changes to an overlay dataset, a dataset which is related to and masks the production dataset. The overlay dataset provides a view of the underlying production dataset masked by changes made by the user in the overlay dataset.
Another type of dataset is the test dataset. The test dataset relays objects from a sandbox view to a test BMC Impact Manager instance.
TestingBefore moving sandbox changes into production, you can send the changes to a defined test cell and explore service model behavior in the context of various events. For example, you could send test data to a test cell, then view the generated events in BMC Impact Explorer to determine if the desired result occurs.
You must have sufficient permissions to send data to a test cell. If you have promote permissions, you also have access to a test cell.
PromotionYou move changes that you make in a sandbox (on the overlay dataset) to the production dataset in a controlled process called promotion.
When a promotion completes successfully, changes in the sandbox are merged with changes from other users and processes in the BMC Atrium CMDB and, if automated publishing is enabled, in-model data is sent to BMC Impact Manager cells in the environment. As soon as you successfully promote changes to a production dataset, the sandboxes of all other users are updated to reflect the new data.
BMC Impact Service Model Editor limits promotion to 3000 component instances at a time.
52 BMC Impact Solutions Service Modeling and Publishing Guide

Service model publishing
Promotion and automated publishing process
Promoting and publishing are a sequence, in which you initiate a process to push objects (new or changed) to the BMC Atrium CMDB, followed by the automatic publication process, which sends that data to appropriate BMC Impact Manager cells.
The promotion process is as follows:
■ After making changes in a sandbox View, you start the promotion process from the BMC Impact Service Model Editor interface.
■ BMC Impact Service Model Editor initiates a reconciliation job.
After the actual promotion process begins, you cannot work in BMC Impact Service Model Editor until the process finishes; however, you can stop the promotion or exit the BMC Impact Service Model Editor interface.
■ Promotion log objects are created in the BMC Atrium CMDB. The objects contain the name of the user, a short, user-specified description of the promotion, the ID of the reconciliation job, start and end dates, and a list of objects selected for promotion.
■ BMC Impact Service Model Editor regularly checks the progress of the reconciliation job. When the process is completed, BMC Impact Service Model Editor updates the objects and indicates that the promotion is complete.
■ When the promotion has ended, if automated publishing is enabled, the BMC Impact Publishing Server initiates a publish from the production dataset to the BMC Impact Manager cells in the environment. If other publish operations are underway at that time, the request is queued.
■ After the changes have been published to BMC Impact Manager instances, an execution log is generated. You can view it from the BMC Impact Service Model Editor Promote and Publish History dialog box.
Service model publishingService model publishing is the process of distributing the service model data to BMC Impact Manager cells. After a promotion completes, the BMC Impact Publishing Server is notified of the termination of a reconciliation and starts a publication. From the BMC Atrium CMDB, the BMC Impact Publishing Server distributes the BMC.ASSET dataset to cells and stores a master copy in the BMC.IMPACT.PROD dataset.
Chapter 3 Understanding a service model created in BMC Impact Service Model Editor 53

Service model execution on cells
The BMC.IMPACT.PROD dataset is updated and maintained only by the BMC Impact Publishing Server. It mirrors the last successful publish to the cells. Publishing can be initiated automatically by using BMC Impact Service Model Editor or manually by using the BMC Impact Publishing Server CLI publish.
When the component instances and relationships are published, you can monitor the component instances by using BMC Impact Explorer and BMC Portal.
Service model execution on cellsService component instances are associated with events through the use of unique aliases, which you specify for each component instance. When events that require alias processing enter the cell, the cell uses the values in the event’s slots to construct an alias and then searches for that alias in the cell’s impact component instances. When a match is found, the event is associated with the component instance and the instance’s status may be changed.
In-model and not-in-model component instances
Service component instances that are visible in BMC Impact Service Model Editor are classified as in-model or not-in-model component instances.
In-model service component instances exist in the BMC Atrium CMDB and in the specified cell, and can be monitored in BMC Impact Explorer and BMC Impact Portal. (At any given time, they might not be visible in BMC Impact Explorer and BMC Impact Portal, depending on their status.)
Not-in-model component instances are visible and available in BMC Impact Service Model Editor; however, they have not been published, are not present in the cell, and cannot be monitored in BMC Impact Explorer and BMC Impact Portal. You can choose to designate component instances as not-in-model at design time. For example, you might want to create the component instance but not monitor it right away. You would designate that component as not in model.
Changes to in-model, published component instances are not seen in BMC Impact Explorer and BMC Impact Portal until the changes are published.
54 BMC Impact Solutions Service Modeling and Publishing Guide

Importing Business Time Segments from BMC Remedy AR System
A component instance that is in model can be monitored in BMC Impact Explorer and BMC Impact Portal. A component instance that is not in the model cannot be monitored in BMC Impact Explorer or BMC Impact Portal.
Importing Business Time Segments from BMC Remedy AR System
You can import Business Time Segments from BMC Remedy AR System into BMC Impact Service Model Editor to use as timeframes when you define service schedules for service components. Imported timeframes, considered Global timeframes, are published when the next publish occurs.
For information on importing Business Time Segments, see BMC Portal Getting Started.
NOTE By default, all components are assigned to DefaultCell (the cell name provided during installation) and are set to In Model.
Chapter 3 Understanding a service model created in BMC Impact Service Model Editor 55

Importing Business Time Segments from BMC Remedy AR System
56 BMC Impact Solutions Service Modeling and Publishing Guide

C h a p t e r 4
4 Building a service model in BMC Impact Service Model EditorThis chapter provides detailed procedures on how to build the service model in BMC Impact Service Model Editor.
This chapter covers the following topics:
Service model creation process . . . . . . . . . . . . . . . . . . . . . . . . . . . . . . . . . . . . . . . . . . . . . 59Launching BMC Impact Service Model Editor . . . . . . . . . . . . . . . . . . . . . . . . . . . . . . . . 59Working with service component instances . . . . . . . . . . . . . . . . . . . . . . . . . . . . . . . . . . 60
Creating service component instances in BMC Impact Service Model Editor . . . 60Switching sandbox View modes . . . . . . . . . . . . . . . . . . . . . . . . . . . . . . . . . . . . . . . . . 65Viewing properties for a component instance . . . . . . . . . . . . . . . . . . . . . . . . . . . . . 65Editing component instances. . . . . . . . . . . . . . . . . . . . . . . . . . . . . . . . . . . . . . . . . . . . 66Performing actions on multiple objects . . . . . . . . . . . . . . . . . . . . . . . . . . . . . . . . . . . 67Copying component instances. . . . . . . . . . . . . . . . . . . . . . . . . . . . . . . . . . . . . . . . . . . 69Hiding a component instance . . . . . . . . . . . . . . . . . . . . . . . . . . . . . . . . . . . . . . . . . . . 69Deleting a component instance . . . . . . . . . . . . . . . . . . . . . . . . . . . . . . . . . . . . . . . . . . 70Finding component instances . . . . . . . . . . . . . . . . . . . . . . . . . . . . . . . . . . . . . . . . . . . 71
Defining relationships between component instances . . . . . . . . . . . . . . . . . . . . . . . . . . 78Creating a component relationship in BMC Impact Service Model Editor . . . . . 79Assigning related component instances to cells . . . . . . . . . . . . . . . . . . . . . . . . . . . . 83Updating relationships . . . . . . . . . . . . . . . . . . . . . . . . . . . . . . . . . . . . . . . . . . . . . . . . . 84Deleting relationships . . . . . . . . . . . . . . . . . . . . . . . . . . . . . . . . . . . . . . . . . . . . . . . . . . 85
Associating events with a component instance . . . . . . . . . . . . . . . . . . . . . . . . . . . . . . . . 86Working with timeframes and service schedules . . . . . . . . . . . . . . . . . . . . . . . . . . . . . . 91
Icons used in the service schedule and timeframes editors . . . . . . . . . . . . . . . . . . 92Working with timeframes . . . . . . . . . . . . . . . . . . . . . . . . . . . . . . . . . . . . . . . . . . . . . . 92Working with service schedules . . . . . . . . . . . . . . . . . . . . . . . . . . . . . . . . . . . . . . . . . 95Assigning components to service schedules . . . . . . . . . . . . . . . . . . . . . . . . . . . . . . . 99
Granting access to service model objects . . . . . . . . . . . . . . . . . . . . . . . . . . . . . . . . . . . . 100Granting permissions to individual service model objects . . . . . . . . . . . . . . . . . . . . . 100Testing the service model . . . . . . . . . . . . . . . . . . . . . . . . . . . . . . . . . . . . . . . . . . . . . . . . . 102
Testing component relationships . . . . . . . . . . . . . . . . . . . . . . . . . . . . . . . . . . . . . . . 102Testing event associations . . . . . . . . . . . . . . . . . . . . . . . . . . . . . . . . . . . . . . . . . . . . . 102
Chapter 4 Building a service model in BMC Impact Service Model Editor 57

Promoting the service model . . . . . . . . . . . . . . . . . . . . . . . . . . . . . . . . . . . . . . . . . . . . . . 103About the publishing process. . . . . . . . . . . . . . . . . . . . . . . . . . . . . . . . . . . . . . . . . . . 103Before you promote . . . . . . . . . . . . . . . . . . . . . . . . . . . . . . . . . . . . . . . . . . . . . . . . . . . 104Submitting a promotion . . . . . . . . . . . . . . . . . . . . . . . . . . . . . . . . . . . . . . . . . . . . . . . 104Verifying promotion status. . . . . . . . . . . . . . . . . . . . . . . . . . . . . . . . . . . . . . . . . . . . . 107
Modifying and deleting service model data. . . . . . . . . . . . . . . . . . . . . . . . . . . . . . . . . . 110Organizing service component instances for monitoring . . . . . . . . . . . . . . . . . . . . . . 110Working with BMC Impact Service Model Editor Views. . . . . . . . . . . . . . . . . . . . . . . 114
Saving, opening, renaming, and deleting Views. . . . . . . . . . . . . . . . . . . . . . . . . . . 115Understanding visual cues in a View . . . . . . . . . . . . . . . . . . . . . . . . . . . . . . . . . . . . 117Repositioning objects in a View . . . . . . . . . . . . . . . . . . . . . . . . . . . . . . . . . . . . . . . . . 118Controlling what you see in a View . . . . . . . . . . . . . . . . . . . . . . . . . . . . . . . . . . . . . 118Exploring consumer and provider paths . . . . . . . . . . . . . . . . . . . . . . . . . . . . . . . . . 120Refreshing the View. . . . . . . . . . . . . . . . . . . . . . . . . . . . . . . . . . . . . . . . . . . . . . . . . . . 121Repositioning the dockable windows. . . . . . . . . . . . . . . . . . . . . . . . . . . . . . . . . . . . 122Showing topology views. . . . . . . . . . . . . . . . . . . . . . . . . . . . . . . . . . . . . . . . . . . . . . . 122
Exporting and importing service model data. . . . . . . . . . . . . . . . . . . . . . . . . . . . . . . . . 123Exporting class definitions from the BMC Atrium CMDB to a cells . . . . . . . . . . . . . 124
58 BMC Impact Solutions Service Modeling and Publishing Guide

Service model creation process
Service model creation processTo build a service model in BMC Impact Service Model Editor, you must
■ find or create component instances in the BMC Atrium CMDB■ assign component instances to a BMC Impact Manager cell■ define component instance relationships ■ associate events with component instances ■ assign schedules to component instances■ promote the service model and publish objects to cells
Launching BMC Impact Service Model EditorYou can open BMC Impact Service Model Editor from the BMC Portal.
To log on to BMC Impact Service Model Editor from BMC Portal
1 Open a browser.
2 In the Address box, enter the URL in the format https://serverName.
serverName represents the name of the server on which BMC Portal is installed.
3 Log on to BMC Portal as a user.
For instructions for logging on to BMC Portal, see BMC Portal Getting Started.
4 On the Configure tab, in the navigation pane on left side, under Tasks, click BMC Impact Service Model Editor.
Before you can launch BMC Impact Service Model Editor to view and manage services, you must install it in one of the following ways:
■ as a stand-alone console from the BMC Portal product installation disk
As a stand-alone console, BMC Impact Service Model Editor can reside on the same host computer as the BMC Portal or it can reside on another host computer. However, all user validation and security is managed by the BMC Portal server.
■ as a Java Web Start application from BMC Impact Portal
Chapter 4 Building a service model in BMC Impact Service Model Editor 59

Working with service component instances
As a Java Web Start application, after BMC Impact Service Model Editor is deployed on your local desktop, you can launch it from
— the local desktop icon— a local startup menu— the Java Web Start Application Manager on your local host computer— from the BMC Portal Configure tab as a task
User authentication and security is managed centrally by the BMC Portal server. To launch BMC Impact Service Model Editor, you must connect to the BMC Portal.
Working with service component instancesTo populate the BMC Atrium CMDB with component instances for the service models, you can use discovery tools such as BMC Topology Discovery or BMC Atrium Discovery, or you can manually create the component instances by using the BMC Impact Service Model Editor. The BMC Impact Service Model Editor component provides a GUI to the reconciled dataset in the BMC Atrium CMDB and provides a workspace for you to create service models using the objects from this dataset.
To search for existing component instances, see “Finding component instances” on page 71.
Creating service component instances in BMC Impact Service Model Editor
You can create a service component instance in BMC Impact Service Model Editor by using the following features of the interface:
■ the Template window■ the Create Component menu command
NOTE BMC Software recommends creating a maximum of 20,000 service model component instances for each BMC Impact Manager cell.
60 BMC Impact Solutions Service Modeling and Publishing Guide

Creating service component instances in BMC Impact Service Model Editor
Before you begin
Ensure that you have the service catalog spreadsheet that lists IT components and their relationships.
Ensure that the BMC Portal product is installed; see the BMC Portal Getting Started guide.
To create a service component instance by using the menu command
1 With a sandbox View open, from the menu bar, choose Edit => Create Component.
When you open BMC Impact Service Model Editor, a new sandbox View opens automatically if you have no saved Views. You can also open a new sandbox View at any time by clicking on the toolbar.
If you have saved Views, you can open the appropriate View from the Views panel.
2 In the Create Component dialog box, on the General tab, scroll in the Component Type pane until you find the appropriate component type for the instance that you are creating.
The service component types are listed in hierarchical order, not in alphabetical order.
Where to go from here
To enter values for other component instance attributes, see “To specify component instance attributes” on page 63.
To learn about creating component instances using the Template window, continue with the next section.
TIP ■ To free more desktop area for the View, you can hide the dockable windows by clicking
the left-pointing quick-expansion arrow located along the right side of the dockable windows.
■ You can also undock and move the Templates, Pan and Zoom, Find, Properties, Views, and Console Navigation Bar windows. See “Repositioning the dockable windows” on page 122.
Chapter 4 Building a service model in BMC Impact Service Model Editor 61

Creating service component instances in BMC Impact Service Model Editor
To create a service component instance by using the Template window
1 With a sandbox View open, find the appropriate service component type (class) for the instance that you are creating in the Templates window.
When you open BMC Impact Service Model Editor, a new sandbox View opens automatically if you have no saved Views. You can also open a new sandbox View at any time by clicking on the toolbar.
If you have saved Views, you can open the appropriate View from the Views panel.
You can change the way the list of components are presented in the Templates window by clicking the appropriate icon for List, Large Icon, and Tree layouts. The List and Large Icon layouts are sorted alphabetically (you can reverse the sort) and the Tree layout is in SIM class hierarchy order.
2 Drag the component type from the Templates window to the View-Sandbox window.
When placing objects in the sandbox View window, place consumer instances above provider instances for a hierarchical layout.
Create multiple copies of the component type at one time by holding down a number key while dragging the component icon to the View window. For example, to create eight copies of a component, hold the number 8 key while dragging the component icon. Holding down the 0 key while dragging creates ten copies.
Note that holding down the 1 key while dragging creates eleven copies of the component type.
3 In the View-Sandbox window, right-click the new component icon and select Edit Component Properties.
On the General tab, in the Component Type pane, the component type you chose is selected by default.
If you chose the wrong component type, click Cancel and start again with step 2.
Where to go from here
To enter values for component instance attributes other than component type, see “To specify component instance attributes” on page 63.
62 BMC Impact Solutions Service Modeling and Publishing Guide
Creating service component instances in BMC Impact Service Model Editor
To specify component instance attributes
1 On the General tab, perform the following steps:
A In the Component Name box, replace the default name with a specific component instance name that is meaningful to your enterprise and that you want to use as the component’s label in a View.
B In the Cell box, accept the default, unassigned, or select the cell that will receive events for the component instance.
BMC Impact Service Model Editor retrieves the list of cell names from the BMC Atrium CMDB. If the cell that you need is not listed, see the BMC Portal Getting Started guide for information about adding a cell.
C (optional) In the Description box, enter a component description that is meaningful to your enterprise.
D (optional) In the Owner section, in the Name box, enter the name of the individual who is responsible for the component, and in the Contact box, enter a contact method, such as a phone number or email address, for the individual.
E In the Component Is area, choose Not In Model or In Model (default):
■ To include a component instance in the service model, select In Model; it can be published to the cell.
■ To not include a component instance in the service model at the present time, select Not In Model; it cannot be published to the cell.
For more information about in-model and not-in-model, see “In-model and not-in-model component instances” on page 54.
2 On the Status and Alias tab, perform the following steps:
A In the Status Computation list, select a status computation model.
The default selection is Standard, which is acceptable for most component instance definitions. For more information about status computation models, see Chapter 5, “Component and relationship status propagation.”
WARNING BMC Impact Service Model Editor verifies that the cell name chosen is present in the BMC Impact Portal, but if the component instance is created outside of BMC Impact Service Model Editor or if the cell is deleted from BMC Impact Portal after it has been created but before it is published, data integrity errors may result.
Chapter 4 Building a service model in BMC Impact Service Model Editor 63

Creating service component instances in BMC Impact Service Model Editor
The default status for new component instances is OK.
B In the Aliases box, click Add Alias.
Each component instance must have a unique alias; if more than one component instance has the same alias, publishing fails.
For information about aliases, see “Event associations” on page 38.
— In the Alias box, enter the alias and press Return or click OK.
— (optional) Enter additional aliases (one for each event that can potentially affect the status of the component instance) by clicking Add Alias.
Each alias that you enter is listed in the Aliases box.
3 On the Permissions tab, assign the proper permissions for this component instance to each of the roles listed.
4 On the Schedule tab, perform the following steps:
A Assign the appropriate service schedules information to the components.
For more information, see “Assigning components to service schedules” on page 99.
B In the Time-variable Properties area
— Choose a base priority for the components for During Schedule Timeframes and Off Schedule Timeframes.
— Enter the cost units per second for During Schedule Timeframes and Off Schedule Timeframes.
C In the Priority Propagation area, select
■ Yes to have the selected components propagate their self priority to their causal components
■ No (default) if self priority should not be propagated
5 (optional) On the Other tab, enter relevant information about the component in the fields listed.
6 To save the component instance in the BMC Atrium CMDB (or save changes if you used the Templates window), click OK.
64 BMC Impact Solutions Service Modeling and Publishing Guide

Switching sandbox View modes
Where to go from here
Continue creating component instances until you have a number of component instances that are related, and then see “Defining relationships between component instances” on page 78.
To learn more about working with component instances (viewing, editing, copying, deleting, and finding), continue with the next section.
Switching sandbox View modes
In the sandbox, you can switch between a model-based view of components that displays the components in a hierarchical graph and a table-based view that displays the components in a table that includes properties. Components selected in either mode remain selected after you switch to the other mode.
You can switch View modes by clicking the appropriate toolbar icon, as shown in Table 19.
Viewing properties for a component instance
You can view properties for a component instance, do one of the following:
■ In a View window, right-click a component instance and select Properties.■ Select the Properties dockable window, and in a View window, select a component
instance or select a component instance and then click Properties on the Properties dockable window.
■ On the toolbar, click the Display the properties window icon.■ Select a component instance and from the menu bar and choose
Windows => Properties.■ Switch to Component Table mode .
You can select columns (for this session only) by right-clicking any column heading and selecting Configure table columns.
Table 19 View mode switch icons
Icon View mode
Topology
Component Table
Chapter 4 Building a service model in BMC Impact Service Model Editor 65

Editing component instances
By default, the properties shown for a component in Component Table mode include
You can configure which component properties are displayed for a component in Component Table mode by right-clicking a table column heading and selecting Configure Table Columns.
The default sort order is by Name.
You can also change the values for a property from the Properties dockable window by clicking the appropriate Edit button. (Each section of data has its own Edit button.) For more information about changing properties of a component instance, see “Editing component instances.”
Editing component instances
You can change properties (attributes) for a component instance, except the component’s class, by opening the Edit Component Properties dialog box.
If the component is already being edited, a warning dialog is displayed. Though you are not locked-out of editing the component, you should wait until the edit is complete before proceeding.
Table 20 Default component properties
Type Description
Type the general component type, such as application, computer system, and database.
Name the name of the component.
Scope whether the component is in a production, sandbox, or test environment.
Cell the name of the BMC Impact Manager to which the component is assigned.
Owner Name the name of the person responsible for the component.
Company the name of the business associated with the component.
Status Model status computation model description, such as Standard
Priority - During Schedule the base priority of a component (1-5) in a During Schedule timeframe
Priority - Off Schedule the base priority of a component (1-5) in an Off Schedule timeframe
Description any special notes on the component
Reconciliation Identity ID used to reconcile this component, as in matching this component instance across datasets
66 BMC Impact Solutions Service Modeling and Publishing Guide

Performing actions on multiple objects
To modify component instance properties
1 Either
■ in the active View window, select the component instance to edit, or■ in a Table of Components view, select the component property to edit.
2 Do one of the following to display the Edit Component Properties dialog:
■ Right-click the component instance or property and choose Edit Component Properties from the context menu.
■ From the menu bar, choose Edit => Edit Component Properties.
3 Make the appropriate changes. For more information about the properties of components, see “To specify component instance attributes” on page 63.
4 Click OK.
Performing actions on multiple objects
You can perform some actions on multiple objects at the same time (or example, you can add the same cell to several component instances, or delete multiple component instances).
To select multiple objects
1 On the toolbar, click Selection .
2 With the mouse pointer, click and drag to draw a box around all the objects that you want to select.
3 Right-click and select the action that you want to perform.
To change in-model or not-in-model setting quickly
In an active View window, select the component instances, or component instances and relationships, and do use of the following methods:
■ On the toolbar, click the add-to-model or remove-from-model icon.■ Right-click and choose Add to Model or Remove from Model.
Only the object type specific to a particular action is affected and the other type is ignored. For example, selected relationships are ignored when you assign multiple objects to a cell.
Chapter 4 Building a service model in BMC Impact Service Model Editor 67

Performing actions on multiple objects
To add or change the assigned cell
1 In an active View window, select the component instances.
2 Right-click and choose Assign Component to Cell.
If all the component instances have the same cell, the cell name is displayed. If even one cell name is different, the Cell box is blank.
3 Select a cell from the list.
When you select a cell, all component instances are updated with that cell.
To edit multiple component instances
1 Select the appropriate component instances. See “To select multiple objects” on page 67.
2 Take one of the following actions:
■ Right-click the component instances and choose Edit Component Properties.■ From the menu bar, choose Edit => Edit Component Properties.
3 In the Edit Multiple Component Properties dialog box, make the necessary changes.
The objects you selected appear in the Component List box. Changes you make will apply to every component instance in the list. If even one component instance has a different value for a property, the field is blank.
4 When you have finished making changes, take on of the following actions:
■ to save and exit, click OK.■ to save and keep the dialog box open, click Apply.■ to discard the changes and exit, click Cancel.
NOTE As of version 7.3.00, the Service Model Editor includes the concept of a default cell, making the following procedure optional.
When a new CI is created using the Service Model Editor, the CI is automatically assigned to the default cell. Consequently, you are not required to add the CI to a service model and then assign the CI to a cell.
68 BMC Impact Solutions Service Modeling and Publishing Guide

Copying component instances
Copying component instances
You can copy one or more component instances and paste the copies into the sandbox View. When pasting copies, you can automatically rename the pasted components by attaching a prefix or suffix to the original component name. To configure copy and paste options, see “To set copy/paste and miscellaneous options” on page 154.
Relationships are not copied unless they are also selected. See “To select multiple objects” on page 67.
To copy component instances
1 Select one or more component instances that you want to copy.
2 Right-click and choose Copy.
3 Right-click and choose Paste.
4 If you are copying more than one component, in the Paste Multiple Components dialog box, add a prefix or suffix to the original component name as needed and click OK.
The default prefix is Copy of, but you can specify a prefix by entering a new value in this box.
Output Preview displays the name of one of the newly pasted component instances. When more than one component instance is selected for copying, the name of only one of the selected component instances displays.
You can replace the default prefix or suffix by changing it in the Options settings. To prevent the Paste Components dialog box from prompting you at each paste, select Do not show this dialog again. When this check box is selected, the current option is used until you change it in the Options settings. See “To set copy/paste and miscellaneous options” on page 154.
Hiding a component instance
You can hide a component instance so that it is not visible in the current active View or in all Views. A hidden component instance that has been published to a cell is not deleted from BMC Impact Service Model Editor and can be retrieved with the Find command.
Chapter 4 Building a service model in BMC Impact Service Model Editor 69

Deleting a component instance
To hide a component instance
1 Select the component instances to hide.
2 To hide the component instances in the active View, take one of the following actions:
■ Right-click and choose Hide in This View.
■ Choose Edit => Hide in This View.
The selected component instances are removed from the active View, but are still visible in other Views in which they have been saved. If they are part of the service model, they remain in the service model.
3 To hide the component instances in all Views, take one of the following actions:
■ Right-click and choose Hide in All Views.
■ Choose Edit => Hide in All Views.
The selected component instances are removed from all Views and from the service model. Data in the component instance is not modified in any way; the component instance just does not appear in any of the current Views.
Deleting a component instance
When you delete a component instance in a View
■ Components in the BMC.ASSET (in the BMC Atrium CMDB) that are marked as deleted (MarkAsDeleted) are not visible in BMC Impact Service Model Editor.
■ Components in your sandbox that are marked as deleted appear in BMC Impact Service Model Editor with an “X” icon.
■ Components that are new in the sandbox (that have no copy in BMC.ASSET yet) are hard-deleted from the sandbox.
NOTE
I
If you want only to remove a component instance from your Views without deleting it permanently, use the Hide in All Views command as described in “Hiding a component instance” on page 69.
70 BMC Impact Solutions Service Modeling and Publishing Guide

Finding component instances
To delete a component instance
1 In a View window, select the component instances you want to delete and take one of the following actions:
■ Right-click the component instance and choose Delete from CMDB.
■ from the menu bar, choose Edit => Delete from CMDB.
2 Verify that you want to delete the component instances and click Yes.
3 Choose File => Promote All Sandbox Changes.
4 Review the Objects to be Promoted area to ensure that the component instances that you want to delete are listed.
5 Click Begin Promotion.
The deleted instances are removed from the service model; they are no longer available in BMC Atrium CMDB.
Finding component instances
You can search the BMC Atrium CMDB for existing component instances by using the Find command. Only component instances associated with classes that are designated for service impact management in the BMC Atrium CMDB can be found in the BMC Impact Service Model Editor.
Chapter 4 Building a service model in BMC Impact Service Model Editor 71
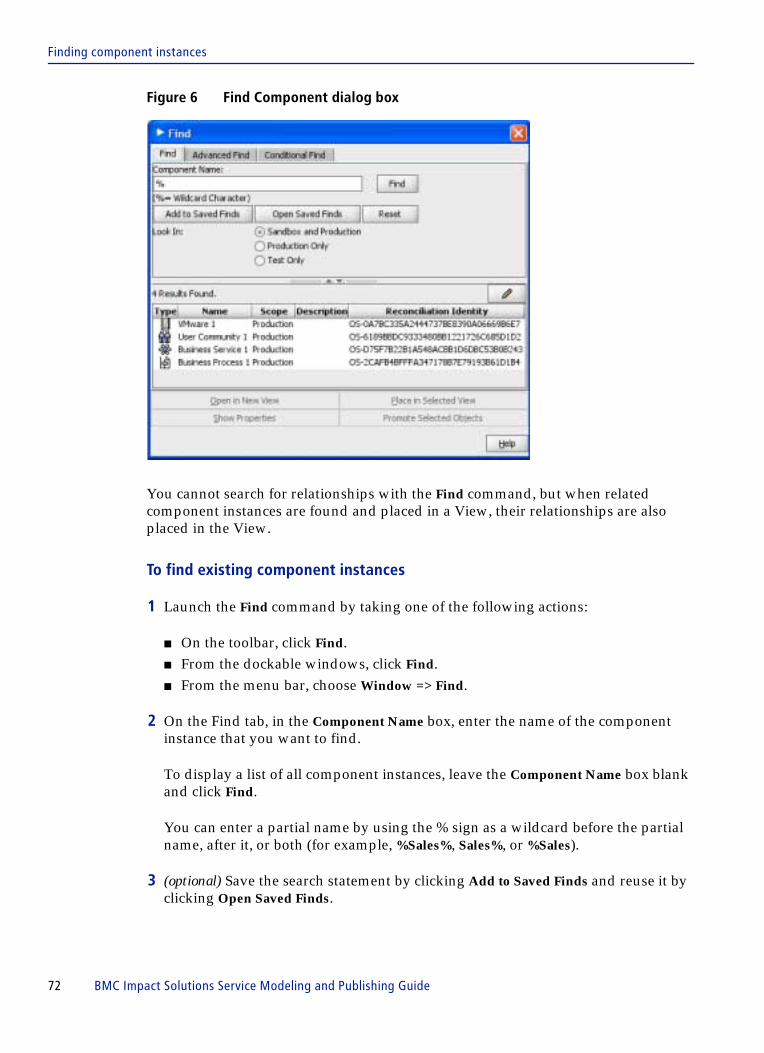
Finding component instances
Figure 6 Find Component dialog box
You cannot search for relationships with the Find command, but when related component instances are found and placed in a View, their relationships are also placed in the View.
To find existing component instances
1 Launch the Find command by taking one of the following actions:
■ On the toolbar, click Find.■ From the dockable windows, click Find.■ From the menu bar, choose Window => Find.
2 On the Find tab, in the Component Name box, enter the name of the component instance that you want to find.
To display a list of all component instances, leave the Component Name box blank and click Find.
You can enter a partial name by using the % sign as a wildcard before the partial name, after it, or both (for example, %Sales%, Sales%, or %Sales).
3 (optional) Save the search statement by clicking Add to Saved Finds and reuse it by clicking Open Saved Finds.
72 BMC Impact Solutions Service Modeling and Publishing Guide

Finding component instances
4 (optional) In the Look in area, accept the default, Sandbox and Production, or filter the list of component instances in the results pane by choosing Production Only or Test Only.
5 (optional) To define the attributes that are displayed in the results table and their order, right-click in any results-table column heading and select Configure table columns.
The attributes shown in the Available Attributes pane are
■ listed in alphabetical order■ common to all component types
In the Configure Find Results dialog box, select the appropriate attributes.
■ To change the order of the columns in the final results display, use the up and down arrow buttons.
■ To move the attributes that you want to display into the Attributes to Show pane, use the left and right arrow buttons.
6 To start the search, click Find.
While the search is in progress, a find-activity indicator spins next to the Find button. You might see results before the search is complete. The indicator disappears when the search is complete.
7 In the Results pane, review the results of the search.
The default sort order is by component name, if component name is one of the columns you choose to display. If component name is not chosen for display, the default sort order is creation date and time.
To sort the values in any column, click the column heading. To change the order of the columns from left to right, drag the column headings.
For each user, the last-used settings are saved and reapplied at the next logon session.
8 (optional) In the results pane, select one of the instances and take any of the following actions:
■ To place objects in a new View window, click Open in New View.
■ To place objects in the active View window, drag the instances into the View window or select them and click Place in Selected View.
Chapter 4 Building a service model in BMC Impact Service Model Editor 73

Finding component instances
When you move one instance into a View, if the object already exists in that View window, the Duplicate Component dialog box opens. To shift the View focus so that you can see the existing object, click Go to Component.
If you select more than one component instance to move into view, the Go to Component button is not available.
■ To view the characteristics of a selected component instance, click Show Properties.
9 (optional) To start another search, click Reset to clear all the selection criteria options on the Find tab to the default values (blank component name field, All Components, no results in table).
Using the Advanced Find feature
On the Advanced Find tab, you can refine a search based on additional search criteria listed in Table 21 on page 75. For example, in Figure 7, the search will locate objects assigned to the specified cell with a publish date within the past year.
Figure 7 Advanced Find dialog box
74 BMC Impact Solutions Service Modeling and Publishing Guide

Finding component instances
Table 21 describes the additional search criteria available in Advanced Find.
Using the Conditional Find feature
With Conditional Find you can create a custom selection criteria phrase to select the component instances that cannot be located using Find or Advanced Find.
Table 21 Description of additional search criteria
Search criteria Options Selects based on
Look in Sandbox and Production
components that are in either sandbox or production (promoted and published) Views
Production Only components that have been promoted and published and are now in production
Test Only components that have been assigned to a test cell
Component Type All any component type
list of component types (classes)
the specific component type selected from the list
Cell All any service impact cell
Specific cell names the specific cell name selected from the list
Date Last Edited Date the date range during which the component instance was last changed
Last Created Date the date range during which the component instance was created
User Last Editor the user ID who last changed the component instance properties
Creator the login ID of the user who created the component instance
Chapter 4 Building a service model in BMC Impact Service Model Editor 75

Finding component instances
Figure 8 Using Conditional Find
In the Query Builder area, you define the attributes and specific values on which you want to base the search.
NOTE When you search on the Aliases attribute, you must use LIKE as the relational operator, because if the component instance has more than one alias, the values are stored as a string, (for example: [dcsrvstore2.cvom, dcsrvstore3.com]).
76 BMC Impact Solutions Service Modeling and Publishing Guide

Finding component instances
To build selection criteria phrases
1 (optional) If needed, in the first list box in Query Builder, select the beginning parenthesis.
If the statement requires multiple selection criteria phrases, you might need the beginning and ending parentheses to define precedence. For example, you need the parentheses for a statement like
(phrase1 OR phrase2) AND phrase3
2 In the Select list box, select a component instance attribute.
As you build the statement, it is displayed in the Query Display area.
3 In the relational operator list box, select one from those defined in Table 22.
4 In the text box, enter the specific value that must be contained in the attribute.
The relational operator describes the relationship between the value in the attribute from step 2 and the value you specify in step 4.
5 (optional) To create multiple selection criteria phrases, add lines as needed by clicking Add Line.
If you have more than one selection criteria line, in the first list box on the subsequent line, select the appropriate Boolean operator:
■ And means both conditions must be met.■ Or means either condition must be met for the component instance to be
selected.
6 (optional) If needed, in the last list box for any selection criteria phrase, select the ending parenthesis.
Table 22 Definition of relational operators
Relational operators Definition
= equal to
!= not equal to
< less than
> greater than
<= less than or equal to
>= greater than or equal to
LIKE similar to
Chapter 4 Building a service model in BMC Impact Service Model Editor 77

Defining relationships between component instances
7 (optional) To delete lines, click the Delete Line button that is directly under the line you want to delete.
8 To start the search, click Find.
Using “smart” select
With “smart” select, you can choose to select only component instances in the current view which match the attributes you specify. The smart select attributes include
■ In Model (any view)■ Out of Model (any view)■ New (sandbox view)■ Edited (sandbox view)■ Production Components (sandbox view)■ Components With No Cell (any view)■ Components With Cell but Out of Model (any view)
To use smart select
1 With a View open, choose Edit=>Select.
2 Click on the appropriate attributes to select.
The component instances which match the specified attributes are selected.
Defining relationships between component instances
Impact relationships define how status propagation is passed from the provider component instance to the consumer component instance. An active relationship is an impact relationship and indicates that the status of the consumer instance depends on the status of the connected provider instance. An inactive relationship means that no dependency exists or that the dependency is irrelevant to the model; in either case, an impact relationship does not exist.
TIP To save the search statement for reusing later, click Add to Saved Finds.
78 BMC Impact Solutions Service Modeling and Publishing Guide

Creating a component relationship in BMC Impact Service Model Editor
Whenever the status of the provider instance changes, it is propagated to the connected consumer component instance.
For each component instance for which you are creating relationships, you must know
■ whether it is a consumer or a provider for the related component■ its relationship state value (active or inactive)■ its status propagation model value (relationship policy)
After you have created relationships, test them to verify that they function in the way that you intended. See “Associating events with a component instance” on page 86.
Creating a component relationship in BMC Impact Service Model Editor
You can create consumer/provider relationships for components in BMC Impact Service Model Editor by
■ drawing lines between components in the View window■ using the Create Relationship command
To create a relationship by using draw mode
1 In the View window, on the toolbar, click .
The default relationship direction is from provider to consumer. If necessary, you can change it to consumer to provider by clicking on the arrow next to the tool.
In draw mode, the cursor changes to .
2 Draw a relationship line from provider to consumer by clicking at the top of the provider component and moving to the bottom of the consumer component, and then click again.
TIP When you place components in a View, place them such that provider components are below consumer components.
TIP To delete a graphic line that you have started and do not want to complete, press Esc.
Chapter 4 Building a service model in BMC Impact Service Model Editor 79

Creating a component relationship in BMC Impact Service Model Editor
3 On the toolbar, click Selection and right-click on the relationship line you just drew.
Where to go from here
To specify other impact relationship attributes, see “To specify other impact relationship attributes” on page 82.
To learn about creating relationships using the commands, continue with the next section.
To create relationships by using menu commands
1 In a View with component instances that need relationships defined, take one of the following actions:
■ On the toolbar, click Create a new Relationship .■ From the menu bar, choose Edit => Create Relationship.■ In a View window, right-click on a component, and choose Create Relationship.
2 In the Create Relationship Properties dialog box, in the Consumer List area, click Add.
80 BMC Impact Solutions Service Modeling and Publishing Guide

Creating a component relationship in BMC Impact Service Model Editor
Figure 9 Create Relationship dialog box
3 In the Find window, locate the component instances that function as the consumer in an impact relationship. For information about the Find command, see “Finding component instances” on page 71.
You can add more than one component instance (using basic Windows selection) to either the Consumer List box or the Provider List box.
4 In the Provider List area, click Add.
5 In the Find window, locate and choose the component instance that functions as the provider in the impact relationship.
If there are multiple component instances in the Consumer List, you can add only one provider component instance; the one that is the provider for each of the component instances in the consumer list.
Chapter 4 Building a service model in BMC Impact Service Model Editor 81

Creating a component relationship in BMC Impact Service Model Editor
6 (optional) To switch the contents of the two lists (make the consumer the provider and vice versa), click Swap List Contents.
Where to go from here
To specify other impact relationship attributes, see “To specify other impact relationship attributes” on page 82.
To specify other impact relationship attributes
1 On the toolbar, select Selection and right-click on a relationship line.
2 Choose Edit Relationship Properties.
3 In the Edit Relationship Properties dialog box, for the Activity options, select Active or Inactive.
■ Active—the status of the provider component instance is propagated to the consumer component instance.
■ Inactive—the status of the provider component instance is not propagated to the consumer component instance.
4 In the Relationship Policy list, select one of the pre-defined status propagation models:
■ Direct—the status of the consumer component instance may be identical to that of its provider component instance, depending on the events directly affecting the consumer’s status, which is also taken into account.
■ Decreasing—the status of the consumer component instance is less critical than that of the provider component instance by one level. For example, if the provider status is WARNING, the consumer status is INFO.
■ Increasing—the status of the consumer component instance becomes more critical than that of its provider component instance by one level. For example, if the provider status is WARNING, the consumer status is MINOR.
WARNING Avoid creating circular relationships in which an component instance can propagate events to itself. For example: instance 1 —> instance 2 —> instance 1 again. Publishing will fail if loops (circular relationships) are created within the service model.
NOTE BMC Impact Service Model Editor verifies that the impact relationship is associated with a valid status propagation model.
82 BMC Impact Solutions Service Modeling and Publishing Guide

Assigning related component instances to cells
5 In the Status Weight box, accept the default value or enter a number for the consumer object. (Status weight is used in the WEIGHTED_CLUSTER status computation model.)
6 (optional) In the Description box, enter an explanation of the relationship that is meaningful to your enterprise.
7 Click OK.
Figure 10 shows an example sandbox View after some relationships were created.
Figure 10 Drawing relationships
Assigning related component instances to cells
After you have grouped your related component instances of the service model and determined on which cells to publish them, you are ready to assign the related components to the specified cells.
WARNING If you attempt to create a relationship between two components that already have a relationship between them, BMC Impact Service Model Editor displays an error message. Even if the original impact relationship was created outside of BMC Impact Service Model Editor, for example, through BMC Topology Discovery, BMC Impact Service Model Editor detects it.
Chapter 4 Building a service model in BMC Impact Service Model Editor 83

Updating relationships
First, identify the target cells that share component relationships. Next, in the cells that share relationships, make entries in each mcell.dir file to identify the other related cells.
For example, you intend to publish different component instances of your model across five different cells (1, 2, 3, 4, and 5), but only three cells (1, 3, 5) share a relationship. The mcell.dir file of cell 1 should have entries identifying cells 3 and 5; the mcell.dir file of cell 3 should have entries identifying cells 1 and 5; and the mcell.dir file of cell should have entries identifying cells 1 and 3.
To assign related component instances to cells
1 In an active View window, select one or more of the component instances and do one of the following:
■ Right-click and choose Edit Component Properties. ■ From the menu bar, choose Edit => Edit Component Properties.
The General tab of the Edit Component Properties dialog box displays the corresponding component type in the component type hierarchy. The component instance name is displayed in the Component Name box.
If you chose more than one component instance, the Edit Multiple Component Properties dialog box is displayed.
2 In the Edit Component Properties dialog box (or Edit Multiple Component Properties dialog box), in the Cell box, select the cell to which you want to publish the components.
3 To assign other related components to a different cell, select them in the View window, and repeat steps 1 and 2.
Where to go from here
To continue with the creation of a service model, see “Associating events with a component instance” on page 86.
To learn about updating and deleting relationships, continue with the next section.
Updating relationships
You can change the properties for an existing relationship, but you cannot add or delete the consumer or provider instances, nor can you swap the consumer and provider nodes.
84 BMC Impact Solutions Service Modeling and Publishing Guide

Deleting relationships
To edit one or more impact relationships
1 In the View window, do one of the following:
■ Select one or more relationship graph lines, right-click and choose Edit Relationship Properties.
■ Select one or more relationship graph lines and from the menu bar, choose Edit => Edit Relationship Properties from the menu bar.
■ Select one or more the relationship graph lines, set the focus on the Properties window, and click Edit.
If more than one relationship is selected, all are listed in the Edit Multiple Relationship Properties window.
2 Enter a new value in the Activity, Relationship Policy, Status Weight, and/or Description boxes.
If more than one relationship was selected:
■ for each of the boxes, values are filled in if they are the same for all relationships listed; if even one relationship has a different value in a property box, the box is blank
■ the changes you make are applied to all relationships listed in the Edit Multiple Relationship Properties dialog box
For more information about the properties, see “To specify other impact relationship attributes” on page 82.
Deleting relationships
When you delete a relationship, the component instances remain in the service model. The relationship is recorded as to be deleted in the user sandbox and it is immediately removed from the SME View.
However, prior to promoting the change, if you activate the Show/Hide Deleted Components toggle button in the toolbar, the deleted relationship can be seen in the View if you re-expand the graph. Relationships that are to be deleted are, by default, rendered in red, though this option can be changed in the Personal Options dialog.
TIP You can select multiple components and multiple relationships and then open the Edit Relationship Properties dialog box.
Chapter 4 Building a service model in BMC Impact Service Model Editor 85

Associating events with a component instance
When a component is deleted, all relationships referencing the component (provider and consumer) are automatically deleted to maintain the consistency of the service model.
To delete a relationship
1 In the View window, select the relationship line that you want to delete and do one of the following:
■ Right-click and choose Delete from CMDB.■ From the menu bar, choose Edit => Delete from CMDB.
2 In the confirmation window, verify that you are deleting the intended object, and click OK.
3 Select File=>Promote All Sandbox Changes to remove the relationship from the production model.
Associating events with a component instanceWhen an event is received by a cell, its event alias slot is checked for a value. If this value does not exist, the cell uses an alias association formula to construct an alias. The constructed alias must match the value you entered in the Alias box on the Status and Alias tab in the Create (or Edit) Component Properties dialog box. This section describes how to create the formula. For more information about event alias association, see “Event associations” on page 38.
To create an event alias association
1 From the menu bar, choose Tools =>Alias Formulas.
2 In the Event Alias Associations dialog box, click Add.
The list of existing alias event associations displays. To sort either column, click in the column heading.
WARNING ■ Only one promotion can be processed at a time. If you submit a promotion while a
previous promotion is being processed, the second promotion will not start until the second one is complete.
■ Event class definitions must be the same in all SIM cells. If you add custom event classes, you must manually modify the KB of each cell, recompile the KB, and then restart each cell.
86 BMC Impact Solutions Service Modeling and Publishing Guide

Associating events with a component instance
3 In the Edit Event Alias Associations dialog box, in the Name box, enter a name for the event association.
Figure 11 Creating an alias association
4 In the Event Match Criteria area, in the Event Class box, select an event class from the list.
BMC Impact Service Model Editor looks at the first available cell and uses its event classes in the list.
When an event comes in, its event class has to match the event class or a subclass of the event class before the alias formula is even considered.
5 (optional) In the Match Attributes box, choose attributes and enter values to refine which events (within the event class) will generate aliases.
Chapter 4 Building a service model in BMC Impact Service Model Editor 87

Associating events with a component instance
Figure 12 Defining the events to be processed by the alias formula
For each attribute you choose, select one of the conditional operators, as described in Table 23, and enter a value in the text box to further define the events that are used to generate aliases using this formula.
If you use more than one attribute, each condition must test true (the Boolean operator between the selection criteria phrases is AND) before the alias formula process is performed. For example, in Figure 13 on page 89, the search phrase would read: Hostname contains SALLOG and IP address equals 555.22.19.105. Both conditions must be true for the event to be selected for alias processing.
Table 23 Description of conditional operators
Conditional operators Description
anything the attribute can contain any value and is not used as a selection criteria
If every attribute listed has anything that means that every incoming event that belongs to the event class will pass through alias formula processing
contains the characters you enter in the text box occur someplace in the value
has prefix the value starts with the characters you enter in the text box
has suffix the value ends with the characters you enter in the text box
equals the value exactly matches the characters you enter in the text box
88 BMC Impact Solutions Service Modeling and Publishing Guide

Associating events with a component instance
Figure 13 Example of match attributes
6 In the Alias Formula area, use the Attribute, Text, and Function buttons in any order and as many times as needed to build the formula:
A To insert an attribute in the formula, click the Attribute button. The attributes shown are those that belong to the event class you selected in the Event Definition area.
When an attribute is selected, the control shows the attribute name, and the preview area is updated to show the syntax of the formula as it currently exists.
B To insert literal text (for example, a period, semi-colon, the word Oracle), click on the Text button. In the text box, type the literal text that you want in the alias formula.
Literal text appears in the first part of the alias formula with data type definitions.
C To insert a function that defines the data type and an expression in the formula, click on the Function button. Type the function and choose the data type.
For a list of functions you can use, see BMC Impact Solutions Knowledge Base Development Reference Guide.
TIP If your formula for a component instance (CI) contains the mc_host slot with a host name value, then the mc_host slot of the matching event definition should also contain the host name value, not the IP address, of the CI. For example, if you assign the mc_host slot in your formula the value mycomputer.abc.com, then the mc_host slot of the incoming event should contain the same host name value, not the IP address.
You can check with your system administrator for the correct Domain Name System (DNS) resolution if the object represented by the component instance experiences host name resolution errors.
Chapter 4 Building a service model in BMC Impact Service Model Editor 89

Associating events with a component instance
D (optional) To change the order of the elements in the alias formula, select the part of the formula you want to move and click the Move arrow button as appropriate.
E (optional) To delete one of the elements in the alias formula, select the part of the formula you want to delete and click the Delete button.
7 When the alias formula is complete, click Save.
Where to go from here
To continue with the creation of a service model, see “Promoting the service model” on page 103.
To learn about editing and deleting an event alias association, and adding an alias to a component instance, continue with the next section.
To edit an event alias formula
1 Choose Tools => Alias Formulas.
2 In the Event Alias Associations dialog box, select an existing alias computing formula.
3 Click Edit.
4 In the Edit Event Alias Association dialog box, make changes as needed.
For details about each field, see “To create an event alias association” starting with step 4 on page 87.
5 When your changes are complete, click OK.
To delete an event alias formula
1 Choose Tools =>Alias Formulas.
2 In the Event Alias Associations dialog box, select an existing alias computing formula.
3 Click Delete.
90 BMC Impact Solutions Service Modeling and Publishing Guide

Working with timeframes and service schedules
To add an alias to a component instance
1 In an active View window, select a component instance and either
■ right-click the component instance and choose Edit Component Properties
■ choose Edit => Edit Component Properties from the menu bar.
2 On the Status and Alias tab, click Add Alias.
3 In the Input box, enter the alias name and click OK.
Each alias you enter is listed in the Aliases box.
4 (optional) Enter additional aliases (one for each event that can potentially affect the status of the component instance).
5 (optional) To edit an alias name, in the Aliases box, select the alias and click Edit.
6 (optional) To delete an alias, in the Aliases box, select the alias and click Delete.
7 Click OK.
Edits on this tab are not saved to the BMC Atrium CMDB until you click OK.
Where to go from here
To learn about creating service schedules and assigning components to service schedules, continue with the next section.
Working with timeframes and service schedules
You edit service schedules using the Schedules Editor function of BMC Impact Service Model Editor. Schedule information is stored in the BMC Atrium CMDB and can be viewed in BMC Impact Portal and BMC IX.
If a schedule is not selected for a component, the component will have a default schedule of 24 x 7 x 365 (always in schedule).
TIP To search for the component instances that use a specific alias, use the Conditional Find tab in the Find dockable window. One of the attributes available in the Select list box is Aliases. You must use LIKE as the relational operator.
Chapter 4 Building a service model in BMC Impact Service Model Editor 91

Icons used in the service schedule and timeframes editors
After service schedules are created, you can assign components to schedules in the Edit Component Properties dialog box as described in “Assigning components to service schedules” on page 99.
Full Access, Service Administrators, and Service Managers user groups have access to the schedule editor.
Icons used in the service schedule and timeframes editors
Table 24 contains descriptions of the functions of icons used in the service schedule and timeframe editors.
Working with timeframes
Service schedules are built from timeframes, which can be created and edited using the Timeframe Edit dialog box of BMC Impact Service Model Editor as shown in Figure 14.
Table 24 Service schedule and timeframes editors icons
Icon Function
Edit the selected service schedule or timeframe
Create a new service schedule or timeframe
Copy of the selected service schedule or timeframe
Show Usages of components assigned to the selected service schedule or timeframe. Opens the Timeframe - Components and Schedule dialog box, which lists the components and schedules currently associated with the timeframe. If you are creating a new timeframe, these lists will not contain any components or schedules.
Delete the selected service schedule or timeframe
92 BMC Impact Solutions Service Modeling and Publishing Guide

Working with timeframes
Figure 14 Timeframe Edit dialog box
Table 25 provides descriptions of the fields in the Timeframe Edit dialog box.
Table 25 Timeframe Edit field descriptions (part 1 of 2)
Name Name of the timeframe
Description Description of the timeframe
Usages (button) Opens the Timeframe - Components and Schedule dialog box, which lists the components and schedules currently associated with the timeframe. If you are creating a new timeframe, these lists will not contain any components or schedules.
Start, End, and Duration Period when the timeframe begins and ends, and the duration of the timeframe. Changing the duration will change the value in the End field, and vice-versa.
The individual time zone of each component’s BMC Impact Manager will be used in timeframe calculations.
Chapter 4 Building a service model in BMC Impact Service Model Editor 93
Working with timeframes
To create or edit a timeframe
1 From the menu bar, choose Tools => Edit Schedules.
2 In the Schedules Editor dialog box, on the Timeframes tab, click the New icon to create a new timeframe or click the Edit icon to edit an existing timeframe.
3 In the Timeframe Edit dialog box, enter or modify the appropriate information in the fields available in the Timeframe Edit dialog box.
For more information about the Timeframe Edit dialog box, see Table 25, “Timeframe Edit field descriptions,” on page 93.
4 Click Save to save the timeframe and make it available for use in the Schedules Editor.
To copy a timeframe
1 From the menu bar, choose Tools => Edit Schedules.
2 In the Schedules Editor dialog box, on the Timeframes tab, select a timeframe to copy.
3 Click the Copy icon.
4 In the Timeframe Edit dialog box, modify the fields for the copied timeframe as appropriate. The copied timeframe name is appended with the prefix “Copy of.”
For more information about the Timeframe Edit dialog box, see Table 25, “Timeframe Edit field descriptions,” on page 93.
5 Click Save.
Recurrence pattern Defines the frequency in which the timeframe recurs. Changing the selection in the left side list changes the options available on the right side.
Besides the Daily, Weekly, Monthly, and Yearly timeframe options, you can select individual dates that are part of the timeframe by selecting Date List and choosing dates from the displayed calendar.
Range of recurrence Defines the starting and ending date range for the recurrence.
Optionally, instead of choosing an end date, you can enter the number of recurrences for the timeframe.
Table 25 Timeframe Edit field descriptions (part 2 of 2)
94 BMC Impact Solutions Service Modeling and Publishing Guide
Working with service schedules
To list the service schedules and components that are associated with a timeframe
1 From the menu bar, choose Tools => Edit Schedules.
2 In the Schedules Editor dialog box, on the Timeframes tab, select a timeframe.
3 Click the Show Usages icon.
In the Timeframe - Components and Schedule dialog box is a list of the components and schedules currently associated with the timeframe.
— To view components associated with the selected timeframe, click the Components tab.
— To view service schedules containing the selected component, click the Schedules tab.
4 Click Close.
To delete a timeframe
1 From the menu bar, choose Tools => Edit Schedules.
2 In the Schedules Editor dialog box, select one or more timeframes from the list of timeframes.
3 On the Schedules tab, click the Delete icon.
To view the schedules that make use of a given timeframe, on the Timeframes tab of the Schedules Editor dialog box, click Show Usages. See “To list the service schedules and components that are associated with a timeframe” on page 95.
4 Click Delete.
Working with service schedules
You create and modify service schedules in the BMC Impact Service Model Editor Schedule Edit dialog box as shown Figure 15.
Chapter 4 Building a service model in BMC Impact Service Model Editor 95

Working with service schedules
Figure 15 Schedule Edit dialog box
To create or edit a service schedule
1 From the menu bar, choose Tools => Edit Schedules.
2 In the Schedules Editor dialog box, on the Schedules tab, click the New icon to create a new service schedule or click the Edit icon to edit an existing service schedule.
3 In the Schedules Edit dialog box, enter or modify the appropriate information in the fields, as shown in Table 26.
Table 26 Schedule Edit field descriptions
Schedule name Name of the service schedule being created or edited
Description Description of the service schedule
Usages (button) Opens the Schedules - Components Assigned to this Schedule dialog box, which lists the components and component descriptions currently associated with the selected schedule.
96 BMC Impact Solutions Service Modeling and Publishing Guide
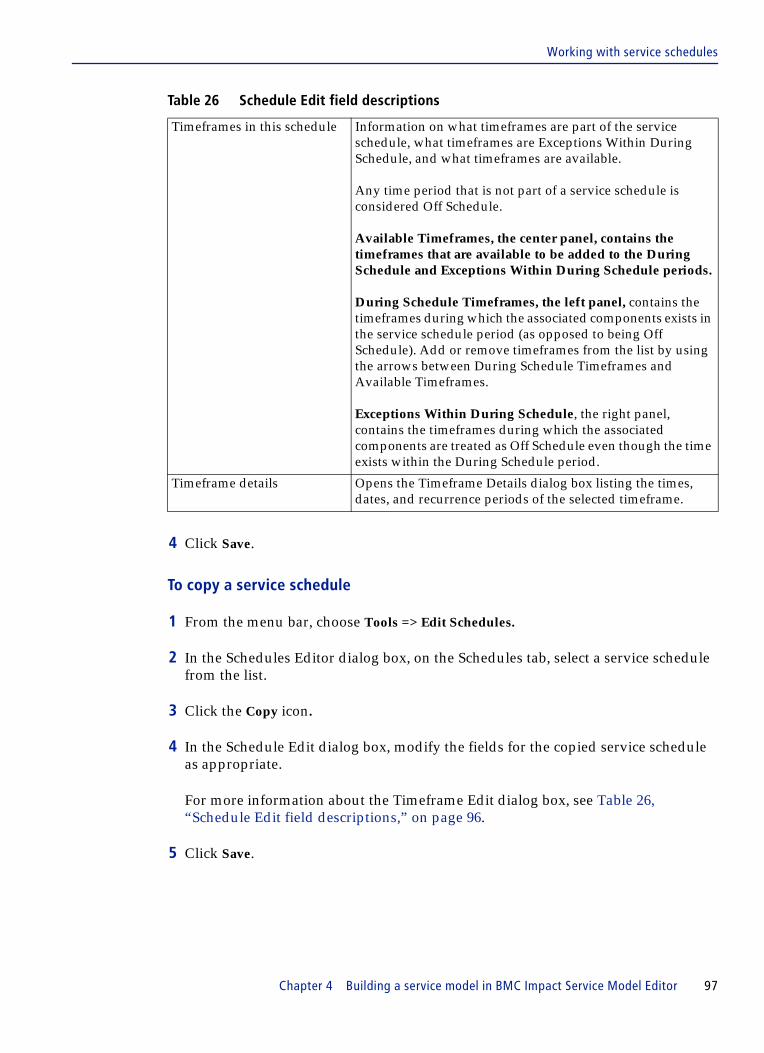
Working with service schedules
4 Click Save.
To copy a service schedule
1 From the menu bar, choose Tools => Edit Schedules.
2 In the Schedules Editor dialog box, on the Schedules tab, select a service schedule from the list.
3 Click the Copy icon.
4 In the Schedule Edit dialog box, modify the fields for the copied service schedule as appropriate.
For more information about the Timeframe Edit dialog box, see Table 26, “Schedule Edit field descriptions,” on page 96.
5 Click Save.
Timeframes in this schedule Information on what timeframes are part of the service schedule, what timeframes are Exceptions Within During Schedule, and what timeframes are available.
Any time period that is not part of a service schedule is considered Off Schedule.
Available Timeframes, the center panel, contains the timeframes that are available to be added to the During Schedule and Exceptions Within During Schedule periods.
During Schedule Timeframes, the left panel, contains the timeframes during which the associated components exists in the service schedule period (as opposed to being Off Schedule). Add or remove timeframes from the list by using the arrows between During Schedule Timeframes and Available Timeframes.
Exceptions Within During Schedule, the right panel, contains the timeframes during which the associated components are treated as Off Schedule even though the time exists within the During Schedule period.
Timeframe details Opens the Timeframe Details dialog box listing the times, dates, and recurrence periods of the selected timeframe.
Table 26 Schedule Edit field descriptions
Chapter 4 Building a service model in BMC Impact Service Model Editor 97

Working with service schedules
To display the component instances that are associated with a service schedule
1 From the menu bar, choose Tools => Edit Schedules.
2 In the Schedules Editor dialog box, on the Schedules tab, select a service schedule from the list.
3 Click the Show Usages icon.
In the Timeframe - Components and Schedule dialog box is a list of the components and schedules currently associated with the timeframe. You can view associated components on the Components tab and associated service schedules on the Schedules tab.
4 Click Close.
To delete a service schedule
1 From the menu bar, choose Tools => Edit Schedules.
2 In the Schedules Editor dialog box, on the Schedules tab, select one or more service schedules from the list.
3 Click the Delete icon.
A Delete Confirmation dialog box is displayed, informing you that after deletion, all components using the deleted schedules will be assigned to the current default schedule.
To view the component instances that are associated with a given service schedule, on the Schedules tab of the Schedules Editor dialog box, click Show Usages. See “To display the component instances that are associated with a service schedule” on page 98.
4 Click Delete.
Where to go from here
After you create service schedules, you assign components to the schedules. See “Assigning components to service schedules” on page 99.
98 BMC Impact Solutions Service Modeling and Publishing Guide

Assigning components to service schedules
Assigning components to service schedules
You can assign one or more components to service schedules by launching the Schedules Editor from the Edit Component Properties dialog box, Schedule tab, as shown in Figure 16.
Figure 16 Schedules Editor section of Edit Component Properties dialog box
To assign components to service schedules
1 Select one or more components in the active View to which you want to assign to a service schedule.
2 Choose Edit=>Edit Component Properties.
3 On the Schedule tab, in the Schedule pane, click Select.
The Select a Schedule dialog box contains the During Schedule and Exceptions Within During Schedule timeframes. By default, components are assigned the always-in-During Service schedule (24 x 7 x 365).
— To choose a schedule for the components, select the schedule from the Schedules pane and click OK.
— To edit an schedule, select a schedule and click Edit to display the Schedules Editor. For more information about editing schedules see “To create or edit a service schedule” on page 96.
— To view what component instances are using the selected schedule, click Usages.
— To view the details of what times and dates are specified in a selected timeframe, click Timeframe Details.
Chapter 4 Building a service model in BMC Impact Service Model Editor 99
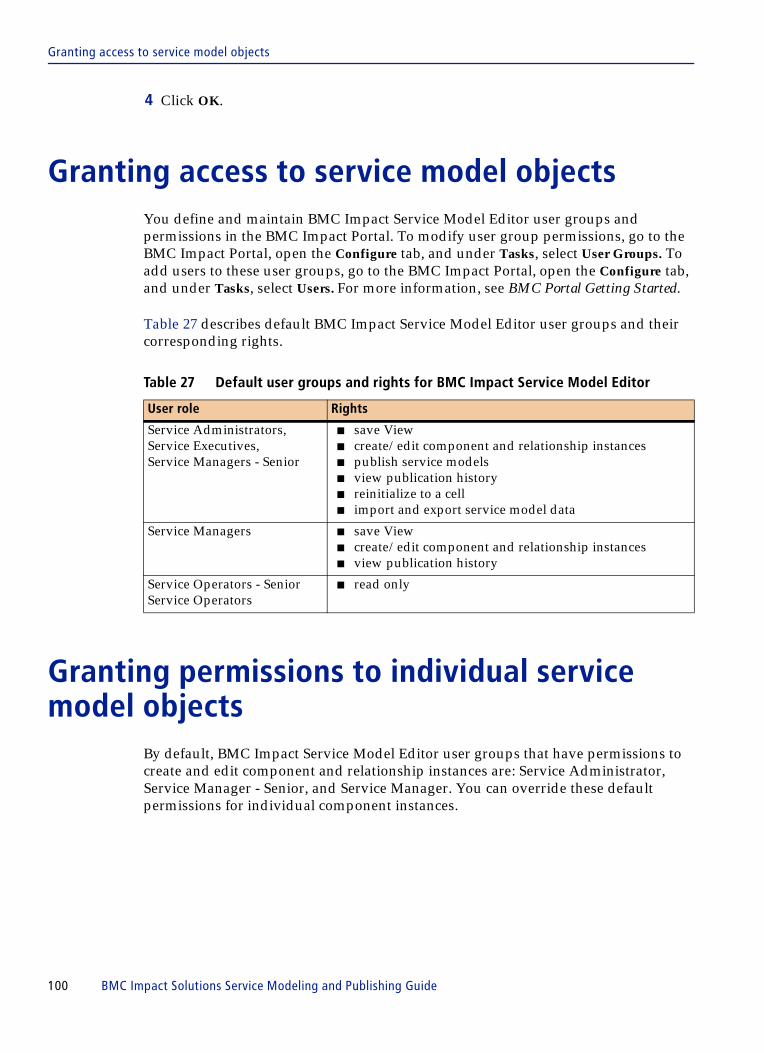
Granting access to service model objects
4 Click OK.
Granting access to service model objectsYou define and maintain BMC Impact Service Model Editor user groups and permissions in the BMC Impact Portal. To modify user group permissions, go to the BMC Impact Portal, open the Configure tab, and under Tasks, select User Groups. To add users to these user groups, go to the BMC Impact Portal, open the Configure tab, and under Tasks, select Users. For more information, see BMC Portal Getting Started.
Table 27 describes default BMC Impact Service Model Editor user groups and their corresponding rights.
Granting permissions to individual service model objects
By default, BMC Impact Service Model Editor user groups that have permissions to create and edit component and relationship instances are: Service Administrator, Service Manager - Senior, and Service Manager. You can override these default permissions for individual component instances.
Table 27 Default user groups and rights for BMC Impact Service Model Editor
User role Rights
Service Administrators, Service Executives,Service Managers - Senior
■ save View■ create/edit component and relationship instances■ publish service models■ view publication history■ reinitialize to a cell■ import and export service model data
Service Managers ■ save View■ create/edit component and relationship instances■ view publication history
Service Operators - SeniorService Operators
■ read only
100 BMC Impact Solutions Service Modeling and Publishing Guide

Granting permissions to individual service model objects
To grant permissions to individual component instances
1 With the component instance in an open View, select the component and do one of the following:
■ Right-click and choose Edit Component Properties
■ From the menu bar, choose Edit => Edit Component Properties.
2 In the Edit Component Properties dialog box, on the Permissions tab, select the appropriate options.
Figure 17 Changing access for an individual component instance
User groups with Unassigned selected do not see the object.
3 Click OK.
NOTE When you modify user access permissions in the BMC Impact Service Model Editor, they are effective immediately in BMC Impact Service Model Editor. For the changes to appear in Impact Portal, they must be promoted from BMC Impact Service Model Editor and you must then log out and then log on to Impact Portal. For permissions at the CI (component) level, you need not log out and log into the Portal portal for the permissions to take effect.
Chapter 4 Building a service model in BMC Impact Service Model Editor 101

Testing the service model
Testing the service modelBefore promoting and publishing the components in your sandbox service model, you may test them by sending the component instances and relationships to a test cell that you have previously created specifically for the purposes of testing. BMC Impact Service Model Editor users having the correct permissions (set up in the BMC Portal) have their own individual test environments.
From the BMC Impact Service Model Editor, you can send component, relationship, and management data to a cell that has been previously created exclusively for testing by using the Send to Test option on the File menu. (if the relationship View option is set to show non-impact relationships, the Send to Test option is not available.)
You can send the sandbox service model to a test cell before promoting it into the production environment.
After the test is initiated, the following events occur:
■ existing data in the test environment is cleared■ components and relationships, including production components, as well as those
in the sandbox, are sent to the test environment. Management data is also sent.■ if no impact relationships are visible in the selected view, or if components exist
which are not part of an impact relationship, a dialog box is displayed warning the user that the test components being sent do not have impact relationships
Testing component relationships
After you have set up a relationship, you can test it by posting events against the provider component in the relationship and observe the resulting status of the consumer component in the relationship.
Testing event associations
After you have set up event alias associations, in the component instance and by creating an alias formula, you need to verify that the association occurs correctly.
In the BMC Impact Explorer console, open the Events tab. When an incoming event is associated with a component instance, the mc_smc_type and mc_smc_id slots will have values. If the slots are empty, the event is not associated. In the BMC Impact Service Model Editor, check the component alias and the event alias formula.
102 BMC Impact Solutions Service Modeling and Publishing Guide

Promoting the service model
To send components to a test cell
1 Choose File => Send to Test Objects in Current View.
If there are no impact relationships for the components in the current View, a warning dialog box is displayed. Choose Yes to continue, or No to stop.
If there are no test cells available in the current environment, an error dialog box is displayed and the process is stopped.
If the send to test is successful, a dialog box is displayed indicating that the test dataset has been populated. Management data is copied automatically to the test environment.
2 Close the dialog box.
Promoting the service modelAfter promoting component instances in BMC Impact Service Model Editor, these changes are stored in the production dataset (BMC.ASSET) in the BMC Atrium CMDB and are automatically published (by default) to the assigned cells. When you service model data is successfully to the cells, the BMC Impact Publishing Server updates the BMC.IMPACT.PROD dataset, which mirrors the last successful publish to the cells.
About the publishing process
Promotion and publishing are decoupled. Promotion is initiated and controlled from BMC Impact Service Model Editor, while publication is controlled by BMC Impact Publishing Server.
There are two modes of running the BMC Impact Publishing Server.
■ In automated mode, by default, publication is initiated by the completion of a reconciliation job run, such as after a promotion.
■ In manual mode, publication is initiated from CLI commands.
Note that a successful promotion does not guarantee that the automated publication will also be successful. For more details about automated publishing, see Chapter 8, “Managing BMC Impact Publishing Server.”
Chapter 4 Building a service model in BMC Impact Service Model Editor 103
Before you promote
During the publishing of a service model, new or modified service model components and their relationships are selected from the BMC.ASSET dataset in the BMC Atrium CMDB and copied to respective BMC Impact Manager cells. The objects in BMC.ASSET are compared to any previously published instance in BMC.IMPACT.PROD and the changes between them are sent to the cell. BMC.IMPACT.PROD is then updated with the changes.
After events that affect service component instances are received by the cell, you can monitor status changes using BMC Impact Explorer or BMC Portal for the published component instances.
Before you promote
To ensure a successful promotion and publication of the service model, verify that:
■ each component instance is assigned to a cell■ all target cells that are registered in the BMC Impact Portal are running and have a
live connection with the BMC Impact Publishing Server■ event types are associated with component instances■ the BMC Impact Publishing Server is running in automated mode by using the CLI
command psstat. This command should return Started - Automated mode.■ your user account belongs to one of these user groups: Service Administrator,
Service Manager, or Service Manager - Senior (these are the default user group assignments; you may change them in the BMC Impact Portal)
■ the SIM class definitions are in sync. The BMC Impact Publishing Server validates the class definitions and establishes a live connection with BMC Impact Portal, the BMC Atrium CMDB, and the cells before submitting the publication.
Submitting a promotion
When you submit a promotion, the Promotion Preview dialog box offers the opportunity to compare your unpromoted sandbox service model component instances and relationships with those that have already been promoted so that you can verify the work done in the current editing session. When you click Begin Promotion, service model objects (component instances, impact relationships, and management data) shown in the preview are promoted (and subsequently automatically published).
Before you begin
Verify the items listed in the section “Before you promote” on page 104.
104 BMC Impact Solutions Service Modeling and Publishing Guide

Submitting a promotion
To promote all sandbox component instances and relationships
1 Start the promotion by doing one of the following:
■ On the toolbar, click Promote .■ From the menu bar, choose File => Promote All Sandbox Changes.■ In a View window, right-click and choose Promote All Sandbox Changes.
2 In the Promotion Preview dialog box, in the Objects to be Promoted area, choose how you want to filter the list of objects that you see. When you filter the list, it only affects what is visible, not what will be promoted. All items will be promoted.
In the first Show list, choose All, Components, Relationships, Components and Relationships, or Management Data.
In the second Show list, choose All Actions, New Objects, Changed Objects, or Deleted Objects.
The component instances and relationships to be promoted are listed in the left pane.
3 In the results pane, review the list of objects.
The default sort order of objects is by Action, then Type (component or relationship), and then by Object Name. To change the sort order, click in the column heading.
The icons in the Action and Type columns are defined in Table 28. The icons in the Class column match the icons associated with the component type in the Templates dockable window.
TIP If promote service model options are unavailable, you may not have the permissions to promote component instances. For information on configuring user rights, see BMC Portal Getting Started.
Table 28 Icons in Objects-to-be-Published pane
Column heading Icon Description
Action object was deleted
object was added
object was modified
Chapter 4 Building a service model in BMC Impact Service Model Editor 105

Submitting a promotion
4 In the Comparison of Sandbox and Promoted Property Values area, for the Show options, select Changed Properties or All Properties for the component instances you selected in the Objects to be Promoted pane.
5 Select one or more objects in the left pane and, in the right pane, compare the new and previously published property values to verify that the new data is correct before you publish it.
6 Click Begin Promotion.
The Promotion in Progress dialog box is displayed, along with the elapsed time since the promotion was started. Even if BMC Impact Service Model Editor is shut down and restarted, the elapsed time will reflect the total time since the promotion was originally started.
7 (optional) To stop the promotion, in the Promotion in Progress dialog box, click Stop.
Closing the dialog box does not stop the promotion; the promotion continues in the background.
8 (optional) To exit BMC Impact Service Model Editor, click Exit SME, then click the appropriate selection on the confirmation dialog box.
9 A status message indicates the success or failure of the promotion request.
Type component
relationship
timeframe or service schedule
TIP ■ To hide either the Objects to be Promoted pane or the Comparison of New and
Promoted Property Values pane, click on the quick expansion arrows (tiny black arrows) between the panes.
■ You can compare published and newly created, changed, or deleted component instances independently of the publication process by choosing Tools => Compare Sandbox to Production.
Table 28 Icons in Objects-to-be-Published pane
Column heading Icon Description
106 BMC Impact Solutions Service Modeling and Publishing Guide
Verifying promotion status
If the promotion and subsequent automated publication processes are successful, the service model is available to the specified cells and you can monitor the component instances in BMC Impact Portal and in BMC Impact Explorer.
For troubleshooting information, see “Initial source parameters” on page 208.
Where to go from here
To learn about verifying promotion status, continue with the next section.
Verifying promotion status
After you submit a promotion request, you can view its status in the Promotion in Progress dialog box that displays after a promotion is requested.
After the promotion process completes, a dialog box will display indicating whether the promotion succeeded or failed.
If the promotion fails, the Promotion Status dialog box declares a promotion failure along with the error, a timestamp, and the user name of the submitter. Click OK to dismiss the dialog box.
Note that a publication success or failure is not shown in the dialog box, but can be viewed in the Promote and Publish History dialog box (Tools => Promote and Publish History) or using the pshowlog command. For more information about CLI commands, see Chapter 9, “BMC Impact Publishing Server CLIs”.
Chapter 4 Building a service model in BMC Impact Service Model Editor 107

Working with publication logs
Working with publication logs
This section contains general guidelines to remember when working with publication logs.
■ After you submit a promotion request, the Promotion in Progress dialog box opens automatically, enabling you to monitor the progress of the promotion request. However, promotion results dialogs only report success or failure of a promotion and do not offer information about publication status. More detailed information about each publication is available in BMC Impact Publishing Server log files. A log exists for every publish request containing detailed information as to why publication failed and can be consulted to diagnose a publication failure.
■ All publish logs are available in BMC Impact Service Model Editor's publish history.
■ Publish logs can be retrieved in user-friendly format via the CLI command pshowlog (see “pshowlog—Obtaining the XML log in user-friendly format” on page 281).
■ Publish logs can also be retrieved via the CLI command plog (see “plog—Obtaining the XML log for a request” on page 265).
■ It is recommended that you give every promotion a unique description because promotion descriptions are found in the publication log and will make locating each publish easier. Another way to find the correct publication in the log is to use the promotion id.
■ BMC Impact Publishing Server includes detailed messages from the different components (such as BMC Impact Portal, BMC Atrium CMDB, and BMC Impact Managers) it communicates with. To understand and troubleshoot these messages, consult the documentation of those components.
Viewing promotion and publication history
At any time, you can use the Promote and Publish History command in BMC Impact Service Model Editor to review previous promotion and publication information, including failures.
The Promote and Publish History command displays the status and date and time of requests. Information in the Publication errors section of the Publish tab can help you troubleshoot publication failures.
To view promotion history
1 From the menu bar, choose Tools => Promote and Publish History.
2 To view promotion details, select the Promotion tab, then select the promotion for which you want to see details in the Promote History table area.
108 BMC Impact Solutions Service Modeling and Publishing Guide

Working with publication logs
The list of recent promotions is in reverse chronological order, that is, the most recent is listed first.
To view publication history
1 From the menu bar, choose Tools => Promote and Publish History.
2 To view publication details, select the Publish tab, then select the publication for which you want to see details in the Publication History table area.
The list of recent publications is in reverse chronological order, that is, the most recent is listed first.
Viewing publication history details
This section contains information on viewing publication history details.
To view publication history details
1 From the menu bar, choose Tools => Promote and Publish History.
The list of recent publications is in reverse chronological order, that is, the most recent is listed first.
By default, 100 publication log files are saved; when the 101st log is saved, the first log is deleted. All BMC Impact Publishing Server requests are counted (not only publish and initialization, but also classinfo (for example, export) requests).
You can change the RequestHistorySize parameter in pserver.conf to modify the default number of logs saved.
2 To view publication details, select the Publication tab, then select the publication for which you want to see details in the Publication History table area.
A On the Publication Details tab, review the detailed information for the publication you selected. Failures are displayed in red.
If the failure is the result of a particular component instance, the component type and component name are included. To open a View with the component instance, select the failure and click Open in New View.
B On the Publication Errors tab (available only if there were failures associated with the selected publication), review the failure information.
You can sort on any column and, if the column width limit truncates the text, the tooltip displays the complete text string.
Chapter 4 Building a service model in BMC Impact Service Model Editor 109

Modifying and deleting service model data
C In the Recommended Action area, review the action to correct the problem with publish.
3 To close the dialog box, click Close.
Modifying and deleting service model dataFor published service model data, changes and deletions are restricted to the original source of the data. Objects delivered to the SIM cell from BMC Atrium CMDB must be edited and deleted in BMC Impact Service Model Editor (or BMC Atrium CMDB) and objects from the CLI command pposter must be changed and deleted using a BAROC source file and pposter.
Published data is protected from modification or deletion by any form of Direct Feed. In other words, while published components are visible in BMC Impact Explorer, you cannot change or delete them in BMC Impact Explorer, nor with a rule, or the mposter command.
If you first create a CI via a pposter and later publish that CI (same ComponentAlias) from BMC Atrium CMDB, then the DirectPublish CI is replaced by a BMC Atrium CMDB CI. If you first create a CI from publish from BMC Atrium CMDB then try to modify it via pposter, this fails because the DirectPublish environment is not the source of the CI.
Organizing service component instances for monitoring
Before you can monitor service model component instances that are in production (have been published) in the BMC Impact Portal and the BMC Impact Explorer, you must populate the console navigation tree in BMC Impact Service Model Editor.
NOTE You can replace the action recommended by BMC Software, add to it, or modify it by editing the pslog_error_solutions.properties file located in the BMC_PORTAL_KIT_HOME\appserver\websdk\tools\jboss\server\all\conf\resources\en_US\smsConsoleServer directory on the server running BMC Portal.
110 BMC Impact Solutions Service Modeling and Publishing Guide

Organizing service component instances for monitoring
The Console Navigation Tree dockable window provides a flexible way of organizing your service component instances under folders that you create. The tree that you create in BMC Impact Service Model Editor is visible in BMC Impact Portal, on the Configure tab, under Properties and in BMC Impact Explorer, from the Services View, the Services Group tab.
The top-level folder of the hierarchical directory is userAccount/Business, with userAccount representing the active BMC Impact Portal user account name. You create subfolders that meet the service monitoring requirements for your enterprise.
Changes that are made to published service model component instances in the console navigation tree are immediately reflected in the BMC Impact Portal.
To add a folder to the console navigation tree
1 In the Console Navigation Tree dockable window, navigate to and select the folder under which you want to create a folders.
All service component folders must be created under the userAccount/Business folder (which cannot be edited or renamed).
The way you organize the folders and component instances is entirely dependent on your enterprise and the way you want to monitor the component instances in BMC Impact Portal and BMC Impact Explorer.
2 In the Console Navigation Tree toolbar, click Create Folder .
3 In the Create New Folder dialog box, in the text box, enter the folder name.
4 Specify the permission levels for the appropriate user groups. These permissions settings enable users to see the folder and its contents in BMC Impact Portal and BMC Impact Explorer.
5 Click OK.
To rename folders
1 In the Console Navigation Tree dockable window, expand the Business folder under the userAccount folder.
2 Select the folder you want to rename.
NOTE You can rename group folders, but you cannot rename component instances from the console navigation tree; you can rename them in a View.
Chapter 4 Building a service model in BMC Impact Service Model Editor 111

Organizing service component instances for monitoring
3 On the Console Navigation Tree toolbar, click Rename Selected Folder .
4 In the Rename Folder dialog box, enter the new name.
5 Click OK.
To move a folder and its component instances
1 In the Console Navigation Tree dockable window, expand the Business folder under the userAccount folder.
2 Select the folder or component instance that you want to move to another folder.
You can only move those component instances which exist directly under a folder. Components which appear as providers to other component instances in the console navigation tree cannot be moved (that would be editing the model).
3 Drag the object to the new location.
To copy folders
1 In the Console Navigation Tree dockable window, expand the Business folder under the userAccount folder.
2 Select the folder or component instance that you want to copy to another folder.
3 Control-drag the object to the new location.
To define permissions for folders
1 In the Console Navigation Tree dockable window, navigate to and select the folder for which you want to define permissions.
2 On the Console Navigation Tree toolbar, click Edit Permissions .
3 In the Edit Permissions dialog box, specify the permission level for the appropriate user groups.
4 Click OK.
NOTE Folder-level permission for the BMC Impact Service Model Editor is controlled by the BMC Portal. This means that if you create a folder in the BMC Impact Service Model Editor and assign specific access control permissions to that folder, the access control permissions from the BMC Portal override the permissions of the BMC Impact Service Model Editor.
112 BMC Impact Solutions Service Modeling and Publishing Guide

Organizing service component instances for monitoring
To remove a folder or a component
1 In the Console Navigation Tree dockable window, expand the Business folder under the userAccount folder.
2 Select the folder you want to remove.
3 On the Console Navigation Tree toolbar, either click Remove Folders or components
or right-click and choose Remove from the context menu.
4 In the Confirmation box, click Yes.
To add a component to the console navigation tree
1 In the Console Navigation Tree dockable window, navigate to and select the folder under which you want to add component instances.
2 On the Console Navigation Tree toolbar, click Add a Component .
3 In the Find window, locate and select the components to add and click Add.
For information on using the Find command, see “Finding component instances” on page 71.
When you click Add, the component instances are automatically saved as part of the console navigation tree.
You can also undock the Find window and drag component instances from the Find results pane to the console navigation tree.
4 (optional) Continue adding component instances using the Find command.
NOTE ■ When you add a component instance that has providers to a folder, you can drill down
and see the providers in the console navigation tree, even if they are not published. To see component instances in the BMC Impact Portal that you see in the console navigation tree, you must publish them.
■ When you expand the tree, BMC Impact Service Model Editor checks the BMC Atrium CMDB to see if there are changes to provider component instances, and if there are changes, the tree is refreshed. These provider component instances are not saved as part of the console navigation tree.
Chapter 4 Building a service model in BMC Impact Service Model Editor 113

Working with BMC Impact Service Model Editor Views
To add a component to the console navigation tree from a View
1 In the Console Navigation Tree dockable window, navigate to and select the folder under which you want to add component instances.
2 In an open View, select the component instances to add and do one of the following:
■ Right-click and choose Add Components to Navigation Tree.■ On the menu bar, choose Edit => Add Components to Navigation Tree.
To open component instances in a View
1 In the Console Navigation Tree dockable window, expand the Business folder under the userAccount folder.
2 Locate the component instances you want to open in a View.
3 Select the component instances and do one of the following:
■ To open in a new View, on the Console Navigation Tree toolbar, click
Open the selected components in a new view .
■ To open in the current View, on the Console Navigation Tree toolbar, click
Place the selected components in current view .
■ Right-click on the component instances and choose Open in New View or Place in Selected View.
You cannot move a folder into a View.
To refresh the tree
To query the BMC Atrium CMDB and redisplay the tree with the latest data, including provider component instances, on the toolbar, click Refresh navigation tree.
Working with BMC Impact Service Model Editor Views
Table 29 lists the topics covered in this section with page numbers.
114 BMC Impact Solutions Service Modeling and Publishing Guide
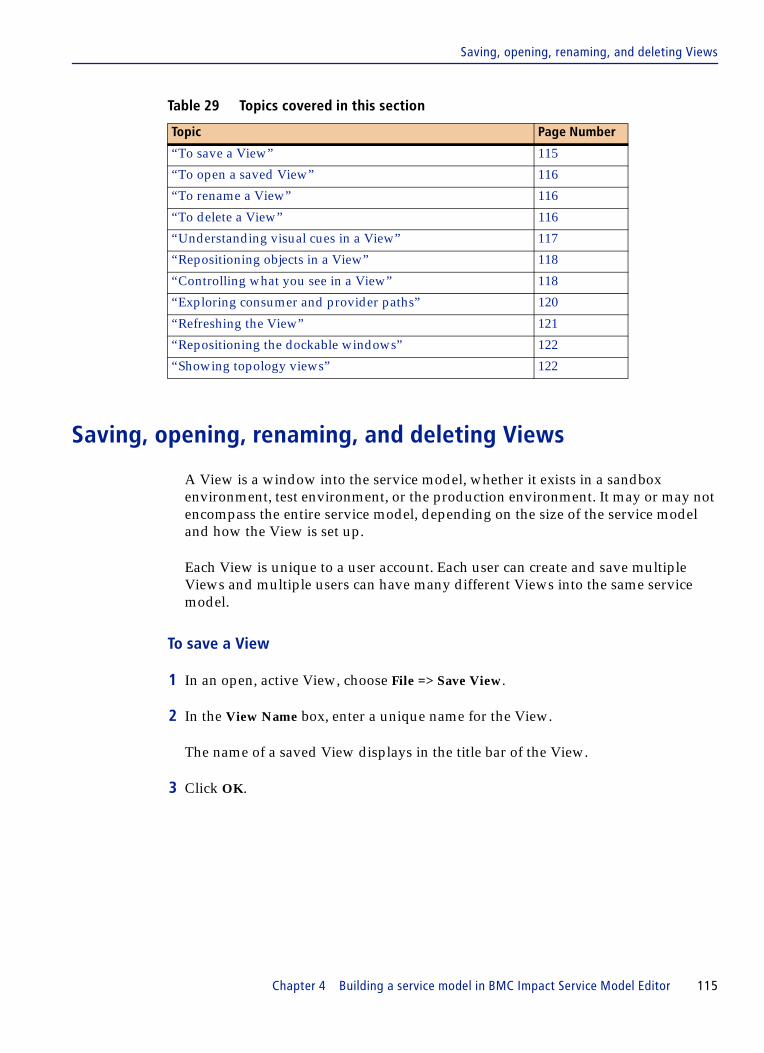
Saving, opening, renaming, and deleting Views
Saving, opening, renaming, and deleting Views
A View is a window into the service model, whether it exists in a sandbox environment, test environment, or the production environment. It may or may not encompass the entire service model, depending on the size of the service model and how the View is set up.
Each View is unique to a user account. Each user can create and save multiple Views and multiple users can have many different Views into the same service model.
To save a View
1 In an open, active View, choose File => Save View.
2 In the View Name box, enter a unique name for the View.
The name of a saved View displays in the title bar of the View.
3 Click OK.
Table 29 Topics covered in this section
Topic Page Number
“To save a View” 115
“To open a saved View” 116
“To rename a View” 116
“To delete a View” 116
“Understanding visual cues in a View” 117
“Repositioning objects in a View” 118
“Controlling what you see in a View” 118
“Exploring consumer and provider paths” 120
“Refreshing the View” 121
“Repositioning the dockable windows” 122
“Showing topology views” 122
Chapter 4 Building a service model in BMC Impact Service Model Editor 115

Saving, opening, renaming, and deleting Views
To open a saved View
1 In the dockable panes area, click Views.
2 In the list of Views, locate the View you want to open and do one of the following:
■ Double-click on the View name.■ Select the View and click on the View toolbar.■ Right-click and choose Open View.
When you open a saved View, its component and relationship instances are verified against the definitions in the BMC Atrium CMDB. Depending on the number of objects contained in the View, this process can take some time. If any instance cannot be verified in the BMC Atrium CMDB, the View does not open.
To rename a View
1 In the dockable panes area, click Views.
2 In the list of Views, locate the View you want to rename and do one of the following:
■ Select the View and click on the View toolbar.■ Right-click and choose Rename View.
3 The selected row becomes editable; type a new name and press Enter.
To delete a View
1 In the dockable panes area, click Views.
2 In the list of Views, locate the View you want to delete and do one of the following:
■ Select the View and click on the View toolbar.■ Right-click and choose Delete View.
3 In the Confirm View Delete box, verify that you are deleting the correct View and click Yes.
NOTE When you delete a View, it does not affect the service model or the topology view. You are deleting only the View window, not any of the actual component or relationship instances in the BMC Atrium CMDB.
116 BMC Impact Solutions Service Modeling and Publishing Guide

Understanding visual cues in a View
Understanding visual cues in a View
BMC Impact Service Model Editor is a graphically rich interface. The component types are depicted as unique icons in the Templates dockable window. Additionally, you have the option of defining colors for background, border, line styles. The definitions for the icons in Table 30 can be viewed in the Legend, available by choosing Window => Legend.
Table 30 contains visual cues for components in the View.
Table 30 Visual cues in a View
Visual cue Icon Description
a component instance that is set to In Model displays the In model Component icon
a component instance that is set to Not in Model displays the Not in Model Component icon
a component instance that has been edited is flagged with this icon in the top right corner
a newly-created component instance is flagged with this icon in the top right corner
a component that is set to be deleted becomes semitransparent and is flagged with this icon in the top right corner
outline a component instance showing the mouseover effect that results as you drag the mouse cursor over the icon
solid background
a selected component instance has a solid background and can be moved, viewed, and edited
Chapter 4 Building a service model in BMC Impact Service Model Editor 117

Repositioning objects in a View
Repositioning objects in a View
You can move objects in a View using a variety of methods:
■ To quickly move all the objects in a View, click on the toolbar and move objects as needed.
■ To layout the objects automatically, click on the toolbar.
You can also manually move single or multiple objects in a View as described below.
To reposition objects manually
1 In an active View, ensure that the mouse cursor is in selection mode .
2 Select an object or multiple objects. To select multiple objects as a group, draw a box around the appropriate objects.
3 Drag the object to the desired position.
Controlling what you see in a View
A service model may become quite large and not be entirely visible in the View window. To explore a service model you need to know how to
■ adjust the graphical view■ use pan and zoom to focus on specific areas of the model■ exploring consumer and provider paths
Table 31 describes each method of adjusting the graphical view.
Table 31 Adjusting the graphical view
Goal Action Toolbar button
automatically align objects ■ on the toolbar, click Auto-Layout or■ from the menu bar, choose
View => Layout Objects
fit all objects in the View window
■ on the toolbar, click Fit to View or■ from the menu bar, choose
View => Fit to View
adjust the zoom factor ■ on the toolbar, choose a value in the percentage list or
■ from the menu bar, choose View => Zoom => value
118 BMC Impact Solutions Service Modeling and Publishing Guide

Controlling what you see in a View
To use the pan and zoom tool
1 Open a View window.
2 Capture the service model view in a outlined rectangle (panner) by using one of the following methods:
■ From the menu bar, choose Window => Pan and Zoom.■ Click the Pan and Zoom dockable window.
The actions you take in the Pan and Zoom dockable window with the panner rectangle are mirrored on the service model in the View window.
3 (optional) To zoom in, position the cursor over a corner of the panner and reduce the size of the panner. To zoom out, increase the size of the panner.
4 (optional) To resize or reposition the window, drag the panner.
5 (optional) Set the zoom percentage by adjusting the slider bar at the bottom of the Pan and Zoom window.
zoom in or out in predefined percentage intervals
■ on the toolbar, click Zoom Out or Zoom In or
■ from the menu bar, choose View => Zoom In or View => Zoom Out
Zoom Out
Zoom In
grab and move objects see “To use the pan and zoom tool” on page 119.
magnify an area of the model ■ click the magnifier icon to turn on magnifier mode
■ left- or right-click an area of the model to magnify that area.
view the component objects in a topology view
■ click the topology view icon to turn on the topology view
view the component objects in component table
■ click the Component Table View icon to turn on the component table view
show or hide deleted components
■ click the Show Deleted Components icon
show or hide modifier icons for each component
■ click the Show Modifier Icons icon
Table 31 Adjusting the graphical view
Goal Action Toolbar button
Chapter 4 Building a service model in BMC Impact Service Model Editor 119

Exploring consumer and provider paths
Exploring consumer and provider paths
The relationships between consumers and providers are depicted with lines between the objects. The graph line that connects providers to consumers begins at the expansion handle atop the provider object and connects to the expansion handle at the bottom of the consumer object. By default, consumer objects are arranged above and providers are arranged below a specific node.
To explore consumer and provider paths
1 In an active View window, ensure that the cursor is in selection mode.
2 To explore the consumer paths, click the collapsed expansion handle at the top of the component instance you want to explore.
3 To explore the provider paths, click the collapsed expansion handle at the bottom of the node.
If the component renditions indicate other providers in the chain, you can continue clicking the expansion handles until you reach the last provider node (identifiable because it has no expansion handle).
When you click on a + expansion handle, the server is always queried and an up-to-date list of consumers or providers is displayed.
120 BMC Impact Solutions Service Modeling and Publishing Guide

Refreshing the View
Refreshing the View
To validate the current component instances against their current class definitions in the BMC Atrium CMDB, do one of the following:
■ On the toolbar, click Refresh .
■ From the menu bar, choose View => Refresh.
To refresh the list of component types, from the menu bar, choose Tools => Refresh Component Types.
Table 32 Understanding expansion handles
A component instance with expansion handles at the top and/or bottom functions as a consumer and/or provider in an impact relationship.
To see the consumer (top +) or provider (bottom +) component instances, click on the expansion handle.
A component instance with two consumer or provider expansion handles indicates that there are other related component instances that are not displayed.
For example, clicking on the expansion handle for Database 1 displays all its providers, in this case, Computer System 3. Computer System 3 has additional consumers as indicated by the extra + symbol at the top of the component instance icon.
Clicking the - symbol above Computer System 3 collapses all of its consumers, as shown.
Clicking on the + symbol above Computer System 3 results in the display of all consumer component instances, as shown.
Chapter 4 Building a service model in BMC Impact Service Model Editor 121

Repositioning the dockable windows
Repositioning the dockable windows
To undock and move the Templates, Pan and Zoom, Find, Properties, Views, or Console Navigation Bar windows, do one of the following:
■ Select one of the bars and drag it into the right pane of BMC Impact Service Model Editor.
■ Right-click on the bar and choose Undock.
To redock an undocked window, do one of the following:
■ Click the X in the top right corner of the undocked window.■ Right-click in the title bar and choose Close.
Showing topology views
There are many configuration items in the BMC Atrium CMDB that do not have consumer/provider relationships and are not appropriate for service impact management. If non-impact relationships exist between such component instances in your active View, you can see this topology for the entire View.
To show topology
1 In an active View window, from the menu bar, choose View, and then choose one of the following:
■ Impact Relationships
■ Non-impact Relationships
■ All Relationships
2 (optional) In the same View, choose another relationship type to view its topology.
3 (optional) To see a legend of line styles, open the Relationship Legend box by choosing Window => Legend.
TIP You can redefine the line style for each type of relationship by selecting Tools => Options. See “To define line styles for relationships” on page 153.
122 BMC Impact Solutions Service Modeling and Publishing Guide
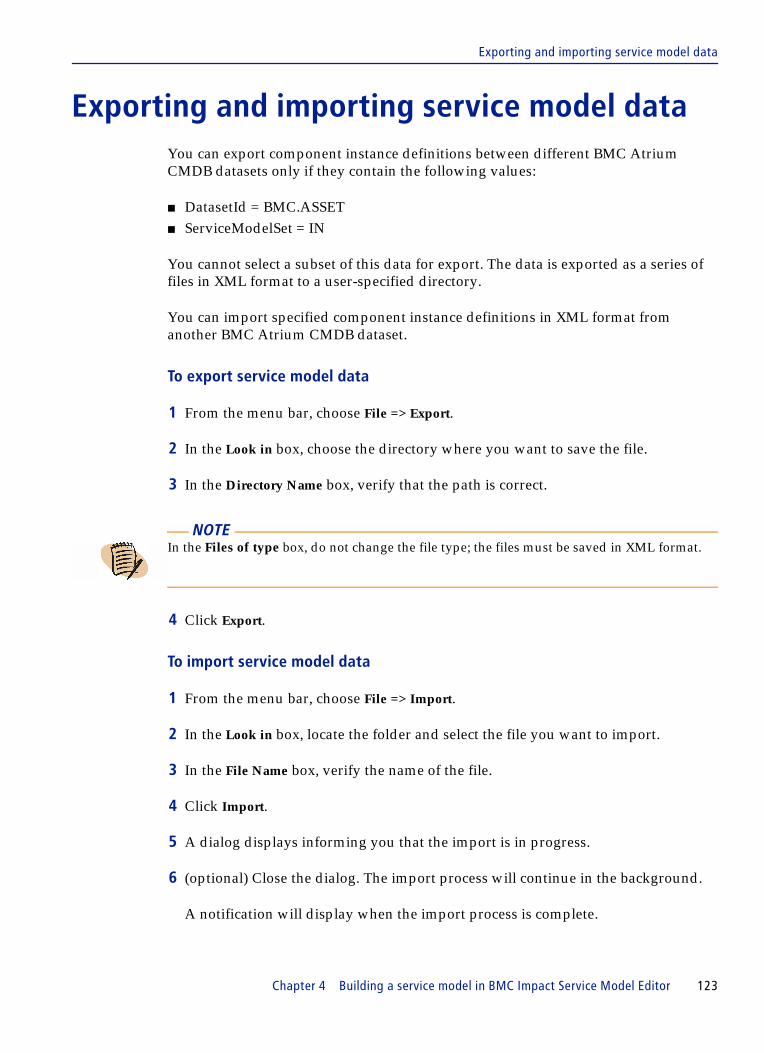
Exporting and importing service model data
Exporting and importing service model dataYou can export component instance definitions between different BMC Atrium CMDB datasets only if they contain the following values:
■ DatasetId = BMC.ASSET ■ ServiceModelSet = IN
You cannot select a subset of this data for export. The data is exported as a series of files in XML format to a user-specified directory.
You can import specified component instance definitions in XML format from another BMC Atrium CMDB dataset.
To export service model data
1 From the menu bar, choose File => Export.
2 In the Look in box, choose the directory where you want to save the file.
3 In the Directory Name box, verify that the path is correct.
4 Click Export.
To import service model data
1 From the menu bar, choose File => Import.
2 In the Look in box, locate the folder and select the file you want to import.
3 In the File Name box, verify the name of the file.
4 Click Import.
5 A dialog displays informing you that the import is in progress.
6 (optional) Close the dialog. The import process will continue in the background.
A notification will display when the import process is complete.
NOTE In the Files of type box, do not change the file type; the files must be saved in XML format.
Chapter 4 Building a service model in BMC Impact Service Model Editor 123

Exporting class definitions from the BMC Atrium CMDB to a cells
7 To update the current View with the most recent data from the BMC Atrium CMDB, on the toolbar, click Refresh .
8 To search for the new data, open the Find dockable window. See “Finding component instances” on page 71.
Exporting class definitions from the BMC Atrium CMDB to a cells
The Export Cell Meta Data command enables you to synchronize the class definitions in the BMC Impact Manager knowledge bases in the target cells with those from the BMC Atrium CMDB.
BMC Impact Service Model Editor sends the export request to the BMC Impact Publishing Server, which collects the entire hierarchy of component and relationship class definitions from the BMC Atrium CMDB. Next, the BMC Impact Publishing Server creates a BAROC-formatted class definition file (mc_sm_object.baroc file) of the component and relationship class definitions so that the BMC Impact Manager cell can interpret the contents of the file. The BMC Impact Publishing Server sends this file to BMC Impact Service Model Editor and you can save it to a location you specify. Then you must manually copy the file to the appropriate directory of the destination cell and recompile the Knowledge Base of the cell.
Alternatively you can export the class definitions with the CLI command
pclassinfo -x -o mc_sm_object.baroc.
For more information on pclassinfo usage, see “pclassinfo—Comparing service model classes on cells with class definitions in the BMC Atrium CMDB” on page 249.
124 BMC Impact Solutions Service Modeling and Publishing Guide

C h a p t e r 5
5 Component and relationship status propagationThis chapter contains the following topics:
About component and relationship status . . . . . . . . . . . . . . . . . . . . . . . . . . . . . . . . . . . 125How component status computation works . . . . . . . . . . . . . . . . . . . . . . . . . . . . . . . . . 126
About status computation models . . . . . . . . . . . . . . . . . . . . . . . . . . . . . . . . . . . . . . 128Anatomy of a status computation model. . . . . . . . . . . . . . . . . . . . . . . . . . . . . . . . . 129Anatomy of a status computation model. . . . . . . . . . . . . . . . . . . . . . . . . . . . . . . . . 129The internal status NONE . . . . . . . . . . . . . . . . . . . . . . . . . . . . . . . . . . . . . . . . . . . . . 129Quorum algorithm examples. . . . . . . . . . . . . . . . . . . . . . . . . . . . . . . . . . . . . . . . . . . 130How status computation algorithms work . . . . . . . . . . . . . . . . . . . . . . . . . . . . . . . 128Quorum algorithm examples. . . . . . . . . . . . . . . . . . . . . . . . . . . . . . . . . . . . . . . . . . . 130
Relationship status propagation concepts . . . . . . . . . . . . . . . . . . . . . . . . . . . . . . . . . . . 132How status propagation works . . . . . . . . . . . . . . . . . . . . . . . . . . . . . . . . . . . . . . . . . 132Status propagation models. . . . . . . . . . . . . . . . . . . . . . . . . . . . . . . . . . . . . . . . . . . . . 133Default status propagation models. . . . . . . . . . . . . . . . . . . . . . . . . . . . . . . . . . . . . . 133What is a valid status propagation model? . . . . . . . . . . . . . . . . . . . . . . . . . . . . . . . 135
Dynamic prioritization . . . . . . . . . . . . . . . . . . . . . . . . . . . . . . . . . . . . . . . . . . . . . . . . . . . 136Self priority . . . . . . . . . . . . . . . . . . . . . . . . . . . . . . . . . . . . . . . . . . . . . . . . . . . . . . . . . . 137Impacts priority . . . . . . . . . . . . . . . . . . . . . . . . . . . . . . . . . . . . . . . . . . . . . . . . . . . . . . 146Determination of final priority . . . . . . . . . . . . . . . . . . . . . . . . . . . . . . . . . . . . . . . . . 147
About component and relationship statusThe status of a component can be influenced directly by the severities of its associated events, indirectly by the propagated status of its provider components, or by both. Status computation models calculate the new value of component status using these factors.
Chapter 5 Component and relationship status propagation 125

How component status computation works
A status computation model’s primary role is to associate an algorithm with each of the status computation functions. The model can be applied to one or more component instances, enabling the cell to handle status computation appropriately for those objects.
The BMC_STATUS_COMPUTATION data class is the basis of all status computation model instances. The service model provides status computation models to support the definition of key component classes.
How component status computation worksThe cell computes component status automatically as new conditions occur, such as the reception of a direct impact event, a status change on a provider component that results in a state change on an inbound relationship.
To compute component status, the cell uses the status computation model assigned to a component instance. The cell obtains the name of the status computation model to use from the instance’s StatusComputationModel slot.
Based on the type of condition that triggered the status computation, the cell selects the appropriate function to use from the status computation model. It also obtains the algorithm to use with the function to calculate the appropriate status for the component. Then, the cell calculates the new component status.
Status computation functions
The following functions perform status computation:
■ impact_function■ self_function■ consolidate_function
Table 33 lists the functions, their inputs, and the type of computed status that each function calculates.
126 BMC Impact Solutions Service Modeling and Publishing Guide

Status computation algorithms
All the functions return a status value in the range of the MC_SM_COMPONENT_STATUS enumeration.
Only the cell maintains the real-time status of components. Component status is not reflected in the BMC Atrium CMDB.
The component instance’s status is set to the computed_status except when you set the component to manual status, in which case, the component instance’s status is set to manual_status.
Status computation algorithms
The status computation algorithms define the functions involved in status computation use the cell’s internal algorithms, such as HIGHEST_VAL. Defining a status computation model includes associating the appropriate algorithm with each function. The algorithms are:
Highest Val—Using this algorithm, a function returns the highest value among those it receives as input. In general, the higher the value, the less desirable it becomes. For example, the highest value for the status of a component is 70 (UNAVAILABLE).
Average—(impact_function only) Using this algorithm, impact_function returns the average status of the propagated status values.
Quorum—(impact_function) This impact_function returns the smaller status value among the highest values propagated by a quorum of incoming active relationships. The number of active relationships that constitute a quorum correspond to the quorum value of the status model multiplied by the total number of incoming active relationships divided by 100 (rounded up to the next integer if necessary).
Table 33 Status computation functions and computed component statuses
Function Description Inputs Output
impact_function computes the impact status from status propagated by provider components
status values propagated by inbound relationships
impact_status
self_function computes the self_status from direct events
severities of direct events associated with the component
self_status
consolidate_function computes the component’s computed_status from impact_status and self_status, or both, or from the no_alert_status of the status computation model
the impact status and the self-status
computed_status
Chapter 5 Component and relationship status propagation 127

How status computation algorithms work
Weighted—Status weight is an attribute (StatusWeight) of the BMC_Impact object, requiring an integer value. It is used in impact relationships to determine how much importance (numerically weighted) to give to each provider relationship that impacts a consumer instance. A higher numerical value indicates a greater importance.
Self-Preferred—(consolidate_function) computed_status is set to the self_status value except when the self_status is NONE.
How status computation algorithms work
Table 34 shows the type of value that a component status computation function returns when using an available algorithm.
About status computation models
In the BMC Impact Service Model Editor product and in the BMC Impact Explorer product, for each component instance, you select one of the predefined status computation models: Standard, Cluster, Weighted Cluster, and Self-Preferred. Standard is the default status computation model.
Table 34 What a function returns when using an available algorithm
Function Algorithm Returns
self_function HIGHEST_VAL the highest value among the severities of the direct events, after they have been automatically mapped to component status values
impact_function HIGHEST_VAL the highest value among the status values of the provider components
AVERAGE the average status of the provider components after weighting each status value, where the “weight” is the number of providers propagating this particular status divided by the total number of providers propagating a status
QUORUM the computed impact status is the lowest status that is propagated by the quorum percentage of providers (ignoring relationships propagating NONE)
consolidate_function HIGHEST_VAL the higher value between the impact status and the self-status
SELF_PREFERRED the self_status value except when the self_status is NONE. In this case, the computed_status is set to the no_alert_status value of the status computation model (by default OK).
128 BMC Impact Solutions Service Modeling and Publishing Guide

Anatomy of a status computation model
The BMC_STATUS_COMPUTATION data class is the basis of all status computation model instances. For a description of BMC_STATUS_COMPUTATION slots, see “BMC_STATUS_COMPUTATION data class” on page 317.
Anatomy of a status computation model
A status computation model defines the following:
■ the algorithm used by each of the functions involved in status computation■ a no-alert status value that applies only when the consolidate_function returns
NONE. The no-alert status is acceptable for all the default status computation functions.
■ a quorum percentage that applies only when the impact_function uses the QUORUM algorithm
■ an external algorithm that applies only when the impact_function uses the EXTERNAL placeholder
The internal status NONE
The status value NONE is an internal status only used in the component status computation function. The main status of a component should never have a value of NONE. For this reason, the following results apply to situations in which there is no input to a function or the input value is NONE.
Table 35 Description of predefined status computation models
Status computation model Description
Standard computes the status of a component using the HIGHEST_VAL impact_function; the impact_status is the highest propagated_status of the incoming relationships
Cluster computes the status of a component using the QUORUM impact function (see “Quorum algorithm examples” on page 130)
Weighted Cluster computes the status of a component using the Status Weight attribute of the BMC_Impact object
Status Weight is used in impact relationships to determine how much importance (numerically weighted) to give to each provider relationship that impacts a consumer instance. The higher the number, the greater the importance.
Self-Preferred computes the status of a component using the self-preferred algorithm for the consolidation_function
Chapter 5 Component and relationship status propagation 129

Quorum algorithm examples
Quorum algorithm examples
The CLUSTER option for Status Computation uses the QUORUM impact function, which is described below.
When you create a quorum type of StatusModel, you specify a percentage, called the quorum percentage. The quorum value is given by the quorum slot of the BMC_STATUS_COMPUTATION instance.
The impact_status is the highest propagated_status that a quorum percentage of provider agree upon.
An easy computation of the quorum status can be done as follows:
■ There are n providers with propagated_status different from NONE: let i be the lowest integer that is greater or equal to quorum*n/100.
■ Consider the array of propagated_status ordered from highest to lowest status.■ The impact_status is the status corresponding to the element i of this array.
Function Input value Output value
impact_function Component has no inbound relationship.
NONE
Inbound relationships propagate NONE as a status.
NONE
self_function No events are associated with the component.
NONE
consolidate_function Impact status value is NONE and self-status value is NONE or there are no inputs.
default no-alert status value from the status computation model
130 BMC Impact Solutions Service Modeling and Publishing Guide

Quorum algorithm examples
EXAMPLE CASE A website 1 (quorum-based component status computation)host1host2
Example A1QUORUM=50, host1=OK, host2=IMPACTED
50*2/100 = 1 => i = 1array = [IMPACTED, OK]The percentage of hosts that are not AVAILABLE is 50%, which breaches the quorum threshold, so the status of website 1 is IMPACTED.
Example A2QUORUM=51, host1=OK, host2=IMPACTED
1 < 51*2/100 < 2 => q = 2 array = [IMPACTED, OK]
The percentage of hosts that are not AVAILABLE is 50%, which does not breach the quorum threshold, so the status of website 1 is OK.
Example A3QUORUM=51, host1=MINOR, host2=IMPACTED
1 < 51*2/100 < 2 => q=2 array = [IMPACTED, MINOR]There is indeed at least 51% of the providers (actually 100%) that state a severity at least MINOR, so the status of website 1 = MINOR
CASE B website 2 (quorum-driven, impact-based component status computation)host1host2host3host4
Example B1quorum_percent=30, host1=OK, host2=OK, host3=OK, host4=Minor
1<30*4/100<2=>q=2array = [MINOR, OK, OK, OK]The percent of hosts that are not UNAVAILABLE is 25%, which is less than 30%, so the status of website2 is OK.
Example B2quorum_percent=30, host1=OK, host2=OK, host3=UNAVAILABLE, host4=MINOR
1 < 30*4/100 < 2 => q = 2 array = [UNAVAILABLE, MINOR, OK, OK]There is at least 30% (actually 50%) of the providers that state a severity of at least MINOR, so the status of website 2 is MINOR.
Example B3quorum_percent=60, host1=MINOR, host2=OK, host3=UNAVAILABLE, host4=UNAVAILABLE
2 < 60*4/100 < 3 => q=3 array = [UNAVAILABLE, UNAVAILABLE, MINOR, OK]There is at least 60% (actually 75%) of the providers that state a severity at least MINOR, so the status of website 2 = MINOR
Chapter 5 Component and relationship status propagation 131

Relationship status propagation concepts
Relationship status propagation conceptsThe cell performs status propagation for relationships and it relies on the status propagation model associated with each impact relationship instance.
The BMC_STATUS_PROPAGATION data class supports relationship control and, together with the BMC_PROPAGATION_MAP data class, provides dynamic status mapping. One status propagation model is made up of several instances in both data classes.
Each status propagation model must have a unique name to identify it. You can create as many status propagation models as needed to control component status propagation. The name of a single BMC_STATUS_PROPAGATION refers to multiple BMC_PROPAGATION_MAP instances all of which have the same name (a one-to-many relationship). Each BMC_PROPAGATION_MAP instance defines how a provider component status is propagated over a relationship to the consumer component.
For example, for the INCREASING status propagation there will be a number of propagation map instances each of which increases the status propagated by a provider component to a consumer component. So, if a provider has status MINOR the status propagated over the relationship to the consumer will be IMPACTED. This would be a single propagation map instances - one is needed for each status.
How status propagation works
The cell automatically propagates the status of component instances through its outbound relationships as new conditions occur, such as a status change on the component or a state change on an outbound relationship. Status propagation is based on impact relationships and status propagation models.
The role of a status propagation model is to define the status value to be propagated in all possible situations. That model can then be applied to one or more impact relationship instances, enabling the cell to handle status propagation appropriately for those objects.
When a status change on a component instance triggers a status propagation, the cell takes the main status (status slot value) of the component, retrieves each outbound impact relationship with its associated state and its status propagation model, and searches the propagation map for a matching entry. The result is the propagated_status value, which is passed as an input to the impact_function of each consumer component.
132 BMC Impact Solutions Service Modeling and Publishing Guide

Status propagation models
When a state change on an outbound impact relationship triggers a new status propagation for that component instance, the cell combines the main status of the component with the retrieved state and the status propagation model of the relationship, and searches the propagation map of the status propagation model for a matching entry. The result is the propagated_status value that is then passed as an input to the impact_function of the consumer component.
Status propagation models
A propagation model defines how the status of a provider component must be propagated in an impact relationship based on
■ the current state of the relationship■ the current value of the provider’s status
Status propagation models are used only by impact relationships.
Status propagation models serve the following purposes:
■ relationship control—enforcement of logical rules in creating new component relationships so that only valid relationships are created
■ dynamic status mapping—translating the main status of the provider component into a propagated status for input into the impact_function of the consumer component in a relationship
The impact_function is part of the status computation of a component. For more information, see “Anatomy of a status computation model” on page 129.
Default status propagation models
The service model provides the following default status propagation models:
■ DIRECT—consumer component depends on the provider’s services to the extent that its status is the same as the provider’s
■ INCREASING—consumer component is overly dependent on the provider. When a problem occurs, the consumer’s status degrades faster than the provider’s does
■ DECREASING—consumer component can function without provider’s services. When a problem occurs, the consumer’s status is less degraded than the provider’s
Chapter 5 Component and relationship status propagation 133

Default status propagation models
■ JUST_WARNING—propagates the status of a provider component so that any value less than OK maps to NONE, OK maps to OK, and any value greater than OK maps to WARNING
■ JUST_INFO—propagates the status of a provider component so that any value less than INFO maps to NONE, and any value greater or equal to INFO maps to INFO
Table 36 describes the how status propagation occurs for a specific model.
Table 36 How status propagation models work in relationships
Status propagation model Relationship state Result
DIRECT ACTIVE propagates the provider’s status without modification to the consumer
INACTIVE propagation of the provider’s status is blocked by mapping the provider’s status to NONE
This value is ignored by the consumer.
INCREASING ACTIVE increases the impact of the provider’s status on the consumer’s status
INACTIVE propagation of the provider’s status is blocked by mapping the provider’s status to NONE
This value is ignored by the consumer.
DECREASING ACTIVE decreases the impact of the provider’s status on the consumer’s status
INACTIVE propagation of the provider’s status is blocked by mapping the provider’s status to NONE
This value is ignored by the consumer.
JUST_WARNING ACTIVE for statuses greater than OK, WARNING is propagated
INACTIVE propagation of the provider’s status is blocked by mapping the provider’s status to NONE
This value is ignored by the consumer.
JUST_INFO ACTIVE for statuses greater than or equal to INFO, INFO is propagated; for statuses less than INFO, NONE is propagated
INACTIVE propagation of the provider’s status is blocked by mapping the provider’s status to NONE
This value is ignored by the consumer.
134 BMC Impact Solutions Service Modeling and Publishing Guide

What is a valid status propagation model?
What is a valid status propagation model?
A valid status propagation model is a BMC_STATUS_PROPAGATION instance, complemented with the appropriate number of BMC_PROPAGATION_MAP instances, all sharing the same name. A BMC_STATUS_PROPAGATION instance is not created if the supporting BMC_PROPAGATION_MAP instances have not yet been created.
A valid status propagation model must have:
■ 8 instances of the data class BMC_PROPAGATION_MAP, one for each possible provider component status value for the ACTIVE state
■ 8 instances of the data class BMC_PROPAGATION_MAP, one for each possible provider component status value for the INACTIVE state
■ 1 instance of the BMC_STATUS_PROPAGATION data class that defines the propagation model’s attributes
Important service componentsImportant service components are components with self_priority slot values that affect the overall impact_priority slot value of their root cause component(s). Root cause components propagate their status values forward to the important service components that they impact. In return, the self_priority slot values of the important service components are propagated back to their respective root cause component(s). Figure 18 depicts this relationship.
Chapter 5 Component and relationship status propagation 135

Dynamic prioritization
Figure 18 Propagation paths between root cause and important components
Component A is considered as a root cause of component B if
■ A.status > OK■ A.status > A.impact_status
and there is no other such component in the true impact path from A to B.
Dynamic prioritizationDynamic prioritization is a system of setting the priority of a component to help you understand what problems to work on first, based on whether a component is in demand at the time (as defined in its service schedule), the severity of its status, and its impacts.
The final priority of a component is determined by comparing the component’s self priority and impacts priority.
136 BMC Impact Solutions Service Modeling and Publishing Guide
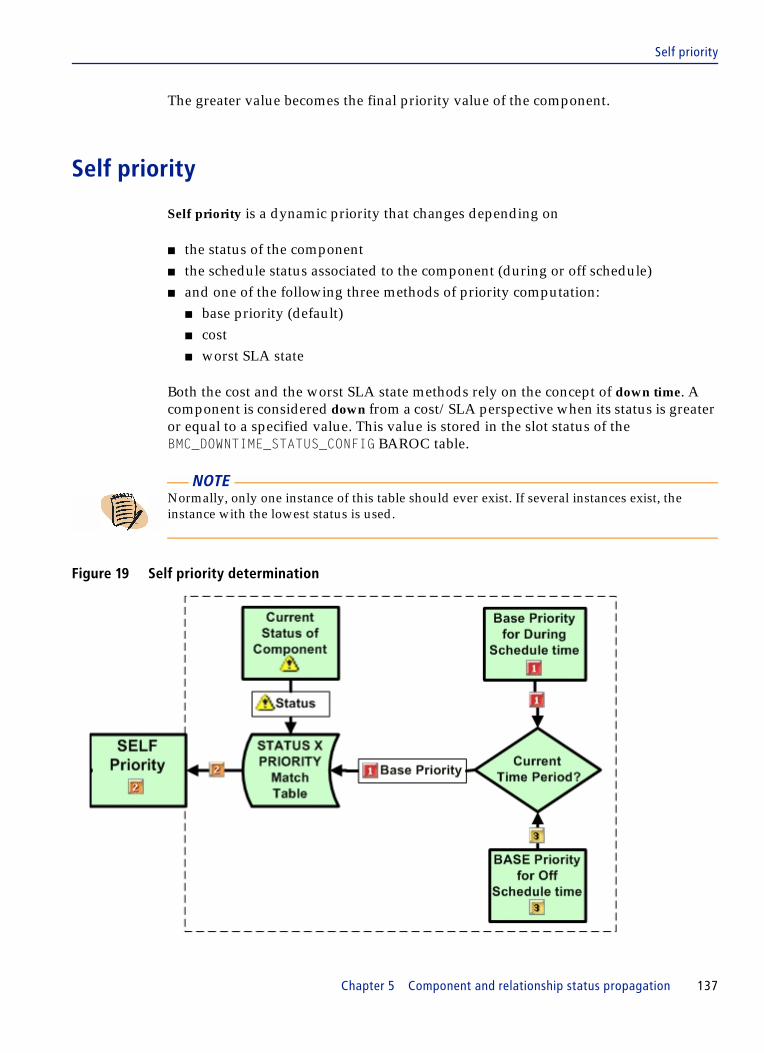
Self priority
The greater value becomes the final priority value of the component.
Self priority
Self priority is a dynamic priority that changes depending on
■ the status of the component■ the schedule status associated to the component (during or off schedule)■ and one of the following three methods of priority computation:
■ base priority (default) ■ cost ■ worst SLA state
Both the cost and the worst SLA state methods rely on the concept of down time. A component is considered down from a cost/SLA perspective when its status is greater or equal to a specified value. This value is stored in the slot status of the BMC_DOWNTIME_STATUS_CONFIG BAROC table.
Figure 19 Self priority determination
NOTE Normally, only one instance of this table should ever exist. If several instances exist, the instance with the lowest status is used.
Chapter 5 Component and relationship status propagation 137

Self priority
Base priority method
Base priority is the default method for computing self priority. Self priority is determined by mapping the current base priority (depending on whether the component is on or off schedule) against the status value of the component.
Enabling the base priority method
The base priority method is enabled by default. To specify the base priority method if the default has been changed, modify MC_SM_COMPONENT class to set the SelfPriorityFunction slot to the value BASE_PRIORITY.
How the base priority method calculates priority
Each component has two base priority values:
■ the During Schedule priority, which is the priority assigned to the component during the peak hours of its schedule stored in the Priority slot
■ the Off Schedule priority, which is the priority assigned to the component during the hours that are not critical for its operation stored in the PriorityOut slot
For example, if the component is a server that supports a business that is open from 8:00AM to 6:00PM, then the higher During Schedule priority would be applied to the server during the hours that the business is open and the Off Schedule priority would be applied to the server when the business is closed (6:00PM to 8:00AM).
The base priority values are static priority values that act as a baseline to determine self priority.
Mapping base priority
You can map these values by editing the BMC_SELF_PRIORITY_MAPPING BAROC table in the BMC Impact Service Model Editor.
138 BMC Impact Solutions Service Modeling and Publishing Guide

Self priority
The self-priority value of the important component is calculated based on a formula that takes into account both the base_priority value and its status value, as depicted in the BMC Impact Portal:
This mapping is configured in the match table in BMC Impact Service Model Editor.
Cost method
The cost method determines priority based on the actual cost of a component being down. Cost is a user-specified monetary value per unit of time—for example, $5.00US per second. The more money it costs for a component to be down, the higher priority that component will have.
Creating a BMC_COST_OF_DOWNTIME_PRIORITY_MAPPING instance
The cost model, concomitant cost values, and the mappings between cost values and the severity levels of the self_priority value are user defined. The cost value is typically defined as cost per unit of time: for example, the value 5 can indicate $5.00 per second of downtime.
NOTE The cost of a component is always computed if the During/Off schedule cost values are set for that component, whether or not the cost method is used to determine the self priority of that component.
Chapter 5 Component and relationship status propagation 139

Self priority
When you create an instance of the BMC_COST_OF_DOWNTIME_PRIORITY_MAPPING, you specify the cost parameter as a date type REAL as shown:
Enabling the cost method
To enable the cost method, you must modify the following slots in the MC_SM_COMPONENT class:
■ Self_Priority_Function=COST
■ Self_Priority_Function_Param=name of the cost of downtime priority mapping group (a mapping group is made of a varying number of BMC_COST_OF_DOWNTIME_PRIORITY_MAPPING instances sharing the same name)
How the cost method calculates priority
Each component has two cost values:
■ the During Schedule cost, which is the cost assigned to the component during the peak hours of its schedule. This value is stored in the ImpactCostPerSec slot.
■ the Off Schedule cost, which is the cost assigned to the component during the hours that are not critical for its operation. This value is stored in the ImpactCostPerSecOut slot.
Depending on whether the component is in the During Schedule or Off Schedule timeframe, the cell copies one or the other of these values to the slot cost.
The cost method first checks to determine if the component is down as specified by the down time definition in SIM_DOWNTIME_STATUS.
If the cost status is less than the SIM_DOWNTIME_STATUS, then the component is not considered to be down, and its self priority is set the lowest priority (PRIORITY_5). Otherwise, the BMC_COST_OF_DOWNTIME_PRIORITY_MAPPING table is used to determine the self_priority value as follows:
Let c be the cost of the component and n be the name of a mapping stored in the SelfPriorityFunctionParam slot of the component.
BMC_PUBLISH_DATA_CLASS :BMC_COST_OF_DOWNTIME_PRIORITY_MAPPING ISA BMC_SIM_DATADEFINES {name: STRING, key=yes;cost: REAL;self_priority : MC_PRIORITY, key=yes;};END
140 BMC Impact Solutions Service Modeling and Publishing Guide

Self priority
If there is an instance i in this table with
■ name = n■ cost = costi
■ self_priority = priorityi
■ such that costi < c
and there is no other instance j with
■ such that costj > costi and costj < c
then the self_priority of the component is set to priorityi.
If there is no such instance, the self_priority of the component is set to the lowest priority (PRIORITY_5).
The status enumeration values for the cost method are stored in the SIM_DOWNTIME_STATUS_CONFIG table in the mc_sm_root.baroc file of each cell.
Figure 20 Cost priority method of priority determination
Cost method example
In this example, the SelfPriorityFunction of the component definition is set equal to COST and the name of the mapping value is test_cost.
Chapter 5 Component and relationship status propagation 141

Self priority
This series of mapping table examples associate different cost values with corresponding self_priority values in ascending order, with 4 as the least severe and 1 as the most severe.
Based on the sample test_cost mapping table, if the status is UNAVAILABLE (or at least greater than or equal to the SIM_DOWNTIME_STATUS) then
■ during schedule the cost is 5.0 and self_priority maps to PRIORITY_2■ off schedule the cost is 1.0 and self_priority maps to PRIORITY_4
BMC_System;mc_udid=comp_r3_c2;Name=comp_r3_c2;SelfPriorityFunction=COST;SelfPriorityFunctionParam=test_cost;PriorityWatchdog=YES;ImpactCostPerSec=5.0;ImpactCostPerSecOut=1.0;END
BMC_COST_OF_DOWNTIME_PRIORITY_MAPPING;name=test_cost;cost=1;self_priority=PRIORITY_4;END
BMC_COST_OF_DOWNTIME_PRIORITY_MAPPING;name=test_cost;cost=2;self_priority=PRIORITY_3;END
BMC_COST_OF_DOWNTIME_PRIORITY_MAPPING;name=test_cost;cost=5;self_priority=PRIORITY_2;END
BMC_COST_OF_DOWNTIME_PRIORITY_MAPPING;name=test_cost;cost=10;self_priority=PRIORITY_1;END
142 BMC Impact Solutions Service Modeling and Publishing Guide

Self priority
Worst SLA state method
The worst SLA state method determines priority based on the Service Level Agreement (SLA) for a component. Each SLA is tracked separately within a specified time period, such as daily or weekly. The SLA states are rolled up for the specified period and the worst SLA state is given priority. The rolled up SLA states are stored in the sla_rollup_status slot. Possible SLA states are:
■ NO_SLAS■ COMPLIANT■ AT_RISK■ BREACHED
The SLA state for each component is assigned by BMC Service Level Management.
Creating a BMC_WORST_SLA_STATE_PRIORITY_MAPPING instance
When you create an instance of the BMC_WORST_SLA_STATE_PRIORITY_MAPPING, you specify the sla_state parameter as belonging to the enumeration type MC_SM_SLM_SLA_STATUS as shown:
The enumeration MC_SM_SLM_SLA_STATUS is defined as follows:
NOTE The worst SLA state method can be used only if you are using the BMC Service Level Management product.
NOTE The sla_rollup_status of a component is always computed if there is at least one service target associated to that component, whether or not the worst SLA method is used to determine the self priority of that component.
MC_PUBLISH_DATA_CLASS :BMC_WORST_SLA_STATE_PRIORITY_MAPPING ISA BMC_SIM_DATADEFINES {name: STRING, key=yes;sla_state: MC_SM_SLM_SLA_STATUS;self_priority : MC_PRIORITY, key=yes;};END
ENUMERATION MC_SM_SLM_SLA_STATUS0 NO_SLAS10 COMPLIANT20 AT_RISK30 BREACHEDEND
Chapter 5 Component and relationship status propagation 143

Self priority
Enabling the worst SLA state method
To enable the cost method, you must modify the following slots in the MC_SM_COMPONENT class:
■ Self_Priority_Function=WORST_SLA_STATE
■ Self_Priority_Function_Param=name of the worst SLA state priority mapping group (a mapping group is made up of a varying number of BMC_WORST_SLA_STATE_PRIORITY_MAPPING instances sharing the same name)
How the worst SLA state method calculates priority
To use the cost method to determine priority of a component, set its SelfPriorityFunction slot to the value WORST_SLA_STATE.
The worst SLA state method first determines if the component is down according to the down time definition in SIM_DOWNTIME_STATUS_CONFIG.
If the cost status is less than the SIM_DOWNTIME_STATUS, then the component is not considered to be down, and its self priority is set the lowest priority (PRIORITY_5). Otherwise, the BMC_WORST_SLA_STATE_PRIORITY_MAPPING BAROC table is used to determine the self_priority value as follows:
Let s be the value stored in the sla_rollup_status slot of the component and n be the name of a mapping stored in the SelfPriorityFunctionParam slot of the component.
If there is an instance i in this table with
■ name = n■ sla_state = s■ self_priority = p
then the self_priority of the component is set to p.
If there is no such instance, the self_priority of the component is set to the lowest priority (PRIORITY_5).
The status enumeration values for the worst SLA state method are stored in the SIM_DOWNTIME_STATUS_CONFIG table in the mc_sm_root.baroc file of each cell.
144 BMC Impact Solutions Service Modeling and Publishing Guide

Self priority
Figure 21 Worst SLA method of priority determination
Worst SLA state method example
This series of mapping table examples associate different sla_state values with corresponding self_priority values arranged in ascending order. In this example, 5 is the least severe and 2 indicates a greater severity.
BMC_WORST_SLA_STATE_PRIORITY_MAPPING;name=test_sla;sla_state=NO_SLAS;self_priority=PRIORITY_5;END
BMC_WORST_SLA_STATE_PRIORITY_MAPPING;name=test_sla;sla_state=COMPLIANT;self_priority=PRIORITY_5;END
BMC_WORST_SLA_STATE_PRIORITY_MAPPING;name=test_sla;sla_state=AT_RISK;self_priority=PRIORITY_2;END
BMC_WORST_SLA_STATE_PRIORITY_MAPPING;name=test_sla;sla_state=BREACHED;self_priority=PRIORITY_1;END
Chapter 5 Component and relationship status propagation 145

Impacts priority
In this example, the Self_Priority_Function of the component definition is set equal to WORST_SLA_STATE and the name of the mapping value is test_sla.
Impacts priority
The impacts priority of a component reflects the urgency of resolving a problem based on the components it impacts.
The impacts priority is based on the components it is impacting that are marked as priority propagators. A component which is a priority propagator can be considered an “important” component in that a priority propagator sends its self priority value back to its causal component, which can have the result that the causal component’s problem is considered a more urgent problem than it would have been otherwise.
Thus, the impacts priority is a dynamic value which changes as the self-priorities of the impacted components change.
Figure 22 Impacts priority determination
BMC_System;mc_udid=compx;Name=compx;SelfPriorityFunction=WORST_SLA_STATE;SelfPriorityFunctionParam=test_slaPriorityWatchdog=YES;END
146 BMC Impact Solutions Service Modeling and Publishing Guide

Determination of final priority
Determination of final priority
The final priority of a component is the highest value between the self priority and impacts priority, as illustrated in Figure 23 on page 148.
Chapter 5 Component and relationship status propagation 147

Determination of final priority
Figure 23 Final priority determination
148 BMC Impact Solutions Service Modeling and Publishing Guide

How cost impact is calculated
How cost impact is calculated
The cell propagates the cost of important components to their root causes (causal components). Root cause components aggregate the cost of all their impacted important components by summing their cost into the impact_cost slot.
How SLA impact is calculated
The cell propagates the sla_rollup_status of important components to their root causes (causal components). Root cause components aggregate the sla_rollup_status of all their impacted important components by propagating the highest value into the impact_sla_rollup_status slot.
NOTE If the cost and sla_rollup_status data are available for an important service component, then these values are always propagated downward to the impact_cost and impact_sla_rollup_status slots of its causal component(s), even if the corresponding cost or worst SLA method is not used to determine the self priority of that important service component.
Chapter 5 Component and relationship status propagation 149

How SLA impact is calculated
150 BMC Impact Solutions Service Modeling and Publishing Guide

C h a p t e r 6
6 Managing BMC Impact Service Model EditorService Management administration is performed in large part within BMC Impact Service Model Editor and its supporting data classes, with some administration also being done in the BMC Impact Portal.
Administration includes managing all user access to information contained in the service model. Access control is managed in the service model through individual component instances. Each component has a ReadSecurity and WriteSecurity set of attributes, and each attribute can be associated with a user group that can be assigned either read or write access to a component.
Additional user control functions in BMC Impact Service Model Editor include console navigation trees, which impose a structure on the organization of service management information, control folder-level rights, and pass this information to the BMC Impact Portal.
This chapter includes the following topics:
Setting BMC Impact Service Model Editor options . . . . . . . . . . . . . . . . . . . . . . . . . . . 152Configuring the topology view in BMC Impact Service Model Editor . . . . . . . . . . . 156Configuring the topology view in BMC Impact Service Model Editor . . . . . . . . . . . 156Adding new classes to the BMC Atrium CMDB . . . . . . . . . . . . . . . . . . . . . . . . . . . . . . 157
Making your changes visible to applications . . . . . . . . . . . . . . . . . . . . . . . . . . . . . 157Creating a new service model component class in the BMC Atrium CMDB. . . 159Associating a custom icon with a service model component . . . . . . . . . . . . . . . . 159Documenting your extensions. . . . . . . . . . . . . . . . . . . . . . . . . . . . . . . . . . . . . . . . . . 163
smeserver properties file and parameters . . . . . . . . . . . . . . . . . . . . . . . . . . . . . . . . . . . 163
Chapter 6 Managing BMC Impact Service Model Editor 151

Setting BMC Impact Service Model Editor options
Setting BMC Impact Service Model Editor options
The Options command offers numerous configuration settings for user-specific definition as well as global options and is available to any user with access to BMC Impact Service Model Editor.
Personal options
Personal options settings are unique to the user. The values specified here are specific to the user and are reapplied when the user logs into BMC Impact Service Model Editor on any computer. The options settings are saved on BMC Impact Service Model Editor server. Options that you can change include icon colors and label styles, line styles, regional preferences, View appearance, copy/paste settings, and log file preferences.
All personal options are available by choosing Tools => Personal Options.
To define component instance icon colors and label styles
1 From the menu bar, choose Tools => Personal Options.
2 On the Components tab, in the Component icon area, choose a drawing mode. Drawing mode affects how the component instance looks when it is being moved.
■ Ghost results in a simple rectangular border.■ Opaque results in the component being fully drawn.
3 In the Selection Background Color list, choose a background color for the component instance icon when the component instance is selected.
4 In the Active Border Color list, choose a color for the border of the component instance icon when the mouse cursor is over it.
5 In the Component Label area,
■ choose a font, type size, color, and style for the label that names the component instance icon.
■ in the Maximum Number of Characters to Display box, choose a number that limits the number of characters to display for component instance name labels. If a component name is longer that the maximum number of characters, the name is truncated. This value applies to every component instance in every View.
152 BMC Impact Solutions Service Modeling and Publishing Guide

Setting BMC Impact Service Model Editor options
To define line styles for relationships
1 From the menu bar, choose Tools => Personal Options.
2 On the Relationships tab, in the Relationship Type pane, select the relationship type that you want to change.
3 In the Line Color list, choose a predefined color or set a custom color for the line.
4 In Line Style list, select one of the predefined line styles or create a custom line style.
To create a custom line style, enter numbers separated by commas, which alternately define the length of the visible/invisible line segments. For example: 9,3,1,3 creates a repeating line pattern with 9 solid units, 3 invisible units, 1 solid unit, and 3 invisible units.
5 In the Line Weight list, choose a predefined line weight or define a custom line weight by entering a decimal number (between 0.01 and 5.0) that defines the width of the line. For example, a weight of 2.0 creates a line that is twice as thick as one with a weight of 1.0.
To set regional preferences
1 From the menu bar, choose Tools => Personal Options.
2 On the Regional Settings tab, in the Locale area, choose the option that works best in your environment.
The Use Country/Region Specified in BMC Portal User Account option uses the locale specified when BMC Portal was registered as a user.
3 In the Date Format and Time Format areas, choose a format for each.
For the Time Format, the Long and Full options appear the same in English, but may be different in other languages.
TIP When a View is open, you can see a legend of line styles by choosing Window => Legend.
Chapter 6 Managing BMC Impact Service Model Editor 153

Setting BMC Impact Service Model Editor options
To set View appearance options
1 From the menu bar, choose Tools => Personal Options.
2 On the Appearance tab, in the Production/Sandbox View Background Color list, choose a color for the production and sandbox View background.
3 In the Test View Background Color list, choose a color for the test View background.
4 In the Desktop Background Color list, choose a color for the right pane of BMC Impact Service Model Editor before a View is opened.
5 For the Show Tooltips check box,
■ clear this check box to not see tooltips, or
■ enter values (in milliseconds) for the Initial Delay, Dismiss Delay, and Reshow Delay.
6 For the Show Embedded Help Text check box, clear this check box to not display paragraph-style instances of Help text that appear in some dialog boxes.
To set copy/paste and miscellaneous options
1 From the menu bar, choose Tools => Personal Options.
2 On the Other tab, in the Copy/Paste area, select the appropriate copy/paste options for renaming copied component instances. This tab also controls the Paste Multiple Components dialog box; see “To copy component instances” on page 69.
3 In the Miscellaneous area, for the Load Saved Views at Login check box, options are defined as follows:
■ check box selected: data for all Views is loaded into memory when you log into BMC Impact Service Model Editor
■ check box cleared: data for a View is loaded into memory only when you open that specific View.
4 For the Use Live Server Data During Selection check box, options are defined as follows:
■ check box selected: as each component is selected in the View, the data is retrieved again from the BMC Atrium CMDB.
■ check box cleared: data for all the components in a View is retrieved from the BMC Atrium CMDB when the View is opened. Data for an individual component may become outdated.
154 BMC Impact Solutions Service Modeling and Publishing Guide

Setting BMC Impact Service Model Editor options
5 For the Show Duplicate Component Dialog checkbox, the dialog box displays when you use the Find command and want to place found objects in a View (by dragging or clicking Place in Selected View) that already has contains the objects:
■ checkbox selected: dialog box displays■ checkbox cleared: dialog box does not display; there is no alert that you are
duplicating objects in the View
To set log file preferences
1 From the menu bar, choose Tools => Personal Options.
2 In the Logging tab, set the level of log information you need on the client computer.
Logging becomes more detailed as you go from the top of column one to the bottom of column one, then to the top of column two to the bottom of column two. The most detailed log selection is All.
The more detailed the log is, the more disk space is used.
3 In the Buffer Size box, enter the maximum number of log messages you want to save in memory.
This is a first in, first out buffer; when the maximum number of messages is reached, the oldest message is deleted when a new one is added.
4 In the Log Files area, select options for saving log files on the client computer.
You can specify a directory to save the files in, but the file name bmc_sme_integer_log# is generated by BMC Impact Service Model Editor.
The first file saved is numbered 0; subsequent logs increment by one. When the number of log files saved reaches the value in the Number of Log Files box, the count starts again at zero and the existing files with the same name are written over.
Global options
To set component instance self-priorities when in a given status, select Tools => Options => Global Options.
NOTE Whichever setting is selected, when you open the Edit Component or Edit Relationship dialog boxes, the latest information is always retrieved from the BMC Atrium CMDB.
Chapter 6 Managing BMC Impact Service Model Editor 155

Configuring the topology view in BMC Impact Service Model Editor
For more information on Service Schedules, see “Service schedules” on page 42.
To edit service schedule self-priorities
1 In the Options - Global dialog box, in the Base Priority/Status table, select the appropriate status level (1-5) for each base priority/status level.
2 In the Impacts Priority Calculation Method, choose the calculation method for the component.
3 In the Default Component Types that Propagate Priority box, enter the classes of components that will have a default value of Propagate Priority=Yes. Separate the class names by commas.
4 Click OK to save your changes.
For more information, see Chapter 5, “Component and relationship status propagation.”
Configuring the topology view in BMC Impact Service Model Editor
You can set the type of topology views displayed by BMC Impact Service Model Editor in the ..\smsIwc\application.properties file using the com.bmc.sms.sme.topoviews parameter. This parameter has a comma-delimited list of the supported topology views. For example, the default is shown in Figure 24.
Each item in the list has two functions:
■ It is a resource key to a localized name (that can appear in the user interface). The localized name is defined in the sme_messages.properties file for the appropriate locale.
■ It is the base key for the definition of the topology view.
NOTE If you change the self-priority of the component for an Other status, the self-priority values are automatically changed for the statuses of INFO, UNKNOWN, and BLACKOUT.
Figure 24 Default value for com.bmc.sms.sme.topoviews parameter
com.bmc.sms.sme.topoviews=com.bmc.sms.sme.topo.application,com.bmc.sms.sme.topo.non.impact
156 BMC Impact Solutions Service Modeling and Publishing Guide

Adding new classes to the BMC Atrium CMDB
Each base key is appended with an integer (for as many as needed) that defines a graph to traverse for the topology view.
The general format of a graph definition is shown in Figure 25.
For example, for a graph type whose key is com.bmc.sms.sme.topo.application, the following graph entries could be defined as shown in Figure 26.
A graph definition can include as many types as desired, but it must always begin and end with a component type. For example:
Adding new classes to the BMC Atrium CMDBThis section contains information about adding new classes and attributes to your data model.
Making your changes visible to applications
When you add classes and attributes to your data model, they are not automatically picked up by BMC Software products that use the BMC Atrium CMDB, such as BMC Impact Solutions products or BMC Remedy Asset Management. You must modify new classes and attributes so they can be used with these applications.
BMC Remedy AR System applications
Some BMC Remedy AR System applications, such as BMC Remedy Asset Management, maintain their own set of join forms for viewing and modifying BMC Atrium CMDB instance data. The BMC Atrium CMDB now has the ability to generate attribute fields for such an application and arrange the fields according to view templates specified by the application. For information about using this feature, see the BMC Atrium CMDB 2.0.1 Installation and Configuration Guide.
Figure 25 Graph definition format
<ComponentType>.<RelationshipType>.<ComponentType>
Figure 26 Example of a graph definition
com.bmc.sms.sme.topo.application.1=BMC_BaseElement.BMC_Component.BMC_BaseElementcom.bmc.sms.sme.topo.application.2=BMC_BaseElement.BMC_MemberOf.BMC_BaseElement
BMC_BaseElement.BMC_Impact.BMC_BaseElement
Chapter 6 Managing BMC Impact Service Model Editor 157

Making your changes visible to applications
BMC Impact Solutions
While updating BMC Impact Solutions to use new classes and attributes, note the following information about classes:
■ Classes with the custom qualifier 100050 are SIM-enabled classes. Instances with this property are pushed by the BMC Impact Publishing Server to the cells.
■ SIM-enabled class definitions in the BMC Atrium CMDB and the class definitions in the BMC Impact Manager cell must match. For more information, see “Exporting class definitions from the BMC Atrium CMDB to a cells” on page 124.
■ For your new class to be a service model component class, not only does the new class need to be SIM-enabled (having the class custom qualifier value of 100050), its superclasses, whether concrete or abstract, up to the root class (such as BMC:BaseElement, BMC:BaseRelationship) must be SIM-enabled as well.
■ BMC Impact Service Model Editor filters out abstract classes.■ The new class inherits the attributes of its superclass.
Note the following information about attributes:
■ SIM-enabled attributes have the custom qualifier 300050.■ BMC Impact Publishing Server pushes attribute values to the cells.
Perform the following steps to update BMC Impact Solutions to use new classes and attributes:
1 Using the Class Manager, add these custom qualifiers to the new classes and attributes:
■ Classes: 1\100050\2\1\
■ SMEReadWrite attributes: 2\300050\2\1\300070\2\1\
■ SMEReadOnly attributes: 2\300050\2\1\300080\2\1\
For instructions on this step, see “Creating a new service model component class in the BMC Atrium CMDB” on page 159.
2 Add custom icons for new classes.
For instructions on this step, see “Associating a custom icon with a service model component” on page 159.
3 From BMC Impact Service Model Editor, export cell metadata, import the resulting file into the cell’s Knowledge Base, and recompile the cell.
For instructions on this step, see “Exporting and importing service model data” on page 123 and BMC Impact Solutions Knowledge Base Development Reference Guide.
158 BMC Impact Solutions Service Modeling and Publishing Guide

Creating a new service model component class in the BMC Atrium CMDB
4 Restart the BMC Impact Portal.
Creating a new service model component class in the BMC Atrium CMDB
This section contains steps for creating a new service model component class.
To create a new service model component class in the BMC Atrium CMDB
1 Use the BMC Atrium CMDB Class Manager to create a new CI class. For instructions, see “Modifying the Data Model” in the BMC Atrium CMDB 2.0.1 Installation and Configuration Guide.
2 Assign the class to the namespace.It is advised not to add new classes to BMC.CORE or BMC.SIM. User userName should use namespace userName.
3 Select the service model component superclass to which you want to assign the new service model component class. SIM-enabled classes are listed in “Service model and the Common Data Model” on page 46.
4 Specify the Custom Qualifier 1\100050\2\1\ in the General tab.
5 Click Save.
All superclasses of a SIM class, up to BMC_BaseElement, need to be SIM classes, regardless if they are abstract or concrete.
Associating a custom icon with a service model component
The BMC Impact Service Model Editor, BMC Impact Portal, and BMC Impact Explorer Services views utilize icons to represent service model components. Each component type in BMC Impact Service Model Editor is associated with an icon, which you can view in the Templates dockable window. For a list of default service model component icons, see “Service model component types” on page 26.
NOTE Icons must be in .gif format. However, you can use icons in .png file format if you rename the file extension from .png to .gif.
Chapter 6 Managing BMC Impact Service Model Editor 159

Associating a custom icon with a service model component
When you create a new component type by adding a new class to the BMC Atrium CMDB, associate an icon with the new component.
To associate an icon with a service model component class
When adding a custom icon to a newly created class, follow this sequence for initializing the new data and synchronizing the class definition with those in the SIM KB of the target cell or cells.
1 Create a new class in the BMC Atrium CMDB. For instructions, see “Adding new classes to the BMC Atrium CMDB” on page 157.
2 Create a set of the three different-sized icons for the new class, and save them using the file naming convention className_size.ext. See “Guidelines for associating a custom icon with a service model component class” on page 161.
3 Store an identical set of the three icon files—each file in the set designating a different pixel size—under each of the three specified subfolders on the system where the BMC Portal application server is running. See “Guidelines for associating a custom icon with a service model component class” on page 161.
4 Associate the icon with the service model component class by performing the following actions:
A Edit the component_icon.properties file. By default, the component_icon.properties file is located in the following directory path:
■ Solaris—%BMC_Portal_Kit_Home%\appserver\websdk\tools\jboss\server\all\conf\properties\smsConsoleServer\
■ Windows—%BMC_Portal_Kit_Home%\appserver\websdk\tools\jboss\server\all\conf\properties\smsConsoleServer\
B Add the following to the component_icon.properties file:
Replace ClassName with the name of the new class you defined in the BMC Atrium CMDB and IconFileClassName with the prefix you used to name the three icon files (className_size.ext).
C Save the component_icon.properties file.
5 Restart the BMC Impact Administration Server.
sms.component.icon.ClassName=IconFileClassName
160 BMC Impact Solutions Service Modeling and Publishing Guide

Associating a custom icon with a service model component
6 Restart the BMC Portal application server and all BMC Impact Service Model Editor client instances.
7 Refresh BMC Impact Service Model Editor templates by using Tools => Refresh Component Types.
8 Synchronize the new service model class definitions with the SIM KB. For instructions see “Exporting and importing service model data” on page 123.
9 Create the new class definition in BAROC format by using Tools => Export Cell Meta Data. The file that is created is named mc_sm_object.baroc.
After you convert the class definition to BAROC format, you make it available to the SIM KB of the target cell or cells.
10 Manually copy the mc_sm_object.baroc file to the destination directory of the target cell or cells.
By default, the mc_sm_object.baroc file is located in the following directory path:
■ Solaris—$MCELL_HOME/etc/CellName/kb/classes
■ Windows—%MCELL_HOME%\etc\CellName\kb\classes
11 Recompile each cell’s KB by using the command: mccomp- -n cellname
12 Restart the cell or cells.
Guidelines for associating a custom icon with a service model component class
Follow these guidelines when adding and associating custom icons with service model component classes:
■ BMC Impact Service Model Editor and BMC Impact Portal accept three sets of pixel sizes for the component icons: 16 x 16, 32 x 32, and 128 x 128.
■ For each custom class that you create, you must include three sets of identical icons, each set using the three different pixel sizes: 16 x 16, 32 x 32, and 128 x 128. Use .gif format only.
For example, set one contains three identical icons of 16 x 16, 32 x 32, and 128 x 128 pixels; set two contains the same three icons of 16 x 16, 32 x 32, and 128 x 128 pixels, and so forth.
■ Name each custom icon using the same name as the custom class it represents. Follow this naming convention:
Chapter 6 Managing BMC Impact Service Model Editor 161
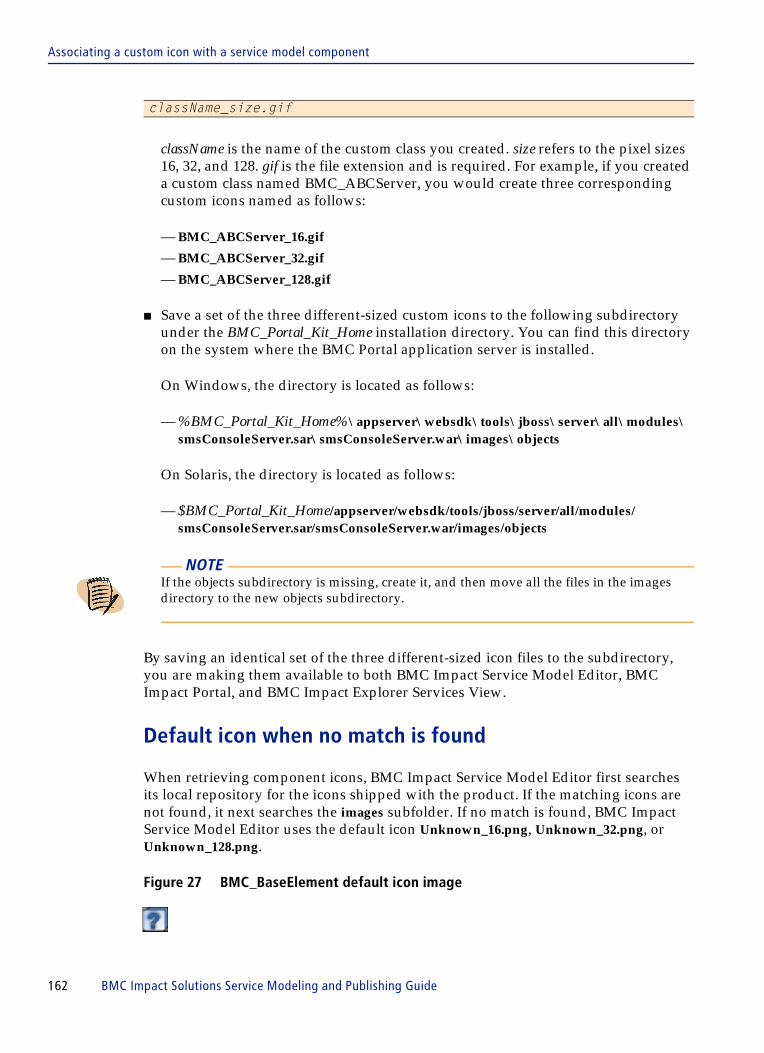
Associating a custom icon with a service model component
className is the name of the custom class you created. size refers to the pixel sizes 16, 32, and 128. gif is the file extension and is required. For example, if you created a custom class named BMC_ABCServer, you would create three corresponding custom icons named as follows:
— BMC_ABCServer_16.gif
— BMC_ABCServer_32.gif
— BMC_ABCServer_128.gif
■ Save a set of the three different-sized custom icons to the following subdirectory under the BMC_Portal_Kit_Home installation directory. You can find this directory on the system where the BMC Portal application server is installed.
On Windows, the directory is located as follows:
— %BMC_Portal_Kit_Home%\appserver\websdk\tools\jboss\server\all\modules\smsConsoleServer.sar\smsConsoleServer.war\images\objects
On Solaris, the directory is located as follows:
— $BMC_Portal_Kit_Home/appserver/websdk/tools/jboss/server/all/modules/smsConsoleServer.sar/smsConsoleServer.war/images/objects
By saving an identical set of the three different-sized icon files to the subdirectory, you are making them available to both BMC Impact Service Model Editor, BMC Impact Portal, and BMC Impact Explorer Services View.
Default icon when no match is found
When retrieving component icons, BMC Impact Service Model Editor first searches its local repository for the icons shipped with the product. If the matching icons are not found, it next searches the images subfolder. If no match is found, BMC Impact Service Model Editor uses the default icon Unknown_16.png, Unknown_32.png, or Unknown_128.png.
Figure 27 BMC_BaseElement default icon image
className_size.gif
NOTE If the objects subdirectory is missing, create it, and then move all the files in the images directory to the new objects subdirectory.
162 BMC Impact Solutions Service Modeling and Publishing Guide

Documenting your extensions
Documenting your extensions
Just as you need to occasionally look up information about classes in the CDM, you will need to look up information about classes you create. One easy way to document a class is to copy one of the existing HTML files in CMDBInstallationFolder\sdk\doc\cdm and modify it to fit your class. If you copy the help file for a class with the same superclass as your class, you won’t need to change the information about inherited attributes and relationships.
After creating your HTML help files, be sure to make a backup copy of them in a separate location so that they won’t be overwritten when you install a future version of the BMC Atrium CMDB.
smeserver properties file and parametersTable 37 describes the smeserver.properties file and its parameters.
Table 37 smeserver.properties file
Filename smeserver.properties
File pathBMC_PORTAL_KIT_HOME/appserver/webskd/tools/jboss/server/all/conf/properties/smsSme
Description contains all the user configurable BMC Impact Service Model Editor properties
Parameter name Description Default value
com.bmc.sms.sme.server.cmdbservice.precache.componenttypes
sets whether the precache applet is run to request component types from the BMC Atrium CMDB
true
com.bmc.sms.sme.server.cmdb.find.result.limit
if defined, sets the number (integer) of component instances retrieved as a result of the Find command
undefined; no limit
com.bmc.sms.sme.server.tmpdir
sets the temp directory of the BMC Impact Service Model Editor server
undefined; default temp directory is JBOSS_HOME/ server/all/tmp/ sme
com.bmc.sms.sme.server.publish.queue.requests
sets the name for the BMC Impact Publishing Server request queue
ps_requests
com.bmc.sms.sme.server.publish.queue.response
sets the name for the BMC Impact Publishing Server response queue
ps_response
com.bmc.sms.sme.server.publish.topic.publish.status.change
sets the name for the BMC Impact Publishing Server notification topic
ps_notifications
Chapter 6 Managing BMC Impact Service Model Editor 163
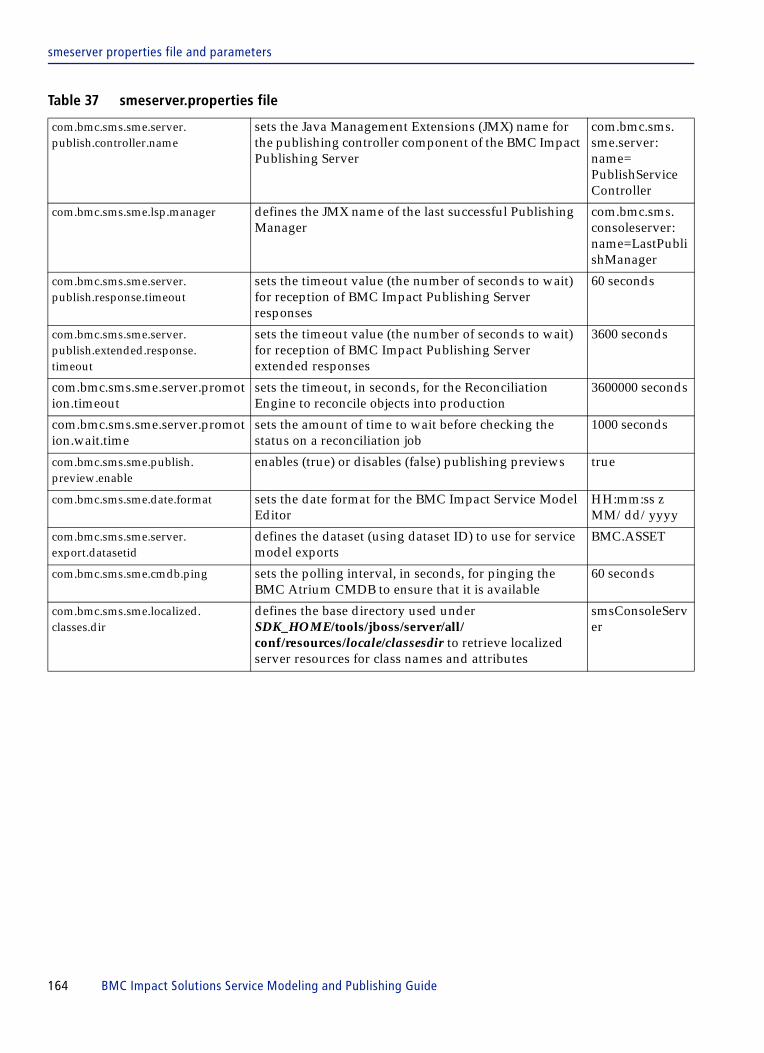
smeserver properties file and parameters
com.bmc.sms.sme.server.publish.controller.name
sets the Java Management Extensions (JMX) name for the publishing controller component of the BMC Impact Publishing Server
com.bmc.sms. sme.server: name=PublishServiceController
com.bmc.sms.sme.lsp.manager defines the JMX name of the last successful Publishing Manager
com.bmc.sms. consoleserver: name=LastPublishManager
com.bmc.sms.sme.server.publish.response.timeout
sets the timeout value (the number of seconds to wait) for reception of BMC Impact Publishing Server responses
60 seconds
com.bmc.sms.sme.server.publish.extended.response.timeout
sets the timeout value (the number of seconds to wait) for reception of BMC Impact Publishing Server extended responses
3600 seconds
com.bmc.sms.sme.server.promotion.timeout
sets the timeout, in seconds, for the Reconciliation Engine to reconcile objects into production
3600000 seconds
com.bmc.sms.sme.server.promotion.wait.time
sets the amount of time to wait before checking the status on a reconciliation job
1000 seconds
com.bmc.sms.sme.publish.preview.enable
enables (true) or disables (false) publishing previews true
com.bmc.sms.sme.date.format sets the date format for the BMC Impact Service Model Editor
HH:mm:ss z MM/dd/yyyy
com.bmc.sms.sme.server.export.datasetid
defines the dataset (using dataset ID) to use for service model exports
BMC.ASSET
com.bmc.sms.sme.cmdb.ping sets the polling interval, in seconds, for pinging the BMC Atrium CMDB to ensure that it is available
60 seconds
com.bmc.sms.sme.localized.classes.dir
defines the base directory used under SDK_HOME/tools/jboss/server/all/conf/resources/locale/classesdir to retrieve localized server resources for class names and attributes
smsConsoleServer
Table 37 smeserver.properties file
164 BMC Impact Solutions Service Modeling and Publishing Guide

smeserver properties file and parameters
If you edit any of these configuration files manually, you must restart the BMC Portal service or daemon for the changes to take effect. If you have edited any of the BMC Impact Publishing Server configuration files, you must restart the BMC Impact Publishing Server service or daemon also.
com.bmc.sms.sme.kb.info.resources
lists the names of property files that contain localized classes and attributes.
You can define custom files and add them to the list. The files are loaded in the order listed and the files loaded later override settings in files loaded earlier. The files listed must exist in the SDK_HOME/tools/jboss/server/all/conf/resources/locale/classesdir
kb_deprecated_resource. properties,kb_core_resource. properties
com.bmc.sms.sme.topoviews defines a comma-delimited list of supported topology views. Each element in the list has two functions:
■ It is a resource key for a localized name (suitable for the UI).
■ It is the base key for the definition of the topology view. Each key is appended with an integer (for as many as needed) that defines a graph to traverse for the topology view.
See smeserver. properties file for current default values.
Table 37 smeserver.properties file
Chapter 6 Managing BMC Impact Service Model Editor 165

smeserver properties file and parameters
166 BMC Impact Solutions Service Modeling and Publishing Guide

C h a p t e r 7
7 Creating a service model by importing HP OVO dataThis chapter covers the following topics:
Overview . . . . . . . . . . . . . . . . . . . . . . . . . . . . . . . . . . . . . . . . . . . . . . . . . . . . . . . . . . . . . . . 168Atrium and non-Atrium environments . . . . . . . . . . . . . . . . . . . . . . . . . . . . . . . . . . . . . 168Installing the integration with HP OVO. . . . . . . . . . . . . . . . . . . . . . . . . . . . . . . . . . . . . 168
Installation . . . . . . . . . . . . . . . . . . . . . . . . . . . . . . . . . . . . . . . . . . . . . . . . . . . . . . . . . . 168Configuration . . . . . . . . . . . . . . . . . . . . . . . . . . . . . . . . . . . . . . . . . . . . . . . . . . . . . . . . 169
Importing HP OVO data to create a service model . . . . . . . . . . . . . . . . . . . . . . . . . . . 172High-level data flow . . . . . . . . . . . . . . . . . . . . . . . . . . . . . . . . . . . . . . . . . . . . . . . . . . 172Steps to import HP OVO data to create a service model. . . . . . . . . . . . . . . . . . . . 172
Chapter 7 Creating a service model by importing HP OVO data 167

Overview
OverviewThe BMC Impact Service Model Integration with HP OpenView Operations (OVO) provides a mechanism to import an HP OVO node hierarchy and automatically create a service model view of the hierarchy. From the Administration tab of the BMC Impact Explorer, you can create an HP OVO service model view on demand or at scheduled intervals. The integration with HP OVO automatically publishes the service model either directly to a BEM or SIM cell in a non-Atrium environment or to the BMC Atrium CMDB for reconciliation before passing the data to a SIM cell.
Atrium and non-Atrium environmentsThe integration with HP OVO supports service model publishing to cells in both Atrium and non-Atrium environments. In an Atrium-enabled environment, the BMC Atrium CMDB Reconciliation Engine reconciles objects fetched from HP OVO against the CMDB before automatically publishing the service model to a cell via the Publishing Server. In a non-Atrium scenario, objects are fetched from HP OVO and the Publishing Server handles publishing the service model directly to a BEM or SIM cell.
Installing the integration with HP OVOThis section explains general installation information for the integration with HP OVO. For detailed instructions for installing the integration with HP OVO, see BMC Impact Solutions Installation Guide.
Installation
The integration with HP OVO is installed as an option of the BMC Impact Solutions installation program. After selecting the integration with HP OVO and completing the remainder of the installation process, the installation program installs the integration in the MCELL_HOME directory.
If you plan to use an Atrium environment, the integration with HP OVO requires a BMC Atrium CMDB dataset and reconciliation rules. The dataset and rules are installed as part of the SIM CMDB extensions.
168 BMC Impact Solutions Service Modeling and Publishing Guide

Configuration
During the installation process, an adapter cell is installed as part of the integration with HP OVO. This adapter cell contains processing rules and handles communication between HP OVO and the Publishing Server. The adapter cell is automatically registered with the Impact Administration Cell (IAC) if the two components are installed on the same computer.
The registered adapter cell is displayed under the ADAP_Cell group in the navigation pane of the Infrastructure Management tab of the Administrator view of BMC Impact Explorer, as shown in Figure 28.
Figure 28 Adapter cell group
Configuration
If you install the adapter cell on the same computer as the Impact Administration Cell (IAC) and the Publishing Server, no configuration is necessary; the adapter cell is automatically registered with the IAC. If you install the adapter cell on a different computer as the IAC, you must add an entry for the IAC in the mcell.dir file of the adapter cell and then restart the adapter cell to recognize the entry.
Chapter 7 Creating a service model by importing HP OVO data 169

Configuration
If you install the adapter cell on a different computer than the Publishing Server, you must add an adapter cell entry in the mcell.dir file in the MCELL_HOME/etc/ directory on the computer where the Publishing Server is installed and then restart the Publishing Server.
Before you attempt to import HP OVO data, you must configure the /etc/profile environment variables. For example (the values you set for your variables depend on your installation):
ORACLE_HOME=/usr/oracle/product/10.2.0.1; export ORACLE_HOMEORACLE_SID=openview export ORACLE_SIDORACLE_BASE=/usr/oracle; export ORACLE_BASETNS_ADMIN=/usr/oracle/product/10.2.0.1/network/admin; export TNS_ADMINPATH=$ORACLE_HOME/bin: export PATH
The configuration files, listed in Table 38, reside in the MCELL_HOME/etc/ directory.
Setting the password for the HP OVO administrator
This section lists the step-by-step instructions for setting the password for the HP OVO administrator user.
To set the HP OVO administrator password
1 Click the Infrastructure Management tab of the Administrator view of BMC Impact Explorer.
2 Navigate to the adapter cell.
3 Right-click on the adapter cell and choose Actions => OVO Adapter => Set OVO User/Password.
A user/password dialog box appears.
NOTE The adapter cell does not support high availability. Do not attempt to configure an adapter cell to run in a high availability environment.
Table 38 Integration with HP OVO configuration files
File Purpose
ovcifetcher.conf configuration file similar to the mcell.conf file
ovcifetcher.map map file used for mapping classes and slots between HP OVO and SIM
ovcifetcher.pass encrypted password file for the HP OVO administrator
170 BMC Impact Solutions Service Modeling and Publishing Guide

Configuration
4 Supply your user name and password and click OK.
Configuration requirement to support CMDB 2.1 or CMDB 7.5
Depending on which version of the BMC Atrium CMDB you use, you must edit the ovcifetcher.map file to uncomment only one of the two version support lines.
To use BMC Atrium CMDB version 2.1, uncomment the following line:
$DoMap(SetTypeItemForCMDB21Map)
To use BMC Atrium CMDB version 7.5, uncomment the following line:
#$DoMap(SetTypeItemForCMDB75Map)
Configuration requirement to support BMC Remedy ITSM
If you employ Remedy ITSM and the Integration for BMC Remedy Service Desk with SIM for automated incident creation, you must update the category, type, and item (CTI) values in the integration for HP OVO map file and the corresponding Product Company Relationship form in Remedy ITSM. To successfully create an incident, IBRSD looks for this CTI mapping in the map file and the Product Company Relationship form. If these values are not present in both places, incident creation fails.
To configure the CTI values in the integration for HP OVO map file, update the values in the ovcifetcher.map file found in $MCELL_HOME/etc folder. For example:
■ Category - Hardware■ Type - Machine■ Item - BMC Discovered
These values must match the corresponding values in the Remedy ITSM Product Company Relationship form. These values are customizable, so if you make changes to any of the values, the changes must be made in both the map file and the Product Company Relationship form.
Chapter 7 Creating a service model by importing HP OVO data 171

Importing HP OVO data to create a service model
Importing HP OVO data to create a service model
This section provides a high-level explanation of how the integration with HP OVO works and lists the detailed steps you take to import HP OVO data into your service model.
High-level data flow
This section explains in basic terms how the integration with HP OVO imports data into service models in both Atrium and non-Atrium environments.
1 A user initiates or schedules a fetch remote action, for example, Fetch Node Group, against the adapter cell.
2 A fetch routine retrieves the requested node group data from HP OVO and passes that data to the adapter cell for CI de-duplication and creation of CIs and relationships, if necessary.
3 The adapter cell passes the data to the publishing server.
4 In non-Atrium scenarios, the Publishing Server publishes the service model data directly to a cell.
5 For Atrium-enabled scenarios, the Publishing Server first sends the service model data to the BMC Atrium CMDB for reconciliation before the final service model data is published to the cell.
Steps to import HP OVO data to create a service model
This section lists the step-by-step instructions for importing HP OVO data to create a service model.
NOTE After a service model has been created by importing HP OVO data, any subsequent changes made in the Service Model Editor take precedence over subsequent changes made in the HP OVO interface if those changes are for the same attributes.
172 BMC Impact Solutions Service Modeling and Publishing Guide

Steps to import HP OVO data to create a service model
To import HP OVO data to create a service model
1 Click the Infrastructure Management tab of the Administrator view of BMC Impact Explorer.
2 Navigate to the adapter cell.
3 Right-click on the adapter cell and choose Actions => OVO Adapter => Fetch From OVO.
An action confirmation dialog box appears.
4 Click Fetch to continue the action.
A user authentication dialog box appears. This dialog box requires your remote execution user name and password.
5 Supply your user name and password and click OK.
A dialog box displays to confirm the fetch operation.
6 Click OK.
Depending on the number of CIs to retrieve, the fetch process can take several minutes to execute. As the fetch process continues, a dialog box appears that provides the status of the process.
7 Click OK to dismiss the status dialog box.
8 Navigate to the Services view of BMC Impact Explorer.
9 If not already selected, select the cell to which the service model is published.
10 In the Results window in the Find Service Components navigation area, choose the retrieved group or node bank to display the new service model.
If the group or node bank does not yet appear, the publish process might not be complete.
TIP The process generates events as CIs and their relationships are fetched. You can view these events in the Events view of BMC Impact Explorer. These events can be used for debugging purposes if errors occur during the fetch process.
Chapter 7 Creating a service model by importing HP OVO data 173

Scheduling a fetch to import HP OVO data
Scheduling a fetch to import HP OVO data
To schedule a fetch to import HP OVO data, use the UNIX crontab command on the computer where the adapter cell is installed. To enable the cifetcher.sh script, make sure you set the environment /etc/profile/, for example:
bash-3.00# crontab -l
09 14 * * 1-5 . /etc/profile && sleep 5 && /opt/bmc/Impact/server/bin/cifetcher.sh start
In this example, the fetcher runs once at 2:09 p.m. every day of the month except Saturday and Sunday.
174 BMC Impact Solutions Service Modeling and Publishing Guide
C h a p t e r 8
8 Managing BMC Impact Publishing ServerAfter you create a service model, the service model data must be delivered from the BMC Atrium CMDB or the pposter source files to the cells. The process of distributing SIM data from the source to the cells is managed and controlled by the BMC Impact Publishing Server component of BMC Impact Solutions.
This chapter provides information on managing the BMC Impact Publishing Server and contains these topics:
Working with publication logs . . . . . . . . . . . . . . . . . . . . . . . . . . . . . . . . . . . . . . . . . . . . 177Viewing publication history . . . . . . . . . . . . . . . . . . . . . . . . . . . . . . . . . . . . . . . . . . . 177Viewing publication history details . . . . . . . . . . . . . . . . . . . . . . . . . . . . . . . . . . . . . 178
Sharing a single log directory between two Publishing Servers. . . . . . . . . . . . . . . . . 179Specifying a port for Service Model Manager . . . . . . . . . . . . . . . . . . . . . . . . . . . . . . . . 180High availability and BMC Impact Publishing Server . . . . . . . . . . . . . . . . . . . . . . . . . 180Monitoring BMC Impact Publishing Server with BMC Impact Manager events. . . 181
Modifying the generation of events . . . . . . . . . . . . . . . . . . . . . . . . . . . . . . . . . . . . . 181Understanding classes and slots for BMC Impact Publishing Server events . . . 183
About SIM management data . . . . . . . . . . . . . . . . . . . . . . . . . . . . . . . . . . . . . . . . . . . . . 191Understanding publish environments . . . . . . . . . . . . . . . . . . . . . . . . . . . . . . . . . . . . . . 192
About publish environments. . . . . . . . . . . . . . . . . . . . . . . . . . . . . . . . . . . . . . . . . . . 192Publishing to a BEM cell. . . . . . . . . . . . . . . . . . . . . . . . . . . . . . . . . . . . . . . . . . . . . . . 194About home cell, home cell alias, and cell alias . . . . . . . . . . . . . . . . . . . . . . . . . . . 193
Publishing from the BMC Atrium CMDB . . . . . . . . . . . . . . . . . . . . . . . . . . . . . . . . . . . 194Enabling AtriumCMDB Publish publishing . . . . . . . . . . . . . . . . . . . . . . . . . . . . . . 195Using BMC Impact Service Model Editor . . . . . . . . . . . . . . . . . . . . . . . . . . . . . . . . 195Creating advanced publish environments. . . . . . . . . . . . . . . . . . . . . . . . . . . . . . . . 199Examples of advanced environments. . . . . . . . . . . . . . . . . . . . . . . . . . . . . . . . . . . . 200Defining BMC Atrium CMDB classes for SIM . . . . . . . . . . . . . . . . . . . . . . . . . . . . 202Defining BMC Atrium CMDB attributes for SIM . . . . . . . . . . . . . . . . . . . . . . . . . . 202ServiceModelSet attribute for components and management data . . . . . . . . . . . 203ServiceModelSet attribute for impact relationships . . . . . . . . . . . . . . . . . . . . . . . . 204Initializing the BMC Atrium CMDB with SIM data. . . . . . . . . . . . . . . . . . . . . . . . 205Initializing a cell. . . . . . . . . . . . . . . . . . . . . . . . . . . . . . . . . . . . . . . . . . . . . . . . . . . . . . 209
Chapter 8 Managing BMC Impact Publishing Server 175

Example—creating SIM data in BMC Atrium CMDB from BAROC files . . . . . . 211Purging and deleting service model objects . . . . . . . . . . . . . . . . . . . . . . . . . . . . . . 212Publishing in automated or manual mode. . . . . . . . . . . . . . . . . . . . . . . . . . . . . . . . 213
Publishing from a Direct Publish source. . . . . . . . . . . . . . . . . . . . . . . . . . . . . . . . . . . . . 215About home cell and cell alias . . . . . . . . . . . . . . . . . . . . . . . . . . . . . . . . . . . . . . . . . . 216About class and slot data . . . . . . . . . . . . . . . . . . . . . . . . . . . . . . . . . . . . . . . . . . . . . . 218Enabling Direct Publish publishing . . . . . . . . . . . . . . . . . . . . . . . . . . . . . . . . . . . . . 218Creating an environment for component instances and relationships . . . . . . . . 219Modifying home cell and cell aliases . . . . . . . . . . . . . . . . . . . . . . . . . . . . . . . . . . . . 219Initializing a cell from a Direct Publish environment. . . . . . . . . . . . . . . . . . . . . . . 220Examples—using cell aliases for Direct Publish publishing . . . . . . . . . . . . . . . . . 220
Securing publish environments . . . . . . . . . . . . . . . . . . . . . . . . . . . . . . . . . . . . . . . . . . . . 222pserver.conf file and parameters . . . . . . . . . . . . . . . . . . . . . . . . . . . . . . . . . . . . . . . . . . . 224Configuring the Notify ARDBC plug-in . . . . . . . . . . . . . . . . . . . . . . . . . . . . . . . . . . . . . 229Configuring the Notify plug-in for AR server groups . . . . . . . . . . . . . . . . . . . . . . . . . 231
176 BMC Impact Solutions Service Modeling and Publishing Guide

Working with publication logs
Working with publication logsThis section contains general guidelines to remember when working with publication logs.
■ After you submit a promotion request in BMC Impact Service Model Editor, the promotion results dialog box reports only the success or failure of a promotion. It does not offer information about publication status. Detailed information about each publication is available in the request log files. A request log file exists for every publish request containing detailed information as to why publication failed and must be consulted to diagnose a publication failure.
■ All request logs are available in BMC Impact Service Model Editor's publish history.
■ Publish logs can also be retrieved by using the CLI command plog -s <requestId> | plogdisplay -@ (see “plog—Obtaining the XML log for a request” on page 265).
■ BMC recommends that you give every promotion a unique description because that makes it easier to locate a specific publish in the BMC Impact Service Model Editor’s publish history. Another way to find the correct publication in the publish history is to use the promotion ID.
■ BMC Impact Publishing Server includes detailed messages from the different products it communicates with (such as BMC Impact Portal, BMC Atrium CMDB, and BMC Impact Managers). To understand and troubleshoot these messages, consult the documentation of the product.
Viewing publication history
At any time, you can use the Promote and Publish History command in BMC Impact Service Model Editor to review publication information, including failures.
The Promote and Publish History command displays the status and date and time of requests. Information in the Publication errors section of the Publish tab can help you troubleshoot publication failures.
To view publication history
1 From the menu bar, choose Tools => Promote and Publish History.
2 To view publication details, select the Publish tab, then select the publication for which you want to see details in the Publication History table area.
The list of recent publications is in reverse chronological order, that is, the most recent is listed first.
Chapter 8 Managing BMC Impact Publishing Server 177

Viewing publication history details
Viewing publication history details
This section contains information on viewing publication history details.
To view publication history details
1 From the menu bar, choose Tools => Promote and Publish History.
The list of recent publications is in reverse chronological order, that is, the most recent is listed first.
By default, 100 publication log files are saved; when the 101st log is saved, the first log is deleted. All BMC Impact Publishing Server requests are counted (not only publish and initialization, but also classinfo (for example, export) requests).
You can change the RequestHistorySize parameter in pserver.conf to modify the default number of logs saved.
2 To view publication details, select the Publication tab, then select the publication for which you want to see details in the Publication History table area.
A On the Publication Details tab, review the detailed information for the publication you selected. Failures are displayed in red.
If the failure is the result of a particular component instance, the component type and component name are included. To open a View with the component instance, select the failure and click Open in New View.
B On the Publication Errors tab (available only if there were failures associated with the selected publication), review the failure information.
You can sort on any column and, if the column width limit truncates the text, the tooltip displays the complete text string.
C In the Recommended Action area, review the action to correct the problem with publish.
3 Click Close.
NOTE You can replace the action recommended by BMC Software, add to it, or modify it by editing the pslog_error_solutions.properties file located in the BMC_PORTAL_KIT_HOME\appserver\websdk\tools\jboss\server\all\conf\resources\en_US\smsConsoleServer directory on the server running BMC Portal.
178 BMC Impact Solutions Service Modeling and Publishing Guide

Sharing a single log directory between two Publishing Servers
Sharing a single log directory between two Publishing Servers
If you employ two Publishing Server instances, each instance on a separate computer, you can share a single log directory between the two instances. For example, if the host of a Publishing Server is not up and running, you can start the other Publishing Server and resume publishing while writing to the same log directory. By default, the Publishing Server log directory is at the location %MCELL_HOME%/log/%PSName%, and %PSName% is ps_<host>, where <host> is the name of the computer on which the Publishing Server is installed. And because the Publishing Server is installed in the MCELL_HOME directory, the default path is MCELL_HOME/log/<PSName>.
To enable two Publishing Servers on different computers to use the same log directory, you must give both Publishing Servers the same name. To change the name of one Publishing Server to match the other:
1 Uninstall the Publishing Server for which you want to change the name. Perform the uninstallation using uninstall_pserver_service.cmd for Windows or uninstall_pserver_service.sh for UNIX. These commands are available from the <MCELL_HOME>/bin directory.
2 In the etc/pserver_service.conf file, set the Publishing Server name (variable PS_NAME) to the new name.
3 Reinstall the Publishing Server by using install_pserver_service.cmd for Windows or install_pserver_service.sh for UNIX.
4 Update the file MCELL_HOME/etc/pserver.conf to change the attribute SystemLogDirName to the name of the shared log directory. Note that you must use an NFS path name to specify the directory. For more information about the pserver.conf file, see “pserver.conf file and parameters” on page 224.
5 Update the SystemLogDirName attribute for the other Publishing Server, giving it the same shared log directory.
6 In the pserver.conf file make sure that the directory path mentioned before SystemLogDirName is accessible. When you specify the path for the SystemLogDirName, you must use an NFS path.
NOTE If the log directory is remote and the Publishing Server runs as a service, then the service must not log on as a "Local System account", which is the default logon. If the service is allowed to log on using the default, the account has no access to the remote directory. The service must log on as an account with access to the remote directory.
Chapter 8 Managing BMC Impact Publishing Server 179
Specifying a port for Service Model Manager
Specifying a port for Service Model ManagerThe Service Model Manager (smmgr) is a service (or process) that is started by the cell to assist in publishing. When the service starts, it selects an available ephemeral port. You can configure it to listen on a fixed port so that the connection is not prevented when a random port crosses a firewall.
To specify a fixed port for Service Model Manager, in the file MCELL_HOME/etc/cellName/smmgr.conf, change the parameter ServerPort to a specific port number. The default value is 0, which means that any port number can be used. If the specified port is not available when Service Model Manager is started, start up fails. If you use more than one cell, each cell must have a different port number for the ServerPort parameter in the smmgr.conf file of the cell.
High availability and BMC Impact Publishing Server
When a publish request is received by the BMC Impact Publishing Server component, the Publishing Server automatically connects to the active server (either primary or secondary) and publishes. To determine which server was active for a specific publish, look in the request log. For information about publishing logs, see “Working with publication logs” on page 108.
If neither the primary nor the secondary server is active, then the publish request fails. The request log indicates that neither server is active. If the active server goes down during a publish, then the publication fails. When a server is active again, you must manually re-execute the publish on the active server with the CLI publish command. For automated publications, there are default retrials, but if the specified number of retrials was executed while there was no active server, and a new retrial will not be executed after one of the servers becomes active, you must execute the publish command again. For information about the CLI command publish, see “publish—Publishing a service model or viewing instances to be published” on page 283.
180 BMC Impact Solutions Service Modeling and Publishing Guide

Monitoring BMC Impact Publishing Server with BMC Impact Manager events
Monitoring BMC Impact Publishing Server with BMC Impact Manager events
This section describes how to monitor the BMC Impact Publishing Server using BMC Impact Manager events. By default, the BMC Impact Publishing Server sends event information to the Impact Administration Cell (IAC). Users with Full Access and Service Administrator access can monitor the status of BMC Impact Publishing Server in BMC Impact Explorer on the Impact Administration Cell subtab. For the request, connection, and error events, see the Events tab. For more information about Impact Administration Cells, see BMC Impact Solutions Infrastructure Administration Guide.
You can view all generated events in BMC IX on the Events tab in the collector "By Location - System - Publishing Server".
Also, the IAC creates ADMIN_EVENTs for the control events of BMC Impact Publishing Server, so you can view the status of the BMC Impact Publishing Server in the Infrastructure Management view of BMC IX.
If automated AtriumCMDB Publishing is enabled, you should monitor the publish requests to find publication failures.
Modifying the generation of events
The BMC Impact Publishing Server creates status, connection, and publish request information that describes the internal state of the BMC Impact Publishing Server and its connection to the BMC Atrium CMDB and BMC Impact Manager cells.
To modify the BMC Impact Publishing Server events sent to a cell, you make changes in configuration files. Table 39 describes the types of events with an example, the configuration file for each, and the location of the configuration file.
Chapter 8 Managing BMC Impact Publishing Server 181

Modifying the generation of events
To modify the generation of events
1 In the pserver.conf file, set the IPSEventsIM parameter to the name of the cell that will receive the events.
In the example, events are sent to the cell named cell.Admin (default Impact Administration Cell).
Table 39 BMC Impact Publishing Server event generation
Type of eventExample event message
Configuration file name
Configuration file location on the BMC Impact Manager computer
control—status events generated when BMC Impact Publishing Server starts or stops in a controlled way
BMC Impact Publishing Server started
pserver.conf MCELL_HOME/etc/ps_hostName/pserver.conf
or if this file does not exist, then MCELL_HOME/etc/pserver.conf
connection—events generated when the BMC Impact Publishing Server makes a connection with one of its surrounding components
serverName connection failure.
pserver.conf MCELL_HOME/etc/ps_hostName/pserver.conf
or if this file does not exist, then MCELL_HOME/etc/pserver.conf
request—events generated for every publish and classinfo request that is processed by Publishing Server
Class validation request failed.
pserver.conf MCELL_HOME/etc/ps_hostName/pserver.conf
or if this file does not exist, then MCELL_HOME/etc/pserver.conf
error—events that indicate there is a problem with the correct functioning of the BMC Impact Publishing Server
serverName exception occurred: xxx
pserver.trace MCELL_HOME/etc/ps_hostName/pserver.trace
or if this does not exist, then MCELL_HOME/etc/pserver.trace
EXAMPLE In the relevant section of the pserver.conf file:
#---------------------------------------------------------------------------#Events#---------------------------------------------------------------------------#Events tracking Publishing Server’s operation and errors are sent to im#<IPSEventsIM>#IPSEventsIM=<ImpactAdminCell>#By default IPS_EVENTs are generated to the Impact Admin CellIPSEventsIM=cell.Admin#Only operation events of the classes listed in IPSEventClasses are created.#By default events of all IPS_EVENT concrete subclasses are created#IPSEventClasses=IPS_START,IPS_STOP,IPS_CONFIG,IPS_CONNECT,#IPS_IM_CONNECT,#IPS_PUBLISH,IPS_CLASSINFO#Enabling of error events (IPS_ERROR) is to be configured in pserver.trace
182 BMC Impact Solutions Service Modeling and Publishing Guide

Understanding classes and slots for BMC Impact Publishing Server events
If you enter an incorrect cell name in this file, (a cell name that is not present in the cell directory as it is configured by IMFileDirectoryName), then no events are generated. In the tmp/ps_hostname/pserver.trace output file, the error message is Unable to report ips events to im X: IPSEventsIM points to unregistered im.
2 To generate error events, in the etc/pserver.trace file, uncomment the following line by removing the # at the beginning of the line.
#log4j.logger.com.bmc.sms.ps=DEBUG, IPSERROREVENTS
as shown in the example.
3 Restart the BMC Impact Publishing Server service or process.
Understanding classes and slots for BMC Impact Publishing Server events
Table 40 describes the Common Event Model (CEM) slots (defined in CORE_EVENT) and values that are applicable to all events generated by BMC Impact Publishing Server.
EXAMPLE In the relevant section of the pserver.trace file:
# Print messages of level DEBUG or above in the package#log4j.logger.com.bmc.sms.imapi=DEBUG#log4j.logger.com.bmc.sms.imapi.nls=DEBUG#log4j.logger.com.bmc.sms.imapi.gw=DEBUG#log4j.logger.com.bmc.sms.imobject=DEBUGlog4j.logger.com.bmc.sms.ps=DEBUG, IPSERROREVENTS
Chapter 8 Managing BMC Impact Publishing Server 183
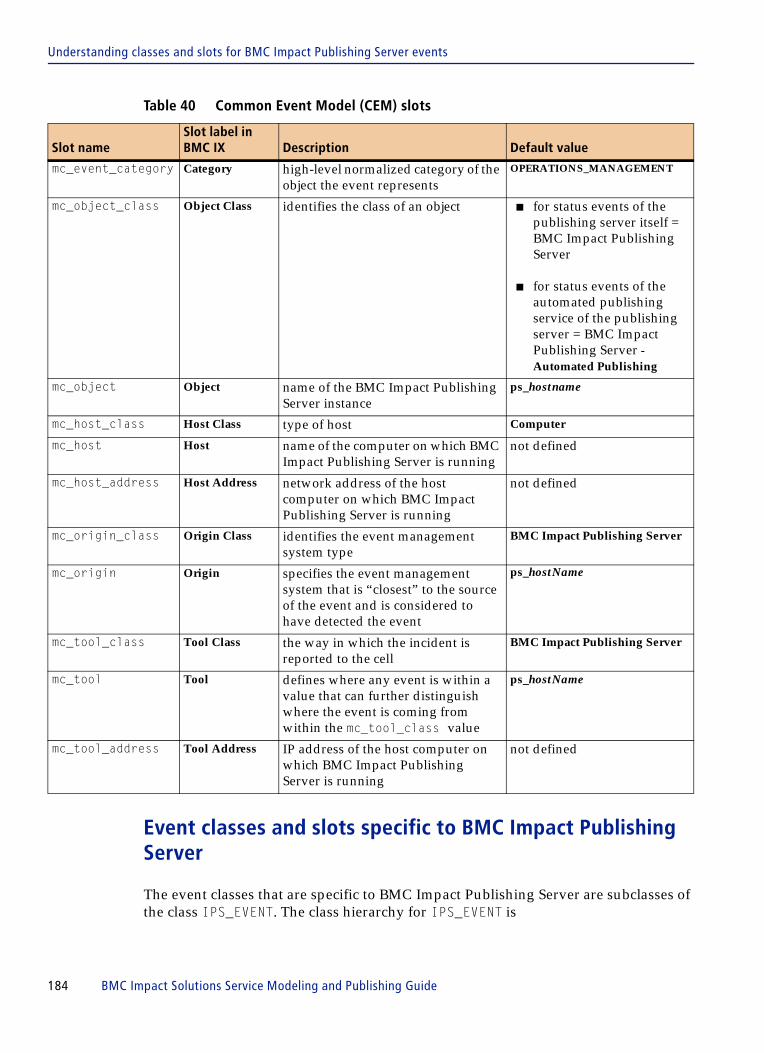
Understanding classes and slots for BMC Impact Publishing Server events
Event classes and slots specific to BMC Impact Publishing Server
The event classes that are specific to BMC Impact Publishing Server are subclasses of the class IPS_EVENT. The class hierarchy for IPS_EVENT is
Table 40 Common Event Model (CEM) slots
Slot nameSlot label in BMC IX Description Default value
mc_event_category Category high-level normalized category of the object the event represents
OPERATIONS_MANAGEMENT
mc_object_class Object Class identifies the class of an object ■ for status events of the publishing server itself = BMC Impact Publishing Server
■ for status events of the automated publishing service of the publishing server = BMC Impact Publishing Server - Automated Publishing
mc_object Object name of the BMC Impact Publishing Server instance
ps_hostname
mc_host_class Host Class type of host Computer
mc_host Host name of the computer on which BMC Impact Publishing Server is running
not defined
mc_host_address Host Address network address of the host computer on which BMC Impact Publishing Server is running
not defined
mc_origin_class Origin Class identifies the event management system type
BMC Impact Publishing Server
mc_origin Origin specifies the event management system that is “closest” to the source of the event and is considered to have detected the event
ps_hostName
mc_tool_class Tool Class the way in which the incident is reported to the cell
BMC Impact Publishing Server
mc_tool Tool defines where any event is within a value that can further distinguish where the event is coming from within the mc_tool_class value
ps_hostName
mc_tool_address Tool Address IP address of the host computer on which BMC Impact Publishing Server is running
not defined
184 BMC Impact Solutions Service Modeling and Publishing Guide

Understanding classes and slots for BMC Impact Publishing Server events
IPS_EVENTIPS_CONTROL
IPS_STARTIPS_STOPIPS_CONFIG
IPS_CNXIPS_CONNECT
IPS_IM_CONNECTIPS_ERRORIPS_REQUEST
IPS_CLASSINFOIPS_PUBLISH
These classes are defined in the ips.baroc file, located in the MCELL_HOME\etc\default\EM\kb\classes directory.
When you enable event generation to a SIM cell, all operational events are generated, which are the event classes IPS_START, IPS_STOP, IPS_CONFIG, IPS_CONNECT, IPS_IM_CONNECT, IPS_PUBLISH, and IPS_CLASSINFO.
In addition to operational events, you can also enable the generation of BMC Impact Publishing Server error events of the class IPS_ERROR.
IPS_START—Impact Publishing Server start
The IPS_START class contains events that occur when the BMC Impact Publishing Server service (or process) is started or when automated publishing is started.
IPS_STOP—Impact Publishing Server stop
The IPS_STOP class contains events that occur when the BMC Impact Publishing Server service (or process) is stopped.
Table 41 IPS_START slots
Slot name Slot label in BMC IX Description
process_run_id Process Run ID All IPS_CONTROL events that are generated from the same processing run of BMC Impact Publishing Server are assigned the same process run ID (guid) for easy correlation of these events.
mc_parameter Status value is the string status
mc_parameter_value Parameter Value indicates the status of BMC Impact Publishing Server:
■ as it launches: starting■ when up and running: started
Chapter 8 Managing BMC Impact Publishing Server 185

Understanding classes and slots for BMC Impact Publishing Server events
IPS_CONFIG—Impact Publishing Server configuration file
The IPS_CONFIG class contains events that are generated when BMC Impact Publishing Server starts and display configuration information for the Publishing Server instance, as shown in Table 43.
Event generation for this class is enabled by default.
Table 42 IPS_STOP slots
Slot name Slot label in BMC IX Description
process_run_id Process Run ID All IPS_CONTROL events that are generated from the same processing run of BMC Impact Publishing Server are assigned the same process run ID (guid) for easy correlation of these events.
severity Severity seriousness of the event; default is INFO
mc_parameter Status value is the string status
mc_parameter_value Parameter Value indicates the status of the BMC Impact Publishing Server:
■ when stopping: stopping■ when stopped: stopped
Table 43 IPS_CONFIG slots (part 1 of 2)
Slot name Slot label in BMC IX Description
os_class OS Class indicates the class of the operating system
os_version OS Version indicates the version of the operating system
process_run_id Process Run ID All IPS_CONTROL events that are generated from the same processing run of BMC Impact Publishing Server are assigned the same process run ID (guid) for easy correlation of these events.
ps_version IPS Version contains the version of the Publishing Server
ps_build_number IPS Build Number contains the software build number of the Publishing Server
ps_build_date IPS Build Date contains the build date of the Publishing Server
home_dir Home Directory contains the absolute path of the home directory for the Publishing Server
conf_file Configuration File contains the absolute path of the configuration file; pserver.conf is the default file
kb_dir KB Directory contains the absolute path of the kb directory
log_dir Log Directory contains the absolute path of the log directory
mcell_dir Cell Directory File contains the absolute path of the cell directory file (default is mcell.dir)
186 BMC Impact Solutions Service Modeling and Publishing Guide

Understanding classes and slots for BMC Impact Publishing Server events
IPS_CONNECT—Impact Publishing Server connect
The IPS_CONNECT class contains events that occur when BMC Impact Publishing Server tries to establish a connection to other components.
trace_conf Trace Configuration File
contains the absolute path of the trace configuration file; pserver.trace is the default file
trace_file Trace File contains the absolute path of the trace file; pserver.trace if the default file
Table 44 IPS_CONNECT slots
Slot name Slot label in BMC IX Description
ips_request_id Request ID the ID of the request sent to the BMC Impact Publishing Server
The connection is required for the processing of the request. For every request, IPS_CONNECT events are created for every component that needs to be connected.
destination Destination type of the component to which BMC Impact Publishing Server is connecting; possible values are:
■ CMDB for BMC Atrium CMDB■ IM for BMC Impact Manager■ SMM for Service Model Manager
dst_name Destination Name name of the component to which BMC Impact Publishing Server is connecting
dst_location Destination Location host and port number of the computer to which BMC Impact Publishing Server is connecting
dst_user Destination User logon used to connect
blank for Impact Manager and Service Model Manager connections because those connections do not require authentication
result Result indicates the success or failure of the connection; possible values are
■ SCS when the connection succeeds■ FLR when the connection fails
Table 43 IPS_CONFIG slots (part 2 of 2)
Slot name Slot label in BMC IX Description
Chapter 8 Managing BMC Impact Publishing Server 187

Understanding classes and slots for BMC Impact Publishing Server events
IPS_IM_CONNECT—Impact Publishing Server connect
The IPS_IM_CONNECT class contains events that occur when BMC Impact Publishing Server tries to establish a connection to an Impact Manager cell.
IPS_REQUEST—BMC Impact Publishing Server request
The IPS_REQUEST class contains events that occur when BMC Impact Publishing Server receives a request (for example, a request for a publishing preview).
Table 45 IPS_IM_CONNECT slots
Slot name Slot label in BMC IX Description
dst_location2 Destination Secondary Location
host and port number of the secondary Impact Manager server, if high availability is enabled
Table 46 IPS_REQUEST slots (part 1 of 2)
Slot name Slot label in BMC IX Description
severity Severity enables you to follow the status of a request
When the request is sent to the BMC Impact Publishing Server, the severity is INFO. When the BMC Impact Publishing Server finishes the processing of this request, it updates the severity of the event:
■ OK if the request is successful■ WARNING if the request failed
client_data Client Data data coming from the client
For automated publishes resulting from a BMC Impact Service Model Editor promotion, this slot displays the ReconJobRunId and the PromotionId.
request_id Request ID the ID of the request sent to the BMC Impact Publishing Server
This ID is necessary when you retrieve the request log by using a BMC IX local action and is useful in diagnosing publication failures. See “Diagnosing publication failures” on page 298.
request_msg Request Message the content of the request (for example, EnvId=PROD; Queue=T)
This is the internal communication protocol, useful for debugging.
188 BMC Impact Solutions Service Modeling and Publishing Guide

Understanding classes and slots for BMC Impact Publishing Server events
request_result Request Result initially UNK (unknown)
Set to SCS (success) or FLR (failure) when processing is terminated.
result_msg Result Message brief description of the success or the failure of the handled request
For example, Request failed: Publish verification of IM(s) failed. You can find more detailed failure messages in the request log.
user_id User ID the logon user ID of the requestor
For automated publishes that are invoked from a BMC Impact Service Model Editor promotion, this slot displays the BMC Impact Service Model Editor logon user ID.
For publishes from a CLI, this slot displays the user of the CLI or publish@hostname if the CLI is run locally without authentication.
description Description the description that comes with the request
For automated publishes resulting from a BMC Impact Service Model Editor promotion, this slot displays the BMC Impact Service Model Editor promotion comment.
For publishes from a CLI, this slot displays the description you enter when using the -s option.
Table 46 IPS_REQUEST slots (part 2 of 2)
Slot name Slot label in BMC IX Description
Chapter 8 Managing BMC Impact Publishing Server 189

Understanding classes and slots for BMC Impact Publishing Server events
IPS_PUBLISH—BMC Impact Publishing Server publish request
The IPS_PUBLISH class contains events that occur when a request for a publish is generated.
IPS_CLASSINFO—BMC Impact Publishing Server class information request
The IPS_CLASSINFO class contains events that are generated when information about classes is requested, for example, when you use a CLI to verify the class definitions between a cell and the BMC Atrium CMDB.
Table 47 IPS_PUBLISH slots
Slot name Slot label in BMC IX Description
publish_type Publish Request Type indicates the type of publish; possible values are
■ direct when the publish request is for a DirectPublish
■ init when the publish request is an initialization, as with the pinit cli
■ publish when the publish request is a delta or incremental publication, as with automated publish or with the publish CLI command
■ selected_publish when a publish request is for selected objects, as with the publish -d CLI command
env_id Environment ID ID of the publish environment
For example:■ PROD for production environment■ TEST.user.1 for BMC Impact Service Model
Editor test environment
Table 48 IPS_CLASSINFO slots
Slot name Slot label in BMC IX Description
classinfo_type Class Info Request Type
indicates the type of classinfo; possible values are
■ validation when the classInfo request happens with the CLI command pclassinfo -n cellName
■ export when the classInfo request is generated with BMC Impact Service Model Editor export meta data functions, or with the CLI command pclassinfo -x
190 BMC Impact Solutions Service Modeling and Publishing Guide

About SIM management data
IPS_ERROR—BMC Impact Publishing Server errors
IPS_ERROR events are different from other events in the IPS_EVENT class. They report issues that occur with the BMC Impact Publishing Server, while other IPS_EVENTs report information.
IPS_ENV—BMC Impact Publishing Server environment request
Each time a penv CLI is issued (except for the action command info), an IPS_ENV event is generated. IPS_ENV events are generated for these environment requests:
■ creation of a publish environment■ modification of a publish environment■ initialization of CMDB datasets of a AtriumCMDB? publish environment ■ removal of a publish environment
About SIM management dataManagement data are the data that are referred to by component instances and impact relationships. Management data is always published to all cells of a publish environment. A default set of management data is in the kb/data directory of the cell as well as in the SIM CMDB extension and in the kb/data directory of the BMC Impact Publishing Server.
A SIM management data instance of a higher priority publish origin might replace the same SIM management data instance of a lower priority publish origin. However, in the case of the same priority publish origin, a SIM management data instance can be published once and only once to a cell.
Table 49 IPS_ERROR slots
Slot name Slot label in BMC IX Description
severity Severity indicates the seriousness of the event
The default is WARNING
Table 50 IPS_ENV slots
Slot name Slot label in BMC IX Description
origin_id Origin ID contains the origin ID (AtriumCMDB or DirectPublish) of the publish environment
env_id Environment ID contains the IDs of the publish environment
env_type Environment Request Type
contains the action open, set, init or close
Chapter 8 Managing BMC Impact Publishing Server 191

Understanding publish environments
Each component and impact relationship of a cell can refer to each management data instance regardless of the source of the management data in the cell (Direct Feed or AtriumCMDB publishing or DirectPublish publishing or CellPublish publishing).
Direct Feed management data can also be referred to by published CIs and relationships. The management data need not be published to be referred to by published CIs and relationships.
Understanding publish environmentsA publish environment defines the source of the data and the cells to which the data is sent.
You can secure publish environments by password protecting them.
About publish environments
A publish is always executed within a set of conditions defined by the requirements of the SIM data. This set of conditions is referred to as a publish environment. For example, you want to send a service model from BMC Atrium CMDB (one condition) to a test cell (second condition). If the source of the service model data is a BAROC file and the data goes to a production cell, this requires a different environment and is handled differently by BMC Impact Publishing Server.
The BMC Impact Publishing Server component supports publishing SIM data (service model data and management data) from three sources or origins: BMC Atrium CMDB, which is referred to as an Atrium Publish Feed, from BAROC source files using the CLI command pposter, which is referred to as Direct Publish Feed, or from a staging cell like the HP OVO adapter cell, which is referred to as Cell Publish Feed.
Publish origin Publish is initiated from OriginID
BMC Atrium CMDB ■ BMC Impact Service Model Editor■ termination of reconciliation job■ CLI command publish
AtriumCMDB
Direct Publish ■ CLI command pposter DirectPublish
Cell Publish ■ HP OVO fetch termination■ CLI command publish
CellPublish
192 BMC Impact Solutions Service Modeling and Publishing Guide

About home cell, home cell alias, and cell alias
An environment is uniquely identified by EnvID plus OriginId. The environment identifier must be unique within all AtriumCMDB Publish environments or within all Direct Publish environments. However, it is simpler and easier to manage if all publish environments in your enterprise have unique identifiers.
Specifying the publish origin
Publishing from these origins is enabled or disabled with configuration parameters (AtriumCMDBPublishOrigin and DirectPublishOrigin and CellPublishOrigin) in the pserver.conf file.
AtriumCMDB Publish is enabled by default and is initiated either through automated publishing or the CLI command publish.
Direct Publish is enabled by default and is initiated either through an API program or the CLI command pposter.
Cell Publish or within all CellPublish environments in a staging cell.
About home cell, home cell alias, and cell alias
A service model component can be assigned to only one cell at a time. If you want, for example, to assign a component to a production cell and, at the same time, use it in a test cell for impact experiments, a mechanism is needed to make this possible. The parameters, HomeCell, CellAliases, and the attributes HomeCell and HomeCellAlias are used by BMC Impact Publishing Server to determine the cells to which a component instance is sent, depending on which have values. CellAliases and HomeCell are parameters of the publish environment, whereas HomeCell and HomeCellAlias are attributes of the component instance.
The environment’s parameter home cell defines the one cell to which all service model data and management data is sent.
The component’s attribute home cell alias defines another name for home cell looked up from a table so that the data with a specific home cell alias can be sent to different cells for different publish environments.
Cell alias defines another name for a cell so that data can be sent to more than one cell.
A cell can have multiple cell aliases, but in a single publish environment, a cell can have only one cell alias. The mapping of cell alias-to-cell name is one to many per environment. In other words, for each environment and for each cell alias, there can be only one cell name, but many cell aliases can be mapped to the same cell name.
Chapter 8 Managing BMC Impact Publishing Server 193

Publishing to a BEM cell
A cell name can only be used in one AtriumCMDB Publish environment, however it can be re-used in many DirectPublish environments, even if it is also used in AtriumCMDB environment.
Cell-alias to cell-name values must already be defined when publishing is initiated.
Default home cell alias
When the parameter DefaultCell is set, the Publishing Server creates a default cell alias mapping to the cell that is configured for the BMC Atrium CMDB PROD publish environment. By default the CIs and impact relationships are assigned to the cell that is set for the DefaultCell parameter. Leaving this parameter empty effectively drops CIs and impact relationships assigned to DefaultCell from publication.
Determining the cell to which a component is published
To determine the cell to which a component is published, the BMC Impact Publishing Server uses the following algorithm:
1. If HomeCell is defined for the publish environment, that value is used (regardless of the values in the component’s HomeCellAlias attribute).
2. The component’s HomeCellAlias is looked up in the CellAliases for the publish environment.
3. If one of the CellAliases defined for the publish environment has empty CellAlias, then its cell name is used as the default cell. Every component that has no HomeCellAlias set is published to this default cell.
Publishing to a BEM cellAs of version 7.3.00, you can publishing on a BEM cell. However, although you can publish CIs on a BEM cell, the impact relationships of the CIs are not propagated.
Publishing from the BMC Atrium CMDBIn the case of AtriumCMDB Publish environments,
■ you can promote SIM objects in the BMC Impact Service Model Editor product, which triggers reconciliation and when that terminates, publishing of the objects to the cells
194 BMC Impact Solutions Service Modeling and Publishing Guide

Enabling AtriumCMDB Publish publishing
■ you can reconcile from any BMC Atrium CMDB reconciliation dataset
■ you can use the Send to test function in BMC Impact Service Model Editor, in which case, the parameters of the environment are defined and managed for you, based on choices you make in the BMC Impact Service Model Editor
■ you can create other AtriumCMDB Publish environments for advanced staging, for which you define the parameters of the environment using the CLI command penv.
During the publishing of a service model, new or modified service model components and their relationships are selected from the asset dataset in the BMC Atrium CMDB and copied to respective BMC Impact Manager cells.
New objects coming from a discovery source (such as BMC Topology Discovery or BMC Foundation Discovery) are flagged by default as In-Model and are therefore published by BMC Impact Publishing Server. This default can have a performance impact if too many CIs exist in non-SIM classes. If the impact is too great, then you can revert and set the default value for ServiceModelSet to OUT. In this case, the new objects coming from a discovery source are ignored by the Publishing Server and you must bring In-Model objects in the Service Model Editor. If discovery sources provide updates to objects that are flagged as In-Model, these changes are sent to the cells.
Enabling AtriumCMDB Publish publishing
AtriumCMDB Publish is enabled by default, with a parameter in the pserver.conf file, located in MCELL_HOME/etc, ServiceModelPublish = T. (Default = T.)
For AtriumCMDB environments, cell information is looked up from the class SIM_CellInformation from the BMC.ASSET dataset of BMC Atrium CMDB. The Impact Administration Server (IAS) creates this information whenever you administer a cell.
Using BMC Impact Service Model Editor
When the source of the service model data is the BMC Atrium CMDB and you are using BMC Impact Service Model Editor, the BMC Impact Publishing Server component can handle all of the requirements for standard publishing. BMC Impact Publishing Server defines the proper publishing environment based on choices you make in BMC Impact Service Model Editor and can automatically deliver the SIM data to the cell after you promote the objects in BMC Impact Service Model Editor.
Chapter 8 Managing BMC Impact Publishing Server 195

Using BMC Impact Service Model Editor
About cell alias
When you use only the BMC Impact Service Model Editor to create service models, it is not necessary for you to understand the concept of cell alias because these values are created and managed for you.
In BMC Impact Service Model Editor, every component instance that is created or modified must have a value for cell name (required field). For each component’s cell name, a cell alias is automatically created and managed by BMC Remedy AR System.
■ When you register a cell in BMC Impact Portal and define it as production, an alias with the same name as the cell name is defined and stored in the SIM_CellAlias CMDB class in the dataset BMC.ASSET.
■ When you send service model objects to test in the BMC Impact Service Model Editor (using the Send to test function), all existing aliases are mapped to the test cell you chose for the test in BMC Impact Service Model Editor.
In production the three component instances are sent to the production cells: cellA, cellB, and cellC. When you send them to test in BMC Impact Service Model Editor, they are all sent to the same test cell, testcell1.
Component Cell alias Cell name (prod cell) Cell name (test cell)
SL Appl cellA cellA testcell1
SL DB cellB cellB testcell1
SL Server cellC cellC testcell1
196 BMC Impact Solutions Service Modeling and Publishing Guide

Using BMC Impact Service Model Editor
About the production environment
An AtriumCMDB Publish environment consists of an asset dataset, by default BMC.ASSET.EnvId and an impact dataset, BMC.IMPACT.EnvId.
The production AtriumCMDB publish environment has the following two datasets:
The production service model data is in the BMC Atrium CMDB in the production dataset BMC.ASSET. After you promote service model objects in BMC Impact Service Model Editor, these changes are reconciled in the production dataset and then stored in the production dataset BMC.IMPACT.PROD upon successful publication, which mirrors the last successful publish to the cells.
Datasets in BMC Atrium CMDB Description Comments
asset dataset:
by default, BMC.ASSET
contains objects to be published
This is the dataset from which service model data is published to cells.
regular dataset
■ read-only; can be updated only by the CMDB Reconciliation Engine as objects are reconciled
■ not limited to objects that are in-model
■ a service model object is successfully promoted when it is moved from the sandbox to this dataset in the BMC Atrium CMDB
impact dataset:
by default, BMC.IMPACT.PROD
contains objects that have been successfully published
This dataset is a “master copy” of the service model data in the asset dataset
regular dataset
■ read-only: can only be updated by the BMC Impact Publishing Server as objects are published
■ a service model object is successfully published when a copy of it is in this dataset in the BMC Atrium CMDB
WARNING To ensure that the service model data in the BMC Atrium CMDB and in the cell are synchronized, the data in the impact dataset should be managed solely by BMC Impact Publishing Server.
Chapter 8 Managing BMC Impact Publishing Server 197

Using BMC Impact Service Model Editor
About test environments
When you select Send To Test Objects In Current View in BMC Impact Service Model Editor, a request is sent to the BMC Impact Publishing Server to open a test environment. The test environment consists of two datasets:
■ asset dataset BMC.ASSET.user.Test.1
■ impact dataset BMC.IMPACT.user.Test.1
BMC Impact Service Model Editor puts the service model data that was sent to test into the asset dataset (BMC.ASSET.user.Test.1) of the new test environment and requests a publication from the BMC Impact Publishing Server. The BMC Impact Publishing Server then looks up the test cell for the cell alias of every component. The last successful publish to the test cells is mirrored in the impact dataset BMC.IMPACT.user.Test.1.
The Send to Test function
■ validates the existence of or creates a test publish environment for the user■ validates the existence of an available test cell for publishing■ updates entries in the Cellalias table for the current environment■ empties test datasets of previous contents
A test cell contains only the latest objects sent to test. Any previous objects are removed. Test objects cannot be added to the Console Navigation Tree in BMC Impact Service Model Editor, which means they cannot be monitored in BMC Impact Portal.
After a successful publish, the BMC Atrium CMDB contains entries in the BMC.ASSET.user.TEST.1 and BMC.IMPACT.user.TEST.1 datasets for the environment.
The BMC Impact Service Model Editor test publish environments have an overlay asset dataset, with the production dataset as underlying dataset.
■ To have all management data instances of the production dataset in the test environment, publish mode Overlay is used for PublishModeMgmtData.
■ To be able to cut down the test to a limited number of components and impact relationships the publish mode Current is used for PublishModeServiceModel.
WARNING To ensure that the service model data in the BMC Atrium CMDB and in the cell are synchronized, only the BMC Impact BMC Impact Publishing Server should modify the data in the impact test dataset.
198 BMC Impact Solutions Service Modeling and Publishing Guide

Creating advanced publish environments
Creating advanced publish environments
To do advanced publishing for SIM data in AtriumCMDB Publish environments, you need to
You use the CLI command penv and the pclient.conf file to create, modify, and delete publish environments. For more information about these topics, see “penv—Managing publish environments” on page 252.
In an AtriumCMDB Publish environment, the cell is automatically initialized with SIM management data of the asset dataset of the environment when you execute the CLI command publish.
Home cell and home cell alias
If all component instances and relationships are being published to one cell, you can assign a home cell by
■ defining it in the CLI command penv when you define the environment■ defining it after the environment is opened in a CLI command penv with the action
command set
Table 51 Basic steps to create advanced test environments
Basic steps How to do
1. Determine the cells to use and create if necessary.
See BMC Impact Solutions Infrastructure Administration Guide
2. Register any new cells in BMC Impact Portal (which automatically creates them in BMC Atrium CMDB).
See BMC Impact Solutions Infrastructure Administration Guide
3. Determine the source of the service model data (another environment or a BAROC source file).
Use the penv init parameters SourceEnvMgmtData and SourceEnvServiceModelor SourceBarocMgmtData and SourceBarocServiceModel
Create a BAROC source file.
4. Define the environment. Execute a CLI command penv open
5. Enter the data in the BMC Atrium CMDB.
If cells are running, this initializes cells with this data.
Execute a CLI command penv init
6. Publish the objects to the cell. Execute a CLI command publish
7. Monitor services. In BMC Impact Explorer, on the Services tab
8. Troubleshoot problems. See Appendix A, Troubleshooting
Chapter 8 Managing BMC Impact Publishing Server 199

Examples of advanced environments
If home cell is defined, cell aliases, as defined in the BMC Atrium CMDB, are ignored. All service model data in that environment is published to the cell specified in HomeCell, even if HomeCellAlias contains a cell alias that points to another cell.
Cell aliases
If you do not have home cell defined, then cell aliases are required. Using Remedy User or an API program, you must assign cell alias-to-cell name values (per environment) in the BMC Atrium CMDB in instances of the BMC.ASSET dataset in the BMC Atrium CMDB class BMC.SIM.CONFIG:SIM_CellAliases. The values that are assigned at the time of publishing are also stored in the dataset BMC.IMPACT.PROD.
■ set the attribute EnvId to the ID of the publish environment■ set the attribute CellAlias to the alias■ set the attribute CellName to the name of a cell that is registered in BMC Impact
Portal (registered in the class SIM_CellInformation)
You can set a default cell by setting CellAlias to null. In this way, the attribute HomeCellAlias for individual CIs is not required to publish. If you create an instance in the BMC Atrium CMDB class BMC.SIM.CONFIG:SIM_Cellaliases like
then every CI in BMC.ASSET.EnvId that has no value in HomeCellAlias is published to the cell arwad.
Examples of advanced environments
You use the Send to test function in BMC Impact Service Model Editor to test small service models. For larger service models, more advanced staging and testing options are available with the CLI command penv.
The penv command allows for staging scenarios like the following:
Example 1—Creating two service models for two departments
This approach is best suited for testing large service models where the effort to automate the tasks by script is acceptable in light of the volume of data being tested.
At the beginning of a BSM project, you want to test two separate service models for two different departments.
Environment CellAlias CellName
EnvId arwad
200 BMC Impact Solutions Service Modeling and Publishing Guide

Examples of advanced environments
1. You define two environments for the two different departments, by executing the following command:
2. The components and impact relationships for each department are loaded from BAROC files, in the respective asset datasets BMC.ASSET.dept1 and BMC.ASSET.dept2.
After an initial publication, modifications are published incrementally. When you are satisfied with the results, the staging asset datasets can be reconciled into the production dataset.
3. Reconcile the staging asset datasets into the production dataset.
Example 2—Publishing a single service model to multiple environments
Additionally, it is possible to publish a single service model (the data in an asset dataset) to multiple environments. For example, you can send the service model to production cells (for real-life monitoring and impact analysis) and send the same service model data to a test cell to experiment with the impact of component failure.
For the simulation publish environment, the HomeCell parameter of the publish environment is defined.
Both the production publish environment and the simulation publish environment use the production asset dataset BMC.ASSET. The last successful publish of the production publish environment is saved in BMC.IMPACT.PROD. The last successful publish of the simulation publish environment SIMULATION is saved in BMC.IMPACT.SIMULATION. A reconciliation merge to the BMC.ASSET dataset triggers an automated publish on both environments.
Alternatively, if you want to do simulations on a service model that is derived from the production service model, then your simulation publish environment would use an overlay asset dataset BMC.ASSET.SIMULATION with underlying dataset BMC.ASSET. Reconciliation merges to the BMC.ASSET dataset will trigger an automated publish (if enabled) on the simulation publish environment.
To create a simulation publish environment that uses the production asset dataset, execute a command similar to the following:
EXAMPLE >penv open -e dept1
>penv open -1 dept2
EXAMPLE penv -e SIMULATION -p “AssetDataSetId=BMC.ASSET” -p “HomeCell=simulation”
Chapter 8 Managing BMC Impact Publishing Server 201

Defining BMC Atrium CMDB classes for SIM
This command creates only the simulation publish environment, not the production publish environment, which should already exist since it is created by default.
To create a simulation publish environment with an overlay asset dataset:
Defining BMC Atrium CMDB classes for SIM
Not all BMC Atrium CMDB classes have component instances that are useful for impact analysis. In order to be published to SIM, BMC Atrium CMDB classes must have the attribute Custom Properties = 100050. You can qualify classes that are not defined as SIM classes out-of-the-box.
To define a class as a SIM class
1. In Remedy User's Class Manager Console, add the value 100050 to the existing Custom Properties.
2. Export the modified SIM class information by executing the CLI command pclassinfo -x.
3. Update the Knowledge Base of the cells and recompile.
For more information, see “Adding new classes to the BMC Atrium CMDB” on page 157.
Defining BMC Atrium CMDB attributes for SIM
Not all of the CMDB attributes of SIM classes are useful for SIM. In order to be published to SIM, CMDB attributes must have attribute Custom Properties = 300050. You can qualify attributes that are not defined as SIM attributes out-of-the-box.
To define an attribute as a SIM attribute
1. In Remedy User's Class Manager Console, add the value 300050 to the existing Custom Properties.
2. Export the modified SIM class information by executing the CLI command pclassinfo -x.
EXAMPLE penv -e SIMULATION -p “AssetDataSetType=Overlay” -p “HomeCell=simulation” -p “AutomatedPublish=T”
202 BMC Impact Solutions Service Modeling and Publishing Guide

ServiceModelSet attribute for components and management data
3. Update the Knowledge Base of the cells and recompile.
ServiceModelSet attribute for components and management data
All SIM classes in the BMC Atrium CMDB have a ServiceModelSet attribute. This attribute makes it possible for data to be in the BMC Atrium CMDB but not be included in any data published to a SIM cell. Possible values are listed in Table 52.
For a component in the BMC Atrium CMDB to be considered for publishing by BMC Impact Publishing Server, this attribute must contain specific values:
■ Only CIs with ServiceModelSet IN or OUT_OF_IN are considered by the BMC Impact Publishing Server.
■ The value IN indicates that the CI is included in the service model published to a SIM cell. The value OUT_OF_IN indicates that the CI is not included in the service model published to SIM.
Table 52 ServiceModelSet attribute values
Value Description
IN (default value) indicates the data instance is in the service model
In-model component instances are published to the cell.
OUT indicates the data instance is not in the service model
Out-of-model instances are not published to the cell.
default value
OUT_OF_IN indicates the data instance was in the model but has since been removed from the model
At the next publication, the instance is removed from the cell.
WARNING By default, the ServiceModelSet attribute is set to IN. If your model as a large number of instances of non-SIM classes, the time required to retrieve those publishable instances can be significant.
If this increase in retrieval time is prohibitive, set the default to OUT. You can also create a Remedy AR filter to set ServiceModelSet IN for cases where the instance should automatically be set IN.
Chapter 8 Managing BMC Impact Publishing Server 203

ServiceModelSet attribute for impact relationships
To ensure synchronization between the impact dataset in BMC Atrium CMDB and the service model in a SIM cell, ServiceModelSet cannot be reset to OUT after it has been IN or OUT_OF_IN.
Every CI that has a ServiceModelSet value of IN or OUT_OF_IN should have a ReconciliationIdentity defined.
See also “In-model and not-in-model component instances” on page 54.
ServiceModelSet attribute for impact relationships
For an impact relationship, the value in ServiceModelSet is calculated from the ServiceModelSet values assigned to the relationships consumer and provider component instances and is determined in the manner shown in Table 53 on page 204.
The determination is:
■ If both instances are assigned IN, then the ServiceModelSet value for the impact relationship is IN.
■ If either or both are assigned OUT_OF_IN, then the relationship is defined as OUT_OF_IN.
■ If either or both are assigned OUT, then the relationship is defined as OUT.
Table 53 Determination of ServiceModelSet value for an impact relationship
If component instance 1 has value
and if component instance 2 has value
Then value of ServiceModelSet for the impact relationship is
IN IN IN
OUT_OF_IN IN OUT_OF_IN
IN OUT_OF_IN
OUT_OF_IN OUT OUT
OUT OUT_OF_IN
OUT IN
IN OUT
OUT OUT
204 BMC Impact Solutions Service Modeling and Publishing Guide

Initializing the BMC Atrium CMDB with SIM data
Initializing the BMC Atrium CMDB with SIM data
SIM requires service management data for successful operations. During installation of SIM’s CMDB extensions, the production dataset is initialized with service model management data. Although possible, it is unlikely that reinitialization of the production environment will be necessary.
For publish environments other than those with an asset dataset BMC.ASSET or overlay asset dataset with BMC.ASSET as the underlying dataset, initialization of the environment with service management data is required for a successful publication.
When you initialize a specific publish environment, objects in the asset and in the impact dataset of that environment are initialized (as well as objects in the datasets of an environment with asset dataset that overlays the asset dataset of the environment that is being initialized):
■ in the impact dataset, existing objects are removed
■ in the asset dataset, existing objects are either removed or kept, but are moved out-of-model, depending on the values in the InitEffectivelyMgmtData and InitEffectivelyServiceModel parameters
■ new initial objects in asset dataset and in impact dataset are copied from the initialization source (see “Initial source parameters” on page 208)
Objects in the datasets of an environment with asset dataset that overlays the asset dataset of the environment that is being initialized are also initialized.
For more information about initializing a publish environment, see also the init action command under “penv—Managing publish environments” on page 252.
Using initialization parameters
You use the configuration parameters of the CLI command penv (with the -p option) to define the initialization. These parameters are defined in the pclient.conf configuration file, located in the MCELL_HOME/etc directory. Two of the parameters, InitEffectivelyMgmtData and InitEffectivelyServiceModel reference the attribute ServiceModelSet.
Table 54 lists and describes the parameters for initializing.
Chapter 8 Managing BMC Impact Publishing Server 205
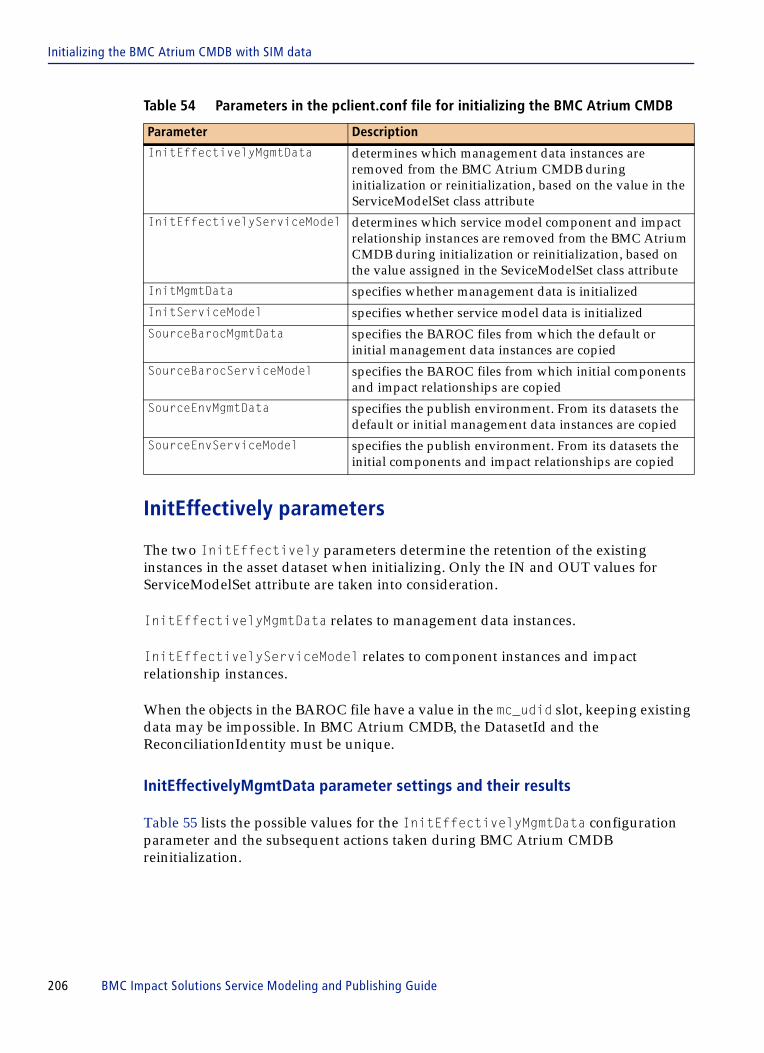
Initializing the BMC Atrium CMDB with SIM data
InitEffectively parameters
The two InitEffectively parameters determine the retention of the existing instances in the asset dataset when initializing. Only the IN and OUT values for ServiceModelSet attribute are taken into consideration.
InitEffectivelyMgmtData relates to management data instances.
InitEffectivelyServiceModel relates to component instances and impact relationship instances.
When the objects in the BAROC file have a value in the mc_udid slot, keeping existing data may be impossible. In BMC Atrium CMDB, the DatasetId and the ReconciliationIdentity must be unique.
InitEffectivelyMgmtData parameter settings and their results
Table 55 lists the possible values for the InitEffectivelyMgmtData configuration parameter and the subsequent actions taken during BMC Atrium CMDB reinitialization.
Table 54 Parameters in the pclient.conf file for initializing the BMC Atrium CMDB
Parameter Description
InitEffectivelyMgmtData determines which management data instances are removed from the BMC Atrium CMDB during initialization or reinitialization, based on the value in the ServiceModelSet class attribute
InitEffectivelyServiceModel determines which service model component and impact relationship instances are removed from the BMC Atrium CMDB during initialization or reinitialization, based on the value assigned in the SeviceModelSet class attribute
InitMgmtData specifies whether management data is initialized
InitServiceModel specifies whether service model data is initialized
SourceBarocMgmtData specifies the BAROC files from which the default or initial management data instances are copied
SourceBarocServiceModel specifies the BAROC files from which initial components and impact relationships are copied
SourceEnvMgmtData specifies the publish environment. From its datasets the default or initial management data instances are copied
SourceEnvServiceModel specifies the publish environment. From its datasets the initial components and impact relationships are copied
206 BMC Impact Solutions Service Modeling and Publishing Guide

Initializing the BMC Atrium CMDB with SIM data
Table 55 InitEffectivelyMgmtData parameter values and results
InitEffectivelyMgmtData parameter setting
Resulting actions on asset management data during Atrium CMDB reinitialization
InitEffectivelyMgmtData=IN,OUT If set to this default value, all current management data instances are removed from the BMC Atrium CMDB.
InitEffectivelyMgmtData=IN Management data instances with the ServiceModelSet attribute value of IN or OUT_OF_IN are removed from the BMC Atrium CMDB.
InitEffectivelyMgmtData=OUT ■ Management data instances with ServiceModelSet attribute value of OUT are removed from the BMC Atrium CMDB.
■ Management data instances with the ServiceModelSet attribute value of IN or OUT_OF_IN have their attribute value reset to OUT.
InitEffectivelyMgmtData= If set to an empty list (default), these actions occur
■ Existing management data instances are kept in the BMC Atrium CMDB.
■ Instances with the ServiceModelSet attribute value of IN or OUT_OF_IN have their values reset to OUT.
Generally, you do not move management data in and out of model. Therefore, you do not want to keep existing management data instances. In fact, some of the default management data instances have a mc_udid set, which makes it impossible to keep them.
In order to keep a backup of custom management data instances, which is useful when you must reinitialize the production environment, export them to BAROC files by using the CLI command mquery. The default management data BAROC files are stored in the file:
MCELL_HOME\etc\ps_hostname\kb\data
Chapter 8 Managing BMC Impact Publishing Server 207

Initializing the BMC Atrium CMDB with SIM data
InitEffectivelyServiceModel parameter settings and their results
Table 56 lists the possible values for the InitEffectivelyServiceModel configuration parameter and the subsequent actions taken during BMC Atrium CMDB reinitialization.
Initial source parameters
The initial data can come from
■ BAROC files■ another publish environment (asset and impact datasets)
Table 56 InitEffectivelyServiceModel parameter settings and results
InitEffectivelyServiceModel parameter setting
Resulting actions on service model asset component instances and impact relationships during BMC Atrium CMDB reinitialization
InitEffectivelyServiceModel= If set to an empty list (default), these actions occur
■ all service model component or impact relationship instances are not removed from the BMC Atrium CMDB
■ components and impact relationships with the ServiceModelSet attribute value of IN or OUT_OF_IN have their attribute value reset to OUT
The default initialization does not contain any component or impact relationship. Generally, when reinitializing you do not want to lose components and impact relationships that were already defined or that were detected by a discovery tool. When you reinitialize, you need to browse the existing components and decide if they still need to be in model.
InitEffectivelyServiceModel=IN Components and impact relationships with the ServiceModelSet attribute value of IN or OUT_OF_IN are removed from the BMC Atrium CMDB.
InitEffectivelyServiceModel=IN, OUT All components and impact relationships, regardless of the value of ServiceModelSet being IN, OUT_OF_IN or OUT, are removed from the BMC Atrium CMDB.
208 BMC Impact Solutions Service Modeling and Publishing Guide

Initializing a cell
By default, the source of service management data for the production publish environment (BMC.ASSET and BMC.IMPACT.PROD) is the BAROC files in MCELL_HOME/etc/ps_hostname/kb/data/.load. For other AtriumCMDB publish environments, the production environment is the source.
If the source is BAROC files, then the baroc instances are copied to the asset dataset and the impact dataset.
If the source is a publish environment, then the instances from the impact dataset of the source publish environment are copied to the impact dataset of the publish environment that is being initialized. Likewise, the instances from the asset dataset of the source publish environment are copied to the asset dataset of the publish environment that is being initialized.
In copying to the asset dataset, the type (Overlay or Regular) and the publish mode (Overlay or Current) is taken into account. If the asset dataset is an overlay dataset and the publish mode is overlay and the initialization's source is the underlying asset dataset, then effectively no copies are taken.
Initializing a cell
Initialization deletes all existing SIM data (service model data and service management data) of the publish environment from the cell. For an AtriumCMDB publish environment, it sends the contents of the BMC Atrium CMDB impact dataset to the cells.
When a cell is initialized, existing events are associated with new copies of components, so status information of component instances is not lost.
You reinitialize a cell by using the CLI command pinit. Typically, you reinitialize only when
■ a cell is reinstalled (restart the cell with the -i option)■ a cell must be restarted for recovery purposes ■ SIM data in the cell is no longer in sync with the data in the BMC Atrium CMDB
impact dataset or with the data in the Direct Publish source
When you add a new cell alias to an AtriumCMDB publish environment, the BMC Impact Publishing Server automatically initializes it with the service model management data upon the first publication to it. When you initialize cells of an AtriumCMDB publish environment, the data in the impact dataset (like BMC.IMPACT.PROD) is sent by the BMC Impact Publishing Server to the cells.
When only DirectPublish publishing is enabled, then you have to initialize the new cell with management data manually.
Chapter 8 Managing BMC Impact Publishing Server 209

Initializing a cell
To initialize a cell from the BMC Atrium CMDB production environment, execute the following CLI command:
pinit -n cellName
For more information about reinitializing a cell, see “pinit—Initializing a cell with service model data” on page 261.
210 BMC Impact Solutions Service Modeling and Publishing Guide

Example—creating SIM data in BMC Atrium CMDB from BAROC files
Example—creating SIM data in BMC Atrium CMDB from BAROC files
In this scenario, the goal is to initialize the publish environment for Dept1 with the default management data instances and with a number of components and impact relationships.
Creating a BAROC source with component and relationship objects
The following BAROC file, sm.baroc, defines the components and impact relationships of “dept1”:
EXAMPLE BMC_BusinessProcess; mc_udid=test1; Name=test1; OwnerName='DSM PSR/I Lab'; OwnerContact='713.918.8800'; Description='BMC DSM - PSR and Interoperability Lab Test Business Process'; StatusModel=STANDARD; HomeCell=lopud;END
BMC_BusinessService; mc_udid=test1_S0101; Name=test1_S0101; OwnerName='DSM PSR/I Lab'; OwnerContact='713.918.8800'; HomeCell=lopud;END
BMC_ComputerSystem; mc_udid=test1_S0101_N01; Type='WINDOWS_SYSTEM'; Name=test1_S0101_N01; OwnerName='DSM PSR/I Lab'; OwnerContact='713.918.8800'; Description=Computer; HostName=test1_S0101_N01; HomeCell=lopud;END
BMC_Application; mc_udid=test1_S0101_N01_A01; Name=test1_S0101_N01_A01; Type=app_type1; OwnerName='DSM PSR/I Lab'; OwnerContact='713.918.8800'; Description=Application; HomeCell=lopud; END
BMC_Impact; mc_udid=test1_obj1<-obj2; provider_id=test1_S0101; consumer_id=test1; PropagationModel=DIRECT; provider_home_cell=lopud; consumer_home_cell=lopud;
END
Chapter 8 Managing BMC Impact Publishing Server 211
Purging and deleting service model objects
Sending service model data to a cell using a BAROC source file
To initialize the publish environment for Dept1 with the default management data instances and a number of components and impact relationships, do the following:
1 Create a directory MCELL_HOME/etc/ps_hostname/kb/data_Dept1.
2 Copy into it the kb/data directory, add the file sm_Dept1, and edit the .load to add the sm_dept1.
3 Define the HomeCell parameter of the Dept1 environment as lopud.
4 Execute the following command:penv -e dept1 -p "SourceBarocServiceModel=etc/kb/data_dept1/.load" init -v
The service model is created in the asset and impact datasets of the AtriumCMDB Publish environment Dept1. The cell for Dept1 is running and is initialized immediately when you initialize the BMC Atrium CMDB.
When the initialization completes, the cell has the components and the impact relationships.
Purging and deleting service model objects
BMC recommends that service model objects be soft-deleted in BMC Atrium CMDB (MarkAsDeleted=Yes) until the BMC Impact Publishing Server is able to process their deletion. Ensure that you have retention rules on the Reconciliation's Purge activities for SIM classes. Occasionally, when objects have been purged or hard deleted in BMC Atrium CMDB before being published, the BMC Impact Publishing Server needs to publish them to avoid synchronization problems between cells and BMC Atrium CMDB data.
For automated publishing, if objects are purged from the asset dataset by a reconciliation’s purge activity, then the automated publisher is triggered, deleting the instances from the cells.
For manual publishing, the CLI command publish supports two parameters: Purge and Merge. By default, Purge=F and Merge=T.
To purge objects from the cells that have been hard deleted (purged) from the asset dataset, execute the following command:
publish -p “Purge=T”
212 BMC Impact Solutions Service Modeling and Publishing Guide

Publishing in automated or manual mode
Publishing in automated or manual mode
When the source of the service model data is the BMC Atrium CMDB, you can control when publishes occur by enabling or disabling automated publish.
By default, the BMC Impact Publishing Server automatically publishes service model objects to the cells. The BMC Impact Publishing Server service (or process) starts in automated mode.
To publish service model objects manually, you disable automated publish and use the CLI command publish. For more information about publish, see “publish—Publishing a service model or viewing instances to be published” on page 283.
Switching between automated publish and manual publish
By default, the BMC Impact Publishing Server service starts in automated mode. This is controlled in the pserver.conf configuration file by the parameter AutomatedStartMode (which is set to Automated).
To permanently switch the mode (if you always want to control all publications, for example), edit the pserver.conf file and change the value of the parameter AutomatedStartMode to Manual.
To temporarily switch the mode in which BMC Impact Publishing Server is running, execute the command pscontrol automated or pscontrol manual.
Automated publish considerations
When automated publish is enabled,
■ publishing operates in the background
■ publish is pre-authenticated if you password protect the AtriumCMDB Publish environment
■ publish requests are queued; a new request starts when the one in progress completes
■ if multiple promotion and reconciliation processes are running at the same time, the throughput time of the publication increases
■ all modified instances since the last successful publish are published, so the instances that are promoted and reconciled, and the instances that are published are not necessarily the same
Chapter 8 Managing BMC Impact Publishing Server 213

Publishing in automated or manual mode
■ publication failures caused by reasons independent of model consistence (for example, when a cell is not available) result in the automated publisher reattempting the publication
■ promotion and reconciliation, and publish are independent processes. It is possible that the promotion and reconciliation processes are successful, but the subsequent publish fails.
■ if an in-progress publish is still retrieving publishable data from an asset dataset, it will also find publishable data that became publishable after the in-progress publish was initiated. This
— might cause inconsistent data (like an impact relationship pointing to a non-existent component) and publication failure. Such a failure cannot be prevented because the BMC Atrium CMDB does not “know” the concept of transactions.
— causes the first publication to also publish the data of the second reconciliation. The second publication displays the message Nothing to be published.
■ you can also use the CLI command publish
How automated publish works
When a BMC Atrium CMDB Reconciliation Engine job terminates, the ARDBC plug-in notifies the BMC Impact Publishing Server that the reconciliation job has terminated. BMC Impact Publishing Server looks up changes to SIM data in the asset dataset since the last successful publication and attempts to publish the changes to the specified cells on publish environments for which automated publication is enabled.
When the automated publisher is temporarily off, notifications from a reconciliation job run are saved in BMC Impact Publishing Server’s persistent store. This ensures that no notifications are lost. When automated publisher restarts, all the notifications that are present are included in one publish request.
By default, automated publish is enabled on publish environments with regular asset dataset, so a promotion from BMC Impact Service Model Editor to a production cell is automatically published. By default, automated publish is disabled on publish environments with overlay asset dataset and an overlay publish mode, so a reconciliation to an asset dataset of a SME test environment to a test cell is not automatically published.
214 BMC Impact Solutions Service Modeling and Publishing Guide

Publishing from a Direct Publish source
Determining the current publish mode
To determine the current publish mode in which the BMC Impact Publishing Server is running, execute the CLI command psstat. One of the following messages is returned:
■ Started - Starting Automated mode■ Started - Automated mode■ Started - Manual mode
In an environment without the BMC Atrium CMDB, psstat returns the status of publishing server as Started.
For more information about psstat, see “psstat—Displaying status of BMC Impact Publishing Server” on page 282.
Publishing from a Direct Publish sourceWhen you have a source of data other than BMC Atrium CMDB, you can send it to cells using Direct Publish publishing. You provide a BAROC file that contains the data that is to be added, updated or deleted in the cells. You execute the CLI command pposter to publish the data from a Direct Publish environment. You can publish from multiple publish environments.
Data that you send from a Direct Publish environment must be updated and deleted in the context of a Direct Publish environment. For example, if you create a component by publishing from the Direct Publish environment MySource, then the component can only be updated or deleted by publishing from the same Direct Publish environment.
The basic process of publishing from a Direct Publish source is
Table 57 Basic process of publishing from a Direct Publish source
Basic process For instructions, see
1. Enable Direct Publishing. “Enabling Direct Publish publishing” on page 218.
2. Create a Direct Publish environment for the SIM management data.
“Creating an environment for component instances and relationships” on page 219
3. Create a Direct Publish environment for component instances and impact relationships.
“Creating an environment for component instances and relationships” on page 219
Chapter 8 Managing BMC Impact Publishing Server 215

About home cell and cell alias
About home cell and cell alias
Table 58 describes the parameters that apply to a Direct Publish environment.
You must define either the HomeCell or the CellAliases parameter for a Direct Publish environment.
You can set a default cell by setting CellAlias to null. Then, the components that do not have a value set for the attribute HomeCellAlias are published to that default cell.
You can define values for the parameters HomeCell and CellAliases of Direct Publish environments when you define the environment or you can modify them later. However, when you modify them, keep track of the cells to which you published data using the Direct Publish environment.
Determining the cell to which a component is published
To determine the cell to which a component is published, the BMC Impact Publishing Server uses the following algorithm:
1. If a HomeCell is defined for the publish environment, that value is used (regardless of the values of the component’s HomeCell or HomeCellAlias slots)
2. Only cell aliases and cell names defined in the publish environment's CellAliases parameter are used.
4. Create a source file that contains the service model data in BAROC format.
“pposter—Sending service model objects to a cell” on page 268
5. Send service model data in the BAROC source file to the cells.
“pposter—Sending service model objects to a cell” on page 268
Table 58 Valid parameters for a Direct Publish environment
Parameter name Function
CellAliases specifies one or more cell alias to cell name pairs
By default, this parameter is not set.
HomeCell specifies to which cell to publish. If HomeCell is set, all SIM data is published to that cell and CellAliases are not used.
By default, this parameter is not set.
Table 57 Basic process of publishing from a Direct Publish source
Basic process For instructions, see
216 BMC Impact Solutions Service Modeling and Publishing Guide

About home cell and cell alias
3. If the component’s attribute HomeCell is set, that value is used (regardless the value of the HomeCellAlias slot).
4. The value of the HomeCellAlias slot is used to look up the HomeCell in the publish environment's CellAliases.
Determining the cell to which an impact relationship is published
To determine the cell to which a impact relationship is published, the BMC Impact Publishing Server uses the following algorithm:
1. If HomeCell is defined for the publish environment, that value is used (regardless of the values of the component's consumer_home_cell or Consumer.HomeCellAlias slots)
2. Only cell aliases and cell names defined in the publish environment's CellAliases are used.
3. If consumer_home_cell is set, that value is used (regardless the value of the Consumer.HomeCellAlias slot)
4. The value of the Consumer.HomeCellAlias slot is used to look up the consumer_home_cell in the publish environment's CellAliases.
An impact relationship must go to the cell of its consumer.
About the home cell of the provider
1. If HomeCell is defined for the publish environment, that value is used (regardless of the values of the component's provider_home_cell or Provider.HomeCellAlias slots)
2. Only cell aliases and cell names defined in the publish environment's CellAliases are used.
3. If provider_home_cell slot is set, that value is used (regardless of the value of the Provider.HomeCellAlias slot)
4. The value of the Provider.HomeCellAlias slot is used to look up the provider_home_cell in the publish environment's CellAliases.
In a Direct Publish environment, status is not propagated when the value for provider_home_cell for a remote provider is incorrect.
Chapter 8 Managing BMC Impact Publishing Server 217

About class and slot data
Relationships that cross cells
When a relationship crosses cells (the provider and consumer components belong to different cells), you must set the provider_classname slot for successful creation of relationship.
Determining the cells to which management data is published
1 If HomeCell is defined for the publish environment, then management data is send to HomeCell.
2 Management data is sent to all cells defined in the CellAliases of the publish environment.
About class and slot data
If there are classes in the source files that do not exist in the cell, the publication continues or terminates, depending on the value of the parameter ContinueOnFailure in the pclient.conf file. For information about the pclient.conf file, see “Configuration file and parameters for CLIs” on page 235.
The attributes or slots in the source files must also exist in the cell or the publication fails.
All slots that are defined in the source files for pposter, except possibly HomeCell, HomeCellAlias, Consumer.HomeCell, Consumer.HomeCellAlias, Provider.HomeCell, and Provider.HomeCellAlias are published to the cell.
Enabling Direct Publish publishing
By default, Direct Publish publishing is enabled. Direct Publish is controlled in the pserver.conf file, located in MCELL_HOME/etc, by the parameter DirectPublishOrigin = T. (Default = T)
For DirectPublish environments, the cell information is looked up from a cell directory file. You set this file in pserver.conf with the parameter IMFileDirectoryName. It defaults to mcell.dir, so cells and BMC Impact Publishing Server share the file.
218 BMC Impact Solutions Service Modeling and Publishing Guide

Creating an environment for component instances and relationships
Creating an environment for component instances and relationships
Sending SIM data to one cell
When all the SIM data for the environment goes to one cell, you can define the cell once with the parameter HomeCell. Create a Direct Publish environment and define HomeCell by executing the following command:
penv open -e EnvId -p “OriginId=DirectPublish” -p “HomeCell=cellName”
EnvId represents the name of the environment you are creating.cellName represents the name of the cell to which you are sending objects.
Sending SIM data to multiple cells
When SIM data for the environment goes to more than one cell, you need to define cell aliases with the parameter CellAliases. Create a Direct Publish environment and define CellAliases by executing a similar command (depending on the number of cells):
penv open -e EnvId -p “OriginId=DirectPublish” -p “CellAliases=[cellAlias1, cellName1, cellAlias2, cellName2]”
EnvId represents the name of the environment you are creating.cellAlias# represents the cell alias to which you are sending objects.cellName# represents the name of the cell to which you are sending objects with the preceding cell alias.
Modifying home cell and cell aliases
To modify existing values for the parameters HomeCell or CellAliases, use the CLI command penv with its action command set.
To change the value of HomeCell to null (unset or remove the value), use the following command:
penv set -e EnvId -p "HomeCell="
NOTE
When you modify the value of the parameter CellAliases, you must redefine all cell aliases.
Chapter 8 Managing BMC Impact Publishing Server 219

Initializing a cell from a Direct Publish environment
To change the value of CellAliases to null (unset or remove the value), use the following command:
penv set -e EnvId -p "CellAliases="
Initializing a cell from a Direct Publish environment
Initializing a cell from a Direct Publish environment consists of deleting all existing SIM data of the publish environment from the cell and then recreating it from the original BAROC source file.m
Reinitializing a cell
To initialize a cell from a Direct Publish environment and recreate the data from the BAROC source file, execute CLI commands similar to the following:
pposter -e EnvId sourceFileName.baroc
pposter -e EnvId -p “Init=T” sourceFileName.baroc
Removing data from a cell
To remove existing service model data for a specific environment from a cell, the second pposter command references an empty (containing no data) BAROC file. Execute CLI commands similar to the following:
pposter -e EnvId sourceFileName.baroc
pposter -e EnvId -p “Init=T” emptyFileName.baroc
For more information about reinitializing a cell, see “pinit—Initializing a cell with service model data” on page 261.
Examples—using cell aliases for Direct Publish publishing
Example 1
You need a service model for the Sales department in the production cells austin and brussels.
You define a Direct Publish production environment by executing the following command:
220 BMC Impact Solutions Service Modeling and Publishing Guide

Examples—using cell aliases for Direct Publish publishing
You create a BAROC source file named sales.baroc. In the source file, these attributes are set: HomeCellAlias=austin, Consumer.HomeCellAlias=austin and Provider.HomeCellAlias=brussels.
You send the objects in the source file to the cells austin and brussels by executing the following command:
Now you want to experiment with the impact of a change to the service model in the test cells austin_test and brussels_test. You define a test Direct Publish environment by executing the following command:
You make a copy of the BAROC source file, sales.baroc, and name the copy sales_test.baroc. In the sales_test.baroc file, you add a new component and a new impact relationship and leave the remainder of the data in the source file unmodified.
You send the objects in the source file sales_test.baroc to the cells austin_test and brussels_test by executing the following command:
Example 2
The service model for the Sales department is needed for training.
You define a Direct Publish environment by executing the following command:
EXAMPLE penv open -e Sales -p “OriginId=DirectPublish” -p “CellAliases=[austin, austin, brussels, brussels]”
EXAMPLE pposter -e Sales sales.baroc
EXAMPLE penv open -e Sales.Test “OriginId=DirectPublish” -p “CellAliases=[austin, austin_test, brussels, brussels_test]”
EXAMPLE pposter -e Sales sales_test.baroc
EXAMPLE penv open -e Sales.Training -p “OriginId=DirectPublish” -p “CellAliases=[austin, austin_training, brussels, brussels_training]”
Chapter 8 Managing BMC Impact Publishing Server 221

Securing publish environments
You need the same objects in the Sales.Training environment that are in the source file sales.baroc, so you send the objects in that source file to the cells austin_training and brussels_training by executing the following command:
Even though you did not modify the source file sales.baroc, which has component instances defined with HomeCellAlias=austin, the service model objects are sent to the cell austin_training because the Sales.Training environment was defined with cellalias-to-cellname pairs as austin, austin_training and brussels, brussels_training. See “Determining the cell to which a component is published” on page 216.
Securing publish environmentsYou can control the execution of publishes for a specific publish environment by putting a password on the environment. You can password protect both Atrium CMDB environments and Direct Publish environments.
Passwords are removed in generated request logs and from BMC Impact Publishing Server request events (class IPS_REQUEST), unless you enable password logging by setting the PasswordLogging parameter to T (true) in the pserver.conf file.
Passwords that contain a semicolon (;) and passwords that end with (encrypted) are not supported.
You can put a password in the pclient.conf CLI’s configuration file. You enter the password in plain text and it is encrypted the first time a CLI is executed. This relieves you from having to enter the password on the command line when executing the CLI, however it makes the password available for anyone who has the right to execute the CLI. Also, a password that is in a CLI's configuration file applies to all executions that do not specify a password on the command line itself, regardless of the publish environment. Therefore, if you have multiple secured environments, you need to decide if you want to put the password of one of them in the configuration file.
Executing commands on password protected environments
If a publish environment is password protected, then you must enter the password for every action on the environment: publishing, initializing, and penv action commands: init, set, close.
EXAMPLE pposter -e Sales.Training sales.baroc
222 BMC Impact Solutions Service Modeling and Publishing Guide

Securing publish environments
For example, you want to assign a value to the HomeCell parameter for the Accounting department, which has an environment ID = Accounting and is password protected, so you execute the following command:
Adding a password when you create an environment
To add a password when you create a new publish environment, you use the CLI command penv and the action command open, in the format:
For example, you want to create a service model for the Sales department using a BAROC source file for the service model data and password protect it. So you create a Direct Publish environment with the CLI command penv and the action command open using the following command:
You can also enter a password in the pclient.conf or pinit.conf configuration files. You enter the password in plain text and it is encrypted the first time a CLI command that uses the configuration file is executed.
Adding a password to an existing environment
To add a password to an environment that was not password protected when it was created, you use the CLI command penv and the action command set, in the format:
EnvId represents the environment ID.the_password (first occurrence) represents the password.the_password (second occurrence) represents the password again, to confirm it.
Modifying the password on an environment
To change a password on an environment, you use the CLI command penv and the action command set, in the format:
EXAMPLE penv set -e Accounting -p “Password=ut0p1a” -p “HomeCell=cell2”
penv open -e EnvId -p “OriginId=DirectPublish|AtriumCMDB” -p “NewPassword1=the_password” -p “NewPassword2=the_password”
EXAMPLE penv open -e Sales -p “OriginId=DirectPublish” -p “NewPassword1=sam3ul” -p “NewPassword2=sam3ul”
penv set -e EnvId -p “NewPassword1=the_password” -p “NewPassword2=the_password”
Chapter 8 Managing BMC Impact Publishing Server 223

pserver.conf file and parameters
Removing the password on an environment
To remove the password on an environment, you use the CLI command penv and the action command set, in the format:
Using CLI command publish for a password protected AtriumCMDB Publish environment
If you password protect an Atrium CMDB Publish environment, you must include the password in the command string when you execute the CLI command publish. For example:
Automated publishing for a secured Atrium CMDB Publish environment is pre-authenticated.
Using CLI command pposter for a password protected Direct Publish environment
If you password protect a Direct Publish environment, you must include the password in the command string when you execute the CLI command pposter. For example:
pserver.conf file and parametersThis section contains information you need to configure the BMC Impact Publishing Server. For changes to this file to take affect, you must restart the BMC Impact Publishing Server service or process.
Table 59 describes the default pserver.conf file and all its parameters.
penv set -e EnvId -p “Password=old_password” - p “NewPassword1=new_password” -p “NewPassword2=new_password”
penv set -e EnvId -p “Password=old_password” - p “NewPassword1=” -p “NewPassword2=”
EXAMPLE publish -e Accounting -p “Password=l0b3l1a”
EXAMPLE pposter -e Payroll -p “Password=86a032” sm_payroll.baroc
224 BMC Impact Solutions Service Modeling and Publishing Guide

pserver.conf file and parameters
Table 59 pserver.conf file
Filename pserver.conf
File path MCELL_HOME/etc/ps_hostname or if that file does not exist MCELL_HOME/etc
Descriptioncontains the configuration settings that control the behavior of the BMC Impact Publishing Server
Parameter name Description Default value
SystemLogDirName specifies the name of the log directory for the BMC Impact Publishing Server
On UNIX platforms, you must specify an NFS path. Specifying a UNC path is not supported.
log
AtriumCMDBPublishOrigin enables (T) or disables (F) publishing from BMC Atrium CMDB to a cell
T (true)
AtriumCMDBHeartbeatInterval sets the length of time that BMC Impact Publishing Server waits for a heartbeat, a cancel, or a commit from a client during publish preview
When no heartbeat is received after this interval, the publish is cancelled.
180 (seconds)
AtriumCMDBPreviewTimeout sets the length of time that BMC Impact Publishing Server waits for an answer to cancel or commit the publish after publish preview
When no answer is received after this interval, the publish is cancelled.
180 (seconds)
CellPublishOrigin enables (T) or disables (F) publishing from staging cells T (true)
CellPublishIms lists all the staging cells, that is, all the cells that define CellPublish publish environments.
If you want to use the command "publish -e OVO" then you have to add the adapter cell to this parameter. If empty, then the command will fail with the message No publish environment OVO found, and you must use the command "pubilsh -e OVO -p "OriginId=CellPublish" -p "Cell=ovo_java""
CellPublishGateway enables (T) or disables (F) listening by the Publishing Server for incoming IPS_CP_TRIGGER events propagated by a staging cell that will trigger a publication for a CellPublish environment of the cell
T (true)
CellPublishGatewayName defines the name of gateway that listens for incoming IPS_CP_TRIGGER events to trigger a CellPublish publication.
This name is looked up in the directory set in IMFileDirectoryName.
not defined, set by install
Chapter 8 Managing BMC Impact Publishing Server 225

pserver.conf file and parameters
CellPublishGatewayIms lists the cells from which the Publishing Server accepts incoming events.
If no cell is listed then all incoming events are accepted.
not defined
CellPublish2CmdbContinueOnWarning
enables (T) or disables (F) continuation when instances that cannot be imported must skipped
The list of skipped instances and the reason they were skipped is output to the request log.
F (false)
CellPublish2CmdbReconJobTimeOut
defines the length of time, in seconds, that CellPublish2Cmdb checks for the termination of the reconciliation job run.
If the interval expires before the reconciliation job run completes, then the request log does not indicate the result. Even though no result is indicated, the reconciliation job might complete successfully after the timeout.
120 (seconds)
CellPublishCommitRetryTimeOut
defines the length of time, in seconds that CellPublish2Cmdb retries in total to commit the data in the import dataset.
When a commit fails, a new commit is retried without the offending data. By retrying the commit without the offending date, CellPublish2Cmdb can find all offending data in one run.
900 (seconds)
DirectPublishOrigin enables (T) or disables (F) direct publishing feed F (false)
DirectPublishHeatbeatInterval
sets the length of time that BMC Impact Publishing Server waits for a heartbeat, a direct request, or a close from a client
When no heartbeat is received after this interval, the publish is cancelled.
180 (seconds)
JNPServers defines the host and port of JNP Servers
When the Portal is set up in cluster mode, this value must match the same value in the pclient.conf file.
localhost:9379
JMSCommWarnReconnectCount the number of times to retry to establish JMS communication
If the trial fails then an IPS_ERROR event with message "Unable to establish JMS communications." of severity WARNING is generated.
If JMSCommWarnReconnectCount is -1 then retries continue indefinitely.
30 (reconnect attempts)
JMSCommWarnReconnectInterval the interval (in seconds) between two reconnection attempts
10 (seconds)
Table 59 pserver.conf file
226 BMC Impact Solutions Service Modeling and Publishing Guide

pserver.conf file and parameters
JMSCommMajorReconnectCount the number of times to retry to establish JMS communication
If the trial fails then an IPS_ERROR event with message "Unable to establish JMS communications." of severity MAJOR is generated.
If JMSCommMajorReconnectCount is -1 then retries continue indefinitely.
-1 (connection attempts)
JMSCommMajorReconnectInterval the interval (in seconds) between two reconnection attempts
300 (seconds)
CMDBServer specifies the name of the computer on which BMC Atrium CMDB resides
not defined, set by install
CMDBPort defines the port number for connecting to the BMC Atrium CMDB
not defined, set by install
use 0 for dynamic port detection
CMDBUser defines the user ID that grants access to the BMC Atrium CMDB
not defined, set by install
CMDBPassword a valid BMC Atrium CMDB user password
appears in plain text when entered; encrypted at first launch
not defined, set by install
ARSGroupMembers lists the host and TCP/IP port of every AR Server Group member
If an AR Server Group is deployed then you must set this parameter, regardless of whether you use a load balancer.
Use 0 for dynamic port detection.
not defined
RequestHistorySize sets the maximum number of request log files that are retained by the BMC Impact Publishing Server
100
CellConnectionTimeout sets the length of time the BMC Impact Publishing Server maintains a connection to a cell when there is no activity from the cell
60 (seconds)
IMMessageBufferSize sets the size of the message buffer for communication with the cell
2000
IMMessageBufferKeepSent sets the time to keep messages buffered while waiting for an answer
300 (seconds)
Table 59 pserver.conf file
Chapter 8 Managing BMC Impact Publishing Server 227

pserver.conf file and parameters
IMFileDirectoryName defines the name of the Impact Manager directory for direct publications; it is looked up in the directory MCELL_HOME/etc/PSName, or if that file does not exist, in the directory MCELL_HOME/etc
This directory file is also used to locate the cell for BMC Impact Publishing Server event generation.
mcell.dir
PaswordLogging enables (T) or disables (F) the display of passwords in generated request logs and IPS_REQUEST events
F (false)
SMMMessageBufferSize sets the size of the message buffer for communication with Service Model Manager
500
SMMMessageBufferKeepSent sets the time to keep messages buffered while waiting for an answer
300 (seconds)
SMMMessageBufferKeepSentEstimate
enables (T) or disables (F) the use of the estimate when the length of time exceeds the value that is calculated for the upload time of the service model
T (true)
ARSNormalTimeOut sets the time to stop waiting on a BMC Remedy AR System operation that occurs quickly
120 (seconds)
ARSLongTimeOut sets the time to stop waiting on a BMC Remedy AR System operation that occurs slowly
300 (seconds)
ARSXLongTimeOut sets the time to stop waiting on a BMC Remedy AR System operation that occurs slowly
1800
ARSXLongTimeOutEstimate enables (T) or disables (F) the use of the estimate when the length of time exceeds the value that is calculated for committing bulk entry transactions
T (true)
AutomatedCancelAckTimeout When automated publishing is stopped, an ongoing publish is canceled, if possible. This parameter sets the length of time for an ack reply of the publishing request, which returns the requestID.
If the requestID is unknown, then the publish request is not canceled.
5 (seconds)
AutomatedCancelScsFlrTimeout When automated publishing is stopped, an ongoing publish is canceled, if possible. This parameter sets the length of time for the final reply of the publish request, which returns a message indicating if the publish request was canceled or not.
If the publish is canceled or if the final reply is unknown, then the publish is retriggered when automated publish is restarted.
900 (seconds)
AutomatedHeartbeatInterval sets the length of time between the BMC Impact Publishing Server and the AR Notify plugin for heartbeat. 0 or a negative value disables heartbeat.
-1 (seconds)
AutomatedHeartbeatTimeout sets the length of time that BMC Impact Publishing Server waits for an answer to a heartbeat from the AR Notify plugin.
5 (seconds)
Table 59 pserver.conf file
228 BMC Impact Solutions Service Modeling and Publishing Guide

Configuring the Notify ARDBC plug-in
Configuring the Notify ARDBC plug-inThe Notify ARDBC plug-in adds real-time notification functionality to BMC Remedy AR System applications and enables clients to receive notification about events in BMC Remedy AR Server.
AutomatedPublishRetryCount the maximum number of times automated publishing is retried after failures
n represents the number of repeated publication attempts:
■ n = 0 means the publication is attempted once and not retried
■ n = 1 means the publication is attempted and then retried once
■ n < 0 means the BMC Impact Publishing Server continues to retry until a publication is successful
Publications that are skipped are not counted as retry attempts, so AutomatedPublishRetryCount is the effective maximum number of retries.
12
AutomatedPublishRetryPeriod sets the length of time between two consecutive publish requests when publish fails
If a previous publish request is not terminated when the interval times out, the next trial is skipped.
300 seconds
AutomatedStartMode the publishing mode when the BMC Impact Publishing Server starts or restarts. When the BMC Impact Publishing Server is running, you can change the publishing mode by using requests (using the CLI command pscontrol). By default, the BMC Impact Publishing Server starts in automated mode.
automated
IPSEventsIM defines the cell to which BMC Impact Publishing Server events are sent
not defined, set by install to Impact Administration Cell
IPSEventClasses defines the event classes for which BMC Impact Publishing Server events are created
all subclassess of IPS_EVENT
DefaultCell sets the CellName for the default HomeCellAlias
This parameter is used by the PROD publish environments of AtriumCMDB and CentralPublish origins.
set when?
Table 59 pserver.conf file
Chapter 8 Managing BMC Impact Publishing Server 229

Configuring the Notify ARDBC plug-in
You can modify the Notify ARDBC parameters in the following files:
UNIX: arInstallDirectory/conf/ar.conf Windows: arInstallDirectory\conf\ar.cfg
After you make changes to these parameters, restart BMC Remedy AR System so the changes take affect.
Table 60 ar.cfg file parameter descriptions
Parameter Description Default value
BMC-ARDBC-NOTIFY-Verify-Log log file location Remedy AR System/ Impact directory
BMC-ARDBC-NOTIFY-Server-Port port number for the server
If 0 is specified, the plug-in allows the operating system to choose an available port and binds to that port. The actual port is visible in the NOTIFY:servers form.
1840, set by install
BMC-ARDBC-NOTIFY-Protocol-V1-Encrypt switches encryption for V1 protocol on or off
If encryption is switched on (T), the NOTIFY:protocols property for the V1 protocol contains the key to use for encryption.
If encryption is switched off (F), the NOTIFY:protocols property for the V1 protocol is empty.
T (True)
BMC-ARDBC-NOTIFY-Mem-Trace enables (T) or disables (F) memory tracing
You should enable memory trace only when BMC Customer Support requests it.
F (False)
BMC-ARDBC-NOTIFY-Event-Cache sets the number of events for the event cache
When the size is 0, event caching is disabled
200
230 BMC Impact Solutions Service Modeling and Publishing Guide

Configuring the Notify plug-in for AR server groups
Configuring the Notify plug-in for AR server groups
The Publishing Server supports the Notify plug-in for Remedy AR server groups. If you use a load balancer, you must add the load balancer host name to the CMDBServer parameter in the pserver.conf file. You must also add the individual group member nodes (<host>:<tcp/ip port>) to the ARSGroupMembers parameter in the pserver.conf file. If you do not use a load balancer, you must set the address of the Remedy AR server group member to which you want the Publishing Server to connect using the CMDBServer parameter in the pserver.conf file.
To check whether the Remedy AR server group is correctly configured for the Publishing Server and the Notify plug-in:
1 From the computer running the Publishing Server, logon as Remedy User to the individual AR Server Group Members.
2 Open the form, NOTIFY:Servers.
3 In the form NOTIFY:Servers, you should find one entry when you attempt to retrieve the entries.
NOTE If a Server Name Alias is set equal to one of the group members, the Publishing Server (the AR API client or Remedy User) cannot access the ARDBC vendor form NOTIFY:Servers of the plugin running on the node that is not the alias. Automated publishing will not function.
Chapter 8 Managing BMC Impact Publishing Server 231

Configuring the Notify plug-in for AR server groups
232 BMC Impact Solutions Service Modeling and Publishing Guide

C h a p t e r 9
9 BMC Impact Publishing Server CLIsUse the BMC Impact Publishing Server Command Line Interface (CLI) to
■ initiate a service model publish■ create service model data (with a BAROC source file)■ create, initialize, and close publish environments■ request and review information about BMC Impact Publishing Server execution■ compare service model class definitions on cells with the class definitions in the
BMC Atrium Configuration Management Database (BMC Atrium CMDB)
This appendix provides reference information on the BMC Impact Publishing Server CLIs. It contains the following topics:
Configuring BMC Impact Publishing Server CLIs . . . . . . . . . . . . . . . . . . . . . . . . . . . . 234Configuration file and parameters for CLIs . . . . . . . . . . . . . . . . . . . . . . . . . . . . . . 235Changing the time-out values for all the CLI commands . . . . . . . . . . . . . . . . . . . 240Setting the configuration for a specific CLI command . . . . . . . . . . . . . . . . . . . . . 241Configuring trace for CLIs . . . . . . . . . . . . . . . . . . . . . . . . . . . . . . . . . . . . . . . . . . . . . 241Configuring trace for CLIs . . . . . . . . . . . . . . . . . . . . . . . . . . . . . . . . . . . . . . . . . . . . . 241
Understanding common command options for CLIs. . . . . . . . . . . . . . . . . . . . . . . . . . 241Understanding return codes for CLIs . . . . . . . . . . . . . . . . . . . . . . . . . . . . . . . . . . . . . . . 243Using CLI commands . . . . . . . . . . . . . . . . . . . . . . . . . . . . . . . . . . . . . . . . . . . . . . . . . . . . 247
Summary of CLI commands for BMC Impact Publishing Server . . . . . . . . . . . . 247pclassinfo—Comparing service model classes on cells with class definitions in
the BMC Atrium CMDB . . . . . . . . . . . . . . . . . . . . . . . . . . . . . . . . . . . . . . . . . . . . 249penv—Managing publish environments . . . . . . . . . . . . . . . . . . . . . . . . . . . . . . . . . 252pinit—Initializing a cell with service model data . . . . . . . . . . . . . . . . . . . . . . . . . . 261plog—Obtaining the XML log for a request . . . . . . . . . . . . . . . . . . . . . . . . . . . . . . 265plogdisplay—Converting the XML log for a request to text format . . . . . . . . . . 266pposter—Sending service model objects to a cell . . . . . . . . . . . . . . . . . . . . . . . . . . 268pscontrol—Sending a command to BMC Impact Publishing Server. . . . . . . . . . 278pserver—Starting the BMC Impact Publishing Server service . . . . . . . . . . . . . . . 280pshowlog—Obtaining the XML log in user-friendly format . . . . . . . . . . . . . . . . 281psstat—Displaying status of BMC Impact Publishing Server . . . . . . . . . . . . . . . 282publish—Publishing a service model or viewing instances to be published . . . 283
Chapter 9 BMC Impact Publishing Server CLIs 233
Configuring BMC Impact Publishing Server CLIs
Configuring BMC Impact Publishing Server CLIs
You configure the BMC Impact Publishing Server CLI by using a text editor to set the parameter values in the pclient.conf file located in the MCELL_HOME/etc directory.
You can configure the CLI to change the length of time that CLI commands wait for an acknowledgement of a request (ConnectionInitTimeout) or for the completion of a request (RequestTimeout). See “Changing the time-out values for all the CLI commands” on page 240.
NOTE As of version 7.3.00, Publishing Server CLIs no longer require authentication. However, the -i option remains viable for compatibility. If you specify the -i option, you do need to provide authentication credentials.
234 BMC Impact Solutions Service Modeling and Publishing Guide

Configuration file and parameters for CLIs
Configuration file and parameters for CLIs
Table 61 on page 235 lists and describes the configuration parameters for BMC Impact Publishing Server CLIs, located in the MCELL_HOME/etc/pclient.conf file.
Table 61 pclient.conf parameters (part 1 of 6)
Parameter Description Default value
JNPServers host and port of the naming service of BMC Impact Portal.
When the Portal is set up in cluster mode, the values must match.
<host of Portal>: 9379
IASServers specifies the BMC Impact Administration Server (usually by host name) that authenticates the CLI commands
If you specify a remote BMC Impact Administration Server in the pclient.conf file but do not provide user credentials, you must provide them as command line arguments when you run a CLI command.
Two BMC Impact Administration Servers can be setup as a high availability pair. To do this, you must enter both servers as a comma separated list, for example:
primaryIAS:3084,secondaryIAS:3084
The p-CLIs first attempt to connect the BMC Impact Administration Server on the host primaryIAS. If that connection attempt fails, an attempt is made to connect to the BMC Impact Administration Server on the host secondaryIAS. Note that this is not only applicable to nodes of a high availability BMC Impact Administration Server pair. You can specify more than one independent BMC Impact Administration Server. The p-CLIs attempt to connect to the first BMC Impact Administration Server. If that connection attempt fails, an attempt is made to connect to the next server in the list and so on until a connection is successful.
localhost: 3084
ConnectionInitTimeout sets the length of time, measured in seconds, that a CLI command on making a request waits for the acknowledging reply from the BMC Impact Publishing Server, or if the Portal is not running, or the Portal's JMS service is not up and running
Normally, the BMC Impact Publishing Server immediately acknowledges any request that it receives. If this time-out expires, it often indicates the BMC Impact Publishing Server is not receiving the request. For example, the BMC Impact Publishing Server service is not running.
5 seconds
Chapter 9 BMC Impact Publishing Server CLIs 235

Configuration file and parameters for CLIs
RequestTimeout sets the length of time, measured in seconds, that a CLI command waits for the processing of an acknowledged request to complete
Depending on the type of request, request processing may take a reasonable amount of time. If this time-out period expires, the CLI command stops following the request processing and, if possible, cancels the request.
3600 seconds
Locale outputs messages in the language of the specified locale if message resource files for the language are defined. The format is language[_country]. Language is a valid 2-letter ISO Language Code as defined by ISO-639. Country is a valid 2-letter ISO Country Code as defined by ISO-3166.
inherits system’s locale
Parameters specific to the publish CLI command
Merge indicates whether the Publishing Server should look for additions, modifications, and soft deletions that are to be published. The option is set to T when an automated publication is triggered from a reconciliation job with Merge activity
T
Purge indicates whether the Publishing Server should look for hard deletions that are to be published. This option is set to T when an automated publication is triggered from a reconciliation job with Purge activity
F
Password sets the password of a secured publish environment for the execution of the publish CLI command
none
Parameters specific to the pposter CLI command
ContinueOnFailure indicates whether pposter should stop when encountering invalid data in the source file
If ContinueOnFailure is set to T, true (default), pposter sends as much data as possible, skipping invalid data in the source file.
If ContinueOnFailure is set to F, false, pposter stops as soon as invalid data in the source file is encountered and no data is sent to the cell, not even those items processed before the incorrect data in the source file.
T
Init when set to T (true), pposter removes all existing data in the cell of the publish environment and recopies the data in the input BAROC file to the cell
when set to F (false), pposter incrementally updates the cell of the publish environment with data in the input BAROC file
F
Password sets the password of a secured publish environment for the execution of the pposter CLI command
none
Parameters specific to the penv CLI command
Table 61 pclient.conf parameters (part 2 of 6)
Parameter Description Default value
236 BMC Impact Solutions Service Modeling and Publishing Guide

Configuration file and parameters for CLIs
AssetDataSetId specifies the asset dataset name BMC.ASSET. EnvId
AssetDataSetType sets the asset dataset type
options are Regular or Overlay
Regular
AssetUnderlyingDataSetId sets the underlying dataset ID
Used when AssetDataSetType = Overlay
BMC.ASSET
AutomatedPublish enables (T) or disables (F) automated publishing on the publish environment
The default value is T, except for an overlay publish environment (an overlay dataset which has a publish mode of overlay), which defaults to F. In this way, automated publication is by default enabled on PROD environment, and is disabled by default on test environments of BMC Impact Service Model Editor.
T (true)
CellAliases defines cell alias and cell name pairs that are unique in a given environment, in the BAROC list of string format:
[cellAlias,cellName[,cellAlias,cellName]]
This parameter applies only on Direct Publish environments. For Atrium CMDB environments, cells aliases cannot be created or modified with the penv CLI command.
not defined
Cells If cell aliases are not used, you can set this parameter as an alternative, in the BAROC list of string format:
[cellName[,cellName]]
This parameter applies only on Direct Publish environments.
not defined
CloseAliases enables (T) or disables (F) the removal of aliases of an environment; this releases the cells for use in another environment
F (false)
CloseAsset enables (T) or disables (F) the removal of the asset dataset along with all objects in the dataset
F (false)
CloseCells enables (T) or disables (F) the removal of all data instances (including management data) of the service model from the cells
T (true)
EnvDesc specifies a description for the environment to BMC Asset EnvDesc
BMC Asset EnvDesc
EnvName sets the environment name to BMC Asset EnvId BMC Asset EnvId
Table 61 pclient.conf parameters (part 3 of 6)
Parameter Description Default value
Chapter 9 BMC Impact Publishing Server CLIs 237

Configuration file and parameters for CLIs
Format sets the format of information to Raw (a parsable data stream) or Display (readable by a user)
specific to the CLI; it is not sent to the Publishing Server as a request
Display
HomeCell sets the cell to which the entire service model is published
If set, CellAliases are not used.
not set
InitEffectivelyMgmtData determines which asset management data instances, based on the value assigned to their ServiceModelSet class attribute, are removed from the BMC Atrium CMDB
Before setting this parameter, please refer to “InitEffectively parameters” on page 206 which discusses the effect of the possible InitEffectivelyMgmtData settings on management data retention in or removal from the BMC Atrium CMDB.
IN, OUT
InitEffectivelyServiceModel determines which service model component and impact relationship instances, based on the value assigned to their ServiceModelSet attribute, are removed from the BMC Atrium CMDB asset dataset
Before setting this parameter, please refer to “InitEffectively parameters” on page 206 that discusses the effect of the possible InitEffectivelyServiceModel settings on SIM component instance retention in or removal from the BMC Atrium CMDB.
By default, all service model component or impact relationship instances are not removed from the BMC Atrium CMDB. Asset instances with the ServiceModelSet attribute value of IN or OUT_OF_IN have their attribute value reset to OUT.
blank
InitMgmtData specifies whether management data are initialized, T (true) or F (false)
T
InitServiceModel specifies whether the service model is initialized, T (true) or F (false)
T
Level determines the amount of information display by the info action command. Cell names and aliases are displayed only when -p “Level=1” is part of the command string.
0
NewPassword1 sets a new password for a secured environment not defined
NewPassword2 confirms a new password for a secured environment not defined
OriginId specifies the origin of the environment
options are AtriumCMDB or DirectPublish
AtriumCMDB
Password sets a password for a secured environment not defined
Table 61 pclient.conf parameters (part 4 of 6)
Parameter Description Default value
238 BMC Impact Solutions Service Modeling and Publishing Guide

Configuration file and parameters for CLIs
PublishModeMgmtData determines the mask used when retrieving publishable management data instances if AssetDataSetType = Overlay
if Overlay, all instances of the overlay dataset, as well as the underlying dataset, are considered
if Current, only instances of the overlay dataset are considered.
Overlay
PublishModeServiceModel determines the mask used when retrieving publishable components and impact relationships, if AssetDataSetType = Overlay
used when the dataset type is overlay, this parameter determines the mask used when retrieving publishable service model instances.
if Overlay, all instances of the overlay dataset, as well as the underlying dataset, are considered
if Current, only instances of the overlay dataset are considered.
Overlay
SIM enables (T) or disables (F) the classes that may be published for the Direct Publish environments only
if T, only SIM classes may be published
if F, components and relationships of MC_SM_COMPONENT, MC_SM_RELATIONSHIP, and all subclasses cannot be published
T (true)
SourceBarocMgmtData causes the import of initial management data from instances in the .baroc files pointed to in the .load file. Service model instances in those files are ignored. This parameter cannot be set if SourceEnvMgmtData is set.
MCELL_HOME/etc/<PSName>/kb/data/.load
This is the default value for the PROD environment.
SourceBarocServiceModel causes the import of initial service model data from instances in the .baroc files pointed to in the .load file. Management data in those files are ignored. This parameter cannot be set if SourceEnvServiceModel is set.
MCELL_HOME/etc/<PSName>/kb/data/.load
This is the default value for the PROD environment.
Table 61 pclient.conf parameters (part 5 of 6)
Parameter Description Default value
Chapter 9 BMC Impact Publishing Server CLIs 239

Changing the time-out values for all the CLI commands
Changing the time-out values for all the CLI commands
You can change the length of time that CLI commands wait for an acknowledgement of a request (ConnectionInitTimeout) or for the completion of a request (RequestTimeout).
To set the time-out values for all the CLI commands
Use a text editor to edit the pclient.conf file located in the MCELL_HOME/etc directory and change the values set of these parameters:
■ ConnectionInitTimeout■ RequestTimeout
SourceEnvMgmtData causes initial management data to be imported from instances of the source environment EnvId.
SourceEnvMgmtData cannot be set if SourceBarocMgmtData is set.
PROD environment
This is the default value for all environments other than PROD.
SourceEnvServiceModel causes initial service model data to be imported from instances in the asset dataset in the source environment EnvId. Data are created in the asset dataset of the environment.
If the asset dataset of source environment is an overlay dataset and EnvId refers to an underlying regular dataset, then:
■ If PublishModeServiceModel is Overlay, no instances are created in the overlay dataset.
■ If PublishModeServiceModel is Current, all instances will be created in the overlay dataset.
SourceEnvServiceModel cannot be set if SourceBarocServiceModel is set.
PROD, for re-initialization of environments other than PROD
Table 61 pclient.conf parameters (part 6 of 6)
Parameter Description Default value
240 BMC Impact Solutions Service Modeling and Publishing Guide

Setting the configuration for a specific CLI command
Setting the configuration for a specific CLI command
If you want to customize a configuration for a specific CLI command, you can create a configuration file just for it; for example, pposter.conf.
To set the configuration for specific CLI command
1 Make a copy of the pclient.conf file and name it CLIcommand.conf where CLIcommand is the name of the CLI command for which you are creating a special configuration; for example: pposter.conf.
2 Save the file in the MCELL_HOME/etc directory.
3 Edit the new configuration file with a text editor and set the appropriate parameter values.
When the CLI command is run, the values in the appropriate configuration file are used. Alternately, you can use the -c option (see “Understanding common command options for CLIs” on page 241).
4 Save the file.
Configuring trace for CLIs
You set and configure tracing of the BMC Impact Publishing Server CLIs in the MCELL_HOME\etc\pclient.trace file.
By default, only fatal, error, and warning messages appear in the trace file MCELL_HOME/tmp/pcli/pcli.trace.
You can enable the inclusion of informational and debugging messages for specific packages and subpackages by editing the pclient.trace file and removing the comment character (# ) from the lines that contain the value =DEBUG.
Understanding common command options for CLIs
Many BMC Impact Publishing Server CLI commands use the same option to perform the same function. This section describes the options that may be used by multiple commands.
Chapter 9 BMC Impact Publishing Server CLIs 241

Understanding common command options for CLIs
Syntax for common options
Common command options
Table 62 describes the common options for the BMC Impact Publishing Server CLI commands.
[-c ConfigFile] [-h|-?] [-i User/Password[@Host[/Port][,Host[/Port][,...]]] [-q] [-l HomeLocation] {-p "Var=Value"} [-r RequestLogFile] [-t ConnectionInitTimeout] [-u RequestTimeout] [-v] [-z]
Table 62 BMC Impact Publishing Server CLI common command options (part 1 of 2)
Option Syntax Description
-c ConfigFile specifies another configuration file to use instead of the default MCELL_HOME\etc\pclient.conf file
-h displays help information, including command syntax and options-?
-i User/Password[@Host[/Port][,Host[/Port][,...]]]
authenticates the specified user name and password with the BMC Impact Administration Server running on the specified host computer and port; you can specify multiple hosts and ports
This option is optional if you execute a CLI command on the BMC Impact Administration Server host computer. However, if you do use this option for local authentication and the credentials that you provide are invalid, the command will fail.
If IASServer and IASPort are set in the configuration file pclient.conf, then you don't have to pass the host and port with the -i option.
-l HomeLocation specifies a home directory other than MCELL_HOME for the command
-p "Var=Value" sets an option (Var) to the specified value (Value); this option modifies and overrides a value defined in the configuration file
-q invokes quiet execution (no banner appears)
-r RequestLogFile retrieves the XML-formatted log file and stores it as RequestLogFile
By default, the location of the log file is relative to the directory where you run the CLI. If you provide only a file name, the file is created in the directory where you run the CLI. You can also provide the absolute path for the log file.
-t ConnectionInitTimeout
specifies the length of time, in seconds, for the command to wait for a connection before terminating; default is 5 seconds
242 BMC Impact Solutions Service Modeling and Publishing Guide
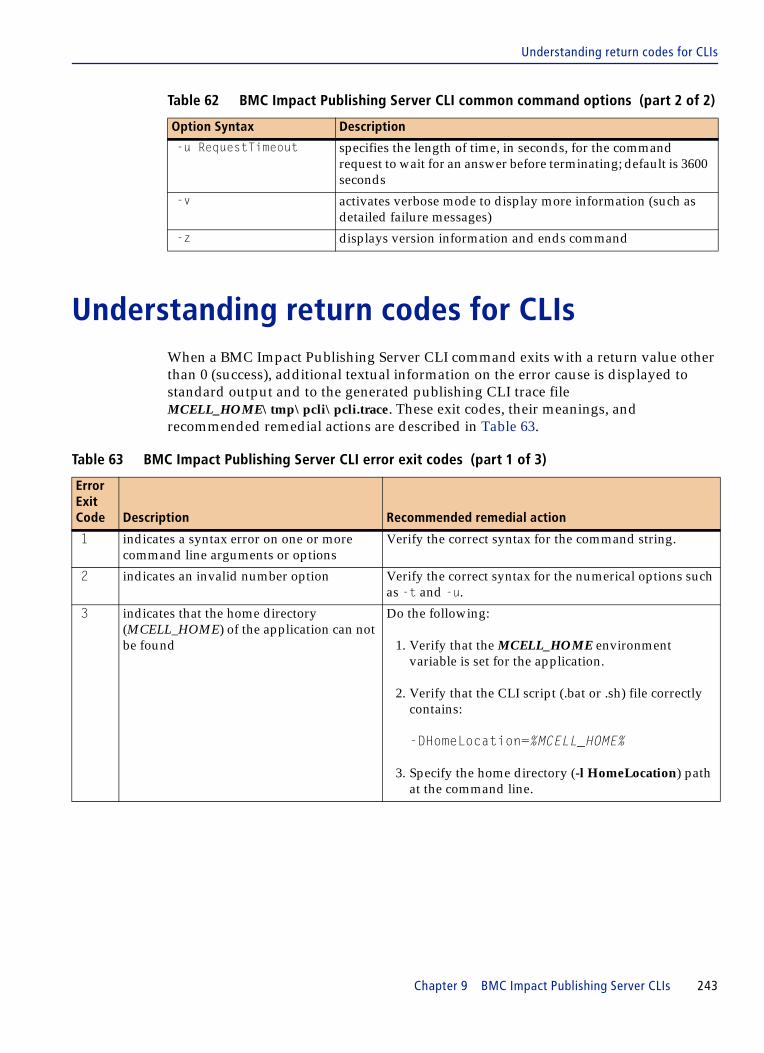
Understanding return codes for CLIs
Understanding return codes for CLIsWhen a BMC Impact Publishing Server CLI command exits with a return value other than 0 (success), additional textual information on the error cause is displayed to standard output and to the generated publishing CLI trace file MCELL_HOME\tmp\pcli\pcli.trace. These exit codes, their meanings, and recommended remedial actions are described in Table 63.
-u RequestTimeout specifies the length of time, in seconds, for the command request to wait for an answer before terminating; default is 3600 seconds
-v activates verbose mode to display more information (such as detailed failure messages)
-z displays version information and ends command
Table 63 BMC Impact Publishing Server CLI error exit codes (part 1 of 3)
Error Exit Code Description Recommended remedial action
1 indicates a syntax error on one or more command line arguments or options
Verify the correct syntax for the command string.
2 indicates an invalid number option Verify the correct syntax for the numerical options such as -t and -u.
3 indicates that the home directory (MCELL_HOME) of the application can not be found
Do the following:
1. Verify that the MCELL_HOME environment variable is set for the application.
2. Verify that the CLI script (.bat or .sh) file correctly contains:
-DHomeLocation=%MCELL_HOME%
3. Specify the home directory (-l HomeLocation) path at the command line.
Table 62 BMC Impact Publishing Server CLI common command options (part 2 of 2)
Option Syntax Description
Chapter 9 BMC Impact Publishing Server CLIs 243

Understanding return codes for CLIs
10 indicates a generic (unspecified) error (This is an internal error.) Do the following:
1. Enable tracing and execute the command again to have a trace.
2. Locate the pcli.trace file to submit to BMC Software Support.
pcli.trace is located in MCELL_HOME/tmp/pcli.
3. Contact BMC Software Support and file a user case for this failure.
11 indicates that the CLI is unable to initialize its communication layer
Retry the command. If the error still occurs, do the following:
1. Verify that the URL of the provider specified in the pclient.conf file (in the MCELL_HOME/etc directory) is correct.
2. Restart the BMC Portal and BMC Impact Publishing Server.
3. Try the command again.
12 indicates a communication failure when the CLI sent data to its communication provider, for example, the jBoss server
Retry the command. If the error still occurs, do the following:
1. Restart the BMC Portal and BMC Impact Publishing Server.
2. Try the command again.
13 indicates that the CLI cannot decode an answer that it has received from its communication provider
(This is an internal error.) Do the following:
1. Enable tracing and execute the command again so there is an entry in the trace file.
2. Locate the pcli.trace file (MCELL_HOME/tmp/pcli ) to submit to BMC Software Support.
3. Contact BMC Software Support and file a user case for this failure.
14 indicates that the CLI cannot find a file that it requires to run properly; for example a FileNotFound exception.
Verify that the file whose name appears as missing does exist
15 indicates that the CLI cannot resolve a host name
Repair the computer’s network settings
Table 63 BMC Impact Publishing Server CLI error exit codes (part 2 of 3)
Error Exit Code Description Recommended remedial action
244 BMC Impact Solutions Service Modeling and Publishing Guide

Understanding return codes for CLIs
16 indicates the failure to authenticate with the BMC Impact Administration Server
Do the following:
■ If you are running a CLI command, verify the credentials that you specified.
■ If automatic authentication is set up in the pclient.conf file, verify that the credentials (IASUsername, IASPassword, and IASServers) are valid.
17 indicates an Impact interface initialization failure; for example the I18N configuration may be wrong
Do the following:
Verify that the file MCELL_HOME/etc/locale/pclient.load exists on the host where the pcli is running/installed.
18 indicates that the UTF-8 character set is not supported by the host
The host computer must support the UTF-8 character set.
19 indicates that the CLI does not have a request identifier
Do the following:
1. Enable tracing and execute the command again to generate a trace.
2. Locate the pcli.trace file (MCELL_HOME/tmp/pcli) to submit to BMC Software Support.
3. Contact BMC Software Support and file a user case for this failure.
20 indicates an I/O error when the publishing log file is written
Verify that the write permission is set for the publishing request log file. You specify the name of the RequestLogFile for a CLI command by using the -r common option
Table 63 BMC Impact Publishing Server CLI error exit codes (part 3 of 3)
Error Exit Code Description Recommended remedial action
Chapter 9 BMC Impact Publishing Server CLIs 245

Return codes for pserver
Return codes for pserver
The pserver command has return codes that differ from other CLI commands. These exit codes, their meanings, and recommended remedial actions are described in Table 64.
Table 64 pserver error exit codes (part 1 of 2)
Error Exit Code Description Recommended remedial action
1 indicates that the HomeLocation system property is not set
Do the following:
1. Verify that the MCELL_HOME environment variable is set for the application.
2. Verify that the CLI script (.bat or .sh) file correctly contains:
-DHomeLocation=%MCELL_HOME%
3. Specify the home directory (-l HomeLocation) path at the command line.
2 indicates the log directory cannot be created
Ensure the pserver user has write access to MCELL_HOME/log.
3 indicates that the log/ps.lock file cannot be created
Ensure the pserver user has write access to MCELL_HOME/log.
4 indicates another Publishing Server is already running
Verify with fuser (Unix) that a process is keeping a lock on ps.lock. If not, remove ps.lock.
5 indicates the CMDB interface cannot initialize
Verify ARServer and BMC Atrium CMDB settings and installation.
6 indicates the Impact Administration Server interface cannot initialize
Verify BMC Impact Administration Server settings and installation.
7 indicates a configuration file is missing Provide the configuration file.
9 indicates an I/O exception occurred on a configuration file
Ensure the pserver user has write access to the configuration file.
10 indicates a syntax error Check the syntax you used for the command and try the command again.
246 BMC Impact Solutions Service Modeling and Publishing Guide

Using CLI commands
Using CLI commandsThis section provides information on how you use BMC Impact Publishing Server CLI commands, including functions, syntax, and examples.
Summary of CLI commands for BMC Impact Publishing Server
Table 65 lists all of the available BMC Impact Publishing Server CLI commands and provides a brief description of the purpose for each command.
You can invoke BMC Impact Publishing Server CLI commands from a command prompt on Windows, from a UNIX operating system prompt, or from a script, either locally on the BMC Portal host computer or remotely on another computer.
To use the BMC Impact Publishing Server CLI commands remotely, you must copy the CLI installation to the remote host and configure the CLI for remote access See “Configuring BMC Impact Publishing Server CLIs” on page 234.
11 indicates the home directory does not exist Do the following:
1. Verify that the MCELL_HOME environment variable is set for the application.
2. Verify that the CLI script (.bat or .sh) file correctly contains:
-DHomeLocation=%MCELL_HOME%
3. Specify the home directory (-l HomeLocation) path at the command line.
12 indicates a security exception error on the home directory
Ensure the pserver user has write access to the home directory.
13 indicates an I/O exception occurred during the creation of the HomeLocation/tmp/ps.trace file
Ensure the pserver user has write access to MCELL_HOME/tmp.
14 indicates the publish environments cannot be initialized
Verify that the SIM CMDB extension of the same version as the Publishing Server is installed.
Table 64 pserver error exit codes (part 2 of 2)
Error Exit Code Description Recommended remedial action
Chapter 9 BMC Impact Publishing Server CLIs 247
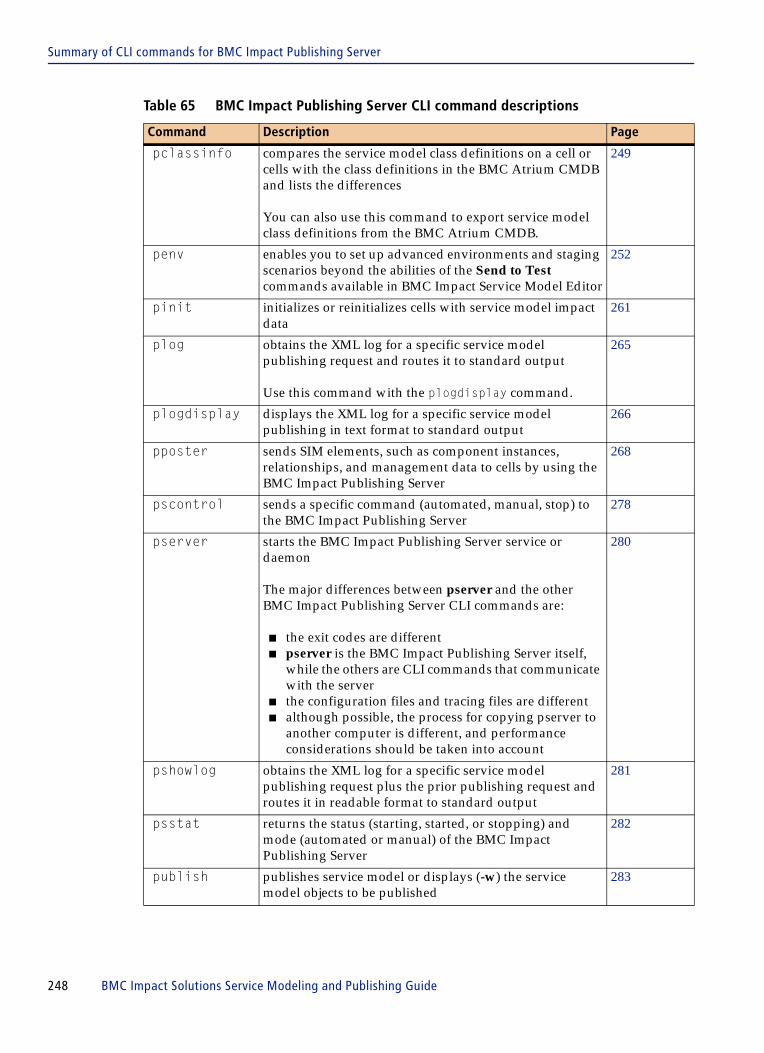
Summary of CLI commands for BMC Impact Publishing Server
Table 65 BMC Impact Publishing Server CLI command descriptions
Command Description Page
pclassinfo compares the service model class definitions on a cell or cells with the class definitions in the BMC Atrium CMDB and lists the differences
You can also use this command to export service model class definitions from the BMC Atrium CMDB.
249
penv enables you to set up advanced environments and staging scenarios beyond the abilities of the Send to Test commands available in BMC Impact Service Model Editor
252
pinit initializes or reinitializes cells with service model impact data
261
plog obtains the XML log for a specific service model publishing request and routes it to standard output
Use this command with the plogdisplay command.
265
plogdisplay displays the XML log for a specific service model publishing in text format to standard output
266
pposter sends SIM elements, such as component instances, relationships, and management data to cells by using the BMC Impact Publishing Server
268
pscontrol sends a specific command (automated, manual, stop) to the BMC Impact Publishing Server
278
pserver starts the BMC Impact Publishing Server service or daemon
The major differences between pserver and the other BMC Impact Publishing Server CLI commands are:
■ the exit codes are different■ pserver is the BMC Impact Publishing Server itself,
while the others are CLI commands that communicate with the server
■ the configuration files and tracing files are different■ although possible, the process for copying pserver to
another computer is different, and performance considerations should be taken into account
280
pshowlog obtains the XML log for a specific service model publishing request plus the prior publishing request and routes it in readable format to standard output
281
psstat returns the status (starting, started, or stopping) and mode (automated or manual) of the BMC Impact Publishing Server
282
publish publishes service model or displays (-w) the service model objects to be published
283
248 BMC Impact Solutions Service Modeling and Publishing Guide

pclassinfo—Comparing service model classes on cells with class definitions in the BMC Atrium CMDB
pclassinfo—Comparing service model classes on cells with class definitions in the BMC Atrium CMDB
Use the pclassinfo command to
■ compare the service model class definitions on a specific cell or cells with the service model class definitions in the BMC Atrium CMDB and list the differences between them.
■ export the service model class definitions from the BMC Atrium CMDB.
pclassinfo syntax
pclassinfo command options
Table 66 lists the options for pclassinfo.
There are no required options for pclassinfo.
pclassinfo <common options> [-n cellName1[,cellName2[...]] |-a | -x][-o OutputFile] [-s Description]
Table 66 pclassinfo options (part 1 of 2)
Options Description
<common options>-? -c -h -i -l -p -q -t -u -v -z
see “Understanding common command options for CLIs” on page 241
-a specifies to retrieve the service model classes from ALL the cells and compare them with the BMC Atrium CMDB service model classes
-n cellName1[,cellName2[...]]
specifies the specific cell or cells from which to retrieve the service model classes and compare them with the BMC Atrium CMDB service model classes
On Windows platforms, you must enclose the cell list in quotation marks (").
If a cell name is not specified, the default cell name (the unqualified version of the host computer name) is used. If the cell has a different name, the command fails.
Chapter 9 BMC Impact Publishing Server CLIs 249
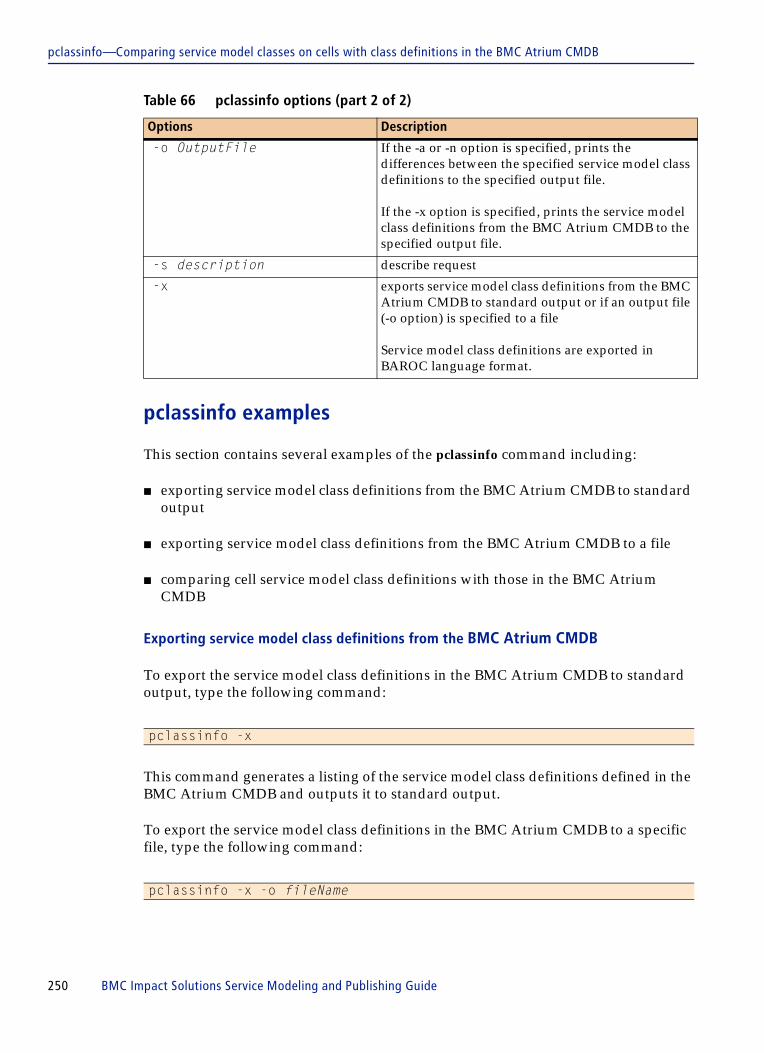
pclassinfo—Comparing service model classes on cells with class definitions in the BMC Atrium CMDB
pclassinfo examples
This section contains several examples of the pclassinfo command including:
■ exporting service model class definitions from the BMC Atrium CMDB to standard output
■ exporting service model class definitions from the BMC Atrium CMDB to a file
■ comparing cell service model class definitions with those in the BMC Atrium CMDB
Exporting service model class definitions from the BMC Atrium CMDB
To export the service model class definitions in the BMC Atrium CMDB to standard output, type the following command:
This command generates a listing of the service model class definitions defined in the BMC Atrium CMDB and outputs it to standard output.
To export the service model class definitions in the BMC Atrium CMDB to a specific file, type the following command:
-o OutputFile If the -a or -n option is specified, prints the differences between the specified service model class definitions to the specified output file.
If the -x option is specified, prints the service model class definitions from the BMC Atrium CMDB to the specified output file.
-s description describe request
-x exports service model class definitions from the BMC Atrium CMDB to standard output or if an output file (-o option) is specified to a file
Service model class definitions are exported in BAROC language format.
pclassinfo -x
pclassinfo -x -o fileName
Table 66 pclassinfo options (part 2 of 2)
Options Description
250 BMC Impact Solutions Service Modeling and Publishing Guide

pclassinfo—Comparing service model classes on cells with class definitions in the BMC Atrium CMDB
The service model class definitions are written to a BAROC file with the specified name. You can load this file on a cell.
Comparing cell service model class definitions with those in the BMC Atrium CMDB
To compare the service model class definitions in the cell whose name is the short-version of its host computer name (the default cell name) with the definitions in the BMC Atrium CMDB, type the following command:
If there are no differences between the service model class definitions on the cell and those defined in the BMC Atrium CMDB, the command returns output similar to the following:
If there are differences between the service model class definitions on the cell and those defined in the BMC Atrium CMDB, the command returns the differences, which appear similar to the following:
To compare the service model class definitions in a specific cell with those defined in the BMC Atrium CMDB on Windows platforms, type the following command:
pclassinfo
MCELL_HOME\bin>pclassinfoBMC Impact Service Model Class Retriever v7.2.00 (Build 1544975.000 - 20-May-2008)Copyright 2005-2008 BMC Software, Inc. as an unpublished work. All rights reserved.Class info is synchronized.
MCELL_HOME\bin>pclassinfo BMC Impact Service Model Class Retriever v7.2.00 (Build 1544975.000 - 20-May-2008)Copyright 2005-2008 BMC Software, Inc. as an unpublished work. All rights reserved.-- BEGIN DIFFS -- <PreviewItem><Im>arwad</Im><SlotAdd><Class>BMC_BaseElement</Class><Slot>VersionNumber</CmdbSlot></SlotAdd></PreviewItem> <PreviewItem><Im>arwad</Im><ClassAdd><CmdbClass>BMC_Region</CmdbClass></ClassAdd></PreviewItem> -- END DIFFS --Class info is not synchronized
pclassinfo -n cellName
Chapter 9 BMC Impact Publishing Server CLIs 251

penv—Managing publish environments
This command returns the differences, if there are any, between the service model class definitions on the cell named with those defined in the BMC Atrium CMDB.
To compare the service model class definitions for all the cells registered with the BMC Impact Portal with those defined in the BMC Atrium CMDB, type the following command:
This command returns the differences, if any, found between the classes defined in the BMC Atrium CMDB and the service model class definitions on all the cells found by the BMC Impact Publishing Server.
pclassinfo return codes
For information about CLI return codes, see “Understanding return codes for CLIs” on page 243.
penv—Managing publish environments
Use the penv command to create and manage publishing environments when the source of the service model data is either the BMC Atrium CMDB (Atrium Publish) or the CLI pposter (Direct Publish). For more information about publish environments, see “Understanding publish environments” on page 192 and “Publishing from a Direct Publish source” on page 215.
You can secure publish environments by applying a password. See “Securing publish environments” on page 222.
NOTE On Windows platforms, you must enclose the cell list in quotation marks (").
pclassinfo -a
NOTE When performing a penv init of a large service model the Stack Size and the Heap Size of the Publishing Server might need to be increased. For more information, see “Publishing large service models” on page 293
252 BMC Impact Solutions Service Modeling and Publishing Guide

penv—Managing publish environments
penv syntax
penv command options
Table 67 lists the options for penv.
penv <common options> [-f] (-e EnvId (close | init | open | set)|[-e EnvID] info)
Table 67 penv options (part 1 of 2)
Option Description
<common options>-c -h -? -i -l -q -p -t -u -v -z
see “Understanding common command options for CLIs” on page 241
Cells = ["["] cell1 {, cellN} ["]"]
The pair of opening and closing brackets are allowed but not mandatory.
Cells extend the existing concept of the HomeCell parameter. HomeCell becomes deprecated because setting HomeCell is equivalent to setting Cells with one element.
A DirectPublish environment can be created using either Cells or CellAliases. Defining a DirectPublish environment with HomeCell is supported for backward compatibility, but it is deprecated. If a CellAliases is given, a list of cells is built by the Publishing Server, consisting of all cell names found in CellAliases.
The destination cell names are determined as follows:
■ If Cells contains a single element, then this cell name is used to publish all data, regardless of any cell information found in the data.
■ If Cells contains more than one element, then for components and relationships, the destination cell must be found through the data instance:
For components, the attribute HomeCell is first searched, then HomeCellAlias is searched. For relationships, the attribute consumer_home_cell is searched, then Consumer.HomeCellAlias is searched.
■ If no valid destination cell is found, publish fails. If HomeCellAlias is used then CellAliases must be set, otherwise publish fails.
Management data or non-SIM data (that is, instances other than components or relationships) are published to all cells.
Chapter 9 BMC Impact Publishing Server CLIs 253

penv—Managing publish environments
penv action commands: open, init, close, set, info
penv provides additional functionality with these action commands: close, info, init, open, and set. Some action commands work differently or have different requirements, depending on the type of environment, Atrium Publish or Direct Publish, as described in Table 68.
-e EnvID sets a unique identifier for the environment
Default is PROD.
-f forces the command execution without prompting the user to confirm the initialization action.
If the -f option is not specified, you are prompted to confirm command execution.
-s description describe request
Table 68 Actions commands (part 1 of 2)
action command General description
Specific to BMC Atrium CMDB environments
Specific to Direct Publish environments
close removes data related to the specified environment. The impact dataset and all its instances are removed.
If CloseAsset=T, asset dataset instances are removed and the asset dataset is removed; default = F (false).
If CloseCells=T, cells are reinitialized with empty ServiceModel; default is T (true).
If CloseAliases=T, aliases of the environment are removed, which releases the cells for usage in another environment; default is T (true).
Table 67 penv options (part 2 of 2)
Option Description
254 BMC Impact Solutions Service Modeling and Publishing Guide

penv—Managing publish environments
Atrium Publish environments—valid parameters for each action command
Table 69 provides a brief description of the parameters in the pclient.conf configuration file for an Atrium Publish environment and specifies the parameters that are valid for each penv action command: close, info, init, open, and set.
For a complete list of parameters in the pclient.conf file and additional parameter information, see “Configuration file and parameters for CLIs” on page 235.
info displays information relevant to environments
■ to display column headings, use the -v option
■ to display cell alias information, use the -p “Level=1” option
■ Display characteristics are— when HomeCell is not set, a
empty string is returned () — cell alias values may include
blank characters— cell name values do not include
blank characters— values containing blank
characters are quoted according to the rules for quoting BAROC strings
all parameters are valid except CellAliases
relevant parameters are CellAliases, Format, HomeCell, Level, and OriginId
you must include -p OriginId=Direct Publish as part of the command string if the EnvID is not included.
init initializes (or reinitializes) the asset and impact datasets of the specified environment
not applicable
open creates the asset and impact datasets of the specified environment and stores environment settings in the cell
after the environment is opened, you cannot modify values for PublishModeServiceModel or PublishModeMgmtData parameters
also stores the settings for the environment in the BMC Atrium CMDB
data is stored only in the cell (and the source file); there is no secondary datastore
set sets or resets the parameters of the publish environment
you can reset only parameters AutomatedPublish, HomeCell, CellAliases, Password, NewPassword1, and NewPassword2
you can reset only parameters HomeCell, Cells, and CellAliases, Password, NewPassword1, and NewPassword2
Table 68 Actions commands (part 2 of 2)
action command General description
Specific to BMC Atrium CMDB environments
Specific to Direct Publish environments
Chapter 9 BMC Impact Publishing Server CLIs 255

penv—Managing publish environments
Table 69 Valid parameters for a BMC Atrium CMDB publish environment (part 1 of 2)
Parameter name Description close info init open set
AssetDataSetId defines the asset dataset ID; default is BMC.ASSET.EnvId
yes
AssetDataSetType defines the asset dataset type as Regular or Overlay; default is Overlay
yes
AssetUnderlyingDataSetId defines the underlying dataset for an overlay asset dataset; default is BMC.ASSET
yes
AutomatedPublish enables (T) or disables (F) automated publication for the publish environment; default is T, except for overlay publish environments
yes
CellAliases defines cellalias-to-cellname pairs that are unique to a given environment
You cannot define CellAliases with the CLI command penv.
yes yes
CloseAliases enables (T) or disables (F) the removal of aliases of an environment; this releases the cells for use in another environment
yes
CloseAsset enables (T) or disables (F) the removal of the asset dataset along with all objects in the dataset
yes
CloseCells enables (T) or disables (F) the removal of all data instances (including management data) of the service model from the cells
yes
EnvDesc describes the environment yes
EnvName specifies the name of the environment yes
HomeCell specifies to which cell to publish. If HomeCell is set, the entire service model is published to the specified cell. In this case, CellAliases are not used
yes yes
Format defines the information displayed with info
yes
InitEffectivelyMgmtData determines which asset management data instances, based on their ServiceModelSet attribute, are removed from the BMC Atrium CMDB
See “Configuration file and parameters for CLIs” on page 235.
yes
256 BMC Impact Solutions Service Modeling and Publishing Guide
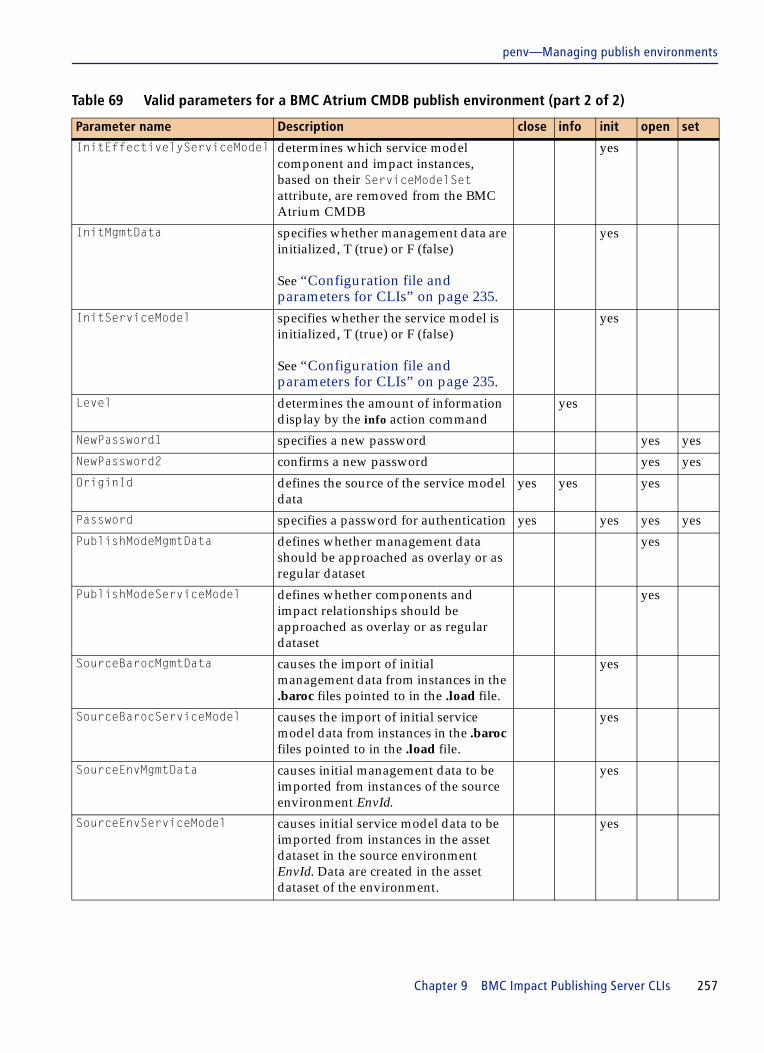
penv—Managing publish environments
InitEffectivelyServiceModel determines which service model component and impact instances, based on their ServiceModelSet attribute, are removed from the BMC Atrium CMDB
yes
InitMgmtData specifies whether management data are initialized, T (true) or F (false)
See “Configuration file and parameters for CLIs” on page 235.
yes
InitServiceModel specifies whether the service model is initialized, T (true) or F (false)
See “Configuration file and parameters for CLIs” on page 235.
yes
Level determines the amount of information display by the info action command
yes
NewPassword1 specifies a new password yes yes
NewPassword2 confirms a new password yes yes
OriginId defines the source of the service model data
yes yes yes
Password specifies a password for authentication yes yes yes yes
PublishModeMgmtData defines whether management data should be approached as overlay or as regular dataset
yes
PublishModeServiceModel defines whether components and impact relationships should be approached as overlay or as regular dataset
yes
SourceBarocMgmtData causes the import of initial management data from instances in the .baroc files pointed to in the .load file.
yes
SourceBarocServiceModel causes the import of initial service model data from instances in the .baroc files pointed to in the .load file.
yes
SourceEnvMgmtData causes initial management data to be imported from instances of the source environment EnvId.
yes
SourceEnvServiceModel causes initial service model data to be imported from instances in the asset dataset in the source environment EnvId. Data are created in the asset dataset of the environment.
yes
Table 69 Valid parameters for a BMC Atrium CMDB publish environment (part 2 of 2)
Parameter name Description close info init open set
Chapter 9 BMC Impact Publishing Server CLIs 257

penv—Managing publish environments
Direct Publish environments—valid parameters for each action command
Table 70 provides a brief description of the valid parameters in the pclient.conf configuration file for a Direct Publish environment and specifies the parameters that are valid for each penv action command: close, info, init, open, and set.
For a complete list of parameters in the pclient.conf file and additional parameter information, see “Configuration file and parameters for CLIs” on page 235.
penv examples
This section contains examples of penv info. For other examples of penv, see “Examples of advanced environments” on page 200.
Table 70 Valid parameters for a Direct Publish environment
Parameter name Description close info init open set
CellAliases defines cell alias and cell name pairs that are unique in an given environment
yes yes
Cells defines cell names when cell aliases are not used
yes
Format defines the information displayed with info yes
HomeCell specifies to which cell to publish. If HomeCell is set, the whole service model is published to the specified cell. In this case, CellAliases are not used.
yes yes
Level determines the amount of information displayed by the info action command
yes
NewPassword1 specifies a new password yes yes
NewPassword2 confirms a new password yes yes
OriginId defines the source of the service model data
yes yes yes
Password specifies a password for authentication yes yes yes yes
SIM enables (T) or disables (F) the classes that may be published for the Direct Publish environments only
if T, only SIM classes may be published
if F, components and relationships of MC_SM_COMPONENT, MC_SM_RELATIONSHIP, and all subclasses cannot be published
yes
258 BMC Impact Solutions Service Modeling and Publishing Guide

penv—Managing publish environments
Example 1—includes cell names and cell aliases, but no column headings
In example 1, Atrium Publish environments are displayed and cell names and cell aliases are displayed because the -p “Level=1” option is used, but column headings are missing because the -v option is not used.
Example 2—raw format
Example 2 displays the information in Raw format, rather than display format
EXAMPLE
$ penv -p "OriginId=AtriumCMDB" -p "Level=1" infoBMC Impact Publishing Server Environment Manager v7.0 (Build 666.343 - 05/21/2007)Copyright 2005-2007 BMC Software, Inc. as an unpublished work. All rights reserved.
Request received and accepted by the Publishing ServerrequestId=Z00000emahxa59Xp9yZhyMZ6zowkZ
AtriumCMDB
Ghislain.TEST.1 BMC.ASSET.Ghislain.TEST.1 BMC.IMPACT.Ghislain.TEST.1 Overlay Overlay Current F
cell1 test_ghislain cell2 test_ghislain cell3 test_ghislain
Marcelle.TEST.1 BMC.ASSET.Marcelle.TEST.1 BMC.IMPACT.Marcelle.TEST.1 Overlay Overlay Current F imtest
PROD BMC.ASSET BMC.IMPACT.PROD Regular
cell1 cell1 cell2 cell2 cell3 cell3
EXAMPLE
$ penv -p "OriginId=AtriumCMDB" -p "Format=Raw" -p "Level=1" infoBMC Impact Publishing Server Environment Manager v7.0 (Build 666.343 - 05/21/2007)Copyright 2005-2007 BMC Software, Inc. as an unpublished work. All rights reserved.
Request received and accepted by the Publishing ServerrequestId=Z00000emahxa59Xp9sZhyMZ6zowkZ
AtriumCMDBGhislain.TEST.1 BMC.ASSET.Ghislain.TEST.1 BMC.IMPACT.Ghislain.TEST.1 Overlay Current Current F ''3cell1 test_ghislaincell2 test_ghislaincell3 test_ghislainMarcelle.TEST.1 BMC.ASSET.Marcelle.TEST.1 BMC.IMPACT.Marcelle.TEST.1 Overlay Current Current F imtest0PROD BMC.ASSET BMC.IMPACT.PROD Regular T ''3cell1 cell1cell2 cell2cell3 cell3
Chapter 9 BMC Impact Publishing Server CLIs 259

penv—Managing publish environments
Example 3—includes cell aliases and column headings
In Example 3, cell aliases and column headings are included for an Atrium Publish environment.
EXAMPLE
$ penv -p "OriginId=AtriumCMDB" -p "Level=1" -v infoBMC Impact Publishing Server Environment Manager v7.0 (Build 666.343 - 05/21/2007)Copyright 2005-2007 BMC Software, Inc. as an unpublished work. All rights reserved.
Request received and accepted by the Publishing ServerrequestId=Z00000emahxa59Xp9uZhyMZ6zowkZ
OriginId: AtriumCMDB
------------------------------------------------------------------------------------EnvId AssetDataSetId ImpactDataSetId AssetDataSetType PublishModeMgmtData PublishModeServiceModel AutomatedPublish HomeCellGhislain.TEST.1 BMC.ASSET.Ghislain.TEST.1 BMC.IMPACT.Ghislain.TEST.1 Overlay Overlay Current F
CellAlias CellName cell1 test_ghislain cell2 test_ghislain cell3 test_ghislain-------------------------------------------------------------------------------------------------------------------------------------------------------------------------EnvId AssetDataSetId ImpactDataSetId AssetDataSetType PublishModeMgmtData PublishModeServiceModel AutomatedPublish HomeCellMarcelle.TEST.1 BMC.ASSET.Marcelle.TEST.1 BMC.IMPACT.Marcelle.TEST.1 Overlay Overlay Current F ImTest------------------------------------------------------------------------------------EnvId AssetDataSetId ImpactDataSetId AssetDataSetType PublishModeMgmtData PublishModeServiceModel AutomatedPublish HomeCellPROD BMC.ASSET BMC.IMPACT.PROD Regular T
CellAlias CellName cell1 cell1 cell2 cell2 cell3 cell3-------------------------------------------------------------------------------------
260 BMC Impact Solutions Service Modeling and Publishing Guide
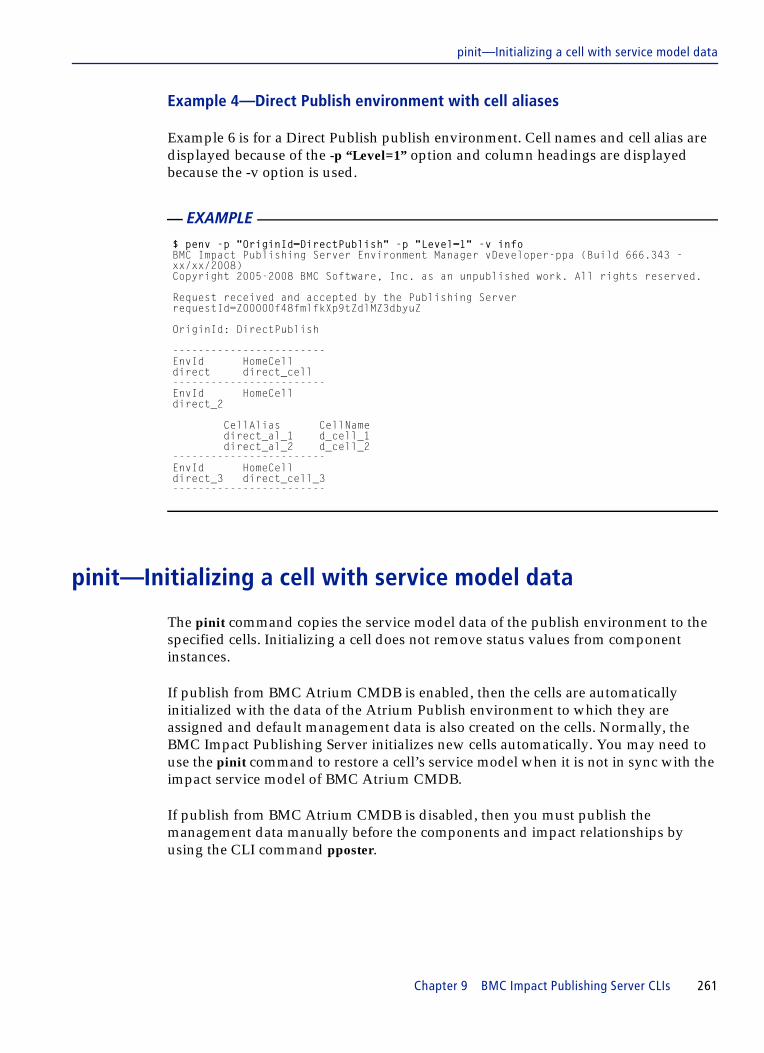
pinit—Initializing a cell with service model data
Example 4—Direct Publish environment with cell aliases
Example 6 is for a Direct Publish publish environment. Cell names and cell alias are displayed because of the -p “Level=1” option and column headings are displayed because the -v option is used.
pinit—Initializing a cell with service model data
The pinit command copies the service model data of the publish environment to the specified cells. Initializing a cell does not remove status values from component instances.
If publish from BMC Atrium CMDB is enabled, then the cells are automatically initialized with the data of the Atrium Publish environment to which they are assigned and default management data is also created on the cells. Normally, the BMC Impact Publishing Server initializes new cells automatically. You may need to use the pinit command to restore a cell’s service model when it is not in sync with the impact service model of BMC Atrium CMDB.
If publish from BMC Atrium CMDB is disabled, then you must publish the management data manually before the components and impact relationships by using the CLI command pposter.
EXAMPLE
$ penv -p "OriginId=DirectPublish" -p "Level=1" -v infoBMC Impact Publishing Server Environment Manager vDeveloper-ppa (Build 666.343 - xx/xx/2008)Copyright 2005-2008 BMC Software, Inc. as an unpublished work. All rights reserved.
Request received and accepted by the Publishing ServerrequestId=Z00000f48fmlfkXp9tZdlMZ3dbyuZ
OriginId: DirectPublish
------------------------EnvId HomeCelldirect direct_cell------------------------EnvId HomeCelldirect_2
CellAlias CellName direct_al_1 d_cell_1 direct_al_2 d_cell_2------------------------EnvId HomeCelldirect_3 direct_cell_3------------------------
Chapter 9 BMC Impact Publishing Server CLIs 261

pinit—Initializing a cell with service model data
For more information for a Direct Publish environment, see “Initializing a cell from a Direct Publish environment” on page 220.
pinit syntax
pinit command options
Table 71 lists the command options for pinit.
There are no required options for pinit.
NOTE When performing a pinit of a large service model the Stack Size and the Heap Size of the Publishing Server might need to be increased. For more information, see “Publishing large service models” on page 293.
pinit <common options> [-f] [-n cellName1[,cellName2[...]] |-a ] -e EnvId [-s Description]
Table 71 pinit options (part 1 of 2)
Option Description
<common options>-c -h -? -i -q -l -p -t -v -z
see “Understanding common command options for CLIs” on page 241
-a initializes HomeCell or the cells defined by CellAliases
If one or more of the cells cannot be initialized (for example, because a cell is not running), none of them are initialized and the request fails.
-f forces the cell initialization without prompting you to confirm the initialization action
If the -f option is not specified, you are prompted to confirm the initialization action.
262 BMC Impact Solutions Service Modeling and Publishing Guide

pinit—Initializing a cell with service model data
When you execute a pinit command for a specific environment, only the data for that environment is reinitialized. So, if the same cell contains different environments (for example, Atrium Publish and CellPublish), then only part of the cell’s data is reinitialized.
pinit examples
This section provides examples of using the pinit command to initialize or reinitialize a cell with service model data.
Initializing a cell with the production service model data from the BMC Atrium CMDB
To initialize or reinitialize the cell whose name is the short host name (default cell name) with the BMC Atrium CMDB production service model, type the following command. (The short host name is the unqualified version of the host computer name.)
-n cellName1[,cellName2[...]]
For a BMC Atrium CMDB publish environment: specifies the cells to initialize or reinitialize with the impact service model.
On Windows platforms, you must enclose the cell list in quotation marks (").
If a cell name is not specified, the default cell name (the unqualified version of the host computer name) is used. If such a cell does not exist or does not belong to the considered environment, the command fails.
If one or more of the cells cannot be initialized (for example, because a cell is not running), none of them are initialized and the request fails.
-s description describes request
-e environmentID sets environment identifier to environmentID. The default value is PROD.
It specifies either an Atrium CMDB environment or a Cell Publish environment, depending on the value of OriginId. For example, OriginId=AtriumCMDB or OriginId=CellPublish).
pinit
Table 71 pinit options (part 2 of 2)
Option Description
Chapter 9 BMC Impact Publishing Server CLIs 263

pinit—Initializing a cell with service model data
Initializing a specific cell with the BMC Atrium CMDB production service model
To initialize a specific cell named ”jana” with the BMC Atrium CMDB production service model, type the following command:
Initializing all BMC Impact Portal-registered cells with the BMC Atrium CMDB production service model
To initialize all the cells registered with the BMC Impact Portal with the BMC Atrium CMDB production service model, type the following command.
If one or more of the specified cells cannot be initialized, for example, if a cell is not running, none of them are initialized and the request fails.
Initializing a cell’s data for a Direct Publish environment
To initialize the cell austin in the Direct Publish environment Sales, type the following command.
This command removes all data of the service model in the Direct Publish environment Sales. In the cell, this corresponds to data that has the slot publish_env_id set to DirectPublish.Sales.
If the BMC Impact Publishing Server has both Atrium CMDB and Direct Publish enabled, then you must specify OriginId=DirectPublish, either in the pclient.conf file or in the CLI penv command string as -p “OriginId=DirectPublish”.
pinit return codes
For information about CLI return codes, see “Understanding return codes for CLIs” on page 243.
pinit -n jana
pinit -a
pinit -n austin -e Sales
264 BMC Impact Solutions Service Modeling and Publishing Guide

plog—Obtaining the XML log for a request
plog—Obtaining the XML log for a request
Use the plog command to obtain and optionally view the XML log for a publishing request. The plog command requests the XML log for a specific request from the BMC Impact Publishing Server and routes it in XML format to standard output. Use the plogdisplay command with the plog command to convert the XML log to text and to output the text to standard output.
plog syntax
plog command options
The required command option for plog is the Request ID.
Table 72 lists the options for plog.
plog examples
This section provides examples of using the plog command to obtain and output the XML log for a specific service model publishing request.
Viewing the XML log for a specific publishing request as stdout
To obtain the XML log for a specific publishing request, and send it to standard output for viewing, type a command similar to the following, substituting the request ID in this example:
plog <common options> RequestID [-r] [-s] [-w]
Table 72 plog options
Option Description
<common options>-c -h -? -i -q -l -p -t -v -z
see “Understanding common command options for CLIs” on page 241
RequestID the ID of a specific publish request
-r request the replies part of the XML log
-w request the instances to be published
-s request the process report of the XML log
plog -s Z00000e8mu7xw9Xpa1ZfsMZeg4v1Z
Chapter 9 BMC Impact Publishing Server CLIs 265

plogdisplay—Converting the XML log for a request to text format
Viewing the XML log for a specific publishing request as a text in stdout
To obtain the XML publishing log for a specific publishing request, convert it to text format, and output it to standard output for viewing, type a command similar to the following, substituting the request ID:
Using this command, you pipe the output of the plog command through the plogdisplay command to convert it to text format for output. See “plogdisplay—Converting the XML log for a request to text format” on page 266.
plog return codes
For information about CLI return codes, see “Understanding return codes for CLIs” on page 243.
plogdisplay—Converting the XML log for a request to text format
Use the plogdisplay command to convert the XML log for a request to text and output it to standard output. Use this command with the plog command.
plogdisplay syntax
plogdisplay command options
You must specify an input for the command; it can be either standard input (-@) or a specified file.
Table 73 lists the options for plogdisplay.
plog -s Z00000e8mu7xw9Xpa1ZfsMZeg4v1Z | plogdisplay -@
plogdisplay <common options> (-@ | RequestLogFile)
266 BMC Impact Solutions Service Modeling and Publishing Guide

plogdisplay—Converting the XML log for a request to text format
plogdisplay examples
This section provides examples of using the plogdisplay command to convert an XML log file for a publishing request to text and output it to standard output.
Converting an XML log file for a specific publishing request to text
To convert the XML log file for a publishing request to text and output it to standard output, type a command similar to the following command, substituting the correct xml file name:
Viewing the XML log for a specific publishing request as a text in stdout
You pipe the output of the plog command through the plogdisplay command to convert it to text format and output it to standard output. To view a specific publishing log in text format, type the following command:
Table 73 plogdisplay options
Option Description
<common options except: -r, -t, and -u>
see “Understanding common command options for CLIs” on page 241
This command does not interact with the BMC Impact Publishing Server so it does not accept these CLI common options: -r, -t, and -u.
You do not need to authenticate a user with the BMC Portal when using this command. If you do include the authentication option (-i), the user is authenticated.
-@ | RequestLogFile specifies the source of input to display
Use one of these arguments:
■ Use -@ to indicate standard input as the source to display.
■ For a specific publishing request, type the name of the XML log file as the source to display.
publish -r myLog.xml plogdisplay myLog.xml
plog -r -s Z00000e8mu7xw9Xpa1ZfsMZeg4v1Z | plogdisplay -@
Chapter 9 BMC Impact Publishing Server CLIs 267
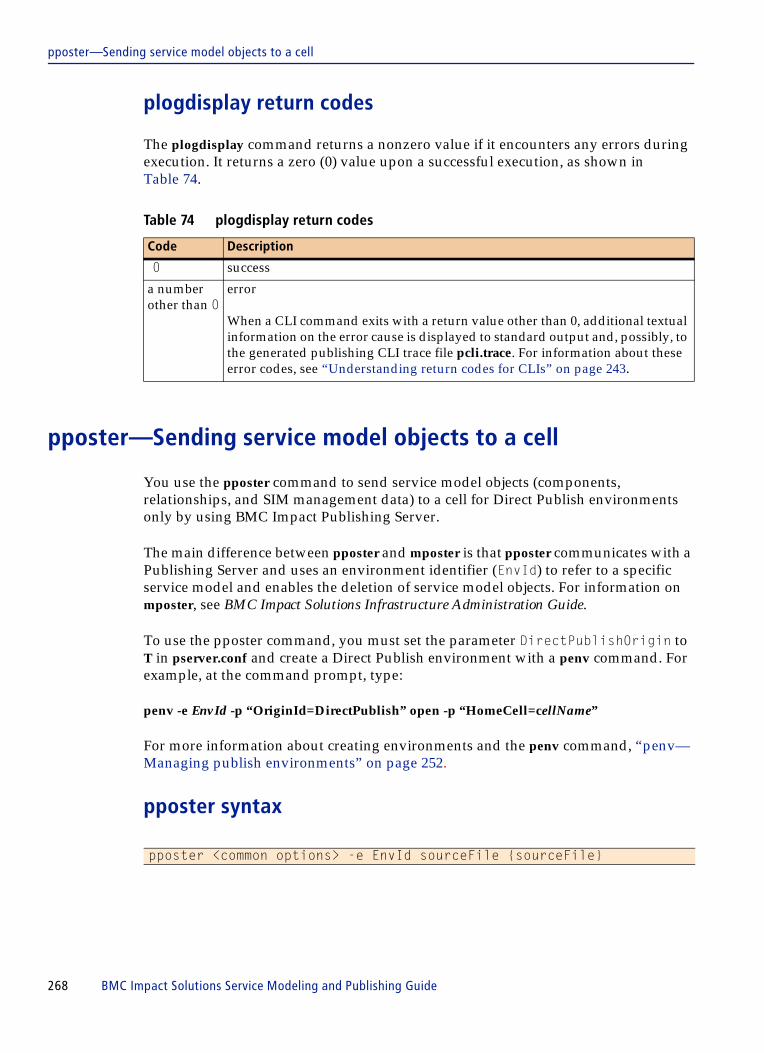
pposter—Sending service model objects to a cell
plogdisplay return codes
The plogdisplay command returns a nonzero value if it encounters any errors during execution. It returns a zero (0) value upon a successful execution, as shown in Table 74.
pposter—Sending service model objects to a cell
You use the pposter command to send service model objects (components, relationships, and SIM management data) to a cell for Direct Publish environments only by using BMC Impact Publishing Server.
The main difference between pposter and mposter is that pposter communicates with a Publishing Server and uses an environment identifier (EnvId) to refer to a specific service model and enables the deletion of service model objects. For information on mposter, see BMC Impact Solutions Infrastructure Administration Guide.
To use the pposter command, you must set the parameter DirectPublishOrigin to T in pserver.conf and create a Direct Publish environment with a penv command. For example, at the command prompt, type:
penv -e EnvId -p “OriginId=DirectPublish” open -p “HomeCell=cellName”
For more information about creating environments and the penv command, “penv—Managing publish environments” on page 252.
pposter syntax
Table 74 plogdisplay return codes
Code Description
0 success
a number other than 0
error
When a CLI command exits with a return value other than 0, additional textual information on the error cause is displayed to standard output and, possibly, to the generated publishing CLI trace file pcli.trace. For information about these error codes, see “Understanding return codes for CLIs” on page 243.
pposter <common options> -e EnvId sourceFile {sourceFile}
268 BMC Impact Solutions Service Modeling and Publishing Guide
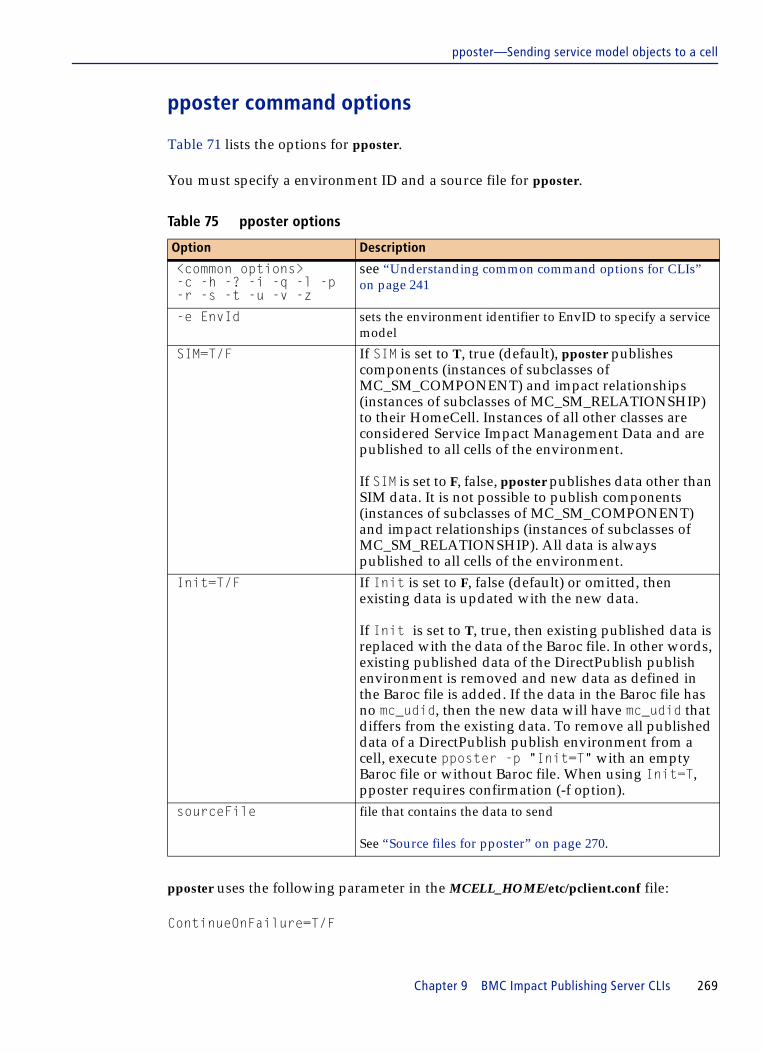
pposter—Sending service model objects to a cell
pposter command options
Table 71 lists the options for pposter.
You must specify a environment ID and a source file for pposter.
pposter uses the following parameter in the MCELL_HOME/etc/pclient.conf file:
ContinueOnFailure=T/F
Table 75 pposter options
Option Description
<common options>-c -h -? -i -q -l -p -r -s -t -u -v -z
see “Understanding common command options for CLIs” on page 241
-e EnvId sets the environment identifier to EnvID to specify a service model
SIM=T/F If SIM is set to T, true (default), pposter publishes components (instances of subclasses of MC_SM_COMPONENT) and impact relationships (instances of subclasses of MC_SM_RELATIONSHIP) to their HomeCell. Instances of all other classes are considered Service Impact Management Data and are published to all cells of the environment.
If SIM is set to F, false, pposter publishes data other than SIM data. It is not possible to publish components (instances of subclasses of MC_SM_COMPONENT) and impact relationships (instances of subclasses of MC_SM_RELATIONSHIP). All data is always published to all cells of the environment.
Init=T/F If Init is set to F, false (default) or omitted, then existing data is updated with the new data.
If Init is set to T, true, then existing published data is replaced with the data of the Baroc file. In other words, existing published data of the DirectPublish publish environment is removed and new data as defined in the Baroc file is added. If the data in the Baroc file has no mc_udid, then the new data will have mc_udid that differs from the existing data. To remove all published data of a DirectPublish publish environment from a cell, execute pposter -p "Init=T" with an empty Baroc file or without Baroc file. When using Init=T, pposter requires confirmation (-f option).
sourceFile file that contains the data to send
See “Source files for pposter” on page 270.
Chapter 9 BMC Impact Publishing Server CLIs 269

pposter—Sending service model objects to a cell
If ContinueOnFailure is set to F, false (default), pposter stops as soon as invalid data in the source file is encountered and no data is sent to the cell, not even those items processed before the incorrect data in the source file.
If ContinueOnFailure is set to T, true, pposter sends as much data as possible, skipping invalid data in the source file.
Source files for pposter
You create a source file and, using the following commands, define the contents in BAROC format with the appropriate data additions, modifications, or deletions.
For each data instance, provide a value for mc_udid. You can publish new data instances without specifying a value for mc_udid, but the mc_udid is still needed to modify or delete the existing data in cell, except if all existing data is replaced when publishing.
For environments that do not have a value for the HomeCell slot, you must provide a value for the HomeCell slot for each component, and a value for the provider_home_cell and the consumer_home_cell slots for each relationship. A relationship is sent to the cell of its consumer component.
For relationships in which the consumer and provider components belong to different cells, you must specify a value for the provider_classname slot. See “pposter example 2—two cells” on page 273.
You can also use cell aliases by specifying values for HomeCellAlias for components, and Consumer.HomeCellAlias and Provider.HomeCellAlias for relationships. Since these slots do not exist in the class definition of the cell, BMC Impact Publishing Server uses the alias table of the environment and replaces them with the values in the HomeCell, consumer_home_cell and provider_home_cell slots. See “pposter example 3—using cell aliases” on page 275.
Command Definition
dnew + create a new data instance; if this instance exists, update it
The space between dnew and + is required.
This is the default; if none of the three commands are present at the beginning of a line in a source file, dnew + is assumed.
dnew - create a new data instance
The space between dnew and - is required.
If this instance exists, do not change it; ignore the dnew - command.
dmodify change the existing data instance
ddelete delete the existing data instance
270 BMC Impact Solutions Service Modeling and Publishing Guide

pposter—Sending service model objects to a cell
Data instances, possibly prepended with dnew (+ or -), dmodify, or ddelete commands, must terminate with END, followed by a Return.
pposter example 1
This example shows how to create a simple service model, modify the service model, and delete the service model.
The service model consists of three objects: an application (comp0), that depends on a database (comp1), and the relationship between the two. The environment is MY_ENV and the HomeCell is MY_HOMECELL.
Creating a service model
To create this service model, create a source file. For this example, it is named FileDnew.baroc:
To send this new service model to the cell, at the command prompt, type the following command:
EXAMPLE BMC_DataBase;
mc_udid = comp0;Name = comp0;
END
BMC_Application;mc_udid = comp1;Name = comp1;
END
BMC_Impact;mc_udid = rel;provider_id = comp0;consumer_id = comp1;PropagationModel = DIRECT;Name = comp1;
END
EXAMPLE pposter -v -e MY_ENV FileDnew.baroc
BMC Impact Publishing Server Data Poster vDeveloper-ppa (Build 666.343 - xx/xx/2007) Copyright 2005-2007 BMC Software, Inc. as an unpublished work. All rights reserved.
Publish successfully applied.
Chapter 9 BMC Impact Publishing Server CLIs 271

pposter—Sending service model objects to a cell
Modifying a service model
To modify the service model by adding impact costs, create a source file. For this example, it is named FileDModify.baroc:
To send this modification to the service model to the cell, at the command prompt, type the following command:
Deleting a service model
To delete the service model, create a source file. For this example, it is named FileDdelete.baroc:
To send this deletion of the service model to the cell, at the command prompt, type the following command:
EXAMPLE dmodify BMC_DataBase;
mc_udid = comp0;ImpactCostPerSec = 5;ImpactCostPerSecOut = 2;
END
EXAMPLE pposter -v -e MY_ENV FileDmodify.baroc
BMC Impact Publishing Server Data Poster vDeveloper-ppa (Build 666.343 - xx/xx/2007) Copyright 2005-2007 BMC Software, Inc. as an unpublished work. All rights reserved.
Publish successfully applied.
EXAMPLE ddelete BMC_DataBase; mc_udid = rel; ENDddelete BMC_Application; mc_udid = comp0; ENDddelete BMC_Impact; mc_udid = comp1; END
EXAMPLE pposter -v -e MY_ENV FileDdelete.baroc
BMC Impact Publishing Server Data Poster vDeveloper-ppa (Build 666.343 - xx/xx/2007) Copyright 2005-2007 BMC Software, Inc. as an unpublished work. All rights reserved.
Publish successfully applied.
272 BMC Impact Solutions Service Modeling and Publishing Guide

pposter—Sending service model objects to a cell
pposter example 2—two cells
This service model consists of three objects: an application (comp0) that belongs in cell_1, a database (comp1) that belongs in cell_2, and the relationship between the two.
Creating a service model for two cells
To create this service model, create a source file. For this example, it is named FileDnew.baroc:
To send this new the service model to the cells, at the command prompt, type the following command:
EXAMPLE BMC_DataBase;
HomeCell = cell_1;mc_udid = comp0;Name = comp0;
END
BMC_Application;HomeCell = cell_2;mc_udid = comp1;Name = comp1;
END
BMC_Impact;provider_home_cell = cell_1;consumer_home_cell = cell_2;provider_classname = BMC_DataBase;mc_udid = rel;provider_id = comp0;consumer_id = comp1;PropagationModel = DIRECT;
END
EXAMPLE pposter -v -e MY_ENV FileDnew.baroc
BMC Impact Publishing Server Data Poster vDeveloper-ppa (Build 666.343 - xx/xx/2007) Copyright 2005-2007 BMC Software, Inc. as an unpublished work. All rights reserved.
Publish successfully applied.
Chapter 9 BMC Impact Publishing Server CLIs 273

pposter—Sending service model objects to a cell
Modifying a service model for two cells
To modify the service model by adding impact costs, create a source file. For this example, it is named FileDModify.baroc:
To send this modification to the service model to the cells, at the command prompt, type the following command:
Deleting a service model
To delete the service model, create a source file. For this example, it is named FileDdelete.baroc:
To send this deletion of the service model to the cell, at the command prompt, type the following command:
EXAMPLE dmodify BMC_DataBase;
HomeCell = cell_1;mc_udid = comp0;ImpactCostPerSec = 5;ImpactCostPerSecOut = 2;
END
EXAMPLE pposter -v -e MY_ENV FileDmodify.baroc
BMC Impact Publishing Server Data Poster vDeveloper-ppa (Build 666.343 - xx/xx/2008) Copyright 2005-2008 BMC Software, Inc. as an unpublished work. All rights reserved.
Publish successfully applied.
EXAMPLE ddelete BMC_DataBase; HomeCell = cell_1; mc_udid = rel; ENDddelete BMC_Application; HomeCell = cell_2; mc_udid = comp0; ENDddelete BMC_Impact; consumer_home_cell = cell_1; mc_udid = comp1; END
274 BMC Impact Solutions Service Modeling and Publishing Guide

pposter—Sending service model objects to a cell
pposter example 3—using cell aliases
This service model consists of three objects: an application (comp0) that belongs in cell_1, a database (comp1) that belongs in cell_2, and the relationship between the two. For this example, cell aliases are as follows:
Creating a service model with cell aliases
To create this service model, create a source file. For this example, it is named FileDnew.baroc:
EXAMPLE pposter -v -e MY_ENV FileDdelete.baroc
BMC Impact Publishing Server Data Poster vDeveloper-ppa (Build 666.343 - xx/xx/2007) Copyright 2005-2007 BMC Software, Inc. as an unpublished work. All rights reserved.
Publish successfully applied.
cell alias cell name
c_alias_1 cell_1
c_alias_2 cell_2
EXAMPLE BMC_DataBase;
HomeCellAlias = c_alias_1;mc_udid = comp0;Name = comp0;
END
BMC_Application;HomeCellAlias = c_alias_2;mc_udid = comp1;Name = comp1;
END
BMC_Impact;Provider.HomeCellAlias = c_alias_1;Consumer.HomeCellAlias = c_alias_2;provider_classname = BMC_DataBase;mc_udid = rel;provider_id = comp0;consumer_id = comp1;PropagationModel = DIRECT;
END
Chapter 9 BMC Impact Publishing Server CLIs 275

pposter—Sending service model objects to a cell
To send this new the service model to the cells, at the command prompt, type the following command:
Modifying a service model with cell aliases
To modify the service model by adding impact costs, create a source file. For this example, it is named FileDModify.baroc:
To send this modification to the service model to the cell, at the command prompt, type the following command:
EXAMPLE pposter -v -e MY_ENV FileDnew.baroc
BMC Impact Publishing Server Data Poster vDeveloper-ppa (Build 666.343 - xx/xx/2007) Copyright 2005-2007 BMC Software, Inc. as an unpublished work. All rights reserved.
Publish successfully applied.
EXAMPLE dmodify BMC_DataBase;
HomeCellAlias = c_alias_1;mc_udid = comp0;ImpactCostPerSec = 5;ImpactCostPerSecOut = 2;
END
EXAMPLE pposter -v -e MY_ENV FileDmodify.baroc
BMC Impact Publishing Server Data Poster vDeveloper-ppa (Build 666.343 - xx/xx/2007) Copyright 2005-2007 BMC Software, Inc. as an unpublished work. All rights reserved.
Publish successfully applied.
276 BMC Impact Solutions Service Modeling and Publishing Guide

pposter—Sending service model objects to a cell
Deleting a service model with cell aliases
To delete the service model, create a source file. For this example, it is named FileDdelete.baroc:
To send this deletion of the service model to the cell, at the command prompt, type the following command:
Return codes for pposter
Table 76 describes the return codes specific to the pposter command. For return (or error exit) codes common to all BMC Impact Publishing Server CLI commands, see “Understanding return codes for CLIs” on page 243.
EXAMPLE ddelete BMC_DataBase; HomeCellAlias = c_alias_1; mc_udid = rel; ENDddelete BMC_Application; HomeCellAlias = c_alias_2; mc_udid = comp0; ENDddelete BMC_Impact; Consumer.HomeCellAlias = c_alias_2; mc_udid = comp1; END
EXAMPLE pposter -v -e MY_ENV FileDdelete.baroc
BMC Impact Publishing Server Data Poster vDeveloper-ppa (Build 666.343 - xx/xx/2007) Copyright 2005-2007 BMC Software, Inc. as an unpublished work. All rights reserved.
Publish successfully applied.
Table 76 pposter return codes (part 1 of 2)
Return Code Description
0 All data commands in the source files are successfully applied to all cells of the environment.
50 Publish has successfully completed, but some errors were detected.
This can occur only if ContinueOnFailure is set to T (true).
For more information, see the publish log; the -v option provides more detail.
51 BMC Impact Publishing Server refused to initiate the publish process. The actual cause of the error (for example, another publish is in progress) is displayed on the standard error device.
52 An error is returned by BMC Impact Publishing Server when data are being sent to it.
For more information, see the publish log; the -v option provides more detail.
Chapter 9 BMC Impact Publishing Server CLIs 277

pscontrol—Sending a command to BMC Impact Publishing Server
pscontrol—Sending a command to BMC Impact Publishing Server
Use the pscontrol command to send a command (automated, manual, stop) to the BMC Impact Publishing Server.
By default, pscontrol only sends the command to the BMC Impact Publishing Server. To monitor that the mode effectively changed to Automated or Manual, you can use the -u option.
pscontrol syntax
pscontrol command options
Table 77 lists the options for the pscontrol command.
There are no required command options for the pscontrol command.
53 An error is returned by BMC Impact Publishing Server when data are effectively applied to the cells.
For more information, see the publish log; the -v option provides more detail.
54 There is a syntax or invalid BAROC object in the source file.
55 There is an I/O error with a source file, for example, no source file or the source file cannot be opened.
pscontrol [-c ConfigFile] [-h|-?] [-i User/Password[@Host[/Port] [,Host[/Port] [,...]]] [-q] [-l HomeLocation] {-p "Var=Value"} [-t ConnectionInitTimeout] [-u RequestTimeout] [-v] [-z] [-f] (automated | manual | stop)
Table 77 pscontrol command options (part 1 of 2)
Options Description
<common options>-c -h -i -q -l -p -t -u -v -z
see “Understanding common command options for CLIs” on page 241
The -u option default for pscontrol is 0 seconds.
-f forces the command to run without prompting the user to verify the execution of the command
stop stops the BMC Impact Publishing Server
Table 76 pposter return codes (part 2 of 2)
Return Code Description
278 BMC Impact Solutions Service Modeling and Publishing Guide

pscontrol—Sending a command to BMC Impact Publishing Server
pscontrol examples
This section contains examples of usage of the pscontrol command.
Figure 29 contains an example of the pscontrol stop command, which stops the BMC Impact Publishing Server.
Figure 30 contains an example of the pscontrol automated command, which restarts automated publishing.
Figure 31 contains an example of the pscontrol automated command using the -u option.
Figure 31 pscontrol automated -u example
automated turns automated publishing on
manual turns automated publishing off
Figure 29 pscontrol stop example
$ pscontrol stopBMC Impact Publishing Server Controller vDeveloper-ppa (Build 666.343 - xx/xx/2007)Copyright 2005-2006 BMC Software, Inc. as an unpublished work. All rights reserved.
Please confirm control command (stop) (type y (yes) / n (no). Default is n): y
Publishing Server is stopping
Figure 30 pscontrol automated example
pscontrol -f automatedBMC Impact Publishing Server Controller vDeveloper-ppa (Build 666.343 - xx/xx/2007)Copyright 2005-2006 BMC Software, Inc. as an unpublished work. All rights reserved.
Automated publishing is starting
pscontrol -f -u 300 automatedBMC Impact Publishing Server Controller vDeveloper-ppa (Build 666.343 - xx/xx/2007)Copyright 2005-2006 BMC Software, Inc. as an unpublished work. All rights reserved.
Automated publishing is starting
Automated publishing is started
Table 77 pscontrol command options (part 2 of 2)
Options Description
Chapter 9 BMC Impact Publishing Server CLIs 279
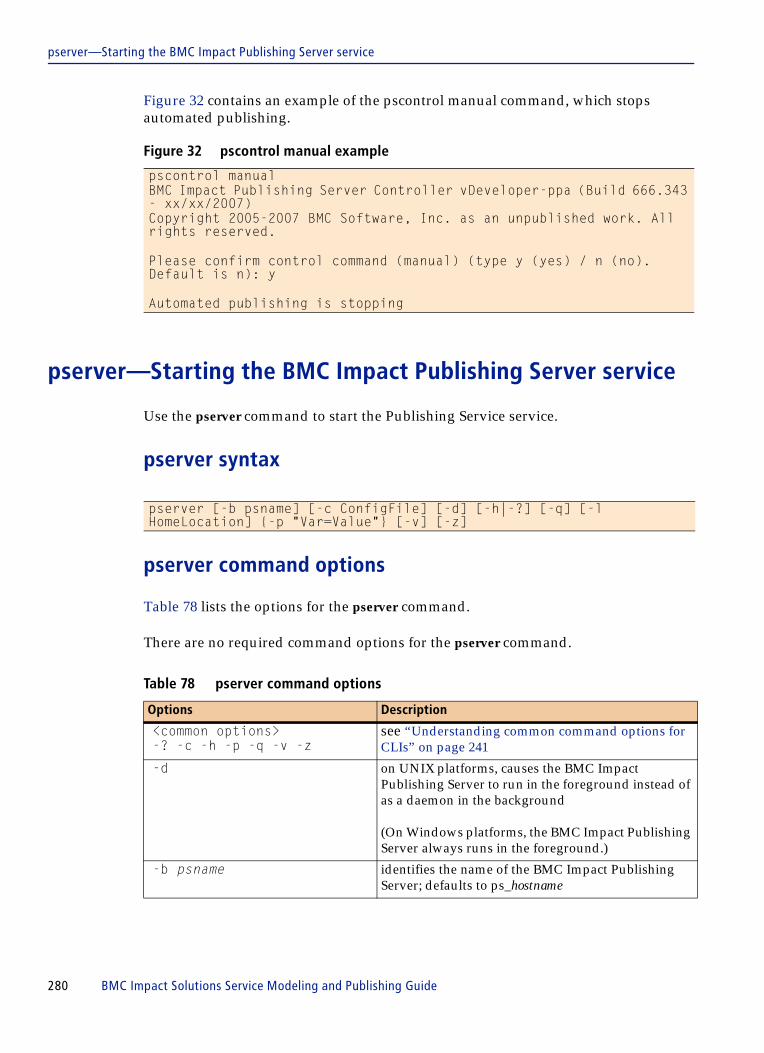
pserver—Starting the BMC Impact Publishing Server service
Figure 32 contains an example of the pscontrol manual command, which stops automated publishing.
pserver—Starting the BMC Impact Publishing Server service
Use the pserver command to start the Publishing Service service.
pserver syntax
pserver command options
Table 78 lists the options for the pserver command.
There are no required command options for the pserver command.
Figure 32 pscontrol manual example
pscontrol manualBMC Impact Publishing Server Controller vDeveloper-ppa (Build 666.343 - xx/xx/2007)Copyright 2005-2007 BMC Software, Inc. as an unpublished work. All rights reserved.
Please confirm control command (manual) (type y (yes) / n (no). Default is n): y
Automated publishing is stopping
pserver [-b psname] [-c ConfigFile] [-d] [-h|-?] [-q] [-l HomeLocation] {-p "Var=Value"} [-v] [-z]
Table 78 pserver command options
Options Description
<common options>-? -c -h -p -q -v -z
see “Understanding common command options for CLIs” on page 241
-d on UNIX platforms, causes the BMC Impact Publishing Server to run in the foreground instead of as a daemon in the background
(On Windows platforms, the BMC Impact Publishing Server always runs in the foreground.)
-b psname identifies the name of the BMC Impact Publishing Server; defaults to ps_hostname
280 BMC Impact Solutions Service Modeling and Publishing Guide

pshowlog—Obtaining the XML log in user-friendly format
pshowlog—Obtaining the XML log in user-friendly format
Use the pshowlog command to view the XML log, in a user-friendly format, for any request to the BMC Impact Publishing Server. The pshowlog command provides a quick way to display all the information shown by the plog command with all command options specified. However, pshowlog displays the log in a non-XML, readable format.. The pshowlog command requests the XML log for the specific request from the BMC Impact Publishing Server and routes it in readable format to standard output.
pshowlog syntax
pshowlog command options
The required command option for pshowlog is the Request ID.
Table 79 lists the options for pshowlog.
Any non-supported options added to the pshowlog command results in the usage being printed to stdout (standard out).
pshowlog example
This section provides examples of using the pshowlog command to obtain and output the XML log in readable format for a specific service model publishing request. Type a command similar to the following, substituting the request ID in this example:
To pass the Impact Administration Server host name and port number, type a command similar to this example:
pshowlog [ -i User/Password[@Host[/Port][,Host[/Port][,...]]] requestId | -h
Table 79 pshowlog options
Option Description
-h, -i see “Understanding common command options for CLIs” on page 241
RequestID the ID of a specific publish request
pshowlog Z00000e8mu7xw9Xpa1ZfsMZeg4v1Z
Chapter 9 BMC Impact Publishing Server CLIs 281
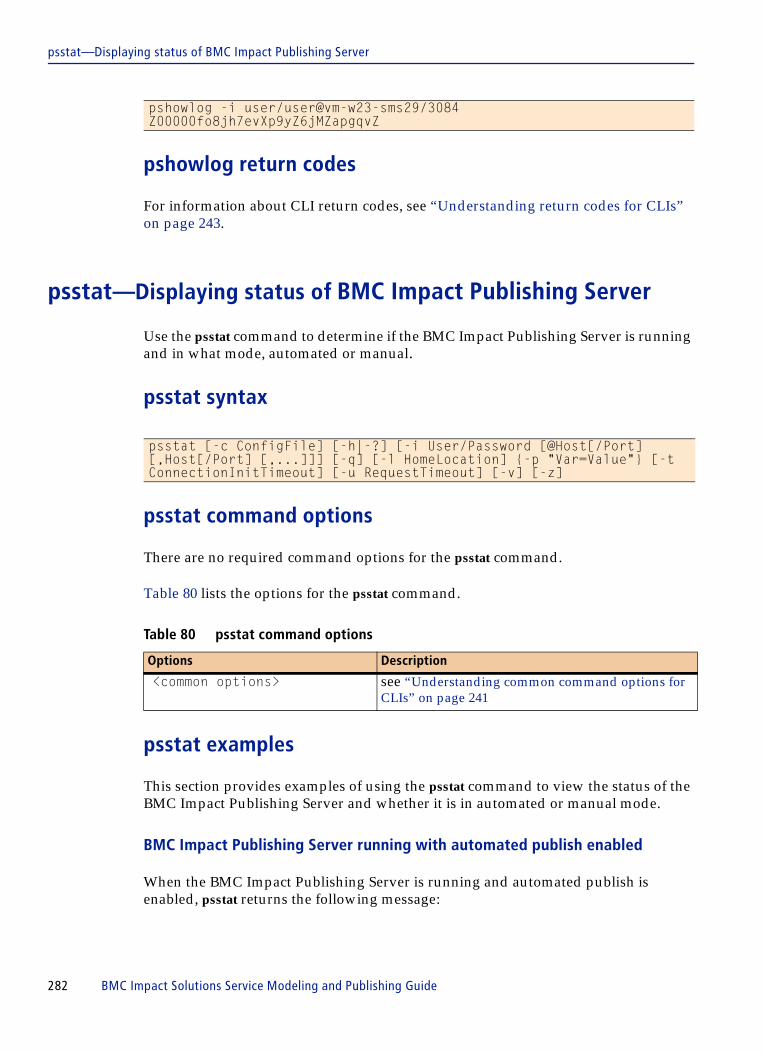
psstat—Displaying status of BMC Impact Publishing Server
pshowlog return codes
For information about CLI return codes, see “Understanding return codes for CLIs” on page 243.
psstat—Displaying status of BMC Impact Publishing Server
Use the psstat command to determine if the BMC Impact Publishing Server is running and in what mode, automated or manual.
psstat syntax
psstat command options
There are no required command options for the psstat command.
Table 80 lists the options for the psstat command.
psstat examples
This section provides examples of using the psstat command to view the status of the BMC Impact Publishing Server and whether it is in automated or manual mode.
BMC Impact Publishing Server running with automated publish enabled
When the BMC Impact Publishing Server is running and automated publish is enabled, psstat returns the following message:
pshowlog -i user/user@vm-w23-sms29/3084 Z00000fo8jh7evXp9yZ6jMZapgqvZ
psstat [-c ConfigFile] [-h|-?] [-i User/Password [@Host[/Port] [,Host[/Port] [,...]]] [-q] [-l HomeLocation] {-p "Var=Value"} [-t ConnectionInitTimeout] [-u RequestTimeout] [-v] [-z]
Table 80 psstat command options
Options Description
<common options> see “Understanding common command options for CLIs” on page 241
282 BMC Impact Solutions Service Modeling and Publishing Guide

publish—Publishing a service model or viewing instances to be published
BMC Impact Publishing Server running with automated publish disabled
When the BMC Impact Publishing Server is up and automated publish is disabled, psstat returns the following message:
BMC Impact Publishing Server not running (or cannot be contacted)
When the BMC Impact Publishing Server is down or cannot be reached, psstat returns the message Request Timeout Expired.
BMC Impact Publishing Server without the BMC Atrium CMDB
In an environement without the BMC Atrium CMDB, psstat returns the status of publishing server as Started.
publish—Publishing a service model or viewing instances to be published
Use the publish command to
■ publish the service model without viewing what is being published (default)
■ view the service model instances, including components, relationships, and management data instances that are marked for publishing
■ publish the entire service model or selected service model class instances and view a listing of the component, relationship, and management data instances being published
publish syntax
psstat
Started - Automated mode
psstat
Started - Manual mode
publish <common options> [-d ClassName.UdId[,ClassName.UdId[,...]]] [-e EnvId] [-w [-o File] [-m]] [-s Description]
Chapter 9 BMC Impact Publishing Server CLIs 283

publish—Publishing a service model or viewing instances to be published
publish command options
Table 81 lists the options for the publish command.
There are no required command options for the publish command.
publish examples
This section provides examples of using the publish command to view the service model class instances to be published (including components, relationships, and management data) and to publish them.
Publishing the service model without viewing it
To publish a service model without viewing the objects queued for publish, type the following command:
Table 81 publish command options
Options Description
<common options> see “Understanding common command options for CLIs” on page 241
[-d ClassName.UdId[,ClassName.UdId[,...]]]
publishes the specified service model object class instances, which can include component, relationship, and management data
-m publishes the service model class instances, including component, relationship, and management data instances, that you viewed (relevant only with the -w option)
-o OutputFile prints the service model class instances, including components, relationships, and management data, to be published to the specified output file (relevant only with the -w option)
-w view the service model class instances marked for publishing
-s description describe request
-e environmentID publishes in environmentID. The default value is PROD. Other values will result in error messages if using a BMC Impact Publishing Server version prior to 5.x.
publish
284 BMC Impact Solutions Service Modeling and Publishing Guide

Viewing the service model class instances to be published prior to publishing
To view the service model class instances that are queued for publishing, type the following command:
Viewing what is queued to publish and then publishing the objects
To view and then publish the service model objects that are marked for publishing, type the following command:
Viewing hard-deleted service model instances and publishing deletions
To view the service model objects that have been hard-deleted from the production asset dataset, but that still exist in cells, type the following command:
To view the service model objects that have been hard-deleted from the production asset dataset, but that still exist in cells, and then to publish the deletions to the cells, type the following command:
publish return codes
For information about CLI return codes, see “Understanding return codes for CLIs” on page 243.
publish -w
publish -w -m
publish -p “Purge=T” -p “Merge=F” -w
publish -p “Purge=T” -p “Merge=F” -w -m
Chapter 9 BMC Impact Publishing Server CLIs 285

286 BMC Impact Solutions Service Modeling and Publishing Guide
A p p e n d i x A
A TroubleshootingThis section describes problem solving for the BMC Impact Service Model Editor, the BMC Impact Publishing Server, and the BMC Impact Service Model Integration with HP OpenView Operations.
BMC Impact Service Model Editor . . . . . . . . . . . . . . . . . . . . . . . . . . . . . . . . . . . . . . . . . 288Using the BMC Impact Service Model Editor log. . . . . . . . . . . . . . . . . . . . . . . . . . 288Other BMC Impact Service Model Editor Troubleshooting Options . . . . . . . . . 292
BMC Impact Publishing Server . . . . . . . . . . . . . . . . . . . . . . . . . . . . . . . . . . . . . . . . . . . . 292Verifying that BMC Impact Publishing Server is running . . . . . . . . . . . . . . . . . . 293Using trace files . . . . . . . . . . . . . . . . . . . . . . . . . . . . . . . . . . . . . . . . . . . . . . . . . . . . . . 293Stopping BMC Impact Publishing Server when JMS is not running. . . . . . . . . . 293Publishing large service models . . . . . . . . . . . . . . . . . . . . . . . . . . . . . . . . . . . . . . . . 293Publishing failures and reattempts . . . . . . . . . . . . . . . . . . . . . . . . . . . . . . . . . . . . . . 295BMC Impact Publishing Server service or daemon fails to start . . . . . . . . . . . . . 296No publication after successful promotion . . . . . . . . . . . . . . . . . . . . . . . . . . . . . . . 296Reconciliation jobs hang . . . . . . . . . . . . . . . . . . . . . . . . . . . . . . . . . . . . . . . . . . . . . . . 297BMC Impact Publishing Server does not reply to requests. . . . . . . . . . . . . . . . . . 297Diagnosing publication failures . . . . . . . . . . . . . . . . . . . . . . . . . . . . . . . . . . . . . . . . 298Another publish request is ongoing . . . . . . . . . . . . . . . . . . . . . . . . . . . . . . . . . . . . . 302Using dynamic ports with the ARDBC Notify plug-in . . . . . . . . . . . . . . . . . . . . . 303
BMC Impact Service Model Integration with HP OVO . . . . . . . . . . . . . . . . . . . . . . . . 303Avoiding duplicate CIs. . . . . . . . . . . . . . . . . . . . . . . . . . . . . . . . . . . . . . . . . . . . . . . . 303Automated publication after reconciling reconciliation failure . . . . . . . . . . . . . . 304
Appendix A Troubleshooting 287

BMC Impact Service Model Editor
BMC Impact Service Model EditorThis section describes problem solving for the BMC Impact Service Model Editor product.
Using the BMC Impact Service Model Editor log
To open the BMC Impact Service Model Editor Log dialog box and view the log messages, choose Tools => View Log.
Figure 33 BMC Impact Service Model Editor log
By default, this log captures startup and shutdown information. To record different levels of information for debugging purposes, see “To set log file preferences” on page 155.
The following illustration depicts representative log entries of the BMC Impact Service Model Editor GUI log.
Outside BMC Impact Service Model Editor, you can enable the log for the BMC Impact Service Model Editor server and the Java Web Start console.
Nov 27, 2006 4:57:08 PM [Seq: 0, ID: BMCSME001010, Level: INFO]FindPanel Creation doneNov 27, 2006 4:57:09 PM [Seq: 2, ID: BMCSME000006, Level: INFO]Service Model Editor console started. Version: 5.0.0 Build: 1124943Nov 27, 2006 4:57:42 PM [Seq: 3, ID: BMCSME000018, Level: INFO]Loaded 1 workspaces from server.Nov 27, 2006 5:01:03 PM [Seq: 4, ID: BMCSME000004, Level: INFO]Logging level changed to ALL.
288 BMC Impact Solutions Service Modeling and Publishing Guide

Using the BMC Impact Service Model Editor log
BMC Impact Service Model Editor Server
The BMC Impact Service Model Editor Server records commands, runtime exceptions, and debugger information. To view the output of the BMC Impact Service Model Editor Server log, you must modify the log4j.xml configuration file of the JBoss application server. The log4j.xml configuration file is located on the system where the BMC Portal is installed in the directory: BMC_PORTAL_KIT_HOME/appserver/websdk/tools/jboss/server/all/conf.
You can modify the log4j.xml file to send its output to
■ the BMC Portal log file■ a console window■ a console window and the JBoss log file
To send BMC Impact Service Model Editor Server debug output to the BMC Portal log file
1 In an appropriate editor, open the BMC_PORTAL_KIT_HOME/appserver/websdk/tools/jboss/server/all/conf/log4j.xml.
2 Add the following appender and category elements under the Setup the Root Category heading.
<appender name="CLUSTER" class="org.jboss.logging.appender.RollingFileAppender"><errorHandler class="org.jboss.logging.util.OnlyOnceErrorHandler"/><param name="Threshold" value="DEBUG"/><param name="File" value="${jboss.server.home.dir}/log/portal.log"/><param name="Append" value="true"/><param name="MaxFileSize" value="100MB"/><param name="MaxBackupIndex" value="10"/>
<layout class="org.apache.log4j.PatternLayout"><param name="ConversionPattern" value="<%5.1p,%d{MM/dd/yy HH:mm:ss z},%c{1}>%m%n"/></layout></appender>
<category name="com.bmc.sms.sme"><priority value="DEBUG"/><appender-ref ref="SME_FILE"/></category>
Appendix A Troubleshooting 289

Using the BMC Impact Service Model Editor log
To send BMC Impact Service Model Editor Server debug output to a console window
1 In an appropriate editor, open the BMC_PORTAL_KIT_HOME/appserver/websdk/tools/jboss/server/all/conf/log4j.xml.
2 Add the following appender and category elements under the Setup the Root Category heading.
3 To view debug output in a console window, start the BMC Impact Portal from a shell window:
■ For Windows, open a Command Prompt window, and enter the following command:
BMC_PORTAL_KIT_HOME\appserver\websdk\bin\run.bat
■ For Solaris, open a terminal window, and enter the following command:
BMC_PORTAL_KIT_HOME/tools/jboss/bin/jboss.sh
4 Restart the BMC Portal application server.
<appender name="SME_CONSOLE" class="org.apache.log4j.ConsoleAppender"><errorHandler class="org.jboss.logging.util.OnlyOnceErrorHandler"/><param name="Target" value="System.out"/><param name="Threshold" value="DEBUG"/><layout class="org.apache.log4j.PatternLayout"> <!-- Since sdk logger prints its own context info, we shorten the context info from log4j and use the following format:<last letter of Priority,Date,Category> Message\n --><param name="ConversionPattern" value="<%5.1p,%d{MM/dd/yy HH:mm:ss z},%c{1}> %m%n"/></layout></appender>
<category name="com.bmc.sms.sme"><priority value="DEBUG"/><appender-ref ref="SME_CONSOLE"/></category>
290 BMC Impact Solutions Service Modeling and Publishing Guide

Using the BMC Impact Service Model Editor log
To send BMC Impact Service Model Editor Server debug output to a console window and the BMC Portal log file
1 In an appropriate editor, open the BMC_PORTAL_KIT_HOME/appserver/websdk/tools/jboss/server/all/conf/log4j.xml.
2 Add both sets of appender and category elements for sending output to the BMC Portal log and to a console window as described in the preceding two procedures.
3 Add the following ref subelement pointing to the SME_FILE under the category element with the value com.bmc.sms.sme.
Java Web Start logging
The Java Web Start log helps you to identify BMC Impact Service Model Editor deployment problems.
To enable Java Web Start logging
1 Open the Java Web Start Application Manager console in one of the following ways:
■ Double-click the Java Web Start icon on your desktop.■ Under Windows, choose Start => Programs => Java Web Start => Java Web Start or,
from the Command Prompt, execute the following command:
%JAVA_HOME%\jre\javaws\javaws.exe
2 In the Java Web Start Application Manager console, choose File => Preferences.
3 On the Advanced tab, in the Output Options area, select Log Output.
4 To select an existing file, click Choose Log File Name, or enter a file path in the Log File Name box.
<category name="com.bmc.sms.sme"><priority value="DEBUG"/><appender-ref ref=”SME_CONSOLE”/><appender-ref ref="SME_FILE"/></category>
NOTE The appender element FILE is defined under the Preserve Messages in a local file heading of the default log4j.xml file.
Appendix A Troubleshooting 291

Other BMC Impact Service Model Editor Troubleshooting Options
5 Click OK.
Other BMC Impact Service Model Editor Troubleshooting Options
These workarounds apply to various troubleshooting scenarios that you might encounter.
Deleting all Views
Remove all the View files from the following locations:
■ BMC_PORTAL_KIT_HOME/appserver/websdk/tools/jboss/server/all/data/smsConsoleServer/sme/indexes
■ BMC_PORTAL_KIT_HOME/appserver/websdk/tools/jboss/server/all/data/smsConsoleServer/sme/Views
Connecting to the Remedy AR System server
To verify that the BMC Atrium CMDB is accessible, you connect to the Remedy AR System server using the Remedy User Tool. If necessary, restart the Remedy AR System server service.
If the BMC Atrium CMDB is not accessible, you may receive a blank error dialog box when performing commands in BMC Impact Service Model Editor.
BMC Impact Publishing ServerThis section contains information on troubleshooting problems with the BMC Impact Publishing Server and publication failures.
Promotion, reconciliation, and publish are independent processes. It is possible that the promotion and reconciliation processes are successful, but the subsequent publication fails.
BMC Impact Service Model Editor notifies you only of the success or failure of a promotion, not whether the publication is successful or has failed. BMC recommends that you monitor the success or failure of publications that are automatically started.
For information about publication logs, which provide helpful information when troubleshooting problems, see “Working with publication logs” on page 108.
292 BMC Impact Solutions Service Modeling and Publishing Guide

Verifying that BMC Impact Publishing Server is running
Verifying that BMC Impact Publishing Server is running
To ensure that only one BMC Impact Publishing Server is running, BMC Impact Publishing Server maintains the file MCELL_HOME/log/ps_hostName/ps.lock. If the BMC Impact Portal JMS is not functioning properly, you can use ps.lock to verify whether a BMC Impact Publishing Server is running.
Using trace files
To help debug problems with publishing, you use the pserver.trace file. The file MCELL_HOME/tmp/ps_hostName/pserver.trace contains tracing information. By default, only trace information of level WARN or higher is logged. Enable debug tracing in MCELL_HOME/etc/<PSName>/pserver.trace (or MCELL_HOME/etc/pserver.trace) by commenting out the last two sections.
Stopping BMC Impact Publishing Server when JMS is not running
If the BMC Impact Portal JMS is not up and running properly, find and stop the BMC Impact Publishing Server process.
Ensure that you do not kill the BMC Impact Publishing Server process when it is processing a request. Note that this procedure is for UNIX platforms only.
1 At the command prompt, navigate to the MCELL_HOME/log/ps_hostName directory.
2 Execute the command fuser ps.lock
The processID of the BMC Impact Publishing Server process is returned.
3 Kill the BMC Impact Publishing Server process by executing the command: fuser -k ps.lock
Publishing large service models
When publishing large models, several parameters may require adjustment:
Appendix A Troubleshooting 293

Publishing large service models
■ In the pserver.conf file, the configuration parameter ARSXLongTimeOut may not be set high enough. This parameter specifies the time out value for the communication between BMC Impact Publishing Server and the BMC Atrium CMDB.
Reinitialization of a cell (pinit) and a new, successful publication are necessary to avoid subsequent publication job failure with the message Unique data identifier not/already in use.
By default, BMC Impact Publishing Server estimates the timeout needed. If the timeout is not adequate, set ARSXLongTimeOutEstimate=F and increase ARSXLongTimeOut.
If publication fails during the database update with the message Failure while applying publish on CMDB - Error - 92 Timeout, the operation has been accepted by the server and will usually complete successfully, the value for ARSXLongTimeOut is not set high enough and expires before the BMC Atrium CMDB has terminated committing modifications in the impact dataset.
The BMC Atrium CMDB continues to commit modifications in the impact dataset and after a while the service model will be available in the impact dataset. Make sure the parameters are set correctly.
The same failure may happen when initializing CMDB with large service models.
■ In the MCELL_HOME/etc/smmgr.conf file, the DestinationBufferKeepSent parameter is the timeout for communication between smmgr and the cell. In the MCELL_HOME/etc/pserver.conf file, the SMMMessageBufferKeepSent parameter is the timeout for communication between BMC Impact Publishing Server and smmgr.
By default, BMC Impact Publishing Server estimates the timeout needed. If the publication fails with Publish verification of IMs failed, set SMMMessageBufferKeepSentEstimate=F and increase SMMMessageBufferKeepSent.
If publication fails with Publish validation of IMs failed, use the following information to troubleshoot the problem according to the message you receive:
IM <CellName> failed to upload service model from SMM
The DestinationBufferKeepSent of smmgr is not high enough and expires before the cell has terminated uploading service model from smmgr.
IM <CellName> did not answer the request
294 BMC Impact Solutions Service Modeling and Publishing Guide
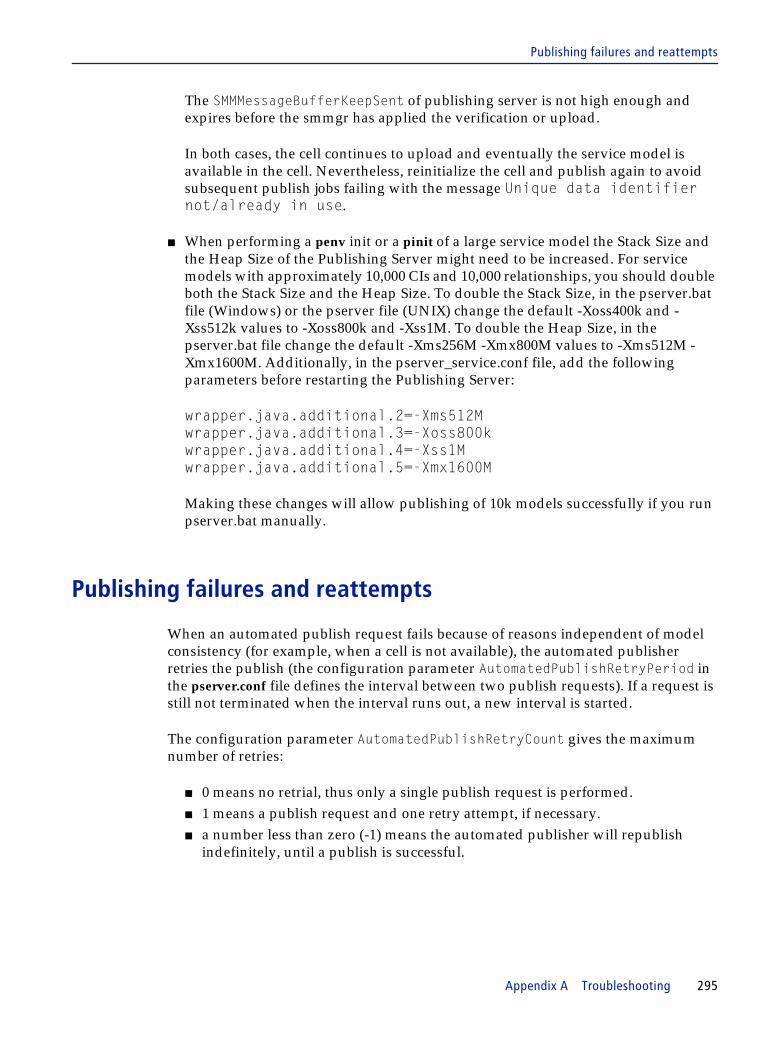
Publishing failures and reattempts
The SMMMessageBufferKeepSent of publishing server is not high enough and expires before the smmgr has applied the verification or upload.
In both cases, the cell continues to upload and eventually the service model is available in the cell. Nevertheless, reinitialize the cell and publish again to avoid subsequent publish jobs failing with the message Unique data identifier not/already in use.
■ When performing a penv init or a pinit of a large service model the Stack Size and the Heap Size of the Publishing Server might need to be increased. For service models with approximately 10,000 CIs and 10,000 relationships, you should double both the Stack Size and the Heap Size. To double the Stack Size, in the pserver.bat file (Windows) or the pserver file (UNIX) change the default -Xoss400k and -Xss512k values to -Xoss800k and -Xss1M. To double the Heap Size, in the pserver.bat file change the default -Xms256M -Xmx800M values to -Xms512M -Xmx1600M. Additionally, in the pserver_service.conf file, add the following parameters before restarting the Publishing Server:
wrapper.java.additional.2=-Xms512M wrapper.java.additional.3=-Xoss800k wrapper.java.additional.4=-Xss1Mwrapper.java.additional.5=-Xmx1600M
Making these changes will allow publishing of 10k models successfully if you run pserver.bat manually.
Publishing failures and reattempts
When an automated publish request fails because of reasons independent of model consistency (for example, when a cell is not available), the automated publisher retries the publish (the configuration parameter AutomatedPublishRetryPeriod in the pserver.conf file defines the interval between two publish requests). If a request is still not terminated when the interval runs out, a new interval is started.
The configuration parameter AutomatedPublishRetryCount gives the maximum number of retries:
■ 0 means no retrial, thus only a single publish request is performed. ■ 1 means a publish request and one retry attempt, if necessary.■ a number less than zero (-1) means the automated publisher will republish
indefinitely, until a publish is successful.
Appendix A Troubleshooting 295

BMC Impact Publishing Server service or daemon fails to start
BMC Impact Publishing Server service or daemon fails to start
Only one BMC Impact Publishing Server may be running at any given time. This is controlled in the MCELL_HOME/log/<PSName>/ps.lock file, which is updated with a timestamp every minute by the BMC Impact Publishing Server as it runs. If the Impact Publish Server is stopped gracefully, then ps.lock is removed.
If the BMC Impact Publishing Server service or daemon fails to start and displays the error message
Unable to launch BMC Impact Publishing Server. Another BMC Impact Publishing Server is already running
remove the ps.lock file in the MCELL_HOME/log/ps_hostname/ directory and restart the BMC Impact Publishing Server service (or daemon).
No publication after successful promotion
Even if promotion is successful, publication might still fail. Promotion and publication are asynchronous processes. If the Promotion Results dialog box in BMC Impact Service Model Editor indicates that the promotion was successful, but data does not appear in the BMC Impact Portal or BMC Impact Explorer, follow the guidelines in this section to troubleshoot the problem.
Unable to start automated publishing
If you receive the following error event after switching to automated mode:
Unable to start automated publishing. ERROR-8755 The specified plug-in does not exists. (BMC.ARDBC.NOTIFY).
This error occurs when the Notify ARDBC plugin is not loaded when BMC Impact Publishing Server starts in automated mode. Verify that the plugin is properly installed and loaded.
Verify automated publishing mode
Verify that the BMC Impact Publishing Server is running in automated mode with the CLI command psstat. If the psstat command returns Started - Automated mode, automated publisher is up and running.
296 BMC Impact Solutions Service Modeling and Publishing Guide

Reconciliation jobs hang
If the psstat command indicates that the BMC Impact Publishing Server is not running in automated mode, it may be in manual mode. This might have occurred because the configuration parameter AutomatedStartMode in pserver.conf is set to Manual, or because the mode was set with the CLI command pscontrol. If the BMC Impact Publishing Server is running in manual mode, you can request a publication using the CLI command publish.
To switch to automated mode, execute the CLI command pscontrol automated.
Reconciliation jobs hang
When reconciliation jobs hang and remain in a started status (causing BMC Impact Service Model Editor promotions to hang), the NotifyARDBC plug-in is not installed or is not running.
Ensure that the NOTIFY plug-in configuration and the BMC Remedy AR System plug-in environment variables are correct so that the NOTIFY plug-in is loaded. To verify that the NotifyARDBC plugin is running, follow these steps:
1 Log on to Remedy User.
2 Open the form NOTIFY:protocols and retrieve entries.
You should get one entry with version 1.
3 Open the form NOTIFY:servers and retrieve entries.
You should get one entry. If the port is not accessible for the BMC Impact Publishing Server to open a TCP/IP connection, verify the installation of the Notify ARDBC plugin. The port should be open for the BMC Impact Publishing Server to open a TCP/IP connection.
BMC Impact Publishing Server does not reply to requests
The client and server use the JMS service of BMC Impact Portal for communication. Normally, the BMC Impact Publishing Server restores when the JMS service drops. If the JMS service remains down, the BMC Impact Publishing Server stops with a critical error.
However, occasionally the communication is not restored and the BMC Impact Publishing Server doesn't stop, and the pserver.trace file contains repeated warnings from org.jboss.mq.SpyJMSException.
To resolve this situation,
Appendix A Troubleshooting 297
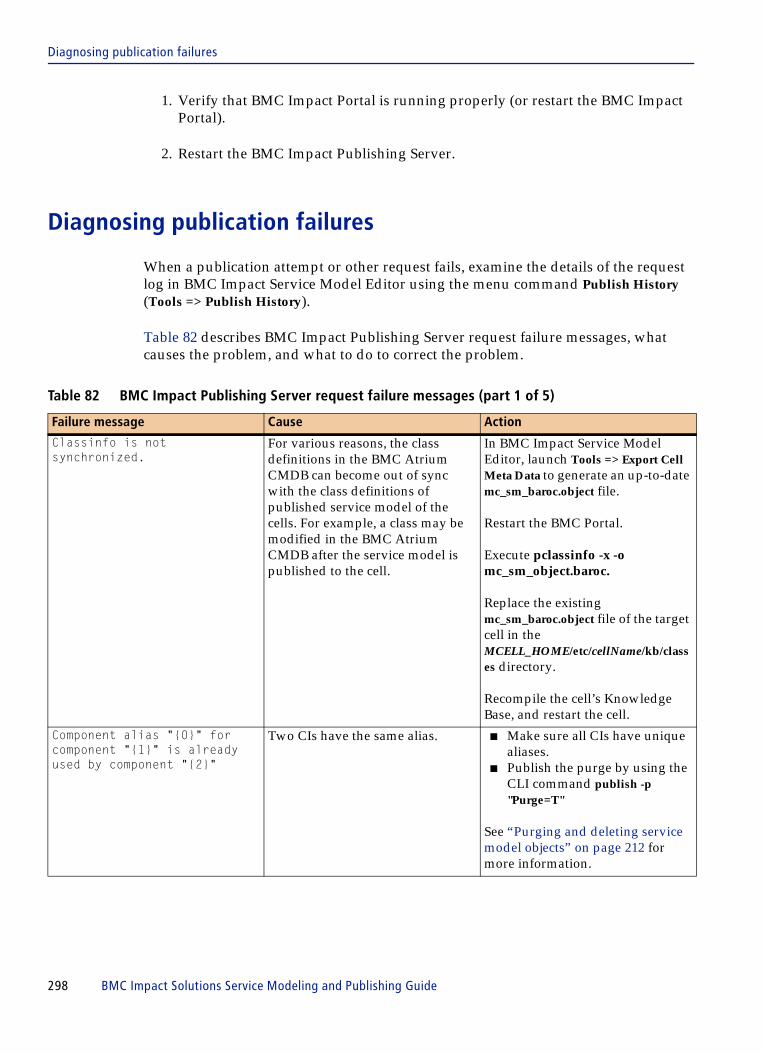
Diagnosing publication failures
1. Verify that BMC Impact Portal is running properly (or restart the BMC Impact Portal).
2. Restart the BMC Impact Publishing Server.
Diagnosing publication failures
When a publication attempt or other request fails, examine the details of the request log in BMC Impact Service Model Editor using the menu command Publish History (Tools => Publish History).
Table 82 describes BMC Impact Publishing Server request failure messages, what causes the problem, and what to do to correct the problem.
Table 82 BMC Impact Publishing Server request failure messages (part 1 of 5)
Failure message Cause Action
Classinfo is not synchronized.
For various reasons, the class definitions in the BMC Atrium CMDB can become out of sync with the class definitions of published service model of the cells. For example, a class may be modified in the BMC Atrium CMDB after the service model is published to the cell.
In BMC Impact Service Model Editor, launch Tools => Export Cell Meta Data to generate an up-to-date mc_sm_baroc.object file.
Restart the BMC Portal.
Execute pclassinfo -x -o mc_sm_object.baroc.
Replace the existing mc_sm_baroc.object file of the target cell in the MCELL_HOME/etc/cellName/kb/classes directory.
Recompile the cell’s Knowledge Base, and restart the cell.
Component alias "{0}" for component "{1}" is already used by component "{2}"
Two CIs have the same alias. ■ Make sure all CIs have unique aliases.
■ Publish the purge by using the CLI command publish -p "Purge=T"
See “Purging and deleting service model objects” on page 212 for more information.
298 BMC Impact Solutions Service Modeling and Publishing Guide

Diagnosing publication failures
Connection to IM cellName is not open OR Connection to IM cellName dropped
The BMC Impact Publishing Server is not able to connect to the BMC Impact Manager or the connection was dropped.
Verify that the target cell instance is running. Restart it if necessary. Also verify that the cell’s location and encryption key are registered with BMC Impact Portal.
Consumer/Provider component with mc_udid {0} is not defined
This message may occur if
■ an impact relationship is pointing to a non-existent CI
■ the impact relationship has ServiceModelSet IN, but the consumer or provider component instance has ServiceModelSet OUT_OF_IN or OUT
Verify that the ServiceModelSet of impact relationship is correct.
Such problems may occur when two promotions follow very quickly and the first promotion adds a relationship and the second promotion moves a CI out of model.
Using automated publish for two promotions will prevent this failure.
IM {0} failed to launch SMM (Service Model Manager)
In a cell's trace file you find the message Service Model Manager process ({0}) not active within expected delay. Please verify.
The cell does fork a Service Model Manager (SMM) process. In the mcell.conf file, the parameter ServiceModelManagerStartTimeOut = 60 defines the timeout.
Increase the value of ServiceModelManagerStartTimeOut.
IM {0} failed to upload service model from SMM
This failure message displays after a failure in the second phase of two-phase commit.
Reinitialize the cell and publish again (to avoid subsequent publishes failing with the message Unique data identifier not/already in use")
IM is not publish enabled. The ServiceModelPublish parameter in the MCELL_HOME/etc/mcell.conf file or in MCELL_HOME/etc/<CellName>/mcell.conf file is set to No.
Reset the ServiceModelPublish parameter to Yes and restart the cell.
init verify failure When you have previously published from a Direct Publish environment and now want to publish from BMC Atrium CMDB, the Direct Publish management data conflicts with management data being published from BMC Atrium CMDB.
Delete Direct Publish management data using the pposter CLI command and the ddelete action command.
Table 82 BMC Impact Publishing Server request failure messages (part 2 of 5)
Failure message Cause Action
Appendix A Troubleshooting 299

Diagnosing publication failures
No user group defined with id {0}
In the BMC Atrium CMDB, a CI's securities point to BMC Remedy AR System user group ids. In the BMC IM, a CI's securities points to BMC Impact Administration User Roles. BMC Impact Publishing Server maps the BMC Remedy AR System user group ids to user role names, by using the user group info found in the AR form groups and the AR external authentication group mappings.
This failure typically occurs when you remove a group in AR Server for which there still are components that refer to it.
Modify the CIs to point only to existing user groups.
Operation on instance of different environment
The data instance is already published to the cell from another publish environment.
Use the instance's publish environment to publish modifications or deletions.
Provider_home_cell ({0}) is remote but component {1} is local
This error can occur as a result of a typo when registering cells. For example, cell X runs on port X, and cell Y runs on port Y. However, port X is mistakenly entered for both cells.
While cell X is running, a provider component with cell name Y is sent to cell on port X, thus the cell X impact relationship is sent to the cell with name Y, thus
■ the cell on port X is component local (same cell as relationship)
■ provider_home_cell has value Y, so the provider_home_cell is remote (other cell as relationship)
The issue originates from the fact that although the CI is sent to cell Y, in reality, it is sent to cell X because that cell is listening on the (erroneous) port (X) of cell Y.
Correctly register the ports of the cells.
Table 82 BMC Impact Publishing Server request failure messages (part 3 of 5)
Failure message Cause Action
300 BMC Impact Solutions Service Modeling and Publishing Guide
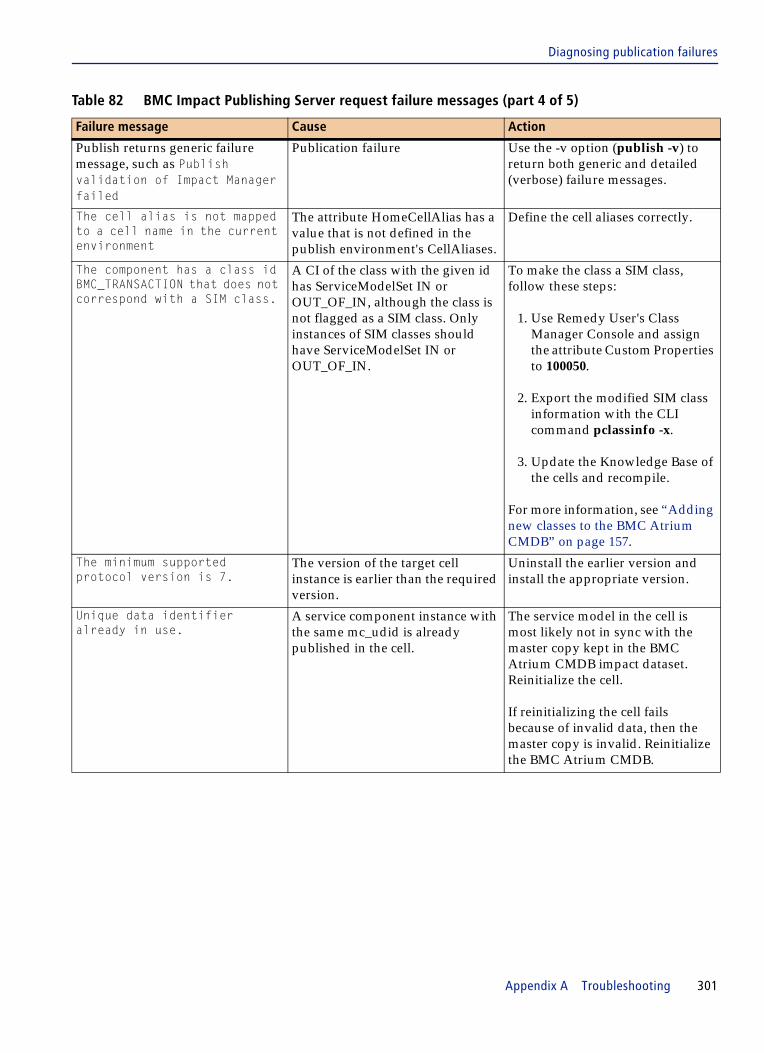
Diagnosing publication failures
Publish returns generic failure message, such as Publish validation of Impact Manager failed
Publication failure Use the -v option (publish -v) to return both generic and detailed (verbose) failure messages.
The cell alias is not mapped to a cell name in the current environment
The attribute HomeCellAlias has a value that is not defined in the publish environment's CellAliases.
Define the cell aliases correctly.
The component has a class id BMC_TRANSACTION that does not correspond with a SIM class.
A CI of the class with the given id has ServiceModelSet IN or OUT_OF_IN, although the class is not flagged as a SIM class. Only instances of SIM classes should have ServiceModelSet IN or OUT_OF_IN.
To make the class a SIM class, follow these steps:
1. Use Remedy User's Class Manager Console and assign the attribute Custom Properties to 100050.
2. Export the modified SIM class information with the CLI command pclassinfo -x.
3. Update the Knowledge Base of the cells and recompile.
For more information, see “Adding new classes to the BMC Atrium CMDB” on page 157.
The minimum supported protocol version is 7.
The version of the target cell instance is earlier than the required version.
Uninstall the earlier version and install the appropriate version.
Unique data identifier already in use.
A service component instance with the same mc_udid is already published in the cell.
The service model in the cell is most likely not in sync with the master copy kept in the BMC Atrium CMDB impact dataset. Reinitialize the cell.
If reinitializing the cell fails because of invalid data, then the master copy is invalid. Reinitialize the BMC Atrium CMDB.
Table 82 BMC Impact Publishing Server request failure messages (part 4 of 5)
Failure message Cause Action
Appendix A Troubleshooting 301

Another publish request is ongoing
Another publish request is ongoing
When the BMC Impact Publishing Server does not accept or begin processing a publish request, the following messages may display:
■ Another publish request is ongoing■ The environment is not registered■ Error with ids/udids for partial publish, i.e. publish of selected instances
Unique data identifier not in use
This failure may occur when the deletion or modification of a CI with a udid that does not exist is requested. For Atrium CMDB Publish, this typically happens when the service model in a cell is not in sync with service model in (the impact dataset of) the BMC Atrium CMDB, typically when a previous publish failed because of failure while applying publish on cell or BMC Atrium CMDB, or when cell has been restarted withthe -id option.
Reinitialize the SIM data from the publish environment by executing the CLI command pinit -n cellName -e EnvId
If this solution fails, the data in the BMC Atrium CMDB may be invalid. Reinitialize the BMC Atrium CMDB.
Unknown home cell "{0}" for shadow component
The entry in the mcell.dir file of the consumer's cell is not defining the provider's cell.
Correct mcell.dir.
You may receive detailed failure messages from the BMC Atrium CMDB.
For instance, you will receive failure messages when the number of CI's exceeds the limited number available with a trial license.
These failures may occur in the second phase of the two-phase commit.
To troubleshoot these failure messages, consult the BMC Remedy AR System and BMC Atrium CMDB documentation.
If the failure occurred in the second phase of the two-phase commit, to avoid subsequent publish failures with the message Unique data identifier not in use or already in use, reinitialize the cell and publish again.
Table 82 BMC Impact Publishing Server request failure messages (part 5 of 5)
Failure message Cause Action
302 BMC Impact Solutions Service Modeling and Publishing Guide
Using dynamic ports with the ARDBC Notify plug-in
Message: Another publish request is ongoing
The BMC Impact Publishing Server executes only one publication at a time, per cell. If you request a new publication (by using the CLI command publish or pposter) while another publication is in progress, the message Another publish request is ongoing displays.
If you receive this message unexpectedly, verify that the previous publication is still running. If a publication hangs (because of an uncached exception, which can be found in tmp/ps.err), then all following publications will result in failure messages and you must contact BMC Customer Support.
Using dynamic ports with the ARDBC Notify plug-in
The Notify plug-in uses the static port 1840 by default . However, if the Notify plug-in is configured to use a dynamic port, automated publishing might not work. If the Notify plug-in listens on a port that is registered and used by another service, for example, port 1828 used by the cell, automated publication does not function. If this occurs, psstat returns the message:
Started - Starting Automated mode
To prevent this issue, restart the Remedy AR Server so that Notify plug- in chooses another port to which to listen.
BMC Impact Service Model Integration with HP OVO
This section discusses solutions to common issues that you might encounter when attempting to create a service model from imported HP OVO data.
Avoiding duplicate CIs
Duplicate CIs can occur when the name of a CI is different based on the discovery type or location of the CI relative to a domain name server. Situations that cause this issue can include, for example, servers that have mulitple IP addresses or DNS names, cluster nodes with several IP addresses, or a router discovered by management tools employing different IP addresses to perform their respective CI discoveries.
Appendix A Troubleshooting 303

Automated publication after reconciling reconciliation failure
To avoid this situation, BMC Software recommends identifying what attributes will avoid duplicate CIs and then modify the identification rule to recognize those attributes.
Automated publication after reconciling reconciliation failure
If a reconciliation job (triggered by the Publishing Server after importing HP OVO data into into the Atrium CMDB) fails, diagnose the cause of the job failure and take corrective action if necessary. You can then trigger the reconciliation job to restart again by selecting this option from the the Reconciliation History Console. If reconciliation succeeds, this triggers an automated publication that will publish the HP OVO service model to the SIM cell or cells.
Limiting HP OVO fetcher trace file growth
When you turn on debug tracing for the HP OVO fetcher, the trace file continuously increases in size when trace is active. As a result, the fetcher trace file can grow large enough to cause disk space issues. To circumvent this issue, turn off trace after debugging is complete.
304 BMC Impact Solutions Service Modeling and Publishing Guide

A p p e n d i x B
B Default service model data classesThis appendix describes the service model class hierarchy in the BMC Atrium CMDB Common Data Model.
This appendix covers the following topics:
Service model data structures . . . . . . . . . . . . . . . . . . . . . . . . . . . . . . . . . . . . . . . . . . . . . 306Service model data class overview . . . . . . . . . . . . . . . . . . . . . . . . . . . . . . . . . . . . . . 306Service model data class files. . . . . . . . . . . . . . . . . . . . . . . . . . . . . . . . . . . . . . . . . . . 306
Service model component data classes . . . . . . . . . . . . . . . . . . . . . . . . . . . . . . . . . . . . . . 307BMC_BaseElement data class . . . . . . . . . . . . . . . . . . . . . . . . . . . . . . . . . . . . . . . . . . 307BMC_Impact data class. . . . . . . . . . . . . . . . . . . . . . . . . . . . . . . . . . . . . . . . . . . . . . . . 313BMC_STATUS_COMPUTATION data class . . . . . . . . . . . . . . . . . . . . . . . . . . . . . 317BMC_STATUS_PROPAGATION data class . . . . . . . . . . . . . . . . . . . . . . . . . . . . . . 319BMC_PROPAGATION_MAP data class . . . . . . . . . . . . . . . . . . . . . . . . . . . . . . . . . 321
SIM data class descriptions. . . . . . . . . . . . . . . . . . . . . . . . . . . . . . . . . . . . . . . . . . . . . . . . 322BMC_SEVERITY_TO_STATUS data class . . . . . . . . . . . . . . . . . . . . . . . . . . . . . . . . 322BMC_SIM_MATCH_TABLE data class . . . . . . . . . . . . . . . . . . . . . . . . . . . . . . . . . . 323BMC_SIM_ALIAS data class . . . . . . . . . . . . . . . . . . . . . . . . . . . . . . . . . . . . . . . . . . . 323BMC_SLOT_FORMULAS data class . . . . . . . . . . . . . . . . . . . . . . . . . . . . . . . . . . . . 324BMC_TIME_SCHEDULE data class . . . . . . . . . . . . . . . . . . . . . . . . . . . . . . . . . . . . . 324BMC_TIME_FRAME_TO_SCHEDULE data class . . . . . . . . . . . . . . . . . . . . . . . . . 325BMC_SELF_PRIORITY_MAPPING data class . . . . . . . . . . . . . . . . . . . . . . . . . . . . 325BMC_SERVICE_SCHEDULE_CONFIG data class . . . . . . . . . . . . . . . . . . . . . . . . 326BMC_STATUS_TO_SEVERITY data class . . . . . . . . . . . . . . . . . . . . . . . . . . . . . . . . 326SIM_TIME_FRAME class . . . . . . . . . . . . . . . . . . . . . . . . . . . . . . . . . . . . . . . . . . . . . . 327SIM_CellAlias class . . . . . . . . . . . . . . . . . . . . . . . . . . . . . . . . . . . . . . . . . . . . . . . . . . . 327SIM_CellInformation class . . . . . . . . . . . . . . . . . . . . . . . . . . . . . . . . . . . . . . . . . . . . . 327BMC_PROMOTION_LOG class . . . . . . . . . . . . . . . . . . . . . . . . . . . . . . . . . . . . . . . . 327
Service model event classes . . . . . . . . . . . . . . . . . . . . . . . . . . . . . . . . . . . . . . . . . . . . . . . 328CORE_EVENT base class . . . . . . . . . . . . . . . . . . . . . . . . . . . . . . . . . . . . . . . . . . . . . . 328Root event class . . . . . . . . . . . . . . . . . . . . . . . . . . . . . . . . . . . . . . . . . . . . . . . . . . . . . . 330History event class. . . . . . . . . . . . . . . . . . . . . . . . . . . . . . . . . . . . . . . . . . . . . . . . . . . . 330Impact event class . . . . . . . . . . . . . . . . . . . . . . . . . . . . . . . . . . . . . . . . . . . . . . . . . . . . 331
Appendix B Default service model data classes 305

Service model data structures
Service model data structuresThe service model uses various data structures as data classes. In this documentation, the term class designates the structure definition. The term table is the set of data instances defined for a data class. The following discussions are not intended to represent an exhaustive hierarchy of all classes associated with the dynamic data model.
Service model data class overview
There are several types of BAROC data classes that are important in the service model:
■ Component data classes—the service model data classes that define the component types typically used by business organizations. These classes are loaded into the Knowledge Base by default.
■ Relationship data class (BMC_Impact)—the data class that defines the different types of relationships that can exist between service components. The only class that exists for impact relationships is BMC_Impact.
■ Service model management classes—the data classes that define the status computation and propagation, as well as the classes that support the service model event-to-component mapping mechanism. These classes are loaded into the Knowledge Base by default.
■ Event classes—the classes that define the product event types and their behaviors.
Service model data class files
Table 83 on page 307 lists the files in which the various data class definitions are located. Default class definitions are in the MCELL_HOME\BMC Software\server\etc\cellName\kb\classes directory. In addition, each cell has a working Knowledge Base with its class definitions in the MCELL_HOME\etc\cellName\classes directory.
306 BMC Impact Solutions Service Modeling and Publishing Guide

Service model component data classes
Service model component data classesA service model component type is the data class that defines a logical or physical IT resource that participates in the delivery of business services. Service model component instances can represent a hardware component, an application, a service, or a business entity. A component instance can be any aspect of the business for which service management is desired.
Service model component instances are organized in a hierarchy of data classes in which each class represents a component type. The farther down the hierarchy a particular class occurs, the more specific its type.
BMC_BaseElement data class
The parent class of the data class hierarchy is the BMC_BaseElement class. The classes that immediately extend from BMC_BaseElement are:
■ BMC_Collection■ BMC_LogicalEntity■ BMC_System■ BMC_SystemComponent■ BMC_SystemService
Table 83 Service management data class files
Data classes File name Contents
Component mc_sm_object.baroc these component types and their subclasses:
■ BMC_BaseElement■ BMC_Collection■ BMC_LogicalEntity■ BMC_System■ BMC_SystemComponent■ BMC_SystemService
Root mc_sm_root.baroc event and data classes and the enumerations that are the foundation of the solution
Mapping mc_sm_event_mapping.baroc mapping data classes that provide the event-to-component mapping mechanism
Appendix B Default service model data classes 307

BMC_BaseElement data class
BMC_BaseElement data class definition
Figure 34 shows the BAROC definition of the BMC_BaseElement class, which is located in the mc_sm_object.baroc file.
BMC_BaseElement inherits slots from MC_SM_COMPONENT class, which is defined in Figure 35 on page 309. MC_SM_COMPONENT class is located in the mc_sm_root.baroc file.
Figure 34 BMC_BaseElement definitions
MC_PUBLISH_DATA_CLASS : BMC_BaseElement ISA MC_SM_COMPONENT DEFINES { Type : STRING; Item : STRING; ReadSecurity : LIST_OF STRING; ManufacturerName : STRING; Description : STRING; ShortDescription : STRING, default = 'n/a'; OwnerContact : STRING; Name : STRING; DatasetId : STRING, default = '0'; ImpactCostUnit : STRING; Notes : STRING; InstanceId : STRING; AccountID : STRING; OwnerName : STRING; Model : STRING; VersionNumber : STRING; WriteSecurity : LIST_OF STRING; Category : STRING; };END
308 BMC Impact Solutions Service Modeling and Publishing Guide
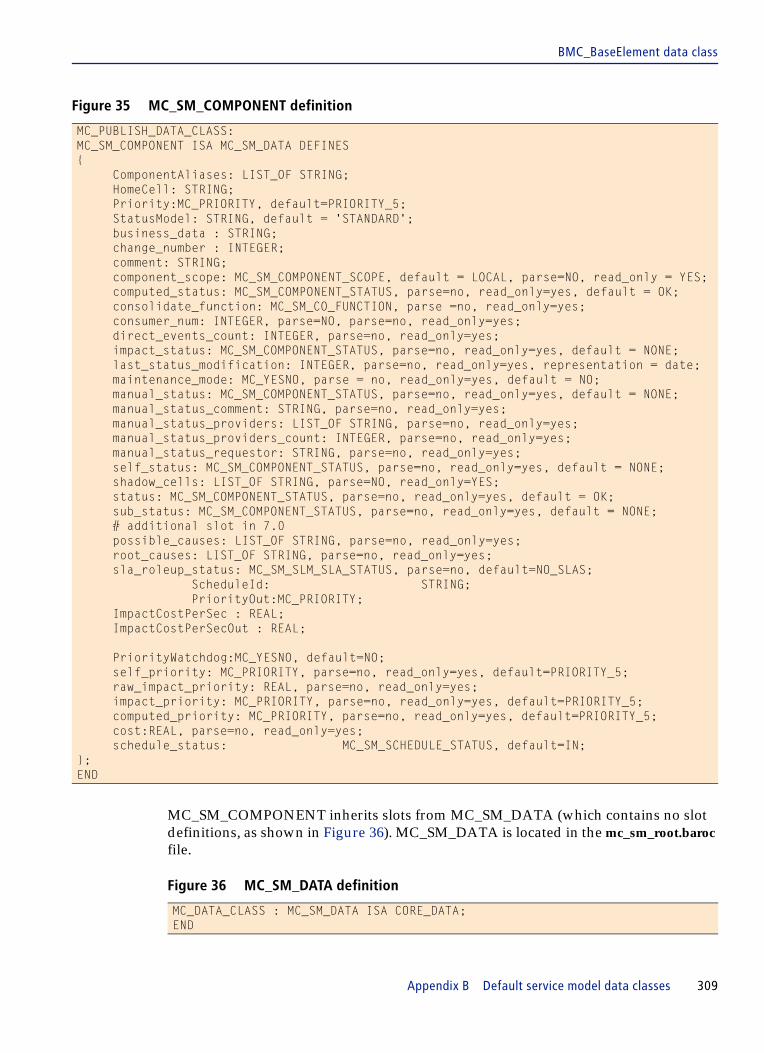
BMC_BaseElement data class
MC_SM_COMPONENT inherits slots from MC_SM_DATA (which contains no slot definitions, as shown in Figure 36). MC_SM_DATA is located in the mc_sm_root.baroc file.
Figure 36 MC_SM_DATA definition
Figure 35 MC_SM_COMPONENT definition
MC_PUBLISH_DATA_CLASS:MC_SM_COMPONENT ISA MC_SM_DATA DEFINES{
ComponentAliases: LIST_OF STRING;HomeCell: STRING;Priority:MC_PRIORITY, default=PRIORITY_5;StatusModel: STRING, default = 'STANDARD';business_data : STRING;change_number : INTEGER;comment: STRING;component_scope: MC_SM_COMPONENT_SCOPE, default = LOCAL, parse=NO, read_only = YES;computed_status: MC_SM_COMPONENT_STATUS, parse=no, read_only=yes, default = OK;consolidate_function: MC_SM_CO_FUNCTION, parse =no, read_only=yes;consumer_num: INTEGER, parse=NO, parse=no, read_only=yes;direct_events_count: INTEGER, parse=no, read_only=yes;impact_status: MC_SM_COMPONENT_STATUS, parse=no, read_only=yes, default = NONE;last_status_modification: INTEGER, parse=no, read_only=yes, representation = date;maintenance_mode: MC_YESNO, parse = no, read_only=yes, default = NO;manual_status: MC_SM_COMPONENT_STATUS, parse=no, read_only=yes, default = NONE;manual_status_comment: STRING, parse=no, read_only=yes;manual_status_providers: LIST_OF STRING, parse=no, read_only=yes;manual_status_providers_count: INTEGER, parse=no, read_only=yes;manual_status_requestor: STRING, parse=no, read_only=yes;self_status: MC_SM_COMPONENT_STATUS, parse=no, read_only=yes, default = NONE;shadow_cells: LIST_OF STRING, parse=NO, read_only=YES;status: MC_SM_COMPONENT_STATUS, parse=no, read_only=yes, default = OK;sub_status: MC_SM_COMPONENT_STATUS, parse=no, read_only=yes, default = NONE;# additional slot in 7.0possible_causes: LIST_OF STRING, parse=no, read_only=yes;root_causes: LIST_OF STRING, parse=no, read_only=yes;sla_roleup_status: MC_SM_SLM_SLA_STATUS, parse=no, default=NO_SLAS;
ScheduleId: STRING; PriorityOut:MC_PRIORITY;
ImpactCostPerSec : REAL;ImpactCostPerSecOut : REAL;
PriorityWatchdog:MC_YESNO, default=NO;self_priority: MC_PRIORITY, parse=no, read_only=yes, default=PRIORITY_5;raw_impact_priority: REAL, parse=no, read_only=yes;impact_priority: MC_PRIORITY, parse=no, read_only=yes, default=PRIORITY_5;computed_priority: MC_PRIORITY, parse=no, read_only=yes, default=PRIORITY_5;cost:REAL, parse=no, read_only=yes;schedule_status: MC_SM_SCHEDULE_STATUS, default=IN;
};END
MC_DATA_CLASS : MC_SM_DATA ISA CORE_DATA;END
Appendix B Default service model data classes 309

BMC_BaseElement data class
MC_SM_DATA inherits slots from CORE_DATA, which is shown in Figure 37. CORE_DATA is located in the mc_root_internal.baroc file.
Figure 37 CORE_DATA definition
Component instance slot descriptions in alphabetical order
Table 84 alphabetically lists the slots that define component instances with their descriptions and data type. The Source class column indicates the name of the class where the slot is defined.
MC_DATA_CLASS : CORE_DATA DEFINES { data_handle : INTEGER, parse = no, read_only = yes; mc_udid : STRING, read_only = yes; mc_creation_time : INTEGER, parse = no, read_only = yes, representation = date; mc_modification_time : INTEGER, parse = no, read_only = yes, representation = date; mc_modification_requestor : STRING, read_only = yes; };END
Table 84 Slots that define component instances (part 1 of 4)
Slots Description Data type or enumeration Source class
AccountId identification of the Account the object
belongs to (Accounts are created in the
Portal)
STRING BMC_BaseElement
Category provides a user-defined categorization of a
component instance
STRING BMC_BaseElement
change_number increments every time an event is sent for
the component. Used to determine the
order of events for events which happen in
the same second.
INTEGER MC_SM_COMPONENT
ComponentAliases list of aliases used to associate events to the
component instance
STRING MC_SM_COMPONENT
consumer_num number of component instances acting as
consumers of the component instance
INTEGER MC_SM_COMPONENT
comment a comment that is set for the component via
BMC Impact Manager
STRING MC_SM_COMPONENT
component_scope scope of the component (local, shadow,
etc.)
STRING MC_SM_COMPONENT
computed_priority the priority of a component that is the
highest between self priority and impacts
priority. Set in the computed_priority field.
enumeration: MC_PRIORITY MC_SM_COMPONENT
computed_status status of the component instance computed
from self and substatuses
enumeration:
MC_SM_COMPONENT_STATUS
MC_SM_COMPONENT
310 BMC Impact Solutions Service Modeling and Publishing Guide

BMC_BaseElement data class
consolidate_function function used to determine impact_status
from the provider’s propagated status
enumeration:
MC_SM_CO_FUNCTION
MC_SM_COMPONENT
cost the current cost for the component
depending on the current value of the
schedule (either During Schedule or
Exceptions Within During Schedule)
REAL MC_SM_COMPONENT
data_handle identifier in local cell INTEGER CORE_DATA
DatasetId identification of the dataset within which
the instance exists. This attribute relates to
the CoreDatasetId attribute of a
BMC_Dataset instance.
STRING BMC_BaseElement
Description a description of the component instance
that is meaningful to the enterprise
STRING BMC_BaseElement
direct_events_count count of events coming from
instrumentation
INTEGER MC_SM_COMPONENT
HomeCell name of the parent cell for the component
instance
STRING MC_SM_COMPONENT
ImpactCostPerSec cost of one second of unavailability of the
component
STRING BMC_BaseElement
ImpactCostPerSec cost for a component when it is During
Schedule
REAL MC_SM_COMPONENT
ImpactCostPerSecOut cost for the component when it is in an
Exceptions Within During Schedule period
REAL MC_SM_COMPONENT
ImpactCostUnit unit of the cost expressed in
ImpactCostPerSec
STRING BMC_BaseElement
impact_priority priority determined from a component’s
impacts
enumeration: MC_PRIORITY MC_SM_COMPONENT
impact_status status computed by impact_function enumeration:
MC_SM_COMPONENT_STATUS
MC_SM_COMPONENT
InstanceId instance identification of a component
within the BMC Atrium CMDBSTRING BMC_BaseElement
Item Provides a user-defined categorization of a
component instance
STRING BMC_BaseElement
last_status_modification last time the status or sub_status was
changed (used by GUI)
INTEGER MC_SM_COMPONENT
maintenance_mode operational switch used to drop events
when UM
enumeration:
MC_YESNO
MC_SM_COMPONENT
manual_status manual status flag of the component
(NONE if not set)
enumeration:
MC_SM_COMPONENT_STATUS
MC_SM_COMPONENT
manual_status_comment comment entered by user when component
instance is set to manual status
STRING MC_SM_COMPONENT
Table 84 Slots that define component instances (part 2 of 4)
Slots Description Data type or enumeration Source class
Appendix B Default service model data classes 311

BMC_BaseElement data class
manual_status_providers list of direct and indirect providers;
mc_udids of component instances with
manual status set (may contain duplicate
entries
LIST_OF_STRING MC_SM_COMPONENT
manual_status_providers_co
unt
number of direct and indirect providers
with manual status set (may contain
duplicate entries)
INTEGER MC_SM_COMPONENT
manual_status_requestor login ID of user who sets the component
instance to manual status
STRING MC_SM_COMPONENT
ManufacturerName name of the company that manufactured
the component instance
STRING BMC_BaseElement
mc_creation_time date and time when the object was created INTEGER CORE_DATA
mc_modification_time date and time when the object was last
changed
INTEGER CORE_DATA
mc_modification_requestor modification requestor STRING CORE_DATA
mc_udid universal data identifier STRING CORE_DATA
Model model assigned to the component instance
by the manufacturing company
STRING BMC_BaseElement
Name user-defined name that is meaningful to the
enterprise
STRING BMC_BaseElement
Notes general notes on the object INTEGER BMC_BaseElement
OwnerContact A string that provides information on how
the primary system owner can be reached
(e.g. phone number, e-mail address
STRING BMC_BaseElement
OwnerName name of the person in the enterprise who is
responsible for the component instance
STRING BMC_BaseElement
possible_causes list of possible causes for the component’s
current status (different from root causes)
LIST_OF_STRING MC_SM_COMPONENT
Priority priority enumeration:
MC_PRIORITY
MC_SM_COMPONENT
PriorityWatchdog indicates whether the component is a
priority propagator
enumeration: MC_YESNO MC_SM_COMPONENT
raw_impact_priority the computed priority for an object (value
between 0 and 1)
REAL MC_SM_COMPONENT
ReadSecurity list of permission groups that defines who
has read access to a component instance
LIST_OF_STRING BMC_BaseElement
root_causes list of root causes for the component’s
current status
LIST_OF_STRING MC_SM_COMPONENT
ShortDescription short textual description (one-line string) of
the object
STRING BMC_BaseElement
schedule_status indicates whether the component is
currently During Schedule or Exception
Within During Schedule
enumeration_
MC_SM_SCHEDULE_STATUS
MC_SM_COMPONENT
Table 84 Slots that define component instances (part 3 of 4)
Slots Description Data type or enumeration Source class
312 BMC Impact Solutions Service Modeling and Publishing Guide

BMC_Impact data class
BMC_BaseElement enumerations
Enumeration types, such as MC_SM_COMPONENT_STATUS, are listed in the mc_sm_root.baroc file and their descriptions are provided in Table 7 on page 24.
BMC_Impact data class
The BMC_Impact class is the parent class of the hierarchy of data classes that define the different types of service model relationships. This class inherits slots from the root class CORE_DATA and the superclass MC_SM_RELATIONSHIP.
BMC_Impact class definition
Figure 38 shows the BAROC definition of the BMC_Impact superclass, which is located in the mc_sm_object.baroc file.
self_priority the priority of the component based on the
base priority and the component’s current
status
enumeration: MC_PRIORITY MC_SM_COMPONENT
self_status the status of the object based on events
directly attached to it (this does not take
into account status from providers)
enumeration:
MC_SM_COMPONENT_STATUS
MC_SM_COMPONENT
sla_roleup_status the aggregation of the compliance status of
the associated SLAs, if any
enumeration:
MC_SM_SLM_SLA_STATUS
MC_SM_COMPONENT
shadow_cells list of cells that contain shadow of the
component instance
LIST_OF_STRING MC_SM_COMPONENT
status main status of the component (equals
computed_status unless manual status is
set)
enumeration:
MC_SM_COMPONENT_STATUS
MC_SM_COMPONENT
StatusModel name of the status computation model STRING MC_SM_COMPONENT
sub_status derived status of the component instance enumeration:
MC_SM_COMPONENT_STATUS
MC_SM_COMPONENT
Type user-defined categorization of a component
instance
STRING BMC_BaseElement
VersionNumber version number of the component instance,
assigned by the manufacturer
LIST_OF_STRING BMC_BaseElement
WriteSecurity list of permission groups that define who
has write access to a component instance
LIST_OF_STRING BMC_BaseElement
Table 84 Slots that define component instances (part 4 of 4)
Slots Description Data type or enumeration Source class
Appendix B Default service model data classes 313
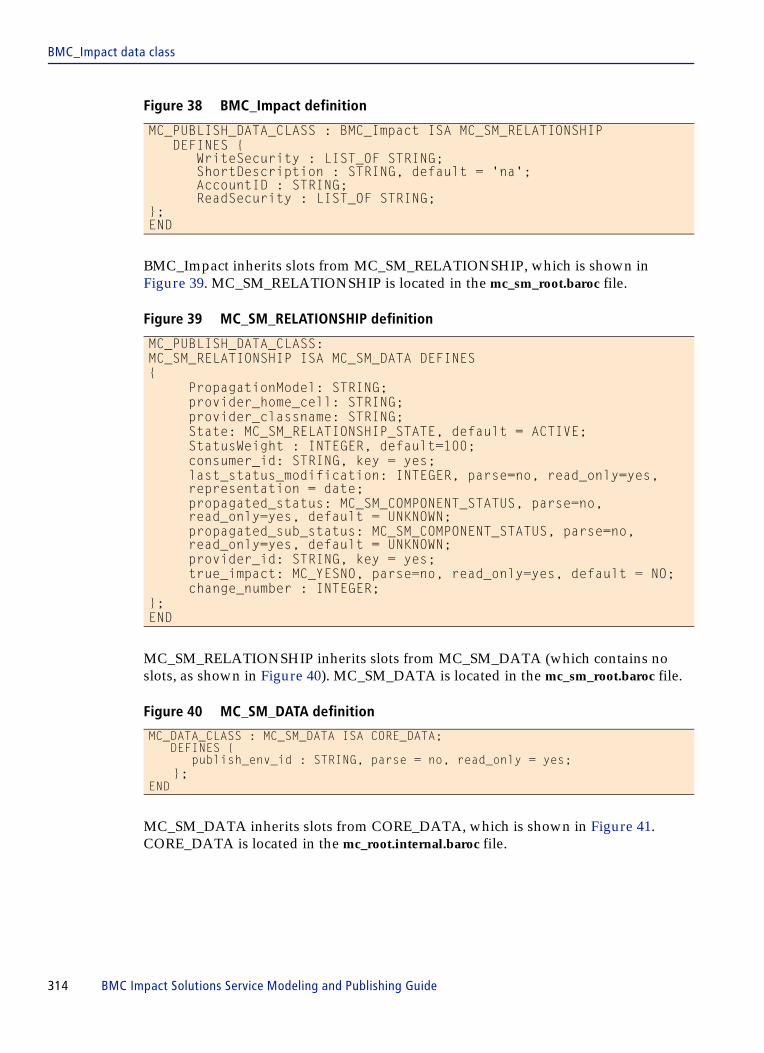
BMC_Impact data class
BMC_Impact inherits slots from MC_SM_RELATIONSHIP, which is shown in Figure 39. MC_SM_RELATIONSHIP is located in the mc_sm_root.baroc file.
Figure 39 MC_SM_RELATIONSHIP definition
MC_SM_RELATIONSHIP inherits slots from MC_SM_DATA (which contains no slots, as shown in Figure 40). MC_SM_DATA is located in the mc_sm_root.baroc file.
Figure 40 MC_SM_DATA definition
MC_SM_DATA inherits slots from CORE_DATA, which is shown in Figure 41. CORE_DATA is located in the mc_root.internal.baroc file.
Figure 38 BMC_Impact definition
MC_PUBLISH_DATA_CLASS : BMC_Impact ISA MC_SM_RELATIONSHIP DEFINES {
WriteSecurity : LIST_OF STRING;ShortDescription : STRING, default = 'na';AccountID : STRING;ReadSecurity : LIST_OF STRING;
};END
MC_PUBLISH_DATA_CLASS:MC_SM_RELATIONSHIP ISA MC_SM_DATA DEFINES{
PropagationModel: STRING;provider_home_cell: STRING;provider_classname: STRING;State: MC_SM_RELATIONSHIP_STATE, default = ACTIVE;StatusWeight : INTEGER, default=100;consumer_id: STRING, key = yes;last_status_modification: INTEGER, parse=no, read_only=yes, representation = date;propagated_status: MC_SM_COMPONENT_STATUS, parse=no, read_only=yes, default = UNKNOWN;propagated_sub_status: MC_SM_COMPONENT_STATUS, parse=no, read_only=yes, default = UNKNOWN;provider_id: STRING, key = yes;true_impact: MC_YESNO, parse=no, read_only=yes, default = NO;change_number : INTEGER;
};END
MC_DATA_CLASS : MC_SM_DATA ISA CORE_DATA;DEFINES {
publish_env_id : STRING, parse = no, read_only = yes;};
END
314 BMC Impact Solutions Service Modeling and Publishing Guide

BMC_Impact data class
Figure 41 CORE_DATA definition
Relationship slot descriptions in alphabetical order
Table 85 alphabetically lists the slots that define component instance relationships, with their descriptions and data type. The Source class column indicates the name of the class where the slot is defined.
MC_DATA_CLASS : CORE_DATA DEFINES{data_handle : INTEGER, parse = no, read_only = yes;mc_udid : STRING, read_only = yes;mc_creation_time : INTEGER, parse = no, read_only = yes, representation = date ;mc_modification_time : INTEGER, parse = no, read_only = yes, representation = date;mc_modification_requestor : STRING, read_only = yes;
};END
Table 85 BMC_Impact slot definitions in alphabetical order
Slot Description Data type or enumeration Source class
consumer_id mc_udid of the consumer component instance
STRING MC_SM_RELATIONSHIP
change_number change number INTEGER MC_SM_RELATIONSHIP
data_handle identifier in local cell INTEGER CORE_DATA
last_status_modification date/time when the value of true_impact function was last changed (used by GUI)
INTEGER MC_SM_RELATIONSHIP
mc_creation_time date and time when the object was created
INTEGER CORE_DATA
mc_modification_time date and time when the object was last changed
INTEGER CORE_DATA
mc_udid internal key used to reference the relationship; it is an inherited slot
STRING CORE_DATA
propagated_status status that is currently propagated through the relationship
enumeration: MC_SM_COMPONENT_STATUS
MC_SM_RELATIONSHIP
propagated_sub_status maximum of provider substatus and status values
enumeration: MC_SM_COMPONENT_STATUS
MC_SM_RELATIONSHIP
PropagationModel name of the status propagation model used for determining the propagated status from of the provider’s main status
STRING MC_SM_RELATIONSHIP
provider_classname name of the class of the provider component instance
STRING MC_SM_RELATIONSHIP
Appendix B Default service model data classes 315

BMC_DOWNTIME_STATUS_CONFIG data class
BMC_Impact enumerations
The following enumerations are listed in the mc_sm_root.baroc file:
■ MC_SM_RELATIONSHIP_STATE■ MC_SM_IMPACT_FUNCTION■ MC_SM_SELF_FUNCTION■ MC_SM_CO_FUNCTION■ MC_SM_SLA_RESET_MODE■ MC_SM_COMPONENT_SCOPE■ MC_SM_COMPONENT_STATUS■ MC_SM_SHADOW_REQUEST_OP■ MC_SM_SLM_SLA_STATUS■ MC_SM_CAUSE_TYPE■ PRIORITY_FORMULA■ MC_SM_SCHEDULE_STATUS■ BMC_SIM_DOWNTIME_STATUS_CONFIG
BMC_DOWNTIME_STATUS_CONFIG data class
The BMC_DOWNTIME_STATUS_CONFIG data class is used to define which status enumeration values qualify as downtime for both impact reports and priority computation.
provider_home_cell the cell that receives events for the provider component instance
STRING MC_SM_RELATIONSHIP
provider_id mc_udid of the provider component instance, the impacting component instance
STRING MC_SM_RELATIONSHIP
State state of the relationship, Active or Inactive
enumeration:MC_SM_RELATIONSHIP_STATE
MC_SM_RELATIONSHIP
StatusWeight number that determines the degree of importance to give to each provider relationship that impacts a consumer component instance
INTEGER MC_SM_RELATIONSHIP
true_impact flag indicating whether this relationship affects the impact_status of the consumer
enumeration:MC_SM_YESNO
MC_SM_RELATIONSHIP
Table 85 BMC_Impact slot definitions in alphabetical order
Slot Description Data type or enumeration Source class
316 BMC Impact Solutions Service Modeling and Publishing Guide

BMC_STATUS_COMPUTATION data class
BMC_DOWNTIME_STATUS_CONFIG data class definition
Figure 42 shows the BAROC definition of the BMC_DOWNTIME_STATUS_CONFIG data class, which is located in the mc_sm_root.baroc file.
BMC_DOWNTIME_STATUS_CONFIG inherits slots from BMC_SIM_DATA, which is shown in Figure 45. BMC_SIM_DATA is located in the mc_sm_root.baroc file.
BMC_DOWNTIME_STATUS_CONFIG slots
BMC_DOWNTIME_STATUS_CONFIG has the following slot.
BMC_STATUS_COMPUTATION data class
The BMC_STATUS_COMPUTATION data class is used to define status computation models for the component instances. A status computation model is a model that determines the current status of a service model component when direct impact events occur or the status of a provider component instance changes.
Figure 42 BMC_DOWNTIME_STATUS_CONFIG definition
MC_PUBLISH_DATA_CLASS : BMC_DOWNTIME_STATUS_CONFIG ISA BMC_SIM_DATA DEFINES { status : MC_SM_COMPONENT_STATUS, default = UNAVAILABLE; }; END
Figure 43 BMC_SIM_DATA definition
MC_DATA_CLASS: BMC_SIM_DATA ISA MC_SM_DATA DEFINES{ReadSecurity : LIST_OF_STRING;WriteSecurity : LIST_OF_STRING;};END
Table 86 BMC_DOWNTIME_STATUS_CONFIG slot
Slot Description Data type or enumeration Source class
status the lowest component status that qualifies as down time
enumeration: MC_SM_COMPONENT_STATUS
BMC_SIM_DOWNTIME_STATUS_CONFIG
Appendix B Default service model data classes 317

BMC_STATUS_COMPUTATION data class
BMC_STATUS_COMPUTATION data class definition
Figure 44 shows the BAROC definition of the BMC_STATUS_COMPUTATION data class, which is located in the mc_sm_root.baroc file.
BMC_STATUS_COMPUTATION inherits slots from BMC_SIM_DATA, which is shown in Figure 45. BMC_SIM_DATA is located in the mc_sm_root.baroc file
BMC_STATUS_COMPUTATION slots in alphabetical order
Table 87 alphabetically lists the BMC_STATUS_COMPUTATION slots with their descriptions and types.
Figure 44 BMC_STATUS_COMPUTATION definition
MC_PUBLISH_DATA_CLASS:BMC_STATUS_COMPUTATION ISA BMC_SIM_DATA DEFINES{ model_name: STRING, key = yes;
impact_function: MC_SM_IMPACT_FUNCTION, default = HIGHEST_VAL;ext_impact_function: LIST_OF STRING;self_function: MC_SM_SELF_FUNCTION, default = HIGHEST_VAL;consolidate_function: MC_SM_CO_FUNCTION, default = HIGHEST_VAL;quorum: INTEGER, default = 51;no_alert_status: MC_SM_COMPONENT_STATUS, default = OK;
};END
Figure 45 BMC_SIM_DATA definition
MC_DATA_CLASS: BMC_SIM_DATA ISA MC_SM_DATA DEFINES{ReadSecurity : LIST_OF_STRING;WriteSecurity : LIST_OF_STRING;};END
318 BMC Impact Solutions Service Modeling and Publishing Guide

BMC_STATUS_PROPAGATION data class
BMC_STATUS_PROPAGATION data class
The BMC_STATUS_PROPAGATION class defines the different pairs of component types whose instances can be related to one another through relationships, along with the propagation map to be used by those relationships.
Table 87 BMC_STATUS_COMPUTATION slots in alphabetical order
Slot Description Data type or enumeration Source class
consolidate_function name of the algorithm used to compute the component computed status; it consolidates the impact_status and the self_status
enumeration:MC_SM_CO_FUNCTION
BMC_STATUS_COMPUTATION
ext_impact_function the name of the external algorithm to be used by the impact_function when the impact_function slot contains the placeholder EXTERNAL This slot is reserved for future extension.
LIST_OF_STRING BMC_STATUS_COMPUTATION
impact_function name of the algorithm used to compute the impact status from provider components; it merges the propagated status values of the different provider components
enumeration:MC_SM_IMPACT_FUNCTIONS
BMC_STATUS_COMPUTATION
model_name name of the status computation model (key of the table)
STRING BMC_STATUS_COMPUTATION
noalert_status default main status when the consolidate function’s status is NONE
enumeration:BMC_BaseElement_STATUS
BMC_STATUS_COMPUTATION
quorum quorum percentage applied by the impact function when set to use the QUORUM algorithm
INTEGER BMC_STATUS_COMPUTATION
ReadSecurity list of permission groups that defines who has read access to a component instance
LIST_OF_STRING BMC_SIM_DATA
self_function name of the algorithm used to compute the self status; it maps and merges the severity values directly from the events
enumeration:MC_SM_SELF_FUNCTION
BMC_STATUS_COMPUTATION
WriteSecurity list of permission groups that defines who has write access to a component instance
LIST_OF_STRING BMC_SIM_DATA
Appendix B Default service model data classes 319

BMC_STATUS_PROPAGATION data class
BMC_STATUS_PROPAGATION class definition
Figure 46 shows the BAROC definition of the BMC_STATUS_PROPAGATION data class, which is located in the mc_sm_root.baroc file.
BMC_STATUS_PROPAGATION inherits slots from BMC_SIM_DATA, which is shown in Figure 47. BMC_SIM_DATA is located in the mc_sm_root.baroc file.
BMC_STATUS_PROPAGATION slots in alphabetical order
Table 88 alphabetically lists the class slots with their descriptions.
Figure 46 BMC_STATUS_PROPAGATION definition
MC_PUBLISH_DATA_CLASS:BMC_STATUS_PROPAGATION ISA BMC_SIM_DATA DEFINES{
name: STRING, key = yes;provider_type: STRING, key = yes;consumer_type: STRING, key = yes;description: STRING;
};END
Figure 47 BMC_SIM_DATA definition
MC_DATA_CLASS: BMC_SIM_DATA ISA MC_SM_DATA DEFINES{ReadSecurity : LIST_OF_STRING;WriteSecurity : LIST_OF_STRING;};END
Table 88 Status propagation slots in alphabetical order
Slot Description Data type Source class
consumer_type
valid component types for the consumer component instance
STRING BMC_STATUS_PROPGATION
description description applicable to the relationships using this model
STRING BMC_STATUS_PROPGATION
name name of the status propagation model; it must match the name of a propagation map
STRING BMC_STATUS_PROPGATION
ReadSecurity list of permission groups that defines who has read access to a component instance
LIST_OF_STRING BMC_SIM_DATA
320 BMC Impact Solutions Service Modeling and Publishing Guide

BMC_PROPAGATION_MAP data class
BMC_PROPAGATION_MAP data class
The BMC_PROPAGATION_MAP class is used to define status mapping instances for the relationships. The BAROC definition of the class follows.
BMC_PROPAGATION_MAP data class definition
Figure 48 shows the BAROC definition of the BMC_PROPAGATION_MAP data class, which is located in the mc_sm_root.baroc file.
BMC_PROPAGATION_MAP inherits slots from BMC_SIM_DATA, shown in Figure 49. BMC_SIM_DATA is located in the mc_sm_root.baroc file
BMC_PROPAGATION_MAP slots in alphabetical order
Table 89 alphabetically lists the BMC_PROPAGATION_MAP slots with their descriptions, enumeration or data type, and source class.
provider_type valid component types for the provider component instance
STRING BMC_STATUS_PROPGATION
WriteSecurity list of permission groups that defines who has write access to a component instance
LIST_OF_STRING BMC_SIM_DATA
Figure 48 BMC_PROPAGATION_MAP definition
MC_PUBLISH_DATA_CLASS:BMC_PROPAGATION_MAP ISA BMC_SIM_DATA DEFINES{
name: STRING, key = yes;relationship_state: MC_SM_RELATIONSHIP_STATE, key = yes;provider_status: MC_SM_COMPONENT_STATUS, key = yes;propagated_status: MC_SM_COMPONENT_STATUS;
};END
Figure 49 BMC_SIM_DATA definition
MC_DATA_CLASS: BMC_SIM_DATA ISA MC_SM_DATA DEFINES{ReadSecurity : LIST_OF_STRING;WriteSecurity : LIST_OF_STRING;};END
Table 88 Status propagation slots in alphabetical order
Slot Description Data type Source class
Appendix B Default service model data classes 321

SIM data class descriptions
SIM data class descriptionsThe following data classes are used in creating service models:
■ BMC_SEVERITY_TO_STATUS■ BMC_SIM_MATCH_TABLE■ BMC_SIM_ALIAS■ BMC_SLOT_FORMULAS■ COMPONENT_CREATION
BMC_SEVERITY_TO_STATUS data class
The BMC_SEVERITY_TO_STATUS class is used to map the severity value of an impact event to a status value that will participate in the computation of the self status for the associated component instance.
Table 89 BMC_PROPAGATION_MAP slot definitions
Slot Description Data type or enumeration Source class
name name of the parent status propagation model
STRING BMC_PROPAGATION_MAP
propagated_status status to be propagated to the consumer component
enumeration:MC_SM_COMPONENT_STATUS
BMC_PROPAGATION_MAP
provider_status status of the provider component
enumeration:MC_SM_COMPONENT_STATUS
BMC_PROPAGATION_MAP
ReadSecurity list of permission groups that defines who has read access to a component instance
LIST_OF_STRING BMC_SIM_DATA
relationship_state applicable relationship state
enumeration:MC_SM_RELATIONSHIP_STATE
BMC_PROPAGATION_MAP
WriteSecurity list of permission groups that defines who has write access to a component instance
LIST_OF_STRING BMC_SIM_DATA
322 BMC Impact Solutions Service Modeling and Publishing Guide

BMC_SIM_MATCH_TABLE data class
BMC_SEVERITY_TO_STATUS data class definition
Figure 50 shows the BAROC definition of the BMC_SEVERITY_TO_STATUS class, which is located in the mc_sm_root.baroc file.
You should not edit a SEVERITY_TO_STATUS table unless the severity and/or the status enumerations are customized.
BMC_SIM_MATCH_TABLE data class
The BMC_SIM_MATCH_TABLE is used to associate events with component instances.
Figure 51 shows the BAROC definition of the BMC_SIM_MATCH_TABLE class. BMC_SIM_MATCH_TABLE is located in the mc_sm_event_mapping.baroc file.
BMC_SIM_ALIAS data class
The BMC_SIM_ALIAS is used to associate events with component instances.
Figure 52 shows the BAROC definition of the BMC_SIM_ALIAS class. BMC_SIM_ALIAS is located in the mc_sm_root.baroc file.
Figure 50 SEVERITY_TO_STATUS definition
MC_PUBLISH_DATA_CLASS:BMC_SEVERITY_TO_STATUS ISA BMC_SIM_DATA DEFINES{
severity: SEVERITY, key = yes;status: MC_SM_COMPONENT_STATUS, key = yes;
};END
Figure 51 BMC_SIM_MATCH_TABLE definition
MC_PUBLISH_DATA_CLASS : BMC_SIM_MATCH_TABLE ISA BMC_SIM_DATA DEFINES { name : STRING ; tag : STRING , key=yes, read_only=yes, default=alias; input_match : LIST_OF STRING , key=yes; ref_instances_classes : LIST_OF STRING ; output_expressions : LIST_OF STRING ; };END
Appendix B Default service model data classes 323

BMC_SLOT_FORMULAS data class
BMC_SLOT_FORMULAS data class
The SLOT_FORMULAS class is used to map event slots to other slots when processing a new raw event.
BMC_SLOT_FORMULAS data class definition
Figure 53 shows the BAROC definition of the SLOT_FORMULAS class, which is located in the mc_sm_event_mapping.baroc file.
BMC_TIME_SCHEDULE data class
The BMC_TIME_SCHEDULE data class defines a service schedule.
Figure 54 shows the BAROC definition of the BMC_TIME_SCHEDULE class, which is located in the mc_sm_root.baroc file.
Figure 52 BMC_SIM_ALIAS definition
MC_PUBLISH_DATA_CLASS: BMC_SIM_ALIAS ISA BMC_SIM_DATA DEFINES { ComponentAlias: STRING, key=yes; ComponentID: STRING; };
END
Figure 53 BMC_SLOT_FORMULAS definition
MC_PUBLISH_DATA_CLASS: BMC_SIM_ALIAS ISA BMC_SIM_DATA DEFINES { ComponentAlias: STRING, key=yes; ComponentID: STRING; };
END
324 BMC Impact Solutions Service Modeling and Publishing Guide

BMC_TIME_FRAME_TO_SCHEDULE data class
BMC_TIME_FRAME_TO_SCHEDULE data class
The BMC_TIME_FRAME_TO_SCHEDULE data class maps timeframes to schedules. As part of the mapping it indicates whether the timeframe contains During Schedule or Exceptions Within During Schedule time.
Figure 55 shows the BAROC definition of the BMC_TIME_FRAME_TO_SCHEDULE class, which is located in the mc_sm_root.baroc file.
BMC_SELF_PRIORITY_MAPPING data class
The BMC_SELF_PRIORITY_MAPPING data class contains the resulting self priorities for each combination of base priority mapped against component status.
Figure 56 shows the BAROC definition of the BMC_SELF_PRIORITY_MAPPING class, which is located in the mc_sm_root.baroc file.
Figure 54 BMC_TIME_SCHEDULE definition
MC_PUBLISH_DATA_CLASS : BMC_TIME_SCHEDULE ISA BMC_SIM_DATA DEFINES { Name : STRING; Description : STRING; status: MC_SM_SCHEDULE_STATUS, read_only=YES,parse=NO; };END
Figure 55 BMC_TIME_FRAME_TO_SCHEDULE definition
MC_PUBLISH_DATA_CLASS : BMC_TIME_FRAME_TO_SCHEDULE ISA BMC_SIM_DATA DEFINES { Timeframe : STRING, key=yes; Schedule : STRING, key=yes; Included : MC_YESNO, default=YES; };END
Appendix B Default service model data classes 325

BMC_SERVICE_SCHEDULE_CONFIG data class
BMC_SERVICE_SCHEDULE_CONFIG data class
The BMC_SERVICE_SCHEDULE_CONFIG data class contains the settings for the priority formula, the default schedule, and the list of classes which are priority propagators by default.
Figure 57 shows the BAROC definition of the BMC_SERVICE_SCHEDULE_CONFIG class, which is located in the mc_sm_root.baroc file.
BMC_STATUS_TO_SEVERITY data class
The BMC_STATUS_TO_SEVERITY class is used to map the status value of an impact event to a severity value that will participate in the computation of the self status for the associated component instance.
Figure 58 shows the BAROC definition of the BMC_STATUS_TO_SEVERITY class, which is located in the mc_sm_root.baroc file.
Figure 56 BMC_SELF_PRIORITY_MAPPING definition
MC_PUBLISH_DATA_CLASS : BMC_SELF_PRIORITY_MAPPING ISA BMC_SIM_DATA DEFINES { priority : MC_PRIORITY, key=yes; status :MC_SM_COMPONENT_STATUS, key=yes; self_priority : MC_PRIORITY; }; END
Figure 57 BMC_SERVICE_SCHEDULE_CONFIG definition
MC_PUBLISH_DATA_CLASS : BMC_SERVICE_SCHEDULE_CONFIG ISA BMC_SIM_DATA DEFINES { PriorityFormula : PRIORITY_FORMULA, default = WEIGHTED; DefaultSchedule : STRING; };END
Figure 58 BMC_STATUS_TO_SEVERITY definition
MC_PUBLISH_DATA_CLASS:BMC_STATUS_TO_SEVERITY ISA BMC_SIM_DATA DEFINES{
status: MC_SM_COMPONENT_STATUS, key = yes;severity: SEVERITY, key = yes;
};END
326 BMC Impact Solutions Service Modeling and Publishing Guide
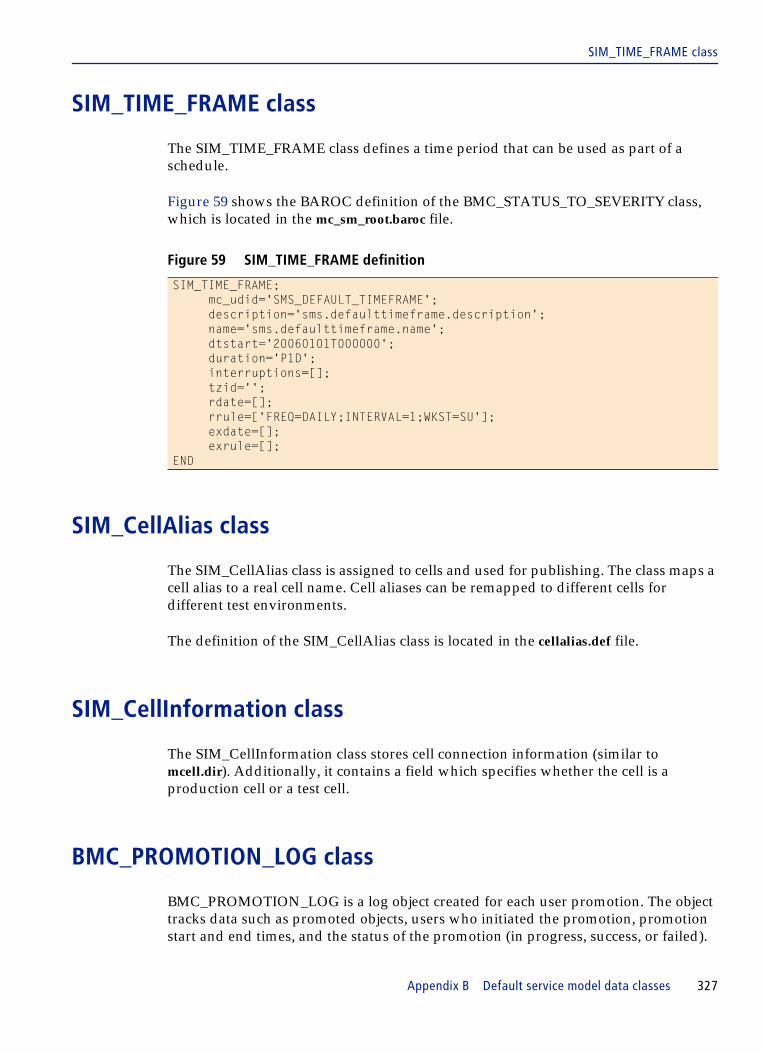
SIM_TIME_FRAME class
SIM_TIME_FRAME class
The SIM_TIME_FRAME class defines a time period that can be used as part of a schedule.
Figure 59 shows the BAROC definition of the BMC_STATUS_TO_SEVERITY class, which is located in the mc_sm_root.baroc file.
SIM_CellAlias class
The SIM_CellAlias class is assigned to cells and used for publishing. The class maps a cell alias to a real cell name. Cell aliases can be remapped to different cells for different test environments.
The definition of the SIM_CellAlias class is located in the cellalias.def file.
SIM_CellInformation class
The SIM_CellInformation class stores cell connection information (similar to mcell.dir). Additionally, it contains a field which specifies whether the cell is a production cell or a test cell.
BMC_PROMOTION_LOG class
BMC_PROMOTION_LOG is a log object created for each user promotion. The object tracks data such as promoted objects, users who initiated the promotion, promotion start and end times, and the status of the promotion (in progress, success, or failed).
Figure 59 SIM_TIME_FRAME definition
SIM_TIME_FRAME;mc_udid='SMS_DEFAULT_TIMEFRAME';description='sms.defaulttimeframe.description';name='sms.defaulttimeframe.name';dtstart='20060101T000000';duration='P1D';interruptions=[];tzid='';rdate=[];rrule=['FREQ=DAILY;INTERVAL=1;WKST=SU'];exdate=[];exrule=[];
END
Appendix B Default service model data classes 327

Service model event classes
Service model event classesThe service model implements event structures. These event structures are in the form of BAROC event classes. The file containing the root class definitions, mc_sm_root.baroc, is in the MCELL_HOME\server\etc\cellName\kb\ directory.
CORE_EVENT base class
CORE_EVENT is the base class for all BMC Impact Manager event classes. This base class is defined in mc_root_internal.baroc file, and extended in the mc_root_redef.baroc file. It is not specific to the service model, but it includes slots specifically for service impact management functionality.
CORE_EVENT partial data class definition (SIM only)
Figure 60 on page 329 shows the SIM-related definition of the class. For a complete description of all event class slots, see BMC Impact Solutions Knowledge Base Development Reference Guide.
328 BMC Impact Solutions Service Modeling and Publishing Guide

CORE_EVENT base class
Figure 60 Partial CORE_EVENT definition
MC_EV_CLASS : CORE_EVENT DEFINES { event_handle : INTEGER, parse = no, read_only = yes; mc_ueid : STRING, read_only = yes; mc_client_address : STRING, parse = no; adapter_host : STRING; mc_location : STRING; mc_service : STRING; mc_host_class : STRING; mc_host : STRING; mc_host_address : STRING; mc_object_class : STRING; mc_object : STRING; mc_tool_class : STRING; mc_tool : STRING; mc_tool_rule : STRING; mc_tool_key : STRING; mc_tool_sev : STRING; mc_origin_class : STRING; mc_origin : STRING; mc_origin_key : STRING; mc_origin_sev : STRING; mc_parameter : STRING; mc_parameter_value : STRING; mc_event_category : MC_EVENT_CATEGORY; mc_incident_time : INTEGER, representation = date; mc_arrival_time : INTEGER, representation = date; mc_local_reception_time : INTEGER, representation = date; date_reception : INTEGER, representation = date; date : STRING; status : STATUS, default = OPEN; severity : SEVERITY, default = WARNING; mc_original_severity : SEVERITY, parse = no; mc_priority : MC_PRIORITY, default = PRIORITY_5; mc_original_priority : MC_PRIORITY, parse = no; mc_owner : STRING; msg : STRING; duration : INTEGER, parse = no; mc_timeout : INTEGER; repeat_count : INTEGER; mc_action_count : INTEGER, parse = no; administrator : STRING; mc_acl : LIST_OF STRING, parse = no; mc_date_modification : INTEGER, representation = date; mc_notes : LIST_OF STRING, hidden = yes; mc_operations : LIST_OF STRING, hidden = yes; mc_notification_history : LIST_OF STRING, hidden = yes; mc_bad_slot_names : LIST_OF STRING; mc_bad_slot_values : LIST_OF STRING; mc_history : LIST_OF STRING, hidden = yes; mc_modhist : LIST_OF STRING, hidden = yes; mc_propagations : LIST_OF STRING, parse = no, hidden = yes; mc_collectors : LIST_OF STRING, parse = no, hidden = yes; mc_abstraction : LIST_OF INTEGER, parse = no, hidden = yes; mc_abstracted : LIST_OF INTEGER, parse = no, hidden = yes; mc_associations : LIST_OF STRING, parse = no, hidden = yes; mc_cause : INTEGER, parse = no, hidden = yes; mc_effects : LIST_OF INTEGER, parse = no, hidden = yes; mc_event_relations : LIST_OF STRING, parse = no, hidden = yes; mc_relation_source : STRING; mc_smc_id : STRING; mc_smc_alias : STRING; mc_smc_impact : INTEGER, default = 0; mc_smc_type : STRING; mc_smc_causes : LIST_OF STRING, parse = no; mc_smc_effects : LIST_OF STRING, parse = no; };END
Appendix B Default service model data classes 329

Root event class
CORE_EVENT slots
The CORE_EVENT slots are listed in BMC Impact Solutions Knowledge Base Development Reference Guide.
Root event class
The MC_SMC_ROOT event class is used to isolate the service management events from the other branches of the event hierarchy and, more specifically, to distinguish among the events associated with a component, those which come from the outside, and those which have been generated internally.
Figure 61 shows the BAROC definition of the MC_SMC_ROOT class, which is located in the mc_sm_root.baroc file.
The service model root event class branches into two subclasses: a history event class and an impact event class.
History event class
The history event class, SMC_STATE_CHANGE, is an internal event class used to trace the status changes of components.
Figure 62 shows the BAROC definition of the SMC_STATE_CHANGE class, which is located in the state.change.baroc file.
Figure 61 MC_SMC_ROOT definition
MC_EV_CLASS : MC_SMC_ROOT ISA EVENT;END
Figure 62 SMC_STATE_CHANGE definition
MC_EV_CLASS:SMC_STATE_CHANGE ISA EVENT DEFINES{
mc_smc_id: STRING, dup_detect=yes ;smc_status: SIM_NOTIFICATION_STATUS;smc_previous_status: SIM_NOTIFICATION_STATUS;msg: default='A Service Management Component status has changed';mc_smc_impact: default=2;
};END
330 BMC Impact Solutions Service Modeling and Publishing Guide

Impact event class
Events of class SMC_STATE_CHANGE are automatically generated and associated with their component by the cell. As history events, they are not used in the status computation process.
Impact event class
The MC_SMC_EVENT internal event class should be used as the abstract class when abstracting raw events into service model events. The BAROC definition of the class follows.
Figure 63 shows the BAROC definition of the MC_SMC_EVENT class, which is located in the mc_sm_root.baroc file.
Events of class MC_SMC_EVENT, or any custom subclass of that class, are not used in the status computation process.
Figure 63 MC_SMC_EVENT definition
MC_EV_CLASS:MC_SMC_EVENT ISA MC_SMC_ROOT DEFINES{
mc_smc_impact : default = 1;component_sub_type: STRING;component_name: STRING;
};END
Appendix B Default service model data classes 331

Impact event class
332 BMC Impact Solutions Service Modeling and Publishing Guide

A B C D E F G H I J K L M N O P Q R S T U V W X Y Z
Index
Aaccess rights to service model objects 100Access Server component type 27active relationship
defined 78setting as 82
Activity component type 26Activity Decision component type 26Activity End component type 26Activity Interaction component type 26Activity Manual component type 26Activity options 82Activity Start component type 26Add to Saved Finds button 72Advanced Find tab 74algorithm, quorum 129alias
entering in component instance 64alias formulas
conditional operators 88creating 86functions in 89
analyzing relevance of events 11Application component type 27Application Infrastructure component type 27Application Service component type 31Application System component type 27applications, using with extended data models 157AR System server
using with extended data models 157ARDBC plug-in 214Atrium Publish environments
parameters for 255attributes
generating fields for AR System 157automated publishing 53, 296AutomatedPublish configuration parameter 230AutomatedPublishRetryPeriod configuration parameter
229, 230
Bblackout status
described 24BMC Atrium Configuration Management Database
described 46exporting SIM class definitions from 250
BMC Impact Portalmonitoring service events 111
BMC Impact Publishing Servergenerating events for 181
BMC Impact Publishing Server CLIcommand summary 247–248common options for commands 241–243configuring 234–??configuring error tracing 241error exit codes 245error tracing, configuring 241pclassinfo command 249–??pcli.trace file 241, 244pinit command 261–??plog command 265–??, 281–??plogdisplay command 266–??pscontrol stop command 278pserver command 280publish command 283–??
BMC Impact Publishing Server servicestopping with pcontrol stop CLI command 278
BMC Impact Solutionsusing new classes 158
BMC Software, contacting iiBMC.ASSET data set 103BMC.IMPACT.PROD data set 54, 103BMC_Activity component class 26BMC_Application component class 27BMC_ApplicationInfrastructure component class 27BMC_ApplicationService component class 31BMC_ApplicationSystem component class 27BMC_BaseElement
BAROC definition 307enumerations 313slot definitions 310, 315
BMC_BusinessProcess component class 26BMC_BusinessService component class 26BMC_CDROMDrive component class 31BMC_Cluster component class 27BMC_ComputerSystem component class 27, 28, 29, 30, 31BMC_ConnectivityCollection component class 27BMC_DataBase component class 26BMC_DataBaseStorage component class 32BMC_DiskDrive component class 31
Index 333

A B C D E F G H I J K L M N O P Q R S T U V W X Y Z
BMC_DiskPartition component class 32BMC_FileSystem component class 32BMC_FloppyDrive component class 31BMC_HardwareSystemComponent component class 31BMC_Impact
data class 313enumerations 316
BMC_IPConnectivitySubnet component class 27BMC_IPXConnectivityNetwork component class 27BMC_LAN component class 27BMC_LNsCollection component class 27BMC_LNsCollection component type 27BMC_LocalFileSystem component class 32BMC_LogicalSystemComponent component class 32BMC_Mainframe component class 29BMC_Media component class 31BMC_Monitor component class 29BMC_OperatingSystem component class 32BMC_Organization component class 27BMC_PROPOGATION_MAP
defined 321slots 321
BMC_RemoteFileSystem component class 32BMC_SIM_ALIAS data class 323BMC_Software component class 32BMC_SoftwareServer component class 28, 29, 30, 31BMC_STATUS_COMPUTATION data class 317BMC_STATUS_PROPOGATION data class 319BMC_SystemResource component class 32BMC_SystemSoftware component class 32BMC_TapeDrive component class 31BMC_UPS component class 31BMC_UserCommunity component class 27BMC_VirtualSystem component class 31BMC_VirtualSystemEnabler component class 32BMC_VMWare component class 32BMC_WAN component class 27Business Process component type 26Business Service component type 26
CCD ROM Drive component type 31cell
add or change name 68assigning related component instances to 83determining topology 14field 63initializing with pinit command 263–264initializing with service model data 261list of cell names 63reinitializing 209SIM, comparing SIM class definitions 252unassigned 63
cell aliasabout 193
334 BMC Impact Solutions Service Modeling and Publi
chart illustrating 196Class Manager Console 158classes
IPS_CONFIG 186IPS_ERROR 191IPS_EVENT 184
CLIfor BMC Impact Publishing Server 233–236
close, action command for penv 254Cluster component type 27color
setting active border 152setting selected background 152
command optionspclassinfo 249pinit 253, 262, 269plog 265, 281plogdisplay 267pscontrol stop 278pserver 280publish 282, 284
commandsmposter 37msend 37pclassinfo 249penv 252penv, action commands 254pinit 261plog 265, 281plogdisplay 266pposter 268pscontrol stop 278pserver 280publish 283
common 245Common Data Model (CDM)
SIM-qualified classes of 46Communication Server component type 28comparing published to new 106component classes
BMC_Activity 26BMC_Application 27BMC_ApplicationInfrastructure 27BMC_ApplicationService 31BMC_ApplicationSystem 27BMC_BMCComputerSystem 27, 28, 29, 30, 31BMC_BusinessProcess 26BMC_BusinessService 26BMC_CDROMDrive 31BMC_Cluster 27BMC_ComputerSystem 27, 28, 29, 30, 31BMC_ConnectivityCollection 27BMC_DataBase 26BMC_DataBaseStorage 32BMC_DiskDrive 31BMC_DiskPartition 32BMC_FileSystem 32
shing Guide

A B C D E F G H I J K L M N O P Q R S T U V W X Y Z
BMC_FloppyDrive 31BMC_HardwareSystemComponent 31BMC_IPConnectivitySubnet 27BMC_IPXConnectivityNetwork 27BMC_LAN 27BMC_LNsCollection 27BMC_LocalFileSystem 32BMC_LogicalSystemComponent 32BMC_Mainframe 29BMC_Media 31BMC_Monitor 29BMC_OperatingSystem 32BMC_Organization 27BMC_RemoteFileSystem 32BMC_SoftwareServer 28, 29, 30, 31BMC_Sofware 32BMC_SystemResource 32BMC_SystemSoftware 32BMC_TapeDrive 31BMC_UPS 31BMC_UserCommunity 27BMC_VirtualSystem 31BMC_VirtualSystemEnabler 32BMC_VMWare 32BMC_WAN 27
component instancesaccess to 100assigning related to cells 83associating with events 86copying 69creating 61creating multiple copies 62deleting 70determining dependencies 10editing 66exporting 123finding existing 71hide 69relationship state 35setting icon colors and labels 152viewing properties 65
component statuscomputation model 25computing 126description of 24
component types 23Access Server 27Activity 26Activity Decision 26Activity End 26Activity Interaction 26Activity Manual 26Activity Start 26Application 27Application Infrastructure 27Application Service 31Application System 27
BMC_LNsCollection 27Business Process 26Business Service 26CD ROM Drive 31Cluster 27Communication Server 28Computer System 28Configuration Management Agent 28Connectivity Collection 27Database 26Database Server 28Database Storage 32Disk Drive 31Disk Partition 32DNS Server 28File Server 28File System 32Firewall 28Floppy Drive 31FTP Server 28Gateway 28Hardware System Component 31Hub 28Input/Output Device 28IP Connectivity Network 27IP Connectivity Subnet 27JBOD 28LAN Network 27Layer 3 Switch 28LDAP Server 29Load Balancer 29Local File System 32Logical System Component 32Mail Server 29Mainframe 29Media 31Message Server 29Mobile User Device 29Monitor 29Operating System 32Organization 27Print Server 29RAID Storage Device 29Remote File System 32Resource Server 29Router 29SAN Bridge 29SAN Director 30SAN Hub 30SAN Router 30SAN Switch 30Security Server 30Server 30Software 32Software Server 30Storage 30Switch 30
Index 335

A B C D E F G H I J K L M N O P Q R S T U V W X Y Z
System Resource 32System Software 32Tape Drive 31Tape Library 30Telnet Server 30Transaction Server 30UDDI Server 30Uninterruptible Power Supply (UPS) 31User Community 27Virtual System 31Virtual System Enabler 32VMware 32WAN Network 27Web Cache 31Web Server 31
Computer System component type 28computing
status, of a component 126Conditional Find tab 75conditional operators in alias formulas 88configuration activities for administrators
associating custom icons with service model component classes 159
Configuration Management Agent component type 28configuration parameters
AutomatedPublish (publishing server) 230AutomatedPublishRetryPeriod 229, 230InitEffectivelyMgmtData 229, 230
configuringBMC Impact Publishing Server CLI 234–??error tracing, BMC Impact Publishing Server CLI 241
Connectivity Collection component type 27Console Navigation Tree
add a component to 113adding a folder 111copying a folder 112dockable window 111moving a folder 112permissions for folders 112refreshing 114removing a folder 113renaming a folder 111
copycomponent instances 69set options for 154
creatingalias formulas 86component instances 60multiple copies of component instances 62relationships 79
custom icons, associating with service model component classes 159
customer support iii
336 BMC Impact Solutions Service Modeling and Publi
Ddata classes
BMC_BaseElement, BAROC definition 307BMC_Impact 313BMC_PROPOGATION_MAP 321BMC_SIM_ALIAS 323BMC_STATUS_COMPUTATION 129, 317BMC_STATUS_PROPOGATION 319extending 23file location 306mapping 322relationship 306service model relationships 313service model, overview of 306SEVERITY_TO_STATUS 322status related 306
Database component type 26Database Server component type 28Database Storage component type 32datasets
BMC.ASSET 104BMC.IMPACT.PROD 104defined 46for Atrium Publish environments 197
date and time formats, setting 153decreasing relationship policy 82deleting
component instance 70event alias associations 90relationships 85Views 116
Direct Feed for service model data 21Direct Publish environments
parameters for 258direct relationship policy 82discovery tools 60Disk Drive component type 31Disk Partition component type 32DNS Server component type 28dockable windows
Console Navigation Tree 111Find 72Pan and Zoom 119repositioning 122Template 62undocking 122
documenting extensions 163drawing relationships 79dynamic prioritization
final priority 147impacts priority 146overview 43priority propagators 146self priority 137
shing Guide

A B C D E F G H I J K L M N O P Q R S T U V W X Y Z
Eediting
component instances 66event alias associations 90in model/not in model setting 67multiple component instances 68multiple objects 67relationships 84
embedded Help options 154error exit codes for BMC Impact Publishing Server CLI 245error messages
modifying 110, 178event alias associations
creating 86deleting 90editing 90testing 102
event classes 328history 330impact 324, 325, 326, 331
eventsassociating to component instances 86generating publishing 181missing, described 12monitoring 110
examplespclassinfo 250–252penv 258pinit 263–264plog 265, 281plogdisplay 267publish 284
expansion handles in relationships 120exploring paths in relationships 120exporting
component instances 123SIM class definitions from BMC Atrium CMDB 250
extending Common Data ModelBMC applications and 157BMC Impact Solutions and 158documenting 163
Ffile location of data classes 306File Server component type 28File System component type 32files
pcli.trace 241, 244pclient.conf 234pserver.trace 241pserver.trace (configure) 241
Find commandconfiguring results pane 73filtering the results 73
relationships 81Find, Advanced 74Find, Conditional 75finding
component instances 71relationships 72
Firewall component type 28Floppy Drive component type 31FTP Server component type 28functions
in alias formulas 89in status computation 126
GGateway component type 28General tab 62generating publishing events 181Go to Component button 74grab hand in View 119
HHardware System Component component type 31hiding
component instance 69dockable windows or View window 61
history event class 330home cell
about 193home cell alias
about 193Hub component type 28
Iicons
custom, associating with user-defined classes in SME 159
identifying critical events 11impact event class 324, 325, 326, 331IMPACTED component status, described 24import service model data 123important component 146in model, defined 54inactive relationship, defined 78increasing relationship policy 82info, action command for penv 255init, action command for penv 255InitEffectivelyMgmtData configuration parameter 229, 230initializing
cells with pinit command 263–264Input/Output Device component type 28IP Connectivity Subnet component type 27IPS_CONFIG class 186
Index 337

A B C D E F G H I J K L M N O P Q R S T U V W X Y Z
IPS_ERROR class 191IPS_EVENT class 184IPX Connectivity Network component type 27
JJBOD (Just a Bunch Of Disks) component type 28
LLAN Network component type 27Layer 3 Switch component type 28LDAP Server component type 29line weight, for relationships 153lines styles, for relationships 153Load Balancer component type 29Local File System component type 32log files
setting preferences for 155log, publishing
viewing with plog command 265logging on
BMC Impact Service Model Editor 59Logical System Component component type 32
MMail Server component type 29Mainframe component type 29Match Attributes box for event alias association 87mc_root_internal.baroc 314mc_root_redef.baroc 328MC_SM_COMPONENT data class, BAROC definition 308mc_sm_event_ mapping.baroc 307mc_sm_object.baroc 307mc_sm_root.baroc 307MC_SMC_EVENT data class BAROC definition 324, 325,
326, 331Media component type 31Message Server component type 29MINOR IMPACT component status, described 24missing events 12Mobile User Device component type 29Monitor component type 29mposter command 37msend command 37
Nnon-impact relationships, showing 122not in model
defined 54setting in component instance 63
338 BMC Impact Solutions Service Modeling and Publi
OOK component status, described 24Open Saved Finds button 72open, action command for penv 255opening, Views 116Operating System component type 32Options command 152Organization component type 27Output Preview option 69
PPan and Zoom dockable window 119parameters
for Arium Publish environments 255for Direct Publish environments 258
Paste Multiple Components dialog box 69pclassinfo command 249–??
examples 250–252options 249–250
pcli.trace 241pcli.trace file 241, 244pclient.conf file
configuring Impact Publishing Server CLI 234location 234
penv command 252pinit command 261–??
examples 263–264options, required 262syntax 262
plog command 265–??, 281–??examples 265, 281syntax 265, 281
plogdisplay command 266–??examples 267options 267return codes 268syntax 266
pposterCLI command 268
Print Server component type 29priority propagators 146product support iiipromotion
all instances 105deleting instances 71guidelines 104overview 52requirements before 104status message 106step-by-step instructions 105submitting 104verifying status 107
promotion of service model 103provider relationship, described 33
shing Guide

A B C D E F G H I J K L M N O P Q R S T U V W X Y Z
pscontrol stop command 278options 278syntax 278
pserver command 280options 280syntax 280
pserver.conf fileconfiguration parameters 205
pserver.trace file 241publish command 283–??
command options 282, 284examples 282, 284syntax 283
Publish History command 108, 177publishing
automated 53, 296changing recommended actions 110, 178viewing history 108, 177
publishing large service models 293publishing log
viewing with plog command 265
Qquery builder in Find 76quick expansion arrows 61
RRAID Storage Device component type 29refresh View 121regional preferences, setting 153reinitializing a cell 209relationship legend 122relationship policy, options defined 82relationships
active 78creating 79define line styles for 153deleting 85drawing 79example View 83expansion handles 120exploring paths 120finding 72inactive 78legend of types of 122selecting 80showing non-impact 122state 35state values 35status propagation models 36testing 102updating 84
Remote File System component type 32
renamingViews 116
repositioning objects in a View 118Reset button in Find 74Resource Server component type 29return codes
plogdisplay 268Router component type 29
SSAN Bridge component type 29SAN Director component type 30SAN Hub component type 30SAN Router component type 30SAN Switch component type 30save
a search statement 72component instances 64Views 115
Security Server component type 30selecting
multiple objects 67relationships 80
Server component type 30service components
types 26service model
class hierarchy 305composition 17data classes, overview of 306Direct Feed 21internals of 305objects, access to 100promotion 103publishing large 293
service model componentscomputing status of 126status colors, default 24status computation 25status values 24
service model relationshipsdata classes 313defined 34
ServiceModelSet class attribute, calculation of relationship values 204
set, action command for penv 255setting
options 152regional preferences 153
SEVERITY_TO_STATUS data class 322showing topology views 122SMC_STATE_CHANGE data class BAROC definition 330Software component type 32Software Server component type 30source file
Index 339

A B C D E F G H I J K L M N O P Q R S T U V W X Y Z
for pposter CLI command 270state_change.baroc file 330status
list of default values for components 24Status and Alias tab 63status computation
functions 129model 25model anatomy 129of components 25
status propagation modelsfor relationships 36in BMC Impact Service Model Editor 133
STATUS_COMPUTATIONdata class, BAROC definition 317, 318slots 317, 318
stoppingBMC Impact Publishing Server service 278
Storage component type 30support, customer iiiSwitch component type 30syntax
pclassinfo 249, 253pinit 262plog 265, 281plogdisplay 266pscontrol stop 278pserver 280publish 283
System Resource component type 32System Software component type 32
TTape Drive component type 31Tape Library component type 30technical support iiiTelnet Server component type 30topology views
configuring 156showing 122
trace configuration fileBMC Impact Publishing Server CLI 241
Transaction Server component type 30
UUDDI Server component type 30UNAVAILABLE component status, described 24undocking dockable windows 122Uninterruptible Power Supply (UPS) component type 31UNKNOWN status
described 24user accounts
views 115
340 BMC Impact Solutions Service Modeling and Publi
User Community component type 27user groups
default rights 100
Vverifying promotion status 107Views
adjusting focus in 118and user accounts 115deleting 116grab and move objects in 119opening 116refreshing 121rename 116reposition objects in 118saving 115setting appearance options 154visual cues in 117zoom 118
Virtual System component type 31Virtual System Enabler component type 32visual cues in a View 117VMware component type 32
WWAN Network component type 27WARNING status, described 24Web Cache component type 31Web Server component type 31weighted cluster status model 25wildcards
using with Find command 72
Zzoom in View 118
shing Guide

Notes

*97725**97725**97725**97725*
*97725*