Bluetooth Module User Manual - Home - LEDsGO · 2 of 21 Casambi app and light control...
22
Bluetooth Module User Manual Version 1.5.1 6.10.2015
Transcript of Bluetooth Module User Manual - Home - LEDsGO · 2 of 21 Casambi app and light control...

Bluetooth Module
User ManualVersion 1.5.1
6.10.2015

1 of 21Casambi app and light control
v1.5.1October2015/MTo
© Casambi Technologies Oy
Linnoitustie 4 A,
02600 Espoo, Finland
www.casambi.com
Table of contents 1
Not just using apps and smartphones 2
Using the Casambi App 3 First time use 3 Taking luminaires into use: Additional info 3
Lamps tab 4 Basic Gestures 4 Creating a group 5 Using a group 5 Editing a lamp control 6
Gallery tab 7 First time use 7 Controlling luminaires 8 Arranging the pictures 8
Scenes tab 9 Creating scenes 9
More Tab 10 Schedule 10 Network settings 11 Network sharing options 11 Managing Networks 12 Nearby Devices 13 Unpairing a luminaire 13 App Settings 14 Help 14
Smart Switching 15 Dim and Save 16 Cycle through modes 16 Control Scenes 17 Cycle Scenes 17 Active/Standby 18 Not in use 18
Push Button 19 Controls this lamp 20 Cycle through modes 20 Control scene 21 Cycle scenes 21
Table of contents

2 of 21Casambi app and light control
v1.5.1October2015/MTo
© Casambi Technologies Oy
Linnoitustie 4 A,
02600 Espoo, Finland
www.casambi.com
Easy to install You don’t need any new
wiring, switches, devices or networks. Plug in the
lighting ixture and pair it with your phone or tablet. No other conigurations
needed.
Delightful to use You can control your lights with an intuitive
and visual user interface on your smartphone or
tablet.
Practical daily use You can still use your existing wall switches. They will have
a new life: use them as dimmers and control many
lamps with one switch.
Lighting as Experience Casambi is more than just a
light switch. With a tap on your smartphone you can set the
ambience for study, watching a movie, or a romantic dinner.
Not just using apps and smartphones
Casambi enabled luminaires can be controlled from a regular power or wall switch without the Casambi app. It is possible to use the wall switch for dimming, controlling one scene with multiple luminaires or switching through multiple scenes. Even a 100 year old power switch can be used.
There is no need to install additional dimmers, simply install the Casambi unit and you are ready to use the regular wall switch for dimming.
To be able to control scenes you need to irst change the Smart Switching settings with Casambi app.
From page 14 onwards you ind more information about Casambi’s Smart Switching options.

3 of 21Casambi app and light control
v1.5.1October2015/MTo
© Casambi Technologies Oy
Linnoitustie 4 A,
02600 Espoo, Finland
www.casambi.com
Using the Casambi App
First time use
Casambi app is easy to take into use. Follow these simple steps.
1. Download the app from Apple App Store or Google Play Store.
2. Switch on your Casambi enabled luminaires.
3. Open the app.
4. Casambi app will automatically ind all Casambi enabled luminaires that are switched on.
5. Tap on the ‘Take all lamps into use’
6. Casambi app will automatically add all found luminaires to one network and open the ‘Lamps’ tab
Taking luminaires into use: Additional info
When irst taking all luminaires into use the Casambi app will automatically create a network. All the luminaires are added to the same network so that they can be easily controlled from ‘Lamps’ tab. One luminaire can only be in one network at a time. When luminaire is part of a network it is in ‘paired’ state and cannot be added to any other network before ‘unpairing’ i.e. removing it from the network.
The network that is automatically created is always a “Not shared” network. This means that the network is only stored in the device that has created it and is not shared with other devices. If you would like to change the network sharing go to ‘More’ tab and select ‘Networks Settings’. In ‘Settings’ screen you can change the network name, time zone, Location, Mode and sharing. See page 11 for more information about these settings.

4 of 21Casambi app and light control
v1.5.1October2015/MTo
© Casambi Technologies Oy
Linnoitustie 4 A,
02600 Espoo, Finland
www.casambi.com
hold
pan left / right
pan up / down
Lamps tab
Basic Gestures
After you have taken your luminaires into use they are displayed in the ‘Lamps’ tab with a picture, name and the current brightness level.
Here are the basic gestures how to control your lights.
To turn off or on your luminaire just tap on the lamp control.
Pan lamp control left or right to adjust light level of the luminaire.
Pan lamp control up or down to adjust the colour temperature of the luminaire.
Hold on top of the lamp control to change the colour.
Tip: Use the basic gestures on the All lamps icon to control all your lamps together or Nearby lamps icon to control lamps that are close to you.

5 of 21Casambi app and light control
v1.5.1October2015/MTo
© Casambi Technologies Oy
Linnoitustie 4 A,
02600 Espoo, Finland
www.casambi.com
double tap
Creating a group
In ‘Lamps’ tab there is the possibility to create a group from your luminaires and control all the luminaires in the group together.
For example, add all living room lights into one group and switch them all on or off with one tap.
There are two ways to create a group.
1. Tap on the ‘Group’ on the top of the screen and select the lamps for the group by tapping them. Conirm selection with ‘Done’. (Available in beta app)
2. Tap on the ‘Edit’ on the top of the screen. Drag the lamp controls on top of each other to create a group.
If you want to add more lamps into the group tap ‘Edit’ and drag and drop them on top of the group.
If you want to edit the group just tap the group while in edit mode and it will open for editing.
In the edit window you can rename the group and remove lamps from it by dragging and dropping them outside the group area.
After you are done just tap ‘Close’ and you get back to the Lamps edit screen.
When the group is done and you don’t need to edit it any more tap ‘Done’ and ‘Close’ to go back to lamps tab.
Using a group
After creating a group you can control the luminaires in it together. Use the normal gestures, tap, pan and hold to control all the luminaires in the group.
If you would like to control luminaires separately even if they are part of a group just double tap the group and a screen will open where it is possible to control luminaires separately.

6 of 21Casambi app and light control
v1.5.1October2015/MTo
© Casambi Technologies Oy
Linnoitustie 4 A,
02600 Espoo, Finland
www.casambi.com
Editing a lamp control
To edit a lamp control either double tap the lamp control you want to edit or tap on the ‘Edit’ on top of the screen and select the lamp control you want to edit.
In the edit screen you can change the name and the icon of the lamp control.
You can also select the Smart Switching mode that you want to use for the luminaires wall switch. For detailed information about Smart Switching, see the Smart Switching section.
If you have a luminaire that uses a push button there is also the possibility to change the Push Button settings. For detailed information about push button, see the Push Button section.
With the Startup State setting you can set the luminaire to either go to default light level or to last state when switching the luminaire on. With last state setting the luminaire will go to same dim level and colour as it was when the luminaire was switched off.
There is also the possibility to add different modes to the luminaire. Modes can be different dimming levels, colours or colour temperatures. See the Smart Switching and Push Button sections for instructions how to save the modes and control them with wall switch or push button.
With the Unpair lamp button it is possible to remove the luminaire from the current network.

7 of 21Casambi app and light control
v1.5.1October2015/MTo
© Casambi Technologies Oy
Linnoitustie 4 A,
02600 Espoo, Finland
www.casambi.com
Gallery tab
First time use
The Gallery in Casambi app is the most intuitive way of controlling your luminaires. Take a picture of the room where your luminaires are and place lamp controls over them in the picture.
To add the irst picture tap on the orange text and choose whether you want to take a photo or use existing picture from your devices gallery.
After you have taken a photo or selected a picture it is added to Casambi Gallery.
Next step is to add lamp controls to the picture.
Tap on the + sign to open selection screen with all your luminaires
Select a luminaire that is in the picture and conirm your selection with ‘Done’
A lamp control circle will appear in the center of the picture. Drag the control circle on top of the luminaire.
If you have more than one luminaire in the picture tap on + sign to add other controls. When you have added controls over all the luminaires in the picture tap on ‘Done’.
To return to Gallery and add more pictures tap on <Gallery.
If you would like to add more pictures tap on the + on top of the Gallery screen. If you don’t see a + sign then tap on ‘Edit’ and the + will appear.
Tip: Take a panorama picture of your room to capture more luminaires in one photo.
8 of 21Casambi app and light control
v1.5.1October2015/MTo
© Casambi Technologies Oy
Linnoitustie 4 A,
02600 Espoo, Finland
www.casambi.com
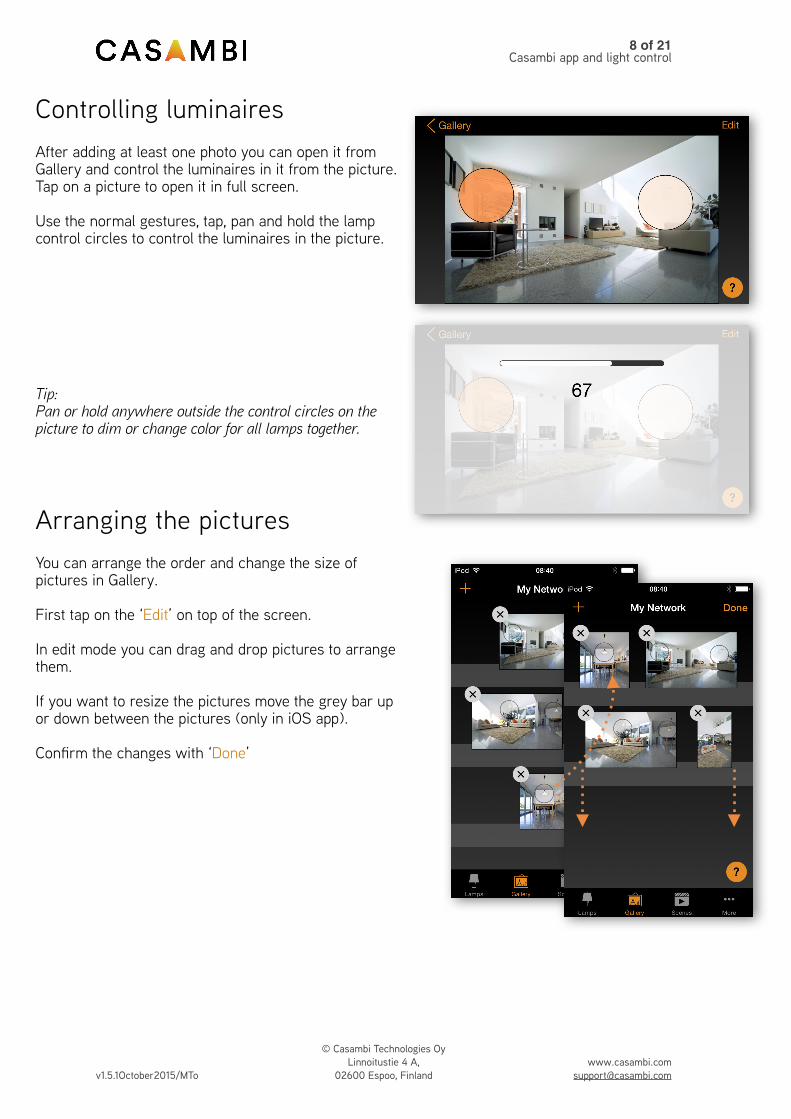
Controlling luminaires
After adding at least one photo you can open it from Gallery and control the luminaires in it from the picture. Tap on a picture to open it in full screen.
Use the normal gestures, tap, pan and hold the lamp control circles to control the luminaires in the picture.
Tip: Pan or hold anywhere outside the control circles on the picture to dim or change color for all lamps together.
Arranging the pictures
You can arrange the order and change the size of pictures in Gallery.
First tap on the ‘Edit’ on top of the screen.
In edit mode you can drag and drop pictures to arrange them.
If you want to resize the pictures move the grey bar up or down between the pictures (only in iOS app).
Conirm the changes with ‘Done’

9 of 21Casambi app and light control
v1.5.1October2015/MTo
© Casambi Technologies Oy
Linnoitustie 4 A,
02600 Espoo, Finland
www.casambi.com
Scenes tab
Creating scenes
In the ‘Scenes’ tab you can create different lightings for different occasions. It is possible to control multiple luminaires with one tap to create perfect ambience for different occasions and needs. One luminaire can be used in several scenes.
Creating irst scene:
Tap on ‘Add a scene’ and enter a name for the scene
Select and adjust the luminaires for this scene. You can adjust the luminaires separately or if you want to have same dim level or colour for all you can use the Lamps in scene control to adjust all luminaires in the scene.
If you want to add luminaires that are in a group double tap the group to open the selection screen.
If you want to add all luminaires in the group to the scene tap on the + sign on right top corner. (Available in beta app)
To adjust all the luminaires in the group use basic gestures anywhere on the group area. (Available in beta app)
To change the name, icon and color for the scene control tap on the settings icon on bottom left corner.
To get back to the scenes tab tap on Done
If you want to create more scenes just tap on the + sign on top of scenes tab.
You can also copy scenes by tapping and holding on top of them. (Available in beta app)
Tip:Select also the luminaires which should be off during the scene and adjust their brightness level to 0%.

! 0 of 211Casambi app and light control
v1.5.1October2015/MTo
© Casambi Technologies Oy
Linnoitustie 4 A,
02600 Espoo, Finland
www.casambi.com
More Tab
Schedule/Timer
With schedule function you can create a list of timers that will turn scenes on and off based on time. You can create a wake up light to wake up nicely in the morning or set the living room lights to automatically turn on in the evening.
Go to More tab and select Schedule. Create a new timer by tapping the Edit on the left top corner and then + on the top right corner.
Select the scene you want to control with this timer.
Tap on the Turns ON button and set the time when the scene should turn on. You can use weekdays or a speciic date. For time you can set a time of day or use local sunrise and sunset to turn on the scene. To use sunrise/sunset the network location needs to be set. See the Network settings section for detailed instructions. Tap on Done to conirm the changes.
Tap on the Turns OFF and select the time when the scene should turn off. You can use all the same criteria as previously. You can also tap the After button and set the time how long the scene will stay on. Tap on Done to conirm the changes.
In the Timer screen it is also possible to set the Fade time for the scene. This means that when the scene is turned on the lights will slowly reach the light level in the scene. The fader will start when the timer is turned on. This means that if you set the scene to come on at 14:05 and you set a fader for 30 seconds then the scene is fully on at 14:05:30.
With faders you can also change from one scene to other very smoothly or create a nice wakeup light.
Conirm your settings by tapping Done.
Casambi units will keep track of time when even one unit in the network is powered on all the time. In a situation where all units have been turned off the time needs to be set to the units again. In this situation please open the network in Casambi app with administrator rights to set the time again.

11 of 21Casambi app and light control
v1.5.1October2015/MTo
© Casambi Technologies Oy
Linnoitustie 4 A,
02600 Espoo, Finland
www.casambi.com
Network settings
When you irst take your luminaires into use Casambi app will automatically create a network and add the luminaires to that network. As a default the network is ‘Not Shared’ which means that it is only stored in the device it has been created with.
To change the network settings go to ‘More’ tab and select ‘Network Settings’.
In Settings screen you can change the name, set the Time zone and the location for the network. The location needs to be set if you would like to create timers using local sunrise or sunset as trigger.
The network mode can only be changed for networks that do not have any luminaires yet. After there is at least one luminaire in the network the mode cannot be changed anymore. The default mode for the network is Balanced and that should be used unless there are large amount of luminaires close to each other.
If there is an installation with large amount of luminaires then the Better performance mode can be used. See Managing networks section for instructions how to create a new network.
To share the network with other devices the sharing settings need to be changed. Tap on ‘Sharing‘ to change the sharing settings for network.
Network sharing options
There are four different options for network sharing:
Not shared - Network is only stored on this device. Other devices cannot access this network.
Administrator only - Network is discovered and accessed only with administrator email and password.
Password protected - Other devices can access this network with a visitor password. Modiications require administrator password.
Open - Other devices access this network without password. Modiications require administrator password

! 2 of 211Casambi app and light control
v1.5.1October2015/MTo
© Casambi Technologies Oy
Linnoitustie 4 A,
02600 Espoo, Finland
www.casambi.com
After changing the network sharing mode it is recommended to set an administrator email and password for the network. A visitor password is needed for password protected network so that other devices can access the network.
To save the new settings tap on ‘Save’. If the sharing setting is something else than ‘Not Shared’ all the changes are uploaded to Casambi Cloud service and network can be accessed from other devices.
Tip: Comparison with Wi-Fi network settings: (1) Wi-Fi off; (2) hidden Wi-Fi; (3) password protected Wi-Fi; (4) open Wi-Fi
Managing Networks
You can see the networks stored in your mobile device from the ‘Networks’ screen. The ‘Networks’ screen can be accessed from ‘More’ tab by selecting ‘Change Network’ or from the Main screen by selecting ‘My Networks’.
In the list all the networks that have powered on luminaires nearby, i.e., ‘online’ networks, will show with black icon and ‘offline’ networks are shown with grey icon. You can select a network by tapping on the name. From this screen it is also possible to create new networks and log into networks with administrator email and password. Tap on the Login to network button and write the administrator email and password to the ields.
You can access a network with administrator email and password even if you are not in the range of the luminaires in that network.
Tip:It is possible to have several networks in one mobile device. For example one for home and other for work. All the created and visited networks will be listed in Networks screen.

! 3 of 211Casambi app and light control
v1.5.1October2015/MTo
© Casambi Technologies Oy
Linnoitustie 4 A,
02600 Espoo, Finland
www.casambi.com
Nearby Devices
In nearby devices screen you can see a list of all Casambi enabled luminaires that are found nearby and HUE Gateways found from wireless network.
In the list you can see the name, vendor, irmware version and signal strength of the luminaire. You can also see if the luminaire is in paired or unpaired state. If you have access to the network that the luminaire is paired to you can also see the network name.
By tapping on a luminaire you can take it into use (add to a network), unpair (remove from network), ignore or update the irmware of the luminaire. When you tap on the luminaire you can see the options that are available.
In this screen you can also check if there are any updates available for your Casambi enabled luminaire. Just tap on the “Check for updates” button and Casambi app will connect to cloud service and look for updates. If there is an update available you can see an arrow on top corner of your luminaire icon.
Unpairing a luminaire
There are two places where you can unpair a lamp from a network. 1. Go to ‘Lamps’ tab and tap ‘edit’. Now you can unpair a lamp from the delete icon on the corner of the lamp control. You can also tap a lamp control to open the ‘edit lamp’ screen and then tapping the ‘Unpair lamp’ button on the bottom of the screen.
2. Go to the ‘Nearby devices’ screen found under ‘More’ tab. Tap on the lamp you want to unpair and select ‘Unpair lamp’. This will unpair the lamp if you have modiication rights to the network.
If you don’t have the modiication rights to the network that the lamp is paired to then you need to have access to the lamp’s power switch for the unpairing. Tap on the ‘Unpair lamp’ and the app will open an 'Unpair’ screen. Tap on the ‘Start’ button and the time bar appears. Now quickly flick the power switch off and back on to unpair the lamp. If unpairing succeeded there is a message that lamp has been unpaired.

! 4 of 211Casambi app and light control
v1.5.1October2015/MTo
© Casambi Technologies Oy
Linnoitustie 4 A,
02600 Espoo, Finland
www.casambi.com
App Settings
In app settings screen it is possible to change settings and send feedback to Casambi.
If you only use Casambi enabled lamps or HUE bulbs you can disable the other one in the app settings. You can also hide the help buttons from the user interface.
By tapping Send feedback button you can send feedback or support request to Casambi. It is possible to Include diagnostics and unit details with your feedback to help with the troubleshooting.
Reset application button will reset all settings, data and delete any networks that you have visited from the device.
Help
Under Help you can ind Frequently asked questions and Release notes.

! 5 of 211Casambi app and light control
v1.5.1October2015/MTo
© Casambi Technologies Oy
Linnoitustie 4 A,
02600 Espoo, Finland
www.casambi.com
double tap
Smart Switching
With Smart Switching feature it is possible to use ordinary wall switches as dimmers or control scenes with them.
The Smart Switching mode for the luminaire’s power switch can be conigured in Casambi app. It is possible to assign different Smart Switching modes to each Casambi enabled luminaire.
For example you can use Smart Switching to switch on several lamps when you come home or switch the lighting to be suitable for dinner party or watching a movie.
Go to ‘Lamps’ tab and double tap the lamp control you want to assign a Smart Switching mode to.
Under ‘Smart Switching’ tap the current mode to open the Smart Switching selection. As a default the mode is ‘ Dim and Save’
There are six different Smart Switching modes:
Dim and save — controls one luminaire Cycle through modes — controls one luminaire Control scenes — controls one or multiple luminaires Cycle scenes — controls one or multiple luminaires Active / Standby — controls one or multiple luminaires Not in use

! 6 of 211Casambi app and light control
v1.5.1October2015/MTo
© Casambi Technologies Oy
Linnoitustie 4 A,
02600 Espoo, Finland
www.casambi.com
Dim and Save
As a default Casambi enabled luminaires are set to use the Dim and Save Smart Switching mode. This means you can use the luminaires power switch for dimming and setting the default light level.
To start the dimming process, just quickly switch OFF and ON the light ixture from the wall or power switch. After flicking the switch the dimming process will start.
Once the light has reached the desired brightness level just flick the power or wall switch quickly again, OFF and ON, to save the current level as new default brightness for the light ixture.
It is always possible to change the default brightness by starting the dimming process over again.
To set the default brightness level back to maximum, just flick the power or wall switch OFF and ON once and the dimming process will start again. When the brightness level reaches the maximum value it is set as a new default for the light ixture.
Cycle through modes
If you have set different modes for the luminaire with Casambi app you can assign the power switch to control them. Modes can be different dimming levels, colours or colour temperatures. Flicking the power switch quickly OFF and ON will cycle between the different modes and off: Default, Mode1, Mode2, Mode3, Off.
To set a mode adjust the light level, colour temperature and colour of the luminaire to desired level and long press the mode you want to save the settings to and a popup will open. Select ‘Save’. Repeat the steps to set more Modes.
After you have set all the desired modes tap the Smart Switching mode and select Cycle through modes from the list.
Tip: Create a standard step dimmer by storing Mode 1 = 75%, Mode 2 = 50% and Mode 3 = 25%.

17 of 21Casambi app and light control
v1.5.1October2015/MTo
© Casambi Technologies Oy
Linnoitustie 4 A,
02600 Espoo, Finland
www.casambi.com
Control Scenes
If you have created different scenes with Casambi app you can control them from a single power switch.
Select which scene or scenes you want to control and turning on one luminaire will also turn on all other luminaires in that scene(s). Turning off the luminaire will turn off also all the luminaires that are currently controlled by that scene.
Select the ‘Control Scenes’ option from Smart Switching and tap on the desired scene or scenes to select them. Conirm changes with ‘Done’
Cycle Scenes
If you have created different scenes with Casambi app you can cycle through them and off with one power switch. Select the scenes you would like to cycle through and flick the power switch off and on to cycle the selected scenes.
Select the ‘Cycle Scenes’ option from Smart Switching and tap on the desired scene or scenes to select them. It is also possible to change the order of the scenes by dragging and dropping. Conirm changes with ‘Done’
Example, selected scenes Movie and Dinner: Flick off-on-> Movie scene activates Flick off-on-> Movie scene goes off and Dinner scene activates Flick off-on-> Dinner scene goes off

18 of 21Casambi app and light control
v1.5.1October2015/MTo
© Casambi Technologies Oy
Linnoitustie 4 A,
02600 Espoo, Finland
www.casambi.com
Active/Standby
With Active/Standby Smart Switching mode you can control two scenes that have same luminaires in them.
Create two scenes, one active scene that should turn on when the controlling luminaire is turned on and one Standby scene that is turned on when the controlling luminaire is turned off. This mode can be used for example with motion sensors.
When motion is detected the luminaires go to full light level and when there is no motion the luminaires are dimmed to 30%. Please see our “Casambi and motion sensors” document for examples.
Not in use
Sometimes it is necessary that the power switch doesn’t do anything special when used. Not in use option will disable our Smart Switching feature.

! 9 of 211Casambi app and light control
v1.5.1October2015/MTo
© Casambi Technologies Oy
Linnoitustie 4 A,
02600 Espoo, Finland
www.casambi.com
double tap
Push Button
If your luminaire has a push button you can select the coniguration for the push button in Casambi app. You can use it to dim the luminaire or control several luminaires with one push button It is possible to assign different modes to each Casambi enabled luminaire’s push button.
For example you can use Push button to switch on several lamps when you come home or switch the lighting to be suitable for dinner party or watching a movie.
Go to ‘Lamps’ tab and double tap the lamp control you want to change the push button coniguration to.
Under ‘Push Button’ tap the current mode to open the Push button selection. As a default the mode is ‘Controls this lamp’
There are four different Push Button modes:
Controls this lamp - controls one luminaire Cycle through modes - controls one luminaire Control scene - controls one or multiple luminaires Cycle scenes - controls one or multiple luminaires

20 of 21Casambi app and light control
v1.5.1October2015/MTo
© Casambi Technologies Oy
Linnoitustie 4 A,
02600 Espoo, Finland
www.casambi.com
Controls this lamp
As a default Casambi enabled luminaires are set to use the Controls this lamp Push Button mode. This means you can use the luminaires push button for dimming and setting the default light level.
To start the dimming process just press down and hold the push button and the light will start to dim down. Once the light has reached the desired brightness level just let go of the push button to save the current level as new default brightness for the light ixture.
Next time when you press down and hold the push button the light level will start to dim up. Once the light has reached the desired brightness level just let go of the push button.
Cycle through modes
If you have set different modes for the luminaire with Casambi app you can assign the push button to control them. Modes can be different dimming levels, colours or colour temperatures. Clicking the push button will cycle between the different modes and off: Default, Mode1, Mode2, Mode3, Off. Pressing and holding the push button will adjust the luminaire brightness.
To set a mode adjust the light level, colour temperature and colour of the luminaire to desired level and long press the mode you want to save the settings to and a popup will open. Select ‘Save’. Repeat the steps to set more Modes.
After you have set all the desired modes tap the Push Button mode and select Cycle through modes from the list.

21 of 21Casambi app and light control
v1.5.1October2015/MTo
© Casambi Technologies Oy
Linnoitustie 4 A,
02600 Espoo, Finland
www.casambi.com
Control scene
If you have created different scenes with Casambi app you can control them from a single push button.
Select which scene you want to control and switching on one luminaire will also switch on all other luminaires in that scene. Pressing and holding the push button will adjust the scene brightness and save it as new brightness for that scene. Switching off the luminaire will switch off also all the luminaires that are currently controlled by that scene.
Select the ‘Control Scenes’ option from Push Button options and tap on the desired scene or scenes to select them. Conirm changes with ‘Done’
Cycle scenes
If you have created different scenes with Casambi app you can cycle through them and off with one push button. Select the scenes you would like to cycle through and click the push button to cycle the selected scenes and off. Pressing and holding will adjust the current scene brightness and save it as new brightness for that scene.
Select the ‘Cycle Scenes’ option from Push Button options and tap on the desired scene or scenes to select them. It is also possible to change the order of the scenes by dragging and dropping. Conirm changes with ‘Done’
Example: Selected scenes: Movie and Dinner. Click push button-> Movie scene activates Click push button-> Movie scene goes off and Dinner scene activates Click push button-> Dinner scene goes off