Blood Glucose Monitoring System - Diabetestype2 Web...
33
Ultra Ultra Ultra Blood Glucose Blood Glucose Monitoring Sy Monitoring System stem
Transcript of Blood Glucose Monitoring System - Diabetestype2 Web...

© LifeScan, Inc. 2000 Milpitas, CA 95035 12/00 AW 060-175-03APatent Nos. 5,708,247 and 5,951,836.
AW *06017503A*
LifeScan Customer Services toll-free numbers:(24 hours a day, 7 days a week)
U.S.A. English 1 800 227-8862Español 1 800 381-7226
Visit the LifeScan Web site: www.LifeScan.com
UltraUltraUltra Blood GlucoseBlood GlucoseMonitoring SyMonitoring Systemstem
LSI-00-195 Ultra OB Color Crx 1/4/01 2:17 PM Page 1

i i ii i
Dear ONE TOUCH® Ultra System Owner:
You have chosen one of the best blood glucosemonitoring systems available. This booklet hasimportant information you must know about theONE TOUCH Ultra System. Read it carefully.
Your ONE TOUCH Ultra System provides you withaccurate, plasma-calibrated test results. Thisfeature makes it easier for you and your doctor tocompare your meter results with laboratory results.If you’ve been using another type of meter, you may notice that your results with the ONE TOUCHUltra System are about 12% higher.
Blood glucose monitoring plays an important rolein diabetes control. A long-term study showed thatkeeping blood glucose levels close to normal canreduce the risk of diabetes complications by up to60%.* The results you get with the ONE TOUCHUltra System can help you and your healthcareprofessional monitor and adjust your treatmentplan to gain better control of your diabetes.
A warranty registration card is included with yoursystem. If you complete it and mail it to us, we willsend you a gift. If you prefer to fill out a warrantycard online, please visit LifeScan.com.
*American Diabetes Association position statement on the DiabetesControl and Complications Trial (1993).
TEST SUMMARY
1. Insert test strip. Meter turns onautomatically.
2. Apply sample. Touch and hold the blood drop to TOP EDGE of test strip, where it meets narrow channel.
3. Hold the blood drop to the TOP EDGE until confirmation window is completely filled beforemeter begins to count down. If confirmation window does not fillcompletely, do not add blood to teststrip. Discard test strip and retest.
4. Accurate test results in just 5 seconds.
This summary is intended only forquick reference and not as a substi-tute for the ONE TOUCH® Ultra Owner’sBooklet. Please read the entire bookletbefore you begin testing.
LSI-00-195 Ultra OB Color Crx 1/4/01 2:17 PM Page ii

v
The ONE TOUCH® Ultra System is intendedfor use outside the body (in vitro diagnosticuse). It should be used only for testingglucose (sugar) and only with freshcapillary whole blood samples. It shouldnot be used for the diagnosis of diabetesor for the testing of newborns.
i v
CAUTION:
Before using any product to test your bloodsugar (blood glucose), read all instructionsand practice the test. Do all quality controlchecks as directed and consult with a diabeteshealthcare professional. These recommendationsapply to all blood glucose monitoring systemsand are supported by the American Associationof Diabetes Educators, the American DiabetesAssociation, the U.S. Food and DrugAdministration, and Advamed.
Important Information� Severe dehydration and excessive water loss
may cause false low results. If you believe youare suffering from severe dehydration, consulta healthcare professional immediately.
� Test results below 60 mg/dL (3.3 mmol/L)mean low blood glucose (hypoglycemia). Testresults greater than 240 mg/dL (13.3 mmol/L)mean high blood glucose (hyperglycemia). If you get results below 60 mg/dL or above240 mg/dL, and do not have symptoms, firstrepeat the test. If you have symptoms or con-tinue to get results that fall below 60 mg/dL orabove 240 mg/dL, follow the treatment adviceof your healthcare professional.
� If you are experiencing symptoms that are not consistent with your blood glucose testresults AND you have followed all instructionsdescribed in the ONE TOUCH® Ultra Owner’sBooklet, call your healthcare professional.
� A red blood cell count (hematocrit) that isvery high (above 55%) or very low (below30%) can cause false results.
LSI-00-195 Ultra OB Color Crx 1/4/01 2:17 PM Page iv

v i iv i
TABLE OF CONTENTS
GETTING STARTED 1
The Complete ONE TOUCH® UltraBlood Glucose Monitoring System 1ONE TOUCH® UltraBlood Glucose Meter 2
ONE TOUCH® Ultra Test Strips 6
BEFORE TESTING 8
Checking the Display 8
Coding the Meter 8
Checking the System with ONE TOUCH® UltraControl Solution 11
TESTING YOUR BLOOD 17
Getting a Drop of Blood 18
Step-by-Step Test Procedure 23
Special Messages 26
USING THE METER MEMORY 27
VIEWING TEST RESULTS ON A PERSONAL COMPUTER 30
Data Downloading 30
COMPARING METER AND LABORATORY RESULTS 32
SETTING THE METER 34
Setting the Time, Date, and Unit of Measurement 34
CARING FOR YOUR METER 39
Maintenance 39
Battery 40
DISPLAY MESSAGES AND PROBLEM-SOLVING GUIDE 42
SPECIFICATIONS 52
GUARANTEE 53
LSI-00-195 Ultra OB Color Crx 1/4/01 2:17 PM Page vi

The Complete ONE TOUCH® UltraBlood Glucose Monitoring System
The ONE TOUCH Ultra Blood GlucoseMonitoring System consists of three mainproducts: the ONE TOUCH® Ultra BloodGlucose Meter, ONE TOUCH® Ultra Test Strips,and ONE TOUCH® Ultra Control Solution.These products have been designed, tested,and proven to work together as a system toproduce accurate blood glucose test results.Use only ONE TOUCH Ultra Test Strips andONE TOUCH Ultra Control Solution with theONE TOUCH Ultra Blood Glucose Meter.
Your system includes:
� ONE TOUCH® Ultra Meter� ONE TOUCH® Ultra Test Strips� ONE TOUCH® Ultra Control Solution� ONE TOUCH® UltraSoft Adjustable
Blood Sampler� ONE TOUCH® UltraSoft Sterile Lancets� Owner’s Booklet� Carrying Case� Quick Reference Guide� Warranty Registration Card� Logbook� One 3.0 V Lithium Battery (Installed)
1
GETTINGSTARTED
v i i i
CAUTION: Check your ONE TOUCH® Ultra System to be sure the outercarton seal is not missing or broken. If either of these conditionsoccurred, please return your system to the place of purchase.
LSI-00-195 Ultra OB Color Crx 1/4/01 2:18 PM Page viii

2 3
DISPLAYYour test results are displayedhere. The large, easy-to-readdisplay guides you through the test using symbols and simple messages.
TEST PORTThe test port is where you insertthe ONE TOUCH® Ultra Test Stripfor testing. The meter will turnon automatically when youinsert a test strip.
DATA PORTThe data port accepts theLifeScan Interface Cable, whichcan be used to help downloadyour test results to a computerfor further analysis using IN TOUCH® DiabetesManagement Software.
C BUTTONThe C (Change) button is used to change the date and time,code number, and unit of mea-surement, as well as to indicatecontrol solution tests and toreview test results while in thememory mode.
M BUTTONThe M (Mode) button is usedto set up the meter, enter thememory mode, and turn themeter on and off.
ONE TOUCH® Ultra Blood Glucose Meter
LSI-00-195 Ultra OB Color Crx 1/4/01 2:18 PM Page 2

54
ONE TOUCH® Ultrameter display segments
BLOOD DROP SYMBOLThis symbol tells you when toapply the sample.
CODEAppears with the code numberof the test strips currently in use.
CTLIndicates a control solution test result.
UNITS OF MEASUREMENTDepending uponhow the meter isset, either mmol/Lor mg/dL will appear with the test result.
TEST RESULTAREATest results aredisplayed here. (A decimal pointappears when theunit of measure-ment is millimolesper liter.)
MONTH DAY HOUR MINUTES
BATTERY SYMBOLAppears when the battery is lowor must be replaced.
KETONES?Appears when ablood glucose testresult is above 240 mg/dL.
MEMIndicates a testresult stored inmemory.
LSI-00-195 Ultra OB Color Crx 1/4/01 2:18 PM Page 4
76See pages 17–26, Testing Your Blood, for complete instructions.
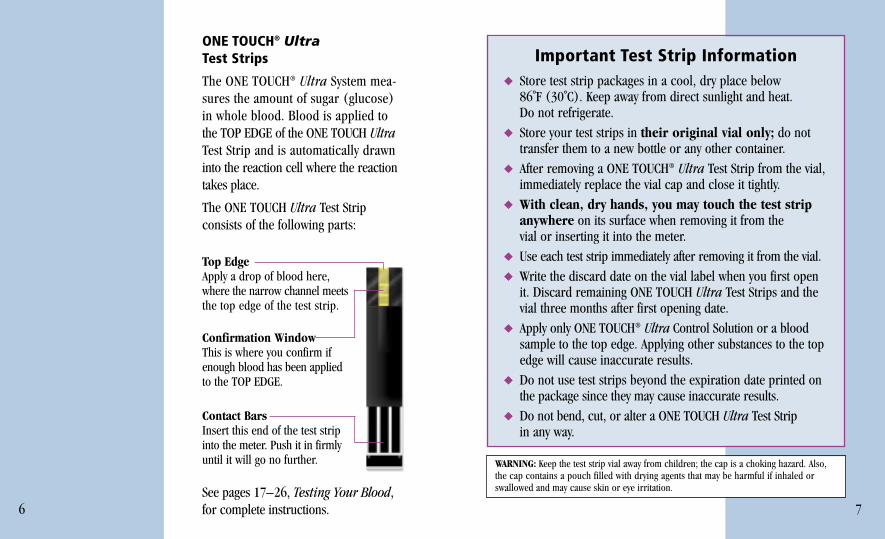
Important Test Strip Information� Store test strip packages in a cool, dry place below
86˚F (30˚C). Keep away from direct sunlight and heat. Do not refrigerate.
� Store your test strips in their original vial only; do nottransfer them to a new bottle or any other container.
� After removing a ONE TOUCH® Ultra Test Strip from the vial,immediately replace the vial cap and close it tightly.
� With clean, dry hands, you may touch the test stripanywhere on its surface when removing it from the vial or inserting it into the meter.
� Use each test strip immediately after removing it from the vial.� Write the discard date on the vial label when you first open
it. Discard remaining ONE TOUCH Ultra Test Strips and thevial three months after first opening date.
� Apply only ONE TOUCH® Ultra Control Solution or a bloodsample to the top edge. Applying other substances to the topedge will cause inaccurate results.
� Do not use test strips beyond the expiration date printed onthe package since they may cause inaccurate results.
� Do not bend, cut, or alter a ONE TOUCH Ultra Test Stripin any way.
WARNING: Keep the test strip vial away from children; the cap is a choking hazard. Also,the cap contains a pouch filled with drying agents that may be harmful if inhaled orswallowed and may cause skin or eye irritation.
ONE TOUCH® UltraTest Strips
The ONE TOUCH® Ultra System mea-sures the amount of sugar (glucose) in whole blood. Blood is applied to the TOP EDGE of the ONE TOUCH UltraTest Strip and is automatically drawninto the reaction cell where the reactiontakes place.
The ONE TOUCH Ultra Test Strip consists of the following parts:
Contact BarsInsert this end of the test stripinto the meter. Push it in firmlyuntil it will go no further.
Top EdgeApply a drop of blood here, where the narrow channel meetsthe top edge of the test strip.
Confirmation WindowThis is where you confirm ifenough blood has been appliedto the TOP EDGE.
LSI-00-195 Ultra OB Color Crx 1/4/01 2:18 PM Page 6
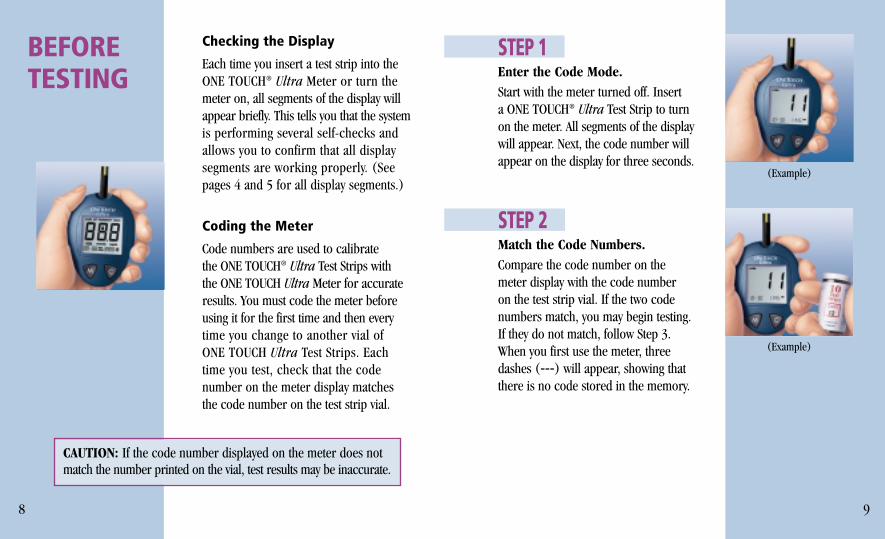
Checking the Display
Each time you insert a test strip into theONE TOUCH® Ultra Meter or turn themeter on, all segments of the display willappear briefly. This tells you that the systemis performing several self-checks andallows you to confirm that all displaysegments are working properly. (Seepages 4 and 5 for all display segments.)
Coding the Meter
Code numbers are used to calibrate the ONE TOUCH® Ultra Test Strips with the ONE TOUCH Ultra Meter for accurateresults. You must code the meter beforeusing it for the first time and then everytime you change to another vial of ONE TOUCH Ultra Test Strips. Each time you test, check that the code number on the meter display matchesthe code number on the test strip vial.
8
BEFORETESTING
CAUTION: If the code number displayed on the meter does notmatch the number printed on the vial, test results may be inaccurate.
9
STEP 1Enter the Code Mode.Start with the meter turned off. Insert a ONE TOUCH® Ultra Test Strip to turnon the meter. All segments of the displaywill appear. Next, the code number willappear on the display for three seconds.
STEP 2Match the Code Numbers.Compare the code number on themeter display with the code number on the test strip vial. If the two codenumbers match, you may begin testing.If they do not match, follow Step 3.When you first use the meter, threedashes (---) will appear, showing thatthere is no code stored in the memory.
(Example)
(Example)
LSI-00-195 Ultra OB Color Crx 1/4/01 2:18 PM Page 8
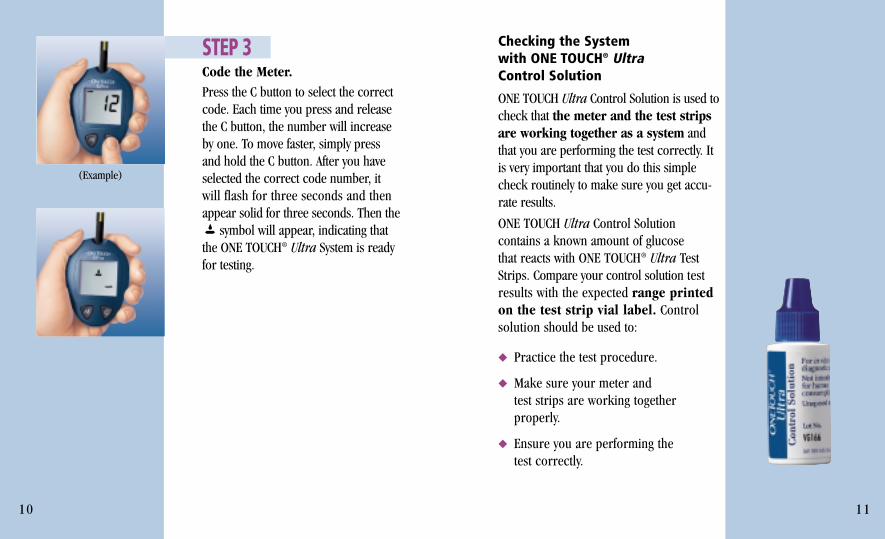
STEP 3Code the Meter.Press the C button to select the correctcode. Each time you press and releasethe C button, the number will increaseby one. To move faster, simply pressand hold the C button. After you haveselected the correct code number, itwill flash for three seconds and thenappear solid for three seconds. Then the
symbol will appear, indicating thatthe ONE TOUCH® Ultra System is readyfor testing.
10 11
(Example)
Checking the System with ONE TOUCH® UltraControl Solution
ONE TOUCH Ultra Control Solution is used tocheck that the meter and the test stripsare working together as a system andthat you are performing the test correctly. Itis very important that you do this simplecheck routinely to make sure you get accu-rate results.
ONE TOUCH Ultra Control Solution contains a known amount of glucose that reacts with ONE TOUCH® Ultra TestStrips. Compare your control solution testresults with the expected range printedon the test strip vial label. Controlsolution should be used to:
� Practice the test procedure.
� Make sure your meter and test strips are working together properly.
� Ensure you are performing the test correctly.
LSI-00-195 Ultra OB Color Crx 1/4/01 2:18 PM Page 10

Before you use the ONE TOUCH® UltraMeter to test your blood for the firsttime, practice the procedure using control solution. When you can dothree tests in a row that are within theexpected range, you are ready to testyour blood.
Do a control solution test:
� When you begin using a new vial of test strips.
� At least once a week.
� Whenever you suspect that the meter or test strips are not workingproperly.
� When your blood glucose test results are not consistent with howyou feel, or when you think yourresults are not accurate.
� If you drop the meter.
The control solution test is similar to a blood test except that you use ONE TOUCH® Ultra Control Solutioninstead of a drop of blood.
1312
Important Control Solution Test Information
� Use only ONE TOUCH® Ultra Control Solution.
� Check the expiration date on the controlsolution vial. Do not use if expired.
� Control solution, meter, and test strips shouldcome to room temperature (68–77˚F/20–25˚C)before testing.
� Shake the vial, discard the first drop of ONE TOUCH Ultra Control Solution, and wipe offthe dispenser tip to ensure a good sample andan accurate result.
� Use only for three months after first opening.Record the discard date (date opened plusthree months) on the control solution vial.Discard after three months.
� Store the control solution tightly closed at temperatures below 86˚F (30˚C). Do not refrigerate.
CAUTION: The control solution range printed onthe test strip vial is for ONE TOUCH Ultra ControlSolution only. It is used to test meter and teststrip performance. It is not a recommendedrange for your blood glucose level.
LSI-00-195 Ultra OB Color Crx 1/4/01 2:18 PM Page 12
15
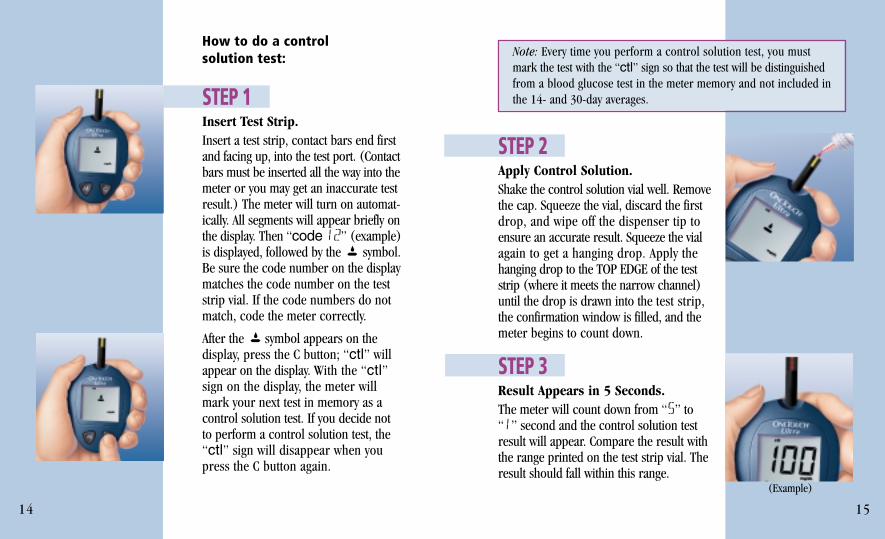
How to do a control solution test:
STEP 1Insert Test Strip.Insert a test strip, contact bars end firstand facing up, into the test port. (Contactbars must be inserted all the way into themeter or you may get an inaccurate testresult.) The meter will turn on automat-ically. All segments will appear briefly onthe display. Then “code 12” (example)is displayed, followed by the symbol.Be sure the code number on the displaymatches the code number on the teststrip vial. If the code numbers do notmatch, code the meter correctly.
After the symbol appears on thedisplay, press the C button; “ctl” willappear on the display. With the “ctl”sign on the display, the meter willmark your next test in memory as acontrol solution test. If you decide notto perform a control solution test, the“ctl” sign will disappear when youpress the C button again.
14
STEP 2Apply Control Solution.Shake the control solution vial well. Removethe cap. Squeeze the vial, discard the firstdrop, and wipe off the dispenser tip toensure an accurate result. Squeeze the vialagain to get a hanging drop. Apply thehanging drop to the TOP EDGE of the teststrip (where it meets the narrow channel)until the drop is drawn into the test strip,the confirmation window is filled, and themeter begins to count down.
STEP 3Result Appears in 5 Seconds.The meter will count down from “5” to“1” second and the control solution testresult will appear. Compare the result withthe range printed on the test strip vial. Theresult should fall within this range.
Note: Every time you perform a control solution test, you mustmark the test with the “ctl” sign so that the test will be distinguishedfrom a blood glucose test in the meter memory and not included inthe 14- and 30-day averages.
(Example)
LSI-00-195 Ultra OB Color Crx 1/4/01 2:18 PM Page 14

Comparing control solution results
If test results fall outside the rangeprinted on the test strip vial, repeat the test. Out-of-range results may becaused by one or more of the following:
� Error in performing the test.� Failure to shake the control solution
vial vigorously.� Expired or contaminated control
solution.� Control solution that is too warm
or too cold.� Failure to discard the first drop of
control solution and wipe the dis-penser tip clean.
� Improper coding of the meter.� Test strip deterioration.� Meter malfunction.
16 17
Be sure to read this section and the teststrip package insert found in the teststrip box carefully before testing. Makesure you have all items needed to test:
� ONE TOUCH® Ultra Meter� ONE TOUCH® Ultra Test Strips� ONE TOUCH® UltraSoft Adjustable
Blood Sampler� ONE TOUCH® UltraSoft Sterile Lancet
TESTINGYOUR BLOOD
CAUTION: If you continue to get control solution test resultsthat fall outside of the range printed on the vial, the system maynot be working properly. Do not use the system to test yourblood if you continue to get test results that fall outside of therange. If you are unable to resolve the problem, call LifeScanCustomer Services at 1 800 227-8862.
LSI-00-195 Ultra OB Color Crx 1/4/01 2:19 PM Page 16

19
Getting a Drop of Blood
STEP 1Insert a Lancet in the ONE TOUCH®
UltraSoft Adjustable Blood Sampler.Twist the ONE TOUCH® UltraSoft Capcounterclockwise to remove it. Insert alancet into the lancet holder and pushdown firmly until it is fully seated. Do nottwist the lancet.
Twist the protective disk until it separatesfrom the lancet.
18
Replace the ONE TOUCH® UltraSoft Cap.Turn the cap clockwise until it is snugbut not too tight.
Adjust the puncture depth setting ifnecessary. Twist the knob toward the smaller bumps for a shallowerpuncture or toward the larger bumps for a deeper puncture.
STEP 2Cock the ONE TOUCH® UltraSoftSampler.Slide the ejection/cocking control backuntil it clicks. If it does not click, theONE TOUCH UltraSoft Sampler mayhave been cocked when the lancetwas inserted.
CAUTION: To reduce the chance of infection:� Never share a lancet or the ONE TOUCH® UltraSoft Sampler
with anyone.� Always use a new, sterile lancet. Lancets are for single use only.� Avoid getting hand lotion, oils, dirt, or debris in or on the
lancets and the ONE TOUCH UltraSoft Sampler.
LSI-00-195 Ultra OB Color Crx 1/4/01 2:19 PM Page 18

2120
STEP 3Wash Your Hands and thePuncture Site.Use warm, soapy water. Rinse and dry thoroughly.
STEP 4Select and Lance a Puncture Site.
Fingertip.
Hold the ONE TOUCH® UltraSoft Samplerfirmly against the side of your finger.Press the release button.
Arm.
� Select a soft, fleshy area (away from bone), free of visible veins orexcess hair.
� To increase blood flow to the site, youmay wish to gently massage or applyheat to the area for a short time.
� If necessary, set the sampler for adeeper puncture. Press and hold thesampler to the site for a few seconds.Then press the release button andcontinue to hold the sampler againstthe site for a few more seconds. Allowenough time for an adequate blooddrop to develop.
If bruising occurs, you may choose tolance a fingertip instead. If you are having difficulty obtaining blood from the arm, call LifeScan Customer Servicesat 1 800 227-8862 for assistance.
Note: The ONE TOUCH® Ultra System requires a very small blood drop to perform a test. You may obtain it from a fingertip or arm. The arm has fewer nerve endings than the fingertips and you may find it much lesspainful for obtaining blood. Choose a different spot each time you test.Repeated punctures in the same spot may cause soreness and calluses.
Note: Consult your healthcare professional before you begin using the armfor testing. You may obtain glucose values from the arm that differ fromthe fingertip. This is a physiological difference that varies by individualas a result of factors like food intake, health state, and medication.
LSI-00-195 Ultra OB Color Crx 1/4/01 2:19 PM Page 20

Step-by-Step Test Procedure
STEP 1Insert Test Strip.Insert the test strip, contact bars endfirst and facing up, into the test port. Thebars must be all the way into the meterto avoid an inaccurate result. The meterwill turn on automatically. All segmentswill appear briefly on the display. Thenthe code number and symbol willappear. Code the meter if necessary.
2322
Correct
Incorrect
STEP 5Gently Massage the Area.Gently massage the chosen area to obtainthe required blood sample (1 microliterin volume [ actual size]). Do notsmear the blood sample. Proceedwith your blood glucose test.
STEP 6Remove the Lancet.Remove the cap. Twist it counterclock-wise. (Optional: To replace the protectivedisk on the lancet, place the disk on ahard surface and push the exposed tipinto the protective disk.)Always use caution when removingthe lancet. Point it down and away.Push forward on the ejection/cockingcontrol and eject the lancet directly intoa container for sharp objects.Return the ejection/cocking control tothe middle position. Replace the cap.
Insert This End
LSI-00-195 Ultra OB Color Crx 1/4/01 2:19 PM Page 22

25
filling the test strip, contact LifeScanCustomer Services for assistance.
STEP 3Accurate Results in Just 5 Seconds.Your blood glucose test result willappear after the meter counts downfrom “5” to “1.” Blood glucose testresults are automatically stored in themeter memory. Turn the meter off byremoving the test strip.
The ONE TOUCH® Ultra Meter providesaccurate, plasma-calibrated test resultsthat can be compared directly with labo-ratory results.
Record all test results in the logbook. This helps you keep track of test results.
24
STEP 2Apply Sample.Obtain a rounded drop of blood usingthe ONE TOUCH® UltraSoft AdjustableBlood Sampler. The blood samplemust be at least 1 microliter in volume ( actual size) or you may getan inaccurate test result. When the symbol appears on the display, touchand hold the drop of blood to theTOP EDGE of the test strip, where it meets the narrow channel. Do notpush your finger against the test strip or try to apply a smeared sample.
Hold the blood drop to the TOP EDGE of the test strip until blood has completely filled the confirmation window before the meter begins to count down. If the confirmation windowdoes not fill completely before the meterbegins to count down, do not add moreblood to the test strip; discard the teststrip and retest. If you have trouble
Plasma-Calibrated Result(Example)
Good Sample SampleToo Small
Correct
Incorrect
Note: If you do not apply a blood sample within two minutes, the meterwill turn itself off. You must remove the test strip and insert it back intothe meter to restart the test procedure.
LSI-00-195 Ultra OB Color Crx 1/4/01 2:20 PM Page 24

Special Messages
The ONE TOUCH® Ultra Meter displaysresults between 20 and 600 mg/dL (1.1 to 33.3 mmol/L). If your test result is lower than 20 mg/dL (1.1mmol/L), “lo” will appear on themeter display. This indicates severehypoglycemia (low blood glucose).You should immediately treathypoglycemia as recommended byyour healthcare professional.
If your blood glucose test result is above600 mg/dL (33.3 mmol/L), “h1” willappear on the meter display. This indi-cates severe hyperglycemia (highblood glucose). You should seekimmediate medical assistance.
When your blood glucose test result isabove 240 mg/dL (13.3 mmol/L) orreads “h1,” “ketones?” will appearon the meter display. This messagedoes not mean that the systemdetected ketones but that testingwith a ketone test strip may beadvisable.
26 27
Your ONE TOUCH® Ultra Meter storesthe 150 most recent blood glucose and control solution test results withdate and time in its memory. It also provides you with 14- and 30-day averages of your blood glucose testresults. You can review the test results in memory with these easy steps.
STEP 1Enter the Memory Mode.With the meter turned off, press the Mbutton. The 14-day average will appear,indicating that you are in the memorymode. After three seconds, the 30-dayaverage will appear for three seconds.You can then review the last 150 tests in the memory.
The 14-day average is calculated fromthe blood glucose results obtained during the last 14 days. It also indicateshow many blood glucose tests have been performed within this period, e.g., 64 (64 tests in the last 14 days).When using the meter for the first time,“14 DAY AVG ---” will appear, showingthat there are no test results in memory.
USING THE METER MEMORY
(Example)
(Example)
(Example)
LSI-00-195 Ultra OB Color Crx 1/4/01 2:20 PM Page 26
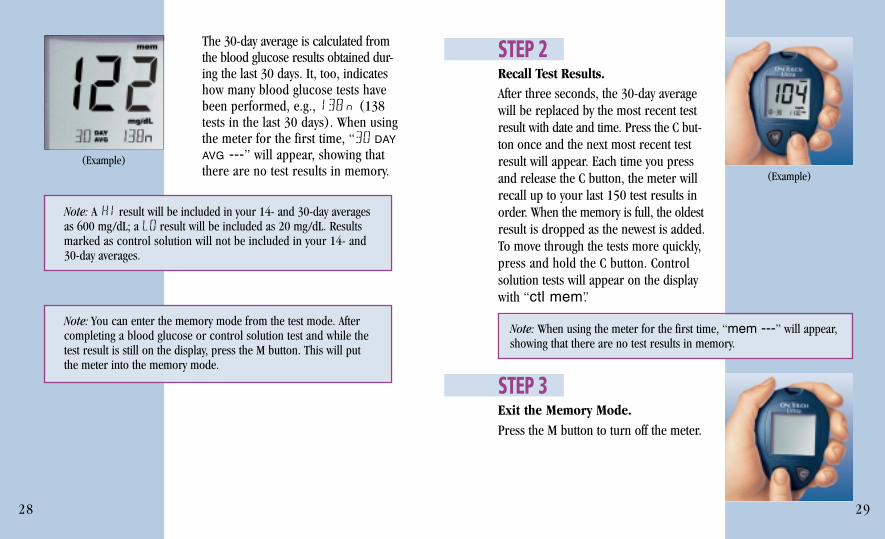
The 30-day average is calculated from the blood glucose results obtained dur-ing the last 30 days. It, too, indicates how many blood glucose tests have been performed, e.g., 138 (138 tests in the last 30 days). When using the meter for the first time, “30 DAY
AVG ---” will appear, showing thatthere are no test results in memory.
28 29
STEP 2Recall Test Results.After three seconds, the 30-day averagewill be replaced by the most recent testresult with date and time. Press the C but-ton once and the next most recent testresult will appear. Each time you pressand release the C button, the meter willrecall up to your last 150 test results inorder. When the memory is full, the oldestresult is dropped as the newest is added.To move through the tests more quickly,press and hold the C button. Controlsolution tests will appear on the displaywith “ctl mem”.
STEP 3Exit the Memory Mode.Press the M button to turn off the meter.
(Example)(Example)
Note: A h1 result will be included in your 14- and 30-day averagesas 600 mg/dL; a lo result will be included as 20 mg/dL. Resultsmarked as control solution will not be included in your 14- and30-day averages.
Note: You can enter the memory mode from the test mode. Aftercompleting a blood glucose or control solution test and while thetest result is still on the display, press the M button. This will putthe meter into the memory mode.
Note: When using the meter for the first time, “mem ---” will appear,showing that there are no test results in memory.
LSI-00-195 Ultra OB Color Crx 1/4/01 2:20 PM Page 28

30 31
Data Downloading
Transferring test results to your personal computer for home viewingrequires IN TOUCH® Diabetes Manage-ment Software from LifeScan and aLifeScan Interface Cable. (IN TOUCH®
Software, which includes the LifeScanInterface Cable, is not included withyour ONE TOUCH® Ultra System andmust be purchased separately.)
STEP 1Install IN TOUCH Software.Install IN TOUCH Software on your computer following the instructions pro-vided in the IN TOUCH® User’s Manual.
STEP 2Connect the LifeScan Interface Cable.Connect the LifeScan Interface Cable to aserial port on the back of your computer.With the meter turned off, connect theLifeScan Interface Cable to the data port
located on the bottom of the meter. pcwill appear on the display once the firstcommand is received, indicating that themeter is in the communication mode.You are now ready to transfer all testresults —with date and time —stored in meter memory to your computer.
STEP 3Transfer Data.Following the instructions in the IN TOUCH® User’s Manual, initiate the data transfer command. If no command is received within two minutes, the meterwill turn itself off. Pressing the M buttonwill also turn the meter off.
To learn more about IN TOUCH® DiabetesManagement Software or to obtain aLifeScan Interface Cable separately, con-tact the LifeScan Data Management Line at 1 800 382-7226.
Note: While in the communication mode, you will be unable to perform a blood glucose test. If the meter is in the memory mode or the settingmode, it will not respond to computer commands.
VIEWINGTESTRESULTS ON A PERSONALCOMPUTER
LSI-00-195 Ultra OB Color Crx 1/4/01 2:20 PM Page 30

� Never use your meter with blood that has been collected in a gray-toptest tube.
� Use fresh capillary blood only.
You may still have a variation from theresult because blood glucose levels can change significantly over shortperiods, especially if you have recentlyeaten, exercised, taken medication, orexperienced stress.1 In addition, if youhave eaten recently, the blood glucoselevel from a fingerstick can be up to 70 mg/dL higher than blood drawn from a vein (venous sample) used for a lab test.2 Therefore, it is best to fast for eight hours before doing compari-son tests. Factors such as the amount of red blood cells in the blood (a high or low hematocrit) or the loss of bodyfluid (severe dehydration) may alsocause a meter result to be different from a laboratory result.
References1. Surwit, R.S., and Feinglos, M.N.: Diabetes
Forecast (1988), April, 49–51.
2. Sacks, D.B.: “Carbohydrates.” Burtis, C.A., and Ashwood, E.R. (ed.), Tietz Textbook ofClinical Chemistry. Philadelphia: W.B.Saunders Company (1994), 959. 3332
ONE TOUCH® Ultra Meter test results andlaboratory test results are both expressedin plasma-equivalent units. However, theresult you obtain from your meter maydiffer somewhat from your laboratoryresult due to normal variation. Meterresults can be affected by factors andconditions that do not affect laboratoryresults in the same way. (See ONE TOUCH®
Ultra Test Strip package insert for typicalaccuracy and precision data, and forimportant information on Limitations.) Tomake an accurate comparison betweenmeter and laboratory results, follow theguidelines below.
Before you go to the lab:� Perform a control solution test to make
sure the meter is working properly.� It is best to fast for at least eight hours
before doing comparison tests.� Take your meter with you to the lab.
While at the lab:� Make sure that the samples for both
tests (the meter test and the lab test)are taken and tested within 15 minutesof each other.
� Wash your hands before obtaining ablood sample.
COMPAR-ING METERAND LABORA-TORYRESULTS
LSI-00-195 Ultra OB Color Crx 1/4/01 2:20 PM Page 32
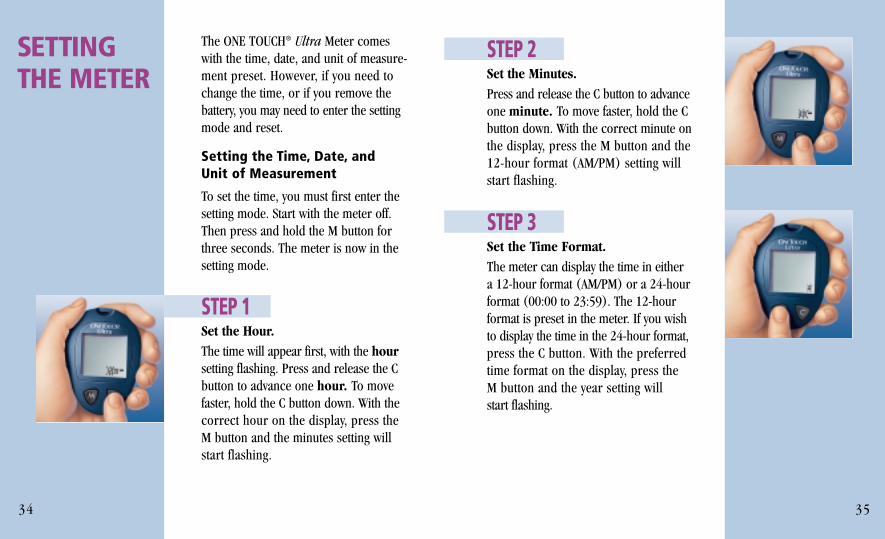
STEP 2Set the Minutes.Press and release the C button to advanceone minute. To move faster, hold the Cbutton down. With the correct minute onthe display, press the M button and the12-hour format (AM/PM) setting will start flashing.
STEP 3Set the Time Format.The meter can display the time in either a 12-hour format (AM/PM) or a 24-hourformat (00:00 to 23:59). The 12-hour format is preset in the meter. If you wishto display the time in the 24-hour format,press the C button. With the preferred time format on the display, press the M button and the year setting will start flashing.
35
The ONE TOUCH® Ultra Meter comeswith the time, date, and unit of measure-ment preset. However, if you need tochange the time, or if you remove thebattery, you may need to enter the settingmode and reset.
Setting the Time, Date, and Unit of Measurement
To set the time, you must first enter thesetting mode. Start with the meter off.Then press and hold the M button forthree seconds. The meter is now in thesetting mode.
STEP 1Set the Hour.The time will appear first, with the hoursetting flashing. Press and release the Cbutton to advance one hour. To movefaster, hold the C button down. With thecorrect hour on the display, press the M button and the minutes setting willstart flashing.
34
SETTING THE METER
LSI-00-195 Ultra OB Color Crx 1/4/01 2:20 PM Page 34

36
Before setting the date, you must havefirst set the time.
STEP 4Set the Year.Press and release the C button to advanceone year. To move faster, hold the C buttondown. With the correct year on the display,press the M button and the date will appear on the display with the month segment flashing.
STEP 5Set the Month.Press and release the C button until thecorrect month appears. To move faster,hold the C button down. With the correctmonth on the display, press the M buttonand the day segment will start flashing.
STEP 6Set the Day.Press and release the C button until the cor-rect day appears. To move faster, hold theC button down. With the correct day on thedisplay, press the M button and the currentunit of measurement will start flashing. 37
The ONE TOUCH Ultra Meter can displaytest results in milligrams per deciliter(mg/dL) or in millimoles per liter(mmol/L). The mg/dL unit is standardin the United States. The mmol/L unit iscommonly used in Canada and someEuropean countries.
STEP 7Select mg/dL or mmol/L.
Press and release the C button until theunit of measurement you are choosingappears on the display.
Note: Your ONE TOUCH® Ultra Meter displays 14- and 30-day averageswhich you can access from the meter memory. These averages arecalculated from results obtained during the 14 and 30 days precedingthe current date and time settings. When the date and time are changed,the 14- and 30-day averages may change.
LSI-00-195 Ultra OB Color Crx 1/4/01 2:20 PM Page 36

Maintenance
Your ONE TOUCH® Ultra Meter does not require special maintenance. As no blood or control solution comes incontact with the meter, there is no special cleaning required. Take care to avoid getting dirt, dust, blood, control solution, or water inside themeter through the test port or dataport. Store the meter in its carryingcase after each use.
A cloth dampened with water and mild detergent can be used to wipedown the outside of the meter. Your ONE TOUCH Ultra Meter is a precision instrument. Please handle it with care.
39
STEP 8Exit the Setting Mode.After choosing your unit of measurement,press the M button to turn off the meter.The meter will display all test results inthis unit of measurement.
38
CARING FOR YOURMETER
Note: You must move through the hour, minutes, time format, year,month, day, and unit of measurement to turn off the meter and exit the setting mode.
LSI-00-195 Ultra OB Color Crx 1/4/01 2:22 PM Page 38
40 4140
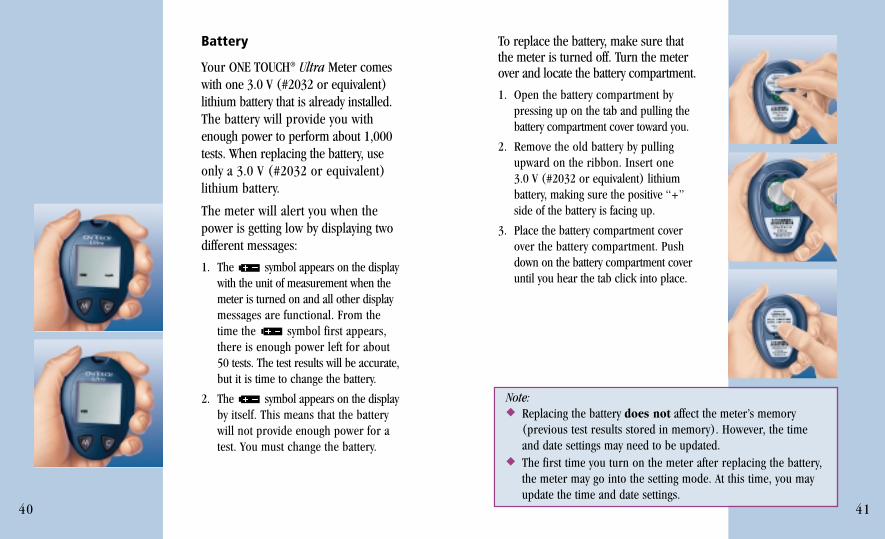
Battery
Your ONE TOUCH® Ultra Meter comeswith one 3.0 V (#2032 or equivalent)lithium battery that is already installed.The battery will provide you withenough power to perform about 1,000tests. When replacing the battery, useonly a 3.0 V (#2032 or equivalent)lithium battery.
The meter will alert you when thepower is getting low by displaying twodifferent messages:
1. The symbol appears on the displaywith the unit of measurement when themeter is turned on and all other displaymessages are functional. From the time the symbol first appears,there is enough power left for about 50 tests. The test results will be accurate,but it is time to change the battery.
2. The symbol appears on the displayby itself. This means that the battery will not provide enough power for atest. You must change the battery.
To replace the battery, make sure thatthe meter is turned off. Turn the meterover and locate the battery compartment.
1. Open the battery compartment bypressing up on the tab and pulling thebattery compartment cover toward you.
2. Remove the old battery by pullingupward on the ribbon. Insert one 3.0 V (#2032 or equivalent) lithiumbattery, making sure the positive “+”side of the battery is facing up.
3. Place the battery compartment coverover the battery compartment. Pushdown on the battery compartment coveruntil you hear the tab click into place.
Note:� Replacing the battery does not affect the meter’s memory
(previous test results stored in memory). However, the timeand date settings may need to be updated.
� The first time you turn on the meter after replacing the battery,the meter may go into the setting mode. At this time, you mayupdate the time and date settings.
LSI-00-195 Ultra OB Color Crx 1/4/01 2:23 PM Page 40

4342
MESSAGE WHAT IT MEANS ACTION
If segments are miss-ing, contact LifeScanCustomer Services forfurther action. Missingsegments can lead to thewrong interpretation ofthe displayed test result.
See “Coding the Meter,”pages 8–10.
Make sure that this code number matchesthe code number on thevial of the test strips you are using.
You may now apply theblood sample.
The system is ready to accept a bloodsample.
This is the codenumber stored in the meter.
This message appearsimmediately after thesystem check if yourmeter has not beencoded.
System check. Appearsupon insertion of atest strip or wheneverthe meter is turned on.Verifies that all seg-ments are present onthe display.
(Example)
Following is a summary of all displaymessages and symbols. These messageshelp to identify certain problems but donot appear in all cases when a problemhas occurred. Improper use may causean inaccurate result without producingan error message or a symbol. In theevent of a problem, refer to the infor-mation under ACTION.
DISPLAY MESSAGESAND PROBLEM-SOLVING GUIDE
LSI-00-195 Ultra OB Color Crx 1/4/01 2:23 PM Page 42

4544
MESSAGE WHAT IT MEANS ACTION
You may now apply thecontrol solution.
No action required.
No action required.
No action required.A blood glucose testresult in mmol/L.
A blood glucose testresult in mg/dL.
Five-second count-down. The meter iscalculating the result.At the end of the count-down, the meter willdisplay the test result.
The system is ready to accept a controlsolution test sample.
MESSAGE WHAT IT MEANS ACTION
You may want to checkyour ketone levels. Actaccording to instruc-tions of your healthcareprofessional.
This message indicatesvery high blood sugar.You should recheck your glucose level and if “h1” call your doctorimmediately.
This message indicatesvery low blood sugar. You should treat this condition according tothe recommendations of your healthcareprofessional.
No action required.A blood glucose testresult stored in thememory.
Your blood glucoselevel is lower than 20mg/dL (1.1 mmol/L).
Your blood glucoselevel is higher than600 mg/dL (33.3mmol/L).
A blood glucose testresult with a sugges-tion to check yourketone levels.
(Example)
(Example)
(Example)(Example)
LSI-00-195 Ultra OB Color Crx 1/4/01 2:23 PM Page 44

MESSAGE WHAT IT MEANS ACTION
No action required.
No action required.
No action required.
No action required.Average of the last 30 days ( meansthat 138 tests were performed within this period).
Average of the last 14 days ( meansthat 64 tests were performed within this period).
There is no test resultstored in this place inthe memory.
A control solution testresult stored in thememory.
MESSAGE WHAT IT MEANS ACTION
Review the instructions and try again with a new test strip. If the problem persists, contact LifeScanCustomer Services at 1 800 227-8862.
Repeat the test with a new test strip. If the error message appearsagain, contact LifeScanCustomer Services at1 800 227-8862.
Repeat the test with anew test strip. Applyblood sample only after appears on the display.
Error message thatindicates that the blood sample wasapplied beforeappeared on the display.
Error message could be caused by a used teststrip, or a temporary orpermanent electronicsproblem occurred.
Error message thatindicates that there is a problem with the meter.
4746
(Example)
(Example)
(Example)
LSI-00-195 Ultra OB Color Crx 1/4/01 2:23 PM Page 46

MESSAGE WHAT IT MEANS ACTION
Check that the code num-ber on the meter displaymatches the code numberon the test strip vial. Checkthe test strip for damage.Code the meter or retest as necessary. Repeat thetest. If the error messageappears again, contactLifeScan Customer Servicesat 1 800 227-8862.
Repeat the test with a new test strip. Hold thesample to the test stripuntil the meter begins tocount down.
Error message thatindicates that themeter has detected aproblem with the teststrip. Possible causesare incorrect blood(or control solution)application or a dam-aged test strip.
Error message thatindicates that theremay be a problem withthe test strip, e.g., thetest strip may havebeen damaged, movedor removed duringtesting, or insertedimproperly.
MESSAGE WHAT IT MEANS ACTION
Test results will stillbe accurate, but replace the battery as soon as possible.
Replace the battery atonce. The meter will not operate.
The battery signappears on the displayby itself. The power ofthe battery is too lowto run a test.
The battery signappears on the displaywith the unit of mea-surement. The powerof the battery is gettinglow. You can completeabout 50 more testsfrom the time thissymbol first appears.
4948
LSI-00-195 Ultra OB Color Crx 1/4/01 2:23 PM Page 48
MESSAGE WHAT IT MEANS ACTION
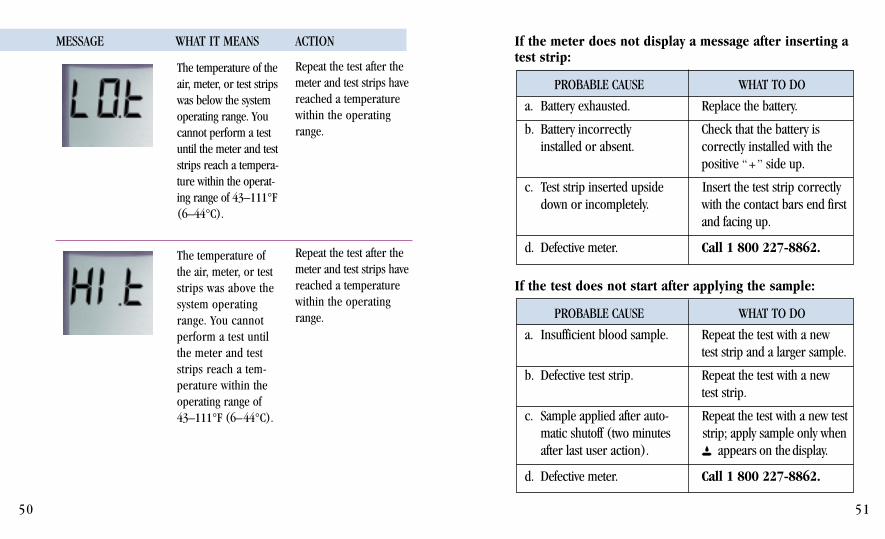
Repeat the test after themeter and test strips havereached a temperaturewithin the operatingrange.
Repeat the test after themeter and test strips havereached a temperaturewithin the operatingrange.
The temperature ofthe air, meter, or teststrips was above thesystem operatingrange. You cannotperform a test untilthe meter and teststrips reach a tem-perature within theoperating range of43–111°F (6–44°C).
The temperature of theair, meter, or test stripswas below the systemoperating range. Youcannot perform a testuntil the meter and teststrips reach a tempera-ture within the operat-ing range of 43–111°F(6–44°C).
If the meter does not display a message after inserting a test strip:
If the test does not start after applying the sample:
PROBABLE CAUSE WHAT TO DO
a. Insufficient blood sample. Repeat the test with a new test strip and a larger sample.
b. Defective test strip. Repeat the test with a new test strip.
c. Sample applied after auto- Repeat the test with a new testmatic shutoff (two minutes strip; apply sample only whenafter last user action). appears on the display.
d. Defective meter. Call 1 800 227-8862.
PROBABLE CAUSE WHAT TO DO
a. Battery exhausted. Replace the battery.
b. Battery incorrectly Check that the battery isinstalled or absent. correctly installed with the
positive “+” side up.
c. Test strip inserted upside Insert the test strip correctlydown or incompletely. with the contact bars end first
and facing up.
d. Defective meter. Call 1 800 227-8862.
5150
LSI-00-195 Ultra OB Color Crx 1/4/01 2:23 PM Page 50
GUAR-ANTEE
SPECIFI-CATIONS
Result Range: 20 to 600 mg/dL (1.1 to 33.3 mmol/L)
Calibration: Plasma-equivalent
Sample: Fresh capillary whole blood
Sample Size: Minimum 1 microliter
Test Time: 5 seconds
Assay Method: Glucose oxidase biosensor
Power Source: One replaceable 3.0 V (#2032 or equivalent) lithiumbattery
Battery Life: 1,000 tests, or about oneyear at three tests per day
Glucose Units: Either mg/dL or mmol/L
Memory: 150 blood glucose and con-trol solution tests
Automatic Shutoff: Two minutes afterlast user action
Size: 3.12” � 2.25” � .85”Weight: 1.5 ounces with battery
Operating Ranges:Temperature 43–111°F/6–44°CRelative Humidity 10–90%Hematocrit 30–55%
The makers guarantee that the ONE TOUCH® Ultra Meter shall be free of defects in material and workmanship for a period of threeyears. This guarantee is valid from the date of purchase. The guaranteeextends only to the original purchaserand is not transferable.
5352
LSI-00-195 Ultra OB Color Crx 1/4/01 2:23 PM Page 52
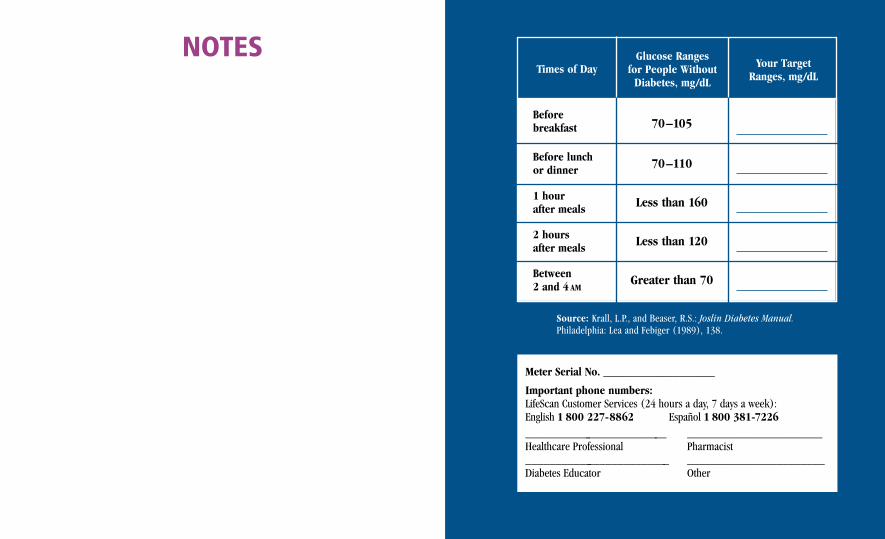
55
Glucose Ranges for People Without
Diabetes, mg/dL
Your Target Ranges, mg/dL
Before breakfast
Before lunch or dinner
1 hourafter meals
2 hoursafter meals
Between2 and 4 AM
70–105
70–110
Less than 160
Less than 120
Greater than 70
Source: Krall, L.P., and Beaser, R.S.: Joslin Diabetes Manual.Philadelphia: Lea and Febiger (1989), 138.
Times of Day
Meter Serial No. ___________________
Important phone numbers:LifeScan Customer Services (24 hours a day, 7 days a week):English 1 800 227-8862 Español 1 800 381-7226_________________________ _______________________Healthcare Professional Pharmacist_________________________ _______________________Diabetes Educator Other
NOTES
LSI-00-195 Ultra OB Color Crx 1/4/01 2:23 PM Page 54

© LifeScan, Inc. 2000 Milpitas, CA 95035 12/00 AW 060-175-03APatent Nos. 5,708,247 and 5,951,836.
AW *06017503A*
LifeScan Customer Services toll-free numbers:(24 hours a day, 7 days a week)
U.S.A. English 1 800 227-8862Español 1 800 381-7226
Visit the LifeScan Web site: www.LifeScan.com
UltraUltraUltra Blood GlucoseBlood GlucoseMonitoring SyMonitoring Systemstem
LSI-00-195 Ultra OB Color Crx 1/4/01 2:17 PM Page 1