Blackboard Collaborate for...
33
CITS Instructional Development Page 1 Blackboard Collaborate for Moderators Introduction This guide walks users through the different tools and features available to moderators in a Blackboard Collaborate Session. Topics Covered: Interface Overview (Quick Start) Audio Setup Wizard Dialing into a Session (Telephony) Communicating Using Chat Audio and Video Polling Participants Using the Whiteboard Application Sharing Recording a Session For additional information or support contact the Instructional Development team by phone at 508-999-8501 or by email at [email protected].
-
Upload
truongminh -
Category
Documents
-
view
216 -
download
0
Transcript of Blackboard Collaborate for...

CITS Instructional Development Page 1
Blackboard Collaborate for Moderators
Introduction This guide walks users through the different tools and features available to moderators in a Blackboard Collaborate Session. Topics Covered:
Interface Overview (Quick Start)
Audio Setup Wizard
Dialing into a Session (Telephony)
Communicating Using Chat
Audio and Video
Polling Participants
Using the Whiteboard
Application Sharing
Recording a Session For additional information or support contact the Instructional Development team by phone at 508-999-8501 or by email at [email protected].

1 © Blackboard Collaborate Materials License
Getting Started for
Moderators Quick
Reference Guide
Blackboard Collaborate gives you the functionality you need to support a
21st century teaching and learning environment, such as two-way audio,
multi-point video, interactive whiteboard, application and desktop sharing,
rich media, breakout rooms, and session recording. Educators and students
can engage as if they were in a traditional classroom, with as good as, or
even better, outcomes.
Tips on Conducting a Sessions
Preparation
Design sessions to include interactivity and include variety of content
and interaction in your session. Provide opportunities for participants to
interact and collaborate with each other.
Create quizzes or surveys to use during your session.
Create customized Clip Art collections in order to load images easily
during the session.
Practice before leading your first session.
Become familiar with the session content.
Open web pages, applications needed for application sharing and
screen captures before session begins.
Load multimedia content and File Transfer content.
Find a comfortable place with no distractions to deliver the session.
In-Session Tips
Greet participants as they join your session.
Remind your participants to use the Audio Setup Wizard in order to test
their microphone and speakers.
Speak clearly and don’t rush.
Ask questions and provide opportunity for interaction. Poll the class at
various intervals to obtain their feedback. Remember to clear
responses after each poll.
Animate your delivery.
Look at the whole screen, not just the whiteboard area. For example,
watch the Chat window for text messages and the Participants window
for new participants joining the session.
Encourage participants to respond and to raise their hands when they
have a question or comment.
Poll the participants at various intervals to obtain feedback. View the
polling summary as needed. Consider sharing the results when
appropriate. Clear responses after each poll.
Use the whiteboard tools to assist you in your delivery. For example,
use the pointer to call attention to specific regions on the screen.
Include features such as application sharing, web tours, video,
multimedia, quizzes, and breakout rooms to assist you in delivering your
content
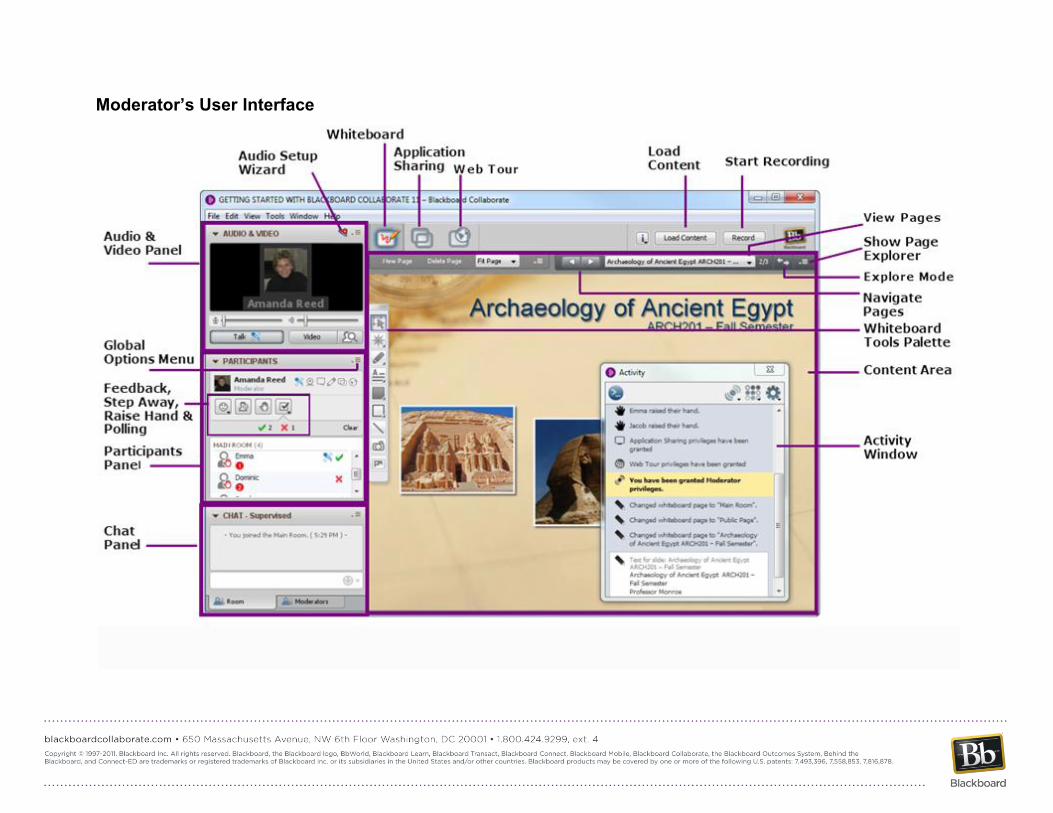
Moderator’s User Interface

1 © Blackboard Collaborate Materials License
Audio Setup Wizard Quick Reference Guide Prior to participating in a session, you should ensure that your audio is configured correctly. Audio settings can be configured using the Audio Setup Wizard.
Using the Audio Setup Wizard on a PC
The Audio Setup Wizard is accessible Audio & Video panel by clicking the Audio Setup Wizard button or from the Audio & Video Options menu.
Steps for Configuring Your Audio
1. Open the Audio Setup Wizard by clicking the Audio & Video menu and clicking Audio Setup Wizard.
2. From the Select Audio Output Device dialog, choose the device that will play the session audio e.g. speakers.
3. Click OK

4. Click the Play button and adjust the volume slider so that you can clearly hear the pre-recorded message. Click Stop and then Yes to confirm you were able to hear the audio. If you were not able to hear the audio, click No and repeat the previous step.
5. Select the device you will use to send your audio during the session e.g. microphone.
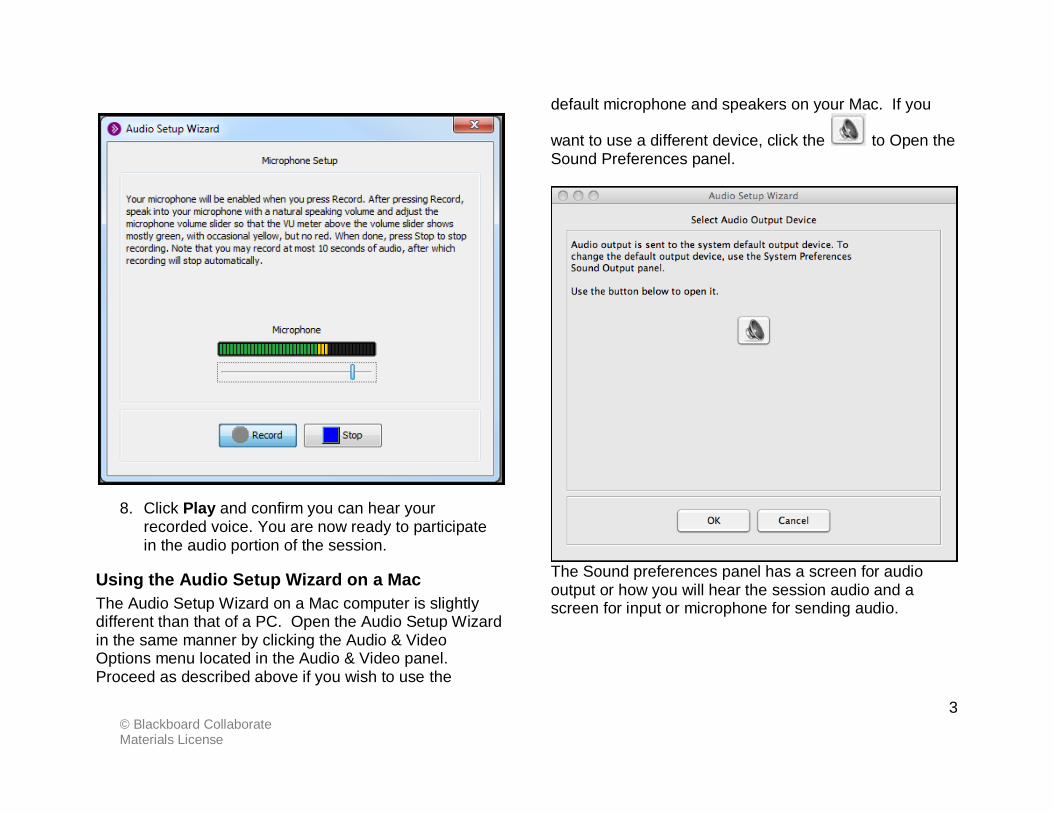
6. Click OK 7. Click Record and speak into the microphone
using your normal speaking voice. Adjust the microphone slide bar so that it displays green bars with an occasional yellow bar. Red indicates that your audio is too loud or you microphone is too close to your mouth.
3 © Blackboard Collaborate Materials License
8. Click Play and confirm you can hear your recorded voice. You are now ready to participate in the audio portion of the session.
Using the Audio Setup Wizard on a Mac
The Audio Setup Wizard on a Mac computer is slightly different than that of a PC. Open the Audio Setup Wizard in the same manner by clicking the Audio & Video Options menu located in the Audio & Video panel. Proceed as described above if you wish to use the
default microphone and speakers on your Mac. If you
want to use a different device, click the to Open the Sound Preferences panel.
The Sound preferences panel has a screen for audio output or how you will hear the session audio and a screen for input or microphone for sending audio.
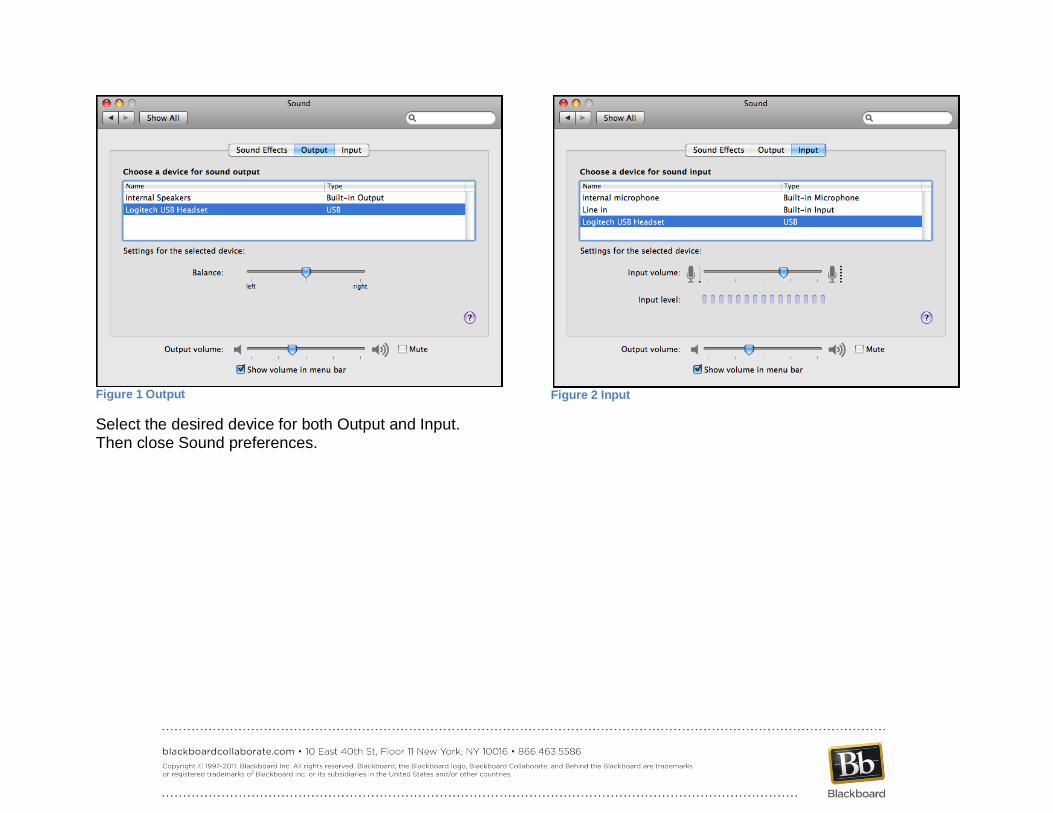
Figure 1 Output
Select the desired device for both Output and Input. Then close Sound preferences.
Figure 2 Input

© Blackboard Collaborate
Materials License 1
Using Telephony – Quick Reference Guide for Moderators
The Telephony feature in Blackboard Collaborate enables you
to conduct your audio communications with other session
attendees via a combination of VoIP and telephone
conferencing, while continuing to use your computer for all
other session features (or to just participate in the audio
portion of the meeting). As a telephone conference user, you
will be fully integrated into the session. You can communicate
with users not connected via teleconference (the traditional
microphone and speaker users) and your communications will
be captured in session recordings. There are two
implementations of Telephony:
Third Party Provider Telephony: With Third Party
Provider Telephony, customers must use their own
teleconference provider. It requires a Moderator or
session creator to manually configure the
teleconference connection information and a Moderator
to manually initiate the connection between the session
and the teleconference (establish the Teleconference
bridge).
Integrated Telephony: With Integrated Telephony,
customers don't need their own teleconference
provider as the teleconference service is provided by
Blackboard Collaborate. Teleconference phone
numbers and PINs are automatically generated during
session creation and anyone in the session can initiate
the connection between the session and the
teleconference (establish the Teleconference bridge)
by simply dialing in to the teleconference.
When you join the session, if you see the Use Telephone
for Audio button in the Audio & Video panel, you will know
that your session is configured with Integrated Telephony and
you will not be required to configure the teleconference.

Configuring Connection Information to a Third Party Provider Telephone Conference
With Third Party Provider Telephony, if the session creator has
not already configured the teleconference connection
information, you must do so within the Blackboard Collaborate
web conferencing session before you can connect a session to
a teleconference. This entails entering the telephone
number(s) and PIN(s) provided by your telephone conference
administrator for the desired teleconference. Teleconference
information can be set as a default from the Blackboard
Collaborate session scheduling system.
To configure telephone conference connection information,
follow these steps:
1. Obtain the phone number(s), PIN(s) and SIP (if
required) for your teleconference from your telephone
conference administrator.
2. Open the Teleconference Connection dialog by
selecting Configure Telephone Conference… from
the Audio & Video Options menu.
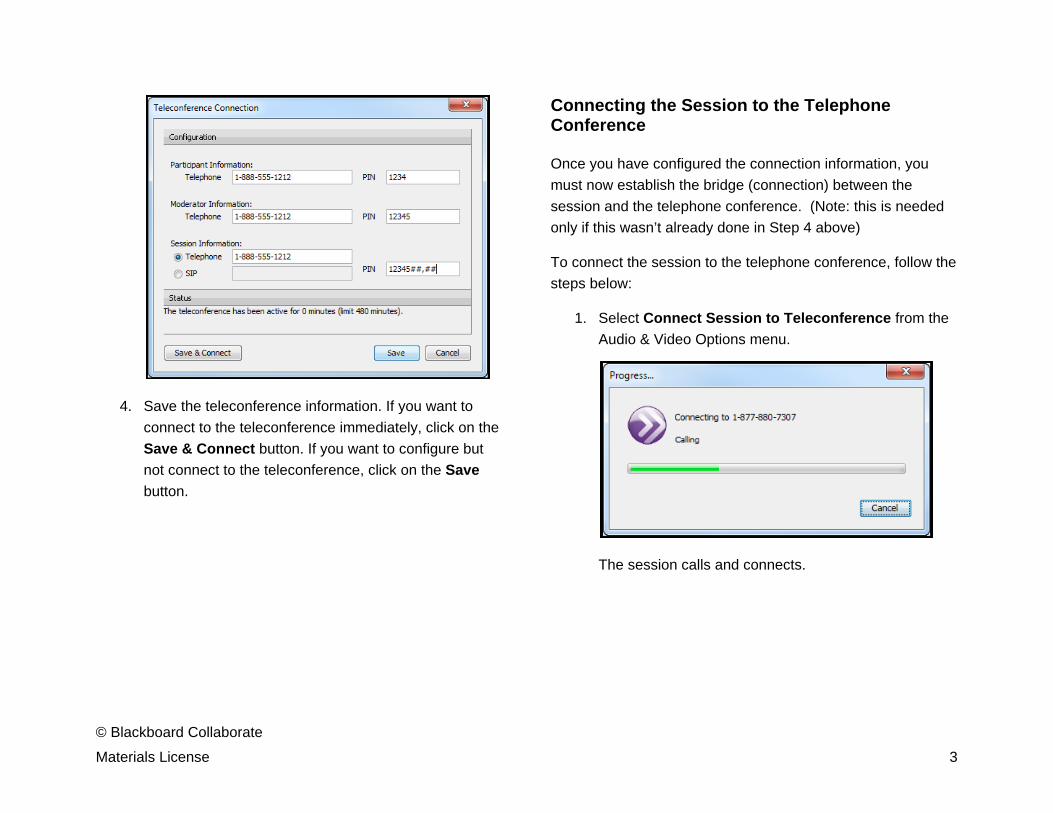
3. Enter the connection information for the
teleconference. The Session Information and the
Moderator Information are typically the same. The
Blackboard Collaborate session will connect to the call
using the Session Information.
© Blackboard Collaborate
Materials License 3
4. Save the teleconference information. If you want to
connect to the teleconference immediately, click on the
Save & Connect button. If you want to configure but
not connect to the teleconference, click on the Save
button.
Connecting the Session to the Telephone Conference
Once you have configured the connection information, you
must now establish the bridge (connection) between the
session and the telephone conference. (Note: this is needed
only if this wasn’t already done in Step 4 above)
To connect the session to the telephone conference, follow the
steps below:
1. Select Connect Session to Teleconference from the
Audio & Video Options menu.
The session calls and connects.

2. Click on Confirm when the Confirm Connection dialog
box appears.
Note that a new “Participant” called Teleconference appears in
the Participants List.
Joining a Teleconference
Now that the session has connected to the teleconference,
any session attendee (Moderator and Participant) can join a
teleconference.
To join a teleconference, follow the steps below:
1. Click the Use Telephone for Audio button in the
Audio & Video panel to access the conference number
and PIN.
2. Using your telephone, dial the teleconference
telephone number displayed in the Use Telephone for
Audio dialog.
3. Enter the teleconference PIN when prompted to do so
by the teleconference (if required). If your
teleconference, prompts you to enter your conference
number followed by the # key, enter your PIN as the
"conference number".

© Blackboard Collaborate
Materials License 5
4. When you’ve successfully connected to the
teleconference, click on OK in the Use Telephone for
Audio dialog. The Use Telephone for Audio button
will change to the Use Microphone and Speakers
for Audio button and the word Teleconferencing…
will appear in the Audio & Video window to confirm you
are communicating via the call.
Adjusting the Sound & Muting the Teleconference
While you are in your session, you can prevent the audio from
the teleconference from entering the session by muting the
teleconference. This will prevent everyone who is on the
teleconference from talking to those in the session who are
using VoIP. However, the teleconference participants will
continue to be able to hear and talk to each other and will still
receive audio from the session.
To mute the teleconference, remove the Audio permission of the Teleconference bridge in the Participant list by clicking its Audio permission in the Participant Option menu.
You will know the teleconference is muted when you see the
icon next to the Teleconference bridge participant in the
Participants list.
Figure 1 Muted
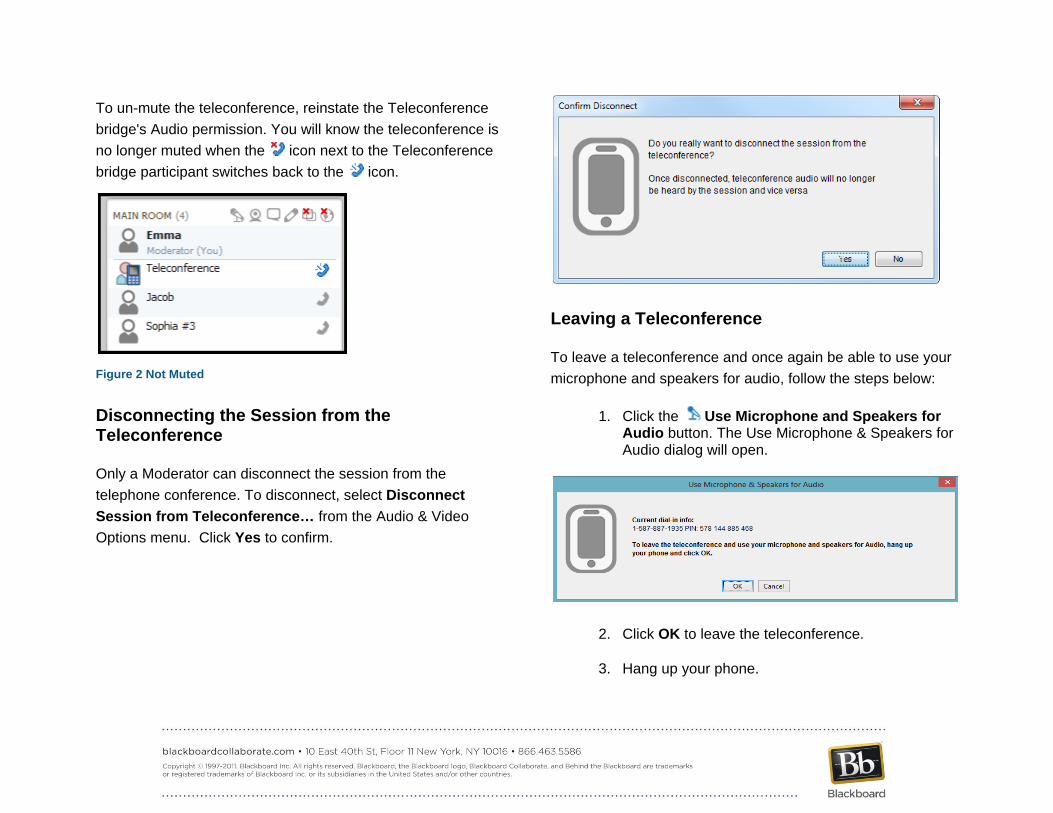
To un-mute the teleconference, reinstate the Teleconference
bridge's Audio permission. You will know the teleconference is
no longer muted when the icon next to the Teleconference
bridge participant switches back to the icon.
Figure 2 Not Muted
Disconnecting the Session from the Teleconference
Only a Moderator can disconnect the session from the
telephone conference. To disconnect, select Disconnect
Session from Teleconference… from the Audio & Video
Options menu. Click Yes to confirm.
Leaving a Teleconference
To leave a teleconference and once again be able to use your
microphone and speakers for audio, follow the steps below:
1. Click the Use Microphone and Speakers for Audio button. The Use Microphone & Speakers for Audio dialog will open.
2. Click OK to leave the teleconference.
3. Hang up your phone.

© Blackboard Collaborate
Materials License 7
Audio Activity Indicators
Activity Indicator
Description
The session attendee has turned on the microphone by clicking the Talk button. (Using VoIP for audio.)
The Teleconference Bridge participant is connected and the teleconference is available to users.
The Teleconference Bridge participant is connected but has had its Audio permission removed and, therefore, the teleconference is muted.
User is using Telephony mode for audio communications. (Using the phone for Audio.)
User is using Telephony mode for audio communications (using the phone for Audio) but the teleconference is muted.
Tips for using Telephony
Manage Teleconference participant interaction using
the same session etiquette as you use with participants
on VoIP. Ask participants to raise their hands before
speaking. This will facilitate better communications and
will let you know who in the Teleconference is speaking
Mute teleconference users during the presentations to
avoid interruptions and the broadcast of unwanted
audio.
Remind users on the teleconference to mute their
telephones while they are not speaking to minimize
distractions for other users on the teleconference.
As a best practice, use the Moderator PIN in the
Session Information field in the Teleconference
Connection dialogue box so that, as soon as the
session joins the teleconference, those on the
teleconference no longer hear music and a Moderator
in the teleconference is not explicitly needed.

1 © Blackboard Collaborate Material License
Using Chat Quick
Reference Guide
Text-based communication is available in web
conferencing using the Chat tool. Use the Chat to send a
text messages to everyone, to selected participants, or to
a single Participant or Moderator in the session.
Depending on your session configuration, the moderator
may be able to monitor all messages sent between
participants, including private messages. This is called a
Supervised session and the word “Supervised” will
appear in the Chat window.
Understanding the Chat Messages
Chat Permissions
By default all Participants have permission to use the
Chat. However the Moderator can take away the
permission from one or all of the participants. If the
permission has been removed visual indicator will appear
to the right of the participants name in the Participants
panel - .
Participants can always send a private text message to
the Moderator even if they do not have the Chat
permission.
The moderator can grant and remove the Chat
permission by clicking the Options menu - - in the
Participants panel and selecting Chat.
Sending a Chat Message
To send message:
1. Type in the message field
2. Hit <ENTER> on your keyboard.
Note the Moderator by default has two tabs – Room and
Moderators. Room is public chat sent to everyone in the
room and Moderators is reserved for private messages
between session Moderators.

Figure 1 Participant Chat Window
Figure 2 Moderator Chat Window
Sending a Private Chat Message
Moderator and Participants can send private chat
messages. If the session is “Supervised”, the
Moderators will be able to read all private messages
exchanged between Participants. The word
“Supervised” appears next to CHAT in the Chat window.
To send a private message:
1. Select the Participant to whom you would like to
send the message.
2. Right-click or from the Participant Options menu
select Send a Private Chat.
3. A new tab will appear with the Participant’s name.
Type your message and hit <ENTER>
Remember:
The Moderators can see all private messages.
The private messages will appear in light gray,
indented and italicized for the Moderator. See the
image below as an example of a private
conversation between Dominic and Emma both
session participants.

3 © Blackboard Collaborate Material License
A new tab will open for each conversation. To
close the tab, hover over the blue icon the left of
the Participant’s name - the icon will
turn into an X . Click to close.
Chat Options Menu
From the Chat Options menu:
Messages can be sent as announcements.
The font size can be increased and
decreased.
The Moderator can choose to turn off the
“Supervised” chat.
The Moderator has the option of viewing all
private messages in the conversation area of
the Room tab by selecting Show My Private
Chats in Room Tab. It will have a heading
that starts with the Private Message icon
Saving Chat Messages to a File
1. Public and private chat messages can be
saved. Click on the tab to select the
messages you wish to save.
2. From the File menu, select Save > Chat
1 © Blackboard Collaborate Materials License
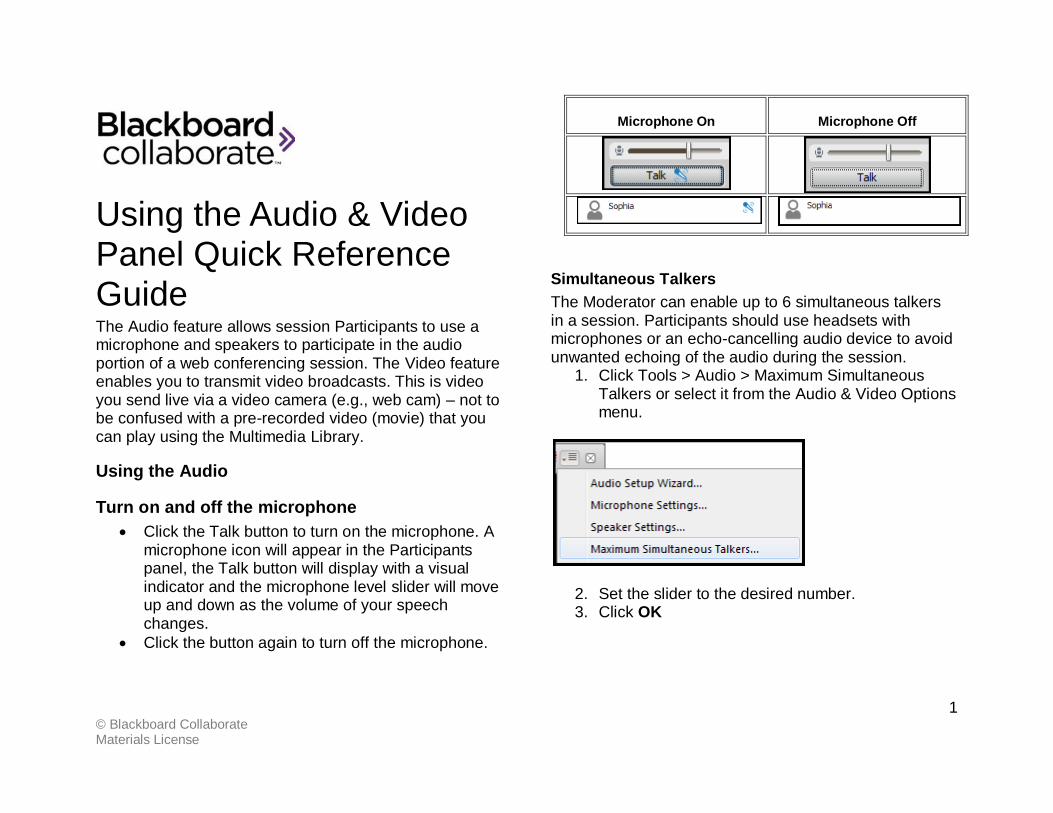
Using the Audio & Video Panel Quick Reference Guide The Audio feature allows session Participants to use a microphone and speakers to participate in the audio portion of a web conferencing session. The Video feature enables you to transmit video broadcasts. This is video you send live via a video camera (e.g., web cam) – not to be confused with a pre-recorded video (movie) that you can play using the Multimedia Library.
Using the Audio
Turn on and off the microphone
Click the Talk button to turn on the microphone. A microphone icon will appear in the Participants panel, the Talk button will display with a visual indicator and the microphone level slider will move up and down as the volume of your speech changes.
Click the button again to turn off the microphone.
Microphone On Microphone Off
Simultaneous Talkers
The Moderator can enable up to 6 simultaneous talkers in a session. Participants should use headsets with microphones or an echo-cancelling audio device to avoid unwanted echoing of the audio during the session.
1. Click Tools > Audio > Maximum Simultaneous Talkers or select it from the Audio & Video Options menu.
2. Set the slider to the desired number. 3. Click OK

Who is talking?
When the session is enabled for simultaneous talkers, it is important to open the Audio & Video panel so you can identify who is talking. The name of the person who is speaking along with their Profile picture (if they have one) will appear in the panel. The panel automatically switches to follow who is talking.
Using the Video
Steps for using live video
1. Click the Video button to begin transmitting live video. Alternatively, click the Preview button first
then when you are satisfied with the preview image, click Video.
2. To Resize or Expand the video window, select Detach Panel from the Audio & Video Options menu.
3. The window is now free floating. It can be moved anywhere on the screen or even to a second monitor. It can also be resized by grabbing the top, bottom or any corner and dragging.
3 © Blackboard Collaborate Materials License
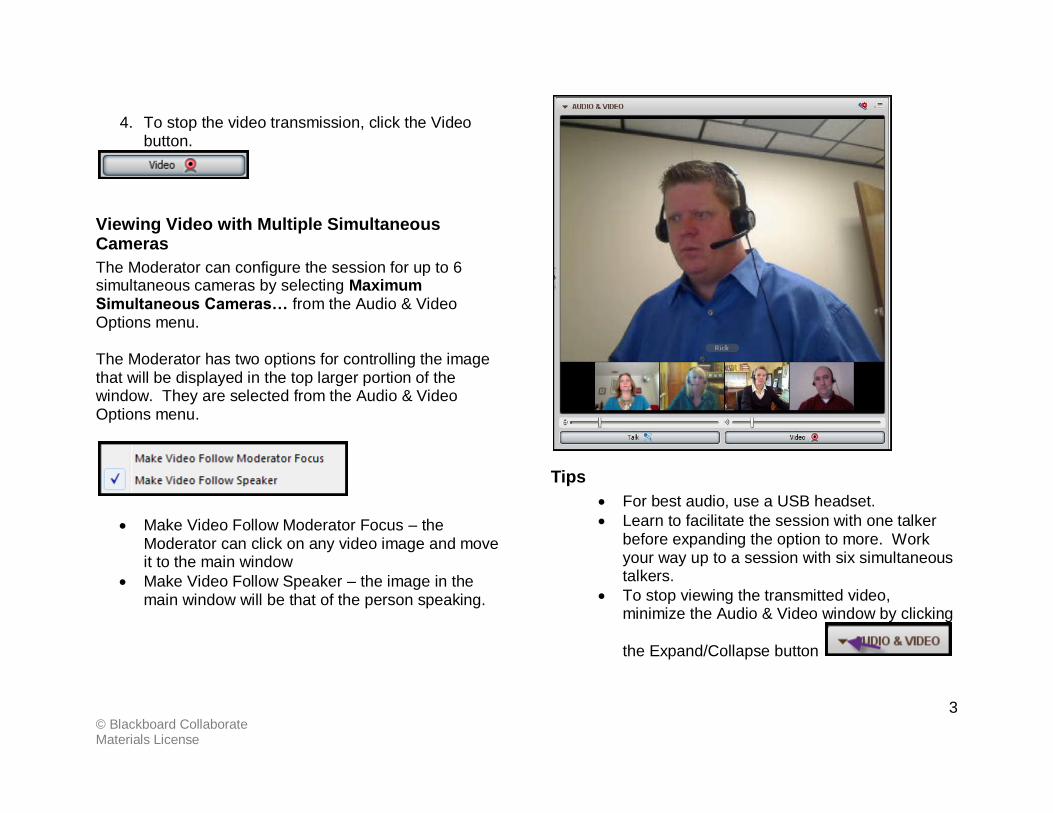
4. To stop the video transmission, click the Video
button.
Viewing Video with Multiple Simultaneous Cameras
The Moderator can configure the session for up to 6 simultaneous cameras by selecting Maximum Simultaneous Cameras… from the Audio & Video Options menu. The Moderator has two options for controlling the image that will be displayed in the top larger portion of the window. They are selected from the Audio & Video Options menu.
Make Video Follow Moderator Focus – the Moderator can click on any video image and move it to the main window
Make Video Follow Speaker – the image in the main window will be that of the person speaking.
Tips
For best audio, use a USB headset.
Learn to facilitate the session with one talker before expanding the option to more. Work your way up to a session with six simultaneous talkers.
To stop viewing the transmitted video, minimize the Audio & Video window by clicking
the Expand/Collapse button
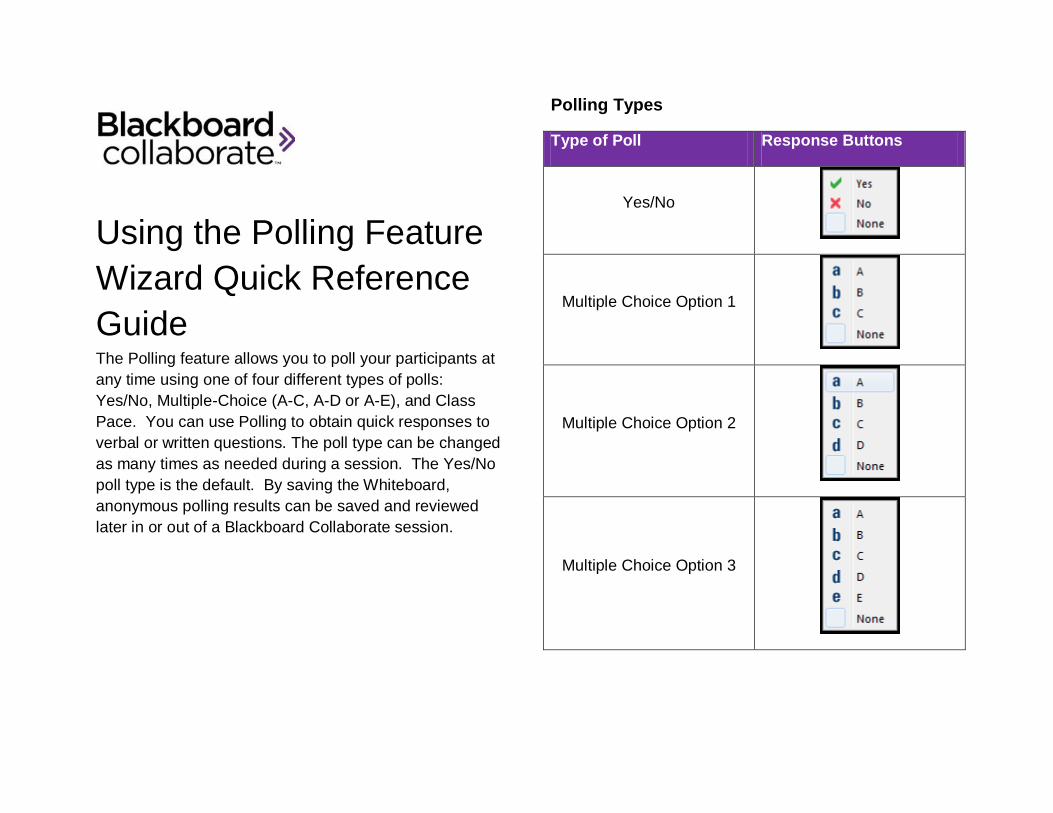
Using the Polling Feature
Wizard Quick Reference
Guide The Polling feature allows you to poll your participants at
any time using one of four different types of polls:
Yes/No, Multiple-Choice (A-C, A-D or A-E), and Class
Pace. You can use Polling to obtain quick responses to
verbal or written questions. The poll type can be changed
as many times as needed during a session. The Yes/No
poll type is the default. By saving the Whiteboard,
anonymous polling results can be saved and reviewed
later in or out of a Blackboard Collaborate session.
Polling Types
Type of Poll Response Buttons
Yes/No
Multiple Choice Option 1
Multiple Choice Option 2
Multiple Choice Option 3

To Poll Participants
1. From the Tools menu, select Polling, select Type
and select the type of poll you wish to use. Or
select Polling from the Global Options menu. The
default is Yes/No.
2. Present the polling question to the Participants
verbally or on the Whiteboard.
3. Instruct the Participants to respond using the
available response options. The options are
located in the Participants panel. Click the Polling
Response Menu and click the desired response.
Viewing and Clearing Polling Results
While conducting a Poll, the Moderator will see the
results tabulated under the Polling Response Menu. To
delete the responses, click the Clear button.

Hide and Show Responses
Determine if you wish to show or hide the polling
responses from the participants by selecting or
deselecting Make Responses Visible from the Tools >
Polling menu.
Locking Responses
The Moderator can choose to lock the polling responses
to prevent Participants from changing their answer.
Select Lock Responses from Tools > Polling.
Publishing Reponses to the Whiteboard
Publishing the responses places a graphical
representation of the results on the Whiteboard.
Tips
Use Polling to break up the session and engage Participants.
Use the Whiteboard to present your Polling question along with the responses.
Hide the Polling results from your Participants until they have responded to ensure honest feedback. Reveal the results only after everyone has responded.
If the Polling results were shown to the Participants they will also be shown in the recording. Hidden results are not recorded.
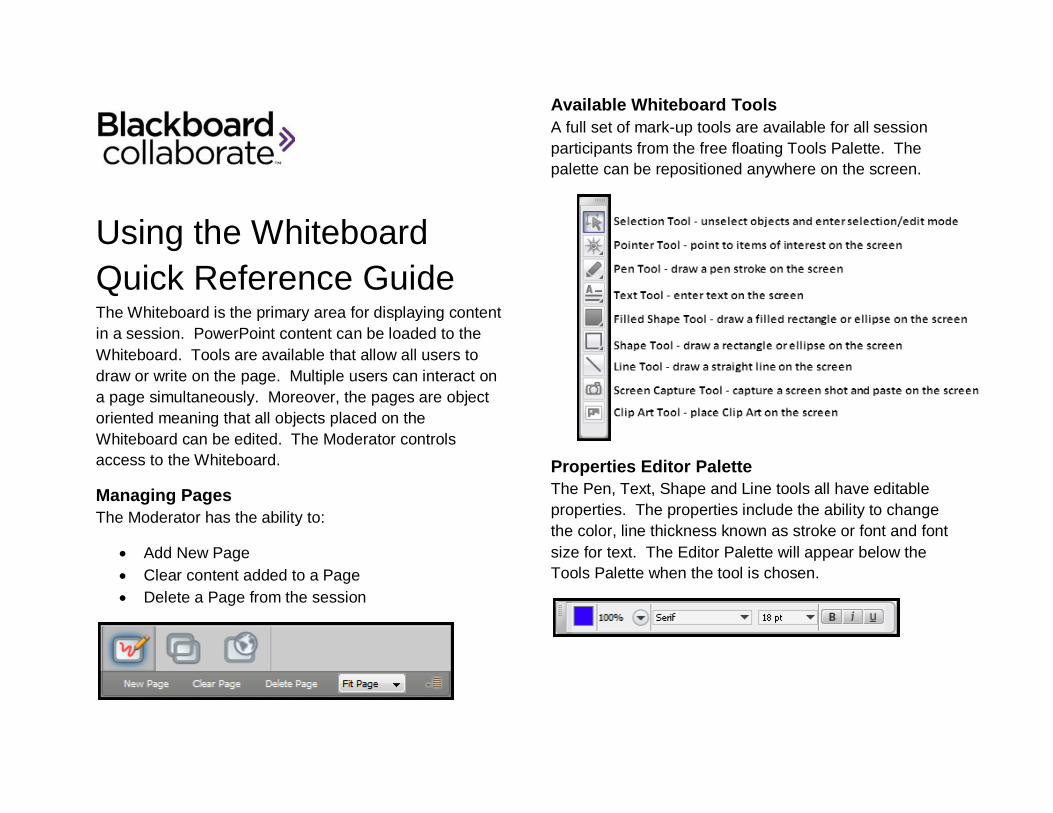
Using the Whiteboard
Quick Reference Guide The Whiteboard is the primary area for displaying content
in a session. PowerPoint content can be loaded to the
Whiteboard. Tools are available that allow all users to
draw or write on the page. Multiple users can interact on
a page simultaneously. Moreover, the pages are object
oriented meaning that all objects placed on the
Whiteboard can be edited. The Moderator controls
access to the Whiteboard.
Managing Pages
The Moderator has the ability to:
Add New Page
Clear content added to a Page
Delete a Page from the session
Available Whiteboard Tools
A full set of mark-up tools are available for all session
participants from the free floating Tools Palette. The
palette can be repositioned anywhere on the screen.
Properties Editor Palette
The Pen, Text, Shape and Line tools all have editable
properties. The properties include the ability to change
the color, line thickness known as stroke or font and font
size for text. The Editor Palette will appear below the
Tools Palette when the tool is chosen.
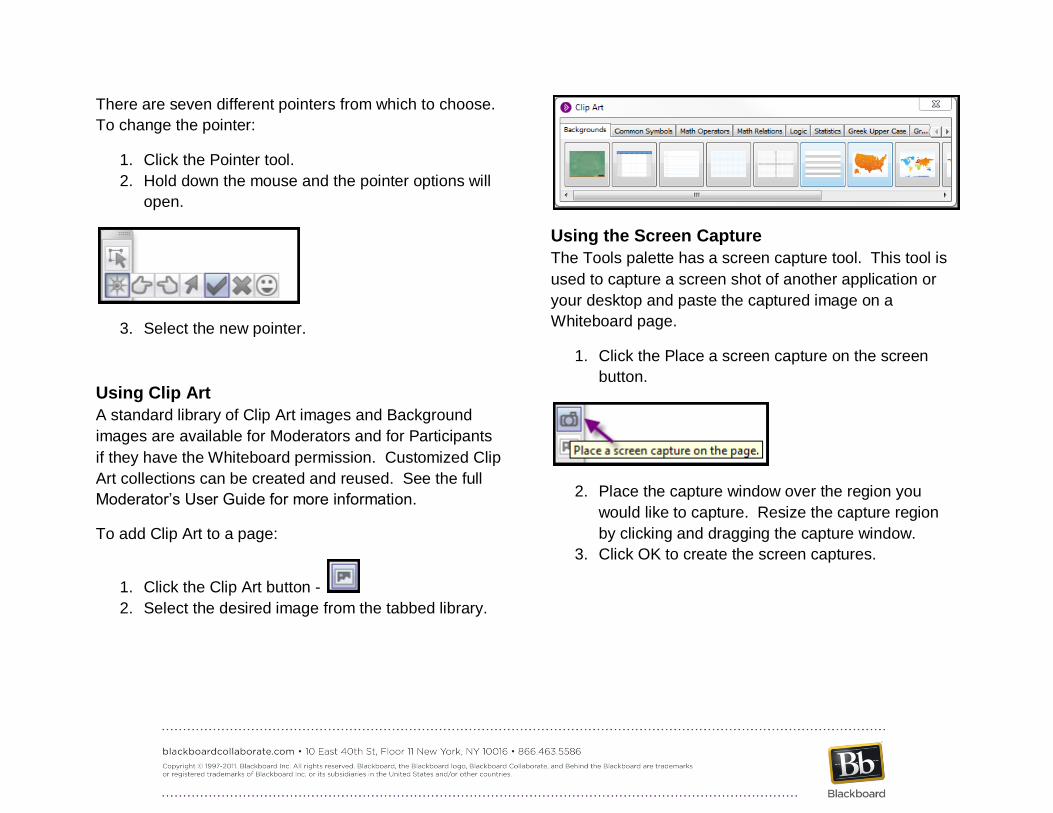
There are seven different pointers from which to choose.
To change the pointer:
1. Click the Pointer tool.
2. Hold down the mouse and the pointer options will
open.
3. Select the new pointer.
Using Clip Art
A standard library of Clip Art images and Background
images are available for Moderators and for Participants
if they have the Whiteboard permission. Customized Clip
Art collections can be created and reused. See the full
Moderator’s User Guide for more information.
To add Clip Art to a page:
1. Click the Clip Art button -
2. Select the desired image from the tabbed library.
Using the Screen Capture
The Tools palette has a screen capture tool. This tool is
used to capture a screen shot of another application or
your desktop and paste the captured image on a
Whiteboard page.
1. Click the Place a screen capture on the screen
button.
2. Place the capture window over the region you
would like to capture. Resize the capture region
by clicking and dragging the capture window.
3. Click OK to create the screen captures.

4. You will be returned to the web conferencing
Whiteboard. Place the screen capture on the
Whiteboard by moving you mouse to the desired
location and single click.
Managing Content on the Whiteboard Page
Content added to a page can be manipulated by
selecting the content and right-clicking. From the menu
there are a lot of options including:
Object alignment
Cut, Copy, Paste
Grouping
Properties
Explore Objects

Object Explorer
The Object Explorer is available by clicking Explore
Objects… The Object Explorer tracks what has been
placed on the Whiteboard and by whom. This is a
great way for the Moderator to monitor content.
Whiteboard Tips
Create interactive Whiteboard activities to engage
participants.
Conduct brainstorming activities on the
Whiteboard.
Load animated GIF images to the page after static
PowerPoint has been loaded.
Add clickable URLs to the page after PowerPoint
content has been loaded.
Save the Whiteboards in WBD or WBP format to
reuse in future sessions.
Save the Whiteboards as PDF to be viewed
outside of a session.

1 © Blackboard Collaborate Material License
Using Application Sharing Quick Reference Guide Application Sharing allows a Moderator or Participant to share any application or the entire desktop with other attendees. The host of the application share can grant remote control of his or her application(s) to others. This allows for true hands-on training, demonstrations, and support applications.
Starting Application Sharing
Any session participant with Application Sharing permission can start Application Sharing. To start:
1. Click the Application Sharing button
2. Select Share Desktop or a specific application from the list. Only open applications that are not minimized will appear on the list.
3. Click Share. 4. The shared application will display in the Content
Window for Participants.

Sizing and Controlling the Application The session participant who is sharing an application should size the application to the approximate size of the content window. This will ensure room on the monitor to see the Blackboard Collaborate side panels and the application. By default a yellow box will appear around the region that is being displayed. A small controller will be available with a button for Stop, Pause and Snap Shot.
The Participant Hosting the shared application will have
indicator next to their name in the Participants List.
Giving Control of Your Application or Desktop To give control of the shared application to another participant in the session, do the following:
1. Select the Participant from the Participants List 2. From the Tools menu, select Application
Sharing > Give Control of Shared Applications. The Participant now has the ability to interact with the shared application.
3. To regain control, from your keyboard hold down the CTRL key and the Space at the same time. Control returns to the host.

3 © Blackboard Collaborate Material License
Giving Participants Application Sharing Permission
By default Participants do not have the permission to use Application Sharing. The Moderator may give permission to all Participants from the Global Options menu or to a single participant from the Participants Option menu.
If the permission is given globally, you will not see a change in the Participants List. However if it is given to an individual Participant, the Application Sharing permission icon will appear next to that Participants name.
Steps:
1. Give the Participant(s) Application Sharing permission as described above.
2. The Participant may then click the Application Sharing button to switch to that mode or the Moderator can change the mode.
3. If the Participant changes the mode, following steps above. If the Moderator changes the mode, the Participant must click the Start Sharing button, select an application and click Share. Now all session Participants will see the shared application.
4. The Application Sharing permission will change to an active status.
Tips
When another attendee is controlling your application, it is important to keep you hand off the mouse so you do not compete for control.
When another attendee is controlling your application, use the audio hot key F2 to turn on and off your audio.
When another attendee is controlling your application, use the Tab key to move between the panels.

To view what your participants are seeing, from the Tools menu, select Application Sharing > Show Preview Window. A thumbnail of the shared application will display in a new window.
Do not place the Preview window on top of the shared application because it will block transmission and appear as a black box on the Participants screens.
The cursor of the shared application can be distinguished from the computer cursor by setting the Application Sharing Preferences to Emphasize Cursor. The cursor will be displayed in this
manner -
If the area being shared is larger than the Application Sharing window, it can be scaled to fit the window. Select Scale to fit.
You can optimize application sharing by selecting the Image Quality you want to transmit. Normal is the default. Go to Preferences > Application Sharing > Hosting Options to make a change.
1 © Blackboard Collaborate Materials License
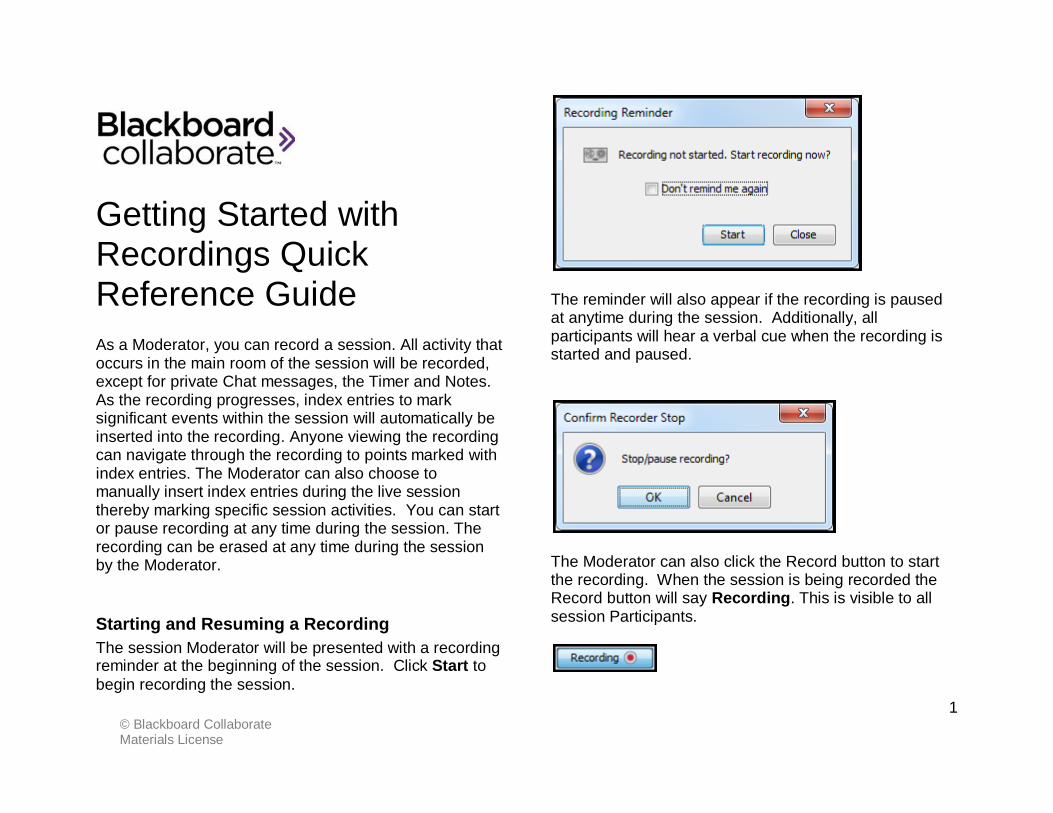
Getting Started with Recordings Quick Reference Guide As a Moderator, you can record a session. All activity that occurs in the main room of the session will be recorded, except for private Chat messages, the Timer and Notes. As the recording progresses, index entries to mark significant events within the session will automatically be inserted into the recording. Anyone viewing the recording can navigate through the recording to points marked with index entries. The Moderator can also choose to manually insert index entries during the live session thereby marking specific session activities. You can start or pause recording at any time during the session. The recording can be erased at any time during the session by the Moderator.
Starting and Resuming a Recording
The session Moderator will be presented with a recording reminder at the beginning of the session. Click Start to
begin recording the session.
The reminder will also appear if the recording is paused at anytime during the session. Additionally, all participants will hear a verbal cue when the recording is started and paused.
The Moderator can also click the Record button to start the recording. When the session is being recorded the Record button will say Recording. This is visible to all session Participants.

Erasing a Recording You can erase the content of the recording at any time during the session.
From the Tools menu select Recorder > Erase Recording... This will erase the entire recording.
Adding an Index Entry At any point during the session, the Moderator can manually add an index point. This is done from Tools > Recorder > Add Index Entry… This only needs to be
done if you want to mark a spot in the session that would not otherwise be automatically indexed. Automatic index markers are created by changing Pages or Modes such as starting Application Sharing.
Playing back a Recording Recordings are typically played by clicking on a recording link or access the archive from a LMS/CMS. The Playback Controller panel is at the bottom of the window in the status bar:
Click the button to play the recording.
Click the button to pause the recording. Use the Recording Index to move around in the recording. You can access the Recording Index in two ways:
1. Click the Expand/Collapse button to show the indices
2. From the Playback menu, select Show Recording Index… the Recording Index window will open.