BlackBerry Workspaces app for iOS User Guide · Introducing BlackBerry Workspaces app for iOS When...
61
BlackBerry Workspaces app for iOS User Guide 7.0
Transcript of BlackBerry Workspaces app for iOS User Guide · Introducing BlackBerry Workspaces app for iOS When...
BlackBerry Workspaces app foriOSUser Guide
7.0

2019-01-14Z
| | 2
Contents
Introduction.......................................................................................................7
Installation and authentication.......................................................................... 8Installing BlackBerry Workspaces app for iOS.................................................................................................... 8Sign in......................................................................................................................................................................8
Sign in by email...........................................................................................................................................8Sign in with a username and password................................................................................................... 8
Sign out................................................................................................................................................................... 9
Getting started................................................................................................ 10Introducing BlackBerry Workspaces app for iOS...............................................................................................10Using the home screen icon............................................................................................................................... 10Sort your files....................................................................................................................................................... 10Browse your files..................................................................................................................................................11Search for workspaces, folders, and files..........................................................................................................11Refresh the display.............................................................................................................................................. 11Access folder and file filters...............................................................................................................................11
Sending and sharing ...................................................................................... 13Share a workspace, folder or file........................................................................................................................13Send a copy of a file........................................................................................................................................... 14Send a photo or video......................................................................................................................................... 15Send a file from another app..............................................................................................................................16Take and send a photo or video.........................................................................................................................17Add recipients to a sent file................................................................................................................................18Share multiple files.............................................................................................................................................. 19Manage access to a sent file............................................................................................................................. 20Manage collaboration.......................................................................................................................................... 21
Working with files........................................................................................... 22Accessing the file menu bar............................................................................................................................... 22Opening and creating files.................................................................................................................................. 22
Open a file in BlackBerry Workspaces app for iOS................................................................................22Open a file in a third-party application....................................................................................................23Open a shared file.................................................................................................................................... 23Create a new document, spreadsheet, or presentation.........................................................................23Take and upload a photo or video.......................................................................................................... 24Upload existing photos or videos............................................................................................................24Switch file view......................................................................................................................................... 24Jump to an annotation bookmark...........................................................................................................25Play media files.........................................................................................................................................25
Upload a file from another app...........................................................................................................................25
| | iii
Editing files with BlackBerry Workspaces Editor...............................................................................................25Edit a file in BlackBerry Workspaces Editor........................................................................................... 26Editing documents.................................................................................................................................... 26Editing spreadsheets................................................................................................................................ 28Editing presentations................................................................................................................................30Save your changes to the workspace.....................................................................................................31
Working with comments......................................................................................................................................31Create a comment.................................................................................................................................... 31Reply to a comment................................................................................................................................. 32Request permission to comment............................................................................................................ 32Edit a comment.........................................................................................................................................32Delete a comment.................................................................................................................................... 33
Annotate files........................................................................................................................................................33Use the drawing markup tool.................................................................................................................. 33Highlight your files....................................................................................................................................33Add a sticky note to a file....................................................................................................................... 34Review annotations...................................................................................................................................34Share annotations.....................................................................................................................................34Erase drawings, highlights, and annotations..........................................................................................35
Search within files................................................................................................................................................35Locking and unlocking files.................................................................................................................................35
Lock a file..................................................................................................................................................35Unlock a file...............................................................................................................................................35
Manage file versions............................................................................................................................................36Select multiple files..............................................................................................................................................36Track file activities............................................................................................................................................... 36Add a file to favorites..........................................................................................................................................36Acknowledge a file...............................................................................................................................................36View a map of places where users accessed a file......................................................................................... 37
Managing workspaces, folders, and files........................................................ 38Create a new workspace or folder..................................................................................................................... 38Create a workspace on an external repository..................................................................................................38Working with an iManage repository..................................................................................................................38Rename a workspace, folder, or file...................................................................................................................39Mark a workspace, folder or file as a favorite...................................................................................................39Copy the link to a workspace, folder, or file...................................................................................................... 39Move a folder or file............................................................................................................................................ 39Delete a workspace, folder, or file...................................................................................................................... 40View info............................................................................................................................................................... 40View recent locations.......................................................................................................................................... 40
Managing access............................................................................................ 41View workspace members.................................................................................................................................. 41Add new members............................................................................................................................................... 41Delete workspace members................................................................................................................................42Managing member permissions......................................................................................................................... 42
Edit access................................................................................................................................................ 42Revoke access.......................................................................................................................................... 43Restore access..........................................................................................................................................43
Managing groups..................................................................................................................................................44
| | iv
Search groups and members.................................................................................................................. 44View group members............................................................................................................................... 44Assign group manager............................................................................................................................. 44Remove group manager...........................................................................................................................44Add users to groups.................................................................................................................................44Remove users from groups..................................................................................................................... 45Rename a group........................................................................................................................................45
Restore inheritance.............................................................................................................................................. 45
Working offline................................................................................................46Save files for offline access............................................................................................................................... 46Enforce offline access......................................................................................................................................... 46Pause automatic offline saving.......................................................................................................................... 46Clear a file saved for offline viewing..................................................................................................................46Clear all files saved for offline viewing..............................................................................................................47
Managing your settings...................................................................................48Add accounts........................................................................................................................................................48Switch accounts................................................................................................................................................... 48Set an app lock code...........................................................................................................................................48Change your app lock code................................................................................................................................ 48Limit file transfer to Wi-Fi....................................................................................................................................49Notifications..........................................................................................................................................................49Enable Touch ID or Face ID................................................................................................................................ 49Enable shake for privacy..................................................................................................................................... 49Learn more............................................................................................................................................................49Contact Support....................................................................................................................................................50
User roles and permissions.............................................................................51Workspace members........................................................................................................................................... 51Roles...................................................................................................................................................................... 51Permissions.......................................................................................................................................................... 51Available permission sets....................................................................................................................................52Customizing access to folders or files.............................................................................................................. 53
Collaboration and recipient sign in..................................................................54Collaboration.........................................................................................................................................................54Requiring recipient sign in...................................................................................................................................54
Read acknowledgement.................................................................................. 56
BlackBerry Workspaces security .................................................................... 57Key storage........................................................................................................................................................... 57File storage........................................................................................................................................................... 57Encryption..............................................................................................................................................................57Data wipe.............................................................................................................................................................. 57File transfer...........................................................................................................................................................57
| | v

App lock................................................................................................................................................................ 58Private cache........................................................................................................................................................ 58Jailbreak detection...............................................................................................................................................58Authentication.......................................................................................................................................................58
Legal notice.................................................................................................... 59
| | vi
IntroductionThe BlackBerry Workspaces app for iOS enables you to securely access, share, work and collaborate with yourfiles while on the go. Files that you open in the BlackBerry Workspaces app for iOS are controlled and protected atall times, ensuring that your organization’s data remains safe.
VIEW
Open and view documents and media files in your workspaces and sent and received files.
CREATE
Create new documents, presentations, and spreadsheets using BlackBerry Workspaces Editor. Take new photosand videos from within the app.
UPLOAD
Upload files opened in third-party applications as well as photos and video from your device.
EDIT
Add highlights, sticky notes, free draw and annotate in your files directly in BlackBerry Workspaces app for iOS.For comprehensive editing, you can edit your files in BlackBerry Workspaces Editor.
VIEW OFFLINE
Securely download your files to your device to view them offline.
COMMENT
Add, view, respond to and tag other users in comments with file access. For comprehensive comment tracking,you can view all comment threads in BlackBerry Workspaces. For comprehensive editing, you can edit your files inBlackBerry Workspaces Editor.
READ ACKNOWLEDGEMENT
Request and receive acknowledgement on shared or sent files, when files are read. Complete readacknowledment requests on files shared with you by others.
SHARE
Share existing, new, or uploaded items easily and securely with BlackBerry Workspaces.
Note: The available features, options, and menu items can depend on your organization’s BlackBerry Workspacesconfiguration and your user permissions per workspace. For any questions, consult your organizationadministrator.
| Introduction | 7

Installation and authentication
Installing BlackBerry Workspaces app for iOSYou can install BlackBerry Workspaces app for iOS from the Apple App Store. Search for BlackBerryWorkspaces and install the app. After it is installed, the App Store notifies you when an updated version isavailable.
Sign inSign in to BlackBerry Workspaces using the authentication method set by your organization. When you open theapp, a sign-in screen is displayed.
1. Swipe left to take the tour.2. Do one of the following:
• If you do not have an account, tap Register and follow the instructions.• If you already have an account, tap Sign in.
3. In the Email area, enter your email address. 4. In the Site area, enter your site URL.
Note: For many users this is www.watchdox.com (watchdox.com is the cloud service URL). If yourorganization uses a virtual appliance to host the BlackBerry Workspaces service or your organization hasits own dedicated subdomain on the BlackBerry Workspaces cloud, the URL will be different (for example,[company-name].watchdox.com).
5. Tap Sign in.6. Do one of the following:
• If your organization is configured for sign in by email, see Signing in by email.• If your organization is configured for sign in by username and password, see Signing in by username and
password.• If your organization is configured for another authentication method, follow the steps on screen to sign in.
Sign in by emailFollow these steps if your organization is configured for email authentication.
Before you begin: Follow the steps in Sign in. An email is sent to the email address supplied.
1. Open the email on your iOS device, copy the verification code, and return to the sign-in screen.2. Enter the verification code.
This completes the sign-in process and you are redirected to the BlackBerry Workspaces app for iOS. Ifdesired, you can sign in to additional accounts. See Adding accounts for more information.
Sign in with a username and passwordFollow these steps if your organization is configured for username and password authentication.
Before you begin: Follow the steps in Sign in. The sign-in screen appears.
1. Enter your email and password.2. Do one of the following:
| Installation and authentication | 8
• If you already have a BlackBerry Workspaces account, tap Sign in.
Your sign-in is validated, and BlackBerry Workspaces app for iOS starts.• If you do not have a BlackBerry Workspaces account, tap Create Account. You are redirected to your device
browser. Follow the on-screen instructions to create an account.
This completes the sign-in process and you are redirected to BlackBerry Workspaces app for iOS.
If desired, you can sign in to additional accounts. See Adding accounts for more information.
Sign out1. Tap > to access Settings.2. Tap Sign out.
A confirmation message appears.3. Do one of the following:
• If you are signed into one account, tap Sign out.• If you are signed into more than one account, tap Sign out from current account to sign out from the
current account only, or Sign out from all accounts to sign out from all of your accounts.
Note: Signing out of the BlackBerry Workspaces app for iOS erases all of your user-associated data on yourdevice. Files marked for offline viewing are also erased. Any unsaved changes in your files will be lost unlessyou save the edits before signing out.
| Installation and authentication | 9
Getting started
Introducing BlackBerry Workspaces app for iOSWhen you log in to the BlackBerry Workspaces app for iOS the Workspaces page appears. Only the workspaces,folders, and files that you have permission to access are displayed.
Note: If you do not have a workspace role, the app opens on Received Files.
Tap next to an item where available to display the menu of actions for the selected entity.
Tap or swipe right anywhere in the workspaces, folders or file lists to access the left pane. From the left pane,access your settings, recent locations, files saved for offline access, favorites, pending acknowledgements,permission requests, and received and sent files.
Using the home screen iconYou can press and hold the BlackBerry Workspaces icon on the home screen to quickly access you favorites,recent locations, received files, and sent files.
1. Press and hold the Workspaces icon on the home screen.2. Select the menu item that you want to view.
Sort your filesSort your workspaces, folders, and files by name or by modification date. Folders are listed before files in theresults.
1. Swipe down and tap the current sort setting or tap in the action bar.2. Tap a sort option.
A-Z Items are sorted in the following ascending order:
• Numbers• Alphabetically, English• Alphabetically, non-English
Z-A Items are sorted in the following descending order:
• Alphabetically, non-English• Alphabetically, English• Numbers
Newest - oldest Items are sorted by newest modified
Oldest - newest Items are sorted by oldest modified
| Getting started | 10
Browse your filesWhen you log into BlackBerry Workspaces app for iOS, all workspaces that you have permission to access aredisplayed on the home screen.
To browse for files:
• Tap a workspace or folder to open it and display its files.• Tap to return to the parent folder.• Tap the folder name in the top bar to view breadcrumb navigation. Tap an item in the breadcrumb list to to go
to that location.• Tap a file to view/open it.
Search for workspaces, folders, and files1. From any location, tap and type your search term. As you type in the search field, the top 5 results display.2. If you want to view all search results, tap Search.
A list of matching workspaces, folders, and files is displayed. Tap and choose from the Sort, Select, orSelect all options.
3. Select a result from the list.4. Tap next to the desired item to access the action menu.5. Tap outside of the action menu to return to the search results.6. To clear the search and return to the main screen, tap Cancel.
Refresh the display• Pull down on the page to resync the page you are on.• Pull down on the workspaces page to resync the workspaces.
Access folder and file filtersBlackBerry Workspaces provides predefined filters so you can quickly access your recent locations, offline files,and favorites.
1. Tap .2. Select the filter you want to access.
Workspaces List of all workspaces which you can access.
External repositories If your organization works with external repositroies,these workspaces can be accessed here.
Recent Locations Recent workspaces and folders where you uploadedor opened a file
Offline Access Files you designated for offline access.
| Getting started | 11

Favorites Files you designated as favorites.
Pending acknowledgement Files sent to you requesting read acknowledgement.
Received Files Files sent to you.
Sent Files Files you sent.
| Getting started | 12
Sending and sharing Use BlackBerry Workspaces app for iOS to send and share files, folders and workspaces. If your organization hasenabled a mobile users sharing policy, you can share workspace files from BlackBerry Workspaces app for iOS.Members are workspace-specific and their defined permissions in one workspace do not grant them access toother workspaces or their folders and files.
Workspace members can be added individually and assigned a role and permission set, or organized into groupswith a group role and permission set. Members can access all of the folders and files in a workspace unless yourBlackBerry workspaces administrator specifies otherwise.
Sent and shared recipients receive a link and notifications by email.
Your organization’s policies determine who you can share with.
Share a workspace, folder or file
1. Next to the desired workspace or folder, tap > Share Workspace or Share Folder. 2. In the Share with area, select an option.3. Depending on which option you selected in step 2, you will have different settings to configure. Do one of the
following:
Users > Add members To manually add recipient email addresses, enterthe email addresses of the intended recipients.
To select contacts from your device's contact list,tap + and select the contacts that you want to sharethe file with. When you are finished, tap Done.
Optionally, you can type a message inthe Message box.
Note that your Organization administrator hasset the sharing permissions but you can edit thepermissions if needed. For more information aboutthe permissions that you can set, see step 4.
Group > Existing group Type a group in the Select Group field or click + andselect a group name. Only permitted groups displayin the list when you start to type.
To manually add recipient email addresses, enterthe email addresses of the intended recipients inthe Add Members To Selected Group field. Notethat adding a user to an existing group grants thenew user access to all files the selected group ispermitted to access.
Optionally, you can type a message inthe Message box.
Note that your Organization administrator hasset the sharing permissions but you can edit the
| Sending and sharing | 13
permissions if needed. For more information aboutthe permissions that you can set, see step 4.
Group > New group Type a group name and add group members.Optionally, add a group description.
Note that your Organization administrator hasset the sharing permissions but you can edit thepermissions if needed. For more information aboutthe permissions that you can set, see step 4.
Email domain > Domain name Type a domain name.
Note that your Organization administrator hasset the sharing permissions but you can edit thepermissions if needed. For more information aboutthe permissions that you can set, see step 4.
4. In the Sharing permissions area, you can perform the following tasks:
• Select a Role to determine user management capabilities within a workspace or folder. When done, tap < togo back.
• Select a Permission set. When done, tap < to go back.• Select an Expiration time when members can no longer access the workspace or folder. Select a specific
date, a time period from the list, or never. If you select Specific date, choose the desired date from thecalendar. When done, tap < to go back.
• In the Watermark area, toggle the switch to the on position to enable PDF files to display with a watermark. • In the Commenting area, toggle the switch to the on position to enable recipients to comment on files and
view the comments of other users in the workspace.
5. Tap Share.
Send a copy of a fileBefore you begin: If you have "Full access" permissions for a file, you can send a secure copy of the file to others.
1. Navigate to a file in a workspace, your Sent files area, or your Received files area.2. Tap > Send a Copy3. In the ADD RECIPIENTS area, do one of the following:
• To manually add recipient email addresses, enter the email address(es) of the intended recipient(s).• To select contacts from your device's contact list, tap and select the contact(s) you want to share the file
with.
When finished, tap Done.4. In the PERMISSIONS area, tap next to Manage permissions.5. If the Require recipients to sign in slider is displayed, do one of the following:
• To ensure that recipients sign in to access the file, set the slider to ON.• To allow recipients to access the file without signing in, set the slider to OFF.
This option is enabled by organizational policy. See Requiring recipient sign in for more information.
Note: If this option is not displayed, recipients need to sign in to access the file.
| Sending and sharing | 14
6. Next to the current permissions, tap and select the desired access level. When done, tap to return toManage Permissions.
Note: For more information about permissions, see Available permission sets.7. To add a read file acknowledgement request to the file, toggle the Require read acknowledgement option to
on.
Note: For more information about Read File Acknowledgement, see Acknowledge a file.8. To set the time when the file will no longer be accessible by the recipients, tap in the Expiration area, and
select the desired time period. When done, tap to return to the Manage Permissions screen.9. To set access for the file link, tap in the Allow acess to area, and select Recipients only, Anyone within
recipients' domain, or Everyone. When done, tap to return to Manage Permissions.10.To ensure that the file is displayed to recipients with a watermark, set the slider to ON in the Watermark area.
Note: Watermarks are set according to organizational policy. When permissions are set to Full access,watermarks are only displayed on PDF files. When permissions are set to any of the Download protectedpermissions, watermarks are not displayed on Office files.
11.In the Collaboration area, set the slider to ON to allow recipients to upload new versions.12.To send the file with annotations if they exist, in the Annotations area, set the slider to ON.13.To enable commenting on the file to permitted members, in the Comments area, set the slider to ON.14.Tap to return to Send a copy.15.If you want to notify the recipients that you are sending a file, set the Notify recipients slider to ON.16.If desired, change the email subject in the SUBJECT area.17.If desired, add a personal message in the Message box.18.Tap Send to send the file.
Authorized recipients can view the file by tapping on the link in the received email.
Send a photo or video1. In the navigation pane, tap > Send Photos or Videos. 2. Browse to the desired location, and select the photo(s) and video(s) that you want to send. 3. Tap Select. 4. In the ADD RECIPIENTS area, do one of the following:
• Enter the recipients’ email addresses. • To select contacts from your device's contact list, tap and select the contact(s) you want to share the file
with.
When finished, tap Done. 5. In the PERMISSIONS area, tap next to Manage permissions. For more information see Permissions. 6. If the Require recipients to sign in slider is displayed, do one of the following:
• To ensure that recipients sign in to access the file, set the slider to ON. • To allow recipients to access the file without signing in, set the slider to OFF.
This option is enabled by organizational policy. See Requiring recipient sign in for more information.
Note: If this option is not displayed, recipients need to sign in to access the file.7. Next to the current permissions, tap and select the desired access level. When done, tap to return to
Manage Permissions.
| Sending and sharing | 15
Note: For more information about permissions, see Available permission sets.8. To add a read acknowledgement request to an image file, toggle the Require read acknowledgement option to
on.
Note: Read acknowledgement is not available on video files. For more information about Read FileAcknowledgement, see Acknowledge a file.
9. To set the time when the file will no longer be accessible by the recipients, tap in the EXPIRATION area, andselect the desired time period. When done, tap to return to Manage Permissions.
10.To set access for the file link, tap in the ALLOW ACCESS TO area, and select Recipients only, Anyone withinrecipients' domain, or Everyone. When done, tap to return to Manage Permissions.
11.To ensure that the file is displayed to recipients with a watermark, set the slider to ON inthe WATERMARK area.
Note: Watermarks are set according to organizational policy. When permissions are set to Fullaccess, watermarks are only displayed on PDF files. When permissions are set to any of the Downloadprotected permissions, watermarks are not displayed on Office files.
12.In the COLLABORATION area, set the slider to ON to allow recipients to upload new versions.13.Tap to return to Send a Copy. 14.If you want to notify the recipients that you are sending a file, set the Notify recipients slider to ON.15.If desired, change the email subject in the SUBJECT area. 16.If desired, add a personal message in the MESSAGE box. 17.Tap Send to send the file(s).
Send a file from another appSend a file via BlackBerry Workspaces from other iOS apps.
Note: The maximum file size that can be sent via BlackBerry Workspaces in this way is 40MB for iPhone and70MB for iPad, depending on available system resources.
After the file has been sent, you can view, annotate, and reshare it just like any other file, and it is synced acrossall your BlackBerry Workspaces applications. The file inherits the default permissions for each group in theworkspace.
1. In the app where you have the file open, for example, Adobe Reader, tap Open in... or tap the share symbol(typically ).
2. Tap Send file to recipients to securely share the file via BlackBerry Workspaces.
The file is uploaded to the BlackBerry Workspaces server and an email containing a link to the file is opened.3. In the ADD RECIPIENTS area, do one of the following:
• To manually add recipient email addresses, enter the email address(es) of the intended recipient(s).• To select contacts from your device's contact list, tap and select the contact(s) you want to share the file
with.
When finished, tap Done.4. In the PERMISSIONS area, tap next to Manage permissions.5. If the Require recipients to sign in slider is displayed, do one of the following:
• To ensure that recipients sign in to access the file, set the slider to ON.• To allow recipients to access the file without signing in, set the slider to OFF.
| Sending and sharing | 16
This option is enabled by organizational policy. See Requiring recipient sign in for more information.
Note: If this option is not displayed, recipients need to sign in to access the file.6. Next to the current permissions, tap and select the desired access level. When done, tap to return to
Manage Permissions.
Note: For more information about permissions, see Available permission sets.7. Next to the current permissions, tap and select the desired access level. When done, tap to return to
Manage Permissions.
Note: For more information about permissions, see Available permission sets.8. To set the time when the file will no longer be accessible by the recipients, tap in the EXPIRATION area, and
select the desired time period. When done, tap to return to Manage permissions.9. To set access to the file link, tap in the ALLOW ACCESS TO area, and select Recipients only, Anyone within
recipients' domain, or Everyone. When done, tap to return to Manage Permissions.10.To ensure that the file is displayed to recipients with a watermark, set the slider to ON in the WATERMARK
area.
Note: Watermarks are set according to organizational policy. When permissions are set to Full access,watermarks are only displayed on PDF files. When permissions are set to any of the Download protectedpermissions, watermarks are not displayed on Office files.
11.In the COLLABORATION area, set the slider to ON to allow recipients to upload new versions.12.Tap to return to Send a copy.13.If you want to notify the recipients that you are sending a file, set the Notify recipients slider to ON.14.If desired, change the email subject.15.If desired, add a personal message in the MESSAGE box.16.Tap Send to send the file.
The file sent and you can locate it in your Sent Files.
Take and send a photo or video1. In the navigation pane, tap > Take Photo or Video.
Your device camera opens.2. Take a photo or video as usual.3. Do one of the following:
• Tap Retake to redo the shot.• Tap Use Photo/Video to use the photo or video.
4. Tap Send photo/video to securely share the file by email via BlackBerry Workspaces.5. In the ADD RECIPIENTS area, do one of the following:
• To manually add recipient email addresses, enter the email address(es) of the intended recipient(s).• To select contacts from your device's contact list, tap and select the contact(s) you want to share the file
with.
When finished, tap Done.6. In the PERMISSIONS area, tap next to Manage permissions. For more information see Permissions.7. If the Require recipients to sign in slider is displayed, do one of the following:
• To ensure that recipients sign in to access the file, set the slider to ON.
| Sending and sharing | 17
• To allow recipients to access the file without signing in, set the slider to OFF.
This option is enabled by organizational policy. See Requiring recipient sign in for more information.
Note: If this option is not displayed, recipients need to sign in to access the file.8. Next to the current permissions, tap and select the desired access level. When done, tap to return to
Manage Permissions.
Note: For more information about permissions, see Available permission sets.9. To add a read acknowledgement request to an image file, toggle theRequire read acknowledgement option to
on.
Note: Read acknowledgement is not available on video files. For more information about Read FileAcknowledgement, see Acknowledge a file.
10.To set the time when the file will no longer be accessible by the recipients, tap in the EXPIRATION area, andselect the desired time period. When done, tap to return to Manage Permissions.
11.To set who can access the file, tap in the ALLOW ACCESS TO area, and select Recipients only, Anyonewithin recipients' domain, or Everyone. When done, tap to return to Manage Permissions.
12.To ensure that the file is displayed to recipients with a watermark, set the slider to ON in the WATERMARKarea.
Note: Watermarks are set according to organizational policy. When permissions are set toFull access,watermarks are only displayed on PDF files. When permissions are set to any of the Download protectedpermissions, watermarks are not displayed on Office files.
13.In the COLLABORATION area, set the slider to ON to allow recipients to upload new versions.14.Tap to return to Send a copy.15.If you want to notify the recipients that you are sending a file, set the Notify recipients slider to ON.16.If desired, change the email subject in the SUBJECT area.17.If desired, add a personal message in the MESSAGE box.18.Tap Send to send the file.
Add recipients to a sent file1. Tap > Sent Files to access your sent files. 2. Next to the desired file, tap > Add Recipients. 3. In the ADD RECIPIENTS area, do one of the following:
• To manually add recipient email addresses, enter the email address(es) of the intended recipient(s). • To select contacts from your device's contact list, tap and select the contact(s) you want to share the file
with.
When finished, tap Done. 4. In the PERMISSIONS area, tap next to Manage permissions.5. If the Require recipients to sign in slider is displayed, do one of the following:
• To ensure that recipients sign in to access the file, set the slider to ON.• To allow recipients to access the file without signing in, set the slider to OFF.
This option is enabled by organizational policy. See Requiring recipient sign in for more information.
Note: If this option is not displayed, recipients need to sign in to access the file.
| Sending and sharing | 18
6. Next to the current permissions, tap and select the desired access level. When done, tap to return toManage Permissions.
Note: For more information about permissions, see Available permission sets.7. To set the time when the file will no longer be accessible by the recipients, tap in the EXPIRATION area, and
select the desired time period. When done, tap to return to the Manage Permissions screen. 8. To set who can access the file, tap in the ALLOW ACCESS TO area, and select Recipients only, Anyone
within recipients' domain, or Everyone. When done, tap to return to Manage Permissions. 9. To ensure that the file is displayed to recipients with a watermark, set the slider to ON in
the WATERMARK area.
Note: Watermarks are set according to organizational policy. When permissions are set to Fullaccess, watermarks are only displayed on PDF files. When permissions are set to any of the Downloadprotected permissions, watermarks are not displayed on Office files.
10.To send the file with annotations if they exist, in the ANNOTATIONS area, set the slider to ON. 11.Tap to return to Add Recipients. 12.To enable commenting on the file to the new recipients, set the slider in the COMMENTS area to ON.
Note: The ability to comment is per recipient. Enabling comments for a new file recipient will not enable themfor previous file recipients. If previous recipients had comments enabled and you wish to remove the ability tocomment for the new receipient, set the slider in the COMMENTS area to OFF.
13.If you want to notify the recipients that you are sending a file, set the Notify recipients slider to ON.14.If desired, change the email subject. 15.If desired, add a personal message in the MESSAGE box. 16.Tap Send to send the file. Authorized recipients can view the file by tapping on the link in the received email.
Share multiple filesSelect and share multiple files from the same location.
1. From the content list of any workspace or folder, tap the file icon of each file you wish to share. 2. The icon of each file you tap will switch to to show it is selected.3. Tap .4. Tap Send a copy. 5. In the ADD RECIPIENTS area, do one of the following:
• To manually add recipient email addresses, enter the email address(es) of the intended recipient(s). • To select contacts from your device's contact list, tap and select the contact(s) you want to share the file
with.
When finished, tap Done. 6. In the PERMISSIONS area, tap next to Manage permissions.7. If the Require recipients to sign in slider is displayed, do one of the following:
• To ensure that recipients sign in to access the files, set the slider to ON.• To allow recipients to access the files without signing in, set the slider to OFF.
This option is enabled by organizational policy. See Requiring recipient sign in for more information.
Note: If this option is not displayed, recipients need to sign in to access the files.
| Sending and sharing | 19
8. Next to the current permissions, tap and select the desired access level. When done, tap to return toManage Permissions.
Note: For more information about permissions, see Available permission sets.9. To add a read file acknowledgement request to the files, toggle the Require read acknowledgement option to
on.
Note: For more information about Read File Acknowledgement, see Acknowledge a file.10.To set the time when the files will no longer be accessible by the recipients, tap in the EXPIRATION area,
and select the desired time period. When done, tap to return to the Manage Permissions screen. 11.To set access for the file link, tap in the ALLOW ACCESS TO area, and select Recipients only, Anyone within
recipients' domain, or Everyone. When done, tap to return to Manage Permissions. 12.To ensure that the files are displayed to recipients with a watermark, set the slider to ON in
the WATERMARK area.
Note: Watermarks are set according to organizational policy. When permissions are set to Fullaccess, watermarks are only displayed on PDF files. When permissions are set to any of the Downloadprotected permissions, watermarks are not displayed on Office files.
13.In the COLLABORATION area, set the slider to ON to allow recipients to upload new versions.14.To send the files with annotations if they exist, in the ANNOTATIONS area, set the slider to ON. 15.To enable commenting on the files to permitted members, in the COMMENTS area, set the slider to ON.16.Tap to return to Send a copy. 17.If you want to notify the recipients that you are sending files, set the Notify recipients slider to ON.18.If desired, change the email subject in the SUBJECT area. 19.If desired, add a personal message in the MESSAGE box. 20.Tap Send to send the link to the copies of the files.
Authorized recipients can view the files by tapping on the link in the received email.
Manage access to a sent fileManage permissions for files you have shared.
1. Tap > Sent Files to access your sent files.2. Next to the desired file, tap > Manage Access.3. Tap the name of the person or group that you want to manage permissions for.4. To change the access permissions, tap in the PERMISSIONS area, and select the desired access level.
When done, tap to return to Manage permissions.
Note: For more information about permissions, see Available permission sets.
Tip: To revoke access, set the permissions to No access.5. To set the time when the file will no longer be accessible by the recipients, tap in the EXPIRATION area, and
select the desired time period. When done, tap to return to Manage Permissions.6. To ensure that the file is displayed to recipients with a watermark, set the slider to ON in the WATERMARK
area.
Note: Watermarks are set according to organizational policy. When permissions are set to Full access,watermarks are only displayed on PDF files. When permissions are set to any of the Download protectedpermissions, watermarks are not displayed on Office files.
7. To enable commenting on the file, set the slider in the COMMENTS area to ON.
| Sending and sharing | 20
8. Tap Done.
Manage collaborationCollaboration mode is when recipients have the ability to upload new versions of a shared file.
Manage collaboration for a file, even when if it was initially sent without collaboration enabled. Upload a newversion yourself, and to allow or block recipients from uploading new versions.
Files shared with collaboration are marked with .
For more information, see Collaboration.
1. Tap > Sent Files to access your sent files. 2. To enable collaboration, next to the desired file, tap > Allow upload of new versions. 3. To disable collaboration, next to the desired file, tap > Block upload of new versions. 4. To upload a new version, next to the desired file, tap > Edit, and edit and save the file.
| Sending and sharing | 21
Working with filesWork with files in BlackBerry Workspaces app for iOS inclulding opening, creating, editing, annotating,commenting, acknowledging, and locking files, play media files, and track file activities.
When you open a file in BlackBerry Workspaces app for iOS, you can access the file menu bar, search within thefile, switch the file view and jump to bookmarked sections. You can also annotate and comment on the file.
See also:
For more information on opening and creating files, see Opening and creating files.
For information on opening files in third party applications, see Open a file in a third-party application.
For more information on editing files, see Editing files with BlackBerry Workspaces Editor.
For more information on comments, see Working with comments.
For more information on read acknowledgement, see Acknowledge a file.
For more information on annotations, see Annotate files.
For more information on tracking files, see Track file activities.
Accessing the file menu bar• Tap a file to open it in BlackBerry Workspaces app for iOS.
When the file opens, you can use standard iOS touch gestures, such as pinch, zoom, and drag to navigate the file.The slider on the right side shows your position in the file. Tap on the slider to quickly navigate to any page in thefile.
The menu bar at the top of the file displays menu options that you can select while viewing the file.
• Tap to search. See Search within files.• Tap to annotate the file. See Annotate files.• Tap for more actions:
• Access Offline: see Save files for offline access.• Add to Favorites: see Access folder and file filters• Send a Copy: see Send a copy of a file.• Share Annotations: see Share annotations.• ViewAnnotation Bookmarks: see Jump to an annotation bookmark.• Lock File: see Locking and unlocking files.• Copy Link: see Copy the link to a workspace, folder, or file.• Switch View : See Switch file view• Edit the file in BlackBerry Workspaces Editor: see Editing files with BlackBerry Workspaces Editor.• Open in a third party application: see Open a file in a third-party application.
Opening and creating files
Open a file in BlackBerry Workspaces app for iOS1. In the relevant workspace or folder, browse to and tap a file to open and view it.
| Working with files | 22
The file opens in the BlackBerry Workspaces viewer.
Note: Files that have been set to be viewed in Spotlight mode can be viewed online via the BlackBerryWorkspaces Web Application only.
2. For files that cannot be opened in the BlackBerry Workspaces viewer, tap Open in and select the applicationyou want to use to open the file.
Open a file in a third-party applicationBefore you begin: For files where you have the full access permissions, you can choose to open the file in a thirdparty application.
1. Do one of the following:
• Next to the desired file, tap > Open In.• Tap the file to open it, and then tap > Open In.
You are offered a choice of apps on your device that can open the file.2. Select the desired app.
The file opens in the selected app.
Open a shared fileOpen files shared with you via BlackBerry Workspaces. Shared files can be opened by accessing the link in thenotification email. Shared files also appear in your Received Files.
Opening a file in BlackBerry Workspaces can depend on the organization from where the file originates:
• If the file was shared from the organization to which you are currently signed in to, you can tap the shared linkto the file in the email, and it opens within BlackBerry Workspaces app for iOS.
• If the file was shared from an organization other than the one to which you are currently signed in, you areprompted to sign in or switch to the organization where the file you are opening is located. If you do not have aBlackBerry Workspaces account with that organization, you can create an account. Tap Create account on thesign in screen.
Note: If you need to switch organizations to view a file, the switch means that your workspaces and sent andreceived files are switched to those of the second account. For more information, see Switch accounts.
• If the shared file was forwarded to you, you may need to request permissions to access the file. Follow the on-screen prompts to do so.
Note: If a file was shared with Permissions set to Spotlight view, you can only view the file using BlackBerryWorkspaces Web Application.
To open a shared file:
• Do one of the following:
• On your device, tap the link to the shared file in the email.• In Received Files, tap the file.
The file opens in BlackBerry Workspaces app for iOS.
Create a new document, spreadsheet, or presentation1. In the navigation pane, tap , and tap New Document, New Spreadsheet, or New Presentation, as desired.2. In the Enter name area, enter a name for the new file.3. (Optional) To change the location of the file.
a) In the Select location area, tap .
| Working with files | 23
b) Browse to the desired location.c) (Optional) To add a new folder, tap Add Folder, enter a folder name, and tap Create.d) Tap Select.
4. To notify other members of the workspace of the upload, set the Notify members slider to ON.5. Tap Create.
The BlackBerry Workspaces Editor opens.6. Author your file, as desired.7. When you have finished, tap > Save.8. To exit the BlackBerry Workspaces Editor, tap .
Your file is saved and synced.
Take and upload a photo or video1. In the navigation pane, tap > Take Photo or Video.
Your device camera opens.2. Take a photo or video as usual.3. Do one of the following:
• Tap Retake to redo the shot.• Tap Use Photo/Video to use the photo or video.
4. Tap Upload photo/video .5. In the Select Upload Location area, tap the current location, and browse to the desired location.6. (Optional) To add a new folder, tap Add Folder, enter a folder name, and tap Create.7. Tap Select.8. To notify other members of the workspace of the upload, set the Notify members slider to ON.9. Tap Upload.
Upload existing photos or videos1. In the navigation pane, tap > Upload Photos or Videos.2. Browse to the desired location, and select the photo(s) and video(s) that you want to upload.3. Tap Select.4. (Optional) To change the upload location:
a) In the SELECT UPLOAD LOCATION area, tap >.b) Browse to the desired location.c) (Optional) To add a new folder, tap Add Folder, enter a folder name, and tap Create.d) Tap Select.
5. To notify other members of the workspace of the upload, set the Notify members slider to ON.6. Tap Upload.
Switch file viewDisplay files in continuous or single page view, directly in BlackBerry Workspaces app for iOS.
Before you begin: By default, presentations display in single page view, other file types in continous page view.The last view mode used is saved automatically and applied when opening new files of the same file type.
1. In the relevant workspace or folder, browse to and tap a file to open it.2. Tap and select Switch to Single Page View or Switch to Continuous View to change the current view mode.
| Working with files | 24
Jump to an annotation bookmarkJump to a bookmarked section in a PDF file.
1. Tap > Annotation Bookmarks .2. Tap a bookmark to jump to that location in the file.
Play media filesPlay media (MP3, MP4, and MV4) files directly in BlackBerry Workspaces app for iOS.
1. In the relevant workspace or folder, browse to and tap a file to open and view it.The media file plays.
2. Do any of the following:
• To pause playback, tap . • To resume playback, tap .• To change the location within the file, move the slider.
Upload a file from another appUpload a file to BlackBerry Workspaces from other iOS apps.
Note: The maximum file size that can be uploaded to BlackBerry Workspaces in this way is 40MB for iPhone and70MB for iPad, depending on available system resources.
After the file has uploaded, you can view, annotate, and share it just like any other file, and it is synced acrossall your BlackBerry Workspaces applications. The file inherits the default permissions for each group in theworkspace.
1. In the app where you have the file open, for example, Adobe Reader or Apple Safari, tap Open in... or tap theshare symbol (typically ).
2. Tap Copy to Workspaces.3. In the UPLOAD TO WORKSPACE area, tap Select location.4. Browse to the desired location.5. (Optional) To add a new folder, tap Add Folder, enter a folder name, and tap Create.6. Tap Select.7. To notify workspace members of the file's addition to the workspace, set the Notify members slider to ON.8. Tap Upload.
A notification indicating that the file was uploaded appears. If you added a folder, the folder is created. If youchose to notify the workspace members, a notification is sent.
Editing files with BlackBerry Workspaces EditorYou can use the BlackBerry Workspaces Editor in the BlackBerry Workspaces app on your device to editdocuments, spreadsheets, presentations and text files directly from workspaces.
To edit files, you must be granted "Full access" or "Download protected" permissions.
Using the tool bar
Use the icons on the tool bar to do the following:
| Working with files | 25
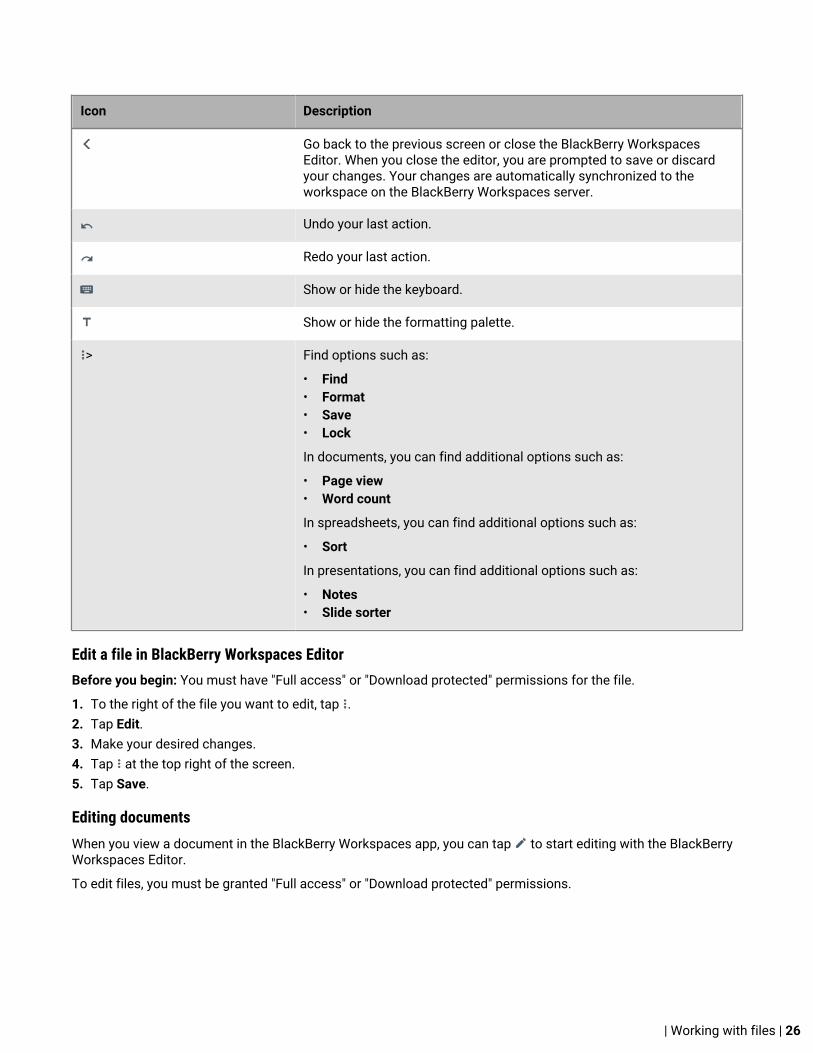
Icon Description
Go back to the previous screen or close the BlackBerry WorkspacesEditor. When you close the editor, you are prompted to save or discardyour changes. Your changes are automatically synchronized to theworkspace on the BlackBerry Workspaces server.
Undo your last action.
Redo your last action.
Show or hide the keyboard.
Show or hide the formatting palette.
> Find options such as:
• Find• Format• Save• Lock
In documents, you can find additional options such as:
• Page view• Word count
In spreadsheets, you can find additional options such as:
• Sort
In presentations, you can find additional options such as:
• Notes• Slide sorter
Edit a file in BlackBerry Workspaces EditorBefore you begin: You must have "Full access" or "Download protected" permissions for the file.
1. To the right of the file you want to edit, tap .2. Tap Edit.3. Make your desired changes.4. Tap at the top right of the screen.5. Tap Save.
Editing documentsWhen you view a document in the BlackBerry Workspaces app, you can tap to start editing with the BlackBerryWorkspaces Editor.
To edit files, you must be granted "Full access" or "Download protected" permissions.
| Working with files | 26
Change the font or formatting in a document
You can change the font or formatting of text that you selected. If no text is selected, formatting is applied to thetext you type at the current cursor position.
1. Tap .2. Tap any of the formatting icons to apply or remove formatting.3. When you are done, tap to close the format palette.
Cut, copy, and paste text in a document
1. Double-tap the text that you want to cut or copy.2. Move the selection pins to adjust the selection.3. Do one of the following:
• To cut text, tap Cut.• To copy text, tap Copy.
4. Tap where you want to paste the text.5. Tap the cursor.6. Tap Paste.
Find and replace text in a document
You can find instances of text within the document you are editing and also replace it with text that you choose.You can also highlight text to limit the search to the text that is highlighted.
1. Tap > Find.2. In the Find field, type the word or phrase that you want to find in the document.3. Optionally, to replace text or see more options, do the following:
a) If necessary, drag the handle down to reveal more options.b) In the Replace field, type a word or phrase that you want to replace the text that you typed in the Find field.c) If necessary, select any of the Whole Words or Case Sensitive options.
4. Do any of the following:
• To find a word or phrase, or its next instance, tap Find.• To replace the highlighted instance of a word or phrase, tap Replace.• To replace all instances of a word or phrase, tap All.
5. When you are done, tap Done.
Obtain the word count of a document
You can obtain the word count for the whole document or for the text that you select.
1. Optionally, select the text that you want to obtain the word count for. If you want to obtain the word count forthe whole document, do not select text.
2. Tap > Word Count.
| Working with files | 27
Editing spreadsheetsWhen you view a spreadsheet in the BlackBerry Workspaces app, you can tap to start editing with theBlackBerry Workspaces Editor.
To edit files, you must be granted "Full access" or "Download protected" permissions.
Add or delete a sheet
Do any of the following:
Task Steps
Add a sheet a. Beside the sheet tabs, tap .
Delete a sheet a. Tap and hold a sheet tab.b. In the confirmation dialog, tap Delete.
Change the font or cell format in a spreadsheet
You can change the font family and size, and also the cell format for numeric values, such as for currency anddates.
1. Select the cells that you want to edit.2. Tap .3. Do any of the following:
• To change font, tap A. Tap the font settings that you want.• To change the formatting, tap 1$%. Tap the formatting settings that you want.
4. Tap to dismiss the formatting palette.
Clear the contents of a cell
1. Tap a cell.2. If necessary, adjust the selection pins to highlight the cells that you want to clear the contents of.3. Do one of the following:
• Tap on the quick formatting bar.• Tap > .
Cut, copy, and paste a cell, row, or column in a spreadsheet
1. Tap a cell, row, or column to select it.2. Do one of the following:
• To cut text, tap Cut.• To copy text, tap Copy.
3. Tap where you want to paste.4. Tap Paste.
| Working with files | 28

Find and replace text in a spreadsheet
You can find instances of text within the spreadsheet that you are editing and also replace it with text that youchoose.
1. Tap > Find.2. In the Find field, type the word or phrase that you want to find in the document.3. Optionally, to replace text or see more options, do the following:
a) If necessary, drag the handle down to reveal more options.b) In the Replace field, type a word or phrase that you want to replace the text that you typed in the Find field.c) If necessary, select any of the Entire workbook, Entire cell, or Case sensitive options.
4. Do any of the following:
• To find a word or phrase, or its next instance, tap Find.• To replace the highlighted instance of a word or phrase, tap Replace.• To replace all instances of a word or phrase, tap All.
5. Tap Done.
Freeze and unfreeze panes in a spreadsheet
1. Select a cell, row, or column.2. To freeze and unfreeze panes, do one of the following:
• Tap on the quick formatting bar.• Tap > .
Hide or show rows and columns in a spreadsheet
You can hide an individual row or column, or you can hide a selection of multiple rows or columns.
1. Tap a row or column header.2. Do one of the following:
• To hide rows or columns, adjust the selection pins to highlight the rows or columns that you want to hide.• To show rows or columns, adjust the selection pins to highlight the rows or columns that surround what
you want to show.3. Do one of the following:
• To hide rows or columns, tap Hide.• To show rows or columns, tap Show.
Note: If necessary, tap the arrows in the pop-up menu to see all options.
Insert or delete a row or column in a spreadsheet
1. Tap a row or column header.2. Do one of the following:
• Adjust the selection pins to highlight where you want to insert the rows or columns.• Adjust the selection pins to highlight the rows or columns that you want to delete.
3. Tap Insert/delete.4. Do one of the following:
• Tap Insert row.
| Working with files | 29

• Tap Insert column.• Tap Delete row.• Tap Delete column.
Note: If necessary, tap the arrows in the pop-up menu to see all options.
Resize a row or column in a spreadsheet
1. Tap and hold a row or column header.2. Do one of the following:
Task Steps
Resize a row On the row header, drag the handle up or down.
Resize a column On the column header, drag the handle left or right.
Sort items in a column
1. Tap a column header.2. Adjust the selection pins to highlight the columns that you want to sort.3. Tap > Sort.4. If necessary, do any of the following:
• If the selection contains a header row, enable Has Header Row.• To sort a column by ascending order, tap .• To sort a column by decending order, tap .
5. Tap Sort.
Editing presentations
When you view a presentation in the BlackBerry Workspaces app, tap > to start editing with the BlackBerryWorkspaces Editor.
To edit files, you must be granted "Full access" or "Download protected" permissions.
Change the font or formatting in a slide
You can change the font or formatting of text that you selected. If no text is selected, formatting is applied to thetext you type at the current cursor position.
1. If necessary, select the text that you want to edit.2. Tap .3. Tap any of the formatting icons to apply or remove formatting.
Cut, copy, and paste text in a slide
1. Double-tap the text that you want to cut or copy.2. Move the selection pins to adjust the selection.
| Working with files | 30
3. Do one of the following:
• To cut text, tap Cut.• To copy text, tap Copy.
4. Tap where you want to paste.5. Tap the cursor.6. Tap Paste.
Edit slide notes
Tip: To toggle the font size for the note, tap .
1. Go to the slide that you want to edit.2. Tap > Notes.
A notes area with a handle bar appears.3. Tap the notes area and edit the notes.4. Drag the handle bar towards the notes area to close the note.
Reorder slides
1. Tap > Slide sorter.2. To move a slide, drag the handle beside it up or down.3. Tap Done.
Save your changes to the workspaceWhen you save a document, spreadsheet, or presentation, it is automatically saved to the workspace.
• Tap > Save.When you're done editing a file, tap .If changes were made since the last time you saved, you are prompted to save or discard your changes.
Working with commentsYou can comment on a file to start a discussion about it. Mention people in your comments, and reply tocomments others have made on the file. Comments can be accessed on files via the apps and online viewers.
Note: The ability to comment on files is enabled by organizational policy; contact your organization administratorfor more information.
To view comments:
• Tap to open any file in the BlackBerry Workspaces app for iOS. • Tap . • The comments pane of the file is displayed.
Create a commentBefore you begin: Locate and select the item that you want to make comments on.
1. In the content list, locate the desired file.2. Tap next to the file. 3. Tap Comments.
| Working with files | 31
4. If the file has an existing comment thread, tap Reply to add your comment to an existing thread, or create anew thread by tapping Add new comment.
5. Type @ and enter an email address or name to mention someone in the comment.6. Tap Post.
Your comment is posted. If you mention someone in a comment using the @, they are notified by email.
After you finish:
If the person you mentioned does not have the necessary permissions to comment on the file, the workspaceadministrator receives an email notifying them that you are requesting permissions on their behalf.
If you are a workspace administrator the Add permissions message appears:
• Tap Give permissions to give access and commenting permissions for the file.
Reply to a comment1. In the content list, locate the file that contains the comment you want to reply to.2. Tap the file to open it.3. Tap to access the comments pane.4. Below the comment that you want to reply to, Tap on the Reply box and enter your reply.5. Tap @ and enter an email address or user name to mention someone.6. Tap Reply.
Your comment is posted. If you mentioned someone using the @ in a comment, they are notified by email.
If the person you mentioned does not have the necessary permissions to comment on the file, the workspaceadministrator receives an email notifying them that you are requesting permissions on their behalf. If you are aworkspace administrator the Add permissions message appears.
7. Tap Give permissions to give access and commenting permissions for the file.
Request permission to commentYou can request commenting permissions on files you already have access to.
Note: The ability to comment on files is enabled by organizational policy; contact your organization administratorfor more information.
1. From the content list, tap next to the file you wish to request commenting permissions on. 2. Tap Comments.3. When the You have no permission to comment message appears, tap the Request permission to
comment link.
Your permission request is sent to the file owner or administrator.
Edit a commentIf you are the workspace administrator in a workspace where a comment was posted, or if you are the user thatoriginally posted the comment, you are able to edit the comment after posting it.
1. In the content list, locate the file containing the comments you wish to edit.2. Tap the file to open it. 3. Tap to open the comments panel. 4. Next to the comment you want to edit, tap > Edit. 5. Edit your comment and then tap Update.
| Working with files | 32
Anyone mentioned in the comment will receive a notification of your edit when the update is submitted.
Delete a commentIf you are the workspace administrator in a workspace where a comment was posted, or if you are the user thatoriginally posted a comment, you are able to delete the comment after posting it.
1. In the content list, locate the file containing the comments you wish to delete.2. Tap the file to open it. 3. Tap to open the comments panel. 4. Next to the comment you want to delete, tap > Delete. 5. Confirm the deletion by tapping Delete.
Annotate filesMark up any file with colored markers, text highlights, or sticky notes anywhere in the file. Annotations are storedseparately from the file and can be shared along with the file. Remove or modify your annotations at any time.
1. Tap a file to open it in BlackBerry Workspaces app for iOS.2. Tap to open the annotation menu bar.
The annotation menu bar offers the drawing markup, highlighter, eraser, and sticky note tools.
Use the drawing markup tool1. Tap to select a marker to draw freely within the file. By default, the last-used color, thickness, and transparency
are selected.2. Use your finger as you would a pen to draw on your file.3. To customize the drawing tool (change color, opacity, stroke), tap again.4. Do one of the following:
• To change the marker color, select the desired color.• To change the marker tip size, select the desired tip size.• To change the transparency of the marker, select the desired transparency.
The tool changes according to your selection. To change another attribute, repeat this step.5. To change the color of the drawing, or the thickness or transparency of the line after drawing, tap it and change
the tool attributes as desired.6. To move the drawing to another part of the screen, tap it and drag it to the desired location.7. To delete the drawing immediately after drawing, tap .8. When done, tap to save. The drawing is saved:
• When you tap .• When you change the annotation tool and make another annotation.• When you close the file.
9. To select the drawing after saving, first tap to close the annotation menu bar. You can then tap the drawingand edit the drawing color, thickness, or transparency, as described above.
10.To delete the drawing, tap it and then tap Delete.
Highlight your files1. Tap to select the text highlighter. By default, the last-used color is selected.
| Working with files | 33
2. Use your finger as you would a pen to highlight text in your file.3. To change the marker color, tap again and select the desired color.
Once selected, the tool customization menu closes.4. To change the color of the highlighted text, tap it, and in the pop-up box, tap the desired color.5. To delete the highlight immediately after highlighting text, tap .6. When done, tap to save. The drawing is saved:
• When you tap .• When you change the annotation tool and make another annotation.• When you close the file.
7. To select the highlighted text after saving, first tap to close the annotation menu bar. You can then tap thehighlight and edit the color or delete the highlight, as described above.
8. To delete the highlight, tap it and then tap Delete.
Add a sticky note to a file1. Tap , and tap the location on the file where you want to add the sticky note. By default, the last-used color is
used.2. Tap again to select a color.3. Use the on-screen keyboard to enter your comment.4. If desired, tap a different color to change the sticky note color.5. Tap to save and close the note.6. To edit the note, tap the note again and edit as desired.
Review annotations1. Tap to review your annotations to a file or others’ annotations that were shared with you.2. Tap one of the choices in the list to select which annotations to view.3. Tap for a list of the pages with annotations.4. Tap any item in the list to go to the page.
You can see annotations from other users if they have shared them with you.5. Tap to open sticky notes and view comments.
Share annotationsAnnotations you make on your file can only be seen by you, unless you share them with others.
If sharing annotations on files in your sent or received items, recipients will receive a link to a copy of the file. Ifsharing from a workspace, recipients will receive a link to the workspace file.
1. Locate the file.2. Tap > Share Annotations3. In the ADD RECIPIENTS area, do one of the following:
• To add all permitted workspace members, tap .• To add individual members, start entering the desired email addresses and then tap the member in the list.
4. If desired, change the email subject in the SUBJECT area.5. If desired, add a personal message in the MESSAGE box.6. Tap Share.
| Working with files | 34
Erase drawings, highlights, and annotationsUse the eraser to delete your drawing markup, highlighting, and sticky notes.
1. Tap to select the eraser.2. Tap the drawing, highlight, or sticky note you want to delete.
The annotation is deleted.
Search within files1. Tap to open a search bar.2. Enter text to search for.
Locking and unlocking filesLock a file to prevent other users from uploading a new version for 24 hours. This feature is enabled byorganizational policy.
File lock is available in organizations when enabled as a file policy and can be executed by workspaceadministrators, contributors, and users with a customized role with update abilities.
Locking files
Files are locked using the locking action only; opening or editing a file does not lock the file. If you lock a file whileanother user is working in the same file, they receive a notification in the open file. If they save the file after youlocked it, their file is saved as a conflicted copy.
Unlocking files
By default, files are automatically released after 24 hours. Files can be unlocked at any time by the person wholocked the file or by a workspace administrator. An email notification is sent to theuser that locked the file whenthe lock expires or when it is unlocked by an administrator. If your BlackBerry Workspaces account is deletedfrom your organization, your locked files are automatically released.
Lock a file• Do one of the following:
• Next to the file you want to lock, tap , and toggle Lock to the on position.• When working on an Office file in BlackBerry Workspaces Editor, tap > Lock.
The file is locked for 24 hours, and during that time can only be unlocked by yourself or a workspaceadministrator. After that time, the lock is automatically removed.
Unlock a file
Locked files are marked with .
You can unlock a file:
• If you locked the file.• If you are a workspace administrator.
• Do one of the following:
• Next to the file you want to unlock, tap , and toggle Lock to the off position.
| Working with files | 35
• When working on an Office file in BlackBerry Workspaces Editor, tap and clear the Lock checkbox.
Manage file versionsView a list of file versions in your received and sent files, open a previous version, and set the current version.
Files with multiple versions are marked with .
1. Locate the desired file in your Received files or Sent files list.2. Tap > Previous Versions.3. To view a previous version, tap the desired version in the list and then tap View.4. To set a previous version as current, tap the desired version in the list and then tap Set as Current.
Select multiple filesYou can select more than one file or folder at a time and perform bulk actions.
Note: You cannot select workspaces.
1. In a workspace, tap on the action bar.2. Select the files or folders for your action by tapping next to each file or folder.3. At the bottom of the screen, tap to choose an action to perform on the selected items.
Track file activitiesFile owners and workspace administrators can access the file activity log.
1. Next to the desired file, tap > Track Activities.2. Tap an entry to see more information.
Add a file to favorites1. Tap to the right of the file that you want to add to Favorites.2. Toggle Add to Favorites to the on position.
Acknowledge a fileDepending on organizational policy, a read acknowledgement request can be implemented on files in aworkspace, or on files sent via BlackBerry Workspaces. Read acknowledgement requires the file recipient tocomplete a read file confirmation process when the file has been read and notifies the initiator when the processis complete.
Before you begin: All files across your workspaces that require read acknowledgement are accessible from theaccess menu, Pending acknowledgement area. Each file that requires your read acknowledgement is marked with
.
1. Tap and open a file pending read acknowledgement using any BlackBerry Workspaces viewer.
| Working with files | 36
2. When opened, a Read Acknowledgement Required banner will be displayed at the top of the file.3. Once you have scrolled to the end of the file, tap Tap here to acknowledge you have read the file.
Notification of your acknowledgement is sent to the workspace administrator or file sender. To learn more, seeRead acknowledgement.
View a map of places where users accessed a fileYou can view a map of the places where users who accessed a file are located.
1. Tap beside the file that you want to view the map for.2. Tap Track activities.3. Tap Map View.
| Working with files | 37
Managing workspaces, folders, and files
Create a new workspace or folder1. In the navigation pane, tap > Add Workspace or New Folder.2. In the Enter name area, enter the name for the workspace or folder.3. If desired, in the Enter description area, enter a description for the workspace or folder.4. If desired, in the ADMINISTRATORS area, enter the email addresses of people that you want to add as
workspace administrators.5. Tap Create.
Create a workspace on an external repositoryTransient workspaces can be created within your external repositories. This procedure describes how to create anew transient workspace on an external repository (such as SharePoint or CMIS) via BlackBerry Workspaces appfor iOS. This action is only available for users with the Workspace owner role.
1. From the navigation pane, select an external repository and then tap > Add Workspace.2. In the Enter name area, enter the name for the workspace.3. If desired, in the Workspace description area, enter a description for the workspace.4. In the Path box, enter the repository path.
The path value determines the root level of the repository. It must begin with the same Allowed path as set bythe Organization Administrator when the connector was configured.
For example: Where the Organization Administrator set the allowed path to \\fileshare\, the followingpaths are valid:
• \\fileshare\
• \\fileshare\folderA\folderB
5. For SharePoint or CMIS workspaces, in the Domain box, enter the repository domain.6. In the User name and Password boxes, enter your access credentials for the external repository.7. Tap Create.
Working with an iManage repositoryBefore you begin: Your BlackBerry Workspaces administrator must configure a connection to your organization’siManage Cloud repository before you can access your iManage files.
1. Tap .2. Tap iManage Work.3. Enter your user name and password.4. Tap Sign In.
After you finish: After you are sign in to your iManage repository, you can perform the following actions:
• Matters (Mapped workspaces): Share matters or their links, add to your favorites, manage access, and sendmessages.
| Managing workspaces, folders, and files | 38
• Folders: Share links to a folder, rename a folder, and delete a folder.
• File: Send a copy of a file, share a link to a file, rename a file, delete a file, and track activities on a file.
Rename a workspace, folder, or file1. Next to the desired workspace, folder, or file, tap > Rename.2. Delete the current name, enter the new name, and then tap Done.3. Tap Rename.
The name is changed.
Mark a workspace, folder or file as a favoriteMarking an item as a favorite is an ideal method of highlighting files of importance to you. Workspaces, foldersand files you choose to mark as favorite display with the favorites icon and appear on your favorites page. .
In the content area, do one of the following:
• Click next to the item that you want to mark as favorite, and toggle Add to Favorites.• Long tap on an item to select it. You can then select multiple items and tap the action menu at the bottom of
the screen and toggle Add to Favorites on.
The items are marked as favorites and added to your favorites page.
Copy the link to a workspace, folder, or fileCopy the link to a workspace, folder, or file to share the link with others.
1. Next to the desired workspace, folder, or file, tap > Copy link.A confirmation message appears.
2. Tap OK.3. Paste the link into the desired outlet (e.g. email, chat, or SMS) to share the link.
The link is sent to the recipient. Recipients can only access the item if they already have the necessarypermissions.
Move a folder or file1. Next to the desired folder, or file, tap > Move. 2. In the SELECT LOCATION area, tap . 3. Browse to the desired location. 4. (Optional) To add a new folder, tap , enter a folder name, and tap Create. 5. Tap Select. 6. Tap Move.
The workspace, folder, or file is moved.
| Managing workspaces, folders, and files | 39
Delete a workspace, folder, or fileYour ability to delete a workspace, folder or file is based on your permission levels for that item.
1. Next to the desired workspace, folder, or file, tap > Delete.A confirmation message appears.
2. Tap Delete.The item, including any sub-items, is deleted. Workspace items can be restored from the workspace Recyclebin by the workspace administrator using the BlackBerry Workspaces Web Application. Workspaces can onlybe restored by an organization administrator.
View infoView more information about a workspace or folder, including creation date, and the total number of files. Yourcapabilities in the workspace or folder, based on your role, are also listed.
• Next to the desired workspace, folder, or file, tap > .
View recent locationsAccess Recent Locations to view a list of workspaces, folders and files you visited. From here, you can managethe list, search for a particular item, and jump to the location and set offline access.
1. Do one of the following:
• Swipe to the right from the middle-left edge of the screen.• Tap .
2. Tap Recent Locations.3. Tap a listed location to jump to it.4. To clear the listed recent locations, in the action bar, tap > Clear Recent.5. To select multiple files, tap , select the desired files, and then tap at the bottom of the screen to apply
offline access to all selections.
Tip: Select or search items in the list using the controls in the action bar.
| Managing workspaces, folders, and files | 40

Managing accessWorkspace administrators can manage access to workspaces, folders, and files. Group managers can also addand remove group members.
Add members in any of the following ways:
• As an individual• As an Active Directory Group• As a group that you create by adding individuals• As an email domain (gives access to anyone within the email domain)
Set the members' role in the workspace or folder to define what members can do in the workspace/folder. Forexample, you can give them the ability to upload and share.
Set the members' permission level to define how they access files in the workspace/folder. For example, you cangrant them permissions to download and print the file.
For more information on the meaning of user roles and permissions, including customized access to folders andfiles, see
User roles and permissions.
View workspace members1. Next to the desired workspace, folder, or file, tap on the name or tap > Manage Access.2. To toggle between the item's permitted members and all members that exist in the workspace, swipe down
and tap Permitted Only or Show all.
Add new membersGive access to a workspace, folder, or file by adding new groups, individuals, Active Directory groups, or an emaildomain to the entity.
1. Next to the desired workspace, folder, or file, tap > Manage Access.2. Tap .3. In the TYPE area, tap , and select the type of member you want to add: Workspaces group, users, Active
Directory group, or email domain.4. Tap and do one of the following:
• If you selected Workspaces group, enter a group name, and enter email addresses or distribution lists.• If you selected Active Directory, enter the Active Directory group name and a description.• If you selected Users, enter the email addresses of users you want to add.• If you selected Email domain, enter the domain name.
5. In the ROLE area, tap and select the desired role. For more information, see Roles.
Note:
Roles can be assigned when giving access to a workspace or folder only.
If you set the role of an Active Directory group to Administrator, this role cannot be changed later. If you setthe role of an Active Directory group to Contributor or Visitor, the role cannot be changed to Administrator at alater time.
| Managing access | 41
6. Tap to return to Add new permissions.7. In the PERMISSIONS area, tap and select the desired permissions set. For more information see
Permissions.
Note: The Download protected permissions set is available for BlackBerry Workspaces Enterprise ES Modeand BlackBerry Workspaces Enterprise ES (Restrict Full Access) Mode only. For more information, contactyour organization administrator.
8. In the EXPIRATION area, tap and select the time when the file will no longer be accessible by members.Select a specific date, a time period from the list, or never.If you select Specific date, choose the desired date from the calendar.
9. Tap to return to Add new permissions.10.In the WATERMARK area, tap to toggle whether or not workspace PDF files are displayed with a watermark.
Note: Watermarks are set according to organizational policy. When permissions are set to Full access,watermarks are only displayed on PDF files. When permissions are set to any of the Download protectedpermissions, watermarks are not displayed on Office files.
11.In the APPLY TO area, select Folders that inherit permissions only to give access to all items that inheritpermissions, or All folders to give access to all subitems.
12.Tap to return to Add new permissions.13.Tap Add.
Delete workspace membersDelete groups, individuals, or email domains to remove them from the workspace.
1. Next to the workspace, folder, or file for which you wish to view members and tap > Manage Access.2. Next to the workspace member, group, or domain that you want to delete, tap > Delete.3. In the confirmation message that appears, tap Delete.
The selected entity is removed from the workspace, and no longer has access to the workspace.
Managing member permissionsBlackBerry Workspaces app for Mac allows you to edit permissions for workspace members, and revoke orrestore access.
Edit accessTo edit access to a workspace, folder, or file:
1. Next to the desired workspace, folder, or file, tap > Manage Access.2. Next to the workspace member, group, or domain for which you wish to edit access, tap > Manage
Permissions.3. In the Role area, tap and select the desired role. For more information, see Roles.
Note: If you set the role of an Active Directory group to Administrator, this role cannot be changed later. If youset the role of an Active Directory group to Contributor or Visitor, the role cannot be changed to Administratorat a later time.
4. Tap to return to Add new permissions.
| Managing access | 42
5. In the Permissions area, tap and select the desired permissions set. For more information see Permissions.
Note: The Download protected permissions set is available for BlackBerry Workspaces Enterprise ES Modeand BlackBerry Workspaces Enterprise ES (Restrict Full Access) Mode only. For more information, contactyour organization administrator.
6. Tap to return to Add new permissions.7. In the Expiration area, tap and select the time when the file will no longer be accessible by members. Select
a specific date, a time period from the list, or never.If you select Specific date, choose the desired date from the calendar.
8. Tap to return to Add new permissions.9. In the Watermark area, tap to toggle whether or not workspace PDF files are displayed with a watermark.
Note: Watermarks are set according to organizational policy. When permissions are set to Full access,watermarks are only displayed on PDF files. When permissions are set to any of the Download protectedpermissions, watermarks are not displayed on Office files.
10.Tap Done.The permission changes are saved.
Revoke accessRevoke access to workspaces, folders, or files for any workspace user.
1. Next to the workspace, folder, or file, tap > Manage Access.2. Next to the user that you want to revoke access for, tap > Revoke Access.3. In the confirmation message, tap Revoke.
The user can no longer access the item.
Restore accessRestore access to workspaces, folders, or files for any workspace user.
1. Next to the workspace, folder, or file, tap > Manage Access.2. To view all members that exist in the workspace, swipe down in the Manage Access panel, and tap Permitted
Only > Show all.3. Next to the entity that you wish to restore access for, tap > Manage Permissions.4. In the Manage Permissions area, tap and select the desired permissions set. For more information see
Permissions.
Note: The Advanced Rights Management permissions set is available for BlackBerry Workspaces EnterpriseES Mode and BlackBerry Workspaces Enterprise ES (Restrict Full Access) Mode only. For more information,contact your organization administrator.
5. Tap to return to Manage Permissions.6. If desired, update the role, expiration, and watermark settings at this time.7. Tap Done.8. In the confirmation message, click Change permissions.
Access is restored.
| Managing access | 43

Managing groupsView, add, and remove group members.
Search groups and membersSearch for groups or members within groups.
1. Next to the workspace, folder, or file for which you want to search the group members, tap .2. Tap Manage Access.3. Next to the workspace name, tap .4. In the search field, enter the name of the user you wish to locate. The search result lists the number of
members that match your search in each group.5. Tap the group with the search result you wish to see. The member names that matched your search are
displayed.6. Tap next to the member listing to Message or Delete the member.
View group members1. Next to the desired workspace, folder, or file, tap > Manage Access.2. Tap the group that you want to view.
The group's members are displayed. From this screen, you can also add members to the group.
Assign group managerAs a workspace administrator, you can set a group manager to give a group member the ability to add andremove people from the workspace group.
Note: Group managers cannot manage group permissions, which are managed by workspace administrators.
1. Next to the desired workspace, folder, or file, tap > Manage Access.2. Next to the desired group, tap > View Members.3. Next to the desired group member, tap .4. Set the Set as Group Manager slider to ON.
The selected member is promoted to group manager.
Remove group managerRemove the group manager position from a member to prevent them from adding or removing group members.
1. Next to the desired workspace, folder, or file, tap > Manage Access. 2. Next to the desired group, tap > View Members. 3. Next to the desired group member, tap . 4. Set the Set as Group Manager slider to OFF.
The selected member is promoted to group manager.
Add users to groups1. Next to the desired workspace, folder, or file, tap > Manage Access.2. Tap the group that you want to add members to.
The group's members are displayed.3. Tap .
| Managing access | 44
4. In the ADD MEMBERS area, enter the email addresses of users you want to add to the group.5. Tap Add.
Note: Members do not receive notification that they have been added to the group.
Remove users from groups1. Next to the desired workspace, folder, or file, tap > Manage Access.2. Tap the group that you want to edit.3. Swipe left over the group member that you want to remove and tap .
The member is removed from the group.
Rename a group1. Next to the desired workspace, folder, or file, tap > Manage Access.2. Next to the group that you want to rename, tap > Rename.3. Enter the new name for the group, and then tap Rename.
The group is renamed.
Restore inheritanceFolders and files that have broken inheritance (different permissions) from their parent workspace or folder areshown with the broken inheritance overlay:
Perform the steps described here to restore the permissions held by the parent workspace or folder.
For more information on inheritance, see Customizing access to folders or files.
1. Click > Manage Access2. In the This folder/file does not inherit role/permissions message, tap Inherit now.3. If restoring inheritance to a folder, do one of the following:
• Select This folder only to apply the permissions to this folder only.• Select This folder and all its subfolders and files to apply the permissions to the folder and all its
subfolders, including those with broken inheritance.
The selected item inherits the access roles and permissions of the parent.
If you selected This folder and all subfolders and files, the inherited permissions are applied to all sub-foldersor files that inherit permissions from the folder for which you are restoring inheritance. Any sub-folders or filesthat have broken inheritance are not affected by this change.
4. If restoring inheritance to a file, in the confirmation message, tap Inherit.
| Managing access | 45
Working offlineSave your folders or files on your iOS device to be able to access them even when offline. Files saved for offlineare downloaded to your iOS device and stored securely in a protected cache.
Save files for offline access1. Next to the desired workspace, folder, or file, tap .2. Next to Access Offline, set the slider to ON.
The item is saved for offline, and marked as pinned .
Enforce offline accessAs a workspace administrator, enforce offline access on a workspace for all members of the workspace. Thisfeature is only available to registered organizations.
Offline access can be enforced on a workspace only during the workspace creation process.
1. Tap > Add Workspace.2. In the Enter workspace name area, enter the name for the workspace.3. Optional: In the Enter workspace description area, enter a description for the workspace.4. Optional: In the Add administrators' email addresses area, enter the email addresses of users that you want to
add as workspace administrators.5. Dependent on your organizational policies and settings, in the Read Acknowledgement Required toggle option,
select to retain the default (on), or switch the option off.6. Dependent on your organizational policies, in the Enforce offline access toggle option, switch the option on.7. Tap Create.
The workspace will be enforced with offline access to all members you added to the workspace. Members ofthe workspace will be unable to turn this setting off.
Pause automatic offline savingPause any background downloading of files selected for offline viewing to save system resources.
1. Tap > to access Settings.2. Tap Pause automatic offline saving.3. To resume the download of files for offline viewing, tap Resume automatic offline saving.
Clear a file saved for offline viewingClear a file that you've saved for offline viewing from the protected cache on your iOS device.
1. Next to the desired workspace, folder, or file, tap .2. Next to Access Offline, set the slider to OFF.3. In the confirmation message, tap Remove.
| Working offline | 46

Tip: You can also locate the file via Offline Access in the left pane and clear the cache in the same way.
Clear all files saved for offline viewingView all files saved for offline in Offline Access, accessible from the left pane.
1. Tap > to access Settings.2. Tap Clear files saved for offline.
All downloaded files are deleted from the cache.
| Working offline | 47
Managing your settingsTo access the Settings dialog, tap then . Swipe up to see all options.
Add accountsIf you have more than one BlackBerry Workspaces account, you can add each account in the Settings dialog andswitch between them as needed.
Note: Accounts must be for different Workspaces servers (e.g., blackberry.watchdox.com andsomeotherdomain.watchdox.com).
1. Tap > to access Settings.2. In the Accounts area, tap Add account.
The sign in screen appears.3. Enter the credentials for the BlackBerry Workspaces account you want to add, and tap Sign in.
You are signed in to the account.4. To switch between your accounts, see Switching accounts.
Switch accountsIf you have defined more than one BlackBerry Workspaces account, you can switch between your differentaccounts.
1. Tap > to access Settings.2. In the Accounts area, tap the account that you want to access.
The main screen appears for the selected account.
Set an app lock codeSet a 4-digit app lock code to protect access to BlackBerry Workspaces app for iOS.
1. Tap > to access Settings.2. Slide the App lock slider to ON to use a lock code.3. Enter a 4-digit lock code.4. Repeat the 4-digit lock code to confirm.
The app lock code is set. The lock code is required when accessing BlackBerry Workspaces app for iOS.5. To remove the app lock code, slide the App lock slider to OFF (white), and enter the current lock code.
Change your app lock code1. Tap > to access Settings.2. Tap Change lock code.3. Enter your existing lock code.4. Enter a new 4-digit lock code.
| Managing your settings | 48
5. Repeat the lock code to confirm.The lock code is changed.
Limit file transfer to Wi-FiRestrict syncing to occur only when connected to Wi-Fi in order to conserve your cellular data.
1. In the toolbar, tap > to access Settings.2. Toggle Sync files only over Wi-Fi to the desired position.
NotificationsGet notifications about the latest activity on your files including file shares, file comments with mentions, file readacknowledgement requests and receipts, and file lock status.
Note: Notification settings are system wide and cannot be set for individual item types.
1. In the toolbar, tap > .2. Toggle Show Notifications to the desired on/off position depending on your preferences.3. Toggle Vibrate to the on/off position depending on your preferences.4. Select Sound to chose your on/off setting and ringtone.
Enable Touch ID or Face IDYou can use Touch ID or Face ID to unlock the BlackBerry Workspaces app.
1. Tap .2. Turn on Use Touch/Face ID.
Enable shake for privacyWhen you enable the shake for privacy feature, you can shake your device which locks the app and helps to keepyour data safe.
1. Tap .2. Turn on Shake for privacy.
Learn moreAccess the BlackBerry Workspaces support portal and open the BlackBerry Workspaces app for iOS New in thisversion list, to learn more.
1. In the toolbar, tap > .2. Do one of the following:
• To access the support portal, tap Help.• To access the version updates, tap New in this version.
| Managing your settings | 49
Contact SupportYou can send a message directly to your dedicated organization support contact if you encounter any problemswith the application.
1. Tap > to access Settings.2. Tap Support.3. Enter your message.4. Tap Send.
| Managing your settings | 50
User roles and permissionsUser roles and permissions are set for each workspace member and for recipients of shared files.
Workspace membersWorkspace members can be added individually and assigned a role and permission set, or organized intogroups with a group role and permission set. Members can access all workspace folders and files unless yourorganization's BlackBerry Workspaces administrator specifies otherwise. Members are workspace-specific andtheir defined permissions in one workspace does not grant them access to other workspaces or their folders andfiles.
RolesUse roles to determine user management capabilities within a workspace or folder. Define roles when you createa workspace, and change or remove roles later by editing access.
There are three standard roles with predefined capabilities. Organizations that are configured for creating customroles can offer additional roles with unique capabilities.
The standard roles are described here:
Administrators
Workspace administrators have full control over the workspace and its folders and files (upload, download, move,delete, and so on). Administrators can also manage workspace groups and users. By default, the workspacecreator is added to the Administrators group.
Contributors
Contributors perform the following actions:
• Folder level: Add and delete folders, move files across folders, and move and rename folders. • File level: Upload, move, rename, and remove files.
Visitors
Visitors can access workspace files depending on their permissions. Visitors cannot upload files to workspaces.Default file permissions for visitors are set by your organization administrator.
PermissionsUse permissions to define user access rights for workspace files. A number of permission sets are available,depending on what has been set by your organization BlackBerry Workspaces administrator, and according toyour organization's defined enterprise mode.
| User roles and permissions | 51
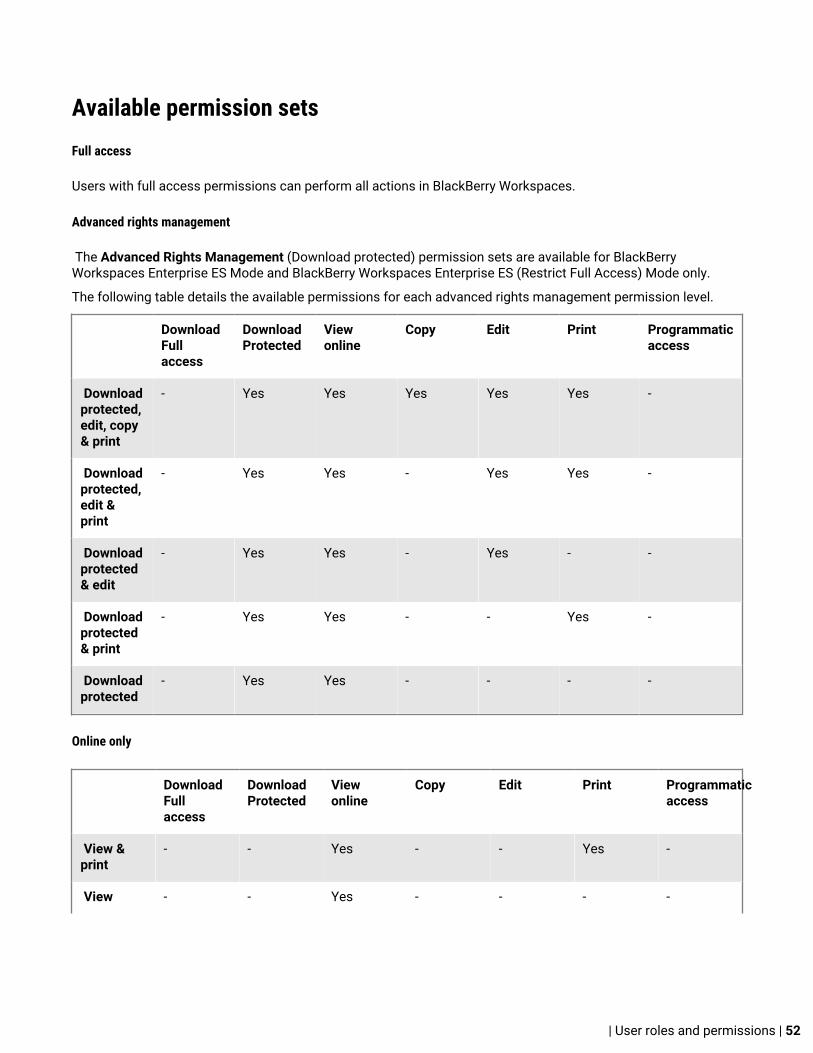
Available permission setsFull access
Users with full access permissions can perform all actions in BlackBerry Workspaces.
Advanced rights management
The Advanced Rights Management (Download protected) permission sets are available for BlackBerryWorkspaces Enterprise ES Mode and BlackBerry Workspaces Enterprise ES (Restrict Full Access) Mode only.
The following table details the available permissions for each advanced rights management permission level.
DownloadFullaccess
DownloadProtected
Viewonline
Copy Edit Print Programmaticaccess
Downloadprotected,edit, copy& print
- Yes Yes Yes Yes Yes -
Downloadprotected,edit &print
- Yes Yes - Yes Yes -
Downloadprotected& edit
- Yes Yes - Yes - -
Downloadprotected& print
- Yes Yes - - Yes -
Downloadprotected
- Yes Yes - - - -
Online only
DownloadFullaccess
DownloadProtected
Viewonline
Copy Edit Print Programmaticaccess
View &print
- - Yes - - Yes -
View - - Yes - - - -
| User roles and permissions | 52
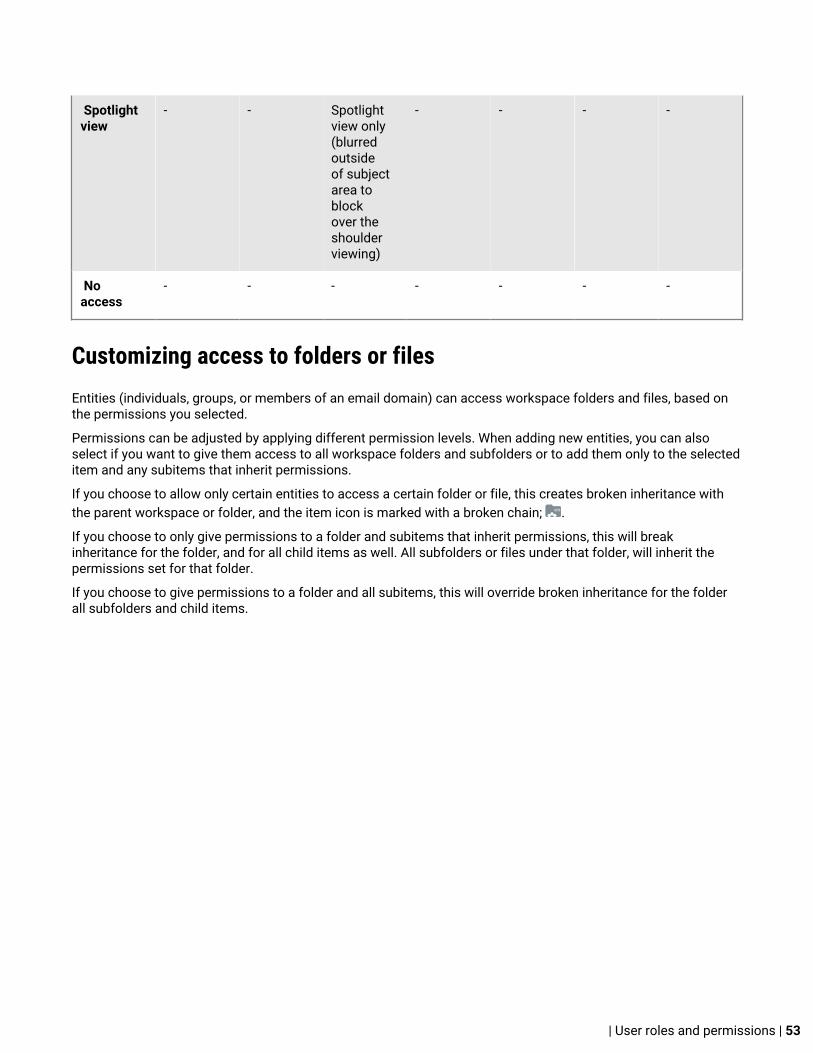
Spotlightview
- - Spotlightview only(blurredoutsideof subjectarea toblockover theshoulderviewing)
- - - -
Noaccess
- - - - - - -
Customizing access to folders or filesEntities (individuals, groups, or members of an email domain) can access workspace folders and files, based onthe permissions you selected.
Permissions can be adjusted by applying different permission levels. When adding new entities, you can alsoselect if you want to give them access to all workspace folders and subfolders or to add them only to the selecteditem and any subitems that inherit permissions.
If you choose to allow only certain entities to access a certain folder or file, this creates broken inheritance withthe parent workspace or folder, and the item icon is marked with a broken chain; .
If you choose to only give permissions to a folder and subitems that inherit permissions, this will breakinheritance for the folder, and for all child items as well. All subfolders or files under that folder, will inherit thepermissions set for that folder.
If you choose to give permissions to a folder and all subitems, this will override broken inheritance for the folderall subfolders and child items.
| User roles and permissions | 53
Collaboration and recipient sign inCollaboration and recipient sign in are set when sharing files.
CollaborationUse BlackBerry Workspaces to easily and seemlessly collaborate with others on shared files.
Collaborate by adding additional members to a workspace or folder; providing access to your original files,sending a copy of your file to others, or by sharing sent files with additional users.
As a workspace administrator or workspace group manager, add group members to a workspace giving membersthe ability to directly access and collaborate on the files in the workspace.
Send a copy of files to others, allowing your recipients to collaborate with one another and upload new versions.File versions are useful when you want to collaborate with multiple other users on the same file, enablingeveryone to share their new versions with all recipients. When sending a copy of a file to others, the original fileremains in the workspace, while a new copy of the file is created and sent. The sent file (the copy) and all of itscollaboration and version history can be found in your Sent files area.
Another way to enable collaboration on files is to add additional recipients to a previously sent file. Addingadditional recipients to a sent file means that you are expanding the group of members who can work on the sentfile.
In your Received and Sent files area, files where upload of new versions is allowed are marked with . When youor any of your recipients upload a new version, files are marked with . From here, you can view a list of versions,and, from BlackBerry Workspaces app for iOS and Android platforms, you can also switch the current version toanother version. In the web application, access the File activities tab to see an overview of activities performed onthe file by members of a collaboration group.
When a recipient uploads a new version, the file versions icon is updated to reflect the new version, and the fileappears in your Received files list. In addition, any member in the group, that uploads a new version can decidewhether or not to send a notification. When selected, a notification is sent to the mail client of all of the otherrecipients in the group.
To turn off collaboration on a file where it was previously enabled, use the Turn off collaboration option onthe file action menu.
Requiring recipient sign inOrganizations that enable users to share files without requiring recipient sign in (simple sharing) can choosewhether or not to give users the option to require their recipients to sign in to access sent and forwarded files.If your organization has simple sharing enabled and has given you the option to choose whether or not yourrecipients are required to sign in, the Require recipients to sign in check box is displayed when sending a copy ofa file.
Select the Require recipients to sign in checkbox to require recipients to sign in to BlackBerry Workspaces toaccess the file. When the checkbox is selected, the Manage permissions link is displayed. Access Managepermissions to set the recipient access permissions to the file.
Clear the Require recipients to sign in checkbox to waive the need for recipients to access the file without signingin.
| Collaboration and recipient sign in | 54

When cleared, users are sent a link giving them access to the original version of the sent file. They can downloadthe file and there is no tracking or restrictions on their use of the file. In this case, access to the file is tracked byBlackBerry Workspaces by the user's email when the user is authenticated to BlackBerry Workspaces, or underthe alias "anonymous" if the user is not authenticated.
Once the file has been shared without requiring recipient sign in, you cannot change the recipient permissions tothe file. Should you need to revoke recipient access to the file, you must delete the file from your sent items.
Note: Shared annotations cannot be viewed by recipients unless you select the Require recipients to sign incheckbox when sending the file.
| Collaboration and recipient sign in | 55

Read acknowledgementRequiring read acknowledgement on files enables you to track and verify who has read a file.
Place the requirement on all files in a workspace, and when sending a copy of a file. The process requires anyonewith access to the file to acknowledge reading the file.
File recipients can browse all files requiring their read acknowledgement via their pending read acknowledgementpage. Each file requiring read acknowledgement is also marked with a acknowledgement required icon withinworkspace or folder views.
In the case of a sent file, the sender receives notification that the file has been acknowledged. In the case of aworkspace, the workspace administrators receive the notification.
The Read acknowledgement required toggle option is displayed only when creating new workspaces inorganizations where the feature is enabled according to policy, and applies to all files added to the workspace.
| Read acknowledgement | 56
BlackBerry Workspaces security BlackBerry Workspaces employs many advanced security features to ensure that your files are only accessed bythose to whom you or your organization has granted permission.
Key storageFiles downloaded to the iOS device from the BlackBerry Workspaces server are encrypted using AES-256, with aunique key for each file.
The decryption key for the file is sent to the application separately from the file, as part of a file ‘license’ thatincludes all the access permissions for the file. This license is encrypted by the user’s passcode.
File storageWhen files are downloaded from the BlackBerry Workspaces server for viewing, they are cached in a secure cacheon your device that is accessible only by BlackBerry Workspaces app for iOS. This cache is not synced or backedup by iTunes or iCloud. Furthermore, the file is stored in this cache in encrypted form. The keys to decrypt the fileare stored separately and are themselves stored in encrypted format.
EncryptionFiles are encrypted using AES-256 (256 bit) and are downloaded to the iOS device encrypted. A unique encryptionkey is generated for each file. This minimizes any security risk if a decryption key is somehow obtained. Thedecryption key (the file ‘license’) is encrypted by the user’s public key and downloaded from the server to the iOSdevice in encrypted form. Keys for downloaded files are cached in the iOS device in encrypted form, in an areathat is not backed up or synced by iOS, iCloud, or iTunes.
The file is decrypted in BlackBerry Workspaces app for iOS at the time the file is viewed; there is no clear textversion of the file stored even in a temporary area. Further, for large files, the file is decrypted and displayed inblocks.
Data wipeThe private cache region used by the BlackBerry Workspaces app for iOS to store or cache files can be wipedon command by the organization administrator through the BlackBerry Workspaces administration console.Furthermore, BlackBerry Workspaces app for iOS automatically wipes this cache if the user enters an incorrectpasscode 10 times in succession.
File transferFiles and keys are always sent between the BlackBerry Workspaces servers and the iOS devices in encrypted formand over an HTTPS (SSL) connection.
The connection between the application and the server uses the BlackBerry Workspaces RESTful API. This APIrequires that the device authenticate itself to the server before any requests are sent. If the authentication is
| BlackBerry Workspaces security | 57
successful, the device is given a unique secure session ID token (SSID) that must be sent with all subsequentrequests.
App lockBlackBerry Workspaces app for iOS uses a 4-digit app lock code to unlock the application when first activated.The lock code can also be mandated (as a file permission) in order to open and view specific files, or if theapplication is idle for longer than 10 minutes.
Private cacheThe application uses a private cache area to store files and licenses. This area is not accessible to otherapplications or iOS and is not backed up or synced by iTunes or iCloud.
Jailbreak detectionBlackBerry Workspaces app for iOS does not open if it detects that the device has been jailbroken (softwareunlocked). The cache is wiped of all files and any signed-in users are signed out.
AuthenticationThe application authenticates to the BlackBerry Workspaces server using either an email address or usernamepassword. In the case of email-based authentication, the server generates a deviceID value and sends a URL backto the device in an email addressed to the address it was given. The device uses this URL to authenticate thedeviceID with the server and stores the deviceID in the application's secure container. This deviceID is used torequest a unique secure session ID token (SSID) from the server; this token is used to authenticate the applicationto the server on each subsequent action.
| BlackBerry Workspaces security | 58
Legal notice©2019 BlackBerry Limited. Trademarks, including but not limited to BLACKBERRY, BBM, BES, EMBLEM Design,ATHOC, MOVIRTU and SECUSMART are the trademarks or registered trademarks of BlackBerry Limited, itssubsidiaries and/or affiliates, used under license, and the exclusive rights to such trademarks are expresslyreserved. All other trademarks are the property of their respective owners.
iOS is a trademark of Cisco Systems, Inc. and/or its affiliates in the U.S. and certain other countries. iOS® is usedunder license by Apple Inc. iPad is a trademark of Apple Inc. Microsoft Excel is either a registered trademarkor a trademark of Microsoft Corporation in the United States and/or other countries. This documentationincluding all documentation incorporated by reference herein such as documentation provided or madeavailable on the BlackBerry website provided or made accessible "AS IS" and "AS AVAILABLE" and withoutcondition, endorsement, guarantee, representation, or warranty of any kind by BlackBerry Limited and itsaffiliated companies ("BlackBerry") and BlackBerry assumes no responsibility for any typographical, technical,or other inaccuracies, errors, or omissions in this documentation. In order to protect BlackBerry proprietary andconfidential information and/or trade secrets, this documentation may describe some aspects of BlackBerrytechnology in generalized terms. BlackBerry reserves the right to periodically change information that is containedin this documentation; however, BlackBerry makes no commitment to provide any such changes, updates,enhancements, or other additions to this documentation to you in a timely manner or at all.
This documentation might contain references to third-party sources of information, hardware or software,products or services including components and content such as content protected by copyright and/or third-party websites (collectively the "Third Party Products and Services"). BlackBerry does not control, and is notresponsible for, any Third Party Products and Services including, without limitation the content, accuracy,copyright compliance, compatibility, performance, trustworthiness, legality, decency, links, or any other aspectof Third Party Products and Services. The inclusion of a reference to Third Party Products and Services in thisdocumentation does not imply endorsement by BlackBerry of the Third Party Products and Services or the thirdparty in any way.
EXCEPT TO THE EXTENT SPECIFICALLY PROHIBITED BY APPLICABLE LAW IN YOUR JURISDICTION, ALLCONDITIONS, ENDORSEMENTS, GUARANTEES, REPRESENTATIONS, OR WARRANTIES OF ANY KIND, EXPRESSOR IMPLIED, INCLUDING WITHOUT LIMITATION, ANY CONDITIONS, ENDORSEMENTS, GUARANTEES,REPRESENTATIONS OR WARRANTIES OF DURABILITY, FITNESS FOR A PARTICULAR PURPOSE OR USE,MERCHANTABILITY, MERCHANTABLE QUALITY, NON-INFRINGEMENT, SATISFACTORY QUALITY, OR TITLE, ORARISING FROM A STATUTE OR CUSTOM OR A COURSE OF DEALING OR USAGE OF TRADE, OR RELATED TO THEDOCUMENTATION OR ITS USE, OR PERFORMANCE OR NON-PERFORMANCE OF ANY SOFTWARE, HARDWARE,SERVICE, OR ANY THIRD PARTY PRODUCTS AND SERVICES REFERENCED HEREIN, ARE HEREBY EXCLUDED.YOU MAY ALSO HAVE OTHER RIGHTS THAT VARY BY STATE OR PROVINCE. SOME JURISDICTIONS MAYNOT ALLOW THE EXCLUSION OR LIMITATION OF IMPLIED WARRANTIES AND CONDITIONS. TO THE EXTENTPERMITTED BY LAW, ANY IMPLIED WARRANTIES OR CONDITIONS RELATING TO THE DOCUMENTATION TOTHE EXTENT THEY CANNOT BE EXCLUDED AS SET OUT ABOVE, BUT CAN BE LIMITED, ARE HEREBY LIMITED TONINETY (90) DAYS FROM THE DATE YOU FIRST ACQUIRED THE DOCUMENTATION OR THE ITEM THAT IS THESUBJECT OF THE CLAIM.
TO THE MAXIMUM EXTENT PERMITTED BY APPLICABLE LAW IN YOUR JURISDICTION, IN NO EVENT SHALLBLACKBERRY BE LIABLE FOR ANY TYPE OF DAMAGES RELATED TO THIS DOCUMENTATION OR ITS USE,OR PERFORMANCE OR NON-PERFORMANCE OF ANY SOFTWARE, HARDWARE, SERVICE, OR ANY THIRDPARTY PRODUCTS AND SERVICES REFERENCED HEREIN INCLUDING WITHOUT LIMITATION ANY OF THEFOLLOWING DAMAGES: DIRECT, CONSEQUENTIAL, EXEMPLARY, INCIDENTAL, INDIRECT, SPECIAL, PUNITIVE,OR AGGRAVATED DAMAGES, DAMAGES FOR LOSS OF PROFITS OR REVENUES, FAILURE TO REALIZE ANYEXPECTED SAVINGS, BUSINESS INTERRUPTION, LOSS OF BUSINESS INFORMATION, LOSS OF BUSINESSOPPORTUNITY, OR CORRUPTION OR LOSS OF DATA, FAILURES TO TRANSMIT OR RECEIVE ANY DATA,PROBLEMS ASSOCIATED WITH ANY APPLICATIONS USED IN CONJUNCTION WITH BLACKBERRY PRODUCTS ORSERVICES, DOWNTIME COSTS, LOSS OF THE USE OF BLACKBERRY PRODUCTS OR SERVICES OR ANY PORTION
| Legal notice | 59

THEREOF OR OF ANY AIRTIME SERVICES, COST OF SUBSTITUTE GOODS, COSTS OF COVER, FACILITIES ORSERVICES, COST OF CAPITAL, OR OTHER SIMILAR PECUNIARY LOSSES, WHETHER OR NOT SUCH DAMAGESWERE FORESEEN OR UNFORESEEN, AND EVEN IF BLACKBERRY HAS BEEN ADVISED OF THE POSSIBILITY OFSUCH DAMAGES.
TO THE MAXIMUM EXTENT PERMITTED BY APPLICABLE LAW IN YOUR JURISDICTION, BLACKBERRY SHALLHAVE NO OTHER OBLIGATION, DUTY, OR LIABILITY WHATSOEVER IN CONTRACT, TORT, OR OTHERWISE TOYOU INCLUDING ANY LIABILITY FOR NEGLIGENCE OR STRICT LIABILITY.
THE LIMITATIONS, EXCLUSIONS, AND DISCLAIMERS HEREIN SHALL APPLY: (A) IRRESPECTIVE OF THE NATUREOF THE CAUSE OF ACTION, DEMAND, OR ACTION BY YOU INCLUDING BUT NOT LIMITED TO BREACH OFCONTRACT, NEGLIGENCE, TORT, STRICT LIABILITY OR ANY OTHER LEGAL THEORY AND SHALL SURVIVE AFUNDAMENTAL BREACH OR BREACHES OR THE FAILURE OF THE ESSENTIAL PURPOSE OF THIS AGREEMENTOR OF ANY REMEDY CONTAINED HEREIN; AND (B) TO BLACKBERRY AND ITS AFFILIATED COMPANIES, THEIRSUCCESSORS, ASSIGNS, AGENTS, SUPPLIERS (INCLUDING AIRTIME SERVICE PROVIDERS), AUTHORIZEDBLACKBERRY DISTRIBUTORS (ALSO INCLUDING AIRTIME SERVICE PROVIDERS) AND THEIR RESPECTIVEDIRECTORS, EMPLOYEES, AND INDEPENDENT CONTRACTORS.
IN ADDITION TO THE LIMITATIONS AND EXCLUSIONS SET OUT ABOVE, IN NO EVENT SHALL ANY DIRECTOR,EMPLOYEE, AGENT, DISTRIBUTOR, SUPPLIER, INDEPENDENT CONTRACTOR OF BLACKBERRY OR ANYAFFILIATES OF BLACKBERRY HAVE ANY LIABILITY ARISING FROM OR RELATED TO THE DOCUMENTATION.
Prior to subscribing for, installing, or using any Third Party Products and Services, it is your responsibility toensure that your airtime service provider has agreed to support all of their features. Some airtime serviceproviders might not offer Internet browsing functionality with a subscription to the BlackBerry® Internet Service.Check with your service provider for availability, roaming arrangements, service plans and features. Installationor use of Third Party Products and Services with BlackBerry's products and services may require one or morepatent, trademark, copyright, or other licenses in order to avoid infringement or violation of third party rights. Youare solely responsible for determining whether to use Third Party Products and Services and if any third partylicenses are required to do so. If required you are responsible for acquiring them. You should not install or useThird Party Products and Services until all necessary licenses have been acquired. Any Third Party Products andServices that are provided with BlackBerry's products and services are provided as a convenience to you and areprovided "AS IS" with no express or implied conditions, endorsements, guarantees, representations, or warrantiesof any kind by BlackBerry and BlackBerry assumes no liability whatsoever, in relation thereto. Your use of ThirdParty Products and Services shall be governed by and subject to you agreeing to the terms of separate licensesand other agreements applicable thereto with third parties, except to the extent expressly covered by a license orother agreement with BlackBerry.
The terms of use of any BlackBerry product or service are set out in a separate license or other agreement withBlackBerry applicable thereto. NOTHING IN THIS DOCUMENTATION IS INTENDED TO SUPERSEDE ANY EXPRESSWRITTEN AGREEMENTS OR WARRANTIES PROVIDED BY BLACKBERRY FOR PORTIONS OF ANY BLACKBERRYPRODUCT OR SERVICE OTHER THAN THIS DOCUMENTATION.
BlackBerry Enterprise Software incorporates certain third-party software. The license and copyright informationassociated with this software is available at http://worldwide.blackberry.com/legal/thirdpartysoftware.jsp.
BlackBerry Limited2200 University Avenue EastWaterloo, OntarioCanada N2K 0A7
BlackBerry UK Limited200 Bath RoadSlough, Berkshire SL1 3XEUnited Kingdom
| Legal notice | 60

Published in Canada
| Legal notice | 61