
BLACK author of Pro Apache Tomcat 6 Pro Apache - Freetesta.roberta.free.fr/My Books/Computer...
348
THE EXPERT’S VOICE ® IN JAVA ™ TECHNOLOGY Matthew Moodie Edited by Kunal Mittal Pro Apache Tomcat 6 Effectively deploy Tomcat 6 to maximize your JSP ™ and servlet-based web applications.
Transcript of BLACK author of Pro Apache Tomcat 6 Pro Apache - Freetesta.roberta.free.fr/My Books/Computer...

this print for content only—size & color not accurate spine = 0.82" 352 page count
EMPOWERING PRODUCTIVITY FOR THE JAVA™ DEVELOPER
Pro Apache Tomcat 6Dear Reader,
The lightweight, open source Apache Tomcat 6 servlet container is the refer-ence implementation of the latest JSP™ 2.1 and Servlet 2.5 specifications,which means it’s the first server to provide the new specifications’ features. Thisalso makes it an incredibly popular choice as a web server—it has reached asignificant level of maturity by being adopted by companies and organizationsfrom around the world.
Pro Apache Tomcat 6 provides accurate, detailed information on how towork with Tomcat’s enterprise-class features out of the box for busy systemadministrators and others using Tomcat 6. Though you will explore the theoryof Java-based, multi-tiered systems with reference to Tomcat’s place in them,you won’t waste time revisiting JSP or servlet coding skills. Instead, you’ll learnhow to obtain, install, and administer Tomcat 6. You’ll see how Tomcat 6’s built-infeatures allow you to configure clustering, load balancing, and shared hostingto enhance its reliability and performance. You’ll also learn how to effectivelyintegrate Tomcat 6 with other popular and necessary systems, including theApache web server 1.3 and 2.0, Microsoft’s IIS web server, MySQL databases,and LDAP and ODBC data sources.
Pro Apache Tomcat 6 is full of invaluable information that will help you getup to speed on managing Tomcat 6 as quickly as possible.
Yours,
Matthew Moodie and Kunal Mittal
Kunal Mittal, author of
Pro Apache Beehive
BEA WebLogic Server 8.1Unleashed
US $39.99
Shelve inJava Programming
User level:Intermediate–Advanced
Moodie,
Mittal,Ed.
Pro Apache Tomcat 6
THE EXPERT’S VOICE® IN JAVA™ TECHNOLOGY
Matthew MoodieEdited by Kunal Mittal
Pro Apache
Tomcat 6
CYANMAGENTA
YELLOWBLACKPANTONE 123 CV
ISBN-13: 978-1-59059-785-9ISBN-10: 1-59059-785-0
9 781590 597859
53999
CompanioneBook Available
Companion eBook
See last page for details on $10 eBook version
Effectively deploy Tomcat 6 to maximize your JSP™
and servlet-based web applications.
Matthew Moodie,author of
Pro Apache Tomcat 5/5.5
Pro Apache Ant
www.apress.comjava.apress.com
SOURCE CODE ONLINE
THE APRESS JAVA™ ROADMAP
Pro JSP™ 2, 4th Edition
Pro JSF™ and Ajax: BuildingRich Internet Components
Beginning Java™ EE 5:From Novice to Professional
Pro Apache Tomcat 6

Pro Apache Tomcat 6
Matthew MoodieEdited by Kunal Mittal
785000FM.qxd 2/28/07 11:23 AM Page i

Pro Apache Tomcat 6
Copyright © 2007 by Matthew Moodie
All rights reserved. No part of this work may be reproduced or transmitted in any form or by any means,electronic or mechanical, including photocopying, recording, or by any information storage or retrievalsystem, without the prior written permission of the copyright owner and the publisher.
ISBN-13 (pbk): 978-1-59059-785-9
ISBN-10 (pbk): 1-59059-785-0
Printed and bound in the United States of America 9 8 7 6 5 4 3 2 1
Trademarked names may appear in this book. Rather than use a trademark symbol with every occurrenceof a trademarked name, we use the names only in an editorial fashion and to the benefit of the trademarkowner, with no intention of infringement of the trademark.
Java™ and all Java-based marks are trademarks or registered trademarks of Sun Microsystems, Inc., in theUS and other countries. Apress, Inc., is not affiliated with Sun Microsystems, Inc., and this book was writ-ten without endorsement from Sun Microsystems, Inc.
Lead Editor: Steve AnglinEditor: Kunal MittalTechnical Reviewer: Scott DavisEditorial Board: Steve Anglin, Ewan Buckingham, Gary Cornell, Jason Gilmore, Jonathan Gennick,
Jonathan Hassell, James Huddleston, Chris Mills, Matthew Moodie, Dominic Shakeshaft, Paul Sarknas,Jim Sumser, Matt Wade
Project Manager: Beth ChristmasCopy Edit Manager: Nicole FloresCopy Editor: Heather LangAssistant Production Director: Kari Brooks-CoponyProduction Editor: Kelly GuntherCompositor: Kinetic Publishing Services, LLCProofreader: Elizabeth BerryIndexer: Toma MulliganArtist: Kinetic Publishing Services, LLCCover Designer: Kurt KramesManufacturing Director: Tom Debolski
Distributed to the book trade worldwide by Springer-Verlag New York, Inc., 233 Spring Street, 6th Floor,New York, NY 10013. Phone 1-800-SPRINGER, fax 201-348-4505, e-mail [email protected], orvisit http://www.springeronline.com.
For information on translations, please contact Apress directly at 2560 Ninth Street, Suite 219, Berkeley, CA94710. Phone 510-549-5930, fax 510-549-5939, e-mail [email protected], or visit http://www.apress.com.
The information in this book is distributed on an “as is” basis, without warranty. Although every precautionhas been taken in the preparation of this work, neither the author(s) nor Apress shall have any liability toany person or entity with respect to any loss or damage caused or alleged to be caused directly or indirectlyby the information contained in this work.
The source code for this book is available to readers at http://www.apress.com in the Source Code/Downloadsection.
785000FM.qxd 2/28/07 11:23 AM Page ii

To Laura
785000FM.qxd 2/28/07 11:23 AM Page iii

785000FM.qxd 2/28/07 11:23 AM Page iv

Contents at a Glance
About the Author . . . . . . . . . . . . . . . . . . . . . . . . . . . . . . . . . . . . . . . . . . . . . . . . . . . . . . . . . . . . . . . . . . xv
About the Editor. . . . . . . . . . . . . . . . . . . . . . . . . . . . . . . . . . . . . . . . . . . . . . . . . . . . . . . . . . . . . . . . . . xvii
About the Technical Reviewer . . . . . . . . . . . . . . . . . . . . . . . . . . . . . . . . . . . . . . . . . . . . . . . . . . . . . . xix
Acknowledgments . . . . . . . . . . . . . . . . . . . . . . . . . . . . . . . . . . . . . . . . . . . . . . . . . . . . . . . . . . . . . . . . xxi
■CHAPTER 1 Introducing Tomcat . . . . . . . . . . . . . . . . . . . . . . . . . . . . . . . . . . . . . . . . . . . . . 1
■CHAPTER 2 Installing Tomcat . . . . . . . . . . . . . . . . . . . . . . . . . . . . . . . . . . . . . . . . . . . . . . 11
■CHAPTER 3 Examining Tomcat’s Directories . . . . . . . . . . . . . . . . . . . . . . . . . . . . . . . . 29
■CHAPTER 4 Working with Tomcat’s Configuration Files. . . . . . . . . . . . . . . . . . . . . . 35
■CHAPTER 5 Administering Web Applications . . . . . . . . . . . . . . . . . . . . . . . . . . . . . . . . 71
■CHAPTER 6 Using Tomcat’s Administration Tools . . . . . . . . . . . . . . . . . . . . . . . . . . . . 91
■CHAPTER 7 Configuring Tomcat . . . . . . . . . . . . . . . . . . . . . . . . . . . . . . . . . . . . . . . . . . . 111
■CHAPTER 8 Understanding Tomcat’s Class Loaders . . . . . . . . . . . . . . . . . . . . . . . . 133
■CHAPTER 9 Using Tomcat’s Connectors . . . . . . . . . . . . . . . . . . . . . . . . . . . . . . . . . . . 143
■CHAPTER 10 Connecting to Databases Using JDBC . . . . . . . . . . . . . . . . . . . . . . . . . 167
■CHAPTER 11 Working with User Authentication . . . . . . . . . . . . . . . . . . . . . . . . . . . . . 179
■CHAPTER 12 Securing Tomcat. . . . . . . . . . . . . . . . . . . . . . . . . . . . . . . . . . . . . . . . . . . . . . 209
■CHAPTER 13 Implementing Shared Tomcat Hosting . . . . . . . . . . . . . . . . . . . . . . . . . 253
■CHAPTER 14 Testing Tomcat’s Performance . . . . . . . . . . . . . . . . . . . . . . . . . . . . . . . . 273
■APPENDIX Installing MySQL. . . . . . . . . . . . . . . . . . . . . . . . . . . . . . . . . . . . . . . . . . . . . . 293
■INDEX . . . . . . . . . . . . . . . . . . . . . . . . . . . . . . . . . . . . . . . . . . . . . . . . . . . . . . . . . . . . . . . . . . . . . . . 301
v
785000FM.qxd 2/28/07 11:23 AM Page v

785000FM.qxd 2/28/07 11:23 AM Page vi

Contents
About the Author . . . . . . . . . . . . . . . . . . . . . . . . . . . . . . . . . . . . . . . . . . . . . . . . . . . . . . . . . . . . . . . . . . xv
About the Editor. . . . . . . . . . . . . . . . . . . . . . . . . . . . . . . . . . . . . . . . . . . . . . . . . . . . . . . . . . . . . . . . . . xvii
About the Technical Reviewer . . . . . . . . . . . . . . . . . . . . . . . . . . . . . . . . . . . . . . . . . . . . . . . . . . . . . . xix
Acknowledgments . . . . . . . . . . . . . . . . . . . . . . . . . . . . . . . . . . . . . . . . . . . . . . . . . . . . . . . . . . . . . . . . xxi
■CHAPTER 1 Introducing Tomcat . . . . . . . . . . . . . . . . . . . . . . . . . . . . . . . . . . . . . . . . . . 1
Understanding the Web Today . . . . . . . . . . . . . . . . . . . . . . . . . . . . . . . . . . . . . . 1
Looking Beyond CGI . . . . . . . . . . . . . . . . . . . . . . . . . . . . . . . . . . . . . . . . . 2
Introducing Java on the Web . . . . . . . . . . . . . . . . . . . . . . . . . . . . . . . . . . 2
Adding to Servlets: JavaServer Pages . . . . . . . . . . . . . . . . . . . . . . . . . . 3
Introducing Servlet Containers . . . . . . . . . . . . . . . . . . . . . . . . . . . . . . . . . . . . . 3
Looking at Tomcat . . . . . . . . . . . . . . . . . . . . . . . . . . . . . . . . . . . . . . . . . . . 4
What’s New in Tomcat 6. . . . . . . . . . . . . . . . . . . . . . . . . . . . . . . . . . . . . . . . . . . 4
Understanding Tomcat’s Architecture . . . . . . . . . . . . . . . . . . . . . . . . . . . . . . . 5
Top-Level Components . . . . . . . . . . . . . . . . . . . . . . . . . . . . . . . . . . . . . . . 5
The Connector Components. . . . . . . . . . . . . . . . . . . . . . . . . . . . . . . . . . . 6
The Container Components . . . . . . . . . . . . . . . . . . . . . . . . . . . . . . . . . . . 6
The Nested Components . . . . . . . . . . . . . . . . . . . . . . . . . . . . . . . . . . . . . 7
Summary . . . . . . . . . . . . . . . . . . . . . . . . . . . . . . . . . . . . . . . . . . . . . . . . . . . . . . . 9
■CHAPTER 2 Installing Tomcat. . . . . . . . . . . . . . . . . . . . . . . . . . . . . . . . . . . . . . . . . . . . 11
Installing Java . . . . . . . . . . . . . . . . . . . . . . . . . . . . . . . . . . . . . . . . . . . . . . . . . . 11
Installing Java on Windows . . . . . . . . . . . . . . . . . . . . . . . . . . . . . . . . . . 11
Installing Java on Linux . . . . . . . . . . . . . . . . . . . . . . . . . . . . . . . . . . . . . 13
Installing Tomcat . . . . . . . . . . . . . . . . . . . . . . . . . . . . . . . . . . . . . . . . . . . . . . . . 14
Installing Tomcat on Windows Using the Installer . . . . . . . . . . . . . . . 15
Installing Tomcat on Windows Using the Zipped File . . . . . . . . . . . . . 20
Installing Tomcat on Linux or Mac OS . . . . . . . . . . . . . . . . . . . . . . . . . . . . . . 20
Viewing the Default Installation . . . . . . . . . . . . . . . . . . . . . . . . . . . . . . . 20
Running Tomcat with the Server Option . . . . . . . . . . . . . . . . . . . . . . . . . . . . 21
Installing Ant. . . . . . . . . . . . . . . . . . . . . . . . . . . . . . . . . . . . . . . . . . . . . . . . . . . . 21
Installing Tomcat from Source. . . . . . . . . . . . . . . . . . . . . . . . . . . . . . . . . . . . . 21
vii
785000FM.qxd 2/28/07 11:23 AM Page vii

Troubleshooting and Tips . . . . . . . . . . . . . . . . . . . . . . . . . . . . . . . . . . . . . . . . . 22
The Tomcat Window Disappears . . . . . . . . . . . . . . . . . . . . . . . . . . . . . . 23
The Port Number Is in Use . . . . . . . . . . . . . . . . . . . . . . . . . . . . . . . . . . . 23
Summary . . . . . . . . . . . . . . . . . . . . . . . . . . . . . . . . . . . . . . . . . . . . . . . . . . . . . . 28
■CHAPTER 3 Examining Tomcat’s Directories . . . . . . . . . . . . . . . . . . . . . . . . . . . 29
Looking at CATALINA_HOME . . . . . . . . . . . . . . . . . . . . . . . . . . . . . . . . . . . . . . 29
The bin Directory . . . . . . . . . . . . . . . . . . . . . . . . . . . . . . . . . . . . . . . . . . . 29
The conf Directory . . . . . . . . . . . . . . . . . . . . . . . . . . . . . . . . . . . . . . . . . . 30
The logs Directory . . . . . . . . . . . . . . . . . . . . . . . . . . . . . . . . . . . . . . . . . . 30
The lib Directory. . . . . . . . . . . . . . . . . . . . . . . . . . . . . . . . . . . . . . . . . . . . 30
The temp Directory . . . . . . . . . . . . . . . . . . . . . . . . . . . . . . . . . . . . . . . . . 30
The webapps Directory. . . . . . . . . . . . . . . . . . . . . . . . . . . . . . . . . . . . . . 31
The work Directory . . . . . . . . . . . . . . . . . . . . . . . . . . . . . . . . . . . . . . . . . 31
Understanding Web Application Structure. . . . . . . . . . . . . . . . . . . . . . . . . . . 31
Web Application Context. . . . . . . . . . . . . . . . . . . . . . . . . . . . . . . . . . . . . 31
The WEB-INF Directory . . . . . . . . . . . . . . . . . . . . . . . . . . . . . . . . . . . . . . 32
The META-INF Directory . . . . . . . . . . . . . . . . . . . . . . . . . . . . . . . . . . . . . 32
Summary . . . . . . . . . . . . . . . . . . . . . . . . . . . . . . . . . . . . . . . . . . . . . . . . . . . . . . 33
■CHAPTER 4 Working with Tomcat’s Configuration Files . . . . . . . . . . . . . . . 35
Examining Tomcat’s Configuration Files . . . . . . . . . . . . . . . . . . . . . . . . . . . . 35
Using catalina.policy for Access Control . . . . . . . . . . . . . . . . . . . . . . . . . . . . 36
Using catalina.properties to Configure Tomcat’s Class Loaders . . . . . . . . 39
Using server.xml to Configure Tomcat . . . . . . . . . . . . . . . . . . . . . . . . . . . . . . 41
Configuring a Server . . . . . . . . . . . . . . . . . . . . . . . . . . . . . . . . . . . . . . . . 41
Configuring Global Naming Resources. . . . . . . . . . . . . . . . . . . . . . . . . 42
Configuring a Service . . . . . . . . . . . . . . . . . . . . . . . . . . . . . . . . . . . . . . . 48
Configuring a Connector . . . . . . . . . . . . . . . . . . . . . . . . . . . . . . . . . . . . . 49
Configuring an Engine. . . . . . . . . . . . . . . . . . . . . . . . . . . . . . . . . . . . . . . 54
Tomcat Logging . . . . . . . . . . . . . . . . . . . . . . . . . . . . . . . . . . . . . . . . . . . . 55
Configuring a Realm . . . . . . . . . . . . . . . . . . . . . . . . . . . . . . . . . . . . . . . . 59
Configuring a Host . . . . . . . . . . . . . . . . . . . . . . . . . . . . . . . . . . . . . . . . . . 61
Configuring a Valve . . . . . . . . . . . . . . . . . . . . . . . . . . . . . . . . . . . . . . . . . 63
Configuring a Listener. . . . . . . . . . . . . . . . . . . . . . . . . . . . . . . . . . . . . . . 63
Configuring an Alias. . . . . . . . . . . . . . . . . . . . . . . . . . . . . . . . . . . . . . . . . 63
Understanding Authentication and the tomcat-users. xml File . . . . . . . . . 64
■CONTENTSviii
785000FM.qxd 2/28/07 11:23 AM Page viii
Configuring Web Application Defaults with web.xml . . . . . . . . . . . . . . . . . . 64
Default Servlet Definitions . . . . . . . . . . . . . . . . . . . . . . . . . . . . . . . . . . . 65
Matching URLs: Servlet Mappings . . . . . . . . . . . . . . . . . . . . . . . . . . . . 66
Configuring Session Timeout . . . . . . . . . . . . . . . . . . . . . . . . . . . . . . . . . 67
Configuring MIME Mappings . . . . . . . . . . . . . . . . . . . . . . . . . . . . . . . . . 67
Configuring Welcome Files . . . . . . . . . . . . . . . . . . . . . . . . . . . . . . . . . . . 67
Changing Service Options on Windows . . . . . . . . . . . . . . . . . . . . . . . . . . . . . 67
Summary . . . . . . . . . . . . . . . . . . . . . . . . . . . . . . . . . . . . . . . . . . . . . . . . . . . . . . 70
■CHAPTER 5 Administering Web Applications . . . . . . . . . . . . . . . . . . . . . . . . . . . 71
Configuring Contexts. . . . . . . . . . . . . . . . . . . . . . . . . . . . . . . . . . . . . . . . . . . . . 71
Configuring Default Contexts . . . . . . . . . . . . . . . . . . . . . . . . . . . . . . . . . 71
The Context Element . . . . . . . . . . . . . . . . . . . . . . . . . . . . . . . . . . . . . . . . 73
Configuring a Parameter. . . . . . . . . . . . . . . . . . . . . . . . . . . . . . . . . . . . . 76
Configuring a Resource Link . . . . . . . . . . . . . . . . . . . . . . . . . . . . . . . . . 76
Examining a Web Application . . . . . . . . . . . . . . . . . . . . . . . . . . . . . . . . . . . . . 76
Mapping URLs to Resources . . . . . . . . . . . . . . . . . . . . . . . . . . . . . . . . . 78
Examining the WEB-INF Folder . . . . . . . . . . . . . . . . . . . . . . . . . . . . . . . 79
Examining the web.xml File. . . . . . . . . . . . . . . . . . . . . . . . . . . . . . . . . . . . . . . 80
<distributable> . . . . . . . . . . . . . . . . . . . . . . . . . . . . . . . . . . . . . . . . . . . . 80
<context-param> . . . . . . . . . . . . . . . . . . . . . . . . . . . . . . . . . . . . . . . . . . 80
<filter> . . . . . . . . . . . . . . . . . . . . . . . . . . . . . . . . . . . . . . . . . . . . . . . . . . . 80
<filter-mapping> . . . . . . . . . . . . . . . . . . . . . . . . . . . . . . . . . . . . . . . . . . . 81
<servlet> . . . . . . . . . . . . . . . . . . . . . . . . . . . . . . . . . . . . . . . . . . . . . . . . . 82
<servlet-mapping>. . . . . . . . . . . . . . . . . . . . . . . . . . . . . . . . . . . . . . . . . 83
<session-config> . . . . . . . . . . . . . . . . . . . . . . . . . . . . . . . . . . . . . . . . . . 84
<mime-mapping>. . . . . . . . . . . . . . . . . . . . . . . . . . . . . . . . . . . . . . . . . . 84
<welcome-file-list> . . . . . . . . . . . . . . . . . . . . . . . . . . . . . . . . . . . . . . . . 84
<error-page> . . . . . . . . . . . . . . . . . . . . . . . . . . . . . . . . . . . . . . . . . . . . . . 85
<resource-env-ref> . . . . . . . . . . . . . . . . . . . . . . . . . . . . . . . . . . . . . . . . 85
<resource-ref> . . . . . . . . . . . . . . . . . . . . . . . . . . . . . . . . . . . . . . . . . . . . 86
<security-constraint>. . . . . . . . . . . . . . . . . . . . . . . . . . . . . . . . . . . . . . . 87
<login-config> . . . . . . . . . . . . . . . . . . . . . . . . . . . . . . . . . . . . . . . . . . . . . 89
<security-role> . . . . . . . . . . . . . . . . . . . . . . . . . . . . . . . . . . . . . . . . . . . . 89
Summary . . . . . . . . . . . . . . . . . . . . . . . . . . . . . . . . . . . . . . . . . . . . . . . . . . . . . . 90
■CONTENTS ix
785000FM.qxd 2/28/07 11:23 AM Page ix

■CHAPTER 6 Using Tomcat’s Administration Tools . . . . . . . . . . . . . . . . . . . . . . 91
Using the Manager Application . . . . . . . . . . . . . . . . . . . . . . . . . . . . . . . . . . . . 91
Setting Up the Manager Application . . . . . . . . . . . . . . . . . . . . . . . . . . . 92
Configuring the Manager Application . . . . . . . . . . . . . . . . . . . . . . . . . . 93
Using the Manager Application . . . . . . . . . . . . . . . . . . . . . . . . . . . . . . . 96
Troubleshooting . . . . . . . . . . . . . . . . . . . . . . . . . . . . . . . . . . . . . . . . . . . 105
Managing Applications with Ant . . . . . . . . . . . . . . . . . . . . . . . . . . . . . . . . . . 106
Using the Tomcat Administration Tool . . . . . . . . . . . . . . . . . . . . . . . . . . . . . 109
Summary . . . . . . . . . . . . . . . . . . . . . . . . . . . . . . . . . . . . . . . . . . . . . . . . . . . . . 110
■CHAPTER 7 Configuring Tomcat . . . . . . . . . . . . . . . . . . . . . . . . . . . . . . . . . . . . . . . . 111
Using Valves to Intercept User Requests . . . . . . . . . . . . . . . . . . . . . . . . . . . 111
Standard Valves . . . . . . . . . . . . . . . . . . . . . . . . . . . . . . . . . . . . . . . . . . . 112
Configuring User Sessions . . . . . . . . . . . . . . . . . . . . . . . . . . . . . . . . . . . . . . . 121
Configuring a Session Manager . . . . . . . . . . . . . . . . . . . . . . . . . . . . . 121
Configuring a Cluster. . . . . . . . . . . . . . . . . . . . . . . . . . . . . . . . . . . . . . . 126
Summary . . . . . . . . . . . . . . . . . . . . . . . . . . . . . . . . . . . . . . . . . . . . . . . . . . . . . 131
■CHAPTER 8 Understanding Tomcat’s Class Loaders . . . . . . . . . . . . . . . . . . 133
Examining the Standard Java SE Class Loaders . . . . . . . . . . . . . . . . . . . . 133
The Bootstrap Class Loader . . . . . . . . . . . . . . . . . . . . . . . . . . . . . . . . . 134
The Extension Class Loader . . . . . . . . . . . . . . . . . . . . . . . . . . . . . . . . . 134
The System Class Loader . . . . . . . . . . . . . . . . . . . . . . . . . . . . . . . . . . . 134
The Delegation Model . . . . . . . . . . . . . . . . . . . . . . . . . . . . . . . . . . . . . . 134
The Endorsed Standards Override Mechanism . . . . . . . . . . . . . . . . 135
Understanding Class Loader Attributes . . . . . . . . . . . . . . . . . . . . . . . . . . . . 135
Loading Classes on Demand . . . . . . . . . . . . . . . . . . . . . . . . . . . . . . . . 135
Class Caching. . . . . . . . . . . . . . . . . . . . . . . . . . . . . . . . . . . . . . . . . . . . . 135
Separate Namespaces . . . . . . . . . . . . . . . . . . . . . . . . . . . . . . . . . . . . . 136
Creating a Custom Class Loader. . . . . . . . . . . . . . . . . . . . . . . . . . . . . 136
Understanding Security and Class Loaders . . . . . . . . . . . . . . . . . . . . . . . . 136
Class Loader Delegation. . . . . . . . . . . . . . . . . . . . . . . . . . . . . . . . . . . . 136
Core Class Restriction . . . . . . . . . . . . . . . . . . . . . . . . . . . . . . . . . . . . . . 136
Separate Class Loader Namespaces . . . . . . . . . . . . . . . . . . . . . . . . . 137
Security Manager. . . . . . . . . . . . . . . . . . . . . . . . . . . . . . . . . . . . . . . . . . 137
■CONTENTSx
785000FM.qxd 2/28/07 11:23 AM Page x
32eeceee020b1b6c36f7005aec98cc94

Understanding Tomcat and Class Loaders . . . . . . . . . . . . . . . . . . . . . . . . . 137
Tomcat and the System Class Loader . . . . . . . . . . . . . . . . . . . . . . . . 138
Tomcat’s Common Class Loader. . . . . . . . . . . . . . . . . . . . . . . . . . . . . 138
Tomcat’s Web Application Class Loader. . . . . . . . . . . . . . . . . . . . . . . 140
Revisiting Class Loader Order . . . . . . . . . . . . . . . . . . . . . . . . . . . . . . . 140
Dynamic Class Reloading . . . . . . . . . . . . . . . . . . . . . . . . . . . . . . . . . . . 140
Avoiding Class Loader Pitfalls . . . . . . . . . . . . . . . . . . . . . . . . . . . . . . . . . . . . 141
Packages Split Among Different Class Loaders . . . . . . . . . . . . . . . . 141
Singletons . . . . . . . . . . . . . . . . . . . . . . . . . . . . . . . . . . . . . . . . . . . . . . . . 141
Summary . . . . . . . . . . . . . . . . . . . . . . . . . . . . . . . . . . . . . . . . . . . . . . . . . . . . . 141
■CHAPTER 9 Using Tomcat’s Connectors . . . . . . . . . . . . . . . . . . . . . . . . . . . . . . . 143
Using the HTTP Connector . . . . . . . . . . . . . . . . . . . . . . . . . . . . . . . . . . . . . . . 143
Configuring the HTTP/1.1 Connector . . . . . . . . . . . . . . . . . . . . . . . . . . . . . . 143
Configuring SSL on Tomcat . . . . . . . . . . . . . . . . . . . . . . . . . . . . . . . . . . . . . . 144
Working with Keystores . . . . . . . . . . . . . . . . . . . . . . . . . . . . . . . . . . . . 144
Running Tomcat Behind a Proxy Server. . . . . . . . . . . . . . . . . . . . . . . . . . . . 145
Using the AJP Connector . . . . . . . . . . . . . . . . . . . . . . . . . . . . . . . . . . . . . . . . 146
The Apache JServ Protocol . . . . . . . . . . . . . . . . . . . . . . . . . . . . . . . . . 146
Worker Implementations . . . . . . . . . . . . . . . . . . . . . . . . . . . . . . . . . . . 147
Integrating Tomcat with Apache 1.3 Using mod_jk . . . . . . . . . . . . . 147
Integrating Tomcat with IIS. . . . . . . . . . . . . . . . . . . . . . . . . . . . . . . . . . 153
Configuring Distributed Networks with Tomcat . . . . . . . . . . . . . . . . . . . . . 158
Understanding Tomcat Load Balancing . . . . . . . . . . . . . . . . . . . . . . . . . . . . 159
Preparing for Load Balancing . . . . . . . . . . . . . . . . . . . . . . . . . . . . . . . 160
The Workers . . . . . . . . . . . . . . . . . . . . . . . . . . . . . . . . . . . . . . . . . . . . . . 161
Configuring Apache 1.3 for Load Balancing . . . . . . . . . . . . . . . . . . . 161
Configuring Tomcat for Load Balancing . . . . . . . . . . . . . . . . . . . . . . . 163
Testing the Load Balancing Behavior . . . . . . . . . . . . . . . . . . . . . . . . . 165
Summary . . . . . . . . . . . . . . . . . . . . . . . . . . . . . . . . . . . . . . . . . . . . . . . . . . . . . 166
■CHAPTER 10 Connecting to Databases Using JDBC . . . . . . . . . . . . . . . . . . . . 167
Introducing SQL . . . . . . . . . . . . . . . . . . . . . . . . . . . . . . . . . . . . . . . . . . . . . . . . 167
Introducing JDBC. . . . . . . . . . . . . . . . . . . . . . . . . . . . . . . . . . . . . . . . . . . . . . . 167
Running Basic JDBC Operations . . . . . . . . . . . . . . . . . . . . . . . . . . . . . 168
Which JDBC Version? . . . . . . . . . . . . . . . . . . . . . . . . . . . . . . . . . . . . . . 169
Examining JDBC Driver Types . . . . . . . . . . . . . . . . . . . . . . . . . . . . . . . 170
Database Connection Pooling . . . . . . . . . . . . . . . . . . . . . . . . . . . . . . . 170
■CONTENTS xi
785000FM.qxd 2/28/07 11:23 AM Page xi

Using Tomcat and JDBC . . . . . . . . . . . . . . . . . . . . . . . . . . . . . . . . . . . . . . . . . 171
Providing JDBC Data Sources in Tomcat . . . . . . . . . . . . . . . . . . . . . . 171
Configuring JNDI JDBC Resources . . . . . . . . . . . . . . . . . . . . . . . . . . . 171
Using the Resource and ResourceParams Elements . . . . . . . . . . . . 172
Transactions and Distributed Transactions Support. . . . . . . . . . . . . 172
Testing JNDI Resource Configuration. . . . . . . . . . . . . . . . . . . . . . . . . . . . . . 173
Creating the MySQL Test Database . . . . . . . . . . . . . . . . . . . . . . . . . . 173
Setting Up the Read-Only User . . . . . . . . . . . . . . . . . . . . . . . . . . . . . . 175
Adding the JDBC JNDI Resource to the Server. . . . . . . . . . . . . . . . . 175
Using JNDI to Look Up a Data Source . . . . . . . . . . . . . . . . . . . . . . . . 176
Summary . . . . . . . . . . . . . . . . . . . . . . . . . . . . . . . . . . . . . . . . . . . . . . . . . . . . . 178
■CHAPTER 11 Working with User Authentication . . . . . . . . . . . . . . . . . . . . . . . . 179
Looking at Realms. . . . . . . . . . . . . . . . . . . . . . . . . . . . . . . . . . . . . . . . . . . . . . 179
Understanding Container-Managed Security . . . . . . . . . . . . . . . . . . . . . . . 180
Storing a Digested Password. . . . . . . . . . . . . . . . . . . . . . . . . . . . . . . . 182
Configuring Realms. . . . . . . . . . . . . . . . . . . . . . . . . . . . . . . . . . . . . . . . . . . . . 182
Configuring a File-Based Realm . . . . . . . . . . . . . . . . . . . . . . . . . . . . . 182
Configuring a User Database Realm. . . . . . . . . . . . . . . . . . . . . . . . . . 185
Protecting a Resource with a Realm . . . . . . . . . . . . . . . . . . . . . . . . . 190
Configuring a JDBC Realm. . . . . . . . . . . . . . . . . . . . . . . . . . . . . . . . . . 192
Configuring JNDI Realms . . . . . . . . . . . . . . . . . . . . . . . . . . . . . . . . . . . 200
Summary . . . . . . . . . . . . . . . . . . . . . . . . . . . . . . . . . . . . . . . . . . . . . . . . . . . . . 207
■CHAPTER 12 Securing Tomcat . . . . . . . . . . . . . . . . . . . . . . . . . . . . . . . . . . . . . . . . . . . 209
Securing the Windows File System . . . . . . . . . . . . . . . . . . . . . . . . . . . . . . . 209
Controlling Users, Groups, and Owners in Windows . . . . . . . . . . . . 212
Assigning Permissions in Windows. . . . . . . . . . . . . . . . . . . . . . . . . . . 216
Planning Security Permissions in Windows. . . . . . . . . . . . . . . . . . . . 217
Configuring File Permissions in Windows . . . . . . . . . . . . . . . . . . . . . 219
Securing the Unix File System. . . . . . . . . . . . . . . . . . . . . . . . . . . . . . . . . . . . 220
Controlling Users, Groups, and Owners in Unix . . . . . . . . . . . . . . . . 221
Assigning Permissions in Unix. . . . . . . . . . . . . . . . . . . . . . . . . . . . . . . 222
Planning Security Permissions . . . . . . . . . . . . . . . . . . . . . . . . . . . . . . 225
Configuring File Permissions in Unix . . . . . . . . . . . . . . . . . . . . . . . . . 225
Examining General Tomcat Security Principles . . . . . . . . . . . . . . . . . . . . . 226
Retaining Tomcat’s Administration Tools . . . . . . . . . . . . . . . . . . . . . . 226
Read-Only webapps Directory. . . . . . . . . . . . . . . . . . . . . . . . . . . . . . . 227
Securing Your Files . . . . . . . . . . . . . . . . . . . . . . . . . . . . . . . . . . . . . . . . 227
Knowing If Your Security Has Been Violated . . . . . . . . . . . . . . . . . . . 227
Read-Only File Systems . . . . . . . . . . . . . . . . . . . . . . . . . . . . . . . . . . . . 227
■CONTENTSxii
785000FM.qxd 2/28/07 11:23 AM Page xii

Securing Tomcat’s Default Configuration . . . . . . . . . . . . . . . . . . . . . . . . . . 228
Securing Tomcat’s Permissions . . . . . . . . . . . . . . . . . . . . . . . . . . . . . . . . . . 228
The Java Security Manager . . . . . . . . . . . . . . . . . . . . . . . . . . . . . . . . . 228
Using the Security Manager with Tomcat . . . . . . . . . . . . . . . . . . . . . 232
Tomcat’s Policy File . . . . . . . . . . . . . . . . . . . . . . . . . . . . . . . . . . . . . . . . 232
Recommended Security Manager Practices . . . . . . . . . . . . . . . . . . . 236
Using Security Realms . . . . . . . . . . . . . . . . . . . . . . . . . . . . . . . . . . . . . . . . . . 238
Adding Settings to web.xml . . . . . . . . . . . . . . . . . . . . . . . . . . . . . . . . . 238
Choosing Form-Based Authentication . . . . . . . . . . . . . . . . . . . . . . . . 239
Using Custom Login and Error Pages. . . . . . . . . . . . . . . . . . . . . . . . . 240
Using the Secure Sockets Layer . . . . . . . . . . . . . . . . . . . . . . . . . . . . . . . . . . 242
Installing JSSE . . . . . . . . . . . . . . . . . . . . . . . . . . . . . . . . . . . . . . . . . . . . 243
Preparing the Certificate Keystore . . . . . . . . . . . . . . . . . . . . . . . . . . . 243
Installing a Certificate from a Certificate Authority . . . . . . . . . . . . . 244
Importing the Certificate. . . . . . . . . . . . . . . . . . . . . . . . . . . . . . . . . . . . 245
Protecting Resources with SSL . . . . . . . . . . . . . . . . . . . . . . . . . . . . . . 245
Configuring the SSL Connector . . . . . . . . . . . . . . . . . . . . . . . . . . . . . . 246
Using SSL with the Apache Web Server. . . . . . . . . . . . . . . . . . . . . . . 246
Summary . . . . . . . . . . . . . . . . . . . . . . . . . . . . . . . . . . . . . . . . . . . . . . . . . . . . . 251
■CHAPTER 13 Implementing Shared Tomcat Hosting. . . . . . . . . . . . . . . . . . . . 253
Examining Virtual Hosting . . . . . . . . . . . . . . . . . . . . . . . . . . . . . . . . . . . . . . . 253
IP-Based Virtual Hosting . . . . . . . . . . . . . . . . . . . . . . . . . . . . . . . . . . . . 254
Name-Based Virtual Hosting . . . . . . . . . . . . . . . . . . . . . . . . . . . . . . . . 256
Implementing Virtual Hosting with Tomcat . . . . . . . . . . . . . . . . . . . . . . . . . 257
Creating an Example Configuration . . . . . . . . . . . . . . . . . . . . . . . . . . 258
Setting Up the Virtual Hosting . . . . . . . . . . . . . . . . . . . . . . . . . . . . . . . 260
Testing the Virtual Hosting . . . . . . . . . . . . . . . . . . . . . . . . . . . . . . . . . . 263
Implementing Virtual Hosting with Apache and Tomcat . . . . . . . . . . . . . . 264
Setting a JVM for Each Virtual Host . . . . . . . . . . . . . . . . . . . . . . . . . . 267
Summary . . . . . . . . . . . . . . . . . . . . . . . . . . . . . . . . . . . . . . . . . . . . . . . . . . . . . 271
■CHAPTER 14 Testing Tomcat’s Performance . . . . . . . . . . . . . . . . . . . . . . . . . . . . 273
Preparing for Load Testing . . . . . . . . . . . . . . . . . . . . . . . . . . . . . . . . . . . . . . . 273
Configuring the Java Heap Size . . . . . . . . . . . . . . . . . . . . . . . . . . . . . 273
Configuring Tomcat’s Connectors . . . . . . . . . . . . . . . . . . . . . . . . . . . . 275
Configuring Application Sessions . . . . . . . . . . . . . . . . . . . . . . . . . . . . 275
Altering Tomcat’s Deployment Architecture . . . . . . . . . . . . . . . . . . . 276
Working with a Developer’s Code . . . . . . . . . . . . . . . . . . . . . . . . . . . . 276
■CONTENTS xiii
785000FM.qxd 2/28/07 11:23 AM Page xiii
Load Testing with JMeter . . . . . . . . . . . . . . . . . . . . . . . . . . . . . . . . . . . . . . . . 276
Installing and Running JMeter. . . . . . . . . . . . . . . . . . . . . . . . . . . . . . . 277
Making and Understanding Test Plans . . . . . . . . . . . . . . . . . . . . . . . . 277
Examining JMeter’s Features. . . . . . . . . . . . . . . . . . . . . . . . . . . . . . . . 281
Interpreting Test Results. . . . . . . . . . . . . . . . . . . . . . . . . . . . . . . . . . . . . . . . . 291
Examining the Mean . . . . . . . . . . . . . . . . . . . . . . . . . . . . . . . . . . . . . . . 291
Examining the Standard Deviation . . . . . . . . . . . . . . . . . . . . . . . . . . . 292
Summary . . . . . . . . . . . . . . . . . . . . . . . . . . . . . . . . . . . . . . . . . . . . . . . . . . . . . 292
■APPENDIX Installing MySQL . . . . . . . . . . . . . . . . . . . . . . . . . . . . . . . . . . . . . . . . . . . 293
Installing MySQL on Windows . . . . . . . . . . . . . . . . . . . . . . . . . . . . . . . . . . . . 293
Installing MySQL on Linux and Unix . . . . . . . . . . . . . . . . . . . . . . . . . . . . . . . 293
Creating a User for MySQL. . . . . . . . . . . . . . . . . . . . . . . . . . . . . . . . . . 293
Installing MySQL from the RPM Package . . . . . . . . . . . . . . . . . . . . . 294
Installing MySQL from Source . . . . . . . . . . . . . . . . . . . . . . . . . . . . . . . 294
Working with MySQL. . . . . . . . . . . . . . . . . . . . . . . . . . . . . . . . . . . . . . . . . . . . 296
Resources . . . . . . . . . . . . . . . . . . . . . . . . . . . . . . . . . . . . . . . . . . . . . . . . . . . . . 299
■INDEX . . . . . . . . . . . . . . . . . . . . . . . . . . . . . . . . . . . . . . . . . . . . . . . . . . . . . . . . . . . . . . . . . . . . . . . 301
■CONTENTSxiv
785000FM.qxd 2/28/07 11:23 AM Page xiv

About the Author
■MATTHEW MOODIE is a native of southwest Scotland and is a graduate of the University ofEdinburgh, where he obtained a master’s degree in linguistics and artificial intelligence.
Matthew enjoys a life of fun in Glasgow, Scotland. He’s a keen novice gardener with a housefulof plants.
xv
785000FM.qxd 2/28/07 11:23 AM Page xv

785000FM.qxd 2/28/07 11:23 AM Page xvi
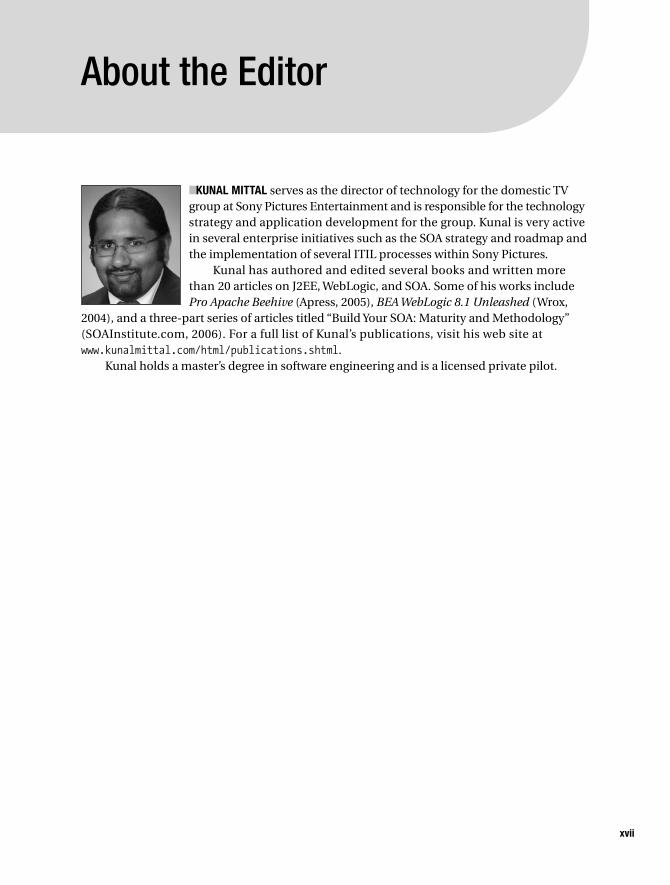
About the Editor
■KUNAL MITTAL serves as the director of technology for the domestic TVgroup at Sony Pictures Entertainment and is responsible for the technologystrategy and application development for the group. Kunal is very activein several enterprise initiatives such as the SOA strategy and roadmap andthe implementation of several ITIL processes within Sony Pictures.
Kunal has authored and edited several books and written morethan 20 articles on J2EE, WebLogic, and SOA. Some of his works includePro Apache Beehive (Apress, 2005), BEA WebLogic 8.1 Unleashed (Wrox,
2004), and a three-part series of articles titled “Build Your SOA: Maturity and Methodology”(SOAInstitute.com, 2006). For a full list of Kunal’s publications, visit his web site atwww.kunalmittal.com/html/publications.shtml.
Kunal holds a master’s degree in software engineering and is a licensed private pilot.
xvii
785000FM.qxd 2/28/07 11:23 AM Page xvii

785000FM.qxd 2/28/07 11:23 AM Page xviii

About the Technical Reviewer
■SCOTT DAVIS is an independent software developer and internationalspeaker. His books include JBoss at Work (O’Reilly, 2005), Google Maps API(Pragmatic Bookshelf, 2005), the forthcoming GIS for Web Developers:Adding Where to Your Application (Pragmatic Bookshelf, 2007), and GroovyRecipes: Greasing the Wheels of Java (Pragmatic Bookshelf, 2007). He isthe editor in chief of http://aboutGroovy.com. Keep up with him athttp://davisworld.org.
xix
785000FM.qxd 2/28/07 11:23 AM Page xix

785000FM.qxd 2/28/07 11:23 AM Page xx
Acknowledgments
I would like to thank Laura for her love, friendship, and cakes. Love to Mum, Valla, Alexandra,Harcus, Angus, Uncle Andrew, Granny, Grandpa, and Howard. A great big thank you to Andrew,Brian, Katy, Lindsey, Mad, Paul, Sally, and Disco Robot Craig for even more good times. Lifewould be pretty grey without you all.
Thanks to Billy, Dave, Pete, Broon, Stuart, and Mark for your friendship over all these years.It’s been 20 years, give or take, and it’s been great.
Matthew Moodie
I would like to thank the entire Apress team for giving me the opportunity to edit this book. Steve,Beth, Sofia, Lori, Kelly, Tina, and many others who have worked behind the scenes on this edi-tion, thanks for putting up with my work and helping getting this book finished! I would alsolike to thank my wife, Neeta, and my pooches, Dusty and Snowie, for bearing with me as I workedweekends and evenings.
Kunal Mittal
xxi
785000FM.qxd 2/28/07 11:23 AM Page xxi

785000FM.qxd 2/28/07 11:23 AM Page xxii
Introducing Tomcat
This, as befits a first chapter in a book on Tomcat, is a short history of dynamic web contentand how Tomcat fits into that history. Once you’ve dealt with that, you’ll learn about Tomcat’sarchitecture and its modular approach to configuration.
Understanding the Web TodayThe Web isn’t solely made up of static pages that show the same document to every user; manypages contain content generated independently for each viewer. Although static files still havetheir place, many useful and necessary web sites would be unable to function without dynamiccontent. For example, Amazon.com is one of the major success stories of the Web and is oftenthe reason people go online for the first time. Without dynamic content, such as shopping baskets,personal recommendations, and personalized welcome messages, Amazon.com wouldn’t bethe success it has been, and many people wouldn’t be online.
The Common Gateway Interface (CGI) was the original dynamic content mechanism thatexecuted programs on a web server and allowed webmasters to customize their pages, whichwas extremely popular in the early days of the Web. The CGI model is as follows:
1. The browser sends a request to the server just as it would for a Hypertext MarkupLanguage (HTML) page.
2. The server maps the requested resource to an external program.
3. The server runs the external program and passes it the original Hypertext TransferProtocol (HTTP) request.
4. The external program executes and sends its results to the server.
5. The server passes the program’s output to the browser as an HTTP response.
CGI has been implemented in many programming languages, but Perl was, and still is, themost popular language for developing CGI applications. However, CGI isn’t very efficient; eachtime the server receives a request, it must start a new copy of the external program.
So, if only a small number of users request a CGI program simultaneously, it’s not too bigof a problem. However, it’s a different story if hundreds or thousands of users request theresource simultaneously. Every copy of the program requires a share of the server’s processing
1
C H A P T E R 1
■ ■ ■
7850ch01FINAL.qxd 2/28/07 10:33 AM Page 1

power, which is rapidly used as requests pile up. The situation is made even worse by CGIprograms that are written in interpreted languages such as Perl, which result in the launch oflarge runtime interpreters with each request.
Looking Beyond CGIMany alternative solutions to CGI have been developed since the Web began. The more suc-cessful of these provide an environment that exists inside an existing server or even functionsas a server on its own.
Many CGI replacements have been built on top of the Apache server (www.apache.org)because of Apache’s popular modular application programming interface (API). Developerscan use the API to extend Apache’s functionality with persistent programs, thus it’s ideal forcreating programs that create dynamic content. Apache loads modules into its memory whenit starts and passes the appropriate HTTP requests to them as needed. It then passes the HTTPresponses to the browser once the modules have processed the requests. Because the modulesare already in the server’s memory, the cost of loading an interpreter is removed, and scriptscan execute faster.
Although few developers actually create modules themselves (they’re relatively difficult todevelop), many third-party modules provide a basis for applications that are much more effi-cient than normal CGI. The following are a few examples:
• mod_perl: This maintains the Perl interpreter in memory, thus removing the overhead ofloading a new copy of the Perl interpreter for each request. This is an incredibly popularmodule.
• mod_php4: This module speeds up PHP in the same way that mod_perl speeds up Perl.
• mod_fastcgi: This is similar to straight CGI, but it keeps programs in memory ratherthan terminating them when each request is finished.
Microsoft provides an interface to its Internet Information Services (IIS) web server, calledthe Internet Server Application Programming Interface (ISAPI). Because of its complexity, thisAPI doesn’t have the following that Apache’s API has, but it’s nevertheless a high-performanceAPI. However, IIS is widely used, mainly because it comes as part of many versions of Windows.In Chapter 9, you’ll configure Tomcat to work with IIS, so you can combine the best features ofboth.
Microsoft also developed the Active Server Pages (ASP) technology, which lets you embedscripts, typically VBScript scripts, into standard HTML pages. This model has proved extremelysuccessful and was the catalyst for Java web technology, which I’ll discuss next.
Introducing Java on the WebJava was initially released in the mid-1990s as a way to liven up static web pages. It was platformindependent and allowed developers to execute their programs, called applets, in the user’sbrowser. An incredible amount of hype surrounded applets: that they would make the Web moreexciting and interactive, that they would change the way people bought computers, and thatthey would reduce all the various operating systems into mere platforms for web browsers.
Applets never really caught on; in fact, other technologies, such as Adobe Flash, becamemore popular ways of creating interactive web sites. However, Java isn’t just for writing applets:you can also use it to create stand-alone, platform-independent applications.
CHAPTER 1 ■ INTRODUCING TOMCAT2
7850ch01FINAL.qxd 2/28/07 10:33 AM Page 2

The main contribution of Java to the web is servlets, which are another alternative technol-ogy to CGI. Just as CGI and its other alternatives aren’t stand-alone programs (because theyrequire a web server), servlets require a servlet container to load servlets into memory. Theservlet container then receives HTTP requests from browsers and passes them to servlets thatgenerate the response. The servlet container can also integrate with other web servers to usetheir more efficient static file abilities while continuing to produce the dynamic content. You’llfind an example of this in Chapter 9, when you integrate Tomcat with Apache and IIS.
Unfortunately, although servlets are an improvement over CGI, especially with respect toperformance and server load, they too have a drawback. They’re primarily suitable for process-ing logic. For the creation of content (that is, HTML), they’re less usable. First, hard-codingtextual output, including HTML tags, in code makes the application less maintainable. This isbecause if text in the HTML must be changed, the servlet must be recompiled.
Second, this approach requires the HTML designer to understand enough about Java toavoid breaking the servlet. More likely, however, the programmer of the application must takethe HTML from the designer and then embed it into the application: an error-prone task ifever there was one.
To solve this problem, Sun Microsystems created the JavaServer Pages (JSP) technology.
Adding to Servlets: JavaServer PagesAlthough writing servlets requires knowledge of Java, a Java newbie can quickly learn some use-ful JSP techniques. As such, JSP represents a viable and attractive alternative to Microsoft’s ASP.
Practically speaking, JSP pages are compiled into servlets, which are then kept in memoryor on the file system indefinitely, until either the memory is required or the server is restarted.This servlet is called for each request, thus making the process far more efficient than ASP,since ASP requires the server to parse and compile the document every time a user comes tothe site. This means that a developer can write software whose output is easy to verify visuallyand with a result that works like a piece of software. In fact, JSP took off mainly as a result ofits suitability for creating dynamic visual content at a time when the Internet was growing inpopularity.
One major practical difference between servlets and JSP pages is that servlets are providedin compiled form and JSP pages often are not (although precompilation is possible). What thismeans for a system administrator is that servlet files are held in the private resources section ofthe servlet container, and JSP files are mixed in with static HTML pages, images, and otherresources in the public section of servlet container.
Introducing Servlet ContainersJSP pages and servlets require a servlet container to operate at all. Tomcat, the subject of thisbook, is the reference implementation (RI) servlet container, which means that Tomcat’s firstpriority is to be fully compliant with the Servlet and JSP specifications published by Sun Microsys-tems. However, this isn’t to say that Tomcat isn’t worthy of use in production systems. Indeed,many commercial installations use Tomcat.
An RI has the added benefit of refining the specification, whatever the technology may be.As developers add code per the specifications, they can uncover problems in implementationrequirements and conflicts within the specification.
CHAPTER 1 ■ INTRODUCING TOMCAT 3
7850ch01FINAL.qxd 2/28/07 10:33 AM Page 3

As noted previously, the RI is completely compliant with the specification and is, there-fore, particularly useful for people who are using advanced features of the specification. TheRI is released with the specification, which means that Tomcat is always the first server to pro-vide the new features of the specification when it’s finished.
Looking at TomcatTomcat has its origins in the earliest days of the servlet technology. Sun Microsystems createdthe first servlet container, the Java Web Server, to demonstrate the technology, but it wasn’t ter-ribly robust. At the same time, the Apache Software Foundation (ASF) created JServ, a servletengine that integrated with the Apache web server.
In 1999, Sun Microsystems donated the Java Web Server code to the ASF, and the two proj-ects merged to create Tomcat. Version 3.x was the first Tomcat series and was directly descendedfrom the original code that Sun Microsystems provided to the ASF. It’s still available and is the RIof the Servlet 2.2 and JSP 1.1 specifications.
In 2001, the ASF released Tomcat 4.0, which was a complete redesign of the Tomcat archi-tecture and which had a new code base. The Tomcat 4.x series is the RI of the Servlet 2.3 andJSP 1.2 specifications.
Tomcat 5.x was the next version of Tomcat and is the RI of the Servlet 2.4 and JSP 2.0 spec-ifications. Note that two branches of Tomcat 5.x exist: Tomcat 5.0.x and Tomcat 5.5.x. Tomcat 5.5.xbranched at Tomcat 5.0.27 and is a refactored version that’s intended to work with the Java 2Platform Standard Edition 5.0 (you can use it with Java 2 Standard Edition 1.4, but it requiresan additional Compatibility Kit patch).
This book covers the newly released Tomcat 6.x version. This version is the new RI for theServlet 2.5 and JSP 2.1 specifications.
What’s New in Tomcat 6Tomcat 6 is built using several new features, such as generics, introduced in Java 5. The keynew elements from the Tomcat 5 release are support for the latest Java Server Pages (JSP) 2.1specification (JSR 245) and the Java Servlet 2.5 specification (JSR 154). In addition to JSP 2.1,Tomcat 6 fully supports the Unified Expression Language (Unified EL) 2.1. As you might know,Unified EL 2.1 was made into its own stand-alone package in the JSP 2.1 specification. Thismeans that you should be able to use EL outside of a container such as Tomcat. Tomcat 6 isalso the first container to support the Java Server Faces 1.2 specification.
In my experience with Tomcat 6, I have noticed it is a little faster (during startup and shut-down) than its predecessor. It also seems to have a slightly smaller memory footprint. Throughoutthis book, as we talk about the different aspects of Tomcat 6, you will notice that not a whole lot haschanged from the Tomcat 5.5 release. However, you will notice some small changes to the directorystructures and start scripts. Of course, if you have not used Tomcat 5.5, you will see more drasticchanges in this version, such as a completely new logging mechanism and a lot more ease-of-usefeatures and flexibility.
CHAPTER 1 ■ INTRODUCING TOMCAT4
7850ch01FINAL.qxd 2/28/07 10:33 AM Page 4

Understanding Tomcat’s ArchitectureThe latest version of Tomcat is 6, which supports the Servlet 2.5 and JSP 2.1 specifications. Itconsists of a nested hierarchy of components.
• Top-level components exist at the top of the configuration hierarchy in a rigid relation-ship with one another.
• Connectors connect the servlet container to requests, either from a browser or anotherweb server that’s handling the static resources.
• Container components contain a collection of other components.
• Nested components can reside in containers but can’t contain other components.
Figure 1-1 illustrates the structure of a Tomcat configuration.
Figure 1-1. An example Tomcat configuration. The components marked with a star can occurmultiple times.
When configuring Tomcat, you can remove some of these objects without affecting theserver. Notably, the engine and host may be unnecessary if you’re using a web server such asApache.
You won’t be surprised to hear that Tomcat is configured with an Extensible MarkupLanguage (XML) file that mirrors the component hierarchy. You’ll learn about this file, calledserver.xml, in Chapter 4.
In the next couple of sections, you’ll look into each component in turn.
Top-Level ComponentsThe top-level components are the Tomcat server, as opposed to the other components, whichare only parts of the server.
CHAPTER 1 ■ INTRODUCING TOMCAT 5
7850ch01FINAL.qxd 2/28/07 10:33 AM Page 5

The Server ComponentThe server component is an instance of the Tomcat server. You can create only one instance ofa server inside a given Java virtual machine (JVM).
You can set up separate servers configured to different ports on a single server to sepa-rate applications so that you can restart them independently. So, if a given JVM crashes, theother applications will be safe in another instance of the server. This is sometimes done inhosting environments where each customer has a separate instance of a JVM so that a badlywritten application won’t cause others to crash.
The Service ComponentA service component groups an engine component with its connectors. An engine is a request-processing component that represents the servlet engine. It examines the HTTP headers todetermine to which host or context (that is, which web application) it should pass the request.Each service is named so that administrators can easily identify log messages sent from eachservice.
This component accepts requests, routes them to the appropriate web application, andreturns the result of the request processing.
The Connector ComponentsConnectors connect web applications to clients. They’re the point where requests are receivedfrom clients, and each has a unique port on the server. Tomcat’s default HTTP port is 8080 toavoid interference with any web server running on port 80, the standard HTTP port. However,you can change this as long as the new port doesn’t already have a service associated with it.
The default HTTP connector implements HTTP 1.1. The alternative is the Apache JServProtocol (AJP) connector, which is a connector for linking with Apache to use its Secure SocketsLayer (SSL) and static content-processing capabilities. I’ll discuss each of these in Chapter 9.
The Container ComponentsThe container components receive the requests from the top-level components as appropri-ate. They then deal with the request process and return the response to the component thatsent it to them.
The Engine ComponentThe engine component is the top-level container and can’t be contained by another containercomponent. Only one may be contained in each service component.
The top-level container doesn’t have to be an engine, because it only has to implementthe container interface. This interface ensures the object implementing it is aware of its posi-tion in the component hierarchy, provides a realm for user authentication and role-basedauthorization, and has access to a number of resources including its session manager andsome important internal structures.
The container at this level is usually an engine, so you’ll see it in that role. As mentionedearlier, the container components are request-processing components, and the engine is noexception. In this case, it represents the Catalina servlet engine. It examines the HTTP headersto determine to which virtual host or context to pass the request. In this way, you can see theprogression of the request from the top-level components down the hierarchy of components.
CHAPTER 1 ■ INTRODUCING TOMCAT6
7850ch01FINAL.qxd 2/28/07 10:33 AM Page 6
If Tomcat is used as a stand-alone server, the defined engine is the default. However, ifTomcat is configured to provide servlet support with a web server providing the static pages,the default engine is overridden, as the web server has normally determined the correct desti-nation for the request.
The host name of the server is set in the engine component if required. An engine maycontain hosts representing a group of web applications and contexts, each representinga single web application.
The Host ComponentA host component is analogous to the Apache virtual host functionality. It allows multipleservers to be configured on the same physical machine and be identified by separate InternetProtocol (IP) addresses or host names. In Tomcat’s case, the virtual hosts are differentiated bya fully qualified host name. Thus, you can have www.apress.com and www.moodie.com on thesame server. In this case, the servlet container routes requests to the different groups of webapplications.
When you configure a host, you set its name; the majority of clients will usually send boththe IP address of the server and the host name they used to resolve the IP address. The enginecomponent inspects the HTTP header to determine which host is being requested.
The Context ComponentThe final container component, and the one at the lowest level, is the context, also known asthe web application. When you configure a context, you inform the servlet container of thelocation of the application’s root folder so that the container can route requests effectively. Youcan also enable dynamic reloading so that any classes that have changed are reloaded into mem-ory. This means the latest changes are reflected in the application. However, this is resourceintensive and isn’t recommended for deployment scenarios.
A context component may also include error pages, which will allow you to configure errormessages consistent with the application’s look and feel.
Finally, you can also configure a context with initialization parameters for the applicationit represents and for access control (authentication and authorization restrictions). Moreinformation on these two aspects of web application deployment is available in Chapter 5.
The Nested ComponentsThe nested components are nested within container components and provide a number ofadministrative services. You can’t nest all of them in every container component, but you cannest many of them this way. The exception to the container component rule is the globalresources component, which you can nest only within a server component.
The Global Resources ComponentAs already mentioned, this component may be nested only within a server component. Youuse this component to configure global Java Naming and Directory Interface (JNDI) resourcesthat all the other components in the server can use. Typically these could be data sources fordatabase access or serverwide constants for use in application code.
CHAPTER 1 ■ INTRODUCING TOMCAT 7
7850ch01FINAL.qxd 2/28/07 10:33 AM Page 7

The Loader ComponentThe loader component may be nested only within a context component. You use a loader tospecify a web application’s class loader, which will load the application’s classes and resourcesinto memory. The class loader you specify must follow the Servlet specification, though it’sunlikely you’ll find it necessary to use this component because the default class loader worksperfectly well.
The Logger ComponentWith Tomcat 6, you should use a logging implementation such as Log4J, which is covered inmore depth in Chapter 4. The logger component, as it exists in Tomcat 5.0.x and previousversions, has not been available since the Tomcat 5.5.x release.
The Manager ComponentThe manager component represents a session manager for working with user sessions ina web application. As such, it can be included only in a context container. A default managercomponent is used if you don’t specify an alternative, and, like the loader component men-tioned previously, you’ll find that the default is perfectly good.
The Realm ComponentThe realm for an engine manages user authentication and authorization. As part of the config-uration of an application, you set the roles that are allowed to access each resource or group ofresources, and the realm is used to enforce this policy.
Realms can authenticate against text files, database tables, Lightweight Directory AccessProtocol (LDAP) servers, and the Windows network identity of the user. You’ll see more of thisin Chapter 11.
A realm applies across the entire container component in which it’s included, so applicationswithin a container share authentication resources. By default, a user must still authenticateseparately to each web application on the server. (This is called single sign-on.) You’ll see howyou can change this in Chapter 7.
The Resources ComponentYou can add the resources component to a context component. It represents the static resourcesin a web application and allows them to be stored in alternative formats, such as compressedfiles. The default is more than sufficient for most needs.
The Valve ComponentYou can use valve components to intercept a request and process it before it reaches its desti-nation. Valves are analogous to filters as defined in the Servlet specification and aren’t in theJSP or Servlet specifications. You may place valve components in any container component.
Valves are commonly used to log requests, client IP addresses, and server usage. Thistechnique is known as request dumping, and a request dumper valve records the HTTP headerinformation and any cookies sent with the request. Response dumping logs the response headersand cookies (if set) to a file.
CHAPTER 1 ■ INTRODUCING TOMCAT8
7850ch01FINAL.qxd 2/28/07 10:33 AM Page 8

Valves are typically reusable components, so you can add and remove them from therequest path according to your needs; web applications can’t detect their presence, so theyshouldn’t affect the application in any way. (However, performance may suffer if a valve isadded.) If your users have applications that need to intercept requests and responses for pro-cessing, they should use filters as per the Servlet specification.
You can use other useful facilities, such as listeners, when configuring Tomcat. However,filters aren’t defined as components. You’ll deal with them in Chapter 7.
SummaryThis chapter was a quick introduction to dynamic web content and the Tomcat web server.You learned about the emergence of CGI, its problems, and the various solutions that havebeen developed over the years. You saw that servlets are Java’s answer to the CGI problem andthat Tomcat is the reference implementation of the Servlet specification as outlined by SunMicrosystems.
The chapter then discussed Tomcat’s architecture and how all its components fit togetherin a flexible and highly customizable way. Each component is nested inside another to allowfor easy configuration and extensibility.
Now that you’re familiar with Tomcat, you’ll learn about how to install it on variousplatforms.
CHAPTER 1 ■ INTRODUCING TOMCAT 9
7850ch01FINAL.qxd 2/28/07 10:33 AM Page 9

7850ch01FINAL.qxd 2/28/07 10:33 AM Page 10
Installing Tomcat
In the previous chapter, you saw a brief history of the Internet and the Web that built up tothe development of servlets and the release of Tomcat. Continuing in this abstract manner,you learned about Tomcat’s modular architecture. However, none of this is useful if you don’thave the Tomcat server, so in this chapter you’ll do the following:
• You’ll install Java if you haven’t done so already.
• You’ll install Tomcat on your platform of choice.
• You’ll install the Ant build tool.
You’ll also see how to compile Tomcat from the source code provided on the Tomcat website. This process is the same on Windows and Linux and requires the Ant build tool, so you’llsee how to do it once all the other installation techniques have been covered.
Installing JavaYour choice of JVM can significantly affect the performance of your Tomcat server, and it’s worthevaluating a few to see which gives you the best performance. This is a subject that many peopledon’t concern themselves with or have never thought about, so you won’t be alone if you thinkthat this isn’t an issue. Sun Microsystems’ JVM is all you need, right?
Well, if performance is really an issue and you want to squeeze as much out of your serversetup as possible, you should look into this area. You can find a lot of information on the Internet,and Sun provides its own guidance at http://java.sun.com/docs/performance/.
IBM (www.ibm.com/developerworks/java/jdk/) and the Blackdown project (www.blackdown.org), which is a Linux port of source donated by Sun Microsystems, provide themain alternatives to Sun Microsystems’ Java development kit (JDK).
Installing Java on WindowsDownload the latest Java installer from http://java.sun.com/j2se/downloads/. Tomcat 6 isdesigned to run on JDK 1.5, so I recommend that you get that. I have not tried running Tomcat6 with JDK 1.4, but you might be able to do so using the JDK compatibility kit. This book willnot talk any further about this. You can download this compatibility package from the Tomcatdownload page at http://tomcat.apache.org/download-55.cgi.
Java 1.5 comes standard on the Mac, with Mac OS X and later, but you can downloadalternate versions by following the instructions for Linux later in this chapter.
11
C H A P T E R 2
■ ■ ■
7850ch02FINAL.qxd 2/28/07 10:36 AM Page 11

The Java installer on Windows is a standard installation package with easy-to-follow steps.Start the installation by double-clicking the downloaded installer, and you’ll shortly have the JDKinstalled. Choose the folder where you want to install Java, which is referred to as %JAVA_HOME%.The %JAVA_HOME%\bin directory is where the installer places all the Java executables, including theJVM, the compiler, the debugger, and a packaging utility.
You’ll probably have noted that the installation directory was specified as if it were an envi-ronment variable. This is because you now have to add the installation folder as an environmentvariable called %JAVA_HOME% so that Windows can find the Java executables. Java itself doesn’t needthis environment variable, but many third-party packages need to know where Java is, and Tom-cat is no exception. Finally, add the %JAVA_HOME%\bin directory to the Windows path. This avoidsclashes with other JVMs that may be on the system.
Setting Environment VariablesTo set environment variables, select Start ➤ Settings ➤ Control Panel, and choose the Systemoption. Now choose the Advanced tab, and click the Environment Variables button. You’ll seea screen like the one shown in Figure 2-1.
Figure 2-1. The Windows Environment Variables dialog box
The top window contains variables for the user you’re logged in as, which are availableonly when you’re logged in as this user, and the bottom window contains system environmentvariables, which are available to all users. To add %JAVA_HOME% so that every user has access toit, click the New button below the bottom window; next, enter JAVA_HOME as the variablename, and enter the directory where Java was installed as the value.
CHAPTER 2 ■ INSTALLING TOMCAT12
7850ch02FINAL.qxd 2/28/07 10:36 AM Page 12

Next, modify the %Path% variable to include %JAVA_HOME%\bin, making sure it’s the firstentry in the path to avoid any naming clashes. Adding this directory to the path will make theJava executables available at the command prompt. To test the installation, open an instanceof the command prompt and type the following:
> java -version
You should then see version information as follows:
java version "1.5.0"
Java(TM) 2 Runtime Environment, Standard Edition (build 1.5.0-b64)
Java HotSpot(TM) Client VM (build 1.5.0_02-b09, mixed mode)
In this example, JDK 1.5.0_02-b09 is installed as the default Java. If you have the wrongversion information, check that you’ve added the correct Java to the Windows path. Doublecheck to see whether this matches whatever version of JDK 1.5 you downloaded.
Setting Environment Variables in Windows 9x
In Windows 2000, XP, and Vista, you set the environment variables by editing the c:\autoexec.batfile. Open the file, and add the following path to your installation:
set JAVA_HOME=c:\java\jdk1.5
For Windows ME, you can use the System Configuration utility to set environment variables.To run it, choose Start ➤ Programs ➤ Accessories ➤ System Tools ➤ System Information. You’llsee a Microsoft help and support page, from which you should select the Tools menu and thenthe System Configuration utility. From here, select the Environment tab, and set the JAVA_HOMEvariable to point to your Java installation directory. Test the installation as mentioned previously.
Installing Java on LinuxDownload a suitable distribution from http://java.sun.com/j2se/downloads/. Two types ofdownload exist: a self-extracting binary file and an RPM package for systems supporting RPMs.As mentioned earlier, Tomcat 6 works with JDK 1.5.
Installing Java Using the Self-Extracting BinaryOnce you’ve obtained the self-extracting binary, you must set its execute permissions. Note thatyou don’t need to be a root user to install Java using the self-extracting binary, though you doneed to be a root user if you want to install it in a system directory such as /usr/local; this isbecause the binary won’t overwrite any system files otherwise. To change the execute permis-sions, type the following command from the directory where the binary is located:
# chmod +x j2sdk-1_5_0-linux-i586.bin
Now change the directory to the one where you want to install Java, and execute the binary.You must prefix the binary’s filename with any path information that’s necessary, like so:
# ./j2sdk-1_5_0-linux-i586.bin
CHAPTER 2 ■ INSTALLING TOMCAT 13
7850ch02FINAL.qxd 2/28/07 10:36 AM Page 13

This command will display a license agreement and, once you’ve agreed to the license,install Java in a j2sdk-1_5_0 directory in the current directory.
You need to add the $JAVA_HOME environment variable to your system to specify the loca-tion of the JDK. So, if you installed it in /usr/java/j2sdk-1_5_0_02-linux-i386, you shouldgive $JAVA_HOME this value. To add it permanently, you can add it to your ~/.bashrc file or, ifyou want all users to have access to Java, to /etc/profile.
Alternatively, /etc/profile runs any shell scripts in /etc/profile.d, so you can add thefollowing lines to a file named tomcat.sh:
JAVA_HOME=/usr/java/j2sdk-1_5_0_02-linux-i386/
export JAVA_HOME
PATH=$JAVA_HOME/bin:$PATH
export PATH
You may have to log out and log in again for your system to read /etc/profile or tomcat.sh.You should also add execute permissions for the $JAVA_HOME/bin folder for all the users who willbe using Java, as appropriate.
To test the installation, type the following:
# java -version
If the installation succeeded, you’ll see version information.
Installing Java Using the RPM InstallerTo install the JDK using the RPM, you must first download the file. Unlike with the self-extractingbinary, you must be a root user to install the RPM.
Sun Microsystems supplies the RPM as an executable to allow you to agree to the licensingterms. If you agree to the licensing terms, the RPM installer decompresses an RPM into the currentdirectory. Before you can run the RPM, you have to set execute permissions for the file, like so:
# chmod a+x j2sdk-1_5_0-linux-i586-rpm.bin
# ./j2sdk-1_5_0-linux-i586-rpm.bin
# rpm -iv jdk-1_5_0-linux-i586.rpm
The RPM will install Java as a replacement of the Linux system version. You should now followthe previous instructions to add execute permissions for the JDK executables and modify the pathto include them. Again, you can test the installation as described previously.
Installing TomcatNow that you’ve installed Java, it’s time for you to install the Tomcat server. The Windowsinstallations are first, followed by instructions for Linux.
The first step for all systems is obtaining the appropriate distribution. This may be a binaryor source distribution, depending on your needs. Whatever your requirements, Tomcat is avail-able from http://jakarta.apache.org/site/binindex.cgi. Choose the most stable version ofTomcat 6 provided. At the time of this writing, this was the 6.00-alpha release.
You can select a binary installer if you’re a Windows user and want to use Tomcat as a service,or you can select a zipped version of the binaries for any system.
CHAPTER 2 ■ INSTALLING TOMCAT14
7850ch02FINAL.qxd 2/28/07 10:36 AM Page 14
If you’re interested in the latest version of Tomcat or want to download an older version,you’ll find both of these options below the binary downloads.
You’ll also require Ant 1.65 or above for various deploy and build tasks later in the book.Ant is a build tool like make and is another excellent Jakarta project.
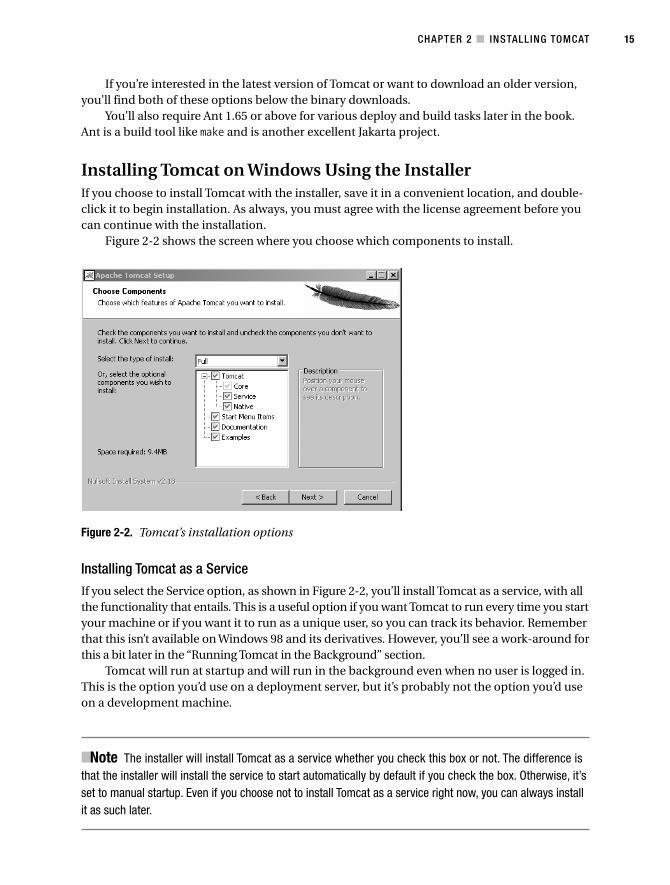
Installing Tomcat on Windows Using the InstallerIf you choose to install Tomcat with the installer, save it in a convenient location, and double-click it to begin installation. As always, you must agree with the license agreement before youcan continue with the installation.
Figure 2-2 shows the screen where you choose which components to install.
Figure 2-2. Tomcat’s installation options
Installing Tomcat as a ServiceIf you select the Service option, as shown in Figure 2-2, you’ll install Tomcat as a service, with allthe functionality that entails. This is a useful option if you want Tomcat to run every time you startyour machine or if you want it to run as a unique user, so you can track its behavior. Rememberthat this isn’t available on Windows 98 and its derivatives. However, you’ll see a work-around forthis a bit later in the “Running Tomcat in the Background” section.
Tomcat will run at startup and will run in the background even when no user is logged in.This is the option you’d use on a deployment server, but it’s probably not the option you’d useon a development machine.
■Note The installer will install Tomcat as a service whether you check this box or not. The difference isthat the installer will install the service to start automatically by default if you check the box. Otherwise, it’sset to manual startup. Even if you choose not to install Tomcat as a service right now, you can always installit as such later.
CHAPTER 2 ■ INSTALLING TOMCAT 15
7850ch02FINAL.qxd 2/28/07 10:36 AM Page 15

Installing Tomcat’s Start Menu ItemsIf you want to add shortcuts to Windows’ Start menu, select this option.
Installing Tomcat’s DocumentationYou should install the Tomcat documentation; it’s a useful resource and includes the Servletand JSP API javadocs. You’ll find these invaluable if you do any web development.
Installing Tomcat’s ExamplesIf you want to examine Tomcat’s example web applications, select this option. This is unlikelyif you’ll be using Tomcat as a production server, because the applications will simply take upspace and are certainly a security risk. The examples aren’t written with security or perform-ance in mind, and as well-known applications, they’re vulnerable to denial-of-service attacksand attempts to gain root access. If your users want to have them in a deployment environ-ment, by all means let them.
Finishing the InstallationOnce you’ve chosen the components you want to install, click Next. The installer will then askyou for information on installation directories, the location of Java, an administrator’s usernameand password, and the port details. Fill in these as appropriate for your installation.
■Note All public web servers run on port 80, which is the default HTTP port. When a browser attempts toconnect to a web site, it uses port 80 behind the scenes; that is, you don’t have to specify it. Tomcat’s HTTPservice runs on port 8080 by default to avoid a clash with other web servers that may already be running.You’ll see how to change this in Chapter 4.
Setting Environment VariablesThe scripts provided with Tomcat will usually be able to guess at your setup so that no furtherintervention is strictly necessary. However, it’s prudent to add the following environment variables.
Adding the CATALINA_HOME Environment Variable
%CATALINA_HOME% is the directory where you chose to install Tomcat. Tomcat needs to know thisinformation to find the resources that are referenced as relative paths to this folder. If you chosethe default directory while installing, this will be c:\Program Files\Apache Software Foundation\Tomcat 6.0.
To add the environment variable in Windows XP, navigate to Start ➤ Settings ➤ ControlPanel, and choose System. Now choose the Advanced tab, and click the Environment Variablesbutton. Click the New button in the System Variables section, call the new variable CATALINA_HOME,and enter the path to your installation.
CHAPTER 2 ■ INSTALLING TOMCAT16
7850ch02FINAL.qxd 2/28/07 10:36 AM Page 16

In Windows 98, set the environment variables in c:\autoexec.bat. Open the file, and addthe following path to your installation:
set CATALINA_HOME= c:\Program Files\Apache Software Foundation\Tomcat 6.0
For Windows ME, you can use the System Configuration utility to set environment variables.To run it, choose Start ➤ Programs ➤ Accessories ➤ System Tools ➤ System Information. You’llsee a Microsoft help and support page, from which you should select the Tools menu and thenthe System Configuration utility. From here, select the Environment tab, and set the CATALINA_HOMEvariable to point to your Tomcat installation directory.
CATALINA_HOME in Windows 9x
In Windows 9x, problems with file length and spaces in the path make it safer to install Tomcatdirectly onto c:\ rather than under Program Files. You’ll also need to increase the default environ-ment space to Tomcat by opening a DOS prompt window, right-clicking it, choosing Properties,selecting the Memory tab, and setting the initial environment to 4096 bytes (4 kilobytes).
Testing the InstallationTo test the installation, you must first start the server. You can start the server in two ways:manually or as a service.
Starting the Server ManuallyYou can start the server manually by selecting Start ➤ Programs ➤ Apache Tomcat 6.0 andthen selecting the Tomcat 6.0 Program Directory option. Navigate to the bin directory anddouble-click startup.bat. A new terminal window will start that shows the server is running.You can also run it from a command prompt, like so:
> %CATALINA_HOME%\bin\startup.bat
Note that if the window appears and promptly disappears again, you can try the tips in the“Troubleshooting and Tips” section.
If you want to shut down the server, use the shutdown.bat file in the bin directory.
Starting the Server as a ServiceIf you want to start the server as a service, you have three choices. First, you could have selectedto start the server at the end of installation.
Second, choose Start ➤ Settings ➤ Control Panel, and select Administrative Tools. Then selectthe Services icon, which will contain an entry for Tomcat, as shown in Figure 2-3.
CHAPTER 2 ■ INSTALLING TOMCAT 17
7850ch02FINAL.qxd 2/28/07 10:36 AM Page 17

Figure 2-3. The Services administrative tool with the Tomcat service highlighted
To start the service, right-click the Tomcat entry, and choose Start. You won’t see a consolewindow, as described previously, because the server is running as a service. Once you’ve started theservice, you can then restart and stop it by right-clicking the service’s entry in the Services window.
You can also start and stop the service using the Tomcat monitor. To start the monitor, selectStart ➤ Programs ➤ Apache Tomcat 6 ➤ Monitor Tomcat. You’ll see a new icon in your systemtray with a red stop sign on it. You can double-click the icon to display the Apache Tomcat Prop-erties box, as shown in Figure 2-4.
Figure 2-4. The Apache Tomcat Properties box
You can start, stop, pause, and restart the service here as you could in the Services utility. Youcan also start and stop the service by right-clicking the monitor’s icon and selecting the actionyou want to perform.
CHAPTER 2 ■ INSTALLING TOMCAT18
7850ch02FINAL.qxd 2/28/07 10:36 AM Page 18

Running Tomcat in the BackgroundIf you don’t want to run Tomcat as a service or are unable to because you’re running Windows9x/ME, you can still run Tomcat without a command prompt/DOS prompt window open whileTomcat is running by modifying the catalina.bat file in %CATALINA_HOME%\bin. Replace thefollowing text:
%_RUNJAVA%
with this:
%_RUNJAVAW%
This command calls the windowless version of the java executable. Tomcat will now startwith no attached Tomcat window, but one will appear and disappear.
You should now check that the server is indeed running (the absence of a window makesit hard to check by the usual means) by going to the server’s home page as described in thenext section. If you find a problem, run the startup batch file from the %CATALINA_HOME%\bindirectory, and note the error messages.
Viewing the Default InstallationTomcat, like most servers, comes with a default home page that you can use to check theinstallation. Enter the following address in a browser: http://localhost:8080. You should seea page similar to the one in Figure 2-5.
Figure 2-5. The Tomcat default home page
CHAPTER 2 ■ INSTALLING TOMCAT 19
7850ch02FINAL.qxd 2/28/07 10:36 AM Page 19
As mentioned, Tomcat connects to port 8080 by default. This is to avoid problems withother servers, such as Apache or IIS, that may be running on the machine.
If you have any problems, refer to the “Troubleshooting and Tips” section later in this chapter.
Installing Tomcat on Windows Using the Zipped FileInstalling Tomcat using the zipped file is extremely straightforward. It’s significantly bigger thanthe executable installer but has the same contents. All you have to do to install Tomcat from thezipped file is to uncompress the contents to a convenient directory.
The final step of installation is to add the %CATALINA_HOME% environment variable, as describedpreviously. To start the server, you need to navigate to %CATALINA_HOME%\bin (there’s no shortcutthis time, though you should create your own).
Now start the server as per the previous manual instructions; that is, double-clickstartup.bat. A new terminal window will start that shows the server is running.
You can also run it from a command prompt, like so:
> %CATALINA_HOME%\bin\startup.bat
Installing Tomcat on Linux or Mac OSYou’ll find that installing Tomcat on Linux or on Mac OS is easy. Download either the zipped fileor the gzipped tar file, if you have GNU gzip. Whatever your requirements, Tomcat is availablefrom http://jakarta.apache.org/site/binindex.cgi.
You should now export the $CATALINA_HOME environment variable, using the followingcommands:
# CATALINA_HOME=/usr/java/jakarta-tomcat-6.0
# export CATALINA_HOME
Alternatively, add these to ~/.bashrc or /etc/profile as you did for the JDK installationpreviously, or create a shell file, tomcat.sh, and place it in the /etc/profile.d. /etc/profilewill run it automatically at startup to make the variable available to all users.
You can now start Tomcat by running the following shell command:
# $CATALINA_HOME/bin/startup.sh
You can shut down Tomcat using
$CATALINA_HOME/bin/shutdown.sh
Viewing the Default InstallationTo check that Tomcat is running, point your browser to http://localhost:8080. You shouldsee a screen like the one in Figure 2-5.
To check that the dynamic side of Tomcat’s functionality is working, choose the JSP Exampleslink from the menu on the left, and select some of the examples. Check that they run withouterror messages. Do the same with the Servlet Examples link to test this functionality.
If you have any problems, refer to the “Troubleshooting and Tips” section later in this chapter.
CHAPTER 2 ■ INSTALLING TOMCAT20
7850ch02FINAL.qxd 2/28/07 10:36 AM Page 20

Running Tomcat with the Server OptionYou can run Tomcat with Java’s server option, which will increase efficiency and thus increaseperformance. To run Tomcat with the server option, you’ll need to modify a number of files inthe bin directory. For Windows, you need to edit setclasspath.bat. Change the last three linesas follows:
set _RUNJAVA="%JAVA_HOME%\bin\java" -server
set _RUNJAVAW="%JAVA_HOME%\bin\javaw" -server
set _RUNJDB="%JAVA_HOME%\bin\jdb" -server
Of course, this assumes you’re starting Tomcat manually.The process is similar in Linux. This time you modify setclasspath.sh, like so:
_RUNJAVA="$JAVA_HOME"/bin/java -server
_RUNJDB="$JAVA_HOME"/bin/jdb -server
Installing AntBefore you install Tomcat from source, or indeed before you start any serious Java-based project,you should install Ant. Ant is a Java-based build tool that has become ubiquitous. You use it tobuild and deploy applications. It benefits from platform independence and can use a single buildfile on multiple platforms. However, the build files must minimize dependency on a specific filepath. (Windows paths, for example, will cause problems on Linux and vice versa.)
You can download the latest binary distribution of Ant from http://ant.apache.org/bindownload.cgi. Ant is easy to install; simply unpack the distribution to a convenient location.
Because Ant is a program that you’ll use on a number of projects, you should make it avail-able from any directory. To do this, add it to your path, and add an ANT_HOME environment variableas you did with CATALINA_HOME. It’s a good idea to set the entry in the path to ANT_HOME\bin to allowfor any updates to Ant that you may make.
To test that you’ve installed Ant, type ant -version in a terminal window. If everything hasgone according to plan, you’ll see Ant’s usage message.
You won’t use Ant for anything but compiling the source code and deploying web applica-tions in this book, so you won’t see the details of it here. However, you should be aware that ituses an XML file, called build.xml by default, to carry out its tasks.
Installing Tomcat from SourceIf you want to obtain the latest version of Tomcat with the newest bug fixes and upgrades, theninstalling it from the source code is a good option. In Linux, it’s far more common for servers to bebuilt for the system. However, this isn’t strictly necessary for a Java-based server such as Tomcat.
Tomcat is easily built using the Ant build utility. You use Ant for automated project building,including compilation and deployment. It has all the system-independent benefits that Javaenjoys, because it’s written in Java.
You can also use Ant to carry out a number of administrative actions on Tomcat, each ofwhich is described in Chapter 6. The deployer application mentioned previously also uses Ant.
CHAPTER 2 ■ INSTALLING TOMCAT 21
7850ch02FINAL.qxd 2/28/07 10:36 AM Page 21
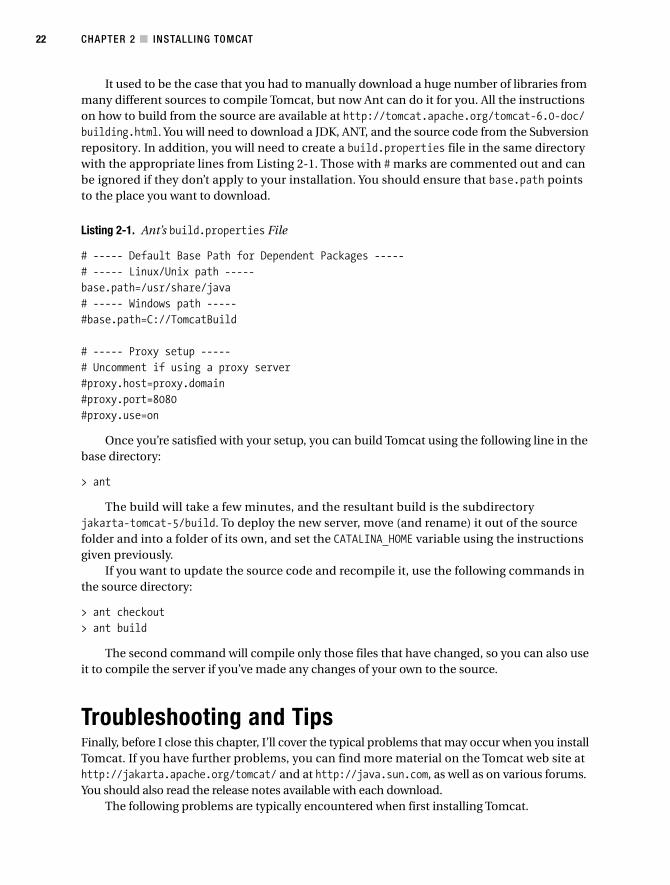
It used to be the case that you had to manually download a huge number of libraries frommany different sources to compile Tomcat, but now Ant can do it for you. All the instructionson how to build from the source are available at http://tomcat.apache.org/tomcat-6.0-doc/building.html. You will need to download a JDK, ANT, and the source code from the Subversionrepository. In addition, you will need to create a build.properties file in the same directorywith the appropriate lines from Listing 2-1. Those with # marks are commented out and canbe ignored if they don’t apply to your installation. You should ensure that base.path pointsto the place you want to download.
Listing 2-1. Ant’s build.properties File
# ----- Default Base Path for Dependent Packages -----
# ----- Linux/Unix path -----
base.path=/usr/share/java
# ----- Windows path -----
#base.path=C://TomcatBuild
# ----- Proxy setup -----
# Uncomment if using a proxy server
#proxy.host=proxy.domain
#proxy.port=8080
#proxy.use=on
Once you’re satisfied with your setup, you can build Tomcat using the following line in thebase directory:
> ant
The build will take a few minutes, and the resultant build is the subdirectory jakarta-tomcat-5/build. To deploy the new server, move (and rename) it out of the sourcefolder and into a folder of its own, and set the CATALINA_HOME variable using the instructionsgiven previously.
If you want to update the source code and recompile it, use the following commands inthe source directory:
> ant checkout
> ant build
The second command will compile only those files that have changed, so you can also useit to compile the server if you’ve made any changes of your own to the source.
Troubleshooting and TipsFinally, before I close this chapter, I’ll cover the typical problems that may occur when you installTomcat. If you have further problems, you can find more material on the Tomcat web site athttp://jakarta.apache.org/tomcat/ and at http://java.sun.com, as well as on various forums.You should also read the release notes available with each download.
The following problems are typically encountered when first installing Tomcat.
CHAPTER 2 ■ INSTALLING TOMCAT22
7850ch02FINAL.qxd 2/28/07 10:36 AM Page 22

The Tomcat Window DisappearsThis is particularly difficult to diagnose and applies especially to Windows. Since the problemusually has one of two causes, you can start by diagnosing it and then move on to the knownsolutions.
If Tomcat doesn’t start, it can be run in the current shell or command prompt, so you cansee what the problem is. Type the following on Linux:
# $CATALINA_HOME/bin/catalina.sh run
Or type the following on Windows:
> %CATALINA_HOME%/bin/catalina run
This will produce the normal startup messages, and any errors will be displayed. These errorsalso appear in the log file in the CATALINA_HOME/logs directory. (You may have to set up logging forTomcat 6.0; see Chapter 4.)
The Port Number Is in UseTomcat uses port 8080 by default, as mentioned previously. You can check if another program isusing this port by using netstat. Typing netstat (netstat -ln on Linux) into your shell/com-mand prompt will list open ports on your system and should show the process that’sinterfering with Tomcat. You have two options: shut the process down or change Tomcat’sport as described earlier.
A common problem is trying to start a new Tomcat instance when one is still running. Thisis especially true if it’s running as a daemon thread. If you suspect this is the case, you can checkit by using telnet to connect to the socket, as follows, and see if you’re given a connection:
$ telnet localhost 8080
If you’re awarded a connection, the screen goes blank rather than giving an error.When you’re connected, type GET / and press Return or Enter. (Echo is turned off by default
on Windows, so it looks a little strange, because typing doesn’t appear to achieve anything.) OnWindows, this results in the following output:
<?xml version="1.0" encoding="ISO-8859-1"?>
<!DOCTYPE html PUBLIC "-//W3C//DTD XHTML 1.0 Strict//EN"
"http://www.w3.org/TR/xhtml1/DTD/xhtml1-strict.dtd">
<html xmlns="http://www.w3.org/1999/xhtml" xml:lang="en" lang="en">
<head>
<title>Apache Tomcat</title>
<style type="text/css">
/*<
img {
border: none;
}
a:link, a:visited {
color: blue
}
th {
font-family: Verdana, "Times New Roman", Times, serif;
font-size: 110%;
font-weight: normal;
font-style: italic;
background: #D2A41C;
text-align: left;
}
td {
color: #000000;
font-family: Arial, Helvetica, sans-serif;
}
td.menu {
background: #FFDC75;
}
.center {
text-align: center;
}
.code {
color: #000000;
font-family: "Courier New", Courier, monospace;
font-size: 110%;
margin-left: 2.5em;
}
#banner {
margin-bottom: 12px;
}
p#congrats {
margin-top: 0;
font-weight: bold;
text-align: center;
}
CHAPTER 2 ■ INSTALLING TOMCAT24
7850ch02FINAL.qxd 2/28/07 10:36 AM Page 24
p#footer {
text-align: right;
font-size: 80%;
}
/*]]>*/
</style>
</head>
<body>
<!-- Header -->
<table id="banner" width="100%">
<tr>
<td align="left" style="width:130px">
<a href="http://tomcat.apache.org/">
<img src="tomcat.gif" height="92" width="130" alt="The Mighty Tomcat - MEOW!"/>
</a>
</td>
<td align="left" valign="top"><b>Apache Tomcat</b></td>
<td align="right">
<a href="http://www.apache.org/">
<img src="asf-logo-wide.gif" height="51" width="537" alt="The Apache ➥
Software Foundation"/>
</a>
</td>
</tr>
</table>
<table>
<tr>
<!-- Table of Contents -->
<td valign="top">
<table width="100%" border="1" cellspacing="0" cellpadding="3">
<tr>
<th>Administration</th>
</tr>
<tr>
<td class="menu">
<a href="manager/status">Status</a><br/>
<a href="admin">Tomcat Administration</a><br/>
<a href="manager/html">Tomcat Manager</a><br/>
</td>
</tr>
</table>
CHAPTER 2 ■ INSTALLING TOMCAT 25
7850ch02FINAL.qxd 2/28/07 10:36 AM Page 25

<br />
<table width="100%" border="1" cellspacing="0" cellpadding="3">
<tr>
<th>Documentation</th>
</tr>
<tr>
<td class="menu">
<a href="RELEASE-NOTES.txt">Release Notes</a><br/>
<a href="docs/changelog.html">Change Log</a><br/>
<a href="docs">Tomcat Documentation</a><br/>
</td>
</tr>
</table>
<br/>
<table width="100%" border="1" cellspacing="0" cellpadding="3">
<tr>
<th>Tomcat Online</th>
</tr>
<tr>
<td class="menu">
<a href="http://tomcat.apache.org/">Home Page</a><br/>
<a href="http://tomcat.apache.org/faq/">FAQ</a><br/>
<a href="http://tomcat.apache.org/bugreport.html"> ➥
Bug Database</a><br/>
<a href="http://issues.apache.org/bugzilla/ ➥
buglist.cgi?bug_status=UNCONFIRMED&bug_status=NEW&bug_status=ASSIGNED&bug_status=➥
REOPENED&bug_status=RESOLVED&resolution=LATER&resolution=REMIND&resolution=---➥
&bugidtype=include&product=Tomcat+6&cmdtype=doit&order
=Importance">Open Bugs</a><br/>
<a href="http://mail-archives.apache.org/mod_mbox/ ➥
tomcat-users/">Users Mailing List</a><br/>
<a href="http://mail-archives.apache.org/mod_mbox/ ➥
tomcat-dev/">Developers Mailing List</a><br/>
<a href="irc://irc.freenode.net/#tomcat">IRC</a><br/>
</td>
</tr>
</table>
<br/>
<table width="100%" border="1" cellspacing="0" cellpadding="3">
<tr>
<th>Miscellaneous</th>
</tr>
CHAPTER 2 ■ INSTALLING TOMCAT26
7850ch02FINAL.qxd 2/28/07 10:36 AM Page 26

<tr>
<td class="menu">
<a href="examples/">Examples</a><br/>
<a href="http://java.sun.com/products/jsp">Sun's ➥
Java Server Pages Site</a><br/>
<a href="http://java.sun.com/products/servlet">Sun's ➥
Servlet Site</a><br/>
</td>
</tr>
</table>
</td>
<td style="width:20px"> </td>
<!-- Body -->
<td align="left" valign="top">
<p id="congrats">If you're seeing this page via a web browser, ➥
it means you've setup Tomcat successfully. Congratulations!</p>
<p>As you may have guessed by now, this is the default Tomcat home ➥
page. It can be found on the local filesystem at:</p>
<p class="code">$CATALINA_HOME/webapps/ROOT/index.html</p>
<p>where "$CATALINA_HOME" is the root of the Tomcat installation ➥
directory. If you're seeing this page, and you don't think you should be, then ➥
either you're either a user who has arrived at new installation of Tomcat, or ➥
you're an administrator who hasn't got his/her setup quite right. Providing the ➥
latter is the case, please refer to the <a href="tomcat-docs">Tomcat ➥
Documentation</a> for more detailed setup and administration information than is ➥
found in the INSTALL file.</p>
<p><b>NOTE: For security reasons, using the administration webapp
is restricted to users with role "admin". The manager webapp
is restricted to users with role "manager".</b>
Users are defined in <code>$CATALINA_HOME/conf/ ➥
tomcat-users.xml</code>.</p>
<p>Included with this release are a host of sample Servlets and JSPs
(with associated source code), extensive documentation (including the ➥
Servlet 2.4 and JSP 2.0 API JavaDoc), and an introductory guide to
developing web applications.</p>
<p>Tomcat mailing lists are available at the Tomcat project ➥
web site:</p>
CHAPTER 2 ■ INSTALLING TOMCAT 27
7850ch02FINAL.qxd 2/28/07 10:36 AM Page 27

<ul>
<li><b><a href="mailto:[email protected]"> ➥
[email protected]</a></b> for general questions related to configuring ➥
and using Tomcat</li>
<li><b><a href="mailto:[email protected]"> ➥
[email protected]</a></b> for developers working on Tomcat</li>
</ul>
<p>Thanks for using Tomcat!</p>
<p id="footer"><img src="tomcat-power.gif" width="77" height="80" ➥
alt="Powered by Tomcat"/><br/>
Copyright © 1999-2005 Apache Software Foundation<br/>
All Rights Reserved
</p>
</td>
</tr>
</table>
</body>
</html>
Connection to host lost.
C:\Documents and Settings\kmittal>
If you see a different message, you might have another web server running on this port.Even if you’re refused a connection, this indicates that a process is sitting on that port. If
the connection fails, then try one of the other possibilities.
SummaryI’ve gone through a great deal of information in this chapter to explain how to select and installa JDK, Ant, and Tomcat in a variety of ways. In the majority of cases, the installation of the serveris a straightforward process because binary versions are available for the common platforms.
If you have any problems, http://jakarta.apache.org has a number of lists that can behelpful to the beginner. The user list is also archived, and you’ll find that most questions havebeen asked, and answered, before.
CHAPTER 2 ■ INSTALLING TOMCAT28
7850ch02FINAL.qxd 2/28/07 10:36 AM Page 28

Examining Tomcat’s Directories
In the previous chapter, you saw how to install Tomcat on various platforms using the bina-ries or the source as the fancy takes you. Now it’s time to look at the directories that make upthe Tomcat installation. You’ll be introduced to the main configuration files and the structureof a web application. However, I’ll leave the details on configuration until Chapter 4.
In this chapter you’ll do the following:
• You’ll examine the default Tomcat installation.
• You’ll learn about the generic web application structure, both unpacked and packed.
Looking at CATALINA_HOMEThe best place to start a discussion of Tomcat’s directory structure is in the default installationdirectory, commonly called CATALINA_HOME. If you’ve installed Tomcat, then you’ll have anenvironment variable pointing to this directory. Let’s start by examining the bin directory andall the scripts it contains.
The bin DirectoryThe bin directory contains many scripts (in Windows they’re called batch files, but the termscripts will do for the sake of brevity) for starting Tomcat in different modes and for stoppingTomcat, a number of utilities, and some Windows-specific executables. Previous versions ofTomcat (prior to Tomcat 5.5.x) came with several different scripts to start and stop Tomcat.With this release, these have been consolidated into the following executables.
The tomcat6 Windows ExecutableYou can use the tomcat6 executable to run the server if it’s installed as an NT service. You caninstall Tomcat as a service when you first install Tomcat, as described in the previous chapter.
Note that the name of this executable must be the same as that of the service you want tostart. So, if you install the service as TomcatServ, you must rename this file TomcatServ.exe ifyou want to use its services.
29
C H A P T E R 3
■ ■ ■
7850ch03FINAL.qxd 2/28/07 10:39 AM Page 29

The tomcat6w Windows ExecutableYou can use the tomcat6w executable to run the Tomcat Properties box if Tomcat is installed asa service. Chapter 2 described this utility. You can use it to start and stop the service and setother options.
Note that the name of this executable must be the same as that of the service you want tostart, with a w appended. So, if you install the service as TomcatServ, you must rename this fileTomcatServw.exe if you want to use its services.
The conf DirectoryThe conf directory contains the following Tomcat configuration files:
• catalina.policy sets up the necessary permissions for Catalina when it’s run within thecontext of a security manager.
• catalina.properties sets the locations of the various class loader directories. The defaultsare the common, server, and shared directories and their subdirectories. The settings inthis file determine which classes are available to all web applications and which classesare available to Tomcat. In other words, these settings configure the classpath of Tomcatand all web applications.
• context.xml is a file that sets the defaults for individual contexts.
• logging.properties is a file that manages the default logging levels for the Tomcatserver itself.
• server.xml is the main configuration file for Tomcat and is discussed in detail inChapter 4. You use it to configure everything from the shutdown command to logging,filtering, connections to other web servers, the port and host on which the server isrunning, and the location of each web application’s files.
• tomcat-users.xml is the default user database for container-managed authentication.You can change the name and location of the file in server.xml. You’ll see more on thismechanism in Chapter 4.
• web.xml is the default deployment descriptor for all web applications. Tomcat processesit before processing the web.xml files in the server’s web applications.
The logs DirectoryThe logs directory is the default location for application log files.
You may have to schedule housekeeping tasks to ensure that the size of the logs directorydoesn’t grow out of hand.
The lib DirectoryThis directory contains all the various JAR files for Tomcat.
The temp DirectoryTomcat uses the temp directory for storing temporary files.
CHAPTER 3 ■ EXAMINING TOMCAT’S DIRECTORIES30
7850ch03FINAL.qxd 2/28/07 10:39 AM Page 30
The webapps DirectoryThe webapps directory is the default location of Tomcat’s web applications. You can change thislocation, and it’s recommended that you do so, as you can then separate the application filesthat change relatively frequently from the server files that don’t tend to change much. As a bonus,the installation directory for Tomcat can be kept as read/write for the administrator only, thusmaintaining greater security—read/write access for other users need be provided only for thenow separate webapps folder.
You can deploy web applications in webapps by placing them here, in both packaged andunpackaged formats, and they will be automatically deployed at the next server bootup. Thisis an alternative to the conf/[Service_name]/[Host_name] method and the various deployer (suchas Ant and the Tomcat manager application) methods. These are discussed in later chapters.
The work DirectoryThe work directory is where Tomcat places the JSP code after it has been converted into servletcode. Once a JSP page has been visited, Tomcat also stores the compiled servlet here.
Understanding Web Application StructureA web application is a collection of web resources, such as JSP pages, HTML pages, servlets,and configuration files, organized into a hierarchy as specified in the Servlet specification. Youhave two ways in which to organize a web application: packed and unpacked. The packed formis called a web archive (WAR) file, and the unpacked form is a collection of directories storedon the file system.
The unpackaged format is convenient for web application developers, as it allows them toreplace individual files while the application is being developed and debugged.
However, in a deployment environment, it’s often more convenient to provide a single filethat can be automatically deployed. This reduces the deployment process to placing the file andsetting up system resources. Tomcat can also automatically expand a web application oncethe server has booted. The automatic expansion of WAR files is configured in the server.xmlfile as part of the <Host> element that configures hosts.
Web Application ContextEach web application corresponds to a context component, as discussed in Chapter 1, andyou assign a context path to each. The default context is called ROOT and corresponds to thename of the server with no other context information. For example, the ROOT web applicationon your local machine will correspond to http://localhost:8080. If you’ve configured DomainName System (DNS) settings for your server, it may also be accessible from a location such aswww.companyname.com.
Users access other web applications by requesting a context relative to the server. Forexample, users can access Tomcat’s manager web application with the following URL: http://localhost:8080/manager.
Applications that you place in the webapps folder are named after the directory they’re in.So, you can access the web application in the tomcat-docs directory with the following:http://localhost:8080/tomcat-docs. Each application on the server is known by its name,and users can access resources according to the remainder of the uniform resource locator(URL) after the web application’s name.
CHAPTER 3 ■ EXAMINING TOMCAT’S DIRECTORIES 31
7850ch03FINAL.qxd 2/28/07 10:39 AM Page 31

This setup has a slight problem, however. If the ROOT web application contains a subdirec-tory that has the same name as a web application, and that web application and that subfolderhave filenames in common, then the applications won’t work as expected. For example, thefollowing are two web applications that could cause confusion:
webapps/
ROOT/
tomcatBook/
index.html
tomcatBook/
index.html
In this case, http://localhost:8080/tomcatBook could map to both files and could causeconfusion. Tomcat will display the index.html page from the tomcatBook web application andwill ignore the folder in the ROOT web application. If your users are expecting the ROOT version,then they will be disappointed.
The WEB-INF DirectoryThe Servlet specification sets out how you partition web applications into public and privateareas. You store the private resources in a directory called WEB-INF in the root of the web appli-cation. This is where you store all the web-application–specific configuration files, applicationclasses, and application-specific utilities. Users may only access these resources indirectly (forexample, through servlet mappings).
WEB-INF has a number of specialized subdirectories where you store specific files, such astag files and tag library descriptors (TLDs). These are defined in the appropriate specification,be it for servlets or JSP pages. You’ll deal with them in detail in Chapter 5 when you configurea web application, but here’s a quick rundown:
webAppX/
WEB-INF/
classes/
lib/
tags/
The classes and lib directory follow the usual pattern in Tomcat; you place class files inclasses and JAR files in lib. tags is a special directory for tag files, which are a part of the JSP2.0 specification.
The META-INF DirectoryThe META-INF directory is placed at the root of a web application when it’s deployed as a WARfile. This is where you place tag TLDs and tag files, so that they can be found using a uniqueuniform resource indicator (URI). If no context XML files for this WAR file exist, then you canalso place one in this directory. You’ll find more details of this directory in Chapter 5.
CHAPTER 3 ■ EXAMINING TOMCAT’S DIRECTORIES32
7850ch03FINAL.qxd 2/28/07 10:39 AM Page 32

SummaryThis chapter outlined the contents of Tomcat’s installation directory, its subdirectories, andthe scripts they contain. This information is all you need to manage Tomcat’s operation, fromstartup to shutdown.
The chapter also covered the structure of a web application, without going into the detailsof configuration. It has given you a familiarity with Tomcat’s internals and prepared you forthe coming chapters.
CHAPTER 3 ■ EXAMINING TOMCAT’S DIRECTORIES 33
7850ch03FINAL.qxd 2/28/07 10:39 AM Page 33

7850ch03FINAL.qxd 2/28/07 10:39 AM Page 34

Working with Tomcat’sConfiguration Files
In this chapter, you’ll focus on basic Tomcat configuration by examining the files found inCATALINA_HOME/conf. The default installation of Tomcat uses these files to configure the serverwhen it starts up; therefore, it’s of the utmost importance that you understand what the defaultconfiguration will do and how you can modify it.
You’ll see the main configuration file, server.xml, and Tomcat’s other configuration files.As you saw in Chapter 1, Tomcat uses a component-based, hierarchical architecture. This modelgreatly simplifies the configuration of the complex server.
You’ll see the top-level components and the hierarchy of containers below them, as wellas the nested components, all of which should be familiar to you from Chapter 1. By the endof this chapter, you’ll be comfortable with the default configuration of Tomcat, and you’ll alsobe able to modify this configuration for your own needs.
The final part of the chapter will cover Windows service configuration and how you canmodify this option for your own needs.
Examining Tomcat’s Configuration FilesTomcat’s configuration directory is CATALINA_HOME/conf. It contains the following files:
• catalina.policy
• catalina.properties
• context.xml
• server.xml
• logging.properties
• tomcat-users.xml
• web.xml
35
C H A P T E R 4
■ ■ ■
7850ch04FINAL.qxd 2/28/07 10:41 AM Page 35

Using catalina.policy for Access ControlBecause you’ll see more on Tomcat security in Chapter 12, in this chapter you’ll take only a quicklook through catalina.policy to learn how it provides fine-grained access control to a Tomcatserver administrator through the built-in security model of Java.
Any access to system resources that isn’t explicitly allowed is prohibited; therefore, youmust anticipate all the resources that Tomcat will need and explicitly grant permission for it todo so. By default, Tomcat starts without security. To start it with security, use the -security switch.
> $CATALINA_HOME/bin/startup security
Tomcat only reads, processes, and enforces the catalina.policy file when started in thesecurity manager in this manner. The general policy entry is in the following form:
grant <security principal> { permission list... };
Here, <security principal> is typically a body of trusted code.Looking at the catalina.policy file, the first set of permissions grants access to all resources
for code from the Java compiler directories; this is essentially the Java compiler and runtimesystem code. (See http://java.sun.com/j2se/1.5.0/docs/guide/security/permissions.htmlfor details about permissions.)
// These permissions apply to javac
grant codeBase "file:${java.home}/lib/-" {
permission java.security.AllPermission;
};
// These permissions apply to all shared system extensions
grant codeBase "file:${java.home}/jre/lib/ext/-" {
permission java.security.AllPermission;
};
// These permissions apply to javac when ${java.home] points at $JAVA_HOME/jre
grant codeBase "file:${java.home}/../lib/-" {
permission java.security.AllPermission;
};
// These permissions apply to all shared system extensions when
// ${java.home} points at $JAVA_HOME/jre
grant codeBase "file:${java.home}/lib/ext/-" {
permission java.security.AllPermission;
};
As these directories have access to the entire system, it’s vital that you protect them usingyour operating system file protection features (see Chapter 12 for details). Without this pre-caution, malicious code could run unchecked on your system.
The next section of catalina.policy grants the Catalina server and API libraries access toall resources.
CHAPTER 4 ■ WORKING WITH TOMCAT’S CONFIGURATION FILES36
7850ch04FINAL.qxd 2/28/07 10:41 AM Page 36

/ These permissions apply to the daemon code
grant codeBase "file:${catalina.home}/bin/commons-daemon.jar" {
permission java.security.AllPermission;
};
// These permissions apply to the logging API
grant codeBase "file:${catalina.home}/bin/tomcat-juli.jar" {
permission java.security.AllPermission;
};
// These permissions apply to the server startup code
grant codeBase "file:${catalina.home}/bin/bootstrap.jar" {
permission java.security.AllPermission;
};
// These permissions apply to the servlet API classes
// and those that are shared across all class loaders
// located in the "lib" directory
grant codeBase "file:${catalina.home}/lib/-" {
permission java.security.AllPermission;
};
Again, you must secure the previous directories on the file system, thus avoiding thepossibility of an attacker adding malicious code to them. Any class files you place in thesedirectories will be granted access to all system resources.
The final set of permissions in catalina.policy contains the default web applicationpermissions. They’re significantly more restrictive than those shown previously. In other words,they’re never granted the java.security.AllPermission super permission.
The first section enables access to system properties that enable Java Naming and Direc-tory Interface (JNDI) and JDBC access.
grant {
// Required for JNDI lookup of named JDBC DataSource's and
// javamail named MimePart DataSource used to send mail
permission java.util.PropertyPermission "java.home", "read";
permission java.util.PropertyPermission "java.naming.*", "read";
permission java.util.PropertyPermission "javax.sql.*", "read";
The next section enables read-only access to some operating system description proper-ties: the type of operating system Tomcat is running under and what this operating systemuses to separate file extensions in a filename.
// OS-specific properties to allow read access
permission java.util.PropertyPermission "os.name", "read";
permission java.util.PropertyPermission "os.version", "read";
permission java.util.PropertyPermission "os.arch", "read";
permission java.util.PropertyPermission "file.separator", "read";
permission java.util.PropertyPermission "path.separator", "read";
permission java.util.PropertyPermission "line.separator", "read";
CHAPTER 4 ■ WORKING WITH TOMCAT’S CONFIGURATION FILES 37
7850ch04FINAL.qxd 2/28/07 10:41 AM Page 37
The third section enables read-only access to some JVM-specific properties that are oftenused in application programming.
// JVM properties to allow read access
permission java.util.PropertyPermission "java.version", "read";
permission java.util.PropertyPermission "java.vendor", "read";
permission java.util.PropertyPermission "java.vendor.url", "read";
permission java.util.PropertyPermission "java.class.version", "read";
permission java.util.PropertyPermission "java.specification.version", "read";
permission java.util.PropertyPermission "java.specification.vendor", "read";
permission java.util.PropertyPermission "java.specification.name", "read";
permission java.util.PropertyPermission "java.vm.specification.version", "read";
permission java.util.PropertyPermission "java.vm.specification.vendor", "read";
permission java.util.PropertyPermission "java.vm.specification.name", "read";
permission java.util.PropertyPermission "java.vm.version", "read";
permission java.util.PropertyPermission "java.vm.vendor", "read";
permission java.util.PropertyPermission "java.vm.name", "read";
The next two sections provide access for JavaBean getAttribute methods and the XMLparser debugger, frequently required during code development (see the JavaBean and Java APIfor XML Processing [JAXP] specifications for more details on these properties).
// Required for OpenJMX
permission java.lang.RuntimePermission "getAttribute";
// Allow read of JAXP-compliant XML parser debug
permission java.util.PropertyPermission "jaxp.debug", "read";
The final section gives permission to the Jasper runtime classes for precompiled JSPpages. Internal Tomcat classes aren’t available by default, but they can be made available inthe catalina.properties file, which is described next.
// Precompiled JSPs need access to this package.
permission java.lang.RuntimePermission
"accessClassInPackage.org.apache.jasper.runtime";
permission java.lang.RuntimePermission
"accessClassInPackage.org.apache.jasper.runtime.*";
};
The following permissions are the minimal ones that are granted by default to webapplications. Your secured production configuration may require additional access to a JDBCserver or network access to an external authentication system. You can find examples of theseat the end of catalina.policy.
// The permissions granted to the context root directory apply to JSP pages.
// grant codeBase "file:${catalina.home}/webapps/examples/-" {
// permission java.net.SocketPermission
"dbhost.mycompany.com:5432", "connect";
CHAPTER 4 ■ WORKING WITH TOMCAT’S CONFIGURATION FILES38
7850ch04FINAL.qxd 2/28/07 10:41 AM Page 38

// permission java.net.SocketPermission "*.noaa.gov:80", "connect";
// };
//
// The permissions granted to the context WEB-INF/classes directory
// grant codeBase "file:${catalina.home}/webapps/examples/WEB-INF/classes/-" {
// };
//
// The permission granted to your JDBC driver
// grant codeBase "jar:file:${catalina.home}
/webapps/examples/WEB-INF/lib/driver.jar!/-" {
// permission java.net.SocketPermission
"dbhost.mycompany.com:5432", "connect";
// };
// The permission granted to the scrape taglib
// grant codeBase "jar:file:${catalina.home}
/webapps/examples/WEB-INF/lib/scrape.jar!/-" {
// permission java.net.SocketPermission "*.noaa.gov:80", "connect";
// };
Using catalina.properties to Configure Tomcat’sClass LoadersYou use the catalina.properties file to configure Tomcat’s class loaders. These determinewhich classes are available to different parts of the server. In the previous chapter, you saw thethree directories—common, server, and shared—that are set as the path for the class loaders bydefault. You can change these directories in catalina.properties.
Another setting you can alter here is the classes that are available to web applicationsrunning on the server. When a class loader tries to load a forbidden class, a java.security.
AccessControlException is thrown. This setting applies only if you start Tomcat in security mode.The first section lists the forbidden packages. By default, Tomcat won’t allow web applica-
tions to load any of Tomcat’s internal classes.
# List of comma-separated packages that start with or equal this string
# will cause a security exception to be thrown when
# passed to checkPackageAccess unless the
# corresponding RuntimePermission ("accessClassInPackage."+package) has
# been granted.
package.access=sun.,org.apache.catalina.,org.apache.coyote.,
org.apache.tomcat.,org.apache.jasper.,sun.beans.
If a web application on your server wants to have access to an internal class, sayorg.apache.tomcat.util.IntrospectionUtils, and you’re happy to let it, then you wouldadd the following to catalina.policy:
// Permission for org.apache.tomcat. package
permission java.lang.RuntimePermission
"accessClassInPackage.org.apache.tomcat.util";
CHAPTER 4 ■ WORKING WITH TOMCAT’S CONFIGURATION FILES 39
7850ch04FINAL.qxd 2/28/07 10:41 AM Page 39

The next section disallows users from defining classes in certain restricted packages.
# List of comma-separated packages that start with or equal this string
# will cause a security exception to be thrown when
# passed to checkPackageDefinition unless the
# corresponding RuntimePermission ("defineClassInPackage."+package) has
# been granted.
#
# by default, no packages are restricted for definition, and none of
# the class loaders supplied with the JDK call checkPackageDefinition.
#
package.definition=sun.,java.,org.apache.catalina.,org.apache.coyote.,
org.apache.tomcat.,org.apache.jasper.
This section is here for completeness only and doesn’t affect Tomcat’s operation.The next section defines Tomcat’s common class loader, which in this case corresponds to
the common directory and its subdirectories.
# List of comma-separated paths defining the contents of the "common"
# class loader. Prefixes should be used to define what is the repository type.
# Path may be relative to the CATALINA_HOME path or absolute. If left as blank,
# the JVM system loader will be used as Catalina's "common" loader.
# Examples:
# "foo": Add this folder as a class repository
# "foo/*.jar": Add all the JARs of the specified folder as class
# repositories
# "foo/bar.jar": Add bar.jar as a class repository
common.loader=${catalina.home}/lib,${catalina.home}/lib/*.jar
Any classes placed in these directories will be available to Tomcat’s internal classes as wellas all web applications.
The next section defines Tomcat’s server class loader, which in this case corresponds tothe server directory and its subdirectories.
# List of comma-separated paths defining the contents of the "server"
# class loader. Prefixes should be used to define what is the repository type.
# Path may be relative to the CATALINA_HOME path or absolute. If left as blank,
# the "common" loader will be used as Catalina's "server" loader.
# Examples:
# "foo": Add this folder as a class repository
# "foo/*.jar": Add all the JARs of the specified folder as class
# repositories
# "foo/bar.jar": Add bar.jar as a class repository
server.loader=
Any classes placed in these directories will be available to Tomcat’s internal classes only.The final section of this file defines Tomcat’s shared class loader, which in this case corre-
sponds to the shared directory and its subdirectories. If this definition is left out, the commonclass loader will be used.
CHAPTER 4 ■ WORKING WITH TOMCAT’S CONFIGURATION FILES40
7850ch04FINAL.qxd 2/28/07 10:41 AM Page 40

# List of comma-separated paths defining the contents of the "shared"
# class loader. Prefixes should be used to define what is the repository type.
# Path may be relative to the CATALINA_BASE path or absolute. If left as blank,
# the "common" loader will be used as Catalina's "shared" loader.
# Examples:
# "foo": Add this folder as a class repository
# "foo/*.jar": Add all the JARs of the specified folder as class
# repositories
# "foo/bar.jar": Add bar.jar as a class repository
shared.loader
Any classes placed in these directories will be available to web applications but notTomcat’s internal classes.
Using server.xml to Configure TomcatTomcat’s component-based architecture considerably simplifies configuration. Any propertiesthat are set on the outer components are inherited by the inner components. For example,a listener that’s configured in an engine will be used by a nested host component.
However, if you need a lower-level component to have its own setup, you can override theouter configuration by adding components to the inner component. For example, you couldset a realm on a context component to override the realm configured at the engine level. Thismeans that the web applications running within this context will use the newly defined realminstead of the outer one.
This component-based model lends itself to XML configuration because of XML’s hierar-chical nature. Each component is represented by an element in an XML file, which makes iteasy to insert and remove components from a server as appropriate. The name of the file thatdoes this job in Tomcat is server.xml, which Tomcat reads at startup.
■Note No DTD or schema exists for server.xml because the attributes of certain elements depend onthe class implementing the component that the element represents.
Tomcat comes bundled with a default server.xml file ready to run on your machine. Itdefines a Catalina service, a Catalina engine, and a localhost host.
Configuring a ServerLet’s take a closer look at how to configure a server by going through the server.xml file thatcomes with Tomcat. As you’ll recall from Chapter 1, a server component is a top-level compo-nent, and any Tomcat instances can have only one server component. This means that the<Server> element in server.xml is the root element.
<Server port="8005" shutdown="SHUTDOWN">
CHAPTER 4 ■ WORKING WITH TOMCAT’S CONFIGURATION FILES 41
7850ch04FINAL.qxd 2/28/07 10:41 AM Page 41
The <Server> element represents the JVM and listens to port 8005 for a shutdown com-mand, which will contain the text SHUTDOWN. This provides a graceful way for an administrator(or management console software) to shut down this Tomcat server instance.
Table 4-1 lists the possible attributes of the <Server> element.
Table 4-1. The Attributes of the <Server> Element
Attribute Description Required?
className The Java class for the server to use. This class must implement Nothe org.apache.catalina.Server interface. The standard implementation is used by default.
port The TCP/IP port to listen to for the command specified by the Yesshutdown attribute before shutting down gracefully. This command must come from the same physical server machine on which Tomcat is running. This provides a certain level of security when used in combination with the shutdown attribute.
shutdown The command string that must be sent to the port number Yesspecified by the port attribute.
Table 4-2 lists the subelements of the <Server> element.
Table 4-2. The Subelements of the <Server> Element
Subelement Description Number
<GlobalNamingResources> The global JNDI resources for this server 1
<Service> A grouping of connectors associated with an engine 1 or more
Configuring Global Naming ResourcesJNDI is an API used for looking up information via a naming and directory service. It’s a platform-independent API, much like JDBC, and it’s designed to work with any compatible naming anddirectory service—regardless of its native interface API. Some common information you canstore and retrieve through JNDI includes the following:
• Usernames and passwords
• An access control policy, such as the Tomcat user and role mechanism
• Organizational directories
• Servers (databases and so on)
• Printers
• Java objects, such as EJBs
JNDI allows you to avoid the problem of programming for the native interfaces of specificplatforms and thus simplifies the process immeasurably. JNDI acts as a layer on top of thenative interfaces and translates between the Java classes and the naming servers on the serverplatform, presenting Tomcat with a uniform view of the naming and directory service no mat-ter what the underlying system is.
CHAPTER 4 ■ WORKING WITH TOMCAT’S CONFIGURATION FILES42
7850ch04FINAL.qxd 2/28/07 10:41 AM Page 42
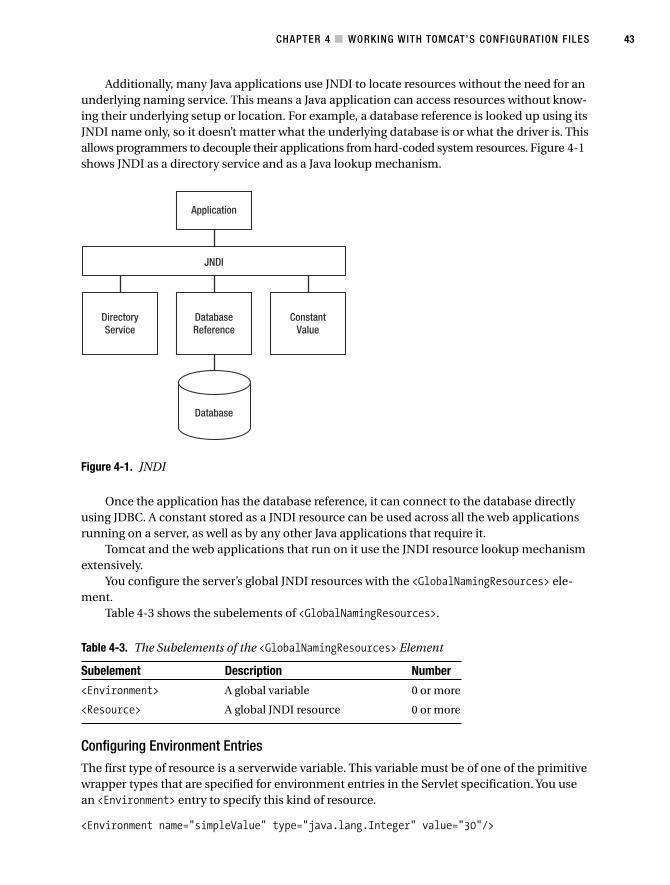
Additionally, many Java applications use JNDI to locate resources without the need for anunderlying naming service. This means a Java application can access resources without know-ing their underlying setup or location. For example, a database reference is looked up using itsJNDI name only, so it doesn’t matter what the underlying database is or what the driver is. Thisallows programmers to decouple their applications from hard-coded system resources. Figure 4-1shows JNDI as a directory service and as a Java lookup mechanism.
Figure 4-1. JNDI
Once the application has the database reference, it can connect to the database directlyusing JDBC. A constant stored as a JNDI resource can be used across all the web applicationsrunning on a server, as well as by any other Java applications that require it.
Tomcat and the web applications that run on it use the JNDI resource lookup mechanismextensively.
You configure the server’s global JNDI resources with the <GlobalNamingResources> ele-ment.
Table 4-3 shows the subelements of <GlobalNamingResources>.
Table 4-3. The Subelements of the <GlobalNamingResources> Element
Subelement Description Number
<Environment> A global variable 0 or more
<Resource> A global JNDI resource 0 or more
Configuring Environment EntriesThe first type of resource is a serverwide variable. This variable must be of one of the primitivewrapper types that are specified for environment entries in the Servlet specification. You usean <Environment> entry to specify this kind of resource.
<Environment name="simpleValue" type="java.lang.Integer" value="30"/>
CHAPTER 4 ■ WORKING WITH TOMCAT’S CONFIGURATION FILES 43
7850ch04FINAL.qxd 2/28/07 10:41 AM Page 43

This environment entry is called simpleValue, is of type java.lang.Integer, and has thevalue 30. It’s looked up using the java:comp/env/simpleValue string.
Table 4-4 specifies the attributes that <Environment> can take.
Table 4-4. The Attributes of the <Environment> Element
Attribute Description Required?
description A description of this environment entry. No
name The name of the environment entry, relative to the java: Yescomp/env context.
override Set this to false if you don’t want a web application deployment Nodescriptor to override this value. The default is true.
type The fully qualified Java class type of this entry. It must be one Yesof the legal values specified in the Servlet specification for webapplication deployment descriptor environment entries: java.lang.Boolean, java.lang.Byte, java.lang.Character, java.lang.Double, java.lang.Float, java.lang.Integer, java.lang.Long, java.lang.Short, and java.lang.String.
value The value of this entry. Yes
Configuring a Global ResourceGlobal resources can include JDBC data sources, Enterprise JavaBean (EJB) references, anduser authentication databases. You define them with a <Resource> element, and you must alsodefine a set of resource parameters to configure the object factory for this resource type. You’llsee how this is done next.
<Resource name="UserDatabase" auth="Container"
type="org.apache.catalina.UserDatabase"
description="User database that can be updated and saved">
</Resource>
This is a user database for authenticating users and is set as the default for the Catalinaengine further down in server.xml.
Table 4-5 describes the attributes that a <Resource> element can take.
CHAPTER 4 ■ WORKING WITH TOMCAT’S CONFIGURATION FILES44
7850ch04FINAL.qxd 2/28/07 10:41 AM Page 44
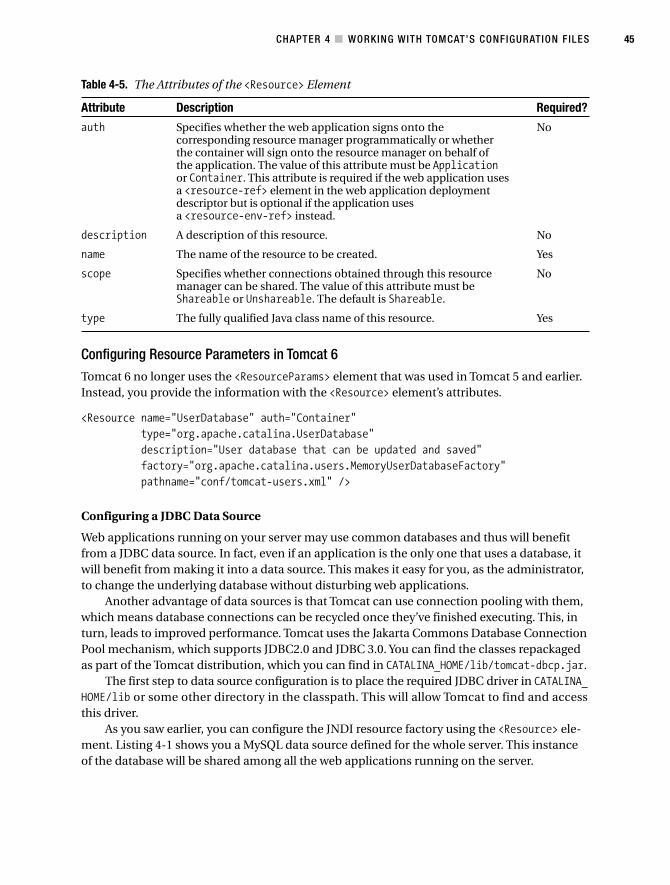
Table 4-5. The Attributes of the <Resource> Element
Attribute Description Required?
auth Specifies whether the web application signs onto the Nocorresponding resource manager programmatically or whether the container will sign onto the resource manager on behalf of the application. The value of this attribute must be Applicationor Container. This attribute is required if the web application uses a <resource-ref> element in the web application deployment descriptor but is optional if the application uses a <resource-env-ref> instead.
description A description of this resource. No
name The name of the resource to be created. Yes
scope Specifies whether connections obtained through this resource Nomanager can be shared. The value of this attribute must be Shareable or Unshareable. The default is Shareable.
type The fully qualified Java class name of this resource. Yes
Configuring Resource Parameters in Tomcat 6Tomcat 6 no longer uses the <ResourceParams> element that was used in Tomcat 5 and earlier.Instead, you provide the information with the <Resource> element’s attributes.
<Resource name="UserDatabase" auth="Container"
type="org.apache.catalina.UserDatabase"
description="User database that can be updated and saved"
factory="org.apache.catalina.users.MemoryUserDatabaseFactory"
pathname="conf/tomcat-users.xml" />
Configuring a JDBC Data Source
Web applications running on your server may use common databases and thus will benefitfrom a JDBC data source. In fact, even if an application is the only one that uses a database, itwill benefit from making it into a data source. This makes it easy for you, as the administrator,to change the underlying database without disturbing web applications.
Another advantage of data sources is that Tomcat can use connection pooling with them,which means database connections can be recycled once they’ve finished executing. This, inturn, leads to improved performance. Tomcat uses the Jakarta Commons Database ConnectionPool mechanism, which supports JDBC2.0 and JDBC 3.0. You can find the classes repackagedas part of the Tomcat distribution, which you can find in CATALINA_HOME/lib/tomcat-dbcp.jar.
The first step to data source configuration is to place the required JDBC driver in CATALINA_HOME/lib or some other directory in the classpath. This will allow Tomcat to find and accessthis driver.
As you saw earlier, you can configure the JNDI resource factory using the <Resource> ele-ment. Listing 4-1 shows you a MySQL data source defined for the whole server. This instanceof the database will be shared among all the web applications running on the server.
CHAPTER 4 ■ WORKING WITH TOMCAT’S CONFIGURATION FILES 45
7850ch04FINAL.qxd 2/28/07 10:41 AM Page 45

Listing 4-1. Configuring a JDBC Data Source
<Resource name="jdbc/TestDB" auth="Container" type="javax.sql.DataSource"
maxActive="100" maxIdle="30" maxWait="10000"
username="javauser"
password="javadude"
driverClassName="com.mysql.jdbc.Driver"
url= "jdbc:mysql://localhost:3306/javatest?autoReconnect=true"
/>
This listing defines a data source called jdbc/CatalogDB and sets its drivers and connectionURL. It illustrates how you could change the underlying database without affecting web appli-cations. In this case, the parameters shown in Table 4-6 are allowed.
Table 4-6. The Parameters for Use with a JDBC Data Source
Parameter Description Required?
driverClassName Java class name of the JDBC driver. This driver should be Yesplaced in CATALINA_HOME/common/lib.
maxActive The maximum number of active connections in this pool. No
maxIdle The maximum number of idle connections in this pool. No
maxWait The time in milliseconds that the driver should wait for a Noconnection before throwing an exception.
username The user ID used to log onto the database. No
password The password used to log onto the database. No
url The URL of the database server to be used. Yes
validationQuery A SQL query used to validate a connection. The factory will Noperform this query and ensure that rows are returned before considering the connection valid.
In addition to the previous configuration, the developer must declare the use of the resourcein the application’s web.xml file using a <resource-ref> element, as shown in Listing 4-2.
Listing 4-2. Configuring a Reference to a JDBC Data Source in web.xml
<?xml version="1.0" encoding="ISO-8859-1"?>
<web-app xmlns="http://java.sun.com/xml/ns/j2ee"
xmlns:xsi="http://www.w3.org/2001/XMLSchema-instance"
xsi:schemaLocation="http://java.sun.com/xml/ns/j2ee
http://java.sun.com/xml/ns/j2ee/web-app_2_4.xsd" version="2.4">
<!-- Describe a DataSource -->
<resource-ref>
<description>
Resource reference to a factory for java.sql.Connection
instances that may be used for talking to a particular
database that is configured in the tomcatBook.xml file.
</description>
<res-ref-name>
CHAPTER 4 ■ WORKING WITH TOMCAT’S CONFIGURATION FILES46
7850ch04FINAL.qxd 2/28/07 10:41 AM Page 46

jdbc/CatalogDB
</res-ref-name>
<res-type>
javax.sql.DataSource
</res-type>
<res-auth>
SERVLET
</res-auth>
</resource-ref>
<!-- Define a Security Constraint on this Application -->
<security-constraint>
<web-resource-collection>
<web-resource-name>Tomcat Book Application</web-resource-name>
<url-pattern>/*</url-pattern>
</web-resource-collection>
<auth-constraint>
<role-name>tomcat</role-name>
</auth-constraint>
<user-data-constraint>
<description>
Constrain the user data transport for the whole application
</description>
<transport-guarantee>CONFIDENTIAL</transport-guarantee>
</user-data-constraint>
</security-constraint>
<!-- Define the Login Configuration for this Application -->
<login-config>
<auth-method>FORM</auth-method>
<realm-name>Tomcat Book Application</realm-name>
<form-login-config>
<form-login-page>/ch12/login.jsp</form-login-page>
<form-error-page>/ch12/error.jsp</form-error-page>
</form-login-config>
</login-config>
<!-- Security roles referenced by this web application -->
<security-role>
<description>
The role that is required to log in to the Tomcat Book Application
</description>
<role-name>tomcat</role-name>
</security-role>
</web-app>
CHAPTER 4 ■ WORKING WITH TOMCAT’S CONFIGURATION FILES 47
7850ch04FINAL.qxd 2/28/07 10:41 AM Page 47

Configuring Mail Sessions
JavaMail is a standard programming API that can be used to create and send e-mails. Tomcatsupports JavaMail by allowing you to configure a JavaMail session as a JNDI resource. Webapplications can then use JNDI to look up and use this session.
You can configure JavaMail sessions that web applications can use much in the same wayas you can configure JDBC data sources. The theory and practice in both configurations aresimilar. In the case of JavaMail sessions, the web application obtains a reference to the mailsession without needing to know about the underlying implementation. Again, this allows youto change the underlying mail server without compromising any web applications.
As already mentioned, the process of setting up a JavaMail session is analogous to settingup a JDBC data source. First, you must place the JavaMail API in CATALINA_HOME/ /lib so thatTomcat and web applications can use its classes. It’s available from http://java.sun.com/products/javamail/downloads/index.html.
Second, configure the mail session in server.xml as shown in Listing 4-3.
Listing 4-3. Configuring a Mail Session
<Resource name="mail/Session" auth="Container"
type="javax.mail.Session"
mail.smtp.host="localhost"/>
By convention, you configure mail sessions to resolve to the mail subcontext. The snippetin Listing 4-3 configures the mail/Session context, which refers to an SMTP server running onlocalhost. You can modify the SMTP port (if it isn’t at the standard port 25) by setting themail.smtp.port parameter.
Finally, set the JNDI resource in web.xml. Listing 4-4 shows the mail/Session reference.
Listing 4-4. Configuring a Reference to a JavaMail Session in web.xml
<resource-ref>
<res-ref-name>mail/Session</res-ref-name>
<res-type>javax.mail.Session</res-type>
<res-auth>Container</res-auth>
</resource-ref>
Configuring a ServiceA service component groups together all the connectors that may be used with an engine.
<Service name="Catalina">
This service is called Catalina. This name will be visible in logs and error messages, clearlyidentifying the component. Service management software can also use it to identify the serviceinstance.
Table 4-7 describes the attributes of the <Service> element.
CHAPTER 4 ■ WORKING WITH TOMCAT’S CONFIGURATION FILES48
7850ch04FINAL.qxd 2/28/07 10:41 AM Page 48

Table 4-7. The Attributes of the <Service> Element
Attribute Description Required?
className The Java class name for the service class to use. The default is Noorg.apache.catalina.core.StandardService.
name The service name, used in logging and management. If more than Yesone <Service> element appears inside the <Server> element, you must make sure their name attributes are different.
Table 4-8 describes the subelements that a <Service> element can have.
Table 4-8. The Subelements of the <Service> Element
Subelement Description Number
Connector Connects Tomcat, either from users or from another web server. 1 or more
Engine This is Tomcat’s request-processing machinery. 1
Configuring a ConnectorThe following are the two connection points where a request enters Tomcat:
• From a front-end web server, which could be Apache, IIS, or any other web server
• From a web browser
One way to handle these connection requirements is to create a customized version ofTomcat for each situation. This is inefficient and hard to maintain. This is where connectorscome in: a connector adapts an engine to the outside world by passing requests into theengine and passing responses out to the user. The connector handles the protocol, connectionconventions, and so on, so that the engine doesn’t have to handle them.
You can associate more than one connector with a single engine. For example, you maywant to provide an HTTP service and an HTTPS service to your users from the same server. Inthis case, you configure an HTTP connector and an SSL connector in the same engine. You’llsee more on this in Chapter 9. In the meantime, let’s look through server.xml and see thedefault settings.
A number of different options are available to you when you configure a connector.server.xml shows four of the most common.
• An HTTP connector
• An SSL connector
• An AJP 1.3 connector for connecting to another web server
• A proxy connector
CHAPTER 4 ■ WORKING WITH TOMCAT’S CONFIGURATION FILES 49
7850ch04FINAL.qxd 2/28/07 10:41 AM Page 49

The default connector for the Catalina engine is an HTTP/1.1 connector.
<!-- Define a non-SSL Coyote HTTP/1.1 Connector on port 8080 -->
<Connector port="8080"
maxThreads="150" minSpareThreads="25" maxSpareThreads="75"
enableLookups="false" redirectPort="8443" acceptCount="100"
debug="0" connectionTimeout="20000"
disableUploadTimeout="true" />
This sets a connector to listen on port 8080 for HTTP requests. Table 4-9 describes theattributes that are common to all connectors, and Table 4-10 describes the HTTP connector’sattributes after the descriptions of the other <Connector> elements in server.xml.
<!-- Define a SSL Coyote HTTP/1.1 Connector on port 8443 -->
<!--
<Connector port="8443"
maxThreads="150" minSpareThreads="25" maxSpareThreads="75"
enableLookups="false" disableUploadTimeout="true"
acceptCount="100" debug="0" scheme="https" secure="true"
clientAuth="false" sslProtocol="TLS" />
-->
This sets a secure SSL connector to listen on port 8443 for HTTPS requests. It shares allthe attributes of an ordinary HTTP connector but has some unique SSL attributes all its own.Table 4-11 describes these.
<!-- Define a Coyote/JK2 AJP 1.3 Connector on port 8009 -->
<Connector port="8009"
enableLookups="false" redirectPort="8443" debug="0"
protocol="AJP/1.3" />
This sets up an AJP 1.3 connector listening on port 8009. This type of connector allowsTomcat to connect to an Apache web server to provide JSP pages and servlets while Apacheprovides HTML pages and important user-management functionality. Table 4-12 describesthe AJP connector’s attributes.
<!-- Define a Proxied HTTP/1.1 Connector on port 8082 -->
<!-- See proxy documentation for more information about using this. -->
<!--
<Connector port="8082"
maxThreads="150" minSpareThreads="25" maxSpareThreads="75"
enableLookups="false"
acceptCount="100" debug="0" connectionTimeout="20000"
proxyPort="80" disableUploadTimeout="true" />
-->
CHAPTER 4 ■ WORKING WITH TOMCAT’S CONFIGURATION FILES50
7850ch04FINAL.qxd 2/28/07 10:41 AM Page 50
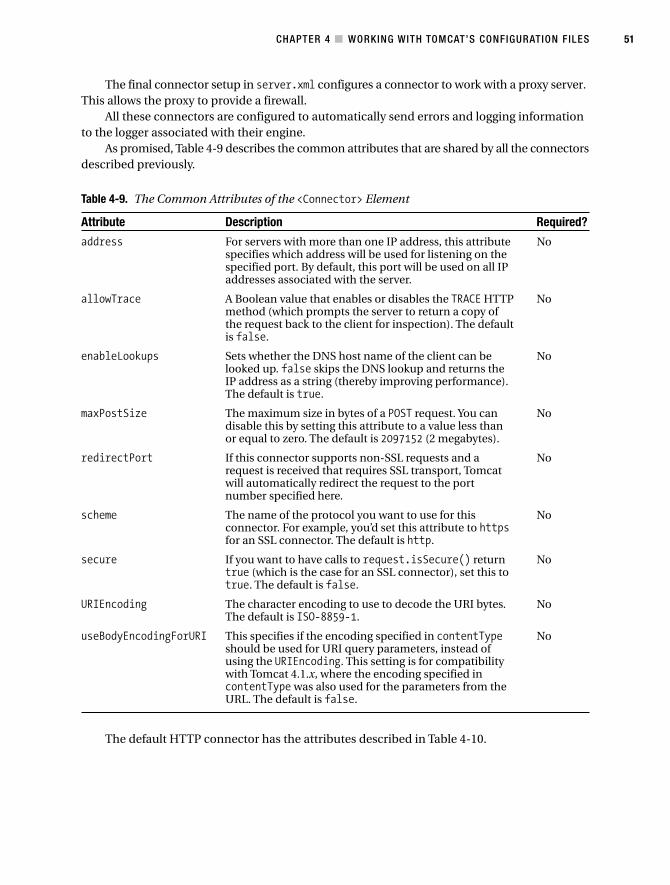
The final connector setup in server.xml configures a connector to work with a proxy server.This allows the proxy to provide a firewall.
All these connectors are configured to automatically send errors and logging informationto the logger associated with their engine.
As promised, Table 4-9 describes the common attributes that are shared by all the connectorsdescribed previously.
Table 4-9. The Common Attributes of the <Connector> Element
Attribute Description Required?
address For servers with more than one IP address, this attribute Nospecifies which address will be used for listening on the specified port. By default, this port will be used on all IP addresses associated with the server.
allowTrace A Boolean value that enables or disables the TRACE HTTP Nomethod (which prompts the server to return a copy of the request back to the client for inspection). The default is false.
enableLookups Sets whether the DNS host name of the client can be Nolooked up. false skips the DNS lookup and returns the IP address as a string (thereby improving performance). The default is true.
maxPostSize The maximum size in bytes of a POST request. You can Nodisable this by setting this attribute to a value less than or equal to zero. The default is 2097152 (2 megabytes).
redirectPort If this connector supports non-SSL requests and a Norequest is received that requires SSL transport, Tomcat will automatically redirect the request to the port number specified here.
scheme The name of the protocol you want to use for this Noconnector. For example, you’d set this attribute to httpsfor an SSL connector. The default is http.
secure If you want to have calls to request.isSecure() return Notrue (which is the case for an SSL connector), set this to true. The default is false.
URIEncoding The character encoding to use to decode the URI bytes. NoThe default is ISO-8859-1.
useBodyEncodingForURI This specifies if the encoding specified in contentType Noshould be used for URI query parameters, instead of using the URIEncoding. This setting is for compatibility with Tomcat 4.1.x, where the encoding specified in contentType was also used for the parameters from the URL. The default is false.
The default HTTP connector has the attributes described in Table 4-10.
CHAPTER 4 ■ WORKING WITH TOMCAT’S CONFIGURATION FILES 51
7850ch04FINAL.qxd 2/28/07 10:41 AM Page 51

Table 4-10. The Attributes of the HTTP <Connector> Element
Attribute Description Required?
acceptCount The maximum queue length for incoming Noconnection requests when all possible request-processing threads are in use. Any requests received when the queue is full will be refused. The default is 10.
bufferSize The size (in bytes) of the buffer to be provided for Noinput streams created by this connector. The default is 2048.
compressableMimeTypes The value is a comma-separated list of MIME types Nofor which HTTP compression may be used. The default is text/html, text/xml, text/plain.
compression The connector may use HTTP/1.1 GZIP compression Noin an attempt to save server bandwidth. The acceptable values for the parameter are off (disables compression), on (allows compression, which causes text data to be compressed), force (forces compression in all cases), or an integer (which is equivalent to on but specifies the minimum amount of data before the output is compressed). If the content length isn’t known and compression is set to on (or a more aggressive setting), the output will also be compressed. The default is off.
connectionLinger The number of milliseconds during which the Nosockets used by this connector will linger when they are closed. The default is -1 (socket linger is disabled).
connectionTimeout The number of milliseconds this connector will wait Noafter accepting a connection for the request URI line to be presented. The default is 60000 (that is, 60 seconds).
disableUploadTimeout Used to set a connection timeout while a servlet is Nobeing executed. This gives the servlet longer to complete its execution or allows a longer timeout during data upload. The default is false.
maxHttpHeaderSize The maximum size of the request and response NoHTTP header, specified in bytes. The default is 4096.
maxKeepAliveRequests The maximum number of HTTP requests that can be Nomaintained until Tomcat closes the connection. A setting of 1 will disable HTTP/1.0 and HTTP/1.1 keep-alive and pipelining. A setting of -1 will allow an unlimited amount of pipelined or keep-alive HTTP requests. The default is 100.
maxSpareThreads The maximum number of unused request-processing Nothreads that will be allowed to exist until the thread pool stops the unnecessary threads. The default is 50.
maxThreads The maximum number of request-processing threads Noto be created, which therefore determines the maximum number of simultaneous requests that can be handled. The default is 200.
CHAPTER 4 ■ WORKING WITH TOMCAT’S CONFIGURATION FILES52
7850ch04FINAL.qxd 2/28/07 10:41 AM Page 52
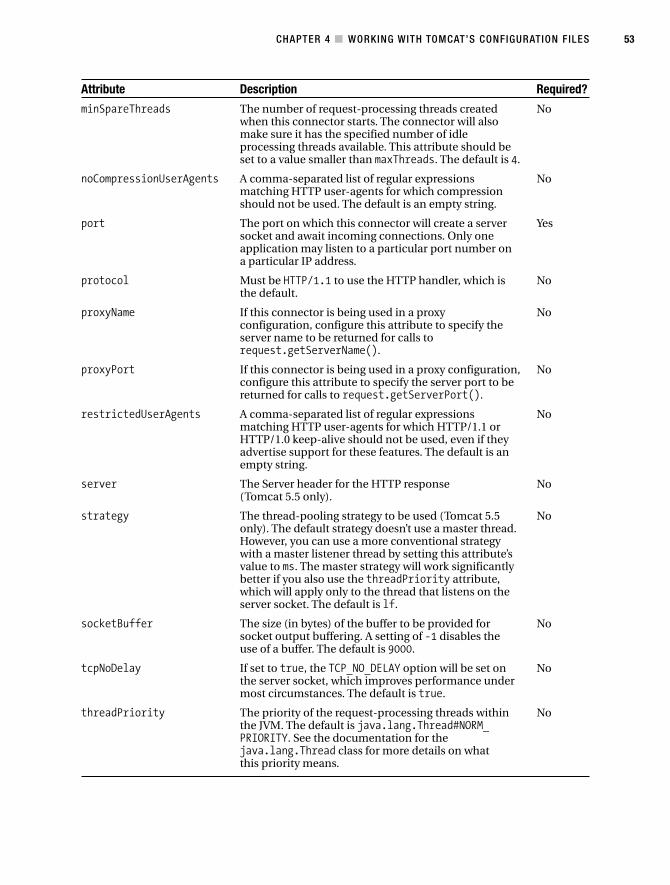
Attribute Description Required?
minSpareThreads The number of request-processing threads created Nowhen this connector starts. The connector will also make sure it has the specified number of idle processing threads available. This attribute should be set to a value smaller than maxThreads. The default is 4.
noCompressionUserAgents A comma-separated list of regular expressions Nomatching HTTP user-agents for which compression should not be used. The default is an empty string.
port The port on which this connector will create a server Yessocket and await incoming connections. Only one application may listen to a particular port number on a particular IP address.
protocol Must be HTTP/1.1 to use the HTTP handler, which is Nothe default.
proxyName If this connector is being used in a proxy Noconfiguration, configure this attribute to specify the server name to be returned for calls to request.getServerName().
proxyPort If this connector is being used in a proxy configuration, Noconfigure this attribute to specify the server port to be returned for calls to request.getServerPort().
restrictedUserAgents A comma-separated list of regular expressions Nomatching HTTP user-agents for which HTTP/1.1 or HTTP/1.0 keep-alive should not be used, even if they advertise support for these features. The default is an empty string.
server The Server header for the HTTP response No(Tomcat 5.5 only).
strategy The thread-pooling strategy to be used (Tomcat 5.5 Noonly). The default strategy doesn’t use a master thread. However, you can use a more conventional strategy with a master listener thread by setting this attribute’s value to ms. The master strategy will work significantly better if you also use the threadPriority attribute, which will apply only to the thread that listens on the server socket. The default is lf.
socketBuffer The size (in bytes) of the buffer to be provided for Nosocket output buffering. A setting of -1 disables the use of a buffer. The default is 9000.
tcpNoDelay If set to true, the TCP_NO_DELAY option will be set on Nothe server socket, which improves performance under most circumstances. The default is true.
threadPriority The priority of the request-processing threads within Nothe JVM. The default is java.lang.Thread#NORM_PRIORITY. See the documentation for the java.lang.Thread class for more details on what this priority means.
CHAPTER 4 ■ WORKING WITH TOMCAT’S CONFIGURATION FILES 53
7850ch04FINAL.qxd 2/28/07 10:41 AM Page 53
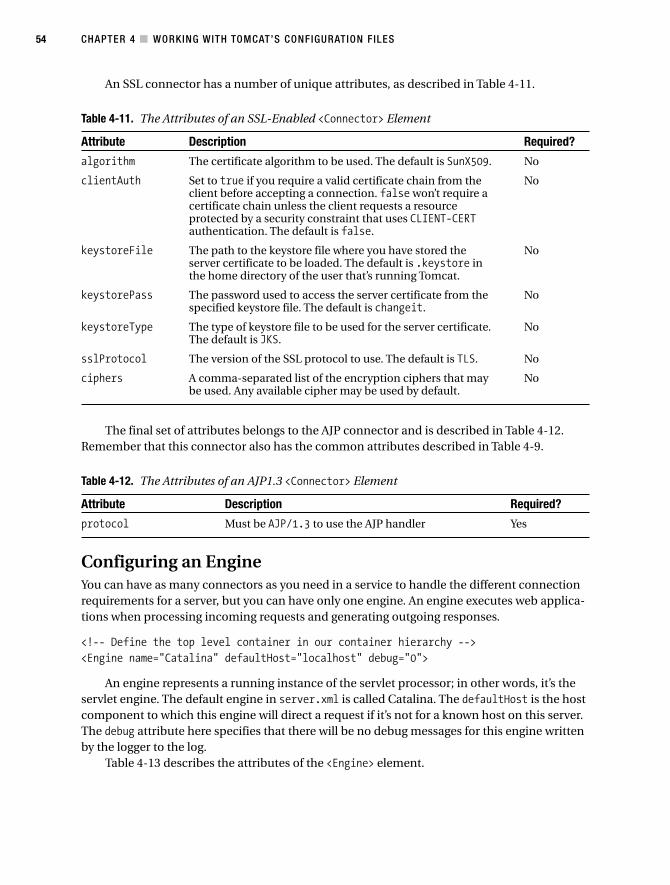
An SSL connector has a number of unique attributes, as described in Table 4-11.
Table 4-11. The Attributes of an SSL-Enabled <Connector> Element
Attribute Description Required?
algorithm The certificate algorithm to be used. The default is SunX509. No
clientAuth Set to true if you require a valid certificate chain from the Noclient before accepting a connection. false won’t require acertificate chain unless the client requests a resource protected by a security constraint that uses CLIENT-CERTauthentication. The default is false.
keystoreFile The path to the keystore file where you have stored the Noserver certificate to be loaded. The default is .keystore in the home directory of the user that’s running Tomcat.
keystorePass The password used to access the server certificate from the Nospecified keystore file. The default is changeit.
keystoreType The type of keystore file to be used for the server certificate. NoThe default is JKS.
sslProtocol The version of the SSL protocol to use. The default is TLS. No
ciphers A comma-separated list of the encryption ciphers that may Nobe used. Any available cipher may be used by default.
The final set of attributes belongs to the AJP connector and is described in Table 4-12.Remember that this connector also has the common attributes described in Table 4-9.
Table 4-12. The Attributes of an AJP1.3 <Connector> Element
Attribute Description Required?
protocol Must be AJP/1.3 to use the AJP handler Yes
Configuring an EngineYou can have as many connectors as you need in a service to handle the different connectionrequirements for a server, but you can have only one engine. An engine executes web applica-tions when processing incoming requests and generating outgoing responses.
<!-- Define the top level container in our container hierarchy -->
<Engine name="Catalina" defaultHost="localhost" debug="0">
An engine represents a running instance of the servlet processor; in other words, it’s theservlet engine. The default engine in server.xml is called Catalina. The defaultHost is the hostcomponent to which this engine will direct a request if it’s not for a known host on this server.The debug attribute here specifies that there will be no debug messages for this engine writtenby the logger to the log.
Table 4-13 describes the attributes of the <Engine> element.
CHAPTER 4 ■ WORKING WITH TOMCAT’S CONFIGURATION FILES54
7850ch04FINAL.qxd 2/28/07 10:41 AM Page 54

Table 4-13. The Attributes of the <Engine> Element
Attribute Description Required?
backgroundProcessorDelay Represents the delay in seconds between the Noinvocation of the backgroundProcess() method on this engine and its child containers, including all hosts and contexts. Child containers will be invoked if their delay value is negative (which wouldmean they’re using their own processing thread). Setting this to a positive value will cause a thread to be spawned. After waiting the specified amount of time, the thread will invoke the backgroundProcess()method on this engine and all its child containers. The default is 10.
className Class name of the implementation to use. NoThe default is org.apache.catalina.core.StandardEngine.
defaultHost The default hostname. This host will process Yesrequests directed to host names on this server that aren’t configured in server.xml. This name must match the name of one of the host elements nested in this engine.
jvmRoute The identifier that must be used in load balancing Noto enable session affinity. This value must be unique across all Tomcat 5 servers that participate in the cluster. It will be appended to the generated session identifier, therefore allowing the front-end proxy to forward a particular session to the same Tomcat 5 instance.
name Name of this engine, used in log and error messages. Yes
The <Engine> element has the subelements described in Table 4-14.
Table 4-14. The Subelements of the <Engine> Element
Subelement Description Number
Realm The user-authentication realm used by Tomcat’s declarative 0 or 1security support.
Host Each <Host> element is a virtual host handled by this engine. 1 or moreTomcat can handle multiple virtual hosts per engine instance.
Listener Life cycle listeners monitor the starting and stopping of the 0 or moreengine. You’ll see one use for listeners in Chapter 9.
Valve Valves add processing logic into the request- and response- 0 or morehandling pipeline at the engine level. Standard valves are used to perform access logging, request filtering, implementing single sign-on, and so on.
Tomcat LoggingTomcat doesn’t include the logger component and relies instead on the Jakarta Commons log-ging mechanism. This mechanism is a thin bridge between logging libraries and allows you touse any logging toolkit you want. The two most common are the Java 1.4 (and onward) built-in
CHAPTER 4 ■ WORKING WITH TOMCAT’S CONFIGURATION FILES 55
7850ch04FINAL.qxd 2/28/07 10:41 AM Page 55
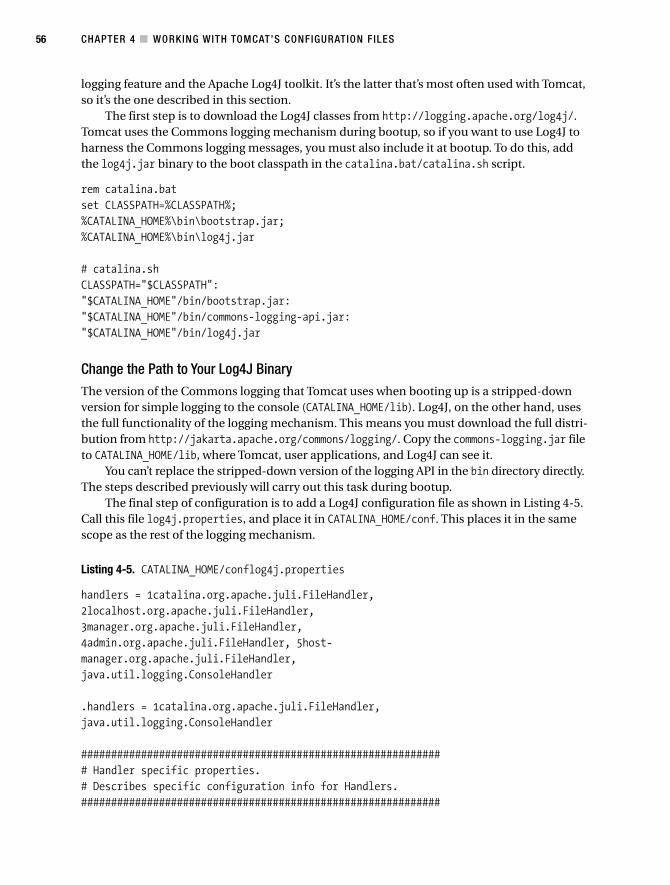
logging feature and the Apache Log4J toolkit. It’s the latter that’s most often used with Tomcat,so it’s the one described in this section.
The first step is to download the Log4J classes from http://logging.apache.org/log4j/.Tomcat uses the Commons logging mechanism during bootup, so if you want to use Log4J toharness the Commons logging messages, you must also include it at bootup. To do this, addthe log4j.jar binary to the boot classpath in the catalina.bat/catalina.sh script.
rem catalina.bat
set CLASSPATH=%CLASSPATH%;
%CATALINA_HOME%\bin\bootstrap.jar;
%CATALINA_HOME%\bin\log4j.jar
# catalina.sh
CLASSPATH="$CLASSPATH":
"$CATALINA_HOME"/bin/bootstrap.jar:
"$CATALINA_HOME"/bin/commons-logging-api.jar:
"$CATALINA_HOME"/bin/log4j.jar
Change the Path to Your Log4J BinaryThe version of the Commons logging that Tomcat uses when booting up is a stripped-downversion for simple logging to the console (CATALINA_HOME/lib). Log4J, on the other hand, usesthe full functionality of the logging mechanism. This means you must download the full distri-bution from http://jakarta.apache.org/commons/logging/. Copy the commons-logging.jar fileto CATALINA_HOME/lib, where Tomcat, user applications, and Log4J can see it.
You can’t replace the stripped-down version of the logging API in the bin directory directly.The steps described previously will carry out this task during bootup.
The final step of configuration is to add a Log4J configuration file as shown in Listing 4-5.Call this file log4j.properties, and place it in CATALINA_HOME/conf. This places it in the samescope as the rest of the logging mechanism.
Listing 4-5. CATALINA_HOME/conflog4j.properties
handlers = 1catalina.org.apache.juli.FileHandler,
2localhost.org.apache.juli.FileHandler,
3manager.org.apache.juli.FileHandler,
4admin.org.apache.juli.FileHandler, 5host-
manager.org.apache.juli.FileHandler,
java.util.logging.ConsoleHandler
.handlers = 1catalina.org.apache.juli.FileHandler,
java.util.logging.ConsoleHandler
############################################################
# Handler specific properties.
# Describes specific configuration info for Handlers.
############################################################
CHAPTER 4 ■ WORKING WITH TOMCAT’S CONFIGURATION FILES56
7850ch04FINAL.qxd 2/28/07 10:41 AM Page 56

1catalina.org.apache.juli.FileHandler.level = FINE
1catalina.org.apache.juli.FileHandler.directory = ${catalina.base}/logs
1catalina.org.apache.juli.FileHandler.prefix = catalina.
2localhost.org.apache.juli.FileHandler.level = FINE
2localhost.org.apache.juli.FileHandler.directory = ${catalina.base}/logs
2localhost.org.apache.juli.FileHandler.prefix = localhost.
3manager.org.apache.juli.FileHandler.level = FINE
3manager.org.apache.juli.FileHandler.directory = ${catalina.base}/logs
3manager.org.apache.juli.FileHandler.prefix = manager.
4admin.org.apache.juli.FileHandler.level = FINE
4admin.org.apache.juli.FileHandler.directory = ${catalina.base}/logs
4admin.org.apache.juli.FileHandler.prefix = admin.
5host-manager.org.apache.juli.FileHandler.level = FINE
5host-manager.org.apache.juli.FileHandler.directory = ${catalina.base}/logs
5host-manager.org.apache.juli.FileHandler.prefix = host-manager.
java.util.logging.ConsoleHandler.level = FINE
java.util.logging.ConsoleHandler.formatter = java.util.logging.SimpleFormatter
############################################################
# Facility specific properties.
# Provides extra control for each logger.
############################################################
org.apache.catalina.core.ContainerBase.[Catalina].[localhost].level = INFO
org.apache.catalina.core.ContainerBase.[Catalina].[localhost].handlers
= 2localhost.org.apache.juli.FileHandler
org.apache.catalina.core.ContainerBase.
[Catalina].[localhost].[/manager].level = INFO
org.apache.catalina.core.ContainerBase.
[Catalina].[localhost].[/manager].handlers = 3manager.org.apache.juli.FileHandler
org.apache.catalina.core.ContainerBase.
[Catalina].[localhost].[/admin].level = INFO
org.apache.catalina.core.ContainerBase.
[Catalina].[localhost].[/admin].handlers = 4admin.org.apache.juli.FileHandler
org.apache.catalina.core.ContainerBase.
[Catalina].[localhost].[/host-manager].level = INFO
org.apache.catalina.core.ContainerBase.
[Catalina].[localhost].[/host-manager].handlers
= 5host-manager.org.apache.juli.FileHandler
CHAPTER 4 ■ WORKING WITH TOMCAT’S CONFIGURATION FILES 57
7850ch04FINAL.qxd 2/28/07 10:41 AM Page 57

# For example, set the com.xyz.foo logger to only log SEVERE
# messages:
#org.apache.catalina.startup.ContextConfig.level = FINE
#org.apache.catalina.startup.HostConfig.level = FINE
#org.apache.catalina.session.ManagerBase.level = FINE
#org.apache.catalina.core.AprLifecycleListener.level=FINE
This is a simple configuration that sets the level of logging and the log file for Tomcat touse. The logging levels are, in ascending order of severity, as follows: ALL, DEBUG, INFO, WARN,ERROR, FATAL, and OFF. Be careful and set logging to only the level you require, because therecan be severe performance penalties if you choose too low a level; at the same time, you maymiss crucial information if you set the level too high.
Start Tomcat, and open the logs directory to see several log files.You aren’t limited to using the simple text file. For example, the previous listing has no dates
or times. To change this, you can use a pattern layout, which uses pattern characters just as C does.Table 4-15 describes those characters relevant to Tomcat logging. See http://logging.apache.org/log4j/docs/api/org/apache/log4j/PatternLayout.html for more details on Log4J’s loggingpatterns.
Table 4-15. Pattern Layout Placeholders
Pattern Character Description
c The category of the logging event. In Tomcat terms, this displays thecomponent that made the log entry. You can configure the precision of the category name by placing aninteger in brackets after the character. In this case, only the correspondingnumber of rightmost components of the category name will be printed. For example, for the category log4j.logger.org.apache.catalina.core.ContainerBase, the pattern %c{1} will print ContainerBase. This is a useful pattern character when you want to find out from wherea certain log message has come.
d The date of this log entry, which may be followed by a date formatenclosed between braces, for example, %d{HH:mm:ss} or %d{dd MMM yyyyHH:mm:ss}. If no format is given, then ISO8601 format is used. For better results, you should use the Log4J date formatters. These areABSOLUTE, DATE, and ISO8601, for specifying AbsoluteTimeDateFormat,DateTimeDateFormat, and ISO8601DateFormat, respectively; for example,%d{ISO8601} or %d{ABSOLUTE}.ABSOLUTE is HH:mm:ss,SSS.DATE is dd MM YYYY HH:mm:ss,SSS.ISO8601 is YYYY-MM-dd HH:mm:ss,SSS.
F The filename where the logging request was issued. This can be slow, soyou should avoid using this option unless execution speed isn’t an issue.
l The location of the caller that generated the logging event. The locationinformation depends on the JVM implementation but usually consists ofthe fully qualified name of the calling method, followed by the filenameand line number between parentheses.Here’s an example:org.apache.jk.server.JkMain.start(JkMain.java:355).The location information can be useful, but obtaining it is extremely slow.
L The line number where the logging request was issued. Obtaining callerlocation information is extremely slow.
CHAPTER 4 ■ WORKING WITH TOMCAT’S CONFIGURATION FILES58
7850ch04FINAL.qxd 2/28/07 10:41 AM Page 58

Pattern Character Description
m The application-supplied message associated with the logging event.
M The method name where the logging request was issued. Obtainingmethod name information is extremely slow.
n The platform-dependent line separator character or characters.This conversion character offers practically the same performance asusing nonportable line separator strings such as \n or \r\n. Thus, it’s thepreferred way of specifying a line separator.
p Used to output the priority of the logging event.
r Used to output the number of milliseconds elapsed from the start of theapplication until the creation of the logging event.
t Used to output the name of the thread that generated the logging event.
% The sequence %% outputs a single percent sign.
Listing 4-7 shows how to put these characters into action.
Listing 4-7. CATALINA_HOME/common/classes/log4j.properties
# Set the root logger for Tomcat
log4j.rootLogger=INFO, Tomcat
# Log to a pattern file
log4j.appender.Tomcat=org.apache.log4j.FileAppender
log4j.appender.Tomcat.File=C:/jakarta-tomcat-5.5.3/logs/tomcat.pattern.log
# Use a pattern layout
log4j.appender.Tomcat.layout=org.apache.log4j.PatternLayout
log4j.appender.Tomcat.layout.ConversionPattern=%d{ISO8601} : %p : %m %n
Configuring a RealmThe next entry in server.xml is a realm, which is used for user authentication.
<!-- Because this Realm is here, an instance will be shared globally -->
<!-- This Realm uses the UserDatabase configured in the global JNDI
resources under the key "UserDatabase". Any edits
that are performed against this UserDatabase are immediately
available for use by the Realm. -->
<Realm className="org.apache.catalina.realm.UserDatabaseRealm"
debug="0" resourceName="UserDatabase"/>
Note that this realm uses the global resource you looked at earlier in the “Configuringa Global Resource” section. This realm is, therefore, attaching the global resource to the enginein which it resides.
Tomcat uses realms to perform authentication and implement container-managed secu-rity. They map usernames to passwords (for authentication) and usernames to user roles (for
CHAPTER 4 ■ WORKING WITH TOMCAT’S CONFIGURATION FILES 59
7850ch04FINAL.qxd 2/28/07 10:41 AM Page 59

container-managed security). This means that Tomcat can then determine that users are whothey say they are, using authentication, and determine which areas of the server are availableto them, using container-managed security.
The user database is only one implementation of a realm. Others are data source realm,JDBC realm, JNDI realm, and JAAS realm. Tomcat 5 supports the memory realm for backwardcompatibility with Tomcat 4, but it’s inefficient and insecure, so you shouldn’t use it.
The various realms are described briefly next but will be dealt with in more detail inChapter 11.
Configuring a User Database RealmThe user database realm is an upgraded version of the memory realm and is backward com-patible with the memory realm. It comes with the same caveats as the memory realm.
Configuring a Data Source RealmData source realms use JDBC data sources stored with JNDI names to authenticate users. Thisallows you to change the underlying storage mechanism without having to change the settingson your realms.
Configuring a JDBC RealmJDBC realms access relational databases to obtain authentication information. You can use anysource of data that can be accessed with JDBC. This includes ODBC sources, such as Excel orcomma-separated files, accessed with the JDBC-ODBC bridge. server.xml has a number of exam-ple JDBC realms commented out. The following uses a MySQL database instead of a text file:
<!--
<Realm className="org.apache.catalina.realm.JDBCRealm" debug="99"
driverName="org.gjt.mm.mysql.Driver"
connectionURL="jdbc:mysql://localhost/authority"
connectionName="test" connectionPassword="test"
userTable="users" userNameCol="user_name"
userCredCol="user_pass"
userRoleTable="user_roles" roleNameCol="role_name" />
-->
Configuring a JNDI RealmYou can configure a JNDI LDAP service provider to provide user information from an existingdirectory service. This would allow you to use employee information that’s already available.
Configuring a JAAS RealmYou can use the JAAS realm to authenticate users using the Java Authentication and Authoriza-tion Service (JAAS). This allows you to use any authentication mechanism you choose, but youhave to write your own authentication module to implement it.
CHAPTER 4 ■ WORKING WITH TOMCAT’S CONFIGURATION FILES60
7850ch04FINAL.qxd 2/28/07 10:41 AM Page 60

Configuring a HostA host component represents a single virtual host running on this server.
<Host name="localhost" debug="0" appBase="webapps"
unpackWARs="true" autoDeploy="true"
xmlValidation="false" xmlNamespaceAware="false">
This virtual host is localhost. The applications running in this host are located in theCATALINA_HOME/webapps directory.
The unpackWARs attribute tells Tomcat to unpack any packaged WAR files found in theappBase directory if it’s set to true. A value of false means that Tomcat will execute the webapplications without unpacking them, which saves space but increases response time.
A <Host> element is a container and has the attributes described in Table 4-16. These arethe attributes of all hosts, and custom implementations of hosts are possible.
Table 4-16. The Common Attributes of the <Host> Element
Attribute Description Required
appBase The base directory for this virtual host. This is a Yesdirectory that may contain web applications to bedeployed on this virtual host. You may specify an absolute pathname or a pathname relative to theCATALINA_HOME directory.
autoDeploy This flag value indicates whether new web Noapplications added to the appBase directory while Tomcat is running should be deployed automatically. The default is true.
background-ProcessorDelay The delay in seconds between the invocation of the YesbackgroundProcess() method on this host and its child containers, including all contexts. Child containers will be invoked if their delay values are negative (which would mean they’re using their own processing threads). A positive value will cause athread to be spawned. After waiting the specified amount of time, the thread will invoke the backgroundProcess() method on this host and all its child containers. A host will use background processing to perform live web application deployment-related tasks. The default is -1, which means the host will rely on the background-processing thread of its parent engine.
className Class name of the implementation to use. NoThe default is org.apache.catalina.core.StandardHost.
deployOnStartup Set to true to automatically deploy web Noapplications on startup. The default is true.
name The name of this virtual host, as configured with YesDNS. One of the hosts nested within an engine must have a name that matches the defaultHostattribute of that engine.
CHAPTER 4 ■ WORKING WITH TOMCAT’S CONFIGURATION FILES 61
7850ch04FINAL.qxd 2/28/07 10:41 AM Page 61

In addition, the standard host has the attributes defined in Table 4-17.
Table 4-17. The Attributes of the Standard <Host> Element
Attribute Description Required
deployXML false disables the ability to deploy applications using Noan XML configuration file. This also prohibits the managerapplication from deploying web application directories or WAR files that aren’t located in CATALINA_HOME/conf/[Engine_name]/[Host_name]. XML-configured applications are deployed with Tomcat’s security permissions, so you should set this to false if untrustworthy users can manage web applications. The default is true.
errorReportValveClass Class name of the error-reporting valve that will be used Noby this host. You can use this property to customize the look of the error pages that will be generated by Tomcat. The class must implement the org.apache.catalina.Valveinterface. The default is org.apache.catalina.valves.ErrorReportValve.
unpackWARs Set to true if you want to unpack WAR files in the appBase Nodirectory into a corresponding directory structure. falsetells Tomcat to run such web applications directly from their WAR file. The default is true.
workDir A scratch directory to be used by applications running in Nothis host. Each application will have its own directory with temporary read/write use. Configuring a working directory for a context will override this value. This directory is visible to servlets in the web application as a servlet context attribute(of type java.io.File) named javax.servlet.context.tempdir, as described in the Servlet specification. The default is a suitable directory underneath CATALINA_HOME/work.
Table 4-18 describes the subelements that can be placed inside a <Host> element.
Table 4-18. The Subelements of the <Host> Element
Subelement Description Number
Context A context defines a web application deployed within this host. 0 or moreWhen using Tomcat 5, you shouldn’t place any context entries inserver.xml because server.xml isn’t reloaded after changes are made. Use XML configuration files or deployment tools, such as the manager application instead.
Realm A realm that can be accessed across all the web applications 0 or 1running within this host—unless a lower-level component specifies its own realm.
Valve You can add a valve to monitor access, filter requests, and 0 or moreimplement single sign-on.
Listener You can add a listener to monitor life cycle events, such as this host 0 or morestarting or stopping, and to implement user web applications.
Alias Defines an alias for this host if two or more network names need to 0 or moreapply to it.
CHAPTER 4 ■ WORKING WITH TOMCAT’S CONFIGURATION FILES62
7850ch04FINAL.qxd 2/28/07 10:41 AM Page 62

I’ll cover context configuration in Chapter 5 when you’ll learn how to configure webapplications.
Configuring a ValveA valve is a Tomcat-specific interception mechanism for catching requests and responses. Anyrequests destined for the localhost host would be passed through the valve defined here, ifit were to be uncommented.
<!--
<Valve className="org.apache.catalina.valves.AccessLogValve"
directory="logs" prefix="localhost_access_log."
suffix=".txt"
pattern="common" resolveHosts="false"/>
-->
The org.apache.catalina.valves.AccessLogValve valve creates access log files in the sameformat as Apache’s log file. The previous configuration will create log files, in the common for-mat, in CATALINA_HOME/logs. They will be named in the form localhost_access_log.DATE.txt.
You can also install valves at the engine level. Any valve that’s installed at the engine levelwill have access to every request handled by the engine, regardless of which connector therequest comes through. Therefore, you must test the valve thoroughly and make sure it doesn’trequire a lot of processor time to complete its operation. The standard valves that come withTomcat have been designed and tested for efficiency.
■Note Valves are specific to Tomcat and not part of the Servlet specification. Application programmerscan use filters as a similar interception mechanism. They are part of the Servlet specification and residewithin a web application.
You’ll see how to configure and use the standard valves in Chapter 7.
Configuring a ListenerIf you have an object that needs to know about server life cycle events, then you need to imple-ment a listener. The basic listener configuration is as follows:
<Listener className="com.acme.listeners.Listener" />
The className attribute is required. You can add other attributes according to the proper-ties of the class. They’re matched with the standard JavaBean naming mechanism.
Configuring an AliasIf you need to map more than one network name to a single virtual host, then you need toconfigure an alias. For example, say you want to map www.company.com and www.company.org tothe same host; you’d do the following:
CHAPTER 4 ■ WORKING WITH TOMCAT’S CONFIGURATION FILES 63
7850ch04FINAL.qxd 2/28/07 10:41 AM Page 63

<Host name="www.company.com" ...>
<Alias>www.company.org</Alias>
</Host>
Understanding Authentication and the tomcat-users. xml FileTomcat’s user database realm uses the tomcat-users.xml file by default and reads the entirefile into memory. Once the realm has loaded the file into memory, no modification to thetomcat-users.xml file will be reflected until the next server restart. Here’s tomcat-users.xml:
<?xml version='1.0' encoding='utf-8'?>
<tomcat-users>
<role rolename="tomcat"/>
<role rolename="role1"/>
<user username="tomcat" password="tomcat" roles="tomcat"/>
<user username="both" password="tomcat" roles="tomcat,role1"/>
<user username="role1" password="tomcat" roles="role1"/>
</tomcat-users>
Each role that a user can play is defined with a <role> element, and each user has a <user>
entry. Note that a user can have more than one role by adding a comma-separated list to theroles attribute.
Configuring Web Application Defaults with web.xmlEvery Servlet 2.4 web application must contain a web.xml deployment descriptor. This filemust be placed in the WEB-INF directory of the web application.
However, Tomcat comes with a default web.xml in CATALINA_HOME/conf. This file is similarto a web application’s web.xml file but is used to specify the default properties for all webapplications that are running within this server instance.
To gain an understanding of what you can do with this file, let’s look at it. The file startswith the standard XML header and a reference to a DTD. Unlike server.xml, web.xml can beformally validated against a corresponding DTD.
<?xml version="1.0" encoding="ISO-8859-1"?>
<Web-app xmlns="http://java.sun.com/xml/ns/j2ee"
xmlns:xsi="http://www.w3.org/2001/XMLSchema-instance"
xsi:schemaLocation="http://java.sun.com/xml/ns/j2ee
http://java.sun.com/xml/ns/j2ee/Web-app_2_4.xsd"
version="2.4">
The most noteworthy thing about this is that the default web application version is 2.4.
CHAPTER 4 ■ WORKING WITH TOMCAT’S CONFIGURATION FILES64
7850ch04FINAL.qxd 2/28/07 10:41 AM Page 64
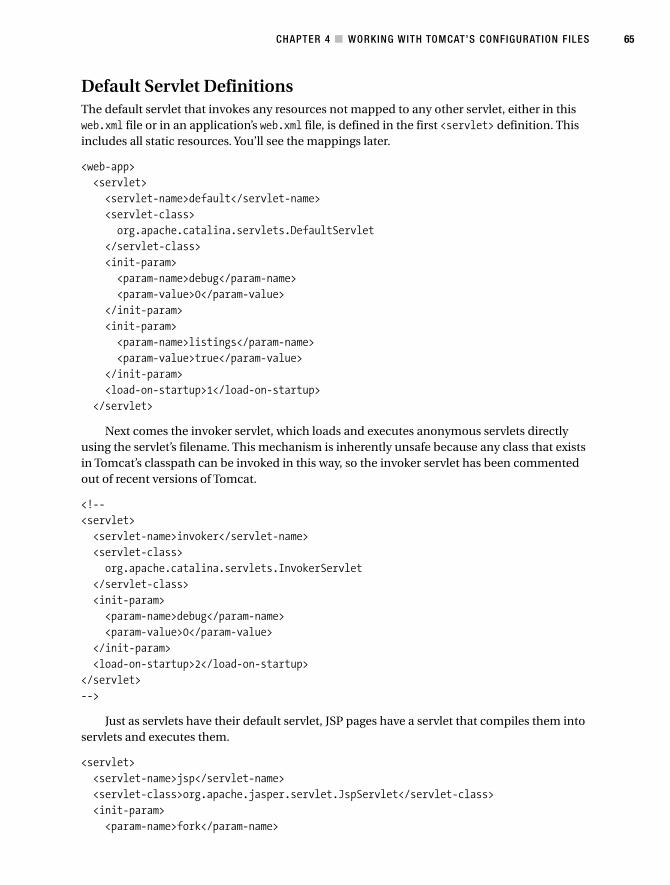
Default Servlet DefinitionsThe default servlet that invokes any resources not mapped to any other servlet, either in thisweb.xml file or in an application’s web.xml file, is defined in the first <servlet> definition. Thisincludes all static resources. You’ll see the mappings later.
<web-app>
<servlet>
<servlet-name>default</servlet-name>
<servlet-class>
org.apache.catalina.servlets.DefaultServlet
</servlet-class>
<init-param>
<param-name>debug</param-name>
<param-value>0</param-value>
</init-param>
<init-param>
<param-name>listings</param-name>
<param-value>true</param-value>
</init-param>
<load-on-startup>1</load-on-startup>
</servlet>
Next comes the invoker servlet, which loads and executes anonymous servlets directlyusing the servlet’s filename. This mechanism is inherently unsafe because any class that existsin Tomcat’s classpath can be invoked in this way, so the invoker servlet has been commentedout of recent versions of Tomcat.
<!--
<servlet>
<servlet-name>invoker</servlet-name>
<servlet-class>
org.apache.catalina.servlets.InvokerServlet
</servlet-class>
<init-param>
<param-name>debug</param-name>
<param-value>0</param-value>
</init-param>
<load-on-startup>2</load-on-startup>
</servlet>
-->
Just as servlets have their default servlet, JSP pages have a servlet that compiles them intoservlets and executes them.
<servlet>
<servlet-name>jsp</servlet-name>
<servlet-class>org.apache.jasper.servlet.JspServlet</servlet-class>
<init-param>
<param-name>fork</param-name>
CHAPTER 4 ■ WORKING WITH TOMCAT’S CONFIGURATION FILES 65
7850ch04FINAL.qxd 2/28/07 10:41 AM Page 65

<param-value>false</param-value>
</init-param>
<init-param>
<param-name>xpoweredBy</param-name>
<param-value>false</param-value>
</init-param>
<load-on-startup>3</load-on-startup>
</servlet>
The next set of servlets is commented out by default. You should uncomment them if youplan to add Apache-style Server Side Include (SSI) features to the stand-alone Tomcat serveror process CGI. You’ll see more of this in later chapters.
Matching URLs: Servlet MappingsServlet mappings specify which servlets are to process incoming requests, as defined by therequest URL.
<!-- The mapping for the default servlet -->
<servlet-mapping>
<servlet-name>default</servlet-name>
<url-pattern>/</url-pattern>
</servlet-mapping>
The previous <servlet-mapping> element maps the pattern / to the default servlet definedearlier in web.xml. So, www.apress.com/tomcat/ will map to the default servlet, which will processthe request.
The second <servlet-mapping> maps all requests that end in /servlet/* to the invokerservlet defined earlier in web.xml.
<!-- The mapping for the invoker servlet -->
<!--
<servlet-mapping>
<servlet-name>invoker</servlet-name>
<url-pattern>/servlet/*</url-pattern>
</servlet-mapping>
-->
The next <servlet-mapping> specifies that all URLs containing *.jsp and *.jspx shouldbe passed to the servlet named jsp for processing:
<!-- The mapping for the JSP servlet -->
<servlet-mapping>
<servlet-name>jsp</servlet-name>
<url-pattern>*.jsp</url-pattern>
</servlet-mapping>
<servlet-mapping>
<servlet-name>jsp</servlet-name>
<url-pattern>*.jspx</url-pattern>
</servlet-mapping>
CHAPTER 4 ■ WORKING WITH TOMCAT’S CONFIGURATION FILES66
7850ch04FINAL.qxd 2/28/07 10:41 AM Page 66

Configuring Session TimeoutThe <session-config> element configures how long Tomcat will maintain a session on theserver side on behalf of a client. For example, if the user leaves a service registration transac-tion in the middle and doesn’t return to the cart for 30 minutes, all of that user’s informationwill be lost.
You must be careful to balance the <session-timeout> value with the potential of over-loading the server with too many stale sessions.
<session-config>
<session-timeout>30</session-timeout>
</session-config>
Configuring MIME MappingsThe <mime-mapping> elements that make up a large chunk of web.xml help Tomcat serve staticfiles with specific extensions to the client. It will generate an HTTP Content-Type header whentransmitting the file to the client. Most browsers will use a helper application to process thefile being transmitted if it recognizes the Content-Type specified. For example, a browser maystart Adobe Acrobat when it detects the application/pdf content type.
<mime-mapping>
<extension>abs</extension>
<mime-type>audio/x-mpeg</mime-type>
</mime-mapping>
... and so on ...
Configuring Welcome FilesTo be compatible with the default behavior of most modern web servers, including Apache,the default servlet will display a welcome file if the incoming URI is terminated in /—forexample, www.apress.com/.
The default servlet will examine the root directory of the named virtual host and look forindex.html, index.htm, or index.jsp in turn to be displayed. Each web application may overridethis list in its own deployment descriptor file.
<welcome-file-list>
<welcome-file>index.html</welcome-file>
<welcome-file>index.htm</welcome-file>
<welcome-file>index.jsp</welcome-file>
</welcome-file-list>
</web-app>
Changing Service Options on WindowsWhen you install Tomcat as a service, it’s set to start automatically, which means that if you wereto restart the computer, Tomcat would start automatically. From now on, every time Windowsis started, Tomcat will automatically start up at boot time and will be available then.
CHAPTER 4 ■ WORKING WITH TOMCAT’S CONFIGURATION FILES 67
7850ch04FINAL.qxd 2/28/07 10:41 AM Page 67
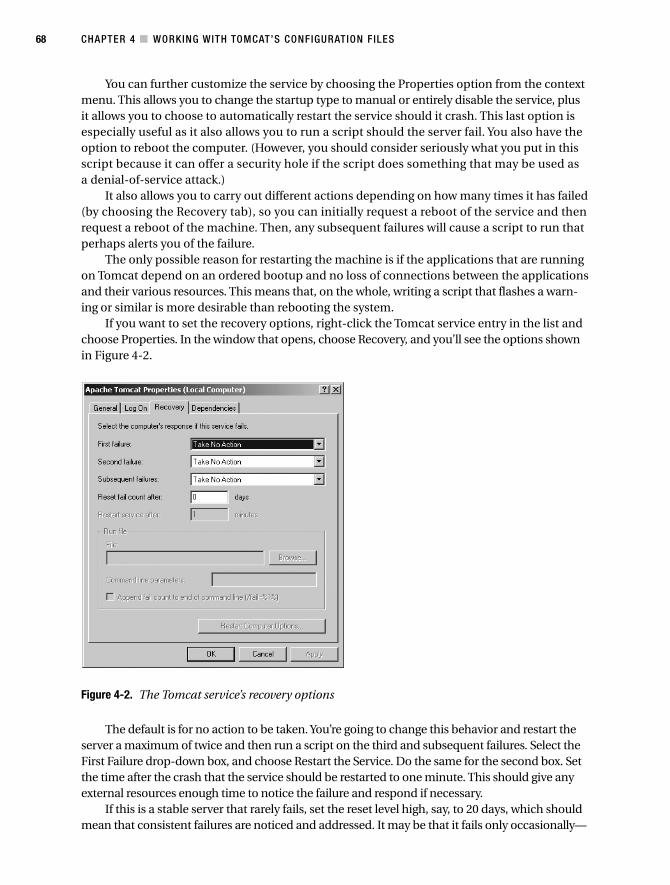
You can further customize the service by choosing the Properties option from the contextmenu. This allows you to change the startup type to manual or entirely disable the service, plusit allows you to choose to automatically restart the service should it crash. This last option isespecially useful as it also allows you to run a script should the server fail. You also have theoption to reboot the computer. (However, you should consider seriously what you put in thisscript because it can offer a security hole if the script does something that may be used asa denial-of-service attack.)
It also allows you to carry out different actions depending on how many times it has failed(by choosing the Recovery tab), so you can initially request a reboot of the service and thenrequest a reboot of the machine. Then, any subsequent failures will cause a script to run thatperhaps alerts you of the failure.
The only possible reason for restarting the machine is if the applications that are runningon Tomcat depend on an ordered bootup and no loss of connections between the applicationsand their various resources. This means that, on the whole, writing a script that flashes a warn-ing or similar is more desirable than rebooting the system.
If you want to set the recovery options, right-click the Tomcat service entry in the list andchoose Properties. In the window that opens, choose Recovery, and you’ll see the options shownin Figure 4-2.
Figure 4-2. The Tomcat service’s recovery options
The default is for no action to be taken. You’re going to change this behavior and restart theserver a maximum of twice and then run a script on the third and subsequent failures. Select theFirst Failure drop-down box, and choose Restart the Service. Do the same for the second box. Setthe time after the crash that the service should be restarted to one minute. This should give anyexternal resources enough time to notice the failure and respond if necessary.
If this is a stable server that rarely fails, set the reset level high, say, to 20 days, which shouldmean that consistent failures are noticed and addressed. It may be that it fails only occasionally—
CHAPTER 4 ■ WORKING WITH TOMCAT’S CONFIGURATION FILES68
7850ch04FINAL.qxd 2/28/07 10:41 AM Page 68
you want to know nevertheless. Setting the reset level high maximizes the chance that the thirdoption will run, thus alerting you to the problem. Remember that the script can easily be responsi-ble for restarting the server so that users feel a minimal downtime, yet you’re still notified. In fact,this option may be preferable to having the system automatically restart the server without explicitnotification of problems.
If the server fails often, it may be necessary to turn the reset level down so that failurescan be noticed.
Now choose Run a File from the Subsequent Failures option menu. This will enable theRun File menu where you can choose the file to run (normally a batch file). The fail count ispassed to the file as a command-line parameter for the script to report.
For the moment, assuming that you haven’t specified any other command-line prompts,you can discover the failure count using a file such as the following:
@echo off
if NOT %1==/fail goto end
echo Number of failures to date is %2 >> T4.fail
:end
cd "c:\jakarta-tomcat\bin\"
start startup
The previous file is the simplest possible reporting script that merely appends the failurecount to a file named T4.fail each time a failure occurs before restarting the server (but notas a service, rather as a manual start in a new command prompt window). In the first line, youturn off echo; the second line checks that the first command-line argument (%1) is equal to/fail and, if so, prints the following line:
Number of failures to date is %x%
where x is the number of failures. Notice that >> T4.fail makes sure that echo is added to theT4.fail file and that the output is appended to, rather than replaces, the existing contents ofthe file. A single > would replace the file contents.
The result of multiple failures with this file, as set previously to run on the third failure,would be something along the lines of this:
Number of failures to date is %3%
Number of failures to date is %4%
Number of failures to date is %5%
Number of failures to date is %6%
Alternatively, you can run a Java class that extracts the information and perhaps e-mailsthe failure to you. To do this, simply forward the fail count to your program, calling it as follows:
@echo off
if NOT %1==/fail goto end
java ReportTomcatFailure %2
:end
cd "c:\jakarta-tomcat\bin\"
start startup
CHAPTER 4 ■ WORKING WITH TOMCAT’S CONFIGURATION FILES 69
7850ch04FINAL.qxd 2/28/07 10:41 AM Page 69

The number of failures is now available as ReportTomcatFailure’s first command-lineargument (accessible as args[0]).
In addition to the security risk involved in having the computer automatically reboot itself,it’s not entirely necessary. Since Tomcat runs within a JVM, unless you’re doing somethingunusual, a failure of the Tomcat instance is isolated from the rest of the system and a soft rebootshould suffice for most problems. This puts hardware reboots in the very serious category, and,as such, they’re something you probably want to control manually.
SummaryIn this chapter, you’ve seen all the configuration files in Tomcat’s CATALINA_HOME/confdirectory. server.xml is the main configuration file for Tomcat, and server-minimal.xml isa blank template from which you can create your own custom server.xml configuration.
The tomcat-users.xml file is used by the default user authentication mechanism in Tomcat.In a production system, you should use a more robust implementation of a realm, such asa JDBC realm or a JNDI realm.
The default web.xml file in CATALINA_HOME/conf specifies properties that are used inevery web application running on the server. Many of the default servlets configured hereprovide web-server–like features (serving static content, SSI, CGI, and so on) for running webapplications.
Tomcat starts in an unsecured mode, but the catalina.policy file is vitally important ina secured Tomcat installation. It specifies who can access what, and anything else that isn’tspecified can’t be accessed. Tomcat takes advantage of the sophisticated, built-in securityinfrastructure of Java .
The other file in the CATALINA_HOME/conf is catalina.properties. catalina.propertiesconfigures Tomcat’s class loaders as well as what classes can be executed by application code.By default, Tomcat internals are barred. In the next chapter, you’ll see how to administer a webapplication.
CHAPTER 4 ■ WORKING WITH TOMCAT’S CONFIGURATION FILES70
7850ch04FINAL.qxd 2/28/07 10:41 AM Page 70

Administering Web Applications
It may seem as if it’s not the administrator’s job to look after a developer’s application once it’sdeployed. But, as web applications are run on the server you have responsibility for, it’s impor-tant to know how they’re structured so that you can administer them effectively. In an idealworld, the developer will have set up the web application so that it runs smoothly as soon as itgoes live. However, this isn’t always the case.
A lot of code running on the server will have hard-coded paths to resources, which meansthat most applications won’t be happy when you move files. The developer may even have torecompile and redeploy the application. Therefore, knowing about administering web appli-cations is a useful skill to have.
In this chapter, I’ll cover how to configure a context. (Remember, I didn’t cover this inChapter 4 because a context is configured in a separate file to server.xml.) To do all of this,however, you’ll need to know where the various files are placed within a web application, whichhas a well-defined structure.
Configuring ContextsIn the past, you may have configured contexts in server.xml, but this is no longer recommended.The main reason is that Tomcat reads server.xml only when it starts and doesn’t reload it atany point of the server’s life. This means that any changes, including new context definitions,won’t be registered.
The new procedure requires you to use the same context definition as before, but this timein its own XML file in the CATALINA_HOME/conf/[Engine_name]/[Host_name] directory. For thedefault setup, this is CATALINA_HOME/conf/Catalina/localhost.
The XML file may be called whatever you want and has the <Context> element as its rootelement. The name of this file is important in Tomcat 6 because it’s used to name the webapplication that the context XML file describes.
Configuring Default ContextsBefore you see how to configure a context, I’ll discuss how Tomcat deploys contexts and howthis affects the default settings. Tomcat uses a set sequence when it automatically deploys webapplications at startup (configured with the host’s deployOnStartup attribute). To start with, itreads any context XML files in the CATALINA_HOME/conf/[Engine_name]/[Host_name] directoryfor each host. The docBase attribute of the <Context> element (see Table 5-1 in the next section)
71
C H A P T E R 5
■ ■ ■
7850ch05FINAL.qxd 2/28/07 10:42 AM Page 71
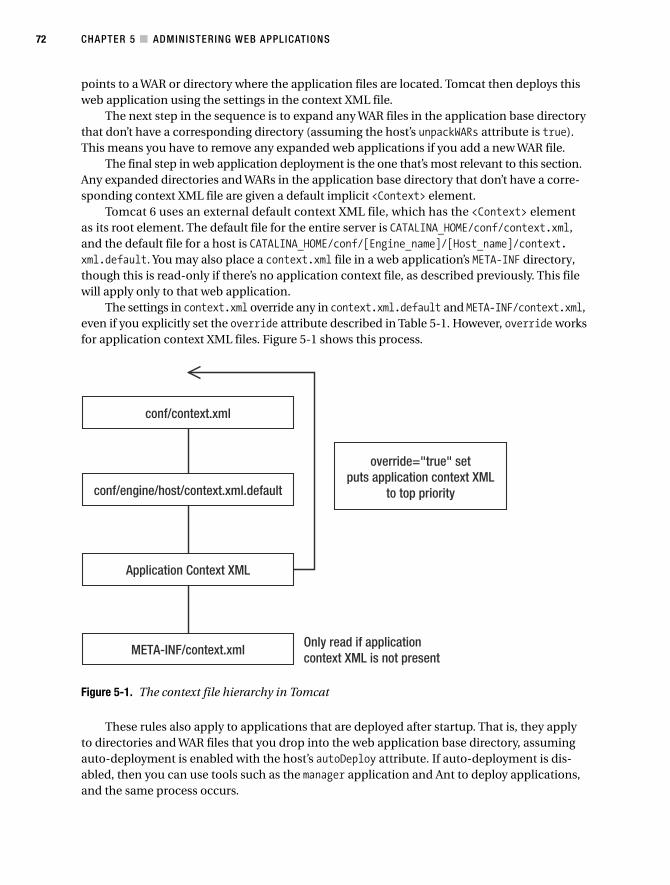
points to a WAR or directory where the application files are located. Tomcat then deploys thisweb application using the settings in the context XML file.
The next step in the sequence is to expand any WAR files in the application base directorythat don’t have a corresponding directory (assuming the host’s unpackWARs attribute is true).This means you have to remove any expanded web applications if you add a new WAR file.
The final step in web application deployment is the one that’s most relevant to this section.Any expanded directories and WARs in the application base directory that don’t have a corre-sponding context XML file are given a default implicit <Context> element.
Tomcat 6 uses an external default context XML file, which has the <Context> elementas its root element. The default file for the entire server is CATALINA_HOME/conf/context.xml,and the default file for a host is CATALINA_HOME/conf/[Engine_name]/[Host_name]/context.xml.default. You may also place a context.xml file in a web application’s META-INF directory,though this is read-only if there’s no application context file, as described previously. This filewill apply only to that web application.
The settings in context.xml override any in context.xml.default and META-INF/context.xml,even if you explicitly set the override attribute described in Table 5-1. However, override worksfor application context XML files. Figure 5-1 shows this process.
Figure 5-1. The context file hierarchy in Tomcat
These rules also apply to applications that are deployed after startup. That is, they applyto directories and WAR files that you drop into the web application base directory, assumingauto-deployment is enabled with the host’s autoDeploy attribute. If auto-deployment is dis-abled, then you can use tools such as the manager application and Ant to deploy applications,and the same process occurs.
CHAPTER 5 ■ ADMINISTERING WEB APPLICATIONS72
7850ch05FINAL.qxd 2/28/07 10:42 AM Page 72

The Context ElementTomcat’s standard <Context> element has the attributes described in Table 5-1.
Table 5-1. The Attributes of the Standard <Context> Element
Attribute Description Required?
allowLinking If true, symlinks pointing to resources outside Nothe web application base path are allowed for this web application.This flag shouldn’t be set to true on Windows, as it will disable case-sensitivity checks, allowing JSP source code disclosure, among other security problems. The default is false.
backgroundProcessorDelay The delay in seconds between the invocation of the NobackgroundProcess() method on this context and its child containers, including all wrappers. Child containers will be invoked if their delay values are negative (which would mean they’re using their own processing threads). Setting this to a positive value will cause a thread to be spawned. After waiting the specified amount of time, the thread will invoke thebackgroundProcess() method on this host and all its child containers. A context will use background processing to perform session expiration and class monitoring for reloading. The default is -1, which means the context will rely on the background processing thread of its parent host.
cacheMaxSize Maximum size of the static resource cache in Nokilobytes. The default is 10240.
cacheTTL Time in milliseconds between cache entries Norevalidation. The default is 5000.
cachingAllowed If true, the cache for static resources will be used. NoThe default is true.
caseSensitive If true, all case-sensitivity checks will be disabled. NoThis flag shouldn’t be set to true on Windows, as it will disable case-sensitivity checks, allowing JSP source code disclosure, among other security problems. The default value is true.
className Class name of the implementation to use. The Nodefault is org.apache.catalina.core.StandardContext.
cookies Set to true if you want cookies to be used to identify Nosessions (if supported by the client). Set to false if you want to disable the use of cookies for session identification and rely only on URL rewriting. The default is true.
crossContext Set to true if you want calls within this application Noto ServletContext.getContext() to successfully return a request dispatcher for other web applications running on this virtual host. Set to false in security-conscious environments. The default is false.
continued
CHAPTER 5 ■ ADMINISTERING WEB APPLICATIONS 73
7850ch05FINAL.qxd 2/28/07 10:42 AM Page 73
Table 5-1. (continued)
Attribute Description Required?
docBase The document base (or context root) directory for Yesthis web application or the pathname to its WAR file.You can specify an absolute pathname for this directory or WAR file, or you can specify a pathnamethat’s relative to the appBase directory of the owning host.
path The context path of this web application, which is Nomatched against the beginning of each request URI. All the context paths within a particular host must be unique. If you specify an empty string (""), you’re defining the default web application for this host, which will process all requests not assigned to other contexts.
processTlds Specify whether the context should process TLDs Noon startup. false is intended for special cases whereyou know in advance that TLDs aren’t part of the web application. The default is true.
reloadable Set to true if you want Tomcat to monitor classes Noin /WEB-INF/classes and /WEB-INF/lib for changesand automatically reload the web application if achange is detected. This feature is useful during development, but it requires significant runtime overhead and isn’t recommended for use on deployed production applications. Use the manager application to reload applications if this is required. The default is false.
swallowOutput If true, the output to System.out and System.err Nowill be redirected to the web application logger. The default is false.
tldNamespaceAware If true, XML validation of TLDs will be namespace Noaware. If you turn this flag on, you should also turn tldValidation on, though setting it to true will incur a performance penalty. The default is false.
tldValidation If true, TLDs will be XML validated on context Nostartup. Setting it to true will incur a performance penalty. The default is false.
useNaming Set to true to have Tomcat enable a JNDI NoInitialContext for this web application. The default is true.
workDir The pathname to a scratch directory to be provided Noby this context for temporary read/write use by servlets. This directory is visible to servlets through a servlet context attribute (of type java.io.File) named javax.servlet.context.tempdir, as described in the Servlet specification. The default is a suitable directory underneath CATALINA_HOME/work.
wrapperClass The Java class name of the org.apache.catalina. NoWrapper implementation class that will be used for servlets managed by this context. The default isorg.apache.catalina.core.StandardWrapper.
CHAPTER 5 ■ ADMINISTERING WEB APPLICATIONS74
7850ch05FINAL.qxd 2/28/07 10:42 AM Page 74
Tomcat 5.5 introduced a number of new attributes to the context element, that are availablewith Tomcat 6 (see Table 5-2).
Table 5-2. New Attributes Since Tomcat 5.5’s Standard <Context> Element
Attribute Description Required?
antiJARLocking If true, Tomcat’s class loader will take extra measures to Noavoid JAR file locking when JARs are accessed through URLs.This will slow application startup times but can prove useful on platforms or configurations where file locking can occur. The default is false.
antiResourceLocking If true, Tomcat will prevent file locking. This will significantly Noslow application startup time but allows full hot deploy and undeploy on platforms or configurations where file locking can occur. The default is false.
unpackWAR If true, Tomcat will unpack this web application before Norunning it, if it’s compressed. If the host’s unpackWARsattribute is false, this setting has no effect. The default is true.
A context is a container and can have the nested components described in Table 5-3.
Table 5-3. The Subelements of the <Context> Element
Subelement Description Number
Environment A global variable. See Chapter 4 for details. 0 or more
Listener You can add a listener to monitor life cycle events, such as this 0 or morehost starting or stopping, and to implement user web applications.See Chapter 4 for details.
Loader Configures the web application class loader. It’s unlikely that you’d 0 or morewant to specify your own class loader. See the Tomcat documentation if this is a necessity.
Manager A custom session manager to handle session persistence for this 0 or 1web application. This is a technique used by programmers to overcome HTTP’s stateless nature. It’s unlikely you’d want to specify your own session manager. See the Tomcat documentation if this is a necessity.
Parameter A value that will be available to the web application as a named 0 or morevariable.
Realm An authentication realm to be used within this web application. 0 or 1This will override any previous realm definitions in the enclosing <Host> or <Engine> definitions. See Chapter 4 for details.
Resource A JNDI resource. See Chapter 4 for details. 0 or more
ResourceLink A link to a global JNDI resource. 0 or more
Resources A resource manager for accessing static resources (for serving 0 or 1static web pages, graphics, and so on) within the web application. It’s unlikely you’d want to specify your own resource manager. See the Tomcat documentation if this is a necessity.
Valve You can add a valve to monitor access, filter requests, and 0 or moreimplement single sign-on. See Chapter 4 for details.
CHAPTER 5 ■ ADMINISTERING WEB APPLICATIONS 75
7850ch05FINAL.qxd 2/28/07 10:42 AM Page 75

Configuring a ParameterYou can add servlet context initialization parameters in your context definition. These will beavailable to servlets throughout the application. Table 5-4 describes the attributes of the<Parameter> element.
Table 5-4. The Attributes of the <Parameter> Element
Attribute Description Required?
description Human-readable description of this context initialization Noparameter.
name The name of the context initialization parameter to be created. Yes
override Sets whether a <context-param> element in the application’s Noweb.xml file can override the value specified here. The default is true.
value The value that will be available to the application. Yes
Configuring a Resource LinkA resource link references a global JNDI variable and makes it available under the new name.Table 5-5 describes the attributes of a <ResourceLink> element.
Table 5-5. The Attributes of the <ResourceLink> Element
Attribute Description Required?
global The name of the global JNDI resource Yes
name The name of the variable to be created, relative to the Yesjava:comp/env context
type The class name expected by the web application when it Yesperforms a lookup for this resource link
Examining a Web ApplicationHTML and JSP pages belong to the public resources that a client may request directly. Servlets,JavaBeans, and other resources within a web application’s WEB-INF directory are private resources.You may allow the client to access these resources indirectly by mapping a URL to a servlet orincluding the page in a JSP page. However, private resources can’t be served to the client with-out some type of intervention.
The following is a typical makeup of a web application required by the Servlet 2.4specification:
webapps/
pics/
index.html
gallery/
index.html
images/
pic01.jpg
CHAPTER 5 ■ ADMINISTERING WEB APPLICATIONS76
7850ch05FINAL.qxd 2/28/07 10:42 AM Page 76

pic02.jpg
images/
code.gif
execute.gif
read.gif
return.gif
WEB-INF/(*)
web.xml(*)
classses/(*)
com/
Controller.class
actions/
ViewGalleryAction.class
jsp/
catalog.jsp
lib/(*)
jstl.jar
standard.jar
tags/(*)
simpleTag.tag
tlds/
simple.tld
META-INF/(*)
Not all these files and directories are required. Those marked with (*) are part of theServlet specification and can’t be renamed or moved, though some of them may be omitted.The WEB-INF folder, its subdirectories, and the META-INF folder are private areas that can beaccessed only indirectly through application code or special configuration. A web applicationdeployed on Tomcat as a WAR file may have a META-INF folder with a default context.xml filethat provides context configuration information. Expanded web applications may also use thismechanism, though providing a separate context XML file is the preferred method in this case.
This web application is deployed in a folder named after the web application (in this caseit’s called pics), and this folder is required. You’d access this web application using the followingURL: http://servername:8080/pics/. The pics/ section is called the context path, and Tomcatuses this to resolve any paths contained within the web application.
When a user requests a resource on the server (that is, an HTML document, a servlet, a JSPpage, and so on), he types the path to it on the file system, relative to the context path. For exam-ple, to request the c:\jakarta-tomcat\webapps\tomcatBook\ch05\login.html file, a user wouldtype http://servername:8080/tomcatBook/ch05/login.html. In other words, the server directorystructure overlays the file system structure from the contents of the webapps directory down.
■Note The directory structure described in the previous paragraph applies to the default setup but doesn’tstrictly apply to JSP pages. While the path to the resource is the same in the server and on the file system, theJSP page is processed into a servlet and compiled before it’s returned as a response. Therefore, there isn’ta one-to-one mapping between the requested resource and the resource that returns content. This distinctionisn’t relevant to your users, as they won’t notice the difference, but it’s a fact worth knowing.
CHAPTER 5 ■ ADMINISTERING WEB APPLICATIONS 77
7850ch05FINAL.qxd 2/28/07 10:42 AM Page 77

This default behavior is a problem if a web application is running servlets because they residein the private WEB-INF area and can’t be accessed directly by users. In times past, the solutionwas to use the invoker servlet, but this isn’t recommended. The answer is servlet mappings.
Mapping URLs to ResourcesIf a web application uses servlets, users need some way to access them. The answer lies inweb.xml, the web application deployment descriptor. You can set a series of URL mappings tomake servlets available to users.
So, for the previous example web application, you need to define a servlet and give ita name:
<servlet>
<servlet-name>
Controller
</servlet-name>
<servlet-class>
com.Controller
</servlet-class>
</servlet>
The name of the servlet must be unique within the web application and can’t clash withthose in the default web.xml file described in Chapter 4. The <servlet-class> element mustcontain the fully qualified class name. The previous servlet has a fully qualified class namewith the package name (com) followed by the class name (Controller). The package name maybe longer (for example, com.apress.servlets).
You have to perform one more step to make this named servlet available to your users.You must map it to a URL:
<servlet-mapping>
<servlet-name>Controller</servlet-name>
<url-pattern>/Controller</url-pattern>
</servlet-mapping>
This says that the http://servername:8080/pics/Controller URL should be passed toa servlet named Controller.
The mapping can use wildcards (*) to specify that you want to match any file, and you canuse this with directories as well. This means you can cover whole directories with a mapping.For example, *.do is a common mapping used by the Apache Struts framework. This meansthat all requests ending in .do are routed to the specified servlet.
You can also map requests to JSP (or HTML) pages in the same manner. For example, sayyou want to show an index page for any requests that don’t correspond to a resource. This meansusers never see a directory listing of the server and won’t see a 404 error. Here’s the resourcedefinition in web.xml:
<servlet>
<servlet-name>
index
</servlet-name>
<jsp-file>
CHAPTER 5 ■ ADMINISTERING WEB APPLICATIONS78
7850ch05FINAL.qxd 2/28/07 10:42 AM Page 78

/index.html
</jsp-file>
</servlet>
This specifies that the index.html file in the root of the web application is called index forthe purpose of this configuration file. Just as you did for the servlet, you must now map URLsto this resource:
<servlet-mapping>
<servlet-name>
index
</servlet-name>
<url-pattern>
/*
</url-pattern>
</servlet-mapping>
So, you’ve mapped the resource called index to the wildcard URL /*. This pattern matchesevery resource, so all requests, no matter if they point to a file that exists or not, will return theindex.html page. However, the servlet engine will get to this entry only if there are no more-specificentries. This allows you to have fine-grained control over your resources.
If you have both of the previous settings in your web.xml file, then http://servername:8080/pics/Controller will display the results of the Controller servlet, and http://servername:8080/pics/Controller2, http://servername:8080/pics/blah, or any other URL that points to the picscontext will display the index page. This is because the Controller mapping is more specificthan the index mapping.
Examining the WEB-INF FolderThe WEB-INF folder contains at least four subfolders and the web.xml file.
Examining the classes FolderThe classes directory is in the web application’s classpath, as are all of its subdirectories. Thisis why it contains servlets and the utility classes for the application, and it may also containa number of resource files needed by these classes. It’s also a subdirectory of WEB-INF, makingit a private resource. Users may not access any of the resources here. You saw an example of thisearlier in the “Examining a Web Application” section.
Java classes in the classes directory follow the same package structure as any other classes.That is, they’re stored in a directory hierarchy within classes just as they would be in a regularsetup. So, com.apress.PackageServlet is stored in the classes/com/apress directory.
Ideally, you don’t need to be concerned with the contents of the classes directory.
Examining the lib FolderThe lib folder is also in the web application’s classpath. This is where you place JAR files thatare required by the web application.
CHAPTER 5 ■ ADMINISTERING WEB APPLICATIONS 79
7850ch05FINAL.qxd 2/28/07 10:42 AM Page 79

Examining the tags FolderAs of JSP 2.0, developers can write tag extensions in JSP syntax without the need to know Java.Traditionally a tag extension was a Java class that defined the functionality of a custom markuptag. For example, a developer may write a tag that displayed the date, like so:
<date:today/>
These tag extensions are grouped together in tag libraries, which are a convenient way togroup code that has similar functionality, much like a Java package does.
It’s in the tags folder and its subdirectories that the developers place these JSP-syntax tagextensions so that the container can find them. Again, you shouldn’t have many dealings withthis folder.
Examining the tlds FolderThe tlds folder contains the configuration files for traditional Java-coded tag libraries. Eachconfiguration file maps tag names to their implementation class so that the container can rec-ognize which class to invoke when it comes across the tag. These configuration files are TLDsand have a .tld extension. The configuration of a tag library is the territory of developers anddesigners so you won’t have many dealings with them.
Examining the web.xml FileYou shouldn’t have many dealings with a web application’s web.xml file, as it’s the realm of theapplication’s developer. However, certain aspects on the server are definitely your concern, sothe following sections will go into the relevant sections in web.xml. They will be illustrated wherepossible by examples from Tomcat’s default web.xml file.
<distributable>The <distributable> element, if present, declares that this web application can be deployedin a distributed servlet container or servlet container executing across multiple JVMs eitherrunning on the same host or different hosts. This Boolean value is false by default.
<context-param>The <context-param> element declares a context initialization parameter, much as the previous<Parameter> element does. It contains the following:
• A <param-name> element containing the parameter’s name
• A <param-value> element containing the parameter’s value
• An optional <description> element
<filter>The <filter> element declares a filter. A filter is a Java class that preprocesses the request datareceived from clients. This preprocessing may include decryption, formatting, or other processes.This element contains the following:
CHAPTER 5 ■ ADMINISTERING WEB APPLICATIONS80
7850ch05FINAL.qxd 2/28/07 10:42 AM Page 80

• An optional <icon> element
• A <filter-name> element containing the filter’s name
• An optional <display-name> element
• An optional <description> element
• A <filter-class> element containing the filter’s class name
• Zero or more <init-param> elements containing initialization parameters for the filter
Each <init-param> element contains the following:
• A <param-name> element containing the parameter name
• A <param-value> element containing the parameter value
• An optional <description> element
Chapter 7 describes a filter for working with requests. Its <filter> entry would be asshown in Listing 5-1.
Listing 5-1. An Entry for a Filter
<filter>
<filter-name>requestFilter</filter-name>
<filter-class>com.apress.admin.filters.RequestFilter</filter-class>
<init-param>
<param-name>allow</param-name>
<param-value></param-value>
</init-param>
<init-param>
<param-name>deny</param-name>
<param-value>127.0.0.1</param-value>
</init-param>
<init-param>
<param-name>blockPage</param-name>
<param-value>/blocked.html</param-value>
</init-param>
</filter>
<filter-mapping>The <filter-mapping> element maps a filter to a servlet or a set of URLs. It contains the following:
• A <filter-name> element containing the name of a filter declared by a <filter> element.
• Either a <url-pattern> element containing a URL pattern to match or a <servlet-name>
element containing the name of a servlet declared by a <servlet> element.
CHAPTER 5 ■ ADMINISTERING WEB APPLICATIONS 81
7850ch05FINAL.qxd 2/28/07 10:42 AM Page 81

• Zero to four <dispatcher> elements; it can have one of the following values: FORWARD,REQUEST, INCLUDE, and ERROR. FORWARD applies the filter to RequestDispatcher.forward()calls; REQUEST applies the filter to ordinary client calls to the path or servlet; INCLUDEapplies the filter to RequestDispatcher.include() calls, and ERROR applies the filter tothe error page mechanism. If the <dispatcher> element is omitted, the default value isREQUEST.
The previous filter would have the filter mapping shown in Listing 5-2.
Listing 5-2. An Example Filter Mapping
<filter-mapping>
<filter-name>requestFilter</filter-name>
<url-pattern>/*</url-pattern>
</filter-mapping>
This maps all requests in the web application to the filter.
<servlet>Because you’ve already seen the <servlet> element in action, I won’t discuss it in detail here. Itcontains the following:
• An optional <icon> element.
• A <servlet-name> element containing the servlet’s name.
• An optional <display-name> element.
• An optional <description> element.
• Either a <servlet-class> element containing the listener’s class name or a <jsp-file>
element containing the location within the web application of a JSP file.
• <init-param> elements.
• An optional <load-on-startup> element indicating that the servlet should be loadedwhen the web application starts up and containing an optional positive integer valuethat indicates the order in which servlets should be started. If a <jsp-file> was speci-fied, then the JSP should be precompiled and loaded.
• <security-role-ref> elements.
• An optional <run-as> element that specifies the identity under which the servlet should run.
Each <init-param> element contains the following:
• A <param-name> element containing the parameter name
• A <param-value> element containing the parameter value
• An optional <description> element
CHAPTER 5 ■ ADMINISTERING WEB APPLICATIONS82
7850ch05FINAL.qxd 2/28/07 10:42 AM Page 82

A <security-role-ref> element maps a role name called from within the servlet andmaps the name of a security role defined for the web application. It contains the following:
• An optional <description> element
• A <role-name> element containing the role name used within the servlet
• An optional <role-link> element containing the name of a role defined in a <security-role>
element
Tomcat’s default web.xml file contains many <servlet> entries. The first is for the defaultservlet, as shown in Listing 5-3.
Listing 5-3. The Default Servlet <servlet> Setting
<servlet>
<servlet-name>default</servlet-name>
<servlet-class>
org.apache.catalina.servlets.DefaultServlet
</servlet-class>
<init-param>
<param-name>debug</param-name>
<param-value>0</param-value>
</init-param>
<init-param>
<param-name>listings</param-name>
<param-value>true</param-value>
</init-param>
<load-on-startup>1</load-on-startup>
</servlet>
<servlet-mapping>The <servlet-mapping> element maps a servlet to a URL pattern. It contains the following:
• A <servlet-name> element containing the name of a servlet declared by a <servlet>
element
• A <url-pattern> element containing a URL pattern to match
The previous default servlet has a corresponding <servlet-mapping> entry, as shown inListing 5-4.
Listing 5-4. The Default Servlet <servlet-mapping> Setting
<servlet-mapping>
<servlet-name>default</servlet-name>
<url-pattern>/</url-pattern>
</servlet-mapping>
CHAPTER 5 ■ ADMINISTERING WEB APPLICATIONS 83
7850ch05FINAL.qxd 2/28/07 10:42 AM Page 83

CHAPTER 5 ■ ADMINISTERING WEB APPLICATIONS84
<session-config>An administrator should be aware of the session settings of a web application because theycan have performance and security implications. A huge number of long-lasting sessions maycause problems for performance, but a session that never expires means that a user is alwaysrecognized. The latter means that any user who has access to the original user’s machine canaccess the web application as that user.
The <session-config> element contains the following:
• An optional <session-timeout> element containing the default session timeout for thisweb application, which must be a whole number of minutes. The default behavior ofthe container without this attribute is never to time out.
Listing 5-5 shows the default session setting from Tomcat’s default web.xml file.
Listing 5-5. The Default Session Setting for Tomcat
<session-config>
<session-timeout>30</session-timeout>
</session-config>
<mime-mapping>Browsers use MIME types to recognize the file type returned by the server so that the browsercan handle the response correctly. That is, the browser chooses whether to display the HTML,plain text, images, and so on in the response; to send it to a plug-in (such as Flash); or to promptthe user to save it locally.
As you saw in Chapter 4, CATALINA_HOME/conf/web.xml comes with many MIME mappingsset. However, you can configure additional MIME mappings in each web application with the<mime-mapping> element.
The <mime-mapping> element contains the following:
• An <extension> element containing a filename extension
• A <mime-type> element containing a defined MIME type
Tomcat has many MIME mappings set, one of which is shown in Listing 5-6. This tellsTomcat to treat *.bmp files as the image/bitmap type.
Listing 5-6. A Default Tomcat MIME Mapping
<mime-mapping>
<extension>bmp</extension>
<mime-type>image/bmp</mime-type>
</mime-mapping>
<welcome-file-list>The <welcome-file-list> element defines an ordered list of welcome files to display if nofilename is specified. It contains the following:
• One or more <welcome-file> elements containing a filename to use as a welcome file
7850ch05FINAL.qxd 2/28/07 10:42 AM Page 84

85
Tomcat has a default setting for welcome files, as shown in Listing 5-7.
Listing 5-7. Tomcat’s Default Welcome Files
<welcome-file-list>
<welcome-file>index.html</welcome-file>
<welcome-file>index.htm</welcome-file>
<welcome-file>index.jsp</welcome-file>
</welcome-file-list>
These files are checked in the order they appear.
<error-page>Web application developers can configure error pages to provide a user-friendly mechanismfor informing users about any problems and allowing them to continue using the application.The errors are mapped to the HTTP specification error mappings: a code for a resource thatcan’t be found, a malfunctioning server, authentication issues, resource issues, and so on.
In addition, since there are no one-to-one correspondences between HTTP errors and Javaexceptions, the exception class type may be specified; this allows error pages that are genericand follows good programming practice. Someone without an understanding of the applica-tion’s internals can configure them.
The <error-page> element contains the following:
• Either an <error-code> element containing an HTTP error code or an <exception-type>element containing the class name of a Java exception type
• A <location> element containing the location of the error page resource within the webapplication
Listing 5-8 shows an example of an error page setting. In this case, any 404 errors generatedby Tomcat will return the myError.jsp page to the client.
Listing 5-8. An Error Page Configuration
<error-page>
<error-code>404</error-code>
<location>/myError.jsp</location>
</error-page>
<resource-env-ref>The <resource-env-ref> element declares that the web application references an administeredobject such as a user database. This is defined in the <GlobalNamingResources> element of theserver component. It contains the following:
• An optional <description> element
• A <resource-env-ref-name> element containing the name of the resource environment
• A <resource-env-ref-type> element containing the type of the resource environmentreference
CHAPTER 5 ■ ADMINISTERING WEB APPLICATIONS
7850ch05FINAL.qxd 2/28/07 10:42 AM Page 85

The manager application configures a reference to a global resource, as shown inListing 5-9.
Listing 5-9. The Manager Web Application’s <resource-env-ref> Setting
<resource-env-ref>
<description>
Link to the UserDatabase instance from which we request lists of
defined role names. Typically, this will be connected to the global
user database with a ResourceLink element in server.xml or the context
configuration file for the manager web application.
</description>
<resource-env-ref-name>users</resource-env-ref-name>
<resource-env-ref-type>
org.apache.catalina.UserDatabase
</resource-env-ref-type>
</resource-env-ref>
<resource-ref>The <resource-ref> element declares that the web application references an external resourcesuch as a data source reference. This is typically configured in a context entry using the <Resource>element. It contains the following:
• An optional <description> element.
• A <res-ref-name> element containing the name of the resource factory reference.
• A <res-type> element specifying the type of the data source.
• A <res-auth> element indicating whether the application code signs onto the resourceprogrammatically or whether the container should sign on based on information sup-plied by the application deployer. Contents must be either Application or Container.
• An optional <res-sharing-scope> element specifying whether connections can be shared.Contents must be either Shareable (the default) or Unshareable.
Listing 5-10 shows an example.
Listing 5-10. A Reference to a JDBC Data Source
<resource-ref>
<description>
Resource reference to a factory for java.sql.Connection
instances that may be used for talking to a particular
database that is configured in the tomcatBook.xml file.
</description>
<res-ref-name>
jdbc/CatalogDB
</res-ref-name>
CHAPTER 5 ■ ADMINISTERING WEB APPLICATIONS86
7850ch05FINAL.qxd 2/28/07 10:42 AM Page 86

<res-type>
javax.sql.DataSource
</res-type>
<res-auth>
SERVLET
</res-auth>
</resource-ref>
<security-constraint>Web resources may be associated with some security constraints for user authentication andaccess control. The constraints limit access to the resource according to user roles, such asmanager, administrator, user, and guest, and by transport guarantee, which can include SSLsecure data transmission, guaranteeing delivery, and noninterference.
The <security-constraint> element contains the following:
• An optional <display-name> element
• One or more <web-resource-collection> elements
• An optional <auth-constraint> element
• An optional <user-data-constraint> element
A <web-resource-collection> element identifies a set of resources within the application;it can be qualified by specifying particular HTTP method(s) such as GET or POST. (By default,the security constraint applies to all HTTP methods.) It contains the following:
• A <web-resource-name> element containing the name of the web resource collection
• An optional <description> element
• One or more <url-pattern> elements, each containing a URL pattern to match
• Zero or more <http-method> elements, each containing the name of an HTTP method
An <auth-constraint> element indicates that certain user roles should be permitted toaccess these web resources. It contains the following:
• An optional <description> element
• Zero or more <role-name> elements, each containing a role referenced in a <security-role-ref> element or the special name * that indicates all roles in thisapplication
A <user-data-constraint> element indicates how data transmitted between the clientand the application should be protected. It contains the following:
• An optional <description> element
• A <transport-guarantee> (can have one of the three values in Table 5-6)
CHAPTER 5 ■ ADMINISTERING WEB APPLICATIONS 87
7850ch05FINAL.qxd 2/28/07 10:42 AM Page 87
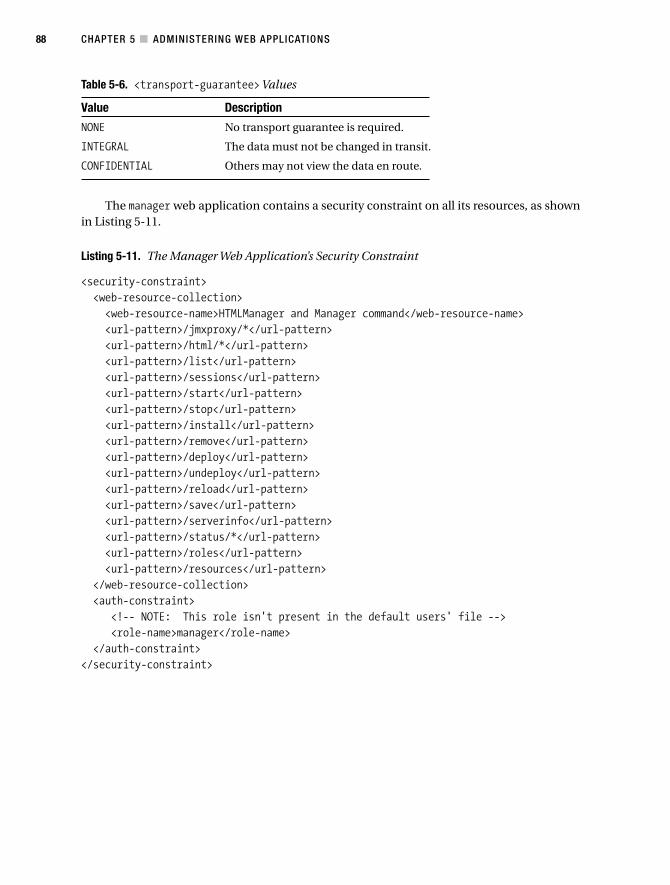
Table 5-6. <transport-guarantee>Values
Value Description
NONE No transport guarantee is required.
INTEGRAL The data must not be changed in transit.
CONFIDENTIAL Others may not view the data en route.
The manager web application contains a security constraint on all its resources, as shownin Listing 5-11.
Listing 5-11. The Manager Web Application’s Security Constraint
<security-constraint>
<web-resource-collection>
<web-resource-name>HTMLManager and Manager command</web-resource-name>
<url-pattern>/jmxproxy/*</url-pattern>
<url-pattern>/html/*</url-pattern>
<url-pattern>/list</url-pattern>
<url-pattern>/sessions</url-pattern>
<url-pattern>/start</url-pattern>
<url-pattern>/stop</url-pattern>
<url-pattern>/install</url-pattern>
<url-pattern>/remove</url-pattern>
<url-pattern>/deploy</url-pattern>
<url-pattern>/undeploy</url-pattern>
<url-pattern>/reload</url-pattern>
<url-pattern>/save</url-pattern>
<url-pattern>/serverinfo</url-pattern>
<url-pattern>/status/*</url-pattern>
<url-pattern>/roles</url-pattern>
<url-pattern>/resources</url-pattern>
</web-resource-collection>
<auth-constraint>
<!-- NOTE: This role isn't present in the default users' file -->
<role-name>manager</role-name>
</auth-constraint>
</security-constraint>
CHAPTER 5 ■ ADMINISTERING WEB APPLICATIONS88
7850ch05FINAL.qxd 2/28/07 10:42 AM Page 88

<login-config>The <login-config> element configures the authentication mechanism for this application. Itcontains the following:
• An optional <auth-method> element specifying the authentication mechanism; it mustcontain the text BASIC, DIGEST, FORM, or CLIENT-CERT; these are plain text, digested text,HTML form, and certificate based, respectively.
• An optional <realm-name> element specifying the realm name for HTTP basic authorization.
• An optional <form-login-config> element to configure form-based authentication. Itcontains a <form-login-page> element specifying the login page and a <form-error-page>
element specifying the error page used if login is unsuccessful.
The manager application defines a <login-config> to go along with the security constraintdescribed previously (see Listing 5-12).
Listing 5-12. The Manager Web Application’s Login Configuration
<login-config>
<auth-method>BASIC</auth-method>
<realm-name>Tomcat Manager Application</realm-name>
</login-config>
<security-role>The <security-role> element declares a security role used in the web application’s securityconstraints. It contains the following:
• An optional <description> element
• A <role-name> element containing the name of the role
The manager application defines a security role to go along with the security constraintdescribed previously (see Listing 5-13).
Listing 5-13. The Manager Web Application’s Security Role
<security-role>
<description>
The role that is required to log in to the Manager Application
</description>
<role-name>manager</role-name>
</security-role>
CHAPTER 5 ■ ADMINISTERING WEB APPLICATIONS 89
7850ch05FINAL.qxd 2/28/07 10:42 AM Page 89

SummaryIn this chapter, you saw the issues relevant to web application configuration. Many of theconfiguration issues will depend on access to well-documented and well-designed applica-tion specifications or, if these aren’t available, working hand-in-hand with a developer. As theapplication grows older, there will tend to be an increasing reliance on the experience of theadministrator in the production environment to guide the administration of the application.Collaboration between the developers and system administration will necessarily increase.
It’s likely that the administration of a web application will mostly concern security config-uration. This will also increasingly include the use of filters to given URL patterns, sessionconfiguration, error page configuration, the addition of tag libraries, and the administration ofapplication initialization parameters to adapt to the server.
CHAPTER 5 ■ ADMINISTERING WEB APPLICATIONS90
7850ch05FINAL.qxd 2/28/07 10:42 AM Page 90

Using Tomcat’sAdministration Tools
As Tomcat has evolved over the years, its administration tools have become more and moresophisticated. Tomcat 6’s administration tools have been designed for use in a number of ways,each of which suits a different style of administration. In this chapter, you’ll see the managerweb application, which you can use to deploy and manage web applications, and the adminapplication, which you can use to configure web applications.
Both these applications have web interfaces you can use to administer the Tomcat server,but you can also use the manager application via HTTP request parameters or with Apache Ant.I’ll discuss all these options.
Using the Manager ApplicationThe manager application is provided as part of the Tomcat 6 distribution and is stored in theCATALINA_HOME/webapps/manager directory by default. It’s a special web application that allowsyou to manage other web applications while the Tomcat server is running. You can, for exam-ple, deploy, undeploy, start, and stop web applications on the server using this tool.
The manager application is necessary for a number of reasons. First, without the managerapplication, you need write access to Tomcat’s installation directory to deploy a web applica-tion, because this is where you copy an expanded web application, WAR file, or context XMLfile. This requires you to have access to the server’s file system, which isn’t always possible ordesirable in a high-security environment.
Second, you can remove a web application only by deleting the files on the server’s filesystem. This has the same drawbacks as previously mentioned. However, Tomcat will still havethe context name configured in memory, which may cause problems in future deployments ifyou try to add another application with the same name. Another problem with this approachis that the web application is removed permanently from the server and not just made unavail-able, which may be a better option.
Third, if the host’s autoDeploy setting is false, then you can’t deploy any applications ona running server, even if you have access to the file system.
Fourth, if the host’s deployOnStartup setting is false, then no new web applications willbe deployed when the server starts up after being shut down. Both of these settings combinedwill make it more difficult for unauthorized users to deploy web applications on the server, sothey may be part of a secured server’s setup.
91
C H A P T E R 6
■ ■ ■
7850ch06FINAL.qxd 2/28/07 10:43 AM Page 91

As it stands, Tomcat seems to be fairly inflexible. You must have access to the file system,and the server must be configured to allow automatic deployment. This is where the managerapplication comes in. You can use it to solve all the problems mentioned and have a choice asto how to go about it.
You can carry out the following tasks with the manager application:
• You can deploy a new web application.
• You can list the currently deployed web applications, with session information.
• You can reload a web application.
• You can list the operating system and JVM properties.
• You can list the available global JNDI resources.
• You can list the available security roles.
• You can display session statistics.
• You can start a stopped application.
• You can stop an existing application.
• You can undeploy a web application.
Setting Up the Manager ApplicationThe manager application is a powerful addition to Tomcat’s functionality. For this reason, youcan access it only if you’re an authenticated user. The system of authentication is the same forthe manager application as it is for other web applications running on a Tomcat server, as describedin Chapter 11.
The default realm for the manager application, as defined in CATALINA_HOME/conf/Catalina/localhost/manager.xml, is the user database defined in server.xml. Recall from Chapter 4 thatthis is conf/tomcat-users.xml.
By default, access to the manager application is disabled in Tomcat, by virtue of omittingany valid users or roles from tomcat-users.xml. To set up the manager application, add a userwith the manager role to this file. You can, for example’s sake, add the manager role and thenalter an existing user, such as tomcat, as follows:
<role rolename="manager"/>
<user username="tomcat" password="tomcat" roles="tomcat, manager"/>
■Note If you used the Windows installer, you would have already defined an admin password for Tomcatand tomcat-users.xml will be configured for you.
CHAPTER 6 ■ USING TOMCAT’S ADMINISTRATION TOOLS92
7850ch06FINAL.qxd 2/28/07 10:43 AM Page 92
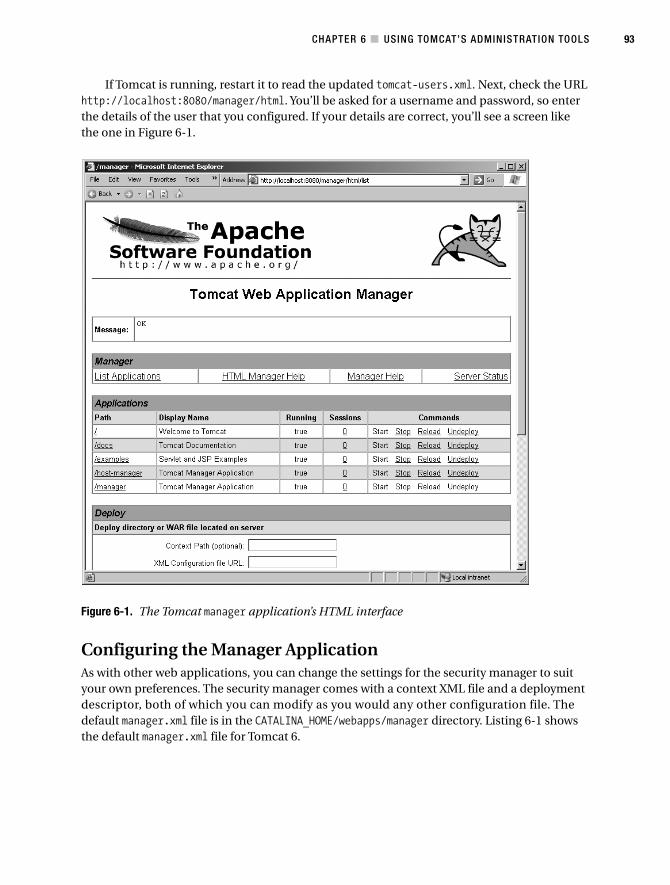
If Tomcat is running, restart it to read the updated tomcat-users.xml. Next, check the URLhttp://localhost:8080/manager/html. You’ll be asked for a username and password, so enterthe details of the user that you configured. If your details are correct, you’ll see a screen likethe one in Figure 6-1.
Figure 6-1. The Tomcat manager application’s HTML interface
Configuring the Manager ApplicationAs with other web applications, you can change the settings for the security manager to suityour own preferences. The security manager comes with a context XML file and a deploymentdescriptor, both of which you can modify as you would any other configuration file. Thedefault manager.xml file is in the CATALINA_HOME/webapps/manager directory. Listing 6-1 showsthe default manager.xml file for Tomcat 6.
CHAPTER 6 ■ USING TOMCAT’S ADMINISTRATION TOOLS 93
7850ch06FINAL.qxd 2/28/07 10:43 AM Page 93

Listing 6-1. The Default manager.xml File
<Context docBase="${catalina.home}/server/webapps/manager"
privileged="true" antiResourceLocking="false" antiJARLocking="false">
<!-- Link to the user database we will get roles from -->
<ResourceLink name="users" global="UserDatabase"
type="org.apache.catalina.UserDatabase"/>
</Context>
This file sets the name of the web application to manager, tells Tomcat that it can find thisweb application in CATALINA_HOME/webapps/manager, and allows this web application access tocontainer servlets. This last setting is important, as the manager application uses the managercontainer servlet to perform its duties. The Tomcat 6 settings are the defaults and allow resourcesto be locked by clients.
The <ResourceLink> element sets up a source of user information for authentication inthis web application. This can quite easily be changed to match any realm you’ve set up inserver.xml. As it stands, this file allows you to use the manager application, assuming you’veset up an authorized user as previously described.
If you want to allow more than one role to access the manager web application, or youwant to change the authentication mechanism to fit in with your server’s setup, then you’llhave to modify the manager application’s web.xml file. Most of this file is given over to servletdefinitions and servlet mappings, which you should leave as they are, but the end of the filecontains security-related configuration.
Listing 6-2 shows the security-related configuration.
Listing 6-2. Security-Related Configuration from the manager Application’s web.xml File
<!-- Define reference to the user database for looking up roles -->
<resource-env-ref>
<description>
Link to the UserDatabase instance from which we request lists of
defined role names. Typically, this will be connected to the global
user database with a ResourceLink element in server.xml or the context
configuration file for the Manager web application.
</description>
<resource-env-ref-name>users</resource-env-ref-name>
<resource-env-ref-type>
org.apache.catalina.UserDatabase
</resource-env-ref-type>
</resource-env-ref>
<!-- Define a Security Constraint on this Application -->
<security-constraint>
<web-resource-collection>
<web-resource-name>HTMLManger and Manager command</web-resource-name>
<url-pattern>/jmxproxy/*</url-pattern>
CHAPTER 6 ■ USING TOMCAT’S ADMINISTRATION TOOLS94
7850ch06FINAL.qxd 2/28/07 10:43 AM Page 94

<url-pattern>/html/*</url-pattern>
<url-pattern>/list</url-pattern>
<url-pattern>/sessions</url-pattern>
<url-pattern>/start</url-pattern>
<url-pattern>/stop</url-pattern>
<url-pattern>/install</url-pattern>
<url-pattern>/remove</url-pattern>
<url-pattern>/deploy</url-pattern>
<url-pattern>/undeploy</url-pattern>
<url-pattern>/reload</url-pattern>
<url-pattern>/save</url-pattern>
<url-pattern>/serverinfo</url-pattern>
<url-pattern>/status/*</url-pattern>
<url-pattern>/roles</url-pattern>
<url-pattern>/resources</url-pattern>
</web-resource-collection>
<auth-constraint>
<!-- NOTE: This role is not present in the default users file -->
<role-name>manager</role-name>
</auth-constraint>
</security-constraint>
<!-- Define the Login Configuration for this Application -->
<login-config>
<auth-method>BASIC</auth-method>
<realm-name>Tomcat Manager Application</realm-name>
</login-config>
<!-- Security roles referenced by this web application -->
<security-role>
<description>
The role that is required to log in to the Manager Application
</description>
<role-name>manager</role-name>
</security-role>
The <resource-env-ref> element defines the user database that Tomcat uses to authenti-cate users. Recall that the name user is defined in manager.xml, which in turn is a reference tothe global user database. You’ll find details of changing the user database to another type ofauthentication scheme in Chapter 11.
The <security-constraint> element defines the resources on the server that are coveredby the security mechanism and sets the roles that are allowed access to them. In this case, allthe servlets defined earlier in web.xml are covered, and only users with the manager role areallowed to access them. This element works in combination with the <security-role> element,which defines the roles used in this web application’s authentication scheme.
If you change the <auth-method> element to anything other than BASIC, tools such as Antwon’t be able to use the manager application because they can’t use any other kind of authen-tication. Therefore, you must balance the security needs of your server with the way you
CHAPTER 6 ■ USING TOMCAT’S ADMINISTRATION TOOLS 95
7850ch06FINAL.qxd 2/28/07 10:43 AM Page 95
administer using the manager application. Using DIGEST or FORM authentication makes the managerapplication more secure but prevents you from using Ant.
■Note You’ll see more mappings in web.xml than manager commands listed in this chapter. This is forbackward compatibility with scripts that were written for older versions of Tomcat. The deprecated commands(install and remove) aren’t available from the HTML interface, and install now calls undeploy in themanager servlet.
If you want to allow users with other roles to access the manager application, add <role-name>elements in the <auth-constraint> element. Once you’ve done this, add a <security-role>
element, with appropriate subelements, for each role you want to add. For example, if youwant to allow users with the admin role to use the manager application, alter web.xml as shownin Listing 6-3.
Listing 6-3. Allowing a User with the Admin Role to Use the manager Application
<auth-constraint>
<!-- NOTE: This role isn't present in the default users' file -->
<role-name>manager</role-name>
<role-name>admin</role-name>
</auth-constraint>
</security-constraint>
...
<!-- Added as part of Tomcat Chapter 6 -->
<security-role>
<description>
The role that is required to log in to the Manager Application
</description>
<role-name>admin</role-name>
</security-role>
Using the Manager ApplicationThe simplest way of using the manager application is through its web interface. Once you’ve loggedin at http://localhost:8080/manager/html, you’ll see the web interface shown in Figure 6-1.All the functions of the manager application are available through this interface. Many of theHTML interface commands listed in this section will prompt you for confirmation. This isa sure sign that your actions may affect users accessing your server. If you want to continue,you should click OK.
CHAPTER 6 ■ USING TOMCAT’S ADMINISTRATION TOOLS96
7850ch06FINAL.qxd 2/28/07 10:43 AM Page 96

It’s also possible for you to use request parameters to administer the web application withscripts. The manager application can provide its responses in plain text so that they can be parsedeasily. Some of these plain text messages appear in the status message section of the webinterface, though the web interface takes a number of the other responses and displays themin user-friendly HTML tables. An example of this is the list of deployed web applications thatyou’ll see in the “Listing Web Applications” section.
The manager application commands that are issued via the web browser have the followingformat:
http://{hostname}:{port}/manager/{command}?{parameters}
The various parts of the URL are as follows:
• hostname: The host on which the Tomcat instance is running.
• port: The port on which the Tomcat instance is running.
• command: The manager command you want to run. The allowed values for command aredeploy, list, reload, resources, roles, sessions, start, stop, and undeploy. You’ll lookat these in more detail later in the chapter. The manager application understands twoother commands: install and remove. These are retained for backward compatibility,though install is now identical to undeploy and is mapped to the undeploy code in themanager servlet. remove is deprecated; you can still use it if you want, though you’llnever need it. Therefore, I won’t describe it in this chapter.
• parameters: The parameters passed to the commands listed previously. These arecommand specific and are explained in detail, along with their related commands, ina moment. Many of these parameters contain the context path to the web application(the path parameter) and the URL to the web application file (the war parameter). Thecontext path for the ROOT application is an empty string. For all other web applications,the context path must be preceded by /.
A number of problems could occur while working with the manager application. The“Troubleshooting” section lists the possible causes of failure.
Listing Web ApplicationsYou can list the applications that are deployed on this server by clicking the List Applicationslink. This is the default when you first visit the web interface (see Figure 6-1). You can clicka web application’s name to run it. The HTML Manager Help and Manager Help links take youto help pages that are part of the manager web application.
The message bar at the top of the page gives you a status message related to the commandsyou run. In this case, the listing was successful, so you get the “OK” status message.
CHAPTER 6 ■ USING TOMCAT’S ADMINISTRATION TOOLS 97
7850ch06FINAL.qxd 2/28/07 10:43 AM Page 97

Checking the Status of the ServerClick the Server Status link to check the server’s status. You’ll see a screen like the one shownin Figure 6-2.
Figure 6-2. Viewing the server’s status with the manager application
The sections shown in Figure 6-2 are straightforward and show the server version andother related information. You can find the real server information below these sections (seeFigure 6-3).
CHAPTER 6 ■ USING TOMCAT’S ADMINISTRATION TOOLS98
7850ch06FINAL.qxd 2/28/07 10:43 AM Page 98

Figure 6-3. Extended server information in the manager application
CHAPTER 6 ■ USING TOMCAT’S ADMINISTRATION TOOLS 99
7850ch06FINAL.qxd 2/28/07 10:43 AM Page 99

The JVM section gives details of the JVM that Tomcat uses. The other headings, in thiscase http-8080 and jk-8009, are the connectors for this host. Their setups and details appearbelow each one, and you can use this information when dealing with performance issues, andso on.
For a web application by web application breakdown, click the Complete Server Statuslink at the top of the screen, as shown in Figure 6-2. The new information appears below that,as shown in Figure 6-3.
No alternative method exists for obtaining this server information.
Starting, Stopping, and Restarting Web ApplicationsThe links under Commands are fairly self-explanatory. Stopping a web application doesn’tremove it from the server but makes it unavailable. Any user who tries to access it will be givena 503 (unavailable) error code. The web application is still deployed, and its name is unavailablefor new web applications. Figure 6-4 shows the results of stopping the Tomcat documentationweb application.
Figure 6-4. Stopping a web application with the manager application
CHAPTER 6 ■ USING TOMCAT’S ADMINISTRATION TOOLS100
7850ch06FINAL.qxd 2/28/07 10:43 AM Page 100

The running status of the tomcatBook web application is now false, and the Start link isactivated. Again, note the status message that tells you the action completed successfully.Another important aspect of Figure 6-4 is the URL that the web interface uses to stop the webapplication. This is how you stop the web application using HTTP request parameters to acti-vate the manager application without the help of the web interface.
The stop command follows; remember to start the web application’s path with /:
http://localhost:8080/manager/stop?path=/webapp
If the command is successful, you’ll get the following message:
OK - Stopped application at context path /webapp
This success message is similar to those you’ll receive for all the other commands.Starting the web application is just a matter of clicking the Start link, and if any configura-
tion or code changes, you can restart it by clicking the Restart link.You can also use the following:
http://localhost:8080/manager/start?path=/webapp
http://localhost:8080/manager/reload?path=/webapp
Undeploying Web ApplicationsIf you want to permanently remove a web application, click the Undeploy link. It’s importantto realize that this command will delete any files associated with the web application, as longas they’re in Tomcat’s directory structure. In other words, the manager application will deletethe expanded web application if it’s in webapps, delete the original WAR file if it’s in webapps, anddelete the context XML file in the subdirectory of conf. If the web application is based elsewhere,the files aren’t deleted, but the web application is no longer available as a web application andits name is available for new web applications.
The web application will shut down gracefully and will no longer appear in the web inter-face of the manager application.
The HTTP request parameter version of this command is as follows:
http://localhost:8080/manager/undeploy?path=/webapp
Checking Session InformationIf you want basic information on the sessions that are active on a web application, click thenumber of active sessions. You’ll be given the information shown in Figure 6-5.
CHAPTER 6 ■ USING TOMCAT’S ADMINISTRATION TOOLS 101
7850ch06FINAL.qxd 2/28/07 10:43 AM Page 101

Figure 6-5. Session information using the manager application
In this case, the default session timeout is 30 minutes, and the manager web applicationhas no sessions listed. A session is listed if it’s inactive for less than the timeout value plus 10minutes.
The following is the basic command:
http://localhost:8080/manager/sessions?path=/webapp
This will produce the same message as in Figure 6-5, though without any of the HTMLwrapping.
Deploying Web ApplicationsThe section below the web application list allows you to deploy a new web application. Youcan deploy a web application using a context XML file, a WAR file, or a web application direc-tory, each of which must be on the server’s machine. You can also deploy a WAR from a remotemachine.
Figure 6-6 shows the options.
CHAPTER 6 ■ USING TOMCAT’S ADMINISTRATION TOOLS102
7850ch06FINAL.qxd 2/28/07 10:43 AM Page 102

Figure 6-6. The web application deployment section of the manager application
Deploying Web Applications from the Local Machine
The context path is optional; if you omit it, the manager application will assign the name of thedirectory, WAR file, or XML file to the web application. You have the following two ways tospecify the location of the web application:
• As a file in the host’s application base directory, which is webapps by default
• In the form file:/absolute/path/to/application
If the web application is installed successfully, you’ll receive an “OK—Deployed applica-tion at context path/path” status message, and the new application will appear in the webapplication list.
This is the most complicated command when using request parameters, and it also differsfrom the command used by the web interface. The three possible parameters are as follows:
• path: This is the path that will be used to access the web application once it has beendeployed. This must be started with /.
• war: This is the WAR file or directory to use as the basis for this web application.
• config: This is the context XML file to use for this web application.
If you’re using a context XML file this way, you must also use the war parameter and omitthe path parameter. You can use the other two parameters by themselves.
The value of war can be in one of the following formats:
• file:/absolute/path/to/a/directory: This specifies the absolute path to a directorywhere a web application is present in an unpackaged form. This entire path is thenadded as the context path of the web application in Tomcat’s configuration.
• file:/absolute/path/to/a/webapp.war: This specifies the absolute path to a WAR file.
• directory: This is a web application directory in the host’s web application base directory(webapps by default).
• webapp.war: This is the name of a web application WAR file in the host’s web applicationbase directory (webapps by default).
CHAPTER 6 ■ USING TOMCAT’S ADMINISTRATION TOOLS 103
7850ch06FINAL.qxd 2/28/07 10:43 AM Page 103
The value of config can be as follows:
• file:/absolute/path/to/a/context.xml: This is the absolute path to a context XML filethat contains the definition of this web application’s context container.
The simplest way to use this command is to deploy a web application from the applicationbase directory, either using an expanded directory or a WAR file. The first line of the followingdeploys the Cat.war file to the /Catalog path, and the second line deploys the Cat directory tothe /Catalog path:
http://localhost:8080/manager/deploy?path=/Catalog&war=Cat.war
http://localhost:8080/manager/deploy?path=/Catalog&war=Cat
If you omit the path parameter, the application is given the name of the directory or WARfile as its path. For example, the following would deploy the bank.war file to the /bank path:
http://localhost:8080/manager/deploy?war=bank.war
You can use request parameters to deploy a web application from anywhere on the server’slocal machine, just as you could with the web interface. The commands are similar to thoseshown previously:
http://localhost:8080/manager/deploy?path=/Catalog&war=file:C:/dev/Cat.war
http://localhost:8080/manager/deploy?path=/Catalog&war=file:C:/dev/Cat
Note the absolute path to the WAR and directory. This creates a new context XML file inconf/[Engine_name]/[Host_name] for this web application. This file is named after the contextand contains a reference to the file you specified as the war parameter. Again, the path param-eter is optional.
Using a context XML file is a slightly more complicated process. Tomcat 6 does use thepath parameter with this command, because you’re encouraged not to use the path attributeof <Context>. config should point to the XML file, and war should point to the application’sfiles, whether they’re in a directory or in a WAR file.
Without the path attribute in a context definition in Tomcat 6, you must use the pathparameter to deploy a web application, like so:
http://localhost:8080/manager/deploy?
config=file:C:/catalog.xml&war=file:C:/Catalog&path=/catalogue
http://localhost:8080/manager/deploy?
config=file:C:/catalog.xml&war=file:C:/Catalog.war&path=/catalogue
In both cases, the file will be renamed to the value of the path parameter (in this example,this would be catalogue.xml).
Deploying Web Applications from a Remote WAR File
The second section of the deploy section allows you to upload a WAR file to the server. This isparticularly useful if you want to administer Tomcat remotely. The manager application willname the resultant web application after the WAR file and receives the WAR file via the HTTPPUT method.
CHAPTER 6 ■ USING TOMCAT’S ADMINISTRATION TOOLS104
7850ch06FINAL.qxd 2/28/07 10:43 AM Page 104
This method copies the WAR file to the server’s application base directory and expands it.This action has a request parameter version, but it can be used only with tools, such as Ant, thatcan send PUT data to a server. You’ll see this in the “Managing Applications with Ant” section.
Listing ResourcesYou can’t list the JNDI resources on the server using the web interface. To do so, use requestparameters as follows:
http://localhost:8080/manager/resources
This will list all the JNDI resources on the server, with the name of the resource followedby a comma and the fully qualified Java language type. If you want only to see resources ofa certain type, use the type parameter, like so:
http://localhost:8080/manager/resources?type=java.lang.Integer
This will display JNDI resources of type java.lang.Integer only. You can use this commandto list user databases, JNDI data sources, and serverwide constants.
Listing Security RolesListing security roles is another request-parameter–only command and lists all the rolesdefined on the server:
http://localhost:8080/manager/roles
This lists the security role name and an optional description. There’s one security rolelisted per line, and the fields are separated by colons. Note that the roles are those defined inthe user database for the manager application and may not be all the roles available to all webapplications.
TroubleshootingA number of things could go wrong while working with the manager application. The possiblecauses of failure are as follows:
Application already exists at path {context_path}: The context path for each web appli-cation must be unique, and this error indicates that another application with the samecontext path exists on the server. It’s possible that this is the same application, and you’vetried to deploy it twice. To fix this, undeploy the previous application, or choose a differ-ent context path.
Encountered exception: The Tomcat log files have error messages relating to the specificerror. Typical causes of errors are missing classes/JAR files while loading the application,invalid commands in the application’s web.xml file, and incorrect settings in a contextXML file.
Invalid context path specified: The context path must start with /, except when the ROOTweb application is being deployed, in which case the context path must be a zero-lengthstring.
CHAPTER 6 ■ USING TOMCAT’S ADMINISTRATION TOOLS 105
7850ch06FINAL.qxd 2/28/07 10:43 AM Page 105

No context path specified: You must specify a context path for the command you’reattempting to run.
Document base does not exist or is not a readable directory: The value specified for theWAR file path/URL in the war parameter is incorrect. This parameter must point to anexpanded web application or an actual WAR file.
No context exists for path {context_path}: The context path is invalid, meaning there’s noweb application deployed under this context path.
Reload not supported on WAR deployed at path {context_path}: The web applicationhas been installed from a WAR file instead of from an unpacked directory.
No global JNDI resources: No JNDI global resources are configured for this Tomcatinstance.
Can’t resolve user database reference: There was an error looking up the appropriateuser database.
No user database is available: The <ResourceLink> element hasn’t been configured prop-erly in the manager.xml configuration file. See the earlier “Configuring the ManagerApplication” section for more information.
Managing Applications with AntYou can also use Ant to run the previous administration commands. This is convenient fordevelopment purposes because an Ant build file could be used to compile, deploy, and evenstart a web application. The steps for doing this once Ant is installed are as follows:
1. Copy the CATALINA_HOME/server/lib/catalina-ant.jar file into Ant’s library directory(ANT_HOME/lib). This JAR file contains the Tomcat management task definitions for Ant.
2. Add ANT_HOME/bin to your path.
3. Add a user with the manager role to Tomcat’s user database if such a user doesn’t exist.
4. Now add <taskdef> elements to your custom build.xml script that call the Tomcatmanager commands.
Listing 6-4 shows a sample build.xml file. You could use it to build and deploy a webapplication. As it stands, it simply allows you to use all the previous commands with Ant.A developer would typically give you the Ant script for building the application.
Listing 6-4. A Sample build.xml File for Using the manager Application
<project name="ManagerApplication" default="list" basedir=".">
<!-- Configure the context path for this application -->
<property name="path" value="/Catalog"/>
<property name="build" value="C:/dev"/>
<property name="file" value="Catalog.war"/>
CHAPTER 6 ■ USING TOMCAT’S ADMINISTRATION TOOLS106
7850ch06FINAL.qxd 2/28/07 10:43 AM Page 106

The <project> tag has attributes for the name of the project and the default target. Thedefault target in this case is called list. Running Ant with no options will invoke the tasksassociated with this default target. The basedir attribute is the base directory for all path cal-culations in the Ant build script. This is set to . (the current directory), and therefore, all thepaths are taken to be relative to the directory from which you run Ant. You define propertiesfor the build (in this case, the path of the web application and the location of your web appli-cation files).
The properties in Listing 6-5 specify the access URL and username/password for themanager application. At the end of this section, you’ll see how you can also pass the passwordfrom the command line.
Listing 6-5. Defining the Properties for the manager Application
<!-- Configure properties to access the Manager application -->
<property name="url" value="http://localhost:8080/manager"/>
<property name="username" value="tomcat"/>
<property name="password" value="tomcat"/>
Listing 6-6 specifies the task definitions for the manager application. Ant allows for customtasks that extend its functionality. Tomcat implements the custom tasks shown in Listing 6-7 forexecuting the manager application commands. For example, org.apache.catalina.ant.DeployTaskexecutes the deploy command against the manager application.
Listing 6-6. Ant Task Definitions for Using the manager Application
<!-- Configure the custom Ant tasks for the Manager application -->
<taskdef name="deploy"
classname="org.apache.catalina.ant.DeployTask"/>
<taskdef name="list"
classname="org.apache.catalina.ant.ListTask"/>
<taskdef name="reload"
classname="org.apache.catalina.ant.ReloadTask"/>
<taskdef name="resources"
classname="org.apache.catalina.ant.ResourcesTask"/>
<taskdef name="roles"
classname="org.apache.catalina.ant.RolesTask"/>
<taskdef name="start"
classname="org.apache.catalina.ant.StartTask"/>
<taskdef name="stop"
classname="org.apache.catalina.ant.StopTask"/>
<taskdef name="undeploy"
classname="org.apache.catalina.ant.UndeployTask"/>
Next, Listing 6-7 shows the manager tasks for listing all web applications anddeploying/undeploying web applications.
CHAPTER 6 ■ USING TOMCAT’S ADMINISTRATION TOOLS 107
7850ch06FINAL.qxd 2/28/07 10:43 AM Page 107
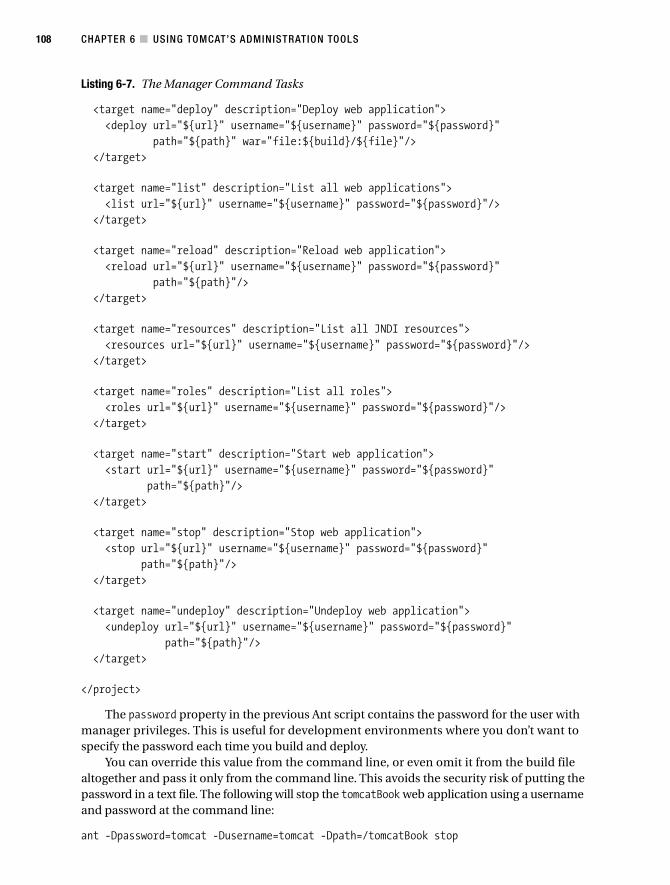
Listing 6-7. The Manager Command Tasks
<target name="deploy" description="Deploy web application">
<deploy url="${url}" username="${username}" password="${password}"
path="${path}" war="file:${build}/${file}"/>
</target>
<target name="list" description="List all web applications">
<list url="${url}" username="${username}" password="${password}"/>
</target>
<target name="reload" description="Reload web application">
<reload url="${url}" username="${username}" password="${password}"
path="${path}"/>
</target>
<target name="resources" description="List all JNDI resources">
<resources url="${url}" username="${username}" password="${password}"/>
</target>
<target name="roles" description="List all roles">
<roles url="${url}" username="${username}" password="${password}"/>
</target>
<target name="start" description="Start web application">
<start url="${url}" username="${username}" password="${password}"
path="${path}"/>
</target>
<target name="stop" description="Stop web application">
<stop url="${url}" username="${username}" password="${password}"
path="${path}"/>
</target>
<target name="undeploy" description="Undeploy web application">
<undeploy url="${url}" username="${username}" password="${password}"
path="${path}"/>
</target>
</project>
The password property in the previous Ant script contains the password for the user withmanager privileges. This is useful for development environments where you don’t want tospecify the password each time you build and deploy.
You can override this value from the command line, or even omit it from the build filealtogether and pass it only from the command line. This avoids the security risk of putting thepassword in a text file. The following will stop the tomcatBook web application using a usernameand password at the command line:
ant -Dpassword=tomcat -Dusername=tomcat -Dpath=/tomcatBook stop
CHAPTER 6 ■ USING TOMCAT’S ADMINISTRATION TOOLS108
7850ch06FINAL.qxd 2/28/07 10:43 AM Page 108

Using the Tomcat Administration ToolTomcat also has a web-based administration (admin) tool that you can use to administer theserver and individual web applications. In other words, it allows you to edit server.xml andweb application context settings remotely as well as other server configuration files. Whenusing Tomcat 6, you must download the admin tool separately from the main server. This is anindirect indication of the status of the admin tool, meaning that, as it stands, the admin tool isn’tas essential or as useful as it may seem on the surface. The following description, the discussionof realms in Chapter 11, and the security discussion in Chapter 12 will cover the drawbacks ofthe admin tool.
■Note The source distribution of Tomcat 6 includes the admin application, which means you’ll install it ifyou build Tomcat 6 from source. At the time of this writing, this admin tool is not available except for in thesource distribution. We are using the tool from the Tomcat 5.5 version for now, but it should not affect any-thing in the book.
Before you run the admin application, you must add an admin role and assign it to a user intomcat-users.xml, or whichever authentication mechanism you’re using. As with the managerapplication’s web interface, the admin tool is a web application running on the server. You canaccess it via the following URL:
http://localhost:8080/admin
You can configure the admin application in the CATALINA_HOME/conf/[Engine_name]/[Host_name]/admin.xml file. Listing 6-8 shows the contents.
Listing 6-8. The admin Application’s Context XML File
<Context docBase="${catalina.home}/server/webapps/admin" privileged="true"
antiResourceLocking="false" antiJARLocking="false">
<!-- Uncomment this Valve to limit access to the Admin app to localhost
for obvious security reasons. Allow may be a comma-separated list of
hosts (or even regular expressions).
<Valve className="org.apache.catalina.valves.RemoteAddrValve"
allow="127.0.0.1"/>
-->
</Context>
The other configuration file for the admin application is the deployment descriptor(CATALINA_HOME/server/webapps/admin/WEB-INF/web.xml). As with the manager application, youcan alter the security constraints and authentication settings for the admin application here. Inthis case, the admin application uses form-based authentication to protect the admin pages. Ifyou’d rather it use something else, change the setting appropriately.
CHAPTER 6 ■ USING TOMCAT’S ADMINISTRATION TOOLS 109
7850ch06FINAL.qxd 2/28/07 10:43 AM Page 109

In the administration tool, each node in the left pane represents a setting you can edit.The Service node corresponds to the <Service> element in server.xml, and its subnodes arethe <Service> element’s subelements. If you expand this node, you’ll see each subelement,which you can alter via commands in the right pane. There are a few settings you can’t alter,and changing the document base of a web application is one of them. If you want to changethe application’s base directory, you’ll have to undeploy it and redeploy it with new settings.
The next set of nodes after the Service node, under Resources, contains global settings forserver.xml. Again, few settings can’t be changed.
The final set of nodes corresponds to the settings in tomcat-users.xml. You can add users,roles, and groups here.
Each setting screen has a Save button and a Reset button. Clicking Save will commit anychanges to the admin application’s memory but won’t write them to server.xml. Therefore, youcan make all your changes before writing to disk. This is important, because when the adminapplication writes the changes to server.xml, it restarts Tomcat to enable the changes to takeeffect. The restart will be graceful, but some users may experience problems with the restart,least of all you because you’ll be logged out of the admin application.
To make the changes permanent, click the Commit Changes button at the top of the adminapplication screen. This makes the write to server.xml. However, the admin application createsa new server.xml file based on the settings it’s holding in memory. It doesn’t delete the oldserver.xml, but it renames it as follows:
server.xml.yyyy-MM-dd.hh-mm-ss
The new server.xml file won’t have any comments in it and thus may be significantlysmaller and less comprehensible to someone not familiar with your setup. It may be a goodidea to copy the comments from the old file into the new one.
As you can see, the admin tool has some drawbacks, the least of which are still to be discussedin the Chapter 9. Careful consideration should go into whether you need the admin tool. Remoteaccess is its biggest advantage.
SummaryThis chapter covered the two tools supplied with Tomcat that allow you to manage the serverremotely: the manager application and the admin application.
The manager application provides you with a user-friendly web interface that you can useto manage web applications. Through this interface, you can deploy new and undeploy oldapplications, as well as start, stop, and list applications. The manager application also comeswith a stripped-down interface that you can use with scripts and Ant.
You can use the admin tool to work with Tomcat’s configuration files, such as server.xmland tomcat-users.xml. Again, it’s a web interface, and you can access and use it remotely.
CHAPTER 6 ■ USING TOMCAT’S ADMINISTRATION TOOLS110
7850ch06FINAL.qxd 2/28/07 10:43 AM Page 110

Configuring Tomcat
In the preceding chapters, you saw how to install Tomcat and how to carry out basic adminis-tration tasks. These are the day-to-day tasks that an administrator would carry out, but Tomcathas other features you may have to work with from time to time. This chapter will show youthese features and how to use them.
You’ll see the following:
• Administrating the access logs
• Request filtering
• Single sign-on
• JNDI resources
• Session managers
The first three of these topics are common administration tasks. The others are built intoTomcat to allow developers to use their features. These are all part of the Servlet and JSP speci-fications as defined by Sun Microsystems, and, as the reference implementation, Tomcat mustinclude them.
Using Valves to Intercept User RequestsA web server wouldn’t be a web server if it didn’t allow you to intercept user requests, examinethem, and log them. As mentioned in Chapter 4, Tomcat provides you with components calledvalves that you can place in the request-processing stream to do just that. Recall that valvescan be configured at different levels within the Tomcat hierarchy and can be applied in chainsso that requests go through more than one filter before reaching their destinations. Figure 7-1shows a set of valves in a Tomcat installation.
111
C H A P T E R 7
■ ■ ■
7850ch07FINAL.qxd 2/28/07 10:51 AM Page 111
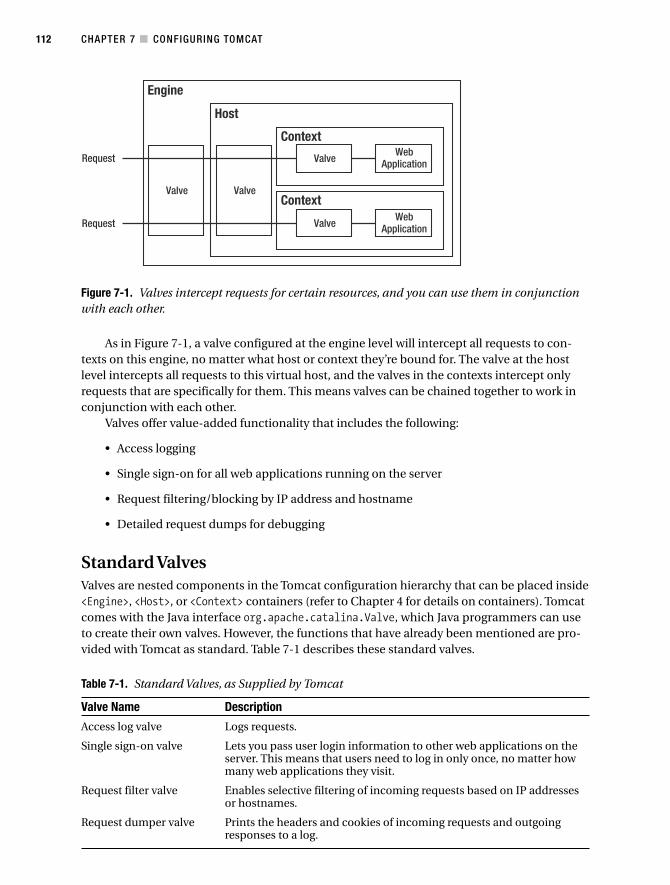
Figure 7-1. Valves intercept requests for certain resources, and you can use them in conjunctionwith each other.
As in Figure 7-1, a valve configured at the engine level will intercept all requests to con-texts on this engine, no matter what host or context they’re bound for. The valve at the hostlevel intercepts all requests to this virtual host, and the valves in the contexts intercept onlyrequests that are specifically for them. This means valves can be chained together to work inconjunction with each other.
Valves offer value-added functionality that includes the following:
• Access logging
• Single sign-on for all web applications running on the server
• Request filtering/blocking by IP address and hostname
• Detailed request dumps for debugging
Standard ValvesValves are nested components in the Tomcat configuration hierarchy that can be placed inside<Engine>, <Host>, or <Context> containers (refer to Chapter 4 for details on containers). Tomcatcomes with the Java interface org.apache.catalina.Valve, which Java programmers can useto create their own valves. However, the functions that have already been mentioned are pro-vided with Tomcat as standard. Table 7-1 describes these standard valves.
Table 7-1. Standard Valves, as Supplied by Tomcat
Valve Name Description
Access log valve Logs requests.
Single sign-on valve Lets you pass user login information to other web applications on theserver. This means that users need to log in only once, no matter howmany web applications they visit.
Request filter valve Enables selective filtering of incoming requests based on IP addressesor hostnames.
Request dumper valve Prints the headers and cookies of incoming requests and outgoingresponses to a log.
CHAPTER 7 ■ CONFIGURING TOMCAT112
7850ch07FINAL.qxd 2/28/07 10:51 AM Page 112

Using Access Log ValvesLogging access to resources is a common activity for web server administrators. Therefore,Tomcat comes with a valve for logging access to resources—whether that access is at the enginelevel, the host level, or the context level. The location of a log valve is fairly important froma performance point of view because each log entry requires Tomcat to write data to disk. Ifyou have a logging valve at the engine level of a busy server as well as logging valves for everycontext, the log will be written to many times and will grow very large. However, you may needto do this to monitor each individual context as well as the whole server. This just illustratesthe need for careful planning when using valves.
An access log valve isn’t a logger, because a logger prints information and errors to a logfile so that you can diagnose errors in web applications. For example, if a component encoun-ters problems and a user reports the error message to you, you’d look in the logger’s log, becausethis is where the error will be reported. However, if you wanted to see how often a client ata certain IP address requests a certain resource, you’d examine the access log valve’s log file.
The logger’s format also depends on the application in question. If it has been writtenproperly, all errors will be written to the error log file in a standard way so that they can beinvestigated and rectified. If not, you may see nasty Java stack traces with details of the errorburied among them.
The typical format for an access log valve is the common log file format, which you canfind at www.w3.org/Daemon/User/Config/Logging.html#common-logfile-format. You may alreadyhave an analysis tool that can analyze log files in this format. If not, don’t worry—they’re quitecommon. AWStats (http://awstats.sourceforge.net) is a great open source option, thoughyou’ll need Perl to use it. Another option is Webalizer (www.mrunix.net/webalizer/).
Table 7-2 shows the attributes for the standard access log valve that’s supplied with Tomcat.In this case, the className attribute must be org.apache.catalina.valves.AccessLogValve.
Table 7-2. The Attributes for the Standard Access Log Valve
Attribute Description Required?
className The Java class of the valve. This must be org.apache.catalina. Yesvalves.AccessLogValve.
condition Turns conditional logging on. If set, the access log valve logs Norequests only if ServletRequest.getAttribute() is null. For example, if this value is set to userId, a particular request will be logged only if ServletRequest.getAttribute("userId")== null.
directory The directory where the log files will be placed. This is usually Norelative to the CATALINA_HOME, but you can specify an absolute path instead. The default is logs.
prefix The prefix added to the name of the log file. No
resolveHosts Determines if the log will contain hostnames via a reverse DNS Nolookup. This can take significant time if enabled. The default is false.
rotatable Determines if log rotation should occur. If false, this file is Nonever rotated, and the fileDateFormat attribute is ignored. Use this attribute with caution, because the log file could grow very large indeed. The default is true.
suffix The extension added to the name of the log file. No
continued
CHAPTER 7 ■ CONFIGURING TOMCAT 113
7850ch07FINAL.qxd 2/28/07 10:51 AM Page 113
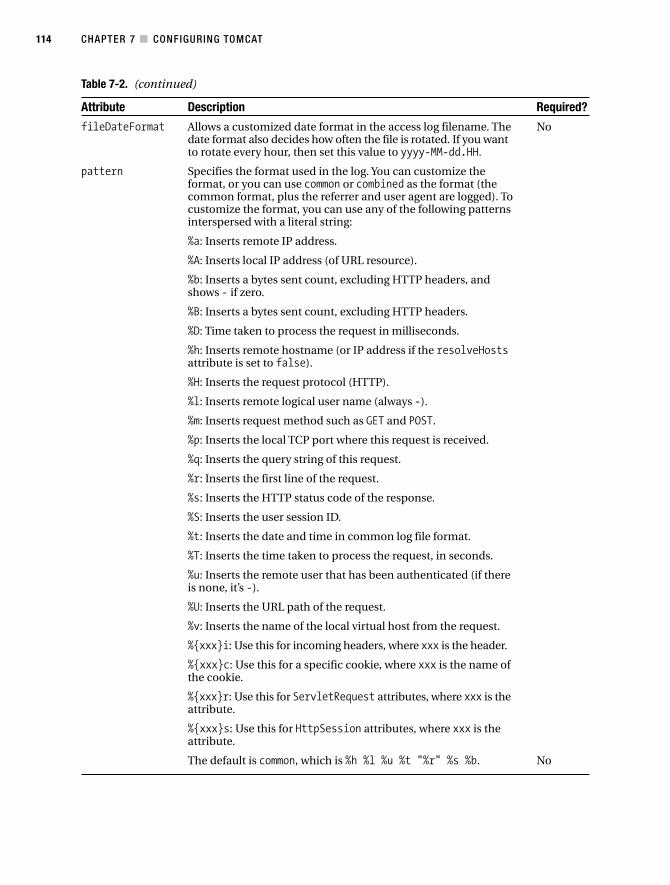
Table 7-2. (continued)
Attribute Description Required?
fileDateFormat Allows a customized date format in the access log filename. The Nodate format also decides how often the file is rotated. If you want to rotate every hour, then set this value to yyyy-MM-dd.HH.
pattern Specifies the format used in the log. You can customize the format, or you can use common or combined as the format (the common format, plus the referrer and user agent are logged). To customize the format, you can use any of the following patterns interspersed with a literal string:
%a: Inserts remote IP address.
%A: Inserts local IP address (of URL resource).
%b: Inserts a bytes sent count, excluding HTTP headers, and shows - if zero.
%B: Inserts a bytes sent count, excluding HTTP headers.
%D: Time taken to process the request in milliseconds.
%h: Inserts remote hostname (or IP address if the resolveHostsattribute is set to false).
%H: Inserts the request protocol (HTTP).
%l: Inserts remote logical user name (always -).
%m: Inserts request method such as GET and POST.
%p: Inserts the local TCP port where this request is received.
%q: Inserts the query string of this request.
%r: Inserts the first line of the request.
%s: Inserts the HTTP status code of the response.
%S: Inserts the user session ID.
%t: Inserts the date and time in common log file format.
%T: Inserts the time taken to process the request, in seconds.
%u: Inserts the remote user that has been authenticated (if there is none, it’s -).
%U: Inserts the URL path of the request.
%v: Inserts the name of the local virtual host from the request.
%{xxx}i: Use this for incoming headers, where xxx is the header.
%{xxx}c: Use this for a specific cookie, where xxx is the name of the cookie.
%{xxx}r: Use this for ServletRequest attributes, where xxx is the attribute.
%{xxx}s: Use this for HttpSession attributes, where xxx is the attribute.
The default is common, which is %h %l %u %t "%r" %s %b. No
CHAPTER 7 ■ CONFIGURING TOMCAT114
7850ch07FINAL.qxd 2/28/07 10:51 AM Page 114
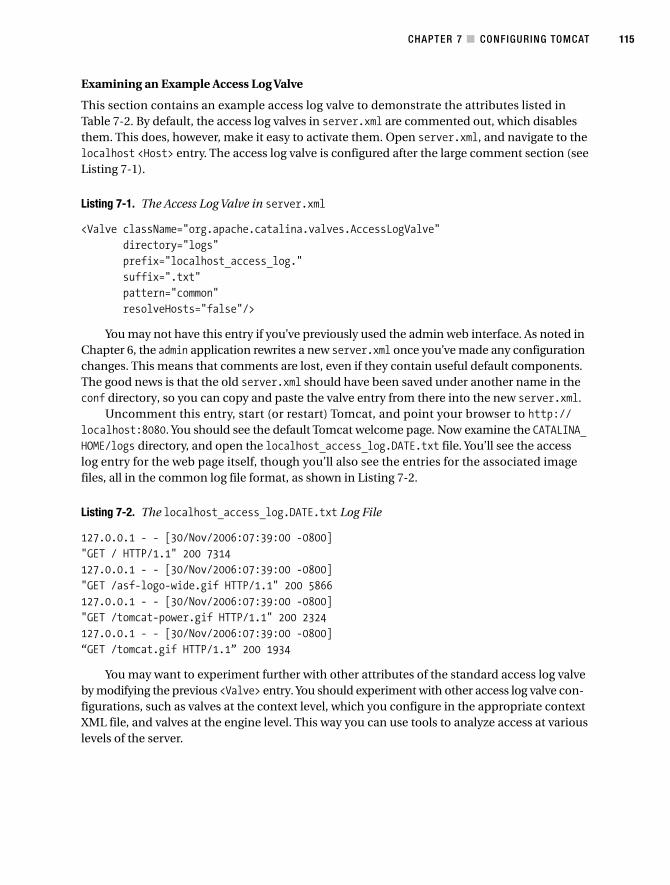
Examining an Example Access Log Valve
This section contains an example access log valve to demonstrate the attributes listed inTable 7-2. By default, the access log valves in server.xml are commented out, which disablesthem. This does, however, make it easy to activate them. Open server.xml, and navigate to thelocalhost <Host> entry. The access log valve is configured after the large comment section (seeListing 7-1).
Listing 7-1. The Access Log Valve in server.xml
<Valve className="org.apache.catalina.valves.AccessLogValve"
directory="logs"
prefix="localhost_access_log."
suffix=".txt"
pattern="common"
resolveHosts="false"/>
You may not have this entry if you’ve previously used the admin web interface. As noted inChapter 6, the admin application rewrites a new server.xml once you’ve made any configurationchanges. This means that comments are lost, even if they contain useful default components.The good news is that the old server.xml should have been saved under another name in theconf directory, so you can copy and paste the valve entry from there into the new server.xml.
Uncomment this entry, start (or restart) Tomcat, and point your browser to http://localhost:8080. You should see the default Tomcat welcome page. Now examine the CATALINA_HOME/logs directory, and open the localhost_access_log.DATE.txt file. You’ll see the accesslog entry for the web page itself, though you’ll also see the entries for the associated imagefiles, all in the common log file format, as shown in Listing 7-2.
Listing 7-2. The localhost_access_log.DATE.txt Log File
127.0.0.1 - - [30/Nov/2006:07:39:00 -0800]
"GET / HTTP/1.1" 200 7314
127.0.0.1 - - [30/Nov/2006:07:39:00 -0800]
"GET /asf-logo-wide.gif HTTP/1.1" 200 5866
127.0.0.1 - - [30/Nov/2006:07:39:00 -0800]
"GET /tomcat-power.gif HTTP/1.1" 200 2324
127.0.0.1 - - [30/Nov/2006:07:39:00 -0800]
“GET /tomcat.gif HTTP/1.1” 200 1934
You may want to experiment further with other attributes of the standard access log valveby modifying the previous <Valve> entry. You should experiment with other access log valve con-figurations, such as valves at the context level, which you configure in the appropriate contextXML file, and valves at the engine level. This way you can use tools to analyze access at variouslevels of the server.
CHAPTER 7 ■ CONFIGURING TOMCAT 115
7850ch07FINAL.qxd 2/28/07 10:51 AM Page 115

Using Request Filter ValvesAs a server administrator, you’ll often find it useful to restrict access to certain resources. You’vealready seen password protection for administration resources, but Tomcat also allows you touse request filter valves to block access so that a user doesn’t even get as far as the passwordprompt. You can use this facility to block access to admin resources to users who are not onthe local machine or an admininstration-only machine. Other options can include blockingdenial-of-service (DoS) attacks or denying access to sales data for nonsales personnel, and so on.
Two types of request filter valves exist: the remote address valve and the remote host valve.The first of these filters requests by the client’s IP address, and the second filters by the client’shost. Table 7-3 shows the attributes of the remote address valve.
Table 7-3. The Attributes of the Remote Address Request Filter Valve
Attribute Description Required?
allow A comma-separated list of regular expressions used to match the Noclient’s IP address. If there’s a match, the request is allowed through to its destination. If not, it’s blocked. If this attribute isn’t specified, all requests are allowed except if they match a pattern in the deny attribute.
className The Java class of the valve. This must be org.apache.catalina. Yesvalves.RemoteAddrValve.
deny A comma-separated list of regular expressions used to match the Noclient’s IP address. If there’s a match, the request is blocked. If not, it’s allowed.
It’s now possible to see how you can allow access to only those users on a local or admininstra-tion machine. In this example, you’d add the IP address of the local (or administration) machine tothe allow list. Listing 7-3 shows the scenario where both conditions are allowed (assuming theadministration machine has 192.168.0.73 as its IP address).
Listing 7-3. An Example Remote Address Request Filter Valve
<Valve className="org.apache.catalina.valves.RemoteAddrValve"
allow="127.0.0.1,192.168.0.73"/>
Visit a page on the local Tomcat server. You should see the page as usual. Now, remove the127.0.0.1 portion and restart Tomcat. Visit the same page, and you should be blocked, as shownin Figure 7-2.
CHAPTER 7 ■ CONFIGURING TOMCAT116
7850ch07FINAL.qxd 2/28/07 10:51 AM Page 116

Figure 7-2. A blocked URL using the remote address request filter valve
You can also achieve this effect by denying access to the localhost:
<Valve className="org.apache.catalina.valves.RemoteAddrValve"
deny="127.0.0.1"/>
Filtering by client host is just as easy. The only difference is the class that implements thevalve and the values of the regular expressions. In the case of the remote host request filtervalve, the class is org.apache.catalina.valves.RemoteHostValve, and the regular expressionsare hostnames instead of IP addresses.
<Valve className="org.apache.catalina.valves.RemoteHostValve"
allow="*.com"/>
■Note The remote host request filter requires a reverse DNS lookup, so the server must have access to DNS.
Request Dumper ValveThe request dumper valve allows you to debug web applications by dumping the headers andcookies of requests and responses to a log. The request dumper valve uses whichever loggingmechanism you’ve configured for the component that contains the valve.
You can use it for the following:
• Checking how the scope of a valve affects the requests that are processed
• Debugging other valves and any other request-processing components that are config-ured on the server
CHAPTER 7 ■ CONFIGURING TOMCAT 117
7850ch07FINAL.qxd 2/28/07 10:51 AM Page 117

To configure a request dumper valve, modify server.xml, and add the following line to thecontext, virtual host, or engine that you want to examine:
<Valve className="org.apache.catalina.valves.RequestDumperValve"/>
If you add the request dumper valve to the default server.xml file at the engine level, itwill use the logger shown in Listing 7-4.
Listing 7-4. An Engine-Level Logger
<!-- Global logger unless overridden at lower levels -->
<Logger className="org.apache.catalina.logger.FileLogger"
prefix="catalina_log." suffix=".txt"
timestamp="true"/>
For Tomcat 6, you’d use the following logger for logging at the host level; each line of thelog has INFO priority:
log4j.logger.org.apache.catalina.core.ContainerBase.[Catalina].[localhost]
If you wanted logging at the context level, assuming that your context is called tomcatBook,you’d use the following:
log4j.logger.org.apache.catalina.core.ContainerBase.
[Catalina].[localhost].[/tomcatBook]
This means the request dumper valve inherits the logger from a higher-level component,which isn’t always desirable if you’re troubleshooting a specific web application’s request- orresponse-processing pipeline.
After you’ve set up the valve, visit a web application that will be covered by the valve. Onceyour request has been processed, open the appropriate log file. You should see somethingsimilar to Listing 7-5. The version of Tomcat and the settings of your logger may differ, thoughthe messages will be the same.
Listing 7-5. The Output of the Request Dumper Valve
REQUEST URI=/tomcatBook/
authType=null
characterEncoding=null
contentLength=-1
contentType=null
contextPath=/tomcatBook
cookie=JSESSIONID=7F31F129712D208903FC6F50FD5143EA
header=host=localhost:8080
header=user-agent=Mozilla/5.0
(Windows; U; Windows NT 5.0; rv:1.7.3) Gecko/20040913 Firefox/0.10.1
header=accept=text/xml,application/xml,application/xhtml+xml,
text/html;q=0.9,text/plain;q=0.8,image/png,*/*;q=0.5
header=accept-language=en-us,en;q=0.5
header=accept-encoding=gzip,deflate
header=accept-charset=ISO-8859-1,utf-8;q=0.7,*;q=0.7
CHAPTER 7 ■ CONFIGURING TOMCAT118
7850ch07FINAL.qxd 2/28/07 10:51 AM Page 118

header=keep-alive=300
header=connection=keep-alive
header=cookie=JSESSIONID=7F31F129712D208903FC6F50FD5143EA
locale=en_US
method=GET
pathInfo=null
protocol=HTTP/1.1
queryString=null
remoteAddr=127.0.0.1
remoteHost=127.0.0.1
remoteUser=null
requestedSessionId=7F31F129712D208903FC6F50FD5143EA
scheme=http
serverName=localhost
serverPort=8080
servletPath=/index.jsp
isSecure=false
---------------------------------------------------------------
---------------------------------------------------------------
authType=null
contentLength=-1
contentType=text/html;charset=ISO-8859-1
message=null
remoteUser=null
status=200
===============================================================
As you can see, this listing contains a fair amount of information, all of which can be usedto analyze a client’s interaction with your server. A word of warning, though: this valve decodesany parameters sent with the request using the platform’s default encoding. This may affect webapplications on the server because calls to request.setCharacterEncoding() will have no effect.
Using Single Sign-on ValvesAnother standard valve that’s frequently used is the single sign-on valve. Conventionally, when-ever users of a web application reach a protected page, they will be required to log in, a processthat’s repeated if they browse to another web application on the same server. Using single sign-on,it’s possible to eliminate this repetition, provided that all the web applications on a host use thesame Tomcat realm.
The single sign-on valve caches users’ credentials on the server and will authenticate usersas they move among web applications on a host. The credentials are cached in the client’s ses-sion, which means that a single sign-on will be effective throughout a session. The user’s browserwill send a cookie with a value that uniquely identifies this user as a user who has signed in. Thevalve then associates the new request with the existing user credentials and allows the user tovisit protected resources. This is one of the main reasons for having a common realm for the host.
Table 7-4 describes the attributes of the single sign-on valve.
CHAPTER 7 ■ CONFIGURING TOMCAT 119
7850ch07FINAL.qxd 2/28/07 10:51 AM Page 119

Table 7-4. The Attributes of the Single Sign-on Valve
Attribute Description Required?
className The Java class of the valve. This must be org.apache. Yescatalina.authenticator.SingleSignOn.
requireReauthentication Determines whether the valve should use the Noauthentication realm to authenticate the user every time authentication is required. If false, the valve uses the cookie sent by the client and automatically authenticates the user without rechecking the realm. The default is false.
Configuring a Single Sign-on Valve
Before seeing what single sign-on does, you should first experience the problem that some-times makes it necessary to configure single sign-on. You’ll need two separate, protected webapplications. Luckily Tomcat comes with two such web applications: the manager applicationand the admin application. If you’re using Tomcat 6, you’ll have to download the admin applica-tion or protect another application for this example to work (this was covered in Chapter 6).
You should already have a user who has the manager role required for access to the managerapplication and a user who has the admin role required for access to the admin application. Youmay even have a user who has both. If not, you must create one in tomcat-users.xml now, asshown in Listing 7-6.
Listing 7-6. A User with Manager and Admin Roles Defined in tomcat-users.xml
<role rolename="manager"/>
<role rolename="admin"/>
<user username="tomcat" password="tomcat" roles="tomcat,manager,admin"/>
Here, the tomcat user has three roles: tomcat, manager, and admin. Now, start (or restart)Tomcat, and navigate to http://localhost:8080/manager/html/. You’ll be asked for your userdetails as usual. Sign in as the user with both roles. Once you’ve done so, you should see theweb interface of the manager application.
The next step is to navigate to http://localhost:8080/admin/. You’ll be presented withthe form for logging into the admin application, which means your login for the manager appli-cation hasn’t carried over into the admin application despite the details being valid for both.This is where single sign-on comes in.
Open server.xml, and navigate to the valve as shown in Listing 7-7. It’s the first valve inthe localhost host, after the large commented-out section.
Listing 7-7. The Single Sign-on Valve in server.xml
<!-- Normally, users must authenticate themselves to each web app
individually. Uncomment the following entry if you would like
a user to be authenticated the first time they encounter a
resource protected by a security constraint, and then have that
user identity maintained across *all* web applications contained
in this virtual host. -->
<!--
CHAPTER 7 ■ CONFIGURING TOMCAT120
7850ch07FINAL.qxd 2/28/07 10:51 AM Page 120

<Valve className="org.apache.catalina.authenticator.SingleSignOn"
debug="0"/>
-->
Uncomment the valve, and restart Tomcat. Make sure you’ve closed your browser windowsto start a new session, and navigate to http://localhost:8080/manager/html/ as before. Log inas the user with both roles again. Once you’ve logged in successfully, navigate to http://localhost:8080/admin/. This time, you won’t be asked to log in again, because the valve willrecognize you from the cookie sent by your browser and will authenticate you.
Configuring User SessionsSessions can play an important part in a server’s performance and its ability to service clientrequests. When you shut down Tomcat, all session information is usually lost, and sessionsthat are idle take up valuable working memory until the session timeout—which is typicallya long period, since some users may leave their computers. Therefore, it would be useful tosave session information across restarts so that users don’t experience a loss of service. Equally,it may be useful to remove idle sessions from memory and store them elsewhere to improveperformance.
To solve these problems, Tomcat comes with session managers, which are works in progress,with features and configuration that are subject to change.
You can do the following with the session managers:
• You can swap inactive sessions onto disk, thereby releasing the memory consumed bythem and making memory available for active sessions.
• You can save current sessions to disk when you shut down Tomcat; upon restart, thesaved sessions are restored.
• You can save sessions lasting beyond a specified threshold period to disk, enabling thesystem to survive an unexpected crash.
The last two features enable you to give a reliable service to users despite minor serverfailures or restarts.
Tomcat also allows you to configure clustering so that you can replicate a users’ sessionacross more than one server, thus minimizing the risk of losing their information when oneserver crashes or becomes unavailable.
Configuring a Session ManagerThe session manager is a context-level component, and you configure it in server.xml usingthe <Manager> element. Tomcat provides two types of session manager: the standard sessionmanager and the persistent session manager. The standard session manager is the defaultsession manager that Tomcat uses if you don’t specify one of your own, and it doesn’t allow forpersistent session management, except that it can retain sessions across a restart. You can stillconfigure a custom standard session manager for a web application. The persistent sessionmanager allows you to perform all the tasks described previously.
CHAPTER 7 ■ CONFIGURING TOMCAT 121
7850ch07FINAL.qxd 2/28/07 10:51 AM Page 121

Both types of session manager share two attributes, shown in Table 7-5.
Table 7-5. The Common Session Manager Attributes
Attribute Description Required?
className The class that implements the session manager. The default is Nothe standard session manager.
distributable Sets whether the session manager should enforce the restrictions Nodescribed in the Servlet specification for distributable applications. This means that all session attributes must implement java.io.Serializable. This setting can also be inherited from an application’s web.xml file. The default is false.
If you want to configure the standard implementation, you must set the className attributeto org.apache.catalina.session.StandardManager. Table 7-6 describes its additional attributes.
Table 7-6. The Standard Session Manager Attributes
Attribute Description Required?
algorithm Name of the message digest algorithm used to calculate Nosession identifiers produced by this manager. This value must be supported by the java.security.MessageDigest class. The default is MD5.
checkInterval The number of seconds between checks for expired sessions Nofor this manager. The default is 60.
entropy A String value that’s used when seeding the random Nonumber generator used to create session identifiers for this manager. If not specified, a semi-useful value is calculated, but a long String value should be specified in security-conscious environments.
maxActiveSessions The maximum number of active sessions that will be created Noby this manager. Use -1 (the default) for no limit.
pathname Absolute or relative (to the work directory for this context, NoCATALINA_HOME/work/[Engine_name]/[Host_name]/[Webapp_name]) pathname of the file in which session state will be preserved across application restarts, if possible. You may disable restart persistence by setting this attribute to an empty string. The default is SESSIONS.ser.
randomClass Java class name of the java.util.Random implementation Noclass to use. The default is java.security.SecureRandom.
To configure a persistent session manager, you need to set the className attribute toorg.apache.catalina.session.PersistentManager. Table 7-7 describes its additional attributes.
CHAPTER 7 ■ CONFIGURING TOMCAT122
7850ch07FINAL.qxd 2/28/07 10:51 AM Page 122

Table 7-7. The Persistent Session Manager Attributes
Attribute Description Required?
algorithm Name of the message digest algorithm used to Nocalculate session identifiers produced by this manager. This value must be supported by the java.security.MessageDigest class. The default is MD5.
checkInterval The number of seconds between checks for expired Nosessions for this manager. The default is 60.
entropy A String value that’s used when seeding the random Nonumber generator used to create session identifiers forthis manager. If not specified, a semi-useful value is calculated, but a long String value should be specified in security-conscious environments.
maxActiveSessions The maximum number of active sessions that will be Nocreated by this manager. Use -1 (the default) for no limit.
maxIdleBackup The time in seconds since the last access to a session Nobefore it’s eligible for being persisted to the session store. -1 (the default) disables this feature.
maxIdleSwap The time in seconds since the last access to a session Nobefore it should be persisted to the session store and taken out of the server’s memory. If this feature is enabled, the time interval specified should be equal to or longer than the value specified formaxIdleBackup. -1 (the default) disables this feature.
minIdleSwap The time in seconds since the last access to a session Nobefore it will be eligible to be persisted to the session store and taken out of the server’s memory. If specified, this value should be less than that specified bymaxIdleSwap. -1 (the default) disables this feature and allows the swap at any time.
processExpiresFrequency Frequency of the session expiration and related Nomanager operations. Manager operations will be doneonce for the specified amount of background process calls. (That is, the lower the amount, the more often the checks will occur.) The minimum value is 1. The default is 6.
randomClass Java class name of the java.util.Random Noimplementation class to use. The default isjava.security.SecureRandom.
saveOnRestart Specifies whether all sessions should be persisted Noand reloaded when Tomcat is shut down and restarted or when this application is reloaded. The default is true.
The differences between the standard session manager and the persistent session man-ager are illustrated by their attributes. The persistent session manager has options for savingsessions to permanent storage at any point in their life cycles, as well as when you shut downthe server, using the maxIdleBackup attribute. It also has options to move sessions out of mem-ory after a certain period using the maxIdleSwap and minIdleSwap methods. You also havecontrol over whether to save the sessions over a restart using the saveOnRestart attribute.
CHAPTER 7 ■ CONFIGURING TOMCAT 123
7850ch07FINAL.qxd 2/28/07 10:51 AM Page 123

One crucial difference between the sets of attributes is the absence of a location for storingthe session in Table 7-7. In the case of the persistent session manager, you configure the ses-sion store using the <Store> subelement. Tomcat allows you to configure two types of store:a file store and a JDBC store.
The file store is the same mechanism used by the standard session manager, except youcan use the extra functionality of the persistent session manager. To configure a file store, setthe className attribute to org.apache.catalina.session.FileStore, and use the attributesfrom Table 7-8.
Table 7-8. The Persistent File Store Attributes
Attribute Description Required?
checkInterval The interval in seconds between checks for expired sessions Noamong those sessions that are currently swapped out. The default is 60.
className Java class name of the implementation to use. Yes
directory Absolute or relative (to the temporary work directory for this Noweb application, CATALINA_HOME/work/[Engine_name]/[Host_name]/[Webapp_name]) pathname of the directory into which individual session files are written. The default is the temporary work directory assigned by the container.
The JDBC store uses JDBC to store the sessions in a permanent data store, usually a database.To configure a JDBC store, set the className attribute to org.apache.catalina.session.JDBCStore,and use the attributes from Table 7-9.
Table 7-9. The Persistent JDBC Store Attributes
Attribute Description Required?
checkInterval The interval in seconds between checks for expired Nosessions among those sessions that are currently swapped out. The default is 60.
className Java class name of the implementation to use. Yes
connectionURL The connection URL that will be handed to the Yesconfigured JDBC driver to establish a connection to the session database.
driverName Java class name of the JDBC driver to be used. Yes
sessionAppCol Name of the database column in the specified session Yestable that contains the engine, host, and context name in the format /Engine/Host/Context.
sessionDataCol Name of the database column in the specified session Yestable that contains the serialized form of all the session attributes for a swapped-out session. The column type must accept a binary object (typically called a BLOB).
sessionIdCol Name of the database column in the specified session Yestable that contains the session identifier of the swapped-out session. The column type must accept character string data of at least as many characters as are contained in session identifiers created by Tomcat (typically 32).
CHAPTER 7 ■ CONFIGURING TOMCAT124
7850ch07FINAL.qxd 2/28/07 10:51 AM Page 124

Attribute Description Required?
sessionLastAccessedCol Name of the database column in the specified session Yestable that contains the lastAccessedTime property of this session. The column type must accept a Java long (64 bits).
sessionMaxInactiveCol Name of the database column in the specified session Yestable that contains the maxInactiveInterval property of this session. The column type must accept a Java integer (32 bits).
sessionTable Name of the database table to be used for storing Yesswapped out sessions. This table must contain (at least) the database columns that are configured by the other attributes of this element.
sessionValidCol Name of the database column in the specified session Yestable that contains a flag indicating whether this swapped-out session is still valid. The column type must accept a single character.
To use the JDBC store, you must create a suitable database in which to store sessions.Listing 7-8 shows an example SQL script for a MySQL database.
Listing 7-8. A SQL Script for MySQL that Creates a JDBC-Store–Compatible Database
CREATE TABLE tomcat_sessions (
session_id VARCHAR(100) NOT NULL PRIMARY KEY,
valid_session CHAR(1) NOT NULL,
max_inactive INT(32) NOT NULL,
last_access INT(64) NOT NULL,
app_name VARCHAR(255),
session_data MEDIUMBLOB,
KEY kapp_name(app_name)
);
Listing 7-9 shows how to configure a JDBC store in server.xml using this table.
Listing 7-9. A Persistent Session Manager Using a JDBC Store in server.xml
<Manager className="org.apache.catalina.session.PersistentManager"
maxIdleBackup="300"
minIdleSwap="0"
maxIdleSwap="360">
<Store className="org.apache.catalina.session.JDBCStore"
connectionURL="jdbc:mysql://localhost:3306/tomcatSession"
driverName="com.mysql.jdbc.Driver"
sessionAppCol="app_name"
sessionDataCol="session_data"
sessionIdCol="session_id"
sessionLastAccessedCol="last_access"
CHAPTER 7 ■ CONFIGURING TOMCAT 125
7850ch07FINAL.qxd 2/28/07 10:51 AM Page 125

sessionMaxInactiveCol="max_inactive"
sessionTable="tomcat_sessions"
sessionValidCol="valid_session"/>
</Manager>
Notice how the attributes of the <Store> element correspond to the columns created inListing 7-8. The settings in the <Manager> element tell Tomcat that sessions left for five minutes(300 seconds) are eligible to be backed up to the store, that sessions can be taken out of mem-ory and placed in the store at any time, and that sessions left for six minutes (360 seconds) shouldbe taken out of memory and placed in the store.
If you use this setup and check the database periodically, you’ll see that it’s empty until eitherthe session backup limit is reached or the server is shut down. Once either of these events occurs,Tomcat will save the session to the database.
Configuring a ClusterTomcat also allows you to implement a clustered environment, so you can replicate user sessionsacross multiple servers to ensure that they don’t lose any data. For clustering to work, you’llhave to use some form of load balancing and activate multicasting. Chapter 9 discusses this.
Each Tomcat instance is a node of the cluster and must report in on multicast ping. If a nodefails to report for a certain amount of time, the other nodes don’t attempt to replicate any sessionchanges to it. Replicating user sessions across nodes is determined by a set of rules, which isdescribed next. The clustering implementation uses a session manager that overrides any othersession manager in the Tomcat instance.
A cluster is defined at the host level using the <Cluster> element, and Tomcat’s defaultserver.xml comes with a very serviceable example cluster setup. Table 7-10 shows the attributesof the <Cluster> element using the standard implementation org.apache.catalina.cluster.tcp.SimpleTcpCluster.
Table 7-10. The Attributes of the <Cluster> Element
Attribute Description Required?
className The class that implements this cluster. Use Yesorg.apache.catalina.cluster.tcp.SimpleTcpCluster.
expireSessionsOnShutdown Set to true to remove sessions when this cluster Nonode is shut down. The default is true.
managerClassName The name of the manager class that looks after the Nosessions. Use org.apache.catalina.cluster.session.DeltaManager, which is the default.
clusterName Set the name of the cluster to join; if no cluster with Nothis name is present, create one.
notifyListenersOnReplication Set to true to notify attribute/context listeners Noupon replication of a session change. These listeners are configured on an application-by-application basis. The default is true.
printToScreen Set to true to write session information to std.out. NoThe default is false.
CHAPTER 7 ■ CONFIGURING TOMCAT126
7850ch07FINAL.qxd 2/28/07 10:51 AM Page 126

Attribute Description Required?
protocol Sets the configurable protocol stack. However, this Nosetting has no function at the time of this writing.
useDirtyFlag Set to false to replicate a session only after a call Noto setAttribute() or removeAttribute(). In other words, replicate only after session information has changed. Set to true to replicate the session after each request. The default is false.
Listing 7-10 shows the setting from Tomcat 6’s server.xml.
Listing 7-10. The Default Cluster Setting in Tomcat 6’s server.xml
<Cluster className="org.apache.catalina.cluster.tcp.SimpleTcpCluster"
managerClassName="org.apache.catalina.cluster.session.DeltaManager"
expireSessionsOnShutdown="false"
useDirtyFlag="true"
notifyListenersOnReplication="true">
These cluster settings should be the same for all nodes of the cluster.
Configuring a Node’s MembershipNow you need to configure this node’s membership credentials using a <Membership> elementwith the standard org.apache.catalina.cluster.mcast.McastService implementation. This isa subelement of <Cluster>, and Table 7-11 shows its attributes.
Table 7-11. The Attributes of the <Membership> Element
Attribute Description Required?
className The class that implements this membership setting. Use Yesorg.apache.catalina.cluster.mcast.McastService.
mcastAddr The multicast address that this cluster uses to maintain its Yescohesion. Each node will ping this address to inform the rest of the cluster that it’s still active. This setting has to be the same for all the nodes.
mcastBindAddr This setting binds the multicast socket to a specific address. The Nodefault is null.
mcastDropTime The number of milliseconds from the last multicast heartbeat Yesbefore a node is considered to be unavailable.
mcastFrequency The number of milliseconds between each multicast heartbeat. Yes
mcastPort The multicast port that this cluster uses to maintain its Yescohesion. This setting has to be the same for all the nodes.
mcastSoTimeout The multicast read timeout. The read of the pings by other Nonodes will last as long as this value. The default is -1 (no timeout).
mcastTTL The multicast’s time to live if you want to limit your broadcast. NoThe heartbeat ping will last only as long as this value. The default is -1 (no timeout).
CHAPTER 7 ■ CONFIGURING TOMCAT 127
7850ch07FINAL.qxd 2/28/07 10:51 AM Page 127

Listing 7-11 shows the setting from Tomcat 5.5’s server.xml.
Listing 7-11. The Default Membership Setting in Tomcat 5.5’s server.xml
<Membership
className="org.apache.catalina.cluster.mcast.McastService"
mcastAddr="228.0.0.4"
mcastPort="45564"
mcastFrequency="500"
mcastDropTime="3000"/>
All these settings should be the same for each node on the cluster.
Configuring a Node’s ReceiverA node in a cluster receives replication information so that it can synchronize its sessions withthe other nodes in the cluster. You achieve this by using a <Receiver> element with the stan-dard org.apache.catalina.cluster.tcp.ReplicationListener implementation in server.xml.These settings are unique to a node, and Table 7-12 describes the relevant attributes.
Table 7-12. The Attributes of the <Receiver> Element
Attribute Description Required?
className The class that implements this receiver. Use org.apache. Yescatalina.cluster.tcp.ReplicationListener.
isSenderSynchronized If set to true, this node will send an acknowledgment to Nothe replication sender. The default is false.
tcpListenAddress The TCP address that this node will listen on for session Yesreplication. Setting this to auto means that the address is determined with a call to InetAddress.getLocalHost().getHostAddress(). In other words, the local address of the machine.
tcpListenPort The TCP port that this node will listen on for session Noreplication. The default is 0, which lets the system pick up an ephemeral port.
tcpSelectorTimeout The timeout in milliseconds for the Selector.select() Nomethod in case the operating system has a bug in java.nio. Set to 0 for no timeout, which is the default.
tcpThreadCount The number of threads to handle incoming replication Norequests. The optimal setting would be the same amount of threads as nodes in this cluster. The default is 0.
Listing 7-12 shows the setting from Tomcat 6’s server.xml.
Listing 7-12. The Default Receiver Setting in Tomcat 6’s server.xml
<Receiver
className="org.apache.catalina.cluster.tcp.ReplicationListener"
tcpListenAddress="auto"
tcpListenPort="4001"
CHAPTER 7 ■ CONFIGURING TOMCAT128
7850ch07FINAL.qxd 2/28/07 10:51 AM Page 128
tcpSelectorTimeout="100"
tcpThreadCount="6"/>
Configuring a Node’s SenderJust as a node must receive replication information, it must send replication information whenone of its sessions changes. You achieve this by using a <Sender> element with the standardorg.apache.catalina.cluster.tcp.ReplicationTransmitter implementation in server.xml.Table 7-13 describes these settings.
Table 7-13. The Attributes of the <Sender> Element
Attribute Description Required?
className The class that implements this sender. Use org.apache. Yescatalina.cluster.tcp.ReplicationTransmitter.
waitforAck Should the server wait to receive an acknowledgment. No
replicationMode Can be pooled, synchronous, or asynchronous. The default is Nopooled.
The settings for replicationMode are as follows:
• synchronous ensures that the thread that executes the request is also the thread thatreplicates the data to the other nodes. It won’t return until all the nodes in the clusterhave received the information. It does this by waiting for an acknowledgment.
• pooled uses several sockets in a synchronous way; that is, the data is replicated, andthen the receiving node sends an acknowledgment. This is the same as synchronousexcept that it uses a pool of sockets, meaning it’s multithreaded. This is the fastest andsafest configuration. Ensure that you have enough threads, as advised previously.
• asynchronous states that there’s a specific sender thread for each node, so the requestthread will queue the replication request and then return to the client. A session isadded to the queue, and if the same session already exists in the queue from a previousrequest, that session will be replaced in the queue instead of replicating two requests.This almost never happens, unless there’s a large network delay.
Listing 7-13 shows the setting from Tomcat 6’s server.xml.
Listing 7-13. The Default Sender Setting in Tomcat 6’s server.xml
<Sender
className="org.apache.catalina.cluster.tcp.ReplicationTransmitter"
replicationMode="pooled"
ackTimeout="15000" waitForAck="true" />
CHAPTER 7 ■ CONFIGURING TOMCAT 129
7850ch07FINAL.qxd 2/28/07 10:51 AM Page 129

Configuring a Node’s Replication ValveIt’s not always necessary to replicate session state after every request. You’ve already seen theuseDirtyFlag attribute of the <Cluster> element. This allows you to replicate session informa-tion only after a change in the session state.
You have other ways to save on the overhead and network traffic involved in session repli-cation. One is to not replicate a session after a request for a static resource, such as an HTMLpage or an image. This may not apply in all cases, but you can do it if you want to use a <Valve>
element with the org.apache.catalina.cluster.tcp.ReplicationValve implementation.Table 7-14 describes its attributes.
Table 7-14. The Attributes of the Replication <Valve> Element
Attribute Description Required?
className The class that implements this valve. Use org.apache.catalina. Yescluster.tcp.ReplicationValve.
filter A set of regular expressions matching file extensions. The valve will Yesintercept requests that match these regular exceptions and bypass the replication mechanism.
Listing 7-14 shows the setting from Tomcat 6’s server.xml.
Listing 7-14. The Default Replication Valve Setting in Tomcat 6’s server.xml.
<Valve className="org.apache.catalina.cluster.tcp.ReplicationValve"
filter=“.*\.gif;.*\.js;.*\.jpg;
.*\.png;.*\.htm;.*\.html;.*\.css;.*\.txt;”/>
Here, you can see that the filter won’t allow replication after requests for images, JavaScript,HTML, and text files.
If you use this valve, the session replication algorithm is as follows (a session is replicatedonly if all the following conditions are met):
• useDirtyFlag is true, or setAttribute has been called, or removeAttribute has been called.
• And a session exists (has been created).
• And the request isn’t trapped by the filter attribute of the replication valve.
Configuring a Node’s DeployerA node can also deploy and undeploy local web applications across the cluster using WAR files.This allows you to quickly and easily drop a web application into the cluster for immediate useand replication. You achieve this by using a <Deployer> element with the standard implemen-tation org.apache.catalina.cluster.deploy.FarmWarDeployer in server.xml. Table 7-15describes these settings.
CHAPTER 7 ■ CONFIGURING TOMCAT130
7850ch07FINAL.qxd 2/28/07 10:51 AM Page 130
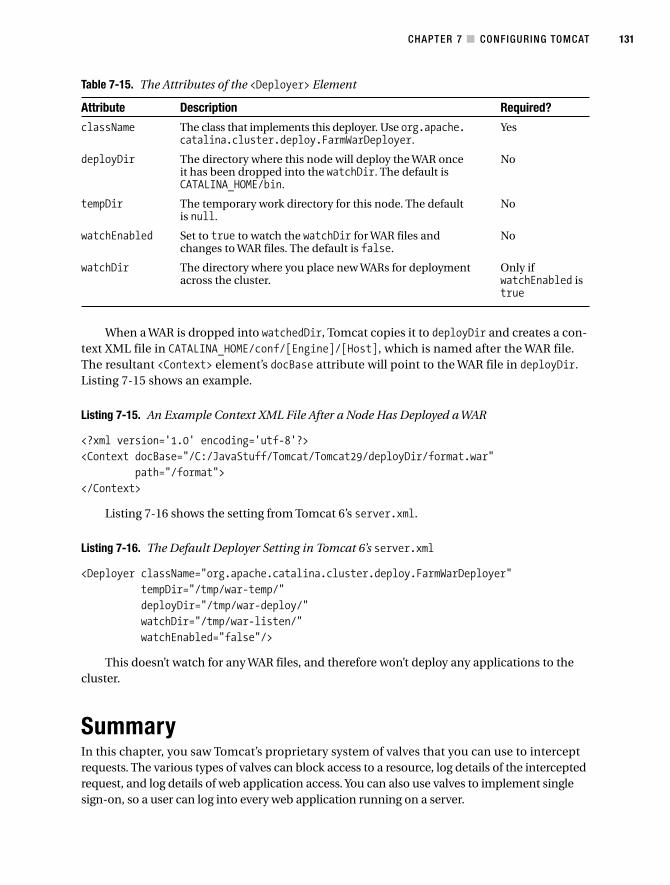
Table 7-15. The Attributes of the <Deployer> Element
Attribute Description Required?
className The class that implements this deployer. Use org.apache. Yescatalina.cluster.deploy.FarmWarDeployer.
deployDir The directory where this node will deploy the WAR once Noit has been dropped into the watchDir. The default is CATALINA_HOME/bin.
tempDir The temporary work directory for this node. The default Nois null.
watchEnabled Set to true to watch the watchDir for WAR files and Nochanges to WAR files. The default is false.
watchDir The directory where you place new WARs for deployment Only if across the cluster. watchEnabled is
true
When a WAR is dropped into watchedDir, Tomcat copies it to deployDir and creates a con-text XML file in CATALINA_HOME/conf/[Engine]/[Host], which is named after the WAR file.The resultant <Context> element’s docBase attribute will point to the WAR file in deployDir.Listing 7-15 shows an example.
Listing 7-15. An Example Context XML File After a Node Has Deployed a WAR
<?xml version='1.0' encoding='utf-8'?>
<Context docBase="/C:/JavaStuff/Tomcat/Tomcat29/deployDir/format.war"
path="/format">
</Context>
Listing 7-16 shows the setting from Tomcat 6’s server.xml.
Listing 7-16. The Default Deployer Setting in Tomcat 6’s server.xml
<Deployer className="org.apache.catalina.cluster.deploy.FarmWarDeployer"
tempDir="/tmp/war-temp/"
deployDir="/tmp/war-deploy/"
watchDir="/tmp/war-listen/"
watchEnabled="false"/>
This doesn’t watch for any WAR files, and therefore won’t deploy any applications to thecluster.
SummaryIn this chapter, you saw Tomcat’s proprietary system of valves that you can use to interceptrequests. The various types of valves can block access to a resource, log details of the interceptedrequest, and log details of web application access. You can also use valves to implement singlesign-on, so a user can log into every web application running on a server.
CHAPTER 7 ■ CONFIGURING TOMCAT 131
7850ch07FINAL.qxd 2/28/07 10:51 AM Page 131

You also saw Tomcat’s session managers, which can ensure that user sessions are persistedacross server restarts and crashes and can give Tomcat the ability to move inert sessions out ofmemory, thus boosting performance. You can configure the location of these sessions, withthe choice being between files or JDBC data sources.
You also saw how you extend this mechanism with Tomcat’s clustering mechanism, whichallows you to provide a more robust service to your users.
CHAPTER 7 ■ CONFIGURING TOMCAT132
7850ch07FINAL.qxd 2/28/07 10:51 AM Page 132

Understanding Tomcat’sClass Loaders
Tomcat is intrinsically linked with the Java programming language; it’s written in Java, andJava applications run on it. As such, it’s governed by the rules and attributes of the Java specifi-cation, two of which are platform independence and suitability for distributed networkarchitectures.
To realize both of these goals, Java employs many innovative techniques, one of which ishow it loads code libraries. If Java is to be platform independent, it can’t rely on a specific type,or types, of file system. In addition, Java is designed to load code libraries from sources spreadacross a network, so it can’t just load them from a single file system.
The Java architects introduced class loaders to deal with these issues. A class loader abstractsthe process of loading classes, making the process completely independent of any type ofunderlying data store, be it a network or a hard drive. Tomcat and its web applications useclass loaders just as any other Java application does. However, as a servlet/JSP container Tomcatmust provide class loaders to its web applications. You’ve already read a quick discussion ofthis in Chapter 3, where you saw the locations for Tomcat’s class loaders. This chapter willexpand on that discussion to give you a more complete picture of Tomcat and of class loaders,starting at the bottom with Java SE class loaders.
Examining the Standard Java SE Class LoadersSince J2SE 1.2, the JVM has used three distinct class loaders:
• Bootstrap class loader
• Extension class loader
• System class loader
These class loaders sit in a hierarchy with the bootstrap class loader at the top and the systemclass loader at the bottom. They have parent-child relationships, so the parent of the system classloader is the extension class loader. The bootstrap class loader is written in native code and isincluded in the JVM, and the other two class loaders, like Tomcat’s class loaders, are writtenin Java.
133
C H A P T E R 8
■ ■ ■
7850ch08FINAL.qxd 2/28/07 10:54 AM Page 133

CHAPTER 8 ■ UNDERSTANDING TOMCAT’S CLASS LOADERS134
The Bootstrap Class LoaderThe JVM uses the bootstrap class loader to load those Java classes that are necessary for it tofunction. This means the bootstrap class loader loads all the core Java classes (such as java.lang.*and java.io.*).
As noted previously, the bootstrap class loader is written in native code, so it solves thecircular problem of loading Java-based class loaders when the initial class loader itself must beloaded. The classes it loads are located in different locations depending on the JVM vendor.They’re always in JAR files, and Sun stores them in JAVA_HOME/jre/lib/.
The Extension Class LoaderWith J2SE 1.2 came the standard extension mechanism. Normally, when developers want theJVM to load class files that aren’t in the bootstrap classpath, they use the CLASSPATH environ-ment variable. Sun introduced the standard extension mechanism as an alternative method;you can drop JAR files into a standard extension directory, and the JVM will automaticallyfind them.
The extension class loader is responsible for loading all the classes in one or more exten-sion directories. Just as the bootstrap class loader’s path can vary on different JVMs, so can thestandard extension path. On Sun’s JVM, the standard extension directory is JAVA_HOME/jre/lib/ext/.
One advantage of the standard extension mechanism is that developers don’t have tostruggle with a huge CLASSPATH environment variable as they add more and more librariesto their systems.
The System Class LoaderThe system class loader places its classes in those directories and JAR files specified in theCLASSPATH environment variable. The system class loader is also used to load an application’smain class and is the default class loader for loading any other classes not covered by the pre-vious two class loaders.
The Delegation ModelSo, Java SE has three different class loaders, but how does the JVM know which class loader touse? The answer is in the delegation model. In every version of Java since J2SE 1.2, whenevera class loader receives a request to load a class, it first asks its parent to fulfill the request. (Inother words, it delegates the request to its parent class loader.) If the parent loads the classsuccessfully, the resulting class object is returned. The original class loader attempts to loadthe class itself only if its parent (and its parent’s parent, and so on) fails to load the class.
Thus, when a developer references a class in a Java program, the JVM will automaticallyroute a request to the system class loader to load the class. The system class loader will thenrequest that the extension class loader load the specified class, which in turn will request thatthe bootstrap class loader load the class. The process stops with the bootstrap class loader,which will check the core Java libraries for the requested class.
If the class doesn’t exist in the core libraries, the extension class loader will check the stan-dard extensions for the class. If it’s still not found, then the system class loader will check thelocations specified by the CLASSPATH variable for the class. If the class still cannot be located,then a ClassNotFoundException exception will be thrown.
7850ch08FINAL.qxd 2/28/07 10:54 AM Page 134

CHAPTER 8 ■ UNDERSTANDING TOMCAT’S CLASS LOADERS 135
The Endorsed Standards Override MechanismFollowing the previous discussion, when a developer uses a class in a Java application, the requestto load it is passed up the class loader hierarchy. This means that if the bootstrap class loadercan load a class, it will load it even if the class is present in the scope of another class loader. Forexample, J2SE 1.4 and 1.5 include a Java API for XML Processing (JAXP) XML parser as standard,which, as a consequence, is loaded by the bootstrap class loader. In this case, developers can’tplace their preferred XML parser in an application’s CLASSPATH because the system class loaderalways defers to the bootstrap class loader.
The Endorsed Standards Override Mechanism solves this problem. If a developer placesJAR files that replace the standard XML parser in some specific location, the bootstrap classloader will load the classes from those JAR files instead. In J2SE 1.4 and 1.5, this location isJAVA_HOME/lib/endorsed/. Users can change the path for this mechanism by setting thejava.endorsed.dirs property.
Before you start thinking about replacing any of the core libraries, Java allows you to overrideonly certain packages. You can find the complete list of packages in the J2SE 5 documentation(http://java.sun.com/j2se/1.5.0/docs/guide/standards/). In summary, you can overrideonly the CORBA classes and the XML parser classes with this mechanism.
Understanding Class Loader AttributesNow that you’ve seen the standard Java class loaders and the delegation model that governshow these class loaders interact, let’s talk more about how class loaders work.
Loading Classes on DemandThe three class loaders don’t preload all the classes in their scopes. Instead, they load theclasses on demand. This is called lazy loading because the class loader doesn’t load the datauntil it’s requested. Although laziness in human beings is generally regarded as negative, it’sactually quite a good thing for class loaders. The reasons are as follows:
• Faster performance: If each class loader had to load every class, it would take muchlonger to initialize the JVM.
• Efficiency: Loading in the classes would consume more memory than necessary ifloaded early.
• Flexibility: JAR files and classes can be added to the search paths of all the class loaderseven after the class loaders have been initialized.
Note that when a class is loaded, all its parent classes must also be loaded. Thus, if ClassBextends ClassA, and ClassB is loaded, then ClassA is also loaded.
Class CachingThe standard Java SE class loaders look up classes on demand, but once a class is loaded intoa class loader, it will stay loaded (cached) for as long as the JVM is running.
7850ch08FINAL.qxd 2/28/07 10:54 AM Page 135
CHAPTER 8 ■ UNDERSTANDING TOMCAT’S CLASS LOADERS136
Separate NamespacesEach class loader has its own unique namespace. In other words, if the bootstrap classloader loads a class named sun.misc.ClassA, and the system class loader loads a class namedsun.misc.ClassB, the two classes will be considered to be in distinct packages, and each classwon’t have access to the other class’s package-private members.
Creating a Custom Class LoaderA developer can even create custom class loaders, though it may seem like a pointless exercise.However, creating custom class loaders is fairly easy and doing so can, in fact, give an applica-tion an incredible amount of flexibility. While creating custom class loaders is beyond the scopeof this book, it’s worth noting that Tomcat extensively uses them.
Understanding Security and Class LoadersClass loading is at the center of the Java security model. After all, if a rogue third party were toget an application to load a custom version of java.lang.String that had the nasty side effectof deleting the hard drive whenever it was instantiated, it would be problematic for users andfor Sun. Understanding the security features of the class loader architecture will help youunderstand how Tomcat’s class loader system works.
The Java class loader architecture tackles the security problem with the following strategies:
• Class loader delegation
• Core class restriction
• Separate class loader namespace creation
• Security management
Class Loader DelegationThe delegation model is often described as a security feature. After all, it seems like it shouldbe: anyone trying to load false versions of the core Java classes will fail because the bootstrapclass loader has priority and will always find the genuine copies of the core Java classes.
However, the delegation model is flawed as a security mechanism because class loadersaren’t required to implement it. In other words, if you want to create a class loader that doesn’tfollow the delegation model, you’re free to do so.
So, if a custom class loader doesn’t have to delegate requests to the system class loader,what’s to stop a custom class loader from loading its own copy of java.lang.String?
Core Class RestrictionFortunately, it’s not possible for any class loader written in Java to instantiate a core Java class.The ClassLoader abstract class, from which all class loaders must descend, blocks the creationof any class whose fully qualified name begins with java. Thus, no false java.* classes are allowed.As the bootstrap class loader isn’t written in Java and doesn’t descend from ClassLoader, it’s notsubject to this restriction.
7850ch08FINAL.qxd 2/28/07 10:54 AM Page 136

CHAPTER 8 ■ UNDERSTANDING TOMCAT’S CLASS LOADERS 137
By implication, this restriction indicates that all class loaders must at least delegate to thebootstrap class loader; otherwise, when the class is loaded, the class loader has no way to loadjava.lang.Object, from which all objects must descend.
Thus, the delegation model by itself doesn’t provide security. It’s the core class restrictionmechanism that prevents rogue class loaders from tampering with the core Java libraries (atleast at run time).
Separate Class Loader NamespacesAs you saw earlier, each class loader has its own namespace, so you can load two differentclasses with the same fully qualified name. Having separate namespaces is an important secu-rity feature because it prevents custom class loaders from stepping over each other or the systemclass loader. No matter how hard a renegade class loader may try, it can’t replace a class loadedby a different class loader; furthermore, it can’t access the package-private members in classesof a package with the same name that was loaded from a different location.
Security ManagerIf developers really want to make sure no one can damage their programs with customclass loaders, they can simply disallow the use of custom class loaders altogether with theSecurityManager class. This is Java’s general mechanism for applying security restrictions inapplications.
With a security manager, and its associated policy files, you can disallow (or allow) a largenumber of tasks. For example, you can prevent a program from opening any socket to somenetwork host or prevent it from opening any file on the local file system. More important, youcan also prevent an application from loading a class loader. In fact, you have the followingoptions for preventing class-loader–related operations:
• You can prevent the loading of any class loader.
• You can prevent a reference to any class loader being obtained (including the systemclass loader).
• You can prevent the context class loader of any thread being changed.
You have to perform only two steps:
1. Configure a policy file with the permissions you want for a given application.
2. Turn on the application’s security manager.
There’s a lot more to the security manager than this, so Chapter 12 is devoted to the subject.
Understanding Tomcat and Class LoadersTomcat builds on the standard Java class loaders by adding its own class loaders to thehierarchy, as shown in Figure 8-1. They’re the common class loader, the server class loader,the shared class loader, and the web application class loader. These are the class loaders yousaw in Chapter 3.
7850ch08FINAL.qxd 2/28/07 10:54 AM Page 137

CHAPTER 8 ■ UNDERSTANDING TOMCAT’S CLASS LOADERS138
Figure 8-1. Tomcat’s class loaders in the class loader hierarchy
As you can see, it’s not the same model of direct delegation. The common class loaderdelegates to the server class loader. This means the web application class loaders don’t haveaccess to internal server classes, but the common class loader does.
Tomcat and the System Class LoaderTomcat uses the default system class loader but clears the CLASSPATH environment variable inits startup file. In its place, Tomcat sets CLASSPATH to the following:
• CATALINA_HOME/bin/bootstrap.jar
• CATALINA_HOME/bin/tomcat-juli.jar
• JAVA_HOME/lib/tools.jar
You’ll recall that the system class loader searches the CLASSPATH environment variable, butsince Tomcat sets CLASSPATH to the previously listed files, the system CLASSPATH variable is ignoredfor the duration of Tomcat’s life cycle. This is an unending source of problems for web applica-tions. As long as you remember that Tomcat has its own classpath that’s separate from the systemclasspath, and that you can add classes to Tomcat’s classpath by using the directories listed inthe “Tomcat’s Common Class Loader” section, you won’t have any problems.
The bootstrap.jar file contains those classes necessary for Tomcat to start, and thetools.jar file contains the javac compiler, which is used to compile JSP pages into class filesat run time. tomcat-juli.jar is used in Tomcat’s bootstrap logging.
Tomcat’s Common Class LoaderNext in the hierarchy is Tomcat’s common class loader, which loads those classes available toTomcat and all web applications. It loads these class files from the following location:
• CATALINA_HOME/lib/
7850ch08FINAL.qxd 2/28/07 10:54 AM Page 138

CHAPTER 8 ■ UNDERSTANDING TOMCAT’S CLASS LOADERS 139
For JAR files, Tomcat includes a number of JAR files in CATALINA_HOME/lib/, as shown inTable 8-1.
Table 8-1. The Contents of CATALINA_HOME/common/lib/
JAR File Description
annotations-api.jar Contains the annotation classes used that can be used since JDK 1.5.
catalina.jar The implementation of the core Tomcat 6 server.
catalina-ant.jar The Ant tasks used to run and manage Tomcat.
catalina-ha.jar The high-availability package included with Tomcat.
catalina-tribes.jar The Tomcat communication package.
el-api.jar The Expression Language (EL) API.
jasper.jar The Jasper 2 Compiler and Runtime, which turns the JSP files intoservlets.
jasper-el.jar The Jasper 2 Expression Language implementation.
jasper-jdt.jar The Eclipse JDT 3.2 Java compiler, which allows Tomcat to run with justa JRE, without requiring the full JDK.
jsp-api.jar The JavaServer Pages (JSP) 2.1 API.
servlet-api.jar The Servlet 2.5 API.
tomcat-coyote.jar A collection of Tomcat connectors and utility classes.
tomcat-dbcp.jar Provides the database connection pooling mechanism and other objectpooling services.
tomcat-i18n-**.jar Available internationalization JARs. If you do not need these, simplydelete them or move them out of the lib directory.
Although developers can reference all these APIs, you shouldn’t allow them to place theirown classes or JARs in CATALINA_HOME/lib. If developers need classes and JAR files to be visibleto all web applications, you should place them where the shared class loader can see them.Note that this doesn’t apply to well-known third-party libraries such as database drivers becauseTomcat often needs to have access to these classes, especially if you’re providing JDBC datasources.
Putting custom classes in the common class loader path is to be discouraged for at leasttwo reasons:
• The custom classes could conceivably cause compatibility problems with Tomcat. Forexample, if you placed your own XML parser in this directory and it wasn’t tested withTomcat, it could introduce hard-to-fix bugs. The same would be true if you introducedan older version of the Servlet API into these paths.
• It’s easy to forget which classes/JAR files belong to developers and which belong toTomcat. Therefore, maintenance is tricky, especially for others who wouldn’t expectuser classes to be in those locations.
7850ch08FINAL.qxd 2/28/07 10:54 AM Page 139
CHAPTER 8 ■ UNDERSTANDING TOMCAT’S CLASS LOADERS140
Tomcat’s Web Application Class LoaderEach web application also has its own class loader, which looks in CATALINA_HOME/webapps/[webapp]/WEB-INF/lib and /WEB-INF/classes for JARs and class files. Two things make the webapplication class loader unique. First, each web application has its own instance of this classloader, which means that web applications can’t see other people’s class files. Second, the webapplication class loader doesn’t use the delegation pattern that class loaders are encouragedto use. Instead, it tries to load classes first, before delegating the request to the other classloaders. This behavior makes it easy for web applications to override classes in the shared andcommon class loaders on a per-web-application basis.
Note that this doesn’t mean the web application class loader can override Java base classes.It can’t.
The other exception is that the web application class loader will always delegate the follow-ing class patterns:
• javax.*
• org.xml.sax.*
• org.w3c.dom.*
• org.apache.xerces.*
• org.apache.xalan.*
If a parent class loader doesn’t load these patterns, the web application class loader willattempt to load them.
Revisiting Class Loader OrderTo review how these various Tomcat class loaders work together, you’ll now see what happenswhen an individual application requests a class. The class loaders in the following list look fora class in the following order:
1. The bootstrap class loader looks in the core Java classes.
2. The system class loader looks in the following places:
• CATALINA_HOME/bin/bootstrap.jar
• CATALINA_HOME/bin/tomcat-juli.jar
• JAVA_HOME/lib/tools.jar
3. The web application class loader looks in CATALINA_HOME/webapp/[webapp]/WEB-INF/
classes and CATALINA_HOME/webapp/[webapp]/WEB-INF/lib.
4. The Common class loader looks in CATALINA_HOME/lib directory and loads all theclasses and JARs in the directory.
Dynamic Class ReloadingAs discussed earlier, once a class loader has loaded a class, it caches the class. This means thatfuture requests for the class always receive the cached copy; thus, if the class on the file systemis changed while the JVM is running, the new class will be ignored.
7850ch08FINAL.qxd 2/28/07 10:54 AM Page 140

CHAPTER 8 ■ UNDERSTANDING TOMCAT’S CLASS LOADERS 141
However, because Tomcat uses its own class loader to load each web application, it canaccomplish dynamic class reloading simply by halting the web application and then reloadingit using a new class loader. The web application’s original class loader is thus orphaned,andgarbage is collected at the JVM’s convenience. This eliminates the need to restart the JVM whennew versions of classes are deployed.
You have two mechanisms for instructing Tomcat to reload a web application:
• You can configure Tomcat to scan WEB-INF/classes and WEB-INF/lib for changes.
• You can explicitly reload the web application with the Tomcat manager application.
Tomcat doesn’t direct its class loaders to dump their caches and reload from disk; rather,when it detects a change or receives an explicit reload instruction, it reloads and restarts theentire web application.
Avoiding Class Loader PitfallsA couple of common problems occur when dealing with Tomcat’s class loaders. The solutionsto these problems come from the information covered previously.
Packages Split Among Different Class LoadersEach class loader has its own unique namespace, which has a practical application in Tomcat.If you have multiple classes in the same package, the same class loader must load them all forthem to have access to other class loaders’ private, protected, or package-private members.
SingletonsA singleton is a class designed so that it can be instantiated only one time in any given JVM. Saya developer wants to share a singleton among multiple web applications and wants to main-tain the contract that only one instance be created in a single JVM.
Placing this class in the web application class loader path means that each web applicationwill create a new instance of this class, which isn’t what the developer intends. This is becauseeach web application has its own class loader and class loaders maintain distinct namespaces.
The solution is to place this class in the shared class loader path, where the singleton willbe shared among all web applications, as they all share the same class loader.
SummaryIn this chapter, you learned how class loaders abstract the process of loading class files beforethe first instantiation and make them available for use. Java’s class loaders support loadingclasses from the local file system to the network and give developers the facility to create theirown custom class loaders. The three basic class loaders are the bootstrap, extension, and sys-tem class loaders.
Class loaders use the delegation model. Every class loader passes the request to its parentuntil the bootstrap class loader is reached and then each class loader looks for the class. If theclass can’t find it, it goes back down the chain. Implementing the delegation model is optional,but class loaders can’t function if they don’t delegate to the bootstrap class loader at some point.Also, some advantages exist in having a unique namespace for each class loader.
7850ch08FINAL.qxd 2/28/07 10:54 AM Page 141

The Java security model prevents the misuse of custom class loaders by allowing only thebootstrap class loader to load classes that start with java.*. Also, by using the security manager,an application can forbid the use of custom class loaders.
Last, you saw that Tomcat has four class loaders: common, server, shared, and web applica-tion. To share classes with all web applications, users should use the shared class loader.
CHAPTER 8 ■ UNDERSTANDING TOMCAT’S CLASS LOADERS142
7850ch08FINAL.qxd 2/28/07 10:54 AM Page 142

Using Tomcat’s Connectors
When you use Tomcat out of the box to run web applications, it’s able to serve HTML pageswithout any additional configuration. This is because it comes with an HTTP connector thatcan handle requests from a user’s web browser. Because of this connector, Tomcat can func-tion as a stand-alone web server and serve static HTML pages in addition to handling servletsand JSP pages.
Tomcat connectors provide the external interface to Tomcat clients. Two kinds of connectorsexist—those that implement an HTTP stack of their own (called HTTP connectors) and thosethat link Tomcat to an external web server such as Apache or IIS (called web server connectors).
In this chapter, you’ll see how to configure both types of Tomcat connectors. As mentionedearlier, you don’t have to do any additional configuration to get the HTTP connector working.So why do you need this chapter? This chapter is useful if you need to modify the HTTP con-nector configuration (for example, to create a secure HTTPS connection) and if you want touse Tomcat with an external web server. The reasons for doing so will become clear shortly.
Note that this chapter contains a reference to the HTTPS-related configuration, but thedetails of SSL setup are in Chapter 12.
Using the HTTP ConnectorThe HTTP connector is a Java class that implements HTTP. The Tomcat 6 version is org.apache.catalina.connector.Connector, which is used for all the connectors described next.
Configuring the HTTP/1.1 ConnectorListing 9-1 shows the default HTTP/1.1 connector configuration (fromCATALINA_HOME/conf/server.xml).
Listing 9-1. The Default HTTP/1.1 Connector
<!-- Define a non-SSL HTTP/1.1 Connector on port 8080 -->
<Connector port="8080"
maxThreads="150"
connectionTimeout="20000"
redirectPort="8443" />
143
C H A P T E R 9
■ ■ ■
7850ch09FINAL.qxd 2/28/07 10:58 AM Page 143

CHAPTER 9 ■ USING TOMCAT’S CONNECTORS144
As with many components in Tomcat’s configuration, some of these attributes are commonto all connectors, and some are unique to the HTTP connector. Chapter 4 shows how to dealwith all these attributes. However, in this case, the attributes specify that this service should lis-ten to port 8080 for HTTP requests and set thread-handling information, among other things.
Configuring SSL on TomcatThe connector for the service that supports HTTPS connections must have its secure attributeset to true and its scheme attribute set to https.
Listing 9-2 shows the SSL connector from server.xml. Note that it’s commented out bydefault. Uncomment it, and make changes if required. If you change the SSL port (8443) tosomething else, you need to change the redirectPort attribute for all the non-SSL connectorsto that port number, too. The non-SSL connectors redirect users to this port if they try to accesspages with a security constraint that specifies that SSL is required.
Listing 9-2. The Default SSL Connector
<!-- Define a SSL HTTP/1.1 Connector on port 8443 -->
<!--
<Connector port="8443"
maxThreads="150"
scheme="https"
secure="true"
clientAuth="false"
sslProtocol="TLS" />
-->
For details of these attributes, see Chapter 4. The two important attributes here are schemeand secure. As noted previously, they’re used to indicate that this is an SSL-enabled connector.
Working with KeystoresTo use an SSL connector with Tomcat, you’ll need to create a keystore. This contains the server’sdigital certificates, which are used by clients to validate the server. Once clients have accepteda certificate, they can use the public key it contains to encrypt any data it wants to send. Theserver, for its part, holds a private key, which is the only way to decrypt the data. Chapter 12 cov-ers this subject, as well as all aspects of Tomcat security, in more detail. I’ll leave the details untilthen, but this chapter will get your SSL connector up and running.
To create the keystore, use the following command (assuming the JAVA_HOME/bin directoryis in your path); keytool is a utility that comes as part of the Java SE distribution:
> keytool -genkey -alias tomcat -keyalg RSA
This creates a public-private key pair (-genkey), for user tomcat, with the RSA algorithm.The MD5 algorithm is also available, but RSA is recommended for web use because of its com-patibility with other Internet-aware applications. This method creates what’s called a self-signedcertificate. If you were serious about your security, you’d use a certificate issued by a certificateauthority, a process that’s discussed in Chapter 12. For now, you can test the mechanism witha self-signed certificate.
7850ch09FINAL.qxd 2/28/07 10:58 AM Page 144

CHAPTER 9 ■ USING TOMCAT’S CONNECTORS 145
Figure 9-1. A browser warning that the certificate may not be trustworthy
You’ll be asked for a password; make sure you specify something other than the default.Once you’ve done this, you’ll be asked for some details. The first and last name question isreally asking for the name of your host. If you don’t put the name of your host, then clients willbe warned and the certificate may not be accepted, as shown in Figure 9-1.
Finally, add the password for the keystore to the SSL connector’s entry in server.xml, asshown in Listing 9-3.
Listing 9-3. Adding a Keystore Password to server.xml
<Connector port="8443"
maxThreads="150" scheme="https" secure="true"
clientAuth="false" sslProtocol="TLS"
keystorePass="tomcat"/>
Now start Tomcat, and visit https://localhost:8443. You’ll be asked to accept the certifi-cate because it’s likely that your browser doesn’t recognize your organization as a certificateauthority. If you accept the certificate, you can continue to Tomcat’s home page and view itusing an SSL connection.
Running Tomcat Behind a Proxy ServerA common deployment scenario is to run Tomcat behind a proxy server. In this kind of envi-ronment, the host name and port that the server should return to the client in the HTTP responseshould be those the client used in the original request and not the actual host name and porton which Tomcat is running. This is controlled via the proxyName and proxyPort attributes ofthe connector.
Apache is a good candidate as a proxy server because of its robustness and all-aroundgood grace. If you use Apache, you can use its proxy module (mod_proxy) to pass the servletrequests to the Tomcat server. Uncomment the following in Apache’s conf/httpd.conf file:
LoadModule proxy_module libexec/mod_proxy.so
LoadModule proxy_http_module modules/mod_proxy_http.so
Next, add the following lines after the module definitions:
7850ch09FINAL.qxd 2/28/07 10:58 AM Page 145

ProxyPass / http://localhost:8080/
ProxyPassReverse / http://localhost:8080/
The Apache server will now pass all requests to the Tomcat server.On the Tomcat side, the configuration in server.xml for the HTTP connector is as shown
in Listing 9-4.
Listing 9-4. Defining a Proxy Name and Proxy Port in server.xml
<!-- Define a non-SSL HTTP/1.1 Connector on port 8080 -->
<Connector port="8080"
maxThreads="150" connectionTimeout="20000"
proxyName="localhost" proxyPort="80"/>
If you don’t specify the proxyName and proxyPort, the response will indicate that it camefrom http://localhost:8080 instead of http://localhost.
Using the AJP ConnectorIf you want another web server, such as Apache or IIS, to handle the static content while Tomcathandles the dynamic content, you need the Apache JServe Protocol (AJP) connector. It worksin conjunction with Apache’s mod_jk or an IIS ISAPI module to deploy web applications withthe combination of Tomcat and another web server. The following sections cover Apache 1.3.x,Apache 2.0.50, and IIS. A basic knowledge of Apache is assumed; the following URL may be ofuse as a quick reference: http://httpd.apache.org/docs/install.html.
The Apache JServ ProtocolThe AJP is a packet-oriented, TCP/IP-based protocol. It provides a communication channelbetween the Apache web server process and running instances of Tomcat. Various versions ofthis protocol are available, including versions 1.2, 1.3, and 1.4. AJP 1.3 is the most commonlyused and well-tested version used by Tomcat, so it’s the only version of the protocol I’ll discuss.
AJP ensures good performance by reusing already open TCP-level connections with theTomcat container and thus saves the overhead of opening new socket connections for eachrequest. This is a concept similar to that of a connection pool and makes things simple by avoid-ing the cost of more opened connections. In the request-response cycle, when a connection isassigned to a particular request, it will not be reused until that request-response cycle iscompleted.
■Note When integrating with IIS, you also use AJP as your protocol. Don’t be deceived by the Apache in itsname. This simply refers to the provider of the protocol and the module, not to the web server.
CHAPTER 9 ■ USING TOMCAT’S CONNECTORS146
7850ch09FINAL.qxd 2/28/07 10:58 AM Page 146

CHAPTER 9 ■ USING TOMCAT’S CONNECTORS 147
Worker ImplementationsA worker is a Tomcat instance that serves JSP/servlet requests coming from another web server.In most cases, there’s only a single Tomcat process, but sometimes you’ll need to run multipleworkers to implement load balancing or site partitioning (mainly required for sites with heavytraffic). You’ll see how to achieve this with both versions of Apache and IIS in the followingsections.
Each worker is identified by a host name/IP and port number combination. Here hostmeans the machine on which the given Tomcat instance is running, and port refers to the porton which that instance is listening for any requests.
Multiple Tomcat WorkersYou may use a multiple worker setup in a number of situations:
• You may want different contexts to be served by different Tomcat workers. This setupwill provide a development environment where all the developers share the same webserver but own a Tomcat worker of their own.
• You may want different virtual hosts served by different Tomcat processes to providea clear separation between sites belonging to different entities.
• You may want to provide load balancing, where you run multiple Tomcat workers eachon a machine of its own (or maybe on the same machine) and distribute the requestsamong them.
Integrating Tomcat with Apache 1.3 Using mod_jkmod_jk isn’t available as a binary for Apache 1.3 if you’re using Linux, though you can build itfrom source, as shown next. It’s available as a binary for Apache 2.0 and 2.2. A Windows DLL(rename it mod_jk.dll) and shared objects exist for other platforms. You can find all these viathe Jakarta binaries download page. After downloading the DLL or shared object (from http://tomcat.apache.org/connectors-doc/), move it to the modules subdirectory of Apache.
To build the module on Linux (and other Unix-like systems), extract the download toa convenient location and navigate to the jk/native subdirectory. Here you should run thefollowing commands (modifying the path to your Apache 1.3 apxs):
> ./configure --with-apxs=/usr/sbin/apxs
> make
> cp ./apache-1.3/mod_jk.so /usr/lib/apache/modules
The first command configures the build so that the resultant module is compatible withApache 1.3 (or whichever version of Apache you specify, because this command is equallyapplicable to Apache 2.0). The make command builds the module, and the final command copiesthe built module to Apache’s modules directory.
Configuring the AJP Connector in server.xmlThe AJP connector configuration in server.xml is already present. This makes configurationeasy, as you don’t need to do anything at all.
7850ch09FINAL.qxd 2/28/07 10:58 AM Page 147

Setting the workers.properties FileEach running Tomcat instance is represented as a single worker. You can set up Tomcat workersfor the web server plug-in by using a simple properties file called workers.properties, whichis used only with mod_jk and not mod_jk2 (which is deprecated). This file consists of entries thatwill convey information about Tomcat workers to the web server plug-in.
Format of workers.properties File
The format used by workers.properties for defining a list of available workers is as follows:
worker.list = <comma-separated list of worker names>
For example, here you define two workers named worker1 and worker2:
worker.list = worker1, worker2
You can also define a property for a given worker, as follows:
worker.<worker name>.<property> = <property value>
For example, you can assign the value localhost to the host attribute of worker1, like so:
worker.worker1.host = localhost
Types of Workers in mod_jk
Any defined Tomcat worker needs to be assigned a type. You can assign the following types tovarious Tomcat workers:
• ajp13: This type of worker uses the AJP 1.3 protocol to forward requests to out-of-process Tomcat workers.
• lb: This type of worker is used for load balancing. In a load-balancing scenario, thistype of worker doesn’t handle any processing; it just handles the communicationbetween a web server and other defined Tomcat workers of type ajp13. This kind ofworker supports round-robin load balancing with a certain level of fault tolerance.You’ll see this in more detail in the “Understanding Tomcat Load Balancing” section.
For example, the following line sets the type of worker1 to ajp13, meaning it will use the AJP1.3 protocol:
worker.worker1.type=ajp13
Worker Properties
After you’ve set a worker’s type, you can set a number of other properties. You can set the porton which the worker listens as shown next. However, if your worker is of type ajp13, it will lis-ten for AJP requests, by default, on port 8009.
worker.worker1.port=8009
Next, you configure the host where the Tomcat worker is listening for requests. For exam-ple, if worker1 is running on localhost, set the entry as follows:
worker.worker1.host=localhost
CHAPTER 9 ■ USING TOMCAT’S CONNECTORS148
7850ch09FINAL.qxd 2/28/07 10:58 AM Page 148
CHAPTER 9 ■ USING TOMCAT’S CONNECTORS 149
When working with a load balancer worker, you need to set the load-balancing factor forthis worker. For example, if worker1 is running with a load balancer, then, depending on thehardware condition of the machine, you can set the corresponding load factor as follows:
worker.worker1.lbfactor=5
Some web servers (for example, Apache 2.0 and IIS) are multithreaded, and Tomcat cantake advantage of this by keeping a number of connections open as a cache. An appropriatelyhigh value for the cache size based on the average number of concurrent users for Tomcat canprove beneficial from a performance point of view (the default is 1).
worker.worker1.cachesize=20
Configuring a Tomcat WorkerCreate workers.properties in CATALINA_HOME/conf, as shown in Listing 9-5.
Listing 9-5. workers.properties for mod_jk
# For Windows:
# Setting Tomcat & Java Home
workers.tomcat_home="c:\jakarta-tomcat"
workers.java_home="c:\jdk1.5"
ps=\
worker.list=worker1
# Settings for worker1 worker
worker.worker1.port=8009
worker.worker1.host=localhost
worker.worker1.type=ajp13
# -----------------------
# For Linux/Unix systems:
# Setting Tomcat & Java Home
workers.tomcat_home=/usr/java/jakarta-tomcat
workers.java_home=/usr/java/jdk1.5
ps=/
worker.list=worker1
# Settings for worker1 worker
worker.worker1.port=8009
worker.worker1.host=localhost
worker.worker1.type=ajp13
The ps=\ line sets the path separator for the operating system on which Tomcat is running.
Configuration Settings for ApacheTomcat and Apache can communicate once the information about the available Tomcat work-ers is included in the httpd.conf Apache web server configuration file. You have two ways inwhich to do this, both of which are discussed next.
7850ch09FINAL.qxd 2/28/07 10:58 AM Page 149

Automatically Generating Configuration SettingsYou can configure Tomcat to automatically generate a configuration file called mod_jk.conf.You can then include this in the main Apache configuration file.
The mod_jk.conf file is created every time Tomcat starts, so make sure you really canafford this overhead. Also, this will reset all your deployment settings, as Tomcat overwritesthe file every time.
To generate the settings, you need to add special listeners at the server and host levels.Just add the code in Listing 9-6 after the <Server port="8005"> declaration.
Listing 9-6. A Listener That Will Automatically Generate mod_jk Settings
<Listener className="org.apache.jk.config.ApacheConfig"
modJk="C:/Program Files/Apache Group/Apache/modules/mod_jk.dll"
workersConfig="C:/jakarta-tomcat/conf/workers.properties"
jkLog="C:/jakarta-tomcat/logs/mod_jk.log"
jkDebug="info"
/>
Here, you provide the necessary information to the listener. It creates appropriate entries,such as the LoadModule entries for mod_jk, in the automatically generated mod_jk.conf file usingthis information. You also provide the location of the workers.properties file, the location ofthe mod_jk module, the location of the log file, and the level of logging information you require.
Table 9-1 describes the attributes supported by the ApacheConfig listener.
Table 9-1. The Attributes of the ApacheConfig Listener
Attribute Description Required?
configHome The default parent directory for all the paths provided as Noattribute values. It’s overridden when absolute paths are provided for any attribute value. The default is CATALINA_HOME.
jkConfig The location of the Apache mod_jk.conf file. The default is NoCATALINA_HOME/conf/auto/mod_jk.conf.
workersConfig The path to the workers.properties file used by mod_jk. The Nodefault is CATALINA_HOME/conf/jk/workers.properties.
modJk The path to the Apache mod_jk module. If not set, this defaults to Nomodules/mod_jk.dll on Windows and modules/mod_jk.so on Linux/Unix systems.
jkLog The path to the log file that mod_jk uses. No
jkDebug The level of logging to be done by mod_jk. This may be debug, Noinfo, error, or emerg. If not set, this defaults to emerg.
jkWorker The desired worker. This must be set to one of the workers Nodefined in the workers.properties file and defaults to ajp13.
forwardAll If this is set to true (the default), mod_jk will forward all requests Noto Tomcat. This ensures that all the behavior configured in web.xml functions correctly. If false, Apache will serve static resources. Note that when set to false, some of Tomcat’s configuration may not be duplicated in Apache, so check the generated mod_jk.conf file to see what configuration is actually being set in Apache.
CHAPTER 9 ■ USING TOMCAT’S CONNECTORS150
7850ch09FINAL.qxd 2/28/07 10:58 AM Page 150

CHAPTER 9 ■ USING TOMCAT’S CONNECTORS 151
Attribute Description Required?
noRoot If this attribute is set to true, the ROOT context isn’t mapped to NoTomcat. If false and forwardAll is true, all requests to the ROOTcontext are mapped to Tomcat. If false and forwardAll is false, only JSP page and servlet requests to the ROOT context are mapped to Tomcat. When false, to correctly serve Tomcat’s ROOT context, you must also modify the DocumentRoot setting in Apache’s httpd.conf file to point to Tomcat’s ROOT context directory. Otherwise, Apache will serve some content, such as index.html, before mod_jk can get the request and pass it on to Tomcat. The default is true.
append Append the generated configuration file to the current Noconfiguration file. The default is false. Therefore, it’s a good idea to back up the values in another file and reference it from Apache.
The next step is to create an Apache <VirtualHost> entry in the resultant mod_jk.conf file.This ensures that all requests to the Tomcat host are mapped to the Apache host correctly. Adda listener below each <Host> entry that you’re integrating, as shown in Listing 9-7.
Listing 9-7. A Listener That Will Define Virtual Hosts in mod_jk.conf
<Listener className="org.apache.jk.config.ApacheConfig"
append="true"
jkWorker="worker1" />
You can also choose individual Tomcat contexts by adding the listener after the <Context>in the context XML file. Now start Tomcat, and open the CATALINA_HOME/conf/auto/mod_jk.conffile. If you had used the previous values, your file should look like the one in Listing 9-8.
Listing 9-8. The Automatically Generated mod_jk.conf File
<IfModule !mod_jk.c>
LoadModule jk_module "C:/Program Files/Apache Group/Apache/modules/mod_jk.dll"
</IfModule>
JkWorkersFile "C:/jakarta-tomcat/conf/workers.properties"
JkLogFile "C:/jakarta-tomcat/logs/mod_jk.log"
JkLogLevel info
<VirtualHost localhost>
ServerName localhost
JkMount /admin worker1
JkMount /admin/* worker1
JkMount /servlets-examples worker1
JkMount /servlets-examples/* worker1
7850ch09FINAL.qxd 2/28/07 10:58 AM Page 151

JkMount /webdav worker1
JkMount /webdav/* worker1
JkMount /jsp-examples worker1
JkMount /jsp-examples/* worker1
JkMount /balancer worker1
JkMount /balancer/* worker1
JkMount /tomcatBook worker1
JkMount /tomcatBook/* worker1
JkMount /tomcat-docs worker1
JkMount /tomcat-docs/* worker1
JkMount /manager worker1
JkMount /manager/* worker1
</VirtualHost>
The JkMount directive mounts a Tomcat directory onto the Apache root web context. Theother three JK directives are pretty self-explanatory.
JkWorkersFile "C:/jakarta-tomcat/conf/workers.properties"
JkLogFile "C:/jakarta-tomcat/logs/mod_jk.log"
JkLogLevel info
The log file is where any AJP-specific information is placed. Access logs for resources onTomcat and Apache function as normal.
Each time Tomcat is started, it will write the configuration file to CATALINA_HOME/conf/auto/mod_jk.conf. As a result, your settings will be overwritten. Therefore, you should eitherdisable the automatic generation option by commenting out the directive in server.xml orcopy the file to another location.
The final step is to include this file in Apache’s httpd.conf file as follows. Place this entryat the end of the file.
Include "C:/jakarta-tomcat/conf/auto/mod_jk.conf"
Adding Configuration Settings ManuallyIf you don’t want to use ApacheConfig, you need to append the previous settings to the end ofyour httpd.conf or save them as mod_jk.conf in CATALINA_HOME/conf/auto.
Testing the Final SetupNext, you’ll see how Apache accepts every request. All the requests for any dynamic process-ing, like JSP pages or servlets, will be handed over to Tomcat. Similarly, any response fromthem will be sent to the client through Apache.
CHAPTER 9 ■ USING TOMCAT’S CONNECTORS152
7850ch09FINAL.qxd 2/28/07 10:58 AM Page 152

CHAPTER 9 ■ USING TOMCAT’S CONNECTORS 153
The first step for testing will be to check the JSP examples web application by pointinga browser at http://localhost/jsp-examples/. If everything is set up correctly, you should seethe list of examples.
This shows that the integrated combination of Tomcat and Apache is working fine forserving static content. Now, check whether mod_jk is doing its job equally well for servingdynamic content by clicking one of the examples.
After testing the deployment from a local machine, test the installation from any othermachine across the network. This will make sure the settings you made are working asexpected.
Integrating Tomcat with IISIIS is Microsoft’s web server, and it is optimized for the Windows operating system. Why wouldyou want to run IIS with Tomcat? You may want to do this in an environment that needs to becapable of supporting multiple development platforms, such as Microsoft’s ASP and the alter-native JSP. Also, you get better performance on Windows by using the web serving capability ofIIS and Tomcat as the servlet/JSP container instead of using Tomcat as both a web server anda servlet container.
IIS is a web server but can also process ASP, which is Microsoft’s answer to server-sidescripting. It doesn’t have a servlet container and can’t, by default, process JSP pages andservlets. However, you can extend IIS by adding ISAPI filters, which you can then use to con-figure third-party components such as servlets and JSP pages. ISAPI filters are plug-ins to IISthat filter incoming requests, perform custom processing, call other applications, and performfiltering functions on output that’s to be sent to the client. The Apache group has created anISAPI filter that can be added to IIS and configured so that IIS handles all requests except forJSP pages and servlets, which it redirects to Tomcat.
Introducing ISAPIThe ISAPI redirector that enables integration between IIS and Tomcat is available for down-load as a DLL called isapi_redirect.dll from the usual range of Apache mirrors. ISAPI isMicrosoft’s answer to CGI, and it allows Microsoft to customize and extend the functionalityof IIS. The isapi_redirect.dll file is referred to as a redirector because it filters incoming URLrequests and redirects some of them to Tomcat using AJP.
The filters processed by isapi_redirect.dll are configurable. As this redirector is basedon mod_jk, these are specified in a file called workers.properties, which uses the same settingsas the Apache configuration described previously. This makes it extremely easy to port yourApache mod_jk settings over to an IIS setup.
You can specify which incoming requests IIS should forward to Tomcat by editing thecontents of this file. The Tomcat process that receives and processes requests from the ISAPIredirector is called the worker. The Tomcat worker exists out of process, that is, as a distinctprocess within the operating system.
The ISAPI redirector communicates with an out-of-process Tomcat worker over TCP/IPusing AJP and must know the specifics of the Tomcat worker. The specific configuration infor-mation could be an IP port number and machine name, and the administrator configures thisinformation in the workers.properties file. This file also has a list of the defined workers. Notethat since AJP 1.3 runs over TCP/IP, it lends itself to distributed client-server configurations.
7850ch09FINAL.qxd 2/28/07 10:58 AM Page 153

Installing IISCheck to verify that IIS is installed on your Windows machine. If not, you’ll need to install IISby going to Start ➤ Settings ➤ Control Panel and selecting the Add/Remove Programs applica-tion. Look under the Add/Remove Windows Components section to install IIS.
Downloading isapi_redirect.dllOnce you have IIS on your system, the next thing to do is download the ISAPI redirector(isapi_redirect.dll) from an Apache mirror. Place this file in the CATLINA_HOME\bin directory.Note that you can also build a copy of this DLL from source, but the easiest thing to do is todownload the binary version.
Configuring the AJP Connector in server.xmlThe AJP connector configuration in server.xml is already present. This makes configurationeasy, as you don’t need to do anything at all.
Setting the workers.properties FileAs mentioned, you set up Tomcat workers for the web server plug-in by using the simpleproperties file called workers.properties. This file consists of entries that will convey infor-mation about Tomcat workers to the web server plug-in. Unlike with Apache, you can placeworkers.properties wherever you like, though you must tell IIS where it is. You’ll see how todo this in the next section.
Creating the Registry EntriesThe ISAPI redirector (isapi_redirect.dll) uses certain registry entries to initialize its configu-ration. These entries need to be created so that Tomcat can locate the configuration files thattell the redirector where to send incoming requests for servlets and how to log messages.Create a file called iis_redirect.reg, and edit it as follows:
REGEDIT4
[HKEY_LOCAL_MACHINE\SOFTWARE\Apache Software Foundation\Jakarta Isapi
Redirector\1.0]
"serverRoot"="C:\\jakarta-tomcat"
"log_file"=" c:\ jakarta-tomcat \logs\isapi.log"
"log-level"="debug"
"extensionUri"="/ jakarta-tomcat /isapi_redirect.dll"
"worker_mount_file"=" c:\ jakarta-tomcat \conf\uriworkermap.properties"
"workersFile"="C:\\jakarta-tomcat\\conf\\workersIIS.properties"
Don’t use relative path names. Most problems with registering the isapi_redirect.dllfilter in IIS are associated with incorrect path names in the registry.
Let’s take a look at some of these registry entries:
CHAPTER 9 ■ USING TOMCAT’S CONNECTORS154
7850ch09FINAL.qxd 2/28/07 10:58 AM Page 154

CHAPTER 9 ■ USING TOMCAT’S CONNECTORS 155
• serverRoot: This is the directory where you’ve installed Tomcat.
• extensionUri: This is the URL to the isapi-redirector extension. Note that jakarta isa virtual directory within IIS that you’ll create later in the installation procedure.
• workersFile: This is the path to the workers.properties file.
To create the registry entries, double-click the iis_redirect.reg file, and you’ll get a warn-ing message box. Select Yes to create the registry entries, and the script will create the values inthe registry. At this point, you should open the registry using the regedt32 utility and verify theregistry entry keys that were created for you under HKEY_LOCAL_MACHINE\SOFTWARE\ApacheSoftware Foundation\Jakarta Isapi Redirector\1.0.
Note that you could also have created these entries manually, but the previous procedurecreates an easy starting point. If you need to uninstall Tomcat at some point, you can removethese registry entries manually by deleting them using the regedt32 utility.
■Caution You should be cautious while modifying the registry, as mistakes can prevent a Windows appli-cation from working correctly.
Configuring a Tomcat WorkerCreate workersIIS.properties as shown in Listing 9-9. You need to place this file in the direc-tory you specified in the “Creating the Registry Entries” section. The path in the registry to thiskey is HKEY_LOCAL_MACHINE\SOFTWARE\Apache Software Foundation\Jakarta Isapi Redirector\1.0\workerFile. In your case, the directory is the %CATALINA_HOME%\conf directory.
Listing 9-9. workers2IIS.properties
[channel.socket:localhost:8009]
[ajp13:localhost:8009]
channel=channel.socket:localhost:8009
[status:statusWorker]
styleMode=1
[uri:/jkstatus]
group=status:statusWorker
[uri:/jsp-examples/*]
worker=ajp13:localhost:8009
This defines an ajp13 worker called localhost:8009 and a status worker called statusWorker.The [uri:] sections assign a URI to a worker. So, /jkstatus is assigned to statusWorker, andeverything under /jsp-examples is assigned to localhost:8009. You set a log file when youconfigured the registry entries previously.
7850ch09FINAL.qxd 2/28/07 10:58 AM Page 155

Configuration Settings for IISYou need to create a virtual directory within IIS for the ISAPI redirector because the IIS redirectoris an IIS plug-in; that is, it’s a filter and an extension. IIS calls the filter function for incomingrequests. If the incoming URL matches the list of filters maintained in workersIIS.properties,control is transferred to the extension in the form /jakarta/isapi_redirect.dll—you mayremember this entry from the registry setting for the extensionUri that you set up. To create thevirtual directory, you should do the following:
1. Open IIS Manager (Internet Services Manager).
2. Right-click Default Web Site, and select New ➤ Virtual Directory.
3. The Virtual Directory Creation Wizard will open. Use jakarta as the name of the virtualdirectory alias. Note that the name of the virtual directory has to be jakarta because ofthe previous registry entry.
4. The wizard will prompt you for a directory. Specify the directory of the installedisapi_redirect.dll. This is the bin\ directory under the root Tomcat install.
5. The wizard will prompt you for access permissions. The access permissions should bejust read and execute.
Once you’ve created the jakarta virtual directory, it’s a good idea to open it to review theproperties you’ve set for the virtual directory. You can do this by right-clicking the virtualdirectory and selecting Properties.
You can now install the ISAPI redirector in IIS. To do this, follow these steps:
1. In IIS Manager, right-click Default Web Site, select Properties from the drop-downmenu, and click it to open the Properties window.
2. In the Properties window, click the ISAPI Filters tab.
3. Click the Add button.
You’ll be prompted for the name of the filter and the location of isapi_redirect.dll. Forthe name of the filter, use jakarta. Use the Browse button to select isapi_redirect.dll, whichis in the %CATALINA_HOME%\bin directory.
Close IIS Manager if you have it open, and restart IIS. Make sure you do this using theServices management console in the Control Panel. Don’t do this using IIS Manager. You’llneed to restart two services—these are the IIS Admin service and the World Wide Web Publish-ing service, though the console may do this automatically.
After you’ve restarted IIS, open IIS Manager, and check to see that there’s a green arrowpointing upward next to the ISAPI redirector that you’ve just installed. If you don’t see thegreen arrow, then there’s a problem with the install of the ISAPI redirector. This is a commonerror encountered during a first install.
Check your registry entries and the configuration files. Nine times out of ten, problemswith this part of the install occur because the paths set in the registry settings for workersFile(workersIIS.properties) are wrong. If these files are in the correct locations and the registrykeys are defined properly, that is, if names are spelled correctly, the ISAPI redirector shouldload regardless of the content in these files and regardless of the values of the other registrysettings. As an experiment, place a blank workersIIS.properties file in the correct location,
CHAPTER 9 ■ USING TOMCAT’S CONNECTORS156
7850ch09FINAL.qxd 2/28/07 10:58 AM Page 156
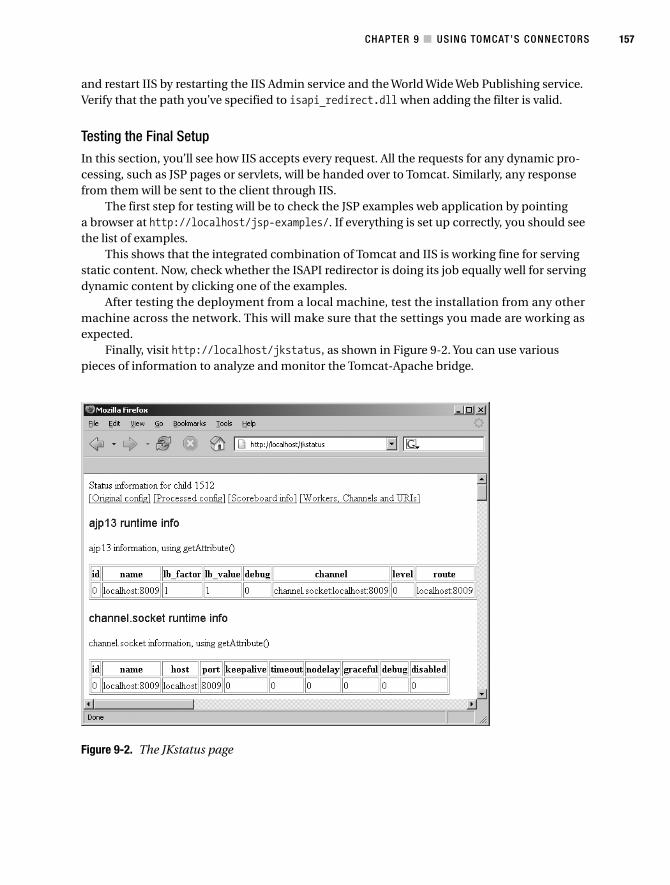
CHAPTER 9 ■ USING TOMCAT’S CONNECTORS 157
and restart IIS by restarting the IIS Admin service and the World Wide Web Publishing service.Verify that the path you’ve specified to isapi_redirect.dll when adding the filter is valid.
Testing the Final SetupIn this section, you’ll see how IIS accepts every request. All the requests for any dynamic pro-cessing, such as JSP pages or servlets, will be handed over to Tomcat. Similarly, any responsefrom them will be sent to the client through IIS.
The first step for testing will be to check the JSP examples web application by pointinga browser at http://localhost/jsp-examples/. If everything is set up correctly, you should seethe list of examples.
This shows that the integrated combination of Tomcat and IIS is working fine for servingstatic content. Now, check whether the ISAPI redirector is doing its job equally well for servingdynamic content by clicking one of the examples.
After testing the deployment from a local machine, test the installation from any othermachine across the network. This will make sure that the settings you made are working asexpected.
Finally, visit http://localhost/jkstatus, as shown in Figure 9-2. You can use variouspieces of information to analyze and monitor the Tomcat-Apache bridge.
Figure 9-2. The JKstatus page
7850ch09FINAL.qxd 2/28/07 10:58 AM Page 157
Troubleshooting the IIS SetupIf you don’t see the screens shown in the previous figures, then one of a number of thingscould have gone wrong with your setup. Verify that IIS is running. You can do this in the Servicesconsole. At a minimum, you need to have the IIS Admin service and the World Wide WebPublishing service running.
Within IIS check that you’ve installed the ISAPI redirector properly. If you’ve installed itproperly, it should have a green arrow next to it.
Verify that you’ve defined the jakarta virtual directory properly. If there’s something wrongwith it, IIS will indicate this by flagging it with a red symbol. Check that the name of this virtualdirectory is indeed jakarta.
Look within the IIS log. The IIS log is located by default in c:\WINNT\system32\LogFiles\W3SVC1; you can also click the Properties button in the web site Properties window to seewhere it is. By default, a different log file is generated every day. In the log file, you should seethe following entry:
01:10:33 127.0.0.1 GET /jakarta/isapi_redirect.dll 200
If this entry doesn’t exist in the IIS log, then the ISAPI redirector isn’t called by IIS. Thevalue 200 is the HTTP status code. If the call to isapi_redirect.dll exists, but you’re gettinga status code such as 400, 404, or 500, then you have an error.
Make sure Tomcat is running and that the connector is listening on the correct port. Thisis port 8009 by default and is defined in the server.xml file. You can review this by openinga DOS prompt and running the command netstat -a from the command line. You should seea line similar to the following line as one of the entries:
TCP localaddress:8009 foreignaddress:0 LISTENING
You may want to check that you don’t have any additional filters defined besides the ISAPIredirector, which may be creating a conflict. If you do have additional filters defined in IIS, youmay want to try removing them.
Verify the content of the workers2IIS.properties file. Check that you’ve defined theworker correctly.
Configuring Distributed Networks with TomcatSo far, you’ve seen a configuration where you have both the web server, be that IIS or Apache,and Tomcat running on the same physical server. This is useful for smaller implementations.However, in a production environment, you may be interested in a more scalable solutionwhere you’d like to partition your architecture into multiple tiers so that the presentation layeror static HTML pages are served up by IIS or Apache on one machine and the web applicationsare hosted by Tomcat workers each residing on a separate server. This makes the system morescalable because you have dedicated machines performing dedicated tasks.
CHAPTER 9 ■ USING TOMCAT’S CONNECTORS158
7850ch09FINAL.qxd 2/28/07 10:58 AM Page 158

CHAPTER 9 ■ USING TOMCAT’S CONNECTORS 159
In addition to scalability, you may also be interested in a distributed configuration to sup-port multiple development and test environments, virtual hosting, and load-balanced Tomcatworkers. In this section, you’ll build on the previous concepts and look at the configurationchanges required to build scalable distributed configurations of web servers and Tomcat.
Let’s look at the software on each sever. The server that has the static web server runningon it will also host the AJP module and the configuration file (workers.properties). Note thatthe JDK and the Tomcat binaries aren’t required on this server.
The server that has the full Tomcat install must have a connector and a Tomcat workerconfigured on it, and the Tomcat worker must be running on a known port. Note that if youhad multiple Tomcat workers distributed across multiple servers servicing the same webapplication, you’d want to duplicate the web application files across all these servers.
[uri:/jsp-examples/*]
It’s as easy as that, though this example simply uses a single Tomcat worker on a remotemachine. You could have multiple web servers that make up a web server farm, which is loadbalanced using a load-balancing switch. The next section describes this scenario, which wasalso touched on in Chapter 7.
These configurations are possible with AJP, and the concepts remain the same whetheryou’re using Apache or IIS as the web server. The previous sections have covered this exten-sively, and the configuration file settings are identical for all servers.
Finally, notice that once you begin partitioning your architecture into web server andapplication server configurations, you have paved the way for a heterogeneous system, soeven though you use IIS for the web server, your application server can be Linux based. It’snow time to discuss load balancing.
Understanding Tomcat Load BalancingOn busy sites, whenever a request call is delegated from the Apache server to Tomcat, it’sa good idea to route these requests to multiple Tomcat servers rather than to a single one,which you can do with mod_jk. mod_jk manages the task of load balancing with support forseamless sessions and round-robin scheduling.
Let’s first look at the concept of a seamless session (also known as session affinity or a stickysession). When a client requests any dynamic resource, such as a JSP page, for the first time,the load balancer will route this request to any of the available Tomcat instances. Now, anyfurther request from the same browser session should be routed to the same Tomcat containerinstance to keep the user session alive (see Figure 9-3).
7850ch09FINAL.qxd 2/28/07 10:58 AM Page 159

Figure 9-3. Load balancing with a web server
If the maximum number of connections to that worker has been reached before this call,then mod_jk waits for the appropriate worker to become free. This is known as a seamless sessionbecause the client sees no break in the application’s function.
Here, the Tomcat instances are listening to different ports (if they’re running on the samemachine) or are running on different machines. You’ll see how to configure Apache 1.3, Apache 2.0,and IIS before seeing how to configure Tomcat. The Tomcat settings are the same no matterwhich server you’re using, with one exception.
Preparing for Load BalancingThe first step in setting up load balancing is to designate a load-balancing (lb) worker. Theload-balancing worker is responsible for managing several actual request-processing workers.The lb worker does the following:
• Instantiates the workers in the web server.
• Uses the workers’ load-balancing levels and load-balancing factors to perform weightedround-robin load balancing, where a low level means a worker belongs to a preferredgroup and a low lb factor means a more powerful machine that can handle more requeststhan others in the group.
• Routes requests belonging to the same session to the same Tomcat worker, thus keepingsession affinity.
• Identifies failed Tomcat workers, suspends requests to them, and falls back to otherworkers managed by the lb worker.
CHAPTER 9 ■ USING TOMCAT’S CONNECTORS160
7850ch09FINAL.qxd 2/28/07 10:58 AM Page 160
CHAPTER 9 ■ USING TOMCAT’S CONNECTORS 161
The overall result is that workers managed by the same lb worker are load balanced (basedon their lb level and factor and current user session) and covered by a fallback mechanism sothat a single Tomcat process death won’t bring down the entire deployment.
The WorkersIn this example, you’ll install and run different Tomcat instances on localhost. For this you haveto install two different Tomcat instances on the test machine at CATALINA_HOME1, listening onport 8009, and CATALINA_HOME2, listening on port 8010. Your web server should also be runningon this machine.
You should keep the following in mind:
• Each Tomcat instance running on the same machine should listen to a unique port.However, two Tomcat instances running on two different machines (which are partici-pating in the same load-balancing mechanism as two workers) can listen on the sameport number.
• The AJP connector of each Tomcat instance running on the same machine should listento a unique port. However, the AJP connectors of two Tomcat instances running on twodifferent machines (which are participating in the same load-balancing mechanism astwo workers) can run on the same port.
Configuring Apache 1.3 for Load BalancingYou’ll now need to define a simple workers.properties file for the load balancing. Here, you’lldefine a single worker in the worker.list option as the load-balancing worker. This workerwill be the single access point for any requests delegated by Apache and will handle the otherworkers. Call it lb, although you can name it whatever you want.
For each Tomcat worker, define the standard parameters: the host and port on which itwill be running, the load-balancing factor that should be applied, and the number of openconnections accepted in the form of cache (see Listing 9-10).
Listing 9-10. A Sample workers.properties File
# Define the path separator appropriate to the platform we are using
# For Windows Systems
ps=\
# For Linux /Unix Systems
#ps=/
# Define the load balancing worker only, and not other workers.
worker.list=lb
# ------------------------------------------------------------------------
# First Tomcat instance running on local machine (localhost)
# ------------------------------------------------------------------------
7850ch09FINAL.qxd 2/28/07 10:58 AM Page 161

# Set the port on which it will listen
worker.tomcat1.port=8009
# Set the host on which the Tomcat worker is running
worker.tomcat1.host=localhost
# Set the type of worker; here we are using ajp13
worker.tomcat1.type=ajp13
# Specify the load-balancing factor, any value greater than 0
worker.tomcat1.lbfactor=10
# Specify the size of the open connection cache.
worker.tomcat1.cachesize=5
# ------------------------------------------------------------------------
# Second Tomcat instance running on local machine (localhost)
# ------------------------------------------------------------------------
# Set the port on which it will listen
worker.tomcat2.port=8010
# Set the host on which the Tomcat worker is running
worker.tomcat2.host=localhost
# Set the type of worker; here we are using ajp13
worker.tomcat2.type=ajp13
# Specify the load-balancing factor, any value greater than 0
worker.tomcat2.lbfactor=10
# Specify the size of the open connection cache.
worker.tomcat2.cachesize=5
# ------------------------
# Load Balancer worker
# ------------------------
worker.lb.type=lb
# State the comma-separated name of workers that will form part of this
# load balancing mechanism
worker.lb.balanced_workers=tomcat1, tomcat2
The lb worker is of type lb and uses a weighted round-robin algorithm for load balancingwith support for seamless sessions as discussed earlier. If a worker dies, the lb worker will checkits state over small time intervals. Until it’s back online, all work is redirected to the other avail-able workers.
The previous are the basic steps for integrating Tomcat and Apache, but perhaps the mostimportant step is to tell Apache about the URL patterns that it should hand over to Tomcat, asin Listing 9-11.
Listing 9-11. Mounting the JSP Examples
# Mappings for the requests to JSP and servlets
JkMount /tomcatBook lb
JkMount /tomcatBook/* lb
mod_jk will forward any requests that match these patterns to the lb worker. Once therequest processing is done, the response is sent to the corresponding client.
CHAPTER 9 ■ USING TOMCAT’S CONNECTORS162
7850ch09FINAL.qxd 2/28/07 10:58 AM Page 162

CHAPTER 9 ■ USING TOMCAT’S CONNECTORS 163
You now need to include the settings for mod_jk, the defined Tomcat lb worker, and a fewother settings such as the location of the log file, the log level, and the mappings for the variousresources that mod_jk will ask Tomcat to provide.
Insert the lines in Listing 9-12 at the bottom of Apache’s httpd.conf. Of course, you coulduse Tomcat to generate the settings for you. Remember to change the host-level listener’sjkWorker attribute to lb.
Listing 9-12. The Final Configuration for Apache
<IfModule !mod_jk.c>
LoadModule jk_module "C:/Program Files/Apache Group/Apache/modules/mod_jk.dll"
</IfModule>
JkWorkersFile "C:/jakarta-tomcat-5.0.27/conf/workers.properties"
JkLogFile "C:/jakarta-tomcat-5.0.27/logs/mod_jk.log"
JkLogLevel info
<VirtualHost localhost>
ServerName localhost
JkMount /tomcatBook lb
JkMount /tomcatBook/* lb
</VirtualHost>
Configuring Tomcat for Load BalancingFor load balancing, you need to specify the jvmRoute attribute of the <Engine> directive inserver.xml for each Tomcat worker. This unique ID ensures the seamless session feature isactivated, and it must be unique across all the available Tomcat workers participating in theload-balancing cluster.
This unique identifier will be appended to the session ID generated for that Tomcat worker.Using this, the front-end web server will forward any particular session request to the appro-priate Tomcat worker.
This configuration is the same no matter which web server or version of mod_jk you’reusing. To continue the example, add a unique jvmRoute attribute to each Tomcat worker’sserver.xml file, as detailed in Listing 9-13.
Listing 9-13. Configuring Tomcat Workers for Tomcat 1 and Tomcat 2
<!-- Define the top-level container in our container hierarchy -->
<!-- Tomcat 1's connector -->
<Engine name="Catalina"
defaultHost="localhost"
debug="0"
jvmRoute="tomcat1">
<!-- Define the top-level container in our container hierarchy -->
<!-- Tomcat 2's connector -->
7850ch09FINAL.qxd 2/28/07 10:58 AM Page 163

CHAPTER 9 ■ USING TOMCAT’S CONNECTORS164
<Engine name="Catalina"
defaultHost="localhost"
debug="0"
jvmRoute="tomcat2">
Before you run the Tomcat workers for testing, you’ll need to handle the CATALINA_HOMEenvironment variable. In most cases, when you run a single Tomcat instance, you set theCATALINA_HOME as an environment variable so that it’s available once your system boots up.This can create a problem when you want to run two instances of Tomcat on the same machinebecause each of the Tomcat instances will need a unique CATALINA_HOME variable.
You can handle this by resetting CATALINA_HOME. Edit the catalina.sh (or catalina.bat forWindows) file located in the second Tomcat’s CATALINA_HOME/bin directory, and add the twolines in Listing 9-14 at the start of it to point to the appropriate directories.
Listing 9-14. Setting CATALINA_HOME for Tomcat Workers
#For Linux/ Unix Systems:
#$JAVA_HOME=/usr/java/jdk1.5
#$CATALINA_HOME=/usr/java/jakarta-tomcat
REM For Windows:
%JAVA_HOME%=c:\jdk1.5
%CATALINA_HOME%=c:\Jakarta-tomcat
If you’re using mod_jk2, edit CATALINA_HOME/conf/jk2.properties, and add the followingline on the second Tomcat instance:
channelSocket.port=8010
Now that you’ve finished configuring your load-balancing setup, you need to make sureall the Tomcat instances are up and running properly. To do this, create a file named index.jsp,and put it in the tomcatBook context of Tomcat 1, as shown in Listing 9-15.
Listing 9-15. Tomcat 1’s index.jsp File
<html>
<body>
<h1><font color="red">Session Served By Tomcat 1</font></h1>
<table align="centre" border="1">
<tr>
<td>Session ID</td>
<td>${pageContext.session.id}</td>
</tr>
<tr>
<td>Created on</td>
<td>${pageContext.session.creationTime}</td>
</tr>
</table>
</body>
</html>
7850ch09FINAL.qxd 2/28/07 10:58 AM Page 164

CHAPTER 9 ■ USING TOMCAT’S CONNECTORS 165
Copy this file into the tomcatBook context of the other Tomcat worker. To help you see whichTomcat instance has processed a request, edit index.jsp by changing this line
<h1><font color="red">Session Served By Tomcat 1</font></h1>
to the following for Tomcat 2:
<h1><font color="blue>"Session Served By Tomcat 2</font></h1>
Testing the Load Balancing BehaviorTo test load balancing, first verify that your web server is serving the static content properly bybrowsing to the URL http://localhost/. You should see the default web server index.html page.Now, test that Tomcat is serving the index.jsp page by browsing to the URL http://localhost/tomcatBook/index.jsp. You’ll be served by one of the two Tomcat instances. If Tomcat 1 servedthe page, you’ll get the page shown in Figure 9-4.
Similarly, if Tomcat 2 worker serves your request, you’ll get the page with the blue headingand the “Session Served By Tomcat 2” message followed by its session data.
Note the session ID in the first row of the table. Refresh your browser, and you’ll noticethat no matter how many hits you make, the session ID remains the same. This indicates thatthe load balancer is keeping the current session contents intact.
Now, open another window with the same URL. This time the other Tomcat worker willhandle your request, because the web server is using a round-robin algorithm.
To test the failover aspect of load balancing, shut down one of the Tomcat workers. You’llthen get output only from the remaining worker. If you start the idle worker again, the loadbalancer will start using it as soon as it finds that the server is up. It periodically checks thestatus of the worker and will start using it as soon as it’s made available.
Now that you know how to configure load balancing, you use the clustering knowledgeyou gained in Chapter 7. You can now set up each of the Tomcat workers from this chapter asa node of the same cluster, as defined in Chapter 7. This means you can deploy web applica-tions across multiple Tomcat workers by dropping an application’s WAR file into a node’swatched deployment directory.
Figure 9-4. Tomcat 1 serving index.jsp
7850ch09FINAL.qxd 2/28/07 10:58 AM Page 165

CHAPTER 9 ■ USING TOMCAT’S CONNECTORS166
SummaryIn this chapter, you enhanced your skills for handling web application deployment. You saw theAJP connector before going on to obtain mod_jk, the Apache redirector module. You looked atthe binary distribution as well as how to build from source on both Windows and Unix systems.
You saw how mod_jk acts as a redirector component to route requests for dynamic contentto Tomcat workers. Also, you’ve acquired skills to exploit the strengths of integrating Tomcatwith Apache. You also saw how to configure IIS to work with Tomcat. You first saw how ISAPIworks as a redirector to forward requests to Tomcat as an out-of-process worker. ISAPI com-municates with Tomcat over TCP/IP using AJP.
You examined a number of ways of setting up your architecture using application servers,web server farms, and multiple dedicated Tomcat workers to provide a more scalable architec-ture. In addition to this, you implemented and tested load balancing for routing traffic betweenmultiple instances of Tomcat and an external web server.
7850ch09FINAL.qxd 2/28/07 10:58 AM Page 166
Connecting to DatabasesUsing JDBC
Many of the web applications running on your server will process data, and most of thatdata will be stored in a database. The most popular databases, including MySQL, PostgreSQL,Oracle, SQL Server, Sybase, Interbase, and DB2, are based on relational concepts. You need tounderstand how Tomcat interacts with relational databases to better understand the require-ments of your users.
In this chapter, you’ll see the many situations that will arise when configuring Tomcat towork with relational databases. More important, you’ll gain some hands-on experience config-uring several examples. By the end of this chapter, you’ll be comfortable integrating databaseswith Tomcat.
Introducing SQLThe Structured Query Language (SQL) is a text-based query language used to perform opera-tions with data stored in a relational database. These operations include selecting data fordisplay, inserting data into the database, deleting data from the database, and manipulatingdatabase structure.
As an administrator, you won’t see much SQL in your Tomcat setup, because the serveruses it behind the scenes to look up usernames and passwords. You will, however, have to befairly familiar with simple SQL commands so that you can add and remove users from yourTomcat user databases. Because these are realm-related commands, they will be dealt with inChapter 11.
Introducing JDBCJDBC is a Java programming interface for accessing databases, which makes it the obviouschoice when using databases with Tomcat. JDBC submits SQL query statements to the remoteSQL processing engine (part of the database that handles multiple, simultaneous connectionsvia a connection manager), and the SQL processing engine returns the result of the query ina set of data called a result set. A result set is typically zero or more rows of data. You can thinkof result sets as temporary database tables.
167
C H A P T E R 1 0
■ ■ ■
7850ch10FINAL.qxd 2/28/07 10:59 AM Page 167

CHAPTER 10 ■ CONNECTING TO DATABASES USING JDBC168
Therefore, JDBC operations are designed to do the following:
• Take the JDBC API calls and transform them into a SQL query.
• Submit that query to the SQL processing engine on the database.
• Retrieve the result set that’s returned from the query and transform it into a Java-accessible data structure.
Not all statements return a result set; you may conduct a search that isn’t successful, sothe returned result set will be empty (called a null result set). In addition, some SQL state-ments, such as those you use to create tables, update data, and delete rows, don’t return anyresult sets.
Running Basic JDBC OperationsIn JDBC programming, a developer must follow these typical steps:
1. Obtain a connection to the remote database server.
2. Create and prepare a SQL statement for execution (or call a stored procedure in thedatabase).
3. Execute the SQL statement.
4. Obtain the returned result set (if any) and work on it.
5. Disconnect from the remote database.
It’s usually the case that you’ll be concerned only with the first step of this process. Onceyou’ve connected the web server to a database, you hand the connection over to any webapplications that need it.
Establishing and Terminating Connections to DatabasesOther than providing a unified way of accessing, modifying, and manipulating data in data-bases, JDBC also provides a unified way of connecting to databases from different vendors.While normal native connections to Oracle will be different from connections to MySQL,which will be different yet from working with Microsoft’s SQL Server, connecting to any ofthese databases can be accomplished using the same JDBC API calls.
As you saw in Chapter 4, JDBC, like JNDI, is simply a layer of abstraction between thenative interfaces and Java . In Figure 10-1, you can see how the underlying database can bechanged without the application having to worry about changing any of its settings. You haveto worry about only one interface with JDBC, and JDBC deals with talking to the database inits own language.
7850ch10FINAL.qxd 2/28/07 10:59 AM Page 168

Figure 10-1. JDBC driver structure
JDBC uses JDBC drivers to communicate with the native database drivers, and these varyfrom database to database. However, application code doesn’t notice the differences amongdrivers, because they all follow the same standard.
Which JDBC Version?Under the JDBC 1.0 standard, the code to establish a connection to a database, as well as thecode to disconnect from the database, is written by the developer. In fact, even the code toselect and activate a JDBC driver is coded by the developer.
Although simple and straightforward to code, this approach creates a problem. In somecases where the driver is written by the developer, the database access code works only witha specific database from the vendor. This makes it difficult to swap to a database from anothervendor and removes many of the advantages of JDBC described in the previous section.
JDBC 2.0 relaxes this restriction and introduces the concept of a data source, which mapsa name to a set of values for obtaining a database connection. A developer can obtain a con-nection to a data source using its name, allowing the same JDBC code to work with driversfrom any vendor. Meanwhile, you can switch database vendor support by configuring a differ-ent data source. The name remains the same, but the settings have changed, so the developerdoesn’t need to change the code.
While data sources and connection pooling (covered in the “Database Connection Pooling”section) open new possibilities for database users, JDBC 2.0 doesn’t specify how these featuresshould be used. As a result, many architectural issues are left for the JDBC driver writer to solve—and code can quickly become vendor specific again (this time depending on the JDBC drivervendor).
JDBC 3.0 is the first specification that clearly spells out the different architectures thatJDBC can operate in, including two-tier and three-tier models. The three-tier model corre-sponds to the application-server model and the model of operation favored by Java EnterpriseEdition (EE) 1.4 applications.
CHAPTER 10 ■ CONNECTING TO DATABASES USING JDBC 169
7850ch10FINAL.qxd 2/28/07 10:59 AM Page 169

The specification also attempts to accommodate JDBC 1.0 and 2.0 drivers and models ofoperations, while formalizing JNDI as the preferred way for applications to obtain a data source.It also formalizes connection pooling as a value-added service of the application server or servletcontainer. Tomcat uses the Jakarta Commons Database Connection Pools (DBCP) componentto implement JDBC 3.0, and all data sources configured in server.xml are JDBC 3.0 data sources(provided you’re using JDK 1.4 or newer—which you will be for Tomcat 6 anyway).
Regardless of the JDBC version, the JDBC driver still has to translate the JDBC commandsinto native commands to connect to the different databases. Most JDBC drivers are high-performance Type IV drivers (explained in the next section). However, some legacy systemswill support only the older Type I to Type III drivers. It’s a good idea to gain some familiaritywith the different types of JDBC driver.
Examining JDBC Driver TypesFour types of JDBC drivers exist; in general, higher driver type numbers represent an improve-ment on performance:
Type I: These are the most primitive JDBC drivers because they’re just data access adapters.They adapt another data access mechanism (such as ODBC) to JDBC. These drivers relycompletely on the other data access mechanism and thus have double the administrativeand maintenance problems. These drivers are also typically hardware/operating-systemspecific (because of the data access mechanism that they depend on), meaning they aren’tportable at all.
Type II: These are partially written in Java and partially written in native data-access lan-guages (typically C or C++). The non-Java portion of these drivers limits the portability ofthe final code and platform migration possibilities. The administrative and maintenanceburdens of Type I still exist.
Type III: These are pure Java drivers on the client side, which gives them the portabilitybenefit of Java. However, they rely on an external middleware engine to operate. The clientcode communicates with the middleware engine, and the engine talks to the different typesof database. The administration and maintenance burden is somewhat reduced but is farfrom eliminated.
Type IV: These are 100 percent Java client drivers that talk directly to database networkprotocols. This results in the highest performance connection and the most portableapplication code. Administration and maintenance is greatly simplified (only the driverneeds to be updated).
Fortunately, all the major databases have Type IV JDBC drivers available, either throughthe database vendors themselves or via a third-party driver vendor.
Database Connection PoolingWhen a web application accesses a remote database, it may do so through a JDBC connection.Typically, a physical JDBC connection is established between the client application and thedatabase server via a TCP/IP connection. Establishing such a connection is CPU and time inten-sive. It involves multiple layers of software and the transmission and receipt of network data.A typical physical database connection may take seconds to establish.
CHAPTER 10 ■ CONNECTING TO DATABASES USING JDBC170
7850ch10FINAL.qxd 2/28/07 10:59 AM Page 170

Some web applications consist of JSP pages and servlets that may need data from a data-base on every HTTP request. For example, an online library application will undoubtedly allowusers to search the library catalog. On a heavily loaded server, the time it takes to establish,disconnect, and reestablish physical connections can substantially slow web applicationperformance.
To create high-performing, scalable web applications, JDBC driver vendors and applicationservers are incorporating database connection pooling into their products. Connection poolingreduces expensive connection establishment time by creating a pool of physical connectionswhen the system starts. When an application requires a connection, one of these physical con-nections is provided. Normally, when the application finishes using the connection, it wouldbe disconnected. However, in the case of connection pooling, it’s merely returned to the poolwhere it awaits the next application request.
Using Tomcat and JDBCTomcat provides valuable services for hosted web applications that use JDBC connections.More specifically, Tomcat will enable running web applications to do the following:
• Access JDBC data sources using standard JNDI lookup
• Use a connection pooling service
Providing JDBC Data Sources in TomcatYou configure JDBC drivers as JNDI resources in Tomcat. These resources are made availableduring web application run time via standard JNDI lookups. The steps are as follows:
1. A web application obtains a JNDI initial context from Tomcat; it then performs a lookupon the JDBC data source by name.
2. Tomcat handles the JNDI lookup by consulting the configuration files (the contextXML file and web.xml) to determine the JDBC driver to use for obtaining a data source.Tomcat will also pool the physical connections made.
Even though no true JNDI-compatible directory services are involved, the Tomcat con-tainer emulates the action of a JNDI provider. This enables code that uses JNDI as the JDBCdata source lookup mechanism to work within the Tomcat container.
Configuring JNDI JDBC ResourcesUsing JNDI resources in Tomcat to configure JDBC data sources is the recommended way toprovide web applications with access to JDBC connections. While other methods are possible—you’ll see at least one alternative later—this approach will lead to portable code and easilymaintainable Tomcat servers.
You must perform the following steps to configure JNDI resource for a JDBC data source:
CHAPTER 10 ■ CONNECTING TO DATABASES USING JDBC 171
7850ch10FINAL.qxd 2/28/07 10:59 AM Page 171

1. Add <Resource> and <ResourceParams> tags in the <Context> element of the contextXML file or in a <DefaultContext> subelement of the Tomcat 5.0.x <Host> element.
2. Ensure that the application developer has defined a <resource-ref> element, corre-sponding to the previous <Resource>, in the web.xml file of the web application usingthe JDBC resource.
Using the Resource and ResourceParams ElementsThe <Resource> element specifies the JNDI resource that represents a JDBC data source, and the<ResourceParams> element configures the associated data source factory. Listing 10-1 showsyou how to configure a data source.
Listing 10-1. Defining a JDBC Data Source for Tomcat
<Context path="/tomcatBook"
docBase="tomcatBook"
crossContext="false"
debug="0"
reloadable="true" >
<Resource name="jdbc/CatalogDB" auth="SERVLET"
type="javax.sql.DataSource"
driverClassName="com.mysql.jdbc.Driver"
url="jdbc:mysql://localhost:3306/catalog"
username="kmittal"
password="pas44word"
maxActive="30"
maxIdle="20000"
maxWait="120"/>
</Context>
Both of these settings create a JNDI resource that the web application can access fromthe context java:comp/env/jdbc/CatalogDB. The web application can then use this contextto look up the data source. The type of resource that will be returned during this lookup isa javax.sql.DataSource. It also specifies that the servlet should authenticate against the data-base on behalf of the web application.
The actual names and values of the parameters depend on the data source connectionfactory that’s used. The previous settings assume you’re configuring the default DBCP factory.The DBCP factory will work with JDBC drivers for any database and return a data source asappropriate.
Transactions and Distributed Transactions SupportDatabases offer varying levels of support for transactions. A transaction is a unit of work composedof multiple operations; it can be committed only once all its operations complete successfully. Ifany of the constituent operations fail, the transaction is rolled back.
CHAPTER 10 ■ CONNECTING TO DATABASES USING JDBC172
7850ch10FINAL.qxd 2/28/07 10:59 AM Page 172

When a transaction involves work that crosses multiple physical databases, it’s calleda distributed transaction. One standard that enables databases from different vendors to par-ticipate in the same distributed transaction is called XA. In the XA operation model, an externaltransaction manager coordinates a two-phase commit protocol between multiple resourcemanagers (databases in this case). The two-phase commit protocol ensures that the pieces ofwork, scattered across multiple physical databases, either are all completed or are all rolled back.
JDBC 3.0 accommodates data sources that support XA operations. Administrators whowork with XA data sources and data source factories should consult the vendor’s documenta-tion to ensure they work with Tomcat.
Testing JNDI Resource ConfigurationHere, you’ll work through an actual example and configure a DBCP data source with a Type IVJDBC driver. You’ll base your example on MySQL, as it’s easily available and widely used.
■Note Installing and configuring MySQL is beyond the scope of this chapter, but see Appendix B for aquick-start guide. Alternatively, see Expert MySQL (Apress, 2007) by Dr. Charles Bell.
This chapter will assume that you have MySQL already configured and tested and thatyou have an account with privileges to create tables and add records to create the test data-base. The latest version of MySQL is available for download from www.mysql.com.
The Type IV JDBC driver you’ll use is the Connector/J driver from MySQL. This driver isopen source and is widely used by the MySQL community. You can download the latest versionof the driver from http://dev.mysql.com/downloads/connector/j/5.0.html.
You must unzip the driver JAR from the download and use the binary JAR file. Place thisfile under CATALINA_HOME/common/lib so that the common class loader can make it available toTomcat and all its web applications.
Creating the MySQL Test DatabaseFirst, you’ll need to create the database you’ll use. This is a database of products available tobuy online and will correspond to the database defined in Listing 10-1 previously.
Listing 10-2 shows a SQL script that will create and populate the catalog database. It’s unlikelyyou’ll have to create tables such as this normally, but it’s a useful instructional exercise.
Listing 10-2. The createCatalogDB.sql Script
DROP TABLE IF EXISTS product;
CREATE TABLE product (
prodid int not null,
prodname varchar(30),
proddesc varchar(150),
price double(7,2)
);
CHAPTER 10 ■ CONNECTING TO DATABASES USING JDBC 173
7850ch10FINAL.qxd 2/28/07 10:59 AM Page 173

INSERT INTO product VALUES (
1,
'Yo-Yo',
'High-quality wooden yo-yo with your company
name and logo imprinted on both sides.',
3.50
);
INSERT INTO product VALUES (
2,
'Slinky',
'Plastic slinky in the color of your choice with your
company logo imprinted on closed slinky.',
0.75
);
INSERT INTO product VALUES (
3,
'Envelope Cutter',
'Small cutting tool for opening envelopes.
Your company logo is imprinted on handle.',
1.25
);
INSERT INTO product VALUES (
4,
'Padfolio',
'Synthetic leather padfolio with company name
and logo imprinted on cover.',
9.50
);
INSERT INTO product VALUES (
5,
'Fountain Pen',
'Attractive fountain pen sporting your company
name on the cap.',
1.20
);
INSERT INTO product VALUES (
6,
'Keychain',
'Rubber keychain with your company name and
logo imprinted in a variety of colors.',
0.50
);
INSERT INTO product VALUES (
7,
'Ruler',
'Wooden ruler with raised lettering containing
your company name and logo.',
CHAPTER 10 ■ CONNECTING TO DATABASES USING JDBC174
7850ch10FINAL.qxd 2/28/07 10:59 AM Page 174

0.25
);
INSERT INTO product VALUES (
8,
'Flashlight',
'Metal flashlight in a variety of colors. Your
company name and logo is imprinted on the handle.',
5.0
);
Use createCatalogDB.sql to create the database as follows:
> mysql < createCatalogDB.sql
Now that you have the tables, you need to create a user that the developers will use toaccess the data in the database. Since your web application functionality requires only readaccess to the data, you’ll create a read-only user for developer access. This will ensure thatdata can’t be accidentally or maliciously modified or altered.
Setting Up the Read-Only UserIf you don’t have privileges as the database system administrator, you’ll need to seek help fromthe database administrator. To give a user read-only privilege on the catalog database, use thefollowing:
mysql> GRANT SELECT ON catalog.*
-> TO 'kmittal'@'localhost'
-> IDENTIFIED BY 'pa44word';
The developer may now use this user to access the data in the table, since in this exam-ple, they won’t perform any modifications to the underlying data. This is the user you saw inListing 10-1.
Adding the JDBC JNDI Resource to the ServerYou saw the context XML file for this example in Listing 10-1, so now you have to configure theweb application’s settings. This is usually the developer’s job, but you’re filling both roles forthis example. Remember that DBCP connection pooling is automatically set up. Now edit thetomcatBook web application’s web.xml file, as shown in Listing 10-3.
Listing 10-3. A <resource-ref> in the tomcatBookWeb Application’s web.xml
<!-- Describe a DataSource -->
<resource-ref>
<description>
Resource reference to a factory for java.sql.Connection
instances that may be used for talking to a particular
database that is configured in the tomcatBook.xml file.
</description>
<res-ref-name>
CHAPTER 10 ■ CONNECTING TO DATABASES USING JDBC 175
7850ch10FINAL.qxd 2/28/07 10:59 AM Page 175

jdbc/CatalogDB
</res-ref-name>
<res-type>
javax.sql.DataSource
</res-type>
<res-auth>
SERVLET
</res-auth>
</resource-ref>
This <resource-ref> makes the jdbc/CatalogDB context available to the web applicationvia JNDI APIs.
Using JNDI to Look Up a Data SourceFinally, the developer will look up the data source and start querying the database. The JSPpage in Listing 10-4, lookup.jsp, will do exactly that. Put it into the CATALINA_HOME/webapps/tomcatBook/ch10 directory. Pay special attention to the way JNDI is used to obtain the datasource in the <sql:setDataSource> tag.
Listing 10-4. lookup.jsp Uses a Data Source to Obtain Data
<%@ taglib prefix="c" uri="http://java.sun.com/jstl/core_rt" %>
<%@ taglib prefix="sql" uri="http://java.sun.com/jstl/sql_rt" %>
<sql:setDataSource dataSource="jdbc/CatalogDB"/>
<sql:query var="products">
SELECT * FROM product
</sql:query>
<html>
<head>
<title>Online Products</title>
</head>
<body>
<center>
<h1>Products</h1>
</center>
<table border="1" align="center">
<tr>
<th>Name</th><th>Description</th><th>Price</th>
</tr>
<c:forEach items="${products.rows}" var="row">
<tr>
<td><c:out value="${row.prodname}" /></td>
CHAPTER 10 ■ CONNECTING TO DATABASES USING JDBC176
7850ch10FINAL.qxd 2/28/07 10:59 AM Page 176
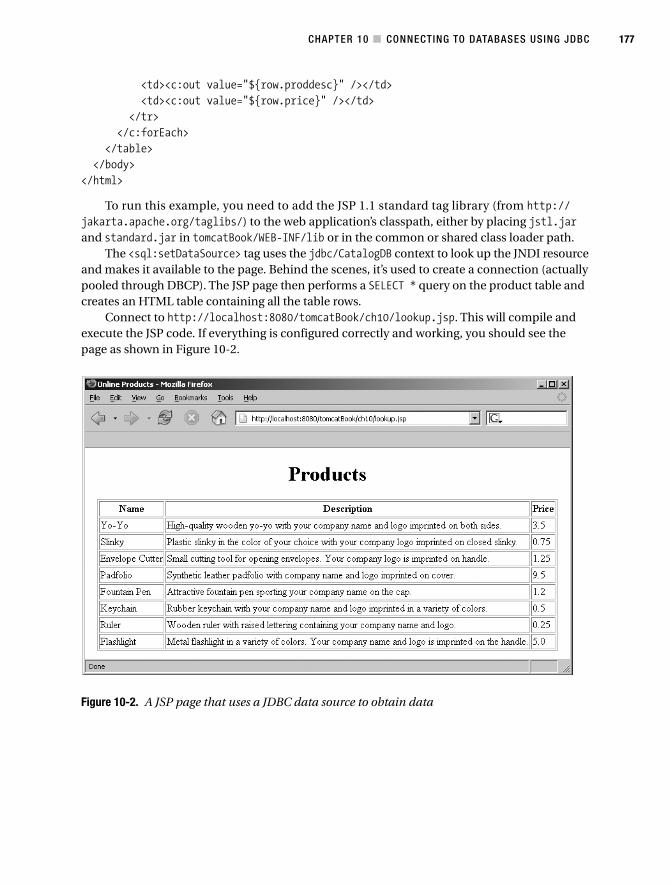
<td><c:out value="${row.proddesc}" /></td>
<td><c:out value="${row.price}" /></td>
</tr>
</c:forEach>
</table>
</body>
</html>
To run this example, you need to add the JSP 1.1 standard tag library (from http://jakarta.apache.org/taglibs/) to the web application’s classpath, either by placing jstl.jarand standard.jar in tomcatBook/WEB-INF/lib or in the common or shared class loader path.
The <sql:setDataSource> tag uses the jdbc/CatalogDB context to look up the JNDI resourceand makes it available to the page. Behind the scenes, it’s used to create a connection (actuallypooled through DBCP). The JSP page then performs a SELECT * query on the product table andcreates an HTML table containing all the table rows.
Connect to http://localhost:8080/tomcatBook/ch10/lookup.jsp. This will compile andexecute the JSP code. If everything is configured correctly and working, you should see thepage as shown in Figure 10-2.
Figure 10-2. A JSP page that uses a JDBC data source to obtain data
CHAPTER 10 ■ CONNECTING TO DATABASES USING JDBC 177
7850ch10FINAL.qxd 2/28/07 10:59 AM Page 177

SummaryIn this chapter, you saw JDBC connectivity in the context of Tomcat. The most obvious interactionis the need of web applications to connect to relational database sources.
I discussed Java’s support for accessing databases in the form of JDBC. I covered the JDBCversion evolution, and I talked briefly about the different types of JDBC drivers that are available.
Next, you saw the recommended way of providing a JDBC data source to web applications,which involved the configuration of JNDI resources in the Tomcat configuration file. In addition,Tomcat also provides a database connection pooling service through the Jakarta CommonsDBCP project.
CHAPTER 10 ■ CONNECTING TO DATABASES USING JDBC178
7850ch10FINAL.qxd 2/28/07 10:59 AM Page 178

Working with UserAuthentication
This chapter and the next deal with Tomcat security, though this chapter deals exclusivelywith access to the server’s resources. Chapter 12 covers securing data transfer and securing themachine on which the server runs. When users attempt to access a restricted resource on theserver, Tomcat challenges them to produce user details to confirm that they are who they saythey are. This is authentication.
Once a user is authenticated, the server must then determine whether this user is author-ized to view the restricted resource requested. This is authorization. Both of these conceptsmake up the security policy of a server.
Tomcat uses realms to implement and enforce specific security policies, some of whichdevelopers specify, but all of which you administer. A realm itself doesn’t enforce security poli-cies; it’s a repository of user information that allows the server, or sometimes an application,to enforce a security policy.
Looking at RealmsAs mentioned, a realm is a repository of user information that authenticates and authorizesusers. As befits a standard data access mechanism in Java, realms present a standard interfaceto Tomcat, no matter what the underlying data store (see Figure 11-1).
As you can see, realms are another layer of abstraction on top of sources of data. In thecase of databases (accessed with JDBC) and JNDI resources, a realm is a layer of abstractionon top of a layer of abstraction. Thus, Tomcat can authenticate against any JNDI or JDBC datasource on any platform that supports it. This allows you to use existing personnel databasesthat may be running on back-end or directory servers.
Realms, as standard abstractions of underlying data, must provide a standard interface toTomcat, which in turn means that the underlying data must conform to a standard format. Inother words, each underlying set of data must have the following, though it may contain manyother pieces of information:
• A username
• A password
• The roles assigned to the user
179
C H A P T E R 1 1
■ ■ ■
7850ch11FINAL.qxd 2/28/07 11:06 AM Page 179
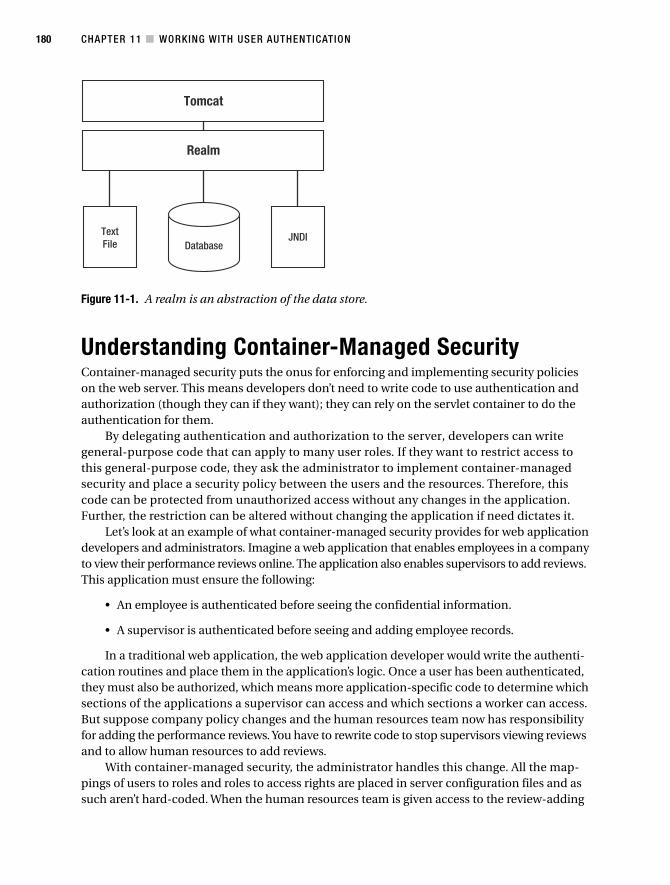
CHAPTER 11 ■ WORKING WITH USER AUTHENTICATION180
Figure 11-1. A realm is an abstraction of the data store.
Understanding Container-Managed SecurityContainer-managed security puts the onus for enforcing and implementing security policieson the web server. This means developers don’t need to write code to use authentication andauthorization (though they can if they want); they can rely on the servlet container to do theauthentication for them.
By delegating authentication and authorization to the server, developers can writegeneral-purpose code that can apply to many user roles. If they want to restrict access tothis general-purpose code, they ask the administrator to implement container-managedsecurity and place a security policy between the users and the resources. Therefore, thiscode can be protected from unauthorized access without any changes in the application.Further, the restriction can be altered without changing the application if need dictates it.
Let’s look at an example of what container-managed security provides for web applicationdevelopers and administrators. Imagine a web application that enables employees in a companyto view their performance reviews online. The application also enables supervisors to add reviews.This application must ensure the following:
• An employee is authenticated before seeing the confidential information.
• A supervisor is authenticated before seeing and adding employee records.
In a traditional web application, the web application developer would write the authenti-cation routines and place them in the application’s logic. Once a user has been authenticated,they must also be authorized, which means more application-specific code to determine whichsections of the applications a supervisor can access and which sections a worker can access.But suppose company policy changes and the human resources team now has responsibilityfor adding the performance reviews. You have to rewrite code to stop supervisors viewing reviewsand to allow human resources to add reviews.
With container-managed security, the administrator handles this change. All the map-pings of users to roles and roles to access rights are placed in server configuration files and assuch aren’t hard-coded. When the human resources team is given access to the review-adding
7850ch11FINAL.qxd 2/28/07 11:06 AM Page 180

process, the administrator maps the new relationship in the configuration file, and the devel-opers don’t need to do anything. Figure 11-2 shows this process.
Figure 11-2. (a) The manager can view and add reviews. (b) The human resources team can nowview and add reviews, but the supervisor can’t.
CHAPTER 11 ■ WORKING WITH USER AUTHENTICATION 181
7850ch11FINAL.qxd 2/28/07 11:06 AM Page 181
In Figure 11-2 (a), the worker and the human resources team can only view the reviews,because they’re mapped to the worker role. Managers can view and add reviews, becausethey’re mapped to the supervisor role. In Figure 11-2 (b), members of the human resourcesteam can now view and add reviews because they’re now mapped to the supervisor role. Thesupervisor is now mapped to the worker role and can only view the reviews. This shows howeasy it is to reassign users to roles without changing an application’s logic. It would be just aseasy to change any of the other mappings.
Storing a Digested PasswordIf you’re worried about storing passwords in plain text (and you probably will be), then you candigest them with the digest utility that’s supplied with Tomcat. Navigate to CATALINA_HOME/binat the command line, and run the following:
> digest -a md5 admin
This digests the password called admin using the MD5 algorithm. You’ll see the digestedpassword as follows:
admin:21232f297a57a5a743894a0e4a801fc3
An alternative is to use the SHA algorithm, which is more secure:
> digest -a sha admin
admin:d033e22ae348aeb5660fc2140aec35850c4da997
You can then copy the section after the colon into the password field of your realm’s pass-word store.
Configuring RealmsNow that you’re familiar with the concepts of realms and container-managed security, it’s timeto start configuring Tomcat to protect its resources. This section will start with server.xml andthe settings you can use to configure realms. The “Protecting a Resource with a Realm” sectionwill show you the settings required in each application’s web.xml file. The first stop is the file-based realm.
Configuring a File-Based RealmThe memory realm is a simple realm implementation that loads the user and role informationinto memory at server startup. The server can then use this information for container-managed security, and developers can use it in their code.
You shouldn’t use the memory realm unless you have an extremely pressing need to do so.It’s for demonstration purposes only and doesn’t support runtime updates. Tomcat 4.1 introduceda much-improved version called a user database (more on the user database in the next section).
The memory realm configuration element in server.xml can have attributes specified inTable 11-1.
CHAPTER 11 ■ WORKING WITH USER AUTHENTICATION182
7850ch11FINAL.qxd 2/28/07 11:06 AM Page 182

Table 11-1. A Memory Realm’s Attributes
Attribute Description Required?
className The class that implements the memory realm. It must Yesbe set to org.apache.catalina.realm.MemoryRealm.
digest The digest algorithm used to store the password. By Nodefault, passwords are stored in plain text.
pathname The XML file that will be the source of data for the Nomemory realm. The default is CATALINA_HOME/conf/tomcat-users.xml.
A memory realm is configured in the default server.xml, but it’s commented out. Thisreflects the concerns mentioned previously. Listing 11-1 shows the relevant section.
Listing 11-1. The Memory Realm in server.xml
<!--
<Realm className="org.apache.catalina.realm.MemoryRealm" />
-->
This specifies a memory realm that uses the CATALINA_HOME/conf/tomcat-users.xml file.It’s at the engine level, so it will be used in all web applications running in that engine. It willalso use the logger associated with that engine, be that a logger component or a Log4J imple-mentation. If you want to use or test this implementation, remember to comment out anyother realms in server.xml.
If you need to specify your own set of users, passwords, and roles for a memory realm,add them to tomcat-users.xml, as shown in Listing 11-2.
Listing 11-2. The tomcat-users.xml File
<?xml version='1.0' encoding='utf-8'?>
<tomcat-users>
<role rolename="tomcat"/>
<role rolename="role1"/>
<role rolename="manager"/>
<role rolename="admin"/>
<user username="tomcat" password="tomcat" roles="tomcat"/>
<user username="both" password="tomcat" roles="tomcat,role1"/>
<user username="role1" password="tomcat" roles="role1"/>
<user username="admin" password="admin" roles="admin,manager"/>
</tomcat-users>
As has already been noted, this memory realm isn’t configured by default. Instead, a greatlyimproved memory realm implementation called a user database has superseded this primitivememory realm implementation. The old memory realm is retained for backward compatibility(which is still no excuse to use it).
If you’re using a digested password, you should copy the digested output of the digest scriptinto the password attribute of the appropriate <user> element in tomcat-users.xml, as shownin Listing 11-3.
CHAPTER 11 ■ WORKING WITH USER AUTHENTICATION 183
7850ch11FINAL.qxd 2/28/07 11:06 AM Page 183

Listing 11-3. A Digested Password Is Added for the admin User
<?xml version='1.0' encoding='utf-8'?>
<tomcat-users>
<role rolename="tomcat"/>
<role rolename="role1"/>
<role rolename="admin"/>
<user username="admin"
password="d033e22ae348aeb5660fc2140aec35850c4da997"
roles="admin"/>
<user username="tomcat" password="tomcat" roles="tomcat"/>
<user username="role1" password="tomcat" roles="role1"/>
<user username="both" password="tomcat" roles="tomcat,role1"/>
</tomcat-users>
When Tomcat asks for a password and you’ve set it up to use digested passwords, it digestswhatever users enter as their passwords and compares them to the values stored in the realm(see Figure 11-3).
Figure 11-3. Tomcat using digested passwords
You can see that it’s important to tell Tomcat to digest the password entered so that it canmake a proper comparison. If Tomcat doesn’t know to digest the password, then it won’tauthenticate the user.
You’ll see how to protect a web application in the “Protecting a Resource with a Realm”section.
CHAPTER 11 ■ WORKING WITH USER AUTHENTICATION184
7850ch11FINAL.qxd 2/28/07 11:06 AM Page 184
Configuring a User Database RealmA user database is a greatly enhanced implementation of a memory realm. Though it maynot seem like much (it still uses tomcat-users.xml, for instance), it does offer three largeimprovements:
• You can now change the user information programmatically during the lifetime of theengine. This allows you to build administrative utilities. Note that this doesn’t mean youcan edit the file manually and expect the changes to be reflected instantly. You’ll have torestart the server in that case.
• Upon modification and shutdown, the user database can save any changes to thetomcat-users.xml data file for use in the future.
• You can alter the username, password, and role mapping with the admin web interfaceutility as described in the next section.
In the default server.xml, the user database is already configured in place of the legacymemory realm implementation, which you may have uncommented earlier. The user databaseis usually configured in the <GlobalNamingResources> element as a JNDI resource that’s avail-able to all applications on the server. Unlike the memory realm, which is implicitly used inconfiguring each web application, the user database must be configured for each web application.Listing 11-4 shows the user database global settings as configured in Tomcat 5.0.x’s server.xml.Tomcat 6 uses attributes of the <Resource> element rather than a <ResourceParams> element.
Listing 11-4. The Global Settings for the Default User Database in server.xml
<!-- Global JNDI resources -->
<GlobalNamingResources> <!-- Test entry for demonstration purposes -->
<Environment name="simpleValue" type="java.lang.Integer" value="30"/>
<!-- Editable user database that can also be used by
UserDatabaseRealm to authenticate users -->
<Resource name="UserDatabase" auth="Container"
type="org.apache.catalina.UserDatabase"
description="User database that can be updated and saved"
factory="org.apache.catalina.users.MemoryUserDatabaseFactory"
pathname="conf/tomcat-users.xml" />
</GlobalNamingResources>
This makes the user database called UserDatabase accessible through JNDI lookup, rela-tive to the java:comp/env naming context. The factory parameter sets the class that will returna user database to Tomcat for use in authentication.
This configuration also allows you to reference the user database in a later scope. For example,you can use the user database as a realm at the engine level as the default server.xml file does.Listing 11-5 shows this situation.
CHAPTER 11 ■ WORKING WITH USER AUTHENTICATION 185
7850ch11FINAL.qxd 2/28/07 11:06 AM Page 185

Listing 11-5. Adding a User Database
<!-- This realm uses the UserDatabase configured in the global JNDI
resources under the key "UserDatabase". Any edits
that are performed against this UserDatabase are immediately
available for use by the Realm. -->
<Realm className="org.apache.catalina.realm.UserDatabaseRealm"
resourceName="UserDatabase"/>
This realm has all the same attributes as the memory realm, save the addition of theresourceName attribute. For example, if you wanted to use message digests with this realm,you’d set it up as in Listing 11-6.
Listing 11-6. A User Database that Uses Digested Passwords
<Realm className="org.apache.catalina.realm.UserDatabaseRealm"
resourceName="UserDatabase"
digest="sha"/>
This will allow you to use the admin user from Listing 11-3. If you didn’t set the digestattribute in this case, then Tomcat would make a comparison between the plain passwordentered by a user and the digested password stored in the realm. Setting the digest attributemakes Tomcat digest the password before comparing it every time the user enters it.
As noted previously, you can alter this realm while the server is running, which is a vastimprovement over the memory realm. You can, if you like, write an application that manipu-lates this file to add, remove, and modify users, though Tomcat’s admin application does justthat. You saw the admin application in Chapter 6 but not in any great detail. I’ll now show youhow to use the admin application to work with user databases.
Configuring User Databases with the admin ApplicationTo add a new user database, start Tomcat, and then visit the admin application via the URLhttp://localhost:8080/admin/. You may have to set up appropriate users for this applicationif you haven’t followed the steps in Chapter 6, which simply tell you to add an admin user totomcat-users.xml. When you visit the admin application, you’ll see the screen shown in Figure 11-4.
Figure 11-4. The Tomcat admin application
CHAPTER 11 ■ WORKING WITH USER AUTHENTICATION186
7850ch11FINAL.qxd 2/28/07 11:06 AM Page 186

Log in using the details of a user with the admin role. You’ll see the admin web interface.Click the User Databases link in the left pane, and you’ll see the screen shown in Figure 11-5.
Figure 11-5. User databases in the Tomcat admin application
This corresponds to the user database entry as defined in Listing 11-4, right down to thedescription. Click the user database’s name, and you’ll see a screen like Figure 11-6.
This is the default user database as defined in server.xml. Only one user database factoryfor user databases exists, so you can’t edit that setting. The others allow you to change the loca-tion of the user information from the default tomcat-users.xml file and change the description.
To add a new user database, click the User Database Actions box, and select Create NewUser Database. You’ll see a blank version of the screen in Figure 11-6, with the factory alreadyfilled in. Enter the details you require, and click Save. Once you’ve clicked Save, Tomcat holdsthe configuration in memory. When you’ve made all the changes you want to make to the serverconfiguration, click the Commit Changes button at the top of the web interface. Any commentsyou had in server.xml will be lost, as Tomcat overwrites the entire file. The good news is thatTomcat will create a backup of the old server.xml file with the date appended to the filename.
■Note When you click Commit Changes, the admin application will restart the server. This means you’llhave to log in again once the server has restarted. If you attempt any actions while the restart is in progress,you’ll receive multiple errors in multiple frames. You don’t have to click Commit Changes to update the userdatabase, as described next.
CHAPTER 11 ■ WORKING WITH USER AUTHENTICATION 187
7850ch11FINAL.qxd 2/28/07 11:06 AM Page 187

Figure 11-6. Editing the default user database
You can also delete user databases if you no longer require them. Click the User DatabaseActions box, and select Delete User Databases. You’ll see a list of user databases and theirdescriptions along with checkboxes, as shown in Figure 11-7.
Tomcat 6 allows you to remove any user database. Select the checkbox of the user databaseyou want to delete, and click Save. That’s the theory anyway. As things stand, this function ofthe admin application is fairly flaky, so you may have to delete your user databases by hand forthe time being.
Figure 11-7. Deleting a user database
CHAPTER 11 ■ WORKING WITH USER AUTHENTICATION188
7850ch11FINAL.qxd 2/28/07 11:06 AM Page 188
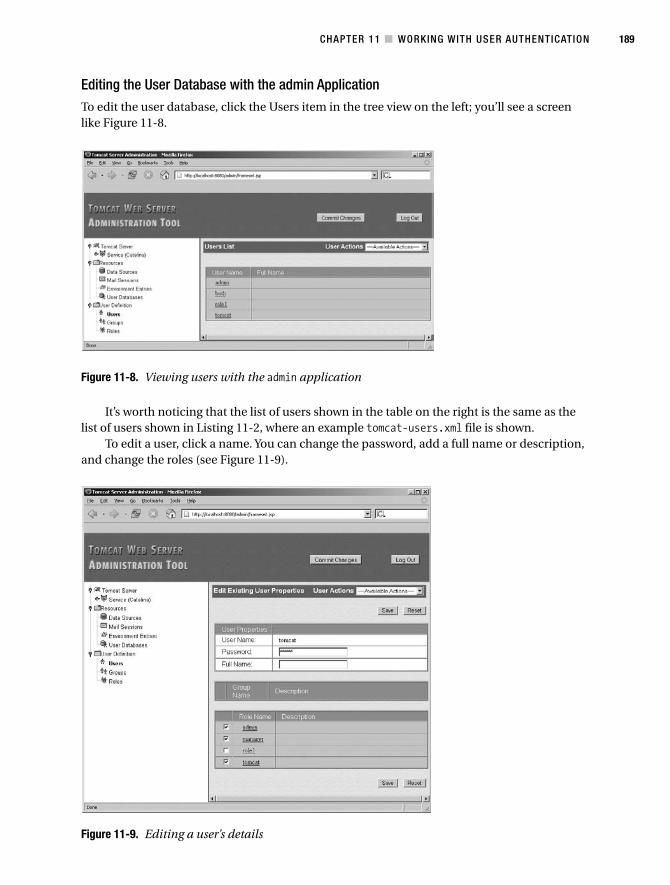
Editing the User Database with the admin ApplicationTo edit the user database, click the Users item in the tree view on the left; you’ll see a screenlike Figure 11-8.
Figure 11-8. Viewing users with the admin application
It’s worth noticing that the list of users shown in the table on the right is the same as thelist of users shown in Listing 11-2, where an example tomcat-users.xml file is shown.
To edit a user, click a name. You can change the password, add a full name or description,and change the roles (see Figure 11-9).
Figure 11-9. Editing a user’s details
CHAPTER 11 ■ WORKING WITH USER AUTHENTICATION 189
7850ch11FINAL.qxd 2/28/07 11:06 AM Page 189

Any changes you make will be written to tomcat-users.xml (or whichever realm you’reusing) once you click Save. As with all the actions of the admin application, any changes willremove comments from the user database file. This is because the admin application writesa new file every time, so “modifying the user database” is a slight misnomer; you’re really spec-ifying new values to replace the old user database, which the admin application will overwrite.You don’t have a backup in this case, though.
To create a new user, click the User Actions box, and select Create New User. You’ll seea screen like the one shown in Figure 11-10.
Figure 11-10. Creating a new user
Click the Save button. After clicking Save, open tomcat-users.xml, and check that yournew user has been added. You don’t need to click Commit Changes in this case, unless you’vemade changes elsewhere and want to restart the server and overwrite server.xml. Your user isnow available to Tomcat for authentication. If you gave the user the admin role, log out of theadmin application, and try to log in as the new user. The user’s details should allow you to accessthe admin application.
Protecting a Resource with a RealmIt’s usually a web application developer who will specify which resources need to be protected,though you’ll have your own applications you want to protect, such as the admin and managerweb applications.
CHAPTER 11 ■ WORKING WITH USER AUTHENTICATION190
7850ch11FINAL.qxd 2/28/07 11:06 AM Page 190

You saw the important security-related elements of web.xml in Chapter 5. You use theseelements to specify the web resource to protect and the way in which you want to protect it.
The security-related elements from web.xml are as follows:
• <security-constraint>: Protects a group of web resources and specifies the role thata user must have before accessing the resource.
• <web-resource-collection>: A subelement of <security-constraint> that specifies theweb resources that this security constraint protects. This can be a URL pattern usingwildcard notation or an HTTP method. In other words, you can protect physical resourcesor protect access from certain access methods.
• <auth-constraint>: A subelement of <security-constraint>. This specifies the rolesthat are allowed to access resources covered by this security constraint.
• <user-data-constraint>: Specifies the data transport security constraint. This can beNONE, INTEGRAL, or CONFIDENTIAL. NONE specifies that no transport guarantee is required.INTEGRAL specifies that the data must not be changed in transit. CONFIDENTIAL specifiesthat others may not view the date in transit. The last two mean that HTTPS must be used.
• <login-config>: Specifies the type of authentication Tomcat should perform. The choicesare BASIC, DIGEST, FORM, or SSL client methods for authentication. BASIC uses the browser’spassword request box but transmits the username and password in unencrypted text.DIGEST uses the browser’s password request box and encryption; this isn’t always wellsupported by browsers. FORM allows you to specify a custom login form, like the adminapplication. The SSL client methods require digital certificates; you’ll learn more aboutthem in Chapter 12.
• <security-role>: Specifies the security roles used within this web application.
You’ve seen these used in various incarnations throughout the book so far, but I won’tdiscuss them in detail until Chapter 12 because they’re security configuration, not realmconfiguration.
However, Listing 11-7 shows how to set up basic protection for the ch11 directory of thetomcatBook web application.
Listing 11-7. A Simple Security Setup
<?xml version="1.0" encoding="ISO-8859-1"?>
<web-app xmlns="http://java.sun.com/xml/ns/j2ee"
xmlns:xsi="http://www.w3.org/2001/XMLSchema-instance"
xsi:schemaLocation="http://java.sun.com/xml/ns/j2ee
http://java.sun.com/xml/ns/j2ee/web-app_2_4.xsd" version="2.4">
<!-- Describe a DataSource -->
<resource-ref>
<description>
Resource reference to a factory for java.sql.Connection
instances that may be used for talking to a particular
database that is configured in the tomcatBook.xml file.
</description>
CHAPTER 11 ■ WORKING WITH USER AUTHENTICATION 191
7850ch11FINAL.qxd 2/28/07 11:06 AM Page 191

<res-ref-name>
jdbc/CatalogDB
</res-ref-name>
<res-type>
javax.sql.DataSource
</res-type>
<res-auth>
SERVLET
</res-auth>
</resource-ref>
<!-- Define a Security Constraint on this application -->
<security-constraint>
<web-resource-collection>
<web-resource-name>Tomcat Book Application</web-resource-name>
<url-pattern>/ch11/*</url-pattern>
</web-resource-collection>
<auth-constraint>
<role-name>tomcat</role-name>
</auth-constraint>
</security-constraint>
<!-- Define the Login Configuration for this Application -->
<login-config>
<auth-method>BASIC</auth-method>
<realm-name>Tomcat Book Application</realm-name>
</login-config>
<!-- Security roles referenced by this web application -->
<security-role>
<description>
The role that is required to log in to the TomcatBook application
</description>
<role-name>tomcat</role-name>
</security-role>
</web-app>
Configuring a JDBC RealmNow that you’re familiar with realms in general, and file-based realms in particular, it’s time tointroduce JDBC realms. JDBC realms use relational databases as their data storage mechanismand can be extremely useful if you have an existing user database that contains usernames andpasswords. They’re even better if the database already contains the roles each user has. Even ifthis isn’t the case, you can easily add another table to the database.
CHAPTER 11 ■ WORKING WITH USER AUTHENTICATION192
7850ch11FINAL.qxd 2/28/07 11:06 AM Page 192

JDBC realms allow you to seamlessly integrate Tomcat into your existing network infra-structure. You gain all the advantages of using a common database for all your users, whichinclude making database maintenance easy, making code maintenance easy, and removingthe need to rewrite any application code. Like the user database, a JDBC realm is up-to-dateand reflects any changes in your common database.
Even if you don’t have a common database, a JDBC realm is a good option for your realm,especially if you have any database applications running on your server. Using the same data-base server as Tomcat’s web applications won’t adversely affect performance and brings someof the advantages outlined previously, namely ease of maintenance. JDBC realms are robust,and you can easily secure databases against unauthorized entry. It’s certainly more difficult forcasual observers to view user information in a database than it is to view it in a text file residingin Tomcat’s directory structure.
Creating a JDBC Realm’s Data StoreJDBC realms are designed to be integrated with existing user databases, and thus their config-uration maps to a common user database setup. Each of the configuration parameters you sawin tomcat-users.xml has a corresponding parameter in a JDBC realm, so a database shouldcontain a username column, a user password column, and a user role column associated witha username. Following good database design, the username and password should be stored inone table and the username and role should be stored in another table, as shown in Figure 11-11.
Figure 11-11. The JDBC realm table schema
The user table has a username field, which is the primary key, and a password field. Thisensures that all usernames are unique, as should be the case in any existing database. The roletable also has a username field, which is linked to user.username with a foreign key constraintto enforce relational integrity. There’s no primary key, though you should use a compound pri-mary key if your database allows it, either of which means there may be more than one roleassigned to a username in the role table. Each combination is given its own row.
These tables and fields don’t have to follow any naming conventions because you canconfigure the JDBC realm to use any table and fields you want. This is all part of the gracefulintegration that makes JDBC realms so easy to use.
You configure JDBC realm definitions in a realm element at the level of any containercomponent, just like the file-based realms previously described. Table 11-2 shows the JDBCrealm’s attributes.
CHAPTER 11 ■ WORKING WITH USER AUTHENTICATION 193
7850ch11FINAL.qxd 2/28/07 11:06 AM Page 193

Table 11-2. The JDBC Realm Attributes
Attribute Description Required?
className The Java class that implements the JDBC realm. This Yesmust be org.apache.catalina.realm.JDBCRealm.
connectionName The JDBC connection username to be used. Yes
connectionPassword The JDBC connection password to be used. Yes
connectionURL The JDBC connection URL used to access the database instance. Yes
digest Specifies the digest algorithm for the password (as used Noby the java.security.MessageDigest class). The default is plain text.
driverName The JDBC driver. Yes
userTable The name of the users table in the database. Yes
userNameCol The username column in the userTable table and the YesuserRoleTable table.
userCredCol The password column in the userTable table. Yes
userRoleTable The user role table in the database. Yes
roleNameCol The role column in the userRoleTable table. Yes
As you can see, it’s a straightforward task to specify the database server, the user and roletables, and the username, password, and role columns. server.xml contains three JDBC realmsby default: MySQL, Oracle, and ODBC. Let’s examine how to work with MySQL before lookingat ODBC.
Configuring a MySQL JDBC Realm
Listing 11-8 shows the default MySQL setting in server.xml. You shouldn’t change its classNameand driverName attributes, because they’re required when using a MySQL JDBC realm. You shouldmake sure that the MySQL driver is in Tomcat’s classpath. For details of obtaining and installinga MySQL driver, see Chapter 10.
You should note, however, that the MySQL driver is no longer called org.gjt.mm.mysql.Driver, though this class is still supplied in the driver JAR file for backward compatibility. Youshould use com.mysql.jdbc.Driver for all other purposes.
Listing 11-8. The Default MySQL JDBC Realm in server.xml
<!--
<Realm className="
org.apache.catalina.realm.JDBCRealm"
driverName="org.gjt.mm.mysql.Driver"
connectionURL="jdbc:mysql://localhost/authority"
connectionName="test" connectionPassword="test"
userTable="users" userNameCol="user_name" userCredCol="user_pass"
userRoleTable="user_roles" roleNameCol="role_name" />
-->
CHAPTER 11 ■ WORKING WITH USER AUTHENTICATION194
7850ch11FINAL.qxd 2/28/07 11:06 AM Page 194
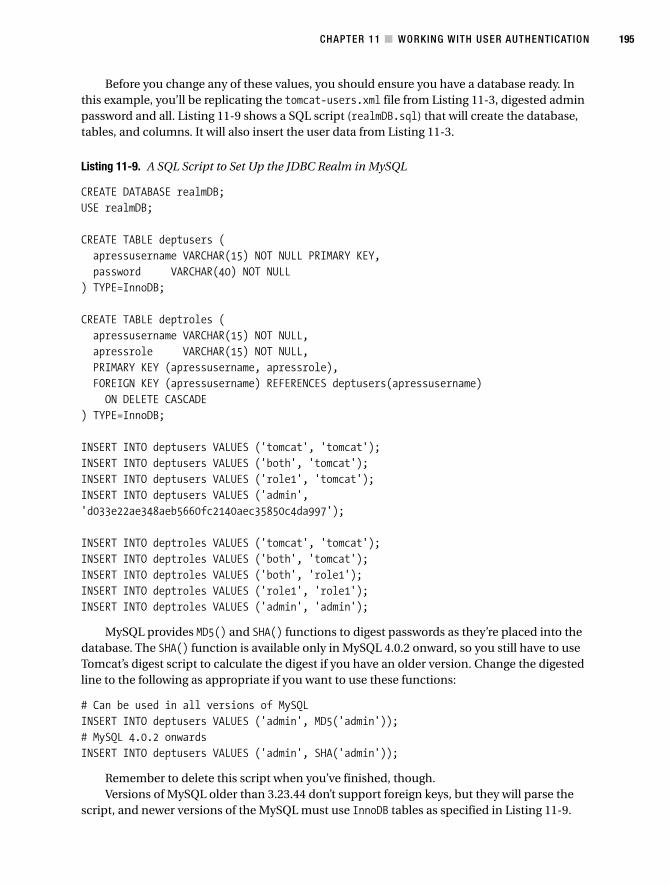
Before you change any of these values, you should ensure you have a database ready. Inthis example, you’ll be replicating the tomcat-users.xml file from Listing 11-3, digested adminpassword and all. Listing 11-9 shows a SQL script (realmDB.sql) that will create the database,tables, and columns. It will also insert the user data from Listing 11-3.
Listing 11-9. A SQL Script to Set Up the JDBC Realm in MySQL
CREATE DATABASE realmDB;
USE realmDB;
CREATE TABLE deptusers (
apressusername VARCHAR(15) NOT NULL PRIMARY KEY,
password VARCHAR(40) NOT NULL
) TYPE=InnoDB;
CREATE TABLE deptroles (
apressusername VARCHAR(15) NOT NULL,
apressrole VARCHAR(15) NOT NULL,
PRIMARY KEY (apressusername, apressrole),
FOREIGN KEY (apressusername) REFERENCES deptusers(apressusername)
ON DELETE CASCADE
) TYPE=InnoDB;
INSERT INTO deptusers VALUES ('tomcat', 'tomcat');
INSERT INTO deptusers VALUES ('both', 'tomcat');
INSERT INTO deptusers VALUES ('role1', 'tomcat');
INSERT INTO deptusers VALUES ('admin',
'd033e22ae348aeb5660fc2140aec35850c4da997');
INSERT INTO deptroles VALUES ('tomcat', 'tomcat');
INSERT INTO deptroles VALUES ('both', 'tomcat');
INSERT INTO deptroles VALUES ('both', 'role1');
INSERT INTO deptroles VALUES ('role1', 'role1');
INSERT INTO deptroles VALUES ('admin', 'admin');
MySQL provides MD5() and SHA() functions to digest passwords as they’re placed into thedatabase. The SHA() function is available only in MySQL 4.0.2 onward, so you still have to useTomcat’s digest script to calculate the digest if you have an older version. Change the digestedline to the following as appropriate if you want to use these functions:
# Can be used in all versions of MySQL
INSERT INTO deptusers VALUES ('admin', MD5('admin'));
# MySQL 4.0.2 onwards
INSERT INTO deptusers VALUES ('admin', SHA('admin'));
Remember to delete this script when you’ve finished, though.Versions of MySQL older than 3.23.44 don’t support foreign keys, but they will parse the
script, and newer versions of the MySQL must use InnoDB tables as specified in Listing 11-9.
CHAPTER 11 ■ WORKING WITH USER AUTHENTICATION 195
7850ch11FINAL.qxd 2/28/07 11:06 AM Page 195

MySQL 5 uses InnoDB tables by default. The absence of foreign key support isn’t too big a prob-lem; you must just be careful when modifying the database.
To check whether InnoDB tables are enabled on your server, run the following in MySQL:
mysql> SHOW VARIABLES LIKE 'have_%';
If InnoDB tables are enabled, you’ll see the following:
+---------------+-------+
| Variable_name | Value |
+---------------+-------+
| have_bdb | YES |
| have_gemini | NO |
| have_innodb | YES |
| have_isam | YES |
| have_raid | NO |
| have_openssl | NO |
+---------------+-------+
6 rows in set (0.00 sec)
If the have_innodb variable is set to DISABLED, then your server has the potential to use InnoDBtables, and you’ll have to configure them. Add the following line under the [mysqld] section toyour my.ini file (through the MySQL admin interface) on Windows or your MYSQL_HOME/data/my.cnf file on other platforms:
innodb_data_file_path = ibdata1:30M:autoextend
This creates a 30MB store for InnoDB tables in the MYSQL_HOME/data directory that grows ifrequired. Restart the server, and check that InnoDB tables are enabled.
To run the realmDB.sql script, log into the MySQL server and run the following, assumingthe script is in MySQL’s bin directory:
mysql> \. ./realmDB.sql
You should create a user in MySQL that will allow Tomcat to read the values in the user data-base. This follows a similar pattern to the read-only user you created in Chapter 10. You couldeven use the same read-only user if you wanted, though you still have to execute a new GRANTcommand. The following creates a tomcat read-only user in the MySQL privileges database:
mysql> GRANT SELECT ON realmDB.*
-> TO 'tomcat'@'localhost'
-> IDENTIFIED BY 'meow';
Now that you’ve prepared the database, you should create the realm definition in server.xml.Listing 11-10 shows the settings for the realmDB database, though you should change theconnectionName and connectionPassword attributes if you have a different username and pass-word than the ones just shown. Comment out any other realm definitions.
CHAPTER 11 ■ WORKING WITH USER AUTHENTICATION196
7850ch11FINAL.qxd 2/28/07 11:06 AM Page 196

Listing 11-10. The Example MySQL JDBC Realm Configuration
<Realm className="org.apache.catalina.realm.JDBCRealm"
driverName="com.mysql.jdbc.Driver"
connectionURL="jdbc:mysql://localhost/realmDB"
connectionName="tomcat" connectionPassword="meow"
userTable="deptusers" userNameCol="apressusername"
userCredCol="password"
userRoleTable="deptroles" roleNameCol="apressrole"
digest="sha"
/>
You should now test the realm by visiting a protected resource, such as the admin applica-tion. If the setup was successful, you’ll be able to log in using the admin user as before. Openthe Service node, and click the Realm node. You’ll see that Tomcat is using the MySQL JDBCrealm for authentication, as shown in Figure 11-12.
Figure 11-12. The admin application shows that Tomcat is using the new realm.
Configuring an ODBC JDBC Realm
For this example, you’ll use an Access database as the ODBC data source, though SQL serveror Excel spreadsheets are just as easy. Create the two tables as described in the previous sec-tion, with a relationship as shown in Figure 11-13.
CHAPTER 11 ■ WORKING WITH USER AUTHENTICATION 197
7850ch11FINAL.qxd 2/28/07 11:06 AM Page 197

Figure 11-13. The relationship between deptroles and deptusers
Now you need to populate the tables. Access allows you to add data to the deptroles tablewhile you’re adding data to the deptusers table: that’s the beauty of defining a relationship.Add the data as shown in Figure 11-14 using Tomcat’s digest utility to create the digested pass-word for the admin user.
Figure 11-14. The data in deptroles and deptusers
Of course, you may already have data you can use. The final step of configuration for Accessis to add a Windows data source. Click Start ➤ Settings ➤ Control Panel ➤ Administrative Tools ➤Data Sources (ODBC). Choose a System DSN, and click Add.
CHAPTER 11 ■ WORKING WITH USER AUTHENTICATION198
7850ch11FINAL.qxd 2/28/07 11:06 AM Page 198

Choose an Access (*.mdb) driver, and fill in the details as shown in Figure 11-15; you canbrowse to the database by clicking Select.
Figure 11-15. Configuring an ODBC data source
Click Advanced to set a username and password. In this case, enter the username tomcatand the password meow.
The JDBC ODBC driver is part of the Java distribution, so you don’t need to add any JARfiles to Tomcat’s classpath. This just leaves the realm configuration in server.xml. Commentout any other realms, and add the definition as shown in Listing 11-11.
Listing 11-11. A JDBC Realm Using an ODBC Data Source
<Realm className="org.apache.catalina.realm.JDBCRealm"
driverName="sun.jdbc.odbc.JdbcOdbcDriver"
connectionURL="jdbc:odbc:realmDB"
connectionName="tomcat" connectionPassword="meow"
userTable="deptusers" userNameCol="apressusername"
userCredCol="password"
userRoleTable="deptroles" roleNameCol="apressrole"
digest="sha"
/>
You shouldn’t change the className or driverName options, because they’re standard forODBC JDBC realms. The connectionURL option is the name of the ODBC data source you con-figured earlier, and the other settings correspond to the database and user details you added.The password for the admin Tomcat user is digested with the SHA algorithm, so enter thedigest attribute sha.
Start Tomcat, and attempt to log into the admin application using this setup. If all went well,you’ll be able to log in successfully. Open the Service node, and click the Realm node. You’ll seethat Tomcat is using the ODBC JDBC realm for authentication, as shown in Figure 11-16.
CHAPTER 11 ■ WORKING WITH USER AUTHENTICATION 199
7850ch11FINAL.qxd 2/28/07 11:06 AM Page 199

Figure 11-16. The admin application shows that Tomcat is using the new realm.
Configuring JNDI RealmsJNDI realms also allow you to use existing data, this time in the form of directory services. Touse a JNDI realm, you must be able to map the configuration attributes to an existing direc-tory schema. This is similar to the process of mapping database tables and columns to Tomcatlogin details. Table 11-3 shows the attributes for the JNDI realm.
Table 11-3. The JNDI Realm’s Attributes
Attribute Description Required?
className Class name of the JNDI realm implementation; must be Yesorg.apache.catalina.realm.JNDIRealm.
connectionName The username used to log into the directory service; not Norequired if simple binding is in use.
connectionPassword The password used to log into the directory service; not Norequired if simple binding is in use.
connectionURL The URL of the directory service. Yes
contextFactory The class used to create the context for the JNDI Noconnection. The standard JNDI Lightweight Directory Access Protocol (LDAP) provider is sufficient in most cases.
digest Specifies the digest algorithm used to digest the user’s Nopassword. This attribute is ignored if you don’t specify userPassword.
roleBase The base element for role searches. The default is the Notop-level element.
CHAPTER 11 ■ WORKING WITH USER AUTHENTICATION200
7850ch11FINAL.qxd 2/28/07 11:06 AM Page 200

Attribute Description Required?
roleName The name of the directory attribute that contains the Norole name.
roleSearch An LDAP pattern for searching the directory for roles. NoThe {0} placeholder inserts the user’s distinguished name, and {1} inserts the username. Often, these are the same.
roleSubtree If set to true, a subtree search will be conducted for the Norole. The default is false.
userBase The base element for user searches using the NouserSearch attribute. This isn’t used if you’re using the userPattern expression. The default is the top-level element in the directory context.
userPassword The name of the user element’s directory attribute that Nocontains the password information.
userPattern An LDAP pattern for searching the directory for a user Noentry. The {0} placeholder inserts the username entered by the user.
userRoleName The name of an attribute in the user’s directory entry Nocontaining zero or more roles assigned to the user. If userRoleName isn’t specified, all the roles for a user derive from the role search.
userSearch The LDAP filter expression for searching for a user’s Nodirectory entry. {0} inserts the username as entered by the user. Use this property (along with the userBase and userSubtree properties) instead of userPattern to search the directory for the user’s entry.
userSubtree Set to true if you want to search the entire subtree of the Noelement specified by the userBase property for the user’s entry. The default value of false causes only the top level to be searched. Not used if you’re using the userPatternexpression.
Let’s see some of these attributes in action, because JNDI realms are slightly more compli-cated than the other realm types.
Setting Up a Directory ServerIf you don’t already have a directory server, then you may want to install OpenLDAP(www.openldap.org). It’s a free, open source directory server that uses Lightweight DirectoryAccess Protocol (LDAP), and you can use its services via a JNDI driver, which means you canalso use it as a JNDI realm data repository. Download the server, and install it in a convenientlocation (LDAP_HOME for the purposes of this discussion). A Windows binary is available athttp://download.bergmans.us/openldap/.
The main configuration file is LDAP_HOME/slapd.conf. The default file already containsa number of settings, none of which you should have to change. However, you may need toadd some settings. Listing 11-12 shows the minimum you’ll require (using OpenLDAP 2.2).
CHAPTER 11 ■ WORKING WITH USER AUTHENTICATION 201
7850ch11FINAL.qxd 2/28/07 11:06 AM Page 201
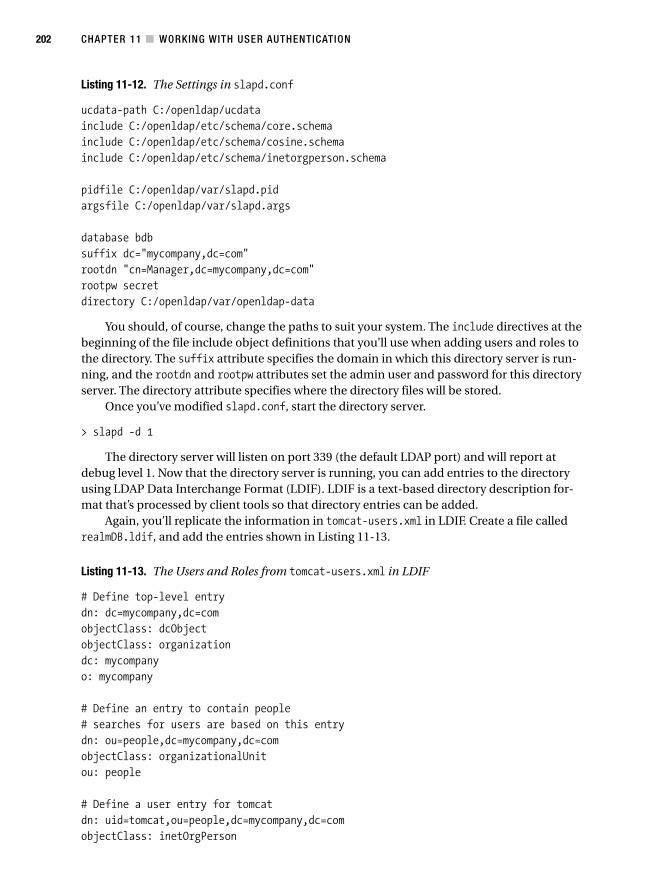
Listing 11-12. The Settings in slapd.conf
ucdata-path C:/openldap/ucdata
include C:/openldap/etc/schema/core.schema
include C:/openldap/etc/schema/cosine.schema
include C:/openldap/etc/schema/inetorgperson.schema
pidfile C:/openldap/var/slapd.pid
argsfile C:/openldap/var/slapd.args
database bdb
suffix dc="mycompany,dc=com"
rootdn "cn=Manager,dc=mycompany,dc=com"
rootpw secret
directory C:/openldap/var/openldap-data
You should, of course, change the paths to suit your system. The include directives at thebeginning of the file include object definitions that you’ll use when adding users and roles tothe directory. The suffix attribute specifies the domain in which this directory server is run-ning, and the rootdn and rootpw attributes set the admin user and password for this directoryserver. The directory attribute specifies where the directory files will be stored.
Once you’ve modified slapd.conf, start the directory server.
> slapd -d 1
The directory server will listen on port 339 (the default LDAP port) and will report atdebug level 1. Now that the directory server is running, you can add entries to the directoryusing LDAP Data Interchange Format (LDIF). LDIF is a text-based directory description for-mat that’s processed by client tools so that directory entries can be added.
Again, you’ll replicate the information in tomcat-users.xml in LDIF. Create a file calledrealmDB.ldif, and add the entries shown in Listing 11-13.
Listing 11-13. The Users and Roles from tomcat-users.xml in LDIF
# Define top-level entry
dn: dc=mycompany,dc=com
objectClass: dcObject
objectClass: organization
dc: mycompany
o: mycompany
# Define an entry to contain people
# searches for users are based on this entry
dn: ou=people,dc=mycompany,dc=com
objectClass: organizationalUnit
ou: people
# Define a user entry for tomcat
dn: uid=tomcat,ou=people,dc=mycompany,dc=com
objectClass: inetOrgPerson
CHAPTER 11 ■ WORKING WITH USER AUTHENTICATION202
7850ch11FINAL.qxd 2/28/07 11:06 AM Page 202

uid: tomcat
sn: tomcat
cn: tomcat user
userPassword: tomcat
# Define a user entry for role1
dn: uid=role1,ou=people,dc=mycompany,dc=com
objectClass: inetOrgPerson
uid: role1
sn: role1
cn: role1 user
userPassword: tomcat
# Define a user entry for both
dn: uid=both,ou=people,dc=mycompany,dc=com
objectClass: inetOrgPerson
uid: both
sn: both
cn: both user
userPassword: tomcat
# Define a user entry for admin
dn: uid=admin,ou=people,dc=mycompany,dc=com
objectClass: inetOrgPerson
uid: admin
sn: admin
cn: admin user
userPassword: d033e22ae348aeb5660fc2140aec35850c4da997
# Define an entry to contain LDAP groups
# searches for roles are based on this entry
dn: ou=groups,dc=mycompany,dc=com
objectClass: organizationalUnit
ou: groups
# Define an entry for the "tomcat" role
dn: cn=tomcat,ou=groups,dc=mycompany,dc=com
objectClass: groupOfUniqueNames
cn: tomcat
uniqueMember: uid=tomcat,ou=people,dc=mycompany,dc=com
uniqueMember: uid=both,ou=people,dc=mycompany,dc=com
# Define an entry for the "role1" role
dn: cn=role1,ou=groups,dc=mycompany,dc=com
objectClass: groupOfUniqueNames
cn: role1
uniqueMember: uid=role1,ou=people,dc=mycompany,dc=com
uniqueMember: uid=both,ou=people,dc=mycompany,dc=com
CHAPTER 11 ■ WORKING WITH USER AUTHENTICATION 203
7850ch11FINAL.qxd 2/28/07 11:06 AM Page 203

# Define an entry for the "admin" role
dn: cn=admin,ou=groups,dc=mycompany,dc=com
objectClass: groupOfUniqueNames
cn: admin
uniqueMember: uid=admin,ou=people,dc=mycompany,dc=com
Here, you’ve added the users to the people group, which is part of the mycompany.comdomain. Table 11-4 shows what each of the user attributes means.
Table 11-4. Attributes for a User Entry
Attribute Description
cn This user’s common name, which can be used as a description.
dn The user’s distinguished name, which makes it unique within the directory.This is used when searching for a user.
objectClass The object that models this user. The inetOrgPerson is a standard definition ofa person with common attributes, such as e-mail addresses and telephonenumbers.
sn The user’s surname.
uid The unique username for this person.
userPassword The password of this user.
The roles are added to a group called groups and follow the same pattern as the users.The uniqueMember attribute specifies a member of that role using the user’s distinguishedname. If you’re interested in seeing how objects and attributes are linked together, examinethe *.schema files in LDAP_HOME/etc/schema.
You have two choices for adding these entries to the directory: online or offline. You shouldcreate the database online using LDAP only when creating small databases (1 to 2,000 entries),because it uses the directory server to create the database. Clients can also access the databasewhile an online operation is in progress, meaning that large, slow updates will result in problems.The offline method creates the database files directly without going through the directory server.
To add the entries to the directory online, use the ldapadd utility that comes with OpenLDAP:
> ldapadd -x -D "cn=Manager,dc=mycompany,dc=com" -w secret -f realmDB.ldif
adding new entry "dc=mycompany,dc=com"
adding new entry "ou=people,dc=mycompany,dc=com"
adding new entry "uid=tomcat,ou=people,dc=mycompany,dc=com"
adding new entry "uid=role1,ou=people,dc=mycompany,dc=com"
adding new entry "uid=both,ou=people,dc=mycompany,dc=com"
adding new entry "uid=admin,ou=people,dc=mycompany,dc=com"
adding new entry "ou=groups,dc=mycompany,dc=com"
adding new entry "cn=tomcat,ou=groups,dc=mycompany,dc=com"
adding new entry "cn=role1,ou=groups,dc=mycompany,dc=com"
adding new entry "cn=admin,ou=groups,dc=mycompany,dc=com"
The -x switch tells the ldapadd client to connect to the directory server using the simplebind method, as opposed to an encrypted method. In this case, the username and passwordare sent in plain text. -D specifies the bind distinguished name, essentially the username for
CHAPTER 11 ■ WORKING WITH USER AUTHENTICATION204
7850ch11FINAL.qxd 2/28/07 11:06 AM Page 204

the domain you’re configuring, and -w specifies the password. The -f switch specifies the LDIFfile to use for creating the directory entries.
To add the entries offline, use the slapadd utility.
> slapadd -v -l realmDB.ldif -f slapd.conf
added: "dc=mycompany,dc=com" (00000001)
added: "ou=people,dc=mycompany,dc=com" (00000002)
added: "uid=tomcat,ou=people,dc=mycompany,dc=com" (00000003)
added: "uid=role1,ou=people,dc=mycompany,dc=com" (00000004)
added: "uid=both,ou=people,dc=mycompany,dc=com" (00000005)
added: "uid=admin,ou=people,dc=mycompany,dc=com" (00000006)
added: "ou=groups,dc=mycompany,dc=com" (00000007)
added: "cn=tomcat,ou=groups,dc=mycompany,dc=com" (00000008)
added: "cn=role1,ou=groups,dc=mycompany,dc=com" (00000009)
added: "cn=admin,ou=groups,dc=mycompany,dc=com" (0000000a)
-v specifies verbose mode; -l specifies the LDIF file, and -f is the slapd configuration file.To test that your entries are in the directory, use the ldapsearch tool, as follows, where -b is
the base distinguished name to search:
> ldapsearch -b "dc=mycompany,dc=com"
If the search is successful, you’ll see output that’s similar to realmDB.ldif with the passwordsscrambled.
To delete the entries, use ldapdelete with the -r switch to do a recursive delete.
> ldapdelete -x -D "cn=Manager,dc=mycompany,dc=com"
-w secret -r "dc=mycompany, dc=com"
Adding the JNDI RealmYou now need to configure the realm in Tomcat’s server.xml file. Listing 11-14 shows a realmdefinition that will connect to the directory server with an anonymous login and search forusers and roles according to the username entered by the user.
Listing 11-14. A JNDI Realm in server.xml
<Realm className="org.apache.catalina.realm.JNDIRealm"
connectionURL="ldap://localhost:389"
userPassword="userPassword"
userPattern="uid={0},ou=people,dc=mycompany,dc=com"
roleBase="ou=groups,dc=mycompany,dc=com"
roleName="cn"
roleSearch="(uniqueMember={0})"
digest="sha"
/>
You shouldn’t change the className or connectionURL attributes, because they’re standardfor JNDI realms. The userPassword attribute specifies which attribute in a user’s directory entryshould be used for password comparison when trying to log into an application.
CHAPTER 11 ■ WORKING WITH USER AUTHENTICATION 205
7850ch11FINAL.qxd 2/28/07 11:06 AM Page 205
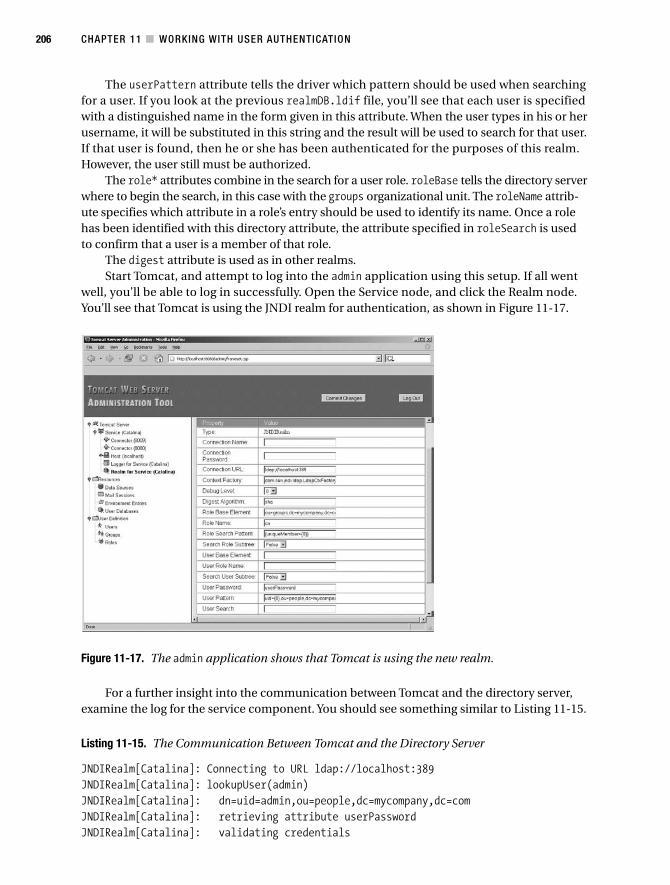
The userPattern attribute tells the driver which pattern should be used when searchingfor a user. If you look at the previous realmDB.ldif file, you’ll see that each user is specifiedwith a distinguished name in the form given in this attribute. When the user types in his or herusername, it will be substituted in this string and the result will be used to search for that user.If that user is found, then he or she has been authenticated for the purposes of this realm.However, the user still must be authorized.
The role* attributes combine in the search for a user role. roleBase tells the directory serverwhere to begin the search, in this case with the groups organizational unit. The roleName attrib-ute specifies which attribute in a role’s entry should be used to identify its name. Once a rolehas been identified with this directory attribute, the attribute specified in roleSearch is usedto confirm that a user is a member of that role.
The digest attribute is used as in other realms.Start Tomcat, and attempt to log into the admin application using this setup. If all went
well, you’ll be able to log in successfully. Open the Service node, and click the Realm node.You’ll see that Tomcat is using the JNDI realm for authentication, as shown in Figure 11-17.
Figure 11-17. The admin application shows that Tomcat is using the new realm.
For a further insight into the communication between Tomcat and the directory server,examine the log for the service component. You should see something similar to Listing 11-15.
Listing 11-15. The Communication Between Tomcat and the Directory Server
JNDIRealm[Catalina]: Connecting to URL ldap://localhost:389
JNDIRealm[Catalina]: lookupUser(admin)
JNDIRealm[Catalina]: dn=uid=admin,ou=people,dc=mycompany,dc=com
JNDIRealm[Catalina]: retrieving attribute userPassword
JNDIRealm[Catalina]: validating credentials
CHAPTER 11 ■ WORKING WITH USER AUTHENTICATION206
7850ch11FINAL.qxd 2/28/07 11:06 AM Page 206

JNDIRealm[Catalina]: Username admin successfully authenticated
JNDIRealm[Catalina]: getRoles(uid=admin,ou=people,dc=mycompany,dc=com)
JNDIRealm[Catalina]: Searching role base 'ou=groups,dc=mycompany,dc=com' for
attribute 'cn'
JNDIRealm[Catalina]: With filter expression
'(uniqueMember=uid=admin,ou=people,dc=mycompany,dc=com)'
JNDIRealm[Catalina]: retrieving values for attribute cn
JNDIRealm[Catalina]: Returning 1 roles
JNDIRealm[Catalina]: Found role admin
Here, you can see the two steps mentioned previously. The directory server authenticatesthe user by looking up the user’s distinguished name, using the string built with the username.The directory server finds the user and retrieves the password attribute for comparison byTomcat. Tomcat validates the user’s credentials and tells the directory server that it can authenti-cate the user, which it does.
The directory server then tries to find a role that’s associated with this user and returnsthe value of the cn attribute. This value is then used by Tomcat to authorize the user’s accessto the resource. Note how all the attribute values in this communication were specified inserver.xml.
SummaryIn this chapter, you saw how realms provide a web application with an authentication mecha-nism as well as container-managed security. Many different types of realm implementationsexist—you saw JDBC realms, JNDI realms, memory realms, and user database realms.
CHAPTER 11 ■ WORKING WITH USER AUTHENTICATION 207
7850ch11FINAL.qxd 2/28/07 11:06 AM Page 207

7850ch11FINAL.qxd 2/28/07 11:06 AM Page 208
Securing Tomcat
Security is the most important aspect of your job as an administrator; a server that’s compro-mised can’t serve any content and could possibly lead to loss of commercial secrets, financialdetails, or dignity. Securing a server includes many aspects, such as securing the file system,securing the databases, and securing the Tomcat server.
You can think of security as several layers, each of which is as important as the other. Ifyour Tomcat server does somehow become compromised, you want to be sure that the filesystem and all the information stored on it aren’t compromised along with Tomcat.
This chapter will deal with Windows file system issues to start and then cover Unix filesystem issues. Once you’ve learned about these specifics, you’ll learn about general Tomcatsecurity issues equally applicable to both operating systems.
Securing the Windows File SystemIn this section, you’ll see how to secure your server’s file system against malicious intruderswho could read and execute sensitive files. You may already know these techniques if you’rea seasoned administrator, so feel free to move on to the Tomcat-specific sections.
Windows implements a file system security architecture that uses permissions. You canuse file system permissions to control the files users are allowed to view, execute, and manipu-late. This means that users can’t access the file system in any way without being given explicitpermission to do so.
Windows has several different file system types, as shown in Table 12-1.
Table 12-1. Windows File System Types
File System Type Description
FAT All early versions of Windows are based on the File Allocation Table (FAT)file system. FAT is capable of associating bytes with files and directories butnot much more. FAT is the reason for good old filenames that couldn’t belonger than eight characters.
NTFS The NT file system (NTFS) is better than FAT in every way; it was developedfor Microsoft’s enterprise NT systems. The latest incarnation of NTFS (availableon Windows 2000/XP/2003 or Vista) supports permissions and encryption,long filenames, networking, disk quotas, and so on. NTFS also stores files ina much more efficient way than FAT and is much more reliable.
continued
209
C H A P T E R 1 2
■ ■ ■
7850ch12FINAL.qxd 2/28/07 11:13 AM Page 209

CHAPTER 12 ■ SECURING TOMCAT210
Table 12-1. (continued)
File System Type Description
FAT32 FAT can handle only up to 2 GB of information, so it’s unusable with anydecent modern computer. NTFS was intrinsically linked with the WindowsNT family, so it was inappropriate for Windows 9x. As a result, Microsoftcreated FAT32, which supports 2 terabytes of space and stores data in a moreefficient way. FAT32 is available on Windows 95, Windows 98, Windows ME,Windows 2000, and Windows XP.
As you can see, only NTFS is appropriate for this discussion, as no other Windows file sys-tem supports security features such as encryption or permissions. This also means that if yourun Tomcat on Windows, and you want to implement security properly, you’ll have to use theNTFS file system and thus Windows 2000 and above. This isn’t to say that you could run a viableserver setup on another operating system, but your file system will be more vulnerable.
■Note Your Windows 2000/XP setup may use the FAT32 file system. It’s fairly straightforward to changethis, however.
Right-click your c: drive (or equivalent), and select Properties. You will see the Propertiespage, shown in Figure 12-1.
Figure 12-1. The Properties page showing the file system type
7850ch12FINAL.qxd 2/28/07 11:13 AM Page 210
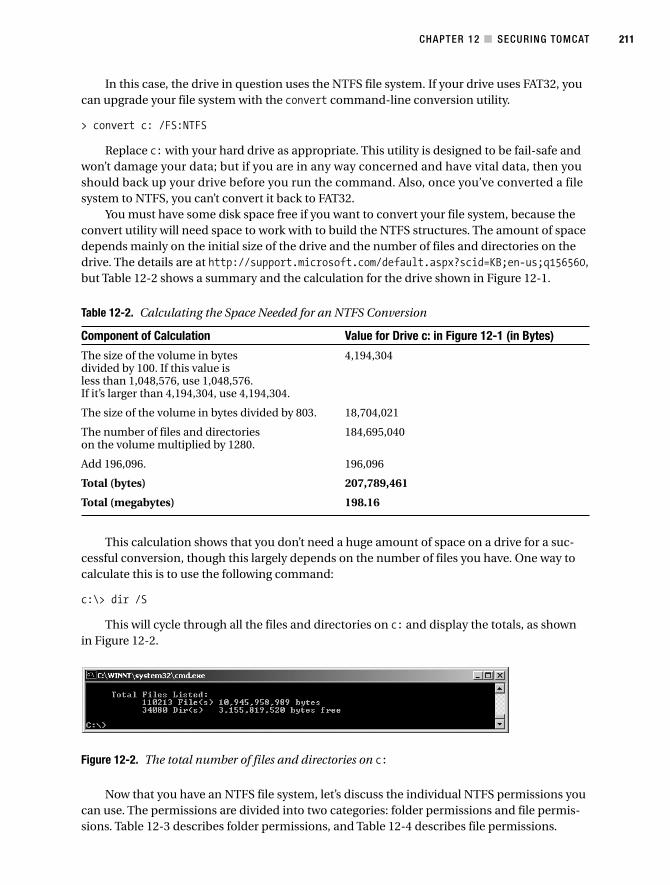
In this case, the drive in question uses the NTFS file system. If your drive uses FAT32, youcan upgrade your file system with the convert command-line conversion utility.
> convert c: /FS:NTFS
Replace c: with your hard drive as appropriate. This utility is designed to be fail-safe andwon’t damage your data; but if you are in any way concerned and have vital data, then youshould back up your drive before you run the command. Also, once you’ve converted a filesystem to NTFS, you can’t convert it back to FAT32.
You must have some disk space free if you want to convert your file system, because theconvert utility will need space to work with to build the NTFS structures. The amount of spacedepends mainly on the initial size of the drive and the number of files and directories on thedrive. The details are at http://support.microsoft.com/default.aspx?scid=KB;en-us;q156560,but Table 12-2 shows a summary and the calculation for the drive shown in Figure 12-1.
Table 12-2. Calculating the Space Needed for an NTFS Conversion
Component of Calculation Value for Drive c: in Figure 12-1 (in Bytes)
The size of the volume in bytes 4,194,304divided by 100. If this value is less than 1,048,576, use 1,048,576. If it’s larger than 4,194,304, use 4,194,304.
The size of the volume in bytes divided by 803. 18,704,021
The number of files and directories 184,695,040on the volume multiplied by 1280.
Add 196,096. 196,096
Total (bytes) 207,789,461
Total (megabytes) 198.16
This calculation shows that you don’t need a huge amount of space on a drive for a suc-cessful conversion, though this largely depends on the number of files you have. One way tocalculate this is to use the following command:
c:\> dir /S
This will cycle through all the files and directories on c: and display the totals, as shownin Figure 12-2.
Figure 12-2. The total number of files and directories on c:
Now that you have an NTFS file system, let’s discuss the individual NTFS permissions youcan use. The permissions are divided into two categories: folder permissions and file permis-sions. Table 12-3 describes folder permissions, and Table 12-4 describes file permissions.
CHAPTER 12 ■ SECURING TOMCAT 211
7850ch12FINAL.qxd 2/28/07 11:13 AM Page 211

Table 12-3. Folder Permissions for Windows
Permission Actions Permitted
Read View files and subfolders; view folder ownership, permissions, and filesystem attributes (read-only, hidden, and so on).
Write Create files and subfolders; view folder ownership and permissions,and change folder attributes.
List Folder Contents View names of files and subfolders in a folder.
Read and Execute Move through a folder to get to subfolders and files. This permissionincludes permissions from Read and List Folder Contents.
Modify Delete or rename the folder. This permission includes permissionsfrom Read and Execute and from Write.
Full Control This permission includes all other folder permissions. Delete files andsubfolders; take ownership, and change permissions.
Table 12-4. File Permissions for Windows
Permission Actions Permitted
Read View the file contents; view file ownership, permissions, and file systemattributes.
Write Overwrite the file; view file ownership and permissions, and change fileattributes.
Read and Execute Execute the file; this permission includes permissions from Read.
Modify Modify and delete the file; this permission includes permissions from Readand Execute and from Write.
Full Control This permission includes all other file permissions. Take ownership, andchange permissions.
Controlling Users, Groups, and Owners in WindowsTo use these permissions, you need to consider how to assign them to the various users whowill be accessing your operating system.
Working with UsersAnyone who wants to log onto a Windows system must know an account name and its associ-ated password. Each user can be assigned one or more of the permissions you saw previouslyand thus be granted authority to manipulate objects (files or directories) in the file system.
Working with GroupsWindows allows you to add users to a group. Groups can then receive permissions with all theusers who belong to a group sharing those permissions.
CHAPTER 12 ■ SECURING TOMCAT212
7850ch12FINAL.qxd 2/28/07 11:13 AM Page 212

Working with OwnersFinally, Windows has the concept of a file/directory owner. An owner is a user who ultimatelyhas complete control over what permissions other users or groups have for a given resource,regardless of what permissions the user has been granted.
Working with SuperusersThis discussion wouldn’t be complete without including one additional detail. Windows hassuperuser accounts, which have complete and unrestricted access to your system, regardlessof any other permission that has been set. On Windows, the default superuser account iscalled Administrator.
The password for this account should be well chosen and extremely well guarded. You’readvised not to use these accounts for your day-to-day operations, as any virus or other mali-cious program may inadvertently execute when it’s running, and this account has completecontrol of your system.
Creating Users and Groups in WindowsYou now need to create users and groups to implement the details mentioned earlier. To dothis, select Control Panel ➤ Administrative Tools ➤ Computer Management to open the con-sole shown in Figure 12-3.
Figure 12-3. The Computer Management tool
Now, click the Local Users and Groups icon. You can add, modify, and delete users andgroups by selecting either of the two folders revealed and right-clicking the list of users orgroups shown on the right.
CHAPTER 12 ■ SECURING TOMCAT 213
7850ch12FINAL.qxd 2/28/07 11:13 AM Page 213
Command-Line Users and GroupsIn addition to the graphical user interface (GUI), Windows also has some command-line utili-ties for working with users and groups. You won’t see how to use it in detail here because theGUI is easier, though the command-line tools allow you to automate user and group tasks.
You have two utilities for working with groups at the command line: net group and netlocalgroup. Their syntax is identical, except that they operate on domain users and local users,respectively, though you can induce net localgroup to work with domain users by adding the/DOMAIN switch to all commands. To list existing groups on the local machine, use the following:
C:\>net localgroup
The equivalent net group command will list groups in the current NT domain.To add a group to the local machine, run the following, where "Tomcat Group" is the name
of the new group:
C:\>net localgroup "Tomcat Group" /ADD
If you wanted to add a description for this group, run the following, where the descriptionis always in quotes:
C:\>net localgroup "Tomcat Group" /ADD /COMMENT:"A Tomcat group"
To delete the same group, run the following:
C:\>net localgroup "Tomcat Group" /DELETE
You can also use these utilities to add users to groups. When adding a user with net localgroup, make sure that the user exists, that domain users have their domain prefix(for example, TOMCAT\matthewm), and that any groups you’re adding to this group aren’t localgroups. You can specify more than one user after the group’s name, as long as all the usernamesare separated by spaces.
C:\>net localgroup "Tomcat Group" matthewm /ADD
This adds the local user matthewm to the Tomcat group. To check that the user was addedsuccessfully, run the following:
C:\>net localgroup "Tomcat Group"
Alias name Tomcat Group
Comment A Tomcat group
Members
-----------------------------------
matthewm
To add a user account at the command line, use the net user command. This is a powerfulcommand, though you’ll see only its basic functions here. To add a new user called tomcat witha specified password of meow, run the following:
C:\>net user tomcat meow /ADD
CHAPTER 12 ■ SECURING TOMCAT214
7850ch12FINAL.qxd 2/28/07 11:13 AM Page 214

If you’re uneasy about displaying passwords in plain text on the screen, you can ask fora password prompt. The following won’t display the password as you type it in:
C:\>net user tomcat * /ADD
Type a password for the user:
Retype the password to confirm:
Again, you can add a description to this user with the same utility.
C:\>net user tomcat /ADD /COMMENT:"A Tomcat user"
To check the user’s details, just supply the username to the net user command.
C:\>net user tomcat
User name tomcat
Full Name
Comment A Tomcat user
User's comment
Country code 000 (System Default)
Account active Yes
Account expires Never
Password last set 10/22/2004 5:49 PM
Password expires 12/4/2004 4:37 PM
Password changeable 10/22/2004 5:49 PM
Password required Yes
User may change password Yes
Workstations allowed All
Logon script
User profile
Home directory
Last logon Never
Logon hours allowed All
Local Group Memberships *Tomcat Group *Users
Global Group memberships *None
You can, of course, set all of the parameters shown. See www.microsoft.com/WINDOWSXP/home/using/productdoc/en/net_user.asp for more details.
To delete the tomcat user, run the following:
C:\>net user tomcat /DELETE
If you delete the user, it will be removed from any groups of which it was a member.Microsoft also provides the addusers utility for creating users from a comma-delimited file.
However, this is provided only in the Windows Resource Kit. See http://support.microsoft.com/default.aspx?scid=kb;en-us;199878 for more details.
CHAPTER 12 ■ SECURING TOMCAT 215
7850ch12FINAL.qxd 2/28/07 11:13 AM Page 215

Assigning Permissions in WindowsWindows gives you much more flexibility when assigning permissions than Unix does. However,this flexibility comes with a hefty price: your security configuration can rapidly deteriorateinto chaos if you aren’t careful. The Unix model, on the other hand, trades the complexity ofWindows for a simplicity that’s easy to understand and easy to administer.
You have two ways to manipulate a file’s permissions in Windows: a GUI and a command-line interface. To view permissions in the GUI, open Windows Explorer, pick the file or directorywhose permissions you want to view, right-click it, and choose Properties. Click the Securitytab of the resulting window, and you’ll see something similar to Figure 12-4.
Figure 12-4. A directory’s permissions
The top section has all the users and groups with explicit permissions for this object. Ifyou click a user or a group, the Permissions section will show the permissions assigned.
The default configurations of Windows XP Professional often hide this Security tab. Toenable it, go to Control Panel ➤ Folder Options. Click the View tab, scroll to the bottom of theAdvanced Settings list, and uncheck the Use Simple File Sharing (Recommended) option.
Inherited PermissionsSome checkboxes that accompany permissions are disabled, which indicates that the permis-sions in question have been inherited from a parent folder. By default, all files and directoriesinherit the permissions that have been assigned to their parent object.
Permission inheritance is recursive, so a folder inherits permissions from its parent, allthe way to the root directory of the file system. When a file or folder inherits a permission, you
CHAPTER 12 ■ SECURING TOMCAT216
7850ch12FINAL.qxd 2/28/07 11:13 AM Page 216

can’t clear the Allow checkbox. You can, however, explicitly deny a permission with the Denycheckbox. Deny settings always override Allow settings, for this reason.
You can also turn off permission inheritance for an object. To do so, uncheck the “Allowinheritable permissions from parent to propagate to this object” box, and you’ll no longer inheritpermissions and can explicitly define them all for your objects.
Group PermissionsA user may inherit permissions from group membership. This means you may want to assignadditional explicit permissions to a user over and above their group permissions. Therefore,you can allow certain users to have access to a file while other members of their group don’t.
In the event that you assign conflicting permissions, through multiple group member-ship, permission denials always take precedence over permission allowances.
Command-Line PermissionsIn addition to the GUI, Windows has the cacls command-line utility, which you can use tomodify permissions. You see only a brief desciption of it here, though, because the GUI is eas-ier and has more features.
You can view the permissions for the Tomcat folder with the following:
C:\>cacls jakarta-tomcat
C:\jakarta-tomcat Everyone:(OI)(CI)F
NT AUTHORITY\SYSTEM:(OI)(CI)F
BUILTIN\Administrators:(OI)(CI)F
Here F donates full control for these groups. You can use the same utility to deny orchange access.
C:\>cacls jakarta-tomcat /E /P Everyone:R
processed dir: C:\jakarta-tomcat
The /E switch indicates that this command should edit the configuration, not overwrite it./P sets a permission, in this case to R, which is read access. Check that this command has workedwith the following:
C:\>cacls jakarta-tomcat
C:\jakarta-tomcat Everyone:(OI)(CI)R
NT AUTHORITY\SYSTEM:(OI)(CI)F
BUILTIN\Administrators:(OI)(CI)F
To revoke access for a user, run the following:
C:\>cacls jakarta-tomcat /E /R Everyone
For more information on cacls, you can execute it with no options and see all the param-eters it supports.
Planning Security Permissions in WindowsNow it’s time to talk about how to secure your system by using wise permission configurations.
CHAPTER 12 ■ SECURING TOMCAT 217
7850ch12FINAL.qxd 2/28/07 11:13 AM Page 217

Separate Tomcat AccountSome users run Tomcat with their normal user accounts or with the superuser account, bothof which are bad ideas. If Tomcat is ever compromised, it could use the permissions granted tothe account that started it (such as your own account or the all-powerful superuser account)to wreak havoc. Therefore, you vastly improve the security of your file system by creatinga special user account just for running Tomcat. This account should be assigned only thosepermissions necessary to run Tomcat and nothing more.
Suggested Account Settings for WindowsYou should create a new user named tomcat. Make sure that the tomcat account doesn’t belongto any groups, including the default user group. Also, make sure you give the account a password.Windows can’t use the tomcat account to launch services without you giving it a password. Formaximum security, the password should be at least six characters long and consist of mixed-caseletters, numbers, and special characters.
The only way for Tomcat to run as a user in Windows is if it’s installed as a service. Chapter 3covered this process. You’ll need to give it permissions to run services and nothing else.
Windows exposes many additional permissions, mostly unrelated to the file system. Thesepermissions are defined in a security policy. Windows security policies may be defined on themachine itself (a local security policy) or may be defined in a central network location (a domainsecurity policy).
You can modify your machine’s local security policy by selecting Control Panel ➤ Admin-istrative Tools ➤ Local Security Policy. You will see a screen similar to the one in Figure 12-5.
Figure 12-5. The local security policy settings
CHAPTER 12 ■ SECURING TOMCAT218
7850ch12FINAL.qxd 2/28/07 11:13 AM Page 218
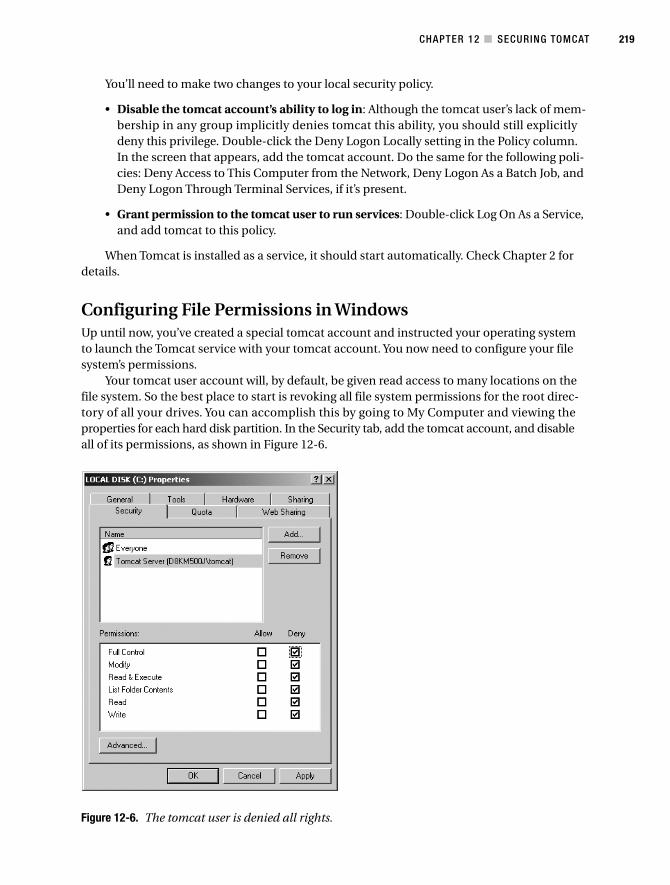
You’ll need to make two changes to your local security policy.
• Disable the tomcat account’s ability to log in: Although the tomcat user’s lack of mem-bership in any group implicitly denies tomcat this ability, you should still explicitlydeny this privilege. Double-click the Deny Logon Locally setting in the Policy column.In the screen that appears, add the tomcat account. Do the same for the following poli-cies: Deny Access to This Computer from the Network, Deny Logon As a Batch Job, andDeny Logon Through Terminal Services, if it’s present.
• Grant permission to the tomcat user to run services: Double-click Log On As a Service,and add tomcat to this policy.
When Tomcat is installed as a service, it should start automatically. Check Chapter 2 fordetails.
Configuring File Permissions in WindowsUp until now, you’ve created a special tomcat account and instructed your operating systemto launch the Tomcat service with your tomcat account. You now need to configure your filesystem’s permissions.
Your tomcat user account will, by default, be given read access to many locations on thefile system. So the best place to start is revoking all file system permissions for the root direc-tory of all your drives. You can accomplish this by going to My Computer and viewing theproperties for each hard disk partition. In the Security tab, add the tomcat account, and disableall of its permissions, as shown in Figure 12-6.
Figure 12-6. The tomcat user is denied all rights.
CHAPTER 12 ■ SECURING TOMCAT 219
7850ch12FINAL.qxd 2/28/07 11:13 AM Page 219
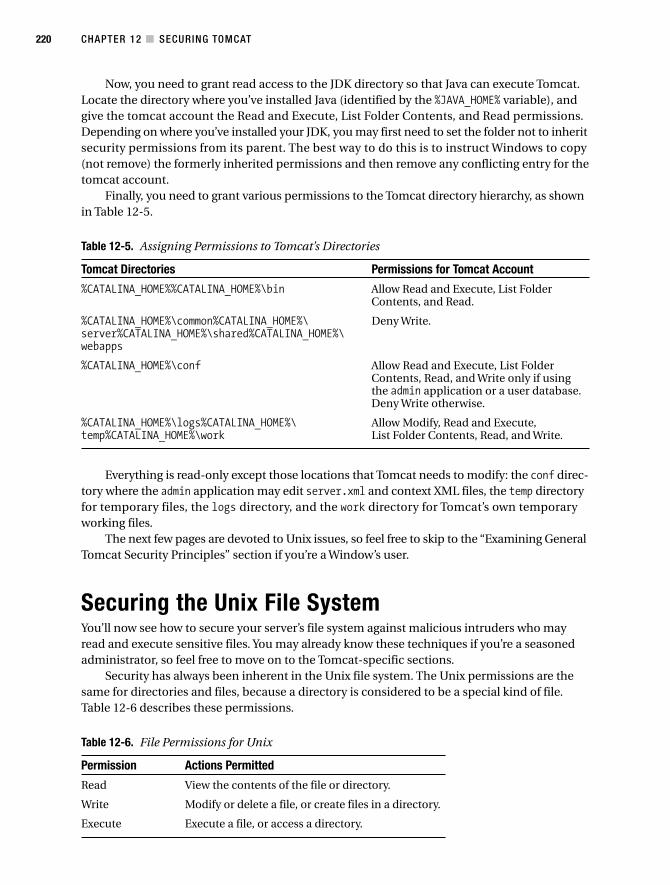
Now, you need to grant read access to the JDK directory so that Java can execute Tomcat.Locate the directory where you’ve installed Java (identified by the %JAVA_HOME% variable), andgive the tomcat account the Read and Execute, List Folder Contents, and Read permissions.Depending on where you’ve installed your JDK, you may first need to set the folder not to inheritsecurity permissions from its parent. The best way to do this is to instruct Windows to copy(not remove) the formerly inherited permissions and then remove any conflicting entry for thetomcat account.
Finally, you need to grant various permissions to the Tomcat directory hierarchy, as shownin Table 12-5.
Table 12-5. Assigning Permissions to Tomcat’s Directories
Tomcat Directories Permissions for Tomcat Account
%CATALINA_HOME%%CATALINA_HOME%\bin Allow Read and Execute, List FolderContents, and Read.
%CATALINA_HOME%\common%CATALINA_HOME%\ Deny Write.server%CATALINA_HOME%\shared%CATALINA_HOME%\webapps
%CATALINA_HOME%\conf Allow Read and Execute, List FolderContents, Read, and Write only if usingthe admin application or a user database.Deny Write otherwise.
%CATALINA_HOME%\logs%CATALINA_HOME%\ Allow Modify, Read and Execute, temp%CATALINA_HOME%\work List Folder Contents, Read, and Write.
Everything is read-only except those locations that Tomcat needs to modify: the conf direc-tory where the admin application may edit server.xml and context XML files, the temp directoryfor temporary files, the logs directory, and the work directory for Tomcat’s own temporaryworking files.
The next few pages are devoted to Unix issues, so feel free to skip to the “Examining GeneralTomcat Security Principles” section if you’re a Window’s user.
Securing the Unix File SystemYou’ll now see how to secure your server’s file system against malicious intruders who mayread and execute sensitive files. You may already know these techniques if you’re a seasonedadministrator, so feel free to move on to the Tomcat-specific sections.
Security has always been inherent in the Unix file system. The Unix permissions are thesame for directories and files, because a directory is considered to be a special kind of file.Table 12-6 describes these permissions.
Table 12-6. File Permissions for Unix
Permission Actions Permitted
Read View the contents of the file or directory.
Write Modify or delete a file, or create files in a directory.
Execute Execute a file, or access a directory.
CHAPTER 12 ■ SECURING TOMCAT220
7850ch12FINAL.qxd 2/28/07 11:13 AM Page 220

Controlling Users, Groups, and Owners in UnixTo use these permissions, you need to consider how to assign these permissions to the varioususers who will be accessing your operating system.
Working with UsersAnyone who wants to log onto a Unix system must know an account name and its associatedpassword. Each user can be assigned one or more of the permissions you saw previously andthus be granted authority to manipulate objects (files or directories) in the file system.
Working with GroupsUnix allows you to add users to a group. Groups can then receive permissions with all theusers who belong to a group sharing those permissions.
Working with OwnersFinally, Unix has the concept of a file/directory owner. An owner is a user who ultimately hascomplete control over what permissions other users or groups have for a given resource,regardless of what permissions the user has been granted.
Working with SuperusersThis discussion wouldn’t be complete without including one additional detail. Unix has a typeof superuser account. These accounts have complete and unrestricted access to your system,regardless of any other permission that has been set. On Unix, the default superuser accountis called root.
The password for this account should be well chosen and extremely well guarded. You’readvised not to use these accounts for your day-to-day operations, as any virus or other mali-cious program may inadvertently execute when it’s running, and this account has completecontrol of your system.
Creating Users and Groups in UnixOn Unix, you use command-line utilities to create and manipulate users and groups. Althoughthese are Linux utilities, they have analogs in other Unix-like operating systems, which willoffer similar functionality. All these commands require you to be logged in as root.
Alternatively, because of the caveats on superuser accounts expressed previously, you canuse the sudo command, which allows you to run commands as if you were logged in as root (orany user you want to configure). This effect wears off after five minutes (though this timeout canalso be configured), and you’re returned to your old user permissions. This ensures that youdon’t leave a root-enabled terminal unattended for longer than five minutes and that, sinceyou use your own password, you don’t have to use the root password in public.
To run a command under sudo, simply append the appropriate command and supplyyour password.
$ sudo useradd lauraj -g users
CHAPTER 12 ■ SECURING TOMCAT 221
7850ch12FINAL.qxd 2/28/07 11:13 AM Page 221

sudo gives you many other features, most of which can be used to give auditable responsi-bility to other users. See www.courtesan.com/sudo/ for more details.
You can determine which groups a user belongs to with the groups command, which dis-plays its results as the username followed by the user’s groups.
$ groups matthewm
matthewm : users abusers
You add new users with the useradd utility.
$ useradd lauraj
This creates a new user in a group with the same name as the user. You can specify whichgroup a user should belong to with the -g parameter, though the group must exist for any ofthe group assignment commands to work.
$ useradd lauraj -g users
Use the -G parameter to add a user to multiple groups and separate each group bya comma.
You can modify the groups to which an existing user belongs with the usermod command.It takes the same -g and -G parameters as the useradd command. The following example of theusermod command will make user matthewm belong only to the users group:
$ usermod -g users -G "" matthewm
You can delete users using the userdel command.
$ userdel matthewm
You can create groups with the groupadd command.
$ groupadd abusers
You can delete groups with the groupdel command.
$ groupdel lovers
Assigning Permissions in UnixThe Unix model of security isn’t as flexible as the Windows model, though it trades the com-plexity of Windows for a simplicity that’s easy to understand and easy to administer.
Setting Permissions in UnixTo view permissions in Unix, all you need is the ls utility. The following command will displaythe contents of a directory complete with permissions information:
$ ls -l
CHAPTER 12 ■ SECURING TOMCAT222
7850ch12FINAL.qxd 2/28/07 11:13 AM Page 222

The -l parameter tells the ls command to display the long file directory format, whichincludes the permissions. The output of this command looks like the following:
$ ls -l
drwxr-xr-x 2 tomcat tomcat 4096 Oct 22 18:38 bin
You’ll see a series of columns that correspond to each file or directory in the current direc-tory. You’re concerned only with the first, third, fourth, and last columns. Let’s define each ofthose and drop out the other columns that are irrelevant to the discussion.
Permissions Owner Group Filename
=======================================
drwxr-xr-x tomcat tomcat bin
Now, let’s break down the values of each entry in the permissions column. The permissionscolumn itself can be viewed as four separate columns: file type, owner permissions, group per-missions, and permissions for other users. Let’s take the first and last files from the previous listand break down the permissions column for each.
File Type Owner Group Other P. Filename
=====================================================
d rwx r-x r-x bin
The first subcolumn of the permissions column dictates the file type, such as d for direc-tory, l for link, or - for a normal file. All of the remaining columns display whether the owner,group, or other users have read (r), write (w), or executable (x) access to that file (rememberthat for directories, the executable property indicates whether the user has access to the direc-tory). In the previous case, all three of these groups have read and execute rights, but only theowner of the bin directory can write to the directory.
Changing Permissions
You use the chmod utility to change the permissions of a file. For example, you can change thepermissions of a file so that every user can read and write to it by running chmod with the fol-lowing parameters:
$ chmod u=rw,g=rw,o=rw file01
The u parameter sets the permissions for the owner of the file; the g parameter sets thepermissions for the group associated with the file, and o sets the permissions for everyoneelse. You can use one, two, or all three of these parameters. The following is the result of theoperation:
$ chmod u=rw,g=rw,o=rw file01
$ ls -l | grep file01
-rw-rw-rw- ... file01
Table 12-7 describes the chmod command in more detail.
CHAPTER 12 ■ SECURING TOMCAT 223
7850ch12FINAL.qxd 2/28/07 11:13 AM Page 223
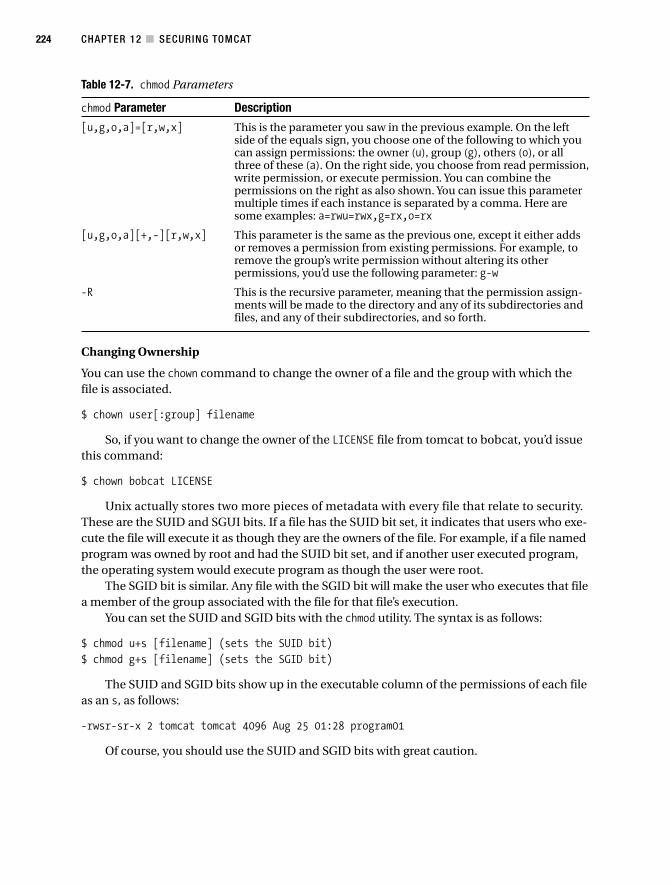
Table 12-7. chmod Parameters
chmod Parameter Description
[u,g,o,a]=[r,w,x] This is the parameter you saw in the previous example. On the leftside of the equals sign, you choose one of the following to which youcan assign permissions: the owner (u), group (g), others (o), or allthree of these (a). On the right side, you choose from read permission,write permission, or execute permission. You can combine thepermissions on the right as also shown. You can issue this parametermultiple times if each instance is separated by a comma. Here aresome examples: a=rwu=rwx,g=rx,o=rx
[u,g,o,a][+,-][r,w,x] This parameter is the same as the previous one, except it either addsor removes a permission from existing permissions. For example, toremove the group’s write permission without altering its otherpermissions, you’d use the following parameter: g-w
-R This is the recursive parameter, meaning that the permission assign-ments will be made to the directory and any of its subdirectories andfiles, and any of their subdirectories, and so forth.
Changing Ownership
You can use the chown command to change the owner of a file and the group with which thefile is associated.
$ chown user[:group] filename
So, if you want to change the owner of the LICENSE file from tomcat to bobcat, you’d issuethis command:
$ chown bobcat LICENSE
Unix actually stores two more pieces of metadata with every file that relate to security.These are the SUID and SGUI bits. If a file has the SUID bit set, it indicates that users who exe-cute the file will execute it as though they are the owners of the file. For example, if a file namedprogram was owned by root and had the SUID bit set, and if another user executed program,the operating system would execute program as though the user were root.
The SGID bit is similar. Any file with the SGID bit will make the user who executes that filea member of the group associated with the file for that file’s execution.
You can set the SUID and SGID bits with the chmod utility. The syntax is as follows:
$ chmod u+s [filename] (sets the SUID bit)
$ chmod g+s [filename] (sets the SGID bit)
The SUID and SGID bits show up in the executable column of the permissions of each fileas an s, as follows:
-rwsr-sr-x 2 tomcat tomcat 4096 Aug 25 01:28 program01
Of course, you should use the SUID and SGID bits with great caution.
CHAPTER 12 ■ SECURING TOMCAT224
7850ch12FINAL.qxd 2/28/07 11:13 AM Page 224

Planning Security PermissionsNow it’s time to talk about how to secure your system by using wise permissions configurations.
Separate Tomcat AccountSome users run Tomcat with their normal user account or with the superuser account, both ofwhich are bad ideas. If Tomcat ever becomes compromised, it could use the permissionsgranted to the account that started it (such as your own account or the all-powerful superuseraccount) to wreak havoc. Therefore, you vastly improve the security of your file system by cre-ating a special user account just for running Tomcat. This distinct account should be assignedonly those permissions necessary to run Tomcat and nothing more.
Suggested Account Settings for UnixCreate an account for running Tomcat called tomcat. You should include tomcat in only onegroup, also named tomcat. Because you’ll want to run Tomcat as a daemon, you shouldn’t letconsole logins use this account. Disabling login ability is often achieved by starring the account’spassword.
Here are two examples of this technique. The first example is from a BSD-like system thatdoesn’t use a shadow password file.
/etc/passwd:
tomcat:*:23102:100:Tomcat:/:/bin/csh
The second example is from a Linux system that does use a shadow password file.
/etc/passwd:
tomcat:x:502:502:Tomcat:/:/bin/bash
/etc/shadow:
tomcat:*:12040:0:99999:7:::
Note how the password column has been given an asterisk (*). This means you can’t loginto this account.
The various Unix operating systems have several mechanisms for creating and configur-ing daemons. Chapter 2 discussed this procedure.
Configuring File Permissions in UnixUp until now, you’ve created a special tomcat account and instructed your operating systemto launch the service with your tomcat account. You now need to configure your file system’spermissions.
Table 12-8 shows the recommended directory, owner/group, and file permission combi-nations.
CHAPTER 12 ■ SECURING TOMCAT 225
7850ch12FINAL.qxd 2/28/07 11:13 AM Page 225

Table 12-8. Assigning Permissions to Tomcat’s Directories
Directory/File Owner/Group Permissions
$CATALINA_HOME root/tomcat rwxr-x---
$CATALINA_HOME/bin root/tomcat rwxr-x---
$CATALINA_HOME/bin/*.sh root/tomcat rwxr-x---
$CATALINA_HOME/common root/tomcat rwxr-x---
$CATALINA_HOME/conf root/tomcat rwxrwx--- (only if using the admin applicationor a user database) or rwxr-x--- (otherwise)
$CATALINA_HOME/logs root/tomcat rwxrwx---
$CATALINA_HOME/logs/*.* root/tomcat r w-rw----
$CATALINA_HOME/server root/tomcat rwxr-x---
$CATALINA_HOME/shared root/tomcat rwxr-x---
$CATALINA_HOME/temp root/tomcat rwxrwx---
$CATALINA_HOME/webapps root/tomcat rwxr-x---
$CATALINA_HOME/work root/tomcat rwxrwx---
If not otherwise indicated, all files in the listed directories should have the same ownershipas their parent directory and have rw-r----- permissions.
Examining General Tomcat Security PrinciplesNow that you’ve secured your file system against attack, you should consider a few other secu-rity issues before tackling Tomcat’s configuration files. All but one of these applies to Windowsand Unix.
Retaining Tomcat’s Administration ToolsBecause tomcat-users.xml stores your username and password for Tomcat’s managementapplications, you may want to switch to a different realm, as discussed in Chapter 11. Other-wise, a hacker may view this file and gain access to your Tomcat management applications(though you can also digest the passwords). Because the tomcat account has only read accessto the webapps directory, the hacker couldn’t modify your web applications, but the hacker couldstop or reload your web applications on demand. Thus, if you use the Tomcat realms that usetomcat-users.xml, you should consider removing the admin and manager web applications.
If you use the admin application to change server.xml or users in tomcat-users.xml, thenyou must have write access to the directory. This also means a hacker can write to this direc-tory and carry out any of the commands that the admin tool can and so may be able to addcontext XML files for malicious code. This also applies to user databases because they needwrite access to tomcat-users.xml.
If this bothers you, remove the admin tool, should it be installed, and use a JDBC or JNDIrealm (or even the memory realm if you want; it doesn’t require write access to any files).
CHAPTER 12 ■ SECURING TOMCAT226
7850ch12FINAL.qxd 2/28/07 11:13 AM Page 226

Read-Only webapps DirectoryYou’ll note that you’ve set read-only permissions on the webapps directory. This is to preventhackers from modifying your web applications. This also means, however, that you may not beable to use WAR files when running Tomcat with the tomcat account, since Tomcat won’t be ableto expand the WAR into the file system. Thus, you’ll need to unzip the WAR file yourself whenyou deploy it, run Tomcat as root from the console when you deploy new WAR files for the firsttime, or set the containing host’s unpackWARs attribute to false.
This also means that web applications can’t write to their directories. This is recommendedin the Servlet specification because it’s assumed that some servlet containers will run unex-panded WAR files and would thus not be able to write changes to the web application’s filesystem (it doesn’t have one). This is the case if unpackWARs is set to false.
Securing Your FilesYou should review your operating system for any additional files stored on the server thatshould be secured. You should consider either moving these files to another server or ensuringthat the tomcat account doesn’t have any permissions for them. On Windows, add the tomcatuser to the Security tab for the file or directory, and explicitly click the Deny checkboxes. InUnix, set the permissions for others to nothing (-rwx).
Knowing If Your Security Has Been ViolatedDespite your best efforts, it’s possible that a hacker may exploit Tomcat (or another service)and modify your file system in some unimagined way. Intrusion detection systems can helpyou detect when your file system has been tampered with. Tripwire is one of these programs,and Red Hat includes instructions for installing and configuring Tripwire in its Official Red HatLinux Reference Guide.
If you’re not using Red Hat Linux, see www.tripwire.com for more information.
Read-Only File SystemsSome operating systems support read-only file systems. In this concept, available only toUnix-like operating systems, you configure two separate file systems. The first file system,a root file system, contains your operating system configured just the way you need it, witha Tomcat daemon. You then make this file system read-only (or for ultimate security, transfer itto a read-only medium, such as a CD or a hard drive that you can make read-only). The sec-ond file system is contained on a read-write medium and contains your Tomcat installationand other files that must be modified.
Should you want to take this (highly secure) step, you’ll need to find documentation foryour specific operating system. No standard Unix way exists to achieve this functionality. Youmust exercise caution if you attempt this route; once you mark your root file system as read-only, you’ll need a boot disk to make any changes.
CHAPTER 12 ■ SECURING TOMCAT 227
7850ch12FINAL.qxd 2/28/07 11:13 AM Page 227

Securing Tomcat’s Default ConfigurationIn this section, you’ll tighten up the default installation by editing the configuration files andmanaging the web applications that come with Tomcat. This will remove some of the mostvulnerable entry points for attacks against the server.
As detailed earlier, the admin application and user databases are the main causes of con-cern. If you don’t use either of these, then you may keep and use the manager application, ifyou have considered the previous options. Without access to the manager password or writeaccess to server.xml, a hacker can’t access the manager application.
If you don’t take these steps, it’s safer to place the manager folder and its contents outsideof Tomcat’s directory structure (you should consider doing this anyway). This means an intrudercan’t enable it by just adding an entry to tomcat-users.xml. However, it’s still possible to enablethe application by modifying the server.xml file and modifying the manager context’s docBaseattribute. As long as the manager folder is on the same machine as the server installation, it’spossible to set up the manager again (though it’s more difficult if you have appropriate per-missions set).
You should always remove the example web applications (jsp-examples andservlets-examples) on a development server. They aren’t necessary for Tomcat to run and take up disk space, if nothing else. Likewise, unless you’re using WebDAV, youshould remove the webdav web application.
The Tomcat documentation is now provided as a web application named tomcat-docs,which is an entirely static web application with no JSP pages or servlets. Whether or not youleave this in place is up to you, as it may be useful for developers to have a local copy of thedocumentation, whether to save network traffic or in case of problems connecting to the out-side world.
It may also be worth disabling the default ROOT web application if you don’t have one ofyour own. If your applications will be accessed by a web application context name, then it maybe worth replacing the contents of the ROOT folder with an empty index.html file. You can thensupply an empty web application that would show access restriction error messages to clientswho attempt to access the directory.
Alternatively, you can also disable unauthorized access to the web application. Thus, it’spossible to restrict access to the ROOT application to internal clients, such as the developergroup, using valves or filters.
Securing Tomcat’s PermissionsConfiguring your file system for maximum security is an important part of securing your Tomcatdeployment, but it’s only half of the picture. By using Java’s security manager architecture, youcan restrict those features of the Java language that Tomcat is able to access.
The Java Security ManagerThe Java security manager architecture allows you to impose fine-grained security restrictionsto all Java applications. This security architecture is turned off by default, but you can turn it onat any time. In the following sections, you’ll see the security manager architecture in generalterms and then look at how this architecture specifically applies to Tomcat.
CHAPTER 12 ■ SECURING TOMCAT228
7850ch12FINAL.qxd 2/28/07 11:13 AM Page 228

Overview of the Security ManagerThe security manager architecture works on the notion of permissions (just as the file systemdoes). Once the security manager is turned on, applications must have explicit permission toperform certain security-sensitive tasks, such as creating a custom class loader or openinga socket to servers.
Therefore, to use the security manager effectively, it’s necessary to know how applicationscan be given permissions and what the possible permissions are.
Granting Permissions to Applications
Policy files are the mechanism that the security manager uses to grant permissions to applica-tions. Policy files are nothing more than simple text files composed of individual actions thatapplications can perform.
A policy file is composed of grant entries, as shown in Listing 12-1.
Listing 12-1. A Policy File
// first grant entry
grant {
permission java.lang.RuntimePermission "stopThread";
}
// second grant entry
grant codeBase "file:${java.home}/lib/ext/*" {
permission java.security.AllPermission;
};
The first grant entry demonstrates the simplicity of the syntax. It grants all applicationsthe ability to access the deprecated Thread.stop() method.
The second grant entry illustrates that code in specific locations can also be granted per-missions. This is useful when you want to extend permissions to certain trusted code whiledenying permissions to all other code. In this case, all code in the JAVA_HOME/lib/ext directoryis granted all permissions, which disables the security manager architecture for that code.
Writing Grant EntriesEach grant entry must be composed of the following syntax:
grant codeBase "URL" {
// this is a comment
permission permission_class_name "target_name", "action";
...
};
Note that comments in policy files must begin with // on each line. As you saw in the firstgrant entry, the codeBase attribute is optional. codeBase specifies a URL to which all the per-missions should apply. Table 12-9 describes the syntax.
CHAPTER 12 ■ SECURING TOMCAT 229
7850ch12FINAL.qxd 2/28/07 11:13 AM Page 229

Table 12-9. The codeBase Attribute’s Syntax
codeBase Example Description
file:/c:/myapp/ This assigns the permissions in the grant block to the c:\myappdirectory. Note that the slash (/) indicates that only class files in thedirectory will receive the permissions, not any JAR files orsubdirectories.
http://java.sun.com/* All code from the specified URL will be granted the permissions. In thiscase, the /* at the end of the URL indicates that all class files and JARfiles will be assigned the permissions but not any subdirectories.
file:/matthewm/- All code in the /matthewm directory will be granted the permissions inthe grant block. The /- indicates that all class files and JAR files in thedirectory and its subdirectories will be assigned the permissions.
Within the grant block, one or more permissions can be assigned. A permission consists ofa permission class name and, in some cases, an additional target that identifies a specific per-mission within the permission class. Some permission targets can additionally take parameters,called actions. Listing 12-2 shows examples of permissions.
Listing 12-2. Example Permissions
grant {
// allows applications to listen on all ports
permission java.net.SocketPermission "localhost", "listen";
// allows applications to read the "java.version" property
permission java.util.PropertyPermission "java.version", "read";
}
Special classes that ultimately inherit from the abstract class java.security.Permissiondefine permissions. Most permission classes define special targets that represent a securitypermission that can be turned on and off.
Nineteen different permission classes offer control over various permissions. Table 12-10describes these classes to demonstrate what’s possible with permissions but doesn’t provide anextensive listing of the permission targets. You can view the complete list of permission classesand their targets at http://java.sun.com/j2se/1.4/docs/guide/security/permissions.html.
Table 12-10. Permissions for Policy Files
Permission Class Description
java.security.AllPermission By granting this permission, all other permissionsare also granted. Granting this permission is thesame as disabling the security manager for theaffected code.
java.security.SecurityPermission Allows programmatic access to various securityfeatures of the Java language.
CHAPTER 12 ■ SECURING TOMCAT230
7850ch12FINAL.qxd 2/28/07 11:13 AM Page 230
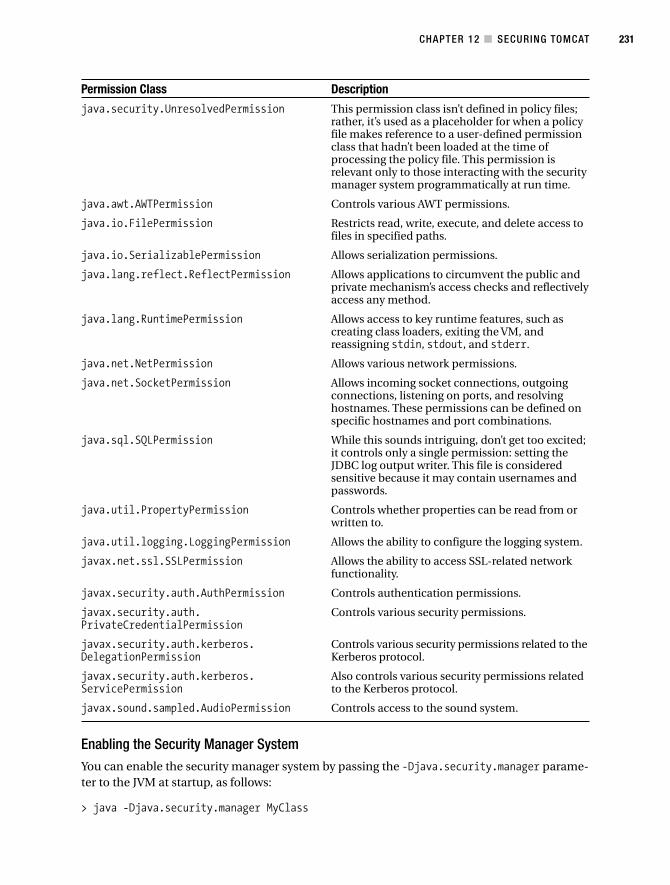
Permission Class Description
java.security.UnresolvedPermission This permission class isn’t defined in policy files;rather, it’s used as a placeholder for when a policyfile makes reference to a user-defined permissionclass that hadn’t been loaded at the time ofprocessing the policy file. This permission isrelevant only to those interacting with the securitymanager system programmatically at run time.
java.awt.AWTPermission Controls various AWT permissions.
java.io.FilePermission Restricts read, write, execute, and delete access tofiles in specified paths.
java.io.SerializablePermission Allows serialization permissions.
java.lang.reflect.ReflectPermission Allows applications to circumvent the public andprivate mechanism’s access checks and reflectivelyaccess any method.
java.lang.RuntimePermission Allows access to key runtime features, such ascreating class loaders, exiting the VM, andreassigning stdin, stdout, and stderr.
java.net.NetPermission Allows various network permissions.
java.net.SocketPermission Allows incoming socket connections, outgoingconnections, listening on ports, and resolvinghostnames. These permissions can be defined onspecific hostnames and port combinations.
java.sql.SQLPermission While this sounds intriguing, don’t get too excited;it controls only a single permission: setting theJDBC log output writer. This file is consideredsensitive because it may contain usernames andpasswords.
java.util.PropertyPermission Controls whether properties can be read from orwritten to.
java.util.logging.LoggingPermission Allows the ability to configure the logging system.
javax.net.ssl.SSLPermission Allows the ability to access SSL-related networkfunctionality.
javax.security.auth.AuthPermission Controls authentication permissions.
javax.security.auth. Controls various security permissions.PrivateCredentialPermission
javax.security.auth.kerberos. Controls various security permissions related to the DelegationPermission Kerberos protocol.
javax.security.auth.kerberos. Also controls various security permissions related ServicePermission to the Kerberos protocol.
javax.sound.sampled.AudioPermission Controls access to the sound system.
Enabling the Security Manager SystemYou can enable the security manager system by passing the -Djava.security.manager parame-ter to the JVM at startup, as follows:
> java -Djava.security.manager MyClass
CHAPTER 12 ■ SECURING TOMCAT 231
7850ch12FINAL.qxd 2/28/07 11:13 AM Page 231

By default, Java looks for JAVA_HOME/lib/security/java.policy to determine what per-missions to grant when the security manager is turned on. For more information on enablingthe security manager and using your own policy files, see http://java.sun.com/j2se/1.4/docs/guide/security/PolicyFiles.html.
Using the Security Manager with TomcatNow that I’ve covered the basics of the security manager system, it’s time to talk about how touse it with Tomcat.
Enabling Tomcat’s Security ManagerThe preferred way to start Tomcat with the security manager enabled on Unix systems follows:
$ $CATALINA_HOME/bin/catalina.sh start -security
On Windows systems, you’d issue this command:
> %CATALINA_HOME%\bin\catalina start -security
Tomcat’s Policy FileTomcat uses the CATALINA_HOME/conf/catalina.policy file to determine its own permissionsand those of its web applications. Listings 12-3, 12-4, and 12-5 show this file in full. Note thatit’s divided into three sections: system code permissions, Catalina code permissions, and webapplication code permissions.
Tomcat’s policy file grants all permissions to javac, which compiles JSP pages into servlets,and it also grants all permissions to any Java standard extensions. Four grant lines are usedinstead of two to deal with multiple path possibilities. Note that you may need to add addi-tional grants to this section if your JVM uses different paths for its standard extensions (Mac OS Xneeds additional grants, for example) and you’re actually putting JARs or classes in those paths.
Listing 12-3. The System and Catalina Code Permissions from Tomcat’s Default Policy File// ========== SYSTEM CODE PERMISSIONS =========================================
// These permissions apply to javac
grant codeBase "file:${java.home}/lib/-" {
permission java.security.AllPermission;
};
// These permissions apply to all shared system extensions
grant codeBase "file:${java.home}/jre/lib/ext/-" {
permission java.security.AllPermission;
};
CHAPTER 12 ■ SECURING TOMCAT232
7850ch12FINAL.qxd 2/28/07 11:13 AM Page 232

// These permissions apply to javac when ${java.home] points at $JAVA_HOME/jre
grant codeBase "file:${java.home}/../lib/-" {
permission java.security.AllPermission;
};
// These permissions apply to all shared system extensions when
// ${java.home} points at $JAVA_HOME/jre
grant codeBase "file:${java.home}/lib/ext/-" {
permission java.security.AllPermission;
};
// ========== CATALINA CODE PERMISSIONS =======================================
/ These permissions apply to the daemon code
grant codeBase "file:${catalina.home}/bin/commons-daemon.jar" {
permission java.security.AllPermission;
};
// These permissions apply to the logging API
grant codeBase "file:${catalina.home}/bin/tomcat-juli.jar" {
permission java.security.AllPermission;
};
// These permissions apply to the server startup code
grant codeBase "file:${catalina.home}/bin/bootstrap.jar" {
permission java.security.AllPermission;
};
// These permissions apply to the servlet API classes
// and those that are shared across all class loaders
// located in the "lib" directory
grant codeBase "file:${catalina.home}/lib/-" {
permission java.security.AllPermission;
};
Note that Catalina grants all permissions to the following:
• Tomcat’s startup classes (CATALINA_HOME/bin/*.jar)
• The common class loader files (CATALINA_HOME/lib)
Tomcat allows read access to various system properties. Note also the following grant:
permission java.lang.RuntimePermission
"accessClassInPackage.org.apache.jasper.runtime";
CHAPTER 12 ■ SECURING TOMCAT 233
7850ch12FINAL.qxd 2/28/07 11:13 AM Page 233

The accessClassInPackage.* target of RuntimePermission allows classes to see otherclasses to which they wouldn’t normally have access. In this case, Tomcat is giving all webapplicationsand access to the org.apache.jasper.runtime.* package.
Listing 12-4. The Web Application Permissions from Tomcat’s Default Policy File
// ======== WEB APPLICATION PERMISSIONS
=====================================
// These permissions are granted by default to all web applications
// In addition, a web application will be given a read FilePermission
// and JndiPermission for all files and directories in its document root.
grant {
// Required for JNDI lookup of named JDBC DataSource's and
// javamail named MimePart DataSource used to send mail
permission java.util.PropertyPermission "java.home", "read";
permission java.util.PropertyPermission "java.naming.*", "read";
permission java.util.PropertyPermission "javax.sql.*", "read";
// OS Specific properties to allow read access
permission java.util.PropertyPermission "os.name", "read";
permission java.util.PropertyPermission "os.version", "read";
permission java.util.PropertyPermission "os.arch", "read";
permission java.util.PropertyPermission "file.separator", "read";
permission java.util.PropertyPermission "path.separator", "read";
permission java.util.PropertyPermission "line.separator", "read";
// JVM properties to allow read access
permission java.util.PropertyPermission "java.version", "read";
permission java.util.PropertyPermission "java.vendor", "read";
permission java.util.PropertyPermission "java.vendor.url", "read";
permission java.util.PropertyPermission "java.class.version", "read";
permission java.util.PropertyPermission "java.specification.version", "read";
permission java.util.PropertyPermission "java.specification.vendor", "read";
permission java.util.PropertyPermission "java.specification.name", "read";
permission java.util.PropertyPermission "java.vm.specification.version", "read";
permission java.util.PropertyPermission "java.vm.specification.vendor", "read";
permission java.util.PropertyPermission "java.vm.specification.name", "read";
permission java.util.PropertyPermission "java.vm.version", "read";
permission java.util.PropertyPermission "java.vm.vendor", "read";
permission java.util.PropertyPermission "java.vm.name", "read";
// Required for OpenJMX
permission java.lang.RuntimePermission "getAttribute";
CHAPTER 12 ■ SECURING TOMCAT234
7850ch12FINAL.qxd 2/28/07 11:13 AM Page 234

// Allow read of JAXP compliant XML parser debug
permission java.util.PropertyPermission "jaxp.debug", "read";
// Precompiled JSPs need access to this package.
permission java.lang.RuntimePermission
"accessClassInPackage.org.apache.jasper.runtime";
permission java.lang.RuntimePermission
"accessClassInPackage.org.apache.jasper.runtime.*";
};
// You can assign additional permissions to particular web applications by
// adding additional "grant" entries here, based on the code base for that
// application, /WEB-INF/classes/, or /WEB-INF/lib/ jar files.
//
// Different permissions can be granted to JSP pages, classes loaded from
// the /WEB-INF/classes/ directory, all jar files in the /WEB-INF/lib/
// directory, or even to individual jar files in the /WEB-INF/lib/ directory.
//
// For instance, assume that the standard "examples" application
// included a JDBC driver that needed to establish a network connection to the
// corresponding database and used the scrape taglib to get the weather from
// the NOAA web server. You might create a "grant" entries like this:
//
// The permissions granted to the context root directory apply to JSP pages.
// grant codeBase "file:${catalina.home}/webapps/examples/-" {
// permission java.net.SocketPermission "dbhost.mycompany.com:5432", "connect";
// permission java.net.SocketPermission "*.noaa.gov:80", "connect";
// };
//
// The permissions granted to the context WEB-INF/classes directory
// grant codeBase "file:${catalina.home}/webapps/examples/WEB-INF/classes/-" {
// };
//
// The permission granted to your JDBC driver
// grant codeBase
"jar:file:${catalina.home}/webapps/examples/WEB-INF/lib/driver.jar!/-" {
// permission java.net.SocketPermission "dbhost.mycompany.com:5432", "connect";
// };
// The permission granted to the scrape taglib
// grant codeBase
"jar:file:${catalina.home}/webapps/examples/WEB-INF/lib/scrape.jar!/-" {
// permission java.net.SocketPermission "*.noaa.gov:80", "connect";
};
CHAPTER 12 ■ SECURING TOMCAT 235
7850ch12FINAL.qxd 2/28/07 11:13 AM Page 235

Recommended Security Manager PracticesNow that you know how to turn on the security manager with Tomcat and where Tomcatstores its policy file, you can look at recommended practices for granting permissions to yourapplications.
Use the Security ManagerIf you don’t turn on Tomcat’s security manager, any JSP page or class file is free to perform anyaction it likes. This includes opening unauthorized connections to other network hosts, destroy-ing your file system, or even abnormally terminating Tomcat by issuing the System.exit()command.
To maintain a secure Tomcat installation, you should assume that at some point a hackerwill be able to deploy malicious code into one of Tomcat’s web applications. By turning thesecurity manager on, you gain explicit control over what web applications are allowed to do.
Regulating Common CodePlacing code into Tomcat’s common class loader directories (CATALINA_HOME/lib) is a good wayto share common libraries among web applications. However, because of Tomcat’s liberal per-mission grants for this class loader (all permissions are granted), you may want to think twicebefore you make a habit of placing code in this class loader.
You must do either of the following:
• Ensure that all code placed in this class loader is trusted.
• Place the code in the shared class loader. This class loader isn’t covered by the securitymanager by default and is thus restricted in its actions.
Example GrantsAs mentioned, turning the security manager on gives you complete control over what webapplications are allowed to do. The flip side of this security coin is that web applications willfind themselves unable to do some things that they may have taken for granted before. Con-sider the following tasks that are unauthorized with Tomcat’s default policy configuration:
• Creating a class loader
• Accessing a database via a socket (for example, the MySQL JDBC driver establishinga connection with a MySQL database)
• Sending an e-mail via the JavaMail API
• Reading or writing to files outside a web application’s directory
Creating a Class Loader
Listing 12-5 shows how to give a specific web application the ability to create a class loader.
CHAPTER 12 ■ SECURING TOMCAT236
7850ch12FINAL.qxd 2/28/07 11:13 AM Page 236

Listing 12-5. Allowing Class Loader Creation
grant codeBase "file:${catalina.home}/webapps/tomcatBook/WEB-INF/-" {
permission java.lang.RuntimePermission "createClassLoader";
};
This is an extremely dangerous permission to grant. Applications that can instantiatetheir own class loaders can, by definition, load their own classes. As mentioned earlier, mali-cious classes could then be used to compromise your system in a number of ways.
Opening Socket Connections to Databases
Listing 12-6 shows how to allow all web applications access to a specific database running onthe host db.server.com on port 54321.
Listing 12-6. Allowing a Database Connection
grant codeBase "file:${catalina.home}/webapps/-" {
permission java.net.SocketPermission "db.server.com:54321", "connect";
};
This example allows all code in all web applications to connect to db.server.com:54321. Ifthis is too much of a security risk for you, you have a few alternative options.
First, explicitly assign permission to each web application’s JDBC driver individually, asshown in Listing 12-7.
Listing 12-7. Enabling a Web Application to Make a Database Connection
grant codeBase "file:${catalina.home}/webapps/tomcatBook/WEB-INF/lib/JDBC.jar" {
permission java.net.SocketPermission "db.server.com:54321", "connect";
};
Second, place the JDBC driver into the common class loader, which has all permissionsgranted to it. This means the driver can access the database, but the web application can’t.
Sending an E-mail with JavaMail
To send e-mail, web applications need access to port 25 on an SMTP server. Listing 12-8 showshow to grant this permission to all classes in a web application.
Listing 12-8. Allowing Access to an SMTP Server
grant codeBase "file:${catalina.home}/webapps/myWebApp/WEB-INF/classes/-" {
permission java.net.SocketPermission "mail.server.com:25", "connect";
};
Reading or Writing to Files Outside a Web Application’s Directory
If you want to use your operating system, rather than Java’s permissions, to control file access,you can give your web applications free rein once again, as in Listing 12-9.
CHAPTER 12 ■ SECURING TOMCAT 237
7850ch12FINAL.qxd 2/28/07 11:13 AM Page 237

Listing 12-9. Allowing Access to All Files
grant {
java.io.FilePermission "<<ALL FILES>>", "read,write,execute,delete";
};
If you don’t grant at least some file permissions to your web application, your web appli-cations will be shut out from accessing your file system. You should still secure your systemwith your operating system’s file permissions, because, even though your web applicationsmay be shut out, Tomcat itself has full permissions, and should a malicious hacker modifyTomcat somehow, they could still access your file system.
Using Security RealmsRecall that a realm is a programming interface that’s used to authenticate users and imple-ment container-managed security based on roles. The actual mapping of users to roles can bespecified at deployment time—and can be changed dynamically without having to change theapplication code. I introduced realms in Chapter 11 but deferred a detailed discussion of theweb application-specific configuration to this chapter.
When protecting a resource, you must know which roles are to have access to it. Thisinformation is stored in the web application’s web.xml file in the <security-constraint> ele-ment. The application’s developer should provide you with this information, but it’s a goodidea to be familiar with the options that can be used in a web application.
These settings are usually the developer’s job, and you just have to set up the serverappropriately. However, the admin and manager applications are also protected resources, andyou’re solely in charge of them and may want to change their configurations.
Adding Settings to web.xmlThe <web-resource-collection> element of web.xml is a convenient place to group web resourcestogether so that security can be applied uniformly. You specify the name of the resource and theURL patterns to cover inside this element, which is a subelement of <security-constraint>.
The <role-name> subelement of <auth-constraint>, itself a subelement of <security-constraint>, specifies a role that’s allowed to access this section of the webapplication. Any user belonging to this role may log in, providing they give a valid pass-word. This is the domain of the administrator, as users and roles are defined in realms inserver.xml. The web application doesn’t care what realm is used, as long as the user isconfigured in one of them.
Listing 12-10 shows the relevant section of the admin application’s web.xml file.
Listing 12-10. The Section of web.xml that Protects a Web Application
<!-- Security is active on entire directory -->
<security-constraint>
<display-name>
Tomcat Server Configuration Security Constraint
</display-name>
<web-resource-collection>
CHAPTER 12 ■ SECURING TOMCAT238
7850ch12FINAL.qxd 2/28/07 11:13 AM Page 238
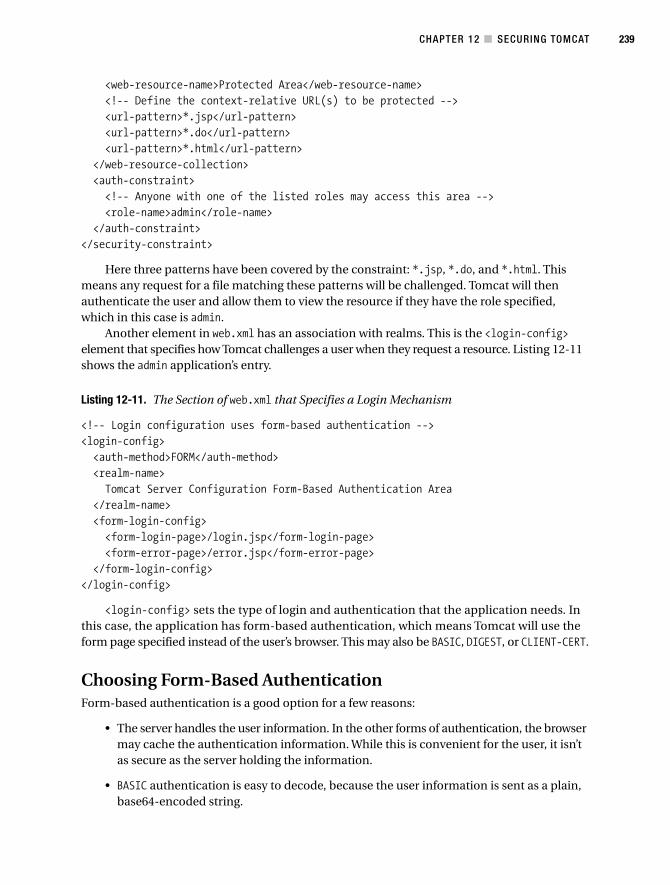
<web-resource-name>Protected Area</web-resource-name>
<!-- Define the context-relative URL(s) to be protected -->
<url-pattern>*.jsp</url-pattern>
<url-pattern>*.do</url-pattern>
<url-pattern>*.html</url-pattern>
</web-resource-collection>
<auth-constraint>
<!-- Anyone with one of the listed roles may access this area -->
<role-name>admin</role-name>
</auth-constraint>
</security-constraint>
Here three patterns have been covered by the constraint: *.jsp, *.do, and *.html. Thismeans any request for a file matching these patterns will be challenged. Tomcat will thenauthenticate the user and allow them to view the resource if they have the role specified,which in this case is admin.
Another element in web.xml has an association with realms. This is the <login-config>element that specifies how Tomcat challenges a user when they request a resource. Listing 12-11shows the admin application’s entry.
Listing 12-11. The Section of web.xml that Specifies a Login Mechanism
<!-- Login configuration uses form-based authentication -->
<login-config>
<auth-method>FORM</auth-method>
<realm-name>
Tomcat Server Configuration Form-Based Authentication Area
</realm-name>
<form-login-config>
<form-login-page>/login.jsp</form-login-page>
<form-error-page>/error.jsp</form-error-page>
</form-login-config>
</login-config>
<login-config> sets the type of login and authentication that the application needs. Inthis case, the application has form-based authentication, which means Tomcat will use theform page specified instead of the user’s browser. This may also be BASIC, DIGEST, or CLIENT-CERT.
Choosing Form-Based AuthenticationForm-based authentication is a good option for a few reasons:
• The server handles the user information. In the other forms of authentication, the browsermay cache the authentication information. While this is convenient for the user, it isn’tas secure as the server holding the information.
• BASIC authentication is easy to decode, because the user information is sent as a plain,base64-encoded string.
CHAPTER 12 ■ SECURING TOMCAT 239
7850ch12FINAL.qxd 2/28/07 11:13 AM Page 239

• Not all browsers supported DIGEST authentication, so you can’t guarantee that all clientswill be able to authenticate. However, if the application is in a closed environment, suchas a corporate intranet, it’s easier to control the choice of browser. Internet Explorer,Mozilla, Firefox, and Konqueror all support DIGEST authentication.
• DIGEST authentication doesn’t work if the passwords are digested on the Tomcat sidebecause of the way that the DIGEST mechanism calculates its digest. The browser firstcalculates a digest of the username, the password, the URL, the HTTP method, anda random string sent to it by the server. Likewise, the server creates a digest using thesame information and then compares the two digests. However, as the password isalready digested on the server, and thus different from the version entered into thebrowser, the two digests will be different and authentication will fail. In other words,Tomcat is creating a message digest of a message digest.
• JDBC realms don’t currently work with DIGEST authentication. Some of the algorithmsto digest the password from the database aren’t yet implemented.
• CLIENT-AUTH is really necessary only in business-to-business transactions, so it doesn’tappear in most web applications that you’ll see.
The one drawback of form-based login for the manager application is that you can’t runmanager commands with Ant, because it can authenticate only using BASIC authentication.
Using Custom Login and Error PagesIf you want to add form-based authentication to a web application in place of some other typesupplied by the developers, Listing 12-12 shows an example.
Listing 12-12. An Example Form for Login
<%@ taglib prefix="c" uri="http://java.sun.com/jstl/core_rt" %>
<c:url value="j_security_check" var="j_security_check"/>
<html>
<head><title>Please Log In</title>
<body>
<form method="POST"
action='${j_security_check}' >
<table border="0" cellspacing="5">
<tr>
<th align="right">Username:</th>
<td align="left"><input type="text" name="j_username"></td>
</tr>
<tr>
<th align="right">Password:</th>
<td align="left"><input type="password" name="j_password"></td>
</tr>
<tr>
<td align="right"><input type="submit" value="Log In"></td>
<td align="left"><input type="reset"></td>
CHAPTER 12 ■ SECURING TOMCAT240
7850ch12FINAL.qxd 2/28/07 11:13 AM Page 240

</tr>
</table>
</form>
</body>
</html>
The important values here are j_security_check, j_username, and j_password. Your formmust submit to the special j_security_check URL (here encoded using the core JSTL tag libraryto allow for browsers that don’t use cookies), with the two special parameter names. This URLis part of the authentication mechanism and will authenticate the user.
Listing 12-13 shows an example error page that’s displayed to users if they fail to log incorrectly, though you could quite easily use the original page.
Listing 12-13. A Login Error Page
<%@ taglib prefix="c" uri="http://java.sun.com/jstl/core_rt" %>
<c:url value="ch12/login.jsp" var="login"/>
<html>
<head><title>Error: Login Failure</title></head>
<body>
Login failed, please try
<a href='${login}'>again</a>.
</body>
</html>
This is simple and gives a link for the user to return to the login page following a failure.Place these files in a web application, and update the links appropriately. The following
examples will assume you’ve placed them in tomcatBook/ch12. Listing 12-14 shows the web.xmlentry to protect the entire web application.
Listing 12-14. An Example web.xml Entry to Protect the tomcatBookWeb Application
<!-- Define a Security Constraint on this Application -->
<security-constraint>
<web-resource-collection>
<web-resource-name>Tomcat Book Application</web-resource-name>
<url-pattern>/*</url-pattern>
</web-resource-collection>
<auth-constraint>
<role-name>tomcat</role-name>
</auth-constraint>
</security-constraint>
<!-- Define the Login Configuration for this Application -->
<login-config>
<auth-method>FORM</auth-method>
<realm-name>Tomcat Book Application</realm-name>
<form-login-config>
<form-login-page>/ch12/login.jsp</form-login-page>
CHAPTER 12 ■ SECURING TOMCAT 241
7850ch12FINAL.qxd 2/28/07 11:13 AM Page 241

<form-error-page>/ch12/error.jsp</form-error-page>
</form-login-config>
</login-config>
<!-- Security roles referenced by this web application -->
<security-role>
<description>
The role that's required to log in to the Tomcat Book Application
</description>
<role-name>tomcat</role-name>
</security-role>
Now, whenever you try to access a page in the tomcatBook application for the first time,you’ll have to enter user details in the ch12/login.jsp page. If you provide the wrong details orhave the wrong role, then you’ll see the ch12/error.jsp page. This security constraint will usewhichever realm you’ve configured (see Chapter 11 for details of configuring realms).
Using the Secure Sockets LayerSSL is a protocol that allows clients and servers in a network environment to communicatesecurely. In addition to encryption of data (and hence secure communication), SSL providesfor authentication.
The security protocols on which SSL is based are public key encryption and symmetrickey encryption. Public key encryption uses a pair of encryption keys to encode a message—a public key that’s public and a private key that isn’t disclosed to anyone else. Anyone wantingto send a message to an application that has a known public key encrypts it with that key. Onlythe corresponding private key can decrypt the message, and thus the transmission is secure.Symmetric key encryption, on the other hand, uses the same secret key for both encryptionand decryption. This algorithm, however, needs a reliable way to exchange the secret key betweenthe two end points in the transmission.
When a client opens an SSL connection with a server, an SSL handshake is performed.The procedure for an SSL handshake is as follows:
1. The server sends its digital certificate. This contains the public key of the server, infor-mation about the server, the authority that issued the server’s certificate, and the use-bydate of the certificate.
2. The client then authenticates the server based on the validity of the certificate andtrustworthiness of the authority that issued the certificate. Certificates issued by well-known (and trusted) certificate authorities (CAs), such as VeriSign and Thawte, arerecognized by most web browsers. If the certificate can’t be validated, the user is warned,and they can choose to either accept the certificate or deny it.
3. A session key is then generated and exchanged over the connection. The connection isnow secured by the public key encryption mechanism, which means that the exchangeis secure. The session key is a symmetric key and is used for the duration of the sessionto encrypt all subsequent data transmissions.
CHAPTER 12 ■ SECURING TOMCAT242
7850ch12FINAL.qxd 2/28/07 11:13 AM Page 242

The server configuration may also require the client to present its own authenticationdetails. In this situation, another step is introduced in the SSL handshake. Such a requirementisn’t common and is used only in some business-to-business application environments.
The HTTP over SSL (HTTPS) protocol uses SSL as a layer under HTTP. Transport Layer Secu-rity (TLS) is the Internet Engineering Task Force (IETF) version of the SSL protocol. It’s defined byRFC 2246 (www.ietf.org/rfc/rfc2246.txt) and is intended to eventually supersede SSL.
Adding support for SSL or TLS in Tomcat is a four-step process:
1. Download and install an SSL/TLS implementation (not necessary for JDK 1.4 and newer).
2. Create the certificate keystore containing a self-signed certificate, which is generatedby you and isn’t guaranteed by anyone else, such as a CA.
3. Obtain a certificate from a CA such as VeriSign (www.verisign.com), Thawte(www.thawte.com), or Trustcenter.de (www.trustcenter.de). Use your self-signed certifi-cate to generate a certificate-signing request, and submit it to the CA to get a certificatedigitally signed by them. This certificate, when presented to a user, guarantees that youare who you claim to be. If you’re using Tomcat in a test/development environment,you can skip this step. You’d need a certificate for a production deployment, though, asusers may not be willing to accept a self-signed certificate.
4. Make the Tomcat configuration changes for SSL.
Installing JSSEJava Secure Socket Extension (JSSE) is Sun’s implementation of the SSL and TLS protocols.JSSE is available for free but isn’t open source. For more information on JSSE, see http://java.sun.com/products/jsse/. JDK 1.4 and newer include JSSE, so you do not need to worryabout this when using Tomcat 6.
Preparing the Certificate KeystoreYou saw how to prepare a keystore in Chapter 9, but here’s a reminder:
> JAVA_HOME\bin\keytool -genkey -alias tomcat -keyalg RSA
The -genkey option specifies that a key pair (a private key and a public key) should be created.This key pair is enclosed in a self-signed certificate. The -keyalg option specifies the algorithm(which in this case is RSA) to be used for the key pair. All keystore entries are accessed via uniquealiases using the -alias option—here the alias is tomcat. The keytool command will ask fora password, with which you should take the usual precautions.
The default name for the keystore file is .keystore, and it’s stored in the home directory ofthe user who runs the keytool command. This directory will vary depending on the operatingsystem. For example, if you install Tomcat as a user called tomcat on Linux, the keystore filewill be in /home/tomcat. Similarly, if you install it as the tomcat user on Windows, the keystorefile would be in c:\Documents and Settings\tomcat. You can also specify an alternative keystorefilename and password using the -keystore and -keypass options.
> JAVA_HOME/bin/keytool -genkey -alias tomcat -keyalg RSA
-keypass somepass -keystore /path/to/keystorefile
CHAPTER 12 ■ SECURING TOMCAT 243
7850ch12FINAL.qxd 2/28/07 11:13 AM Page 243

Here’s an example run of the keytool:
> keytool -genkey -alias tomcat -keyalg RSA
Enter keystore password: tomcat
What is your first and last name?
[Unknown]: localhost
What is the name of your organizational unit?
[Unknown]: Editorial
What is the name of your organization?
[Unknown]: Java
What is the name of your City or Locality?
[Unknown]: Glasgow
What is the name of your State or Province?
[Unknown]: Scotland
What is the two-letter country code for this unit?
[Unknown]: UK
Is CN=localhost, OU=Editorial, O=Java, L=Glasgow, ST=Scotland, C=UK correct?
[no]: yes
Enter key password for <tomcat>
(RETURN if same as keystore password):
Note that the first field you’re asked for is the domain name of your server, whichbecomes the common name (CN). This needs to be of the format www.domainname.com,hostname.domainname.com, or just domainname.com. This name is embedded in the certificate.The CN should be the fully qualified hostname for the machine where Tomcat is deployed. Ifthis isn’t so, users will get a warning message in their web browsers when they try to accessa secure page from your web site, as you saw in Chapter 9.
If this is a test/development environment or you don’t want a certificate from a CA, youcan stop here. You’re now ready to make Tomcat-related setup changes. If you were deployingin a production environment, you’d need to get a certificate that’s validated by a CA.
Installing a Certificate from a Certificate AuthorityFirst, create a local certificate as before using the keytool command.
> keytool -genkey -alias tomcat -keyalg RSA -keystore <keystore_filename>
Next, use this certificate to create a certificate signing request (CSR).
> keytool -certreq -keyalg RSA -alias tomcat -file certreq.csr -keystore <
keystore_filename>
If the keystore file is the default (that is, a file named .keystore in the home directory),then you can omit the -keystore <keystore_filename> option.
The -certreq option creates a CSR file called certreq.csr that you can submit to the CAto get a certificate. The file will be in the directory where you ran the keytool command previ-ously. Getting a certificate requires payment to the CA for the authentication services. SomeCAs have test certificates available for download at no cost, which are usually valid only fora short time.
CHAPTER 12 ■ SECURING TOMCAT244
7850ch12FINAL.qxd 2/28/07 11:13 AM Page 244

To submit your CSR, go to the CA of your choice and paste the contents of the file into theform provided there. Then follow the instructions.
Importing the CertificateAfter you have the certificate, you need to get the chain certificate (also called the root certificate)from the CA. You can download this from the following sites (depending on the CA):
• www.verisign.com/support/install/intermediate.html
• www.trustcenter.de/set_en.htm
• www.thawte.com/roots/
The chain certificate is a self-signed certificate from the CA that contains its well-knownpublic key. You can view the contents of a certificate using the -printcert option.
> keytool -printcert -file /path/to/certificate
This is good practice before you import a third-party certificate into the keystore. Youthen import the chain certificate into the keystore.
> keytool -import -alias root -keystore <keystore_filename>
-trustcacerts -file <filename_of_the_chain_certificate>
And finally, import the new certificate.
> keytool -import -alias tomcat -keystore <keystore_filename>
-trustcacerts -file <certificate_filename>
Here, the <filename_of_the_chain_certificate> contains the chain certificate you gotfrom the CA. As mentioned earlier, the -keystore <keystore_filename> option isn’t required ifthe keystore file has a default name (.keystore). You’re now ready to make Tomcat-relatedsetup changes.
Protecting Resources with SSLYou can protect resources with SSL just as you can protect resources with authentication con-straints. The <user-data-constraint> subelement of <security-constraint> in web.xml specifiesthe guaranteed integrity of the data flowing between the client and the server for this resource.There are three levels of integrity: NONE, INTEGRAL, and CONFIDENTIAL.
NONE means there’s no guarantee that the data hasn’t been intercepted and tampered with,and INTEGRAL guarantees the integrity of the data, meaning that the data hasn’t been interferedwith. The strongest guarantee is CONFIDENTIAL, which guarantees that a third party hasn’t inter-cepted the data. If you specify INTEGRAL or CONFIDENTIAL, the server will use SSL for all requeststo this resource by redirecting the client to the SSL port of the server. The redirection portis configured in the redirectPort attribute of the HTTP connector.
For your secure resource, you want to be sure that all the data you transfer is safe, so you’lluse the CONFIDENTIAL level. Simply add the element in Listing 12-15 to the <security-constraint>in your web.xml file from the previous example.
CHAPTER 12 ■ SECURING TOMCAT 245
7850ch12FINAL.qxd 2/28/07 11:13 AM Page 245

Listing 12-15. Guaranteeing the Integrity of Data with a Security Constraint
<security-constraint>
...
<user-data-constraint>
<description>
Constrain the user data transport for the whole application
</description>
<transport-guarantee>CONFIDENTIAL</transport-guarantee>
</user-data-constraint>
</security-constraint>
This will force all requests for your secure web application to use HTTPS, even if the origi-nal request came in over HTTP. This is the only setup required in web.xml.
Configuring the SSL ConnectorThe setup procedure for an SSL connector is straightforward. You’ve already seen its attributesin Chapter 4, so this section covers how to configure a connector for the keystore you createdearlier.
Modify the default SSL HTTP connector, and add the location and password of the keystoreif appropriate (see Listing 12-16).
Listing 12-16. Configuring an SSL Connector
<Connector port="8443" maxThreads="150" scheme="https" secure="true"
clientAuth=“false” sslProtocol=“TLS” />
Now start Tomcat, and point a browser to http://localhost/tomcatBook/. You’ll be presentedwith a warning about the suspicious certificate (note that this warning may vary depending onyour browser).
You can choose to view the certificate to see the details of the issuer. These details willmatch those you specified when you created the certificate. Before you proceed, your browserwill give you the option to install this certificate forever (you’ll have to view the certificate withInternet Explorer to do this), which means that you trust this site and won’t be shown the securitywarning again. An additional warning will be given if you didn’t use the domain name of yourserver.
Once you’ve confirmed you’re happy with accepting this certificate, you’ll see the loginpage from Listing 12-13, only this time your session will be conducted over SSL. To confirmthis, examine the URL. It should be https://localhost:8443/tomcatBook/. Tomcat knows toredirect you to this port for SSL because of the redirectPort="8443" setting in the defaultHTTP connector.
Using SSL with the Apache Web ServerYou’ve seen how the stand-alone HTTP connector handles SSL. Another approach that’smore widely used is to have a dedicated web server handle the SSL-related functionality.This is a more stable configuration and has better performance. In this configuration, thecommunication between the user’s browser and web server is encrypted over SSL, but the com-munication between the web server and Tomcat isn’t.
CHAPTER 12 ■ SECURING TOMCAT246
7850ch12FINAL.qxd 2/28/07 11:13 AM Page 246

Before you can configure Apache, you need to create a private key and certificate. This isa separate process from Tomcat’s because the keytool command creates a propriety keystoreformat (maintained by Sun) that Apache can’t use. To create a private key and a certificate forApache, you need the OpenSSL library from www.openssl.org.
If you’re using Windows, you should visit http://hunter.campbus.com and download theApache/OpenSSL combination for your Apache installation. You don’t need to install the wholebundle, but you will need the openssl utility and the libeay32.dll, ssleay32.dll, and mod_ssl.sofiles. Place the first three (openssl, libeay32.dll, and ssleay32.dll) in Apache’s bin directoryand mod_ssl.so in Apache’s modules directory.
If you don’t have an openssl.cnf file, create one with contents similar to those shown inListing 12-17. These are the certificate details you would have entered in the previous keytoolexamples.
Listing 12-17. The openssl.cnf File Setting Your Server’s Certificate Properties
[ req ]
default_bits = 1024
distinguished_name = req_distinguished_name
attributes = req_attributes
[ req_distinguished_name ]
countryName = Country Name (2 letter code)
countryName_default = UK
countryName_min = 2
countryName_max = 2
stateOrProvinceName = State or Province Name (full name)
stateOrProvinceName_default = Scotland
localityName = Locality Name (eg, city)
localityName_default = Glasgow
organizationName = Organization Name (eg, company)
organizationName_default = Java
organizationalUnitName = Organizational Unit Name (eg, section)
organizationalUnitName_default = Editorial
commonName = Common Name (eg, YOUR name)
commonName_default = localhost
commonName_max = 64
emailAddress = Email Address
emailAddress_max = 40
[ req_attributes ]
challengePassword = A challenge password
challengePassword_min = 4
challengePassword_max = 20
CHAPTER 12 ■ SECURING TOMCAT 247
7850ch12FINAL.qxd 2/28/07 11:13 AM Page 247

Then run the following to create a private key:
> openssl genrsa -des3 1024 > ./certs/localhost.key
Loading 'screen' into random state - done
Generating RSA private key, 1024 bit long modulus
...++++++
...............++++++
e is 65537 (0x10001)
Enter pass phrase:
Verifying - Enter pass phrase:
This will create the localhost.key key file in the certs directory with password protec-tion. You’ll have to provide this password to enable SSL when you start or restart Apache. Ifyou don’t want to use a password to protect this file (more on this later), then omit the -des3switch.
Now create a CSR, which you can use to request a certificate from a CA, or create a self-signed certificate.
> openssl req -new -key ./certs/localhost.key
-out ./certs/localhost.csr -config openssl.cnf
Enter pass phrase for ./certs/localhost.key:
You are about to be asked to enter information that will be incorporated
into your certificate request.
What you are about to enter is what is called a Distinguished Name or a DN.
There are quite a few fields but you can leave some blank
For some fields there will be a default value,
If you enter '.', the field will be left blank.
-----
Country Name (2 letter code) [UK]:
State or Province Name (full name) [Scotland]:
Locality Name (eg, city) [Glasgow]:
Organization Name (eg, company) [Java]:
Organizational Unit Name (eg, section) [Editorial]:
Common Name (eg, YOUR name) [localhost]:
Email Address []:
Please enter the following 'extra' attributes
to be sent with your certificate request
A challenge password []:tomcat
This creates the localhost.csr file in the certs directory. Note the default values fromopenssl.cnf. Provide the password for the private key as appropriate. The final step is to createthe certificate.
>openssl req -x509 -key ./certs/localhost.key -in ./certs/localhost.csr
-out ./certs/localhost.crt
Enter pass phrase for ./certs/localhost.key:
This creates the localhost.crt certificate in the certs directory. You’re now ready to con-figure Apache and Tomcat.
CHAPTER 12 ■ SECURING TOMCAT248
7850ch12FINAL.qxd 2/28/07 11:13 AM Page 248

Deploying a Web ApplicationBegin by configuring Apache. If you’re responding to user requests on port 80 (the default HTTPport) and the SSL port (default value 443), Apache needs to listen on both these ports. In thisexample, you’ll protect the tomcatBook web application with Apache’s SSL and leave the defaultApache files unprotected.
# Listen on port 80 and 443 (the SSL port)
Listen 80
Listen 443
# Use name-based virtual hosts on these ports
NameVirtualHost *:80
NameVirtualHost *:443
You now have to make the SSL-related settings in Apache.
<VirtualHost *:443>
# The name of this host
ServerName localhost
# Switch on SSL for this host
SSLEngine on
# The path to the certificate
SSLCertificateFile /path/to/certs/localhost.crt
# The path to the private key
SSLCertificateKeyFile /path/to/certs/localhost.key
# You are protecting the tomcatBook webapp
# so enable the connector settings
Include /path/to/tomcatBook/WEB-INF/jk2/jk2.conf"
</VirtualHost>
Here, you create a virtual host listening on the SSL port (443) for protecting the tomcatBookweb application. You switch on SSL for this host and set the locations of the certificate and theprivate key. Assuming that you’ve enabled mod_jk2 and have generated the settings using thetechniques from Chapter 9, you then include the settings for the tomcatBook web application.
Next, you need to configure the non-SSL host for Apache’s static files.
<VirtualHost *:80>
ServerName localhost
DocumentRoot /path/to/Apache2/htdocs
</VirtualHost>
A final point to consider is running Apache and SSL on Windows. The default private keypassword prompt doesn’t work on Windows, so you must either configure a private key withoutpassword protection or configure a script or utility to provide the password. Both scenarioshave inherent problems, so you must make sure that both files (the private key and the utility)are heavily protected.
CHAPTER 12 ■ SECURING TOMCAT 249
7850ch12FINAL.qxd 2/28/07 11:13 AM Page 249

To specify the file that will give the key password to Apache, set the following outside yourvirtual host definitions:
SSLPassPhraseDialog exec:bin/password.bat
This points to the password batch file in Apache’s bin directory. Listing 12-18 shows thepassword batch file.
Listing 12-18. The password.bat File that Sends the Key Password to Tomcat
@echo tomcat
There’s no more to it than that (providing that tomcat is your key password), though thisdoesn’t do any checking as to who is running the script and for which domain. If more thanone domain were to use this file, and each domain had a different password, then you’d haveto check the domain name. Apache sends this information as servername:port in the firstargument to the script and the appropriate algorithm in the second argument. Listing 12-19shows an example batch file that does this for the server you have configured.
Listing 12-19. The password.bat File that Sends the Key Password to Tomcat
@echo off
if "%1" == "localhost:443" @echo tomcat
Here, you check that the first argument matches the name and port of the server. If this isthe case, you echo the password to stdout.
Listing 12-20 shows an example workers2.properties file for this setup.
Listing 12-20. The workers2.properties File Using Apache’s SSL Functionality
# Define the channel
[channel.socket:localhost:8009]
# Define the worker
[ajp13:localhost:8009]
channel=channel.socket:localhost:8009
# Uri mapping
[uri:localhost:443/tomcatBook/*]
group=ajp13:localhost:8009
The important thing to note here is the URI mapping. Only requests to the tomcatBook webapplication that also map to the server name and the SSL port will be passed on to Tomcat.
Testing the InstallationAfter making these changes, restart Tomcat and Apache. You should be able to access thesecure Tomcat web application through https://localhost/tomcatBook and the nonsecureApache files through http://localhost.
CHAPTER 12 ■ SECURING TOMCAT250
7850ch12FINAL.qxd 2/28/07 11:13 AM Page 250

A common problem in the setup is related to SSL configuration on Apache. Apache mayfail to start or not serve up SSL content. If you face this problem, first check the new directivesadded to httpd.conf.
> apache/bin/apache -t
This should uncover any errors related to directive syntax. Next, look for Apache errormessages logged in APACHE_HOME/logs/error.log. You can control logging via the LogLevelApache directive.
LogLevel debug
The log levels are debug, trace, info, warn, error, and none. A debug level of none turns off alllogging. The log levels are in order of priority, and setting logging to a certain level shows mes-sages of that and higher levels. For example, the warn level shows warnings and error messages.
SummaryIn this chapter, you looked at various security topics with respect to Tomcat. First you lookedat general security: removing or disabling the default web applications and locking up the filesystem. Both of these procedures are common practice in all server installations, so they shouldfit into your general security policy without too much trouble.
Then you moved on to the Tomcat-specific security. You examined Java’s security managerand its role in controlling access to system resources. Tomcat can take advantage of this featureto prevent web applications from carrying out potentially dangerous actions. A rogue servletcould easily take down the file system if you don’t take measures to restrict access.
You then learned how to put realms into practice with Tomcat’s security constraints. Yousaw the different kinds of login mechanism you can use, as well as their strengths and weak-nesses. Next, you saw how to force SSL connections for groups of web resources on the Tomcatserver. SSL prevents third parties from listening in on your data transfers between the serverand the client. When dealing with sensitive data, it’s always wise to use SSL. The final topic wassecuring the data channel between Tomcat and the client using Apache’s SSL abilities.
CHAPTER 12 ■ SECURING TOMCAT 251
7850ch12FINAL.qxd 2/28/07 11:13 AM Page 251

7850ch12FINAL.qxd 2/28/07 11:13 AM Page 252

Implementing Shared TomcatHosting
This chapter shows how you can use Tomcat to implement shared hosting, which means thatmany hosts can run on the same server and thus share resources. Shared hosting has beena popular and useful part of the Apache web server’s architecture for a long time, and Tomcathas an analogous mechanism.
In this chapter, a web site refers to the contents of a distinct, fully qualified domain name(FQDN) that is served by a web server. An FQDN consists of two parts: a host name anda domain name. For example, the FQDN www.apress.com consists of the host name www and thedomain name apress.com. The domain name can have other hosts, such as mail or java—the FQDNs would be mail.apress.com and java.apress.com.
A standard web server in its default configuration allows only one domain to be servedfrom the machine. In this case, if you wanted to serve hundreds of domains from your servers,you would have to set up hundreds of computers to serve all these web sites. This is clearly nota scalable solution.
Also, IP addresses are a scarce resource. A web-hosting provider gets a limited number ofIP addresses from its connectivity providers for hosting. Using one IP address for every webhost would quickly eat up all the allocated IP addresses. To overcome these limitations, virtualhosting uses all your available resources, be they services, IP addresses, or other computingresources, in an optimal way.
Examining Virtual HostingYou can implement one of the following two types of virtual hosting:
• IP-based virtual hosting: Based on machines with multiple, distinct IP addresses, everydomain is allocated one IP address. The web server listens to each of these network inter-faces and serves resources from the relevant domain based on the IP address on whichthe request arrived.
• Name-based virtual hosting: The web server listens on a single IP address and servesresources from the relevant web site based on the HTTP request headers from the webclient.
253
C H A P T E R 1 3
■ ■ ■
7850ch13FINAL.qxd 2/28/07 11:16 AM Page 253

CHAPTER 13 ■ IMPLEMENTING SHARED TOMCAT HOSTING254
IP-Based Virtual HostingIn this form of virtual hosting, the machine is configured to have the same number of IP addressesas the hosts it’s to serve, so a machine hosting ten web sites needs ten IP addresses. You configurethese additional IP addresses either by adding physical network interfaces to the machine or, as ismore common, by adding aliased network interfaces to the computer.
Normally when you add a network interface card (NIC) to your machine, you configure itwith a single IP address, which you then use in various services. However, it’s possible to configurethe same NIC with more than one IP address. Adding these additional IP addresses involves usingoperating-system–specific commands for creating a virtual interface and then configuring it witha virtual IP address. This process normally involves using a physical NIC and adding virtual inter-faces on top, a process known as aliasing.
Configuring Aliasing for WindowsWindows versions from Windows NT onward support aliasing and therefore IP-based virtual host-ing. Each flavor of Windows has slightly different ways to configure this, but they’re similar enoughthat you’ll be able to transfer the example shown here to your version.
This example uses Windows 2000 Professional. Open Control Panel ➤ Network and Dial-upConnections, and double-click the network interface you want to configure. For example, thismay be your local area network connection. You’ll see a properties dialog box similar to the oneshown in Figure 13-1.
Figure 13-1. The network properties dialog box
Select the TCP/IP component as shown, and click Properties. The TCP/IP properties boxallows you to specify a main IP address and DNS servers for this network interface. If there’sno IP address, enter a value that’s appropriate for your network, as shown in Figure 13-2. Thedefault subnet mask should be sufficient.
7850ch13FINAL.qxd 2/28/07 11:16 AM Page 254

Figure 13-2. The TCP/IP properties dialog box
To add further IP addresses, click Advanced. You’ll see the IP address you just entered listed inthe top pane of the resultant dialog box. To add further IP addresses, click Add, and enter anothervalue. You’ll see the new IP address that has been added to the list, as in Figure 13-3. This computerwill now listen on 192.168.0.1 and 192.168.0.2.
Figure 13-3. The Advanced TCP/IP Settings dialog box
CHAPTER 13 ■ IMPLEMENTING SHARED TOMCAT HOSTING 255
7850ch13FINAL.qxd 2/28/07 11:16 AM Page 255

Configuring Aliasing for UnixTo set network interface options on Unix-like systems, you use the ifconfig utility. On mostsystems, to check which network interfaces are installed, run ifconfig with the -a switch.
# ifconfig -a
If this doesn’t work, try netstat -i.Once you know which network interfaces are installed, you can view the details of a spe-
cific interface with the following:
# ifconfig interface_name
To set the IP address of a network interface, specify the interface’s name, followed by the IPaddress, options such as the netmask, and the up parameter. So, to set the IP address of eth0 to192.168.0.1, run the following:
# ifconfig eth0 192.168.0.1 netmask 255.255.255.0 up
eth0 will now be listening on the new IP address. To turn the network interface off, use thedown parameter:
# ifconfig eth0 down
To add an additional IP address to a network interface to implement aliasing, run the fol-lowing:
# ifconfig eth0:1 192.168.0.2
eth0 will now listen on 192.168.0.1 and 192.168.0.2.
Name-Based Virtual HostingWhile IP-based virtual hosts help maximize resources, they’re still not feasible in placeswhere hundreds of domains need to be hosted on the same machine. In such cases, eitherobtaining one IP address for each host or configuring many network interfaces on thesame machine becomes a logistical nightmare. In these cases, you can use name-basedvirtual hosting.
An HTTP 1.1 request contains the Host: header, which specifies the host on which therequested resource resides. When such a request is sent to a server, the server can read the Host:header and determine which of its hosts the client would like to reach. The server then processesthe request accordingly and sends back the response. This system requires the client to first lookup a list of IP address/host name mappings, which is usually configured in a DNS server.Figure 13-4 shows this process.
You can see how this makes more efficient use of the available resources. If you were lim-ited to one host for one IP address, the Internet would soon run out of space.
CHAPTER 13 ■ IMPLEMENTING SHARED TOMCAT HOSTING256
7850ch13FINAL.qxd 2/28/07 11:16 AM Page 256
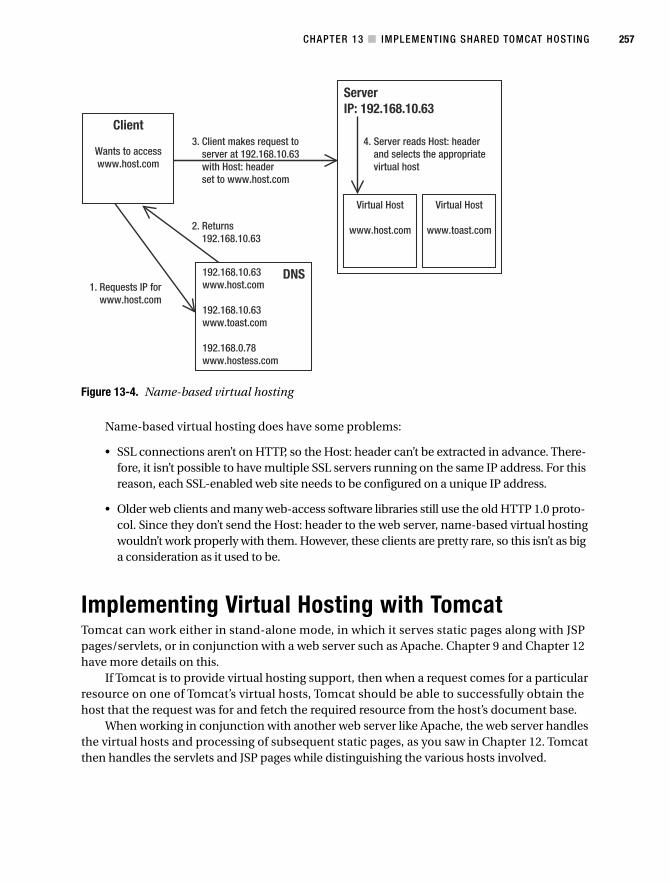
Figure 13-4. Name-based virtual hosting
Name-based virtual hosting does have some problems:
• SSL connections aren’t on HTTP, so the Host: header can’t be extracted in advance. There-fore, it isn’t possible to have multiple SSL servers running on the same IP address. For thisreason, each SSL-enabled web site needs to be configured on a unique IP address.
• Older web clients and many web-access software libraries still use the old HTTP 1.0 proto-col. Since they don’t send the Host: header to the web server, name-based virtual hostingwouldn’t work properly with them. However, these clients are pretty rare, so this isn’t as biga consideration as it used to be.
Implementing Virtual Hosting with TomcatTomcat can work either in stand-alone mode, in which it serves static pages along with JSPpages/servlets, or in conjunction with a web server such as Apache. Chapter 9 and Chapter 12have more details on this.
If Tomcat is to provide virtual hosting support, then when a request comes for a particularresource on one of Tomcat’s virtual hosts, Tomcat should be able to successfully obtain thehost that the request was for and fetch the required resource from the host’s document base.
When working in conjunction with another web server like Apache, the web server handlesthe virtual hosts and processing of subsequent static pages, as you saw in Chapter 12. Tomcatthen handles the servlets and JSP pages while distinguishing the various hosts involved.
CHAPTER 13 ■ IMPLEMENTING SHARED TOMCAT HOSTING 257
7850ch13FINAL.qxd 2/28/07 11:16 AM Page 257

Creating an Example ConfigurationYou’ll configure Tomcat to serve three hosts: www.tomcatbook.com, www.catalinabook.com, andwww.jasperbook.com, each running on the same machine with a common IP address. Thismachine may be part of your network, or it may be the local machine with the 127.0.0.1 localloopback address. If it’s part of your network, you should ensure you have set up a DNS entryfor each host (Listing 13-8 later in the chapter shows an example of this).
These domains will be hosted in a directory outside the Tomcat base directory. Each ofthe domains has its own document area in /home/sites/<domain-name>. Web applications aredeployed in the webapps folder under this hierarchy. If you were planning on using Apachewith this setup, you could also consider a /home/sites/<domain-name>/web directory as Apache’sdocument root. I’ll get to this in the “Implementing Virtual Hosting with Apache and Tomcat”section.
You may even want to place the static pages into a separate directory anyway (say the ROOTweb application), because in many shared hosting scenarios, the clients’ hosting requirementsinclude Tomcat support as an additional feature to their regular web needs. Clients who wantto add web applications can drop their WAR files in the webapps directory without mixing themup with the static content. Figure 13-5 shows the general layout of the sample shared hosts onthe Tomcat server.
Figure 13-5. The general layout of the example shared hosts
You’ll need a way to identify which host you have accessed to determine if your configura-tion is correct. Therefore, each host should have a ROOT web application with an index.html filethat points to a JSP page in the dynamic section, as shown in Listing 13-1.
Listing 13-1. The index.hml Page for Shared Hosting
<html>
<head><title>Welcome to catalinabook.com</title>
<body>
<h1>Welcome to catalinabook.com</h1>
<hr/>
<p>
Click <a href="jsp/index.jsp">here</a>
to access the dynamic section of the site.
</p>
</body>
</html>
CHAPTER 13 ■ IMPLEMENTING SHARED TOMCAT HOSTING258
7850ch13FINAL.qxd 2/28/07 11:16 AM Page 258
Remember to change the name of the host. Feel free to change these setup details to suit yourown server hosting policy. Just remember to change the settings given in Listing 13-5 accordingly.
The JSP page is common to all the hosts and should be placed in the jsp web application.Listing 13-2 shows this page.
Listing 13-2. The index.jsp Page that Is Common to All Hosts
<html>
<head>
<title>
Welcome to ${pageContext.servletContext.servletContextName}
</title>
<body>
<h1>Welcome to ${pageContext.servletContext.servletContextName}</h1>
<hr/>
</body>
</html>
The EL segments obtain the name of the host so that you can see that the virtual hosting isworking and that JSP pages are producing dynamic content. The servletContextName property isset in each web application’s web.xml file.
Finally, you don’t necessarily need a web.xml file for each of these simple web applications,though to follow good practice, you should add one, as shown in Listings 13-3 and 13-4.
Listing 13-3. A web.xml File for the ROOTWeb Application
<?xml version="1.0" encoding="ISO-8859-1"?>
<web-app xmlns="http://java.sun.com/xml/ns/j2ee"
xmlns:xsi="http://www.w3.org/2001/XMLSchema-instance"
xsi:schemaLocation="http://java.sun.com/xml/ns/j2ee
http://java.sun.com/xml/ns/j2ee/web-app_2_4.xsd" version="2.4">
<display-name>ROOT web application</display-name>
<description>
Users should place their static HTML files here.
</description>
</web-app>
You should change the <display-name> setting for each host as follows. This will be dis-played to show that each host is serving a different dynamic page.
Listing 13-4. A web.xml File for the jspWeb Application
<?xml version="1.0" encoding="ISO-8859-1"?>
<web-app xmlns="http://java.sun.com/xml/ns/j2ee"
xmlns:xsi="http://www.w3.org/2001/XMLSchema-instance"
xsi:schemaLocation="http://java.sun.com/xml/ns/j2ee
http://java.sun.com/xml/ns/j2ee/web-app_2_4.xsd" version="2.4">
CHAPTER 13 ■ IMPLEMENTING SHARED TOMCAT HOSTING 259
7850ch13FINAL.qxd 2/28/07 11:16 AM Page 259

<display-name>the jsp web application on catalinabook.com</display-name>
<description>
A dynamic web application.
</description>
</web-app>
You now have all you need to implement virtual hosting. Figure 13-6 shows you how yourfinal configuration should look for each host.
Figure 13-6. The final web application configuration
Here, you can see that the static HTML files are separated from any dynamic content. Youcan then host static web sites alongside dynamic web sites by placing subdirectories in theROOT web application should you choose to do so.
Setting Up the Virtual HostingYou define virtual hosts in server.xml. For this example, you’ll see a complete server.xml filewritten from scratch. Feel free to add the settings to your existing server.xml.
Listing 13-5 shows the setup for the first virtual host. To add the other two, simply duplicatethe settings appropriately.
Listing 13-5. Creating a Virtual Host in server.xml
<Server port="8005" shutdown="SHUTDOWN">
<Service name="Virtual Hosting Tomcat">
<Connector port="8080"
maxThreads="150"
enableLookups="false" redirectPort="8443" acceptCount="100"
connectionTimeout="20000"
disableUploadTimeout="true" />
<Engine name="Catalina" defaultHost="www.catalinabook.com">
<Host name="www.catalinabook.com" debug="0"
appBase="C:/home/sites/catalinabook.com/webapps"
unpackWARs="true">
CHAPTER 13 ■ IMPLEMENTING SHARED TOMCAT HOSTING260
7850ch13FINAL.qxd 2/28/07 11:16 AM Page 260

<Valve className="org.apache.catalina.valves.AccessLogValve"
directory="C:/home/sites/catalinabook.com/logs"
prefix="catalinabook.com.access."
suffix=".log"
pattern="common"/>
</Host>
<!-- The other two virtual hosts go here -->
</Engine>
</Service>
</Server>
The connector is copied from the default server.xml file and listens for HTTP requests onport 8080 as usual. The engine setting configures www.catalinabook.com as the default host. Theengine examines the HTTP headers, especially the Host: header, and determines which of the vir-tual host definitions should receive the request. If none of the virtual hosts seems to match therequest headers, the engine passes on the request to the default host. The value of this attributemust match a <Host> definition in the engine. Then, the host setting assigns a home directory forwebapps and sets an access log and a general log.
For Tomcat 6 logging, follow the instructions in Chapter 4 to set up Log4J and then appendthe logging.properties file with the code in Listing 13-6 in CATALINA_HOME/conf.
Listing 13-6. log4j.properties Logging File for Virtual Hosting
#--------------------------------#
# Set the root logger for Tomcat #
#--------------------------------#
log4j.rootLogger=INFO, TomcatINFO, TomcatERROR
#---------------------------------------------#
# Send all INFO messages and above to a file #
#---------------------------------------------#
log4j.appender.TomcatINFO=org.apache.log4j.FileAppender
log4j.appender.TomcatINFO.File=C:/jakarta-tomcat-5.5.3/logs/catalina_log.txt
# Use the simple layout
log4j.appender.TomcatINFO.layout=org.apache.log4j.SimpleLayout
#--------------------------------------------------#
# Send all ERROR messages and above to the console #
#--------------------------------------------------#
log4j.appender.TomcatERROR=org.apache.log4j.ConsoleAppender
log4j.appender.TomcatERROR.Target=System.out
log4j.appender.TomcatERROR.layout=org.apache.log4j.PatternLayout
log4j.appender.TomcatERROR.layout.ConversionPattern=%p: %m: %d{ABSOLUTE} %n
log4j.appender.TomcatERROR.Threshold=ERROR
CHAPTER 13 ■ IMPLEMENTING SHARED TOMCAT HOSTING 261
7850ch13FINAL.qxd 2/28/07 11:16 AM Page 261

#--------------------------------------------#
# Define a log for the catalinabook.com host #
#--------------------------------------------#
log4j.logger.org.apache.catalina.core.ContainerBase.
[Catalina].[www.catalinabook.com]=INFO,catalinabook
# Log to a file
log4j.appender.catalinabook=org.apache.log4j.FileAppender
log4j.appender.catalinabook.
File=C:/home/sites/catalinabook.com/logs/catalinabook.com.log
# Use the simple layout
log4j.appender.catalinabook.layout=org.apache.log4j.SimpleLayout
#------------------------------------------#
# Define a log for the jasperbook.com host #
#------------------------------------------#
log4j.logger.org.apache.catalina.core.ContainerBase.
[Catalina].[www.jasperbook.com]=INFO,jasperbook
# Log to a file
log4j.appender.jasperbook=org.apache.log4j.FileAppender
log4j.appender.jasperbook.File=C:/home/sites/jasperbook.com/logs/jasperbook.com.log
# Use the simple layout
log4j.appender.jasperbook.layout=org.apache.log4j.SimpleLayout
#------------------------------------------#
# Define a log for the tomcatbook.com host #
#------------------------------------------#
log4j.logger.org.apache.catalina.core.ContainerBase.
[Catalina].[www.tomcatbook.com]=INFO,tomcatbook
# Log to a file
log4j.appender.tomcatbook=org.apache.log4j.FileAppender
log4j.appender.tomcatbook.File=C:/home/sites/tomcatbook.com/logs/tomcatbook.com.log
# Use the simple layout
log4j.appender.tomcatbook.layout=org.apache.log4j.SimpleLayout
This file sets the same loggers as the <Logger> components in Listing 13-5.To configure contexts for catalinabook.com, place a context XML file in CATALINA_HOME/
conf/Catalina/www.catalinabook.com. Note the name of the host is the name of the last direc-tory. Listing 13-7 shows the jsp.xml configuration file, and Listing 13-8 shows the ROOT.xmlconfiguration file.
CHAPTER 13 ■ IMPLEMENTING SHARED TOMCAT HOSTING262
7850ch13FINAL.qxd 2/28/07 11:16 AM Page 262

Listing 13-7. The jsp.xml Configuration File
<Context path="/jsp" docBase="jsp" />
Listing 13-8. The ROOT.xml Configuration File
<Context displayName="Welcome to Tomcat" docBase="ROOT" path="" />
These files are common to all the web applications, so place them inCATALINA_HOME/conf/Catalina/www.jasperbook.com and inCATALINA_HOME/conf/Catalina/www.tomcatbook.com as well.
Testing the Virtual HostingIf you don’t have your DNS server set up to point to your machine, you can alter your local hostsfile to simulate a DNS server. On Unix systems, this is the /etc/hosts file, and in Windows, it’sWindows/system32/drivers/etc/hosts (or equivalent on older systems). Listing 13-9 shows theentries in the hosts file that map the three hosts to your local machine’s IP address.
Listing 13-9. An Example Hosts File
127.0.0.1 localhost
127.0.0.1 www.catalinabook.com
127.0.0.1 www.jasperbook.com
127.0.0.1 www.tomcatbook.com
Start Tomcat, and browse to one of the virtual hosts, as shown in Figure 13-7. Rememberthat Tomcat is still listening on port 8080.
Figure 13-7. The index page of www.jasperbook.com
Here, you can see that the correct index page is shown for www.jasperbook.com. Click thelink to try the JSP page, as shown in Figure 13-8.
Again, this is the expected behavior, so the dynamic part of the virtual host is working. Trythe other hosts to confirm that they’re also working, and examine their access logs.
CHAPTER 13 ■ IMPLEMENTING SHARED TOMCAT HOSTING 263
7850ch13FINAL.qxd 2/28/07 11:16 AM Page 263

Figure 13-8. The dynamic JSP page of www.jasperbook.com
You should next check that the defaultHost setting of the <Engine> element is workingproperly. Try to access the dynamic section on IP address 127.0.0.1 (or whatever you’ve setyour machine’s IP address to be). You should see the www.catalinabook.com page, as shown inFigure 13-9.
Figure 13-9. Accessing the default host using an IP address
Implementing Virtual Hosting with Apache andTomcatIf you want to use Apache to serve the static files of your virtual hosts and Tomcat to serve thedynamic content, you need to add an AJP connector to server.xml. Remove the HTTP connec-tor from your server.xml, and add the configuration shown in Listing 13-10.
Listing 13-10. Adding an AJP Connector to server.xml
<Server port="8005" shutdown="SHUTDOWN">
<Service name="Virtual Hosting Tomcat with Apache">
<!-- Define a Coyote/JK2 AJP 1.3 Connector on port 8009 -->
CHAPTER 13 ■ IMPLEMENTING SHARED TOMCAT HOSTING264
7850ch13FINAL.qxd 2/28/07 11:16 AM Page 264

<Connector port="8009"
enableLookups="false"
protocol="AJP/1.3" />
<!-- The rest of the file remains the same -->
Now you need to configure Apache to pass all requests for dynamic content to Tomcat.The first port of call is the workers2.properties file, as shown in Listing 13-11.
Listing 13-11. The workers2.properties File for Virtual Hosting
[channel.socket:localhost:8009]
# define the worker
[ajp13:localhost:8009]
channel=channel.socket:localhost:8009
# Uri mapping
[uri:/*.jsp]
group=ajp13:localhost:8009
Here, you instruct Apache to pass all requests for *.jsp files to Tomcat. Tomcat will thenprocess them according to the virtual host they’re requesting. To serve static files from Apache,you first need to generate the settings for each web application using Ant or a similar tool (seeChapter 9 for details). Listing 13-12 shows a sample jk2.conf file as generated by Ant.
Listing 13-12. The jk2.conf File for www.catalinabook.com
# Must be included in a virtual host context for www.catalinabook.com
Alias /jsp "C:/home/sites/catalinabook.com/webapps/jsp"
<Directory "C:/home/sites/catalinabook.com/webapps/jsp" >
Options Indexes FollowSymLinks
DirectoryIndex
AddHandler jakarta-servlet2 .jsp
</Directory>
<Location "/jsp/WEB-INF" >
AllowOverride None
Deny from all
</Location>
<Location "/jsp/META-INF" >
AllowOverride None
Deny from all
</Location>
As the comment at the beginning of this file says, you must include this file in the appro-priate virtual host definition to protect Tomcat’s files. Apache’s virtual hosts must matchTomcat’s virtual hosts so that there’s a seamless integration of static pages and dynamic con-tent. In this case, you’ll use the web directory for static content instead of the ROOT webapplication. Figure 13-10 shows this configuration.
CHAPTER 13 ■ IMPLEMENTING SHARED TOMCAT HOSTING 265
7850ch13FINAL.qxd 2/28/07 11:16 AM Page 265

Figure 13-10. The virtual hosting configuration when using Apache
Therefore, the Apache setup will be as shown in Listing 13-13.
Listing 13-13. The Apache Setup for Virtual Hosting with Tomcat
NameVirtualHost www.catalinabook.com
NameVirtualHost www.jasperbook.com
NameVirtualHost www.tomcatbook.com
<VirtualHost www.catalinabook.com>
ServerName www.catalinabook.com
DocumentRoot "C:/home/sites/catalinabook.com/web"
Include "C:/home/sites/catalinabook.com/webapps/jsp/WEB-INF/jk/jk.conf"
</VirtualHost>
<VirtualHost www.jasperbook.com>
ServerName www.jasperbook.com
DocumentRoot "C:/home/sites/jasperbook.com/web"
Include "C:/home/sites/jasperbook.com/webapps/jsp/WEB-INF/jk/jk.conf"
</VirtualHost>
<VirtualHost www.tomcatbook.com>
ServerName www.tomcatbook.com
DocumentRoot "C:/home/sites/tomcatbook.com/web"
Include "C:/home/sites/tomcatbook.com/webapps/jsp/WEB-INF/jk2/jk2.conf"
</VirtualHost>
Each virtual host corresponds to a Tomcat virtual host and has a document root correspon-ding to the web directory in the host’s installation directory. Any requests that don’t match thesetting in workers.properties (that is, any non-JSP pages) will be served from here. If you wantto continue to use the ROOT directory, you can change the DocumentRoot directive to point to it.
To test the setup, copy index.html from each host’s ROOT directory into its web directoryand change it as shown in Listing 13-14.
CHAPTER 13 ■ IMPLEMENTING SHARED TOMCAT HOSTING266
7850ch13FINAL.qxd 2/28/07 11:16 AM Page 266
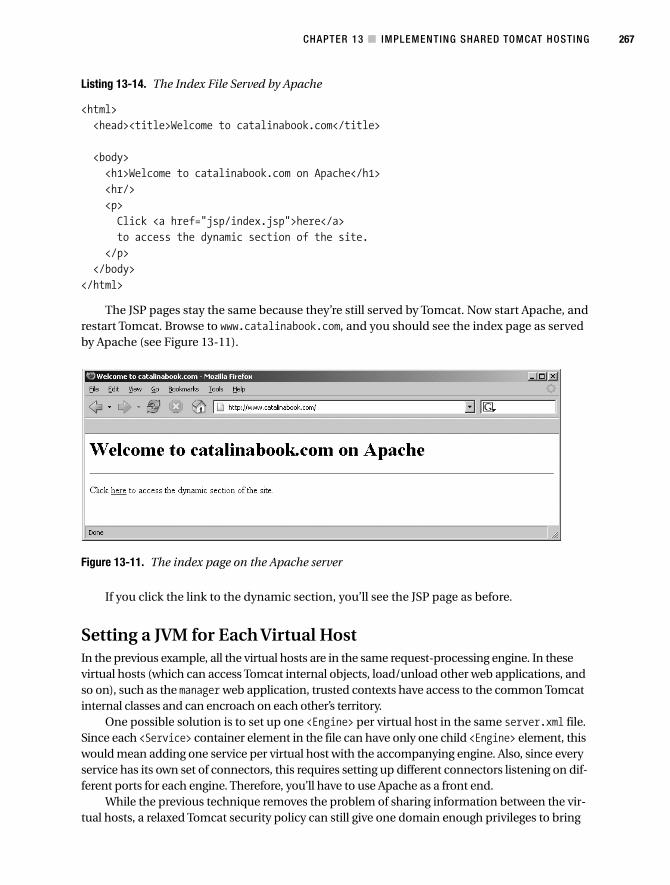
Listing 13-14. The Index File Served by Apache
<html>
<head><title>Welcome to catalinabook.com</title>
<body>
<h1>Welcome to catalinabook.com on Apache</h1>
<hr/>
<p>
Click <a href="jsp/index.jsp">here</a>
to access the dynamic section of the site.
</p>
</body>
</html>
The JSP pages stay the same because they’re still served by Tomcat. Now start Apache, andrestart Tomcat. Browse to www.catalinabook.com, and you should see the index page as servedby Apache (see Figure 13-11).
Figure 13-11. The index page on the Apache server
If you click the link to the dynamic section, you’ll see the JSP page as before.
Setting a JVM for Each Virtual HostIn the previous example, all the virtual hosts are in the same request-processing engine. In thesevirtual hosts (which can access Tomcat internal objects, load/unload other web applications, andso on), such as the manager web application, trusted contexts have access to the common Tomcatinternal classes and can encroach on each other’s territory.
One possible solution is to set up one <Engine> per virtual host in the same server.xml file.Since each <Service> container element in the file can have only one child <Engine> element, thiswould mean adding one service per virtual host with the accompanying engine. Also, since everyservice has its own set of connectors, this requires setting up different connectors listening on dif-ferent ports for each engine. Therefore, you’ll have to use Apache as a front end.
While the previous technique removes the problem of sharing information between the vir-tual hosts, a relaxed Tomcat security policy can still give one domain enough privileges to bring
CHAPTER 13 ■ IMPLEMENTING SHARED TOMCAT HOSTING 267
7850ch13FINAL.qxd 2/28/07 11:16 AM Page 267
down the whole Tomcat process. The more secure, albeit more resource-intensive, solution tothese security problems is to have one Tomcat process per virtual host.
Tomcat depends on two environment variables to find its internal classes and theconfiguration-specific files:
• CATALINA_HOME is needed for Tomcat to function properly. Tomcat uses this variable tofind its internal classes and libraries.
• CATALINA_BASE is used by Tomcat to find the location of the configuration files anddirectories, such as the web application directories. If CATALINA_BASE isn’t set, it defaultsto the value of CATALINA_HOME.
Therefore, to maintain separate Tomcat processes, all you have to do is set the value ofCATALINA_BASE to a different area of the disk for each server instance. Each server has its ownserver.xml file, which contains only one virtual host definition, different connector port num-bers, and different directories for logs, scratch areas, and so on.
For the previous three virtual hosts, you’d store their configurations in directories under/home/sites/<domain-name>/catalina. In this case, www.catalinabook.com’s CATALINA_BASEwould be /home/sites/www.catalinabook.com/catalina; www.jasperbook.com’s CATALINA_BASEwould be /home/sites/www.jasperbook.com/catalina; and www.tomcatbook.com’sCATALINA_BASE would be /home/sites/www.tomcatbook.com/catalina.
Ensure that only the virtual host definition of www.catalinabook.com is present in /home/sites/www.catalinabook.com/catalina/conf/server.xml, and the default host of the <Engine>is set to this domain. The rest of the configuration is as before. Listing 13-15 shows the listingfor www.catalinabooks.com.
Listing 13-15. server.xml for www.catalinabooks.com Using a Separate JVM
<Server port="8005" shutdown="SHUTDOWN">
<Service name="Virtual Hosting Tomcat">
<!-- Define a Coyote/JK2 AJP 1.3 Connector on port 8009 -->
<Connector port="8009"
enableLookups="false"
protocol="AJP/1.3" />
<Engine name="Catalina" defaultHost="www.catalinabook.com">
<Host name="www.catalinabook.com" debug="0"
appBase="C:/home/sites/catalinabook.com/webapps"
unpackWARs="true">
<Valve className="org.apache.catalina.valves.AccessLogValve"
directory="C:/home/sites/catalinabook.com/logs"
prefix="catalinabook.com.access."
suffix=".log"
pattern="common"/>
-->
</Host>
CHAPTER 13 ■ IMPLEMENTING SHARED TOMCAT HOSTING268
7850ch13FINAL.qxd 2/28/07 11:16 AM Page 268
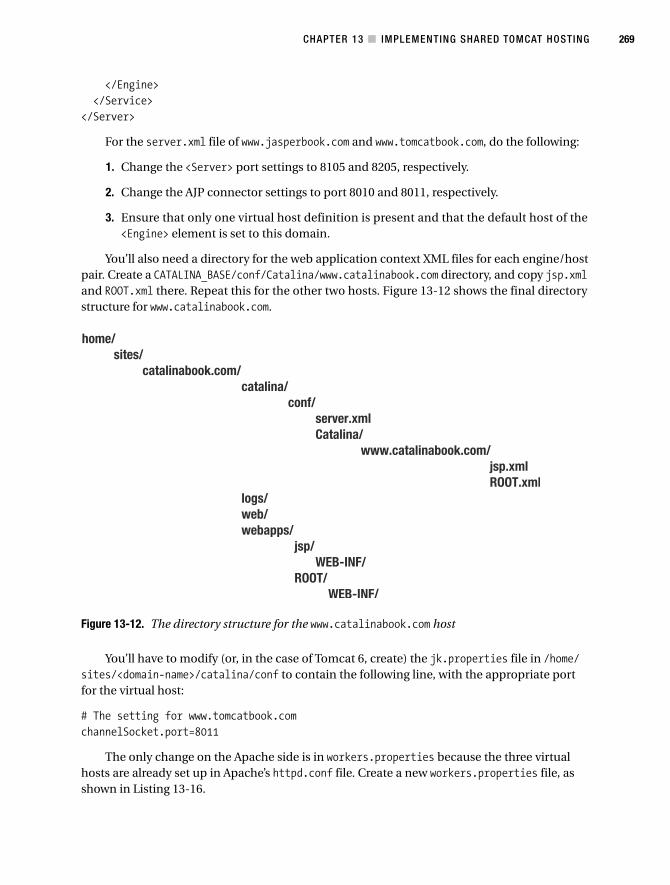
</Engine>
</Service>
</Server>
For the server.xml file of www.jasperbook.com and www.tomcatbook.com, do the following:
1. Change the <Server> port settings to 8105 and 8205, respectively.
2. Change the AJP connector settings to port 8010 and 8011, respectively.
3. Ensure that only one virtual host definition is present and that the default host of the<Engine> element is set to this domain.
You’ll also need a directory for the web application context XML files for each engine/hostpair. Create a CATALINA_BASE/conf/Catalina/www.catalinabook.com directory, and copy jsp.xmland ROOT.xml there. Repeat this for the other two hosts. Figure 13-12 shows the final directorystructure for www.catalinabook.com.
Figure 13-12. The directory structure for the www.catalinabook.com host
You’ll have to modify (or, in the case of Tomcat 6, create) the jk.properties file in /home/sites/<domain-name>/catalina/conf to contain the following line, with the appropriate portfor the virtual host:
# The setting for www.tomcatbook.com
channelSocket.port=8011
The only change on the Apache side is in workers.properties because the three virtualhosts are already set up in Apache’s httpd.conf file. Create a new workers.properties file, asshown in Listing 13-16.
CHAPTER 13 ■ IMPLEMENTING SHARED TOMCAT HOSTING 269
7850ch13FINAL.qxd 2/28/07 11:16 AM Page 269

Listing 13-16. The workers.properties File for Separate Virtual Hosts
# Only at beginning. In production comment it out.
[logger.apache2]
level=DEBUG
# Socket channels.
[channel.socket:localhost:8009]
[channel.socket:localhost:8010]
[channel.socket:localhost:8011]
# Define the workers.
[ajp13:localhost:8009]
channel=channel.socket:localhost:8009
[ajp13:localhost:8010]
channel=channel.socket:localhost:8010
[ajp13:localhost:8011]
channel=channel.socket:localhost:8011
# Uri mappings.
[uri:www.catalinabook.com/*.jsp]
group=ajp13:localhost:8009
[uri:www.jasperbook.com/*.jsp]
group=ajp13:localhost:8010
[uri:www.tomcatbook.com/*.jsp]
group=ajp13:localhost:8011
The three workers correspond to the three hosts you’ve already configured in Tomcat. Noticethe corresponding port numbers.
You now need to start each of the instances with a new CATALINA_BASE each time. Run thebatch file shown in Listing 13-17 if you’re on Windows.
Listing 13-17. Running the Three Virtual Hosts Using a Windows Batch File
@echo Running three Tomcat workers
set CATALINA_BASE=C:\home\sites\catalinabook.com\catalina
start /B catalina start
set CATALINA_BASE=C:\home\sites\jasperbook.com\catalina
start /B catalina start
set CATALINA_BASE=C:\home\sites\tomcatbook.com\catalina
start /B catalina start
Run the batch file shown in Listing 13-18 if you’re on a Unix-like system.
CHAPTER 13 ■ IMPLEMENTING SHARED TOMCAT HOSTING270
7850ch13FINAL.qxd 2/28/07 11:16 AM Page 270
Listing 13-18. Running the Three Virtual Hosts Using a Unix Shell Script
CATALINA_BASE=/home/sites/catalinabook.com/catalina
catalina start
CATALINA_BASE=/home/sites/jasperbook.com/catalina
catalina start
CATALINA_BASE=/home/sites/tomcatbook.com/catalina
catalina start
Now stop all the instances of Apache and Tomcat. Now, start Tomcat. Next, start Apache,and test the installation as you did for the previous Apache examples. You should see no changein functionality.
SummaryIn this chapter, you learned about various topics related to using Tomcat in a shared hostingscenario. You initially looked at the concept of shared hosting and the various types of sharedhosting that are possible.
You configured Tomcat to work as a stand-alone web server and as a servlet/JSP engine forApache. You then examined some common security enhancements for using virtual hosts withTomcat.
CHAPTER 13 ■ IMPLEMENTING SHARED TOMCAT HOSTING 271
7850ch13FINAL.qxd 2/28/07 11:16 AM Page 271

7850ch13FINAL.qxd 2/28/07 11:16 AM Page 272

Testing Tomcat’s Performance
Before you can confidently move your test server into production, meaning that it will be com-pletely open to the elements, you have to have some idea of how it will respond to heavy usage.Ignorance is no defense in this situation; you must be sure of your server’s ability to cope with reallife. The most effective way of doing this, barring having hundreds of offshore testers bombard theserver, is to run an automated load test.
An automated server load test simulates client requests so that a server is exposed to largeamounts of activity in an environment you control. Load testing, therefore, helps you under-stand the scalability and performance limits of your server before it’s exposed to a heavyproduction load.
Server load testing tests the scalability of the server and thus the ability of the system tohandle an increased load without degradation of performance or reliability. Scalability is howwell a solution to a problem will work when the size of the problem increases. In the case ofweb applications, scalability is the ability of the server to handle the jump from a small num-ber of clients to a large number of clients. This usually involves the addition of hardware,though a well-configured system is the first line of defense. Scalability is intrinsically linked toperformance, and a scalable system is one that has an increase in performance proportionalto the new resources added, be they network equipment, high-performance databases, band-width, or hardware.
This chapter will show you some basic tools and techniques on how to test your Tomcatapplications for performance and load.
Preparing for Load TestingYou need to make several decisions when setting up and configuring Tomcat that will affectthe scalability of your installation.
Configuring the Java Heap SizeThe JVM sets its own memory usage, but you can configure the limits that it uses at the com-mand line. These settings alter the JVM’s heap, which is where object instances are stored.
You should remember two very important switches when you set up a Tomcat instance.
• -Xmx<size>: The maximum heap size for the JVM
• -Xms<size>: The initial heap size for the JVM
273
C H A P T E R 1 4
■ ■ ■
7850ch14FINAL.qxd 2/28/07 11:17 AM Page 273

CHAPTER 14 ■ TESTING TOMCAT’S PERFORMANCE274
If you don’t explicitly set these parameters, the JVM will use its defaults, which are a mini-mum of 2MB and a maximum of 64MB for JDK 1.4 and later.
Setting the Maximum Heap SizeThe maximum heap size is the upper limit of RAM that the JVM will allocate to the heap. To setthe maximum heap size to 256MB, use the following switch:
-Xmx256m
To specify memory size in GB, use the letter g instead of m.In a data-intensive application with long-lived objects, memory usage can build up
quickly. If an application’s memory requirement exceeds the maximum heap size of the JVM,the JVM will first default to virtual memory and then fail and throw a java.lang.OutOfMemory
error. This gives you systemwide protection, but you must be careful when setting maximumheap size. You should always make sure your system has enough memory to comply with theJVM setting, because you shouldn’t rely on the virtual memory mechanism to save your server.
Setting the Minimum Heap SizeYou use the initial heap size setting to allocate memory to the Java heap at JVM startup. Ina memory-intensive, heavily loaded application, initial heap size can be important. If theJVM starts with a very small heap size and receives a large number of requests that requirelarge object instantiations, it will struggle to keep up with the memory allocation needsand may not recover in some situations. In this case, it’s often useful to set the minimumheap size to be the same as the maximum heap size. This will ensure that a large numberof object instantiations at once doesn’t incure a performance hit. For example, the follow-ing line sets the minimum and maximum heap sizes to 256MB:
-Xms256m -Xmx256m
Bear in mind when doing this that setting the heap size to a value that’s as large as yourserver will allow isn’t always a good idea. This may cause otherwise unexplainable pauses inthe applications running on the server. It could also cause poor average server performance.Both of these phenomena are caused by the garbage collector, which runs only when memory isexhausted and runs through the entire system. If your server handles heavy-duty applicationsand has a large heap, then the garbage collector has more work to do.
One possible solution to this problem is to pass the following command-line option tothe Java executable:
-Xincgc
This forces the garbage collector to run in incremental mode, meaning it runs more oftenbut checks through smaller amounts of memory. You should monitor this carefully becausethere may be a small performance hit with this method, too.
Lowering the size of the heap may also help this situation, as would a combination ofboth these techniques. These are prime examples of why you should load test your serverbefore it goes into production. Otherwise, you wouldn’t know which of these settings wasmost appropriate for the web applications on your server.
7850ch14FINAL.qxd 2/28/07 11:17 AM Page 274

Configuring Tomcat’s ConnectorsSeveral connector parameters may affect your server’s performance. The following sections out-line the performance-critical attributes of the <Connector> element. For an exhaustive discussionof these elements, see Chapter 9.
The acceptCount AttributeacceptCount sets the number of connections that the server will accept while waiting for a freeprocessor. Incoming connections once this limit has been reached will be refused. While you maybe tempted to increase this to a very high number, a high setting may cause your system to runout of free file descriptors, which can cause processes—or under extreme circumstances, operat-ing systems—to crash or become unstable. The default is 10.
The enableLookups AttributeThis setting tells Tomcat to resolve each request’s host name. This is useful when viewing logfiles, but it puts extra load on the server and the network. You should, therefore, use it withcaution. The default is true.
The maxProcessors AttributeThe maxProcessors attribute imposes a limit on the number of threads the server will start, regard-less of the server load. If the server receives more simultaneous requests for a given connectionthan the value of this setting, the requests will block until a thread is freed to handle them. If thisnumber is set too high, heavily loaded sites run the risk of a performance slowdown as the JVMstruggles to manage the large number of threads and network connections that will be created.
You can monitor thread count with operating-system–specific tools, such as ps in Unix-likesystems. If the number of threads approaches the maxProcessors setting, followed by a server per-formance slowdown, you should increase this setting and repeat the experiment. The default is 20.
The minProcessors AttributeA processor is a thread that handles requests for a connector on a given port. Setting theminProcessors attribute too high can produce a large number of unnecessary threads,which will put an extra burden on the JVM. Setting it too low can cause delays when servicingrequests that come in soon after server startup, because the server will have to spawna separate thread for incoming requests if it’s already servicing the number of clients equal tothis setting.
As with the maxProcessors attribute, you can monitor the thread count with operating-system–specific tools. If you see the number of threads increasing rapidly before reachinga plateau, the number of threads reached at the plateau makes a good general minProcessorssetting. The default is 5.
Configuring Application SessionsTomcat’s default session manager is very fast because it stores its data in memory, as discussedin Chapter 7. This implies a trade-off between speed and memory consumption on the server.However, the problem when working with sessions is that they’re configured at the application
CHAPTER 14 ■ TESTING TOMCAT’S PERFORMANCE 275
7850ch14FINAL.qxd 2/28/07 11:17 AM Page 275
level in web.xml, using the <session-timeout> subelement of the <session-config> element.This means developers are in charge of them in the beginning and may have their own reasonsfor configuring them they way they are.
You must weigh the needs of your server against the needs of the developer’s applicationand its users. Ultimately, you have responsibility for the application once it’s deployed on yourserver, so you have the means and the authority to change the session settings as appropriate.
In extreme cases, such as data-entry applications or point-of-sale systems, where sessionsneed to be active for hours at a time, it may be worthwhile to use Tomcat’s persistent sessionmanager. Reactivation of the sessions will be sluggish in terms of performance, but the mem-ory trade-off may prove to be worth the cost. Chapter 7 also covered the persistent sessionmanager.
Altering Tomcat’s Deployment ArchitectureThe simplest Tomcat setup with a single stand-alone Tomcat server using an HTTP connectoris usually appropriate for very small installations. However, as load increases and applicationsbecome resource intensive, the deployment architecture can make or break a server’s per-formance.
It’s possible, under certain conditions, for the JVM to become a bottleneck, even if a singleserver is sufficient. The JVM isn’t optimized for dealing with huge amounts of memory, sobreaking it into multiple processes on the same system may help, as discussed in Chapter 13.
If application performance is constrained by the limits of the operating system or serverhardware, it may be necessary to load balance two or more application servers, as discussed inChapter 9.
While Tomcat has an HTTP connector, it isn’t optimized as an HTTP server. Bringing Apacheor other supported web servers into the picture would increase performance, as they’re designedfor handling only HTTP requests, as discussed in Chapter 9.
Working with a Developer’s CodeA well-configured server is no match for inefficient application code deployed within it. Thebest weapon in this situation is a clear understanding of the performance of your server whenit’s unencumbered with sluggish code. Regardless of what the reality is, the onus is always onyou, as the server administrator, to identify the bottleneck. Thorough preapplication load test-ing and analysis will allow you to cast off undeserved blame and quickly identify applicationperformance bottlenecks as and when they appear.
Load Testing with JMeterThe first thing you’re going to need for load testing, unless you have the aforementioned armyof web-savvy offshore testers, is some software to help you simulate a heavy load.
You have a number of options, including open source software, commercial packages, andhome-brewed efforts (which are universally a mistake). In this case, as the rest of the book focuseson open source software, you need not look very far. Tomcat’s sister project, Apache JMeter, fitsthe bill quite nicely.
JMeter is capable of load testing FTP sites, JDBC data sources, and Java objects, but thischapter will focus on load testing HTTP servers and applications.
CHAPTER 14 ■ TESTING TOMCAT’S PERFORMANCE276
7850ch14FINAL.qxd 2/28/07 11:17 AM Page 276
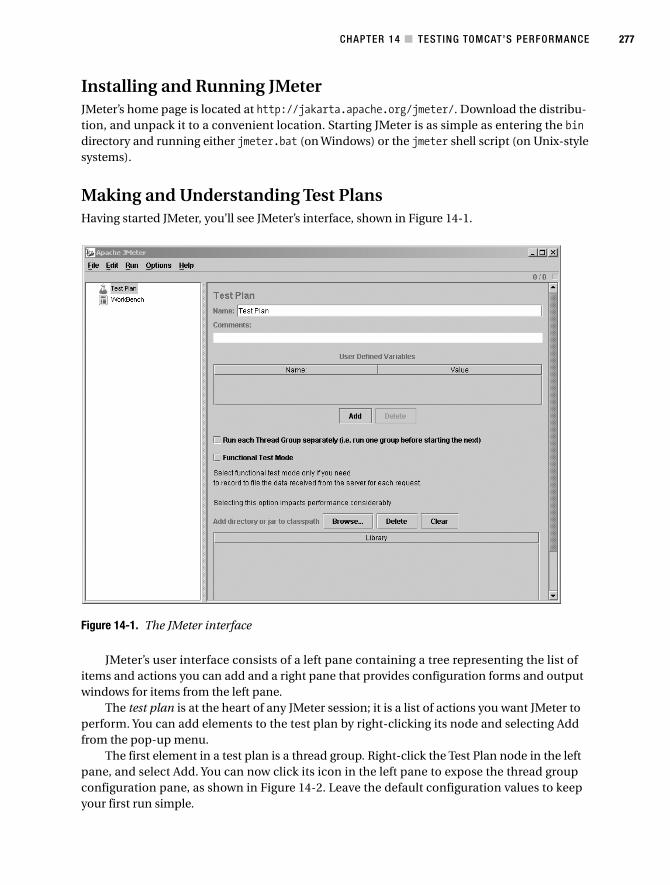
Installing and Running JMeterJMeter’s home page is located at http://jakarta.apache.org/jmeter/. Download the distribu-tion, and unpack it to a convenient location. Starting JMeter is as simple as entering the bindirectory and running either jmeter.bat (on Windows) or the jmeter shell script (on Unix-stylesystems).
Making and Understanding Test PlansHaving started JMeter, you’ll see JMeter’s interface, shown in Figure 14-1.
Figure 14-1. The JMeter interface
JMeter’s user interface consists of a left pane containing a tree representing the list ofitems and actions you can add and a right pane that provides configuration forms and outputwindows for items from the left pane.
The test plan is at the heart of any JMeter session; it is a list of actions you want JMeter toperform. You can add elements to the test plan by right-clicking its node and selecting Addfrom the pop-up menu.
The first element in a test plan is a thread group. Right-click the Test Plan node in the leftpane, and select Add. You can now click its icon in the left pane to expose the thread groupconfiguration pane, as shown in Figure 14-2. Leave the default configuration values to keepyour first run simple.
CHAPTER 14 ■ TESTING TOMCAT’S PERFORMANCE 277
7850ch14FINAL.qxd 2/28/07 11:17 AM Page 277

Figure 14-2. Thread group settings
Table 14-1 describes the available options.
Table 14-1. The Options for a Thread Group
Option Description
Name If you had multiple thread groups, it’s useful to choosedescriptive names that reflect their purposes.
Action to Be Taken After A sampler tells JMeter to send requests to a server. You can a Sampler Error configure its behavior in the event of any kind of error.
Number of Threads The number of threads you’d like the thread group to spawn tocarry out its work. If you wanted to simulate a heavy load,you’d want to increase this number to simulate simultaneoususers.
Ramp-Up Period (in seconds) JMeter will start with one thread and will add threads evenlyover the course of the specified period until the number ofthreads configured has been reached.
Loop Count The number of times you want JMeter to execute the elements ofthis thread group. The default is Forever, which means theelements of the test plan will execute until you tell them to stop.
Scheduler You can schedule the test to run at a more convenient time ifresources are at a premium.
CHAPTER 14 ■ TESTING TOMCAT’S PERFORMANCE278
7850ch14FINAL.qxd 2/28/07 11:17 AM Page 278
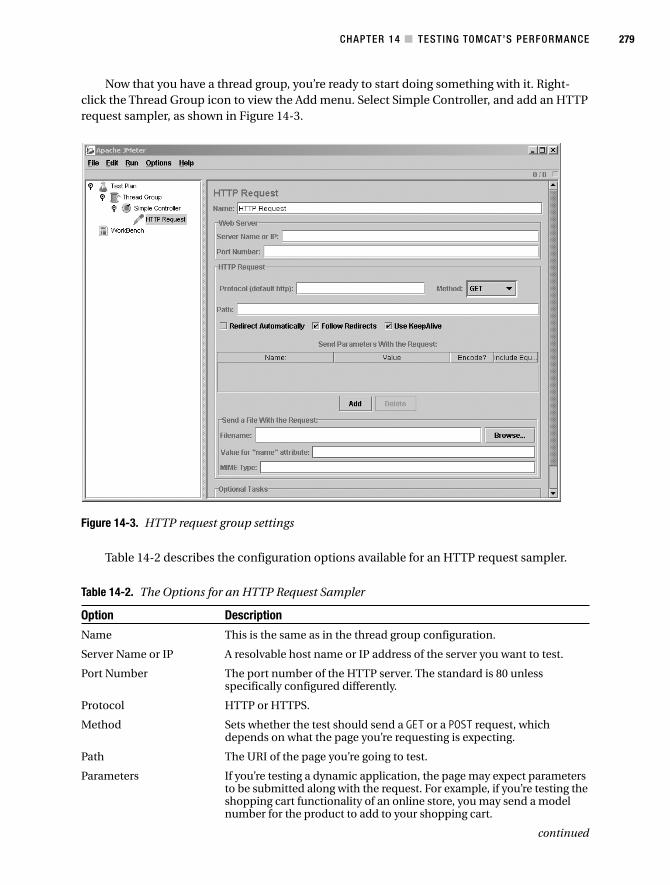
Now that you have a thread group, you’re ready to start doing something with it. Right-click the Thread Group icon to view the Add menu. Select Simple Controller, and add an HTTPrequest sampler, as shown in Figure 14-3.
Figure 14-3. HTTP request group settings
Table 14-2 describes the configuration options available for an HTTP request sampler.
Table 14-2. The Options for an HTTP Request Sampler
Option Description
Name This is the same as in the thread group configuration.
Server Name or IP A resolvable host name or IP address of the server you want to test.
Port Number The port number of the HTTP server. The standard is 80 unlessspecifically configured differently.
Protocol HTTP or HTTPS.
Method Sets whether the test should send a GET or a POST request, whichdepends on what the page you’re requesting is expecting.
Path The URI of the page you’re going to test.
Parameters If you’re testing a dynamic application, the page may expect parametersto be submitted along with the request. For example, if you’re testing theshopping cart functionality of an online store, you may send a modelnumber for the product to add to your shopping cart.
continued
CHAPTER 14 ■ TESTING TOMCAT’S PERFORMANCE 279
7850ch14FINAL.qxd 2/28/07 11:17 AM Page 279

Table 14-2. (continued)
Option Description
Filename Some web applications accept file uploads via HTTP POST. Thissetting specifies which file you’d like to upload with the request.
Parameter Name The file will be uploaded as a key-value pair. This is the name of thekey that the web application will use to reference the file in therequest.
MIME Type The type of the file you’re uploading. For example, an HTML filewould have a MIME type of text/html, and an Adobe Acrobat filewould be application/pdf.
Retrieve All Embedded If this is set, when a request is made for a web page, the page will be Resources from HTML parsed, and all embedded images and applets will be downloaded as Files part of the request. If you were to test a graphics-intensive site for
performance, this would more accurately reflect the end userexperience, as the bulk of the response time would be apportionedto downloading images.
Use As Monitor Select this to use this sampler as a monitor. A monitor uses Tomcat’sstatus servlet to request data on the server’s general health. You canuse it to monitor the server and react to any issues.
Keep this simple by filling in only the bare minimum number of fields for this first test.Assuming you have a Tomcat installation on the same machine from which you’re runningJMeter, set the server name to localhost, the port to 8080, and the path to /. If you were to runJMeter on a different physical machine from the server, you’d simply set the server name tothe appropriate host or IP address of the server you wanted to load test. All other parameterscan remain unchanged for now.
You have now done enough to start testing Tomcat’s performance. You can start the testby selecting Run ➤ Start from the menu bar. However, the example isn’t very practical so far,since you have no way to capture or view the results of the test.
JMeter separates the execution of a test plan from the collection and analysis of the testplan’s results. You can accomplish this with the Observer or, as it’s sometimes called, Event Lis-tener design pattern. This is reflected in the JMeter interface by its use of the listener terminology.Controllers are responsible for performing actions, and listeners are responsible for reactingto those actions. Thus, if you want access to the results of a test plan, you must use one of theJMeter listeners.
To finish the simple test plan, right-click the Thread Group icon, and select Add ➤ Listener ➤View Results Tree. Select the View Results Tree icon in the left pane to show its output window. Youdon’t need to add any configuration for this listener. When running a test with a view results treelistener, you can watch each response as it’s received from the server. Selecting the response fromthe bottom-left area of the right pane, you’ll see the actual data returned in the bottom-right areaof that pane.
Before starting the test, you should save the test plan. Right-click the Test Plan icon in the leftpane, and choose Save As from the pop-up menu. For consistency, use the default .jmx extensionwhen saving your test plan.
Now, click the View Results Tree icon, and choose Start from the Run menu on the menubar. You should see the Root node in the bottom-left pane change to a folder icon as testresults start to come in. Click that node to open it, revealing the individual test results con-tained within. Selecting any of the results will change the bottom-right pane to show you the
CHAPTER 14 ■ TESTING TOMCAT’S PERFORMANCE280
7850ch14FINAL.qxd 2/28/07 11:17 AM Page 280

results of the request (including response code and load time) under the Sampler result tab,the actual request made under the Request tab, and the data received in the response underthe Response data tab. Select Run ➤ Stop to finish the test.
Figure 14-4 shows the completed test plan with the View Results Tree listener activated.
Figure 14-4. The results of the simple test
Examining JMeter’s FeaturesYou now know how to load test a web server and how to view the results of the test. You can getsome idea of how well your Tomcat server is responding to the test in terms of load time andstability. If you were content to manually click through each result in the View Results Tree win-dow and inspect the full page, this might be enough. Fortunately, JMeter provides many morefeatures to aid you in capturing and analyzing load data. JMeter has five major feature types:
• Configuration element
• Listener
• Logic controller
• Sampler
• Timer
Though JMeter can test many different types of server, I’ll cover only HTTP-relatedsettings in the sections to follow.
CHAPTER 14 ■ TESTING TOMCAT’S PERFORMANCE 281
7850ch14FINAL.qxd 2/28/07 11:17 AM Page 281

Using Timer FeaturesIn the previous example, JMeter spawns one thread and makes requests as fast as it and theserver being tested can keep up. In real-world cases, it may not make sense to pound theserver with a constant onslaught of requests. Only in exceptional cases will a server be facedwith a large number of simultaneous requests with no delay in between.
To spare your server the full brunt of this load and to make the load more representativeof the real world, you can add a timer to your thread group. This will introduce some intelli-gent logic that regulates the frequency and speed of each thread’s requests. JMeter includesfour types of timers: two random timers and two constant timers.
The constant throughput timer allows you to specify how many requests you want tomake per minute, and the constant timer inserts a delay between each request for a giventhread. These are just two different ways of accomplishing the same thing, so take your pick asto which one you prefer.
The two random timers are the Gaussian random timer and uniform random timer. Thesetimers simulate real-world traffic more accurately by inserting randomly calculated delaysbetween the requests for each thread. The uniform random timer appends a random delay toa configurable constant delay, and the Gaussian random timer uses a statistical calculation togenerate a pseudo-random delay. Each random timer takes a configurable constant time towhich its random calculation will be appended.
To add a timer, right-click a thread group, select Timer from the Add menu, and choosethe timer you want. Timers will affect the entire thread group to which they’re added but won’taffect peer thread groups. Adding more than one timer to a thread group will have a cumula-tive effect on the delay between requests.
Using Listener FeaturesJMeter uses listeners to monitor and react to the results of the requests it sends. The previousexample used the View Results Tree listener to show the data returned from the server, theresponse time, the HTTP response code, and the HTTP response message. You add a listener byright-clicking a thread group and selecting the desired listener from the Add ➤ Listener menu.
The listener listens only to the activity of the thread group to which it’s added. So, if youhave two thread groups in your test plan, thread group A and thread group B, a listener addedto thread group B will be oblivious to anything that happens in the scope of thread group A.Table 14-3 lists the listeners currently provided by default with JMeter.
Table 14-3. JMeter’s Listeners
Listener Description
Assertion Results The output of the assertion elements of a sampler.
Graph Full Results A cumulative graph of the response times of each request made.
Graph Results A simple graph view, plotting individual data points, mean responsetime, and standard deviation of response time for all requests in itsparent thread group.
Mailer Visualizer Sends an e-mail to a specified e-mail address if a certain number of failuresoccur. You must add mail.jar to JMeter’s lib directory to add this listener.
Monitor Results Shows the results of any monitored samplers.
Simple Data Writer Writes the results to a file in CSV format.
CHAPTER 14 ■ TESTING TOMCAT’S PERFORMANCE282
7850ch14FINAL.qxd 2/28/07 11:17 AM Page 282

Listener Description
Spline Visualizer A graph view of all data points made during a test plan run that showsthe results as an interpolated curve.
Aggregate Report Each request sampler is given an entry in a table, and the totals andaverages are calculated in real time.
View Results in Table Provides a real-time view of the test results.
View Results Tree Organizes the results into a tree.
You can group each listener into one of three categories:
• Visualization listeners
• Data listeners
• Other listeners
Visualization Listeners
Graph Full Results, Graph Results, and Spline Visualizer all create graphical, real-time depictionsof the test results. Graph Results is the simplest and most popular of these, plotting mean responsetime, standard deviation, and individual data points.
Data Listeners
Simple Data Writer, View Results in Table, Aggregate Report, and View Results Tree capture theraw data, response time, and return codes returned from the server. While View Results in Tableand View Results Tree are useful as status checkers while running tests, Simple Data Writer isperhaps the most important of the listeners. Simple Data Writer listeners perform the task oflogging response time to a file, as well as logging response codes and other information. Thisis an important tool because it allows you to keep your data for posterity as well as to importthe data into other more sophisticated tools for more detailed analysis.
■Note All the listeners, except the Monitor Results listener, can use the Simple Data Writer listener as well.When you configure one of these elements, add the filename of the results file as you would for a SimpleData Writer listener.
You can save the data as an XML file or as a CSV file. The following setting is in thejmeter.properties file:
jmeter.save.saveservice.output_format=xml
The Simple Data Writer listener offers the following configuration options:
• Name: A descriptive name for the simple data writer element as it will appear in the testplan.
• Filename: The path to the output file to be created by the file reporter. If you supplya relative path, it’s relative to JMETER_HOME/bin.
CHAPTER 14 ■ TESTING TOMCAT’S PERFORMANCE 283
7850ch14FINAL.qxd 2/28/07 11:17 AM Page 283

The Monitor Results Listener
If you want to monitor the server’s overall performance, you can use the Monitor Results lis-tener. This listener allows you to monitor multiple Tomcat servers from one console using themanager application’s status servlet.
It’s a good idea to create a new thread group for a Monitor Results listener. Name it ServerStatus Thread Group, and add an HTTP request sampler. Set the host name, port, and protocolas normal. Now set the path to /manager/status, add a request parameter called “XML”, andset it to true. Finally, check the Use As Monitor box. The XML parameter will cause the statusservlet to return its response in an XML format that JMeter can translate into monitoringinformation. Figure 14-5 shows this setup.
Figure 14-5. The HTTP request sampler for the Monitor Results listener
The manager application is protected by authentication, so you’ll have to send yourauthentication information along with your request. To do this, add an HTTP authorizationmanager configuration element to the HTTP request sampler using the Add menu. Set theBase URL to http://servername:port/manager and the Username and Password properties toa user with the manager role.
Finally, add a monitor results listener and a constant timer, set to 5,000 milliseconds. Afterall, you don’t want to drown your server with the monitoring tool.
When you run the test, check the Monitor Results listener to see how your server is per-forming. The Health tab will show a summary of the server’s performance, with a colored icon
CHAPTER 14 ■ TESTING TOMCAT’S PERFORMANCE284
7850ch14FINAL.qxd 2/28/07 11:17 AM Page 284
indicating general health and a load bar that tells you the relative load. The Performance tabbreaks down the server’s performance.
The Assertion Results Listener
You use assertions to test if the response contains the data that you expect. If you want to seethe results of your assertions, add an Assertion Results listener to your thread group. It willshow you the URL of the request and the result of the assertion as applied to the response.
The Mailer Visualizer Listener
If you want to be informed of any successes or failures in your test plan, then you should con-figure a Mailer Visualizer listener.
Using a Logic Controller FeatureA logic controller’s primary purpose is to manage the execution flow of a test plan; they’re con-tainers for other executable test plan elements. Logic controllers that are added to a threadgroup—or even as a subnode of another logic controller—will be treated by their parent exe-cution context as a single node to be executed. Elements added beneath logic controller nodeswill be executed according to the rules of the specific logic controller to which they’re added.
Like thread groups, logic controllers create a separate namespace for listeners, timers,and other elements, which are context specific. You can think of logic controllers as the closestapproximation JMeter test plans have for the while, for, and function constructs of typicalprogramming languages.
The Interleave Controller
The Interleave controller will execute one of its subelements each time its parent containerloops. It will execute them in the order in which they’re listed in the configuration tree. Forexample, if you were to create an Interleave controller with four elements under a threadgroup set to loop 14 times, JMeter would execute the entire set of Interleave controllersubelements three times and would then execute only the first two subelements a fourthtime (4 + 4 + 4 + 2 = 14).
Interleave controllers are good for testing a sequential process, where each requestdepends on the previous request for successful completion. An obvious example is an onlineshopping application, where users search for items, add them to their shopping carts, entercredit card details, and finalize the orders.
The Simple Controller
The Simple controller is a container for other elements and provides no special functionality.You can use the Simple controller to organize test elements in much the same way as you usefolders on a file system to organize their contents.
If you were to load test a site with a nontrivial amount of functionality, it would makesense to use Simple controller elements to separate the tested functionality into related mod-ules to ensure a maintainable test plan. This enhances the maintainability of the test plan inthe same way that dividing large software projects into modules and functions enhances themaintainability of the software.
CHAPTER 14 ■ TESTING TOMCAT’S PERFORMANCE 285
7850ch14FINAL.qxd 2/28/07 11:17 AM Page 285

The Loop Controller
The Loop controller will loop through all its subelements as many times as specified in theLoop controller’s configuration panel. Therefore, any elements under the Loop controller willexecute this number of times, multiplied by the number of times the parent thread is set toloop. If you were to configure a Loop controller to loop four times under a thread group thatloops four times, each subelement of the Loop controller will be executed 16 times.
The Once Only Controller
The Once Only controller executes its child elements only once during the run of a load test.You can use this controller to execute an initial login, create an application entity on whichother tests depend (for example, creating an order in a sales application so you can manipu-late it with other requests), or perform any other operation that needs to happen only once.
Using AssertionsEven if your application is giving subsecond responses, you have no cause to celebrate if itsoutput is invalid. An assertion gives you a way to validate the actual data returned as a resultof each request so that you can be sure the server is both responsive and reliable. Assertionsare created as subelements of samplers, such as the HTTP request sampler. An assertion isa declaration of some truth you want to test against.
The first step is to build an HTTP request sampler into the test plan that will access thefile’s URL. After creating the HTTP request sampler, you can right-click the HTTP Requesticon, and then choose Assertions ➤ Response Assertion from the Add menu. Select the newassertion, and add a new pattern, as shown in Figure 14-6.
CHAPTER 14 ■ TESTING TOMCAT’S PERFORMANCE286
7850ch14FINAL.qxd 2/28/07 11:17 AM Page 286
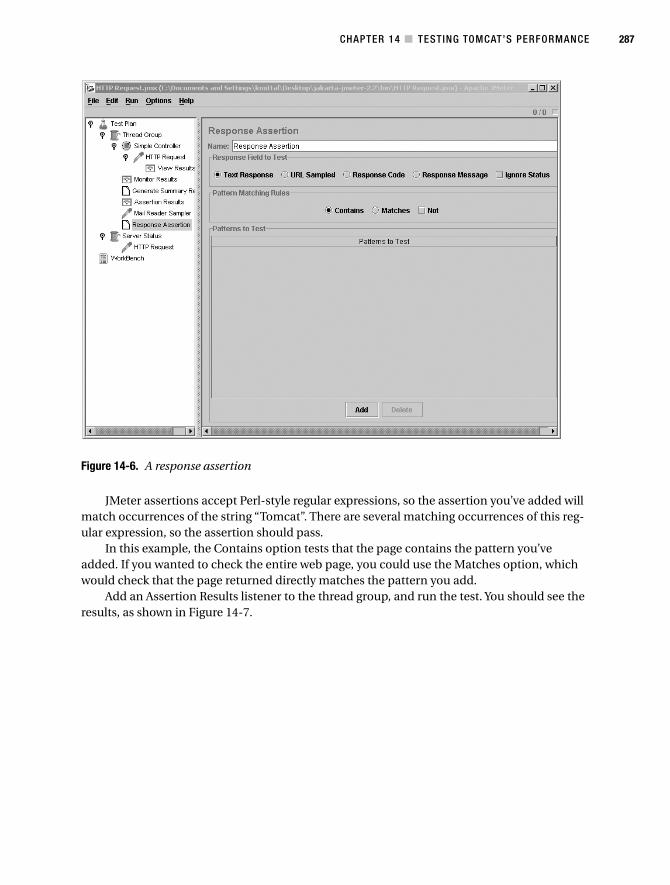
Figure 14-6. A response assertion
JMeter assertions accept Perl-style regular expressions, so the assertion you’ve added willmatch occurrences of the string “Tomcat”. There are several matching occurrences of this reg-ular expression, so the assertion should pass.
In this example, the Contains option tests that the page contains the pattern you’veadded. If you wanted to check the entire web page, you could use the Matches option, whichwould check that the page returned directly matches the pattern you add.
Add an Assertion Results listener to the thread group, and run the test. You should see theresults, as shown in Figure 14-7.
CHAPTER 14 ■ TESTING TOMCAT’S PERFORMANCE 287
7850ch14FINAL.qxd 2/28/07 11:17 AM Page 287

Figure 14-7. Viewing successful assertions
The results of the assertion don’t show any assertion failures, so the tests were successful.You can test many different aspects of a response, including its response code and the
contents of the entire response. If you want to validate your HTML, add an HTML assertion,and select the strictness of the test. Assertions also exist for testing the server response timeand the size of the response.
Using a Configuration ElementA configuration element’s job is to modify requests in some way. They offer a pluggable way toadd request modification logic from various types of default values to automatic building ofrequests.
The HTTP Header Manager
In some cases, application testing will require specific HTTP headers to be set to get a validreflection of true application performance. For example, if an application performs differentactions depending on the browser type making the request, it’s necessary to set the User-Agent header when making test requests.
You use the HTTP header manager to explicitly set header keys and values to be sent aspart of each request. If added as a node under an HTTP request element, the custom headerswill be sent only for the request under which they’re added. These headers will be sent withevery request in the same branch if they’re set at the thread group level.
CHAPTER 14 ■ TESTING TOMCAT’S PERFORMANCE288
7850ch14FINAL.qxd 2/28/07 11:17 AM Page 288
Configuring an HTTP header manager is simple and is similar to configuring thename/value parameters in an HTTP request element.
The HTTP Authorization Manager
The HTTP authorization manager handles requests that require HTTP authentication. Likethe HTTP header managers, they can be added directly underneath an HTTP request elementor to an entire branch of a tree. The configuration parameters are simple, accepting a baseURL from which the manager will attempt to send authentication credentials, plus the obliga-tory username and password. You saw this element in action in the “The Monitor ResultsListener” section.
The HTTP Cookie Manager
Like HTTP authorization managers and HTTP header managers, HTTP cookie managers canaccept a hard-coded list of cookies that should be sent for every request. In this way, you cansimulate a browser that has previously visited a site. Additionally, HTTP cookie managers canmimic a browser’s ability to receive, store, and resend cookies. For example, if a cookie isdynamically assigned to each visitor, the HTTP cookie manager will receive it and resend itwith every appropriate subsequent request.
You can also add HTTP cookie managers to a thread group or directly to an HTTP requestelement, depending on the scope of its intended influence.
The HTTP Request Defaults
In most cases, each test plan will be created for a single-server environment or online applica-tion. Because of this, you’ll find yourself typing the same server name, port, path, orparameters into each new HTTP request sampler you add to the test plan. HTTP requestdefaults eliminate this duplication of work by allowing you to specify defaults for many of theHTTP request element’s configuration parameters. After adding the defaults, you can leavethese fields blank in any HTTP request element in the same thread group.
For example, if you were load testing an application that follows the Model View Con-troller design pattern, with all traffic flowing through a single HTTP servlet, you may havea common base URL for every request like http://loadtest.apress.com/Router/.
This servlet will provide access to different functionality in the application via a requestparameter such as the following:
http://localhost:8080/Router?action=addToCart
http://localhost:8080/Router?action=checkOut
The server name, port, protocol, and path are common to all HTTP requests that accessthis application, with only the request parameters varying. In such a case, you could add anHTTP request defaults element, as shown in Figure 14-8.
Any requests that are in the same thread group will inherit these settings unless they’reexplicitly overridden in their own configurations. To access any addToCart and checkOut featuresof your imaginary application, you’d need to add HTTP request elements, leaving all configura-tion options blank except for the addition of the action parameter and corresponding values. Ina large load test scenario with potentially numerous HTTP requests, this will really save you timeand give your fingers a break from typing.
CHAPTER 14 ■ TESTING TOMCAT’S PERFORMANCE 289
7850ch14FINAL.qxd 2/28/07 11:17 AM Page 289

Figure 14-8. Setting default values for HTTP tests
Using Preprocessor ElementsThe preprocessor elements can extract links from a web page or options from a form, and youcan use them to modify a sampler’s request before it’s sent to the server. Once JMeter has thisinformation, it can use it to iteratively follow each link or submit each option. Other function-ality includes adding a counter or user variables before each request to test various behaviorsdepending on the variable sent to the server.
Creating a Web Spider
If you want to run through your application to check that all your links work and are valid, you canuse JMeter as a web spider. To do this, create a simple controller and an HTTP request sampler. Inthis example, you’ll use the JSP examples web application, so set the path to /jsp-examples/. Adda constant timer if you don’t want to burden your server too much.
Now that you have the initial request set up, you can use its results to modify subsequentrequests. However, if you put settings (in the form of regular expressions) into the original requestto be modified by subsequent requests, the original request won’t return meaningful resultsbecause Tomcat won’t recognize them. If the original request doesn’t return meaningfulresults, then the subsequent requests can’t be modified. To solve this, you must use anotherHTTP request sampler to work on the new requests.
Add another HTTP request sampler with the path set to .*. This matches any links foundin the response returned by the previous requests and fills in the values for this request. For
CHAPTER 14 ■ TESTING TOMCAT’S PERFORMANCE290
7850ch14FINAL.qxd 2/28/07 11:17 AM Page 290

this to work, though, you must add an HTML link parser to this HTTP request sampler. Youdon’t have to configure any extra settings on this component. If you want to see the results ofthe link parser, you should add a listener. If you’re testing for valid links, you could add anassertion, as shown earlier in this chapter.
To see if all the links on your site link to existing resources, add an assertion listener, andrun the test. You’ll see each link from the jsp-examples web application executed in turn andwill be told if any don’t exist. Rename one of the files to see what happens.
Using Post-Processor ElementsPost-processor elements act after a request has finished. You can use them to save the responsesto a file for your reference, stop the test if an error occurred, or create a running summary. Touse this functionality, add a post-processor to a sampler.
Generating Summaries
To generate a running summary of a test, add a Generate Summary Results post-processorelement to an HTTP request sampler. You can view the summary in stdout, in JMeter’s logfile, or in both. You can configure where the summary is sent and how often it is compiled injmeter.properties. The following sends the summary to the JMeter log file but not to stdout:
summariser.interval=300
summariser.out=false
summariser.log=true
The summariser.interval setting is the number of seconds between summaries. Thedefault is 180 seconds (that is, three minutes). The other two settings aren’t mutually exclusive,and you can set them both to true if you want. Here’s an example of the summary:
2004/10/25 23:31:03 INFO - jmeter.reporters.Summariser:
Generate Summary Results = 22 in 86s = 0.3/s
Avg: 3 Min: 0 Max: 20 Err: 0 (0.0%)
Here, 22 responses were returned in 86 seconds, which is 0.3 responses per second. The aver-age response time was 3 milliseconds, with response times ranging from 0 to 20 milliseconds.
Interpreting Test ResultsYou now have the data in whichever format you wanted it, be that in a graph or in a CSV file.What are you looking for? The two simplest measures are mean and standard deviation.
Examining the MeanThe mean is the average response time for a sample. It indicates the central tendency ofyour server’s performance. But what about variation? If your server has a good meanresponse time but a huge amount of variation among the samples, you’ll end up with theaverage user having a decent experience and the occasional user or request having a reallybad (or really good) experience. It’s this kind of variation that drives an unpredictable andfrustrating user experience, so another good measure of variation is the standard deviation.
CHAPTER 14 ■ TESTING TOMCAT’S PERFORMANCE 291
7850ch14FINAL.qxd 2/28/07 11:17 AM Page 291
Examining the Standard DeviationStandard deviation is a measure of how widely values in a sample are dispersed from the meanvalue. Hence, a higher standard deviation indicates more variance in response time. You havemany ways to slice and dice performance data. Sometimes, mentally comparing two samples isenough. Other times, it may make sense to delve into more complex statistical tools, such asregression analysis, for predictive modeling of a process’s performance. Although a descriptionof these statistical methods is beyond the scope of this book, you can find many online andprinted statistics resources at www.prndata.com/statistics_sites.htm.
SummaryLoad testing is an important but often overlooked activity of the system administrator. It canhelp you to make initial architectural decisions as well as to validate the decisions you’ve pre-viously made. In this chapter, you examined the following topics:
• Scalability, the ability of a system to handle increased load without experiencing per-formance problems or reliability issues, is driven by many factors. In a Tomcatinstallation, some of those factors are server hardware, software configuration, anddeployment architecture.
• JMeter is an open source load tester, which is part of the Jakarta project. I covered JMeterload testing techniques from the simple to the advanced.
• Server load testing and application load testing require different approaches. They’retightly coupled, and it’s up to the server administrator to gauge how application codeaffects server performance and to understand which factors contribute to performanceissues.
The open source world also has more to offer in terms of load testing tools. For exam-ple, the Grinder (http://grinder.sourceforge.net) is a well-established Java tool. A greatresource for finding the latest in open source load testing tools is the FreshMeat.net opensource software archive site, which includes a category specifically for these kinds of tools athttp://freshmeat.net/browse/863/.
Additionally, many testing resources are available on the Web. A great place to look for a listof sites is the Open Directory Software Testing list (www.dmoz.org/Computers/Programming/Software_Testing/), which is a directory of sites that focus on testing topics.
CHAPTER 14 ■ TESTING TOMCAT’S PERFORMANCE292
7850ch14FINAL.qxd 2/28/07 11:17 AM Page 292

Installing MySQL
This appendix is a quick-start guide to installing and running MySQL on Windows and Linux/Unix. To start, download the appropriate MySQL installer from http://mysql.com/downloads/.Windows users have a choice of an MSI installer or a zipped file. Linux and Unix users havea huge array of binary installations as well as the source code.
Installing MySQL on WindowsIf you’re using the installer, unzip the file to a suitable location, and double-click the setup pro-gram in your desktop or Windows Explorer. After reading the standard introductory screens,choose the directory in which to install MySQL. Unless you have a really good reason not to, it’sbetter to install it in the default directory. On the next screen, choose the Typical installationunless you’re extremely short of space on your hard drive.
As with Tomcat, Windows 9.x/ME users will need to run the mysqld.exe program as anapplication, but Windows NT/2000/XP users have the option to install it as a service. You canunzip and use the zipped file without an installer.
To test the installation, open a DOS prompt, and run the following command (run allcommands from the bin subdirectory of the MySQL installation):
> mysqlshow
This will list the databases that come with MySQL. You’re now ready to work with MySQL,so you can skip ahead to the “Working with MySQL” section.
Installing MySQL on Linux and UnixAs noted, you have a number of options for installing MySQL on Linux and Unix. The MySQLbinaries are available as generic precompiled binaries for a number of systems, as RPM pack-ages, and as source bundles. The method you use for installation is up to you. In the followingsections, you’ll see how to install from the RPM package and from source.
Creating a User for MySQLThe MySQL server will be running as a process on your system. Since MySQL must create andmanipulate files to maintain the database, and it’s potentially able to accept connections fromremote computers, you must create a unique user and group for MySQL.
293
A P P E N D I X
■ ■ ■
7850chAppAFINAL.qxd 2/28/07 11:18 AM Page 293
APPENDIX ■ INSTALLING MYSQL294
# groupadd mysql
# useradd -g mysql mysql
This creates the mysql group using the groupadd command. The useradd command addsa user to the group specified with the -g switch.
Installing MySQL from the RPM PackageDownload the following packages to an appropriate place:
• MySQL: The base server package
• MySQL-bench: MySQL benchmarks and test suite
• MySQL-client: MySQL client applications
• MySQL-devel: Header files and libraries for development
• MySQL-shared: MySQL client shared libraries
• MySQL-Max: The server version that includes InnoDB tables (see Chapter 11 for detailson this)
Before you begin the install, make sure you’ve logged on as root. To install the RPM pack-ages, use the RPM Package Manager application. You have two options with this: you could usethe graphical package manager of your choice, or you could place all the RPM files in a singledirectory and (making sure you are root) execute the following:
# rpm -i *.rpm
This will unpack the packages and install all the files into their correct places for yourdistribution.
To test the installation, run the following command (run all commands from the binsubdirectory of the MySQL installation):
> mysqlshow
This will list the databases that come with MySQL. You’re now ready to begin working withMySQL, so you can skip ahead to the “Working with MySQL” section.
Installing MySQL from SourceYou can find the entire MySQL source code in a single tarball that will have a name similar tomysql-4.0.x.tar.gz.
Compiling MySQL is a relatively simple operation. If you’re familiar with compiling opensource products, there will be no surprises for you here; even if this is your first attempt incompiling and installing an open source product, you should have no real difficulty.
The MySQL build scripts will give an error if you’re missing any of the required developmentutilities. If this happens, you’ll need to install the missing development tools and try again. Linuxdistributions generally ship with a suitable development environment containing the GNUtools from the Free Software Foundation.
7850chAppAFINAL.qxd 2/28/07 11:18 AM Page 294

■Note At the time of this writing, there were some issues with compiling certain versions of the GNU C/C++compiler, especially versions 2.96 and 3.0. Check the MySQL web site for the latest news on compiler compati-bility; also, read the release notes of the tarball you downloaded.
Transfer the source tarball to the target machine, and place it in an appropriate directoryfor compiling. This shouldn’t be the final location of your MySQL installation.
Unpack the tarball to extract the source code.
$ tar zxvf mysql-4.0.x.tar.gz
You must use the GNU version of the tar utility for this to work. On systems without GNUtar, you may need a two-step extraction to decompress the tarball.
$ gunzip mysql-4.0.x.tar.gz
$ tar xvf mysql-4.0.x.tar
Note that Solaris’s version of tar causes problems with the decompression, so you shouldinstall GNU tar instead.
The extraction process will make a new directory related to the version of MySQL you’rebuilding. Move into that directory.
$ cd mysql-4.0.x
In this directory, you’ll find a file, INSTALL-SOURCE, that contains detailed manual buildinstructions. This can be useful in the unlikely event that the automated method outlined inthis appendix fails for some reason.
The build process uses the configure configuration script to tailor the build parametersto your specific environment. To accept all defaults, you can simply run configure withoutarguments.
$ ./configure
The configuration script can take a number of parameters that alter the features built intoMySQL. One of these features is the ability to use different implementations for its databasetables. You can choose table types optimized for speed or features, such as transactions. Youwill use the InnoDB table type in Chapter 11, so you need to tell the configuration script to includesupport for this table type.
$ ./configure --with-innodb
For a full list of options, you can use the --help argument.Once the compilation is configured, you can build the software with the make utility.
$ make
If all goes well, you should see a large number of compilations proceeding. When make hasfinished, you need to copy the programs to their final locations. Use the make install commandto do this, but you need to be root first.
$ su
# make install
APPENDIX ■ INSTALLING MYSQL 295
7850chAppAFINAL.qxd 2/28/07 11:18 AM Page 295

Now you have a complete but empty installation of MySQL in the directory /usr/local/mysqland its subdirectories. You have another couple of steps to take before you’re ready to use MySQL.The initial database doesn’t contain any user definitions or privileges that MySQL will use to con-trol access to your data. To create the privilege tables, you need to run a script provided for thispurpose. Again, this must be run as root after moving into the /usr/local/mysql directory.
# scripts/mysql_install_db
The MySQL files need to have the correct ownership set that’s to be owned by the MySQLuser. After using make install, all the files are owned by root. You want root to own everythingexcept the /var subdirectory, and you do this by using the recursive form of chmod and chgrp.
# chown -R root /usr/local/mysql
# chown -R mysql /usr/local/mysql/var
# chgrp -R mysql /usr/local/mysql
You’re now in much the same situation as you would have been had you installed MySQLfrom binary packages. Now it’s time to turn your attention to setting up MySQL to run.
To start the MySQL server, execute the following:
# /etc/rc.d/init.d/mysql start
To stop the server, run the following:
# /etc/rc.d/init.d/mysql stop
To test the installation, run the following command (run all commands from the bin sub-directory of the MySQL installation):
> mysqlshow
This will list the databases that come with MySQL. You’re now ready to begin working withMySQL.
Working with MySQLNow that you’ve installed MySQL, set the MySQL root password (it’s blank by default). Failureto do so will leave your MySQL server, and ultimately your entire machine, open to maliciousattacks. To set the root password, run the following command from the command line andsubstitute your preferred password:
> mysqladmin -u root password sc00bI
Once you’ve done this, the mysql command will start a command-line client program thatlets you issue SQL commands to the database server. When administering MySQL, you shoulduse the root administrator user, so issue the following to ensure that MySQL prompts you foryour password:
mysql -u root -p
You should see some status messages about the version of MySQL and a prompt such asthe one shown in Figure A-1.
APPENDIX ■ INSTALLING MYSQL296
7850chAppAFINAL.qxd 2/28/07 11:18 AM Page 296

Figure A-1. The MySQL command-line tool
You can use the \q or exit command to exit the MySQL client.Now you should create a database. Run the following at the MySQL prompt:
mysql> CREATE DATABASE catalog;
To add some data to the catalog database, start by typing the following at the prompt:
mysql> USE catalog;
Database changed
You’re now in the catalog database, which has no tables and no data. Type the followingat the prompt:
mysql> CREATE TABLE product (
-> prodid int not null,
-> prodname varchar(30)
-> );
The -> prompt means you haven’t finished a SQL statement. This isn’t a problem becauseSQL statements can span multiple lines.
If you see a prompt such as '>, it means you have an opening apostrophe that hasn’t beenclosed. Similarly, "> means you have an opening quotation mark that hasn’t been closed.Apostrophes and quotation marks must always balance out.
To view details of your new table, type the following:
mysql> DESCRIBE product;
+----------+-------------+------+-----+---------+-------+
| Field | Type | Null | Key | Default | Extra |
+----------+-------------+------+-----+---------+-------+
| prodid | int(11) | | | 0 | |
| prodname | varchar(30) | YES | | NULL | |
+----------+-------------+------+-----+---------+-------+
2 rows in set (0.10 sec)
To insert a row of data into your table, type the following:
mysql> INSERT INTO product VALUES (
-> 1,
-> 'Yo-Yo'
-> );
APPENDIX ■ INSTALLING MYSQL 297
7850chAppAFINAL.qxd 2/28/07 11:18 AM Page 297
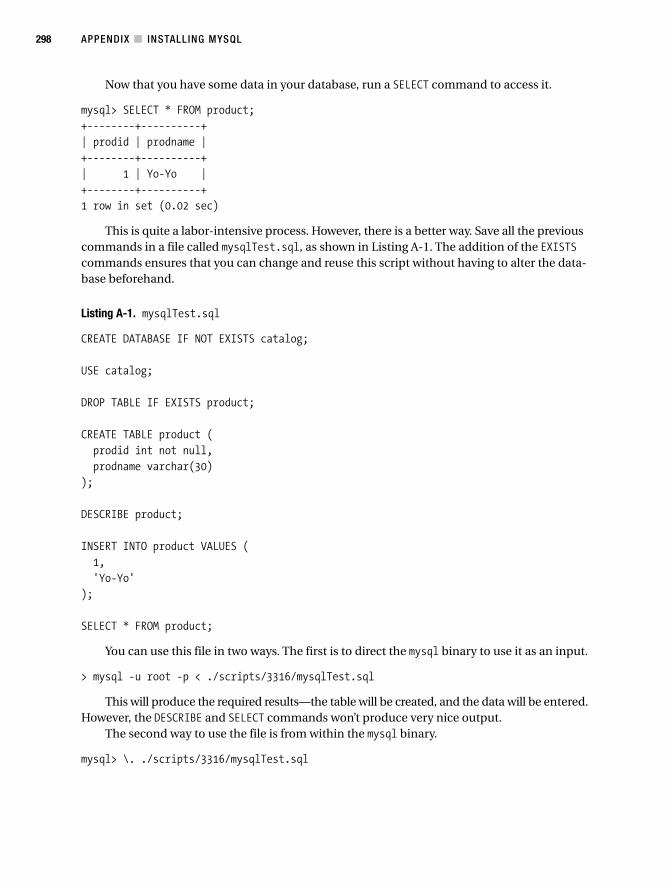
Now that you have some data in your database, run a SELECT command to access it.
mysql> SELECT * FROM product;
+--------+----------+
| prodid | prodname |
+--------+----------+
| 1 | Yo-Yo |
+--------+----------+
1 row in set (0.02 sec)
This is quite a labor-intensive process. However, there is a better way. Save all the previouscommands in a file called mysqlTest.sql, as shown in Listing A-1. The addition of the EXISTScommands ensures that you can change and reuse this script without having to alter the data-base beforehand.
Listing A-1. mysqlTest.sql
CREATE DATABASE IF NOT EXISTS catalog;
USE catalog;
DROP TABLE IF EXISTS product;
CREATE TABLE product (
prodid int not null,
prodname varchar(30)
);
DESCRIBE product;
INSERT INTO product VALUES (
1,
'Yo-Yo'
);
SELECT * FROM product;
You can use this file in two ways. The first is to direct the mysql binary to use it as an input.
> mysql -u root -p < ./scripts/3316/mysqlTest.sql
This will produce the required results—the table will be created, and the data will be entered.However, the DESCRIBE and SELECT commands won’t produce very nice output.
The second way to use the file is from within the mysql binary.
mysql> \. ./scripts/3316/mysqlTest.sql
APPENDIX ■ INSTALLING MYSQL298
7850chAppAFINAL.qxd 2/28/07 11:18 AM Page 298
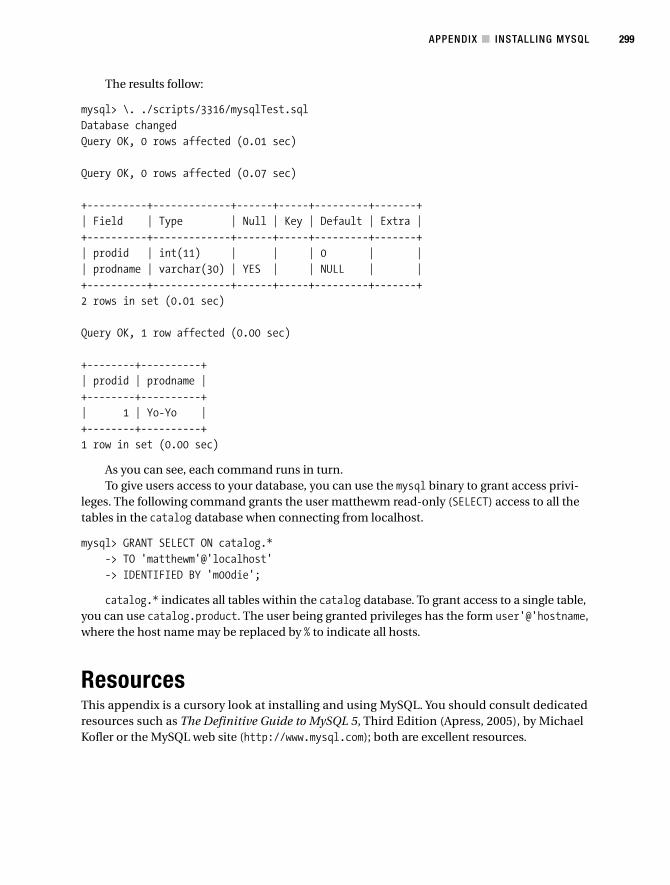
The results follow:
mysql> \. ./scripts/3316/mysqlTest.sql
Database changed
Query OK, 0 rows affected (0.01 sec)
Query OK, 0 rows affected (0.07 sec)
+----------+-------------+------+-----+---------+-------+
| Field | Type | Null | Key | Default | Extra |
+----------+-------------+------+-----+---------+-------+
| prodid | int(11) | | | 0 | |
| prodname | varchar(30) | YES | | NULL | |
+----------+-------------+------+-----+---------+-------+
2 rows in set (0.01 sec)
Query OK, 1 row affected (0.00 sec)
+--------+----------+
| prodid | prodname |
+--------+----------+
| 1 | Yo-Yo |
+--------+----------+
1 row in set (0.00 sec)
As you can see, each command runs in turn.To give users access to your database, you can use the mysql binary to grant access privi-
leges. The following command grants the user matthewm read-only (SELECT) access to all thetables in the catalog database when connecting from localhost.
mysql> GRANT SELECT ON catalog.*
-> TO 'matthewm'@'localhost'
-> IDENTIFIED BY 'm00die';
catalog.* indicates all tables within the catalog database. To grant access to a single table,you can use catalog.product. The user being granted privileges has the form user'@'hostname,where the host name may be replaced by % to indicate all hosts.
ResourcesThis appendix is a cursory look at installing and using MySQL. You should consult dedicatedresources such as The Definitive Guide to MySQL 5, Third Edition (Apress, 2005), by MichaelKofler or the MySQL web site (http://www.mysql.com); both are excellent resources.
APPENDIX ■ INSTALLING MYSQL 299
7850chAppAFINAL.qxd 2/28/07 11:18 AM Page 299

7850chAppAFINAL.qxd 2/28/07 11:18 AM Page 300

■AacceptCount attribute, 275Access, 198access log valves
table of attributes, 113–114using, 113
Active Server Pages (ASP) and VBScript, 2addusers utility, 215admin application, 228
adding a new user database, 187admin role, 109, 120Commit Changes button, 110, 187configuring a user database with, 186configuring the admin.xml file, 109context XML file, code example, 109creating a new user in the user database, 190defining roles in tomcat-users.xml, 120deleting a user database, 188deployment descriptor, 109downloading for Tomcat 6, 120downloading from the main server, in
Tomcat 6, 109drawbacks of, 109editing a user database, 189editing web application context settings
remotely, 109overwriting an old user database, 190Service node, 110URL for accessing, 109use of form-based authentication, 109User Database Actions box, 187–188using the Tomcat web-based
administration tool, 109writing a new server.xml after
configuration changes, 115writing application changes to server.xml,
110administration tools
admin application, 91manager application, 91
Administrator account, 213Adobe Flash, 2AJP connector, 49–50, 264
AJP 1.3 <Connector> element, attributesof, 54
AJP 1.3 protocol, 148Apache JServe Protocol (AJP), definition
of, 146
assigning types of workers in mod_jk, 148configuring a Tomcat worker, 149host, definition of, 147identifying workers, 147Jakarta binaries download page, 147load balancing, 148mod_jk.dll, 147port, definition of, 147providing load balancing, 147request-response cycle, 146running multiple Tomcat workers, 147serving different contexts, 147setting the workers.properties file, 148worker, definition of, 147
aliasingconfiguring an alias, 63configuring for Unix, 256configuring for Windows, 254definition of, 254
Amazon.com, 1Ant
adding <taskdef> elements to the custombuild.xml script, 106
BASIC authentication and, 240defining the properties for the manager
application, 107manager command tasks, code example,
107–108managing applications with, 106password property, 108running administration commands, 106sample build.xml file for using the
manager application, 106task definitions for using the manager
application, 107Apache 1.3
configuring for load balancing, 161final Apache configuration, code example,
163Apache JMeter. See JMeterApache JServe Protocol (AJP)
available versions of, 146definition of, 146
Apache Log4J toolkitadding a Log4J configuration file, 56adding the log4j.jar binary to the boot
classpath, 56downloading the Log4J classes, 56
Index
301
7850chIDXFINAL.qxd 2/28/07 11:21 AM Page 301

log4j.properties, code example, 56–59logging levels, 58
Apache serveradding a listener to generate mod_jk
settings, 150adding an AJP connector to server.xml, 264Apache setup for virtual hosting with
Tomcat, 266ApacheConfig listener, supported
attributes, 150automatically generated mod_jk.conf file,
151changing the index.html file served by
Apache, 266checking mod_jk, 153checking the JSP examples web
application, 153comparison of ISAPI to Apache’s API, 2conf/httpd.conf file, 145, 152configuration settings, adding manually, 152configuration settings, generating
automatically, 150configuring SSL with, 246configuring the non-SSL host for Apache’s
static files, 249controlling logging via the LogLevel
Apache directive, 251creating a certificate signing request
(CSR), 248creating a private key and certificate, 247creating an Apache <VirtualHost> entry in
mod_jk.conf, 151creating the localhost.csr file, 248creating the localhost.key file, 248examples of third-party modules, 2httpd.conf configuration file, 149implementing virtual hosting with Apache
and Tomcat, 264integrating Tomcat with Apache 1.3 using
mod_jk, 147isapi_redirect.dll, 153–154jk.properties, modifying, 269JkMount directive, 152loading modules into memory, 2modular application programming
interface (API), 2mod_fastcgi, 2mod_jk, building on Linux, 147mod_jk.conf configuration file, 150mod_perl, 2mod_php4, 2OpenSSL library, 247openssl utility, 247password batch file, 250protecting the tomcatBook web
application with Apache’s SSL, 249providing faster script execution, 2
as a proxy server, 145responding to user requests on the HTTP
and SSL ports, 249running Apache and SSL on Windows, 249running the three virtual hosts using
a Unix shell script, 270running the three virtual hosts using
a Windows batch file, 270sample jk2.conf file generated by Ant, 265server.xml for www.catalinabook.com
using a separate JVM, 268setting a JVM for each virtual host, 267setting log levels, 251testing the integration of Tomcat and
Apache, 152troubleshooting a failure to start or not
serve up SSL content, 251using its proxy module (mod_proxy), 145workers.properties file for separate virtual
hosts, 269workers2.properties file for virtual
hosting, 265workers2.properties file using Apache’s
SSL functionality, 250www.catalinabook.com, final directory
structure, 269Apache Software Foundation (ASF)
history of the Tomcat series, 4JServ, 4Tomcat 5.0.27 and Java 2 Platform
Standard Edition 5.0, 4Tomcat 6, new features, 4
Apache Struts, 78Apache Tomcat Properties box, 18ApacheConfig listener, supported attributes,
150applets, 2Assertion Results listener, 285, 287assertions
accepting Perl-style regular expressions,287
building an HTTP request sampler, 286Contains option, 287Matches option, 287testing different aspects of a response, 288using, 285–286validating request data returned, 286
<auth-constraint> element, 87, 96, 191, 238authentication, 179
advantages of form-based authentication,239
BASIC, 239CLIENT-AUTH, 240DIGEST, 240using custom login and error pages,
240–242<auth-method> element, 89, 95
■INDEX302
7850chIDXFINAL.qxd 2/28/07 11:21 AM Page 302
authorization, 179autoDeploy attribute, 72, 91AWStats, 113
■BBASIC authentication, 239batch files, 29bin directory
batch files, 29scripts, 29tomcat6 Windows executable, 29tomcat6w Windows executable, 30
bootstrap class loader, 133checking the core Java libraries for
a requested class, 134directory location of JAR files, 134loading all the core Java classes, 134written in native code, 133
bootstrap.jar file, 138build.xml, 21
■Cc:\autoexec.bat file, editing, 13cacls utility, 217Catalina
default connector, 50default engine in server.xml, 54servlet engine, 6
CATALINA_BASE environment variable, 268CATALINA_HOME directory
bin directory, 29conf directory, 30examining Tomcat’s default installation
directory, 29lib directory, 30logs directory, 30temp directory, 30webapps directory, 31work directory, 31
CATALINA_HOME environment variable, 16,268
setting for Tomcat workers, 164CATALINA_HOME/conf directory
catalina.policy, 35–39catalina.properties, 35configuration files, 35context.xml, 35logging.properties, 35server.xml, 35, 41tomcat-users.xml, 35web.xml, 35
catalina.policyaccessClassInPackage.* target of
RuntimePermission, 234avoiding an attacker’s malicious code,
36–37Catalina code permissions, 232
common class loader files, 233default web application permissions, 37enabling JNDI and JDBC access, 37enabling read-only access to JVM-specific
properties, 38enabling read-only access to operating
system properties, 37giving permission to the Jasper runtime
classes, 38granting access to code resources from
Java compiler directories, 36granting the API libraries access to all
resources, 36granting the Catalina server access to all
resources, 36java.security.AllPermission, 37javac, 232making internal Tomcat classes available,
38minimal default permissions granted to
web applications, 38providing access for the JavaBean
getAttribute methods, 38providing access for the XML parser
debugger, 38<security principal> entry, 36starting Tomcat with security, 36system code permissions, 232Tomcat’s startup classes, 233using the -security switch, 36web application code permissions, 232,
234catalina.properties
adding access permissions to internalclasses, 39
changing the classes available to webapplications, 39
defining and configuring Tomcat’s classloaders, 39–40
disallowing defining classes in restrictedpackages, 40
java.security.AccessControlException, 39
server directory, 40shared directory, 40starting Tomcat in security mode,
39certificate authorities (CAs), 144,
242certificate keystore, preparing,
243–244certificate signing request (CSR), 244, 248chgrp command, 296chmod command, 296chmod utility, 223–224chown command, 224class caching, 135
■INDEX 303
Find it faster at http://superindex.apress.com/
7850chIDXFINAL.qxd 2/28/07 11:21 AM Page 303

class loadersbootstrap class loader, 133–134bootstrap.jar file, 138CATALINA_HOME/common/lib/,
contents of, 139class caching, 135ClassLoader abstract class, 136ClassNotFoundException exception, 134CLASSPATH environment variable, 134common class loader, 137–138configuring, 39core class restriction mechanism, 137creating custom class loaders, 136defining Tomcat’s class loaders, 40delegation model, 134, 136directory locations of, 30Endorsed Standards Override Mechanism,
135extension class loader, 133–134false java.* classes not allowed, 136function of, in Java and Tomcat, 133having separate and unique namespaces, 136hierarchical relationship of, 133instructing Tomcat to reload a web
application, 141java.lang.Object, 137lazy loading, benefits of, 135loading classes on demand, 135not placing custom classes in the
common class loader path, 139options for preventing class-
loader–related operations, 137overriding the CORBA and XML parser
classes, 135packages split among different class
loaders, 141parent-child relationships of, 133pitfalls to avoid, 141placing a singleton in the shared class
loader path, 141search order for Tomcat’s class loaders, 140security features of, 136SecurityManager class, 137separate namespaces as a security feature,
137server class loader, 137setting the java.endorsed.dirs property, 135shared class loader, 137singletons, 141system class loader, 133–134three Java SE class loaders in the JVM, 133Tomcat’s additions to the standard Java
class loaders, 137Tomcat’s dynamic class reloading, 140Tomcat’s settings for CLASSPATH, 138tomcat-juli.jar, 138tools.jar file, 138
understanding the attributes of, 135using a security manager to disallow
custom class loaders, 137web application class loader, 137, 140
classes directoryclass files, 32package structure of Java classes within,
79ClassLoader abstract class, 136className attribute, 63, 194ClassNotFoundException exception, 134CLASSPATH environment variable, 134CLIENT-AUTH, 240cluster
activating multicasting, 126<Cluster> element, attributes of, 126–127configuring, 126configuring a node’s deployer, 130configuring a node’s membership, 127configuring a node’s receiver, 128configuring a node’s replication valve, 130configuring a node’s sender, 129<Context> element, 131<Deployer> element, attributes of, 130load balancing, 126<Membership> element, attributes of, 127node, definition of, 126<Receiver> element, attributes of, 128receiving replication information, 128replicating user sessions across nodes, 126replicationMode settings, 129reporting of nodes, 126saving on session-replication overhead,
130<Sender> element, attributes of, 129sending replication information, 129session manager, use of, 126session replication algorithm, 130using WAR files to deploy/undeploy local
web applications, 130<Valve> element, attributes of, 130
<Cluster> elementattributes of, 126useDirtyFlag attribute, 130
codeBase attribute, syntax of, 229command-line permissions, 217Commit Changes button, 110common class loader, 137
CATALINA_HOME/common/lib/,contents of, 139
not placing custom classes in, 139Common Gateway Interface (CGI)
alternatives to, 2executing dynamic content on a web
server, 1limitations of, 1Perl language and, 1
■INDEX304
7850chIDXFINAL.qxd 2/28/07 11:21 AM Page 304

common name (CN), 244com.mysql.jdbc.Driver, 194Complete Server Status link, 100Computer Management tool, 213conf directory
catalina.policy, 30catalina.properties, 30configuring the class path of Tomcat and
web applications, 30context.xml, 30logging.properties, 30server.xml, 30setting the locations of the class loader
directories, 30Tomcat configuration files, 30tomcat-users.xml, 30web.xml, 30
configuration elementsHTTP authorization manager, 289HTTP cookie manager, 289HTTP header manager, 288HTTP request defaults, 289User-Agent header, 288using, 288
configuration files, 30connection pooling, 45, 170connectionName attribute, 196connectionPassword attribute, 196<Connector> element
acceptCount attribute, 275attributes of, 51enableLookups attribute, 275maxProcessors attribute, 275minProcessors attribute, 275
connectors, 6configuring, 49server performance and connector
parameters, 275constant throughput timer, 282constant timer, 282container components, 6container-managed security, 60context component, 7, 31<Context> container, 112<Context> element, 71–72, 131, 172
attributes of, 73–74new attributes since Tomcat 5.5, 75subelements of, 75
context path, 31, 97, 103, 105definition of, 77
<context-param> element, 80contexts
adding servlet context initializationparameters, 76
autoDeploy attribute, 72configuring a parameter, 76configuring a resource link, 76
configuring default contexts, 71configuring in server.xml as no longer
recommended, 71as containers with nested components, 75<Context> element, 71–75context.xml as the default file for a server,
72context.xml.default as the default file for
a host, 72deployOnStartup attribute, 71docBase attribute, 71jdbc/CatalogDB, 177overriding attribute and application
context XML files, 72<Parameter> element, attributes of, 76placing in a web application’s META-INF
directory, 72<ResourceLink> element, attributes of, 76server.xml not reloaded after Tomcat
starts, 71Tomcat’s sequence for deploying web
applications at startup, 71use of an external default context XML file
in Tomcat 6, 72context.xml, 30
default file for a server, 72context.xml.default
default file for a host, 72overriding the settings in, 72
convert utility, 211createCatalogDB.sql SQL script, 173, 175
■Ddata listeners, 283data source, 169databases
Access, 198connection pooling, 170creating a read-only user in the MySQL
privileges database, 196data source, 169DBCP factory, 172distributed transaction, definition of, 173establishing a physical database
connection, 170establishing and terminating connections
to, 168external transaction manager, 173Jakarta Commons Database Connection
Pools (DBCP) component, 170JDBC 1.0 and 2.0, 169JDBC 3.0, 169, 173JDBC drivers, 169JNDI lookup, 171null result set, 168remote SQL processing engine, 167result set, definition of, 167
■INDEX 305
Find it faster at http://superindex.apress.com/
7850chIDXFINAL.qxd 2/28/07 11:21 AM Page 305

Structured Query Language (SQL), 167Tomcat and JDBC, 171transaction, definition of, 172Type I to Type IV JDBC drivers, definitions
of, 170XA operation model, 173
DBCP factory, 172debug attribute, 54<DefaultContext> element, 172defaultHost, 54delegation model, 134, 136denial-of-service (DoS) attacks, blocking, 116deploy command parameters, 103<Deployer> element, attributes of, 130deployOnStartup attribute, 71, 91deptroles table, 198deptusers table, 198DESCRIBE command, 298<description> element, 80–83, 85–87, 89digest attribute, 206DIGEST authentication, browser support for,
240digest utility
MD5 algorithm, 182SHA algorithm, 182storing a digested password, 182
digital certificates, 144, 242directory attribute, 202<dispatcher> element, 82<display-name> element, 81–82, 87<distributable> element, 80distributed networks
configuring with Tomcat, 158multiple Tomcat workers distributed
across multiple servers, 159software requirements for the Tomcat
installation, 159distributed transaction, definition of, 173docBase attribute, 71domain name mismatch, 145Domain Name System (DNS), 31
DNS server, 256performing a reverse DNS lookup, 117
domain name, definition of, 253driverName attribute, 194dynamic class reloading, 140
■EenableLookups attribute, 275encryption
public key, 242symmetric key, 242
Endorsed Standards Override Mechanism,135
engineconfiguring, 54definition of, 6
<Engine> container, 112<Engine> element, 264
attributes of, 54subelements of, 55
Enterprise JavaBean (EJB), 44<Environment> entry
attributes of, 44configuring, 43
<error-code> element, 85error codes and messages
503 (unavailable), 100typical causes of errors, 105
error page configuration, code example, 85<error-page> element, 85executables
tomcat6 (Windows), 29tomcat6w (Windows), 30
EXISTS commands, 298exit command, 297Extensible Markup Language (XML)
configuring Tomcat 6 with an XML file, 5extension class loader
CLASSPATH environment variable, 134
standard extension directory location, 134
<extension> element, 84
■Ffactory parameter, 185FAT32
features of, 210upgrading with the convert utility,
211File Allocation Table (FAT), features of,
209file permissions (Windows), 212file/directory owner, 213, 221filter
definition of, 80filter mapping, code example, 82
<filter> element, 80<filter> entry, code example, 81<filter-class> element, 81<filter-mapping> element, 81<filter-name> element, 81folder permissions (Windows), 211foreign keys, 193, 195<form-error-page> element, 89<form-login-config> element, 89<form-login-page> element, 89Free Software Foundation, 294FreshMeat.net software archive site, 292fully qualified domain name (FQDN)
domain name, definition of, 253host name, definition of, 253web site, definition of, 253
■INDEX306
7850chIDXFINAL.qxd 2/28/07 11:21 AM Page 306
■Ggarbage collector
poor server performance and, 274running in incremental mode, 274-Xincgc parameter, 274
Gaussian random timer, 282<GlobalNamingResources> element, 85, 185
configuring, 42subelements of, 43
global resources, configuring, 44global resources component, 7GNU tar, 295grant entries
codeBase attribute, syntax of, 229examples of, 229permissions, permission targets, and
actions, 230syntax of, 229
Graph Results listener, 283Grinder, 292groupadd command, 222, 294groupdel command, 222groups
creating (Unix), 221creating (Windows), 213
groups command, 222
■Hhost component, 7<Host> container, 112<Host> element, 31, 172
attributes of, 61subelements of, 62
Host: header, 256, 261host name, definition of, 253host, configuring, 61HTML link parser, 291HTML Manager Help link, 97HTTP authorization manager, 289HTTP connector, 49–50
Apache as a proxy server, 145<Connector> element, attributes of, 51–53default HTTP/1.1 connector
configuration, 143defining a proxy name and proxy port in
server.xml, 146org.apache.catalina.connector.Connector,
143proxyName attribute, 145proxyPort attribute, 145redirectPort attribute, 245running Tomcat behind a proxy server,
145serving HTML pages without additional
configuration, 143using Apache’s proxy module
(mod_proxy), 145
HTTP Content-Type header, 67HTTP cookie manager, 289HTTP header manager, 288HTTP request defaults, 289httpd.conf, 145, 149, 152<http-method> element, 87HTTPS protocol, 243
■IIBM, 11<icon> element, 81–82IETF RFC 2246, 243ifconfig utility, 256IIS
checking the IIS log file, 158checking the JSP examples web
application, 157communicating with an out-of-process
Tomcat worker, 153Control Panel, Services management
console, 156creating a virtual directory for the ISAPI
redirector, 156creating workersIIS.properties, 155downloading the ISAPI redirector,
153–154editing registry entries in iis_redirect.reg,
154extending by adding ISAPI filters to,
153IIS Admin service, 156IIS Manager, 156installing, 154installing the ISAPI redirector, 156ISAPI module, 146partitioning into web server and
application server configurations,159
porting Apache mod_jk settings to an IISsetup, 153
processing ASP on, 153processing JSP pages and servlets, 153reasons for integrating Tomcat with, 153regedt32 utility, 155testing the installation and deployment,
157troubleshooting the setup, 158Virtual Directory Creation Wizard,
156workers.properties file, configuring,
153–154World Wide Web Publishing service, 156
iis_redirect.reg, 154initial heap size, 274<init-param> element, 81–82InnoDB tables, 195, 295INSTALL-SOURCE file, 295
■INDEX 307
Find it faster at http://superindex.apress.com/
7850chIDXFINAL.qxd 2/28/07 11:21 AM Page 307

installing Antadding an ANT_HOME environment
variable, 21build.xml, use of, 21downloading and installing the binary
distribution, 21testing the installation, 21
installing Java (Linux)adding the $JAVA_HOME environment
variable, 14downloading a distribution from Sun, 13installing in a j2sdk-1_5_0 directory, 14root user requirements, 13–14setting the execute permissions, 13testing the installation, 14using the RPM installer, 14using the self-extracting binary, 13
installing Java (Windows)adding the installation folder as an
environment variable, 12alternatives to Sun Microsystems’ JDK, 11downloading the Java installer, 11editing the c:\autoexec.bat file, 13evaluating JVMs for performance, 11%JAVA_HOME% installation directory, 12JDK 1.4 and the JDK compatibility kit, 11modifying the %Path% variable, 13running the installation package, 12setting environment variables, 12–13testing the installation, 13using JDK 1.5 with Tomcat 6, 11Windows Environment Variables dialog
box, 12installing Tomcat (Linux or Mac OS)
downloading the zipped file or thegzipped tar file, 20
exporting the $CATALINA_HOMEenvironment variable, 20
shell commands for starting and stoppingTomcat, 20
testing the installation, 20installing Tomcat (Windows)
adding the CATALINA_HOMEenvironment variable, 16
Apache Tomcat Properties box, 18completing the installation, 16documentation, installing, 16example web applications, installing, 16installing as a service, 15obtaining either a binary or source
distribution, 14port 80 and public web servers, 16port 8080 and Tomcat’s HTTP service, 16requirement for using Ant 1.65 or above,
15running Tomcat in the background, 19setting automatic or manual startup, 15
setting the environment variables, 16–17starting the server manually, 17startup.bat, 20testing the installation, 17using the binary installer, 15using the zipped file for installation, 20viewing the default home page to check
the installation, 19Windows 98 and, 15
installing Tomcat from sourcecreating a build.properties file, 22downloading the source code from the
Subversion repository, 22updating the source code and
recompiling, 22using the Ant build utility, 21
Interleave controller, 285intrusion detection systems, 227IP addresses
configuring, 254scarcity of, 253
IP-based virtual hostingadding aliased network interfaces, 254adding physical network interfaces, 254aliasing, configuring for Unix, 256aliasing, configuring for Windows, 254configuring a NIC with more than one IP
address, 254definition of, 253ifconfig utility, 256requirements for IP addresses, 254
ISAPIApache group and, 153communicating with an out-of-process
Tomcat worker, 153comparison to Apache’s API, 2creating workersIIS.properties, 155editing registry entries in iis_redirect.reg,
154extending IIS by adding ISAPI filters, 153isapi_redirect.dll, 153–154regedt32 utility, 155workers.properties file, configuring,
153–154isapi_redirect.dll, 153–154
■JJakarta binaries download page, 147Jakarta Commons Database Connection
Pools (DBCP), 45, 170Jakarta Commons logging mechanism, 55Jakarta project, 15Java
applets, introduction of, 2bootstrap class loader, 133–134class loaders, function of, 133ClassLoader abstract class, 136
■INDEX308
7850chIDXFINAL.qxd 2/28/07 11:21 AM Page 308

core class restriction mechanism, 137Endorsed Standards Override Mechanism,
135extension class loader, 133–134Java API for XML Processing (JAXP) XML
parser, 135loading code libraries, 133overriding the CORBA and XML parser
classes, 135platform independence, 133SecurityManager class, 137servlet containers, 3suitability for distributed network
architectures, 133system class loader, 133–134three Java SE class loaders in the JVM, 133
Java API for XML Processing (JAXP) XMLparser, 135
Java Authentication and AuthorizationService (JAAS), 60
Java Enterprise Edition (EE) 1.4, 169Java Naming and Directory Interface (JNDI),
7, 37functions and benefits of, 42–43
Java Secure Socket Extension (JSSE), 243Java Security Manager
allowing access to an SMTP server, 237allowing class loader creation, 236allowing the operating system to control
file access, 237assigning permission to a web
application’s JDBC driver, 237enabling on Tomcat, 232grant entries, 229granting permissions to applications,
229java.security.Permission, 230opening socket connections to databases,
237overview of, 229permission classes, table of, 230permissions in Tomcat’s default
catalina.policy file, 232policy files, 229recommended practices for granting
application permissions, 236regulating Tomcat’s common class loader
code, 236as turned off by default, 228unauthorized tasks with Tomcat’s default
policy configuration, 236using to maintain a secure Tomcat
installation, 236writing grant entries, 229
Java Server Faces 1.2, 4Java Server Pages (JSP) 2.1 (JSR 245), 4Java Servlet 2.5 specification (JSR 154), 4
Java virtual machine (JVM), Tomcat 6 servercomponent, 6
Java Web Server, 4javac, 232%JAVA_HOME% directory, 12java.lang.Object, 137java.lang.OutOfMemory error, 274JavaMail, configuring sessions, 48java.security.AccessControlException, 39java.security.AllPermission, 37java.security.Permission, 230javax.sql.DataSource, 172JDBC
adding the JSP 1.1 standard tag library, 177configuring JDBC drivers as JNDI
resources in Tomcat, 171connection pooling, 170Connector/J Type IV JDBC driver from
MySQL, 173<Context> element, 172data source, 169DBCP factory, 172<DefaultContext> element, 172defining a JDBC data source for Tomcat,
172drivers, 169editing web.xml for the tomcatBook web
application, 175establishing a physical database
connection, 170establishing and terminating connections
to databases, 168functions of, 168<Host> element, 172Jakarta Commons Database Connection
Pools (DBCP) component, 170JDBC 1.0 to JDBC 3.0, 169JNDI lookup, 171lookup.jsp, 176null result set, 168<Resource> element, 172<resource-ref> element, 172, 175<ResourceParams> element, 172result set, definition of, 167returning a javax.sql.DataSource,
172running basic JDBC operations, 168<sql:setDataSource> tag, 176–177submitting SQL query statements via,
167three-tier model, 169Tomcat and, 171Type I to Type IV drivers, definitions of,
170using its API calls, 168web.xml, 172XA operation model and JDBC 3.0, 173
■INDEX 309
Find it faster at http://superindex.apress.com/
7850chIDXFINAL.qxd 2/28/07 11:21 AM Page 309

JDBC data sourceconfiguring, 45parameters, 46using connection pooling, 45
JDBC realmsadvantages of, 193attributes of, 193className attribute, 194configuring, 192configuring a MySQL JDBC realm, 194configuring an ODBC JDBC realm,
197–199database table and field schema, 193driverName attribute, 194foreign key constraint, 193lack of support for DIGEST
authentication, 240MySQL JDBC realm, example
configuration, 195–196three default realms, 194use of relational databases as a data
storage mechanism, 192JDBC-ODBC bridge, 60JDK 1.5, running Tomcat 6 with, 11jk.properties, 269jk2.conf, 265jk2.properties, 164JkMount directive, 152JMeter
accessing test plan results with a listener,280
adding a Generate Summary Results post-processor element, 291
adding a listener, 282adding a timer to a thread group, 282Assertion Results listener, 285, 287constant timer, 282data listeners, 283examining the average response time
(mean), 291examining the standard deviation, 292executing a test plan, 280Gaussian random timer, 282Graph Results listener, 283HTML link parser, 291HTTP authorization manager, 289HTTP cookie manager, 289HTTP header manager, 288HTTP request defaults, 289HTTP request group settings, 279installing and running, 277Interleave controller, 285interpreting test results, 291jmeter shell script, 277jmeter.bat, 277jmeter.properties file, 283, 291list of default listeners, 282
Listener menu, 282load testing HTTP servers and
applications, 276logic controllers, 285Loop controller, 286Mailer Visualizer listener, 285major features of, 281Monitor Results listener, 284monitor, definition of, 280Observer (Event Listener) design pattern,
280Once Only controller, 286random and pseudo-random delays, 282random timers, 282sampler, definition of, 278saving a test plan, 280saving listener data as an XML file or CSV
file, 283Simple controller, 285Simple Data Writer listener, 283stdout, 291Test Plan node, 277test plan, definition of, 277thread group, available options, 278timer features, 282uniform random timer, 282user interface, explanation of, 277User-Agent header, 288using a configuration element, 288using a View Results tree listener, 280using as a web spider, 290using assertions, 285–286using post-processor elements, 291using preprocessor elements, 290visualization listeners, 283
jmeter shell script, 277jmeter.bat, 277jmeter.properties, 283, 291JNDI
adding the JSP 1.1 standard tag library, 177configuring as the resource for a JDBC
data source, 171<Context> element, 172DBCP factory, 172<DefaultContext> element, 172defining a JDBC data source for Tomcat,
172editing web.xml for the tomcatBook web
application, 175<Host> element, 172lookup.jsp, 176<Resource> element, 172<resource-ref> element, 172, 175<ResourceParams> element, 172returning a javax.sql.DataSource, 172<sql:setDataSource> tag, 176–177testing JNDI resource configuration, 173
■INDEX310
7850chIDXFINAL.qxd 2/28/07 11:21 AM Page 310

using to look up a data source, 176web.xml, 172
JNDI realmsattributes of, 200communication log between Tomcat and
the directory server, 206configuring in server.xml, 205digest attribute, 206Lightweight Directory Access Protocol
(LDAP), 201mapping configuration attributes to
directory schema, 200OpenLDAP, downloading and installing, 201role* attributes, 206userPassword attribute, 205userPattern attribute, 206
JServ, 4JSP
as an alternative to Microsoft’s ASP, 3creating dynamic visual content with, 3JSP pages, 77as uncompiled, 3
JSP 2.0, writing tag extensions in JSP syntax, 80<jsp-file> element, 82jsp.xml, 262JVM
configuring the heap size, 273garbage collector and poor server
performance, 274initial heap size, 274java.lang.OutOfMemory error, 274monitoring thread count, 275processor, definition of, 275running out of free file descriptors, 275setting the minimum and maximum heap
size, 274virtual memory, 274-Xincgc parameter, 274-Xms<size> parameter, 273-Xmx<size> parameter, 273
■Kkeystore
adding a keystore password to server.xml, 145creating a public-private key pair (-genkey),
144keytool utility, 144self-signed certificate, 144server’s digital certificates, 144
keytool command, 243–244keytool utility, 144
■Llazy loading, benefits of, 135lb (load-balancing) worker
functions of, 160identifying failed Tomcat workers, 160
maintaining session affinity, 160performing weighted round-robin load
balancing, 160LDAP Data Interchange Format (LDIF), 202ldapadd utility, 204ldapsearch tool, 205lib directory, 30, 79
JAR files, 32Lightweight Directory Access Protocol
(LDAP), 8, 201List Applications link, 97Listener menu, 282listeners, 280
className attribute, 63configuring, 63
load balancing, 126, 147–148adding a jvmRoute attribute to server.xml,
163configuring Apache 1.3 for, 161configuring Tomcat for, 163creating Tomcat 1’s index.jsp file, 164defining a workers.properties file, 161–162designating a load-balancing (lb) worker, 160ensuring the seamless session feature is
activated, 163final Apache configuration, code example,
163installing and running Tomcat instances
on localhost, 161jk2.properties, editing, 164keeping the current session contents
intact, 165mod_jk, 162mounting the JSP examples, 162performing weighted round-robin load
balancing, 160round-robin algorithm, 165seamless session, definition of, 159setting CATALINA_HOME for Tomcat
workers, 164setting up, 160testing, 165understanding, in Tomcat, 159using mod_jk, 159
<load-on-startup> element, 82load testing
adding a timer to a thread group, 282altering Tomcat’s deployment
architecture, 276bottlenecks due to inefficient application
code, 276configuring application sessions, 275configuring the Java heap size, 273<Connector> element, 275connector parameters and server
performance, 275definition of, 273
■INDEX 311
Find it faster at http://superindex.apress.com/
7850chIDXFINAL.qxd 2/28/07 11:21 AM Page 311

FreshMeat.net software archive site, 292garbage collector and poor server
performance, 274Grinder, 292HTTP servers and applications, 276initial heap size, 274java.lang.OutOfMemory error, 274load balancing two or more application
servers, 276monitoring thread count, 275Open Directory Software Testing list, 292processor, definition of, 275running out of free file descriptors, 275scalability and performance, 273setting the minimum and maximum heap
size, 274tools for, 292using Tomcat’s persistent session
manager, 276virtual memory, 274-Xincgc parameter, 274-Xms<size> parameter, 273-Xmx<size> parameter, 273
loader component, 8localhost, 61, 63<location> element, 85log files
AWStats, 113common log file format, 113Webalizer, 113
Log4J, 8log4j.properties, code example, 56–59logger component, 8logging
levels of, 58pattern layout placeholders, 58–59
logging.properties, 30logic controllers
Interleave controller, 285Loop controller, 286Once Only controller, 286purpose of, 285Simple controller, 285
<login-config> element, 89, 191, 239
logs directory, 30lookup.jsp, 176Loop controller, 286ls utility, 222
■MMac OS X and Java 1.5, 11mail sessions, configuring, 48mail.smtp.port parameter, 48Mailer Visualizer listener, 285make install command, 295make utility, 295
manager application, 86, 120, 228503 (unavailable) error code, 100adding a user with the manager role to
tomcat-users.xml, 92allowing access by an admin role user,
code example, 96allowing more than one role to access, 94<auth-constraint> element, 96<auth-method> element, 95autoDeploy attribute, 91balancing the security and administration
needs of a server, 95CATALINA_HOME/webapps/manager
directory, 91changing the security manager’s settings,
93checking server status and information, 98checking session information, 101Complete Server Status link, 100configuring, 93default access as disabled in Tomcat, 92default manager.xml file for Tomcat 6,
code example, 93default realm defined in manager.xml,
92default session timeout, 102defining roles in tomcat-users.xml, 120deleting files associated with a web
application, 101deploy command, parameters, 103deploying web applications from a local
machine, 103deploying web applications from a remote
WAR file, 104deployOnStartup attribute, 91function availability through its web
interface, 96functions of, 91–92help pages, 97HTML Manager Help link, 97inactive session, 102List Applications link, 97listing security roles, 105listing the JNDI resources on the server,
105listing the server’s deployed web
applications, 97Manager Help link, 97manager role, 120manager web application’s <resource-env-
ref> setting, code example, 86possible causes of failure, 105–106reasons for using, 91<resource-env-ref> element, 95<ResourceLink> element, 94, 106Restart link, 101<role-name> element, 96
■INDEX312
7850chIDXFINAL.qxd 2/28/07 11:21 AM Page 312

<security-constraint> element, 95security-related configuration of web.xml,
code example, 94–95<security-role> element, 95–96Server Status link, 98setting up, 92Start link, 101starting, stopping, and restarting web
applications, 100stop command, 101syntax of commands issued via the web
browser, 97system of authentication, 92troubleshooting, 105–106Undeploy link, 101use of the manager container servlet, 94using, 91–92, 96using DIGEST or FORM authentication, 96using request parameters to administer
the web application, 97using the path parameter to deploy a web
application, 104manager component, 8<Manager> element, 121, 126Manager Help link, 97maxIdleBackup attribute, 123maxIdleSwap method, 123maximum heap size, 274maxProcessors attribute, 275MD5 algorithm, 144, 182MD5(), 195mean, 291<Membership> element, attributes of,
127memory realm
attributes of, 182configuring in the default server.xml,
183specifying users, passwords, and roles in
tomcat-users.xml, 183superseding of, by the user database, 183
META-INF directory, 32, 77META-INF/context.xml, overriding the
settings in, 72Microsoft
Access, 198VBScript, 2
<mime-mapping> element, 67, 84MIME mappings, configuring, 67<mime-type> element, 84minIdleSwap method, 123minimum heap size, 274minProcessors attribute, 275Model View Controller design pattern, 289modular application programming interface
(API), 2mod_fastcgi, 2
mod_jkassigning the types of workers in, 148binary availability of, 147building on Linux, 147integrating Tomcat with Apache 1.3, 147load balancing and, 159testing after deployment, 153workers.properties file for, 149
mod_jk.conf, 150automatically generated file, code
example, 151creating an Apache <VirtualHost> entry in,
151creating LoadModule entries for mod_jk,
150mod_jk.dll, 147mod_perl, 2mod_php4, 2mod_proxy, 145Monitor Results listener, 284monitor, definition of, 280multicasting, 126my.cnf, 196my.ini, 196MySQL, 45
building with the make utility, 295closing apostrophes and quotation marks,
297com.mysql.jdbc.Driver, 194compiling, 294configuring a MySQL JDBC realm, 194Connector/J Type IV JDBC driver, 173createCatalogDB.sql SQL script, 173, 175creating a database, 297creating a read-only user for developer
access, 175creating a read-only user in the MySQL
privileges database, 196creating a test database, 173creating a unique user and group for, 293creating privilege tables, 296decompression problems with Solaris’s
version of tar, 295DESCRIBE command, 298digesting passwords in, 195downloading the installer, 293downloading the latest version of, 173EXISTS commands, 298exit command, 297Free Software Foundation, 294GNU tar, 295groupadd command, 294information resources on, 299InnoDB tables, 195, 295inserting a row of data into a table, 297INSTALL-SOURCE file, 295installing from source, 294
■INDEX 313
Find it faster at http://superindex.apress.com/
7850chIDXFINAL.qxd 2/28/07 11:21 AM Page 313

installing on Linux and Unix, 293installing on Windows, 293make install command, 295MD5(), 195MySQL JDBC realm, example
configuration, 196mysql-4.0.x.tar.gz, 294org.gjt.mm.mysql.Driver, 194realmDB.sql, 195–196RPM Package Manager application, 294running chmod and chgrp to set correct
user ownership, 296running the configure configuration
script, 295running the mysql command, 296running the mysqld.exe program, 293saving SQL commands in a mysqlTest.sql
file, 298SELECT command, 298setting the root password, 296SHA(), 195SQL script for creating a JDBC-
store–compatible database, 125SQL script to set up the JDBC realm in
MySQL, 195starting and stopping the MySQL server,
296support for foreign keys, 195testing the installation, 293–294, 296types of binaries available, 293useradd command, 294using the mysql binary to grant access
privileges, 299using the root administrator user, 296working with, 296
mysql command, 296mysql-4.0.x.tar.gz, 294mysqld.exe, 293
■Nname-based virtual hosting
advantages over IP-based virtual hosting,256
definition of, 253disadvantages of, 257DNS server, 256HTTP 1.0 vs. 1.1 protocol, 257looking up IP address/host name
mappings, 256reading the Host: header from an HTTP
1.1 request, 256namespaces, 136nested components, 7net group and net localgroup utilities,
command-line syntax, 214net user command, command-line syntax,
214
netstat, 23network interface card (NIC), 254network interfaces
aliased, 254physical, 254
nodesconfiguring a node’s deployer, 130configuring a node’s membership, 127configuring a node’s receiver, 128configuring a node’s replication valve, 130configuring a node’s sender, 129<Context> element, 131definition of, 126<Deployer> element, attributes of, 130<Membership> element, attributes of,
127multicast ping, 126<Receiver> element, attributes of, 128receiving replication information, 128replicating user sessions across, 126replicationMode settings, 129reporting of, 126saving on session-replication overhead,
130<Sender> element, attributes of, 129sending replication information, 129using WAR files to deploy/undeploy local
web applications, 130<Valve> element, attributes of, 130
non-SSL connectors, 144NT file system (NTFS)
calculating the space needed for an NTFSconversion, 211
features of, 209null result set, 168
■OObserver (Event Listener) design pattern, 280ODBC
configuring an ODBC JDBC realm,197–199
deptroles table, 198deptusers table, 198using the SHA algorithm for a digested
password, 199Once Only controller, 286Open Directory Software Testing list, 292OpenLDAP
attributes for a user entry, 204default LDAP port, 202downloading and installing, 201LDAP Data Interchange Format (LDIF),
202realmDB.ldif, 202settings in slapd.conf, 201simple bind method, 204uniqueMember attribute, 204
■INDEX314
7850chIDXFINAL.qxd 2/28/07 11:21 AM Page 314

users and roles from tomcat-users.xml inLDIF, 202
using the ldapadd utility to add directoryentries online, 204
using the ldapsearch tool, 205using the slapadd utility to add directory
entries offline, 205OpenSSL library, 247openssl utility, 247openssl.cnf, 247org.apache.catalina.connector.Connector, 143org.gjt.mm.mysql.Driver, 194override attribute, 72
■P<Parameter> element, 76, 80<param-name> element, 80–82<param-value> element, 80–82passwords
creating secure passwords, 218disabling login ability by starring an
account’s password, 225shadow password file, 225
Perl and CGI applications, 1permissions
assigning conflicting permissions, 217assigning in Windows (command-line),
217assigning in Windows (GUI), 216assigning in Unix, 222assigning to Tomcat’s directories, 220cacls utility, 217changing file ownership, 224changing file permissions, 223chmod utility and its parameters, 223–224chown command, 224configuring file permissions in Unix, 225configuring file permissions in Windows,
219creating a special user account for
running Tomcat, 218, 225Deny settings as overriding Allow settings,
217domain security policy, 218file permissions in Unix, 220file system, 209grant entries, 229granting read access to the JDK directory, 220group, 217inherited, 216Java Security Manager and application
permissions, 229java.security.Permission, 230ls utility, 222modifying a machine’s local security
policy, 218planning security permissions in Unix, 225
planning security permissions in Windows, 217policy files, 229, 232revoking all file system permissions for the
root directory, 219revoking user access, 217securing Tomcat’s permissions, 228setting read-only permissions on the
webapps directory, 227SGUI bit, setting, 224SUID bit, setting, 224turning off permission inheritance for an
object, 217viewing file or directory permissions,
216viewing permissions in Unix, 222
PHP, mod_php4, 2policy files
downloading information on, 232grant entries, 229Java Security Manager, 229
post-processor elementsadding a Generate Summary Results
element, 291using, 291
preprocessor elementsjmeter.properties file, 291stdout, 291using, 290
privilege tables, creating, 296processor, definition of, 275Properties window, Security tab, 216proxy connector, 49public and private resources, 76public key encryption, 242public-private key pair, 144
■RrealmDB.ldif, 202realmDB.sql, 195–196<realm-name> element, 89realms
applying across an entire containercomponent, 8
configuring, 59, 182configuring a memory realm in the default
server.xml, 183configuring a MySQL JDBC realm, 194configuring JDBC realms, 192data source, 60definition of, 179delegating authentication and
authorization to the web server,180
implementing and enforcing securitypolicies, 179
JAAS, 60JDBC, 60
■INDEX 315
Find it faster at http://superindex.apress.com/
7850chIDXFINAL.qxd 2/28/07 11:21 AM Page 315

JNDI, 60mapping roles and access rights in server
configuration files, 180mapping usernames to passwords and
user roles, 59memory (Tomcat 5), 60memory realm, attributes of, 182security-related elements in web.xml, 191simple security setup, code example, 191as standard abstractions of underlying
data stores, 179understanding container-managed
security, 180user database, 60, 185user database, as superseding the memory
realm, 183using security realms, 238using the digest utility to digest
passwords, 182<Receiver> element, attributes of, 128redirectPort attribute, 144, 245reference implementation (RI), 3regedt32 utility, 155relational databases. See databasesreplicationMode, settings, 129request dumper valve
configuring, 118debugging web applications with, 117decoding any parameters sent with the
request, 119inheriting a logger from a higher-level
component, 118sample output, 118–119using, 117
request dumping, 8request filter valves
remote address valve, table of attributes, 116remote host valve, 116–117using, 116
<res-auth> element, 86<Resource> element, 172, 185
attributes of, 44–45resource parameters in Tomcat 6,
configuring, 45<resource-env-ref> element, 85, 95<resource-env-ref-type> element, 85<ResourceLink> element, 94, 106
attributes of, 76resourceName attribute, 186<ResourceParams> element, 172, 185<resource-ref> element, 46, 86, 172, 175resources component, 8<res-ref-name> element, 86<res-sharing-scope> element, 86Restart link, 101<res-type> element, 86result set, definition of, 167
role* attributes, 206<role> element, 64<role-link> element, 83<role-name> element, 83, 87, 89, 96, 238roles attribute, 64root account, 221ROOT web application, 31ROOT.xml, 262rootdn attribute, 202rootpw attribute, 202RPM package
installing MySQL from, 294RPM Package Manager application, 294testing the installation, 294
RSA algorithm, 144, 243<run-as> element, 82
■Ssampler, definition of, 278saveOnRestart attribute, 123scalability, definition of, 273scheme attribute, 144scripts, 29seamless session, 159secure attribute, 144Secure Sockets Layer (SSL)
adding SSL or TLS support in Tomcat, 243certificate authorities (CAs), 242common name (CN), 244CONFIDENTIAL integrity level, 245configuring an SSL connector, 246configuring an SSL-enabled web site on
a unique IP address, 257configuring with the Apache Web Server,
246creating a certificate signing request
(CSR), 244digital certificate, 242guaranteeing data integrity with a security
constraint, 245HTTP over SSL (HTTPS) protocol, 243IETF RFC 2246, 243importing a chain certificate into the
keystore, 245installing a certificate from a certificate
authority, 244INTEGRAL integrity level, 245Java Secure Socket Extension (JSSE), 243keytool command, 243–244NONE integrity level, 245obtaining a chain certificate (root
certificate) from the CA, 245obtaining a test certificate, 244openssl.cnf file for setting a server’s
certificate properties, 247preparing a certificate keystore, 243–244procedure for an SSL handshake, 242
■INDEX316
7850chIDXFINAL.qxd 2/28/07 11:21 AM Page 316

protecting resources with, 245providing data encryption and
authentication, 242public key encryption, 242redirectPort attribute, 245RSA algorithm, 243running Apache and SSL on Windows, 249self-signed certificate, 243session key, 242symmetric key encryption, 242Thawte, 242Transport Layer Security (TLS), 243Trustcenter.de, 243VeriSign, 242
securityadmin application, 228advantages of form-based authentication,
239allowing class loader creation, 236allowing the operating system to control
file access, 237assigning permission to a web
application’s JDBC driver, 237authentication, definition of, 179authorization, definition of, 179dangers of a compromised server,
209disabling the default ROOT web
application, 228general Tomcat security principles, 226intrusion detection systems, 227manager application, 228marking the root file system as read-only,
227opening socket connections to databases,
237placing the manager folder outside of
Tomcat’s directory structure, 228regulating Tomcat’s common class loader
code, 236removing the admin and manager web
applications for security, 226removing the example web applications
on a development server, 228removing the webdav web application,
228securing Tomcat’s default configuration,
228security risk involved in automatic
reboots, 70security-related elements in web.xml, 191setting read-only permissions on the
webapps directory, 227setting start and recovery options on
Windows, 67–70tomcat-users.xml and, 226Tripwire, 227
unauthorized tasks with Tomcat’s defaultpolicy configuration, 236
understanding container-managedsecurity, 180
using custom login and error pages,240–242
using realms to implement and enforcesecurity policies, 179
<security principal> entry, 36<security-constraint> element, 87, 95, 191,
238, 245SecurityManager class, 137<security-role> element, 83, 89, 95–96, 191<security-role-ref> element, 82–83SELECT command, 298self-signed certificate, 144, 243<Sender> element, attributes of, 129server class loader, 137server component, 6<Server> element
attributes of, 42subelements of, 42
Server Side Include (SSI), 66Server Status link, 98server, configuring, 41server.xml
adding a keystore password to, 145adding an AJP connector to, 264adding components to the inner
component, 41AJP 1.3 connector, 49–50, 54alias, configuring, 63Apache Log4J toolkit, 56associating more than one connector with
a single engine, 49authentication, 59Catalina as the default engine in, 54configuring JNDI realms in, 205configuring a connector to work with
a proxy server, 51configuring a JDBC store in, 125configuring a memory realm in, 183configuring a realm, 59configuring a reference to a JavaMail
session in web.xml, 48configuring a reference to a JDBC data
source in web.xml, 46configuring JavaMail sessions as a JNDI
resource, 48configuring the server’s global JNDI
resources, 43connection points where a request enters
Tomcat, 49connectionName attribute, 196connectionPassword attribute, 196<Connector> element, 50connector, configuring, 49
■INDEX 317
Find it faster at http://superindex.apress.com/
7850chIDXFINAL.qxd 2/28/07 11:21 AM Page 317

container-managed security, 60copying comments from an old version
into a new one, 110creating a virtual host in, 260data source realm, configuring, 60debug attribute, 54default cluster setting, 127default deployer setting in Tomcat 6, 131default membership setting in Tomcat 5.5,
128default MySQL JDBC realm in, 194default receiver setting in Tomcat 6, 128default replication valve setting in Tomcat
6, 130default sender setting in Tomcat 6, 129defaultHost, 54defining a Catalina service and a Catalina
engine, 41defining a proxy name and proxy port in,
146<Engine> directive, jvmRoute attribute,
163<Engine> element, 54engine, configuring, 54<Environment> entry, 43example access log valve, 115factory parameter, 185global resources, configuring, 44<GlobalNamingResources> element, 43<Host> element, 61host, configuring, 61HTTP connector, 49–53installing valves at the engine level, 63JAAS realm, configuring, 60Jakarta Commons Database Connection
Pools (DBCP), 45Jakarta Commons logging mechanism, 55Java Authentication and Authorization
Service (JAAS), 60JDBC 3.0 data sources, 170JDBC data source, configuring, 45JDBC realm, configuring, 60JNDI LDAP service provider, configuring, 60lack of DTD or schema for, 41listener, configuring, 63listening to port 8005 for a shutdown
command, 42localhost as the virtual host, 61localhost, 63logging, in Tomcat, 55logging, pattern layout placeholders, 58–59mail sessions, configuring, 48not reloaded after Tomcat starts, 71outer component properties as inherited
by inner components, 41overriding the outer configuration, 41parameters for use with a JDBC data source, 46
proxy connector, 49renaming of, after settings changes, 110request dumper valve, configuring, 118<Resource> element, 44–45, 185resource parameters in Tomcat 6,
configuring, 45resourceName attribute, 186<ResourceParams> element, 185<resource-ref> element, 46saving old versions of, in the conf
directory, 115<Server> element, as the root element,
41<Server> element, attributes of, 42<Service> element, 48, 110server, configuring, 41service, configuring, 48setting logging levels, 58setting the mail.smtp.port parameter, 48setting up one <Engine> element per
virtual host, 267single sign-on valve in, 120specifying a serverwide variable, 43SSL connector, 49–50, 54three default JDBC realms, 194Tomcat’s component-based model and
XML configuration, 41unpackWARs attribute, 61user database realm, configuring, 60user database, global settings, 185valves, configuring, 63WAR files, 31www.catalinabook.com, virtual host
definition, 268www.jasperbook.com, virtual host
definition, 269www.tomcatbook.com, virtual host
definition, 269serverwide variable, specifying, 43service
configuring, 48discovering the server failure count, script
example, 69e-mailing a failure report, 69Properties dialog box, Recovery tab, 68running a script if the server fails, 68service component, 6
<Service> element, 110attributes of, 48subelements of, 49
Service node, 110Servlet 2.4 specification, 76servlet containers
Tomcat as the reference implementation(RI) servlet container, 3
<servlet> element, 82servlet mappings, 78
■INDEX318
7850chIDXFINAL.qxd 2/28/07 11:21 AM Page 318

Servlet specification, 31–32filters and, 63
<servlet-class> element, 82including the fully qualified class name, 78
servletContextName property, 259<servlet-mapping> element, 66, 83<servlet-name> element, 82–83servlets
defining and naming, 78drawbacks of, 3provided in compiled form, 3servlet containers, 3unsuitability for creating HTML content, 3
session affinity, 159session key, 242session managers
common attributes, 122configuring, 121configuring a JDBC store in server.xml,
125as a context-level component, 121creating a database in which to store
sessions, 125features of, 121file store, configuring, 124JDBC store, configuring, 124persistent, 121persistent attributes, 122–125SQL script for creating a JDBC-
store–compatible database, 125standard attributes, 122<Store> element, 124, 126
<session-config> element, 67, 84, 276<session-timeout> element, 67, 84, 276SGUI bit, setting, 224SHA algorithm, 182SHA(), 195shadow password file, 225shared class loader, 137shared hosting
Apache server, 253configuring Tomcat to serve multiple
virtual hosts, 258definition of, 253domain name, definition of, 253host name, definition of, 253implementing virtual hosting with
Tomcat, 257IP addresses, scarcity of, 253virtual hosting, types of, 253
shutdown command, 30, 42simple bind method, 204Simple controller, 285Simple Data Writer listener, 283single sign-on valves
caching credentials in a client’s session, 119configuring, 120
server.xml and, 120table of attributes, 119using, 119
singletondefinition of, 141placing in the shared class loader path,
141slapadd utility, 205slapd.conf
directory attribute, 202modifying its settings, 201rootdn attribute, 202rootpw attribute, 202suffix attribute, 202
<sql:setDataSource> tag, 176–177SSL connector, 49–50
adding a keystore password to server.xml,145
certificate authority, 144changing the SSL port, 144<Connector> element, attributes of, 54creating a keystore, 144creating a public-private key pair
(-genkey), 144default SSL connector configuration, 144domain name mismatch, 145HTTPS connections, 144keytool utility, 144MD5 algorithm, 144non-SSL connectors, 144redirectPort attribute, 144RSA algorithm, 144scheme attribute, 144secure attribute, 144self-signed certificate, 144server’s digital certificates, 144
SSL handshake, procedure for, 242standard <Host> element, attributes of, 62standard deviation, 292start and recovery options, setting, 67–70Start link, 101stdout, 291sticky session, 159<Store> element, 124, 126Structured Query Language (SQL)
definition of, 167JDBC and, 167necessity of learning basic commands,
167performing a SELECT * query, 177result sets, 167
sudo command, 221suffix attribute, 202SUID bit, setting, 224Sun Microsystems
information on evaluating JVMs, 11Java Development Kit (JDK), 11
■INDEX 319
Find it faster at http://superindex.apress.com/
7850chIDXFINAL.qxd 2/28/07 11:21 AM Page 319

Java Web Server, 4JavaServer Pages (JSP), 3
superuser accounts, 213, 221symmetric key encryption, 242system class loader
CLASSPATH environment variable, 134loading an application’s main class, 134
system memoryconfiguring the Java heap size, 273–274garbage collector and poor server
performance, 274setting the minimum and maximum heap
size, 274-Xincgc parameter, 274-Xms<size> parameter, 273-Xmx<size> parameter, 273
System.exit(), 236
■Ttag extensions, 80tag library descriptors (TLDs), 32tags folder
JSP-syntax tag extensions, 80tag files, 32
<taskdef> element, 106temp directory, 30test plan
definition of, 277executing, 280saving, 280Test Plan node, 277thread group, available options, 278
Thawte, 242thread count, monitoring, 275Thread.stop(), 229TLD configuration files, 80tlds folder, 80Tomcat 6
adding an AJP connector to server.xml, 264adding SSL or TLS support, 243advantages of form-based authentication,
239Apache setup for virtual hosting with
Tomcat, 266Catalina servlet engine, 6CATALINA_BASE environment variable, 268CATALINA_HOME environment variable,
268changes from Tomcat 5.5, 4configuring JDBC drivers as JNDI
resources in, 171configuring to serve multiple virtual hosts,
258configuring with an Extensible Markup
Language (XML) file, 5connectors, 6container components, 6
context, 7creating a virtual host in server.xml, 260default HTTP port, 6differentiating virtual hosts, 7disabling the default ROOT web
application, 228enabling dynamic reloading, 7engine component, 6<Engine> element, 264general Tomcat security principles, 226global resources component, 7host component, 7implementing virtual hosting on, 257implementing virtual hosting with Apache
and Tomcat, 264index.hml page for shared hosting, 258index.jsp page common to all hosts, 259Java Security Manager, enabling, 232Java Server Faces 1.2, support for, 4Java Server Pages (JSP) 2.1 (JSR 245),
support for, 4Java Servlet 2.5 specification (JSR 154),
support for, 4Java virtual machine (JVM) and, 6jk.properties, creating, 269jsp.xml configuration file, 262loader component, 8Log4J, 8log4j.properties logging file for virtual
hosting, 261logger component, 8manager component, 8mapping local IP addresses in a hosts file,
263nested components, 7new features, 4not optimized as an HTTP server, 276permissions in the default catalina.policy
file, 232placing the manager folder outside of
Tomcat’s directory structure, 228realm component, 8removing the admin and manager web
applications for security, 226removing the webdav web application,
228resources component, 8ROOT.xml configuration file, 262running the three virtual hosts using
a Unix shell script, 270running the three virtual hosts using
a Windows batch file, 270running with the server option, 21securing the default configuration, 228securing Tomcat’s permissions, 228server and service components, 6setting a JVM for each virtual host, 267
■INDEX320
7850chIDXFINAL.qxd 2/28/07 11:21 AM Page 320

testing the virtual hosting, 263tomcat-users.xml and security, 226top-level components, 5understanding its architecture, 5Unified Expression Language (Unified EL)
2.1, support for, 4using custom login and error pages,
240–242valve component, 8web.xml file for the jsp web application,
259web.xml file for the ROOT web
application, 259workers.properties file for separate virtual
hosts, 269www.catalinabook.com, final directory
structure, 269Tomcat Properties box, 30tomcat6 Windows executable, 29tomcat6w Windows executable, 30tomcatBook web application
protecting with Apache’s SSL, 249simple security setup, code example, 191
tomcat-docs, 228tomcat-juli.jar, 138tomcat-users.xml, 30
adding a digested password, 183code example, 64defining roles in, 120<role> element, 64roles attribute, 64saving user-database changes in, 185specifying users, passwords, and roles for
a memory realm, 183user database realm and, 64<user> element, 183<user> entry, 64users as having more than one role, 64
tools.jar file, 138transaction, definition of, 172Transport Layer Security (TLS), 243<transport-guarantee> element, 87Tripwire, 227troubleshooting and tips
checking log files in theCATALINA_HOME/logs directory, 23
if port 8080 is in use, 23, 28if the Tomcat window disappears, 23if Tomcat doesn’t start, 23listing open ports with netstat, 23making a successful connection, output
example, 23starting multiple Tomcat instances, 23Tomcat web site location, 22using telnet to connect to the socket, 23
Trustcenter.de, 243
■UUndeploy link, 101Unified Expression Language (Unified EL)
2.1, 4uniform random timer, 282uniform resource indicator (URI), 32uniform resource locator (URL), 31uniqueMember attribute, 204Unix file system
assigning permissions, 222changing file ownership, 224changing file permissions, 223chmod utility and its parameters, 223–224chown command, 224configuring file permissions, 225creating a special user account for
running Tomcat, 225creating users and groups, 221disabling login ability by starring an
account’s password, 225file permissions, 220file/directory owner, 221groupadd command, 222groupdel command, 222groups command, 222ls utility, 222marking the root file system as read-only,
227planning security permissions, 225root account, 221running Tomcat as a daemon, 225SGUI bit, setting, 224sudo command, 221SUID bit, setting, 224superuser accounts, 221useradd utility, 222userdel command, 222usermod command, 222viewing permissions, 222working with users, groups, and owners,
221unpackWARs attribute, 61, 72<url-pattern> element, 81, 83, 87user database
adding, using the admin application, 187
advantages of, 185altering while the server is running, 186configuring, 185–186creating a new user, 190editing and deleting, using the admin
application, 188–189global settings, in server.xml, 185<GlobalNamingResources> element, 185saving changes in tomcat-users.xml, 185setting the digest attribute, 186superseding of the memory realm, 183
■INDEX 321
Find it faster at http://superindex.apress.com/
7850chIDXFINAL.qxd 2/28/07 11:21 AM Page 321
using as a realm at the engine level, 185using digested passwords with, 186
<user> element, 183<user> entry, 64user requests, intercepting, 111user sessions
checking session information, 101configuring, 121configuring a JDBC store in server.xml,
125contrasting the standard and persistent
session managers, 123creating a database in which to store
sessions, 125default session timeout, 102file store, configuring, 124inactive session, 102JDBC store, configuring, 124<Manager> element, 121, 126maxIdleBackup attribute, 123maxIdleSwap method, 123minIdleSwap method, 123persistent file store attributes, 124persistent JDBC store attributes, 124–125persistent session manager, 121–123providing reliable service despite server
failures or restarts, 121removing idle sessions from memory, 121replicating across more than one server, 121saveOnRestart attribute, 123saving session information across restarts,
121session managers, common and standard
attributes, 122session managers, configuring, 121session replication algorithm, 130session timeout, 121SQL script for creating a JDBC-
store–compatible database, 125<Store> element, 124, 126
useradd command, 294useradd utility, 222User-Agent header, 288<user-data-constraint> element, 87, 191, 245userdel command, 222usermod command, 222userPassword attribute, 205userPattern attribute, 206users
creating (Unix), 221creating (Windows), 213
■V<Valve> element, attributes of, 130valves
access log valves, server.xml example, 115access log valves, table of attributes, 113–114
access logging, 112applying in chains, 111AWStats, 113benefits of, 112blocking denial-of-service (DoS) attacks, 116common log file format, 113configuring, 63configuring a node’s replication valve, 130configuring at different levels within the
Tomcat hierarchy, 111<Context> container, 112context-level valves, 112<Engine> container, 112engine-level valves, 112filtering by the client’s host, 116filtering by the client’s IP address, 116<Host> container, 112host-level valves, 112installing at the engine level, 63org.apache.catalina.Valve Java interface, 112remote address filter request valve, table
of attributes, 116remote host filter request valve, 116–117request dumper valve, configuring and
using, 117–119request dumping, 8request dumps for debugging, 112request filter valves, using, 116request filtering/blocking, 112single sign-on for web applications, 112single sign-on valves, configuring, 120single sign-on valves, table of attributes, 119standard Tomcat-supplied valves, table of, 112testing thoroughly, 63<Valve> entry, 115Webalizer, 113writing errors to a log file in a standard
way, 113VBScript, 2VeriSign, 242View Results tree listener, 280Virtual Directory Creation Wizard, 156virtual hosting
adding aliased network interfaces, 254adding an AJP connector to server.xml, 264adding physical network interfaces, 254aliasing, configuring for Unix, 256aliasing, configuring for Windows, 254Apache setup for virtual hosting with
Tomcat, 266changing the index.html file served by
Apache, 266configuring a NIC with more than one IP
address, 254configuring Tomcat to serve multiple
virtual hosts, 258creating a virtual host in server.xml, 260
■INDEX322
7850chIDXFINAL.qxd 2/28/07 11:21 AM Page 322
<Engine> element, 264ifconfig utility, 256implementing with Apache and Tomcat,
264implementing with Tomcat, 257index.hml page for shared hosting, 258index.jsp page common to all hosts, 259IP-based, 253jk.properties, modifying, 269jsp.xml configuration file, 262log4j.properties logging file, 261mapping local IP addresses in a hosts file,
263matching Apache’s virtual hosts with
Tomcat’s, 265name-based virtual hosting, 256requirements for IP addresses, 254ROOT.xml configuration file, 262running the three virtual hosts using
a Unix shell script, 270running the three virtual hosts using
a Windows batch file, 270sample jk2.conf file generated by Ant, 265server.xml for www.catalinabook.com
using a separate JVM, 268setting a JVM for each virtual host, 267setting up one <Engine> element per
virtual host in server.xml, 267testing the Tomcat virtual hosting, 263types of, 253web.xml file for the jsp web application,
259web.xml file for the ROOT web
application, 259workers.properties file for separate virtual
hosts, 269workers2.properties file, 265www.catalinabook.com, final directory
structure, 269virtual hosts, 147virtual memory, 274<VirtualHost> entry, 151visualization listeners, 283
■Wweb
Common Gateway Interface (CGI), 1Hypertext Transfer Protocol (HTTP)
requests, 1Perl language and CGI applications, 1static vs. dynamic content, 1
web application class loader, 137class patterns delegated, 140delegation pattern not used, 140
web applications503 (unavailable) error code, 100checking session information, 101
classes directory, 79configuring error pages, 85context component, 31context path, assigning, 31context path, definition of, 77default context, 31defining a servlet, 78definition of, 31deploying from a local machine, 103deploying from a remote WAR file, 104Domain Name System (DNS), 31instructing Tomcat to reload a web
application, 141JSP pages, 77knowing how to administer effectively, 71manager web application, 31mapping requests to JSP or HTML pages,
78mapping URLs to make servlets available
to users, 78META-INF directory, 32, 77naming an application after its directory,
31organized as packed or unpacked formats,
31overriding classes in the shared and
common class loaders, 140partitioning into public and private areas,
32problems when web applications run
servlets, 78providing a separate context XML file, 77public and private resources, 76resource definitions in web.xml, 78<resource-env-ref-name> element, 85ROOT, definition of, 31scalability of, 273server directory structure as overlaying the
file system structure, 77Servlet 2.4 specification, 76servlet mappings, 78servlet names and web.xml, 78Servlet specification, 32<servlet-class> element, 78starting, stopping, and restarting, 100stop command, 101tag extensions, 80tags folder, 80TLD configuration files, 80tlds folder, 80typical makeup of, 76undeploying, 101understanding the structure of, 31using the path parameter for deploying,
104using wildcards (*) in servlet mappings, 78web application class loader, 140
■INDEX 323
Find it faster at http://superindex.apress.com/
7850chIDXFINAL.qxd 2/28/07 11:21 AM Page 323
web archive (WAR), 31WEB-INF directory, 32, 77, 79
web archive (WAR), 31web spider, creating in JMeter, 290Webalizer, 113webapps directory, 227
changing its location, 31deploying web applications in, 31
webdav web application, removing, 228WEB-INF directory
classes directory, 79contents of, 79lib folder, 79specialized subdirectories of, 32storing private resources in, 32tag extensions, 80tags folder, 80tlds folder, 80
<web-resource-collection> element, 87, 191,238
<web-resource-name> element, 87web.xml, 30, 122, 172
adding Apache-style Server Side Include(SSI) features, 66
adding settings to, 238allowing access by an admin role user,
code example, 96<auth-constraint> element, 87, 191, 238<auth-method> element, 89code example, 64<context-param> element, 80declaring the use of a resource in, 46default servlet <servlet-mapping> setting,
code example, 83default servlet <servlet> setting, code
example, 83default servlet definitions, 65default session setting for Tomcat, code
example, 84default Tomcat MIME mapping, code
example, 84<description> element, 80–83, 85–87, 89<dispatcher> element, 82<display-name> element, 81–82, 87<distributable> element, 80error page configuration, code example,
85<error-code> element, 85<error-page> element, 85<extension> element, 84<filter> element, 80<filter> entry, code example, 81<filter-class> element, 81<filter-mapping> element, 81<filter-name> element, 81<form-error-page> element, 89<form-login-config> element, 89
<form-login-page> element, 89<GlobalNamingResources> element, 85guaranteeing data integrity with a security
constraint, 245HTTP Content-Type header, 67<http-method> element, 87<icon> element, 81–82<init-param> element, 81–82invoker servlet, 65<jsp-file> element, 82<load-on-startup> element, 82<location> element, 85<login-config> element, 89, 191, 239manager web application’s <resource-env-
ref> setting, code example, 86manager web application’s login
configuration, code example, 89manager web application’s security
constraint, code example, 88mappings for backward compatibility with
Tomcat scripts, 96MIME mappings, configuring, 67MIME types and mappings, 84<mime-mapping> element, 67, 84<mime-type> element, 84overloading the server with stale sessions,
67<Parameter> element, 80<param-name> element, 80–82<param-value> element, 80–82<realm-name> element, 89reference to a JDBC data source, code
example, 86<res-auth> element, 86<res-ref-name> element, 86<res-sharing-scope> element, 86<res-type> element, 86resource definitions in, 78<resource-env-ref> element, 85<resource-env-ref-name> element, 85<resource-env-ref-type> element, 85<resource-ref> element, 86<role-link> element, 83<role-name> element, 83, 87, 89, 238<run-as> element, 82section specifying a login mechanism, 239sections protecting a web application, 238<security-constraint> element, 87, 191,
238, 245security-related elements in, 191<security-role> element, 83, 89, 191<security-role-ref> element, 82–83Servlet 2.4 web applications and, 64<servlet> element, 82servlet for JSP pages, 65servlet mappings, 66servlet names and, 78
■INDEX324
7850chIDXFINAL.qxd 2/28/07 11:21 AM Page 324

<servlet-class> element, 82servletContextName property, 259<servlet-mapping> element, 66, 83<servlet-name> element, 82–83session timeout, configuring, 67<session-config> element, 67, 84, 276<session-timeout> element, 67, 84, 276Tomcat’s default welcome files, code
example, 85<transport-guarantee> element, 87<url-pattern> element, 81, 83, 87<user-data-constraint> element, 87, 191,
245web application defaults, configuring, 64<web-resource-collection> element, 87,
191, 238<web-resource-name> element, 87
welcome files, configuring, 67<welcome-file> element, 84<welcome-file-list> element, 84Windows Environment Variables dialog box, 12Windows file system
adding a user account at the commandline, 214
addusers utility, 215Administrator account, 213assigning conflicting permissions, 217assigning permissions (command-line), 217assigning permissions (GUI), 216assigning permissions to Tomcat’s
directories, 220cacls utility, 217calculating the space needed for an NTFS
conversion, 211Computer Management tool, 213configuring file permissions, 219convert utility, 211creating a special user account for
running Tomcat, 218creating users and groups, 213deleting a user, 215Deny settings as overriding Allow settings,
217domain security policy, 218FAT32, 210File Allocation Table (FAT), 209file permissions, 212file/directory owner, 213folder permissions, 211granting read access to the JDK directory,
220
group permissions, 217inherited permissions, 216installation of Tomcat as a service, 218Local Users and Groups icon, 213modifying a machine’s local security
policy, 218net group utility, using, 214net localgroup utility, using, 214net user command, 214NT file system (NTFS), 209permissions, 209planning security permissions, 217Properties window, Security tab, 216revoking file system permissions for the
root directory, 219revoking user access, 217superuser accounts, 213turning off permission inheritance for an
object, 217types of, 209using the Properties page to show the file
system type, 210viewing file or directory permissions, 216Windows Resource Kit, 215Windows XP Professional, 216working with users, groups, and owners, 212
Windows Resource Kit, 215work directory, 31workers
assigning types of, in mod_jk, 148configuring a Tomcat worker, 149configuring the host, 148definition of, 147identifying, 147running multiple Tomcat workers, 147setting the cache size, 149setting the load-balancing factor, 149setting the port, 148workers.properties file for mod_jk, 149workers.properties file, format of, 148
workers.properties, 269workersIIS.properties, 155World Wide Web Publishing service, 156
■XXA operation model, 173-Xincgc parameter, 274XML. See Extensible Markup Language
(XML)-Xms<size> parameter, 273-Xmx<size> parameter, 273
■INDEX 325
Find it faster at http://superindex.apress.com/
7850chIDXFINAL.qxd 2/28/07 11:21 AM Page 325


![CorrespondenceUsing caching and optimization techniques to ... · Apache benchmarking The Apache webserver comes with a benchmarking pro-gram, ab [7], which can be used to analyze](https://static.fdocuments.net/doc/165x107/5ee08cffad6a402d666bb764/correspondenceusing-caching-and-optimization-techniques-to-apache-benchmarking.jpg)