bk3500 Ultrasound System · English source version ... (MI, TIS, TIB, etc) ... • The bk3500...
64
16-01410-EN-03 January 2017 For Professional Users Only User Guide bk3500 Ultrasound System
Transcript of bk3500 Ultrasound System · English source version ... (MI, TIS, TIB, etc) ... • The bk3500...

16-01410-EN-03January 2017
For Professional Users Only
User Guide
bk3500 Ultrasound System

LEGAL MANUFACTURER
BK Medical ApSMileparken 34
2730 Herlev
Denmark
Tel.:+45 4452 8100/Fax:+45 4452 8199
www.bkultrasound.com
Email: [email protected]
The serial number label on a BK product contains information about the year of manufacture.
BK Medical ApS Customer SatisfactionInput from our customers helps us improve our products and services. As part of our customer satisfaction program, we contact a sample of our customers a few months after they receive their orders. If you receive an email message from us asking for your feedback, we hope you will be willing to answer some questions about your experience buying and using our products. Your opinions are important to us. You are of course always welcome to contact us via your BK service representative or by contacting us directly.
If you have comments about the user documentation, please write to us at the email address above. We would like to hear from you.
System Software• NOT FAULT TOLERANT. THE SOFTWARE IS NOT FAULT TOLERANT. BK Medical HAS
INDEPENDENTLY DETERMINED HOW TO USE THE SOFTWARE IN THE DEVICE, AND MS HASRELIED UPON BK Medical TO CONDUCT SUFFICIENT TESTING TO DETERMINE THAT THESOFTWARE IS SUITABLE FOR USE.
• EXPORT RESTRICTIONS. You acknowledge that Windows 8 Embedded is of US-origin. You agree to complywith all applicable international and national laws that apply to Windows 8 Embedded, including the U.S. ExportAdministration Regulations, as well as end-user, end-use and country destination restrictions issued by U.S. andother governments. For additional information on exporting Windows 8 Embedded, see http://www.microsoft.com/exporting/
• The bk3500 Ultrasound System is closed. Any modification of or installation of software to the system maycompromise safety and function of the system. Any modification of or installation of software without writtenpermission from BK Medical will immediately void any warranty supplied by BK Medical. Such changes will alsovoid any service contract and result in charges to the customer for restoration of the original bk3500 UltrasoundSystem.
Trademarks:DICOM is the registered trademark of the National Electrical Manufacturers Association for its standards publicationsrelating to digital communications of medical information.
Microsoft and Windows are either registered trademarks or trademarks of Microsoft Corporation in the United Statesand/or other countries.
bk3500 = Ref. Type 2300
© 2017 BK Medical
Information in this document may be subject to change without notice.

Contents
Chapter 1 Introduction . . . . . . . . . . . . . . . . . . . . . . . . . . . . . . . . . . . . . . . . . . . . . . . . . . . . . . . . . . . . . . . 5Essential Performance . . . . . . . . . . . . . . . . . . . . . . . . . . . . . . . . . . . . . . . . . . . . . . 5Intended Use . . . . . . . . . . . . . . . . . . . . . . . . . . . . . . . . . . . . . . . . . . . . . . . . . . . . . 6Modes of Operation . . . . . . . . . . . . . . . . . . . . . . . . . . . . . . . . . . . . . . . . . . . . . . . . 6Indications for Use . . . . . . . . . . . . . . . . . . . . . . . . . . . . . . . . . . . . . . . . . . . . . . . . 7Contraindications. . . . . . . . . . . . . . . . . . . . . . . . . . . . . . . . . . . . . . . . . . . . . . . . . . 7
Chapter 2 Getting Started . . . . . . . . . . . . . . . . . . . . . . . . . . . . . . . . . . . . . . . . . . . . . . . . . . . . . . . . . . . . 9The bk3500 System . . . . . . . . . . . . . . . . . . . . . . . . . . . . . . . . . . . . . . . . . . . . . . . . 9Before You Start . . . . . . . . . . . . . . . . . . . . . . . . . . . . . . . . . . . . . . . . . . . . . . . . . 10
Turning System On and Off . . . . . . . . . . . . . . . . . . . . . . . . . . . . . . . . . . . . . 10Connecting Transducers . . . . . . . . . . . . . . . . . . . . . . . . . . . . . . . . . . . . . . . . 11Barcode Reader. . . . . . . . . . . . . . . . . . . . . . . . . . . . . . . . . . . . . . . . . . . . . . . 11
Control Panel . . . . . . . . . . . . . . . . . . . . . . . . . . . . . . . . . . . . . . . . . . . . . . . . . . . . 12Quick Access . . . . . . . . . . . . . . . . . . . . . . . . . . . . . . . . . . . . . . . . . . . . . . . . . . . . 13
Quick Exam Start-Up . . . . . . . . . . . . . . . . . . . . . . . . . . . . . . . . . . . . . . . . . . 13Starting an Exam Using the Touch Screen Buttons . . . . . . . . . . . . . . . . . . . 18
Monitor and Touch Screen Display. . . . . . . . . . . . . . . . . . . . . . . . . . . . . . . . . . . 21Battery . . . . . . . . . . . . . . . . . . . . . . . . . . . . . . . . . . . . . . . . . . . . . . . . . . . . . . . . . 23
Charging the Battery. . . . . . . . . . . . . . . . . . . . . . . . . . . . . . . . . . . . . . . . . . . 23Battery Status. . . . . . . . . . . . . . . . . . . . . . . . . . . . . . . . . . . . . . . . . . . . . . . . . . . . 24
Information Available on the Monitor . . . . . . . . . . . . . . . . . . . . . . . . . . . . . 24Battery Life. . . . . . . . . . . . . . . . . . . . . . . . . . . . . . . . . . . . . . . . . . . . . . . . . . 25
Chapter 3 Safety Information . . . . . . . . . . . . . . . . . . . . . . . . . . . . . . . . . . . . . . . . . . . . . . . . . . . . . . . . 27Safety Information. . . . . . . . . . . . . . . . . . . . . . . . . . . . . . . . . . . . . . . . . . . . . . . . 27Safety Symbols and Information on the Equipment . . . . . . . . . . . . . . . . . . . . . . 27General Safety Precautions . . . . . . . . . . . . . . . . . . . . . . . . . . . . . . . . . . . . . . . . . 29Mechanical Safety . . . . . . . . . . . . . . . . . . . . . . . . . . . . . . . . . . . . . . . . . . . . . . . . 30Explosion Hazards. . . . . . . . . . . . . . . . . . . . . . . . . . . . . . . . . . . . . . . . . . . . . . . . 31Electrical Safety. . . . . . . . . . . . . . . . . . . . . . . . . . . . . . . . . . . . . . . . . . . . . . . . . . 31
ESD Training . . . . . . . . . . . . . . . . . . . . . . . . . . . . . . . . . . . . . . . . . . . . . . . . 31Interference . . . . . . . . . . . . . . . . . . . . . . . . . . . . . . . . . . . . . . . . . . . . . . . . . . . . . 32
Electrical Noise. . . . . . . . . . . . . . . . . . . . . . . . . . . . . . . . . . . . . . . . . . . . . . . 32Electromagnetic Interference . . . . . . . . . . . . . . . . . . . . . . . . . . . . . . . . . . . . 32RF (Radio Frequency) Interference . . . . . . . . . . . . . . . . . . . . . . . . . . . . . . . 32
Installation . . . . . . . . . . . . . . . . . . . . . . . . . . . . . . . . . . . . . . . . . . . . . . . . . . . . . . 33Connecting Other Equipment . . . . . . . . . . . . . . . . . . . . . . . . . . . . . . . . . . . . . . . 34Network Connection . . . . . . . . . . . . . . . . . . . . . . . . . . . . . . . . . . . . . . . . . . . . . . 34
Network Security . . . . . . . . . . . . . . . . . . . . . . . . . . . . . . . . . . . . . . . . . . . . . 34Network Printing . . . . . . . . . . . . . . . . . . . . . . . . . . . . . . . . . . . . . . . . . . . . . 34Connectors . . . . . . . . . . . . . . . . . . . . . . . . . . . . . . . . . . . . . . . . . . . . . . . . . . 35EMC Requirements . . . . . . . . . . . . . . . . . . . . . . . . . . . . . . . . . . . . . . . . . . . 37Isolation of DICOM Network. . . . . . . . . . . . . . . . . . . . . . . . . . . . . . . . . . . . 38Wireless Networks . . . . . . . . . . . . . . . . . . . . . . . . . . . . . . . . . . . . . . . . . . . . 38
3

4
Medical Equipment. . . . . . . . . . . . . . . . . . . . . . . . . . . . . . . . . . . . . . . . . . . . 39Non-Medical Equipment . . . . . . . . . . . . . . . . . . . . . . . . . . . . . . . . . . . . . . . 39
Battery Support System. . . . . . . . . . . . . . . . . . . . . . . . . . . . . . . . . . . . . . . . . . . . 40Computer Security. . . . . . . . . . . . . . . . . . . . . . . . . . . . . . . . . . . . . . . . . . . . . . . . 40Printer . . . . . . . . . . . . . . . . . . . . . . . . . . . . . . . . . . . . . . . . . . . . . . . . . . . . . . . . . 40Touch Screen . . . . . . . . . . . . . . . . . . . . . . . . . . . . . . . . . . . . . . . . . . . . . . . . . . . . 40Service and Repair. . . . . . . . . . . . . . . . . . . . . . . . . . . . . . . . . . . . . . . . . . . . . . . . 41Transducers . . . . . . . . . . . . . . . . . . . . . . . . . . . . . . . . . . . . . . . . . . . . . . . . . . . . . 41During an Examination . . . . . . . . . . . . . . . . . . . . . . . . . . . . . . . . . . . . . . . . . . . . 41
Checking the Date . . . . . . . . . . . . . . . . . . . . . . . . . . . . . . . . . . . . . . . . . . . . 41Verifying the Transducer Type. . . . . . . . . . . . . . . . . . . . . . . . . . . . . . . . . . . 42Measurements. . . . . . . . . . . . . . . . . . . . . . . . . . . . . . . . . . . . . . . . . . . . . . . . 42VFI - Vector Flow Imaging . . . . . . . . . . . . . . . . . . . . . . . . . . . . . . . . . . . . . 43Puncture . . . . . . . . . . . . . . . . . . . . . . . . . . . . . . . . . . . . . . . . . . . . . . . . . . . . 43
Acoustic Output. . . . . . . . . . . . . . . . . . . . . . . . . . . . . . . . . . . . . . . . . . . . . . . . . . 44General . . . . . . . . . . . . . . . . . . . . . . . . . . . . . . . . . . . . . . . . . . . . . . . . . . . . . 44Monitor Display . . . . . . . . . . . . . . . . . . . . . . . . . . . . . . . . . . . . . . . . . . . . . . 45Thermal and Mechanical Indices . . . . . . . . . . . . . . . . . . . . . . . . . . . . . . . . . 45Acoustic Output Measurement . . . . . . . . . . . . . . . . . . . . . . . . . . . . . . . . . . . 47Functions Affecting Acoustic Output. . . . . . . . . . . . . . . . . . . . . . . . . . . . . . 48Default Acoustic Output. . . . . . . . . . . . . . . . . . . . . . . . . . . . . . . . . . . . . . . . 48
Clinical Measurements: Ranges and Accuracies. . . . . . . . . . . . . . . . . . . . . . . . . 48Geometric Measurements . . . . . . . . . . . . . . . . . . . . . . . . . . . . . . . . . . . . . . . 50Time Measurements . . . . . . . . . . . . . . . . . . . . . . . . . . . . . . . . . . . . . . . . . . . 50Doppler Measurements. . . . . . . . . . . . . . . . . . . . . . . . . . . . . . . . . . . . . . . . . 50
Index . . . . . . . . . . . . . . . . . . . . . . . . . . . . . . . . . . . . . . . . . . . . . . . . . . . . . . . . . . . . . . . . . . . . . . . . . . . . . 51
Appendix A Warnings and Cautions Displayed on the System . . . . . . . . . . . . . . . . . . . . . . . . . 53
English source version16-01410-EN-03

bk350
Chapter 1Introduction
This user guide is for the bk3500 ultrasound system.
Before using the equipment, please make yourself familiar with the information in the accompanying user information documents. Some documents are printed. Make sure that you also read the transducer user guide and specifications for each transducer that you use.
Table 1-1. User information documentation that accompanies the equipment.
Improper use Failure to follow safety instructions or use for purposes other than those described in the user manuals constitutes improper use.
Essential PerformanceThe system can provide 2D ultrasound echo and flow imaging systems as an aid in diagnosis, data processing and -transfer, and guidance of puncture and biopsy.
The system can perform simple geometric measurements and calculations.
The system can guide biopsy- and puncture needles.
The system is free from artefacts or distortion in the image or error of a displayed value, which can be attributed to a physiological effect and which may alter the diagnosis.
The system displays correct numerical values associated with the diagnosis to be performed.
Document Information
System User Guide Introductory information, safety information, getting started.
Quick Start Guide User interface, basic operating instructions.
System Advanced User Guide Information about advanced functions, glossary.
Product Data for system Specifications for the system, including disinfection methods that can be used. Indications for use for each transducer that can be used with the system.
Technical Data (BZ2100) Acoustic output data, clinical measurements (ranges and accuracies), factory default power levels and data about EMC (electromagnetic compatibility) for all transducers. Pro Package calculation formulas.
Care and Cleaning Cleaning, disinfection, sterilization, checking, storing and disposing of BK medical equipment. Includes environmental limits.
Transducer User Guide Specific instructions for the transducer and puncture attachments.
Product Data for each transducer Specifications for the transducer, including disinfection methods that can be used.
0 User Guide (16-01410-EN-03) Introduction 5

6 Ch
The As Low As Reasonably Achievable (ALARA) principle is used and safety related indications (MI, TIS, TIB, etc) are displayed as worst-case values.
The system does not generate unintended or excessive ultrasound output or transducer surface temperature.
There is no unintended or uncontrolled motion of transducer assemblies intended for intra-corporeal use.
Intended UseThe system is intended for diagnostic ultrasound imaging or fluid flow analysis of the human body, data processing and guidance of puncture and biopsy.
The system performs simple geometric measurements and calculations in the following areas:
• Emergency Medicine
• Anesthesia
• MSK
• Vascular
• Cardiology
• OB/GYN
Modes of Operation• B-Mode (including Tissue Harmonic imaging)
• M-Mode
• PWD Mode
• CFM Mode
• Power Doppler
• CW Doppler
apter 1 January 2017 bk3500 User Guide (16-01410-EN-03)

bk350
Indications for UseThe system is a diagnostic ultrasound imaging system used by qualified and trained healthcare professionals for ultrasound imaging, human body fluid flow analysis and puncture and biopsy guidance.
The clinical applications and exam types include:
• Fetal (including Obstetrics)
• Abdominal
• Pediatric
• Small Organ (also known as Small Parts)
• Adult Cephalic (also known as Adult Transcranial)
• Neonatal Cephalic
• Transvaginal
• Transrectal
• Musculoskeletal (Conventional and Superficial)
• Cardiac Adult
• Peripheral Vessel (also known as Peripheral Vascular)
Indications for use are different for different transducers. The Product Data sheet for the system contains a table listing the indicated uses for each transducer that can be used with the system.
Contraindications• The bk3500 ultrasound system is not intended for ophthalmic use or any use
causing the acoustic beam to pass through the eye.
• The Cardiac Adult application is not intended for direct use on the heart.
0 User Guide (16-01410-EN-03) Introduction 7

8 Ch
apter 1 January 2017 bk3500 User Guide (16-01410-EN-03)
bk350
Chapter 2Getting Started
The bk3500 System
Monitor
Control panel
Transducer
Touch screen
Scan engine
Transducer
Battery cover
Battery display
Front handle withrelease handles
Battery
sockets
holders
compartment
Endotransducerholder
Baskets for accessories
Lockable wheels
0 User Guide (16-01410-EN-03) Getting Started 9
10 Ch
Before You StartBefore you turn on the system, make sure that the installation has been approved by a qualified electrician or by hospital safety personnel.
Read the battery support warnings (warnings with BS numbers) in “Battery Support System” on page 40.
Turning System On and Off
When you turn the system on or off, you must give the system enough time to save and recover open files and unsaved data. Otherwise, a serious system failure may occur that requires technical support.
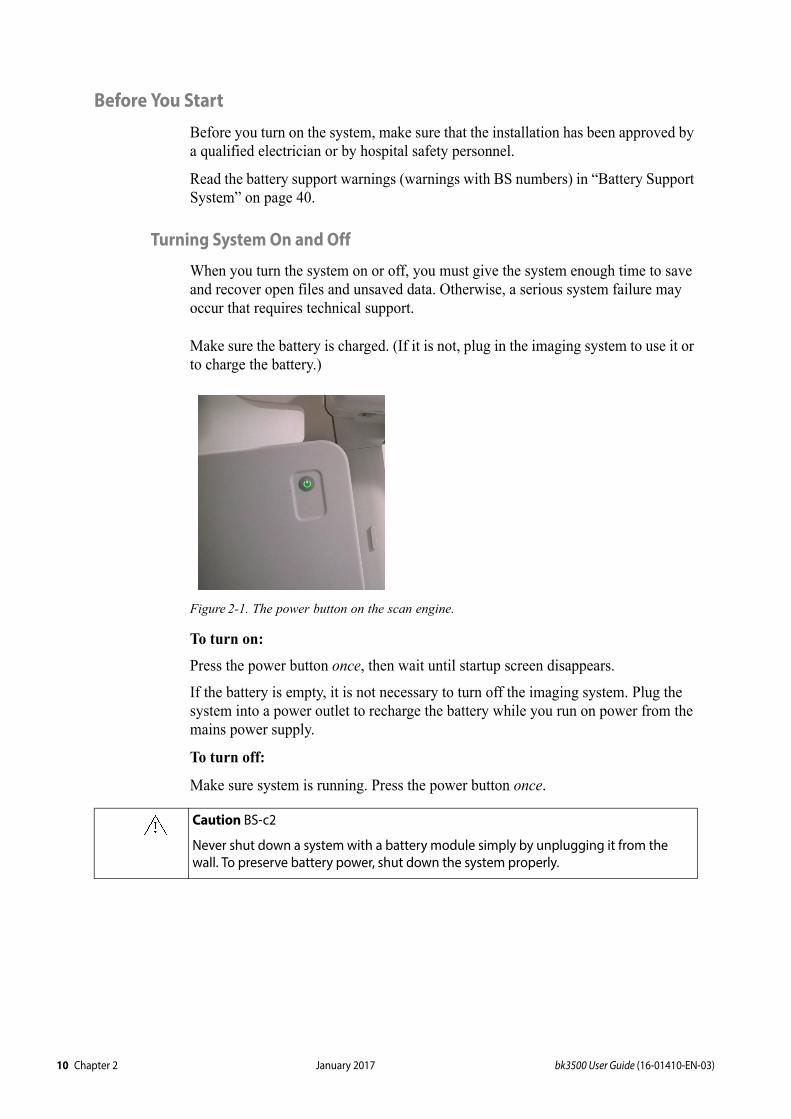
Make sure the battery is charged. (If it is not, plug in the imaging system to use it or to charge the battery.)
Figure 2-1. The power button on the scan engine.
To turn on:
Press the power button once, then wait until startup screen disappears.
If the battery is empty, it is not necessary to turn off the imaging system. Plug the system into a power outlet to recharge the battery while you run on power from the mains power supply.
To turn off:
Make sure system is running. Press the power button once.
Caution BS-c2
Never shut down a system with a battery module simply by unplugging it from the wall. To preserve battery power, shut down the system properly.
apter 2 January 2017 bk3500 User Guide (16-01410-EN-03)

bk350
Connecting Transducers
Figure 2-2. Transducer plugs and sockets.
To connect:
1 Insert transducer plug into socket with locking lever to the right.
2 Turn locking lever on socket to the left.
To disconnect:
1 Freeze image.
2 Turn locking lever on socket to the right.
3 Remove plug from socket.
NOTE: If more than one transducer is connected, select a different transducer before you disconnect. Otherwise, the following message will be displayed on the touch screen:
Figure 2-3. Message if the active transducer is disconnected.
Barcode Reader
To enter Patient Information with the barcode reader:
1 Tap the touch screen Patient button.
2 With the cursor in the Patient ID field, scan the relevant patient barcode with the barcode reader.
0 User Guide (16-01410-EN-03) Getting Started 11

12 Ch
3 Continue entering the patient/exam data as required.
NOTE: Fields that will accept data entry via the keyboard will also accept data scanned with the barcode reader. Simply ensure that the cursor is located in the required field then scan the relevant barcode.
Control Panel
Figure 2-4. The control panel and touch screen.
WARNING SR-w2
To avoid personal injury, connecting/disconnecting the barcode reader and/or printer must be carried out only by BK personnel or authorized representatives.
Icon System Control Functionality
Trackball Positions the mouse cursor, measurement cursor and label.
QUICK ACCESS button
Opens the quick exam start-up workflow. When the exam has started, the Q button works as an Auto button which will automatically optimize the image settings.
apter 2 January 2017 bk3500 User Guide (16-01410-EN-03)

bk350
Quick AccessThe Q button provides the following basic functions:
• Quick exam start-up
Quick Exam Start-Up
Once the Q button is selected, users can navigate through the Quick Exam Start-up using the touch screen:
1 Enter Patient Information.
2 Select Transducer.
3 Select Application (Exam type).
4 Select Imaging Preset.
5 Begin the exam.
2 Button
Live image: Stores a prospective video clip.
Frozen image: Stores a retrospective video clip.
• SELECT Button
Provides a wide variety of functions depending on the imaging state, for example toggles between moving/resizing the color box and selects/sets measurements, labels, etc.
UPDATE Button
Provides a wide variety of functions depending on the imaging state, for example toggles between image views and image mode and rotates the transducer on the bodymark icon.
1 Button
Stores the current image.
FREEZE Button Freezes/unfreezes live imaging. A snowflake icon is displayed on the monitor when the image is frozen.
Touch Screen Dials
Five dials that control touch screen options, which change depending on the imaging mode/state. Once the touch screen option is tapped, turn the related dial to make the relevant adjustments.
Touch ScreenDisplays selectable options. Touch screen buttons may change depending on the chosen imaging mode/state or action.
Icon System Control Functionality
0 User Guide (16-01410-EN-03) Getting Started 13

14 Ch
For the Quick Exam Start-Up:
1 Press the control panel Q button.
2 Enter Patient information.The Patient ID is filled in automatically with a timestamp, but you can change this to a relevant ID or use a barcode reader. See “Barcode Reader” on page 11.
Figure 2-5. Patient window.
3 Swipe the screen from right to left to enter additional patient information.
Figure 2-6. Second screen in Patient window.
apter 2 January 2017 bk3500 User Guide (16-01410-EN-03)

bk350
4 Tap the Exam Info button to add specific information relevant for the exam, and tap Next.
Figure 2-7. Exam Info window.
5 Select Transducer (in this case 6C2 is selected).
Figure 2-8. List of available transducers (those that are plugged in).
0 User Guide (16-01410-EN-03) Getting Started 15

16 Ch
6 Select Application (the exam type you intend to perform). The applications available depend on the selected transducer (in this case 6C2).
Figure 2-9. List of available applications.
7 Select imaging Preset:The imaging presets available are dependent on the transducer and theapplication (exam type) selected.
Figure 2-10. Available presets.
apter 2 January 2017 bk3500 User Guide (16-01410-EN-03)

bk350
8 Begin the exam.
Figure 2-11. The Touch screen in Basic layout during an exam.
When you are finished, select End Exam.
WARNING Exam-w2b
If, after beginning an exam without entering any Patient information, you want to save an image, you must verify that the system auto-created a properly configured Patient ID before exiting the exam. Whenever possible, BK recommends that you also enter a complete Patient Name.
0 User Guide (16-01410-EN-03) Getting Started 17

18 Ch
Starting an Exam Using the Touch Screen Buttons
If you have several patients who need the same transducer/application/preset, you can choose not to use the Q workflow and use the touch screen buttons to go directly into the windows you need to update. You can also update details in the patient window and change transducer, application or preset during an exam.
Do as follows:
• Tap the Patient button on the touch screen.
• Enter patient information. The Patient ID is filled in automatically with a timestamp, but you can change this to a relevant ID or use a barcode reader. See “Barcode Reader” on page 11.
Figure 2-12. Patient window when using the touch screen buttons.
• Swipe the screen from right to left if you need to add more information. Add exam info by tapping the Exam Info button. See steps 3 and 4 above.
• To use the transducer, application and preset already selected on the system, tap Start Exam. Otherwise, continue your selection by tapping the relevant main button (see Fig 2-18).
apter 2 January 2017 bk3500 User Guide (16-01410-EN-03)

bk350
• To select Transducer, tap the transducer you want. Alternatively, you can press the Smart button on the connected transducer to select it.
Figure 2-13. Transducer window when using the touch screen buttons.
• To use the application and preset already selected on the system, continue the exam. Otherwise, continue your selection.
• To select Application, tap the application you want..
Figure 2-14. Application window when using the touch screen buttons.
0 User Guide (16-01410-EN-03) Getting Started 19

20 C
To use the preset already selected on the system, continue the exam. Otherwise, continue your selection.
• To select Preset, tap the preset you want.
Figure 2-15. The preset window when using the touch screen buttons.
Figure 2-16. The touch screen in Basic layout during an exam.
• The exam ends when you tap End Exam.
hapter 2 January 2017 bk3500 User Guide (16-01410-EN-03)

bk350
Monitor and Touch Screen Display
Figure 2-17. Monitor (clinical display).
Trans-ducer
Review tab with browser
Exam type Patient
Biopsy line
Imagedataincludingbatterystatus
Measure-mentdata
Hospital
Operator
0 User Guide (16-01410-EN-03) Getting Started 21

22 Ch
Figure 2-18. Touch screen Advanced layout.
Figure 2-19. Touch screen Basic layout.
Mode function buttons
Image parameter buttons
Touch screen dials
Mode buttons
Exam Management
buttons
Function buttons, including the Home button.
Exam Management
buttons
Function buttons, including the Home button.
Mode function buttons
Image parameter buttons
Touch screen dials
Mode buttons
apter 2 January 2017 bk3500 User Guide (16-01410-EN-03)

bk350
• You select or deselect a button by tapping it.
• The buttons and window elements in the exam management and function button groups are highlighted in white when selected.
• The buttons in the remaining groups are highlighted in green when selected in the live image and in blue when the image is frozen.
Battery
Charging the Battery
The battery automatically begins charging when the system is plugged into a power outlet.
There is a battery display on the battery compartment. The battery will be fully charged from empty after approximately 4 hours.
May need todischarge
and rechargefully
If the Battery Appears Not to Charge to 100%
After repeated use, the battery may require a full discharge, full charge, and full discharge in order to recalibrate the electronic fuel gauge so that the indication of how much charge is left in the battery is accurate.
Button Group Functionality
Exam management buttons
The exam management buttons follow the workflow to start an exam for a new patient, or allow the user to change the transducer, application or preset in an exam that has been started.
Mode buttonsThe mode buttons allow the user to select mode/modes for the exam. The modes are M-mode, Doppler, Color and 2D (B-mode).
Mode function buttons
The mode function buttons display the functions available for the selected modes.
Image parameter buttons
The image parameter buttons display the image parameters that can be set for each mode/combination of modes. Tap the image parameter button and turn the related dial to set the parameter.
Function buttons
The function button group contains the Measure, Label, Worksheet, Report, Settings, Help and Home buttons. Tap the Home button to return to default settings for the current exam type. The functions are described further in the bk3500 Advanced User Guide.
0 User Guide (16-01410-EN-03) Getting Started 23

24 Ch
Battery StatusWhile the system is operating, battery status is visible both on the monitor (in the bottom right-hand corner) and on the display on the battery compartment.
• When the system is plugged into a power outlet, battery status is shown as percent (%) of capacity remaining.
• When the system is running on the battery, battery status is shown as time remaining in “hours:minutes”.
NOTE: The time displayed is an estimate based on typical use; for continuous imaging, the actual time available will be less than indicated on the display.
Information Available on the Monitor
The battery status indicator appears in the bottom right-hand corner of the monitor.
Figure 2-20. Battery level shown as % or as time available.
A message appears on the monitor when a battery reaches the end of its lifespan and needs replacing. For information about the disposal of depleted batteries, see page 40.
Low Battery
When battery capacity is very low,
• An alarm sounds every 15 seconds
• A message appears on the monitor
• The on-screen battery indicator turns red
• The display on the battery compartment blinks regularly
Figure 2-21. Low battery message.
The low-battery message informs you that the battery level is low and that the system will shut down when the system monitor clock matches the time stamp in the message (shown here as 13:18:58).
The display on the battery compartment begins to blink regularly when the low battery threshold is met, and it continues to blink even after the critical low battery threshold is met and the system has shut down.
Caution BS-c1
If the battery reaches the auto-shutdown level, plug in the system and keep it plugged in until the battery recharges to at least 10 %.
apter 2 January 2017 bk3500 User Guide (16-01410-EN-03)

bk350
Critical Low Battery
The setting for critical low battery is 3 minutes. When the battery reaches the critical level, the system shuts down immediately.
When the system is plugged in, the display on the battery compartment is lit.
NOTE: The time settings for low and critical low battery can be changed. Contact your BK service representative.
Battery LifeTypical vs.
continuoususe
With typical use (which includes imaging and freezing), a fully charged battery provides approximately 2 hours of operation. With a fully charged battery pack, you can scan continuously for approximately 1 hour 20 minutes.
Batterylifespan
When a battery reaches the end of its lifespan, the replace battery message appears on the monitor at start-up.
On average, a battery will need to be replaced after approximately 300 recharge and discharge cycles – the battery lifespan. Contact your BK service representative for replacement of batteries.
For information about the disposal of depleted batteries, see page 40.
0 User Guide (16-01410-EN-03) Getting Started 25

26 Ch
apter 2 January 2017 bk3500 User Guide (16-01410-EN-03)
bk350
Chapter 3Safety Information
The system can be used for continuous operation, but imaging duration for individual patients must not exceed 60 minutes. We recommend, however, that you turn off the system at the end of each workday.
Safety InformationThis user guide contains cautions, warnings and other information about what you must do to ensure the safe and proper performance of the ultrasound system. You must also follow local government rules and guidelines at all times.
NOTE: Notes contain information that you should be aware of.
Safety Symbols and Information on the EquipmentTable 3-1 contains brief explanations of the symbols and information used to label the equipment. (Some labels in the table may appear on the transducer.)
BK Medical ApS disclaims all responsibility for the operating safety, reliability and performance of the equipment if these symbols and warnings are disregarded in any way.
WARNING
Warnings contain information that is important for avoiding personal injury.
Caution
Cautions contain information and instructions that must be followed to avoid damaging equipment, data, or software.
Symbol Name Description
Caution or Warning Consult accompanying user guides when you encounter this sign on the instrument, to avoid reducing its safety.
Follow instructions for use
Read the user guide or other instructions for important safety warnings.
Follow instructions for use
Consult user guide or other instructions.
Pushing prohibited Do not use excessive force to push the system. Excessive force when pushing over uneven surfaces can cause the system to overbalance and tip.
Table 3-1. Symbols and information on the equipment.
0 User Guide (16-01410-EN-03) Safety Information 27

28 Ch
Keep hands clear Show caution when you adjust the system monitor.
Manufacturer Legal manufacturer.
UL Classification for Canada and US
UL requirements are met for special conditions.
Rx only United States law restricts this device to sale or use by or on the order of a physician.
Potential Equalization
Terminal connected to the chassis. Should be connected to corresponding terminals on other equipment to eliminate potential differences.
Ground (earth) Additional protective ground (earth).
Type BF BF: Isolated from ground. Maximum patient leakage current under • Normal condition 100A • Single-fault condition 500A
Type BF BF, defibrillator-proof.
Type B B: Maximum patient leakage current under • Normal condition 100A• Single-fault condition 500A
Sealing Dust- and immersion-protected according to EN 60529.
Standby Symbol on Power button on side of scanner engine – used to turn system on and off.
ESD (electrostatic discharge)
Do not touch pins in connectors with this symbol unless you follow ESD precautionary procedures.
WEEE waste Within the EU, when you discard the equipment, you must send it to appropriate facilities for recovery and recycling.
Battery waste Dispose of used batteries properly. When you dispose of the batteries, you must follow national rules. Within the EU, you must send them to appropriate facilities for recovery and recycling.
Battery recycle Recycle used batteries properly.
China ROHS 25 Years Lifetime
Environmentally Friendly Use Period for ROHS is 25 years.
Symbol Name Description
Table 3-1. Symbols and information on the equipment. (continued)
3D56
LI-ION
apter 3 January 2017 bk3500 User Guide (16-01410-EN-03)

bk350
General Safety PrecautionsThe ultrasound system is designed and tested in accordance with EN/IEC 60601-1 (2012) (Part 1: General requirements for basic safety and essential performance) and EN 60601–2–37 (2008)/IEC 60601-2-37 (2007) (Particular requirements for the basic safety and essential performance of ultrasonic medical diagnostic and monitoring equipment).
The system also complies with ANSI/AAMI ES60601-1 (2012) and CAN/CSA C22.2 No.60601.1 (2008).
It fulfills the requirements for dust protection (IP20) for ordinary equipment specified in EN 60529.
Physiciansonly
Caution Rx-c1
United States law restricts this device to sale by or on the order of a physician.
ProperTraining
WARNING GS-w1
To ensure safe and proper use of the equipment, before you attempt to use BK equipment, you should be trained in ultrasonography or be under the supervision of someone who is trained in ultrasonography. You should also be thoroughly familiar with the safe operation of your ultrasound system: read all the user documentation that accompanies it.
In addition, if your system interacts with other equipment directly or indirectly, you need to make sure the interactions are both safe and secure.
No further training is required, but BK offers training in how to use the system. Consult BK for information.
Equipmentfailure
WARNING GS-w2
If at any time the system malfunctions, or the image is severely distorted or degraded, or you suspect in any way that the system is not functioning correctly:• Remove all transducers from contact with the patient.• Turn off the system. Unplug the system from the wall and make sure it cannot be used
until it can be checked.• Do not try to repair the system yourself.• Contact your BK service representative or hospital technician.
Isolating thesystem
WARNING GS-w3
The power supply cord connects the equipment to the line voltage. To isolate the equipment, you must unplug the power supply cord from the power source. Do this before you try to make any repairs to the system.
Spilledliquids
Caution S-c2b
The ultrasound system control panel is not watertight. Be careful not to spill any liquids, gel or moist substances on either the buttons or the touch screen.
0 User Guide (16-01410-EN-03) Safety Information 29

30 Ch
Before you use the equipment, make sure that all the safety requirements described in this chapter have been satisfied.
Mechanical SafetyMechanical failure or unintended use of ultrasound equipment can result in physical injury to patients or operators.
Conden-sation
Caution S-c3
Large variations in temperature or humidity may cause water to condense inside the system. If this happens, the system may fail to operate properly. Always let the system come to room temperature before you plug it in.• Wait at least 2 hours after the system has been subjected to major changes in
temperature or humidity.• If there is visible evidence of condensation, wait at least 8 hours.
Mechanicalinjury
WARNING MS-w1
Be careful to avoid the following potential sources of injury:• Parts of the body can be pinched by moveable parts of the equipment, such as the
control panel.• Tilting the system can cause it to be unstable and injure someone. • Do not lean or sit on the control panel or any other part of the system. The control
panel or monitor can break if subjected to heavy weights or impact.
All partsmust be
stable
WARNING MS-w2
When parts of the equipment can be mounted individually (for example, for use in an operating room) each part must be securely mounted to a stable support so that it does not tip, fall or come loose and injure someone.
Scan enginecan be hot
WARNING MS-w3
To avoid personal injury, be aware that the scan engine can become hot after prolonged use.
Don’t pushtoo hard
WARNING MS-w4
To avoid injury and equipment damage, do not push the system too hard, especially when you roll the system over an uneven surface. Applying excessive force near the top could cause the system to overbalance and tilt.
apter 3 January 2017 bk3500 User Guide (16-01410-EN-03)

bk350
Explosion Hazards
Electrical Safety
ESD Training
The ESD Symbol
Anyone using the equipment must be able to recognize the ESD symbol and understand how to take the necessary precautionary procedures, as described in the caution below.
Explosionhazards
WARNING EH-w1
The equipment is not designed to be used in potentially explosive environments. It should not be operated in the presence of flammable liquids or gases, or in oxygen-enriched atmospheres.
There is a possible explosion hazard if the equipment is used in the presence of flammable anesthetic. The system should be placed at least 25cm (10 inches) from the patient.
The ultrasound system contains a lithium battery. Never remove or replace this battery. The lithium battery must not be removed except by a BK service representative.
Do not use apower strip
WARNING ES-w1
Do not plug the equipment into an ordinary power strip. If the ground connection fails, this is dangerous because• the total leakage current for all the connected equipment can exceed the limits
specified in EN/IEC 60601-1 (Part 1: General requirements for safety).• the impedance of the ground connection could exceed the limits specified in EN/IEC
60601-1.
Electricalshock
WARNING ES-w3
You risk electrical shock if you try to get inside the equipment (other than opening a cover to access connectors described in the user guide). Do not allow anyone but qualified service personnel to service the equipment.
ESD
Caution ESD-c1
Do not touch pins in connectors that have the ESD symbol . Do not connect anything to them unless you follow these ESD (electrostatic discharge) precautionary procedures:• Discharge your body to ground before you touch the pins with your hand or a tool. For
example, touch an unpainted metal part of the system cover.• You can use a wrist strap connected to the additional protective ground or potential
equalization terminal on the system if that is more convenient.
0 User Guide (16-01410-EN-03) Safety Information 31

32 Ch
InterferenceThe bk3500 Ultrasound System is suitable for use in most healthcare establishments, other than domestic establishments and those directly connected to the public low-voltage power supply network that supplies buildings used for domestic purposes.
Electrical Noise
Electromagnetic InterferenceMedical electrical equipment requires special precautions regarding EMC (electromagnetic compatibility). You must follow the instructions in this chapter when you install the system and put it into service.
If the image is distorted, it may be necessary to position the system further from sources of electromagnetic interference or to install magnetic shielding.
EMC noise can reduce the usable image depth. Therefore, to avoid having to repeat an ultrasound examination, you must make sure beforehand that the ultrasound system can be used for the examination. Repeating an examination can be regarded as a potential risk that should be avoided, especially if the examination involves transducers used intracorporeally or transducers used for puncture.
RF (Radio Frequency) InterferencePortable and mobile RF (radio frequency) communication equipment can affect the system, but the system will remain safe and meet essential performance requirements.
An ultrasound system intentionally receives RF electromagnetic energy for the purpose of its operation. The transducers are very sensitive to frequencies within their signal frequency range (0.3MHz to 80MHz). Therefore RF equipment operating in this frequency range can affect the ultrasound image. However, if disturbances occur, they will appear as white lines in the ultrasound image and cannot be confused with physiological signals.
Electricalnoise
WARNING EN-w1
Electrical noise from nearby devices such as electrosurgical devices – or from devices that can transmit electrical noise to the AC line – may cause disturbances in ultrasound images. This could increase the risk during diagnostic or interventional procedures.
Otherequipment
nearby
WARNING EMC-w1
Do not use this equipment adjacent to other equipment. If you must place it next to or stacked with other equipment, verify that it operates normally there and neither causes nor is affected by electromagnetic interference.
Possibleinterference
sources
Caution Inter-c1
Other equipment may interfere with the system, even if that other equipment complies with CISPR (International Special Committee on Radio Interference) emission requirements.
apter 3 January 2017 bk3500 User Guide (16-01410-EN-03)

bk350
Installation
Originalpower cords
If the original power cords are missing or damaged, you must order new ones from your BK service representative.
Additional Protective Ground and Potential Equalization
An additional protective ground can be connected to the terminal underneath the control panel, see Fig 3-1.
The potential equalization terminal underneath the control panel is connected to the system chassis. It can be connected to corresponding terminals on other equipment to eliminate potential differences. Do NOT use it for additional protective grounding.
Figure 3-1. The terminals for additional protective ground and potential equalization are on each side of the stand underneath the control panel.
Use specifiedequipment
only
Caution Inter-c2
If you use accessories, transducers or cables with the system, other than those specified, increased emission or decreased immunity of the system may result.
Installationsafety
requirement
WARNING I-w1
To ensure safe performance, a qualified electrician or hospital safety personnel must verify that the equipment is correctly installed and that it complies with the following safety requirements: • Use only the original power supply cord. In the USA, this is fitted with a hospital grade
three-prong grounded power plug. Never try to remove or change the plug on the power supply cord.
• All equipment must only be connected to a grounded AC power supply (or wall outlet) that meets EN/IEC/NEC requirements or applicable local regulations. The examination room’s grounding system should be checked regularly by a qualified electrician or hospital safety personnel.
• Never use extension cords. The increased length of the cord will increase the resistance of the protective ground conductor and may increase the equipment’s leakage current beyond an acceptable level.
• Keep power cords, sockets and plugs clean and dry at all times.• Make sure that the power supply cord cannot be accidentally disconnected from the
power source or the equipment.
0 User Guide (16-01410-EN-03) Safety Information 33

34 Ch
Connecting Other EquipmentFor connection to other equipment, BK systems have a communication protocol on top of TCP/IP.
Network ConnectionBK’s range of ultrasound systems comply with the DICOM standard for handling, storing, printing and transmitting information in medical imaging. DICOM includes a file format definition and a network communication protocol which facilitates the exchange of data between electronic medical systems.
For detailed information about:
• network requirements
• network configuration
• workflow between devices
• technical specifications
• safety specifications
see the DICOM conformance statement atwww.bkultrasound.com/support/bk/resources/DICOM
Network Security
It is the responsibility of the on-site personnel or technician to maintain the IT-network and identify, analyze, evaluate and control new risks caused by a change in the network configuration.
If the applicable network connection does not meet the required characteristics of the IT-network, the following hazardous situations may occur:
• Corrupt patient data due to network errors, see Warning Exam-w3 on page 42
• System is unable to use the network due to faulty or overloaded network, see Warning GS-w1 on page 29
• System overloads the network causing other equipment to fail.
Networkguidelines
NOTE: If your system interacts with other equipment directly or indirectly you must ensure that your network is properly dimensioned and that critical equipment is placed on a separate network. Otherwise you could risk overloading the network and your equipment failing.
Network Printing
For printing on network printers, BK supports protocols PCL 5, PCL 6 and PS (Post Script).
Connectionguidelines
WARNING C-w1
Follow the guidelines in EN/IEC 60601-1 when you connect the system to other equipment.
apter 3 January 2017 bk3500 User Guide (16-01410-EN-03)

bk350
Connectors
As seen in Fig 3-2, the bk3500 ultrasound system has four transducer sockets on the side of the system.
PC connectors for connecting the system to equipment such as approved printers and video equipment are located on the rear of the system. Do not use connectors that are not labeled.
Information about the correct cables to use is in Table 3-4.
Figure 3-2. Transducer sockets and system connectors.
LAN Connector
Composite Connector
USB 2.0 Connector
USB 3.0 Connector
S-video Out
Microphone Audio In Audio Out
DVI or VGA Monitor
Wi-Fi Dongle
Transducer Sockets
0 User Guide (16-01410-EN-03) Safety Information 35
36 Ch
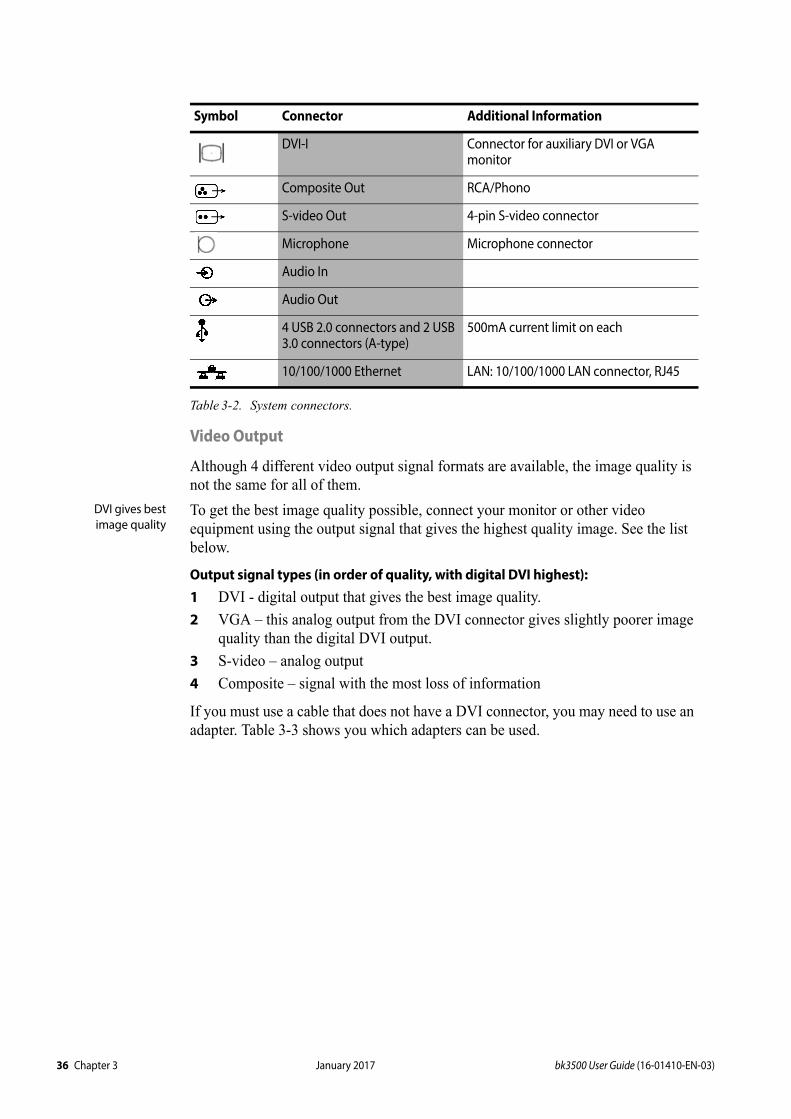
Table 3-2. System connectors.
Video Output
Although 4 different video output signal formats are available, the image quality is not the same for all of them.
DVI gives bestimage quality
To get the best image quality possible, connect your monitor or other video equipment using the output signal that gives the highest quality image. See the list below.
Output signal types (in order of quality, with digital DVI highest):1 DVI - digital output that gives the best image quality.
2 VGA – this analog output from the DVI connector gives slightly poorer image quality than the digital DVI output.
3 S-video – analog output
4 Composite – signal with the most loss of information
If you must use a cable that does not have a DVI connector, you may need to use an adapter. Table 3-3 shows you which adapters can be used.
Symbol Connector Additional Information
DVI-I Connector for auxiliary DVI or VGA monitor
Composite Out RCA/Phono
S-video Out 4-pin S-video connector
Microphone Microphone connector
Audio In
Audio Out
4 USB 2.0 connectors and 2 USB 3.0 connectors (A-type)
500mA current limit on each
10/100/1000 Ethernet LAN: 10/100/1000 LAN connector, RJ45
apter 3 January 2017 bk3500 User Guide (16-01410-EN-03)

bk350
Table 3-3. Video connectors and adapters.
EMC Requirements
To fulfill EMC requirements, cables attached to the system must be shielded and no longer than 5 m.
Cable Connectors (in order of preference)
Adapter bk3500 Connector
HDMI Adapter needed DVI-I
DVI-D Not neededDVI-I
15-pin (VGA) DVI to VGA adapter (2 views)DVI-I
S-video Not needed
BNC (Composite) BNC (female) to Phono (male)
Phono RCA (Composite) Not needed
0 User Guide (16-01410-EN-03) Safety Information 37

38 Ch
Table 3-4. List of cables used in testing for EMC compliance
Do not attach transducers and other accessories unless the user guide for the transducer or accessory states that it can be used with this system. Attaching other equipment may cause an increase in electromagnetic emissions or may cause the system to be more sensitive to electromagnetic interference.
Isolation of DICOM Network
The system must not be galvanically connected to a computer network (DICOM®) that has not been isolated. If the network is not isolated, the system must be connected via a network isolator DP0925 .
Wireless Networks
The system can be connected to a wireless network for printing and archiving data. A Wi-Fi dongle and a 30 cm USB 3.0 extender cable are supplied with the system. Connect the dongle to the extender cable and insert into one of the USB 3.0 connectors (see Fig 3-3 on page 30).
Connecting to a Wireless Network
You must establish a secure wireless network at your hospital, clinic or institution, including a password for the network, before you can use the system’s Wi-Fi for printing and archiving.
For setting up a wireless network, see the bk3500 Advanced User Guide.
Connector Cable
DVI-I DVI-D Dual link Shielded 7.6 m
Composite Out Composite Video RCA Shielded 7.6 m
S-video Out S-video 7.6 m
Audio In Audio Stereo, 3.5 mm plug, Shielded 5 m
Audio Out Audio Stereo, 3.5 mm plug, Shielded 5 m
10/100/1000 Ethernet Ethernet CAT6 5 m
Caution Wifi-c1
The network must be set up correctly so that data is sent to the correct location. Otherwise data can be lost or accessed by unauthorized people.
Caution Wifi-c2
A safe encrypted protocol for data transmission, approved by the hospital, must be used. This is to prevent unauthorized people from getting access to the data.
apter 3 January 2017 bk3500 User Guide (16-01410-EN-03)

bk350
Medical Equipment
If any other electrical equipment/accessory is connected to the system, the system including this equipment and/or accessory will become a medical system. Medical systems must comply with EN/IEC 60601–1, ANSI/AAMI ES60601-1 or CAN/CSA C22.2 No. 60601-1.
Non-Medical Equipment
WARNING NME-w1
Follow the guidelines in EN/IEC 60601–1.
If you connect non-medical equipment (instruments that do not comply with safety requirements for medical equipment, such as a video monitor, video recorder, endoscopic camera control unit or other documentation device), this equipment must be placed outside the patient environment (1.5m from the bed, for example). The equipment must fulfill the relevant EN standard or other applicable national or international standard.
One of the following conditions must be fulfilled:• The system and other equipment are plugged into an external common isolation
transformer to control the leakage current during a ground connection fault.
or• The system is grounded with an additional safety ground connection (see “Additional
Protective Ground and Potential Equalization” on page 33).
If in doubt, contact your BK service representative.
0 User Guide (16-01410-EN-03) Safety Information 39

40 Ch
Battery Support SystemIf you use a battery to supply power to the system, read the battery support chapter of this user guide.
Also observe the following warning for the battery:
Batterydisposal
When you dispose of the batteries, you must follow national rules. Within the EU, you must send them to appropriate facilities for recovery and recycling.
Computer SecurityWhen the ultrasound system is connected to a hospital network, BK Medical does not take any responsibility for computer viruses from the network that may infect the system.
See Exporting Data in the bk3500 Advanced User Guide.
Printer
Touch Screen
WARNING BS-w6
To ensure proper ventilation and avoid overheating, keep both ends of the battery clear.
Checkexternal
media
Caution CS-c1
You must perform a virus check on any external storage medium (USB device or DVD) to make sure that it is virus-free before you connect it to the system.
Caution CS-c2
We recommend that you perform regular backups to protect patient data.
Caution Print-c1
The quality of a printed ultrasound image may vary, depending on the printer.
Touch screenmust be
clean
WARNING TS-w1
To avoid misdiagnosis of an image, make sure the touch screen is clean before use.
apter 3 January 2017 bk3500 User Guide (16-01410-EN-03)

bk350
Service and Repair
Transducers
BK transducers fulfill EMC requirements when they are outside as well as inside the patient’s body.
During an Examination
Checking the Date
Before you start imaging, verify that the date and time displayed on the monitor are correct.
Authorizedpersonnel
WARNING SR-w1
Service and repair of BK electromedical equipment must be carried out only by the manufacturer or its authorized representatives. BK Medical reserves the right to disclaim all responsibility, including but not limited to responsibility for the operating safety, reliability and performance of equipment serviced or repaired by other parties. After service or repairs have been carried out, a qualified electrician or hospital technician should verify the safety of all equipment.
WARNING SR-w2
To avoid personal injury, connecting/disconnecting the barcode reader and/or printer must be carried out only by BK personnel or authorized representatives.
Electricalshock
WARNING T-w1
The transducer sockets contain terminals with 3.3V. Do not touch the patient while you are touching an uncovered socket.
Type Btransducers
WARNING T-w2
When using Type B (non-isolated) transducers, carefully check all electrical equipment within the patient area. Also, consider using additional protective grounding.
Electricalburns
WARNING T-w3
Do not leave transducers in contact with the patient when using HF electrosurgical equipment.
Surfacetemperature
on array
WARNING T-w4
Do not turn the transducer on and allow it to scan into mid-air without ultrasound gel applied to the surface of the array. Doing so may cause the surface temperature on the array to heat up to 27 °C above room temperature (measured according to EN 60601–2–37 (Particular requirements for the safety of ultrasonic medical diagnostic and monitoring equipment)). To avoid this, freeze the image when the transducer is not used for imaging.
0 User Guide (16-01410-EN-03) Safety Information 41
42 Ch
Verifying the Transducer Type
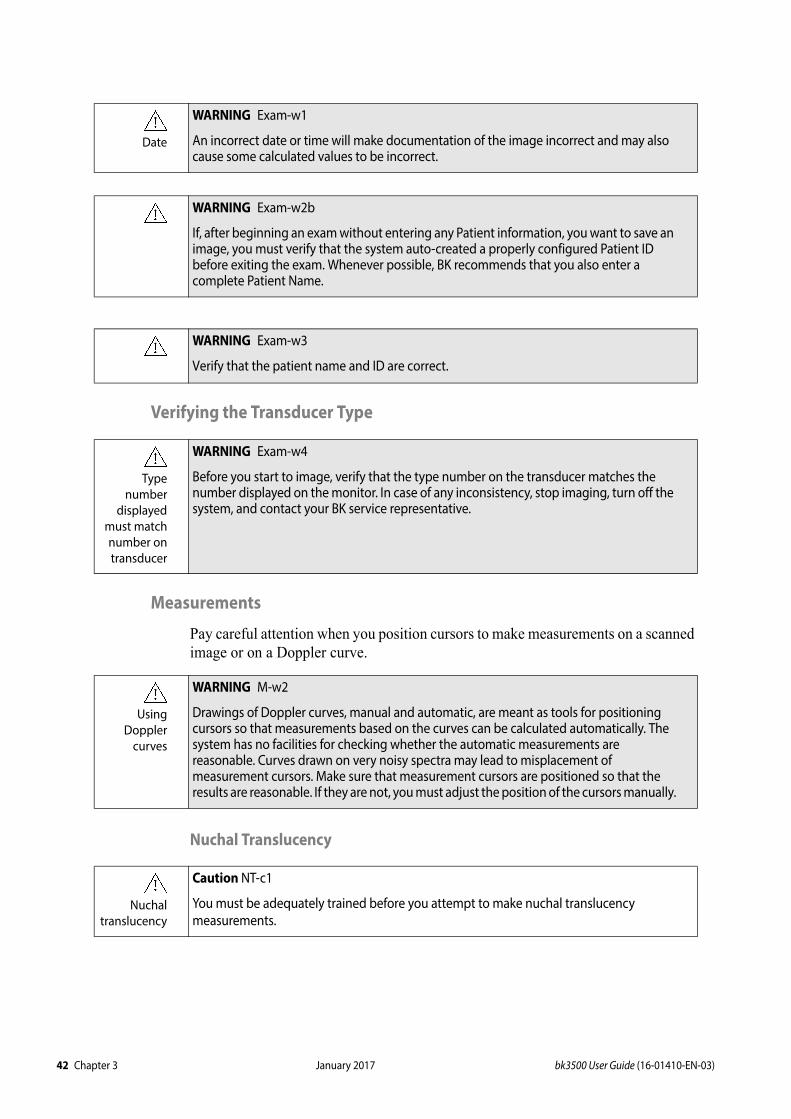
Measurements
Pay careful attention when you position cursors to make measurements on a scanned image or on a Doppler curve.
Nuchal Translucency
Date
WARNING Exam-w1
An incorrect date or time will make documentation of the image incorrect and may also cause some calculated values to be incorrect.
WARNING Exam-w2b
If, after beginning an exam without entering any Patient information, you want to save an image, you must verify that the system auto-created a properly configured Patient ID before exiting the exam. Whenever possible, BK recommends that you also enter a complete Patient Name.
WARNING Exam-w3
Verify that the patient name and ID are correct.
Typenumber
displayedmust matchnumber ontransducer
WARNING Exam-w4
Before you start to image, verify that the type number on the transducer matches the number displayed on the monitor. In case of any inconsistency, stop imaging, turn off the system, and contact your BK service representative.
UsingDoppler
curves
WARNING M-w2
Drawings of Doppler curves, manual and automatic, are meant as tools for positioning cursors so that measurements based on the curves can be calculated automatically. The system has no facilities for checking whether the automatic measurements are reasonable. Curves drawn on very noisy spectra may lead to misplacement of measurement cursors. Make sure that measurement cursors are positioned so that the results are reasonable. If they are not, you must adjust the position of the cursors manually.
Nuchaltranslucency
Caution NT-c1
You must be adequately trained before you attempt to make nuchal translucency measurements.
apter 3 January 2017 bk3500 User Guide (16-01410-EN-03)

bk350
VFI - Vector Flow Imaging
Puncture
Artifacts
WARNING VFI-w1
Before you turn on VFI, check the B-mode image to make sure there are no artifacts visible in the blood vessel. If there are strong artifacts in the B-mode image, the arrows in VFI may be pulled to point in a more axial direction (toward or away from the transducer), especially in low flow situations with correspondingly low PRF. These artifacts will not affect the color mode (CFM) image, so it is important to check in B-mode.
Arrowaliasing
WARNING VFI-w2
Check to make sure the VFI arrows are not aliasing before you activate the assisted Doppler gate placement. Otherwise, the Doppler gate will not be positioned correctly.
Diametermarkers
WARNING VFI-w3
Check to make sure that the diameter markers correspond to the inner vessel wall and that the connecting line between the markers is perpendicular to the direction of the vessel. Otherwise, the real-time volume flow measurement may not be precise.
Doppler gatelarge
enough
WARNING VFI-w4
Check to make sure that the Doppler gate covers the entire vessel. Otherwise, the real-time volume flow measurement may not be precise.
Doppler gateover only
one vessel
WARNING VFI-w5
Check to make sure that the Doppler gate only covers one vessel. Otherwise, the real-time volume flow measurement may not be precise.
Dopplerspectrum
aliasing
WARNING VFI-w6
Check to make sure that the Doppler spectrum does not alias. Otherwise, the real-time volume flow measurement may not be precise.
Verifytransducer
type number
WARNING P-w1
Before you start imaging, verify that the type number or name of the transducer and the type number or description of the needle guide you are using match the number displayed on the monitor. Also make sure that the needle guide is positioned correctly. If the numbers do not match, or if the needle guide position is not correct, the puncture line on the monitor may not correspond to the true puncture path in the tissue. In case of any inconsistency, stop imaging, turn off the system, and contact your BK service representative.
0 User Guide (16-01410-EN-03) Safety Information 43

44 Ch
NOTE: If the image depth is set very low (to see tissue close to the transducer with high magnification), the needle tip echo can be outside the displayed image area. To see the needle tip in this case, zoom out so the full needle path is visible or pan the image to the side (to keep the high magnification).
Acoustic Output
General
Medical research has yet to prove whether or not ultrasound causes biological effects. Therefore, prudent use considerations require you to follow certain guidelines; see EN60601-2-37 (Particular requirements for the safety of ultrasonic medical diagnostic and monitoring equipment).
Prudent Use
• Image patients only when clinical reasons make it necessary.
• Keep exposure time as short as possible.
• Be careful to prepare the patient correctly so that you get the best possible image.
• Start imaging at a low acoustic output level (see “Thermal and Mechanical Indices” on page 45) and increase the level only as much as necessary to obtain a satisfactory image.
• If you switch from an application requiring high acoustic output levels (see “Functions Affecting Acoustic Output” on page 48), to one that requires lower levels (fetal imaging, for example), be sure to reset the levels before you image. (For example, start in B-mode.)
• Take into account all the types of tissue that may be affected. For example, when imaging a breast, it may be appropriate to monitor the TI (Thermal Index)in bone rather than in soft tissue because the ribs will be subjected to ultrasound.
Verifypuncture
guide typenumber
WARNING P-w2
Verify that the type number of the puncture guide displayed on the monitor corresponds to the puncture guide that you are actually using. If the number is incorrect, the puncture line on the monitor may not correspond to the true puncture path in the tissue.
Watch theneedle tip
WARNING P-w4
The puncture line on the image is an indication of the expected needle path. To avoid harming the patient, the needle tip echo should be monitored at all times so any deviation from the desired path can be corrected.
Exposurelevel
WARNING AO-w1
To avoid tissue damage, always keep the exposure level (the acoustic output level and the exposure time) as low as possible.
apter 3 January 2017 bk3500 User Guide (16-01410-EN-03)

bk350
Acoustic output data for transducers used with the system are given in the Technical Data (BZ2100) that accompanies this user guide. The uncertainty level for each parameter is also listed. For definitions of the parameters, refer to the Food and Drug Administration (FDA) Guide as well as EN 60601-2-37 (Particular requirements for the safety of ultrasonic medical diagnostic and monitoring equipment) and AIUM/NEMA standards.
The routes (or tracks) available for clearance by the FDA are well-defined. Track 3 is for diagnostic ultrasound systems that follow the Output Display Standard. Under Track 3, acoustic output will not be evaluated on an application-specific basis, but the maximum derated Spatial Peak–Temporal Average Intensity (ISPTA) must be 720mW/cm2, the maximum Mechanical Index (MI) must be 1.9, and the maximum Thermal Index (TI) must be 6. All BK transducers for use with the bk3500 Ultrasound System are Track 3.
Monitor Display
The Mechanical Index (MI) and Thermal Index (TI) can be viewed in all imaging modes.
Thermal and Mechanical Indices
The MI and TI indices are intended to allow users to implement the ALARA (As Low As Reasonably Achievable) principle using an indicator related to a potential bioeffect.
The MI can be adjusted by using the MI image parameter button and the touch screen dial:
Figure 3-3. The MI image parameter button.
Appropriatetransducer
WARNING AO-w2
To avoid tissue damage, always use the transducer best suited to the examination.
0 User Guide (16-01410-EN-03) Safety Information 45

46 Ch
In Settings, you can select TI tissue type between TIB (bone), TIC (cranial) or TIS (soft tissue).
Figure 3-4. The General settings. Here, you can also select between Basic and Advanced lay-out. See“Monitor and Touch Screen Display” on page 21.
The full details of the indices are given in references EN60601-2-37 and AIUM/NEMA standard, but the formulas are given below.
MI Formula
where the variables are defined in the table below.
TI Formula
where the variables are defined in the table below.
Variable Definition
Pr0.3(zsp) Peak Rarefactional Pressure (MPa), derated by 0.3dB/cm·MHz, measured at zsp, the point on the beam axis where pulse intensity integral (PII0.3) is maximum
fc measured center frequency (in MHz)
Variable Definition
W0 time-averaged acoustic power of the source or other power parameter (W)
MIPr0,3 zsp
fc
------------------------=
TIW0
Wdeg-------------=
apter 3 January 2017 bk3500 User Guide (16-01410-EN-03)

bk350
Bloodperfusion and
TI
As a rule of thumb, the Thermal Index (TI) indicates the highest expected temperature increase in degrees Celsius. It is based on an average level of blood perfusion. The displayed TI may underestimate the temperature rise in poorly perfused tissues; you must take this into account when deciding on the maximum TI you will allow. Conversely, in areas with a rich perfusion of blood the temperature increase will be less than the displayed TI indicates.
Fever A temperature increase of one degree Celsius increase in a patient with fever may cause complications in certain circumstances; it may be safer to delay the investigation.
Acoustic Output Measurement
All values are measured in water according to the EN 60601-2-37 and AIUM/NEMA display standards. For some of the acoustic parameters, an estimated in situ derated value is given. This is derived assuming a tissue attenuation of 0.3 dB/(cm·MHz) when the estimated in situ derated value (I) is described by the following equation:
I formula
where the variables are defined in the table below.
It should be stressed that the in situ values given are only applicable when there is attenuating tissue between the transducer face and the focal point.
Possibility of Adverse Effects
Although it is believed that diagnostic ultrasound causes no significant biological effects in mammalian tissue, the user should be aware of the hypothetical possibilities of adverse effects.
Fetal imaging Current scientific and clinical concern over possible adverse effects is particularly focused on fetal ultrasound imaging. It is due to the increased sensitivity of mammalian cells and organs at this phase of their development and the fact that such a risk could have profound implications on public health. If you use high acoustic output levels for some reason (see “Functions Affecting Acoustic Output”, below), be sure to return to B-mode alone and turn down the power level before you do any fetal imaging.
Wdeg estimated power necessary to raise the temperature of the target tissue one degree Celsius (W/°C)
Variable Definition
Variable Definition
IW Intensity in water at the position where I is maximum
f transducer frequency (in MHz)
z distance (in cm) from the transducer face to the position where I is maximum
I Iwexp 0,069fz– =
0 User Guide (16-01410-EN-03) Safety Information 47

48 Ch
Functions Affecting Acoustic Output
The system has a control function that ensures that neither the ISPTA nor MI nor TI value exceeds the maximum allowable value. When necessary, the system will reduce the output voltage and/or PRF (pulse repetition frequency) to the transducer to comply with requirements.
Some of the system functions can affect the acoustic output, as listed here. (Instructions for using these functions are given in the relevant sections of this user guide.)
• Sizing functions such as ROI (Region Of Interest) – in general, smaller size results in higher acoustic intensity because the Pulse Repetition Frequency (PRF) is higher or the ultrasound beam is more strongly focused.
• Focus – in general, strongly focusing the beam makes the acoustic intensity higher.
• Frame rate – higher frame rate results in higher acoustic intensity.
• Range – increasing the Doppler range increases the acoustic intensity by increasing the PRF.
• CFM Resolution – higher resolution increases the acoustic output.
• Color box size – narrowing the color box generally increases the acoustic output within it.
The user can set a Thermal Index limit. This will provide an upper limit for acoustic output.
Default Acoustic Output
After the system has been turned off, the transducers will start in the default setup when the system is turned on again. The default setup may be factory-defined or defined by the user.
The factory-defined default setup values of acoustic output for each transducer are listed in the Technical Data (BZ2100).
These setups have been optimized to give the best compromise between low acoustic output and enough power to obtain the image features as quickly as possible. The factory default setup for all transducers is B-Mode to ensure the lowest acoustic output when you start imaging.
When you enter a new patient ID, by default the transducer setup will be reset to the factory setup.
Fetal imaging When you use transducers intended for fetal imaging, it is important to make sure that the default settings are appropriate and to reset to the default setting before imaging a new patient.
Clinical Measurements: Ranges and Accuracies This section states the accuracies for measurements made using the BK range of ultrasound systems. A table containing accuracies for specific transducers can be found in the Technical Data (BZ2100) that accompanies this user guide.
apter 3 January 2017 bk3500 User Guide (16-01410-EN-03)

bk350
The measurement accuracies are based on the assumption of “ideal” tissue, that is, a tissue characterized by a sound velocity of 1540 m/s. When making clinical measurements with ultrasound, errors may arise which are not taken into account in this section. For example,
• The sound velocity may vary from approximately 1450 m/s in fatty tissue to 1585 m/s in muscle. This can, in simple cases, give rise to errors of up to 6% for linear measurements. This inaccuracy may be further increased by refraction occurring at tissue boundaries.
• The user can introduce errors when using approximate formulas, when positioning the system’s calipers with respect to the ultrasound image and when outlining structures in the image.
• The ellipsoid volume approximation, described in this user guide, is only applicable when the cross section of the structure being studied approximates an ellipse (the circle being a special ellipse), and when the structure is roughly symmetrical about the selected axis of rotation.
NOTE: The choice of the axis of rotation is important for the calculation of the volume. A vertical axis gives a different volume than a horizontal axis.
The minimum requirement is that the cross section outlined by the user should be convex. If the user draws a non-convex outline, an inaccuracy is introduced which is not taken into account in this section. In this case, the system calculates and displays the convex hull of the figure, that is, the smallest convex figure containing the non-convex figure outlined by the user (see Fig 3-5). The system bases the calculation of the ellipsoid volume on the convex hull.
Figure 3-5. The dotted line indicates the convex hull of the non-convex figure.
Measuring volume using a stepping method produces an approximation caused by the finite number of steps in the measurement. The user must always try to assess how large an inaccuracy is introduced by the selected step size, that is, the distance between organ cross sections.
0 User Guide (16-01410-EN-03) Safety Information 49

50 Ch
Geometric Measurements
2D Measurements
The geometric measurements performed by BK Ultrasound systems are distance, perimeter, area and ellipsoid volume. The accuracy of these measurements is influenced by the following factors:
• Transducer geometry
• Rounding of results
• Resolution of digital image memory
Time Measurements
In M-mode and spectral Doppler mode, data is displayed along a time axis. It is possible to measure time differences. The accuracy for a time difference measurement is:
• Rounded to the nearest: 0.01s
• Accuracy: 0.01 x twhere t is the full time scale of the image field.
Doppler Measurements
In measuring blood flow velocity it is assumed that the measured power spectral distribution of the Doppler signal equals the blood cell velocity distribution.
The measurement accuracy of blood flow velocity is heavily dependent on the angle between the ultrasound beam and the velocity vector of the blood cells. The velocity accuracies given in the Technical Data (BZ2100) are valid for = 55. To find the percentage accuracy for other angles, multiply the stated accuracy by
If the blood velocity exceeds the selected velocity range, aliasing occurs, corresponding to an overload condition of the measurement system.
cos 1,8+ cos–cos
------------------------------------------------
100 0,5+
apter 3 January 2017 bk3500 User Guide (16-01410-EN-03)

Index
Aaccuracy
2D geometric measurements 50clinical measurements explained 48Doppler measurements 50time difference measurements 50
acoustic outputdefault 48factors affecting 48measurement 47
ALARA principle 6, 45
Bbattery
battery life 25charging new battery 23disposal 40recycle symbol 28recycling 28, 40status 24warnings 40waste symbol 28
biopsy. See puncture.
Ccaution or warning, symbol 27Cautions
about 27displayed on the system 53
center frequency 46charging battery 23connectors for other equipment
accessing 35location 35picture 35
consult instructions for use (symbol) 27contraindications 7
DDICOM
conformance statement 34connection if network is not isolated 38network isolator 38standard 34
disposing of the system 28distorted image 32Doppler measurements
accuracies 50warnings 42
Doppler modefetal imaging 48
Eearth. See ground.electrical noise 32
electrical safety 33electrical shock 31electromagnetic compatibility. See EMC.electromagnetic interference 32EMC
attaching cables 37data in BZ2100 5noise, checking for 32precautions 32
equipment failure 29ESD
precautions 31symbol 28, 31training 31
essential performance 5explosion hazards 31exposure level 44extension cord, do not use 33
Ffetal imaging, acoustic output settings for 48
Gground (earth), additional protective
adding 33symbol 28
HHF electrosurgical equipment, warning 41
Iimage distortion 29, 32indications for use 7installation 33intended use 6isolation from line voltage 29
Lleakage current 31, 39liquids, do not spill on system 29
Mmagnetic shielding 32manufacturer (symbol) 28measurements, Doppler warnings 42MI (Mechanical Index)
and ALARA 45formula 46
modes of operation 6
Nnetwork
guidelines 34isolator 38printing, protocols for 34
51

network securityguidelines 34responsibility for 34
noiseelectrical 32EMC 32
non-medical equipment, connecting to system 39
Ooverbalance and tipping
warning 30warning symbol 27
PPeak Rarefactional Pressure 46potential equalization
symbol 28terminal 33
power buttonsymbol on 28
power cordkeep clean and dry 33original 33
power plug 33power strip, do not use 31power supply cord
accidental disconnection 33use original 33
printingquality of printed image 40
prudent use 44puncture
warning to verify puncture guide number 44warning to verify transducer type number 43
pushing prohibited, symbol 27
Rradio frequency interference. See RF interference.RF interference 32
Ssafety
electrical 31, 33transducer 41
sealing (symbol) 28security, network. See network security.service and repair 41standby (symbol) 28system
isolation from line voltage 29malfunction 29
TTechnical Data (BZ2100) 5, 45, 48Thermal Index limit
setting 48Thermal Index limit, setting 48TI (Thermal Index)
and ALARA 45blood perfusion and 47
time measurements 50tipping and overbalance
warning 30warning symbol 27
training before using equipment 29transducer sockets, warning about covering 41transducer, electrical safety 41Type B (non-isolated) transducers, warning about 41Type B (symbol) 28Type BF (symbol) 28Type BF, defibrillator-proof (symbol) 28
UUL (symbol) 28
VVFI (Vector Flow Imaging), warnings about 43virus
checking external storage media 40from network 40
WWarnings
about 27displayed on the system 53
waste disposal symbol 28WEEE waste (symbol) 28
52

bk350
Appendix AWarnings and Cautions Displayed on the System
This appendix contains a list of warnings and cautions that may appear on the system if you perform an undesirable action or e.g. type in a wrong setting value. Contact a BK service technician if you encounter a persistent problem that can not be solved by the suggested action(s) below.
This list covers all warnings and cautions on systems bk3000, bk3500 and bk5000, so it may include warnings that are not relevant to your specific system.
The list also covers potential system and transducer malfunctions. Always contact a service technician if the system or the transducer malfunctions, see Warning GS-w2 on page 29.
Warning text Action (if necessary)
Current date and time (%s) are before the scanner was last run (%s). Check your system clock.
Failed to parse the prom received from the probe.
Try again.
Failed to read general settings from database. Try again.
Failed to save bodymark catalog. Try again.
Note that changing the time zone requires restarting the scanner.
Restart the system.
Probe prom read failed.
Sensor data from probe is not received. Scanning is stopped.
The probe could not be connected.
The Probe FW is obsolete.
The read probe prom has a wrong CRC.
The read probe prom was empty.
The system time is invalid and has been changed to %s %s. The system time can be set in the setup menu.
The system time %s is invalid and setting it to %s failed. The system time can be set in the setup menu.
Parking of the transducer %s failed. Try again.
0 User Guide (16-01410-EN-03) January 2017 53

54
Caution text Action (if necessary)
%d text(s) has been truncated to %d characters.
"%s" is not a unique name. Type in a unique name.
"%s" is not a valid number. Type in a valid number.
A 3D volume was not acquired because no mover is connected. Please connect a mover.
A 3D volume was not acquired because the connected mover does not match the selected mover. The connected mover is %s and the selected mover is %s. \n
Make sure that connected mover matches the selected mover.
A curve cannot have itself as parent curve.
A formula in the measurement contains an invalid device attribute "%s.%s".
Use valid device attribute.
A formula in the measurement contains an invalid result name "%s".
Use valid result name.
A formula in the measurement contains an undefined measurement tool "%s".
Use a defined measurement tool.
A measurement cannot depend on itself.
Adjusting the guide's height.
Adjusting the guide's width.
All available pro packs for %s has been hidden
An error occurred while the patient archiving database was being copied.
Try again.
Another scanner is using this network drive for archiving. This can cause problems. For independent backups, each scanner must use a separate subdirectory.
Changes not in effect until transducer(s) has been reconnected.
Click Yes to clear the patient archive. All patients in the patient archive will be lost. Click No to cancel.
Could not create temporary subdirectory for outgoing mail data.
Try again.
Curve name, x-axis and y-axis are required. Do not leave the fields empty.
Fill out required fields.
Default LCD backlight has not been adjusted. Adjust default LCD backlight.
January 2017 bk3500 User Guide (16-01410-EN-03)
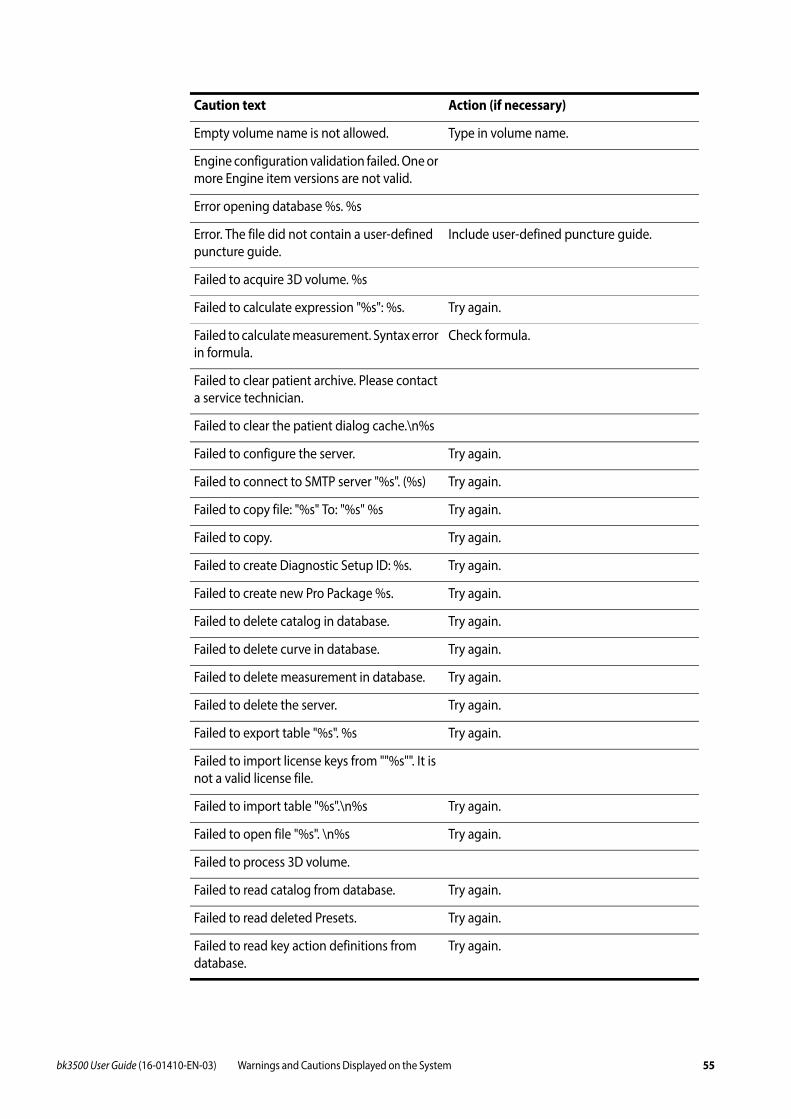
bk350
Empty volume name is not allowed. Type in volume name.
Engine configuration validation failed. One or more Engine item versions are not valid.
Error opening database %s. %s
Error. The file did not contain a user-defined puncture guide.
Include user-defined puncture guide.
Failed to acquire 3D volume. %s
Failed to calculate expression "%s": %s. Try again.
Failed to calculate measurement. Syntax error in formula.
Check formula.
Failed to clear patient archive. Please contact a service technician.
Failed to clear the patient dialog cache.\n%s
Failed to configure the server. Try again.
Failed to connect to SMTP server "%s". (%s) Try again.
Failed to copy file: "%s" To: "%s" %s Try again.
Failed to copy. Try again.
Failed to create Diagnostic Setup ID: %s. Try again.
Failed to create new Pro Package %s. Try again.
Failed to delete catalog in database. Try again.
Failed to delete curve in database. Try again.
Failed to delete measurement in database. Try again.
Failed to delete the server. Try again.
Failed to export table "%s". %s Try again.
Failed to import license keys from ""%s"". It is not a valid license file.
Failed to import table "%s".\n%s Try again.
Failed to open file "%s". \n%s Try again.
Failed to process 3D volume.
Failed to read catalog from database. Try again.
Failed to read deleted Presets. Try again.
Failed to read key action definitions from database.
Try again.
Caution text Action (if necessary)
0 User Guide (16-01410-EN-03) Warnings and Cautions Displayed on the System 55

56
Failed to read key assignments from database.
Try again.
Failed to read key definitions from database. Try again.
Failed to read measurement list from database.
Try again.
Failed to restore factory default catalogs in database.
Try again.
Failed to restore factory default general settings.
Try again.
Failed to restore factory default measurement groups.
Try again.
Failed to save 3D volume.
Failed to save configuration "%s" in database. Try again.
Failed to save measurement in database. Try again.
Failed to send SMTP message (%s). Try again.
Failed to store catalog in database. Try again.
Failed to store clip in file. Try again.
Failed to store curve in database. Try again.
Failed to store general settings in the database.
Try again.
Failed to store key assignments in database. Try again.
Failed to store the curve "%s". Two curves cannot have the same Reference Name, and the imported curve's Reference Name "%s" is already used for the curve "%s".
Use a different reference name to store the curve.
Failed to update Pro Package: %s. Try again.
Failed to update the ICM file.
Failed to validate database %s. Reverting to the latest backup from %s.
Hard disk space on %s is critically low. Please clear some space on the hard disk or contact a service technician before proceeding.
Hard disk space on %s is getting low. Free up hard disk space.
Import of license keys from "%s" completed. The following license keys could not be imported: %s
Try again.
Caution text Action (if necessary)
January 2017 bk3500 User Guide (16-01410-EN-03)

bk350
Incorrect settings for HistoScanning acquisition. Data will be rejected by HistoScanning. Please adjust the scanner settings.
Invalid %s. Empty names are not allowed. Names must be shorter than %d characters. Names must not contain any of the following characters: %s
Fill out the required fields according to the on screen instructions.
License already in use.
License key ""%s"" is invalid.
Licenses missing: No available pro packs for %s has valid licenses
Login error. Please try again.
Name and description are required. Do not leave the fields empty.
Fill in name and description.
Name and formula are required. Do not leave the fields empty.
Fill in name and formula.
No available pro packages in database for transducer %s
No catalogs available. Assign catalogs in setup window.
No default propackage available for the %s transducer choose a default propackage
No Preset name was specified.\nNothing will be saved.
Specify a preset name.
One or more batteries are wearing out. Consider replacing the following batteries: %s (where 1 is the top battery).
Only %d fields can be selected for the Patient window. Deselect some of the fields.
Please disconnect all transducers, restart the scanner, and start the import again.
Please enter a number
Please enter an SMTP Server Address. It must be entered as a name or an IP address.
Please insert the archive disc labeled "%s" and try again.
Pro Package %s could not be deleted because it would leave some transducers without a Pro Package.
Caution text Action (if necessary)
0 User Guide (16-01410-EN-03) Warnings and Cautions Displayed on the System 57

58
Staging area is not ready. Try again later.
System restarts now.
The '%s' curve could not be found in the database.
Try again.
The 3D volume is too big for the scanner memory. Please reduce the capture area or extent and try again.
The AE title is invalid.
The alias "%s" for the measurement "%s" is invalid. 1: Aliases cannot be empty. 2: Aliases must not contain any of the following characters: %s . 3: Aliases in each measurement must be unique.
Fill out the required fields according to the on screen instructions.
The archived document (%s) was not found on the network drive.
The connected transducer cannot be used because there is a problem with its PROM. Please remove the transducer and contact a service technician.
The curve definition is not compatible with this software version.
Upgrade software.
The curve definition must contain x and y values.
The Display Controller Board has no ICM file.
The document cannot be displayed because document data is corrupted
Contact BK service technician.
The document cannot be displayed. Try again.
The document cannot be displayed. Currently there is no viewer available.
Install a viewer.
The entered license key has expired: %s.
The entered license key is invalid. Type in valid license key.
The field must not be empty.
The file \\"%s\\" is too large to open. Max size is %d bytes.
If possible, reduce the file size.
The file does not contain a valid curve. Use valid curve.
The file does not contain a valid measurement.
Use valid measurement.
The file size is too large to display on scanner
Caution text Action (if necessary)
January 2017 bk3500 User Guide (16-01410-EN-03)

bk350
The following licenses have expired:\n%s. Install new license.
The formula exceeds the maximum length of %d characters.
Reduce length.
The guide's height is invalid. Use valid height setting.
The guide's horizontal holes/cm is invalid. Use valid horizontal holes/cm setting
The guide's horizontal offset is invalid. Use valid horizontal offset setting.
The guide's name is invalid. Use valid guide name.
The guide's vertical holes/cm is invalid. Use valid vertical holes/cm setting.
The guide's vertical offset is invalid. Use valid vertical offset setting.
The guide's width is invalid. Use valid guide width setting.
The host name is invalid.
The license could not be removed.
The measurement cannot be edited. The template contains errors.
Contact service technician.
The measurement contains an invalid procedure name "%s".
Use valid procedure name.
The measurement could not be found in the database.
Try again.
The measurement definition is not compatible with this software version.
Upgrade software.
The measurement requires an unsupported measurement device type "%s".
Install supported measurement device type.
The measurement type is invalid. Use valid measurement type.
The media was not burned: %s
The name ""%s"" is already used.
The name is invalid.
The port number is invalid
The procedure "%s" takes %d parameters.
The report cannot be saved before a patient ID is entered.
The report file cannot be generated: "%s" Try again.
The same CD cannot contain both archived and non-archived documents.
Caution text Action (if necessary)
0 User Guide (16-01410-EN-03) Warnings and Cautions Displayed on the System 59

60
The scanner cannot communicate with the battery system. If you want to run the scanner using battery power, we recommend that you contact a service technician.
The scanner is ready to enter service mode. The next time it starts, the PC will start in Windows mode. Please press the standby switch to turn off the scanner.
The scanner is unable to communicate with other equipment through a COM port. %s
Use appropriate communication port(s). See System User Guides or contact service technician.
The scanner's hardware does not support %s.
The selected curve is invalid. Use valid curve.
The system has not finished sending the last mail. Please try again later.
The system must be restarted for changes to take effect.
The system must be restarted to fully implement the language change.
The tool attribute %s is invalid. Use valid tool attribute.
The transducer button %d is stuck on the transducer connected to connector %s.
The two passwords you have typed are not identical.
The USB Device cannot be safely removed. Try again.
The user already exists. Enter a different username.
The value "%s" (%s) contains the invalid character(s) "%s".
Type in valid characters.
The value "%s" (%s) is outside the legal range (%.2f - %.2f ).
Keep value (s) within legal range.
The volume name is already used in the patient archiving system. Please enter another name.
The volume name is not valid. It contains only illegal character(s). Please enter the new volume name.
The volume name is too long. The name must be no longer than %d characters.
Caution text Action (if necessary)
January 2017 bk3500 User Guide (16-01410-EN-03)

bk350
The width and height must be numbers between %d and %d.
There are no files to be burned to a CD.
There is no mail receiver (SMTP To-address) configured.\nTechnical service must configure this service before it can be used.
There is no USB Device connected to the scanner.
There was a problem saving the Diagnostic Setup %s.
Try again.
This scanner does not support CW Doppler. (This may be because of the power supply version.)
Try again or contact BK service technician.
Transducer "%s" cannot be used with this scanner.
Connect a compatible transducer. See Product Data Sheet for more details.
Transducer "%s" cannot be used with this scanner. A hardware upgrade may solve the problem.
Connect a compatible transducer. See Product Data Sheet for more details.
Transducer ""%s"" is disabled for this scanner.
Unable to capture image. Try again.
Unable to connect remote control.
Unable to connect to the network drive. Check server (UNC path), username and password.
Unable to connect to the network drive. %s
Unable to create backup of database because of %s. If the error persists, contact a service technician.
Unable to launch application ("%s") Try again.
You must end the on-going exam before you can clear the patient archive.
You must restart the scanner after you enable or disable the OEM interface.
Your old password is not valid. Create new password.
Caution text Action (if necessary)
0 User Guide (16-01410-EN-03) Warnings and Cautions Displayed on the System 61

62
January 2017 bk3500 User Guide (16-01410-EN-03)