BioGraph Infiniti - Thought Technology V6.0 BioGraph Infinit… · Be sure to keep in mind that a...
39
Getting Started with BioGraph Infiniti Thought Technology Ltd. 8205 Montreal/Toronto Blvd. Suite 223, Montreal West, QC, Canada, H4X 1N1 Tel: (800) 361-3651 ۰ (514) 489-8251 Fax: (514) 489-8255 E-mail: [email protected] Webpage: http://www.thoughttechnology.com
Transcript of BioGraph Infiniti - Thought Technology V6.0 BioGraph Infinit… · Be sure to keep in mind that a...

Getting Started with
BioGraph Infiniti
Thought Technology Ltd. 8205 Montreal/Toronto Blvd. Suite 223, Montreal West, QC, Canada, H4X 1N1 Tel: (800) 361-3651 ۰ (514) 489-8251 Fax: (514) 489-8255 E-mail: [email protected] Webpage: http://www.thoughttechnology.com
Getting Started with BioGraph Infiniti
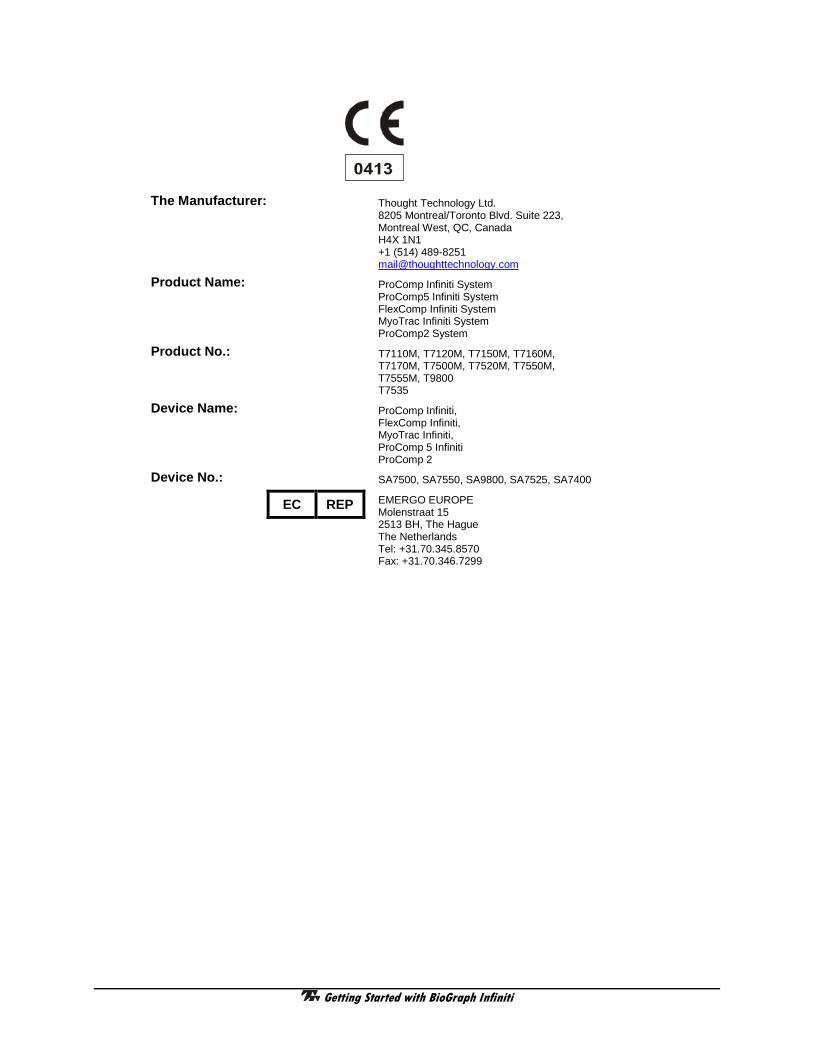
The Manufacturer: Thought Technology Ltd. 8205 Montreal/Toronto Blvd. Suite 223, Montreal West, QC, Canada H4X 1N1 +1 (514) 489-8251 [email protected]
Product Name: ProComp Infiniti System ProComp5 Infiniti System FlexComp Infiniti System MyoTrac Infiniti System ProComp2 System
Product No.: T7110M, T7120M, T7150M, T7160M, T7170M, T7500M, T7520M, T7550M, T7555M, T9800 T7535
Device Name: ProComp Infiniti, FlexComp Infiniti, MyoTrac Infiniti, ProComp 5 Infiniti ProComp 2
Device No.: SA7500, SA7550, SA9800, SA7525, SA7400
EC REP
EMERGO EUROPE Molenstraat 15 2513 BH, The Hague The Netherlands Tel: +31.70.345.8570 Fax: +31.70.346.7299

Getting Started with BioGraph Infiniti i
CLASSIFICATION
• Type BF Equipment • Internally powered equipment (battery-powered floating) • Continuous operation
• Read Instruction Manual – Refer to applicable hardware manuals for additional information.
CAUTION
• US Federal Law restricts this device to sale by, or on order of, a physician or any other practitioner licensed by the law of the state in which he or she practices to use or order the use of this device.
WARNING • Do not operate Active Sensors within 10 feet of an operating cellular phone, similar radio
transmitting device, other powerful radio interference producing sources such as arc welders, radio thermal treatment equipment, x-ray machines, or any other equipment that produces electrical sparks.
• All encoders are totally isolated from line (110 or 220VAC) power due to battery operation and fiber optic connections to computers. However, many hospitals and the FDA require that computers, printers and any other equipment used with medical devices be electrically isolated from line voltage to UL or CSA medical safety standards.
• The PC used with device must be placed outside the patient/client environment (more than 3 meters or 10 feet) or the PC must comply with EN 60601-1-1 (system safety).
• After use, the Disposable Electrodes may be a biohazard. Handle, and when applicable, dispose of these materials in accordance with accepted medical practice and any applicable local, state and federal laws and regulations.
• Reusable electrodes present a potential risk of cross-infection especially when used on abraded skin, unless they are restricted to a single patient or sterilized between patients. If sterilizing electrodes, employ only gas sterilization.
• Radiated radio frequency electromagnetic fields can cause performance degradation in the MyoScan-Pro EMG sensor. In the worst case, an RF field strength of 22mV/M can cause an increase of 1µV in the signal reading from a MyoScan-Pro sensor. Be sure to keep in mind that a very relaxed muscle should provide an EMG reading of approximately 1–3µV.
• Due to the slight risk of inducing photosensitive epileptic seizures, proceed with caution when using repetitive EP/ERP visual stimuli protocols with BioGraph Infiniti 6.0 (Protocol Generator algorithm/Stim screen instrument) and the AV Sync sensor. If a seizure appears to be starting, stop the visual stimulus immediately.
• Explosion Hazard; Do not use in the presence of a flammable anesthetic mixture with air, or with Oxygen or Nitrous Oxide.
• Not to be immersed in water • Take care in arranging patient and sensor cables to avoid risk of patient entanglement or
strangulation. • The operator is responsible for ensuring the safety of any devices controlled or triggered by Infiniti
equipment or software, or by any software or hardware receiving data from Infiniti equipment. Infiniti equipment must not be configured or connected in such a way that failure in its data acquisition, processing or control functions can trigger patient feedback stimulus that poses an unacceptable level of risk.
• Use of any equipment in a biofeedback context should be immediately terminated upon any sign of treatment-related distress or discomfort.
• Not to be connected to a patient undergoing MRI, Electro surgery or defibrillation.
ATTENTION • Sensors damaged by static electricity are not covered under warranty. To prevent static discharge
from damaging the sensor and/or encoders, use anti-static mats or sprays in your working area. A humidifier may also be used to prevent static environments by conditioning hot, dry air.

Getting Started with BioGraph Infiniti ii
• Do not apply any electrode gel or equivalent directly on the sensor snaps. Always use electrodes as a medium between the sensor and the client.
• Not for diagnostic purposes, not defibrillator proof, not for critical patient monitoring. • To prevent voiding warranty by breaking connector pins, carefully align white guiding dot on sensor
plug with slot on sensor input. • Sharp bends or winding the fiber optic cable in a loop smaller than 4 inches (10cm) may destroy the
cable. • A fiber optic cable not fully pushed into its receptacle may cause the unit not to operate; make sure
that both ends of the cable are fully inserted into their receptive jacks and the nut is tightened firmly. • Make sure to remove electrodes from sensor snaps immediately after use. • Do not plug third party sensors directly into instrument inputs. Plug only Thought Technology
Active Sensor cable connectors into instrument inputs. All electrodes and third party sensors must be connected to active sensors, either directly or through an adapter.
• Remove batteries when the device is not being used for an extended period of time. Please dispose of batteries following local regulations.
INTENDED PURPOSE • Biofeedback, Relaxation & Muscle Re-education purposes.
CONTRAINDICATIONS • None
NOTE • No preventative inspections required; maintenance must be performed by qualified personnel. • The supplier will make available, upon request, circuit diagrams, component parts lists and
description or other information required for the repair of product by qualified personnel. • If a fiber optic or patient cable is damaged or breaks please replace. • Due to the essential performance and intended use of the device, testing for immunity to
electromagnetic disturbances was not required and was not performed. The device may be susceptible at levels below IEC60601-1-2 immunity test levels.
• The operator must be familiar with typical characteristics of signals acquired by this equipment, and be able to detect anomalies in the acquired signal that could interfere with treatment effectiveness. Depending on the importance of signal integrity, it may be advisable to continuously monitor the raw signals, in time and/or frequency domain, while the device is being used for biofeedback or other purposes. If anomalies are observed on acquired signals, and if you suspect a problem with electromagnetic interference, contact Thought Technology for a technical note on identification and remediation.
MAINTENANCE AND CALIBRATION • Wipe encoder with a clean cloth • Factory testing and calibration ensure equipment accuracy and frequency response. The user may
invoke a self-calibration function that will recalibrate certain device parameters (see section in hardware manual). Contact Thought Technology for factory recalibration if necessary.
STORAGE • Store in its original case. • Temperature 23 to +60C • Humidity (Non-condensing) 10% to 90% • Atmospheric Pressure 70 to 106 Kpa
TRANSPORTATION • Transport in its original case. • Temperature 23 to +60C • Humidity (Non-condensing) 10% to 90% • Atmospheric Pressure 70 to 106 Kpa

Getting Started with BioGraph Infiniti iii
Guidance and manufacturer's declaration – electromagnetic emissions The Infiniti system is intended for use in the electromagnetic environment specified below. The customer or the user of the Infiniti system should assure that it is used in such an environment.
Emissions test Compliance Electromagnetic environment – guidance
RF emissions CISPR 11 Group 1
The Infiniti system uses RF energy only for its internal function. Therefore, its RF emissions are very low and are not likely to cause any interference in nearby electronic equipment.
RF emissions CISPR 11 Class B
The Infiniti system is suitable for use in all establishments, including domestic establishments and those directly connected to the public low-voltage power supply network that supplies buildings used for domestic purposes.
Harmonic emissions IEC 61000-3-2 Not applicable
Voltage fluctuations/flicker emissions IEC 61000-3-3
Not applicable
Manual No. SA7913 ver. 6.0 © copyright Thought Technology Ltd. 2003-2013

Getting Started with BioGraph Infiniti iv
Table of Contents Introduction ............................................................................................................................... 1
Overview .................................................................................................................................................. 1 System Requirements .............................................................................................................................. 1 Before You Begin ..................................................................................................................................... 1 Connecting the Hardware ........................................................................................................................ 2
Correct orientation of sensors ............................................................................................................... 4 Starting BioGraph Infiniti .......................................................................................................................... 4
Setting Preferences ............................................................................................................................... 4 Enabling Confidential Setting ................................................................................................................ 6
Using a Compact Flash Card ................................................................................................................... 7 Formatting the Compact Flash .............................................................................................................. 7 Preparing the Compact Flash for Use with your Encoder ..................................................................... 8
Recording Sessions .................................................................................................................. 9 Overview .................................................................................................................................................. 9 First Time Run: Entering Key Codes ....................................................................................................... 9 Recording an Open Display Session ..................................................................................................... 10
Defining new open display session settings........................................................................................ 11 Recording a Script Session.................................................................................................................... 13
Defining new script session settings ................................................................................................... 13 Ending a Session ................................................................................................................................... 15 Other Recording Functions .................................................................................................................... 16
Setting Review Mode Auto-Rejection Levels ...................................................................................... 16 Checking the Battery Level ................................................................................................................. 17
Troubleshooting the Start Sequence ..................................................................................................... 17 Reviewing Sessions ................................................................................................................ 19
Overview ................................................................................................................................................ 19 Client Database ..................................................................................................................................... 19 Selecting Review Screens ..................................................................................................................... 19 Rejecting Artifacts .................................................................................................................................. 21
Automatically Rejecting Artifacts ......................................................................................................... 21 Manually Rejecting Artifacts ................................................................................................................ 22 Managing Rejection Segments ........................................................................................................... 22
Setting In/Out Markers ........................................................................................................................... 23 Setting Temporary Markers ................................................................................................................... 23 Calculating Statistics .............................................................................................................................. 24 Generating Session Reports .................................................................................................................. 24 Generating Trend Reports ..................................................................................................................... 26
Favorites and Quick Starts ..................................................................................................... 27 Overview ................................................................................................................................................ 27 Starting a session with a Favorite .......................................................................................................... 27 Recording and Reviewing with a Favorite ............................................................................................. 27
Reference ................................................................................................................................ 29 Contacting Thought Technology ............................................................................................................ 29
Returning Equipment ........................................................................................................................... 29 Technical Support ............................................................................................................................... 29
Repair Return Form ............................................................................................................................... 30 Index ........................................................................................................................................ 31

Getting Started with BioGraph Infiniti

Getting Started with BioGraph Infiniti 1
Introduction Overview The purpose of this guide is to provide you with a rapid overview of the main functions of the BioGraph Infiniti program. It includes an introduction to recording open display and script sessions, as well as basic functions used for reviewing and reporting upon session data.
This manual uses examples to illustrate how to record open display and script sessions, as well as functions for reviewing sessions. Screen captures were taken from sessions recorded using the ProComp Infiniti encoder and channel sets, display screens and sample data from the EEG Suite. What you see on your computer monitor will vary, depending on the encoder type and Application Suites that you are using.
Please refer to the on-line help manual for a more detailed description of all the functions and features of the program. To open on-line help, simply press the F1 function key, on your keyboard, from any window in the program. Because the on-line help manual is designed to provide contextual information, it should automatically open at the section that discusses the window from which the help was called.
Note: Important safety information about operating your system is provided in the front matter of the manual starting on page i.
System Requirements Please refer to IS7915 – BioGraph Infiniti PC System Requirements for a detailed list of requirements for running BioGraph Infiniti 6.0.
Before You Begin Ensure that BioGraph Infiniti 6.0 and at least one Application Suite have been installed on your computer.
Note: To ensure compatibility with Windows operating systems newer than Microsoft® Windows® XP, from version 5.0 forward, BioGraph Infiniti installs a different file structure from previous versions. As a result, only Application Suites with the version number 5.0 or later can be installed after BioGraph Infiniti 6.0 has been installed on your computer.
• If this is the first time that you have installed BioGraph Infiniti
Confirm that your Application Suite is at least version 5.0. This indicates that the Application Suite has been modified to incorporate the changes to the BioGraph Infiniti system file structure.
If you install a version 5.0 or earlier Application Suite, you should manually run Fast Upgrade of BioGraph Infiniti Files before you use it with BioGraph Infiniti 6.0.
Access this utility from BioGraph Infiniti Docs & Editors on your computer desktop.

Getting Started with BioGraph Infiniti 2
• If you are updating BioGraph Infiniti from a version earlier than 5.0
The process will also update the file structure of any previously-installed version of an Application Suite (i.e., version 4.0 installed with BioGraph Infiniti 4.0). After you have updated BioGraph Infiniti to version 6.0, you should not install an Application Suite with a lower version number than 5.0.
If you need to install an older version of an Application Suite after installing BioGraph Infiniti 6.0, or if you have problems installing your Application Suites, check for a solution in the FAQ section of the Thought Technology website or contact our Technical Support (see page 29 for contact information).
Connecting the Hardware This section describes briefly how to connect a TT-USB device and sensors to an encoder. Detailed information about your Infiniti encoder is provided in its hardware manual.
FlexComp Infiniti encoder
An Infiniti encoder is a multiple-channel battery-operated device for real-time psychophysiology, biofeedback and data acquisition.
The encoder has a protected pin sensor input for each data channel (the number of inputs depends on the encoder model).
The encoder samples incoming signals, and digitizes, encodes, and transmits the sampled data to the TT-USB interface unit.
It uses a fiber optic cable for transmission to provide maximum freedom of movement, signal fidelity, and electrical isolation.
The TT-USB interface unit connects to a USB port on the host computer. It receives the data from the encoder in optical form and converts it into USB format to communicate with the software.
Unconnected hardware components
Insert one end of the fiber optic cable carefully into the fiber optic port on the encoder. Tighten the nut gently so that the cable won't slip out.
Do the same with the other end of the fiber optic cable and the fiber optic port of the TT-USB interface unit.

Getting Started with BioGraph Infiniti 3
Insert the small connector of the USB cable into the USB port on the TT-USB interface device.
Insert the large connector of the USB cable into the USB port of your PC.
Connected hardware components
USB ports on a PC are generally located at the back of the base unit. You may also find a USB port at the front of your base unit; you can connect the other end of the USB cable to it. On a laptop, USB ports are usually located at the side or the back of the laptop.
Before a session can be recorded, the correct sensors must be connected to the encoder. The channel set or script used for recording determines which sensors to connect. This information is provided in the user documentation that comes with your Application Suite.
Encoder inputs and sensor outputs use the same protected pin design, and are connected with special cables (provided with the sensors). When connecting the cable to an encoder or sensor, make sure to properly line up the guiding dot on the top of the plug with the notch in the protected pin socket. Forcing the plug into the socket in any other position may damage the equipment.
Guiding dot
Notch

Getting Started with BioGraph Infiniti 4
Correct orientation of sensors For some sensors, such as the temperature and skin conductance sensors, either the connection cable or the electrode cable forms a permanent part of the item. Other sensors, for example the push button switch, have removable cables but only a single input entrance. This makes it impossible to connect these sensors in the wrong orientation to the encoder.
Certain sensors, however, have removable cables and two input entrances. It is important to orient these sensors to the encoder correctly so that the physiological signal is properly received. These sensors include the EKG, EEG, and EMG sensors, all of which are shaped like the illustration at the right.
Such a sensor is correctly oriented to the encoder when the cable joining them is connected to the bottom entrance of the sensor. If an extender cable with electrodes needs to be attached to such a sensor, it should be connected to the top entrance of the sensor.
Starting BioGraph Infiniti To start the software, do one of the following:
• Double-click on the BioGraph Infiniti icon on the Desktop. • Select BioGraph Infiniti in the Start Menu under Program Files\Thought Technology\Infiniti\.
The program always starts in the Main Menu window.
From here you can record sessions, replay or review recorded sessions, maintain session and client information, or manage session data recorded on a Compact Flash memory card.
You can also set global settings that affect the performance of BioGraph Infiniti.
Note: Global settings remain in effect unless you change them.
Setting Preferences To manage global settings for your BioGraph Infiniti system, select Preferences from the Tools menu in the Main Menu Screen.
Connect to encoder
Connect to electrodes

Getting Started with BioGraph Infiniti 5
In the General tab you can select values for the following global settings. These settings affect all channel sets.
Temperature, Force, and Frequency:
Default values for these settings are determined from your computer's Regional Settings at the time BioGraph Infiniti is run for the first time. If necessary, you can modify them; they are not automatically reset.
Notch Filter:
A notch filter removes the specific frequency caused by electrical interference from a raw signal. The signals that are susceptible to electrical interference are EEG, EKG and raw EMG. Notch filter settings affect all signals of the selected type and work with any channel set.
Show / Hide File Names:
Channel sets, screens, scripts, and favorites are identified by a Description and File Name. By default, BioGraph Infiniti displays only Descriptions. However, you have the option to display File Names if you prefer.
• Select Show to display file names in the BioGraph Infiniti interface. • Select Hide to hide the file names.
Script list with file names hidden
Script list with file names displayed

Getting Started with BioGraph Infiniti 6
The first time you run BioGraph Infiniti, it pops up a message explaining how to display file names.
• Click Close to close the message pop-up.
If you don't want to see this message each time you reopen the software, select the check box before you close it.
Enabling Confidential Setting The Confidential setting helps protect clients' privacy by masking their names in the client database.
• Click Database to open the Main Database window. • From the Settings menu, select Confidential. The check mark indicates
that the setting is enabled. • If you need to disable the Confidential setting, repeat these steps to
remove the check mark.
With the Confidential setting disabled
With the Confidential setting enabled
• If you are using BioGraph Infiniti for the first time, read First Time Run: Entering Key Codes on page 9.
• For information about Recording an Open Display Session, go to page 10.
• For information about Recording a Script Session, go to page 13.
• Information about Reviewing Sessions begins on page 19.
• Information about Favorites and Quick Starts is provided on page 27.
Getting Started with BioGraph Infiniti 7
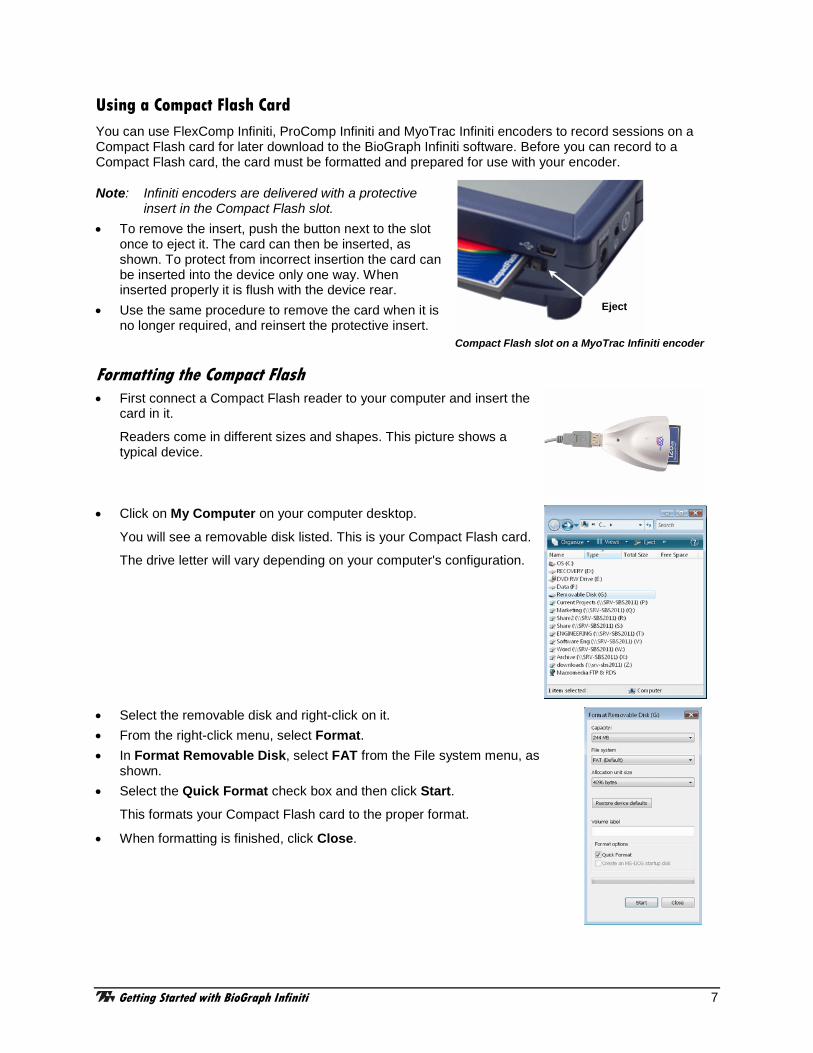
Using a Compact Flash Card You can use FlexComp Infiniti, ProComp Infiniti and MyoTrac Infiniti encoders to record sessions on a Compact Flash card for later download to the BioGraph Infiniti software. Before you can record to a Compact Flash card, the card must be formatted and prepared for use with your encoder.
Note: Infiniti encoders are delivered with a protective insert in the Compact Flash slot.
• To remove the insert, push the button next to the slot once to eject it. The card can then be inserted, as shown. To protect from incorrect insertion the card can be inserted into the device only one way. When inserted properly it is flush with the device rear.
• Use the same procedure to remove the card when it is no longer required, and reinsert the protective insert.
Compact Flash slot on a MyoTrac Infiniti encoder
Formatting the Compact Flash • First connect a Compact Flash reader to your computer and insert the
card in it.
Readers come in different sizes and shapes. This picture shows a typical device.
• Click on My Computer on your computer desktop.
You will see a removable disk listed. This is your Compact Flash card.
The drive letter will vary depending on your computer's configuration.
• Select the removable disk and right-click on it. • From the right-click menu, select Format. • In Format Removable Disk, select FAT from the File system menu, as
shown. • Select the Quick Format check box and then click Start.
This formats your Compact Flash card to the proper format.
• When formatting is finished, click Close.
Eject

Getting Started with BioGraph Infiniti 8
Preparing the Compact Flash for Use with your Encoder Use this procedure to prepare a FAT-formatted Compact Flash card for use with your ProComp Infiniti, ProComp5 Infiniti, FlexComp Infiniti or MyoTrac Infiniti encoder.
Note: If you have a MyoTrac Infiniti encoder, you can optionally prepare the card for recording sessions using the CF Report Generator Software (available on the MyoTrac Infiniti CD or from our website at www.thoughttechnology.com). See the Report Generator User Guide for more information.
• Connect the Compact Flash reader to your computer and insert the formatted card in it. • Open BioGraph Infiniti. • In the Main Menu screen, do one of the following:
o Click Compact Flash Options. o From the Tools menu, select Compact Flash Options.
• In Compact Flash Options, click Prepare Compact Flash.
• In Prepare Compact Flash, select
Create new master session file and click OK.
• At the warning prompt, click Yes.
• In the file browsing window, locate and select the removable disk that is your Compact Flash card.
The drive letter will vary depending on your computer's configuration.
• In the Save browser window, do the following: o Ensure that Save as type is Master Files (*.msf). o In File name, type Flash.msf. o Click Save.
• At the confirmation prompt, click OK.
The system builds the master file on the card.
• At the acknowledgement prompt, click OK and then click Close to exit Compact Flash Options and
return to the Main Menu screen.
Your Compact Flash card is now ready for use. This procedure needs to be done only once.
Note: Once it has been prepared for use with your encoder, the Compact Flash card cannot be used for other purposes (such as file storage).

Getting Started with BioGraph Infiniti 9
Recording Sessions Overview With the BioGraph Infiniti software you can record two types of session: Open Display and Script. Open display sessions are generally used for biofeedback training, when flexibility is important and you need to be able to rapidly change session parameters depending on the client's reactions. Script sessions, on the other hand, are important for recording assessment or follow-up sessions, where a standardized and constant approach is more appropriate. While both open display and script sessions can be used for trend reports, script sessions generally generate more comparable sessions.
Follow these general steps to start recording a session. Detailed explanations are provided in later sections of this chapter.
• Click on Start Open Display Session (page 10) or Start Script Session (page 13). • Select a Client file. This is done from the Client Database window. • Select a previously recorded session and click Start as Selected or define a new session
configuration. This is done from the Start Session window. • To define a new session configuration, depending on the session type, select a channel set and up to
5 display screens or select a script. This is done from the Select Screens or the Script Database windows.
• Verify the sensor connections. This is done from the Channel Set Configuration window. • In the recording window, you can:
o From the Options menu: set open display statistics. o From the Edit menu: modify channel set parameters. o From the Tools menu: set automatic rejection parameters for reviewing the session (page 16). o From the Hardware menu: perform an impedance check on your sensors; zero EMG sensors; or
check the battery level of your encoder (page 17).
First Time Run: Entering Key Codes An encoder key code is associated with a given encoder serial number. An application key code is a number that validates a specific BioGraph Infiniti installation. Key codes are unique numbers generated by Thought Technology and provided to you when you purchase your BioGraph Infiniti system.
Note: If you purchased your encoder and software separately, the key codes should be inside the cover of the BioGraph Infiniti manual. If you purchased them at the same time, you should find the key codes inside the battery compartment of the encoder and the front cover of the manual. If you can't find the key codes, contact Thought Technology Technical Support (see page 29 for contact information) with details of your purchase so that we can send you key codes for your system.
If you have upgraded to BioGraph Infiniti 6.0 from version 5.1 or earlier, you can no longer use the original key codes for your existing encoders. Your upgrade package should include new key codes for your encoders. If you are missing any key codes, contact Thought Technology or your dealer to receive new ones.
The first time you record a session with your new software, BioGraph Infiniti will check for the key codes and ask you to enter them. You will also be asked to enter key codes if you have uninstalled and reinstalled BioGraph Infiniti, or if this is the first time you are using a specific encoder with your existing installation.
If you are using an Infiniti encoder in one of the Infiniti communication protocols, the program should detect its serial number automatically and you will be asked to enter the Key Codes for your system.

Getting Started with BioGraph Infiniti 10
• When the Encoder Key Codes window opens, click to highlight your unit’s serial number in the left table, for example, DA1002. This is the same serial number you can see on the back of the unit.
• Type the Encoder Key Code (found inside the battery compartment) into the Key Code text box.
• Click on the arrow key to move the serial number from the left table to the right table. The serial number should now appear in the Encoders Table.
Note: If you are using a ProComp+ encoder, you will have to type in your encoder's serial number before you can enter the Key Codes (please refer to the on-line help – press F1 – for more information on how to do this).
If you are using more than one encoder, repeat this procedure for the other encoders in the list.
• When done, click OK. • Enter the Application Key Code (also found inside the battery
compartment) for your system. • Click OK when done.
Note: Even if you are using more than one encoder, you enter only one Application Key Code.
If the key codes have been entered properly and there is no problem with your encoder setup or your sensor connections, you will enter recording mode.
If you are recording an open display session, go to page 10; if you are recording a script session, go to page 13.
Recording an Open Display Session Click Start Open Display Session. This takes you through the process of selecting a client file and setting up the session parameters for biofeedback or data acquisition, and launches recording mode.
When the Start Session window appears, you can select the client file for which the session will be recorded by clicking on a name in the leftmost column. When you click a client name, the list in the middle shows you all the uncompressed open display sessions that were recorded for that client.
Note: Even if you aren't going to save the session, you must select a client file.
Note: If the session list is empty, it doesn't mean that no sessions were recorded for that client, only that no open display sessions were recorded for that client.
Getting Started with BioGraph Infiniti 11
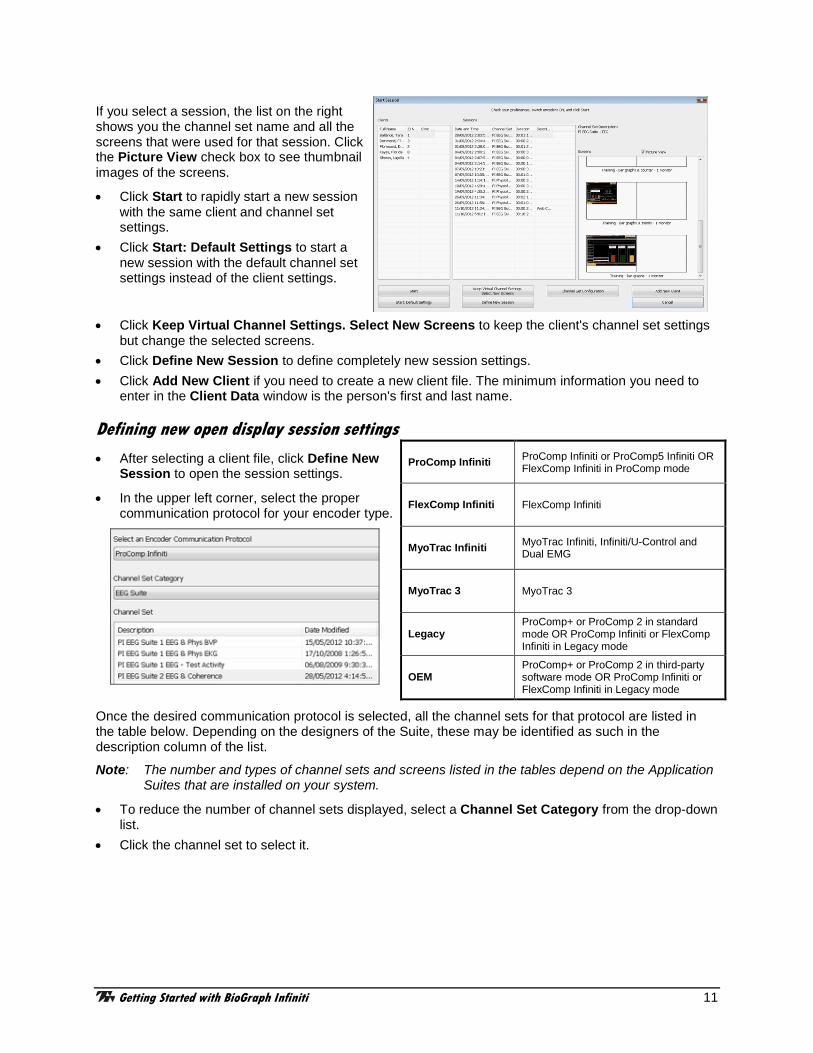
If you select a session, the list on the right shows you the channel set name and all the screens that were used for that session. Click the Picture View check box to see thumbnail images of the screens.
• Click Start to rapidly start a new session with the same client and channel set settings.
• Click Start: Default Settings to start a new session with the default channel set settings instead of the client settings.
• Click Keep Virtual Channel Settings. Select New Screens to keep the client's channel set settings
but change the selected screens. • Click Define New Session to define completely new session settings. • Click Add New Client if you need to create a new client file. The minimum information you need to
enter in the Client Data window is the person's first and last name.
Defining new open display session settings • After selecting a client file, click Define New
Session to open the session settings.
• In the upper left corner, select the proper communication protocol for your encoder type.
ProComp Infiniti ProComp Infiniti or ProComp5 Infiniti OR FlexComp Infiniti in ProComp mode
FlexComp Infiniti FlexComp Infiniti
MyoTrac Infiniti MyoTrac Infiniti, Infiniti/U-Control and Dual EMG
MyoTrac 3 MyoTrac 3
Legacy ProComp+ or ProComp 2 in standard mode OR ProComp Infiniti or FlexComp Infiniti in Legacy mode
OEM ProComp+ or ProComp 2 in third-party software mode OR ProComp Infiniti or FlexComp Infiniti in Legacy mode
Once the desired communication protocol is selected, all the channel sets for that protocol are listed in the table below. Depending on the designers of the Suite, these may be identified as such in the description column of the list.
Note: The number and types of channel sets and screens listed in the tables depend on the Application Suites that are installed on your system.
• To reduce the number of channel sets displayed, select a Channel Set Category from the drop-down list.
• Click the channel set to select it.

Getting Started with BioGraph Infiniti 12
After selecting the channel set, you can open the drop-down list in the upper right corner and select a screen category. Selecting a particular category lists only the screens of that category.
Note: Select "Show all categories" to list all the screens for the channel set.
• Select up to 5 screens from the table on the right by clicking on them. To select more than one screen, press the [Control] or [Shift] key as you click.
If you have not already done so, at this point you should connect sensors to your encoder. Click Channel Set Configuration to verify the sensor configuration for the channel set you have selected.
A window opens, where you can see a table of encoder inputs, each with its corresponding sensor type, and a quick overview of the channel set's virtual channel structure.
Note: Click Toggle to switch between EEG-Z, EEG-Z3 and EEG-Pro/Flex sensors if you own an older EEG sensor.
You can also Toggle between MyoScan-Pro 1600, MyoScan-Pro 400 and MyoScan-Z, if your channel set includes these EMG sensors.
• Click Close to return to the session settings. Make sure to turn your encoder ON and click OK to continue when you have selected the screens you want to use.
Note: If this is the first time you use your system, at this point you will be asked to enter Key Codes (see page 9 for a description of Key Codes and how to enter them).

Getting Started with BioGraph Infiniti 13
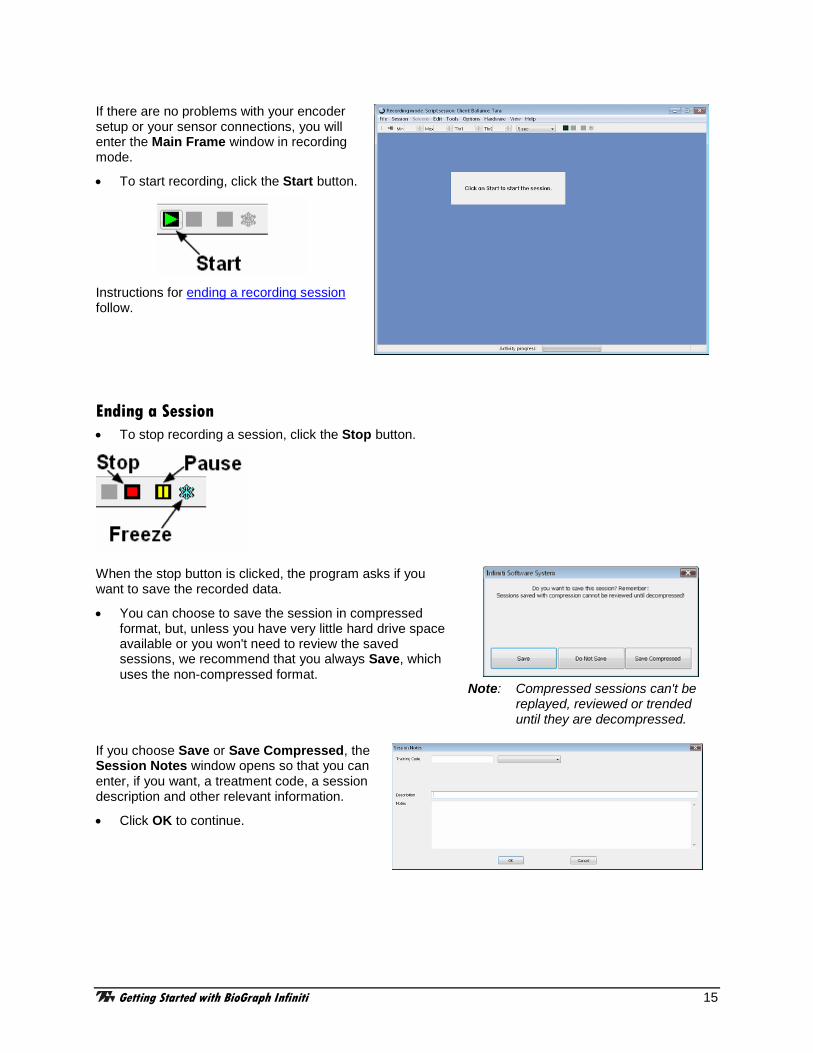
If there are no problems with your encoder setup or your sensor connections, you will enter the Main Frame window in recording mode.
• To start recording, click the Start button.
Instructions for ending a recording session are given on page 15.
Recording a Script Session Click Start Script Session. This takes you through the process of selecting a client file and setting up the session parameters, and launches recording mode.
The Start Session window is similar to the one for defining open display sessions. You can select the client file for which the session will be recorded by clicking on a name in the leftmost column. When you click a client name, the list in the middle shows you all the uncompressed script sessions that were recorded for that client.
Note: If the session list is empty, it doesn't mean that no sessions were recorded for that client, only that no script sessions were recorded for that client.
If you select a session, the list on the right shows you the channel set and script names as well as all the screens that were used by the script.
• Click Start to rapidly start a new session with the same client and script settings. • Click Start: Default Settings to start a new session with the default channel set settings instead of
the client settings. • Click Keep Virtual Channel Settings. Select New Script to keep the client's channel set and
settings but change the selected script. • Click Define New Session to define completely new session settings. • Click Add New Client to create a new client file. The minimum information you need to enter in the
Client Data window is the person's first and last name. • Click Edit Script Settings to modify script step durations and select different screens for selected
steps.
Defining new script session settings • After selecting a client file, click Define New Session to open the session settings.

Getting Started with BioGraph Infiniti 14
• Select the encoder that you will use for the session from the list in Encoder Communication Protocol. (A list of communication protocols is on page 11.)
After selecting a protocol, you should see a list of all the scripts that were designed for this encoder set to this communication protocol.
Note: The number and types of scripts that are listed in the table depend on the Application Suites that are installed on your system.
• Click the script to select it.
After the script is selected, the bottom section shows you the list of screens that are used by the script. Click the Picture View check box to see thumbnail images of the screens.
• If you have not already done so, at this point, you should connect sensors to your encoder. Click Channel Set Configuration to verify the sensor configuration for the script you have selected.
A window opens, where you can see a table of encoder inputs, each with its corresponding sensor type, and a quick overview of the script's virtual channel structure.
Note: Click Toggle to switch between EEG-Z, EEG-Z3 and EEG-Pro/Flex sensors if you own an older EEG sensor.
You can also Toggle between MyoScan-Pro 1600, MyoScan-Pro 400 and MyoScan-Z, if your channel set includes these EMG sensors.
• Click Close to return to the session settings. Make sure to turn your encoder ON and click OK to continue when you have selected the script you want to use.
Note: If this is the first time you use your system, at this point you will be asked to enter Key Codes (see page 9 for a description of Key Codes and how to enter them).
Getting Started with BioGraph Infiniti 15
If there are no problems with your encoder setup or your sensor connections, you will enter the Main Frame window in recording mode.
• To start recording, click the Start button.
Instructions for ending a recording session follow.
Ending a Session • To stop recording a session, click the Stop button.
When the stop button is clicked, the program asks if you want to save the recorded data.
• You can choose to save the session in compressed format, but, unless you have very little hard drive space available or you won't need to review the saved sessions, we recommend that you always Save, which uses the non-compressed format.
Note: Compressed sessions can't be replayed, reviewed or trended until they are decompressed.
If you choose Save or Save Compressed, the Session Notes window opens so that you can enter, if you want, a treatment code, a session description and other relevant information.
• Click OK to continue.
Getting Started with BioGraph Infiniti 16
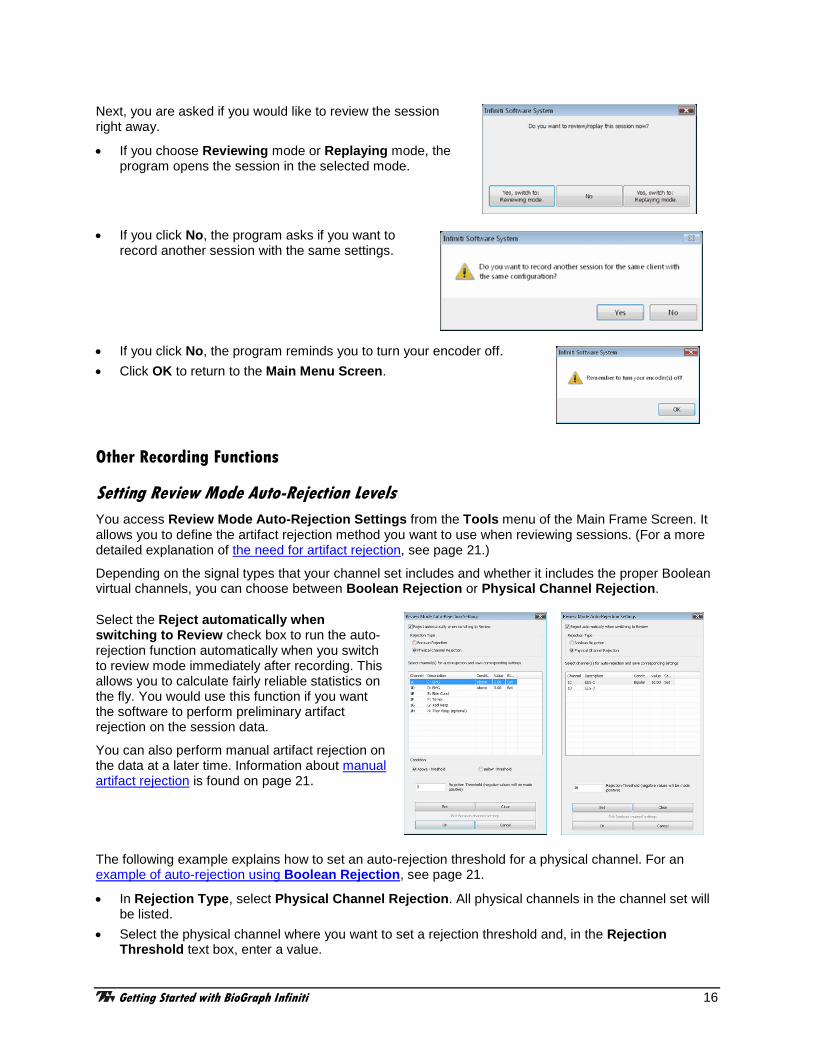
Next, you are asked if you would like to review the session right away.
• If you choose Reviewing mode or Replaying mode, the program opens the session in the selected mode.
• If you click No, the program asks if you want to record another session with the same settings.
• If you click No, the program reminds you to turn your encoder off. • Click OK to return to the Main Menu Screen.
Other Recording Functions
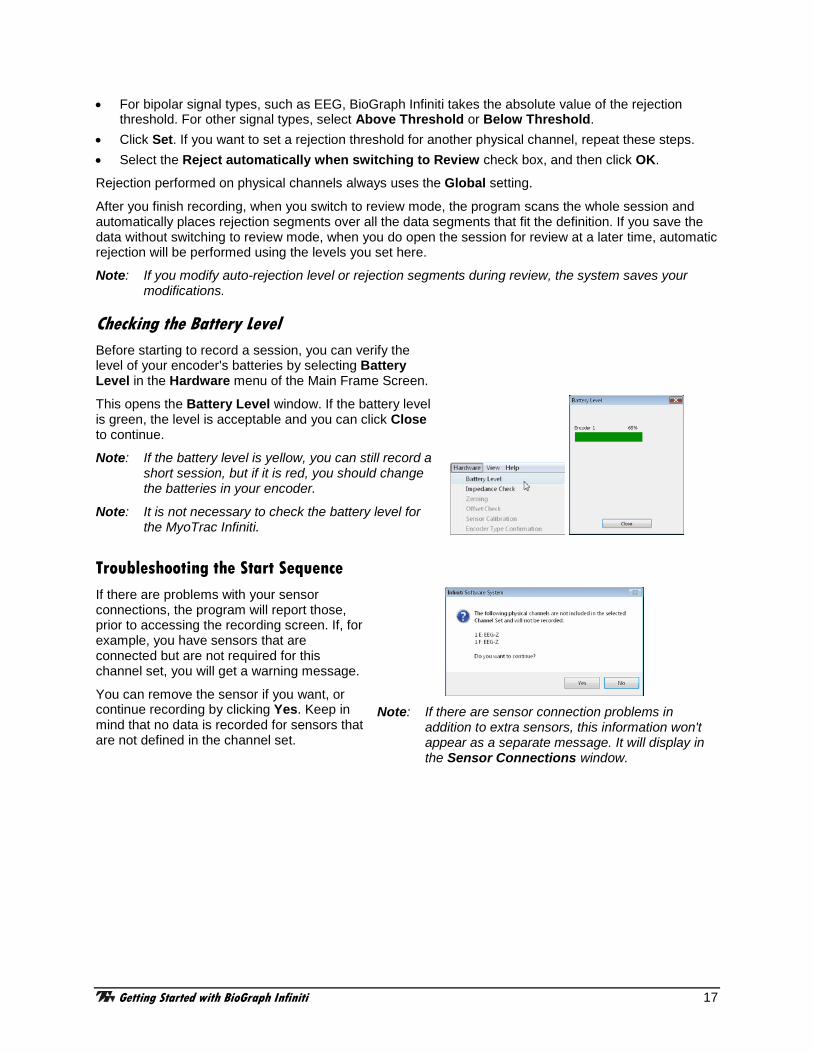
Setting Review Mode Auto-Rejection Levels You access Review Mode Auto-Rejection Settings from the Tools menu of the Main Frame Screen. It allows you to define the artifact rejection method you want to use when reviewing sessions. (For a more detailed explanation of the need for artifact rejection, see page 21.)
Depending on the signal types that your channel set includes and whether it includes the proper Boolean virtual channels, you can choose between Boolean Rejection or Physical Channel Rejection.
Select the Reject automatically when switching to Review check box to run the auto-rejection function automatically when you switch to review mode immediately after recording. This allows you to calculate fairly reliable statistics on the fly. You would use this function if you want the software to perform preliminary artifact rejection on the session data.
You can also perform manual artifact rejection on the data at a later time. Information about manual artifact rejection is found on page 21.
The following example explains how to set an auto-rejection threshold for a physical channel. For an example of auto-rejection using Boolean Rejection, see page 21.
• In Rejection Type, select Physical Channel Rejection. All physical channels in the channel set will be listed.
• Select the physical channel where you want to set a rejection threshold and, in the Rejection Threshold text box, enter a value.
Getting Started with BioGraph Infiniti 17
• For bipolar signal types, such as EEG, BioGraph Infiniti takes the absolute value of the rejection threshold. For other signal types, select Above Threshold or Below Threshold.
• Click Set. If you want to set a rejection threshold for another physical channel, repeat these steps. • Select the Reject automatically when switching to Review check box, and then click OK.
Rejection performed on physical channels always uses the Global setting.
After you finish recording, when you switch to review mode, the program scans the whole session and automatically places rejection segments over all the data segments that fit the definition. If you save the data without switching to review mode, when you do open the session for review at a later time, automatic rejection will be performed using the levels you set here.
Note: If you modify auto-rejection level or rejection segments during review, the system saves your modifications.
Checking the Battery Level Before starting to record a session, you can verify the level of your encoder's batteries by selecting Battery Level in the Hardware menu of the Main Frame Screen.
This opens the Battery Level window. If the battery level is green, the level is acceptable and you can click Close to continue.
Note: If the battery level is yellow, you can still record a short session, but if it is red, you should change the batteries in your encoder.
Note: It is not necessary to check the battery level for the MyoTrac Infiniti.
Troubleshooting the Start Sequence If there are problems with your sensor connections, the program will report those, prior to accessing the recording screen. If, for example, you have sensors that are connected but are not required for this channel set, you will get a warning message.
You can remove the sensor if you want, or continue recording by clicking Yes. Keep in mind that no data is recorded for sensors that are not defined in the channel set.
Note: If there are sensor connection problems in
addition to extra sensors, this information won't appear as a separate message. It will display in the Sensor Connections window.

Getting Started with BioGraph Infiniti 18
If you have connected wrong sensor types, you will see the Sensor Connections window. All the sensors that are expected will be listed in the Expected Sensor column. The Wrong Sensor Type column shows which sensor type was actually detected.
You can remove the wrong sensor or replace it with the right one. Click Repeat to check the sensor connections again until the system no longer detects a wrong sensor type. The program will not allow you to record a session with the wrong sensors.
Note: If the Wrong Sensor Type column is empty, the
correct sensor has been connected.
If you do not connect all the sensors that are required for the selected channel set, the message "Sensor is not detected" appears in the Wrong Sensor Type column. When a sensor is not connected, the program replaces its signal value by a constant value of 1. It is possible to record a session with missing sensors but you need to keep in mind that that the corresponding signal will be a flat line and that all calculations performed from that signal will not be reflecting real physiological changes.
Note: If you are using a ProComp+ or a ProComp 2, the sensor recognition function does not work and you have to verify the sensor types yourself.
Please refer to the on-line help for more information on troubleshooting sensor configuration errors.

Getting Started with BioGraph Infiniti 19
Reviewing Sessions Overview The reviewing mode allows you to perform many important data processing functions that impact directly on your ability to produce valid session and trend reports. With biofeedback therapy, being able to demonstrate clinical effectiveness is most easily achieved by showing that the client is learning and that the effects of the training are being maintained from session to session.
The ability to show a learning curve on a trend report can be an invaluable tool for successful discussions with third-party payers. The Infiniti software's reporting abilities allow you to produce such tools, but it requires that you perform careful artifact rejection on all assessment sessions prior to generating your reports. Without artifact rejection, the statistical calculations may have little or no meaning.
Generally, when reviewing a session, the following tasks are performed:
• Selecting reviewing and reporting screens. • Scrolling through the session data to identify areas of interest and placing event markers. • Normalizing the data by performing artifact rejection. • Calculating statistics and generating session reports. • Generating trend reports.
Client Database • In the Main Menu window, click on the Database button or menu option.
This opens the Main Database window.
• Select a client file by clicking on a client name in the list on the left.
When a client file is selected, all the sessions that were recorded for that client are shown in the list on the right.
• When a session file is selected, click Review/Report or Replay Session.
Selecting Review Screens This guide describes only the Review/Report functions.
When the Review/Report button is clicked, the Review Session Confirmation screen appears. The options available in it depend on whether you are reviewing an open display session or a script session.

Getting Started with BioGraph Infiniti 20
When reviewing or replaying an open display session, you can click on Select Channel Set to load a channel set that is different from the one with which the session was recorded.
Note: Both channel sets must use the same encoder type and configuration of sensors and inputs. For example, if both channel sets send EEG signals on physical channels C and D to a ProComp Infiniti, you can use one to record the session and the other to review it.
Open Display Session
You will most often review a script session using the same script and channel set as those used to record it.
Note: You can click on Select Script to load a different script and channel set. This is not commonly done, because the new script must have an activity and step structure similar to the original script.
Script Session
The first time you select a session for reviewing, you have to select one or more review screens.
• Click on Select Screens.
You can review a session with any of the display screens listed in Select Screens for the selected channel set.
• To select a screen, click on it.
As with recording, you can load up to 5 screens for reviewing. To select more than one screen, press the [Control] or [Shift] key while clicking.
• Click OK to return to Review Session Confirmation.
• In Review Session Confirmation click OK to continue.

Getting Started with BioGraph Infiniti 21
The session opens in Reviewing mode; you should see a screen similar to this.
Rejecting Artifacts The main purpose of reviewing data is to reject artifacts and generate reliable statistics. Session statistics can only be as good as the data from which they are generated. If the recorded signal is of poor quality, the statistics will reveal more about the amount of noise affecting your recording than about any progress your client might be showing. Even with the best recording techniques, noise in the signal cannot be completely avoided. This is why artifact rejection is important.
Artifact rejection can be performed automatically by the software, or manually by the person reviewing the data (see page 22). Once you have reviewed the session and placed artifact rejection segments where required, you can generate statistics and print a session report.
Automatically Rejecting Artifacts You access Review Mode Auto-Rejection Settings from the Tools menu. It allows you to define the artifact rejection method you want to use when reviewing sessions. Depending on the signal types that your channel set includes and whether it includes the proper Boolean virtual channels, you can choose Boolean Rejection or Physical Channel Rejection.
In order for you to use Boolean Rejection, your channel set must include one or more Boolean virtual channels. These channels are used to define the conditions for rejecting sensor readings.
For information about setting auto-rejection options in Recording mode, as well as an example of setting an auto-rejection threshold for a physical channel, see page 16.
When you select Boolean Rejection, all Boolean channels in the channel set are listed. Select a channel that best defines the artifact condition you want to use. Then, you can define the Boolean state you want to use for the rejection. The output of a Boolean channel is either ON or OFF. If the condition is met, the output is ON, otherwise, it is OFF. By selecting the appropriate state, you reject either all data that fits the condition or all data that doesn't fit the condition. You can also choose to make the rejection segment specific to only the selected channel or applied to all channels.
• In Rejection Type, select Boolean Rejection. All Boolean channels in the channel set will be listed.

Getting Started with BioGraph Infiniti 22
• Select the Boolean channel to use for rejecting artifacts. • If you want to modify the channel settings, click Edit Boolean channel settings and make your
changes. • In Boolean state for rejection, select On if the system should reject any signal that does meet the
condition, and Off if it should reject any signal that does not meet the condition. • In Scope, select Global if the system should place rejection segments on all channels, and Channel
Dependent if it should place rejection segments only on the selected Boolean channel. The Channel Dependent setting is useful if the Boolean channel is used as a source by other virtual channels where you don't want rejection segments placed.
• Click Set. If you want to set rejection conditions for another Boolean channel, repeat these steps. • Click OK to run the auto-rejection function. The program warns you that any previously placed
rejection segments will be deleted. To continue, click Yes.
The program scans the whole session and automatically places rejection segments over all the data segments that match the defined conditions.
Manually Rejecting Artifacts To scroll through the recorded data, click and drag the scroll bar on the button bar at the top of the screen. When you locate an artifact, you can place a rejection segment over it.
To manually place an artifact rejection segment over a section of noisy data on a single line graph, follow these steps.
• Select the line graph containing the segment to be rejected. (The selected graph will display a
magenta border.) • Press and hold the [Control] key. • Place the cursor over one end of the segment to be rejected. • Click and hold the left mouse button. (You can release the [Control] key at this point.) • Drag the cursor across the segment to be rejected. The selected segment is highlighted in gray. • At the end of the segment, release the mouse button.
Note: You can place artifact rejection segments only on single-line graph instruments. If you get an error message, you have to select a different screen for reviewing.
Managing Rejection Segments You can review what was rejected and remove individual segments or all of them at once by right-clicking over a segment and selecting Undo Rejection Segment or Undo All Rejection Segments.
If you placed rejection segments globally, but want to remove rejection segments from all but one channel, you have the option to Convert Rejection Segment. Select the line graph where you want to keep a rejection segment, position your cursor within the rejection segment that you want to keep, and click the right mouse button. Choose this option to remove the selected segment from all other channels without further confirmation.

Getting Started with BioGraph Infiniti 23
If you want to remove all channel-specific rejection segments from a specific channel, you have the option to Undo Channel Rejection Segments. Position your cursor anywhere in the line graph for the channel, right-click, and select this option. It removes all channel-specific rejection segments while leaving all other rejection segments where they were defined. If you choose this option, you must confirm the action.
The program will save rejection settings with the session when you exit review mode.
Setting In/Out Markers You can perform this function on single line and multiple line graphs. It allows you to define specific areas where you can perform statistical analysis.
• Place your cursor at a specific point on the graph, click the right mouse button, and select Set In Marker for Area.
• When Event Marker Labels opens, select or enter a name for the area and click OK. An In marker is placed on the graph.
• Place your cursor at a subsequent point on the graph, click the right mouse button again, and select Set Out Marker for Area to place an Out marker. The two markers together indicate an area of the graph which is uniquely identified by the name you entered.
You can set as many In/Out areas as you want, but areas cannot overlap.
Setting Temporary Markers You can use a specified Boolean channel to place temporary markers on the data. They are called "temporary" because the system maintains them only as long as the session is loaded. When the session is closed, they are erased.
In order for this option to be available, the channel set must contain Boolean channels. These include epoch timers, comparators, AND, OR, NOT, Periodic Impulse and Target Counter. Temporary markers are useful for finding the specific moment in a session when a given condition occurs (such as EMG 1 > EMG 2). When an Epoch Timer channel is selected, they can also identify the segments of data corresponding to the selected epoch period.
After temporary markers have been set, you can convert them to other types of event markers, such as In/Out marker pairs.
• To identify the Boolean channel and the condition that determines where the markers will be placed, select Temporary Markers from the Tools menu in the Main Frame Screen.
• Select the Boolean channel to use for setting temporary markers. • If you want to modify the channel settings, click Edit Boolean channel settings and make your
changes. • In Condition, select the point where the temporary marker should be placed.
Markers can be placed when the condition is Off, On, or Both. For On and Off, a single marker indicates when the condition occurs. For Both, a pair of markers indicate the points where the condition starts and ends.
• Optionally, enter values for Minimum interval between identical events and Minimum interval between opposite events. The purpose of these intervals is to prevent minor signal variations from being treated as separate events, and to determine how many temporary markers will be placed on the graph. If intervals are too long, no markers will be placed. If they are too short, too many temporary markers will be placed.
Getting Started with BioGraph Infiniti 24
• Click OK to place temporary markers on the graph.
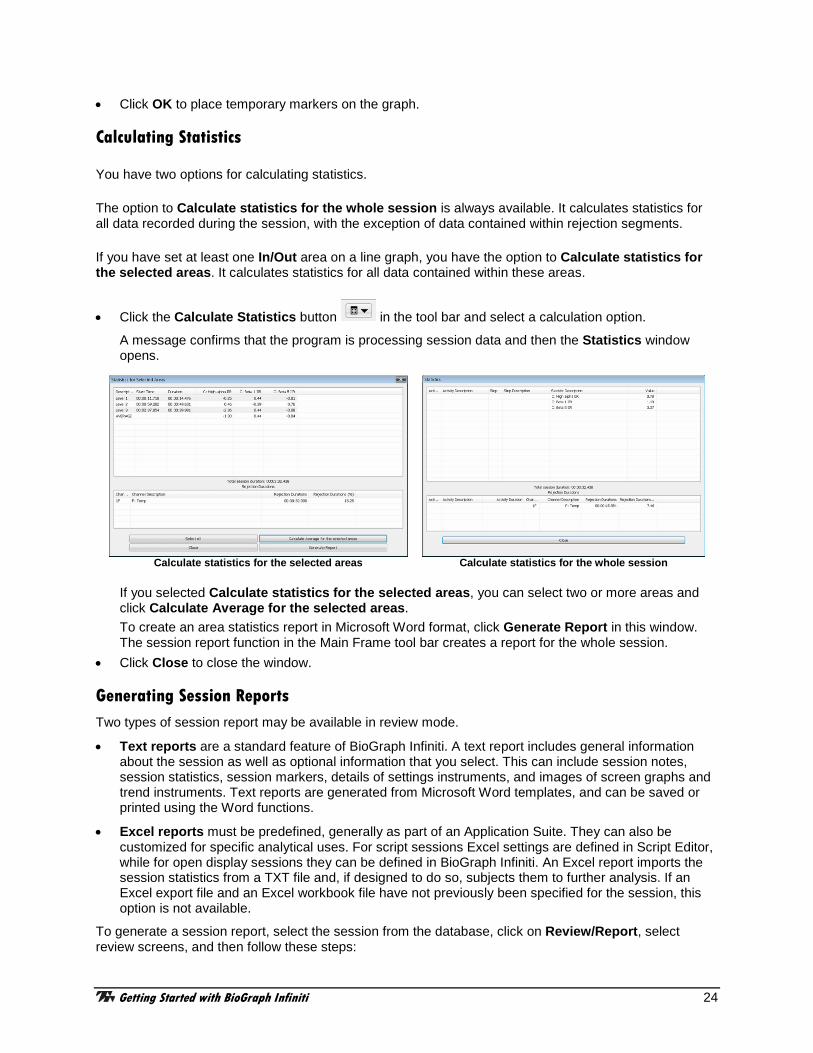
Calculating Statistics
You have two options for calculating statistics.
The option to Calculate statistics for the whole session is always available. It calculates statistics for all data recorded during the session, with the exception of data contained within rejection segments.
If you have set at least one In/Out area on a line graph, you have the option to Calculate statistics for the selected areas. It calculates statistics for all data contained within these areas.
• Click the Calculate Statistics button in the tool bar and select a calculation option.
A message confirms that the program is processing session data and then the Statistics window opens.
Calculate statistics for the selected areas
Calculate statistics for the whole session
If you selected Calculate statistics for the selected areas, you can select two or more areas and click Calculate Average for the selected areas. To create an area statistics report in Microsoft Word format, click Generate Report in this window. The session report function in the Main Frame tool bar creates a report for the whole session.
• Click Close to close the window.
Generating Session Reports Two types of session report may be available in review mode.
• Text reports are a standard feature of BioGraph Infiniti. A text report includes general information about the session as well as optional information that you select. This can include session notes, session statistics, session markers, details of settings instruments, and images of screen graphs and trend instruments. Text reports are generated from Microsoft Word templates, and can be saved or printed using the Word functions.
• Excel reports must be predefined, generally as part of an Application Suite. They can also be customized for specific analytical uses. For script sessions Excel settings are defined in Script Editor, while for open display sessions they can be defined in BioGraph Infiniti. An Excel report imports the session statistics from a TXT file and, if designed to do so, subjects them to further analysis. If an Excel export file and an Excel workbook file have not previously been specified for the session, this option is not available.
To generate a session report, select the session from the database, click on Review/Report, select review screens, and then follow these steps:

Getting Started with BioGraph Infiniti 25
• If this is an open display session, from the Options menu select Set Open Display Statistics and choose the channels for which statistics should be calculated.
• If necessary, perform artifact rejection on the recorded data.
• Click Recalculate in the tool bar to recalculate the statistics. • If you have loaded more than one screen, open the screen from which you want to generate the
report. Different screens can generate different reports.
• Click the Session Report icon in the tool bar and select the type of report that you want to generate. o If you select Generate Excel Report, Microsoft Excel opens and displays your report as a
workbook. You can print or save the report using Excel's Print and Save functions. o If you select Generate Text Report, the Session Report window opens, and you must continue
to the next step.
• Select report components by placing a check mark in the desired boxes. • Click Generate Report to generate the report. Word opens and displays your report as a document.
You can print or save the report using Word's Print and Save functions.
Note: Microsoft Word and Microsoft Excel must be installed on your system for these functions to work.
Excel-generated session report
Word-generated session report

Getting Started with BioGraph Infiniti 26
Generating Trend Reports BioGraph Infiniti also allows you to create trend reports, which can compare statistics across different activities within a single session or across multiple sessions.
• To generate a trend report, go to the Database screen, select a client file and click on Trend Report. • Select the type of session to be trended by clicking on the appropriate radio button at the top.
If you select Script Session, the table on the left lists the scripts used to record sessions for this client. If you select Open Display Session, it lists channel sets.
• Choose a session. The table on the right displays all the sessions recorded with this script (or channel set).
• Pressing the [Control] or [Shift] key, on your keyboard, select all the sessions you want to include in the trend report and click OK.
• If you selected Open Display Sessions, the Set Statistics window opens for you to select which statistics you want to trend.
• In Select Trend Report, choose a trend report and click OK.
The system creates the trend report and displays it on your computer monitor.
• To generate the report as a document in Microsoft Word, click Generate Reports. You can use Word to save and print the document.
Note: Microsoft Word must be installed on your system for this function to work.
For more information on generating trend reports, consult on-line help (F1).

Getting Started with BioGraph Infiniti 27
Favorites and Quick Starts Overview A Favorite is a predefined session configuration that contains all the settings needed for recording, replaying, and reviewing a session. Depending on the session type (script or open display), these settings can include scripts, channel sets and screens, statistics for session reports, auto-rejection settings for review mode, and Excel data export options. Favorites are intended to simplify and standardize the process of recording and reviewing sessions.
Favorites are not associated with a specific client file. You select a client name after you choose the Favorite. (This differs from the procedures described in Recording Sessions (page 10 – Open Display, and page 13 – Script), where you first select a client name and then define the session settings.)
Your Application Suite may include predefined Favorites, and you can define your own Favorites using the Favorites Editor in BioGraph Infiniti.
Starting a session with a Favorite You can access Favorites by clicking the Quick Start button in the Main Menu Screen.
• The Quick Start window opens, displaying names from the client database and a list of existing Favorites.
If there is only one Favorite, only the client names will be displayed.
• Select a client's name and a Favorite and click OK.
If your sensors are correctly connected and your encoder is turned on, the recording screen will open. The session will be recorded using the configuration defined in the selected Favorite.
Recording and Reviewing with a Favorite Recording:
When you use a Favorite to start a session, Recording mode is no different from when you manually define session settings. All the same functions are available. You can check battery level, perform an impedance check, modify open display session statistics or auto-rejection settings, and so on.

Getting Started with BioGraph Infiniti 28
Reviewing:
• If you select Switch to Reviewing Mode when you finish recording a session with a Favorite, you don't select review screens. Instead, BioGraph Infiniti immediately loads the screens and channel set or script selected when the Favorite was defined and opens the Main Frame screen in Reviewing mode.
• If the session you select for review from the Main Database was recorded using a Favorite, its default review settings (channel set or script, screens, open display statistics) are those that were set in the Favorite.
In all other respects, Reviewing mode for a session recorded using a Favorite is no different from when you manually define session settings. You can generate a session report, modify open display session statistics or auto-rejection settings, and so on.

Getting Started with BioGraph Infiniti 29
Reference Contacting Thought Technology
Returning Equipment Be sure to call for an authorization number (RA) before returning any equipment!
Send the unit(s) postage prepaid and insured, with proof of purchase to one of the addresses below.
If you are shipping from outside Canada or the USA to Canada, mark the package "Goods to be repaired – Made in Canada" to avoid unnecessary customs charges.
All customs and duties charges will be billed to you if incurred by sending the unit to the wrong address.
Provide a detailed description of the problem you are experiencing, and your telephone/fax number and email (see form on the next page of this manual).
In the USA, ship insured to:
Thought Technology Ltd. Cimetra LLC 8396 State Route 9 West Chazy, New York 12992, USA
In Canada and all other countries, contact your dealer or ship insured to:
Thought Technology Ltd. 8205 Montreal/Toronto Blvd. Suite 223 Montreal West, Quebec Canada H4X 1N1
Technical Support For technical support please refer to the Thought Technology Ltd. website at www.thoughttechnology.com for frequently asked questions. If your support issue is not covered please e-mail or telephone at the number below.
(514) 489-8251 [email protected]

Getting Started with BioGraph Infiniti 30
Repair Return Form
Name:
Company:
Address:
Telephone Number:
Fax Number:
Date Purchased:
From:
Model Name:
Serial Number:
Problem:

Getting Started with BioGraph Infiniti 31
Index A
Application key codes, 10 Artifact rejection
Automatic, 16 Importance of, 21 Manual, 22 Physical rejection threshold, 16
B Battery level, 17
C Channel set configuration, 12, 14 Check battery level, 17 Client confidentiality, 6 Client database, 19 Compact flash
Formatting, 7 Preparing for use, 8
Confidential settings, 6 Connecting hardware, 2
D Data compression, 15 Define new session
Open display, 11 Script, 14
E Encoder serial numbers, 9 End session, 15 Extra sensors, 17
F Favorites, 27 File names, 5
H Hardware connections, 2 Hide file names, 5
I In/Out markers, 23
K Key codes, 9
M Markers
In/Out, 23 On/Off, 23 Temporary, 23
Missing sensors, 18
N Notch filters, 5
O On/Off markers, 23 On-line help, 1 Orienting sensors, 4
P Privacy settings, 6
Q Quick Starts, 27
R Recording sessions, 9 Reports
Session, 24 Trend, 26
Returning equipment Instructions, 29 Repair return form, 30
Review screens, 19 Reviewing sessions, 19
S Safety issues, i Save data, 15 Screen category, 12 Sensor configuration, 12, 14 Sensor orientation, 4 Session notes, 15 Session reports, 24 Session statistics, 24

Getting Started with BioGraph Infiniti 32
Show file names, 5 Start session
Open display, 10 Script, 13
Starting BioGraph Infiniti, 4 Stop session, 15
T Technical support, 29 Temporary markers, 23 Trend reports, 26
W Wrong sensors, 18