BICYCLE HELMET - Bell Helmets · Securely fasten retention system. Grasp the helmet and try ......
30
OWNER’S MANUAL BICYCLE HELMET AS/NZ
Transcript of BICYCLE HELMET - Bell Helmets · Securely fasten retention system. Grasp the helmet and try ......

OWNER’S MANUALBICYCLE HELMET
AS/NZ

BELL® HELMET OWNER’S MANUAL
HELMET SAFETY AND CARE ............2
FULL-FACE HELMETS .................... 6
MULTISPORT HELMETS .................12
BICYCLE HELMETS .......................17
WARRANTIES .............................. 28

2
OWNER’S MANUALGENERAL SAFETY, USE AND CARE · No helmet can protect the wearer against all possible
impacts. · The helmet is designed to be retained by a strap under the
lower jaw. · To be effective, a helmet must fit and be worn correctly. To
check for correct fit, place helmet on head and make any adjustments indicated. Securely fasten retention system. Grasp the helmet and try to rotate it to the front and rear. A correctly fitted helmet should be comfortable and should not move forward to obscure vision or rearward to expose the forehead.
· No attachments should be made to the helmet except those recommended by the helmet manufacturer.
· The helmet is designed to absorb shock by partial destruction of the shell and liner. This damage may not be visible. Therefore, if subjected to a severe blow, the helmet should be destroyed and replaced even if it appears undamaged.
· The helmet may be damaged and rendered ineffective by petroleum and petroleum products, cleaning agents, paints, adhesives and the like, without the damage being visible to the user.
· A helmet has a limited lifespan in use and should be replaced when it shows obvious signs of wear.

3
· This helmet should not be used by children while climbing or doing other activities where there is a risk of hanging or strangulation if the child gets trapped whilst wearing the helmet.
· Helmet can be seriously damaged by substances such as petrol, paint, adhesives, or cleaning agents. They can damage helmet, sometimes invisibly. Use mild soap and water only.
· Bicycle Helmet—NOT intended for use in motor sports or by motor cyclists.
· Do not modify or remove any original component parts of the helmet, other than as recommended by Bell.® Do not adapt the helmet for the purpose of attaching accessories, other than as recommended by Bell.®
· Please exercise care and good judgment whenever you ride. Comply with all traffic regulations and do your part to avoid accidents of any kind. Many accidents happen close to home.
· Pretend you’re invisible. Watch carefully for drivers turning in front of you. Drivers often report that they never saw the bicycle or the rider.
· Don’t ride at night without proper lighting and reflectors. Watch for parked cars. Doors often open without warning.
LIMITED IMPACT PROTECTION Helmets cannot always protect against injury. Even a very low speed accident can result in serious injury or death. Any

4
helmet subjected to a severe impact should be discarded and destroyed, even though damage may not be outwardly visible. Since this helmet is made of polystyrene foam, there’s a chance it may be penetrated by sharp objects.
HELMETS CAN’T PREVENT ALL HEAD INJURIESSome head injuries are not caused by impacts at all, but by other forces. You can scramble an egg just by shaking it. You don’t have to break the shell to destroy the contents. Helmets cannot prevent this type of injury.
HELMETS CAN’T PROTECT WHAT THEY DON’T COVERThe helmet will not protect the neck or any area of the head it doesn’t cover. It cannot guard against spinal or other bodily injuries that may result from an accident.
YOU SHOULD ALWAYS:1. Wear your helmet low in the front to protect the forehead.2. Fasten your buckle and tighten your chin strap.3. Check your adjustments every time you wear your helmet. 4. Replace your helmet after an accident, even if no damage
is visible.5. Store your helmet in a cool dry place.6. Wear a helmet designed for what you’re doing.7. Ride Safely.

5
YOU SHOULD NEVER:1. Wear a helmet that’s been in an accident, even if no
damage is visible.2. Wear someone else’s helmet.3. Wear your helmet with the buckle unfastened.4. Wear your helmet tipped back to expose your forehead.5. Wear anything under your helmet.6. Wear this helmet while operating a motor vehicle.7. Clean your helmet with chemical cleaners.8. Take unnecessary risks just because you’re wearing a
helmet.
CARING FOR YOUR HELMET
Cleaning: Helmets can be damaged by many available cleaners, especially Petroleum based solvents. Clean the helmet using a soft cloth or sponge, warm water and mild soap.
Storage: Excessive heat can damage the helmet. In direct sunlight, dark gear bags and automobile trunks can get hot enough to cause heat damage. Damaged helmets will appear to have uneven or bubbly surfaces.
WARNING: DO NOT use heat damaged helmets.

6
FULL-FACE HELMETSHELMET USEThis helmet is intended only for pedal cyclists. It is not designed for motor vehicle use or other sports. If your helmet bears a CPSC designation it meets the standard safety requirements of the Consumer Product Safety Commission. If your helmet bears a CE designation it meets the EN 1078 safety requirements of the European Committee for Standardization. If your helmet bears an ASTM F1952-10 designation it meets the ASTM requirements of a downhill helmet. If your helmet bears an ASTM F2032-11 designation it meets the ASTM requirements of a BMX helmet. If your helmet bears an AS/NZ 2063:28 designation it meets the bicycle helmet standard for Australia and New Zealand.
FITTING THE HELMET TO YOUR HEADThis helmet can only protect you if it fits well. Be sure to try on different sizes and choose the size which feels secure and comfortable on your head. Never wear anything under your helmet.
Positioning Wear the helmet low in front to protect the forehead (Figure 1A). Do not wear the helmet tilted back on the head (Figure 1B).
RIGHT WAY WRONG WAY
Figure 1A Figure 1B

7
Fit To be effective, a helmet must fit and be worn correctly. To check for correct fit, place helmet on head and make any adjustments indicated. The helmet is designed to be retained by a strap under the lower jaw. Securely fasten retention system. Grasp the helmet and try to rotate it to the front and rear. A correctly fitted helmet should be comfortable and should not move forward to obscure vision or rearward to expose forehead.
The helmet fits correctly when:
1. The padding holds the helmet firmly in place.2. The straps have been adjusted, fastened and tightened
so that the helmet movement is limited.
FOLLOW THESE STEPS TO GET THE PROPER FIT:
1. Put the helmet on.a. If you have a D-Ring: Un-thread
the chin strap from the Double D Rings. If you have a side squeeze buckle: Unfasten the chin strap by releasing the buckle.
b. Hold the straps out of the way with your thumbs while you put the helmet on (Fig. 2).
c. Position the helmet correctly.
Figure 2

8
2. Adjust the fit in the crown area.a. The padding should grip the
crown of your head firmly, but comfortably, all the way around.
b. To check the fit, look in the mirror and rotate the helmet from left to right and enough to cause the skin on your forehead to move as the helmet moves (Diagram A).
3. Fit the cheek area.a. The padding in the cheek area reduces side to side
helmet movement.b. The padding should grip the sides of your face very
firmly to do this.
4. Fasten the chin strap. If you have a D-ring:
Thread the loose end of the strap through the Double D-Rings as shown in Fig. 3.
If you have a side squeeze buckle: a. The loose ends of the straps must be
passed through the rubber “O” ring.b. Close the chin buckle and tighten
the combined straps until they are comfortable underneath your chin. a
Figure 3
Diagram A

9
Position the buckle away from your jawbone.
c. Pull on the end until the strap is snug, so it is almost uncomfortable and well back against your throat.
d. When riding, always wear the helmet with the chin strap in this position.
CHECK THE FIT1. With the helmet on and the straps fastened and pulled tight,
try to remove the helmet from your head. Grasp it securely and make a serious effort to roll it off your head by moving it forwards and backwards.
2. If you can remove the helmet by rolling it backwards far enough to expose your forehead or forward enough to block your vision, repeat STEP 2.
3. If, after repeating STEP 2, you can still remove the helmet, by rolling it forward far enough to block your vision or backward enough to expose your forehead, DO NOT USE THIS HELMET. Replace the helmet with a smaller size.
4. If you cannot remove this helmet and it does not roll backward far enough to expose your forehead or forward enough to block your vision, you have a proper fit.
REMOVING THE HELMET1. Un-thread chin strap from Double D-Ring or release buckle.2. Remove the helmet.
b

10
ADJUSTING AND REMOVING THE VISOR1. The visor is held in place by 2 screws.2. Loosen both screws, adjust the visor to the desired
location and then re-tighten the screws. You can use an Allen key, flathead screwdriver or a coin.
REMOVING THE VISOR 1. Take out the screws.2. Carefully pull the visor away from the helmet.
HELMETS WITH OPTIONAL ACCESSORY—CAMERA MOUNT
FULL-9The top vent is designed to receive both GoPro® (Figure 4) and Contour® (Figure 5) camera mounting brackets. The GoPro breakaway insert can be replaced with a Contour breakaway insert (Figure 5). To replace GoPro breakaway insert apply firm pressure to center of insert and unsnap it from bracket. Firmly snap Contour breakaway insert into center of bracket. Figure 4 Figure 5

11
ATTACH AND REMOVE CAMERA MOUNT1. Snap selected bracket into the top vent as shown.2. To remove bracket, press button and slide out bracket.
TRANSFER-91. Attach the separate part to the top of the helmet. 2. Follow instructions above to replace GoPro insert with
Contour breakaway insert.
TEST RIDE Once you are satisfied with the fit, put on your helmet and take an extended test ride. Immediately after the test ride double-check the positioning of the straps. If the helmet was comfortable, remained firmly in place, the straps stayed properly adjusted, and you are satisfied with the positioning of your visor, your helmet is ready to be used. If the helmet felt uncomfortable, or the straps or visor need adjusting, repeat STEPS 2 through 5 as necessary to correct the problem. If you are still unable to adjust your helmet to meet these requirements, or if you have any other problems, DO NOT continue to use the helmet. Replace it with a different size or model.

12
MULTISPORT HELMETS This helmet is intended only for pedal cyclists, skateboarders, roller-skaters, or in-line skating. It is not designed for motor vehicle use or other sports. If your helmet bears a CPSC designation it meets the CPSC Safety Standard for bicycle helmets. If your helmet bears a CE 1078 designation it meets the CE requirements of a helmet intended for pedal cyclists. If your helmet bears an ASTM designation it meets the specific safety requirements of a particular stated ASTM standard. If your helmet bears an AS/NZ 2063:28 designation it meets the bicycle helmet standard for Australia and New Zealand.
FITTING THE HELMET TO YOUR HEADTo be effective, a helmet must fit and be worn correctly. To check for correct fit, place helmet on head and make any adjustments indicated. The helmet is designed to be retained by a strap under the lower jaw. Securely fasten retention system. Grasp the helmet and try to rotate it to the front and rear. A correctly fitted helmet should be comfortable and should not move forward to obscure vision or rearward to expose forehead.
Follow these simple steps to learn how to properly fit and wear your helmet. You will need a mirror.
STEP 1: WEAR YOUR HELMET IN ITS PROPER POSITION Always wear the helmet low in the front to protect the forehead (Figure 1A). Never wear the helmet tipped back to

13
expose your forehead (Figure 1B). IMPORTANT: All fitting adjustments MUST be made with the helmet in the proper position. Failure to do so will result in a poor fit. This will allow the helmet to move out of position or come off in an accident.
STEP 2: ADJUST THE STRAPSThe front and rear straps should join at a point slightly below and in front of (but not covering) the ears (Figure 2).
STEP 3: ADJUST THE CHIN STRAPAlways wear the helmet with the chin strap buckle fastened and the strap pulled tight. Make sure the strap is well back against the throat, NOT on the point of the chin. Straps worn on the point of the chin increase the chance of the helmet coming off in an accident. Figures 3 and 4 shows how to fasten and release the buckle and
RIGHT WAY WRONG WAY
Figure 1A Figure 1B
Figure 3 Figure 4
Figure 2

14
Figure 5 shows the proper position of the chin strap.
WARNING: Make sure the loose end of the strap passes through the rubber “O” ring (Figure 6). If it does not, the strap may slide loose and the helmet can come off accidentally.
STEP 4: GETTING THE CORRECT FITThe helmet fits correctly when it is held firmly but comfortably in place by the interior fit pads. Adjustments are made by varying the thickness of the interior pads and by varying the position and tension of the straps.
The front fit pad should lightly touch your forehead. If it does not, replace it with the thicker pad provided. If it still does not, try a smaller size helmet.
When correctly adjusted, you should feel a slight pressure at the back of your head, and the front pad will push firmly, but comfortably against your forehead.
STEP 5: CHECKING THE FIT AND ADJUSTMENTSBefore using the helmet, make sure it fits correctly, the straps are correctly adjusted, and the chin strap is tight enough. Put the helmet on in the correct position. Fasten the chin strap and pull it tight. Stand in front of the mirror.
Figure 5 Figure 6

15
a. Check the fit. Grab the helmet with both hands and twist it to the left and to the right. If the helmet fits right, the skin on the forehead will move as the helmet moves. If it does not, the helmet is too loose. Return to Step 4.
b. Check the straps. Grab the helmet with both hands and try to remove it by rolling the helmet forward and backward as far as you can. Make a serious effort. THIS IS IMPORTANT. If you can roll it off the head completely in either direction, by rolling it forward so far that its blocks your vision, or backward far enough to expose the forehead, it doesn’t fit correctly. Repeat Steps 2 and 3 until the helmet movement is minimal.
WARNING: If you cannot adjust the helmet to fit properly according to Step 5, DO NOT USE THIS HELMET. Replace it with a different size or model. Return it to your dealer or contact Bell® for assistance.
Once you are satisfied that the helmet fits correctly and that all straps are properly adjusted and tightened, take a short test ride. Pay attention to overall comfort and helmet stability while riding. Make any minor adjustments to the fit pads and straps to improve comfort or stability.

16
HELMETS WITH OPTIONAL ACCESSORY—VISORIf your helmet comes with a visor, please note it is removable. To remove it, gently tug on the visor until it releases (Figure 7). It is attached by friction only (no screws, pins or clips) so to put it back on please line up the tabs on the visor so the center tab is in between the front two vents on the helmet (Figure 8).
Figure 7 Figure 8

17
STANDARD BICYCLE HELMETS This helmet is intended only for pedal cyclists. It is not designed for motor vehicle use or other sports. If your helmet bears a CPSC designation it meets the CPSC Safety Standard for bicycle helmets. If your helmet bears a CE 1078 designation it meets the CE requirements of a helmet intended for pedal cyclists. If your helmet bears an AS/NZ 2063:28 designation it meets the bicycle helmet standard for Australia and New Zealand.
FITTING THE HELMET TO YOUR HEADTo be effective, a helmet must fit and be worn correctly. To check for correct fit, place helmet on head and make any adjustments indicated. The helmet is designed to be retained by a strap under the lower jaw. Securely fasten retention system. Grasp the helmet and try to rotate it to the front and rear. A correctly fitted helmet should be comfortable and should not move forward to obscure vision or rearward to expose forehead.
Follow these simple steps to learn how to properly fit and wear your helmet. You will need a mirror.
STEP 1: WEAR YOUR HELMET IN ITS PROPER POSITION Always wear the helmet low in the front to protect the forehead (Figure 1A). Never wear the helmet tipped back to expose your forehead (Figure 1B).
18
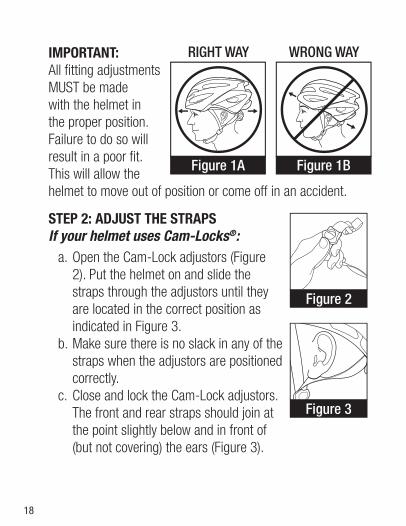
IMPORTANT: All fitting adjustments MUST be made with the helmet in the proper position. Failure to do so will result in a poor fit. This will allow the helmet to move out of position or come off in an accident.
STEP 2: ADJUST THE STRAPSIf your helmet uses Cam-Locks®:
a. Open the Cam-Lock adjustors (Figure 2). Put the helmet on and slide the straps through the adjustors until they are located in the correct position as indicated in Figure 3.
b. Make sure there is no slack in any of the straps when the adjustors are positioned correctly.
c. Close and lock the Cam-Lock adjustors. The front and rear straps should join at the point slightly below and in front of (but not covering) the ears (Figure 3).
RIGHT WAY WRONG WAY
Figure 1A Figure 1B
Figure 2
Figure 3

19
If your helmet uses Cinch Guides: Remove the helmet to adjust the Cinch Guides.
a. Grip the ribbed edges of the plastic base (A) and pull up on the fabric tab (B) attached to metal Cinch Plug, Figure 4.
b. Now that the metal plug is separated from the base, you can adjust their location on the strap (Figure 5). By sliding the strap through the system you can reposition Cinch Guide fore or aft to achieve its optimal positioning below the earlobe.
c. There is no vertical adjustment for Cinch Guide strap configurations. Slide metal Cinch Plug back into place once position is correct.
STEP 3: ADJUST THE CHIN STRAPAlways wear the helmet with the chin strap buckle fastened and the strap pulled tight. Figures 6 and 7 show how to fasten and release the buckle. Make sure the strap is well back against the throat, NOT on the point of the chin. Straps worn on the point of the chin increase the chance of the helmet coming off in an accident. Figure 8 shows the proper position of the chin strap.
Figure 6
Figure 7
Figure 8
A
B
Figure 4 Figure 5

20
WARNING: Make sure the loose end of the strap passes through the rubber “O” ring (Fig. 9). If it does not, the strap may slide loose and the helmet can come off accidentally.
STEP 4: GETTING THE CORRECT FITThe helmet fits correctly when it is held firmly but comfortably in place by the interior fit pads and the fit system. Identify your helmet’s fit system by matching it to one of the illustrations and follow the accompanying adjustment instructions.
a. ErgoDial Fit System Follow steps 1–3 above. Next, press the button on top of the ErgoDial (Figure 10) with your fingers and turn dial with your thumb clockwise to tighten, counterclockwise to loosen (Figure 11) to a comfortable fit. The fit system should be snug, but not uncomfortably tight.
b. Geared Positions System (GPS) Fit System Follow steps 1–3 above. Next, find the GPS gear located at the back of your head at your occipital lobe (Figure 12). With your thumb, press the GPS dial
Figure 9
Figure 10 Figure 11
Figure 12

21
upward and turn clockwise to tighten the fit. To loosen the fit, simply press the GPS dial upward with your thumb and turn counter-clockwise (Figure 13). The fit system should be snug, but not uncomfortably tight.
c. Twin Axis Gear (TAG) Fit System Follow steps 1–3 above. Next, find the TAG gear located at the back of your head at your occipital lobe (Figure 14). With your thumb, press the TAG dial upward and turn clockwise to tighten the fit. To loosen the fit, simply press the TAG dial upward with your thumb and turn counter-clockwise (Figure 15). The TAG fit system is equipped with a height adjustment mechanism. Slide the fit system up or down in the helmet until it is in the most comfortable position for you (Figure 16). The fit system should be snug, but not uncomfortably tight.
d. Speed Dial Fit System Follow steps 1–3 above. Next, find the Speed Dial gear located at the back of your head at your occipital lobe
Figure 14 Figure 15
Figure 16
Figure 13

22
(Figure 17). With your thumb, press the Speed Dial upward and turn clockwise to tighten the fit. To loosen the fit, simply press the Speed Dial upward with our thumb and turn counter-clockwise. The Speed Dial fit system is equipped with a height adjustment option. Unsnap the pins and slide the arms up or down. Snap pins into the most comfortable position for you (Figure 18). The fit system should be snug, but not uncomfortably tight.
e. TAG (Twin Access Gear) Float Fit System Follow steps 1–3 above. Next, find the TAG Float gear located at the back of your head (Figure 19). Pull down on the belt and place the gear at the base of your occipital lobe. With your thumb, press the TAG dial upward and turn clockwise to tighten the fit. To loosen the fit, simply press the TAG dial upward with your thumb and turn counter-clockwise (Figure 20). The TAG Float fit system is equipped
Figure 17 Figure 18
Figure 19 Figure 20

23
with a height adjustment option. Side arms on both right and left side of the belt snap into baskets molded into the helmet interior (Figure 21). The arm plug can be adjusted down to fit larger heads, or moved up to fit smaller heads. Find the position most comfortable for you. The fit system should be snug, but not uncomfortably tight.
STEP 5: CHECKING THE FIT AND ADJUSTMENTSBefore using the helmet, make sure it fits correctly, the straps are correctly adjusted, and the chin strap is tight enough. Put the helmet on in the correct position. Fasten the chin strap and pull it tight. Stand in front of the mirror.
a. Check the fit. Grab the helmet with both hands and twist it to the left and to the right. If the helmet fits right, the skin on the forehead will move as the helmet moves. If it does not, the helmet is too loose. Return to Step 4.
b. Check the straps. Grab the helmet with both hands and try to remove it by rolling the helmet forward and backward as far as you can. Make a serious effort. THIS IS IMPORTANT. If you can roll it off the head completely in either direction, by rolling it forward so far that its blocks your vision, or backward far enough to expose the forehead, it doesn’t fit correctly. Repeat Steps 2 and 3 until the helmet movement is minimal.
Figure 21

24
WARNING: If you cannot adjust the helmet to fit properly according to Step 5, DO NOT USE THIS HELMET. Replace it with a different size or model. Return it to your dealer or contact Bell® for assistance.
Once you are satisfied that the helmet fits correctly and that all straps are properly adjusted and tightened, take a short test ride. Pay attention to overall comfort and helmet stability while riding. Make any minor adjustments to the fit pads and straps to improve comfort or stability.
HELMETS WITH OPTIONAL ACCESSORY—VISORSome helmets come with removable Snap-On visors. To remove visor, follow these steps:
a. Pull the ends of the visor loose from the helmet and then lift away from the helmet.
b. To replace the visor, center it on the helmet and then snap the pins (A) on the visor into the holes (B) in the helmet, Figure 22.
Some Bell® helmets come with a Variable Position Visor (VPV) or a Goggle Compatible Visor. These visors offer a vertical angle adjustment by simply tilting the visor up or down to the desired position (Figure 23).
Figure 22
Figure 23

25
CAUTION: DO NOT try to remove the visor by pulling forward on the center. This will damage the helmet and the visor.
HELMETS WITH OPTIONAL ACCESSORY—EYE SHIELDThe Star Pro™ Shield and Javelin™ models come with an eye shield. We recommend cleaning the eye shield with a soft fleece cloth before you put on the helmet to make sure you can clearly see in front of you while riding.
Removing and attaching the Star Pro eye shield:
To remove, pull the shield straight down by grabbing the center top clip attachment. This part is magnetically attached to the interior EPS shell and is easily replaced by fitting it back into the brow garage port (Figure 24). The eye shield can also be magnetically placed in a rest position on top of the helmet toward the front, as shown in Figure 25.
WARNING: Shield should not be mounted on top of helmet in rough terrain.
Removing and attaching the Javelin eye shield: To remove, grab it directly below one of the outside snaps and pull it straight down from the helmet. Then grab the eye
Figure 24 Figure 25

26
shield directly below the snap on the other side and pull it straight down from the helmet. Repeat this process with the last snap in the center. To reattach the shield, reverse this process by pushing the snap on the eye shield directly into the snap basket in the helmet starting from the center, and then insert the snap on one side, and then the other. Please make sure all three snaps on the eye shield are securely attached to the helmet before riding.
HELMETS WITH OPTIONAL ACCESSORY—CAMERA MOUNT
HELMETS WITH OPTIONAL ACCESSORY— WRAPAROUND CHINBARRemoving and attaching the Wraparound Chinbar:
The Super 2R™ model comes with a Chinbar attached. To remove the Chinbar, first open the rear buckle. Next, open both side buckles and pull the Chinbar away from the helmet. To attach Chinbar, first make sure the rear buckle and side buckles are in open position. Wrap the Chinbar around the

27
lower perimeter of the helmet, placing Chinbar vents inside rear helmet vents and the rear buckle at the back. When correctly positioned, latch rear buckle as indicated in Figure 26. Next, make sure side buckles are aligned with lower injected shell. Press each side of the Chinbar flush to the helmet, making certain it clicks into place (Figure 27). With Chinbar snug to helmet, close both buckles ensuring J-hooks lock into the garage ports (Figure 28). It is important that the J-hooks lock into place and that all buckles are fastened tight. Make sure when closing the buckles, that they snap down tight against the helmet.
WARNING: All chinbars have limits. Even some low speed accident can exceed the protective capability of a chinbar.
HELMETS WITH ACTIVE AERO SLIDERThe Star Pro™ comes with an Active Aero Slide that allows a cyclist to open and close off vents. With the helmet securely attached, locate the slider button at the top of the helmet. Slide forward to open vents and back to close vents.
Figure 27
Figure 28J-hook
Figure 26

WARRANTIES Bell® warrants to the original purchaser of this product that the product is free of defects in material and workmanship for a period of one year from the original date of purchase. This warranty does not apply to defects of physical damage resulting from abuse, neglect, improper repair, improper fit, alterations, or use unintended by the manufacturer.
If your Bell® helmet is found to be defective in materials or workmanship within one year from the date of purchase, Bell® or the country distributor will at its sole option either repair or replace the helmet free of charge. Just take it to your retailer, with a letter indicating the specific reasons you are returning the helmet, and proof of date of purchase. The retailer will then evaluate the claim. Bell® does not warranty any helmet damaged due to heat or contact with solvents. This warranty does not affect your statutory rights. This warranty is in lieu of all other agreements and warranties, general or special, express or implied and no representative or person is authorized to assume liability on behalf of Bell® in connection with the sale or use of this product.

Part# 5001076300-C / Date: 08.19.14
UNITED STATESBell Sports
5550 Scotts Valley DriveScotts Valley, CA, 95066 USA
tel: 831 461 7500 fax: 831 461 7503
WORLDWIDETo find a current distributor
in your region or territory, please visit us online at
or contact the U.S. office.
© 2014 Bell Sports, Inc.1-800-456-BELL / 1001 Innovation Road / Rantoul, IL 61866 USA
AUSTRALIA & NEW ZEALANDDistributed by Monza Imports Australia:
ABN 86 574 983 366PO Box 359 Altona North
Victoria 3025tel: 03 8327 8080