BHS Digitization Cataloging Manual …files.archivists.org/groups/museum/standards/8....
73
BHS Digitization_Cataloging_Manual_BrooklynHistoricalSociety.doc C:\Users\mes037\Desktop\section 8\BHS Digitization_Cataloging_Manual_BrooklynHistoricalSociety.doc L. Loscutoff; Edited by Julie May Page 1 6/20/2017 Brooklyn Historical Society Photographic Digitization and Cataloging Manual Digitizing Standards and Cataloging Procedures SAA Museum Archives Section Working Group Example
Transcript of BHS Digitization Cataloging Manual …files.archivists.org/groups/museum/standards/8....
BHS Digitization_Cataloging_Manual_BrooklynHistoricalSociety.doc
C:\Users\mes037\Desktop\section 8\BHS Digitization_Cataloging_Manual_BrooklynHistoricalSociety.doc L. Loscutoff; Edited by Julie May Page 1 6/20/2017
Brooklyn Historical Society Photographic Digitization and Cataloging Manual
Digitizing Standards and Cataloging Procedures
SAA Mus
eum A
rchive
s Sec
tion W
orking
Grou
p Exa
mple
TABLE OF CONTENTS
C:\Users\mes037\Desktop\section 8\BHS Digitization_Cataloging_Manual_BrooklynHistoricalSociety.doc L. Loscutoff; Edited by Julie May Page 2 6/20/2017
Table of Contents: Introduction: 1. Introduction to the Photographic Collections ........................................ 3 2. Getting Started ........................................................................................ 4 3. Digitization Criteria ................................................................................ 4 4. Material Types to be Digitized ............................................................... 4-5 5. Digitization Equipment ........................................................................... 5 6. Digital Imaging Definitions ..................................................................... 6-7 Specifications: 1. Recommended Scanning Standards and Specifications ........................ 8-9 Scanning Procedures: 1. Digitization Processing Plan…………………………………………………………….....10-11 2. How to Scan Individual Images ............................................................. 12-16 3. How to Scan Multiple Images ................................................................ 17-23 Digitization Log and Quality Assurance: Digitization Log ........................................................................................... 24 Digitization Quality Assurance Checklist ..................................................... 25 File naming Rules:
1. File Naming Rules ................................................................................. 26-28 Special Cases:
1. Duplicate images ................................................................................. 29 2. Albums .................................................................................................. 29
Embedded Metadata: 1. Embedded Metadata with an XMP file ................................................ 30-32
Making Derivative Copies: 1. How to make derivative copies from the master images ...................... 33-34 Watermarking Images in Adobe Photoshop: 1. How to Watermark images .................................................................... 35 Batch Processing Images: 1. Batch Processing in Adobe Photoshop .................................................. 35-38 Image Folders and Storage: Image Folders and Storage ......................................................................... 39 How to Calibrate the Scanner: Calibrating the Scanner ............................................................................... 40-42 Adding New Images to Past Perfect: 1. Adding New Images and Records to Past Perfect .................................. 43 Metadata and Cataloging in Past Perfect: 1. Adding New Images and Records to Past Perfect .................................. 43-44 2. Cataloging and Metadata Standards ...................................................... 45-51 3. Adding New Authorities ......................................................................... 52 4. Required Metadata Fields in Past Perfect............................................... 53-54 Linking Past Perfect to NYU Finding Aid Portal and Emma:
1. Past Perfect Custom Menu ................................................................... 55 2. Archivists’ Toolkit ................................................................................. 55 3. NYU Finding Aid Portal ......................................................................... 55-56 4. Emma .................................................................................................... 56
SAA Mus
eum A
rchive
s Sec
tion W
orking
Grou
p Exa
mple
TABLE OF CONTENTS
C:\Users\mes037\Desktop\section 8\BHS Digitization_Cataloging_Manual_BrooklynHistoricalSociety.doc L. Loscutoff; Edited by Julie May Page 3 6/20/2017
Summing things up: 1. Digitization Workflow for Project CHART ............................................... 57
2. Digitization Procedures Checklist ............................................................ 58 3. Brief Summary ........................................................................................ 59 In-House Photography Guidelines:
1. When to photograph collection items……………………………………………… 67 2. What can be photographed in the digital suite?................................. 67 3. Removing exhibit items for photography…………………………………………. 67 4. Keys and access to the digital suite………………………………………………….. 67 5. Handling the camera equipment……………………………………………………… 67 6. Shooting Mode………………………………………………………………………………… 68 7. Camera settings……………………………………………………………………………….. 68 8. Recording format…………………………………………………………………………….. 68 9. White balance and flash………………………………………………………………….. 68 10. Focus……………………………………………………………………………………………….. 69 11. Lenses……………………………………………………………………………………………… 69 12. Using the copy stand………………………………………………………………………. 69 13. Lights………………………………………………………………………………………………. 69 14. Third party photography…………………………………………………………………. 70
Introduction The purpose of this manual is to articulate the procedures for processing and digitizing photographic collections at the item level. This manual is applicable after processing and collection-level description is completed using the BHS Processing Manual and the BHS Archivists’ Toolkit Manual (located in the p_drive). History of the photography collection at Brooklyn Historical Society Like many historical societies and special collections, the photography collection at BHS was donated, sometimes as part of a manuscript collection and sometimes on its own, to the archives. Where in 2011, archivists would never split up collections by medium, 19th and 20th century archivists and librarians at BHS did this as common practice. In short, photographs were separated from the family papers or collections they visualized and lost valuable contextual and descriptive information. It is the goal of current BHS collection staff to reconnect photographs to the papers with which they arrived in order to reestablish the context that the photographs were created or collected by the creator, to make the photographs more valuable for scholarly research and more accessible through improved cataloging. Software BHS Library & Archives uses Aleph/Bobcat to catalog published works (books, serials, etc.) and maps in partnership with NYU. For archival collections, BHS uses Archivists’ Toolkit for accession information, location, and description. AT records are currently exported as PDFs and attached to blog posts in Emma, our online access tool for archival collections (http://brooklynhistory.org/library/wp/). BHS uses PastPerfect for item-level description of Photographic and Oral History Collections, Works on Paper, and Fine Art. At this time, we scan as much as possible in-house and store it on Archived Digital Assets, our server. We do not have a Digital Assets Management (DAM) system at this time. PastPerfect Records
SAA Mus
eum A
rchive
s Sec
tion W
orking
Grou
p Exa
mple
INTRODUCTION
C:\Users\mes037\Desktop\section 8\BHS Digitization_Cataloging_Manual_BrooklynHistoricalSociety.doc L. Loscutoff; Edited by Julie May Page 4 6/20/2017
PastPerfect is the software application used to manage BHS’s image-based collections, mostly photographs but also works on paper, postcards, fine art, and oral histories. It includes item level information about most, though not all, of BHS’s various image-based collections. Many of these records include a digital version of the original image. Most of the digital versions of the images were made in the 1990s and are 72dpi scans. Therefore, it is necessary to rescan each image at current archival specifications. The PastPerfect database is maintained on BHS servers and the front-end application can be launched from the library’s desktops and laptops. PastPerfect requires a login name and password in order to access the information. Check with your supervisor or the reference desk for login information. Preliminary Stages: Collection and Series level records can be found in Archivists’ Toolkit (AT). Some of the collections identified for digitization already have digital images uploaded into Past Perfect, but there is only a low resolution scan and in most cases no master TIF file saved on the server. This digitization project is interested in not only providing increased access to the public, but to ensure that the digital assets created are preserved. These are the five main requirements under consideration before digitization of the collection begins: Digitization Criteria:
1. No high resolution scan has been made.
2. If the same collection is being digitized by another institution (e.g., Brooklyn Museum, Brooklyn Public Library), then the selected images for digitization enhance and not duplicate efforts.
3. We have the right to display and publish this information online.
4. The collection has been reunited under a single archival call number (ie. ARC.009), or created a
collection-level record for the photographic collection. 5. The collection is already cataloged into AT, and has a resource record. The collection should be
under intellectual control before it is digitized. (*The only exception to this rule is the lantern slides and glass plate negatives, which we plan to digitize with limited intellectual control)
Material Types to be Digitized Photographs: For photographic formats in particular, it is important to carefully analyze the material prior to scanning, especially if it is not a camera original format. Because every generation of photographic copying involves some quality loss, using intermediates, duplicates, or copies inherently implies some decrease in quality and may also be accompanied by other problems (such as improper orientation, low or high contrast, uneven lighting, etc.). (NARA technical guide) Scanning equipment should not harm the photographs through overexposure to light or flattening pressures. Negatives (Film): Often it is better to scan negatives in positive mode (to produce an initial image that appears negative) because frequently scanners are not well calibrated for scanning negatives and detail is clipped in either the highlights and/or the shadows. After scanning, the image can be inverted to produce a positive image. Also,
SAA Mus
eum A
rchive
s Sec
tion W
orking
Grou
p Exa
mple
INTRODUCTION
C:\Users\mes037\Desktop\section 8\BHS Digitization_Cataloging_Manual_BrooklynHistoricalSociety.doc L. Loscutoff; Edited by Julie May Page 5 6/20/2017
often it is better to scan older black-and-white negatives in color (to produce an initial RGB image) because negatives frequently have staining, discolored film base, retouching, intensification, or other discolorations (both intentional and the result of deterioration) that can be minimized by scanning in color and performing an appropriate conversion to grayscale. Evaluate each color channel individually to determine the channel which minimizes the appearance of any deterioration and optimizes the monochrome image quality, use that channel for the conversion to a grayscale image. Slides (transparencies): Scan by using the Epson 10000 XL photo scanner. A sheet can be scanned at a time using the slide holder. Stereoscopic slides do not fit a slide holder, so just place on the flatbed. This is true for older non-standard formats also. *Please remember to remove the white board from the scanner when scanning transparencies. Please ask a supervisor if you are not sure how!
Transparency: Color or black-and-white film positive, viewed or projected by transmitted light (i.e., light shining through film). A slide is a 35mm (sometimes larger) transparency in a 2 by 2 inch mount. Positive: The characteristic of having the same tonal values (either black-and-white or color) as the object originally photographed. Positives can be on paper, film, glass, or other support.
Oversize Materials (e.g., maps): Oversize materials can be photographed using a digital SLR camera. Use the digital lab on the mezzanine level. Digitization Equipment Flat Bed Scanner: Regular sized photographs, loose documents, transparencies, slides, photographic prints, negatives, and other unbound pages should be scanned using the flat bed scanner (Epson 10000 XL, photo scanner). Scanners have a wide choice of dpi settings, can handle both transmission and reflection materials, and there is a lower learning curve. The flat bed scanner can accommodate sizes up to 12” x 17.” Digital SLR camera: Oversize materials, objects, paintings, and other items that are too fragile or large for the flatbed scanner, may be photographed with BHS’ Canon Eos 7D. A digital camera can handle a variety of document/object types (3-D. bound, glass plates, non-flat, and oversized). The digital SLR camera requires a higher skill level. Please refer to the Canon EOS 7D manual for more detailed instructions. (more camera instructions will be added later) Digital Imaging Definitions RAW Images: A Raw image is the data output by the image sensor, converted to digital data and recorded on the card as is. With RAW images, you can use software (Adobe Photoshop) to make various adjustments as desired and then generate a JPEG, TIFF, etc. JPEG images: The JPEG file format is a compressed format, with some loss of quality during compression. TIF images:
SAA Mus
eum A
rchive
s Sec
tion W
orking
Grou
p Exa
mple

INTRODUCTION
C:\Users\mes037\Desktop\section 8\BHS Digitization_Cataloging_Manual_BrooklynHistoricalSociety.doc L. Loscutoff; Edited by Julie May Page 6 6/20/2017
TIF is a flexible, adaptable file format for handling images and data within a single file. The ability to store image data in a lossless format makes a TIF file a useful image archive, unlike standard JPEG files that lose image quality each time the image is opened. Derivative Images: Derivatives are the workhorse images used for access and reference reproduction, although not as often for publishing reproduction. When creating digital images in-house, archives can make derivative images from the digital master. To review a table summarizing important attributes for eight common image formats in use today, please click on link below: http://www.library.cornell.edu/preservation/tutorial/presentation/table7-1.html Pixel Dimensions: The horizontal and vertical measurements of an image expressed in pixels. The pixel dimensions may be determined by multiplying both the width and the height by the dpi. A digital camera will also have pixel dimensions, expressed as the number of pixels horizontally and vertically that define its resolution (e.g., 2,048 by 3,072). Calculate the dpi achieved by dividing a document's dimension into the corresponding pixel dimension against which it is aligned. An 8" x 10" document that is scanned at 300 dpi has the pixel dimensions of 2,400 pixels (8" x 300 dpi) by 3,000 pixels (10" x 300 dpi) Bit Depth: Determines the number of bits used to define each pixel. The greater the bit depth, the greater the number of tones (grayscale or color) that can be represented. Digital images may be produced in black and white (bitonal), grayscale, or color. Dynamic Range: The range of tonal difference between the lightest light and darkest dark of an image. The higher the dynamic range, the more potential shades can be represented, although the dynamic range does not automatically correlate to the number of tones reproduced. For instance, high-contrast microfilm exhibits a broad dynamic range, but renders few tones. Dynamic range also describes a digital system's ability to reproduce tonal information. This capability is most important for continuous-tone documents that exhibit smoothly varying tones, and for photographs it may be the single most important aspect of image quality.
SAA Mus
eum A
rchive
s Sec
tion W
orking
Grou
p Exa
mple
INTRODUCTION
C:\Users\mes037\Desktop\section 8\BHS Digitization_Cataloging_Manual_BrooklynHistoricalSociety.doc L. Loscutoff; Edited by Julie May Page 7 6/20/2017
Digital Imaging Definitions Compression: To reduce the image file size for storage, processing, and transmission. The file size for digital images can be quite large, taxing the computing and networking capabilities of many systems. Resolution/threshold: Increasing resolution enables the capture of finer detail. At some point, however, added resolution will not result in an appreciable gain in image quality, only larger file size. DPI: "Dots per inch", or DPI, is a term that has been around since the invention of the printer, and is a term that is used to describe the amount of ink used per pixel, or the number of ink dots in each pixel. This means that the higher the DPI the greater the quality of the image being printed, although this leads to much longer printing times as well as using a lot more ink. An example of this would be printing something at 200 DPI is 40,000 dots per inch, cutting the DPI to 100 would equate to just 10,000 dots per inch. PPI is quickly becoming the new standard though; it stands for “pixels per inch”. This definition has not been around as long as DPI, but it is a more accurate term for describing resolution. Cameras and scanners produce images at PPI larger than most websites will display. Using re-sampling and lessening the PPI, creates a more website friendly image, which is also harder for individuals to copy to their own hard drive due to low resolution. * DPI and PPI are sometimes used interchangeably. However, DPI is a print term and PPI is a digital or electronic term.
SAA Mus
eum A
rchive
s Sec
tion W
orking
Grou
p Exa
mple

Recommended Scanning Standards and Specifications
C:\Users\mes037\Desktop\section 8\BHS Digitization_Cataloging_Manual_BrooklynHistoricalSociety.doc L. Loscutoff; Edited by Julie May Page 8 6/20/2017
Introduction: The following pages describe step-by-step instructions for scanning. The table of specifications should be used as a guideline for scanning specifications. Most material types that we will digitize are included, but there will sometimes be odd sizes that need you to configure the resolution calculations on your own. Since BHS is an exhibiting institution our master image files need to be at a higher quality. The master files should be scanned at a high enough resolution, so that the output size is as large as 16” x 20” and at 300 dpi, or 8” x 10” at 600 dpi. Some Formulas to remember: Formula 1 for File Size File Size = (height x width x bit depth x dpi2) / 8 Formula 2 for File Size File Size = (pixel dimensions x bit depth) / 8
1 Kilobyte (KB) = 1,024 bytes 1 Megabyte (MB) = 1,024 KB 1 Gigabyte (GB) = 1,024 MB 1 Terabyte (TB) = 1,024 GB
Storage Formula: Total storage needed = # of image files x average size x 1.25 Also, you may need to calculate the correct scanning resolution for a 16” x 20” output at 300 dpi. This site is helpful too, http://www.scantips.com/calc.html Scanning Formula: 300ppi x length (desired print output on longest side) Example: 300ppi x 20” = 6000 = 3000ppi (original image longest side excluding borders) 2” 2
* Note that it is important to use a ruler to measure your image size – for example, 35mm film typically creates an image 36mm x 24mm, or 1.417” x 0.945.”
SAA Mus
eum A
rchive
s Sec
tion W
orking
Grou
p Exa
mple

Recommended Scanning Standards and Specifications
C:\Users\mes037\Desktop\section 8\BHS Digitization_Cataloging_Manual_BrooklynHistoricalSociety.doc L. Loscutoff; Edited by Julie May Page 9 6/20/2017
Recommended Scanning Standards and Specifications : Everything will be scanned in color (RGB), except for black-and-white glass plate negatives and black-and-white film, which will be scanned in grayscale. Master files should always be left alone, with no corrections (with the exception of 35mm slides, which might need slight cropping due to the slide trays). Access and thumbnail images can be slightly corrected and cropped (if needed). *These calculations are rounded up. Also, not all of these resolutions will be available through the scanning software, always round to the closest resolution available Please ask the Digitization Archivist or Photo Archivist if you are not sure.
Doc. Type
Size of Original
Output Size (exhibit quality) @ 300 ppi
Output Size (Access) @ 600 ppi
Spatial Resolution/master
File format/ master
Bit Depth /master
Spatial Resolution/ access
Bit Depth (access)
File Format (access and thumbnail)
Spatial Res.(thumbnail)
Bit Depth (thumb nail)
File Size (approximate) master/access
Slides 1 x 1.5” (35mm)
16” x 20” 8” x 10” 4000/4800 ppi
.tif 48 bit rgb 2000 ppi 24 bit rgb .jpg 72 ppi 16 bit rgb 1,125,000 KB/ 562,500
Ne.g.s and transp.
4 x 5” ; 8 x 10”
16” x 20” 8” x 10” 1200 ppi; 600 ppi
.tif 48 bit rgb/ 16 bit grayscale
600 ppi; 300 ppi
24 bit rgb .jpg 72 ppi 16 bit rgb/ 8 bit grayscale
1,350,000 KB/ 675,000 KB
Photo prints, negs. and transp.
5 x 7”; 10 x 14”
16” x 20” 8” x 10” 900 ppi; 400 ppi
.tif 48 bit rgb 400 ppi; 250 ppi
24 bit rgb .jpg 72 ppi 16 bit rgb 1,328,900 KB/ 664,453 KB
Photo prints, negs. and transp.
8 x 10” 16” x 20” 8” x 10” 600 ppi .tif 48 bit rgb 300 ppi
24 bit rgb .jpg 72 ppi 16 bit rgb 1,350,000 KB/ 675,000 KB
Postcard 3 ½ x 5” 16” x 20” 8” x 10” 1200 ppi .tif 48 bit rgb 600 ppi 24 bit rgb .jpg 72 ppi 16 bit rgb 1,181,250 KB/ 590,625 KB
Glass Negative
5 x 7” 16” x 20” 8” x 10” 850 ppi .tif 16 bit grayscale 400 ppi 16 bit rgb jpg 72 ppi 8 bit grayscale
1,185,351 KB/ 592,675 KB
Lantern slides
3 x 4” 6 x 8”
16” x 20” 8” x 10” 1500 ppi 720 ppi
.tif 48 bit rgb 750 ppi; 400 ppi
16 bit rgb .jpg 72 ppi 16 bit rgb 1,265,625 KB/ 632,812 KB
Printed Matter
8.5 x 11” 16” x 20” 8” x 10” 600 ppi .tif 16-bit grayscale 48 bit rgb (docs. w/ color)
250 ppi 16 bit rgb .jpg 72 ppi 16 bit rgb/ 8 bit grayscale
525,937 KB/ 262,968 KB
SAA Mus
eum A
rchive
s Sec
tion W
orking
Grou
p Exa
mple

Recommended Scanning Standards and Specifications
C:\Users\mes037\Desktop\section 8\BHS Digitization_Cataloging_Manual_BrooklynHistoricalSociety.doc L. Loscutoff; Edited by Julie May Page 10 6/20/2017
Before you begin to digitize a collection it is good to write up a plan beforehand. Some collections will be more complicated than others, so making up a digitization/processing plan will make the process more efficient and streamlined. This plan will be approved by supervisor(s) before the digitization begins. The template below is how to frame the digitization/processing plan. Digitization/Processing plan Template: [Collection title, with date range] I. Collection Processing/Digitization Plan Accession #(s):
Related collections (if applicable): Current arrangement and condition: Does the collection need more arrangement and description? Are there preservation issues with the collection? Current description:
AT Resource? Emma? Finding aid on p drive? N
HDI MARC record? (If so, cite file name found at L:\p_drive\Archivists' Toolkit\HDI MARC RECORDS)
SAA Mus
eum A
rchive
s Sec
tion W
orking
Grou
p Exa
mple

Recommended Scanning Standards and Specifications
C:\Users\mes037\Desktop\section 8\BHS Digitization_Cataloging_Manual_BrooklynHistoricalSociety.doc L. Loscutoff; Edited by Julie May Page 11 6/20/2017
Proposed digitization plan: Format types and size? Resolution? Flatbed scanner or digital SLR camera? II. Outcome in relation to plan (post-processing assessment):
SAA Mus
eum A
rchive
s Sec
tion W
orking
Grou
p Exa
mple
HOW TO SCAN INDIVIDUAL IMAGES
C:\Users\mes037\Desktop\section 8\BHS Digitization_Cataloging_Manual_BrooklynHistoricalSociety.doc L. Loscutoff; Edited by Julie May Page 12 6/20/2017
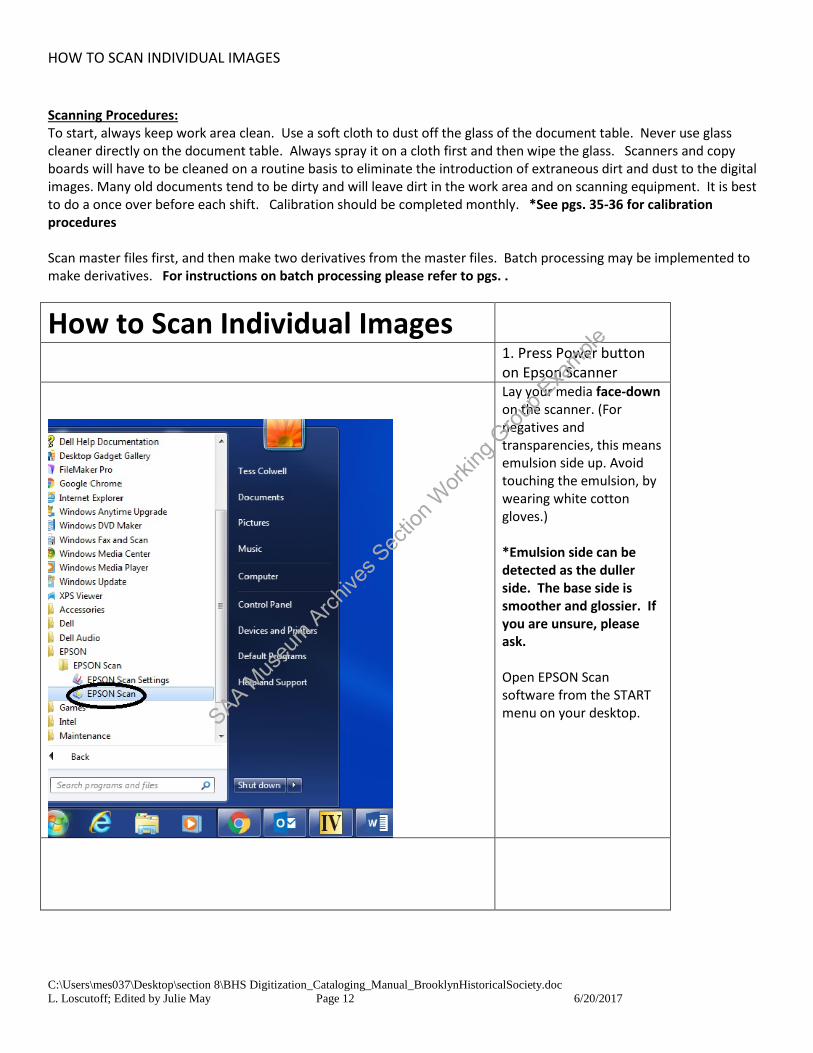
Scanning Procedures: To start, always keep work area clean. Use a soft cloth to dust off the glass of the document table. Never use glass cleaner directly on the document table. Always spray it on a cloth first and then wipe the glass. Scanners and copy boards will have to be cleaned on a routine basis to eliminate the introduction of extraneous dirt and dust to the digital images. Many old documents tend to be dirty and will leave dirt in the work area and on scanning equipment. It is best to do a once over before each shift. Calibration should be completed monthly. *See pgs. 35-36 for calibration procedures Scan master files first, and then make two derivatives from the master files. Batch processing may be implemented to make derivatives. For instructions on batch processing please refer to pgs. .
How to Scan Individual Images
1. Press Power button on Epson Scanner
Lay your media face-down on the scanner. (For negatives and transparencies, this means emulsion side up. Avoid touching the emulsion, by wearing white cotton gloves.) *Emulsion side can be detected as the duller side. The base side is smoother and glossier. If you are unsure, please ask. Open EPSON Scan software from the START menu on your desktop.
SAA Mus
eum A
rchive
s Sec
tion W
orking
Grou
p Exa
mple

HOW TO SCAN INDIVIDUAL IMAGES
C:\Users\mes037\Desktop\section 8\BHS Digitization_Cataloging_Manual_BrooklynHistoricalSociety.doc L. Loscutoff; Edited by Julie May Page 13 6/20/2017
2. Choose “professional” mode
The scanner software will open. Your scan software may vary in appearance, but should have all the same basic functions and choices. Choose “Professional” mode. Make sure that under “Preview” “normal” is selected rather than thumbnail.
3. Choose type of media.
What kind of media are you scanning? Choose “Reflective” for print media, and “Film” for any sort of film or transparency. *Try to always digitize similar formats together, so that the settings are the same. This will make digitization more efficient.
SAA Mus
eum A
rchive
s Sec
tion W
orking
Grou
p Exa
mple
HOW TO SCAN INDIVIDUAL IMAGES
C:\Users\mes037\Desktop\section 8\BHS Digitization_Cataloging_Manual_BrooklynHistoricalSociety.doc L. Loscutoff; Edited by Julie May Page 14 6/20/2017
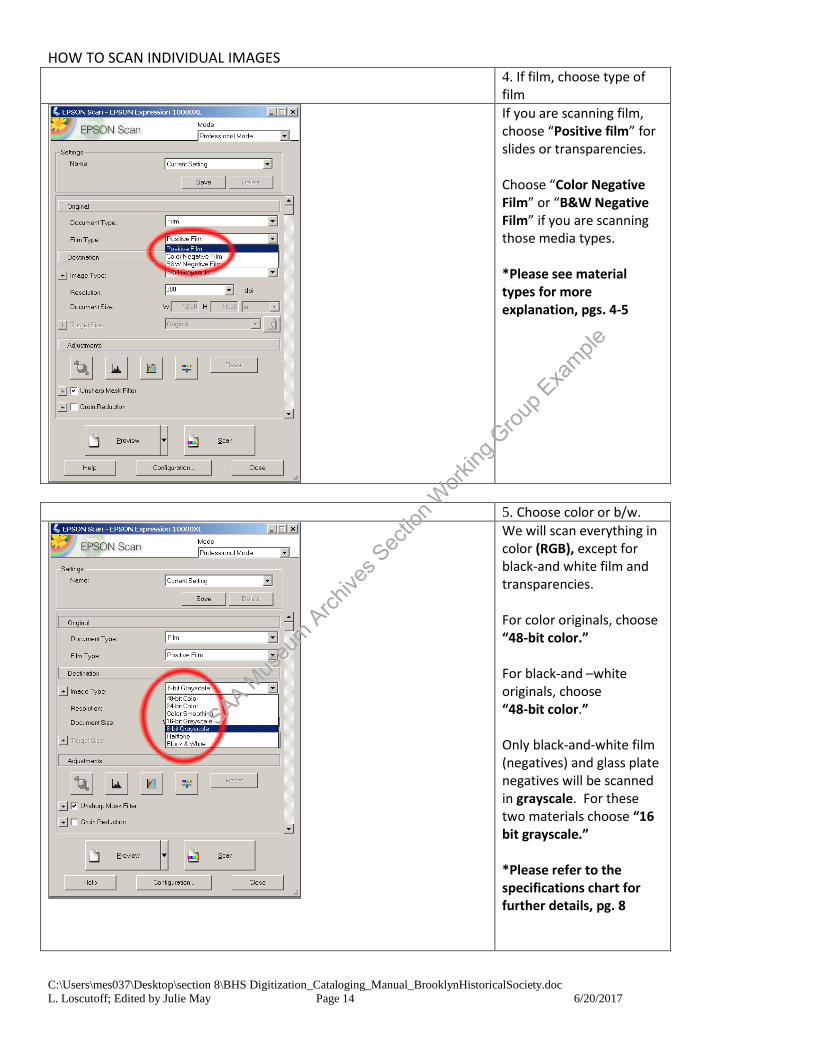
4. If film, choose type of film
If you are scanning film, choose “Positive film” for slides or transparencies. Choose “Color Negative Film” or “B&W Negative Film” if you are scanning those media types. *Please see material types for more explanation, pgs. 4-5
5. Choose color or b/w.
We will scan everything in color (RGB), except for black-and white film and transparencies. For color originals, choose “48-bit color.” For black-and –white originals, choose “48-bit color.” Only black-and-white film (negatives) and glass plate negatives will be scanned in grayscale. For these two materials choose “16 bit grayscale.” *Please refer to the specifications chart for further details, pg. 8
SAA Mus
eum A
rchive
s Sec
tion W
orking
Grou
p Exa
mple
HOW TO SCAN INDIVIDUAL IMAGES
C:\Users\mes037\Desktop\section 8\BHS Digitization_Cataloging_Manual_BrooklynHistoricalSociety.doc L. Loscutoff; Edited by Julie May Page 15 6/20/2017
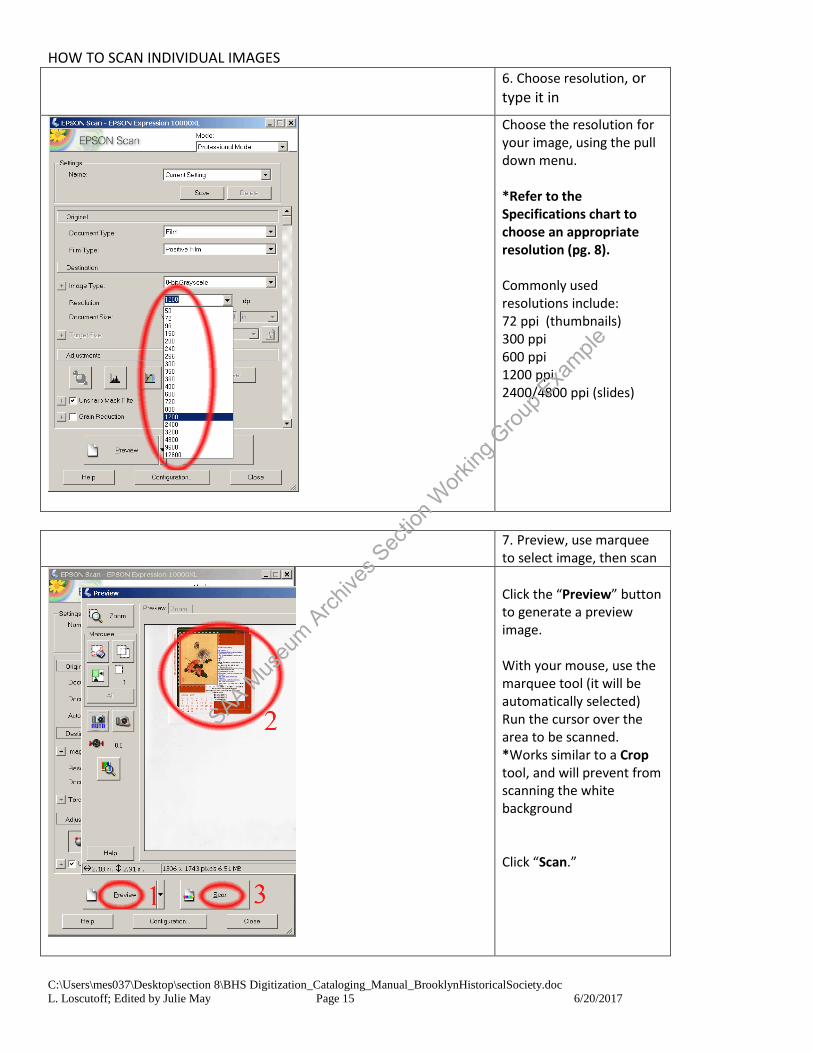
6. Choose resolution, or type it in
Choose the resolution for your image, using the pull down menu. *Refer to the Specifications chart to choose an appropriate resolution (pg. 8). Commonly used resolutions include: 72 ppi (thumbnails) 300 ppi 600 ppi 1200 ppi 2400/4800 ppi (slides)
7. Preview, use marquee
to select image, then scan
Click the “Preview” button to generate a preview image. With your mouse, use the marquee tool (it will be automatically selected) Run the cursor over the area to be scanned. *Works similar to a Crop tool, and will prevent from scanning the white background Click “Scan.”
SAA Mus
eum A
rchive
s Sec
tion W
orking
Grou
p Exa
mple
HOW TO SCAN INDIVIDUAL IMAGES
C:\Users\mes037\Desktop\section 8\BHS Digitization_Cataloging_Manual_BrooklynHistoricalSociety.doc L. Loscutoff; Edited by Julie May Page 16 6/20/2017
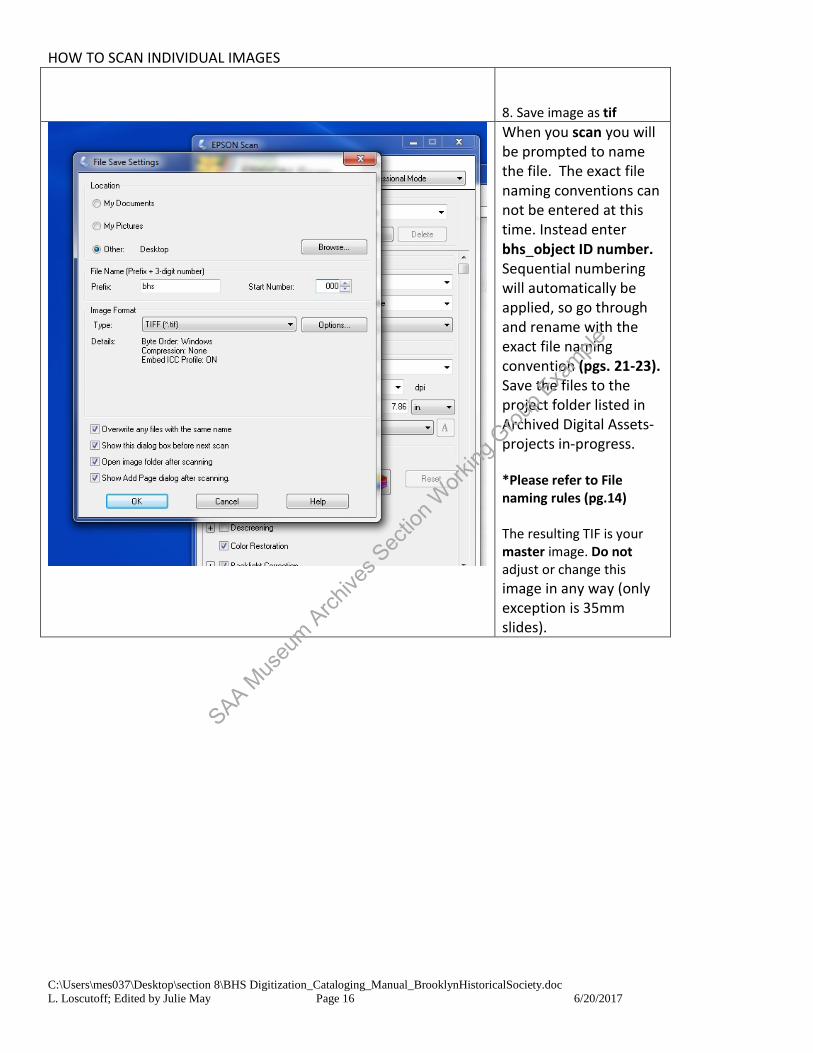
8. Save image as tif
When you scan you will be prompted to name the file. The exact file naming conventions can not be entered at this time. Instead enter bhs_object ID number. Sequential numbering will automatically be applied, so go through and rename with the exact file naming convention (pgs. 21-23). Save the files to the project folder listed in Archived Digital Assets-projects in-progress. *Please refer to File naming rules (pg.14) The resulting TIF is your master image. Do not adjust or change this image in any way (only exception is 35mm slides).
SAA Mus
eum A
rchive
s Sec
tion W
orking
Grou
p Exa
mple
HOW TO SCAN MULTIPLE IMAGES
C:\Users\mes037\Desktop\section 8\BHS Digitization_Cataloging_Manual_BrooklynHistoricalSociety.doc L. Loscutoff; Edited by Julie May Page 17 6/20/2017
Scanning Procedures for Multiple Items: If you’re working with photos or film, you can place multiple images on the scanner, and then scan them all at once (instead of one-by-one) with the Epson 10000 XL photo scanner. This will allow you to quickly digitize a larger number of images. Smaller sizes can be scanned together (i.e., 5 x 4 photos and 35mm color slides).
How to Scan Multiple Images
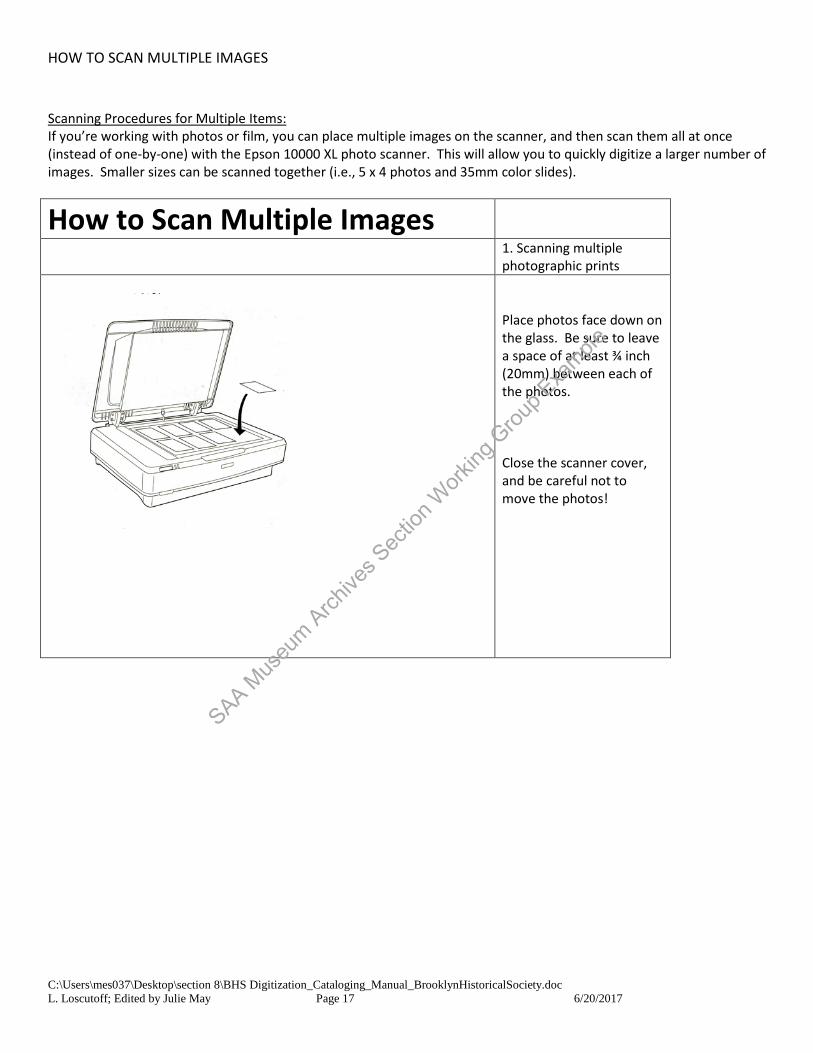
1. Scanning multiple photographic prints
Place photos face down on the glass. Be sure to leave a space of at least ¾ inch (20mm) between each of the photos. Close the scanner cover, and be careful not to move the photos!
SAA Mus
eum A
rchive
s Sec
tion W
orking
Grou
p Exa
mple

HOW TO SCAN MULTIPLE IMAGES
C:\Users\mes037\Desktop\section 8\BHS Digitization_Cataloging_Manual_BrooklynHistoricalSociety.doc L. Loscutoff; Edited by Julie May Page 18 6/20/2017
2. Scanning film, film
strips, and slides
*When scanning transparencies and film make sure that the white reflective document mat is removed and placed in the storage pocket, located on top of the scanning unit. Use the film holders that came with the scanner. -35mm slides -35mm film strips -4x5 “ film -Medium format film Place the film holder on a flat surface. Open its cover (if it has one), then load the film with its shiny side face-down and the film emulsion layer face-up. *Emulsion side can be detected as the duller side. The base side is smoother and glossier. If you are unsure, please ask.
SAA Mus
eum A
rchive
s Sec
tion W
orking
Grou
p Exa
mple
HOW TO SCAN MULTIPLE IMAGES
C:\Users\mes037\Desktop\section 8\BHS Digitization_Cataloging_Manual_BrooklynHistoricalSociety.doc L. Loscutoff; Edited by Julie May Page 19 6/20/2017
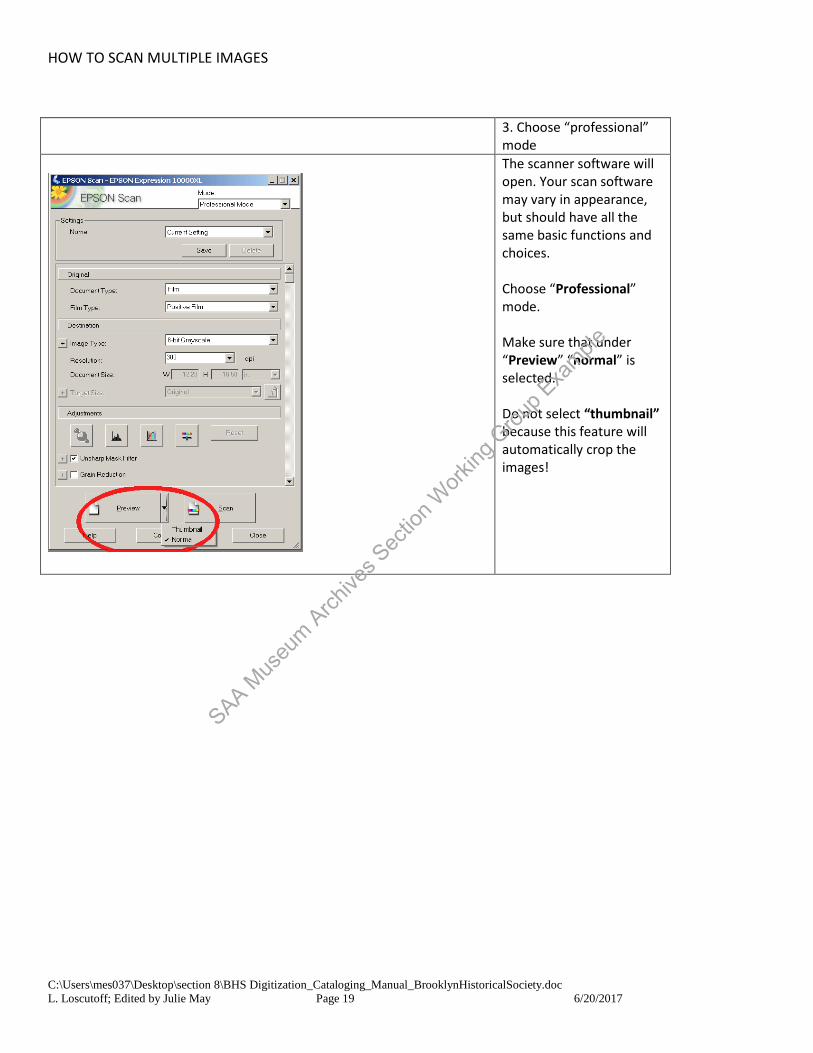
3. Choose “professional”
mode
The scanner software will open. Your scan software may vary in appearance, but should have all the same basic functions and choices. Choose “Professional” mode. Make sure that under “Preview” “normal” is selected. Do not select “thumbnail” because this feature will automatically crop the images!
SAA Mus
eum A
rchive
s Sec
tion W
orking
Grou
p Exa
mple
HOW TO SCAN MULTIPLE IMAGES
C:\Users\mes037\Desktop\section 8\BHS Digitization_Cataloging_Manual_BrooklynHistoricalSociety.doc L. Loscutoff; Edited by Julie May Page 20 6/20/2017
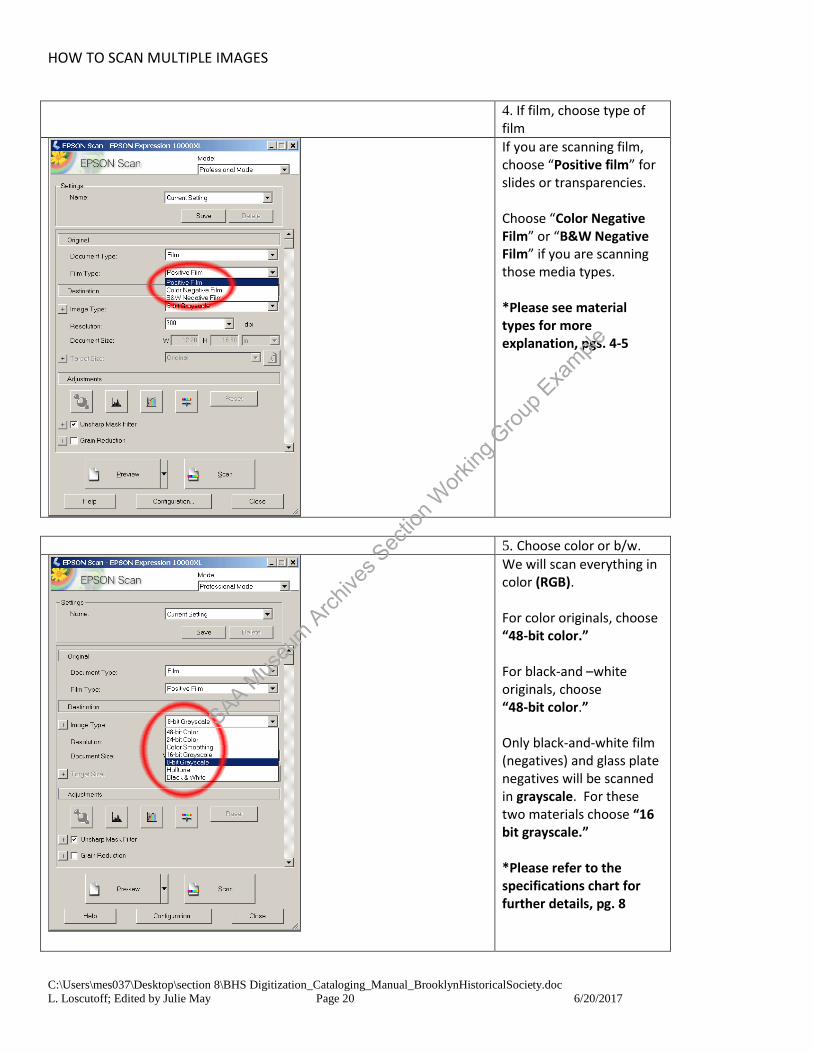
4. If film, choose type of
film
If you are scanning film, choose “Positive film” for slides or transparencies. Choose “Color Negative Film” or “B&W Negative Film” if you are scanning those media types. *Please see material types for more explanation, pgs. 4-5
5. Choose color or b/w.
We will scan everything in color (RGB). For color originals, choose “48-bit color.” For black-and –white originals, choose “48-bit color.” Only black-and-white film (negatives) and glass plate negatives will be scanned in grayscale. For these two materials choose “16 bit grayscale.” *Please refer to the specifications chart for further details, pg. 8
SAA Mus
eum A
rchive
s Sec
tion W
orking
Grou
p Exa
mple
HOW TO SCAN MULTIPLE IMAGES
C:\Users\mes037\Desktop\section 8\BHS Digitization_Cataloging_Manual_BrooklynHistoricalSociety.doc L. Loscutoff; Edited by Julie May Page 21 6/20/2017
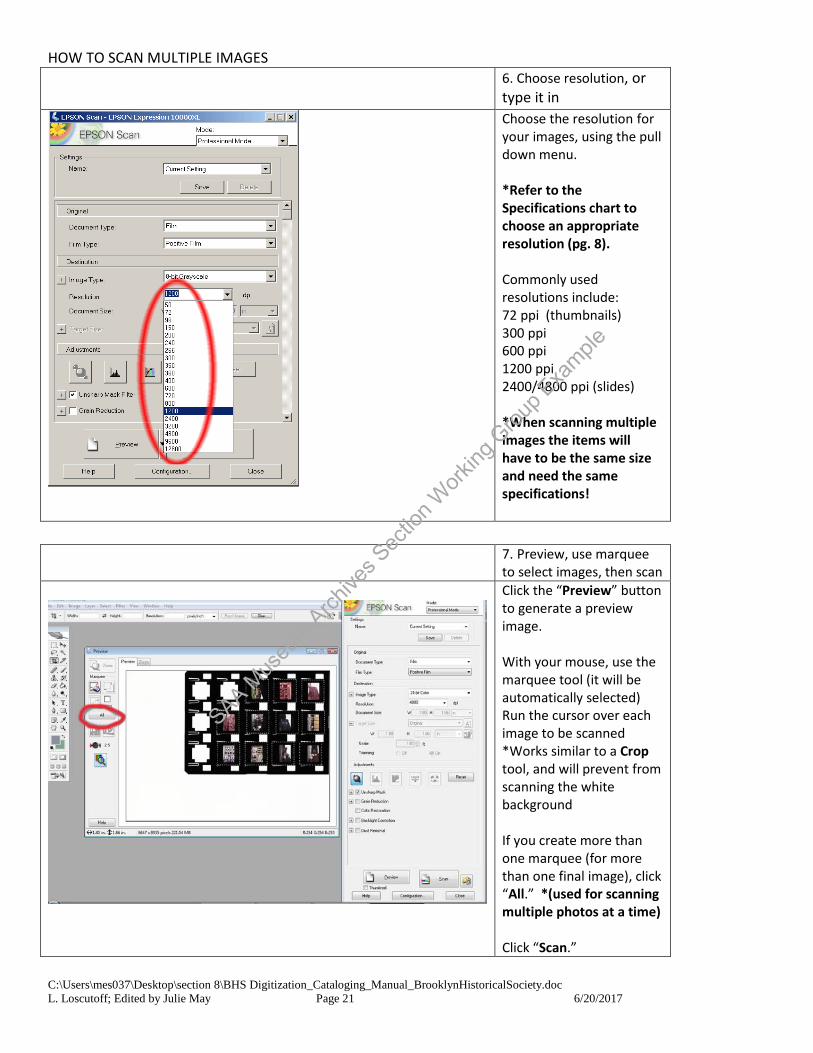
6. Choose resolution, or type it in
Choose the resolution for your images, using the pull down menu. *Refer to the Specifications chart to choose an appropriate resolution (pg. 8). Commonly used resolutions include: 72 ppi (thumbnails) 300 ppi 600 ppi 1200 ppi 2400/4800 ppi (slides) *When scanning multiple images the items will have to be the same size and need the same specifications!
7. Preview, use marquee
to select images, then scan
Click the “Preview” button to generate a preview image. With your mouse, use the marquee tool (it will be automatically selected) Run the cursor over each image to be scanned *Works similar to a Crop tool, and will prevent from scanning the white background If you create more than one marquee (for more than one final image), click “All.” *(used for scanning multiple photos at a time) Click “Scan.”
SAA Mus
eum A
rchive
s Sec
tion W
orking
Grou
p Exa
mple
HOW TO SCAN MULTIPLE IMAGES
C:\Users\mes037\Desktop\section 8\BHS Digitization_Cataloging_Manual_BrooklynHistoricalSociety.doc L. Loscutoff; Edited by Julie May Page 22 6/20/2017
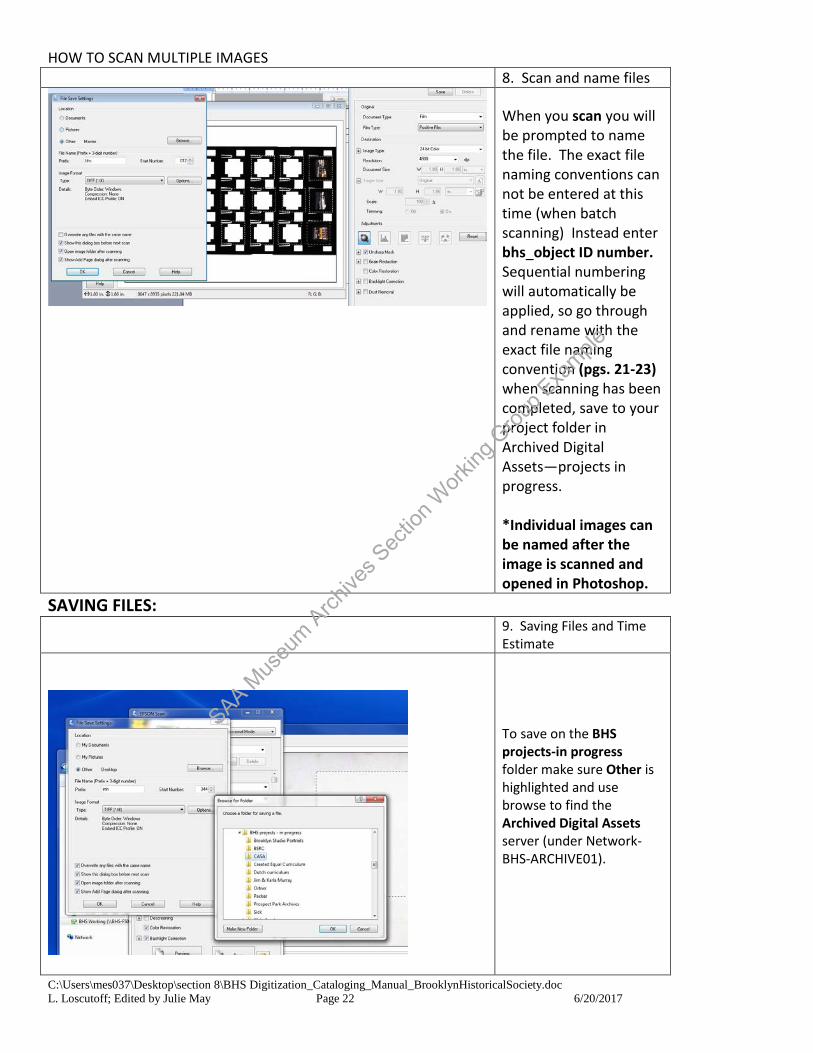
8. Scan and name files
When you scan you will be prompted to name the file. The exact file naming conventions can not be entered at this time (when batch scanning) Instead enter bhs_object ID number. Sequential numbering will automatically be applied, so go through and rename with the exact file naming convention (pgs. 21-23) when scanning has been completed, save to your project folder in Archived Digital Assets—projects in progress. *Individual images can be named after the image is scanned and opened in Photoshop.
SAVING FILES: 9. Saving Files and Time
Estimate
To save on the BHS projects-in progress folder make sure Other is highlighted and use browse to find the Archived Digital Assets server (under Network-BHS-ARCHIVE01).
SAA Mus
eum A
rchive
s Sec
tion W
orking
Grou
p Exa
mple
HOW TO SCAN MULTIPLE IMAGES
C:\Users\mes037\Desktop\section 8\BHS Digitization_Cataloging_Manual_BrooklynHistoricalSociety.doc L. Loscutoff; Edited by Julie May Page 23 6/20/2017
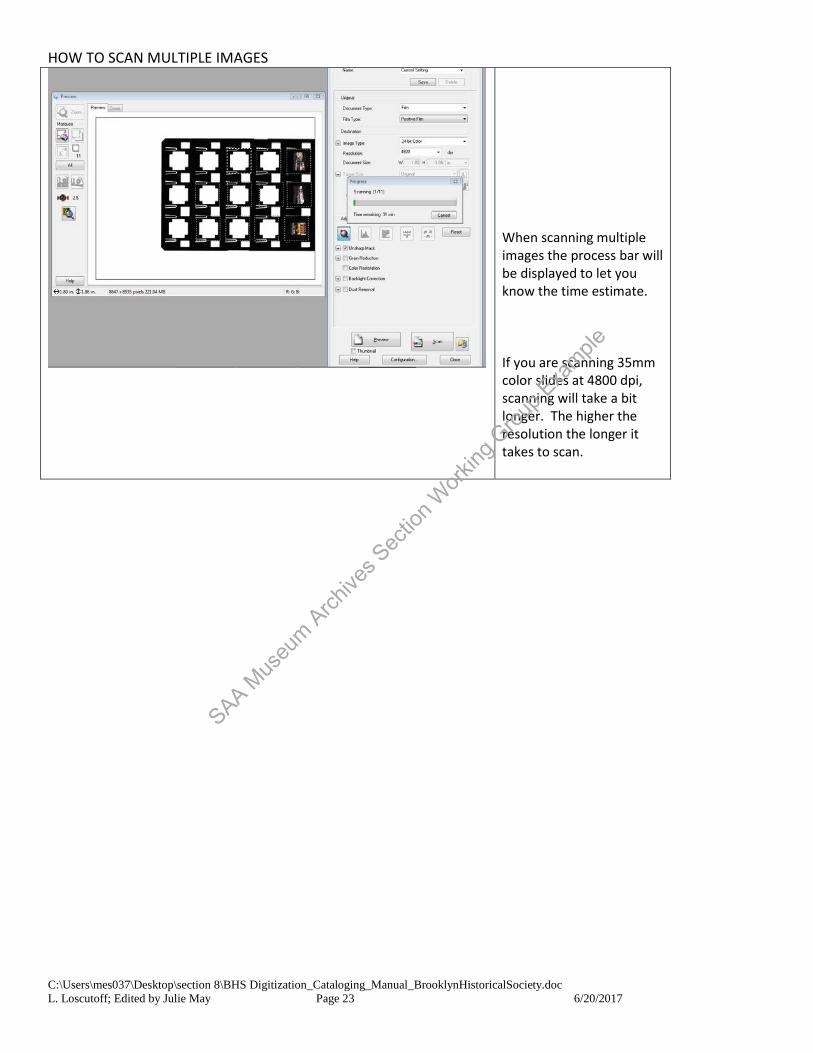
When scanning multiple images the process bar will be displayed to let you know the time estimate. If you are scanning 35mm color slides at 4800 dpi, scanning will take a bit longer. The higher the resolution the longer it takes to scan.
SAA Mus
eum A
rchive
s Sec
tion W
orking
Grou
p Exa
mple
DIGITIZATION LOG AND QUALITY ASSURANCE
C:\Users\mes037\Desktop\section 8\BHS Digitization_Cataloging_Manual_BrooklynHistoricalSociety.doc L. Loscutoff; Edited by Julie May Page 24 6/20/2017
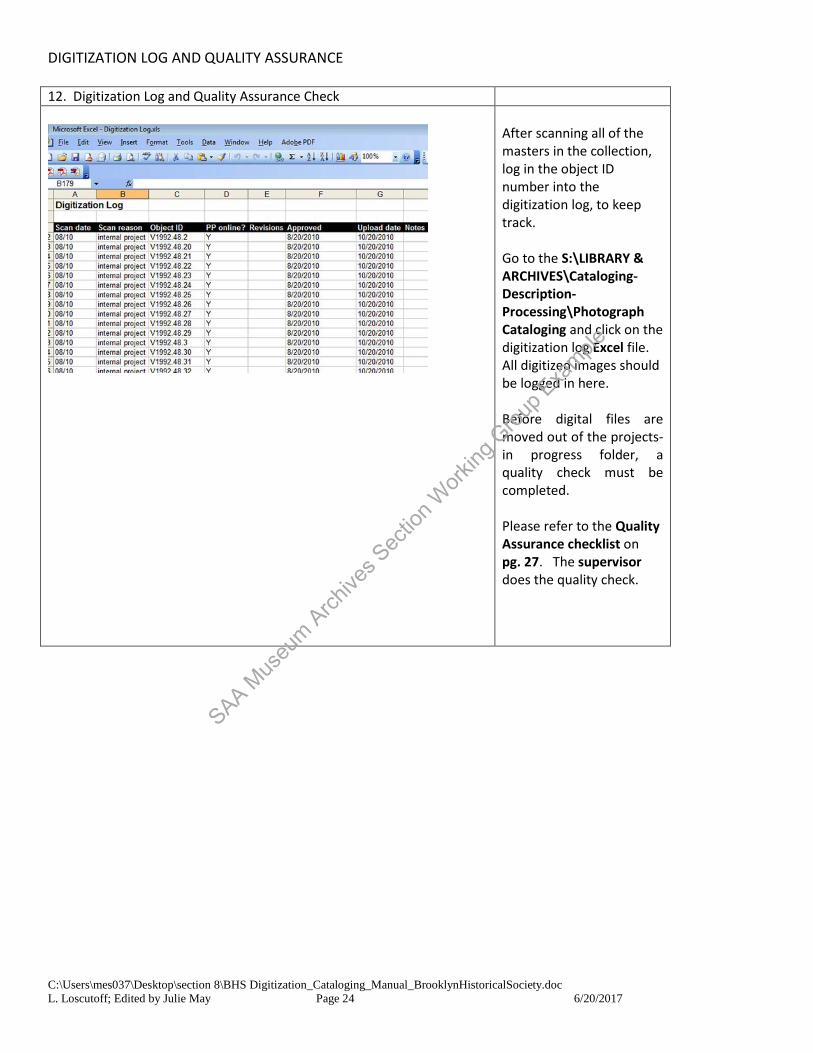
12. Digitization Log and Quality Assurance Check
After scanning all of the masters in the collection, log in the object ID number into the digitization log, to keep track. Go to the S:\LIBRARY & ARCHIVES\Cataloging-Description-Processing\Photograph Cataloging and click on the digitization log Excel file. All digitized images should be logged in here. Before digital files are moved out of the projects-in progress folder, a quality check must be completed. Please refer to the Quality Assurance checklist on pg. 27. The supervisor does the quality check.
SAA Mus
eum A
rchive
s Sec
tion W
orking
Grou
p Exa
mple

DIGITIZATION QUALITY ASSURANCE CHECKLIST
C:\Users\mes037\Desktop\section 8\BHS Digitization_Cataloging_Manual_BrooklynHistoricalSociety.doc L. Loscutoff; Edited by Julie May Page 25 6/20/2017
1. Image is correct size/ resolution in long dimension ______
2. File name is correct ______ Master file name: bhs_[existing object id]_u.tif Access file: bhs_[existing object id]_a.jpg Thumbnail file: bhs_[ existing object id]_t.jpg
3. File format is correct ______
Archive file = tif Access and thumbnail = jpg
4. Image is in correct mode (ie., 8bit grayscale; see recommendations pgs.8-10 ) ______
5. Image is cropped properly ______ (Master image should show borders and color bar)
6. Image is not rotated or backwards ______
7. Image is not skewed or not centered ______ 8. Lack of sharpness/excessive sharpening ______ Tonal and other quality: 9. Overall too light or too dark ______ 10. Image dull or no tonal variation ______ 11. Uneven tonal values or flare ______ 12. Loss of detail in highlights or shadow ______
SAA Mus
eum A
rchive
s Sec
tion W
orking
Grou
p Exa
mple
SPECIAL CASES
C:\Users\mes037\Desktop\section 8\BHS Digitization_Cataloging_Manual_BrooklynHistoricalSociety.doc L. Loscutoff; Edited by Julie May Page 26 6/20/2017
File Naming Rules
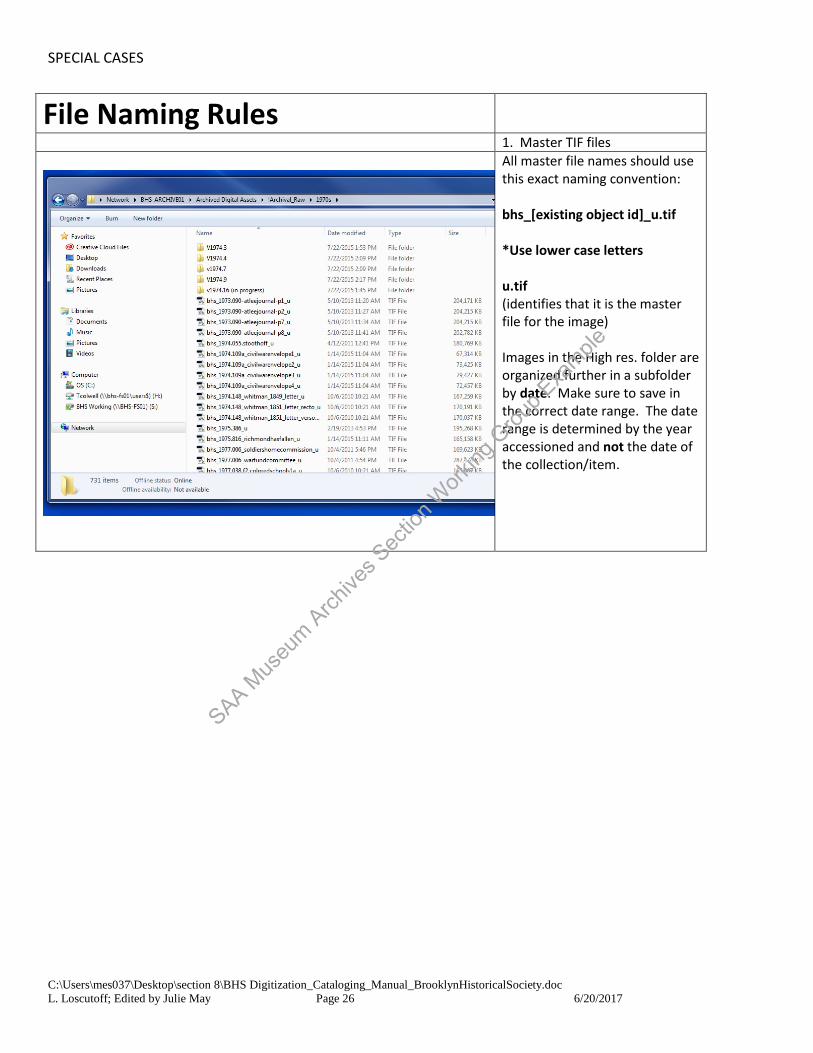
1. Master TIF files
All master file names should use this exact naming convention: bhs_[existing object id]_u.tif *Use lower case letters u.tif (identifies that it is the master file for the image) Images in the High res. folder are organized further in a subfolder by date. Make sure to save in the correct date range. The date range is determined by the year accessioned and not the date of the collection/item.
SAA Mus
eum A
rchive
s Sec
tion W
orking
Grou
p Exa
mple
SPECIAL CASES
C:\Users\mes037\Desktop\section 8\BHS Digitization_Cataloging_Manual_BrooklynHistoricalSociety.doc L. Loscutoff; Edited by Julie May Page 27 6/20/2017
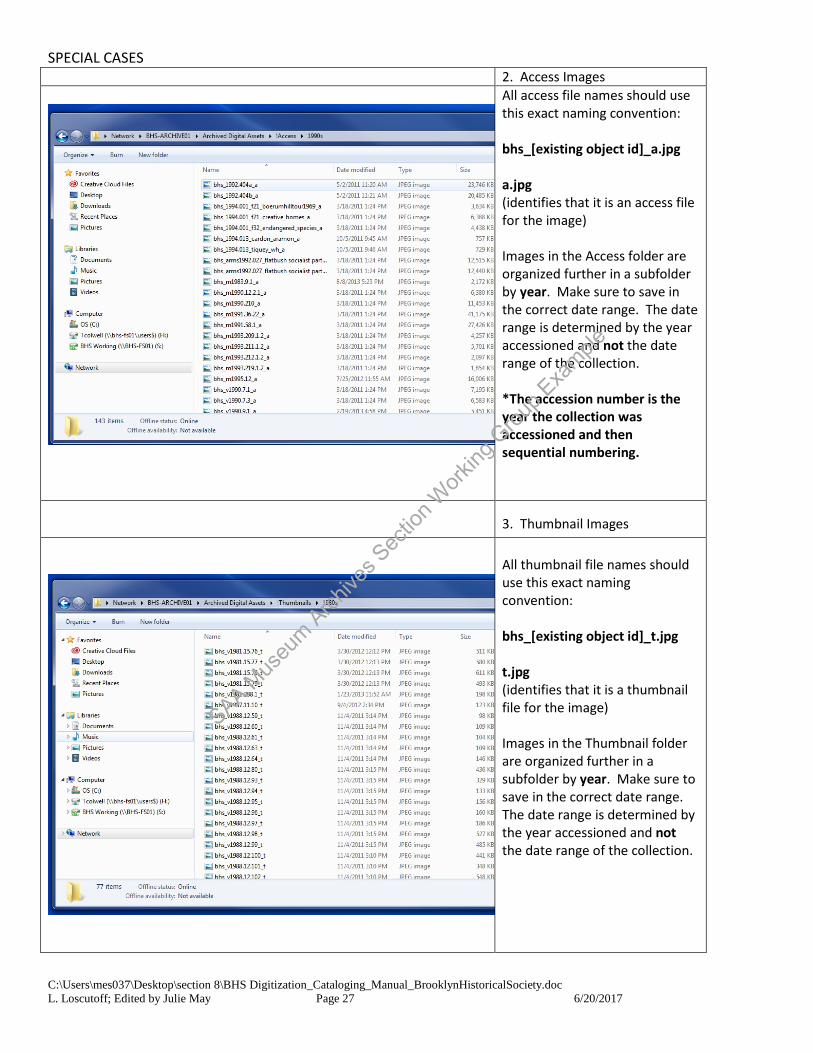
2. Access Images
All access file names should use this exact naming convention: bhs_[existing object id]_a.jpg a.jpg (identifies that it is an access file for the image) Images in the Access folder are organized further in a subfolder by year. Make sure to save in the correct date range. The date range is determined by the year accessioned and not the date range of the collection. *The accession number is the year the collection was accessioned and then sequential numbering.
3. Thumbnail Images
All thumbnail file names should use this exact naming convention: bhs_[existing object id]_t.jpg t.jpg (identifies that it is a thumbnail file for the image) Images in the Thumbnail folder are organized further in a subfolder by year. Make sure to save in the correct date range. The date range is determined by the year accessioned and not the date range of the collection.
SAA Mus
eum A
rchive
s Sec
tion W
orking
Grou
p Exa
mple

SPECIAL CASES
C:\Users\mes037\Desktop\section 8\BHS Digitization_Cataloging_Manual_BrooklynHistoricalSociety.doc L. Loscutoff; Edited by Julie May Page 28 6/20/2017
FILE NAMING RULES 4. Watermarked Images
All thumbnail files will then need to be watermarked, before being published online (Same resolution and file size). All watermarked file names should use this exact naming convention: bhs_[existing object id]_w.jpg w.jpg (identifies that it is a watermarked file for the image) Again, these are organized by accession dates in the subfolders. The BHS watermark image can be found on the _s drive. You can save your own copy on the desktop for quick reference.
SAA Mus
eum A
rchive
s Sec
tion W
orking
Grou
p Exa
mple

SPECIAL CASES
C:\Users\mes037\Desktop\section 8\BHS Digitization_Cataloging_Manual_BrooklynHistoricalSociety.doc L. Loscutoff; Edited by Julie May Page 29 6/20/2017
Duplicate Copies – Scanning, Filenaming and Cataloging: Scanning:
• Scan the original photograph and make the usual derivatives. • If multiple prints were made at the same time, scan the print with the best tonal range, best physical condition,
more complete or no crop. Filenaming:
• Remove alphabetical suffixes that indicate 1st copy, 2nd copy, 3rd copy etc. (e.g. v1973.5.878a.jpg) • Add a numerical suffix to identify and indicate the copy that was scanned for the record (e.g. v1973.5.878-3.jpg
– indicates copy #3) PastPerfect description record:
• Indicate in description field how many copies exist of that same photograph (e.g. There are 7 duplicate, modern copies in the file).
• Remove alphabetical suffix from the object id field. The object id should not have any suffix (e.g. v1973.5.878) Albums – File naming:
• Scan each page of the album and assign each page a number. • In addition to the album page scan, if there are multiple images on one album page, scan each image separately
and add a numerical suffix to identify the image.
Ex. Album page scan file name: v1973.5.2.6.jpg – indicates page 6 of the second album in accession v1973.5 Image on album page: v1973.5.2.6-3.jpg – indicates image 3 on album page 6 of album number 2 in accession v1973.5
SAA Mus
eum A
rchive
s Sec
tion W
orking
Grou
p Exa
mple
SPECIAL CASES
C:\Users\mes037\Desktop\section 8\BHS Digitization_Cataloging_Manual_BrooklynHistoricalSociety.doc L. Loscutoff; Edited by Julie May Page 30 6/20/2017
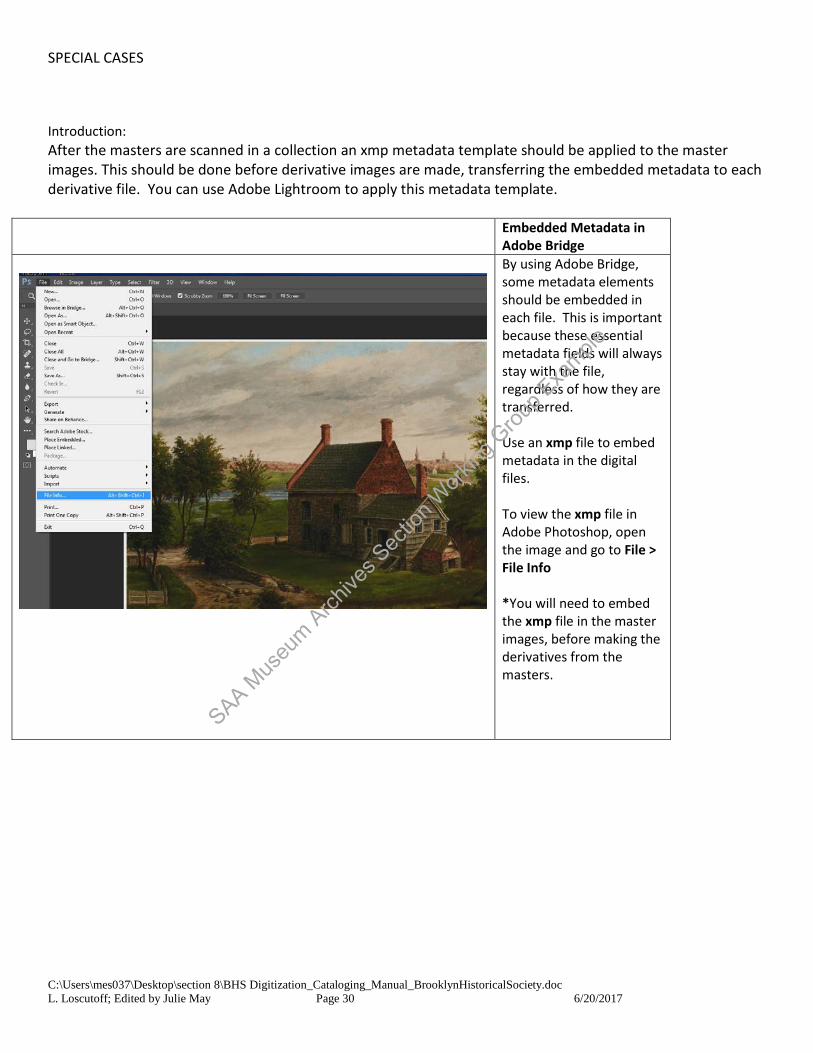
Introduction: After the masters are scanned in a collection an xmp metadata template should be applied to the master images. This should be done before derivative images are made, transferring the embedded metadata to each derivative file. You can use Adobe Lightroom to apply this metadata template.
Embedded Metadata in Adobe Bridge
By using Adobe Bridge, some metadata elements should be embedded in each file. This is important because these essential metadata fields will always stay with the file, regardless of how they are transferred. Use an xmp file to embed metadata in the digital files. To view the xmp file in Adobe Photoshop, open the image and go to File > File Info *You will need to embed the xmp file in the master images, before making the derivatives from the masters.
SAA Mus
eum A
rchive
s Sec
tion W
orking
Grou
p Exa
mple
EMBEDDED METADATA
C:\Users\mes037\Desktop\section 8\BHS Digitization_Cataloging_Manual_BrooklynHistoricalSociety.doc L. Loscutoff; Edited by Julie May Page 31 6/20/2017
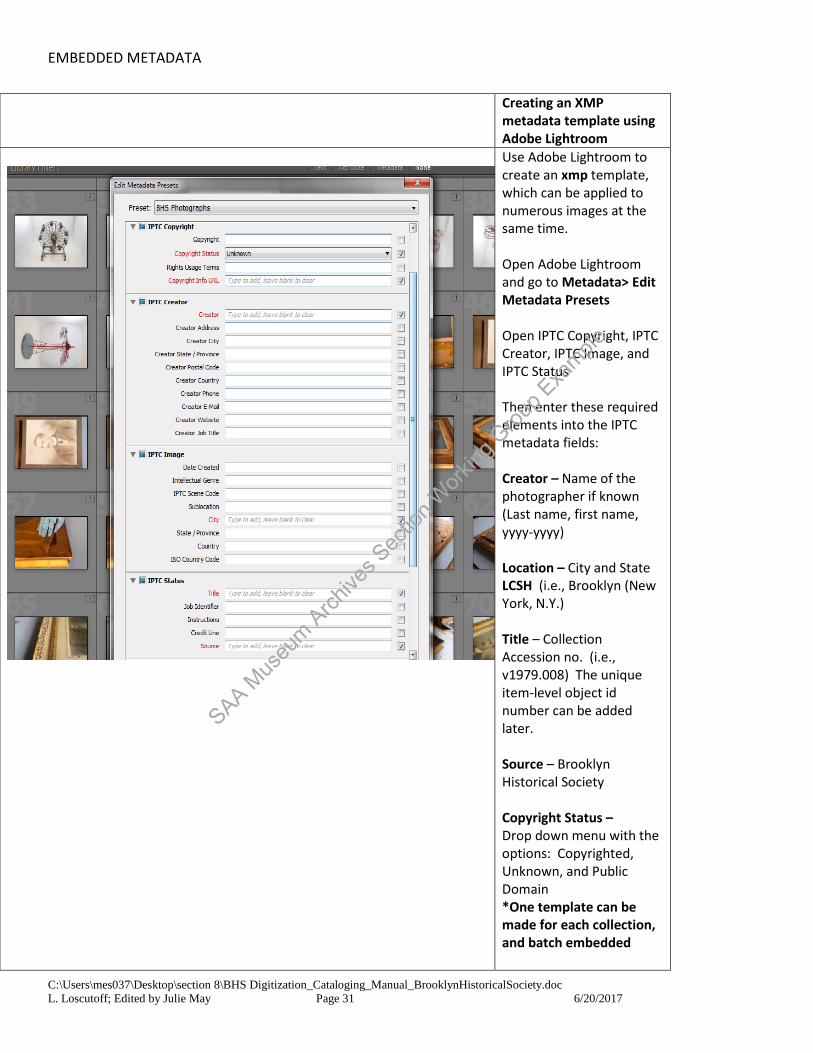
Creating an XMP
metadata template using Adobe Lightroom
Use Adobe Lightroom to create an xmp template, which can be applied to numerous images at the same time. Open Adobe Lightroom and go to Metadata> Edit Metadata Presets Open IPTC Copyright, IPTC Creator, IPTC Image, and IPTC Status Then enter these required elements into the IPTC metadata fields: Creator – Name of the photographer if known (Last name, first name, yyyy-yyyy) Location – City and State LCSH (i.e., Brooklyn (New York, N.Y.) Title – Collection Accession no. (i.e., v1979.008) The unique item-level object id number can be added later. Source – Brooklyn Historical Society Copyright Status – Drop down menu with the options: Copyrighted, Unknown, and Public Domain *One template can be made for each collection, and batch embedded
SAA Mus
eum A
rchive
s Sec
tion W
orking
Grou
p Exa
mple
EMBEDDED METADATA
C:\Users\mes037\Desktop\section 8\BHS Digitization_Cataloging_Manual_BrooklynHistoricalSociety.doc L. Loscutoff; Edited by Julie May Page 32 6/20/2017
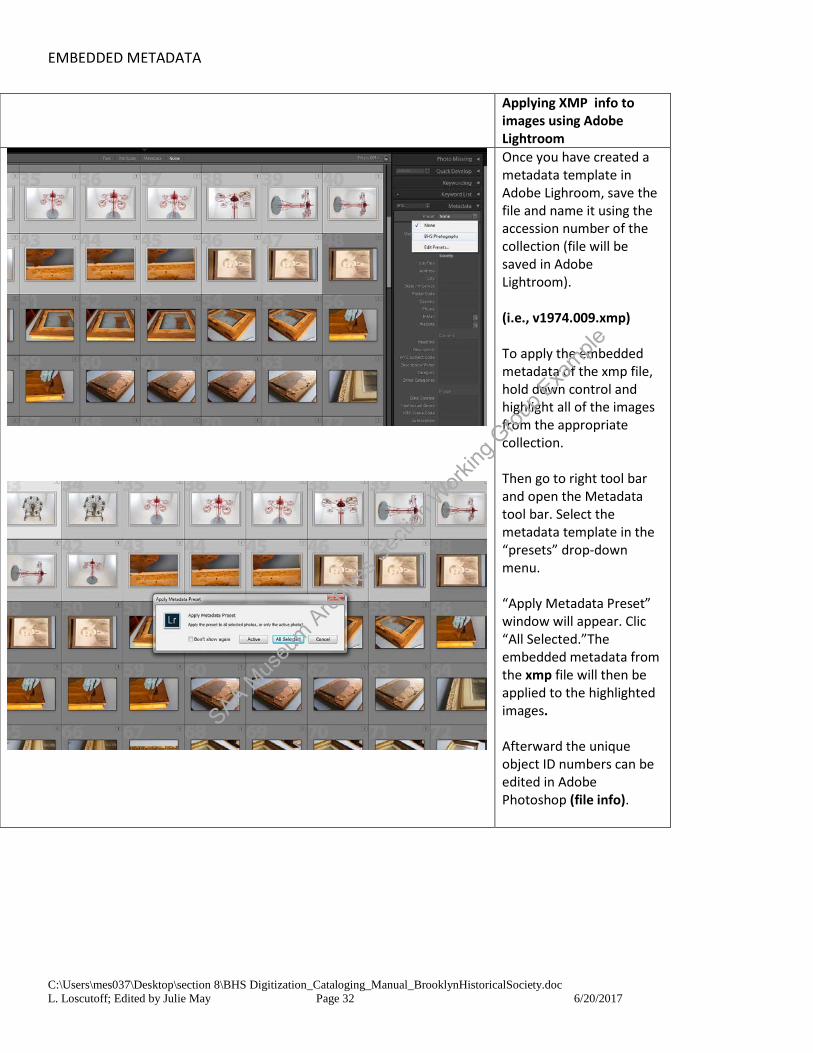
Applying XMP info to
images using Adobe Lightroom
Once you have created a metadata template in Adobe Lighroom, save the file and name it using the accession number of the collection (file will be saved in Adobe Lightroom). (i.e., v1974.009.xmp) To apply the embedded metadata of the xmp file, hold down control and highlight all of the images from the appropriate collection. Then go to right tool bar and open the Metadata tool bar. Select the metadata template in the “presets” drop-down menu. “Apply Metadata Preset” window will appear. Clic “All Selected.”The embedded metadata from the xmp file will then be applied to the highlighted images. Afterward the unique object ID numbers can be edited in Adobe Photoshop (file info).
SAA Mus
eum A
rchive
s Sec
tion W
orking
Grou
p Exa
mple

EMBEDDED METADATA
C:\Users\mes037\Desktop\section 8\BHS Digitization_Cataloging_Manual_BrooklynHistoricalSociety.doc L. Loscutoff; Edited by Julie May Page 33 6/20/2017
SAA Mus
eum A
rchive
s Sec
tion W
orking
Grou
p Exa
mple
MAKING DERIVATIVE COPIES
C:\Users\mes037\Desktop\section 8\BHS Digitization_Cataloging_Manual_BrooklynHistoricalSociety.doc L. Loscutoff; Edited by Julie May Page 34 6/20/2017
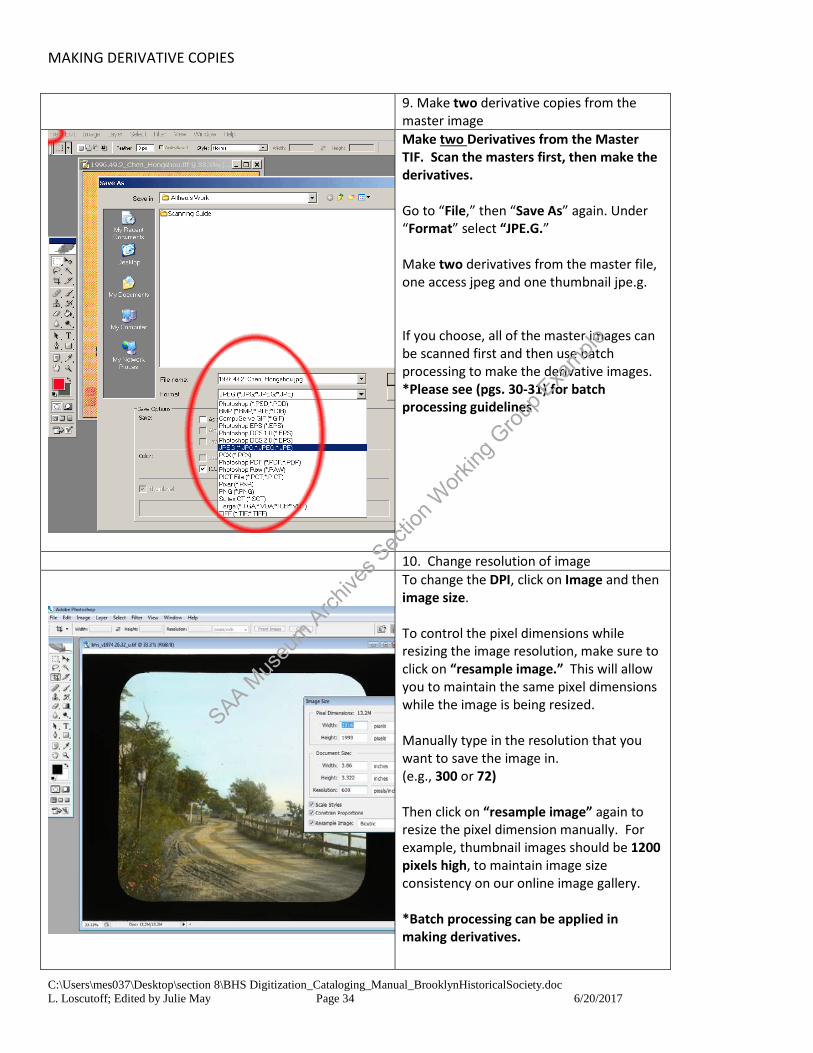
9. Make two derivative copies from the
master image
Make two Derivatives from the Master TIF. Scan the masters first, then make the derivatives. Go to “File,” then “Save As” again. Under “Format” select “JPE.G.” Make two derivatives from the master file, one access jpeg and one thumbnail jpe.g. If you choose, all of the master images can be scanned first and then use batch processing to make the derivative images. *Please see (pgs. 30-31) for batch processing guidelines
10. Change resolution of image
To change the DPI, click on Image and then image size. To control the pixel dimensions while resizing the image resolution, make sure to click on “resample image.” This will allow you to maintain the same pixel dimensions while the image is being resized. Manually type in the resolution that you want to save the image in. (e.g., 300 or 72) Then click on “resample image” again to resize the pixel dimension manually. For example, thumbnail images should be 1200 pixels high, to maintain image size consistency on our online image gallery. *Batch processing can be applied in making derivatives.
SAA Mus
eum A
rchive
s Sec
tion W
orking
Grou
p Exa
mple
MAKING DERIVATIVE COPIES
C:\Users\mes037\Desktop\section 8\BHS Digitization_Cataloging_Manual_BrooklynHistoricalSociety.doc L. Loscutoff; Edited by Julie May Page 35 6/20/2017
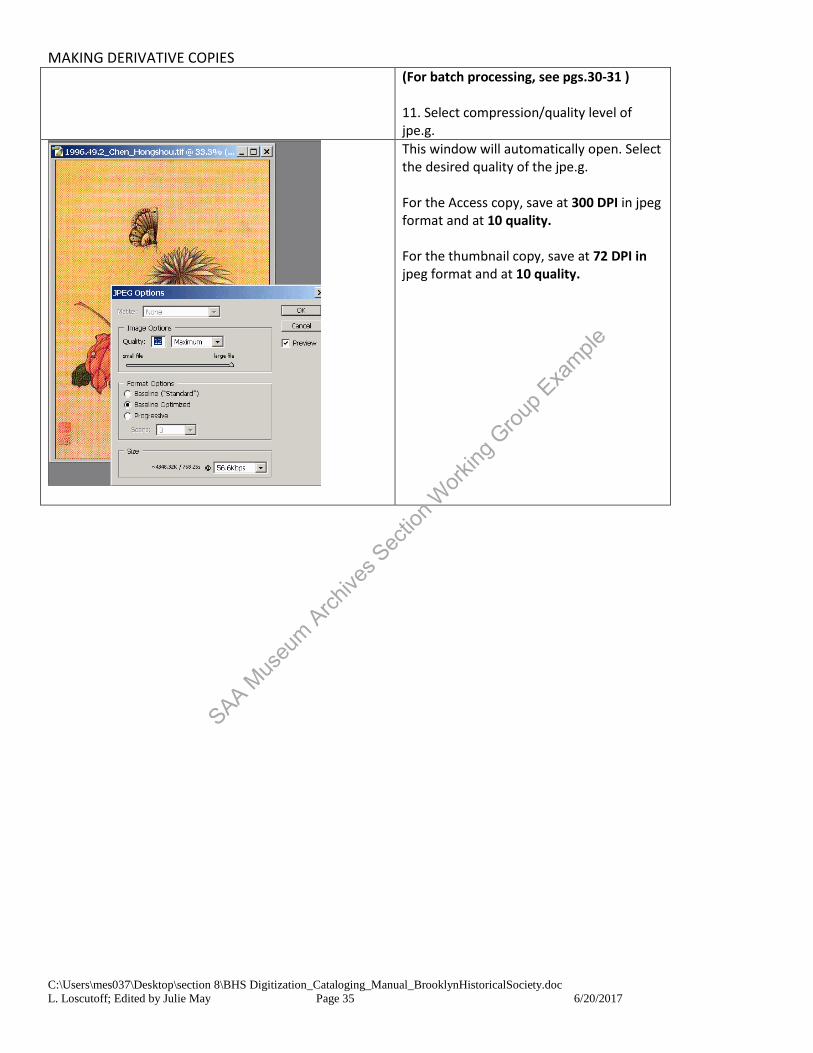
(For batch processing, see pgs.30-31 ) 11. Select compression/quality level of jpe.g.
This window will automatically open. Select the desired quality of the jpe.g. For the Access copy, save at 300 DPI in jpeg format and at 10 quality. For the thumbnail copy, save at 72 DPI in jpeg format and at 10 quality.
SAA Mus
eum A
rchive
s Sec
tion W
orking
Grou
p Exa
mple

BATCH PROCESSING IN ADOBE PHOTOSHOP
C:\Users\mes037\Desktop\section 8\BHS Digitization_Cataloging_Manual_BrooklynHistoricalSociety.doc L. Loscutoff; Edited by Julie May Page 36 6/20/2017
1. How to watermark images in
Adobe Photoshop
1. Batch processing in Adobe
Photoshop
SAA Mus
eum A
rchive
s Sec
tion W
orking
Grou
p Exa
mple

BATCH PROCESSING IN ADOBE PHOTOSHOP
C:\Users\mes037\Desktop\section 8\BHS Digitization_Cataloging_Manual_BrooklynHistoricalSociety.doc L. Loscutoff; Edited by Julie May Page 37 6/20/2017
Editing, resizing, and watermarking of images can be batch processed in Adobe Photoshop. For batch processing there are saved actions on Adobe Photoshop. The 4 main reasons to use batch processing is:
1. Watermarking black-and-white images
2. Watermarking color images
3. Making 300 dpi derivatives
4. Making 600 dpi derivatives
*These 4 actions are saved as files and can be dragged and dropped into your Adobe Photoshop program.
Batch Processing Steps: 1. Step One:
Choose File > Automate > Batch (Photoshop) 2. Step Two:
Specify the action you want to use to process files from the Set and Action pop-up menus. The menus display actions available in the Actions panel (actions will be saved there). You may need to choose a different set or load a set in the panel if you don’t see your action. * Following page has steps on how to create a new action
3. Step Three: Choose the files to process from the Source pop-up menu: Folder
Processes files in a folder you specify (different variants on a desktop folder). You will need to keep the master files in one folder (per collection) for batch processing, then move them back to the single masters folder. Click Choose to locate and select the destination folder. *The newly batched processed images should be saved in a new folder (i.e., access or thumbnail folders).
Override Actions Make sure that override actions “open commands” and override actions “save as” commands are both selected and boxes are checked.
Import Processes images from a digital camera, scanner, or a PDF document.
Opened Files - Processes all open files (i.e., the folder you select to batch process should be open).
SAA Mus
eum A
rchive
s Sec
tion W
orking
Grou
p Exa
mple
BATCH PROCESSING IN ADOBE PHOTOSHOP
C:\Users\mes037\Desktop\section 8\BHS Digitization_Cataloging_Manual_BrooklynHistoricalSociety.doc L. Loscutoff; Edited by Julie May Page 38 6/20/2017
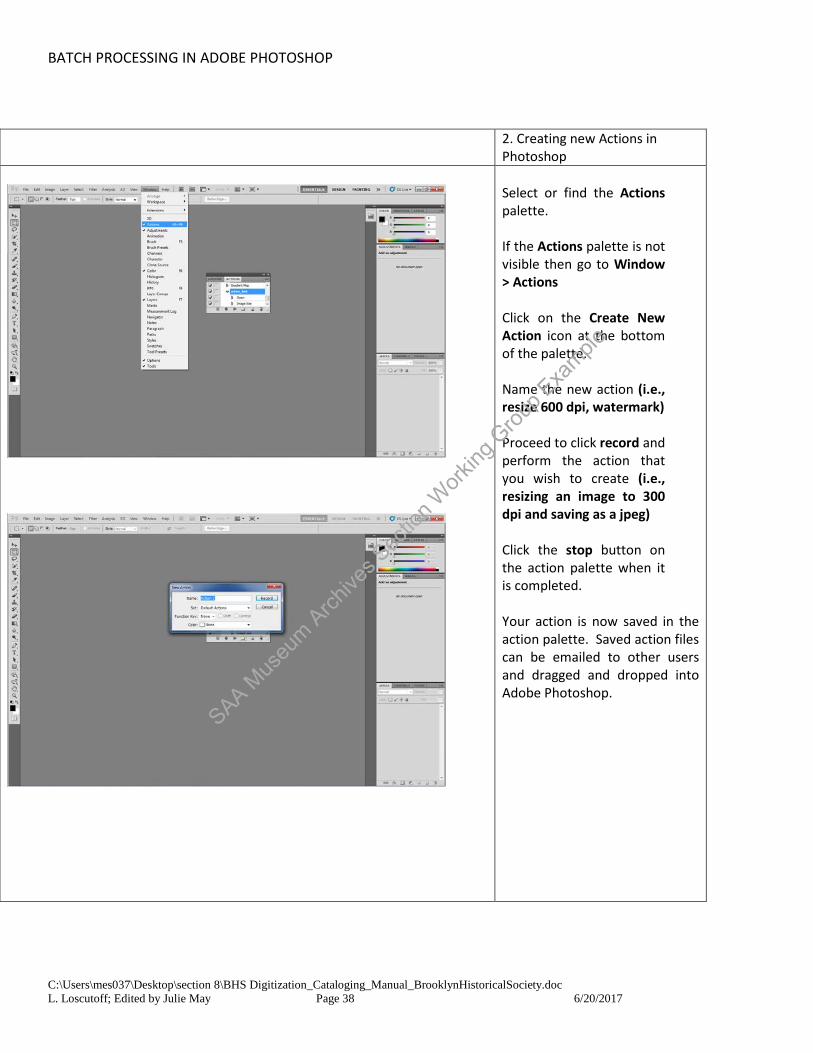
2. Creating new Actions in
Photoshop
Select or find the Actions palette. If the Actions palette is not visible then go to Window > Actions
Click on the Create New Action icon at the bottom of the palette. Name the new action (i.e., resize 600 dpi, watermark) Proceed to click record and perform the action that you wish to create (i.e., resizing an image to 300 dpi and saving as a jpeg) Click the stop button on the action palette when it is completed. Your action is now saved in the action palette. Saved action files can be emailed to other users and dragged and dropped into Adobe Photoshop.
SAA Mus
eum A
rchive
s Sec
tion W
orking
Grou
p Exa
mple
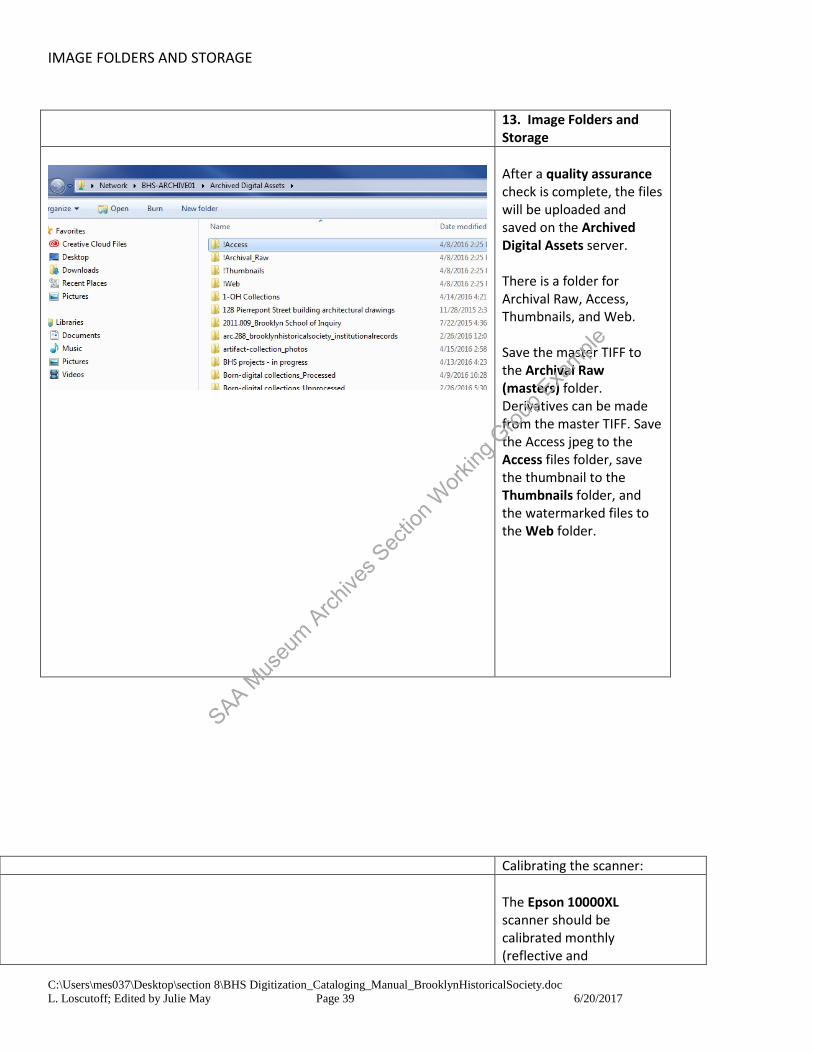
IMAGE FOLDERS AND STORAGE
C:\Users\mes037\Desktop\section 8\BHS Digitization_Cataloging_Manual_BrooklynHistoricalSociety.doc L. Loscutoff; Edited by Julie May Page 39 6/20/2017
13. Image Folders and
Storage
After a quality assurance check is complete, the files will be uploaded and saved on the Archived Digital Assets server. There is a folder for Archival Raw, Access, Thumbnails, and Web. Save the master TIFF to the Archival Raw (masters) folder. Derivatives can be made from the master TIFF. Save the Access jpeg to the Access files folder, save the thumbnail to the Thumbnails folder, and the watermarked files to the Web folder.
Calibrating the scanner:
The Epson 10000XL scanner should be calibrated monthly (reflective and
SAA Mus
eum A
rchive
s Sec
tion W
orking
Grou
p Exa
mple
CALIBRATING THE SCANNER
C:\Users\mes037\Desktop\section 8\BHS Digitization_Cataloging_Manual_BrooklynHistoricalSociety.doc L. Loscutoff; Edited by Julie May Page 40 6/20/2017
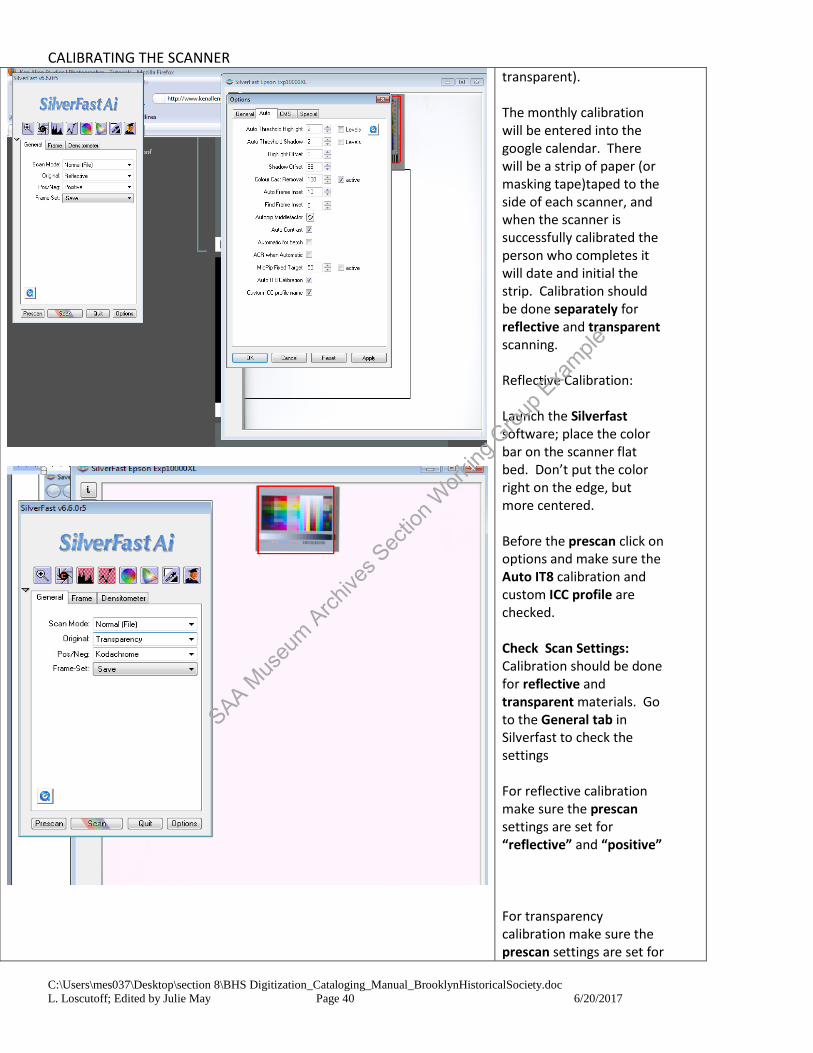
transparent). The monthly calibration will be entered into the google calendar. There will be a strip of paper (or masking tape)taped to the side of each scanner, and when the scanner is successfully calibrated the person who completes it will date and initial the strip. Calibration should be done separately for reflective and transparent scanning. Reflective Calibration: Launch the Silverfast software; place the color bar on the scanner flat bed. Don’t put the color right on the edge, but more centered. Before the prescan click on options and make sure the Auto IT8 calibration and custom ICC profile are checked. Check Scan Settings: Calibration should be done for reflective and transparent materials. Go to the General tab in Silverfast to check the settings For reflective calibration make sure the prescan settings are set for “reflective” and “positive” For transparency calibration make sure the prescan settings are set for
SAA Mus
eum A
rchive
s Sec
tion W
orking
Grou
p Exa
mple
CALIBRATING THE SCANNER
C:\Users\mes037\Desktop\section 8\BHS Digitization_Cataloging_Manual_BrooklynHistoricalSociety.doc L. Loscutoff; Edited by Julie May Page 41 6/20/2017
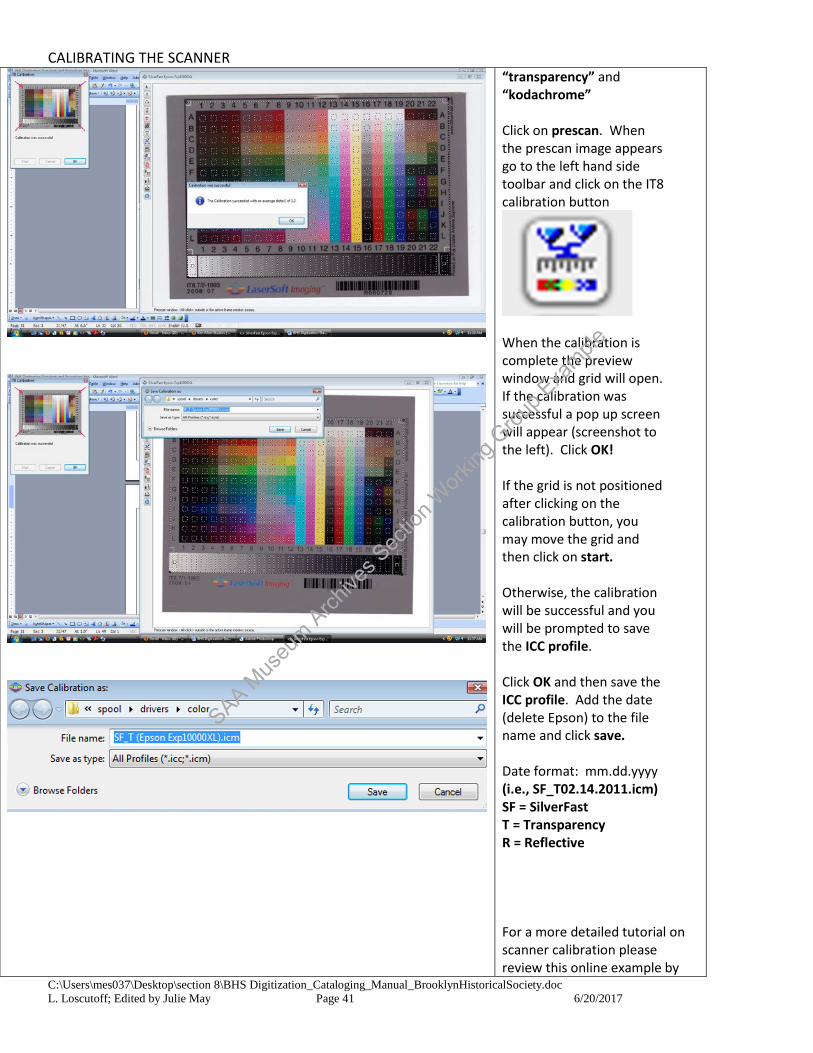
“transparency” and “kodachrome” Click on prescan. When the prescan image appears go to the left hand side toolbar and click on the IT8 calibration button
When the calibration is complete the preview window and grid will open. If the calibration was successful a pop up screen will appear (screenshot to the left). Click OK! If the grid is not positioned after clicking on the calibration button, you may move the grid and then click on start. Otherwise, the calibration will be successful and you will be prompted to save the ICC profile. Click OK and then save the ICC profile. Add the date (delete Epson) to the file name and click save. Date format: mm.dd.yyyy (i.e., SF_T02.14.2011.icm) SF = SilverFast T = Transparency R = Reflective For a more detailed tutorial on scanner calibration please review this online example by
SAA Mus
eum A
rchive
s Sec
tion W
orking
Grou
p Exa
mple

CALIBRATING THE SCANNER
C:\Users\mes037\Desktop\section 8\BHS Digitization_Cataloging_Manual_BrooklynHistoricalSociety.doc L. Loscutoff; Edited by Julie May Page 42 6/20/2017
Ken Allen. http://www.kenallenstudios.com/tutorialsP.html
SAA Mus
eum A
rchive
s Sec
tion W
orking
Grou
p Exa
mple

ADDING NEW IMAGES AND RECORDS TO PAST PERFECT
C:\Users\mes037\Desktop\section 8\BHS Digitization_Cataloging_Manual_BrooklynHistoricalSociety.doc L. Loscutoff; Edited by Julie May Page 43 6/20/2017
1. Adding new images to Past
Perfect
Log in to Past Perfect and click on the ADD button. When entering a collection at a time these fields can be prefilled: Accession # Object Name Lexicon Categories Object Id Required Past Perfect fields should be completely filled out, refer to the cataloging and metadata standards. See (pgs. 42-48) Click on the Image management toolbar (toolbar below image screen).
2. Uploading Images
It will take you to this screen. This is where you will upload the image. Click on Acquire new image in the top right hand corner, and upload the 72 dpi watermarked thumbnails to Past Perfect. If you are uploading an image that already has a record in Past Perfect, then go through the metadata fields and clean up/add information where necessary. Also, just upload the most recent scan. *We will only upload the 72 DPI thumbnails to Past Perfect!
SAA Mus
eum A
rchive
s Sec
tion W
orking
Grou
p Exa
mple
ADDING NEW IMAGES AND RECORDS TO PAST PERFECT
C:\Users\mes037\Desktop\section 8\BHS Digitization_Cataloging_Manual_BrooklynHistoricalSociety.doc L. Loscutoff; Edited by Julie May Page 44 6/20/2017
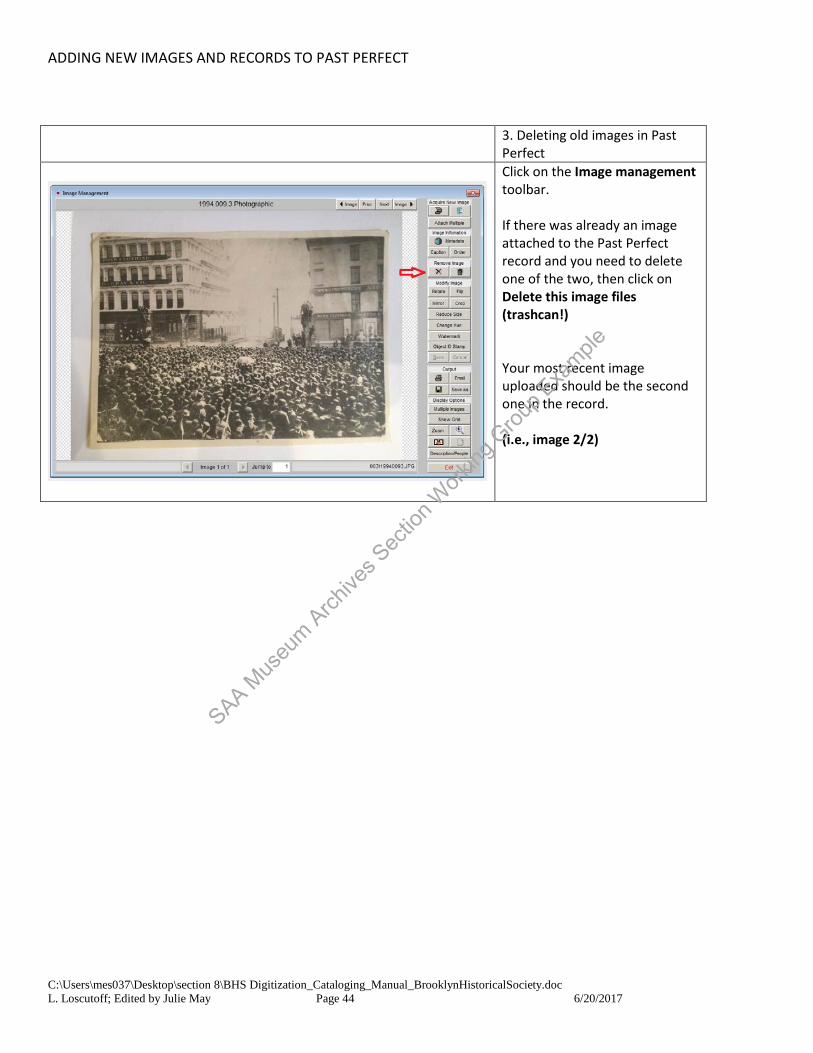
3. Deleting old images in Past
Perfect
Click on the Image management toolbar. If there was already an image attached to the Past Perfect record and you need to delete one of the two, then click on Delete this image files (trashcan!) Your most recent image uploaded should be the second one in the record. (i.e., image 2/2)
SAA Mus
eum A
rchive
s Sec
tion W
orking
Grou
p Exa
mple

CATALOGING AND METADATA
C:\Users\mes037\Desktop\section 8\BHS Digitization_Cataloging_Manual_BrooklynHistoricalSociety.doc L. Loscutoff; Edited by Julie May Page 45 6/20/2017
Adding metadata into Past Perfect:
• Opening screen: Log on with name and password. Administrator will add new names and password permissions. • Click on "Photographs" Module (Note: paintings and artifacts are cataloged in “Objects.”)
Required Past Perfect Fields:
Collection All photographs unattached to a specific collection should be “Photography Collection.” For photographs that do not belong to a collection, use the collection name that is already in AT and is DACS compliant (2.3). *See AT cataloging manual (pg.3) for more specific details. Title The title element identifies or names material. When devising titles for documentary material, give the factual content as far as possible (e.g., who, what, where, when). Many photographs can share the same title. Graphic Materials rule 1C2 suggests using the following kinds of information as appropriate:
• Main subject(s) depicted, i.e., persons, events, activities, and objects • Geographical location(s) depicted, if known and significant • If the title is derived from the cataloger and not original to the photograph, put the title in brackets.
[Title of photograph] Title Examples: “A Group of German immigrants at Ellis Island” “Getting tagged by an official for a railroad trip, Ellis Island” ObjectName *(this field is automatically filled, and must be selected and checked before the file can be saved) Photographic 8.Communication Artifact Documentary Artifact Object ID Identifier number (item level) (e.g. V1973.2.40) Other No. If there is another number associated with this collection, please fill this field out. For example the ARC number which is collection level and can be found in the resource records of AT. (e.g. ARC.028) Accession No. Collection level identification. BHS accession numbers are formatted so that the accession year and sequential numbering are separated by a decimal point (e.g., 1973.80). The accession number can be found in AT. Make sure to use the original archival accession number! Search the accession records for the correct accession number. Accession numbers can also be found in the resource identifier field in AT.
SAA Mus
eum A
rchive
s Sec
tion W
orking
Grou
p Exa
mple

CATALOGING AND METADATA
C:\Users\mes037\Desktop\section 8\BHS Digitization_Cataloging_Manual_BrooklynHistoricalSociety.doc L. Loscutoff; Edited by Julie May Page 46 6/20/2017
For Example: In AT the Eberhard Faber Pencil Company Collection is linked to 3 different accession numbers: -1988.017 (Eberhard Faber Papers) -1988.019 (Eberhard Faber Pencil Company Portfolio of Sketches) -v1988.035 (Photographs from the Eberhard Faber Papers) Photographs were originally pulled from the collection and given a “v” accession number. CLIR technicians are currently intellectually and sometimes physically linking collections together, so the original archival accession number is 1988.017. This is the correct accession number to enter into the Past Perfect field. If you are unsure, please ask the Photo Archivist. *See also AT cataloging manual for more details on the accession number (pg. 2) Home Location Repository, which in this case will always be “Brooklyn Historical Society, 128 Pierrepont St. Brooklyn, NY.” Location Please search AT resource records (manage locations) for the collection location. There is an authority list in Past Perfect with location ID. There should be no need to add any new location authorities, just right click or hit F7. -Room (e.g. 4C) -Shelf (e.g. 12.2.C) -Container (box and label if any) Geo-Data Open Google Maps and pin a location for your record. Right-click on the pin and select "What's here?". Copy the latitude and longitude information into the Geo-data fields. The default is N and W and should remain for New York locations. There is no need to use a - or + sign as the N and W provide that information. Choose "View on Map" to confirm correct location was entered. For general locations like a neighborhood, choose a spot in the center of the neighborhood. Use Neighborhoods of Brooklyn as a reference. For more specific locations, enter the intersection or address to drop a more specific location pin. (e.g. Bushwick neighborhood: Latitude: 40.696873-N, Longitude: 73.918558-W; Corner of N. 11th Street and Bedford Avenue: Latitude: 40.720298-N, Longitude: 73.955348-W; and 1705 Dorchester Road: Latitude: 40.640689-N, Longitude: 73.962107-W) Date entered/modified Captures the date that the metadata is entered or modified. Date Format of date in PP date field is yyyy/mm/dd or yyyy ca. Year Range The year range, for item level this will be the same year (e.g. 1941 to 1941). For circa dates use a 5 year time span to describe the date range (e.g. 1945-1950ca.).
SAA Mus
eum A
rchive
s Sec
tion W
orking
Grou
p Exa
mple

CATALOGING AND METADATA
C:\Users\mes037\Desktop\section 8\BHS Digitization_Cataloging_Manual_BrooklynHistoricalSociety.doc L. Loscutoff; Edited by Julie May Page 47 6/20/2017
Print Size (format) The dimensions of the print H x W (in inches) in using whole numbers and fractions (e.g. 3 ¼” x 4”). When cataloging an image that is smaller than its mount, use the size of the mount. For example, dimensions for a scrapbook page should be the page, not the image(s) pasted on the page. Medium Getty AAT (e.g. color slides). The medium field should be used for format types. Right click or use F7 to download the authority list. The medium field authority fields are approved Getty AAT terms. The thesaurus was imported into Past Perfect. Select the medium type from the controlled authorities. If for some reason the medium type you are looking for is not listed, please consult the Photo Archivist.
SAA Mus
eum A
rchive
s Sec
tion W
orking
Grou
p Exa
mple

CATALOGING AND METADATA
C:\Users\mes037\Desktop\section 8\BHS Digitization_Cataloging_Manual_BrooklynHistoricalSociety.doc L. Loscutoff; Edited by Julie May Page 48 6/20/2017
Description Describe the image as succinctly as possible with brief historical background and as many keywords as possible in this section; locations, place names, information on recto, verso and the name of photographer and persons in the image (if known). Item-level Description:
• Description may include but is not limited to: an abstract, a table of contents, a graphical representation, or a free-text account of the resource. Dublin Core metadata elements is a good framework for item-level description. (Dublin Core)
• A prose description of the content and context of a work—explaining, summarizing, or otherwise elaborating on the record for the work. Useful for keyword access. Ideal: A description of the content and context of a work. Good: A description of the content.
Description Example: View from off Point Lobos looking towards San Francisco Bay with Steamship John L. Stephens and clipper ship Flying Cloud just entering the Golden Gate. For images with original writing on the front or back, please transcribe in the description Recto – Writing on the front. If the image is a poster/flyer the whole description does not need to be transcribed, just the main title (see example). Verso – Writing on the back. Please transcribe writing from the back of the photograph (verbatim). Please note that verbatim transcription does not include the exact capitalization/punctuation as written on the item. When transcribing a description from the photograph itself, please site where the description is derived from in brackets (see example below). Example:
SAA Mus
eum A
rchive
s Sec
tion W
orking
Grou
p Exa
mple

CATALOGING AND METADATA
C:\Users\mes037\Desktop\section 8\BHS Digitization_Cataloging_Manual_BrooklynHistoricalSociety.doc L. Loscutoff; Edited by Julie May Page 49 6/20/2017
Description: Paul Bauer’s West Brighton Hotel, Coney Island [printed on image]; Purchased from J.S. Hall Mar 7 1939. 1.50 [handwritten on verso] Description Tip: Description often provides information not otherwise on the photographs. It is used as a document with the photographs, as well as for access to the photographs. Description often compensates for the lack of textual information on photographs. This does not mean however that all description has to be elaborate. In a group photo list all of the identified persons in the description field as <first name last name>, <first name last name>, etc. Add only the main subject names to the people field, as an authority. For Example: A group photo of James Patterson with his grade school friends from the Patterson Family Papers and Photographs Collection should add Patterson, James to the people authority file; then, list all identified group photo in the description field as <first name last name>, <first name last name>, etc. *Look over the biographical/historical note in AT for further collection information. For more details on what the biographical/historical note entails, please consult the AT manual (pg. 14) Provenance Include history of the item and/or information about the donor if known. *Look at the custodial history note in AT. For more details on what the custodial history is please consult the AT manual (pg. 16) Introduction to Authorities: Authorized access points are used for the metadata fields of medium, photographer, people, subjects, and search terms. The purposed of an authorized access point is to bring together variant forms of a name. Every authorized access point that is not locally created should be taken from the 1xx (MARC field – Authorized heading) of an authority record. Authority records can be search through OCLC Connexion. For more information of how to read an authority record, please see Carolyn’s authority handout.
o Carolyn’s PowerPoint slide presentation on authorities for a more detailed overview, which can be found in p_drive > Authorities folder > Documentation > Authority headings for corporate bodies
Authorities in Past Perfect For the metadata fields of medium, photographer, people, subjects, and search terms, only supervisors will have the access rights to edit these authority lists. The “subjects’ and “medium” fields already have approved terms, from the Library of Congress and The Getty AAT thesaurus. Terms that are found in the approved authority lists can be selected from the list. If the term is not yet added to the authority list, search for approved authorities using OCLC Connexion. If you find the authority in OCLC, you can go ahead and add it to the spreadsheet for photographs, which can be found under the p_drive, in the cataloging folder (photographs).
• File path is p_drive > cataloging and book processing > photograph cataloging > past perfect cleanup > copy of authorities pending.
Either the Photo Archivist or the Digitization Archivist will approve these new authorities and add them to the authority list in Past Perfect. For local corporate or personal names that are not found in OCLC connexion, please add to Carolyn’s personal/corporate name spreadsheet for approval. All newly approved authorities will be entered into the Past Perfect authority list by a supervisor.
SAA Mus
eum A
rchive
s Sec
tion W
orking
Grou
p Exa
mple

CATALOGING AND METADATA
C:\Users\mes037\Desktop\section 8\BHS Digitization_Cataloging_Manual_BrooklynHistoricalSociety.doc L. Loscutoff; Edited by Julie May Page 50 6/20/2017
See also: Guidelines for adding new authorities (pg. 48) for further details on adding new authorities go to the Authorities folder on the _p drive. Place The place field in Past Perfect will not be used, please leave blank. All geographic terms should be entered into the “search terms” field. People (Personal and Corporate Names) The people field will be used for personal names and names of businesses and organizations (corporate names). The metadata in Past Perfect will be cleaned up, which will be an on-going responsibility of supervisors. Personal and corporate names are currently in the subjects. These names will need to be moved to people while editing the metadata in Past Perfect. A name should be added to the People field when it is of particular importance. The subjects of a group photo should not be individually listed in the People field – only the most significant subjects. Personal Names: Only add a personal name as an authority if the person is the main subject in the photograph. In a photograph with a group of persons with names transcribed, please write these names in the description field. For Example (again!): A group photo of James Patterson with his grade school friends from the Patterson Family Papers and Photographs Collection should add Patterson, James to the people authority file; then, list all identified group photo in the description fields as <first name last name>, <first name last name>, etc. General Rules for Personal and Corporate Names: Determine the name by which a person is commonly known from the chief sources of information of works by that person issued in his or her language. If the person works in a nonverbal context (e.g., a painter, a sculptor) or is not known primarily as an author, determine the name by which he or she is commonly known from
• reference sources can include books and articles written about a person.
Determine the name of a corporation by deriving the name from chief sources of information of works by that corporation. In our case the information might be derived from the photographs themselves. If available also use,
• reference sources can include books and articles written about a corporation. • reference sources issued in an official letter, or publication. • Refer to archival materials (if there are some) for further guidance. • For corporate names use the name if the name of a corporate body consists of or contains initials, omit or
include periods and other marks of punctuation according to the predominant usage of the body. In case of doubt omit the periods, etc. Do not leave a space between such punctuation and a following initial.
For example: W.H. Ross Foundation for the Study of Prevention of Blindess
• For personal names, fill out the Primary Name (i.e. surname), Rest of Name (i.e. first and middle) as well as any other applicable options such as prefix, title, suffix, number, qualifier or fuller form.
• For corporate names, fill in the Primary Name, and Subordinate elements, Qualifiers, or Numbers that apply o A Subordinate Element is an organizational unit within the corporate body specified in the Primary
Name field. For example, “New York (N.Y.). Dept. of Health. Office of Vital Statistics would be entered
SAA Mus
eum A
rchive
s Sec
tion W
orking
Grou
p Exa
mple

CATALOGING AND METADATA
C:\Users\mes037\Desktop\section 8\BHS Digitization_Cataloging_Manual_BrooklynHistoricalSociety.doc L. Loscutoff; Edited by Julie May Page 51 6/20/2017
into Past Perfect with New York (N.Y.) in the Primary Name field, Dept. of Health in the Subordinate 1 field, and Office of Vital Statistics in the Subordinate 2 field.
o Please refer to Carolyn’s PowerPoint slide presentation on authorities for a more detailed overview, which can be found in p_drive > Authorities folder > Documentation > Authority headings for corporate bodies
People (Personal and Corporate Names)
• If the Personal/corporate name is in the Past Perfect authority list (F7), make sure the term is selected and entered into the People field.
• If the term is not in the Past Perfect authority list (F7) but it was found in OCLC Connexion, go ahead and enter the term in Excel spreadsheet located in the p_drive, in the cataloging folder (photographs).
• Grandfathering Names: If a personal or corporate name has been used on an earlier BHS record, use that form of the name, even if the form does not comply with best local practice. Do change the form if it has an error. In these cases, we will need go into earlier records and change the form to the correct version (A supervisor would make these changes).
o File path is p_drive > cataloging and book processing > photograph cataloging > past perfect cleanup > copy of authorities pending.
• If the term can not be found in an approved authority list (e.g., Library of Congress or OCLC Connexion), please enter the term into the personal/corporate names spreadsheet for Carolyn’s approval. This spreadsheet can be found in the p_drive under the authorities folder. Once it is approved the Photo Archivist or Digitization Archivist will update the Past Perfect authority list, so the term may be selected.
See also: Guidelines for adding new authorities (pg. 48) for further details on adding new authorities go to the Authorities folder on the _p drive. Photographer
• If the name is known, select from the authority list (F7) e.g., “Armbruster, Eugene L., 1865-1943.” • If the name is known and not in the authority list (F7), then add the new authority to the Past Perfect authorities
pending spreadsheet, located in the p_drive under the cataloging folder (photographs). • Always enter the photographer’s name (Last name, First name). Please include the middle initial and date range
if that is known. For example: Armbruster, Eugene L., 1865-1943
• For unknown photographer: choose “unknown ” from the authority list • If not in local authority list, use LC authority files or Clark Marlor’s Brooklyn Artists Index (Reference shelf). • For unknown birth and death dates: use “flourished” (fl.). This denotes the years in which we know the creator
was living, e.g.: “Huntington, Edna, fl. 1928-1952.” See also: Guidelines for adding new authorities (pg. 48) for further details on adding new authorities go to the Authorities folder on the _p drive. *Please read and review DACS, chapters 12-14 for more overview of personal and corporate names. Also, refer to AACR2 chapters 21-24, which describe how to form names. This is available through Cataloger’s Desktop. Subjects This field is for subject terms (LCSH authorities). Proper nouns will be entered into subjects. The LCSH authorities have been imported into Past Perfect. Also, refer to the subject terms already assigned to the collection in Archivists’ Toolkit (AT). Please note that the collection level subject headings assigned in AT will be more broad, since they are collection level and not item level. The subject terms in AT should be used as guidance, although not all of the terms will apply to each individual image. Item level subject terms in Past Perfect will be more specific to the individual photograph. Since place names and location will be entered into the search terms there will be no need to geographically qualify the
SAA Mus
eum A
rchive
s Sec
tion W
orking
Grou
p Exa
mple
CATALOGING AND METADATA
C:\Users\mes037\Desktop\section 8\BHS Digitization_Cataloging_Manual_BrooklynHistoricalSociety.doc L. Loscutoff; Edited by Julie May Page 52 6/20/2017
subject terms in Past Perfect, or subdivide the terms any further. Select already approved authorities by right-clicking or F7. Subjects
• The Library of Congress thesaurus was imported into the Past Perfect authority list. The term should be selected from this authority list. *Please note that format type will be from the AAT thesaurus and located in the “medium” field.
• Please use the Library of Congress (LOC) authorities that are already uploaded into the Past Perfect authority list.
• Local terms should not need to be created for the “subjects” field, since we are only using LOC. Examples of Subject Terms: -Abolition Movement -Aircraft -Playgrounds -Floods Search terms Search terms will be used for “place” names. Place names already populate the search and subject terms in Past Perfect. These fields will need to be cleaned up as we proceed with this project. This will be done in phases and on going, until it is complete. Place is currently found in both subject and search terms. This will be rectified when the Past Perfect clean up is complete.
Rules for Place Name: • Include here the location that is photographed. Use only: city (or fort) and state; city and country; or
geographical feature and locality (Rocky Mountains; Mississippi River) in LC format. • If the exact address is visible or noted on the photograph, then enter the exact address; do not include
(Brooklyn, New York, N.Y.) or (New York, N.Y.) when including the full address (e.g. 145 Atlantic Avenue) • Geographic qualifiers need to be entered in the “place” field e.g. Eleventh Street (New York, N.Y.) • If the same street name is located in more than one borough, make sure to disambiguate the term by
borough name, e.g. Fulton Street (Brooklyn, New York, N.Y.) • If the street name is not located in more than one borough then you can qualify the term as (New York, NY.),
e.g. Dekalb Avenue (New York, N.Y.) *Dekalb Avenue is located in Brooklyn, but there is only one Dekalb Avenue in New York.
• Use OCLC Connexion to access and obtain authority location terms. Search Terms (Place)
• If the search term is in the Past Perfect authority list (F7), make sure the term is selected and entered into Search Terms.
• Search the local authority file in the p_drive folder to make sure there isn’t already an established local heading that would be appropriate to use. Go to the Authorities folder on the _p drive.
• If the term is not in the Past Perfect authority list (F7), or the already approved local headings, but it was found in OCLC Connexion, go ahead and enter the term in Excel spreadsheet located in the p_drive, in the cataloging folder (photographs).
• If the term can not be found in an approved authority list (e.g., Library of Congress or OCLC), please enter the term into the Excel spreadsheet located in the p_drive, in the cataloging folder (photographs).
SAA Mus
eum A
rchive
s Sec
tion W
orking
Grou
p Exa
mple

CATALOGING AND METADATA
C:\Users\mes037\Desktop\section 8\BHS Digitization_Cataloging_Manual_BrooklynHistoricalSociety.doc L. Loscutoff; Edited by Julie May Page 53 6/20/2017
o File path is p_drive > cataloging and book processing > photograph cataloging > past perfect cleanup > copy of authorities pending.
• The Photo Archivist or Digitization Archivist will then approve the search term and update the Past Perfect authority list, so the term may be selected.
The place terms should include specific, narrower terms (e.g. Fulton Street Mall). Always spell out Street, Road, Place, and Avenue (no abbreviations). Include business names if discerned from the image.
*Just a note, search terms will most likely be local terms and need to go through the approval process! See also: Guidelines for adding new authorities (pg. 48) for further details on adding new authorities go to the Authorities folder on the _p drive. Legal field Copyright information, restrictions, and rights. Check AT for copyright information. If Unrestricted, enter Public Domain. If Restricted, elaborate: e.g. Copyright is held by BHS. Permission to reproduce or publish must be secured by the repository. e.g. Donor is not creator or copyright holder. Donor gave only physical ownership of the film to the Brooklyn Historical Society. e.g. Copyright is held by the Brooklyn Historical Society. All uses beyond fair use require a licensing agreement as per Title 17 of the U.S. Copyright Law. Please consult library staff for more information. e.g. Photographer retains copyright. BHS has rights to license. Copyrights: “Restricted” or “Unrestricted”.
SAA Mus
eum A
rchive
s Sec
tion W
orking
Grou
p Exa
mple

ADDING NEW AUTHORITIES
C:\Users\mes037\Desktop\section 8\BHS Digitization_Cataloging_Manual_BrooklynHistoricalSociety.doc L. Loscutoff; Edited by Julie May Page 54 6/20/2017
Basic step-by-step procedure for creating local authority headings:
1. Search authority records in OCLC to make sure that there isn’t already an authorized heading that would be appropriate.
2. Search the local authority file in the p_drive folder to make sure there isn’t already an established local heading that would be appropriate to use.
3. Search for the heading in OCLC to see if there is a particular format of the heading being used by other
institutions. If there is one, use that format.
4. For corporate name headings, double-check the LOC ambiguous headings list, http://lib2.dss.go.th/elib/marc21/ambiguous-headings.html to make sure that you are classifying your heading appropriately. Categories marked X00, X10, X11, and X30 belong to the field types personal name, corporate name, conference name and title, respectively. The ambiguous headings list tells you whether to set up a name as a corporate body (110) or a geographic entity (151). For example, a train station would be set up as a 110, and a park as a 151.
5. For corporate names entered directly, always qualify geographically when possible/appropriate for
disambiguation. Geographic qualification need not get more specific than “Brooklyn, New York, N.Y.” unless differentiating between two organizations of the same name located in Brooklyn.
The spreadsheet supervisors are as follows:
• Personal names – Matthew • Corporate/conference names – Carolyn • Geographic names – Carolyn
SAA Mus
eum A
rchive
s Sec
tion W
orking
Grou
p Exa
mple
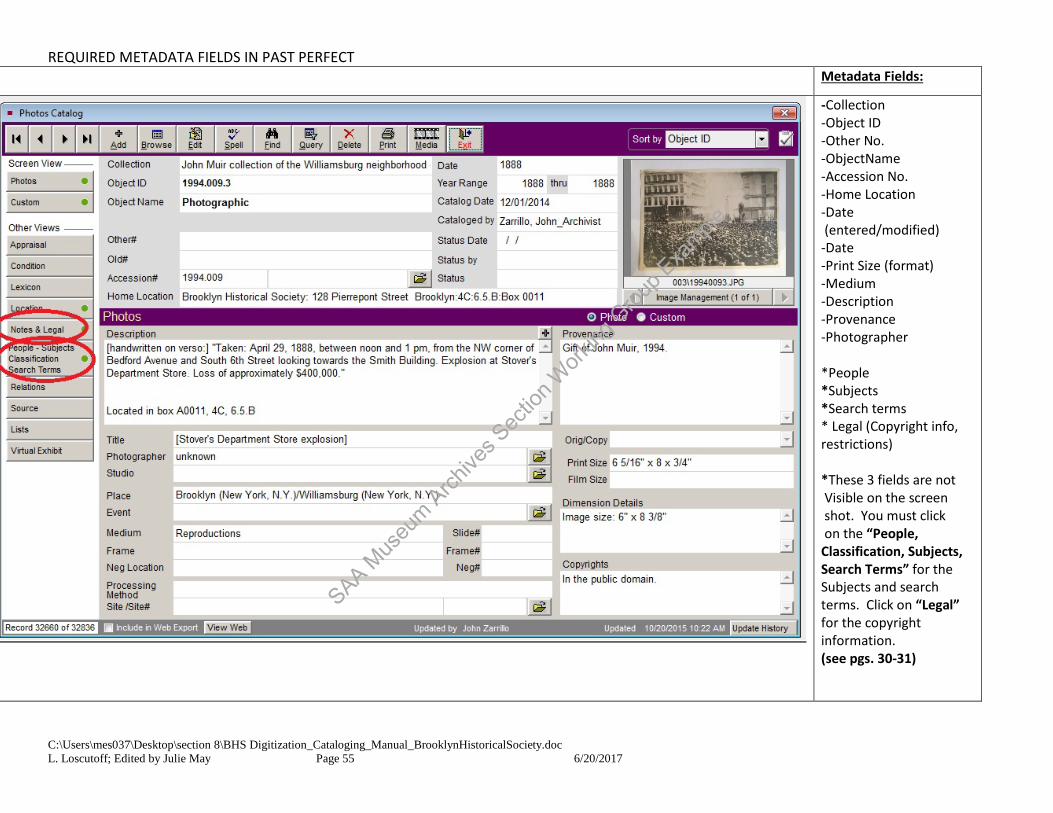
REQUIRED METADATA FIELDS IN PAST PERFECT
C:\Users\mes037\Desktop\section 8\BHS Digitization_Cataloging_Manual_BrooklynHistoricalSociety.doc L. Loscutoff; Edited by Julie May Page 55 6/20/2017
Metadata Fields:
-Collection -Object ID -Other No. -ObjectName -Accession No. -Home Location -Date (entered/modified) -Date -Print Size (format) -Medium -Description -Provenance -Photographer *People *Subjects *Search terms * Legal (Copyright info, restrictions) *These 3 fields are not Visible on the screen shot. You must click on the “People, Classification, Subjects, Search Terms” for the Subjects and search terms. Click on “Legal” for the copyright information. (see pgs. 30-31)
SAA Mus
eum A
rchive
s Sec
tion W
orking
Grou
p Exa
mple
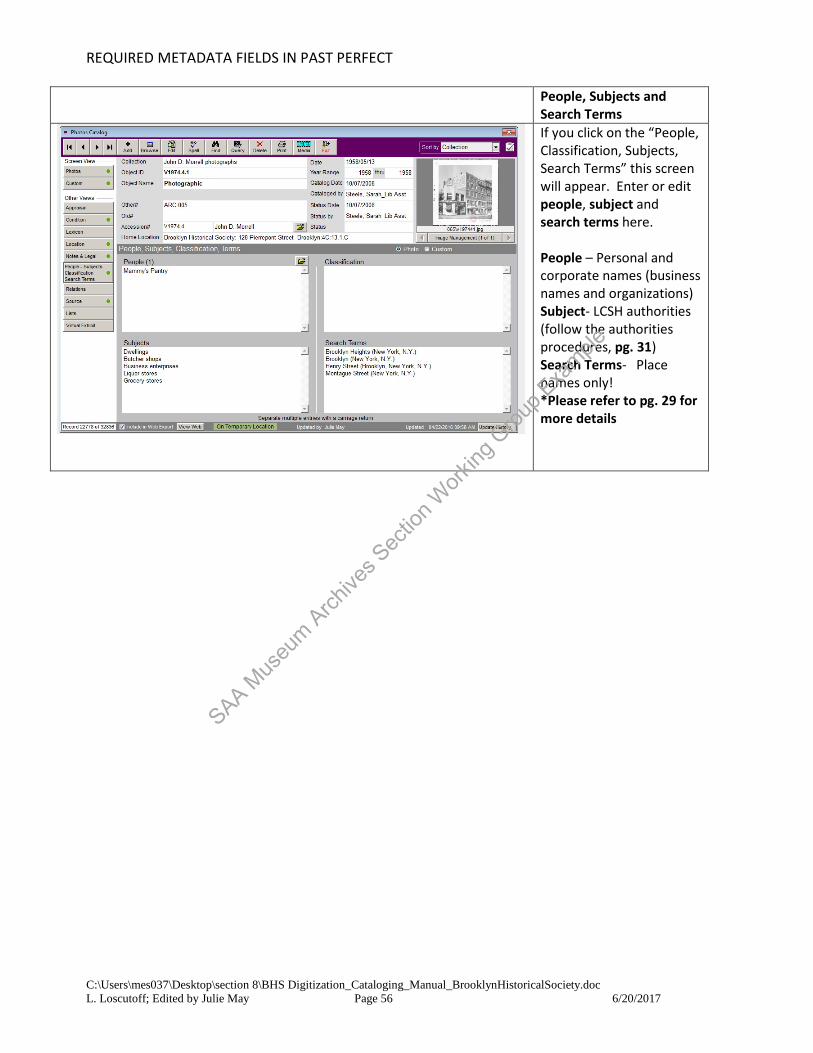
REQUIRED METADATA FIELDS IN PAST PERFECT
C:\Users\mes037\Desktop\section 8\BHS Digitization_Cataloging_Manual_BrooklynHistoricalSociety.doc L. Loscutoff; Edited by Julie May Page 56 6/20/2017
People, Subjects and
Search Terms
If you click on the “People, Classification, Subjects, Search Terms” this screen will appear. Enter or edit people, subject and search terms here. People – Personal and corporate names (business names and organizations) Subject- LCSH authorities (follow the authorities procedures, pg. 31) Search Terms- Place names only! *Please refer to pg. 29 for more details
SAA Mus
eum A
rchive
s Sec
tion W
orking
Grou
p Exa
mple
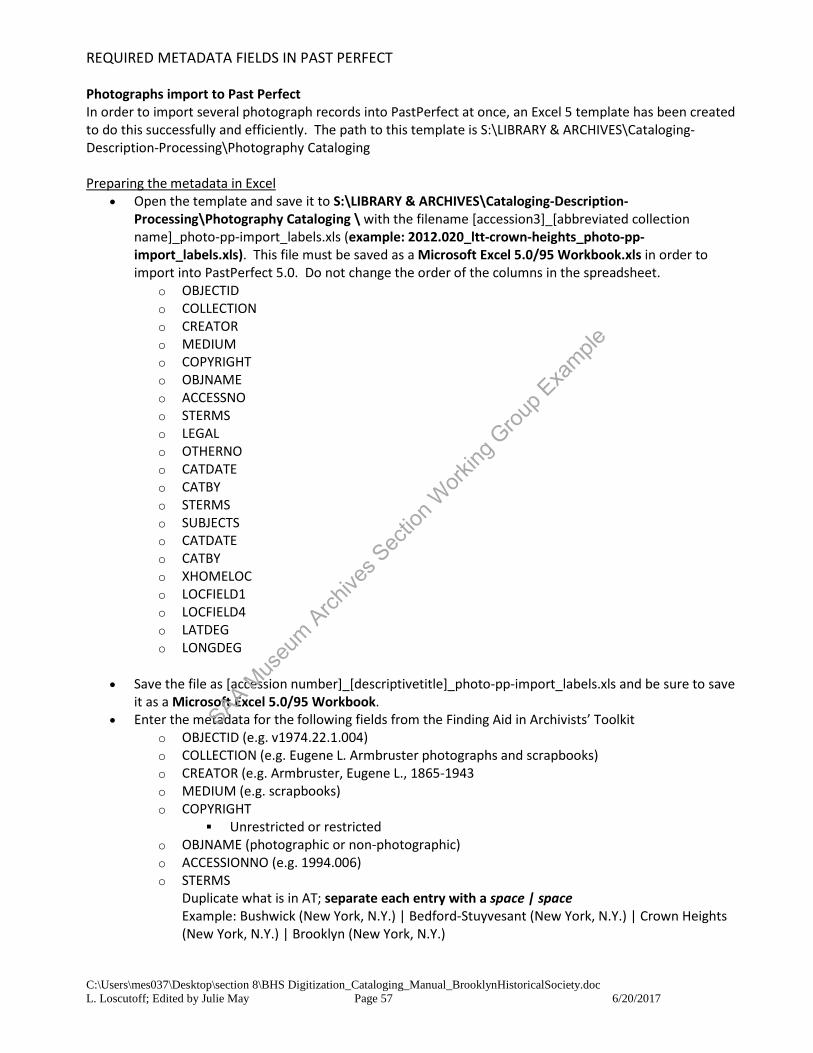
REQUIRED METADATA FIELDS IN PAST PERFECT
C:\Users\mes037\Desktop\section 8\BHS Digitization_Cataloging_Manual_BrooklynHistoricalSociety.doc L. Loscutoff; Edited by Julie May Page 57 6/20/2017
Photographs import to Past Perfect In order to import several photograph records into PastPerfect at once, an Excel 5 template has been created to do this successfully and efficiently. The path to this template is S:\LIBRARY & ARCHIVES\Cataloging-Description-Processing\Photography Cataloging Preparing the metadata in Excel
• Open the template and save it to S:\LIBRARY & ARCHIVES\Cataloging-Description-Processing\Photography Cataloging \ with the filename [accession3]_[abbreviated collection name]_photo-pp-import_labels.xls (example: 2012.020_ltt-crown-heights_photo-pp-import_labels.xls). This file must be saved as a Microsoft Excel 5.0/95 Workbook.xls in order to import into PastPerfect 5.0. Do not change the order of the columns in the spreadsheet.
o OBJECTID o COLLECTION o CREATOR o MEDIUM o COPYRIGHT o OBJNAME o ACCESSNO o STERMS o LEGAL o OTHERNO o CATDATE o CATBY o STERMS o SUBJECTS o CATDATE o CATBY o XHOMELOC o LOCFIELD1 o LOCFIELD4 o LATDEG o LONGDEG
• Save the file as [accession number]_[descriptivetitle]_photo-pp-import_labels.xls and be sure to save
it as a Microsoft Excel 5.0/95 Workbook. • Enter the metadata for the following fields from the Finding Aid in Archivists’ Toolkit
o OBJECTID (e.g. v1974.22.1.004) o COLLECTION (e.g. Eugene L. Armbruster photographs and scrapbooks) o CREATOR (e.g. Armbruster, Eugene L., 1865-1943 o MEDIUM (e.g. scrapbooks) o COPYRIGHT
Unrestricted or restricted o OBJNAME (photographic or non-photographic) o ACCESSIONNO (e.g. 1994.006) o STERMS
Duplicate what is in AT; separate each entry with a space | space Example: Bushwick (New York, N.Y.) | Bedford-Stuyvesant (New York, N.Y.) | Crown Heights (New York, N.Y.) | Brooklyn (New York, N.Y.)
SAA Mus
eum A
rchive
s Sec
tion W
orking
Grou
p Exa
mple

REQUIRED METADATA FIELDS IN PAST PERFECT
C:\Users\mes037\Desktop\section 8\BHS Digitization_Cataloging_Manual_BrooklynHistoricalSociety.doc L. Loscutoff; Edited by Julie May Page 58 6/20/2017
o LEGAL Public Domain or Restricted
o OTHERNO (Call # or duplicate accession # here: e.g. ARC.204 or 1994.006) o CATDATE (mm/dd/yyyy) o CATBY (your last name, first name_title)
Example: May, Julie_MgDirofL&A o HOMELOC (Brooklyn Historical Society: 128 Pierrepont Street Brooklyn) o LOCFIELD1 (4c) o LOCFIELD4 (Shelf #) o LATITUDE o LONGITUDE
• When you have finished populating the spreadsheet, save it again. • Remove the column labels and save your spreadsheet as [accession
number]_[descriptivetitle]_photo-pp-import_nolabels.xls as a Microsoft Excel 5.0/95 Workbook. • Close the spreadsheet. • Open Past Perfect, perform a backup to hard drive • Go to Utilities and then Import • Choose the following: Excel 5; browse for your spreadsheet and chose the no labels version; Photos;
Selected • Select Fields:
o Double click to add each of the fields above to the “Import Data into these Fields” o Be sure they are in the same order as the above list and your spreadsheet
• Click done. • Select Prepare Import • Under Destination File Information, select Photos from the Import unspecified records as option • Select Import Data Now • Once completed, choose exit. • Click “Reindex” on the Main Menu. Please be sure all of the boxes are checked (you will need to
manually check some of them). Then click “Start Reindex Now.” • When the reindex is complete, go into Photos and check the records you just imported to be sure
that the import and the global commands went as expected.
SAA Mus
eum A
rchive
s Sec
tion W
orking
Grou
p Exa
mple
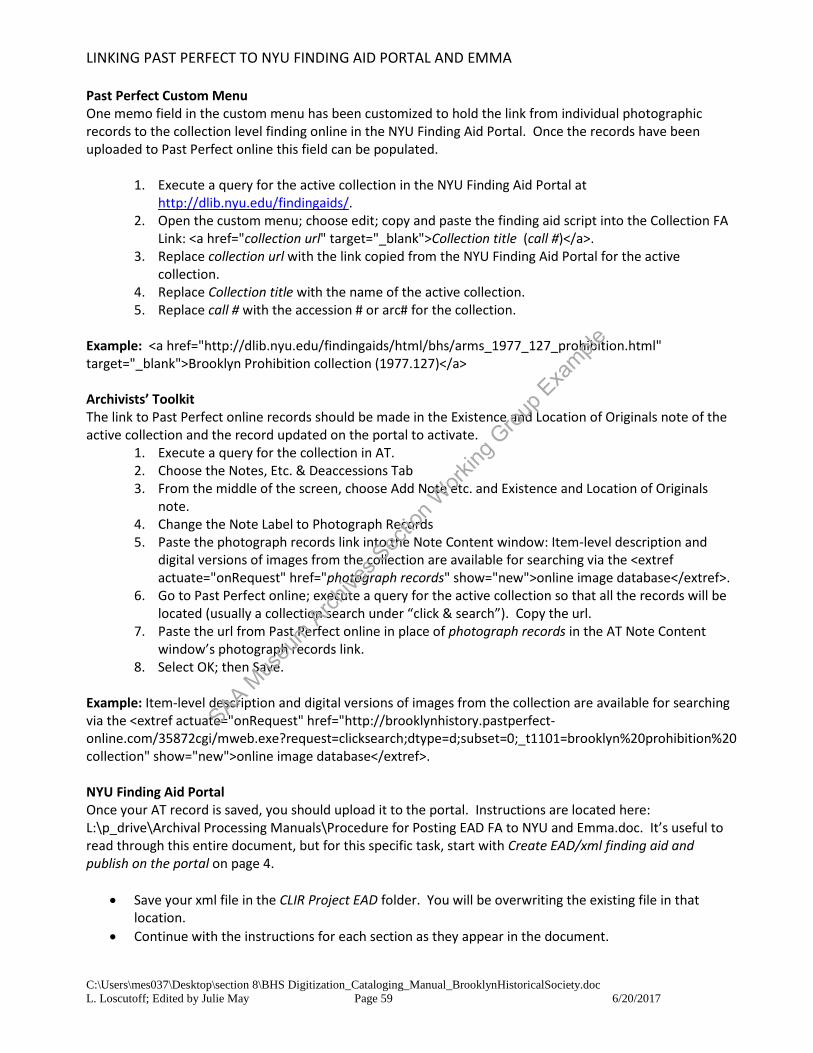
LINKING PAST PERFECT TO NYU FINDING AID PORTAL AND EMMA
C:\Users\mes037\Desktop\section 8\BHS Digitization_Cataloging_Manual_BrooklynHistoricalSociety.doc L. Loscutoff; Edited by Julie May Page 59 6/20/2017
Past Perfect Custom Menu One memo field in the custom menu has been customized to hold the link from individual photographic records to the collection level finding online in the NYU Finding Aid Portal. Once the records have been uploaded to Past Perfect online this field can be populated.
1. Execute a query for the active collection in the NYU Finding Aid Portal at http://dlib.nyu.edu/findingaids/.
2. Open the custom menu; choose edit; copy and paste the finding aid script into the Collection FA Link: <a href="collection url" target="_blank">Collection title (call #)</a>.
3. Replace collection url with the link copied from the NYU Finding Aid Portal for the active collection.
4. Replace Collection title with the name of the active collection. 5. Replace call # with the accession # or arc# for the collection.
Example: <a href="http://dlib.nyu.edu/findingaids/html/bhs/arms_1977_127_prohibition.html" target="_blank">Brooklyn Prohibition collection (1977.127)</a> Archivists’ Toolkit The link to Past Perfect online records should be made in the Existence and Location of Originals note of the active collection and the record updated on the portal to activate.
1. Execute a query for the collection in AT. 2. Choose the Notes, Etc. & Deaccessions Tab 3. From the middle of the screen, choose Add Note etc. and Existence and Location of Originals
note. 4. Change the Note Label to Photograph Records 5. Paste the photograph records link into the Note Content window: Item-level description and
digital versions of images from the collection are available for searching via the <extref actuate="onRequest" href="photograph records" show="new">online image database</extref>.
6. Go to Past Perfect online; execute a query for the active collection so that all the records will be located (usually a collection search under “click & search”). Copy the url.
7. Paste the url from Past Perfect online in place of photograph records in the AT Note Content window’s photograph records link.
8. Select OK; then Save. Example: Item-level description and digital versions of images from the collection are available for searching via the <extref actuate="onRequest" href="http://brooklynhistory.pastperfect-online.com/35872cgi/mweb.exe?request=clicksearch;dtype=d;subset=0;_t1101=brooklyn%20prohibition%20collection" show="new">online image database</extref>. NYU Finding Aid Portal Once your AT record is saved, you should upload it to the portal. Instructions are located here: L:\p_drive\Archival Processing Manuals\Procedure for Posting EAD FA to NYU and Emma.doc. It’s useful to read through this entire document, but for this specific task, start with Create EAD/xml finding aid and publish on the portal on page 4.
• Save your xml file in the CLIR Project EAD folder. You will be overwriting the existing file in that location.
• Continue with the instructions for each section as they appear in the document.
SAA Mus
eum A
rchive
s Sec
tion W
orking
Grou
p Exa
mple

LINKING PAST PERFECT TO NYU FINDING AID PORTAL AND EMMA
C:\Users\mes037\Desktop\section 8\BHS Digitization_Cataloging_Manual_BrooklynHistoricalSociety.doc L. Loscutoff; Edited by Julie May Page 60 6/20/2017
Emma An additional hyperlink should be added to the collection’s post in the catablog. Follow the procedures to create a new post or edit an existing post as per below.
• Click admin to login to Emma • Locate the post by browsing or executing a search; choose edit • Scroll to the bottom of the post and insert the following after the View Full Finding Aid line: <a href="
photograph records " target="_blank">View Collection title photographs (object id range)</a> • Replace photograph records with the Past Perfect online query for the active collection so that all the
records will be located (usually a collection search under “click & search”). • Replace Collection title with the appropriate title followed by photographs if the title does not
include the word photographs. • Replace object id range with the range of ids that represent the photographs. • Click update from the right. Preview the changes to ensure it displays in red, bold underneath View
Full Finding Aid. To insert a rotating gif to post:
o Create your rotating gif in Photoshop. o Save as an animated gif to: L:\p_drive\ArMs\Catablog\catablog images with the following
naming convention: “bhs_[call#]_[brief collections name].gif” o Recommended size is 400 pixesl wide o In wordpress edit window, in the first line of code, insert image from file folder at 100% (if
you modify the size in wordpress, the animation will not work). o Save and preview.
Example: <a href="http://brooklynhistory.pastperfect-online.com/35872cgi/mweb.exe?request=clicksearch;dtype=d;subset=0;_t1101=brooklyn%20prohibition%20collection" target="_blank">View Brooklyn Prohibition collection photographs (v1977.127.1-19)</a> MARC XML XML will be exported at the collection level from AT. Records have been sent to NYU for testing so this section is in development. More information to come.
SAA Mus
eum A
rchive
s Sec
tion W
orking
Grou
p Exa
mple
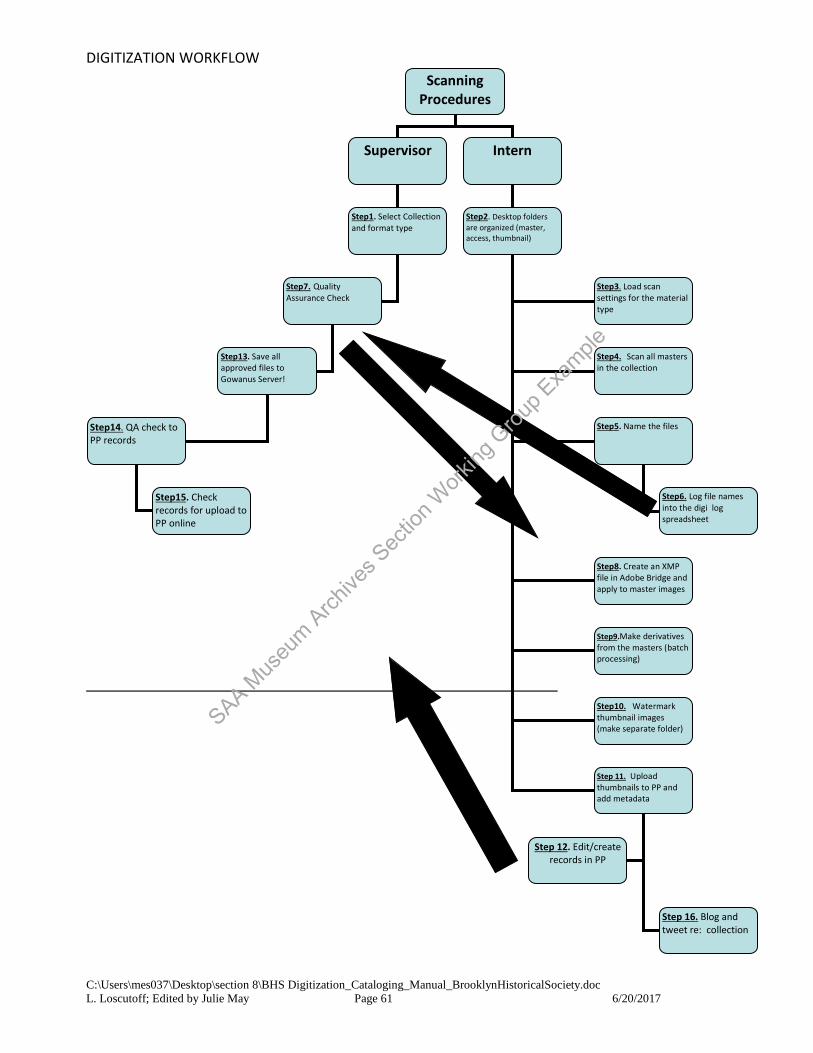
DIGITIZATION WORKFLOW
C:\Users\mes037\Desktop\section 8\BHS Digitization_Cataloging_Manual_BrooklynHistoricalSociety.doc L. Loscutoff; Edited by Julie May Page 61 6/20/2017
Scanning Procedures
Supervisor Intern
Step1. Select Collection and format type
Step2. Desktop folders are organized (master, access, thumbnail)
Step3. Load scan settings for the material type
Step4. Scan all masters in the collection
Step5. Name the files
Step8. Create an XMP file in Adobe Bridge and apply to master images
Step9.Make derivatives from the masters (batch processing)
Step10. Watermark thumbnail images (make separate folder)
Step 11. Upload thumbnails to PP and add metadata
Step7. Quality Assurance Check
Step13. Save all approved files to Gowanus Server!
Step6. Log file names into the digi log spreadsheet
Step14. QA check to PP records
Step15. Check records for upload to PP online
Step 12. Edit/create records in PP
Step 16. Blog and tweet re: collection
SAA Mus
eum A
rchive
s Sec
tion W
orking
Grou
p Exa
mple

DIGITIZATION PROCEDURES CHECKLIST
C:\Users\mes037\Desktop\section 8\BHS Digitization_Cataloging_Manual_BrooklynHistoricalSociety.doc L. Loscutoff; Edited by Julie May Page 62 6/20/2017
1. Master files have been scanned and correctly named_______
2. Image object id’s have been logged into the digitization spreadsheet log______
3. XMP file template was created in Adobe Bridge (per collection), and applied to the master
images_______
4. Derivative images have been created by using batch processing in Adobe Photoshop, and correctly
named______
5. Use batch processing in Adobe Photoshop to apply watermarks to thumbnail images and save in a
separate folder______
6. Upload watermarked thumbnail files to Past Perfect______
7. Add metadata to Past Perfect, when images are uploaded______
8. Add links to AT and Emma ______
9. Update xml, pdf files, and links to online catalogs (NYU FA Portal, Emma) ______
SAA Mus
eum A
rchive
s Sec
tion W
orking
Grou
p Exa
mple

BRIEF SUMMARY
C:\Users\mes037\Desktop\section 8\BHS Digitization_Cataloging_Manual_BrooklynHistoricalSociety.doc L. Loscutoff; Edited by Julie May Page 63 6/20/2017
Brief Summary: Each 600 dpi (or recommended resolution) TIF scan is an ARCHIVAL ORIGINAL and is to be saved on the Gowanus server in Edna. Interns will save the variant copies of the images on the RAID server. Interns should submit their authorities to their immediate supervisor, before entering into Past Perfect. All scans will be logged into the digitization log and spreadsheet, which is located on the p_drive, under the CHART tab. Each intern will create their own folder for saved images. More metadata will be entered into Past Perfect, as the watermarked thumbnails are uploaded by the interns. A supervisor will upload the images to the Gowanus server (interns won’t have access), after a quality assurance check is completed. Any images that need to be rescanned or edited will be noted and the object ID’s will be noted for the intern to fix. Only the Photo Archivist, Photo Collections Assistant, and the Digitization Archivist, will be responsible for cleaning up the subject terms in Past Perfect. Interns will only have access to choose already approved LOC terms that are already uploaded into Past Perfect. Interns will be able to create the search terms (place names and addresses). This manual is an active document and as this project gets more under way changes might be made.
SAA Mus
eum A
rchive
s Sec
tion W
orking
Grou
p Exa
mple
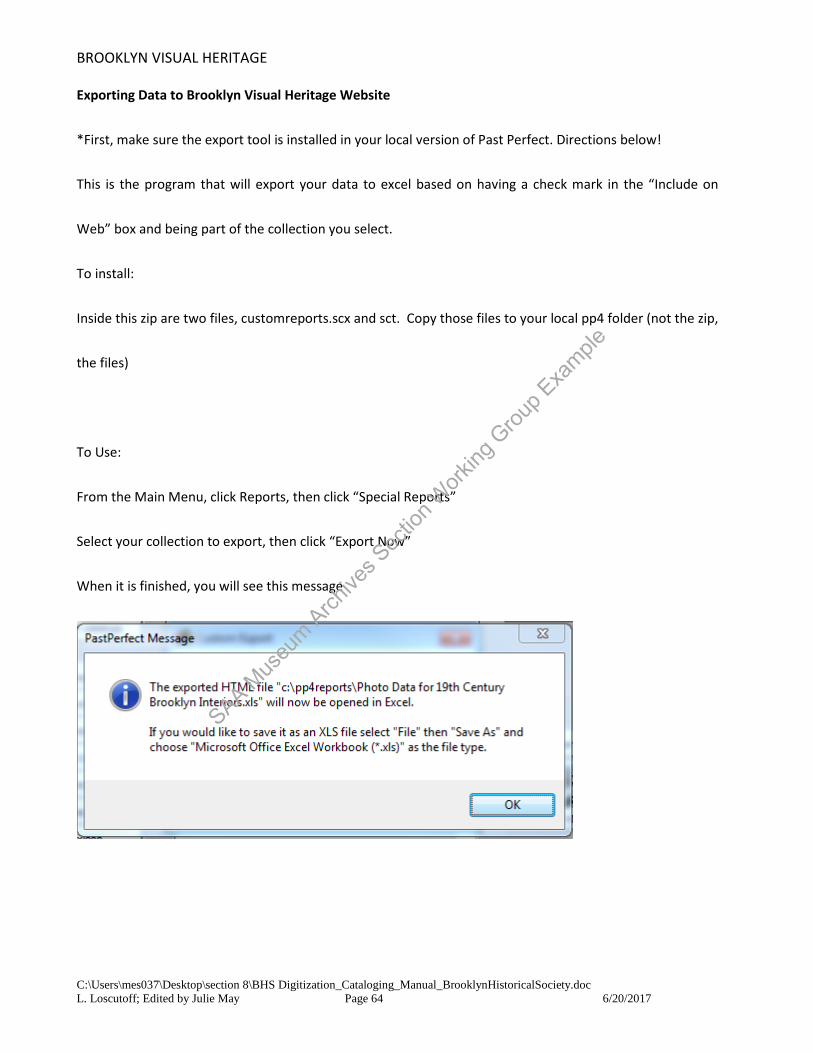
BROOKLYN VISUAL HERITAGE
C:\Users\mes037\Desktop\section 8\BHS Digitization_Cataloging_Manual_BrooklynHistoricalSociety.doc L. Loscutoff; Edited by Julie May Page 64 6/20/2017
Exporting Data to Brooklyn Visual Heritage Website
*First, make sure the export tool is installed in your local version of Past Perfect. Directions below!
This is the program that will export your data to excel based on having a check mark in the “Include on
Web” box and being part of the collection you select.
To install:
Inside this zip are two files, customreports.scx and sct. Copy those files to your local pp4 folder (not the zip,
the files)
To Use:
From the Main Menu, click Reports, then click “Special Reports”
Select your collection to export, then click “Export Now”
When it is finished, you will see this message
SAA Mus
eum A
rchive
s Sec
tion W
orking
Grou
p Exa
mple
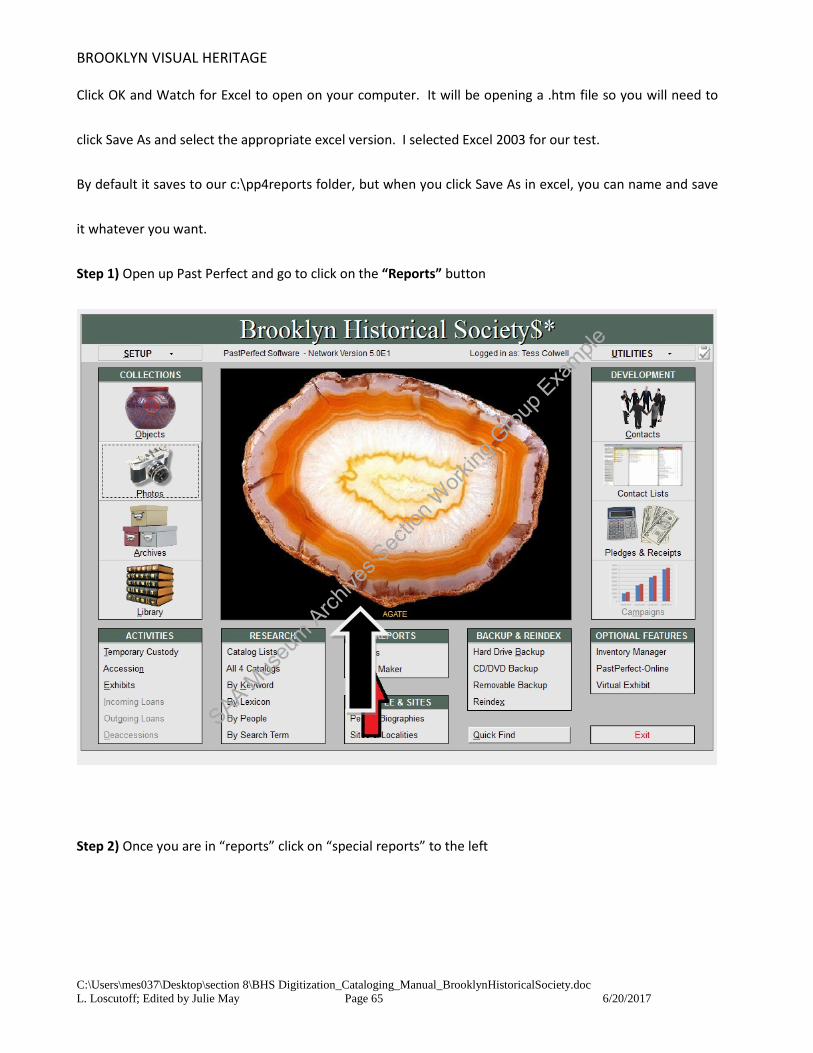
BROOKLYN VISUAL HERITAGE
C:\Users\mes037\Desktop\section 8\BHS Digitization_Cataloging_Manual_BrooklynHistoricalSociety.doc L. Loscutoff; Edited by Julie May Page 65 6/20/2017
Click OK and Watch for Excel to open on your computer. It will be opening a .htm file so you will need to
click Save As and select the appropriate excel version. I selected Excel 2003 for our test.
By default it saves to our c:\pp4reports folder, but when you click Save As in excel, you can name and save
it whatever you want.
Step 1) Open up Past Perfect and go to click on the “Reports” button
Step 2) Once you are in “reports” click on “special reports” to the left
SAA Mus
eum A
rchive
s Sec
tion W
orking
Grou
p Exa
mple
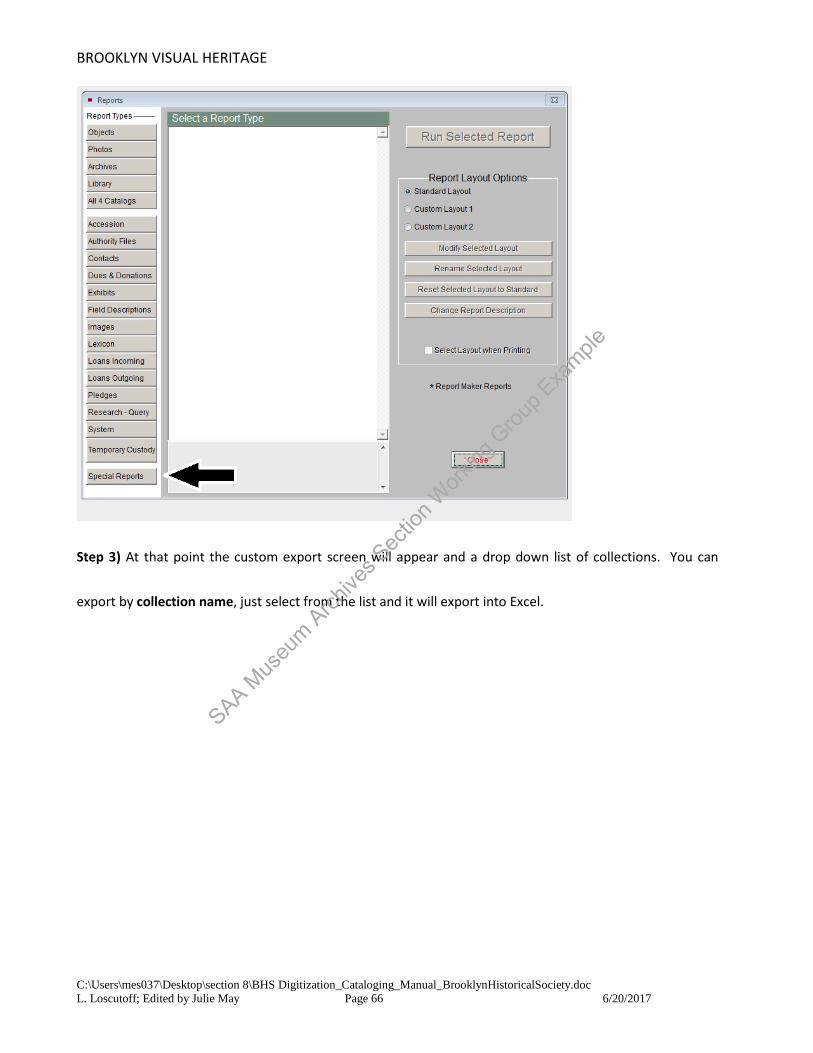
BROOKLYN VISUAL HERITAGE
C:\Users\mes037\Desktop\section 8\BHS Digitization_Cataloging_Manual_BrooklynHistoricalSociety.doc L. Loscutoff; Edited by Julie May Page 66 6/20/2017
Step 3) At that point the custom export screen will appear and a drop down list of collections. You can
export by collection name, just select from the list and it will export into Excel.
SAA Mus
eum A
rchive
s Sec
tion W
orking
Grou
p Exa
mple
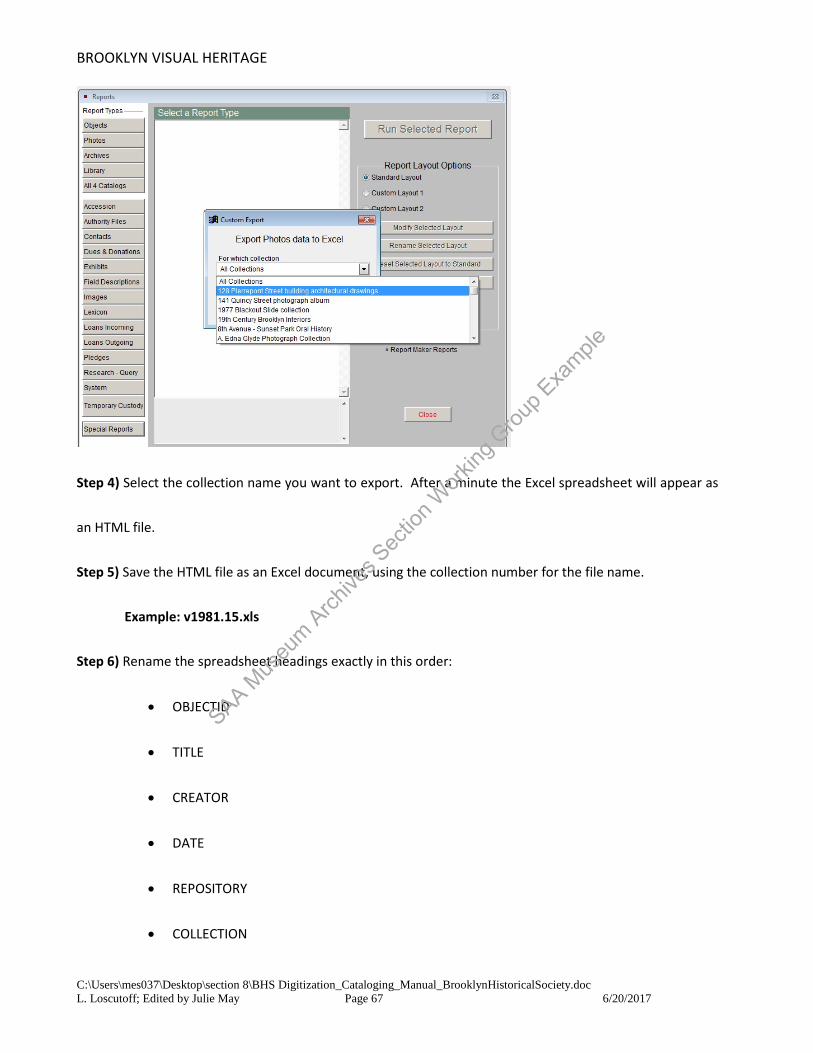
BROOKLYN VISUAL HERITAGE
C:\Users\mes037\Desktop\section 8\BHS Digitization_Cataloging_Manual_BrooklynHistoricalSociety.doc L. Loscutoff; Edited by Julie May Page 67 6/20/2017
Step 4) Select the collection name you want to export. After a minute the Excel spreadsheet will appear as
an HTML file.
Step 5) Save the HTML file as an Excel document, using the collection number for the file name.
Example: v1981.15.xls
Step 6) Rename the spreadsheet headings exactly in this order:
• OBJECTID
• TITLE
• CREATOR
• DATE
• REPOSITORY
• COLLECTION
SAA Mus
eum A
rchive
s Sec
tion W
orking
Grou
p Exa
mple

BROOKLYN VISUAL HERITAGE
C:\Users\mes037\Desktop\section 8\BHS Digitization_Cataloging_Manual_BrooklynHistoricalSociety.doc L. Loscutoff; Edited by Julie May Page 68 6/20/2017
• SUBJECTS
• SUBJECTS2
• DESCRIP
• MEDIUM
• RIGHTS
• LOCATION
• IMAGEFILE
• RECORDLINK
Step 7) Save the spreadsheet and save it in the “xls files for Brooklyn Visual Heritage” folder here:
S:\LIBRARY & ARCHIVES\Cataloging-Description-Processing\Photograph Cataloging
Step 8) Make sure the data is all there, and then email the spreadsheet to Tom at BPL!
Step 9) The data is emailed after the images are pushed online with Past Perfect.
REPAIRING A MISSING PHOTO IN AN IMAGE RECORD
1) Click on the original record link
2) Click on the image on the BVH page to make it larger
3) Right click on the image and select view image info
4) Copy the whole link in the "location" field such as http://brooklynhistory.pastperfect-
online.com/35872images/019/V197817448.JPG
5) On BVH select edit for the image
SAA Mus
eum A
rchive
s Sec
tion W
orking
Grou
p Exa
mple

BROOKLYN VISUAL HERITAGE
C:\Users\mes037\Desktop\section 8\BHS Digitization_Cataloging_Manual_BrooklynHistoricalSociety.doc L. Loscutoff; Edited by Julie May Page 69 6/20/2017
6) Paste this web address into the field Image: Leave all other fields alone.
7) Save the record
SAA Mus
eum A
rchive
s Sec
tion W
orking
Grou
p Exa
mple
BROOKLYN VISUAL HERITAGE
C:\Users\mes037\Desktop\section 8\BHS Digitization_Cataloging_Manual_BrooklynHistoricalSociety.doc L. Loscutoff; Edited by Julie May Page 70 6/20/2017
In-house Photography When to photograph collection items
• Situations that call for photographing collection items:
o Items are too large for flatbed scanner: items are larger than 11” x 17” o Items are too delicate to place on the flatbed scanner o Items are framed o Items are three-dimensional
What can be photographed in the digital suite?
• Items smaller than 20” x 24” can be photographed at 300dpi. If larger items are photographed, the image shows lens distortion. These larger items can be photographed to create reference images only.
Removing exhibit items for photography
• If items to be photographed are currently on exhibit, discuss with the Director of Exhibitions and the Education Coordinator before removing them. Always try to schedule photography during hours when the museum is closed to the public. Keep in mind that education tours may be scheduled during hours when the museum is closed.
Keys and access to the digital suite
• The digital suite is located on the mezzanine level. The floor can only be accessed by the elevator. The elevator key can be found in the reference desk drawer, or at the Photographic Archivist’s desk. Unlock the mezzanine by turning the “Mezz.” elevator key to “on.”
• IMPORTANT: Keep the key with you at all times while on the mezzanine level and return it when finished. Be sure to leave the elevator key “on” while on the mezzanine, and to turn the elevator key to “off” at all times when you are not on the mezzanine.
Handling the camera equipment
• Always leave the lens on the camera, even when you have finished shooting and returned the camera to its bag. This prevents wear and tear and the risk of dust entering the camera and lens. It should only be removed when you have to change lenses. The camera bag should be kept at the Photo Collections Assistant’s desk when not in use, and all materials should be kept in the photo bag.
• Use care when attaching and removing the camera from the copy stand.
SAA Mus
eum A
rchive
s Sec
tion W
orking
Grou
p Exa
mple
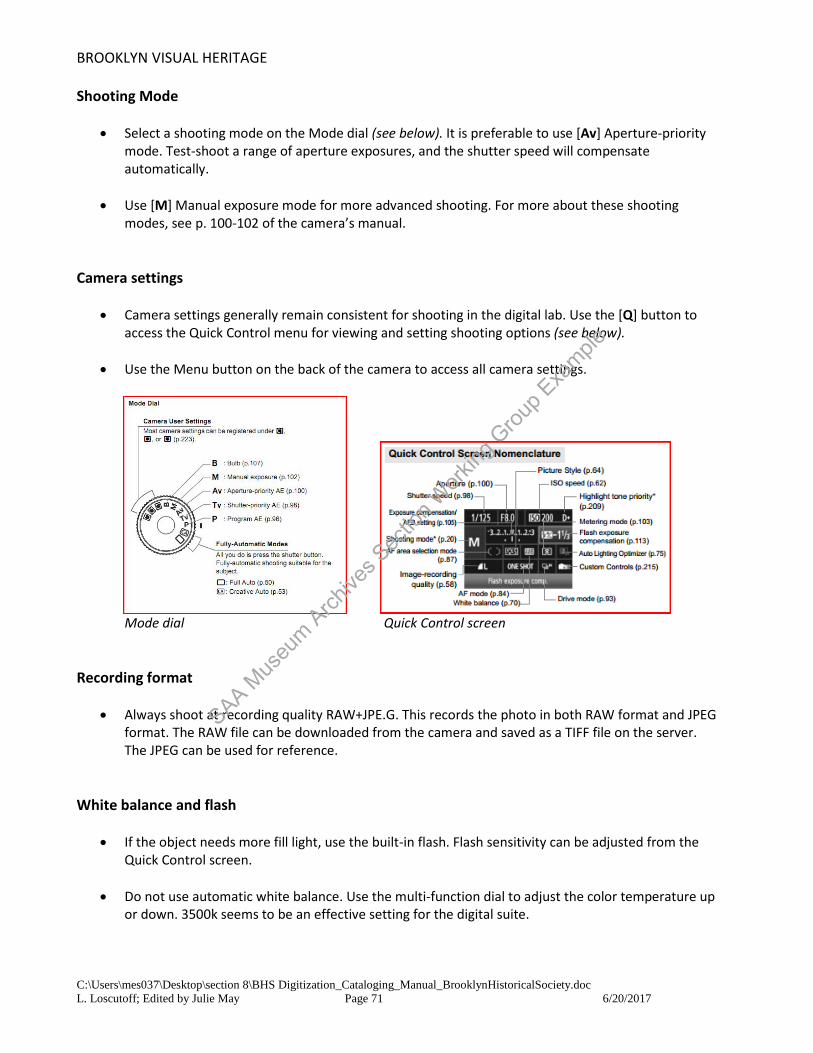
BROOKLYN VISUAL HERITAGE
C:\Users\mes037\Desktop\section 8\BHS Digitization_Cataloging_Manual_BrooklynHistoricalSociety.doc L. Loscutoff; Edited by Julie May Page 71 6/20/2017
Shooting Mode
• Select a shooting mode on the Mode dial (see below). It is preferable to use [Av] Aperture-priority mode. Test-shoot a range of aperture exposures, and the shutter speed will compensate automatically.
• Use [M] Manual exposure mode for more advanced shooting. For more about these shooting modes, see p. 100-102 of the camera’s manual.
Camera settings
• Camera settings generally remain consistent for shooting in the digital lab. Use the [Q] button to access the Quick Control menu for viewing and setting shooting options (see below).
• Use the Menu button on the back of the camera to access all camera settings.
Mode dial Quick Control screen Recording format
• Always shoot at recording quality RAW+JPE.G. This records the photo in both RAW format and JPEG format. The RAW file can be downloaded from the camera and saved as a TIFF file on the server. The JPEG can be used for reference.
White balance and flash
• If the object needs more fill light, use the built-in flash. Flash sensitivity can be adjusted from the Quick Control screen.
• Do not use automatic white balance. Use the multi-function dial to adjust the color temperature up or down. 3500k seems to be an effective setting for the digital suite.
SAA Mus
eum A
rchive
s Sec
tion W
orking
Grou
p Exa
mple

BROOKLYN VISUAL HERITAGE
C:\Users\mes037\Desktop\section 8\BHS Digitization_Cataloging_Manual_BrooklynHistoricalSociety.doc L. Loscutoff; Edited by Julie May Page 72 6/20/2017
• Shoot test shots with the lights on. Shoot a range of exposures and compare for find what has the best results. View the images on a computer monitor for best results—the camera’s display should not be considered accurate.
Focus
• Always use the remote shutter release.
• Use Automatic focus (AF) when shooting. Pressing the shutter button half way will show the grids in the screen of the camera to display what the camera is focusing on.
• Shooting from higher up and then zooming in is most effective and prevents lens distortion. Lenses
• Use the 18-200mm lens for almost all shooting. Use the macro lens for small object shooting and small details of larger objects.
Using the copy stand
• The copy stand supports photographing items no larger than 20” x 24”.
• First, make sure the surface area is clean using dust-off spray. Place the object flat on the copy stand, or on a piece of foam board on the stand (for larger flat objects). Use a book cradle for oversized and fragile books. Attach the camera securely.
• Two people may be needed to photograph fragile objects, particularly scrapbooks, oversized objects, and bound items.
Lights
• Adjust the angle of the lights if needed. Opening the lights to a wider angle may help with photographing encapsulated materials, which show reflections. If you adjust their angle, please return the lights to their original position when you are finished.
• IMPORTANT: Minimize the time the copy stand lights are on. Do not turn them on until the object
is set up and you are ready to shoot. The lights get very hot and should be turned off when you finish shooting each object. They can cause materials to curl if they are on for extended periods. DO NOT touch the lights after they have been in use.
SAA Mus
eum A
rchive
s Sec
tion W
orking
Grou
p Exa
mple

BROOKLYN VISUAL HERITAGE
C:\Users\mes037\Desktop\section 8\BHS Digitization_Cataloging_Manual_BrooklynHistoricalSociety.doc L. Loscutoff; Edited by Julie May Page 73 6/20/2017
Third party photography
• When objects are too large to scan or photograph in-house, and funding for photography is available, objects may be approved for third party photography. Please refer to our vendor list spreadsheet “Exhibition_consultants-vendors” located here: S:\EXHIBITIONS\_Exhibition Planning
• To receive a price estimate for at-size photography, measure the object’s dimensions in inches. Call
the studio and ask for a price estimate. Submit the price estimate to the project’s supervisor for approval. Once approved and funding is guaranteed, make an appointment to bring the object to be photographed. Flat objects should be transported securely inside acid-free paper, inside a sturdy folder, and in the handled portfolio.
• BHS depends upon established and healthy relationships with our vendors to promote and support
our collections. It is important that vendors be paid as promptly as is possible to ensure these relationships can continue. Please see the Photographic Archivist for questions about payments.
SAA Mus
eum A
rchive
s Sec
tion W
orking
Grou
p Exa
mple