BETA Version, January 10th, 2005: Introduction to...
383
“main” 2005/1/11 page i ✐ ✐ ✐ ✐ ✐ ✐ BETA Version, January 10th, 2005: Introduction to Computing and Programming in Java: A Multimedia Approach Mark Guzdial and Barbara Ericson College of Computing/GVU Georgia Institute of Technology PRENTICE HALL, Upper Saddle River, New Jersey 07458
Transcript of BETA Version, January 10th, 2005: Introduction to...

“main”2005/1/11page i
i
i
i
i
i
i
i
i
BETA Version, January 10th,2005:
Introduction to Computing andProgramming in Java:
A Multimedia Approach
Mark Guzdial and Barbara EricsonCollege of Computing/GVU
Georgia Institute of Technology
PRENTICE HALL, Upper Saddle River, New Jersey 07458

“main”2005/1/11page ii
i
i
i
i
i
i
i
i
ii
Copyright held by Mark Guzdial and Barbara Ericson, 2005.

“main”2005/1/11page iii
i
i
i
i
i
i
i
i
iii
Dedicated to our children Matthew, Katherine, and Jennifer

“main”2005/1/11page iv
i
i
i
i
i
i
i
i
Contents
Contents iv
Preface 1
I Introduction 7
1 Introduction to Computer Science and Media Computation 81.1 What is Computer Science About? . . . . . . . . . . . . . . . . . . . 81.2 What Computers Understand . . . . . . . . . . . . . . . . . . . . . . 131.3 Media Computation: Why Digitize Media? . . . . . . . . . . . . . . 151.4 Computer Science for Everyone . . . . . . . . . . . . . . . . . . . . . 16
1.4.1 It’s About Communication . . . . . . . . . . . . . . . . . . . 171.4.2 It’s About Process . . . . . . . . . . . . . . . . . . . . . . . . 17
2 Introduction to Java 192.1 Java . . . . . . . . . . . . . . . . . . . . . . . . . . . . . . . . . . . . 19
2.1.1 History of Java . . . . . . . . . . . . . . . . . . . . . . . . . . 192.1.2 Introduction to Objects and Classes . . . . . . . . . . . . . . 20
2.2 Introduction to DrJava . . . . . . . . . . . . . . . . . . . . . . . . . . 212.2.1 Starting DrJava . . . . . . . . . . . . . . . . . . . . . . . . . 21
2.3 Java Basics . . . . . . . . . . . . . . . . . . . . . . . . . . . . . . . . 242.3.1 Math Operators . . . . . . . . . . . . . . . . . . . . . . . . . 242.3.2 Printing the Result of a Statement . . . . . . . . . . . . . . . 242.3.3 Types in Math Expressions . . . . . . . . . . . . . . . . . . . 272.3.4 Casting . . . . . . . . . . . . . . . . . . . . . . . . . . . . . . 272.3.5 Relational Operators . . . . . . . . . . . . . . . . . . . . . . . 272.3.6 Strings . . . . . . . . . . . . . . . . . . . . . . . . . . . . . . . 29
2.4 Variables . . . . . . . . . . . . . . . . . . . . . . . . . . . . . . . . . 312.4.1 Declaring Variables . . . . . . . . . . . . . . . . . . . . . . . . 312.4.2 Using Variables in Calculations . . . . . . . . . . . . . . . . . 312.4.3 Memory Maps of Variables . . . . . . . . . . . . . . . . . . . 322.4.4 Object Variables . . . . . . . . . . . . . . . . . . . . . . . . . 342.4.5 Reusing Variables . . . . . . . . . . . . . . . . . . . . . . . . 362.4.6 Multiple References to an Object . . . . . . . . . . . . . . . . 37
2.5 Concepts Summary . . . . . . . . . . . . . . . . . . . . . . . . . . . . 392.5.1 Statements . . . . . . . . . . . . . . . . . . . . . . . . . . . . 392.5.2 Relational Operators . . . . . . . . . . . . . . . . . . . . . . . 402.5.3 Types . . . . . . . . . . . . . . . . . . . . . . . . . . . . . . . 402.5.4 Casting . . . . . . . . . . . . . . . . . . . . . . . . . . . . . . 402.5.5 Variables . . . . . . . . . . . . . . . . . . . . . . . . . . . . . 41
iv

“main”2005/1/11page v
i
i
i
i
i
i
i
i
v
3 Introduction to Programming 433.1 Programming is About Naming . . . . . . . . . . . . . . . . . . . . . 433.2 Files and their Names . . . . . . . . . . . . . . . . . . . . . . . . . . 453.3 Class and Object Methods . . . . . . . . . . . . . . . . . . . . . . . . 46
3.3.1 Invoking Class Methods . . . . . . . . . . . . . . . . . . . . . 463.3.2 Invoking Object Methods . . . . . . . . . . . . . . . . . . . . 47
3.4 Working with Turtles . . . . . . . . . . . . . . . . . . . . . . . . . . . 483.4.1 Defining Classes . . . . . . . . . . . . . . . . . . . . . . . . . 483.4.2 Creating Objects . . . . . . . . . . . . . . . . . . . . . . . . . 483.4.3 Sending Messages to Objects . . . . . . . . . . . . . . . . . . 513.4.4 Objects Control Their State . . . . . . . . . . . . . . . . . . . 523.4.5 Additional Turtle Capabilities . . . . . . . . . . . . . . . . . . 53
3.5 Creating Methods . . . . . . . . . . . . . . . . . . . . . . . . . . . . 563.5.1 Methods that Take Input . . . . . . . . . . . . . . . . . . . . 61
3.6 Working with Media . . . . . . . . . . . . . . . . . . . . . . . . . . . 643.6.1 Creating a Picture Object . . . . . . . . . . . . . . . . . . . . 643.6.2 Showing a Picture . . . . . . . . . . . . . . . . . . . . . . . . 663.6.3 Variable Substitution . . . . . . . . . . . . . . . . . . . . . . 683.6.4 Object references . . . . . . . . . . . . . . . . . . . . . . . . . 703.6.5 Playing a Sound . . . . . . . . . . . . . . . . . . . . . . . . . 713.6.6 Naming your Media (and other Values) . . . . . . . . . . . . 723.6.7 Naming the Result of a Method . . . . . . . . . . . . . . . . . 72
3.7 Concepts Summary . . . . . . . . . . . . . . . . . . . . . . . . . . . . 743.7.1 Invoking Object Methods . . . . . . . . . . . . . . . . . . . . 743.7.2 Invoking Class Methods . . . . . . . . . . . . . . . . . . . . . 743.7.3 Creating Objects . . . . . . . . . . . . . . . . . . . . . . . . . 743.7.4 Creating new Methods . . . . . . . . . . . . . . . . . . . . . . 75
II Pictures 79
4 Modifying Pictures using Loops 804.1 How Pictures are Encoded . . . . . . . . . . . . . . . . . . . . . . . . 80
4.1.1 Color Respresentations . . . . . . . . . . . . . . . . . . . . . . 844.2 Manipulating Pictures . . . . . . . . . . . . . . . . . . . . . . . . . . 88
4.2.1 Exploring Pictures . . . . . . . . . . . . . . . . . . . . . . . . 944.3 Changing color values . . . . . . . . . . . . . . . . . . . . . . . . . . 95
4.3.1 Using While Loops in Pictures . . . . . . . . . . . . . . . . . 964.3.2 Increasing/Decreasing Red (Green, Blue) . . . . . . . . . . . 1004.3.3 Creating a Sunset . . . . . . . . . . . . . . . . . . . . . . . . 1134.3.4 Making Sense of Methods . . . . . . . . . . . . . . . . . . . . 1154.3.5 Variable Name Scope . . . . . . . . . . . . . . . . . . . . . . 1184.3.6 Using a For Loop . . . . . . . . . . . . . . . . . . . . . . . . . 1224.3.7 Lightening and Darkening . . . . . . . . . . . . . . . . . . . . 1244.3.8 Creating a Negative . . . . . . . . . . . . . . . . . . . . . . . 1254.3.9 Converting to Grayscale . . . . . . . . . . . . . . . . . . . . . 127
4.4 Concepts Summary . . . . . . . . . . . . . . . . . . . . . . . . . . . . 129

“main”2005/1/11page vi
i
i
i
i
i
i
i
i
vi
4.4.1 Arrays . . . . . . . . . . . . . . . . . . . . . . . . . . . . . . . 1294.4.2 Loops . . . . . . . . . . . . . . . . . . . . . . . . . . . . . . . 1304.4.3 Comments . . . . . . . . . . . . . . . . . . . . . . . . . . . . . 131
5 Modifying Pixels in a Matrix 1365.1 Copying Pixels . . . . . . . . . . . . . . . . . . . . . . . . . . . . . . 136
5.1.1 Looping Across the Pixels with a Nested Loop . . . . . . . . 1375.1.2 Mirroring a Picture . . . . . . . . . . . . . . . . . . . . . . . . 139
5.2 Copying and Transforming Pictures . . . . . . . . . . . . . . . . . . 1475.2.1 Copying . . . . . . . . . . . . . . . . . . . . . . . . . . . . . . 1485.2.2 Creating a Collage . . . . . . . . . . . . . . . . . . . . . . . . 1545.2.3 Blending Pictures . . . . . . . . . . . . . . . . . . . . . . . . 1595.2.4 Rotation . . . . . . . . . . . . . . . . . . . . . . . . . . . . . . 1625.2.5 Scaling . . . . . . . . . . . . . . . . . . . . . . . . . . . . . . 166
5.3 Concepts Summary . . . . . . . . . . . . . . . . . . . . . . . . . . . . 1715.3.1 Two-dimensional Arrays . . . . . . . . . . . . . . . . . . . . . 1715.3.2 Nested Loops . . . . . . . . . . . . . . . . . . . . . . . . . . . 1725.3.3 Returning a Value from a Method . . . . . . . . . . . . . . . 1735.3.4 Method Overloading . . . . . . . . . . . . . . . . . . . . . . . 174
5.4 Color Figures . . . . . . . . . . . . . . . . . . . . . . . . . . . . . . . 176
6 Conditionally Modifying Pixels 1856.1 Conditional Pixel Changes . . . . . . . . . . . . . . . . . . . . . . . . 186
6.1.1 Comparing Colors . . . . . . . . . . . . . . . . . . . . . . . . 1876.1.2 Replacing Colors . . . . . . . . . . . . . . . . . . . . . . . . . 1876.1.3 Reducing Red-Eye . . . . . . . . . . . . . . . . . . . . . . . . 192
6.2 Simple Edge Detection: conditionals with two options . . . . . . . . 1946.2.1 Negation . . . . . . . . . . . . . . . . . . . . . . . . . . . . . 1946.2.2 Testing for Both Conditions . . . . . . . . . . . . . . . . . . . 1956.2.3 Conditionals with Two Options . . . . . . . . . . . . . . . . . 1956.2.4 Simple Edge Detection . . . . . . . . . . . . . . . . . . . . . . 196
6.3 Sepia-Toned and Posterized Pictures: Using multiple conditionals tochoose the color . . . . . . . . . . . . . . . . . . . . . . . . . . . . . . 198
6.4 Highlighting Extremes . . . . . . . . . . . . . . . . . . . . . . . . . . 2066.5 Combining Pixels: Blurring . . . . . . . . . . . . . . . . . . . . . . . 2076.6 Background Subtraction . . . . . . . . . . . . . . . . . . . . . . . . . 2106.7 Chromakey . . . . . . . . . . . . . . . . . . . . . . . . . . . . . . . . 2146.8 Concepts Summary . . . . . . . . . . . . . . . . . . . . . . . . . . . . 218
6.8.1 Boolean Expressions . . . . . . . . . . . . . . . . . . . . . . . 2186.8.2 Combining Boolean Expressions . . . . . . . . . . . . . . . . 2196.8.3 Conditional Execution . . . . . . . . . . . . . . . . . . . . . . 220
7 Drawing 2247.1 Drawing on Images Using the Graphics Class . . . . . . . . . . . . . 224
7.1.1 Drawing with Graphics methods . . . . . . . . . . . . . . . . 2277.1.2 Vector and bitmap representations . . . . . . . . . . . . . . . 2337.1.3 Drawing Text (Strings) . . . . . . . . . . . . . . . . . . . . . 235

“main”2005/1/11page vii
i
i
i
i
i
i
i
i
vii
7.2 Programs as Specifying Drawing Process . . . . . . . . . . . . . . . . 2397.2.1 Why do we write programs? . . . . . . . . . . . . . . . . . . . 242
7.3 Using Graphics2D for Advanced Drawing . . . . . . . . . . . . . . . 2427.3.1 Setting the Brush Width . . . . . . . . . . . . . . . . . . . . 2437.3.2 Copying Pictures by Drawing Images . . . . . . . . . . . . . . 2447.3.3 General Scaling . . . . . . . . . . . . . . . . . . . . . . . . . . 2487.3.4 Shearing . . . . . . . . . . . . . . . . . . . . . . . . . . . . . . 2497.3.5 Drawing with a GradientPaint . . . . . . . . . . . . . . . . . 2517.3.6 Interfaces . . . . . . . . . . . . . . . . . . . . . . . . . . . . . 2517.3.7 Blending Pictures Using AlphaComposite . . . . . . . . . . . 2537.3.8 Clipping . . . . . . . . . . . . . . . . . . . . . . . . . . . . . . 255
7.4 Concept Summary . . . . . . . . . . . . . . . . . . . . . . . . . . . . 2577.4.1 Packages . . . . . . . . . . . . . . . . . . . . . . . . . . . . . . 2577.4.2 Predefined Java Classes . . . . . . . . . . . . . . . . . . . . . 2587.4.3 Inheritance . . . . . . . . . . . . . . . . . . . . . . . . . . . . 2587.4.4 Interfaces . . . . . . . . . . . . . . . . . . . . . . . . . . . . . 259
III Sounds 263
8 Modifying all Samples in a Sound 2648.1 How Sound is Encoded . . . . . . . . . . . . . . . . . . . . . . . . . . 264
8.1.1 The Physics of Sound . . . . . . . . . . . . . . . . . . . . . . 2658.1.2 Exploring Sounds . . . . . . . . . . . . . . . . . . . . . . . . . 2688.1.3 Encoding Sounds . . . . . . . . . . . . . . . . . . . . . . . . . 270
8.2 Manipulating Sounds . . . . . . . . . . . . . . . . . . . . . . . . . . . 2748.2.1 Opening Sounds and Manipulating Samples . . . . . . . . . . 2758.2.2 Using MediaTools for Looking at Sounds . . . . . . . . . . . 2798.2.3 Introducing Loops . . . . . . . . . . . . . . . . . . . . . . . . 280
8.3 Changing the Volume of Sounds . . . . . . . . . . . . . . . . . . . . 2848.3.1 Increasing Volume . . . . . . . . . . . . . . . . . . . . . . . . 2848.3.2 Did that Really Work? . . . . . . . . . . . . . . . . . . . . . . 2868.3.3 Decreasing Volume . . . . . . . . . . . . . . . . . . . . . . . . 2908.3.4 Using a For Loop . . . . . . . . . . . . . . . . . . . . . . . . . 2928.3.5 Making Sense of Methods . . . . . . . . . . . . . . . . . . . . 293
8.4 Normalizing Sounds . . . . . . . . . . . . . . . . . . . . . . . . . . . 2948.4.1 Generating Clipping . . . . . . . . . . . . . . . . . . . . . . . 296
8.5 Concepts Summary . . . . . . . . . . . . . . . . . . . . . . . . . . . . 2988.5.1 Arrays . . . . . . . . . . . . . . . . . . . . . . . . . . . . . . . 2988.5.2 Loops . . . . . . . . . . . . . . . . . . . . . . . . . . . . . . . 2988.5.3 Conditional Execution . . . . . . . . . . . . . . . . . . . . . . 300
9 Modifying Samples using Ranges 3049.1 Manipulating Different Sections of the Sound Differently . . . . . . . 3049.2 Create a Sound Clip . . . . . . . . . . . . . . . . . . . . . . . . . . . 3069.3 Splicing Sounds . . . . . . . . . . . . . . . . . . . . . . . . . . . . . . 3089.4 Reversing a Sound . . . . . . . . . . . . . . . . . . . . . . . . . . . . 315

“main”2005/1/11page viii
i
i
i
i
i
i
i
i
viii
9.5 Mirroring a Sound . . . . . . . . . . . . . . . . . . . . . . . . . . . . 3179.6 Concepts Summary . . . . . . . . . . . . . . . . . . . . . . . . . . . . 318
9.6.1 Ranges in Loops . . . . . . . . . . . . . . . . . . . . . . . . . 3189.6.2 Returning a Value from a Method . . . . . . . . . . . . . . . 318
10 Combining and Creating Sounds 32110.1 Composing Sounds Through Addition . . . . . . . . . . . . . . . . . 32110.2 Blending Sounds . . . . . . . . . . . . . . . . . . . . . . . . . . . . . 32310.3 Creating an Echo . . . . . . . . . . . . . . . . . . . . . . . . . . . . . 324
10.3.1 Creating Multiple Echoes . . . . . . . . . . . . . . . . . . . . 32710.4 How Sampling Keyboards Work . . . . . . . . . . . . . . . . . . . . . 328
10.4.1 Sampling as an Algorithm . . . . . . . . . . . . . . . . . . . . 33410.5 Additive Synthesis . . . . . . . . . . . . . . . . . . . . . . . . . . . . 334
10.5.1 Making Sine Waves . . . . . . . . . . . . . . . . . . . . . . . . 33410.5.2 Creating Sounds Using Static Methods . . . . . . . . . . . . . 33510.5.3 Adding Sine Waves Together . . . . . . . . . . . . . . . . . . 33710.5.4 Checking our Result . . . . . . . . . . . . . . . . . . . . . . . 33810.5.5 Square Waves . . . . . . . . . . . . . . . . . . . . . . . . . . . 33910.5.6 Triangle Waves . . . . . . . . . . . . . . . . . . . . . . . . . . 342
10.6 Modern Music Synthesis . . . . . . . . . . . . . . . . . . . . . . . . . 34310.6.1 MP3 . . . . . . . . . . . . . . . . . . . . . . . . . . . . . . . . 34310.6.2 MIDI . . . . . . . . . . . . . . . . . . . . . . . . . . . . . . . 34410.6.3 Private Methods . . . . . . . . . . . . . . . . . . . . . . . . . 346
10.7 Concepts Summary . . . . . . . . . . . . . . . . . . . . . . . . . . . . 35210.7.1 Class Methods . . . . . . . . . . . . . . . . . . . . . . . . . . 35210.7.2 Private Methods . . . . . . . . . . . . . . . . . . . . . . . . . 35310.7.3 Build a Program from Multiple Methods . . . . . . . . . . . . 353

“main”2005/1/11page ix
i
i
i
i
i
i
i
i
List of Figures
1.1 A cooking recipe–you can always double the ingredients, but throw-ing in an extra cup of flour won’t cut it, and don’t try to brown thechicken after adding the tomato sauce! . . . . . . . . . . . . . . . . . 11
1.2 Comparing programming languages: A common simple program-ming task is to print the words “Hello, World!” to the screen. . . . . 12
1.3 Eight wires with a pattern of voltages is a byte, which gets inter-preted as a pattern of eight 0’s and 1’s, which gets interpreted as adecimal number. . . . . . . . . . . . . . . . . . . . . . . . . . . . . . 13
2.1 DrJava Preferences Window . . . . . . . . . . . . . . . . . . . . . . . 222.2 DrJava Splash Screen . . . . . . . . . . . . . . . . . . . . . . . . . . 222.3 DrJava (with annotations) . . . . . . . . . . . . . . . . . . . . . . . . 232.4 A calculator with a number in memory . . . . . . . . . . . . . . . . . 312.5 Declaring primitive variables and memory assignment . . . . . . . . 332.6 Showing the parent and child relationship between mammal and dog
(left) and Object and String (right) . . . . . . . . . . . . . . . . . . 342.7 Declaring object variables and memory assignment . . . . . . . . . . 352.8 Shows creation and reuse of an object variable. . . . . . . . . . . . . 372.9 An object with multiple references to it . . . . . . . . . . . . . . . . 382.10 An object with no references to it . . . . . . . . . . . . . . . . . . . . 383.1 A window that shows a World object. . . . . . . . . . . . . . . . . . 493.2 A window that shows a Turtle object in a World object. . . . . . . 503.3 A window that shows two Turtle objects in a World object. . . . . . 513.4 The result of messages to the first Turtle object. . . . . . . . . . . . 523.5 The result of messages to the second Turtle object. . . . . . . . . . 533.6 The turtle won’t leave the world . . . . . . . . . . . . . . . . . . . . 543.7 Drawing two squares with a turtle. . . . . . . . . . . . . . . . . . . . 553.8 Defining and executing drawSquare() . . . . . . . . . . . . . . . . . 593.9 Diagram of an object . . . . . . . . . . . . . . . . . . . . . . . . . . . 603.10 Showing the result of sending the width as a parameter to drawSquare 633.11 Creating a Picture object using new Picture() . . . . . . . . . . . 643.12 The File Chooser . . . . . . . . . . . . . . . . . . . . . . . . . . . . . 653.13 File chooser with media types identified . . . . . . . . . . . . . . . . 673.14 Picking, making, and showing a picture, using the result of each
method in the next method. The picture used is matt-spaceman.jpg. 683.15 Picking, making, and showing a picture, when naming the pieces.
The picture shown is katie.jpg. . . . . . . . . . . . . . . . . . . . . . 714.1 A depiction of the first five elements in an array . . . . . . . . . . . 814.2 An example matrix (two-dimensional array) of numbers . . . . . . . 824.3 The top left corner of the battleship guess board with a miss at B-3. 834.4 Upper left corner of DrJava window with part magnified 600% . . . 83
ix
“main”2005/1/11page x
i
i
i
i
i
i
i
i
x LIST OF FIGURES
4.5 Image shown in the picture explorer: 100% image on left and 500%on right (close-up of the branch over the mountain) . . . . . . . . . . 84
4.6 Merging red, green, and blue to make new colors . . . . . . . . . . . 854.7 Picking colors using the HSB color model . . . . . . . . . . . . . . . 854.8 The ends of this figure are the same colors of gray, but the middle
two quarters contrast sharply so the left looks darker than the right 864.9 The Macintosh OS X RGB color picker . . . . . . . . . . . . . . . . 874.10 Picking a color using RGB sliders from Java . . . . . . . . . . . . . . 874.11 RGB triplets in a matrix representation . . . . . . . . . . . . . . . . 884.12 Directly modifying the pixel colors via commands: Note the small
black line on the left under the line across the leaf . . . . . . . . . . 944.13 Exploring the caterpillar with the line . . . . . . . . . . . . . . . . . 944.14 Using the MediaTools image exploration tools . . . . . . . . . . . . . 954.15 Flowchart of a while loop . . . . . . . . . . . . . . . . . . . . . . . . 984.16 The original picture (left) and red-decreased version (right) . . . . . 1034.17 Using the picture explorer to convince ourselves that the red was
decreased . . . . . . . . . . . . . . . . . . . . . . . . . . . . . . . . . 1104.18 Overly blue (left) and red increased by 30% (right) . . . . . . . . . . 1124.19 Original (left) and blue erased (right) . . . . . . . . . . . . . . . . . 1144.20 Original beach scene (left) and at (fake) sunset (right) . . . . . . . . 1154.21 Flowchart of a for loop . . . . . . . . . . . . . . . . . . . . . . . . . . 1234.22 Original picture, lightened picture, and darkened picture . . . . . . 1264.23 Negative of the image . . . . . . . . . . . . . . . . . . . . . . . . . . 1274.24 Color picture converted to grayscale . . . . . . . . . . . . . . . . . . 1285.1 Once we pick a mirror point, we can just walk x halfway and sub-
tract/add to the mirror point . . . . . . . . . . . . . . . . . . . . . . 1405.2 Original picture (left) and mirrored along the vertical axis (right) . . 1415.3 A motorcycle mirrored horizontally, top to bottom (left) and bottom
to top (right) . . . . . . . . . . . . . . . . . . . . . . . . . . . . . . . 1435.4 Temple of Hephaistos from the ancient agora in Athens, Greece . . . 1435.5 Coordinates where we need to do the mirroring . . . . . . . . . . . . 1445.6 The manipulated temple . . . . . . . . . . . . . . . . . . . . . . . . . 1455.7 Copying a picture to a canvas . . . . . . . . . . . . . . . . . . . . . . 1495.8 Copying a picture midway into a canvas . . . . . . . . . . . . . . . . 1505.9 Copying part of a picture onto a canvas . . . . . . . . . . . . . . . . 1525.10 Flowers in the mediasources folder . . . . . . . . . . . . . . . . . . 1545.11 Collage of flowers . . . . . . . . . . . . . . . . . . . . . . . . . . . . . 1575.12 Blending the picture of Katie and Jenny . . . . . . . . . . . . . . . 1625.13 Rotating some numbers in a table to the left 90 degrees . . . . . . . 1635.14 Copying a picture to a blank page rotated to the left 90 degrees . . . 1645.15 Scaling the picture down . . . . . . . . . . . . . . . . . . . . . . . . . 1675.16 Scaling up a picture . . . . . . . . . . . . . . . . . . . . . . . . . . . 1695.17 Merging red, green, and blue to make new colors . . . . . . . . . . . 1765.18 Color: RGB triplets in a matrix representation . . . . . . . . . . . . 1765.19 Color: The original picture (left) and red-decreased version (right) . 1775.20 Color: Overly blue (left) and red increased by 30% (right) . . . . . . 1775.21 Color: Original (left) and blue erased (right) . . . . . . . . . . . . . 177
“main”2005/1/11page xi
i
i
i
i
i
i
i
i
LIST OF FIGURES xi
5.22 Original beach scene (left) and at (fake) sunset (right) . . . . . . . . 1785.23 Color: Lightening and darkening the original picture . . . . . . . . . 1785.24 Color: Negative of the image . . . . . . . . . . . . . . . . . . . . . . 1785.25 Color: Color picture converted to grayscale . . . . . . . . . . . . . . 1795.26 Color: Increasing reds in the browns . . . . . . . . . . . . . . . . . . 1795.27 Color: Increasing reds in the browns, within a certain range . . . . . 1805.28 Finding the range where Jenny’s eyes are red, then changing them
to black . . . . . . . . . . . . . . . . . . . . . . . . . . . . . . . . . . 1805.29 Frames from the slow sunset movie . . . . . . . . . . . . . . . . . . . 1815.30 Frames from the slow fade-out movie . . . . . . . . . . . . . . . . . . 1815.31 Frames from the Mommy watching Katie movie . . . . . . . . . . . . 1825.32 Frames from the original too dark movie . . . . . . . . . . . . . . . . 1825.33 Frames from the modified lighter movie . . . . . . . . . . . . . . . . 1835.34 Frames from the original movie with kids crawling in front of a blue
screen . . . . . . . . . . . . . . . . . . . . . . . . . . . . . . . . . . . 1835.35 Frames from the kids on the moon movie . . . . . . . . . . . . . . . 1846.1 Flowchart of an if statement . . . . . . . . . . . . . . . . . . . . . . . 1866.2 Increasing reds in the browns . . . . . . . . . . . . . . . . . . . . . . 1886.3 On left the couch color changes, on right the couch color doesn’t change1906.4 Finding the range of where Jenny’s eyes are red . . . . . . . . . . . . 1936.5 After fixing red-eye. . . . . . . . . . . . . . . . . . . . . . . . . . . . 1946.6 Flowchart of an if with an else . . . . . . . . . . . . . . . . . . . . . 1956.7 Original picture and after edge detection . . . . . . . . . . . . . . . . 1986.8 Flowchart of an if, else if, and an else . . . . . . . . . . . . . . . . . . 1996.9 Original scene (left) and using our sepia-tone program . . . . . . . . 2006.10 Reducing the colors (right) from the original (left) . . . . . . . . . . 2026.11 Pictures posterized to two levels (left) and four levels (right) . . . . 2056.12 Original picture (left) and light or dark areas highlighted (right)) . . 2076.13 Making the flower bigger, then blurring to reduce pixellation . . . . 2106.14 A picture of a child (Katie), and her background without her . . . . 2106.15 A new background, the moon . . . . . . . . . . . . . . . . . . . . . . 2116.16 Katie on the moon . . . . . . . . . . . . . . . . . . . . . . . . . . . . 2126.17 Two people in front of a wall, and a picture of the wall . . . . . . . 2146.18 Swapping a beach for the wall, using background subtraction, with
a threshold of 50 . . . . . . . . . . . . . . . . . . . . . . . . . . . . . 2156.19 Mark in front of a blue sheet . . . . . . . . . . . . . . . . . . . . . . 2156.20 Mark on the moon . . . . . . . . . . . . . . . . . . . . . . . . . . . . 2176.21 Mark on the beach . . . . . . . . . . . . . . . . . . . . . . . . . . . . 2186.22 Student in front of a red background, and with flash on . . . . . . . 2196.23 Using chromakey program with a red background . . . . . . . . . . . 2197.1 Adding a grid of lines to a picture (barbara.jpg) . . . . . . . . . . . 2267.2 Viewing the Java API for java.awt.Graphics . . . . . . . . . . . . . . 2297.3 A box washed up on the shore of the beach . . . . . . . . . . . . . . 2297.4 An example drawn picture . . . . . . . . . . . . . . . . . . . . . . . . 2327.5 A drawn face (left) and the face with enclosing rectangles (right) . . 2337.6 Shows font information including the baseline . . . . . . . . . . . . . 2357.7 Drawing a string on a picture . . . . . . . . . . . . . . . . . . . . . . 237

“main”2005/1/11page xii
i
i
i
i
i
i
i
i
xii LIST OF FIGURES
7.8 Drawing a string centered on a picture . . . . . . . . . . . . . . . . . 2387.9 A programmed gray scale effect . . . . . . . . . . . . . . . . . . . . . 2397.10 Nested colored rectangles . . . . . . . . . . . . . . . . . . . . . . . . 2417.11 Nested outlined rectangles . . . . . . . . . . . . . . . . . . . . . . . . 2427.12 Drawing a red X on a picture . . . . . . . . . . . . . . . . . . . . . . 2457.13 Drawing a turtle on a beach . . . . . . . . . . . . . . . . . . . . . . . 2467.14 Documentation for Graphics2D . . . . . . . . . . . . . . . . . . . . . 2477.15 Original picture and picture scaled up 2 times in x and down by half
in y . . . . . . . . . . . . . . . . . . . . . . . . . . . . . . . . . . . . 2497.16 Picture sheared by 1.0 in x . . . . . . . . . . . . . . . . . . . . . . . 2517.17 A beach with a sun that is filled with a gradient from yellow to red . 2537.18 Two pictures with a horizontal overlap . . . . . . . . . . . . . . . . . 2567.19 Clip picture using an ellipse . . . . . . . . . . . . . . . . . . . . . . . 2578.1 Raindrops causing ripples in the surface of the water, just as sound
causes ripples in the air . . . . . . . . . . . . . . . . . . . . . . . . . 2658.2 One cycle of the simplest sound, a sine wave . . . . . . . . . . . . . . 2668.3 The note A above middle C is 440 Hz . . . . . . . . . . . . . . . . . 2678.4 Some synthesizers using triangular (or sawtooth) or square waves. . . 2688.5 Sound editor main tool . . . . . . . . . . . . . . . . . . . . . . . . . . 2688.6 Viewing the sound signal as it comes in . . . . . . . . . . . . . . . . 2698.7 Viewing the sound in a spectrum view . . . . . . . . . . . . . . . . . 2708.8 Viewing a sound in spectrum view with multiple “spikes” . . . . . . 2718.9 Viewing the sound signal in a sonogram view . . . . . . . . . . . . . 2728.10 Area under a curve estimated with rectangles . . . . . . . . . . . . . 2728.11 A depiction of the first five elements in a real sound array . . . . . . 2748.12 A sound recording graphed in the MediaTools . . . . . . . . . . . . . 2748.13 The sound editor open menu in MediaTools application . . . . . . . 2798.14 MediaTools application open file dialog . . . . . . . . . . . . . . . . . 2808.15 A sound opened in the editor in MediaTools application . . . . . . . 2808.16 Exploring the sound in the editor in MediaTools application . . . . . 2818.17 Comparing the graphs of the original sound (left) and the louder one
(right) . . . . . . . . . . . . . . . . . . . . . . . . . . . . . . . . . . . 2868.18 Comparing specific samples in the original sound (left) and the louder
one (right) . . . . . . . . . . . . . . . . . . . . . . . . . . . . . . . . . 2878.19 Comparing the original sound with the normalized one . . . . . . . . 2968.20 Comparing the original sound with one with all values set to extremes.2989.1 Exploring the ”This is a test” to find the end of the first word . . . 3079.2 Exploring the sound clip . . . . . . . . . . . . . . . . . . . . . . . . 3099.3 Comparing the original sound (left) to the spliced sound (right) . . . 3149.4 Comparing the original sound (left) to the reversed sound (right) . . 3179.5 Comparing the mirror point in the original sound (left) to the mir-
rored sound (right) . . . . . . . . . . . . . . . . . . . . . . . . . . . . 31810.1 The top and middle waves are added together to create the bottom
wave . . . . . . . . . . . . . . . . . . . . . . . . . . . . . . . . . . . . 32210.2 The original “ahh” sound, the original bassoon note, and the blended
sound . . . . . . . . . . . . . . . . . . . . . . . . . . . . . . . . . . . 325

“main”2005/1/11page xiii
i
i
i
i
i
i
i
i
LIST OF FIGURES xiii
10.3 The original “This is a test” sound (left), and the sound with anecho (right) . . . . . . . . . . . . . . . . . . . . . . . . . . . . . . . . 326
10.4 The original sound (left), and the sound with the frequency doubled(right) . . . . . . . . . . . . . . . . . . . . . . . . . . . . . . . . . . . 329
10.5 The sine wave with a frequency of 880 and a maximum amplitude of4000 . . . . . . . . . . . . . . . . . . . . . . . . . . . . . . . . . . . . 337
10.6 The raw 440 Hz signal on top, then the 440+880+1320 Hz signal onthe bottom . . . . . . . . . . . . . . . . . . . . . . . . . . . . . . . . 339
10.7 FFT of the 440 Hz sound . . . . . . . . . . . . . . . . . . . . . . . . 33910.8 FFT of the combined sound . . . . . . . . . . . . . . . . . . . . . . . 33910.9 The 440 Hz square wave (top) and additive combination of square
waves (bottom) . . . . . . . . . . . . . . . . . . . . . . . . . . . . . . 34110.10FFT’s of the 440 Hz square wave (top) and additive combination of
square waves (bottom) . . . . . . . . . . . . . . . . . . . . . . . . . . 341

“main”2005/1/11page xiv
i
i
i
i
i
i
i
i
xiv LIST OF FIGURES

“main”2005/1/11page 1
i
i
i
i
i
i
i
i
Preface
One of the clearest lessons from the research on computing education is thatone doesn’t just “learn to program.” One learns to program something [4, 15]. Howmotivating that something is can make the difference between learning to programor not [6].
In this book students will learn about programming by writing programs tomanipulate media. Students will create and modify images, such as the imagecollage on the front cover of this book. Students will modify sounds, like splicingwords into sentences or reversing sounds to make interesting effects. Students willwrite programs to generate web pages from data in databases, in the same waythat CNN.com and Amazon.com do. They will create animations and movies usingspecial effects like the ones students see on television and in movies.
Students in courses taught at Georgia Tech have found these programs inter-esting and motivating. Students have even reported that they sometimes turn intheir programs and then keep working on them to see what else they can do.
People want to communicate. We are social creatures, and the desire tocommunicate is one of our primal motivations. Increasingly, the computer is usedas a tool for communication, even more than as a tool for calculation. Virtuallyall published text, images, sounds, music, and movies today are prepared usingcomputing technology.
This book is about teaching people to program in order to communicate. Thebook focuses on how to manipulate images, sounds, text, and movies as professionalsmight, but with programs written by the students. We realize that most peoplewill use professional-grade applications to perform these same manipulations. Butknowing how to do it with your own programs means that you can do it if you needto. You may want to say something with your media, but you may not know howto make PhotoShop or Final Cut Pro do what you want. Knowing how to programmeans that you have power of expression that is not limited by your applicationsoftware.
This book is not just about programming to manipulate media. Media ma-nipulation programs can be hard to write, or behave in unexpected ways. Questionsarise like “Why is this same image filter faster in Photoshop?” and “That was hardto debug–are there ways of writing programs that are easier to debug?” Answeringquestions like these is what computer scientists do. There are several chapters atthe end of the book that are about computing, not just programming.
The computer is the most amazingly creative device that humans have everconceived of. It is literally completely made up of mind-stuff. The notion “Don’tjust dream it, be it” is really possible on a computer. If you can imagine it, youcan make it “real” on the computer. Playing with programming can be and shouldbe enormous fun.
TO TEACHERS
The media computation approach used in this book starts with what students usecomputers for: image manipulation, digital music, web pages, games, and so on.
1
“main”2005/1/11page 2
i
i
i
i
i
i
i
i
2 LIST OF FIGURES
We then explain programming and computing in terms of these activities. We wantstudents to visit Amazon (for example) and think, “Here’s a catalog website–and Iknow that this is implemented with a database and a set of programs that formatthe database entries as Web pages.” Starting from a relevant context makes transferof knowledge and skills more likely, and it also helps with retention.
The media computation approach spends about 2/3 of the time on givingstudents experiences with a variety of media in contexts that they find motivating.After that 2/3, though, they start to develop questions. “Why is it that Photoshopis faster than my program?” and “Movie code is slow – how slow do programs get?”are typical. At that point, we introduce the abstractions and the valuable insightsfrom Computer Science that answer their questions. That’s what the last part ofthis book is about.
Researchers in computing education have been exploring why withdrawal orfailure rates in college-level introductory computing courses have been so high. Therate of students withdrawing from college-level introductory computing courses orreceiving a D or F grade (commonly called the WDF rate) has been reported inthe 30–50% range, or even higher. One of the common themes from research intowhy the WDF rate is so high is that computing courses seem “irrelevant” andunnecessarily focusing on “tedious details” such as efficiency [20][1].
However, students have found media computation to be relevant as evidencedby survey responses and the reduction in our WDF rate from an average of 28% to11.5% for the pilot offering of this course. Spring 2004 was the first semester taughtby instructors other than Mark Guzdial, and the WDF rate dropped to 9.5% forthe 395 students who enrolled. Charles Fowler at Gainesville College in Georgiahas been having similar results in his courses there.
The approach in this book is different than in many introductory programmingbooks. We teach the same computing concepts but not necessarily in the usualorder. For example, while we create and use objects early we don’t have studentsdefining new classes till fairly late. Studies have shown that learning to program ishard and that students often have trouble with the basics (variables, iteration, andconditionals). We focus on the basics for eight chapters, two introductory, three onimages, and three on sounds. We introduce new concepts only after setting the stagefor why we would need them. For example, we don’t introduce iteration until afterwe change pixel colors one-by-one. We don’t introduce procedural decompositionuntil after our methods get too long to easily be debugged.
Memory is associative–we remember things based on what else we relate tothose things. People can learn concepts and skills on the promise that it will beuseful some day, but those concepts and skills will be related only to those promises,not to everyday life. The result has been described as “brittle knowledge” [7]–thekind of knowledge that gets you through the exam, but promptly gets forgottenbecause it doesn’t relate to anything but being in that class. If we want studentsto gain transferable knowledge (knowledge that can be applied in new situations),we have to help them to relate the knowledge to more general problems, so thatthe memories get indexed in ways that associate with those kinds of problems [18].Thus, we teach with concrete experiences that students can explore and relate to(e.g., iteration for removing red-eye in pictures).
We do know that starting from the abstractions doesn’t really work for stu-

“main”2005/1/11page 3
i
i
i
i
i
i
i
i
LIST OF FIGURES 3
dents. Ann Fleury has shown that novice students just don’t buy what we tellthem about encapsulation and reuse (e.g., [10]). Students prefer simpler code thatthey can trace easily, and actually think that code that an expert would hate isbetter. It takes time and experience for students to realize that there is value inwell-designed systems, and without experience, it’s very difficult for students tolearn the abstractions.
Another unusual thing about this book is that we start using arrays in chapter4, in our first significant programs. Typically, introductory computing courses pusharrays off until later, since they’re obviously more complicated than variables withsimple values. But a relevant context is very powerful [15]. The matrices of pixelsin images occur in the students’ everyday life–a magnifying glass on a computermonitor or television makes that clear.
Our goal is to teach programming in a way that students find relevant, moti-vating, and social. To be relevant we have the students write programs to do thingsthat students currently use computers for: i.e. image, sound, and text manipula-tion. For motivation we assign open-ended creative assignments such as: create animage collage with the same image at least 4 times using 3 different image manip-ulations and a mirroring. As for the social aspect we encourage collaboration onassignments and posting of student work. Students learn from each other and tryto outdo each other.
Ways to Use This Book
This book is based on content that we teach at Georgia Tech. Individual teachersmay skip some sections (e.g., the section on additive synthesis, MIDI, and MP3),but all of the content here has been tested with our students.
However, we can imagine using this material in many other ways:
• A short introduction to computing could be taught with just chapters 2-4.We have taught even single day workshops on media computation using justthis material.
• Chapters 8 and 9 replicate the computer science basics from chapters 4through 6, but in the context of sounds rather than images. We find thereplication useful–some students seem to relate better to the concepts of iter-ation and conditionals better when working with one medium than the other.Further, it gives us the opportunity to point out that the same algorithm canhave similar effects in different media (e.g., scaling a picture up or down andshifting a sound higher or lower in pitch is the same algorithm). But it couldcertainly be skipped to save time.
• Chapter 12 (on movies) introduces no new programming or computing con-cepts. While motivating, movie processing could be skipped for time.
• We do recommend getting to at least some of the chapters in the last unit, inorder to lead students into thinking about the computing and programmingin a more abstract manner, but clearly not all of the chapters have to becovered.

“main”2005/1/11page 4
i
i
i
i
i
i
i
i
4 LIST OF FIGURES
TYPOGRAPHICAL NOTATIONS
Examples of Java code look like this: x = x + 1;. Longer examples look look likethis:
public class Greeter {public stat ic void main ( St r ing [ ] argv ){
// show the s t r i n g ”He l l o World” on the conso l eSystem . out . p r i n t l n ( ” He l lo World” ) ;
}}
When showing something that the user types in the interactions pane withDrJava’s response, it will have a similar font and style, but the user’s typing willappear after a DrJava prompt (>):
> 3 + 47
User interface components of DrJava will be specified using a smallcaps font,like File menu item and the Compile All button. DrJava is the developmentenvironment we use in the book and we do recommend that you use it. It is afree development environment that has an interactions pane which allows users totype Java statements and get immediate results. Of course, you can use otherdevelopment environments with this book.
There are several special kinds of sidebars that you’ll find in the book.
Program 1: An Example Program
Programs (recipes) appear like this:
public stat ic void main ( St r ing [ ] argv ){
// show the s t r i n g ”He l l o World” on the conso l eSystem . out . p r i n t l n ( ” He l lo World” ) ;
}

“main”2005/1/11page 5
i
i
i
i
i
i
i
i
LIST OF FIGURES 5
Computer Science Idea: An Example IdeaKey computer science concepts appear like this.
Â
Á
¿
À
Common Bug: An Example Common BugCommon things that can cause your program to fail appearlike this.
Debugging Tip: An Example Debugging TipIf there’s a good way to keep those bugs from creeping intoyour programs in the first place, they’re highlighted here.
Â
Á
¿
À
Making it Work Tip: An Example How To MakeIt WorkBest practices or techniques that really help are highlightedlike this.
Java
The programming language used in this book is Java. Java is a high-level object-oriented programming language that runs on most computers and many small elec-tronic devices. It is widely used in industry and in universities.
The development environment used in this book is DrJava. It is a free andeasy to use development environment. DrJava lets the student focus on learningto program in Java and not on how to use the development environment. Anadvantage of DrJava is that you can try out Java code in the interactions panewithout having to write a ”main” method.
You don’t have to use this development environment. There are many de-velopment environments that are available for use with Java. If you use anotherdevelopment environment just add the directory that has the Java classes devel-oped for this book to the classpath. See the documentation for your developmentenvironment for how to do this.
ACKNOWLEDGEMENTS
Our sincere thanks go out to the following:
• Adam Wilson built the MediaTools that are so useful for exploring soundsand images and processing video.

“main”2005/1/11page 6
i
i
i
i
i
i
i
i
6 LIST OF FIGURES
• Matthew, Katherine, and Jennifer Guzdial all contributed pictures for use inthis book.
• Thanks for permission to use their snapshots from class in examples are for-mer Media Computation students Constantino Kombosch, Joseph Clark, andShannon Joiner.
The cover image was created by Rachel Cobb who was a first year Architecturestudent at Georgia Institute of Technology in Spring 2003 when she created theimage for a homework assignment to build a collage. The original arch image camefrom the National Park Service gallery at http://www.nps.gov/arch/gallery/index.htm. The original image and the collage are both used with permission, andour thanks!
“main”2005/1/11page 7
i
i
i
i
i
i
i
i
P A R T O N E
INTRODUCTIONChapter 1 Introduction to Computer Science and Me-
dia Computation
Chapter 2 Introduction to Java
Chapter 3 Introduction to Programming
7

“main”2005/1/11page 8
i
i
i
i
i
i
i
i
C H A P T E R 1
Introduction to ComputerScience and MediaComputation
1.1 WHAT IS COMPUTER SCIENCE ABOUT?
1.2 WHAT COMPUTERS UNDERSTAND
1.3 MEDIA COMPUTATION: WHY DIGITIZE MEDIA?
1.4 COMPUTER SCIENCE FOR EVERYONE
Chapter Learning Objectives
• To explain what computer science is about and what computer scientists areconcerned with.
• To explain why we digitize media.
• To explain why it’s valuable to study computing.
• To use the concept of an encoding .
• To explain the basic components of a computer.
1.1 WHAT IS COMPUTER SCIENCE ABOUT?
Computer science is the study of process: How we do things, how we specify whatwe do, how we specify what the stuff is that you’re processing. But that’s a prettydry definition. Let’s try a metaphorical one.
Computer Science Idea: Computer science is thestudy of recipes (programs)They’re a special kind of recipe—one that can be exe-
cuted by a computational device, but that point is only ofimportance to computer scientists. The important pointoverall is that a computer science program defines exactlywhat’s to be done.
If you’re a biologist who wants to describe how migration works or how DNAreplicates, or if you’re a chemist who wants to explain how an equilibrium is reachedin a reaction, or if you’re a factory manager who wants to define a machine-and-belt layout and even test how it works before physically moving heavy things into
8

“main”2005/1/11page 9
i
i
i
i
i
i
i
i
Section 1.1 What is Computer Science About? 9
position, then being able to write a program that specifies exactly what happens, interms that can be completely defined and understood, is very useful. This exactnessis part of why computers have radically changed so much of how science is doneand understood.
It may sound funny to call programs or algorithms a recipe, but the analogygoes a long way. Much of what computer scientists study can be defined in termsof recipes:
• Some computer scientists study how recipes are written: Are there betteror worse ways of doing something? If you’ve ever had to separate whitesfrom yolks in eggs, you know that knowing the right way to do it makes aworld of difference. Computer science theoreticians worry about the fastestand shortest recipes, and the ones that take up the least amount of space(you can think about it as counter space — the analogy works). How arecipe works, completely apart from how it’s written, is called the study ofalgorithms. Software engineers worry about how large groups can put togetherrecipes that still work. (The recipe for some programs, like the one that keepstrack of Visa/MasterCard records has literally millions of steps!)
• Other computer scientists study the units used in recipes. Does it matterwhether a recipe uses metric or English measurements? The recipe may workin either case, but if you have the read the recipe and you don’t know whata pound or a cup is, the recipe is a lot less understandable to you. There arealso units that make sense for some tasks and not others, but if you can fit theunits to the tasks well, you can explain yourself more easily and get thingsdone faster—and avoid errors. Ever wonder why ships at sea measure theirspeed in knots? Why not use things like meters per second? There are places,like at sea, where more common terms aren’t appropriate or don’t work aswell. The study of computer science units is referred to as data structures.Computer scientists who study ways of keeping track of lots of data in lots ofdifferent kinds of units are studying databases.
• Can recipes be written for anything? Are there some recipes that can’t bewritten? Computer scientists actually do know that there are recipes thatcan’t be written. For example, you can’t write a recipe that can absolutelytell, for any other recipe, if the other recipe will actually work. How aboutintelligence? Can we write a recipe that, when a computer followed it, thecomputer would actually be thinking (and how would you tell if you got itright)? Computer scientists in theory , intelligent systems, artificial intelli-gence, and systems worry about things like this.
• There are even computer scientists who worry about whether people likewhat the recipes produce, like the restaurant critics for the newspaper. Someof these are human-computer interface specialists who worry about whetherpeople like how the recipes work (those “recipes” that produce an interfacethat people use, like windows, buttons, scrollbars, and other elements of whatwe think about as a running program).

“main”2005/1/11page 10
i
i
i
i
i
i
i
i
10 Chapter 1 Introduction to Computer Science and Media Computation
• Just as some chefs specialize in certain kinds of recipes, like crepes or barbe-cue, computer scientists also specialize in special kinds of recipes. Computerscientists who work in graphics are mostly concerned with recipes that pro-duce pictures, animations, and even movies. Computer scientists who workin computer music are mostly concerned with recipes that produce sounds(often melodic ones, but not always).
• Still other computer scientists study the emergent properties of recipes. Thinkabout the World Wide Web. It’s really a collection of millions of recipes(programs) talking to one another. Why would one section of the Web getslower at some point? It’s a phenomena that emerges from these millionsof programs, certainly not something that was planned. That’s somethingthat networking computer scientists study. What’s really amazing is thatthese emergent properties (that things just start to happen when you havemany, many recipes interacting at once) can also be used to explain non-computational things. For example, how ants forage for food or how termitesmake mounds can also be described as something that just happens when youhave lots of little programs doing something simple and interacting.
The recipe metaphor also works on another level. Everyone knows that somethings in a recipe can be changed without changing the result dramatically. Youcan always increase all the units by a multiplier (say, double) to make more. Youcan always add more garlic or oregano to the spaghetti sauce. But there are somethings that you cannot change in a recipe. If the recipe calls for baking powder,you may not substitute baking soda. If you’re supposed to boil the dumplings thensaute’ them, the reverse order will probably not work well (Figure 1.1.
Similarly, for software recipes (programs), there are usually things you caneasily change: The actual names of things (though you should change names con-sistently), some of the constants (numbers that appear as plain old numbers, notas variables), and maybe even some of the data ranges (sections of the data) beingmanipulated. But the order of the commands to the computer, however, almostalways has to stay exactly as stated. As we go on, you’ll learn what can be changedsafely, and what can’t.
Computer scientists specify their programs with programming languages (Fig-ure 1.2). Different programming languages are used for different purposes. Some ofthem are wildly popular, like Java and Visual Basic. Others are more obscure, likeSqueak and T. Others are designed to make computer science ideas very easy tolearn, like Scheme or Python, but the fact that they’re easy to learn doesn’t alwaysmake them very popular nor the best choice for experts building larger or morecomplicated programs. It’s a hard balance in teaching computer science to pick alanguage that is easy to learn and is popular and useful enough that students aremotivated to learn it.
Why don’t computer scientists just use natural human languages, like Englishor Spanish? The problem is that natural languages evolved the way that they didto enhance communications between very smart beings, humans. As we’ll go intomore in the next section, computers are exceptionally dumb. They need a level ofspecificity that natural language isn’t good at. Further, what we say to one anotherin natural communication is not exactly what you’re saying in a computational

“main”2005/1/11page 11
i
i
i
i
i
i
i
i
Section 1.1 What is Computer Science About? 11
FIGURE 1.1: A cooking recipe–you can always double the ingredients, but throwingin an extra cup of flour won’t cut it, and don’t try to brown the chicken after addingthe tomato sauce!
recipe (program). When was the last time you told someone how a videogame likeDoom or Quake or Super Mario Brothers worked in such minute detail that theycould actually replicate the game (say, on paper)? English isn’t good for that kindof task.
There are so many different kinds of programming languages because there areso many different kinds of programs to write. Programs written in the programminglanguage C tend to be very fast and efficient, but they also tend to be hard to read,hard to write, and require units that are more about computers than about birdmigrations or DNA or whatever else you want to write your program about. Theprogramming language Lisp (and its related languages like Scheme, T, and CommonLisp) is very flexible and is well suited to exploring how to write programs that havenever been written before, but Lisp looks so strange compared to languages like Cthat many people avoid it and there are (natural consequence) few people who knowit. If you want to hire a hundred programmers to work on your project, you’re goingto find it easier to find a hundred programmers who know a popular language thana less popular one—but that doesn’t mean that the popular language is the bestone for your task!
The programming language that we’re using in this book is Java (http://java.sun.com for more information on Java). Java is a very popular pro-gramming language. Delta uses it to handle its web site (http://www.delta.com). NASA used it on the Mars Rover ”Spirit” (http://www.sun.com/aboutsun/media/features/mars.html). It has been used in touchscreen kiosks for SuperBowl fans (http://java.sun.com/features/1998/01/superbowl.html).
Java is known for being object-oriented, platform neutral (runs on many com-

“main”2005/1/11page 12
i
i
i
i
i
i
i
i
12 Chapter 1 Introduction to Computer Science and Media Computation
Python/Jython
def hello():print "Hello World"
Java
class HelloWorld {static public void main( String args[] ) {
System.out.println( "Hello World!" );}
}
C++
#include <iostream.h>
main() {cout << "Hello World!" << endl;return 0;
}
Scheme
(define helloworld(lambda ()
(display "Hello World")(newline)))
FIGURE 1.2: Comparing programming languages: A common simple programmingtask is to print the words “Hello, World!” to the screen.
puters and electronic devices), robust, and secure. An early drawback to Java wasthat programs written in Java often had a slower execution time than ones writtenin C or C++. However, current Java compilers and interpreters have essentiallyeliminated this problem.
Let’s make clear some of our language that we’ll be using in this book. Aprogram is a description of a process in a particular programming language thatachieves some result that is useful to someone. A program could be small (like onethat implements a calculator), or could be huge (like the program that your bankuses to track all of its accounts). An algorithm (in contrast) is a description ofa process apart from any programming language. The same algorithm might beimplemented in many different languages in many different ways in many differentprograms–but it would all be the same process if we’re talking about the samealgorithm.

“main”2005/1/11page 13
i
i
i
i
i
i
i
i
Section 1.2 What Computers Understand 13
1.2 WHAT COMPUTERS UNDERSTAND
Programs are written to run on computers. What does a computer know how to do?What can we tell the computer to do in the program? The answer is “Very, verylittle.” Computers are exceedingly stupid. They really only know about numbers.
Actually, even to say that computers know numbers is a myth, or more ap-propriately, an encoding . Computers are electronic devices that react to voltageson wires. We group these wires into sets (a set of eight of these wires is calleda byte and one wire is called a bit). If a wire has a voltage on it, we say that itencodes a 1. If it has no voltage on it, we say that it encodes a 0. So, from a set ofeight wires (a byte), we get a pattern of eight 0’s and 1’s, e.g., 01001010. Using thebinary number system, we can interpret this byte as a decimal number (Figure 1.3).That’s where we come up with the claim that a computer knows about numbers1.
Computer Science Idea: Binary Number SystemBinary numbers are made up of only 2 digits (0 and 1). Weusually work in the decimal number system which has thedigits (0 to 9). The value of a decimal number is calculatedby multiplying each digit by a power of 10 and summingthe result. The powers of 10 start at 0 and increase fromright to left. The value of a binary number is calculated bymultiplying each digit by a power of 2 and summing theresult (Figure 1.3).
The computer has a memory filled with bytes. Everything that a computer isworking with at a given instant is stored in its memory. That means that everythingthat a computer is working with is encoded in its bytes: JPEG pictures, Excelspreadsheets, Word documents, annoying Web pop-up ads, and the latest spamemail.
FIGURE 1.3: Eight wires with a pattern of voltages is a byte, which gets interpretedas a pattern of eight 0’s and 1’s, which gets interpreted as a decimal number.
1We’ll talk more about this level of the computer in Chapter 13

“main”2005/1/11page 14
i
i
i
i
i
i
i
i
14 Chapter 1 Introduction to Computer Science and Media Computation
A computer can do lots of things with numbers. It can add them, subtractthem, multiply them, divide them, sort them, collect them, duplicate them, filterthem (e.g., “make a copy of these numbers, but only the even ones”), and comparethem and do things based on the comparison. For example, a computer can be toldin a program “Compare these two numbers. If the first one is less than the secondone, jump to step 5 in this program. Otherwise, continue on to the next step.”
It sounds like computers are incredible calculators, and that’s certainly whythey were invented. The first use of computers was during World War II for calcu-lating trajectories of projectiles (“If the wind is coming from the SE at 15 MPH,and you want to hit a target 0.5 miles away at an angle of 30 degrees East of North,then incline your launcher to . . .”). The computer is an amazing calculator. Butwhat makes it useful for general programs is the concept of encodings.
Computer Science Idea: Computers can layer en-codingsComputers can layer encodings to virtually any level ofcomplexity. Numbers can be interpreted as characters,which can be interpreted in groups as Web pages. Butat the bottommost level, the computer only “knows” volt-ages which we interpret as numbers.
If one of these bytes is interpreted as the number 65, it could just be thenumber 65. Or it could be the letter A using a standard encoding of numbers-to-letters called the American Standard Code for Information Interchange (ASCII).If that 65 appears in a collection of other numbers that we’re interpreting as text,and that’s in a file that ends in “.html” it might be part of something that lookslike this <a href=. . ., which a Web browser will interpret as the definition of a link.Down at the level of the computer, that A is just a pattern of voltages. Many layersof programs up, at the level of a Web browser, it defines something that you canclick on to get more information.
If the computer understands only numbers (and that’s a stretch already), howdoes it manipulate these encodings? Sure, it knows how to compare numbers, buthow does that extend to being able to alphabetize a class list? Typically, each layerof encoding is implemented as a piece or layer of software. There’s software thatunderstands how to manipulate characters. The character software knows how todo things like compare names because it has encoded that a comes before b andso on, and that the numeric comparison of the order of numbers in the encodingof the letters leads to alphabetical comparisons. The character software is used byother software that manipulates text in files. That’s the layer that something likeMicrosoft Word or Notepad or TextEdit would use. Still another piece of softwareknows how to interpret HTML (the language of the Web), and another layer ofthat software knows how to take HTML and display the right text, fonts, styles,and colors.
We can similarly create layers of encodings in the computer for our specifictasks. We can teach a computer that cells contain mitochondria and DNA, and thatDNA has four kinds of nucleotides, and that factories have these kinds of pressesand these kinds of stamps. Creating layers of encoding and interpretation so that

“main”2005/1/11page 15
i
i
i
i
i
i
i
i
Section 1.3 Media Computation: Why Digitize Media? 15
the computer is working with the right units (recall back to our recipe analogy)for a given problem is the task of data representation or defining the right datastructures.
If this sounds like lots of software, it is. When software is layered like this,it slows the computer down some. But the amazing thing about computers is thatthey’re amazingly fast—and getting faster all the time!
Computer Science Idea: Moore’s LawGordon Moore, one of the founders of Intel (maker of com-puter processing chips for computers running Windows op-erating systems), made the claim that the number of tran-sistors (a key component of computers) would double atthe same price every 18 months, effectively meaning thatthe same amount of money would buy twice as much com-puting power every 18 months. This Law has continued tohold true for decades.
Computers today can execute literally BILLIONS of program steps per sec-ond! They can hold in memory entire encyclopedias of data! They never get tirednor bored. Search a million customers for a particular card holder? No problem!Find the right set of numbers to get the best value out of an equation? Piece ofcake!
Process millions of picture elements or sound fragments or movie frames?That’s media computation.
1.3 MEDIA COMPUTATION: WHY DIGITIZE MEDIA?
Let’s consider an encoding that would be appropriate for pictures. Imagine thatpictures were made up of little dots. That’s not hard to imagine: Look really closelyat your monitor or at a TV screen and see that your images are already made up oflittle dots. Each of these dots is a distinct color. You may know from physics thatcolors can be described as the sum of red , green, and blue. Add the red and greento get yellow. Mix all three together to get white. Turn them all off, and you geta black dot.
What if we encoded each dot in a picture as a collection of three bytes, oneeach for the amount of red, green, and blue at that dot on the screen? We couldcollect a bunch of these three-byte-sets to specify all the dots of a given picture.That’s a pretty reasonable way of representing pictures, and it’s essentially howwe’re going to do it in Chapter 4.
Manipulating these dots (each referred to as a pixel or picture element) cantake a lot of processing. There can be thousands or even millions of them in apicture. But, the computer doesn’t get bored and it’s mighty fast.
The encoding that we will be using for sound involves 44,100 two-byte-sets(called a sample) for each second of time. A three minute song requires 158,760,000bytes. Doing any processing on this takes a lot of operations. But at a billionoperations per second, you can do lots of operations to every one of those bytes injust a few moments.
Creating these kinds of encodings for media requires a change to the media.

“main”2005/1/11page 16
i
i
i
i
i
i
i
i
16 Chapter 1 Introduction to Computer Science and Media Computation
Look at the real world: It isn’t made up of lots of little dots that you can see.Listen to a sound: Do you hear thousands of little bits of sound per second? Thefact that you can’t hear little bits of sound per second is what makes it possibleto create these encodings. Our eyes and ears are limited: We can only perceive somuch, and only things that are just so small. If you break up an image into smallenough dots, your eyes can’t tell that it’s not a continuous flow of color. If youbreak up a sound into small enough pieces, your ears can’t tell that the sound isn’ta continuous flow of auditory energy.
The process of encoding media into little bits is called digitization, sometimesreferred to as “going digital .” Digital means (according to the American HeritageDictionary) “Of, relating to, or resembling a digit, especially a finger.” Makingthings digital is about turning things from continuous, uncountable, to somethingthat we can count, as if with our fingers.
Digital media, done well, feel the same to our limited human sensory appara-tus as the original. Phonograph recordings (ever seen one of those?) capture soundcontinuously, as an analog signal. Photographs capture light as a continuous flow.Some people say that they can hear a difference between phonograph recordingsand CD recordings, but to my ear and most measurements, a CD (which is digi-tized sound) sounds just the same—maybe clearer. Digital cameras at high enoughresolutions produce photograph-quality pictures.
Why would you want to digitize media? Because it’s easier to manipulate, toreplicate, to compress, and to transmit. For example, it’s hard to manipulate imagesthat are in photographs, but it’s very easy when the same images are digitized. Thisbook is about using the increasingly digital world of media and manipulating it—and learning computation in the process.
Moore’s Law has made media computation feasible as an introductory topic.Media computation relies on the computer doing lots and lots of operations on lotsand lots of bytes. Modern computers can do this easily. Even with slow (but easy tounderstand) languages, even with inefficient (but easy to read and write) programs,we can learn about computation by manipulating media.
1.4 COMPUTER SCIENCE FOR EVERYONE
But why should you? Why should anyone who doesn’t want to be a computerscientist learn about computer science? Why should you be interested in learningabout computation through manipulating media?
Most professionals today do manipulate media: Papers, videos, tape record-ings, photographs, drawings. Increasingly, this manipulation is done with a com-puter. Media are very often in a digitized form today.
We use software to manipulate these media. We use Adobe Photoshop formanipulating our images, and Macromedia SoundEdit to manipulate our sounds,and perhaps Microsoft PowerPoint for assembling our media into slideshows. Weuse Microsoft Word for manipulating our text, and Netscape Navigator or MicrosoftInternet Explorer for browsing media on the Internet.
So why should anyone who does not want to be a computer scientist studycomputer science? Why should you learn to program? Isn’t it enough to learn touse all this great software? The following two sections provide two answers to these
“main”2005/1/11page 17
i
i
i
i
i
i
i
i
Section 1.4 Computer Science for Everyone 17
questions.
1.4.1 It’s About Communication
Digital media are manipulated with software. If you can only manipulate mediawith software that someone else made for you, you are limiting your ability tocommunicate. What if you want to say something or say it in some way thatAdobe, Microsoft, Apple, and the rest don’t support you in saying? If you knowhow to program, even if it would take you longer to do it yourself, you have thatfreedom.
What about learning those tools in the first place? In my years in computers,I’ve seen a variety of software come and go as the package for drawing, painting,word-processing, video editing, and beyond. You can’t learn just a single tool andexpect to be able to use that your entire career. If you know how the tools work,you have a core understanding that can transfer from tool to tool. You can thinkabout your media work in terms of the algorithms, not the tools.
Finally, if you’re going to prepare media for the Web, for marketing, for print,for broadcast, for any use whatsoever, it’s worthwhile for you to have a sense ofwhat’s possible, what can be done with media. It’s even more important as aconsumer of media that you know how the media can be manipulated, to knowwhat’s true and what could be just a trick. If you know the basics of mediacomputation, you have an understanding that goes beyond what any individualtool provides.
1.4.2 It’s About Process
In 1961, Alan Perlis gave a talk at MIT where he made the argument that com-puter science, and programming explicitly, should be part of a general, liberaleducation [12]. Perlis is an important figure in the field of computer science. Thehighest award that a computer scientist can be honored with is the ACM TuringAward. Perlis was the first recipient of that award. He’s also an important fig-ure in software engineering, and he started several of the first computer sciencedepartments in the United States.
Perlis’ argument can be made in comparison with calculus. Calculus is gen-erally considered part of a liberal education: Not everyone takes calculus, but ifyou want to be well-educated, you will typically take at least a term of calculus.Calculus is the study of rates, which is important in many fields. Computer science,as we said before (page 8), is the study of process. Process is important to nearlyevery field, from business to science to medicine to law. Knowing process formallyis important to everyone.
PROBLEMS
1.1. Every profession uses computers today. Use a Web browser and a search enginelike Google to find sites that relate your field of study with computer science orcomputing or computation. For example, search for “biology computer science”or “management computing.”
1.2. Find an ASCII table on the Web: A table listing every character and its corre-sponding numeric representation. Write down the sequence of numbers whose
“main”2005/1/11page 18
i
i
i
i
i
i
i
i
18 Chapter 1 Introduction to Computer Science and Media Computation
ASCII values make up your name.1.3. Find a Unicode table on the Web. What’s the difference between ASCII and
Unicode?1.4. Consider the representation for pictures described in Section 1.3, where each
“dot” (pixel) in the picture is represented by three bytes, for the red, green,and blue components of the color at that dot. How many bytes does it taketo represent a 640x480 picture, a common picture size on the Web? How manybytes does it take to represent a 1024x768 picture, a common screen size? (Whatdo you think is meant now by a “3 megapixel” camera?)
1.5. How many different numbers can be represented by one byte? In other words,eight bits can represent from zero to what number? What if you have two bytes?Four bytes?
*1.6. How might you represent a floating point number in terms of bytes? Do a searchon the Web for “floating point” and see what you find.
1.7. Look up Alan Kay and the Dynabook on the Web. Who is he, and what does hehave to do with media computation?
1.8. Look up Alan Turing on the Web. Who was he, and what does he have to dowith our notion of what a computer can do and how encodings work?
1.9. Look up Kurt Goedel on the Web. Who was he, and what amazing things didhe do with encodings?
TO DIG DEEPER
James Gleick’s book Chaos describes more on emergent properties–how small changescan lead to dramatic effects, and the unintended impacts of designs because ofdifficult-to-foresee interactions.
Mitchel Resnick’s book Turtles, Termites, and Traffic Jams: Explorations inMassively Parallel Microworlds [21] describes how ants, termites, and even trafficjams and slime molds can be described pretty accurately with hundreds or thou-sands of very small processes (programs) running and interacting all at once.
Exploring the Digital Domain [3] is a wonderful introductory book to compu-tation with lots of good information about digital media.

“main”2005/1/11page 19
i
i
i
i
i
i
i
i
C H A P T E R 2
Introduction to Java
2.1 JAVA
2.2 INTRODUCTION TO DRJAVA
2.3 JAVA BASICS
2.4 VARIABLES
2.5 CONCEPTS SUMMARY
Chapter Learning ObjectivesThe computer science goals for this chapter are:
• To introduce objects and classes.
• To use DrJava to execute Java statements.
• To use Java math and relational operators.
• To recognize different types (encodings) of data, such as integers, floatingpoint numbers, booleans, characters, and strings.
• To introduce casting.
• To introduce variables and show the difference between primitive and objectvariables.
2.1 JAVA
The programming language that we’re going to be using in this book is called Java.It’s a language invented by James Gosling (http://java.sun.com/people/jag/)at Sun Microsystems.
2.1.1 History of Java
Back in 1990 Sun created project Green to try and predict the next big thing incomputers. The goal of the project was to try and develop something to positionSun ahead of its competitors. They thought that the next big thing would benetworked consumer electronics devices like set-top boxes for downloading video ondemand. They tried to develop a prototype using C++ but after many problemsthey decided to develop a new object-oriented language which they originally namedOak, after a tree outside James Gosling’s office. They created a demonstration butthe cable companies weren’t really interested and the future of the project was indoubt.
At a brainstorming session they decided to try to reposition the languagefor use with the internet. They created a web browser that had Java programs
19

“main”2005/1/11page 20
i
i
i
i
i
i
i
i
20 Chapter 2 Introduction to Java
(applets) embedded in HTML pages to do 3D rotation of a molecule and animationof a sorting algorithm. They showed this at a conference. At that time web pagesdidn’t respond to user action. They simply displayed text and unchanging graphics.The audience was amazed to see the user rotate the 3d molecule on a web page.Later they renamed Oak to Java and released it for free in 1995. Since then it hasbecome one of the fastest adopted technologies of all times. It is now used for morethan just web pages. It is used in many devices from cell phones to web servers.For more on the history of Java see http://java.sun.com/features/1998/05/birthday.html.
2.1.2 Introduction to Objects and Classes
Java is an object-oriented programming language. This means that the focus is onobjects (who) as well as procedures (what). Objects are persons, places, or thingsthat do the action in a situation or are acted upon.
An example might help you to understand what focusing on the objects means.When customers enter a restaurant a greeter will welcome them to the restaurantand show them to their table. A waiter will take the order and bring the drinksand food. One or more chefs will cook the food. The waiter will create the bill andgive it to the customers. The customers will pay the bill.
How many people does it take to get a customer fed in a restaurant? Well,you need at least a customer, greeter, waiter, and a chef. What other things aredoing action or being acted upon? We mentioned order, table, drink, food, andbill. Each of these are objects. The objects in this situation are working togetherto feed the customer.
What types of objects are they? We have given names to each thing wementioned: customer, waiter, food, etc. The names we gave are how we classifythese objects. You probably know what I mean by a customer or food. But thecomputer doesn’t know what we mean by these things. The way that we get thecomputer to understand what we mean is by defining a class. A class in Java tellsthe computer what data we expect objects of the class to have and what they cando. We would expect that food would have a name, a price, and a way to prepareit. We would expect that a customer would know what they can afford to pay andhow to pay a bill.
Every object of the same class will have the same skills or operations (thingsit can do) and data or variables (things it knows about). For example, each objectof the order class should know which customer placed that order and what food isin the order. An object of the chef class should know how to prepare the food.
There can be many objects of a class. A restaurant might have 3 chefs, 10waiters, 2 greeters, and 100 food objects on its menu. On a given day and time itmight have 100 customers.
Why don’t restaurants just have one type of employee? One person couldgreet the customers, take the orders, cook the food and deliver the food. Thatmight be okay if there is only one customer but what about when there are manycustomers? You can imagine that one person wouldn’t be able to handle so manytasks and food would get burnt, orders would take too long to fill, and customerswouldn’t be happy. Restaurants break the tasks into different jobs so that they

“main”2005/1/11page 21
i
i
i
i
i
i
i
i
Section 2.2 Introduction to DrJava 21
can be efficient and effective. Object-oriented programs also try to distribute thetasks to be done so that no one object does all the work. This makes it easier tomaintain and extend the program. It can also make the program more efficient.
2.2 INTRODUCTION TO DRJAVA
You’ll actually be programming using a tool called DrJava. DrJava is a simpleeditor (tool for entering program text) and interaction space so that you can trythings out in DrJava and create new programs (methods) and classes. DrJava isavailable for free under the DrJava Open Source License, and it is under activedevelopment by the JavaPLT group at Rice University.
If you don’t wish to use DrJava you can use this book with another devel-opment environment. Simply set the classpath (place to look for classes that youare using in your program) to include the classes used in this book. Check yourdocumentation for your development environment to see how to do this. We rec-ommend using DrJava because it is free, easy to use, has an interactions pane fortrying out Java statements, is written in Java so it works on all platforms, and itincludes a debugger.
To install DrJava, you’ll have to do these things:
1. Make sure that you have Java 1.4 or above installed on your computer. Ifyou don’t have it, load it from the CD, or you can get it from the Sun site athttp://www.java.sun.com.
2. You’ll need to install DrJava. You can either load it from the CD or get itfrom http://drjava.org/.
3. Add the Java classes that come with the book to the extra classpaths forDrJava. Start DrJava (see the next section for how to do this), click on Editand then Preferences. This will show the Preferences window (Figure 2.1).Click on the Add button below the Extra Classpath textarea and add thepath to the directory where the classes that come with the book are, such as:c:/intro-prog-java/bookClasses.
2.2.1 Starting DrJava
How you start DrJava depends on your platform. In Windows, you’ll have a DrJavaicon that you’ll simply double-click. In Linux, you’ll probably cd into your Dr-Java directory and type a command like java -jar drjava-DATE-TIME.jar whereDATE-TIME are values for the release of DrJava that you are using. On the Mac-intosh, you’ll probably have to type commands in your Terminal application whereyou cd to the correct directory then type ./DrJava. See the instructions on theCD for what will work for your kind of computer.Â
Á
¿
À
Common Bug: DrJava is slow to startDrJava will take a while to load on all platforms. Don’tworry—you’ll see the splash screen for a long time, but ifyou see the splash screen (Figure 2.2), it will load.

“main”2005/1/11page 22
i
i
i
i
i
i
i
i
22 Chapter 2 Introduction to Java
FIGURE 2.1: DrJava Preferences Window
FIGURE 2.2: DrJava Splash Screen
'
&
$
%
Common Bug: Making DrJava run fasterAs we’ll talk more about later, when you’re running Dr-
Java, you’re actually running Java. Java needs memory. Ifyou’re finding that DrJava is running slowly, give it morememory. You can do that by quitting out of other ap-plications that you’re running. Your email program, yourinstant messenger, and your digital music player all takeup memory (sometimes lots of it!). Quit out of those andDrJava will run faster.
Once you start DrJava, it will look something like Figure 2.3. There are threemain areas in DrJava (the bars between them move so that you can resize theareas):
• The top left window pane is the files pane. It has a list of the open files inDrJava. In Java each class that you create is usually stored in its own file.Java programs often consist of more than one class, thus more than one file.You can click on a file name in the Files pane to view the contents of that filein the top right window pane (definitions pane).
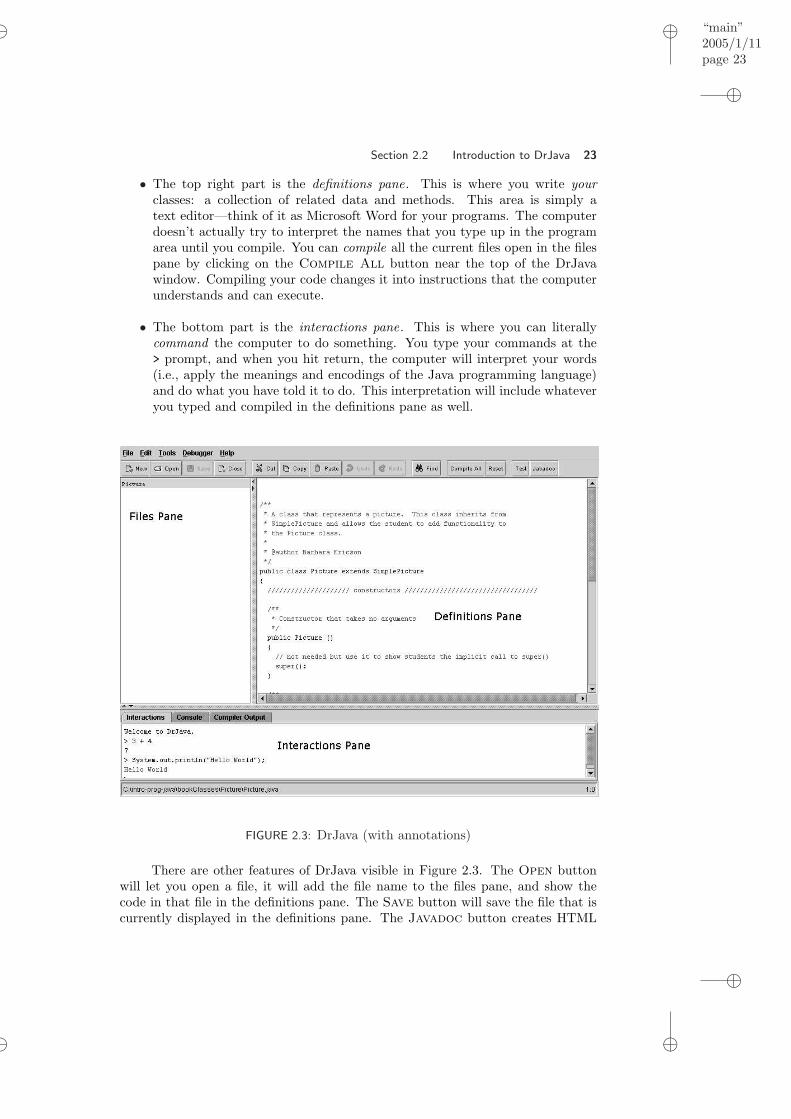
“main”2005/1/11page 23
i
i
i
i
i
i
i
i
Section 2.2 Introduction to DrJava 23
• The top right part is the definitions pane. This is where you write yourclasses: a collection of related data and methods. This area is simply atext editor—think of it as Microsoft Word for your programs. The computerdoesn’t actually try to interpret the names that you type up in the programarea until you compile. You can compile all the current files open in the filespane by clicking on the Compile All button near the top of the DrJavawindow. Compiling your code changes it into instructions that the computerunderstands and can execute.
• The bottom part is the interactions pane. This is where you can literallycommand the computer to do something. You type your commands at the> prompt, and when you hit return, the computer will interpret your words(i.e., apply the meanings and encodings of the Java programming language)and do what you have told it to do. This interpretation will include whateveryou typed and compiled in the definitions pane as well.
FIGURE 2.3: DrJava (with annotations)
There are other features of DrJava visible in Figure 2.3. The Open buttonwill let you open a file, it will add the file name to the files pane, and show thecode in that file in the definitions pane. The Save button will save the file that iscurrently displayed in the definitions pane. The Javadoc button creates HTML

“main”2005/1/11page 24
i
i
i
i
i
i
i
i
24 Chapter 2 Introduction to Java
documentation from the Javadoc comments in your files (comments that start with’/**’ and end with ’*/’.
'
&
$
%
Making it Work Tip: Get to know your Help!An important feature to already start exploring is theHelp. If you click on Help and then click on Help againwhen a menu is displayed you will see a help window. Startexploring it now so that you have a sense for what’s there.
2.3 JAVA BASICS
We’re going to start out by simply typing commands in the interactions pane—notdefining new names yet, but simply using the names and symbols that Java knows.
2.3.1 Math Operators
Try typing the following in the interactions pane.
> 34 + 5690> 26 - 323> 3 * 412> 4 / 22
As you can see Java understands how to recognize numbers, add, subtract,multiply and divide. You can type a mathematical expression in the interactionspane and then hit the “Enter” key and it will display the result of the expression.Go ahead and try it.
2.3.2 Printing the Result of a Statement
In English you end sentences with a period. In Java you typically end a program-ming statement with a semicolon. However, in the interactions pane you can leaveoff the semicolon and it will print the result of whatever you have typed (as you sawin the interactions pane). If you do add the semicolon at the end of a Java state-ment in the interactions pane it will execute the statement but not automaticallyprint the result in the interactions pane.
Even though you do not have to type the semicolon after statements in theinteractions pane you must type the semicolon at the end of your statements in thedefinitions pane or the code will not compile.
Since you will need to provide the semicolon at the end of statements in thedefinitions pane you should get used to using them in the interactions pane too.But, then how do you show the result of a statement in the interactions pane?The phrase System.out.println() is an important one to know. The meaning

“main”2005/1/11page 25
i
i
i
i
i
i
i
i
Section 2.3 Java Basics 25
for System.out.println() is “Use the PrintStream object known as out on theSystem class to print out the value of whatever is in the parentheses followed byan end-of-line character.” DrJava will print the result of an expression in theinteractions pane when you use System.out.println(expression ).
You can have nothing in the parentheses which will just move the output to anew line, or it can be a name that the computer knows, or an expression (literally,in the algebraic sense). Try typing System.out.println(34 + 56) by clicking inthe interactions area, typing the command, and hitting return—like this:
> System.out.println(34 + 56);90> System.out.println(26 - 3);23> System.out.println(3 * 4);12> System.out.println(4 / 2);2> System.out.println(9 % 4);1> System.out.println(9 / 5 * -3 + 32);29> System.out.println(3 + 2 * 4);11> System.out.println((3 + 2) * 4);20
The code 34 + 56 is a numeric expression that Java understands. Obviously,it’s composed of two numbers and an operation that Java knows how to do, ’+’meaning “add.” In Java we call math symbols like ’+’ and ’-’ operators. Theoperator ’-’ means subtract. The operator ’*’ means multiply. The operator ’/’means divide. The operator ’%’ means calculate the remainder of the first numberdivided by the second one.
Notice that you get a different result from System.out.println(3 + 2 *4); than from System.out.println((3 + 2) * 4);. This is because multiplica-tion has higher precedence than addition (meaning it is done first by default). Youcan use parentheses to change the default order of evaluation of an expression or

“main”2005/1/11page 26
i
i
i
i
i
i
i
i
26 Chapter 2 Introduction to Java
to make the order clear.'
&
$
%
Common Bug: Matching ParenthesesWhen you use parentheses you will need an open paren-thesis for each close parenthesis. If you don’t have a matchyou will get an error.
> System.out.println(3 + 2) * 4);Syntax Error: ")"> System.out.println((3 + 2 * 4);Syntax Error: ";"
'
&
$
%
Making it Work Tip: Using Another DevelopmentEnvironmentIf you are not using DrJava you will need to type all codethat we show in the interactions pane in a main methodinstead. Compile and execute the class with the mainmethod. To get the above example to work in anotherdevelopment environment I could have written the follow-ing class definition in a file named “Test.java”.
public class Test {public stat ic void main ( St r ing [ ] a rgs ) {
System . out . p r i n t l n (34 + 56 ) ;}
}The next step is to compile the Java source file. Thischanges it from something people can read and understandinto something the computer can read and understand. Tocompile the source file with the free command line toolsfrom Sun do the following:
> javac Test . java
When you compile a Java source file the compiler will cre-ate a class file, so if you compile the source file “Test.java”the compiler will create the file “Test.class”. This file willhave the same name as the source file but will have anextension of “.class”. After you have compiled the sourceyou can execute the class. To execute it using the freecommand line tools from Sun is to use:
> java Test
The ability to try things in the interactions pane withouthaving to create a class and a main method is one of themajor advantages to using DrJava.

‘‘main’’2005/1/11page 27
i
i
i
i
i
i
i
i
Section 2.3 Java Basics 27
2.3.3 Types in Math Expressions
Java takes types seriously. If it sees you using integers, it thinks you want an integerresult from your expressions. If it sees you using floating point numbers, it thinksyou want a floating point result. Sounds reasonable, no? But how about:
> System.out.println(1.0/2.0);0.5> System.out.println(1/2);0
The answer to 1/2 is 0? Well, sure! The numbers 1 and 2 are integers. Thereis no integer equal to 1/2, so the answer must be 0 (the part after the decimal pointis thrown away)! Simply by adding “.0” to a number convinces Java that we’retalking about floating point numbers (specifically the Java primitive type double),so the result is in floating point form.
2.3.4 Casting
We could also have used casting to get the correct result from the division of twointegers. Casting is like using a mold to give some material a new shape. It tellsthe compiler to change a value to a particular type even if it could lead to a loss ofdata. To cast you put the type that you want the value changed to inside an openand close parenthesis: (type). There are two floating point types in Java: floatand double. The type double is larger than the type float and thus more accurate.We will use this type for most of the floating point numbers in this book. Noticethat we can cast either the 1 or 2 to double and the answer will then be given asa double. We could cast both the 1 and 2 to double and the result would be fine.However, if we cast the result of the integer division to a double it is too late sincethe result of integer division of 1 by 2 is 0 since the result is an integer.
> System.out.println((double) 1 / 2);0.5> System.out.println(1 / (double) 2);0.5> System.out.println((double) (1/2));0.0
2.3.5 Relational Operators
We can write Java statements that do simple math operations. But if that was allwe could do computers wouldn’t be terribly useful. Computers can also decide ifsomething is true or false.
> System.out.println(3 > 2);true> System.out.println(2 > 3);false> System.out.println(’a’ < ’b’);true

“main”2005/1/11page 28
i
i
i
i
i
i
i
i
28 Chapter 2 Introduction to Java
> System.out.println(’j’ > ’c’);true> System.out.println(2 == 2);true> System.out.println(2 != 2);false> System.out.println(2 >= 2);true> System.out.println(2 <= 2);true> System.out.println(true == false);false
Using symbols we can check if one value is greater than another ’>’, less thananother ’<’, equal to another ’==’, not equal to another ’ !=’, greater or equal toanother ’>=’, and less than or equal to another ’<=’. You can use these relationaloperators on many items such as numbers and characters as shown above. Acharacter can be specified between a pair of single quotes (’a’).
You might find ’==’ odd as a way to test for equality. But, in Java ’=’ isused to assign a value, not check for equality, as you will see in the next section.
Notice that Java understands the concepts true and false. These are re-

“main”2005/1/11page 29
i
i
i
i
i
i
i
i
Section 2.3 Java Basics 29
served words in Java which means that they can’t be used as names.'
&
$
%
Making it Work Tip: Java Primitive Types
• Integers are numbers without a decimal point inthem. Integers are represented by the types: int,byte, short, or long. Example integers are: 3, -2350, 502893. In this book we will use only int torepresent integers. Each integer takes up 32 bits ofmemory (4 bytes).
• Floating point numbers are numbers with a decimalpoint in them. Floating point numbers can be rep-resented by the types: double or float. Exampledoubles are 3.0, -19.23, and 548.675. In this book wewill use mostly use double to represent floating pointnumbers. Each double in memory takes up 64 bits(8 bytes).
• Characters are individual characters such as can bemade with one key stroke on your keyboard. Char-acters are represented by the type: char. Charactersare specified inside single quotes, like ’a’ or ’A’. Eachcharacter in memory takes up 16 bits (2 bytes).
• True and false values are represented by the typeboolean. Variables of type boolean can only havetrue or false as values. While a boolean could berepresented by just one bit the size of a boolean isup to the virtual machine.
2.3.6 Strings
Computers can certainly work with numbers and even characters. They can alsowork with strings. Strings are sequences of characters. Try the following in theinteractions pane.
> System.out.println("Mark");Mark> System.out.println("13 + 5");13 + 5
Java knows how to recognize strings (lists of characters) that start and endwith " (double quotes). Notice what happens when you enclose a math expressionlike 13 + 5 in a pair of double quotes. It doesn’t print the result of the mathexpression but the characters inside the pair of double quotes. Whatever is inside apair of double quotes is not evaluated, the value of it is exactly what was entered.

“main”2005/1/11page 30
i
i
i
i
i
i
i
i
30 Chapter 2 Introduction to Java
Now try the following in the interactions pane.
> System.out.println("Barbara" + "Ericson");BarbaraEricson> System.out.println("Barbara" + " " + "Ericson");Barbara Ericson> System.out.println("Barbara " + "Ericson");Barbara Ericson
You can “add” strings together using a + operator as you see in "Barbara"+ "Ericson". It simply creates a new string with the characters in the first stringfollowed by the characters in the second string. This is called appending strings.Notice that no space is added automatically. If you want space in your string youwill need to put it there using a space between a pair of double quotes as shownabove with "Barbara" + " " + "Ericson". Or you can have a space inside astring as shown in "Barbara " + "Ericson".
Now try the following in the interactions pane.
> System.out.println("The total is " + (13 + 5));The total is 18> System.out.println("The total is " + 13 + 5);The total is 135
You can “add” a string and a number. It will turn the number into a stringand then append the two strings. This does what you would expect to show theresult of "The total is " + (13 + 15) but you may not expect what happenswith "The total is " + 13 + 5.
The computer evaluates statements from left to right so the computer eval-uates this as “add” the string "The total is" to the number 13 by turning thenumber 13 into a string "13". Next it sees the + 5 as adding a number to thestring "The total is 13". It turns the second number into a string and resultsin The total is 135.
The way to get what you would expect is to use parentheses to enclose themath expression. Just like in algebra the parentheses change the order things areevaluated. The (13 + 5) will be evaluated before the append of the string and theresulting number 18.
If you want to put a double quote inside of a string you will need some wayto tell the computer that this isn’t the ending double quote. In Java the backslash\ character is used to treat the next character differently. So using \" results in adouble quote inside a string. Some other special characters are \n to force a newline and \t to force a tab.
> System.out.println("Barb says, \"Hi\".");Barb says, "Hi."> System.out.println("This is on one line.\nThis is on the next");This is on one line.This is on the next

‘‘main’’2005/1/11page 31
i
i
i
i
i
i
i
i
Section 2.4 Variables 31
2.4 VARIABLES
We have used Java to do calculations and to append strings, but we have not storedthe results. The results would be in memory but we don’t know where they are inmemory and we can’t get back to them. On a calculator we can store the resultof one calculation to memory (Figure 2.4). We can then use that stored value inother calculations. On a calculator you also have access to the result of the lastcalculation.
FIGURE 2.4: A calculator with a number in memory
2.4.1 Declaring Variables
On a computer we can store many calculated values by naming them. We canthen access those values by using the variable names. The computer takes care ofmapping the name to the memory location (address) that stores the value. We callnaming values declaring a variable.
When you declare a variable in Java you specify the type for the variable anda name (type name ). You need to specify a type so that Java knows how manybits to reserve in memory and how to interpret the bits. You can also assign avalue to a variable using the ’=’ operator and provide a value or an expression(type name = expression ). Don’t read ’=’ as equals but as assign the value ofthe right side to the variable on the left (which makes using ’==’ for equals makemore sense). The bits in the variable will be set to represent the value. We will usethe type int for storing integer values (numbers without decimal points) and thetype double for storing floating point values (numbers with decimal points).
2.4.2 Using Variables in Calculations
What if you want to calculate the total bill for a meal including the tip? You wouldstart with the bill value and multiply it by the percentage you want to tip (20%),that would give you the tip amount. You could then add the tip amount to the billtotal to get the total amount to leave.
We will use type type double to store the bill amount, tip, and total amountsince they can have numbers after a decimal point. If we also wanted to calculatethe cost per person we could divide the total by the number of people. We coulduse an integer variable to hold the number of people.

“main”2005/1/11page 32
i
i
i
i
i
i
i
i
32 Chapter 2 Introduction to Java
> int numPeople = 2;> System.out.println(numPeople);2> double bill = 32.45;> System.out.println(bill);32.45> double tip = bill * 0.2;> System.out.println(tip);6.490000000000001> double total = bill + tip;> System.out.println(total);38.940000000000005> double totalPerPerson = total / numPeople;> System.out.println(totalPerPerson);19.470000000000002
So, each person would need to pay 19.47, which they would probably roundup to 19.50.'
&
$
%
Making it Work Tip: Variable NamesBy convention the first word in a variable name is lower-case. So if the variable name is just one word then thewhole thing is lowercase such as bill. The first letterof each additional word in a variable name should be up-percase, as shown by the variables named numPeople andtotalPerPerson. This is a Java convention (usual waysomething is done) and it will make you programs easierfor others to read.
We don’t have to print out the value of the variable after we assign a value toit. We are doing that so that you see that the computer does return a value whenyou use the name of a variable. What about the extra amount for the final answer?The answer should be just $19.47 per person. If we look back at the printing of thetip amount we see where this first occurred. Floating point numbers do not alwaysgive exact results.
2.4.3 Memory Maps of Variables
In Java when you declare variables to be of the type int or double you are askingthe computer to set aside space for a variable of that type (32 bits for int and 64for double) and to remember the address of that space. When you assign a valueto a variable using the ’=’ operator you change the value in that space to representthe new value. The code int numPeople reserves 32 bits of space and associatesthe name “numPeople” with that reserved space (Figure 2.5). The code = 2 setsthe value of that space to the integer value 2. The code double bill reserves 64bits of space and associates the name “bill” with that space. The = 32.45 changesthe values in the reserved space to represent the value 32.45.
When we print out a variable name using System.out.println(bill); the

‘‘main’’2005/1/11page 33
i
i
i
i
i
i
i
i
Section 2.4 Variables 33
0
1
2
3
4
5
6
7
8
9
10
11
double bill = 32.45;
Reserves 64 bits (8 bytes)and sets the value stored in that space to 32.45. The name "bill" is associated with this space.
int numPeople = 2;
Reserves 32 bits (4 bytes) and sets the value stored in that space to 2. The name "numPeople" is associated with this space.
2
23
.45
FIGURE 2.5: Declaring primitive variables and memory assignment
computer looks up the name bill to find the address of that variable in memoryand prints the value stored in that space. It knows how many bytes to use andhow to interpret the bytes in calculating the value based on the declared type ofthe variable.
How would you calculate the cost of a shirt that was originally $47.99 dollarsbut was 40% off? And, what if you also had a coupon for an additional 20% off thesale price? First you would need to determine the first discount amount by multi-plying 40% (0.40) times the original price. Next, calculate the first discount totalby subtracting the first discount amount from the original price. Next calculatethe second discount amount by mutliplying 20% (0.20) times the second discountamount. The second discount total is the first discount total minus the seconddiscount amount. We would need variables to hold the first discount amount, firstdiscount total, second discount amount, and second discount total. What typeshould those variables be declared to be? Since they have fractional parts they canbe declared as double.
> double originalPrice = 47.99;> double firstDiscountAmount = originalPrice * 0.40;> System.out.println(firstDiscountAmount);19.196> double firstDiscountTotal = originalPrice - firstDiscountAmount;> System.out.println(firstDiscountTotal);28.794> double secondDiscountAmount = firstDiscountTotal * 0.20;> System.out.println(secondDiscountAmount);5.758800000000001> double secondDiscountTotal = firstDiscountTotal -secondDiscountAmount;> System.out.println(secondDiscountTotal);

“main”2005/1/11page 34
i
i
i
i
i
i
i
i
34 Chapter 2 Introduction to Java
23.0352
When these statements are executed 64 bits of space is reserved for eachvariable declared as a double. So how much memory does this calculation take?We have declared 5 doubles so we have used 5 times 64 bits of space. Each bytehas 8 bits in it so how many bytes have we used? How much memory does yourcomputer have and how much of it have you used? If your computer has 128Megabytes of memory then that is 128000 bytes of memory and we used 40 bytesthen we have only used 0.03125% of memory. That isn’t very much. We can declarelots of variables and still not use up all of the memory.
Each time we use the variable name above the computer substitutes the valuein the memory location associated with that name. What are the values in each ofthe 5 declared variables when these statements are finished?
2.4.4 Object Variables
Variables that are declared to be of any of the primitive types: byte, short, int,long, float, double, boolean or char reserve space and associate the variablename with the starting location of that space. Variables that are declared to be ofany other type are object variables. This is because all other types inherit fromthe class Object.
Mammal
Dog
Object
String
FIGURE 2.6: Showing the parent and child relationship between mammal and dog(left) and Object and String (right)
You can think of inheritance as saying that one class “is a kind of” anotherclass like saying that a dog is a kind of mammal (Figure 7.14). If you need amammal you can use a dog, but if you need a dog another mammal won’t do.Because a dog is a kind of mammal we know that it has the same characteristicsthat a mammal does such as breathing oxygen, bearing live young, having hair, etc.We say that it inherits characteristics from mammal. The String class is a childof the Object class so it is a kind of object (Figure 7.14). All of the classes thatyou define will inherit from the Object class either directly or indirectly.
When you declare a variable you specify the type and a name type name ; ortype name = expression ;. What if you want to declare a variable that will referto a string? What type can you use? Well it can’t be int or double because thoserepresent numbers. It can’t be char because that represents a single character.
Java has a class String that is used to represent character strings. The Stringclass inherits from the Object class. So to declare a variable that represents a string
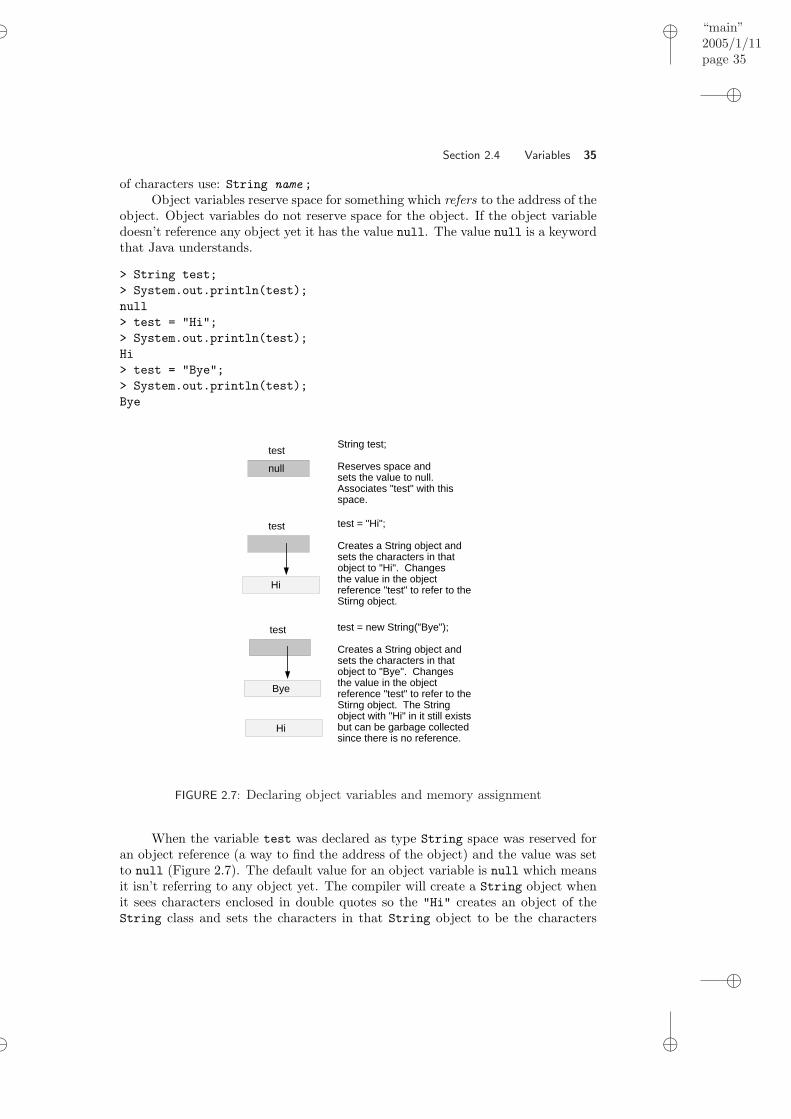
“main”2005/1/11page 35
i
i
i
i
i
i
i
i
Section 2.4 Variables 35
of characters use: String name ;Object variables reserve space for something which refers to the address of the
object. Object variables do not reserve space for the object. If the object variabledoesn’t reference any object yet it has the value null. The value null is a keywordthat Java understands.
> String test;> System.out.println(test);null> test = "Hi";> System.out.println(test);Hi> test = "Bye";> System.out.println(test);Bye
null
String test;
Reserves space and sets the value to null.Associates "test" with thisspace.
test
test test = "Hi";
Creates a String object andsets the characters in thatobject to "Hi". Changesthe value in the objectreference "test" to refer to the Stirng object.
Hi
test test = new String("Bye");
Creates a String object andsets the characters in thatobject to "Bye". Changesthe value in the objectreference "test" to refer to the Stirng object. The String object with "Hi" in it still exists but can be garbage collectedsince there is no reference.
Bye
Hi
FIGURE 2.7: Declaring object variables and memory assignment
When the variable test was declared as type String space was reserved foran object reference (a way to find the address of the object) and the value was setto null (Figure 2.7). The default value for an object variable is null which meansit isn’t referring to any object yet. The compiler will create a String object whenit sees characters enclosed in double quotes so the "Hi" creates an object of theString class and sets the characters in that String object to be the characters

‘‘main’’2005/1/11page 36
i
i
i
i
i
i
i
i
36 Chapter 2 Introduction to Java
”Hi”. The code test = "Hi" changes the value of the space reserved for the objectreference from null to a reference to the String object with the characters ”Hi”.
What happens to the String object with the characters ”Hi” in it when youchanged the variable test to refer to the new String object with the characters”Bye”? Java keeps track of used space and if there are no valid references to theused space it will put it back into available space. This is called garbage collection.
The fact that Java automatically handles freeing used memory when it is nolonger needed is one of the advantages to Java over languages like C++ whichrequired the programmer to free memory when it was no longer needed. Program-mers aren’t very good at keeping track of when memory is no longer needed andso many programs never free memory when it is no longer needed. This is called amemory leak and it is why some programs use more and more memory while theyare running. Sometimes programmers free memory when it is still being used whichcan cause major problems such as incorrect results and even cause your computerto crash.
2.4.5 Reusing Variables
Once we have declared variables we can reuse them by assigning new values tothem..
> String myName = "Mark";> System.out.println(myName);Mark> myName = "Barb";> System.out.println(myName);Barb
This actually means to first set the variable myName to refer to the Stringobject with the characters ”Mark” in it. Then it changes the variable myName torefer to another String object with the characters ”Barb” in it. The first Stringobject with the characters ”Mark” in it still exists and can be garbage collected(reused as available space).
'
&
$
%
Making it Work Tip: Variables versus LiteralsNotice that we have changed the value of the variable testseveral times. We call items like test variables because thevalues inside of them can change. This is different fromliterals such as the string literal "Hi" in that the value ofthat won’t change. You can set the value of a variable to aliteral but you can’t set the value of a literal to a variable.
You can’t declare the same variable name twice. Declare the name one time(by specifying the type and name) and then you can use it many times.
> String myName = "Mark";> System.out.println(myName);

‘‘main’’2005/1/11page 37
i
i
i
i
i
i
i
i
Section 2.4 Variables 37
myName
Mark
String myName = "Mark";
Creates a String object andsets the characters in thatobject to "Mark". Setsthe value in the objectreference "myName" to refer to the String object.
myName = "Barb";
Creates a String object andsets the characters in thatobject to "Barb". Changesthe value in the objectreference "myName" to refer to the new String object. The String object with "Mark" in it still exists but can be garbage collected since there is no reference to it.
myName
Barb
Mark
FIGURE 2.8: Shows creation and reuse of an object variable.
Mark> String myName = "Sue";Error: Redefinition of ’myName’
The binding between the name and the data only exists (a) until the name getsassigned to something else or (b) you quit DrJava or (c) you reset the interactionspane (by clicking on the Reset button. The relationship between names and datain the interactions pane only exists during a session of DrJava.'
&
$
%
Common Bug: Redefinition ErrorYou can’t declare a variable with the same name morethan once in the interactions pane. If you do you will get a“Redefinition Error”. If you want to “start over” click theReset button in DrJava to let it know that you want toget rid of all currently defined variables. Or, just removethe types and you won’t be redeclaring the variables, justchanging their values (reusing them).
2.4.6 Multiple References to an Object
You can have several variables that reference an object. You can use any of thereferences to access the object.
> String name1 = "Suzanne Clark";> System.out.println(name1);Suzanne Clark> String name2 = name1;

“main”2005/1/11page 38
i
i
i
i
i
i
i
i
38 Chapter 2 Introduction to Java
> System.out.println(name2);Suzanne Clark
When the compiler encounters the characters inside the pair of double quotesit creates a String object. The code String name1 creates a variable name1 thatwill refer to this string object. Print out name1 to see what it refers to usingSystem.out.println(name1);. Next the code String name2 = name1; createsanother variable name2 and sets the value of it to refer to the same string. Printingthe new variable name2 will result in the same string being printed.
Suzanne Clark
String Object name1
name2
FIGURE 2.9: An object with multiple references to it
An object can only be garbage collected when there are no current referencesto it. To allow the String object with the characters "Suzanne Clark" in it to begarbage collected set the variables that refer to it to null.
> name1 = null;> System.out.println(name1);null> System.out.println(name2);Suzanne Clark> name2 = null;> System.out.println(name2);null
Now all references to the String object are set to null so the object can begarbage collected.
Suzanne Clark
String Object name1
name2
FIGURE 2.10: An object with no references to it

“main”2005/1/11page 39
i
i
i
i
i
i
i
i
Section 2.5 Concepts Summary 39
2.5 CONCEPTS SUMMARY
This chapter introduced many basic concepts: printing the result of a statement(expression), math operators, relational operators, types, casting, and variables.
2.5.1 Statements
Java programs are made of statements or expressions. Java statements can end insemicolons ’;’ just like sentences can end in periods ’.’ in English. When you typestatements in the definitions pane (when you define methods) they must have somesort of punctuation to show the end of the statement. One way to do this is to usea semicolon ’;’.
If you leave off the semicolon in the interactions pane it will print the resultof the statement. If you do end a statement with a semicolon in the interactionspane, and you want to print the result use System.out.println(expression); toprint the result of the expression.
> int numPeople = 3;> double bill = 52.49;> double amountPerPerson = bill / numPeople;> System.out.println("Each person should pay: " + amountPerPerson);Each person should pay: 17.496666666666666
Math Operators
+ Addition Used to add numbers together (3+ 4) = 7
- Subtraction Used to subtract one numberfrom another (5 - 2) = 3
* Multiplication Used to multiply two numbers to-gether (2 * 3) = 6
/ Division Used to divide one number by an-other (18 / 2) = 9
% Modulus (Re-mainder)
Used to find the remainder of onenumber divided by another (19 %2) = 1

‘‘main’’2005/1/11page 40
i
i
i
i
i
i
i
i
40 Chapter 2 Introduction to Java
2.5.2 Relational Operators
< Less Than Used to check if one value is lessthan another (2 < 3) = true
> Greater Than Used to check if one value isgreater than another (3 > 2) =true
== Equals Used to check if two values arethe same (2 == 2) = true
!= Not Equals Used to check if two values aren’tequal (2 != 3) = true
<= Less Than orEqual
Used to check if one value is lessthan or equal to another (2 <= 3)= true
>= Greater Than orEqual
Used to check if one value isgreater than or equal to another(3 >= 2) = true
2.5.3 Types
A type is a description of the “kind of” thing something is. It affects how muchspace is reserved for a variable and how the bits in that space are interpreted. Inthis chapter, we talk about several kinds of types (encodings) of data.
Floating pointnumbers
Java primitive types double orfloat e.g., 5.2, -3.01, 928.3092
Numbers with a decimal point inthem.
Integers Java primitive types int, byte,short, long e.g., -3, 5239, 0
Numbers without a decimalpoint—they can’t representfractions.
Characters Java primitive type char e.g. ’a’,’b’, ’?’
A character is delimited by a pairof single quotes.
Strings Java String object e.g., ”Hello!” A sequence of characters (includ-ing spaces, punctuation, etc.) de-limited on either end with a dou-ble quote character.
Booleans Java primitive type boolean withonly two possible values
The value of a boolean can bethe reserved word true or the re-served word false.
2.5.4 Casting
Java compilers recognize integer (-3) and floating point values (32.43). The resultof a mathematical expression depends on the types involved in the expression.Expressions that involve integer values will have integer results. Expressions thathave floating point (decimal) values will have floating point results.
This can lead to unexpected results.
> 1 / 2

“main”2005/1/11page 41
i
i
i
i
i
i
i
i
Section 2.5 Concepts Summary 41
0
There are two ways to fix this problem. One is to make one of the numbers afloating point number by adding ’.0’ (it doesn’t matter which one) and the other isto use casting to change the type of one of the numbers to a floating point number(the primitive type float or double).
> 1.0 / 20.5> (double) 1 / 20.5
2.5.5 Variables
Variables are used to store and access values. You create variables by declaringthem: type name ; or type name = expression ;. Declaring a variable reservesspace for the variable and allows the computer to map the variable name to theaddress of that reserved space.
We introduced two types of variables: primitive and object. Primitive vari-ables are any of the types: int, byte, short, long, float, double, char, or boolean.Object variables refer to an object of a class. Use the class name as the type whendeclaring object variables ClassName name; or ClassName name = expression;.
Primitive variables store a value in the reserved space for that variable. Youcan change the value using variableName = value;. You can access the valueusing variableName.
Object variables store a reference to an object in the reserved space for thatvariable. Object variables do not just store the address of the object. They storesomething that allows the address to be determined.
If the object variable doesn’t refer to any object yet it has the value null. Youcan change the what object it references using variableName = objectReference;.You can access the referenced object using variableName.
PROBLEMS
2.1. Some computer science concept questions:
• What is an object?
• What is a class?
• What is a type? Why are types important?
• What is casting? What is it used for?
• What is a variable? When do you need one?
2.2. • What objects would you encounter in a bank?
• What objects would you encounter in going to a movie?
• What objects would you encounter in a clothing store?
• What objects are involved in a soccer game?
• What objects are involved in a airplane flight?

“main”2005/1/11page 42
i
i
i
i
i
i
i
i
42 Chapter 2 Introduction to Java
2.3. Use the interactions pane to calculate how long it will take to travel 770 milesat an average speed of 60 miles per hour? How much shorter will it take if youaverage 70 miles per hour?
2.4. Use the interactions pane to calculate how much money will you make if youwork 40 hours at $13.00 and 10 hours at time and a half?
2.5. Test your understanding of Java with the following:
• What does System.out.println(); do?
• What does the statement System.out.println(3 + 2); do?
• What does the statement System.out.println("The answer is: " + 3 +
2); do?
• What does the statement System.out.println("Hi " + " there"); do?
• What does the code int x = 3; System.out.println("The result is " +
x); do?
• What does the code String firstName = "Sue"; System.out.println(firstName);
do?
2.6. Declare variables for each of the following:
• the number of people in your family
• the cost of a video game
• your name
• answer to, ”Are you righthanded?”
• the temperature in your room
• the number of items in a shopping cart
• your grade point average
• your telephone number
• the number of times you were absent from class
• the number of miles from your home to school
• answer to, ”Do you wear glasses?”
• your credit card number
TO DIG DEEPER
There is a wealth of material for Java on Sun’s Java web site http://java.sun.comincluding tutorials, papers, and APIs. To learn more about DrJava see the web sitehttp://www.drjava.org/. Thinking in Java by Bruce Eckel is a good book forthose who have some coding experience and like to understand a language deeply.Beginners might want to start with Headfirst Java by Kathy Sierra and Bert Bates.

“main”2005/1/11page 43
i
i
i
i
i
i
i
i
C H A P T E R 3
Introduction to Programming
3.1 PROGRAMMING IS ABOUT NAMING
3.2 FILES AND THEIR NAMES
3.3 CLASS AND OBJECT METHODS
3.4 WORKING WITH TURTLES
3.5 CREATING METHODS
3.6 WORKING WITH MEDIA
3.7 CONCEPTS SUMMARY
Chapter Learning ObjectivesThe media learning goals for this chapter are:
• To create a World object and Turtle objects and move the turtles to drawshapes.
• To create Picture objects and show them.
• To create Sound objects and play them.
The computer science goals for this chapter are:
• To invoke class and object methods.
• To create objects using the new keyword.
• To write methods (functions).
3.1 PROGRAMMING IS ABOUT NAMING
Computer Science Idea: Much of programming isabout namingA computer can associate names, or symbols, with justabout anything: With a particular byte; with a collectionof bytes making up a numeric variable or a string of let-ters; with a media element like a file, sound, or picture; oreven with more abstract concepts, like a named recipe (aprogram or method) or a named encoding (a type or class).A computer scientist sees a choice of names as being highquality in the same way that a philosopher or mathemati-cian might: If the names are elegant, parsimonious, andusable.
Obviously, the computer itself doesn’t care about names. Names are for the
43

“main”2005/1/11page 44
i
i
i
i
i
i
i
i
44 Chapter 3 Introduction to Programming
humans. If the computer were just a calculator, then remembering names and thenames’ association with values would be just a waste of the computer’s memory.But for humans, it’s very powerful. It allows us to work with the computer in anatural way.
A programming language is really a set of names that a computer has en-codings for, such that those names make the computer do expected actions andinterpret our data in expected ways. Some of the programming language’s namesallow us to define new names—which allows us to create our own layers of encod-ing. We can associate a name with a location in memory, this is called declaringa variable. We can associate a name with a group of Java statements, we call thisdefining a method (function). In Java you can also assign a name to a group ofrelated variables and methods (functions) when you define a class (type).
Computer Science Idea: Programs are for people,not computers.Remember names are only meaningful for people, not com-puters. Computers just take instructions. A good programis meaningful (understandable and useful) for humans.
A program is a set of names and their values, where some of these names havevalues of instructions to the computer (“code”). Our instructions will be in theJava programming language. Combining these two definitions means that the Javaprogramming language gives us a set of useful names that have a meaning to thecomputer, and our programs are then made up of Java’s useful names as a way ofspecifying what we want the computer to do.
There are good names and bad names. Bad names aren’t curse words, orTLA’s (Three Letter Acronyms), but names that aren’t understandable or easyto use. A good set of encodings and names allow one to describe methods ina way that’s natural, without having to say too much. The variety of differentprogramming languages can be thought of as a collection of sets of namings-and-encodings. Some are better for some tasks than others. Some languages require youto write more to describe the same program (function) than others—but sometimesthat “more” leads to a much more (human) readable program that helps others tounderstand what you’re saying.
Philosophers and mathematicians look for very similar senses of quality. Theytry to describe the world in few words, using an elegant selection of words that covermany situations, while remaining understandable to their fellow philosophers andmathematicians. That’s exactly what computer scientists do as well.
How the units and values (data) of a program can be interpreted is often alsonamed. Remember how we said in Section 1.2 (page 13) that everything is storedin groups of eight bits called bytes, and we can interpret those bytes as numbers?In some programming languages, you can say explicitly that some value is a byte,and later tell the language to treat it as a number, an integer (or sometimes int).Similarly, you can tell the computer that these series of bytes is a collection ofnumbers (an array of integers), or a collection of characters (a String), or evenas a more complex encoding of a single floating point number (any number with adecimal point in it).

“main”2005/1/11page 45
i
i
i
i
i
i
i
i
Section 3.2 Files and their Names 45
In Java, we will explicitly tell the computer how to interpret our values.Languages such as Java, C++, and C# are strongly typed . Names are stronglyassociated with certain types or encodings. They require you to say that this namewill only be associated with integers, and that one with floating point numbers.In Java, C++, and C# you can also create your own types which is part of whatmakes object-oriented languages so powerful. We do this in Java by defining classessuch as Picture which represents a simple digital picture. An object of the Pictureclass has a width and height and you can get and set the pixels of the Pictureobject. This isn’t a class that is part of the Java language, but a class that we havedefined using Java to make it easier for students to work with digital pictures.
3.2 FILES AND THEIR NAMES
A programming language isn’t the only place where computers associate names andvalues. Your computer’s operating system takes care of the files on your disk, andit associates names with those files. Operating systems you may be familiar withinclude Windows XP, Windows 2000 (Windows ME, NT,. . .), MacOS, and Linux.A file is a collection of values (bytes) on your hard disk (the part of your computerthat stores things after the power gets turned off). If you know the name of a file,you can tell it to the operating system, and it can give you the values associatedwith that name.
You may be thinking, “I’ve been using the computer for years, and I’ve never’given a file name to the operating system.’ ” Maybe you didn’t realize that youwere doing it, but when you pick a file from a file choosing dialog in Photoshop,or double-click a file in a directory window (or Explorer or Finder), you are askingsome software somewhere to give the name you’re picking or double-clicking to theoperating system, and get the values back. When you write your own programs,though, you’ll be explicitly getting file names and asking for the values stored inthat file.
Files are very important for media computation. Disks can store acres andacres of information on them. Remember our discussion of Moore’s Law (Page 15)?Disk capacity per dollar is increasing faster than computer speed per dollar! Com-puter disks today can store whole movies, hours (days?) of sounds, and the equiv-alent of hundreds of film rolls of pictures.
These media are not small. Even in a compressed form, screen size picturescan be over a million bytes large, and songs can be three million bytes or more. Youneed to keep them someplace where they’ll last past the computer being turned offand where there’s lots of space. This is why they are stored on your hard disk.
In contrast, your computer’s memory (RAM) is impermanent (the contentsdisappear when the power does) and is relatively small. Computer memory isgetting larger all the time, but it’s still just a fraction of the amount of space onyour disk. When you’re working with media, you will load the media from the diskinto memory, but you wouldn’t want it to stay in memory after you’re done. It’stoo big.
Think about your computer’s memory as your desk. You would want to keepbooks that you are currently working with on your desk but when you are done youwill probably move those books to a book shelf. You may have many more books
“main”2005/1/11page 46
i
i
i
i
i
i
i
i
46 Chapter 3 Introduction to Programming
on your book shelf than can fit on your desk. A computer can fit much more dataon the hard disk than can fit in memory. However, data must be read from diskinto memory before you can work with it.
When you bring things into memory, you usually will name the value, so thatyou can retrieve it and use it later. In that sense, programming is something likealgebra. To write generalizable equations and functions (those that work for anynumber or value), you wrote equations and functions with variables, like PV = nRTor e = Mc2 or f(x) = sin(x). Those P’s, V’s, R’s, T’s, e’s, M’s, c’s, and x’s werenames for values. When you evaluated f(30), you knew that the x was the namefor 30 when computing f . We’ll be naming values when we program.
3.3 CLASS AND OBJECT METHODS
Java also understands about functions. Remember functions from algebra? They’rea “machine or box” into which you put one value, and out comes another. Javacalls these methods.
However, you can’t just call a function or method in Java like you can in someother languages. Every method or function in Java must be defined inside a class.There are two types of methods in Java: class methods or object methods. Classmethods are methods that can be invoked using the class name or on an object ofthe class. Object methods can only be invoked on an object of the class. Classmethods are used for general methods that don’t pertain to a particular object andobject methods work with a particular object’s data.
3.3.1 Invoking Class Methods
Class methods can be invoked (executed) by using the class name followed by aperiod and then the method name: ClassName.methodName (). By convention classnames in Java start with an uppercase letter: like Character. The Character classis a wrapper class for the primitive type char. It also provides general charactermethods.'
&
$
%
Making it Work Tip: Wrapper ClassesWrapper classes are classes that you use to “wrap” aroundprimitive types in order to have an object to work with.Many general purpose classes in Java such as the collec-tion classes (List and Set) require the values that you addto the collections to be objects. Since primitive types arenot objects you wouldn’t be able to use them in collec-tions (prior to Java version 1.5). However, if you wrap aprimitive type with a wrapper object you will be able touse it with classes that require objects. As of Java version1.5 the wrapping of a primitive value is automatically donewhen it is needed. This is called boxing and unboxing.
One of the class methods for the Character class takes a character as theinput value (the value that goes into the box) and returns (the value that comesout of the box) the number that is the integer value for that character. Characters

‘‘main’’2005/1/11page 47
i
i
i
i
i
i
i
i
Section 3.3 Class and Object Methods 47
in Java are specified between single quotes: ’A’. The name of that function isgetNumericValue and you can use System.out.println to display the value thatthe method getNumericValue returns:
> System.out.println(Character.getNumericValue(’A’));10
Another class method that’s built in to the Math class in Java is named abs—it’s the absolute value function. It returns the absolute value of the input numericvalue.
> System.out.println(Math.abs(1));1> System.out.println(Math.abs(-1));1
Debugging Tip: Common typosIf you type a class name and Java can’t figure out whatclass you are taking about you will get an undefined classerror.
> Mat.abs(-3);Error: Undefined class ’Mat’
If you mistype a method (function) name you will get thefollowing error:
> Math.ab(-3);Error: No ’ab’ method in ’java.lang.Math’
3.3.2 Invoking Object Methods
Object methods are methods that must be invoked on an object using:objectReference.methodName ()An object reference can be the name of an object variable. You can’t invoke objectmethods using the class name like you can with class methods.
In Java there is a String class which is how you represent lists of characters(letters), like the letters of a person’s name. Objects of the String class are createdby the compiler whenever it sees string literals (characters enclosed with doublequotes), like "Barbara" or "cat.jpg". The double quotes tell the compiler thatthis is an object of the String class and not a variable name.
There are many object methods in the String class, such as toLowerCase()and toUpperCase. These methods actually create and return new String objects(objects of the class String). See the API (application program interface) for theString class for a full listing of the available methods.
> String name = "Fred Farmer";> System.out.println(name);

“main”2005/1/11page 48
i
i
i
i
i
i
i
i
48 Chapter 3 Introduction to Programming
Fred Farmer> String lowerName = name.toLowerCase();> System.out.println(lowerName);fred farmer> String upperName = name.toUpperCase();> System.out.println(upperName);FRED FARMER> System.out.println(name);Fred Farmer
Notice that value of name didn’t change even though we invoked toLowerCaseon it. All of the String methods that can modify a string don’t change the originalstring but instead return a new string with the action done on that string. We saythat strings are immutable, meaning that they don’t change.
3.4 WORKING WITH TURTLES
Seymour Papert, at MIT, used robot turtles to help children think about how tospecify a procedure in the late 1960s. The turtle had a pen in the middle of it thatcould be raised and lowered to leave a trail of its movements. As graphical displaysbecame available he used a virtual turtle on a computer screen.
We are going to work with some turtle objects that move around a world.The turtles know how to move forward, turn left, turn right, and turn by somespecified angle. The turtles have a pen in the middle of them that leaves a trail toshow their movements. The world keeps track of the turtles that are in it.
3.4.1 Defining Classes
How does the computer know what we mean by a world and a turtle? We have todefine what a world is, what it knows about, and what it can do. We have to definewhat a turtle is, what it knows about, and what it can do. We do this by writingclass definitions for World and Turtle. In Java each new class is usually definedin a file with the same name as the class and an extension of “.java”. Class namesstart with a capital letter and the first letter of each additional word is capitalized.So we define the class Turtle in the file Turtle.java. We define the class World inthe file World.java. The class Turtle inherits from a class called SimpleTurtle(notice that the first letter of each additional word is capitalized). We have definedthese classes for you so that you can practice creating and sending messages toobjects.
3.4.2 Creating Objects
Object-oriented programs consist of objects. But, how do we create those objects?The class knows what each object of that class needs to keep track of and what itshould be able to do, so the class creates the objects of that class. You can thinkof the class as an object factory. It can create many objects of that class.
To create and initialize an object use new Class (parameterList ) where theparameter list is a list of items used to initialize the new object. This asks the objectthat defines the class to reserve space in memory for the data that an object of that

‘‘main’’2005/1/11page 49
i
i
i
i
i
i
i
i
Section 3.4 Working with Turtles 49
class needs to keep track of and also keep a reference to the object that defines theclass. The new object’s data will be initialized based on the items passed in theparameter list. There can be several ways to initialize a new object and which oneyou are using depends on the order and types of things in the parameter list.
One way to create an object of the class World use new World(). We don’thave to pass any parameters to initialize the new world. Objects can have defaultvalues.
> System.out.println(new World());A 640 by 480 world with 0 turtles in it.
FIGURE 3.1: A window that shows a World object.
When you type the above in the interactions pane you will see a windowappear with the title “World” as shown in Figure 3.1. We have created an objectof the World class which has a width of 640 and a height of 480. The world doesn’thave any turtles in it yet. We would like to add a turtle to this world, but we havea problem. We don’t have any way to refer to this World object. We didn’t declarea variable that refers to that object in memory, so it will just be garbage collectedafter you close the window. Go ahead and close the window and let’s try again,but this time we will declare a variable to let us refer to the World object again.
When we declare a variable we are associating a name with the memorylocation so that we can access it again using it’s name. To declare a variable inJava you must give the type of the variable and a name for it Type name ; TheType is the name of the class if you are creating a variable that refers to an object.So to create a variable that will refer to a World object we need to say the type isWorld and give it a name. The first word in the variable name should be lowercasebut the first letter of each additional word should be uppercase. The name shoulddescribe what the variable represents. So, let’s declare a variable that refers to anobject of the class World using the name worldObj.

“main”2005/1/11page 50
i
i
i
i
i
i
i
i
50 Chapter 3 Introduction to Programming
> World worldObj = new World();> System.out.println(worldObj);A 640 by 480 world with 0 turtles in it.
This says to create a variable with the name of worldObj that will be oftype World (will refer to an object of the class World). It will refer to the ob-ject created by the World class because of the code: new World(). We can useSystem.out.println(worldObj) to ask the new World object to print out someinformation about it.
To create a turtle object in this world we will again use new Class (parameterList ).This time we will ask the Turtle class to create the object in our World by passinga reference to the world to create it in. We will declare a variable so that we canrefer to the Turtle object again.
> Turtle turtle1 = new Turtle(worldObj);> System.out.println(turtle1);No name turtle at 320, 240 heading 0.
Now a Turtle object appears in the middle of the World object as shown inFigure 3.2. This turtle hasn’t been assigned a name and has a location of (320,240)and a heading of 0 which is north. The default location for a new turtle is themiddle of the World object. The default heading is 0 (north).
FIGURE 3.2: A window that shows a Turtle object in a World object.
We can create another Turtle object and this time we can say what locationwe want it to appear at. To do this we need to pass more than one parameter inthe parameter list of items to use to initialize the new object. To do this separatethe values with commas.
> Turtle turtle2 = new Turtle(30,50,worldObj);> System.out.println(turtle2);No name turtle at 30, 50 heading 0.

‘‘main’’2005/1/11page 51
i
i
i
i
i
i
i
i
Section 3.4 Working with Turtles 51
Notice that the second turtle appears at the specified location (30,50). Thetop left of the window is location (0,0). The x values increase going to the rightand the y values increase going down.
FIGURE 3.3: A window that shows two Turtle objects in a World object.
3.4.3 Sending Messages to Objects
In object-oriented programming we send messages to objects to ask them to dothings. The full syntax for sending a message is
objectReference.message (parameterList );The objectReference is a reference to an object, message is what we want
the object to do, and parameterList is any additional information that more fullydescribes what we want the object to do. The ’.’ and ’()’ are required even if thereis no parameter list.
Turtles know how to go forward, turn left, turn right, turn by a specifiedangle, change their color, and set their names. So if we want turtle1 to go for-ward 20 steps we would use turtle1.forward(20);. If we want it to turn leftwe would use turtle1.turnLeft();. If we want it to turn right we would useturtle1.turnRight();. If we want it to turn by an angle to the left by 45 degreeswe would use turtle1.turn(-45);. To turn turtle1 to the right 45 degrees useturtle1.turn(45);. Negative angles turn to the left and positive angles turn thatamount to the right.
> turtle1.forward(20);> turtle1.turnLeft();> turtle1.forward(30);> turtle1.turnRight();> turtle1.forward(40);> turtle1.turn(-45);> turtle1.forward(30);

‘‘main’’2005/1/11page 52
i
i
i
i
i
i
i
i
52 Chapter 3 Introduction to Programming
> turtle1.turn(90);> turtle1.forward(20);
FIGURE 3.4: The result of messages to the first Turtle object.
In Figure 3.4 we see the trail of the first turtle’s movements. Notice that all ofthe messages were sent to the first Turtle object that is referenced by the turtle1variable. The messages only get sent to that object. Notice that the second Turtleobject didn’t move. It didn’t get any messages yet. To send a message to thesecond Turtle object we use the variable name that refers to that Turtle objectwhich is turtle2.
> turtle2.turnRight();> turtle2.forward(200);> turtle2.turnRight();> turtle2.forward(200);
In Figure 3.5 we see the trail of the second turtle’s movement. Can you drawa square with a turtle? Can you draw a triangle with a turtle? Can you draw apentagon with a turtle? How about a circle?
3.4.4 Objects Control Their State
In object-oriented programming we ask an object to doing something by sendingit a message. The object can refuse to do what you ask it to do. Why would anobject refuse? An object should refuse when you ask it to do something that wouldcause it’s data to be wrong. The world that the turtles are in is 640 by 480. Tryasking the Turtle object to go forward past the end of the world. What happens?First click the Reset button to reset the interactions pane. When you reset theinteractions pane you get rid of any currently declared variables. Then create anew World and Turtle.

“main”2005/1/11page 53
i
i
i
i
i
i
i
i
Section 3.4 Working with Turtles 53
FIGURE 3.5: The result of messages to the second Turtle object.
> World world1 = new World();> Turtle turtle1 = new Turtle(world1);> System.out.println(turtle1);No name turtle at 320, 240 heading 0.> turtle1.turnRight();> turtle1.forward(400);> System.out.println(turtle1);No name turtle at 639, 240 heading 90.> System.out.println(world1.getWidth());640
Remember that Turtle objects are first created in the middle of the world(320,240) facing the top of the world. When the turtle turned right it was facingthe right side of the window. If the turtle went forward 300 steps it would it wouldbe past the right edge of the window (320 + 400 = 720) since the x values increaseto the right. Notice that the turtle stops when the middle of it reaches the limit ofthe window (639) Figure 3.6. This means your turtle will always have at least partof it in the world.
It may seem strange that turtle stopped when it reached 639 but the firstpixel is at 0 and the last is 639. If I asked you to count 10 numbers starting at 0you should end at 9. The number of items is the ending value minus the startingvalue plus 1. So 639 - 0 + 1 is 640, which means that a window with a width of640 that starts with 0 must end at 639.
3.4.5 Additional Turtle Capabilities
You may not want to see the turtle, but just the trail of it’s movements. To askthe turtle to stop drawing itself, send it the message hide(). To start drawing theturtle again send it the message show().
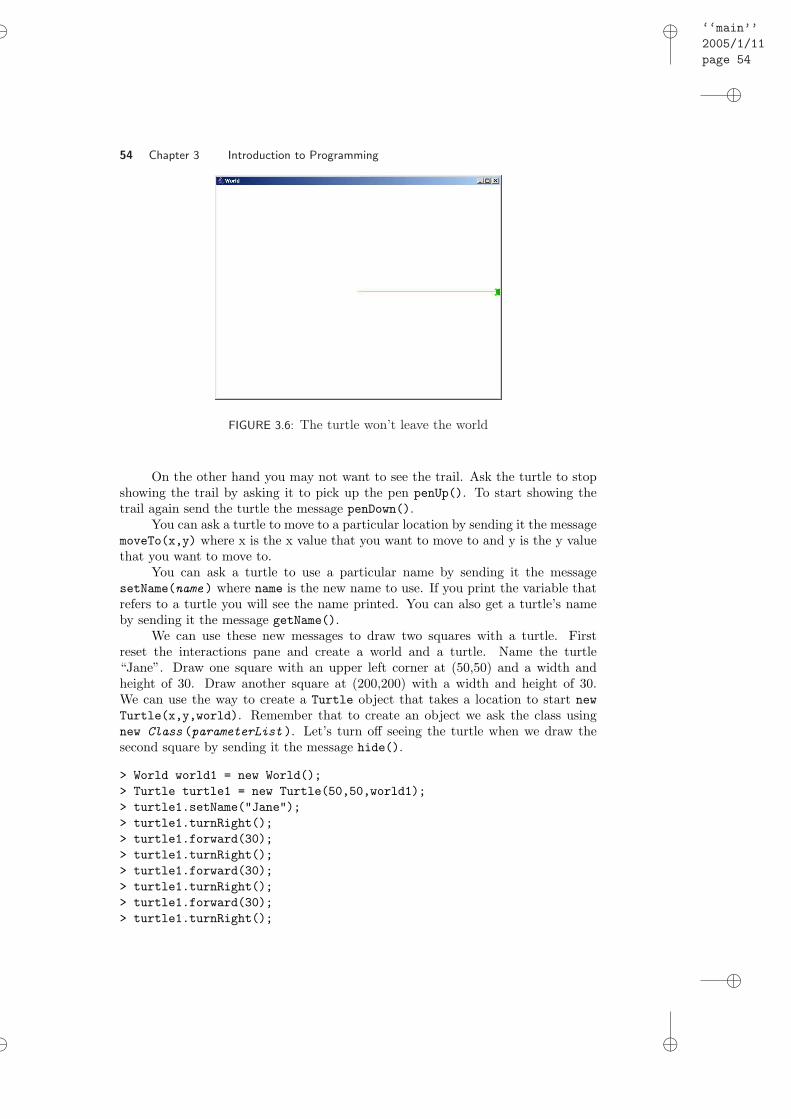
‘‘main’’2005/1/11page 54
i
i
i
i
i
i
i
i
54 Chapter 3 Introduction to Programming
FIGURE 3.6: The turtle won’t leave the world
On the other hand you may not want to see the trail. Ask the turtle to stopshowing the trail by asking it to pick up the pen penUp(). To start showing thetrail again send the turtle the message penDown().
You can ask a turtle to move to a particular location by sending it the messagemoveTo(x,y) where x is the x value that you want to move to and y is the y valuethat you want to move to.
You can ask a turtle to use a particular name by sending it the messagesetName(name ) where name is the new name to use. If you print the variable thatrefers to a turtle you will see the name printed. You can also get a turtle’s nameby sending it the message getName().
We can use these new messages to draw two squares with a turtle. Firstreset the interactions pane and create a world and a turtle. Name the turtle“Jane”. Draw one square with an upper left corner at (50,50) and a width andheight of 30. Draw another square at (200,200) with a width and height of 30.We can use the way to create a Turtle object that takes a location to start newTurtle(x,y,world). Remember that to create an object we ask the class usingnew Class (parameterList ). Let’s turn off seeing the turtle when we draw thesecond square by sending it the message hide().
> World world1 = new World();> Turtle turtle1 = new Turtle(50,50,world1);> turtle1.setName("Jane");> turtle1.turnRight();> turtle1.forward(30);> turtle1.turnRight();> turtle1.forward(30);> turtle1.turnRight();> turtle1.forward(30);> turtle1.turnRight();

“main”2005/1/11page 55
i
i
i
i
i
i
i
i
Section 3.4 Working with Turtles 55
> turtle1.forward(30);> turtle1.penUp();> turtle1.moveTo(200,200);> turtle1.hide();> turtle1.penDown();> turtle1.turnRight();> turtle1.forward(30);> turtle1.turnRight();> turtle1.forward(30);> turtle1.turnRight();> turtle1.forward(30);> turtle1.turnRight();> turtle1.forward(30);> System.out.println(turtle1);Jane turtle at 200, 200 heading 0.
FIGURE 3.7: Drawing two squares with a turtle.
You can see the result of these commands in Figure 3.7.'
&
$
%
Making it Work Tip: Reuse the previous line inDrJavaYou can use the up arrow on the keyboard to bring upprevious lines you have typed in the interactions pane inDrJava. This is easier than typing the same line in again.
“main”2005/1/11page 56
i
i
i
i
i
i
i
i
56 Chapter 3 Introduction to Programming
3.5 CREATING METHODS
We had to send many messages to our Turtle object just to draw two squares.Do you notice any similarities in how we draw the squares? Each time we draw asquare we turn right and go forward by 30 steps for a total of 4 times. It would benice to name the list of steps for drawing a square and then just do the list of stepswhen a turtle is asked to draw a square. We do this by creating a method thatknows how to draw a square. Methods are named blocks of commands that aredefined inside a class definition. Once we have defined a method and successfullycompiled the class definition the objects of the class will respond to a message withthe same name and parameters as the new method. So if we want Turtle objectsto understand the message drawSquare() we define a method drawSquare().
Computer Science Idea: Messages Map to Meth-odsWhen we send an object a message it must map to amethod that objects of that class understand. If objectsof the class don’t understand the message you will get anerror when you compile. Be sure that the parameter listis correct because if it isn’t you will get an error that sayssuch a method does not exist. Make sure that you compileafter you add a new method before you try and use it.
You have seen how you declare variables in Javatype name; or type name = expression ;.
To declare a method in Java use:visibility type methodName(parameterList)
The structure of how you declare a method is referred to as the syntax —thewords and characters that have to be there for Java to understand what’s going on,and the order of those things.
A method declaration usually has a visibility (usually the keyword public,the type of the thing being returned from the method, the method name, and theparameter list in parentheses. This is usually followed by a block which has curlybraces around the series of commands you want to have executed when the methodis invoked.
Visibility means who can invoke the method (ask for the method to beexecuted). If the keyword public is used this method can be invoked by any codein any class definition. If the keyword private is used then the method can onlybe accessed from inside the class definition. You can think of this as a securityfeature. If you keep your journal on the web (a blog) then it is open and anyonecan read it. If you keep it hidden in your room then it is private and hopefully onlyyou can read it.
The return type is required and is given before the method name. If you leaveoff a return type you will get a compiler error. If your method returns a value thereturn type must match the type of the value returned. Remember that types canbe any of the primitive types (char, byte, int, short, long, float, double, or boolean)or a class name. Methods that don’t return any value use the Java keyword void

“main”2005/1/11page 57
i
i
i
i
i
i
i
i
Section 3.5 Creating Methods 57
for the return type in the method declaration.By convention method names start with a lowercase letter and the first letter
of each additional word is uppercase: turnRight(). The name of this method isturnRight. The first word is all lowercase and the first letter of each additionalword is capitalized.
A method must have parentheses following the method name. If any param-eters are passed to the method then they will be declared inside the parenthesesseparated by commas. To declare a parameter you must give a type and name.The type can be any primitive type or class name. The name can be used by thecode in the body of the method to refer to the passed value.
We create a collection of commands by defining a block . A block is codebetween an open curly brace ’{’and a close curly brace ’}’. The block of commandsthat follow a method declaration are the ones associated with the name of themethod (function) and are the ones that will be executed when the method isinvoked.
Most real programs that do useful things require the definition of more thanone method (function). Imagine that in the definitions pane you have severalmethod declarations. How do you think Java will figure out that one functionhas ended and a new one begun? Java needs some way of figuring out where themethod body ends: Which statements are part of this method and which are partof the next? Java uses curly braces to do this. All statements between the opencurly brace and close curly brace are part of the method body.
Debugging Tip: Proper Method DeclarationsAll method declarations must be inside a class definitionwhich means that they are defined inside the open ’{’ andclose ’}’ curly braces that enclose the body of the classdefinition. If you put a method declaration after the endof the class definition you will get “Error: ’class’ or ’in-terface’ expected”. Methods can not be defined inside ofother methods. If you accidently do this you will get “Er-ror: illegal start of expression” at the beginning of theinner method declaration. Statements in a method end ina semicolon (this is not optional in the definitions pane). Ifyou forget to put the semicolon at the end of a statementyou will get “Error: ’;’ expected”. All compiler errors willhighlight the line of code that caused the error. If youdon’t see the error on that line of code check the precedingline. You can double click on an error in the “CompilerOutput” area and it will place the cursor at that line ofcode and highlight it.
We can now define our first program (method)! Open Turtle.java by clickingon the Open button near the top of the window and using the file chooser to pick“Turtle.java”. Type the following code into the definitions pane of DrJava beforethe last closing curly brace ’}’ (which ends the class definition). When you’redone, save the file and click the Compile All button near the top of the window

“main”2005/1/11page 58
i
i
i
i
i
i
i
i
58 Chapter 3 Introduction to Programming
(Figure 3.8).
Program 2: Draw a Square
public void drawSquare ( ){
this . turnRight ( ) ;this . forward ( 3 0 ) ;this . turnRight ( ) ;this . forward ( 3 0 ) ;this . turnRight ( ) ;this . forward ( 3 0 ) ;this . turnRight ( ) ;this . forward ( 3 0 ) ;
}
'
&
$
%
Making it Work Tip: Copying and pastingText can be copied and pasted between the interactionspane and definitions pane. To copy text select it and clickcopy (in the Edit menu), then click in the definitionspane and click on paste (also in the Edit menu). Youcan also use keyboard shortcuts for copy (Control-c) andpaste (Control-c). This means to hold the “Ctrl” key andthen press the “c” key to copy and hold the “Ctrl” key andthe ’v’ key to paste. You can copy entire methods in thedefinitions pane by selecting the text in the method andthen copying and pasting it. You can select a method namein the definitions pane and paste it in the interactions paneto send a message asking for that method to be executed.You can also try things out in the interactions pane andlater save them in a method in the definitions pane.
Notice that we changed turtle1.turnRight() to this.turnRight(). Thevariable turtle1 isn’t defined inside the method drawSquare(). Variables namesare known in a context (area that they apply). The variables that we define inthe interactions pane are only known in the interactions pane, they aren’t knowninside methods. We need some other way to reference the object that we want toturn. Object methods are implicitly passed a reference to the object the methodwas invoked on. You can refer to that current object using the keyword this.
Compiling a Java class definition “Turtle.java” will produce a “Turtle.class”file. Compiling translates the Java source code which is in a format that humansunderstand into a format that computers understand. One of the advantages toJava is that the “.class” files aren’t specific to any particular type of computer.They can be understood by any computer that has a Java run-time environment.So you can create your Java source code on a Window’s based computer and run

“main”2005/1/11page 59
i
i
i
i
i
i
i
i
Section 3.5 Creating Methods 59
3. Try new method here
1. Type methodhere
2. Compile
FIGURE 3.8: Defining and executing drawSquare()
the compiled code on an Apple computer.'
&
$
%
Making it Work Tip: Try every program!To really understand what’s going on, type in, compile,and execute every program (method) in the book. EVERYone. None are long, and the practice will go a long way to-wards convincing you that the programs work, developingyour programming skill, and helping you understand whythey work.
This code creates a method with the name drawSquare that takes no param-eters and whenever the method is executed it will execute the statements inside ofthe open and close curly braces. It is a public method. It doesn’t return anything soit uses the keyword void to indicate this. This method must be called on an objectof the Turtle class. The this is a keyword that refers to the object this methodwas invoked on. Since this method is defined in the Turtle class the keyword thiswill refer to a Turtle object.
Once the method has successfully compiled you can ask for it to be executedby sending a message to a Turtle object with the same name and parameter listas the method. Click on the Interactions tab in the interactions pane (near thebottom of the window). This method doesn’t take any parameters so just finishwith the open and close parenthesis and the semicolon. When you compile theinteractions pane will be reset, meaning that all the variables that we have defined

“main”2005/1/11page 60
i
i
i
i
i
i
i
i
60 Chapter 3 Introduction to Programming
in the interactions pane will no longer be understood. We will need to create aWorld and Turtle object again.
> World world1 = new World();> Turtle turtle1 = new Turtle(world1);> turtle1.drawSquare();
Whenever the Java run-time encounters a name of a new class it will firstload the class definition from the “.class” file. This creates an object that definesthe class Figure 3.9. This object knows how to create objects of that class andcontains the code for the methods defined in that class. So when you type Worldworld1 = new World(); the “World.class” file is loaded and an object is createdthat represents the definition of the World class. That object is asked to createa new World object. Enough memory is reserved to hold the data (fields) for theobject and a reference to the object that defines the class. A reference to the newWorld object is stored in the space reserved for the variable world1.
When you invoke the method drawSquare() on the Turtle object referencedby the variable turtle1 the code for that method is found in the object thatdefines the Turtle class and the method is passed the object referenced by turtle1.Inside the method you can refer to the passed object using the keyword this. Theinstructions in the body of that method are executed.
World Object
Class that defines World
information on how to create and initialize objects of the class
Data for World Object
method definitions
FIGURE 3.9: Diagram of an object
What if we want to draw a larger or smaller square? We could change eachof the this.forward(30); lines to the new width and height and then compile.But, it would be easier to declare a variable in the method that would represent thewidth of the square and then use that variable name as the amount to go forwardby like this: this.forward(width);. Then if we want to change the size of thesquare we only have to change 1 line. You can declare a variable anywhere in thebody of a method but you must declare it before you use it. The name will beknown and the value substituted for each occurrence of the name in the rest of themethod. But, the name will only be known inside the method it is declared in.
We can’t have two methods with the same name and the same parameter listso we need a new name for this method. We simply named it drawSquare2 to show

“main”2005/1/11page 61
i
i
i
i
i
i
i
i
Section 3.5 Creating Methods 61
that it is the second version. We can copy the first method and paste it and renameit and then change it to declare and use the width variable.
Program 3: Draw Square Using a Variable for Width
public void drawSquare2 ( ){
int width = 30 ;this . turnRight ( ) ;this . forward ( width ) ;this . turnRight ( ) ;this . forward ( width ) ;this . turnRight ( ) ;this . forward ( width ) ;this . turnRight ( ) ;this . forward ( width ) ;
}
Compile and run this method and check that you get the same results as withdrawSquare().
> World world = new World();> Turtle turtle1 = new Turtle(world);> turtle1.drawSquare2();
3.5.1 Methods that Take Input
This is a bit better than the first version and a bit easier to change. But, you stillhave to recompile after you change the width to draw a larger or smaller square.Wouldn’t it be nice if there was a way to tell the method what size you want whenyou ask for the method to be executed by sending a message that matches themethod? Well you can! That is what the parameter list is for.
We can make the width of the square a parameter. Remember that if amethod takes a parameter you must list the type and name for the parameter inthe parameter list. What type should we use for width? Well, in the second versionwe used int because the turtle only takes whole steps not fractional ones so let’suse that. What should we call this method? We could call it drawSquare3(intwidth) but someone may thing this means it draws a square with a width of 3. Wecould call it drawSquareWithPassedWidth(int width) but that is rather long andyou can tell it takes a passed width by looking at the parameter list. How about ifwe just call it drawSquare(int width)? You may think that isn’t allowed since wehave a method drawSquare() but that method doesn’t take any parameters andour new method does. Java allows you to use the same method name as anothermethod as long as the parameter list is different. This is called method overloading .
Program 4: Draw Square With Width as a Parameter

“main”2005/1/11page 62
i
i
i
i
i
i
i
i
62 Chapter 3 Introduction to Programming
/∗∗∗ Method to draw a square wi th a width and he i g h t∗ o f some passed amount .∗ @param width the width and h e i g h t to use∗/
public void drawSquare ( int width ){
this . turnRight ( ) ;this . forward ( width ) ;this . turnRight ( ) ;this . forward ( width ) ;this . turnRight ( ) ;this . forward ( width ) ;this . turnRight ( ) ;this . forward ( width ) ;
}
Type in the new method declaration and compile. Let’s try this new methodout.
> World world1 = new World();> Turtle turtle1 = new Turtle(world1);> turtle1.drawSquare(200);
When you send the message drawSquare(200) you are telling it to substitute200 for the parameter width everywhere it appears in the method drawSquare.The parameter name width is known throughout the body of the method. This isvery similar to drawSquare2() but has the advantage that we don’t need to changethe method and recompile to use a different width.
An important reason for using parameters is to make a method more general.Consider method drawSquare(int width). That method handles the general caseof drawing a square. We call that kind of generalization abstraction. Abstraction

“main”2005/1/11page 63
i
i
i
i
i
i
i
i
Section 3.5 Creating Methods 63
FIGURE 3.10: Showing the result of sending the width as a parameter to drawSquare
leads to general solutions that work in lots of situations.'
&
$
%
Making it Work Tip: Use names that make senseWe called the first method drawSquare() and the seconddrawSquare2(). Does it matter? Absolutely not! Well,not to the computer, at any rate. The computer doesn’tcare what names you use—they’re entirely for your benefit.Pick names that (a) are meaningful to you (so that you canread and understand your program), (b) are meaningful toothers (so that others can read and understand it), and (c)are easy to type. long names, like,drawARectangleWithEqualWidthAndHeightare meaningful, easy-to-read, but are a pain to type.Does this mean that you can use ”orange” as a methodname? Yes, you can, but it may be confusing even for you,and especially confusing for others. It helps to use methodnames that indicate what the method does.
Defining a method that takes input is very easy. It continues to be a matterof substitution and evaluation. We’ll put a type and name inside those parenthesesafter the method name. The names given inside the parentheses are called theparameters or input variables.
When you evaluate the function, by specifying its name with input values (also

“main”2005/1/11page 64
i
i
i
i
i
i
i
i
64 Chapter 3 Introduction to Programming
FIGURE 3.11: Creating a Picture object using new Picture()
called the arguments) inside parentheses (like turtle1.drawSquare(20); or newTurtle(20,30,world1), each parameter variable is set to a copy of the argumentvalue. This is called pass by value. All arguments in Java are passed by making acopy of their value. Does this mean that we make a copy of the World object whenwe pass it as a parameter? No, we just make a copy of the object reference whichmeans we make another reference to that World object.
3.6 WORKING WITH MEDIA
What if we want to create and manipulate media like pictures or sounds? Just aswe created the World and Turtle classes to define what we mean by these to thecomputer we have created Picture and Sound classes.
3.6.1 Creating a Picture Object
How would you create a picture? The syntax for creating an object isnew Class (parameterList )Try entering the following in the interactions pane.
> System.out.println(new Picture());Picture, filename null height 100 width 200
It looks like we create a Picture object with a height of 100 and a widthof 200, but why don’t we see it? New objects of the class Picture aren’t shownautomatically. You have to ask them to show themselves using the message show().So let’s ask the Picture object to show itself. Oops, we forgot to declare a variableto refer to the Picture object so we don’t have any way to access it. Let’s try itagain and this time declare a variable for it. The syntax for declaring a variable istype name ; or type name = expression ;. The type is the name of the classso we will use a type of Picture. What should the name be? Well the name shoulddescribe what the object is so let’s use picture1.
> Picture picture1 = new Picture();> picture1.show();
Now we can see the created picture in Figure 3.11.Why doesn’t it have anything in it? When you create a Picture object
using new Picture() the default width is 200 and the default height is 100 and

“main”2005/1/11page 65
i
i
i
i
i
i
i
i
Section 3.6 Working with Media 65
FIGURE 3.12: The File Chooser
the default is that all of the pixels in the picture are white. How can we create apicture from data in a file from a digital camera? We can use new Picture(StringfileName) which takes an object of the String class which is the full file name ofa file to read the picture information from.
What is the full file name of a file? The full or complete name of a file isthe path to the file as well as the base file name and extension. How can we getthe full file name for a file? One way is to use another class we have created foryou. The FileChooser class has a class method pickAFile() which will display adialog window that will help you pick a file.
> System.out.println(FileChooser.pickAFile());
Â
Á
¿
À
Common Bug: File Chooser doesn’t appearIf you don’t see the window with the file chooser in itafter typing in the code above, try minimizing your DrJavawindow. Sometimes the file chooser comes up behind theDrJava window.
You’re probably already familiar with how to use a file chooser or file dialoglike this:
• Double-click on folders/directories to open them.
• Click on the top right iconic button to see the details about the files such asthe types of files they are (if you put the cursor over the button and leave itthere it will show “Details”). To create a picture we want to pick a file witha type of “JPEG Image”. To create a sound we would pick a file with a typeof “Wave Sound”.

“main”2005/1/11page 66
i
i
i
i
i
i
i
i
66 Chapter 3 Introduction to Programming
• Click on the file name to select it and then click Open, or double-click, toselect a file.
Once you select a file, what gets returned is the full file name as a string (asequence of characters). (If you click Cancel, pickAFile() returns null which isa predefined value in Java that means nothing. Try it, type the code below afterthe > in the interactions pane and select a file by clicking the mouse button whenthe cursor points to the desired file name, then click on the Open button.
> System.out.println(FileChooser.pickAFile());C:\intro-prog-java\mediasources\flower1.jpg
What you get when you finally select a file will depend on your operatingsystem. On Windows, your file name will probably start with C: and will havebackslashes in it (e.g., \). There are really two parts to this file name:
• The character between words (e.g., the \ between “intro-prog-java” and “me-diasources”) is called the path separator . Everything from the beginning ofthe file name to the last path separator is called the path to the file. Thatdescribes exactly where on the hard disk (in which directory) a file exists.A directory is like a drawer of a file cabinet and it can hold many files. Adirectory can even hold other directories.
• The last part of the file (e.g. “cat.jpg”) is called the base file name. When youlook at the file in the Finder/Explorer/Directory window (depending on youroperating system), that’s the part that you see. Those last three characters(after the period) is called the file extension. It identifies the encoding of thefile. You may not see the extension depending on the settings you have. But,if you show the detail view (top right iconic button on the file chooser) youwill see the file types. Look for files of type “JPEG Image”.
Files that have an extension of “.jpg” or a type of “JPEG Image” are JPEGfiles. They contain pictures. (To be picky, they contain data that can be inter-preted to be a representation of a picture – but that’s close enough to “they containpictures.”) JPEG is a standard encoding (a representation) for any kind of image.The other kind of media files that we’ll be using frequently are “.wav” files (Fig-ure 3.13). The “.wav” extension means that these are WAV files. They containsounds. WAV is a standard encoding for sounds. There are many other kinds ofextensions for files, and there are even many other kinds of media extensions. Forexample, there are also GIF (“.gif”) files for images and AIFF (“.aif” or “.aiff”)files for sounds. We’ll stick to JPEG and WAV in this text, just to avoid too muchcomplexity.
3.6.2 Showing a Picture
So now we know how to get a complete file name: Path and base name. Thisdoesn’t mean that we have the file itself loaded into memory. To get the file intomemory, we have to tell Java how to interpret this file. We know that JPEG filesare pictures, but we have to tell Java explicitly to read the file and make a Pictureobject from it (an object of the Picture class).

“main”2005/1/11page 67
i
i
i
i
i
i
i
i
Section 3.6 Working with Media 67
Click here to see the file types
Click here to open the selected file
Click here to select a file
FIGURE 3.13: File chooser with media types identified
The way we create and initialize new objects in Java is to ask the class tocreate a new object using new ClassName (parameterList ). The class containsthe description of the data each object of the class needs to have so it is the thingthat knows how to create objects of that class. You can think of a class as a factoryfor making objects of that class. So, to create a new object of the Picture classfrom a file name use new Picture(fileName). The fileName is the name of a fileas a string. We know how to get a file name using FileChooser.pickAFile().
> System.out.println(new Picture(FileChooser.pickAFile()));Picture, filenameC:\intro-prog-java\mediasources\partFlagSmall.jpg height 217 width139
The result from System.out.println suggests that we did in fact make aPicture object, from a given filename and with a given height and width. Success!Oh, you wanted to actually see the picture? We’ll need another method! (Did Imention somewhere that computers are stupid?) The method to show the pictureis named show().
You ask a Picture object to show itself using the method show(). It mayseem strange to say that a picture knows how to show itself but in object-orientedprogramming we treat objects as intelligent beings that know how to do the thingsthat we would expect an object to be able to do, or that someone would want todo to it. We typically show pictures, so in object-oriented programming Pictureobjects know how to show themselves (make themselves visible).

“main”2005/1/11page 68
i
i
i
i
i
i
i
i
68 Chapter 3 Introduction to Programming
3.6.3 Variable Substitution
We can now pick a file, make a picture, and show it in a couple of different ways.
• We can do it all at once because the result from one method can be used in thenext method: new Picture(FileChooser.pickAFile()).show(). That’swhat we see in figure 3.14. This code will first invoke the pickAFile() classmethod of the class FileChooser because it is inside the parentheses. ThepickAFile() method will return the name of the selected file as a string.Next it will create a new Picture object with the selected file name. Andfinally it will ask the created Picture object to show itself.
FIGURE 3.14: Picking, making, and showing a picture, using the result of eachmethod in the next method. The picture used is matt-spaceman.jpg.
• The second way is to name each of the pieces by declaring variables. To de-clare a variable (a name for data) use type name; or type name=expression ;.
“main”2005/1/11page 69
i
i
i
i
i
i
i
i
Section 3.6 Working with Media 69
'
&
$
%
Making it Work Tip: Types in JavaA type in Java can be any of the predefined primitive types(char, byte, int, short, long, float, double, or boolean)or the name of a class. Java is not a completely object-oriented language in that the primitive types are not ob-jects.Why are there so many primitive types? The answer has todo with how many bits you want to use to represent a value.The more bits you use the larger the number that you canstore. We will only use int, float, double, and boolean inthis book. The type int is for integer numbers and takesup 32 bits. The type float is for floating point numbersand takes up 32 bits. The type double is for floating pointnumbers and takes up 64 bits. The type boolean is forthings that are just true or false so a boolean value couldbe stored in just 1 bit. However, how much space a booleantakes isn’t specified in the Java language specifications (itdepends on the virtual machine). Java uses primitive typesto speed calculations.A class name used as a type can be either a class defined aspart of the Java language like (String, JFrame, or Buffered-Image) or a class that you or someone else created (like thePicture class we created).
Try the following in the interactions pane. Pick a file name that ends in “.jpg”.
> String fileName = FileChooser.pickAFile();> Picture pictureObj = new Picture(fileName);> pictureObj.show();
As you can see we can name the file that we get from FileChooser.pickAFile()by using using ( String fileName =). This says that the variable named fileNamewill be of type String (will refer to an object of the String class) and that theString object that it will refer to will be returned from FileChooser.pickAFile().In a similar fashion we can create a variable named pictureObj that will refer toan object of the Picture class that we get from creating a new Picture objectwith the fileName using Picture pictureObj = new Picture(fileName). Wecan then ask that Picture object to show itself by sending it the show() message
“main”2005/1/11page 70
i
i
i
i
i
i
i
i
70 Chapter 3 Introduction to Programming
using pictureObj.show(). That’s what we see in figure 3.15.'
&
$
%
Making it Work Tip: Java ConventionsBy convention all class names in Java begin with an up-percase letter, all variable and method names begin witha lowercase letter. This will help you tell the differencebetween a class name and a variable or method name. So,Picture is a class name since it starts with a uppercaseletter and pictureObj is a variable name since it startswith a lowercase letter. These are two different names toJava. If a name has several words in it the convention is touppercase the first letter of each additional word like pick-AFile(). A convention is the usual way of doing somethingwhich means that the compiler won’t care if you don’t doit this way but other programmers will tar and feather youbecause it will make your programs harder to understand.
Debugging Tip: Methods names must be followedby parentheses!In Java all methods (functions) have to have parenthesesafter the method name both when you declare the methodand when you invoke it. You can’t leave off the parentheseseven if the method doesn’t take any parameters. So, youmust type picture.show() not picture.show.
If you try picture.show(), you’ll notice that there is no output from thismethod. Methods in Java don’t have to return a value, unlike real mathematicalfunctions. A method may just do something (like display a picture).
3.6.4 Object references
When the type of a variable is int or double or boolean we call that a primitivevariable. As you have seen when a primitive variable is declared space is reservedto represent that variable’s value and the name is used to find the address of thatreserved space.
When the type of a variable is the name of a class (like String) then thisis called an object variable or object reference. Unlike primitive variables, objectvariables do not reserve space for the value of the variable. How could they? Howmuch space do you need for an object? How about an object of the class String?How about an object of the class Picture? The amount of space you need for anobject depends on the number and types of fields (data) each object of that classhas.
Object variables (references) reserve space for a reference to an object of thegiven class. A reference allows the computer to determine the address of the actualobject (it isn’t just the address of the object). If the object variable is declared butnot assigned to an object the reference is set to null which means that it doesn’t

“main”2005/1/11page 71
i
i
i
i
i
i
i
i
Section 3.6 Working with Media 71
FIGURE 3.15: Picking, making, and showing a picture, when naming the pieces. Thepicture shown is katie.jpg.
refer to any object yet.
3.6.5 Playing a Sound
We can replicate this entire process with sounds.
• We still use FileChooser.pickAFile() to find the file we want and get itsfile name.
• We use new Sound(fileName ) to make a Sound object using the passedfileName as the file to read the sound information from.
• We will use play() to play the sound. The method play() is an objectmethod (invoked on a Sound object). It plays the sound one time. It doesn’treturn anything.
Here are the same steps we saw previously with pictures:
> System.out.println(FileChooser.pickAFile());C:\intro-prog-java\mediasources\croak.wav> System.out.println(new Sound(FileChooser.pickAFile()));Sound file: croak.wav length: 17616> new Sound(FileChooser.pickAFile()).play();

“main”2005/1/11page 72
i
i
i
i
i
i
i
i
72 Chapter 3 Introduction to Programming
The System.out.println(FileChooser.pickAFile()); allows you to pick afile with a file chooser and displays the full file name. The code System.out.println(newSound(FileChooser.pickAFile())); also allows you to pick a file and creates asound object from the full file name and displays information about the sound ob-ject: the file name, and the length of the sound. We’ll explain what the length of thesound means in a later chapter. The code new Sound(FileChooser.pickAFile()).play();has you pick a file name, creates the sound object using that file name, and tellsthat sound object to play.
Please do try this on your own, using WAV files that you have on your owncomputer, that you make yourself, or that came on your CD. (We talk more aboutwhere to get the media and how to create it in future chapters.)
3.6.6 Naming your Media (and other Values)
The code new Sound(FileChooser.pickAFile()).play() looks awfully compli-cated and long to type. You may be wondering if there are ways to simplify it. Wecan actually do it just the way that mathematicians have for centuries: We namethe pieces! The results from methods (functions) can be named, and these namescan be used as the inputs to other methods.
> String fileName = FileChooser.pickAFile();> Sound soundObj = new Sound(fileName);> soundObj.play();
3.6.7 Naming the Result of a Method
We can assign names to the results of methods (functions). If we name the resultfrom FileChooser.pickAFile(), each time we print the name, we get the sameresult. We don’t have to re-run FileChooser.pickAFile(). Naming code in orderto re-execute it is what we’re doing when we define methods (functions), whichcomes up in Section 3.5.
> String fileName = FileChooser.pickAFile();> System.out.println(fileName);C:\intro-prog-java\mediasources\beach-smaller.jpg> System.out.println(fileName);C:\intro-prog-java\mediasources\beach-smaller.jpg
In the below example, we declare variables (assign names) for the file name(a String object) and the Picture object.
> String myFileName = FileChooser.pickAFile();> System.out.println(myFileName);C:\intro-prog-java\mediasources\katie.jpg> Picture myPicture = new Picture(myFileName);> System.out.println(myPicture);Picture, filename C:\intro-prog-java\mediasources\katie.jpg height360 width 381

“main”2005/1/11page 73
i
i
i
i
i
i
i
i
Section 3.6 Working with Media 73
Notice that the algebraic notions of subsitution and evaluation work hereas well. Picture myPicture = new Picture(myFileName) causes the exact samepicture to be created as if we had executedPicture myPicture = new Picture(FileChooser.pickAFile())1, because we setmyFileName to be equal to the result of FileChooser.pickAFile();. The valuesget substituted for the names when the expression is evaluated. new Picture(myFileName)is an expression which, at evaluation time, gets expanded intonew Picture (‘‘C:\intro-prog-java\mediasources\katie.jpg’’)because C:\intro-prog-java\mediasources\katie.jpg is the name of the filethat was picked when FileChooser.pickAFile() was evaluated and the returnedvalue was named myFileName.
We can also replace the method (function) invocations (“function calls”) withthe value returned. FileChooser.pickAFile() returns a String object—a bunchof characters enclosed inside of double quotes. We can make the last example worklike this, too.'
&
$
%
Common Bug: Backslashes and SlashesYou have seen the names of files dis-played with backslashes in them, such asC:\intro-prog-java\mediasources\beach.jpg. How-ever, when you create an object of the String class inJava you might not want to use backslashes because theyare used to create special characters in strings like tab ornewline. You can use slashes ’/’ instead as a path sep-arator C:/intro-prog-java/mediasources/beach.jpg.Java can still figure out the path name when youuse slashes. You can still use backslashes in thefull path name, but you need to double each oneC:\\intro-prog-java\\mediasources\\beach.jpg.
> String myFileName ="C:/intro-prog-java/mediasources/katie.jpg";> System.out.println(myFileName);C:/intro-prog-java/mediasources/katie.jpg> Picture myPicture = new Picture(myFileName);> System.out.println(myPicture);Picture, filename C:/intro-prog-java/mediasources/katie.jpg height360 width 381
Or even substitute for the name.
> Picture aPicture = newPicture("C:/intro-prog-java/mediasources/katie.jpg");> System.out.println(aPicture);Picture, filename C:/intro-prog-java/mediasources/katie.jpg height360 width 381
1Assuming, of course, that you picked the same file.

“main”2005/1/11page 74
i
i
i
i
i
i
i
i
74 Chapter 3 Introduction to Programming
Computer Science Idea: We can substitute names,values, and methods.We can substitute a value, a name assigned to that value(the variable name), and the method returning that valueinterchangeably. The computer cares about the values, notif it comes from a string, a name (a variable), or a method(function) call.
We actually don’t need to use System.out.println() every time we ask thecomputer to do something. If we want to call a method that doesn’t return anything(and so is pretty useless to System.out.println()), we can just ask the methodto be executed by on an object by typing the variable name for the object followedby a ’.’ and then the method name and its input (if any) in parentheses followedby a semicolon.
> aPicture.show();
We tend to call these statements to the computer that are telling it to dothings commands. System.out.println(aPicture) is a command. So is StringmyFileName = FileChooser.pickAFile(), and aPicture.show(). These are morethan expressions: They’re telling the computer to do something.
3.7 CONCEPTS SUMMARY
This chapter introduced many concepts: invoking object and class methods, creat-ing objects, and how to create new methods.
3.7.1 Invoking Object Methods
You must invoke an object method on an object.objectReference.methodName(parameterList);
The object that the method is invoked on will be implicitly passed to themethod and can be referred to using the keyword this inside of the method. Objectmethods usually work with the data in the current object.
3.7.2 Invoking Class Methods
You can invoke a class method using the name of the class.ClassName.methodName(parameterList);
Class methods are used for general methods like Math.abs(-3). Class meth-ods do not have access to object data.
3.7.3 Creating Objects
To create an object ask the class to create and initialize a new object.new ClassName(parameterList)

“main”2005/1/11page 75
i
i
i
i
i
i
i
i
Section 3.7 Concepts Summary 75
3.7.4 Creating new Methods
To create a method open the class definition file ClassName.java and put themethod before the closing curly brace at the end of the file.
To define a method use:
public returnType methodName( parameterLi s t ){// s ta tement in the body o f the method}
If the method doesn’t return a value use the keyword “void” as the returntype. Each parameter in the parameter list has a type and name. Parameters areseparated by commas. Method and parameter names start with a lowercase letter,but the first letter of each additional word is capitalized.
OBJECTS AND METHODS SUMMARY
In this chapter, we talk about several kinds of encodings of data (or objects).
Pictures objects of our Picture class Pictures are encodings of images,typically coming from a JPEGfile.
Sounds objects of our Sound class Sounds are encodings of sounds,typically coming from a WAV file.
Strings Java String object e.g., ”Hello!” A sequence of characters (includ-ing spaces, punctuation, etc.) de-limited on either end with a dou-ble quote character.
Turtles objects of our Turtle class Turtles can move forward, turnleft, turn right, turn by a speci-fied angle, and leave a trail.
Worlds objects of our World class Worlds can hold objects such asobjects of the Turtle class.
Here are the methods (functions) introduced in this chapter:

“main”2005/1/11page 76
i
i
i
i
i
i
i
i
76 Chapter 3 Introduction to Programming
Character.getNumericValue(Character character) Returns the equivalent numericvalue in Unicode for the inputcharacter.
FileChooser.pickAFile() Lets the user pick a file and re-turns the complete path name asa string.
Math.abs(int number) Takes a number and returns theabsolute value of it.
picture.show() Shows the Picture object that itis invoked on. No return value.
sound.play() Plays the sound object (object ofthe Sound class) that it is invokedon.
turtle.forward(int numberOfSteps) Asks the Turtle object that it isinvoked on to move forward bythe passed number of steps. Noreturn value.
turtle.setPenDown(boolean value) Asks the Turtle object that it isinvoked on to set the pen downvalue to the passed value. If thepen is down and you set it to falsethen the pen is lifted. No returnvalue.
turtle.hide() Asks the Turtle object that it isinvoked on to stop showing itself.No return value.
turtle.moveTo(int x, int y) Asks the Turtle object that it isinvoked on to move to the speci-fied x and y location. No returnvalue.
turtle.penDown() Asks the Turtle object that it isinvoked on to put down the penand draw the trail of future move-ments. No return value.
turtle.penUp() Asks the Turtle object that it isinvoked on to pick up the pen soyou don’t see the trail of futuremovements. No return value.
turtle.show() Asks the Turtle object that it isinvoked on to show (draw) itself.No return value.
turtle.turn(int angle) Asks the Turtle object that it isinvoked on to turn by the speci-fied angle. A negative angle willturn that much to the left and apositive angle will turn that muchto the right. No return value.
turtle.turnLeft() Asks the Turtle object that it isinvoked on to turn left 90 degrees.No return value.
turtle.turnRight() Asks the Turtle object that it isinvoked on to turn right 90 de-grees. No return value.

“main”2005/1/11page 77
i
i
i
i
i
i
i
i
Section 3.7 Concepts Summary 77
PROBLEMS
3.1. Some computer science concept questions:• What is an algorithm?• What is a program?• What is Moore’s Law?• What is a method?• What creates new objects?• What does “pass by value” mean?
3.2. Test your understanding of Java with the following:• What does picture.show() do?• What does FileChooser.pickAFile() do?• What does turtle.turnLeft() do?• What does turtle.forward() do?• What does turtle.turn(-45) do?• What does turtle.turn(45) do?• What does turtle.penUp() do?• What does turtle.hide() do?
3.3. Which of the following are class methods and which are object methods? Howdo you tell which are which?• Math.abs(-3);
• sound.play();
• FileChooser.pickAFile();
• picture.show();
• ColorChooser.pickAColor();
• turtle.turnLeft();
3.4. How many and what kind of variables (primitive or object) are created in thecode below? Draw what the variables look like.> String fileName = FileChooser.pickAFile();
> Picture p = new Picture(fileName);
> p.show();
3.5. How many and what kind of variables (primitive or object) are created in thecode below? Draw what the variables look like.> World world = new World();
> Turtle turtle1 = new Turtle();
> turtle1.forward(30);
> Turtle turtle2 = new Turtle();
> turtle2.turnRight();
> turtle2.forward(30);
3.6. We evaluated the expression FileChooser.pickAFile() when we wanted to in-voke the method named pickAFile(). But what does this do? Open theFileChooser class and find the method declaration.
3.7. Create a World object and a Turtle object and use the Turtle object to draw ahouse.
3.8. Create a World object and a Turtle object and use the Turtle object to draw astar.

“main”2005/1/11page 78
i
i
i
i
i
i
i
i
78 Chapter 3 Introduction to Programming
TO DIG DEEPER
The best (deepest, most material, most elegant) computer science textbook is Struc-ture and Interpretation of Computer Programs [2], by Abelson, Sussman, and Suss-man. It’s a hard book to get through, though. Somewhat easier, but in the samespirit is the new book How to Design Programs [9].
Neither of these books are really aimed at students who want to programbecause it’s fun or because they have something small that they want to do. They’rereally aimed at future professional software developers. The best books aimed atthe less hardcore user are by Brian Harvey. His book Simply Scheme uses thesame programming language as the earlier two, Scheme, but is more approachable.My favorite of this class of books, though, is Brian’s three volume set ComputerScience Logo Style [16] which combine good computer science with creative and funprojects.

“main”2005/1/11page 79
i
i
i
i
i
i
i
i
P A R T T W O
PICTURESChapter 4 Modifying Pictures using Loops
Chapter 5 Modifying Pixels in a Matrix
Chapter 6 Conditionally Modifying Pixels
Chapter 7 Drawing
79
“main”2005/1/11page 80
i
i
i
i
i
i
i
i
C H A P T E R 4
Modifying Pictures using Loops
4.1 HOW PICTURES ARE ENCODED
4.2 MANIPULATING PICTURES
4.3 CHANGING COLOR VALUES
4.4 CONCEPTS SUMMARY
Chapter Learning ObjectivesThe media learning goals for this chapter are:
• To understand how images are digitized by taking advantage of limits inhuman vision.
• To identify different models for color, including RGB, the most common onefor computers.
• To manipulate color values in pictures, like increasing or decreasing red values.
• To convert a color picture to grayscale, using more than one method.
• To convert a color picture to its negative representation.
The computer science goals for this chapter are:
• To introduce arrays.
• To write object methods.
• To do iteration with while and for loops.
• To introduce comments.
• To understand the scope of a variable name.
• To introduce breaking a method into smaller methods.
4.1 HOW PICTURES ARE ENCODED
Pictures (images, graphics) are an important part of any media communication.In this chapter, we discuss how pictures are represented on a computer (mostly asbitmap images—each dot or pixel is represented separately) and how they can bemanipulated.
Pictures are two-dimensional arrays of pixels (which is short for picture ele-ment) . In this section, each of those terms will be described.
80
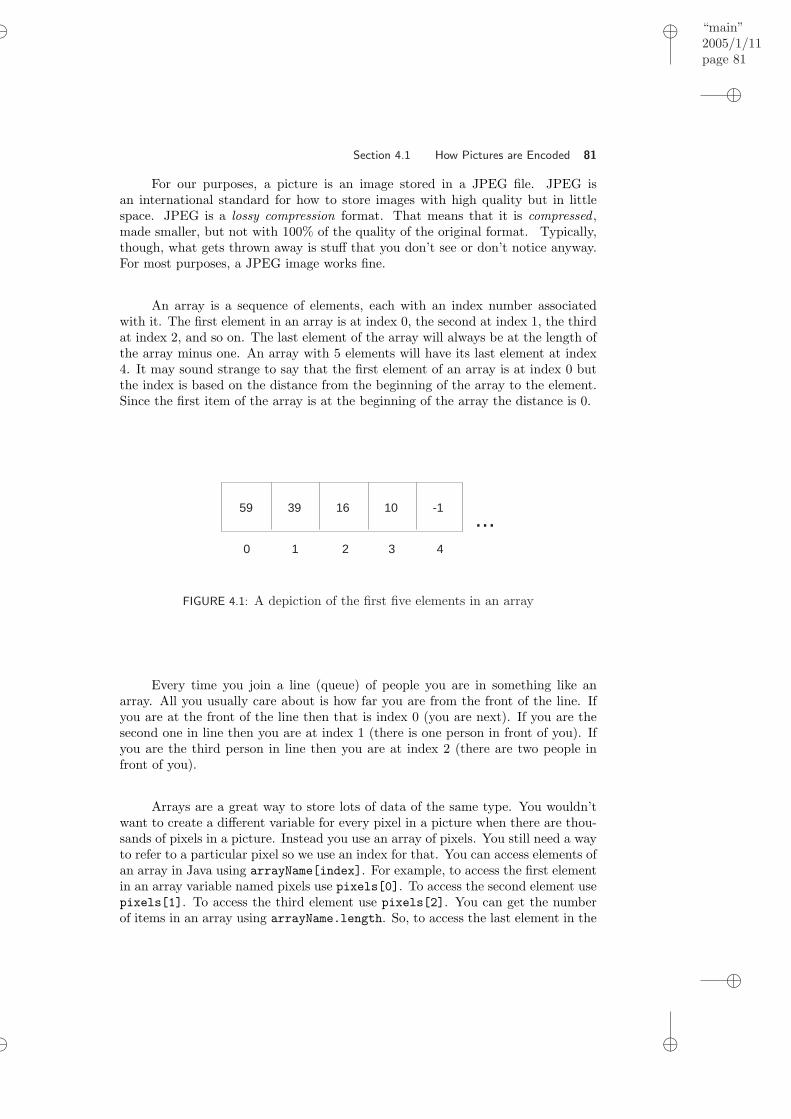
“main”2005/1/11page 81
i
i
i
i
i
i
i
i
Section 4.1 How Pictures are Encoded 81
For our purposes, a picture is an image stored in a JPEG file. JPEG isan international standard for how to store images with high quality but in littlespace. JPEG is a lossy compression format. That means that it is compressed ,made smaller, but not with 100% of the quality of the original format. Typically,though, what gets thrown away is stuff that you don’t see or don’t notice anyway.For most purposes, a JPEG image works fine.
An array is a sequence of elements, each with an index number associatedwith it. The first element in an array is at index 0, the second at index 1, the thirdat index 2, and so on. The last element of the array will always be at the length ofthe array minus one. An array with 5 elements will have its last element at index4. It may sound strange to say that the first element of an array is at index 0 butthe index is based on the distance from the beginning of the array to the element.Since the first item of the array is at the beginning of the array the distance is 0.
59 39 16 10 -1
0 1 2 3 4
...
FIGURE 4.1: A depiction of the first five elements in an array
Every time you join a line (queue) of people you are in something like anarray. All you usually care about is how far you are from the front of the line. Ifyou are at the front of the line then that is index 0 (you are next). If you are thesecond one in line then you are at index 1 (there is one person in front of you). Ifyou are the third person in line then you are at index 2 (there are two people infront of you).
Arrays are a great way to store lots of data of the same type. You wouldn’twant to create a different variable for every pixel in a picture when there are thou-sands of pixels in a picture. Instead you use an array of pixels. You still need a wayto refer to a particular pixel so we use an index for that. You can access elements ofan array in Java using arrayName[index]. For example, to access the first elementin an array variable named pixels use pixels[0]. To access the second element usepixels[1]. To access the third element use pixels[2]. You can get the numberof items in an array using arrayName.length. So, to access the last element in the
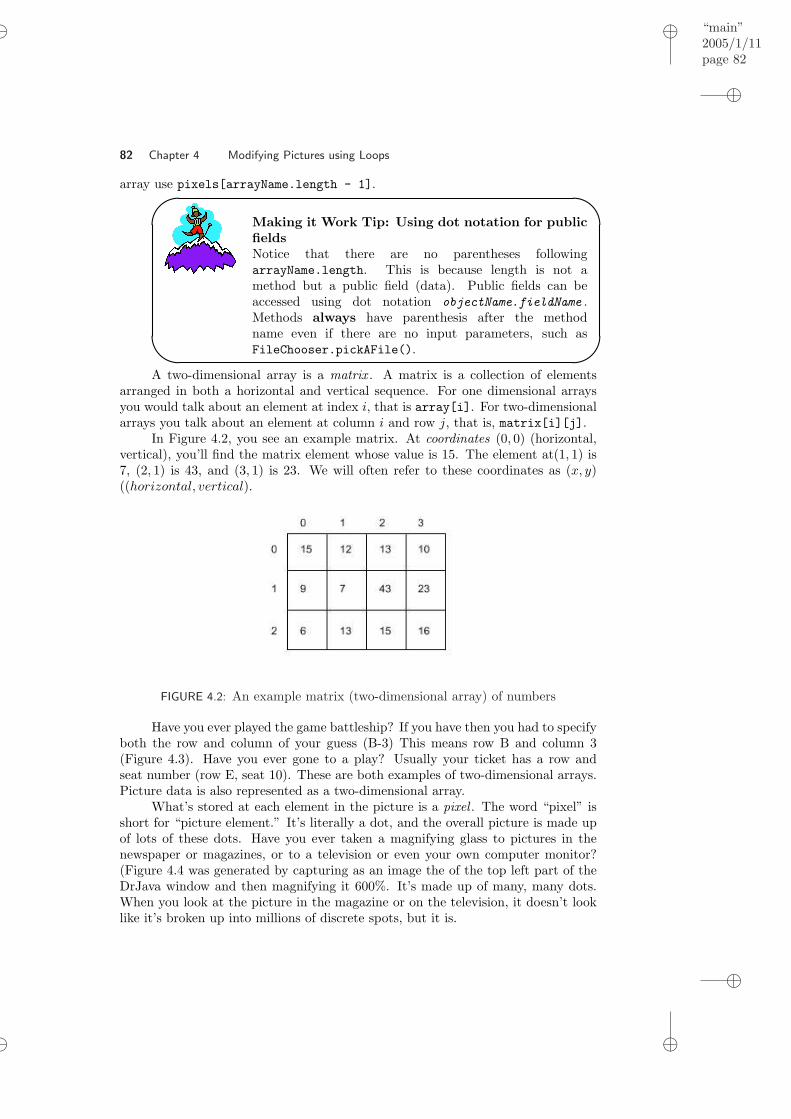
“main”2005/1/11page 82
i
i
i
i
i
i
i
i
82 Chapter 4 Modifying Pictures using Loops
array use pixels[arrayName.length - 1].'
&
$
%
Making it Work Tip: Using dot notation for publicfieldsNotice that there are no parentheses followingarrayName.length. This is because length is not amethod but a public field (data). Public fields can beaccessed using dot notation objectName.fieldName .Methods always have parenthesis after the methodname even if there are no input parameters, such asFileChooser.pickAFile().
A two-dimensional array is a matrix . A matrix is a collection of elementsarranged in both a horizontal and vertical sequence. For one dimensional arraysyou would talk about an element at index i, that is array[i]. For two-dimensionalarrays you talk about an element at column i and row j, that is, matrix[i][j].
In Figure 4.2, you see an example matrix. At coordinates (0, 0) (horizontal,vertical), you’ll find the matrix element whose value is 15. The element at(1, 1) is7, (2, 1) is 43, and (3, 1) is 23. We will often refer to these coordinates as (x, y)((horizontal, vertical).
FIGURE 4.2: An example matrix (two-dimensional array) of numbers
Have you ever played the game battleship? If you have then you had to specifyboth the row and column of your guess (B-3) This means row B and column 3(Figure 4.3). Have you ever gone to a play? Usually your ticket has a row andseat number (row E, seat 10). These are both examples of two-dimensional arrays.Picture data is also represented as a two-dimensional array.
What’s stored at each element in the picture is a pixel . The word “pixel” isshort for “picture element.” It’s literally a dot, and the overall picture is made upof lots of these dots. Have you ever taken a magnifying glass to pictures in thenewspaper or magazines, or to a television or even your own computer monitor?(Figure 4.4 was generated by capturing as an image the of the top left part of theDrJava window and then magnifying it 600%. It’s made up of many, many dots.When you look at the picture in the magazine or on the television, it doesn’t looklike it’s broken up into millions of discrete spots, but it is.
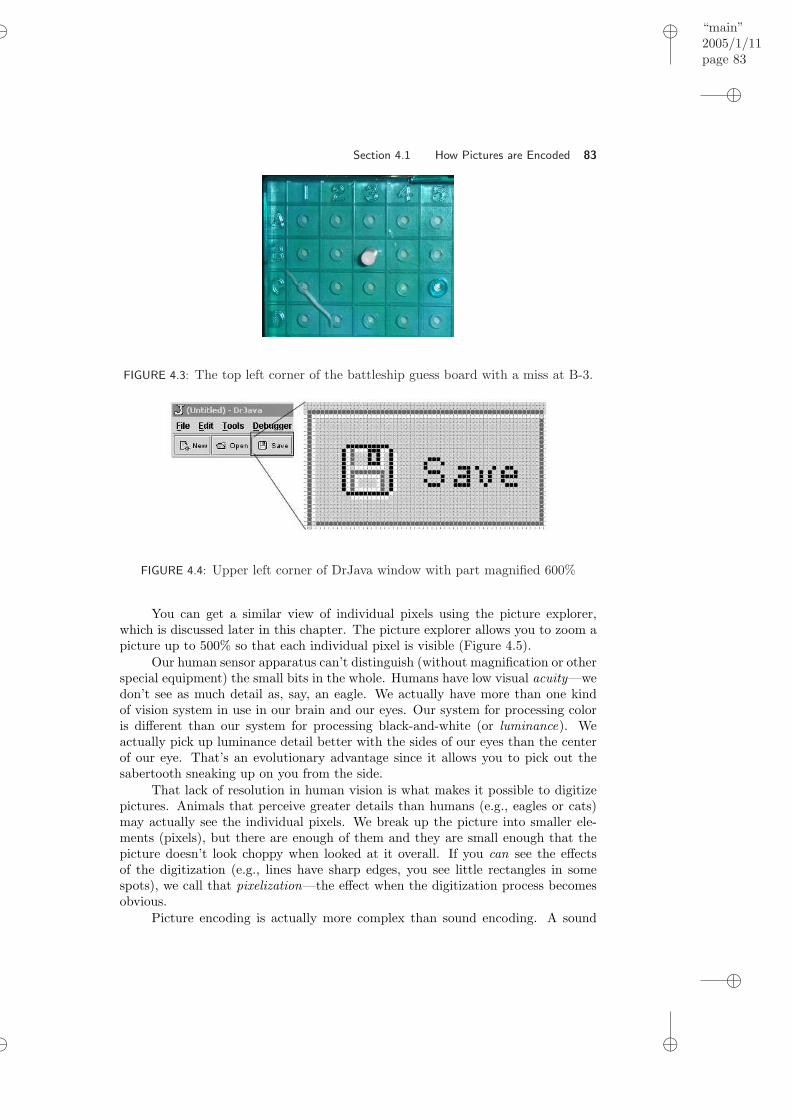
“main”2005/1/11page 83
i
i
i
i
i
i
i
i
Section 4.1 How Pictures are Encoded 83
FIGURE 4.3: The top left corner of the battleship guess board with a miss at B-3.
FIGURE 4.4: Upper left corner of DrJava window with part magnified 600%
You can get a similar view of individual pixels using the picture explorer,which is discussed later in this chapter. The picture explorer allows you to zoom apicture up to 500% so that each individual pixel is visible (Figure 4.5).
Our human sensor apparatus can’t distinguish (without magnification or otherspecial equipment) the small bits in the whole. Humans have low visual acuity—wedon’t see as much detail as, say, an eagle. We actually have more than one kindof vision system in use in our brain and our eyes. Our system for processing coloris different than our system for processing black-and-white (or luminance). Weactually pick up luminance detail better with the sides of our eyes than the centerof our eye. That’s an evolutionary advantage since it allows you to pick out thesabertooth sneaking up on you from the side.
That lack of resolution in human vision is what makes it possible to digitizepictures. Animals that perceive greater details than humans (e.g., eagles or cats)may actually see the individual pixels. We break up the picture into smaller ele-ments (pixels), but there are enough of them and they are small enough that thepicture doesn’t look choppy when looked at it overall. If you can see the effectsof the digitization (e.g., lines have sharp edges, you see little rectangles in somespots), we call that pixelization—the effect when the digitization process becomesobvious.
Picture encoding is actually more complex than sound encoding. A sound

“main”2005/1/11page 84
i
i
i
i
i
i
i
i
84 Chapter 4 Modifying Pictures using Loops
FIGURE 4.5: Image shown in the picture explorer: 100% image on left and 500% onright (close-up of the branch over the mountain)
is inherently linear—it progresses forward in time. It can be represented using aone-dimensional array. A picture has two dimensions, a width and a height.
4.1.1 Color Respresentations
Visible light in continuous—visible light is any wavelength between 370 and 730nanometers (0.00000037 and 0.00000073 meters). But our perception of light islimited by how our color sensors work. Our eyes have sensors that trigger (peak)around 425 nanometers (blue), 550 nanometers (green), and 560 nanometers (red).Our brain determines what a particular color based on the feedback from thesethree sensors in our eyes. There are some animals with only two kinds of sensors,like dogs. Those animals still do perceive color, but not the same colors nor inthe same way as humans do. One of the interesting implications of our limitedvisual sensory apparatus is that we actually perceive two kinds of orange. There isa spectral vision—a particular wavelength that is natural orange. There is also amixture of red and yellow that hits our color sensors just right that we perceive asthe same orange.
Based on how we perceive color, as long as we encode what hits our threekinds of color sensors, we’re recording our human perception of color. Thus, we canencode each pixel as a triplet of numbers. The first number represents the amountof red in the pixel. The second is the amount of green, and the third is the amountof blue. We can make up any human-visible color by combining red, green, andblue light (Figure 4.6) (replicated at Figure 5.17 (page 176). Combining all threegives us pure white. Turning off all three gives us black. We call this the RGBcolor model .
There are other models for defining and encoding colors besides the RGB colormodel. There’s the HSV color model which encodes Hue, Saturation, and Value(sometimes also called the HSB color model for Hue, Saturation, and Brightness).The nice thing about the HSV model is that some notions, like making a color“lighter” or “darker” map cleanly to it, e.g., you simply change the saturation

“main”2005/1/11page 85
i
i
i
i
i
i
i
i
Section 4.1 How Pictures are Encoded 85
FIGURE 4.6: Merging red, green, and blue to make new colors
(Figure 4.7). Another model is the CMYK color model , which encodes Cyan,Magenta, Yellow, and blacK (“B” could be confused with Blue). The CMYK modelis what printers use—those are the inks they combine to make colors. However, thefour elements means more to encode on a computer, so it’s less popular for mediacomputation. RGB is the most popular model on computers.
FIGURE 4.7: Picking colors using the HSB color model
Each color component (sometimes called a channel) in a pixel is typicallyrepresented with a single byte, eight bits. Eight bits can represent 256 patterns(28): 0000000, 00000001, up through 11111111. We typically use these patterns torepresent the values 0 to 255. Each pixel, then, uses 24 bits to represent colors.That means that there are 224 possible patterns of 0’s and 1’s in those 24 bits. Thatmeans that the standard encoding for color using the RGB model can represent16,777,216 colors. We can actually perceive more than 16 million colors, but itturns out that it just doesn’t matter. Humans have no technology that comes evenclose to being able to replicate the whole color space that we can see. We do havedevices that can represent 16 million distinct colors, but those 16 million colors

“main”2005/1/11page 86
i
i
i
i
i
i
i
i
86 Chapter 4 Modifying Pictures using Loops
don’t cover the entire space of color (nor luminance) that we can perceive. So, the24 bit RGB model is adequate until technology advances.
There are computer models that use more bits per pixel. For example, thereare 32 bit models which use the extra 8 bits to represent transparency—how muchof the color “below” the given image should be blended with this color? Theseadditional 8 bits are sometimes called the alpha channel . There are other modelsthat actually use more than 8 bits for the red, green, and blue channels, but theyare uncommon.
We actually perceive borders of objects, motion, and depth through a separatevision system. We perceive color through one system, and luminance (how light/-dark things are) through another system. Luminance is not actually the amountof light, but our perception of the amount of light. We can measure the amount oflight (e.g., the number of photons reflected off the color) and show that a red and ablue spot each are reflecting the same amount of light, but we’ll perceive the blue asdarker. Our sense of luminance is based on comparisons with the surroundings—theoptical illusion in Figure 4.8 highlights how we perceive gray levels. The two endquarters are actually the same level of gray, but because the two mid quarters endin a sharp contrast of lightness and darkness, we perceive that one end is darkerthan the other.
FIGURE 4.8: The ends of this figure are the same colors of gray, but the middle twoquarters contrast sharply so the left looks darker than the right
Most tools for allowing users to pick out colors let the users specify the coloras RGB components. The Macintosh offers RGB sliders in its basic color picker(Figure 4.9). The color chooser in Java offers a similar set of sliders (Figure 4.10).
As mentioned a triplet of (0, 0, 0) (red, green, blue components) is black,and (255, 255, 255) is white. (255, 0, 0) is pure red, but (100, 0, 0) is red, too—justdarker. (0, 100, 0) is a dark green, and (0, 0, 100) is a dark blue.
When the red component is the same as the green and as the blue, the resul-tant color is gray. (50, 50, 50) would be a fairly dark gray, and (150, 150, 150) is alighter gray.
The Figure 4.11 (replicated at Figure 5.18 (page 176) in the color pages) isa representation of pixel RGB triplets in a matrix representation. Thus, the pixelat (1, 0) has color (30, 30, 255) which means that it has a red value of 30, a greenvalue of 30, and a blue value of 255—it’s a mostly blue color, but not pure blue.Pixel at (2, 1) has pure green but also more red and blue ((150, 255, 150)), so it’s afairly light green.
Images on disk and even in computer memory are usually stored in some kind

“main”2005/1/11page 87
i
i
i
i
i
i
i
i
Section 4.1 How Pictures are Encoded 87
FIGURE 4.9: The Macintosh OS X RGB color picker
FIGURE 4.10: Picking a color using RGB sliders from Java
of compressed form. The amount of memory needed to represent every pixel of evensmall images is pretty large (Table 4.1). A fairly small image of 320 pixels across by240 pixels wide, with 24-bits per pixel, takes up 230, 400 bytes–that’s roughly 230kilobytes (1000 bytes) or 1/4 megabyte (million bytes). A computer monitor with1024 pixels across and 768 pixels vertically with 32-bits per pixel takes up over 3

“main”2005/1/11page 88
i
i
i
i
i
i
i
i
88 Chapter 4 Modifying Pictures using Loops
FIGURE 4.11: RGB triplets in a matrix representation
TABLE 4.1: Number of bytes needed to store pixels at various sizes and formats
320x240 image 640x480 1024x76824-bit color 230, 400 bytes 921, 600 2, 359, 29632-bit color 307, 200 1, 228, 800 3, 145, 728
megabytes just to represent the screen.
Computer Science Idea: Kilobyte (kB) versusKibibyte (Kib or K or KB)The term kilobyte has caused problems because it has beeninterpreted differently by different groups. Computer sci-entist used it to mean 2 to the 10th power which is 1024bytes. Telecommunications engineers have used it to mean1000 bytes. The International Electrotechnical Commis-sion (IEC) decreed in 1998 to call 1,024 bytes a kibibyte(KiB) and 1,000 bytes a kilobyte. Similarly a mebibtye isdefined to be 2 raised to the 20th power and a megabyte is1,000,000 bytes (one million bytes). A gibitype is definedto be 2 raised to the 30th power and a gigabtye is definedto be 1,000,000,000 (one billion bytes).
4.2 MANIPULATING PICTURES
We manipulate a picture in DrJava by making a picture object out of a JPEG file,then changing the pixels in that picture. We change the pixels by changing the colorassociated with the pixel—by manipulating the red, green, and blue components.
We make a picture using new Picture(fileName ). We make the pictureappear with the method show(). We can also explore a picture with the method

‘‘main’’2005/1/11page 89
i
i
i
i
i
i
i
i
Section 4.2 Manipulating Pictures 89
explore(). These are both object methods so they must be called on an object ofthe class that understands the method. This means that show() and explore()must be called on a Picture object (object of the Picture class) using dot notationas in pictureObject.show().
> String fileName = FileChooser.pickAFile();> System.out.println(fileName);c:\intro-prog-java\mediasources\caterpillar.jpg> Picture pictureObject = new Picture(fileName);> pictureObject.show();> System.out.println(pictureObject);Picture, filename c:\intro-prog-java\mediasources\caterpillar.jpgheight 150 width 329
What new Picture(fileName) does is to scoop up all the bytes in the inputfilename, bring them in to memory, reformat them slightly, and place a sign onthem “This is a picture object!” When you execute Picture pictureObject =new Picture(fileName), you are saying “The name pictureObject is referringto a Picture object created from the contents of the file.”
Picture objects know their width and their height. You can query them withthe methods getWidth() and getHeight().
> System.out.println(pictureObject.getWidth());329> System.out.println(pictureObject.getHeight());150
We can get any particular pixel from a picture using getPixel(x,y)where xand y are the coordinates of the pixel desired. The x coordinate starts at 0 at thetop left of the picture and increases horizontally. The y coordinate starts at 0 at thetop left of the picture and increases vertically. We can also get a one-dimensionalarray containing all the pixels in the picture using the method getPixels(). Thisjust grabs all the pixels in the first column from top to bottom and then all thepixels in the second column from top to bottom and so on till it has all of the pixels.
> Pixel pixelObject = pictureObject.getPixel(0,0);> System.out.println(pixelObject);Pixel red=252 green=254 blue=251> Pixel[] pixelArray=pictureObject.getPixels();> System.out.println(pixelArray[0]);Pixel red=252 green=254 blue=251
Pixels know where they came from. You can ask them their x and y coordi-nates with getX() and getY().
> System.out.println(pixelObject.getX());0> System.out.println(pixelObject.getY());0

“main”2005/1/11page 90
i
i
i
i
i
i
i
i
90 Chapter 4 Modifying Pictures using Loops
Each pixel object knows how to get the red value getRed() and set the redvalue setRed(redValue). (Green and blue work similarly.)
> System.out.println(pixelObject.getRed());252> pixelObject.setRed(0);> System.out.println(pixelObject.getRed());0
You can ask a pixel object for its color with getColor(), and you can ask thepixel object to set the color with setColor(color). Color objects (objects of theclass Color in package java.awt) know their red, green, and blue components. Youcan also create new Color objects with new Color(redValue,greenValue,blueValue)(the color values must be between 0 and 255). The Color class also has severalcolors predefined that you can use. If you need a color object that represents thecolor black you can use Color.black or Color.BLACK, for yellow use Color.yellowor Color.YELLOW. Other colors that are predefined are: Color.blue, Color.green,Color.red, Color.gray, Color.orange, Color.pink, Color.cyan, Color.magenta, andColor.white (or use all capitals for the color names). Notice that this is accessingfields on the Color class, not invoking class methods (no parentheses). Public class

“main”2005/1/11page 91
i
i
i
i
i
i
i
i
Section 4.2 Manipulating Pictures 91
variables (fields) can be accessed using ClassName.fieldName .'
&
$
%
Making it Work Tip: Importing Classes from Pack-agesColor is a Java class in the package java.awt. A pack-age is a group of related classes. Java uses packages togroup classes that you need for a particular purpose. Touse classes in packages other than java.lang (which con-tains System and Math) you will need to import them.Importing a class or all classes in a package allows youto use the name of a class without fully qualifying it. Tofully qualify a name use the package name followed by aperiod (dot) and the class name. The fully qualified namefor the Color class is java.awt.Color. You can alwaysuse the fully qualified name instead of importing but peo-ple don’t usually want to type that much. To import allclasses in the package java.awt use import java.awt.*;.To import just the Color class from the package java.awtuse import java.awt.Color;. Importing doesn’t makeyour class larger, it is just used to determine what classyou mean.
Debugging Tip: Undefined Class ErrorIf you get the message “Error: Undefined class Color”it means that you didn’t import the class Color. Youmust either import classes that are in packages other thanjava.lang or fully qualify them. To import just the classColor so that you can refer to it using just the class nameuse import java.awt.Color;. If you are using severalclasses from the same package you can import all classesin a package using import java.awt.*;. You can typethe import statement in the interactions pane. When youwrite class files the import statements go before the classdefinition at the beginning of the file.
> import java.awt.Color;> Color colorObj=pixelObject.getColor();> System.out.println(colorObj);java.awt.Color[r=0,g=254,b=251]> Color newColorObj=new Color(0,100,0);> System.out.println(newColorObj);java.awt.Color[r=0,g=100,b=0]> pixelObject.setColor(newColorObj);> System.out.println(pixelObject.getColor());java.awt.Color[r=0,g=100,b=0]
If you change the color of a pixel, the picture that the pixel is from does get

“main”2005/1/11page 92
i
i
i
i
i
i
i
i
92 Chapter 4 Modifying Pictures using Loops
changed. However you won’t see the change until the picture repaints.
> System.out.println(pictureObject.getPixel(0,0));Pixel red=0 green=100 blue=0
'
&
$
%
Common Bug: Seeing changes in the pictureIf you show your picture, and then change thepixels, you might be wondering, “Where are thechanges?!?” Picture displays don’t automatically up-date. If you ask the Picture object to repaint usingpictureObject.repaint(), the display of the Pictureobject will update.
You can automatically get a darker or lighter color from a Color object withcolorObj.darker() or colorObj.brighter(). (Remember that this was easy inHSV, but not so easy in RGB. These functions do it for you.)
> Color testColorObj = new Color(168,131,105);> System.out.println(testColorObj);java.awt.Color[r=168,g=131,b=105]> testColorObj = testColorObj.darker();> System.out.println(testColorObj);java.awt.Color[r=117,g=91,b=73]> testColorObj = testColorObj.brighter();> System.out.println(testColorObj);java.awt.Color[r=167,g=130,b=104]
Notice that even though we darken the color and then brighten it the finalcolor doesn’t exactly match the original color. This is due to rounding errors. Arounding error is when calculations are done in floating point but the answer isstored in an integer. The floating point result can’t fit in the type of the result(integer) and so some of the detail is lost.
You can also get a color using ColorChooser.pickAColor(), which gives youa variety of ways of picking a color. ColorChooser is a class that we have created tomake it easy for you to pick colors using the Java class javax.swing.JColorChooser.
> import java.awt.Color;> Color pickedColorObj = ColorChooser.pickAColor();> System.out.println(pickedColorObj);java.awt.Color[r=51,g=255,b=102]
When you have finished manipulating a picture, you can write it out to a filewith write(fileName).
> pictureObject.write("newPicture.jpg");

“main”2005/1/11page 93
i
i
i
i
i
i
i
i
Section 4.2 Manipulating Pictures 93
Â
Á
¿
À
Common Bug: End with .jpgBe sure to end your filename with “.jpg” in order to getyour operating system to recognize it as a JPEG file.
'
&
$
%
Common Bug: Saving a file quickly—and how tofind it again!What if you don’t know the whole path to a directory ofyour choosing? You don’t have to specify anything morethan the base name. The problem is finding the file again!In what directory did it get saved? This is a pretty simplebug to resolve. The default directory (the one you get ifyou don’t specify a path) is wherever DrJava is.
We don’t have to write new functions to manipulate pictures. We can do itfrom the command area using the methods (functions) just described. Please resetthe interactions pane by clicking the Reset button at the top of DrJava before youdo the following.
> import java.awt.Color;> String fileName = "C:/intro-prog-java/mediasources/caterpillar.jpg";> Picture picture = new Picture(fileName);> picture.show();> picture.getPixel(10,100).setColor(Color.black);> picture.getPixel(11,100).setColor(Color.black);> picture.getPixel(12,100).setColor(Color.black);> picture.getPixel(13,100).setColor(Color.black);> picture.getPixel(14,100).setColor(Color.black);> picture.getPixel(15,100).setColor(Color.black);> picture.getPixel(16,100).setColor(Color.black);> picture.getPixel(17,100).setColor(Color.black);> picture.getPixel(18,100).setColor(Color.black);> picture.getPixel(19,100).setColor(Color.black);> picture.repaint();> picture.explore();
'
&
$
%
Making it Work Tip: Reuse the previous line inDrJavaYou can use the up arrow on the keyboard to bring upprevious lines you have typed in the interactions pane inDrJava. You can then use the left arrow key to get toa character to correct or change and then execute it bypressing the ’Enter’ key.
The result showing a small black line on the left side below the middle of the

“main”2005/1/11page 94
i
i
i
i
i
i
i
i
94 Chapter 4 Modifying Pictures using Loops
leaf appears in Figure 4.12. The black line is 100 pixels down, and the pixels 10though 19 from the left edge have been turned black.
FIGURE 4.12: Directly modifying the pixel colors via commands: Note the smallblack line on the left under the line across the leaf
4.2.1 Exploring Pictures
On your CD, you will find the MediaTools application with documentation forhow to get it started. You can also open a picture explorer in DrJava. Both theMediaTools application and the picture explorer will let you get pixel informationfrom a picture. You can see the picture explorer in Figure 4.13 and the MediaToolsapplication appears in Figure 4.14. Both of these will display the x, y, red, green,and blue values for a pixel. They will also both let you zoom in or out.
FIGURE 4.13: Exploring the caterpillar with the line
The picture explorer can be opened on a Picture object. Picture p = newPicture(FileChooser.pickAFile()); will allow you to define a Picture objectand name it p. You can open a picture explorer on the picture using p.explore().The picture explorer will make a copy of the current picture and show it. Thecopy will not be affected by any changes you make to the picture.
The picture explorer allows you to zoom at various levels of magnification, bychoosing one in the Zoom menu. As you move your cursor around in the picture,press down with the mouse button. You’ll be shown the (x, y) (horizontal, vertical)coordinates of the pixel your mouse cursor is currently over, and the red, green,and blue values at that pixel. You can use the next and previous buttons to change

“main”2005/1/11page 95
i
i
i
i
i
i
i
i
Section 4.3 Changing color values 95
the pixel that you want to examine. You can also type in the x and y values andpress ’Enter’ to see the pixel information for a particular pixel.
The MediaTools application works from files on the disk. If you want to checkout a file before loading into DrJava, use the MediaTools application. Click on thePicture Tools box in MediaTools, and the tools will open. Use the Open buttonto bring up a file selection box—you click on directories you want to explore on theleft, and images you want on the right, then click OK. When the image appears,you have several different tools available. Move your cursor over the picture andpress down with the mouse button.
• The red, green, and blue values will be displayed for the pixel you’re pointingat. This is useful when you want to get a sense of how the colors in yourpicture map to numeric red, green, and blue values. It’s also helpful if you’regoing to be doing some computation on the pixels and want to check thevalues.
• The x and y position will be display for the pixel you’re point at. This isuseful when you want to figure out regions of the screen, e.g., if you want toprocess only part of the picture. If you know the range of x and y coordinateswhere you want to process, you can tune your program to reach just thosesections.
• Finally, a magnifier is available to let you see the pixels magnified. (Themagnifier can be clicked and dragged around.)
FIGURE 4.14: Using the MediaTools image exploration tools
4.3 CHANGING COLOR VALUES
The easiest thing to do with pictures is to change the color values of their pixelsby changing the red, green, and blue components. You can get radically different
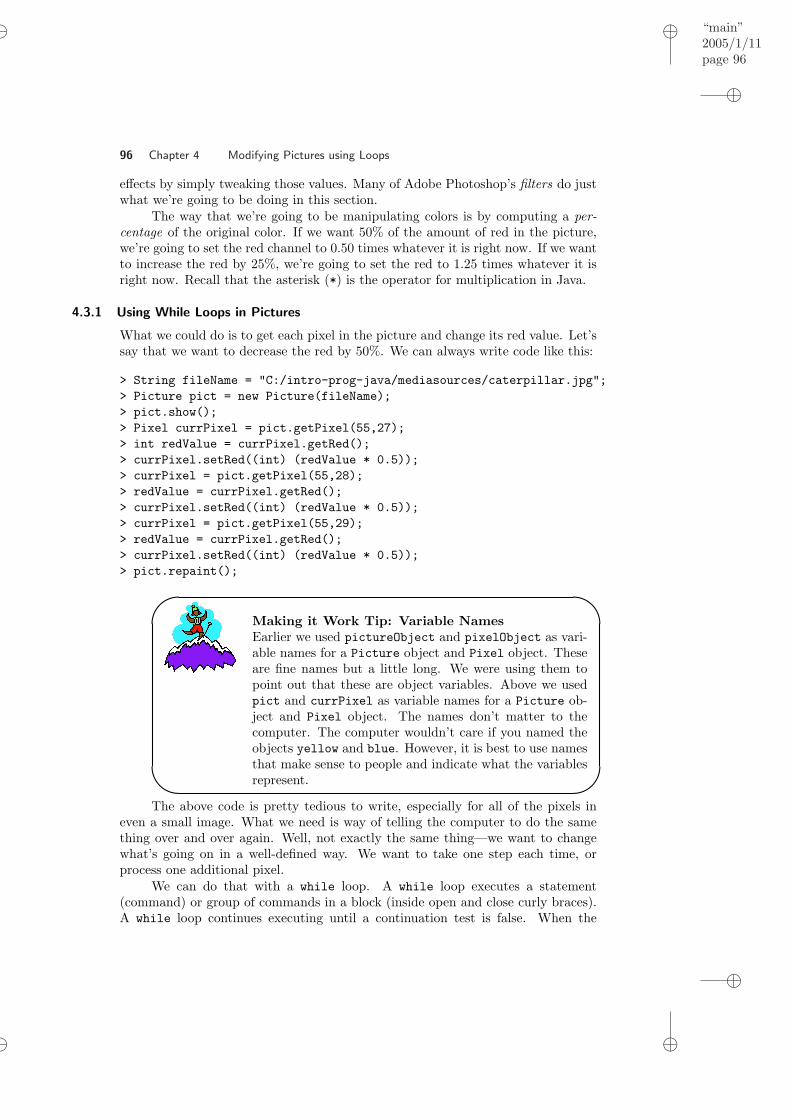
“main”2005/1/11page 96
i
i
i
i
i
i
i
i
96 Chapter 4 Modifying Pictures using Loops
effects by simply tweaking those values. Many of Adobe Photoshop’s filters do justwhat we’re going to be doing in this section.
The way that we’re going to be manipulating colors is by computing a per-centage of the original color. If we want 50% of the amount of red in the picture,we’re going to set the red channel to 0.50 times whatever it is right now. If we wantto increase the red by 25%, we’re going to set the red to 1.25 times whatever it isright now. Recall that the asterisk (*) is the operator for multiplication in Java.
4.3.1 Using While Loops in Pictures
What we could do is to get each pixel in the picture and change its red value. Let’ssay that we want to decrease the red by 50%. We can always write code like this:
> String fileName = "C:/intro-prog-java/mediasources/caterpillar.jpg";> Picture pict = new Picture(fileName);> pict.show();> Pixel currPixel = pict.getPixel(55,27);> int redValue = currPixel.getRed();> currPixel.setRed((int) (redValue * 0.5));> currPixel = pict.getPixel(55,28);> redValue = currPixel.getRed();> currPixel.setRed((int) (redValue * 0.5));> currPixel = pict.getPixel(55,29);> redValue = currPixel.getRed();> currPixel.setRed((int) (redValue * 0.5));> pict.repaint();
'
&
$
%
Making it Work Tip: Variable NamesEarlier we used pictureObject and pixelObject as vari-able names for a Picture object and Pixel object. Theseare fine names but a little long. We were using them topoint out that these are object variables. Above we usedpict and currPixel as variable names for a Picture ob-ject and Pixel object. The names don’t matter to thecomputer. The computer wouldn’t care if you named theobjects yellow and blue. However, it is best to use namesthat make sense to people and indicate what the variablesrepresent.
The above code is pretty tedious to write, especially for all of the pixels ineven a small image. What we need is way of telling the computer to do the samething over and over again. Well, not exactly the same thing—we want to changewhat’s going on in a well-defined way. We want to take one step each time, orprocess one additional pixel.
We can do that with a while loop. A while loop executes a statement(command) or group of commands in a block (inside open and close curly braces).A while loop continues executing until a continuation test is false. When the

“main”2005/1/11page 97
i
i
i
i
i
i
i
i
Section 4.3 Changing color values 97
continuation test is false execution continues with the statement following the whileloop.
The syntax for a while loop is:
while ( t e s t ){
/∗∗ commands to be done go here ∗/}
Let’s talk through the pieces here.
• First comes the required Java keyword while.
• Next we have a required opening parenthesis
• Next is the continuation test. While this test is true the loop will continueto be executed. When this test is false the loop will finish and the statementfollowing the body of the loop will be executed.
• Next is the required closing parenthesis.
• Usually this is followed by a block of commands to be executed each timethe expression following the while keyword is true. The block of commandsis enclosed by curly braces. This is called the body of the loop. If there isonly one command to be executed you may leave off the curly braces but youshould still indent the command to show it is in the body of the while loop.
Tell someone to clap their hands 12 times. Did they do it right? How do youknow? In order to tell if they did it right you would have to count each time theyclapped and when they stopped clapping your count would be 12 if they did it right.A loop often needs a counter to count the number of times you want somethingdone and an expression that stops when that count is reached. You wouldn’t wantto declare the count variable inside the while loop because you want it to changeeach time through the loop. Typically you declare the count variable just beforethe while loop and then increment it just before the end of the block of commandsyou want to repeat.
Computer Science Idea: FlowchartsFigure 4.15 shows the flowchart of a while loop. Aflowchart is a visual representation of the execution of amethod or function. It shows the order in which statementsare executed and branches or conditional execution. Nor-mal statements are shown in rectangles. Tests are shown indiamonds and have a true branch which is executed whenthe test is true and a false branch that is executed whenthe test is false. A flowchart can help you understand whata method is doing.
So, a typical while loop will look like the following code.

‘‘main’’2005/1/11page 98
i
i
i
i
i
i
i
i
98 Chapter 4 Modifying Pictures using Loops
Statement(s)
while (expression)
true
false
Statement(s)
declare andinit loopvariable(s)
change loopvariable(s)
FIGURE 4.15: Flowchart of a while loop
int count = 0 ;while ( count < t a r g e t ){
// commands to be done i n s i d e loopcount = count + 1 ;
}
What if you want to write out the same sentence 5 times. You know howto print out a string using System.out.println("some string"); So, put this inthe body of the loop. Start the count at 0 and increment it each time after thestring is printed. When the count is 5 the string will have been printed 5 times sostop the loop.
> int count = 0;> while (count < 5){System.out.println("This is a test.");count = count + 1;
}This is a test.This is a test.This is a test.This is a test.

“main”2005/1/11page 99
i
i
i
i
i
i
i
i
Section 4.3 Changing color values 99
This is a test.
Debugging Tip: Stopping an Infinite LoopIf you forget to increment the count in the body of thewhile loop, or if you close the body of the while loopbefore the count is incremented you will have an infiniteloop. An infinite loop is one that will never stop. You cantell that you are in an infinite loop in this case becausemany more than 5 copies of ”This is a test.” will be printed.To stop an infinite loop click on the Reset button nearthe top of the DrJava window.
What if we want to change the color of all the pixels in a picture? Pictureobjects understand the method getPixels() which returns a one dimensional arrayof pixel objects. Even though the pixels are really in a two-dimensional array (amatrix) getPixels() puts the pixels in a one-dimensional array to make them easyto process if we just want to process all the pixels. We can get a pixel at a positionin the array using pixelArray[index] with the index starting at 0 and changingeach time through the loop by one until it is equal to the length of the array ofpixels. Instead of calling the variable “count” we will call it “index” since that iswhat we are using it for. It doesn’t matter to the computer but it makes the codeeasier for people to understand.
Here is the while loop that simply sets each pixel’s color to black in a picture.
> import java.awt.Color;> String fileName = "C:/intro-prog-java/mediasources/caterpillar.jpg";> Picture pict = new Picture(fileName);> pict.show();> Pixel[] pixelArray = pict.getPixels();> Pixel pixel = null;> int index = 0;> while (index < pixelArray.length){
pixel = pixelArray[index];pixel.setColor(Color.black);index++;
}>pict.repaint();
Let’s talk through this code.
• We will be using the Color class so we need to either use the fully qualifiedname (java.awt.Color) or import the Color class using import java.awt.Color;.
• Next we declare a variable with the name fileName to refer to the string ob-ject that has a particular file name “C:/intro-prog-java/mediasources/caterpillar.jpg”stored in it.
• The variable pict is created and refers to the new Picture object createdfrom the picture information in the file named by the variable fileName.

“main”2005/1/11page 100
i
i
i
i
i
i
i
i
100 Chapter 4 Modifying Pictures using Loops
• We tell the Picture object to show (display) itself using pict.show();.
• Next we declare a variable pixelArray that references an array of Pixel ob-jects (Pixel[]). We get the array of Pixel objects by asking the Pictureobject for them using the getPixels() method.
• We declare an object variable, Pixel pixel, that will refer to a pixel objectbut initialize it to null to show that it isn’t referring to to any pixel objectyet.
• We declare a primitive variable index and initialize its value to 0.
• Next we have the while loop. First we test if the value of index is less thanthe length of the array of pixels with while (index < pixelArray.length).While it is, we set the variable pixel to refer to the pixel object at the currentvalue of index in the array of pixel objects. Next we set the color of thatpixel to the color black. Finally, we increment the variable index. Eventuallythe value of the variable index will equal the length of the array of pixels andthen execution will continue after the body of the loop. Remember that inan array of 5 items the valid indexes are 0-4 so when the index is equal to thelength of the array you need to stop the loop.
• The statement after the body of the while loop will ask the Picture objectpict to repaint so that we can see the color change.
Debugging Tip: Loops and Variable DeclarationsDeclare any variables that you will need before you startthe loop. “While” loops typically need some sort of counteror index declared outside the loop but changed inside theloop. If you forgot to change the counter or index you willend up with a loop that never stops. This is called aninfinite loop. Use the Reset button to stop if your codeis in an infinite loop.
Now that we see how to get the computer to do thousands of commandswithout writing thousands of individual lines, let’s do something useful with this.
4.3.2 Increasing/Decreasing Red (Green, Blue)
A common desire when working with digital pictures is to shift the redness (orgreenness or blueness—but most often, redness) of a picture. You might shift ithigher to “warm” the picture, or to reduce it to “cool” the picture or deal withoverly-red digital cameras.
The method below decreases the amount of red by 50% in the current picture.
Program 5: Decrease the amount of red in a picture by 50%

“main”2005/1/11page 101
i
i
i
i
i
i
i
i
Section 4.3 Changing color values 101
/∗∗∗ Method to decrease the red by h a l f in the∗ curren t p i c t u r e∗/
public void decreaseRed ( ){
Pixe l [ ] p ixe lArray = this . g e tP i x e l s ( ) ;P ixe l p i x e l = null ;int value = 0 ;int index = 0 ;
// loop through a l l the p i x e l swhile ( index < pixe lArray . l ength ){
// ge t the current p i x e lp i x e l = pixe lArray [ index ] ;
// ge t the va luevalue = p i x e l . getRed ( ) ;
// decrease the red va lue by 50% (1/2)value = ( int ) ( va lue ∗ 0 . 5 ) ;
// s e t the red va lue o f the curren t p i x e l to the new va luep i x e l . setRed ( value ) ;
// increment the indexindex = index + 1 ;
}}
Go ahead and type the above into your DrJava definitions pane before the lastcurly brace in the Picture.java file. Click Compile All to get DrJava to compilethe new method. Why do we have to compile the file before we can use the newmethod? Computers don’t understand the Java source code directly. We mustcompile it which translates the class definition from something people can readand understand into something a computer can read and understand. When wesuccessfully compile a ClassName.java file the compiler outputs a ClassName.classfile which contains the instructions that a computer can understand. If our compileis not successful we will get error messages that explain what is wrong. We have

“main”2005/1/11page 102
i
i
i
i
i
i
i
i
102 Chapter 4 Modifying Pictures using Loops
to fix the errors and compile again before we can try out our new method.
'
&
$
%
Making it Work Tip: Comments in JavaYou may notice that there are some interesting charactersin the reduceRed method. The ’/**’ and ’//’ are com-ments in Java. Comments are descriptions of what yourcode is doing. Use comments to make the code easier toread and understand (not only for yourself but also forothers). There are actually three kinds of comments inJava. The ’//’ starts a comment and tells the computer toignore everything else till the end of the current line. Youcan use ’/*’ followed at some point by ’*/’ for a multi-linecomment. The ’/**’ followed at some point by ’*/’ createsa JavaDoc comment. JavaDoc is a utility that pulls theJavaDoc comments from your class files and creates hy-perlinked documentation from them. All of the Java classfiles written by Sun have JavaDoc comments in them andthat is how the API documentation was created.
This program works on a Picture object—the one that we’ll use to get thepixels from. To create a Picture object, we pass in the filename. After we askthe picture to decreaseRed(), we’ll want to repaint the picture to see the effect.Therefore, the decreaseRed method can be used like this:
> String fileName = "C:/intro-prog-java/mediasources/caterpillar.jpg";> Picture picture = new Picture(fileName);> picture.explore();> picture.decreaseRed();> picture.explore();
'
&
$
%
Common Bug: Patience: loops can take a long timeThe most common bug with this kind of code is to give upand quit because you don’t think the loop is working. Itmight take a full minute (or two!) for some of the manip-ulations we’ll do—especially if your source image is large.
The original picture and its red-decreased version appear in Figure 4.16 (andat Figure 5.19 on page 177). 50% is obviously a lot of red to reduce! The picturelooks like it was taken through a blue filter.
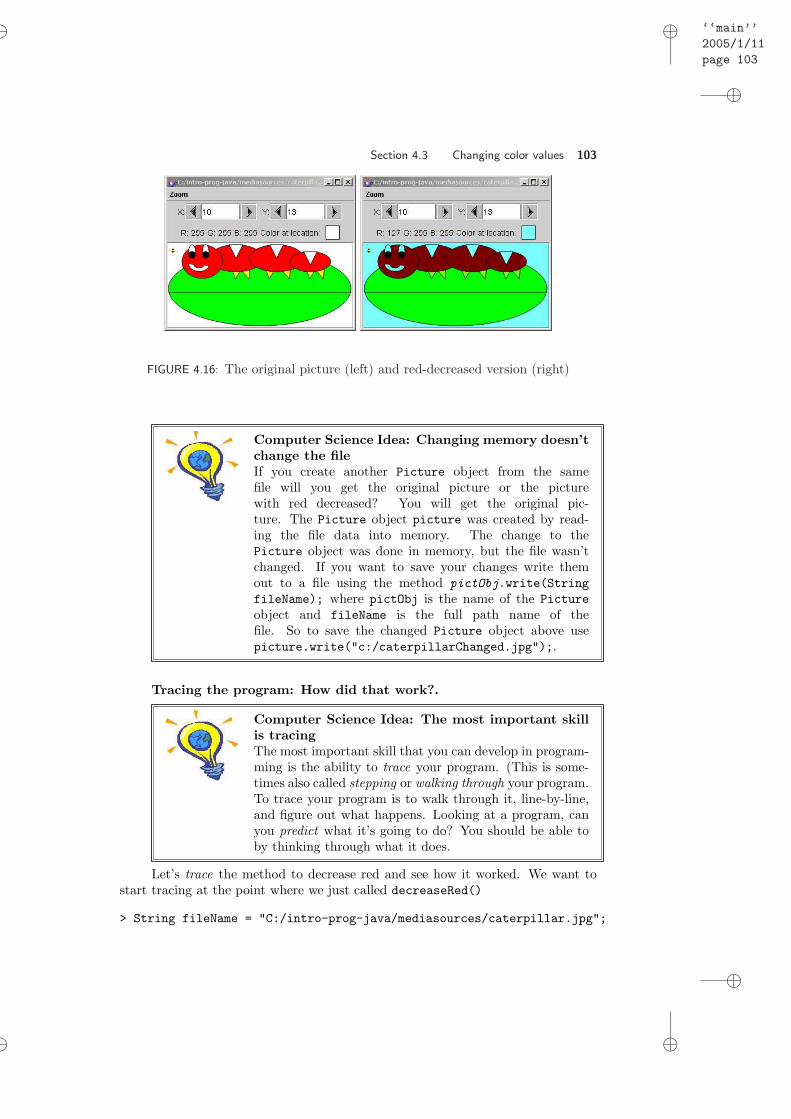
‘‘main’’2005/1/11page 103
i
i
i
i
i
i
i
i
Section 4.3 Changing color values 103
FIGURE 4.16: The original picture (left) and red-decreased version (right)
Computer Science Idea: Changing memory doesn’tchange the fileIf you create another Picture object from the samefile will you get the original picture or the picturewith red decreased? You will get the original pic-ture. The Picture object picture was created by read-ing the file data into memory. The change to thePicture object was done in memory, but the file wasn’tchanged. If you want to save your changes write themout to a file using the method pictObj.write(StringfileName); where pictObj is the name of the Pictureobject and fileName is the full path name of thefile. So to save the changed Picture object above usepicture.write("c:/caterpillarChanged.jpg");.
Tracing the program: How did that work?.
Computer Science Idea: The most important skillis tracingThe most important skill that you can develop in program-ming is the ability to trace your program. (This is some-times also called stepping or walking through your program.To trace your program is to walk through it, line-by-line,and figure out what happens. Looking at a program, canyou predict what it’s going to do? You should be able toby thinking through what it does.
Let’s trace the method to decrease red and see how it worked. We want tostart tracing at the point where we just called decreaseRed()
> String fileName = "C:/intro-prog-java/mediasources/caterpillar.jpg";
“main”2005/1/11page 104
i
i
i
i
i
i
i
i
104 Chapter 4 Modifying Pictures using Loops
> Picture picture = new Picture(fileName);> picture.show();> picture.decreaseRed();
What happens now? picture.decreaseRed() really means invoking thedecreaseRed method which you have just added to the Picture.java file on thePicture object referred to by the variable picture. The picture object is implicitlypassed to the decreaseRed method and can be referenced by the keyword this.What does “implicitly passed” mean? It means that even though decreaseReddoesn’t have any parameters listed it is passed the Picture object it was invokedon. So, picture.decreaseRed() is like decreaseRed(Picture this). All objectmethods (methods without the keyword static in them) are implicitly passed theobject that they are invoked on and that object can be referred to as this.
/∗∗∗ Method to decrease the red by h a l f in the current p i c t u r e∗/
public void decreaseRed ( ){
Pixe l [ ] p ixe lArray = this . g e tP i x e l s ( ) ;P ixe l p i x e l = null ;int value = 0 ;int index = 0 ;
// loop through a l l the p i x e l swhile ( index < pixe lArray . l ength ){
// ge t the current p i x e lp i x e l = pixe lArray [ index ] ;
// ge t the va luevalue = p i x e l . getRed ( ) ;
// decrease the red va lue by 50% (1/2)value = ( int ) ( va lue ∗ 0 . 5 ) ;
// s e t the red va lue o f the curren t p i x e l to the new va luep i x e l . setRed ( value ) ;
// increment the indexindex = index + 1 ;
}}
The first line we execute is Pixel[] pixelArray = this.getPixels(). Let’sbreak this down.
• The Pixel[] pixelArray is a declaration of a variable pixelArray that ref-erences an array of Pixel objects. The ’=’ means that the variable pixelArraywill be initialized to the result of the right side expression which is this.getPixels()which returns a one-dimensional array of Pixel object in the current Pictureobject.

“main”2005/1/11page 105
i
i
i
i
i
i
i
i
Section 4.3 Changing color values 105
• The this is a keyword that represents the current object. Since the methoddeclaration doesn’t have the keyword static in it this is an object method.Object methods are always implicitly passed the current object (the objectthe method was invoked on). In this case the method decreaseRed() wasinvoked by picture.decreaseRed(); so the Picture object referenced bythe variable picture is the current object. We could leave off the this andget the same result. If you don’t reference any object when invoking a methodthe compiler will assume you mean the current object (referenced by the thiskeyword).
• The this.getPixels() invokes the method getPixels() on the current ob-ject. This method returns a one-dimensional array of Pixel objects whichare the pixels in the current Picture object.
So at the end of the first line we have a variable pixelArray that refers to anarray of Pixel objects. The Pixel objects came from the Picture object whichwas referred to as picture in the interaction pane and as this in the methoddecreaseRed().
Next is a declaration of a couple of variables that we will need in the forloop. We will need something to represent the current Pixel object so we declarea variable pixel of type Pixel by Pixel pixel =. We start it off referring tonothing by using the defined value null. We also will need a variable to hold thecurrent red value and we declare that as int value = 0;. We initialize the variablevalue to be 0. Finally we declare a variable to be the index into the array and thevalue that changes in the loop int index = 0;. Remember that array element areindexed starting with 0 and ending at the length of the array minus one.
Variables that you declare inside methods are not automatically initialized foryou so you should initialize them when you declare them.

“main”2005/1/11page 106
i
i
i
i
i
i
i
i
106 Chapter 4 Modifying Pictures using Loops
Computer Science Idea: ScopeThe names inside a method like pixel and value are com-pletely different than the names in the interactions pane orany other method. We say that they have a different scope.The scope of a variable is the area in which the variable isknown. The variables that we declare inside of a methodare only known from where they are declared until the endof the method. Variables declared in the interactions paneare known in the interactions pane until it is reset or youexit DrJava.
Next comes the loop while (index < pixelArray.length). This tests ifthe value of the variable index is less than the length of the array of pixels referredto by pixelArray. If the test is true the body of the loop will be executed. Thebody of the loop is all the code between the open and close curly braces followingthe test. If the test is false, execution continues after the body of the loop.
In the body of the loop we have pixel = pixelArray[index];. This willset the pixel variable to point to a Pixel object in the array of pixels with anindex equal to the current value of index. Since index is initialized to 0 before theloop the first time through this loop the pixel variable will point to the first Pixelobject in the array.
Next in the body of the loop is value = pixel.getRed();. This sets thevariable value to the amount of red in the current pixel. Remember that theamount of red can vary from a minimum of 0 to a maximum of 255.

“main”2005/1/11page 107
i
i
i
i
i
i
i
i
Section 4.3 Changing color values 107
Next in the body of the loop is value = (int) (value * 0.5);. This setsthe variable value to the integer amount that you get from multiplying the currentcontents of value by 0.5. The (int) is a cast to integer so that the compiler doesn’tcomplain about losing precision since we are storing a floating point number inan integer number. Any numbers after the decimal point will be discarded. Wedo this because colors are represented as integers. The (int) (value * 0.5) isneeded because the variable value is declared of type int and yet the calculationof (value * 0.5) contains a floating point number and so will automatically bedone in floating point. However, a floating point result (say of 1.5) won’t fit intoa variable of type int. So, the compiler won’t let us do this without telling it thatwe really want it to by including the (int). This is called casting and is requiredwhenever a larger value is being placed into a smaller variable. So if the result ofa multiplication has a fractional part that fractional part will just be thrown awayso that the result can fit in an int.
The next step in the body of the loop is pixel.setRed(value);. This changesthe amount of red in the current pixel to be the same as what is stored in variablevalue. The current pixel is the first one so we see that the red value has changedfrom 252 to 126 after this line of code is executed.
After the statements in the body of the loop are executed the index = index
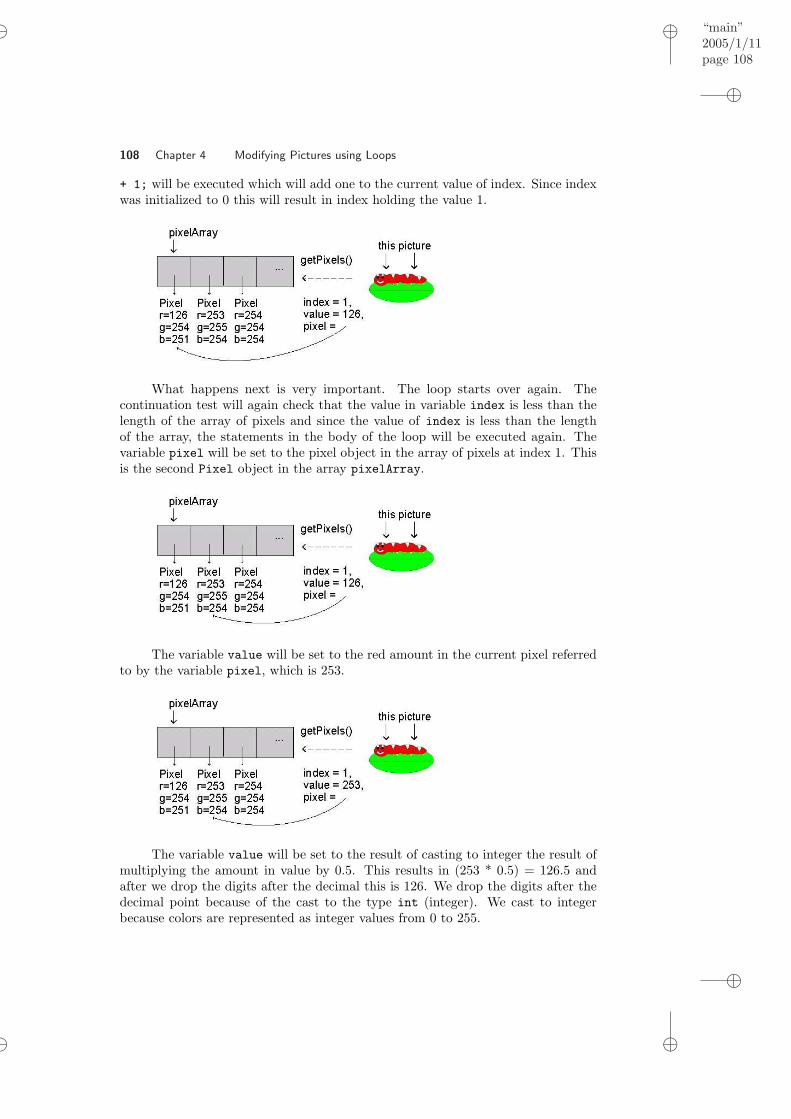
“main”2005/1/11page 108
i
i
i
i
i
i
i
i
108 Chapter 4 Modifying Pictures using Loops
+ 1; will be executed which will add one to the current value of index. Since indexwas initialized to 0 this will result in index holding the value 1.
What happens next is very important. The loop starts over again. Thecontinuation test will again check that the value in variable index is less than thelength of the array of pixels and since the value of index is less than the lengthof the array, the statements in the body of the loop will be executed again. Thevariable pixel will be set to the pixel object in the array of pixels at index 1. Thisis the second Pixel object in the array pixelArray.
The variable value will be set to the red amount in the current pixel referredto by the variable pixel, which is 253.
The variable value will be set to the result of casting to integer the result ofmultiplying the amount in value by 0.5. This results in (253 * 0.5) = 126.5 andafter we drop the digits after the decimal this is 126. We drop the digits after thedecimal point because of the cast to the type int (integer). We cast to integerbecause colors are represented as integer values from 0 to 255.

“main”2005/1/11page 109
i
i
i
i
i
i
i
i
Section 4.3 Changing color values 109
The red value in the current pixel is set to the same amount as what is storedin value. So the value of red in the second pixel changes from 253 to 126.
The variable index is set to the result of adding 1 to its current value. Thisadds 1 to 1 resulting in 2.
At the end of the loop body we go back to the continuation test. The testwill be evaluated and if the result is true the commands in the loop body will beexecuted again. If the continuation test evaluates to false execution will continuewith the first statement after the body of the loop.
Eventually, we get Figure 4.16 (and at Figure 5.19 on page 177). We keepgoing through all the pixels in the sequence and changing all the red values.
Testing the program: Did that really work?.
How do we know that that really worked? Sure, something happened to the

“main”2005/1/11page 110
i
i
i
i
i
i
i
i
110 Chapter 4 Modifying Pictures using Loops
FIGURE 4.17: Using the picture explorer to convince ourselves that the red wasdecreased
picture, but did we really decrease the red? By 50%?'
&
$
%
Making it Work Tip: Don’t just trust your pro-grams!It’s easy to mislead yourself that your programs worked.After all, you told the computer to do a particular thing,you shouldn’t be surprised if the computer did what youwanted. But computers are really stupid—they can’t fig-ure out what you want. They only do what you actuallytell them to do. It’s pretty easy to get it almost right.Actually check.
We can check it several ways. One way is with the picture explorer. Createtwo Picture objects: Picture p = new Picture(FileChooser.pickAFile());and Picture p2 = new Picture(FileChooser.pickAFile()); and pick the samepicture each time. Decrease red in one of them. Then open a picture explorer oneach of the Picture objects using p.explore(); and p2.explore();.
We can also use the functions that we know in the Interactions pane to checkthe red values of individual pixels.
> String fileName = "C:/intro-prog-java/mediasources/caterpillar.jpg";> Picture pict = new Picture(fileName);> Pixel pixel = pict.getPixel(0,0);> System.out.println(pixel);Pixel red=252 green=254 blue=251> pict.decreaseRed();> Pixel newPixel = pict.getPixel(0,0);> System.out.println(newPixel);Pixel red=126 green=254 blue=251> System.out.println( 252 * 0.5);126.0

“main”2005/1/11page 111
i
i
i
i
i
i
i
i
Section 4.3 Changing color values 111
Increasing red.
Let’s increase the red in the picture now. If multiplying the red componentby 0.5 decreased it, multiplying it by something over 1.0 should increase it. I’mgoing to apply the increase to the exact same picture, to see if we can reduce theblue (Figure 4.18 and Figure 5.20).
Program 6: Increase the red component by 30%
/∗∗∗ Method to inc rea se the amount o f red by 30%∗/
public void increaseRed ( ){
Pixe l [ ] p ixe lArray = this . g e tP i x e l s ( ) ;P ixe l p i x e l = null ;int value = 0 ;int index = 0 ;
// loop through a l l the p i x e l swhile ( index < pixe lArray . l ength ){
// ge t the current p i x e lp i x e l = pixe lArray [ index ] ;
// ge t the va luevalue = p i x e l . getRed ( ) ;
// change the va lue to 1 .3 t imes what i t wasvalue = ( int ) ( va lue ∗ 1 . 3 ) ;
// s e t the red va lue to 1 .3 t imes what i t wasp i x e l . setRed ( value ) ;
// increment the indexindex++;
}}
This method works much the same was as the method decreaseRed. We setup some variables that we will need such as the array of pixel objects, the currentpixel, the current value, and the current index. We loop through all the pixels inthe array of pixels and change the red value for each pixel to 1.3 times its original

“main”2005/1/11page 112
i
i
i
i
i
i
i
i
112 Chapter 4 Modifying Pictures using Loops
FIGURE 4.18: Overly blue (left) and red increased by 30% (right)
value.'
&
$
%
Making it Work Tip: Shortcuts for Increment andDecrementAdding one or subtracting one from a current value issomething that is done frequently in programs. Program-mers have to do lots of typing so they try to reduce theamount of typing that they have to do for things they dofrequently. Notice the index++; in the increase red pro-gram. This has the same result as index = index + 1;and can also be written as ++index;. You can also useindex--; or --index; which will have the same result asindex = index - 1;. Be careful of using this when youare also assigning the result to a variable. If you do intx = index++; x will be assigned the original value of in-dex and then index will be incremented. If you do int x= ++index; first index will be incremented and then thevalue assigned to x.
Compile the new method increaseRed and first use decreaseRed and thenincreaseRed on the same picture. Explore the picture objects to check thatincreaseRed worked. Remember that the method explore makes a copy of thepicture and allows you to check the color values of individual pixels.
> String fileName = "C:/intro-prog-java/mediasources/caterpillar.jpg";> Picture picture = new Picture(fileName);> picture.decreaseRed();> picture.explore();> picture.increaseRed();> picture.explore();
We can even get rid of a color completely. The method below erases the bluecomponent from a picture by setting the blue value to 0 in all pixels(Figure 4.19

“main”2005/1/11page 113
i
i
i
i
i
i
i
i
Section 4.3 Changing color values 113
and Figure 5.21).
Program 7: Clear the blue component from a picture
/∗∗∗ Method to c l e a r the b l u e from the p i c t u r e ( s e t∗ the b l u e to 0 f o r a l l p i x e l s )∗/
public void c l e a rB lue ( ){
Pixe l [ ] p ixe lArray = this . g e tP i x e l s ( ) ;P ixe l p i x e l = null ;int index = 0 ;
// loop through a l l the p i x e l swhile ( index < pixe lArray . l ength ){
// ge t the current p i x e lp i x e l = pixe lArray [ index ] ;
// s e t the b l u e on the p i x e l to 0p i x e l . s e tBlue ( 0 ) ;
// increment indexindex++;
}}
Compile the new method clearBlue and invoke it on a Picture object. Ex-plore the picture object to check that all the blue values are indeed 0.
> String fileName = "C:/intro-prog-java/mediasources/caterpillar.jpg";> Picture picture = new Picture(fileName);> picture.explore();> picture.clearBlue();> picture.explore();
This method is also similar to the decreaseRed and increaseRed methodsexcept that we don’t need to get out the current blue value since we are simplysetting all the blue values to 0.
4.3.3 Creating a Sunset
We can certainly do more than one color manipulation at once. Mark wanted totry to generate a sunset out of a beach scene. His first attempt was to increase thered, but that doesn’t always work. Some of the red values in a given picture arepretty high. If you go past 255 for a channel value it will keep the value at 255.

“main”2005/1/11page 114
i
i
i
i
i
i
i
i
114 Chapter 4 Modifying Pictures using Loops
FIGURE 4.19: Original (left) and blue erased (right)
His second thought was that maybe what happens in a sunset is that there isless blue and green, thus emphasizing the red, without actually increasing it. Herewas the program that we wrote for that:
Program 8: Making a sunset
/∗∗∗ Method to s imu la t e a sunse t by decreas ing the green∗ and b l u e∗/
public void makeSunset ( ){
Pixe l [ ] p ixe lArray = this . g e tP i x e l s ( ) ;P ixe l p i x e l = null ;int value = 0 ;int i = 0 ;
// loop through a l l the p i x e l swhile ( i < pixe lArray . l ength ){
// ge t the current p i x e lp i x e l = pixe lArray [ i ] ;
// change the b l u e va luevalue = p i x e l . getBlue ( ) ;p i x e l . s e tBlue ( ( int ) ( va lue ∗ 0 . 7 ) ) ;
// change the green va luevalue = p i x e l . getGreen ( ) ;p i x e l . setGreen ( ( int ) ( va lue ∗ 0 . 7 ) ) ;
// increment the indexi++;

“main”2005/1/11page 115
i
i
i
i
i
i
i
i
Section 4.3 Changing color values 115
FIGURE 4.20: Original beach scene (left) and at (fake) sunset (right)
}}
'
&
$
%
Making it Work Tip: Using short variable namesfor loop countersNotice that instead of using index as the counter for theloop we are using i. Again, programmers like to reducethe amount of typing and so the simple variable name iis commonly used to represent the counter or index for aloop.
Compile the new method makeSunset and invoke it on a Picture object.Explore the picture object to check that the blue and green values have been de-creased.
> String fileName = "C:/intro-prog-java/mediasources/beach-smaller.jpg";> Picture picture = new Picture(fileName);> picture.explore();> picture.makeSunset();> picture.explore();
What we see happening in Method 8 is that we’re changing both the blueand green channels—reducing each by 30%. The effect works pretty well, as seenin Figure 4.20 (and in the color section at Figure 5.22).
4.3.4 Making Sense of Methods
You probably have lots of questions about methods at this point. Why did we writethese methods in this way? How is that we’re reusing variable names like pixel inevery method? Are there other ways to write these methods? Is there such a thingas a better or worse method?

“main”2005/1/11page 116
i
i
i
i
i
i
i
i
116 Chapter 4 Modifying Pictures using Loops
Since we’re always picking a file (or typing in a filename) then making a pic-ture, before calling one of our picture manipulation functions, and then showing orrepainting the picture, it’s a natural question why we’re not building those in. Whydoesn’t every method have String fileName = FileChooser.pickAFile(); andnew Picture(fileName); in it?
We actually want to write the methods to make them more general andreusable. We want our methods to do one and only one thing, so that we canuse the method again in a new context where we need that one thing done. An ex-ample might make that clearer. Consider the program to make a sunset (Method 8).That works by reducing the green and blue, each by 30%. What if we rewrote thatmethod so that it called two smaller methods that just did the two pieces of themanipulation? We’d end up with something like Method 9.
Program 9: Making a sunset as three methods
/∗∗∗ Method to decrease the green in the p i c t u r e by 30%∗/
public void decreaseGreen ( ){
Pixe l [ ] p ixe lArray = this . g e tP i x e l s ( ) ;P ixe l p i x e l = null ;int value = 0 ;int i = 0 ;
// loop through a l l the p i x e l s in the arraywhile ( i < pixe lArray . l ength ){
// ge t the current p i x e lp i x e l = pixe lArray [ i ] ;
// ge t the va luevalue = p i x e l . getGreen ( ) ;
// s e t the green va lue to 70% of what i t wasp i x e l . setGreen ( ( int ) ( va lue ∗ 0 . 7 ) ) ;
// increment the indexi++;
}}
/∗∗∗ Method to decrease the b l u e in the p i c t u r e by 30%∗/
public void decreaseBlue ( ){
Pixe l [ ] p ixe lArray = this . g e tP i x e l s ( ) ;

“main”2005/1/11page 117
i
i
i
i
i
i
i
i
Section 4.3 Changing color values 117
Pixe l p i x e l = null ;int value = 0 ;int i = 0 ;
// loop through a l l the p i x e l s in the arraywhile ( i < pixe lArray . l ength ){
// ge t the current p i x e lp i x e l = pixe lArray [ i ] ;
// ge t the va luevalue = p i x e l . getBlue ( ) ;
// s e t the b l u e va lue to 70% of what i t wasp i x e l . s e tBlue ( ( int ) ( va lue ∗ 0 . 7 ) ) ;
}}
/∗∗∗ Method to make a p i c t u r e l ook l i k e i t was taken at sunse t∗ by reduc ing the b l u e and green to make i t l ook more red∗/
public void makeSunset2 ( ){
decreaseGreen ( ) ;decreaseBlue ( ) ;
}
The first thing to note is that this actually does work. makeSunset2()does the same thing here as in the previous method. It’s perfectly okay to haveone method (makeSunset2() in this case) use other methods in the same class(decreaseBlue() and decreaseGreen()). You use makeSunset2() just as youhad before. It’s the same algorithm (it tells the computer to do the same thing),but with different methods. The earlier program did everything in one method,and this one does it in three. In fact, you can also use decreaseBlue() anddecreaseGreen() by themselves too—make a picture in the Command Area andinvoke either method on the Picture object. They work just like decreaseRed().
What’s different is that the method makeSunset() is much simpler to read.That’s very important.
Computer Science Idea: Programs are for people.Computers don’t care about how a program looks. Pro-grams are written to communicate with people. Makingprograms easy to read and understand means that theyare more easily changed and reused, and they more effec-tively communicate process to other humans.
What if we had written decreaseBlue() and decreaseGreen() so that eachasked you to pick a file and created the picture before changing the color. Wewould be asked for to pick a file twice—once in each function. Because we wrote
“main”2005/1/11page 118
i
i
i
i
i
i
i
i
118 Chapter 4 Modifying Pictures using Loops
these functions to only decrease the blue and decrease the green (“one and only onething”) in the implicitly passed Picture object, we can use them in new functionslike makeSunset()
There is an issue that the new makeSunset() will take twice as long to finishas the original one, since every pixel gets changed twice. We address that issuein a later chapter on speed and complexity. The important issue is still to writethe code readably first, and worry about efficiency later. However, this could alsobe handled by a method that changes each color by some passed in amount. Thiswould be a very general and reusable method.
Now, let’s say that we asked you to pick a picture and created the picture inmakeSunset() before calling the other methods. The methods reduceBlue() andreduceGreen() are completely flexible and reusable again. But makeSunset() isnow less flexible and reusable. Is that a big deal? No, not if you only care abouthaving the ability to give a sunset look to a single picked picture. But what if youlater want to build a movie with a few hundred frames of Picture objects, to eachof which you want to add a sunset look? Do you really want to pick out each ofthose few hundred frames? Or would you rather write a method to go througheach of the frames (which we’ll learn how to do in a few chapters) and invokemakeSunset() on each Picture object. That’s why we make methods general andreusable—you never know when you’re going to want to use that method again, ina larger context.
'
&
$
%
Making it Work Tip: Don’t start by trying to writeapplicationsThere’s a tendency for new programmers to want to writecomplete applications that a non-technical user can use.You might want to write a makeSunset() application thatgoes out and fetches a picture for a user and generates asunset for them. Building good user interfaces that anyonecan use is hard work. Start out more slowly. It’s hardenough to make a method just operates on a picture. Youcan work on user interfaces later.
Even larger methods, like makeSunset(), do “one and only one thing.” makeSunset()makes a sunset-looking picture. It does that by decreasing green and decreasingblue. It calls two other methods to do that. What we end up with is a hierarchy ofgoals—the “one and only one thing” that is being done. makeSunset() does its onething, by asking two other methods to do their one thing. We call this hierarchi-cal decomposition (breaking down a problem into smaller parts, and then breakingdown those smaller parts until you get something that you can easily program), andit’s very powerful for creating complex programs out of pieces that you understand.
4.3.5 Variable Name Scope
Names in methods are completely separate from names in the interactions pane andalso from names in other methods. We say that they have different scope. Scopeis the area where a name is known by the computer. . Variables declared inside of
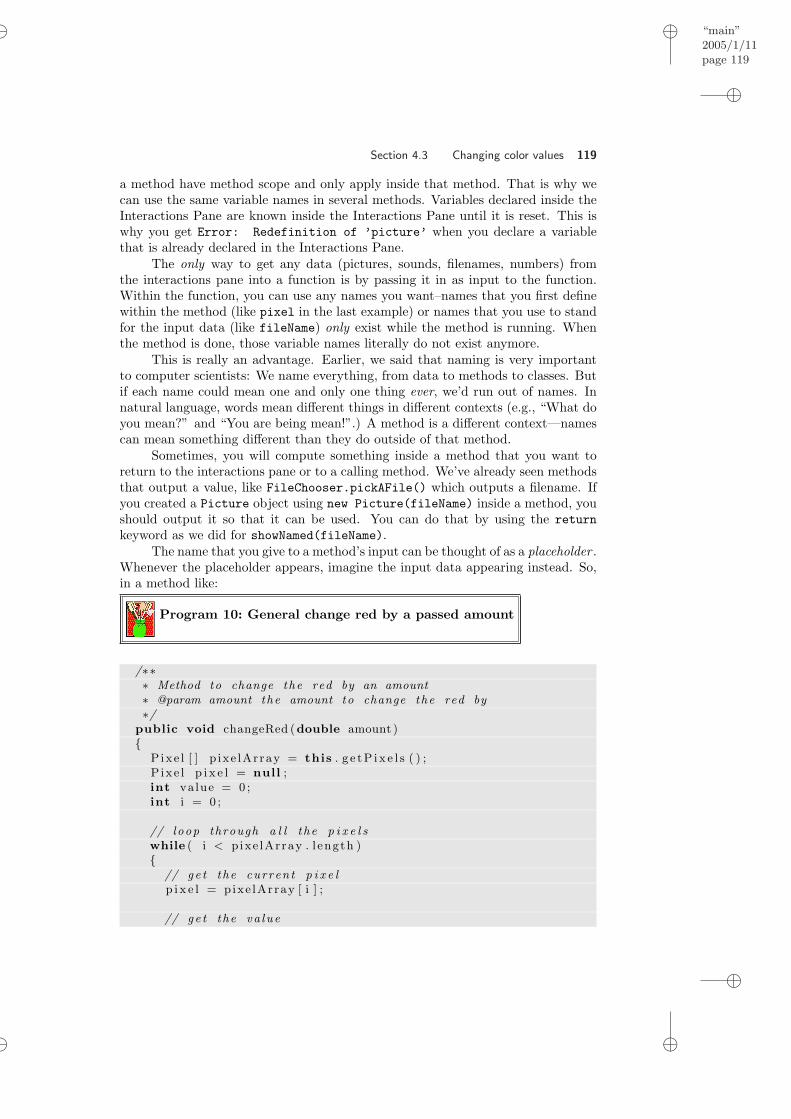
“main”2005/1/11page 119
i
i
i
i
i
i
i
i
Section 4.3 Changing color values 119
a method have method scope and only apply inside that method. That is why wecan use the same variable names in several methods. Variables declared inside theInteractions Pane are known inside the Interactions Pane until it is reset. This iswhy you get Error: Redefinition of ’picture’ when you declare a variablethat is already declared in the Interactions Pane.
The only way to get any data (pictures, sounds, filenames, numbers) fromthe interactions pane into a function is by passing it in as input to the function.Within the function, you can use any names you want–names that you first definewithin the method (like pixel in the last example) or names that you use to standfor the input data (like fileName) only exist while the method is running. Whenthe method is done, those variable names literally do not exist anymore.
This is really an advantage. Earlier, we said that naming is very importantto computer scientists: We name everything, from data to methods to classes. Butif each name could mean one and only one thing ever, we’d run out of names. Innatural language, words mean different things in different contexts (e.g., “What doyou mean?” and “You are being mean!”.) A method is a different context—namescan mean something different than they do outside of that method.
Sometimes, you will compute something inside a method that you want toreturn to the interactions pane or to a calling method. We’ve already seen methodsthat output a value, like FileChooser.pickAFile() which outputs a filename. Ifyou created a Picture object using new Picture(fileName) inside a method, youshould output it so that it can be used. You can do that by using the returnkeyword as we did for showNamed(fileName).
The name that you give to a method’s input can be thought of as a placeholder .Whenever the placeholder appears, imagine the input data appearing instead. So,in a method like:
Program 10: General change red by a passed amount
/∗∗∗ Method to change the red by an amount∗ @param amount the amount to change the red by∗/
public void changeRed (double amount ){
Pixe l [ ] p ixe lArray = this . g e tP i x e l s ( ) ;P ixe l p i x e l = null ;int value = 0 ;int i = 0 ;
// loop through a l l the p i x e l swhile ( i < pixe lArray . l ength ){
// ge t the current p i x e lp i x e l = pixe lArray [ i ] ;
// ge t the va lue

“main”2005/1/11page 120
i
i
i
i
i
i
i
i
120 Chapter 4 Modifying Pictures using Loops
value = p i x e l . getRed ( ) ;
/∗ s e t the red va lue to the o r i g i n a l va lue∗ t imes the passed amount∗/p i x e l . setRed ( ( int ) ( va lue ∗ amount ) ) ;
// increment ii++;
}}
When you call (invoke) the method changeRed with a specific amount such aspicture.changeRed(0.7); which would decrease the red by 30%. In the methodchangeRed the input parameter amount is set to 0.7. This is similar to declaring avariable inside the method like this double amount = 0.7;. Just like any variabledeclared in the method the parameter amount is known inside the method. It hasmethod scope.
Call changeRed with an amount less than one to decrease the amount of redin a picture. Call changeRed with an amount greater than one to increase theamount of red in a picture. Remember that the amount of red must be between 0and 255. If you try to set the amount of red less than 0 it will be set to 0. If youtry to set the amount of red greater than 255 it will be set to 255.
We’ve now talked about different ways of writing the same method—somebetter, some worse. There are others that are pretty much equivalent, and othersthat are much better. Let’s consider a few more ways that we can write methods.
We can pass in more than input at a time. Consider the following:
Program 11: Change all pixel colors by the passed amounts
/∗∗∗ Method to change the co l o r o f each p i x e l in the p i c t u r e∗ o b j e c t by passed in amounts .∗ @param redAmount the amount to change the red va lue∗ @param greenAmount the amount to change the green va lue∗ @param blueAmount the amount to change the b l u e va lue∗/
public void changeColors (double redAmount ,double greenAmount ,double blueAmount )
{Pixe l [ ] p ixe lArray = this . g e tP i x e l s ( ) ;P ixe l p i x e l = null ;int value = 0 ;int i = 0 ;
// loop through a l l the p i x e l swhile ( i < pixe lArray . l ength )
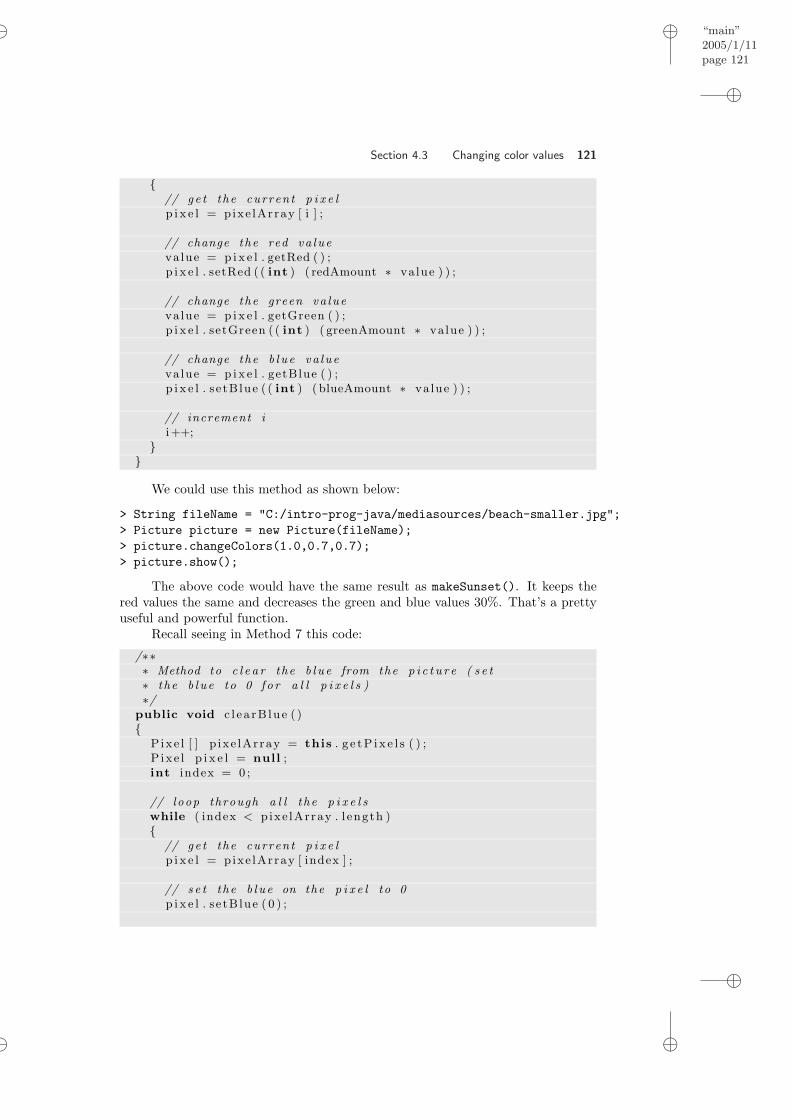
“main”2005/1/11page 121
i
i
i
i
i
i
i
i
Section 4.3 Changing color values 121
{// ge t the current p i x e lp i x e l = pixe lArray [ i ] ;
// change the red va luevalue = p i x e l . getRed ( ) ;p i x e l . setRed ( ( int ) ( redAmount ∗ value ) ) ;
// change the green va luevalue = p i x e l . getGreen ( ) ;p i x e l . setGreen ( ( int ) ( greenAmount ∗ value ) ) ;
// change the b l u e va luevalue = p i x e l . getBlue ( ) ;p i x e l . s e tBlue ( ( int ) ( blueAmount ∗ value ) ) ;
// increment ii++;
}}
We could use this method as shown below:
> String fileName = "C:/intro-prog-java/mediasources/beach-smaller.jpg";> Picture picture = new Picture(fileName);> picture.changeColors(1.0,0.7,0.7);> picture.show();
The above code would have the same result as makeSunset(). It keeps thered values the same and decreases the green and blue values 30%. That’s a prettyuseful and powerful function.
Recall seeing in Method 7 this code:
/∗∗∗ Method to c l e a r the b l u e from the p i c t u r e ( s e t∗ the b l u e to 0 f o r a l l p i x e l s )∗/
public void c l e a rB lue ( ){
Pixe l [ ] p ixe lArray = this . g e tP i x e l s ( ) ;P ixe l p i x e l = null ;int index = 0 ;
// loop through a l l the p i x e l swhile ( index < pixe lArray . l ength ){
// ge t the current p i x e lp i x e l = pixe lArray [ index ] ;
// s e t the b l u e on the p i x e l to 0p i x e l . s e tBlue ( 0 ) ;

“main”2005/1/11page 122
i
i
i
i
i
i
i
i
122 Chapter 4 Modifying Pictures using Loops
// increment indexindex++;
}}
We could also write that same algorithm like this:
/∗∗∗ Method to c l e a r the b l u e from the p i c t u r e ( s e t∗ the b l u e to 0 f o r a l l p i x e l s )∗/
public void c l ea rB lue2 ( ){
Pixe l [ ] p ixe lArray = this . g e tP i x e l s ( ) ;int i = 0 ;
// loop through a l l the p i x e l swhile ( i < pixe lArray . l ength ){
pixe lArray [ i ] . s e tBlue ( 0 ) ;i++;
}}
It’s important to note that this function achieves the exact same thing as theearlier method did. Both set the blue channel of all pixels to zero. An advantage ofthe second method is that it is shorter and doesn’t require a variable declaration fora pixel. However, it may be harder for someone to understand. A shorter methodisn’t necessarily better.
4.3.6 Using a For Loop
You may have had the problem that you forgot to declare the index variable beforeyou tried to use it in your while loop. You may also have had the problem offorgetting to increment the index variable before the end of the loop body. Thishappens often enough that another kind of loop is usually used when you want toloop a set number of times. It is called a for loop.
A for loop executes a command or group of commands in a block. A for loopallows for declaration and/or initialization of variables before the loop body is firstexecuted. A for loop continues executing the loop body while the continuationtest is true. After the end of the body of the loop and before the continuation testone or more variables can be changed.
The syntax for a for loop is:
for ( i n i t i a l i z a t i o n area ; cont inuat i on t e s t ; change area ) {/∗ commands in body o f the loop ∗/
}Let’s talk through the pieces here.
• First comes the required Java keyword for.
• Next we have a required opening parenthesis

“main”2005/1/11page 123
i
i
i
i
i
i
i
i
Section 4.3 Changing color values 123
• Next is the initialization area. You can declare and initialize variables here.For example, you can have int i=0 which declares a variable i of the primitivetype int and initializes it to 0. You can initialize more than one variable hereby separating the initializations with commas. You are not required to haveany initializations here.
• Next comes the required semicolon.
• Next is the continuation test. This holds an expression that returns true orfalse. When this expression is true the loop will continue to be executed.When this test is false the loop will finish and the statement following thebody of the loop will be executed.
• Next comes the required semicolon.
• Next is the change area. Here you usually increment or decrement variables,such as i++ to increment i. The statements in the change area actually takeplace after each execution of the body of the loop.
• Next is the required closing parenthesis.
If you just want to execute one statement (command) in the body of the loopit can just follow on the next line. It is normally indented to show that it is partof the for loop. If you want to execute more than one statements in the body ofthe for loop you will need to enclose the statements in a block (a set of open andclose curly braces).
Statement(s)
for (expression)
true
false
Statement(s)
declare andinit loopvariable(s)
change loopvariable(s)
for(int i=0; i < pixelArray.length(); i++)
FIGURE 4.21: Flowchart of a for loop

“main”2005/1/11page 124
i
i
i
i
i
i
i
i
124 Chapter 4 Modifying Pictures using Loops
Compare the flowchart (Figure 4.21) for a for loop with the flowchart for awhile loop (Figure 4.15). They look the same because for loops and while loopsexecute in the same way even though the code looks different. Any code can bewritten using either. The syntax of the for loop just makes it easier to rememberto declare a variable for use in the loop and to change it each time through theloop since all of that is written at the same time that you write the test. To changeclearBlue() to use a for loop simply move the declaration and initialization ofthe index variable i to be done in the initialization area and the increment of i tobe done in the change area.
Program 12: Another clear blue method
/∗∗∗ Method to c l e a r the b l u e from the p i c t u r e ( s e t∗ the b l u e to 0 f o r a l l p i x e l s )∗/
public void c l ea rB lue3 ( ){
Pixe l [ ] p ixe lArray = this . g e tP i x e l s ( ) ;
// loop through a l l the p i x e l sfor ( int i =0; i < pixe lArray . l ength ; i++)
p ixe lArray [ i ] . s e tBlue ( 0 ) ;}
4.3.7 Lightening and Darkening
To lighten or darken a picture is pretty simple. It’s the same pattern as we sawpreviously, but instead of changing a color component, you change the overall color.Here’s lightening and then darkening as methods. Figure 4.22 (Figure 5.23) showsthe lighter and darker versions of the original picture seen earlier.
Program 13: Lighten the picture
/∗∗∗ Method to l i g h t e n the c o l o r s in the p i c t u r e∗/
public void l i g h t e n ( ){
Pixe l [ ] p ixe lArray = this . g e tP i x e l s ( ) ;Color c o l o r = null ;P ixe l p i x e l = null ;
// loop through a l l the p i x e l sfor ( int i = 0 ; i < pixe lArray . l ength ; i++)

“main”2005/1/11page 125
i
i
i
i
i
i
i
i
Section 4.3 Changing color values 125
{// ge t the current p i x e lp i x e l = pixe lArray [ i ] ;
// ge t the current co l o rc o l o r = p i x e l . getColor ( ) ;
// ge t a l i g h t e r co l o rc o l o r = co l o r . b r i gh t e r ( ) ;
// s e t the p i x e l c o l o r to the l i g h t e r co l o rp i x e l . s e tCo lo r ( c o l o r ) ;
}}
Program 14: Darken the picture
/∗∗∗ Method to darken the co l o r in the p i c t u r e∗/
public void darken ( ){
Pixe l [ ] p ixe lArray = this . g e tP i x e l s ( ) ;Color c o l o r = null ;P ixe l p i x e l = null ;
// loop through a l l the p i x e l sfor ( int i = 0 ; i < pixe lArray . l ength ; i++){
// ge t the current p i x e lp i x e l = pixe lArray [ i ] ;
// ge t the current co l o rc o l o r = p i x e l . getColor ( ) ;
// ge t a darker co l o rc o l o r = co l o r . darker ( ) ;
// s e t the p i x e l c o l o r to the darker co l o rp i x e l . s e tCo lo r ( c o l o r ) ;
}}
4.3.8 Creating a Negative
Creating a negative image of a picture is much easier than you might think at first.Let’s think it through. What we want is the opposite of each of the current values
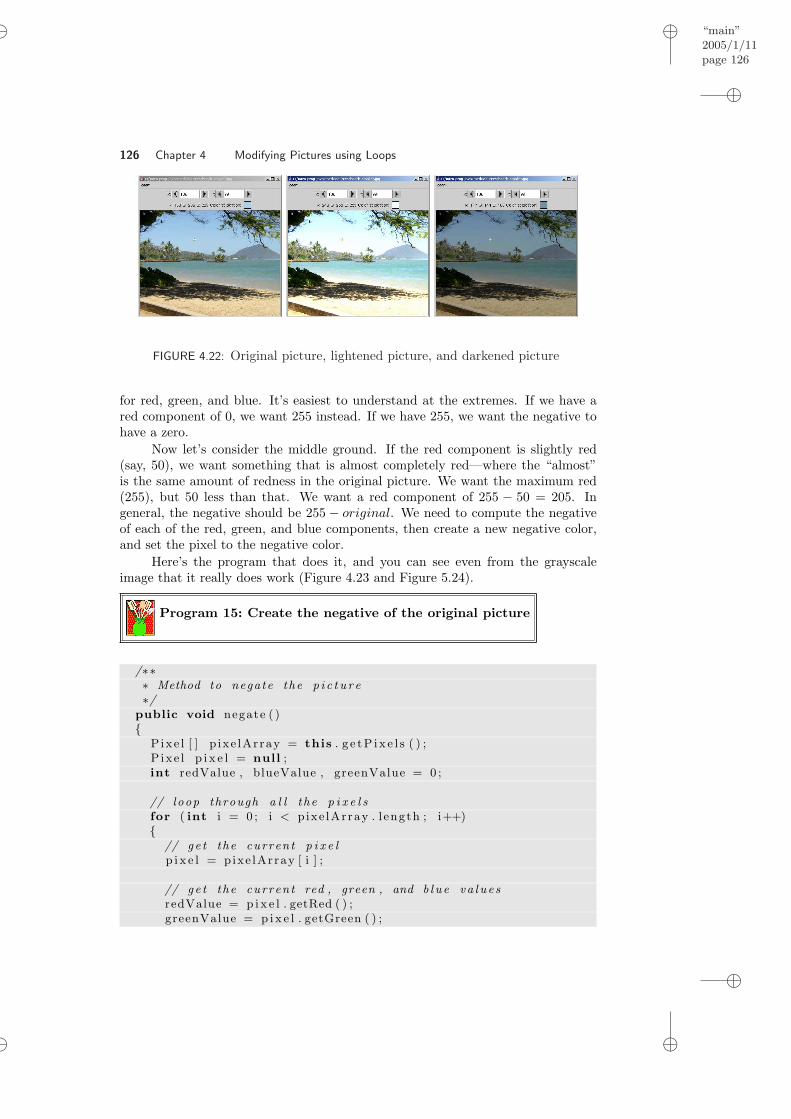
“main”2005/1/11page 126
i
i
i
i
i
i
i
i
126 Chapter 4 Modifying Pictures using Loops
FIGURE 4.22: Original picture, lightened picture, and darkened picture
for red, green, and blue. It’s easiest to understand at the extremes. If we have ared component of 0, we want 255 instead. If we have 255, we want the negative tohave a zero.
Now let’s consider the middle ground. If the red component is slightly red(say, 50), we want something that is almost completely red—where the “almost”is the same amount of redness in the original picture. We want the maximum red(255), but 50 less than that. We want a red component of 255 − 50 = 205. Ingeneral, the negative should be 255 − original. We need to compute the negativeof each of the red, green, and blue components, then create a new negative color,and set the pixel to the negative color.
Here’s the program that does it, and you can see even from the grayscaleimage that it really does work (Figure 4.23 and Figure 5.24).
Program 15: Create the negative of the original picture
/∗∗∗ Method to negate the p i c t u r e∗/
public void negate ( ){
Pixe l [ ] p ixe lArray = this . g e tP i x e l s ( ) ;P ixe l p i x e l = null ;int redValue , blueValue , greenValue = 0 ;
// loop through a l l the p i x e l sfor ( int i = 0 ; i < pixe lArray . l ength ; i++){
// ge t the current p i x e lp i x e l = pixe lArray [ i ] ;
// ge t the current red , green , and b l u e va l u e sredValue = p i x e l . getRed ( ) ;greenValue = p i x e l . getGreen ( ) ;
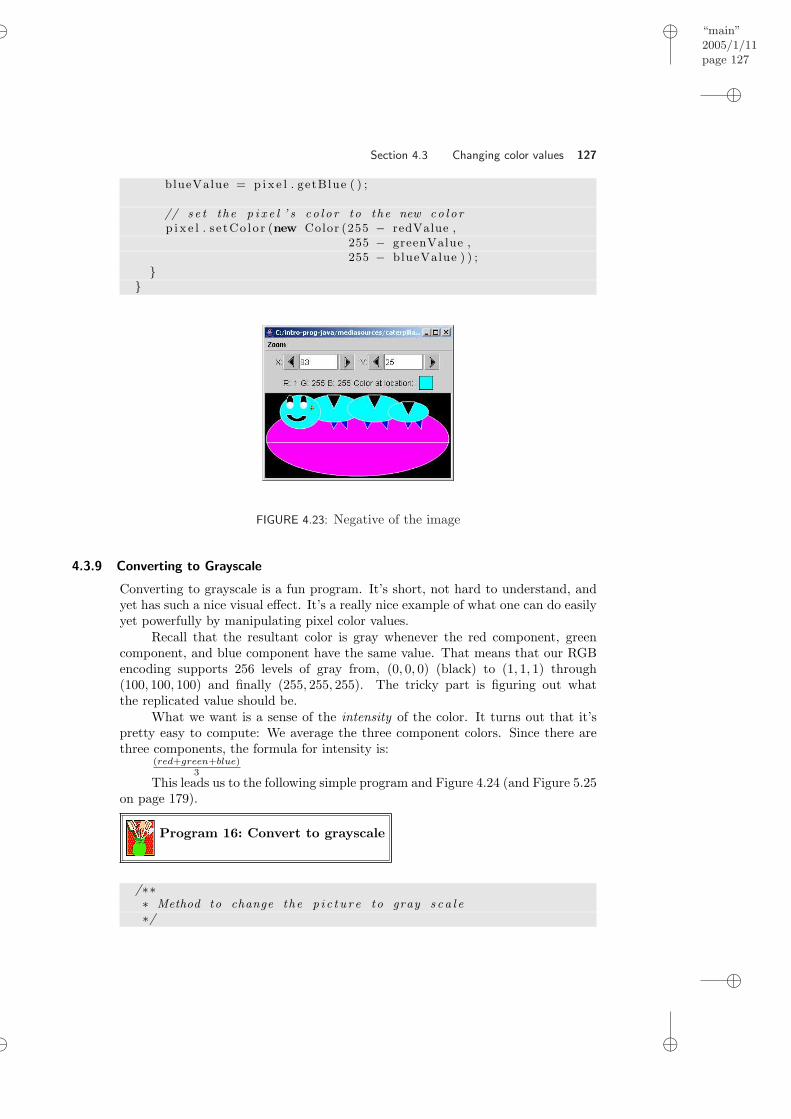
“main”2005/1/11page 127
i
i
i
i
i
i
i
i
Section 4.3 Changing color values 127
blueValue = p i x e l . getBlue ( ) ;
// s e t the p i x e l ’ s c o l o r to the new co l o rp i x e l . s e tCo lo r (new Color (255 − redValue ,
255 − greenValue ,255 − blueValue ) ) ;
}}
FIGURE 4.23: Negative of the image
4.3.9 Converting to Grayscale
Converting to grayscale is a fun program. It’s short, not hard to understand, andyet has such a nice visual effect. It’s a really nice example of what one can do easilyyet powerfully by manipulating pixel color values.
Recall that the resultant color is gray whenever the red component, greencomponent, and blue component have the same value. That means that our RGBencoding supports 256 levels of gray from, (0, 0, 0) (black) to (1, 1, 1) through(100, 100, 100) and finally (255, 255, 255). The tricky part is figuring out whatthe replicated value should be.
What we want is a sense of the intensity of the color. It turns out that it’spretty easy to compute: We average the three component colors. Since there arethree components, the formula for intensity is:
(red+green+blue)3
This leads us to the following simple program and Figure 4.24 (and Figure 5.25on page 179).
Program 16: Convert to grayscale
/∗∗∗ Method to change the p i c t u r e to gray s c a l e∗/

“main”2005/1/11page 128
i
i
i
i
i
i
i
i
128 Chapter 4 Modifying Pictures using Loops
FIGURE 4.24: Color picture converted to grayscale
public void g ray s c a l e ( ){
Pixe l [ ] p ixe lArray = this . g e tP i x e l s ( ) ;P ixe l p i x e l = null ;int i n t e n s i t y = 0 ;
// loop through a l l the p i x e l sfor ( int i = 0 ; i < pixe lArray . l ength ; i++){
// ge t the current p i x e lp i x e l = pixe lArray [ i ] ;
// compute the i n t e n s i t y o f the p i x e l ( average va lue )i n t e n s i t y = ( int ) ( ( p i x e l . getRed ( ) + p i x e l . getGreen ( ) +
p i x e l . getBlue ( ) ) / 3 ) ;
// s e t the p i x e l c o l o r to the new co l o rp i x e l . s e tCo lo r (new Color ( i n t en s i t y , i n t en s i t y , i n t e n s i t y ) ) ;
}}
This is an overly simply notion of grayscale. Below is a program that takesinto account how the human eye perceives luminance. Remember that we considerblue to be darker than red, even if there’s the same amount of light reflected off.So, we weight blue lower, and red more, when computing the average.
Program 17: Convert to grayscale with more careful control of luminance
/∗∗∗ Method to change the p i c t u r e to gray s c a l e wi th luminance∗/

“main”2005/1/11page 129
i
i
i
i
i
i
i
i
Section 4.4 Concepts Summary 129
public void grayscaleWithLuminance ( ){
Pixe l [ ] p ixe lArray = this . g e tP i x e l s ( ) ;P ixe l p i x e l = null ;int luminance = 0 ;double redValue = 0 ;double greenValue = 0 ;double blueValue = 0 ;
// loop through a l l the p i x e l sfor ( int i = 0 ; i < pixe lArray . l ength ; i++){
// ge t the current p i x e lp i x e l = pixe lArray [ i ] ;
// ge t the co r r e c t ed red , green , and b l u e va l u e sredValue = p i x e l . getRed ( ) ∗ 0 . 2 9 9 ;greenValue = p i x e l . getGreen ( ) ∗ 0 . 5 8 7 ;blueValue = p i x e l . getBlue ( ) ∗ 0 . 1 1 4 ;
// compute the i n t e n s i t y o f the p i x e l ( average va lue )luminance = ( int ) ( redValue + greenValue + blueValue ) ;
// s e t the p i x e l c o l o r to the new co l o rp i x e l . s e tCo lo r (new Color ( luminance , luminance , luminance ) ) ;
}}
4.4 CONCEPTS SUMMARY
In this chapter we have introduced arrays, while loops, for loops, and comments.
4.4.1 Arrays
Arrays are used to store many pieces of data of the same type. They allow you toquickly access a particular item in the array using an index. If you couldn’t use anarray, you would have to create a separate variable name for each piece of data.
To declare a variable that refers to an array use the type followed by open ’[’and close ’]’ square brackets and then the variable name.
Pixe l [ ] p ixe lArray ;
This declares an array of Pixel objects. The value stored at each position inthe array is a reference to a Pixel object.
Arrays are objects and you can find out how large an array by getting it’slength.
i < pixe lArray . l ength
Notice that this isn’t a method call (there are no parentheses). This accessesa public read-only field.

“main”2005/1/11page 130
i
i
i
i
i
i
i
i
130 Chapter 4 Modifying Pictures using Loops
You can get an element of the array using arrayReference[index]. Wherethe index values can range from 0 to arrayReference.length-1.
p i x e l = pixe lArray [ i ] ;
4.4.2 Loops
Loops are used to execute a block of statements while a boolean expression is true.Most loops have variables that change during the loop which eventually cause theboolean expression to be false and the loop to stop. Loops that never stop arecalled infinite loops.
We introduced two types of loops in this chapter: while and for. The whileloop is usually used when you don’t know how many times a loop needs to executeand the for loop is usually used when you do know how many times the loop willexecute. We introduced the while loop first because it is easier for beginners tounderstand.
The while loop has the keyword while followed by a boolean expression andthen a block of statements between an open and close curly brace. If the booleanexpression is true the body of the loop will be executed. If the boolean expression isfalse execution will continue after the body of the loop (after the close curly brace).If you just want to execute one statement in the body of the loop then you don’tneed the open and close curly braces, but you should indent the statement.
while (boolean exp r e s s i on ){
statement1 ;statement2 ;. . .
}If you use a while loop to execute a block of statements a set number of times
you will need to declare a variable before the while and that variable will need tobe changed in the body of the loop. You may also need to declare other variablesthat you use in the loop before the while. Don’t declare variables inside the loopbecause you will use more memory that way.
int index = 0 ;
// loop through a l l the p i x e l swhile ( index < pixe lArray . l ength ){
// ge t the current p i x e lp i x e l = pixe lArray [ index ] ;
// do something to the p i x e l
// increment the indexindex++;
}The for loop does the same thing as a while loop but it lets you declare the
variables that you need for the loop, specify the boolean expression to test, and

“main”2005/1/11page 131
i
i
i
i
i
i
i
i
Section 4.4 Concepts Summary 131
specify how to change the loop variables all in one place. This means you are lesslikely to forget to do each of these things.
// loop through a l l the p i x e l sfor ( int index = 0 ; index < pixe lArray . l ength ; index++){
// ge t the current p i x e lp i x e l = pixe lArray [ index ] ;
// do something to the p i x e l
}
4.4.3 Comments
Comments are text that the programmer adds to the code to explain the code. Thecompiler ignores the comments when it translates the code into a form that thecomputer understands.
There are several types of comments in Java. To tell the compiler to ignoreall text till the end of the current line use //.
// ge t the current p i x e lp i x e l = pixe lArray [ index ] ;
To tell the compiler to ignore several lines use a starting /* and ending */.
/∗ s e t the red va lue to the o r i g i n a l va lue∗ t imes the passed amount∗/
p i x e l . setRed ( ( int ) ( va lue ∗ amount ) ) ;
To put special comments in that can be parsed out by the javadoc utility tomake html documentation use a starting /** followed by an ending */.
/∗∗∗ Method to change the red by an amount∗ @param amount the amount to change the red by∗/
OBJECTS AND METHODS SUMMARY
In this chapter, we talk about several kinds of encodings of data (or objects).Color An object that holds red, green, and blue values,
each between 0 and 255.Picture Pictures are encodings of images, typically coming
from a JPEG file or a bitmap (.bmp) file.Pixel A pixel is a dot in a Picture object. It has a
color (red, green, and blue) and an (x, y) positionassociated with it. It remembers its own Pictureobject so that a change to the pixel changes thereal dot in the picture.
Picture methods
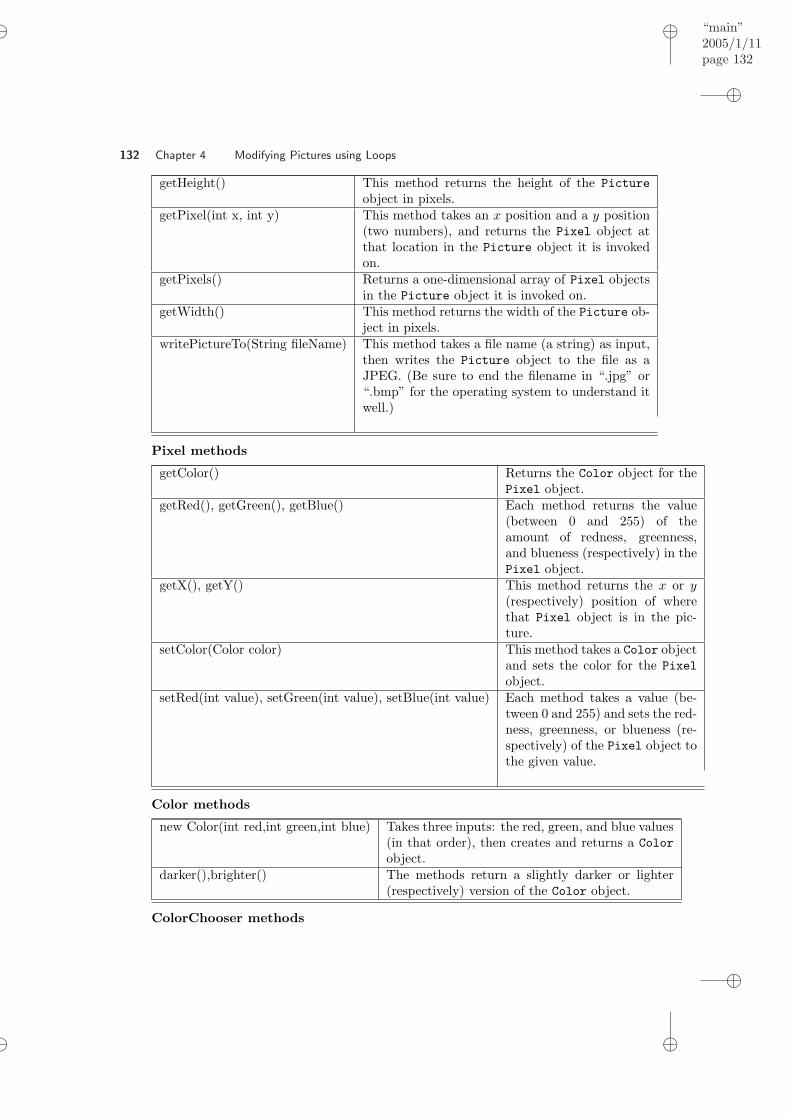
“main”2005/1/11page 132
i
i
i
i
i
i
i
i
132 Chapter 4 Modifying Pictures using Loops
getHeight() This method returns the height of the Pictureobject in pixels.
getPixel(int x, int y) This method takes an x position and a y position(two numbers), and returns the Pixel object atthat location in the Picture object it is invokedon.
getPixels() Returns a one-dimensional array of Pixel objectsin the Picture object it is invoked on.
getWidth() This method returns the width of the Picture ob-ject in pixels.
writePictureTo(String fileName) This method takes a file name (a string) as input,then writes the Picture object to the file as aJPEG. (Be sure to end the filename in “.jpg” or“.bmp” for the operating system to understand itwell.)
Pixel methods
getColor() Returns the Color object for thePixel object.
getRed(), getGreen(), getBlue() Each method returns the value(between 0 and 255) of theamount of redness, greenness,and blueness (respectively) in thePixel object.
getX(), getY() This method returns the x or y(respectively) position of wherethat Pixel object is in the pic-ture.
setColor(Color color) This method takes a Color objectand sets the color for the Pixelobject.
setRed(int value), setGreen(int value), setBlue(int value) Each method takes a value (be-tween 0 and 255) and sets the red-ness, greenness, or blueness (re-spectively) of the Pixel object tothe given value.
Color methods
new Color(int red,int green,int blue) Takes three inputs: the red, green, and blue values(in that order), then creates and returns a Colorobject.
darker(),brighter() The methods return a slightly darker or lighter(respectively) version of the Color object.
ColorChooser methods

“main”2005/1/11page 133
i
i
i
i
i
i
i
i
Section 4.4 Concepts Summary 133
ColorChooser.pickAColor() Displays a window with ways to pick a color. Findthe color you want, and the function will returnthe Color object that you picked.
There are a bunch of constants that are useful in this chapter. These are vari-ables with pre-defined values. These values are colors: Color.black, Color.white,Color.blue, Color.red, Color.green, Color.gray, Color.darkGray, Color.pink,Color.yellow, Color.orange, Color.lightGray, Color.magenta, Color.cyan.Notice that these are not method calls but are class variables (fields) so they canbe accessed using ClassName.fieldName .
PROBLEMS
4.1. Some questions about picture concepts:
• Why don’t we see red, green, and blue spots at each position in our picture?
• What is luminance?
• Why is the maximum value of any color channel 255?
• The color encoding we’re using is “RGB”. What does that mean, in termsof the amount of memory required to represent color? Is there a limitto the number of colors that we can represent? Are there enough colorsrepresentable in RGB?
4.2. Program 5 (page 100) is obviously too much color reduction. Write a versionthat only reduces the red by 10%, then one by 20%. Which seems to be moreuseful? Note that you can always repeatedly reduce the redness in a picture, butyou don’t want to have to do it too many times, either.
4.3. Write the blue and green versions of Program 5 (page 100).4.4. Each of the below is equivalent to Program 6 (page 111). Test them and convince
yourself that they are equivalent. Which do you prefer and why?
/∗∗∗ Method to inc rea se the amount o f red by 1.3∗/
public void increaseRed2 ( ){
Pixe l [ ] p ixe lArray = this . g e tP i x e l s ( ) ;int value = 0 ;
// loop through a l l the p i x e l sfor ( int i = 0 ; i < pixe lArray . l ength ; i++){
// s e t the red va lue to 1.3 t imes what i t wasvalue = pixe lArray [ i ] . getRed ( ) ;p ixe lArray [ i ] . setRed ( ( int ) ( va lue ∗ 1 . 3 ) ) ;
}}
/∗∗∗ Method to inc rea se the amount o f red by 1.3∗/
public void increaseRed3 ( )

“main”2005/1/11page 134
i
i
i
i
i
i
i
i
134 Chapter 4 Modifying Pictures using Loops
{Pixe l [ ] p ixe lArray = this . g e tP i x e l s ( ) ;P ixe l p i x e l = null ;int red = 0 ;int green = 0 ;int blue = 0 ;int newRed = 0 ;
// loop through a l l the p i x e l sfor ( int i = 0 ; i < pixe lArray . l ength ; i++){
// ge t the curren t p i x e lp i x e l = pixe lArray [ i ] ;
// ge t the co l o r va l u e sred = p i x e l . getRed ( ) ;green = p i x e l . getGreen ( ) ;b lue = p i x e l . getBlue ( ) ;
// c a l c u l a t e the new red va luenewRed = ( int ) ( red ∗ 1 . 3 ) ;
// s e t the p i x e l c o l o r to the new co l o rp i x e l . s e tCo lo r (new Color (newRed , green , b lue ) ) ;
}}
4.5. Change any of the methods that used a while loop to use a for loop. Compileand run the changed method and make sure it still works.
4.6. Change a variable name in any of the given methods. Make sure you change allinstances of the original name to the new name. Compile and run the changedmethod and make sure it still works.
4.7. Write new methods like Program 7 (page 113) to clear red and green. Foreach of these, which would be the most useful in actual practice? How aboutcombinations of these?
4.8. Write a method to keep just the blue color. This means to set all the green andred values to zero.
4.9. Write a new method to maximize blue (i.e., setting it to 255) instead of clearingit use Program 7 (page 113) as a starting point. Is this useful? Would the redor green versions be useful?
4.10. There is more than one way to compute the right grayscale value for a colorvalue. The simple method that we use in Program 16 (page 127) may not bewhat your grayscale printer uses when printing a color picture. Compare thecolor (relatively unconverted by the printer) grayscale image using our simplealgorithm in Figure 5.25 with the original color picture that the printer hasconverted to grayscale (left of Figure 4.16). How do the two pictures differ?
4.11. Think about how the grayscale algorithm works. Basically, if you know theluminance of anything visual (e.g., a small image, a letter), you can replace apixel with that visual element in a similar way to create a collage image. Tryimplementing that. You’ll need 256 visual elements of increasing lightness, allof the same size. You’ll create a collage by replacing each pixel in the originalimage with one of these visual elements.

“main”2005/1/11page 135
i
i
i
i
i
i
i
i
Section 4.4 Concepts Summary 135
TO DIG DEEPER
A wonderful new book on how vision works, and how artists have learned to ma-nipulate it, is Vision and art: The biology of Seeing by Margaret Livingstone [19].

“main”2005/1/11page 136
i
i
i
i
i
i
i
i
C H A P T E R 5
Modifying Pixels in a Matrix
5.1 COPYING PIXELS
5.2 COPYING AND TRANSFORMING PICTURES
5.3 CONCEPTS SUMMARY
5.4 COLOR FIGURES
Chapter Learning ObjectivesThe media learning goals for this chapter are:
• To mirror pictures, horizontally or vertically.
• To compose pictures into one another and create collages.
• To blend two pictures.
• To rotate pictures.
• To scale pictures smaller and larger.
The computer science goals for this chapter are:
• To use nested loops for processing elements of a matrix (a two-dimensionalarray).
• To initialize and change multiple variables in a for loop.
• To develop some debugging strategies, specifically, using System.out.println()statements to explore executing code.
• To break long methods into smaller pieces.
• To show how to return a value from a method.
• To introduce method overloading.
5.1 COPYING PIXELS
We can only get so far in our image processing with getPixels() before we needto know where a pixel is. For example, if we want to copy just part of a picture toanother picture we will need to know the x and y values to start with and end at.
136

“main”2005/1/11page 137
i
i
i
i
i
i
i
i
Section 5.1 Copying Pixels 137
5.1.1 Looping Across the Pixels with a Nested Loop
We can’t use a single for loop if we want to keep track of the x and y values for apixel. We have to use two for loops—one to move horizontally across the columns,and the other to move vertically to get every pixel. The function getPixels()did this inside itself, to make it easier to write simple picture manipulations. Butif you want to access each individual pixel, you’ll need to use two loops, one foreach dimension of the picture. The inner loop will be nested inside the outer loop,literally, inside its block.
Your loops will look something like this:
// loop through the columns ( x d i r e c t i o n )for ( int x = 0 ; x < getWidth ( ) ; x++){
// loop through the rows ( y d i r e c t i o n )for ( int y = 0 ; y < getHeight ( ) ; y++){
// ge t the curren t p i x e l a t t h i s x and y po s i t i o np i x e l = ge tP ix e l (x , y ) ;
// do something to the co l o r
// s e t the new co l o rp i x e l . s e tCo lo r ( aColor ) ;
}}
This will process all the y values from top to bottom in the first column andthen all the y values in the next column and so on until all the pixels are processed.
You could also process all the x values in the top row and then all the x valuesin the next row and so on using this:
// loop through the rows ( y d i r e c t i o n )for ( int y = 0 ; y < getHeight ( ) ; y++){
// loop through the columns ( x d i r e c t i o n )for ( int x = 0 ; x < getWidth ( ) ; x++){
// ge t the curren t p i x e l a t t h i s x and y po s i t i o np i x e l = ge tP ix e l (x , y ) ;
// do something to the co l o r
// s e t the new co l o rp i x e l . s e tCo lo r ( aColor ) ;
}}
Does it matter which way you process the pixels? Not if all you are tryingto do is process all the pixels. Both of these loops will process all the pixels in apicture.

“main”2005/1/11page 138
i
i
i
i
i
i
i
i
138 Chapter 5 Modifying Pixels in a Matrix
For example, here’s Program 13 (page 124), but using explicit pixel references.
Program 18: Lighten the picture using nested loops
/∗∗∗ Method to l i g h t e n the c o l o r s in the p i c t u r e∗/
public void l i g h t en2 ( ){
Color c o l o r = null ;P ixe l p i x e l = null ;
// loop through the columns ( x d i r e c t i o n )for ( int x = 0 ; x < getWidth ( ) ; x++){
// loop through the rows ( y d i r e c t i o n )for ( int y = 0 ; y < getHeight ( ) ; y++){
// ge t p i x e l a t the x and y l o c a t i o np i x e l = ge tP ix e l (x , y ) ;
// ge t the curren t co l o rc o l o r = p i x e l . getColor ( ) ;
// ge t a l i g h t e r co l o rc o l o r = co l o r . b r i gh t e r ( ) ;
// s e t the p i x e l c o l o r to the l i g h t e r co l o rp i x e l . s e tCo lo r ( c o l o r ) ;
}}}
Let’s walk through (trace) how it would work. Imagine that we just executedpicture.lighten2().
1. The code picture.lighten2() executes the object method in the Pictureclass public void lighten2(). The method is implicitly passed the currentpicture object (you can refer to the current picture object using the keywordthis).
2. The code Color color = null; and Pixel pixel = null; declares the vari-ables color (an object of the Color class) and pixel (an object of the Pixelclass). Both of these are initialized to null (not referring to any object yet).These variables will be needed when we are looping through the pixels. Wecould declare these in the for loop but then they would be redeclared eachtime through the loop. It is better to declare them once before the loop andchange them each time through the loop.
3. The code for (int x = 0; x < getWidth(); x++) declares a variable x of

“main”2005/1/11page 139
i
i
i
i
i
i
i
i
Section 5.1 Copying Pixels 139
type int which will be initialized to 0 and then a check will be made to seeif x is less than the width of the current Picture object. If x is less than thewidth, then the body of this for loop will be executed. After the body of theloop has been executed one time the value in x will be incremented and thecontinuation condition will be tested again.
4. The code for (int y = 0; y < getHeight(); y++) declares a variable yof type int which will be initialized to 0. The test checks that y is less thanthe height of the current Picture object. If y is less than the height then thebody of this for loop will be executed. After the body has executed the valuein y will be incremented and the continuation condition will be tested again.
5. The code pixel = getPixel(x,y); sets the variable pixel to refer to thePixel object at the given x and y location in the picture.
6. The code color = pixel.getColor(); sets the variable color to refer tothe Color object at the current pixel.
7. Next comes color = color.brighter();. This creates a new lighter (brighter)Color object based on the original Color object and sets the variable colorto refer to that new Color object.
8. The code pixel.setColor(color); sets the current pixel’s color to be thelighter color.
9. Each time we reach the end of the inner for loop the y value will be incre-mented by 1 and then the value of y will be compared to the height of thepicture. If the value of y is less than the height, the statements in the bodyof the loop will be executed again. If the value of y is equal or greater thanthe height, execution will jump to the next statement (the outer loop).
10. Each time we reach the end of the outer for loop the x value will be incre-mented by 1 and then the value of x will be compared to the width of thepicture. If the x value is less than the width of the picture, the commands inthe loop body will be executed. If the value of x is equal or greater than thewidth of the picture, execution will continue at the statement following thebody of the loop.
5.1.2 Mirroring a Picture
Let’s start out with an interesting effect that is only occasionally useful, but it isfun. Let’s mirror a picture along its vertical axis. In other words, imagine thatyou have a mirror, and you place it on a picture so that the left side of the pictureshows up in the mirror. That’s the effect that we’re going to implement. We’ll doit in a couple of different ways.
First, let’s think through what we’re going to do. We’ll pick a horizontalmirrorPoint—halfway across the picture, (int) (picture.getWidth()/2). (Wewant this to be an integer, a whole number, so we’ll cast it using (int).) We’llhave the x value increment from 1 to the mirrorPoint. At each value of x, we wantto copy the color at the pixel x pixels to the left of the mirrorPoint to the pixel xpixels to the right of the mirrorPoint. The left would be mirrorPoint-x and theright would be mirrorPoint+x. Take a look at Figure 5.1 to convince yourself thatwe’ll actually reach every pixel using this scheme. Here’s the actual program.
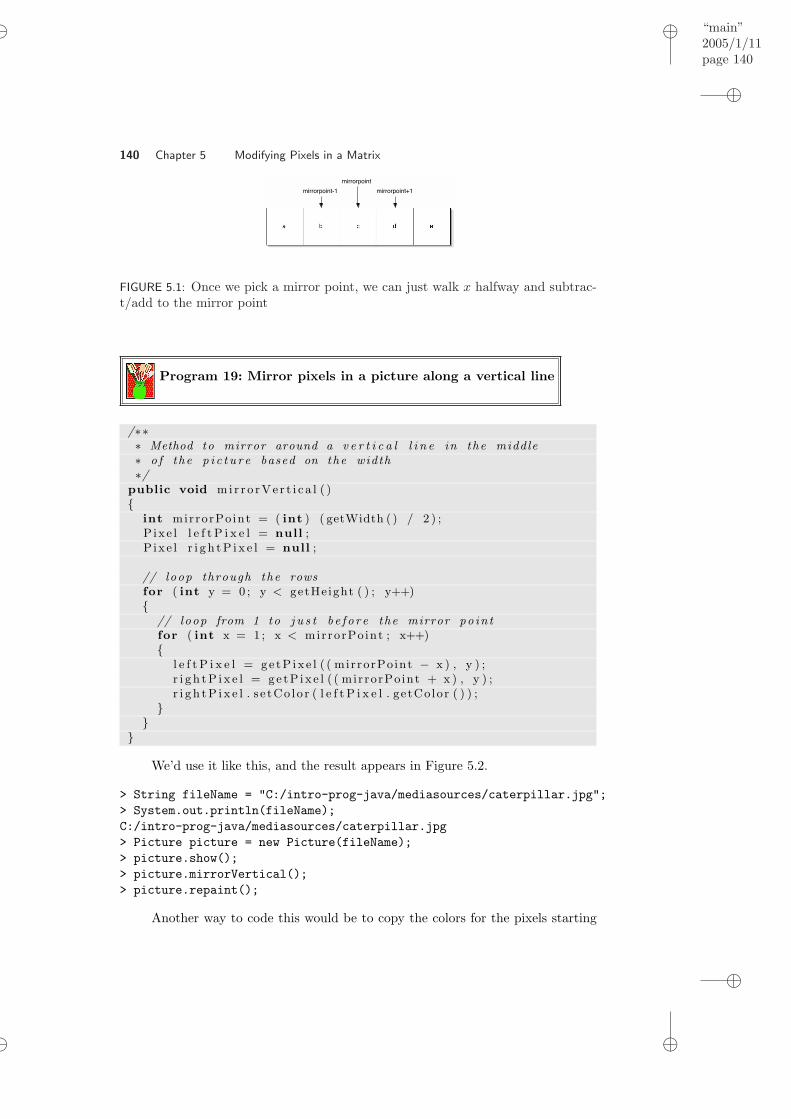
“main”2005/1/11page 140
i
i
i
i
i
i
i
i
140 Chapter 5 Modifying Pixels in a Matrix
a b c d e
mirrorpointmirrorpoint-1 mirrorpoint+1
FIGURE 5.1: Once we pick a mirror point, we can just walk x halfway and subtrac-t/add to the mirror point
Program 19: Mirror pixels in a picture along a vertical line
/∗∗∗ Method to mirror around a v e r t i c a l l i n e in the middle∗ o f the p i c t u r e based on the width∗/
public void mi r r o rVe r t i c a l ( ){
int mirrorPoint = ( int ) ( getWidth ( ) / 2 ) ;P ixe l l e f t P i x e l = null ;P ixe l r i g h tP i x e l = null ;
// loop through the rowsfor ( int y = 0 ; y < getHeight ( ) ; y++){
// loop from 1 to j u s t b e f o r e the mirror po in tfor ( int x = 1 ; x < mirrorPoint ; x++){
l e f t P i x e l = ge tP ix e l ( ( mirrorPoint − x ) , y ) ;r i g h tP i x e l = ge tP ix e l ( ( mirrorPoint + x ) , y ) ;r i g h tP i x e l . s e tCo lo r ( l e f t P i x e l . getColor ( ) ) ;
}}
}
We’d use it like this, and the result appears in Figure 5.2.
> String fileName = "C:/intro-prog-java/mediasources/caterpillar.jpg";> System.out.println(fileName);C:/intro-prog-java/mediasources/caterpillar.jpg> Picture picture = new Picture(fileName);> picture.show();> picture.mirrorVertical();> picture.repaint();
Another way to code this would be to copy the colors for the pixels starting

‘‘main’’2005/1/11page 141
i
i
i
i
i
i
i
i
Section 5.1 Copying Pixels 141
FIGURE 5.2: Original picture (left) and mirrored along the vertical axis (right)
with the left-most x (x=0) into the right-most pixel (width - 1). To do this have xrange from 0 to less than the mirrorPoint and copy it to (width - 1 - x).
Can we mirror horizontally? Sure!
Program 20: Mirror pixels horizontally, top-to-bottom
/∗∗∗ Method to mirror around a ho r i z on t a l l i n e in the middle∗ based on the h e i g h t . I t cop i e s the top mirrored to∗ the bottom∗/
public void mir ro rHor i zonta l ( ){
int mirrorPoint = ( int ) ( getHeight ( ) / 2 ) ;P ixe l topPixe l = null ;P ixe l bottomPixel = null ;
// loop through the columnsfor ( int x=0; x < getWidth ( ) ; x++){
// loop from 1 to j u s t b e f o r e the mirror po in tfor ( int y=1; y < mirrorPoint ; y++){
topPixe l = ge tP ix e l (x , ( mirrorPoint − y ) ) ;bottomPixel = ge tP ix e l (x , ( mirrorPoint + y ) ) ;bottomPixel . s e tCo lo r ( topPixe l . getColor ( ) ) ;
}}
}
We’d use it like this, and the result appears in Figure 5.3.
> String fileName = "C:/intro-prog-java/mediasources/redMotorcycle.jpg";> System.out.println(fileName);C:/intro-prog-java/mediasources/redMotorcycle.jpg> Picture picture = new Picture(fileName);> picture.show();> picture.mirrorHorizontal();

“main”2005/1/11page 142
i
i
i
i
i
i
i
i
142 Chapter 5 Modifying Pixels in a Matrix
> picture.repaint();
Now this last method copies from the top of the picture onto the bottom (seeFigure 5.3). You can see that we’re getting the color from topPixel which is frommirrorPoint - y–that will always be above mirrorPoint since smaller values of yare nearer the top of the picture. To copy from the bottom up, simply change thecolor at the top pixel to the color of the bottom pixel. (Figure 5.3).
Program 21: Mirror pixels horizontally, bottom-to-top
/∗∗∗ Method to mirror around a ho r i z t o n a l l i n e in the middle∗ based on the h e i g h t o f the p i c t u r e . I t cop i e s the bottom∗ to the top .∗/
public void mirrorHorizontalBottomToTop ( ){
int mirrorPoint = ( int ) ( getHeight ( ) / 2 ) ;P ixe l topPixe l = null ;P ixe l bottomPixel = null ;
// loop through the columnsfor ( int x=0; x < getWidth ( ) ; x++){
// loop from 1 to j u s t b e f o r e the mirror po in tfor ( int y=1; y < mirrorPoint ; y++){
topPixe l = ge tP ix e l (x , ( mirrorPoint − y ) ) ;bottomPixel = ge tP ix e l (x , ( mirrorPoint + y ) ) ;topPixe l . s e tCo lo r ( bottomPixel . getColor ( ) ) ;
}}
}
We’d use it like this, and the result appears in Figure 5.3.
> String fileName = "C:/intro-prog-java/mediasources/redMotorcycle.jpg";> Picture picture = new Picture(fileName);> picture.show();> picture.mirrorHorizontalBottomToTop();> picture.repaint();
Mirroring Usefully.While mirroring is probably mostly used for interesting effects, occasionally it
has some more serious (but still fun!) purposes. Mark took a picture of the Templeof Hephaistos which is in the ancient agora in Athens, Greece, when traveling toa conference (Figure 5.4). By sheer luck, Mark got the pediment dead horizontal.

“main”2005/1/11page 143
i
i
i
i
i
i
i
i
Section 5.1 Copying Pixels 143
FIGURE 5.3: A motorcycle mirrored horizontally, top to bottom (left) and bottomto top (right)
The Temple of Hephaistos had its pediment damaged. Mark wondered if he could“fix” it by mirroring the good part onto the broken part.
This time we don’t want to mirror one-half of the picture onto the other half.We just want to mirror the pixels from the good side of the pediment on the leftonto the bad side on the right. We also don’t want to mirror all the pixels in the ydirection. We just need the pixels from the top of the pediment to the bottom ofthe pediment. We can use the explorer to find out the value for those pixels (Figure5.5). The pediment starts at x=13 and the middle is at x=276. The highest partof the pediment is at y=27 and it ends at y=97.
FIGURE 5.4: Temple of Hephaistos from the ancient agora in Athens, Greece
How do we mirror just a small part of a picture? Well, we still need a point tomirror around. We will use 276 for that instead of half the width like we did in themethod mirrorVertical(). Let’s start by copying the mirrorVertical() methodand changing the name to mirrorPartVertical() and setting the mirror point to thevalue 276. We also don’t want to stop when x gets all the way to the mirror point.We just want to copy from x=13 to x¡276. We can start x at 1 and copy while xis less than the number of pixels to copy (276-13=263). We can start y at the topof the pediment 27 (instead of 0) and copy while it is less than 97 (instead of the

‘‘main’’2005/1/11page 144
i
i
i
i
i
i
i
i
144 Chapter 5 Modifying Pixels in a Matrix
FIGURE 5.5: Coordinates where we need to do the mirroring
height of the picture).
Program 22: Mirror Part of a Picture Vertically
/∗∗∗ Method to mirror par t o f the p i c t u r e around a v e r t i c a l l i n e∗ at a mirror po in t∗/
public void mir ro rPar tVer t i c a l ( ){
int mirrorPoint = 276 ;P ixe l l e f t P i x e l = null ;P ixe l r i g h tP i x e l = null ;
// loop through the rowsfor ( int y = 27 ; y < 97 ; y++){
// loop from 1 to j u s t b e f o r e the mirror po in tfor ( int x = 1 ; x < 263 ; x++){
l e f t P i x e l = ge tP ix e l ( ( mirrorPoint − x ) , y ) ;r i g h tP i x e l = ge tP ix e l ( ( mirrorPoint + x ) , y ) ;r i g h tP i x e l . s e tCo lo r ( l e f t P i x e l . getColor ( ) ) ;
}}
}
To use this method try this.
> String fileName = "C:/intro-prog-java/mediasources/temple.jpg";

“main”2005/1/11page 145
i
i
i
i
i
i
i
i
Section 5.1 Copying Pixels 145
> Picture picture = new Picture(fileName);> picture.explore();> picture.mirrorPartVertical();> picture.explore();
The final picture is in (Figure 5.6)–it worked pretty well! Of course, it ispossible to tell that it was digitally manipulated. For example, if you check theshadows, you can see that the sun must have been on the left and the right at thesame time.
FIGURE 5.6: The manipulated temple
You may be tired of typing the full path name to each file. You can save thename of the directory that has your media in it and then use FileChooser.getMediaPath(fileName)to get the full path name. The method FileChooser.getMediaPath(fileName)generates a complete path for you by returning a string with the saved directoryname followed by the base file name. The default media directory is “c:/intro-prog-java/mediasources/”. If you wish to use a different media directory you should exe-cute FileChooser.setMediaPath(directory ) first!. FileChooser.setMediaPath(directory)lets you specify the place (directory) where you store your media.
The temple example is a good one to ask ourselves about. If you reallyunderstand, you can answer questions like “What’s the first pixel to be mirroredin this function?” and “How many pixels get copied anyway?” You should be ableto figure these out by thinking through the program–pretend you’re the computerand execute the program in your mind.
If that’s too hard, you can insert System.out.println() statements, likethis:
/∗∗∗ Method to mirror par t o f the p i c t u r e around a v e r t i c a l l i n e∗ at a mirror po in t∗/
public void mir ro rPar tVer t i c a l ( )

“main”2005/1/11page 146
i
i
i
i
i
i
i
i
146 Chapter 5 Modifying Pixels in a Matrix
{int mirrorPoint = 276 ;P ixe l l e f t P i x e l = null ;P ixe l r i g h tP i x e l = null ;int count = 0 ;
// loop through the rowsfor ( int y = 27 ; y < 97 ; y++){
// loop from 1 to j u s t b e f o r e the mirror po in tfor ( int x = 1 ; x < 263 ; x++){
System . out . p r i n t l n ( ” copying c o l o r from ” +mirrorPoint − x” ) ;
l e f t P i x e l = ge tP ix e l ( ( mirrorPoint − x ) , y ) ;System . out . p r i n t l n ( ” to ” + mirrorPoint + x” ) ;r i g h tP i x e l = ge tP ix e l ( ( mirrorPoint + x ) , y ) ;r i g h tP i x e l . s e tCo lo r ( l e f t P i x e l . getColor ( ) ) ;count = count + 1 ;
}}System . out . p r i n t l n ( ”We copied ” + count + ” p i x e l s ” ) ;
}When we run this version, it takes a long time to finish. Hit Reset after a
little bit since we only really care about the first few pixels. Here’s what we got:
> Picture.mirrorTemple();Copying color from 275,27 to 277,27
Copying color from 275,28 to 277,28
Copying color from 275,29 to 277,29
Copying color from 275,30 to 277,30
It copies from just to the left of the mirror point (276), since x is 1 at first,and we copy from mirrorpoint-x to mirrorpoint+x. Thus, we copy down thecolumn before the mirror point to the column of pixels to the right of the mirrorpoint. Then we move back one column to the left, and copy one column further tothe right.
How many pixels did we process? We can have the computer figure that oneout, too.
/∗∗∗ Method to mirror par t o f the p i c t u r e around a v e r t i c a l l i n e∗ at a mirror po in t∗/
public void mir ro rPar tVer t i c a l ( ){
int mirrorPoint = 276 ;

“main”2005/1/11page 147
i
i
i
i
i
i
i
i
Section 5.2 Copying and Transforming Pictures 147
Pixe l l e f t P i x e l = null ;P ixe l r i g h tP i x e l = null ;int count = 0 ;
// loop through the rowsfor ( int y = 27 ; y < 97 ; y++){
// loop from 1 to j u s t b e f o r e the mirror po in tfor ( int x = 1 ; x < 263 ; x++){
l e f t P i x e l = ge tP ix e l ( ( mirrorPoint − x ) , y ) ;r i g h tP i x e l = ge tP ix e l ( ( mirrorPoint + x ) , y ) ;r i g h tP i x e l . s e tCo lo r ( l e f t P i x e l . getColor ( ) ) ;count = count + 1 ;
}}System . out . p r i n t l n ( ”We copied ” + count + ” p i x e l s ” ) ;
}This one comes back with We copied 18340 pixels. Where did that number
come from? You can calculate how many times you execute the commands in a forloop with end - start + 1. We copy 70 rows of pixels (y goes from 27 to 96 (becauseof the < 97) which is 96− 27 + 1. We copy 262 columns of pixels (x goes from 1 to< 263 which is 262− 1 + 1 = 262). 70 ∗ 262 is 18, 340.
5.2 COPYING AND TRANSFORMING PICTURES
We can even copy from one picture to another. We’re going to end up keeping trackof a source picture that we take pixels from and a target picture that we’re goingto set pixels in. Actually, we don’t copy the pixels–we simply make the pixels inthe target the same color as the pixels in the source. Copying pixels requires uskeep track of multiple index variables: The (x, y) positions in the source and the(x, y) in the target.
What’s exciting about copying pixels is that making some small changes inhow we deal with the index variables leads to not only copying the image but trans-forming it. In this section, we’re going to talk about copying, cropping, rotating,and scaling pictures.
We’re going to use FileChooser.getMediaPath(fileName). We’ve seen itbefore. It’s particularly helpful when you want to deal with several pieces of mediain the same directory but don’t want to spell out the whole directory name. Youjust have to remember to use FileChooser.setMediaPath(directory) first! Allthat this method does is return the media directory followed by the input filename.To set the media directory use: FileChooser.setMediaPath(directory).
> FileChooser.setMediaPath("C:/intro-prog-java/mediasources/");> FileChooser.getMediaPath("temple.jpg")"C:/intro-prog-java/mediasources/temple.jpg"> Picture temple = new Picture(FileChooser.getMediaPath("temple.jpg"));
Our target will be the paper-sized JPEG file in the mediasources directory,

“main”2005/1/11page 148
i
i
i
i
i
i
i
i
148 Chapter 5 Modifying Pixels in a Matrix
which is 7x9.5 inches, which will fit on a 9x11.5 inch lettersize piece of paper withone inch margins.
> String paperFile = FileChooser.getMediaPath("7inx95in.jpg");> Picture paperPicture = new Picture(paperFile);> paperPicture.show();> System.out.println(paperPicture.getWidth());504> System.out.println(paperPicture.getHeight());684
5.2.1 Copying
To copy a picture we simply make sure that we increment sourceX and targetXvariables (the source and target index variables for the X axis) together, and thesourceY and targetY variables together. We can initialize more than one variablein the initialization area of a for loop and change more than one variable in thechange area.
Here’s a program for copying a picture of Katie to the current picture.
Program 23: Copying a picture to the current picture
/∗∗∗ Method to copy the p i c t u r e o f Katie to the∗ upper l e f t corner o f the curren t p i c t u r e∗/
public void copyKatie ( ){
St r ing s ou r c eF i l e =Fi leChooser . getMediaPath ( ”KatieFancy . jpg ” ) ;
P i c ture sou r c eP i c tu r e = new Picture ( s ou r c eF i l e ) ;P ixe l s ou r c eP ix e l = null ;P ixe l t a r g e tP i x e l = null ;
// loop through the columnsfor ( int sourceX = 0 , targetX=0;
sourceX < s ou r c eP i c tu r e . getWidth ( ) ;sourceX++, targetX++)
{// loop through the rowsfor ( int sourceY = 0 , targetY =0;
sourceY < s ou r c eP i c tu r e . getHeight ( ) ;sourceY++, targetY++)
{// s e t the t a r g e t p i x e l c o l o r to the source p i x e l c o l o rs ou r c eP ix e l = sourc eP i c tu r e . g e tP ix e l ( sourceX , sourceY ) ;t a r g e tP i x e l = this . g e tP ix e l ( targetX , targetY ) ;t a r g e tP i x e l . s e tCo lo r ( s ou r c eP ix e l . getColor ( ) ) ;
}
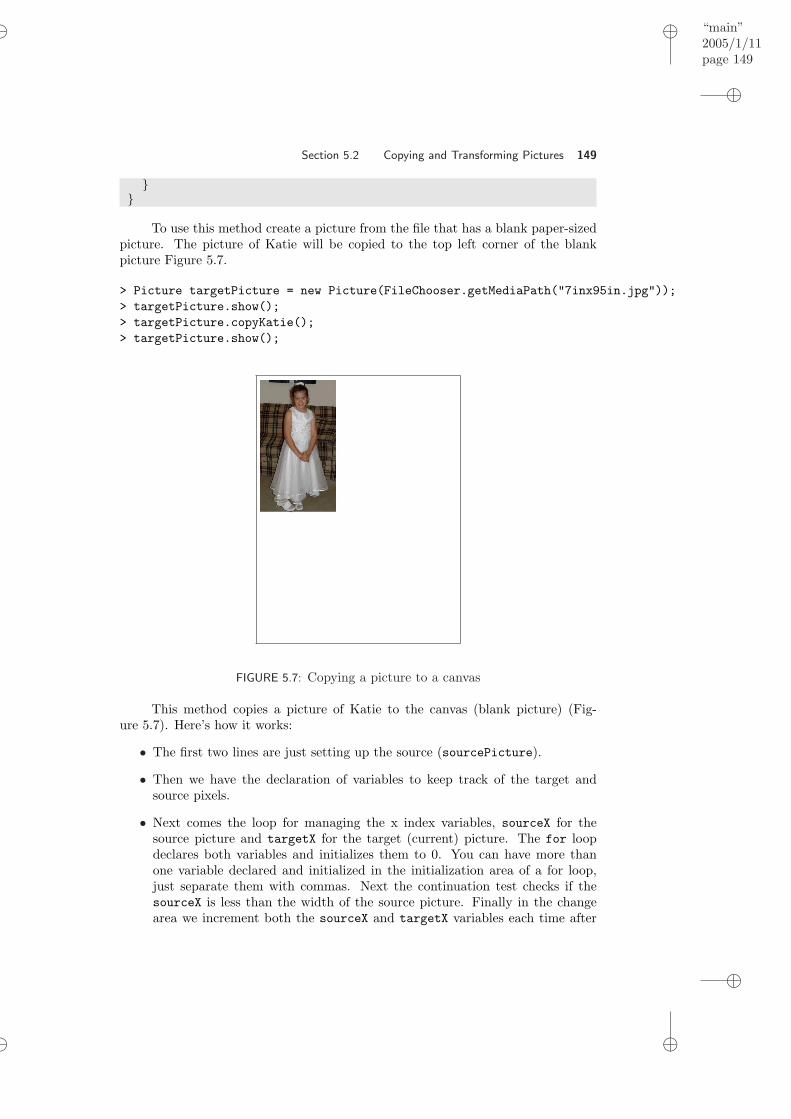
“main”2005/1/11page 149
i
i
i
i
i
i
i
i
Section 5.2 Copying and Transforming Pictures 149
}}
To use this method create a picture from the file that has a blank paper-sizedpicture. The picture of Katie will be copied to the top left corner of the blankpicture Figure 5.7.
> Picture targetPicture = new Picture(FileChooser.getMediaPath("7inx95in.jpg"));> targetPicture.show();> targetPicture.copyKatie();> targetPicture.show();
FIGURE 5.7: Copying a picture to a canvas
This method copies a picture of Katie to the canvas (blank picture) (Fig-ure 5.7). Here’s how it works:
• The first two lines are just setting up the source (sourcePicture).
• Then we have the declaration of variables to keep track of the target andsource pixels.
• Next comes the loop for managing the x index variables, sourceX for thesource picture and targetX for the target (current) picture. The for loopdeclares both variables and initializes them to 0. You can have more thanone variable declared and initialized in the initialization area of a for loop,just separate them with commas. Next the continuation test checks if thesourceX is less than the width of the source picture. Finally in the changearea we increment both the sourceX and targetX variables each time after

“main”2005/1/11page 150
i
i
i
i
i
i
i
i
150 Chapter 5 Modifying Pixels in a Matrix
the statements in the body of the loop have been executed. You can changemore than one variable in the change area as long as you separate the changeswith commas. The for loop for looping through the columns is:
for ( int sourceX = 0 , targetX=0;sourceX < s ou r c eP i c tu r e . getWidth ( ) ;sourceX++, targetX++)
• Inside the loop for the X variables is the loop for the Y variables. It has avery similar structure, since it’s goal is to keep targetY and sourceY in synchin exactly the same way.
for ( int sourceY = 0 , targetY =0;sourceY < s ou r c eP i c tu r e . getHeight ( ) ;sourceY++, targetY++)
It’s inside the Y loop that we actually get the color from the source pixel andset the corresponding pixel in the target (current picture) to the same color.
FIGURE 5.8: Copying a picture midway into a canvas
Of course, we don’t have to copy from (0, 0) in the source to (0, 0) in thetarget. We can easily copy to another location in the target picture. All we have todo is to change where the target X and Y coordinates start. The rest stays exactlythe same (Figure 5.8).
Program 24: Copy elsewhere into the current picture

“main”2005/1/11page 151
i
i
i
i
i
i
i
i
Section 5.2 Copying and Transforming Pictures 151
/∗∗∗ Method to copy the p i c t u r e o f Katie to (100 ,100) in the∗ current p i c t u r e∗/
public void copyKatieMidway ( ){
St r ing s ou r c eF i l e =Fi leChooser . getMediaPath ( ”KatieFancy . jpg ” ) ;
P i c ture sou r c eP i c tu r e = new Picture ( s ou r c eF i l e ) ;P ixe l s ou r c eP ix e l = null ;P ixe l t a r g e tP i x e l = null ;
// loop through the columnsfor ( int sourceX = 0 , targetX =100;
sourceX < s ou r c eP i c tu r e . getWidth ( ) ;sourceX++, targetX++)
{// loop through the rowsfor ( int sourceY = 0 , targetY =100;
sourceY < s ou r c eP i c tu r e . getHeight ( ) ;sourceY++, targetY++)
{// s e t the t a r g e t p i x e l c o l o r to the source p i x e l c o l o rs ou r c eP ix e l = sourc eP i c tu r e . g e tP ix e l ( sourceX , sourceY ) ;t a r g e tP i x e l = this . g e tP ix e l ( targetX , targetY ) ;t a r g e tP i x e l . s e tCo lo r ( s ou r c eP ix e l . getColor ( ) ) ;
}}
}
To try this method create the target picture from the blank paper-sized picturefile, invoke the method on it, and show the result. The picture of Katie will becopied with the upper left corner at (100, 100).
> Picture targetPicture = new Picture(FileChooser.getMediaPath("7inx95in.jpg"));> targetPicture.copyKatieMidway();> targetPicture.show();
Similarly, we don’t have to copy a whole picture. Cropping is taking only partof a picture out of the whole picture. Digitally, that’s just a matter of changingyour start and end coordinates. To grab just Katie’s face out of the picture, we onlyhave to figure out the upper left corner of a rectangle enclosing her face and usethat as the staring values for sourceX and sourceY. We also need to determine thebottom right corner of the rectangle enclosing her face and use that as the stoppingx and y values. (Figure 5.9). We can use the picture explorer to determine thesevalues. The upper left corner of the rectangle enclosing the face is at (70, 3) andthe bottom right corner is at (135, 80).

“main”2005/1/11page 152
i
i
i
i
i
i
i
i
152 Chapter 5 Modifying Pixels in a Matrix
FIGURE 5.9: Copying part of a picture onto a canvas
Program 25: Cropping a picture onto a canvas
/∗∗∗ Method to copy j u s t Katie ’ s f a ce to the current p i c t u r e∗/
public void copyKatiesFace ( ){
St r ing s ou r c eF i l e =Fi leChooser . getMediaPath ( ”KatieFancy . jpg ” ) ;
P i c ture sou r c eP i c tu r e = new Picture ( s ou r c eF i l e ) ;P ixe l s ou r c eP ix e l = null ;P ixe l t a r g e tP i x e l = null ;
// loop through the columnsfor ( int sourceX = 70 , targetX = 100 ;
sourceX < 135 ; sourceX++, targetX++){
// loop through the rowsfor ( int sourceY = 3 , targetY = 100 ;
sourceY < 80 ; sourceY++, targetY++){
// s e t the t a r g e t p i x e l c o l o r to the source p i x e l c o l o rs ou r c eP ix e l = sourc eP i c tu r e . g e tP ix e l ( sourceX , sourceY ) ;t a r g e tP i x e l = this . g e tP ix e l ( targetX , targetY ) ;

“main”2005/1/11page 153
i
i
i
i
i
i
i
i
Section 5.2 Copying and Transforming Pictures 153
t a r g e tP i x e l . s e tCo lo r ( s ou r c eP ix e l . getColor ( ) ) ;}
}}
To try this method create the target picture from the blank paper-sized picturefile, invoke the method on it, and show the result. Just Katie’s face will be copiedto the target picture with the upper left corner at (100, 100).
> Picture targetPicture = new Picture(FileChooser.getMediaPath("7inx95in.jpg"));> targetPicture.copyKatiesFace();> targetPicture.show();
Try to copy part of another picture to the blank paper-sized picture file. Whatdo you need to change and what can stay the same?
How Does That Work?.Let’s look at a small example to see what’s going on in the copying program.
We start out with a source and a target, and copy from x=0, y=0 to x=3, y=1.
We then increment both the sourceY and targetY, and copy again.
We continue down the column, incrementing both Y index variables.
When done with that column, we increment the X index variables and moveon to the next column, until we copy every pixel.

“main”2005/1/11page 154
i
i
i
i
i
i
i
i
154 Chapter 5 Modifying Pixels in a Matrix
5.2.2 Creating a Collage
In the mediasources folder are a couple images of flowers (Figure 5.10), each 100pixels wide. Let’s make a collage of them, by combining several of our effects tocreate different flowers. We’ll copy them all into the blank image 640x480.jpg. Allwe really have to do is to copy the pixel colors to the right places.
FIGURE 5.10: Flowers in the mediasources folder
Program 26: Creating a collage by copying flowers
/∗∗∗ Method to copy f l owe r p i c t u r e s to c r ea t e a c o l l a g e .∗ Al l the f l owe r p i c t u r e s w i l l be l i n e d up near the∗ bottom of the current p i c t u r e (5 p i x e l s from the bottom )∗/
public void copyFlowers ( ){
// c rea t e the f l owe r p i c t u r e sPicture f l owe r1P i c tu r e =
new Picture ( Fi l eChooser . getMediaPath ( ” f l ower1 . jpg ” ) ) ;P i c ture f l owe r2P i c tu r e =
new Picture ( Fi l eChooser . getMediaPath ( ” f l ower2 . jpg ” ) ) ;
// dec l a r e the source and t a r g e t p i x e l v a r i a b l e sPixe l s ou r c eP ix e l = null ;P ixe l t a r g e tP i x e l = null ;
// save the h e i g h t s o f the two p i c t u r e sint f l ower1He ight = f l owe r1P i c tu r e . getHeight ( ) ;

“main”2005/1/11page 155
i
i
i
i
i
i
i
i
Section 5.2 Copying and Transforming Pictures 155
int f l ower2He ight = f l owe r2P i c tu r e . getHeight ( ) ;
/∗ copy the f i r s t f l owe r p i c t u r e to 5 p i x e l s from the bottom∗ l e f t corner o f the current p i c t u r e∗/
for ( int sourceX = 0 , targetX = 0 ;sourceX < f l owe r1P i c tu r e . getWidth ( ) ;sourceX++, targetX++)
{for ( int sourceY = 0 ,
targetY = this . getHeight ( ) − f l ower1He ight − 5 ;sourceY < f l owe r1P i c tu r e . getHeight ( ) ;sourceY++, targetY++)
{s ou r c eP ix e l = f l owe r1P i c tu r e . g e tP ix e l ( sourceX , sourceY ) ;t a r g e tP i x e l = this . g e tP ix e l ( targetX , targetY ) ;t a r g e tP i x e l . s e tCo lo r ( s ou r c eP ix e l . getColor ( ) ) ;
}}
// copy the f l ower2 p i c t u r e s t a r t i n g wi th x = 100for ( int sourceX = 0 , targetX = 100 ;
sourceX < f l owe r2P i c tu r e . getWidth ( ) ;sourceX++, targetX++)
{for ( int sourceY = 0 ,
targetY = this . getHeight ( ) − f l ower2He ight − 5 ;sourceY < f l owe r2P i c tu r e . getHeight ( ) ;sourceY++, targetY++)
{s ou r c eP ix e l = f l owe r2P i c tu r e . g e tP ix e l ( sourceX , sourceY ) ;t a r g e tP i x e l = this . g e tP ix e l ( targetX , targetY ) ;t a r g e tP i x e l . s e tCo lo r ( s ou r c eP ix e l . getColor ( ) ) ;
}}
// copy the f l ower1 negated to x = 200f l owe r1P i c tu r e . negate ( ) ;for ( int sourceX = 0 , targetX = 200 ;
sourceX < f l owe r1P i c tu r e . getWidth ( ) ;sourceX++, targetX++)
{for ( int sourceY = 0 ,
targetY = this . getHeight ( ) − f l ower1He ight − 5 ;sourceY < f l owe r1P i c tu r e . getHeight ( ) ;sourceY++, targetY++)
{s ou r c eP ix e l = f l owe r1P i c tu r e . g e tP ix e l ( sourceX , sourceY ) ;t a r g e tP i x e l = this . g e tP ix e l ( targetX , targetY ) ;t a r g e tP i x e l . s e tCo lo r ( s ou r c eP ix e l . getColor ( ) ) ;
}

“main”2005/1/11page 156
i
i
i
i
i
i
i
i
156 Chapter 5 Modifying Pixels in a Matrix
}
// c l e a r the b l u e in f l owe r 2 p i c t u r e and add at x=300f l owe r2P i c tu r e . c l e a rB lue ( ) ;for ( int sourceX = 0 , targetX = 300 ;
sourceX < f l owe r2P i c tu r e . getWidth ( ) ;sourceX++, targetX++)
{for ( int sourceY = 0 ,
targetY = this . getHeight ( ) − f l ower2He ight − 5 ;sourceY < f l owe r2P i c tu r e . getHeight ( ) ;sourceY++, targetY++)
{s ou r c eP ix e l = f l owe r2P i c tu r e . g e tP ix e l ( sourceX , sourceY ) ;t a r g e tP i x e l = this . g e tP ix e l ( targetX , targetY ) ;t a r g e tP i x e l . s e tCo lo r ( s ou r c eP ix e l . getColor ( ) ) ;
}}
// copy the negated f l owe r 1 to x=400for ( int sourceX = 0 , targetX = 400 ;
sourceX < f l owe r1P i c tu r e . getWidth ( ) ;sourceX++, targetX++)
{for ( int sourceY = 0 ,
targetY = this . getHeight ( ) − f l ower1He ight − 5 ;sourceY < f l owe r1P i c tu r e . getHeight ( ) ;sourceY++, targetY++)
{s ou r c eP ix e l = f l owe r1P i c tu r e . g e tP ix e l ( sourceX , sourceY ) ;t a r g e tP i x e l = this . g e tP ix e l ( targetX , targetY ) ;t a r g e tP i x e l . s e tCo lo r ( s ou r c eP ix e l . getColor ( ) ) ;
}}
}
Here’s how we run the collage(Figure 5.11):
> Picture targetPicture = new Picture(FileChooser.getMediaPath("7inx95in.jpg"));> targetPicture.copyFlowers();> targetPicture.show();
This method is long and repetitive which makes it hard to read. One of theways to improve it is to pull out pieces of code that are basically the same andmake new methods. Each time we add a new picture to our canvas the only thingschanging are the picture to be added and the targetX. The targetY is alwayscalculated the same way as the height of the canvas minus the height of the picturebeing copied minus 5.
Let’s write a new more general method that is passed the picture to copy andthe x location to start copying it to. For the y location let’s put it 5 pixels fromthe bottom of the current picture.

“main”2005/1/11page 157
i
i
i
i
i
i
i
i
Section 5.2 Copying and Transforming Pictures 157
FIGURE 5.11: Collage of flowers
/∗∗∗ Method t ha t w i l l copy a l l o f the passed source p i c t u r e in t o∗ the current p i c t u r e o b j e c t s t a r t i n g wi th the l e f t corner∗ g iven by xS ta r t . I t w i l l put the sourcePic ture at 5 p i x e l s∗ from the bottom of t h i s p i c t u r e∗ @param sourcePic ture the p i c t u r e o b j e c t to copy∗ @param xS ta r t the x p o s i t i o n to s t a r t the copy in the t a r g e t∗/
public void copyPictureTo ( Pic ture sourceP ic ture ,int xStart )
{Pixe l s ou r c eP ix e l = null ;P ixe l t a r g e tP i x e l = null ;
// loop through the columnsfor ( int sourceX = 0 , targetX = xStart ;
sourceX < s ou r c eP i c tu r e . getWidth ( ) ;sourceX++, targetX++)
{// loop through the rowsfor ( int sourceY = 0 ,
targetY = this . getHeight ( ) −s ou r c eP i c tu r e . getHeight ( ) − 5 ;
sourceY < s ou r c eP i c tu r e . getHeight ( ) ;sourceY++, targetY++)
{s ou r c eP ix e l = sourc eP i c tu r e . g e tP ix e l ( sourceX , sourceY ) ;t a r g e tP i x e l = this . g e tP ix e l ( targetX , targetY ) ;t a r g e tP i x e l . s e tCo lo r ( s ou r c eP ix e l . getColor ( ) ) ;
}}

“main”2005/1/11page 158
i
i
i
i
i
i
i
i
158 Chapter 5 Modifying Pixels in a Matrix
}
/∗∗∗ Method to copy two f l owe r s in a pa t t e rn to the∗ bottom (5 p i x e l s from bottom ) o f the curren t p i c t u r e∗/
public void copyFlowersBetter ( ){
// c r ea t e the t h r e e p i c t u r e sPicture f l owe r1P i c tu r e =
new Picture ( Fi l eChooser . getMediaPath ( ” f l ower1 . jpg ” ) ) ;P i c ture f l owe r2P i c tu r e =
new Picture ( Fi l eChooser . getMediaPath ( ” f l ower2 . jpg ” ) ) ;
// copy the f i r s t f l owe r p i c t u r e to near the// bottom l e f t corner o f the canvasthis . copyPictureTo ( f l ower1P ic ture , 0 ) ;
/∗ copy the f l ower2 p i c t u r e s t a r t i n g wi th∗ x = 100 in the canvas∗/
this . copyPictureTo ( f l ower2P ic ture , 1 0 0 ) ;
// copy the f l ower1 negated to x = 200 in the canvasf l owe r1P i c tu r e . negate ( ) ;this . copyPictureTo ( f l ower1P ic ture , 2 0 0 ) ;
/∗ c l e a r the b l u e in f l owe r 2 p i c t u r e and∗ add at x=300 in the canvas∗/
f l owe r2P i c tu r e . c l e a rB lue ( ) ;this . copyPictureTo ( f l ower2P ic ture , 3 0 0 ) ;
// copy the negated f l owe r 1 to x=400this . copyPictureTo ( f l ower1P ic ture , 4 0 0 ) ;
}The method copyFlowersBetter is much easier to read and understand now.
And, we now have a method copyPictureTo which is easy to reuse.We can even make a more general copy method which takes both the starting
x and starting y values for the target picture and copies the passed source pictureinto the current picture with the source pictures upper left corner at the passedstarting x and y values in the target.
/∗∗∗ Method t ha t w i l l copy a l l o f the passed source p i c t u r e in t o∗ the current p i c t u r e o b j e c t s t a r t i n g wi th the l e f t corner∗ g iven by xStar t , yS ta r t∗ @param sourcePic ture the p i c t u r e o b j e c t to copy∗ @param xS ta r t the x p o s i t i o n to s t a r t the copy in t o on the

“main”2005/1/11page 159
i
i
i
i
i
i
i
i
Section 5.2 Copying and Transforming Pictures 159
∗ t a r g e t∗ @param yS ta r t the y po s i t i o n to s t a r t the copy in to on the∗ t a r g e t∗/
public void copyPictureTo ( Pic ture sourceP ic ture ,int xStart ,int yStart )
{Pixe l s ou r c eP ix e l = null ;P ixe l t a r g e tP i x e l = null ;
// loop through the columnsfor ( int sourceX = 0 , targetX = xStart ;
sourceX < s ou r c eP i c tu r e . getWidth ( ) ;sourceX++, targetX++)
{// loop through the rowsfor ( int sourceY = 0 ,
targetY = yStart ;sourceY < s ou r c eP i c tu r e . getHeight ( ) ;sourceY++, targetY++)
{s ou r c eP ix e l = sourc eP i c tu r e . g e tP ix e l ( sourceX , sourceY ) ;t a r g e tP i x e l = this . g e tP ix e l ( targetX , targetY ) ;t a r g e tP i x e l . s e tCo lo r ( s ou r c eP ix e l . getColor ( ) ) ;
}}
}
Notice that you can have two methods with the same names (like copyPictureTo)and you don’t have any trouble when you compile. How can that be? Java allowsyou to have many methods with the same method name as long as the parametersare different. The first copyPictureTo method took a Picture object and an int.The second copyPictureTo method took a Picture object, and two int values.So the two methods have a different number of parameters. Having more thanone method with the same name but different parameters is called overloading . Itdoesn’t really matter what you name the parameters. What matters in the types.Two methods with the same name are allowed if the number of parameters is dif-ferent, or the types of the parameters are different, or the order of the parametertypes is different.
5.2.3 Blending Pictures
When we create collages by copying, any overlap typically means that one pictureshows over another. The last picture painted on is the one that appears. But itdoesn’t have to be that way. We can blend pictures by multiplying their colors andadding them. This gives us the effect of transparency .
We know that 100% of something is the whole thing. 50% of one and 50% ofanother would also add up to 100%. In the program below, we blend a picture of

“main”2005/1/11page 160
i
i
i
i
i
i
i
i
160 Chapter 5 Modifying Pixels in a Matrix
the two sisters with an overlap of some 50 (the width of Katie minus 150) columnsof pixels (Figure 5.12) onto the current picture.
Program 27: Blending two pictures
/∗∗∗ Method to b l end two s i s t e r s t o g e t h e r onto the current∗ p i c t u r e∗/
public void b l endPic ture s ( ){
// c rea t e the s i s t e r p i c t u r e sPicture ka t i eP i c t u r e =
new Picture ( Fi l eChooser . getMediaPath ( ”KatieFancy . jpg ” ) ) ;P i c ture j ennyPic ture =
new Picture ( Fi l eChooser . getMediaPath ( ”JenParty . jpg ” ) ) ;
// dec l a r e the source and t a r g e t p i x e l v a r i a b l e sPixe l k a t i eP i x e l = null ;P ixe l j ennyPixe l = null ;P ixe l t a r g e tP i x e l = null ;
/∗ dec l a r e the t a r g e t x and source x s ince we w i l l need∗ the va l u e s a f t e r the∗/
// f o r loopint sourceX = 0 ;int targetX = 0 ;
// copy the f i r s t 150 p i x e l s o f k a t i e to the canvasfor ( ; sourceX < 150 ; sourceX++, targetX++){
for ( int sourceY=0, targetY=0;sourceY < ka t i eP i c tu r e . getHeight ( ) ;sourceY++, targetY++)
{ka t i eP i x e l = ka t i eP i c tu r e . g e tP ix e l ( sourceX , sourceY ) ;t a r g e tP i x e l = this . g e tP ix e l ( targetX , targetY ) ;t a r g e tP i x e l . s e tCo lo r ( k a t i eP i x e l . getColor ( ) ) ;
}}
/∗ copy 50% of k a t i e and 50% of jenny t i l l∗ the end o f k a t i e ’ s width∗/
for ( ; sourceX < ka t i eP i c tu r e . getWidth ( ) ;sourceX++, targetX++)
{

“main”2005/1/11page 161
i
i
i
i
i
i
i
i
Section 5.2 Copying and Transforming Pictures 161
for ( int sourceY=0, targetY=0;sourceY < ka t i eP i c tu r e . getHeight ( ) ;sourceY++, targetY++)
{ka t i eP i x e l = ka t i eP i c tu r e . g e tP ix e l ( sourceX , sourceY ) ;j ennyPixe l =
jennyPicture . g e tP ix e l ( sourceX − 150 , sourceY ) ;t a r g e tP i x e l = this . g e tP ix e l ( targetX , targetY ) ;t a r g e tP i x e l . s e tCo lo r (
new Color ( ( int ) ( k a t i eP i x e l . getRed ( ) ∗ 0 .5 +jennyPixe l . getRed ( ) ∗ 0 . 5 ) ,
( int ) ( k a t i eP i x e l . getGreen ( ) ∗ 0 .5 +jennyPixe l . getGreen ( ) ∗ 0 . 5 ) ,
( int ) ( k a t i eP i x e l . getBlue ( ) ∗ 0 .5 +jennyPixe l . getBlue ( ) ∗ 0 . 5 ) ) ) ;
}}
// copy the r e s t o f JennysourceX = sourceX − 150 ;for ( ; sourceX < j ennyPic ture . getWidth ( ) ;
sourceX++, targetX++){
for ( int sourceY = 0 , targetY = 0 ;sourceY < j ennyPic ture . getHeight ( ) ;sourceY++, targetY++)
{j ennyPixe l = jennyPic ture . g e tP ix e l ( sourceX , sourceY ) ;t a r g e tP i x e l = this . g e tP ix e l ( targetX , targetY ) ;t a r g e tP i x e l . s e tCo lo r ( j ennyPixe l . getColor ( ) ) ;
}}
}
To try this out create a picture object using the blank 640 by 480 file andinvoke the method on that. Show the result.
> Picture picture = new Picture(FileChooser.getMediaPath("640x480.jpg"));> picture.blendPictures();> picture.show();

“main”2005/1/11page 162
i
i
i
i
i
i
i
i
162 Chapter 5 Modifying Pixels in a Matrix
FIGURE 5.12: Blending the picture of Katie and Jenny
'
&
$
%
Making it Work Tip: Optional parts of the forloopNotice that we are missing the initialization area in thefor loops in the method blendPictures(). Also notice thatwe moved the declaration of sourceX and sourceY outsidethe loops. This is because we want to keep the valuesaround after the first loop ends. The initialization area ofa for loop is optional (the ’;’ is not optional). In fact, theinitialization area, continuation test, and change area areall optional. You could code a for loop as for (;;;) butthat isn’t terribly useful. It would execute the body of theloop forever. This is known as an infinite loop.
5.2.4 Rotation
Transformations to the image occur by using the index variables differently orincrementing them differently, but otherwise keeping the same program. Let’srotate Katie 90 degrees to the left. What does that mean? Let’s try it withsomething simple first. You can write some numbers in a table on a piece of paperand then rotate it left and then read the new table to see where the old numberswere moved to (Figure 5.13). Notice that the columns become the rows and therows the columns but it isn’t as simple as just using the source x for the target yand the source y for the target x.
Value (0,0) in the source moves to (0,2) in the target. Value (0,1) in thesource moves to (1,2) in the target. Value (1,0) in the source moves to (0,1) in thetarget. Value (1,1) in the source moves to (1,1) in the target. Value (2,0) in the

“main”2005/1/11page 163
i
i
i
i
i
i
i
i
Section 5.2 Copying and Transforming Pictures 163
source moves to (0,0) in the target. Value (2,1) in the source moves to (1,0) in thetarget. So the first column values move into the bottom row and the last columnvalues move into the top row. Also notice that the target x value is the same asthe source y value.
We will do the rotation by looping through the pixels in the usual way andgetting the source pixel in the usual way but the target pixel’s x value will be thesource y and the target pixel’s y value will be width of the source picture - 1 - thesource x (Figure 5.14).
654
321
41
52
630 1 2
0
1
0
0
1
1
2
FIGURE 5.13: Rotating some numbers in a table to the left 90 degrees
Program 28: Rotating a picture left 90 degrees
/∗∗∗ Method to copy the p i c t u r e o f Katie but r o t a t e∗ her l e f t 90 degrees on the curren t p i c t u r e∗/
public void copyKat ieLef tRotat ion ( ){
St r ing s ou r c eF i l e =Fi leChooser . getMediaPath ( ”KatieFancy . jpg ” ) ;
P i c ture sour c eP i c tu r e = new Picture ( s ou r c eF i l e ) ;P ixe l s ou r c eP ix e l = null ;P ixe l t a r g e tP i x e l = null ;
// loop through the columnsfor ( int sourceX = 0 ;
sourceX < s ou r c eP i c tu r e . getWidth ( ) ;sourceX++)
{// loop through the rowsfor ( int sourceY = 0 ;
sourceY < s ou r c eP i c tu r e . getHeight ( ) ;sourceY++)
{// s e t the t a r g e t p i x e l c o l o r to the source p i x e l c o l o r

“main”2005/1/11page 164
i
i
i
i
i
i
i
i
164 Chapter 5 Modifying Pixels in a Matrix
s ou r c eP ix e l = sourceP i c tu r e . g e tP ix e l ( sourceX , sourceY ) ;t a r g e tP i x e l = this . g e tP ix e l ( sourceY ,
sour c eP i c tu r e . getWidth ( ) − 1 − sourceX ) ;t a r g e tP i x e l . s e tCo lo r ( s ou r c eP ix e l . getColor ( ) ) ;
}}
}
To try this out create a picture from the blank paper-sized file and then invokethe method on it. Show the result.
> Picture picture = new Picture(FileChooser.getMediaPath("7inx95in.jpg"));> picture.copyKatieLeftRotation();> picture.show();
FIGURE 5.14: Copying a picture to a blank page rotated to the left 90 degrees
How Does That Work?.
Rotating starts with the same source and target, and even the same variablevalues, but since we use the target X and Y differently, we get a different effect.
Now, as we increment the Y variables, we’re moving down the source, butacross the target from left to right. As we increment the X variables we’re movingacross the source but up the target.

“main”2005/1/11page 165
i
i
i
i
i
i
i
i
Section 5.2 Copying and Transforming Pictures 165
654
321
1
0 1 2
0
1
0
0
1
1
2sourceX = 0sourceY = 0
sourcePixel
targetX = sourceY = 0targetY = source width - 1 - sourceXtargetY = 3 - 1 - 0 = 2
targetPixel
The source x and source y are both 0. The target x is equal to the source yso it is also 0. But, the target y is equal to the width of the source picture minus1 minus the source x. The width of the source picture is 3 so the target y is 3 - 1- 0 which is 2. So we copy the color of the source pixel at (0,0) to the target pixelat (0,2).
654
321
1
0 1 2
0
1
0
0
1
1
2
sourceX = 0sourceY = 1
sourcePixel
targetX = sourceY = 1targetY = source width - 1 - sourceXtargetY = 3 - 1 - 0 = 2
targetPixel
4
The source y is incremented by the inner loop to 1 and tested against theheight of the source picture (2). Since it is less than the height we do the body ofthe inner loop. So now the source x is 0 and the source y is 1. The target x is equalto the source y so it is 1. The target y is equal to the width of the source pictureminus 1 minus the source y. The width of the source picture is 3 so the target y is3 - 1 - 0 which is 2. So we copy the color of the source pixel at (0,1) to the targetpixel at (1,2).
654
321
1
0 1 2
0
1
0
0
1
1
2
sourceX = 1sourceY = 0
sourcePixel
targetX = sourceY = 0targetY = source width - 1 - sourceXtargetY = 3 - 1 - 1 = 1
targetPixel4
2

“main”2005/1/11page 166
i
i
i
i
i
i
i
i
166 Chapter 5 Modifying Pixels in a Matrix
The source y is incremented by the inner loop to 2 and tested against theheight of the source picture (2). Since it is not less than the height the inner loopfinishes and the source x is incremented to 1 by the outer loop. The inner loopstarts and sets the source y to 0. So, the source x is 1 and the source y is 0. Thetarget x is equal to the source y so it is 0. The target y is equal to the width of thesource picture minus 1 minus the source y. The width of the source picture is 3 sothe target y is 3 - 1 - 1 which is 1. So we copy the color of the source pixel at (1,0)to the target pixel at (0,1).
The inner loop will increment source y and so the next color will be copiedfrom (1,1) to (1,1). Then, the inner loop will stop again and source x will beincremented by 1 to 2. The next color will be copied from (2,0) to (0,0). The innerloop will increment source y so the next color will be copied from (2,1) to (1,0). Atthis point source x will be incremented to 3 which is not less than the width of thesource picture (3) and the nested loop will stop.
5.2.5 Scaling
A very common transformation for pictures is to scale them. Scaling up means tomake them larger, and scaling them down makes them smaller. It’s common toscale a 1-megapixel or 3-megapixel picture down to a smaller size to make it easierto use on the Web. Smaller pictures require less disk space, and thus less networkbandwidth, and thus are easier and faster to download.
Scaling a picture requires the use of sampling which we’ll also use with soundslater. To scale a picture smaller we are going to take every other pixel when copyingfrom the source to the target. To scale a picture larger we are going to take everypixel twice.
Scaling the picture down is the easier function. We will use the passion-Flower.jpg picture which is 640 (width) by 480 (height). Instead of incrementingthe source X and Y variables by 1, we simply increment by 2. We divide the amountof space by 2, since we’ll fill half as much room–our width will be 640/2 and theheight will be 480/2. The result is a smaller flower on the blank 640 by 480 picture(Figure 5.15).
Program 29: Scaling a picture down (smaller)
/∗∗∗ Method to copy the f l owe r but sma l l e r ( h a l f as b i g )∗ on to the curren t p i c t u r e∗/
public void copyFlowerSmaller ( ){
Picture f l owe rP i c tu r e =new Picture ( Fi l eChooser . getMediaPath ( ” pass ionFlower . jpg ” ) ) ;
P ixe l s ou r c eP ix e l = null ;P ixe l t a r g e tP i x e l = null ;
// loop through the columns
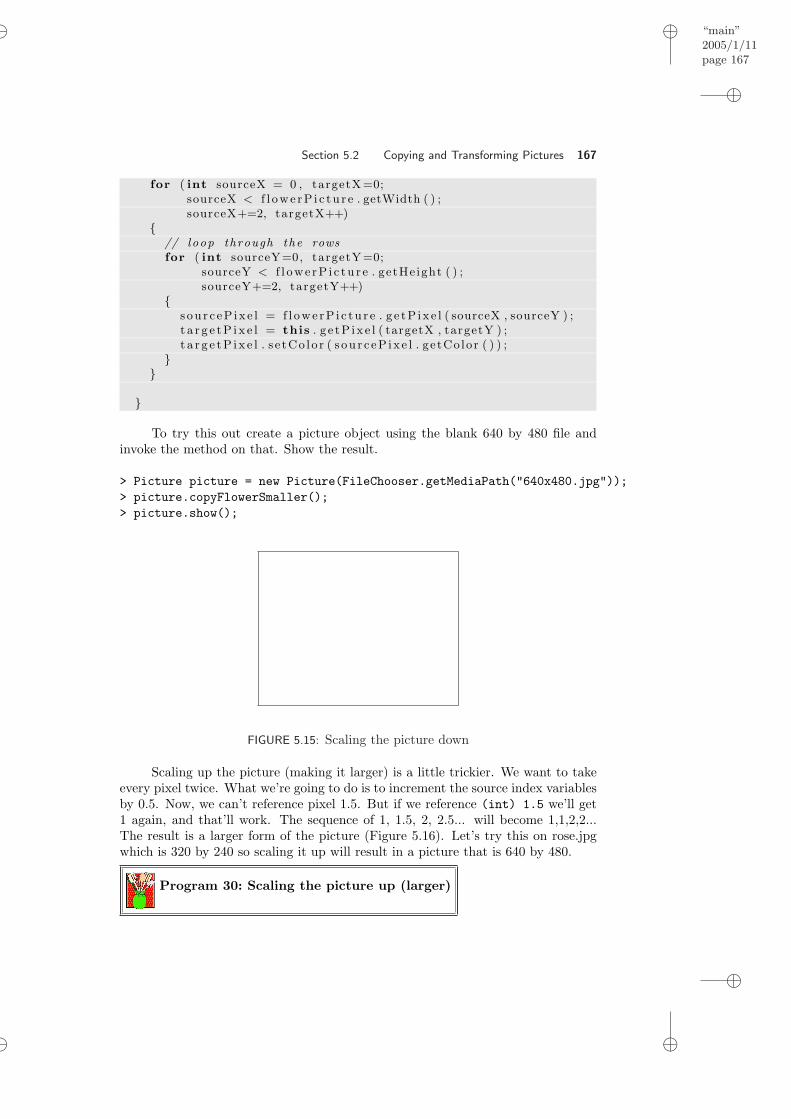
“main”2005/1/11page 167
i
i
i
i
i
i
i
i
Section 5.2 Copying and Transforming Pictures 167
for ( int sourceX = 0 , targetX=0;sourceX < f l owe rP i c tu r e . getWidth ( ) ;sourceX+=2, targetX++)
{// loop through the rowsfor ( int sourceY=0, targetY=0;
sourceY < f l owe rP i c tu r e . getHeight ( ) ;sourceY+=2, targetY++)
{s ou r c eP ix e l = f l owe rP i c tu r e . g e tP ix e l ( sourceX , sourceY ) ;t a r g e tP i x e l = this . g e tP ix e l ( targetX , targetY ) ;t a r g e tP i x e l . s e tCo lo r ( s ou r c eP ix e l . getColor ( ) ) ;
}}
}
To try this out create a picture object using the blank 640 by 480 file andinvoke the method on that. Show the result.
> Picture picture = new Picture(FileChooser.getMediaPath("640x480.jpg"));> picture.copyFlowerSmaller();> picture.show();
FIGURE 5.15: Scaling the picture down
Scaling up the picture (making it larger) is a little trickier. We want to takeevery pixel twice. What we’re going to do is to increment the source index variablesby 0.5. Now, we can’t reference pixel 1.5. But if we reference (int) 1.5 we’ll get1 again, and that’ll work. The sequence of 1, 1.5, 2, 2.5... will become 1,1,2,2...The result is a larger form of the picture (Figure 5.16). Let’s try this on rose.jpgwhich is 320 by 240 so scaling it up will result in a picture that is 640 by 480.
Program 30: Scaling the picture up (larger)

“main”2005/1/11page 168
i
i
i
i
i
i
i
i
168 Chapter 5 Modifying Pixels in a Matrix
/∗∗∗ Method to copy a f l owe r but s c a l e d to 2x normal s i z e∗ onto the curren t p i c t u r e∗/
public void copyFlowerLarger ( ){
Picture f l owe rP i c tu r e =new Picture ( Fi l eChooser . getMediaPath ( ” ro s e . jpg ” ) ) ;
P ixe l s ou r c eP ix e l = null ;P ixe l t a r g e tP i x e l = null ;
// loop through the columnsfor (double sourceX = 0 , targetX=0;
sourceX < f l owe rP i c tu r e . getWidth ( ) ;sourceX = sourceX + 0 .5 , targetX++)
{// loop through the rowsfor (double sourceY=0, targetY=0;
sourceY < f l owe rP i c tu r e . getHeight ( ) ;sourceY = sourceY + 0 . 5 , targetY++)
{s ou r c eP ix e l =
f l owe rP i c tu r e . g e tP ix e l ( ( int ) sourceX , ( int ) sourceY ) ;t a r g e tP i x e l = this . g e tP ix e l ( ( int ) targetX , ( int ) targetY ) ;t a r g e tP i x e l . s e tCo lo r ( s ou r c eP ix e l . getColor ( ) ) ;
}}
}
STo try this out create a picture object using the blank 640 by 480 file andinvoke the method on that. Show the result.
> Picture picture = new Picture(FileChooser.getMediaPath("640x480.jpg"));> picture.copyFlowerLarger();> picture.show();
How Did That Work?.We start from the same place as the original code for copying a picture. Say
we are copying from the source picture starting at (0,0) and copying to the targetpicture starting at (3,1). First we will copy the color of the pixel at (0,0) in thesource picture to (3,1) in the target picture.

“main”2005/1/11page 169
i
i
i
i
i
i
i
i
Section 5.2 Copying and Transforming Pictures 169
FIGURE 5.16: Scaling up a picture
When we increment sourceY by 0.5, the actual value will be 0.5 but the (int)value is 0 so we end up referring to the same pixel in the source, but the target hasmoved on to the next pixel. So we will copy the color of the pixel at (0,0) to (3,2).
When we increment sourceY a second time by 0.5 it will now equal 1.0, sowe now move on to the next pixel in the source. So we will copy the color of thepixel at (0,1) to (3,3).
Again when the sourceY is incremented by 0.5 the actual value will be 1.5but the (int) of that is 1 so we will copy from (0,1) to (3,4).
And eventually, we cover every pixel. Notice that the end result is degraded–

“main”2005/1/11page 170
i
i
i
i
i
i
i
i
170 Chapter 5 Modifying Pixels in a Matrix
it’s choppier than the original. Each pixel is copied four times: twice in the xdirection and twice in the y direction.
You might want to be able to scale a picture to a particular size, instead ofalways using the canvas pictures. There is a constructor that takes a width andheight new Picture(width,height ) and creates a blank picture of the passedwidth and height (both specified in pixels). new Picture(640,480) would createa picture object that is 640 pixels wide by 480 pixels tall—just like the canvas.
Here is a more general method that will scale up the current picture objectby some passed number of times. It uses the constructor that specifies a width andheight for the new Picture object.
Since this method creates a picture object that it changes we want to be ableto return this object so that we can refer to it again. How do we return somethingfrom a method? Well we need to say what type of thing we are returning andthen we have to actually return it. You specify the type of thing that the methodreturns in the method declaration. Up to now we have been using the keywordvoid to say that the method doesn’t return anything. So, change the void to bethe type of thing that you are returning. Since this method will return an object ofthe Picture class the type is Picture. At the end of the method use the keywordreturn followed by what you want to return. The compiler will check that thetype of the thing you actually return matches the type you used in the methoddeclaration. If it doesn’t you will get a compile error.
Program 31: General scale method
/∗∗∗ Method to c r ea t e a new p i c t u r e t ha t i s s c a l e d∗ up by the passed number o f t imes .∗ @return the new sca l e d up p i c t u r e∗/
public Picture scaleUp ( int numTimes){
Picture t a r g e tP i c tu r e =new Picture ( this . getWidth ( ) ∗ numTimes ,
this . getHeight ( ) ∗ numTimes ) ;double f a c t o r = 1 .0 / numTimes ;P ixe l s ou r c eP ix e l = null ;P ixe l t a r g e tP i x e l = null ;
// loop through the columns

“main”2005/1/11page 171
i
i
i
i
i
i
i
i
Section 5.3 Concepts Summary 171
for (double sourceX = 0 , targetX=0;sourceX < this . getWidth ( ) ;sourceX = sourceX + fac to r , targetX++)
{// loop through the rowsfor (double sourceY=0, targetY=0;
sourceY < this . getHeight ( ) ;sourceY = sourceY + fac to r , targetY++)
{s ou r c eP ix e l =
this . g e tP ix e l ( ( int ) sourceX , ( int ) sourceY ) ;t a r g e tP i x e l =
ta r g e tP i c tu r e . g e tP ix e l ( ( int ) targetX ,( int ) targetY ) ;
t a r g e tP i x e l . s e tCo lo r ( s ou r c eP ix e l . getColor ( ) ) ;}
}
return t a r g e tP i c tu r e ;}
Since the method scaleUp returns the resulting scaled Picture object we hadbetter save a reference to the Picture object to be able to refer to it again.
> Picture p = new Picture(FileChooser.getMediaPath("flower1.jpg"));> p = p.scaleUp(2);> p.explore();
Since this method create a new Picture object and copies the scaled pictureinto that new Picture object and then returns the new Picture object if you wantto see the result you will have to save a reference to the resulting picture. You canreuse variables like p, but realize that you will no longer have a reference to theoriginal Picture object. Of course, you could have declared a new variable to holdthe scaled picture. It would also be of type Picture.
> Picture origPicture = new Picture(FileChooser.getMediaPath("flower1.jpg"));> Picture scaledPicture = origPicture.scaleUp(2);> scaledPicture.show();> origPicture.show();
5.3 CONCEPTS SUMMARY
This chapter introduced two-dimensional arrays, nested loops, working with mul-tiple variables in a for loop, returning a value from a method, and method over-loading.
5.3.1 Two-dimensional Arrays
Pixels are stored in a two-dimensional array. A two-dimensional array is similarto seating in an auditorium. You can find your seat based on the row and chairnumber. You can access a location in a two-dimensional array by specifying an xand y. All indices start with 0.

“main”2005/1/11page 172
i
i
i
i
i
i
i
i
172 Chapter 5 Modifying Pixels in a Matrix
5.3.2 Nested Loops
To process all of the pixels in a picture and track the x and y location of each pixelyou need to use a nested loop. Nested loops are loops inside of loops. You caneither loop through the rows and then the columns (y and then x) or loop throughthe columns and then the rows (x and then y).
// loop through the rows ( y d i r e c t i o n )for ( int y = 0 ; y < this . getHeight ( ) ; y++){
// loop through the columns ( x d i r e c t i o n )for ( int x = 0 ; x < this . getWidth ( ) ; x++){
// ge t the curren t p i x e l a t t h i s x and y po s i t i o np i x e l = this . g e tP ix e l (x , y ) ;
// do something to the co l o r
// s e t the new co l o rp i x e l . s e tCo lo r ( aColor ) ;
}}To restrict the area that you are looping through use different values for
starting and stopping the loop. To loop through a rectangular area starting withthe pixel at (startX, startY) at the upper left corner of the rectangular area andending with the pixel at (endX,endY) as the bottom right corner of the rectangulararea use:
// loop through the rows ( y d i r e c t i o n )for ( int y = startY ; y <= endY ; y++){
// loop through the columns ( x d i r e c t i o n )for ( int x = startX ; x <= endX ; x++){
// ge t the curren t p i x e l a t t h i s x and y po s i t i o np i x e l = this . g e tP ix e l (x , y ) ;
// do something to the co l o r
// s e t the new co l o rp i x e l . s e tCo lo r ( aColor ) ;
}}You can declare more than one variable in a loop. This is useful when you
copy from one picture to another. Use variables to represent the source picture xand y values and use other variables to represent the target picture x and y values.You can change how the source and target pixel are used in order to rotate thepicture.
// loop through the columnsfor ( int sourceX = 0 , targetX = 0 ;

“main”2005/1/11page 173
i
i
i
i
i
i
i
i
Section 5.3 Concepts Summary 173
sourceX < s ou r c eP i c tu r e . getWidth ( ) ;sourceX++, targetX++)
{// loop through the rowsfor ( int sourceY = 0 , targetY = 0 ;
sourceY < s ou r c eP i c tu r e . getHeight ( ) ;sourceY++, targetY++)
{s ou r c eP ix e l = sourc eP i c tu r e . g e tP ix e l ( sourceX , sourceY ) ;t a r g e tP i x e l = this . g e tP ix e l ( targetX , targetY ) ;t a r g e tP i x e l . s e tCo lo r ( s ou r c eP ix e l . getColor ( ) ) ;
}}
By changing the initial and ending values of sourceX, sourceY, targetX andtargetY you can change what part of the source picture you want to copy andwhere you want it to go on the target picture. Using this you can clip and createcollages.
If you change the amount you increment or decrement a loop variable by youcan scale a picture up or down.
5.3.3 Returning a Value from a Method
To declare a method you specify the visibility for the method, the type of thing itreturns, the name of the method, and the parameter list inside parentheses. Thisis followed by the body of the method which is inside of an open and close curlybrace.
v i s i b i l i t y returnType name( parameterLi s t ){
// s ta tements in method
// re turn a va luereturn valueToReturn ;
}Methods that do not return any value use the keyword void as the returnType.
Methods that do return a value use the type of that value for the returnType andthen have a return keyword in them that is followed by the thing to return. Re-member that a type is any of the primitive types or the name of a class.
Here is an example public method declaration that doesn’t return anythingand the name of the method is mirrorVertical and it doesn’t take any parameters.
public void mi r r o rVe r t i c a l ( )
Here is an example public method declaration that returns an object of theclass Picture.
public Picture scaleUp ( int numTimes)
Notice that it gives a return type of Picture. The body of the method musthave the keyword return in it and it must return an object that is an instance ofthe class Picture.

“main”2005/1/11page 174
i
i
i
i
i
i
i
i
174 Chapter 5 Modifying Pixels in a Matrix
5.3.4 Method Overloading
A class can have more than one method with the same name as long as the pa-rameter list is different. The methods can take a different number of parameters,or the types of the parameters can be different, or the order of the types can bedifferent. You can’t have two methods with the same name and the same numberof parameters with the same types in the same order.
public void copyPictureTo ( Pic ture sourceP ic ture , int xStart )public void copyPictureTo ( Pic ture sourceP ic ture , int xStart ,
int yStart )
Notice that there are two method declarations with the same name but onetakes 2 parameters and one takes 3. The compiler will check that a method existsthat takes the same number and type of parameters. If the compiler can’t find amethod with the same number, type, and order of parameters it will report thatthe method doesn’t exist.
> p.copyPictureTo();Error: No ’copyPictureTo’ method in ’Picture’
OBJECTS AND METHODS SUMMARY
Here are the functions used or introduced in this chapter:new Picture(int width, int height) Creates a new Picture object with the given
width and height. All pixels are white.getMediaPath(String fileName) Returns the full path name with the media di-
rectory followed by the passed file name. Thisis a class method on the FileChooser class.The default media directory is ”c:/intro-prog-java/mediasources/”.
setMediaPath(String directory) Sets the media directory to use when getting a fullpath using getMediaPath(String fileName). Thisis a class method on the FileChooser class.
PROBLEMS
5.1. Write the code to mirror a picture around a horizontal line from (0,height-1) to(width-1,height-1). Be aware that this will double the height of the picture.
5.2. Try to mirror a picture around a diagonal line from (0,0) to (width-1,height-1).Try to mirror a picture around a diagonal line from (0,height-1) to (width-1,0).
5.3. Write the code to rotate a picture to the right by 90 degrees.5.4. We’ve seen that if you increment the source picture index by 2 while incrementing
the target picture index by 1 for each copied pixel, you end up with the sourcebeing scaled down onto the target. What happens if you increment the targetpicture index by 2 as well? What happens if you increment both the source andtarget by 0.5 and use int to get just the integer part?
5.5. Write a method named createCollage to create a collage of the same imageat least four times onto the 7x95in.jpg blank JPEG. (You are welcome to addadditional images, too.) One of those four copies can be the original picture.The other three should be modified forms. You can do any of scaling, cropping,
“main”2005/1/11page 175
i
i
i
i
i
i
i
i
Section 5.3 Concepts Summary 175
or rotating the image; creating a negative of the image; shifting or altering colorson the image; and making it darker or lighter.After composing your image, mirror it. You can do it vertically or horizontally(or otherwise), in any direction–just make sure that your four base images arevisible still after mirroring.Your single method should make all of this happen–all of the effects and com-positing must occur from the single function createCollage. Of course, it isperfectly okay to use other functions, but make it so that a tester of your pro-gram need only to call setMediaPath() and put all your input pictures in hermediasources directory, create a Picture object from the blank paper-sized file,and then execute createCollage()–and will expect to have a collage generatedand returned.
*5.6. Think about how the grayscale algorithm works. Basically, if you know theluminance of anything visual (e.g., a small image, a letter), you can replace apixel with that visual element in a similar way to create a collage image. Tryimplementing that. You’ll need 256 visual elements of increasing lightness, allof the same size. You’ll create a collage by replacing each pixel in the originalimage with one of these visual elements.
TO DIG DEEPER
The bible of computer graphics is Introduction to Computer Graphics [11]. It’shighly recommended.

“main”2005/1/11page 176
i
i
i
i
i
i
i
i
176 Chapter 5 Modifying Pixels in a Matrix
5.4 COLOR FIGURES
FIGURE 5.17: Merging red, green, and blue to make new colors
FIGURE 5.18: Color: RGB triplets in a matrix representation

“main”2005/1/11page 177
i
i
i
i
i
i
i
i
Section 5.4 Color Figures 177
FIGURE 5.19: Color: The original picture (left) and red-decreased version (right)
FIGURE 5.20: Color: Overly blue (left) and red increased by 30% (right)
FIGURE 5.21: Color: Original (left) and blue erased (right)
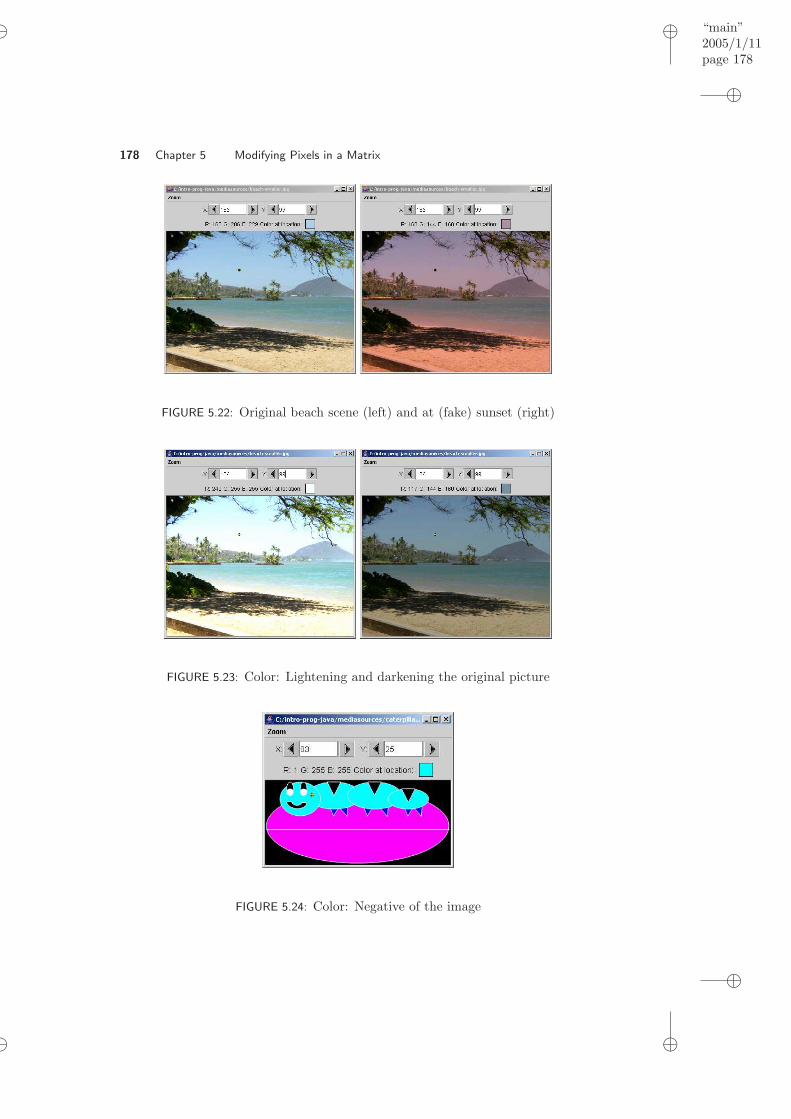
“main”2005/1/11page 178
i
i
i
i
i
i
i
i
178 Chapter 5 Modifying Pixels in a Matrix
FIGURE 5.22: Original beach scene (left) and at (fake) sunset (right)
FIGURE 5.23: Color: Lightening and darkening the original picture
FIGURE 5.24: Color: Negative of the image

“main”2005/1/11page 179
i
i
i
i
i
i
i
i
Section 5.4 Color Figures 179
FIGURE 5.25: Color: Color picture converted to grayscale
FIGURE 5.26: Color: Increasing reds in the browns
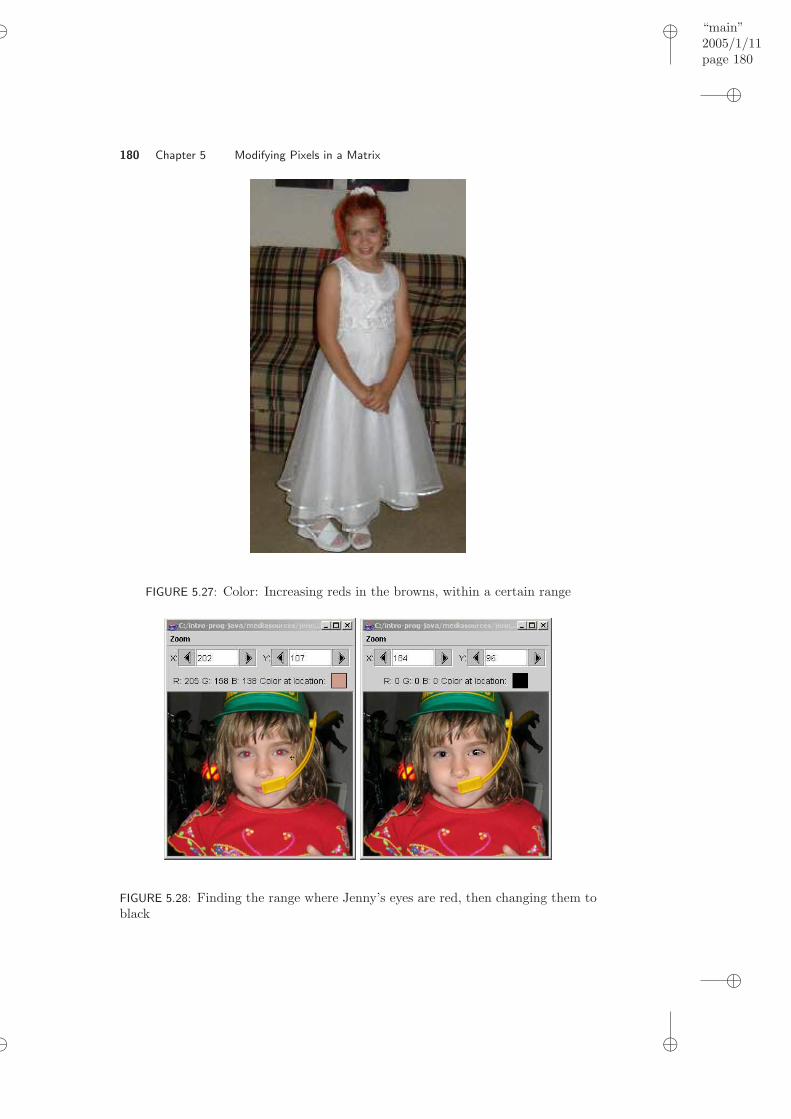
“main”2005/1/11page 180
i
i
i
i
i
i
i
i
180 Chapter 5 Modifying Pixels in a Matrix
FIGURE 5.27: Color: Increasing reds in the browns, within a certain range
FIGURE 5.28: Finding the range where Jenny’s eyes are red, then changing them toblack

“main”2005/1/11page 181
i
i
i
i
i
i
i
i
Section 5.4 Color Figures 181
FIGURE 5.29: Frames from the slow sunset movie
FIGURE 5.30: Frames from the slow fade-out movie

“main”2005/1/11page 182
i
i
i
i
i
i
i
i
182 Chapter 5 Modifying Pixels in a Matrix
FIGURE 5.31: Frames from the Mommy watching Katie movie
FIGURE 5.32: Frames from the original too dark movie

“main”2005/1/11page 183
i
i
i
i
i
i
i
i
Section 5.4 Color Figures 183
FIGURE 5.33: Frames from the modified lighter movie
FIGURE 5.34: Frames from the original movie with kids crawling in front of a bluescreen

“main”2005/1/11page 184
i
i
i
i
i
i
i
i
184 Chapter 5 Modifying Pixels in a Matrix
FIGURE 5.35: Frames from the kids on the moon movie

“main”2005/1/11page 185
i
i
i
i
i
i
i
i
C H A P T E R 6
Conditionally Modifying Pixels
6.1 CONDITIONAL PIXEL CHANGES
6.2 SIMPLE EDGE DETECTION: CONDITIONALS WITH TWO OPTIONS
6.3 SEPIA-TONED AND POSTERIZED PICTURES: USING MULTIPLE CONDITION-ALS TO CHOOSE THE COLOR
6.4 HIGHLIGHTING EXTREMES
6.5 COMBINING PIXELS: BLURRING
6.6 BACKGROUND SUBTRACTION
6.7 CHROMAKEY
6.8 CONCEPTS SUMMARY
Chapter Learning ObjectivesThe media learning goals for this chapter are:
• To replace one color with another in a picture.
• To do simple edge detection.
• To replace several colors in a picture: sepia-toned.
• To replace a range of colors with one color: posterizing.
• To average nearby pixels when scaling up for a smoother result: blur.
• To replace the background in a picture.
The computer science goals for this chapter are:
• To conditionally execute a statement or block of statements using if.
• To use a conditional with two possible results: if and else.
• To use a conditional with greater than two possible results: if, else if, andelse.
• To combine boolean expressions with and and or.
185

‘‘main’’2005/1/11page 186
i
i
i
i
i
i
i
i
186 Chapter 6 Conditionally Modifying Pixels
6.1 CONDITIONAL PIXEL CHANGES
So far we have been processing all of the pixels in the same way. But, what if wewant to process the pixels in different ways? For example, we might want to turnsomeone’s hair a different color, or get rid of ’red-eye’ in a picture, or even reducethe number of colors in a picture.
We need something that executes a block of code only if some condition (ex-pression) is true. We know that computers can compare values to see if they areequal, less than, or greater than (and combinations of these) and return true orfalse. We have used this with loops by continuing a loop while the index is lessthan the length of the array as in: while(index < pixelArray.length). Thiswill execute the loop while the expression (index < pixelArray.length) is true.
Try the following in the interactions pane:
> 0 < 20true> 30 < 20false> 20 < 20false> 20 <= 20true
One way to conditionally execute code in Java is with an if (expression).The if is a keyword that means that if the expression in the parentheses evaluatesto true then execute the following statement or block of statements. If it is falsejust skip the execution of that statement or block of statements (Figure 6.1) So,we can check if the color at the current pixel is close to a particular color and if soexecute a statement or block of statements (in curly braces).
statement
if (expression)
true
false
Statement or block
FIGURE 6.1: Flowchart of an if statement
Try the following in the interactions pane:
> int x = 30;> if (x < 40) System.out.println("x is less than 40");
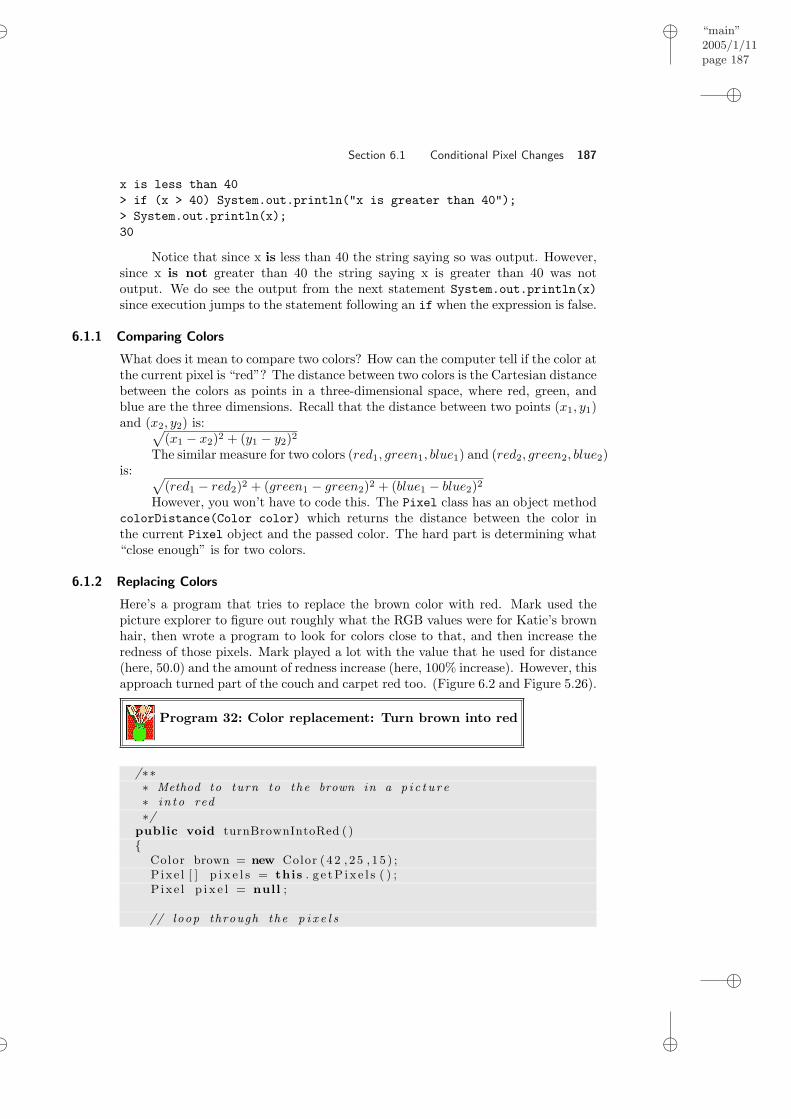
“main”2005/1/11page 187
i
i
i
i
i
i
i
i
Section 6.1 Conditional Pixel Changes 187
x is less than 40> if (x > 40) System.out.println("x is greater than 40");> System.out.println(x);30
Notice that since x is less than 40 the string saying so was output. However,since x is not greater than 40 the string saying x is greater than 40 was notoutput. We do see the output from the next statement System.out.println(x)since execution jumps to the statement following an if when the expression is false.
6.1.1 Comparing Colors
What does it mean to compare two colors? How can the computer tell if the color atthe current pixel is “red”? The distance between two colors is the Cartesian distancebetween the colors as points in a three-dimensional space, where red, green, andblue are the three dimensions. Recall that the distance between two points (x1, y1)and (x2, y2) is:√
(x1 − x2)2 + (y1 − y2)2The similar measure for two colors (red1, green1, blue1) and (red2, green2, blue2)
is: √(red1 − red2)2 + (green1 − green2)2 + (blue1 − blue2)2
However, you won’t have to code this. The Pixel class has an object methodcolorDistance(Color color) which returns the distance between the color inthe current Pixel object and the passed color. The hard part is determining what“close enough” is for two colors.
6.1.2 Replacing Colors
Here’s a program that tries to replace the brown color with red. Mark used thepicture explorer to figure out roughly what the RGB values were for Katie’s brownhair, then wrote a program to look for colors close to that, and then increase theredness of those pixels. Mark played a lot with the value that he used for distance(here, 50.0) and the amount of redness increase (here, 100% increase). However, thisapproach turned part of the couch and carpet red too. (Figure 6.2 and Figure 5.26).
Program 32: Color replacement: Turn brown into red
/∗∗∗ Method to turn to the brown in a p i c t u r e∗ i n t o red∗/
public void turnBrownIntoRed ( ){
Color brown = new Color ( 42 , 2 5 , 1 5 ) ;P ixe l [ ] p i x e l s = this . g e tP i x e l s ( ) ;P ixe l p i x e l = null ;
// loop through the p i x e l s

“main”2005/1/11page 188
i
i
i
i
i
i
i
i
188 Chapter 6 Conditionally Modifying Pixels
for ( int i =0; i<p i x e l s . l ength ; i++){
// ge t the current p i x e lp i x e l = p i x e l s [ i ] ;
// check i f in d i s t ance to brown and i f so doub le the redi f ( p i x e l . c o l o rD i s t ance ( brown ) < 50 . 0 )
p i x e l . s e tCo lo r (new Color ( ( int ) ( p i x e l . getRed ( ) ∗ 2 . 0 ) ,p i x e l . getGreen ( ) ,p i x e l . getBlue ( ) ) ) ;
}}
To use this method to turn Katie into a redhead first create a Picture objectfrom the file “KatieFancy.jpg”. Then invoke the method turnBrownIntoRed onthat Picture object and show the result.
> Picture picture = new Picture(FileChooser.getMediaPath("KatieFancy.jpg"));> picture.turnBrownIntoRed();> picture.explore();
FIGURE 6.2: Increasing reds in the browns
Notice that we can use a simple for loop through the one-dimensional arrayof pixels for this. We don’t care where the pixels are in the two-dimensional arrayin this method. Of course, we could have used nested for loops instead to loopthrough all the pixels.
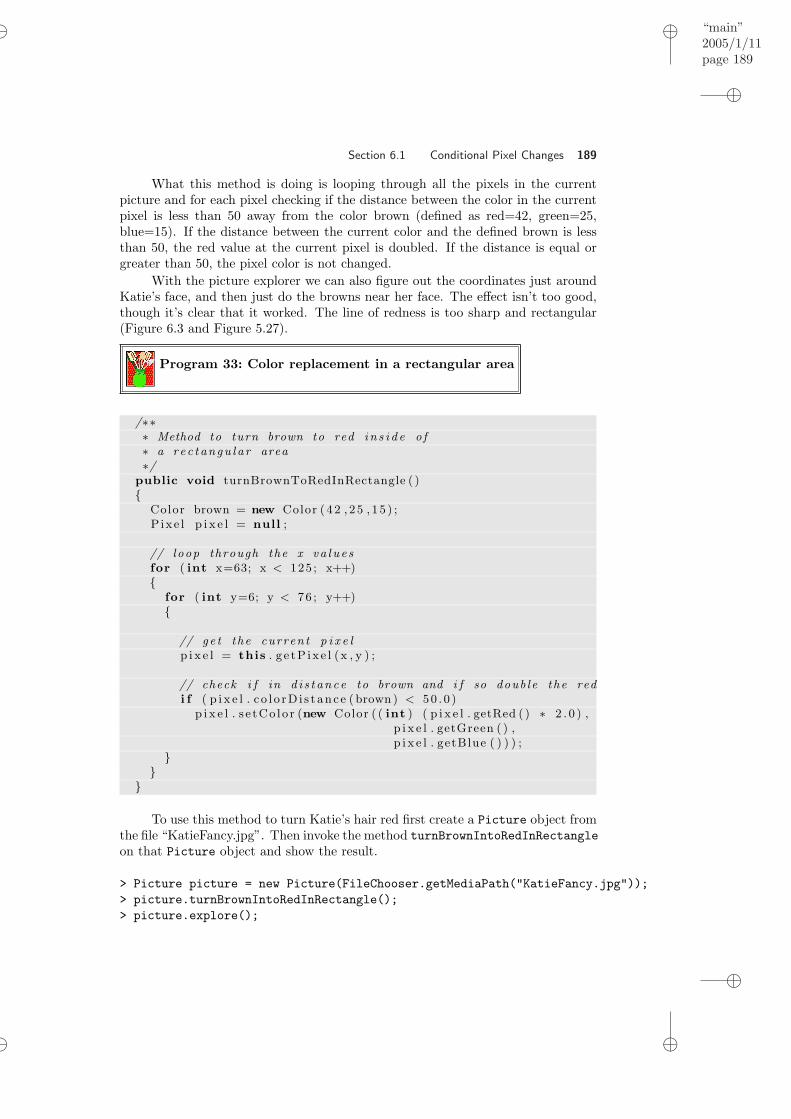
“main”2005/1/11page 189
i
i
i
i
i
i
i
i
Section 6.1 Conditional Pixel Changes 189
What this method is doing is looping through all the pixels in the currentpicture and for each pixel checking if the distance between the color in the currentpixel is less than 50 away from the color brown (defined as red=42, green=25,blue=15). If the distance between the current color and the defined brown is lessthan 50, the red value at the current pixel is doubled. If the distance is equal orgreater than 50, the pixel color is not changed.
With the picture explorer we can also figure out the coordinates just aroundKatie’s face, and then just do the browns near her face. The effect isn’t too good,though it’s clear that it worked. The line of redness is too sharp and rectangular(Figure 6.3 and Figure 5.27).
Program 33: Color replacement in a rectangular area
/∗∗∗ Method to turn brown to red i n s i d e o f∗ a r e c t angu l a r area∗/
public void turnBrownToRedInRectangle ( ){
Color brown = new Color ( 42 , 2 5 , 1 5 ) ;P ixe l p i x e l = null ;
// loop through the x va l u e sfor ( int x=63; x < 125 ; x++){
for ( int y=6; y < 76 ; y++){
// ge t the curren t p i x e lp i x e l = this . g e tP ix e l (x , y ) ;
// check i f in d i s t ance to brown and i f so doub le the redi f ( p i x e l . c o l o rD i s t ance ( brown ) < 50 . 0 )
p i x e l . s e tCo lo r (new Color ( ( int ) ( p i x e l . getRed ( ) ∗ 2 . 0 ) ,p i x e l . getGreen ( ) ,p i x e l . getBlue ( ) ) ) ;
}}
}
To use this method to turn Katie’s hair red first create a Picture object fromthe file “KatieFancy.jpg”. Then invoke the method turnBrownIntoRedInRectangleon that Picture object and show the result.
> Picture picture = new Picture(FileChooser.getMediaPath("KatieFancy.jpg"));> picture.turnBrownIntoRedInRectangle();> picture.explore();

“main”2005/1/11page 190
i
i
i
i
i
i
i
i
190 Chapter 6 Conditionally Modifying Pixels
FIGURE 6.3: On left the couch color changes, on right the couch color doesn’t change
We put the values for the range right inside the method turnBrownIntoRedInRectangle().This meant that we didn’t need to pass any parameters to specify the range but itmakes the method less reusable. If we want to use it to change a different picture wewould probably have to edit the method to change the range and then recompile.The method would be easier to reuse if we specified the range when we invoke themethod.
Program 34: Color replacement with passing in the range
/∗∗∗ Method to turn brown to red in a r e c t angu l a r area∗ s p e c i f e d∗ by startX , endX−1, startY , endY−1∗ @param star tX the s t a r t i n g l o c a t i o n to check in x∗ @param endX the l a s t p i x e l checked i s one l e s s than∗ t h i s in x∗ @param star tY the s t a r t i n g l o c a t i o n to check in y∗ @param endY the l a s t p i x e l checked i s one l e s s than∗ t h i s in y∗/
public void turnBrownToRedInRectangle ( int startX , int endX ,int startY , int endY ,double d i s t ance )
{

“main”2005/1/11page 191
i
i
i
i
i
i
i
i
Section 6.1 Conditional Pixel Changes 191
Color brown = new Color ( 42 , 2 5 , 1 5 ) ;P ixe l p i x e l = null ;
// loop through the x va l u e sfor ( int x=startX ; x < endX ; x++){
for ( int y=startY ; y < endY ; y++){
// ge t the curren t p i x e lp i x e l = this . g e tP ix e l (x , y ) ;
/∗ check i f in d i s t ance to brown i s l e s s than∗ the passed d i s t ance and i f so doub le the red∗/
i f ( p i x e l . c o l o rD i s t ance ( brown ) < d i s t anc e )p i x e l . s e tCo lo r (new Color ( ( int ) ( p i x e l . getRed ( ) ∗ 2 . 0 ) ,
p i x e l . getGreen ( ) ,p i x e l . getBlue ( ) ) ) ;
}}
}
That certainly is easier to reuse now for other ranges. But, what if we wantto change the distance to use between brown and the current color? We could pullout the distance and pass that in as well.
Program 35: Color replacement with passing in the range and distance
/∗∗∗ Method to turn brown to red in a r e c t angu l a r area∗ s p e c i f i e d∗ by startX , endX−1, startY , endY−1∗ @param star tX the s t a r t i n g l o c a t i o n to check in x∗ @param endX the l a s t p i x e l checked i s one l e s s than∗ t h i s in x∗ @param star tY the s t a r t i n g l o c a t i o n to check in y∗ @param endY the l a s t p i x e l checked i s one l e s s than∗ t h i s in y∗ @param d i s t ance i f the curren t co l o r i s w i th in∗ t h i s d i s t ance to brown then change i t∗/
public void turnBrownToRedInRectangle ( int startX , int endX ,int startY , int endY ,double d i s t ance )
{Color brown = new Color ( 42 , 2 5 , 1 5 ) ;P ixe l p i x e l = null ;

“main”2005/1/11page 192
i
i
i
i
i
i
i
i
192 Chapter 6 Conditionally Modifying Pixels
// loop through the x va l u e sfor ( int x=startX ; x < endX ; x++){
for ( int y=startY ; y < endY ; y++){
// ge t the curren t p i x e lp i x e l = this . g e tP ix e l (x , y ) ;
/∗ check i f in d i s t ance to brown i s l e s s than∗ the passed d i s t ance and i f so doub le the red∗/
i f ( p i x e l . c o l o rD i s t ance ( brown ) < d i s t anc e )p i x e l . s e tCo lo r (new Color ( ( int ) ( p i x e l . getRed ( ) ∗ 2 . 0 ) ,
p i x e l . getGreen ( ) ,p i x e l . getBlue ( ) ) ) ;
}}
}
Can you think of any other things that you could do to make this methodeasier to reuse? What if I want to change something other than brown? What if Iwant to change the old color by increasing the green?
6.1.3 Reducing Red-Eye
“Red-eye” is the effect where the flash from the camera bounces off the back of thesubject’s eyes. Reducing red-eye is a really simple matter. We find the pixels thatare “pretty close” (a distance from red of 165 works well) to red, then change thosepixels’ color to a replacement color.
We probably don’t want to change the whole picture. In the Figure 6.4, wecan see that Jenny is wearing a red dress—we don’t want to wipe out that red, too.We’ll fix that by only changing the area where Jenny’s eyes are. Using the pictureexplorer, we find the upper left and lower right corners of her eyes. Those pointswere (109, 91) and (202, 107).
Program 36: Remove red-eye
/∗∗∗ Method to remove red−eye from the curren t p i c t u r e o b j e c t∗ in the r e c t an g l e de f i ned by startX , startY , endX , endY .∗ The red w i l l be r ep l a ced wi th the passed newColor∗ @param star tX the top l e f t corner x va lue o f a r e c t an g l e∗ @param star tY the top l e f t corner y va lue o f a r e c t an g l e∗ @param endX the bottom r i g h t corner x va lue o f a∗ r e c t an g l e∗ @param endY the bottom r i g h t corner y va lue o f a∗ r e c t an g l e

“main”2005/1/11page 193
i
i
i
i
i
i
i
i
Section 6.1 Conditional Pixel Changes 193
FIGURE 6.4: Finding the range of where Jenny’s eyes are red
∗ @param newColor the new co l o r to use∗/
public void removeRedEye ( int startX , int startY , int endX ,int endY , Color newColor )
{Pixe l p i x e l = null ;
/∗ l oop through the p i x e l s in the r e c t an g l e de f ined by thestartX , startY , and endX and endY ∗/
for ( int x = startX ; x < endX ; x++){
for ( int y = startY ; y < endY ; y++){
// ge t the curren t p i x e lp i x e l = ge tP ix e l (x , y ) ;
// i f the co l o r i s near red then change i ti f ( p i x e l . c o l o rD i s t ance ( Color . red ) < 167)
p i x e l . s e tCo lo r ( newColor ) ;}
}}
We call this function with:
> Picture jennyPicture = new Picture("c:/intro-prog-java/mediasources/jenny-red.jpg");> jennyPicture.removeRedEye(109,91,202,107,java.awt.Color.black);> jennyPicture.explore();
to replace the red with black—certainly other colors could be used for the
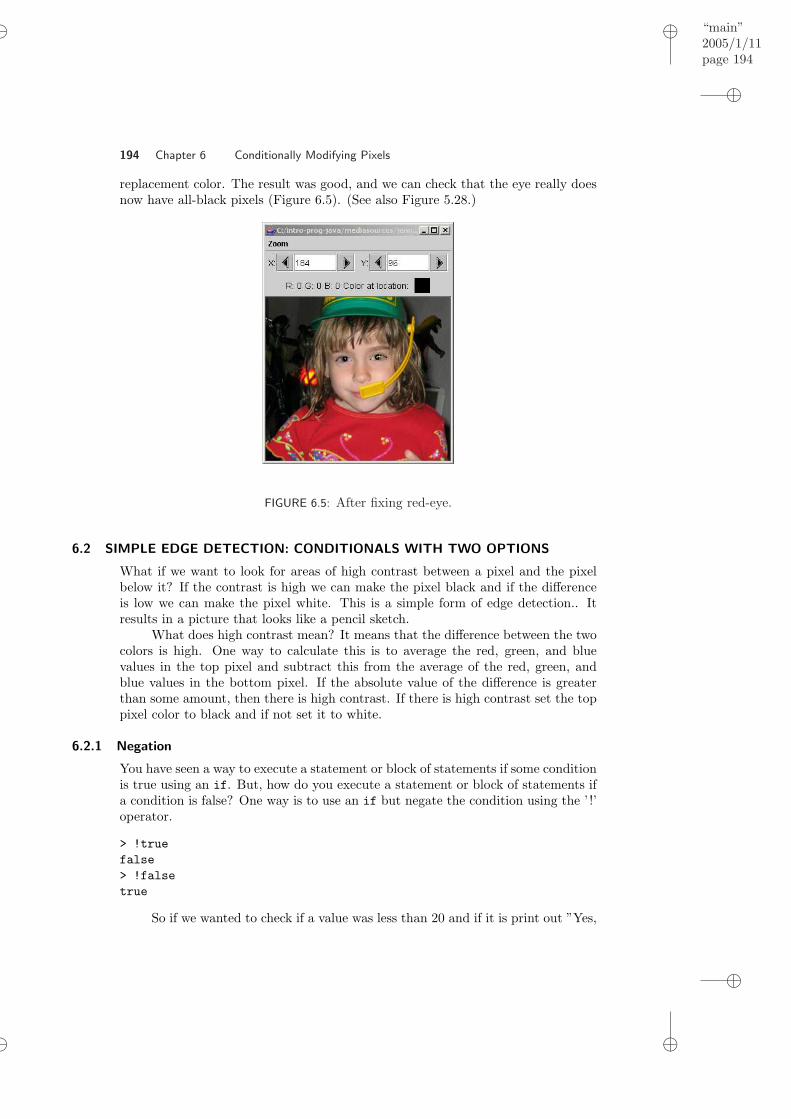
“main”2005/1/11page 194
i
i
i
i
i
i
i
i
194 Chapter 6 Conditionally Modifying Pixels
replacement color. The result was good, and we can check that the eye really doesnow have all-black pixels (Figure 6.5). (See also Figure 5.28.)
FIGURE 6.5: After fixing red-eye.
6.2 SIMPLE EDGE DETECTION: CONDITIONALS WITH TWO OPTIONS
What if we want to look for areas of high contrast between a pixel and the pixelbelow it? If the contrast is high we can make the pixel black and if the differenceis low we can make the pixel white. This is a simple form of edge detection.. Itresults in a picture that looks like a pencil sketch.
What does high contrast mean? It means that the difference between the twocolors is high. One way to calculate this is to average the red, green, and bluevalues in the top pixel and subtract this from the average of the red, green, andblue values in the bottom pixel. If the absolute value of the difference is greaterthan some amount, then there is high contrast. If there is high contrast set the toppixel color to black and if not set it to white.
6.2.1 Negation
You have seen a way to execute a statement or block of statements if some conditionis true using an if. But, how do you execute a statement or block of statements ifa condition is false? One way is to use an if but negate the condition using the ’ !’operator.
> !truefalse> !falsetrue
So if we wanted to check if a value was less than 20 and if it is print out ”Yes,

‘‘main’’2005/1/11page 195
i
i
i
i
i
i
i
i
Section 6.2 Simple Edge Detection: conditionals with two options 195
the value is less than 20” and if it isn’t print out ”No, this value is not less than20” we could test for the value being less than 20 and also test for the value beingnot less than 20 using the ’ !’ operator.
> int x = 30;> if (x < 20) System.out.println("Yes, the value is less than 20");> if (! (x < 20)) System.out.println("No, this value is not less than 20");No, this value is not less than 20
6.2.2 Testing for Both Conditions
Another way to test that a way isn’t less than 20 is to test if it is greater or equalto 20.
> int x = 30;> if (x < 20) System.out.println("Yes, the value is less than 20");> if (x >= 20) System.out.println("No, this value is not less than 20");No, this value is not less than 20
The problem with this approach is that we have to run both tests every time.But, if the first test is true there is no reason to run the second test (x can’t beboth less than 20 and greater or equal to 20). We would like a way to say if thefirst test is true execute one statement or block of statements and if it is false thenexecute a different statement or block of statements.
6.2.3 Conditionals with Two Options
The way to do this is with if (expression) and else. As before, the if part willexecute the statement or block of statements following the if when the expressionis true. But, if we add an else this will also execute the statement or block of state-ments following the else when the expression following the if is false (Figure 6.8).And it will also mean that the else is skipped if the if test was true.
statement
if (expression)
true
false
Statement or block
Statement or block
else
FIGURE 6.6: Flowchart of an if with an else
To enter the following in DrJava’s interaction pane use Shift-Enter afterthe if statement to let DrJava know that there will be a following else.

“main”2005/1/11page 196
i
i
i
i
i
i
i
i
196 Chapter 6 Conditionally Modifying Pixels
> int x = 30;> if (x < 20) System.out.println("Yes, the value is less than 20");else System.out.println("No, this value is not less than 20"); No,this value is not less than 20
As you can see the statement following the if didn’t execute, but the state-ment following the else did. Try the same thing but this time give x a value lessthan 20.
> x = 15;> if (x < 20) System.out.println("Yes, the value is less than 20");else System.out.println("No, this value is not less than 20");Yes, the value is less than 20
Notice that this time the statement following the if did execute but thestatement following the else did not.
6.2.4 Simple Edge Detection
To do simple edge detection we will loop through the pixels with the outer loopincrementing y from 0 to less than picture height-1. Usually we have been loopingwhile y is less than the height, so why stop at height-1? We are comparing the valueat a y position with the pixel below it so the last y value that still has another rowbelow it is at height-1.
The inner loop will increment x from 0 to less than the picture width. The toppixel will be set to the pixel at the current x and y location. The bottom pixel willbe set to the pixel at the current x but y+1. We will compare the absolute valueof the difference between the intensities (average of color values) and if it is lessthan some passed limit we will change the top pixel color to white and otherwisewe will set the top pixel color to black. The Pixel class has an object methodgetAverage() that returns the average of the three color values.
Program 37: Edge Detection
/∗∗∗ Method to do a s imple edge d e t e c t i on by comparing the∗ a b s o l u t e va lue o f the d i f f e r e n c e between the co l o r∗ i n t e n s i t i e s ( average o f the co l o r va l u e s ) between a∗ p i x e l and the p i x e l be low i t . I f the a b s o l u t e va lue∗ o f the d i f f e r e n c e between the co l o r i n t e n s i t i e s i s∗ l e s s than a passed amount the top p i x e l c o l o r∗ w i l l be s e t to whi te . Otherwise i t i s s e t to b l a c k .∗ @param amount i f the a b s o l u t e va lue o f the d i f f e r e n c e s∗ in the co l o r average i s l e s s than t h i s∗ s e t the co l o r to white , e l s e b l a c k∗/
public void edgeDetect ion (double amount ) {Pixe l topPixe l = null ;

“main”2005/1/11page 197
i
i
i
i
i
i
i
i
Section 6.2 Simple Edge Detection: conditionals with two options 197
Pixe l bottomPixel = null ;double topAverage = 0 . 0 ;double bottomAverage = 0 . 0 ;int endY = this . getHeight ( ) − 1 ;
/∗ l oop through y va l u e s from 0 to h e i g h t − 1∗ ( s ince compare to be low p i x e l ) ∗/
for ( int y = 0 ; y < endY ; y++) {
// loop through the x va l u e s from 0 to widthfor ( int x = 0 ; x < this . getWidth ( ) ; x++) {
// ge t the top and bottom p i x e l stopPixe l = this . g e tP ix e l (x , y ) ;bottomPixel = this . g e tP ix e l (x , y+1);
// ge t the co l o r averages f o r the two p i x e l stopAverage = topPixe l . getAverage ( ) ;bottomAverage = bottomPixel . getAverage ( ) ;
/∗ check i f the a b s o l u t e va lue o f the d i f f e r e n c e∗ i s l e s s than the amount ∗/
i f (Math . abs ( topAverage − bottomAverage ) < amount ) {topPixe l . s e tCo lo r ( Color .WHITE) ;
// e l s e s e t the co l o r to b l a c k} else {
topPixe l . s e tCo lo r ( Color .BLACK) ;}
}}
}
To execute this method use:
> Picture p = new Picture(FileChooser.getMediaPath("butterfly1.jpg"));> p.explore();> p.edgeDetection(10);> p.explore();

“main”2005/1/11page 198
i
i
i
i
i
i
i
i
198 Chapter 6 Conditionally Modifying Pixels
FIGURE 6.7: Original picture and after edge detection
'
&
$
%
Making it Work Tip: Using Curly BracesYou may have noticed that the method edgeDetectionshows the starting curly braces at the end of the line in-stead of on a new line as shown in the previous methods.Java doesn’t care if the curly braces are at the end of aline or on a new line. Some programmers prefer one toanother. It is often easier to see that you forgot a curlybrace if it is by itself on a new line. However, the Javaguidelines say to put the opening curly brace at the end ofa line and the closing one on a new line.You may also notice that we are using curly braces afterthe if and else even though there is only one statementto be executed, so they aren’t really needed. It is goodpractice to have them even if they aren’t needed becausethe code is easier to read and change.
6.3 SEPIA-TONED AND POSTERIZED PICTURES: USING MULTIPLE CONDI-TIONALS TO CHOOSE THE COLOR
We handled the case of having two different ways to process the pixels using anif and else. What if we have more than two ways that we want to process somepixels? For example, what if we wanted to do one thing if a value is less than somenumber, another thing if it is equal and yet a third if it is greater than the number?

‘‘main’’2005/1/11page 199
i
i
i
i
i
i
i
i
Section 6.3 Sepia-Toned and Posterized Pictures: Using multiple conditionals to choose the color 199
We could check for each of these conditions with an if as shown below:
> int y = 10;> if (y < 10) System.out.println("y is less than 10");> if (y == 10) System.out.println("y is equal to 10");y is equal 10> if (y > 10) System.out.println("y is greater than 10");
This works but results in some unnecessary checking. Notice that y was equalto 10 and so that was printed out but it still executed the next statement whichchecked if y was greater than 10. But, can y be equal to 10 and greater than 10?What would have happened if y was less than 10? It would have printed out astring saying that y is less than 10 and then still checked if y was equal or greaterthan 10. We need something to say if the previous test was true only execute thatand then skip to the end of all the checks. We have seen a way to do this for twopossibilities (true or false) using if and else. One way to handle more three ormore possibilities is with if, else if and finally else. You can use as many elseif statements as needed. You are not required to have a final else.
statement
if (expression)
true
false
Statement or block
else
if (expression)
Statement or block
true
Statement or block
else
false
FIGURE 6.8: Flowchart of an if, else if, and an else
> int y = 2;> if (y < 10) System.out.println("Y is less than 10");else if (y == 10) System.out.println("y is equal to 10");
else System.out.println("y is greater than 10");

“main”2005/1/11page 200
i
i
i
i
i
i
i
i
200 Chapter 6 Conditionally Modifying Pixels
y is less than 10
So far, we’ve done color modification by simply saying “This color replacesthat color.” We can be more sophisticated in our color swapping. We can look fora range of colors, by using if, else if, and else, and replace the color with somefunction of the original color or a specific color. The results are quite interesting.
For example, we might want to generate sepia-toned prints. Older printssometimes have a yellow-ish tint to them. We could just do an overall color change,but the end result isn’t aesthetically pleasing. By looking for different kinds ofcolor–highlights, middle ranges, and shadows–and treating them differently, we canget a better effect (Figure 6.9).
FIGURE 6.9: Original scene (left) and using our sepia-tone program
The way we do this is to first convert the picture to gray, both because olderprints were in shades of gray, and because it makes it a little easier to work with.We then look for high, middle, and low ranges of color, and change them separately.We want to make the shadows (darkest grays) a bit darker. We want to make mostof the picture (middle grays) into a brownish color. We want to the highlights(lightest grays) a bit yellow. Recall that yellow is a mixture of red and green soone way to make things yellow is to increase the red and green. Another way is toreduce the amount of blue. The advantage to reducing the blue is that you don’thave to worry about increasing a value past 255 which is the maximum.
Program 38: Convert a picture to sepia-tones
/∗∗∗ Method to change the curren t p i c t u r e to a sep ia∗ t i n t ( modify the middle c o l o r s to a l i g h t brown and∗ the l i g h t c o l o r s to a l i g h t y e l l ow and make the∗ shadows darker
“main”2005/1/11page 201
i
i
i
i
i
i
i
i
Section 6.3 Sepia-Toned and Posterized Pictures: Using multiple conditionals to choose the color 201
∗/public void s ep iaTint ( ){
Pixe l p i x e l = null ;double redValue = 0 ;double greenValue = 0 ;double blueValue = 0 ;
// f i r s t change the curren t p i c t u r e to g r ay s ca l ethis . g r ay s c a l e ( ) ;
// loop through the p i x e l sfor ( int x = 0 ; x < this . getWidth ( ) ; x++){
for ( int y = 0 ; y < this . getHeight ( ) ; y++){
// ge t the curren t p i x e l and co l o r va l u e sp i x e l = this . g e tP ix e l (x , y ) ;redValue = p i x e l . getRed ( ) ;greenValue = p i x e l . getGreen ( ) ;blueValue = p i x e l . getBlue ( ) ;
// t i n t the shadows darkeri f ( redValue < 60){
redValue = redValue ∗ 0 . 9 ;greenValue = greenValue ∗ 0 . 9 ;blueValue = blueValue ∗ 0 . 9 ;
}
// t i n t the midtones a l i g h t brown// by reduc ing the b l u eelse i f ( redValue < 190){
blueValue = blueValue ∗ 0 . 8 ;}
// t i n t the h i g h l i g h t s a l i g h t y e l l ow// by reduc ing the b l u eelse{
blueValue = blueValue ∗ 0 . 9 ;}
// s e t the c o l o r sp i x e l . setRed ( ( int ) redValue ) ;p i x e l . setGreen ( ( int ) greenValue ) ;p i x e l . s e tBlue ( ( int ) blueValue ) ;
}}
}

“main”2005/1/11page 202
i
i
i
i
i
i
i
i
202 Chapter 6 Conditionally Modifying Pixels
Try this method out by:
> Picture picture = new Picture(Picture.getMediaPath("gorge.jpg"));> picture.show();> picture.sepiaTint();> picture.repaint();
Posterizing is a process of converting a picture to a smaller number of colors.We’re going to do that by looking for specific ranges of color, then setting the colorto one value in that range. The result is that we reduce the number of colors inthe picture (Figure 6.10).
FIGURE 6.10: Reducing the colors (right) from the original (left)
Program 39: Posterizing a picture
/∗∗∗ Method to p o s t e r i z e ( reduce the number o f c o l o r s ) in∗ the p i c t u r e . The number o f reds , greens , and b l u e s∗ w i l l be 4 .∗/
public void po s t e r i z e ( ){
Pixe l p i x e l = null ;int redValue = 0 ;int greenValue = 0 ;int blueValue = 0 ;

“main”2005/1/11page 203
i
i
i
i
i
i
i
i
Section 6.3 Sepia-Toned and Posterized Pictures: Using multiple conditionals to choose the color 203
// loop through the p i x e l sfor ( int x = 0 ; x < this . getWidth ( ) ; x++) {
for ( int y = 0 ; y < this . getHeight ( ) ; y++) {
// ge t the curren t p i x e l and co l o r sp i x e l = this . g e tP ix e l (x , y ) ;redValue = p i x e l . getRed ( ) ;greenValue = p i x e l . getGreen ( ) ;blueValue = p i x e l . getBlue ( ) ;
// check f o r red range and change co l o ri f ( redValue < 64)
redValue = 31 ;else i f ( redValue < 128)
redValue = 95 ;else i f ( redValue < 192)
redValue = 159 ;else
redValue = 223 ;
// check f o r green rangei f ( greenValue < 64)
greenValue = 31 ;else i f ( greenValue < 128)
greenValue = 95 ;else i f ( greenValue < 192)
greenValue = 159 ;else
greenValue = 223 ;
// check f o r b l u e rangei f ( blueValue < 64)
blueValue = 31 ;else i f ( blueValue < 128)
blueValue = 95 ;else i f ( blueValue < 192)
blueValue = 159 ;else
blueValue = 223 ;
// s e t the c o l o r sp i x e l . setRed ( redValue ) ;p i x e l . setGreen ( greenValue ) ;p i x e l . s e tBlue ( blueValue ) ;
}}
}
What’s really going on here, though, is setting up (a) a bunch of levels then(b) setting the value of red, green, or blue to the midpoint of that level. We can do

“main”2005/1/11page 204
i
i
i
i
i
i
i
i
204 Chapter 6 Conditionally Modifying Pixels
this more generally using mathematics to compute the ranges for a desired numberof levels and picking the midpoint. We need to check if the current value is in therange and if so set it to the midpoint of the range.
How do we check if a value is in a range? If we call the bottom of the rangebottomValue and the top of the range topValue then we could use this math nota-tion bottomValue <= testValue < topValue. However in Java we need to writeit bottomValue <= testValue && testValue < topValue. The two ampersands(’&&’) mean ’and’. If I say you have to set the table and sweep the floor, howmany jobs do you have to do? The answer is two, or both of them. If I say youcan set the table or sweep the floor, how many jobs do you have to do then? Theanswer is one, or just one of the two. Similarly if in Java you have if (expression&& expression) then both expressions must be true for the body of the if to beexecuted. And, if you have if (expression ‖ expression) then only one of thetwo expressions must be true for the body of the if to be executed. The ‖ means’or’.
Below is the program for a flexible number of levels, and Figure 6.11 shows acouple of examples.
Program 40: Posterize by levels
/∗∗∗ Method to p o s t e r i z e ( reduce the number o f c o l o r s ) in∗ the p i c t u r e∗ @param numLevels the number o f co l o r l e v e l s to use∗/
public void po s t e r i z e ( int numLevels ){
Pixe l p i x e l = null ;int redValue = 0 ;int greenValue = 0 ;int blueValue = 0 ;int increment = ( int ) (256 . 0 / numLevels ) ;int bottomValue , topValue , middleValue = 0 ;
// loop through the p i x e l sfor ( int x = 0 ; x < this . getWidth ( ) ; x++) {
for ( int y = 0 ; y < this . getHeight ( ) ; y++) {
// ge t the curren t p i x e l and co l o r sp i x e l = this . g e tP ix e l (x , y ) ;redValue = p i x e l . getRed ( ) ;greenValue = p i x e l . getGreen ( ) ;blueValue = p i x e l . getBlue ( ) ;
// loop through the number o f l e v e l sfor ( int i = 0 ; i < numLevels ; i++){
// compute the bottom , top , and middle va l u e s

“main”2005/1/11page 205
i
i
i
i
i
i
i
i
Section 6.3 Sepia-Toned and Posterized Pictures: Using multiple conditionals to choose the color 205
bottomValue = i ∗ increment ;topValue = ( i + 1) ∗ increment ;middleValue = ( int ) ( ( bottomValue + topValue − 1)
/ 2 . 0 ) ;
/∗ check i f curren t va l u e s are in current range and∗ i f so s e t them to the middle va lue∗/
i f ( bottomValue <= redValue &&redValue < topValue )
p i x e l . setRed ( middleValue ) ;i f ( bottomValue <= greenValue &&
greenValue < topValue )p i x e l . setGreen ( middleValue ) ;
i f ( bottomValue <= blueValue &&blueValue < topValue )
p i x e l . s e tBlue ( middleValue ) ;}
}}
}
FIGURE 6.11: Pictures posterized to two levels (left) and four levels (right)

“main”2005/1/11page 206
i
i
i
i
i
i
i
i
206 Chapter 6 Conditionally Modifying Pixels
Computer Science Idea: OverloadingNotice that we now have two methods called posterize.One method doesn’t take any parameters and the othertakes the number of levels. In Java you are allowed tohave more than one method with the same name as longas the parameters are different. This is called overloading .You can have a different number of parameters as in thiscase. You can also use different types and/or orders forthe parameters. It means that you can have several meth-ods that have the same behavior but operate on differentparameters. It certainly is easier than coming up with newnames for methods that do that same thing.
6.4 HIGHLIGHTING EXTREMES
What if we want to highlight the lightest and darkest areas of a picture? Would wehighlight areas that are less than some amount from white and less than the sameamount from black? Is there any color that is both close to white and black? No,we would want to replace the color at all pixels that have a distance from white ora distance from black less than some amount. We used ’&&’ to mean ’and’ in thelast program. In this program we will use ’‖’ to mean ’or’.
Program 41: Highlight extremes
/∗∗∗ Method to r ep l a c e the p i x e l c o l o r s in the curren t∗ p i c t u r e o b j e c t t h a t have a co l o r d i s t ance l e s s than∗ the passed amount to whi te or b l a c k wi th the passed∗ rep lacement co l o r∗ @param rep lacementColor the new co l o r to use∗/
public void highl ightLightAndDark (double amount ,Color replacementColor ) {
Pixe l p i x e l = null ;
// loop through a l l the p i x e l s in the x d i r e c t i o nfor ( int x = 0 ; x < getWidth ( ) ; x++) {
// loop through a l l the p i x e l s in the y d i r e c t i o nfor ( int y = 0 ; y < getHeight ( ) ; y++) {
// ge t the curren t p i x e lp i x e l = ge tP ix e l (x , y ) ;
// i f the d i s t ance from whi te or b l a c k i s l e s s than the

‘‘main’’2005/1/11page 207
i
i
i
i
i
i
i
i
Section 6.5 Combining Pixels: Blurring 207
// passed amount use the r ep l a c e co l o r in s t eadi f ( p i x e l . c o l o rD i s t ance ( Color . white ) < amount | |
p i x e l . c o l o rD i s t ance ( Color . b lack ) < amount ) {p i x e l . s e tCo lo r ( replacementColor ) ;
}}
}}
You can use this as follows:
> Picture picture = new Picture(Picture.getMediaPath("butterfly1.jpg"));> picture.explore();> picture.highlightLightAndDark(50.0,java.awt.Color.yellow);> picture.explore();
FIGURE 6.12: Original picture (left) and light or dark areas highlighted (right))
6.5 COMBINING PIXELS: BLURRING
When we make pictures larger (scaling them up), we usually get rough edges: Sharpsteps to lines, which we call pixelation. We can reduce pixelation by blurring theimage. What we do is set each pixel to an average of pixels around it. In thisexample, we go through all pixels (note the large loop that surrounds everything)and then in the X and Y dimensions, compute the average of the pixels to eitherside of the pixel. It takes a picture, and a number (size) of pixels to compute theaverage.
Of course we need to be careful not to try and access pixels beyond the allowedvalues of the two-dimensional array of pixels. Try this in the interactions pane:

“main”2005/1/11page 208
i
i
i
i
i
i
i
i
208 Chapter 6 Conditionally Modifying Pixels
> Picture p = new Picture(FileChooser.getMediaPath("caterpillar.jpg"));> System.out.println(p.getWidth());329> System.out.println(p.getHeight());150> p.getPixel(330,160);java.lang.ArrayIndexOutOfBoundsException: Coordinate out ofbounds!at sun.awt.image.ByteInterleavedRaster.getDataElements(Unknown Source)at java.awt.image.BufferedImage.getRGB(Unknown Source)at SimplePicture.getBasicPixel(SimplePicture.java:247)at Pixel.setValuesFromPictureAndLocation(Pixel.java:137)at Pixel.<init>(Pixel.java:57)at SimplePicture.getPixel(SimplePicture.java:270)at sun.reflect.NativeMethodAccessorImpl.invoke0(Native Method)at sun.reflect.NativeMethodAccessorImpl.invoke(Unknown Source)at sun.reflect.DelegatingMethodAccessorImpl.invoke(Unknown Source)at java.lang.reflect.Method.invoke(Unknown Source)
The java.lang.ArrayIndexOutOfBoundsException tells us that we tried toaccess an array element that was outside the allowed indices. If this happens whenour program is executing the program will stop and report the exception.
So how do we check that the index values are acceptable? We know that the xindices range from 0 to width - 1 and the y indices range from 0 to height - 1. So wecan use x >= 0 && x < this.getWidth() && y >= 0 && y < this.getHeight()).
Program 42: A simple blur
/∗∗∗ Method to b l u r the p i x e l s∗ @param numPixels the number o f p i x e l s to average in a l l∗ d i r e c t i o n s so i f the numPixels i s 2 then we w i l l average∗ a l l p i x e l s in the r e c t an g l e de f ined by 2 be f o r e the∗ curren t p i x e l to 2 a f t e r the curren t p i x e l∗/
public void blur ( int numPixels ){
Pixe l p i x e l = null ;P ixe l samplePixe l = null ;int redValue = 0 ;int greenValue = 0 ;int blueValue = 0 ;int count = 0 ;
// loop through the p i x e l sfor ( int x=0; x < this . getWidth ( ) ; x++) {
for ( int y=0; y < this . getHeight ( ) ; y++) {

“main”2005/1/11page 209
i
i
i
i
i
i
i
i
Section 6.5 Combining Pixels: Blurring 209
// ge t the curren t p i x e lp i x e l = this . g e tP ix e l (x , y ) ;
// r e s e t the count and red , green , and b l u e va l u e scount = 0 ;redValue = greenValue = blueValue = 0 ;
/∗ l oop through p i x e l numPixels b e f o r e x to∗ numPixels a f t e r x∗/
for ( int xSample = x − numPixels ;xSample <= x + numPixels ;xSample++) {
for ( int ySample = y − numPixels ;ySample <= y + numPixels ;ySample++) {
/∗ check t ha t we are in the range o f a c c ep t a b l e∗ p i x e l s∗/
i f ( xSample >= 0 && xSample < this . getWidth ( ) &&ySample >= 0 && ySample < this . getHeight ( ) ) {
samplePixe l = this . g e tP ix e l ( xSample , ySample ) ;redValue = redValue + samplePixe l . getRed ( ) ;greenValue = greenValue + samplePixe l . getGreen ( ) ;blueValue = blueValue + samplePixe l . getBlue ( ) ;count = count + 1 ;
}}
}
// use average co l o r o f surrounding p i x e l sColor newColor = new Color ( redValue / count ,
greenValue / count ,blueValue / count ) ;
p i x e l . s e tCo lo r ( newColor ) ;}
}}
Here is how to use this method:
> Picture p = new Picture(FileChooser.getMediaPath("flower1.jpg"));> p = p.scaleUp(2);> p.explore();> p.blur(2);> p.explore();
Figure 6.13 shows the flower from the collage made bigger, then blurred. Youcan see the pixelation in the bigger version—the sharp, blocky edges. With the blur,

“main”2005/1/11page 210
i
i
i
i
i
i
i
i
210 Chapter 6 Conditionally Modifying Pixels
some of that pixelation goes away. More careful blurs take into account regions ofcolors (so that edges between colors are kept sharp), and thus are able to reducepixelation without removing sharpness.
FIGURE 6.13: Making the flower bigger, then blurring to reduce pixellation
6.6 BACKGROUND SUBTRACTION
Let’s imagine that you have a picture of someone, and a picture of where they stoodwithout them there (Figure 6.14). Could you subtract the background of the person(i.e., figure out where the colors are close), and then replace another background?Say, of the moon (Figure 6.15)?
FIGURE 6.14: A picture of a child (Katie), and her background without her
Program 43: Subtract the background and replace it with a new one
/∗∗∗ Method to r ep l a c e the background in the curren t p i c t u r e

“main”2005/1/11page 211
i
i
i
i
i
i
i
i
Section 6.6 Background Subtraction 211
FIGURE 6.15: A new background, the moon
∗ with the background from another p i c t u r e∗ @param oldBackground a p i c t u r e wi th the o ld background∗ to r ep l a c e∗ @param newBackground a p i c t u r e wi th the new background∗ to use∗/
public void swapBackground ( Pic ture oldBackground ,P ic ture newBackground )
{Pixe l cu r rP i x e l = null ;P ixe l o l dP ix e l = null ;P ixe l newPixel = null ;
// loop through the columnsfor ( int x=0; x<getWidth ( ) ; x++){
// loop through the rowsfor ( int y=0; y<getHeight ( ) ; y++){
// ge t the curren t p i x e l and o ld background p i x e lcu r rP ix e l = this . g e tP ix e l (x , y ) ;o l dP ix e l = oldBackground . g e tP ix e l (x , y ) ;
/∗ i f t he d i s t ance between the curren t p i x e l c o l o r∗ and the o ld background p i x e l c o l o r i s l e s s∗ than the 15 then swap in the new background p i x e l∗/
i f ( cu r rP i x e l . c o l o rD i s t ance ( o l dP ix e l . getColor ( ) ) < 15 . 0 ){

“main”2005/1/11page 212
i
i
i
i
i
i
i
i
212 Chapter 6 Conditionally Modifying Pixels
newPixel = newBackground . g e tP ix e l (x , y ) ;cu r rP i x e l . s e tCo lo r ( newPixel . getColor ( ) ) ;
}}
}}
To test if we can replace an old background with a new background try:
> Picture p = new Picture(FileChooser.getMediaPath("kid-in-frame.jpg"));> Picture oldBg = new Picture(FileChooser.getMediaPath("bgframe.jpg"));> Picture newBg = new Picture(FileChooser.getMediaPath("moon-surface.jpg"));> p.swapBackground(oldBg,newBg);> p.show();
We can, but the effect isn’t as good as we would like (Figure 6.16). Ourdaughter’s shirt color was too close to the color of the wall. And though the lightwas dim, the shadow is definitely having an effect here.
FIGURE 6.16: Katie on the moon
Mark tried the same thing with a picture of two students in front of a tiledwall. While Mark did use a tripod (really critical to get the pixels to line up), Markunfortunately left autofocus on, so the two original pictures (Figure 6.17) weren’tall that comparable. The background swap (again with the jungle scene) hardlydid anything at all! We changed the threshold value to 50, and finally got someswapping (Figure 6.18).
> Picture p = new Picture(FileChooser.getMediaPath("wall-two-people.jpg"));> Picture oldBg = new Picture(FileChooser.getMediaPath("wall.jpg"));> Picture newBg = new Picture(FileChooser.getMediaPath("beach.jpg"));> p.swapBackground(oldBg,newBg);> p.show();

“main”2005/1/11page 213
i
i
i
i
i
i
i
i
Section 6.6 Background Subtraction 213
'
&
$
%
Making it Work Tip: Add an input parameter togeneralize a methodNotice that we changed the threshold from 15.0 to 50.0for the second test of the swapBackground(oldBG,newBG)method. A better thing to do would be to change themethod to take the threshold distance as another inputparameter swapBackground(oldBG,newBG,threshold).This means we won’t have to keep changing the methodeach time we want to change the threshold, which meansthe method can be used in more situations.
Program 44: Better Swap Background
/∗∗∗ Method to r ep l a c e the background in the curren t p i c t u r e∗ with the background from another p i c t u r e∗ @param oldBackground a p i c t u r e wi th the o ld background∗ to r ep l a c e∗ @param newBackground a p i c t u r e wi th the new background∗ to use∗ @param th r e s h o l d i f the d i s t ance between the curren t∗ p i x e l c o l o r and the background p i x e l c o l o r i s l e s s∗ than t h i s amount use the new background p i x e l c o l o r∗/
public void swapBackground ( Pic ture oldBackground ,P ic ture newBackground ,double th r e sho ld )
{Pixe l cu r rP i x e l = null ;P ixe l o l dP ix e l = null ;P ixe l newPixel = null ;
// loop through the columnsfor ( int x=0; x<getWidth ( ) ; x++){
// loop through the rowsfor ( int y=0; y<getHeight ( ) ; y++){
// ge t the curren t p i x e l and o ld background p i x e lcu r rP ix e l = this . g e tP ix e l (x , y ) ;o l dP ix e l = oldBackground . g e tP ix e l (x , y ) ;
/∗ i f t he d i s t ance between the curren t p i x e l c o l o r

“main”2005/1/11page 214
i
i
i
i
i
i
i
i
214 Chapter 6 Conditionally Modifying Pixels
∗ and the o ld background p i x e l c o l o r i s l e s s than∗ the t h r e s h o l d then swap in the new background∗ p i x e l∗/
i f ( cu r rP i x e l . c o l o rD i s t ance ( o l dP ix e l . getColor ( ) ) <th r e sho ld )
{newPixel = newBackground . g e tP ix e l (x , y ) ;cu r rP i x e l . s e tCo lo r ( newPixel . getColor ( ) ) ;
}}
}}
To make this work pass the threshold too when invoking swapBackground:
> Picture p = new Picture(FileChooser.getMediaPath("wall-two-people.jpg"));> Picture oldBg = new Picture(FileChooser.getMediaPath("wall.jpg"));> Picture newBg = new Picture(FileChooser.getMediaPath("beach.jpg"));> p.swapBackground(oldBg,newBg,50);> p.show();
FIGURE 6.17: Two people in front of a wall, and a picture of the wall
6.7 CHROMAKEY
The way that weatherpersons appear to be in front of a weather map that changes,is that they actuallly stand before a background of a fixed color (usually blue orgreen), then subtract that color. This is called chromakey . Mark took our son’sblue sheet, attached it to the entertainment center, then took a picture of himselfin front of it, using a timer on a camera (Figure 6.19).
Mark tried a new way to test for “blueness”. If the blue value was greaterthan the sum of the red and green values then it the color was “blue”.
Program 45: Chromakey: Replace all blue with the new background

“main”2005/1/11page 215
i
i
i
i
i
i
i
i
Section 6.7 Chromakey 215
FIGURE 6.18: Swapping a beach for the wall, using background subtraction, with athreshold of 50
FIGURE 6.19: Mark in front of a blue sheet
/∗∗∗ Method to do chromakey us ing a b l u e background∗ @param newBg the new background image to use to r ep l a c e∗ the b l u e from the curren t p i c t u r e∗/
public void chromakey ( P ic ture newBg){
Pixe l cu r rP i x e l = null ;P ixe l newPixel = null ;
// loop through the columnsfor ( int x=0; x<getWidth ( ) ; x++){
// loop through the rowsfor ( int y=0; y<getHeight ( ) ; y++)

“main”2005/1/11page 216
i
i
i
i
i
i
i
i
216 Chapter 6 Conditionally Modifying Pixels
{
// ge t the curren t p i x e lcu r rP ix e l = this . g e tP ix e l (x , y ) ;
/∗ i f t he co l o r at the curren t p i x e l most ly b l u e∗ ( b l u e va lue i s g r ea t e r than red and green∗ combined , then use new background co l o r∗/
i f ( cu r rP i x e l . getRed ( ) + cu r rP ix e l . getGreen ( ) <cu r rP ix e l . getBlue ( ) )
{newPixel = newBg . g e tP ix e l (x , y ) ;cu r rP i x e l . s e tCo lo r ( newPixel . getColor ( ) ) ;
}}
}}
The effect is really quite striking (Figure 6.20). Do note the “folds” in thelunar surface, though. The really cool thing is that this program works for anybackground that’s the same size as the image (Figure 6.21). To put Mark on themoon and on the beach try this:
> Picture mark = new Picture(FileChooser.getMediaPath("blue-mark.jpg"));> Picture newBg = new Picture(FileChooser.getMediaPath("moon-surface.jpg"));> mark.chromakey(newBg);> mark.explore();> mark = new Picture(FileChooser.getMediaPath("blue-mark.jpg"));> newBg = new Picture(FileChooser.getMediaPath("beach.jpg"));> mark.chromakey(newBg);> mark.explore();
There’s another way of writing this code, which is shorter but does the samething.
Program 46: Chromakey, shorter
/∗∗∗ Method to do chromakey us ing a b l u e background∗ @param newBg the new background image to use to r ep l a c e∗ the b l u e from the curren t p i c t u r e∗/
public void chromakeyBlue ( P ic ture newBg){
Pixe l [ ] p ixe lArray = this . g e tP i x e l s ( ) ;P ixe l cu r rP i x e l = null ;P ixe l newPixel = null ;

“main”2005/1/11page 217
i
i
i
i
i
i
i
i
Section 6.7 Chromakey 217
FIGURE 6.20: Mark on the moon
// loop through the p i x e l sfor ( int i = 0 ; i < pixe lArray . l ength ; i++){
// ge t the current p i x e lcu r rP ix e l = pixe lArray [ i ] ;
/∗ i f t he co l o r at the curren t p i x e l most ly b l u e∗ ( b l u e va lue i s g r e a t e r than green and red∗ combined , then use new background co l o r∗/
i f ( cu r rP ix e l . getRed ( ) + cu r rP ix e l . getGreen ( ) <cu r rP ix e l . getBlue ( ) )
{newPixel = newBg . g e tP ix e l ( cu r rP i x e l . getX ( ) ,
cu r rP i x e l . getY ( ) ) ;cu r rP i x e l . s e tCo lo r ( newPixel . getColor ( ) ) ;
}
}}

‘‘main’’2005/1/11page 218
i
i
i
i
i
i
i
i
218 Chapter 6 Conditionally Modifying Pixels
FIGURE 6.21: Mark on the beach
'
&
$
%
Making it Work Tip: When do you need a differentmethod name?Notice that we used a different name for the new shortermethod. We couldn’t have used the same name and hadboth methods in our Picture class since the parametersare the same. Methods can be overloaded (use the samename) as long as the parameters are different (in number,or order, or type).
You don’t really want to do chromakey with a common color, like red—something that there’s a lot of in your face. Mark tried it with the two picturesin Figure 6.22—one with the flash on, and one with it off. We changed the test to if(currPixel.getRed() > currPixel.getGreen() + currPixel.getBlue()). Theone without a flash was terrible—the student’s face was replaced with the back-ground. The one with the flash was better, but the flash is still clear after the swap(Figure 6.23). It’s clear why moviemakers and weather people use blue or greenbackgrounds.
6.8 CONCEPTS SUMMARY
We have covered boolean expressions, conditionally executing code using if andelse, combining boolean expressions using “and” (&&) and “or” (||) and methodoverloading.
6.8.1 Boolean Expressions
A boolean expression is one that results in true or false. The values true andfalse are reserved words in Java. Here are some example boolean expressions.

“main”2005/1/11page 219
i
i
i
i
i
i
i
i
Section 6.8 Concepts Summary 219
FIGURE 6.22: Student in front of a red background, and with flash on
FIGURE 6.23: Using chromakey program with a red background
> int x = 20;> System.out.println(x <= 30);true> System.out.println(x > 30);false> System.out.println(x == 20);true> System.out.println(x != 20);false
Notice that to check for a variable having a value we use == not =. The = isused to assign a value to a variable, not check for equality. To check for inequalityuse !=.
6.8.2 Combining Boolean Expressions
You can combine boolean expressions with the Java operators && to represent “and”and || to represent “or”. When you use && both boolean expressions must be truein order for it to return true. If the first boolean expression isn’t true the secondwon’t even be tested. This is called short-circuit evaluation. When you use || onlyone boolean expression must be true in order for it to return true. With “or” if the

“main”2005/1/11page 220
i
i
i
i
i
i
i
i
220 Chapter 6 Conditionally Modifying Pixels
first boolean expression is true the second won’t be evaluated. If the first booleanexpression is false the second one will still be evaluated.
> int x = 3;> int y = 5;> System.out.println(x < 5 && y < 6);true> System.out.println(x > 5 && y < 6);false> System.out.println(x < 5 && y > 6);false> System.out.println(x > 5 && y > 6);false> System.out.println(x > 5 || y < 6);true
6.8.3 Conditional Execution
To conditionally execute one statement use the if keyword followed by a booleanexpression inside of an open and close parenthesis. Put the statement that you onlywant executed if the boolean expression is true on a new line and indent it. If theboolean expression is false then execution will continue with the next statement.
i f (boolean exp r e s s i on )// sta tement to execu te i f the boo lean expre s s i on i s t ruestatement
// next s ta tementstatement
To conditionally execute a block of statements use the if keyword followed bya boolean expression inside of an open and close parenthesis. Put the statements tobe executed when the boolean expression is true inside of an open and close curlybrace. Indent the statements to make it easier to visually see that these statementswill only be executed if the boolean expression is true. If the boolean expression isfalse execution will continue with the statement following the close curly brace.
i f (boolean exp r e s s i on ) {statements
}If you want to execute one block of statements if the boolean expression is
true and another if it is false use the else keyword as well. Put the statementsthat you want to execute when the boolean expression is true inside of an openand close curly brace after the if(booleanExpression). Next, add the keywordelse and put the statements that you want executed when the boolean expressionis false inside of an open and close curly brace.
i f (boolean exp r e s s i on ) {statements

“main”2005/1/11page 221
i
i
i
i
i
i
i
i
Section 6.8 Concepts Summary 221
} else {statements}
If you have 3 or more options use nested ifs and elses.
i f (boolean exp r e s s i on ) {statements
} else i f (boolean exp r e s s i on ) {statements
} else {statements
}If you have 4 options start with an if (boolean expression) and have two
else if (boolean expression) and a final else. The last else is optional.
PROBLEMS
6.1. Try doing chromakey in a range—grab something out of its background wherethe something is only in one part of a picture. For example, put a halo aroundsomeone’s head, but don’t mess with the rest of their body.
6.2. Write a method to copy all but the white pixels from one picture to another.Use this to put the robot in robot.jpg on the moon in moon-surface.jpg.
6.3. Start with a picture of someone you know, and make some specific color changesto it:
• Turn the skin green
• Turn the eyes red.
• Turn the hair orange.
Of course, if you’re friend’s skin is already green, or eyes red, or hair orange–choose a different target color.
6.4. Which of the methods below removes all the blue from every pixel of a picturethat already has a blue value of more than 100?
1. A only2. D only3. B and C4. C and D5. None6. All
What do the other ones do?A.
public void blueOneHundred ( ){
Pixe l p = null ;
for ( int x = 0 ; x < 100 ; x++) {for ( int y=0; y < 100 ; y++) {
p = ge tP ix e l (x , y ) ;
“main”2005/1/11page 222
i
i
i
i
i
i
i
i
222 Chapter 6 Conditionally Modifying Pixels
p . se tBlue ( 1 0 0 ) ;}
}}
B.
public void blueChange ( ){
Pixe l [ ] p ixe lArray = ge tP i x e l s ( ) ;P ixe l p i x e l = null ;
for ( int i = 0 ; i < pixe lArray . l ength ; i++) {p i x e l = pixe lArray [ i ] ;i f ( p i x e l . getBlue ( ) > 0) {
p i x e l . s e tBlue ( 1 0 0 ) ;}
}}
C.
public void clearSomeBlue ( ) {Pixe l [ ] p ixe lArray = ge tP i x e l s ( ) ;P ixe l p i x e l = null ;
for ( int i = 0 ; i < pixe lArray . l ength ; i++) {p i x e l = pixe lArray [ i ] ;i f ( p i x e l . c o l o rD i s t ance ( Color .BLUE) > 100)
p i x e l . s e tBlue ( 0 ) ;}
}D.
public void se tBlue ( ) {Pixe l [ ] p ixe lArray = ge tP i x e l s ( ) ;P ixe l p i x e l = null ;
for ( int i = 0 ; i < pixe lArray . l ength ; i++) {p i x e l = pixe lArray [ i ] ;i f ( p i x e l . getBlue ( ) > 100)
p i x e l . s e tBlue ( 0 ) ;}
}6.5. Convert the method copyFlowerLarger() to a method that can scale any picture
up. It should return a new picture object created using new Picture(this.getWidth()
* 2,this.getHeight() * 2).6.6. Write the method to turn the lightest areas of a picture gray to simulate a fog.6.7. Write other edge detection methods. Try comparing the current pixel intensity
with the one on the right. Try comparing the current pixel to the average of thepixels to the right and below.
6.8. What would the output from the following be:

“main”2005/1/11page 223
i
i
i
i
i
i
i
i
Section 6.8 Concepts Summary 223
int x = 30 ;for ( int i=x ; i < 40 ; i++) {
i f ( i < 35) System . out . p r i n t l n ( ” i i s l e s s than 35” ) ;else i f ( i == 35) System . out . p r i n t l n ( ” i i s 35” ) ;else System . out . p r i n t l n ( ” i i s g r e a t e r than 35” ) ;}
6.9. Write a method to do green or red chromakey.6.10. Write a method to do chromakey in a specified rectangular region.

“main”2005/1/11page 224
i
i
i
i
i
i
i
i
C H A P T E R 7
Drawing
7.1 DRAWING ON IMAGES USING THE GRAPHICS CLASS
7.2 PROGRAMS AS SPECIFYING DRAWING PROCESS
7.3 USING GRAPHICS2D FOR ADVANCED DRAWING
7.4 CONCEPT SUMMARY
Chapter Learning ObjectivesThe media learning goals for this chapter are:
• To be able to draw simple shapes (lines, ovals, rectangles, arcs) on existingpictures.
• To create pictures by drawing them.
• To use the Java2D API for more complicated drawing.
The computer science goals for this chapter are:
• To be able to choose between using vector and bitmapped image formats.
• To be able to choose when one should write a program for a task versus usingexisting applications software.
• To promote reuse by working with existing classes.
• To introduce the concept of inheritance.
• To introduce the concept of an interface.
7.1 DRAWING ON IMAGES USING THE GRAPHICS CLASS
Professional photographers have a problem in that it is easy for people to scanpictures and print many copies of them. How can they allow people to see proofs ofpictures, but discourage people from using their pictures without paying for them?One way that professional photographers protect their images is to put some texton them. People can still scan the picture and make copies, but it is obvious thatthe picture is stolen. The text also hides some of the picture so people are morelikely to pay for pictures without the text.
How can you add text to a picture? We know that this is just a matter ofsetting pixel values to whatever we want, but setting individual pixel values to drawa line or a circle or some letters is hard. Here’s an example that creates a grid of
224

“main”2005/1/11page 225
i
i
i
i
i
i
i
i
Section 7.1 Drawing on Images Using the Graphics Class 225
lines on a picture (Figure 7.1). It works by simply setting all the pixels in a line toblack! The gap between the lines is 20 pixels.
Program 47: Draw lines by setting pixels
/∗∗∗ Method to draw a g r i d on a p i c t u r e∗/
public void drawGrid ( ){
Pixe l p i x e l = null ;
// Draw the h o r i z on t a l l i n e sfor ( int y = 20 ; y < this . getHeight ( ) ; y+=20) {
for ( int x = 0 ; x < this . getWidth ( ) ; x++) {p i x e l = this . g e tP ix e l (x , y ) ;p i x e l . s e tCo lo r ( Color . b lack ) ;
}}
// draw the v e r t i c a l l i n e sfor ( int x = 20 ; x < this . getWidth ( ) ; x+=20) {
for ( int y = 0 ; y < this . getHeight ( ) ; y++) {p i x e l = this . g e tP ix e l (x , y ) ;p i x e l . s e tCo lo r ( Color . b lack ) ;
}}
}
To test this method create a Picture object and then invoke the method onthe Picture.
> Picture pictureObj = new Picture(FileChooser.getMediaPath("barbara.jpg"));> pictureObj.show();> pictureObj.drawGrid();> pictureObj.repaint();
This method first draws the horizontal lines by setting y to a value of 20 andincrementing y by 20, while x starts at 0 and is incremented by 1. Next the methoddraws the vertical lines by setting x to 20 and incrementing x by 20 while y startsat 0 and is incremented by 1. To draw more lines decrease the start and incrementvalues and to draw less lines increase the start and increment values.

“main”2005/1/11page 226
i
i
i
i
i
i
i
i
226 Chapter 7 Drawing
FIGURE 7.1: Adding a grid of lines to a picture (barbara.jpg)
'
&
$
%
Making it Work Tip: Working with Color ObjectsYou may notice that this program is using the pre-defined Color object (object of the Color class)Color.black. Remember that Java pre-defines foryou a bunch of colors: Color.black, Color.white,Color.blue, Color.red, Color.green, Color.gray,Color.lightGray, Color.darkGray, Color.yellow,Color.orange, Color.pink, Color.magenta, andColor.cyan. You can use any of these when you need acolor. You can also create a Color object by providingthe red, green, and blue values (between 0 and 255) usingnew Color(red,green,blue). For example to createa pure black color you would use new Color(0,0,0)and to create a pure white color you would use newColor(255,255,255).
We can imagine drawing anything we want like this, by simply setting individ-ual pixels to whatever colors we want. We could draw rectangles or circles, simplyby figuring out what pixels need to be what color. We could even draw letters—bysetting the appropriate pixels to the appropriate colors, we could make any letterwe want. While we could do it, it would involve a lot of work to do all the mathfor all the different shapes and letters. That’s work that lots of people want done,so instead, the basic drawing has been built into Java for you.

“main”2005/1/11page 227
i
i
i
i
i
i
i
i
Section 7.1 Drawing on Images Using the Graphics Class 227
7.1.1 Drawing with Graphics methods
Most modern programming languages with graphics libraries provide ways to drawa variety of shapes and text. In Java the Graphics class in the java.awt packagehas a number of methods that allow you to draw simple shapes and text. Thesegraphics methods work similar to painting. First you pick a color to use to paintwith and then you can paint several shapes using that color. If one shape is drawnover another it will cover the shape underneath.
Computer Science Idea: PackagesA package is a collection of related classes. Java definesa large number of classes and it would be overwhelmingif they weren’t grouped into packages. Some commonpackages are java.lang which has the basics of the Javalanguage in it, java.awt which has the original graphicsclasses in it, and java.io which contains classes used forinput and output.
• setColor(Color color) sets the color to use for drawing.
• drawLine(int x1, int y1, int x2, int y2) draws a line from position(x1, y1) to (x2, y2) using the current color.
• drawRect(int x1, int y1,int w, int h) draws the outline of a rectanglewith the upper left corner at (x1, y1), a width of w, and a height of h usingthe current color.
• fillRect(int x1, int y1, int w, int h) draws a filled (solid) rectanglewith the upper left corner at (x1, y1), a width of w, and a height of h usingthe current color.
• drawOval(int x1, int y1, int w, int h) draws the outline of an ovalwith the upper left corner of the enclosing rectangle at (x1, y1), the widthof the enclosing rectangle is w and the height of the enclosing rectangle is husing the current color.
• fillOval(int x1, int y1, int w, int h) draws a filled (solid) oval withthe upper left corner of an enclosing rectangle at (x1, y1), the width of theenclosing rectangle is w and the height of the enclosing rectangle is h usingthe current color.
• drawArc(int x1, int y1, int w, int h, int startAngle, int arcAngle)draws an outline of an arc that is part of an oval that fits in the enclosingrectangle at (x1, y1), the width of the enclosing rectangle is w and the heightof the enclosing rectangle is h. The arc starts at the given startAngle andextends arcAngle degrees (where 0 degrees is at the 3 o’clock position on aclock and 45 degrees goes through the upper right corner of the enclosingrectangle). The ending angle is the startAngle plus arcAngle.

“main”2005/1/11page 228
i
i
i
i
i
i
i
i
228 Chapter 7 Drawing
• fillArc(int x1, int y1, int w, int h, int startAngle, int arcAngle)draws a filled arc that is part of an oval that fits in the enclosing rectangleat (x1, y1), the width of the enclosing rectangle is w and the height of theenclosing rectangle is h. The arc starts at the given startAngle and extendsarcAngle degrees (where 0 degrees is at the 3 o’clock position on a clock and45 degrees goes through the upper right corner of the enclosing rectangle).The ending angle is the startAngle plus arcAngle.
• drawPolygon(int[] xArray, int[] yArray, int numPoints) draws the out-line of a closed polygon using the x values in xArray and the y values inyArray using the current color.
• fillPolygon(int[] xArray,int[] yArray, int numPoints) draws a filledclosed polygon using the x values in xArray and the y values in yArray usingthe current color.'
&
$
%
Making it Work Tip: Use the Java APIJava is a large language and it is nearly impossible to knowevery method for every class. Use the application programinterface (API) documentation to see the methods that areavailable for a class. If you look at the documentation forthe Graphics class in the java.awt package you will see allof the methods defined for that class. We are only show-ing some of the most commonly used methods here. Toview the API documentation go to: http://java.sun.com/.Find the specification for the version of the language thatyou are using. Click on the package in the top left win-dow frame and then click on the class name in the bottomleft window frame. The documentation for that class willappear on the right. Scroll down to “Method Summary”(Figure 7.2). This gives an alphabetical listing of all of themethods in defined in that class.
We can use these commands to add simple shapes to existing pictures. Whatwould it look like if a mysterious red box washed up on the shore of a beach? Wewill need to get a Graphics object to use for the drawing. We can get one froma Picture object using the method getGraphics(). When you draw you set thecolor using setColor(Color color) and then do any drawing commands. We canmake a box appear on a picture of a beach with this method (Figure 7.3).
Program 48: Adding a box
/∗∗∗ Method to add a s o l i d red r e c t an g l e to the current p i c t u r e∗/
public void addBox ( )

‘‘main’’2005/1/11page 229
i
i
i
i
i
i
i
i
Section 7.1 Drawing on Images Using the Graphics Class 229
Documentation for the class: Graphics
List of classes in this package
List of packages
FIGURE 7.2: Viewing the Java API for java.awt.Graphics
FIGURE 7.3: A box washed up on the shore of the beach
{
// ge t the g raph i c s con t ex t from the p i c t u r eGraphics g = this . getGraphics ( ) ;
// s e t the co l o r to redg . s e tCo lo r ( Color . red ) ;
// draw the box as a f i l l e d r e c t an g l eg . f i l l R e c t (150 , 200 , 50 , 50 ) ;
}
Execute this method using:
> Picture p = new Picture(FileChooser.getMediaPath("beach-smaller.jpg"));

“main”2005/1/11page 230
i
i
i
i
i
i
i
i
230 Chapter 7 Drawing
> p.addBox();> p.show();
This method isn’t very reusable. The only way to change it to work for otherrectangles is to modify the color and rectangle information and then recompile. Ifwe want this to work on any rectangle then we will want to pass parameters tomake the method more general.
Program 49: General draw box
/∗∗∗ Method to draw a f i l l e d box on the curren t p i c t u r e∗ @param co l o r the co l o r to draw the box wi th∗ @param topLeftX the top l e f t x coord ina te o f the box∗ @param topLeftY the top l e f t y coord ina te o f the box∗ @param width the width o f the box∗ @param he i g h t the h e i g h t o f the box∗/
public void drawBox ( Color co lo r , int topLeftX , int topLeftY ,int width , int he ight )
{// ge t the g raph i c s con t ex t f o r drawingGraphics g = this . getGraphics ( ) ;
// s e t the current co l o rg . s e tCo lo r ( c o l o r ) ;
// draw the f i l l e d r e c t an g l eg . f i l l R e c t ( topLeftX , topLeftY , width , he ight ) ;
}
We could use this more general method to generate the same picture by:
> Picture p = new Picture(FileChooser.getMediaPath("beach-smaller.jpg"));> p.drawBox(java.awt.Color.red,150,200,50,50);> p.show();
The advantage of the method drawBox over the method addBox is that it canbe used to draw any rectangle of any color on any picture.
Below is another example of using the simple drawing commands (Figure 7.4).
Program 50: An example of using drawing commands
/∗∗∗ Method to show d i f f e r e n t drawing c a p a b i l i t i e s . I t∗ w i l l draw a s t r i n g , a l i n e , a f i l l e d r ec tang l e , the∗ ou t l i n e o f a r ec tang l e , the o u t l i n e o f an oval ,

“main”2005/1/11page 231
i
i
i
i
i
i
i
i
Section 7.1 Drawing on Images Using the Graphics Class 231
∗ and a f i l l e d arc .∗/
public void drawExample ( ){
// ge t the g raph i c s o b j e c t to use f o r drawingGraphics g raph i c s = this . getGraphics ( ) ;
// s t a r t wi th a b l a c k co l o rgraph i c s . s e tCo lo r ( Color . b lack ) ;
/∗ draw the s t r i n g wi th a upper l e f t corner∗ at x=10, y=75∗/
graph i c s . drawString (”This i s a t e s t o f drawing a s t r i n g on a p i c tu r e ” ,
10 , 75 ) ;
// draw a l i n e from (10 ,20) to (300 ,50)graph i c s . drawLine (10 , 20 , 300 , 50 ) ;
// s e t the co l o r to ye l l owgraph i c s . s e tCo lo r ( Color . ye l low ) ;
/∗ draw a f i l l e d r e c t an g l e ( f i l l e d wi th y e l l ow ) at∗ upper l e f t (0 ,200) wi th a width o f 300 and∗ h e i g h t 250∗/
graph i c s . f i l l R e c t ( 0 , 200 , 300 , 250 ) ;
// s e t the co l o r back to b l a c kgraph i c s . s e tCo lo r ( Color . b lack ) ;
/∗ draw the o u t l i n e o f a r e c t an g l e wi th the upper∗ l e f t a t (10 ,210) and a width o f 200 and a h e i g h t∗ o f 100∗/
graph i c s . drawRect (10 , 210 , 200 , 100 ) ;
/∗ draw an ova l enc lo sed by a r e c t an g l e wi th the top∗ l e f t corner at (400 ,10) and a width o f 200 and a∗ h e i g h t o f 100∗/
graph i c s . drawOval (400 , 10 , 200 , 100 ) ;
/∗ draw an arc which i s par t o f an ova l enc lo sed by∗ a r e c t an g l e wi th the top l e f t corner at (400 ,300)∗ a width o f 200 , and a h e i g h t o f 150. The arc∗ s t a r t s a t 0 (3 o ’ c l o c k p o s i t i o n ) and goes 180∗ degrees counter−c l o c kw i s e to the 9 o ’ c l o c k p o s i t i o n∗/
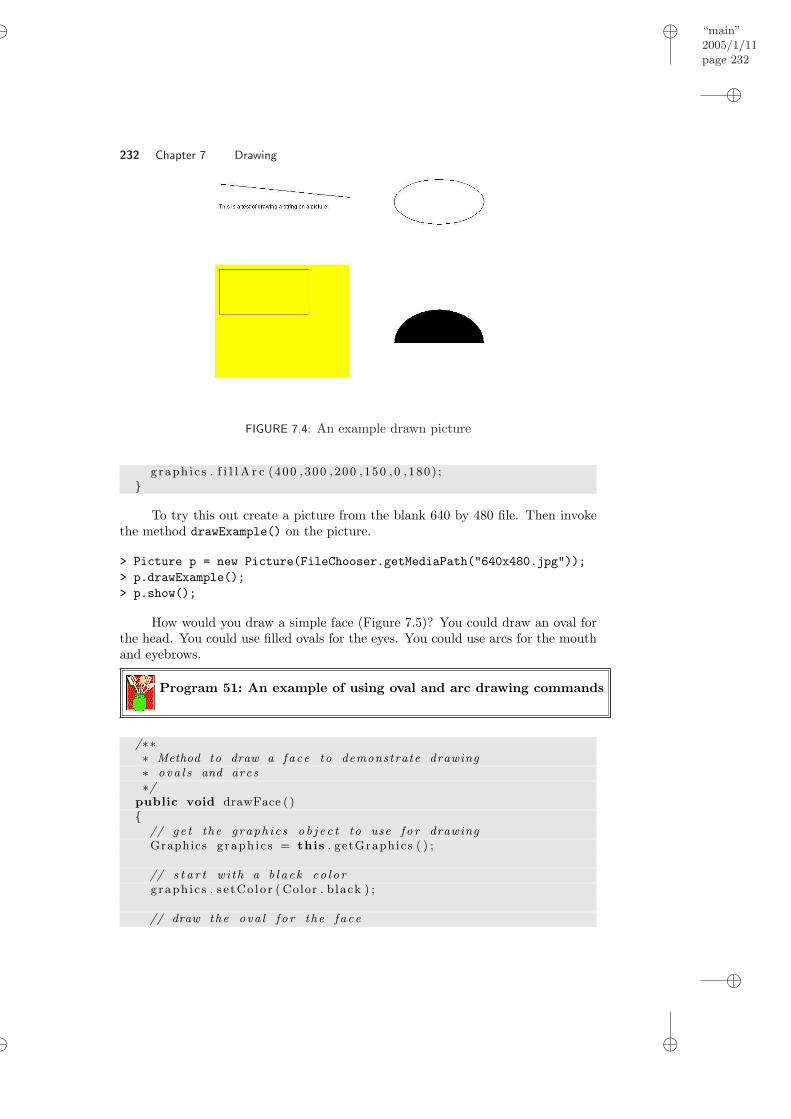
“main”2005/1/11page 232
i
i
i
i
i
i
i
i
232 Chapter 7 Drawing
FIGURE 7.4: An example drawn picture
graph i c s . f i l l A r c (400 ,300 ,200 , 150 ,0 , 180 ) ;}
To try this out create a picture from the blank 640 by 480 file. Then invokethe method drawExample() on the picture.
> Picture p = new Picture(FileChooser.getMediaPath("640x480.jpg"));> p.drawExample();> p.show();
How would you draw a simple face (Figure 7.5)? You could draw an oval forthe head. You could use filled ovals for the eyes. You could use arcs for the mouthand eyebrows.
Program 51: An example of using oval and arc drawing commands
/∗∗∗ Method to draw a face to demonstrate drawing∗ ova l s and arcs∗/
public void drawFace ( ){
// ge t the g raph i c s o b j e c t to use f o r drawingGraphics g raph i c s = this . getGraphics ( ) ;
// s t a r t wi th a b l a c k co l o rgraph i c s . s e tCo lo r ( Color . b lack ) ;
// draw the ova l f o r the face

“main”2005/1/11page 233
i
i
i
i
i
i
i
i
Section 7.1 Drawing on Images Using the Graphics Class 233
FIGURE 7.5: A drawn face (left) and the face with enclosing rectangles (right)
graph i c s . drawOval (130 , 50 , 380 , 380 ) ;
// draw the ova l s f o r the eyesgraph i c s . f i l l O v a l ( 225 , 155 , 40 , 40 ) ;g raph i c s . f i l l O v a l ( 375 , 155 , 40 , 40 ) ;
// draw the arcs f o r the eyebrowsgraph i c s . drawArc (225 , 145 , 40 , 40 , 45 , 90 ) ;g raph i c s . drawArc (375 , 145 , 40 , 40 , 45 , 90 ) ;
// draw the arc f o r the mouthgraph i c s . drawArc (190 ,85 ,255 ,255 ,−45 ,−90);
}
To try this out create a picture from the blank 640 by 480 file. Then invokethe method drawFace() on the picture.
> Picture p = new Picture(FileChooser.getMediaPath("640x480.jpg"));> p.drawFace();> p.show();
'
&
$
%
Making it Work Tip: Drawing Ovals and ArcsNotice that to draw an oval or arc you give the upper leftcorner of the enclosing rectangle, not the upper left cornerof the oval or arc (Figure 7.5). Arcs specify the startingangle, but not the ending angle. The ending angle is thestarting angle added to the arc angle. Graph paper and aprotractor can help you plan your drawing.
7.1.2 Vector and bitmap representations
Here’s a thought: Which of these is smaller–the picture (Figure 7.4) or the methodProgram 50 (page 230)? The picture, on my disk, is about 31 kilobytes (a kilobyteis a thousand bytes). The program is less than 2 kilobytes. What if you just saved

“main”2005/1/11page 234
i
i
i
i
i
i
i
i
234 Chapter 7 Drawing
the program and not the pixels? That’s what a vector representation for graphicsis about.
Vector-based graphical representations are basically executable programs thatgenerate the picture when desired. Vector-based representations are used in Postscript,Flash, and AutoCAD. When you make a change to an image in Flash or AutoCAD,you are actually making a change to the underlying representation—essentially,you’re changing the program, like the one in Program 7.4 (page 232). The programis then executed again to make the image appear. But thanks to Moore’s Law,that execution-and-new-display occurs so fast that it feels like you’re changing thepicture.
Font definitions languages like Postscript and TrueType actually define minia-ture programs (or equations) for each and every letter or symbol. When you wantthe letter or symbol at a particular size, the program is run to figure out whichpixels should be set to what values. (Some actually specify more than one color tocreate the effect of smoother curves.) Because the programs are written to handlethe desired font size as an input, the letters and symbols can be generated at anysize.
Bitmap graphical representations, on the other hand, store every individualpixel, or some compressed representation of the pixels. Formats like BMP, GIF,and JPEG are essentially bitmap representations. GIF and JPEG are compressedrepresentations—they don’t represent each and every pixel with 24 bits. Instead,they use some techniques to represent the same information but with fewer bits.
What does compression mean? It means that various techniques have beenused to make the file smaller. Some compression techniques are lossy compression–some detail is lost, but hopefully the least significant (perhaps even invisible to thehuman eye, or ear) detail. Other techniques, lossless compression lose no detail, butstill scrunch the file. One of the lossless techniques is run length encoding (RLE).
Imagine that you’ve got a long line of yellow pixels in a picture, surroundedby some blue pixels. Something like this:
B B Y Y Y Y Y Y Y Y Y B B
What if you encoded this, not as a long line of pixels, but as something like:
B B 9 Y B B
In words, you encode “blue, blue, then 9 yellows, then blue and blue.” Sinceeach of those yellow pixels takes 24 bits (3 bytes for red, green and blue), butrecording “9” takes just a single byte, there’s a huge savings. We say that we’reencoding the length of the run of yellows–thus, run length encoding. That’s justone of the compression methods that gets used to make pictures smaller.
There are several benefits to vector-based representations over bitmap repre-sentations. If you can represent the picture you want to send (say, over the Internet)using a vector-based representation, it’s much smaller than sending all the pixels–in a sense, vector notation is already compressed. Essentially, you’re sending theinstructions for how to make the picture, rather than sending the picture itself.For very complex images, however, the instructions can be as long as the imageitself (imagine sending all the directions on how to paint the Mona Lisa!), so there

“main”2005/1/11page 235
i
i
i
i
i
i
i
i
Section 7.1 Drawing on Images Using the Graphics Class 235
FIGURE 7.6: Shows font information including the baseline
is no benefit. But when the images are simple enough, representations like thoseused in Flash make for faster upload and download times than sending the sameinformation as JPEG images.
The real benefit of vector-based notations come when you want to change theimage. Let’s say that you’re working on an architectural drawing, and you extenda line in your drawing tool. If your drawing tool is only working with bitmappedimages (sometimes called a painting tool) then all you have are more pixels on thescreen that are adjacent to the other pixels on the screen representing the line.There’s nothing in the computer that says that all those pixels represent a line ofany kind—they’re just pixels. But if your drawing tool is working with vector-basedrepresentations (sometimes called a drawing tool) then extending a line means thatyou’re changing an underlying representation of a line.
Why is that important? The underlying representation is actually a specifi-cation of the drawing, and it can be used anywhere that a specification is needed.Imagine taking the drawing of a part, then actually running the cutting and stamp-ing machines based on that drawing. This happens regularly in many shops, and it’spossible because the drawing isn’t just pixels—it’s a specification of the lines andtheir relationships, which can then be scaled and used to determine the behaviorof machines.
You might be wondering, ”But how could we change the program? Canwe write a program that would essentially re-type the program or parts of theprogram?” Yes, we can, and we’ll do that in the chapter on text.
7.1.3 Drawing Text (Strings)
In order to add text to an image we can use the java.awt.Graphics methoddrawString(String str, int x, int y). This will draw the passed string atthe passed x and y position. However, the x and y position are not the top leftcorner as is usual with the drawing methods. The x and y position give the baselineof the string which is the line on which you would write the string if you were usinglined paper (Figure 7.6).
When you use the drawString method the string will be drawn in the currentcolor and font . The font specifies what the characters in the string will look like,what style will be used (bold, italic, plain), and how big the characters will be. Youhave seen that you can set the color using setColor(Color colorObj). You canalso set the font using setFont(Font fontObj).
To create a Font object you specify the font name, style, and size: newFont(String name, int style, int size). You can always use any of Dialog,

“main”2005/1/11page 236
i
i
i
i
i
i
i
i
236 Chapter 7 Drawing
DialogInput, Monospaced, Serif, or SansSerif for font names. You can get an arrayof all of the available font names using:
> import java.awt.*;> GraphicsEnvironment env = GraphicsEnvironment.getLocalGraphicsEnvironment();> String[] nameArray = env.getAvailableFontFamilyNames();> for (int i=0; i < nameArray.length; i++)
System.out.println(nameArray[i]);
The method to draw a passed string on the current picture at the passed xand y is:
Program 52: Draw a string on a picture
/∗∗∗ Method to draw a s t r i n g on the curren t p i c t u r e∗ @param t e x t the s t r i n g to draw∗ @x the x l o c a t i o n to s t a r t a t∗ @y the y l o c a t i o n o f the b a s e l i n e∗/
public void drawString ( St r ing text , int x , int y ){
// ge t the g raph i c s o b j e c tGraphics g = getGraphics ( ) ;
// s e t the co l o rg . s e tCo lo r ( Color . b lack ) ;
// s e t the f on tg . setFont (new Font ( ” Ar i a l ” , Font .BOLD, 2 4 ) ) ;
// draw the s t r i n gg . drawString ( text , x , y ) ;
}
To use this program you can use the picture explorer to determine where youwant the baseline of the string to be and then use the drawString method to drawthe string on the picture. Our son, Matthew, took a picture of a kitten on a trip toGreece. Let’s add a string that explains the picture near the bottom of the picture(Figure 7.7).
> Picture p = new Picture(FileChooser.getMediaPath("kitten.jpg"));> p.explore();> p.drawString("Matt’s picture of a kitten in Greece",67,283);> p.explore();
.
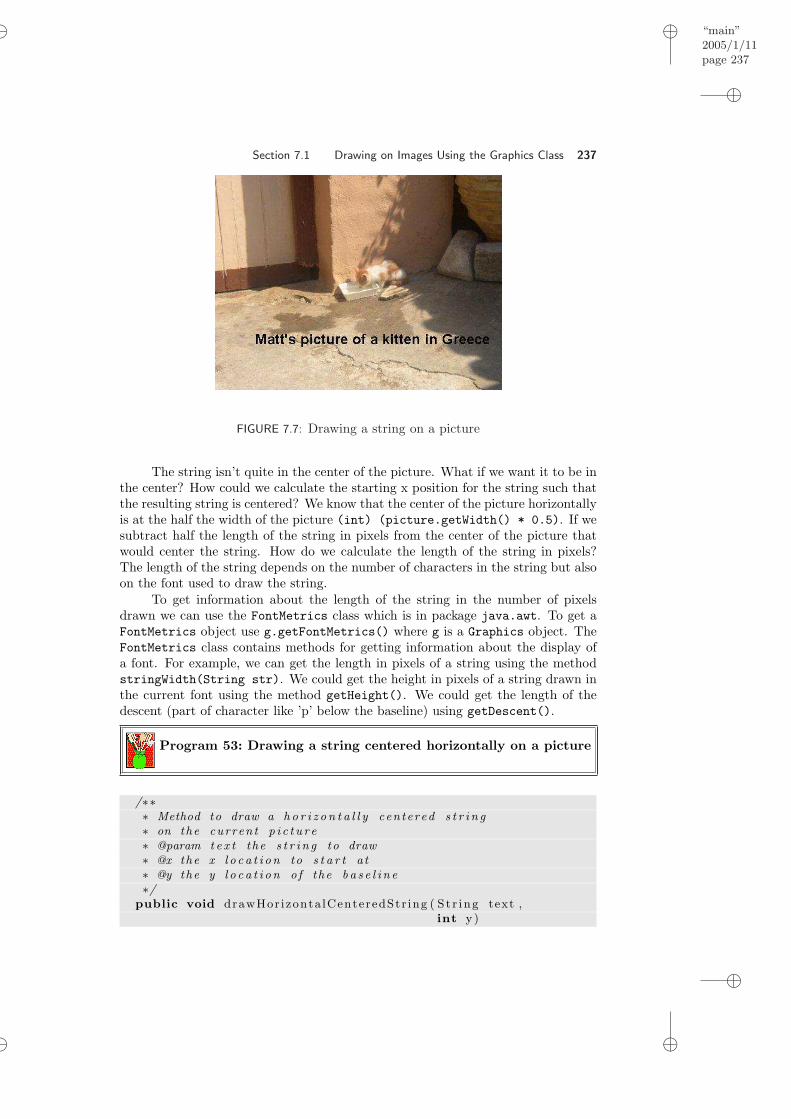
“main”2005/1/11page 237
i
i
i
i
i
i
i
i
Section 7.1 Drawing on Images Using the Graphics Class 237
FIGURE 7.7: Drawing a string on a picture
The string isn’t quite in the center of the picture. What if we want it to be inthe center? How could we calculate the starting x position for the string such thatthe resulting string is centered? We know that the center of the picture horizontallyis at the half the width of the picture (int) (picture.getWidth() * 0.5). If wesubtract half the length of the string in pixels from the center of the picture thatwould center the string. How do we calculate the length of the string in pixels?The length of the string depends on the number of characters in the string but alsoon the font used to draw the string.
To get information about the length of the string in the number of pixelsdrawn we can use the FontMetrics class which is in package java.awt. To get aFontMetrics object use g.getFontMetrics() where g is a Graphics object. TheFontMetrics class contains methods for getting information about the display ofa font. For example, we can get the length in pixels of a string using the methodstringWidth(String str). We could get the height in pixels of a string drawn inthe current font using the method getHeight(). We could get the length of thedescent (part of character like ’p’ below the baseline) using getDescent().
Program 53: Drawing a string centered horizontally on a picture
/∗∗∗ Method to draw a h o r i z o n t a l l y cen tered s t r i n g∗ on the curren t p i c t u r e∗ @param t e x t the s t r i n g to draw∗ @x the x l o c a t i o n to s t a r t a t∗ @y the y l o c a t i o n o f the b a s e l i n e∗/
public void drawHor izonta lCenteredStr ing ( S t r ing text ,int y )
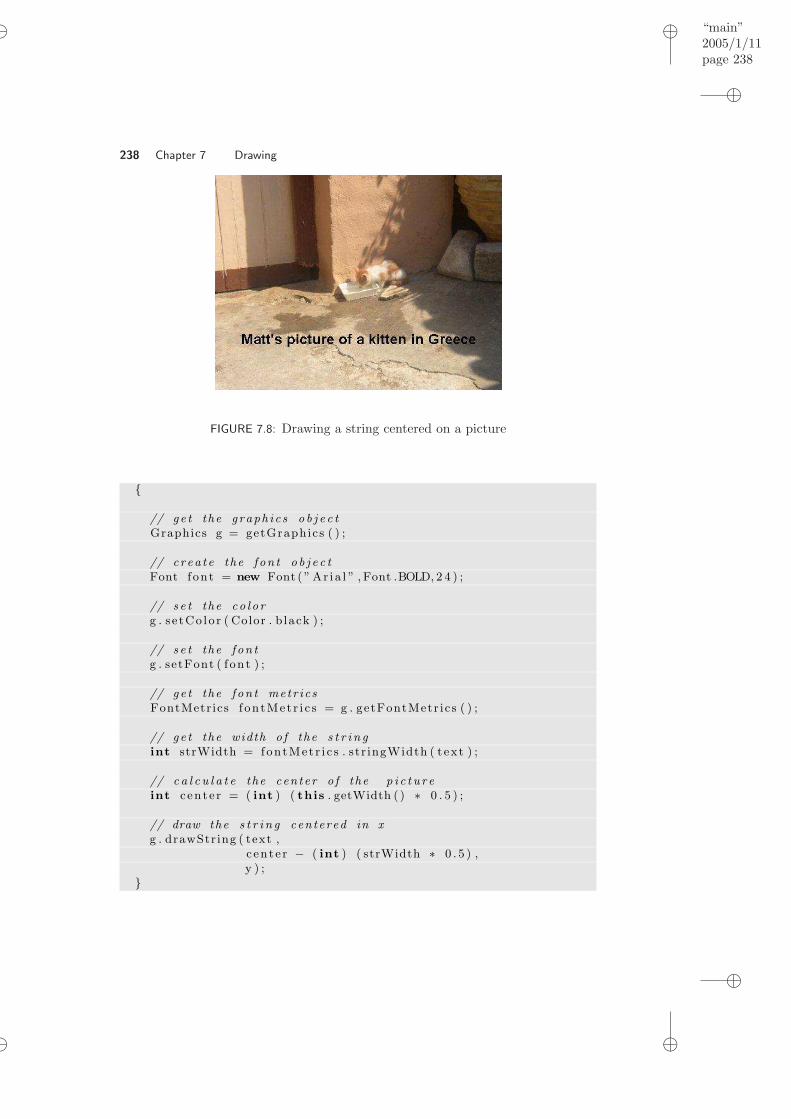
“main”2005/1/11page 238
i
i
i
i
i
i
i
i
238 Chapter 7 Drawing
FIGURE 7.8: Drawing a string centered on a picture
{
// ge t the g raph i c s o b j e c tGraphics g = getGraphics ( ) ;
// c rea t e the f on t o b j e c tFont font = new Font ( ” Ar i a l ” , Font .BOLD, 2 4 ) ;
// s e t the co l o rg . s e tCo lo r ( Color . b lack ) ;
// s e t the f on tg . setFont ( f ont ) ;
// ge t the f on t metr i c sFontMetrics f on tMet r i c s = g . getFontMetr ics ( ) ;
// ge t the width o f the s t r i n gint strWidth = fontMet r i c s . str ingWidth ( text ) ;
// c a l c u l a t e the cen te r o f the p i c t u r eint cente r = ( int ) ( this . getWidth ( ) ∗ 0 . 5 ) ;
// draw the s t r i n g cen tered in xg . drawString ( text ,
c en t e r − ( int ) ( strWidth ∗ 0 . 5 ) ,y ) ;
}
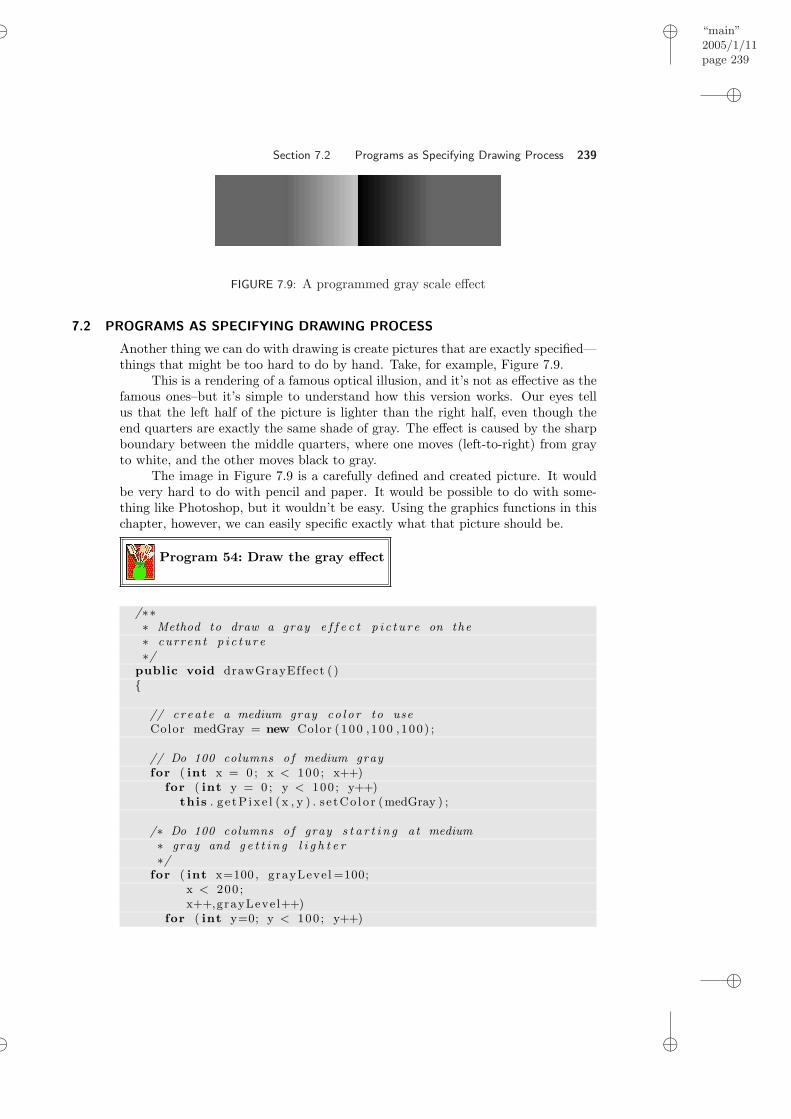
“main”2005/1/11page 239
i
i
i
i
i
i
i
i
Section 7.2 Programs as Specifying Drawing Process 239
FIGURE 7.9: A programmed gray scale effect
7.2 PROGRAMS AS SPECIFYING DRAWING PROCESS
Another thing we can do with drawing is create pictures that are exactly specified—things that might be too hard to do by hand. Take, for example, Figure 7.9.
This is a rendering of a famous optical illusion, and it’s not as effective as thefamous ones–but it’s simple to understand how this version works. Our eyes tellus that the left half of the picture is lighter than the right half, even though theend quarters are exactly the same shade of gray. The effect is caused by the sharpboundary between the middle quarters, where one moves (left-to-right) from grayto white, and the other moves black to gray.
The image in Figure 7.9 is a carefully defined and created picture. It wouldbe very hard to do with pencil and paper. It would be possible to do with some-thing like Photoshop, but it wouldn’t be easy. Using the graphics functions in thischapter, however, we can easily specific exactly what that picture should be.
Program 54: Draw the gray effect
/∗∗∗ Method to draw a gray e f f e c t p i c t u r e on the∗ curren t p i c t u r e∗/
public void drawGrayEffect ( ){
// c rea t e a medium gray co l o r to useColor medGray = new Color (100 , 100 , 100 ) ;
// Do 100 columns o f medium grayfor ( int x = 0 ; x < 100 ; x++)
for ( int y = 0 ; y < 100 ; y++)this . g e tP ix e l (x , y ) . s e tCo lo r (medGray ) ;
/∗ Do 100 columns o f gray s t a r t i n g at medium∗ gray and g e t t i n g l i g h t e r∗/
for ( int x=100 , grayLeve l =100;x < 200 ;x++,grayLeve l++)
for ( int y=0; y < 100 ; y++)

‘‘main’’2005/1/11page 240
i
i
i
i
i
i
i
i
240 Chapter 7 Drawing
this . g e tP ix e l (x , y ) . s e tCo lo r (new Color ( grayLevel , grayLevel , grayLeve l ) ) ;
// Do 100 columns s t a r t i n g at b l a c k and g e t t i n g l i g h t e rfor ( int x=200 , grayLeve l =0; x < 300 ; x++, grayLeve l++)
for ( int y=0; y < 100 ; y++)this . g e tP ix e l (x , y ) . s e tCo lo r (
new Color ( grayLevel , grayLevel , grayLeve l ) ) ;
// Do 100 columns o f medium grayfor ( int x=300; x < 400 ; x++)
for ( int y=0; y < 100 ; y++)this . g e tP ix e l (x , y ) . s e tCo lo r (medGray ) ;
}
To use this method create a picture of the file that has a blank 640 by 480picture in it. Invoke the method on that picture.
> Picture p = new Picture(FileChooser.getMediaPath("640x480.jpg"));> p.drawGrayEffect();> p.show();
Graphics functions are particularly good at drawings that are repeated wherethe positions of lines and shapes and the selection of colors can be made by math-ematical relationships.
Program 55: Draw the picture in Figure 7.10
/∗∗∗ Method to draw a p i c t u r e wi th a succe s s i on o f∗ f i l l e d r e c t an g l e s wi th the top l e f t corner the∗ darke s t and the bottom r i g h t the l i g h t e s t on∗ the curren t p i c t u r e∗/
public void drawFi l l edRectang l e s ( ){
Graphics g = this . getGraphics ( ) ;Color c o l o r = null ;
// loop 25 t imesfor ( int i = 25 ; i > 0 ; i−−){
c o l o r = new Color ( i ∗ 10 , i ∗ 5 , i ) ;g . s e tCo lo r ( c o l o r ) ;g . f i l l R e c t (0 , 0 , i ∗10 , i ∗10 ) ;
}}
To use this method create a picture of the file that has a blank 640 by 480picture in it. Invoke the method on that picture.

“main”2005/1/11page 241
i
i
i
i
i
i
i
i
Section 7.2 Programs as Specifying Drawing Process 241
> Picture p = new Picture(FileChooser.getMediaPath("640x480.jpg"));> p.drawFilledRectangles();> p.show();
FIGURE 7.10: Nested colored rectangles
Program 56: Draw the picture in Figure 7.11
/∗∗∗ Method to draw a p i c t u r e wi th a succe s s i on o f∗ r e c t a n g l e s on the curren t p i c t u r e∗/
public void drawRectangles ( ){
Graphics g = this . getGraphics ( ) ;Color c o l o r = null ;
// loop 25 t imesfor ( int i = 25 ; i > 0 ; i−−){
g . s e tCo lo r ( Color . b lack ) ;g . drawRect ( i , i , i ∗3 , i ∗4 ) ;g . drawRect(100+ i ∗4 ,100+ i ∗3 , i ∗8 , i ∗10 ) ;
}}
To use this method create a picture of the file that has a blank 640 by 480picture in it. Invoke the method on that picture.
> Picture p = new Picture(FileChooser.getMediaPath("640x480.jpg"));> p.drawRectangles();> p.show();

“main”2005/1/11page 242
i
i
i
i
i
i
i
i
242 Chapter 7 Drawing
FIGURE 7.11: Nested outlined rectangles
7.2.1 Why do we write programs?
Why do we write programs, especially to draw pictures? Couldn’t we draw pictureslike these in Photoshop or Visio? Certainly we can, but we’d have to know how,and that’s not easy knowledge to come by. Could I teach you how to do this inPhotoshop? Probably, but that may take a lot of effort–Photoshop isn’t simple.
But if I give you these methods (programs), you can create the picture anytimeyou want. What’s more, by giving you the methods, I’m giving you the exactdefinition that you can go and change for yourself.
Computer Science Idea: We write programs to en-capsulate and communicate processThe reason why we write programs is to exactly specify aprocess and to communicate it to others.
Imagine that you have some process to communicate. It doesn’t have tobe drawing—imagine that it’s a financial process (such that you could do it in aspreadsheet or in a program like Quicken) or something that you do with text (suchas laying out text for a book or a brochure). If you can do something by hand,you should just do it. If you need to teach someone else to do it, consider writinga program to do it. If you need to explain to lots of people how to do it, definitelyuse a program. If you want lots of people to be able to do the process themselves,without someone having to teach them something first, write a program and givethe people the program.
7.3 USING GRAPHICS2D FOR ADVANCED DRAWING
We have used the java.awt.Graphics object to draw simple shapes like lines,rectangles, ovals, arcs, and polygons. The Graphics object is like a painter whopicks up a brush with the color you set and paints a shape with it. If you ask thepainter to paint another shape over a previous one the new shape will cover theoriginal shape. But, what if we want to use a thicker ’brush’ when we draw? Whatif we want shapes to combine rather than occlude? What if we want to treat ourshapes as objects?

“main”2005/1/11page 243
i
i
i
i
i
i
i
i
Section 7.3 Using Graphics2D for Advanced Drawing 243
The java.awt.Graphics class is okay for simple drawing but lacks manyadvanced features. However, the class java.awt.Graphics2D which is part of theJava 2D API can be used for more advanced drawing. Some of the capabilities ofa Graphics2D object are:
• You can set the width of the ’brush’ (pen). You can also set the style of the’brush’ to do different types of dashed lines.
• You can rotate, translate, scale, or shear what you are drawing.
• You can fill a shape with more than just a solid color. You can fill a shapewith a gradient or a texture.
• You can change what happens when objects overlap.
• You can clip objects so that only the part visible inside the clipping area isdrawn. This is like using a stencil.
• You can set rendering hints to make your curves smoother using anti-aliasingif it is available.
7.3.1 Setting the Brush Width
To use these advanced features you will need a Graphics2D object. To get aGraphics2D object you must cast the Graphics object to a Graphics2D objectusing Graphics2D g2 = (Graphics2D) graphics. All Graphics objects that youget are really Graphics2D objects, so this is allowed.
You can set the ’brush’ options using setStroke. You set the color, gradient,or texture to use for painting with the method setPaint(Paint p). Instead ofmethods that draw shapes the Graphics2D class has you create objects and eitherdraw them to draw the outline or fill them to fill with the current paint informa-tion. Here is a simple program that draws a red x on the current picture using abrush (stroke) with the specified width.
Program 57: Draw an X on a Picture
/∗∗∗ Method to add two crossed l i n e s to a p i c t u r e .∗ One l i n e w i l l go from the top l e f t corner to the∗ bottom r i g h t corner . The o ther w i l l go from the∗ bottom l e f t corner to the top r i g h t corner .∗/
public void drawWideX( Color co lo r , f loat width ){
// ge t the Graphics2D o b j e c tGraphics g raph i c s = getGraphics ( ) ;Graphics2D g2 = ( Graphics2D ) graph i c s ;
// s e t the co l o r and brush width

“main”2005/1/11page 244
i
i
i
i
i
i
i
i
244 Chapter 7 Drawing
g2 . s e tPa in t ( c o l o r ) ;g2 . s e tS t roke (new Bas icStroke ( width ) ) ;
// ge t the max x and y va l u e sint maxX = getWidth ( ) − 1 ;int maxY = getHeight ( ) − 1 ;
// draw the l i n e sg2 . draw (new Line2D . Double (0 , 0 ,maxX,maxY) ) ;g2 . draw (new Line2D . Double (0 ,maxY, maxX, 0 ) ) ;
}
You can use this program to add a wide red ’X’ to a picture as shown inFigure 7.12.
> Picture p = new Picture(FileChooser.getMediaPath("grayMotorcycle.jpg"));> p.drawWideX(java.awt.Color.red,5);> p.show();
'
&
$
%
Making it Work Tip: Creating and DrawingShapes with Graphics2DNotice that we created a Line2D.Double object and thenasked the Graphics2D object named g2 to draw this ob-ject. This is different from how we drew shapes using theGraphics class. With the Graphics2D class you creategeometric objects and either draw or fill them.The Line2D.Double probably looks strange to you. Thisis actually the name of a class in the java.awt.geom pack-age. Even though java.awt.geom and java.awt bothstart the same they are different packages. If you im-ported all classes in the package java.awt using the wild-card ’*’ you still wouldn’t have imported the classes inthe java.awt.geom package. You need at least two im-port statements if you are using classes from both of thesepackages.
7.3.2 Copying Pictures by Drawing Images
Both the Graphics and Graphics2D classes have methods for drawing images. Youcan use these methods to copy a picture to the current picture object. You don’thave to copy the colors pixel by pixel. The method to do this is drawImage.
There are many methods with the name drawImage. Recall that methodoverloading allows methods with the same name as long as the parameters aredifferent. Look at the API for the Graphics class to see all the drawImage methods.Which method would you use to copy all the pixels in one image (picture) to anotherat a particular location?

“main”2005/1/11page 245
i
i
i
i
i
i
i
i
Section 7.3 Using Graphics2D for Advanced Drawing 245
FIGURE 7.12: Drawing a red X on a picture
Notice that the drawImage methods take an Image object not a Pictureobject. The Picture class is one we created, but it contains a method that will getyou an Image object: getImage().
So, to copy a picture to the current picture object you need to get theGraphics object to use to draw on the current picture. You can do this usingthe method getGraphics(). Next draw the Image that you get from the passedPicture (using the method getImage()) at the passed x and y location usingthe method drawImage(Image img, int x, int y, ImageObserver observer).What is an ImageObserver? It is an object that wants to be notified as the imageis changed. It can be null to say that no object wants to be notified.
Program 58: Copy a picture to this picture
/∗∗∗ Method to copy the passed p i c t u r e in t o the current∗ p i c t u r e at the g iven x and y po s i t i o n in the∗ curren t p i c t u r e∗ @param source the p i c t u r e to copy∗ @param x the x o f the uppper l e f t corner to copy to∗ @param y the y to the upper l e f t corner to copy to∗/
public void copy ( P ic ture source , int x , int y ){
// ge t the g raph i c s o b j e c tGraphics g = this . getGraphics ( ) ;
// copy the imageg . drawImage ( source . getImage ( ) , x , y , null ) ;

“main”2005/1/11page 246
i
i
i
i
i
i
i
i
246 Chapter 7 Drawing
}
You can use this program to copy a turtle to the beach using:
> Picture p1 = new Picture(FileChooser.getMediaPath("beach.jpg"));> p1.explore();> Picture p2 = new Picture(FileChooser.getMediaPath("turtle.jpg"));> p1.copy(p2,194,304);> p1.show();
FIGURE 7.13: Drawing a turtle on a beach
Now change the copy method to use a Graphics2D object. Will it still com-pile? Try it and see. Does the Graphics2D class have the drawImage method?
Program 59: Copy a picture to this picture using Graphics2D
/∗∗∗ Method to copy the passed p i c t u r e in t o the current∗ p i c t u r e at the g iven x and y po s i t i o n in the current∗ p i c t u r e∗ @param source the p i c t u r e to copy∗ @param x the x o f the uppper l e f t corner to copy to∗ @param y the y to the upper l e f t corner to copy to∗/
public void copy2D( Pic ture source , int x , int y ){
// ge t the g raph i c s o b j e c tGraphics g = this . getGraphics ( ) ;Graphics g2 = ( Graphics2D ) g ;

“main”2005/1/11page 247
i
i
i
i
i
i
i
i
Section 7.3 Using Graphics2D for Advanced Drawing 247
// copy the imageg2 . drawImage ( source . getImage ( ) , x , y , null ) ;
}
Why does this work? The class Graphics2D inherits from the class Graphics.What does that mean? Have you heard of children inheriting features or abilitiesfrom their parents like eye color, hair color, or musical ability? A child class inheritsfrom a parent class. What can it inherit? Classes don’t have eye color, but theydo define data (fields) and behavior (methods). A child class inherits data (fields)and behavior (methods).
Unlike people, classes inherit all of the fields and methods of the parent classand they can only have one parent. An object of a child class can invoke publicmethods that are defined in a parent class just as if they were defined in the childclass. An object of a child class can also access any public fields in a parent classas if they were defined in the child class.
What about private fields and methods? While these are inherited they cannot be directly accessed by a child object, nor should they be. The standard way towork with private fields is to provide public methods that can modify or access theprivate fields, but keep the data in a valid state. Private methods are only meantto be used inside the class they are defined in so you wouldn’t want a child directlyusing those.
How can we tell that the class Graphics2D inherits from the class Graphics?If you look at the API for Graphics2D you will see that the API starts with thepackage name. On the next line is the class name. Following that is the ancestor treeof the class. It shows all the ancestors of the class starting with java.lang.Object.The class java.awt.Graphics2D class inherits from the class java.awt.Graphicswhich inherits from the class java.lang.Object. You can also tell who the parentclass is by finding the class name given after the extends keyword in the classdeclaration.
Shows the parentclass
Shows the package
FIGURE 7.14: Documentation for Graphics2D

“main”2005/1/11page 248
i
i
i
i
i
i
i
i
248 Chapter 7 Drawing
'
&
$
%
Making it Work Tip: Object is the Top AncestorAll classes inherit from the class java.lang.Object, andit is the only class that doesn’t inherit from another class.Even if a class doesn’t specify in the class definition theclass it inherits from using the extends keyword it willinherit from Object.
7.3.3 General Scaling
We have shown how to scale an image up by copying the same pixel more thanonce. We have shown how to scale an image down by skipping every other pixel.The methods that we wrote would double the size of the original image or reduceit by half. But, what if we want to scale up in x and down in y? What if wewant to scale to a specific size? The Graphics2D class provides ways to handlingscaling using an AffineTransform object in package java.awt.geom to handle thetransformation. Here is a program that will scale a picture by the passed x and yfactors.
Program 60: General Scale Method
/∗∗∗ Method to c r ea t e a new p i c t u r e by s c a l i n g the curren t∗ p i c t u r e by the g iven x and y f a c t o r s∗ @param xFactor the amount to s c a l e in x∗ @param yFactor the amount to s c a l e in y∗ @return the r e s u l t i n g p i c t u r e∗/
public Picture s c a l e (double xFactor , double yFactor ){
// s e t up the s c a l e tranformAff ineTransform sca leTrans form = new Aff ineTransform ( ) ;sca leTrans form . s c a l e ( xFactor , yFactor ) ;
// c rea t e a new p i c t u r e o b j e c t t h a t i s the r i g h t s i z ePicture r e s u l t = new Picture ( ( int ) ( getWidth ( ) ∗ xFactor ) ,
( int ) ( getHeight ( ) ∗ yFactor ) ) ;
// ge t the g raph i c s 2d o b j e c t to draw on the r e s u l tGraphics g raph i c s = r e s u l t . getGraphics ( ) ;Graphics2D g2 = ( Graphics2D ) graph i c s ;
// draw the curren t image onto the r e s u l t image s ca l e dg2 . drawImage ( this . getImage ( ) , scaleTransform , null ) ;
return r e s u l t ;

“main”2005/1/11page 249
i
i
i
i
i
i
i
i
Section 7.3 Using Graphics2D for Advanced Drawing 249
}
You can use the scale method to create a new picture from the originalpicture by scaling up or down by any amount in x and/or y.
> Picture p = new Picture(FileChooser.getMediaPath("mattDoor.jpg"));> Picture p1 = p.scale(2.0,0.5);> p1.show();
FIGURE 7.15: Original picture and picture scaled up 2 times in x and down by halfin y
'
&
$
%
Making it Work Tip: Build from Working PartsEarlier we wrote a method to scale a picture by copyingcolors from a source picture to a target picture pixel bypixel. Here we are using classes defined as part of theJava language to do that work for us. There are manyclasses in Java available for you to use. When you startsolving a problem you don’t have to create everything youneed from scratch. Instead you can assemble your solutionfrom classes that already exist. This is one of the goalsof object-oriented programming: make things reusable byencapsulating them in objects defined by classes.
7.3.4 Shearing
One of the effects that is easy to do with an java.awt.geom.AffineTransformobject is to shear the image. Shearing by 1.0 in x moves each row over by the yindex amount. So the first row, with a y index of 0, starts at (0, 0). The second row,with a y index of 1, starts at (1, 1). The third row, with a y index of 2, starts at(2, 2). The last row’s x will start at (height− 1, height− 1). To figure out how bigour new picture will need to be no matter what the amounts are we are shearing byuse the getTranslationEnclosingRectangle(AffineTransform trans) methodwhich takes an AffineTransform object and returns a rectangle that will enclose

“main”2005/1/11page 250
i
i
i
i
i
i
i
i
250 Chapter 7 Drawing
the picture that results from applying that AffineTransform object to the currentPicture object.
Program 61: General Shear Method
/∗∗∗ Method to c r ea t e a new p i c t u r e by shear ing the curren t∗ p i c t u r e by the g iven x and y f a c t o r s∗ @param xFactor mu l t i p l i e r to use to s h i f t in x∗ d i r e c t i o n based on y index∗ @param yFactor mu l t i p l i e r to use to s h i f t in y∗ d i r e c t i o n based on x index∗ @return the r e s u l t i n g p i c t u r e∗/
public Picture shear (double xFactor , double yFactor ){
// s e t up the shear tranformAff ineTransform shearTransform = new Aff ineTransform ( ) ;shearTransform . shear ( xFactor , yFactor ) ;Rectangle2D r e c t =
getTrans l a t i onEnc lo s ingRectang l e ( shearTransform ) ;
/∗ c r ea t e a new p i c t u r e o b j e c t b i g enough to ho ld the∗ r e s u l t∗/
Picture r e s u l t = new Picture (( int ) (Math . c e i l ( r e c t . getWidth ( ) ) ) ,( int ) (Math . c e i l ( r e c t . getHeight ( ) ) ) ) ;
// ge t the g raph i c s 2d o b j e c t from the r e s u l tGraphics g raph i c s = r e s u l t . getGraphics ( ) ;Graphics2D g2 = ( Graphics2D ) graph i c s ;
/∗ save the current t rans format ion and se t−up to∗ cen te r the new image∗/
Aff ineTransform savedTrans = g2 . getTransform ( ) ;Af f ineTransform centerTrans = new Aff ineTransform ( ) ;centerTrans . t r a n s l a t e (0 − r e c t . getX ( ) , 0 − r e c t . getY ( ) ) ;g2 . setTransform ( centerTrans ) ;
// draw the curren t image onto the r e s u l t image shearedg2 . drawImage ( this . getImage ( ) , shearTransform , null ) ;
// r e s e t g2 t rans format ion to the saved oneg2 . setTransform ( savedTrans ) ;
return r e s u l t ;}

“main”2005/1/11page 251
i
i
i
i
i
i
i
i
Section 7.3 Using Graphics2D for Advanced Drawing 251
You can use the shear method to create a new picture from the originalpicture by shearing by any amount in x and/or y.
> Picture p = new Picture(FileChooser.getMediaPath("mattDoor.jpg"));> Picture p1 = p.shear(1.0,0.0);> p1.show();
FIGURE 7.16: Picture sheared by 1.0 in x
7.3.5 Drawing with a GradientPaint
Instead of just filling with a solid color you can fill with a blend of two colors(a gradient). You have to specify the two colors and the rectangular area wherethey transition from one color to another in the coordinates of the shapes you aredrawing.
What if you want to add a sun that changes color from yellow at the top to redat the bottom to a picture? You can create a java.awt.GradientPaint object andset that to be the paint using the method setPaint(Paint p). A GradientPaintobject is a kind of Paint object because the class GradientPaint implements thePaint interface.
7.3.6 Interfaces
What is an interface? An interface in Java is a special kind of class that onlyhas abstract methods (methods with just a method declaration and no body) andperhaps some constants defined in it. Even though a class can only inherit fromone parent class a class can implement many interfaces. An object of a class that

“main”2005/1/11page 252
i
i
i
i
i
i
i
i
252 Chapter 7 Drawing
implements an interface is said to be of the interface type.
Computer Science Idea: ConstantsConstants are variables that are declared with the key-word final which means that the value of the variablecan’t change. Constants are usually also declared with thekeyword static so that they are allocated in the objectthat defines the class and not in each object of the class.You don’t need each object of a class to have a copy ofa constant. The convention in Java is to name constantswith all capital letters and use ’ ’ between words (like Al-phaComposite.SRC OVER). Notice that if a constant isdefined with the keyword static it can be referred to us-ing ClassName.CONSTANT NAME.
So even though the class GradientPaint inherits from java.lang.Object itimplements the interface java.awt.Paint and so objects of GradientPaint can bepassed to methods that expect objects of the type Paint. The classes Color andTexturePaint also implement the Paint interface which is why they can also bepassed to the method setPaint(Paint p).
Computer Science Idea: InterfaceAn interface is a boundary between two things. You maybe familiar with the USB interface. It allows several differ-ent types of devices to communicate with a computer. Youcan hook up a mouse, a camera, or a disk drive and thecomputer will know how to communicate with the devicebecause they understand the same interface.
Program 62: Overlap Pictures Using AlphaComposite
/∗∗∗ Method to add a g rad i en t pa in ted sun to the curren t p i c t u r e∗ @param x the x l o c a t i o n f o r the upper l e f t corner o f the∗ r e c t an g l e enc l o s i n g the sun∗ @param y the y l o c a t i o n f o r the upper l e f t corner o f the∗ r e c t an g l e enc l o s i n g the sun∗ @param width the width o f the enc l o s i n g r e c t an g l e∗ @param he i g h t the h e i g h t o f the enc l o s i n g r e c t an g l e∗/
public void drawSun ( int x , int y , int width , int he ight ){
// ge t the graphics2D o b j e c t f o r t h i s p i c t u r eGraphics g = this . getGraphics ( ) ;Graphics2D g2 = ( Graphics2D ) g ;

“main”2005/1/11page 253
i
i
i
i
i
i
i
i
Section 7.3 Using Graphics2D for Advanced Drawing 253
// c rea t e the g rad i en t f o r pa in t i n g from ye l l ow to red wi th// ye l l ow at the top o f the sun and red at the bottomf loat xMid = ( f loat ) ( width / 0 .5 + x ) ;GradientPaint gPaint = new GradientPaint (xMid , y ,
Color . yel low ,xMid , y + height ,Color . red ) ;
// s e t the g rad i en t and draw the e l l i p s eg2 . s e tPa in t ( gPaint ) ;g2 . f i l l (new El l ipse2D . Double (x , y , width , he ight ) ) ;
}
You can use this program to add a sun to the beach.
> Picture p = new Picture(FileChooser.getMediaPath("beach.jpg"));> p.drawSun(201,80,40,40);> p.show();
FIGURE 7.17: A beach with a sun that is filled with a gradient from yellow to red
7.3.7 Blending Pictures Using AlphaComposite
In the blendPictures method we blended two pictures by multiplying the pixelcolor values by 0.5 and adding them. It is also possible to use an AlphaCompositeobject from package java.awt to do blending or transparency effects. The de-fault is to replace the color at overlapping pixels with the new color. To mod-ify this default you can get an AlphaComposite object that specifies how youwant to handle overlapping pixels in the source and destination using the classmethod AlphaComposite.getInstance(int rule, float alpha) that returns anAlphaComposite object to handle the overlap. For the rule you can use one of the

“main”2005/1/11page 254
i
i
i
i
i
i
i
i
254 Chapter 7 Drawing
predefined constants such as SRC_OVER which draws the new pixels on top of the oldpixels. The alpha value can be between 0.0 and 1.0 where 0.0 is fully transparent(invisible) and 1.0 is fully opaque. If we use an alpha value of 0.5 we will achievethe same effect as the method blendPictures without having to loop through allthe pixels and calculate the resulting color.
To overlap two pictures we will draw the part of the first picture before a givenoverlap point using one of the drawImage methods inherited from Graphics thatspecifies the rectangular area to draw to and the rectangular area to draw from.We will draw the first part using an AlphaComposite that uses an alpha value of1.0 (opaque) so that it replaces any previous pixel color. Next we will draw theparts of the two pictures that overlap using an alpha value of 0.5 so that it uses halfthe color from the image being drawn and half the color from the current image.Finally we will draw the part of the second picture that is after the overlappingarea using an alpha value of 1.0 (opaque).
Program 63: Overlap Pictures Using AlphaComposite
/∗∗∗ Method to ove r l ap one p i c t u r e wi th another∗ h o r i z o n t a l l y on top o f the curren t p i c t u r e . F i r s t∗ the par t o f the f i r s t p i c t u r e b e f o r e the ove r l ap∗ w i l l be d i sp l ayed , next to t ha t w i l l be the ove r l app ing∗ reg ion up to the end o f the f i r s t p i c ture , a f t e r t h a t∗ i s the remainder o f the second p i c t u r e∗ @param p1 the f i r s t p i c t u r e to d i s p l a y∗ @param p2 the second p i c t u r e to d i s p l a y∗ @param s ta r tOve r l ap the x p o s i t i o n where the ove r l ap beg in s∗/
public void ove r l apP i c tu r e s ( P ic ture p1 ,P ic ture p2 ,int s ta r tOver lap )
{int amountOverlap = p1 . getWidth()− s ta r tOver lap ;
// ge t the Graphics2D o b j e c tGraphics g = this . getGraphics ( ) ;Graphics2D g2 = ( Graphics2D ) g ;
// draw p1 up to ove r l ap po in tg2 . setComposite (
AlphaComposite . g e t In s tance ( AlphaComposite .SRC OVER,( f loat ) 1 . 0 f ) ) ;
g2 . drawImage ( p1 . getImage ( ) ,0 ,0 , s tartOver lap , p1 . getHeight ( ) ,0 ,0 , s tartOver lap , p1 . getHeight ( ) ,null ) ;
// draw p1 in the ove r l ap area ( r ep l a c e background )

“main”2005/1/11page 255
i
i
i
i
i
i
i
i
Section 7.3 Using Graphics2D for Advanced Drawing 255
g2 . drawImage ( p1 . getImage ( ) ,s tartOver lap , 0 , p1 . getWidth ( ) , p1 . getHeight ( ) ,s tartOver lap , 0 , p1 . getWidth ( ) , p1 . getHeight ( ) ,null ) ;
// s e t the composi te to b l end the o ld and new p i x e l s// 50%g2 . setComposite (
AlphaComposite . g e t In s tance ( AlphaComposite .SRC OVER,0 .5 f ) ) ;
g2 . drawImage ( p2 . getImage ( ) ,s tartOver lap , 0 , p1 . getWidth ( ) , p2 . getHeight ( ) ,0 ,0 , amountOverlap , p2 . getHeight ( ) , null ) ;
// draw p2 a f t e r the ove r l apg2 . setComposite (
AlphaComposite . g e t In s tance ( AlphaComposite .SRC OVER,( f loat ) 1 . 0 f ) ) ;
g2 . drawImage ( p2 . getImage ( ) ,p1 . getWidth ( ) , 0 , p2 . getWidth ( ) + startOver lap ,p2 . getHeight ( ) , amountOverlap , 0 , p2 . getWidth ( ) ,p2 . getHeight ( ) , null ) ;
}
To use this program to overlap two pictures do:
> Picture p1 = new Picture(FileChooser.getMediaPath("KatieFancy.jpg"));> Picture p2 = new Picture(FileChooser.getMediaPath("JenParty.jpg"));> Picture p3 = new Picture(FileChooser.getMediaPath("640x480.jpg"));> p3.overlapPictures(p1,p2,150);> p3.show();
You can experiment with the alpha amount that you use in the methodgetInstance. If you specify 0.5 then half of the source color values will be com-bined with half of the target color values. If you specify 1.0 then the source colorwill replace the target color. If you use 0.25 then only 0.25 of the source color willbe combined with 0.75 of the target color.
7.3.8 Clipping
You can create one shape and then use that shape as a stencil to limit what isshown when you draw other shapes or images. Only the area inside of the stencilwill be seen. This is called clipping .
Let’s create a stencil from an ellipse and then draw the beach using thatstencil to clip the image of the beach. The only part of the beach that will be
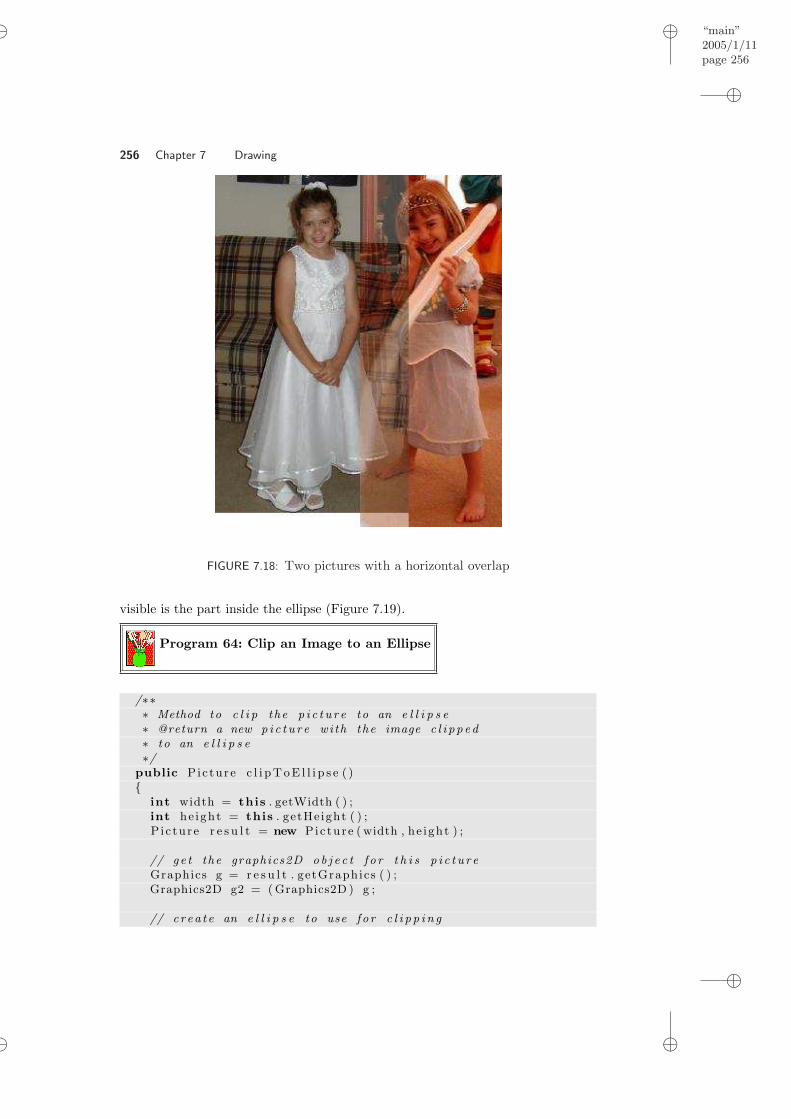
“main”2005/1/11page 256
i
i
i
i
i
i
i
i
256 Chapter 7 Drawing
FIGURE 7.18: Two pictures with a horizontal overlap
visible is the part inside the ellipse (Figure 7.19).
Program 64: Clip an Image to an Ellipse
/∗∗∗ Method to c l i p the p i c t u r e to an e l l i p s e∗ @return a new p i c t u r e wi th the image c l i p p e d∗ to an e l l i p s e∗/
public Picture c l i pToE l l i p s e ( ){
int width = this . getWidth ( ) ;int he ight = this . getHeight ( ) ;P i c ture r e s u l t = new Picture ( width , he ight ) ;
// ge t the graphics2D o b j e c t f o r t h i s p i c t u r eGraphics g = r e s u l t . getGraphics ( ) ;Graphics2D g2 = ( Graphics2D ) g ;
// c rea t e an e l l i p s e to use f o r c l i p p i n g

“main”2005/1/11page 257
i
i
i
i
i
i
i
i
Section 7.4 Concept Summary 257
El l ipse2D . Double e l l i p s e =new El l ipse2D . Double (0 , 0 , width , he ight ) ;
// use the e l l i p s e f o r c l i p p i n gg2 . s e tC l i p ( e l l i p s e ) ;
// draw the imageg2 . drawImage ( this . getImage ( ) , 0 , 0 , width ,
height , null ) ;
// re turn the r e s u l treturn r e s u l t ;
}
To use this program try the following:
> Picture p = new Picture(FileChooser.getMediaPath("beach.jpg"));> Picture p2 = p.clipToEllipse();> p2.show();
FIGURE 7.19: Clip picture using an ellipse
7.4 CONCEPT SUMMARY
In this chapter we discussed packages, using predefined Java classes, inheritance,and interfaces.
7.4.1 Packages
A package is a group of related classes. Classes that are basic to the Java languageare in java.lang like the System class. Classes that are used for graphics are injava.awt like the Color class. Classes that are used for input and output are injava.io like the File class.

“main”2005/1/11page 258
i
i
i
i
i
i
i
i
258 Chapter 7 Drawing
The full name for a class is packageName.ClassName . You don’t have to usethe full name for any class in the package java.lang. You don’t have to use the fullname for classes in packages other than java.lang if you use a import statement.You can import a class by using the keyword import and then the full name of theclass.
> import java.awt.Color;
You can also import all classes in a package.
> import java.awt.*;
When you use classes in packages other than java.lang in methods you willeither need to use the full class name or add import statements before the classdefinition.import java . awt . ∗ ;import java . awt . f ont . ∗ ;import java . awt . geom . ∗ ;import java . t ex t . ∗ ;
/∗∗∗ A c l a s s t ha t r ep r e s en t s a p i c t u r e . This c l a s s i n h e r i t s from∗ SimplePic ture and a l l ows the s tuden t to add f u n c t i o n a l i t y to∗ the Pic ture c l a s s .∗∗ Copyright Georgia I n s t i t u t e o f Technology 2004∗ @author Barbara Ericson ericson@cc . ga tech . edu∗/
public class Picture extends SimplePicture
7.4.2 Predefined Java Classes
There are a large number of predefined classes in Java. The API contains thedocumentation for all the classes in a version of Java. The documentation tellsyou important information about each class such as what methods it has. Thedocumentation is organized by packages. There are classes for doing graphical userinterfaces (in packages javax.swing and java.awt). There are classes for doing inputand output (in package java.io). There are classes for doing work with databases(in package java.sql). There are classes for doing work with sound (in packagejavax.sound). There are classes for working with lists, sets, and maps (java.util).
It is easier and faster to build on what exists rather than write your ownclasses. Even if what you need isn’t part of Java someone else may have writtensomething similar.
7.4.3 Inheritance
When one class inherits from another it gets all the data (fields) and behavior(methods) from that class. This means that if Graphics2D inherits from Graphicsit understands the same public messages as Graphics. The API for a class showswhat class it inherits from as well as all methods that are inherited and what classthey are inherited from.
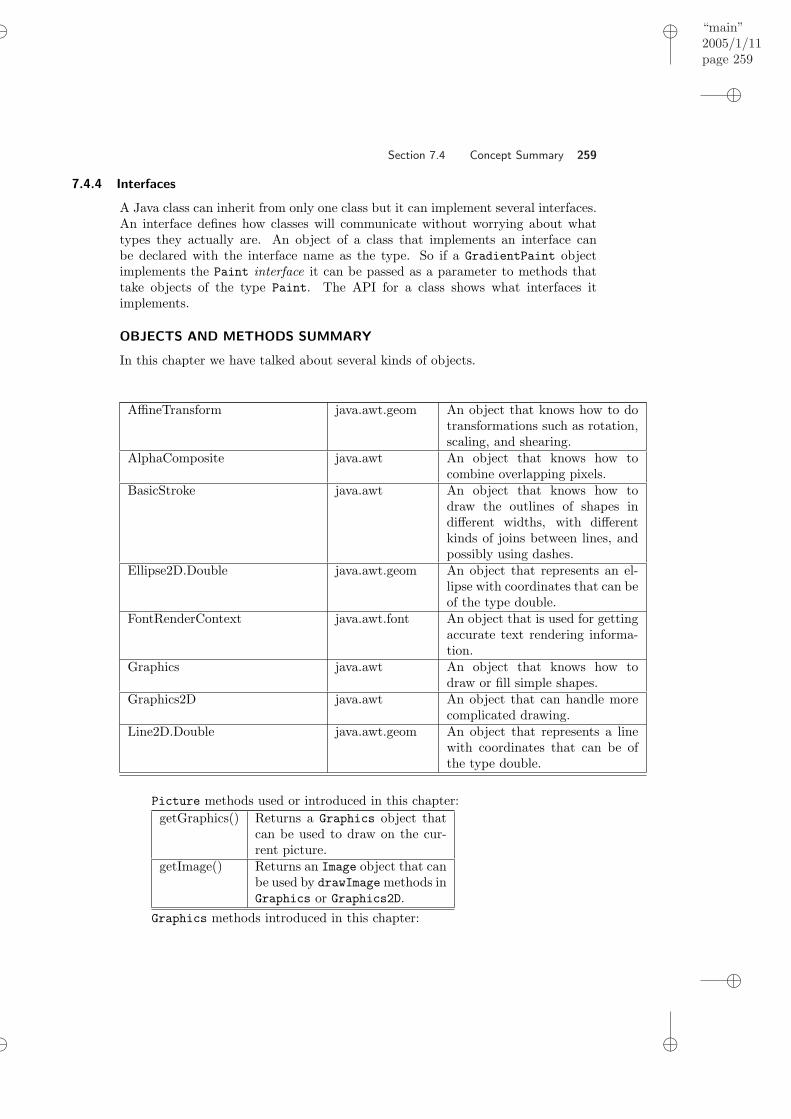
“main”2005/1/11page 259
i
i
i
i
i
i
i
i
Section 7.4 Concept Summary 259
7.4.4 Interfaces
A Java class can inherit from only one class but it can implement several interfaces.An interface defines how classes will communicate without worrying about whattypes they actually are. An object of a class that implements an interface canbe declared with the interface name as the type. So if a GradientPaint objectimplements the Paint interface it can be passed as a parameter to methods thattake objects of the type Paint. The API for a class shows what interfaces itimplements.
OBJECTS AND METHODS SUMMARY
In this chapter we have talked about several kinds of objects.
AffineTransform java.awt.geom An object that knows how to dotransformations such as rotation,scaling, and shearing.
AlphaComposite java.awt An object that knows how tocombine overlapping pixels.
BasicStroke java.awt An object that knows how todraw the outlines of shapes indifferent widths, with differentkinds of joins between lines, andpossibly using dashes.
Ellipse2D.Double java.awt.geom An object that represents an el-lipse with coordinates that can beof the type double.
FontRenderContext java.awt.font An object that is used for gettingaccurate text rendering informa-tion.
Graphics java.awt An object that knows how todraw or fill simple shapes.
Graphics2D java.awt An object that can handle morecomplicated drawing.
Line2D.Double java.awt.geom An object that represents a linewith coordinates that can be ofthe type double.
Picture methods used or introduced in this chapter:getGraphics() Returns a Graphics object that
can be used to draw on the cur-rent picture.
getImage() Returns an Image object that canbe used by drawImage methods inGraphics or Graphics2D.
Graphics methods introduced in this chapter:

“main”2005/1/11page 260
i
i
i
i
i
i
i
i
260 Chapter 7 Drawing
drawArc(int x1, int y1, int w, inth, int startAngle, int arcAngle)
Draws the outline of an arc which is part of an ovalthat fits in an enclosing rectangle with an upperleft corner at (x1, y1), a width of w, and a heightof h. The arc will start at the given startAngleand end at startAngle + arcAngle.
drawImage(Image image, int x,int y, ImageObserver observer)
Draws the passed image with the top left cornerat (x, y). The observer is the object to be notifiedas more of the image is drawn.
drawImage(Image image, int dx1,int dy1, int dx2, int dy2, int sx1,sy1, sx2, sy2, ImageObserver ob-server)
Draws the area from the passed image that isinside the rectangle defined by (sx1, sy1) and(sx2, sy2) into the rectangle defined by (dx1, dy1)and (dx2, dy2) in the destination. The observer isthe object to be notified as more of the image isdrawn.
drawLine(int x1, int y1, int x2,int y2)
Draws a line from position (x1, y1) to (x2, y2).
drawOval(int x1, int y1, int w, inth)
Draws the outline of an oval that fits in an enclos-ing rectangle with an upper left corner at (x1, y1),a width of w, and a height of h.
drawPolygon(int[] xArray, int[]yArray, int numPoints)
Draws the outline of a closed polygon with thepoints of the polygon given in the x and y arrays.
drawRect(int x1, int y1,int w, inth)
Draws the outline of a rectangle with the upperleft corner at (x1, y1), a width of w, and a heightof h.
fillArc(int x1, int y1, int w, int h,int startAngle, int arcAngle)
Draws a filled arc which is part of an oval that fitsin an enclosing rectangle with an upper left cornerat (x1, y1), a width of w, and a height of h. Thearc will start at the given startAngle and end atstartAngle + arcAngle.
fillOval(int x1, int y1, int w, inth)
Draws a filled oval that fits in an enclosing rectan-gle with an upper left corner at (x1, y1), a widthof w, and a height of h.
fillPolygon(int[] xArray, int[]yArray, int numPoints)
Draws a filled closed polygon with the points ofthe polygon given in the x and y arrays.
fillRect(int x1, int y1,int w, int h) Draws a rectangle filled with the current color withan upper left corner at (x1, y1), a width of w, anda height of h.
setClip(Shape clip) Sets the shape to use as a stencil to limit what isshown.
setColor(Color colorObj) Sets the color to draw with.setFont(Font fontObj) Sets the font to use for drawing strings.
Graphics2D methods introduced in this chapter:

“main”2005/1/11page 261
i
i
i
i
i
i
i
i
Section 7.4 Concept Summary 261
draw(Object obj) Draw the outline of the passed object.drawImage(Image image, Affine-Transform xform, ImageObserverobserver)
Draws the passed Image object after applying thepassed AffineTransform object to it and notifiesthe ImageObserver as more of the rendered imageis available.
getFontRenderContext() Returns a FontRenderContext object that con-tains rendering hints and device information suchas the dots-per-inch.
getTransform() Returns the current AffineTransform object thatrepresents all current transformations (rotations,translations, scaling, etc).
fill(Object obj) Draw the passed object filled with the currentpaint type.
setComposite(Composite comp) Set the Composite object that specifies how tohandle overlapping pixels.
setPaint(Paint paint) Sets the color, gradient, or texture to using whenpainting.
setStroke(Stroke s) Set the brush (pen) to the one defined by thepassed Stroke object.
setTransform(AffineTransformtranform)
Sets the current transformation object to thepassed AffineTransform object.
PROBLEMS
7.1. Using the drawing tools presented here, draw a house—just go for the simplechild’s house with one door, two windows, walls, and a roof.
7.2. Put a cabana on that beach. Draw the house from the previous exercise on thebeach where we put the mysterious box previously.
7.3. Now use your house to draw a town with dozens of houses at different sizes. You’llprobably want to modify your house function to draw at an input coordinate,then change the coordinate where each house is drawn.
7.4. Draw a rainbow–use what you know about colors, pixels, and drawing opera-tions to draw a rainbow. Is this easier to do with our drawing functions or bymanipulating individual pixels? Why?
7.5. Modify the method drawFace to take the width and height of the desired faceand calculate the positions based on the desired width and height.
7.6. Draw a string on a picture at the top of the picture and centered horizontally.You will need to use the FontMetrics class to get the height of the string inpixels in order to determine where the baseline should be so that the string isvisible. You should also subtract the descent from the height.
7.7. Create another method that takes the text, x, y, font and color to use when youdraw a string. Rewrite the old drawString() method to call this new method.
7.8. Create a method that draws an X across the current picture using dashed lines.7.9. Write a general rotate method that takes the degrees to rotate the current
Picture object and returns a new Picture object. Use the AffineTransform.rotate(doubleradians) method to do this. You will need to use the general Math.toRadians(intdegrees) method to translate the degrees to radians.
7.10. Write a method to draw a text string rotated 90 degrees to the right down theright side of the picture.

“main”2005/1/11page 262
i
i
i
i
i
i
i
i
262 Chapter 7 Drawing
7.11. Write a method to overlap two pictures vertically using an AlphaComposite ob-ject.
7.12. Write a method to clip an image to a triangle or star shape.
“main”2005/1/11page 263
i
i
i
i
i
i
i
i
P A R T T H R E E
SOUNDSChapter 8 Modifying all Samples in a Sound
Chapter 9 Modifying Samples using Ranges
Chapter 10 Combining and Creating Sounds
263

“main”2005/1/11page 264
i
i
i
i
i
i
i
i
C H A P T E R 8
Modifying all Samples in aSound
8.1 HOW SOUND IS ENCODED
8.2 MANIPULATING SOUNDS
8.3 CHANGING THE VOLUME OF SOUNDS
8.4 NORMALIZING SOUNDS
8.5 CONCEPTS SUMMARY
Chapter Learning ObjectivesThe media learning goals for this chapter are:
• To understand how we digitize sounds, and what the limitations are of humanhearing that allow us to digitize sounds.
• To use the Nyquist theorem to determine the sampling rate necessary fordigitizing a desired sound.
• To manipulate the volume of a sound.
• To create (and avoid) clipping.
The computer science goals for this chapter are:
• To understand and use a one-dimensional array as a data structure.
• To use the formula that n bits result in 2n possible patterns in order to figureout the number of bits needed to save values.
• To debug sound programs (methods).
• To use iteration (with while and for loops) for manipulating sounds.
• To use conditionals when manipulating sounds.
8.1 HOW SOUND IS ENCODED
There are two parts to understanding how sound is encoded and manipulated.
• First, what are the physics of sound? How is it that we hear a variety ofsounds?
• Next, how can we then map these sounds into the numbers of a computer?
264

“main”2005/1/11page 265
i
i
i
i
i
i
i
i
Section 8.1 How Sound is Encoded 265
8.1.1 The Physics of Sound
Physically, sounds are waves of air pressure. When something makes a sound,it makes ripples in the air just like stones or raindrops dropped into a pond causeripples in the surface of the water (Figure 8.1). Each drop causes a wave of pressureto pass over the surface of the water, which causes visible rises in the water, andless visible but just as large depressions in the water. The rises are increases inpressure and the lows are decreases in pressure. Some of the ripples we see areactually ones that arise from combinations of ripples—some waves are the sumsand interactions from other waves.
FIGURE 8.1: Raindrops causing ripples in the surface of the water, just as soundcauses ripples in the air
In the air, we call these increases in pressure compressions and decreases inpressure rarefactions. It’s these compressions and rarefactions that lead to ourhearing. The shape of the waves, their frequency , and their amplitude all impacthow we perceive the sound.
The simplest sound in the world is a sine wave (Figure 10.5). In a sine wave,the compressions and rarefactions arrive with equal size and regularity. In a sinewave, one compression plus one rarefaction is called a cycle. At some point inthe cycle, there has to be a point where there is zero pressure, just between thecompression and the rarefaction. The distance from the zero point to the greatestpressure (or least pressure) is called the amplitude.
Formally, amplitude is measured in Newtons per meter-squared (N/m2). That’sa rather hard unit to understand in terms of perception, but you can get a senseof the amazing range of human hearing from this unit. The smallest sound thathumans typically hear is 0.0002N/m2, and the point at which we sense the vibra-tions in our entire body is 200N/m2! In general, amplitude is the most importantfactor in our perception of volume: If the amplitude rises, we perceive the sound asbeing louder typically. Other factors like air pressure factor into our perception ofincreased volume, too. Ever noticed how sounds sound differently on very humiddays as compared with very dry days?
When we perceive an increase in volume, we say that we’re perceiving anincrease in the intensity of sound. Intensity is measured in watts per meter-squared(W/m2). (Yes, those are watts just like the ones you’re referring to when you geta 60-watt light bulb—it’s a measure of power.) The intensity is proportional to

“main”2005/1/11page 266
i
i
i
i
i
i
i
i
266 Chapter 8 Modifying all Samples in a Sound
FIGURE 8.2: One cycle of the simplest sound, a sine wave
the square of the amplitude. For example, if the amplitude doubles, intensityquadruples.
Human perception of sound is not a direct mapping from the physical reality.The study of the human perception of sound is called psychoacoustics. One ofthe odd facts about psychoacoustics is that most of our perception of sound islogarithmically related to the actual phenomena. Intensity is an example of this.A change in intensity from 0.1W/m2 to 0.01W/m2 sounds the same to us (as inthe same amount of volume change) as a change in intensity of 0.001W/m2 to0.0001W/m2.
We measure the change in intensity in decibels (dB). That’s probably the unitthat you most often associate with volume. A decibel is a logarithmic measure, soit does match the way we perceive volume. It’s always a ratio, a comparison of twovalues. 10 ∗ log10(I1/I2) is change in intensity in decibels between I1 and I2. Iftwo amplitudes are measured under the same conditions, we can express the samedefinition as amplitudes: 20 ∗ log10(A1/A2). If A2 = 2 ∗ A1 (i.e., the amplitudedoubles), the difference is roughly 6dB.
When decibel is used as an absolute measurement, it’s in reference to thethreshold of audibility at sound pressure level (SPL): 0 dB SPL. Normal speechhas intensity about 60 dB SPL. Shouted speech is about 80 dB SPL.
How often a cycle occurs is called the frequency . If a cycle is short, then therecan be lots of them per second. If a cycle is long, then there are fewer of them. Asthe frequency increases we perceive the pitch to increase. We measure frequency incycles per second (cps) or Hertz (Hz).
All sounds are periodic: there is always some pattern of rarefaction and com-pression that leads to cycles, In a sine wave, the notion of a cycle is easy. Innatural waves, it’s not so clear where a pattern repeats. Even in the ripples in apond, the waves aren’t as regular as you might think. The time between peaks inwaves isn’t always the same: it varies. This means that a cycle may involve severalpeaks-and-valleys until it repeats.
Humans hear between 2 Hz and 20,000 Hz (or 20 kilohertz, abbreviated 20

“main”2005/1/11page 267
i
i
i
i
i
i
i
i
Section 8.1 How Sound is Encoded 267
kHz). Again, as with amplitudes, that’s an enormous range! To give you a senseof where music fits into that spectrum, the note A above middle C is 440 Hz intraditional, equal temperament tuning (Figure 8.3).
FIGURE 8.3: The note A above middle C is 440 Hz
Like intensity, our perception of pitch is almost exactly proportional to thelog of the frequency. We really don’t perceive absolute differences in pitch, but theratio of the frequencies. If you heard a 100 Hz sound followed by a 200 Hz sound,you’d perceive the same pitch change (or pitch interval) as a shift from 1000 Hz to2000 Hz. Obviously, a difference of 100 Hz is a lot smaller than a change of 1000Hz, but we perceive it to be the same.
In standard tuning, the ratio in frequency between the same notes in adjacentoctaves is 2 : 1. Frequency doubles each octave. We told you earlier that A abovemiddle C is 440 Hz. You know then that the next A up the scale is 880 Hz.
How we think about music is dependent upon our cultural standards, butthere are some universals. Among these universals are the use of pitch intervals(e.g., the ratio between notes C and D remains the same in every octave), therelationship between octaves remains constant, and the existence of four to sevenmain pitches (not considering sharps and flats here) in an octave.
What makes the experience of one sound different from another? Why is itthat a flute playing a note sounds so different than a trumpet or a clarinet playingthe same note? We still don’t understand everything about psychoacoustics andwhat physical properties influence our perception of sound, but here are some of thefactors that lead us to perceiving different sounds (especially musical instruments)as distinct.
• Real sounds are almost never single frequency sound waves. Most naturalsounds have several frequencies in them, often at different amplitudes. Theseadditional frequencies are sometimes called overtones. When a piano playsthe note C, for example, part of the richness of the tone is that the notes Eand G are also in the sound, but at lower amplitudes. Different instrumentshave different overtones in their notes. The central tone, the one we’re tryingto play, is called the fundamental .
• Instrument sounds are not continuous with respect to amplitude and fre-quency. Some come slowly up to the target frequency and amplitude (like

“main”2005/1/11page 268
i
i
i
i
i
i
i
i
268 Chapter 8 Modifying all Samples in a Sound
wind instruments), while others hit the frequency and amplitude very quicklyand then the volume fades while the frequency remains pretty constant (likea piano).
• Not all sound waves are represented well by sine waves. Real sounds havefunny bumps and sharp edges. Our ears can pick these up, at least in thefirst few waves. We can do a reasonable job synthesizing with sine waves,but synthesizers sometimes also use other kinds of wave forms to get differentkinds of sounds (Figure 8.4).
FIGURE 8.4: Some synthesizers using triangular (or sawtooth) or square waves.
8.1.2 Exploring Sounds
On your CD, you will find the MediaTools application with documentation for howto get it started. The MediaTools application contains tools for sound, graphics,and video. Using the sound tools, you can actually observe sounds as they’re cominginto your computer’s microphone to get a sense of what louder and softer soundslook like, and what higher and lower pitched sounds look like.
The basic sound editor looks like Figure 8.5. You can record sounds, openWAV files on your disk, and view the sounds in a variety of ways. (Of course,assuming that you have a microphone on your computer!)
FIGURE 8.5: Sound editor main tool
To view sounds, click the View button, then the Record button. (Hit theStop button to stop recording.) There are three kinds of views that you can makeof the sound.
The first is the signal view (Figure 8.6). In the signal view, you’re looking atthe sound raw—each increase in air pressure results in an rise in the graph, andeach decrease in sound pressure results in a drop in the graph. Note how rapidly

“main”2005/1/11page 269
i
i
i
i
i
i
i
i
Section 8.1 How Sound is Encoded 269
the wave changes! Try some softer and louder sounds so that you can see how thesounds’ look changes. You can always get back to the signal view from anotherview by clicking the Signal button.
FIGURE 8.6: Viewing the sound signal as it comes in
The second view is the spectrum view (Figure 8.7). The spectrum view is acompletely different perspective on the sound. In the previous section, you readthat natural sounds are often actually composed of several different frequencies atonce. The spectrum view shows these individual frequencies. This view is alsocalled the frequency domain.
Frequencies increase in the spectrum view from left to right. The height of acolumn indicates the amount of energy (roughly, the volume) of that frequency inthe sound. Natural sounds look like Figure 8.8 with more than one spike (rise inthe graph). (The smaller rises around a spike are often seen as noise.)
The technical term for how a spectrum view is generated is called a Fouriertransform. A Fourier transform takes the sound from the time domain (rises andfalls in the sound over time) into the frequency domain (identifying which frequen-cies are in a sound, and the energy of those frequencies, over time). The specifictechnique being used in the MediaTools signal view is a Fast Fourier Transform(or FFT ), a very common way to do Fourier transforms quickly on a computer sothat we can get a real time view of the changing spectra.
The third view is the sonogram view (Figure 8.9). The sonogram view is verymuch like the spectrum view in that it’s describing the frequency domain, but itpresents these frequencies over time. Each column in the sonogram view, sometimescalled a slice or window (of time), represents all the frequencies at a given momentin time. The frequencies increase in the slice from lower (bottom) to higher (top).The darkness of the spot in the column indicates the amount of energy of thatfrequency in the input sound at the given moment. The sonogram view is great forstudying how sounds change over time, e.g., how the sound of a piano key beingstruck changes as the note fades, or how different instruments differ in their sounds,or in how different vocal sounds differ.

“main”2005/1/11page 270
i
i
i
i
i
i
i
i
270 Chapter 8 Modifying all Samples in a Sound
FIGURE 8.7: Viewing the sound in a spectrum view
#
"
Ã
!
Making it Work Tip: Explore sounds!You really should try these different views on real sounds.You’ll get a much better understanding of sound and whatthe manipulations we’re doing in this chapter are doing tothe sounds.
8.1.3 Encoding Sounds
You just read about how sounds work physically and how we perceive them. Tomanipulate these sounds on a computer and to play them back on a computer, wehave to digitize them. To digitize sound means to take this flow of waves and turnit into numbers. We want to be able to capture a sound, perhaps manipulate it, andthen play it back (through the computer’s speakers) and hear what we captured—asexactly as possible.
The first part of the process of digitizing a sound is handled by the com-puter’s hardware—the physical machinery of the computer. If a computer has amicrophone and the appropriate sound equipment (like a SoundBlaster sound cardon Wintel computers), then it’s possible, at any moment, to measure the amountof air pressure against that microphone as a single number. Positive numbers cor-respond to rises in pressure, and negative numbers correspond to rarefactions. Wecall this an analog-to-digital conversion (ADC)—we’ve moved from an analog signal(a continuously changing sound wave) to a digital value. This means that we canget an instantaneous measure of the sound pressure, but it’s only one step alongthe way. Sound is a continuous changing pressure wave. How do we store that inour computer?
By the way, playback systems on computers work essentially the same inreverse. The sound hardware does a digital-to-analog conversion (DAC), and theanalog signal is then sent to the speakers. The DAC process also requires numbers

“main”2005/1/11page 271
i
i
i
i
i
i
i
i
Section 8.1 How Sound is Encoded 271
FIGURE 8.8: Viewing a sound in spectrum view with multiple “spikes”
representing pressure.If you’ve had some calculus, you’ve got some idea of how we might do that.
You know that we can get close to measuring the area under a curve with more andmore rectangles whose height matches the curve (Figure 8.10). With that idea, it’spretty clear that if we capture enough of those microphone pressure readings, wecapture the wave. We call each of those pressure readings a sample—we are literally“sampling” the sound at that moment. But how many samples do we need? Inintegral calculus, you compute the area under the curve by (conceptually) havingan infinite number of rectangles. While computer memories are growing larger andlarger all the time, we still can’t capture an infinite number of samples per sound.
Mathematicians and physicists wondered about these kinds of questions longbefore there were computers, and the answer to how many samples we need wasactually computed long ago. The answer depends on the highest frequency youwant to capture. Let’s say that you don’t care about any sounds higher than 8,000Hz. The Nyquist theorem says that we would need to capture 16,000 samples persecond to completely capture and define a wave whose frequency is less than 8,000cycles per second.
Computer Science Idea: Nyquist TheoremTo capture a sound of at most n cycles per second, youneed to capture 2n samples per second.
This isn’t just a theoretical result. The Nyquist theorem influences applica-tions in our daily life. It turns out that human voices don’t typically get over 4,000Hz. That’s why our telephone system is designed around capturing 8,000 samplesper second. That’s why playing music through the telephone doesn’t really work

“main”2005/1/11page 272
i
i
i
i
i
i
i
i
272 Chapter 8 Modifying all Samples in a Sound
FIGURE 8.9: Viewing the sound signal in a sonogram view
FIGURE 8.10: Area under a curve estimated with rectangles
very well. The limits of (most) human hearing is around 22,000 Hz. If we were tocapture 44,000 samples per second, we would be able to capture any sound that wecould actually hear. CD’s are created by capturing sound at 44,100 samples persecond—just a little bit more than 44 kHz for technical reasons and for a fudgefactor.
We call the rate at which samples are collected the sampling rate. Mostsounds that we hear in daily life are well within the range of the limits of ourhearing. You can capture and manipulate sounds in this class at a sampling rateof 22 kHz (22,000 samples per second), and it will sound quite reasonable. If youuse too low of a sampling rate to capture a high-pitched sound, you’ll still hearsomething when you play the sound back, but the pitch will sound strange.
Typically, each of these samples are encoded in two bytes(16 bits). Thoughthere are larger sample sizes, 16 bits works perfectly well for most applications.CD-quality sound uses 16 bit samples.

“main”2005/1/11page 273
i
i
i
i
i
i
i
i
Section 8.1 How Sound is Encoded 273
In 16 bits, the numbers that can be encoded range from -32,768 to 32,767.These aren’t magic numbers—they make perfect sense when you understand theencoding. These numbers are encoded in 16 bits using a technique called two’scomplement notation, but we can understand it without knowing the details ofthat technique. We’ve got 16 bits to represent positive and negative numbers.Let’s set aside one of those bits (remember, it’s just 0 or 1) to represent whetherwe’re talking about a positive (0) or negative (1) number. We call that the signbit . That leaves 15 bits to represent the actual value. How many different patternsof 15 bits are there? We could start counting:
000000000000000000000000000001000000000000010000000000000011...111111111111110111111111111111
That looks forbidding. Let’s see if we can figure out a pattern. If we’ve gottwo bits, there are four patterns: 00, 01, 10, 11. If we’ve got three bits, there areeight patterns: 000, 001, 010, 011, 100, 101, 110, 111. It turns out that 22 is four,and 23 is eight. Play with four bits. How many patterns are there? 24 = 16 Itturns out that we can state this as a general principle.
Computer Science Idea: 2n patterns in n bitsIf you have n bits, there are 2n possible patterns in thosen bits.
215 = 32, 768. Why is there one more value in the negative range than thepositive? Zero is neither negative nor positive, but if we want to represent it as bits,we need to define some pattern as zero. We use one of the positive range values(where the sign bit is zero) to represent zero, so that takes up one of the 32,768patterns.
The sample size is a limitation on the amplitude of the sound that can becaptured. If you have a sound that generates a pressure greater than 32,767 (or ararefaction greater than -32,768), you’ll only capture up to the limits of the 16 bits.If you were to look at the wave in the signal view, it would look like somebody tooksome scissors and clipped off the peaks of the waves. We call that effect clippingfor that very reason. If you play (or generate) a sound that’s clipped, it soundsbad—it sounds like your speakers are breaking.
There are other ways of digitizing sound, but this is by far the most common.The technical term for this way of encoding sound is pulse coded modulation (PCM).You may encounter that term if you read further in audio or play with audiosoftware.
What this means is that a sound in a computer is a long list of numbers, eachof which is a sample in time. There is an ordering in these samples: If you playedthe samples out of order, you wouldn’t get the same sound at all. The most efficient

“main”2005/1/11page 274
i
i
i
i
i
i
i
i
274 Chapter 8 Modifying all Samples in a Sound
way to store an ordered list of data items on a computer is with an array . An arrayis literally a sequence of bytes right next to one another in memory. We call eachvalue in an array an element .
We can easily store the samples that make up a sound in an array. Think ofeach two bytes as storing a single sample. The array will be large—for CD-qualitysounds, there will be 44,100 elements for every second of recording. A minute longrecording will result in an array with 26,460,000 elements.
Each array element has a number associated with it, called its index . Theindex numbers start at 0 and increase sequentially. The first one is 0, the secondone is 1, and so on. It may sound strange to say the the index for the first arrayelement is 0 but this is basically a measure of the distance from the first elementin the array. Since the distance from the first element to itself is 0, the index is 0.You can think about an array as a long line of boxes, each one holding a value andeach box having an index number on it (Figure 8.11).
59 39 16 10 -1
0 1 2 3 4
...
FIGURE 8.11: A depiction of the first five elements in a real sound array
Using the MediaTools, you can graph a sound file (Figure 8.12) and get asense of where the sound is quiet (small amplitudes), and loud (large amplitudes).This is actually important if you want to manipulate the sound. For example, thegaps between recorded words tend to be quiet—at least quieter than the wordsthemselves. You can pick out where words end by looking for these gaps, as inFigure 8.12.
FIGURE 8.12: A sound recording graphed in the MediaTools
You will soon read about how to read a file containing a recording of a soundinto a sound object , view the samples in that sound, and change the values of thesound array elements. By changing the values in the array, you change the sound.Manipulating a sound is simply a matter of manipulating elements in an array.
8.2 MANIPULATING SOUNDS
Now that we know how sounds are encoded, we can manipulate sounds using Javaprograms. Here’s what we’ll need to do.

“main”2005/1/11page 275
i
i
i
i
i
i
i
i
Section 8.2 Manipulating Sounds 275
1. We’ll need to get a filename of a WAV file, and make a Sound object from it.You already saw how to do that in a previous chapter.
2. You will often get the samples of the sound as an array. Sample objects areeasy to manipulate, and they know that when you change them, they shouldautomatically change the original sound. You’ll read first about manipulatingthe samples to start with, then about how to manipulate the sound samplesfrom within the sound itself.
3. Whether you get the sample objects out of a sound, or just deal with thesamples in the sound object, you will then want to do something to the valueat the sample.
4. You may then want to write the sound back out to a new file, to use elsewhere.(Most sound editing programs know how to deal with audio.)
8.2.1 Opening Sounds and Manipulating Samples
You have already seen how to pick a file with FileChooser.pickAFile() and thenmake a Sound object (object of the class Sound) with new Sound(fileName). Here’san example of doing that in DrJava.
> String fileName = FileChooser.pickAFile();> Sound sound1 = new Sound(fileName);> System.out.println(sound1);Sound file: preamble.wav number of samples: 421110
What new Sound(fileName) does is to scoop up all the bytes from the filename provided as input, dump them into memory, and place a big sign on themsaying, “This is a sound object (an object of the class Sound)!” When you executeSound sound1 = new Sound(fileName), you are saying, “Create an object vari-able called sound1 that refers to the Sound object created from the information inthe file with a file name given by the variable fileName.” When you use sound1as input to functions, you are saying “Use that sound object over there (yeah, theone referred to the by the variable sound1) as input to this function.”
You can get the samples from a sound using getSamples(). The methodgetSamples() must be invoked on a Sound object and returns an array of all thesamples as SoundSample objects (objects of the class SoundSample). When youexecute this function, it may take quite a while before it finishes—longer for longersounds, shorter for shorter sounds.
> SoundSample[] sampleArray = sound1.getSamples();> System.out.println(sampleArray.length);421110
The method getSamples() is making an array of SoundSample objects outof the samples in the Sound object. An object is more than just a simple value–for example, a SoundSample object knows what Sound object it came from andwhat its index is. You will read more about objects later, but take it at face valuenow that getSamples() provides you with a bunch of sample objects that youcan manipulate—and in fact, makes manipulation pretty easy. You can get the

“main”2005/1/11page 276
i
i
i
i
i
i
i
i
276 Chapter 8 Modifying all Samples in a Sound
value of a SoundSample object by using getValue(), and you set the value of aSoundSample object with setValue(value).
But before we get to the manipulations, let’s look at some other ways to getand set samples. We can ask the sound to give us the value of a specific sample at aspecific index, by using the method getSampleValueAt(index) on a Sound object.
> System.out.println(sound1.getSampleValueAt(0));36> System.out.println(sound1.getSampleValueAt(1));29
What numbers can we use as index values? Anything between 0 and thenumber of samples minus 1. We can get the number of samples using getLength().Notice the error that we get below if we try to get a sample past the end of thearray.
> System.out.println(sound1.getLength());421110> sound1.getSampleValueAt(500000);You are trying to access the sample at index: 500000, but the lastvalid index is at 421109
We can similarly change sample values in a Sound object with setSampleValueAt(index).This method changes the value of the sample at the passed index. We can thencheck it again with getSampleValueAt().
> System.out.println(sound1.getSampleValueAt(0));36> sound1.setSampleValueAt(0,12);> System.out.println(sound1.getSampleValueAt(0));12
'
&
$
%
Common Bug: Mistyping a nameYou just saw a whole bunch of method names, and someof them are pretty long. What happens if you type one ofthem wrong? DrJava will complain that it doesn’t knowwhat you mean, like this:
> sound1.setSampleVAlueAt(0,12);Error: No ’setSampleVAlueAt’ method in ’Sound’
It’s no big deal. Use the up arrow on the keyboard to bringup the last thing you typed into DrJava and then use theleft arrow to get to the place with the error and then fix it.You can use the up arrow to get to any of the commandsyou have typed in the interactions pane since you startedDrJava.
What do you think would happen if we then played this sound? Would it reallysound different than it did before, now that we’ve turned the first sample from the
‘‘main’’2005/1/11page 277
i
i
i
i
i
i
i
i
Section 8.2 Manipulating Sounds 277
number 36 to the number 12? Not really. To explain why not, let’s find out whatthe sampling rate is for this sound, by using the method getSamplingRate().
> Sound aSound = new Sound(FileChooser.getMediaPath("preamble.wav"));> System.out.println(aSound.getSamplingRate());22050.0
To make some of our manipulations easier, we’re going to be usingFileChooser.setMediaPath(String directory)andFileChooser.getMediaPath(String baseFileName)
Using setMediaPath(String directory) will set a media directory (folder),and then getMediaPath(String baseFileName) will reference media files withinthat directory. This makes it much easier to reference media files—you don’t haveto spell out the whole path. The method getMediaPath takes a base file name as anargument, and will return the directory set by setMediaPath with the passed filename added to the end of the directory name. The default for the media directory isc:/intro-prog-java/mediasources/. If you have your media in another directoryyou will need to use setMediaPath before you can use getMediaPath.
> FileChooser.setMediaPath("c:/intro-prog-java/mediasources/");The media directory is now c:/intro-prog-java/mediasources/> System.out.println(FileChooser.getMediaPath("barbara.jpg"));c:/intro-prog-java/mediasources/barbara.jpg> System.out.println(FileChooser.getMediaPath("croak.wav"));c:/intro-prog-java/mediasources/croak.wav
'
&
$
%
Common Bug: It’s not a file, it’s a stringJust because getMediaPath returns something that lookslike a path doesn’t mean that a file really exists there.You have to know the right base name, but if you do, it’seasier to use in your code. But if you put in a non-existentfile, you’ll get a path to a non-existent file. The methodgetMediaPath will warn you if the file doesn’t exist.
> FileChooser.getMediaPath("blahblah.wav");There is no file named blahblah.wav in directoryc:/intro-prog-java/mediasources/>
The sound that we’re manipulating in this example (a recording of Markreading part of the U.S. Constitution’s preamble) has a sampling rate of 22,050samples per second. Changing one sample changes 1/22050 of the first second ofthat sound. If you can hear that, you have amazingly good hearing—and I willhave my doubts about your truthfulness!
Obviously, to make a significant manipulation to the sound, we have to ma-nipulate hundreds if not thousands of samples. We’re certainly not going to do thatby typing thousands of lines like this:

“main”2005/1/11page 278
i
i
i
i
i
i
i
i
278 Chapter 8 Modifying all Samples in a Sound
> aSound.setSampleValueAt(0,12);> aSound.setSampleValueAt(1,24);> aSound.setSampleValueAt(2,100);> aSound.setSampleValueAt(3,99);> aSound.setSampleValueAt(4,-1);
We need to take advantage of the computer executing our program, by tellingit to go do something hundreds or thousands of times. That’s the topic for the nextsection.
But we will end this section by talking about how to write your results backout to a file. Once you’ve manipulated your sound and want to save it out to useelsewhere, you use write(String fileName) which takes a filename as input. Besure that your file ends with the extension “.wav” if you’re saving a sound so thatyour operating system knows what to do with it (what type of data is in it)!
> Sound aSound = new Sound(FileChooser.pickAFile());> System.out.println(aSound.getFileName());c:\intro-prog-java\mediasources\preamble.wav> aSound.write("c:\\intro-prog-java\\mediasources\\preamble.wav");
'
&
$
%
Making it Work Tip: Slashes and Backslashes inJavaEven though the file name is output with backslashes (\)in it, a Java string that wants to have a backslash in itmust double it since the backslash character is used in Javastrings to indicate special characters like tab. Or, you canuse a forward slash (/) instead of double backslashes.
'
&
$
%
Common Bug: Saving a file quickly—and how tofind it again!What if you don’t know the whole path to a directory ofyour choosing? You don’t have to specify anything morethan the base name.
> aSound.write("new-preamble.wav")
The problem is finding the file again! In what directorydid it get saved? This is a pretty simple bug to resolve.The default directory (the one you get if you don’t specifya path) is wherever DrJava is. You can also useFileChooser.getMediaPath("new-preamble.wav"); toget the full name of the media directory and base file name.
You’ll probably figure out when playing sounds a lot that if you use play()a couple times in quick succession, you’ll mix the sounds. How do you make surethat the computer plays only a single sound and then waits for that sound to end?

“main”2005/1/11page 279
i
i
i
i
i
i
i
i
Section 8.2 Manipulating Sounds 279
You use something called blockingPlay(). That works the same as play(), butit waits for the sound to end so that no other sound can interfere while it’s playing.
8.2.2 Using MediaTools for Looking at Sounds
The MediaTools for manipulating sounds that you read about earlier can also beused to study sound files. Any WAV file on your computer can be opened andstudied within the sound tools.
Using the MediaTools Application.
From the basic sound editor tool in the MediaTools application, click on Fileto get the option to open a WAV file (Figure 8.13). The MediaTools’ open filedialog will then appear. Find a WAV file by clicking on the directories on the leftuntil you find one that contains the WAV files you want on the right (Figure 8.14),then click OK.
Your CD contains a mediasources directory on it. Most of the examplesin the book use the media in this directory. You’ll probably want to drag themediasources folder onto your hard disk so that you can use it there. The defaultmedia directory is c:/intro-prog-java/mediasources so that would be a goodplace to put it. If you put it somewhere else just useFileChooser.setMediaPath(directory) to set the directory to use to a differentdirectory.
FIGURE 8.13: The sound editor open menu in MediaTools application
You will then be shown the file in the sound editor view (Figure 8.15). Thesound editor lets you explore a sound in many ways (Figure 8.16). As you scrollthrough the sound and change the sound cursor (the red/blue line in the graph)position, the index changes to show you which sound array element you’re currentlylooking at, and the value shows you the value at that index. You can also fitthe whole sound into the graph to get an overall view (but currently breaks theindex/value displays). You can even “play” your recorded sound as if it were aninstrument—try pressing the piano keys across the bottom of the editor. You canalso set the cursor (via the scrollbar or by dragging in the graph window) and playthe sound before the cursor—a good way to hear what part of the sound correspondsto what index positions. Clicking the <> button provides a menu of options whichincludes getting an FFT view of the sound.

“main”2005/1/11page 280
i
i
i
i
i
i
i
i
280 Chapter 8 Modifying all Samples in a Sound
FIGURE 8.14: MediaTools application open file dialog
FIGURE 8.15: A sound opened in the editor in MediaTools application
8.2.3 Introducing Loops
The problem of wanting to do something similar a great many times is a commonone in computing: How do we get the computer to do something over-and-overagain? We need to get the computer to loop or iterate. Java has commandsespecially for looping (iterating).
Starting with Java version 1.5 there is a new way of looping through allmembers of an array using a for each loop. The syntax isfor (Type variableName : array)
You can read this as, ”for each element in the array execute the body of theloop.” The first time through the loop the variableName will refer to the firstelement of the array (the one at index 0). The second time through the loop thevariableName will refer to the second element of the array (the one at index 1).The last time through the loop the variableName will refer to the last elementof the array (the one at index (length - 1)). The code to loop through all theSoundSample objects in an array of SoundSample objects and set the value of each

“main”2005/1/11page 281
i
i
i
i
i
i
i
i
Section 8.2 Manipulating Sounds 281
FIGURE 8.16: Exploring the sound in the editor in MediaTools application
sample to its original value (no change) is below:
public void doNothing ( ){
SoundSample [ ] sampleArray = this . getSamples ( ) ;int value = 0 ;
// loop through a l l the samples in the arrayfor ( SoundSample sample : sampleArray ){
value = sample . getValue ( ) ;sample . setValue ( va lue ) ;
}}
As you can see the for each loop makes it easy to loop through all theelements of an array. You can use the for each loop whenever you want to processall the elements of an array and you don’t need to know the current index in thebody of the loop.
However, not everyone is using Java 1.5 yet. If you are not using Java 1.5you may want to start with a while loop. A while loop executes some commandswhile a test returns true. In order for the loop to stop there but be some way forthe test to end up false.
The way that we will manipulate a sound is to change the values in the samplesthat make up the sound. We want to loop through all the samples in a sound anddo something to each value. One way to do that is to loop through all the elementsof the array of samples. We are going to use the getSamples() function we sawearlier to provide our array.
For example, here is the while loop that simply sets each sample to its ownvalue (a particularly useless exercise, but it’ll get more interesting in just a couplepages).
public void doNothing ( ){
SoundSample [ ] sampleArray = this . getSamples ( ) ;SoundSample sample = null ;int index = 0 ;

“main”2005/1/11page 282
i
i
i
i
i
i
i
i
282 Chapter 8 Modifying all Samples in a Sound
int value = 0 ;
// loop through a l l the samples in the arraywhile ( index < sampleArray . l ength ){
sample = sampleArray [ index ] ;va lue = sample . getValue ( ) ;sample . setValue ( va lue ) ;index++;
}}
Let’s talk through this code.
• The first statement gets the array of SoundSample objects from the cur-rent Sound object using the method getSamples() and declares a variablesampleArray which refers to it. The “this” means the current Sound objectthat was implicitly passed to the method. You could leave off the “this” andthe compiler would add it.
• The next statement declares a variable sample that can refer to a SoundSampleobject but is set to null to show that it doesn’t reference any object yet.
• Next a primitive variable index is declared and initialized to 0.
• The primitive variable value is declared and initialized to 0.
• The code while (index < sampleArray.length) tests if the value of indexis less than the length of the array of SoundSample objects. If it is, the bodyof the loop will be executed. If not, execution will continue with the firststatement following the body of the loop.
• The first statement in the body of the loop sets the variable sample to referto the SoundSample object at the value of index in the array soundArray.Since index starts off with a value of 0 this will refer to the first SoundSampleobject in the array the first time through the loop.
• The space reserved for the variable value is set to the value of the SoundSampleobject referred to by sample.
• Next, the value of the SoundSample object referred to by sample is set tothe contents of value. Since the contents of the variable value is the valuefor this SoundSample object there will be no change. It just sets the samplevalue to the original value.
• Finally, the value in index in incremented by one. Then execution will jumpback to the while test again.
Here’s the exact same code (it would work exactly the same), but with differentvariable names.

“main”2005/1/11page 283
i
i
i
i
i
i
i
i
Section 8.2 Manipulating Sounds 283
SoundSample [ ] a = this . getSamples ( ) ;SoundSample s = null ;int i = 0 ;int v = 0 ;
// loop through a l l the samples in the arraywhile ( i < a . l ength ){
s = a [ i ] ;v = s . getValue ( ) ;s . setValue (v ) ;i++;
}
What’s the difference? These are slightly easier to confuse variable names. a and sare not as obvious as to what they are naming as sampleArray and sample. Javadoesn’t care which we use, and the single character variable names are clearly easierto type. But the longer variable names make it easier to understand your code. Itis best to try to make your code easier for humans to understand.
You may have wondered do we need the variable v? We could combine thetwo statements into one.
SoundSample [ ] a = this . getSamples ( ) ;SoundSample s = null ;int i = 0 ;
// loop through a l l the samples in the arraywhile ( i < a . l ength ){
s = a [ i ] ;s . setValue ( s . getValue ( ) ) ;i++;
}
Now that we see how to get the computer to do thousands of commands

“main”2005/1/11page 284
i
i
i
i
i
i
i
i
284 Chapter 8 Modifying all Samples in a Sound
without writing thousands of individual lines, let’s do something useful with this.Â
Á
¿
À
Common Bug: Keep sounds shortLonger sounds take up more memory and will process moreslowly.
'
&
$
%
Common Bug: Windows and WAV filesThe world of WAV files isn’t as compatible and smooth asone might like. WAV files created with other applications(such as Windows Recorder) may not play in DrJava, andDrJava WAV files may not play in all other applications(e.g., WinAmp 2). Some tools like Apple QuickTimePlayer Pro (http://www.apple.com/quicktime) aregood at reading any WAV file and being able to exporta new one that most any other application can read.Some WAV files are encoded using MP3 which meansthey are really MP3 files. You can convert these usingSound.convert(origFileName, convertedFileName)where origFileName and convertedFileName are the fullnames (include path information).
8.3 CHANGING THE VOLUME OF SOUNDS
Earlier, we said that the amplitude of a sound is the main factor in the volume.This means that if we increase the amplitude, we increase the volume. Or if wedecrease the amplitude, we decrease the volume.
Don’t get confused here—changing the amplitude doesn’t reach out and twistup the volume knob on your speakers. If your speaker’s volume (or computer’svolume) is turned down, the sound will never get very loud. The point is gettingthe sound itself louder. Have you ever watched a movie on TV where, withoutchanging the volume on the TV, sound becomes so low that you can hardly hearit? (Marlon Brando’s dialogue in the movie The Godfather comes to mind.) That’swhat we’re doing here. We can make sounds shout or whisper by tweaking theamplitude.
8.3.1 Increasing Volume
Here’s a function that doubles the amplitude of an input sound.
Program 65: Increase an input sound’s volume
/∗∗∗ Method to doub le the volume ( ampl i tude ) o f the sound∗/

“main”2005/1/11page 285
i
i
i
i
i
i
i
i
Section 8.3 Changing the Volume of Sounds 285
public void increaseVolume ( ){
SoundSample [ ] sampleArray = this . getSamples ( ) ;SoundSample sample = null ;int value = 0 ;int index = 0 ;
// loop through a l l the samples in the arraywhile ( index < sampleArray . l ength ){
sample = sampleArray [ index ] ;va lue = sample . getValue ( ) ;sample . setValue ( va lue ∗ 2 ) ;index++;
}}
Go ahead and type the above into your DrJava definitions pane before the lastcurly brace in the Sound.java class. Click Compile All to get DrJava to compileit. Follow along the example below to get a better idea of how this all works.
To use this program, you have to create a sound first and invoke this methodon it. Don’t forget that you can’t type this code in and have it work as-is: Yourpath names may be different than what is shown here!
> String f = "c:/intro-prog-java/mediasources/gettysburg10.wav";> Sound s = new Sound(f);> s.play();> s.explore();> s.increaseVolume();> s.play();> s.explore();
In the interactions pane we create a variable f which refers to a String objectthat holds the name of a file. We create the variable s which refers to a Sound objectcreated from the file using new Sound(f). We ask this Sound object to play usings.play(). We then open an explorer on the sound to see what it looks like graphi-cally using s.explore(). We next increase its volume using s.increaseVolume().This implicitly passes the Sound object to the method increaseVolume(). So thecode this.getSamples() in the method increaseVolume() means to get them

“main”2005/1/11page 286
i
i
i
i
i
i
i
i
286 Chapter 8 Modifying all Samples in a Sound
from the implicitly passed Sound object (the one referred to by variable s).
Computer Science Idea: Changing memory doesn’tchange the fileIf you create another Sound object from the same file willyou get the original sound or the sound with volume in-creased? You will get the original sound. The Soundobject s was created by reading the file data into mem-ory. The change to the Sound object was done in mem-ory, but the file wasn’t changed. If you want to saveyour changes write them out to a file using the methodsoundObj.write(String fileName); where soundObj isthe name of the Sound object and fileName is the fullpath name of the file. So to save the changed Sound objectabove use s.write("gettyLouder.wav");.
8.3.2 Did that Really Work?
Now, is it really louder, or does it just seem that way? We can check it in severalways. You could always make the sound even louder by evaluating increaseVolumeon our sound a few more times—eventually, you’ll be totally convinced that thesound is louder. But there are ways to test even more subtle effects.
If you compare graphs of the two sounds using the sound explorer, you willfind that the graph of the sound does have greater amplitude after increasing itusing our function. Check it out in Figure 8.17.
FIGURE 8.17: Comparing the graphs of the original sound (left) and the louder one(right)
Maybe you’re unsure that you’re really seeing a larger wave in the secondpicture. You can use a sound explorer to check the individual sample values. Youcan actually already see that in Figure 8.17—see that the first value (index number0) is 59 in the original sound and 118 in the second sound. You can also checkthe value at any index using the sound explorer. Just click on a location and thevalue will be displayed for that location. To check the same location in the secondexplorer just type in the desired current index and it will show the value at thatindex. You’ll see that the louder sound really does have double the value of the

“main”2005/1/11page 287
i
i
i
i
i
i
i
i
Section 8.3 Changing the Volume of Sounds 287
FIGURE 8.18: Comparing specific samples in the original sound (left) and the louderone (right)
same sample in the original sound.Finally, you can always check for yourself from within DrJava. If you’ve been
following along with the example1, then the variable s is the now louder sound.f should still be the filename of the original sound. Go ahead and make a newsound object which is the original sound—that is named below as sOrig (for soundoriginal). Check any sample that you want—it’s always true that the louder soundhas twice the value than the the original sound.
> System.out.println(s);Sound file:c:/intro-prog-java/mediasources/gettysburg10-louder.wav number ofsamples: 220568> System.out.println(f);c:/intro-prog-java/mediasources/gettysburg10.wav> Sound sOrig = new Sound(f);> System.out.println(s.getSampleValueAt(0));118> System.out.println(sOrig.getSampleValueAt(0));59> System.out.println(s.getSampleValueAt(1));78> System.out.println(sOrig.getSampleValueAt(1));39> System.out.println(s.getSampleValueAt(999));-80> System.out.println(sOrig.getSampleValueAt(999));-40
You can see from the last value that even negative values become more neg-ative. That’s what’s meant by “increasing the amplitude.” The amplitude of thewave goes in both directions. We have to make the wave larger in both the positiveand negative dimensions.
1What? You haven’t? You should ! It’ll make much more sense if you try it yourself!

“main”2005/1/11page 288
i
i
i
i
i
i
i
i
288 Chapter 8 Modifying all Samples in a Sound
It’s important to do what you just read in this chapter: Doubt your programs.Did that really do what I wanted it to do? The way you check is by testing . That’swhat this section is about. You just saw several ways to test:
• By looking at the result overall (like with the graphs created by the explorer),
• By checking pieces of the results (like with the explorer or MediaTools), and
• By writing additional code statements that check the results of the originalprogram.
Figuring out how it Worked.Let’s walk through the code, slowly, and consider how this program worked.
/∗∗∗ Method to doub le the volume ( ampl i tude ) o f the sound∗/
public void increaseVolume ( ){
SoundSample [ ] sampleArray = this . getSamples ( ) ;SoundSample sample = null ;int value = 0 ;int index = 0 ;
// loop through a l l the samples in the arraywhile ( index < sampleArray . l ength ){
sample = sampleArray [ index ] ;va lue = sample . getValue ( ) ;sample . setValue ( va lue ∗ 2 ) ;index++;
}}
Recall our picture of the samples in a sound array.
59 39 16 10 -1
0 1 2 3 4
...
This is what sound.getSamples() would return: An array of SoundSampleobjects. The while loop allows us to walk through each sample, one at a time. Thename (variable) sample will refer to each SoundSample object in turn.
The variable index starts out with a value of 0. This is less than the lengthof the array sampleArray so the body of the loop is executed. The variable sampleis changed to refer to the first SoundSample object (the one at index 0).

“main”2005/1/11page 289
i
i
i
i
i
i
i
i
Section 8.3 Changing the Volume of Sounds 289
59 39 16 10 -1
0 1 2 3 4
...
sample
index = 0value = 0
The variable value will take on the value of 59 when value=sample.getValue()is executed. The value stored at that SoundSample object will be set to value times2 (59 ∗ 2 = 118).
118 39 16 10 -1
0 1 2 3 4
...
sample
index = 0value = 59
The value in variable index will be incremented by 1 (0 + 1 = 1). That’s theend of the first pass through the body of the while loop. The loop will then startover. The test that index is less than the length of the array of samples will happenagain. Since, it is still less the body of the loop will be executed (statements insidethe open and close curly braces). The variable sample will be changed to refer tothe second item in the array (the one at index 1).
118 39 16 10 -1
0 1 2 3 4
...
sample
index = 1value = 59
Again, the variable value is set to the value of the SoundSample object. Thevalue of the SoundSample object is set to twice the amount held in the variablevalue.

“main”2005/1/11page 290
i
i
i
i
i
i
i
i
290 Chapter 8 Modifying all Samples in a Sound
118 78 16 10 -1
0 1 2 3 4
...
sample
index = 1value = 39
This is what it will look like after 5 times through the loop.
118 78 32 20 -2
0 1 2 3 4
...
sample
index = 4value = -1
But really, the while loop keeps going through all the samples—tens of thou-sands of them! Thank goodness it’s the computer executing this program!
What you have just read in this section is called tracing the program. Weslowly went through how each step in the program was executed. We drew picturesto describe the data in the program. We used numbers, arrows, equations, and evenplain English to explain what was going on in the program. This is the single mostimportant technique in programming. It’s part of debugging . Your program will notalways work. Absolutely, guaranteed, without a shadow of a doubt—you will writecode that does not do what you want. But the computer will do SOMETHING.How do you figure out what it is doing? You debug, and the most significant wayto do that is by tracing the program.
8.3.3 Decreasing Volume
Decreasing volume, then, is the reverse of the previous process.
Program 66: Decrease an input sound’s volume
/∗∗∗ Method to ha l v e the volume ( ampl i tude ) o f the sound .∗/
public void decreaseVolume ( ){

“main”2005/1/11page 291
i
i
i
i
i
i
i
i
Section 8.3 Changing the Volume of Sounds 291
SoundSample [ ] sampleArray = this . getSamples ( ) ;SoundSample sample = null ;int value = 0 ;int index = 0 ;
// loop through a l l the samples in the arraywhile ( index < sampleArray . l ength ){
sample = sampleArray [ index ] ;va lue = sample . getValue ( ) ;sample . setValue ( ( int ) ( va lue ∗ 0 . 5 ) ) ;index++;
}}
• Our method is called on a Sound object. The Sound object is implicitlypassed to the method and is accessed using the keyword this. You can leaveoff the this on this.getSamples() since it is understood to be invoked onthe current object.
• The variable sample will refer to a different SoundSample object each timethrough the loop.
• Each time sample refers to a new SoundSample object, we will get the valueof that SoundSample object. We put that in the variable value.
• We then set the value held by the SoundSample object to 50% of its currentvalue, by multiplying value by 0.5, and setting the sample value to that.However, because the value is an integer and the result of a computationwith a floating point value (0.5) is a floating point number we must cast tointeger using (int) (value * 0.5) to let the compiler know we realize thatwe will be throwing away the fractional part.
We can use it like this.
> String f = FileChooser.pickAFile();> System.out.println(f);C:\intro-prog-java\mediasources\gettysburg10-louder.wav> Sound sound1 = new Sound(f);> System.out.println(sound1);Sound file:C:\intro-prog-java\mediasources\gettysburg10-louder.wav number ofsamples: 220568> sound1.play();> sound1.decreaseVolume();> sound1.play();
We can even do it again, and lower the volume even further.
> sound1.decreaseVolume();> sound1.play();

“main”2005/1/11page 292
i
i
i
i
i
i
i
i
292 Chapter 8 Modifying all Samples in a Sound
8.3.4 Using a For Loop
Have you ever forgotten to declare the variable index? If you did the methodwouldn’t compile. Did you ever forgot to increment the the variable index? Ifyou did the loop would never end until you hit Reset. Because of these problemsprogrammers typically use a for loop instead of a while loop when they want toexecute a block of commands a set number of times. A for loop is equivalent to awhile loop (means the same thing to the computer). For loops are just less errorprone for a programmer (though they are harder for a beginner to understand).
A for loop looks like this: for (initialization ; test ; change ). Theinitialization area lets you declare and initialize variables for use in the loop, thetest is where you test if the loop should continue, and the change area is whereyou change the value of counters or indices used in the loop. For example, see thefollowing new version of the method decreaseVolume which has been modified touse a for loop instead of a while loop.
Program 67: Decrease an input sound’s volume using a for loop
/∗∗∗ Method to ha l v e the volume ( ampl i tude ) o f the sound .∗/
public void decreaseVolume2 ( ){
SoundSample [ ] sampleArray = this . getSamples ( ) ;SoundSample sample = null ;int value = 0 ;// i n t index = 0;
// loop through a l l the samples in the array// wh i l e ( index < sampleArray . l e n g t h )for ( int index = 0 ; index < sampleArray . l ength ; index++){
sample = sampleArray [ index ] ;va lue = sample . getValue ( ) ;sample . setValue ( ( int ) ( va lue ∗ 0 . 5 ) ) ;// index++;
}}
We have use the to-end-of-line comment ’//’ to comment out some lines ofcode to show the difference between the while and for loops. Notice that whatis different is that we don’t declare and initialize the index before the loop, it isdone in the initialization part of the for statement. We also don’t increment theindex as the last statement in the loop. This is moved to the change area in thefor statement. So we have replaced three lines of code with one and made it morelikely that we will remember to declare variables for use in the loop and changethem. However, what really happens during execution is the same thing as whathappened during the while loop. The declarations and initializations done in the
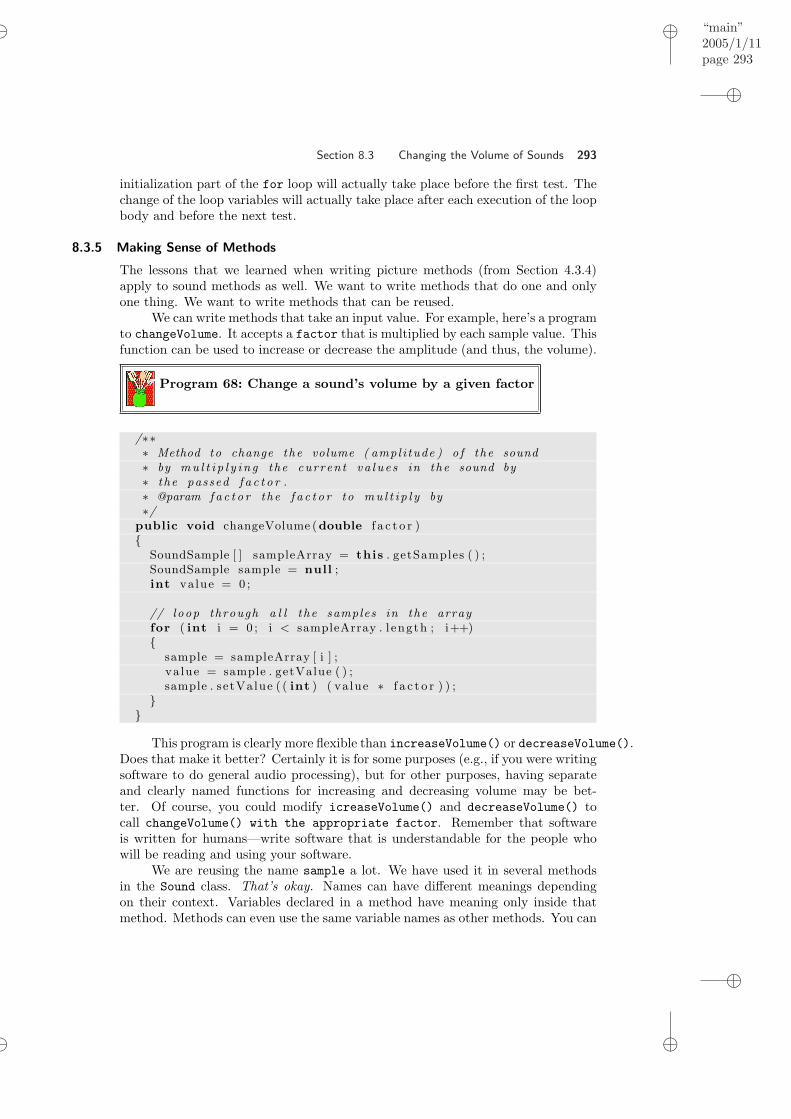
“main”2005/1/11page 293
i
i
i
i
i
i
i
i
Section 8.3 Changing the Volume of Sounds 293
initialization part of the for loop will actually take place before the first test. Thechange of the loop variables will actually take place after each execution of the loopbody and before the next test.
8.3.5 Making Sense of Methods
The lessons that we learned when writing picture methods (from Section 4.3.4)apply to sound methods as well. We want to write methods that do one and onlyone thing. We want to write methods that can be reused.
We can write methods that take an input value. For example, here’s a programto changeVolume. It accepts a factor that is multiplied by each sample value. Thisfunction can be used to increase or decrease the amplitude (and thus, the volume).
Program 68: Change a sound’s volume by a given factor
/∗∗∗ Method to change the volume ( ampl i tude ) o f the sound∗ by mu l t i p l y i n g the curren t va l u e s in the sound by∗ the passed f a c t o r .∗ @param f a c t o r the f a c t o r to mu l t i p l y by∗/
public void changeVolume (double f a c t o r ){
SoundSample [ ] sampleArray = this . getSamples ( ) ;SoundSample sample = null ;int value = 0 ;
// loop through a l l the samples in the arrayfor ( int i = 0 ; i < sampleArray . l ength ; i++){
sample = sampleArray [ i ] ;va lue = sample . getValue ( ) ;sample . setValue ( ( int ) ( va lue ∗ f a c t o r ) ) ;
}}
This program is clearly more flexible than increaseVolume() or decreaseVolume().Does that make it better? Certainly it is for some purposes (e.g., if you were writingsoftware to do general audio processing), but for other purposes, having separateand clearly named functions for increasing and decreasing volume may be bet-ter. Of course, you could modify icreaseVolume() and decreaseVolume() tocall changeVolume() with the appropriate factor. Remember that softwareis written for humans—write software that is understandable for the people whowill be reading and using your software.
We are reusing the name sample a lot. We have used it in several methodsin the Sound class. That’s okay. Names can have different meanings dependingon their context. Variables declared in a method have meaning only inside thatmethod. Methods can even use the same variable names as other methods. You can

“main”2005/1/11page 294
i
i
i
i
i
i
i
i
294 Chapter 8 Modifying all Samples in a Sound
even use the same variable names that you use in your methods in the interactionspane. This is a different context. If you create a variable in a method context (likevalue in Method 68 above), then that variable won’t exist when you get back outto the interactions pane. We can return values from a method context back out tothe interactions pane (or a calling method) by using return, which we’ll talk moreabout later.
8.4 NORMALIZING SOUNDS
If you think about it some, it seems strange that the last two methods work! Wecan just multiply these numbers representing a sound—and the sound seems (essen-tially) the same to our ears just louder? The way we experience a sound dependsless on the specific numbers than on the relationship between them. Rememberthat the overall shape of the sound waveform is dependent on many samples. Ingeneral, if we multiply all the samples by the same multiplier, we only effect oursense of volume (intensity), not the sound itself. (We’ll work to change the sounditself in future sections.)
A common operation that people want to do with sounds is to make them asLOUD AS POSSIBLE. That’s called normalizing . It’s not really hard to do, butit takes more lines of code than we’ve used previously and a few more variables, butwe can do it. Here’s the algorithm, in English, that we need to tell the computerto do.
• We have to figure out what the largest sample in the sound is. If it’s alreadyat the maximum value (the allowed range is -32768 to 32767 so the maximumallowed positive value is 32767), then we can’t really increase the volume andstill get what seems like the same sound. Remember that we have to multiplyall the samples by the same multiplier.
It’s an easy (algorithm) to find the largest value—sort of a sub-program withinthe overall normalizing program. Define a name (say, largest) and assign ita small value (0 works). Now, check all the samples. If you find a sample withan absolute value larger than the largest, save that as the value for largest.Keep checking the samples, comparing to the new largest. Eventually, thevery largest value in the array will be in the variable largest.
To do this, we’ll need a way of figuring out the maximum value of two values.We can use an if (value > largest) to check if the current value is greaterthan the current largest and if so set that value to the largest. We can alsosave the index of that value so that we can check it with the sound explorer.
• Next, we need to figure out what value to multiply all the samples by. We wantthe largest value to become 32767. Thus, we want to figure out a multipliersuch that
(multiplier)(largest) = 32767.
Solve for the multiplier:
multiplier = 32767/largest. The multiplier will need to be a floating pointnumber (have a decimal component), so we need to convince Java that not

“main”2005/1/11page 295
i
i
i
i
i
i
i
i
Section 8.4 Normalizing Sounds 295
everything here is an integer. Turns out that that’s easy—use 32767.0. Simplystick on “.0”.
• Now, loop through all the samples, as we did for increaseVolume, and mul-tiply the sample by the multiplier.
Here’s a program to normalize sounds.
Program 69: Normalize the sound to a maximum amplitude
/∗∗∗ Method to normal ize (make as loud as p o s s i b l e ) a sound .∗/
public void normal ize ( ){
int l a r g e s t = 0 ;int maxIndex = 0 ;SoundSample [ ] sampleArray = this . getSamples ( ) ;SoundSample sample = null ;int value = 0 ;
// loop comparing the a b s o l u t e va lue o f the curren t va lue// to the curren t l a r g e s tfor ( int i = 0 ; i < sampleArray . l ength ; i++){
sample = sampleArray [ i ] ;va lue = Math . abs ( sample . getValue ( ) ) ;i f ( va lue > l a r g e s t ){
l a r g e s t = value ;maxIndex = i ;
}}
// now c a l c u l a t e the mu l t i p l i e r to mu l t i p l y bydouble mu l t i p l i e r = 32767.0 / l a r g e s t ;
// p r i n t out the l a r g e s t va lue and the mu l t i p l i e rSystem . out . p r i n t l n ( ”The l a r g e s t va lue was ” + l a r g e s t +
” at index ” + maxIndex ) ;System . out . p r i n t l n ( ”The mu l t i p l i e r i s ” + mu l t i p l i e r ) ;
/∗ l oop through a l l the samples and mu l t i p l y by the∗ mu l t i p l i e r∗/
for ( int i = 0 ; i < sampleArray . l ength ; i++){
sample = sampleArray [ i ] ;sample . setValue ( ( int ) ( sample . getValue ( ) ∗ mu l t i p l i e r ) ) ;

“main”2005/1/11page 296
i
i
i
i
i
i
i
i
296 Chapter 8 Modifying all Samples in a Sound
}}
There are several notational items to note about this program.
• There is more than one loop in this method. That is okay. I can even use thesame variable i in each loop. Since the variable is declared in the initializationarea of the for loop it is only known in that loop. So, when we declare iagain in the second loop it is seen as a new variable and not an attempt todeclare the same variable more than once.
• There are System.out.println() statements in there! These statementscan be really useful. First, they give you some feedback that the programis running—a useful thing in long-running programs. Second, they show youwhat it’s finding, which can be interesting. Third, it’s a terrific testing methodand a way to debug your programs. Let’s imagine that the printout showedthat the multiplier was less than 1.0. We know that that kind of multiplierdecreases volume. You should probably suspect that something went wrong.
Here’s how to run this program:
> Sound s = new Sound(FileChooser.getMediaPath("preamble.wav"));> s.explore();> s.normalize();The largest value was 10216 at index 179377
The multiplier is 3.207419733750979> s.play();> s.explore();
Exciting, huh? Obviously, the interesting part is hearing the much loudervolume, which is awfully hard to do in a book. So please try it now if you haven’tyet. But, you can see from Figure 8.19 that the values have increased.
FIGURE 8.19: Comparing the original sound with the normalized one
8.4.1 Generating Clipping
Earlier, we talked about clipping , what happens when the normal curves of thesound are broken by the limitations of the sample size. One way of generatingclipping is to keep increasing the volume. Another way is to explicitly force clipping.

“main”2005/1/11page 297
i
i
i
i
i
i
i
i
Section 8.4 Normalizing Sounds 297
What if you only had the largest and smallest possible sample values? Whatif all positive values (including zero), were the maximum value (32767) and allnegative values were the minimum value (-32768)? Try this program, particularlyon sounds with words in them.
Program 70: Set all samples to extreme values
/∗∗∗ Method to s e t a l l t he sample va l u e s to the∗ maximum p o s i t i v e va lue i f they were p o s i t i v e∗ ( i n c l u d i n g 0) and the minimum nega t i v e∗ va lue i f they were nega t i v e .∗/
public void forceToExtremes ( ){
SoundSample [ ] sampleArray = this . getSamples ( ) ;SoundSample sample = null ;
// loop through the sample va l u e sfor ( int i = 0 ; i < sampleArray . l ength ; i++){
// ge t the current samplesample = sampleArray [ i ] ;
// i f the va lue was p o s i t i v e ( or zero ) s e t i t to the// maximum p o s i t i v e va luei f ( sample . getValue ( ) >= 0)
sample . setValue (32767 ) ;
// e l s e f o r c e to max nega t i v e va lueelse
sample . setValue (−32768);}
}
Here’s how to run this program:
> Sound s = new Sound(FileChooser.getMediaPath("preamble.wav"));> s.play();> s.explore();> s.forceToExtremes();> s.play();> s.explore();
Look at Figure 8.20 and see that all the values have been set to extremes.When you play the sound back, you’ll hear a bunch of awful noises. That’s clipping.The really amazing thing is that you can still make out the words in sounds that

“main”2005/1/11page 298
i
i
i
i
i
i
i
i
298 Chapter 8 Modifying all Samples in a Sound
you manipulate with this method. Our ability to decipher words from noise isincredibly powerful.
FIGURE 8.20: Comparing the original sound with one with all values set to extremes.
8.5 CONCEPTS SUMMARY
In this chapter we worked with one-dimensional arrays, while loops, for loops,and conditionals.
8.5.1 Arrays
Arrays are used to store many pieces of data of the same type. They allow you toquickly access a particular item in the array using an index. If you couldn’t use anarray, you would have to create a separate variable name for each piece of data.
To declare a variable that refers to an array use the type followed by open ’[’and close ’]’ square brackets and then the variable name.
SoundSample [ ] sampleArray ;
This declares an array of SoundSample objects. The value stored at eachposition in the array is a reference to a SoundSample object.
Arrays are objects and you can find out how large an array is using:arrayReference.length.Notice that this isn’t a method call but instead it accesses a public field.
You can get an element of the array using arrayReference[index]. Wherethe index values can range from 0 to arrayReference.length-1.
8.5.2 Loops
Loops are used to execute a block of statements while a boolean expression is true.Most loops have variables that change during the loop which eventually cause theboolean expression to be false and the loop to stop. Loops that never stop arecalled infinite loops.
We used two types of loops in this chapter: while and for. The while loop isusually used when you don’t know how many times a loop needs to execute and thefor loop is usually used when you do know how many times the loop will execute.
We introduced a special kind of for loop in this chapter which is often calleda “for each” loop. This new loop was introduced in Java 1.5 and loops through allthe elements of an array one at a time.
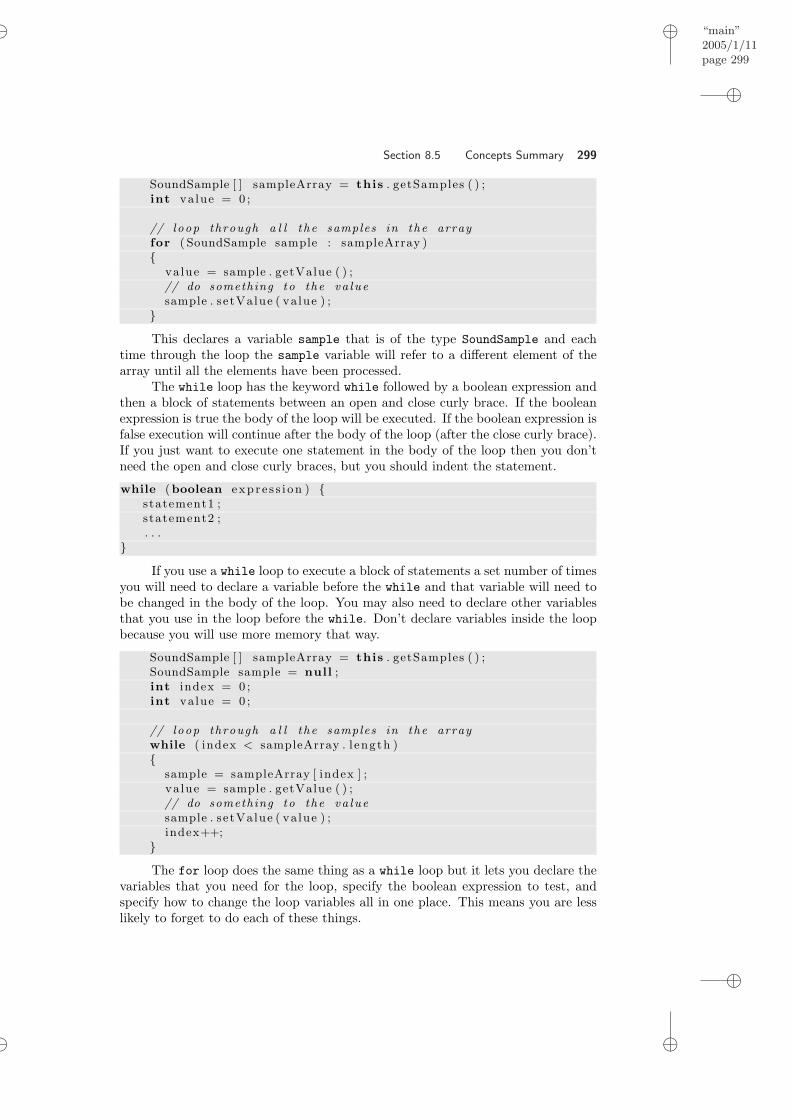
“main”2005/1/11page 299
i
i
i
i
i
i
i
i
Section 8.5 Concepts Summary 299
SoundSample [ ] sampleArray = this . getSamples ( ) ;int value = 0 ;
// loop through a l l the samples in the arrayfor ( SoundSample sample : sampleArray ){
value = sample . getValue ( ) ;// do something to the va luesample . setValue ( va lue ) ;
}This declares a variable sample that is of the type SoundSample and each
time through the loop the sample variable will refer to a different element of thearray until all the elements have been processed.
The while loop has the keyword while followed by a boolean expression andthen a block of statements between an open and close curly brace. If the booleanexpression is true the body of the loop will be executed. If the boolean expression isfalse execution will continue after the body of the loop (after the close curly brace).If you just want to execute one statement in the body of the loop then you don’tneed the open and close curly braces, but you should indent the statement.
while (boolean exp r e s s i on ) {statement1 ;statement2 ;. . .
}If you use a while loop to execute a block of statements a set number of times
you will need to declare a variable before the while and that variable will need tobe changed in the body of the loop. You may also need to declare other variablesthat you use in the loop before the while. Don’t declare variables inside the loopbecause you will use more memory that way.
SoundSample [ ] sampleArray = this . getSamples ( ) ;SoundSample sample = null ;int index = 0 ;int value = 0 ;
// loop through a l l the samples in the arraywhile ( index < sampleArray . l ength ){
sample = sampleArray [ index ] ;va lue = sample . getValue ( ) ;// do something to the va luesample . setValue ( va lue ) ;index++;
}The for loop does the same thing as a while loop but it lets you declare the
variables that you need for the loop, specify the boolean expression to test, andspecify how to change the loop variables all in one place. This means you are lesslikely to forget to do each of these things.

“main”2005/1/11page 300
i
i
i
i
i
i
i
i
300 Chapter 8 Modifying all Samples in a Sound
SoundSample [ ] sampleArray = this . getSamples ( ) ;SoundSample sample = null ;int value = 0 ;
// loop through a l l the samples in the arrayfor ( int index = 0 ; index < sampleArray . l ength ; index++){
sample = sampleArray [ index ] ;va lue = sample . getValue ( ) ;// do something to the va luesample . setValue ( va lue ) ;
}
8.5.3 Conditional Execution
To conditionally execute one statement use the if keyword followed by a booleanexpression inside of an open and close parenthesis. Put the statement that you onlywant executed if the boolean expression is true on a new line and indent it. If theboolean expression is false then execution will continue with the next statement.
i f (boolean exp r e s s i on )// sta tement to execu te i f the boo lean expre s s i on i s t ruestatement
// next s ta tementstatement
To conditionally execute a block of statements use the if keyword followed bya boolean expression inside of an open and close parenthesis. Put the statements tobe executed when the boolean expression is true inside of an open and close curlybrace. Indent the statements to make it easier to visually see that these statementswill only be executed if the boolean expression is true. If the boolean expression isfalse execution will continue with the statement following the close curly brace.
i f (boolean exp r e s s i on ) {statements
}
If you want to execute one block of statements if the boolean expression istrue and another if it is false use the else keyword as well. Put the statementsthat you want to execute when the boolean expression is true inside of an openand close curly brace after the if(booleanExpression). Next, add the keywordelse and put the statements that you want executed when the boolean expressionis false inside of an open and close curly brace.
i f (boolean exp r e s s i on ) {statements} else {statements}

“main”2005/1/11page 301
i
i
i
i
i
i
i
i
Section 8.5 Concepts Summary 301
OBJECTS AND METHODS SUMMARY
In this chapter, we talk about several kinds of encodings of data (or objects).
Sound Sound objects are encodings of sounds, typicallycoming from a WAV file.
SoundSample An object that represents a sample in a sound.The value of a sample is between -32768 and32767 representing the voltage that a microphonewould generate at a given instant when recordinga sound. The length of the instant is typically ei-ther 1/44, 1000 of a second (for CD-quality sound)or 1/22, 050 of a second (for good enough sound onmost computers). A SoundSample object remem-bers what sound it came from, so if you change itsvalue, it knows to go back and change the rightsample value in the sound.
Here are the functions used or introduced in this chapter:
Math methods
Math.abs(number) Takes a number and returns it as a positive num-ber.
FileChooser methods
FileChooser.getMediaPath(String fileName) Takes a filename as input, and re-turns the full path name of thefile with the media directory be-fore the filename.
FileChooser.pickAFile() Lets the user pick a file and re-turns the complete path name asa string.
FileChooser.setMediaPath(String directory) Takes a directory as input andsets the directory name to bewhat is added to the passed file-name using getMediaPath.
Sound methods

“main”2005/1/11page 302
i
i
i
i
i
i
i
i
302 Chapter 8 Modifying all Samples in a Sound
blockingPlay() Plays the Sound object it is in-voked on, and makes sure thatno other sound plays at the ex-act same time. (Compare twoblockingPlay’s with two play’sright after each other.)
getLength() Returns the number of samples inthe Sound object it is invoked on.
getSamples() Returns an array of SoundSampleobjects for the Sound object it isinvoked on.
getSampleValueAt(int index) Takes an index (an integer value),and returns the value of the sam-ple at that index for the Soundobject it is invoked on.
getSamplingRate() Returns the number representingthe number of samples in eachsecond for the Sound object it isinvoked on.
play() Plays the Sound object it is in-voked on.
setSampleValueAt(int index, int value) Takes an index, and a value, andsets the value of the sample at thegiven index in the Sound object itwas invoked on to the given value.
write(String fileName) Takes a filename (a string) andwrites the sound in the Soundobject it is invoked on to thatfile as a WAV file. (Make surethat the filename ends in “.wav”if you want the operating systemto treat it right.)
SoundSample methodsgetValue() Returns the value for the SoundSample object it
is invoked on.setValue(int value) Sets the value for the SoundSample object it is
invoked on to be the passed value.
PROBLEMS
8.1. Open up the Sonogram view and say some vowel sounds. Is there a distinctivepattern? Do “Oh’s” always sound the same? Do “Ah’s”? Does it matter if youswitch speakers—are the patterns the same?
8.2. Get a couple of different instruments and play the same note on them into Me-diaTool application’s sound editor with the sonogram view open. Are all “C’s”made equal? Can you see some of why one sound is different than another?

“main”2005/1/11page 303
i
i
i
i
i
i
i
i
Section 8.5 Concepts Summary 303
8.3. Try out a variety of WAV files as instruments, using the piano keyboard in theMediaTools application sound editor. What kinds of recordings work best asinstruments?
8.4. The increase volume Method 65 (page 284) uses a while loop. Convert it to afor loop.
8.5. The decrease volume Method 66 (page 290) uses a while loop. Convert it to afor loop.
8.6. In section 8.3.2, we walked through how Program 65 (page 284) worked. Drawthe pictures to show how Program 66 (page 290) works, in the same way.
8.7. What happens if you increase a volume too far? Explore that by creating a Sound
object, then increase the volume once, and again, and again. Does it always keepgetting louder? Or does something else happen? Can you explain why?
8.8. Instead of multiplying samples by a multiplier (like 2 or 0.5), try adding a valueto them. What happens to a sound if you add 100 to every sample? 1000?
8.9. Try sprinkling in some specific values into your sounds. What happens if you setthe value of a few hundred samples in the middle of a sound to 32767? Or a fewhundred -32768? Or a bunch of zeroes? What happens to the sound?
TO DIG DEEPER
There are many wonderful books on psychoacoustics and computer music. Oneof my favorites for understandability is Computer Music: Synthesis, Composition,and Performance by Dodge and Jerse [8]. The bible of computer music is CurtisRoads’ massive The Computer Music Tutorial [22].

“main”2005/1/11page 304
i
i
i
i
i
i
i
i
C H A P T E R 9
Modifying Samples usingRanges
9.1 MANIPULATING DIFFERENT SECTIONS OF THE SOUND DIFFERENTLY
9.2 CREATE A SOUND CLIP
9.3 SPLICING SOUNDS
9.4 REVERSING A SOUND
9.5 MIRRORING A SOUND
9.6 CONCEPTS SUMMARY
Chapter Learning ObjectivesThe media learning goals for this chapter are:
• To manipulate parts of a sound differently.
• To create a sound clip.
• To splice sounds together to make sound compositions.
• To reverse sounds.
• To mirror sounds.
The computer science goals for this chapter are:
• To return a value from a method.
• To use ranges in iteration.
• To change more than one variable in a loop.
• To identify some algorithms that cross media boundaries.
9.1 MANIPULATING DIFFERENT SECTIONS OF THE SOUND DIFFERENTLY
Manipulating all of the samples in a sound in the same way can be useful, butreally interesting effects come from chopping up sounds and manipulating themdifferentially: Some words this way, other sounds that way. How would you dothat? We need to be able to loop through portions of the sample, without walkingthrough the whole thing. This turns out to be an easy thing to do, but we needto manipulate samples somewhat differently (e.g., we have to use our for loop in aslightly different way).
304

“main”2005/1/11page 305
i
i
i
i
i
i
i
i
Section 9.1 Manipulating Different Sections of the Sound Differently 305
Recall that each sample has an index number, and that we can get eachindividual sample value with getSampleValue(int index) (with an index numberas input). We can set any sample with setSampleValue(int index, int value)(with inputs of an index number, and a new value). That’s how we can manipulatesamples without using getSamples() and SoundSample objects. But we still don’twant to have to write code like:
sound . setSampleValue ( 0 , 1 2 ) ;sound . setSampleValue ( 1 , 2 8 ) ;
Not for tens of thousands of samples! So, we will continue to use a for loop.However, if we are not processing the entire sound in the same way the index valuethat we start at won’t necessarily be 0 and the last index value won’t necessarilybe the length of the sound minus 1.
What if we want to increase the sound for the first half of the sound, thendecrease it in the second half. How could we do that? First we will need to calculatethe half-way point. We can determine that by dividing the length of the sound by2. Since the length and 2 are both integers the result will also be an integer so nocasting is needed (any values after the decimal point will be thrown away). We willneed two loops. One loop will start at the beginning of sound (0) and loop till thehalf-way point. The second loop will start at the half-way point and loop to theend of the sound (length - 1).
Program 71: Increase the volume then decrease
/∗∗∗ Method to inc rea se the f i r s t h a l f o f the sound∗ ( doub l e i t ) and then decrease the∗ second h a l f ( h a l f i t ) .∗/
public void increaseAndDecrease ( ){
int ha l f = this . getLength ( ) / 2 ;int value = 0 ;
// loop through the f i r s t h a l f o f the soundfor ( int i = 0 ; i < ha l f ; i++){
// ge t the current va luevalue = this . getSampleValueAt ( i ) ;
// s e t the va lue to 2x the o r i g i n a lthis . setSampleValueAt ( i , va lue ∗ 2 ) ;
}
// loop through the second h a l f o f the soundfor ( int i = ha l f ; i < this . getLength ( ) ; i++) {
// ge t the current va lue

“main”2005/1/11page 306
i
i
i
i
i
i
i
i
306 Chapter 9 Modifying Samples using Ranges
value = this . getSampleValueAt ( i ) ;
// s e t the va lue to h a l f the o r i g i n a lthis . setSampleValueAt ( i , ( int ) ( va lue ∗ 0 . 5 ) ) ;
}
}
There are two loops in increaseAndDecrease(), each of which deals withone half of the sound.
• The first loop deals with the samples from 0 to halfway through the sound.Those samples all get multiplied by 2, to double their amplitude.
• The second loop goes from halfway through to the end of the sound. Here,we multiply each sample by 0.5 thus decreasing the sound by 50%.
Another Way of Writing Array References.It’s worth pointing out that, in many languages, square brackets ([ ]) are
standard notation for manipulating arrays. It works that way in Java. For anyarray, array[index] returns the index-th element in the array. The number insidethe square brackets is always an index variable, but it’s sometimes referred to as asubscript , because of the way that mathematicians refer to the i-th element of a,e.g., ai.
Let’s demonstrate how to get the elements at various index values.
> Sound sound = new Sound(FileChooser.getMediaPath("croak.wav"));> SoundSample[] sampleArray = sound.getSamples();> System.out.println(sampleArray[0]);Sample at index 0 has value 0> System.out.println(sampleArray[1]);Sample at index 1 has value 0> System.out.println(sampleArray[8000]);Sample at index 8000 has value 512
9.2 CREATE A SOUND CLIP
Sometimes a sound is too long and you want just part of it. This can happen whenyou record a sound. There may be silence before and after the actual sound. Or,you may want to pull one word out of a sound. You can “clip” a sound just as weclipped a picture by copying just part of the sound. What if we want to pull the“This” out of the sound thisisatest.wav? How can we tell where it ends? Openan explorer on the sound using sound.explore();. Click at the first flat area afterthe first non-flat area (silence should have values near 0). Click the Play Beforebutton to play the part of the sound before the current index. You can use thearrow buttons to change the current index as well. Using the explorer we see thatthe word “this” ends at about 8500 (Figure 9.1).
So to copy just part of a sound into another sound we will need to create anew Sound object. One of the ways to make a new Sound object is to tell it how

“main”2005/1/11page 307
i
i
i
i
i
i
i
i
Section 9.2 Create a Sound Clip 307
FIGURE 9.1: Exploring the ”This is a test” to find the end of the first word
many samples it will have. To calculate the number of samples we can subtract theending value from the starting value and add 1.
We can then create a new sound and loop copying from the start to the endfrom the source Sound object into the target Sound object starting at the beginningof the target sound. We have to make sure to increment both the index in the sourceand the index in the target. If we forget to increment the source index we will copythe same source sample over and over and if we fail to increment the target indexwe will copy to the same place in the target over and over.
We need to return our new sound object in order to be able to refer to itagain. To return something from a method we need to specify the type of the thingthat will be returned in the method declaration (replacing the void keyword). Wealso need to use the keyword return followed by what we want to return.
Program 72: Create a sound clip
/∗∗∗ Method to c r ea t e a new sound by copying j u s t par t o f∗ the curren t sound to a new sound∗ @param s t a r t the index to s t a r t the copy at ( i n c l u s i v e )∗ @param end the index to s top the copy at ( i n c l u s i v e )∗ @return a new sound wi th j u s t the samples from s t a r t to∗ end in i t∗/
public Sound c l i p ( int s t a r t , int end ){
// c a l c u l a t e the number o f samples in the c l i p
“main”2005/1/11page 308
i
i
i
i
i
i
i
i
308 Chapter 9 Modifying Samples using Ranges
int l engthInSamples = end − s t a r t + 1 ;Sound ta r g e t = new Sound ( lengthInSamples ) ; // ho ld c l i pint value = 0 ; // ho l d s the curren t sample va lueint ta rge t Index = 0 ; // index in t a r g e t sound
// copy from s t a r t to end from source in t o t a r g e tfor ( int i = s t a r t ; i <= end ; i++, targe t Index++) {
value = this . getSampleValueAt ( i ) ;t a r g e t . setSampleValueAt ( target Index , va lue ) ;
}
return t a r g e t ;}
Notice that we said that we would return a Sound object from this method bysaying that the type of thing returned is from the class Sound. At the end of themethod we use the keyword return followed by the variable that refers to the newSound object. So, in order to refer to this new Sound object again we will need todeclare a variable and set the value of that variable to refer to the returned Soundobject.
> Sound test = newSound(FileChooser.getMediaPath("thisisatest.wav"));> test.explore();> Sound clip = test.clip(0,8500);> clip.play();> clip.explore();
Use the explorer on the original sound and the clip. Change the number ofsamples between pixels to be 100 in the clip. Then compare the sample values.Convince yourself that the clip does have the same values as the original. (Fig-ure 9.2)
9.3 SPLICING SOUNDS
Splicing sounds is a term that dates back to when sounds were recorded on tape,so juggling the order of things on the tape involved literally cutting the tape intosegments and then gluing it back together in the right order. That’s “splicing”.When everything is digital, it’s much easier.
To splice sounds, we simply have to copy elements around in the array. It’seasiest to do this with two (or more) arrays, rather than copying within the samearray. Splicing lets you create all kinds of sounds, speeches, non-sense, and art.
The easiest kind of splice to do is when the sounds are in separate files. Allthat you need to do is to copy each sound, in order, into a target sound. You needto keep track of the next index in the target sound. Here’s a recipe that creates thestart of a sentence “Guzdial is...”. (Readers are welcome to complete the sentence.)
Program 73: Splice words into a single sentence

“main”2005/1/11page 309
i
i
i
i
i
i
i
i
Section 9.3 Splicing Sounds 309
FIGURE 9.2: Exploring the sound clip
/∗∗∗ Method to s p l i c e two sounds t o g e t h e r wi th some s i l e n c e between them∗ i n t o the current sound∗/
public void s p l i c e ( ) {Sound sound1 =
new Sound ( Fi l eChooser . getMediaPath ( ” guzd i a l . wav” ) ) ;Sound sound2 =
new Sound ( Fi l eChooser . getMediaPath ( ” i s . wav” ) ) ;int ta rge t Index = 0 ; // the s t a r t i n g p l ace on the t a r g e tint value = 0 ;
// copy a l l o f sound 1 in t o the curren t sound ( t a r g e t )for ( int i = 0 ;
i < sound1 . getLength ( ) ;i++, ta rge t Index++) {
value = sound1 . getSampleValueAt ( i ) ;this . setSampleValueAt ( target Index , va lue ) ;
}
// c rea t e s i l e n c e between words by s e t t i n g va l u e s to 0for ( int i = 0 ;
i < ( int ) ( this . getSamplingRate ( ) ∗ 0 . 1 ) ;i++, ta rge t Index++) {
this . setSampleValueAt ( target Index , 0 ) ;}
// copy a l l o f sound 2 in t o the curren t sound ( t a r g e t )for ( int i = 0 ;
“main”2005/1/11page 310
i
i
i
i
i
i
i
i
310 Chapter 9 Modifying Samples using Ranges
i < sound2 . getLength ( ) ;i++, ta rge t Index++) {
value = sound2 . getSampleValueAt ( i ) ;this . setSampleValueAt ( target Index , va lue ) ;
}}
To test this we need a “blank” sound that the two sounds will be copied to. You canuse the file “sec3silence.wav” for this. It holds 3 seconds of silence, which shouldbe more than enough.
> String silence = FileChooser.getMediaPath("sec3silence.wav");> Sound target = new Sound(silence);> target.play();> target.splice();> target.play();
There are three loops in this method splice, each of which copies one segmentinto the current (target) sound—a segment being either a word or a silence betweenwords.
• The function starts by creating sound objects for the word “Guzdial” (s1)and the word “is” (s2).
• Notice that we set targetIndex (the index for the target sound) equal to 0before the first loop. We then increment it in every loop, but we never againset it to a specific value. That’s because targetIndex is always the indexfor the next empty sample in the target sound. Because each loop follows theprevious, we just keep tacking samples onto the end of the current sound (thetarget).
• In the first loop, we copy each and every sample from s1 into the currentsound this. We have the index i go from 0 to one before the length of s1.We get the sample value at index i from s1, then set the sample value attargetIndex in the current sound to that value. We then increment both iand targetIndex.
• In the second loop, we create 0.1 seconds of silence. Since this.getSamplingRate()gives us the number of samples in one second of the current sound, 0.1 timesthat tells us the number of samples in 0.1 seconds. We don’t get any sourcevalue here–we simply set the targetIndex-th sample to 0 (for silence), thenincrement the targetIndex.
• Finally, we copy in all the samples from s2, just like the first loop where wecopied in s1.
The more common kind of splicing is when the words are in the middle of anexisting sound, and you need to pull them out from there. The first thing to do insplicing like that is to figure out the index numbers that delimit the pieces you’reinterested in. Using the explorer, that’s pretty easy to do.

“main”2005/1/11page 311
i
i
i
i
i
i
i
i
Section 9.3 Splicing Sounds 311
• Open an explorer using sound.explore().
• Click the mouse button to choose a current position and then play the soundbefore or after that current position.
• Or, select part of the sound by clicking the mouse when the cursor pointsto where a place to start and dragging the mouse to the end of an area ofinterest. This selection will highlight and you can play the selection.
Using exactly this process, Mark found the ending points of the first few wordsin preamble10.wav. (He assumed that the first word starts at the index 0, thoughthat might not always be true for every sound.)
Word Ending indexWe 15730the 17407People 26726of 32131the 33413United 40052States 55510
Writing a loop that copies things from one array to another requires a littlebit of juggling. You need to think about keeping track of two indices: Where youare in the array that you’re copying from, and where you are in the array thatyou’re copying to. These are two different variables, tracking two different indexes.But they both increment in the same way.
Below is the recipe that changes the preamble from ”We the people of theUnited States” to ”We the UNITED people of the United States.”
Program 74: Splice the preamble to have united people
Be sure to set the media path before trying this on your computer.
/∗∗∗ Method to s p l i c e ”We the ” then ”United” then∗ ” peop l e o f the United S t a t e s ” in t o the current∗ sound∗/
public void sp l i cePreamble ( ){
St r ing f i l e = Fi leChooser . getMediaPath ( ”preamble10 . wav” ) ;Sound source = new Sound ( f i l e ) ;int ta rge t Index = 0 ; // s t a r t copying to f i r s t sample va lueint value = 0 ;
// loop copying the ”We the ” in t o the current soundfor ( int sourceIndex = 0 ;
sourceIndex < 17407 ;sourceIndex++, targe t Index++) {

“main”2005/1/11page 312
i
i
i
i
i
i
i
i
312 Chapter 9 Modifying Samples using Ranges
value = source . getSampleValueAt ( sourceIndex ) ;this . setSampleValueAt ( target Index , va lue ) ;
}
// loop copying the ” un i t ed ” in t o the current soundfor ( int sourceIndex = 33414 ;
sourceIndex < 40052 ;sourceIndex++,targe t Index++) {
value = source . getSampleValueAt ( sourceIndex ) ;this . setSampleValueAt ( target Index , va lue ) ;
}
// copy the ” peop l e o f the United S t a t e s ”for ( int sourceIndex = 17408 ;
sourceIndex < 55510 ;sourceIndex++, targe t Index++) {
value = source . getSampleValueAt ( sourceIndex ) ;this . setSampleValueAt ( target Index , va lue ) ;
}}
> String silence = FileChooser.getMediaPath("sec3silence.wav");> Sound target = new Sound(silence);> target.play();> target.splicePreamble();> target.play();
The first loop copies the words “We the” into the current sound. The secondloop is copies the word “united” into the current sound. The last loop copies thewords “people of the United States” into the current sound. Notice that the valueof targetIndex is set to 0 at the beginning so we start copying at the beginningof the current sound. In each loop we increment targetIndex but we never resetit’s value so it always points to the next place in the current sound to copy to.
Figure 9.3 shows the original preamble10.wav file in the left sound explorer,and the new spliced one (saved with write(String fileName)) on the right.
Let’s see if we can figure out what’s going on mathematically. Recall thetable back on page 311. First we copy the range from 0 to 17406 to the targetsound. This means we copied 17407 pixels (17406 - 0 + 1 = 17407). After thefirst loop the value of targetIndex will be 17407. Next we copy the range from33414 to 40051 which means we copy (40051 - 33414 + 1 = 6,638) 6638 pixels.After the second loop the value of targetIndex will be 24045 (17407 + 6638 =24045). Next we copy the range from 17408 to 55509 which is (55509 - 17408 + 1= 38102) pixels. The total number of copied pixels is (17407 + 6638 + 38102 =62,147). The value of targetIndex will be 62147 after the last loop. You can addSystem.out.println("Target index is " + targetIndex); after each loop to

“main”2005/1/11page 313
i
i
i
i
i
i
i
i
Section 9.3 Splicing Sounds 313
check that this is correct.
Program 75: Splice preamble and show target index
/∗∗∗ Method to s p l i c e ”We the ” then ”United” then∗ ” peop l e o f the United S t a t e s ” in t o the current∗ sound∗/
public void sp l i cePreamble ( ){
St r ing f i l e = Fi leChooser . getMediaPath ( ”preamble10 . wav” ) ;Sound source = new Sound ( f i l e ) ;int ta rge t Index = 0 ; // s t a r t copying to f i r s t sample va lueint value = 0 ;
// loop copying the ”We the ” in t o the current soundfor ( int sourceIndex = 0 ;
sourceIndex < 17407 ;sourceIndex++, targe t Index++) {
value = source . getSampleValueAt ( sourceIndex ) ;this . setSampleValueAt ( target Index , va lue ) ;
}
// p r i n t the va lue o f the t a r g e t indexSystem . out . p r i n t l n ( ”Target index i s ” + targe t Index ) ;
// loop copying the ” un i t ed ” in t o the current soundfor ( int sourceIndex = 33414 ;
sourceIndex < 40052 ;sourceIndex++,targe t Index++) {
value = source . getSampleValueAt ( sourceIndex ) ;this . setSampleValueAt ( target Index , va lue ) ;
}
// p r i n t the va lue o f the t a r g e t indexSystem . out . p r i n t l n ( ”Target index i s ” + targe t Index ) ;
// copy the ” peop l e o f the United S t a t e s ”for ( int sourceIndex = 17408 ;
sourceIndex < 55510 ;sourceIndex++, targe t Index++) {
value = source . getSampleValueAt ( sourceIndex ) ;this . setSampleValueAt ( target Index , va lue ) ;
}
// p r i n t the va lue o f the t a r g e t indexSystem . out . p r i n t l n ( ”Target index i s ” + targe t Index ) ;
}

“main”2005/1/11page 314
i
i
i
i
i
i
i
i
314 Chapter 9 Modifying Samples using Ranges
FIGURE 9.3: Comparing the original sound (left) to the spliced sound (right)
We can also use the explorer to check that the last copied pixel is at 62146by checking the value at 62147. It should still be 0, as should all the values fromthat index to the end of the sound.
Each of the loops that copies part of the preamble sound into the currentsound is very similar. To make a general splice method we will pass in the Soundobject to copy from, the starting index to use in that passed sound, the index tostop before in the passed sound, and the place to start the copy to in current sound.
Program 76: General splice method
/∗∗∗ Method to copy par t o f the passed sound in to t h i s sound at∗ the g iven s t a r t index∗ @param source the source sound to copy from∗ @param sourceS ta r t the s t a r t i n g index to copy from in the∗ source ( the copy w i l l i n c l ude t h i s )∗ @param sourceStop the ending index ( the copy won ’ t i n c l ude∗ t h i s )∗ @param t a r g e t S t a r t the index to s t a r t copying in t o∗/
public void s p l i c e ( Sound source ,int sourceStar t ,int sourceStop ,int t a r g e t S t a r t )
{// loop copying from source to t a r g e tfor ( int sourceIndex = sourceStar t ,
ta rge t Index = ta r g e tS t a r t ;sourceIndex < sourceStop &&
targe t Index < this . getLength ( ) ;sourceIndex++, targe t Index++)
this . setSampleValueAt ( target Index ,source . getSampleValueAt ( sourceIndex ) ) ;
}

“main”2005/1/11page 315
i
i
i
i
i
i
i
i
Section 9.4 Reversing a Sound 315
This new object method can be used to splice “united” in the phrase “We thepeople of the United States” as shown below:
Program 77: Using the General Splice Method
/∗∗∗ Method to s p l i c e the preamble in t o the curren t sound so t ha t∗ i t says We the United peop l e o f the United S t a t e s∗/
public void sp l i cePreamble2 ( ){
Sound preamble =new Sound ( Fi l eChooser . getMediaPath ( ”preamble10 . wav” ) ) ;
// f i r s t s p l i c e the ”we the ” in t o the current soundthis . s p l i c e ( preamble , 0 , 1 7 407 , 0 ) ;
// now s p l i c e the ” un i t ed ” in t o the curren t soundthis . s p l i c e ( preamble , 33414 ,40052 ,17407) ;
/∗ now s p l i c e the ” peop l e o f the United S t a t e s ” in t o∗ the current sound∗/
this . s p l i c e ( preamble ,17408 , 55510 , 24045) ;}
You can execute this new method using the following:
> Sound target = new Sound(FileChooser.getMediaPath("sec3silence.wav"));> target.splicePreamble2();> target.explore();
Compare the sound created using the splicePreamble method versus thesound created using the splicePreamble2 method. They should result in exactlythe same sound. Why should we try to write general methods? Take a look atsplicePreamble2 it is much easier to read than splicePreamble. We want generalmethods because they are easier to reuse and make our programs smaller and easierto understand.
9.4 REVERSING A SOUND
In the splicing example, we copied the samples from the words just as they were inthe original sound. We don’t have to always go in the same order. We can reversethe words—or make them faster, slower, louder, or softer. For an example, here’s

“main”2005/1/11page 316
i
i
i
i
i
i
i
i
316 Chapter 9 Modifying Samples using Ranges
a recipe that reverses a sound so that you can play it backwards.
Program 78: Reverse a sound
/∗∗∗ Method to r e v e r s e the current sound .∗/
public void r e v e r s e ( ){
Sound o r i g = new Sound ( this . getFileName ( ) ) ;int l ength = this . getLength ( ) ;
// loop through the samplesfor ( int ta rge t Index = 0 , sourceIndex = length − 1 ;
ta rge t Index < l ength && sourceIndex > 0 ;ta rge t Index++, sourceIndex−−)
this . setSampleValueAt ( target Index ,o r i g . getSampleValueAt ( sourceIndex ) ) ;
}
This method firsts creates another Sound object from the same file as thecurrent Sound object. This will make a copy of the original sound. Next themethod saves the length of the current Sound object. Then it loops.
The loop initializes the value of targetIndex to 0, and the value of sourceIndexto the length of the sound minus 1. It loops while targetIndex is less thanthe length of the sound and the sourceIndex is greater than 0. It incrementstargetIndex by 1 after the body of the loop and it decrements the value ofsourceIndex by one each time through the loop.
Why does is start sourceIndex at the length of the sound minus 1 and decre-ment it each time through the loop? Remember that the last valid index is at thelength minus 1, which is why the sourceIndex starts with this value. So we copyfrom the end of the source sound (length - 1) to the beginning of the target sound(0) during the first execution of the loop. The second time through the loop wecopy from the next to last sound sample in the source (length - 2) to the secondposition in the target (1). We will keep looping until the targetIndex equals thelength of the sound.
To use this method to reverse a sound try:
> Sound s = new Sound(FileChooser.getMediaPath("croak.wav"));> s.play();> s.explore();> s.reverse();> s.play();> s.explore();

“main”2005/1/11page 317
i
i
i
i
i
i
i
i
Section 9.5 Mirroring a Sound 317
FIGURE 9.4: Comparing the original sound (left) to the reversed sound (right)
9.5 MIRRORING A SOUND
Once we know how to play sounds forwards and backwards, mirroring the soundis the exact same process as mirroring pictures! Compare this to Program 19(page 140). Do you see that this is the same algorithm, though we’re dealing witha different medium?
Program 79: Mirror a sound, front to back
/∗∗∗ Method to mirror a sound f r on t to back∗/
public void mirrorFrontToBack ( ){
int l ength = getLength ( ) ; // save the l e n g t hint l a s t Index = length − 1 ; // l a s t v a l i d indexint mirrorPoint = length / 2 ; // mirror around t h i sint value = 0 ; // ho ld the current va lue
// loop from 0 to mirrorPointfor ( int i = 0 ; i < mirrorPoint ; i++) {
value = this . getSampleValueAt ( mirrorPoint−i ) ;this . setSampleValueAt ( mirrorPoint+i ) ;
}}
To use this recipe try:
> Sound s = new Sound(FileChooser.getMediaPath("croak.wav"));> s.explore();> s.mirrorFrontToBack();> s.explore();
The length of the sound in the file ”croak.wav” is 8808, so the mirror point isat 4404. Use the explorer to check the values on either side of the mirror point.

“main”2005/1/11page 318
i
i
i
i
i
i
i
i
318 Chapter 9 Modifying Samples using Ranges
FIGURE 9.5: Comparing the mirror point in the original sound (left) to the mirroredsound (right)
9.6 CONCEPTS SUMMARY
This chapter covered working with ranges in loops and how to return a value froma method.
9.6.1 Ranges in Loops
To limit the range of a loop change the starting value and/or ending value. Forexample to mirror the front of the sound to the back start with an index value of1 and end before the mirror point (midpoint).
public void mirrorFrontToBack ( ){
int l ength = getLength ( ) ; // save the l e n g t hint mirrorPoint = length / 2 ; // mirror around t h i sint value = 0 ; // ho ld the current va lue
// loop from 1 to mirrorPointfor ( int i = 1 ; i < mirrorPoint ; i++) {
value = this . getSampleValueAt ( mirrorPoint−i ) ;this . setSampleValueAt ( mirrorPoint+i , va lue ) ;
}}
9.6.2 Returning a Value from a Method
To declare a method you specify the visibility for the method, the type of thing itreturns, the name of the method, and the parameter list inside parentheses. Thisis followed by the body of the method which is inside of an open and close curlybrace.
v i s i b i l i t y returnType name( parameterLi s t ) {// s ta tements in method
// re turn a va luereturn valueToReturn ;
}

“main”2005/1/11page 319
i
i
i
i
i
i
i
i
Section 9.6 Concepts Summary 319
Methods that do not return any value use the keyword void as the returnType.Methods that do return a value use the type of that value for the returnType andthen have a return keyword in them that is followed by the thing to return. Re-member that a type is any of the primitive types or the name of a class.
Here is an example public method declaration that doesn’t return anythingand the name of the method is mirrorFrontToBack and it doesn’t take any param-eters.
public void mirrorFrontToBack ( )
Here is an example public method declaration that returns an object of theclass Sound.
public Sound echo ( int delay , int numEchoes )
Notice that it gives a return type of Sound. The body of the method musthave the keyword return in it and it must return an object that is an instance ofthe class Sound.
PROBLEMS
9.1. Rewrite Program 71 (page 305) so that two input values are provided to thefunction: The sound, and a percentage of how far into the sound to go beforedropping the volume.
9.2. Rewrite Program 71 (page 305) so that you normalize the first second of a sound,then slowly decrease the sound in steps of 1/5 for each following second. (Howmany samples are in a second? getSamplingRate() is the number of samples persecond for the given sound.)
9.3. Try rewriting Program 71 (page 305) so that you have a linear increase in volumeto halfway through the sound, then linearly decrease the volume down to zero inthe second half.
9.4. I think that if we’re going to say “We the UNITED people” in the splice (Pro-gram 74 (page 311)), the “UNITED” should be really emphasized—really loud.Change the recipe so that the word “united” is maximally loud (normalized) inthe phrase “united people.”
9.5. Try using a stopwatch to time the execution of the recipes in this chapter. Timefrom hitting return on the command, until the next prompt appears. What is therelationship between execution time and the length of the sound? Is it a linearrelationship, i.e., longer sounds take longer to process and shorter sounds takeless time to process? Or is it something else? Compare the individual recipes.Does normalizing a sound take longer than raising (or lowering) the amplitudea constant amount? How much longer? Does it matter if the sound is longer orshorter?
9.6. Make an audio collage. Make it at least five seconds long, and include at leasttwo different sounds (e.g., come from different files). Make a copy of one of thosedifferent sounds and modify it using any of the techniques described in thischapter (e.g., mirroring, splicing, and volume manipulations). Splice togetherthe original two sounds and the modified sound to make the complete collage.
9.7. Compose a sentence that no one ever said, by combining words from other soundsinto a grammatically correct new sound. Write a method named audioSentence
to generate a sentence out of individual words. Use at least three words in yoursentence! You can use the words in the mediasources folder on your CD or record

“main”2005/1/11page 320
i
i
i
i
i
i
i
i
320 Chapter 9 Modifying Samples using Ranges
your own words. Be sure to include a tenth (1/10) of a second pause between thewords. (Hint 1: Remember that zeroes for the sample values generate silence orpause.) (Hint 2: Remember that the sampling rate is the number of samples persecond. From there, you should be able to figure out how many samples needto be made zero to generate a 1/10 of a second pause.) Be sure to access yoursounds in your Media Folder using getMediaPath so that it will work for users ofyour program will work as long as they first execute setMediaPath.
9.8. Write a method called erasePart to set all the samples in the 2nd second of”thisisatest.wav” to 0’s-essentially, making the 2nd second go silent. (Hint: Re-member that getSamplingRate() tells you the number of samples in a singlesecond in a sound.) Play and return the partially-erased sound.
9.9. We’ve seen a function that reverses a sound and a function that can processsamples by index number.Write a function called reverseLastHalf that reverses just the second half of thecurrent sound. For example, if the sound said “MarkBark” the returned soundshould say “MarkkraB.”
9.10. Write a method similar to Program 79 (page 317) that mirrors from back tofront.
TO DIG DEEPER
When you are using the MediaTools application, you are actually using a pro-gramming language called Squeak , developed initially and primarily by Alan Kay,Dan Ingalls, Ted Kaehler, John Maloney, and Scott Wallace [17]. Squeak is nowopen-source1, and is an excellent cross-platform multimedia tool. There is a bookthat introduces Squeak including its sound capabilities [13], and another book onSqueak [14] that includes a chapter on Siren, a variation of Squeak by StephenPope especially designed for computer music exploration and composition.
1http://www.squeak.org

“main”2005/1/11page 321
i
i
i
i
i
i
i
i
C H A P T E R 10
Making Sounds by CombiningPieces
10.1 COMPOSING SOUNDS THROUGH ADDITION
10.2 BLENDING SOUNDS
10.3 CREATING AN ECHO
10.4 HOW SAMPLING KEYBOARDS WORK
10.5 ADDITIVE SYNTHESIS
10.6 MODERN MUSIC SYNTHESIS
10.7 CONCEPTS SUMMARY
Chapter Learning ObjectivesThe media learning goals for this chapter are:
• To blend sounds so that one fades into another.
• To create echoes.
• To change the frequency (pitch) of a sound.
• To create sounds that don’t exist in nature by composing more basic sounds(sine waves).
• To choose between sound formats such as MIDI and MP3 for different pur-poses.
The computer science goals for this chapter are:
• To explain blending as an algorithm that crosses media boundaries.
• To build programs from multiple methods.
• To introduce class (static) methods.
• To introduce private methods.
10.1 COMPOSING SOUNDS THROUGH ADDITION
Creating sounds digitally that didn’t exist previously is lots of fun. Rather than sim-ply moving around samples or multiplying them, we actually change their values—add waves together. The result are sounds that never existed until you made them.
321
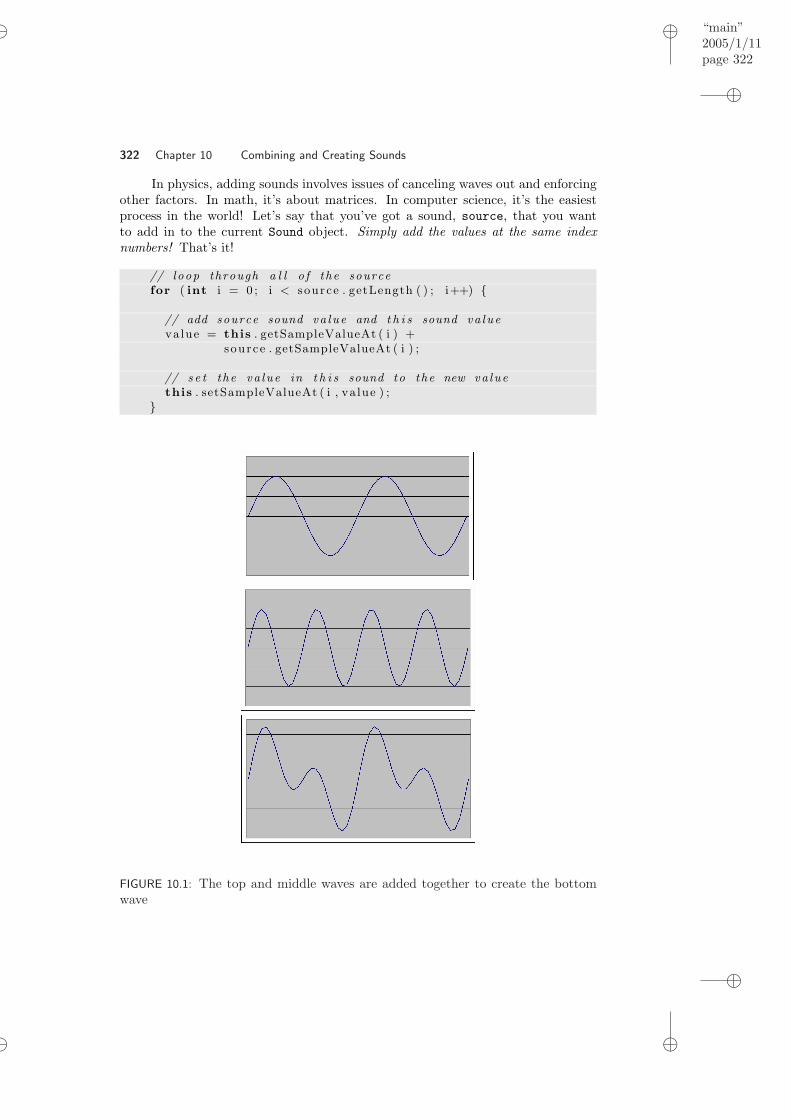
“main”2005/1/11page 322
i
i
i
i
i
i
i
i
322 Chapter 10 Combining and Creating Sounds
In physics, adding sounds involves issues of canceling waves out and enforcingother factors. In math, it’s about matrices. In computer science, it’s the easiestprocess in the world! Let’s say that you’ve got a sound, source, that you wantto add in to the current Sound object. Simply add the values at the same indexnumbers! That’s it!
// loop through a l l o f the sourcefor ( int i = 0 ; i < source . getLength ( ) ; i++) {
// add source sound va lue and t h i s sound va luevalue = this . getSampleValueAt ( i ) +
source . getSampleValueAt ( i ) ;
// s e t the va lue in t h i s sound to the new va luethis . setSampleValueAt ( i , va lue ) ;
}
FIGURE 10.1: The top and middle waves are added together to create the bottomwave

“main”2005/1/11page 323
i
i
i
i
i
i
i
i
Section 10.2 Blending Sounds 323
10.2 BLENDING SOUNDS
In this example, we take two sounds–someone saying ”Aah!” and an bassoon instru-ment sound of C in the fourth octave–and blend the two sounds. The way we dothis is to first copy part of the first sound, “Aah!”, then copy 50% of each sound,and then copying the second sound. This is very much like mixing 50% of eachsound at a mixing board. It’s also very much like the way that we blended picturesin Program 27 (page 160)!
Program 80: Blending two sounds
/∗∗∗ Method to ove r l ap or b l end two sounds . S t a r t∗ by copying the f i r s t 20 ,000 samples from sound1 in t o∗ the curren t sound then copy the sum of h a l f o f sound1∗ and h a l f o f sound2 f o r the next 20 ,000 samples and∗ end wi th the next 20 ,000 samples from sound2 .∗/
public void blendSounds ( ) {Sound sound1 =
new Sound ( Fi l eChooser . getMediaPath ( ”aah . wav” ) ) ;Sound sound2 =
new Sound ( Fi l eChooser . getMediaPath ( ”bassoon−c4 . wav” ) ) ;int value = 0 ;
// copy the f i r s t 20 ,000 samples from sound1 in t o t a r g e tfor ( int index =0; index < 20000 ; index++)
this . setSampleValueAt ( index ,sound1 . getSampleValueAt ( index ) ) ;
// copy the next 20 ,000 samples from sound1 and b l end t ha t// wi th the f i r s t 20 ,000 samples from sound2for ( int index = 0 ; index < 20000 ; index++) {
value = ( int ) ( ( sound1 . getSampleValueAt ( index + 20000) ∗0 . 5 ) +
( sound2 . getSampleValueAt ( index ) ∗ 0 . 5 ) ) ;this . setSampleValueAt ( index + 20000 , va lue ) ;
}
// copy the next 20 ,000 samples from sound2 in to the t a r g e tfor ( int index =20000; index < 40000 ; index++)
this . setSampleValueAt ( index + 20000 ,sound2 . getSampleValueAt ( index ) ) ;
}

“main”2005/1/11page 324
i
i
i
i
i
i
i
i
324 Chapter 10 Combining and Creating Sounds
Â
Á
¿
À
Common Bug: Set the media folder first!If you’re going to write code that usesFileChooser.getMediaPath(String baseName), you’llneed to execute FileChooser.setMediaPath(Stringdirectory) first.
Like blending the picture (Program 27 (page 160)), there are loops in thisfunction for each segment of the blended sound.
• We start by creating the sound1 and sound2 sounds for blending. The lengthof these sounds is over 40,000 samples, but we’re just going to use the first40,000 as an example.
• In the first loop, we simply get 20,000 samples from sound1 and copy theminto the current sound this. Notice that we’re not using a separate indexvariable for the target–instead, we’re using the same index variable, index,for both sounds since we are copying from 0 to 19,999 from sound1 into 0 to19,999 in the current sound.
• In the next loop, we copy 20,000 samples from both sound1 and sound2blended into the current sound. We get a sample from each of sound1 andsound2, then multiply each by 0.5 and add the results together. The resultis a sample that represents 50% of each. Notice that we are using one indexvariable here as well but adding 20,000 to the value of that for determiningthe index of sound1 and the current sound. So we blend values from sound1starting at index 20,000 and from sound2 starting at index 0 and the blendedvalues go into the current sound starting at index 20,000.
• Finally, we copy another 20,000 samples from sound2. The result sounds like“Aah,” first, then half of each, then just a bassoon note. Notice that we startthe index at 20,000 for the next place to copy from sound2. This means weneed to add 20,000 to that value for the index in the current sound (sincethere are already 40,000 values in the current sound).
To create the blended sound first create a sound using the file that has 3seconds of silence. Then explore it to see what it looks like before the blending.Next, blend the two sounds into the silent sound. Finally, explore the new sound.
> Sound target = new Sound(FileChooser.getMediaPath("sec3silence.wav"));> target.explore();> target.blendSounds();> target.explore();
10.3 CREATING AN ECHO
Creating an echo effect is similar to the splicing recipe (Program 74 (page 311)) thatwe saw in the last chapter, but involves actually creating sounds that didn’t existbefore. We do that by actually adding wave forms. What we’re doing here is adding
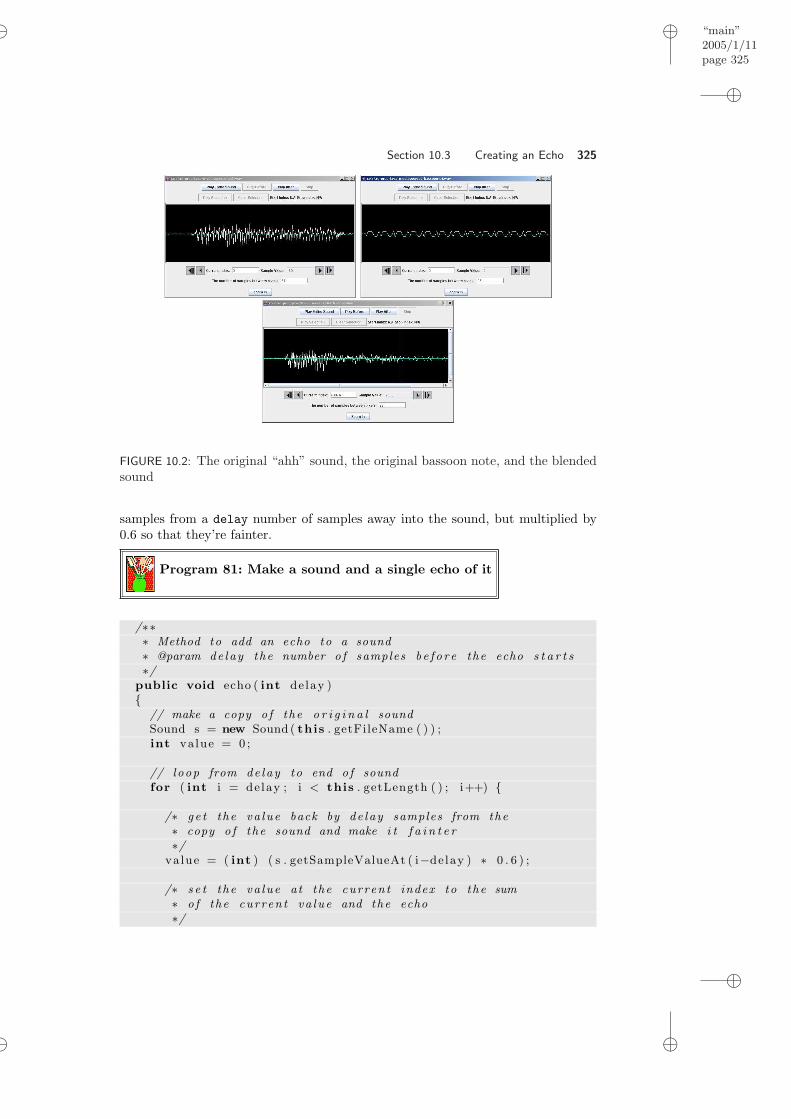
“main”2005/1/11page 325
i
i
i
i
i
i
i
i
Section 10.3 Creating an Echo 325
FIGURE 10.2: The original “ahh” sound, the original bassoon note, and the blendedsound
samples from a delay number of samples away into the sound, but multiplied by0.6 so that they’re fainter.
Program 81: Make a sound and a single echo of it
/∗∗∗ Method to add an echo to a sound∗ @param de lay the number o f samples b e f o r e the echo s t a r t s∗/
public void echo ( int delay ){
// make a copy o f the o r i g i n a l soundSound s = new Sound ( this . getFileName ( ) ) ;int value = 0 ;
// loop from de lay to end o f soundfor ( int i = delay ; i < this . getLength ( ) ; i++) {
/∗ ge t the va lue back by de lay samples from the∗ copy o f the sound and make i t f a i n t e r∗/
value = ( int ) ( s . getSampleValueAt ( i−delay ) ∗ 0 . 6 ) ;
/∗ s e t the va lue at the current index to the sum∗ o f the current va lue and the echo∗/

“main”2005/1/11page 326
i
i
i
i
i
i
i
i
326 Chapter 10 Combining and Creating Sounds
this . setSampleValueAt ( i ,this . getSampleValueAt ( i ) +value ) ;
}}
How it works: The echo function takes a delay: the number of samples beforethe echo starts. Try this with different amounts of delay. With low values of delay,the echo will sound more like vibrato. Higher values (try 10,000 or 20,000) will giveyou a real echo.
• This method creates a copy of the current sound s. This is where we’ll getthe original, unadulterated samples for creating the echo. (You could try thiswithout creating a copy to get some interesting layered echoes.)
• Next we declare a variable value to hold a value of a sample.
• Our loop starts with the index i being set to the passed delay and continuesthrough the rest of the sound.
• The echoed sound is delay samples back, so i-delay is the sample we need.We multiply it by 0.6 to make it softer in volume.
• We then add the echoed sample to the current sample at i and set it in thecurrent Sound object.
Try this method on sounds with words in them.
> Sound sound = new Sound(FileChooser.getMediaPath("thisisatest.wav"));> sound.explore();> sound.echo(20000);> sound.explore();
FIGURE 10.3: The original “This is a test” sound (left), and the sound with an echo(right)

‘‘main’’2005/1/11page 327
i
i
i
i
i
i
i
i
Section 10.3 Creating an Echo 327
10.3.1 Creating Multiple Echoes
This recipe actually lets you set the number of echoes that you get. You cangenerate some amazing effects like this.
Program 82: Creating multiple echoes
/∗∗∗ Method to c r ea t e mu l t i p l e echoes o f the current sound∗ @param de lay the number o f samples b e f o r e the echo s t a r t s∗ @param numEchoes the number o f echoes d e s i r e d∗ @return a new sound wi th the echoes in i t∗/
public Sound echo ( int delay , int numEchoes ){
int soundLength = this . getLength ( ) ;Sound echoSound = new Sound (numEchoes ∗ delay + soundLength ) ;int value = 0 ;int echoIndex = 0 ;int echoValue = 0 ;double echoAmplitude = 1 ; // to s t a r t
// copy the o r i g i n a l soundechoSound . s p l i c e ( this , 0 , soundLength , 0 ) ;
/∗ l oop s t a r t i n g wi th 1 to c r ea t e the f i r s t echo at the∗ r i g h t p l a ce and end then when = the number o f echoes∗/
for ( int echoCount = 1 ; echoCount <= numEchoes ; echoCount++){
// decrease the volume ( ampl i tude ) o f the echoechoAmplitude = echoAmplitude ∗ 0 . 6 ;
// echo the whole soundfor ( int i = 0 ; i < soundLength ; i++){
echoIndex = i + ( de lay ∗ echoCount ) ;echoValue = ( int ) ( this . getSampleValueAt ( i ) ∗
echoAmplitude ) ;echoSound . setSampleValueAt ( echoIndex , echoValue +
echoSound . getSampleValueAt ( echoIndex ) ) ;}
}return echoSound ;
}
To try out this recipe create a Sound object and then invoke this method onthe Sound object. Be sure to save the resulting Sound.
> Sound sound = new Sound(FileChooser.getMediaPath("croak.wav"));

“main”2005/1/11page 328
i
i
i
i
i
i
i
i
328 Chapter 10 Combining and Creating Sounds
> Sound echo = sound.echo(8000,5);> echo.play();
10.4 HOW SAMPLING KEYBOARDS WORK
Sampling keyboards are keyboards that use recordings of sounds (e.g., pianos,harps, trumpets) to create music by playing those sound recordings in the de-sired pitch. Modern music and sound keyboards (and synthesizers) allow musiciansto record sounds in their daily lives, and turn them into “instruments” by shiftingthe frequency of the original sounds. How do the synthesizers do it? It’s not reallycomplicated. The interesting part is that it allows you to use any sound you wantas an instrument.
Sampling keyboards use huge amounts of memory to record lots of differ-ent instruments at different pitches. When you press a key on the keyboard, therecording closest (in pitch) to the note you pressed is selected, then the recordingis shifted to exactly the pitch you requested.
This first recipe works by creating a sound that skips every other sample.You read that right—after being so careful treating all the samples the same, we’renow going to skip half of them! In the mediasources directory, you’ll find a soundnamed c4.wav. This is the note C, in the fourth octave of a piano, played for onesecond. It makes a good sound to experiment with, though really, any sound willwork.
Program 83: Double the frequency of a sound
/∗∗∗ Method to doub le the f requency o f a sound by t a k ing∗ every second sample . The r e s u l t w i l l be a h i ghe r∗ sound .∗/
public void doubleFreq ( ){
// make a copy o f the o r i g i n a l soundSound s = new Sound ( this . getFileName ( ) ) ;
/∗ l oop through the sound and increment t a r g e t index∗ by one but source index by 2 and s e t t a r g e t va lue∗ to the copy o f the o r i g i n a l sound∗/
for ( int sourceIndex =0, ta rge t Index = 0 ;sourceIndex < this . getLength ( ) ;sourceIndex=sourceIndex +2, ta rge t Index++)
this . setSampleValueAt ( target Index ,s . getSampleValueAt ( sourceIndex ) ) ;
// c l e a r out the r e s t o f t h i s soundfor ( int i = this . getLength ( ) / 2 ;
i < this . getLength ( ) ;

“main”2005/1/11page 329
i
i
i
i
i
i
i
i
Section 10.4 How Sampling Keyboards Work 329
i++)this . setSampleValueAt ( i , 0 ) ;
}
Here’s how to use the double frequency method.
> Sound s = new Sound(FileChooser.getMediaPath("c4.wav"));> s.explore();> s.doubleFreq();> s.explore();
FIGURE 10.4: The original sound (left), and the sound with the frequency doubled(right)
This method starts like the other ones in this chapter by making a copy ofthe sound. Then it loops through the sound but it increments the index that keepsthe position in the source sound sourceIndex by 2 and the index that keeps theposition in the target sound targetIndex by 1. This will copy the sample valueat sourceIndex 0 to targetIndex 0, then sourceIndex 2 to targetIndex 1, thensourceIndex 4 to targetIndex 2, and so on. Since the resulting sound will be halfas long as it was the second loop just fills the rest of the sound with zeroes.
Try it1! You’ll see that the sound really does double in frequency with theresult that it sounds higher!
How did that happen? It’s not really all that complicated. Think of it thisway–The frequency of the original sound is really the number of cycles that passby in a certain amount of time. If you skip every other sample, the new sound hasjust as many cycles, but has them in half the amount of time!
Now let’s try the other way: Let’s take every sample twice! What happensthen?
To do this, we need to use a cast to “throw away” the fractional part of afloating point number using a cast to integer. To cast a floating point number toan integer number use (int).
> System.out.println((int)0.5)0
1You are now trying this out as you read, aren’t you?

“main”2005/1/11page 330
i
i
i
i
i
i
i
i
330 Chapter 10 Combining and Creating Sounds
> System.out.println((int)1.5)1
Here’s the recipe that halves the frequency. The for loop moves the targetIndexalong the length of the sound. The sourceIndex is now being incremented–butonly by 0.5! The effect is that we’ll take every sample in the source twice. ThesourceIndex will be 1, 1.5, 2, 2.5, and so on, but because we’re using the (int) ofthat value, we’ll take samples 1, 1, 2, 2, and so on.
Program 84: Half the frequency
/∗∗∗ Method to ha l v e the f requency o f a sound by t a k ing∗ each sample tw ice . The r e s u l t w i l l be a lower∗ sound .∗/
public void halveFreq ( ){
// make a copy o f the o r i g i n a l soundSound s = new Sound ( this . getFileName ( ) ) ;
/∗ l oop through the sound and increment t a r g e t index∗ by one but source index by 0.5 and s e t t a r g e t va lue∗ to the copy o f the o r i g i n a l sound∗/
for (double sourceIndex =0, ta rge t Index = 0 ;ta rge t Index < this . getLength ( ) ;sourceIndex=sourceIndex +0.5 , ta rge t Index++)
this . setSampleValueAt ( ( int ) target Index ,s . getSampleValueAt ( ( int ) sourceIndex ) ) ;
}
This method first creates a copy of the sound. Then it loops through thesound incrementing the sourceIndex by 0.5 and the targetIndex by 1. We get asample value from source at the integer value using ((int)) of the sourceIndex.We set the target at the integer value using ((int)) of the targetIndex to thesample value that we got from the copy of the sound. We then add 0.5 to thesourceIndex. This means that the sourceIndex, each time through the loop, willtake on the values 0.0, 0.5, 1.0, 1.5, 2.0, 2.5, and so on. But the integer part of thissequence is 0, 0, 1, 1, 2, 2, and so on. The result is that we take each sample fromthe source sound twice.
Think about what we’re doing here. Imagine that the 0.5 above were actually0.75 or 3.0. Would this work? The for loop would have to change, but essentiallythe idea is the same in all these cases. We are sampling the source data to createthe target data. Using a sample index of 0.5 slows down the sound and halves thefrequency. A sample index larger than one speeds up the sound and increases thefrequency.

“main”2005/1/11page 331
i
i
i
i
i
i
i
i
Section 10.4 How Sampling Keyboards Work 331
Let’s try to generalize this sampling with the below recipe. (Note that thisone won’t work right!)
Program 85: Changing the frequency of a sound: BROKEN!
/∗∗∗ Method to change the f requency o f a sound by the∗ passed f a c t o r∗ @param f a c t o r the amount to increment the source∗ index by . A number g r ea t e r than 1 w i l l i n c r ea se the∗ f r equency and make the sound h i ghe r∗ wh i l e a number l e s s than one w i l l decrease the∗ f r equency and make the sound lower .∗/
public void changeFreq1 (double f a c t o r ){
// make a copy o f the o r i g i n a l soundSound s = new Sound ( this . getFileName ( ) ) ;
/∗ l oop through the sound and increment the t a r g e t index∗ by one but increment the source index by the f a c t o r∗/
for (double sourceIndex =0, ta rge t Index = 0 ;ta rge t Index < this . getLength ( ) ;sourceIndex=sourceIndex+fac to r , ta rge t Index++)
{this . setSampleValueAt ( ( int ) target Index ,
s . getSampleValueAt ( ( int ) sourceIndex ) ) ;}
}
Here’s how we could use this:
> s = new Sound(FileChooser.getMediaPath("c4.wav"));> s.explore();> s.changeFreq(0.75);> s.explore();
That will work really well! But what if the factor for sampling is MOREthan 1.0?
>Sound hello = new Sound(FileChooser.getMediaPath("Elliot-hello.wav"));> hello.changeFreq1();You are trying to access the sample at index: 54759, but the lastvalid index is at 54757.
Why? What’s happening? Here’s how you could see it: Print out thesourceIndex just before the setSampleValueAt. You’d see that the sourceIndex

“main”2005/1/11page 332
i
i
i
i
i
i
i
i
332 Chapter 10 Combining and Creating Sounds
becomes larger than the source sound! Of course, that makes sense. If each timethrough the loop, we increment the targetIndex by 1, but we’re incrementing thesourceIndex by more than one, we’ll get past the end of the source sound beforewe reach the end of the target sound. But how do we avoid it?
Here’s what we want to happen: If the sourceIndex ever gets equal or largerthan length of the source, we want to reset the sourceIndex—probably back to 0.The key word there is if, or even if.
We can can tell Java to make decisions based on a test . We use if as astatement to do something if a test is true. In our case, the test is sourceIndex>= s.getLength(). We can test on < , > , == (for equality), != (for inequality,not-equals) and even <= and >=. An if statement takes a block , just as while andfor do. The block defines the things to do if the test in the if statement is true.In this case, our block is simply sourceIndex = 0;. The block of statements isdefined inside of an open curly brace ’’ and a close curly brace ’’. If you just haveone statement that you want to execute it doesn’t have to be in a block but it isbetter to keep it in a block.
The below recipe generalizes this and allows you to specify how much to shiftthe samples by.
Program 86: Changing the frequency of a sound
/∗∗∗ Method to change the f requency o f a sound∗ by the passed f a c t o r∗ @param f a c t o r the amount to increment the source∗ index by . A number g r ea t e r than 1 w i l l i n c r ea se the∗ f r equency and make the sound h i ghe r∗ wh i l e a number l e s s than one w i l l decrease the f requency∗ and make the sound lower .∗/
public void changeFreq (double f a c t o r ){
// make a copy o f the o r i g i n a l soundSound s = new Sound ( this . getFileName ( ) ) ;
/∗ l oop through the sound and increment the t a r g e t index∗ by one but increment the source index by the f a c t o r∗/
for (double sourceIndex =0, ta rge t Index = 0 ;ta rge t Index < this . getLength ( ) ;sourceIndex=sourceIndex+fac to r , ta rge t Index++)
{i f ( sourceIndex >= s . getLength ( ) ) {
sourceIndex = 0 ;}this . setSampleValueAt ( ( int ) target Index ,
s . getSampleValueAt ( ( int ) sourceIndex ) ) ;

“main”2005/1/11page 333
i
i
i
i
i
i
i
i
Section 10.4 How Sampling Keyboards Work 333
}
}
We can actually set the factor so that we get whatever frequency we want.We call this factor the sampling interval . For a desired frequency f0, the samplinginterval should be:
samplingInteval = (sizeOfSourceSound) f0samplingRate
This is how a keyboard synthesizer works. It has recordings of pianos, voices,bells, drums, whatever. By sampling those sounds at different sampling intervals,it can shift the sound to the desired frequency.
The last recipe of this section plays a single sound at its original frequency,then at two times, three times, four times, and five times the frequency. We needto use blockingPlay to let one sound finish playing before the next one starts. Tryit with just play and you’ll hear the sounds collide as they’re generated faster thanthe computer can play them.
Program 87: Playing a sound in a range of frequencies
/∗∗∗ Method to p lay a sound 5 t imes and each time inc rea se the∗ f r equency . I t doesn ’ t change the o r i g i n a l sound .∗/
public void play5Freq ( ){
Sound s = null ;
// loop 5 t imes but s t a r t wi th 1 and end at 5for ( int i = 1 ; i < 6 ; i++){
// r e s e t the sounds = new Sound ( this . getFileName ( ) ) ;
// change the f requencys . changeFreq ( i ) ;
// p lay the sounds . b lock ingPlay ( ) ;
}}
To use this method try:
> Sound s = new Sound(FileChooser.getMediaPath("c4.wav"));> s.play5Freq();
This method loops with the value of i staring at 1 and ending before it is 6.This will loop 5 times. Why start at 1 instead of 0? What would happen if we used
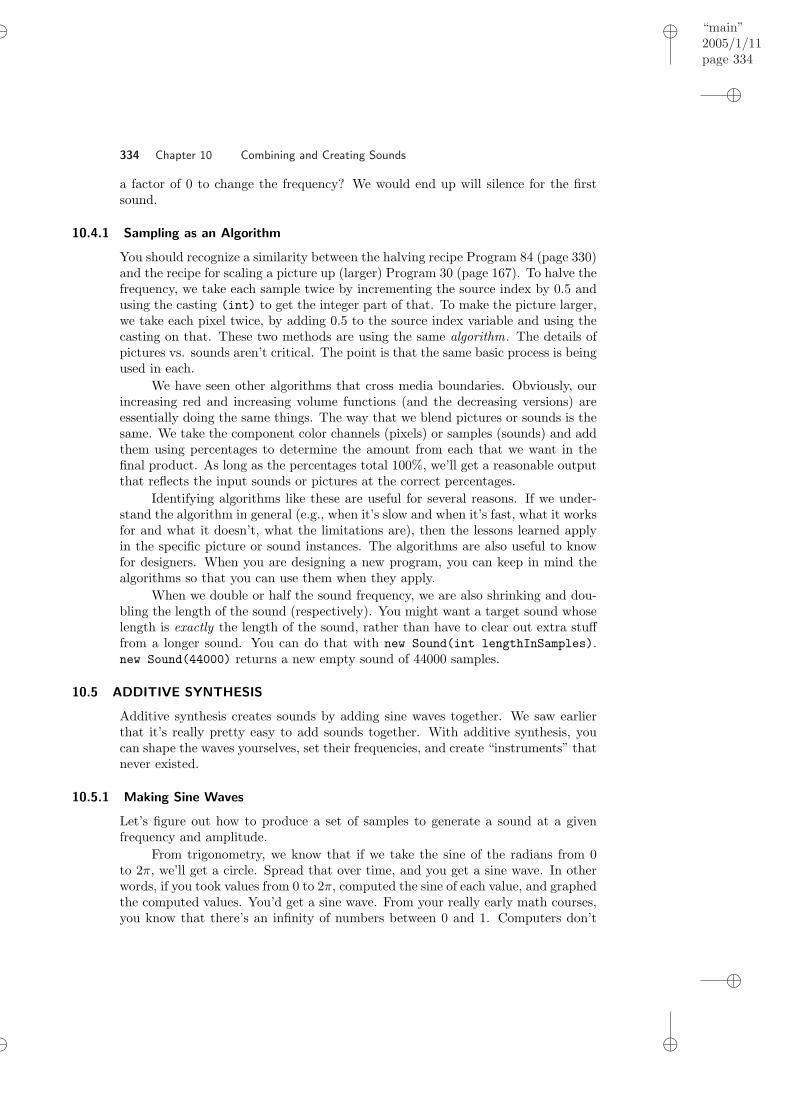
“main”2005/1/11page 334
i
i
i
i
i
i
i
i
334 Chapter 10 Combining and Creating Sounds
a factor of 0 to change the frequency? We would end up will silence for the firstsound.
10.4.1 Sampling as an Algorithm
You should recognize a similarity between the halving recipe Program 84 (page 330)and the recipe for scaling a picture up (larger) Program 30 (page 167). To halve thefrequency, we take each sample twice by incrementing the source index by 0.5 andusing the casting (int) to get the integer part of that. To make the picture larger,we take each pixel twice, by adding 0.5 to the source index variable and using thecasting on that. These two methods are using the same algorithm. The details ofpictures vs. sounds aren’t critical. The point is that the same basic process is beingused in each.
We have seen other algorithms that cross media boundaries. Obviously, ourincreasing red and increasing volume functions (and the decreasing versions) areessentially doing the same things. The way that we blend pictures or sounds is thesame. We take the component color channels (pixels) or samples (sounds) and addthem using percentages to determine the amount from each that we want in thefinal product. As long as the percentages total 100%, we’ll get a reasonable outputthat reflects the input sounds or pictures at the correct percentages.
Identifying algorithms like these are useful for several reasons. If we under-stand the algorithm in general (e.g., when it’s slow and when it’s fast, what it worksfor and what it doesn’t, what the limitations are), then the lessons learned applyin the specific picture or sound instances. The algorithms are also useful to knowfor designers. When you are designing a new program, you can keep in mind thealgorithms so that you can use them when they apply.
When we double or half the sound frequency, we are also shrinking and dou-bling the length of the sound (respectively). You might want a target sound whoselength is exactly the length of the sound, rather than have to clear out extra stufffrom a longer sound. You can do that with new Sound(int lengthInSamples).new Sound(44000) returns a new empty sound of 44000 samples.
10.5 ADDITIVE SYNTHESIS
Additive synthesis creates sounds by adding sine waves together. We saw earlierthat it’s really pretty easy to add sounds together. With additive synthesis, youcan shape the waves yourselves, set their frequencies, and create “instruments” thatnever existed.
10.5.1 Making Sine Waves
Let’s figure out how to produce a set of samples to generate a sound at a givenfrequency and amplitude.
From trigonometry, we know that if we take the sine of the radians from 0to 2π, we’ll get a circle. Spread that over time, and you get a sine wave. In otherwords, if you took values from 0 to 2π, computed the sine of each value, and graphedthe computed values. You’d get a sine wave. From your really early math courses,you know that there’s an infinity of numbers between 0 and 1. Computers don’t
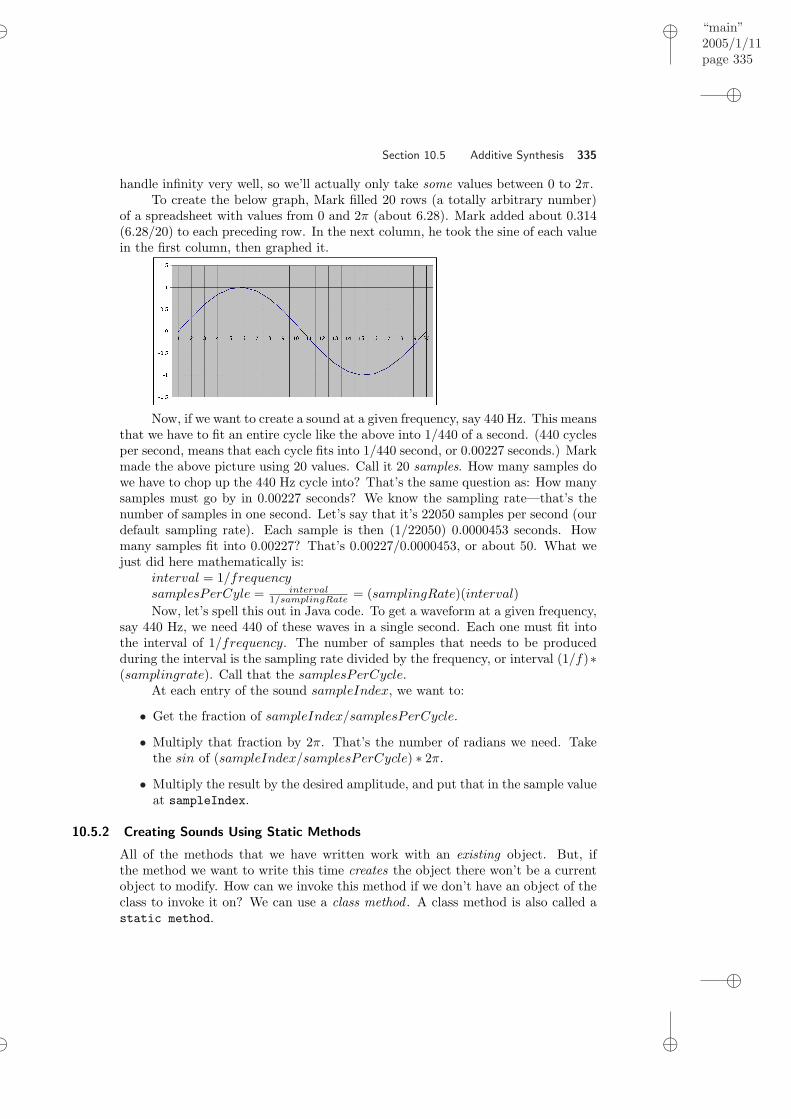
“main”2005/1/11page 335
i
i
i
i
i
i
i
i
Section 10.5 Additive Synthesis 335
handle infinity very well, so we’ll actually only take some values between 0 to 2π.To create the below graph, Mark filled 20 rows (a totally arbitrary number)
of a spreadsheet with values from 0 and 2π (about 6.28). Mark added about 0.314(6.28/20) to each preceding row. In the next column, he took the sine of each valuein the first column, then graphed it.
Now, if we want to create a sound at a given frequency, say 440 Hz. This meansthat we have to fit an entire cycle like the above into 1/440 of a second. (440 cyclesper second, means that each cycle fits into 1/440 second, or 0.00227 seconds.) Markmade the above picture using 20 values. Call it 20 samples. How many samples dowe have to chop up the 440 Hz cycle into? That’s the same question as: How manysamples must go by in 0.00227 seconds? We know the sampling rate—that’s thenumber of samples in one second. Let’s say that it’s 22050 samples per second (ourdefault sampling rate). Each sample is then (1/22050) 0.0000453 seconds. Howmany samples fit into 0.00227? That’s 0.00227/0.0000453, or about 50. What wejust did here mathematically is:
interval = 1/frequencysamplesPerCyle = interval
1/samplingRate = (samplingRate)(interval)Now, let’s spell this out in Java code. To get a waveform at a given frequency,
say 440 Hz, we need 440 of these waves in a single second. Each one must fit intothe interval of 1/frequency. The number of samples that needs to be producedduring the interval is the sampling rate divided by the frequency, or interval (1/f)∗(samplingrate). Call that the samplesPerCycle.
At each entry of the sound sampleIndex, we want to:
• Get the fraction of sampleIndex/samplesPerCycle.
• Multiply that fraction by 2π. That’s the number of radians we need. Takethe sin of (sampleIndex/samplesPerCycle) ∗ 2π.
• Multiply the result by the desired amplitude, and put that in the sample valueat sampleIndex.
10.5.2 Creating Sounds Using Static Methods
All of the methods that we have written work with an existing object. But, ifthe method we want to write this time creates the object there won’t be a currentobject to modify. How can we invoke this method if we don’t have an object of theclass to invoke it on? We can use a class method . A class method is also called astatic method.

“main”2005/1/11page 336
i
i
i
i
i
i
i
i
336 Chapter 10 Combining and Creating Sounds
Class methods can be called using ClassName.methodName (parameterList ).Recall that when a class definition is compiled it creates a file (ClassName.class)that contains all the information in the class definition in a form that the computercan understand. When you use a class name for the first time in your code or inthe interactions pane Java looks for that file and loads the definition of that class.It also creates an object that represents that class.
We have been using new Class (parameterList ) to create new objects ofthe class by asking that object that represents the class to create an object for us.Now we will use ClassName.methodName (parameterList ) to ask the object thatrepresents the class to create an object of that class and return it.
How do we make a method a class method? We add the keyword static to it,usually after the visibility. Now when you hear “static” you may think of noise onyour radio or that something won’t move. But, in Java “static” means somethingthat exists in the object that represents the class. So, why not use “class” insteadof “static”? The keyword class is used in Java to define new classes. But, whenyou see the keyword static think class. So, the keyword static in a methoddeclaration tells you that the method is a “class” method.
To build sounds, there are some silent sounds in the media sources. Our sinewave generator will use the one second of silence sound to build a sine wave of onesecond. We’ll provide an amplitude as input—that will be the maximum amplitudeof the sound. (Since sine generates between −1 and 1, the range of amplitudes willbe between −amplitude and amplitude.)
Program 88: Generate a sine wave at a given frequency and amplitude
/∗∗∗ Method to c r ea t e a one second s ine wave sound wi th the∗ g iven f requency and maximum ampl i tude∗ @param f r e q the de s i r e d f requency∗ @param maxAmplitude the maximum ampl i tude∗ @return the new sound∗/
public stat ic Sound createSineWave ( int f r eq , int maxAmplitude ){
Sound s =new Sound ( Fi l eChooser . getMediaPath ( ” s e c 1 s i l e n c e . wav” ) ) ;
double samplingRate = s . getSamplingRate ( ) ;double rawValue = 0 ;int value = 0 ;double i n t e r v a l = 1 .0 / f r e q ; // l en g t h o f c y c l e in secondsdouble samplesPerCycle = i n t e r v a l ∗ samplingRate ;double maxValue = 2 ∗ Math . PI ;
// loop through the l e n g t h o f the soundfor ( int i = 0 ; i < s . getLength ( ) ; i++){
// c a l c u l a t e the va lue between −1 and 1
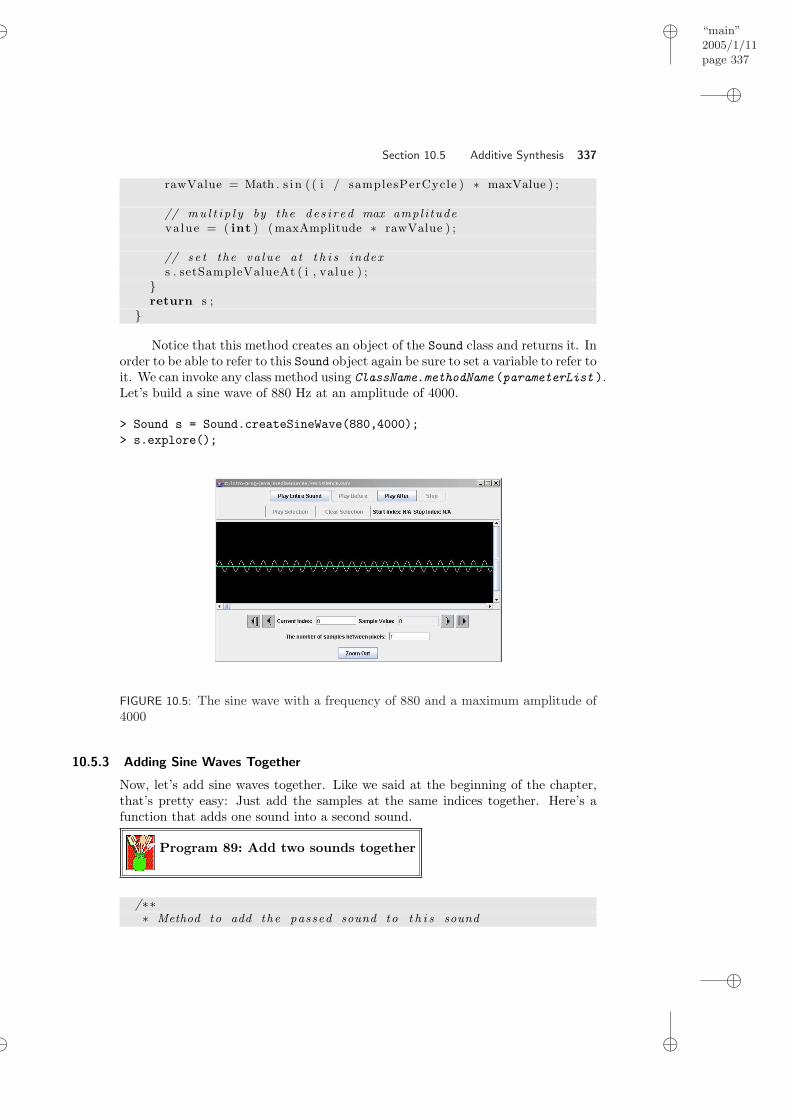
“main”2005/1/11page 337
i
i
i
i
i
i
i
i
Section 10.5 Additive Synthesis 337
rawValue = Math . s i n ( ( i / samplesPerCycle ) ∗ maxValue ) ;
// mu l t i p l y by the de s i r e d max ampl i tudevalue = ( int ) (maxAmplitude ∗ rawValue ) ;
// s e t the va lue at t h i s indexs . setSampleValueAt ( i , va lue ) ;
}return s ;
}
Notice that this method creates an object of the Sound class and returns it. Inorder to be able to refer to this Sound object again be sure to set a variable to refer toit. We can invoke any class method using ClassName.methodName (parameterList ).Let’s build a sine wave of 880 Hz at an amplitude of 4000.
> Sound s = Sound.createSineWave(880,4000);> s.explore();
FIGURE 10.5: The sine wave with a frequency of 880 and a maximum amplitude of4000
10.5.3 Adding Sine Waves Together
Now, let’s add sine waves together. Like we said at the beginning of the chapter,that’s pretty easy: Just add the samples at the same indices together. Here’s afunction that adds one sound into a second sound.
Program 89: Add two sounds together
/∗∗∗ Method to add the passed sound to t h i s sound

“main”2005/1/11page 338
i
i
i
i
i
i
i
i
338 Chapter 10 Combining and Creating Sounds
∗ @param source the sound to combine wi th t h i s one∗/
public void add (Sound source ){
int value = 0 ; // ho lde r f o r new va lue
// loop through a l l o f the sourcefor ( int i = 0 ; i < source . getLength ( ) ; i++) {
// add source sound va lue and t h i s sound va luevalue = this . getSampleValueAt ( i ) +
source . getSampleValueAt ( i ) ;
// s e t the va lue in t h i s sound to the new va luethis . setSampleValueAt ( i , va lue ) ;
}}
How are we going to use this function to add together sine waves? We needboth of them at once? Turns out that it’s easy:
Let’s add together 440 Hz, 880 Hz (twice 440), and 1320 Hz (880+440), andwe’ll increase the amplitudes. We’ll double the amplitude each time: 2000, then4000, then 8000. We’ll add them all up into a sound called sound440. At the end,we generate a 440 Hz sound so that we can listen to them both and compare.
> Sound s440 = Sound.createSineWave(440,2000);> Sound s880 = Sound.createSineWave(880,4000);> Sound s1320 = Sound.createSineWave(1320,8000);> s440.add(s880);> s440.add(s1320);> s440.explore();> Sound orig440 = Sound.createSineWave(440,2000);> orig440.explore();
'
&
$
%
Common Bug: Beware of adding amplitudes past32767When you add sounds, you add their amplitudes, too. Amaximum of 2000+4000+8000 will never be greater than32767, but do worry about that. Remember what hap-pened when the amplitude got too high last chapter. . .
10.5.4 Checking our Result
How do we know if we really got what we wanted? We can test our code by usingthe sound tools in the MediaTools. First, we save out a sample wave (just 440 Hz)and the combined wave.
> orig440.write(FileChooser.getMediaPath("just440.wav"));> s440.write(FileChooser.getMediaPath("combined440.wav"));
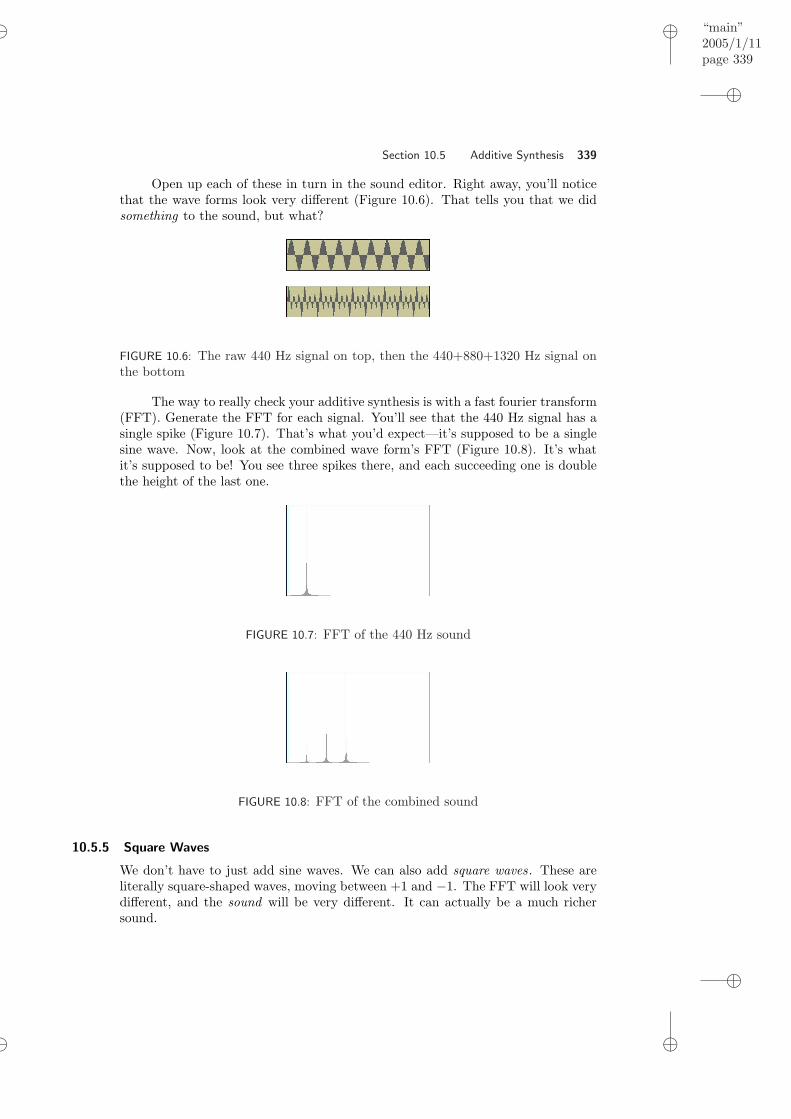
“main”2005/1/11page 339
i
i
i
i
i
i
i
i
Section 10.5 Additive Synthesis 339
Open up each of these in turn in the sound editor. Right away, you’ll noticethat the wave forms look very different (Figure 10.6). That tells you that we didsomething to the sound, but what?
FIGURE 10.6: The raw 440 Hz signal on top, then the 440+880+1320 Hz signal onthe bottom
The way to really check your additive synthesis is with a fast fourier transform(FFT). Generate the FFT for each signal. You’ll see that the 440 Hz signal has asingle spike (Figure 10.7). That’s what you’d expect—it’s supposed to be a singlesine wave. Now, look at the combined wave form’s FFT (Figure 10.8). It’s whatit’s supposed to be! You see three spikes there, and each succeeding one is doublethe height of the last one.
FIGURE 10.7: FFT of the 440 Hz sound
FIGURE 10.8: FFT of the combined sound
10.5.5 Square Waves
We don’t have to just add sine waves. We can also add square waves. These areliterally square-shaped waves, moving between +1 and −1. The FFT will look verydifferent, and the sound will be very different. It can actually be a much richersound.

“main”2005/1/11page 340
i
i
i
i
i
i
i
i
340 Chapter 10 Combining and Creating Sounds
Try this method instead of the sine wave generator and see what you think.Note the use of an if statement to swap between the positive and negative sidesof the wave half-way through a cycle.
Program 90: Square wave generator for given frequency and amplitude
/∗∗∗ Method to genera te a 1 second sound wi th square waves∗ with the passed f requency and maximum ampl i tude .∗ @param f r e q the de s i r e d f requency∗ @param maxAmplitude the maximum ampl i tude∗ @return the crea t ed sound∗/
public stat ic Sound createSquareWave ( int f r eq ,int maxAmplitude )
{Sound s =
new Sound ( Fi l eChooser . getMediaPath ( ” s e c 1 s i l e n c e . wav” ) ) ;double samplingRate = s . getSamplingRate ( ) ;double rawValue = 0 ;int value = 0 ;double i n t e r v a l = 1 .0 / f r e q ; // l en g t h o f c y c l e in secondsdouble samplesPerCycle = i n t e r v a l ∗ samplingRate ;double samplesPerHal fCycle = ( int ) ( samplesPerCycle / 2 ) ;double maxValue = 2 ∗ Math . PI ;
// loop through the l e n g t h o f the soundfor ( int soundIndex = 0 , sampleCounter = 0 ;
soundIndex < s . getLength ( ) ;soundIndex++, sampleCounter++)
{// check i f in f i r s t h a l f o f c y c l ei f ( sampleCounter < samplesPerHal fCycle )
va lue = maxAmplitude ;else{
// make the va lue nega t i v evalue = maxAmplitude ∗ −1;
/∗ i f t he sample counter i s g r ea t e r than the∗ samples per c y c l e r e s e t i t to 0∗/
i f ( sampleCounter > samplesPerCycle )sampleCounter = 0 ;
}
// s e t the va lues . setSampleValueAt ( soundIndex , va lue ) ;
}

“main”2005/1/11page 341
i
i
i
i
i
i
i
i
Section 10.5 Additive Synthesis 341
return s ;}
Use it like this:
> Sound sq440 = Sound.createSquareWave(440,4000);> sq440.play();> Sound sq880 = Sound.createSquareWave(880,8000);> Sound sq1320 = Sound.createSquareWave(1320,10000);> sq440.write(FileChooser.getMediaPath("square440.wav"));> sq440.add(sq880);> sq440.add(sq1320);> sq440.play();> sq440.write(FileChooser.getMediaPath("squareCombined.wav"));
You’ll find that the waves (in the wave editor of MediaTools) really do looksquare (Figure 10.9), but the most amazing thing is all the additional spikes in FFT(Figure 10.10). Square waves really do result in a much more complex sound.
FIGURE 10.9: The 440 Hz square wave (top) and additive combination of squarewaves (bottom)
FIGURE 10.10: FFT’s of the 440 Hz square wave (top) and additive combination ofsquare waves (bottom)

‘‘main’’2005/1/11page 342
i
i
i
i
i
i
i
i
342 Chapter 10 Combining and Creating Sounds
10.5.6 Triangle Waves
Try triangle waves instead of square waves with this recipe.
Program 91: Generate triangle waves
/∗∗∗ Method to c r ea t e a one second t r i a n g l e wave sound∗ with the g iven f requency and maximum ampl i tude∗ @param f r e q the de s i r e d f requency∗ @param maxAmplitude the maximum ampl i tude∗ @return the new sound∗/
public stat ic Sound createTriangleWave ( int f r eq ,int maxAmplitude )
{Sound s =
new Sound ( Fi l eChooser . getMediaPath ( ” s e c 1 s i l e n c e . wav” ) ) ;double samplingRate = s . getSamplingRate ( ) ;int value = 0 ;double i n t e r v a l = 1 .0 / f r e q ; // l en g t h o f c y c l e in secondsdouble samplesPerCycle = i n t e r v a l ∗ samplingRate ;int samplesPerQuarterCycle =
( int ) ( samplesPerCycle / 4 ) ;int increment =
( int ) (maxAmplitude / samplesPerQuarterCycle ) ;
// loop through the l e n g t h o f the soundfor ( int soundIndex = 0 ;
soundIndex < s . getLength ( ) ;soundIndex++, value = value + increment )
{// check i f the va lue i s equa l to the de s i r e d maxi f ( va lue >= maxAmplitude | |
value <= maxAmplitude ∗ −1){
increment = increment ∗ −1;va lue = value + increment ;
}
// s e t the sample va lues . setSampleValueAt ( soundIndex , va lue ) ;
}return s ;
}
Since this is a class method it can be invoked usingClassName.methodName (parameterList ).

“main”2005/1/11page 343
i
i
i
i
i
i
i
i
Section 10.6 Modern Music Synthesis 343
> Sound triangle = Sound.createTriangleWave(440,4000);> triangle.play();> triangle.explore();
You have seen other class (static) methods. What about Math.abs(intnumber), FileChooser.pickAFile(), and ColorChooser.pickAColor()? All ofthese are class methods which is why you can invoke them usingClassName.methodName (parameterList ).
Class methods are useful for general methods that don’t require an object ofthe class to be created (Math.abs or for methods that create objects of the classcreateTriangleWave.
10.6 MODERN MUSIC SYNTHESIS
Additive synthesis is how early music synthesizers work. Nowadays, additive syn-thesis isn’t too common because the sounds that it generates aren’t natural sound-ing. Synthesizing from recorded sounds is quite common, but it isn’t pure synthesisin the sense of creating sounds out of nothing.
The most common synthesis technique today is probably FM synthesis or fre-quency modulation synthesis. In FM synthesis, an oscillator (a programmed objectthat generates a regular series of outputs) controls (modulates) frequencies withother frequencies. The result is a richer sound, less tinny or computer sounding.
Another common technique is subtractive synthesis. In subtractive synthesis,out-and-out noise is used as the input, and then filters are applied to removeunwanted frequencies. The result is, again, a richer sound, though typically not asrich as FM synthesis.
Why would we want to create sounds or music with computers anyway?What’s the point when there are lots of great sounds, music, and musicians inthe world? The point is that if you want to tell someone else how you got thatsound, so that they could replicate the process, or even modify the sound in someway (perhaps making it better), a program is the way to do it. A program suc-cinctly captures and communicates a process—how a sound or piece of music isgenerated.
10.6.1 MP3
Nowadays, the most common kind of audio file that you have on your computer isprobably MP3 files (or perhaps MP4 or one of its related or descendant file types).MP3 files are sound (and video, in some cases) encodings based on the MPEG-3standard. They are audio files, but compressed in special ways.
One way in which MP3 files are compressed is called lossless compression. Aswe know, there are techniques for storing data that use fewer bits. For example,we know that every sample is typically two bytes wide. What if we didn’t storeevery sample, but instead stored the difference from the last sample to the currentsample? The difference between samples is usually much smaller than 32,767 to-32,768—it might be +/- 1000. That takes fewer bits to store.
But MP3 also uses lossy compression. It actually throws away some of thesound information. For example, if there’s a really soft sound immediately after or

“main”2005/1/11page 344
i
i
i
i
i
i
i
i
344 Chapter 10 Combining and Creating Sounds
simultaneous with a really loud sound, you won’t be able to hear the soft sound. Adigital recording keeps all those frequencies. MP3 throws away the ones you can’tactually hear.
WAV files are kind of compressed, but not as much as MP3, and they onlyuse lossless techniques. Some WAV files use MP3 compression which makes themreally MP3 files. MP3 files tend to be much smaller than the same sound in a WAVformat. AIFF files are similar to WAV files.
10.6.2 MIDI
MIDI is the Musical Instrument Digital Interface. It’s really a set of agreementsbetween manufacturers of computer music devices (sequencers, synthesizers, drummachines, keyboards, etc.) for how their devices will work together. Using MIDI,you can control various synthesizers and drum machines from different keyboards.
MIDI doesn’t really record what something sounds like, instead it encodeshow it is played. Literally, MIDI encodes information like “Press the key down onsynthesized instrument X at pitch Y ” then later “Release the key Y on instrumentX.” The quality of MIDI sound depends entirely on the synthesizer, the devicegenerating the synthesized instrument.
MIDI files tend to be very small. Instructions like “Play key #42 on track7” are only some five bytes long. This makes MIDI attractive in comparison withlarge sound files. MIDI has been particularly popular for karaoke machines.
MIDI has an advantage over MP3 or WAV files in that they can specify alot of music in very few bytes. But MIDI can’t record any particular sound. Forexample, if you want to record a particular person’s style of playing an instrument,or record anyone singing, you don’t want to use MIDI. To capture actual sounds,you need to record the actual samples, so you’ll need MP3 or WAV.
Most modern operating systems have pretty good synthesizers built into them.We can actually use them from Java. We have created a class MidiPlayer that hasa method playNote that takes as input a note as a number and a duration (howlong to play the sound) in milliseconds. The note numbers correspond to keys, notto frequencies. C in the first octave is 1, C# is 2. C in the fourth octave is 60, D is62, and E is 64. See http://www.harmony-central.com/MIDI/Doc/table2.html formore information on the note numbers. If you don’t specify what instrument youwant to play the note on it will simulate a piano.
Here’s a simple example of playing some MIDI notes from DrJava.
> MidiPlayer player = new MidiPlayer();> player.playNote(62,250); // d quarter note> player.playNote(60,500); // c half note
The 250 and 500 specify the number of milliseconds to play the note. If youwant a measure to take one second (1000 milliseconds) then a quarter note wouldbe 250 milliseconds and a half note would be 500 milliseconds.
We can write a method to play a song. How about writing a method to playpart of Jingle Bells? Here is a method that plays the first 4 measures from it. Put

“main”2005/1/11page 345
i
i
i
i
i
i
i
i
Section 10.6 Modern Music Synthesis 345
this in the MidiPlayer class (before the ending curly brace) and compile it.
Program 92: Playing a song
/∗∗∗ Method to p lay the f i r s t 4 measures o f J i n g l e B e l l s∗ with each measure t a k ing 1000 m i l l i s e c ond s (1 second )∗ t h i s i s 2/4 time∗/
public void p l a y J i n g l eB e l l s 4 ( ){
// measure 1playNote ( 52 , 2 50 ) ; // e e i g h t h noteplayNote ( 60 , 2 50 ) ; // c e i g h t h noteplayNote ( 58 , 2 50 ) ; // b f l a t e i g h t h noteplayNote ( 56 , 2 50 ) ; // a f l a t e i g h t h note
// measure 2playNote ( 52 , 5 00 ) ; // e quar t e r noter e s t ( 2 5 0 ) ; // r e s tplayNote ( 52 , 1 25 ) ; // e s i x t e e n t h noteplayNote ( 52 , 1 25 ) ; // e s i x t e e n t h note
// measure 3playNote ( 52 , 5 00 ) ; // e e i g h t h noteplayNote ( 60 , 2 50 ) ; // c e i g h t h noteplayNote ( 58 , 2 50 ) ; // b f l a t e i g h t h noteplayNote ( 56 , 2 50 ) ; // a f l a t e i g h t h note
// measure 4playNote ( 53 , 1000 ) ; // f h a l f note
}
This method only plays the first 4 measures of Jingle Bells. This may notsound like “Jingle Bells” to you since I am using the original version first publishedin 1859 by James Pierpont.
To play this using the default piano sounding instrument do the following:
> MidiPlayer player = new MidiPlayer();> player.playJingleBells4();
You can change the instrument that you want to use to play the notes usingthe method setInstrument(int num) where the num is a number from 0 to 127that maps to an instrument. We have create constants for some of the instrumentnumbers as you can see at the top of the MidiPlayer class definition. To play thefirst 4 measures of Jingle Bells on a flute do the following:
> MidiPlayer player = new MidiPlayer();

“main”2005/1/11page 346
i
i
i
i
i
i
i
i
346 Chapter 10 Combining and Creating Sounds
> player.setInstrument(MidiPlayer.FLUTE);> player.playJingleBells4();
10.6.3 Private Methods
Music often repeats. In Jingle Bells the first verse is played and then the refrain.Next, the second verse is played and then the refrain is played again. The firstverse and second verse are a bit different, but many of the measures in the twoverses are the same. If we want to write a method that plays the first two verses ofJingle Bells with each verse followed by the refrain, we could put all the measuresin it for both verses and the refrains, but then it would be very long (67 measures).Another option is to pull out the measures in the refrain and make a method thatjust plays the refrain and then call that method from the one that plays JingleBells.
Does this new method that plays just the refrain need to be public? If wedon’t think any other class will need access to the new method we can make itprivate. Private methods can only be invoked from code in the class that theyare declared in. You will get an error if you try to invoke a private method in codethat is in another class.
To declare a method to be private use the keyword private for the visibility.Remember that to declare a method you must specify:visibility returnType methodName( parameterList )
The following method is a private method that will play the refrain of JingleBells.
Program 93: Playing the refrain
/∗∗∗ Method to p lay r e f r a i n o f J i n g l e B e l l s∗/
private void p l a yJ i n g l eBe l l sR e f r a i n ( ){
// measure 1playNote ( 60 , 2 50 ) ; // c e i g h t h noteplayNote ( 60 , 2 50 ) ; // c e i g h t h noteplayNote ( 60 , 5 00 ) ; // c quar t e r note
// measure 2playNote ( 63 , 2 50 ) ; // e f l a t e i g h t h noteplayNote ( 63 , 2 50 ) ; // e f l a t e i g h t h noteplayNote ( 63 , 5 00 ) ; // e f l a t quar t e r note
// measure 3playNote ( 60 , 2 50 ) ; // c e i g h t h noteplayNote ( 60 , 2 50 ) ; // c e i g h t h noteplayNote ( 65 , 3 75 ) ; // f do t t ed e i g h t h noteplayNote ( 65 , 1 25 ) ; // f s i x t e e n t h note

“main”2005/1/11page 347
i
i
i
i
i
i
i
i
Section 10.6 Modern Music Synthesis 347
// measure 4playNote ( 64 , 1000 ) ; // e h a l f note
// measure 5playNote ( 65 , 2 50 ) ; // f e i g h t h noteplayNote ( 61 , 2 50 ) ; // d f l a t e i g h t h noteplayNote ( 56 , 2 50 ) ; // a f l a t e i g h t h noteplayNote ( 64 , 2 50 ) ; // f e i g h t h note
// measure 6playNote ( 63 , 2 50 ) ; // e f l a t e i g h t h noteplayNote ( 60 , 2 50 ) ; // c e i g h t h noteplayNote ( 56 , 2 50 ) ; // a f l a t e i g h t h noteplayNote ( 56 , 1 25 ) ; // a f l a t s i x t e e n t h noteplayNote ( 58 , 1 25 ) ; // b f l a t s i x t e e n t h note
// measure 7playNote ( 60 , 2 50 ) ; // c e i g h t h noteplayNote ( 58 , 2 50 ) ; // b f l a t e i g h t h noteplayNote ( 56 , 2 50 ) ; // a f l a t e i g h t h noteplayNote ( 58 , 2 50 ) ; // b f l a t e i g h t h note
// measure 8playNote ( 60 , 1000 ) ; // c h a l f note
// measure 9playNote ( 60 , 2 50 ) ; // c e i g h t h noteplayNote ( 60 , 2 50 ) ; // c e i g h t h noteplayNote ( 60 , 5 00 ) ; // c quar t e r note
// measure 10playNote ( 63 , 2 50 ) ; // e f l a t e i g h t h noteplayNote ( 63 , 2 50 ) ; // e f l a t e i g h t h noteplayNote ( 63 , 5 00 ) ; // e f l a t quar t e r note
// measure 11playNote ( 60 , 2 50 ) ; // c e i g h t h noteplayNote ( 60 , 2 50 ) ; // c e i g h t h noteplayNote ( 65 , 2 50 ) ; // f e i g h t h noteplayNote ( 65 , 2 50 ) ; // f e i g h t h note
// measure 12playNote ( 64 , 1000 ) ; // e h a l f note
// measure 13playNote ( 53 , 2 50 ) ; // f e i g h t h noteplayNote ( 61 , 2 50 ) ; // d f l a t e i g h t h noteplayNote ( 60 , 2 50 ) ; // c e i g h t h noteplayNote ( 58 , 2 50 ) ; // b f l a t e i g h t h note
// measure 14

“main”2005/1/11page 348
i
i
i
i
i
i
i
i
348 Chapter 10 Combining and Creating Sounds
playNote ( 56 , 2 50 ) ; // a f l a t e i g h t h noteplayNote ( 63 , 2 50 ) ; // e f l a t e i g h t h noteplayNote ( 62 , 2 50 ) ; // d e i g h t h noteplayNote ( 63 , 1 25 ) ; // e f l a t s i x t e e n t h noteplayNote ( 63 , 1 25 ) ; // e f l a t s i x t e e n t h note
// measure 16playNote ( 65 , 2 50 ) ; // f e i g h t h noteplayNote ( 63 , 2 50 ) ; // e f l a t e i g h t h noteplayNote ( 61 , 2 50 ) ; // d f l a t e i g h t h noteplayNote ( 58 , 2 50 ) ; // b f l a t e i g h t h note
// measure 17playNote ( 56 , 5 00 ) ; // a f l a t quar t e r noter e s t ( 5 0 0 ) ; // r e s t
}
Here is a method that will play the first verse of Jingle Bells.
Program 94: Playing the first verse
/∗∗∗ Method to p lay the f i r s t v e r s e o f j i n g l e b e l l s∗ with each measure t a k ing 1000 m i l l i s e c ond s (1 second )∗ I t i s in 2/4 time∗/
private void p layJ ing l eBe l l sV1 ( ){
// measure 1playNote ( 52 , 2 50 ) ; // e e i g h t h noteplayNote ( 60 , 2 50 ) ; // c e i g h t h noteplayNote ( 58 , 2 50 ) ; // b f l a t e i g h t h noteplayNote ( 56 , 2 50 ) ; // a f l a t e i g h t h note
// measure 2playNote ( 52 , 5 00 ) ; // e quar t e r noter e s t ( 2 5 0 ) ; // r e s tplayNote ( 52 , 1 25 ) ; // e s i x t e e n t h noteplayNote ( 52 , 1 25 ) ; // e s i x t e e n t h note
// measure 3playNote ( 52 , 5 00 ) ; // e e i g h t h noteplayNote ( 60 , 2 50 ) ; // c e i g h t h noteplayNote ( 58 , 2 50 ) ; // b f l a t e i g h t h noteplayNote ( 56 , 2 50 ) ; // a f l a t e i g h t h note
// measure 4playNote ( 53 , 1000 ) ; // f h a l f note

“main”2005/1/11page 349
i
i
i
i
i
i
i
i
Section 10.6 Modern Music Synthesis 349
// measure 5playNote ( 53 , 2 50 ) ; // f e i g h t h noteplayNote ( 61 , 2 50 ) ; // d f l a t e i g h t h noteplayNote ( 60 , 2 50 ) ; // c e i g h t h noteplayNote ( 58 , 2 50 ) ; // b f l a t e i g h t h note
// measure 6playNote ( 55 , 1000 ) ; // g h a l f note
// measure 7playNote ( 55 , 2 50 ) ; // g e i g h t h noteplayNote ( 65 , 2 50 ) ; // f e i g h t h noteplayNote ( 63 , 2 50 ) ; // e f l a t e i g h t h noteplayNote ( 61 , 2 50 ) ; // d f l a t e i g h t h note
// measure 8playNote ( 60 , 1000 ) ; // c h a l f note
// measure 9playNote ( 52 , 2 50 ) ; // e e i g h t h noteplayNote ( 60 , 2 50 ) ; // c e i g h t h noteplayNote ( 58 , 2 50 ) ; // b f l a t e i g h t h noteplayNote ( 56 , 2 50 ) ; // a f l a t e i g h t h note
// measure 10playNote ( 52 , 1000 ) ; // e h a l f note
// measure 11playNote ( 52 , 2 50 ) ; // e e i g h t h noteplayNote ( 60 , 2 50 ) ; // c e i g h t h noteplayNote ( 58 , 2 50 ) ; // b f l a t e i g h t h noteplayNote ( 56 , 2 50 ) ; // a f l a t e i g h t h note
// measure 12playNote ( 53 , 1000 ) ; // f h a l f note
// measure 13playNote ( 53 , 2 50 ) ; // f e i g h t h noteplayNote ( 61 , 2 50 ) ; // d f l a t e i g h t h noteplayNote ( 60 , 2 50 ) ; // c e i g h t h noteplayNote ( 58 , 2 50 ) ; // b f l a t e i g h t h note
// measure 14playNote ( 55 , 2 50 ) ; // g e i g h t h noteplayNote ( 63 , 2 50 ) ; // e f l a t e i g h t h noteplayNote ( 62 , 2 50 ) ; // d e i g h t h noteplayNote ( 63 , 2 50 ) ; // e f l a t e i g h t h note
// measure 15playNote ( 65 , 2 50 ) ; // f e i g h t h noteplayNote ( 63 , 2 50 ) ; // e f l a t e i g h t h note

“main”2005/1/11page 350
i
i
i
i
i
i
i
i
350 Chapter 10 Combining and Creating Sounds
playNote ( 61 , 2 50 ) ; // d f l a t e i g h t h noteplayNote ( 58 , 2 50 ) ; // b f l a t e i g h t h note
// measure 16playNote ( 56 , 1000 ) ; // a f l a t h a l f note
}
Here is a method that will play the second verse of Jingle Bells.
Program 95: Playing the second verse
/∗∗∗ Method to p lay the second ver se o f j i n g l e b e l l s∗ with each measure t a k ing 1000 m i l l i s e c ond s (1 second )∗ I t i s in 2/4 time∗/
private void p layJ ing l eBe l l sV2 ( ){
// measure 1r e s t ( 7 5 0 ) ;playNote ( 52 , 2 50 ) ; // e e i g h t h note
// measure 2playNote ( 52 , 2 50 ) ; // e e i g h t h noteplayNote ( 60 , 2 50 ) ; // c e i g h t h noteplayNote ( 58 , 2 50 ) ; // b f l a t e i g h t h noteplayNote ( 56 , 2 50 ) ; // a f l a t e i g h t h note
// measure 3playNote ( 52 , 5 00 ) ; // e quar t e r noter e s t ( 2 5 0 ) ; // r e s tplayNote ( 52 , 1 25 ) ; // e s i x t e e n t h noteplayNote ( 52 , 1 25 ) ; // e s i x t e e n t h note
// measure 4playNote ( 52 , 5 00 ) ; // e e i g h t h noteplayNote ( 60 , 2 50 ) ; // c e i g h t h noteplayNote ( 58 , 2 50 ) ; // b f l a t e i g h t h noteplayNote ( 56 , 2 50 ) ; // a f l a t e i g h t h note
// measure 5playNote ( 53 , 7 50 ) ; // f do t t ed quar t e r noteplayNote ( 53 , 2 50 ) ; // f e i g h t h note
// measure 6playNote ( 53 , 2 50 ) ; // f e i g h t h noteplayNote ( 61 , 2 50 ) ; // d f l a t e i g h t h note
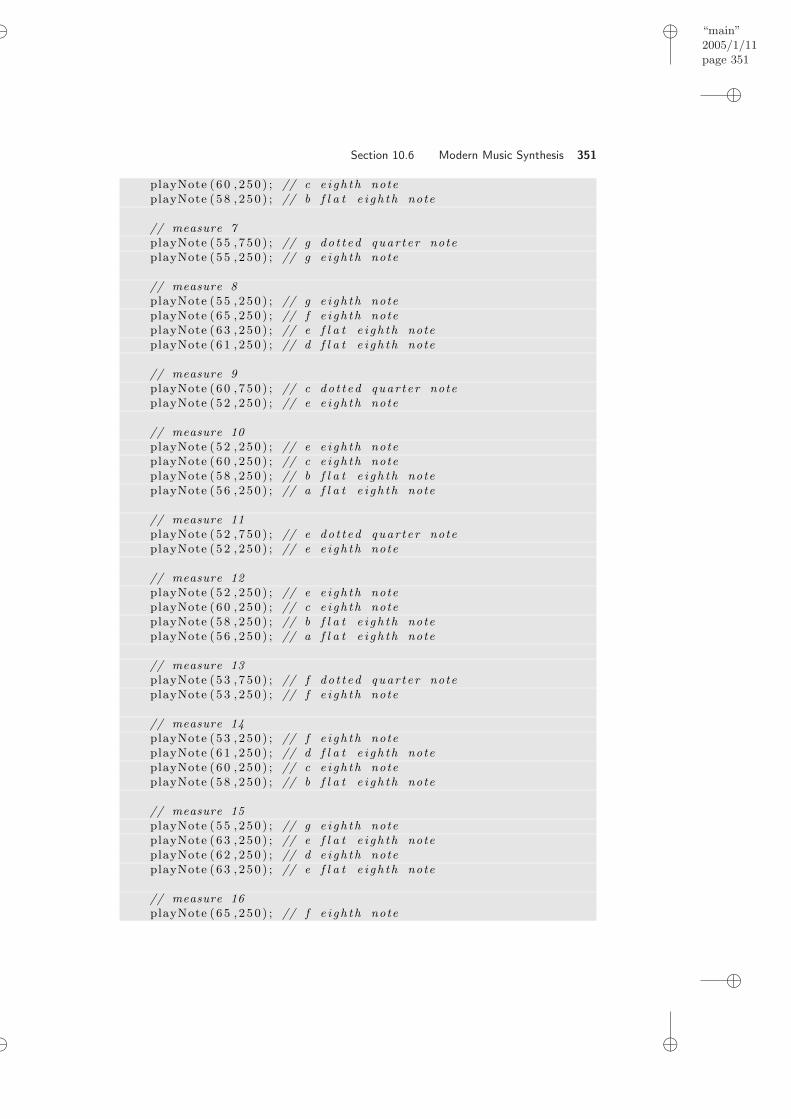
“main”2005/1/11page 351
i
i
i
i
i
i
i
i
Section 10.6 Modern Music Synthesis 351
playNote ( 60 , 2 50 ) ; // c e i g h t h noteplayNote ( 58 , 2 50 ) ; // b f l a t e i g h t h note
// measure 7playNote ( 55 , 7 50 ) ; // g do t t ed quar t e r noteplayNote ( 55 , 2 50 ) ; // g e i g h t h note
// measure 8playNote ( 55 , 2 50 ) ; // g e i g h t h noteplayNote ( 65 , 2 50 ) ; // f e i g h t h noteplayNote ( 63 , 2 50 ) ; // e f l a t e i g h t h noteplayNote ( 61 , 2 50 ) ; // d f l a t e i g h t h note
// measure 9playNote ( 60 , 7 50 ) ; // c do t t ed quar t e r noteplayNote ( 52 , 2 50 ) ; // e e i g h t h note
// measure 10playNote ( 52 , 2 50 ) ; // e e i g h t h noteplayNote ( 60 , 2 50 ) ; // c e i g h t h noteplayNote ( 58 , 2 50 ) ; // b f l a t e i g h t h noteplayNote ( 56 , 2 50 ) ; // a f l a t e i g h t h note
// measure 11playNote ( 52 , 7 50 ) ; // e do t t ed quar t e r noteplayNote ( 52 , 2 50 ) ; // e e i g h t h note
// measure 12playNote ( 52 , 2 50 ) ; // e e i g h t h noteplayNote ( 60 , 2 50 ) ; // c e i g h t h noteplayNote ( 58 , 2 50 ) ; // b f l a t e i g h t h noteplayNote ( 56 , 2 50 ) ; // a f l a t e i g h t h note
// measure 13playNote ( 53 , 7 50 ) ; // f do t t ed quar t e r noteplayNote ( 53 , 2 50 ) ; // f e i g h t h note
// measure 14playNote ( 53 , 2 50 ) ; // f e i g h t h noteplayNote ( 61 , 2 50 ) ; // d f l a t e i g h t h noteplayNote ( 60 , 2 50 ) ; // c e i g h t h noteplayNote ( 58 , 2 50 ) ; // b f l a t e i g h t h note
// measure 15playNote ( 55 , 2 50 ) ; // g e i g h t h noteplayNote ( 63 , 2 50 ) ; // e f l a t e i g h t h noteplayNote ( 62 , 2 50 ) ; // d e i g h t h noteplayNote ( 63 , 2 50 ) ; // e f l a t e i g h t h note
// measure 16playNote ( 65 , 2 50 ) ; // f e i g h t h note
“main”2005/1/11page 352
i
i
i
i
i
i
i
i
352 Chapter 10 Combining and Creating Sounds
playNote ( 63 , 2 50 ) ; // e f l a t e i g h t h noteplayNote ( 61 , 2 50 ) ; // d f l a t e i g h t h noteplayNote ( 58 , 2 50 ) ; // b f l a t e i g h t h note
// measure 17playNote ( 56 , 1000 ) ; // a f l a t h a l f note
}
Here is a method that will play the first two verses of Jingle Bells with eachverse followed by the refrain write a method that calls the other methods.
Program 96: Playing Jingle Bells
/∗∗∗ Method to p lay J i n g l e B e l l s∗/
public void p l a y J i n g l eB e l l s ( ){
// p lay ver se 1p layJ ing l eBe l l sV1 ( ) ;
// p lay r e f r a i np l a yJ i n g l eBe l l sR e f r a i n ( ) ;
// p lay ver se 2p layJ ing l eBe l l sV2 ( ) ;
// p lay r e f r a i np l a yJ i n g l eBe l l sR e f r a i n ( ) ;
}
The advantage to breaking methods into smaller reusable methods is that ifthere is an mistake in one of the smaller methods it is easier to find and fix. If Ihad created one very long method with all the measures in it I probably would havecopied and pasted the measures in the refrain. If I had to fix notes in the refrainI would have to fix them in both copies of it. By pulling out repeated code I haveonly one copy of it to fix and check for errors.
10.7 CONCEPTS SUMMARY
In this chapter we introduced class methods, private methods, and building methodsfrom other methods.
10.7.1 Class Methods
Class methods are general methods like Math.abs(int num) or methods that createobjects like Sound.createTriangleWave(int freq, int maxAmplitude). Class

“main”2005/1/11page 353
i
i
i
i
i
i
i
i
Section 10.7 Concepts Summary 353
methods do not work on object data (no implicit this current object is passed tothe method).
Class methods are defined with the keyword static on the method declara-tion: visibility static returnType methodName (parameterList ).
public stat ic Sound createTriangleWave ( int f r eq , int maxAmplitude )
You can invoke a class method using ClassName.methodName(parameterList).To invoke the class method createTriangleWave on the class Sound and then savea reference to the new Sound object in a variable called triangle do the following:
> Sound triangle = Sound.createTriangleWave(440,4000);
If the method doesn’t use object data then it can be a class method. If amethod does use object data then it should be an object method.
10.7.2 Private Methods
Private methods can only be invoked from code in the same class that they aredeclared in. Use private methods to break down long public methods into smallerreusable parts.
To declare a method to be private use the private keyword for the visibility.Remember that to declare a method you can usevisibility [static] returnType
methodName (parameterList ). The static keyword is optional and is used fordeclaring class methods.
private void p l a yJ i n g l eBe l l sR e f r a i n ( )
If you try to access a private method from code outside the class the methodis defined in you will get an error.
> MidiPlayer player = new MidiPlayer();> player.playJingleBellsRefrain();java.lang.IllegalAccessException: Classkoala.dynamicjava.interpreter.EvaluationVisitor can not access amember of class MidiPlayer with modifiers "private"at sun.reflect.Reflection.ensureMemberAccess(Reflection.java:57)at java.lang.reflect.Method.invoke(Method.java:317)
>
10.7.3 Build a Program from Multiple Methods
You can build a program (method) from several methods. If you want to play awhole song like Jingle Bells you can break this into smaller reusable methods.
/∗∗∗ Method to p lay J i n g l e B e l l s∗/
public void p l a y J i n g l eB e l l s ( ){
// p lay ver se 1
“main”2005/1/11page 354
i
i
i
i
i
i
i
i
354 Chapter 10 Combining and Creating Sounds
p layJ ing l eBe l l sV1 ( ) ;
// p lay r e f r a i np l a yJ i n g l eBe l l sR e f r a i n ( ) ;
// p lay ver se 2p layJ ing l eBe l l sV2 ( ) ;
// p lay r e f r a i np l a yJ i n g l eBe l l sR e f r a i n ( ) ;
}
Long methods are hard to read and understand. Try to break down methodsinto smaller parts.
PROBLEMS
10.1. Rewrite the echo function (Program 81 (page 325)) to generate two echoes back,each delay samples previous. Hint: Start your index loop at 2*delay + 1, thenaccess one echo sample at index-delay and another at index - 2*delay.
10.2. How long is a sound compared to the original when it’s been frequency doubled(Program 83 (page 328))?
10.3. Hip-hop DJ’s move turntables so that sections of sound are moved forwards andbackwards quickly. Try combining backwards play (Program 78 (page 316)) andfrequency shifting (Program 83 (page 328)) to get the same effect. Play a secondof a sound quickly forward, then quickly backward, two or three times. (Youmight have to move faster than just double the speed.)
10.4. Consider changing the if block in the frequency shift recipe (Program 86 (page 332))to sourceIndex = sourceIndex - getLength(source). What’s the differencefrom just setting the sourceIndex to 1? Is this better or worse? Why?
10.5. If you use the shifting recipe (Program 86 (page 332)) with a factor of 2.0 or 3.0,you’ll get the sound repeated or even triplicated. Why? Can you fix it? WriteshiftDur that takes a number of samples (or even seconds) to play the sound.
10.6. Change the shift function in Program 86 (page 332) to shiftFreq which takes afrequency instead of a factor, then plays the given sound at the desired frequency.
10.7. Using the sound tools, figure out the characteristic pattern of different instru-ments. For example, pianos tend to have a pattern the opposite of what wecreated—the amplitudes decrease as we get to higher sine waves. Try creating avariety of patterns and see how they sound and how they look.
10.8. When musicians work with additive synthesis, they will often wrap envelopesaround the sounds, and even around each added sine wave. An envelope changesthe amplitude over time: It might start out small, then grow (rapidly or slowly),then hold at a certain value during the sound, and then drop before the soundends. That kind of pattern is sometimes called the attack-sustain-decay (ASD)envelope. Pianos tend to attack quickly then decay quickly. Flutes tend to attackslowly and sustain as long as you want. Try implementing that for the sine andsquare wave generators.
10.9. Write a method to play a simple song like Jingle Bells. The song should haveat least one repeating part. Make sure that you create a private method for therepeating part.

“main”2005/1/11page 355
i
i
i
i
i
i
i
i
Section 10.7 Concepts Summary 355
TO DIG DEEPER
Good books on computer music will talk a lot about creating sounds from scratchlike in this chapter. One of my favorites for understandability is Computer Music:Synthesis, Composition, and Performance by Dodge and Jerse [8]. The bible ofcomputer music is Curtis Roads’ massive The Computer Music Tutorial [22].
One of the most powerful tools for playing with this level of computer mu-sic is CSound . It’s a software music synthesis system, free, and totally cross-platform. The book by Richard Boulanger [5] has everything you need for playingwith CSound.
jMusic is a free programming library written for musicians in Java (see http://http://jmusic.ci.qut.edu.au/jmtutorial/t1.html). It allows you to com-pose music. It can also import and export MIDI and audio files.

“main”2005/1/11page 356
i
i
i
i
i
i
i
i
356 Chapter 10 Combining and Creating Sounds

“main”2005/1/11page 357
i
i
i
i
i
i
i
i
Bibliography
1. AAUW, Tech-savvy: Educating girls in the new computer age, American Associationof University Women Education Foundation, New York, 2000.
2. Harold Abelson, Gerald Jay Sussman, and Julie Sussman, Structure and in-tepretation of computer programs – 2nd edition, MIT Press, Cambridge, MA, 1996.
3. Ken Abernethy and Tom Allen, Exploring the digital domain: An introduction tocomputing with multimedia and networking, PWS Publishing, Boston, 1998.
4. Beth Adelson and Elliot Soloway, The role of domain experience in softwaredesign., IEEE Transactions on Software Engineering SE-11 (1985), no. 11, 1351–1360.
5. Richard Boulanger (ed.), The csound book: Perspectives in synthesis, sound design,signal processing, and programming, MIT Press, Cambridge, MA, 2000.
6. Amy Bruckman, Situated support for learning: Storm’s weekend with rachael, Jour-nal of the Learning Sciences 9 (2000), no. 3, 329–372.
7. John T. Bruer, Schools for thought: A science of learning in the classroom, MITPress, Cambridge, MA, 1993.
8. Charles Dodge and Thomas A. Jerse, Computer music: Synthesis, composition,and performance, Schimer:Thomason Learning Inc., 1997.
9. Matthias Felleisen, Robert Bruce Findler, Matthew Flatt, and ShriramKrishnamurthi, How to design programs: An introduction to programming and com-puting, MIT Press, Cambridge, MA, 2001.
10. Ann E. Fleury, Encapsulation and reuse as viewed by java students, Proceedings fothe 32nd SIGCSE technical symposium on computer science education (2001), 189–193.
11. James D. Foley, Andries Van Dam, and Steven K. Feiner, Introduction tocomputer graphics, Addison Wesley, Reading, MA, 1993.
12. Martin Greenberger, Computers and the world of the future, Transcribed record-ings of lectures held at the Sloan School of Business Administration, April, 1961, MITPress, Cambridge, MA, 1962.
13. Mark Guzdial, Squeak: Object-oriented design with multimedia applications,Prentice-Hall, Englewood, NJ, 2001.
14. Mark Guzdial and Kim Rose (eds.), Squeak, open personal computing for multimedia,Prentice-Hall, Englewood, NJ, 2001.
15. Idit Harel and Seymour Papert, Software design as a learning environment, In-teractive Learning Environments 1 (1990), no. 1, 1–32.
16. Brian Harvey, Computer science logo style 2/e vol. 1: Symbolic computing, MITPress, Cambridge, MA, 1997.
17. Dan Ingalls, Ted Kaehler, John Maloney, Scott Wallace, and Alan Kay,Back to the future: The story of squeak, a practical smalltalk written in itself, OOP-SLA’97 Conference Proceedings, ACM, Atlanta, GA, 1997, pp. 318–326.
18. Janet Kolodner, Case based reasoning, Morgan Kaufmann Publishers, San Mateo,CA, 1993.
357

“main”2005/1/11page 358
i
i
i
i
i
i
i
i
358 BIBLIOGRAPHY
19. Margaret Livingstone, Vision and art: The biology of seeing, Harry N. Abrams,Inc., New York, 2002.
20. Jane Margolis and Allan Fisher, Unlocking the clubhouse: Women in computing,MIT Press, Cambridge, MA, 2002.
21. M. Resnick, Turtles, termites, and traffic jams: Explorations in massively parallelmicroworlds, MIT Press, Cambridge, MA, 1997.
22. Curtis Roads, The computer music tutorial, MIT Press, Cambridge, MA, 1996.

“main”2005/1/11page 359
i
i
i
i
i
i
i
i
Index
==, 332
greater-than-or-equals, 332
abstraction, 62, 63ACM Turing Award, 17acuity, 83algebra, 46algorithm, 9, 12, 294, 317, 334
defintion, 12mirroring, 317
alpha channel, 86American Standard Code for Information Interchange (ASCII), 14amplitude, 265analog, 16analog-to-digital conversion, 270analog-to-digital conversion (ADC), 270appending, 30applets, 20arguments, 64array, 44, 274
access elements, 81copying, 311definition, 81element, 274index, 274notation, 306
artificial intelligence, 9ASCII, 14attack-sustain-decay (ASD) envelope, 354AutoCAD, 234
background subtraction, 210base file name, 66binary, 13binary number system, 13binding, 37bit, 13bitmap, 80bitmap graphical representations, 234blend, 159, 323blending
pictures, 159
359

“main”2005/1/11page 360
i
i
i
i
i
i
i
i
360 Index
sounds, 323block, 57, 332blue, 15blurring, 207BMP, 234body of method, 57boxing, 46Brando, Marlon, 284byte, 13, 44
definition, 44
C, 11calculus, 17casting, 27, 107changeVolume, 293channel, 85chromakey, 214class, 20, 43
fully qualified name, 91class fields
accessing, 91class method, 335class methods, 46
defintion, 46class variables
accessing, 91clipped, 273clipping, 255, 273, 296CMYK color model, 85code, 44collage, 154color
sepia, 200color replacement, 187ColorChooser.pickAColor(), 92colorObj.brighter(), 92colorObj.darker(), 92commands, 74compile, 23, 101compiling
definition, 23compressed, 45, 81, 87compression, 81, 234compressions, 265computational recipe, 8computer, 13computer hardware, 270

“main”2005/1/11page 361
i
i
i
i
i
i
i
i
Index 361
computer music, 10constant, 252constants, 10, 133context, 58coordinates, 82copying, 147cropping, 151CSound, 355cycle, 265cycles per second, 266
data, 44data representation, 15data structures, 9, 15databases, 9debuggging
using print statements, 145debugging, 290, 296
using print statements, 145decibels, 266decimal number, 13definitions pane, 23Digital, 16Digital media, 16digital-to-analog conversion, 271digital-to-analog conversion (DAC), 270digitization, 16digitizing media
sounds, 270digitizing media
pictures, 83why?, 16
directory, 45, 66disk, 45double quote, 29drawing tool, 235DrJava, 21
definitions pane, 23interactions pane, 23files pane, 22installing, 21running slowly, 22starting, 21
Dynabook, 18
edge detection, 194editor, 21

“main”2005/1/11page 362
i
i
i
i
i
i
i
i
362 Index
emergent properties, 10encoding, 8, 13, 66envelopes, 354equal temperament, 267equality, 332equals-to, 332error
illegal start of expression, 57semicolon expected, 57
evaluation, 63, 73explore(), 89expression, 25
Fast Fourier Transform, 269FFT, 269file, 45file extension, 66FileChooser.getMediaPath(fileName), 145, 147files pane, 22fillPolygon(int[] xArray,int[] yArray, int numPoints), 228filters, 343Flash, 234floating point
typing, 27floating point number, 18, 44FM synthesis, 343font, 235
how defined, 234for loop, 122Fourier transform, 269frequency, 265, 266, 271frequency domain, 269frequency modulation synthesis, 343full file name, 65, 66fully qualified name, 91function
arguments, 63input values, 63input variables, 63parameters, 63
function calls, 73functions, 46fundamental, 267
garbage collection, 36general, 116getColor(), 90

“main”2005/1/11page 363
i
i
i
i
i
i
i
i
Index 363
getHeight(), 89getPixel(x,y), 89getPixels(), 89getRed(), 90getWidth(), 89getX(), 89getY(), 89GIF, 234going digital, 16graphics, 10grayscale, 127greater-than, 332green, 15
hard disk, 45hardware, 270Hertz, 266hierarchical decomposition, 118hierarchy, 118HSB, 84HSV color model, 84HTML, 14human-computer interface, 9
if, 332, 340immutable, 48implicitly, 58import, 91
how to, 91why, 91
infinite loop, 99, 100, 162stopping one, 99
Ingalls, Dan, 320inherit, 34, 247inheritance, 34inherits, 247input, 46input values, 63input variables, 63integer, 44
typing, 27Intel, 15intelligence, 9intelligent systems, 9intensity, 127, 265interactions pane, 23interface, 9, 251, 259

“main”2005/1/11page 364
i
i
i
i
i
i
i
i
364 Index
iterate, 280
Java, 11, 19installing, 21
Javadoc comments, 24JPEG, 66, 81, 234
Kaehler, Ted, 320Kay, Alan, 320kilobyte, 233kilobytes, 87knots, 9
less-than, 332less-than-or-equals, 332liberal education, 17Lisp, 11literal, 47loop, 280
nested, 137lossless compression, 234, 343lossy compression, 81, 234, 343luminance, 83, 86, 128
makeSoundwhat it does, 275
Maloney, John, 320matrix, 82
definition, 82max, 294maximum, finding, 294media computation, 15MediaTools, 94, 268
application, 279picture tools, 94sound tools, 268
megabyte, 87memory, 13, 22memory leak, 36method, 43
definition, 46, 56method body, 57method overloading, 61methods, 46methods vs. recipes, 117MIDI, 344mirroring, 317mixing sounds, 323

“main”2005/1/11page 365
i
i
i
i
i
i
i
i
Index 365
Moore’s Law, 15Moore, Gordon, 15MP3, 343MP4, 343MPEG-3, 343Musical Instrument Digital Interface, 344
negative image, 125nested, 137nested loop, 172nested loops, 137networking, 10new Color(redValue,greenValue,blueValue), 90new Picture(fileName), 88new Picture(width,height), 170new Sound(fileName), 71new Sound(int lengthInSamples), 334noise, 269, 343normalizing, 294not-equals, 332Nyquist theorem, 271
applications, 271
object, 275definition, 20
object methods, 46definition, 46
object reference, 70object variable, 70object-oriented, 19objects, 275operating system, 45operators, 25overloading, 159, 206overtones, 267
packagedefinition, 91
packages, 227painting tool, 235parameters, 63pass by value, 64path, 66path separator, 66PCM, 273percentage, 96Perlis, Alan, 17

“main”2005/1/11page 366
i
i
i
i
i
i
i
i
366 Index
physicscolor, 15
pictureshow(), 67
picture element, 15picture objects, 80picture tool, 94pictureObject.repaint(), 92pitch, 266pitch interval, 267pixel, 15, 80, 82
definition, 82pixelation, 207pixelization, 83pixels, 80placeholder, 119play(), 71playNote, 344posterizing, 202Postscript, 234precedence, 25primitive, 69, 70primitive type, 69private visibility
definition, 56process, 17program, 9, 12, 43, 44
defined, 44definition, 12
programming language, 44programming languages, 10psychoacoustics, 266public visibility
definition, 56pulse coded modulation (PCM), 273
ranges, 10rarefactions, 265recipe, 8recipes vs. methods, 117red, 15reference, 70reserved words, 29return, 119, 294reusable, 116RGB color model, 84Roads, Curtis, 303, 355

“main”2005/1/11page 367
i
i
i
i
i
i
i
i
Index 367
rounding errors, 92run length encoding, 234
sample, 15, 271sample index, 330sample objects, 275sample size, 296sample sizes, 272sampling, 166, 330, 333sampling rate, 277sampling interval, 333sampling rate, 272
in additive synthesis, 335sawtooth, 268scope, 106, 118
definition, 118sepia-toned, 200setColor(color), 90setRed(redValue), 90short-circuit evaluation, 219show(), 67, 88sign bit, 273signal view, 268sine wave, 265Siren, 320slice, 269software engineering, 9, 17sonogram view, 269sound
amplitude, 265blockingPlay, 279clipping, 273decibels, 266decreasing volume, 290frequency, 265frequency domain, 269fundamental, 267getLength(), 276getSamples, 275getSampleValueAt, 276getSamplingRate, 277getValue, 276how to manipulate, 274increasing volume, 284intensity, 265new Sound(fileName), 71overtones, 267
“main”2005/1/11page 368
i
i
i
i
i
i
i
i
368 Index
pitch, 266play(), 71pulse coded modulation, 273sampling rate, 272setSampleValueAt, 276setValue, 276sonogram view, 269splicing, 308volume, 265, 284, 290
sound cursor, 279sound editor, 268sound object, 274sound pressure level, 266source, 147specification, 235spectrum view, 269spike, 269splicing, 308square brackets, 306square waves, 339Squeak, 320static method, 335stepping, 103String, 44, 73strings, 29
appending, 30strongly typed, 45sub-program, 294sub-recipe
sampling, 330subscript, 306subsitution, 73substitution, 63subtractive synthesis, 343Sun, 21symbols, 43syntax, 56synthesizers, 328systems, 9
target, 147test, 332testing, 288
using print statements, 145testing methods, 288, 296The Godfather, 284theory, 9

“main”2005/1/11page 369
i
i
i
i
i
i
i
i
Index 369
this, 58, 105time domain, 269trace, 103tracing, 290
using print statements, 145transforming, 147transistor, 15transparency, 86, 159TrueType, 234two’s complement notation, 273type, 43types
byte, 44double, 44float, 44int, 44integer array, 44String, 44
unboxing, 46Unicode, 18
variable, 68declaration, 31, 68object, 70primitive, 70
variables, 46reusing, 36
vector representation, 234vibrato, 326visibility, 56
definition, 56private, 56public, 56
volume, 265
walking through, 103Wallace, Scott, 320WAV, 66while, 96while loop, 96, 281window (of time), 269wrapper, 46wrapper classes
definition, 46write(fileName), 92