BERISP Maunal - snowmannetwork.com€¦ · Web viewThe first introductory screen displays the...
74
SNOWMAN NETWORK Knowledge for sustainable soils Breaking ecotoxicological restraints in spatial planning (BERISP) Manual for the BERISP-DSS 1 1 2 3 4 5 6 7 8 9 10 11 12 13 14 15 16 17 18 19 2
Transcript of BERISP Maunal - snowmannetwork.com€¦ · Web viewThe first introductory screen displays the...

SNOWMAN NETWORKKnowledge for sustainable soils
Breaking ecotoxicological restraints in spatial planning (BERISP)
Manual for the BERISP-DSS
1
1
2
3
45
6
789
1011
1213
1415
1617
18
19
20
2

3
21
2223242526272829303132333435363738394041
4

Contents
5
42
6

1 Introduction 71.1 Objectives of BERISP-DSS 71.2 Applicability and restrictions of the BERISP-DSS 71.3 Quality of the required data. 9
2 BERISP approach 93 Your first steps into the BERISP DSS 113.1 Describing and defining the system 113.2 Analysis of the effects of contamination on the target species
173.3 Comparison of the results of the scenarios 19
4 Application manual 204.1 General outline of the working process 204.2 Project 214.3 Base scenario 244.4 Alternative scenarios 264.5 Exposure and Risks 274.6 Compare Scenarios 304.7 Viewing and assigning maps in Berisp 32
5 Maps needed by BERISP 335.1 Format 335.2 Input maps 33
6 BERISP on disk 366.1 The Projects directory 366.2 The <Your Project> directory 376.3 The Scenarios directory 37
7 Case study: Demo Holme 387.1 Setting up the project 38
7
43444546
47
4849505152
5354555657585960
616263
64656667
686970717273
8

Alterra-document.docx 5
9
74
10

1 Introduction
This manual describes the decision support system (BERISP-DSS) that has been developed in the BERISP project (BERISP: Breaking Ecotoxicological Restraints in Spatial Planning). For details on the BERISP project see www.berisp.org. In this manual the use of the BERISP-DSS will be explained, in terms of both its technical application and how it can be utilised within spatial planning processes. The scientific underpinning of the DSS will not fully be supported by this manual, this will be published in peer review papers. If any information is required please contact Nico van den Brink ([email protected])
The goal of the BERISP decision support system (BERISP-DSS) is to aid spatial planners in dealing with contamination patterns, in order to reach their objectives. The method presented here is 1) scientifically sound, 2) it incorporates stakeholders of the spatial planning process, and 3) its results can be directly used in the spatial planning process.
1.1 Objectives of BERISP-DSS
Due to changes in demography, economic prosperity and time expenditure of people, there is an increasing demand for areas for nature conservation/development and for recreational use. An extra complicating factor in this process may be the presence of environmental pollution in these areas. The contaminants could pose a risk to organisms, and may hamper the development of the areas. Effects may affect the occurrence or functioning of organisms or complete ecosystems, and may even have impact on humans. Risks of environmental pollution therefore need to be assessed. Currently the methods used to assess risks are complex, and for the general public too specific. Hence, decisions based on such methods may lack the support of the general public. Other disadvantages of the current methods are that they do not seize upon the relevant parameters and do not rely on the participation of stakeholders. For spatial planning purposes the current methods often miss the necessary spatial information that spatial planners need in their planning process. Contamination patterns often vary at a very small scale (smaller than the planners scale), while larger animals (often a protection goal) may range over a larger scale (about the planners scale). Small scale contamination patterns are directly coupled to exposure of larger animals through food uptake so effects of contaminants may therefore have relevancy on scales that are important for spatial planners.
The objective of the BERISP project is to develop a so-called decision support system (DSS) that aids spatial planners in their process to optimise their plans
6
11
75
7677787980818283848586878889909192
93
949596979899
100101102103104105106107108109110111112113114115116
12

in relation to the occurrence of pollutants in the area of concern. Within the DSS, the risks of pollutants to wildlife will be assessed and the results presented in a spatially explicit way.
1.2 Applicability and restrictions of the BERISP-DSS
The BERISP-DSS is an instrument to facilitate the redevelopment of contaminated areas (derelict) for natural or recreational use. The DSS is developed to compare risks of the present situation and alternative planning scenarios, using computer models that execute a scientific, spatially explicit risk assessment of the contaminant in the planning area.
The DSS plays a specific role in the spatial planning process as shown in the flowchart (figure 1).
Plan development
Planning result
Spatially explicit plan info
BERISP-DSS
Risk unacceptable
Iteration
Risk acceptable
Process succeededPolicy and management objectives
Current Land use Stakeholders
Figure 1. Conceptual outline of the role of the BERISP-DSS within a planning process.
The spatial planning process starts with political or management objectives concerning a certain area or region. This process begins by making plans of alternative scenarios for the area in cooperation with relevant stakeholders. In such a plan all options, possibilities, interests, objectives, impossibilities and problems of the individual stakeholder can be taken into account. Spatially explicit information of the area, like the physical, chemical and biological properties are the input for the DSS. The consultation between stakeholders and risk assessors takes place in an iterative process. When risks are considered to be acceptable (as will be shown in maps resulting from the DSS) a new spatial structure for the area is ready to be implemented. When unacceptable risks occur, a new consultation round with the stakeholders
7
13
117118119120
121
122123124125126127128129
130131132133134135136137138139140141142143
14

needs to be performed with the goal of minimizing the risks of contaminants. This leads to a new (adapted) proposed land-use plan in which the views and goals of each stakeholder are still reflected. This plan is fed into the DSS again and the previously described process is repeated until a proposed land-use plan leads to a new spatial structure for the area with acceptable risks that can be implemented.
This spatial planning process is described within the BERISP manual, including a description of the collection of the necessary spatially explicit information that is required for using the DSS. The DSS is designed in such a way that current land-use and proposed land-use can be compared with regard to spatially explicit risks of contaminants. In this way the DSS helps to design plans with acceptable ecotoxicological risks (scientifically sound) and an acceptable spatial configuration (stakeholders).There are some restrictions to the use of the BERISP-DSS and its results. It is more or less a quick scan tool, which uses site specific information on abiotic conditions, but generic information on the species that are modelled in the DSS. The results should therefore be regarded as an assessment of potential risks, based on modelling, and not an assessment of actual risks based on measurements of contaminant levels of effects in organisms. This is both a restriction and an advantage, because this approach allows the user to assess risks a priori to plan development. Nevertheless, the results of the DSS should be treated in relation to the quality of the input data (see later). This system has been developed to support the decision making processes of the planners, not to make the decisions – the output does not recommend a course of action, it instead provides comparative risks of various planning scenarios.
1.3 Quality of the required data.
The data required in spatial planning processes is mostly general information about the current use, the management (and policy) objectives and future plans, but also information about interests and viewpoints of all relevant stakeholders. Basic knowledge about the problems regarding contamination is needed here. The design of a proposed land-use plan should be a creative process that is not hindered by detailed information.
The information required for running the BERISP-DSS is far more explicit. This information should be very detailed about species, contamination, physical, chemical and biological properties of the area (as detailed as possible). Moreover this information should be available on a spatially explicit level. This means that the spatial distribution of all these characteristics has to be available (GIS). The quality-standard of the data is high and additional research maybe needed to gather the necessary information.
8
15
144145146147148149150151152153154155156157158159160161162163164165166167168169170
171
172173174175176177178179180181182183184185
16

2 BERISP approach
The DSS approach is based on two concepts. The first concept is the spatial habitat use and foraging of the organisms. At the spatial scale planners are interested in (i.e. the landscape scale), most top predators do not distribute their foraging efforts homogeneously over the area of concern. Instead they may exhibit preferential foraging in certain landscape elements, e.g. where prey is numerous or easily encountered. The second concept refers to the food web and the way trophic relationships determine the accumulation of contaminants in the food resources of the top predator.
Spatial foraging occurs on all trophic levels. At the landscape scale, however, we have both a known, heterogeneous, distribution of contaminants in soil as well as clear spatial patterns in the resource exploitation of top predators. This matching of scales of contaminant and foraging effort distribution makes it mandatory to be spatially explicit when estimating e.g. daily uptake of potentially deleterious substances.
Spatial processesFor a given landscape we thus estimate, for an individual predator, where we expect it will spend its foraging effort, assuming that this distribution of foraging effort will be affected by the relative abundance and availability of food resources as well as by the specific preferences for foraging in landscape types, e.g. for certain prey, near to the centre of the home-range, etc.
For the top predator species we explicitly model spatial foraging. Conceptually, the same approach is followed for the prey species. However, for several of these species (e.g. earthworms), the resolution of the spatial representation (grid cells with a dimension of 10 by 10 metre) is such that they can be assumed to spend most of their life within a single grid cell. For these species a spatial foraging approach is not required. Note that they have to cope with spatial heterogeneity as well, but at a scale smaller than the landscape scale chosen for the modelling.
Temporal variabilityThe modelling approach deals with spatial variability. However we don’t take into account temporal variability. This means that all densities and biomass values represent long-term averages. Seasonal fluctuations are ignored. For some of the prey groups (e.g. carabid beetles) age- or stage-structure of the population is taken into account in the estimate of average individual age and/or weight. For the top-predator we assume that it is resident in the area and year-round present.For more detail on the modelling approaches see appendix 2.
9
17
186
187188189190191192193194195196197198199200201202203204205206207208209210211212213214215216217218219220221222223224225226227228
18

3 Your first steps into the BERISP DSS
This chapter will guide you through your very first BERISP-session. Hence, this chapter is not meant to cover everything - see chapter 4 for a more detailed description of the DSS. On your first use of the DSS just closely follow the steps given below and within five minutes you will have completed your first risk evaluation. Do not try anything beyond this tutorial yet at the risk of getting lost in the details of the system. To find out what all the options and buttons are for, please refer to the Application manual in chapter 4 of this document. For your orientation, it may be helpful to browse through the introductory paragraphs of that chapter outlining the general plan of the application. In the following paragraphs an example project will be presented, with the goal of getting used to working with the application. The example used is pre-installed with the program and is called ‘Afferdsche en Deestsche Waarden’. This is a real floodplain in the Netherlands along the river Rhine, with contamination problems. This project is only in the DSS for demonstration use only.
3.1 Describing and defining the system
In this first part we will guide you through the steps of the DSS that define the input for the analysis. For any case study to be analysed, the habitats, the soil properties, and the concentrations of one or more contaminants have to be defined.
Start the Berisp-application.
The first introductory screen displays the general introductory text of the Project-chapter. Generally the screens of the DSS are split in three parts: (a) across the top the banner shows the project name, (b) on the left the main function buttons can be used to navigate through the different steps of the project, (c) on the
Alterra-document.docx 10
19
229
230231232233234235236237238239240241242243244245246247
248
249250251252253254
20

Project
right a larger “working screen” is available in which options and information can be entered in the DSS. The screens will change according to the information needed, or produced by the DSS.
No project has yet been loaded, as can be easily seen from the label in the green banner at the top of the screen, which says “(no name)”. In the next steps we will load a project.
a) BERISP banner shows project nameb) Menu barc) Working screen
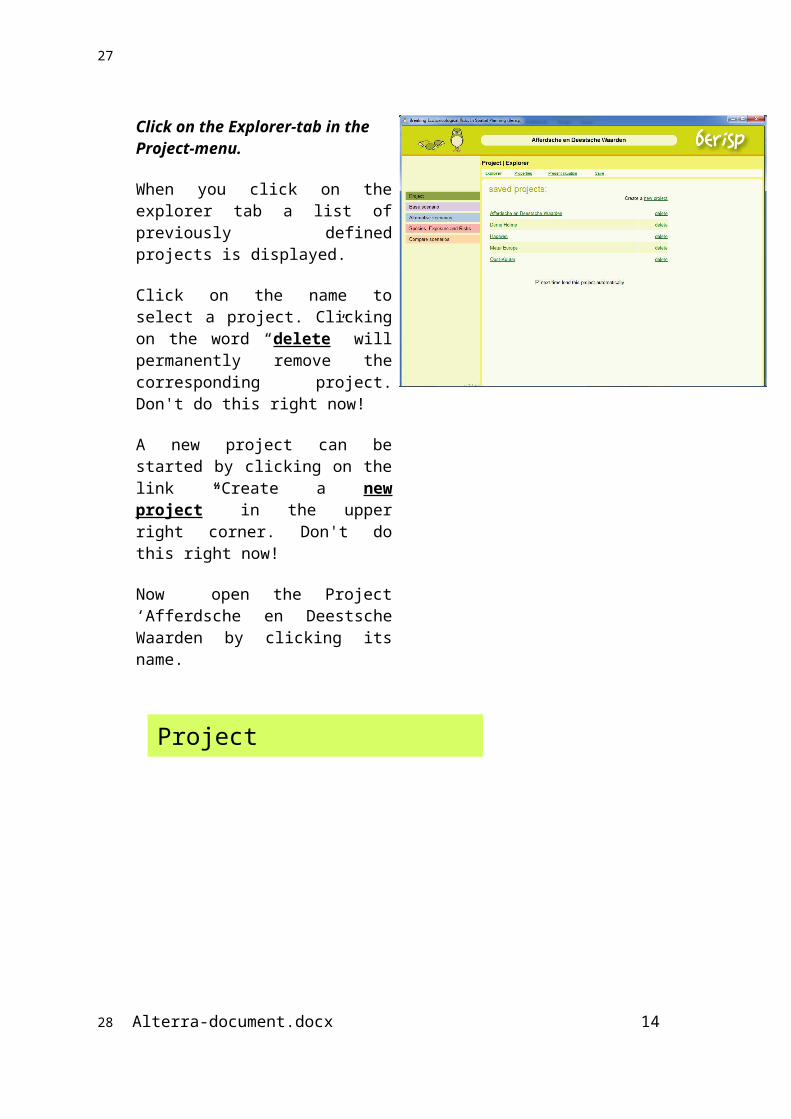
Click on the Explorer-tab in the Project-menu.
When you click on the explorer tab a list of previously defined projects is displayed.
Click on the name to select a project. Clicking on the word “delete” will permanently remove the corresponding project. Don't do this right now!
A new project can be started by clicking on the link “Create a new project” in the upper right corner. Don't do this right now!
Now open the Project ‘Afferdsche en Deestsche Waarden by clicking its name.
Alterra-document.docx 11
21
22

Define a project
The name of the selected project appears in the green banner at the top of the screen.
The Project-Properties page is displayed. Here you can enter essential information about the project, as well as descriptions that only serve documentary purposes. The essential fields are marked by a little black square, the documentary ones by a white one.
At this page you also define the project area by selecting two maps: a map with topographic information, which can be used for orientation purposes and a mask-map, which defines the boundaries of the project area. The former is non-essential, as the DSS can be run without this map, however the latter is essential and the DSS will not run without it.
Click on the Properties-tab to further define the project.
Alterra-document.docx 12
23
24

Base scenario
Project: Present Situation
The present situation of the Project is defined in this screen. A more detailed description can be made of the present situation of the project area, and of the plan objectives. Also a general description of the contamination status of the area can be presented These are for documentation purposes only and will not be processed by the application.
Click on the Base Scenario item in the menu bar at the left to define the Base Scenario.
Define the Base Scenario
The Base Scenario is the reference situation with which alternatives will be compared. Often this is the present situation, but it is also possible to define a future scenario as a reference Base Scenario.
Other scenarios are defined as deviations from the Base Scenario.
In the tabs in the “working screen” the Base Scenario can be further defined.
Read the introduction and click on the Habitat-tab in the “working screen”.
Alterra-document.docx 13
25
26
Define the Habitat of the Base Scenario
Defining the habitat is a crucial step in the process as it defines the distribution of the prey species and the behaviour of the predator.
The habitat map is defined as an ASCII-grid (this is a text file representing spatial data, also called a map) that can be imported into the application. Values in the map correspond to the Berisp-habitat classes (see appendix 5 for details on map definitions, formats and properties).
Expert users can specify the occurrence of the prey species per habitat type. Press the Expert button to see this and then Cancel to close the Prey-abundance Definition Window.
Now click the Contaminants-tab to define the spatial distribution of the contaminants.
Alterra-document.docx 14
27
28

Define the contaminants in the project area
Defining the contamination is a two step action. First, check which contaminants you would like to evaluate.
The contaminants which are supported by Berisp are listed here. Note, that when you (un-)check any of them, the corresponding item in the contamination-sub menu (dis-)appears.
When the selection is complete, click on each of the items in the contamination-sub menu to define the spatial distribution of that contaminant.Define the contaminant patterns of the Base Scenario
As an example, we show here the page that is displayed when you click the Cadmium-tab from the sub menu.
Like the habitat, the contamination is defined by importing a map (ASCII-grid) by the import button. Values in the map define the concentration of contaminant within each cell.
A map can also be imported in a file in which x- and y-coordinates are listed with a measurement value. Such data can be imported, and in the DSS a method is available to
Alterra-document.docx 15
29
30

interpolate the data, based on Inverse Distance Weighting.
Note: when a map does not show well, it may be that the legend is not in accordance with its values. Double-click on the legend to open its definition. “Auto detect” will help you find appropriate bounds.
Define soil properties
The final step in the definition of the Base Scenario of the Project is to specify the Soil properties.
The best way to do this is to supply maps for pH, Clay Content and Organic Matter, similar to the contamination map. When such maps are not (all) available there are two alternatives:- enter a mean value in the table for the whole project-area- enter a mean value for each habitat.
The Soil Properties-tab opens with this Substitute screen where values may be entered or by using the menu bar, maps for pH, clay content and organic matter can be entered.
Alterra-document.docx 16
31
32

Alternative scenarios
Clay-map construed from substitute values
In the previous step we defined the Clay Content-map as a fixed percentage for each habitat. The DSS then creates a map using this data.
The result is shown here. You could still import a real map here. If you do so, the substitute table will be reset for this component.
Note that both Acidity and Organic Matter are two additional input maps defined exactly the same way.
Define Alternative Scenarios
The next step may be to define Alternatives Scenarios, although you can also run the models on the Base scenario alone. These are scenarios in which factor(s) are changed compared to the Base Scenario, e.g. a different Habitat, or (part of) the contamination is remediated. These changes are a result of the planning process, and the required maps can be completely redesigned by the stakeholders, as long as the technical format is not changed.
Alterra-document.docx 17
33
34

Defining a scenario starts out much the same as defining a project - with an explorer screen.
Try this and check the different Alternative Scenarios. In this tutorial we will skip this step for it is similar to the definition the Base Scenario.
Alterra-document.docx 18
35
255
36

Species, Exposure and Risks
3.2 Analysis of the effects of contamination on the target species
In section 3.1 the (physical) outline of the project area has been defined. Next, the risk assessment needs to be further defined and then executed. Firstly the species to be used in the assessment, including its associated, predefined food web is chosen. Exposure to the contaminants and the associated risks for this species are calculated and will be illustrated on a map. Exposure and risks are specific to the selected species, as each has its own tolerances and exploit different food chains and habitats. Selection of the target species is therefore an important step in the process.
Execute a Risk assessment
Press the Exposure and Risks menu option and then the Exposure-tab.
To start an assessment of a Scenario, the Scenario, the Contaminant and the Predator species must be selected.
Then click the Show-button. The models start running, and after a while the result appears instead of the empty map at the bottom.In this tutorial not all option are explored, for details on the other buttons, please see the Application Manual in chapter 4.
Alterra-document.docx 19
37
256
257258
259260261262263264265266267268269270
38

Exposure
After pressing the Show-button the result map area is updated.
This map shows the exposure of the predator to the contaminant as it is taken up through the food chain in µg contaminant per day. Not used means that the habitat is not used by the receptor, not calculated means there is no data, insufficient data means that not all data is available, which may differ between species
To view the same results expressed as risks, click on the Risk-tab.Risk
Risk evaluation is essentially the reclassification of the Exposure results. Exposure values are grouped into three classes, relative to the threshold level, specific to the selected risk.
Each combination of contaminant and predator species has its own risks defined. They may differ in name and/or values.
The final step in the evaluation process is to compare inputs and results from different scenarios. To do so, click the Compare Scenarios menu option.
Alterra-document.docx 20
39
271272
40

Alterra-document.docx 21
41
273274
42

Compare scenarios
3.3 Comparison of the results of the scenarios
In this final step, all the maps produced during the previous steps can be compared with each other. A combination map is produced which presents the difference between the maps in terms of increase or decrease.
Compare data inputs and Results
In this screen, any two maps can be compared. When the maps show the same theme, a combination map is constructed and shown at the bottom.
To change the selection, click on the title of the left or the right map (green, underlined). Calculations will be started whenever necessary.
4 Application manual
4.1 General outline of the working process
In order to assess the risks that contaminants may pose to target species in a specific case study, case specific information on the habitat and contaminants is needed from the user of the DSS, which will be combined with generic information on species properties (already available in the DSS). The case-specific information describes the spatially explicit landscape properties of the case, including habitat patterns and spatial patterns of contamination and soil properties. In the DSS, information is available on the habitat specific food web of the
Alterra-document.docx 22
43
275
276
277278279280281
282283
284
285
286287288289290291292293294
44

target species, its sensitivity towards exposure, its foraging behaviour etc. In figure 4.1 the different types of information and their use are illustrated in a flow-chart.
Figure 4.1 Flow chart of different types of information needed in the DSS
The application is organised into five stages, each represented by its own main menu entry (see figure 4.2). The first three of them (Project, Base Scenario, and Alternative Scenarios) define and describe the cases and their scenarios. The next one (Exposure & Risks) takes the previously defined cases and scenarios and performs the risk assessment. The last menu entry (Compare Scenarios) is a post-analysis step to compare the results between scenarios or the input data of the various scenarios. To allow maximum flexibility, the choice of species and contaminant can be made at any moment during the analysis and post-analysis phase and additional model runs will be initiated automatically wherever required.
Figure 4.2 Flow chart of the different stages of an assessment procedure with the BERISP-DSS
Alterra-document.docx 23
Note: technical descriptions of the input maps can be found in
chapter 5 on the Maps needed by BERISP
45
295296297298299
300301302303304305306307308309310311312313314315316317318320321322323324325326
46

Project
4.2 Project
The Project defines the case study area, its topography, its background, the soil concentrations of the pollutants, habitat, etc. Furthermore, the Project defines a number of possible developments in the area, which are called scenarios. One of these scenarios, the Base Scenario, defines the reference situation. Its data requirements must be fully completed before exposure or risks can be evaluated. All other scenarios are referred to as Alternative Scenarios (see figure 4.2).
A project in Berisp is stored in a self-contained directory. All definitions, maps and scenarios are stored within this directory. For more information about the way information in Berisp is stored, see chapter 6 “BERISP on Disk”.
ExplorerMultiple projects can be managed within Berisp. The Explorer-page enables the management of the Berisp projects. Here you can open a project, delete a project, or create a new project.
Click on a project-name to open it. The Explorer-page closes and the Project Properties-page is opened.
Click on delete to remove an existing project. The project directory with all its content will be erased from disk.
Click on new project to create and open an empty project. The Explorer-page closes and the Project Properties-page is opened. The first time a project is saved, a subdirectory in the folder Projects\ of the Berisp installation directory will be created with a name derived from the project name at that moment.
When the check box at the bottom (“next time load this project automatically”) is checked before opening a project, the project of your selection will become default and at program start-up its Properties-page will be opened without having to select it in the Explorer.
Properties
Alterra-document.docx 24
47
327
328
329
330331332333334335336337338339340341342343344345346347348349350351352353354355356357358359360361362363364365366367
48

■ Project name:This is the display name of the project. Every project needs a name. The first time a project is saved, a subdirectory in the folder PROJECTS\ of the Berisp installation directory will be created with a name derived from this name. The project name can be changed at anytime, but the directory name will remain as it was.
□ Location:Optional, this information is not used in the calculations of the DSS. Enter a description of the whereabouts of the project area.
□ Basic topography / ■ Project area mask:The project area outline is defined by the project area mask. This is a map (ASCII-grid file) of the project area specifying for each cell whether it is included in the area or not. No calculations will be performed outside the area defined by the mask, although the effective area can be further limited when required data are not available for the full area positively included by the mask.Within the mask grid, cells of which the value corresponds with the grid's NODATA_VALUE are excluded, whereas cells with any other value are included. For the sake of human readability, an inclusion value of one (1.) is advised.
The Basic topography is not needed by the models or the application, but helps to interpret the maps by providing boundaries and other topographic symbols. Basic topography is read from shape files (ESRI, see chapter 5 on details on maps, and map-formats).
Both maps are designated for use within the project simultaneously. The Import-button activates the following dialog:
Alterra-document.docx 25
49
368369370371372373374375376377378379380381382383384385386387388389390391392393394395396397398399400
50

Press the Select-buttons to open a file selector dialog. The blue-shaded area is the area excluded by the mask file. Any point outside the extent of the mask file (the blue-shaded rectangle) is excluded by default.
□ Objective:Optional. Describe the objectives of the project. This information is not used in the calculations of the DSS, but can be used to describe the project.
Present SituationIn this screen a more detailed description is provided of the present situation of the project area as well as of the plans for this area in the future. Also a general description is made of the contamination at present. Both fields are for documentation only and not used in the DSS.
□ Present land use:Optional. Describe in words the current land use in the area of concern.
□ Present contamination:Optional. Describe in words the current contamination patterns.
Alterra-document.docx 26
51
402403404405406407408409410411412413414415416417418419420421422423424
52

SaveSaves the project and everything included in it. Using the save command is optional as many choices are saved automatically. Not saving a project does not imply it won't be changed.
4.3 Base scenario
The Base Scenario is the starting point with which alternatives will be compared. Often this will be the present situation, but it could also be any future option. The Base Scenario defines those properties of the project that can be changed in Alternative Scenarios, including the Habitat, Contamination and Soil. Other scenarios are defined as deviations from the Base Scenario with regard to any of these factors.
HabitatDefining the habitat is a crucial step in the process as it defines the distribution of the prey species and the behaviour of the predator. The habitat is defined by importing an ASCII-grid (a map) into the application. Values in the map correspond to the Berisp-habitat classes (see Chapter 5: Maps required by Berisp).Expert users can specify the distribution of the prey species. Abundances are given in numbers per square meter, and the list may vary between predators. Negative numbers and zeros are interpreted as the prey being absent in that particular habitat. Changes in this table are saved in PREYABUNDANCE.DAT in the Project directory. Although the number of prey items may vary between predators, prey abundance is not.
Alterra-document.docx 27
Base scenario
53
425426427428429430431432433434435436437
438
439440441442443444445446447448449450451452453454455456457458459
54

Detailed information on the file defining the habitat can be found in Appendices 3-5.
ContaminantsIn this section the contaminants are defined as along with their spatial distributions (concentration maps). The Contaminants-page has a submenu that always includes a first option Define, and a varying number of tabs corresponding with each selected contaminant.
Contaminants supported by Berisp are listed; the ones relevant to the project should be checked. Make sure at least one item is checked.
Once complete, each selected contaminant must be assigned a distribution map. Click on the corresponding tabs to open the respective maps.
See chapter 5: “Maps in Berisp” for the general map options.
Soil properties
The simulation models underlying BERISP need three soil parameters: Acidity, Clay Content and Organic Matter. Each of
Alterra-document.docx 28
55
460461462463464465466467468469470471472473474475476477478479480481482483484
56

them must be assigned a distribution (value) map. When one or more of these maps are unavailable, substitute maps can be generated with a single value for the whole project area, of different values for each habitat type.
The Soil properties-page has a submenu that always includes a first option Substitute, and three tabs corresponding with each soil parameter. Use the check boxes in the top rows of the Substitute table to specify whether soil maps are available, or if one of the substitute maps should be generated. Click on the corresponding tabs to open the respective maps.
Space utilisationOne of the ecological receptors in the BERISP-DSS is the larger grazer (bovine). in contrast to the other receptors (little owl and blackbird) are the grazers normally confined to a specific area, fenced off. Hence, risks need to be analysed at the level of the specific areas. This can be defined in the tab on space utilisation. In this map, the project-area is divided into different sub-areas, simply by assigning a number to it (e.g. 1 is sub-area 1, 2 subarea 2 etc.). Exposure is calculated spatially explicit, but the risks are averaged over the sub-areas.
In the space utilisation tab it is also possible to define the period in which the large grazers are actually in the area. Other receptors are expected to be in the area year-round, large grazers may be managed, and only by in the area in specific periods of time. Depending on the occurrence of vegetation this may affect the exposure, and it is therefore needed to define this. The calculated risks however are for the specific period, per sub-area. It is not possible to include exposure from the
Alterra-document.docx 29
57
485486487488489490491492493494495496497498499500501502503504505506507
508509510511512513514515516517
58

Alternative scenarios
other periods within the year. For each compartment it is possible to define the specific period that the grazers will be in the areaq.
4.4 Alternative scenarios
Alternative Scenarios define alterations to the Base Scenario that could have an effect on the exposure of the predator species to the contaminants. Such alterations include changes to the habitat, to the contaminant concentrations, or to the soil parameters.
ExplorerThe Explorer-page facilitates the management of the Alternative Scenarios. Here you can open the definition of a scenario, delete a scenario, create a new scenario, or copy an existing scenario to create a variant.Click on a scenario-name to open it. The Explorer-page closes and the Description-page is opened.Click on delete to remove an existing scenario. Click on new scenario to create and open an empty scenario. The Explorer-page closes and the Scenario Description-page is opened.Click on copy to create a copy of an existing scenario and open it.
Alterra-document.docx 30
59
518519520521
522523524
525
526
527528529530531532533534535536537538539540541542543544545546
60

DescriptionScenario name:This is the display name of the scenario. Every scenario needs a name. The first time a scenario is saved, a scenario-file in the folder SCENARIOS\ in the project directory will be created with a name derived from this name. The scenario's name can be changed at any time, but the file name will remain as it was.
Measures:Optional. Enter a description of the measures (to be) taken that characterise this scenario.
HabitatDefine a new habitat map when the new scenario involves changes in the habitat configuration. The habitat is defined by importing an ASCII-grid (a map) into the application. Values in the map correspond to the Berisp-habitat classes (see Chapter 5 “Maps needed by Berisp”).It is not necessary to define a new map here. When it is, the new map overrides the settings of the Base Scenario. When it's not, the map of the Base Scenario will be used. To revert to using the Base Scenario's map, press the Reset-button.
ContaminantsThe Scenario Contaminants-page has a submenu that, contrary to that of the Base Scenario, does not include an option to define contaminant species, but only a varying number of tabs corresponding with each selected contaminant.
Each contaminant may be assigned a distribution map. Click on the corresponding tabs to open the respective maps.
It is not necessary to define new maps here. When they are, the new maps override the settings of the Base Scenario. When they're not, the maps of the Base Scenario will be used. To revert to using a Base Scenario's map, press the Reset-button.
Soil propertiesThe Soil properties-page has a submenu that includes three tabs corresponding with each soil parameter. Click at the corresponding tabs to open the respective maps.
It is not necessary to define new maps here. When they are, the new maps override the settings of the Base Scenario. When
Alterra-document.docx 31
61
547548549550551552553554555556557558559560561562563564565566567568569570571572573574575576577578579580581582583584585586587588589590
62

they're not, the maps of the Base Scenario will be used. To revert to using a Base Scenario's map, press the Reset-button.
However, at least one of the above three maps must be changed for the scenario to be different from that of the base scenario.
4.5 Exposure and Risks
ExposureSelect the desired Scenario, Contaminant and Predator species. Then click the Show-button to update the map display.
Reliability indicates the data quality of the models' input. A total of 5 input maps are required, but some can be substituted by fixed values. More details about the input maps can be seen after clicking the Reliability-link. This generates a report showing all maps and for each map the coverage, i.e. the number of cells for which the map defines a value.
The i-buttons on the right side of the Contaminant and Species drop down lists open windows with static information about the selected items.
Models start running once you press the Show-button. Depending on the overall speed of your computer system, these may take about 15 seconds to complete. After completion the map will be updated to reflect the latest calculations.
Three more buttons at the right of the window offer additional options, these are the ‘expert’, ‘settings’ and ‘report’ buttons.
Expert-button
Alterra-document.docx 32
Species, Exposure and Risks
63
591592593594595596597598599
600
601602603604605606607608609610611612613614615616617618619620621622623624625626627628629630631
64

The models produce a number of intermediate results that are normally deleted. However, you may want to inspect these temporary data in order to better understand the results you've obtained. Press the Expert-button to retain the intermediate results. Once this option is chosen, intermediate results will be kept as ASCII-grid files in the subdirectory INTERMEDIATE RESULTS\ in the Berisp installation directory.
To rerun the models, it may be necessary to check the Force Recalculation-option underneath the Show-button.
Stored ASCII-grids cannot be inspected from within Berisp. However, an ASCII-grid viewer is provided alongside the Berisp software.
The following options appear when the expert button is clicked,
allowing you to view these intermediate files.
Settings-buttonA Berisp model-run depends on a large number of parameters. A change in any of them may provide a different result. Berisp keeps track of many changes in these parameters and detects when there is a need for recalculation, but it cannot detect every parameter change. For example, changes in the data files can easily go unnoticed. Therefore, a structured log file is created with each recalculation specifying that runs particular parameter and data environment. The value of every parameter
Alterra-document.docx 33
65
632633634635636637638639640641642643644645646647
648649650651652653654655656657658659
66

is included, the maps listed, and for each map a fingerprint value is generated based on the content of the file.
This log file is stored in the subdirectory LOG\<species>-<Contaminant>-<Scenario>\ of the project directory. E.g. the log file for an evaluation of the effects of Cadmium to the Little Owl in the scenario named “Future” will be written to the directory LOG\OWL-CD-FUTURE\. The file name of the log file is based on the date and time of the run. File name and location can be found in the reference-line at the bottom of the displayed result maps.
Report-buttonA summarising report can be generated and displayed by clicking the Report-button. It can be saved to a self-contained html-file.
RiskRisk evaluation essentially is the reclassification of the Exposure results. Exposure values are grouped into three classes, relative to the No Observable Effect Limit (NOEL) specific to the selected risk. To update the risk map, select a risk and press the Show-button (when the exposure has already been calculated, the updating will be near instantaneous).
The rest of this screen is identical to the Exposure screen.
4.6 Compare Scenarios
MapsIn this screen, any two maps available to Berisp can be compared. The lay-out of the screen is self-adapting so that it will always fit on the screen. When two maps of a different theme (e.g. habitat and pH) are compared they will be displayed side by side each with its own legend. When a pair of maps of the same theme (e.g. pH and pH) are compared, they'll share their legend, and additionally a generated map will be displayed highlighting the differences.
To select a map to show, click on the green links on top of either of the maps. Then a window pops up allowing you to
Alterra-document.docx 34
Compare scenarios
67
660661662663664665666667668669670671672673674675676677678679680681682683684685686687688
689
690691692693694695696697698699700701
68

choose various selection parameters. Click the Copy-button to copy the settings from the other map. Click OK to close the window and implement your new choices, or anywhere outside the window to close it without changing the map.
4.7 Viewing and assigning maps in Berisp
Maps in Berisp can be either dynamically generated or based on an existing file. In the latter case (as in the example below) a location bar is present showing the current file name and an import-button. Selecting a file results in copying that file into the project directory so the project directory will be completely self-contained. However, files with the same file name imported
Alterra-document.docx 35
69
702703704705706707708709710711712713714715
716717718
719
720721722723724725
70

from different locations do conflict, so beware of using maps with similar names.
Toolbuttons in the toolbar allow to return to the full map's extent, to switch to the zoom-in mode, zoom out, save the map as bitmap file, copy the map to the clipboard, and open the cell value inspection window.
The legend at the right can be moved out of the way by pressing the to close it. Double click on a category to open its definition (change colour etc.).
Notice the information bar at the bottom where important information about scale, position and identity of the map is displayed.
5 Maps needed by BERISP
5.1 Format
All maps except the general topography map should be provided in the ASCII-grid format. Three variants of this format are accepted:
1 the standard ASCII-grid format (see description below); the file should have the file extension .ASC
2 the float grid format: this format uses the same header as the previous, but the data are stored in a separate file as a binary sequence of NRows x NCols 4-byte reals. The text file with the header data is designated by the file extension .HDR and the binary data file by the file extension .FLT.
3 a proprietary interpolation format called points grid, which is especially suitable for coordinate-based measurement data (see description below). The file extension should be .PTS.
5.2 Input maps
Habitat mapHabitat maps must be provided using BERISP's simplified land use typology:
Alterra-document.docx 36
71
726727728729730731732733734735736737738739740
741
742
743
744745746747748749750751752753754755756757758
759
760761762
72

value type1 avoided2 unused3 arable land4 coniferous plantation5 long grass6 orchard7 short grass8 shrubs9 woodland no understory10 woodland with understory11 heath12 moor13 inland marsh
The habitat map is required. The interpolation format is not suited for the habitat data, which are essentially integers. To reclassify an existing map, a conversion utility is provided.
Contamination mapsFor each contaminant in the project area to be evaluated, a concentration map must be provided.
The soil maps pH, Organic Matter & Clay ContentThree maps with soil parameters are required by BERISP to estimate the exposure to contaminant(s). However, when not available, the parameters may be supplied using a scalar value for the whole project area, or scalar values for each habitat. These values can be set at the base scenario's definition.
Definition of the project area (Mask)Each map describes a rectangular area. To define which points are within the project area and which are out, a mask-map is mandatory. This is an ASCII-grid in which the points outside the project area must have the NODATA-value whereas the points within the project area may have any other value.
TopographyThe topography is not used by the models and therefore is for presentation only. The topography should be supplied as a shapefile. The ESRI Shapefile is a popular geospatial vector data format for geographic information systems software. It has been developed and regulated by ESRI as a (mostly) open specification for data interoperability among ESRI and other software products.
Alterra-document.docx 37
73
763
764765766767768769770771772773774775776777778779780781782783784785786787788789790791792793794795796
74

The ASCII-Grid formatThe ASCII file must consist of header information containing a set of keywords, followed by cell values in row-major order. The file format is
<NCOLS xxx> <NROWS xxx> < XLLCORNER xxx> < YLLCORNER xxx> <CELLSIZE xxx> {NODATA_VALUE xxx} row 1 row 2 . . . row n
where xxx is a number and the keyword NODATA_VALUE is not optional and the default value of -9999 is preferred. Row 1 of the data is at the top of the raster, row 2 is just under row 1, and so on. For example:
ncols 480 nrows 450 xllcorner 378923 yllcorner 4072345 cellsize 30 nodata_value -9999 43 2 45 7 3 56 2 5 23 65 34 6 32 54 57 34 2 2 54 6 35 45 65 34 2 6 78 4 2 6 89 3 2 7 45 23 5 8 4 1 62 ...
The NODATA_VALUE is the value in the ASCII file assigned to those cells whose true value is unknown. In the raster, they will be assigned the keyword NODATA. In deviance of the standard ASCII-grid format by ESRI, this value is not optional.In deviance of the standard ASCII-grid format by ESRI, xllcenter and yllcenter are not supported.Cell values should be delimited by spaces. No carriage returns are necessary at the end of each row in the raster. The number of columns in the header determines when a new row begins.The number of cell values must be equal to the number of rows times the number of columns, or an error will be returned.
Alterra-document.docx 38
75
797798799800801802803804805806807808809810811812813814815816817818819820821822823824825826827828829830831832833834835836837838839840
76

The points grid formatThe points file must consist of exactly the same header information as is used by the ASCII-grid format. The data are an arbitrary number of x-y-value sequences. Header and data may be separated by one or more blank lines.
ncols 502nrows 130xllcorner 169860yllcorner 433160cellsize 10NODATA_value 0
170570.00000,434292.00000,0.700170890.00000,434167.00000,5.000171075.00000,433844.00000,0.500
The Nodata_value parameter will be ignored.Make sure the decimal format corresponds with your computer's locale settings.
6 The points and values will be interpolated to get a more complete area coverage.BERISP on disk
This section describes how Berisp and its subdirectories are laid out on your hard disk. All paths here are relative to the directory in which BERISP.EXE has been installed (the Berisp-installation directory). Typically this will be C:\PROGRAM FILES\BERISP\, but individual computers systems may differ. Also it is possible to have more than one copy of the installation directory.
The directory structure is outlined below, with some explanation to the content of the subdirectories. Underlined directories will be explained in more detail.
<BERISP INSTALLATION DIRECTORY>CONTAMINANTS contains contaminant definitions
INTERMEDIATE FILES here intermediate files produced by the model recalculation can be found.
PROJECTS in this directory your projects are stored, each in its own subdirectory
Alterra-document.docx 39
77
841842843844845846847848849850851852853854855856857858859860
861
862
863
864865866867868869870871872873874875
78

AFFERDENSCHE AND DEESTSCHE WAARDEN this is Berisp's example project
LOG log files of the model run are stored here; see the 'reference'-line at the bottom of the exposure maps
MAPS contains copies of the maps you've imported
GENERATED soil maps that have been generated from fixed substitute values
REPORTS (reserved)
SCENARIOS contains the alternative scenario definitions
<YOUR PROJECT> LEGENDS (reserved)
MAPS s. above
REPORTS (reserved)
SCENARIOS s. above
RESOURCE contains texts used by the application
SPECIES contains species definitions
TEMPLATES contains report templates
6.1 The Projects directory
A project in Berisp is stored in a self-contained directory. That means, to copy a project from one Berisp-installation to another, only this directory needs be copied. You can send it by mail to a co-worker abroad who then, after copying it into his Projects-directory, can work with it in Berisp.
6.2 The <Your Project> directory
Project definition, maps and scenarios are all saved into a directory named after the project's original epithet. (The names may differ to some extent because a directory name must conform to the operating system's rules for valid file names). When a new project is created and saved, a new directory in the Projects directory is created. Conversely, when a project is deleted its directory is removed from disk.
Alterra-document.docx 40
79
876
877
878879880881882
883
884885886887888889890
80

6.3 The Scenarios directory
7 Each of the alternative scenarios consists of a single definition file in the Scenarios directory, situated within the project directory. Berisp can not stop the removing or copying of scenario files by hand, provided the project is not presently loaded in the application, however, it is the user's own responsibility that scenarios manipulated in such a way still make sense and that file references in the scenario definition file remain valid.Case study: Demo Holme
In this chapter we will illustrate how to set up a completely new project and to realise useful evaluations with it. It is assumed that you have at least completed the tutorial in the Getting Started with Berisp-section of this document, and that you know to find your way around in the Application Manual and the Maps-section (Chapter 5).
7.1 Setting up the project
Start a new projectClick in the side menu on Project and then go to the Explorer. Do not select an existing project, but click on the link Create a new project. You will arrive now in the Project|Properties screen, which is almost empty.
First go to the Project name, which is still labelled “(no name)”, and change it into something useful. In this case study we change it to “Demo Holme”. Then continue to Location and Objective and complete the fields with information about the project.
Alterra-document.docx 41
81
891
892
893
894
895
896
897
898
899
900
901
902
903904905906907908
909
910911912913914915916917918919920921
82

Define the project areaThe next step is to provide the system with information about the limits and whereabouts of the project area. All maps are geo-referenced by absolute coordinates. Although it is not important which coordinate system is used, provided coordinates can be expressed in a x, y-format, maps within a project must use the same system and be aligned over the same area.
The Project Area Mask defines the location of the project area (which is a rectangle) and which cells to use within that area. Basically, the Mask is an ASCII-grid with zeros and ones for exclusion and inclusion respectively.
The optional Basic Topography does not define anything, but provides topographic symbols that make the maps easier to read when presented in the application.
Click on the Import-button to open the basic maps dialog.
Alterra-document.docx 42
83
922923924925926927928929930931932933934935936937938939940941942943
84
Getting the Basic Topography map file is straightforward, for we have an ESRI-shape file of the area available. Using the file selector, this file is selected and immediately displayed in the dialog.
The mask file is not pre-available though. So one has to be created. This can not be done within Berisp, however, any GIS-package can be used. An alternative way is to use the Berisp Habitat Reclassification Tool.
Leave the dialog open and start FILE WIZARD.EXE, which is in the BERISP program directory. Go to the AreaMask section and select the option that is most appropriate. If we have a ASCII grid file of the project area, for instance a habitat map, this can be used to create the Mask file. For each class it is possible to include or exclude it in the Mask. If you have a shape file then the next step is highly dependent on the shape file itself. We need to identify an attribute that helps us to distinguish “inside the area” form “outside the area”. The distinction can be made either by the attribute's value, or by its existence. Some trial and error will help you here.
The converter utility can be closed now and we'll return to Berisp. Here the newly created mask file can be loaded and the dialog is closed.
Alterra-document.docx 43
85
944945946947948949950951952953954955956957958959960961962963964965966967968969970
86

Define the habitatThe habitat map can be included in the project conform the description earlier. However, the program FILEWIZARD.EXE may also be used to reclassify the habitat. This is rather simple, and can only be done to reclassify one habitat type in another for all locations e.g. all long grass may be changed into short grass.
For doing so open FileWizard.exe, and select the habitat map option. Then you can open an existing habitat map in your data directory or another existing ASCII-map fitting the area or a shape file. Normally, an existing habitat will need to be selected. The original habitat map will open with the original data values in the map. This may not directly by the actual habitat classes, this depends on the classification used to produce the original habitat map. With the drop-down menus it is now possible to assign a specific habitat type to each class.
Define the contaminantsNext, click the Contaminants link to define which contaminants are present in the project area and will be evaluated. Then
Alterra-document.docx 44
87
971972973974975976977978979980981982983984985986987988
989990991992993994995
88
assign a map to each contaminant. Currently, risks can be assessed for cadmiu, copper, lead and zinc
Alterra-document.docx 45
89
996997
90

Define the contaminationContaminant data can be entered in two formats, either as an ASCII file with already integrated values, or as a data file with coordinates and measurement values. The procedure to inport ASCII file is similar to the habitat map. Here we will explain how to use measurement data.
The contamination data need to be available as a series of measurements and stored in Microsoft Excel.
This should be converted in a format that could be read by Berisp. This procedure is quite straightforward. Save your data as CSV (Comma Delimited) file. However, you file should also contain a heading, which is available in the mask file.
Alterra-document.docx 46
91
998999
1000100110021003100410051006100710081009101010111012101310141015101610171018101910201021102210231024102510261027102810291030
92

Open the Project Area Mask file (MASK.ASC or something similar) into notepad. Select the header lines and copy them to the clipboard. Open the newly created CSV-file into notepad. Paste the header lines above the data: make sure no column names remain and there's at least one blank line between header and datSave to e.g. CADMIUM.PTSThe result should look similar to this:ncols 483nrows 137xllcorner 169966.59375yllcorner 433150.125cellsize 10nodata_value -9999
170570,434292,0.7170890,434167,5171075,433844,0.5171928,434094,0.5171610,433672,1.5171972,433585,1.9etc.
Saved to a .PTS-file, this can be loaded into Berisp directly instead of an ASCII-grid. The area between the data points will be interpolated. It should be noted that the interpolation method used is quite simple (Inverse Distance Weighing). We'll continue to the Cadmium tab to load the file.
This is how it looks like:
The black dots represent the locations of the data points. Circular boundaries caused by the limited range of the interpolation may be visible. By default, the interpolation is
Alterra-document.docx 47
93
10311032103310341035103610371038103910401041104210431044104510461047104810491050105110521053105410551056105710581059
106110621063
94

inverse distance weighed with a range of 40 (m). The range can be changed by clicking on the Expert-button and entering a new range. In order to cover the whole area, in this map the range is increased to 48 m.
Define the soil propertiesFor the soil properties we have constructed .PTS-maps just like the one described above. Please refer to the manual section when such data are not available and need be substituted by general values.
Define an alternative scenario From the exposure and risk maps of the base scenario it is evident that most cadmium uptake is occurring at patches of arable land. To investigate would what happen if those areas were taken out of use and planted with trees, an alternative scenario is constructed. In this alternative scenario the habitat map is reloaded and substituted with one where all cells of arable land are replaced by Woodland with No Understory.
Compare present situation with the alternative Then, in Compare Scenarios, the effect of the intervention is examined. In the top-left pane the exposure map of the Base Scenario (cadmium, owl) is selected, in the top-right pane the
Alterra-document.docx 48
95
1064106510661067106810691070107110721073107410751076107710781079108010811082
1084108510861087
96

exposure map of the alternative scenario (ditto) is selected. The generated map at the bottom shows where both maps differ in exposure to cadmium. It is clear that this habitat change reduces the contamination uptake by the little owl.
Alterra-document.docx 49
97
10881089109010911092
98

Evaluation Overview
When pressing this button a short overview of the results will be given on the input maps and the results of the calculations (the results given here may not match the ones from the Del Holmo case)..
Alterra-document.docx 50
99
10931094
10951096
100

Alterra-document.docx 51
101
109710981099
102

Detailed Model descriptionsOverview
The modelling approach is based on two concepts. The first concept is spatial foraging. At the spatial scale we are interested in (the landscape scale), most top predators do not distribute their foraging efforts homogeneously over their home range. Instead they may exhibit preferential foraging in certain landscape elements, e.g. where prey is numerous or easily encountered. The second concept refers to the food web and the way trophic relationships determine the accumulation of contaminants in the food resources of the top predator. Spatial foraging occurs on all trophic levels. At the landscape scale, however, we have both a known, heterogeneous, distribution of contaminants in soil as well as clear spatial patterns in the resource exploitation of top predators. This matching of scales of contaminant and foraging effort distribution makes it mandatory to be spatially explicit when estimating e.g. daily uptake of potentially deleterious substances. For a given landscape we thus estimate for a predator individual where we expect it will spend its foraging effort, assuming that this distribution of foraging effort will be affected by the relative abundance and availability of food resources as well as by the specific preferences for foraging in landscape types, for certain prey, near to the centre of the home-range, etc.
Spatial processesFor the top predator species we explicitly model spatial foraging. Conceptually, the same approach is followed for the prey species. However, for several of these species, the resolution of the spatial representation (grid cells with a dimension of 10 by 10 meter) is such that they can be assumed to spend most of their life within a single grid cell. For these species a spatial foraging approach is not required. Note that they have to cope with spatial heterogeneity as well, but at a scale smaller than the (landscape) scale chosen for the modelling.
Temporal variabilityThe modelling approach deals with spatial variability. However we don’t take into account temporal variability, besides the possibility to define periods of exposure for the large grazers. For the prey items of the little owl and the blackbird, all densities and biomass values represent long-term averages. Seasonal fluctuations are ignored. For the vegetation, food for the large grazers, a seasonal biomass is calculated per vegetation type, see later.
NotationAll weight and biomass values refer to fresh weight, unless explicitly stated otherwise. For clarity’s sake the names of the maps are capitalized; in shorthand notation we may omit the x,y subscripts that indicate a specific location on these maps.
Alterra-document.docx 52
103
1100
11011102110311041105110611071108110911101111111211131114111511161117111811191120112111221123112411251126112711281129113011311132113311341135113611371138113911401141114211431144114511461147
104

Prey species of the little owl and blackbird
Prey species densitiesDensity of prey species in the landscape is defined in the biomass maps Ni (ind m-2) or Bi (g m-2). With bi the average individual (fresh) weight of species i, these two maps relate to each other as Bi = bi * Ni.
Contamination in prey speciesThe transfer of (heavy metal) contaminant from the soil to all prey items is accounted for in two different ways. For the mammalian prey (vole and shrew) a single-compartment uptake model is used. For invertebrate prey and vegetation linear-regression models are used. EarthwormThe availability of heavy metals for uptake by earthworms depends on the concentration of free metal ions present in the dissolved soil solution phase. Typical relevant site-related variables determining the uptake include soil pH, clay and organic matter fractions, cationic exchange capacity, and certain macro-element concentrations. For cadmium, a regression equation linking soil cadmium concentration to the total body burden in earthworms from Ma (2004) is used, with the values listed in table 1 (OM refers to the organic matter percentage of the soil):
logCearthworm=a+b⋅logC soil+c⋅logOM+d⋅pH (mg kg-1 DW)
For zinc and arsenic, the only significant site-related variable in the available data was found to be pH (Sample et al. 1998). Thus the basic equation for these metals is:
lnC earthworm=a+b⋅lnC soil+d⋅pH
Where m, n and c are constants: Table 1: constant values for the worm model of zinc and arsenic bioaccumulation.
Constant Cadmium Zinc Arsenica 2.92 4.453 0.341b 0.747 0.234 1.0908c -0.5336 0.0 0.0d -0.2101 0.12845 -0.41611
VegetationThe heavy metal concentration in vegetation (grass) is given by the following regression equation :
logCveg=a+b⋅log C soil+c⋅logOM +d⋅pH+e⋅log Clay (mg kg-1 DW)
Alterra-document.docx 53
105
1148114911501151115211531154115511561157115811591160116111621163116411651166116711681169117011711172
1173117411751176117711781179
118011811182
1183
11841185118611871188
11891190
106

metal a b c D eCd 0.17 0.49 -0.28 -0.12 0Cu 1.4 0.83 -0.65 -0.18 0Zn 2.06 0.41 1.09 -0.09 -1.05
Pb 1.018 1.287-0.609 -.021
-1.533
CarabidEquations for the beetles are similar to the ones for vegetation and earthworm, although the influence of the soil properties have not been included.
metal a bCd -1.0 0.6Cu 0.8 0.31Zn 1.5 0.24Pb -1.9 0.98
Dry-fresh weight conversions
For Earthworms, Slugs and Carabids, contamination is calculated in mgkg-1
dry weight. To convert to a fresh weight-based value of contamination the following experimentally determined equations are used.
For earthworms:W fresh=W dry⋅6 .25
For carabids:W fresh=W dry⋅2.5
For grass:W fresh=W dry⋅9 .09
For herbs, trees and shrubs:W fresh=W dry⋅9 .
Vole and shrewFor mammalian prey, contaminant uptake is related to food intake. Heavy metal body burden is calculated using a simple single-compartment model (Gorree et al. what year?) describing the amount of contaminant in the body, and dividing this amount by average individual weight (b):
C=1bfood⋅C food⋅cup
cout⋅(1−e−cout⋅a)
(mg kg-1)
Alterra-document.docx 54
107
1191119211931194119511961197
119811991200
12011202120312041205
120612071208
120912101211
121212131214
1215121612171218121912201221
1222
108

With c_up referring to the assimilation efficiency of food (dimension-less), c_out the excretion rate of food (d-1), a the average age (days) of the species. Initial concentration at birth C0 is assumed to be zero.
The different small mammals have a specific diet, based upon literature and own data.
grass herbs berries seeds earthworm beetle soilbank vole 20 20 26 24 4 4 2common vole 42 41 15 2Wood mouse 6 6 12 58 8 8 2shrew 49 49 2
Top-predators: little owl and black bird
Home-rangeSpatial foraging takes place within the home-range of the individual. The home-range is represented as a square area of species-specific and fixed size. For a given (grid-based) landscape representation the home-range consists of a fixed number of grid cells. Spatial foraging within the home-range depends on the landscape, both directly by certain landscape elements not being used or preferentially being used to forage for certain prey, and indirectly, through the landscape-specific density of food items.
Functional responseWe assume a type II functional response (Holling, 1959) adapted to the situation where multiple prey are available and (simultaneously) searched for. The number of prey items of species i consumed when j prey species are present in densities Nj amounts to
FRi=e iN i
1+∑jh j e j N j
(ind d-1)In the equation e refers to the attack or encounter rate (m2 d-1) and h to the handling time (d) per prey item. The prey intake is converted into g d-1 by multiplying it with the average (fresh) weight of the prey. In the table the coefficients max and coef are used belonging to a different notation of the same functional response equation; max = 1/h and coef = 1/he. The functional response equation is applied per grid cell, and thus FRi represents the consumption rate (ind d-1) for each prey when foraging in this cell. When applied to all cells of the landscape we obtain the spatial distribution of the local consumption rate per prey i. These maps we coin the “availability” map for species i (shorthand Ai):
Ai , x , y=FRi , x , y⋅b i (g d-1)
Alterra-document.docx 55
109
1223122412251226122712281229
123012311232123312341235123612371238123912401241124212431244124512461247124812491250
12511252125312541255125612571258125912601261
1262
110

It should be noted that, by using a multiple prey functional response equation, these are not independent of each other, for the different species.
Spatial foraging behaviourSpatial foraging behaviour of the species results in a distribution of foraging effort over the home-range. For a mobile species like the Little owl, the actual movement path is irrelevant (when acting as a central place forager however distance to nesting or resting place might play a role). We assume that it flies directly to the part of the home-range where it wants to forage. For a ground-dwelling species like the hedgehog the actual movement behaviour may be important. We may thus need to estimate the distribution of the fraction of foraging time spent in each cell of the home-range (coined the “utilization” or “effort” map) in different ways. Note that the sum of all values
in this map equals one (∑x∑y
U x , y=1).
Utilization depends on the way landscape composition and structure affect foraging decisions. We account for 4 general situations, in the following referred to as foraging strategies. Firstly, uniform utilization where equal time is spent in every cell (the “uniform” strategy). Secondly, availability-driven utilization where the time spent in a cell depends on the (total) availability of prey in this cell (the “availability” strategy). Thirdly, distance-driven utilization where the time spent is related to the nearness of the cell to the home-range centre (the “distance” strategy). Fourthly, preference-driven utilization where the time spent is related to the preference for foraging in specific landscape elements (the “preference” strategy). We also account for two mixed strategies: the “availability-distance” and “preference-distance” strategy. Note that in “uniform” and “distance” there is no influence of the landscape on the choice of foraging locations.
UniformIn each cell of the home-range equal time is spent. Thus,
U x , y=cshs
with cs the cell size (m2) and hs the home-range size (m2).
AvailabilityThe time spent in a cell is weighted by the amount of biomass effectively available in the cell. This equals the sum of local availability for each prey, divided by the total availability within the home-range:
U x , y=∑i
Ai , x , y
∑x∑y∑i
Ai , x , y
Distance The time spent in a cell is weighted by the nearness to the home-range centre following a negative exponential relationship:
Alterra-document.docx 56
111
1263126412651266126712681269127012711272127312741275
12761277127812791280128112821283128412851286128712881289129012911292
1293129412951296129712981299
130013011302130313041305
112

U x , y=e−α⋅dx , y
∑x∑ye−α⋅d x , y
Here dx,y denotes the distance from the cell to the home-range centre and defines the rate of decline (m-1).
PreferenceThe time spent in a cell is weighted by the preference value v associated to the landscape type contained in the cell:
U x , y=v x , y
∑x∑y
vx , y
Availability-distanceA combination of both the weighting by availability and by distance:
U x , y=e−α⋅dx , y⋅∑
iAi , x , y
∑x∑y( e
−α⋅dx , y ¿∑i
A i , x , y )
Preference-distanceA combination of both the weighting by preference and by distance:
U x , y=e−α⋅dx , y⋅vx , y
∑x∑y( e−α⋅dx , y ¿v x, y )
Food uptakeThe amount of food-items of each prey species consumed at each location within the home-range amounts to:
U x , y⋅Ai , x , y (g)With Ux,y (d) being the utilization map defining how much time is spent at each location and Ai,x,y in (g d-1) is the availability of prey species i at each location after accounting for a (multiple prey) functional response.Depending on the prey species, a fraction of the intake is assumed to be digested (fi, Table top predator). For instances, owls return a part of the voles and shrews ingested, i.e., the hair and the bones, in the form of pellets (. The intake is scaled to the required individual net daily biomass intake (ndbi, see table) using a scaling factor for this particular home-range of:
sh=ndbi
∑i∑x∑y
f i⋅U x , y⋅Ai , x , y(-)
The (gross) consumption of prey i from each location x,y in the home-range thus amounts to
Alterra-document.docx 57
113
1306130713081309131013111312
13131314131513161317
13181319132013211322
13231324132513261327
132813291330133113321333133413351336
1337133813391340
114

DI i , x , y=sh⋅U x , y⋅A i , x , y (g d-1)The total (gross) consumption over the whole home-range amounts to:
tbi=∑x∑y∑i
sh⋅U x , y⋅Ai , x , y(g d-1)
The total net biomass consumption over the whole home-range is, after application of the scaling factor by definition equal to the net daily biomass intake:
sh∑x∑y∑i
f i⋅U x , y⋅A i , x , y=ndbi
Contaminant uptakeThe amount of contaminant taken up daily depends on the amount of prey biomass digested and the body burden in the prey. The latter depends on the location where it was obtained. Thus, net daily contaminant uptake from each location in the home-range equals:
DCU i , x , y=DI i , x , y⋅f i⋅Ci , x , y=sh⋅U x , y⋅A i , x , y⋅f i⋅Ci , x , y (g d-1)
The total daily contaminant uptake (tdcu) of the individual in the home-range amounts to:
tdcu=∑x∑y∑i
DI i , x , y⋅f i⋅Ci , x , y=sh⋅∑x∑y∑iU x , y⋅A i , x , y⋅f i⋅C i , x , y
(g d-1)
Risk assessment
Within home-rangeThe total daily contaminant uptake tdcu (see above) estimated for a specific home-range can be used to model the internal concentration build up in the predator, e.g. assuming a single-compartment model. In such case the internal concentration would reach equilibrium at:
C=1btdcu⋅cup
cout⋅(1−e−cout⋅a)
(g g-1)where c_up is the fraction of ingested contaminant that is taken up by the intestines, c_out is the excretion rate, a is the age of owls (averaged), and b is the total body weight of owls (averaged).
For cadmium, Pascoe et al. found that several bird species may face no adverse effects for a body burden of up to 0.8 mg/kg. Recalculation of this value to Little owls with an average weight of 0.175 kg and an excretion rate of 0.005 day-1, results in an uptake rate of 710-4 mg/day. This rate is considered the lowest observed adverse effect level (LOAEL). The total daily cadmium uptake for a specific home-range can be compared to this LOAEL in a spatially explicit risk assessment at the home-range level.
Alterra-document.docx 58
115
13411342
1343134413451346
13471348134913501351135213531354
13551356135713581359
13601361136213631364
13651366136713681369
1370137113721373137413751376137713781379138013811382
116

Risk mapsTo move the risk assessment from home-range to the landscape level, home-ranges are projected as a moving window over the whole landscape, with each cell in the landscape map acting as the centre of a potential home-range. For each home-range, projected in this manner, the uptake of contaminant (tdcu) is estimated. The resulting value, per home-range, is assigned to the centre cell of the home-range. From the spatial distribution of this total uptake over the landscape several statistics are obtained in a landscape-level spatially-explicit risk assessment, a major one being the number or fraction of cells where the LOAEL is exceeded.
Large ruminant herbivores,
Model description
Input mapsAdditional maps are needed in case large herbivores are modelled which define the compartments in which they graze (they cannot cross fences or ditches). Compartment map. An asciigrid defining the area that is accessible to a single group of large herbivores. Often certain parts of a nature reserve are fenced off, or the area is divided into several compartments with no pos-sibility of exchange. In the map each cell has a compartment number (integer, value of 0 means inaccessible). The distribution of foraging time and effort will be calculated for each compartment separately.
-
ResourcesIn each cell of the landscape 4 different resources for herbivores may be present, characterized by their standing crop (g DW m-2) and overall digestibility (kJ kg-1 DW):
- grass- herbs- shrubs- trees (leaves, twigs and bark within reach of the animal)
Depending on the herbivore species, a subset of these resources can be consumed. For cattle, grass, herbs and shrubs are available; for horses all 4 resources.
Foraging processThe spatial distribution of energy intake is assumed to be proportional to the total amount of available (digestible) energy in forage (kJ m-2) in a grid cell, Ei. Following (Prins et al., 2008c) but summing over resources instead of over vegetation types and taking Xi as the standing crop of resource i instead of amount eaten of resource i, total energy obtainable from a cell is given by:
E=∑i=1
r
GE×% DOM×cGD×X i
Alterra-document.docx 59
117
13831384138513861387138813891390139113921393
1394139513961397139813991400140114021403140414051406140714081409141014111412141314141415141614171418141914201421142214231424142514261427
1428
118

Where GE represents the energy content of the resource (kJ kg-1, in the following kJ g-1 will be used), %DOM the digestibility of organic matter of resource i, cGD the fraction of the digestible energy in the resource that can be converted into metabolic energy, and r is the number of resources. Note that we thus ignore the functional response for feeding on the resource and assume that intake rate is not limited by resource density. To further simplify, we take the first three terms together, roughly representing overall digestibility (kJ g-1 DW) or nutritional quality (Wilmshurst et al., 2000), and assume this is constant during the year. Standing crop (g DW m-2) on the other hand fluctuates throughout the year. Input values for standing crop can be corrected for seasonal variation in digestibility: at the end it is only the product of both that matters (in the model). Some habitat types can be excluded from foraging: although forage might be available there, these habitats are not used by the animals (Ei = 0). Available energy in each cell in the compartment is used as a weight, to define the fraction of the required daily energy intake, NDE (kJ), taken up in each cell:
w i=(1−σ )⋅Ei
∑j
n
E j (-)
with n representing the total number of cells used in the compartment. When animals receive supplementary feeding, the weight is reduced by 1-, where refers to the fraction of required daily energy intake met by supplementary feeding. Energy intake is converted into biomass intake (g DW), by multiplying with digestibility (kJ g-1 DW) of the resource. Within cell i with multiple resources, the intake is divided over the resources present in proportion to the relative amount of energy represented by each resource. Thus, in terms of energy, intake of resource r in cell i is
I i , r=w i⋅Ei ,r
Ei⋅NDE
(kJ day-1 of resource r)while in terms of biomass it is
Bi , r=Ii , rδr (g DW day-1 of resource r)
ExposureThe amount of contaminant (mg kg-1= g g-1) in the ingested plant material is calculated from the soil concentration using the regression equation:
Intake of the contaminant from a cell is calculated by multiplying biomass intake per resource in each cell i with contaminant concentration in the resource at this location, and summing this over the resources r:
Alterra-document.docx 60
119
142914301431143214331434143514361437143814391440144114421443144414451446
144714481449145014511452145314541455
14561457
14581459146014611462146314641465146614671468
120

CI i=∑r
m
Bi , rCi ,r
with m representing the total number of resources in the cell.An animal is assumed to have a fixed soil intake per day (DSI, g DW). The fractions of the total soil intake consumed in each cell of the compartment, are given by the same weight wi as used to distribute energy intake by grazing:
SI i=w i⋅DSI
Input data
- Digestibility of resource, per resource (kJ g-1DW)- Resource biomass (standing crop, per month) in g DW m-2
- Conversion table CORINE land cover classes to BERISP habitat types- Table defining the resources used in each BERISP habitat type (basically
0/1)- Table defining net daily energy requirement (NDE, in kJ) in each month- Daily intake of soil (g DW)- Fraction of net daily energy requirement met by supplementary feeding,
per month
References
Gordon, I.J. and Prins, H.H.T., 2008. The Ecology of Browsing and Grazing. Ecological Studies 195. Springer, 330 pp.
Prins, H.H.T. and Langevelde, F.v., 2008a. Resource Ecology: Spatial and Temporal Dynamics of Foraging. Wageningen UR Frontis Series 23. Springer, 306 pp.
Prins, H.H.T. and Langevelde, F.v., 2008b. Prospects for further development of resource ecology. In: H.H.T. Prins and F.v. Langevelde (Editors), Resource Ecology: Spatial and Temporal Dynamics of Foraging. Springer, pp. 267-271.
Prins, H.H.T. and Langevelde, F.v., 2008c. Assembling a diet from different places. In: H.H.T. Prins and F.v. Langevelde (Editors), Resource Ecology: Spatial and Temporal Dynamics of Foraging. Springer, pp. 129-158.
Wallis de Vries, M.F., 1994. Foraging in a landscape mosaic : diet selection and performance of free-ranging cattle in heathland and riverine grassland, Wageningen University, Wageningen.
Wilmshurst, J.F., Fryxell, J.M. and Bergman, C.M., 2000. The allometry of patch selection in ruminants. Proc. R. Soc. B Biol. Sci., 267: 345-349.
Alterra-document.docx 61
121
146914701471147214731474
1475147614771478147914801481148214831484148514861487148814891490149114921493149414951496149714981499150015011502150315041505150615071508150915101511
122