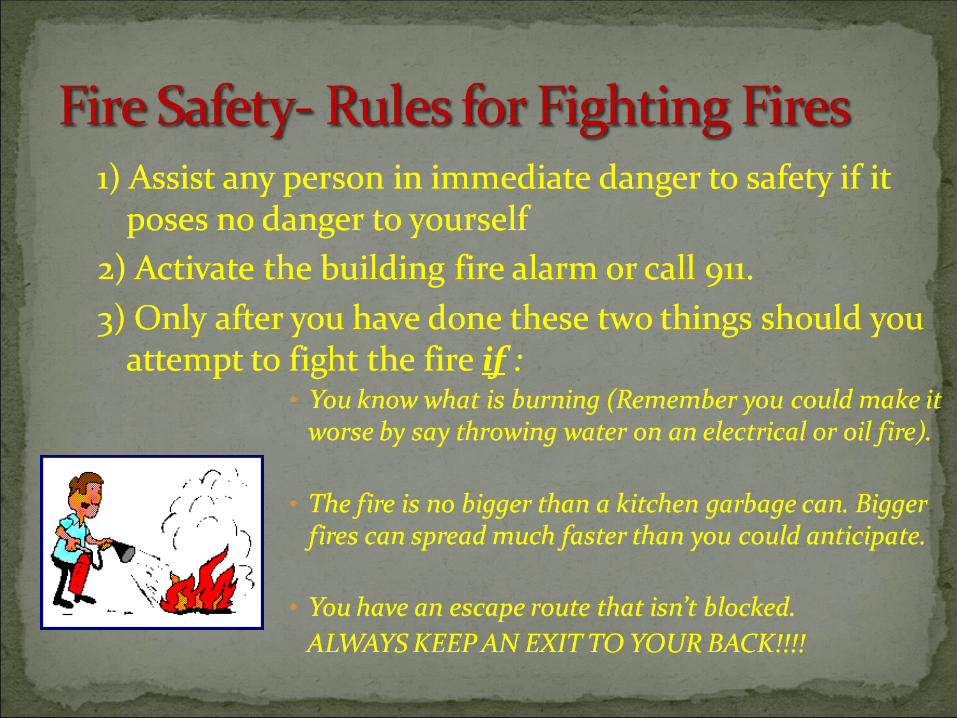
Before we learn how to extinguish fires, we first need to know a little about how they work. The...
25
-
Upload
julius-pearson -
Category
Documents
-
view
214 -
download
0
Transcript of Before we learn how to extinguish fires, we first need to know a little about how they work. The...

Before we learn how to extinguish fires, we first need to know a little about how they work.
The fire triangle to the right shows the three things that must be present at the same time in order for a fire to occur.
Take any of these away and the fire will be extinguished!

Not all fires are the same.
We classify fires based on the type of fuel they burn.
If you use a fire extinguisher on the wrong type of fire you can in fact make it worse!
Most extinguishers have a label showing which fires they can fight.

The extinguisher in our room is a Dry Chemical Extinguisher used to fight A, B and C fires.
These are filled with a fine yellow powder and pressurized with nitrogen.
Read the label carefully before using to ensure it can put out the type of fire you are fighting!
These extinguishers put out fires by coating the fuel with a fine layer of dust, separating the fuel from the oxygen in the air.
They also interrupt the chemical reaction of the fire, so they are extremely effective!

It's easy to remember how to use a fire extinguisher if you can remember the acronym PASS, which stands for:
Pull Aim
Squeeze Sweep

Pull the pin.This will allow you todischarge theextinguisher.

Aim at the base of the fire. If you aim at the flames (which is frequently the temptation), the extinguishing agent will fly right through and do no good. You want to hit the fuel.

Squeeze the tophandle or lever.This depresses a button that releases the pressurizedextinguishing agent in the extinguisher.

Sweep from side toside until the fire iscompletely out. Startusing the extinguisherfrom a safe distanceaway, then move forward. Once the fire is out, keep an eye on the area in case it re-ignites.

Remember!!!!Never use a water extinguisher to put out any type of fire except type A. Using one on an electrical fire could electrocute you!Using one on a flammable liquid fire (like gas) will be ineffective and could make it worse.


Know where exits are: in the front or back of the room, depending on which chemistry room you are in.
Exits should always be kept clear. Backpacks should stay under desks to prevent tripping and injury if we have to evacuate quickly!

Never stick anything in the outlets- it can remain stuck and cost A LOT of $ to remove.
Outlets are off if the valves are perpendicular (at a right angle) to the nozzle.
OFFOFFON

Make sure they are off before you touch.
Most injuries occur because the plate is still hot even after it is turned off.

Don’t complete the circuit!
Don’t be a pathway to the ground.
Grounding pins in the plug, help ground the wire and protect againstdangerous current.

1) Always pour acids into water.If anything splashes out it will most likely be
water.Pouring water into acid can create an
exothermic reaction that explodes!
2) Always wear goggles when working with chemicals.
3) Never smell a chemical directly. Waft it with you hand to your nose.


Eyewash
•If a chemical gets into your eyes, don’t notify me first- GO DIRECTLY TO THE EYEWASH!
•Wash eyes for at least 15 minutes, even if there is no pain or irritation.

Contacts
•Contacts can pose a greater risk of eye injury when working with chemicals.
•Some chemicals will literally melt the contact to your eye.
•It is strongly recommended (but not required) that you wear glasses and not contacts during a chemistry lab.

Fume Hood
•In the back of the room.
•Sucks air out to prevent dangerous vapors from getting into the lab space.•Anything in the hood should only be touched with explicit instruction!

Safety Shower•This you must ask me to use first, unless I’m not around.
•If you spill dangerous chemicals onto yourself, you will need to remove the clothes and stand under the shower until I say it is ok (probably 15 minutes).
•Don’t worry everyone will leave the room, and you’ll be given a new set of clothes.

First Aid Kit
•Currently in a drawer behind the projector screen (will be on the wall soon)•Depending on the chemistry room, it could be in the prep room. TAKE NOTE•If I’m not around, feel free to get out and use if necessary.

Available online at http://www.flinnsci.com/msds-search
You will need to fill out a table for all chemicals we use in each lab.
The higher the number, the more hazardous a chemical is in that category. (a 2 for flammability is more flammable than a 0)

Make sure all valves are closed before you begin.
Open valve at lab bench ¾ open.Open gas valve on burner slightly, then light
burner with a striker (a 45° angle works well)Adjust air valve on burner to obtain a steady
blue flame with a small blue cone in the middle.
When you are finished, turn gas off at the lab bench!