
BC66&BC66-NA MQTT Application Note - AURORA EVERNET
68
BC66&BC66-NA MQTT Application Note NB-IoT Module Series Rev. BC66&BC66-NA_MQTT_Application_Note_V2.0 Date: 2020-03-20 Status: Released www.quectel.com
Transcript of BC66&BC66-NA MQTT Application Note - AURORA EVERNET

BC66&BC66-NA
MQTT Application Note
NB-IoT Module Series
Rev. BC66&BC66-NA_MQTT_Application_Note_V2.0
Date: 2020-03-20
Status: Released
www.quectel.com
NB-IoT Module Series BC66&BC66-NA MQTT Application Note
BC66&BC66-NA_MQTT_Application_Note 1 / 67
Our aim is to provide customers with timely and comprehensive service. For any
assistance, please contact our company headquarters:
Quectel Wireless Solutions Co., Ltd.
Building 5, Shanghai Business Park Phase III (Area B), No.1016 Tianlin Road, Minhang District, Shanghai
200233, China
Tel: +86 21 5108 6236
Email: [email protected]
Or our local office. For more information, please visit:
http://www.quectel.com/support/sales.htm
For technical support, or to report documentation errors, please visit:
http://www.quectel.com/support/technical.htm
Or email to: [email protected]
GENERAL NOTES
QUECTEL OFFERS THE INFORMATION AS A SERVICE TO ITS CUSTOMERS. THE INFORMATION
PROVIDED IS BASED UPON CUSTOMERS’ REQUIREMENTS. QUECTEL MAKES EVERY EFFORT
TO ENSURE THE QUALITY OF THE INFORMATION IT MAKES AVAILABLE. QUECTEL DOES NOT
MAKE ANY WARRANTY AS TO THE INFORMATION CONTAINED HEREIN, AND DOES NOT ACCEPT
ANY LIABILITY FOR ANY INJURY, LOSS OR DAMAGE OF ANY KIND INCURRED BY USE OF OR
RELIANCE UPON THE INFORMATION. ALL INFORMATION SUPPLIED HEREIN IS SUBJECT TO
CHANGE WITHOUT PRIOR NOTICE.
COPYRIGHT
THE INFORMATION CONTAINED HERE IS PROPRIETARY TECHNICAL INFORMATION OF
QUECTEL WIRELESS SOLUTIONS CO., LTD. TRANSMITTING, REPRODUCTION, DISSEMINATION
AND EDITING OF THIS DOCUMENT AS WELL AS UTILIZATION OF THE CONTENT ARE
FORBIDDEN WITHOUT PERMISSION. OFFENDERS WILL BE HELD LIABLE FOR PAYMENT OF
DAMAGES. ALL RIGHTS ARE RESERVED IN THE EVENT OF A PATENT GRANT OR
REGISTRATION OF A UTILITY MODEL OR DESIGN.
Copyright © Quectel Wireless Solutions Co., Ltd. 2020. All rights reserved.

NB-IoT Module Series BC66&BC66-NA MQTT Application Note
BC66&BC66-NA_MQTT_Application_Note 2 / 67
About the Document
Revision History
Version Date Author Description
1.0 2018-08-28 Louis GU Initial
2.0 2020-03-20 Taber JIANG
1. Added AT+QMTCFG="ssl" command.
2. Added descriptions to illustrate how to establish
connections with Azure IoT Hub and AWS IoT Core
(Chapter 3 and Chapter 4).
NB-IoT Module Series BC66&BC66-NA MQTT Application Note
BC66&BC66-NA_MQTT_Application_Note 3 / 67
Contents
About the Document .................................................................................................................................. 2
Contents ...................................................................................................................................................... 3
Table Index .................................................................................................................................................. 5
Figure Index ................................................................................................................................................ 6
1 Introduction ......................................................................................................................................... 8
1.1. MQTT Data Interaction ............................................................................................................... 8
2 MQTT Related AT Commands ......................................................................................................... 10
2.1. Definitions ................................................................................................................................ 10
2.2. Types of AT Commands ........................................................................................................... 10
2.3. Description of MQTT AT Commands ....................................................................................... 10
2.3.1. AT+QMTCFG Configure Optional Parameters of MQTT ........................................... 10
2.3.2. AT+QMTOPEN Open a Network for MQTT Client ..................................................... 16
2.3.3. AT+QMTCLOSE Close a Network for MQTT Client .................................................. 17
2.3.4. AT+QMTCONN Connect a Client to MQTT Server .................................................... 17
2.3.5. AT+QMTDISC Disconnect a Client from MQTT Server ............................................. 19
2.3.6. AT+QMTSUB Subscribe to Topics ............................................................................. 20
2.3.7. AT+QMTUNS Unsubscribe from Topics ..................................................................... 21
2.3.8. AT+QMTPUB Publish Messages ............................................................................... 22
2.4. MQTT Related URCs ............................................................................................................... 24
2.4.1. +QMTSTAT URC to Indicate State Change in MQTT Link Layer .............................. 24
2.4.2. +QMTRECV URC to Inform the Host to Read MQTT Packet Data ........................... 25
2.5. Examples.................................................................................................................................. 26
2.5.1. Use Normal TCP Connection for MQTT ....................................................................... 26
2.5.2. Use SSL/TLS TCP Secure Connection for MQTT ........................................................ 27
3 Connection with Azure IoT Hub ...................................................................................................... 29
3.1. Create Azure Account .............................................................................................................. 29
3.1.1. Create a Free Account .................................................................................................. 29
3.1.2. Enter Azure Portal ......................................................................................................... 29
3.1.3. Create a Resource Group ............................................................................................. 30
3.1.4. Create an IoT Hub Resource ........................................................................................ 31
3.1.5. Get Azure Root CA certificate ....................................................................................... 33
3.2. Communicate with Azure via X.509 Self-Signed Certificate .................................................... 35
3.2.1. Generate X.509 Self-Signed CA Certificate .................................................................. 35
3.2.2. Add X.509 Self-Signed CA Certificate .......................................................................... 35
3.2.3. Verify X.509 Self-Signed CA Certificate ........................................................................ 37
3.2.3.1. Generate Verification Code ................................................................................ 37
3.2.3.2. Generate Verification Certificate ........................................................................ 38
3.2.3.3. Verify Verification Certificate .............................................................................. 39
3.2.4. Generate X.509 Self-Signed Client Certificate ............................................................. 39
3.2.5. Create X.509 Self-Signed Device ................................................................................. 40

NB-IoT Module Series BC66&BC66-NA MQTT Application Note
BC66&BC66-NA_MQTT_Application_Note 4 / 67
3.3. Usage of Device Explorer Tool................................................................................................. 42
3.3.1. Download/Install ............................................................................................................ 42
3.3.2. Configuration ................................................................................................................. 42
3.4. Usage of MQTT.fx Tool............................................................................................................. 44
3.4.1. Download/Install ............................................................................................................ 44
3.4.2. Edit Connection Profiles ................................................................................................ 44
3.4.3. Send Device-to-Cloud Messages ................................................................................. 47
3.5. Use BC66/BC66-NA as MQTT Client ...................................................................................... 48
3.5.1. AT Command Example ................................................................................................. 48
3.5.2. Receive Cloud-to-Device Messages ............................................................................. 50
3.5.3. Send Device-to-Cloud Messages ................................................................................. 50
4 Connection with AWS IoT Core ....................................................................................................... 51
4.1. Create AWS Account ................................................................................................................ 51
4.1.1. Create a Free Account .................................................................................................. 51
4.1.2. Enter AWS Console....................................................................................................... 51
4.1.3. Create a Shortcut for "IoT Core" Resource .................................................................. 52
4.1.4. Create Things ................................................................................................................ 52
4.1.5. Create Policies .............................................................................................................. 54
4.1.6. Attach Policies to Certificate(s) ..................................................................................... 55
4.1.7. Attach Things to Certificate(s) ....................................................................................... 57
4.2. Communicate with AWS IoT Core ........................................................................................... 59
4.2.1. Related Resource Information ...................................................................................... 59
4.2.1.1. Endpoint ............................................................................................................. 59
4.2.1.2. Certificates ......................................................................................................... 60
4.2.2. Usage of MQTT.fx Tool .................................................................................................. 60
4.2.2.1. Download/Install ................................................................................................. 60
4.2.2.2. Edit Connection Profiles ..................................................................................... 60
4.2.2.3. Subscribe and Publish ....................................................................................... 61
4.2.3. Use BC66/BC66-NA as MQTT Client ........................................................................... 63
4.2.3.1. AT Command Example ...................................................................................... 63
4.2.3.2. Subscribe and Publish ....................................................................................... 65
5 Appendix A References .................................................................................................................... 66
NB-IoT Module Series BC66&BC66-NA MQTT Application Note
BC66&BC66-NA_MQTT_Application_Note 5 / 67
Table Index
Table 1: Types of AT Commands and Responses ..................................................................................... 10
Table 2: MQTT Related URCs ................................................................................................................... 24
Table 3: Error Codes of +QMTSTAT URC ................................................................................................. 24
Table 4: Terms and Abbreviations .............................................................................................................. 66

NB-IoT Module Series BC66&BC66-NA MQTT Application Note
BC66&BC66-NA_MQTT_Application_Note 6 / 67
Figure Index
Figure 1: MQTT Data Interaction Mechanism .............................................................................................. 9
Figure 2: Azure Portal ................................................................................................................................. 29
Figure 3: Create a Resource Group (Step a) ............................................................................................. 30
Figure 4: Create a Resource Group (Step b and c) ................................................................................... 30
Figure 5: Create an IoT Hub Resource (Step a) ........................................................................................ 31
Figure 6: Create an IoT Hub Resource (Step b) ........................................................................................ 32
Figure 7: Create an IoT Hub Resource (Step c) ........................................................................................ 32
Figure 8: Create an IoT Hub Resource (Step d) ........................................................................................ 33
Figure 9: Set Azure Root CA Certificate with Google Chrome .................................................................. 33
Figure 10: Copy Certification Path to File .................................................................................................. 34
Figure 11: Export File ................................................................................................................................. 34
Figure 12: Add a Certificate (Step b) .......................................................................................................... 36
Figure 13: Add a Certificate (Step c and d) ................................................................................................ 37
Figure 14: Generate Verification Code ....................................................................................................... 38
Figure 15: Upload and Verify Verification Certificate ................................................................................. 39
Figure 16: Check the Verification Result .................................................................................................... 39
Figure 17: Create X.509 Self-Signed Device (Step a) ............................................................................... 41
Figure 18: Create X.509 Self-Signed Device (Step b to e) ........................................................................ 41
Figure 19: Check the Creation Result ........................................................................................................ 42
Figure 20: Device Explorer Configuration (Step a) .................................................................................... 43
Figure 21: Device Explorer Configuration (Step b) .................................................................................... 43
Figure 22: Use Device Explorer ................................................................................................................. 44
Figure 23: MQTT Broker Profile Settings and General Configuration ....................................................... 45
Figure 24: User Credentials Configuration ................................................................................................ 46
Figure 25: SSL/TLS Configuration ............................................................................................................. 47
Figure 26: Send Messages with MQTT.fx .................................................................................................. 48
Figure 27: Module Receives Messages from IoT Cloud Platform ............................................................. 50
Figure 28: Module Sends Messages to the IoT Cloud Platform ................................................................ 50
Figure 29: AWS Console ............................................................................................................................ 51
Figure 30: Create a Shortcut for "IoT Core" Resource .............................................................................. 52
Figure 31: Create Things (Step a to c) ....................................................................................................... 53
Figure 32: Create Things (Step d-1) .......................................................................................................... 53
Figure 33: Create Things (Step d-2) .......................................................................................................... 54
Figure 34: Create Things (Step e) .............................................................................................................. 54
Figure 35: Create Policies (Step a to c) ..................................................................................................... 55
Figure 36: Policy Created ........................................................................................................................... 55
Figure 37: Attach Policies to Certificate(s) (Step a) ................................................................................... 56
Figure 38: Attach Policies to Certificate(s) (Step b) ................................................................................... 56
Figure 39: Attach Policies to Certificate(s) (Step c) ................................................................................... 57
Figure 40: Attach Things to Certificate(s) (Step a) ..................................................................................... 57
Figure 41: Attach Things to Certificate(s) (Step b) ..................................................................................... 58
Figure 42: Attach Things to Certificate(s) (Step c) ..................................................................................... 58

NB-IoT Module Series BC66&BC66-NA MQTT Application Note
BC66&BC66-NA_MQTT_Application_Note 7 / 67
Figure 43: Check Endpoint - A ................................................................................................................... 59
Figure 44: Check Endpoint - B ................................................................................................................... 59
Figure 45: Check Certificates ..................................................................................................................... 60
Figure 46: Edit Connection Profiles ........................................................................................................... 61
Figure 47: Subscribe to a Topic .................................................................................................................. 62
Figure 48: Publish the Message ................................................................................................................ 63

NB-IoT Module Series BC66&BC66-NA MQTT Application Note
BC66&BC66-NA_MQTT_Application_Note 8 / 67
1 Introduction
MQTT is a broker-based publish/subscribe messaging protocol designed to be open, simple, lightweight
and easy to implement. It is designed for connections with remote locations where a "small code footprint"
is required or the network bandwidth is limited.
This document mainly introduces how to use the MQTT function of Quectel BC66 and BC66-NA modules
through AT commands.
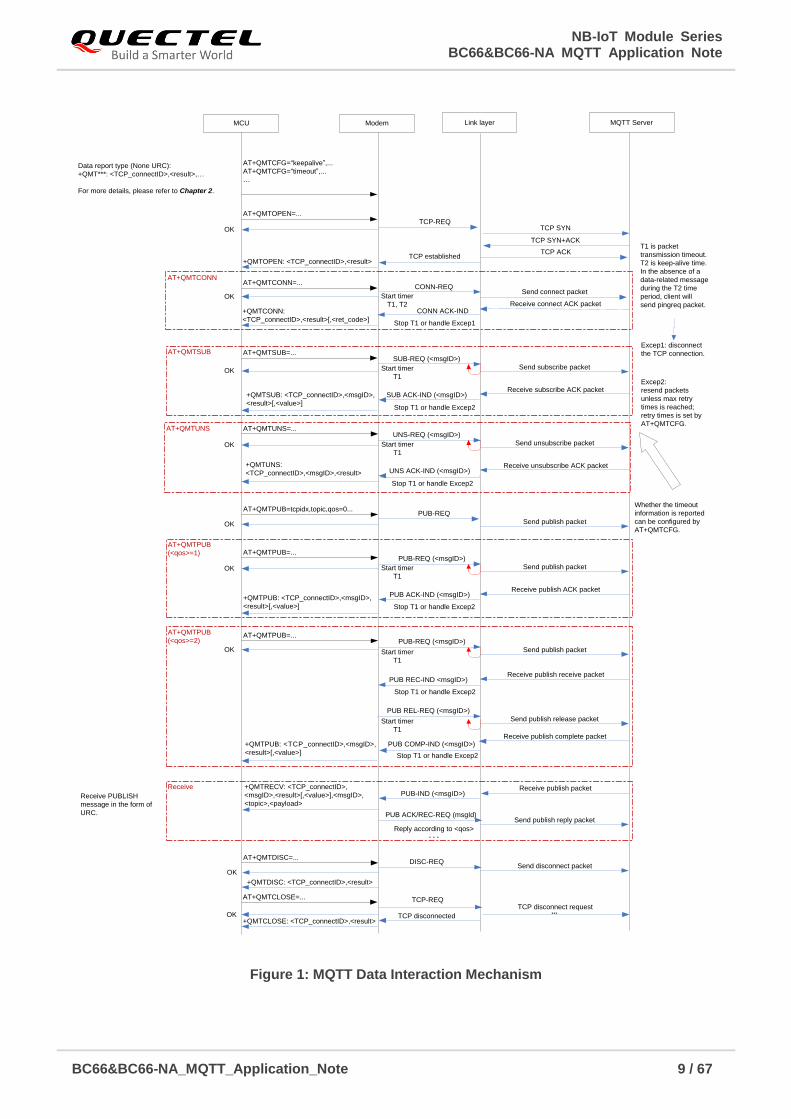
1.1. MQTT Data Interaction
This chapter gives the data interaction mechanism of MQTT function.
NB-IoT Module Series BC66&BC66-NA MQTT Application Note
BC66&BC66-NA_MQTT_Application_Note 9 / 67
Modem MQTT ServerMCU
AT+QMTCFG=“keepalive”,...
AT+QMTCFG=“timeout”,...
…
AT+QMTOPEN=...
Link layer
TCP-REQ TCP SYN
TCP SYN+ACK
TCP established+QMTOPEN: <TCP_connectID>,<result>
AT+QMTCONN=...CONN-REQ
Send connect packet
Receive connect ACK packetCONN ACK-IND+QMTCONN:
<TCP_connectID>,<result>[,<ret_code>]Stop T1 or handle Excep1
AT+QMTSUB=...SUB-REQ (<msgID>)
Start timer
T1, T2
Send subscribe packet
SUB ACK-IND (<msgID>) Receive subscribe ACK packet
+QMTSUB: <TCP_connectID>,<msgID>,
<result>[,<value>]
Start timer
T1
AT+QMTUNS=...UNS-REQ (<msgID>)
Send unsubscribe packet
UNS ACK-IND (<msgID>) Receive unsubscribe ACK packet+QMTUNS:
<TCP_connectID>,<msgID>,<result>
Start timer
T1
AT+QMTPUB=...PUB-REQ (<msgID>)
Send publish packet
PUB ACK-IND (<msgID>) Receive publish ACK packet
+QMTPUB: <TCP_connectID>,<msgID>,
<result>[,<value>]
Start timer
T1
AT+QMTPUB=tcpidx,topic,qos=0...PUB-REQ
Send publish packet
Stop T1 or handle Excep2
Stop T1 or handle Excep2
Stop T1 or handle Excep2
AT+QMTPUB=...PUB-REQ (<msgID>)
Send publish packet
PUB REC-IND <msgID>) Receive publish receive packet
Start timer
T1
Stop T1 or handle Excep2
PUB REL-REQ (<msgID>)
Send publish release packetStart timer
T1 Receive publish complete packet
Stop T1 or handle Excep2
PUB COMP-IND (<msgID>)
AT+QMTDISC=...DISC-REQ
Send disconnect packet
AT+QMTCLOSE=... TCP-REQ TCP disconnect request
...TCP disconnected
+QMTCLOSE: <TCP_connectID>,<result>
Receive publish packet
Reply according to <qos>
PUB-IND (<msgID>)+QMTRECV: <TCP_connectID>,
<msgID>,<result>[,<value>],<msgID>,
<topic>,<payload>
PUB ACK/REC-REQ (msgId)
. . .
Send publish reply packet
Excep1: disconnect
the TCP connection.
Excep2:
resend packets
unless max retry
times is reached;
retry times is set by
AT+QMTCFG.
T1 is packet
transmission timeout.
T2 is keep-alive time.
In the absence of a
data-related message
during the T2 time
period, client will
send pingreq packet.
TCP ACK
Receive PUBLISH
message in the form of
URC.
Data report type (None URC):
+QMT***: <TCP_connectID>,<result>,…
For more details, please refer to Chapter 2.
AT+QMTCONN
AT+QMTSUB
AT+QMTUNS
AT+QMTPUB
(<qos>=1)
AT+QMTPUB
(<qos>=2)
Whether the timeout
information is reported
can be configured by
AT+QMTCFG.
OK
OK
OK
OK
OK
OK
OK
OK
OK
Receive
+QMTDISC: <TCP_connectID>,<result>
+QMTPUB: <TCP_connectID>,<msgID>,
<result>[,<value>]
Figure 1: MQTT Data Interaction Mechanism
NB-IoT Module Series BC66&BC66-NA MQTT Application Note
BC66&BC66-NA_MQTT_Application_Note 10 / 67
2 MQTT Related AT Commands
2.1. Definitions
<...> Parameter name. Angle brackets do not appear on command line.
[...] Optional parameter of a command or an optional part of TA information response.
Square brackets do not appear on command line. When an optional parameter is not
given, the new value equals to its previous value or its default setting, unless otherwise
specified.
Underline Default setting of a parameter.
2.2. Types of AT Commands
Table 1: Types of AT Commands and Responses
2.3. Description of MQTT AT Commands
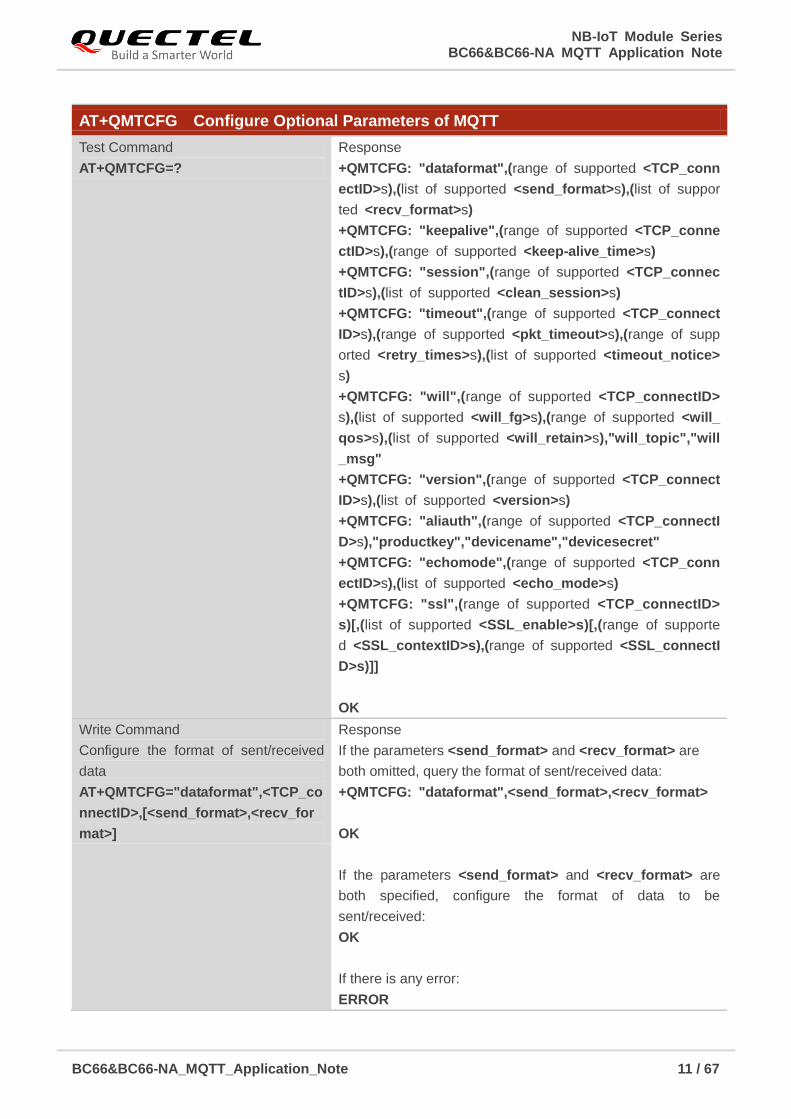
2.3.1. AT+QMTCFG Configure Optional Parameters of MQTT
This command is used to configure optional parameters of MQTT.
Test Command AT+<cmd>=?
This command returns the list of parameters and
value ranges set by the corresponding Write
Command or internal processes.
Read Command AT+<cmd>? This command returns the currently set value of the
parameter or parameters.
Write Command AT+<cmd>=<p1>[,<p2>
[,<p3>[...]]]
This command sets the user-definable parameter
values.
Execution
Command AT+<cmd>
This command reads non-variable parameters
affected by internal processes in the module.
NB-IoT Module Series BC66&BC66-NA MQTT Application Note
BC66&BC66-NA_MQTT_Application_Note 11 / 67
AT+QMTCFG Configure Optional Parameters of MQTT
Test Command
AT+QMTCFG=?
Response
+QMTCFG: "dataformat",(range of supported <TCP_conn
ectID>s),(list of supported <send_format>s),(list of suppor
ted <recv_format>s)
+QMTCFG: "keepalive",(range of supported <TCP_conne
ctID>s),(range of supported <keep-alive_time>s)
+QMTCFG: "session",(range of supported <TCP_connec
tID>s),(list of supported <clean_session>s)
+QMTCFG: "timeout",(range of supported <TCP_connect
ID>s),(range of supported <pkt_timeout>s),(range of supp
orted <retry_times>s),(list of supported <timeout_notice>
s)
+QMTCFG: "will",(range of supported <TCP_connectID>
s),(list of supported <will_fg>s),(range of supported <will_
qos>s),(list of supported <will_retain>s),"will_topic","will
_msg"
+QMTCFG: "version",(range of supported <TCP_connect
ID>s),(list of supported <version>s)
+QMTCFG: "aliauth",(range of supported <TCP_connectI
D>s),"productkey","devicename","devicesecret"
+QMTCFG: "echomode",(range of supported <TCP_conn
ectID>s),(list of supported <echo_mode>s)
+QMTCFG: "ssl",(range of supported <TCP_connectID>
s)[,(list of supported <SSL_enable>s)[,(range of supporte
d <SSL_contextID>s),(range of supported <SSL_connectI
D>s)]]
OK
Write Command
Configure the format of sent/received
data
AT+QMTCFG="dataformat",<TCP_co
nnectID>,[<send_format>,<recv_for
mat>]
Response
If the parameters <send_format> and <recv_format> are
both omitted, query the format of sent/received data:
+QMTCFG: "dataformat",<send_format>,<recv_format>
OK
If the parameters <send_format> and <recv_format> are
both specified, configure the format of data to be
sent/received:
OK
If there is any error:
ERROR
NB-IoT Module Series BC66&BC66-NA MQTT Application Note
BC66&BC66-NA_MQTT_Application_Note 12 / 67
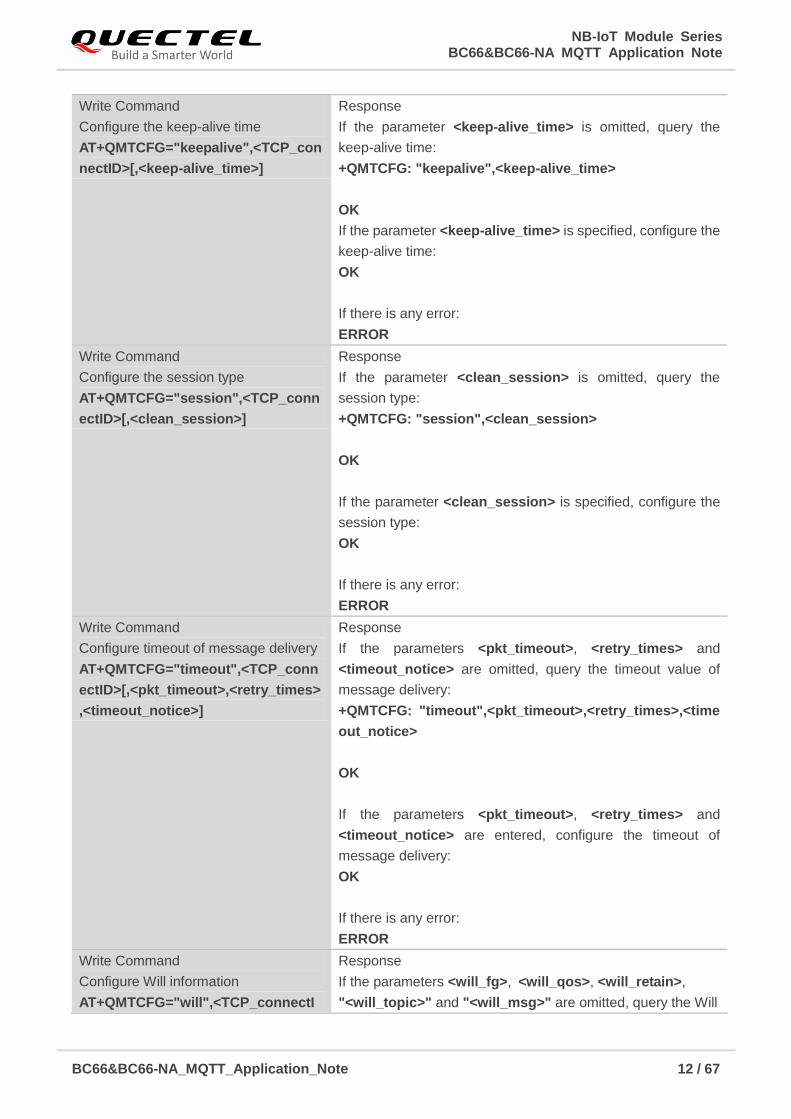
Write Command
Configure the keep-alive time
AT+QMTCFG="keepalive",<TCP_con
nectID>[,<keep-alive_time>]
Response
If the parameter <keep-alive_time> is omitted, query the
keep-alive time:
+QMTCFG: "keepalive",<keep-alive_time>
OK
If the parameter <keep-alive_time> is specified, configure the
keep-alive time:
OK
If there is any error:
ERROR
Write Command
Configure the session type
AT+QMTCFG="session",<TCP_conn
ectID>[,<clean_session>]
Response
If the parameter <clean_session> is omitted, query the
session type:
+QMTCFG: "session",<clean_session>
OK
If the parameter <clean_session> is specified, configure the
session type:
OK
If there is any error:
ERROR
Write Command
Configure timeout of message delivery
AT+QMTCFG="timeout",<TCP_conn
ectID>[,<pkt_timeout>,<retry_times>
,<timeout_notice>]
Response
If the parameters <pkt_timeout>, <retry_times> and
<timeout_notice> are omitted, query the timeout value of
message delivery:
+QMTCFG: "timeout",<pkt_timeout>,<retry_times>,<time
out_notice>
OK
If the parameters <pkt_timeout>, <retry_times> and
<timeout_notice> are entered, configure the timeout of
message delivery:
OK
If there is any error:
ERROR
Write Command
Configure Will information
AT+QMTCFG="will",<TCP_connectI
Response
If the parameters <will_fg>, <will_qos>, <will_retain>,
"<will_topic>" and "<will_msg>" are omitted, query the Will
NB-IoT Module Series BC66&BC66-NA MQTT Application Note
BC66&BC66-NA_MQTT_Application_Note 13 / 67
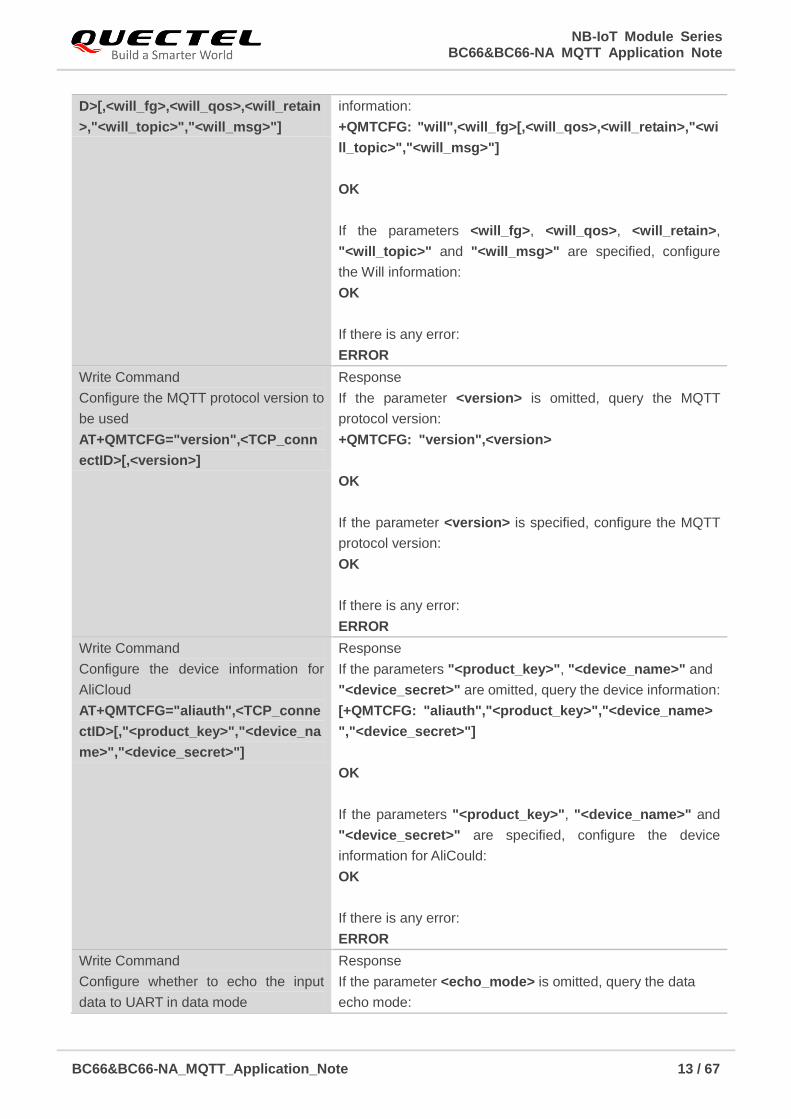
D>[,<will_fg>,<will_qos>,<will_retain
>,"<will_topic>","<will_msg>"]
information:
+QMTCFG: "will",<will_fg>[,<will_qos>,<will_retain>,"<wi
ll_topic>","<will_msg>"]
OK
If the parameters <will_fg>, <will_qos>, <will_retain>,
"<will_topic>" and "<will_msg>" are specified, configure
the Will information:
OK
If there is any error:
ERROR
Write Command
Configure the MQTT protocol version to
be used
AT+QMTCFG="version",<TCP_conn
ectID>[,<version>]
Response
If the parameter <version> is omitted, query the MQTT
protocol version:
+QMTCFG: "version",<version>
OK
If the parameter <version> is specified, configure the MQTT
protocol version:
OK
If there is any error:
ERROR
Write Command
Configure the device information for
AliCloud
AT+QMTCFG="aliauth",<TCP_conne
ctID>[,"<product_key>","<device_na
me>","<device_secret>"]
Response
If the parameters "<product_key>", "<device_name>" and
"<device_secret>" are omitted, query the device information:
[+QMTCFG: "aliauth","<product_key>","<device_name>
","<device_secret>"]
OK
If the parameters "<product_key>", "<device_name>" and
"<device_secret>" are specified, configure the device
information for AliCould:
OK
If there is any error:
ERROR
Write Command
Configure whether to echo the input
data to UART in data mode
Response
If the parameter <echo_mode> is omitted, query the data
echo mode:

NB-IoT Module Series BC66&BC66-NA MQTT Application Note
BC66&BC66-NA_MQTT_Application_Note 14 / 67
Parameter
AT+QMTCFG="echomode",<TCP_co
nnectID>[,<echo_mode>]
+QMTCFG: "echomode",<echo_mode>
OK
If the parameter <echo_mode> is specified, configure
whether to echo the input data to UART in data mode:
OK
If there is any error:
ERROR
Write Command
Configure whether to use SSL secure
connection
AT+QMTCFG="ssl",<TCP_connectID
>[,<SSL_enable>,<SSL_contextID>,<
SSL_connectID>]
Response
If the parameters <SSL_enable>, <SSL_contextID> and
<SSL_connectID> are omitted, query the current
configuration:
+QMTCFG: "ssl",<SSL_enable>[,<SSL_contextID>,<SSL
_connectID>]
OK
If the parameters <SSL_enable>, <SSL_contextID> and
<SSL_connectID> are specified, configure whether to use
SSL secure connection:
OK
If there is any error:
ERROR
Maximum Response Time 300 ms
Characteristics
The command takes effect immediately.
Invalid after deep-sleep wakeup. The configurations will not
be saved to NVRAM.
<TCP_connectID> Integer type. MQTT socket identifier. The range is 0-5.
<will_fg> Integer type. The Will flag.
0 Ignore the Will flag configuration
1 Require the Will flag configuration
<will_qos> Integer type. Quality of service for message delivery
0 At most once
1 At least once
2 Exactly once
<will_retain> Integer type. The Will retain flag is only used on PUBLISH messages.
0 When a client sends a PUBLISH message to a server, the server will not hold

NB-IoT Module Series BC66&BC66-NA MQTT Application Note
BC66&BC66-NA_MQTT_Application_Note 15 / 67
on to the message after it has been delivered to the current subscribers.
1 When a client sends a PUBLISH message to a server, the server should hold
on to the message after it has been delivered to the current subscribers.
<will_topic> String type. Will topic string. The maximum size is 255 bytes.
<will_msg> String type. The Will message defines the content of the message that is
published to the will topic if the client is unexpectedly disconnected. It can be a
zero-length message. The maximum size is 255 bytes.
<pkt_timeout> Integer type. Timeout of the packet delivery. The range is 1-60. The default value
is 10. Unit: second.
<retry_times> Integer type. Retry times when packet delivery times out. The range is 0-10. The
default value is 3.
<timeout_notice> Integer type. Whether to report timeout message when transmitting packet.
0 Not report
1 Report
<clean_session> Integer type. The session type.
0 The server must store the subscriptions of the client after it is disconnected.
1 The server must discard any previously maintained information about the
client and treat the connection as "clean".
<keep-alive_time> Integer type. Keep-alive time. The range is 0-3600. The default value is 120. Unit:
second. It defines the maximum time interval between messages received from a
client. If the server does not receive a message from the client within 1.5 times of
the keep-alive time period, it disconnects the client as if the client has sent a
DISCONNECT message.
0 The client is not disconnected
<product_key> String type. Product key issued by AliCloud. The maximum size is 64 bytes.
<device_name> String type. Device name issued by AliCloud. The maximum size is 64 bytes.
<device_secret> String type. Device secret key issued by AliCloud. The maximum size is 64 bytes.
<version> Integer type. The version of MQTT protocol.
3 MQTT v3.1
4 MQTT v3.1.1
<send_format> Integer type. The format of sent data.
0 Text format
1 Hex format
<recv_format> Integer type. The format of received data.
0 Text format
1 Hex format
<echo_mode> Integer type. Whether to echo the input data to UART in data mode.
0 Do not echo the input data to UART
1 Echo the input data to UART
<SSL_enable> Integer type. Configure whether to use SSL secure connection for MQTT.
0 Use normal TCP connection for MQTT
1 Use SSL/TLS TCP secure connection for MQTT
<SSL_contextID> Integer type. SSL context index. The range is 1-3.

NB-IoT Module Series BC66&BC66-NA MQTT Application Note
BC66&BC66-NA_MQTT_Application_Note 16 / 67
1. <clean_session>=0 is effective only when the server supports the “clean” operation.
2. Care must be taken to ensure message delivery does not time out while it is still being sent.
3. AT+QMTCFG="aliauth" command is only used for AliCloud. If it is configured, the parameters
<username> and <password> in command AT+QMTCONN can be omitted.
4. <echo_mode> is only valid in data mode transferring.
5. When <SSL_enable>=1, parameters <SSL_contextID> and <SSL_connectID> must be specified,
and then the SSL/TLS connection configurations must be set by AT+QSSLCFG. For details of the
command, please refer to Quectel_BC66&BC66-NA_SSL_Application_Note.
6. The settings of "will", "session", "keepalive", "aliauth", "version" and "ssl" have to be
configured before the executing of AT+QMTOPEN.
2.3.2. AT+QMTOPEN Open a Network for MQTT Client
This command is used to open a network for MQTT client.
<SSL_connectID> Integer type. SSL connect index. The range is 0-5.
AT+QMTOPEN Open a Network for MQTT Client
Test Command
AT+QMTOPEN=? Response
+QMTOPEN: (range of supported <TCP_connectID>s),"<
host_name>",<port>
OK
Read Command
AT+QMTOPEN?
Response
[+QMTOPEN: <TCP_connectID>,"<host_name>",<port>]
OK
Write Command
AT+QMTOPEN=<TCP_connectID>,"<
host_name>",<port>
Response
OK
+QMTOPEN: <TCP_connectID>,<result>
If there is any error:
ERROR
Maximum Response Time 75 s, determined by network
Characteristics /
NOTES
NB-IoT Module Series BC66&BC66-NA MQTT Application Note
BC66&BC66-NA_MQTT_Application_Note 17 / 67
Parameter
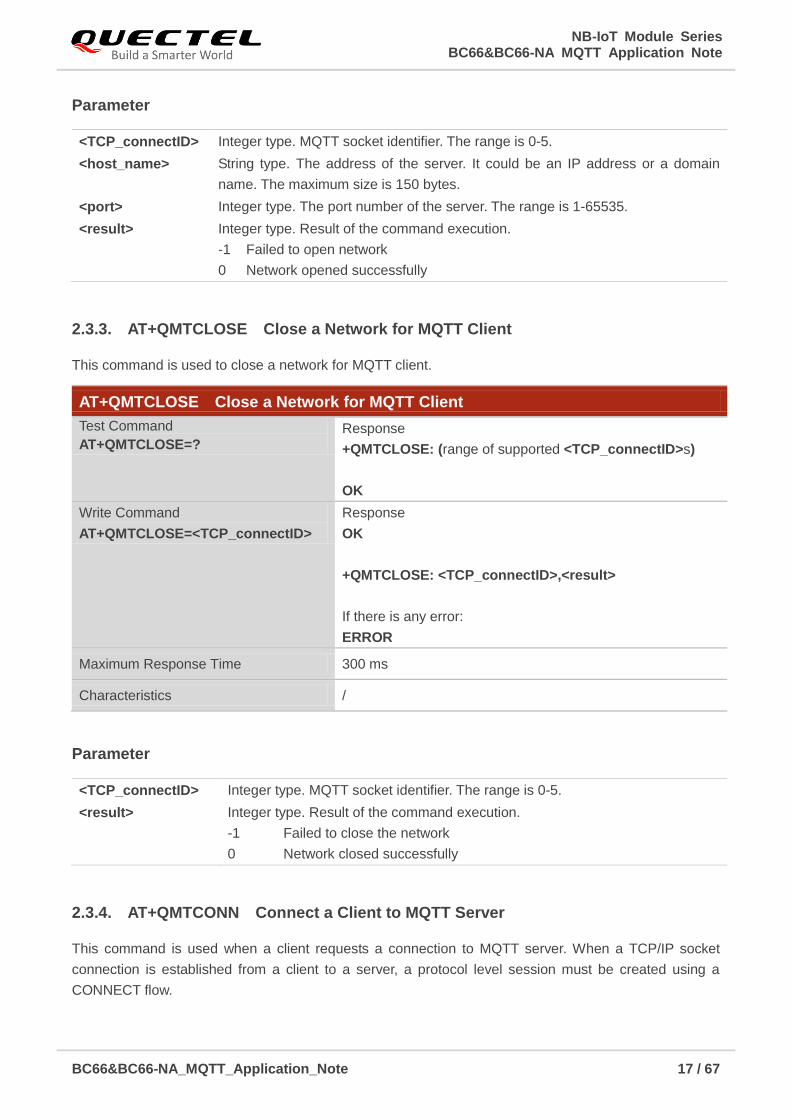
2.3.3. AT+QMTCLOSE Close a Network for MQTT Client
This command is used to close a network for MQTT client.
Parameter
2.3.4. AT+QMTCONN Connect a Client to MQTT Server
This command is used when a client requests a connection to MQTT server. When a TCP/IP socket
connection is established from a client to a server, a protocol level session must be created using a
CONNECT flow.
<TCP_connectID> Integer type. MQTT socket identifier. The range is 0-5.
<host_name> String type. The address of the server. It could be an IP address or a domain
name. The maximum size is 150 bytes.
<port> Integer type. The port number of the server. The range is 1-65535.
<result> Integer type. Result of the command execution.
-1 Failed to open network
0 Network opened successfully
AT+QMTCLOSE Close a Network for MQTT Client
Test Command
AT+QMTCLOSE=? Response
+QMTCLOSE: (range of supported <TCP_connectID>s)
OK
Write Command
AT+QMTCLOSE=<TCP_connectID>
Response
OK
+QMTCLOSE: <TCP_connectID>,<result>
If there is any error:
ERROR
Maximum Response Time 300 ms
Characteristics /
<TCP_connectID> Integer type. MQTT socket identifier. The range is 0-5.
<result> Integer type. Result of the command execution.
-1 Failed to close the network
0 Network closed successfully

NB-IoT Module Series BC66&BC66-NA MQTT Application Note
BC66&BC66-NA_MQTT_Application_Note 18 / 67
Parameter
AT+QMTCONN Connect a Client to MQTT Server
Test Command
AT+QMTCONN=?
Response
+QMTCONN: (range of supported <TCP_connectID>s),"<
clientID>"[,"<username>"[,"<password>"]]
OK
Read Command
AT+QMTCONN?
Response
[+QMTCONN: <TCP_connectID>,<state>]
OK
Write Command
AT+QMTCONN=<TCP_connectID>,"<
clientID>"[,"<username>"[,"<passwo
rd>"]]
Response
OK
+QMTCONN: <TCP_connectID>,<result>[,<ret_code>]
If there is any error:
ERROR
Maximum Response Time <pkt_timeout> (default 10 s), determined by network
Characteristics /
<TCP_connectID> Integer type. MQTT socket identifier. The range is 0-5.
<clientID> String type. The client identifier. The max length is 128 bytes.
<username> String type. User name of the client. It can be used for authentication. The max
length is 256 bytes.
<password> String type. Password corresponding to the user name of the client. It can be
used for authentication. The max length is 256 bytes.
<result> Integer type. Result of the command execution
0 Sent the packet successfully and received ACK from server
1 Packet retransmission
2 Failed to send packet
<state> Integer type. The MQTT connection state.
1 MQTT is initial
2 MQTT is connecting
3 MQTT is connected
4 MQTT is disconnecting
<ret_code> Integer type. Connection return code.
0 Connection Accepted
1 Connection Refused: Unacceptable Protocol Version
2 Connection Refused: Identifier Rejected
NB-IoT Module Series BC66&BC66-NA MQTT Application Note
BC66&BC66-NA_MQTT_Application_Note 19 / 67
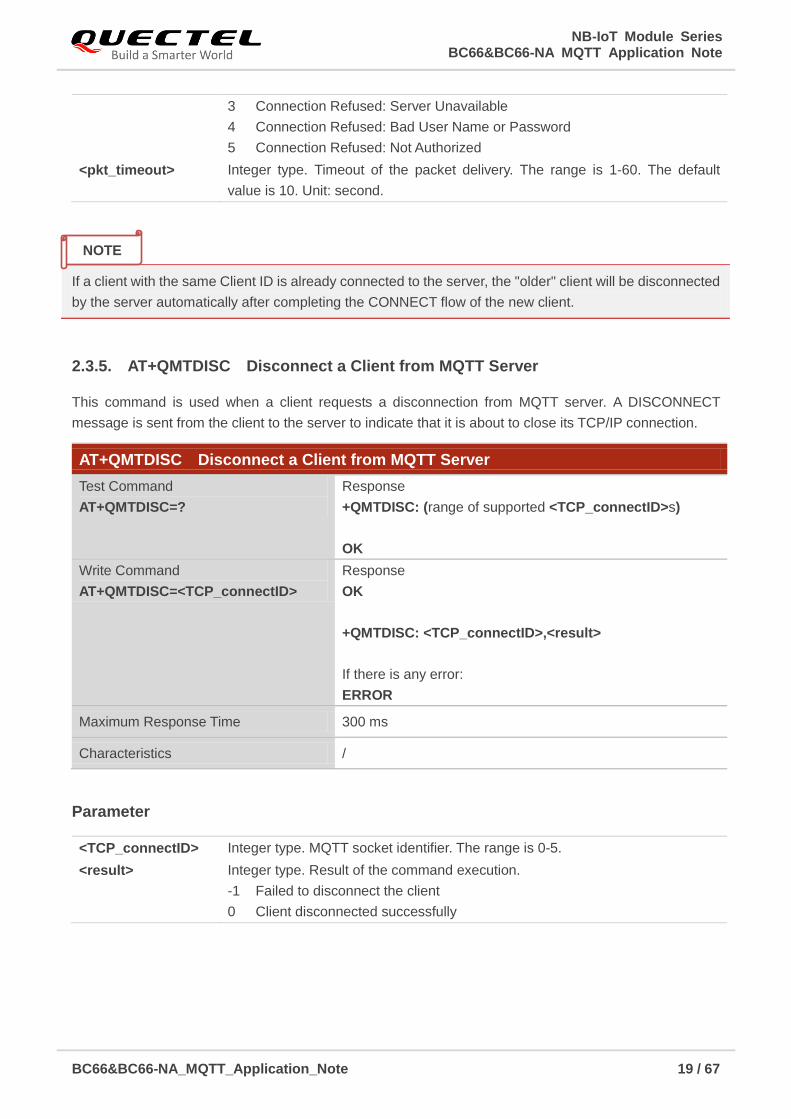
If a client with the same Client ID is already connected to the server, the "older" client will be disconnected
by the server automatically after completing the CONNECT flow of the new client.
2.3.5. AT+QMTDISC Disconnect a Client from MQTT Server
This command is used when a client requests a disconnection from MQTT server. A DISCONNECT
message is sent from the client to the server to indicate that it is about to close its TCP/IP connection.
Parameter
3 Connection Refused: Server Unavailable
4 Connection Refused: Bad User Name or Password
5 Connection Refused: Not Authorized
<pkt_timeout> Integer type. Timeout of the packet delivery. The range is 1-60. The default
value is 10. Unit: second.
AT+QMTDISC Disconnect a Client from MQTT Server
Test Command
AT+QMTDISC=?
Response
+QMTDISC: (range of supported <TCP_connectID>s)
OK
Write Command
AT+QMTDISC=<TCP_connectID>
Response
OK
+QMTDISC: <TCP_connectID>,<result>
If there is any error:
ERROR
Maximum Response Time 300 ms
Characteristics /
<TCP_connectID> Integer type. MQTT socket identifier. The range is 0-5.
<result> Integer type. Result of the command execution.
-1 Failed to disconnect the client
0 Client disconnected successfully
NOTE

NB-IoT Module Series BC66&BC66-NA MQTT Application Note
BC66&BC66-NA_MQTT_Application_Note 20 / 67
2.3.6. AT+QMTSUB Subscribe to Topics
This command is used to subscribe to one or more topics. A SUBSCRIBE message is sent by a client to
register an interest in one or more topic names with the server. Messages published to these topics are
delivered from the server to the client as PUBLISH messages.
Parameter
AT+QMTSUB Subscribe to Topics
Test Command
AT+QMTSUB=? Response
+QMTSUB: (range of supported <TCP_connectID>s),<msg
ID>,"<topic>",<qos>[,"<topic>",qos>...]
OK
Write Command
AT+QMTSUB=<TCP_connectID>,<
msgID>,"<topic1>",<qos1>[,"<topic
2>",<qos2>…]
Response
OK
+QMTSUB: <TCP_connectID>,<msgID>,<result>[,<value>]
If there is any error:
ERROR
Maximum Response Time <pkt_timeout> + <pkt_timeout> × <retry_times>
(default 40 s), determined by network
Characteristics /
<TCP_connectID> Integer type. MQTT socket identifier. The range is 0-5.
<msgID> Integer type. Message identifier of packet. The range is 1-65535.
<topic> String type. Topic that the client wants to subscribe to or unsubscribe from. The
maximum length is 255 bytes.
<qos> Integer type. The QoS level at which the client wants to publish the messages.
0 At most once
1 At least once
2 Exactly once
<result> Integer type. Result of the command execution.
0 Sent the packet successfully and received ACK from server
1 Packet retransmission
2 Failed to send packet
<value> If <result> is 0, it is a vector of granted QoS levels. The value 128 indicates that
the subscription has been rejected by the server.
If <result> is 1, it means the times of packet retransmission.
If <result> is 2, it will not be presented.
<pkt_timeout> Integer type. Timeout of the packet delivery. The range is 1-60. The default value
is 10. Unit: second.

NB-IoT Module Series BC66&BC66-NA MQTT Application Note
BC66&BC66-NA_MQTT_Application_Note 21 / 67
The <msgID> is only present in messages where the QoS bits in the fixed header indicate QoS levels 1
or 2. It must be unique amongst the set of "in flight" messages in a particular direction of communication.
It typically increases by exactly one from one message to the next, but is not required to do so.
2.3.7. AT+QMTUNS Unsubscribe from Topics
This command is used to unsubscribe from one or more topics. An UNSUBSCRIBE message is sent by
the client to the server to unsubscribe from named topics.
Parameter
<retry_times> Integer type. Retry times when packet delivery times out. The range is 0-10. The
default value is 3.
AT+QMTUNS Unsubscribe from Topics
Test Command
AT+QMTUNS=?
Response
+QMTUNS: (range of supported <TCP_connectID>s),<msg
ID>,"<topic>"[,"<topic>"...]
OK
Write Command
AT+QMTUNS=<TCP_connectID>,<
msgID>,"<topic1>"[,"<topic2>"…]
Response
OK
+QMTUNS: <TCP_connectID>,<msgID>,<result>
If there is any error:
ERROR
Maximum Response Time <pkt_timeout> + <pkt_timeout> × <retry_times>
(default 40 s), determined by network
Characteristics /
<TCP_connectID> Integer type. MQTT socket identifier. The range is 0-5.
<msgID> Integer type. Message identifier of packet. The range is 1-65535.
<topic> String type. Topic that the client wants to subscribe to or unsubscribe from. The
maximum length is 255 bytes.
<result> Integer type. Result of the command execution.
0 Sent the packet successfully and received ACK from server
1 Packet retransmission
2 Failed to send packet
<pkt_timeout> Integer type. Timeout of the packet delivery. The range is 1-60. The default value
NOTE
NB-IoT Module Series BC66&BC66-NA MQTT Application Note
BC66&BC66-NA_MQTT_Application_Note 22 / 67
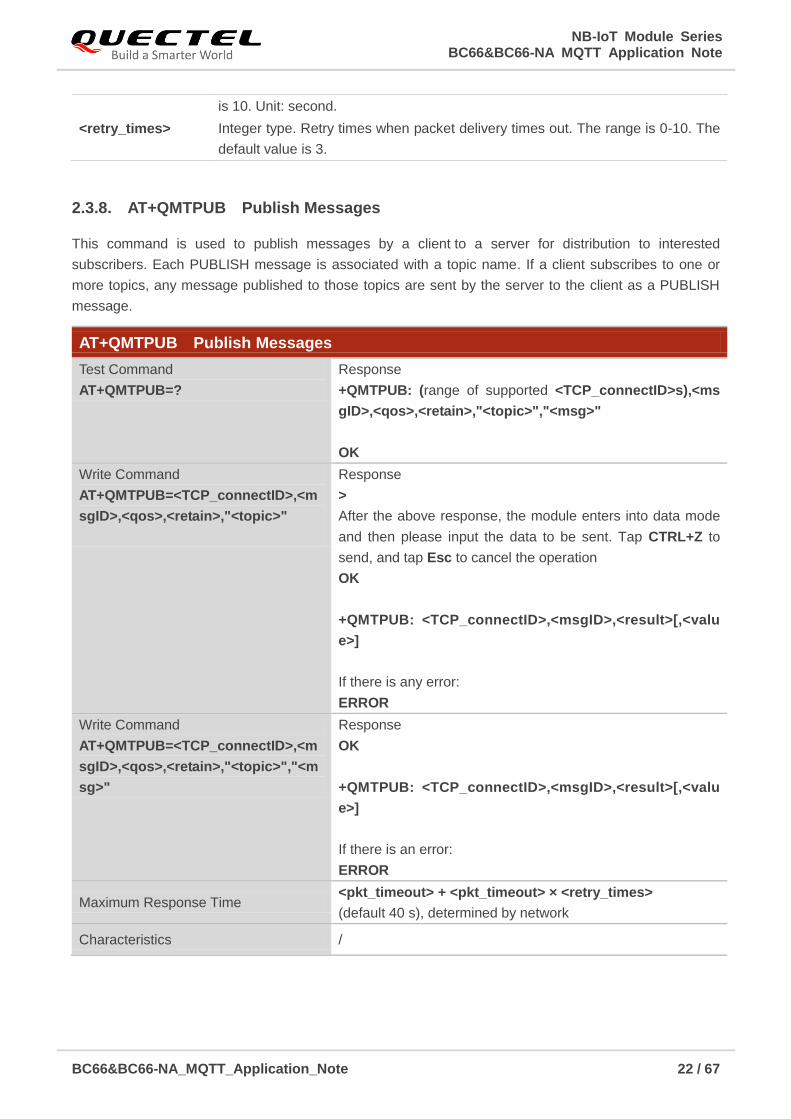
2.3.8. AT+QMTPUB Publish Messages
This command is used to publish messages by a client to a server for distribution to interested
subscribers. Each PUBLISH message is associated with a topic name. If a client subscribes to one or
more topics, any message published to those topics are sent by the server to the client as a PUBLISH
message.
is 10. Unit: second.
<retry_times> Integer type. Retry times when packet delivery times out. The range is 0-10. The
default value is 3.
AT+QMTPUB Publish Messages
Test Command
AT+QMTPUB=?
Response
+QMTPUB: (range of supported <TCP_connectID>s),<ms
gID>,<qos>,<retain>,"<topic>","<msg>"
OK
Write Command
AT+QMTPUB=<TCP_connectID>,<m
sgID>,<qos>,<retain>,"<topic>"
Response
>
After the above response, the module enters into data mode
and then please input the data to be sent. Tap CTRL+Z to
send, and tap Esc to cancel the operation
OK
+QMTPUB: <TCP_connectID>,<msgID>,<result>[,<valu
e>]
If there is any error:
ERROR
Write Command
AT+QMTPUB=<TCP_connectID>,<m
sgID>,<qos>,<retain>,"<topic>","<m
sg>"
Response
OK
+QMTPUB: <TCP_connectID>,<msgID>,<result>[,<valu
e>]
If there is an error:
ERROR
Maximum Response Time <pkt_timeout> + <pkt_timeout> × <retry_times>
(default 40 s), determined by network
Characteristics /
NB-IoT Module Series BC66&BC66-NA MQTT Application Note
BC66&BC66-NA_MQTT_Application_Note 23 / 67
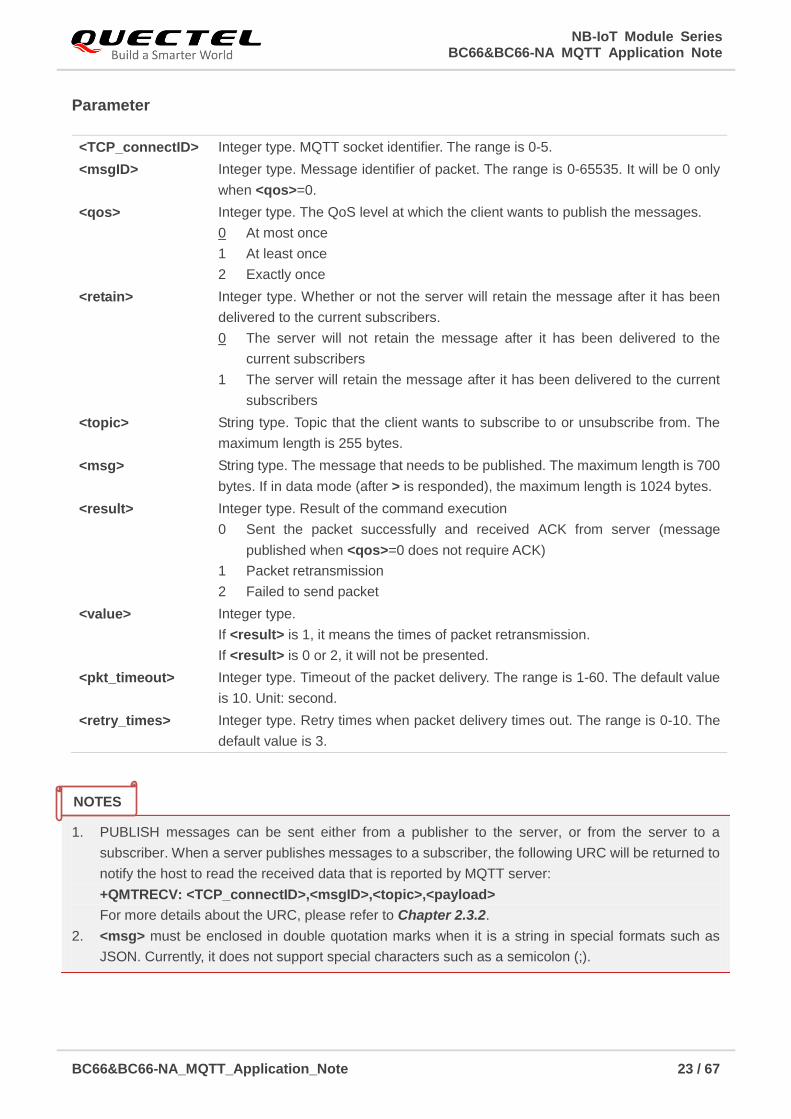
Parameter
1. PUBLISH messages can be sent either from a publisher to the server, or from the server to a
subscriber. When a server publishes messages to a subscriber, the following URC will be returned to
notify the host to read the received data that is reported by MQTT server:
+QMTRECV: <TCP_connectID>,<msgID>,<topic>,<payload>
For more details about the URC, please refer to Chapter 2.3.2.
2. <msg> must be enclosed in double quotation marks when it is a string in special formats such as
JSON. Currently, it does not support special characters such as a semicolon (;).
<TCP_connectID> Integer type. MQTT socket identifier. The range is 0-5.
<msgID> Integer type. Message identifier of packet. The range is 0-65535. It will be 0 only
when <qos>=0.
<qos> Integer type. The QoS level at which the client wants to publish the messages.
0 At most once
1 At least once
2 Exactly once
<retain> Integer type. Whether or not the server will retain the message after it has been
delivered to the current subscribers.
0 The server will not retain the message after it has been delivered to the
current subscribers
1 The server will retain the message after it has been delivered to the current
subscribers
<topic> String type. Topic that the client wants to subscribe to or unsubscribe from. The
maximum length is 255 bytes.
<msg> String type. The message that needs to be published. The maximum length is 700
bytes. If in data mode (after > is responded), the maximum length is 1024 bytes.
<result> Integer type. Result of the command execution
0 Sent the packet successfully and received ACK from server (message
published when <qos>=0 does not require ACK)
1 Packet retransmission
2 Failed to send packet
<value> Integer type.
If <result> is 1, it means the times of packet retransmission.
If <result> is 0 or 2, it will not be presented.
<pkt_timeout> Integer type. Timeout of the packet delivery. The range is 1-60. The default value
is 10. Unit: second.
<retry_times> Integer type. Retry times when packet delivery times out. The range is 0-10. The
default value is 3.
NOTES

NB-IoT Module Series BC66&BC66-NA MQTT Application Note
BC66&BC66-NA_MQTT_Application_Note 24 / 67
2.4. MQTT Related URCs
This chapter gives MQTT related URCs and their descriptions.
Table 2: MQTT Related URCs
2.4.1. +QMTSTAT URC to Indicate State Change in MQTT Link Layer
The URC begins with +QMTSTAT. It will be reported when there is a change in the state of MQTT link
layer.
Parameter
Table 3: Error Codes of +QMTSTAT URC
Index URC Format Description
[1] +QMTSTAT: <TCP_connectID>,<err_code>
When the state of MQTT link layer is
changed, the client will close the MQTT
connection and report the URC.
[2] +QMTRECV: <TCP_connectID>,<msgID>,<topi
c>,<payload>
Reported when the client has received the
packet data from MQTT server.
+QMTSTAT URC to Indicate State Change in MQTT Link Layer
+QMTSTAT: <TCP_connectID>,<err_
code>
When the state of MQTT link layer is changed, the client will
close the MQTT connection and report the URC.
Reference
<TCP_connectID> Integer type. MQTT socket identifier.
<err_code> Integer type. An error code. Please refer to the table below for details.
Code of <err> Description How to do
1 Connection is closed or reset by
peer.
Execute AT+QMTOPEN command and reopen
MQTT connection.
2 Sending PINGREQ packet timed
out or failed.
Deactivate PDP first, and then active PDP and
reopen MQTT connection.
3 Sending CONNECT packet
timed out or failed
1. Check whether the inputted user name and
password are correct or not.
2. Make sure the client ID is not used.
3. Reopen MQTT connection and try to send

NB-IoT Module Series BC66&BC66-NA MQTT Application Note
BC66&BC66-NA_MQTT_Application_Note 25 / 67
2.4.2. +QMTRECV URC to Inform the Host to Read MQTT Packet Data
The URC begins with +QMTRECV. It is mainly used to inform the host to read the received MQTT packet
data that is reported from MQTT server.
Parameter
CONNECT packet to server again.
4 Receiving CONNACK packet
timed out or failed
1. Check whether the inputted user name and
password are correct.
2. Make sure the client ID is not used.
3. Reopen MQTT connection and try to send
CONNECT packet to server again.
5
The client sends DISCONNECT
packet to sever but the server is
initiative to close MQTT
connection.
This is a normal process.
6
The client is initiative to close
MQTT connection due to packet
sending failure all the time.
1. Make sure the data is correct.
2. Try to reopen MQTT connection since there
may be network congestion or an error.
7 The link is not alive or the server
is unavailable.
Make sure the link is alive or the server is available
currently.
8-255 Reserved for future use
+QMTRECV URC to Inform the Host to Read MQTT Packet Data
+QMTRECV: <TCP_connectID>,<msg
ID>,<topic>,<payload>
Inform the host to read the received data that is reported from
MQTT server.
Reference
<TCP_connectID> Integer type. MQTT socket identifier.
<msgID> Integer type. The message identifier of packet.
<topic> String type. The topic that received from MQTT server.
<payload> String type. The payload that relates to the topic name.

NB-IoT Module Series BC66&BC66-NA MQTT Application Note
BC66&BC66-NA_MQTT_Application_Note 26 / 67
2.5. Examples
2.5.1. Use Normal TCP Connection for MQTT
AT+QMTOPEN=0,"220.180.239.212",8401 //Open a network for MQTT client.
OK
+QMTOPEN: 0,0 //Opened the MQTT client network successfully.
AT+QMTCONN=0,"clientExample"
OK
+QMTCONN: 0,0,0 //Connected the client to MQTT server successfully.
AT+QMTSUB=0,1,"topic/example",2 //Subscribe to the topic.
OK
+QMTSUB: 0,1,0,2
AT+QMTSUB=0,1,"topic/pub",0
OK
+QMTSUB: 0,1,0,0
//If a client subscribes to a topic and other devices publish the same topic to the server, the module will
report the following information.
+QMTRECV: 0,0,"topic/example","This is the payload related to topic"
AT+QMTUNS=0,2,"topic/example" //Unsubscribe from the topic.
OK
+QMTUNS: 0,2,0
AT+QMTPUB=0,0,0,0,"topic/pub","hello MQTT." //Publish the message.
OK
+QMTPUB: 0,0,0
//If a client subscribes to a topic named "topic/pub" and other devices publish the same topic to the server,
the module will report the following information.
+QMTRECV: 0,0,"topic/pub","hello MQTT."
AT+QMTPUB=0,0,0,0,"topic/pub" //Publish the message in data mode.
>
This is test data, hello MQTT. //Input the data to be published and then tap CTRL+Z to send.
OK

NB-IoT Module Series BC66&BC66-NA MQTT Application Note
BC66&BC66-NA_MQTT_Application_Note 27 / 67
+QMTPUB: 0,0,0
//If a client subscribes to a topic named "topic/pub" and other devices publish the same topic to the server,
the module will report the following information.
+QMTRECV: 0,0,"topic/pub","This is test data, hello MQTT."
AT+QMTDISC=0 //Disconnect the client from MQTT server.
OK
+QMTDISC: 0,0 //Connection closed successfully.
2.5.2. Use SSL/TLS TCP Secure Connection for MQTT
AT+QSCLK=0 //Disable sleep mode
OK
//Configure certificates and keys
AT+QSSLCFG=1,5,"seclevel",2 //Manage server and client authentication
OK
AT+QSSLCFG=1,5,"cacert" //Configure CA certificate
> //Input the content of the trusted CA certificate in PEM
format. Tap CTRL+Z to send.
+QSSLCFG: 1,5,"cacert",1216
OK
AT+QSSLCFG=1,5,"clientcert" //Configure client certificate
> //Input the content of the client certificate in PEM format.
Tap CTRL+Z to send.
+QSSLCFG: 1,5,"clientcert",1224
OK
AT+QSSLCFG=1,5,"clientkey" //Configure client private key
> //Input the content of the client private key in PEM
format. Tap CTRL+Z to send.
+QSSLCFG: 1,5,"clientkey",1679
OK
AT+QSCLK=1 //Enable light sleep and deep sleep, and wakeup by
PSM_EINT (falling edge).
OK
AT+QMTCFG="ssl",3,1,1,5 //Enable SSL and configure SSL context/connect index.
OK
AT+QMTOPEN=3,"hf.quectel.com",8164 //Open a network for MQTT client.
NB-IoT Module Series BC66&BC66-NA MQTT Application Note
BC66&BC66-NA_MQTT_Application_Note 28 / 67
OK
+QMTOPEN: 3,0 //Opened the MQTT client network successfully.
AT+QMTCONN=3,"clientExample"
OK
+QMTCONN: 3,0,0 //Connected the client to MQTT server successfully.
AT+QMTSUB=3,1,"topic/example/tls",1 //Subscribe to the topic.
OK
+QMTSUB: 3,1,0,1
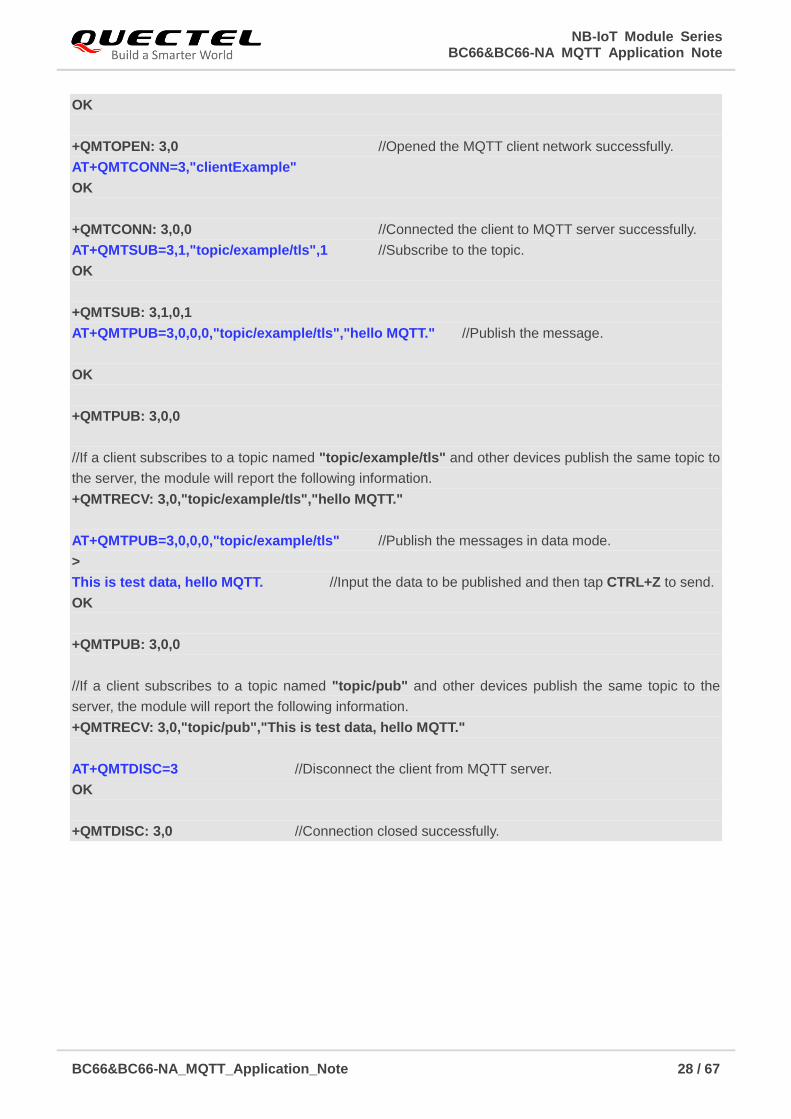
AT+QMTPUB=3,0,0,0,"topic/example/tls","hello MQTT." //Publish the message.
OK
+QMTPUB: 3,0,0
//If a client subscribes to a topic named "topic/example/tls" and other devices publish the same topic to
the server, the module will report the following information.
+QMTRECV: 3,0,"topic/example/tls","hello MQTT."
AT+QMTPUB=3,0,0,0,"topic/example/tls" //Publish the messages in data mode.
>
This is test data, hello MQTT. //Input the data to be published and then tap CTRL+Z to send.
OK
+QMTPUB: 3,0,0
//If a client subscribes to a topic named "topic/pub" and other devices publish the same topic to the
server, the module will report the following information.
+QMTRECV: 3,0,"topic/pub","This is test data, hello MQTT."
AT+QMTDISC=3 //Disconnect the client from MQTT server.
OK
+QMTDISC: 3,0 //Connection closed successfully.

NB-IoT Module Series BC66&BC66-NA MQTT Application Note
BC66&BC66-NA_MQTT_Application_Note 29 / 67
3 Connection with Azure IoT Hub
This chapter introduces the steps to establish connection with Azure IoT hub through TLS/SSL secured
MQTT.
3.1. Create Azure Account
3.1.1. Create a Free Account
Create a free Azure account in https://azure.microsoft.com/en-gb/free/.
3.1.2. Enter Azure Portal
Enter Azure Portal via link https://portal.azure.com/#home.
Figure 2: Azure Portal
NB-IoT Module Series BC66&BC66-NA MQTT Application Note
BC66&BC66-NA_MQTT_Application_Note 30 / 67
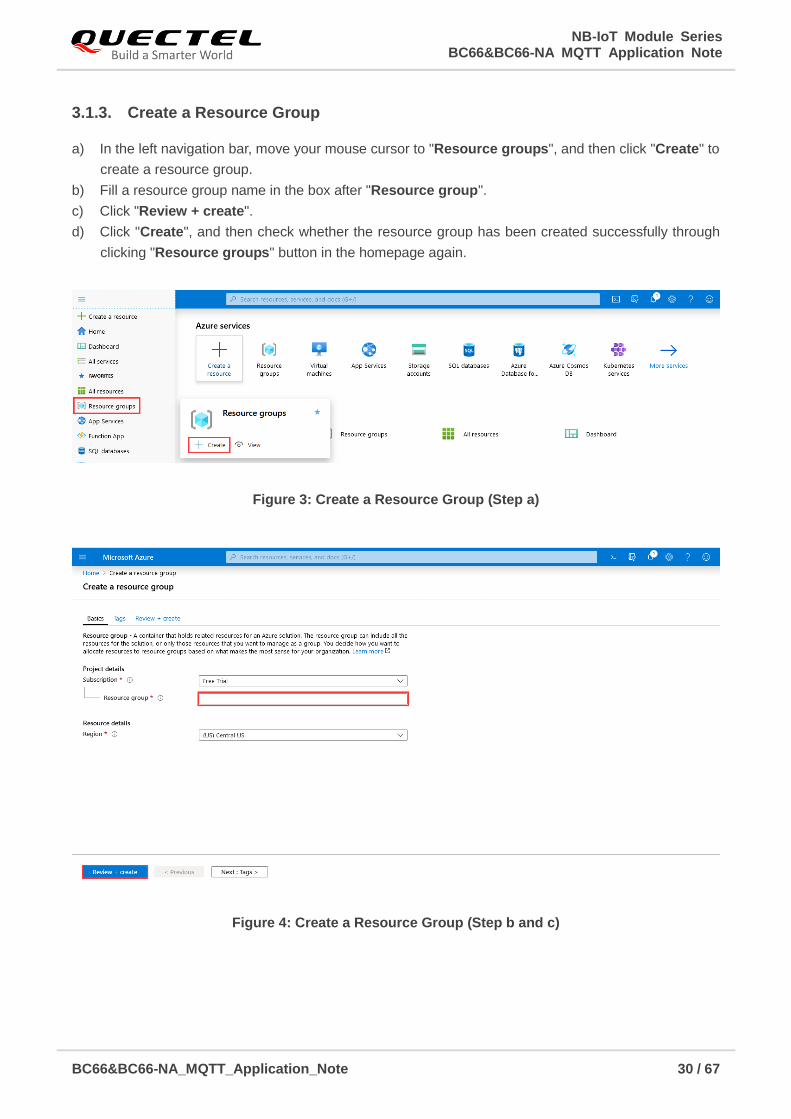
3.1.3. Create a Resource Group
a) In the left navigation bar, move your mouse cursor to "Resource groups", and then click "Create" to
create a resource group.
b) Fill a resource group name in the box after "Resource group".
c) Click "Review + create".
d) Click "Create", and then check whether the resource group has been created successfully through
clicking "Resource groups" button in the homepage again.
Figure 3: Create a Resource Group (Step a)
Figure 4: Create a Resource Group (Step b and c)
NB-IoT Module Series BC66&BC66-NA MQTT Application Note
BC66&BC66-NA_MQTT_Application_Note 31 / 67
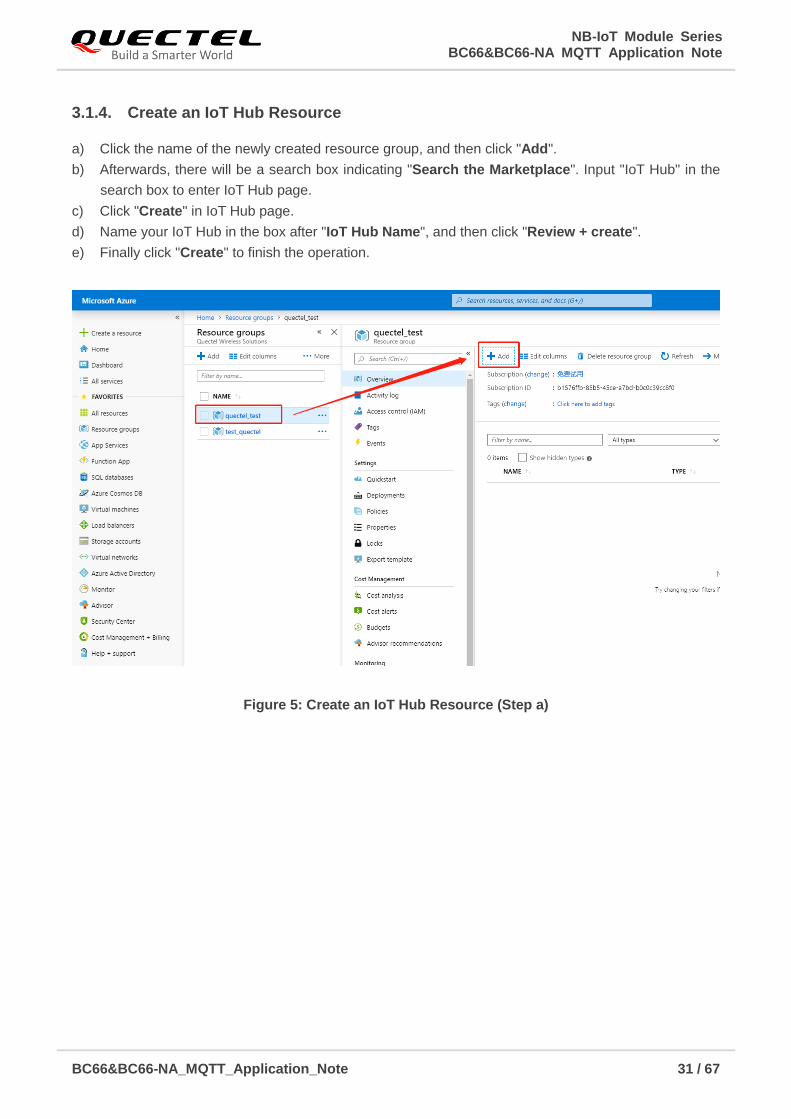
3.1.4. Create an IoT Hub Resource
a) Click the name of the newly created resource group, and then click "Add".
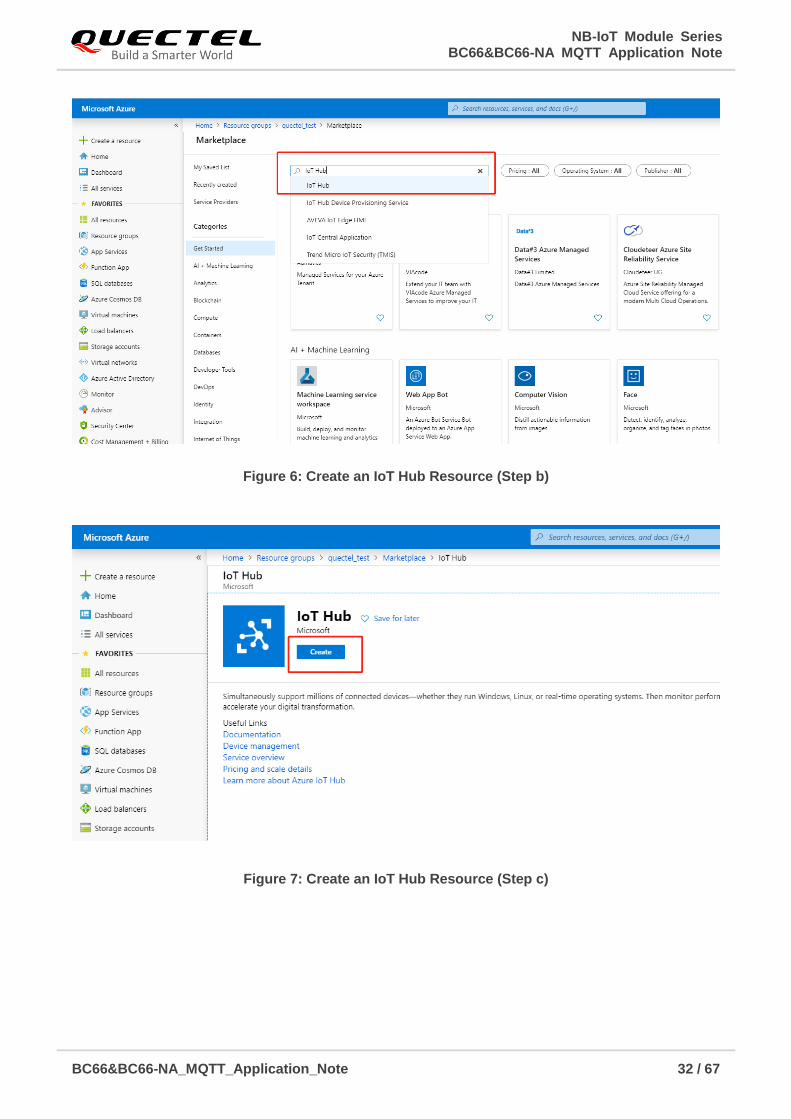
b) Afterwards, there will be a search box indicating "Search the Marketplace". Input "IoT Hub" in the
search box to enter IoT Hub page.
c) Click "Create" in IoT Hub page.
d) Name your IoT Hub in the box after "IoT Hub Name", and then click "Review + create".
e) Finally click "Create" to finish the operation.
Figure 5: Create an IoT Hub Resource (Step a)
NB-IoT Module Series BC66&BC66-NA MQTT Application Note
BC66&BC66-NA_MQTT_Application_Note 32 / 67
Figure 6: Create an IoT Hub Resource (Step b)
Figure 7: Create an IoT Hub Resource (Step c)

NB-IoT Module Series BC66&BC66-NA MQTT Application Note
BC66&BC66-NA_MQTT_Application_Note 33 / 67
Figure 8: Create an IoT Hub Resource (Step d)
3.1.5. Get Azure Root CA certificate
The Azure root CA certificates can be got with Google Chrome as follows:
Figure 9: Set Azure Root CA Certificate with Google Chrome

NB-IoT Module Series BC66&BC66-NA MQTT Application Note
BC66&BC66-NA_MQTT_Application_Note 34 / 67
Figure 10: Copy Certification Path to File
Figure 11: Export File
Or please refer to https://github.com/Azure/azure-iot-sdk-c/blob/master/certs/certs.c.

NB-IoT Module Series BC66&BC66-NA MQTT Application Note
BC66&BC66-NA_MQTT_Application_Note 35 / 67
3.2. Communicate with Azure via X.509 Self-Signed Certificate
This document takes X.509 certificate as an example. Create customized X.509 certificates using a
third-party tool such as OpenSSL. This technique is ideal for test and development purposes.
3.2.1. Generate X.509 Self-Signed CA Certificate
The X.509 self-signed CA certificate can be generated with OpenSSL.
#Generate ca certificate private key (pem file)
openssl genrsa -out mycakey.pem 2048
#Generate the ca certificate sign application file (csr file)
openssl req -new -key mycakey.pem -out myca.csr -subj
"/C=CN/ST=myprovince/L=mycity/O=myorganization/OU=mygroup/CN=myCA"
#Self-signed ca certificate
openssl x509 -req -days 365 -sha1 -extensions v3_ca -signkey mycakey.pem -in myca.csr -out
mycacert.pem
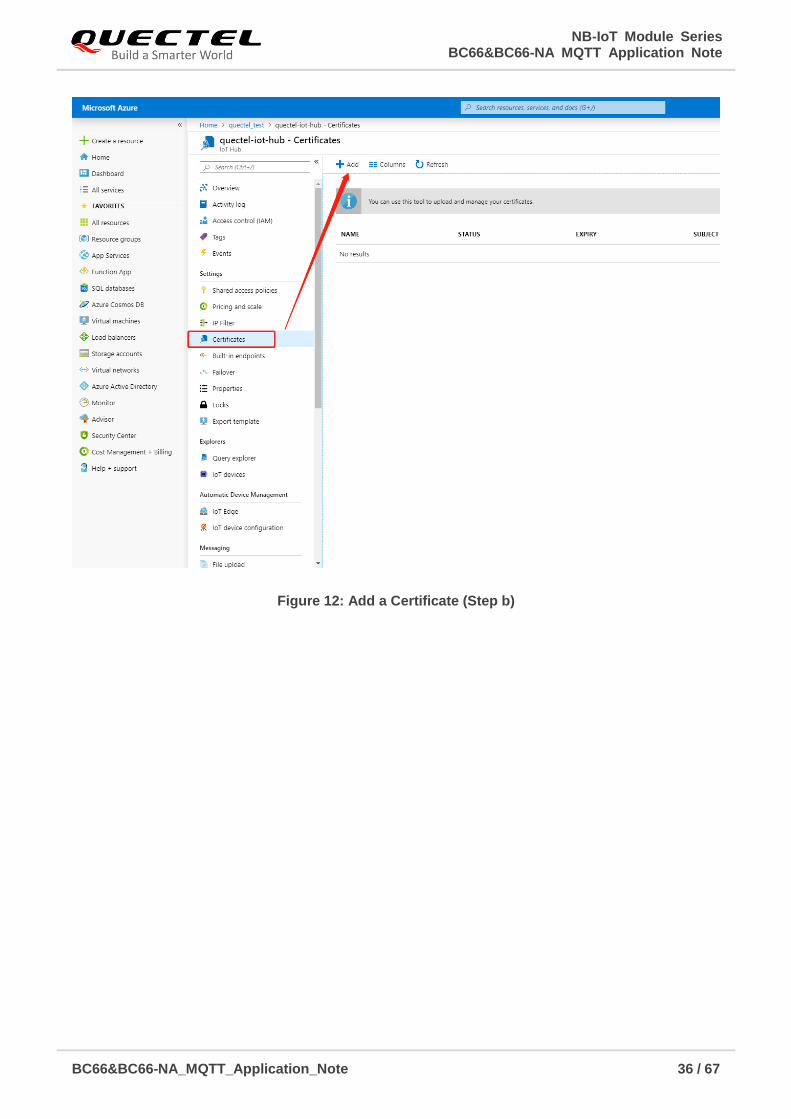
3.2.2. Add X.509 Self-Signed CA Certificate
Follow the steps below to add the generated X.509 self-signed CA certificates into Azure IoT Hub.
a) Click the name of "quectel-iot-hub" resource.
b) Click "Certificates", and then click "Add" to add a certificate.
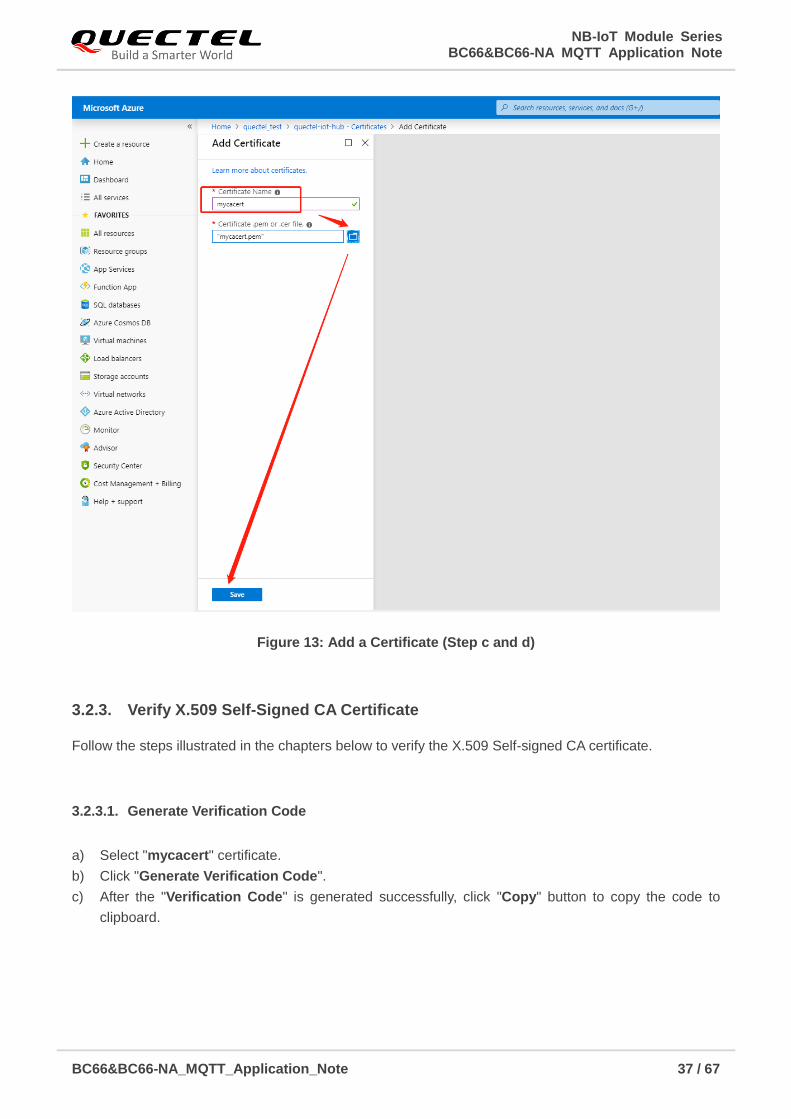
c) Fill the certificate name (mycacert for instance) and then upload the certificate mycacert.pem.
d) Click "Save" to save the operations.
NB-IoT Module Series BC66&BC66-NA MQTT Application Note
BC66&BC66-NA_MQTT_Application_Note 36 / 67
Figure 12: Add a Certificate (Step b)
NB-IoT Module Series BC66&BC66-NA MQTT Application Note
BC66&BC66-NA_MQTT_Application_Note 37 / 67
Figure 13: Add a Certificate (Step c and d)
3.2.3. Verify X.509 Self-Signed CA Certificate
Follow the steps illustrated in the chapters below to verify the X.509 Self-signed CA certificate.
3.2.3.1. Generate Verification Code
a) Select "mycacert" certificate.
b) Click "Generate Verification Code".
c) After the "Verification Code" is generated successfully, click "Copy" button to copy the code to
clipboard.

NB-IoT Module Series BC66&BC66-NA MQTT Application Note
BC66&BC66-NA_MQTT_Application_Note 38 / 67
Figure 14: Generate Verification Code
3.2.3.2. Generate Verification Certificate
Here are the details about how to generate verification certificate.
#Generate verificationCert.csr
openssl req -new -newkey rsa:2048 -nodes -subj "/CN=B18033B5B38E529B49200EE5DF1E3BD5D
0A2EC850B850BD8/" -keyout ./verificationCert.key -sha256 -days 365 -out ./verificationCert.csr
#Self-signed verificationCert
openssl x509 -req -in ./verificationCert.csr -CA ./mycacert.pem -CAkey ./mycakey.pem -CAcreateseri
al -out ./verificationCert.cer -days 365 -sha256
NB-IoT Module Series BC66&BC66-NA MQTT Application Note
BC66&BC66-NA_MQTT_Application_Note 39 / 67
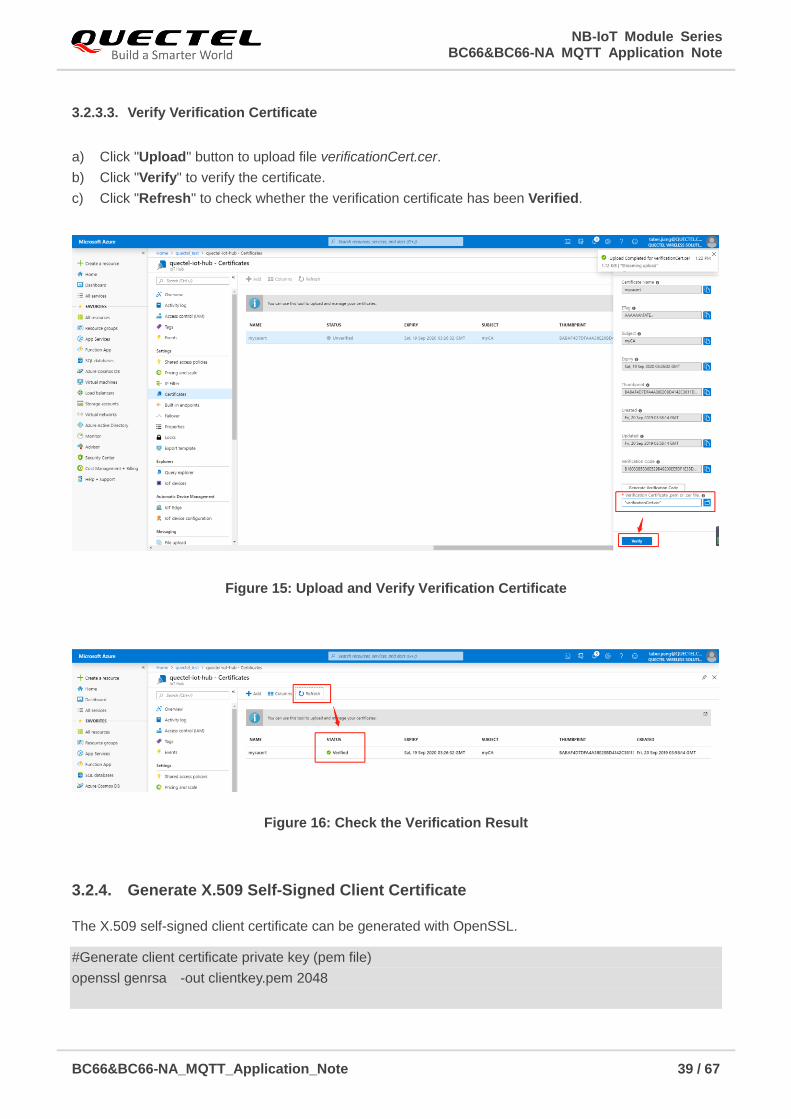
3.2.3.3. Verify Verification Certificate
a) Click "Upload" button to upload file verificationCert.cer.
b) Click "Verify" to verify the certificate.
c) Click "Refresh" to check whether the verification certificate has been Verified.
Figure 15: Upload and Verify Verification Certificate
Figure 16: Check the Verification Result
3.2.4. Generate X.509 Self-Signed Client Certificate
The X.509 self-signed client certificate can be generated with OpenSSL.
#Generate client certificate private key (pem file)
openssl genrsa -out clientkey.pem 2048

NB-IoT Module Series BC66&BC66-NA MQTT Application Note
BC66&BC66-NA_MQTT_Application_Note 40 / 67
#Generate client certificate sign application file (csr file)
Openssl req -new -key clientkey.pem -out client.csr -subj "/C=CN/ST=myprovince/L=mycity/O=myorg
anization/OU=mygroup/CN=myClient"
#Self-signed client certificate
openssl x509 -req -days 365 -sha1 -extensions v3_req -CA ./mycacert.pem -Cakey ./mycakey.pe
m -CAserial ./.srl -in client.csr -out clientcert.pem
#verify
Openssl verify -CAfile ./mycacert.pem clientcert.pem
#convert PEM to CRT format
openssl x509 -outform der -in ./clientcert.pem -out ./clientcert.crt
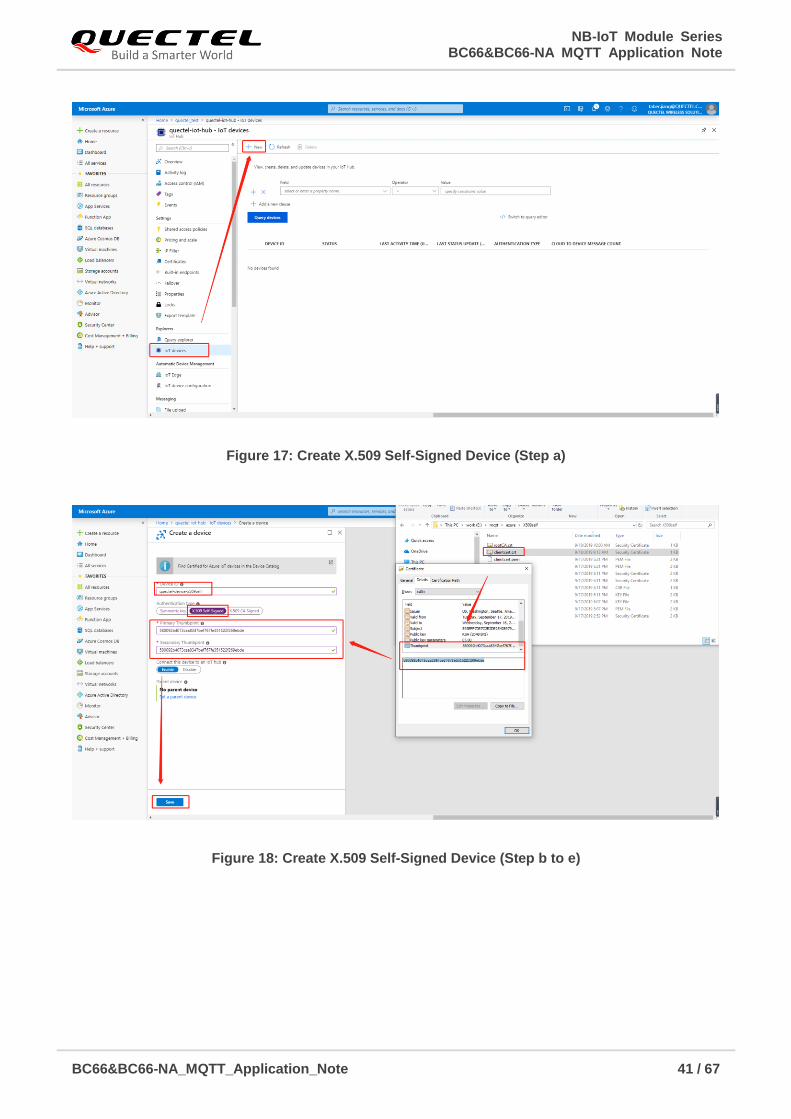
3.2.5. Create X.509 Self-Signed Device
Please create X.509 self-signed device in Azure IoT Hub as follows:
a) Click "IoT devices" and then click "New".
b) Select "X.509 Self-Signed".
c) Open clientcert.crt to get "Thumbprint".
d) Input "Device ID", "Primary Thumbprint" and "Secondary Thumbprint".
e) Click "Save".
f) Check the creation result.
NB-IoT Module Series BC66&BC66-NA MQTT Application Note
BC66&BC66-NA_MQTT_Application_Note 41 / 67
Figure 17: Create X.509 Self-Signed Device (Step a)
Figure 18: Create X.509 Self-Signed Device (Step b to e)

NB-IoT Module Series BC66&BC66-NA MQTT Application Note
BC66&BC66-NA_MQTT_Application_Note 42 / 67
Figure 19: Check the Creation Result
3.3. Usage of Device Explorer Tool
The Device Explorer tool can be used to manage devices connecting to customer's IoT hub, for example,
registering a device with customer's IoT hub, monitoring messages from the devices, and sending
messages to the devices.
This chapter describes the usage of the Device Explorer tool which will be used as Azure server tool.
3.3.1. Download/Install
The Device Explorer tool can be downloaded from link: https://github.com/Azure/azure-iot-sdk-cshar
p/releases/download/2019-1-4/SetupDeviceExplorer.msi.
More details about downloading and installation can be reached from link: https://github.com/Azure/
azure-iot-sdk-csharp/tree/master/tools/DeviceExplorer.
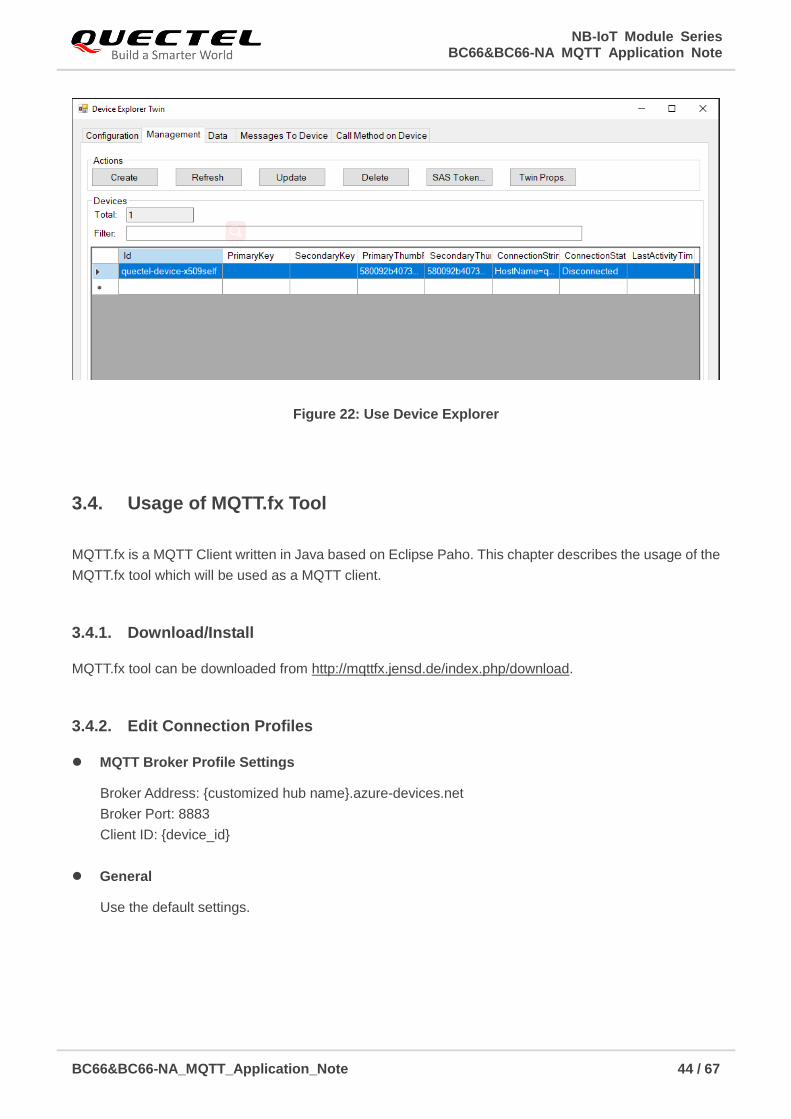
3.3.2. Configuration
a) Get "Connection string—primary key" from Azure iothubowner, and copy the connection string to
clipboard.
b) Click the "Configuration" tab in the Device Explorer Twin window, and then paste the connection
string to the input box of "IoT Hub Connection String". After that, click “Update” “OK” to finish the

NB-IoT Module Series BC66&BC66-NA MQTT Application Note
BC66&BC66-NA_MQTT_Application_Note 43 / 67
operation.
Figure 20: Device Explorer Configuration (Step a)
Figure 21: Device Explorer Configuration (Step b)
NB-IoT Module Series BC66&BC66-NA MQTT Application Note
BC66&BC66-NA_MQTT_Application_Note 44 / 67
Figure 22: Use Device Explorer
3.4. Usage of MQTT.fx Tool
MQTT.fx is a MQTT Client written in Java based on Eclipse Paho. This chapter describes the usage of the
MQTT.fx tool which will be used as a MQTT client.
3.4.1. Download/Install
MQTT.fx tool can be downloaded from http://mqttfx.jensd.de/index.php/download.
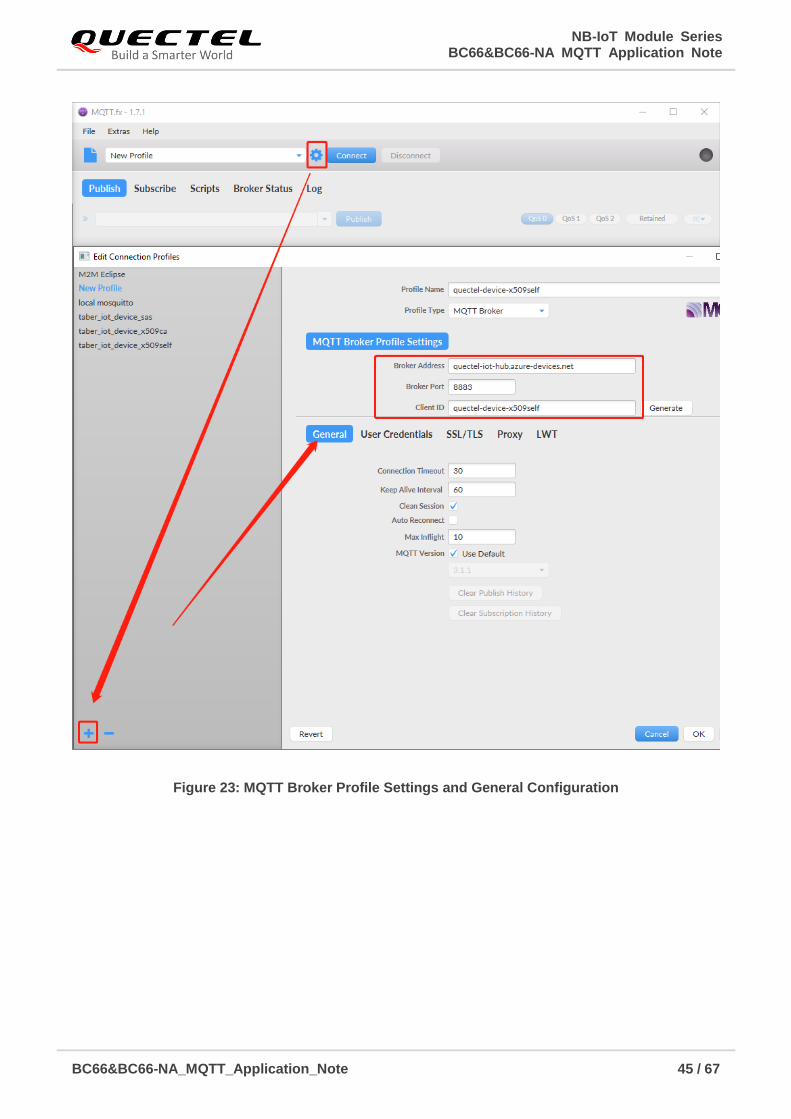
3.4.2. Edit Connection Profiles
MQTT Broker Profile Settings
Broker Address: {customized hub name}.azure-devices.net
Broker Port: 8883
Client ID: {device_id}
General
Use the default settings.
NB-IoT Module Series BC66&BC66-NA MQTT Application Note
BC66&BC66-NA_MQTT_Application_Note 45 / 67
Figure 23: MQTT Broker Profile Settings and General Configuration

NB-IoT Module Series BC66&BC66-NA MQTT Application Note
BC66&BC66-NA_MQTT_Application_Note 46 / 67
User Credentials
User Name: {customized hub name}.azure-devices.net/{device_id}/?api-version=2018-06-30
Password: no password required.
Figure 24: User Credentials Configuration

NB-IoT Module Series BC66&BC66-NA MQTT Application Note
BC66&BC66-NA_MQTT_Application_Note 47 / 67
SSL/TLS
Select "Enable SSL/TLS" option
Check "Self signed certificates"
CA File: AzureCA.cer
Client Certificate File: clientcert.pem
Client Key File: clientkey.pem
Figure 25: SSL/TLS Configuration
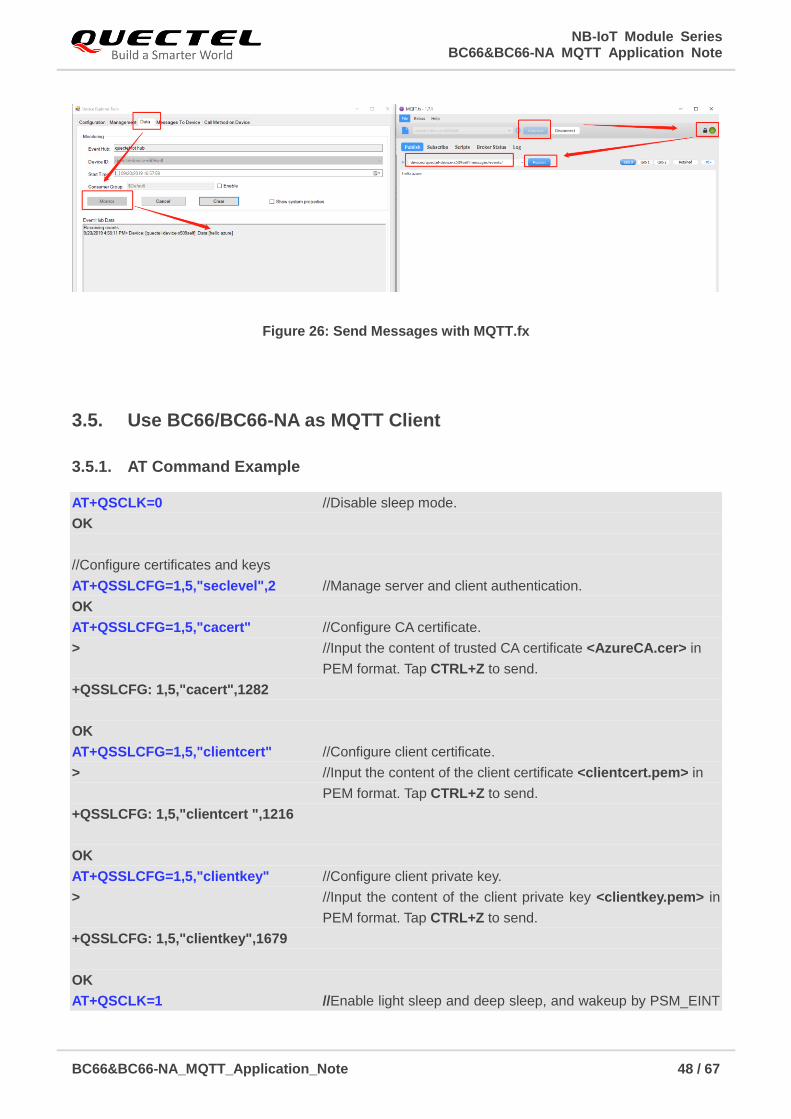
3.4.3. Send Device-to-Cloud Messages
a) Click "Data" of Device Explorer tool, and then click "Monitor".
b) Click "Connect" of MQTT.fx tool and then input the topic devices/{device_id}/messages/events/.
Finally click "Publish".
NB-IoT Module Series BC66&BC66-NA MQTT Application Note
BC66&BC66-NA_MQTT_Application_Note 48 / 67
Figure 26: Send Messages with MQTT.fx
3.5. Use BC66/BC66-NA as MQTT Client
3.5.1. AT Command Example
AT+QSCLK=0 //Disable sleep mode.
OK
//Configure certificates and keys
AT+QSSLCFG=1,5,"seclevel",2 //Manage server and client authentication.
OK
AT+QSSLCFG=1,5,"cacert" //Configure CA certificate.
> //Input the content of trusted CA certificate <AzureCA.cer> in
PEM format. Tap CTRL+Z to send.
+QSSLCFG: 1,5,"cacert",1282
OK
AT+QSSLCFG=1,5,"clientcert" //Configure client certificate.
> //Input the content of the client certificate <clientcert.pem> in
PEM format. Tap CTRL+Z to send.
+QSSLCFG: 1,5,"clientcert ",1216
OK
AT+QSSLCFG=1,5,"clientkey" //Configure client private key.
> //Input the content of the client private key <clientkey.pem> in
PEM format. Tap CTRL+Z to send.
+QSSLCFG: 1,5,"clientkey",1679
OK
AT+QSCLK=1 //Enable light sleep and deep sleep, and wakeup by PSM_EINT
NB-IoT Module Series BC66&BC66-NA MQTT Application Note
BC66&BC66-NA_MQTT_Application_Note 49 / 67
(falling edge).
OK
AT+QMTCFG="ssl",3,1,1,5 //Enable SSL and configure SSL context/connect index.
OK
AT+QMTCFG="version",3,4 //Configure the MQTT version. Azure IoT Hub supports MQTT
v3.1.1 only.
OK
AT+QMTOPEN=3,"quectel-iot-hub.azure-devices.net",8883 //Open a network for Azure MQTT
client with TLS 1.2.
OK
+QMTOPEN: 3,0 //Opened the MQTT client network successfully.
AT+QMTCONN=3,"quectel-device-x509self","quectel-iot-hub.azure-devices.net/quectel-device-x5
09self"
OK
+QMTCONN: 3,0,0 //Connected the client to MQTT server successfully.
AT+QMTSUB=3,1,"devices/quectel-device-x509self/messages/devicebound/#",1
OK
+QMTSUB: 3,1,0,1
+QMTRECV: 3,2,"devices/quectel-device-x509self/messages/devicebound/%24.mid=419cfb05-70
53-4c7a-ba6a-68eb2c5077d6&%24.to=%2Fdevices%2Fquectel-device-x509self%2Fmessages%2F
deviceBound&iothub-ack=full","hi quectel" //Received cloud-to-device messages.
AT+QMTPUB=3,0,0,0,"devices/quectel-device-x509self/messages/events/","{"a":"1","b":"2"}"
OK
+QMTPUB: 3,0,0
AT+QMTPUB=3,0,0,0,"devices/quectel-device-x509self/messages/events/" //Publish the message
in data mode.
>
hello azure iot hub //Input the data to be published and then tap CTRL+Z to send.
OK
+QMTPUB: 3,0,0
AT+QMTDISC=3 //Disconnect the client from MQTT server.
OK
+QMTDISC: 3,0 //Connection closed successfully.
NB-IoT Module Series BC66&BC66-NA MQTT Application Note
BC66&BC66-NA_MQTT_Application_Note 50 / 67
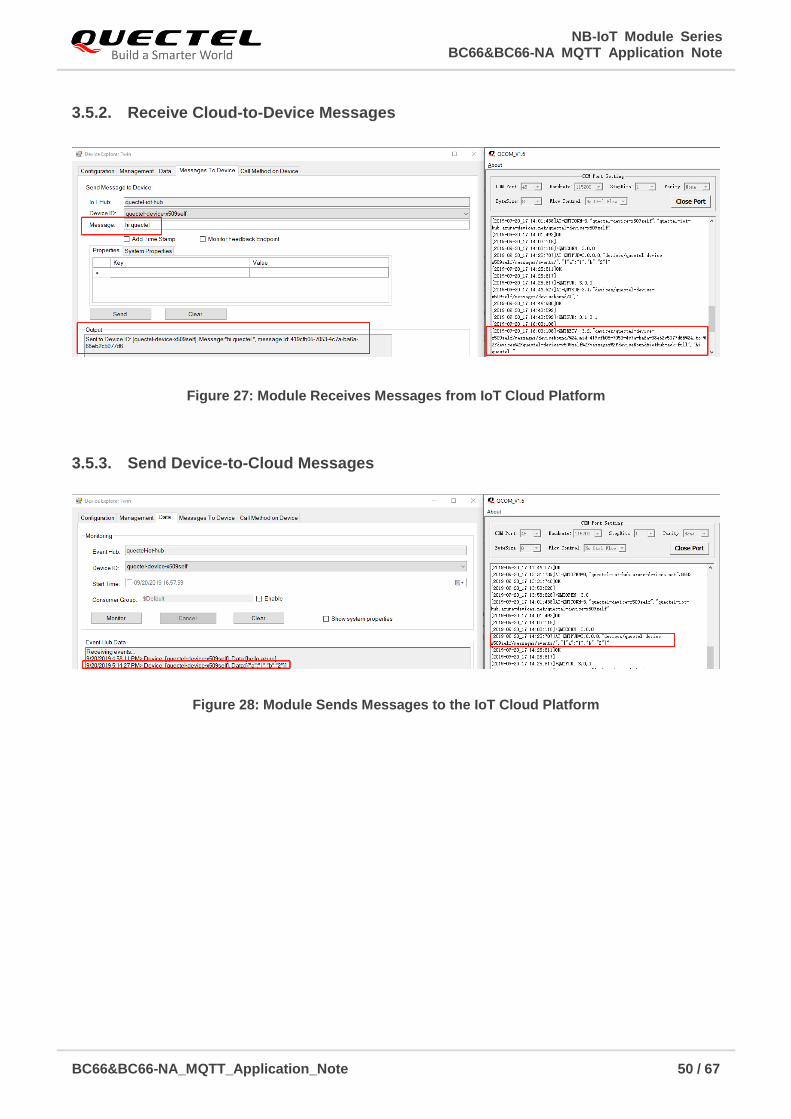
3.5.2. Receive Cloud-to-Device Messages
Figure 27: Module Receives Messages from IoT Cloud Platform
3.5.3. Send Device-to-Cloud Messages
Figure 28: Module Sends Messages to the IoT Cloud Platform
NB-IoT Module Series BC66&BC66-NA MQTT Application Note
BC66&BC66-NA_MQTT_Application_Note 51 / 67
4 Connection with AWS IoT Core
This chapter introduces the steps to establish connection with AWS IoT core through TLS/SSL secured
MQTT.
4.1. Create AWS Account
4.1.1. Create a Free Account
Create a free AWS account in https://aws.amazon.com/.
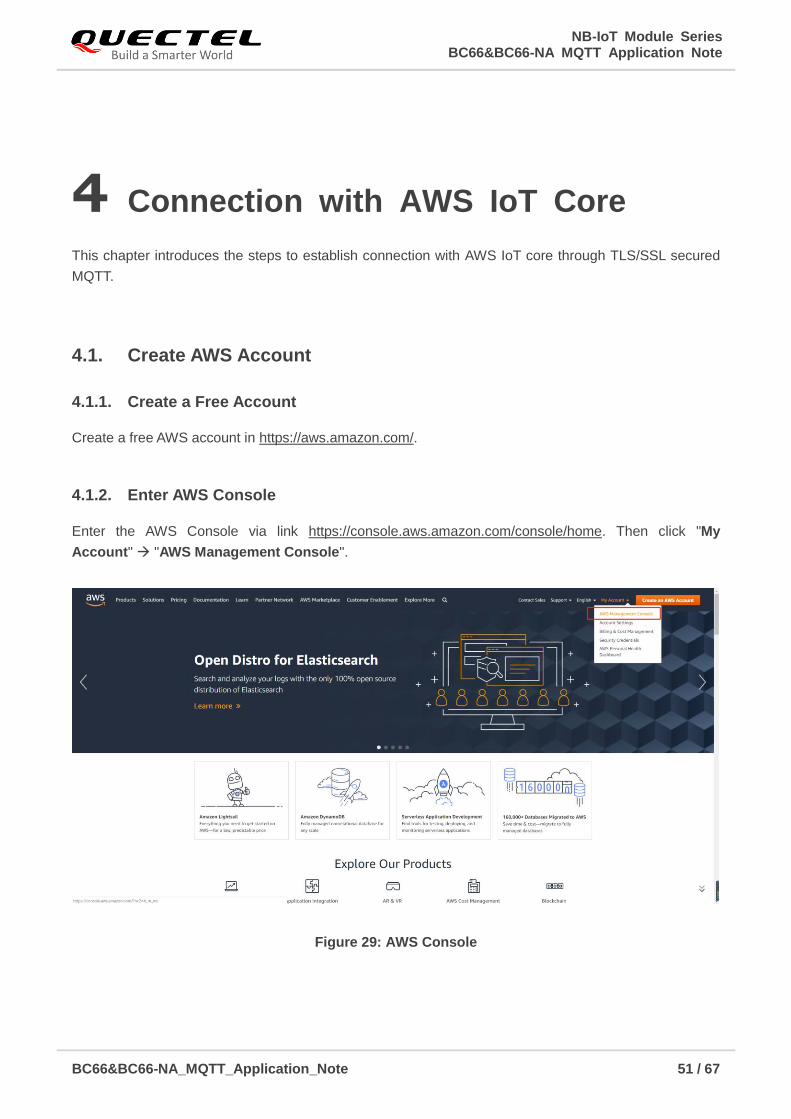
4.1.2. Enter AWS Console
Enter the AWS Console via link https://console.aws.amazon.com/console/home. Then click "My
Account" "AWS Management Console".
Figure 29: AWS Console

NB-IoT Module Series BC66&BC66-NA MQTT Application Note
BC66&BC66-NA_MQTT_Application_Note 52 / 67
4.1.3. Create a Shortcut for "IoT Core" Resource
In the "AWS Management Console" as shown below, a shortcut for "IoT Core" can be created simply by
dragging it to the menu bar.
Figure 30: Create a Shortcut for "IoT Core" Resource
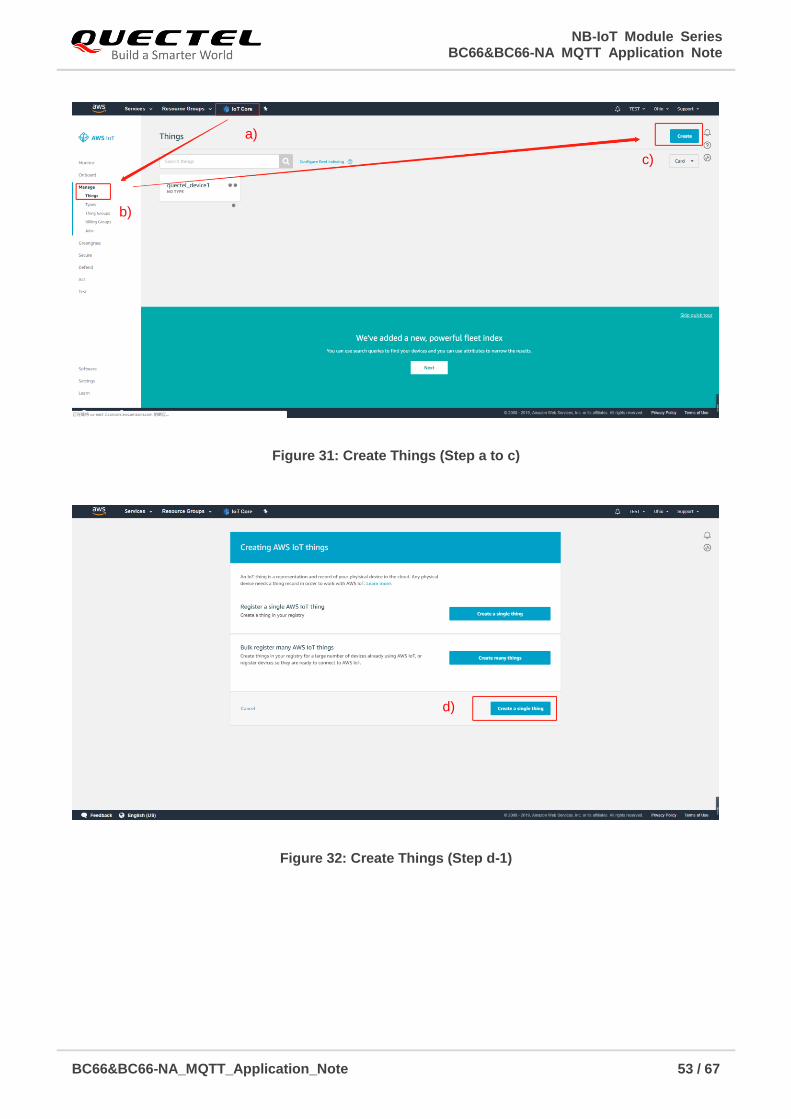
4.1.4. Create Things
a) Click "IoT Core" menu.
b) Click "Manage""Things" in the left navigation bar.
c) Click "Create".
d) Click "Create a single thing".
STEP 1: Fill "Name", and then click "Next".
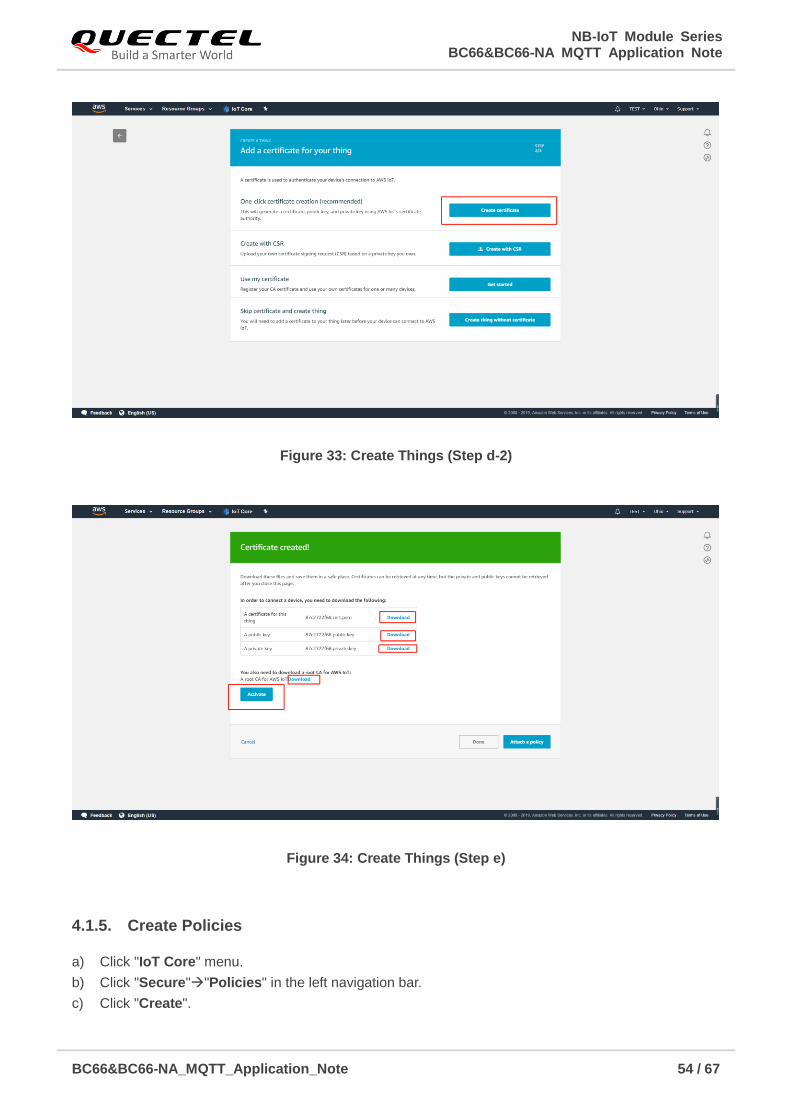
STEP 2: Click "Create certificate", and then click "Download""Activate".
e) Click "Done".
NB-IoT Module Series BC66&BC66-NA MQTT Application Note
BC66&BC66-NA_MQTT_Application_Note 53 / 67
Figure 31: Create Things (Step a to c)
Figure 32: Create Things (Step d-1)
a)
b)
c)
d)
NB-IoT Module Series BC66&BC66-NA MQTT Application Note
BC66&BC66-NA_MQTT_Application_Note 54 / 67
Figure 33: Create Things (Step d-2)
Figure 34: Create Things (Step e)
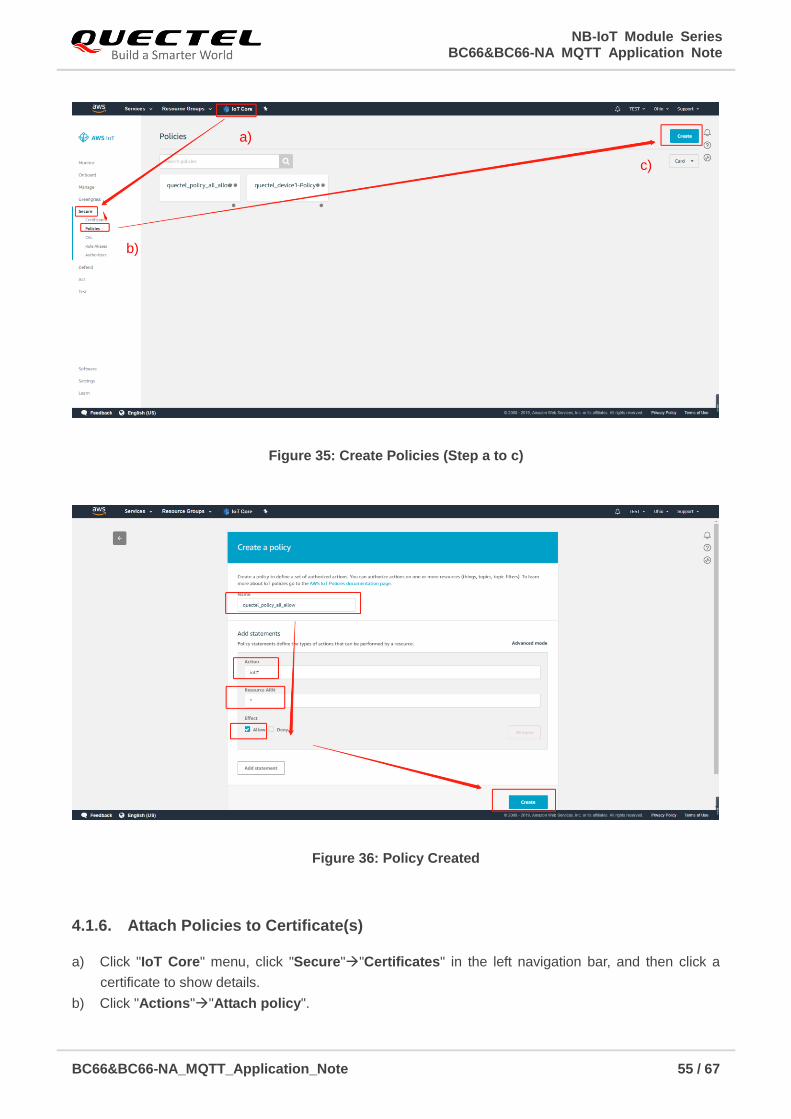
4.1.5. Create Policies
a) Click "IoT Core" menu.
b) Click "Secure""Policies" in the left navigation bar.
c) Click "Create".
NB-IoT Module Series BC66&BC66-NA MQTT Application Note
BC66&BC66-NA_MQTT_Application_Note 55 / 67
Figure 35: Create Policies (Step a to c)
Figure 36: Policy Created
4.1.6. Attach Policies to Certificate(s)
a) Click "IoT Core" menu, click "Secure""Certificates" in the left navigation bar, and then click a
certificate to show details.
b) Click "Actions""Attach policy".
a)
b)
c)

NB-IoT Module Series BC66&BC66-NA MQTT Application Note
BC66&BC66-NA_MQTT_Application_Note 56 / 67
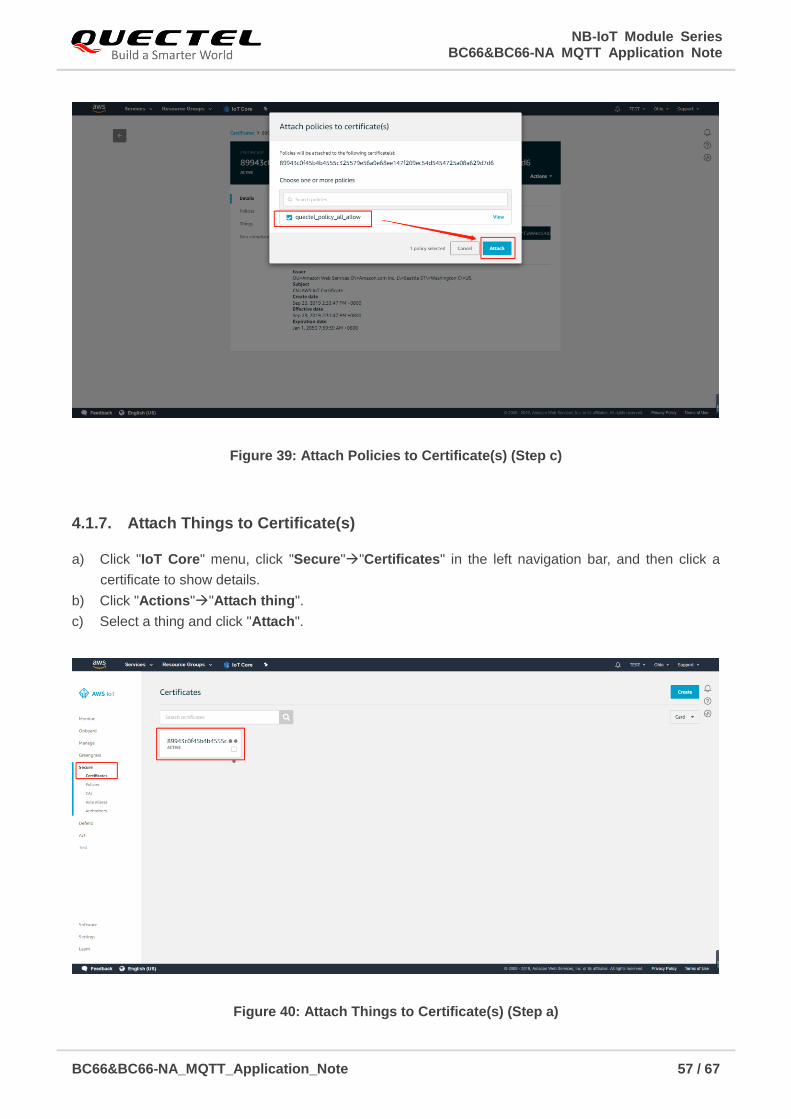
c) Select a policy and click "Attach".
Figure 37: Attach Policies to Certificate(s) (Step a)
Figure 38: Attach Policies to Certificate(s) (Step b)
NB-IoT Module Series BC66&BC66-NA MQTT Application Note
BC66&BC66-NA_MQTT_Application_Note 57 / 67
Figure 39: Attach Policies to Certificate(s) (Step c)
4.1.7. Attach Things to Certificate(s)
a) Click "IoT Core" menu, click "Secure""Certificates" in the left navigation bar, and then click a
certificate to show details.
b) Click "Actions""Attach thing".
c) Select a thing and click "Attach".
Figure 40: Attach Things to Certificate(s) (Step a)

NB-IoT Module Series BC66&BC66-NA MQTT Application Note
BC66&BC66-NA_MQTT_Application_Note 58 / 67
Figure 41: Attach Things to Certificate(s) (Step b)
Figure 42: Attach Things to Certificate(s) (Step c)

NB-IoT Module Series BC66&BC66-NA MQTT Application Note
BC66&BC66-NA_MQTT_Application_Note 59 / 67
4.2. Communicate with AWS IoT Core
4.2.1. Related Resource Information
4.2.1.1. Endpoint
The endpoint of thing "quectel_device1" is a3pupxb4was62j-ats.iot.us-east-2.amazonaws.com.
Figure 43: Check Endpoint - A
Figure 44: Check Endpoint - B
NB-IoT Module Series BC66&BC66-NA MQTT Application Note
BC66&BC66-NA_MQTT_Application_Note 60 / 67
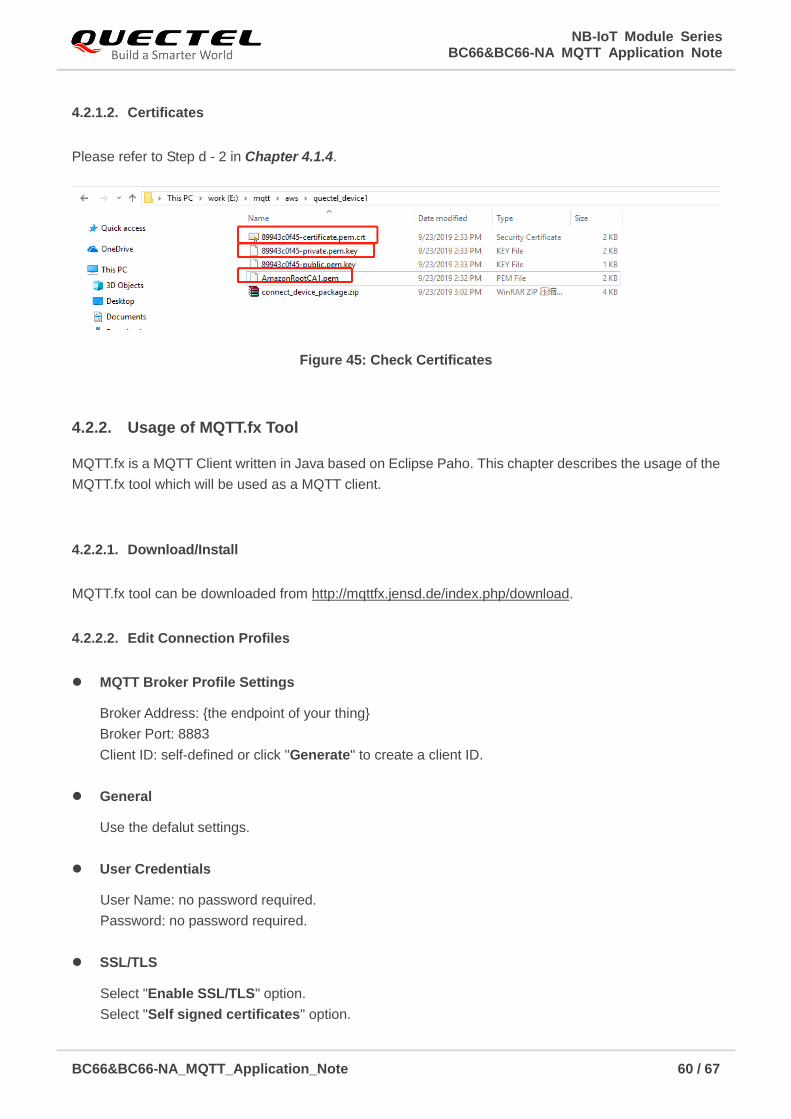
4.2.1.2. Certificates
Please refer to Step d - 2 in Chapter 4.1.4.
Figure 45: Check Certificates
4.2.2. Usage of MQTT.fx Tool
MQTT.fx is a MQTT Client written in Java based on Eclipse Paho. This chapter describes the usage of the
MQTT.fx tool which will be used as a MQTT client.
4.2.2.1. Download/Install
MQTT.fx tool can be downloaded from http://mqttfx.jensd.de/index.php/download.
4.2.2.2. Edit Connection Profiles
MQTT Broker Profile Settings
Broker Address: {the endpoint of your thing}
Broker Port: 8883
Client ID: self-defined or click "Generate" to create a client ID.
General
Use the defalut settings.
User Credentials
User Name: no password required.
Password: no password required.
SSL/TLS
Select "Enable SSL/TLS" option.
Select "Self signed certificates" option.

NB-IoT Module Series BC66&BC66-NA MQTT Application Note
BC66&BC66-NA_MQTT_Application_Note 61 / 67
CA File: AmazonRootCA1.pem
Client Certificate File: 89943c0f45-certificate.pem.crt
Client Key File: 89943c0f45-private.pem.key
Figure 46: Edit Connection Profiles
4.2.2.3. Subscribe and Publish
a) Click "Connect" of MQTT.fx tool.
b) Input the topic to be subscribed, quectel/topic for instance.
c) Click "Subscribe".
d) Click "Publish".

NB-IoT Module Series BC66&BC66-NA MQTT Application Note
BC66&BC66-NA_MQTT_Application_Note 62 / 67
Figure 47: Subscribe to a Topic

NB-IoT Module Series BC66&BC66-NA MQTT Application Note
BC66&BC66-NA_MQTT_Application_Note 63 / 67
Figure 48: Publish the Message
4.2.3. Use BC66/BC66-NA as MQTT Client
4.2.3.1. AT Command Example
AT+QSCLK=0 //Disable sleep mode.
OK
//Configure certificates and keys
AT+QSSLCFG=1,5,"seclevel",2 //Manage server and client authentication.
OK
AT+QSSLCFG=1,5,"cacert" //Configure CA certificate.
> //Input the content of the trusted CA certificate <AmazonRo
otCA1.pem> in PEM format. Tap CTRL+Z to send.
+QSSLCFG: 1,5,"cacert",1220
OK
AT+QSSLCFG=1,5,"clientcert" //Configure client certificate.
> //Input the content of client certificate <89943c0f45-certificat
e.pem.crt> in PEM format. Tap CTRL+Z to send.
+QSSLCFG: 1,5,"clientcert",1679
OK
AT+QSSLCFG=1,5,"clientkey" //Configure client private key.
> //Input the content of the client private key <89943c0f45-pri
vate.pem.key> in PEM format. Tap CTRL+Z to send.
+QSSLCFG: 1,5,"clientkey",1451
OK

NB-IoT Module Series BC66&BC66-NA MQTT Application Note
BC66&BC66-NA_MQTT_Application_Note 64 / 67
AT+QSCLK=1 //Enable light sleep and deep sleep, and wakeup by PSM_EINT
(falling edge).
OK
AT+QMTCFG="ssl",3,1,1,5 //Enable SSL and configure SSL context/connect index.
OK
AT+QMTCFG="version",3,4 //Configure the MQTT version. AWS IoT Core supports MQTT
v3.1.1.
OK
AT+QMTOPEN=3,"a3pupxb4was62j-ats.iot.us-east-2.amazonaws.com",8883 //Open a network for
AWS MQTT client with
TLS 1.2.
OK
+QMTOPEN: 3,0 //Opened the MQTT client network successfully.
AT+QMTCONN=3,"clientExample"
OK
+QMTCONN: 3,0,0 //Connected the client to MQTT server successfully.
AT+QMTSUB=3,1,"topic/example/tls",1 //Subscribe to the topic.
OK
+QMTSUB: 3,1,0,1
AT+QMTPUB=3,0,0,0,"topic/example/tls","i am json : "{"a":"1","b":"2"}"" //Send device-to-cloud
messages.
OK
+QMTPUB: 3,0,0
+QMTRECV: 3,0,"topic/example/tls","i am json : "{"a":"1","b":"2"}"" //Received cloud-to-device
messages
AT+QMTPUB=3,0,0,0,"topic/example/tls" //Publish the message in data mode.
>
hello aws iot core //Input the data to be published and then tap CTRL+Z to send.
OK
+QMTPUB: 3,0,0
+QMTRECV: 3,0,"topic/example/tls","hello aws iot core" //Received cloud-to-device messages
AT+QMTDISC=3 //Disconnect the client from MQTT server.
OK
+QMTDISC: 3,0 //Connection closed successfully.
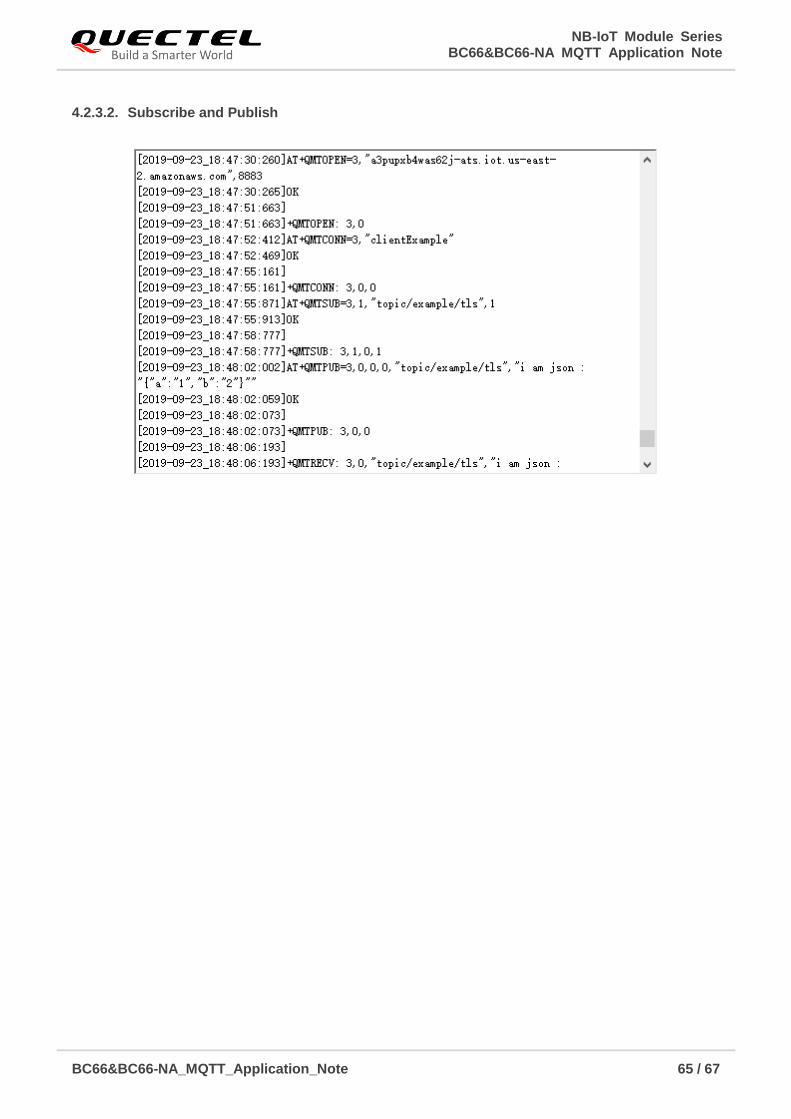
NB-IoT Module Series BC66&BC66-NA MQTT Application Note
BC66&BC66-NA_MQTT_Application_Note 65 / 67
4.2.3.2. Subscribe and Publish
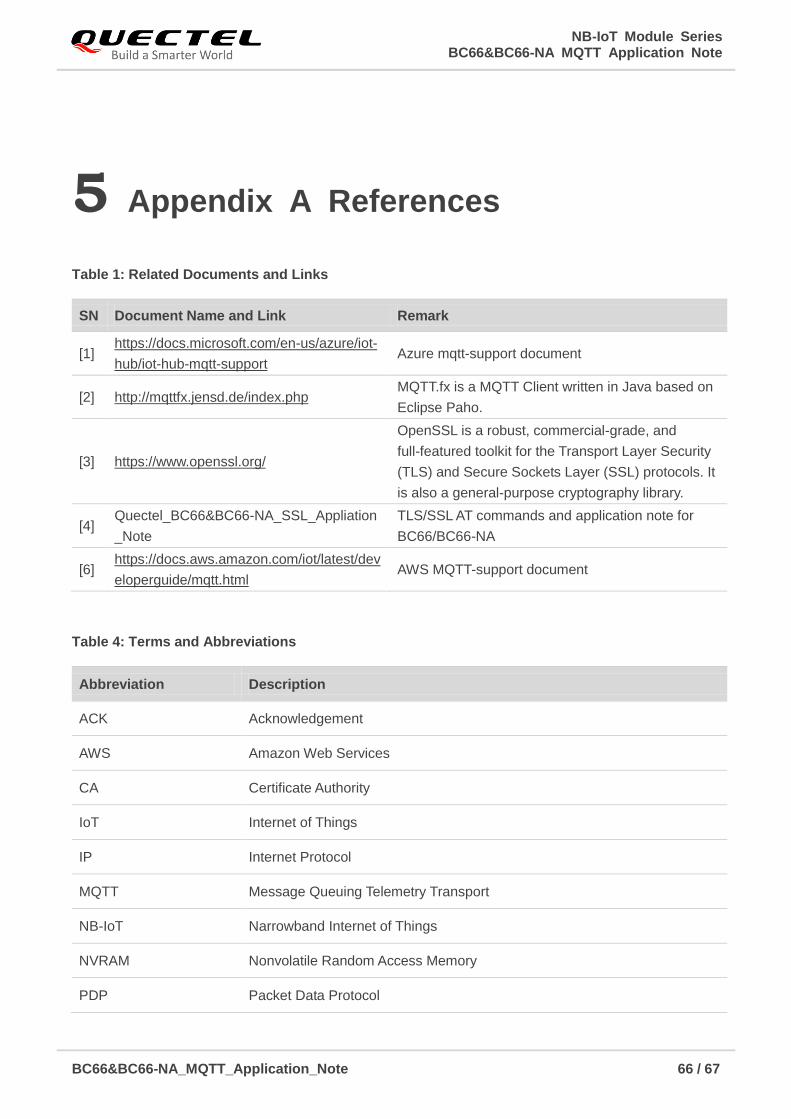
NB-IoT Module Series BC66&BC66-NA MQTT Application Note
BC66&BC66-NA_MQTT_Application_Note 66 / 67
5 Appendix A References
Table 1: Related Documents and Links
Table 4: Terms and Abbreviations
SN Document Name and Link Remark
[1] https://docs.microsoft.com/en-us/azure/iot-
hub/iot-hub-mqtt-support Azure mqtt-support document
[2] http://mqttfx.jensd.de/index.php MQTT.fx is a MQTT Client written in Java based on
Eclipse Paho.
[3] https://www.openssl.org/
OpenSSL is a robust, commercial-grade, and
full-featured toolkit for the Transport Layer Security
(TLS) and Secure Sockets Layer (SSL) protocols. It
is also a general-purpose cryptography library.
[4] Quectel_BC66&BC66-NA_SSL_Appliation
_Note
TLS/SSL AT commands and application note for
BC66/BC66-NA
[6] https://docs.aws.amazon.com/iot/latest/dev
eloperguide/mqtt.html AWS MQTT-support document
Abbreviation Description
ACK Acknowledgement
AWS Amazon Web Services
CA Certificate Authority
IoT Internet of Things
IP Internet Protocol
MQTT Message Queuing Telemetry Transport
NB-IoT Narrowband Internet of Things
NVRAM Nonvolatile Random Access Memory
PDP Packet Data Protocol

NB-IoT Module Series BC66&BC66-NA MQTT Application Note
BC66&BC66-NA_MQTT_Application_Note 67 / 67
QoS Quality of Service
SSL Secure Socket Layer
TCP Transmission Control Protocol
TLS Transport Layer Security
UART Universal Asynchronous Receiver/Transmitter
URC Unsolicited Result Code