Basic Mines WordPress Manual · Basic Mines WordPress Manual. 2 Accessing Word Press Getting Access...
28
1 Contents Accessing Word Press ..................................... 2 Getting Access ................................................... 2 Signing in .............................................................. 2 Dashboard ........................................................... 2 Adding & Editing Users ................................... 3 Switching between sites.................................. 3 Creating a Page ................................................ 4 Templates ............................................................. 4 Page Attributes .................................................. 7 Components of a Page .................................... 8 Sections................................................................. 8 Rows ....................................................................... 8 Modules ................................................................. 9 Hyperlinks .......................................................... 10 To Other Pages ................................................... 10 Anchored links.................................................... 11 Working with Pages ......................................... 11 Viewing & Organizing Pages......................... 11 Editing a Page ................................................... 12 Add to Template Library................................. 12 Visibility and Accessibility .............................. 13 Accessibility......................................................... 13 Module Visibility................................................. 13 Images ................................................................ 14 Image library ....................................................... 14 Embedding an Image....................................... 14 Editing image ...................................................... 14 Adding Attachments........................................ 15 Faculty Profiles ................................................. 16 Creating a new project .................................... 17 Editing Faculty Profiles ................................... 18 Draft Changes ..................................................... 18 Customizing DP Blog Portfolio ...................... 19 Setup Faculty Profiles...................................... 19 Updating Custom Fields ................................. 19 Setup Faculty/Staff Page ............................... 20 Display Order ...................................................... 20 Site Menu ........................................................... 22 Editing ................................................................... 22 Adding a New Page to the Menu ................ 23 Custom Links....................................................... 23 Null Menu Headings.......................................... 24 Live Preivew ........................................................ 24 Feeds .................................................................. 24 News Feed ........................................................... 24 Calendar Feed .................................................... 25 Embed a Twitter feed ...................................... 26 Embed a Facebook feed ................................ 26 Calendar Events ................................................ 27 Creating a New Event ...................................... 27 QUESTIONS? ..................................................... 28 Basic Mines WordPress Manual
Transcript of Basic Mines WordPress Manual · Basic Mines WordPress Manual. 2 Accessing Word Press Getting Access...

1
Contents
Accessing Word Press ..................................... 2Getting Access ................................................... 2
Signing in .............................................................. 2
Dashboard ........................................................... 2
Adding & Editing Users ................................... 3
Switching between sites .................................. 3Creating a Page ................................................ 4
Templates .............................................................4
Page Attributes .................................................. 7
Components of a Page .................................... 8Sections .................................................................8
Rows .......................................................................8
Modules .................................................................9
Hyperlinks .......................................................... 10To Other Pages ................................................... 10
Anchored links .................................................... 11
Working with Pages ......................................... 11Viewing & Organizing Pages ......................... 11
Editing a Page ................................................... 12
Add to Template Library ................................. 12
Visibility and Accessibility .............................. 13Accessibility ......................................................... 13
Module Visibility ................................................. 13
Images ................................................................ 14Image library ....................................................... 14
Embedding an Image....................................... 14
Editing image ...................................................... 14
Adding Attachments ........................................ 15
Faculty Profiles ................................................. 16Creating a new project .................................... 17
Editing Faculty Profiles ................................... 18
Draft Changes ..................................................... 18
Customizing DP Blog Portfolio ...................... 19Setup Faculty Profiles ...................................... 19
Updating Custom Fields ................................. 19
Setup Faculty/Staff Page ............................... 20
Display Order ...................................................... 20
Site Menu ........................................................... 22Editing ................................................................... 22
Adding a New Page to the Menu ................ 23
Custom Links ....................................................... 23
Null Menu Headings .......................................... 24
Live Preivew ........................................................ 24
Feeds .................................................................. 24News Feed ........................................................... 24
Calendar Feed .................................................... 25
Embed a Twitter feed ...................................... 26
Embed a Facebook feed ................................ 26
Calendar Events ................................................ 27Creating a New Event ...................................... 27
QUESTIONS? ..................................................... 28
Basic Mines WordPress Manual

2
Accessing Word Press
Getting Access
• Contact Mark Ramirez in the Communications office to get setup as a site admin. ° Tell him which site(s) you should have access to and if you’ll be posting events to the
school calendar.
Signing in
• Go to your site and put /wp-admin at the end (e.g. petroleum.mines.edu/wp-admin).• This will bring up the log in page• Enter your username and password. For now, these are NOT your ADIT or network creden-
tials. CCIT is still working to integrate this ID system into the new website.• If you’ve forgotten your password, click on “Lost your password?” and follow the instruc-
tions.• A black menu across the top of your site will appear next time you visit if you choose to stay
logged in. ° You can select “Edit Page” to edit whatever page you are on at the time, including faculty
project profiles.
Dashboard
Once you’ve successfully logged in, you’ll find yourself in the Dashboard of your site. From the dashboard, you will be able to access all the functions necessary for managing your web-site. It will look like this:
To access the pages.
To access facul-ty profiles.

3
The dashboard can be customized and the modules moved around. The left menu is where you’ll want to focus.
Adding & Editing Users
Only users with the role of Administrator can edit users.• Click on Users on the left side of your Dashboard to see a list of all users—this list only ap-
plies to the site you are currently managing.• To add a user, click on Add New. If the new user already has an account on another site, en-
ter their info under Add Existing User.• Otherwise, enter their info under Add New User. Only Mines email addresses may be
used. The username should be the user’s network username. For example, if their email is [email protected], their username should be “johnsmith.” They will receive an email invit-ing them to be a user of the site.
• The process of adding users will change once Mines logins are integrated into the system.Here’s a guide to WordPress user roles and permissions: http://www.wpbeginner.com/be-ginners-guide/wordpress-user-roles-and-permissions/
Switching between sitesIf you are an administrator for multiple sites, you can switch between them by hovering over “My Sites” in the very top left corner of the page. This will display all the sites you have access to.
Use the top menu to switch between sites you have permission to edit, such as the calen-dar and your department site.
• NOTE - New Post does NOT create a new event or page

4
Creating a Page• Select “Add New” at the top of the Pages menu or from left menu on the dashboard.• You’ll see this screen:
• In the topmost box, enter the title of your page. The URL or address of your page will be au-tomatically created based on this title, with all letters made lowercase and spaces replaced by dashes. You can override this and manually set a URL. After saving a draft of a page, its URL will appear right under where you’ve entered the page name. Click on the “Edit” but-ton to change this URL. This can be useful for when you want a shorter URL that’s easier to share in print materials, etc. For example, you can title a page “Faculty and Staff” but have the URL just be /faculty.
• Click on the purple button that says “Use The Divi Builder.” This allows you to use a more visually oriented method for building a page. The large text box will disappear and be re-placed by this:
Templates
• To load a page template, click on “Load From Library.” On the page that pops up, click on the “Add From Library” tab. Check the box next to “Replace the existing content with loaded layout.”

5
• Click on the “Load” button for the template you would like to use. We currently have two templates for Mines pages: Home Page, which is for home pages, and one labeled UNDER-GRAD/GRAD/PROGRAM TEMPLATE, for all other pages. Both templates can easily be modi-fied after being loaded onto a page.
The Home Page template looks like this:

6
The UNDERGRAD/GRAD/PROGRAM template looks like this:

7
This template should suffice for nearly all purposes. Here’s what it looks like on the back end:
All of the templates have modules with text already loaded in them. Alter the text, add and remove modules to suit your needs.
Page Attributes
In the Page Attibutes box, choose whether this has a par-ent page
° E.g adding a Past Events page as a subpage of your Events page
Manage the status of your page with the Publish Box lo-cated in the top right.
• Select Preview to have a new tab open up to pre-view your page.
• Select Edit after the different categories to open up the options.
• Hit Publish to make the page go live. ° You can delay the publication until a certain day
and time.• Select Save Draft if you’re not ready for it to go live.

8
Components of a PagePages are made up of Sections, Rows and Modules.
Sections
Sections, which have blue bars, are the largest building blocks.• The vast majority of the time, you will use what is called a Standard Section, which creates a
block of content with space on both sides (as seen in the middle of the UNDERGRAD tem-plate). A Standard Section can hold multiple rows, each of which can have a different num-ber of columns.
• In some cases, you may want to use a Fullwidth Section, which, as the name implies, stretch-es across the entire page. Fullwidth Sections do not have rows and can only take certain full-width modules, such as sliders, headers and images.
• Specialty Sections come in various configurations and allow you to combine different num-bers of columns in one row.
• The standard page templates come with a top section that contains the header image and page title. You can edit them to change the background image, but do not delete them.
• To edit the header image, click on the icon with three lines in the header section:
• Click on the current background image. You can then select another image that’s already been uploaded to the site, or upload a new image.
Rows
Rows, which have the green bars, come in many configurations, from one to four columns. They allow you to easily align content of varying widths and heights.

9
The number of columns in a row can always be changed by clicking on the icon of a box divided into three columns:
• You must add a new row if you want a different column configuration; you can’t have differ-ent configurations in the same row.
Modules
Modules – the dark gray boxes – contain the content. Modules come in many varieties and are chosen based on your content and how you want to display them. WordPress/Divi comes with a set of standard modules; we’ve also created a few unique to the Mines site that you have access to and are encouraged to use.
You can access the following modules by clicking on “Insert Module(s)” in a Row.• Text
° This is likely the module you will use the most. In addition to containing text of various sizes, it can also contain images. Most other modules will have a similar interface, which is a lot like Microsoft Word or any other word processing software:
° To add regular text, just start typing. ° To change the font, highlight the text you want to alter then click on the dropdown that
says “Paragraph.” Note: Heading 1 should be reserved for the title of a page. ° See “Embedding an image” section for details on that process.
10
• Image ° This module can contain a single image. Any image in this module will automatically ex-
pand the fill the width of the column it is in.• Toggle
° This is similar to the text module in that it can contain text and images. The difference is that it has a field for a header, which can be clicked to either hide or display its content. The module can be set to either hide or display the content when the pages first loads.
• Accordion ° Essentially a series of toggles stacked on top of one another. The top toggle will be open
when the page loads. When the header of another toggle is clicked, it will open and all other toggles will be closed.
• Tabs ° Similar to an accordion, except horizontally oriented.
• Button ° Creates a square light blue button with white text that can be linked to any URL.
• Code ° This allows you to insert script into a page. Particularly useful for embed codes from Twit-
ter, Facebook and other sites, and for embedding feeds from Mines news and calendar sites.
• Video ° Allows you to embed video from YouTube, Vimeo and other sources. All you need to do is
paste in the URL of the video into the correct field.• Map
° Creates an embedded, interactive Google Map on your site. You can create pins for multi-ple locations, then set the address for the center of the map.
• Slider ° Images and text that the viewer cycles through; can include buttons
• Call to Action ° This creates a text box with a dark blue background, allowing content to stand out on a
page. It can contain images as well as text. If you enter a URL and text, it will also create a button at the bottom of the module.
The following modules are custom ones created for the Mines website. They can be ac-cessed by clicking on “Insert Module(s)” then clicking on the “Add from Library” tab.
• Heading (for above orange divider) ° This creates a text module with an H2 header. This is the standard format for breaking up
a page into various headers.• Orange divider for under headings
° This creates an orange line of the proper thickness and with the correct spacing.• Custom blockquote module
° This creates box of large italic text with a gray background. Is used sparingly, usually for quotes or testimonials.
At the bottom of every module is a field called Admin Label. The text you put in this field is not shown to the public, but is handy for later editing of the page, so it’s easier to deter-mine which modules correspond to the content you want to edit.
Once you’re done with your module, click on “Save & Exit.”
Hyperlinks
To Other Pages
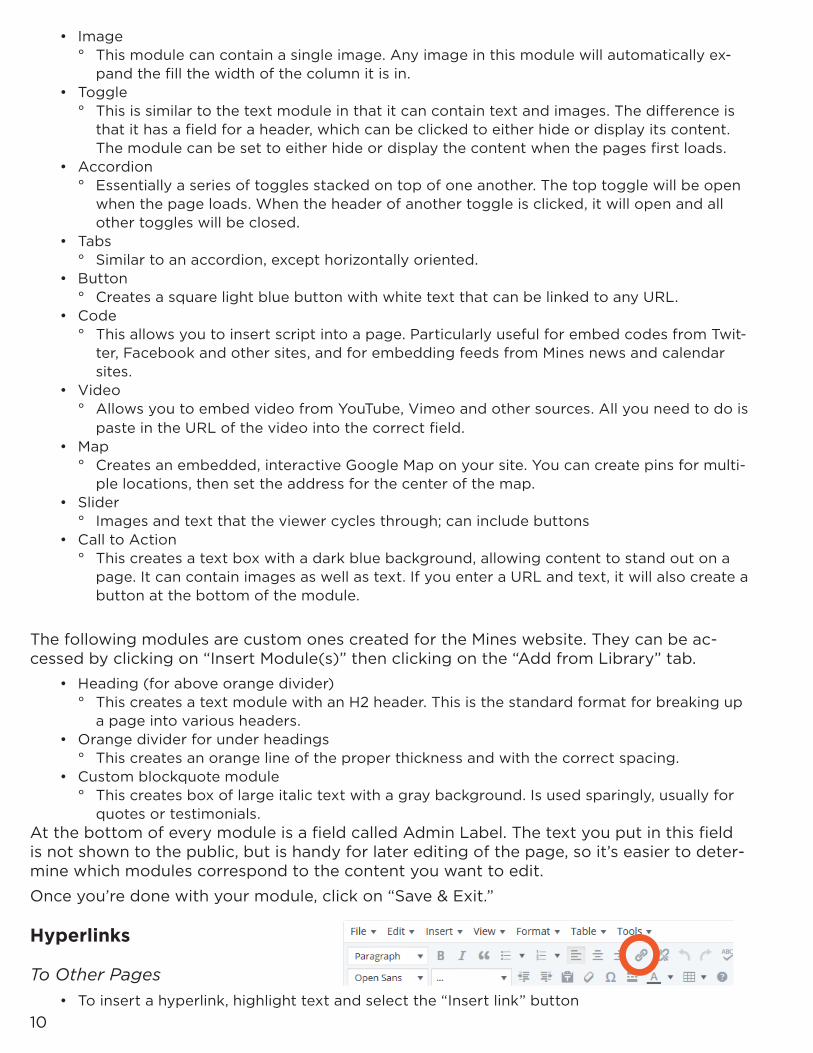
• To insert a hyperlink, highlight text and select the “Insert link” button
11
• Type in or paste the URL.• The search only works for pages or proj-
ects you have editing rights to within WP• Select the gear icon to open the link dia-
logue box and use the dialogue box to change whether the link will open in a new tab.
Anchored links
Use this when you want to link to a certain location on a page. There are two parts to this.• First, tag the location you want to jump to
° Open the module with the text you want to jump to. ° Switch to the text editor, so it looks like below.
° add <a id=”Your link name”> Text you’re anchoring to</a> • Second, create the anchor link
° Open the module where you want to create the anchored hyperlink ° HIghlight text link as you would to create a normal hyperlink, but then use #”Your text
here”
Working with Pages
Viewing & Organizing Pages
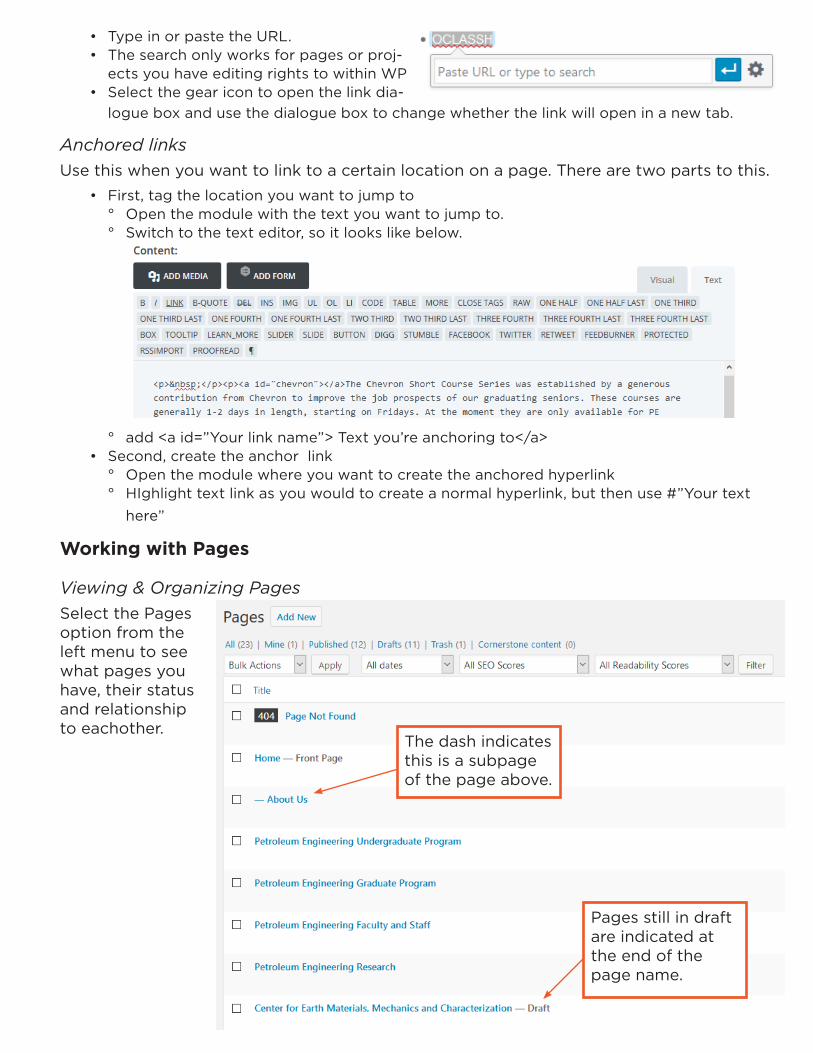
Select the Pages option from the left menu to see what pages you have, their status and relationship to eachother.
The dash indicates this is a subpage of the page above.
Pages still in draft are indicated at the end of the page name.

12
You can use the top menu to filter by set criteria or search the page contents.• People added or referenced using the Portfolio options will NOT come up in this search, but
all mentions within the pages will come up.• E.g. Below are the pages which use the term “field session”.
Editing a Page
The following applies to Sections, Rows and Modules.
You can change the location of any element by clicking and dragging it.
To make changes to an element you’ve already created, click on the icon of three horizontal lines. If you duplicate a Section or Row, it will also duplicate any other elements inside of it.
TIP: Duplicate content to try the modules in different column arrangements, then delete the ones you decide not to use.
Add to Template Library
To save a page element for use on other pages on your site, edit it by clicking on the three-line icon. At the bottom, instead of clicking on “Save & Exit,” click on “Save & Add to Li-brary.” Assign a Template Name to your element.
Edit content
Duplicate section, module or row
Insert columns
The blue is the background content; usually leave blank
13
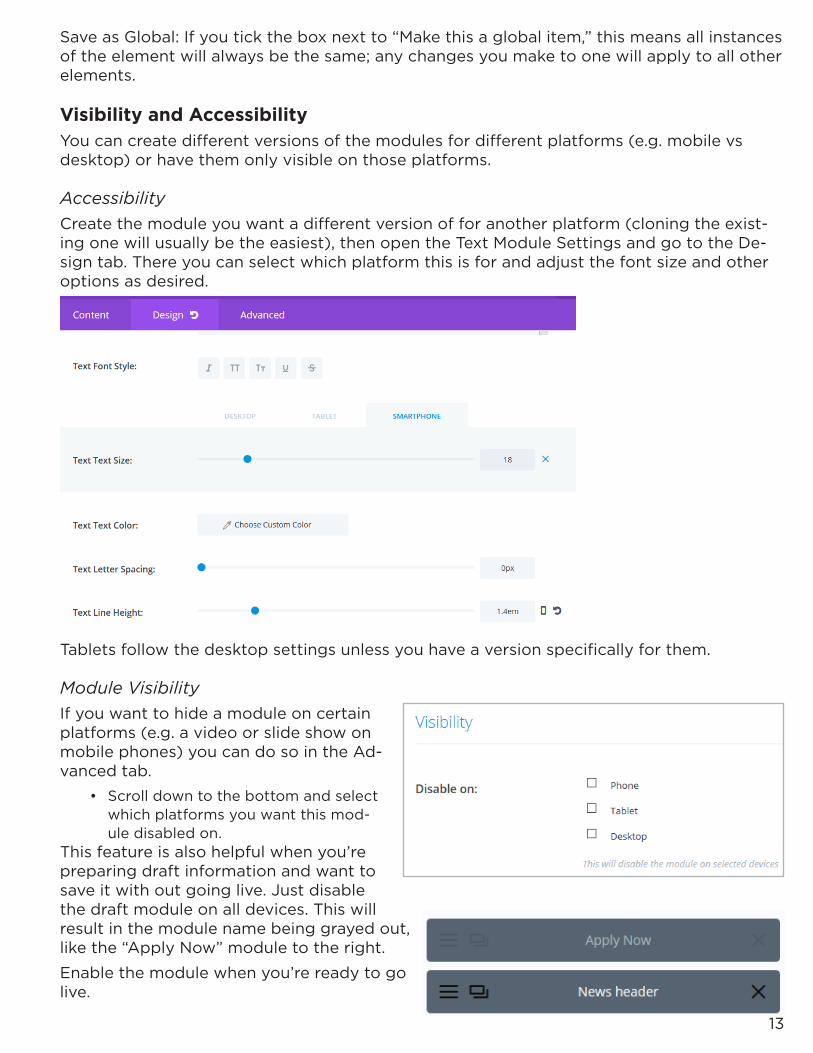
Save as Global: If you tick the box next to “Make this a global item,” this means all instances of the element will always be the same; any changes you make to one will apply to all other elements.
Visibility and AccessibilityYou can create different versions of the modules for different platforms (e.g. mobile vs desktop) or have them only visible on those platforms.
Accessibility
Create the module you want a different version of for another platform (cloning the exist-ing one will usually be the easiest), then open the Text Module Settings and go to the De-sign tab. There you can select which platform this is for and adjust the font size and other options as desired.
Tablets follow the desktop settings unless you have a version specifically for them.
Module Visibility
If you want to hide a module on certain platforms (e.g. a video or slide show on mobile phones) you can do so in the Ad-vanced tab.
• Scroll down to the bottom and select which platforms you want this mod-ule disabled on.
This feature is also helpful when you’re preparing draft information and want to save it with out going live. Just disable the draft module on all devices. This will result in the module name being grayed out, like the “Apply Now” module to the right.
Enable the module when you’re ready to go live.

14
Images
Image library
Found in left menu under Media. It’s a repository of media items uploaded to the site, in-cluding images and PDFs. They are in upload order, but can be searched.
• Media library has everything uploaded to the parent site• Uploads in calendar or different sites are not available in your site library and vice versa.
Embedding an Image
• To insert an image into a module, place your cursor where you’d like it to appear. Click on the Add Media button above the text box. The media library will pop up. If the image you’d like to use is already in the system, you can choose or search for it from here.
• If you need to upload a new file, simply drag and drop it into the window to upload. ° Keep in mind that the file size limit for embedding an image is 1.6MB.
• Once you choose the image you’d like to insert, its details will appear on the right side of the page. Make sure the Alt Text box has descriptive information—this doesn’t have to be long, but it is necessary to make sure our website is accessible. Captions and descriptions are not required, but may be helpful for users.
• Further below in the details, you can choose whether the image is aligned left, right or cen-ter, and if it links to something (the default is None). You also choose the size of the image. The system provides preset sizes, but this can be changed.
• Click Insert into Post
Editing image
• To edit an image once it’s been placed, just click on it so a border appears. You can edit the alignment in the menu that pops up, delete it by clicking on the X, or edit it by clicking on the pencil icon. In the Image Details window that pops up, you can again edit the alignment, choose a custom size, add a link, caption and alt text, etc.
• Cropping doesn’t work well in WP, so crop before importing if possible.
Label so you & others can find pic later.
Descriptive for accessibility.
15
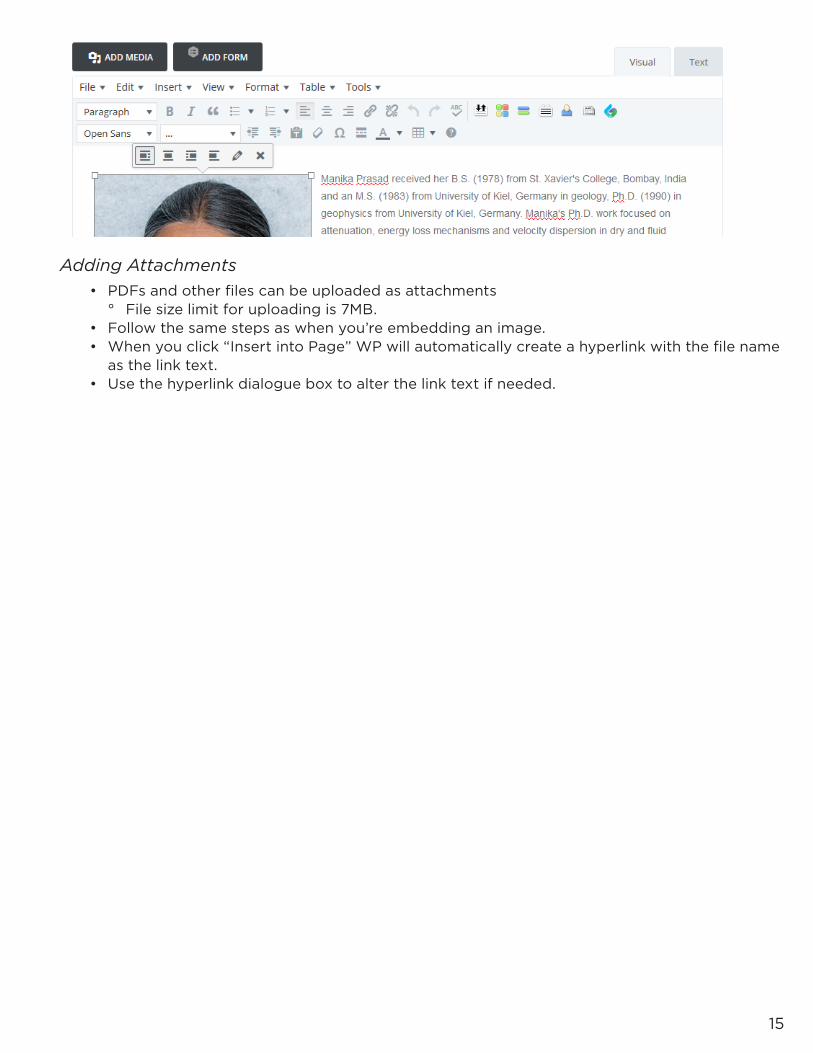
Adding Attachments
• PDFs and other files can be uploaded as attachments ° File size limit for uploading is 7MB.
• Follow the same steps as when you’re embedding an image.• When you click “Insert into Page” WP will automatically create a hyperlink with the file name
as the link text.• Use the hyperlink dialogue box to alter the link text if needed.

16
Faculty ProfilesThis only applies to sites that display faculty profiles – generally, departments, interdisci-plinary programs and research centers. Faculty profiles originate from the faculty member’s home department and are broadcast to other sites – for this reason, profiles should only be modified in their “home” site.
For example, a Chemistry professor might also be a faculty member in Biology or Hydrolo-gy. Any edits should be made to the version of the profile that is in the Chemistry Depart-ment site; otherwise, those changes will not be reflected in all versions.
In the new Mines websites, faculty profiles are a content type called Projects – you can find this in the left column of your dashboard.
While Projects are different from Pages, they behave similarly in that they are made up of Sections, Rows and Modules. The same rules for editing these elements apply.
The real advantage of creating Faculty Profiles as Projects is the ability to automatically display them in a neat grid on a page, using the DP Blog Portfolio module:

17
Creating a new project
These instructions are to create a profile page that look like this:
• Select “Add New” either from the left menu or at the top of the All Project page.• Enter the faculty member name in the title• Select Divi Builder• Insert text modules according to the layout below

18
• Title Module ° Use Heading 1 for faculty member’s name and Heading 6 for their title(s).
• Bio & Pic Modules ° Add whatever bio information you want to include. ° Heading 3 was used for the Education heading ° Click on Add Media to insert faculty photo. See Images section for details on uploading
and editing options.• Contact Module
° Add whatever contact info you want to include. ° Email hyperlink- just write the email address, select it and then press the hyperlink button
in the menu and it will automatically create the link.• Labs & Research Centers
° Add labs, research centers or any other affiliations you wish to highlight• Project Categories
° Select all applicable titles- this is important as it determines how and where the profile feeds into other pages
° Create new categories if needed
• Featured Image ° This is image that will feed into other pages ° Add the image the same way you do in the modules.
• Click Preview Changes button in the upper right to check the formatting before publising the profile. ° The preview will open in a new tab.
• You can either save the profile as a draft or publish it.
Editing Faculty Profiles
You can’t edit the profile information from the Faculty/Staff page. The only thing you con-trol on the Faculty/Staff page is what information is shown; you must go into the individual projects to change content.
Draft Changes
Projects don’t have a way to save changes once they are published that keeps the changes off the live page. See Module Visibility section for a work-around.

19
Customizing DP Blog PortfolioThis allows you to control what info is shown below the faculty photos on your main facul-ty/staff page, like these below.
Otherwise the DP Blog Portfolio only feeds in the faculty names. If you manually set up the faculty page with the extra info any changes made in the project wont feed into your page.
Setup Faculty Profiles
• Go to the Projects page and select a faculty profile. • Scroll down to the Custom Fields box. • Select “Enter New” and give the field a title.• In the Value box type in the information you want displayed below the photo
° This MUST be done in HTML code. (See the examples of how to do the codes)• Select Add Custom Field and you’re done.• You can have multiple custom fields.
Updating Custom Fields
Updating the field is simple. Just make the changes in the Value box and press update. Once the box flashes yellow it has updated; you don’t need to update the project to have it saved and updat-ed.
20
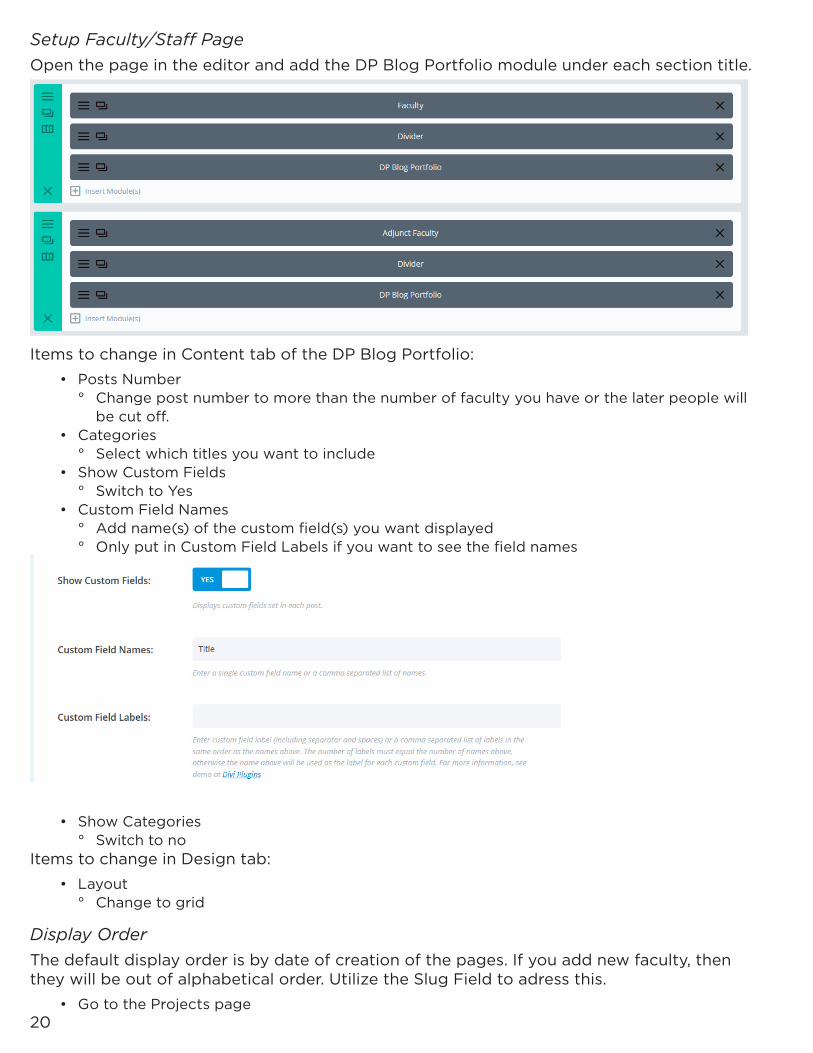
Setup Faculty/Staff Page
Open the page in the editor and add the DP Blog Portfolio module under each section title.
Items to change in Content tab of the DP Blog Portfolio:• Posts Number
° Change post number to more than the number of faculty you have or the later people will be cut off.
• Categories ° Select which titles you want to include
• Show Custom Fields ° Switch to Yes
• Custom Field Names ° Add name(s) of the custom field(s) you want displayed ° Only put in Custom Field Labels if you want to see the field names
• Show Categories ° Switch to no
Items to change in Design tab:• Layout
° Change to grid
Display Order
The default display order is by date of creation of the pages. If you add new faculty, then they will be out of alphabetical order. Utilize the Slug Field to adress this.
• Go to the Projects page

21
• Hover the mouse over a name and select Quick Edit
• The default Slug is first, then last name.
• Change it to [Last Name, First Name]
• Go to the individual DP Blog Portfolio modules on the faculty/staff page. ° Change “Order by” to Slug.

22
Site MenuSite menus are created manually, separately from pages. This means how you organize your pages has no bearing on the navigation that appears at the top of your site.
• Access your site menu by going to the left menu Appearance, Menus.
• Your page will look like the one below.
Editing
Menu Structure• Drag and drop the page boxes into the order
and hierarchy you want.
This indent indicates these pages are sublist-ed under this heading.
• You can also use the Move options at the bottom of the individual boxes to adjust placement.
• The default name displayed in the menu is your page name. Alter the Navigation Label if you want a different name/title displayed. ° Petroleum Engineering Events is listed
in the menu as simply Events.

23
You can adjust Menu settings at the bottom of the Menu page.• Don’t change the Secondary or Footer Menu as these are the Mines menus we want all
pages to have.
Adding a New Page to the Menu
Make sure the page you want to add is already published as unpublished pages can’t be added.
• Go to the Pages box on the left and select the page you wish to add, then click Add to Menu.
• The page will be added at the bottom of the menu ° Page will be added even if already in the menu.
• Change name and placement as desired.
Custom Links
Custom links allow you to add pages outside of your site, in-cluding other Mines sites, to your menu.
• Go to the Custom Links box on the left to insert the URL and link names. Once you cick Add to Menu it will appear in the Menu Structure list.

24
Null Menu Headings
If you want to create a heading in your menu and don’t have or want a page for it, you can create a custom link that leads nowhere using the format below.
Live Preivew
Really is live! Otherwise, you can’t preview menu changes.
Feeds
News Feed
Most departments are set up with a news page with a feed, but in case you aren’t, insert a Code module. Use the code below, but replace the tag number with whichever tag you want to feed.
25
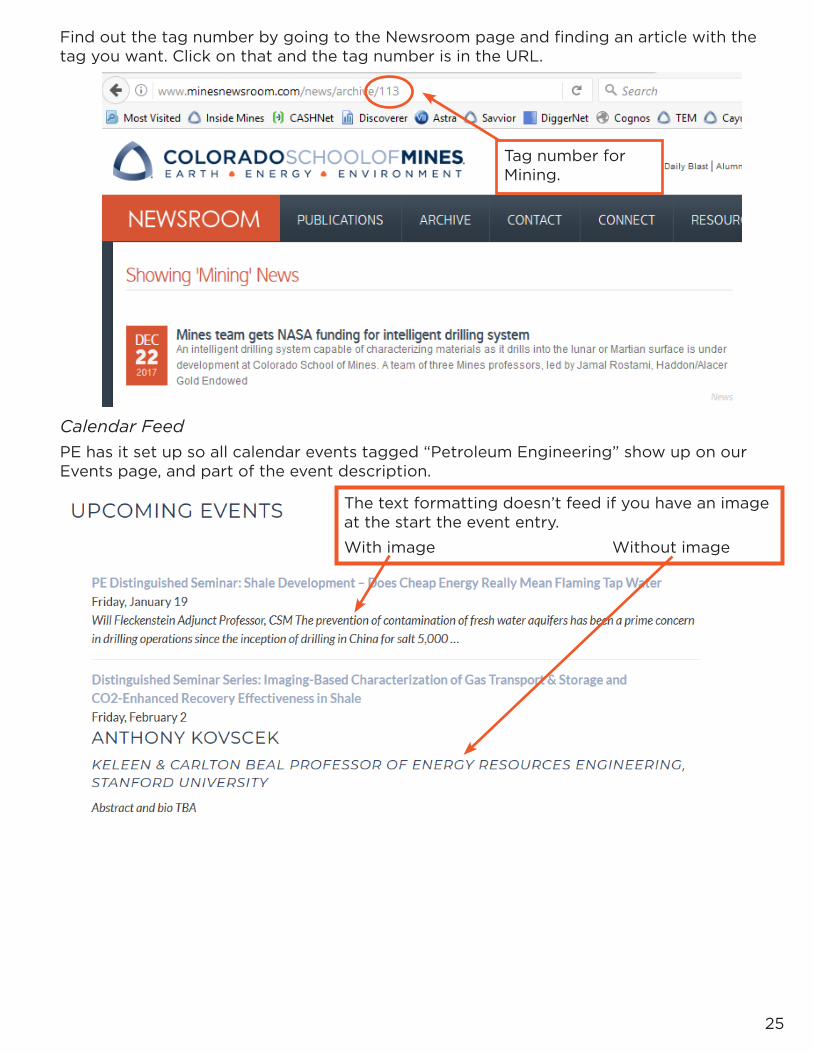
Find out the tag number by going to the Newsroom page and finding an article with the tag you want. Click on that and the tag number is in the URL.
Calendar Feed
PE has it set up so all calendar events tagged “Petroleum Engineering” show up on our Events page, and part of the event description.
The text formatting doesn’t feed if you have an image at the start the event entry.
With image Without image
Tag number for Mining.
26
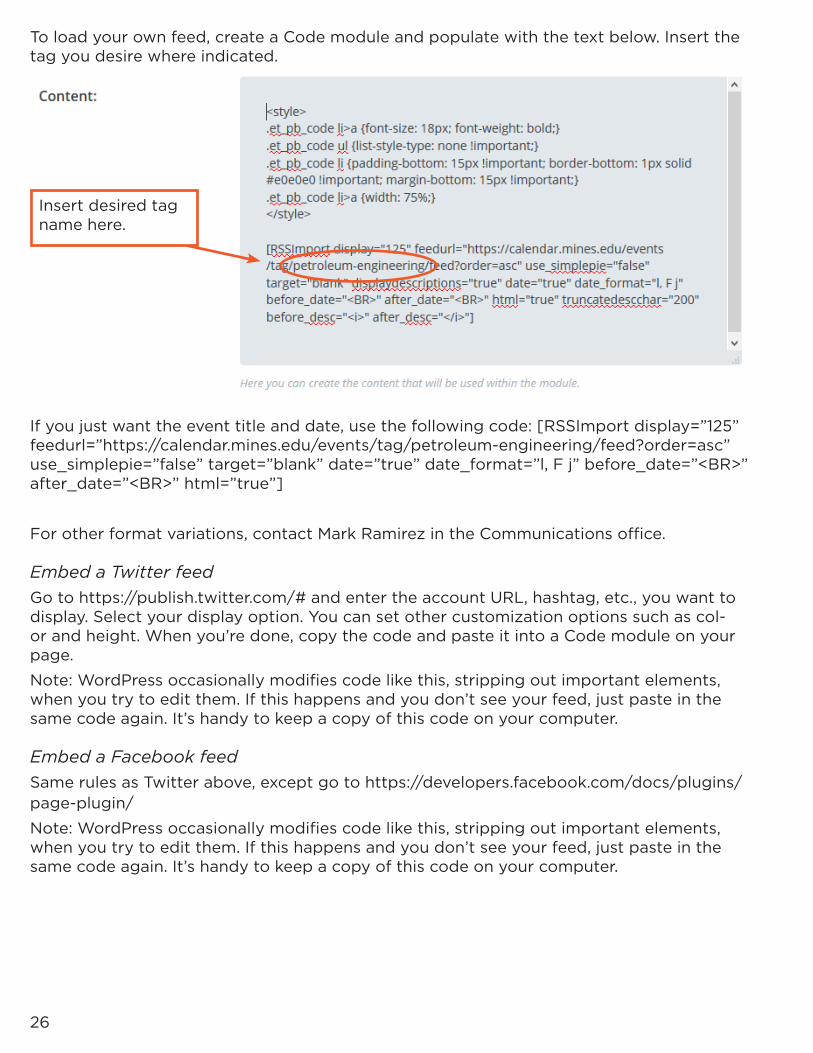
To load your own feed, create a Code module and populate with the text below. Insert the tag you desire where indicated.
If you just want the event title and date, use the following code: [RSSImport display=”125” feedurl=”https://calendar.mines.edu/events/tag/petroleum-engineering/feed?order=asc” use_simplepie=”false” target=”blank” date=”true” date_format=”l, F j” before_date=”<BR>” after_date=”<BR>” html=”true”]
For other format variations, contact Mark Ramirez in the Communications office.
Embed a Twitter feed
Go to https://publish.twitter.com/# and enter the account URL, hashtag, etc., you want to display. Select your display option. You can set other customization options such as col-or and height. When you’re done, copy the code and paste it into a Code module on your page.
Note: WordPress occasionally modifies code like this, stripping out important elements, when you try to edit them. If this happens and you don’t see your feed, just paste in the same code again. It’s handy to keep a copy of this code on your computer.
Embed a Facebook feed
Same rules as Twitter above, except go to https://developers.facebook.com/docs/plugins/page-plugin/
Note: WordPress occasionally modifies code like this, stripping out important elements, when you try to edit them. If this happens and you don’t see your feed, just paste in the same code again. It’s handy to keep a copy of this code on your computer.
Insert desired tag name here.

27
Calendar EventsUsing the Mines calendar website in WordPress
Creating a New Event
On the left side of the Dashboard page, hover over Events. A menu will appear; click on Add New, or click “New Event” at the top of the Events page.
• Enter the title of your event in the top text box. Do not include date, time or place informa-tion in the title. If the event is part of a series, e.g., the Heiland Lecture Series, include that in the title.
• In the large text box below, enter the details of your event: abstract, speaker bio, location.• If you are copying text from elsewhere, such as a Word document or PDF, prevent any un-
wanted formatting from being copied over by first pasting it into a plain-text editor such as Notepad, copying it from there again, then pasting it into the text box. Another method is to click on Edit in the menu above the text box, then click on Paste as text. When this is clicked, any text pasted into the text box will be stripped of formatting.
• To insert an image, follow the directions found in the Images section.

28
• Tagging your event: This is important to make sure that your event makes it to the right places, especially your department calendar. Events can accommodate multiple tags. To tag your event, click on the Tags text box on the right side of the page and start typing the tag. Choices will appear; click on the correct tags. You can also click on Choose from the most used tags. Some departments and lecture series tags already exist in the system, but you can create new ones. As with organizers, consistency is important.
• Event Categories: This is fairly self-explanatory.• Set the Time and Date in the window below the text box.• All campus buildings and locations should be available in the dropdown box for Venue. Let
Mark Ramirez know if any are missing. These do not include individual rooms, so this infor-mation should be in the main body of the event or in the “Additional Event Fields” section under room number.
• Organizers: You can choose your department from the dropdown menu. If your department is not yet in the system, you can create it by typing in the name and clicking Create. Be sure to use the same organizer each time, and not to create variations such as Physics Depart-ment and Department of Physics.
• Event Website: Optional, and likely not necessary.• NOTE: WordPress will autosave your post, but you can click on Save Draft in the upper right
corner of the window at any time to save your progress without publishing.• Click on Publish.
QUESTIONS?Contact Mark Ramirez in Communications at [email protected] or x3088.