Baseline and Reduction Opportunity (BRO) Assessment ...
13
Baseline and Reduction Opportunity (BRO) Assessment Program BRO Assessment (BROA) App Last updated: April 15, 2021
Transcript of Baseline and Reduction Opportunity (BRO) Assessment ...

Baseline and Reduction Opportunity (BRO)
Assessment Program
BRO Assessment (BROA) App
Last updated: April 15, 2021
BROA App Help
April 15, 2021 Page 1
Table of Contents
The BRO Assessment (BROA) Data Collection App .............................................................................................. 2
General Information ................................................................................................................................................... 2
Installing the BROA App in a Device ........................................................................................................................... 2
Using the BROA App ................................................................................................................................................... 4 The Landing Page .................................................................................................................................................... 4 The Projects Screen ................................................................................................................................................ 5 The Facilities Screen ............................................................................................................................................... 6 The Sources Screen ................................................................................................................................................ 8
General Data Entry Considerations ............................................................................................................................ 9 Fields that allow “Other: [specify]” Option ............................................................................................................ 9 Opening CSV Files in Microsoft Excel Without Losing the Required Formatting ................................................... 9 Entering Negative Values ..................................................................................................................................... 11
Release Notes ........................................................................................................................................................... 12

BROA App Help
April 15, 2021 Page 2
The BRO Assessment (BROA) Data Collection App General Information The BROA App has been developed to assist in the collection of the data required for the Device / Equipment Inventory and, if applicable, the Leak Detection assessment types.
The BROA App is a progressive web app that can be used in a number of devices (i.e., cell phones, tablets, desktop, etc.)
After it is installed as an App on the device, it will run without the need of internet or the use of cell data.
All project, facility, and source data is stored locally in the user’s device. o Note: CCI has NO WAY to access the data stored in users’ devices, so export project data
frequently and email to yourself or save to the cloud to prevent data loss in the event of a device malfunction. Manually deleting device data (e.g., clearing cache data) may also result in data loss.
Project information downloaded from the BROA App will match the BRO Assessment Program required CSV output format.
The App allows partially completed data to be saved. Ensure that you have completed all required fields before submitting the project files. o The Data Input Library file (available in the “BROA Documents/Templates” tab of the CCI Portal)
defines all requirements for these assessment types. Sample CSV files (Facilities and Sources) are also available for download.
Installing the BROA App in a Device Access the App through the link provided on the CCI Portal.
The first time you access the link on your device, you may be asked whether you would like to install it. If you accept that option, the BROA App will be downloaded to your device.
If are not given the option to install, you can still do so manually:
On Android devices: o Open the link on your browser. o If using Google Chrome, click the three dots at
the top of the screen, beside the URL. Select the “Install app” option.
o Other popular browsers offer similar “Install” or “Save” options.

BROA App Help
April 15, 2021 Page 3
On iOS devices:
o Open the link on your browser. o Click the save/share icon that usually appears at the
bottom of the screen. o Select “Add to Home Screen”. o You may have the option to name the App
before saving it. On a Windows device (e.g., laptop), using Google Chrome:
o See the instructions for Android devices above. On a Windows device (e.g.,
laptop), using Microsoft Edge: o The first time you access
the link, click the “+” icon beside the URL to open the app installation screen, then click the Install button.
o If you choose the “Not Now” option, you would still be able to install it at a later date by clicking the three dots to the right of the URL, then choosing the “Save to Home Screen” option.
Other popular browsers offer similar “Install” or “Save” options.

BROA App Help
April 15, 2021 Page 4
Using the BROA App
THE LANDING PAGE
From the App’s landing page users have the option to:
Add a new Project. View the list of Projects that have been previously added. Select the “Get Help” button to be directed to the BROA
page on CCI’s website. Note the warning recommending that users download the data on a regular basis and reminding that deleting device data (e.g., clearing cache data) may result in data loss. The App requests permission from the device to mark the data as “persistent,” so that it knows that the data should not be recycled as part of its normal storage management strategies. So, the first time you open the App, you will see “NOT PERSISTED” at the bottom of the landing page (as shown to the right).
When you navigate to a data page, the App requests permission from the device to make the data persistent. You may get a pop-up asking if you allow this, but in many cases the device will automatically grant it. Once permission is
granted, the label at the bottom will change to “PERSISTED.”
BROA App Help
April 15, 2021 Page 5
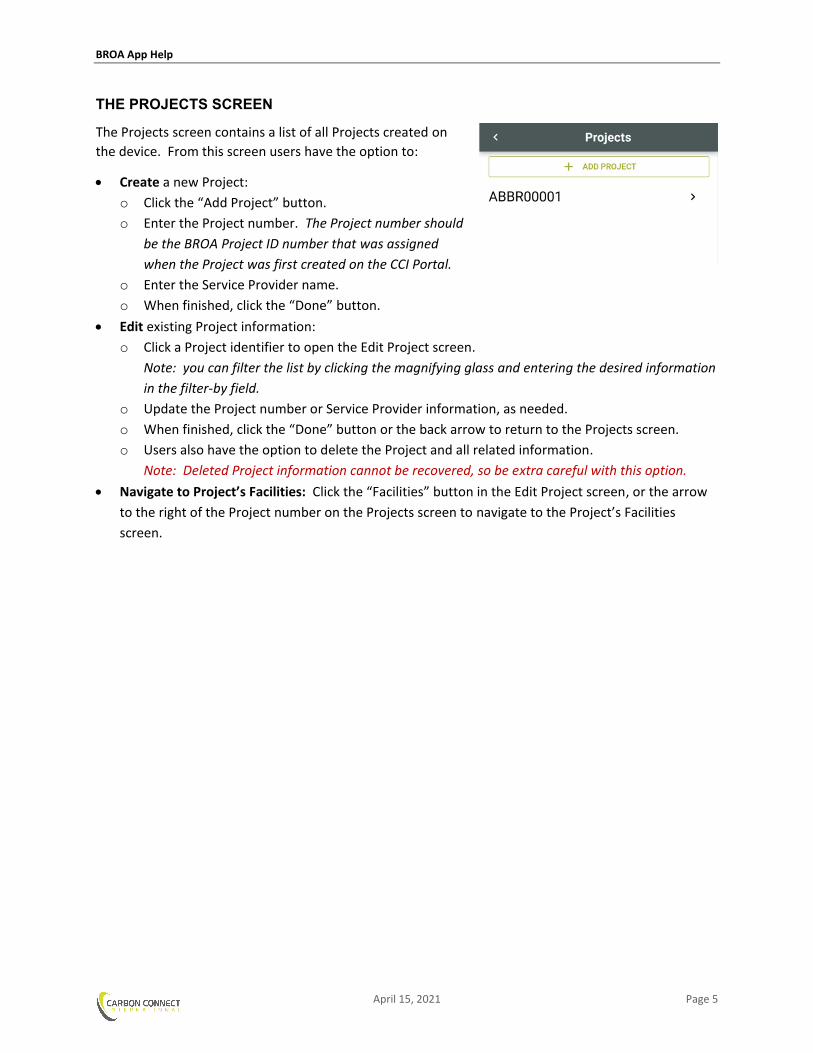
THE PROJECTS SCREEN
The Projects screen contains a list of all Projects created on the device. From this screen users have the option to:
Create a new Project: o Click the “Add Project” button. o Enter the Project number. The Project number should
be the BROA Project ID number that was assigned when the Project was first created on the CCI Portal.
o Enter the Service Provider name. o When finished, click the “Done” button.
Edit existing Project information: o Click a Project identifier to open the Edit Project screen.
Note: you can filter the list by clicking the magnifying glass and entering the desired information in the filter-by field.
o Update the Project number or Service Provider information, as needed. o When finished, click the “Done” button or the back arrow to return to the Projects screen. o Users also have the option to delete the Project and all related information.
Note: Deleted Project information cannot be recovered, so be extra careful with this option. Navigate to Project’s Facilities: Click the “Facilities” button in the Edit Project screen, or the arrow
to the right of the Project number on the Projects screen to navigate to the Project’s Facilities screen.

BROA App Help
April 15, 2021 Page 6
THE FACILITIES SCREEN
The Facilities screen contains a list of all Facilities that have been added for a particular Project. From this screen users have the option to:
Create a new Facility: o Click the “Add Facility” button. You will be taken to a
blank “Edit Facility” screen, where you can provide the Facility information. The “Service Provider Name” and “BROA Project ID” will be pre-populated. The answer to the “Fugitive Survey included?” field determines whether “Fugitives” will be
one of the available Sources for the facility. Only answer “Yes” is a Fugitive Leak Assessment was included in the Project submission.
o The “Tag Photo(s)” field allows you to choose the image(s) from your device that correspond to the facility. The file names of the tagged images associated to each facility will be exported to an interim “photos” column in the Facilities CSV file. The association of file names to the facility is meant to assist users with the process of renaming image files to follow the naming convention described in the Data Input Library document (contact the Reviewer assigned to your project if you need guidance regarding this process). The interim “photos” column is not part of data submission, so remember to delete it prior to submitting the data.
o When finished, click the arrow on the left of the title bar to return to the Facilities screen. o Note: The unique Facility Identifier will be automatically created, based on the information
provided for the Facility. See the Data Input Library file to review the components that make up the Facility Identifier.
o Click the garbage can icon to cancel without saving the new Facility. Download Project information:
o Click the download icon on the right of the title bar. The download pop-up will open.
o Click each the “Download Facilities” and/or the “Download Sources” button. Android Devices: After confirming the download,
the file will be saved to your device. From there you will have the option of emailing it to yourself, saving to the cloud, etc.
iOS Devices: You may need to tap and hold the download button until a screen appears displaying the file name. Click the save/share icon that appears at the bottom of the screen, and then choose to save the file to your device. From there you will have the option of emailing it to yourself, saving to the cloud, etc.

BROA App Help
April 15, 2021 Page 7
Edit existing Facility information: o Click a Facility identifier to open the Edit Facility
screen. Note: you can filter the list by clicking the magnifying glass and entering the desired information in the filter-by field.
o Update the Facility information, as needed. o When finished, click the arrow on the left of the title
bar to return to the Facilities screen. o Users also have the option to delete the Facility and
all related information. Note: Deleted Facility information cannot be recovered, so be extra careful with this option.
Navigate to Facility’s Sources: Click the “Sources” button
in the Edit Facility screen, or the arrow to the right of the Facility identifier on the Facilities screen to navigate to the Facility’s Sources screen.

BROA App Help
April 15, 2021 Page 8
THE SOURCES SCREEN
The Sources screen contains a list of all Sources that have been added for a particular Facility. From this screen users have the option to:
Create a new Source: o Click the “Add Source” button. You will be taken to a
blank “Edit Source” screen, where you can provide the Source information. The “Facility Identifier” will be pre-populated. Fields that are common to all Sources appear first. Source-specific fields, based on the
“Equipment / Source Category” chosen, will appear at the bottom of the form. o The “Tag Photo(s)” field allows you to choose the image(s) from your device that correspond to
the source. The file names of the tagged images associated to each source will be exported to an interim “photos” column in the Sources CSV file. The association of file names to the source is meant to assist users with the process of renaming image files to follow the naming convention described in the Data Input Library document (contact the Reviewer assigned to your project if you need guidance regarding this process). The interim “photos” column is not part of data submission, so remember to delete it prior to submitting the data.
o When finished, click the arrow on the left of the title bar to return to the Sources screen. o Note: The “Equipment / Source Identifier” provided must be unique within the Facility. You may
need to append a sequential number (e.g., Pressure Controller 1, Pressure Controller 2, etc.), or use other information about the Source to make the Source Identifier unique. See the Data Input Library file to review these requirements.
o Click the garbage can icon to cancel without saving the new Source. Edit existing Source information:
o Click the Source identifier to open the Edit Source screen. Note: you can filter the list by clicking the magnifying glass and entering the desired information in the filter-by field.
o Update the Source information, as needed. o When finished, click the arrow on the left of the title
bar to return to the Sources screen. o Users also have the option to delete the Source.
Note: Deleted Source information cannot be recovered, so be extra careful with this option.

BROA App Help
April 15, 2021 Page 9
General Data Entry Considerations
FIELDS THAT ALLOW “OTHER: [SPECIFY]” OPTION
In some cases, fields that contain a drop-down list also allow users to enter different information from the choices provided (see the Data Input Library file for fields that include this option).
In those cases, the BROA App will allow you to either choose an item from the drop-down list OR type directly into the field.
The information you enter in the field will be saved and displayed as “Other: Your Info”.
OPENING CSV FILES IN MICROSOFT EXCEL WITHOUT LOSING THE REQUIRED FORMATTING
THE PROBLEM
At times you may decide to open the exported CSV files using programs like Microsoft Excel to check or update their contents before submitting them. However, when Microsoft Excel opens a CSV file, it attempts to “interpret” the data in that file and usually makes changes to it. Unfortunately, this has the unintended consequence of breaking the CSV file for the application that the CSV was specifically designed for.
For example, if Excel sees something in the CSV file that it identifies as a date, Excel will change the format in the CSV file to suit the way that it prefers dates to be formatted, regardless of the prescribed data format (in this case YYYY-MM-DD). Also, if Excel sees a value that it identifies as a number (e.g., “002” in the Township column), it will change the format in the CSV file to display it as a number (“2”) by dropping any leading zeros.
THE SOLUTION
If you need to open a CSV file in Excel without breaking it, follow these steps:
1) Save the CSV file to your device.
2) Open a new Excel sheet, select the “Data” tab, then click 'From Text/CSV' in the Get & Transform Data group.
3) Browse to the CSV file and select 'Import'.
4) In the Import Wizard, ensure Delimiter is set to “Comma” and Data Type Detection is set to “Do not detect data types”.

BROA App Help
April 15, 2021 Page 10
5) Click “Load” to insert the data into cell A1.
6) Excel will likely add a new header row above the file column headings showing “Column 1”, “Column 2”, etc., and will display the “Table Design” tab.
a) Uncheck the “Header Row” in the Table Style Options group.
b) Delete the now blank top row, so that the first row displays the Facilities or Sources column headings.
7) Highlight the whole sheet and, in the “Home” tab, set the data type to “Text” in the Number group.
You should now have a spreadsheet with the imported data, but without Excel breaking the formatting required for the BRO Assessment Program submission.
If you make any changes to the data, remember to save the file as a CSV again before submitting.
Note: If you are using an older version of Microsoft Excel, search online for “open csv file without changing format” for directions.

BROA App Help
April 15, 2021 Page 11
ENTERING NEGATIVE VALUES
The default keyboard in some devices may not contain the dash/minus sign, so you would not have the option of entering negative values. However, this would be required for all the Longitude fields, and could be needed for some temperature values as well.
If that is the case, you could try clicking the keyboard icon at the bottom of the screen and changing the keyboard to one that contains the dash/minus sign.
Note that the keyboard options may also vary depending on which browser you used to download the App.
If that option is not available for your device, you would have the choice of updating the information after it is downloaded to the CSV file. See the “Opening CSV Files in Microsoft Excel” section above to ensure that the required formatting is maintained.
Note that it is the Service Provider’s responsibility to ensure that submitted data is in the correct format, as specified in the Data Input Library file.

BROA App Help
April 15, 2021 Page 12
Release Notes
BUILD NOTES
2020-12-17 BROA App initial release.
2021-01-19
Updated warning on landing page to clarify that wiping phone or browser data (e.g., cache data) may result in loss.
Included functionality to make data persistent, so that the device would know that the data should not be recycled as part of its normal storage management strategies.
Added a Sources navigation button to the Edit Facility screen.
2021-02-18 Reordered data points so that fields that are more likely to be completed
in the office, as part of a desktop exercise, will appear at the bottom of the screen.
2021-04-13
Added a “Tag Photo(s)” field to both the Edit Facility and Edit Sources screens. This interim information from this field facilitates the association between image files from the user’s device to either an individual facility or a source record.
Added “Other” as an optional choice in the Equipment / Source Category field. o If “Other” is chosen as the source category, users would need to
describe the source type in the Equipment / Device Type field.