Banner General / User Guide / 8.5 · April 2012 Banner General 8.5.1 vii User Guide Contents...
330
Banner General User Guide Release 8.5.1 April 2012
Transcript of Banner General / User Guide / 8.5 · April 2012 Banner General 8.5.1 vii User Guide Contents...

Banner GeneralUser Guide
Release 8.5.1April 2012

Banner®, Colleague®, PowerCAMPUS®, Luminis® and Datatel® are trademarks of Ellucian or its affiliates and are registered in the U.S. and other countries. Ellucian, Advance, DegreeWorks, fsaATLAS, Course Signals, SmartCall, Recruiter, MOX, ILP, and WCMS are trademarks of Ellucian or its affiliates. Other names may be trademarks of their respective owners.
©1992-2012 Ellucian. All rights reserved. The unauthorized possession, use, reproduction, distribution, display or disclosure of this material or the information contained herein is prohibited.
Contains confidential and proprietary information of Ellucian and its subsidiaries. Use of these materials is limited to Ellucian licensees, and is subject to the terms and conditions of one or more written license agreements between Ellucian and the licensee in question.
In preparing and providing this publication, Ellucian is not rendering legal, accounting, or other similar professional services. Ellucian makes no claims that an institution's use of this publication or the software for which it is provided will insure compliance with applicable federal or state laws, rules, or regulations. Each organization should seek legal, accounting and other similar professional services from competent providers of the organization’s own choosing.
Prepared by: Ellucian4375 Fair Lakes CourtFairfax, Virginia 22033United States of America
Revision History
Publication Date Summary
April 2012 New version that supports Banner General 8.5.1 software.

Contents
Banner General 8.5.1User Guide
Chapter 1 System Overview . . . . . . . . . . . . . . . . . . . . . . . . . . . . . . . . . . . . . . . . . . . . . . . . . . . . 1-1
Modules . . . . . . . . . . . . . . . . . . . . . . . . . . . . . . . . . . . . . . . . . . 1-1
System Overview . . . . . . . . . . . . . . . . . . . . . . . . . . . . . . . . . . . . 1-1
Job Submission . . . . . . . . . . . . . . . . . . . . . . . . . . . . . . . . . . . . . . 1-2
Population Selection . . . . . . . . . . . . . . . . . . . . . . . . . . . . . . . . . . . 1-2
Letter Generation . . . . . . . . . . . . . . . . . . . . . . . . . . . . . . . . . . . . . 1-2
General International Management . . . . . . . . . . . . . . . . . . . . . . . . . . . 1-2
System Functions/Administration . . . . . . . . . . . . . . . . . . . . . . . . . . . . 1-2
Event Management . . . . . . . . . . . . . . . . . . . . . . . . . . . . . . . . . . . . 1-2
General Web Management . . . . . . . . . . . . . . . . . . . . . . . . . . . . . . . 1-3
General VR Management . . . . . . . . . . . . . . . . . . . . . . . . . . . . . . . . 1-3
Business Rule Builder . . . . . . . . . . . . . . . . . . . . . . . . . . . . . . . . . . 1-3
Proxy Access . . . . . . . . . . . . . . . . . . . . . . . . . . . . . . . . . . . . . . . 1-3
Features . . . . . . . . . . . . . . . . . . . . . . . . . . . . . . . . . . . . . . . . . . 1-3
More Information . . . . . . . . . . . . . . . . . . . . . . . . . . . . . . . . . . . . 1-5
Online Help: Banner Form and Field Reference . . . . . . . . . . . . . . . . . . . 1-5
Getting Started Guide . . . . . . . . . . . . . . . . . . . . . . . . . . . . . . . . . . 1-5
Specialized Handbooks . . . . . . . . . . . . . . . . . . . . . . . . . . . . . . . . . 1-5
Technical Publications . . . . . . . . . . . . . . . . . . . . . . . . . . . . . . . . . . 1-5
Chapter 2 Validation Forms . . . . . . . . . . . . . . . . . . . . . . . . . . . . . . . . . . . . . . . . . . . . . . . . . . . . 2-1
Accessing Validation Forms. . . . . . . . . . . . . . . . . . . . . . . . . . . . . . 2-1
Validation Forms Reference . . . . . . . . . . . . . . . . . . . . . . . . . . . . . . 2-1
April 2012 Banner General 8.5.1 iiiUser Guide
Contents

Chapter 3 Processing . . . . . . . . . . . . . . . . . . . . . . . . . . . . . . . . . . . . . . . . . . . . . . . . . . . . . . . . . . 3-1
Multi-Entity Processing Procedures . . . . . . . . . . . . . . . . . . . . . . . . . 3-2
Home Context . . . . . . . . . . . . . . . . . . . . . . . . . . . . . . . . . . . . . . . 3-2
Process Context. . . . . . . . . . . . . . . . . . . . . . . . . . . . . . . . . . . . . . 3-2
How to Switch Between Institution Codes . . . . . . . . . . . . . . . . . . . . . . . 3-3
How Changing Institution Codes Impacts your Banner Session . . . . . . . . . . 3-3
Job Submission . . . . . . . . . . . . . . . . . . . . . . . . . . . . . . . . . . . . . 3-4
Oracle Reports . . . . . . . . . . . . . . . . . . . . . . . . . . . . . . . . . . . . . 3-5
How Institution Role Maintenance Process (GURIROL) Works . . . . . . . . . . . 3-5
Setting Up Medical Information. . . . . . . . . . . . . . . . . . . . . . . . . . . . 3-7
Chapter 4 Job Submission . . . . . . . . . . . . . . . . . . . . . . . . . . . . . . . . . . . . . . . . . . . . . . . . . . . . 4-1
Overview . . . . . . . . . . . . . . . . . . . . . . . . . . . . . . . . . . . . . . . . . 4-1
Job Submission . . . . . . . . . . . . . . . . . . . . . . . . . . . . . . . . . . . . . 4-1
Validation Forms. . . . . . . . . . . . . . . . . . . . . . . . . . . . . . . . . . . . . 4-1
Related Report . . . . . . . . . . . . . . . . . . . . . . . . . . . . . . . . . . . . . . 4-2
Menu Navigation Table . . . . . . . . . . . . . . . . . . . . . . . . . . . . . . . . . 4-2
Job Submission Procedures . . . . . . . . . . . . . . . . . . . . . . . . . . . . . 4-4
Defining New Reports and Processes to Job Submission . . . . . . . . . . . . . . 4-4
Setting up Parameter Defaults for Banner Reports and Processes . . . . . . . . . 4-4
Setting Up System-Level Defaults . . . . . . . . . . . . . . . . . . . . . . . . . . 4-5
Setting Up Valid Characters for the Special Print Field . . . . . . . . . . . . . . . 4-5
Setting Up User-Level Defaults . . . . . . . . . . . . . . . . . . . . . . . . . . . . 4-6
Changing User-Level Defaults. . . . . . . . . . . . . . . . . . . . . . . . . . . . . 4-8
Copying User-Level Defaults to Another User . . . . . . . . . . . . . . . . . . . . 4-10
Creating a Job Parameter Set . . . . . . . . . . . . . . . . . . . . . . . . . . . . . 4-11
Using Oracle*Reports . . . . . . . . . . . . . . . . . . . . . . . . . . . . . . . . . . 4-12
Setting Up Default Values for Parameters 71-77 . . . . . . . . . . . . . . . . . . 4-13
Accessing the Oracle Reports URL (Report Server Showjobs) . . . . . . . . . . 4-15
Running Banner Reports and Processes . . . . . . . . . . . . . . . . . . . . . . . 4-15
Using Job Submission . . . . . . . . . . . . . . . . . . . . . . . . . . . . . . . . . 4-16
Using the Operating System Prompt . . . . . . . . . . . . . . . . . . . . . . . . . 4-20
Job Submission Messages . . . . . . . . . . . . . . . . . . . . . . . . . . . . . . 4-21
iv Banner General 8.5.1 April 2012User GuideContents

Chapter 5 Population Selection . . . . . . . . . . . . . . . . . . . . . . . . . . . . . . . . . . . . . . . . . . . . . . . 5-1
Overview . . . . . . . . . . . . . . . . . . . . . . . . . . . . . . . . . . . . . . . . . 5-1
Definitions . . . . . . . . . . . . . . . . . . . . . . . . . . . . . . . . . . . . . . . . 5-1
Validation Forms. . . . . . . . . . . . . . . . . . . . . . . . . . . . . . . . . . . . . 5-2
Related Processes . . . . . . . . . . . . . . . . . . . . . . . . . . . . . . . . . . . 5-2
Menu Navigation Table . . . . . . . . . . . . . . . . . . . . . . . . . . . . . . . . . 5-3
Population Selection Procedures . . . . . . . . . . . . . . . . . . . . . . . . . . 5-4
Definitions . . . . . . . . . . . . . . . . . . . . . . . . . . . . . . . . . . . . . . . . . 5-4
Building a Population Selection . . . . . . . . . . . . . . . . . . . . . . . . . . . . . 5-5
Task Notes . . . . . . . . . . . . . . . . . . . . . . . . . . . . . . . . . . . . . . . . 5-9
Copying a Population Selection . . . . . . . . . . . . . . . . . . . . . . . . . . . . . 5-10
Creating a Population with GLBDATA . . . . . . . . . . . . . . . . . . . . . . . . . 5-10
Extracting IDs Using Population Selection Rules . . . . . . . . . . . . . . . . . . 5-11
Creating a Population from the Union, Intersection,or Minus of Existing Population Selection Rules . . . . . . . . . . . . . . . . . 5-12
Task Notes . . . . . . . . . . . . . . . . . . . . . . . . . . . . . . . . . . . . . . . . 5-14
Creating a Manual Population . . . . . . . . . . . . . . . . . . . . . . . . . . . . . . 5-15
Task Note . . . . . . . . . . . . . . . . . . . . . . . . . . . . . . . . . . . . . . . . 5-16
Population Selection Messages . . . . . . . . . . . . . . . . . . . . . . . . . . . 5-16
Variable/Population Selection Messages . . . . . . . . . . . . . . . . . . . . . . 5-17
Chapter 6 Letter Generation . . . . . . . . . . . . . . . . . . . . . . . . . . . . . . . . . . . . . . . . . . . . . . . . . . . 6-1
Overview . . . . . . . . . . . . . . . . . . . . . . . . . . . . . . . . . . . . . . . . . 6-1
Validation Forms. . . . . . . . . . . . . . . . . . . . . . . . . . . . . . . . . . . . . 6-1
Related Processes and Report . . . . . . . . . . . . . . . . . . . . . . . . . . . . 6-2
Menu Navigation Table . . . . . . . . . . . . . . . . . . . . . . . . . . . . . . . . . 6-3
Letter Generation Procedures . . . . . . . . . . . . . . . . . . . . . . . . . . . . 6-5
Defining Variables. . . . . . . . . . . . . . . . . . . . . . . . . . . . . . . . . . . . . 6-5
April 2012 Banner General 8.5.1 vUser Guide
Contents

Creating a Variable . . . . . . . . . . . . . . . . . . . . . . . . . . . . . . . . . . . 6-6
Task Notes . . . . . . . . . . . . . . . . . . . . . . . . . . . . . . . . . . . . . . . . 6-11
Copying Variable Rules . . . . . . . . . . . . . . . . . . . . . . . . . . . . . . . . 6-12
Creating a Multiple-Sequence Variable . . . . . . . . . . . . . . . . . . . . . . . . 6-13
Creating a Variable with ID Information Other Than the ID Receiving the Letter . . . . . . . . . . . . . . . . . . . . . . . . . . . . . . . . . . . . . . . . . . 6-16
Sorting Variables . . . . . . . . . . . . . . . . . . . . . . . . . . . . . . . . . . . . 6-16
Creating a Hidden Variable . . . . . . . . . . . . . . . . . . . . . . . . . . . . . . 6-18
Defining a Variable with a First Variable Type . . . . . . . . . . . . . . . . . . . . 6-18
Building Letters . . . . . . . . . . . . . . . . . . . . . . . . . . . . . . . . . . . . . . 6-20
Task Notes . . . . . . . . . . . . . . . . . . . . . . . . . . . . . . . . . . . . . . . . 6-21
Facility Oracle Report Formatting Emulation Commands . . . . . . . . . . . . . 6-21
Extracting Variables with GLBLSEL . . . . . . . . . . . . . . . . . . . . . . . . . . 6-25
Using Job Submission . . . . . . . . . . . . . . . . . . . . . . . . . . . . . . . . . 6-25
Using the Operating System . . . . . . . . . . . . . . . . . . . . . . . . . . . . . . 6-28
Task Notes . . . . . . . . . . . . . . . . . . . . . . . . . . . . . . . . . . . . . . . . 6-28
Pending Letters . . . . . . . . . . . . . . . . . . . . . . . . . . . . . . . . . . . . . 6-29
Generating Letters from Banner with GLRLETR . . . . . . . . . . . . . . . . . . . 6-29
Using Job Submission . . . . . . . . . . . . . . . . . . . . . . . . . . . . . . . . . 6-30
Using the Operating System . . . . . . . . . . . . . . . . . . . . . . . . . . . . . . 6-33
Task Notes . . . . . . . . . . . . . . . . . . . . . . . . . . . . . . . . . . . . . . . . 6-34
Creating a Download File with GLRLETR . . . . . . . . . . . . . . . . . . . . . . . 6-35
Task Notes . . . . . . . . . . . . . . . . . . . . . . . . . . . . . . . . . . . . . . . . 6-39
Letter Generation Messages . . . . . . . . . . . . . . . . . . . . . . . . . . . . . 6-39
Chapter 7 General International Management . . . . . . . . . . . . . . . . . . . . . . . . . . . . . . . . 7-1
Overview . . . . . . . . . . . . . . . . . . . . . . . . . . . . . . . . . . . . . . . . . 7-1
General International Management . . . . . . . . . . . . . . . . . . . . . . . . . . 7-1
Validation Forms. . . . . . . . . . . . . . . . . . . . . . . . . . . . . . . . . . . . . 7-1
Menu Navigation Table . . . . . . . . . . . . . . . . . . . . . . . . . . . . . . . . . 7-3
General International Management Procedures . . . . . . . . . . . . . . . . . . 7-6
Visa Tracking . . . . . . . . . . . . . . . . . . . . . . . . . . . . . . . . . . . . . . . 7-6
Setting Up Supporting Forms . . . . . . . . . . . . . . . . . . . . . . . . . . . . . 7-6
Entering Visa Information . . . . . . . . . . . . . . . . . . . . . . . . . . . . . . . 7-7
Deleting Records . . . . . . . . . . . . . . . . . . . . . . . . . . . . . . . . . . . . 7-8
Overlapping Visa Dates . . . . . . . . . . . . . . . . . . . . . . . . . . . . . . . . 7-8
Displaying Multiple Visas . . . . . . . . . . . . . . . . . . . . . . . . . . . . . . . . 7-8
Student and Exchange Visitors Information System (SEVIS) . . . . . . . . . . . . 7-8
vi Banner General 8.5.1 April 2012User GuideContents

Setting Up SEVIS Features . . . . . . . . . . . . . . . . . . . . . . . . . . . . . . 7-11
Creating Student and Exchange Visitor Records . . . . . . . . . . . . . . . . . . 7-12
Viewing Records . . . . . . . . . . . . . . . . . . . . . . . . . . . . . . . . . . . . 7-14
Handling Adjudicated Information . . . . . . . . . . . . . . . . . . . . . . . . . . . 7-14
Sending Records to the Bureau . . . . . . . . . . . . . . . . . . . . . . . . . . . . 7-15
Transmitting Data via the RTI . . . . . . . . . . . . . . . . . . . . . . . . . . . . . 7-15
Sending Data to the Bureau via the Batch Process . . . . . . . . . . . . . . . . . 7-16
If Records are Rejected by SEVISTA . . . . . . . . . . . . . . . . . . . . . . . . . 7-17
Responses from the Bureau . . . . . . . . . . . . . . . . . . . . . . . . . . . . . . 7-18
Receiving Data from the Bureau . . . . . . . . . . . . . . . . . . . . . . . . . . . 7-18
If a Record is Rejected . . . . . . . . . . . . . . . . . . . . . . . . . . . . . . . . . 7-19
Interface with fsaATLAS . . . . . . . . . . . . . . . . . . . . . . . . . . . . . . . . 7-19
EducationLevel/Change and EducationLevel/Cancel Processing . . . . . . . . . 7-21
Chapter 8 System Functions/Administration . . . . . . . . . . . . . . . . . . . . . . . . . . . . . . . . . 8-1
Overview . . . . . . . . . . . . . . . . . . . . . . . . . . . . . . . . . . . . . . . . . 8-1
Validation Forms. . . . . . . . . . . . . . . . . . . . . . . . . . . . . . . . . . . . . 8-2
Related Process . . . . . . . . . . . . . . . . . . . . . . . . . . . . . . . . . . . . . 8-4
Menu Navigation Table . . . . . . . . . . . . . . . . . . . . . . . . . . . . . . . . . 8-5
System Functions/Administration Procedures . . . . . . . . . . . . . . . . . . 8-7
Establishing Currency Conversions. . . . . . . . . . . . . . . . . . . . . . . . . . . 8-7
Creating Bank Information . . . . . . . . . . . . . . . . . . . . . . . . . . . . . . . . 8-8
Defining a New Bank Code . . . . . . . . . . . . . . . . . . . . . . . . . . . . . . 8-8
Linking Bank Funds and Bank Accounts with Cash Accounts (For Finance Only) . . . . . . . . . . . . . . . . . . . . . . . . . . . . . . . . . . 8-10
Creating ACH Information for a Bank Account . . . . . . . . . . . . . . . . . . . 8-10
Updating Bank Code Records . . . . . . . . . . . . . . . . . . . . . . . . . . . . . . 8-11
Setting Up Events in the Event Queue Maintenance Module . . . . . . . . . . . . 8-12
Customizing Menus. . . . . . . . . . . . . . . . . . . . . . . . . . . . . . . . . . . . 8-13
Creating and Maintaining Menus for Your Institution . . . . . . . . . . . . . . . . 8-13
Creating and Maintaining Personal Menus. . . . . . . . . . . . . . . . . . . . . . 8-17
Changing the Appearance of the Main Menu . . . . . . . . . . . . . . . . . . . . 8-18
Managing the Data Extract Feature. . . . . . . . . . . . . . . . . . . . . . . . . . . 8-18
Enabling the Data Extract Feature for a Form . . . . . . . . . . . . . . . . . . . . 8-18
Changing the Default Directory Location for Extract Files . . . . . . . . . . . . . 8-19
Creating and Using QuickFlows . . . . . . . . . . . . . . . . . . . . . . . . . . . . . 8-19
Creating a QuickFlow. . . . . . . . . . . . . . . . . . . . . . . . . . . . . . . . . . 8-19
Using a QuickFlow . . . . . . . . . . . . . . . . . . . . . . . . . . . . . . . . . . . 8-20
April 2012 Banner General 8.5.1 viiUser Guide
Contents

Chapter 9 Event Management . . . . . . . . . . . . . . . . . . . . . . . . . . . . . . . . . . . . . . . . . . . . . . . . . . 9-1
Event Management . . . . . . . . . . . . . . . . . . . . . . . . . . . . . . . . . . . 9-1
Validation Forms. . . . . . . . . . . . . . . . . . . . . . . . . . . . . . . . . . . . . 9-1
Menu Navigation Table . . . . . . . . . . . . . . . . . . . . . . . . . . . . . . . . . 9-4
Event Management Procedures . . . . . . . . . . . . . . . . . . . . . . . . . . . 9-9
Definitions . . . . . . . . . . . . . . . . . . . . . . . . . . . . . . . . . . . . . . . . . 9-9
Managing Buildings and Rooms . . . . . . . . . . . . . . . . . . . . . . . . . . . . 9-9
Managing Events . . . . . . . . . . . . . . . . . . . . . . . . . . . . . . . . . . . . . 9-10
Managing Functions . . . . . . . . . . . . . . . . . . . . . . . . . . . . . . . . . . . 9-10
Managing Tasks . . . . . . . . . . . . . . . . . . . . . . . . . . . . . . . . . . . . . . 9-11
Managing Participants . . . . . . . . . . . . . . . . . . . . . . . . . . . . . . . . . . 9-12
Chapter 10 General Web Management. . . . . . . . . . . . . . . . . . . . . . . . . . . . . . . . . . . . . . . . . . 10-1
Validation Forms. . . . . . . . . . . . . . . . . . . . . . . . . . . . . . . . . . . . . 10-1
Menu Navigation Table . . . . . . . . . . . . . . . . . . . . . . . . . . . . . . . . . 10-2
Managing User PINs . . . . . . . . . . . . . . . . . . . . . . . . . . . . . . . . . . 10-4
Strong Passwords. . . . . . . . . . . . . . . . . . . . . . . . . . . . . . . . . . . . . 10-4
Resetting a PIN . . . . . . . . . . . . . . . . . . . . . . . . . . . . . . . . . . . . . . 10-5
Web Management Procedures . . . . . . . . . . . . . . . . . . . . . . . . . . . . 10-5
Creating a Set of Security Questions . . . . . . . . . . . . . . . . . . . . . . . . . . 10-5
Verifying a User’s Answers to Security Questions . . . . . . . . . . . . . . . . . . 10-6
Resetting a User’s PIN . . . . . . . . . . . . . . . . . . . . . . . . . . . . . . . . . . 10-6
Using Letter Generation to Notify a User of a New PIN . . . . . . . . . . . . . . . 10-7
Chapter 11 Voice Response Management . . . . . . . . . . . . . . . . . . . . . . . . . . . . . . . . . . . . . . 11-1
Menu Navigation Table . . . . . . . . . . . . . . . . . . . . . . . . . . . . . . . . . 11-1
Chapter 12 Business Rule Builder . . . . . . . . . . . . . . . . . . . . . . . . . . . . . . . . . . . . . . . . . . . . . . 12-1
Validation Forms. . . . . . . . . . . . . . . . . . . . . . . . . . . . . . . . . . . . . 12-1
viii Banner General 8.5.1 April 2012User GuideContents

Menu Navigation Table . . . . . . . . . . . . . . . . . . . . . . . . . . . . . . . . . 12-1
Business Rule Builder Procedures . . . . . . . . . . . . . . . . . . . . . . . . . 12-2
Establish the Rule Builder . . . . . . . . . . . . . . . . . . . . . . . . . . . . . . . . 12-2
Building Business Actions . . . . . . . . . . . . . . . . . . . . . . . . . . . . . . . . 12-4
Building Auto-population Rules . . . . . . . . . . . . . . . . . . . . . . . . . . . . . 12-5
Chapter 13 Basic Person . . . . . . . . . . . . . . . . . . . . . . . . . . . . . . . . . . . . . . . . . . . . . . . . . . . . . . . . 13-1
Common Forms Object Library (GOQCLIB) . . . . . . . . . . . . . . . . . . . . 13-1
Tab-Level Security . . . . . . . . . . . . . . . . . . . . . . . . . . . . . . . . . . . . 13-2
Key Block . . . . . . . . . . . . . . . . . . . . . . . . . . . . . . . . . . . . . . . . . 13-2
Current Identification Window . . . . . . . . . . . . . . . . . . . . . . . . . . . . . . 13-3
Alternate ID Window . . . . . . . . . . . . . . . . . . . . . . . . . . . . . . . . . . . 13-7
The Original Creation User of an Identification Record . . . . . . . . . . . . . . . 13-8
Address Window . . . . . . . . . . . . . . . . . . . . . . . . . . . . . . . . . . . . . 13-9
Telephone Window . . . . . . . . . . . . . . . . . . . . . . . . . . . . . . . . . . . . 13-16
Biographical Window . . . . . . . . . . . . . . . . . . . . . . . . . . . . . . . . . . . 13-19
Race Block. . . . . . . . . . . . . . . . . . . . . . . . . . . . . . . . . . . . . . . . 13-23
E-mail Window . . . . . . . . . . . . . . . . . . . . . . . . . . . . . . . . . . . . . . 13-23
Emergency Contact Window . . . . . . . . . . . . . . . . . . . . . . . . . . . . . . 13-25
Additional ID Window . . . . . . . . . . . . . . . . . . . . . . . . . . . . . . . . . . . 13-28
Basic Person Procedures . . . . . . . . . . . . . . . . . . . . . . . . . . . . . . . 13-29
Common Matching and Basic Person . . . . . . . . . . . . . . . . . . . . . . . . . 13-29
To access GOAMTCH from an identification form: . . . . . . . . . . . . . . . . . 13-30
Using ID and Name Extended Search . . . . . . . . . . . . . . . . . . . . . . . . . 13-30
To use the Extended Search window: . . . . . . . . . . . . . . . . . . . . . . . . 13-31
To review additional information about the persons in the search result set: . . 13-31
To review additional information about the non-persons in the search result set: . . . . . . . . . . . . . . . . . . . . . . . . . . . . . . . . . . . . . . . . . . . 13-31
To reduce the search to person or non-person: . . . . . . . . . . . . . . . . . . . 13-32
To reduce the search based on additional criteria: . . . . . . . . . . . . . . . . . 13-32
To clear the data from a previous search, or to enter a new query: . . . . . . . . 13-32
To close the Extended Search window: . . . . . . . . . . . . . . . . . . . . . . . 13-32
To determine who entered the current name/ID of a non-person and the form on which the data was entered: . . . . . . . . . . . . . . . . . . . . . . . . 13-32
To determine who entered the alternate name/ID of a non-person and the form on which the data was entered: . . . . . . . . . . . . . . . . . . . . . . . . 13-33
Searching for Names that Include Accented Characters . . . . . . . . . . . . . . 13-33
Searching by SSN in an ID Field . . . . . . . . . . . . . . . . . . . . . . . . . . . . 13-34
April 2012 Banner General 8.5.1 ixUser Guide
Contents

To find a person record by Social Security Number (SSN): . . . . . . . . . . . . 13-34
Search by Telephone, Email, and Additional ID . . . . . . . . . . . . . . . . . . . . 13-35
Entering Basic Person Information . . . . . . . . . . . . . . . . . . . . . . . . . . . 13-36
To enter current identification data for a person: . . . . . . . . . . . . . . . . . . 13-36
To enter alternate identification data for a person: . . . . . . . . . . . . . . . . . 13-37
To view alternate identification data for a person: . . . . . . . . . . . . . . . . . . 13-37
To enter current identification data for a non-person: . . . . . . . . . . . . . . . . 13-38
To update an organization's and a person's name or ID: . . . . . . . . . . . . . . 13-38
To delete an organization's and person's alternate name or ID: . . . . . . . . . . 13-38
Maintaining Address and Telephone Information . . . . . . . . . . . . . . . . . . . 13-39
To enter address information for a person:. . . . . . . . . . . . . . . . . . . . . . 13-39
To enter address information for a non-person: . . . . . . . . . . . . . . . . . . . 13-40
To enter a primary telephone number with a new address: . . . . . . . . . . . . 13-41
To add a primary telephone number to an existing address:. . . . . . . . . . . . 13-41
To enter a telephone number without an address: . . . . . . . . . . . . . . . . . 13-42
To make an address inactive: . . . . . . . . . . . . . . . . . . . . . . . . . . . . . 13-43
Chapter 14 Supplemental Data Engine . . . . . . . . . . . . . . . . . . . . . . . . . . . . . . . . . . . . . . . . . 14-1
Overview . . . . . . . . . . . . . . . . . . . . . . . . . . . . . . . . . . . . . . . . . 14-1
The Structure of SDE . . . . . . . . . . . . . . . . . . . . . . . . . . . . . . . . . . . 14-1
Limitations of SDE . . . . . . . . . . . . . . . . . . . . . . . . . . . . . . . . . . . . 14-1
Not all Tables, Blocks, and Forms Work with SDE . . . . . . . . . . . . . . . . . 14-1
Multi-Entity Processing . . . . . . . . . . . . . . . . . . . . . . . . . . . . . . . . . 14-2
Masking . . . . . . . . . . . . . . . . . . . . . . . . . . . . . . . . . . . . . . . . . 14-3
Menu Navigation Table . . . . . . . . . . . . . . . . . . . . . . . . . . . . . . . . . 14-3
Supplemental Data Engine Processes. . . . . . . . . . . . . . . . . . . . . . . . 14-3
Using the Supplemental Data Window . . . . . . . . . . . . . . . . . . . . . . . . . 14-3
Interpreting the SDE Lightbulb Icon. . . . . . . . . . . . . . . . . . . . . . . . . . 14-3
Entering Supplemental Data . . . . . . . . . . . . . . . . . . . . . . . . . . . . . . 14-4
Administrative Setup for SDE . . . . . . . . . . . . . . . . . . . . . . . . . . . . . . 14-5
Enabling the <Ctrl-D> Keystroke . . . . . . . . . . . . . . . . . . . . . . . . . . . 14-5
Planning for Supplemental Data Setup . . . . . . . . . . . . . . . . . . . . . . . . 14-5
Setting Up a Supplemental Data Attribute . . . . . . . . . . . . . . . . . . . . . . . 14-5
Creating Delete Triggers for Supplemental Data . . . . . . . . . . . . . . . . . . . 14-6
Supplemental Data Engine (SDE) Data Validation . . . . . . . . . . . . . . . . . . 14-7
Data setup on GOASDMD . . . . . . . . . . . . . . . . . . . . . . . . . . . . . . . 14-8
Testing the Data Validation rules . . . . . . . . . . . . . . . . . . . . . . . . . . . 14-12
Confirming Data Validation rules for existing data. . . . . . . . . . . . . . . . . . 14-13
Security Setup Requirements . . . . . . . . . . . . . . . . . . . . . . . . . . . . . 14-14
x Banner General 8.5.1 April 2012User GuideContents

Loading SDE Data in Batch . . . . . . . . . . . . . . . . . . . . . . . . . . . . . . 14-15
Using Supplemental Data in Self-Service . . . . . . . . . . . . . . . . . . . . . . . 14-19
Chapter 15 Reports & Processes. . . . . . . . . . . . . . . . . . . . . . . . . . . . . . . . . . . . . . . . . . . . . . . . 15-1
List of Reports and Parameters . . . . . . . . . . . . . (GJRRPTS). . . . . . . 15-2
Report Sample . . . . . . . . . . . . . . . . . . . . . . . . . . . . . . . . . . . . . 15-3
Letter Generation Print Report . . . . . . . . . . . . . . (GLRLETR) . . . . . . . 15-5
Sample Letter . . . . . . . . . . . . . . . . . . . . . . . . . . . . . . . . . . . . . . 15-7
Report Sample . . . . . . . . . . . . . . . . . . . . . . . . . . . . . . . . . . . . . 15-7
Person Geo Region/Divisions Report . . . . . . . . . . (GORPGEO) . . . . . . 15-9
Report Sample . . . . . . . . . . . . . . . . . . . . . . . . . . . . . . . . . . . . . 15-11
SEVIS Batch Export Process . . . . . . . . . . . . . . (GORSEVE) . . . . . . 15-15
Report Sample . . . . . . . . . . . . . . . . . . . . . . . . . . . . . . . . . . . . . 15-20
SBGI Geo Region/Divisions Report . . . . . . . . . . . (GORSGEO) . . . . . . 15-22
Report Sample . . . . . . . . . . . . . . . . . . . . . . . . . . . . . . . . . . . . . 15-23
Address Purge . . . . . . . . . . . . . . . . . . . . . . (GPPADDR) . . . . . . 15-24
Report Sample . . . . . . . . . . . . . . . . . . . . . . . . . . . . . . . . . . . . . 15-25
Document Code Delete Process . . . . . . . . . . . . . (GUPDELT) . . . . . . . 15-27
Document Detail Report . . . . . . . . . . . . . . . . . (GURDETL) . . . . . . 15-28
Report Sample . . . . . . . . . . . . . . . . . . . . . . . . . . . . . . . . . . . . . 15-28
Insert Output Program . . . . . . . . . . . . . . . . . . (GURINSO). . . . . . . 15-29
Institution Role Maintenance Process . . . . . . . . . . (GURIROL) . . . . . . . 15-30
Print Dynamic Help for a Form . . . . . . . . . . . . . . (GURHELP) . . . . . . 15-32
Report Sample . . . . . . . . . . . . . . . . . . . . . . . . . . . . . . . . . . . . . 15-33
Data Element Dictionary . . . . . . . . . . . . . . . . . (GURPDED) . . . . . . 15-34
Report Sample . . . . . . . . . . . . . . . . . . . . . . . . . . . . . . . . . . . . . 15-35
Condensed Table Listing . . . . . . . . . . . . . . . . . (GURTABL) . . . . . . . 15-36
Report Sample . . . . . . . . . . . . . . . . . . . . . . . . . . . . . . . . . . . . . 15-36
Document Code Report . . . . . . . . . . . . . . . . . (GURTEXT) . . . . . . 15-37
Report Sample . . . . . . . . . . . . . . . . . . . . . . . . . . . . . . . . . . . . . 15-37
PIN Create Process . . . . . . . . . . . . . . . . . . . (GURTPAC) . . . . . . 15-38
Report Sample . . . . . . . . . . . . . . . . . . . . . . . . . . . . . . . . . . . . . 15-39
SDE Inquiry and Delete Process . . . . . . . . . . . . . (GUSMDID) . . . . . . 15-40
Automatic Letter Compilation Process . . . . . . . . . . (GLOLETT) . . . . . . . 15-41
Population Selection Extract Process . . . . . . . . . . (GLBDATA) . . . . . . . 15-42
April 2012 Banner General 8.5.1 xiUser Guide
Contents

Letter Extract Process . . . . . . . . . . . . . . . . . . (GLBLSEL) . . . . . . . 15-44
Parameter Selection Compile Process . . . . . . . . . . (GLBPARM) . . . . . . 15-47
User ID/Password Verification Process . . . . . . . . . (GUAVRFY) . . . . . . 15-48
Index . . . . . . . . . . . . . . . . . . . . . . . . . . . . . . . . . . . . . . . . . . . . . . . . . . . . . . . . . . . . . . . . . I-1
xii Banner General 8.5.1 April 2012User GuideContents

April 20
1 System Overview
Banner® supports the integrated processing of the information your organization uses to manage its resources and functions. The General System is the core component of Banner, providing centralized system management tools and utility programs to the other Banner systems. This manual provides instructions for using the General System.
Modules
System Overview
The General System contains the modules that are common to all the Banner application systems:
Student Accounts Receivable Financial Aid
Human Resources Advancement Finance
Banner Application Systems
General System Modules
Job Submission Population Selection Letter Generation
System Functions/Administration Event Management
Business Rule Builder
General Web Management General International Management
General VR Management
Oracle
12 Banner General 8.5.1 1-1User Guide
System Overview

1-2
Job Submission
This module facilitates the submission of reports and processes throughout Banner. You can define new reports and processes to Job Submission, define default parameters, and run Banner reports and processes. You can also set up Job Submission for reports and processes developed on site.
Population Selection
This module lets you identify and group entities in the database, such as people, vendors, or organizations. You can define selection criteria to identify and extract a subset of these entities to use in Banner reports, processes, and letters.
Letter Generation
This module lets you define extract variables, build paragraphs, build a letter, extract variable data form the database, and merge the extracted variable data into the letter. You can also create a download file that can be used to produce letters with Microsoft Word or WordPerfect.
General International Management
This module has been designed to help institutions meet the requirements of the United States Bureau of Citizenship and Immigration Services (BCIS). If your institution is not located in the USA, you may not need these features. This module includes Visa tracking and SEVIS support.
System Functions/Administration
This module lets you set up, operate, and monitor Banner. You can set up currency codes, maintain EDI information, set up the Desktop Tools application, set up Event Queue Maintenance, customize menus, create Banner objects, and set up QuickFlows, Fine-Grained Access Control (FGAC), and Common Matching.
Event Management
This module helps you manage an event and the functions, tasks, and participants associated with the event. You can schedule functions, organize administrative tasks, track attendance, and send messages. Keeping track of this information not only helps you manage the current event, but provides information that can be used to plan future events.
Banner General 8.5.1 April 2012User GuideSystem Overview

April 20
General Web Management
This module supports the integrated processing between Banner and your self-service applications (Student Self-Service, Faculty and Advisor Self-Service, Employee Self-Service, Advancement Self-Service, and Executive Self-Service).
General VR Management
This module is a Banner software option available for Banner Student and Banner Financial Aid Systems that supports touch-tone telephone data entry and inquiry for student information. Voice Response includes Registration, Grade Reporting, Billing, Financial Aid, and Admissions modules.
Additional information about this module is in the Banner Voice Response Implementation Guide.
Business Rule Builder
This module includes forms you can use to build business rules. It was designed to help you manage your Banner data for SEVIS processing, Multi-Institution Functionality (MIF), and Banner Integration Components, but rules you create can be used for other purposes.
You can create rules to create student and exchange visitor records automatically, and to populate columns in Banner tables with values from other columns.
Proxy Access
Proxy Access allows properly authenticated constituents to set up access to designated Self-Service Banner pages and specify what activities a proxy user can perform.
Once these decisions are configured, users will then have the option to set up proxies. For example, each student can then decide who they want to serve as a parental proxy and who they want as potential employer proxies. Users may also decide to not set up any proxies. For each individual proxy, each user can select specific pages from the list of available pages to authorize.
For more information on Proxy Access, please refer to the Banner General 8.5 Proxy Access Handbook.
Features
The General System includes the following major features:
12 Banner General 8.5.1 1-3User Guide
System Overview

1-4
• Comprehensive reporting. Both hard-copy reports and online inquiry forms are available.
• Main menu. The main menu provide easy access and navigation to infrequent users. Menus can be customized for your institution and individual users. Frequent users can use Direct Access or Object Search to bypass the main menu. It also includes a high-level Site Map to help users move through Banner more efficiently.
• Validation forms. Validation forms standardize the contents of certain fields and control data input. You can specify custom values without programmer intervention.
• Flexible, user-defined security. The limited access security system helps ensure that data is viewed and updated by authorized users only. The security feature can accommodate both centralized and decentralized operations. Additional information is provided in the Banner Security Administration Handbook.
NoteIn some fields, data can be partially or completed obscured for selected users through techniques called masking and concealing. Fields can also be made completely invisible to users through field hiding. For more information, see the Banner Data Security Handbook.
NoteValue-based security (VBS) and personally identifiable information security (PII) -- both implemented through Oracle's Fine-Grained Access Control (FGAC), can selectively limit the data users can see through Banner forms. The details of the limitations depend entirely on the institution's VBS and PII rules. For more information, see the Banner Data Security Handbook.
• Online Help. The Online Help system contains information about forms and fields.
• Local Dynamic Help and Item Properties (choices available from the Help pull-down menu in Banner) both display column information when it is available.
NoteSunGard® Higher Education no longer delivers form and field information for Dynamic Help, but there are no plans to phase out Local Dynamic Help, which is a good place for you to maintain any custom information about forms or fields.
• Online manuals. You can access Banner documents directly from your computer. These electronic documents look the same as the hard copy versions, regardless of the computer you are using.
Banner General 8.5.1 April 2012User GuideSystem Overview

April 20
More Information
In addition to the information found in this Banner General User Guide, there are other sources of information to help you understand the Banner General system.
Online Help: Banner Form and Field Reference
Information on Banner forms and fields can be found in Banner Online Help. The help system runs in a web browser, and is available by choosing the Online Help button on the toolbar or the Online Help option from the Help pull-down menu. Additionally, you can access online help by selecting the Help Center link on the main menu.
Beginning with Release 8.0, Online Help includes a PDF version of form and field reference, which you can print or save to your local computer.
The latest version of Banner General Online Help is posted as a .zip file on the Customer Support Center. You can download and install Help on your own computer if you want to refer to it when the online Banner system is not available.
Getting Started Guide
The Banner Getting Started Guide is aimed at new Banner users. It describes how to navigate and use the Banner system.
Specialized Handbooks
Several handbooks deal with specialized topics:
The Banner Data Security Handbook describes how to set up Value-Based Security (VBS), Personally Identifiable Information (PII) security, and field-level masking—techniques that are aimed at limiting users’ access to sensitive data in the Banner database.
The Common Matching Handbook describes how to set up and use Banner’s common matching feature, which helps users search for person records in the system.
The GTVSDAX Handbook documents the code cross-references stored in Banner’s GTVSDAX table.
Technical Publications
Several publications are aimed at the technical staff who set up and support Banner.
• The Banner General Technical Reference Manual includes information on some of the behind-the-scenes components of the Banner General system.
12 Banner General 8.5.1 1-5User Guide
System Overview

1-6
• The Banner Middle Tier Implementation Guide is a guide to setting up the middle tier servers that support the Banner system in connection with Self-Service Banner products and Luminis® Channels.
• The Banner Security Administration Handbook is a guide to setting up and managing Banner user accounts and other aspects of Banner security.
NoteThe Middle Tier Implementation Guide and the Banner Security Administration Handbook are posted on the Software Downloads section of the Customer Support Center. Only users with software download privileges have access to these publications.
Banner General 8.5.1 April 2012User GuideSystem Overview

April 20
2 Validation Forms
This chapter describes the forms used to set up validation tables for the General System. Validation tables let you tailor the system to your needs by providing lists of coded values that can be entered in specific fields. You can use validation forms to build, maintain, and view validation tables.
The Expense Code Validation Form (GTVEXPN), for example, lets you identify and assign a code to each expense associated with event functions. When a user enters a value in the Expense field on a data entry form, the system checks the validation table, verifies the code, and issues an error message if the value is not valid. The system may also display the complete name of the expense code entered. If you need a new event expense or want to delete an obsolete expense, you can easily update the list of valid values by editing the validation form.
If more than one Banner® product is installed at your institution, a number of the validation form names beginning with STV are shared validation forms. Shared validation forms are also listed in this chapter.
Accessing Validation Forms
Validation forms can be accessed in the following ways:
• Use Direct Access to enter the form name.
• Use Object Search to search for and select the form.
• Choose the List function while in the field. Sometimes the complete validation form appears, while other times a List of Values (LOV) appears. In either case, the values are display-only.
• Select from a menu.
Validation Forms Reference
The list below identifies the validation forms used by the General System. Further information on these forms can be found in Online Help. See “Online Help: Banner Form and Field Reference” on page 1-5.
12 Banner General 8.5.1 2-1User Guide
Validation Forms

2-2
Validation Form Used By
GTVADIDAdditional Identification Type Validation Form
%IDEN forms
GTVCCRDCredit Card Type Validation Form
GORCCRDCredit Card Rules Form
GOAMERCCredit Card Merchant ID Form
GTVCELGCertification of Eligibility Validation Form
GOAINTLInternational Information Form
GTVCMSCCommon Matching Source Code Validation Form
GOAMTCHCommon Matching Entry Form
GORCMRLCommon Matching Rules Form
GORCMSCCommon Matching Source Rules Form
GORCMUSCommon Matching User Setup Form
GTVCTYPProxy Access Communication Type Validation Form
GERCOMMProxy Access Communication Rule Form
GTVCURRCurrency Codes Validation Form
GUACURRCurrency Conversion Form
GUAINSTInstallation Control Form
GXRBANKBank Code Rule Form
GTVDADDDesktop Tools - Add-In Validation Form
GOADADDDesktop Tools - Add-In Application Form
GTVDICDDistrict Division Code Validation Form
SLAEVNTEvent Form
STVCAMPCampus Code Validation Form
GTVDIRODirectory Item Validation Form
GOADPRFWeb User Directory Profile Form
Banner General 8.5.1 April 2012User GuideValidation Forms

April 20
GTVDOCMVisa Document Code Validation Form
GOAINTLVisa International Information Form
GTVDPRPDesktop Tools - Step Property Validation Form
GORDPRPDesktop Tools - Step Property Values Rule Form
GORDSTPDesktop Tools - Step Type Properties Rule Form
GTVDSTPDesktop Tools - Step Type Validation Form
GOADSTEDesktop Tools - Wizard Steps Setup Application Form
GORDSTPDesktop Tools - Step Type Properties Rule Form
GTVDTYPProxy Access Data Type Validation Form
GERPRXYProxy Access Data Option Rules
GTVDUNTDuration Unit Validation Table
SCACRSEBasic Course Information FormSFARGFEStudent Course Registration FormSFARHSTStudent Registration History andExtension FormSSARULESchedule Processing Rules FormSSASECQSchedule Section Query FormSSASECTSchedule Form
GTVEMALE-mail Address Type Validation Form
GOAEMALE-mail Address Form
GTVEMPHEmphasis Code Validation Form
GEAFUNCEvent Function Form
GTVEQNMEvent Queue Code Validation Form
GOAEQRMEvent Queue Record Maintenance Form
GOREQNMEvent Queue Name Definition Form
Validation Form Used By
12 Banner General 8.5.1 2-3User Guide
Validation Forms

2-4
GTVEQPGParameter Group Code Validation Form
GOREQNMEvent Queue Name Definition Form
GOREQPGParameter Group Rule Form
GTVEQPMParameter Code Validation Form
GOREQPGParameter Group Rule Form
GTVEQTSTarget System Code Validation Form
GOAEQRMEvent Queue Record Maintenance Form
GOREQNMEvent Queue Name Definition Form
GTVEXPNExpense Code Validation Form
GEAFUNCEvent Function Form
GTVFDMNFGAC Domain Validation Form
GOAFGACFGAC Group Rules Form
GORFDMNFGAC Domain Driver Rules Form
GOAFBPIFGAC PII Domain Business Profile Assignments
GTVFDTPFGAC Domain Type Validation Form
GORFDMNFGAC Domain Driver Rules FormGORFDTPFGAC Domain Type Predicate Rules Form
GTVFEESFee Status Code Validation Form
GEAATIDEvent Registration Form
GEAATTDAttendance Form
GTVFGACFGAC Group Validation Form
GOAFGACFGAC Group Rules Form
Validation Form Used By
Banner General 8.5.1 April 2012User GuideValidation Forms

April 20
GTVFBPRFGAC Business Profile Validation Form
GOAFGACFGAC Group Rules Form
GOAFPUDFGAC Person User Defaults Form
GORDMSKData Display Mask Rules Form
GOAFBPRFGAC Business Profile Assignments Form
GOIFBPRFGAC Business Profile Inquiry Form
GTVFSTAFunction Status Code Validation Form
GEAFUNCEvent Function Form
GTVFTYPFee Type Code Validation Form
GEAFUNCEvent Function Form
GTVFUNCFunction Code Validation Form
GEAFUNCEvent Function Form
SLAEVNTEvent Form
GTVINSMInstructional Method Validation Form
ROASECTSection Unavailable for Aid FormSCACRSEBasic Course Information FormSFARGFERegistration Fee Assessment Rules FormSOAORULOpen Learning Section Default Rules FormSSADFEESection Fee Assessment Control FormSSASECQSchedule Section Query FormSSASECTSchedule FormSTVSCHDSchedule Type Code Validation Form
GTVLETRLetter Code Validation Form
GEAFUNCEvent Function Form
GUALETR Letter Process Form
Validation Form Used By
12 Banner General 8.5.1 2-5User Guide
Validation Forms

2-6
GTVLFSTLearner Field of Study Type Validation Form
SRARECRRecruit Prospect Information FormSAAADMSAdmissions Application FormSGASTDNGeneral Student FormSFAREGSStudent Course Registration FormSHADEGRDegrees and Other Formal Awards Form
GTVMAILMail Code Validation Form
GEAFUNCEvent Function Form
GTVMENUMenu Code Validation Form
GEAATIDEvent Registration Form
GEAATTDAttendance Form
GEAFUNCEvent Function Form
GTVMTYPMeeting Type Validation Form
SSASECTSchedule FormSSAXMTICross List Meeting Time / Instructor Query Form
GTVNTYPName Type Validation Form
xPAIDENIdentification Form
GTVOBJTObject Code Validation Form
GUAOBJSObject Definition Form
GUTGMNUMenu Maintenance Form
GUAPMNU My Banner Maintenance Form
GUTPMNUMy Banner Maintenance and Copy Form
GTVOTYPProxy Access Option Type Validation Form
GERPRXYProxy Access Data Option Rules
Validation Form Used By
Banner General 8.5.1 April 2012User GuideValidation Forms
April 20
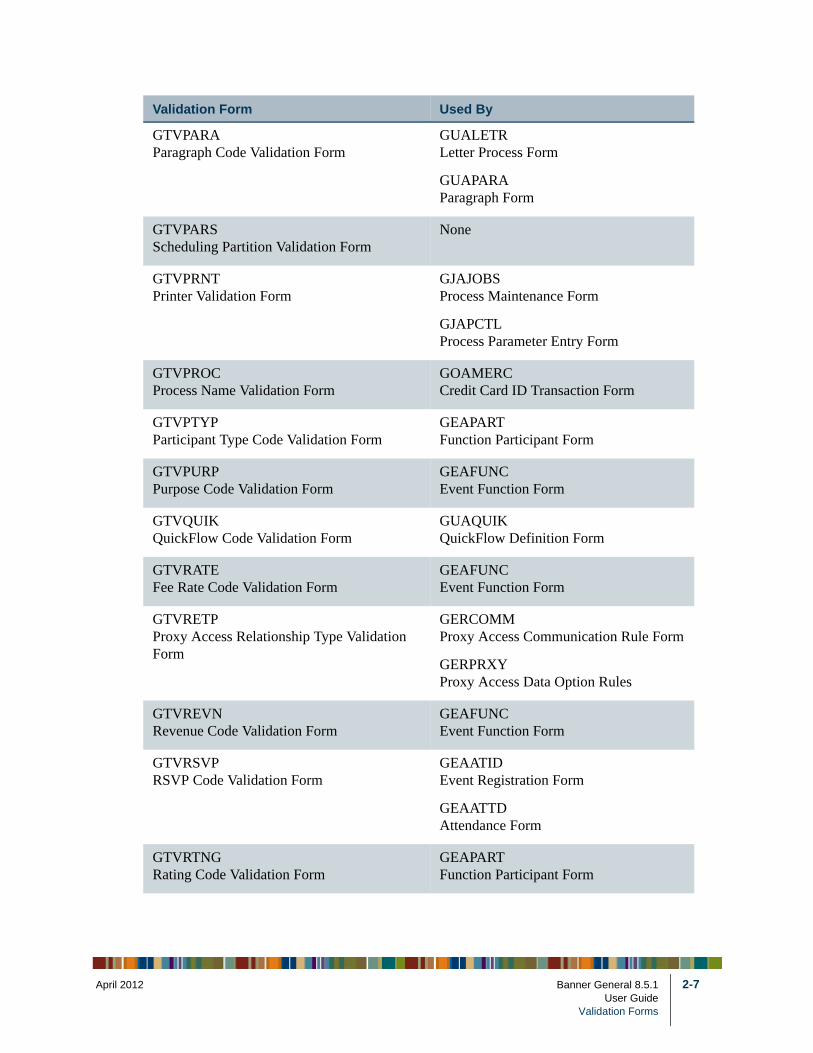
GTVPARAParagraph Code Validation Form
GUALETRLetter Process Form
GUAPARAParagraph Form
GTVPARSScheduling Partition Validation Form
None
GTVPRNTPrinter Validation Form
GJAJOBSProcess Maintenance Form
GJAPCTLProcess Parameter Entry Form
GTVPROCProcess Name Validation Form
GOAMERCCredit Card ID Transaction Form
GTVPTYPParticipant Type Code Validation Form
GEAPARTFunction Participant Form
GTVPURPPurpose Code Validation Form
GEAFUNCEvent Function Form
GTVQUIKQuickFlow Code Validation Form
GUAQUIKQuickFlow Definition Form
GTVRATEFee Rate Code Validation Form
GEAFUNCEvent Function Form
GTVRETPProxy Access Relationship Type Validation Form
GERCOMMProxy Access Communication Rule Form
GERPRXYProxy Access Data Option Rules
GTVREVNRevenue Code Validation Form
GEAFUNCEvent Function Form
GTVRSVPRSVP Code Validation Form
GEAATIDEvent Registration Form
GEAATTDAttendance Form
GTVRTNGRating Code Validation Form
GEAPARTFunction Participant Form
Validation Form Used By
12 Banner General 8.5.1 2-7User Guide
Validation Forms

2-8
GTVSCHSScheduling Status Code Validation Form
None
GTVSCODEDI/ISO Standard Code Validation Form
GUACURRCurrency Code Maintenance Form
GTVSDAXCrosswalk Validation Form
None
GTVSQPABusiness Rule Parameter Code Validation Form
GORRSQLBusiness Rules Form
GTVSQPRBusiness Rule Process Code Validation Form
GORRSQLBusiness Rules Form
GTVSQRUBusiness Rule Code Validation Form
GORRSQLBusiness Rules Form
GTVSRCEVisa Source Code Validation Form
GOAINTLVisa International Information Form
GTVSUBJSubject Index Code Validation Form
GEAFCOMFunction Comment Form
GTVSVCASEVIS Student Cancellation Reason Code Validation Form
GOASEVSSEVIS Information Form
GTVSVCCSEVIS Category Code Validation Form
GOASEVSSEVIS Information Form
GTVSVCPSEVIS Consular Post Validation Form
GOASEVSSEVIS Information Form
GTVSVCRSEVIS Creation Reason Code Validation Form
GOASEVSSEVIS Information Form
GTVSVDTSEVIS Dependent Termination Code Validation Form
GOASEVSSEVIS Information Form
GTVSVELSEVIS Education Level Code Validation Form
GOASEVSSEVIS Information Form
GTVSVEPSEVIS EV End Program Reason Code Validation Form
GOASEVSSEVIS Information Form
Validation Form Used By
Banner General 8.5.1 April 2012User GuideValidation Forms

April 20
GTVSVFTSEVIS Drop Below Full Time Reason Code Validation Form
GOASEVSSEVIS Information Form
GTVSVGOSEVIS Governmental Organization Code Validation Form
GOASEVSSEVIS Information Form
GTVSVIOSEVIS International Organization Code Validation Form
GOASEVSSEVIS Information Form
GTVSVITSEVIS Infraction Type Code Validation Form
GOASEVSSEVIS Information Form
GTVSVPCSEVIS Exchange Visitor Position Code Validation Form
GOASEVSSEVIS Information Form
GTVSVRPSEVIS Request for Form Reprint Code Validation Form
GOASEVSSEVIS Information Form
GTVSVTRSEVIS Termination Reason Code Validation Form
GOASEVSSEVIS Information Form
GTVSVTSSEVIS Transmittal Status Code Validation Form
SEVIS Transmittal History Form (GOASEVR)
GTVSYSISystem Indicator Validation Form
GJAJOBSProcess Maintenance Form
GLRAPPLApplication Definition Rules Form
GORTCTLThird-Party Electronic Control Rules Form
GUAOBJSObject Maintenance Form
GUTGMNUMenu Maintenance Form
GSASECRBanner Security Maintenance Form
Validation Form Used By
12 Banner General 8.5.1 2-9User Guide
Validation Forms

2-10
GTVSYSTProxy Access System Code Validation Form
GERCOMMProxy Access Communication Rule Form
GERPRXYProxy Access Data Option Rules
GTVOTYPProxy Access Option Type Validation Form
GTVTARGTarget Audience Code Validation Form
GEAFUNCEvent Function Form
GTVTASKTask Code Validation Form
GEATASKFunction Task Form
GTVTRTPEDI Transaction Type Validation Form
GXATPIDEDI Trading Partner Identification Form
GXRETIDEDI Transaction ID Rules Form
GTVTSTATask Status Code Validation Form
GEATASKFunction Task Form
GTVTTYPTask Type Code Validation Form
GEATASKFunction Task Form
GTVTASKTask Code Validation Form
GTVVAPPValue-Based Security Application Codes Form
GOABACRValue-Based Security Access Rules Form
GOAPCRLValue-Based Security Pattern Control Rules Form
GOAVUSRValue-Based Restricted Users Form
GTVVBTYValue-Based Security Type Validation Form
GTVVAPPValue-Based Security Application Codes Form
GTVVISSVisa Issuing Authority Validation Form
GOAINTLVisa International Information Form
Validation Form Used By
Banner General 8.5.1 April 2012User GuideValidation Forms

April 20
GTVVOBJValue-Based Security Object Code Validation Form
GOABACRValue Based Security Access Rules Form
GOAPCRLValue-Based Security Pattern Control Rules Form
GTVZIPCZIP/Postal Code Validation Form
SLABLDGBuilding Definition Form
STVSITESite Code Validation Form
GXVDIRDBank Routing Number Validation Form
GXADIRDDirect Deposit Recipient Form
STVASRCAddress Source Validation Form
GOAADDRAddress Review and Verification Form
STVATYPAddress Type Code Validation Form
GOAADDRAddress Review and Verification Form
GOAADRLAddress Role Privileges Form
GOADIRODirectory Options Rule Form
STVBLDGBuilding Code Validation Form
SLABLDGBuilding Definition Form
STVCAMPCampus Code Validation Form
GTVPARSScheduling Partition Validation Form
SLABLDGBuilding Definition Form
SLAEVNTEvent Form
STVCITZCitizen Type Code Validation Form
Refer to the system-specific documentation for a complete listing
Validation Form Used By
12 Banner General 8.5.1 2-11User Guide
Validation Forms

2-12
STVCNTYCounty Code Validation Form
GOAADDRAddress Review and Verification Form
GTVZIPCZIP/Postal Code Validation Form
SLABLDGBuilding Definition Form
APAIDEN, FOAIDEN, PPAIDEN, SPAIDENIdentification Forms
STVCOLLCollege Code Validation Form
GTVEMPHEmphasis Code Validation Form
SLABLDGBuilding Definition Form
SLAEVNTEvent Form
SLARDEFRoom Definition Form
STVDAYSDay of Week Validation Form
GEAFUNCEvent Function Form
SLAEVNTEvent Form
STVDEGCDegree Code Validation Form
Refer to the system-specific documentation for a complete listing
STVDEPTDepartment Code Validation Form
GTVEMPHEmphasis Code Validation Form
SLABLDGBuilding Definition Form
SLAEVNTEvent Form
SLARDEFRoom Definition Form
STVEMPTEmployment Type Validation Form
Refer to the system-specific documentation for a complete listing
Validation Form Used By
Banner General 8.5.1 April 2012User GuideValidation Forms

April 20
STVETHNEthnic Code Validation Form
Refer to the system-specific documentation for a complete listing
STVETYPEvent/Function Type Code Validation Form
GEAFUNCEvent Function Form
GTVFUNCFunction Code Validation Form
SLAEVNTEvent Form
STVHONDDepartmental Honors Code Validation Form
Refer to the system-specific documentation for a complete listing
STVLGCYLegacy Code Validation Form
Refer to the system-specific documentation for a complete listing
STVMAJRMajor, Minor, Concentration Code Validation Form
Refer to the system-specific documentation for a complete listing
STVMRTLMarital Status Code Validation Form
Refer to the system-specific documentation for a complete listing
STVNATNNation Code Validation Form
GOAADDRAddress Review and Verification Form
GOASEVSSEVIS Information Form
GTVZIPCZIP/Postal Code Validation Form
GUACURR Currency Code Maintenance Form
GUAINST Installation Control Form
STVSITE Site Code Validation Form
APAIDEN, FOAIDEN, PPAIDEN, SPAIDEN
STVPRCDPhone Rate Code Validation Form
SLABLDGBuilding Definition Form
SLARDEFRoom Definition Form
Validation Form Used By
12 Banner General 8.5.1 2-13User Guide
Validation Forms

2-14
STVRDEFBuilding/Room Attribute Code Validation Form
SLABLDGBuilding Definition Form
SLARDEFRoom Definition Form
STVRELGReligion Code Validation Form
Refer to the system-specific documentation for a complete listing
STVRELTRelation Code Validation Form
Refer to the system-specific documentation for a complete listing
STVRMSTRoom Status Code Validation Form
SLARDEFRoom Definition Form
STVRRCDRoom Rate Code Validation Form
SLABLDGBuilding Definition Form
SLARDEFRoom Definition Form
STVSITESite Code Validation Form
SLABLDGBuilding Definition Form
SLAEVNTEvent Form
STVSTATState/Province Code Validation Form
GOAADDRAddress Review and Verification Form
GTVZIPCZIP/Postal Code Validation Form
SLABLDGBuilding Definition Form
STVSITESite Code Validation Form
STVTELETelephone Type Validation Form
GOAADDRAddress Review and Verification Form
STVATYPAddress Type Code Validation Form
APAIDEN, FOAIDEN, PPAIDEN, SPAIDENIdentification Forms
Validation Form Used By
Banner General 8.5.1 April 2012User GuideValidation Forms

April 20
STVTERMTerm Code Validation Form
SLARDEFRoom Definition Form
GTVIMMUImmunization Code Validation Form
GOAIMMUImmunization Information Form
GTVIMSTImmunization Status Code Validation Form
GOAIMMUImmunization Information Form
Validation Form Used By
12 Banner General 8.5.1 2-15User Guide
Validation Forms

2-16
Banner General 8.5.1 April 2012User GuideValidation Forms
April 20
3 Processing
This chapter describes miscellaneous tasks you can perform with Banner General.
In addition, tasks related to the following General modules can be found in their respective chapters in this User Guide:
• Job Submission
• Population Selection
• Letter Generation
• General International Management
• System Functions/Administration
• Event Management
• Business Rule Builder
• Basic Person Maintenance
The following documentation contains additional information about using Banner General features:
• The Banner Getting Started Guide contains basic information about using the Banner® system, such as navigating, querying, and entering data in a form.
• The WebTailor User Guide includes detailed information on using the General Web Management module.
• The Voice Response Implementation Guide contains more detailed information on using the Voice Response module.
• The Banner Data Security Handbook has more detailed information on using the FGAC module.
• The Banner Common Matching Handbook includes information about setting up and using Common Matching.
• The Banner Security Administration Handbook includes information about managing Banner security and user accounts.
• The Banner General Technical Reference Manual includes information for database administrators and technicians maintaining the Banner system.
12 Banner General 8.5.1 3-1User GuideProcessing

3-2
Multi-Entity Processing Procedures
At institutions that use Multi-Entity Processing, all forms that are Multi-Entity Processing-enabled display two contexts in the title bar: the home context and the process context. In the following example, the home context appears first, and is enclosed in parentheses. The process context appears second, and has no parentheses.
Home Context
The home context is the Institution Code that is an Oracle Application Context; the value is your default VPDI code. Your options for choosing the home context vary according to how Institution Codes are set up for you on the Oracle/Banner VPD Security Maintenance Form (GSAVPDI):
• If there are multiple Institution Codes set up for your User ID on the User Assignment tab of GSAVPDI, then you will have multiple codes from which to choose the home context for your Banner session. If you exit GUQSETI without manually selecting a code, then the code designated as your default Institution Code on GSAVPDI will be used as the home context. Your default code always appears first in the GUQSETI list, and is highlighted.
• If there is only one Institution Code set up on the User Assignment tab, then that code will be used as your home context, and GUQSETI will not appear when you log in. The Institution Code assigned to you is your default Institution Code.
• If no codes are set up for you on the User Assignment tab, then the Banner system default Institution Code will be used as your home context.
Process Context
The process context is the Institution Code to which you switch during your Banner session. In some Multi-Entity Processing implementations, the process context can be changed to query different institutions. If your process context is different than your home context, you cannot save any changes to the database for the Institution Code of your process context.
NoteIf you need to switch to a different Institution Code and make changes to that institution’s data, you must restart your Banner session and select the new Institution Code during login. The new Institution Code is then your home context.
Banner General 8.5.1 April 2012User GuideProcessing

April 20
If you do not change codes during the session, then your process context will be the same as your home context.
NoteThe process context (and not the home context) is used by the Banner Document Management Suite (BDMS) interface. The process context is passed as a parameter in the URL handed from Banner to BDMS.
How to Switch Between Institution Codes
If your institution has determine to allow cross institution viewing of data on specific forms, you can switch institutions (process context) without leaving the form. This feature only works for data that has been designed to be queried by all institutions. The Institution Selector button is enabled only for forms that use data which is designed to be queried by all institutions.
1. Click the icon on the toolbar, or press the Ctrl-Shift-F10 keys simultaneously.
2. Enter an Institution Code. You can use the Search button to select a code from the Institution Code Validation (GTVVPDI) list, or, if you want to view further information about the available codes, click the View Existing Institutions Values link. If you select a row from the Existing Institution Values list, the values are brought back to the key block of the form. You can then view the data related to those particular values elsewhere on the form.
3. Click OK.
This Institution Code (the “process context”) now appears in the title bar after the code under which you logged in (the “home context”). Depending on the security policies established by the institution, you may have the ability to insert, update, or delete information using this selected institution code, or you may be limited to only viewing data with this selected institution.
How Changing Institution Codes Impacts your Banner Session
Banner processes always use the user’s home context, the institution chosen on the Set Institution Code Form (GUQSETI) during Banner login. Banner forms might use the new institution code (your process context) if the Multi-Entity Processing implementation allows the data on the form to be queried across institutions; processes will continue to use your home context.
When you change Institution Codes during a session, the Banner form might use the code that appears second in your title bar if the Multi-Entity Processing implementation allows for querying across institutions for the data the form uses. The code you chose on GUQSETI upon login appears first in the title bar.
12 Banner General 8.5.1 3-3User GuideProcessing

3-4
Example of title bar after you have switched Institution Codes:(CAMP1) : CAMP2
(CAMP1) is the Home Context you chose upon login. It is always used by Banner processes, regardless of whether you change Institution Codes.
CAMP2 is the Process Context, the code to which you changed. It might be user by Banner forms if the Multi-Entity Processing implementation allows for querying across institutions for the data behind the Banner forms.
Job Submission
Your jobs will run under the home institution that you set for the session at login, regardless of the default institution code that is set up for you on GSAVPDI.
For Jobs Submitted Through Job Submission (Not on Hold)
The institution code that Banner uses for processing in a particular session is always the one you chose on login to that Banner session. Prior to this enhancement, if you had several sessions open at once, Banner used the code from the most recently-opened session for jobs that you processed in any of your open sessions, regardless of the code originally chosen for that session. With this enhancement, the institution code used for processing jobs is specific to the session you are in, regardless of other sessions you may have open.
For Jobs Put on Hold for Future Processing
When you put a job on hold on the Job Submission Form (GJAPCTL), Banner saves the institution code that you chose for the session, along with the job sequence number, to a new table. Later, when you submit the job for processing, you must manually set the “one up” environment variable to the job sequence number, so that Banner can retrieve the stored institution code for the job.
The environment variable you must set is:
Platform Variable Example
UNIX ONE_UP export ONE_UP=123456(where 123456 is the jobseqno)
WIN NT SCTBAN_ONE_UP_NUMBER set SCTBAN_ONE_UP_NUMBER = 123456(where 123456 is the jobseqno)
VMS SEQ ONE_UP_NO :== 123456(where 123456 is the jobseqno)
Banner General 8.5.1 April 2012User GuideProcessing

April 20
Oracle Reports
Running Oracle Reports From the Form
Oracle Reports are run using the process context setting in the preceding example), as long as the form from which the report is being called is listed on GORVPDI.
NoteIf the form that calls the Oracle Report is not listed on GORVPDI, then the report can only be run under the user's home context.
Running Oracle Reports From Job Submission
If you have Oracle Reports that can only be run via GJAPCTL, or if the Oracle Report is initiated through GJAPCTL, then the home context is used.
If users need to use the process context for Oracle Reports that are initiated through GJAPCTL, then you may consider adding GJAPCTL to GORVPDI. However, this causes the process context to appear in the title bar of GJAPCTL, which then allows the user to change Institution Codes. A user who is executing a C process or other Banner report might assume that the process or report is being executed under the process context institution, which is not the case. The change in the Institution Code is effective only for Oracle Reports.
How Institution Role Maintenance Process (GURIROL) Works
The Institution Role Maintenance Process (GURIROL) manages processing with scope roles for Luminis in a multi-entity processing implementation using VPD.
Following is the example from gurirol.pc 7.4 version:FUNCTION f_get_context_tab (context_in VARCHAR2) RETURN gt_context_tab_type
IS
TYPE gt_context_ex_tab_type IS TABLE OF VARCHAR2(15);
context_tab gt_context_tab_type := gt_context_tab_type ();
context_tab_tmp gt_context_tab_type := gt_context_tab_type ();
lv_cursor SYS_REFCURSOR;
context_exclusion_tab gt_context_ex_tab_type;
exclude VARCHAR2(1) := 'N';
CURSOR gtvsdax_c
IS
SELECT gtvsdax_external_code
FROM gtvsdax
WHERE gtvsdax_internal_code = 'LDIINSTEX'
12 Banner General 8.5.1 3-5User GuideProcessing

3-6
AND gtvsdax_internal_code_group = 'INTCOMP';
BEGIN
IF context_in = 'NOCONTEXT'
THEN
context_tab.EXTEND;
context_tab (1).code := 'NOCONTEXT';
context_tab (1).description := 'No context';
ELSIF context_in = 'GETMIF'
THEN
IF g$_vpdi_security.g$_is_mif_enabled
THEN
-- Set multiuse_context to OVERRIDEALL
gokvpda.p_set_vpdi_m_context_o_all;
-- Get full set of GTVVPDI codes
g$_vpdi_security.g$_vpdi_get_mif_codes (lv_cursor);
-- Assign ref cursor to local variable
FETCH lv_cursor BULK COLLECT INTO context_tab_tmp;
-- Set multiuse_context to RESTRICT
gokvpda.p_set_vpdi_off_process_context;
-- Get context codes to exclude in return variable
OPEN gtvsdax_c;
FETCH gtvsdax_c BULK COLLECT INTO context_exclusion_tab;
CLOSE gtvsdax_c;
-- If context code is in exclusion list, set exclude flag to Y.
FOR idx IN 1 .. NVL (context_tab_tmp.LAST, 0)
LOOP
FOR idx1 IN 1 .. NVL (context_exclusion_tab.LAST, 0)
LOOP
IF context_exclusion_tab(idx1) = context_tab_tmp(idx).code
THEN
exclude := 'Y';
END IF;
END LOOP;
-- If exclude flag is not Y, then copy context code to return variable.
IF exclude = 'N'
THEN
context_tab.EXTEND;
context_tab (context_tab.LAST).code := context_tab_tmp (idx).code;
context_tab (context_tab.LAST).description := context_tab_tmp (idx).description;
Banner General 8.5.1 April 2012User GuideProcessing

April 20
END IF;
-- Reset exclude flag
exclude := 'N';
END LOOP;
END IF;
ELSE
context_tab.EXTEND;
context_tab (1).code := context_in;
context_tab (1).description := context_in;
END IF;
RETURN context_tab;
END f_get_context_tab;
BEGIN
IF g$_vpdi_security.g$_is_mif_enabled
THEN
lv_context_tab := f_get_context_tab ('GETMIF');
ELSE
lv_context_tab := f_get_context_tab ('NOCONTEXT');
END IF;
p_get_inst_codes (lv_context_tab, :inst_codes);
END;
END-EXEC;
POSTORA;
Setting Up Medical Information
The General Medical Information Form (GOAMEDI) allows you to view and update the medical conditions of people at your institution, including students, faculty, and staff. The following steps are necessary to set up medical information:
1. Go to Disability Type Validation Form (STVDISA).
1.1. Create Disability Codes.
1.2. Save the form.
2. Go to the Medical Disability Rule Form (GORMEDR).
2.1. In Disability Type Information Block, search for the Disability Code that will be the default code on the General Medical Information Form (GOAMEDI).
2.2. Check Default for the code that will be the default code on the General Medical Information Form (GOAMEDI).
12 Banner General 8.5.1 3-7User GuideProcessing

3-8
2.3. Save the form.
3. Go to General Medical Information Form (GOAMEDI).
3.1. In the Key Block, search for the name of the person for which you are defining medical information.
3.2. In the Medical Information Block, enter a Medical Code, a Medical Date, and a Disability Type, and a Comment at a minimum.
3.3. Save the form.
Banner General 8.5.1 April 2012User GuideProcessing

April 20
4 Job Submission
Overview
The Job Submission module facilitates the submission of reports and processes throughout Banner®. Some of the functions you can perform in the Job Submission module are:
Job Submission
• Submit a Banner report or process for processing.
• Define the characteristics of each Banner report or process that can be run at your institution.
• Define the parameters that control the processing of a report or process.
• Define user-level defaults for the parameters that control the processing of a report or process.
• Display output from a report or process that was run through Job Submission and saved to the database.
Validation Forms
Job Submission forms use the following validation forms. Further information on these forms can be found in Online Help. See “Online Help: Banner Form and Field Reference” on page 1-5.
Validation Form Used By
GTVPRNTPrinter Validation Form
GJAJOBSProcess Maintenance Form
GJAPCTLProcess Submission Control Form
GTVSYSISystem Indicator Validation Form
GJAJOBSProcess Maintenance Form
12 Banner General 8.5.1 4-1User Guide
Job Submission

4-2
Related Report
The List of Reports and Parameters (GJRRPTS) shows reports and processes with their associated parameters. You can print the report for a single process, or you can use wildcards to print the report for all processes that begin with a specified string of characters. For additional information and a report sample, refer to Chapter 13, Reports and Processes.
Menu Navigation Table
Forms in the Job Submission module can be accessed from the following menu.
GJAPCTL Process Submission Control Form
Lets you submit a Banner report or process for processing. You can run the process or report immediately or hold it for later processing. You can save the parameter values as user-level defaults.
GJAJOBS Process Maintenance Form
Defines the characteristics of each Banner report and process that can be run at your institution.
GJAPDEF Parameter Definition Form
Identifies the parameters that control the processing of a report or process. Establishes validation characteristics for the parameters. Defines system-level defaults for the parameters.
GJAPVAL Parameter Value Validation Form
Defines valid values for the parameters that control the processing of a report or process.
GJAPDFT Default Parameter Value Validation Form
Defines user-level defaults for the parameters that control the processing of a report or process.
Banner General 8.5.1 April 2012User GuideJob Submission

April 20
Job Submission also uses the Alternate Logon Verification Form (GUAUIPW), which is not called from the menu. This form lets you enter an alternate user ID and password, changing the user ID that runs the job.
NoteYou cannot enter an OPS$ account in the Alternate User ID field on GUAUIPW.
GJRJPRM Job Parameter Set Rule Form
Defines the names of the job parameter sets used at your institution.
The actual defaults in a set are defined on the Process Submission Control Form (GJAPCTL) or the Default Parameter Value Validation Form (GJAPDFT).
GJARSLT Process Results Form
Displays a list of reports and processes that were run through Job Submission. Failure messages identify problems in batch processing and COBOL processes that were run online.
GTVPRNT Printer Validation Form
Defines the codes that identify the printers at your institution.
GJIREVO Saved Output Review Form
Displays output from a report or process that was run on the Process Submission Control Form (GJAPCTL) and saved to the database.
GJAJPRF Job Submission Profile Maintenance Form
Defines the directory used to save output from Pro*C jobs run with the Process Submission Control Form (GJAPCTL).
GJASWPT Sleep Wake Maintenance Form
Allows you to monitor and control sleep/wake processing that has been set up for specific Banner processes in the Student System and the Accounts Receivable System.
12 Banner General 8.5.1 4-3User Guide
Job Submission

4-4
Job Submission Procedures
Submitting reports and other data processing jobs is a common activity for all Banner systems. With the Job Submission module you can:
• Define new reports and processes to Job Submission
• Define default parameter settings
• Run Banner reports and processes
Defining New Reports and Processes to Job Submission
1. Use the Process Maintenance Form (GJAJOBS) to define the characteristics of the report or process.
NoteIf the code for the process is not written in RPT or Pro C, you may need to modify the gjajobs procedure (gjajobs.shl or gjajobs.com) to submit jobs from the Process Submission Control Form (GJAPCTL).
2. Use the Parameter Definitions Form (GJAPDEF) to define the characteristics and validation requirements of the parameters for the report or process. Optionally, you can establish system-level defaults.
3. For parameters that cannot be validated by an existing validation or list form on Banner, but have a defined set of values, use the Parameter Value Validation Form (GJAPVAL) to set up valid values. An example of this type of parameter is a Y/N option or a R (report)/U (update) option.
4. Use the Default Parameter Value Validation Form (GJAPDFT) to define any user-level defaults. Each user must individually identify defaults on this form. Defaults are saved under the user ID that logged on to Banner.
Setting up Parameter Defaults for Banner Reports and Processes
Using default parameters reduces the number of parameter values you must enter each time you run a report or process. You can define both system-level and user-level defaults.
System-level defaults apply to all users at your institution. They have lower priority and are used only when a parameter does not have a user-level default. System-level defaults are defined on the Parameter Definition Form (GJAPDEF). A report or process can have only one set of system-level defaults.
Banner General 8.5.1 April 2012User GuideJob Submission

April 20
Individual users can have one or more sets of user-level defaults for a report or process. This is useful if a user wants to run a report or process with distinct, but frequently used parameter combinations. For example, a user can have three sets of defaults for running the Person Directory (SPRPDIR): one set for recruits, another for students, and another for faculty. Each set of defaults is called a job parameter set and has its own name. If a user has more than one set of defaults for a report or process, the name of the job parameter set must be entered when the report or process is submitted on the Process Submission Control Form (GJAPCTL).
Parameter defaults must pass several validation checks when you create them:
• If specific parameter values are defined on the Parameter Value Validation Form (GJAPVAL), the default must equal one of these values.
• If a validation form is linked to the parameter on the Parameter Definition Form (GJAPDEF), the default must equal a value on the validation form.
• If a validation routine is linked to the parameter on GJAPDEF, the default must pass the special validation checking.
• The default must meet all validation criteria defined on GJAPDEF. These criteria include the data type, length, and range of values.
• If a validation routine is linked to the report or process on the Process Maintenance Form (GJAJOBS), the default must pass consistency checks applied to a group of parameters.
Setting Up System-Level Defaults
1. Access the Parameter Definition Form (GJAPDEF).
2. Enter the name of the report or process in the Process Name field. You can select the down arrow icon to access the Process Maintenance Form (GJAJOBS) to search for a report or process.
3. Go to the next block.
4. Select the parameter for which you are entering a system-level default.
5. Enter the default value in the Default field. If validation requirements have been established for the parameter, select the down arrow icon to display a list of valid parameter values.
6. Save your changes.
Setting Up Valid Characters for the Special Print Field
You can establish which characters are permitted in commands entered in GJAPCTL’s Special Print field. You can set up either a list of invalid characters that will not be
12 Banner General 8.5.1 4-5User Guide
Job Submission

4-6
permitted in the special print field, or a list of valid characters, with all other characters being prohibited.
This rule is set up once and affects all users in the institution The setup must be done by a security administrator in the Banner Security Maintenance form (GSASECR). See the Banner Security Administration Handbook for details.
Setting Up User-Level Defaults
There are two ways to set up user-level parameter defaults:
• You can create a single set of user-level defaults for a report or process on the Default Parameter Value Validation Form (GJAPDFT). The defaults are associated with the user ID.
• You can create one or multiple sets of defaults by using the Process Submission Control Form (GJAPCTL). If you have multiple sets, each job parameter set must have its own name. The defaults in each set are associated with the user ID and the job parameter set.
Using GJAPDFT
This form lets you create a single set of user-level parameter defaults for a report or process.
1. Log on to Banner with the user ID that will be linked to the defaults.
2. Access the Default Parameter Value Validation Form (GJAPDFT).
3. Enter the report or process name in the Process field. Select the down arrow icon to access the Process Maintenance Form (GJAJOBS) to search for a report or process.
4. Make sure the Parameter Set field is blank.
5. Go to the next block.
6. Select the parameter for which you are entering a user-level default.
NoteA message at the bottom of the form describes the selected parameter.
7. Go to the next block.
8. Enter the valid parameter value in the User Default field. If validation requirements have been established for the parameter, select the down arrow icon to display a list of valid parameter values.
9. Save your changes.
Banner General 8.5.1 April 2012User GuideJob Submission

April 20
Using GJAPCTL
This form lets you run a report or process and save the parameters as user-level defaults. If you want to save more than one set of parameters for the report or process, you can save the current set with a unique name. The defaults in each set are associated with the user ID and the job parameter set.
1. Log on to Banner with the user ID that will be linked to the defaults.
2. Access the Process Submission Control Form (GJAPCTL).
3. Enter the name of the report or process in the Process field. You can select the down arrow icon to access the Process Maintenance Form (GJAJOBS) to search for a report or process.
4. Make sure the Parameter Set field is blank.
5. Go to the Printer Control block.
6. (Optional) Enter any print parameters. (Print parameters are not saved as user-level defaults.)
7. Go to the Parameter Values block.
8. Enter the default value for each parameter in the Values fields.
Select the down arrow icon on the Parameters field to display the Parameter Definition Form (GJAPDEF) with details for the selected parameter.
If validation requirements have been established for the parameter, you can select the down arrow icon on the Values field to display a list of valid parameter values.
NoteA message at the bottom of the block describes the selected parameter.
9. Go to the Submission block.
10. Select the Save Parameters check box.
11. If you want only one set of parameter defaults for the report or process, make sure the As field is blank.
OR
If you want multiple sets of parameter defaults for the report or process, enter the name and description of a new job parameter set in the As field.
12 Banner General 8.5.1 4-7User Guide
Job Submission

4-8
12. Select the Hold radio button or the Submit radio button.
13. Save your changes.
NoteIf you enter a job parameter set name and description in step 11, the job parameter set is automatically added to the Job Parameter Set Rule Form (GJRJPRM).
Changing User-Level Defaults
You can change user-level parameter defaults on two different forms:
• Default Parameter Value Validation Form (GJAPDFT)
• Process Submission Control Form (GJAPCTL)
Using GJAPDFT
1. Log on to Banner with the user ID that is linked to the defaults that need to be changed.
2. Access the Default Parameter Value Validation Form (GJAPDFT).
3. Enter the report or process name in the Process field. You can select the down arrow icon to access the Process Maintenance Form (GJAJOBS) to search for a report or process.
4. If you are changing defaults for a job parameter set, enter the name of the set in the Parameter Set field. You can select the down arrow icon to access the Job Parameter Set Rule Form (GJRJPRM) to search for a job parameter set.
5. Go to the next block.
6. Select the parameter for which you are changing a user-level default.
NoteA message at the bottom of the form describes the selected parameter.
7. Go to the next block.
8. To change the default, enter the new default in the User Default field. If validation requirements have been established for the parameter, you can select the down arrow icon to display a list of valid parameter values.
OR
To delete the default, select the Remove Record function.
OR
Banner General 8.5.1 April 2012User GuideJob Submission

April 20
To clear all user-level defaults associated with the job parameter set for the report or process, select the Clear Block function.
9. Save your changes. The new defaults appear on the Process Submission Control Form (GJAPCTL) the next time the report or process is run.
Using GJAPCTL
1. Log on to Banner with the user ID that is linked to the defaults that need to be changed.
2. Access the Process Submission Control Form (GJAPCTL).
3. Enter the name of the report or process in the Process field. You can select the down arrow icon to access the Process Maintenance Form (GJAJOBS) to search for a report or process.
4. If you are changing defaults for a job parameter set, enter the name of the set in the Parameter Set field. You can select the down arrow icon to access the Job Parameter Set Rule Form (GJRJPRM) to search for a job parameter set.
5. Go to the Printer Control block.
6. (Optional) Enter any print parameters. (Print parameters are not saved as user-level defaults.)
7. Go to the Parameter Values block.
8. Enter any changes to the parameter values in the Values fields.
Select the down arrow icon on the Parameters field to display the Parameter Definition Form (GJAPDEF) with details for the selected parameter.
If validation requirements have been established for the parameter, you can select the down arrow icon on the Values field to display a list of valid parameter values.
NoteA message at the bottom of the block describes the selected parameter.
9. Go to the Submission block.
12 Banner General 8.5.1 4-9User Guide
Job Submission
4-10
10. Select the Save Parameters check box.
NoteIf you entered a job parameter set name in step 4, the name and description automatically appear in the As fields.
WarningIf you delete the job parameter set in this block, defaults associated with the user ID will be updated, not the defaults associated with the job parameter set.
11. Select the Hold radio button or the Submit radio button.
12. Save your changes.
Copying User-Level Defaults to Another User
1. Log on to Banner with the user ID that is linked to the defaults that are being copied.
2. Access the Default Parameter Value Validation Form (GJAPDFT).
3. Enter the name of the report or process in the Process field. Select the down arrow icon to access the Process Maintenance Form (GJAJOBS) to search for a report or process.
4. If you are copying defaults for a job parameter set, enter the name of the set in the Parameter Set field. You can select the down arrow icon to access the Job Parameter Set Rule Form (GJRJPRM) to search for a job parameter set.
5. Go to the next block.
6. Select Copy Defaults to New User from the Options menu. The Copy Defaults to New User window appears.
7. Enter the user ID to whom the defaults are to be copied in the New User field. You can select the down arrow icon to list user IDs.
8. Save your changes.
Banner General 8.5.1 April 2012User GuideJob Submission

April 20
Creating a Job Parameter Set
A single user can have multiple sets of user-level parameter defaults for a report or process. Each set of defaults is called a job parameter set and has its own name. There are two ways to create a job parameter set:
• You can use the Job Parameter Set Rule Form (GJRJPRM) to define the name of the job parameter set. The actual defaults for a specific user are defined at a later time on the Process Submission Control Form (GJAPCTL). Different users can use the same job parameter set name but have different defaults in the set.
• You can define the name of the job parameter set and save the associated parameter values as user-level defaults all at once on the Process Submission Control Form (GJAPCTL). The job parameter set is automatically added to GJRJPRM.
In either case, once defaults are saved on GJAPCTL, the job parameter set cannot be deleted from GJRJPRM.
Using GJRJPRM
1. Access the Job Parameter Set Rule Form (GJRJPRM).
2. Enter the report or process name in a blank Process field. Select the down arrow icon to access the Process Maintenance Form (GJAJOBS) to search for a report or process.
3. Enter the name of the job parameter set in the Parameter Set field.
4. Enter a description of the job parameter set in the Description field.
5. Save your changes.
These steps establish the name of the job parameter set. The actual defaults in the set are defined on the Process Submission Control Form (GJAPCTL). See the steps on 4-7 for details.
Different users can define different defaults with the same job parameter set name. For example, users JKELLY and KMEYER might both use job parameter set YEAREND. JKELLY’s default for parameter 1 might be Y (yes), while KMEYER’s default for the same parameter might be N (no).
Using GJAPCTL
You can define the name of the job parameter set and save the associated parameter values as user-level defaults all at once on the Process Submission Control Form (GJAPCTL). The job parameter set is automatically added to the Job Parameter Set Rule Form (GJRJPRM). See the steps on 4-7 for details.
12 Banner General 8.5.1 4-11User Guide
Job Submission

4-12
Using Oracle*Reports
Oracle Reports are special product-specific reports that are delivered with Banner Student, Accounts Receivable, and Finance. Additionally, your site may have its own custom Oracle Reports.
For information about running a specific Oracle Report, refer to the appropriate Banner Student, Accounts Receivable, or Finance user guide. For technical information about Oracle Reports, refer to the Banner General Technical Reference Manual.
You can specify the following for your Oracle Reports:
• Format of the report (PDF, HTML, RTF, XML, and so on.)
• Destination type of the report (CACHE, FILE, MAIL, or PRINTER)
• Where you want the report to be sent (either a file location or, if the destination type is MAIL, an e-mail address)
• Execution mode (BATCH or RUNTIME)
• Whether the report should be run synchronously or asynchronously
• Whether you will run the report from GJAPCTL alone or from a form
• Whether the Oracle Reports parameter form should appear, displaying the existing parameters and allowing you to change them
These options are specified in the following parameters:
• 71 - Destination Format
• 72 - Destination Type
• 73 - Destination Name
• 74 - Execution Mode
• 75 - Communication Mode
• 76 - Parameter Form
• 77 - Display Report Value Window
Banner General 8.5.1 April 2012User GuideJob Submission

April 20
Setting Up Default Values for Parameters 71-77
Job Submission parameters 71 -77 define how the report will be run (for example, its format, destination, whether it will be run in synchronous or asynchronous mode, and so on.). You can set up the default values for each report on the Parameter Definitions Form (GJAPDEF) and the Parameter Value Validations Form (GJAPVAL).
NoteYou have the option of using GJAPCTL to run custom Oracle Reports without any rows defined on the Parameter Definitions Form (GJAPDEF). The system automatically adds parameters 71 through 76.
1. Access the Parameter Definitions Form (GJAPDEF).
2. Enter a value for 71 - Destination Format.
This parameter defines the report’s default format. Valid values include DELIMITED, HTML, PDF, and RTF. The default value is PDF.
NotePOSTSCRIPT and PRINTER DEFINITION are not available at this time. If you choose either of these values, you will receive the error Destination format of printer definition is not currently supported.
3. Enter a value for 72 - Destination Type.
This parameter specifies the report’s default destination type. Valid values are:
• CACHE - display the report on the screen (the default)
• FILE - save the report to a file
• MAIL - send the report to an e-mail address
• PRINTER - send the report to a printer
NoteIf you choose a Destination Type of FILE, MAIL, or PRINTER, then the Execution Mode parameter must be ASYNC.
WarningBecause your institution’s reports could contain sensitive information, make sure that you send report data to a place where only the appropriate users have access to it.
4. Enter a value for 73 - Destination Name.
12 Banner General 8.5.1 4-13User Guide
Job Submission
4-14
This parameter defines the default location where you want the report to be sent. You can enter up to 30 characters.
• If the Destination Type is FILE, this must be the name and location of a file to which the data should be written.
• If the Destination Type is MAIL, this must be a valid e-mail address. If you are sending the data to more than one address, each address must be separated by a comma (no spaces are permitted).
• If the Destination Type is PRINTER, this must be a valid printer name. If you leave this blank, the output will go to the report server’s default printer (if you have defined one).
5. Enter a value for 74 - Execution Mode.
This parameter specifies either BATCH or RUNTIME as the execution mode. RUNTIME is the default value.
6. Enter a value for 75 - Communication Mode.
• If the Communication Mode is ASYNC (asynchronous), the person who submitted the report can continue working in Banner while the report runs.
• If the Communication Mode is SYNC (synchronous), control only returns to the calling form after the report has finished processing.
The default value is SYNC.
When you submit a report asynchronously, you will receive a message in a pop-up window with the report job ID.
NoteIf you have the Communication Mode parameter set to ASYNC (Asynchronous), you cannot set the Parameter Form Designation to Yes.
7. (Optional) Enter a value for 76 - Parameter Form Designation.
This parameter controls the display of the Oracle Reports parameter form.
• If YES, the form is displayed.
• If NO, the form is not displayed.
If you want to run a report with the Parameter Form Designation parameter set to YES, then the Destination Type parameter must be CACHE.
NoteYou will receive an error if you run any Oracle Report with the parameters form set to display (parameter 76 = YES) in conjunction with a wildcard value for any of the other parameters.
Banner General 8.5.1 April 2012User GuideJob Submission

April 20
8. Enter a value for 77 - Show Report Value Window.
This parameter specifies whether the Oracle Report Value Window appears when a user runs a report from a form other than GJAPCTL. It enables you to review and, if necessary, change various processing parameters for your job.
• If YES, the window appears and the user can change the values before submitting the report.
• If NO, the window does not appear and the report is run with the default values.
NoteThe Report Value Window is not displayed for reports run from GJAPCTL because the information it contains is displayed in the Parameter Values block on GJAPCTL. It is available for forms like the Standard Billing 270 Form (FRR270B), where you can enter data into the form, then run the report via the Options menu.
9. Save your changes.
NoteYou will receive an error if you try to resubmit a report after returning to the parameter form to correct an error.
NoteFor example, if you entered a detail category code value of BLL instead of BIL, you would receive no data. You would then return to the parameter form, correct your mistake, and re-execute the report, at which point you would receive the error.
Accessing the Oracle Reports URL (Report Server Showjobs)
Only users with the Reports Administrator role can access Oracle Report output via a URL or any of the Report Server commands.
Running Banner Reports and Processes
There are two ways to run Banner reports and processes:
• Using Job Submission
• Using the operating system prompt
Whatever method you use, your Job Submission procedures may vary from the ones described in this section, usually because of differences in operating systems, different versions, or site-specific system modifications. Modify the following procedures to your
12 Banner General 8.5.1 4-15User Guide
Job Submission

4-16
site-specific standards as necessary. See the Banner General Technical Reference Manual for more information.
NoteInteractively entering job parameters from the host is no longer supported. Parameters for all jobs must be entered on the Process Submission Controls Form (GJAPCTL).
Using Job Submission
Job Submission uses the Process Submission Control Form (GJAPCTL) to run reports and processes. You can optionally use the Saved Output Review Form (GJIREVO) to view, save, and print these reports and processes without exiting to the operating system.
Running Reports and Processes
You must have proper authorization before you can run a report or process. User authorization is established on the Oracle/Banner Security Maintenance Form (GSASECR) by authorized staff according to the policies and procedures defined at your institution.
1. Access the Process Submission Control Form (GJAPCTL).
2. Enter the name of the report or process in the Process field. You can select the down arrow icon to access the Process Maintenance Form (GJAJOBS) to search for a report or process.
3. If the report or process has more than one job parameter set, enter the name of the set in the Parameter Set field. You can select the down arrow icon to access the Job Parameter Set Rule Form (GJRJPRM) to search for a job parameter set.
4. Go to the Printer Control block.
5. (Optional) Enter any print parameters. Defaults come from the Process Maintenance Form (GJAJOBS), but they can be changed.
NoteIf you want to view, save, or print online, enter DATABASE in the Printer field.
6. Go to the Parameter Values block. Parameters defined for the report or process appear. These parameters are defined on the Parameter Definition Form (GJAPDEF). Default parameter values appear, if they have been defined. These defaults can be system-level or user-level.
Banner General 8.5.1 April 2012User GuideJob Submission
April 20
7. Enter any changes to the parameter values in the Values fields. Here are some tips:
• A message at the bottom of the block describes the currently selected parameter.
• You can select the down arrow icon on the Parameters field to display the Parameter Definition Form (GJAPDEF) with details for the selected parameter.
• If validation requirements have been established for the parameter, you can select the down arrow icon on the Values field to display a list of parameter values.
• Some parameters can have more than one value. This is indicated in the message at the bottom of the block as M/S: Multiple. To enter multiple values, place the cursor on the parameter. Select Insert Record. Select Duplicate Record to copy the previous value. Place the cursor on the copied value and change it to the appropriate value. Do not enter multiple values on the same line.
8. Go to the Submission block.
9. (Optional) To save the set of parameter values as user-level defaults, select the Save Parameters check box. If you have only one set of user-level defaults for the report or process, leave the As field blank. If you have more than one set of user-level defaults, enter the job parameter set name and description in the As field.
NoteIf you entered a job parameter set name in step 3, the name and description automatically appear in the As fields.
10. To hold the report or process and run it from the operating system, select the Hold radio button. Take note of the sequence number that appears in the auto hint. Refer to the procedure on 4-20 to run the report or process from the operating system.
OR
To run the report or process immediately, select the Submit radio button.
11. Save your changes.
WarningWhen a report or process is saved on GJAPCTL, the associated parameters are stored in the GJBPRUN Table with an assigned parameter sequence number. If a process on hold is never run or if a process runs and fails, the parameter entries remain in the GJBPRUN Table. Over time the table can grow in size tremendously. This is a potential problem depending on the procedures at your installation. The space allocation for GJBPRUN should be monitored closely. Parameters left in the table can be removed through SQL*Plus.
12 Banner General 8.5.1 4-17User Guide
Job Submission

4-18
Viewing, Saving, and Printing Online Output
Job Submission provides online access to output for viewing, saving, and printing via the Saved Output Review Form (GJIREVO).
NoteIn a Macintosh environment you cannot print directly from GJIREVO. You must first save the output to a desktop file and print from there.
The Job Submission Profile Maintenance Form (GJAJPRF) contains user-level parameters that are used with GJIREVO. The GURJOBS_DIRECTORY parameter identifies the directory used to save your output from Pro*C jobs that are run with the Process Submission Control Form (GJAPCTL).
To set up Banner to support this feature, you must perform the following steps:
1. Create an Oracle Application Server Listener and PL/SQL cartridge, or use an existing one. An example URL might be:
http://yourserver.com:portnumber/plsql/
2. In Banner, go to the General User Preferences Maintenance Form (GUAUPRF). Select the Directory Options tab.
3. Scroll down until you find the Description that contains Enter the name of your Web Output URL.
The Default Value field contains http://yourserver.com/directory.
4. Enter your directory name in User Value.
5. Enter the URL you created in User Value and save your changes. For example:
http://machine123.college.edu:8888/plsql/
NoteIf you want to change this value for all users, you must log onto Banner as the BASELINE user, and then make the changes on GUAUPRF.
6. Login to Banner and go to GJIREVO. The output of the job appears in a separate browser window. You can save the output to a file or send it to a printer by selecting the appropriate item from the Options menu.
Banner General 8.5.1 April 2012User GuideJob Submission

April 20
Use these steps to view, save, and print online output:
1. Make sure that the default printer used to print online output is set up on the Printer Validation Form (GTVPRNT).
2. Use the Process Submission Control Form (GJAPCTL) to run the report or process as usual. Enter DATABASE in the Printer field.
NoteIf you are running multiple jobs with the same name, the system should not overwrite existing output because Job Submission uses the job’s “one up number” as part of the file name. If you are running jobs that don’t use the “one up number” as part of the file name, you may overwrite an existing file.
3. Access the Saved Output Review Form (GJIREVO).
4. Enter the report or process name that created the output in the Process Name field.
5. Enter the sequence number that identifies the specific report or process in the Number field.
6. Enter the name of the output file in the File Name field.
7. Review the job’s output.
8. Select one of these options to save your output
• To save your output to your local directory and print a copy:
• Windows PC: Select Save and Print File from the Options menu. A series of dialog boxes asks you to choose a printer and optionally set up a default printer.
• Macintosh computer: Select Save to File from the Options menu. Then print from your desktop.
• Web browser: The output of the job appears in a separate browser window. You can save the output to a file or send it to a printer by selecting the appropriate item from the Options menu.
• To save your output to your local directory without printing, select Save to File from the Options menu.
• To remove the selected file from the database, select Delete Output from the Options menu.
NoteA file is not automatically deleted from the local directory when you save or print the file. You must maintain this directory.
12 Banner General 8.5.1 4-19User Guide
Job Submission
4-20
Using the Operating System Prompt
You can submit a report or process from the operating system. You need directions from your technical support staff regarding directory names, specific commands, and syntax for your operating system. There may be timing restrictions at your installation to prevent long processes from being executed during peak operating hours.
Use the following command format to submit a Banner baseline report or process from the host command:
For example, the command to run GJRRPTS is
If you don't specify the username and password on the command line, the system prompts you for them.
Depending on where the executable C program is located at your institution, you may need to enter the directory name before entering the job name. Check with your data center personnel for details. All output is directed to the current directory.
To create an automatic page break for each page (rather than a series of line feeds), enter -f following the job name. For example,
NoteInteractively entering job parameters from the host is no longer supported. Parameters for all jobs must be entered on the Process Submission Controls Form (GJAPCTL).
The system requests two additional parameters:
• Run Sequence Number. This is a system-generated number that uniquely identifies the parameter values for executing the job. It is generated when you select the Hold field on the Process Submission Control Form (GJAPCTL). If you can leave the parameter blank, the report or process prompts you for all other parameters required for processing. If you enter the run sequence number, the report or process does not prompt for any other parameters. It obtains the parameter values from the parameter table, using the run sequence number as the key to the table. All reports and processes request this parameter, even those normally set up on sleep/wake routines. Entries in the GJBPRUN Table for the run sequence number are deleted once the process is successfully completed.
UNIX: jobname username/password
OpenVMS: runproc jobname username/password
UNIX: gjrrpts genlusr/u_pick_it
OpenVMS: runproc gjrrpts genlusr/u_pick_it
UNIX: gjrrpts -f genlusr/u_pick_it
OpenVMS: runproc gjrrpts -f genlusr/u_pick_it
Banner General 8.5.1 April 2012User GuideJob Submission

April 20
• Number of Lines Per Printed Page. This parameter controls page breaking. The default, which is set on the Process Maintenance Form (GJAJOBS), is 55 lines per page. You can override the default on GJAPCTL before the job is run.
WarningThe default 55 lines per page cannot be overridden with a value greater than 66 because of an existing rpf restriction that is being enforced to emulate rpf functionality in Pro*C programs converted via SCTCCONV.
You may wish to view the contents of your report online before you print it to verify that you will get the desired output. Check with your technical staff for instructions.
Banner also allows specific reports to be written to a collector file for user-specified time interval processing and print capabilities. These processes use the “sleep/wake” routines which are unique to each process.
Job Submission Messages
If you make a mistake when you submit a job using the Process Submission Control Form (GJAPCTL), Banner provides a diagnostic message to alert you to the problem and gives you directions to remedy the situation. Here are some of the common diagnostic messages you may see, with their corrective actions.
Can't read form by that name
The system cannot validate a parameter you entered on the Process Submission Control Form (GJAPCTL) because it can't find the appropriate validation form for this application. GJAPCTL validates parameters on the system-specific validation form (*OQPVAL), where * is the first character of the application's job name:
If this is the first time you are trying to run this job, the required validation form may not be in the process's path. Make sure that the correctly defined *OQPVAL form exists in the base system. If you are not sure how to do this, talk with your data center personnel.
If you have created this job with a first letter different from the ones delivered with your base system, you must also create an appropriately named validation form to
AOQPVAL AlumniFOQPVAL FinanceGOQPVAL GeneralNOQPVAL Position ControlPOQPVAL PayrollROQPVAL Financial AidSOQPVAL StudentTOQPVAL Accounts Receivable
12 Banner General 8.5.1 4-21User Guide
Job Submission

4-22
provide the appropriate parameter validation checks for your process. Remember that SunGard® Higher Education recommends you use letters X, Y, or Z for your own customized jobs. Talk with your data center personnel about your requirements.
Can't read form by that name
This message usually occurs when trying to submit a locally created job that begins with W, Y, or Z. For baseline Banner jobs, parameter and process level validation are performed by a product specific database package xOKPVAL, where x is the product’s System Indicator code. For example, General’s package is named GOKPVAL. In the event that the database package is not accessible, an attempt is made to call the product specific validation form xOQPVAL, where, once again, x is the product’s System Indicator code.
The reason for the error message is that neither the package nor the form could be found and validation was specified for the parameter or job.
If you are submitting a baseline job, speak with your data center personnel and tell them you suspect a problem with the XOKPVAL package. If you are submitting a local job, one beginning with the letter W, Y, or Z, verify that a corresponding xOKPVAL database package has been created, or that a xOQPVAL form has been created. One or the other must exist before the validation can occur. Talk with your data center personnel about your requirements.
Run sequence number is invalid. Aborting job.
If you submitted this job using the Process Parameter Control Form (GJAPCTL), the system cannot find the parameter values and associated run sequence numbers that are stored for each job in the GENERAL.GJBPRUN Table. If the job is a newly-created one, it's possible that the variable that defines the name of the process is not correct. Often a new process is cloned from an existing one, and some instances of the old process name are not changed.
If you submitted this job interactively from the host command, the run sequence number you entered can't be found with the parameter values that are stored for each job in the GJAPCTL. You probably did not enter the correct run sequence number.
If this is a first-time use of a new job, look for all occurrences of the name of the process that was copied and change them to the new name. You may need help from your data processing personnel. Resubmit the job.
If you're running this job from the host command, you probably did not enter the correct run sequence number. Enter the parameter values on GJAPCTL again and “hold” the values. When you have finished, note the sequence number that appears in the auto hint -- this is the number that should be used as the run sequence number when you rerun the job from the host.
Banner General 8.5.1 April 2012User GuideJob Submission
April 20
Run sequence number is invalid. Aborting job.
No entries were found in the Process Run Parameter Table (GJBPRUN) for the run sequence number specified. If you submitted this job interactively, the run sequence number you entered can't be found in the GENERAL.GJBPRUN Table. You probably did not enter the correct run sequence number.
Check the source of the program to verify that all selects against the GJBPRUN table refer to the correct job name. If the job is new and was cloned from an existing one, check that the selects against the GJBPRUN table were changed to refer to the new program name, not the cloned one. You may need help from your data processing personnel. Resubmit the job. If you're running this job from the operating system prompt, you probably did not enter the correct run sequence number. Enter the parameter values on GJAPCTL again and select “hold”, then select Commit. When you have finished, note the sequence number that appears in the autohelp -- this is the number which should be used as the Run Sequence Number when you rerun the job from the operating system prompt.
*ERROR* Problem communicating with job submission program. Seek Help.
Either the background process that processes Job Submission requests is not running, or the volume of job requests is excessive.
Contact your technical staff to determine whether you should start the background process (gurjobs) if it not running. If it is running, technical staff may need to start more than one occurrence of gurjobs to handle the volume.
*ERROR* Unable to submit job. Verify that the gurjobs program is running.
Either the background process that processes job submission requests is not running, or the volume of job requests is excessive.
Contact your technical staff to determine whether it is necessary to start the background process (gurjobs) if it not running. If it is running, technical staff may need to start more than one occurrence of gurjobs to handle the volume.
*Warning* Timed out waiting for response from job submission program.
The background process that processes job submission requests is not running, the volume of job requests is excessive, the job you submitted is still running or the job you submitted aborted.
Contact your technical staff to determine whether it is necessary to start the background process (gurjobs) if it not running. If it is running, try to locate any output files generated by your job to see if an error message is present.
12 Banner General 8.5.1 4-23User Guide
Job Submission

4-24
The variables’ values do not print when I run GLRLETR. When I print my letters directly from Banner (the “0 = none” option), only the variables within the letter print (for example, *FNAME, *LNAME), and not the values for the variables. The GLRCOLR table has been updated correctly through the GLBLSEL process.
This situation occurs when the letter’s table definitions [i.e., “margin settings”] are not contained within a separate paragraph code (GTVPARA/GUAPARA).
All table definitions [not text or variables] must be held in a separate paragraph, and that paragraph must be Sequence 1 on the Letter Process Form (GUALETR). A good technique, also, is to have the new page format command [#NP] in a separate paragraph and to have that be Sequence 2 on the Letter Process Form.
External Program Could Not Execute Or Had An Error.
This occurs sometimes when I enter variable rules on GLRVRBL or population selection rules on GLRSLCT, and I exit the forms so the GLOLETT process can compile the rules, How can I prevent this from occurring?
The Process Results table, GJBRSLT, may be growing too large. This table should be monitored and periodically cleaned out through SQL*Plus.
There may be some extraneous values lodged in the GJBPRUN table. Have your Computer Services Department issue the following statement using SQL*Plus:
SQL> delete gjbprun where gjbprun_job =’GLOLETT’;
Dynamic parameters found. Please fill in the appropriate values.
The job which you have submitted has dynamic parameters which must be entered. You will be prompted with a second window to allow you to enter the necessary values.
Banner General 8.5.1 April 2012User GuideJob Submission
April 20
5 Population Selection
Overview
The Population Selection module lets you identify and group entities in the database (for example, people, vendors, and organizations). You can define selection criteria to identify and extract a subset of these entities to use in Banner® reports, processes, and letters. Some of the functions you can perform in the Population Selection module are:
• Manually create, change, and display a population of IDs for reports, processes, and letters.
• Define the rules used to select IDs from the Banner database for reports, processes, and letters.
• Define the functional areas (applications) used in the Population Selection and Letter Generation modules.
• Define the variables used in the Population Selection and Letter Generation modules to select a specific piece of data in the database.
• Define common rules, or objects, that are used in many different population selections and variables.
Definitions
The following definitions are useful for understanding the functions of the Population Selection module:
• Population. A set of Banner IDs used for reports, processes, and letters. A population is uniquely identified by an application, selection ID, creator ID, and user ID.
• Population selection. A set of rules used to select IDs from the Banner database for reports, processes, and letters. A population selection is uniquely identified by an application, selection ID, and creator ID.
• Application. A functional area with similar characteristics that can be applied to population selections, populations, and variables.
12 Banner General 8.5.1 5-1User Guide
Population Selection

5-2
• Variable. A specific piece of data in the database and the set of rules used to select that data.
• Object. A set of common rules used in many different population selections and variables. Objects are not required, but they simplify data entry and provide some consistency.
Validation Forms
Population Selection forms use the following validation form. Further information on these forms can be found in Online Help. See “Online Help: Banner Form and Field Reference” on page 1-5.
Related Processes
The following processes are related to the Population Selection module. For additional information, refer to Chapter 13, Reports and Processes.
• The Population Selection Extract Process (GLBDATA) extracts IDs (people and non-persons) from the Banner database based on the rules entered on the Population Selection Definition Rules Form (GLRSLCT). This is a COBOL program. If the results of this extract will be used to identify the population receiving a letter, it should be executed before running the Variable Data Extract Process (GLBLSEL). If the results of this extract will be used to identify the population to be used in a report, it must be executed before running that report.
• Parameter Selection Compile Process (GLBPARM) creates Job Submission parameters for all variables for a given application and all selection IDs for the logged in user ID. This COBOL program that should be executed before the Automatic Letter Compilation Process (GLOLETT). Only execute this process when application rule changes require recompiling the associated population selections.
• Automatic Letter Compilation Process (GLOLETT) generates SQL statements from the rules entered on the Population Selection Definition Rules Form (GLRSLCT) and the Variable Rules Definition Form (GLRVRBL). This COBOL program that is executed automatically from the GLRSLCT Form when a population selection is created or changed and from the GLRVRBL Form when a variable is created or changed.
Validation Form Used By
GTVSYSISystem Indicator Validation Form
GLRAPPLApplication Definition Rules Form
Banner General 8.5.1 April 2012User GuidePopulation Selection

April 20
Menu Navigation Table
Forms in the Population Selection module can be accessed from the following menu. Further information on these forms can be found in Online Help. See “Online Help: Banner Form and Field Reference” on page 1-5.
GLIEXTR Population Selection Extract Inquiry FormDisplays a population, which is a set of Banner IDs used for reports, processes, and letters.
GLAEXTR Population Selection Extract Data FormAllows you to manually create, change, and display a population, which is a set of Banner IDs used for reports, processes, and letters.
GLRSLCT Population Selection Definition Rules FormDefines a population selection, which is a set of rules used to select IDs from the Banner database for reports, processes, and letters.
GLISLCT Population Selection Inquiry FormDisplays a list of population selections within an application.
GLRAPPL Application Definition Rules FormDefines an application, which is a functional area that controls population selections, populations, and variables.
GLIAPPL Application Inquiry FormDisplays a list of all applications defined on the GLRAPPL Form.
GLRVRBL Variable Rules Definition FormDefines a variable, which is a specific piece of data in the database and the set of rules used to select that data.
GLIVRBL Variable Inquiry FormDisplays a list of the variables defined on the GLRVRBL Form for an application.
GLROBJT Object Definition Rules FormDefines an object, which is a set of common rules used in many different population selections and variables.
12 Banner General 8.5.1 5-3User Guide
Population Selection

5-4
Population Selection also uses the Population Selection Result Inquiry Form (GLIRSLT), which is not called from the menu. This form displays a list of populations within a specific application.
Population Selection Procedures
Many Banner reports, processes, and letters use sets of Banner IDs called populations. For example, a particular letter may be mailed to a specific population, and a Banner report may be generated for another population.
With the Population Selection module you can:
• Build a population selection, which is a set of rules used to select IDs from the Banner database. You can build the rules from scratch or copy an existing population selection and make changes.
• Create a population of Banner IDs. You can either use the rules in a population selection to extract IDs from the database, or you can manually create a population.
Once a population is created, you can view its contents on the Population Selection Extract Inquiry Form (GLIEXTR).
Definitions
The following definitions are useful for understanding the functions of the Population Selection module:
GLIOBJT Object Inquiry FormDisplays a list of objects defined on the GLROBJT Form.
GTVSYSI System Indicator Validation FormDefines codes that identify the Banner applications used at your institution.
Population A set of Banner IDs used for reports, processes, and letters. A population is uniquely identified by an application, selection ID, creator ID, and user ID.
Population selection
A set of rules used to select IDs from the Banner database for reports, processes, and letters. A population selection is uniquely identified by an application, selection ID, and creator ID.
Banner General 8.5.1 April 2012User GuidePopulation Selection

April 20
Building a Population Selection
A population selection is a set of rules used to select IDs from the Banner database for reports, processes, and letters. A population selection is uniquely identified by an application, selection ID, and creator ID.
NoteYou can use objects to simplify the building process. An object is a set of common rules used in many different population selections and variables. Objects are defined on the Object Definition Rules Form (GLROBJT). Once they are defined, you can reference the object rather than enter the entire set of rules each time it is needed. Objects are not required, but they simplify data entry and provide some consistency.
1. Make sure the application associated with the population selection is defined on the Application Definition Rule Form (GLRAPPL). An application is a functional area that controls a population selection. Optionally, an application will include general, high-level rules used to select IDs, if they exist for that application.
NoteOnce defined, the application can be used repeatedly for every population selection associated with that application.
2. Access the Population Selection Definition Rules Form (GLRSLCT).
3. Enter the application in the Application field.
4. Enter a population selection name in the Selection ID field. You can click the down arrow icon to access the Population Selection Inquiry Form (GLISLCT) to see the population selections that already exist.
5. Verify the Creator ID. Your user ID is the default, but it can be changed.
Application A functional area with similar characteristics that can be applied to population selections, populations, and variables.
Variable A specific piece of data in the database and the set of rules used to select that data.
Object A set of common rules used in many different population selections and variables. Objects are not required, but they simplify data entry and provide some consistency.
12 Banner General 8.5.1 5-5User Guide
Population Selection

5-6
6. Go to the Description block.
6.1. Enter a free-form description of the population selection in the Description field.
6.2. (Optional) Select the Manual check box if all joins must be entered manually in the Rules block. No automatic PIDM joins occur when rules are compiled. This check box is used for population selections that use secondary PIDMs rather than key PIDMs to join two or more tables.
Any GLRAPPL high-level rules for the application will be included in manual population selections.
6.3. (Optional) Select the Lock check box to lock the population selection. If the population selection is locked, only the creator ID can use this population selection in the Population Selection Extract Process (GLBDATA), view a selected population on the Population Selection Extract Inquiry Form (GLIEXTR), or change a selected population on the Population Selection Extract Data Form (GLAEXTR).
NoteA user cannot change or delete population selection rules that were created by another user ID, regardless of the lock indicator.
6.4. (Optional) Select the Delete check box to delete all rules associated with the population selection. This also deletes all IDs that have the same user ID as the creator ID associated with their population selection. If a population was extracted by a user ID different from the creator ID, the IDs are not deleted.
7. Go to the Definition block. This is where you identify the data to be selected from the database.
7.1. In the Select field, enter the database column from which data will be extracted. This database column must reference a PIDM (for example, SPRIDEN_PIDM or RORSTAT_PIDM). (A PIDM is a unique internal ID maintained by the system for each entity entered on Banner.) This column name is validated against the data dictionary.
7.2. In the From field, enter the names of all tables from which you want to extract data. Use the format <table><alias>, separating multiple table names with commas. You can use aliases to reference tables in subqueries within the selection rules, or multiple times within the selection rules. Aliases have a maximum length of four characters. Table names are validated against the data dictionary.
If the application associated with a population selection has selection rules, include all tables referenced in the application rules. To improve performance of the Population Selection Extract Process (GLBDATA), list multiple tables in the From field from most general to most specific, or largest to smallest. For
Banner General 8.5.1 April 2012User GuidePopulation Selection

April 20
example, if two tables are being used, one with one record per ID and another with multiple records, list the multiple record table first.
8. Go to the Rules block. This is where you enter the selection rules.
NoteUse open and closed parentheses to group nested statements for logical evaluation. You can use up to three levels of nested statements. The number of open parentheses on a line must equal the number of closed parentheses.
8.1. In the Object field, enter an object name or, in the Data Element field, enter the name of the database column used in the selection rule. The name must be a valid database column in the Oracle data dictionary. You cannot enter the name of an SQL function, such as MAX or MIN, in this field.
To reference an object, enter *INCL followed by the object name. For example, enter *INCL AID_PERIOD. Then select Next Item. The rules from the AID_PERIOD object are automatically added to the population selection. You can click the down arrow icon to access the Object Inquiry Form (GLIOBJT) to search for an object.
8.2. In the Operator field, enter an SQL operator (=, <>, >, <, and so forth). The operator is used to compare the Data Element and Value fields.
For date comparisons, avoid using an equal sign (=) because dates are often stored with hours, minutes, and seconds. A better approach is to use less than (<), greater than (>), less than or equal (<=), or greater than or equal (>=). You might need an extra condition. For example, ACTIVITY_DATE is stored with hours, minutes, and seconds. Use these statements to find addresses changed on March 1, 2003:
SPRADDR_ACTIVITY_DATE >= ‘01-MAR-03’ ANDSPRADDR_ACTIVITY_DATE < ‘02-MAR-03’
IN checks for inclusion in a list of values:
GOREMAL_EMAL_CODE IN ('ACAD','BUS','HOME')
NOT IN checks for exclusion from a list of values:
GOREMAL_EMAL_CODE NOT IN ('ACAD','BUS','HOME')
8.3. In the Value field, enter the value that is compared with the Data Element based on the Operator. This can be a constant literal, another database column
12 Banner General 8.5.1 5-7User Guide
Population Selection

5-8
name or alias, combination of a constant literal and database column name, dynamic parameter, or subquery. Use upper case.
NoteDo not enter a value if the Operator contains NULL or IS NOT NULL.
Constant literal: The data type of the Data Element determines the format of the literal. Values that are compared to character data elements must be enclosed in single quotes. Values that are compared to numeric data elements must be numeric. Values that are compared to date data elements must be in the format 'DD-MON-YY' or 'DD-MON-YYYY'. Single quotes are not used with SYSDATE. Use the operator AND between ranges. For example, enter ‘01-JAN-03’ AND ‘31-JAN-03’. Use the same format for both years (YY or YYYY).
NoteThe operator BETWEEN cannot execute dynamic parameters in a Selection ID or Variable. Dynamic parameters contained within single quotes are treated as literals.
Another database column name: The Value is validated against the Oracle data dictionary. If the data types (character, numeric, or date) of the Value and Data Element are not the same, a warning appears. You can override the warning and keep the comparison.
Dynamic parameter: Enter an ampersand (&) followed by text (for example, &Letter_Code). When you extract a population with the Population Selection Extract Process (GLBDATA), the system prompts for each dynamic parameter in the selection rules.
Subquery: Enter (*SUB<variable>). Use a subquery to select one record when an ID might have multiple records. The parentheses are required. The literal *SUB indicates this is a subquery, or reference to another variable. The variable is a valid variable name already defined on the Variable Rules Definition Form (GLRVRBL) and compiled in this application. You can select the down arrow icon to access the Variable Inquiry Form (GLIVRBL) to search for a variable. If you select a variable from the list, the system gives it the proper syntax. A population selection can have only one subquery. If defined, it must be the last rule.
9. In the AND/OR field, enter the connector that links rules with AND or OR logic. All lines in the Rules block, except the last line, must contain a connector.
10. Once all the rules are entered, save your changes.
11. Exit the form. The GLOLETT process will run to compile the selection only after you exit the GLRSLCT form.
Banner General 8.5.1 April 2012User GuidePopulation Selection

April 20
Task Notes
• When using a dynamic parameter with an IN or NOT IN operator do not include left and right parentheses. Do not include spaces when entering the value for the dynamic parameter. Define the IN statement similar to the following:
column_name IN &Term
• GLBLSEL will generate an 88 level prompt for &Term. Enter the values within single quotes with the parentheses, without using spaces:
88 &Term ('200111','200222','200333')
• LIKE compares a character value to a pattern and may include wildcards. The following wildcards may be used:
• an underscore (_) matches exactly one character
• a percent sign (%) matches zero or more characters
• To find SPRIDEN_LAST_NAME values like 'Smith' and 'Smithsonian', the following may be used:
SPRIDEN_LAST_NAME LIKE 'Smith%'
• NOT LIKE compares a character value to a pattern and excludes the matched values. For example, to exclude SPRIDEN_LAST_NAME values like 'Smith' and 'Smithsonian':
SPRIDEN_LAST_NAME NOT LIKE 'Smith%'
• IS NULL selects rows which have a null value in a particular column. For example:
GURMAIL_DATE_PRINTED IS NULL
• IS NOT NULL selects rows which have a non-null value. For example:
GURMAIL_DATE_PRINTED IS NOT NULL
• BETWEEN tests whether a value is within a range of values by testing "greater than or equal to <low value> and less than or equal to <high value>”. For example:
GURMAIL_TERM_CODE BETWEEN '20100' AND '20999'
• To improve processing time, certain criteria (such as whether a person is alive or has a current ID) should be specified through population selection rules rather than with a subquery.
• Outer joins cannot be performed. A join in Oracle occurs when fields from two or more tables are compared. If a matching row in one table does not exist, no result is returned. An outer join would cause a result to be returned even if a matching row does not exist.
For example, suppose you want to select everyone on Banner with a birth date after 1985, or an unknown birth date. The birth date is stored on the General Person Table (an optional table). If the person record exists for an ID, the ID and birth date are selected even if the birth date does not exist. If the person record does not exist for the ID, the ID is not selected. To extract this information you must create two
12 Banner General 8.5.1 5-9User Guide
Population Selection

5-10
population selections: one to select everyone with a person record whose birth date is greater than 1985 or whose birthdate is null, and another to select everyone who does not have a person record. The two population selections would then be combined in the Population Selection Extract Process (GLBDATA) with a union function, to give the desired population.
Copying a Population Selection
You can copy the rules in an existing population selection to create a new population selection. You can change the application and selection ID. Your ID becomes the creator ID. A copied population selection can be changed as needed.
1. Access the Population Selection Definition Rules Form (GLRSLCT).
2. Enter the application associated with the population selection you want to copy in the Application field.
3. Enter the population selection you want to copy in the Selection ID field. You can select the down arrow icon to access the Population Selection Inquiry Form (GLISLCT) to search for a population selection.
4. To access the Selection ID Copy window, select Copy from the Options menu. Information in the Copy From block defaults from the main window.
5. Enter the application associated with the new population selection in the Copy To Application field.
6. Enter the new population selection ID in the Copy To Selection field. You can select the down arrow icon to access the Population Selection Inquiry Form (GLISLCT) to see the existing population selection IDs that cannot be used.
NoteThe Creator ID defaults to your user ID. It cannot be changed.
7. Select the Insert Record function. The main window reappears with the cursor in the Description field.
8. Use the normal steps to change and save rules for the new population selection. You can use the steps in “Building a Population Selection” on page 5-5, beginning with step 6.
Creating a Population with GLBDATA
A population is a set of Banner IDs used for reports, processes, and letters. One way to create a population is with the Population Selection Extract Process (GLBDATA). The Banner user ID that runs GLBDATA becomes the user ID associated with the population.
Banner General 8.5.1 April 2012User GuidePopulation Selection

April 20
There are two ways to use GLBDATA:
• Extract IDs using the population selection rules defined on the Population Selection Definition Rules Form (GLRSLCT).
• Create a population from the union, intersection, or difference (minus) of the rules in two existing population selections.
You can run GLBDATA from the Process Submission Control Form (GJAPCTL) or from the operating system. If you run the process from the operating system prompt, check with your technical personnel for the appropriate command to use at your institution. For example:
Extracting IDs Using Population Selection Rules
You can create a population by extracting IDs using the population selection rules defined on the Population Selection Definition Rules Form (GLRSLCT).
1. Access the Process Submission Control Form (GJAPCTL).
2. Enter GLBDATA in the Process field.
3. If the process has more than one job parameter set, enter the name of the set in the Parameter Set field. You can select the down arrow icon to access the Job Parameter Set Rule Form (GJRJPRM) to search for a job parameter set.
4. (Optional) If you want to view, save, or print online, enter DATABASE in the Printer field.
5. Go to the Parameter Values block. Parameters defined for the process appear. Default parameter values appear, if they have been defined.
6. Enter the following parameter values:
UNIX: glbdata.shl username password
OpenVMS: @glbdata username password
Parameter Number Parameter Value
1 Selection Identifier 1
ID of the population selection that will be used to extract the population
6 Application Code
Application associated with the population selection
12 Banner General 8.5.1 5-11User Guide
Population Selection

5-12
7. Go to the Submission block.
8. Select the Hold radio button or the Submit radio button.
9. Save your changes.
10. (Optional) If the population selection in parameter 1 has dynamic parameters, the cursor returns to the Parameter Values block. Enter values for the dynamic parameters in parameter 88. Return to the Submission block. Save your changes again.
NoteYou must enter a non-blank value for each 88 level prompt.
Creating a Population from the Union, Intersection,or Minus of Existing Population Selection Rules
You can create a population from the union, intersection, or minus (difference) of the rules in two existing population selections. The rules in both of the existing population selections are defined on the Population Selection Definition Rules Form (GLRSLCT).
NoteThe two existing population selections must have the same application and creator ID.
1. Access the Process Submission Control Form (GJAPCTL).
2. Enter GLBDATA in the Process field.
3. If the process has more than one job parameter set, enter the name of the set in the Parameter Set field. You can select the down arrow icon to access the Job Parameter Set Rule Form (GJRJPRM) to search for a job parameter set.
4. (Optional) To view, save, or print online, enter DATABASE in the Printer field.
5. Go to the Parameter Values block. Parameters defined for the process appear. Default parameter values appear, if they have been defined.
6. Enter the following parameter values:
7 Creator ID of Selection ID
Oracle ID of the user who created the population selection
8 Detail Execution Report
S - Display SQL statements.I - Display SQL statements and inserts.Y - Display paragraphs.
Parameter Number Parameter Value
Banner General 8.5.1 April 2012User GuidePopulation Selection

April 20
7. Go to the Submission block.
8. Select the Hold radio button or the Submit radio button.
Parameter Number Parameter Value
1 Selection Identifier 1 ID of the first existing population selection that will be used to create a new population selection.
2 Selection Identifier 2 ID of the second existing population that will be used to create a new population selection.
3 New Selection Identifier ID of the new population selection that will be created from the two existing population selections.
4 Description for New Selection
Freeform description of the new population selection.
5 Union/Intersection/Minus Code that determines the contents of the resulting population:
U The population includes all IDs extracted by the first population selection and all IDs extracted by the second population selection. If an ID is selected by both, it is included only once in the population.
I The population includes only those IDs that are extracted by both population selections.
M The population includes all IDs extracted by the first population selection except those IDs extracted by the second population selection.
6 Application Code Application associated with the two existing population selections. This becomes the application associated with the new population selection.
7 Creator ID of Selection ID
Oracle ID of the user who created the two existing population selections.
8 Detail Execution Report S - Display SQL statements.I - Display SQL statements and inserts.Y - Display paragraphs.
12 Banner General 8.5.1 5-13User Guide
Population Selection

5-14
9. Save your changes.
10. (Optional) If either of the population selections in parameter 1 or 2 has dynamic parameters, the cursor returns to the Parameter Values block. Enter values for the dynamic parameters in parameter 88. Return to the Submission block. Save your changes again.
NoteYou must enter a non-blank value for each 88 level prompt.
Task Notes
• Creating a new population from the union, intersection, or minus of two existing population selections uses the rules defined for the two existing population selections. Manual entries for a population are not considered as part of any population selection.
• For the union or intersection option, the order of the selection IDs in parameters 1 and 2 does not matter. For the minus option, the results are different depending on the order of the selection IDs.
• A population selection created from the union, intersection, or minus cannot be used as parameter 1 or parameter 2 because there are no rules associated with it. However, a population selection can be created with rules that extract the IDs from the generated population selection with no rules.
• If you are using the union, intersection, or minus option, you only have to run GLBDATA once to get IDs for the new population (union, intersection, or minus). You don’t have to run GLBDATA for the two existing population selections before you run it for the new population selection.
• When you create a new population selection from two existing population selections, “header” information for the new population selection is based on parameters 3 (ID) and 4 (description) that are entered for GLBDATA.
• If this is a new ID, the ID and description are added to the Population Selection Definition Rules Form (GLRSLCT). The new population selection has no selection rules.
Banner General 8.5.1 April 2012User GuidePopulation Selection

April 20
• If the ID already exists on GLRSLCT without rules associated with it, the description is updated with the description you entered in parameter 4.
• If the ID already exists on GLRSLCT with rules, you'll receive an error message. The GLBDATA process terminates.
• To avoid a potential problem with GLBDATA adding duplicate IDs to POP SEL on GLAEXTR, use the following steps:
10.1. Before running any popsel where you think you may have duplicate IDs, remove all records from GLBEXTR.
10.2. Got to GLAEXTR, pull up POP SEL, and check the Delete All check box.
OR
Delete via SQLPLUS:
delete from glbextrwhere GLBEXTR_APPLICATION = 'MARK_TEST'AND GLBEXTR_SELECTION = 'SMITH'AND GLBEXTR_CREATOR_ID = 'SAISUSR'AND GLBEXTR_USER_ID = 'SAISUSR';commit;
10.3. Run GLBDATA to get all the correct SYSTEM entry IDs.
10.4. Run GLAEXTR and manually add those IDs you need to add, making sure to not to add any MANUAL duplicates as described above.
Creating a Manual Population
A population is a set of Banner IDs used for reports, processes, and letters. You can create a manual population with the Population Selection Extract Data Form (GLAEXTR).
1. Make sure the application associated with the population is defined on the Application Definition Rule Form (GLRAPPL). An application is a functional area that controls a population.
NoteOnce defined, the application can be used repeatedly for every manual population associated with that application.
2. Make sure the population selection associated with the population is defined on the Population Selection Definition Rules Form (GLRSLCT). Because this is a manual population, you don’t need selection rules, just a name and description.
3. Access the Population Selection Extract Data Form (GLAEXTR).
4. Enter the application in the Application field.
12 Banner General 8.5.1 5-15User Guide
Population Selection

5-16
5. Enter the population selection name in the Selection ID field. You can select the down arrow icon to access the Population Selection Inquiry Form (GLISLCT) to search for a population selection.
NoteIf the population selection is locked, only the creator ID can create a population with the population selection.
6. Verify the Creator ID. The ID associated with the population selection is the default.
7. Go to the next block.
8. Enter each ID in the population. You can select the down arrow icon to access the Person Search Form (SOAIDEN) or the Non-Person Search Form (SOACOMP) to search for an ID. The Manual radio button is automatically selected to indicate the ID was added manually.
NoteDuplicate IDs cannot be added on GLAEXTR.
9. Save your changes.
Task Note
No rules are associated with a manual population. Therefore, a manual population cannot be used in the Population Selection Extract Process (GLBDATA) to create a new population from the union, intersection, or minus of two population selections.
Population Selection Messages
If a problem arises as you work with the Population Selection Extract Process (GLBDATA), Banner provides diagnostic messages to guide you toward solution.
In addition, you may encounter Oracle messages if GLBDATA does not run successfully. Look up the message number displayed on the screen as “SQLCODE=####” in your Oracle Error Messages Manual.
Listed below are some of the Banner diagnostic messages you may see, with their corrective actions.
Application <application> does not exist
The application entered as a parameter has not been defined on the Application Definition Rules Form (GLRAPPL).
Banner General 8.5.1 April 2012User GuidePopulation Selection

April 20
Define the application on GLRAPPL, or enter the correct application for the parameter.
Maximum number of dynamic parms exceeded
More than 100 unique dynamic parameters were found among all population selection and application rules used in the population.
Reduce the number of dynamic parameter to less than 100 by either “hardcoding” values or setting values equal to other field values.
No GLRCMPL record for <selection ID>
No rules were found for the combination of application code, selection ID, and creator ID that were entered as parameters.
Reenter rules on the Population Selection Definition Rules Form (GLRSLCT) to force the rules to be generated again.
Private Selection ID. Cannot Access.
The population selection is locked on the Population Selection Definition Rules Form (GLRSLCT).
Either unlock the population selection on GLRSLCT (if you are the creator), or enter a population selection that is not locked.
Query does not exist <application/selection/creator>
The combination of the application code, selection ID, and creator ID that were entered as parameters does not exist on the Population Selection Definition Rules Form (GLRSLCT).
Either create the selection ID under the application and creator ID on GLRSLCT, or enter a combination that is already defined.
Variable/Population Selection Messages
When you build population selection rules on the Population Selection Definition Rules Form (GLRSLCT) and variable rules on the Variable Rules Definition Form (GLRVRBL), the system generates SQL code to extract the IDs and variable data. Both forms call the COBOL process Automatic Letter Compilation Process (GLOLETT). The following diagnostic messages may be generated during the process.
12 Banner General 8.5.1 5-17User Guide
Population Selection

5-18
MAXIMUM NUMBER OF TABLES ALLOWED HAS BEEN REACHED . . . ABORTING
More than 15 tables are used in the variable/population selection.
Reduce the number of tables being used to less than 15.
No GLRVFRM record found for: <application, variable >
The variable being “compiled” by the Automatic Letter Compilation Process (GLOLETT) could not be found.
Verify that the variable has the 'Select' information entered on the Variable Rules Definition Form (GLRVRBL).
Only 1 sub-query per variable allowed . . . ABORTING
A variable being compiled has a subquery on another variable that has a subquery defined. Subqueries can be nested only 1 deep.
Redefine the variables to only use one subquery.
Select Valid Column . . . Aborting
A column name found in the variable or population selection could not be found or is found multiple times in the ALL_TAB_COLUMNS view. Finding it multiple times implies that the field name might exist on two different tables or views.
Create unique field names within Banner tables and views that are used by variables and population selections.
Unknown function . . . Aborting
The text immediately preceding a left parenthesis in the Select statement of the variable is not one of the fifty (50) functions known to the program.
Change the variable.
Undefined column located . . . Aborting
A column specified in the variable or population selection is not found in the ALL_TAB_COLUMNS view for that table and user.
Change the variable or population selection to include the correct column name. Usually it is a misspelling of a column name in the Select statement or the Value field.
Unknown variable/object . . . Aborting
A table specified in the variable or population selection is not found in the ALL_TAB_COLUMNS view for that user, and is considered invalid. This is probably because the user ID running the program has not been granted Select access to a table
Banner General 8.5.1 April 2012User GuidePopulation Selection

April 20
referenced in the variable or population selection. It does not matter to the program that the user might have DBA access; explicit grants to the table(s) are needed.
Verify that the user ID of the person who is attempting to run the variable/selection process has access to all tables referenced in the rules. To do this, perform a Describe on each table in SQL* Plus.
Variable <variable> cannot be used here . . . Aborting
A variable referenced in the Select clause of another variable cannot reference THAT variable in its own Select clause.
Change the variables.
Variable <variable> does not return a numeric value
The variable specified in the error message is referenced in the Select clause of the variable being compiled. This 'referenced' variable was not compiled first.
Find the variables 'referenced' in the Select statements and compile them first. They can be found with the following SQL statement: SELECT GLRVFRM_APPLICATION, GLRVFRM_SELECT_CLAUSE
FROM GENERAL.GLRVFRM
WHERE (GLRVFRM_SELECT_CLAUSE LIKE '%*%'
AND GLRVFRM_SELECT_CLAUSE NOT LIKE '%* %')
ORDER BY GLRVFRM_APPLICATION, GLRVFRM_SELECT_CLAUSE
<element> is undefined. Cannot compile.
An undefined element was found in the Select clause of the variable. The program cannot determine what it is, so compilation terminates.
Find the variable causing the problem, and correct the syntax in the Select clause, or redefine the element.
12 Banner General 8.5.1 5-19User Guide
Population Selection

5-20
Banner General 8.5.1 April 2012User GuidePopulation Selection
April 20
6 Letter Generation
Overview
The Letter Generation module lets you generate letters or produce a download file that can be used to produce letters with Microsoft Word or WordPerfect. Some of the functions you can perform in the Letter Generation module are:
• Define the functional areas (applications) used in the Population Selection and Letter Generation modules.
• Define common rules (objects) that are used in many different population selections and variables.
• Define the variables used in the Population Selection and Letter Generation modules to select a specific piece of data in the database.
• Build paragraphs that include user-created text, variables, and formatting commands.
• Build a letter from these paragraphs.
• Extract variable data from the database for pending letters, or for a specific letter and selected population. (You can use the Population Selection module or a specific Banner® process to select the population.)
• Merge the extracted variable data into the letter and generate letters, or produce a download file for Microsoft Word or WordPerfect.
NoteSunGard® Higher Education does not support WordPerfect 8.0 and higher.
Validation Forms
Letter Generation forms use the following validation forms. Further information on these forms can be found in Online Help. See “Online Help: Banner Form and Field Reference” on page 1-5.
12 Banner General 8.5.1 6-1User Guide
Letter Generation

6-2
Related Processes and Report
The following processes and report are related to the Letter Generation module. For additional information, refer to Chapter 13, Reports and Processes.
• The Automatic Letter Compilation Process (GLOLETT) generates SQL statements from the rules entered on the Variable Rules Definition Form (GLRVRBL). This COBOL program is executed automatically when you create or change a variable on GLRVRBL. It adds the necessary pidm joins as part of the SQL statements.
• The Letter Extract Process (GLBLSEL) extracts variable data from the Banner database to be included when letters are printed. This COBOL program is run before executing the Letter Generation Print Process (GLRLETR). GLBLSEL can be run for all pending letters (letters waiting to be printed) for a letter code, or for a letter code for a specific population. If the letter cannot be created because no address existed in SPRADDR for that ID, or because the address was found but it is inactive, a log file will list the names and IDs for those who did not receive the letter. This listing is printed whether or not you elect to print the error report.
The messages are:
• ### Following persons did NOT meet Selection criteria and will not get a letter
• ### Following person did NOT meet Address criteria and will not get a letter
• The Letter Generation Print Report (GLRLETR) generates letters directly from Banner, prints a summary report, and updates the General Mail Table (GURMAIL).
Validation Form Used By
GTVLETRLetter Code Validation Form
GUALETRLetter Process Form
GTVPARA Paragraph Code Validation Form
GUALETRLetter Process Form
GUAPARAParagraph Form
GTVSYSISystem Indicator Validation Form
GLRAPPLApplication Definition Rules Form
Banner General 8.5.1 April 2012User GuideLetter Generation

April 20
Alternatively, GLRLETR can produce a download file for Microsoft Word or WordPerfect.
NoteIFNULL only works when you run GLRLETR for a Banner extracted letter (Word Processor Extract Option = 0). In addition, the download file will not contain paragraph text or literals.
Multiple Letters Per Time Frame
For Financial Aid, Advancement, Student, and other products that use a time frame parameter (such as fiscal or aid year, or term code), one method to allow for the letter to be run multiple times is to check the Allow Duplicates check box on the Letter Code Validation Form (GTVLETR).
Below is a select clause that can be run in sqlplus that you can use to keep track of people to whom you might have sent duplicate letters. It contains an example to identify those PIDMs that have already received the specific letter in the current fiscal year.
Note that you would need to enter the specific letter code as well as the last day the previous fiscal year ended indicated on the Fiscal Year Validation Form (ATVFISC).
select * from gurmailwhere gurmail_system_ind not in ('R','S')and gurmail_letr_code = '&LETRCODE' and gurmail_date init > to_date('&&fiscyr_end_date','DD-MON-YY') and gurmail_date_printed > to_date('&&fiscyr_end_date','DD-MON-YY');
TipInspect both the gurmail_date_init and gurmail_date_printed columns rather than just the date_printed, since there might be some previous years’ letters actually printed in the current fiscal year.
Menu Navigation Table
Forms in the Letter Generation module can be accessed from the following menu. Further information on these forms can be found in Online Help. See “Online Help: Banner Form and Field Reference” on page 1-5.
12 Banner General 8.5.1 6-3User Guide
Letter Generation

6-4
GUIMAIL Mail Query FormLists printed letters and pending letters (those waiting to be sent) for an ID.
GUALETR Letter Process FormBuilds a letter from paragraphs created on the Paragraph Form (GUAPARA).
GUAPARA Paragraph FormBuilds a paragraph that can be inserted in letters on the Letter Process Form (GUALETR). A paragraph can include text, variables, and formatting commands.
GLRVRBL Variable Rules Definition FormDefines a variable, which is a specific piece of data in the database and the set of rules used to select that data.
GLIVRBL Variable Inquiry FormDisplays a list of the variables defined on the GLRVRBL Form for an application.
GLROBJT Object Definition Rules FormDefines an object, which is a set of common rules used in many different population selections and variables.
GLIOBJT Object Inquiry FormDisplays a list of objects defined on the GLROBJT Form.
GLRAPPL Application Definition Rules FormDefines an application, which is a functional area that controls population selections, populations, and variables.
GLIAPPL Application Inquiry FormDisplays a list of all applications defined on the GLRAPPL Form.
GTVLETR Letter Code Validation FormDefines codes that identify the letters you can generate in Banner.
GTVPARA Paragraph Code Validation FormDefines codes that identify the paragraphs used in Banner letters.
GTVSYSI System Indicator Validation FormDefines codes that identify the Banner applications used at your institution.
Banner General 8.5.1 April 2012User GuideLetter Generation

April 20
Letter Generation also uses the Letter Display Form (GUQLETR), which is not called from the menu. This form displays the details of a letter, including the text, variables, and formatting commands.
Letter Generation Procedures
With the Letter Generation module you can:
• Define the variables used to select a specific piece of data in the database.
• Build letters.
• Extract variable data from the database for a specific letter.
• Generate letters by merging the extracted variable data with a letter.
• Create a download file to merge with a Microsoft Word or WordPerfect text file.
NoteSunGard Higher Education does not support WordPerfect 8.0 or higher.
Before using these procedures, you should be familiar with the procedures described for the Population Selection module. See the “Population Selection” chapter of this User Guide.
SunGard Higher Education delivers and supports certain letters, variables, and population selections. Refer to the product-specific Banner user guides for additional information.
NoteThe overall Letter Generation process is a powerful tool. The coding or modification of variables and population selections requires SQL-like code, which is considered site-specific customization that is not eligible for support.
Defining Variables
A variable is a specific piece of data in the database and the set of rules used to select that data. Variables are used to:
• Insert variable data into letters.
• Reference subqueries in application rules, population selection rules, and variable selection rules.
Each variable is associated with an application.
12 Banner General 8.5.1 6-5User Guide
Letter Generation

6-6
Creating a Variable
1. Make sure the application associated with the variable is defined on the Application Definition Rule Form (GLRAPPL). An application is a functional area that controls a variable.
2. Access the Variable Rules Definition Form (GLRVRBL).
3. Enter the application in the Application field.
4. Enter the variable name in the Variable field. The name must begin with an asterisk (*) and must contain at least one alpha character. The maximum number of characters is 30.
You can select the down arrow icon to access the Variable Inquiry Form (GLIVRBL) to see the variable names that already exist for the application.
NoteThe same variable name can be used with different applications and defined with different rules.
5. Go to the Description block.
5.1. Enter a free-form description of the variable in the Description field.
(Optional) Select the Type of variable if special processing and updating of the database occur when the variable is used in a letter. See the list of types below.
Leave this field blank if none of these type applies.
Checklist The value of the variable contains information regarding checklist items associated with an admissions application. For example, the Admissions Office uses this type of variable for applicants who need to send information to the institution to continue the admissions process. When you run the Letter Generation Print Report (GLRLETR) for a letter containing a checklist variable, the First Request, Last Request, and Count fields on the Student Checklist Table (SARCHKL) on the Admissions Application Form (SAAADMS) are updated for all checklist items for an applicant and term (parameter to GLRLETR) that have not been received yet and are indicated to print.
First The Letter Extract Process (GLBLSEL) processes this variable first. See “Defining a Variable with a First Variable Type” on page 6-18 for more information.
Banner General 8.5.1 April 2012User GuideLetter Generation

April 20
Manual You must enter all joins in the Rules block. See “Creating a Variable with ID Information Other Than the ID Receiving the Letter” on page 6-16 for more information.
RORVIEW The variable looks at one of the following Financial Aid views to determine its value:
ROVCSUM Third Party Contract Payment Detail ROVESUM Billing Exemption Payment Summary RPVARCO Contract Resource RPVAREX Exemption ResourceRPVATRM Award by TermRPVTERM Applicant Award Term
Identifying a RORVIEW variable improves performance. The Letter Extract Process (GLBLSEL) populates RORVIEW with a record for each type RORVIEW variable in the letter.
Note: There are two other Financial Aid RORVIEW views that cannot be used with GLBLSEL. These views are Basic Student Selection (ROVSTDD) and GPA By Term and Level Selection (ROVTRMG). ROVSTDD and ROVTRMG select rows where the RORVIEW_TYPE_IND is A or T, respectively. GLBLSEL inserts records into RORVIEW only when the RORVIEW_TYPE_IND is R, so variables that reference ROVTRMG or ROVSTDD will never extract any data.
Signature The value of the variable comes from the Initials Code Validation Form (STVINIT). This form maintains initials, descriptions, and titles for people. The initials associated with the value of the variable are placed in the Initials field on the Mail Table (GURMAIL) when the Letter Generation Print Report (GLRLETR) is run in update mode.
Checklist The value of the variable contains information regarding checklist items associated with an admissions application. For example, the Admissions Office uses this type of variable for applicants who need to send information to the institution to continue the admissions process. When you run the Letter Generation Print Report (GLRLETR) for a letter containing a checklist variable, the First Request, Last Request, and Count fields on the Student Checklist Table (SARCHKL) on the Admissions Application Form (SAAADMS) are updated for all checklist items for an applicant and term (parameter to GLRLETR) that have not been received yet and are indicated to print.
12 Banner General 8.5.1 6-7User Guide
Letter Generation

6-8
6. Go to the Definition block. This is where you identify the data to be selected from the database.
NoteThe system-generated Sequence fields identify the number of pieces of information being selected from the database. The first number defines the sequence number of the record currently displayed. The second number defines the total number of records defined for the variable (for example, 1 of 3).
6.1. In the Select field, enter the database column from which data will be extracted, literal text, or a combination of both such as 'Dear' || SPRIDEN_FIRST_NAME || ','. SQL functions (such as MAX or MIN) are allowed in the Select field.
NoteDatabase columns entered here are not validated against the data dictionary, so be careful to enter the names correctly. All database columns and functions should be referenced in upper case on the Variable Inquiry (GLRVRBL) form to ensure proper compiles.
You can refer to another variable in the Select statement as long as the variable is already defined and the rules are compiled under the same application as the variable that references them. You must also define a referenced variable in the letter so that the Letter Extract Process (GLBLSEL) can determine the value.
You can model a more complex query on the following example:
Example where the same table is used in both the query and the subquery: SELECT DISTINCT(SPRIDEN_PIDM),SYSDATE FROM SATURN.SPBPERS A,SATURN.SPRIDEN WHERE SPBPERS_PIDM = SPRIDEN_PIDM AND SPRIDEN_LAST_NAME = 'Smith' AND SPRIDEN_CHANGE_IND IS NULL AND SPRIDEN_PIDM NOT IN (SELECT SPBPERS_PIDM FROM SATURN.SPBPERS WHERE SPBPERS_DEAD_IND = 'Y' AND SPBPERS_PIDM = A.SPBPERS_PIDM )
6.2. In the From field, enter the names of all tables referenced in the Select field. Use the format <owner>.<table><alias>, separating multiple table names with commas. The owner is required only if your database contains multiple tables with the same name. You can use aliases to reference tables in subqueries within the variable selection rules. Aliases have a maximum length of four characters. Owner and table names are validated against the data dictionary.
To improve performance of the Letter Extract Process (GLBLSEL), list multiple tables in the From field from most general to most specific, or largest to smallest. For example, if two tables are being used, one with one record per ID and another with multiple records, list the multiple record table first.
Banner General 8.5.1 April 2012User GuideLetter Generation

April 20
6.3. In the Order By field, enter the names of the database columns used to sort multiple records returned from the database. Use commas to separate multiple column names. These database column names are validated against the data dictionary. SQL functions (such as MAX or MIN) are not allowed with these field names.
6.4. In the Group By field, enter the names of the database columns used to group multiple records returned from the database. Use commas to separate multiple column names.These database columns are validated against the data dictionary. SQL functions (such as MAX or MIN) are not allowed with these field names.
6.5. In the Description field, enter an optional description of this selection within the variable. This is an 80-character field.
7. Go to the Rules block. This is where you enter the selection rules that determine how data is selected. PIDM join rules are not required except for a Manual type variable. The Automatic Letter Compilation Process (GLOLETT) adds the necessary PIDM joins for other variable types.
TipUse open and closed parentheses to group nested statements for logical evaluation. You can use up to three levels of nested statements. The number of open parentheses on a line must equal the number of closed parentheses.
7.1. In the Data Element field, enter the name of the database column used in the selection rule. The name must be a valid database column in the data dictionary. SQL functions (such as MAX or MIN) are not allowed with these column names.
To reference an object, enter *INCL followed by the object name (for example, *INCL AID_PERIOD). Then select Next Item. The rules from the AID_PERIOD object are automatically added to the variable rule. You can click the down arrow icon to access the Object Inquiry Form (GLIOBJT) to search for a valid object.
7.2. In the Operator field, enter an SQL operator (=, <>, >, <, and so forth). The operator is used to compare the Data Element and Value fields.
For date comparisons, avoid using an equal sign (=) because dates are often stored with hours, minutes, and seconds. A better approach is to use less than (<), greater than (>), less than or equal (<=), or greater than or equal (>=). You might need an extra condition. For example, ACTIVITY_DATE is stored with
12 Banner General 8.5.1 6-9User Guide
Letter Generation

6-10
hours, minutes, and seconds. Use these statements to find addresses changed on March 1, 2003:
SPRADDR_ACTIVITY_DATE >= ‘01-MAR-03’ ANDSPRADDR_ACTIVITY_DATE < ‘02-MAR-03’
IN checks for inclusion in a list of values:
GOREMAL_EMAL_CODE IN ('ACAD','BUS','HOME')
NOT IN checks for exclusion from a list of values:
GOREMAL_EMAL_CODE NOT IN ('ACAD','BUS','HOME')
7.3. In the Value field, enter the value that is compared with the Data Element based on the Operator. This can be a constant literal, another database column name or alias, combination of a constant literal and database column name, dynamic parameter, or subquery. Use upper case.
NoteDo not enter a value if the Operator contains NULL or IS NOT NULL.
Constant literal: The data type of the Data Element determines the format of the literal. Values that are compared to character data elements must be enclosed in single quotes. Values that are compared to numeric data elements must be numeric. Values that are compared to date data elements must be in the format 'DD-MON-YY' or 'DD-MON-YYYY'. Single quotes are not used with SYSDATE. Use the operator AND between the ranges. For example, enter ‘01-JAN-03’ AND ‘31-JAN-03’. Use the same format for both years (YY or YYYY).
NoteThe operator BETWEEN cannot execute dynamic parameters in a Selection ID or Variable. Dynamic parameters contained within single quotes are treated as literals.
Another database column name: The Value is validated against the data dictionary. If the data types (character, numeric, or date) of the Value and Data Element are not the same, a warning appears. You can override the warning and keep the comparison.
Dynamic parameter: Enter an ampersand (&) followed by text (for example, &Letter_Code). When you extract a variable with the Letter Extract Process (GLBLSEL), the system prompts for each dynamic parameter in the application rules and variable rules.
Subquery: Enter (*SUB<variable>). The parentheses are required. The literal *SUB indicates this is a subquery or a reference to another variable. The variable is a valid variable name already defined on the Variable Rules Definition Form (GLRVRBL) and compiled in this application. You can click the down arrow icon to access the Variable Inquiry Form (GLIVRBL) to search for a variable. If you select a variable from the list, the system gives it the
Banner General 8.5.1 April 2012User GuideLetter Generation

April 20
proper syntax. A variable used as a subquery cannot have another subquery defined within it. A variable can have only one subquery. If defined, it must be the last rule.
8. In the AND/OR field, enter the connector that links rules with AND or OR logic. All lines in the Rules block, except the last line, must contain a connector.
9. Once all the rules are entered, save your changes.
10. Exit the form. The GLOLETT process will run to compile the variable only after you exit the GLRVRBL form.
Task Notes
• When using a dynamic parameter in a variable, the field that is being compared to the dynamic parameter should, if possible, be from the table that is used in the Select statement.
• When using a dynamic parameter with an IN or NOT IN operator do not include left and right parentheses. Do not include spaces when entering the value for the dynamic parameter. Define the IN statement similar to the following:
column_name IN &Term
• GLBLSEL will generate an 88 level prompt for &Term. Enter the values within single quotes with the parentheses, without using spaces:
88 &Term ('200111','200222','200333')
• LIKE compares a character value to a pattern and may include wildcards. The following wildcards may be used:
• an underscore (_) matches exactly one character
• a percent sign (%) matches zero or more characters
• To find SPRIDEN_LAST_NAME values like 'Smith' and 'Smithsonian', the following may be used:
SPRIDEN_LAST_NAME LIKE 'Smith%'
• NOT LIKE compares a character value to a pattern and excludes the matched values. For example, to exclude SPRIDEN_LAST_NAME values like 'Smith' and 'Smithsonian':
SPRIDEN_LAST_NAME NOT LIKE 'Smith%'
• IS NULL selects rows which have a null value in a particular column. For example:
GURMAIL_DATE_PRINTED IS NULL
• IS NOT NULL selects rows which have a non-null value. For example:
GURMAIL_DATE_PRINTED IS NOT NULL
12 Banner General 8.5.1 6-11User Guide
Letter Generation

6-12
• BETWEEN tests whether a value is within a range of values by testing "greater than or equal to <low value> and less than or equal to <high value>”. For example:
GURMAIL_TERM_CODE BETWEEN '20100' AND '20999'
• To improve processing time, certain criteria (such as whether a person is alive or has a current ID) should be specified through population selection rules rather than in variables.
• Columns from the Address View (SPVADDS) or any view using collector table records, cannot be concatenated with columns from other tables in the same Select statement on GLRVRBL. For example, Mr. John Smith cannot be extracted from a single variable because Mr. is the prefix being extracted from the Person Table (SPBPERS) and John Smith is the name being extracted from the Address View (SPVADDS). Creating two separate variables, one for the prefix and one for the name, and printing them together is a solution. A second solution would be to extract the name from the Identification Table (SPRIDEN) rather than the Address View. If the second solution is used, the prefix can be extracted in the same variable and concatenated to the name.
• A variable cannot have multiple sequences if the SPVADDS view is being used. The address variables must be broken into their component pieces such as street line 1, city, and state.
• Rules entered in the Rules block on the GLRVRBL Form are ignored for variables that select columns from the SPVADDS view.
Copying Variable Rules
You can copy the rules for an existing variable to create a new variable. A copied variable can be changed as needed.
1. Access the Variable Rules Definition Rules Form (GLRVRBL).
2. Enter the application associated with the variable you want to copy in the Application field.
3. Enter the variable you want to copy in the Variable field. You can select the down arrow icon to access the Variable Inquiry Form (GLIVRBL) to search for a variable.
4. To access the Variable Copy window, select Copy from the Options menu. Information in the Copy From block defaults from the main window.
5. Enter the application associated with the new variable in the Copy To Application field. You can select the down arrow icon to access the Application Inquiry Form (GLIAPPL) to search for an application.
6. Enter the new variable in the Copy To Variable field. The name must begin with an asterisk (*).
Banner General 8.5.1 April 2012User GuideLetter Generation

April 20
7. Save your changes. The main window reappears with the cursor in the Description field.
8. Use the normal steps to change and save rules for the new variable. You can use the steps in “Creating a Variable” on page 6-6, beginning with step 5.
Creating a Multiple-Sequence Variable
You can create a variable with multiple sequences. Each sequence can have its own definition elements such as Select, From, Order By, Group By, and selection rules. Situations when multiple sequence variables are valuable include:
• Bringing back a value for each sequence without creating multiple variables
• Bringing back a single value that depends on the characteristics of the ID
Bringing Back a Value for Each Sequence Without Creating Multiple Variables
It is sometimes easier and gives better results to create a single variable with multiple sequences than to create multiple variables. For example, you want to print an individual's first, last, and middle names on a letter in this format:
Last: SmithFirst: RonMiddle: James
You could create three variables, one for each part of the name. Another method is to create one variable with three sequences, one for each part of the name:
1. Enter Full Name as the variable description in the Description field.
2. Define the first variable sequence:
This sequence concatenates the text of ‘Last:’ with the value of the last name. Notice the rule to check that the current name record is accessed (SPRIDEN_CHANGE_IND IS NULL).
3. Define the second variable sequence:
Sequence 1 of 3
Select 'Last: '||SPRIDEN_LAST_NAME
From SPRIDEN
Data ElementOperatorValue
SPRIDEN_CHANGE_INDIS NULL
12 Banner General 8.5.1 6-13User Guide
Letter Generation

6-14
This sequence concatenates the text of ‘First:’ with the first name. Again note the rule to check that the current name record is accessed.
4. Define the third variable sequence:
This sequence concatenates the text of ‘Middle:’ with the middle initial. You must enter the same rule on all sequences to ensure the current name record is returned. You have created only one variable. If an ID doesn’t have a middle name, the printed letter will not have a blank.
Sequence 2 of 3
Select 'First: '||SPRIDEN_FIRST_NAME
From SPRIDEN
Data ElementOperatorValue
SPRIDEN_CHANGE_INDIS NULL
Sequence 3 of 3
Select 'Middle: '||SPRIDEN_MIDDLE_NAM
From SPRIDEN
Data ElementOperatorValue
SPRIDEN_CHANGE_INDIS NULL
Banner General 8.5.1 April 2012User GuideLetter Generation

April 20
Bringing Back a Single Value That Depends on the Characteristics of the ID
A variable can sometimes return only one value for an ID, but, depending on the characteristics of the ID, the value could differ. For example, you’re sending the same letter to both people and organizations. You could define, as a single variable, a variable that has either first and last name (if a person) or name (if an organization). But because an ID is a person or an organization (not both), you can use a multiple sequence variable.
1. Define the first variable sequence:
This sequence concatenates the first name and last name, with a space between, based on the rules established for the person. Notice the rule to check that the current name record is accessed (SPRIDEN_CHANGE_IND IS NULL).
2. Define the second variable sequence:
This sequence retrieves only the last name field because that is where the organization name is stored. Notice the rule that this sequence will be met only by IDs that are organizations (SPRIDEN_ENTITY_IND = ‘C’). Again note the rule to check that the current name record is accessed (SPRIDEN_CHANGE_IND IS NULL).
Sequence 1 of 2
Select SPRIDEN_FIRST_NAME||' '||SPRIDEN_LAST_NAME
From SPRIDEN
Data ElementOperatorValue
SPRIDEN_CHANGE_INDIS NULL
Data ElementOperatorValue
SPRIDEN_ENTITY_IND=‘P’
Sequence 2 of 2
Select SPRIDEN_LAST_NAME||'
From SPRIDEN
Data ElementOperatorValue
SPRIDEN_CHANGE_INDIS NULL
Data ElementOperatorValue
SPRIDEN_ENTITY_IND=‘C’
12 Banner General 8.5.1 6-15User Guide
Letter Generation

6-16
The rules on each sequence are mutually exclusive, so any ID meets the criteria of only one sequence. You have created fewer variables, which results in simpler letter definitions for determining whether a person or an organization is being processed.
Creating a Variable with ID Information Other Than the ID Receiving the Letter
Some variables have ID information other than the ID receiving the letter. Examples of this type of variable include:
• Spouse ID information
• Roommate ID information
• Employer ID information
• Advisor ID information
Rules for these variables are defined differently because they involve multiple IDs (PIDMs). Two conditions must exist:
• The variable Type must be defined on the Variable Rules Definition Form (GLRVRBL) as Manual. This means that all joins must be entered in the Rules block, including PIDM joins that automatically take place in other variable types.
• The first table in the From field must be the table that contains the column from the Rules block that references the PIDM receiving the letter. This is necessary for the Letter Extract Process (GLBLSEL) to correctly extract the data for the variable.
Sorting Variables
When you use the Letter Generation Print Report (GLRLETR) to produce letters directly in Banner, not through the download option, you may want to sort the letters by a variable such as name, ZIP code, or postal code. The GLRLETR process uses a sort parameter.
NoteUse a sort variable that returns a single value. If the sort variable returns more than one value, the process will generate duplicate letters.
Sometimes you may want to sort on a variable that is not being printed in the letter by itself. For example, the variable for name might concatenate first and last name. You want to sort the letter by last name, which is not a variable being printed in the letter. Because the name variable is a concatenation of fields, it cannot be used as the sort variable. Here's how you can accomplish the task:
1. Use the Variable Rules Definition Form (GLRVRBL) to create a variable that is always NULL. This is a simple variable to create, and it controls logic flow in the letter:
• Enter *NULL_VAR in the Variable field.
Banner General 8.5.1 April 2012User GuideLetter Generation

April 20
• Enter Null Variable in the Description field.
• Enter two single quotes (’’) in the Select field.
• Enter DUAL in the From field.
• Don’t enter any rules for the variable.
2. Use the Paragraph Form (GUAPARA) to create a paragraph that includes:
• An ^IFNULL check on the *NULL_VAR variable.
• A branch around the sort variable. This branch prevents the variable from being printed but allows its value to be extracted by the Letter Extract Process (GLBLSEL) and used as a sort value by the Letter Generation Print Report (GLRLETR).
• The sort variable on a line by itself, between the check on the *NULL_VAR and the location to which the logic branches.
3. Use the Letter Process Form (GUALETR) to build a letter that includes the paragraph.
Example:
This sample paragraph checks to see if a null variable is null (which it will always be) and branches to another location, preventing the lines following the check from being printed:
This paragraph checks the value of *NULL_VAR, and if it is null, branches to the line that starts with &END_PARA. The variables between the ^IFNULL check and the &END_ PARA line are not printed in the letter. These variables must be listed because their values are used for other purposes (other variables have these variables in their Select statements).
NoteThe *NULL_VAR must be listed even though it is in the ^IFNULL line. This is because the GLBLSEL process extracts data only for variables
^IFNULL*NULL_VAR &END_PARA*NULL_VAR*BAMT*CAMT*ORES_AMT*ERES_AMT*CRES_AMT*RESOURCES*TERM01_TOTAL*TERM02_TOTAL*TERM03_TOTAL&END_PARA
12 Banner General 8.5.1 6-17User Guide
Letter Generation

6-18
that start in position 1. To correctly process the ^IFNULL check on the *NULL_VAR, GLBLSEL must know the value of *NULL_VAR. The only way it can know the value is if it is on a line by itself like all other variables.
Creating a Hidden Variable
The Letter Extract Process (GLBLSEL) only extracts variables starting in column 1 and appearing on a separate line in the letter. To extract variables found within another variable’s Select clause, or variables only referenced in ^IFNULL statements, the variables must be hidden on the letter:
• Define a variable that will always be null.
• Enter this variable on the letter just before all other variables to be hidden.
• Place an ^IFNULL condition above the dummy null variable. This causes the logic to skip around the null variable and hidden variables.
Defining a Variable with a First Variable Type
When the Letter Extract Process (GLBLSEL) is run, it must identify the variable it will process first to determine whether the ID should receive the letter. The first processed variable must return only one value for an ID, because it becomes the key of extracting the values of the other variables in this letter. If the first variable returns more than one value for an ID, then all other variables in the letter have that many values multiplied by the number of values it should have returned. Also, if the first variable returns no value for an ID, no other variable in the letter returns a value for that ID, and the ID does not receive a letter.
There are two ways to identify the first variable:
• Using the default first variable
• Defining the first variable on GLRVRBL
WarningIf there is no default first variable and no first variable defined on GLRVRBL, the first variable that GLBSLEL processes is unpredictable. The output of the variables in the letter can cause unexpected results.
Using the Default First Variable
The default first variable that GLBLSEL uses is a variable that defines an address using the SPVADDS view. This view contains one address per ID based on the address hierarchy entered for the address type parameters on GLBLSEL. This means that every ID receiving the letter being processed needs to have an effective address with an address type that matches one of the address parameter values entered during processing. If it does, then the SPVADDS variable returns one value per ID and the other variables in the letter return the correct number of values. If the ID does not have an effective address with an address type that matches one of the address parameter values entered during processing, no value will
Banner General 8.5.1 April 2012User GuideLetter Generation

April 20
be in the SPVADDS view for the ID. The SPVADDS variable returns no value, and the ID does not receive a letter.
On the Variable Definition Rules Form (GLRVRBL), an SPVADDS_NAME variable is defined like this:
This variable retrieves the last name of the ID if the ID has an address of one of the address types entered for the address type (parameter 10) when you run GLBLSEL.
Defining the First Variable on GLRVRBL
Another way to identify the first variable that GLBLSEL processes is to define the variable type as First on the Variable Definition Rules Form (GLRVRBL). This variable, when used in a letter not containing SPVADDS - related variables, indicates that it is the first variable GLBLSEL should process.
Using a first type variable allows you to specify an address not necessarily found in the SPVADDS view. Some of the Banner products have specific address types that are to be used for a letter, and the first-type variable allows those addresses to be used. (Those address variables are probably defined using SPRADDR field names.)
In defining a first-type variable, two important items must be considered:
• The variable must be ID-related. That is, it must be a table where the ID has a record and it cannot be a variable that uses a non-PIDM table like DUAL or GUBINST.
• The variable must return only one value per ID. If more than one value is returned, all other variables in the letter will have multiple values. If no value is returned, the ID will not receive a letter.
If more than one variable in a letter is defined as first-type, there is no way to determine which one GLBLSEL will process first. However, if all first-type variables follow these two guidelines, it is not a problem to have multiple first-type variables in a letter.
WarningEven if a first-type variable is used and no SPVADDS variable is used, the address type parameter on GLBLSEL must be entered with at least one value.
Sequence 1 of 1
Select SPVADDS_LAST_NAME
From SPVADDS
12 Banner General 8.5.1 6-19User Guide
Letter Generation

6-20
Example:
SPRIDEN_CHANGE_IND IS NULL ensures that the current name record is accessed, not any previous last names. This guarantees that only one value per ID is selected.
Building Letters
1. Use the Letter Code Validation Form (GTVLETR) to create a letter code and description for the letter. You can identify whether duplicate letters are allowed.
2. Use the Paragraph Code Validation Form (GTVPARA) to create a paragraph code and description for each paragraph in the letter.
3. Use the Variable Definition Rules Form (GLRVRBL) to define the variables used in the paragraphs and build their associated selection rules. Examples include name, address, and salutations.
NoteThe GLBLSEL process can handle up to about 2500 variables per letter. The exact number depends on the length of the variable name; if you use shorter names you may be able to use more variables. This is controlled by the WS-PARM-LIST value in GLBLSEL.pco.
If you exceed the limit, an error message “*ERROR* Length of variables has exceeded max limit” is displayed and GLBLSEL stops responding.
4. Use the Paragraph Form (GUAPARA) to build individual paragraphs that can be used in letters. Paragraphs contain user-defined text, variables, and formatting commands (for example, underline and center). Whenever possible, build paragraphs that can be used in multiple letters.
5. Use the Letter Process Form (GUALETR) to build the letter. Identify the paragraphs in the letter and the sequence in which the paragraphs should appear.
Sequence 1 of 1
Select SPRIDEN_LAST_NAME
From SPRIDEN
Data ElementOperatorValue
SPRIDEN_CHANGE_INDIS NULL
Banner General 8.5.1 April 2012User GuideLetter Generation

April 20
Co
#B
#Cxx
Task Notes
• Letter Generation does not support the GOTO command. You can simulate this command by using the ^IFNULL condition on a variable that is always null.
• Variables whose data can contain a pound sign (#), such as the street line of an address, should be preceded by a #CL formatting command and followed by a pound sign. This prevents Letter Generation from treating the pound sign in the variable as a formatting command.
• A page break should exist at the top of each letter (after any table definitions) so that each copy of the letter starts on a new page. The page break should be in a paragraph by itself.
• If the letter will be created from a download file, the letter only needs to contain one paragraph. This paragraph must contain a list of the variables used in the letter. Text and formatting commands are ignored.
• If additional table definitions need to be used in a letter, all table definitions must be defined in a paragraph by themselves. This must be the first paragraph in the letter.
• Use caution if you use the SunGard Higher Education-delivered variable names in your own letters. The delivered variables have been created specifically for the SunGard Higher Education-supported letters and may need modifications in other letter extract selections.
Facility Oracle Report Formatting Emulation Commands
The following formatting commands can be used when building paragraphs on the Paragraph Form (GUAPARA). Formatting commands must appear on a line by themselves.
These conventions are used in following table:
• The word closed indicates that the command must be terminated by a pound sign (#) after the information about the command. For example, you must identify the last character of the text to be underlined by inserting a pound sign (#) after the last character to be underlined. The pound sign does not have to appear on a line by itself.
• The character x indicates text or variable information.
• The character n indicates a numeric value.
de Description
Blank — Insert one blank line in the output text.
ENx#
Center Text — Center the text or variable “xxx” in the current column. Closed.
12 Banner General 8.5.1 6-21User Guide
Letter Generation

6-22
#Cxx
#C
#C
#Cxx
Co
L x#
Column Literal — Suspend formatting for all text or variables in the current column for #CL through #. Closed.
Note: Variables containing multiple sequence numbers will not format properly using the column literal. If you want this type of formatting, each sequence number must be a separate variable.
ONCAT x Concatenate — Place x next to the preceding word without inserting a space between them. Frequently used to place punctuation after a variable.
Note: A backslash (\) is required to concatenate a period (.), for example:
*VARIABLE#CONCAT ,
*VARIABLE#CONCAT !
*VARIABLE#CONCAT \.
Note: A trailing space is required after the #CONCAT command and before the x string.
S n Column Skip — Skip n lines in the current column.
ULx#
Center with Underline — Center and underline the text or variable xxx following the #CUL command within the current column. Closed.
de Description
Banner General 8.5.1 April 2012User GuideLetter Generation

April 20
#Den
#F
#I
#N
#N
Co
T n s1 e1 s2 e2 ...sn #
Define Table — Define the column boundaries for the specified table where n is the unique table number, s1 is the starting position of column 1, e1 is the ending position of column 1, and s2 through en are the starting and ending positions of other columns.
Table numbers must be within the range of 1 through 25.
The #DT command is similar to setting formatting lines and tab stops in word processing. Multiple tables can be defined within the same letter, but must be placed as the first paragraphs in the letter. They must be in a paragraph by themselves. #DT commands are the only commands that should precede the #NP command at the top of the letter.
Make sure the first paragraph has only #DT commands. You will not receive an error message if the first paragraph is not a #DT paragraph, but the letter will not process.
A #DT, seq#1 paragraph is necessary when the letter contains a #T command. You do not need the #DT if the #T is not present.
#DT is not required if the GLRLETR parameter 02, Word Processor Extract Option is 1 (Word) or 2 (WordPerfect). #DT is required if the GLRLETR parameter 02 is 0 (Banner).
IFNULL only works when you run GLRLETR for a Banner extracted letter (Word Processor Extract Option = 0). In addition, the download file will not contain paragraph text or literals.
R Flush Right — Justify both left and right margins. This is the default setting.
Note: When using #FR, large gaps may appear between words so that both margins align properly.
n Indent — Indents all the following text or variables by n number of spaces in the current column. This is different from #P which only indents the first line. To terminate the indent command, use the #TE command at the end of last line of text to be indented.
New Line — Advance to the next line in the current column.
C New Column — Advance to the next column.
de Description
12 Banner General 8.5.1 6-23User Guide
Letter Generation

6-24
#N
#P
#P
#R
#R
#S
#S
#T
#T
#Txx
Co
P New Page — End the current page and start a new page. To prevent page creep, the #NP command should be placed as the first command in a letter and should be the only command in a paragraph. It is preceded only by a paragraph with #DT commands.
AGE t b Page Boundary — Define the top and bottom page boundaries where t is the top line and b is the bottom line.
Paragraph — Start a new line within the current column. Indent five spaces at the beginning of the line.
Right Justify — Set or reset the switch to right justify all text or variables in the current column.
R Ragged Right — Left justify all text or variables, but leave the right margin unjustified.
n Line Skip — Skip n lines.
PN t p sl bn sn # Start Page Numbering — Define page numbering where t is the type of numbering:
1 = Section Page Numbering [m-n] 2 = Letter Page Numbering [n - from page 2 onward]3 = Period Page Numbering [n]4 = Plain Page Numbering [n]
p is the character position where the number is printed; sl is the number of lines to skip after printing the number; bn is the number of the first output page; and sn is the section number if type 1 was selected. Closed.
n Table — Use the column rules for table n previously defined in the #DT command.
Note: Tables do not close when a new table is invoked. Remember to use the #TE command before invoking a new table.
E Table End — End one table before invoking another.
TL yx #
Title —Underline a specific title at the top of each page. y is the length of line to center. Closed.
If a new page formatting command (for example, #NP) is in the same letter as a title command, place the new page marker directly after the title command in the letter.
de Description
Banner General 8.5.1 April 2012User GuideLetter Generation

April 20
#U
^I&B
Co
Extracting Variables with GLBLSEL
The Letter Extract Process (GLBLSEL) extracts values from the database for the variables that appear in a specified letter. The extracted data is inserted into the Letter Collector Table (GLRCOLR).
You can run GLBLSEL from the Process Submission Control Form (GJAPCTL) or from the operating system.
Using Job Submission
You can process all pending letters (those waiting to be printed) for a specific letter code, or you can process the letter code for a specific population.
NoteIf you process the letter code for a specific population, the population must be extracted with the Population Selection Extract Process (GLBDATA) before you run GLBLSEL
1. If you are extracting variables for a specific population, make sure the population has been extracted with the Population Selection Extract Process (GLBDATA).
2. Access the Process Submission Control Form (GJAPCTL).
3. Enter GLBLSEL in the Process field.
4. If the process has more than one job parameter set, enter the name of the set in the Parameter Set field. You can click the down arrow icon to access the Job Parameter Set Rule Form (GJRJPRM) to search for a job parameter set.
5. (Optional) If you want to view, save, or print online, enter DATABASE in the Printer field.
L CLOSED #UL Underline. Closed.
FNULL *VARIABLE RANCH
If *VARIABLE returns a null value, skip all actions (text, variables, and formatting commands) up to &BRANCH. &BRANCH must be a label that begins with an ampersand(&), starts in the first position of a line in a paragraph, and is the only item on that line.
*VARIABLE is the variable to be checked for null values. *VARIABLE must also be identified elsewhere in the letter on a line by itself.
de Description
12 Banner General 8.5.1 6-25User Guide
Letter Generation

6-26
PaNu
1
2
3
4
5
6
6. Go to the Parameter Values block. Parameters defined for the process appear. Default parameter values appear, if they have been defined.
7. Enter the following parameter values:
rameter mber Parameter Value
Application Application associated with the letter being processed. This must be a valid application defined on the Application Definition Rules Form (GLRAPPL). This must be the same application associated with the population selection (if being used) and all variables in the letter. One application can be processed per run.
Process Pending Letters
Code that determines how the letter code is processed:
Y Process all pending letters for the letter code. See “Pending Letters” on page 6-29 for more information.
N Process the letter code for a specific population. The population must have been previously extracted with the Population Selection Extract Process (GLBDATA).
Note: If you are running GLBLSEL from the operating system, system prompts give you the ability to process all pending letters for the application or all pending letters for a specific letter code. If you are running online from GJAPCTL, you can only process pending letters for a specific letter code.
Letter Code Code of the letter being processed. This must be a valid letter defined on the Letter Code Validation Form (GTVLETR). One letter can be processed per run.
Selection ID ID of the population selection for which the letter is being processed. This must be a valid population selection defined on the Population Selection Definition Rules Form (GLRSLCT) and must be associated with the application entered in parameter 1. A population selection is required if parameter 2 is set to N.
Creator ID Oracle ID of the user who created the population selection. A creator ID is required if you entered a population selection in parameter 4.
User ID Oracle ID of the user who extracted the population with the Population Selection Extract Process (GLBDATA). A user ID is required if you entered a population selection in parameter 4.
Note: A population must exist for the combination of application, selection ID, creator ID, and user ID.
Banner General 8.5.1 April 2012User GuideLetter Generation

April 20
7
8
9
10
11
12
PaNu
8. Go to the Submission block.
9. Select the Hold radio button or the Submit radio button.
10. Select the Save function.
Term Code Code of the term for which you wish to process pending letters. This must be a valid code on the Term Code Validation Form (STVTERM). This parameter is used only if you are processing pending letters in the Student System. One term can be processed per run.
Aid Year Aid year for which you wish to process pending letters. This parameter is used only if you are processing pending letters in the Financial Aid System. One aid year can be processed per run.
Address Selection Date
Address date for which the address of choice must be effective. If blank, the current date is used.
Address Type Type codes of the addresses you wish to process, prefixed by the priority of each type code. The first character is the priority, and the second and third characters are the address type code from the Address Type Validation Form (STVATYP). For example, 1MA means the mailing address (MA) is the first choice; 2PR means the permanent address (PR) is the second choice. Enter each choice on a separate line.
Note: You can have up to 9 entries, and the valid priority numbers are 1 - 9. More than one entry can have the same priority.
Detailed Error Report
Y Write error messages to the glblsel.log file for IDs for which variable data could not be extracted.
N Do not write error messages to the log file.
Detailed Execution Report
S Display SQL statements.
I Display SQL statements and inserts.
Y Display paragraphs.
rameter mber Parameter Value
12 Banner General 8.5.1 6-27User Guide
Letter Generation

6-28
11. (Optional) If the letter contains variables with dynamic parameters, the cursor returns to the Parameter Values block. Enter values for the dynamic parameters in parameter 88. Select the Save function again.
NoteYou must enter a non-blank value for each 88 level prompt.
Using the Operating System
Check with your technical personnel for the appropriate command to use at your institution. For example:
The parameters used if you are running from the operating system are similar to those used if you are running online from the Process Submission Control Form (GJAPCTL). The only difference is that you can process pending letters for all letter codes within an application. With GJAPCTL you are limited to processing pending letters for a specific letter code.
NoteInteractively entering job parameters from the host is no longer supported. Parameters for all jobs must be entered on the Process Submission Controls Form (GJAPCTL).
Task Notes
• GLBLSEL does not write a record to the Letter Collector Table (GLRCOLR) if the value of the variable selected is blank. For example, if the variable is a birthdate (*BDATE) and the person's birthdate is not on the system, no record is written for this person for birthdate. Only variables requested in the paragraphs contained in the letter are written to GLRCOLR.
• If you are processing pending letters and multiple applications are associated with the system indicator, GLBLSEL extracts the variables for the application entered as parameter 1 and not necessarily the application associated with the variables in the letters.
• If different pending letters use the same format table definitions (for example, DT #1), the formatting of the letters causes errors and indicates that the table is defined multiple times.
• Letters are not extracted unless an effective address is found for the person which meets one of the address types entered in GLBLSEL and a first type variable is not used. This applies to both pending and nonpending letters. If a letter could not be created because no address existed in SPRADDR for that ID or because an address was found, but it was inactive, Banner lists that person’s name and ID in the log file for GLBLSEL.
UNIX: glblsel.shl username password
OpenVMS: @glblsel username password
Banner General 8.5.1 April 2012User GuideLetter Generation

April 20
• When DATABASE is specified in the Printer field, GLBLSEL creates a .log for reviewing output, but not a .lis.
Pending Letters
Pending letters are letters that were created on the system-specific Mail Form (xUAMAIL) or created through a process but not yet printed. You can query pending letters or all letters for an ID, regardless of the Banner system, on the Mail Query Form (GUIMAIL). Check the appropriate Banner system documentation to determine which processes may create a pending letter.
GLBLSEL identifies pending letters as those letters on GUIMAIL that meet all of the following conditions:
• The Letter code on GUIMAIL matches the letter code entered as parameter 3 for GLBLSEL.
• The Term on GUIMAIL matches the term in parameter 7 for GLBLSEL (Student System only).
• The Initiated plus the Wait days on GUIMAIL is less than or equal to the current date.
• The Printed date on GUIMAIL is blank.
If you are running GLBLSEL from the operating system, you can also process pending letters for all letter codes within an application. Rather than checking for a match of the Letter code, GLBLSEL checks to make sure the System indicator on GUIMAIL matches the system indicator of the application in parameter 1.
Generating Letters from Banner with GLRLETR
The Letter Generation Print Report (GLRLETR) can generate letters directly from Banner. The system reads the paragraphs within a letter in the sequence specified. Text is formatted and printed. When a variable is encountered (identified by an asterisk and a variable name), the value of the variable name is extracted from the Letter Collector Table (GLRCOLR) and merged into the letter. When an RPF command is read, the letter is formatted as specified. The General Mail Table (GURMAIL) is updated.
NoteGLRLETR can also create a download file that can be merged with a word processing text file. See “Creating a Download File with GLRLETR” on page 6-35 for more details.
12 Banner General 8.5.1 6-29User Guide
Letter Generation

6-30
GLRLETR can be run through Job Submission or through the operating system.
NoteInteractively entering job parameters from the host is no longer supported. Parameters for all jobs must be entered on the Process Submission Controls Form (GJAPCTL).
Using Job Submission
1. Make sure the letter was built on the Letter Process Form (GUALETR).
2. If a population is being used, make sure the population was selected with the Population Selection Extract Process (GLBDATA).
3. Make sure variable data was extracted from the database with the Letter Extract Process (GLBLSEL).
4. Access the Process Submission Control Form (GJAPCTL).
5. Enter GLRLETR in the Process field.
6. If the process has more than one job parameter set, enter the name of the set in the Parameter Set field. You can click the down arrow icon to access the Job Parameter Set Rule Form (GJRJPRM) to search for a job parameter set.
7. (Optional) If you want to view, save, or print online, enter DATABASE in the Printer field.
8. Go to the Parameter Values block. Parameters defined for the process appear. Default parameter values appear, if they have been defined.
9. Enter the following parameter values:
Banner General 8.5.1 April 2012User GuideLetter Generation

April 20
ParaNum
1
2
3
4
5
6
meter ber Parameter Value
Application Code Application associated with the letter being processed. This must be a valid application defined on the Application Definition Rules Form (GLRAPPL). One application can be processed per run.
Word Processor Extract Option
Code that indicates whether letters are generated directly from Banner or created from a download file. Enter the value 0 to generate letters directly from Banner.
Note: If this option is 1 (Word) or 2 (WordPerfect), you do not need a #DT paragraph.
Process ALL Pending Letters
Code that determines what letters are printed:
Y Print all pending letters extracted for the application code. See “Pending Letters” on page 6-29 for more information.
N Print a specific letter code. This is the default value.
Note: Process ALL Pending Letters only works when the Word Processor Extract Option is 0 (extracted directly from Banner)
Letter Code Code of the letter being printed. This must be a valid letter code defined on the Letter Code Validation Form (GTVLETR). One letter can be processed per run.
Sort Variable Name of the variable used to sort letters in a specific order. The variable name must start with an asterisk (*). Use uppercase. Examples of sort variables are ZIP/postal code and name.
If the variable is not in the letter, no letters are printed and the Control Report indicates the sort variable is not valid.
Note: Use a sort variable that returns a single value. If the sort variable returns more than one value, the process will generate duplicate letters.
Term Code Code of the term for which you wish to print letters. This must be a valid code on the Term Code Validation Form (STVTERM). One term code can be processed per run. This code is required if you are processing letters in the Student System.
WarningIf you are processing GLRLETR through Job Submission, this parameter is required regardless of the system. However, it is used only to process letters in the Student System.
12 Banner General 8.5.1 6-31User Guide
Letter Generation

6-32
7
8
9
ParaNum
Module Code One-character code that identifies the module associated with the letter being printed. Examples include A (Admissions), G (Gift/Pledge), C (Constituent), R (Recruiting), B (Billing), H (History), and F (Registration). This parameter is not validated.
Module codes vary by Banner product. For a complete list of module codes, see the “Module Identifier” table in Chapter 1 of the Banner Getting Started Guide.
GLRLETR updates the print date in the GURMAIL Table for published materials that match this module code. A list of the recipients and their materials is included in the report control information. Published materials are items that are sent to individuals, but are not printed by Letter Generation. Examples include college catalogs, sports brochures, and pre-printed forms.
WarningThis parameter is not required if you are processing from the operating system. A value is required, however, if you are processing from Job Submission. If updates should not be made for published materials, enter a module code that is not currently used.
Audit Indicator Y Print one sample letter for each letter code extracted. No updates occur.
N Generate letters, generate a summary report, update the print dates for generated letters on the Mail Query Form (GUIMAIL), and delete all data in the Letter Collector Table (GLRCOLR) for the letters selected to print.
Free Format Date 1 Free-form date that is printed on the requested letter for variable *DATE1. *DATE1 can be a variable on a letter that is not built on the Variable Definition Rules Form (GLRVRBL); the value of this parameter becomes the variable value. The maximum length of this date is 30 characters.
meter ber Parameter Value
Banner General 8.5.1 April 2012User GuideLetter Generation

April 20
10
11
12
ParaNum
10. Go to the Submission block.
11. Select the Hold radio button or the Submit radio button.
12. Save your changes.
13. Print the letter using the operating system’s print command.
Using the Operating System
Use these steps to generate letters directly in Banner from the operating system:
1. Use the appropriate command for your institution. For example:
The resulting output file (glrletr.rpf) contains formatting commands and instructions, boilerplate text, and variable text that will be substituted in each letter.
2. Enter this command to format the results:
The resulting output file is named glrletr.lis. If you want to specify a different name for the output file, format the command like this:
Free Format Date 2 Free-form date that is printed on the requested letter for variable *DATE2. *DATE2 can be a variable on a letter that is not built on the Variable Definition Rules Form (GLRVRBL); the value of this parameter becomes the variable value. The maximum length of this date is 30 characters.
Free Format Date 3 Free-form date that is printed on the requested letter for variable *DATE3. *DATE3 can be a variable on a letter that is not built on the Variable Definition Rules Form (GLRVRBL); the value of this parameter becomes the variable value. The maximum length of this date is 30 characters.
Aid Year Code Aid year for which you wish to print letters. This must be a valid code on the Institution Financial Aid Options Form (ROAINST). This parameter is required if the application code in parameter 1 is associated with the Financial Aid System.
meter ber Parameter Value
UNIX: glrletr -r userid/password
OpenVMS: runproc glrletr -r userid/password
UNIX: guaprpf -f glrletr
OpenVMS: runproc guaprpf -f glrletr
12 Banner General 8.5.1 6-33User Guide
Letter Generation

6-34
3. Print the letter using the operating system’s print command.
NoteInteractively entering job parameters from the host is no longer supported. Parameters for all jobs must be entered on the Process Submission Controls Form (GJAPCTL).
Task Notes
• A letter is not generated for an ID if the letter code has a duplicate indicator of N on the Letter Code Validation Form (GTVLETR) and the ID already has an entry on the Mail Query Form (GUIMAIL) for the letter.
• A letter is not generated for an ID if Date Printed is not blank.
• If a checklist variable is used in a letter, the request dates and request count on the Admissions Checklist block of the Admissions Application Form (SAAADMS) are updated.
• If a variable name is found in a letter but does not exist on the extract file, nothing is printed. For example, if the letter is requesting some action by the person as of a certain date and the date parameters are not entered in the extract program, the text appears but the date does not. In this example, the date should appear after the word “by,” but the date does not exist:
Please send your transcript to my office by or you will be unable to register.
• Only one letter is created in a run for a letter code and person.
UNIX: guaprpf -f -o outputfilename glrletr
OpenVMS: runproc guaprpf -f -o outputfilename glrletr
Banner General 8.5.1 April 2012User GuideLetter Generation

April 20
• If multiple items for a variable are extracted, the first value is printed and a line is skipped before the next value is printed. If there is a single value variable, no line is skipped.
In the following example, there is a single date and a single term. Multiple *CHKL variables have been extracted. The paragraph reads as follows:
Line 1:The following items are requested by
Line 2:*DATE1
Line 3:in order for you to register by
Line 4:*TERM
Line 5:#CONCAT \.
Line 6:#S 2
Line 7:*CHKL
Line 8:#S 2
Line 9:Thank you.
The result is:
The following items are requested by August 1, 2002 in order for you to register by Fall 2003.
0001 High School Transcript
0004 Tuition Deposit
Thank you.
Creating a Download File with GLRLETR
The Letter Generation Print Report (GLRLETR) can create a download file that can be merged with a text file created by certain word processors. Supported tools are Microsoft Word for Windows (version 2.0 or higher) and WordPerfect (version 4.2 or higher). This download option allows you to print letters using all available formatting, styles, and fonts of your word processor.
NoteSunGard Higher Education does not support WordPerfect 8.0 and higher.
GLRLETR can also generate a letter directly in Banner. See “Generating Letters from Banner with GLRLETR” on page 6-29 for more details.
The download option of GLRLETR creates two files:
• The download file contains a “header record” with all of the variables used in the letter and records for each ID in the population. The name of the download file
12 Banner General 8.5.1 6-35User Guide
Letter Generation

6-36
depends on the run sequence number produced by job submission and ends with a .DOC extension. For example, GLRLETR_1234.DOC is a valid name, where 1234 is the run sequence number.
• A control report contains information about the letters that were processed. This information includes the number of “letters” produced, referring to the number of IDs that had data extracted.
NoteIFNULL only works when you run GLRLETR for a Banner extracted letter (Word Processor Extract Option = 0). In addition, the download file will not contain paragraph text or literals.
Use these steps to create a download file:
1. Make sure the letter was built on the Letter Process Form (GUALETR).
NoteThe letter only needs to contain one paragraph. This paragraph must contain a list of the variables used in the letter. (Text and formatting commands are ignored.) Variables must be defined on the Variable Definition Rules Form (GLRVRBL). Each variable must be entered on a separate line. The order of the variables does not matter.
2. If a population is being used, make sure the population was selected with the Population Selection Extract Process (GLBDATA).
3. Make sure variable data was extracted from the database with the Letter Extract Process (GLBLSEL).
4. Access the Process Submission Control Form (GJAPCTL).
5. Enter GLRLETR in the Process field.
6. If the process has more than one job parameter set, enter the name of the set in the Parameter Set field. You can click the down arrow icon to access the Job Parameter Set Rule Form (GJRJPRM) to search for a job parameter set.
7. (Optional) If you want to view, save, or print online, enter DATABASE in the Printer field.
8. Go to the Parameter Values block. Parameters defined for the process appear. Default parameter values appear, if they have been defined.
9. Enter the following parameter values:
Banner General 8.5.1 April 2012User GuideLetter Generation

April 20
PN
1
2
3
4
6
arameter umber Parameter Value
Application Code Application associated with the letter being processed. This must be a valid application defined on the Application Definition Rules Form (GLRAPPL). One application can be processed per run.
Word Processor Extract Option
Code that indicates whether letters are generated directly from Banner or created from a download file. Enter one of these values:
0 Letters are generated directly from Banner.
1 Produce an output file for Word.
2 Produce an output file for WordPerfect.
Process ALL Pending Letters
Code that determines what letters are printed:
Y Print all pending letters for the application code. See “Pending Letters” on page 6-29 for more information.
N Print a specific letter code. This is the default value.
Note: Process ALL Pending Letters is only valid when the Word Processor Extract Option is 0 (letters produced directly from Banner).
Letter Code Code of the letter being printed. This must be a valid letter code defined on the Letter Code Validation Form (GTVLETR). One letter can be processed per run.
Term Code Code of the term for which you wish to print letters. This must be a valid code on the Term Code Validation Form (STVTERM). This parameter is required if the application code in parameter 1 is associated with the Student System.
12 Banner General 8.5.1 6-37User Guide
Letter Generation

6-38
7
8
1
PN
10. Go to the Submission block.
11. Select the Hold radio button or the Submit radio button.
12. Save your changes. This creates a download file.
13. Use your institution’s procedures to merge the letter into your word processing environment. Check your word processor’s documentation for instructions on using the “mail merge” feature.
NoteThe WordPerfect download file is a binary file. Make sure you indicate in your communication software that a binary file is being downloaded.
Module Code One-character code that identifies the module associated with the letter being printed. This code updates pending published letter codes in the GURMAIL Table with a print date and lists the information in the report control information. Examples include A (Admissions), G (Gift/Pledge), C (Constituent), R (Recruiting), B (Billing), H (History), and F (Registration). This parameter is not validated.
Module codes vary by Banner product. For a complete list of module codes, see the “Module Identifier” table in Chapter 1 of the Banner Getting Started Guide.
Audit Indicator Y Print one sample letter for each letter code extracted. No updates occur.
N Generate letters, generate a summary report, update the print dates for generated letters on the Mail Query Form (GUIMAIL), and delete all the data in the Letter Collector Table (GLRCOLR) for the letters selected to print.
2 Aid Year Code Aid year for which you wish to print letters. This must be a valid code on the Institution Financial Aid Options Form (ROAINST). This parameter is required if the application code in parameter 1 is associated with the Financial Aid System.
arameter umber Parameter Value
Banner General 8.5.1 April 2012User GuideLetter Generation

April 20
Task Notes
• When you produce a download file, you can produce only one letter (that is, one letter code) for a single run of GLRLETR. Each letter needs its own unique header record and, therefore, its own data file.
• The three date parameters (*DATE1, *DATE2, and *DATE3) are ignored if they are defined in the letter. The feature of entering dates dynamically can be accomplished in MS Word for Windows and WordPerfect (DOS version).
• The Mail Table (forms *UAMAIL) is updated when you use the extract option.
• Other GLRLETR processing performed when creating a letter in Banner (option 0) still occurs (such as signature variables and duplicate letter checking).
• IFNULL only works when you run GLRLETR for a Banner extracted letter (Word Processor Extract Option = 0). In addition, the download file will not contain paragraph text or literals.
Letter Generation Messages
As you work with the Letter Generation programs, Banner provides diagnostic messages to alert you to problem that might occur along the way and gives you directions to remedy the situation. Messages may indicate a data entry mistake, such as an invalid or missing value, or other problem.
If an Oracle error occurs during the running of the GLBLSEL process, the message usually ends with the word “Aborting.” To help you diagnose and correct these situations, the system displays an error number in the glblsel.log file as "SQLCODE=####." Refer to your Oracle Error Messages Manual for help.
Listed below are some of the common Banner diagnostic messages you may see, with their corrective actions.
<address type> is not valid
The address type entered as a parameter is not defined on the Address Type Code Validation Form (STVATYP).
Define the address type on STVATYP, or enter the correct address type for the parameter.
Application <application> does not exist
The application entered as a parameter is not defined on the Application Definition Rules Form (GLRAPPL).
Define the application on GLRAPPL, or enter the correct application for the parameter.
12 Banner General 8.5.1 6-39User Guide
Letter Generation

6-40
CANNOT PROCESS ALL VARIABLES
No compiled variables (GLRCMPL records) were found for any variables in the letter.
Recompile all variables, and re-run GLBLSEL. (Recompiling requires running GLBPARM and GLOLETT. See the Banner General Technical Reference Manual for details.)
Letter <letter> does not exist
The letter code entered as a parameter is not defined on the Letter Code Validation Form (GTVLETR).
Define the letter code on GTVLETR, or enter the correct letter code for the parameter.
Program must be run using Pending Letters or Selection
Running GLBLSEL requires either choosing pending letters or entering a population. Pending letters were not chosen, and a population was not entered.
Run GLBLSEL again, either choosing pending letters or entering a population.
Term <term> does not exist
The term code entered as a parameter is not defined on the Term Code Validation Form (STVTERM).
Define the term code on STVTERM, or enter the correct term code for the parameter.
Variable <variable> on letter <letter> is not owned by application <application>
A variable defined in the letter does not belong to the application entered as the parameter.
Use the Variable Definition Form (GLRVRBL) to copy the variable from the application that does own the variable to the one entered for the parameter.
In a letter generated directly by the Letter Generation module (rather than by downloading), a variable's name, rather than the translation value for the variable, appears in the text of the letter. For example, the variable “*freestone” rather than the value “John” appears.
Either the generated letter has multiple tables defined (that is, #DT commands) and the #DT commands are not the first paragraph of the letter, or the #DT command paragraphs have commands other than #DT (for example, #NP).
Banner General 8.5.1 April 2012User GuideLetter Generation

April 20
Use the Letter Process Form (GUALETR) to review the first paragraph of the letter. Make sure the first paragraph has only #DT commands. Use the Paragraph Form (GUAPARA) to make any modifications. Rerun the Letter Extract Process (GLBLSEL) and the Letter Generation Print Report (GLRLETR).
NoteIf you ran GLRLETR in audit mode when you determined the error, you only need to run GLRLETR. There's no need to run GLBLSEL again.
12 Banner General 8.5.1 6-41User Guide
Letter Generation

6-42
Banner General 8.5.1 April 2012User GuideLetter Generation
April 20
V
GC
GD
7 General International Management
Overview
The General International Management module lets you store information about foreign students attending your institution and create reports with that information. It has been designed to help institutions meet the requirements of the United States Bureau of Citizenship and Immigration Services (BCIS). If your institution is not located in the USA, you may not need this module.
Some of the functions you can perform in the General International Management module are:
General International Management
• Store and maintain visa information for students, applicants, and employees
• Track visas for students, applicants and employees
• Create reports to track expiring visa documents
• Create SEVIS records to be sent to the Bureau
• Collect and report on race/ethnicity codes
Validation Forms
International Management forms use the following validation forms. Further information on these forms can be found in Online Help. See “Online Help: Banner Form and Field Reference” on page 1-5.
alidation Form Used By
TVCELGertification of Eligibility Validation Form
GOAINTLVisa International Information Form
TVDOCMocumentation Code Validation Form
GOAINTLVisa International Information Form
12 Banner General 8.5.1 7-1User Guide
General International Management

7-2
GS
GS
GS
GS
GSV
GS
GSV
GSV
GSV
GSV
GS
GSV
GSV
V
TVSRCEource Code Validation Form
GOAINTLVisa International Information Form
TVSVCCEVIS Category Code Validation Form
GOASEVSSEVIS Information Form
TVSVCPEVIS Consular Post Validation Form
GOASEVSSEVIS Information Form
TVSVCREVIS Creation Reason Code Validation Form
GOASEVSSEVIS Information Form
TVSVDTEVIS Dependent Termination Code alidation Form
GOASEVSSEVIS Information Form
TVSVELEVIS Education Level Code Validation Form
GOASEVSSEVIS Information Form
TVSVEPEVIS EV End Program Reason Code alidation Form
GOASEVSSEVIS Information Form
TVSVFTEVIS Drop Below Full Time Reason Code alidation Form
GOASEVSSEVIS Information Form
TVSVGOEVIS Governmental Organization Code alidation Form
GOASEVSSEVIS Information Form
TVSVIOEVIS International Organization Code alidation Form
GOASEVSSEVIS Information Form
TVSVITEVIS Infraction Type Code Validation Form
GOASEVSSEVIS Information Form
TVSVPCEVIS Exchange Visitor Position Code alidation Form
GOASEVSSEVIS Information Form
TVSVRPEVIS Request for Form Reprint Code alidation Form
GOASEVSSEVIS Information Form
alidation Form Used By
Banner General 8.5.1 April 2012User GuideGeneral International Management

April 20
GSF
GSF
GS
GS
GV
GR
V
Menu Navigation Table
Forms in the General International Management module can be accessed from the following menus. Further information on these forms can be found in Online Help. See “Online Help: Banner Form and Field Reference” on page 1-5.
TVSVTREVIS Termination Reason Code Validation orm
GOASEVSSEVIS Information Form
TVSVTSEVIS Transmittal Status Code Validation orm
GOASEVRSEVIS Transmittal History Form
TVSVAPEVIS Auto-populate Code Validation Form
GORSVSQSEVIS Business Rules Form
TVSVBAEVIS Business Action Code Validation Form
GORSVSQSEVIS Business Rules Form
TVVISSisa Issuing Authority Validation Form
GOAINTLVisa International Information Form
TVRRACegulatory Race Validation Form
GORRACERace Rules Form
alidation Form Used By
*GENMVISA General Multi Visa MenuContains the menus that help you track visa information for students, applicants, and employees
*GENSEVIS General SEVIS MenuContains the menus that help you manage your institution’s relationship with the Bureau.
GOAINTL Visa International Information FormAllows you to store and display information about the visas held by students, applicants, and employees.
GTVCELG Certification of Eligibility Validation FormProvides a list of certifications of eligibility for employment. Some examples, in the United States, are the I-20 and IAP-66.
12 Banner General 8.5.1 7-3User Guide
General International Management

7-4
GTVDOCM Documentation Code Validation FormProvides a list of documents that could be used to validate a visa request.
GTVSRCE Visa Source Code Validation FormProvides a list of documents that could be used to validate a visa request.
GTVVISS Visa Issuing Authority Validation FormLists the codes representing the agencies that may issue visas.
GOASEVR SEVIS Transmittal History FormDisplays the student’s or exchange visitor’s completed record, ready for transmittal to the Bureau. It will also display historical records.
GOASEVS SEVIS Information FormAllows you to store information about students and exchange visitors so it can be sent to the Bureau using the Internet. It contains SEVIS-specific data elements and dependent relationship information.
GOISEVS SEVIS Transmittal Status Query Form Allows you to view records that have been created from the SEVIS Batch Export Process (GORSEVE).
GTVSVCC SEVIS Category Code Validation FormAllows you to store data for the valid SEVIS exchange visitor category codes.
GTVSVCP SEVIS Consular Post Code Validation FormAllows you to store data for the valid SEVIS consular post codes.
GTVSVCR SEVIS Creation Reason Code Validation FormContains the codes that represent why the student or exchange visitor records were created, such as initial attendance or transfer.
GTVSVDT SEVIS Dependent Termination Code Validation Form Stores codes representing the reasons a person’s dependent is no longer included on the record. For example, the dependent may have left the United States.
GTVSVEL SEVIS Education Level Code Validation FormProvides codes representing education levels, for example, associate, bachelor, and other university-obtained degrees.
Banner General 8.5.1 April 2012User GuideGeneral International Management

April 20
GTVSVEP SEVIS EV End Program Reason Code Validation FormStores codes representing the reasons an exchange visitor’s program could be ended.
GTVSVFT SEVIS Drop Below Full Time Reason Code Validation FormStores SEVIS drop below full time reason codes. They describe why the student did not carry enough credits to be considered a full-time student. Examples include illness and difficulty learning English.
GTVSVGO SEVIS Governmental Organization Code Validation FormStores SEVIS governmental organization codes. They describe the government organization that allowed the EV to enter the United States. An example would be the Department of State.
GTVSVIO SEVIS International Organization Code Validation FormStores SEVIS EV infraction codes. They describe the international organization that is sponsoring the EV while in the United States. An example would be the World Health Organization.
GTVSVIT SEVIS Infraction Type Code Validation FormStores SEVIS EV infraction type codes. An example would be the failure to extend a DS-2019 in a timely manner.
GTVSVRP SEVIS Request for Form Reprint Code Validation FormStores codes representing reasons for reprinting Visa request forms. The student may have lost the original, or it may have been damaged.
GTVSVTR SEVIS Termination Reason Code Validation FormStores SEVIS termination reason codes. They indicate why the student or exchange visitor was terminated from the school (expulsion, delinquency, and so on.).
GTVSVTS SEVIS Transmittal Status Code Validation Form These codes are not defined by the Bureau. These codes are used by Banner® to process your institution’s SEVIS transactions. They represent the status of a transaction, for example, Processing Complete.
GTVSVAP SEVIS Auto-populate Code Validation FormStores the fields in the GOBSEVS table that will be populated automatically (auto-populated) from other Banner tables. Column names from the GOBSEVS table have been delivered.
12 Banner General 8.5.1 7-5User Guide
General International Management

7-6
General International Management Procedures
Visa Tracking
The International Information Form (GOAINTL) is used to track Visa information. Details about this form are located in the General International Management chapter of this guide.
Setting Up Supporting Forms
Begin by entering information in the following validation forms:
• Nation Code Validation Form (STVNATN)
• Visa Type Code Validation Form (STVVTYP)
• Port of Entry Code Validation Form (STVPENT)
• Language Code Validation Form (STVLANG)
• International Student Sponsor Code Validation Form (STVSPON)
• Employment Type Validation Form (STVEMPT)
• Admission Request Checklist Code Validation Form (STVADMR)
• Visa Issuing Authority Validation Form (GTVVISS)
• Visa Source Code Validation Form (GTVSRCE)
• Visa Document Code Validation Form (GTVDOCM)
• Certification of Eligibility Validation Form (GTVCELG)
GTVSVBA SEVIS Business Action Code Validation FormAllows you to define business action codes and the procedures they will execute. Two business actions are delivered as seed data; CREATE_STUDENT and CREATE_EV.
GORSVSQ SEVIS Business Rules FormAllows you to associate business actions or auto-populations with process code/rule code combinations.
GOISVBH SEVIS Batch Header Query Form Allows you to review the header information for batches that have been sent to the Bureau.
Banner General 8.5.1 April 2012User GuideGeneral International Management

April 20
Entering Visa Information
Visa tracking information is stored on the Visa International Information Form (GOAINTL). To enter visa information about an international student:
NoteA student, prospect, or employee must exist in Banner (have a Banner ID) before you can enter information about them into GOAINTL.
1. Enter the person’s ID in the key block, or search for it by selecting the pull-down arrow.
2. Use <Ctrl><PgDn> to move into the Visa Information block on the Visa tab.
3. Enter the data into the Visa Information block.
4. Save your changes.
5. Navigate to the Document block.
6. Enter information about the person’s supporting documents.
7. Save your changes.
8. Navigate to the Passport Information tab.
9. Enter information about the person’s passport, and their admission and departure.
10. Save your changes.
11. Navigate to the Certification of Eligibility tab.
12. Enter information about the documents that prove the person’s eligibility.
13. Save your changes.
14. Navigate to the Nationality tab.
15. Enter information about the person’s Nationality and about family members who have accompanied them to the United States.
16. Save your changes.
12 Banner General 8.5.1 7-7User Guide
General International Management

7-8
Deleting Records
Previously, you could not delete GOAINTL records; they were all stored as history. Now you can delete visa information from the Visa Information block. You cannot change the visa type, you can only delete the record.
NoteYou cannot delete a record if there are supporting documents for it. You will receive an error message, and you will not be able to save your change. You must first go to the Document block and delete all the items listed there.
Overlapping Visa Dates
GOAINTL has always supported multiple visas for one person, but none of the dates could overlap. If they did, you would receive an error message and you could not save the record.
Now people can have visas with overlapping dates. Banner will display an informational message, but you do not need to take any special actions as a result of it.
Displaying Multiple Visas
GOAINTL had displayed multiple visas sorted by the date, now it displays them by sequence number. The lowest number (the visa added earliest) appears on the form first, and you can scroll down to see the rest, sorted lowest to highest.
Student and Exchange Visitors Information System (SEVIS)
The Bureau of Citizenship and Immigration Services (BCIS), part of the U.S. Department of Homeland Security, is asking institutions in the United States to provide information about non-immigrant students and exchange visitors using the Internet.
The Student and Exchange Visitors Information System (SEVIS) provides tracking, monitoring, and access to accurate and current information on non-immigrant students (those with an F or M visa) and exchange visitors (those with a J visa), and on their dependents. Using SEVIS ensures that information is collected in a usable, shareable electronic format from the beginning, before the State Department issues the visa, and provides current, accurate data throughout the person’s course of study or program.
All institutions must be certified by the Bureau of Citizenship and Immigration Services to participate in SEVIS. The certification process will provide each institution with the appropriate login IDs and passwords.
Banner General 8.5.1 April 2012User GuideGeneral International Management

April 20
For more information about SEVIS, please refer to the Bureau of Citizenship and Immigration Service’s web site.
NoteThe Bureau of Citizenship and Immigration Services was formerly known as the Immigration and Naturalization Service (INS).
Banner currently supports:
• Fields in which you can enter the SEVIS-required data
• Conversion of Banner data into the codes required by the Bureau
• Storage of responses from the Bureau
• Storage and maintenance of historic SEVIS data
• An inquiry form to view and query records
• A batch process to prepare your data for transmittal to the Bureau and help you load the results of the transactions into Banner databases
• Interfaces with an external tool, the SEVIS Transfer Adaptor (SEVISTA), to send your files to the Bureau’s web site and import the response data into Banner tables.
You enter information into the SEVIS Information Form (GOASEVS), and create a student or exchange visitor history record. You can do this by:
• Selecting Create Student or Create Exchange Visitor from the Options menu
• Executing the SEVIS Batch Extract Process (GORSEVE)
Either method will create a Student or Exchange Visitor history record, respectively, and will convert certain Banner codes into SEVIS codes. The Bureau will only accept SEVIS codes. You can view the final record on the SEVIS Transmittal History Form (GOASEVR).
Any time there is a change for the student or exchange visitor that must be reported to the Bureau, you will update the information on the GOASEVS form, select the appropriate option or run GORSEVE, view the information on the GOASEVR form, and send it to the Bureau. You cannot change data on GOASEVR.
What is SEVISTA?
The SEVIS Transfer Adaptor (SEVISTA) is a Java tool that will reside on the platform that has the VeriSign Certificate. It takes data from Banner temporary table entries created by GORSEVE, converts it to XML, validates the XML and transmits it to the Bureau's web site.
NoteIf SEVISTA finds errors in certain records when it validates the XML, it rejects those records. They are not included in the batch that SEVISTA
12 Banner General 8.5.1 7-9User Guide
General International Management

7-10
transmits to the Bureau. The Status Code field on GOASEVR will be set to R (Returned with error).
SEVISTA will relay the Bureau's responses, sending an e-mail to the designated person. That information can be used to check the status of the batch and resubmit any records that were rejected.
NoteTo receive e-mails from SEVISTA, you must have subscribed to it. For more information, please refer to the SEVIS Transfer Adaptor Installation & Implementation Guide.
When the batch has been processed by the Bureau, SEVISTA returns the information to your institution, loading it directly into the Banner tables by updating the Status Code and SEVIS Result Code Message fields on GOASEVR.
SEVISTA relies on the school code to transmit student records and the program code to transmit exchange visitor records. The school code and the program code must be unique for each instance of SEVISTA.
NoteGORSEVE does not validate the school or program code. If you enter a code that does not exist in a SEVISTA instance, either as a parameter to GORSEVE or on an individual record, GORSEVE will still select the records to send to the Bureau. It will create a batch ID and header information, but the header data will remain in GORSVBH and the transaction data will remain in GOTSVBT with no SEVISTA activity.
NoteWhen you check on your batches you will see that the transmittal status code never changed. To get the batch to process, you must correct the school or program code on GOASEVS and re-create the records.
Structures
The Bureau has grouped related pieces of information together in a structure. A structure can contain other structures.
A record is created whenever any data element within that structure is changed. Each changed structure is included in a separate record. Because the INS requires this, you will probably find that your institution sends a larger number of records than you might have expected.
In Banner, the name of the structure is included in the GOASEVR record, and is displayed on the SEVIS Transmittal Status Query Form (GOISEVS) and on the SEVIS Transmittal History Form (GOASEVR).
Banner General 8.5.1 April 2012User GuideGeneral International Management

April 20
Setting Up SEVIS Features
1. Determine the address codes to be used to populate the US and Foreign Address fields.
2. Use GTVSDAX to identify the address types to the SEVIS process. The codes are SVSUADDR and SVSFADDR
NoteA hierarchy of address types can be used to identify multiple address types.
3. The Bureau requires you to provide certain pieces of information about each student and exchange visitor. In some cases, the information (for example, Nation) is already captured in Banner with a Banner code. You must map the SEVIS codes to the existing Banner ones because the Bureau will only accept SEVIS codes. You can find the SEVIS codes on the Bureau’s web site.
Add SEVIS equivalent codes to the corresponding Banner codes on the following validation forms:
3.1. Major, Minor, Concentration Code Validation Form (STVMAJR)
3.2. Nation Code Validation Form (STVNATN)
3.3. Relation Code Validation Form (STVRELT)
3.4. Visa Type Code Validation Form (STVVTYP)
3.5. Port of Entry Code Validation Form (STVPENT)
NoteIf you try to create a SEVIS record without first mapping these codes, you will receive an error message.
4. Enter both the US and foreign addresses for each student or exchange visitor on the Address Information window on the Identification Form (SPAIDEN).
5. Enter all information into the SEVIS Information Form (GOASEVS). Information will default in from SPAIDEN and SPAPERS.
NoteIf the people and their dependents are set up on SPAIDEN and SPAPERS, their names, birthdates, and genders will be automatically populated on GOASEVS. You cannot enter this information into GOASEVS; it must be populated from SPAIDEN or SPAPERS.
6. Create population selection rules, if necessary.
7. Run the SEVIS Batch Export Process (GORSEVE).
12 Banner General 8.5.1 7-11User Guide
General International Management

7-12
Creating Student and Exchange Visitor Records
Creating Records Manually
NoteThe student or exchange visitor must already exist in Banner before information can be added for them. They must have been created on the Identification Form (SPAIDEN).
1. Access the SEVIS Information Form (GOASEVS) through Direct Access or through the Banner Menus.
2. Enter the person’s Banner ID in the key block, or search for it by selecting the pull-down arrow then selecting Person Search (SOAIDEN) or Alternate ID Search (GUIALTI) from the Options.
3. Use <Ctrl><PgDn> to navigate to the SEVIS Common Data tab, or select it from the Options pull-down menu.
4. Enter information into the block and save your changes.
NoteSome Creation Reason codes are valid for students and some for exchange visitors. When you select Create Student or Create Exchange Visitor from the Options pull-down menu, Banner verifies that you have an appropriate Creation Reason code. If you don’t, Banner displays an error message.
5. Navigate to the SEVIS Student Data tab (if the person is a student) or to the Exchange Visitor Data tab (if the person is an exchange visitor).
6. Enter information into the block and save your changes.
7. Enter information in the Activity Site Data block (if the person is an exchange visitor).
8. Access the SEVIS Dependent Data block if the person has dependents in the United States.
If the dependent exists in Banner, enter the Banner ID to automatically populate some of data from SPAIDEN. Otherwise, enter the dependent’s name and biographical information manually.
9. If you want to verify or change the person’s personal information, select Name, Address, and Telephone Information from the Options pull-down menu. The link will take you directly to the Identification Form (SPAIDEN). Exit the form to return to GOASEVS.
Banner General 8.5.1 April 2012User GuideGeneral International Management

April 20
10. When you are sure the data is complete and accurate, select Create Student or Create Exchange Visitor from the Options pull-down menu, depending on whether the person is a student or an exchange visitor. This invokes the scripts that convert various Banner codes to SEVIS codes and populate the SEVIS Transmittal History Form (GOASEVR). The scripts will verify that there is a SEVIS equivalent code for the Banner codes you entered for Visa Type, Primary Major, Birth Nation, Legal Nation, and Port of Entry for the person and their dependents.
The process that creates these records will verify that there is information in all of the required fields.
NoteGOASEVS will always contain the current information. You can view the history of your transactions on GOASEVR.
NoteYou can enter data into all the fields on GOASEVS. You can only enter status information on GOASEVR - all the other fields are display only.
NoteGOASEVS contains Banner codes. GOASEVR contains the corresponding SEVIS codes.
11. Select View SEVIS Record from the Options pull-down menu. GOASEVR is displayed, and you can see that the SEVIS codes have been substituted for the Banner codes.
Creating Records Automatically
The SEVIS Batch Extract Process (GORSEVE) creates records, too.
When you run GORSEVE in audit or update mode, it compares GORSEVS records (present) to the most current GORSEVS record (history) to see if there is a change. If there is, it automatically creates the student and exchange visitor records as if you had selected Create Student or Create Exchange Visitor for them individually.
As part of its processing, GORSEVS will verify that there is information in all of the required fields.
After it creates the records, GORSEVS transmits them to the SEVIS Transfer Adaptor (SEVISTA), which converts them to an XML file and send them to the Bureau.
For more information about GORSEVE, refer to the Reports and Processes chapter in this document.
12 Banner General 8.5.1 7-13User Guide
General International Management

7-14
Viewing Records
Querying Records
1. Go to the SEVIS Transmittal Status Query Form (GOISEVS)
2. Enter the criteria by which you want to search and submit the query. The records that match your criteria will be listed in the Record block. You can also issue queries from the Record block itself.
Running GORSEVE in Audit Mode
If you want to see the records that will go to the Bureau before they are sent, you can run GORSEVE in audit mode.
• If the records can be transmitted through normal processing, GORSEVE creates the record for GOASEVR with a transmittal status code of W
• If the records contain adjudicated information and, therefore, must be transmitted manually, GORSEVE changes the transmittal status code to M
It will create the records as if it were going to send them, but it will print them on a report. You can use the report and the GOISEVS form to review the records. If you find a record that should not be sent to the Bureau, change the transmittal status code to X, and it will not be sent the next time GORSEVE is run (update mode).
Handling Adjudicated Information
The Bureau has determined that some information is so critical that it must be transmitted manually via the SEVIS RTI. Therefore, it is possible that a change to one person’s information could result in more than one record; you could have some records with adjudicated information that you must send manually and some with information that can be sent as XML files.
The SEVIS Batch Extract Process (GORSEVE) is designed to know which events for students are adjudicated and which are not. It will take the information you enter on the SEVIS Information Form (GOASEVS) and will divide it into multiple records, as necessary. It will list the adjudicated records on the GORSEVE report, and give them the transmittal status code M. You must enter the information manually on the Bureau’s web site.
Adjudicated events for exchange visitors must be handled manually at this time. GORSEVE will not identify them.
The response records from the Bureau will be uploaded into Banner using SEVISTA.
Banner General 8.5.1 April 2012User GuideGeneral International Management

April 20
Sending Records to the Bureau
There are two ways to send records to the Bureau:
1. You can provide the information to the Bureau manually via the SEVIS RTI.
2. You can use the batch process GORSEVE and the external tool SEVISTA
It is the responsibility of your institution to make sure the proper information is sent to the Bureau. For example, when you terminate a dependent, you cannot request an I-20 for that dependent. Banner will not prevent you from making this request, but the record will be rejected by the Bureau.
Transmitting Data via the RTI
1. Access the SEVIS Transmittal History Form (GOASEVR).
2. Access the Bureau web site.
3. Transfer the information in the Banner fields to fields on the web site.
4. Save your changes.
5. Check to see the record’s status:
5.1. If the record was accepted, access GOASEVR, display the person’s record, and enter the Status Code and any SEVIS Result Code Message. The Creation Date is populated automatically. Save your changes.
Access GOASEVS. Enter the SEVIS IDs for the person and for any dependents. Save your changes.
NoteAfter the SEVIS ID has been entered for this person, it will not have to be entered again, even if the information about that person changes.
5.2. If the record was rejected, see If the Record is Rejected in this document.
12 Banner General 8.5.1 7-15User Guide
General International Management
7-16
Sending Data to the Bureau via the Batch Process
NoteSunGard® Higher Education recommends that you set up the GORSEVE process and SEVISTA to run automatically each night.
1. Create a directory on the server/pc with the VeriSign certificate, and name it SEVIS. After GORSEVE has run, SEVISTA will send the XML file to the SEVIS directory.
2. SEVISTA will verify that the data is formatted correctly. It will also make sure that all the codes are accepted values. SEVISTA will send back a message indicating if the file has passed this check.
For details about GORSEVE, please refer to the Reports and Processes chapter in this document.
All the records that come from GORSEVE that have a transmittal status of P will be sent to the Bureau by SEVISTA. SEVISTA formats the data into an XML file and validates it against the SEVIS XML schemas to make sure it is in the proper format for transmission.
All the valid records are then uploaded to the Bureau’s web site.
When the records are sent to the Bureau, the transmittal status code remains P, because no response has yet come from the Bureau. When the Bureau responds, the code is changed to C if the Bureau approved the batch or R if the Bureau rejected it.
Multiple School/Program Codes
If your institution has multiple campuses, you must install multiple instances of SEVISTA. Each instance uniquely identifies the campus with a school and program code, and will process records for that school and program code only.
For more information about installing multiple instances of SEVISTA on the same server, please refer to the SEVIS Transfer Adaptor Installation & Implementation Guide.
Record submission is triggered by the SEVIS Batch Export Process (GORSEVE). You should run GORSEVE for a single school code or program code at a time, each with its own SEVIS Officer IDs for the Batch Approver and Transaction Approver.
WarningDo not try to submit GORSEVE with both a school code and a program code as parameters; the program checks for one or the other, and will issue an error message if it finds both.
NoteSunGard Higher Education recommends that you use population selections or Banner IDs as parameter values for GORSEVE if you have more than one school or program code.
Banner General 8.5.1 April 2012User GuideGeneral International Management

April 20
If you set up new Student or EV records without assigning them a school or program code and create the actual records using GORSEVE, they will be given the school or program code for which GORSEVE was run.
NoteThe SEVIS Approver ID needs to be correct for the school or program code or the Bureau will reject the transmission.
If you want to make sure student or exchange visitor records are associated with a specific school or program code, you can assign the code directly on GOASEVS.
All records with a transmittal status code of W (waiting) will be selected by GORSEVE for transmission to the Bureau, no matter what the school or program code is:
• If the school or program code stored on the record is the same as the one you entered as a parameter for GORSEVE, that school or program code will be included in the batch
• If a different school or program code is stored in the record, the stored code will be included in a new batch
• If there is no school or program code stored in the record, GORSEVE will use the one you entered as a parameter for GORSEVE, including it in the batch
NoteThe school or program code must be unique for each batch. If one execution of GORSEVE finds records with more than one school or program code, GORSEVE will separate them into different batches.
If Records are Rejected by SEVISTA
SEVISTA validates your data against the SEVIS XML schemas. If any records are rejected, SEVISTA sends an e-mail to the SEVISTA subscriber. It also populates the Error Code field with SEVISTA. This is the field that usually contains any error codes from the Bureau.
The e-mail includes the batch number and lists the rejected records. You can review batch header information on the SEVIS Batch Header Inquiry Form (GOISVBH).
After the records are corrected, GORSEVE will select the records and pass them to SEVISTA, as usual. SEVISTA will convert them to XML, validate the XML and send them to the Bureau. The new batch header will have different information than the original. The Bureau considers the original batch to have been processed completely and the updated records are part of a new batch. The rejection is stored as part of the records’ history and cannot be changed.
12 Banner General 8.5.1 7-17User Guide
General International Management

7-18
Responses from the Bureau
The Bureau will respond to a batch in one of three ways:
1. It will reject the entire batch
2. It will accept some records and reject the others
3. It will accept all the records
In all of these cases, the designated person (a subscriber) will receive an e-mail from SEVISTA. It will provide the batch number and the number of records that have been accepted and rejected.
SEVISTA will automatically take the file from the Bureau and update the Trans. Status field with:
• C if the record was accepted
• R if it was rejected
If the record was accepted and the person did not already have a SEVIS ID, SEVISTA enters the SEVIS ID into the GOBSEVS and GORSEVD tables, too.
If the record was rejected, SEVISTA enters the Status Code and SEVIS Result Code Message provided by the Bureau into the Banner tables.
NoteIf you have requested student or exchange visitor forms, SEVISTA places them in one of its directories. For more information, please refer to the SEVIS Transfer Adaptor Installation & Implementation Guide.
Receiving Data from the Bureau
NoteBefore SEVISTA was available, the now-obsolete SEVIS Batch Import Process (GORSEVI) required you to set up the directory where you would place the XML files, XMLSEVIS. If you had created this directory previously, you should drop it now.
SEVISTA files, including the uploaded XML files and the downloaded files from the Bureau (including the .pdf files), are stored in directories on the SEVISTA server.
Banner General 8.5.1 April 2012User GuideGeneral International Management

April 20
If a Record is Rejected
If a record is rejected, the result code (an error code), the result code message, and the transmittal status code (R) are automatically entered into the SEVIS Transmittal History Form (GOASEVR).
NoteYou cannot correct a record and resend it. You must store the information about the rejection and create a new record. Only the new record can be sent. The rejected record is locked. The transmittal status code R indicates that it was returned with error.
1. You must go into the SEVIS Information Form (GOASEVS), the Identification Form (SPAIDEN), or General Person Form (SPAPERS) to make the changes.
2. Save your changes.
3. (Optional) From GOASEVS, select Create a Student or Create an Exchange Visitor from the Options pull-down menu. GOASEVR appears. W appears in the Transmittal Status Code field automatically. This will ensure that the next run of GORSEVE includes the record in the batch file.
Interface with fsaATLAS
NoteYou will not need this feature if your institute does not perform SEVIS processing, or if you use SEVISTA to process SEVIS records.
The SEVIS Batch Export Process (GORSEVE) can create a comma-separated value (CSV) file that can be imported by the fsaATLAS Campus DataLink. You can use the CSV file as you wish, but it was designed for fsaATLAS. fsaATLAS is an application specifically designed for Visa, Case Management, and SEVIS tracking.
NoteIf you use fsaATLAS, you will not use the SEVIS Transfer Adaptor (SEVISTA) to transmit your records to the United States Bureau of Citizenship and Immigration Services (BCIS).
This differs from existing SEVIS processing in the following ways:
• No history records are created, so you cannot see the record on the SEVIS Transmittal History Form (GOASEVR).
• You will not use SEVISTA to validate and transmit your data.
• The CSV file will reside in your Job Submission directory and will have the same one-up name as the GORSEVE.lis file. You cannot view this file on the Saved Output Review Form (GJIREVO). You can download the file to fsaATLAS using the process in place at your institution.
12 Banner General 8.5.1 7-19User Guide
General International Management

7-20
If you do not specify individual Banner IDs or a population selection, the CSV file will contain an extract of all the records in SEVIS Data Table (GOBSEVS) and the associated views.
NoteIf you do not have fsaATLAS, you can continue to use SEVISTA. There has been no change to SEVIS reporting when GORSEVE is run it Audit or Update mode for SEVISTA.
To create a CSV file of SEVIS data:
1. Specify individual Banner IDs or create a population selection for entry on GORSEVE. If no population selection or individual IDs have been entered on GORSEVE, all the records on the SEVIS Data Table (GOBSEVS) will be selected to be part of the extract/CSV file.
2. Enter the following parameters:
2.1. For parameter 02, enter the SEVIS User ID (Batch Approver). GORSEVE requires the Batch Approver to execute in Extract mode, but it is not required by fsaATLAS. You can enter any value for Batch Approver; it cannot be left blank (be null).
2.2. For parameter 05, enter Y if you use Business Actions to create records. Otherwise enter N.
2.3. For parameter 06, enter Y if you use Auto-population to create records. Otherwise enter N.
2.4. For parameter 07, enter the Term Code if you use Auto-population. Otherwise, do not enter anything for parameter 07.
2.5. For parameter 08, enter the Banner IDs you want to process. Optional.
2.6. For parameters 09 - 12, enter population selection values. Optional.
2.7. For parameter 13, enter Y if you want to print records that have had no activity in the GORSEVE.lis file. Otherwise enter N.
2.8. For parameter 14, enter E.
NoteParameter 14 is required if you are creating the CSV file.
2.9. For parameter 15, enter the Department Owner ID for fsaATLAS.
NoteParameter 15 is required if you are creating the CSV file. It is also required by fsaATLAS.
Banner General 8.5.1 April 2012User GuideGeneral International Management

April 20
3. fsaATLAS Campus DataLink will insert the Banner ID into the Admissions ID field in fsaATLAS. This will help you cross-reference the data in the two systems. Admissions ID is not SEVIS-specific information.
4. The CSV file resides in your Job Submission directory, just like the results of any other job. You can view the CSV file in any editor you choose. It will not be available on GJIREVO; it is only written to the Job Submission directory.
NoteIf you do not specify individual Banner IDs or create a population selection, all the records in the SEVIS Data Table (GOBSEVS) will be selected and written to the CSV file. You can run GORSEVE with the extract parameters as many times as you want; all it does is create another CSV file. It will not adversely affect Banner.
You can set up and use Business Rules (Business Actions and Auto-population) with the extract option.
WarningThe minimum data required by GORSEVE for each record Extracted is a creation reason or termination reason code. Records that do not have one or the other will not be processed by GORSEVE and included in the CSV file, but the records will appear on the .lis file.
NoteRecords that have both a creation reason code and a termination reason code will not be processed by GORSEVE, too.
EducationLevel/Change and EducationLevel/Cancel Processing
The new SEVIS 5.0 data structures are straightforward, but two of them (EducationLevel/Change Program and EducationLevel/Cancel) deserve mention regarding the handling of the data by SEVIS versus by Banner.
EducationLevel/Change
The EducationLevel/Change program structure submits a new program request with the same SEVIS ID. For example, a student in a BS program wants to continue at the institution in a master’s program, so an Education Level/Change program would be submitted for this student while he/she was still considered ACTIVE and currently attending the institution at the B.S. level.
As of SEVIS 5.0, once the new EducationLevel/Change program structure is processed by SEVIS, it is very important to note that SEVIS will begin to maintain two separate records for the individual: one record in ACTIVE (for example, BS) status and one record in INITIAL (for example, MS) status.
12 Banner General 8.5.1 7-21User Guide
General International Management

7-22
Banner/GOASEVS maintains only the most recent SEVIS record, which once the EducationLevel/Change program structure is submitted and processed by SEVIS, would be considered the INITIAL (MS, for example) record at SEVIS and not the ACTIVE (BS, for example) record. Certain structures can be submitted at this point that may update the ACTIVE and/or INITIAL record. Please refer to the EXHIBIT 5: SEVIS Batch - RTI Event Matrix for Students and Dependents section of the ICD/API. It is important for you to know which record you intend to update versus the record that is actually updated at SEVIS when you submit structures where two different records exist at SEVIS.
It is suggested that you do not send the Education Level/Change program structure to SEVIS until you have no more structures to submit against the ACTIVE record, and move forward at that point with the understanding that you are maintaining the INITIAL record only.
In order to ACTIVATE the student in the new program, a REGISTRATION structure would be applied to the student in the new program. Once SEVIS processes that transaction, the student would become ACTIVE in his/her new program.
EducationLevel/Cancel
If the student has no intention of registering in the new program, or if there is reason to cancel the request, the EducationLevel/Cancel can be submitted to SEVIS. When SEVIS processes this request, the INITIAL record at SEVIS will be deactivated and SEVIS will revert to allow maintenance of the original ACTIVE record only.
When Banner submits the EducationLevel/Cancel structure, it looks for a Completed EducationLevel/Change structure in GORSEVS/GOASEVR. If it finds the structure 'C'omplete, it will find the structure submitted just prior to the EducationLevel/Change and backfill previous program information to GOBSEVS/GOASEVS.
A new history record in GOASEVR will be created representing this backfill called RevertHistory.
NoteStructures submitted to SEVIS between the EducationLevel/Change and EducationLevel/Cancel will need careful review. You may not have been aware of the record that got updated at SEVIS. You may want to log into the SEVIS RTI and review the SEVIS data and GOASEVS data for the student to be sure it is not out of sync.
The program fields that will be re-populated/backfilled upon EducationLevel/Cancel are listed in the following table:
Banner General 8.5.1 April 2012User GuideGeneral International Management

April 20
GORSEVS
GORSEVS_S
GORSEVS_S
GORSEVS_M
GORSEVS_M
GORSEVS_M
GORSEVS_S
GORSEVS_P
GORSEVS_P
GORSEVS_E
GORSEVS_E
GORSEVS_E
GORSEVS_A
GORSEVS_T
GORSEVS_L
GORSEVS_D
GORSEVS_O
GORSEVS_O
GORSEVS_P
GORSEVS_S
GORSEVS_S
Field Description Backfilled to GOBSEVS
VEL_CODE LEVEL GOBSEVS_SVEL_CODE
VEL_COMMENT OTHER REMARKS GOBSEVS_SVEL_COMMENT
AJR_CODE PRIMARY MAJOR GOBSEVS_MAJR_CODE*
AJR_CDE_2 SECOND MAJOR GOBSEVS_MAJR_CDE_2*
AJR_CDE_MINR MINOR GOBSEVS_MAJR_CDE_MINR*
TUDY_LENGTH LENGTH OF STUDY GOBSEVS_STUDY_LENGTH
ROGRAM_BEGIN_DATE PROGRAM START DATE
GOBSEVS_PROGRAM_BEGIN_DATE
ROGRAM_END_DATE PROGRAM END DATE GOBSEVS_PROGRAM_END_DATE
NG_PROF_REQ_IND ENGLISH REQUIRED GOBSEVS_ENG_PROF_REQ_IND
NG_PROF_MET_IND ENGLISH REQUIREMENTS MET
GOBSEVS_ENG_PROF_MET_IND
NG_PROF_REASON NOT REQUIRED REASON
GOBSEVS_ENG_PROF_REASON
CADEMIC_TERM_MONTHS ACADEMIC TERM GOBSEVS_ACADEMIC_TERM_MONTHS
UITION_EXPENSE TUITION GOBSEVS_TUITION_EXPENSE
IVING_EXPENSES LIVING EXPENSES GOBSEVS_LIVING_EXPENSES
EPENDENT_EXPENSES DEPENDENT EXPENSES
GOBSEVS_DEPENDENT_EXPENSES
THER_EXPENSES AMOUNT GOBSEVS_OTHER_EXPENSES
THER_EXP_COMMENT REMARKS GOBSEVS_OTHER_EXP_COMMENT
ERSONAL_FUNDS PERSONAL GOBSEVS_PERSONAL_FUNDS
CHOOL_FUNDS AMOUNT GOBSEVS_SCHOOL_FUNDS
CHOOL_FUNDS_COMMENT REMARKS GOBSEVS_SCHOOL_FUNDS_COMMENT
12 Banner General 8.5.1 7-23User Guide
General International Management

7-24
GORSEVS_O
GORSEVS_O
GORSEVS_E
GORSEVS
THER_FUNDS AMOUNT GOBSEVS_OTHER_FUNDS
THER_FUNDS_COMMENT REMARKS GOBSEVS_OTHER_FUNDS_COMMENT
MPLOYMENT_FUNDS EMPLOYMENT (FUNDS) GOBSEVS_EMPLOYMENT_FUNDS
Field Description Backfilled to GOBSEVS
Banner General 8.5.1 April 2012User GuideGeneral International Management

April 20
8 System Functions/Administration
Overview
The System Functions/Administration module lets you set up, operate, and monitor Banner®. Many forms in this module are used primarily by members of your data center to define and monitor the ongoing use of the system. Other forms are useful to end users. Some of the functions you can perform in the System Functions/Administration module are:
• Define the currency codes used in the system
• Define bank codes, bank routing information, and direct deposit information
• Display and maintain information used with EDI (Electronic Data Interchange)
• Define the codes and rules used by the Desktop Tools application to access data from a PC application
• Define the codes and rules used by the Event Queue Maintenance module to define and track events as they occur in the Banner database
• Create and maintain custom menus for your institution
• Create or copy personal menus
• Establish personal preferences for the logged in user ID
• Create new objects
• Define and submit QuickFlows
• Extend the Banner data model with the Supplemental Data Engine.
• Set up VBS (Value-Based Security)
• Track changes to a Social Security Number (SSN), Social Insurance Number (SIN), or Tax Filing Number (TFN)
• Cross-reference institution-defined codes with valid integration partner system codes
12 Banner General 8.5.1 8-1User Guide
System Functions/Administration

8-2
Val
FTAc
FTCh
FTFun
GTCu
GTDe
GTDe
GTDe
GTEv
Validation Forms
Systems Functions/Administration forms use the following validation forms. Further information on these forms can be found in Online Help. See “Online Help: Banner Form and Field Reference” on page 1-5.
idation Form Used By
VACCTcount Code Validation Form
GXRBANKBank Code Rule Form
VCOASart of Accounts Validation Form
GXRBANKBank Code Rule Form
VFUNDd Code Validation Form
GXRBANKBank Code Rule Form
VCURRrrency Codes Validation Form
GUACURRCurrency Code Maintenance Form
GUAINSTInstallation Control Form
GXRBANKBank Code Rule Form
VDADDsktop Tools - Add-In Validation Form
GOADADDDesktop Tools - Add-In Application Form
VDPRPsktop Tools - Step Property Validation Form
GORDPRPDesktop Tools - Step Property Values Rule Form
GORDSTPDesktop Tools - Step Type Properties Rule Form
VDSTPsktop Tools - Step Type Validation Form
GOADSTEDesktop Tools - Wizard Steps Setup Application Form
GORDSTPDesktop Tools - Step Type Properties Rule Form
VEQNMent Queue Code Validation Form
GOAEQRMEvent Queue Record Maintenance Form
GOREQNMEvent Queue Name Definition Form
Banner General 8.5.1 April 2012User GuideSystem Functions/Administration

April 20
GTPar
GTPar
GTTar
GTIntFor
GTOb
GTQu
GTED
GTSys
GTVal
GTVal
Val
VEQPGameter Group Code Validation Form
GOREQNMEvent Queue Name Definition Form
GOREQPGParameter Group Rule Form
VEQPMameter Code Validation Form
GOREQPGParameter Group Rule Form
VEQTSget System Code Validation Form
GOAEQRMEvent Queue Record Maintenance Form
GOREQNMEvent Queue Name Definition Form
VINTPegration Partner System Code Validation m
GORINTGIntegration Partner System Rules Form
VOBJTject Code Validation Form
GUAOBJSObject Maintenance Form
GUTGMNUMenu Maintenance Form
VQUIKickFlow Code Validation Form
GUAQUIKQuickFlow Definition Form
VSCODI/ISO Standard Code Validation Form
GUACURRCurrency Codes Validation Form
VSYSItem Indicator Validation Form
GUAOBJSObject Maintenance Form
GUTGMNUMenu Maintenance Form
GUTMENUGeneral Menu Maintenance Form
VVAPPue-Based Security Application Codes Form
GOABACRValue-Based Security Access Rules Form
GOAVUSRValue-Based Security Restricted Users Form
VVBTYue-Based Security Object Types Form
GTVVAPPValue-Based Security Application Codes Form
idation Form Used By
12 Banner General 8.5.1 8-3User Guide
System Functions/Administration

8-4
GTVal
GXBa
STCa
STCo
STDe
STLev
STNa
Val
Related Process
The Print Dynamic Help for a Form Process (GURHELP) prints Dynamic Help for selected forms. You can print form-level, block-level, and field-level help.
VVOBJue-Based Security Objects Form
GOABACRValue-Based Security Access Rules Form
GOAPCRLValue-Based Security Pattern Control Rules Form
VDIRDnk Routing Number Validation Form
GXADIRDDirect Deposit Recipient Form
VCAMPmpus Code Validation Form
GOABACRValue-Based Security Access Rules Form
VCOLLllege Code Validation Form
GOABACRValue-Based Security Access Rules Form
VDEPTpartment Code Validation Form
GOABACRValue-Based Security Access Rules Form
VLEVLel Code Validation Form
GOABACRValue-Based Security Access Rules Form
VNATNtion Code Validation Form
GTVZIPCZIP/Postal Code Validation Form
GUACURRCurrency Code Maintenance Form
GUAINSTInstallation Control Form
idation Form Used By
Banner General 8.5.1 April 2012User GuideSystem Functions/Administration

April 20
Menu Navigation Table
Forms in the System Functions/Administration module can be accessed from the following menus. Further information on the forms in this module can be found in Online Help. See “Online Help: Banner Form and Field Reference” on page 1-5.
*GENCURR Banking and Currency MenuProvides access to the forms used to define currency codes, bank codes, bank routing information, and direct deposit information.
*GENEDI Electronic Data Interchange MenuProvides access to the forms used to maintain EDI information.
*GENDTOOLS Desktop Tools MenuProvides access to the forms used to define the codes and rules used by the Desktop Tools application.
*GENEQS Event Queue Maintenance MenuProvides access to the forms used to define the codes and rules used by the Event Queue Maintenance module.
*GENMENU Menu/Preference Maintenance MenuProvides access to the forms used to customize menus for your institution, change an Oracle password, establish personal preferences for the logged in user ID, create personal menus, and copy personal menus.
*GENOBJS Object Maintenance MenuProvides access to the forms used to create Banner objects.
*GENQUIK QuickFlow Process MenuProvides access to the forms used to define and submit QuickFlows.
*GENMISC Miscellaneous General FormsProvides access to miscellaneous General forms.
*GENMSSG MessagingProvides access to messaging functions.
*GENFGAC Fine-Grained Access Control MenuProvides access to forms to set up Value-Based Security, PII Security, and Masking.
*GENMATCH Common Matching MenuProvides access to forms for setting up Common Matching.
*GENINTCOMP Integration Component Management MenuProvides access to Integration Components forms.
12 Banner General 8.5.1 8-5User Guide
System Functions/Administration

8-6
System Functions/Administration also uses some forms that are cannot be called from a menu:
• The About Banner Form (GUAABOT) displays information about Banner, including the name and version number of the form from which GUAABOT was called and your session ID.
• The Calculator Form (GUACALC) displays a calendar. You can access this form by double-clicking any numeric field on a form, using a button on the Banner tool bar, or using Direct Access.
• The Calendar Form (GUACALN) displays a calendar. You can access this form by double-clicking any date field on a form, using a button on the Banner tool bar, or using Direct Access.
• The Direct Access Form (GUAPARM) is used to directly access forms, jobs, menus, and QuickFlows by name. You can access this form from the File pull-down menu.
The Display Banner Versions and Patches Form (GUIVERS) is used to display Banner versions and patches by product. This form allows you to easily check your installed product versions and patches.
You can access this form directly, but it is not found on a menu. It is also accessible through the About Banner form (GUAABOT) or the Installation Controls Form (GUAINST). On either form, click the Display Installed Patch Information button to display the GUIVERS form.
*GENSDE Supplemental Data Engine MenuProvides access to forms for setting up Banner supplemental data.
*GENMDUU Mass Data Update Utility MenuProvides access to forms for mass data updates.
*GENPROXY Proxy Access Forms MenuProvides access to forms for setting up Proxy Access.
Banner General 8.5.1 April 2012User GuideSystem Functions/Administration

April 20
System Functions/Administration Procedures
The System Functions/Administration module lets you set up, operate, and monitor Banner. With this module you can:
• Establish currency conversions.
• Set up events in the Event Queue Maintenance module.
• Customize menus.
• Manage the Data Extract feature.
• Create and use QuickFlows.
• Set up Value-Based Security with Fined-Grained Access Controls. See the Banner Data Security Handbook for more information.
• Set up and use Common Matching. See the Banner Common Matching Handbook for more information.
• Manage integration components for your institution.
• Set up Electronic Data Interchange (EDI).
• Manage Banner objects.
• Set up Supplemental Data. See Chapter 14, “Supplemental Data Engine.”
Establishing Currency Conversions
Banner can process foreign currencies. The base currency for your institution, referenced on the Institutional Description Table (GUBINST), is used in all foreign currency calculations. The currency codes, with daily or periodic rates, are maintained on the Currency Code Maintenance Form (GUACURR).
Currency conversions are used in the Purchasing and Procurement, Accounts Payable, and General Ledger modules of the Finance System. Unless otherwise specified, amounts are entered in the installation's base currency that is referenced on the Installation Control Form (GUAINST). When dealing with a foreign currency, you can enter a currency code in the Currency Code field. The system automatically calculates the converted amount (entered amount divided by the exchange rate). Refer to the Banner Finance User Guide for additional information.
12 Banner General 8.5.1 8-7User Guide
System Functions/Administration

8-8
To process transactions in a foreign currency, the associated currency code (for example, DM for Deutsch Marks) must be defined on the Currency Conversion Validation Table (GTVCURR). You can produce statements or invoices in foreign currencies.
1. Determine which foreign currencies are used at your institution.
2. Use the Currency Code Maintenance Form (GUACURR) to create your currency records. This updates the Currency Conversion Validation Table (GTVCURR).
Creating Bank Information
The Bank Code Rule Form (GXRBANK) is used to:
• Define bank codes for you institution’s bank accounts
• Link bank funds and bank accounts with your cash accounts
• Define Automatic Clearing House (ACH) information for your institution’s bank accounts
The first two actions are performed on the main window of GXRBANK. ACH information is entered on the ACH Rules window of the form.
You can create several records for a particular bank code. Only one record per bank code is valid for a defined effective date range. Each record, however, can be distinguished by a different bank name.
As illustrated in the procedures below, new bank codes are defined in data entry mode; and additional records for a previously defined bank code are accessible in query mode. Any modifications to existing bank records must be done after executing a query.
Defining a New Bank Code
1. Access the Bank Code Rule Form (GXRBANK). The system displays a message indicating that the form is in query mode. Select OK.
2. Enter the bank code in the Bank field.
You can use the down arrow icon to access a list of previously defined bank codes. If more than one bank name exists for the same bank code, use the down arrow to view other bank names with that code.
3. Enter the name to be associated with the bank code in the Name field.
4. Select the Active Status check box if the bank is available for use within Banner. Clear this check box if the bank is not active.
Banner General 8.5.1 April 2012User GuideSystem Functions/Administration

April 20
5. Enter the effective date of the bank record in the Effective Date field. The default value of this field is today’s date. This value can be changed.
6. (Optional) Enter the date that the bank code record is no longer valid in the Termination Date field. You can enter a past or future date.
NoteIf you want a bank code to be valid for only a certain length of time, you can enter an effective date (when you can start using the bank code) and a termination date (when the bank code can no longer be used).
7. (Used only by Banner Finance) Enter the currency code for this bank in the Base Currency field, for example, USD may represent U.S. dollars. You can double-click in the field to access the Currency Code Validation Form (GTVCURR) and search for a currency code.
8. Enter the identification number for the bank in the Bank ID field. You can select the down arrow icon to access the Non-Person Search Form (SOACOMP) and search for a bank ID.
NoteWhen you save a bank code, Banner creates an identification record in the Identification Table (spriden) for the bank ID and bank name. Use the Identification Form (FOAIDEN for Finance or PPAIDEN for Human Resources) to update existing bank names.
9. Enter the bank account number in the Bank Account Number field.
If the bank code you’re defining is to be used with the Banner Finance System, identify the Banner bank funds and bank accounts associated with your cash account. (See the Linking Bank Funds and Bank Accounts with Cash Accounts sub-procedure below for instructions on providing this information.)
10. Select the ACH Status check box if the ACH functionality is active for the bank. Clear this check box if it isn’t.
If you selected the check box, you must specify the information required for sending direct deposit tapes from your bank to the Automatic Clearing House (ACH). (See the Creating ACH Information for a Bank Account sub-procedure below for instructions on providing this information.)
If you did not select it, continue to step 11.
11. Save the record.
12 Banner General 8.5.1 8-9User Guide
System Functions/Administration

8-10
Linking Bank Funds and Bank Accounts with Cash Accounts (For Finance Only)
This sub-procedure of the Defining a New Bank Code procedure is used to identify the Banner Finance bank funds and bank accounts to be associated with the bank code. You must perform all the steps in this sub-procedures if the bank code you are defining will be used with the Banner Finance System. Perform these steps after performing step 9 of the main procedure.
NoteThe fields referenced in the sub-procedure are active and navigable only if the Banner Finance System is installed at your site.
Sub-Procedure
1. Enter the code identifying the Chart of Accounts (COA) for the Banner accounts in the Chart of Accounts field. You can double click in the field to access the Chart of Accounts List (FTVCOAS) and search for a COA code.
2. Enter the code identifying the bank fund (that is, the account that represents the accumulation, or total, of all your institution’s cash accounts) in the Bank Fund field. You can double click in the field to access the Fund Code Validation Form (FTVFUND) and search for a bank fund.
3. Enter the code identifying the account used for cash transactions in the Cash Account field. You can double-click in the field to access the Account Code Validation Form (FTVACCT) and search for an account code.
4. Enter the code identifying the interfund account in the Interfund Account field. The interfund account acts as an intermediate account that can hold money temporarily before the money is sent to the final destination accounts.
5. Go to step 10 of the Defining a New Bank Code procedure.
Creating ACH Information for a Bank Account
This sub-procedure of the Defining a New Bank Code procedure is used to specify the information required for sending direct deposit tapes from your bank to the Automatic Clearing House (ACH). This information must be defined for a bank account if funds are to be transferred from that account to another account. It is sent with the direct deposit tapes submitted to your bank. The information is available from your bank or clearing house.
Performs the steps in this sub-procedure after performing step 9 in the main procedure.
Banner General 8.5.1 April 2012User GuideSystem Functions/Administration

April 20
Sub-procedure
1. Access the ACH Rules window of GXRBANK by selecting ACH Rules from the Options menu.
2. Enter the routing number of the ACH operator or receiving point to which the direct deposit files are sent in the Destination ID field.
3. Enter the name associated with the destination ID in the Destination Name field.
4. Enter the routing number of the ACH operator or sending point that is sending the direct deposit files in the Origin ID field.
5. Enter the name associated with the origin ID in the Origin Name field.
6. Enter the short name to be associated with the origin ID in Short Name field. The default short name comes from the Origin Name field; it matches the first 16 characters in this field. This value can be overridden.
NoteThe name entered in this field will be used as the origin name for a Canadian magnetic tape deposit.
7. Enter the routing number of the Deposit Finance Institution originating entries in the Originating Bank Routing Number field.
8. Complete the Organization Number Type field by selecting the radio group entry identifying the type of identification number that your institution uses for direct deposit processing.
9. Enter your institution’s identification number for direct deposit processing in the Organization ID Number field. Enter a number of the type specified in the Organization Number Type field.
10. Save the record.
Updating Bank Code Records
Any updates to bank code records (i.e., the creation of new records or modifications to existing records) must be done upon executing a query. Procedures for updating bank code records follow:
1. Access the Bank Code Rule Form (GXRBANK). The system displays a message indicating that the form is in data entry mode. Select OK and go to step 2.
12 Banner General 8.5.1 8-11User Guide
System Functions/Administration

8-12
NoteTo determine whether records currently exist for a particular bank code, use the down arrow icon for the Bank field to access a list of previously defined bank codes. If more than one bank name exists for the same bank code, use the down arrow to view other bank names with that code. Do this before performing step 2.
2. Enter query mode.
3. Enter the bank code for the record you want to modify or duplicate.
4. Execute the query.
5. If additional records have previously been created for the bank code, scroll through the records until the version that you want to modify or duplicate is displayed.
NoteIf a more recent record exists, its date is displayed in the Next Change Date field.
If you want to modify the displayed record, go to step 7. If you want to create a new record, go to step 6.
6. Duplicate the displayed record.
7. Make your changes on the original or duplicated record.
8. Save the record.
Setting Up Events in the Event Queue Maintenance Module
An event is a Banner database change that potentially triggers another action in an external system. For example, a clerk in the Registrar’s Office cancels a class using a Banner form. This triggers an event for each student registered for that class. The same cancellation event could also be sent to Workflow, which might initiate a workflow that cancels the faculty member’s teaching contract and removes any job records associated with that contract.
The Event Queue Maintenance module within Banner General supports the event queue processing required by Luminis®, Workflow, and potentially other external systems.
Banner General 8.5.1 April 2012User GuideSystem Functions/Administration

April 20
Use these steps to set up an event:
1. Use the Target System Code Validation Form (GTVEQTS) to define the external systems that require notification when an event occurs.
2. Use the Event Queue Code Validation Form (GTVEQNM) to define the events that will be captured and sent to external systems.
3. Use the Parameter Code Validation Form (GTVEQPM) to define the parameters that are associated with events.
4. Use the Parameter Group Code Validation Form (GTVEQPG) to define the parameter groups that can be associated with events.
5. Use the Parameter Group Rule Form (GOREQPG) to assign defined parameters to a groups.
6. Use the Event Queue Name Definition Form (GOREQNM) to define specific events for the target systems. This definition includes associating a parameter group with each event.
Refer to Integrating Banner or Plus With Partner Systems for more details on event processing for Luminis.
Refer to Workflow Functional Integration Guide for more details on event processing for Workflow.
Customizing Menus
Your institution can create new menus and customize the contents of the menus delivered with Banner. In addition, each user can create a customized, personal menu tied to the Oracle user ID and make minor changes to the appearance of the main menu.
NoteAll menus must be placed on an existing menu structure that branches out from *MAIN.
Creating and Maintaining Menus for Your Institution
Banner is delivered with a set of menus to provide access to Banner forms. You can use the Menu Maintenance Form (GUTGMNU) to create new menus and customize the contents of menus for your institution. A menu can contain any combination of forms, jobs, other menus, and QuickFlows.
12 Banner General 8.5.1 8-13User Guide
System Functions/Administration

8-14
Creating a New Menu Using the List of Objects
Use these steps to create a menu by choosing objects from a displayed list of objects.
1. Access the Menu Maintenance Form (GUTGMNU).
2. Enter the new menu name, menu description, and system identifier in the three fields above the right pane. Remember that a menu name must start with an asterisk (*).
3. Use the pull-down list above the left pane to select the object type you want to display. The left pane lists the objects of the selected type that can be added to the menu.
4. (Optional) To query for specific objects:
4.1. Click in the left pane.
4.2. Select the Enter Query function. The object list disappears.
4.3. Enter the search criteria for the object description.
You can use the Oracle wildcards % and _. Capitalization matters. Data is matched against the search criteria exactly as you enter them.
4.4. Select the Execute Query function. The left pane lists the matching objects.
5. To add all objects displayed in the left pane to the menu (if there are 20 objects or less), select the Insert All button in the middle of the form .
6. To add selected objects to the menu:
6.1. In the left pane, select each object you want to add to the menu. When you select an object, the name is highlighted.
As you move the cursor over an object description, its seven-character name is displayed.
You can highlight a menu name or QuickFlow name and Key-Next-Block to list the items associated with that object.
6.2. (Optional) Use the pull-down list above the left pane to select another object type. Select additional objects for the menu. (You can select objects from multiple object types and insert them together.)
6.3. Click in the right pane where you want to place the new menu items.
6.4. Select the Insert Selection button in the middle of the form . The selected objects are added to the right pane below the place you clicked.
Banner General 8.5.1 April 2012User GuideSystem Functions/Administration

April 20
7. (Optional) Customize object descriptions.
8. Save your changes.
NoteAll menus must be placed on an existing menu structure that branches out from *MAIN.
Creating a Menu Using Object Names
Use these steps to create a menu if you know the object names you want to appear on the menu.
1. Access the Menu Maintenance Form (GUTGMNU).
2. Enter the new menu name, menu description, and system identifier in the three fields above the right pane. Remember that a menu name must start with an asterisk (*).
3. Place the cursor in a blank Name field in the right pane.
4. Enter the object’s seven-character name.
5. Press Enter. The object’s type, description, and name appear in the right pane.
6. Repeat steps 3 through 5 for each object you want to add to the menu.
7. (Optional) Customize the object descriptions.
8. Save your changes.
NoteAll menus must be placed on an existing menu structure that branches out from *MAIN.
Maintaining an Existing Menu (Additions, Deletions, and Changed Sequence)
1. Access the Menu Maintenance Form (GUTGMNU).
2. Enter the menu name in the left-most field above the right pane (field to the left of the down arrow icon). You can click the down arrow icon to access the Object Search Form (GUIOBJS) to search for a menu name.
3. Click in the right pane. All existing menu items appear.
4. Click the selected menu item so it is no longer selected.
12 Banner General 8.5.1 8-15User Guide
System Functions/Administration

8-16
5. To add objects to the menu:
5.1. Use the pull-down list above the left pane to select the object type you want to display. The left pane lists the objects of the selected type.
5.2. (Optional) To query for specific objects, click in the left pane. Select the Enter Query function. The object list disappears. Enter the search criteria for the object description. (You can use the Oracle wildcards % and _. Capitalization matters. Data is matched against the search criteria exactly as you enter them.) Select the Execute Query function. The left pane lists the matching objects.
5.3. In the left pane, select each object you want to add to the menu. When you select an object, the name is highlighted.
As you move the cursor over an object description, its seven-character name is displayed.
You can highlight a menu name or QuickFlow name and Key-Next-Block to list the items associated with that object.
5.4. Repeat steps a through c for each object type you want to add to the menu. (You can select objects from multiple object types and insert them together.)
5.5. Click in the right pane where you want to place the new menu items.
5.6. Select the Insert Selection button in the middle of the form . The selected objects are added to the right pane below the place you clicked.
5.7. (Optional) Customize the object descriptions.
6. To delete selected objects from the menu:
6.1. In the right pane, select each object you want to delete from the menu. When you select an object, the name is highlighted.
6.2. Select the Remove Selection button in the middle of the form . The selected objects are deleted.
7. To delete all objects from the menu, click the Remove All button in the middle of the
form .
8. To change the order of objects on the menu:
8.1. Use the tasks in step 5 to add the object to its new location.
8.2. Use the tasks in step 6 to delete the object from the old location.
Banner General 8.5.1 April 2012User GuideSystem Functions/Administration

April 20
9. Save your changes.
NoteIf you add an object to a menu, all objects on the menu are processed, not just the new ones. The transaction count on the status line includes all menu items.
Deleting a Menu
1. Access the Menu Maintenance Form (GUTGMNU).
2. Enter the menu name in the left-most field above the right pane (field to the left of the down arrow icon). You can select the down arrow icon to access the Object Search Form (GUIOBJS) to search for a menu name.
3. Select the Delete Record function. A dialog box asks if you really want to delete the menu.
Alternatively, you can click the right pane. All existing menu items appear. Select the
Remove All button in the middle of the form . Save your changes. A dialog box asks if you want to delete the menu.
4. Select the Yes button.
5. Save your changes.
Creating and Maintaining Personal Menus
Individual users can create personal menus that include the forms, jobs, menus, and QuickFlows that are most important in their daily work. A personal menu is tied to the user’s Oracle user ID and can be accessed from the main menu (under My Banner).
NoteObjects must be added to GUAOBJS properly before they can be used on on any of the menus.
You can use these forms to create and copy personal menus:
• Personal Menu Maintenance Form (GUAPMNU). Lets a user create and change a personal menu.
• Personal Menu Maintenance and Copy Form (GUTPMNU). Lets a user copy a personal menu to or from another user.
NoteAll menus must be placed on an existing menu structure that branches out from *MAIN.
12 Banner General 8.5.1 8-17User Guide
System Functions/Administration

8-18
Changing the Appearance of the Main Menu
Individual users can make the following changes to the main menu:
• Sizes of the left and right panes
• Show or hide the 7- or 8-character form mnemonics
• Order of items in the right pane
Managing the Data Extract Feature
Banner is delivered with the Data Extract feature enabled on most validation forms. With this feature, you can extract data from a Banner form to a spreadsheet. You can extract detail data from the current block with or without data from the key block.
SunGard® Higher Education also supports the extract feature on a limited number of rule, application, and inquiry forms where the feature has been tested. The system administrator at your institution can enable the extract feature on any form that has been tested. For a list of tested forms, refer to chapter 3 of the Banner Getting Started Guide.
Extract results are unpredictable on forms that have not been tested with this feature. If you want to extract data on an untested form, you can consider enabling the extract feature on GUAOBJS. SunGard Higher Education does not support this feature on untested forms.
WebUtil offers another way to save extracted data in Banner. Information about configuring WebUtil is contained in the Middle Tier Implementation Guide.
Enabling the Data Extract Feature for a Form
WarningIf you wish to enable the extract feature on local forms, you must test the extract feature on them before you enable the feature on GUAOBJS.
1. Access the Object Maintenance Form (GUAOBJS).
2. Select a value from the pull-down list in the Data Extract Option field:
Key and Data BlockEnable the extract feature for both key and data blocks.Data Block OnlyEnable the extract feature for data blocks only.
Banner General 8.5.1 April 2012User GuideSystem Functions/Administration

April 20
Changing the Default Directory Location for Extract Files
SunGard Higher Education delivers Banner with C:\temp as the default directory for extract files. The system administrator at your institution can use the General User Preferences Maintenance Form (GUAUPRF) to change this default value to meet your institutional needs. Only those staff members with appropriate security can perform this task.
In addition, individual users can set their own default directory for extract files. Chapter 3 of the Banner Getting Started Guide contains instructions for how to change the default directory.
Creating and Using QuickFlows
A QuickFlow is a technique that lets you access a set of forms in a specific sequence. QuickFlow processing uses the following forms:
• QuickFlow Validation Form (GTVQUIK). Defines a QuickFlow code and description.
• QuickFlow Definition Form (GUAQUIK). Specifies the sequence of forms and assigns a four-character identifier for executing the flow of forms.
• QuickFlow Form (GUAQFLW). Lets you enter the identifier and access the first form in the QuickFlow. When you exit the first form, the next form in the sequence is automatically accessed. This process continues until all forms in the QuickFlow have been accessed and exited. At this point, you can execute the QuickFlow again or exit to the location where you called the QuickFlow.
Creating a QuickFlow
Any form, except the following, can be added to a QuickFlow:
• Main menu (GUAGMNU)
• Welcome to Banner Form (GUAINIT)
• QuickFlow Form (GUAQFLW)
• Security Maintenance Form (GSASECR)
• Any query form (Q is the third character of the form name)
12 Banner General 8.5.1 8-19User Guide
System Functions/Administration

8-20
Use these steps to create a QuickFlow:
1. Determine the purpose of your QuickFlow, and identify all forms that must be accessed for the tasks you wish to perform. For example:
2. Use the QuickFlow Validation Form (GTVQUIK) to create a code and description for the QuickFlow. For example:
3. Access the QuickFlow Definition Form (GUAQUIK).
4. Enter the QuickFlow code (defined in step 2) in the QuickFlow field. If you want to search for a QuickFlow code, click the Search button to select the QuickFlow Codes option, which accesses the QuickFlow Validation (GTVCALL) list.
5. Go to the next block. All existing object names appear in the left pane.
6. Select the objects you want to add, and then use the arrow buttons to move the objects from the left pane to the right pane. Be sure to list them in the order they are to be accessed in the QuickFlow.
OR
Enter the seven-character name of each object you want in the QuickFlow. Be sure to list them in the order they are to be accessed in the QuickFlow. You can use the List function to access the Object Search Form (GUIOBJS) to search for an object.
7. When all the desired objects are entered in the right pane, save your changes.
Using a QuickFlow
1. Access the QuickFlow Form (GUAQFLW).
2. Enter the QuickFlow code in the QuickFlow field. You can select the down arrow icon to access the QuickFlow Query Form (GUQQUIK) to search for a QuickFlow code.
3. Select the Start button or select the Next Block function. The first form in the QuickFlow appears.
Purpose: Add jobs to Job SubmissionForms needed: GJAJOBS
GJAPDEFGJAPVALGJAPDEF
Code: JOBDescription: Job Submission
Banner General 8.5.1 April 2012User GuideSystem Functions/Administration

April 20
4. Enter data on the form.
5. Exit the form. The next form in the QuickFlow appears.
6. Repeat steps 4 and 5 for all the forms in the QuickFlow. After you pass through all the forms in the QuickFlow, the QuickFlow Form (GUAQFLW) reappears.
A form in a QuickFlow cannot be bypassed. If you do not have any data to enter on a form, exit the form. If the message DO YOU WANT TO QUIT? appears, answer Y. (The message is form-dependent.)
If you want to exit the QuickFlow before all the forms are accessed, select the Exit QuickFlow option on the File pull-down menu.
7. If you are finished, select the Cancel button.
OR
To execute the QuickFlow again, select the Start button.
12 Banner General 8.5.1 8-21User Guide
System Functions/Administration

8-22
Banner General 8.5.1 April 2012User GuideSystem Functions/Administration
April 20
ValidForm
GTVD
GTVE
GTVE
GTVF
GTVF
GTVF
9 Event Management
The Banner® Event Management module helps you manage an event and the functions, tasks, and participants associated with the event. You can perform these kinds of activities:
• Schedule dates and date ranges, times, buildings, and rooms.
• Organize administrative tasks associated with functions.
• Determine financial requirements, including fee and rate structures, budgets, costs, anticipated income, and actual income.
• Arrange for speakers, entertainment, ticketing, invitations, and mailings.
• Track anticipated attendance and actual attendance.
Keeping track of this information not only helps you manage the current event, but provides information that can be used to plan future events.
Event Management
Validation Forms
Event Management forms use the following validation forms. Further information on these forms can be found in Online Help. See “Online Help: Banner Form and Field Reference” on page 1-5.
ation Used By
ICD District Division Code Validation Form
SLAEVNT
STVCAMP
Event Form
Campus Code Validation Form
MPH Emphasis Code Validation Form GEAFUNC Event Function Form
XPN Expense Code Validation Form GEAFUNC Event Function Form
EES Fee Status Code Validation Form GEAATID
GEAATTD
Event Registration Form
Attendance Form
STA Function Status Code Validation Form
GEAFUNC Event Function Form
TYP Fee Type Code Validation Form GEAFUNC Event Function Form
12 Banner General 8.5.1 9-1User Guide
Event Management

9-2
GTVF
GTVL
GTVM
GTVM
GTVP
GTVP
GTVR
GTVR
GTVR
GTVR
GTVS
GTVS
GTVT
GTVT
GTVT
GTVT
GTVZ
ValidForm
UNC Function Code Validation Form GEAFUNC
SLAEVNT
SSAMATX
Event Function Form
Event Form
Building/Room Schedule Form
ETR Letter Code Validation Form GEAFUNC Event Function Form
AIL Mail Code Validation Form GEAFUNC Event Function Form
ENU Menu Code Validation Form GEAATID
GEAATTD
GEAFUNC
Event Registration Form
Attendance Form
Event Function Form
TYP Participant Type Code Validation Form
GEAPART Function Participant Form
URP Purpose Code Validation Form GEAFUNC Event Function Form
ATE Fee Rate Code Validation Form GEAFUNC Event Function Form
EVN Revenue Code Validation Form GEAFUNC Event Function Form
SVP RSVP Code Validation Form GEAATID
GEAATTD
Event Registration Form
Attendance Form
TNG Rating Code Validation Form GEAPART Function Participant Form
UBJ Subject Index Validation Form GEAFCOM Function Comment Form
YSI System Indicator Validation Form SLAEVNT Event Form
ARG Target Audience Code Validation Form
GEAFUNC Event Function Form
ASK Task Code Validation Form GEATASK Function Task Form
STA Task Status Code Validation Form
GEATASK Function Task Form
TYP Task Type Code Validation Form GEATASK
GTVTASK
Function Task Form
Task Code Validation Form
IPC ZIP/Postal Code Validation Form SLABLDG
STVSITE
Building Definition Form
Site Code Validation Form
ation Used By
Banner General 8.5.1 April 2012User GuideEvent Management

April 20
STVB
STVC
STVC
STVC
STVD
STVE
STVN
STVP
STVR
STVR
STVR
ValidForm
LDG Building Code Validation Form SLABLDG Building Definition Form
AMP Campus Code Validation Form GTVPARS
SLABLDG
SLAEVNT
Scheduling Partition Validation Form
Building Definition Form
Event Form
NTY County Code Validation Form SLABLDG
GTVZIPC
Building Definition Form
ZIP/Postal Code Validation Form
OLL College Code Validation Form GTVEMPH
SLABLDG
SLAEVNT
SLARDEF
Emphasis Code Validation Form
Building Definition Form
Event Form
Room Definition Form
EPT Department Code Validation Form
GTVEMPH
SLABLDG
SLAEVNT
SLARDEF
Emphasis Code Validation Form
Building Definition Form
Event Form
Room Definition Form
TYP Event/Function Type Code Validation Form
GEAFUNC
GTVFUNC
SLAEVNT
Event Function Form
Function Code Validation Form
Event Form
ATN Nation Code Validation Form STVSITE
GTVZIPC
Site Code Validation Form
ZIP/Postal Code Validation Form
RCD Phone Rate Code Validation Form
SLABLDG
SLARDEF
Building Definition Form
Room Definition Form
DEF Building/Room Attribute Code Validation Form
SLABLDG
SLARDEF
Building Definition Form
Room Definition Form
MST Room Status Code Validation Form
SLARDEF Room Definition Form
RCD Room Rate Code Validation Form
SLABLDG
SLARDEF
Building Definition Form
Room Definition Form
ation Used By
12 Banner General 8.5.1 9-3User Guide
Event Management
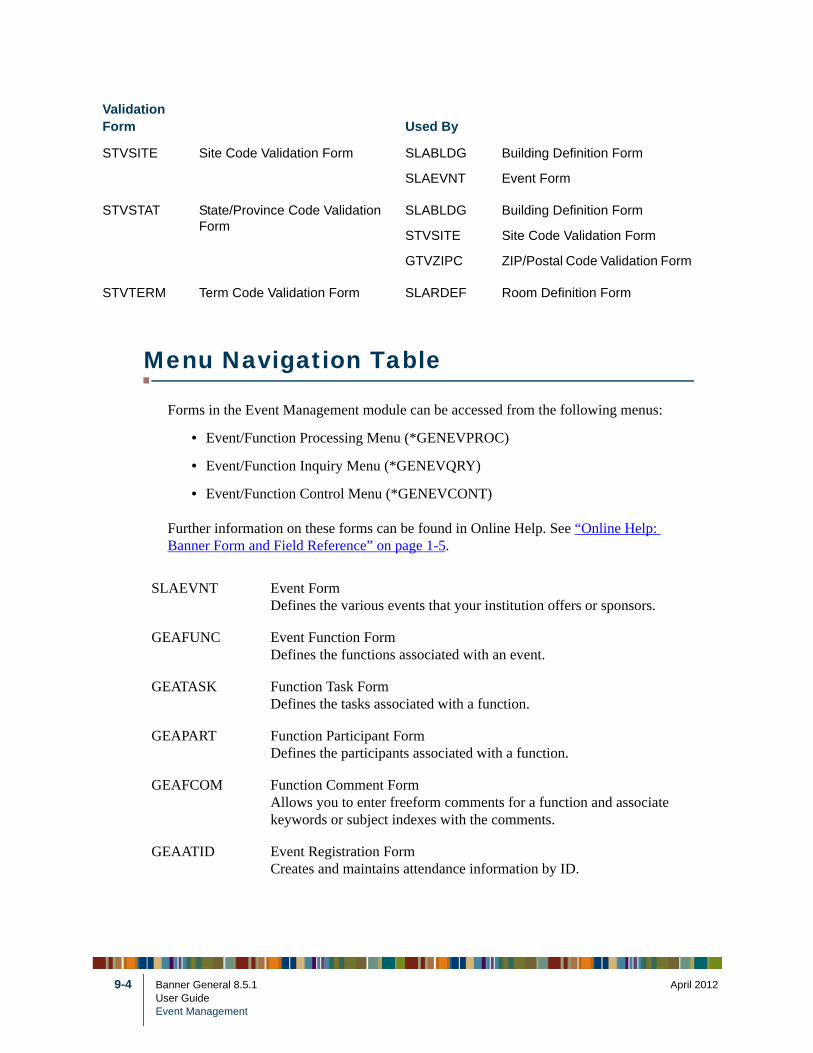
9-4
STVS
STVS
STVT
ValidForm
Menu Navigation Table
Forms in the Event Management module can be accessed from the following menus:
• Event/Function Processing Menu (*GENEVPROC)
• Event/Function Inquiry Menu (*GENEVQRY)
• Event/Function Control Menu (*GENEVCONT)
Further information on these forms can be found in Online Help. See “Online Help: Banner Form and Field Reference” on page 1-5.
ITE Site Code Validation Form SLABLDG
SLAEVNT
Building Definition Form
Event Form
TAT State/Province Code Validation Form
SLABLDG
STVSITE
GTVZIPC
Building Definition Form
Site Code Validation Form
ZIP/Postal Code Validation Form
ERM Term Code Validation Form SLARDEF Room Definition Form
ation Used By
SLAEVNT Event FormDefines the various events that your institution offers or sponsors.
GEAFUNC Event Function FormDefines the functions associated with an event.
GEATASK Function Task FormDefines the tasks associated with a function.
GEAPART Function Participant FormDefines the participants associated with a function.
GEAFCOM Function Comment FormAllows you to enter freeform comments for a function and associate keywords or subject indexes with the comments.
GEAATID Event Registration FormCreates and maintains attendance information by ID.
Banner General 8.5.1 April 2012User GuideEvent Management

April 20
GEAATTD Attendance FormCreates and maintains attendance information by function.
SLABLDG Building Definition FormDescribes the buildings at your institution.
SLARDEF Room Definition FormDescribes the rooms within a building.
GEIATTD Function Attendance Inquiry FormDisplays information about invitees and their guests.
GEIFUNC Event Function Inquiry FormDisplays information about all the functions associated with an event.
GEIIDFN Individual Function Inquiry FormDisplays information about all events and their functions that an ID has attended or in which the ID has participated.
GEISUBJ Function Subject Index Query FormDisplays all subject index codes associated with comments for a function.
SLABQRY Building Query FormSelects a subset of the buildings at your institution based on a set of criteria.
SSAMATX Building Room Schedule FormDisplays information for all scheduled buildings and rooms at your institution.
*GENEVVAL1 Validation Forms (STV)Provides access to the forms that build, maintain, and display the Student System validation tables used by the Event Management module.
*GENEVVAL2 Validation Forms (GTVEMPH - GTVPURP)Provides access to the forms that build, maintain, and display the General System validation tables used by the Event Management module (GTVEMPH through GTVPURP).
*GENEVVAL3 Validation Forms (GTVRATE - GTVZIPC)Provides access to the forms that build, maintain, and display the General System validation tables used by the Event Management module (GTVRATE through GTVZIPC).
12 Banner General 8.5.1 9-5User Guide
Event Management
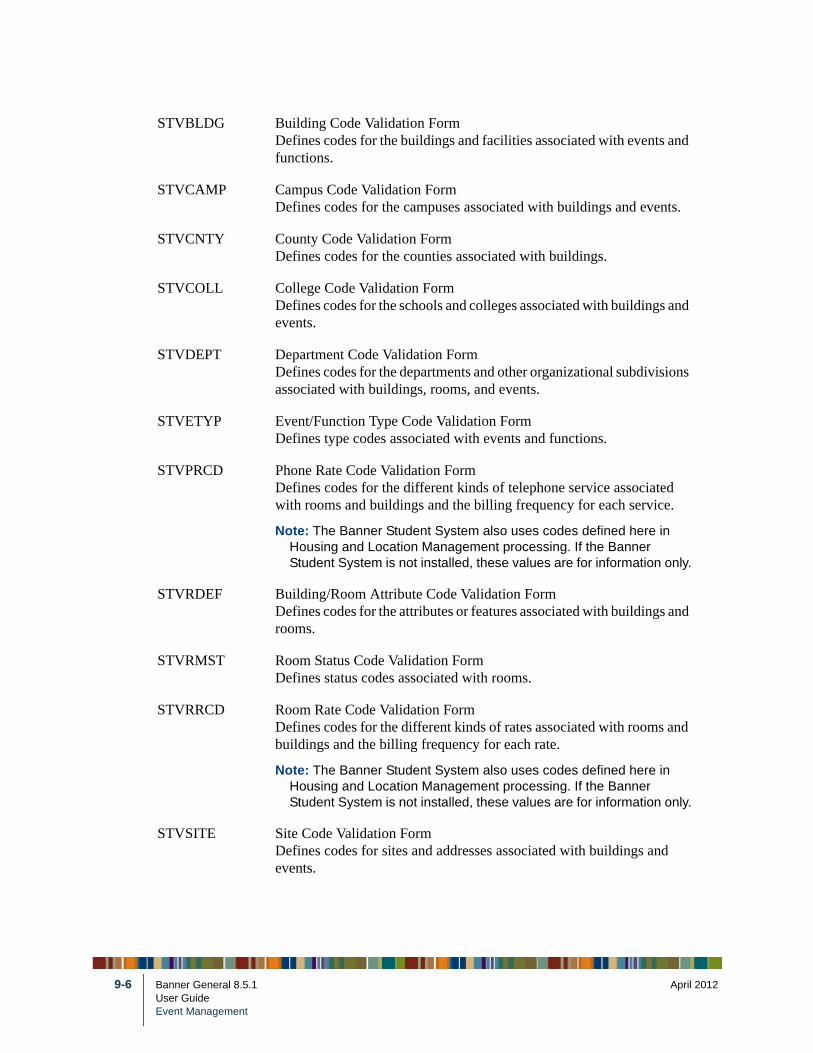
9-6
STVBLDG Building Code Validation FormDefines codes for the buildings and facilities associated with events and functions.
STVCAMP Campus Code Validation FormDefines codes for the campuses associated with buildings and events.
STVCNTY County Code Validation FormDefines codes for the counties associated with buildings.
STVCOLL College Code Validation FormDefines codes for the schools and colleges associated with buildings and events.
STVDEPT Department Code Validation FormDefines codes for the departments and other organizational subdivisions associated with buildings, rooms, and events.
STVETYP Event/Function Type Code Validation FormDefines type codes associated with events and functions.
STVPRCD Phone Rate Code Validation FormDefines codes for the different kinds of telephone service associated with rooms and buildings and the billing frequency for each service.
Note: The Banner Student System also uses codes defined here in Housing and Location Management processing. If the Banner Student System is not installed, these values are for information only.
STVRDEF Building/Room Attribute Code Validation FormDefines codes for the attributes or features associated with buildings and rooms.
STVRMST Room Status Code Validation FormDefines status codes associated with rooms.
STVRRCD Room Rate Code Validation FormDefines codes for the different kinds of rates associated with rooms and buildings and the billing frequency for each rate.
Note: The Banner Student System also uses codes defined here in Housing and Location Management processing. If the Banner Student System is not installed, these values are for information only.
STVSITE Site Code Validation FormDefines codes for sites and addresses associated with buildings and events.
Banner General 8.5.1 April 2012User GuideEvent Management

April 20
GTVEMPH Emphasis Code Validation FormDefines codes that identify the emphasis of functions.
GTVEXPN Expense Code Validation FormDefines codes for expenses associated with functions.
GTVFEES Fee Status Code Validation FormDefines codes for the payment status of fees associated with functions.
GTVFSTA Function Status Code Validation FormDefines status codes associated with functions.
GTVFTYP Fee Type Code Validation FormDefines codes for the types of fees associated with functions.
GTVFUNC Function Code Validation FormDefines codes for the types of functions.
GTVLETR Letter Code Validation FormDefines codes for the letters associated with functions.
GTVMAIL Mail Code Validation FormDefines codes for mailings associated with functions.
GTVMENU Menu Code Validation FormDefines codes for the food and beverage items associated with functions.
GTVNTYP Name Type Validation FormDefines codes for the name types associated with IDs.
GTVPARS Partition Code Validation FormDefines codes for categories or groupings of rooms.
GTVPTYP Participant Type Code Validation FormDefines codes for the types of participants associated with functions.
GTVPURP Purpose Code Validation FormDefines codes that describe the purposes of functions.
GTVRATE Fee Rate Code Validation FormDefines codes for the types of rates associated with functions.
GTVREVN Revenue Code Validation FormDefines codes for revenues associated with functions.
GTVRSVP RSVP Code Validation FormDefines codes for the responses invitees can give to function invitations.
12 Banner General 8.5.1 9-7User Guide
Event Management

9-8
Event Management also uses the following inquiry and query forms that are not called from a menu:
• The Event Available Room Query Form (SLIAEVN) displays a list of rooms available in a date and time range.
• The Building Category Query Form (SLQBCAT) displays a list of categories in a building. A category is a physical area of a building (for example, specific wings and floors). The only way to access SLQBCAT is from the Category field on specific forms.
• The Room Query Form (SLQROOM) displays summary information about the rooms in your institution’s buildings for an indicated term. The only way to access SLQROOM is from the Room field on specific forms.
• The Event Query Form (SLQEVNT) displays summary information about the events at your institution. The only way to access SLQEVNT is from the Event field on specific forms.
GTVRTNG Rating Code Validation FormDefines codes for ratings that can be assigned to function participants.
GTVSCHS Scheduling Partition Validation FormDefines Schedule25 status codes, which are used in the interface between Banner schedule processing and the third party scheduling products Schedule 25/Model25 to control whether a section is to be scheduled and listed.
GTVSUBJ Subject Index Validation FormDefines codes for indexes (keywords) that describe the subject matter of function comments.
GTVTARG Target Audience Code Validation FormDefines codes for groups of people who can be invited to a function.
GTVTASK Task Code Validation FormDefines codes for the tasks required to plan or carry out functions.
GTVTSTA Task Status Code Validation FormDefines status codes for tasks associated with functions.
GTVTTYP Task Type Code Validation FormDefines type codes for tasks associated with functions.
GTVZIPC ZIP/Postal Code Validation FormDefines codes for ZIP codes and postal codes associated with buildings.
Banner General 8.5.1 April 2012User GuideEvent Management

April 20
Event Management Procedures
The Event Management module helps you manage an event and the functions, tasks, and participants associated with the event. You can schedule functions, organize administrative tasks, determine financial requirements, and track attendance. Keeping track of this information not only lets you manage the current event, but provides information that can be used to plan future events.
With the Event Management module you can manage:
• Buildings and rooms
• Events
• Functions
• Tasks
• Participants
Definitions
The following definitions are useful for understanding the functions of the Event Management module:
Managing Buildings and Rooms
Data must be set up for every building and room that is a potential site for an event. Event Management uses the same forms used by the Banner Student System to schedule classes
Event Any occasion that your institution offers or sponsors. Examples include a meeting, conference, and graduation ceremony.
Function An activity associated with an event and scheduled for a specific date, time, and place. An event can have several functions. Examples include reception, dinner, and lecture.
Task A specific activity required to plan or carry out a function.
Participant An ID who assists with a function and may or may not attend.
12 Banner General 8.5.1 9-9User Guide
Event Management

9-10
and housing. If your institution uses Banner Student, buildings and rooms may already be set up. If not, you need to set up buildings and rooms.
1. Use the Building Code Validation Form (STVBLDG) to set up building codes for each building at your institution.
2. Use the Building Definition Form (SLABLDG) to enter data for each building where functions can be scheduled.
3. Use the Room Definition Form (SLARDEF) to enter data for each room in a building. Values default from SLABLDG but can be overwritten.
NoteA room can be inactivated for a period of time by defining a Start Date and End Date in the Room Inactivation Block of SLARDEF. For example, a room can be inactivated for scheduled maintenance.
Managing Events
1. Use the Event/Function Type Code Validation Form (STVETYP) to set up codes for each type of event sponsored or offered by your institution (such as alumni gathering, social gathering, and conference).
2. Use the Event Form (SLAEVNT) to enter data for the event. The system assigns a five-character ID beginning with the letter A.
3. (Optional) To create and schedule functions, select Schedule from the Options menu. The Meeting Times window appears. Schedule the functions.
4. (Optional) To add comments about the event, select Comments from the Options menu. The Event Comments window appears. Enter free-form comments.
NoteYou can use SLAEVNT or the Event Function Form (GEAFUNC) to schedule functions. Other function details, however, must be entered on the GEAFUNC Form.
Managing Functions
1. Use the Event/Function Type Code Validation Form (STVETYP) to set up codes for each type of function sponsored or offered by your institution (such as meal, break, and sporting function).
2. Use the Function Code Validation Form (GTVFUNC) to set up codes for each function sponsored or offered by your institution (such as breakfast, football game, and basketball game).
Banner General 8.5.1 April 2012User GuideEvent Management

April 20
3. Make sure that the event has been created with the Event Form (SLAEVNT).
4. (Optional) To create and schedule functions using SLAEVNT, select Schedule from the Options menu. The Meeting Times window appears. Enter the schedule.
5. Use the Event Function Form (GEAFUNC) to enter details for each function.
NoteYou can use the GEAFUNC Form to track function details such as revenue, expenses, fee structure, target audience codes, mailings, and meal selections.
6. (Optional) To schedule functions using the GEAFUNC Form, select Meeting Time from the Options menu. The Meeting Time window appears. Enter the schedule.
NoteYou can use the SLAEVNT or GEAFUNC Form to schedule a function. Function details, however, must be entered on the GEAFUNC Form.
You can also enter information on the following optional forms to manage additional function details:
• Attendance Form (GEAATTD). Lets you record attendance information for a specific function. You can track information for each ID invited to the function and the ID’s guests.
• Event Registration Form (GEAATID). Lets you record attendance information for an ID who is invited to multiple functions within an event. You can also track information for the ID’s guests.
• Function Comment Form (GEAFCOM). Lets you enter, display, and edit freeform comments about a function. You can assign subject indexes (key words) to a comment to help you search for the comment at a later time.
• Function Affiliation Form (AEAAFIL). If Banner Alumni/Development is installed, this form lets you affiliate a function with campaigns, designations, and prospect management projects.
Managing Tasks
1. (Optional) Use the Task Type Code Validation Form (GTVTTYP) to define each type of task (such as administrative, maintenance, and security) that can be associated with a function.
2. Use the Task Code Validation Form (GTVTASK) to set up codes for the tasks (such as check room availability, reserve space, and clean up) that can be associated with functions.
12 Banner General 8.5.1 9-11User Guide
Event Management

9-12
3. Use the Function Task Form (GEATASK) to identify the specific tasks associated with a function. Tasks are automatically displayed in chronological order, based on the From date.
4. (Optional) To create a message, select Detail from the Options menu. Task details appear. Enter the Recipient ID and the Message. You can select the down arrow icon to access the User Identification Control Form (GUAIDEN) to search for an ID.
NoteThe message is sent to the recipient on the message date. The recipient can use the General Message Form (GUAMESG) to read the message. This form identifies the source of the message as GEATASK and shows the task’s function code, but does not link the message to a specific task. To make the message more useful, you should refer to the task in the text of the message.
5. (Optional) To assign a task to a person, select Detail from the Options menu. Task details appear. Enter the ID of the assigned person in the ID field in the ID Assigned to Task block. To assign more persons to the task, select the Next Record function and enter another ID. You can use the ID/name search feature to search for a name or ID.
NoteEach person assigned to a task must have a Banner ID. These IDs are set up with the ID maintenance form of the appropriate Banner system.
Managing Participants
1. Use the Participant Type Code Validation Form (GTVPTYP) to define each type of participant (such as speaker or caterer) that can be associated with a function.
2. Use the Function Participant Form (GEAPART) to identify the participants associated with a function.
NoteEach participant must have a Banner ID. These IDs are set up with the ID maintenance form of the appropriate Banner system.
Banner General 8.5.1 April 2012User GuideEvent Management

April 20
Valid
GTVDire
GTVE-m
GTVSyst
10 General Web Management
The General Web Management module supports the integrated processing between Banner® and your Web applications (Student Self-Service, Faculty/Advisor Self-Service, Employee Self-Service, Advancement Self-Service, Finance Self-Service, and Executive Self-Service). Some of the functions you can perform in the General Web Management module are:
• Associate address type codes with user roles and access privileges.
• Display addresses added or changed within Banner or via the Web.
• Define PINs and other user parameters for third-party access products.
• Define controls for Banner interfaces with third-party products.
• Identify the kinds of information that are included in your student, employee, and alumni directories.
• Define the profile information that appears on the Web directory for an ID.
• Record one or more e-mail addresses for any Banner ID.
• Set up and track surveys.
Refer to the Banner Middle Tier Implementation Guide for more information.
Validation Forms
General Web Management forms use the following validation forms. Further information on these forms can be found in Online Help. See “Online Help: Banner Form and Field Reference” on page 1-5.
ation Form Used By
DIROctory Item Validation Form
GOADPRFWeb User Directory Profile Form
EMALail Address Type Validation Form
GOAEMALE-mail Address Form
SYSIem Indicator Validation Form
GORTCTLThird Party Electronic Control Rules Form
12 Banner General 8.5.1 10-1User Guide
General Web Management
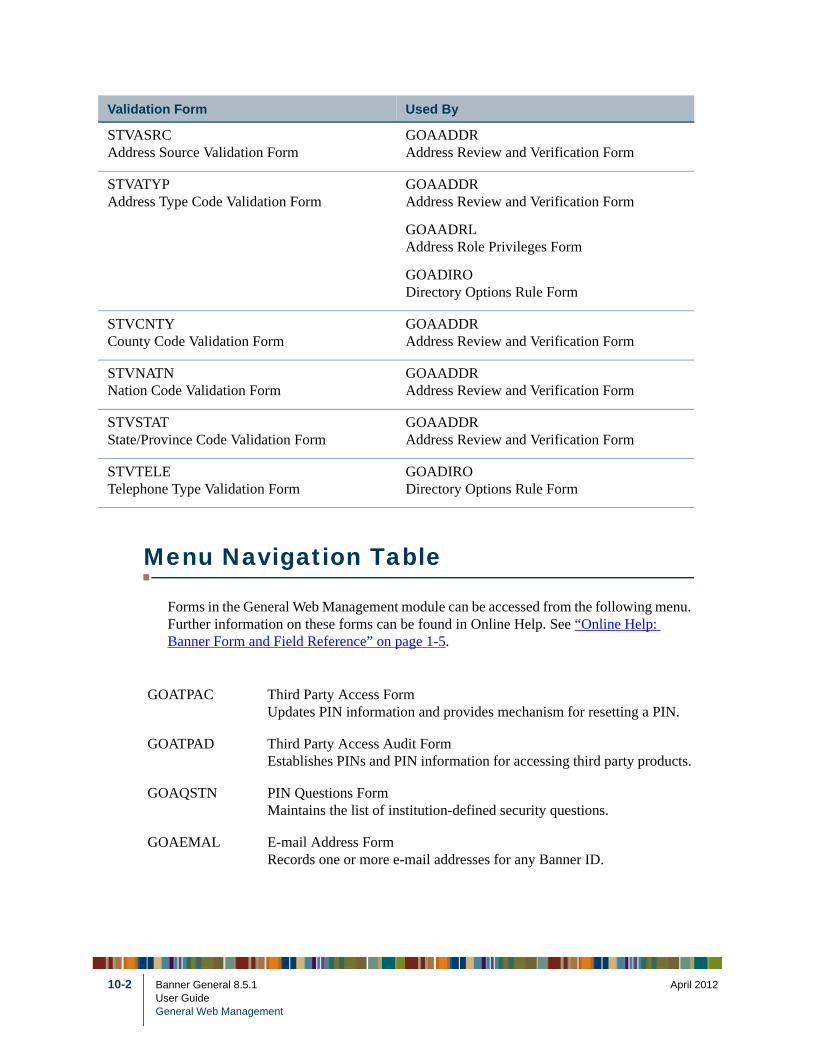
10-2
STVAdd
STVAdd
STVCou
STVNati
STVState
STVTele
Valid
Menu Navigation Table
Forms in the General Web Management module can be accessed from the following menu. Further information on these forms can be found in Online Help. See “Online Help: Banner Form and Field Reference” on page 1-5.
ASRCress Source Validation Form
GOAADDRAddress Review and Verification Form
ATYPress Type Code Validation Form
GOAADDRAddress Review and Verification Form
GOAADRLAddress Role Privileges Form
GOADIRODirectory Options Rule Form
CNTYnty Code Validation Form
GOAADDRAddress Review and Verification Form
NATNon Code Validation Form
GOAADDRAddress Review and Verification Form
STAT/Province Code Validation Form
GOAADDRAddress Review and Verification Form
TELEphone Type Validation Form
GOADIRODirectory Options Rule Form
ation Form Used By
GOATPAC Third Party Access FormUpdates PIN information and provides mechanism for resetting a PIN.
GOATPAD Third Party Access Audit FormEstablishes PINs and PIN information for accessing third party products.
GOAQSTN PIN Questions FormMaintains the list of institution-defined security questions.
GOAEMAL E-mail Address FormRecords one or more e-mail addresses for any Banner ID.
Banner General 8.5.1 April 2012User GuideGeneral Web Management

April 20
GOAADRL Address Role Privileges FormAssociates address type codes from the Address Type Code Validation Form (STVATYP) with user roles and access privileges.
GOAADDR Address Review and Verification FormDisplays addresses added or changed within Banner or via the Web.
GOADIRO Directory Options Rule FormIdentifies the kinds of information that are included in your student, employee, and advancement Web directories.
GOADPRF Web User Directory Profile FormDefines the profile information that appears on the Web directory for an ID.
GOISRVY Survey Response Query FormDisplays responses to surveys, by person.
GUASRVY Survey Definition FormDefines a survey.
GUISRVS Survey Summary Query FormDisplays responses to surveys, by survey.
GOAFNXR Third Party Procedures and Parameters Form (GOAFNXR)Allows you to view functions and transactions used by third-party products.
GORTCTL Third Party Electronic Control Rules FormDefines controls for Banner interfaces with third-party products.
GUAPPRF Enterprise PIN Preferences FormDefines institutional preferences for handling PINs.
GTVDIRO Directory Item Validation FormDefines codes for the types of information included in directory profiles.
GTVEMAL E-mail Address Type Validation FormDefines e-mail address type codes (for example, business, personal, and school).
12 Banner General 8.5.1 10-3User Guide
General Web Management

10-4
Managing User PINs
The General Web Management Module is used to manage PINs (passwords) for Banner Self-Service products.
PIN is an abbreviation for personal identification number, a term that is usually used to refer to a numeric password. Although passwords can now be alphanumeric, they are still referred to as PINs.
Beginning with Release 8.0, PINs are stored in the database in encrypted form. A cryptographic hash is used to transform the PIN before it is stored, so that the unencrypted form of the PIN can never be retrieved from the database.
The cryptographic transformation is a one-way process, so that even if someone were able to retrieve the encrypted PIN from the database and learned the details of the encryption process, they still would not be able to decode the original, unencrypted form of the password.
NoteOne-way encryption means that even the security administrator cannot retrieve the PIN. If a user forgets a PIN, you cannot look up the PIN for the user. The only recourse in that situation is to reset the user’s PIN.
For additional security, the PIN is “salted” before it is encrypted. Salt, in this context, refers to a randomly generated string that is added to the PIN before encryption. This adds another layer of complexity to the encryption.
When a user enters a PIN to gain access to the system, the user’s entered PIN is transformed using the same cryptographic function. The transformed string entered by the user is then compared to the hashed PIN stored in the database. If the values match, the user is allowed to proceed.
Strong Passwords
If a password can be easily guessed by another person, it does not provide much protection. Security experts recommend using “strong passwords,” ones which are long and complex enough that it would be nearly impossible for someone to guess them.
Banner provides support for strong password standards for Self-Service PINs. Because there are varying standards for strong passwords, Banner offers a flexible approach based on institutional preferences. Your institution can enforce its own strong password standards for Banner PINs. The institution’s rules are set up on the GUAPPRF form and are stored on the GUBPPRF table.
Banner General 8.5.1 April 2012User GuideGeneral Web Management

April 20
• You can specify a minimum and maximum permissible length for your users’ PINs.
• You can require that PINs include letters, digits, or both letters and digits.
• You can restrict a user’s re-use of PINs. Specifically, you can set a number of days during which a user’s previous PIN cannot be reused.
Resetting a PIN
For occasions when a user forgets a PIN, the user can request a PIN reset by answering a series of security questions with answers that the user previously provided.
Your institution can decide how many questions a user must answer for a PIN reset. You can also decide whether users can generate their own security questions, or whether they must use standard questions established by the institution.
The user’s answers to security questions are stored in encrypted form, just as the PIN is.
PINs can be reset on the GOATPAD form by typing in the new PIN and then retyping the new PIN in the Confirm PIN field.
PINs can also be reset by clicking the Reset button on GOATPAD or GOATPAC. The PIN will be reset based on the settings on GUAPPRF. If the reset format is set to Random, you will not be able to determine what the PIN is.
WarningU.S.-based institutions should not use GUAPPRF’s Birthdate option for PIN resets. According to the U.S. Family Policy Compliance Office (FPCO), using a student’s birthdate when assigning PINs is a violation of the Family Educational Rights and Policy Act (FERPA).
To extract a clear text PIN, you would need to run letter generation and create a letter using the *PINRESET variable to reset the PIN again and display the PIN prior to encrypting it.
Web Management Procedures
Creating a Set of Security Questions
Security questions are used as part of the Self-Service PIN reset process. You can allow users to create their own security questions, or you can specify standard security questions that all users at your institution must use—or you can use a combination of institution-defined questions and user-defined questions.
12 Banner General 8.5.1 10-5User Guide
General Web Management

10-6
To create a set of standard security questions:
1. Navigate to the PIN Questions form (GOAQSTN).
2. For each question, create a new record with the text of the question.
3. Check the Display check box for each question that you want to be visible to Self-Service end users.
Verifying a User’s Answers to Security Questions
A security administrator can use the GOATPAD form to verify a user’s identity by checking the user’s answers to security questions. The answers should match the user’s previously stored answers to the questions.
Because the user’s stored answers are encrypted, you cannot view them directly. Instead, the user’s new answers are encrypted using the same hashing process and the two encrypted values are compared.
To verify a user’s answers to security questions:
1. Navigate to the Third Party Access Audit form (GOATPAD).
2. In the key block, enter or select the user’s ID.
3. Navigate to the Verify Answers tab. The user’s security questions are displayed.
4. For each question
4.1. Ask the user the question.
4.2. Type the user’s answer into the Verify Answer field.
5. Click Verify. For each new answer that matches the user’s stored answer, the Verified check box will be checked.
Resetting a User’s PIN
To reset a user’s PIN by assigning a new PIN in GOATPAD:
1. Navigate to the Third Party Access Audit form (GOATPAD).
2. In the key block, enter or select the user’s ID.
Banner General 8.5.1 April 2012User GuideGeneral Web Management

April 20
3. Change the PIN using either of these methods:
• Type a new PIN in the PIN and Confirm New PIN fields.
• Click the reset button to the right of the PIN field.
NoteIf you use the reset button, the value of the new PIN depends on the institution’s PIN reset value preferences (as established on the GUAPPRF form).
4. Save the record.
Using Letter Generation to Notify a User of a New PIN
User PINs are encrypted using a one-way process and cannot be retrieved from the database. If the institution’s PIN reset value (selected on the GUAPPRF form) is Random, the only way to see the new PIN value in clear text (unencrypted) is to obtain it from the API prior to hashing. You can do this using the Banner Letter Generation process.
To reset PINs and notify users through Letter Generation:
1. Select the single user or group of users who will have their PINs reset.
2. Create a letter which contains the variable *PINRESET.
The *PINRESET variable is delivered with Release 8.0. It selects GB_THIRD_PARTY_ACCESS.F_PROC_PIN(GOBTPAC_PIDM) from GENERAL.GOBTPAC. This variable calls a function which resets the PIN and delivers the clear text PIN to the .doc file when GLRLETR is run
3. Run GLBDATA for your Population selection to populate it, or manually add people to the Population Selection via GLAEXTR.
4. Run GLBLSEL for your letter that contains the *PINRESET variable.
5. Run GLRLETR for your letter which contains the *PINRESET variable. The reset variable will reset the PINs for the population selection and will insert the value of each new PIN in the .doc file.
6. Forward the notification letters to the affected users.
NotePINs can be generated for users that do not yet have a PIN by running the GURTPAC process. In addition, PINs will be generated when a record is created for that user in any of the tables selected in the Table PIN Creation Controls block on GUAPPRF.
12 Banner General 8.5.1 10-7User Guide
General Web Management

10-8
Banner General 8.5.1 April 2012User GuideGeneral Web Management
April 20
11 Voice Response Management
Voice Response is a Banner software option available for Banner® Student and Banner Financial Aid Systems that supports touch-tone telephone data entry and inquiry for student information. Voice Response includes Registration, Grade Reporting, Billing, Financial Aid, and Admissions modules. All Banner Voice Response modules provide your institution with the following:
• Direct student access to online registration, billing, admissions, financial aid, and/or grade information from a touch-tone telephone through a series of simple entries — student ID, Personal Identification Number (PIN), menu selections, and course request numbers.
• Modifiable voice response system messages.
• Easy-to-use Oracle tables for modification of system responses.
Refer to the Banner Voice Response Implementation Guide for detailed information about setting up Voice Response.
Menu Navigation Table
Forms in the General Voice Response Management module can be accessed from the following menu. Further information on these forms can be found in Online Help. See “Online Help: Banner Form and Field Reference” on page 1-5.
GORMENU VR Menu Control Rules FormMaintains all menu records, regardless of the Voice Response modules to which they apply.
GORFLAG Voice Response Duty Flag Rules FormMaintains all duty flags, regardless of the Voice Response modules to which they pertain.
GORPARM VR Operator Availability /System Parameter Rules FormMaintains all system parameters and operator availability information, regardless of the Voice Response module to which they pertain.
GORADMS VR Admissions Term Based Rules FormMaintains basic information about the VR Admissions module.
12 Banner General 8.5.1 11-1User Guide
Voice Response Management

11-2
GORBILL Voice Response Billing Term Based Rules FormMaintains information about billing terms and dates, and billing deadline dates.
GORAWPD Voice Response Financial Aid Award Year/Term Based Rules FormMaintains basic information about the VR Financial Aid module.
GORRGTM Voice Response Registration & Grading Term Based Rules FormMaintains basic registration and grading information.
GORRSTS Voice Response Registration Status Rules FormMaintains the status information for the VR Registration module.
GORVCTL Voice Response Control Rules FormCreates and maintains the group, function and control number combinations.
Banner General 8.5.1 April 2012User GuideVoice Response Management

April 20
12 Business Rule Builder
To help you manage your Banner® data for SEVIS processing, Multi-Institution Functionality (MIF), and Banner Integration Components, General includes forms you can use to build business rules. The rules you create can be used to populate columns in Banner tables with values from other columns. Your rules can also create student and exchange visitor records automatically.
Validation Forms
Business Rule Builder forms use the following validation forms. Further information on these forms can be found in Online Help. See “Online Help: Banner Form and Field Reference” on page 1-5.
Menu Navigation Table
Forms in the Business Rule Builder module can be accessed from the following menu. Further information on these forms can be found in Online Help. See “Online Help: Banner Form and Field Reference” on page 1-5.
Validation Form Used By
GTVSQRUBusiness Rule Code Validation Form
GORSVSQSEVIS Business Rules FormGORRSQLBusiness Rules FormGOIRSQLBusiness Rule Inquiry Form
GTVSQPRBusiness Rule Process Code Validation Form
GORSVSQSEVIS Business Rules FormGORRSQLBusiness Rules FormGOIRSQLBusiness Rule Inquiry Form
GTVSQPABusiness Rule Parameter Code Validation Form
GORRSQLBusiness Rules Form
12 Banner General 8.5.1 12-1User Guide
Business Rule Builder

12-2
Business Rule Builder Procedures
Establish the Rule Builder
The general process is as follows:
1. Set up Process Codes using the Business Rule Process Code Validation Form (GTVSQPR). The code SEVIS has been delivered.
2. Save your changes.
GTVSQRU Business Rule Code Validation FormMaintains the rule codes that will be used in your dynamic SQL statements. For SEVIS reporting, you might want to set up rule codes such as Create Student, Update Major, and so on.
GTVSQPR Business Rule Process Code Validation FormMaintains the process codes that are valid for dynamic query processing. The delivered value is SEVIS.
GTVSQPA Business Rule Parameter Code Validation FormMaintains the parameters or variables you will use to build your process rules on the Business Rules Form (GORRSQL). You will use the codes you define on this form in the dynamic SQL statements on GORRSQL.
GORSQPA Business Rule Process Parameters FormAssociates a process code with the parameter codes it will use on GORRSQL. The valid parameter codes are defined on the Business Rule Parameter Code Validation Form (GTVSQPA).
GORRSQL Business Rules FormAllows you to build SQL statements that will perform certain functions when they are executed from the SEVIS Batch Extract Process (GORSEVE).
GOIRSQL Business Rule Inquiry FormAllows you to inquire for existing Business rules. A query can be performed with a process code and/or rule code or with no query criteria (to return the set of all business rules).
Banner General 8.5.1 April 2012User GuideBusiness Rule Builder

April 20
3. Establish substitution parameters on the Business Rule Parameter Code Validation Form (GTVSQPA). The codes TERM and PIDM have been delivered.
3.1. TERM allows you to ask the user for a value for the term, which will be used as a parameter in your rule.
3.2. PIDM allows you to ask the user to enter a specific PIDM, which will be processed in your rule.
4. Save your changes.
5. On the Business Rule Process Parameters Form (GORSQPA), associate process codes defined on GTVSQPR with substitution parameters defined on GTVSQPA. The number of substitution parameters a process code can have is restricted by the coding associated with the process. As delivered, the SEVIS Information Form (GOASEVS) will only prompt users to enter TERM or PIDM.
NoteThe package that processes parameters, GOKSVSQ, is only set up to handle TERM and PIDM at present. If you want to add other parameters, you must modify GOKSVSQ.
6. Save your changes.
7. Set up codes and descriptions for all the Business Rules you plan to use on the Business Rule Code Validation Form (GTVSQRU).
8. Save your changes.
9. On the SEVIS Business Rules Form (GORSVSQ), associate your process code/rule code combinations with an auto-population field or business action. If you select Business Action from the Process Type pull-down menu, you can only enter information in the SEVIS Business Action field (from GTVSVBA). If you select Auto-populate from the pull-down menu, you can only enter information in the SEVIS Auto-populate Code field (from GTVSVAP).
10. Save your changes.
11. You will define the Business Rules themselves on the Business Rules Form (GORRSQL) by linking a Process Code (defined in Step 1) with a Rule Code (defined in Steps 4 and 7). Then you must create the dynamic SQL statements that will be executed when the SEVIS Batch Extract Process (GORSEVE) is executed, or when Business Action or Auto-populate is selected from the Options pull-down menu on GOASEVS. Be sure to save your changes.
NoteBe careful to enter your statements on GORRSQL in the correct order. GORSEVE and GOASEVS (when you select Create Student SEVIS Transaction or Create Exchange Visitor SEVIS Transaction from the
12 Banner General 8.5.1 12-3User Guide
Business Rule Builder

12-4
Options menu) will execute each rule until they receive the Boolean value True for Business Actions or a single valid value for auto-population. It does not process any rules after that.
You can build two types of Business Rules without changing Banner programming logic: rules that initiate business actions and rules that auto-populate Banner columns from other Banner columns. If you want to make other kinds of rules, you must change the code.
Building Business Actions
A rule that initiates Business Actions will return a true/false condition. To build a Business Action:
1. On the SEVIS Business Action Code Validation Form (GTVSVBA), create a code and description for the package/procedure that will perform the tasks for your business action. SunGard® Higher Education has delivered CREATE_STUDENT and CREATE_EV to be used with your SEVIS reporting.
2. Save your changes.
3. On the SEVIS Business Rules Form (GORSVSQ), associate an existing Rule Code (from GTVSQRU) with a Process Code (from GTVSQPR).
4. Select Business Rule from the Process Type pull-down menu on GORSVSQ.
5. Enter the name of the Business Action you created on GTVSVBA in the SEVIS Business Action field.
6. Provide additional information about how it will be used, as necessary. For example, you can specify an effective date and end date for your rule with the Start Date and End Date fields.
7. Save your changes.
Your Business Action can be triggered in two ways:
• When you execute GORSEVE with Y as Parameter 05 - Process Business Action. You must enter a term code as Parameter 07.
• When you select Business Action from the Options pull-down menu from GOASEVS. You will be prompted to enter a term code.
The package GOKSVSQ executes the specific process associated with the Business Rule, sending the person’s PIDM and Term as parameters.
NoteThe package that processes parameters, GOKSVSQ, is only set up to handle Term and PIDM at present. If you want to add other parameters, you must modify GOKSVSQ.
Banner General 8.5.1 April 2012User GuideBusiness Rule Builder

April 20
In either case, all Business Actions with a process code of SEVIS are executed. If this results in the creation of any student or exchange visitor SEVIS records, any auto-population rules where the process code is SEVIS will be executed, too.
WarningIf you create a Business Action and it does not apply to anyone in the population selection, Banner will not provide you with an error message. This is also the case if there are no active Business Actions at all. As far as the Banner logic is concerned, it has processed all valid, active Business Actions for all the applicable people.
Building Auto-population Rules
A rule that initiates the auto-population of columns with other Banner data will return a single value. For auto-population, you have to perform the following as described in the Establish the Rule Builder section of this document:
1. Create a process code on the Business Rule Process Code Validation Form (GTVSQPR). SEVIS has been delivered.
Then you must perform a few additional steps:
2. On the SEVIS Auto-populate Code Validation Form (GTVSVAP), create a code and description for your auto-population. The code is the column name that you want to populate from another source. The column names from the GOBSEVS table have been delivered.
3. Save your changes.
4. On the SEVIS Business Rules Form (GORSVSQ), associate an existing Rule Code (from GTVSQRU) with a Process Code (from GTVSQPR).
5. Select Auto-populate from the Process Type pull-down menu on GORSVSQ.
6. Enter the name of the auto-population code you created on GTVSVAP in the SEVIS Auto-populate Code field.
7. Provide additional information about how it will be used, as necessary. For example, you can specify an effective date and end date for your rule with the Start Date and End Date fields.
8. Save your changes.
12 Banner General 8.5.1 12-5User Guide
Business Rule Builder

12-6
Your Auto-population can be triggered in two ways:
• When you execute GORSEVE with Y as Parameter 06 - Auto-population. You must enter a term code as Parameter 07.
• When you select Auto-populate from the Options pull-down menu from GOASEVS. You will be prompted to enter a term code.
NoteYou cannot access Auto-populate from the Options pull-down menu if you are in the Key block.
The value returned in the auto-populate rule will update the field associated with the rule on GORSVSQ.
The package GOKSVSQ executes the specific process associated with the Auto-population, sending the person’s PIDM and Term as parameters.
NoteThe package that processes parameters, GOKSVSQ, is only set up to handle Term and PIDM at present. If you want to add other parameters, you must modify GOKSVSQ.
When you use the Auto-population feature, the value returned in the Auto-populate rule will update the field associated with it on GORSVSQ.
Banner General 8.5.1 April 2012User GuideBusiness Rule Builder

April 20
13 Basic Person
Basic Person identification forms (forms that follow the naming convention %IDEN, such as APAIDEN, SPAIDEN, and PPAIDEN) are used throughout Banner® to capture biographic/demographic information for all persons/non-persons associated with the institution.
Persons/non-persons may belong to any or all of the installed applications (Student, Finance, and so on.). All persons/non-persons are first entered into the database using an identification form. The information maintained in this form is specific to the person/non-person and does not relate to the person's/non-person's involvement at the institution. All other modules/applications are dependent on the information captured and maintained in this form. Any changes or additions to a person's/non-person's biographic/demographic information must be made in this form.
To maintain consistency in Banner, the identification forms all reference a Banner library called the Common Forms Object Library (GOQCLIB). This library is a form object, just like other forms, but it is used to store common form elements that are used by many other forms.
The common elements that support Basic Person are stored in GOQCLIB, and are described in this chapter. Familiarizing yourself with these elements will help you understand Basic Person processing, as well as troubleshoot errors that may occur during your work with Basic Person functionality.
Common Forms Object Library (GOQCLIB)
This library contains the tabs that display in the %IDEN forms and other forms in Banner. The following table lists the forms which display the tabs that exist in the library. The purpose of the tabs that exist in the library is for creating basic information about a person or non-person. The data that is collected through the forms includes Identification number, Name information, Address, Telephone, Biographical information such as age and birth date, E-mail, and Emergency Contact information.
Further information on the forms supported by GOQCLIB can be found in Online Help. See “Online Help: Banner Form and Field Reference” on page 1-5.
Form IDAlt. ID
Addl. ID Address
Tele-phone E-mail Bio
Emergency contact
APAIDEN Yes Yes Yes Yes Yes Yes YesAPANAME YesFOAIDEN Yes Yes Yes Yes Yes Yes Yes Yes
12 Banner General 8.5.1 13-1User Guide
Basic Person

13-2
Tab-Level Security
On the APAIDEN, FOAIDEN, PPAIDEN and SPAIDEN forms, tab-level security can be used to restrict users from seeing or changing data in specific tabs. If you don’t see all of the tabs used by a specific form, as listed in the table above, it could be because tab-level security is in place, preventing you from seeing some of the tabs.
The Banner Security Administration Handbook describes how to set up tab-level security.
Key Block
Use the Key Block to enter the ID of the person or non-person. If the ID already exists, the person/non-person's name information will display in the name field in the key block. If the ID does not exist, the user can move to the current Identification window to create the new ID and related name information. The user has the option of generating an ID or entering a new ID when creating a new person/non-person.
FTMVEND YesFTMFMGR YesFTMCUST YesFTMAGCY YesGOAEMAL YesPPAIDEN Yes Yes Yes Yes Yes Yes Yes YesPPATELE YesPEA1PAY YesPEAHIRE YesSAAQUIK Yes YesSPAEMRG YesSPAIDEN Yes Yes Yes Yes Yes Yes Yes YesSPAPERS YesSPATELE YesSRAQUIK Yes Yes
Form IDAlt. ID
Addl. ID Address
Tele-phone E-mail Bio
Emergency contact
Banner General 8.5.1 April 2012User GuideBasic Person

April 20
Current Identification Window
The Current Identification window is used to insert or update name information. If the record being added is a person, the first and last names are required. All other fields in the Person block are not required but can be entered for a person. If the record being added is a company or other non-person entity, the non-person name should be added in the non-person block. The fields in the person block cannot be entered for a non-person. The name that displays on this window is a person/non-person's current name and the one that will display on forms through the Banner system. This record can be updated but cannot be deleted. When the name is changed, the old name will become an alternate record. The user ID of the Banner user who originally created the ID will always display in the in the Original creation user field on the current ID window, regardless of whether subsequent name or ID changes have been made.
Field Description
Confidential (Confidential Message)
Displays when the Confidential check box is checked on the General Person Form (SPAPERS). Confidentiality may be requested by the student or determined by institution policy.
Column: Not a base table item
Note: The confidential warning message is displayed for a user when the GUAUPRF Alert Option Display Additional Confidential Warning check box is checked.
Deceased (Deceased Message)
Displays when the Deceased check box is checked on the General Person Form (SPAPERS). You may process data for a person who is deceased.
Column: Not a base table item
Note: The deceased warning message is displayed for a user when the GUAUPRF Alert Option Display Additional Deceased Warning check box is checked.
ID ID and name of the person or non-person. Choices differ by form. For example, choices on SPAIDEN are: the Person Search Form (SOAIDEN), the Non-Person Search Form (SOACOMP), or the Alternate ID Search Form (GUIALTI). Use the Options Menu to access the forms, use List for SOAIDEN or Count Query Hits for SOACOMP, or use Duplicate Record from for GUIALTI.
Column: Not base table items (ID and name)
12 Banner General 8.5.1 13-3User Guide
Basic Person

13-4
Field Description
ID This field defines the identification number used to access person online.
The ID field is used to create or update a current identification number for a person associated with a record. To change information, the user can type over the current information.
Column: SPRIDEN_ID
Length: 9
Name Type Use this field to enter a type for the name in the key block. For example, name types could be preferred name, legal name, maiden name, formal name, and so on.
Column:SPRIDEN_NTYP_CODE
Length: 4
List: Name Type (GTVNTYP)
SSN/SIN/TIN This field maintains person social security number, social insurance number, or tax identification number.
Column: SPBPERS_SSN
Length: 15
Note: The SSN data entry length might be as short as 9 or as long as 15 depending on the value set for the institution on the Installation Controls form (GUAINST).
Last Name Prefix
The prefix that appears before the person’s last name.
Column: SPRIDEN_SURNAME_PREFIX
Length: 60
Note: Depending on your institution’s settings, this field might be hidden.
Last Name This field defines the last name of person.
Column: SPRIDEN_LAST_NAME
Length: 60
First Name This field identifies the first name of person.
Column: SPRIDEN_FIRST_NAME
Length: 60
Banner General 8.5.1 April 2012User GuideBasic Person

April 20
Middle Initial This field identifies the middle name of person.
Column: SPRIDEN_MI
Length: 60
Prefix This field maintains the prefix (Mr., Mrs., and so on.) used before person name.
Column: SPBPERS_NAME_PREFIX
Length: 20
Suffix This field maintains the suffix (Jr., Sr., and so on.) used after person name.
Column: SPBPERS_NAME_SUFFIX
Length: 20
Preferred First Name
This field maintains the preferred first name associated with person.
Column: SPBPERS_PREF_FIRST_NAME
Length: 60
Full Legal Name
This field maintains legal name associated with person.
Column: SPBPERS_LEGAL_NAME
Length: 500
Marital Status This field maintains martial status associated with person.
Column: SPBPERS_MRTL_CODE
Length: 1
Non-Person Name
The Non-Person Name field is used to create or change the current name of a non-person associated with the identification number. To change information, the user can type over the current information. Full name of non-person must be entered.
Column: SPRIDEN_LAST_NAME
Length: 60
Last Update User
The ID for the user that most recently updated the record.
Column: SPRIDEN_USER
Length: 30
Field Description
12 Banner General 8.5.1 13-5User Guide
Basic Person

13-6
Last Update Activity Date
This field defines the most current date record is created or changed.
Column: SPRIDEN_ACTIVITY_DATE
Length: 7
Last Update Origin
The name of the Banner object that was used most recently to update the row in the SPRIDEN table.
Column: SPRIDEN_ORIGIN
Length: 30
Original Creation User
This field contains the ID of the Banner user who created the new identification record. When a new identification record is created, the user's ID is stored in this field. When the name or ID is changed for a particular Identification record, the ID of the original user, not the user who made the change will continue to display on the current ID window. The ID of the user who made the name or ID change will be reflected on the Alternate ID window on the record that gets inserted when the change is made on the Current ID window.
Column: SPRIDEN_CREATE_USER
Length: 30
Original Creation Create Date
This field contains the date on which Banner user created the new identification record. When a new identification record is created, the date is stored in this field. When the name or ID is changed for a particular Identification record, the date of the original record creation, not date of the change will continue to display in this field on the Current ID window. The date the change was made will be reflected on the Alternate ID window on the record that gets inserted when the change is made on the Current ID window.
Column: SPRIDEN_CREATE_DATE
Length: 7
Field Description
Banner General 8.5.1 April 2012User GuideBasic Person

April 20
Alternate ID Window
The purpose of the Alternate ID window is to record a persons/non-persons alternate names. Alternate names can be inserted on this window without changing the person's current name.
Field Description
Name Type Use the Name Type field to enter a type for the name in the key. For example, name types could be preferred name, legal name, maiden name, formal name, and so on.
Column: SPRIDEN_NTYP_CODE
Length: 4
List: Name Type (GTVNTYP)
Change Type This field is used to display the type of change which occurred. The letter I indicates an identification number change, while the letter N indicates a name change.
Column: SPRIDEN_CHANGE_IND
ID The person/non-person's alternate ID. This could represent a previous ID, if the person ID changed, or it could represent an alternate ID associate with the person/non-person.
Column: SPRIDEN_ID
Length: 8
Last Name Prefix
The prefix that appears before the person’s last name.
Column: SPRIDEN_SURNAME_PREFIX
Length: 60
Note: Depending on your institution’s settings, this field might be hidden.
Last Name This field defines the last name of person.
Column: SPRIDEN_LAST_NAME
Length: 60
First Name This field identifies the first name of person.
Column: SPRIDEN_FIRST_NAME
Length: 60
12 Banner General 8.5.1 13-7User Guide
Basic Person

13-8
The Original Creation User of an Identification Record
Each identification record includes a field for the Original Creation User (SPRIDEN_CREATE_USER). The purpose of this field is to retain a record of the Banner user who “created the PIDM.” Each identification record’s unique PIDM is assigned when the record is initially created, and the Original Creation User is the Banner user who entered the data that originally created the ID record.
There is also a Last Update User field (SPRIDEN_USER) to record the Banner user who made the most recent change to an identification record.
If you consider only a person’s current identification record, the relationship between these two fields is easy to grasp: the Original Creation User field always stays the same, while the Last Update User field may change several times as the record is updated over
Middle Initial This field identifies the middle name of person.
Column: SPRIDEN_MI
Length: 60
Origin The name of the Banner object that was used most recently to update the row in the SPRIDEN table.
Column: SPRIDEN_ORIGIN
User The ID for the user that most recently updated the record.
Column: SPRIDEN_USER
Activity Date This field defines the most current date record is created or changed.
Column: SPRIDEN_ACTIVITY_DATE
Create User This field contains the ID of the Banner user who created the alternate identification record. When a new alternate record is created, the user's ID is stored in this field. When the name or ID is changed for a particular identification record on the Current ID window, the ID of the user who is making the change will be reflected in the create user on the Alternate ID window. See “The Original Creation User” topic, below.
Create Date This field contains the date on which the alternate identification record was created. When a new alternate record is created, the date is stored in this field. When the name or ID is changed for a particular identification record on the Current ID window, the date on which the change took place will be reflected in the create date on the Alternate ID window.
Field Description
Banner General 8.5.1 April 2012User GuideBasic Person

April 20
a period of time. But a person may also have alternate identification records which also have Original Creation User fields. If the alternate record was created directly on the Alternate ID tab, then the Original Creation User of the record is the person who entered the data to create the new record.
But alternate records can also be created automatically by the system when the primary, current identification record is changed. In these cases, the Original Creation User on the alternate record will reflect the Banner user who made the change in the primary record. And this new alternate record will contain the person’s original name, which is now considered to be an alternate name associated with the person’s PIDM.
To understand how this works, consider what happens in a typical example when a student’s name is changed. First, Banner user AADAMS creates an identification record for a new student, Stacy Kanner.
Later, Banner user BBARRY learns that the name was misspelled; it should be Staci Kanner. BBARRY enters the corrected name. The system saves the correction in the primary record (Row 1) but also copies the record to create a new record (Row 2), which retains the old spelling of the name as an alternate name for the student.
The Change Indicator value of N in Row 2 indicates that this row is not a current record. Row 1 has a null Change Indicator, showing that Row 1 is the current identification record for this person.
BBARRY is correctly shown as the Original Creation User of Row 2, because BBARRY's spelling correction caused the name Stacy Kramer to become an alternate name for this student. A new alternate record gets inserted into the SPRIDEN table to capture this as an alternate name for Staci and it will reflect BBARRY as the user who created it.
Address Window
Addresses (for both persons and non-persons) are maintained on this window. A person (or non-person) can have different types of addresses (for example, a mailing address,
Row ID PIDM NameOriginal Creation User
Last Update User
Change Indicator
1 5678 Stacy Kanner AADAMS AADAMS
Row ID PIDM NameOriginal Creation User
Last Update User
Change Indicator
1 5678 Staci Kanner AADAMS BBARRY
2 5678 Stacy Kanner BBARRY BBARRY N
12 Banner General 8.5.1 13-9User Guide
Basic Person

13-10
parent’s address, and so on.); however, only one address may be designated as active for each address type.
NoteA limited number of entities can have more than one active address per address type:
• Vendors (entered on FTMVEND)
• Financial Managers (entered on FTMFMRG)
• Agencies (entered on FTMAGCY)
• Customers (entered on FTMCUST)
Telephone numbers can also be maintained on this window. When you enter a telephone number, it automatically becomes the primary telephone number for the selected address type and sequence number. You can designate as many telephone numbers as active as you want, but if you make an address inactive by checking the Inactivate check box, then the telephone number for that address will also be designated as inactive. If you want to keep the telephone number active, do one of the following:
• On the Telephone window, uncheck the Inactivate check box for the telephone number.
• On the Address window, choose To and From Dates to specify the active dates for the address, instead of checking the Inactivate check box for the address.
• On the Telephone window, do not associate an address type with the telephone number. If an address type is already specified, then delete it.
NoteFor telephone numbers entered on the Address window of Banner Self-Service, the address type and sequence number specified on the window are always automatically associated with the telephone number in Banner.
For more information about how to create and update address and telephone information, refer to the “Processing” chapter of the Banner General User Guide.
Banner General 8.5.1 April 2012User GuideBasic Person

April 20
Field Description
From Date Specifies the effective start date of the address associated with a person.
Column: SPRADDR_FROM_DATE
Length: 7
To Date Specifies the date until which the address is effective. If this field is left blank, then the address is always effective.
Column: SPRADDR_TO_DATE
Length: 7
Inactivate Check box that indicates if the address information is active (current) or inactive.
Note: If you check this box for an address, then the telephone numbers associated with it will automatically become inactive.
Column: SPRADDR_STATUS_IND
Length: 1
Address Type The Address Type field is used to enter code for address type (for example permanent residence, mailing). Click on the Type button to display an Options list from which you can select either a list of valid address codes (STVATYP) or an address summary form. The user can use LIST to display the Address Type Validation Form (STVATYP), from which address type search/selection may be conducted.
Column: SPRADDR_ATYP_CODE
Length: 2
Sequence Number
The Sequence Number field is used to assign an internal sequence number to each address. There is a separate sequencing by address type for each person/non-person.
Column: SPRADDR_SEQNO
Length:2
House Number A code used in some countries to uniquely identify a house.
Column: SPRADDR_HOUSE_NUMBER
Length: 10
Note: Depending on your institution’s settings, this field might be hidden.
12 Banner General 8.5.1 13-11User Guide
Basic Person
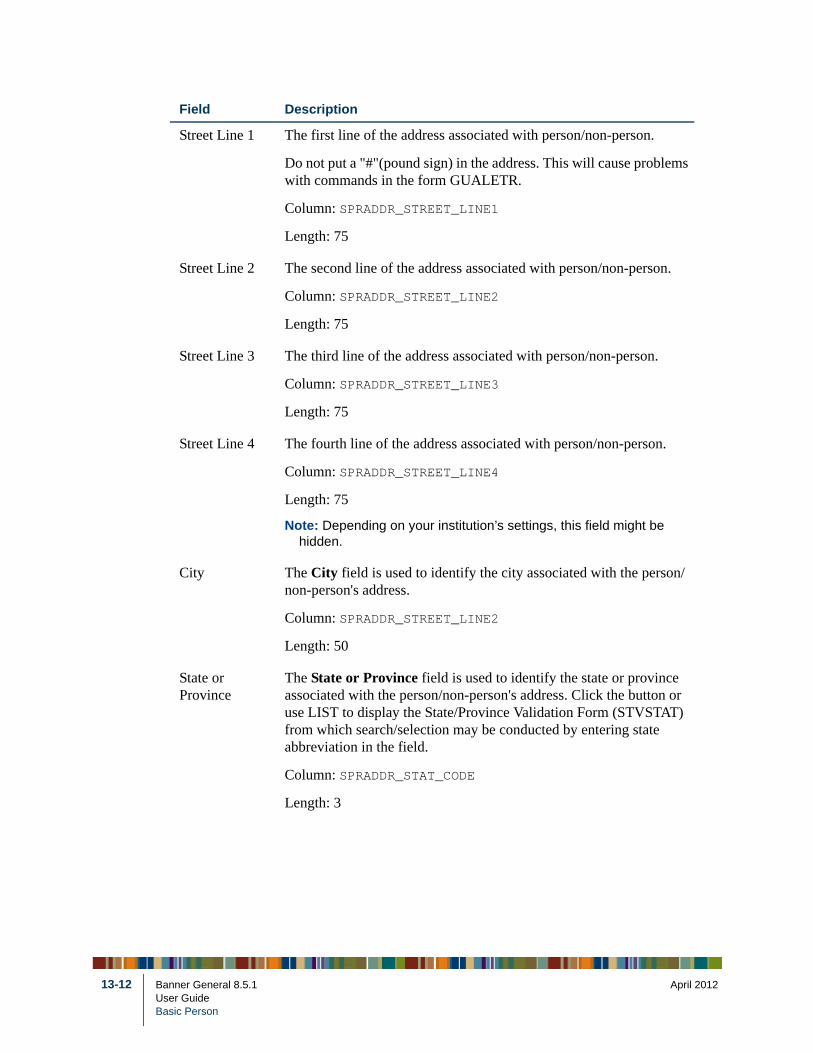
13-12
Street Line 1 The first line of the address associated with person/non-person.
Do not put a "#"(pound sign) in the address. This will cause problems with commands in the form GUALETR.
Column: SPRADDR_STREET_LINE1
Length: 75
Street Line 2 The second line of the address associated with person/non-person.
Column: SPRADDR_STREET_LINE2
Length: 75
Street Line 3 The third line of the address associated with person/non-person.
Column: SPRADDR_STREET_LINE3
Length: 75
Street Line 4 The fourth line of the address associated with person/non-person.
Column: SPRADDR_STREET_LINE4
Length: 75
Note: Depending on your institution’s settings, this field might be hidden.
City The City field is used to identify the city associated with the person/non-person's address.
Column: SPRADDR_STREET_LINE2
Length: 50
State or Province
The State or Province field is used to identify the state or province associated with the person/non-person's address. Click the button or use LIST to display the State/Province Validation Form (STVSTAT) from which search/selection may be conducted by entering state abbreviation in the field.
Column: SPRADDR_STAT_CODE
Length: 3
Field Description
Banner General 8.5.1 April 2012User GuideBasic Person

April 20
ZIP/Postal Code
The ZIP or Postal Code field is used to enter the ZIP or postal code associated with person/non-person's address. Click the ZIP/PC button or use LIST to display a list of valid codes from the ZIP/Postal Code Validation Form (GTVZIPC). If an existing ZIP/postal code is entered before the city and state are entered on the address window, the city and state will default from GTVZIPC.
Column: SPRADDR_ZIP
Length: 30
County The County Code field is used to enter the code assigned to the county associated with person/non-person's address. Click the County button or use LIST to display valid codes from the County Code Validation Form (STVCNTY) from which search/selection may be conducted by entering county name.
Column: SPRADDR_CNTY_CODE
Length: 5
Nation The Nation Code field is used to identify the nation/country associated with person/non-person's address. Click the Nation/Country button or use LIST to display valid codes from the Nation Code Validation Form (STVNATN) which search/selection may be conducted by entering name of nation/country in the field.
Column: SPRADDR_NATN_CODE
Length: 5
Telephone Type The Telephone Type field is used to enter code for phone type (for example permanent residence, mailing). Click on the Type button or use LIST to display the Phone Type Validation Form (STVTELE) from which phone type codes can be selected.
Column: SPRTELE_TELE_CODE
Length: 4
Field Description
12 Banner General 8.5.1 13-13User Guide
Basic Person

13-14
Telephone Specifies the telephone number of the person/non-person in the key block.
Click on the Telephone button to display the Telephone window, where you can create an unlimited number of telephone numbers associated with a person. The telephone number can be associated with an address type and sequence number. The primary indicator must be Y to display with the address information.
Column: SPRTELE_CTRY_CODE_PHONE
Length: 4
Column: SPRTELE_PHONE_AREA
Length: 6
Column: SPRTELE_PHONE_NUMBER
Length: 12
Column: SPRTELE_PHONE_EXT
Length: 10
Note: Depending on your institution's settings, Country Code (SPRTELE_CTRY_CODE_PHONE) might be hidden.
Source The Source field is used to identify how the address information was created or updated. Click the Source button or use LIST to display valid codes from the Address Source Code Validation Form (STVASRC).
Column: SPRADDR_ASRC_CODE
Length: 4
Delivery Point This field is used to designate the delivery point for mail as established by the Postal Service.
Column: SPRADDR_DELIVERY_POINT
Length: 2
Correction Digit
The Correction Digit field is defined by the Postal Service and is used to determine the digits used for delivery related to the ZIP code.
Column: SPRADDR_CORRECTION_DIGIT
Length: 1
Field Description
Banner General 8.5.1 April 2012User GuideBasic Person

April 20
Carrier Route The addresses to which a carrier delivers mail. In common usage, carrier route includes city routes, rural routes, highway contract routes, post office box sections, and general delivery units.
Column: SPRADDR_CARRIER_ROUTE
Length: 4
Last Update User
The ID for the user that most recently updated the record.
Column: SPRADDR_USER
Length: 30
Last Update Activity Date
This field defines the most current date record is created or changed.
Column: SPRADDR_ACTIVITY_DATE
Length: 7
Preferred Address
The preferred address displays on APAIDEN only. It is a calculated value which depends on the preferred address type that is set on APACONS for the person. The preferred address check box on the Address window will be 'checked' on the current active address having the same address type as the preferred address type designated on APACONS.
Preferred Region
The preferred region displays in APAIDEN only. The Preferred Region Address Type is the address type that identifies the address to which you want to send information that has a geographical orientation. For instance, if an advancement individual wants to receive, at a business address, notifications of alumni events that are being held near that business, you would enter the address type for that business address as the Preferred Region Address Type.
The Preferred Region Address Type is optional; it defaults based on the Preferred Address Type defined on APACONS. Although it isn't used by any processes or reports, it can be incorporated into correspondence by using Banner Letter Generation. For more information, see the "Letter Generation" chapter of the Banner General User Guide.
Field Description
12 Banner General 8.5.1 13-15User Guide
Basic Person

13-16
Telephone Window
Telephone numbers (for a person or non-person) are maintained on this window. When entering a telephone number, you must always choose a Telephone Type. You can then enter a number in the Telephone fields.
Telephone numbers can be associated with an address by entering the address type and sequence number. The telephone number will display on the Address window if the primary indicator is checked.
Checking the Inactivate check box makes a telephone number inactive. You can have as many active telephone numbers as you want. When a telephone number is associated with an address, then it will become inactive if the address is designated as inactive.
Combined Mailing
The Combined Mailing Address Type is used in conjunction with the Combined Mailing Name in creating labels. This address type determines which address is used when one piece of mail is to be sent jointly to two IDs. The combined mailing information Address type is set on APANAME.
Employment Details
This indicator is checked if the address displaying is associated with an employment record on APAEHIS. The button navigates to APAEHIS to display the related employment history record.
This field only displays on APAIDEN.
Field Description
Banner General 8.5.1 April 2012User GuideBasic Person

April 20
Field Description
Telephone Type Telephone type code.
Column: SPRTELE_TELE_CODE
Length: 3
Telephone Number
The telephone country code, area code, number, and extension.
Column: SPRTELE_CTRY_CODE_PHONE
Length: 4
Column: SPRTELE_PHONE_AREA
Length: 6
Column: SPRTELE_PHONE_NUMBER
Length: 12
Column: SPRTELE_PHONE_EXT
Length: 10
Note: Depending on your institution's settings, Country Code (SPRTELE_CTRY_CODE_PHONE) might be hidden.
Primary Primary indicator to denote primary telephone numbers based on telephone types.
Column: SPRTELE_PRIMARY_IND
Length: 1
Unlisted Unlisted telephone number indicator.
Column: SPRTELE_UNLIST_IND
Length: 1
Inactivate Indicates whether the status of the telephone number is active or inactive. Check the box to inactivate the telephone number.
Column: SPRTELE_STATUS_IND
Length: 1
12 Banner General 8.5.1 13-17User Guide
Basic Person

13-18
International Access
Free-format international access code for telephone number including country and city code and telephone number.
Note: In earlier Banner releases, this field was the only place where you could enter telephone numbers that did not match US formats. SunGard® recommends that you now use the Telephone Number fields, which have been expanded to allow numbers of varying lengths and formats, instead of this field.
Column: SPRTELE_INTL_ACCESS
Length: 16
Comment Comment relating to telephone number.
Column: SPRTELE_COMMENT
Length: 60
Address Type Optional address type code associated with telephone number.
Note: The telephone number will display on the address window on the address that has the same address type and sequence number as entered on the telephone window, if the primary checkbox is checked.
Column: SPRTELE_ATYP_CODE
Length: 2
Sequence Optional address sequence associated with telephone number.
Note: The telephone number will display on the address window on the address that has the same address type and sequence number as entered on the telephone window, if the primary checkbox is checked.
Column: SPRTELE_ADDR_SEQNO
Length: 2
Activity Date This field defines the most current date record is created or changed.
Column: SPRTELE_ACTIVITY_DATE
Length: 7
User The ID for the user that most recently updated the record.
Column: SPRTELE_USER_ID
Length: 30
Field Description
Banner General 8.5.1 April 2012User GuideBasic Person

April 20
Biographical Window
A person's biographical information is maintained on the Biographical window.
Field Description
Gender The person’s gender. Select Male or Female, or Not Available if the gender is unknown.
Column: SPBPERS_SEX
Length: 1
Birth Date The person’s birth date. You may not enter a future birth date, i.e., one which is greater than the system date.
Column: SPBPERS_BIRTH_DATE
Length: 7
Age The person’s age. Calculated by the system based on the date of birth. The age is not stored in the database, but is calculated each time the form is called.
SSN/SIN/TIN The person’s Social Security Number, Social Insurance Number (Canada), or Tax Identification Number (non-person) as applicable. Institutions in other countries can use this field to store another identifier, such as a TFN (Tax Form Number) for Australia.
SSN/SIN/TIN is used by some reports and processes, instead of the ID, such as tax documents (W-20, T2202A, and so on.). Tape loads can match against either ID or SSN/SIN/TIN.
Column: SPBPERS_SSN
Length: 15
Confidential Confidential indicator. To indicate that information about this person should remain confidential, select the checkbox. If the box is checked, then the message Confidential displays on any forms with the ID in the key information.
The Confidential indicator does not control any other system processing.
Column: SPBPERS_CONFID_IND
Length: 1
12 Banner General 8.5.1 13-19User Guide
Basic Person

13-20
Deceased Select if the person is deceased. Online processing is not prevented for deceased IDs; however, the message Deceased displays on any forms with the ID in the key information. You may request and run a transcript for a student who is deceased. However, the Grade Mailer Report (SHRGRDE) and associated processing are prohibited for a deceased person.
Column: SPBPERS_DEAD_IND
Length: 1
Deceased Date Date of death if deceased. If you enter the deceased date, then the system automatically checks the Deceased check box.
Column: SPBPERS_DEAD_DATE
Length: 7
Citizenship The person’s citizenship.
Column: SPBPERS_CITZ_CODE
Length: 1
List: Citizen Type Validation list
Marital Status The person’s marital status.
Column: SPBPERS_MRTL_CODE
Length: 1
List: Marital Status Validation List
Religion The person’s religion.
Column: SPBPERS_RELG_CODE
Length: 2
List: Religion Code Validation list
Legacy The person’s relationship to alumni of the institution.
Column: SPBPERS_LGCY_CODE
Length: 1
List: Legacy Code Validation list
Field Description
Banner General 8.5.1 April 2012User GuideBasic Person

April 20
Ethnicity The person’s ethnic background. This is critical for IPEDs and additional reports.
Column: SPBPERS_ETHN_CODE
Length: 1
List: Ethnic Code Validation list
New Ethnicity This field identifies the ethnic code defined by the U.S. government. The valid values are 1 - Not Hispanic or Latino, 2 - Hispanic or Latino, or null.
Column: SPBPERS_ETHN_CDE
Length: 1
Ethnicity and Race Confirmed
This field identifies the race and ethnicity has been confirmed. Valid values are (Y)es, (N)o and null.
Column: SPBPERS_CONFIRMED_RE_CDE
Length: 1
Confirmed Date
This field identifies when the race and ethnicity has been confirmed.
Column: SPBPERS_CONFIRMED_RE_DATE
Length: 7
Veteran File Number
The person’s Vietnam file number.
Column: SPBPERS_VETC_FILE_NUMBER
Length: 10
Field Description
12 Banner General 8.5.1 13-21User Guide
Basic Person

13-22
Veteran Category
If the ID is associated with one of the categories in the pulldown list, they may be eligible for Veteran-related programs, if applicable. This field is also used in Banner Human Resources VETS-100 reporting. The values for the pulldown list are:
Category--Employees Included in
None--Non-veterans
Other Protected Veteran Only--Other protected veterans who did not serve in Vietnam
Vietnam Veteran Only--Vietnam veterans who do not meet the criterion for other protected veteran only
Both Vietnam and Other Eligible Veteran--Vietnam veterans who meet the criterion for other protected veteran only
Column: SPBPERS_VERA_IND
Length: 1
Active Duty Separation
This is the date the person was separated from active duty. Enter in DD-MON-YYYY format.
Column: SPBPERS_ACTIVE_DUTY_SEPR_DATE
Length: 7
Special Disabled Veteran
Indicator to identify an individual as a special disabled veteran.
Column: SPBPERS_SDVET_IND
Length: 1
Armed Forces Service Medal Indicator
Identifies armed forces veterans who are medal recipients.
Column: SPBPERS_MEDAL_IND
Length: 1
Last Update User
This is the ID of the user who created or updated the record.
Column: SPBPERS_USER_ID
Length: 30
Last Update Activity Date
This is the date the record was created or updated.
Column: SPBPERS_ACTIVITY_DATE
Length: 7
Field Description
Banner General 8.5.1 April 2012User GuideBasic Person

April 20
Race Block
The Race block is used to record the race of the person. Multiple races can be added for a person.
The U.S. 2000 Census was collected using new race and ethnicity categories, and the EEOC has mandated that Affirmation Action reports for 2005 use this census data for comparison purposes. Not all U.S. government departments have adopted this requirement. SunGard anticipates that the National Center for Education Statistics (NCES) will eventually release new IPEDS reporting parameters that require institutions to provide information based on the new OMB categories. Thus, institutions should begin the process of collecting the information based on the new categories.
E-mail Window
The E-mail window allows you to set up one or more e-mail addresses or URLs for any Banner ID. A person/non-person can have multiple addresses of the same e-mail address type (for example, personal and professional). Only one however, can be designated as the preferred address. This window will also allow you to specify if an e-mail address should appear on the web.
Field Description
Race This field identifies the person's institution race code as defined on GORRACE.
Column: GORPRAC_RACE_CDE
Length: 3
User User who inserted or last updated the data.
Column: GORPRAC_USER_ID
Length: 30
Activity Date This field defines the most current date a record is added or changed.
Column: GORPRAC_ACTIVITY_DATE
Length: 7
12 Banner General 8.5.1 13-23User Guide
Basic Person

13-24
Field Description
E-mail Type The type of e-mail address.
Column: GOREMAL_EMAL_CODE
Length: 4
E-mail Address The E-mail address.
Column: GOREMAL_EMAIL_ADDRESS
Length: 128
Preferred This column indicates if the e-mail address is the preferred contact address.
Column: GOREMAL_PREFERRED_IND
Length: 1
Inactivate The status of the e-mail address: (A)ctive, or (I)nactive.
Column: GOREMAL_STATUS_IND
Length: 1
Display on Web Indicates whether a e-mail address should appear on the Web.
Column: GOREMAL_DISP_WEB_IND
Length: 1
URL This field is display-only on the E-mail window. If the check box is checked, it indicates that the e-mail type entered is a URL.
Column: GTVEMAL_URL_IND
Length: 1
Comment This is a free-format comment regarding the e-mail information.
Column: GOREMAL_COMMENT
Length: 60
Banner General 8.5.1 April 2012User GuideBasic Person

April 20
Emergency Contact Window
The Emergency Contact window is used to capture emergency contact information for persons. The information you can enter here includes: contact name, relationship to the person with the emergency, and address and phone information for the person to be contacted.
Activity Date The date on which the row was added or modified.
Column: GOREMAL_ACTIVITY_DATE
Length: 7
User The user ID when the row was added or modified.
Column: GOREMAL_USER_ID
Length: 30
Field Description
Priority Priority indicator associated with emergency address of person record.
Column: SPREMRG_PRIORITY
Length: 1
Last Name Prefix
The prefix that appears before the last name of the person associated with emergency address information.
Column: SPREMRG_SURNAME_PREFIX
Length: 60
Note: Depending on your institution’s settings, this field might be hidden.
Contact Last Name
Last name of person associated with emergency address information.
Column: SPREMRG_LAST_NAME
Length: 60
First Name First name of person associated with emergency address information.
Column: SPREMRG_FIRST_NAME
Length: 60
Field Description
12 Banner General 8.5.1 13-25User Guide
Basic Person

13-26
Middle Initial Middle initial of person associated with emergency address information.
Column: SPREMRG_MI
Length: 60
Relationship This field identifies the relationship between emergency contact person and the person record.
Column: SPREMRG_RELT_CODE
Address Type The address type associated with the emergency address. The purpose of this field on the emergency contact window is to allow the user to choose an address from the persons list of address to associate with the emergency contact. For example the emergency contact person maybe the parent of a student and when creating the emergency contact record, you can choose from the students list of existing address's. The address chosen will default into the emergency contact record. If a change is made to an address on the emergency contact window, the emergency contact's address will be updated but the person's (i.e., student's) address will not be updated.
Column: SPREMRG_ATYP_CODE
Length: 2
House Number A code used in some countries to uniquely identify a house.
Column: SPREMRG_HOUSE_NUMBER
Length: 10
Note: Depending on your institution’s settings, this field might be hidden.
Street Line 1 Line one of emergency address.
Column: SPREMRG_STREET_LINE1
Length: 75
Street Line 2 Line two of emergency address.
Column: SPREMRG_STREET_LINE2
Length: 75
Field Description
Banner General 8.5.1 April 2012User GuideBasic Person

April 20
Street Line 3 Line three of emergency address.
Column: SPREMRG_STREET_LINE3
Length: 75
Street Line 4 Line four of emergency address.
Column: SPREMRG_STREET_LINE4
Length: 75
Note: Depending on your institution’s settings, this field might be hidden.
City City associated with emergency address.
Column: SPREMRG_CITY
Length: 50
State State associated with emergency address.
Column: SPREMRG_STAT_CODE
Length: 3
Zip or Postal Code
Zip code associated with emergency address.
Column: SPREMRG_ZIP
Length: 30
Nation Nation/country associated with emergency address.
Column: SPREMRG_NATN_CODE
Length: 5
Field Description
12 Banner General 8.5.1 13-27User Guide
Basic Person

13-28
Additional ID Window
This window is used to enter extra IDs for a person. Each additional ID must be assigned an ID type. You can set up additional ID types using the Additional Identification Type Validation Form (GTVADID). Use the Additional Identification tab to access this window.
Telephone Phone number associated with emergency address.
Column: SPREMRG_CTRY_CODE_PHONE
Length: 4
Column: SPREMRG_PHONE_AREA
Length: 6
Column: SPREMRG_PHONE_NUMBER
Length: 12
Column: SPREMRG_PHONE_EXT
Length: 10
Note: Depending on your institution's settings, Country Code (SPRTELE_CTRY_CODE_PHONE) might be hidden.
Last Update User
User who inserted or last update the data.
Column: SPREMRG_USER_ID
Length: 30
Last Update Activity Date
Most current date that the record was created or changed.
Column: SPREMRG_ACTIVITY_DATE
Length: 7
Field Description
ID Type Type of additional ID.
Column: GORADID_ADID_CODE
List of Values/Search: Additional Identification Type Validation (GTVADID)
Description Description of additional ID.
Column: GORADID_DESC
Field Description
Banner General 8.5.1 April 2012User GuideBasic Person

April 20
Basic Person Procedures
Basic person is a generic term that refers to people (persons) and companies (non-persons). Basic person information includes:
• Name/ID
• Address
• Telephone
• Biographical information
• Emergency contact information
The basic person identification forms (forms whose seven-character names end with IDEN, such as SPAIDEN or PPAIDEN) are used throughout the Banner applications to capture information for all persons (and non-persons) associated with the institution. All persons/non-persons are first entered into the database using one of these forms. Information maintained on these forms is specific to the person/non-person, and does not relate to their involvement at the institution. All other modules and applications depend on the information captured and maintained on these forms. Any changes to a person's/non-person's biographic or demographic information must be made on one of them.
Common Matching and Basic Person
Common Matching is a feature in Banner that helps your institution avoid duplicate PIDMs, or storing the same information for a person under several different IDs. The Common Matching process checks for existing identification records before a new one is added to the database. You can access the Common Matching Entry Form (GOAMTCH) from an identification form to enter information for a new ID, and then execute the matching process before a new PIDM is created in Banner. Common Matching also
Additional Identification Enter the Additional ID in this field.
Column: GORADID_ADDITIONAL_ID
Activity Date Date on which the record was last updated. Display only.
Column: GORADID_ACTIVITY_DATE
User ID of the user who last updated the record. Display only.
Column: GORADID_USER_ID
Field Description
12 Banner General 8.5.1 13-29User Guide
Basic Person

13-30
provides a mechanism to add new records to the Banner database and update existing ones.
For information about setting up and using Common Matching, refer to the Common Matching Handbook.
To access GOAMTCH from an identification form:
1. Go to an identification form such as SPAIDEN or APAIDEN.
2. Enter GENERATED in the ID field.
Or, you can instead do either of the following:
• Select the Generate ID button.
• Enter an ID in the ID field that does not exist in Banner.
3. The GOAMTCH form appears.
NoteIf a person record is created using the GOAMTCH form, then the Origin field (on SPAIDEN and SPRIDEN) is set to GOAMTCH. If the person record is created using SRRSRIN or SRIPREL, then the Origin field is set to SRKPREL.
You can search on last names, first names, and non-person names by text to see if similar names exist. Use the Search feature from the Last Name and First Name fields to view similar names on the Person Search Form (SOAIDEN). Use the Search feature from the Non-Person Name Information Name field to view similar names on the Non-Person Search Form (SOACOMP).
Tip: The current identification information on the main window is accessed by the Current Identification tab, if you want to return to the main window from a secondary window.
Using ID and Name Extended Search
The Extended Search feature provides advanced querying capabilities to help you maintain identification information for persons and non-persons.
NoteUsers must be granted access to the SSN_SEARCH special security object in order to see and use the SSN field on the Extended Search window. The SSN field on this window is not affected by field-level rules for masking, hiding, or concealing. Use SSN_SEARCH, not masking rules, to control access to this field.
Banner General 8.5.1 April 2012User GuideBasic Person

April 20
To use the Extended Search window:
1. In a key block ID field, enter a partial ID and a wildcard ( % and _), or enter a partial name in the Name field. Wildcards can also be used in the Name field, but are not required for searching. For example, if an entire last name is entered, with no first name or wildcards, the Extended Search window will open and the search results will include all persons/non-persons that have that last name.
NoteThe underscore ( _ ) wildcard cannot be used to search in the Name fields.
2. The ID and Name Extended Search window appears. The person/non-person count displays the number of persons/non-persons returned by the search.
3. Click the Search Results pull-down list to see the ID and name of the person/non-persons returned from the query.
NoteA person/non-person may be listed multiple times in the results list if the person has alternate names or IDs. However, each person/non-person is only included in the count once.
To review additional information about the persons in the search result set:
1. Click the Person Search Detail icon.
2. The Person Search form opens. The form that appears will vary by Banner product. For example, if the searching is being performed on a Student form such as SPAIDEN, the SOAIDEN form will open. An ID can be selected on this form. If the ID is selected, you will be returned to the original form and this ID will display in the key block. If no ID is selected, when you exit this form, you will return to the key block of the original form. The Extended Search window will not redisplay automatically.
To review additional information about the non-persons in the search result set:
1. Click the Non-Person Search Detail icon.
2. The Non-Person Search form opens. The form that is called will vary by Banner product. For example, if the searching is being performed on a Student form such as SPAIDEN, the SOACOMP form will open. An ID can be selected on this form. If the ID is selected, you will be returned to the original form and this ID will display in the key block. If no ID is selected, when you exit this form, you will return to the key
12 Banner General 8.5.1 13-31User Guide
Basic Person

13-32
block of the original form. The Extended Search window will not redisplay automatically.
To reduce the search to person or non-person:
1. Click the radio button for the person or non-person.
2. The results will be updated to included only persons or non-persons, depending on your selection.
3. To reset the results to include persons and non-persons, select the Both radio button.
To reduce the search based on additional criteria:
1. Add additional search criteria in any combination of the fields: City, State or Province, ZIP or Postal Code, Name Type, SSN/SIN/TIN, Birth Date, Gender.
2. Click the Reduce Search button.
To clear the data from a previous search, or to enter a new query:
1. Click the Clear Search button.
To close the Extended Search window:
1. Click the X in the upper right hand corner of the window, or use keystrokes to perform a Clear Form function.
To determine who entered the current name/ID of a non-person and the form on which the data was entered:
1. Go to an identification form such as SPAIDEN or APAIDEN.
2. Enter the ID of the non-person you are identifying.
3. Verify that the non-person's name has been entered on the main window on the Current Identification window.
4. Review the data in the ID and Name Source block.
Banner General 8.5.1 April 2012User GuideBasic Person

April 20
To determine who entered the alternate name/ID of a non-person and the form on which the data was entered:
1. Go to an identification form such as SPAIDEN or APAIDEN.
2. Enter the ID of the non-person you are identifying.
3. Verify that the non-person's name has been entered on the main window on the Current Identification window.
4. Go to the Alternate Identification window.
5. Review the data in the Origin, User, Activity Date, Create User, and Create Date fields.
Searching for Names that Include Accented Characters
Extended ID/name search supports searching for names that include accented characters and other special characters. This feature applies to extended Latin characters that are considered altered forms of baseline Latin characters, as, for example, Á and à are considered altered forms of A.
Names that include extended characters are returned in search results when you search for names with the related baseline character. For example, if you search the for the last name Adams, the search would return records containing Adams and Ádams.
If your search criteria include extended characters, names with related baseline characters are also returned. For example, if you search the for the last name Ádams, typing the extended character Á, the search would return records containing Adams and Ádams.
The table below lists the capital versions of the characters that are treated as extended characters for this feature. Extended search is not case-sensitive in Banner, so the lower-case version of each of these extended characters corresponds to a baseline character in just the same way.
Extended Character Description CHR(x)
Baseline Character
À LATIN CAPITAL LETTER A WITH GRAVE 50048 AÁ LATIN CAPITAL LETTER A WITH ACUTE 50049 AÂ LATIN CAPITAL LETTER A WITH CIRCUMFLEX 50050 AÃ LATIN CAPITAL LETTER A WITH TILDE 50051 AÄ LATIN CAPITAL LETTER A WITH DIAERESIS 50052 AÅ LATIN CAPITAL LETTER A WITH RING ABOVE 50053 AÆ LATIN CAPITAL LETTER AE 50054 AÇ LATIN CAPITAL LETTER C WITH CEDILLA 50055 CÈ LATIN CAPITAL LETTER E WITH GRAVE 50056 E
12 Banner General 8.5.1 13-33User Guide
Basic Person

13-34
Searching by SSN in an ID Field
You might be able to enter a Social Security Number (SSN) in an ID field when querying for a person record. When you search by ID, the system first checks for an ID record that matches the number you entered. If no matching ID is found, the system then checks for a matching SSN.
SSN searching is available only if all of the following conditions are met:
• The SSN Search feature is enabled for the institution. The feature is controlled by the Enable SSN Lookup check box on the Installation Controls form (GUAINST).
• Your own Banner security setup includes permission to use the SSN search feature. A security administrator can give you permission by adding the SSN_SEARCH security object to the list of Banner objects for which you have access.
• The ID field has extended ID/name search capability build into the field.
To find a person record by Social Security Number (SSN):
1. Type the SSN in an ID field that has extended search capability.
2. Press Enter.
É LATIN CAPITAL LETTER E WITH ACUTE 50057 EÊ LATIN CAPITAL LETTER E WITH CIRCUMFLEX 50058 EË LATIN CAPITAL LETTER E WITH DIAERESIS 50059 EÌ LATIN CAPITAL LETTER I WITH GRAVE 50060 IÍ LATIN CAPITAL LETTER I WITH ACUTE 50061 IÎ LATIN CAPITAL LETTER I WITH CIRCUMFLEX 50062 IÏ LATIN CAPITAL LETTER I WITH DIAERESIS 50063 IÑ LATIN CAPITAL LETTER N WITH TILDE 50065 NÒ LATIN CAPITAL LETTER O WITH GRAVE 50066 OÓ LATIN CAPITAL LETTER O WITH ACUTE 50067 OÔ LATIN CAPITAL LETTER O WITH CIRCUMFLEX 50068 OÕ LATIN CAPITAL LETTER O WITH TILDE 50069 OÖ LATIN CAPITAL LETTER O WITH DIAERESIS 50070 OØ LATIN CAPITAL LETTER O WITH STROKE 50072 OÙ LATIN CAPITAL LETTER U WITH GRAVE 50073 UÚ LATIN CAPITAL LETTER U WITH ACUTE 50074 UÛ LATIN CAPITAL LETTER U WITH CIRCUMFLEX 50075 UÜ LATIN CAPITAL LETTER U WITH DIAERESIS 50076 UÝ LATIN CAPITAL LETTER Y WITH ACUTE 50077 Y
Extended Character Description CHR(x)
Baseline Character
Banner General 8.5.1 April 2012User GuideBasic Person

April 20
When the matching record is found, the person’s name is displayed in the Name field, and the person’s ID (not the SSN you entered) is displayed in the ID field.
Search by Telephone, Email, and Additional ID
There are several search forms in Banner system, but most of them relied upon having a name, ID, or SSN. Banner General 8.4 has been enhanced to enable searching by using an e-mail address, telephone number, or the additional ID. This new functionality is available on the new form, General Search (GUISRCH).
• You can enter only one search criteria at a time - alternate id, e-mail, or phone (but may be limited via masking).
• Searches are always case insensitive.
• If the telephone is used for searching then any null phone entry (country, area code, phone) will be assumed to be %.
• There may be uses of the Alternate Id that should not be available for searching (i.e. blind grading) and therefore a new option, GUISRCH Bypass, has been added to GTVADID. If this indicator is set, then those records will not be included in the search results.
• The search results are limited to 1000 unless a GTVSDAX entry (SEARCH_MAX/GUISRCH) is changed to allow more/less.
• The result line will indicate the matching type and the code and value.
• Double clicking the ID field will place the ID in the global.key_idno so that when you go to the next form (i.e. SPAIDEN) that id will be in context.
Common matching has also been modified to enable the primary search to be done on the e-mail or telephone instead of the name or SSN. This matching process does not require the entry of a name or SSN in order to process the match request. However, this requires the e-mail address or telephone since that is now the primary search field.
In order to enable common matching to use the e-mail address as the primary search, you must first create a GTVSDAX entry with GROUP=CM_SOURCE_CODE and CODE=EMAIL_PRIM and then set the EXTERNAL CODE=<common matching source code used for primary e-mail searching>. You can use the Sequence field to specify multiple source codes used for primary e-mail matching.
In order to enable common matching to use the telephone number as the primary search, you must first create a GTVSDAX entry with GROUP=CM_SOURCE_CODE and CODE=PHONE_PRIM and then set the EXTERNAL CODE=<common matching source code used for primary telephone searching>. You can use the Sequence field to specify multiple source codes used for primary telephone matching.
12 Banner General 8.5.1 13-35User Guide
Basic Person
13-36
Entering Basic Person Information
To enter current identification data for a person:
1. Go to an identification form such as SPAIDEN or APAIDEN.
2. Enter the ID.
NoteIf Common Matching is enabled for you, you will be directed to the Common Matching Entry Form (GOAMTCH), where you can enter information for the new ID and check for matches. Save the record. The ID and associated name are displayed in the key block.
3. Go to the Current Identification window.
NoteIf the person currently has a record in Banner, the system copies the identification information and automatically places it into the fields in the current identification block. Complete the remaining fields, following the directions below.
4. Enter the person's Name Type.
5. Enter the person's SSN/TIN/SIN. This field is available on FOAIDEN and PPAIDEN.
6. Enter the person's First Name, Last Name, and any other applicable parts of the name.
7. Enter the person's Marital Status. This field is available on APAIDEN and FOAIDEN.
8. Save.
Banner General 8.5.1 April 2012User GuideBasic Person
April 20
To enter alternate identification data for a person:
1. Go to an identification form such as SPAIDEN or APAIDEN.
2. Verify the ID and the First Name, Last Name, and Middle Initial information on the Current Identification window.
NoteIf the ID is generated, you must save the record before accessing the Alternate Identification block.
NoteIf Common Matching is enabled for you, you will be directed to the Common Matching Entry Form (GOAMTCH) where you can enter information for the new ID and check for matches. Save the record. The ID and associated name are displayed in the key block.
3. Go to the Alternate Identification window.
4. Enter the Change of Name or ID.
NoteThe Duplicate Record function will copy the ID or name information into the appropriate fields on the Alternate Identification window depending on what type of change you enter.
5. Enter the person's alternate ID.
OR
Enter the person's alternate Last Name.
6. Enter the person's alternate First Name.
7. Enter the person's alternate Middle Name.
8. Save your changes.
To view alternate identification data for a person:
1. Go to an identification form such as SPAIDEN or APAIDEN.
2. Verify the ID and the First Name, Last Name, and Middle Name information on the Current Identification window.
3. Go to the Alternate Identification window.
12 Banner General 8.5.1 13-37User Guide
Basic Person
13-38
To enter current identification data for a non-person:
1. Go to an identification form such as SPAIDEN or APAIDEN.
2. Enter an ID.
NoteIf Common Matching is enabled for you, you will be directed to the Common Matching Entry Form (GOAMTCH) where you can enter information for the new ID and check for matches. Save the record. The ID and associated name are displayed in the key block.
3. Go to the Current Identification window.
4. Enter the name of the non-person in the Non-Person Information field.
5. Save.
To update an organization's and a person's name or ID:
1. Go to an identification form such as SPAIDEN or APAIDEN.
2. Go to the Current Identification window.
3. Enter the new data over the existing data.
4. Save.
5. Go to the Alternate Identification window to see the changes.
NoteFor updated IDs, the ID appears in the Change field. For updated names, the name appears in the Change field.
6. Select Next Record to view alternate names or IDs.
To delete an organization's and person's alternate name or ID:
1. Go to an identification form such as SPAIDEN or APAIDEN.
2. Select Next Record until the desired name or ID appears.
3. Select Remove Record.
4. Save. The record is no longer displayed, and it no longer exists on either the Person Search Form (SOAIDEN) or the Non-Person Search Form (SOACOMP).
Banner General 8.5.1 April 2012User GuideBasic Person

April 20
Maintaining Address and Telephone Information
To enter address information for a person:
1. Go to an identification form such as SPAIDEN or APAIDEN.
2. Enter the ID.
3. Verify that the person's First Name and Last Name have been entered on the main window in the Current Identification tab.
4. Go to the Address window.
NoteIf the person currently has a record in Banner, the system displays the address information on the Address window. You can insert new information by selecting Insert Record. Complete the remaining fields, following the directions below.
5. Enter the Type code for a new address.
Or, you can select an address to be modified from the group of addresses previously entered for the person.
6. Enter the street address portion of the address in the Address fields.
7. Enter the City (required), State or Province, and ZIP or Postal Code portion of the address.
Or, you can search to select a City, ZIP or Postal Code, and State or Province from the ZIP or Postal Code Validation Form (GTVZIPC).
NoteIf the city and state are both blank and a ZIP or postal code is entered, the city and state will default into those fields from GTVZIPC.
8. Enter the Nation code portion of the address.
NoteYou must enter either the State /Province code or the Nation code.
9. (Optional) Enter all available delivery information.
10. (Optional) Enter the Phone number associated with the Address.
11. Save.
NoteA person must have at least one complete address.
12 Banner General 8.5.1 13-39User Guide
Basic Person

13-40
To enter address information for a non-person:
1. Access an Identification Form (%IDEN).
2. Enter the ID of the non-person you are identifying.
3. Verify the non-person's Name field entry have been entered on the Current Identification window.
4. Go to the Address window.
5. Enter the Type code for a new address.
Or, you can select an address to be modified from the group of addresses previously entered for the person.
6. Enter the street address portion of the address in the Address fields.
7. Enter the City (required), State or Province, and ZIP or Postal Code portion of the address.
Or, you can search to select a City, ZIP or Postal Code, and State or Province from the ZIP or Postal Code Validation Form (GTVZIPC).
NoteIf the city and state are both blank and a ZIP or postal code is entered, the city and state will default into those fields from GTVZIPC.
8. Enter the Nation code portion of the address.
NoteYou must enter either the State/Province code or the Nation code.
9. If you do not want to create bar codes for the address, go to step 13.
Or, if you want to create bar codes for the addresses, go to step 10.
10. Select the ZIP/Postal Code field, and go to the Delivery Information window.
11. Enter all available delivery information.
12. Return to the Address window.
13. (Optional) Enter the Telephone number associated with the address.
14. Save.
Banner General 8.5.1 April 2012User GuideBasic Person

April 20
To enter a primary telephone number with a new address:
1. Go to an identification form such as SPAIDEN or APAIDEN.
2. Enter the ID.
3. Go to the Address window.
4. Enter the Type code for the new address.
5. Enter the street address portion of the address in the Address fields.
6. Enter the City (required), State or Province, and ZIP or Postal Code portion of the address.
Or, you can search to select a City, ZIP or Postal Code, and State or Province from the ZIP or Postal Code Validation Form (GTVZIPC).
NoteIf the city and state are both blank and a ZIP or postal code is entered, the city and state will default into those fields from GTVZIPC.
7. Enter the Nation Code portion of the address.
NoteYou must enter either the State/Province code or the Nation code.
8. Enter the country code (if applicable), area code, basic number, and the extension in the Telephone fields.
9. Enter the Telephone Type.
NoteTelephone types are associated with address types on the Address Type Code Validation Form (STVATYP). The telephone type associated with the address type defaults, but can be overwritten.
10. Save.
NoteTelephone numbers entered on the Address window are automatically associated with an address.
To add a primary telephone number to an existing address:
You can associate a primary telephone number with an address by using either the Address window or the Telephone window. Keep in mind that when you associate a telephone number with an address, the telephone number will become inactive if you designate the address inactive at some point.
12 Banner General 8.5.1 13-41User Guide
Basic Person

13-42
To use the Address window:
1. Go to an identification form such as SPAIDEN or APAIDEN.
2. Enter an ID in the ID field.
3. Go to the Address window.
4. Enter an address and address type, or query for an existing one that you want to use.
5. Choose the Telephone Type.
NoteTelephone types are associated with address types on the Address Type Code Validation Form (STVATYP). The telephone type associated with the address type defaults, but can be overwritten.
6. Enter the telephone number in the Telephone field.
7. Save.
To use the Telephone window:
1. Go to an identification form such as SPAIDEN or APAIDEN.
2. Enter an ID in the ID field.
3. Go to the Telephone window.
4. Choose a Telephone Type.
NoteTelephone types are associated with address types on the Address Type Code Validation Form (STVATYP). The telephone type associated with the address type defaults, but can be overwritten.
5. Enter the telephone number in the Telephone fields.
6. Choose an Address Type and Sequence Number. You can query to find the address type and sequence number that identifies the address you want to use.
7. Save.
To enter a telephone number without an address:
1. Go to an identification form such as SPAIDEN or APAIDEN.
2. Enter an ID in the ID field.
Banner General 8.5.1 April 2012User GuideBasic Person

April 20
3. Go to the Telephone window.
4. Choose a Telephone Type.
5. Enter the telephone number in the Telephone fields.
6. Save.
To make an address inactive:
1. Go to an identification form such as SPAIDEN or APAIDEN.
2. Enter an ID in the ID field.
3. Go to the Address window.
4. Choose the address you want to inactivate.
5. Check the Inactivate check box.
6. Save.
NoteWhen you inactivate an address, then the telephone number for that address will also be designated as inactive. If you want to keep the telephone number active, do one of the following:
• On the Telephone window, uncheck the Inactivate check box for the telephone number.
• On the Address window, choose To and From Dates to specify the active dates for the address, instead of checking the Inactivate check box for the address.
• On the Telephone window, do not associate an address type with the telephone number. If an address type is already specified, then delete it.
NoteFor telephone numbers entered on the Address window of Banner Self-Service, the address type and sequence number specified on the window are always automatically associated with the telephone number in Banner.
12 Banner General 8.5.1 13-43User Guide
Basic Person

13-44
Banner General 8.5.1 April 2012User GuideBasic Person
April 20
14 Supplemental Data Engine
Overview
Supplemental Data Engine (SDE) is a simple way to add data fields to Banner® forms. SDE allows you to store data that is not part of the existing Banner data model.
No customization of Banner forms or tables is needed to capture and use additional data with SDE. The new data is displayed in a popup window, the Supplemental Data Window, and is stored in a supplemental data table. Because no customization is needed, supplemental data is generally not impacted by Banner upgrades.
The Structure of SDE
Each supplemental data record created through SDE is tied to a specific Banner table. The Banner table’s unique key enables a specific record on the source table to be linked to a specific record on the Supplemental Data table. Through SDE you can create additional fields associated with a specific Banner table but stored in a separate table, the Supplemental Data Table.
Although it is natural to think of supplemental data in terms of extra fields on Banner forms, SDE is tied to forms only indirectly.
If the same table is used by two or more forms, supplemental data associated with the table will automatically be viewable on all of those forms.
When you are setting up SDE for a form with multiple data blocks, each associated with a different table, each data block’s SDE must be set up separately by setting up the table that supplies the data for each block.
Limitations of SDE
Not all Tables, Blocks, and Forms Work with SDE
Supplemental data is not guaranteed to work in every instance. There may be some forms and blocks where SDE cannot be used.
12 Banner General 8.5.1 14-1User Guide
Supplemental Data Engine

14-2
Supplemental data can only be associated with tables; therefore, any form that relies on a view to display data cannot use SDE. For example, the AOAIDEN form displays data from a view and, as a result, SDE cannot be displayed on that form.
The security tables owned by BANSECR cannot be used with supplemental data. Because SDE’s architecture is incompatible with the security requirements of the BANSECR-owned security forms, these forms will not be SDE-enabled in future releases.
Because of technical limitations, there are certain Banner forms where SDE does not work at all or does not function correctly. At the time of Release 8.0, SDE could not be used in the forms listed below.
Banner General Forms
Banner Student Forms
NoteIf you encounter other table/form/canvas combinations where there are issues with SDE, you are encouraged to raise an RPE through the Customer Support Center.
Multi-Entity Processing
The combination of SDE with Virtual Private Database (VPD) is currently not supported. If you use VPD to implement Multi-Entity Processing (MEP), you should be aware the SDE does not work automatically with VPD. If you want to apply VPD rules to the SDE table, this must be planned for and set up as part of your VPD implementation.
GOAFBPI GOAFBPR GOAFPUD GOAFPUD GOAINTLGOAQSTN
GOIFBPR GORFEOBGORVPDIGSADSECGSASECR
GSAVPDIGTVADIDGTVLFSTGTVPARSGTVSVCA
SAAETBLSAARRFTSAAWADFSAAWATRSAQOLIBSCARRESSFAEPRTSHAGCOMSHAGRULSHARPARSHARQTS
SHARTYPSHATATCSOACTRLSOAMAUDSOIHCURSORCACTSORCSTSSORLCDFSRAPRELSSARRESSSASCHW
STVCACTSTVCSTSSTVELMTSTVGCMTSTVLMODSTVMECLSTVWPYOSTVWSCFSTVWSSO
Banner General 8.5.1 April 2012User GuideSupplemental Data Engine
April 20
Masking
Masking is not currently supported with SDE. Supplemental data fields cannot be masked, concealed, or hidden.
Menu Navigation Table
The Supplemental Data Engine (*GENSDE) menu can be accessed from the System Functions/Administration menu (*GENSYS).
Further information on these forms can be found in Online Help. See “Online Help: Banner Form and Field Reference” on page 1-5.
In addition to these forms, SDE uses the Supplemental Data Window, which does not appear on any menu.
Supplemental Data Engine Processes
Using the Supplemental Data Window
Supplemental data columns, after they have been set up for your institution, are displayed in the Supplemental Data window. If you have the appropriate permissions, you can add or edit data on this window. Your permissions in the Supplemental Data window match your permissions in the form displayed in the main Banner window.
Interpreting the SDE Lightbulb Icon
A lightbulb icon on the Banner toolbar lets you know when there is supplemental data to be seen.
GTVSDTB Tables with Existing Supplemental Data Attributes FormLists Banner tables that are enabled for SDE.
GOASDMD Supplemental Data Attributes Definition FormDefines the attributes for supplemental data fields that will be displayed on the Supplemental Data window.
GOADISC Supplemental Data Discriminators FormIdentifies discriminator codes for SDE, and defines the discriminator methods that will dynamically handle supplemental data.
12 Banner General 8.5.1 14-3User Guide
Supplemental Data Engine

14-4
Entering Supplemental Data
The Supplemental Data window is accessed by clicking the lightbulb icon in the Banner toolbar. The window will display one or more fields where you can enter data related to the data in the current main Banner window.
TipYou can also show and hide the Supplemental Data window from the menu bar with Block > View Supplemental Data, or by pressing <Ctrl-D> (if the <Ctrl-D> keystroke has been enabled for your institution).
Any fields you see in the Supplemental Data window have been specifically set up for your institution. Look for hint text that provides guidance on what to enter in the supplemental data fields.
If you see an existing set of numbered fields (for example, labeled Comment 1 and Comment 2), you can open the next available field in the series by clicking one of the fields and then selecting Record>Duplicate from the menu bar.
If a supplemental data field is marked with an asterisk (*), that means it is a required field. You must enter a value for it before you close the Supplemental Data window.
When you are done viewing or editing supplemental data, you can close the Supplemental Data window. To close the window, do any of the following:
• Click the Close SDE Window button in the window
• Click the SDE icon in the Banner toolbar
• Press <Ctrl-D> (if the <Ctrl-D> keystroke has been enabled for your institution)
You can also leave the Supplemental Data Window open while you return to the main Banner window. If you navigate to a different record or to a different block in the main Banner window, the Supplemental Data window automatically updates to show the supplemental data for the new record or block.
A grayed-out lightbulb icon indicates that there is no Supplemental Data window for the database table in the current block.
A colored lightbulb icon indicates that there is a Supplemental Data window for the current block, but it does not contain any data. You can click the lightbulb icon to open the Supplemental Data window and enter data.
An active lightbulb-with-rays icon indicates that supplemental data exists for the current record. You can click the lightbulb icon to open the Supplemental Data window and view or edit the data.
Banner General 8.5.1 April 2012User GuideSupplemental Data Engine

April 20
You can move the Supplemental Data window as needed, by dragging the window by its title bar.
Supplemental data is saved automatically when you save the record in the main Banner window, or you can save while in the Supplemental Data Window.
Administrative Setup for SDE
Enabling the <Ctrl-D> Keystroke
The <Ctrl-D> keystroke is a convenient way for users to show and hide the Supplemental Data window. To enable this keystroke for users at your institution, add the following line to your fmrweb.res file in your $ORACLE_HOME/forms/java directory on your Oracle Application Server.
68 : 2 : "Ctrl+D" : 11022 : "Accelerator1"
Planning for Supplemental Data Setup
Some things to think about before you start your SDE setup:
• The form(s) where you want the data to be viewed/edited
• The name(s) of the underlying table(s)
• Whether you want the SDE fields to add to or replace baseline fields in views that use the data
• Do you want to add a single SDE field or multiple fields? If multiple, how do you want to differentiate them?
• What labels should end users see on the SDE window? What hint text will help your users enter data correctly?
• Where else in the system do you want the SDE data to be visible? What views might you need to create to use the data? Do you want the SDE data to be available in Self-Service?
Setting Up a Supplemental Data Attribute
Following is an overview of the setup process. See Online Help for each of the forms for more information.
1. Enable the underlying table for SDE processing. Before you can create supplemental data for a Banner table, the table must be added in the GTVSDTB form. See for details.
2. Create discriminators, if necessary. If you want to add multiple, related supplemental data fields under a single SDE attribute, you must use a discriminator to differentiate
12 Banner General 8.5.1 14-5User Guide
Supplemental Data Engine

14-6
the fields. You can use an existing discriminator, if a suitable one has been previously created. If not, you can set up a new discriminator in the Supplemental Data Discriminators form (GOADISC).
There are different kinds of discriminators that give you different options. If you are creating a single SDE field, no discriminator is necessary, and you can skip this step.
3. Set up the attribute on the Supplemental Data Attribute Definition form (GOASDMD). You must specify the field’s data type and how it will appear to users.
4. Generate DDL and create a view if necessary. If you plan to use this SDE attribute in Banner Self-Service or in some other context that requires a view, you can generate DDL code for the view in GOASDMD.
5. Modify Self-Service if necessary. To make full use of supplemental data in Self-Service, custom modifications must be made in Banner Self-Service packages. This step should be undertaken by a programmer experienced with SQL.
Creating Delete Triggers for Supplemental Data
The delete trigger script contains code that can be applied to the database table so that if a base record is removed, the associated supplemental data will also be removed.
The following steps describe how to create SDE triggers.
1. Go to the GOASDMD form.
2. Select the Generate DDL tab.
3. Check the Delete Trigger Script check box.
4. Click the Generate DDL button.
NoteThe delete trigger script cannot be applied through the GOASDMD form. It must be manually copied and applied to the database by a DBA.
5. The DBA clicks Edit with the cursor positioned in the Generated DDL field for the trigger script.
A screen similar to the following will appear.
Banner General 8.5.1 April 2012User GuideSupplemental Data Engine

April 20
6. The DBA copies this source to their local source library.
7. Compile it and apply the trigger to the database as the correct owner.
The owner of the trigger should be the same as the owner of the table to which the trigger is being applied. If you try to apply a trigger by clicking the apply ddl button in the lower right hand corner of GOASDMD, a pop-up message will be displayed indicating that the trigger must be applied by a DBA.
The delete trigger will be named <application>T_<table>_SDE_DELETE (i.e. GT_GTVZIPC_SDE_DELETE). The delete trigger code will be generated as a standalone trigger and will not be merged with any other trigger.
Supplemental Data Engine (SDE) Data Validation
Banner released the Supplemental Data Engine (SDE) as part of General 8.0, which enabled the addition of user defined columns to the database and forms without requiring user maintained modifications to the system. The ability to store, edit, view, and report upon user defined data was an important addition to Banner. However, there was no validation of the data that was entered (other than data type, i.e. date, character, or numeric). With the release of General 8.4 validation has now been added to SDE.
Value validation may now be specified on the modified GOASDMD form, if desired, with several different methods:
• Simple low-high value checking
• Validation against an existing code validation table
12 Banner General 8.5.1 14-7User Guide
Supplemental Data Engine

14-8
• Validation using the same rules as used for GJAPCTL value validation
• Validation using a SDE specific code validation table (values maintained on the new GTVSDLV form)
• Validation using user defined SQL entered on GORRSQL
In cases where a code validation table is being used, an optional LOV button can be specified to appear on the SDE window for ease in the entering of the data.
In addition to the validation checking upon the entry of SDE data, a new script (gchecksde.sql) is being delivered to enable the validation of SDE data that already exists.
Due to the flexibility of the SDE validation rules, additional special security objects have been added to enable as much (or little) access to the setup. By default, access is denied to the validation rule setup.
Data setup on GOASDMD
The LOV Form (similar to List on GJAPDEF) indicates an existing LOV form which would pass back a specific value just as it does on GJAPCTL. If it is equal to GTQSDLV, then the SDE LOV table will be used.
NoteGTQSDLV is used to prevent direct navigation to the form (i.e. Q in the 3rd position).
The value entered here will dynamically execute the form indicated if the drop-down is selected upon data input and then pass back the selected value. There is no edit check (other than ensuring that it is a valid form name) on this field since it is really not known until execution time whether or not it is valid validation form.
If the value entered is GTQSDLV, then the Table OVRD and Attr OVRD fields can be entered if required. The GTQSDLV form is a generic validation form that uses the Table Name (from the key block) and the Attribute Name as a key. However, there may be cases where a generic validation is required (or even a validation set up associated with another table/attribute) and in those cases you could use a Table OVRD value of DEFAULT and an Attr OVRD reflecting the generic field validation.
NoteYou can only use table/attribute overrides for columns that have a Data Type of VARCHAR2. If you need edits on NUMBER or DATE (other than the Low/High range), then you will have to use the GORRSQL process/rule.
If you are using GTQSDLV, then you can also override the standard Code and Description labels for the column titles on the LOV.
Banner General 8.5.1 April 2012User GuideSupplemental Data Engine

April 20
You can use the Table OVRD field to override the table name if you are using the GTQSDLV in the LOV form. The value of DEFAULT can be used to define generic validations. The Attr OVRD field can be used to override the attribute name if using the GTQSDLV in the LOV form.
LOV Title Code can be used as an override for Code for the title of the Value field on GTQSDLV. LOV Title Desc can be used as an override for Description for the title of the Description field on GTQSDLV.
Low/High Ranges (similar to Low/High on GJAPDEF) can be used for a range check. To do this:
• The values entered must match the Data Type, including length / precision (if applicable).
• If the field is a data type of DATE, then the value SYSDATE may be used to represent today.
• You do not have to enter both fields, but if you do then the low value must be less than or equal to the high value.
The following is a sample LOV form.
Validation GJAPDEF (similar to the validation field on the GJAPDEF form) can be used for validation in the same way that GJAPCTL validates values. These routines are all hard coded and will work the exact way that they work on GJAPCTL. If a value of LOV_VALIDATION is used, then the validation will validate the value against the xxx_CODE column in the table with the same name as the LOV Form.
NoteThe validation will always fail, if the LOV table does not have an xxx_CODE column defined.
If this validation is not adequate (i.e. the form and table names are different), then you can always use the GORRSQL Process/Rule).
NoteThere is no validation until execution time.
12 Banner General 8.5.1 14-9User Guide
Supplemental Data Engine
14-10
You can use LOV Form and Validation GJAPDEF independently of each other. In other words, you can use a LOV form to enable drop-down values to be entered, but then bypass actual validation of values (i.e. GTVZIPC). The reverse is also true; you can have validation, but no LOV for data value selection.
GORRSQL Process/Rule can be used for free form dynamic validation of values. The Process and Rule codes from GORRSQL are used to indicate these rules.
• Several bind variables are available and will be substituted in the dynamic call if found.
• SDE_VALUE represents the value passed in from the SDE field
• SDE_FORM represents the form name that the validation is being performed from
• SDE_TABLE represents the root table with which the SDE value is associated with
• SDE_ATTRIBUTE represents the attribute name that is being validated
• SDE_PK represents the primary key of the record with which the SDE value is associated with
• In order to be considered a valid rule on GORRSQL, it must be active, validated, and the execution date must be between the start/end dates, and at least one of the 5 SDE_xxx bind variables must be used.
• The result returned must be equal Y if the validation is successful. Otherwise, it is assumed that the return value is an error message.
• A user must have the special security object of SDE_SQL_VALIDATION set up on GSASECR in order to be able to update these fields on GOASDMD. See the Security Setup Requirements section for additional information.
• A user must have the special security object of 'SDE_SQL_TESTING' set up on GSSECR in order to be able to actually execute this procedure as part of the 'Test Data' process. No special security is needed to execute the procedure during normal LOV validation at SDE value data entry.
See Chapter 12, Business Rule Builder of the Banner General User Guide for information related to the building of business rules.
The following example shows how the statements can be coded in several different formats.
GORRSQL Setup using a SELECT with a list of values
-- Using a SELECT statement with a predefined list of values. NOTE: all SDE values are passed as character strings
-- Since the SELECT 'Y' will only occur if a match is found and we want to display an error message as well, we will
-- use a DECODE with an outer SELECT COUNT(*) to either pass back a 'Y' if the edit passed or an error message using
Banner General 8.5.1 April 2012User GuideSupplemental Data Engine

April 20
-- G$_NLS.Get if it did not
SELECT decode(count(*),0,G$_NLS.Get('x','x','*ERROR* Code %01% not found in list of valid values',:SDE_VALUE) ,'Y')
FROM ( SELECT 'Y' FOUND_IT
FROM DUAL
WHERE :sde_value IN ('1','2'))
GORRSQL Setup using a FUNCTION
-- Use of a function that returns a 'Y' if a code exists in the table, otherwise it returns an 'N'.
-- Since we want an error message returned, we use a DECODE and the G$_NLS.Get to build an error message
SELECT decode(f_code_exists('GTVZIPC', :SDE_VALUE ), 'Y','Y',
G$_NLS.Get('x','x','*ERROR* Code %01% not found in GTVZIPC',:SDE_VALUE))
FROM dual
GORRSQL Setup using a SELECT against a table
-- Using a SELECT statement with a check against a table. NOTE: all SDE values are passed as character strings
-- Since the SELECT 'Y' will only occur if a match is found and we want to display an error message as well, we
-- will use a DECODE with an outer SELECT COUNT(*) to either pass back a 'Y' if the edit passed or an error message
-- using G$_NLS.Get if it did not.
SELECT decode(count(*),0,G$_NLS.Get('x','x','*ERROR* Code %01% not found in the GTVZIPC table',:SDE_VALUE) ,'Y')
FROM ( SELECT 'Y' FOUND_IT
FROM GTVZIPC
WHERE gtvzipc_code = :sde_value)
GORRSQL Setup using DATE checking
-- Using a SELECT statement to check for a valid fiscal year in a specific chart of accounts.
-- NOTE: all SDE values are passed as character strings
-- Since the SELECT 'Y' will only occur if a match is found and we want to display an error message as well, we will
-- use a DECODE with an outer SELECT COUNT(*) to either pass back a 'Y' if the edit passed or an error message
-- using G$_NLS.Get if it did not
SELECT decode(count(*),0,G$_NLS.Get('x','x','*ERROR* Date %01% not valid for COAS "W".',:SDE_VALUE) ,'Y')
FROM (SELECT *
FROM FTVFSYR
WHERE ftvfsyr_start_date <= to_date(:sde_value)
12 Banner General 8.5.1 14-11User Guide
Supplemental Data Engine

14-12
AND ftvfsyr_end_date >= to_date(:sde_value)
AND ftvfsyr_coas_code = 'W')
GORRSQL Setup using multiple SELECTs and conditions for 'extra' error checking
In certain cases, you may have to create multiple rules. Each test will be validated in order until one fails and then the checking will stop.
Rule #1-- Using a SELECT statement with a check against a table. NOTE: all SDE values are passed as character strings
-- Since the SELECT 'Y' will only occur if a match is found and we want to display an error message as well, we will
-- use a DECODE with an outer SELECT COUNT(*) to either pass back a 'Y' if the edit passed or an error message using
-- G$_NLS.Get if it did not
SELECT decode(count(*),0,G$_NLS.Get('x','x','*ERROR* Code %01% not found in the GTVZIPC table',:SDE_VALUE) ,'Y')
FROM ( SELECT 'Y' FOUND_IT
FROM GTVZIPC
WHERE gtvzipc_code = :sde_value)
Rule #2 -- Using a SELECT statement with a check against a table. NOTE: all SDE values are passed as character strings
-- Since the SELECT 'Y' will only occur if a match is found and we want to display an error message as well, we
-- will use a DECODE with an outer SELECT COUNT(*) to either pass back a 'Y' if the edit passed or an error message
-- using G$_NLS.Get if it did not
SELECT decode(count(*),0,G$_NLS.Get('x','x','*ERROR* Code %01% found in the GTVZIPC table but the STATE was NULL',:SDE_VALUE) ,'Y')
FROM ( SELECT 'Y' FOUND_IT
FROM GTVZIPC
WHERE gtvzipc_code = :sde_value
AND gtvzipc_stat_code is not NULL)
Testing the Data Validation rules
The Test Data option displays a pop-up where the user can test out the validation routines that have been saved without having to actually go to a form and enter SDE data.
To ensure security for testing, a user must have special security objects enabled. See Security Setup Requirements section below for additional information. If security is not
Banner General 8.5.1 April 2012User GuideSupplemental Data Engine

April 20
granted, and a LOV or SQL process exists, the user will be denied access and an error will be generated when attempting to validate. No special security objects are required for standard SDE data validation from an application data entry form or batch process.
A successful validation will look like the following:
An unsuccessful validation using the low and high range values will look like the following:
Confirming Data Validation rules for existing data
A new standalone validation routine (gchksde.sql) will verify existing SDE data that was entered before the rules were put into place. The process should be run, preferably, after the orphan purge (GUSMDID) process. The gchksde will accept a table name (wild cards available), a maximum number of records to validate, and a maximum number of errors to locate. It will then display any SDE Data values that do not pass the validation processing which will then have to be corrected manually.
Processing SDE validation for GORSDAV entries for table %...Output format is <table>:<attribute> <SDE Primary key> [<SDE value] <error message>
GORCMSC:SDE_ATT_24 key=103345 [test2] *ERROR* Invalid date value or format. Entry format is MDY.
GTVCURR:NEWTEST key=ACT / 20030101000000 / 20991231000000 [111] *Error* Invalid Number. Expected format: D9999
GTVZIPC:TEST_DATE key=00LES / Test for SDE Validation [01-JAN-10] *ERROR* Date 01-JAN-2010 not valid for COAS "W".
12 Banner General 8.5.1 14-13User Guide
Supplemental Data Engine

14-14
GTVZIPC:TEST_NUM_4_5 key=00LES / Test for SDE Validation [125] *ERROR* Code 125 not found in the GTVZIPC table
GURSRVQ:NEWONE key=CMS TEST2 / 1 [cms test2] *Error* Value too long, maximum length is 3
GURSRVQ:SDE_ATT_163 key=SDE TEST / 1 [12345678901234567892123] *Error* Value too long, maximum length is 2
Processed 2533 entries and found 74 errors (with a maximum of 9999 rows)
Security Setup Requirements
Typically, form level security is used to control which users are able to update an LOV form. However, with the generic LOV form used for SDE validation, it is not possible. that FGAC could always be used and can be a bit too complicated for this purpose. The solution was the use of special security objects in the form of SDE_LOV_<table name> (assumes all table names are less than 23 characters in length).
Because of the nature of the values that can be seen during a testing process of the LOV's or GORRSQL validations, the user must have the special security access for any of the following:
• * SDE_SQL_TESTING - Allows the 'Test Data' process to test any GJAPDEF or GORRSQL
NoteIf a user has SDE_SQL_VALIDATION to allow maintenance of the GORRSQL fields then they can also test.
• * SDE_LOV_<table> - Allows the user to modify data on GTVSDLV for the specified table
• The table may be DEFAULT to modify the generic tables if applicable
• The table may be ALL to indicate they can update any table on GTVSDLV. For example, SDE_LOV_ALL, SDE_LOV_SPRIDEN, SDE_LOV_DEFAULT
NoteSince the users y can modify the LOVs, they can also test them.
• * SDE_TEST_<table>- Allows the user to test LOVs for the specified table with the 'Test Data' button
• The table may be DEFAULT to test the generic tables if applicable
• The table may be ALL to indicate they can test any table on GTVSDLV. For example, SDE_TEST_ALL, SDE_TEST_SPRIDEN, SDE_TEST_DEFAULT
NoteIn order to allow everyone to update and test all fields of GOASDMD you should create SDE_SQL_VALIDATION and SDE_LOV_ALL and assign them to the BAN_GENERAL_C class. Needless to say security can be
Banner General 8.5.1 April 2012User GuideSupplemental Data Engine

April 20
set up as fine grained as needed (i.e. by table, class, or user). This assumes that the user already has update access to GOASDMD.
The description, [1-100] on the GTVSDLV form, indicates the minimum and maximum length of this attribute in all of the places that it is used. Typically, they should be the same and if so, only one value will be displayed. The code will be validated against the maximum length.
Loading SDE Data in Batch
In order to mass load values into SDE fields you only need to call a few API routines assuming the SDE columns have already been defined.
In the following example, two columns are added to SPRIDEN:
MASS_LOAD 10 Characters - with LOV validation rules
MASS_LOAD_DATE DATE
12 Banner General 8.5.1 14-15User Guide
Supplemental Data Engine
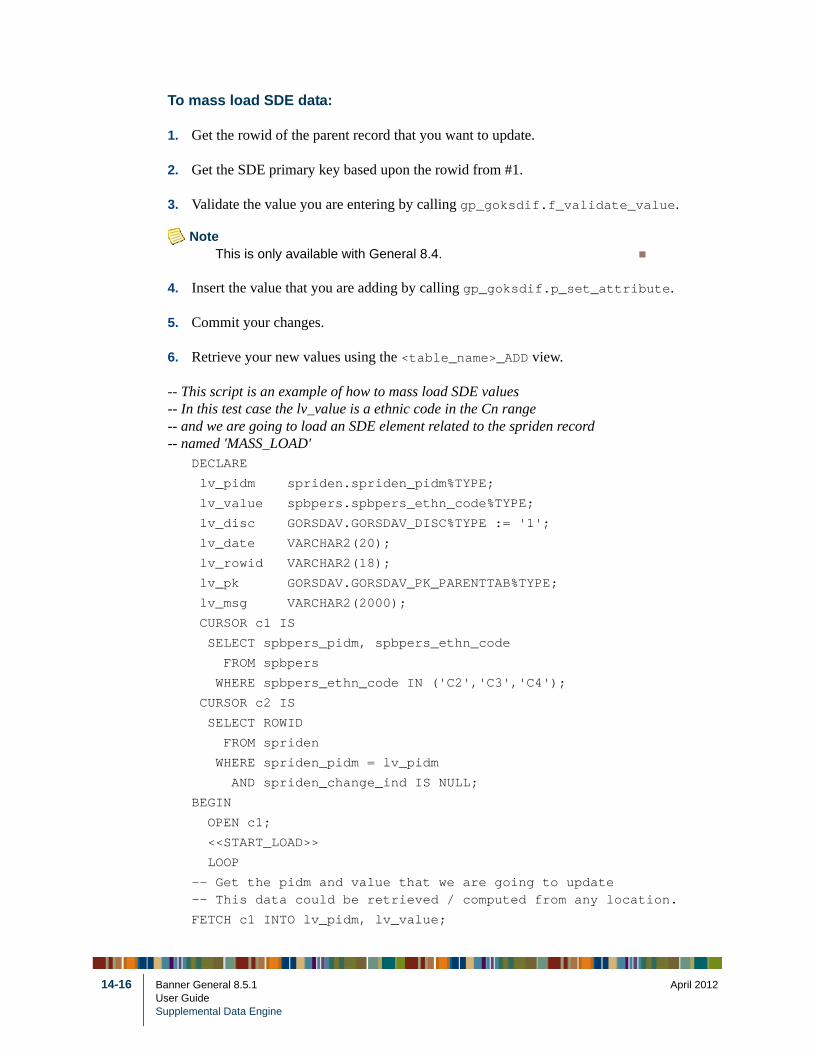
14-16
To mass load SDE data:
1. Get the rowid of the parent record that you want to update.
2. Get the SDE primary key based upon the rowid from #1.
3. Validate the value you are entering by calling gp_goksdif.f_validate_value.
NoteThis is only available with General 8.4.
4. Insert the value that you are adding by calling gp_goksdif.p_set_attribute.
5. Commit your changes.
6. Retrieve your new values using the <table_name>_ADD view.
-- This script is an example of how to mass load SDE values-- In this test case the lv_value is a ethnic code in the Cn range-- and we are going to load an SDE element related to the spriden record-- named 'MASS_LOAD'
DECLARE
lv_pidm spriden.spriden_pidm%TYPE;
lv_value spbpers.spbpers_ethn_code%TYPE;
lv_disc GORSDAV.GORSDAV_DISC%TYPE := '1';
lv_date VARCHAR2(20);
lv_rowid VARCHAR2(18);
lv_pk GORSDAV.GORSDAV_PK_PARENTTAB%TYPE;
lv_msg VARCHAR2(2000);
CURSOR c1 IS
SELECT spbpers_pidm, spbpers_ethn_code
FROM spbpers
WHERE spbpers_ethn_code IN ('C2','C3','C4');
CURSOR c2 IS
SELECT ROWID
FROM spriden
WHERE spriden_pidm = lv_pidm
AND spriden_change_ind IS NULL;
BEGIN
OPEN c1;
<<START_LOAD>>
LOOP
-- Get the pidm and value that we are going to update-- This data could be retrieved / computed from any location.
FETCH c1 INTO lv_pidm, lv_value;
Banner General 8.5.1 April 2012User GuideSupplemental Data Engine

April 20
EXIT WHEN c1%NOTFOUND;
OPEN c2;
-- We need to find the root record with which the SDE data will be associated.-- We need the ROWID so that we can determine the SDE primary root key
FETCH c2 INTO lv_rowid;
CLOSE c2;
-- In order to load into SDE, the primary key of the root table must be-- determined. This can be retrieved once the root table ROWID is known.
lv_pk := gp_goksdif.f_get_pk('SPRIDEN',lv_rowid);
dbms_output.put_line('Loading ' || lv_value || ' into ' || lv_pk);
-- We can optionally validate the data being loaded. Whether or not validation-- rules have been defined or not, the validation routines can be called.-- The result of the validation is either 'Y' indicating a successful validation-- or an error message returned from the validation.-- Make sure to set row id to NULL to enforce insert
lv_msg := gp_goksdif.f_validate_value(p_table_name => 'SPRIDEN'
,p_attr_name => 'MASS_LOAD'
,p_disc => lv_disc
,p_pk_parenttab => lv_pk
,p_form_or_process=> 'Mass load'
,p_attr_data_type => 'VARCHAR2'
,p_value_as_char => lv_value
);
IF lv_msg != 'Y' THEN
dbms_output.put_line(lv_msg);
GOTO start_load;
END IF;
lv_date := to_char(SYSDATE);
lv_msg := gp_goksdif.f_validate_value(p_table_name => 'SPRIDEN'
12 Banner General 8.5.1 14-17User Guide
Supplemental Data Engine

14-18
,p_attr_name => 'MASS_LOAD_DATE'
,p_disc => lv_disc
,p_pk_parenttab => lv_pk
,p_form_or_process=> 'Mass load'
,p_attr_data_type => 'DATE'
,p_value_as_char => lv_date
);
IF lv_msg != 'Y' THEN
dbms_output.put_line(lv_msg);
GOTO start_load;
END IF;
-- Validation has passed, now update the values-- make sure to set row id to NULL to enforce insert
lv_rowid := NULL;
gp_goksdif.p_set_attribute(p_table_name => 'SPRIDEN'
,p_attr_name => 'MASS_LOAD'
,p_disc => lv_disc
,p_pk_parenttab => lv_pk
,p_gorsdav_rowid => lv_rowid
,p_attr_data_type => 'VARCHAR2'
,p_value_as_char => lv_value
);
lv_rowid := NULL;
gp_goksdif.p_set_attribute(p_table_name => 'SPRIDEN'
,p_attr_name => 'MASS_LOAD_DATE'
,p_disc => lv_disc
,p_pk_parenttab => lv_pk
,p_gorsdav_rowid => lv_rowid
,p_attr_data_type => 'DATE'
,p_value_as_char => lv_date
);
COMMIT;
END LOOP;
CLOSE c1;
dbms_output.put_line('SDE MASS load process completed');
EXCEPTION
Banner General 8.5.1 April 2012User GuideSupplemental Data Engine

April 20
WHEN OTHERS THEN
lv_msg := SQLERRM;
dbms_output.put_line('Error loading '|| lv_value || ' for ' || lv_pk || ' - ' || lv_msg);
END;
Loading C2 into ?ID 4?A00037105?Race Ethnicity???66073
Loading C2 into ?ID 6?A00037108?Race Ethnicity???66076
Loading C3 into ?ID 11?A00037109?Race Ethnicity???66077
Loading C4 into ?ID 7?A00037110?Race Ethnicity???66078
*Error* Value C4 not found in validation table SPRIDEN.
Loading C3 into ?ID 9?A00037112_Race Ethnicity???66080
SDE MASS load process completed.
You can view the loaded data using the SDE view of <table>_ADD.
Using Supplemental Data in Self-Service
Supplemental data can be used in Banner Self-Service with a limited amount of custom programming. Note that if you modify a Self-Service package to incorporate SDE Views on a Self-Service page, the page is then considered modified and is not longer supported by the Action Line.
The following narrative illustrates the steps of the process in a typical example.
Step 1 Set Up SDE Attributes
SDE attributes have been created for table GTVCELG to add three SDE fields: an Active Indicator, a From Date, and a To Date.
Step 2 Generate DDL
In the Generate DDL block of GOASDMD, DDL Type is set to Additional Attributes View, and the Generate (hourglass) button is clicked. A script is generated. The script is copied from GOASDMD and pasted into the text editor window shown below.
12 Banner General 8.5.1 14-19User Guide
Supplemental Data Engine
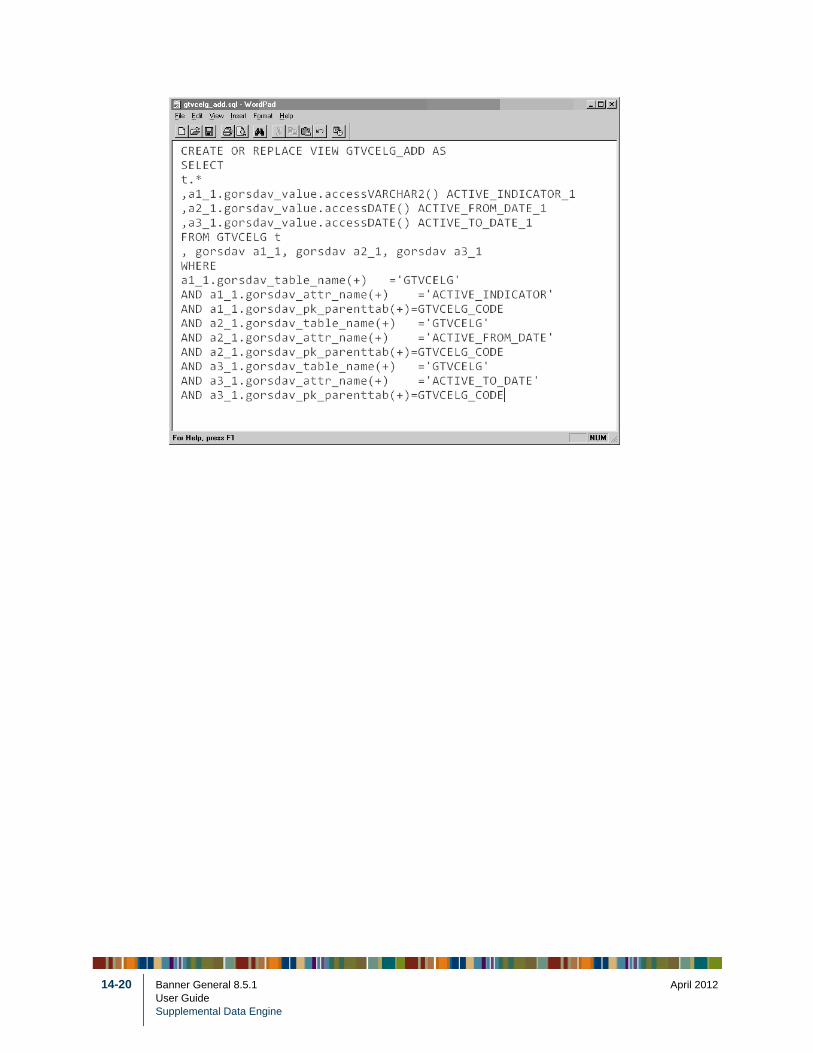
14-20
Banner General 8.5.1 April 2012User GuideSupplemental Data Engine
April 20
Step 3 Generate View
The Apply button is clicked, and the view shown below is created in the database.
Step 4 Make a Backup Copy of Packages
Before making any changes to a Self-Service package, save a copy of the baseline version of the package.
For example, a copy of the Self-Service package header bwgkoprf.sql is saved as bwgkoprf_baseline.sql, and a copy of package body bwgkopr1.sql is saved as bwgkopr1_baseline.sql.
12 Banner General 8.5.1 14-21User Guide
Supplemental Data Engine

14-22
Step 5 Modify the Record Type in the Self-Service Package
The code from the view is inserted into the Self-Service package header bwgkoprf.sql. First, the record type is modified to include new columns from the view.
Step 6 Add Cursor Type
A cursor type for the new columns is added.
Banner General 8.5.1 April 2012User GuideSupplemental Data Engine

April 20
Step 7 Add Record Reference
In the self-service package body, bwgkopr1.sql, a record reference is added.
Step 8 Add Cursor Body
In the self-service package body, the cursor body is added.
12 Banner General 8.5.1 14-23User Guide
Supplemental Data Engine

14-24
Step 9 Add Cursor Open and Fetch
The cursor open and fetch is added, along with data display statements.
Banner General 8.5.1 April 2012User GuideSupplemental Data Engine

April 20
Step 10 Rebuild the Modified Packages
The modified packages are rebuilt by running bwgkoprf.sql and bwgkopr1.sql.
The resulting new block can be seen on the existing Directory Profile page, which is displayed by the BWGKOPRF package.
12 Banner General 8.5.1 14-25User Guide
Supplemental Data Engine

14-26
Banner General 8.5.1 April 2012User GuideSupplemental Data Engine
April 2012
list of parameters,
obol Processes
Automatic Letter Compilation Process LOLETT)” on page 15-41
Population Selection Extract Process LBDATA)” on page 15-42
Letter Extract Process (GLBLSEL)” on age 15-44
Parameter Selection Compile Process LBPARM)” on page 15-47
User ID/Password Verification Process UAVRFY)” on page 15-48
15-1 Banner General 8.5.1User GuideReports & Processes
15 Reports & Processes
This chapter describes the reports and processes in the Banner® General System. A description,and sample report are given where appropriate.
General Reports and Processes C
“List of Reports and Parameters (GJRRPTS)” on page 15-2
“Letter Generation Print Report (GLRLETR)” on page 15-5
“Person Geo Region/Divisions Report (GORPGEO)” on page 15-9
“SEVIS Batch Export Process (GORSEVE)” on page 15-15
“SBGI Geo Region/Divisions Report (GORSGEO)” on page 15-22
“Address Purge (GPPADDR)” on page 15-24
“Document Code Delete Process (GUPDELT)” on page 15-27
“Document Detail Report (GURDETL)” on page 15-28
“Insert Output Program (GURINSO)” on page 15-29
“Institution Role Maintenance Process (GURIROL)” on page 15-30
“Print Dynamic Help for a Form (GURHELP)” on page 15-32
“Data Element Dictionary (GURPDED)” on page 15-34
“Condensed Table Listing (GURTABL)” on page 15-36
“Document Code Report (GURTEXT)” on page 15-37
“PIN Create Process (GURTPAC)” on page 15-38
“SDE Inquiry and Delete Process (GUSMDID)” on page 15-40
“(G
“(G
“p
“(G
“(G

April 2012
ay be specified, or er information that le/multiple es. User defaults
Values
er ,
r Y Print default values.
N Do not print default values.
15-2 Banner General 8.5.1User GuideReports & Processes
List of Reports and Parameters (GJRRPTS)
Description This report lists all reports/batch processes and their associated parameters. A single job name ma wildcard may be used to print all jobs that begin with a specified string of characters. Parametis printed includes parameter number, description, length, type, required/optional indicator, singoccurrence indicator, low range, high range, validation label, system default, and validation valufor all parameters may optionally be printed.
Parameter Name Required? Description
Jobs to be Selected No Wildcard that determines what reports are listed. Enter % to list all reports and their parameters. Othwildcard selections may also be used; for exampleG% lists only the General reports and their parameters.
Print User Level Defaults
No Code that determines whether user-level defaults fothe parameters are printed.

April 2012
Report Sample
PAGE 1
VALIDATION LABEL-----------------------------
VALIDATION LABEL-----------------------------
15-3 Banner General 8.5.1User GuideReports & Processes
08-JAN-2001 16:04:41 Systems & Computer Technology List of reports and parameters
JOB NAME TITLE/DESCRIPTION VALIDATION LABEL------- ------------------------------ ------------------------------GJRRPTS list of reports and parameters
PARAMETER NO DESCRIPTION LENGTH TYPE R/O S/M LOW RANGE HIGH RANGE -- ----------------------------- ------ ---- --- --- ---------------------- ---------------------- - 01 Jobs to be Selected 30 Char O S System Default: Validation Values: User Defaults: FAISMNT R%
02 Print User Level Defaults 1 Char O S System Default: Y Validation Values: N Y User Defaults: FAISMNT N FIMSUSR Y SAISUSR Y
GLBLSEL Letter Extract
PARAMETER NO DESCRIPTION LENGTH TYPE R/O S/M LOW RANGE HIGH RANGE -- ----------------------------- ------ ---- --- --- ---------------------- ---------------------- - 01 Application 30 Char R S System Default: Validation Values: User Defaults:
02 Selection date 9 Date O S System Default: Validation Values: User Defaults:

April 2012
PAGE 2
VALIDATION LABEL-----------------------------
VALIDATION LABEL-----------------------------
PAGE 9
15-4 Banner General 8.5.1User GuideReports & Processes
08-JAN-2001 16:04:41 Systems & Computer Technology List of reports and parameters
JOB NAME TITLE/DESCRIPTION VALIDATION LABEL------- ------------------------------ ------------------------------GLBLSEL (continued)
PARAMETER NO DESCRIPTION LENGTH TYPE R/O S/M LOW RANGE HIGH RANGE -- ----------------------------- ------ ---- --- --- ---------------------- ---------------------- - 03 Address Type 3 Char R M System Default: Validation Values: User Defaults:
04 Process Pending 1 Char R S System Default: Validation Values: User Defaults:
05 Term Code 6 Char R S System Default: Validation Values: User Defaults:
06 Initials 4 Char O S System Default: Validation Values: User Defaults:
GLOLETT Automatic Letter Compilation Financial Aid Automatic Letter Compilation Program
PARAMETER NO DESCRIPTION LENGTH TYPE R/O S/M LOW RANGE HIGH RANGE -- ----------------------------- ------ ---- --- --- ---------------------- ---------------------- - 01 Type Indicator 2 Char R S System Default: Validation Values: User Defaults:
08-JAN-2001 16:04:41 Systems & Computer Technology List of reports and parameters
* * * REPORT CONTROL INFORMATION * * *
Report Name: GJRRPTS
Jobs Selected: g% Print User Defaults: Y Line Count: 45 Jobs Count: 11

April 2012
oduce a download
Values
Application Inquiry Form (GLIAPPL)
0 None
1 Word
2 WordPerfect
Y All pending letters extracted for the application code
N Specific letter code
Letter Code Validation Form (GTVLETR)
ic d
Use a sort variable that returns a single value. If the sort variable returns more than one value, the process will generate duplicate letters.
Term Code Validation Form (STVTERM).
15-5 Banner General 8.5.1User GuideReports & Processes
Letter Generation Print Report (GLRLETR)
Description This report prints letters with data extracted by the GLBLSEL process. It can also be used to prfile for Microsoft Word for Windows or WordPerfect.
Parameter Name Required? Description
Application Code Yes Application code for the letters being printed. Onecode may be entered per run.
Word Processor Extract Option
Yes Type of output file to be created.
Process ALL Pending Letters
No Code that determines which letters are printed forthe application code.
Letter Code No Code of the letter to be printed. Letter code is onlyrequested if all pending letters are not selected.
Sort Variable No Name of the variable used to sort letters in a speciforder (for example, the ZIP/postal code or name).The variable name must start with an asterisk (*) anmust be entered in all capital letters.
Term Code Yes * Term code for which letters are being printed. Oneterm code must be specified per run.

April 2012
e Examples include A (Admissions), G (Gift/Pledge), C (Constituent), R (Recruiting), B (Billing), H (History), and F (Registration). This parameter is not validated.
Module codes vary by Banner product. For a complete list of module codes, see the “Module Identifier” table in Chapter 1 of the Banner Getting Started Guide.
Y Print sample letter.
N Do not print sample letter.
n
n
n
Aid Year Inquiry Form (ROIAIDY)
Values
15-6 Banner General 8.5.1User GuideReports & Processes
Module Code Yes Code that identifies the module associated with thletters being printed. This code updates the Mail Table.
Audit Indicator No Code that determines whether a sample letter is printed.
Free Format Date 1 No Freeform date (up to 30 characters) that is printed oletters where the *DATE1 variable is referenced.
Free Format Date 2 No Freeform date (up to 30 characters) that is printed oletters where the *DATE2 variable is referenced.
Free Format Date 3 No Freeform date (up to 30 characters) that is printed oletters where the *DATE3 variable is referenced.
Aid Year Code Yes† Aid year code for Financial Aid letters.
Note: * for Student applications only
Note: † for Financial Aid letters only
Parameter Name Required? Description

April 2012
Sample Letter
15-7 Banner General 8.5.1User GuideReports & Processes
Report Sample
April 11, 2002
Richard Scott 312 Bridle Rd. Villanova PA 19101
Dear Richard,
It's a pleasure to send the information you requested. Take your time reading it to find out more about the Institute of Technology.
I invite you to learn firsthand about us by visiting the campus. We'll be glad to welcome you for a personal visit between 8:00 a.m. and 5:00 p.m. Monday through Friday. Just stop by or, better yet, write or call for an appointment. Our Preview provides another good way to see and learn about the Institute of Technology. It takes place MAY 30, 2002, so mark your calendar now. We will send you more information after APRIL 30,2002.
We appreciate each opportunity to serve you as you make your college choice. Of course, we hope that you'll agree with us that the Institute of Technology can be for you.
Sincerely,
B. Andrew Stevens III University President S.C.T. Institute of Technology
08-JAN- 2001 16:30:32 Systems & Computer Technology PAGE 1199301 Letter Generation Print Report GLRLETR
AUDIT MODE, SAMPLE LETTERS, NO UPDATES

April 2012
15-8 Banner General 8.5.1User GuideReports & Processes* * * REPORT CONTROL INFORMATION * * *
RUN SEQUENCE NUMBER: APPLICATION CODE:RECRUITINGEXTRACT FOR 1=WORD, 2=WORD PERFECT, 0=NONE:0 PRINT ALL PENDING:y LETTER CODE: SORT BY VARIABLE: TERM CODE:199301 MODULE CODE:R AUDIT MODE:Y DATE 1:APRIL 11, 2002
Parameter entered but not used by letter DATE 2:APRIL 30,2001
Parameter entered but not used by letter DATE 3: LINE COUNT:45
LETTER COUNT:35

April 2012
mbination with the d with the
Values
C Use all IDs in collector table GORCGEO
I Use individual ID in collector table
P Use population selection
h f d.
ry e
Application Inquiry Form (GLIAPPL)
h n ).
Population Selection Inquiry Form (GLISLCT)
f d.
15-9 Banner General 8.5.1User GuideReports & Processes
Person Geo Region/Divisions Report (GORPGEO)
Description This process assigns regions to individuals using the data in the GORCGEO collector table in corules defined on the Geographic Region Rules Form (SOAGEOR). These regions are then storeGORPGEO table.
Parameter Name Required? Description
Use Collector File Yes Code that determines what IDs are used to run theprocess.
ID No ID of the person for whom you want to create geographic region/division records.
Application Code No Code that identifies the application group for whicthe population selection was defined. All or none othe population selection parameters must be entere
You can use the Population Selection Extract InquiForm (GLIEXTR) to review the people who will bprocessed in the load based on the selection identifier and application code entered.
Selection Identifier No ID of the population selection with which you wisto work. The selection identifier must be defined othe Population Selection Inquiry Form (GLISLCTAll or none of the population selection parametersmust be entered.
Creator ID No User ID of the person who created the population selection. The creator ID must have been specifiedwhen defining the selection identifier. All or none othe population selection parameters must be entere

April 2012
Address Type Code Validation Form (STVATYP)
Y Run in sleep/wake mode.
N Do not run in sleep/wake mode.
The default is 60 seconds.
p/ Printer Validation Form (GTVPRNT)
A Run in audit mode.
U Run in update mode.
Y Print all details.
N Suppress details and print summary totals only.
Values
15-10 Banner General 8.5.1User GuideReports & Processes
Address Type No Address type for the ID or population selection.
Run in Sleep/Wake Mode
No Code that determines whether the process is run insleep/wake mode.
Sleep/Wake Time No Number of seconds to sleep, if the sleep/wake parameter is Y.
Sleep/Wake Printer No Printer used in the Sleep/Wake process, if the sleewake parameter is Y.
Audit Indicator Yes
Report Indicator Yes
Parameter Name Required? Description

April 2012
Report Sample
PAGE
GORPGEO
EOR GEOD ACTALT/WASH ALUMALT/WASH ALURECRUITOUTHEAST DEVELRISTATE ALUM
INIEAST ADMISSIONSEWENGLAND RECRECRDZK RECR
INIEAST ADMISSIONSEWENGLAND RECRECRDZK RECR
INIEAST ADMISSIONSEWENGLAND RECRECRDZK RECR
INIEAST ADMISSIONSEWENGLAND RECRECRDZK RECR
ALT/WASH ALUMALT/WASH ALURECRUITOUTH DEVELRISTATE ALUM
ALT/WASH ALUMALT/WASH ALURECRUITOUTH DEVELRISTATE ALUM
INIEAST ADMISSIONSEWENGLAND RECRECRDZK RECR
INIEAST ADMISSIONSEWENGLAND RECRECRDZK RECR
ALT/WASH ALUMALT/WASH ALURECRUITRISTATE ALUM
INIEAST ADMISSIONSEWENGLAND RECRECRDZK RECR
ALT/WASH ALUMALT/WASH ALURECRUITIDATLANTC RECRRISTATE ALUM
15-11 Banner General 8.5.1User GuideReports & Processes
10-NOV-2000 10:11:56 SunGard Higher Ed University 1 Person Geo Region/Divisions
ID - NAME ATY SEQ CITY ST ZIP NATN CNTY G589446377 Skinner, Daniel C PR 1 N Charleston SC 294182122 B B S T
462796830 Rangel, Cecilia A PR 1 Pomfret Center CT 06259 M N R
A00006488 Emilio, Emily PR 1 Pomfret CT 06259 M N R
A00006490 Emilio, Anthony PR 1 Pomfret CT 06259 M N R
A00006492 Carpenter, Rose PR 1 Pomfret CT 06259 M N R
701000050 Adams, Aretha L MA 1 Petterson AL 359012626 B B S T
701000050 Adams, Aretha L MA 2 Gadsden AL 359012626 B B S T
725497210 Zaurtskie, Tom PR 1 Boston MA 02134 M N R
725497211 Zarutskie, Kevin PR 1 Boston MA 02134 M N R
A00006496 Endicott, Joe MA 1 Bayonne NJ 25841 B B T
A00006497 Lusa, Jill PR 1 Pomfret CT 06259 M N R
875555511 Ramon, Else PR 1 LLLL MD 222222 B B M T

April 2012
PAGE
GORPGEO
EOR GEOD ACTRISTATE ALURECRUIT
INIEAST ADMISSIONSEWENGLAND RECRECRDZK RECR
INIEAST ADMISSIONSEWENGLAND RECRECRDZK RECR
ALT/WASH ALUMALT/WASH ALURECRUITRISTATE ALUMRISTATE ALURECRUIT
ALT/WASH ALUMALT/WASH ALURECRUITIDATLANTC RECRRISTATE ALUMRISTATE ALURECRUIT
INIEAST ADMISSIONSEWENGLAND RECRECRDZK RECR
ECRDMF RECRUITERESTCOAST ALURECRUITESTCOAST DEVEL
ALT/WASH ALUMALT/WASH ALURECRUITIDATLANTC RECRRISTATE ALUMRISTATE ALURECRUIT
ALT/WASH ALUMALT/WASH ALURECRUITIDATLANTC RECRRISTATE ALUMRISTATE ALURECRUIT
ECRDMF RECRUITEROUTH DEVEL
ECRDMF RECRUITEROUTH DEVEL
ECRDMF RECRUITEROUTH DEVEL
ECRDMF RECRUITER
15-12 Banner General 8.5.1User GuideReports & Processes
10-NOV-2000 10:11:56 SunGard Higher Ed University 2 Person Geo Region/Divisions
ID - NAME ATY SEQ CITY ST ZIP NATN CNTY G875555511 Ramon, Else PR 1 LLLL MD 222222 T
A00006498 Lusa, Jack PR 1 Pomfret CT 06259 M N R
A00006499 Lemon, Jane PR 1 Pomfret CT 06259 M N R
A00006500 Langley, William PR 1 Fairfax VA 20891 B B T T
A00006501 Foster, Janice Annette PR 1 lllll MD 20901 B B M T T
A00006502 Hall, Mary Ann PR 1 Boston MA 02134 M N R
A00006503 Hall, John PR 1 San Francisco CA 97123 R W W
A00006504 Foster, William PR 1 xxxxxx MD 2222222 B B M T T
A00006505 Foster, Heather PR 1 uuuuu MD 20904 B B M T T
A00006506 Evan, Lee PR 1 Lonestar TX 7079 R S
A00006507 Evan, Lisa PR 1 Lonestar TX 78099 R S
A00006508 Evan, Matilda Ruth PR 1 Lonestar TX 77809 R S
A00006509 Evans, Ruth Ann PR 1 LL TX 78099 R
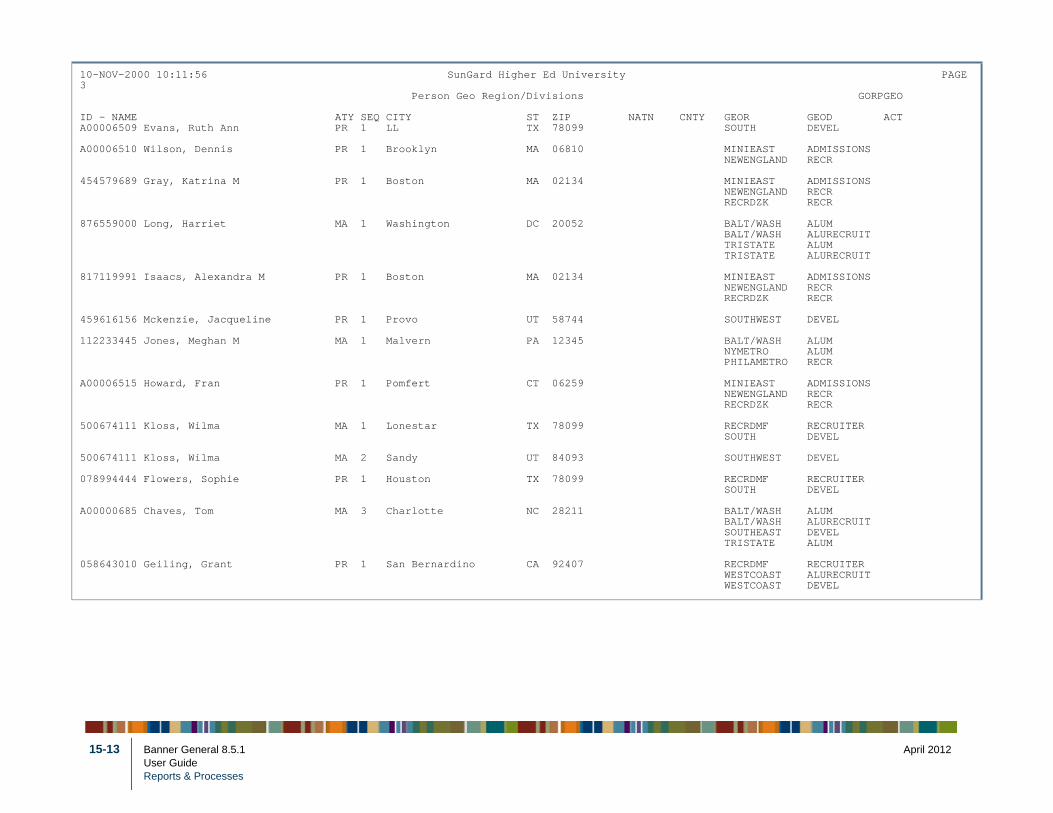
April 2012
PAGE
GORPGEO
EOR GEOD ACTOUTH DEVEL
INIEAST ADMISSIONSEWENGLAND RECR
INIEAST ADMISSIONSEWENGLAND RECRECRDZK RECR
ALT/WASH ALUMALT/WASH ALURECRUITRISTATE ALUMRISTATE ALURECRUIT
INIEAST ADMISSIONSEWENGLAND RECRECRDZK RECR
OUTHWEST DEVEL
ALT/WASH ALUMYMETRO ALUMHILAMETRO RECR
INIEAST ADMISSIONSEWENGLAND RECRECRDZK RECR
ECRDMF RECRUITEROUTH DEVEL
OUTHWEST DEVEL
ECRDMF RECRUITEROUTH DEVEL
ALT/WASH ALUMALT/WASH ALURECRUITOUTHEAST DEVELRISTATE ALUM
ECRDMF RECRUITERESTCOAST ALURECRUITESTCOAST DEVEL
15-13 Banner General 8.5.1User GuideReports & Processes
10-NOV-2000 10:11:56 SunGard Higher Ed University 3 Person Geo Region/Divisions
ID - NAME ATY SEQ CITY ST ZIP NATN CNTY GA00006509 Evans, Ruth Ann PR 1 LL TX 78099 S
A00006510 Wilson, Dennis PR 1 Brooklyn MA 06810 M N
454579689 Gray, Katrina M PR 1 Boston MA 02134 M N R
876559000 Long, Harriet MA 1 Washington DC 20052 B B T T
817119991 Isaacs, Alexandra M PR 1 Boston MA 02134 M N R
459616156 Mckenzie, Jacqueline PR 1 Provo UT 58744 S
112233445 Jones, Meghan M MA 1 Malvern PA 12345 B N P
A00006515 Howard, Fran PR 1 Pomfert CT 06259 M N R
500674111 Kloss, Wilma MA 1 Lonestar TX 78099 R S
500674111 Kloss, Wilma MA 2 Sandy UT 84093 S
078994444 Flowers, Sophie PR 1 Houston TX 78099 R S
A00000685 Chaves, Tom MA 3 Charlotte NC 28211 B B S T
058643010 Geiling, Grant PR 1 San Bernardino CA 92407 R W W

April 2012
PAGE
GORPGEO
15-14 Banner General 8.5.1User GuideReports & Processes
10-NOV-2000 10:11:56 SunGard Higher Ed University 4 Person Geo Region/Divisions * * * REPORT CONTROL INFORMATION * * *
RPTNAME: GORPGEOVERSION: 4.1SOURCE IS COLLECTOR TABLESLEEP WAKE MODE: NOAUDIT OR UPDATE INDICATOR: UREPORT INDICATOR : YLINE COUNT : 55
RECORD COUNT: 111
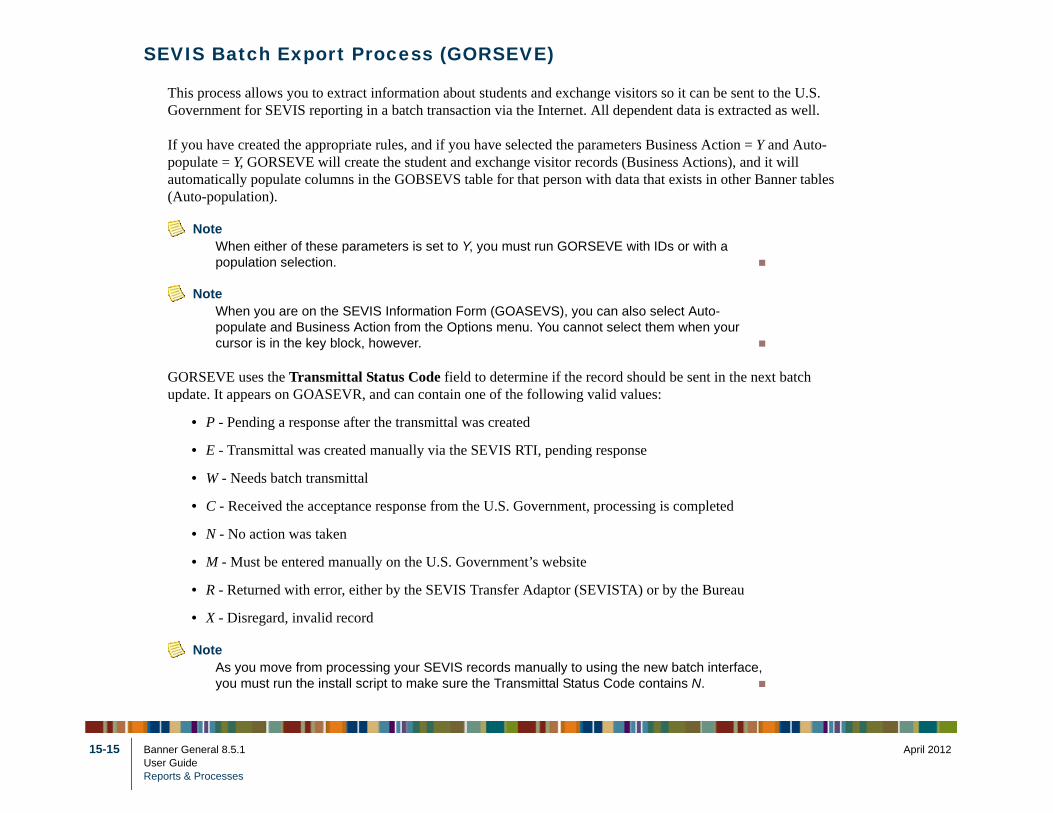
April 2012
sent to the U.S. tracted as well.
on = Y and Auto-), and it will ther Banner tables
ur
the next batch
d
au
rface,
15-15 Banner General 8.5.1User GuideReports & Processes
SEVIS Batch Export Process (GORSEVE)
This process allows you to extract information about students and exchange visitors so it can beGovernment for SEVIS reporting in a batch transaction via the Internet. All dependent data is ex
If you have created the appropriate rules, and if you have selected the parameters Business Actipopulate = Y, GORSEVE will create the student and exchange visitor records (Business Actionsautomatically populate columns in the GOBSEVS table for that person with data that exists in o(Auto-population).
NoteWhen either of these parameters is set to Y, you must run GORSEVE with IDs or with apopulation selection.
NoteWhen you are on the SEVIS Information Form (GOASEVS), you can also select Auto-populate and Business Action from the Options menu. You cannot select them when yocursor is in the key block, however.
GORSEVE uses the Transmittal Status Code field to determine if the record should be sent inupdate. It appears on GOASEVR, and can contain one of the following valid values:
• P - Pending a response after the transmittal was created
• E - Transmittal was created manually via the SEVIS RTI, pending response
• W - Needs batch transmittal
• C - Received the acceptance response from the U.S. Government, processing is complete
• N - No action was taken
• M - Must be entered manually on the U.S. Government’s website
• R - Returned with error, either by the SEVIS Transfer Adaptor (SEVISTA) or by the Bure
• X - Disregard, invalid record
NoteAs you move from processing your SEVIS records manually to using the new batch inteyou must run the install script to make sure the Transmittal Status Code contains N.

April 2012
GORSEVE creates a record with the transmittal status code P for each structure updated (a structure is a SEVISTA, which
I equivalents. The
mpares data on EVE will create a rd but will, ed for your own
de of W (or M for code from W to X E in update mode, that allows
code of W (or M nstead, s the transmittal t accounts with no t. (A Create record
st
s to a student or to r the person is a VIS Creation ill extract student
15-16 Banner General 8.5.1User GuideReports & Processes
combination of like data elements), and changes the submit date. Then it hands the records off toconverts them to XML and sends them to the Bureau.
GORSEVE converts special characters (ampersand, quotation mark, and so on.) into their ASCIfiles cannot be transmitted without this conversion.
GORSEVE has three modes, audit, update and extract. In audit and update mode, the process coGOASEVS to the last transaction for the person on GOASEVR. If there are differences, GORSGOASEVR record. In extract mode, GORSEVE will not create a SEVIS transmittal history recoinstead, create a file of SEVIS data in comma-separated value (CSV) format. This file can be uspurposes or it can be imported into fsaATLAS.
• If GORSEVE is running in audit mode, the records are created with a transmittal status costudent adjudicated events). You can review the records and change the transmittal statusfor any records you do not wish to send to the U.S. Government. When you run GORSEVit will change the transmittal status code from W to P and will populate a temporary tabletransmittal to SEVISTA.
• If GORSEVE is running in update mode, the records are created with a transmittal statusfor student adjudicated events). You are not given the opportunity to review the records. IGORSEVE populates a temporary table that allows transmittals to SEVISTA and changestatus code to P. Also, if you run GORSEVE in update mode and use parameter #8 to prinactivity, anyone who has changes pending but no SEVIS ID will be included on the reporcan be sent for a person with no SEVIS ID, but an Update record cannot.)
NoteGORSEVE will not transmit records to SEVISTA if they have adjudicated fields. You muenter that data directly into the SEVIS RTI on the U.S. Government’s website.
The process will look at GOBSEVS_SVCR_CODE for each record so determine if the record appliean exchange visitor. Different information is sent to the U.S. Government, depending on whethestudent or an exchange visitor. If the usage indicator associated with the creation code on the SEReason Code Validation Table (GTVSVCR) contains 1, the person is a student, and the process wdata. If it contains 2, GORSEVE will extract exchange visitor data.
GORSEVE is a two-step process:

April 2012
1. GORSEVE creates GORSEVS records (either student or exchange visitor) with the transmittal status code of er ID or what was
d then hands them smittal status code ction was entered
can contain a a batch.
them in ascending
SEVIS H) records where S), SEVIS nd SEVIS
ach batch ds to SEVIS.
15-17 Banner General 8.5.1User GuideReports & Processes
W (or M for an adjudicated event for a student). It is affected by the parameters for the Bannset up in a population selection.
2. GORSEVE looks for records with a transmittal status code of W in the GORSEVE table, anoff to SEVISTA to be converted to XML for the U.S. Government. Then it changes the tranto P to indicate that the response from SEVIS is pending. If Banner IDs or a population selefor processing, only those students or exchange visitors will be processed.
GORSEVE creates separate batches for student and exchange visitor records. Since each batch maximum of 250 records, you may have a number of files to transmit to the U.S. Government in
Batch IDs are in the following format:
yymmddhhmissxx.XML
The batch ID is the date and timestamp, followed by a 2-digit sequence number. You must send order, otherwise they will be rejected by the U.S. Government.
At the time specified for transmission to the U.S. Government, GORSEVE:
1. Assigns a batch ID to the set of records being transmitted
2. Creates SEVIS History Table (GORSEVS), SEVIS Dependent History Table (GORSEVH),Employment History Table (GORSVEH) and SEVIS Activity Site History Table (GORSVAchanges to the person’s information have been detected in the SEVIS Data Table (GOBSEVDependent Data Table (GORSEVD), SEVIS Employment Information Table (GORSVEI), aActivity Site Table (GORSVAS).
3. Creates rows in temporary tables for each batch (GOTSVBH) and each transaction within e(GOTSVBT). The creation of the Batch Header row signals SEVISTA to transmit the recor
4. Uses the processing parameters, where necessary, to create the SEVIS data.
5. Changes the transmittal status code to P (pending response from SEVIS) for all the records

April 2012
6. Prints the SEVIS Record Extract Report, including all records transmitted in that batch.
Value
Y (yes) or N (no)
n Y (yes) or N (no)
d s
15-18 Banner General 8.5.1User GuideReports & Processes
NoteIt is recommended that you schedule GORSEVE to run every night.
Parameter Name Required? Description
School Code Yes Your institution’s code as defined by the U.S. Government
SEVIS User ID (Batch Approver)
Yes Administrative user ID assigned by SEVIS for thebatch approver
SEVIS User ID (Transaction App)
Yes Administrative user ID assigned by SEVIS for thetransaction approver
Program Number Yes The 9-character number the U.S. Government assigned to your institution’s exchange visitor program
Process Business Actions
Yes Choose whether to process business actions
Process Auto-population Yes Choose whether to process column auto-populatio
Term Code No Term code for business action processing or auto-population processing
Banner ID No If you are running in update mode or audit mode anyou want to include a few people, list the Banner IDand the process will process only those IDs
Application No The application code for population selection, an optional field used when creating a batch via population selection
Selection ID No The selection identifier for population selection

April 2012
on
e s
N the message will not be displayed
Y the message will be displayed for all IDs that do not have a SEVIS ID
The U.S. Government differentiates between create records (information about a person they do not have in their database yet) and update records (a change for a person they have in their database). Create records will never have a SEVIS ID; all update records must have one.
If this parameter is Y, you will not receive the warning message for create records, but you will receive it for update records.
Value
15-19 Banner General 8.5.1User GuideReports & Processes
Creator ID No The Banner ID for the person who created the population selection
User ID No The User ID associated with the population selecti
Print No Activity No Determines if a warning message is displayed in thLIS file, Updates cannot be sent until SEVIS ID habeen assigned
Parameter Name Required? Description

April 2012
ters listed above.
A Audit mode
U Update mode
E Extract mode
le
r
ot
Determined by fsaATLAS.
Value
15-20 Banner General 8.5.1User GuideReports & Processes
Report Sample
The GORSEVE process generates a report, the SEVIS Record Extract Report, using the parameThe records are listed in Banner ID order.
Mode Yes The mode the process will run under
Department Owner ID for Extract
Yes, if using fsaATLAS
Used by fsaATLAS. If you are creating the CSV fifor another purpose, this parameter is optional.
Note: The minimum data required by GORSEVE foeach record extracted is a creation reason or termination reason code. Records that do not have one or the other will not be processed by GORSEVE and included in the CSV file, but therecords will appear on the .lis file.Records that have both a creation reason codeand a termination reason code will not be processed by GORSEVE.GORSEVE requires the 02 - Batch Approver parameter to execute in Extract mode, but it is nrequired by fsaATLAS. You can enter any valuefor Batch Approver; it cannot be left blank (be null).
Parameter Name Required? Description

April 2012
GORSEVE
------------g.
issing.
g.
issing.
ssing.
Contd...2
GORSEVE
------------
15-21 Banner General 8.5.1User GuideReports & Processes
30-MAR-2003 08:16:54 AM SunGard Higher Ed 1 SEVIS Extract Process Stu/EV ID Name | Tran | Result/Comment ------------------------------------------------------------------------------------------------------429887341 No Last Name, Othello | | Cannot update - Required EditPersonal field(s) missin429887341 No Last Name, Othello | | Cannot update - EditProgramInfo Major Code missing.429887341 No Last Name, Othello | | Cannot update-EditStudentFinancial Term mos or exp. m123456987 Nevermind MH, Bernard | | Cannot create transmittal-US addr field(s) missing.181489814 Blake, Ian Russell | | Cannot update - Required EditPersonal field(s) missin181489814 Blake, Ian Russell | | Cannot update - EditProgramInfo Study Length missing.181489814 Blake, Ian Russell | | Cannot update-EditStudentFinancial Term mos or exp. m181489815 Blake, Nichole Ellen | | Cannot create transmittal-Create comment required.210009307 Dennis Johnson, Doris Jan | | Cannot create transmittal-Session dates required.A00006417 Guillaume, Ernesto Rudolp | W | UAddr info not updated - Required field(s) missing.A00006417 Guillaume, Ernesto Rudolp | | Cannot update - EditProgramInfo Study Length missing.ZYB000000 Peters, Mathew Ryan | | Cannot update - Required US Address field(s) missing.A00006831 SEVIS, Carlos Jose | | Cannot create transmittal-Study length missing.A00006786 Sevis, One Test | | Cannot update-StudentReg Session date or Addr Info miA00006335 Patterson, Anna Grace | P | Student create A00006786 Sevis, One Test | P | Student create A00007306 Sevis, Stu Test | P | Student create A00006790 Sevis, Test3 Test | P | Student create A00006339 Thompson, Alisa Marie | P | Student create
30-MAR-2003 08:16:54 AM SunGard Higher Ed 2 SEVIS Extract Process Stu/EV ID Name | Tran | Result/Comment ------------------------------------------------------------------------------------------------------
CONTROL SUMMARY ---------------
Program Name : GORSEVE(6.0) One up Number : 1067719 Print Report : Number of lines per page :
Total pages Printed : 2
****** END OF REPORT ******

April 2012
he region rules set d in the
Values
A Run in audit mode.
U Run in update mode.
Y Print all details.
N Suppress details and print summary totals only.
ct
Source/Background Institution Validation Form (STVSBGI)
n
s 0-
15-22 Banner General 8.5.1User GuideReports & Processes
SBGI Geo Region/Divisions Report (GORSGEO)
Description This process assigns regions to high schools using the high school address in combination with tup on the Geographic Region Rule Form (SOAGEOR). These high school regions are then storeGORSGEO table.
Parameter Name Required? Description
Audit Indicator Yes
Report Indicator Yes
Source/Background Inst Code
No Source/background institution code for which youwant to assign region records. Leave blank to seleall codes.
Activity Date No Beginning date for selecting all changed records oSOBSBGI.
For example, if the activity date equals 10-MAY-2006, the process runs against all SOBSBGI recordhaving an activity date greater than (or equal to) 1MAY-2006.
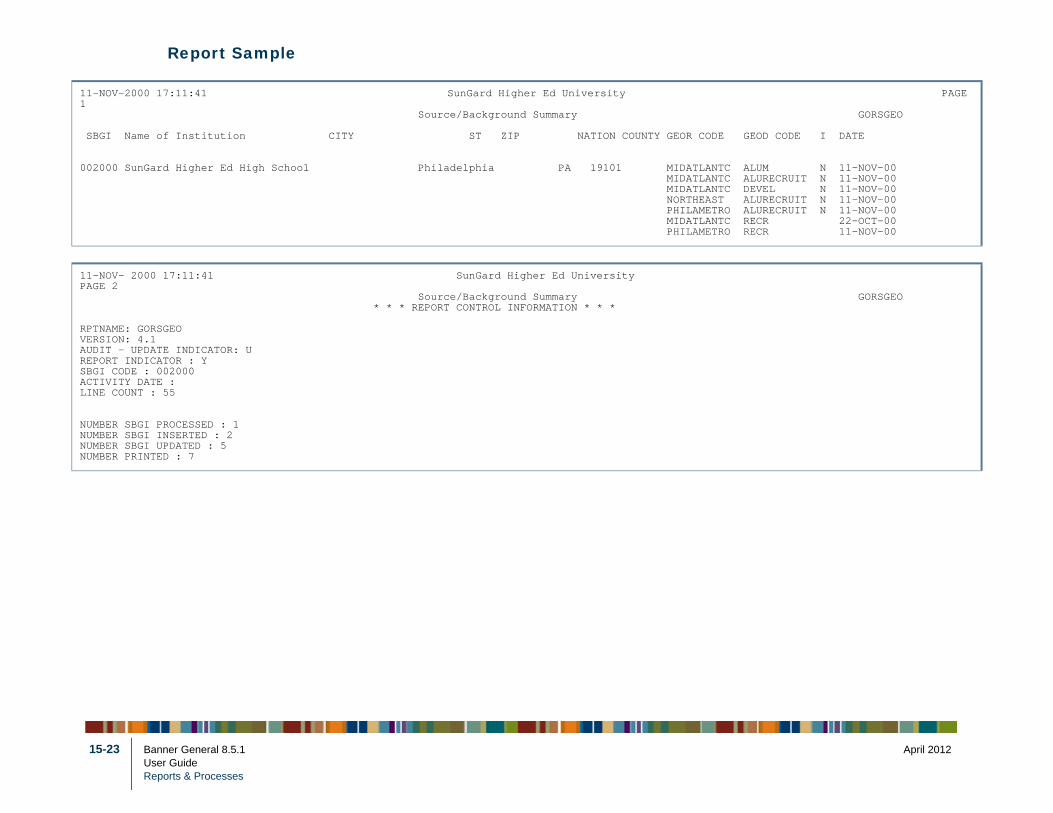
April 2012
Report Sample
PAGE
GORSGEO
GEOD CODE I DATE
ALUM N 11-NOV-00 ALURECRUIT N 11-NOV-00 DEVEL N 11-NOV-00 ALURECRUIT N 11-NOV-00 ALURECRUIT N 11-NOV-00 RECR 22-OCT-00 RECR 11-NOV-00
GORSGEO
15-23 Banner General 8.5.1User GuideReports & Processes
11-NOV-2000 17:11:41 SunGard Higher Ed University 1 Source/Background Summary
SBGI Name of Institution CITY ST ZIP NATION COUNTY GEOR CODE
002000 SunGard Higher Ed High School Philadelphia PA 19101 MIDATLANTC MIDATLANTC MIDATLANTC NORTHEAST PHILAMETRO MIDATLANTC PHILAMETRO
11-NOV- 2000 17:11:41 SunGard Higher Ed University PAGE 2 Source/Background Summary * * * REPORT CONTROL INFORMATION * * *
RPTNAME: GORSGEOVERSION: 4.1AUDIT - UPDATE INDICATOR: UREPORT INDICATOR : YSBGI CODE : 002000ACTIVITY DATE :LINE COUNT : 55
NUMBER SBGI PROCESSED : 1NUMBER SBGI INSERTED : 2NUMBER SBGI UPDATED : 5NUMBER PRINTED : 7

April 2012
te must exist to be
s. It dress. es
back. ause
Values
1 Purge by address expiration date. (Date must exist to be purged.)
2 Purge inactive addresses. (Purge occurs regardless of expiration date.)
s Date format of DD-MMM-YYYY
Address Type Code Validation Form (STVATYP)
A Audit mode (no addresses purged)
U Update mode (addresses purged)
15-24 Banner General 8.5.1User GuideReports & Processes
Address Purge (GPPADDR)
Description This process purges address information for people. You can purge by address expiration date (dapurged), or you can purge all inactive addresses (regardless of date).
NoteThe Address API (gb_address) maintains the deletion of associated telephone recordonly deletes phone records if there is exactly one phone number associated with the adIf there is more than one telephone number, then the API raises an exception. When anexception is raised, GPPADDR simply reports the error, skips that address, and continuprocessing.
NoteIn audit mode, the API is called to delete the address, and then that transaction is rolledThis allows the user to view any addresses in the .lis file that the API cannot delete becmultiple phone records exist.
Parameter Name Required? Description
Purge Option Yes Criteria by which address information should be purged.
Address Selection Date Yes† Date used with option 1 to purge addresses. Addresses with an expiration date on or before thidate are purged.
Note: † if option 1 chosen
Address Types to be Bypassed
No Address types to be excluded from the purge process. Multiple types are permitted.
Run Mode Yes Code that indicates the mode for running the process.

April 2012
Report Sample
PAGE 1 GPPADDR
15-25 Banner General 8.5.1User GuideReports & Processes
24-MAY-2006 09:12:42 BANNER University Address Purge Audit Report Only
2821smithx Rachel, A2051385 A00020705 MA I Greenwood Po Box 169 Montego B Y, R710750 76
ACheck Vendor With A Nice Long Name for T VCHECK AP I PO BOX 247 Fall River, MA 02720
AT&T new name 10/26/04, V9 MA I 888 Pacific Ave San Francisco, CA 98773
Adams, Adam A00023291 MA 29-NOV-2004 I 56 Crandall Cranford, RI 43222 133 29-NOV-2004 I 8685 Moody St Cypress, CA 90630
Adams, April CD0000002 BU I 315 Maple Glen Malvern, PA 19355
Adams, Cindy A00027108 MA I 1st address Malvern, PA 11111 Address cannot be deleted, more than one phone number is associated.
Adams, Jennifer A00027116 MA I 3 Broomall, PA 19008 Address cannot be deleted, more than one phone number is associated.
Adams, John A00027110 MA I 1 Malvern, PA 19355 Address cannot be deleted, more than one phone number is associated.
Adams, Julie A00027115 MA I 2 Broomall, PA 19008 Address cannot be deleted, more than one phone number is associated.

April 2012
PAGE 19 GPPADDR
15-26 Banner General 8.5.1User GuideReports & Processes
24-MAY-2006 09:12:42 BANNER University Address Purge Audit Report Only
* * * REPORT CONTROL INFORMATION * * *
Report Name........................: GPPADDRCurrent Release....................: 7.3Purge Option.......................: 2Address Selection Date.............: 24-MAY-2006Excluded Address Type(s)...........: PRAudit Mode.........................: A
Entities Selected..................: 197Number of Potential Address Deletes: 421Number of errors encountered.........: 94
April 2012
T tables. Job
. This s ry.
Function. Enter leted in the ment numbers are
GURTEXT.
Values
A Audit
U Update
15-27 Banner General 8.5.1User GuideReports & Processes
Document Code Delete Process (GUPDELT)
Description This new process is used to delete inappropriate documents from the GURFEED and GURTEXparameters allow specification of multiple document numbers.
NoteIt is recommended that access to the Document Code Delete Process (GUPDELT) be restricted to staff members responsible for maintenance of data in the GURFEED and GURTEXT tables. Caution should be exercised when selecting a document for removalprocess can be used for any document in GURFEED (not just those from FUPLOAD). Asuch, AR, Advancement, and HR information could be deleted without chance of recove
To enter multiple Document Codes, enter the first document to be deleted. Use the Insert Recordthe parameter value “01” in the parameter number column and enter the next document to be deparameter value column. The Insert Record/Duplicate Record Function can also be used if docusimilar and only requires changing a few values for each.
Some sub-systems may not be able to recreate transactions that have been fed to GURFEED and
Delete operations are not performed in Audit Mode.
Parameter Name Required? Description
Enter Document Number Yes Alpha, 8 characters, allow multiple numbers.
Enter Run Mode Yes Code that indicates the mode for running the process.
Enter System ID Yes Specify SYSTEM_ID for the document(s) to be deleted.

April 2012
e to Finance Table
Values
PR-2002 01:46:05
DB/CR NUMBER ITEM SEQ# TYPE ACTION
- ---- ---- ---- ------ ---- --------- D
C
DB/CR NUMBER ITEM SEQ# TYPE ACTION
-- --- ---- ---- ------ ---- --------- D
C
PR-2002 01:46:05
15-28 Banner General 8.5.1User GuideReports & Processes
Document Detail Report (GURDETL)
Description This report is used to list transaction data for any document stored in the Banner General Interfac(GURFEED).
Report Sample
Parameter Name Required? Description
Document Number Yes Alpha, 8 characters, allow multiple numbers.
GURDETL SunGard Higher Ed Development 26-A Document Detail report Page : 1
DOCUMENT# SUB# TRANSACTION DOCUMENT TOTAL USER ID System ID DATE--------- ---- ----------- -------------- -------- ---------CM000014 26-MAR-02 20.00 JWILDER COMPUP================================================================================
SEQ# RULE CHART INDEX FUND ORG ACCOUNT PROGRAM ACTIVITY LOCATION PROJECT TRANSACTIONBANK DOCUMENT CLASS CODE AMOUNT REF NO ---- ------ ------ ------ ------ ----- ------ ------ ------- ------- ------- ----------- ---- ------ 1 JE16 1 JFUNDA JORGA JACTA JPROGA JLOCNA 10.00 J1 DOCREF 2 JE16 1 JFUNDA JORGA JACTA JPROGA JACTVA 10.00 J1 DOCREF
DOCUMENT# SUB# TRANSACTION DOCUMENT TOTAL USER ID System ID DATE--------- ---- ----------- -------------- -------- ---------CM000013 26-MAR-02 20.01 JWILDER COMPUP================================================================================
SEQ# RULE CHART INDEX FUND ORG ACCOUNT PROGRAM ACTIVITY LOCATION PROJECT TRANSACTION BANK DOCUMENT CLASS CODE AMOUNT REF NO ---- ------ ------ ------ ------ ----- ------ ------ ------- ------- ------- ------------ ---- ----- 1 JE16 1 JFUNDA JORGA JACTA JPROGA JACTVA 10.01 J1 DOCREF 2 JE16 1 JFUNDA JORGA JACTA JPROGA JLOCNA 10.00 J1 DOCREF
* * * REPORT CONTROL INFORMATION - GURDETL Release: 5.4.1 * * *
GURDETL SunGard Higher Ed Development 26-A Document Detail report Page : 2

April 2012
e Saved Output
e switches:
program was executed.
to the database.
; notifies entry to each
15-29 Banner General 8.5.1User GuideReports & Processes
Insert Output Program (GURINSO)
Description This program reads a file from the file system and loads it into the database. You can then use thReview Form (GJIREVO) to access the file on the database.
This program is run from the operating system with the following command lin
Switch Required? Description
-j <job/process name> Yes Job or process that generated the file.
-i <input file> Yes File to be loaded into the database.
-n <number> Yes One-up number created when the batch
-w <username> Yes User who ran the job.
-o <output file name> No New name of the file after it is loaded in
-t No Switch that turns on sql_trace.
-x No Switch that turns on extended debuggingfunction.

April 2012
mation in the SQL) to determine e Institution Role
ed as et the
n at any time to n role information or partner data
it from
Value
Choices come from the Application Inquiry Form (GLIAPPL).
Choices come from the Population Selection Inquiry Form (GLISLCT).
15-30 Banner General 8.5.1User GuideReports & Processes
Institution Role Maintenance Process (GURIROL)
Description The Institution Role Maintenance Process (GURIROL) is used to maintain institution role inforGORIROL table. This process uses the rules that are set up on the Business Rules Form (GORRusers’ roles, and then calls the gb_institution_role.p_maintain_roles procedure in thAPI to insert, update, or delete those roles from GORIROL.
NoteInstitution roles are created from Banner data (PIDMs) only for individuals who are definPerson Entities (spriden_entity_ind = P), are not dead (spbpers_dead_ind = N), and mecriteria defined to create their role.
You can use Population Selection to limit the number of users processed. This process can be ruupdate the GORIROL table. This process is used to support Integration for e-Learning. The persostored in the GORIROL table is used by Integration for e-Learning's extract and event process fsynchronization.
NoteThis process is designed to be run via the Job Submission Form (GJAPCTL). Running the host is not supported by SunGard Higher Education, and should only be used for troubleshooting purposes.
Parameter Name Required? Description
Application Code No Application code of the Population Selection.
Selection ID No ID of the Population Selection.
Creator ID No ID that created the Population Selection rules.
User ID No ID of user who selected the population.

April 2012
ss For Integration for e-Learning clients, INTCOMP is the valid value.
. n
n
For Integration for e-Learning clients, all valid institution and custom roles are supported.
Value
15-31 Banner General 8.5.1User GuideReports & Processes
Role Group Yes The Institution Role group is the same as the ProceCode used on the Business Rules Form (GORRSQL).
Role No Person Institution role(s) that you want to processYou can specify one role and/or population selectioper individual job run.
If you leave this parameter blank, then all institutioand custom roles will be processed.
Parameter Name Required? Description

April 2012
be run only by
a wildcard
ator (for example,
Values
1 Form help
2 Form and block help
3 Form, block, and field help
15-32 Banner General 8.5.1User GuideReports & Processes
Print Dynamic Help for a Form (GURHELP)
Description This report lists all the Dynamic Help for a selected system, module, or form. This report shouldyour data center.
To print Help for a single form, specify the form name (for example, GJAPDEF).
To print Help for the forms in a single module, specify the first two characters of the forms withindicator (for example, GJ% for all forms in the Job Submission module).
To print Help for all forms in a system, use the system designation followed by the wildcard indicG%).
Parameter Name Required? Description
Form Name Yes Form(s) for which help is to be printed. Wildcardsare acceptable.
Level Yes Level of help to be printed.

April 2012
Report Sample
15-33 Banner General 8.5.1User GuideReports & Processes
PROCESS SUBMISSION CONTROL FORM ( GJAPCTL )
The purpose of the Job Submission Form is to define parameter values, for specific processes, and to submit the report using these parameter values. The characteristics defined in the Parameter Definition Form (GJAPDEF) are used to validate the values for each parameter entered in this form. FORM DEPENDENCIES A process must first be created and then defined to the system using the Process Maintenance Form (GJAJOBS). The parameters for the report must also be defined using the Parameter Definition Form (GJAPDEF).
PARAMETER DEFINITION FORM ( GJAPDEF )
The purpose of the Parameter Definition Form is to define the parameters, and their validation characteristics, for specific processes. The characteristics defined in this form will be used to validate the parameter values entered on the Job Submission form (GJAPCTL). This insures parameter values are validated before a report is submitted. FORM DEPENDENCIES The process must first be created and then defined/assigned to the system using the Process Maintenance Form (GJAJOBS) before it can be accessed by the Parameter Definition Form. * *NOTE* This form is a control form. Only the person who designed and/or created the specific report/process should enter or edit the parameter definitions.
* * * REPORT CONTROL INFORMATION * * *
RPTNAME .............................GURHELP Report Run Date ....................... 01/08/2000 SQL*Forms Application Name ............ g%
RECORD COUNT - Forms .................. 48

April 2012
omments.
m the
Values
is
re
re
in N Do not increase the top margin.
Y Increase the top margin (default).
Y Underline.
N Do not underline (default).
15-34 Banner General 8.5.1User GuideReports & Processes
Data Element Dictionary (GURPDED)
Description This report shows information for all the database columns, including type, scale, and column c
NoteTables in the Oracle recycle bin (a feature introduced in Oracle 10gR2) are excluded froreport.
Parameter Name Required? Description
USERID of Table Creator
Yes Oracle account under which the table was created(owner of the table). For example, a General table owned by GENERAL.
Table(s) to be Reported Yes Name of a specific table to be printed. Wildcards aallowed.
USERID of View Creator
No Oracle account under which the view was created(owner of the view).
View(s) to be Reported No Name of a specific view to be printed. Wildcards aallowed.
Binding Margin Option Yes Code that indicates whether an extra binding margis required.
Heading Underline Option
Yes Code that indicates whether report and page headings are underlined.

April 2012
Report Sample
=====================
===================== Up Number and Number
long with Job andds.ng with Job and One Upds.for this parameter.ecord was created.s field for optional
=====================
=====================e or report. job.eter.ameter.tify parameter type of (N)umber.identify whether oror (R)equired.entify whether or not (M)ultiple times.r was created or last
e boundary for this
ge boundary for this
rameter.ation label to behrough the Job
for List of Values
15-35 Banner General 8.5.1User GuideReports & Processes
Date: 01/08/2000 Page: 1
TABLE: GJBCOLR
CREATOR: GENERAL
Jobs Parameter Collector Table
============================================================================================== Column Name Type Width Scale Nulls Column Comments =============================== ====== ===== ===== ========= ================================= GJBCOLR_JOB CHAR 30 NOT NULL JOB: Job name used along with One to uniquely identify records. GJBCOLR_ONE_UP_NO NUMBER NOT NULL ONE UP NO: Sequence number used a Number to uniquely identify recor GJBCOLR_NUMBER CHAR 2 NOT NULL NUMBER: Parameter number used alo Number to uniquely identify recor GJBCOLR_VALUE CHAR 30 NOT NULL VALUE: Actual value being stored GJBCOLR_ACTIVITY_DATE DATE 7 NOT NULL ACTIVITY DATE: Actual date this r GJBCOLR_MISC_VALUE CHAR 30 NULL MISCELLANEOUS VALUE: Miscellaneou use.
CREATOR: GENERAL
Jobs Parameter Definition Table
============================================================================================== Column Name Type Width Scale Nulls Column Comments =============================== ====== ===== ===== ========= ================================= GJBPDEF_JOB CHAR 30 NOT NULL JOB: Name of executable, procedur GJBPDEF_NUMBER CHAR 2 NOT NULL NUMBER: Parameter number for this GJBPDEF_DESC CHAR 30 NOT NULL DESCRIPTION: Description of param GJBPDEF_LENGTH NUMBER 2 NOT NULL LENGTH: Length of the defined par GJBPDEF_TYPE_IND CHAR 1 NOT NULL TYPE INDICATOR: Indicator to iden (C)haracter, (D)ate, (I)nteger or GJBPDEF_OPTIONAL_IND CHAR 1 NOT NULL OPTIONAL INDICATOR: Indicator to not this parameter is (O)ptional GJBPDEF_SINGLE_IND CHAR 1 NOT NULL SINGLE INDICATOR: Indicator to id this parameter occurs (S)ingle or GJBPDEF_ACTIVITY_DATE DATE 7 NOT NULL ACTIVITY DATE: Date this paramete modified. GJBPDEF_LOW_RANGE CHAR 30 NULL LOW RANGE: Specifies the low rang parameter. GJBPDEF_HIGH_RANGE CHAR 30 NULL LOW RANGE: Specifies the high ran parameter. GJBPDEF_HELP_TEXT CHAR 78 NULL HELP TEXT: Long description of pa GJBPDEF_VALIDATION CHAR 30 NULL VALIDATION: Parameter level valid performed when job is submitted t Submission system. GJBPDEF_LIST_VALUES CHAR 30 NULL LIST VALUES: Name of form to call for this parameter.

April 2012
m the
ERAL.
allowed. For example, to list all General
15-36 Banner General 8.5.1User GuideReports & Processes
Condensed Table Listing (GURTABL)
Description This report lists selected system tables.
NoteTables in the Oracle recycle bin (a feature introduced in Oracle 10gR2) are excluded froreport.
Report Sample
Parameter Name Required? Description
Table Owner Yes Owner of the tables you wish to list, such as GEN
Table Name Yes Name of the tables you wish to list. Wildcards arevalidation tables enter gtv%.
DATA DICTIONARY REPORT ON TABLES FOR THE FOLLOWING OWNER GENERAL 10/19/00 * * * * * * * * * * * * * * * * * * * * * * *
1TABLE FIELD SIZE D TYPE NULL MAXIMUM RECORD LENGTHSPRIDEN Person Identification/Name Repeating Table SPRIDEN_PIDM 8 NUMBER N SPRIDEN_ID 9 VARCHA N SPRIDEN_LAST_NAME 60 VARCHA N SPRIDEN_FIRST_NAME 15 VARCHA Y SPRIDEN_MI 15 VARCHA Y SPRIDEN_CHANGE_IND 1 VARCHA Y SPRIDEN_ENTITY_IND 1 VARCHA Y SPRIDEN_ACTIVITY_DATE 7 DATE N SPRIDEN_USER 30 VARCHA Y SPRIDEN_ORIGIN 30 VARCHA Y SPRIDEN_SEARCH_LAST_NAME 60 VARCHA Y SPRIDEN_SEARCH_FIRST_NAME 15 VARCHA Y SPRIDEN_SEARCH_MI 15 VARCHA Y SPRIDEN_SOUNDEX_LAST_NAME 4 CHAR Y SPRIDEN_SOUNDEX_FIRST_NAME 4 CHAR Y SPRIDEN_NTYP_CODE 4 VARCHA Y MAXIMUM RECORD LENGTH 278

April 2012
xt Table
UN-2002 03:59:05
UN-2002 03:59:05
15-37 Banner General 8.5.1User GuideReports & Processes
Document Code Report (GURTEXT)
Description This report is used to list document numbers currently stored in the External Feed Document Te(GURTEXT). There are no parameters for this report.
Report Sample
GURTEXT SunGard Higher Ed Development 24-J GURTEXT Document List Page : 1
Document Code---------BK000104BK000107BK000109BK000114
* * * REPORT CONTROL INFORMATION - GURTEXT Release: 5.4.1 * * *
GURTEXT SunGard Higher Ed Development 24-J GURTEXT Document List Page : 2

April 2012
PIN records and
Values
Application Inquiry Form (GUIAPPL)
Population Selection Inquiry Form (GLISLCT)
Y Print a detailed listing of results.
N Print the control report.
15-38 Banner General 8.5.1User GuideReports & Processes
PIN Create Process (GURTPAC)
Description This process will take a population selection (list of PIDMs) and will assign Third Party Accessexternal user IDs based on settings in the Enterprise PIN Preferences Form (GUAPPRF).
Parameter Name Required? Description
Application Yes Application for the population selection.
Selection ID Yes Selection identifier for the population selection.
Creator ID Yes Creator of the Selection ID rules.
User ID Yes ID of the person who performed the population selection.
Print Detail Report? Yes Specifies if the detail report should be printed.
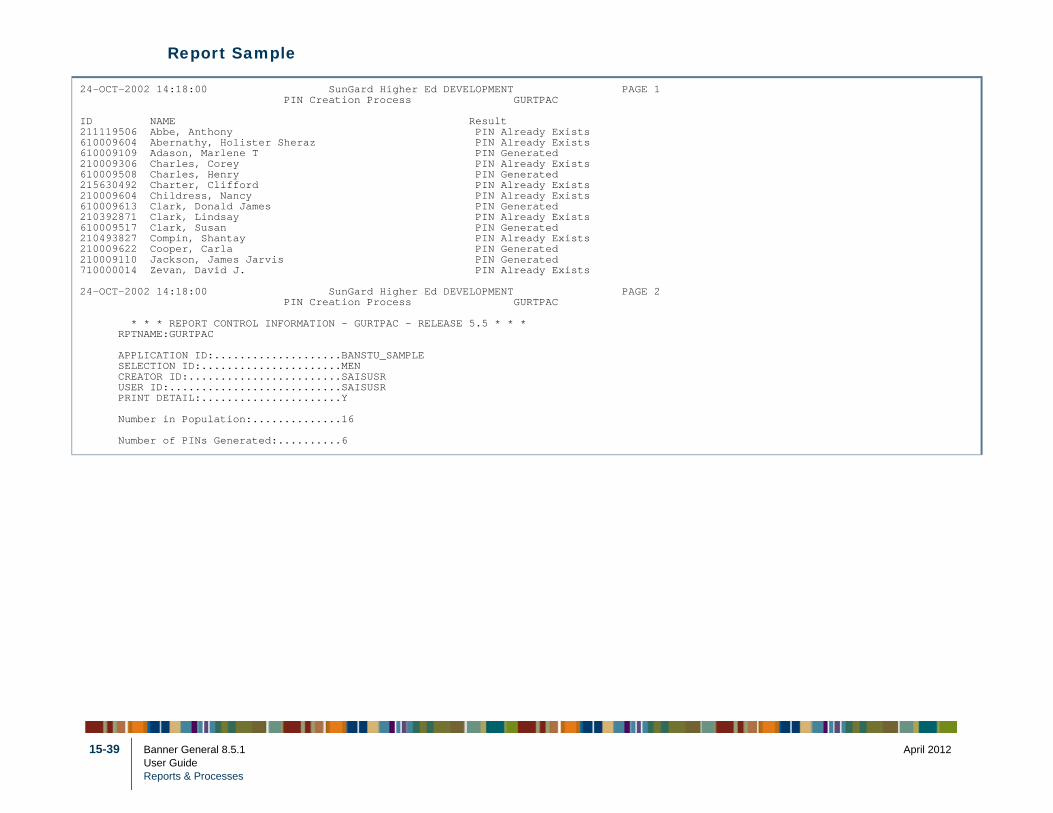
April 2012
Report Sample
15-39 Banner General 8.5.1User GuideReports & Processes
24-OCT-2002 14:18:00 SunGard Higher Ed DEVELOPMENT PAGE 1 PIN Creation Process GURTPAC
ID NAME Result 211119506 Abbe, Anthony PIN Already Exists610009604 Abernathy, Holister Sheraz PIN Already Exists610009109 Adason, Marlene T PIN Generated210009306 Charles, Corey PIN Already Exists610009508 Charles, Henry PIN Generated215630492 Charter, Clifford PIN Already Exists210009604 Childress, Nancy PIN Already Exists610009613 Clark, Donald James PIN Generated210392871 Clark, Lindsay PIN Already Exists610009517 Clark, Susan PIN Generated210493827 Compin, Shantay PIN Already Exists210009622 Cooper, Carla PIN Generated210009110 Jackson, James Jarvis PIN Generated710000014 Zevan, David J. PIN Already Exists
24-OCT-2002 14:18:00 SunGard Higher Ed DEVELOPMENT PAGE 2 PIN Creation Process GURTPAC
* * * REPORT CONTROL INFORMATION - GURTPAC - RELEASE 5.5 * * * RPTNAME:GURTPAC
APPLICATION ID:....................BANSTU_SAMPLE SELECTION ID:......................MEN CREATOR ID:........................SAISUSR USER ID:...........................SAISUSR PRINT DETAIL:......................Y
Number in Population:..............16
Number of PINs Generated:..........6

April 2012
ental data records ted. Although the upplemental Data
ents without
d parent status.
rd. To create ibutes
t): report only; no data will be changed
te): SDE records selected by the process h a parent status of No Parent will be eted
e short table name. You can use wildcards. ple, enter G% for all General tables.
e attribute name. You can use wildcards to ultiple attributes. Enter % by itself to select utes for the tables selected in parameter 02.
15-40 Banner General 8.5.1User GuideReports & Processes
SDE Inquiry and Delete Process(GUSMDID)
Description This new process allows you to review and delete orphaned supplemental data records. Supplemcan become orphaned when their corresponding “parent” records in base Banner tables are delesupplemental data record cannot be viewed after the parent record is deleted it still exists in the STable. The GUSMDID process gives you an optional way to clean up these orphaned records.
The Supplemental Data Engine (SDE), introduced in Release 8.0, is a way to add new data elemchanging the baseline Banner data model.
The report output shows, for each record found, the table name, attribute name, primary key, an
NoteThe GUSMDID report does not show the actual values for each supplemental data recoreview the actual data, you can use supplemental data views for each attribute. Code to these views can be generated in the Generate DDL block of the Supplemental Data AttrDefinition form (GOASDMD).
Parameter Name Required? Description Values
01 Audit/Update Yes Choose whether to report only (to view orphaned records) or to actually delete orphaned records.
A (Audi
U (Updawitdel
02 Table Yes The base Banner table(s) for which you want to find orphaned supplemental data records
Enter thFor exam
03 Attribute Name Yes The SDE attribute for which you want to find orphaned supplemental data records.
Enter thselect mall attrib

April 2012
e called t runtime.
determined by ables and
Values
%V Variable
%S Population selection
15-41 Banner General 8.5.1User GuideReports & Processes
Automatic Letter Compilation Process (GLOLETT)
Description This process compiles variables and population selection rules in the Banner database. A log filglolett_NUMBER.log is created, where NUMBER is the one-up sequence number created a
When you run GLOLETT, the variables and population selection rules waiting to be compiled (records existing in GJBPRUN) are compiled. Running the GLBPARM process can identify varipopulation selection rules to be compiled.
NoteYou can model a more complex query on the following example:
Example where the same table is used in both the query and the subquery: SELECT DISTINCT(SPRIDEN_PIDM),SYSDATE FROM SATURN.SPBPERS A,SATURN.SPRIDEN WHERE SPBPERS_PIDM = SPRIDEN_PIDM AND SPRIDEN_LAST_NAME = 'Smith' AND SPRIDEN_CHANGE_IND IS NULL AND SPRIDEN_PIDM NOT IN (SELECT SPBPERS_PIDM FROM SATURN.SPBPERS WHERE SPBPERS_DEAD_IND = 'Y' AND SPBPERS_PIDM = A.SPBPERS_PIDM )
Parameter Name Required? Description
Type Indicator Yes Record type to be compiled.
Application Name Yes Application code of the variable or population selection to be compiled.
Selection ID or Variable Name
No Code that identifies the population selection or variable.
Creator ID of Selection ID
Yes User ID of the Oracle user who created the population selection or variable.

April 2012
ion Rules Form of the rules in two MBER is the one-
Values
ll
. l
s.
15-42 Banner General 8.5.1User GuideReports & Processes
Population Selection Extract Process (GLBDATA)
Description This process selects a population based on the rules entered on the Population Selection Definit(GLRSLCT). It can also create a population based on either the union, intersection, or differenceexisting population selections. A log file called glbdata_NUMBER.log is created, where NUup sequence number created at runtime.
Parameter Name Required? Description
Selection Identifier 1 Yes ID of the first existing population selection that wibe used to create a new population selection.
Note: Any dynamic parameters for this populationselection are entered after the standard parametersYou must enter a non-blank value for each 88 leveprompt.
Selection Identifier 2 No ID of the second existing population that will be used to create a new population selection.
New Selection Identifier No ID of the new population selection that will be created from the two existing population selection
Description for New Selection
No Free-form description of the new population selection.

April 2012
I Include only those IDs that are extracted by both populations selections.
M Include all IDs extracted by the first population selection except those IDs extracted by the second population selection.
U Include all IDs extracted by the first population selection and all IDs extracted by the second population selection. If an ID is selected by both, include only once.
n Application Inquiry Form (GLIAPPL)
S Displays no debug information for selected parameters.
I Displays no debug information for selected parameters.
Y Shows debug information for SQL, inserts, and paragraphs.
Values
15-43 Banner General 8.5.1User GuideReports & Processes
Union/Intersection/Minus
No Code that determines the contents of the resultingpopulation.
Application Code Yes Application associated with the two existing population selections. This becomes the applicatioassociated with the new population selection.
Creator ID of Selection ID
Yes Oracle ID of the user who created the two existingpopulation selections.
Detail Execution Report No Code that determines the contents of the detail execution report.
Parameter Name Required? Description

April 2012
These variable t is created on quence number
his limit is
ame,
Values
Y Process all pending letters for the letter code.
N Process the letter code for a specific population.
is s. l
Letter Code Validation Form (GTVLETR)
15-44 Banner General 8.5.1User GuideReports & Processes
Letter Extract Process (GLBLSEL)
Description This process extracts values from the database for the variables that appear in a specified letter. values are merged into letters with the Letter Generation Print Report (GLRLETR). An error lisrequest. A log file called glblsel_NUMBER.log is created, where NUMBER is the one-up secreated at runtime.
There is a limit on the number of variables that can be added to a letter (about 121 variables). Tcontrolled by the WS-PARM-LIST value in GLBLSEL.pco.
Beginning with Release 8.1, the control report for GLBLSEL includes a count of
• number of IDs processed
• number of letters inserted into the collector table
• number of IDs not processed
NoteIn most cases, the number of IDs processed and number of letters inserted will be the sbut there are some situations where there could be more than one letter for a given ID.
Parameter Name Required? Description
Application Yes Application associated with the letter being processed.
Process Pending Letters Yes Code that determines how the letter code is processed.
Letter Code Yes Code of the letter being processed.
Note: Any dynamic parameters for variables in thletter code are entered after the standard parameterYou must enter a non-blank value for each 88 leveprompt.

April 2012
is Population Selection Inquiry Form (GLISLCT)
n
Term Code Validation Form (STVTERM)
Aid Year Inquiry Form (ROIAIDY)
e
n el
d.
Address Type Code Validation Form (STVATYP)
Values
15-45 Banner General 8.5.1User GuideReports & Processes
Selection ID Yes ID of the population selection for which the letter being processed.
Creator ID Yes Oracle ID of the user who created the population selection.
User ID Yes Oracle ID of the user who extracted the populatiowith the Population Selection Extract Process (GLBDATA).
Term Code No* Code of the term for which you wish to process pending letters.
Aid Year No† Aid year for which you wish to process pending letters.
Address Selection Date No Address date for which the address of choice must beffective.
You can define a system-level parameter default othe Parameter Definition Form (GJAPDEF) to usethe system date as this date. However, any user-levdefaults would override it.
If the job is executed with a null value for this parameter, the current system date is used. If the users save their parameters, the null would be save
If users want some other value than the current system date, they must enter a not-null value on GJAPCTL.
Address Type Yes Type codes of the addresses you wish to process, prefixed by the priority of each type code.
Parameter Name Required? Description

April 2012
le. Y Write error messages for IDs for which variable data could not be extracted.
N Do not write error messages.
S Show SQL statements.
I Show SQL statements and inserts.
Y Show paragraphs.
Values
15-46 Banner General 8.5.1User GuideReports & Processes
Detailed Error Report No Code that determines the contents of the glblsel fi
Detailed Execution Report
No Code that determines the contents of the detail execution report.
Note: * for Student applications only
Note: † for Financial Aid letters only
Parameter Name Required? Description

April 2012
tomatic Letter les. For each he list of .log is created,
Values
Application Inquiry Form (GLIAPPL)
Y Extract variable.
N Do not extract variables.
15-47 Banner General 8.5.1User GuideReports & Processes
Parameter Selection Compile Process (GLBPARM)
Description This process identifies population selections and variables that need to be recompiled by the AuCompilation Process (GLOLETT) in certain situations, such as when you change application ruvariable/population selection, a record is inserted into the list of records awaiting compilation. Tpopulation selections and variables appears on the report. A log file called glbparm_NUMBERwhere NUMBER is the one-up sequence number created at runtime.
Parameter Name Required? Description
Application Code Yes Application you wish to compile.
Extract Variables Indicator
Yes Code that determines whether variables are extracted for the application.

April 2012
og is created,
15-48 Banner General 8.5.1User GuideReports & Processes
User ID/Password Verification Process (GUAVRFY)
Description This process verifies the correct user ID and password. A log file called guavrfy_NUMBER.lwhere NUMBER is the one-up sequence number created at runtime.
This process contains no parameters.

April 20
Index
A
Address Purge (GPPADDR) 15-24
Alternate Logon Verification Form (GUAUIPW) 4-3
application, definition of 5-1, 5-5
Attendance Form (GEAATTD) 9-5
auto-population rules 12-5
Automatic Letter Compilation Process (GLOLETT) 5-2, 6-2, 15-41
B
Bannerextracting data to a spreadsheet 8-18module overview 1-1running reports and processes 4-15
Banner forms 1-5
basic personCommon Forms Object Library
(GOQCLIB) 13-1
basic person information 13-29
building a letter 6-20
building a population selection 5-5
Building Category Query Form (SLQBCAT) 9-8
Building Definition Form (SLABLDG) 9-5
Building Query Form (SLABQRY) 9-5
Building Room Schedule Form (SSAMATX) 9-5
business actions 12-4
Business Rule Buildervalidation forms reference 12-1
Business Rule Builder procedures 12-2
Business Rulesbuilding auto-population rules 12-5building business rules 12-4creating 12-2
C
changing the appearance of the main menu 8-18
changing user-level defaults 4-8
Common Forms Object Library (GOQCLIB) 13-1
Concealing 1-4
Condensed Table Listing (GURTABL) 15-36
copying a population selection 5-10
copying user-level defaults 4-10
copying variable rules 6-12
creatingdownload file 6-35hidden variable 6-18job parameter set 4-11manual population 5-15menu 8-13multiple-sequence variable 6-13personal menu 8-17population 5-10population from the union, intersection,
or minus of existing population selection rules 5-12
QuickFlow 8-19variable 6-6variable with ID information other than
the ID receiving the letter 6-16
creating ACH information for a bank account 8-10
creating additional records or modifying records for an existing bank code 8-11
currency conversions 8-7
customizing Bannermain menu 8-13
D
Data Element Dictionary (GURPDED) 15-34
Data Extract 8-18See also Banner Getting Started Guide
8-18
12 Banner General 8.5.1 I-1User Guide
Index

Default Parameter Value Validation Form (GJAPDFT) 4-2, 4-4, 4-6, 4-8, 4-10
definingnew processes 4-4new reports 4-4variable with a first variable type 6-18variables 6-5
defining a new bank code 8-8
deleting Visa records 7-8
direct deposit 8-8, 8-10, 8-11
displaying multiple Visas 7-8
download file for letters 6-35
E
entering Visa information 7-7
establishing bank information 8-8
establishing currency conversions 8-7
Event Available Room Query Form (SLIAEVN) 9-8
Event Form (SLAEVNT) 9-4
Event Function Form (GEAFUNC) 9-4
Event Function Inquiry Form (GEIFUNC) 9-5
Event Managementdefinitions 9-9forms 9-4managing buildings and rooms 9-9managing events 9-10managing functions 9-10managing participants 9-12managing tasks 9-11menus and forms 9-4overview 9-1procedures 9-9validation forms reference 9-1
Event Management formsAttendance Form (GEAATTD) 9-5Building Definition Form (SLABLDG) 9-5Building Query Form (SLABQRY) 9-5Building Room Schedule Form
(SSAMATX) 9-5Bulding Category Query Form
(SLQBCAT) 9-8Event Available Room Query Form
(SLIAEVN) 9-8Event Form (SLAEVNT) 9-4Event Function Form (GEAFUNC) 9-4Event Function Inquiry Form (GEIFUNC)
9-5
Event Query Form (SLQEVNT) 9-8Event Registration Form (GEAATID) 9-4Function Attendance Inquiry Form
(GEIATTD) 9-5Function Comment Form (GEAFCOM)
9-4Function Participant Form (GEAPART)
9-4Function Subject Index Query Form
(GEISUBJ) 9-5Function Task Form (GEATASK) 9-4Individual Function Inquiry Form
(GEIIDFN) 9-5Room Definition Form (SLARDEF) 9-5Room Query Form (SLQROOM) 9-8
Event Query Form (SLQEVNT) 9-8
Event Registration Form (GEAATID) 9-4
event, definition of 9-9
extracting Banner data 8-18
extracting IDs using population selection rules 5-11
extracting variables 6-25
F
facility Oracle report formatting emulation commands 6-21
fields and formsreference information 1-5
Fine-Grained Access Control 1-4
forms 1-5GEAATID Event Registration Form 9-4GEAATTD Attendance Form 9-5GEAFCOM Function Comment Form 9-4GEAFUNC Event Function Form 9-4GEAPART Function Participant Form 9-4GEATASK Function Task Form 9-4GEIATTD Function Attendance Inquiry
Form 9-5GEIFUNC Event Function Inquiry Form
9-5GEIIDFN Individual Function Inquiry
Form 9-5GEISUBJ Function Subject Index Query
Form 9-5GJAJOBS Process Maintenance Form
4-2, 4-4GJAJPRF Job Submission Profile
Maintenance Form 4-3, 4-18
I-2 Banner General 8.5.1 April 2012User GuideIndex

April 20
GJAPCTL Process Submission Control Form 4-2, 4-7, 4-9, 4-11, 4-16, 5-11, 5-12
GJAPDEF Parameter Definition Form 4-2, 4-4, 4-5
GJAPDFT Default Parameter Value Validation Form 4-2, 4-4, 4-6, 4-8, 4-10
GJAPVAL Parameter Value Validation Form 4-2, 4-4
GJARSLT Process Results Form 4-3GJASWPT Sleep Wake Maintenance
Form 4-3GJIREVO Saved Output Review Form
4-3, 4-19GJRJPRM Job Parameter Set Rule Form
4-3, 4-11GLAEXTR Population Selection Extract
Data Form 5-15GLRSLCT Population Selection
Definition Rules Form 5-5, 5-10GLRVRBL Variable Rules Definition
Form 6-6, 6-12, 6-16GOAINTL Visa International Information
Form 7-7GOASEVR SEVIS Transmittal History
Form 7-9GOASEVS SEVIS Information Form 7-9GTVPRNT Printer Validation Form 4-3GUALETR Letter Process Form 6-17GUAPARA Paragraph Form 6-17GUAQFLW QuickFlow Form 8-20GUAQUIK QuickFlow Definition Form
8-20GUAUIPW Alternate Logon Verification
Form 4-3GUTGMNU Menu Maintenance Form
8-14SLABLDG Building Definition Form 9-5SLABQRY Building Query Form 9-5SLAEVNT Event Form 9-4SLARDEF Room Definition Form 9-5SLIAEVN Event Available Room Query
Form 9-8SLQBCAT Building Category Query
Form 9-8SLQEVNT Event Query Form 9-8SLQROOM Room Query Form 9-8SSAMATX Building Room Schedule
Form 9-5
Function Attendance Inquiry Form (GEIATTD) 9-5
Function Comment Form (GEAFCOM) 9-4
Function Participant Form (GEAPART) 9-4
Function Subject Index Query Form (GEISUBJ) 9-5
Function Task Form (GEATASK) 9-4
function, definition of 9-9
G
GEAATID Event Registration Form 9-4
GEAATTD Attendance Form 9-5
GEAFCOM Function Comment Form 9-4
GEAFUNC Event Function Form 9-4
GEAPART Function Participant Form 9-4
GEATASK Function Task Form 9-4
GEIATTD Function Attendance Inquiry Form 9-5
GEIFUNC Event Function Inquiry Form 9-5
GEIIDFN Individual Function Inquiry Form 9-5
GEISUBJ Function Subject Index Query Form 9-5
General Business Rule Builderforms 12-1overview 12-1, 13-1
General formsreference information 1-5
General International Managementdeleting Visa records 7-8displaying multiple Visas 7-8entering Visa information 7-7overlapping Visa dates 7-8procedures 7-6setting up SEVIS codes 7-11SEVIS 7-8Visa tracking 7-6
General International Management formsSEVIS Information Form (GOASEVS)
7-9SEVIS Transmittal History Form
(GOASEVR) 7-9Visa International Information Form
(GOAINTL) 7-7
general personCommon Forms Object Library
(GOQCLIB) 13-1
12 Banner General 8.5.1 I-3User Guide
Index

General Voice Response Managementforms 11-1
General Web Managementforms 10-2, 14-3overview 10-1valiation forms reference 10-1
generating lettersfrom Banner 6-29from the operating system 6-33
GJAJOBS Process Maintenance Form 4-2, 4-4
GJAJPRF Job Submission Profile Maintenance Form 4-3, 4-18
GJAPCTL Process Submission Control Form 4-2, 4-7, 4-9, 4-11, 4-16, 5-11, 5-12
GJAPDEF Parameter Definition Form 4-2, 4-4, 4-5
GJAPDFT Default Parameter Value Validation Form 4-2, 4-4, 4-6, 4-8, 4-10
GJAPVAL Parameter Value Validation Form 4-2, 4-4
GJARSLT Process Results Form 4-3
GJASWPT Sleep Wake Maintenance Form 4-3
GJIREVO Saved Output Review Form 4-3, 4-19
GJRJPRM Job Parameter Set Rule Form 4-3, 4-11
GJRRPTS List of Reports and Parameters 15-2
GLAEXTR Population Selection Extract Data Form 5-15
GLBDATA Population Selection Extract Process 5-2, 5-10, 15-42
GLBLSEL Letter Extract Process 6-2, 6-25, 15-44
GLBPARM Parameter Selection Compile Process 5-2, 15-47
GLOLETT Automatic Letter Compilation Process 5-2, 6-2, 15-41
GLRLETR Letter Generation Print Report 6-2, 6-29, 6-35, 15-5
GLRSLCT Population Selection Definition Rules Form 5-5, 5-10
GLRVRBL Variable Rules Definition Form 6-6, 6-12, 6-16
GOAINTL Visa International Information Form 7-7
GOASEVR SEVIS Transmittal History Form 7-9
GOASEVS SEVIS Information Form 7-9
GOISEVS SEVIS Transmittal Status Query Form 7-14
GOQCLIBCommon Forms Object Library 13-1
GORPGEO Person Geo Region/Divisions Report 15-9
GORSEVESEVIS Batch Extract Process 7-13
GORSEVE SEVIS Batch Export Process 15-15
GORSGEO SBGI Geo Region/Divisions Report 15-22
GPPADDR Address Purge 15-24
GTVPRNT Printer Validation Form 4-3
GUALETR Letter Process Form 6-17
GUAPARA Paragraph Form 6-17
GUAQFLW QuickFlow Form 8-20
GUAQUIK QuickFlow Definition Form 8-20
GUAUIPW Alternate Logon Verification Form 4-3
GUAVRFY User ID/Password Verification Process 15-48
GUPDELT Document Code Delete Process 15-27
GURDETL Document Detail Report 15-28
GURHELP Print Dynamic Help for a Form 15-32
GURINSO Insert Output Program 15-29
GURIROL Institution Role Maintenance Process 15-30
GURPDED Data Element Dictionary 15-34
GURTABL Condensed Table Listing 15-36
GURTEXT Document Code Report 15-37
GURTPAC PIN Create Process 15-38
GUTGMNU Menu Maintenance Form 8-14
H
Hiding 1-4
home context 3-2
I
Individual Function Inquiry Form (GEIIDFN) 9-5
I-4 Banner General 8.5.1 April 2012User GuideIndex

April 20
Insert Output Program (GURINSO) 15-27, 15-29
institution codes, switching between 3-3
Institution Role Maintenance Process (GURIROL) 15-30
International Managementoverview 7-1validation forms reference 7-1
J
job parameter set 4-11
Job Parameter Set Rule Form (GJRJPRM) 4-3, 4-11
Job Submissionchanging user-level defaults 4-8copying user-level defaults 4-10creating a job parameter set 4-11defining new processes 4-4defining new reports 4-4forms 4-2generating letters from Banner 6-30overview 4-1printing online output 4-18procedures 4-4reports 4-2running Banner reports and processes
4-16saving online output 4-18setting up parameter defaults 4-4setting up system-level defaults 4-5setting up user-level defaults 4-6validation forms reference 4-1viewing online output 4-18
Job Submission formsAlternate Logon Verification Form
(GUAUIPW) 4-3Default Parameter Value Validation Form
(GJAPDFT) 4-2, 4-4, 4-6, 4-8, 4-10Job Parameter Set Rule Form
(GJRJPRM) 4-3, 4-11Job Submission Profile Maintenance
Form (GJAJPRF) 4-3, 4-18Parameter Definition Form (GJAPDEF)
4-2, 4-4, 4-5Parameter Value Validation Form
(GJAPVAL) 4-2, 4-4Printer Validation Form (GTVPRNT) 4-3Process Maintenance Form (GJAJOBS)
4-2, 4-4
Process Results Form (GJARSLT) 4-3Process Submission Control Form
(GJAPCTL) 4-2, 4-7, 4-9, 4-11, 4-16, 5-11, 5-12
Saved Output Review Form (GJIREVO) 4-3, 4-19
Sleep Wake Maintenance Form (GJASWPT) 4-3
Job Submission Profile Maintenance Form (GJAJPRF) 4-3, 4-18
L
letterbuilding 6-20generating 6-29pending 6-29variable extract 6-25
Letter Extract Process (GLBLSEL) 6-2, 6-25, 15-44
Letter Generationbuilding a letter 6-20copying variable rules 6-12creating a download file 6-35creating a hidden variable 6-18creating a multiple-sequence variable
6-13creating a variable 6-6creating a variable with ID information
other than the ID receiving the letter 6-16
defining a variable with a first variable type 6-18
defining variables 6-5extracting variables 6-25facility Oracle report formatting emulation
commands 6-21forms 6-3generating letters from Banner 6-29overview 6-1pending letters 6-29procedures 6-5processes 6-2report 6-2sorting variables 6-16troubleshooting 6-39validation forms reference 6-1
Letter Generation formsLetter Process Form (GUALETR) 6-17Paragraph Form (GUAPARA) 6-17
12 Banner General 8.5.1 I-5User Guide
Index

Variable Rules Definition Form (GLRVRBL) 6-6, 6-12, 6-16
Letter Generation Print Report (GLRLETR) 6-2, 6-29, 6-35, 15-5
Letter Process Form (GUALETR) 6-17
librariesGOQCLIB 13-1
linking bank funds and bank accounts with cash accounts 8-10
List of Reports and Parameters (GJRRPTS) 15-2
M
main menucustomizing 8-13
maintaining menu 8-13
maintaining personal menu 8-17
managing buildings and rooms 9-9
managing events 9-10
managing functions 9-10
managing participants 9-12
managing tasks 9-11
Masking 1-4
Menu Maintenance Form (GUTGMNU) 8-14
Multi-Entity Processing (MEP) procedures 3-2
O
object, definition of 5-2, 5-5
Online Help 1-5
operating system prompt, running from 4-20
Oracle report formatting emulation commands 6-21
Oracle Reportsparameters 71 - 77 4-12, 4-13under MIF 3-5
overlapping Visa dates 7-8
P
Paragraph Form (GUAPARA) 6-17
parameter defaultschanging 4-8copying 4-10job parameter set 4-11
setting up 4-4, 4-5system-level 4-4use of 4-4user-level 4-5validation checks 4-5
Parameter Definition Form (GJAPDEF) 4-2, 4-4, 4-5
Parameter Selection Compile Process (GLBPARM) 5-2, 15-47
Parameter Value Validation Form (GJAPVAL) 4-2, 4-4
parameters 71 - 77 4-12, 4-13
participant, definition of 9-9
pending letters 6-29
Person Geo Region/Divisions Report (GORPGEO) 15-9
personal menucreating 8-17maintaining 8-17
PIIPersonally Identifiable Information 1-4
PIN Create Process (GURTPAC) 15-38
populationcreating with GLBDATA 5-10manual 5-15
Population Selectionbuilding a population selection 5-5copying a population selection 5-10creating a manual population 5-15creating a population 5-10creating a population from the union,
intersection, or minus of existing population selection rules 5-12
definitions 5-1extracting IDs using population selection
rules 5-11forms 5-3, 7-3overview 5-1procedures 8-7related processes 5-2troubleshooting 5-16validation forms reference 5-2
population selectionbuilding 5-5copying 5-10definition of 5-1, 5-4
Population Selection Definition Rules Form (GLRSLCT) 5-5, 5-10
I-6 Banner General 8.5.1 April 2012User GuideIndex

April 20
Population Selection Extract Data Form (GLAEXTR) 5-15
Population Selection Extract Process (GLBDATA) 5-2, 5-10, 15-42
Population Selection formsPopulation Selection Definition Rules
Form (GLRSLCT) 5-5, 5-10Population Selection Extract Data Form
(GLAEXTR) 5-15Variable Rules Definition Form
(GLRVRBL) 6-6, 6-12, 6-16
population, definition of 5-1, 5-4
Print Dynamic Help for a Form (GURHELP) 15-32
Printer Validation Form (GTVPRNT) 4-3
printing online output 4-18
Proceduresbasic person 13-29
proceduresextended ID and name searching 13-30
process context 3-2
Process Maintenance Form (GJAJOBS) 4-2, 4-4
Process Results Form (GJARSLT) 4-3
Process Submission Control Form (GJAPCTL) 4-2, 4-7, 4-9, 4-11, 4-16, 5-11, 5-12
processessee reports and processes
Q
QuickFlowcreating 8-19definition of 8-19using 8-20
QuickFlow Definition Form (GUAQUIK) 8-20
QuickFlow Form (GUAQFLW) 8-20
R
report formatting emulation commands 6-21
report parameters 71 - 77 4-12, 4-13
reports and processesdefining to Job Submission 4-4GJRRPTS List of Reports and
Parameters 15-2
GLBDATA Population Selection Extract Process 5-2, 5-10, 15-42
GLBLSEL Letter Extract Process 6-2, 6-25, 15-44
GLBPARM Parameter Selection Compile Process 5-2, 15-47
GLOLETT Automatic Letter Compilation Process 5-2, 6-2, 15-41
GLRLETR Letter Generation Print Report 6-2, 6-29, 6-35, 15-5
GORPGEO Person Geo Region/Divisions Report 15-9
GORSEVE Batch Export Process 15-15GORSGEO SBGI Geo Region/Divisions
Report 15-22GPPADDR Address Purge 15-24GUAVRFY User ID/Password
Verification Process 15-48GURHELP Print Dynamic Help for a
Form 15-32GURINSO Insert Output Program 15-27,
15-29GURIROL Institution Role Maintenance
Process 15-30GURPDED Data Element Dictionary
15-34GURTABL Condensed Table Listing
15-36GURTPAC PIN Create Process 15-38parameter defaults 4-4printing online output 4-18running from the operating system 4-20running with Job Submission 4-16saving online output 4-18viewing online output 4-18
Room Definition Form (SLARDEF) 9-5
Room Query Form (SLQROOM) 9-8
running Banner reports and processes 4-15
S
Saved Output Review Form (GJIREVO) 4-3, 4-19
saving online output 4-18
SBGI Geo Region/Divisions Report (GORSGEO) 15-22
Searchingextended ID and name 13-30
setting up direct deposit 8-8
setting up events 8-12
12 Banner General 8.5.1 I-7User Guide
Index

setting up parameter defaults 4-4
setting up SEVIS codes 7-11
setting up system-level defaults 4-5
setting up user-level defaults 4-6
SEVIS 7-8handling adjudicated information 7-14If a Record is Rejected 7-19If Records are Rejected by SEVISTA
7-17Receiving data from the Bureau 7-18Responses from the Bureau 7-18Sending Data to the Bureau via the Batch
Process 7-16Sending Records to the Bureau 7-15structures 7-10Transmitting Data via the RTI 7-15
SEVIS Batch Export Process (GORSEVE) 15-15
SEVIS Batch Extract Process (GORSEVE) 7-13, 15-15
SEVIS codessetting up 7-11
SEVIS Information Form (GOASEVS) 7-9
SEVIS Transfer Adaptor (SEVISTA) 7-9
SEVIS Transmittal History Form (GOASEVR) 7-9
SEVIS Transmittal Status Query Form (GOISEVS) 7-14
SLABLDG Building Definition Form 9-5
SLABQRY Building Query Form 9-5
SLAEVNT Event Form 9-4
SLARDEF Room Defintion Form 9-5
Sleep Wake Maintenance Form (GJASWPT) 4-3
SLIAEVN Event Available Room Query Form 9-8
SLQBCAT Building Category Query Form 9-8
SLQEVNT Event Query Form 9-8
SLQROOM Room Query Form 9-8
sorting variables 6-16
spreadsheet, data extracted to 8-18
SSAMATX Building Room Schedule Form 9-5
Student and Exchange Visitors Information System (SEVIS) 7-8
subquery 5-8
System Functions/Administration
changing the appearance of the main menu 8-18
creating a QuickFlow 8-19creating and using QuickFlows 8-19creating menu 8-13creating personal menu 8-17customizing menus 8-13establishing bank information 8-8, 8-10,
8-11establishing currency conversions 8-7forms 8-5maintaining menu 8-13maintaining personal menu 8-17overview 8-1procedures 8-7process 8-4setting up events 8-12using a QuickFlow 8-20validation forms reference 8-2
System Functions/Administration formsMenu Maintenance Form (GUTGMNU)
8-14QuickFlow Definition Form (GUAQUIK)
8-20QuickFlow Form (GUAQFLW) 8-20
T
task, definition of 9-9
troubleshootingLetter Generation 6-39Population Selection 5-16variable/population selection 5-17
U
User ID/Password Verification Process (GUAVRFY) 15-48
using a QuickFlow 8-20
V
validation formsaccessing 2-1list of 2-1Printer Validation Form (GTVPRNT) 4-3
Value-based securityVBS 1-4
I-8 Banner General 8.5.1 April 2012User GuideIndex
April 20
variablecopying rules 6-12creating 6-6definition of 5-2, 5-5, 6-5extracting 6-25first variable type 6-18hidden 6-18multiple-sequence 6-13sorting 6-16type 6-6
Variable Rules Definition Form (GLRVRBL) 6-6, 6-12, 6-16
viewing online output 4-18
Visa International Information Form (GOAINTL) 7-7
Visa tracking 7-6
12 Banner General 8.5.1 I-9User Guide
Index

I-10 Banner General 8.5.1 April 2012User GuideIndex