Banner Finance Research Accounting Training …cfweb.cc.ysu.edu/yes_info/Training Workbooks/Finance...
122
Banner Finance Research Accounting Training Workbook January 2007 Release 7.3 What can we help you achieve? HIGHER EDUCATION
-
Upload
hoangthien -
Category
Documents
-
view
222 -
download
1
Transcript of Banner Finance Research Accounting Training …cfweb.cc.ysu.edu/yes_info/Training Workbooks/Finance...

Banner FinanceResearch Accounting Training Workbook
January 2007 Release 7.3
What can we help you achieve? HIGHER EDUCATION

Confidential Business Information ------------------------------------------------------------------------------------------------------------------------------------------------------------------------------- This documentation is proprietary information of SunGard Higher Education and is not to be copied, reproduced, lent or disposed of, nor used for any purpose other than that for which it is specifically provided without the written permission of SunGard Higher Education. Prepared By: SunGard Higher Education
4 Country View Road Malvern, Pennsylvania 19355 United States of America
© 2006 SunGard. All rights reserved. The unauthorized possession, use, reproduction, distribution, display or disclosure of this material or the information contained herein is prohibited. In preparing and providing this publication, SunGard Higher Education is not rendering legal, accounting, or other similar professional services. SunGard Higher Education makes no claims that an institution's use of this publication or the software for which it is provided will insure compliance with applicable federal or state laws, rules, or regulations. Each organization should seek legal, accounting and other similar professional services from competent providers of the organization’s own choosing. Without limitation, SunGard, the SunGard logo, Banner, Campus Pipeline, Luminis, PowerCAMPUS, Matrix, and Plus are trademarks or registered trademarks of SunGard Data Systems Inc. or its subsidiaries in the U.S. and other countries. Third-party names and marks referenced herein are trademarks or registered trademarks of their respective owners.

Table of Contents
Section A: Introduction ..............................................................................................................4 Overview ..................................................................................................................................4 Process Introduction .................................................................................................................5 Terminology .............................................................................................................................6
Section B: Set Up.........................................................................................................................7 Overview ..................................................................................................................................7 Completing the System Control Maintenance Form................................................................8 Defining Proposal and/or Grant Status Codes, Categories, Types, or Sub-categories.............9 Setting Up Cost Codes for Indirect Cost Calculations ...........................................................11 Setting Up Cost Codes for Cost Share Calculations ..............................................................22 Establishing Sponsors in Research Accounting .....................................................................31 Defining the Personnel Assigned to a Proposal and/or Grant ................................................34 Creating and Cross-referencing Sponsors’ Account Codes ...................................................35 Self Check ..............................................................................................................................38 Answer Key for Self Check....................................................................................................39
Section C: Day-to-Day Operations ..........................................................................................40 Overview ................................................................................................................................40 Setting Up and Maintaining a Proposal..................................................................................41 Tracking Events and Notifications to a Proposal ...................................................................53 Querying a Proposal ...............................................................................................................59 Generating Proposal Reports..................................................................................................67 Creating a Grant and Assigning it to a Fund ..........................................................................73 Creating a Grant Budget.........................................................................................................82 Tracking Events to a Grant.....................................................................................................86 Querying a Grant ....................................................................................................................94 Generating Grant Reports.....................................................................................................111 Self Check ............................................................................................................................113 Answer Key for Self Check..................................................................................................114
Section D: Reference...............................................................................................................115 Overview ..............................................................................................................................115 Setup Forms and Where Used ..............................................................................................116 Day-to-Day Forms and Setup Needed..................................................................................118 Forms Job Aid ......................................................................................................................121

© SunGard 2004-2007 Research Accounting Page 4
Section A: Introduction
Lesson: Overview
Workbook goal The goal of this course is to become familiar with fundamental forms, tables, and reports, whereby allowing you to set-up and process Research Accounting transactions in the Banner System. The workbook is divided into three sections:
• Introduction • Set-up • Day-to-day operations
Intended audience Staff members who will be responsible for recording and tracking proposal and grant information and entering budgeted information for grants.
Section contents Overview ..................................................................................................................................4 Process Introduction .................................................................................................................5 Terminology .............................................................................................................................6

© SunGard 2004-2007 Research Accounting Page 5
Section A: Introduction
Lesson: Process Introduction
About the process Research at many institutions is funded through grants. Grant Personnel writes and submits proposals to grant agencies which provide funding for approved proposals. The grant accounting personnel bills expenses incurred for the grant. The Finance office then receives payments from the grant agency.
Flow diagram This diagram highlights the processes used to record and track proposal and grant information in the Banner system within the overall Finance process.
What happens The stages of the process are described in this table.
Stage Description Grant Personnel
1 Writes and submits proposals. Agency
2 Approves grant. Grant Personnel
3 Creates grant for approved proposals. Grant Accounting Personnel
4 Review and bill expenses incurred for grant. Finance Office
5 Receives payments.

© SunGard 2004-2007 Research Accounting Page 6
Section A: Introduction
Lesson: Terminology
Agency The external organization that provides funding in the form of a grant. Examples: The National Science Foundation (NSF), the Center for Disease Control (CDC)
Direct cost Tangible costs to an organization. Examples: A person’s salary, the price of supplies and equipment.
Indirect costs Intangible costs to an enterprise associated with the cost to the institution for administering the grant. Indirect costs are typically calculated a percentage of some or all direct costs.

© SunGard 2004-2007 Research Accounting Page 7
Section B: Set Up
Lesson: Overview
Introduction The goal of this section is to perform the set up required to maintain proposals and grants in the Research Accounting Module.
Intended audience Staff members who will be responsible for recording and tracking proposal and grant information and entering budgeted information for grants.
Objectives At the end of this section, you will be able to • define system controls for grant processing • maintain system data for reporting purposes • set up the basis for indirect cost/cost share calculations • establish indirect cost/cost share account codes • define the indirect cost/cost share distribution codes • identify the rates for indirect cost/cost share calculations • create and maintain sponsor’s (agency codes) • classify user-defined codes and values.
Prerequisites To complete this course, you should have completed the Education Practices computer-based training (CBT) tutorial “Banner 7 Fundamentals,” or have equivalent experience navigating in the Banner system.
Section contents Overview ..................................................................................................................................7 Completing the System Control Maintenance Form................................................................8 Defining Proposal and/or Grant Status Codes, Categories, Types, or Sub-categories.............9 Setting Up Cost Codes for Indirect Cost Calculations ...........................................................11 Setting Up Cost Codes for Cost Share Calculations ..............................................................22 Establishing Sponsors in Research Accounting .....................................................................31 Defining the Personnel Assigned to a Proposal and/or Grant ................................................34 Creating and Cross-referencing Sponsors’ Account Codes ...................................................35 Self Check ..............................................................................................................................38 Answer Key for Self Check....................................................................................................39

© SunGard 2004-2007 Research Accounting Page 8
C
Section B: Set Up
Lesson: Completing the System Control Maintenance Form
Purpose The System Control Maintenance Form (FOASYSC) will be used to specify whether you want to perform grant accounting calculations on a transaction-by-transaction (online) basis or on a periodic (deferred) basis.
Banner form
Procedure Follow these steps to defer auto calculation. Step Action
1 Access the System Control Maintenance Form (FOASYSC). 2 If FOASYSC has been previously completed, you must insert a new record by
performing an Insert Record function (F6), Duplicate Record function (F4), and then modify the duplicated record by completing steps 3 & 4 below.
3 Select Grant Processing Info from the Options menu. 4 Click the Defer Calculations of Indirect Cost and Cost Share checkbox. 5 Select an option to calculate first in the Indirect Cost and Cost Share Calculation
Order field. 6 Click the Save icon. 7 Click the Exit icon.

© SunGard 2004-2007 Research Accounting Page 9
Section B: Set Up
Lesson: Defining Proposal and/or Grant Status Codes, Categories, Types, or Sub-categories
Introduction The Research Accounting Module provides you with four important classificatory fields for defining your proposals and grants: Status Code, Type, Category, and Sub-Category, which will be used on the Proposal Maintenance Form (FRAPROP) and the Grant Maintenance Form (FRAGRNT). Seed data values are provided for these classifications, which you can review. You are encouraged to devise your own user-defined values for these classifications. These are created using the System Data Maintenance Form (FTMSDAT). In determining what codes you’d like to use, take into account any classifications used in your current grants database. You may want to use these fields to preserve classifications that are used in your legacy data. Instructions follow detailing how to query existing codes and enter new codes. IMPORTANT NOTE: It is recommended that update access to the System Data Maintenance Form (FTMSDAT) be limited to key technical and/or Functional Finance System Manager, as this form controls processing for all of Banner Finance. The Grant Personnel should define the codes and turn in to authorized user to update.
Banner Form The System Data Maintenance Form (FTMSDAT).

© SunGard 2004-2007 Research Accounting Page 10
Section B: Set Up
Lesson: Defining Proposal and/or Grant Status Codes, Categories, Types, or Sub-categories (Continued)
Procedure Follow these steps to complete the process. Step Action
1 Access the System Data Maintenance Form (FTMSDAT). 2 Perform an Enter Query function. 3 Enter FRBGRNT in the Entity or Usage Code field. This allows you to perform a query
of all the information related to the grant. 4 Tab to the Attribute Code field, and enter GRANT_TYPE 5 Perform an Execute Query function. 6 The value displayed in Optional Code Number 1 field is the actual code value. Use
your up and down arrow keys to page through the values existing for grant type 7 Perform an Insert Record function to insert a new record. 8 Perform a Duplicate Record function. 9 Modify the duplicated record by typing your new code in the Optional Code Number 1
field. 10 Type an accompanying description in the Description or Title field. 11 Type a short description in the Short Title field.
Note: FTMSDAT will not automatically limit the number of characters you use for your codes. However, you may not exceed the following limits for each of the code types: GRANT_TYPE = 2, CATEGORY = 1, SUB_CATEGORY = 4, STATUS_CODE = 2.
12 Click the Save icon. 13 Perform additional queries to review the seed data provided for Attribute Codes
CATEGORY, SUB_CATEGORY and STATUS_CODE (the Entity/Usage code will remain FRBGRNT) Note: Perform the same queries using the Entity/Usage code FRBPROP. This will display the values for these fields that can be used in the FRAPROP form.
14 Perform an Insert Record function to add new values. 15 Perform a Duplicate Record function. 16 Modify the duplicated record by typing your new code in the Optional Code Number 1
field. 17 Type an accompanying description in the Description or Title field. 18 Type a short description in the Short Title field. 19 Click the Save icon. 20 Click the Exit icon.
© SunGard 2004-2007 Research Accounting Page 11
Section B: Set Up
Lesson: Setting Up Cost Codes for Indirect Cost Calculations
Introduction You can set up cost codes that will be linked to a proposal and/or grant for indirect cost calculations. Indirect costs are those costs to an enterprise that are not, in many respects, tangible. Example: A person’s salary, the price of supplies, and equipment are known costs and are considered direct costs. Indirect costs are typically calculated as a percentage of some or all direct costs representing the cost to the institution for administering the grant. The rate is determined through negotiations with the agency. There are four forms you must use to create an indirect cost method:
Basis Definition Code Maintenance Form The Basis Definition Code Maintenance Form (FTMBASI) is used to define and establish the base for indirect cost calculations.
Indirect Cost Rate Code Maintenance Form The Indirect Cost Rate Code Maintenance Form (FTMINDR) is used to define the Indirect Cost rate.
Indirect Cost Charge Code Maintenance Form The Indirect Cost Charge Code Maintenance Form (FTMINDA) is used to enter the account or accounts for overhead charge calculations. The account codes used on this form must be associated with an internal account type Labor (60) or Expenditures (70) and the Account Class ‘I’ for indirect cost.
Indirect Cost Distribution Maintenance Form The Indirect Cost Distribution Maintenance Form (FTMINDD) is used to enter the FOAPAL distribution for the recovery of indirect charges. This form creates transactions used on the credit side for indirect costs in the ledgers. All of the FOAPAL elements are defined on this form.

© SunGard 2004-2007 Research Accounting Page 12
Section B: Set Up
Lesson: Setting Up Cost Codes for Indirect Cost Calculations (Continued)
Banner form Basis Definition Code Maintenance Form (FTMBASI)
Procedure Follow these steps to complete the process. Step Action
1 Access the Basis Definition Code Maintenance Form (FTMBASI) to define and establish the base for indirect cost calculations.
2 Enter a new or existing basis code in the Basis Definition Code field to indicate the way in which indirect cost will be calculated.
3 Enter a description in the Description field if you entered a new code in the Basis Definition Code field.
4 Select Indirect Cost as the calculation type you want to perform in the Basis Type field. 5 Perform a Next Block function. 6 Enter the chart of account code for use in validating the base account codes that will be
entered in the Chart of Accounts field. 7 Enter the effective date of the definition in the Effective Date field. 8 Enter the external account type that should be included in the basis in the Account Type
field. Notes: By specifying an account type in this field, you are telling the system that all accounts that fall within this account type structure should be included in the base for calculations of indirect cost. To copy the basis definition code from another record, select Perform Copy from the Options menu, enter the Basis Definition Code, and then click the OK button. If you change your mind and don’t want to use the Copy function, click the Exit to cancel. When setting up the codes to include or exclude in the basis for each record the Account Type or Account From & To range is required, but not both per record.

© SunGard 2004-2007 Research Accounting Page 13
Section B: Set Up
Lesson: Setting Up Cost Codes for Indirect Cost Calculations (Continued)
Procedure, continued
Step Action 9 Enter an account code that will begin a range of accounts to be included in the cost
calculations in the Account Code From field. 10 Enter an account code that will end the range of accounts to be included in the cost
calculations in the Account Code To field. 11 You may override the values entered on FTMINDR. Enter the override values in the
Rate and Memo fields; specify the threshold amount in the Maximum Amount field. These are optional fields. Note: By specifying an amount, you are telling the system that indirect cost calculations will no longer be taken once this amount has been reached for all accounts that fall within this account code range structure. You cannot enter a maximum amount when an account type is entered.
12 Click the Save icon. 13 Click the Exit icon.

© SunGard 2004-2007 Research Accounting Page 14
Section B: Set Up
Lesson: Setting Up Cost Codes for Indirect Cost Calculations (Continued)
Banner form The Indirect Cost Rate Code Maintenance Form (FTMINDR).
Procedure Follow these steps to complete the process. Step Action
1 Access the Indirect Cost Rate Code Maintenance Form (FTMINDR). 2 Enter a new or existing indirect cost rate code in the Indirect Cost Rate Code field. 3 Perform a Next Block function.
Note: For a new indirect cost rate you will receive a pop-up box indicating, “Query caused no records to be retrieved.” Click OK.
4 Enter a description in the Description field if you entered a new code in the Indirect Cost Rate Code field.
5 Click the Save icon. 6 Perform a Next Block function.
Note: For a new indirect cost rate you will receive a pop-up box indicating, “Query caused no records to be retrieved.” Click OK.

© SunGard 2004-2007 Research Accounting Page 15
Section B: Set Up
Lesson: Setting Up Cost Codes for Indirect Cost Calculations (Continued)
Procedure, continued
Step Action 7 Enter the rate at which indirect cost should be calculated in the Rate field.
Note: The rate can be overridden on the Basis Definition Code Maintenance Form (FTMBASI). Note: To update an existing Indirect Cost Rate Code, perform a Next Record function.
8 Enter the rate in which memo indirect costs should be calculated in the Memo Rate field. This is an optional field. Note: This field allows you to enter the difference between the sponsor’s negotiated rate and your actual rate (waived overhead). Example: If your standard rate for indirect is 40%, but you negotiated a rate with the sponsor at 30%, you may wish to enter the indirect rate as 30% and a memo rate as 10%. The system will calculate the 10% rate based on the base and store that amount in the memo ledger, and can be queried at any time after the calculations have been posted.
9 Click the Federal Negotiated Rate checkbox to indicate that the indirect cost rate was negotiated by the federal government, or leave this check box unselected if the indirect cost rate is not a federally negotiated rate
10 Enter the amount whereby indirect cost calculations will no longer be calculated once this amount has been reached in the Maximum Amount field.
11 Enter the amount whereby the memo indirect cost calculations will no longer be calculated and stored in the memo ledger once this amount has been reached in the Memo Maximum Amount field.
12 Select I/C Rate History Information from the Options drop-down menu to view the Indirect Cost Rate History Form (FRHINDR)
13 Click the Exit icon. 14 Click the Save icon. Click the Exit icon.

© SunGard 2004-2007 Research Accounting Page 16
Section B: Set Up
Lesson: Setting Up Cost Codes for Indirect Cost Calculations (Continued)
Banner form Indirect Cost Charge Code Maintenance Form (FTMINDA)

© SunGard 2004-2007 Research Accounting Page 17
Section B: Set Up
Lesson: Setting Up Cost Codes for Indirect Cost Calculations (Continued)
Procedure Follow these steps to enter the accounts and percentages for recording overhead charges. Step Action
1 Access the Indirect Cost Charge Code Maintenance Form (FTMINDA). 2 Enter a new or existing indirect cost charge code in the Indirect Cost Charge Code
field. Note: To update an existing Indirect Cost Charge Code, go to step 6.
3 Perform a Next Block function. Note: For a new indirect cost charge code you will receive a pop-up box indicating, “Query caused no records to be retrieved.” Click OK.
4 Enter a description in the Description field if you are creating a new code. 5 Perform a Next Block function. 6 Enter the chart of accounts code in the Chart of Accounts field.
Notes: This code is used to validate the charge account codes that you can enter. This value is displayed from your user profile record and may be overridden. If you are updating an existing Indirect Cost Charge Code you must perform a Next Record function.
7 Perform a Next Block function. Note: If you want to copy data from an existing Indirect Cost Charge Code, proceed to step 10.
© SunGard 2004-2007 Research Accounting Page 18
Section B: Set Up
Lesson: Setting Up Cost Codes for Indirect Cost Calculations (Continued)
Procedure, continued
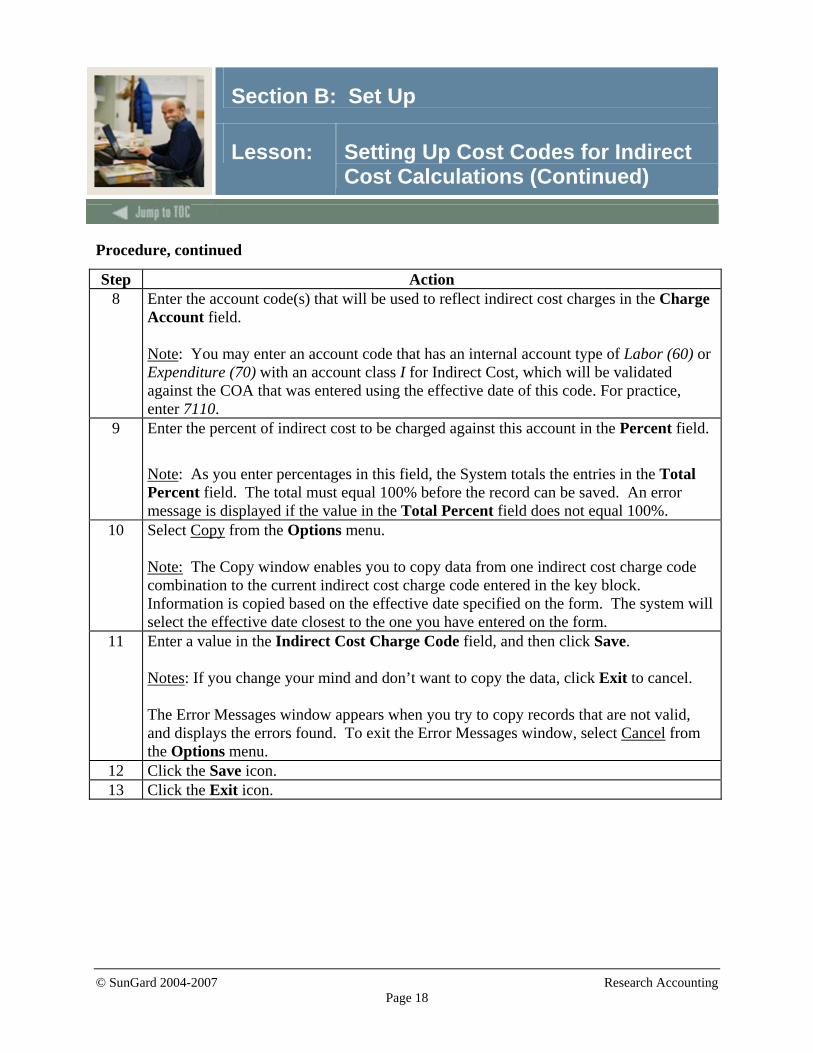
Step Action 8 Enter the account code(s) that will be used to reflect indirect cost charges in the Charge
Account field. Note: You may enter an account code that has an internal account type of Labor (60) or Expenditure (70) with an account class I for Indirect Cost, which will be validated against the COA that was entered using the effective date of this code. For practice, enter 7110.
9 Enter the percent of indirect cost to be charged against this account in the Percent field. Note: As you enter percentages in this field, the System totals the entries in the Total Percent field. The total must equal 100% before the record can be saved. An error message is displayed if the value in the Total Percent field does not equal 100%.
10 Select Copy from the Options menu. Note: The Copy window enables you to copy data from one indirect cost charge code combination to the current indirect cost charge code entered in the key block. Information is copied based on the effective date specified on the form. The system will select the effective date closest to the one you have entered on the form.
11 Enter a value in the Indirect Cost Charge Code field, and then click Save. Notes: If you change your mind and don’t want to copy the data, click Exit to cancel. The Error Messages window appears when you try to copy records that are not valid, and displays the errors found. To exit the Error Messages window, select Cancel from the Options menu.
12 Click the Save icon. 13 Click the Exit icon.

© SunGard 2004-2007 Research Accounting Page 19
Section B: Set Up
Lesson: Setting Up Cost Codes for Indirect Cost Calculations (Continued)
Banner form Indirect Cost Distribution Maintenance Form (FTMINDD)
© SunGard 2004-2007 Research Accounting Page 20
Section B: Set Up
Lesson: Setting Up Cost Codes for Indirect Cost Calculations (Continued)
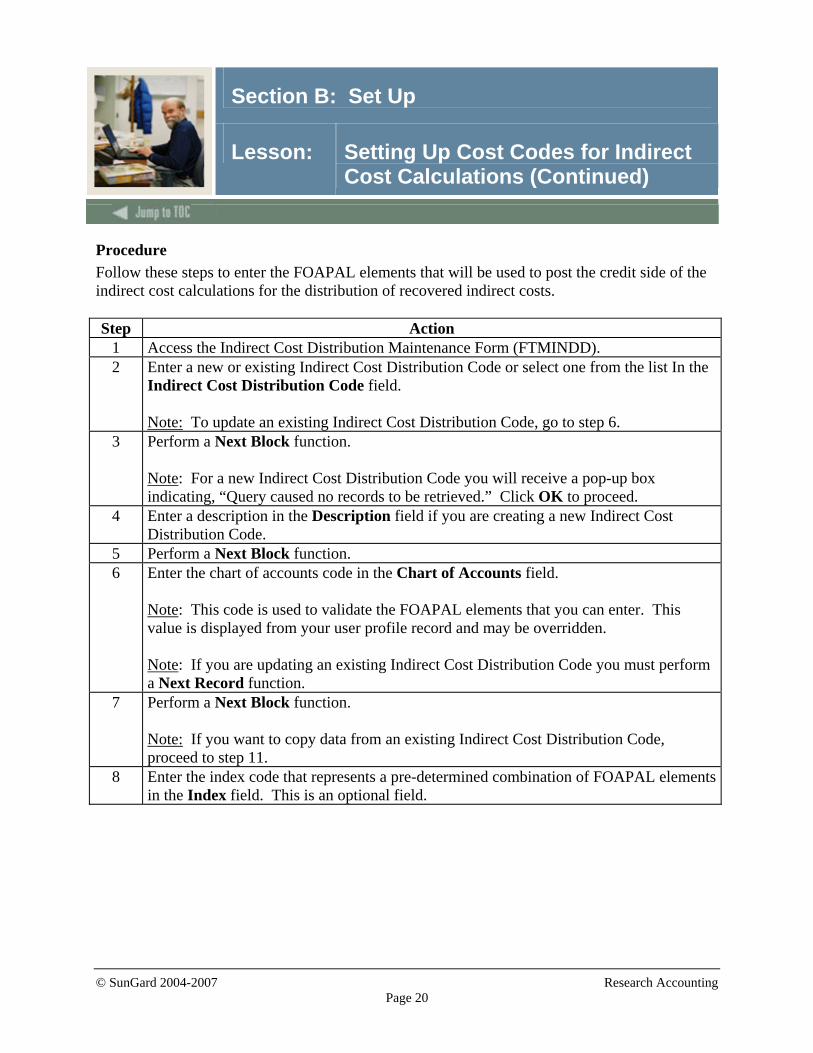
Procedure Follow these steps to enter the FOAPAL elements that will be used to post the credit side of the indirect cost calculations for the distribution of recovered indirect costs. Step Action
1 Access the Indirect Cost Distribution Maintenance Form (FTMINDD). 2 Enter a new or existing Indirect Cost Distribution Code or select one from the list In the
Indirect Cost Distribution Code field. Note: To update an existing Indirect Cost Distribution Code, go to step 6.
3 Perform a Next Block function. Note: For a new Indirect Cost Distribution Code you will receive a pop-up box indicating, “Query caused no records to be retrieved.” Click OK to proceed.
4 Enter a description in the Description field if you are creating a new Indirect Cost Distribution Code.
5 Perform a Next Block function. 6 Enter the chart of accounts code in the Chart of Accounts field.
Note: This code is used to validate the FOAPAL elements that you can enter. This value is displayed from your user profile record and may be overridden. Note: If you are updating an existing Indirect Cost Distribution Code you must perform a Next Record function.
7 Perform a Next Block function. Note: If you want to copy data from an existing Indirect Cost Distribution Code, proceed to step 11.
8 Enter the index code that represents a pre-determined combination of FOAPAL elements in the Index field. This is an optional field.

© SunGard 2004-2007 Research Accounting Page 21
Section B: Set Up
Lesson: Setting Up Cost Codes for Indirect Cost Calculations (Continued)
Procedure, continued
Step Action 9 Enter the values to which recovered indirect costs will be distributed in the Fund,
Organization, Account, Program, Activity and Location fields. 10 Enter the percentage for each FOAPAL accounting distribution in the Percent field.
Note: You may enter one distribution line at 100% or multiple distribution lines; however, the Total Percent field must equal 100%. The system totals the entries in the Total Percent field. If the value in the Total Percent field does not equal 100%, the record cannot be saved.
11 Select Perform Copy from the Options menu. Note: The Copy window enables you to copy data from one Indirect Cost Distribution Code to the current Indirect Cost Distribution Code entered in the key block. Information is copied based on the effective date specified on the form. The system will select the effective date closest to the one you have entered on the form.
12 Enter a value in the Indirect Cost Distribution Code field or select from the List of Values (LOV), and then click Save. Notes: If you change your mind and don’t want to copy the data, click Exit to cancel. The Error Messages window appears when you try to copy records that are not valid, and displays the errors found. To exit the Error Messages window, click Cancel from the Options menu.
13 Click the Save icon. 14 Click the Exit icon.

© SunGard 2004-2007 Research Accounting Page 22
Section B: Set Up
Lesson: Setting Up Cost Codes for Cost Share Calculations
Introduction You can set up cost codes that will be linked to a proposal and/or grant for cost share calculations. Cost share is the enterprise’s share of the cost associated with this grant or proposal. There are four forms you will use for calculating cost shares in your system:
Basis Definition Code Maintenance Form The Basis Definition Code Maintenance Form (FTMBASI) is used to define and establish the base for cost share calculations.
Cost Share Rate Code Maintenance Form The Cost Share Rate Code Maintenance Form (FTMCSTR) is used to enter cost share rate codes and their related descriptions. This form is also used to record the rate amount for cost share calculations.
Cost Share Credit Account Code Maintenance Form The Cost Share Credit Account Code Maintenance Form (FTMCSTA) is used to enter the accounts to which cost share amounts are to be credited, or to enter a fund code that can be used as an alternate fund to track cost share activity. The account codes used on this form must be associated with an internal account type Labor (60) or Expenditures (70) and the Account Class ‘C’ for cost share.
Cost Share Distribution Maintenance Form The Cost Share Distribution Maintenance Form (FTMCSTD) is used to define the FOAPAL elements used to reflect the cost (or debit) side of the cost share calculations on the grant fund.

© SunGard 2004-2007 Research Accounting Page 23
Section B: Set Up
Lesson: Setting Up Cost Codes for Cost Share Calculations (Continued)
Banner form
Procedure Follow these steps to define and establish the base for cost sharing calculations. Step Action
1 Access the Basis Definition Code Maintenance Form (FTMBASI). 2 Enter a new or existing basis code to indicate the way in which cost share cost will be
calculated in the Basis Definition Code field. 3 Perform a Next Block function.
Note: For a new Cost Share Basis Definition Code you will receive a pop-up box indicating, “Query caused no records to be retrieved.” Click OK.
4 Enter a description in the Description field if you entered a new code in the Basis Definition Code field.
5 Select Cost Share for the calculation type you want to perform in the Basis Type field.

© SunGard 2004-2007 Research Accounting Page 24
Section B: Set Up
Lesson: Setting Up Cost Codes for Cost Share Calculations (Continued)
Procedure, continued
Step Action 6 Perform a Next Block function. 7 Enter the chart of account code for use in validating the base account codes that will be
entered in the Chart of Accounts field. 8 Enter the effective date of the definition in the Effective Date field. 9 Perform a Next Block function.
Note: To copy the basis definition code from another record, select Perform Copy from the Options menu, enter the Basis Definition Code, and then click the OK button. If you change your mind and don’t want to use the Copy function, click Exit to cancel.
10 Enter the external account type that is associated with the internal account types you’re working with in the Account Type field. Note: By specifying an account type in this field, you are telling the system that all accounts that fall within this account type structure should be included in the base for calculations of cost sharing. Account type or account range is required, but not both.
11 Enter an account code that will begin a range of accounts to be included in the cost calculations in the Account Code From field.
12 Enter an account code that will end the range of accounts to be included in the cost calculations In the Account Code To field. Note: Account Type or Account From & To range is required, but not both.
13 You may override the values entered on FTMCSTR. Enter the override values in the Rate field; specify the threshold amount in the Maximum Amount field. These are optional fields. Note: By specifying an amount, you are telling the system that cost share calculations will no longer be taken once this amount has been reached for all accounts that fall within this account code range structure. You cannot enter a maximum amount when an account type is entered.
14 Click the Save icon. 15 Click the Exit icon.

© SunGard 2004-2007 Research Accounting Page 25
Section B: Set Up
Lesson: Setting Up Cost Codes for Cost Share Calculations (Continued)
Banner Form The Cost Share Rate Code Maintenance Form (FTMCSTR).
Procedure Follow these steps to complete the process. Step Action
1 Access the Cost Share Rate Code Maintenance Form (FTMCSTR). 2 Enter a new or existing cost share rate code in the Cost Share Rate Code field. 3 Perform a Next Block function. 4 Enter a description in the Description field if you entered a new code in the Cost Share
Rate Code field. 5 Perform a Next Block function.
Note: For a new cost share rate you will receive a pop-up box indicating, “Query caused no records to be retrieved.” Click OK.
6 Enter the rate at which cost share should be calculated in the Rate field. Notes: The rate can be overridden on the Basis Definition Code Maintenance Form (FTMBASI). To update an existing Cost Share Rate Code, perform a Next Record function.
7 Enter the amount whereby cost share calculations will no longer be calculated once this amount has been reached in the Maximum Amount field.
8 Enter the date on which the Cost Share Rate Code will no longer be in effect in the Termination Date field.
9 Click the Save icon. 10 Click the Exit icon.

© SunGard 2004-2007 Research Accounting Page 26
Section B: Set Up
Lesson: Setting Up Cost Codes for Cost Share Calculations (Continued)
Banner form Cost Share Credit Code Maintenance Form (FTMCSTA)

© SunGard 2004-2007 Research Accounting Page 27
Section B: Set Up
Lesson: Setting Up Cost Codes for Cost Share Calculations (Continued)
Procedure Follow these steps to complete the process. Step Action
1 Access the Cost Share Credit Code Maintenance Form (FTMCSTA). Use this form to enter the accounts and percentages for recording cost share credits and to enter a fund code (optional) that can be used as an alternate fund to track cost share activity.
2 Enter a new or existing cost share credit code in the Cost Share Credit Code field. Note: To update an existing Cost Share Credit Code, go to step 6.
3 Perform a Next Block function. Note: For a new Cost Share Credit Code you will receive a pop-up box indicating, “Query caused no records to be retrieved.” Click OK.
4 Enter a description in the Description field if you are creating a new code. 5 Perform a Next Block function. 6 Enter the chart of accounts code in the Chart of Accounts field.
Notes: This code is used to validate the credit account codes that you can enter. This value is displayed from your user profile record and may be overridden. If you are updating an existing Cost Share Credit Code you must perform a Next Record function.
7 Perform a Next Block function. Notes: For a new Cost Share Credit Code you will receive a pop-up box indicating, “Query caused no records to be retrieved.” Click OK If you want to copy data from an existing Cost Share Credit Code, proceed to step 10.

© SunGard 2004-2007 Research Accounting Page 28
Section B: Set Up
Lesson: Setting Up Cost Codes for Cost Share Calculations (Continued)
Procedure, continued
Step Action 8 Enter the account code(s) that will be used to reflect cost share credits in the Account
field. Note: You may enter an account code that has an internal account type of Labor (60) or Expenditure (70) with an account class C for Cost Share, which will be validated against the COA that was entered using the effective date of this code.
9 Enter the percent of cost share to be credited to this account in the Percent field. Note: As you enter percentages in this field, the System totals the entries in the Total Percent field. The total must equal 100% before the record can be saved. An error message is displayed if the value in the Total Percent field does not equal 100%.
10 Select Perform Copy from the Options menu. Note: The Copy window enables you to copy data from one Cost Share Credit Code to the current Cost Share Credit Code entered in the key block. Information is copied based on the effective date specified on the form. The system will select the effective date closest to the one you have entered on the form.
11 Enter a value in the Cost Share Credit Code field, and then click the Save icon. Notes: If you change your mind and don’t want to copy the data, click Exit to cancel. The Error Messages window appears when you try to copy records that are not valid, and displays the errors found. To exit the Error Messages window, select Cancel from the Options menu.
12 Click the Save icon. 13 Click the Exit icon.

© SunGard 2004-2007 Research Accounting Page 29
Section B: Set Up
Lesson: Setting Up Cost Codes for Cost Share Calculations (Continued)
Banner form
Procedure Follow these steps to define the FOAPAL elements used to reflect the cost (or debit) side of the cost share calculations on the Grant fund. Step Action
1 Access the Cost Share Distribution Maintenance Form (FTMCSTD). 2 Enter a new or existing Cost Share Distribution Code or select one from the list in the
Cost Share Distribution Code field. Note: To update an existing Cost Share Distribution Code, go to step 6.
3 Perform a Next Block function. Note: For a new Cost Share Distribution Code you will receive a pop-up box indicating, “Query caused no records to be retrieved.” Click OK to proceed.
4 Enter a description in the Description field if you are creating a new Cost Share Distribution Code.
5 Perform a Next Block function. 6 Enter the chart of accounts code in the Chart of Accounts field.
Notes: This code is used to validate the FOAPAL elements that you can enter. This value is displayed from your user profile record and may be overridden. If you are updating an existing Cost Share Distribution Code you must perform a Next Record function.
7 Perform a Next Block function. Note: If you want to copy data from an existing Cost Share Distribution Code, proceed to step 11.
8 Enter the index code that represents a pre-determined combination of FOAPAL elements in the Index field. Note: This is an optional field.

© SunGard 2004-2007 Research Accounting Page 30
Section B: Set Up
Lesson: Setting Up Cost Codes for Cost Share Calculations (Continued)
Procedure, continued
Step Action 9 Enter the values to which cost sharing will be distributed in the Fund, Organization,
Account, Program, Activity and Location fields. 10 Enter the percentage for each FOAPAL accounting distribution in the Percent field.
Note: You may enter one distribution line at 100% or multiple distribution lines; however, the Total Percent field must equal 100%. The system totals the entries in the Total Percent field. If the value in the Total Percent field does not equal 100%, the record cannot be saved.
11 Select Perform Copy from the Options menu. Note: The Copy window enables you to copy data from one Cost Share Distribution Code to the current Cost Share Distribution Code entered in the key block. Information is copied based on the effective date specified on the form. The system will select the effective date closest to the one you have entered on the form.
12 Enter a value in the Cost Share Distribution Code field. Note: If you change your mind and don’t want to copy the data, click Exit to cancel. Note: An error message appears on the hint line when you try to copy records that are not valid. To continue click the Cancel button.
13 Click the Save icon. 14 Click the Exit icon.

© SunGard 2004-2007 Research Accounting Page 31
Section B: Set Up
Lesson: Establishing Sponsors in Research Accounting
Introduction You can build a database of sponsors or agencies in Banner to which you submit proposals and receive awards on the Agency Code Maintenance Form (FTMAGCY). Using this form will automatically update the Identification table (SPRIDEN).
Banner form The Agency Code Maintenance Form (FTMAGCY)
© SunGard 2004-2007 Research Accounting Page 32
Section B: Set Up
Lesson: Establishing Sponsors in Research Accounting (Continued)
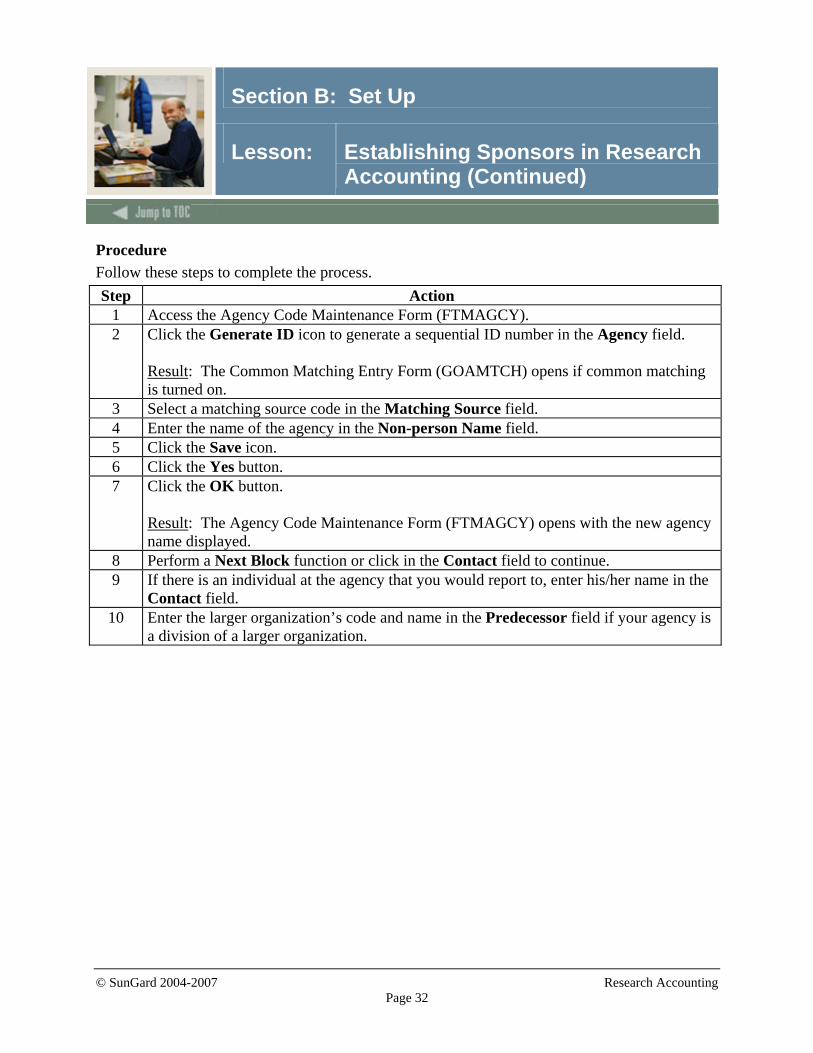
Procedure Follow these steps to complete the process. Step Action
1 Access the Agency Code Maintenance Form (FTMAGCY). 2 Click the Generate ID icon to generate a sequential ID number in the Agency field.
Result: The Common Matching Entry Form (GOAMTCH) opens if common matching is turned on.
3 Select a matching source code in the Matching Source field. 4 Enter the name of the agency in the Non-person Name field. 5 Click the Save icon. 6 Click the Yes button. 7 Click the OK button.
Result: The Agency Code Maintenance Form (FTMAGCY) opens with the new agency name displayed.
8 Perform a Next Block function or click in the Contact field to continue. 9 If there is an individual at the agency that you would report to, enter his/her name in the
Contact field. 10 Enter the larger organization’s code and name in the Predecessor field if your agency is
a division of a larger organization.

© SunGard 2004-2007 Research Accounting Page 33
Section B: Set Up
Lesson: Establishing Sponsors in Research Accounting (Continued)
Address tab
Procedure Follow these steps to complete the process. Step Action
1 Select the Address tab. 2 Select an address type in the Address Type field. 3 Enter all of the address information associated with the sponsor in the appropriate fields.
The Address Type, Sequence Number, City, State or Province, Zip or Postal Code, and Nation fields are required. Note: Repeat the address information for each address associated with the sponsor by performing a Next Record.
4 Click the Save icon. 5 Go back to the main tab and enter a default address type and sequence, this address will
default into the individual grant records. 6 Click the Save icon. 7 Click the Exit icon.
© SunGard 2004-2007 Research Accounting Page 34
Section B: Set Up
Lesson: Defining the Personnel Assigned to a Proposal and/or Grant
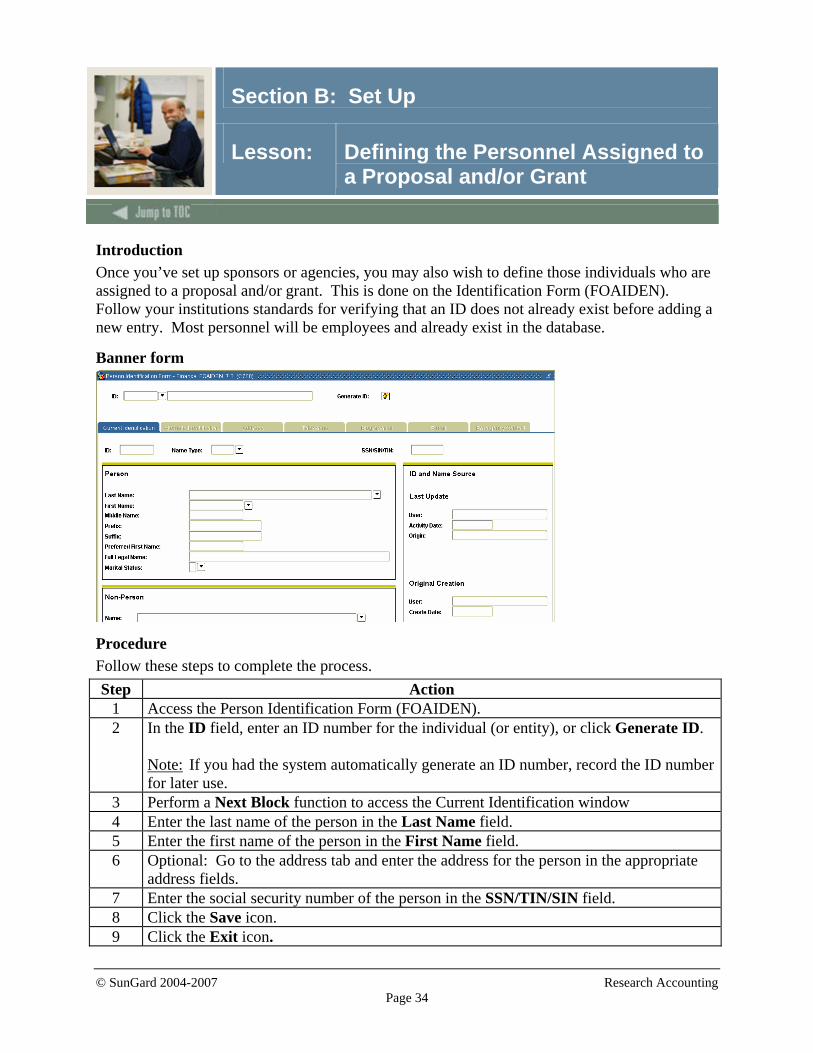
Introduction Once you’ve set up sponsors or agencies, you may also wish to define those individuals who are assigned to a proposal and/or grant. This is done on the Identification Form (FOAIDEN). Follow your institutions standards for verifying that an ID does not already exist before adding a new entry. Most personnel will be employees and already exist in the database.
Banner form
Procedure Follow these steps to complete the process. Step Action
1 Access the Person Identification Form (FOAIDEN). 2 In the ID field, enter an ID number for the individual (or entity), or click Generate ID.
Note: If you had the system automatically generate an ID number, record the ID number for later use.
3 Perform a Next Block function to access the Current Identification window 4 Enter the last name of the person in the Last Name field. 5 Enter the first name of the person in the First Name field. 6 Optional: Go to the address tab and enter the address for the person in the appropriate
address fields. 7 Enter the social security number of the person in the SSN/TIN/SIN field. 8 Click the Save icon. 9 Click the Exit icon.

© SunGard 2004-2007 Research Accounting Page 35
Section B: Set Up
Lesson: Creating and Cross-referencing Sponsors’ Account Codes
Introduction Often a sponsor wants Financial Reporting done using its own account codes. This requires the completion of two forms: • The Sponsor Account Code Maintenance Form (FRVSACT) is used to define a sponsor’s
account codes. • The Institution/Sponsor Account Maintenance Form (FRVISAC) enables you to cross-
reference your account codes to a sponsor’s account codes. By creating this cross-reference, you can view budgets utilizing a sponsor’s account codes or your account codes.
Banner form The Sponsor Account Code Maintenance Form (FRVSACT).

© SunGard 2004-2007 Research Accounting Page 36
Section B: Set Up
Lesson: Creating and Cross-referencing Sponsors’ Account Codes (Continued)
Procedure Follow these steps to complete the process. Step Action
1 Access the Sponsor Account Code Maintenance Form (FRVSACT). 2 In the Agency field, enter or select (F9) the agency code you wish to create sponsor
accounts for. 3 Perform a Next Block function. 4 Enter the sponsor’s account code in the Sponsor Account field. 5 Enter the description of the sponsor’s account code in the Description field. 6 Continue creating sponsor’s account codes on the additional lines. 7 Click the Save icon. 8 Click the Exit icon.

© SunGard 2004-2007 Research Accounting Page 37
Section B: Set Up
Lesson: Creating and Cross-referencing Sponsors’ Account Codes (Continued)
Banner form The Institution/Sponsor Account Maintenance Form (FRVISAC)
Procedure Follow these steps to complete the process. Step Action
1 Access the Institution/Sponsor Account Maintenance Form (FRVISAC). 2 Enter the agency code you wish to cross-reference sponsor accounts to In the Agency
field. 3 Perform a Next Block function.
Note: The Institution Account Cross-reference window enables you to cross-reference your account codes or account types to a sponsor’s account codes. This window displays your account codes that have been previously cross-referenced to the sponsor’s account codes.
4 Enter a chart of accounts code in the COA field. 5 Enter or select an account code in the Institution Account field. 6 Enter or select the code that is the counterpart to your account code in the Sponsor
Account field. Notes: Each enterprise account code must be unique; however, you may map as many of your account codes to the same sponsor account code, as necessary. Continue cross-referencing your account codes to a sponsor’s account codes on the additional lines as needed.
7 Click the Save icon. 8 Click the Exit icon.

© SunGard 2004-2007 Research Accounting Page 38
Section B: Set Up
Lesson: Self Check
Directions Use the information you have learned in this workbook to complete this self check activity.
Question 1 The price of supplies and equipment are examples of indirect costs when administering a grant. True or False
Question 2 The rate of direct costs is 5% of the grant total. True or False

© SunGard 2004-2007 Research Accounting Page 39
Section B: Set Up
Lesson: Answer Key for Self Check
Question 1 The price of supplies and equipment are examples of indirect costs when administering a grant. False. These are examples of direct costs.
Question 2 The rate of direct costs is 5% of the grant total. False. The rate is determined through negotiations with the agency.
© SunGard 2004-2007 Research Accounting Page 40
Section C: Day-to-Day Operations
Lesson: Overview
Introduction The purpose of this section is to explain the regular process and detail the procedures to handle Research Accounting procedures at your institution.
Intended audience Staff members who will be responsible for recording and tracking proposal and grant information and entering budget information for grants.
Objectives At the end of this section, you will be able to • create a proposal • create a proposal budget • create and track events for proposals • create a grant • create a grant budget • create and track events for grants • maintain information on awarding agencies.
Prerequisites To complete this course, you should have completed the Education Practices computer-based training (CBT) tutorial “Banner 7 Fundamentals,” or have equivalent experience navigating in the Banner system.
Section contents Overview ................................................................................................................................40 Setting Up and Maintaining a Proposal..................................................................................41 Tracking Events and Notifications to a Proposal ...................................................................53 Querying a Proposal ...............................................................................................................59 Generating Proposal Reports..................................................................................................67 Creating a Grant and Assigning it to a Fund ..........................................................................73 Creating a Grant Budget.........................................................................................................82 Tracking Events to a Grant.....................................................................................................86 Querying a Grant ....................................................................................................................94 Generating Grant Reports.....................................................................................................111 Self Check ............................................................................................................................113 Answer Key for Self Check..................................................................................................114

© SunGard 2004-2007 Research Accounting Page 41
Section C: Day-to-Day Operations
Lesson: Setting Up and Maintaining a Proposal
Introduction There are two main forms used to set up and maintain a proposal, and create a proposal budget in Research Accounting: Proposal Maintenance Form (FRAPROP): This form is used to enter or update proposal information. It is also used to maintain information such as key personnel, agency information, and cost code information for indirect cost and cost share calculations on the proposal Proposal Budget Form (FRABUDP): This form enables you to enter and track proposal budgets. This form supports budget iterations which may be developed for the entire length of the project or for each year within the project period
Banner Form The Proposal Maintenance Form (FRAPROP).

© SunGard 2004-2007 Research Accounting Page 42
Section C: Day-to-Day Operations
Lesson: Setting Up and Maintaining a Proposal (Continued)
Procedure Follow these steps to complete the process. Step Action
1 Access the Proposal Maintenance Form (FRAPROP). 2 Enter a new or existing proposal code in the Proposal Code field or type NEXT for a
system generated proposal number. 3 Perform a Next Block function.
Note: To create a new proposal from an existing proposal use the Copy Proposal Information function under the Options menu
4 Enter the chart of accounts code (the default value comes from the User Profile Record) in the Chart of Accounts field.
5 Enter the responsible organizational code of the responsible administrative office for this proposal in the Responsible Organization field.
6 Enter the title of the proposal (up to 256 characters) in the Long Title field. Note: The first 35 characters will display in the Title field. You can edit the Title field if desired.
7 Enter the sponsor agency identification code in the Agency field. 8 Enter a principal investigator ID in the Principal Investigator ID field.
Note: If you enter a Principal Investigator ID here, the ID and name will display on the Personnel Information window with an Indicator of 001, and is always hard-coded as the primary person responsible.
9 Enter the original preparation date in the Original Date field. This is a required field. Notes: This date is intended to be the preparer’s date and does not change over the life of the proposal. The current date is displayed, but can be overridden with a prior or future date. This date can be used in ad hoc reporting to track the elapsed time between the Proposal Preparation date and the Grant date. Once the proposal is saved, this date cannot be updated. This date is different from the Project Period Start date, Project Period End date, Expected Grant date, Proposal Due date, and Activity date. It is intended to provide the ability to track proposal to grant or proposal to submission time frames.
© SunGard 2004-2007 Research Accounting Page 43
Section C: Day-to-Day Operations
Lesson: Setting Up and Maintaining a Proposal (Continued)
Procedure, continued
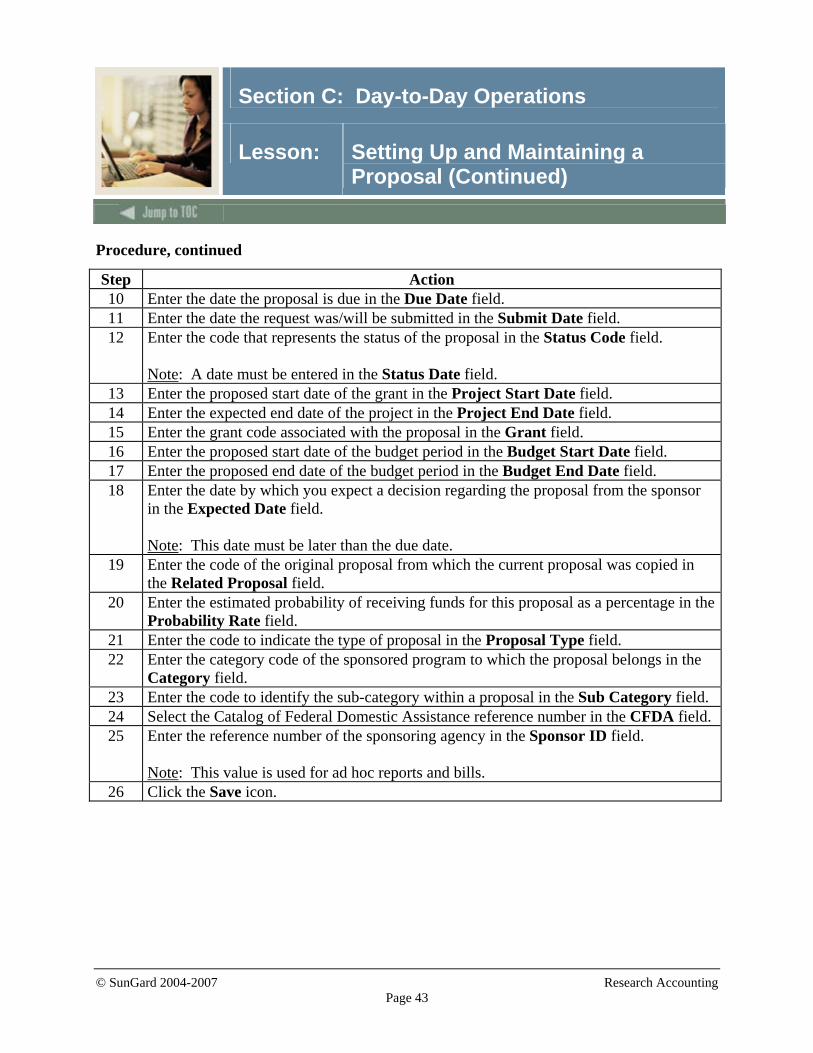
Step Action 10 Enter the date the proposal is due in the Due Date field. 11 Enter the date the request was/will be submitted in the Submit Date field. 12 Enter the code that represents the status of the proposal in the Status Code field.
Note: A date must be entered in the Status Date field.
13 Enter the proposed start date of the grant in the Project Start Date field. 14 Enter the expected end date of the project in the Project End Date field. 15 Enter the grant code associated with the proposal in the Grant field. 16 Enter the proposed start date of the budget period in the Budget Start Date field. 17 Enter the proposed end date of the budget period in the Budget End Date field. 18 Enter the date by which you expect a decision regarding the proposal from the sponsor
in the Expected Date field. Note: This date must be later than the due date.
19 Enter the code of the original proposal from which the current proposal was copied in the Related Proposal field.
20 Enter the estimated probability of receiving funds for this proposal as a percentage in the Probability Rate field.
21 Enter the code to indicate the type of proposal in the Proposal Type field. 22 Enter the category code of the sponsored program to which the proposal belongs in the
Category field. 23 Enter the code to identify the sub-category within a proposal in the Sub Category field. 24 Select the Catalog of Federal Domestic Assistance reference number in the CFDA field. 25 Enter the reference number of the sponsoring agency in the Sponsor ID field.
Note: This value is used for ad hoc reports and bills.
26 Click the Save icon.

© SunGard 2004-2007 Research Accounting Page 44
Section C: Day-to-Day Operations
Lesson: Setting Up and Maintaining a Proposal (Continued)
Proposal Agency tab
Procedure Follow these steps to complete the process. Step Action
1 Select the Proposal Agency tab. 2 Enter the contact person’s name in the Contact field. 3 Verify or add address and predecessor information if needed. 4 Click the Save icon.
Location tab
Procedure Follow these steps to complete the process. Step Action
1 Select the Location tab. 2 Select the location code in the Location field. 3 Click the Save icon.

© SunGard 2004-2007 Research Accounting Page 45
Section C: Day-to-Day Operations
Lesson: Setting Up and Maintaining a Proposal (Continued)
Cost Code tab
Procedure Follow these steps to complete the process. Step Action
1 Select the Cost Code tab. 2 Enter the Chart of Accounts in the Chart of Accounts field, as well as the appropriate
codes for automatic Indirect Cost and Cost Share calculations. 3 Click the Save icon.

© SunGard 2004-2007 Research Accounting Page 46
Section C: Day-to-Day Operations
Lesson: Setting Up and Maintaining a Proposal (Continued)
Personnel tab
Procedure Follow these steps to complete the process. Step Action
1 Select the Personnel tab. 2 Select an ID of the person you want to add to the proposal in the ID field. 3 Select an indicator code in the Indicator field.
Warning: You can only have one primary investigator.
4 Click the Save icon.

© SunGard 2004-2007 Research Accounting Page 47
Section C: Day-to-Day Operations
Lesson: Setting Up and Maintaining a Proposal (Continued)
User Defined Data tab
Procedure Follow these steps to complete the process. Step Action
1 Select the User Defined Data tab. 2 Enter any applicable user codes that were created on FRVSDAT in the Literal and
Value fields. 3 Click the Save icon. 4 Click the Exit icon.

© SunGard 2004-2007 Research Accounting Page 48
Section C: Day-to-Day Operations
Lesson: Setting Up and Maintaining a Proposal (Continued)
Banner form
Procedure Follow these steps to complete the process. Step Action
1 Access the Proposal Budget Form (FRABUDP). Note: This form consists of two tabs. The Budget Header tab allows you to define the proposal budget elements that define the nature of the budget. The Budget Detail tab allows you to enter multiple budget line items, and perform auto calculations of Indirect Cost, Cost Sharing, Waived Indirect, and Fringe.
2 Enter a proposal code in the Proposal field. 3 Enter a budget code in the Budget Code field. 4 Perform a Next Block function.
Note: If the budget exists, its associated attributes (budget description, COA, Indirect Cost and Cost Sharing Basis Codes, Indirect Cost and Cost Sharing Rate Codes) that were used in developing the budget are displayed.
5 Enter the description for the budget code in the Budget Description field. 6 Enter the code to identify the accounting or reporting entity associated with the proposal
budget in the Chart of Accounts field.

© SunGard 2004-2007 Research Accounting Page 49
Section C: Day-to-Day Operations
Lesson: Setting Up and Maintaining a Proposal (Continued)
Procedure, continued
Step Action 7 Click the Select Budgets checkbox to build a new budget from a previously created
budget code. Notes: Navigation from this checkbox automatically takes you to the Proposal Budget Selection Form (FRCBSEL). On FRCBSEL, you may select one or more budget codes that have already been created for existing proposals and use them as a basis for creating your new budget. If more than one budget is selected, they are consolidated into one budget by account code or title. You may not use the Select Budgets checkbox feature if you have already created budget line items for this budget code
8 Enter the date the budget period ends in the End Date field. 9 Enter the year to which this budget applies in the Year field. 10 Enter the budget type in the Type field.
Note: The Indirect Cost Basis Code, Indirect Cost Rate Code, The Cost Sharing Basis Code, and Cost Sharing Rate Code fields will display the values set on the Proposal Maintenance Form (FRAPROP).
11 Enter the total amount of money requested from the sponsoring agency in the Total Requested Amount field.

© SunGard 2004-2007 Research Accounting Page 50
Section C: Day-to-Day Operations
Lesson: Setting Up and Maintaining a Proposal (Continued)
Options – Budget Detail Information

© SunGard 2004-2007 Research Accounting Page 51
Section C: Day-to-Day Operations
Lesson: Setting Up and Maintaining a Proposal (Continued)
Procedure Follow these steps to complete the process. Step Action
1 Select Budget Detail tab.
Note: The Budget Detail tab allows you to add budget line items. With this tab, you can:
• Enter budget information by supplying account code information
• Enter a description of what you are budgeting without having to enter the account, proposed budget, and cost sharing amounts.
• Enter a combination of the budget line items where you provide the account code (if established) and some lines where only the title is entered.
2 Enter the account code in the Account field, or the title of the account code in the Title field.
3 Enter the amount of money requested from a sponsoring agency for the account line item in the Proposed Budget field.
4 Enter the amount of money the organization agreed to contribute toward the account line item in the Cost Sharing field.

© SunGard 2004-2007 Research Accounting Page 52
Section C: Day-to-Day Operations
Lesson: Setting Up and Maintaining a Proposal (Continued)
Procedure, continued
Step Action 5 The Project Value field displays the sum of the proposed budget and the cost share.
Notes: The Automatic Calculations feature in the proposal budget process allows the system to automatically calculate indirect cost or cost share based on the proposed budget amount. The calculation includes the waived indirect amount. When the indirect cost rate has a memo rate, the indirect cost foregone is put in the cost share column of the waived indirect line. So the first four sequences in this form are reserved for Indirect Cost, Fringe, Cost Share Maximum Amount, and Waive Indirect. You cannot change the title of these lines. You may supply the proposed budget or cost sharing amounts. The indirect cost amount can be automatically calculated by the system if you have supplied the I/C basis code and the I/C rate code in the main window, and if you have supplied account codes in the budget detail lines. Based on the I/C basis code, the system will determine what accounts, exclusions, or overrides should be used in the calculation of the indirect cost amounts. The system looks at the indirect cost rate to determine the rate for this calculation. The Fringe amount line may also be automatically calculated if you supplied the fringe rate in the main window and if you have supplied the account codes in your entry of budget detail lines. From the account codes entered, the system determines which accounts have an internal account type of 60 (Labor), and it multiplies the rate against the proposed labor dollars to store the fringe amount in the fringe amount budget line.
6 Select Calculate Information Now from the Options menu to calculate and display the calculations in their respective budget lines.
7 Click the Save icon. 8 Click the Exit icon.

© SunGard 2004-2007 Research Accounting Page 53
Section C: Day-to-Day Operations
Lesson: Tracking Events and Notifications to a Proposal
Introduction Events in the Research Accounting Module are actions that need to be taken to satisfy requirements for the administration of the proposal or grant. Proposal submissions and reporting requirements, for example, would qualify as events. The Research Accounting Module provides for the scheduling of these events such that the responsible personnel will receive automatic notification, and will be required to date and designate whether and when these events have been satisfied. The FRPMESG process must be running in sleep/wake mode in order for the system to generate automatic notification. There are several forms used to track events to a proposal:
Event Code Validation Form The Event Code Validation Form (FRVEVNT) is used to maintain event codes. You may add a new event code, delete an event code, or update an existing event code or description. Notes: Event codes can be used to identify reports, requirements, reminders, etc., to be associated with a proposal or grant. Events can be one of three types: Bills (B), Reports (R), or Others (E).
Event Group Validation Form The Event Group Validation Form (FRVEGRP) is used to assign individual events to an event grouping code that will be associated with a particular proposal.
The Proposal Events Assignment Form The Proposal Events Assignment Form (FRAEVPA) is used to attach event codes or event groups to a proposal code.
The Proposal Event Action Form The Proposal Event Action Form (FRAEVNP) allows you to satisfy or cancel an event that has been created or completed. Note: when viewing this form you will only be able to view event assignments for your logon. Other assignments can not be seen here.
The Entity Text Form The Entity Text Form (FOAETXT) is used to view, enter or edit text for events assigned to a proposal.

© SunGard 2004-2007 Research Accounting Page 54
Section C: Day-to-Day Operations
Lesson: Tracking Events and Notifications to a Proposal (Continued)
Banner form The Event Code Validation Form (FRVEVNT).
Procedure Follow these steps to complete the process. Step Action
1 Access the Event Code Validation Form (FRVEVNT). 2 Enter a code used to represent the user-defined event in the Event Code field. 3 Enter a brief description of the event code in the Description field. 4 Enter the code for the event type in the Type field.
Note: Acceptable values are E (Event), B (Bill), and R (Report).
5 Click the Save icon. 6 Click the Exit icon.

© SunGard 2004-2007 Research Accounting Page 55
Section C: Day-to-Day Operations
Lesson: Tracking Events and Notifications to a Proposal (Continued)
Banner form The Event Group Validation Form (FRVEGRP).
Procedure Follow these steps to assign individual event codes created in FRVEVNT to an event group code that will be associated with a particular type of proposal. Step Action
1 Access the Event Group Validation Form (FRVEGRP). 2 Enter a new event group code in the Event Group Code field. 3 Enter a brief description for the new event group code in the Description field. 4 Select a code in the Event Code field. 5 Click the Save icon. 6 Click the Exit icon.

© SunGard 2004-2007 Research Accounting Page 56
Section C: Day-to-Day Operations
Lesson: Tracking Events and Notifications to a Proposal (Continued)
Banner form The Proposal Events Assignment Form (FRAEVPA).
Procedure Follow these steps assign event codes or event groups to a proposal code. Step Action
1 Access the Proposal Events Assignment Form (FRAEVPA). 2 Enter your proposal code in the Proposal Code field. 3 Select the Event Management radio button to assign event codes to a proposal code. 4 Enter the number of days before an event is due in which the user should be notified to
satisfy or perform a particular event in the Number of Days Reminder field. 5 Perform a Next Block function, to access the Event Assignment Window. 6 Enter the event in the Event Code field. 7 Enter the number of days before/after the begin/end date that the event is due in the
Number of Days field. Notes: This field is used for one-time events. If you enter a value in this field you must select a value for the Begin Date field. You may enter data in the Number of Days and Begin Date fields or the Date From and Date To fields, but not both.
8 Select the date from the pull-down list in the Begin Date field. Note: This field is required if you entered data in the Number of Days field.
9 Enter the date that the first event is due in the Date From field. Note: This field is used for recurring events. If you enter a value here you must also enter a value in the Date To and Frequency fields.

© SunGard 2004-2007 Research Accounting Page 57
Section C: Day-to-Day Operations
Lesson: Tracking Events and Notifications to a Proposal (Continued)
Procedure, continued
Step Action 10 Enter the date that the reports are no longer due in the Date To field.
Note: This field is used for recurring events. If you enter a value here you must also enter a value in the Date From and Frequency fields.
11 Select how often the event occurs in the Frequency field. Note: This field is required if the Date To and Date From fields have been populated.
12 Enter the user ID of the individual primarily responsible for the satisfaction of this event in the Responsible User ID field.
13 Click the Proxy User ID button to select a secondary person to be responsible for the satisfaction of this event.
14 Click the OK button to return to the Event Assignment Window. Note: Steps 15 – 19 are optional.
15 Highlight a pending event. 16 Click Options and select Text Information this will take you to the Entity Text Form
(FOAETXT). 17 Enter the text related to the event code for your proposal. Use the down-arrow key to
move to a new line. 18 Click the Print checkbox if you want the selected text to print on a document. 19 Click the Save icon. 20 Click the Exit icon.

© SunGard 2004-2007 Research Accounting Page 58
Section C: Day-to-Day Operations
Lesson: Tracking Events and Notifications to a Proposal (Continued)
Banner form The Proposal Event Action Form (FRAEVNP).
Procedure Follow these steps to satisfy or cancel an event that has been created or completed. Step Action
1 Access the Proposal Event Action Form (FRAEVNP). Note: when viewing this form you will only be able to view event assignments for your logon. Other assignments can not be seen here.
2 Enter the proposal code in the Proposal Code field. Note: This code must have pending events attached to it.
3 Perform a Next Block function. 4 Use the down-arrow key to access the event that you would like to satisfy or cancel. 5 Enter S (Satisfy) or C (Cancel) in the Status field. 6 Click the Save icon.
Note: The Approved By and Date fields will be populated.
7 Click the Exit icon.
© SunGard 2004-2007 Research Accounting Page 59
Section C: Day-to-Day Operations
Lesson: Querying a Proposal
Introduction There are several different methods used to query a proposal. Each method requires a specific form:
Proposal Agency Inquiry Form The Proposal Agency Inquiry Form (FRIASTP) is used to monitor all proposal activity by agency.
Proposal Budget Totals Form The Proposal Budget Totals Form (FRIBUDT) is used to perform an online query of summarized budget data by Institution, Sponsor, Title, or ATYP levels for each proposal budget code. This form displays cost sharing and sponsor-funded amounts information.
Proposal Budget Distribution Inquiry Form The Proposal Budget Distribution Inquiry Form (FRIBDSP) is used to view budget distributions.
Proposal/Budget Codes Inquiry Form The Proposal/Budget Codes Inquiry Form (FRIBUDP) provides a list of proposal and budget codes and their related title/description.
Proposal Title Search Form The Proposal Title Search Form (FRIKPRO) is used to search for a proposal by the words and/or characters in the proposal’s title. This form queries both the long and short title, and allows you to use “wildcards” to search all proposals using a key word from within its title.
Proposal Code Inquiry Form The Proposal Code Inquiry Form (FRIPROP) displays a list of all proposal codes.
Proposal Status History Query Form The Proposal Status History Query Form (FRIPRST) is used to view proposal status history information.
Proposal Personnel Query Form The Proposal Personnel Query Form (FRIPSTP) is used to monitor proposal activity by primary personnel.

© SunGard 2004-2007 Research Accounting Page 60
Section C: Day-to-Day Operations
Lesson: Querying a Proposal (Continued)
Banner form The Proposal Agency Inquiry Form (FRIASTP).
Procedure Follow these steps to monitor all proposal activity by agency. Step Action
1 Access the Proposal Agency Inquiry Form (FRIASTP). 2 Enter an agency code or select one from the list in the Agency field. 3 Perform a Next Block function. 4 Select Proposal Information from the Options menu to view the Proposal associated
with this agency 5 Click the Exit icon to return to the Proposal Agency Inquiry Form. 6 Select Grant Information from the Options menu to view the Grant information as well
as the amount requested for this proposal 7 Click the Exit icon to return to the Proposal Agency Inquiry Form. 8 Click the Exit icon.

© SunGard 2004-2007 Research Accounting Page 61
Section C: Day-to-Day Operations
Lesson: Querying a Proposal (Continued)
Banner form
Procedure Follow these steps to perform an online query of summarized budget data by Institution, Sponsor, Title or Account Type levels for each proposal budget code. Step Action
1 Access the Proposal Budget Totals Inquiry Form (FRIBUDT). 2 Enter the proposal code you wish to query in the Proposal field,. 3 Enter the budget code you wish to query in the Proposal Budget Code field. 4 In the Display by block, click the appropriate radio button.
Button Description Institution
All lines within the proposal budget are displayed in order by account code.
Sponsor You can view the budget the way the agency or sponsor wants to see it.
Title
All lines within the proposal budget are displayed in account title order.
Account Type Level 2
Only those lines within the proposal budget that contain accounts are rolled into their account types at level 2 to be summarized and displayed.
Account Type Level 1
Only those lines within the proposal budget that contain accounts are rolled into their account types at level 1 to be summarized and displayed.
5 Perform a Next Block function. 6 Click the Exit icon.

© SunGard 2004-2007 Research Accounting Page 62
Section C: Day-to-Day Operations
Lesson: Querying a Proposal (Continued)
Banner form
Procedure Follow these steps to view budget distributions. Step Action
1 Access the Proposal Budget Distribution Inquiry Form (FRIBDSP). 2 Enter the proposal code you wish to query in the Proposal field. 3 Enter the type of proposal in the Type field.
Note: In the Budget Code and Account fields, by specifying a budget code and an account code, you can see budget line items just for those combinations. By leaving the budget code blank and entering the type, you can view line items for multiple budgets of that type.
4 Perform a Next Block function. 5 Select Budget Total Information from the Options menu. 6 Click the Exit icon to return to the Proposal Distribution Inquiry Form. 7 Click the Exit icon.

© SunGard 2004-2007 Research Accounting Page 63
Section C: Day-to-Day Operations
Lesson: Querying a Proposal (Continued)
Banner form
Procedure Follow these steps to view a list of Proposal and budget codes and their related titles/descriptions. Step Action
1 Access the Proposal/Budget Codes Inquiry Form (FRIBUDP). 2 Click the Exit icon.

© SunGard 2004-2007 Research Accounting Page 64
Section C: Day-to-Day Operations
Lesson: Querying a Proposal (Continued)
Banner form
Procedure Follow these steps to search for a proposal by the words and/or characters in the proposal’s long and short titles with the use of “wildcards.” Step Action
1 Access the Proposal Title Search Form (FRIKPRO). 2 Enter any part of the title that you know in the Search Value field.
Example: If the only word that you know in the proposal’s title is cancer, enter the following in this field using the % sign as a wildcard character: %cancer%.
3 Perform a Next Block function to display the proposals that match the criteria you entered.
4 Select Proposal Information from the Options menu to view the Proposal Maintenance Form (FRAPROP).
5 Click the Exit icon to return to the Proposal Title Search Form. 6 Select Grant Information from the Options menu to view the Grant Maintenance Form
(FRAGRNT). 7 Click the Exit icon to return to the Proposal Title Search Form. 8 Click the Exit icon.

© SunGard 2004-2007 Research Accounting Page 65
Section C: Day-to-Day Operations
Lesson: Querying a Proposal (Continued)
Banner form
Procedure Follow these steps to display a list of all proposal codes. Step Action
1 Access the Proposal Codes Inquiry Form (FRIPROP). 2 Enter the Proposal Code you want to view in the Proposal Code field. To view all
codes, leave this field blank. 3 Execute the query (F8). 4 Use the Next Record and Previous Record icons to scroll through the various proposal
codes. 5 Click the Exit icon.
Banner form
Procedure Follow these steps to view proposal status history information. Step Action
1 Access the Proposal Status History Query Form (FRIPRST). 2 Enter a proposal code in the Proposal field. 3 Perform a Next Block function to view the status codes for the selected proposal code
beginning with the most recent. 4 Click the Exit icon.

© SunGard 2004-2007 Research Accounting Page 66
Section C: Day-to-Day Operations
Lesson: Querying a Proposal (Continued)
Banner form
Procedure Follow these steps to monitor proposal activity, if you are primary personnel. Step Action
1 Access the Proposal Personnel Query Form (FRIPSTP). 2 Enter your personnel ID in the Personnel ID field. 3 Perform a Next Block function to view the proposal codes and corresponding values for
the personnel indicated. 4 Select Proposal Information from the Options menu to view the Proposal Maintenance
Form (FRAPROP). 5 Click the Exit icon to return to the Proposal Personnel Query Form. 6 Click the Exit icon.

© SunGard 2004-2007 Research Accounting Page 67
Section C: Day-to-Day Operations
Lesson: Generating Proposal Reports
Introduction The following proposal reports support the Research Accounting process:
Agency Budget Report The Agency Budget Report (FRRABUD) allows you to print a proposal budget so that it can be forwarded to the agency. The report can be run in either Audit or Update mode.
Proposal Events Report The Proposal Events Report (FRREVNP) displays events and reminders associated to a proposal. You may choose to view events for a specific Personnel indicator; for a specific time period; or for a range of proposals, a specific proposal, or a selection of proposals.
Grant Interface Processes (FRPGINF and FRPBINF) The Grant Interface processes enable you to maintain proposal and grant information in a system external to Banner while simultaneously maintaining billing and accounting information within the Banner environment. Features of these processes include the following: • The definition of the data elements for collector tables that hold the data loaded from an
external source. • New processes that insert and update all associated grant tables including grant budget tables,
grant billing tables, grant events, and grant user-defined fields. The client is responsible for developing a client-specific program that loads data from an external source into collector tables. After these data are loaded into the collector tables, the interface processes are submitted using Banner’s job submission module. The process can be run at your discretion. These processes will not be demonstrated during this training as client external system data is not available. Refer to the Bookshelf documentation Banner 7 Chapter 2 Processing, “How to interface Grant information from an external system” for detailed information regarding these processes.

© SunGard 2004-2007 Research Accounting Page 68
Section C: Day-to-Day Operations
Lesson: Generating Proposal Reports (Continued)
Banner form The Agency Budget Report (FRRABUD).

© SunGard 2004-2007 Research Accounting Page 69
Section C: Day-to-Day Operations
Lesson: Generating Proposal Reports (Continued)
Procedure Follow these steps to complete the process. Step Action
1 Access the Agency Budget Report (FRRABUD). 2 Enter the desired printer name in the Printer field.
Note: You can enter DATABASE to write the report to a table for on-line viewing and to enable the saving of the report to a shared folder on a designated network drive.
3 Enter values for the parameters as directed by your instructor. Note: If the Proposal Code parameter is left blank, all proposal codes will be included. If the Budget Code parameter is left blank, all budget codes will be included.
4 Click the Save Parameter Set as checkbox. 5 Enter a name and description in the Name and Description fields. 6 Click the Submit radio button. 7 Click the Save icon to execute the report.
Result: The Auto hint line displays the job submission number for the report log and list file.
8 Select Review Output on the Options menu to review the report. 9 Click the Exit icon.

© SunGard 2004-2007 Research Accounting Page 70
Section C: Day-to-Day Operations
Lesson: Generating Proposal Reports (Continued)
Banner form
Procedure Follow these steps to display events and reminders associated with a proposal. You may choose to view events for a specific personnel indicator; for a specific time period; or for a range of proposals, a specific proposal, or a selection of proposal. Step Action
1 Access the Proposal Events Report (FRREVNP). 2 Enter the desired printer name in the Printer field.
Note: You can enter DATABASE to write the report to a table for on-line viewing and to enable the saving of the report to a shared folder on a designated network drive.

© SunGard 2004-2007 Research Accounting Page 71
Section C: Day-to-Day Operations
Lesson: Generating Proposal Reports (Continued)
Procedure, continued
Step Action 3 Enter these parameter values.
Parameter Description Parameter 01: Report Option
Indicate the way you want to sort events. This is a required field. You may enter one of the following option values:
1. Sort by responsible organization 2. Sort by proposal
Parameter 02: Begin Date
Enter the first date you want to include in the report.
Parameter 03: End Date
Enter the last date you want to include in the report.
Parameter 04: Personnel Indicator
Enter the Personnel ID of the person for whom you want to view events. The default is 001 (Principal Investigator). This is a required field.
Parameter 05: Event Code
Enter the code representing the event. You may enter a partial event code with a wildcard (%). When left blank, all events will display.
Parameter 06: Value Indicator
Indicate the type of events you want to include in the report. This is a required field. Values are:
A – All events S – Satisfied events
P – Pending events C – Canceled events
Parameter 07: Proposal
Enter the user-defined code representing a proposal. Note: You may enter a partial proposal code with a wildcard (%). If left blank, all proposals will be included.
Parameter 08: Chart of Accounts
Enter the code representing an accounting or reporting entity. This is a required parameter.

© SunGard 2004-2007 Research Accounting Page 72
Section C: Day-to-Day Operations
Lesson: Generating Proposal Reports (Continued)
Procedure, continued
Step Action 3 Enter these parameter values.
Parameter Description Parameter 09: Responsible Orgn Option
This field indicates the way you want to enter organization codes. Values are:
A – All organization codes W – Search for a specific organization code using a wildcard R – Enter a range of organization codes
S – Enter a specific organization code Parameter 10: From Responsible Orgn
Enter the first organization code in a series. Note: This field is required only if the Responsible Orgn Option field’s value is R.
Parameter 11: To Responsible Orgn
Enter the last organization code in a series. Note: This field is required only if the Responsible Orgn Option field’s value is R.
Parameter 12: Responsible Orgn
Enter the code representing an administrative office responsible for a grant. . Note: This field is required only if the Responsible Orgn Option field’s value is W or S. You may use a wildcard (%) if the Responsible Orgn Option field’s value is W.
4 Click the Save Parameter Set as checkbox. 5 Enter a name and description in the Name and Description fields. 6 Click the Submit radio button. 7 Click the Save icon to execute the report.
Result: The Auto hint line displays the job submission number for the report log and list file.
8 Select Review Output on the Options menu to review the report. 9 Click the Exit icon.
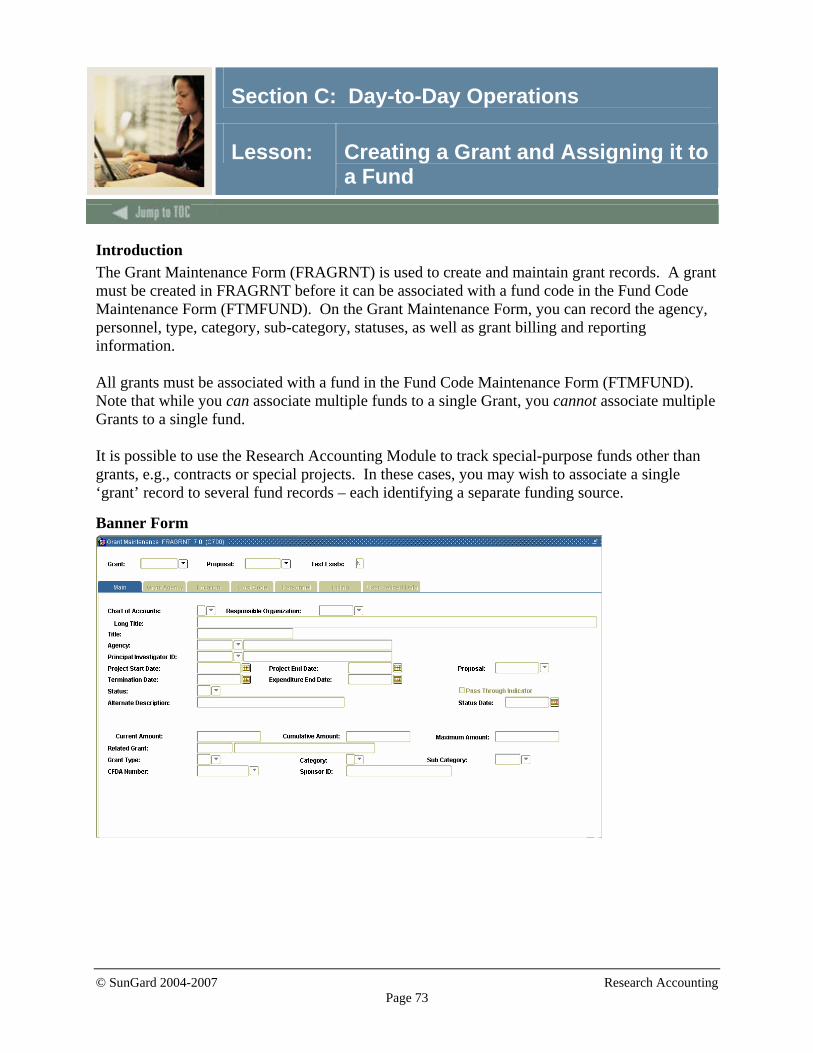
© SunGard 2004-2007 Research Accounting Page 73
Section C: Day-to-Day Operations
Lesson: Creating a Grant and Assigning it to a Fund
Introduction The Grant Maintenance Form (FRAGRNT) is used to create and maintain grant records. A grant must be created in FRAGRNT before it can be associated with a fund code in the Fund Code Maintenance Form (FTMFUND). On the Grant Maintenance Form, you can record the agency, personnel, type, category, sub-category, statuses, as well as grant billing and reporting information. All grants must be associated with a fund in the Fund Code Maintenance Form (FTMFUND). Note that while you can associate multiple funds to a single Grant, you cannot associate multiple Grants to a single fund. It is possible to use the Research Accounting Module to track special-purpose funds other than grants, e.g., contracts or special projects. In these cases, you may wish to associate a single ‘grant’ record to several fund records – each identifying a separate funding source.
Banner Form

© SunGard 2004-2007 Research Accounting Page 74
Section C: Day-to-Day Operations
Lesson: Creating a Grant and Assigning it to a Fund (Continued)
Procedure Follow these steps to complete the process. Step Action
1 Access the Grant Maintenance Form (FRAGRNT). 2 Enter a new or existing grant code, or type NEXT for a system generated proposal
number in the Grant Code field.
IF you want to create a grant from…
THEN…
scratch perform a Next Block function a proposal enter the proposal code in the Proposal field and
perform a Next Block function from an existing grant perform a Next Block function. Select Copy
Grant Information from the Options menu. Type in the grant code or select from the LOV (F9) and click OK.
3 Enter the chart of accounts code (the default value comes from the User Profile Record) in the Chart of Accounts field.
4 Enter the responsible organizational code of the responsible office for this grant in the Responsible Organization field.
5 Enter the title of the grant (up to 256 characters) in the Long Title field. Note: The first 35 characters will display in the Title field. You may change the text in this field if you want.
6 Enter the sponsor agency identification code in the Agency field. 7 Enter a principal investigator ID in the Principal Investigator ID field.
Note: If you enter a Principal Investigator ID here, the ID and name will display on the Personnel Information window with an Indicator of 001, and is hard-coded as the primary person responsible.
8 Enter the proposed start date of the grant in the Project State Date field.

© SunGard 2004-2007 Research Accounting Page 75
Section C: Day-to-Day Operations
Lesson: Creating a Grant and Assigning it to a Fund (Continued)
Procedure, continued
Step Action 9 Enter the expected end date of the project in the Project End Date field. 10 The Proposal field will automatically be populated with the proposal code if you created
the grant from a proposal. 11 Set the date in the Termination Date field.
Note: This date will default into the termination date on the FTMFUND record. This is the date that you want transactions to stop posting for this grant unless the transaction is completed by an authorized user. For this example use 60 days after the Project End Date.
12 Set the Expenditure End Date to a date after the Project End Date Note: The Expenditure End Date allows you to define a period after the Termination Date to post expenses to the grant by persons authorized for ‘Expenditure End’ posting in the User Profile Form (FOMPROF). This period is often referred to as a ‘Trail Out’ period.
13 Enter the code that represents the status of the grant from the LOV (F9) created in FTMSDAT from an earlier exercise in the Status Code field. Note: A date must be entered in the Status Date field.
14 Enter the dollar amounts for the Current Amount, Cumulative Amount and Maximum Amount fields for this grant.
15 Enter the code to indicate the type of grant in the Grant Type field. 16 Enter the category code of the sponsored program to which the grant belongs from the
LOV (F9) in the Category field. 17 Enter the code to identify the sub-category within a grant from the LOV (F9) in the Sub
Category field. 18 Enter the Catalog of Federal Domestic Assistance reference number from the LOV (F9)
in the CFDA field. 19 Enter the reference number of the sponsoring agency in the Sponsor ID field. This
value is used for ad hoc reports and bills. 20 Click the Save icon.

© SunGard 2004-2007 Research Accounting Page 76
Section C: Day-to-Day Operations
Lesson: Creating a Grant and Assigning it to a Fund (Continued)
Grant Agency tab
Procedure Follow these steps to complete the process. Step Action
1 Select the Grant Agency tab. 2 Update the Grant Agency Information window. 3 Click the Save icon.
Location tab
Procedure Follow these steps to complete the process. Step Action
1 Select the Location tab. 2 Select the location code in the Location field. 3 Click the Save icon.

© SunGard 2004-2007 Research Accounting Page 77
Section C: Day-to-Day Operations
Lesson: Creating a Grant and Assigning it to a Fund (Continued)
Cost Code tab
Procedure Follow these steps to complete the process. Step Action
1 Select the Cost Code tab. 2 Enter the Chart of Accounts in the COA field, as well as the appropriate codes for
automatic Indirect Cost and Cost Share calculations. 3 Click the Save icon.

© SunGard 2004-2007 Research Accounting Page 78
Section C: Day-to-Day Operations
Lesson: Creating a Grant and Assigning it to a Fund (Continued)
Personnel tab
Procedure Follow these steps to complete the process. Step Action
1 Select the Personnel tab. 2 Select additional personnel in the ID field. 3 Select a code in the Indicator field.
Note: If the personnel being added to the grant have the responsibility to sign a bill or report enter the format in the Billing/Report Format field. When the bill or report is printed, his/her name will appear in the signature block of the document.
4 Click the Save icon.

© SunGard 2004-2007 Research Accounting Page 79
Section C: Day-to-Day Operations
Lesson: Creating a Grant and Assigning it to a Fund (Continued)
User Defined Data tab
Procedure Follow these steps to complete the process. Step Action
1 Select the User Defined Data tab. 2 Select user defined data applicable to this grant in the Literal and Value fields. 3 Click the Save icon. 4 Click the Exit icon.

© SunGard 2004-2007 Research Accounting Page 80
Section C: Day-to-Day Operations
Lesson: Creating a Grant and Assigning it to a Fund (Continued)
Banner form The Fund Code Maintenance Form (FTMFUND)
Procedure Follow these steps to complete the process. Step Action
1 Access the Fund Code Maintenance Form (FTMFUND). 2 Enter B (or your Chart of Accounts code) in the Chart of Accounts field. 3 Enter your Grant code in the Grant field.
Note: You can query this field by clicking on the Search icon.
4 Tab to the Fund field and enter a new code to associate it to the grant. Note: To determine a new fund code, examine the fund codes from the List of Values (F9). Perform an Enter Query (F7). If you are using Chart B, enter ‘B’ in the COA column and ‘2%’ in the Code column to query the restricted funds. Perform an Execute Query (F8) and select the best logical point for inserting a new fund code number. Every participant should select a unique code to avoid attempting to create the same record.

© SunGard 2004-2007 Research Accounting Page 81
Section C: Day-to-Day Operations
Lesson: Creating a Grant and Assigning it to a Fund (Continued)
Procedure, continued
Step Action 5 The Effective Date field will default to the current date.
Note: Transactions cannot be posted to this fund prior to the effective date. In most cases, you will want this date to correspond to the start date of your grant or before. For your test grant, be sure to use a date prior to today.
6 The Termination Date and Expenditure End Date will default from your grant, unless you left these fields blank in FRAGRNT. Note: No transactions can be posted to this fund after the Expenditure End Date.
7 Ensure that the Data Entry check box is selected, which will permit posting to this fund 8 Select the Fund Type that corresponds to the new fund code. 9 Select a Predecessor Fund (‘roll-up’ fund) for the new fund code. 10 Enter a valid account code for Unbilled Accrual Account (if you are using Chart B, use
account code 1319). 11 Enter a valid Revenue Account for grant revenue (if you are using Chart B, use account
code 5520) 12 Set the Restriction Indicator appropriately for your fund 13 Enter the default Organization, Program, Activity and Location codes that you want
to be used for operating ledger postings (budget, revenue and expense) associated with this grant.
14 Click the Save icon. 15 Select I/C C/S Code Information from the Options menu to access the Research
Accounting Fund Maintenance Form (FRMFUND). 16 Tab through the fields to default the information from the grant record.
Notes: To complete the Indirect Cost and Cost Share fields select Default Grant Codes from the Options menu To enter grant-billing information, select Billing Information from the Options menu.
17 Enter a valid account code for Billed Account Receivables in the Billed Accounts Receivable Account Code field (if you are using Chart B, use 1320).
18 Click the Save icon. 19 Click the Exit icon.

© SunGard 2004-2007 Research Accounting Page 82
Section C: Day-to-Day Operations
Lesson: Creating a Grant Budget
Introduction The Grant Budget Form (FRABUDG) enables you to create grant budgets either by entering original budget information or by copying an existing grant budget. Grant budgets created using this form will be interfaced and posted to the operating ledger using the Transaction Interface Process (FGRTRNI) and Posting Process (FGRACTG).
Banner form The Grant Budget Form (FRABUDG).

© SunGard 2004-2007 Research Accounting Page 83
Section C: Day-to-Day Operations
Lesson: Creating a Grant Budget (Continued)
Procedure Follow these steps to complete the process. Step Action
1 Access the Grant Budget Form (FRABUDG). 2 Enter the grant code in the Grant field. 3 Enter a budget code to identify the grant budget in the Budget Code field.
Note: Multiple grant budgets may be developed for a grant, by assigning each a new budget code.
4 Perform a Next Block function. 5 Enter a brief description in the Budget Description field. 6 Enter the chart of account code in the Chart of Accounts field. 7 The Budget Begin Date and End Date fields will default from the grant. 8 Enter the last two digits of the budget year in the Year field. 9 Enter a budget type in the Type field.
Note: Seed data acceptable values are A (active) or W (working).
10 Enter the date in the Transaction Date field. Note: The current date will be the default.
11 Click the Reversal checkbox if you want the completed and posted grant budget to reverse a previously posted grant budget.
12 Enter the chart of accounts code that the budget line items will be posted to in the Chart of Accounts field.
13 Enter an index code if you are using index codes and they have been set up in FTMACCI in the Index field.
14 Enter the fund code that you assigned to your grant in the preceding lesson in the Fund field. If you leave this field blank, no defaulting will occur in the Grant budget line items section
15 Enter the organization code that will be used for operating ledger postings (budget, revenue and expense) for this grant in the Organization field. Note: This will be the organization code you entered as a default for your fund in the preceding lesson.

© SunGard 2004-2007 Research Accounting Page 84
Section C: Day-to-Day Operations
Lesson: Creating a Grant Budget (Continued)
Procedure, continued
Step Action 16 Enter the program code that will be used for operating ledger postings (budget, revenue
and expense) for this grant in the Program field. Note: This will be the program code you entered as a default for your fund in the preceding lesson.
17 Enter the activity code (or leave blank) in the Activity field. 18 Enter the location code (or leave blank) in the Location field. 19 Select Cost Code Information from the Options menu to review or change the Grant
Cost Codes for indirect costs and cost share. 20 Click the Credit Indirect Cost checkbox if you want to credit indirect cost when
posting the grant budget. 21 Click the Credit Cost Share checkbox if you want to credit cost share when posting the
grant budget. 22 Click the Distribute Cost Share checkbox if you want to distribute cost share when
posting the grant budget. 23 Perform a Next Block function or select Info in Worksheet Format from the Options
menu. 24 Enter or modify the six-character account code in the Account field.
Note: At least one account code per distribution is required. Do not enter an account code in the two rows labeled ‘Indirect Cost Expense’ and ‘Cost Share Maximum Amount’. These rows are reserved for Indirect Cost and Cost Share calculations.
25 Enter or modify the line item budget amount in the Budget field. Note: This amount is what will be rolled to the ledgers for the FOAPAL distribution that exists to its right.
26 Use your down-arrow key to move to the next line and enter another valid account code in the Account field, then another budget amount in the Budget column. Continue to do so until you have entered the entire budget for this grant.
27 Select Calculate Information Now from the Options menu. The system will total your budget entries and calculate the amounts for indirect cost and cost share based on the cost codes entered on the Grant Cost Codes window. Note: You may receive warnings that Indirect Cost and Cost Share cannot be calculated if you did not enter the indirect cost or cost share codes.

© SunGard 2004-2007 Research Accounting Page 85
Section C: Day-to-Day Operations
Lesson: Creating a Grant Budget (Continued)
Procedure, continued
Step Action 28 Select the Calculate Information Now option to change an amount in the Budget field. 29 When you are satisfied with your budget figures, perform a Next Block or select Process
and Post Entries from the Options menu. 30 Click on the Completion button or select Complete from the Options menu. 31 Click the OK button when you receive the message Grant Budget Completed and
Forwarded to the Transaction Interface Process. Click EXIT and run the Transaction Interface process (FGRTRNI) to feed and post the grant budget.
32 Enter FGRTRNI in the Go field from the main menu screen. 33 Perform a Next Block function. 34 Enter DATABASE in the Printer field (or choose a printer from the list of values). 35 Perform a Next Block function. 36 Perform a Next Block function. 37 Click the Save icon. 38 Enter FGRTRNR in the Process field.
Note: The Transaction Error Report will verify if any errors occurred while running the transaction interface process.
39 Perform a Next Block function. 40 Enter DATABASE in the Printer field (or choose a printer from the list of values). 41 Perform a Next Block function. 42 Perform a Next Block function. 43 Click the Save icon. 44 Choose Review Output from the Options menu. 45 Double-click on File Name to select and review the .lis file produced by the FGRTRNR
report. Note: If errors are listed for the grant budget, you must go to either FGAJVCD or FGAJVCQ to correct them.
46 Click the Exit icon.

© SunGard 2004-2007 Research Accounting Page 86
Section C: Day-to-Day Operations
Lesson: Tracking Events to a Grant
Introduction Events in the Research Accounting Module are actions that need to be taken to satisfy requirements for the administration of the proposal or grant. Billing and reporting requirements, for example, would qualify as events. The Research Accounting Module provides for the scheduling of these events such that the responsible personnel will receive automatic notification, and will be required to date and designate whether and when these events have been satisfied. Warning: The FRPMESG process must be running in sleep/wake mode in order for the system to generate automatic notification. There are several forms used to track events to a grant:
Event Code Validation Form The Event Code Validation Form (FRVEVNT) is used to maintain event codes. You may add a new event code, delete an event code, or update an existing event code or description. Note: Event codes can be used to identify reports, requirements, reminders, etc., to be associated with a grant. Note: Events can be one of three types: Bills (B), Reports (R), or Others (E).
Event Group Validation Form The Event Group Validation Form (FRVEGRP) is used to assign individual events to an event grouping code that will be associated with a particular grant.
The Grant Events Assignment Form The Grant Events Assignment Form (FRAEVGA) is used to attach event codes or event groups to a grant code.
The Grant Event Action Form The Grant Event Action Form (FRAEVNG) allows you to satisfy or cancel an event that has been created or completed.
The Entity Text Form The Entity Text Form (FOAETXT) is used to view, enter or edit text for events assigned to a grant.

© SunGard 2004-2007 Research Accounting Page 87
Section C: Day-to-Day Operations
Lesson: Tracking Events to a Grant (Continued)
Banner form The Event Code Validation Form (FRVEVNT).
Procedure Follow these steps to complete the process. Step Action
1 Access the Event Code Validation Form (FRVEVNT). 2 Enter a code used to represent the user-defined event in the Event Code field. 3 Enter a brief description of the event code in the Description field. 4 Enter the code for the event type in the Type field.
Note: Acceptable values are E (Event), B (Bill), and R (Report).
5 Click the Save icon. 6 Click the Exit icon.

© SunGard 2004-2007 Research Accounting Page 88
Section C: Day-to-Day Operations
Lesson: Tracking Events to a Grant (Continued)
Banner form
Procedure Follow these steps to complete the process. Step Action
1 Access the Entity Text Entry Form (FOAETXT) 2 Enter the primary document type for the text (this will be GRT for a grant) in the
Primary Type field. 3 Enter the grant code you created in the Code field. 4 Enter the secondary document type for the text (this will be EVT for an event) in the
Secondary Type field. 5 Enter the event code you created in the Code field. 6 Perform a Next Block function. 7 Enter the text related to the event code for your grant. 8 Click the Print checkbox if you want the selected text to print on a document. 9 Click the Save icon. 10 Click the Exit icon.

© SunGard 2004-2007 Research Accounting Page 89
Section C: Day-to-Day Operations
Lesson: Tracking Events to a Grant (Continued)
Banner Form
Procedure Follow these steps to complete the process. Step Action
1 Access the Event Group Validation Form (FRVEGRP). Note: Use this form to assign individual event codes created in FRVEVNT to an event grouping code that will be associated with a particular type of grant.
2 Enter a new event group code, e.g., FED, for federal grant events in the Event Group Code field.
3 Enter a brief description for the new event group code, e.g., Federal Grants in the Description field.
4 Select an event code in the Event Code field. 5 Click the Save icon. 6 Click the Exit icon.

© SunGard 2004-2007 Research Accounting Page 90
Section C: Day-to-Day Operations
Lesson: Tracking Events to a Grant (Continued)
Banner Form The Grant Events Assignment Form (FRAEVGA).
Procedure Follow these steps to complete the process. Step Action
1 Access the Grant Events Assignment Form (FRAEVGA). This form is used to assign event codes or event groups to a grant code.
2 Enter your grant code in the Grant Code field. 3 Enter the agency code in the Agency field. 3
IF you want to assign…. THEN… an event group to a grant code click the Group Management radio button
(proceed to step 4). event codes to a grant code click the Event Management radio button
(proceed to step 9).
4 Perform a Next Block function to access the Group/Event Management Window. 5 Perform a Next Block function. 6 Select the event group code you just created in the Event Group Code field. You may
enter up to five event group codes. 7 Perform a Next Block function to display the Event Assignment Window. 8 Perform a Next Block function. 9 The Event Code field will be populated with the first event code from your event group.
Access other event codes with the down-arrow key. Note: If you selected the Event Management radio button in step 3 perform a Next Block function and enter the event code from the LOV.
10 Enter the number of days before an event is due in which the user should be notified to satisfy or perform a particular event In the Number of Days Reminder field.

© SunGard 2004-2007 Research Accounting Page 91
Section C: Day-to-Day Operations
Lesson: Tracking Events to a Grant (Continued)
Procedure, continued
Step Action 11 Enter the number of days before/after the begin/end date that the event is due in the
Number of Days field. Notes: This field is used for one-time events. If you enter a value in this field you must select a value for the Begin Date field. You may enter data in the Number of Days and Begin Date fields or the Date From and Date To fields, but not both.
12 Enter the date that the first report or bill is due in the Date From field. 13 Enter the date that the reports are no longer due in the Date To field. 14 Select the date from the pull-down list in the Begin Date field.
Note: This field is required if you entered data in the Number of Days field.
15 Select how often the event occurs in the Frequency field. Note: This field is required if the Date To and Date From fields have been populated.
16 The Payment Method Type Indicator field is used for Billing Events. Refer to the Grant Billing Workbook for information on the set up. Note: The two available options for Payment Method Type are Cost Reimbursement or Fixed Cost. Cost Reimbursement means that you will be billing for incurred expenses. Fixed Cost means that you will be billing a fixed amount for each interval (monthly, quarterly) and Banner will calculate the difference between this amount and incurred costs and post the difference to deferred revenue.
17 Enter the user ID of the individual primarily responsible for the satisfaction of this event in the Default Responsible User ID field.
18 Click the Default Proxy User ID button to select a secondary person to be responsible for the satisfaction of this event.
19 Click the Save icon to return to the Event Assignment Window. 20 If you are assigning a billing or reporting event, in the Period To field, enter the date
through which current billing or reporting is effective (i.e., expenses up to this date should be included in your billing or report).

© SunGard 2004-2007 Research Accounting Page 92
Section C: Day-to-Day Operations
Lesson: Tracking Events to a Grant (Continued)
Procedure, continued
Step Action 21 If you are assigning a billing or reporting event, in the Bill Format field, enter the bill or
report format code that you want to associate with the grant. 22 Click the Default Fixed Schedule button only if you are setting up a Fixed Cost billing
event. This option will allow you to create a fixed schedule for your billing event. 23 Click the Save icon to return to the Event Assignment Window. 24 Use the down-arrow key to access the next event code for this event group. Repeat steps
10-20 to complete the assignments for all the events associated to your grant. 25 Perform a Next Block function when you have completed the assignments for all of the
events associated with your grant. Note: Performing a Next Block function will save the events assigned to your grant code and will allow you to view the responsible user id, due dates, text indicator and status code for each event sequence.
26 Click the Exit icon.

© SunGard 2004-2007 Research Accounting Page 93
Section C: Day-to-Day Operations
Lesson: Tracking Events to a Grant (Continued)
Banner Form The Grant Event Action Form (FRAEVNG).
Procedure Follow these steps to satisfy or cancel an event that has been created or completed. Step Action
1 Access the Grant Event Action Form (FRAEVNG). 2 Enter the grant code in the Grant Code field. 3 Perform a Next Block function. 4 Use the down-arrow key to access the event that you would like to satisfy or cancel. 5 Enter S (Satisfy) or C (Cancel) in the Status field. 6 Click the Save icon.
Note: The Approved By and Date fields will be populated.
7 Click the Exit icon.

© SunGard 2004-2007 Research Accounting Page 94
Section C: Day-to-Day Operations
Lesson: Querying a Grant
Introduction There are a number of forms that can be used to query a grant:
Grant Agency Inquiry Form The Grant Agency Inquiry Form (FRIASTG) is used to monitor grant activity, and allows the entry of agency codes at all levels within the hierarchy.
Grant Budget Distribution Inquiry Form The Grant Budget Distribution Inquiry Form (FRIBDSG) is used to view budget distributions.
Grant Budget Totals Form The Grant Budget Totals Form (FRIBUTG) is used to view grant budgets by account code or account type.
Grant Budget Codes Inquiry Form The Grant Budget Codes Inquiry Form (FRIBUDG) is used to view grant and associated budget information.
Grant Events Inquiry Form The Grant Events Inquiry Form (FRIEVNG) is used by any user to view all event codes that have been assigned to a particular Oracle user ID.
Grant Codes Inquiry Form The Grant Codes Inquiry Form (FRIGRNT) is used to display the list of all grant codes.
Grant Status History Query Form The Grant Status History Inquiry Form (FRIGRST) is used to view the history of grant information.
Grant Transaction Detail Form The Grant Transaction Detail Form (FRIGTRD) provides a detailed list of transactions from the Transaction Detail table, and provides the list of transactions based on the key values entered.
Grant Title Search Form The Grant Title Search Form (FRIKGNT) is used to search for a grant document when you are unsure of the grant code or full grant title.

© SunGard 2004-2007 Research Accounting Page 95
Section C: Day-to-Day Operations
Lesson: Querying a Grant (Continued)
Grant Memo Ledger Inquiry Form The Grant Memo Ledger Inquiry Form (FRIMEMO) is used to track the amount of waived overhead as defined on the Basis Definition Code Maintenance Form (FTMSBASI).
Grant Organization Inquiry Form The Grant Organization Inquiry Form (FRIORGH) is used to query all grants for a particular organization code.
Principal Investigator Grant Inquiry Form The Principal Investigator Grant Inquiry Form (FRIPSTG) is used to monitor grant activity by Personnel ID.
Grant Inception to Date Form The Grant Inception to Date Form (FRIGITD) is used to retrieve account or account type information including adjusted budget, inception-to-date actual activity, encumbrance, and available balance information.

© SunGard 2004-2007 Research Accounting Page 96
Section C: Day-to-Day Operations
Lesson: Querying a Grant (Continued)
Banner form The Grant Agency Inquiry Form (FRIASTG).
Procedure Follow these steps to monitor all grant activity by agency. Step Action
1 Access the Grant Agency Inquiry Form (FRIASTG). 2 Enter an agency code or select one from the list in the Agency field. 3 Perform a Next Block function. 4 Select Grant Ledger Information from the Options menu to view the Grant Inception to
Date information for the grant selected. 5 Click the Exit icon to return to the Grant Agency Inquiry Form. 6 Select Grant Information from the Options menu to view the Grant information on the
Grant Maintenance Form (FRAGRNT). 7 Click the Exit icon to return to the Grant Agency Inquiry Form. 8 Click the Exit icon.

© SunGard 2004-2007 Research Accounting Page 97
Section C: Day-to-Day Operations
Lesson: Querying a Grant (Continued)
Banner form
Procedure Follow these steps to view budget distributions. Step Action
1 Access the Grant Budget Distribution Inquiry Form (FRIBDSG). 2 Enter a grant code in the Grant field. 3 Enter a budget code in the Budget Code field. 4 Enter the budget type code in the Type field. 5 The following fields may be entered (optional) to obtain more specific information:
COA, Index, Fund, Organization, Account, Program, Activity, Location. 6 Perform a Next Block function. 7 Select Budget Total Information from the Options menu to view the Grant Budget
Totals for the grant selected. 8 Click the Exit icon to return to the Grant Budget Distribution Form. 9 Click the Exit icon.

© SunGard 2004-2007 Research Accounting Page 98
Section C: Day-to-Day Operations
Lesson: Querying a Grant (Continued)
Banner form

© SunGard 2004-2007 Research Accounting Page 99
Section C: Day-to-Day Operations
Lesson: Querying a Grant (Continued)
Procedures Follow these steps to view grant budgets by account code or account type. Step Action
1 Access the Grant Budget Totals Form (FRIBUTG). 2 Enter a grant code to query in the Grant field. 3 Enter a grant budget code to query in the Grant Budget Code field. 4 Click the appropriate radio button in the Display by block.
Button Description Institution
All lines within the proposal budget are displayed in order by account code.
Sponsor
You can view the budget the way the agency or sponsor wants to see it.
Title
All lines within the proposal budget are displayed in account title order.
Account Type Level 2
Only those lines within the proposal budget that contain accounts are rolled into their account types at level 2 to be summarized and displayed.
Account Type Level 1
Only those lines within the proposal budget that contain accounts are rolled into their account types at level 1 to be summarized and displayed.
5 Perform a Next Block function. 6 Click the Exit icon.
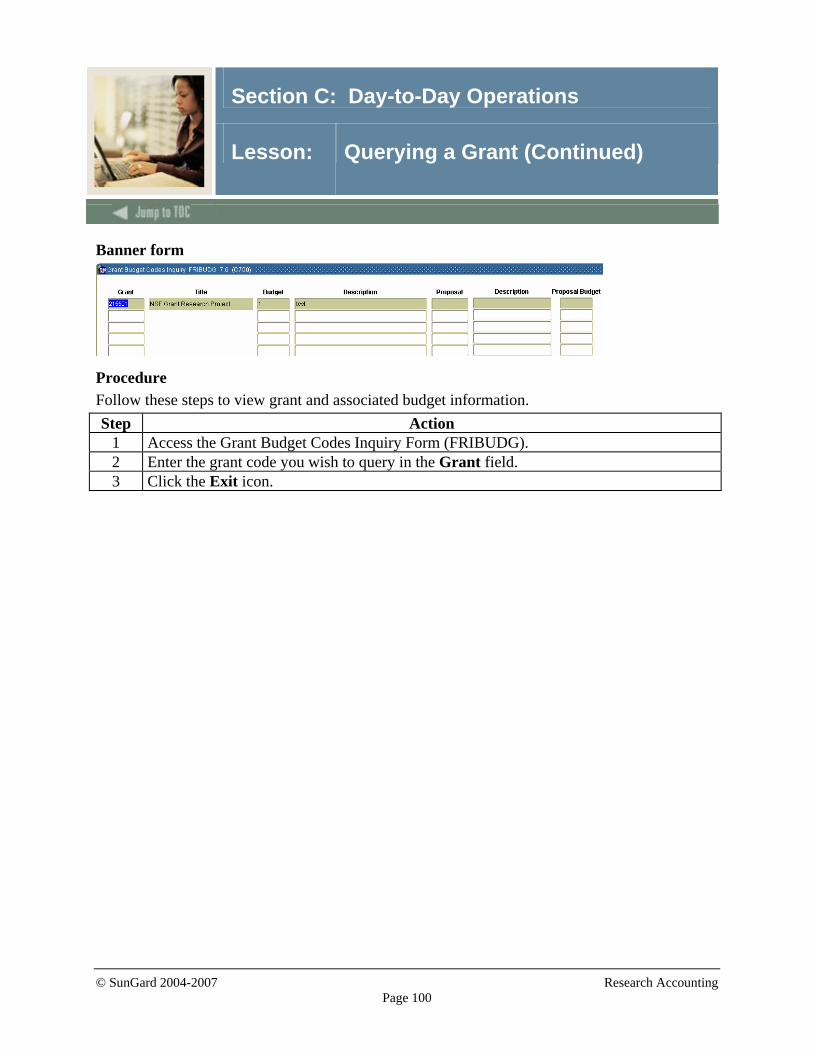
© SunGard 2004-2007 Research Accounting Page 100
Section C: Day-to-Day Operations
Lesson: Querying a Grant (Continued)
Banner form
Procedure Follow these steps to view grant and associated budget information. Step Action
1 Access the Grant Budget Codes Inquiry Form (FRIBUDG). 2 Enter the grant code you wish to query in the Grant field. 3 Click the Exit icon.

© SunGard 2004-2007 Research Accounting Page 101
Section C: Day-to-Day Operations
Lesson: Querying a Grant (Continued)
Banner form
Procedure Follow these steps to view all event codes, which have been assigned to a particular User ID. Note: This form also allows you to view events by User ID, by Grant, or a combination of the two. Step Action
1 Access the Grant Event Inquiry Form (FRIEVNG). 2 Enter the ID of the user who is either primarily or secondarily responsible for creating
and/or completing an event in the User ID field. 3 Enter the grant code in the Grant field. 4 Enter the payment management system code in the PMS Code field. 5 Perform a Next Block function. 6 Select Event Actions from the Options menu to view the Grant Event Action form to
satisfy or cancel a pending event. 7 Click the Exit icon to return to the Grant Event Inquiry Form. 8 Click the Exit icon.
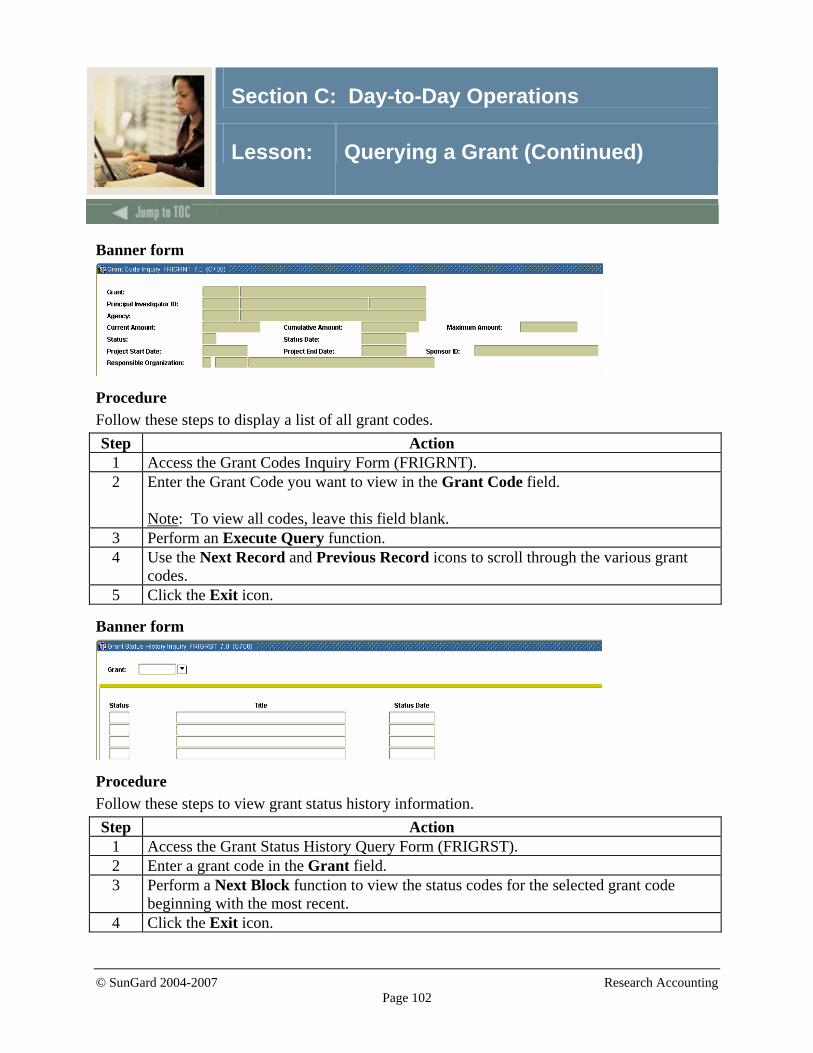
© SunGard 2004-2007 Research Accounting Page 102
Section C: Day-to-Day Operations
Lesson: Querying a Grant (Continued)
Banner form
Procedure Follow these steps to display a list of all grant codes. Step Action
1 Access the Grant Codes Inquiry Form (FRIGRNT). 2 Enter the Grant Code you want to view in the Grant Code field.
Note: To view all codes, leave this field blank.
3 Perform an Execute Query function. 4 Use the Next Record and Previous Record icons to scroll through the various grant
codes. 5 Click the Exit icon.
Banner form
Procedure Follow these steps to view grant status history information. Step Action
1 Access the Grant Status History Query Form (FRIGRST). 2 Enter a grant code in the Grant field. 3 Perform a Next Block function to view the status codes for the selected grant code
beginning with the most recent. 4 Click the Exit icon.

© SunGard 2004-2007 Research Accounting Page 103
Section C: Day-to-Day Operations
Lesson: Querying a Grant (Continued)
Banner form
Procedure Follow these steps to complete the process. Step Action
1 Access the Grant Transaction Detail Form (FRIGTRD). This form provides a detailed list of transactions from the Transaction Detail table, based on the key values entered.
2 Enter a chart of accounts code in the COA field. 3 Enter the grant code you want to view in the Grant field. 4 Enter the account index code in the Index field. 5 Enter values in the Fund, Organization, Account, Program, Activity, and/or Location
fields to obtain specific transactions. Note: Leaving these fields blank will allow you to execute a query to produce a list of all the transactions linked to the grant.

© SunGard 2004-2007 Research Accounting Page 104
Section C: Day-to-Day Operations
Lesson: Querying a Grant (Continued)
Procedure, continued
Step Action 6 Enter a commitment code to query for the type of commitment for this grant in the
Commit field. 7 Enter a grant year to query for a specific year in the Year field.
Note: Leave this field blank to query for inception to date.
8 Enter a grant period to query for a specific period in the Period field. Note: Leave this field blank to query on all periods.
9 Enter the first date in the range in the Date From field. 10 Enter the last date in the range in the Date To field. 11 Perform a Next Block function. 12 Enter query criteria in the appropriate fields and perform an Execute Query function. 13 Click the Exit icon.
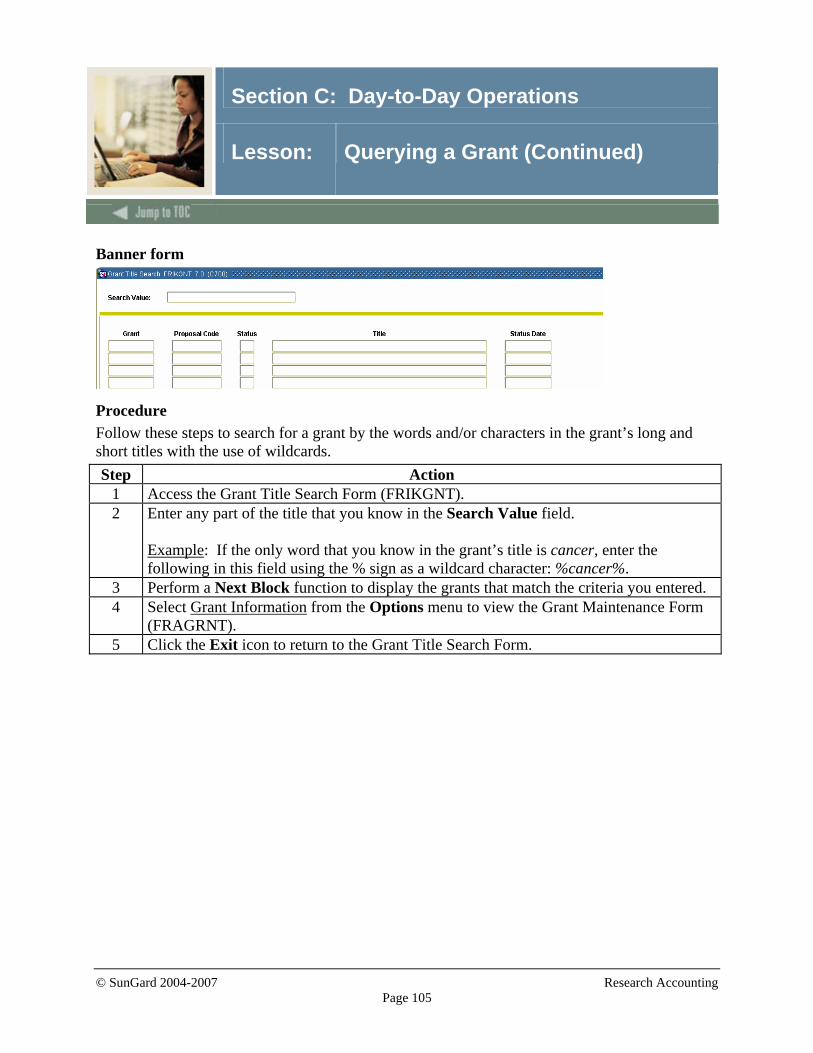
© SunGard 2004-2007 Research Accounting Page 105
Section C: Day-to-Day Operations
Lesson: Querying a Grant (Continued)
Banner form
Procedure Follow these steps to search for a grant by the words and/or characters in the grant’s long and short titles with the use of wildcards. Step Action
1 Access the Grant Title Search Form (FRIKGNT). 2 Enter any part of the title that you know in the Search Value field.
Example: If the only word that you know in the grant’s title is cancer, enter the following in this field using the % sign as a wildcard character: %cancer%.
3 Perform a Next Block function to display the grants that match the criteria you entered. 4 Select Grant Information from the Options menu to view the Grant Maintenance Form
(FRAGRNT). 5 Click the Exit icon to return to the Grant Title Search Form.

© SunGard 2004-2007 Research Accounting Page 106
Section C: Day-to-Day Operations
Lesson: Querying a Grant (Continued)
Banner form
Procedure Follow these steps to track the amount of waived indirect costs (overhead). This form does not display budget or commitment information. Step Action
1 Access the Grant Memo Ledger Inquiry Form (FRIMEMO). 2 Enter the chart of accounts code in the Chart of Accounts field. 3 Enter the grant code in the Grant field. 4 Perform a Next Block function. 5 Click the Exit icon.

© SunGard 2004-2007 Research Accounting Page 107
Section C: Day-to-Day Operations
Lesson: Querying a Grant (Continued)
Banner form
Procedure Follow these steps to query of all grants for a particular organization code. Step Action
1 Access The Grant Organization Inquiry Form (FRIORGH). 2 Enter the chart of accounts code in the Chart of Accounts field. 3 Enter the organization code in the Organization field. 4 Perform a Next Block function. 5 Select Grant Information from the Options menu to view the Grant Maintenance Form
(FRAGRNT). 6 Click the Exit icon to return to the Grant Organization Inquiry Form. 7 Click the Exit icon.

© SunGard 2004-2007 Research Accounting Page 108
Section C: Day-to-Day Operations
Lesson: Querying a Grant (Continued)
Banner form
Procedure Follow these steps to monitor proposal activity if you are entered as primary personnel for the grant. Step Action
1 Access the Grant Personnel Query Form (FRIPSTG). 2 Enter the personnel ID In the Personnel ID field. 3 Perform a Next Block function to view the grant codes and corresponding values for the
personnel indicated. 4 Select Grant Information from the Options menu to view the Grant Maintenance Form
(FRAGRNT). 5 Click the Exit icon to return to the Grant Personnel Query Form. 6 Select Grant Ledger Information from the Options menu to view the Grant Inception to
Date information for the grant selected. 7 Click the Exit icon to return to the Grant Personnel Query Form. 8 Click the Exit icon.
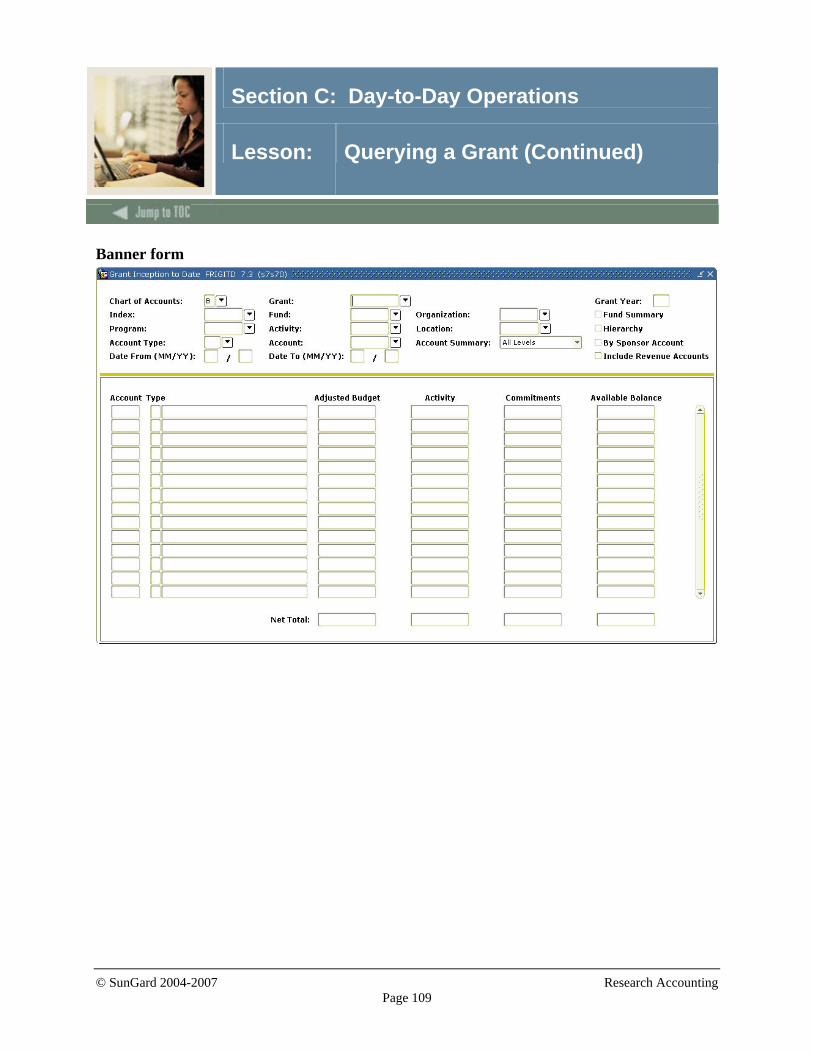
© SunGard 2004-2007 Research Accounting Page 109
Section C: Day-to-Day Operations
Lesson: Querying a Grant (Continued)
Banner form

© SunGard 2004-2007 Research Accounting Page 110
Section C: Day-to-Day Operations
Lesson: Querying a Grant (Continued)
Procedure Follow these steps to retrieve account or account type information including adjusted budget, inception-to-date actual activity, encumbrance, and available balance information. Step Action
1 Access the Grant Inception To Date Form (FRIGITD). 2 Enter the chart of accounts code in the Chart of Accounts field. 3 Enter the grant code in the Grant field. 4 Enter the beginning month and year of grant activity that you want to query in the Date
From (MM/YY) field. 5 Enter the last month and year of grant activity that you want to query in the Date To
(MM/YY) field. 6 Select the Fund Summary checkbox to view a summary by fund if the grant is linked to
multiple funds. 7 Click the Hierarchy checkbox to view details based on hierarchical values supplied in
the Key block for query. 8 Click the By Sponsor Accounts checkbox to view the activity using the sponsor-defined
accounts. 9 Click the Include Revenue Accounts checkbox to view the activity for revenue
accounts for this grant. 10 Perform a Next Block function. 11 Click the Exit icon.

© SunGard 2004-2007 Research Accounting Page 111
Section C: Day-to-Day Operations
Lesson: Generating Grant Reports
Introduction There are several reports and processes you can generate within the grant portion of Research Accounting:
Grant Inception to Date Report The Grant Inception to Date Report (FRRGITD) displays operating account information, from the inception of a grant or project, to the “as of” date specified when the report is executed. FRRGITD displays budget information, actual activity, commitments, and a calculated available balance. The report derives information from the Grant Ledger. Note: This report may be run by Chart of Accounts for all grants, for a range of grants, or a selection of grants. You can also see the breakout of grant information by fund code(s) associated with the grant
Grant Budget Status Year Report The Grant Budget Status Year Report (FRRGBFY) displays operating account information on a grant or project based on the fiscal year specified. FRRGBFY displays budget information, YTD activity, commitments, and a calculated available balance. The report derives information from the Operating Ledger. Note: This report may be run by Chart of Accounts for all grants, a range of grants, or a selection of grants. You can also include accrual period activity on the report.
Grant Events Report The Grant Events Report (FRREVNG) displays events or reminders associated with a grant. You can view events for a specific Personnel indicator, a specific time period, a range of grants, a specific grant, or a selection of grants. You can also view events which are pending, satisfied, or both. The format of the display may be selected by choosing a sort option. One option displays the responsible organization, the grant, and the Due dates for each event. With this option, you may also specify an organizational code, or a range of organizations. A second option displays events by grant code.

© SunGard 2004-2007 Research Accounting Page 112
Section C: Day-to-Day Operations
Lesson: Generating Grant Reports (Continued)
Grant Expenditures Report The Grant Expenditures Report (FRRINDC) displays operating account activity by fund; organization; account type; account; and program for a grant, a range of grants, or a selection of grants. FRRINDC displays the account title, the account type to which the account code is linked, the total expenditure amount based on the “as of” date specified when the report was executed, the amount of indirect costs or overhead calculated on that direct cost, and the total of the direct and indirect costs. Totals are displayed for each fund, organization, account type, account, and program, with a grand total by grant.
Grant Budget Report The Grant Budget Report (FRRBUDG) displays a specific budget, or a series of budget iterations that have been created through the Grant Budget Form (FRABUDG) for a specific grant. You will see a breakdown of grant budget information by fund, organization, program, activity, and location for each account code budgeted. The reports will also display the amounts for indirect costs and cost sharing.
Deferred Grant Process The Deferred Grant Process (FRRGRNT), in conjunction with the System Control Maintenance Form (FOASYSC), enables you to control when indirect cost, cost share, and revenue recognition transactions are calculated. If you do not want the calculations to be performed on a real-time, transaction-by-transaction basis, then check the Defer Calculations of I/C and C/S field on the System Control Maintenance Form (FOASYSC). You can then run the Deferred Grant Process from Job Submission to perform the calculations.
© SunGard 2004-2007 Research Accounting Page 113
Section C: Day-to-Day Operations
Lesson: Self Check
Directions Use the information you have learned in this workbook to complete this self check activity.
Question 1 List the forms used to query a proposal.
Question 2 List the various Grant Reports that are available.

© SunGard 2004-2007 Research Accounting Page 114
Section C: Day-to-Day Operations
Lesson: Answer Key for Self Check
Question 1 List the forms used to query a proposal. Proposal Agency Inquiry Form (FRIASTP) Proposal Budget Totals Form (FRIBUDT) Proposal Budget Distribution Inquiry Form (FRIDBSP) Proposal/Budget Inquiry Form (FRIBUPD) Proposal Title Search Form (FRIKPRO) Proposal code Inquiry Form (FRIPROP) Proposal Status History Query Form (FRIPRST) Proposal Personnel Query Form (FRIPSTP).
Question 2 List the various Grant Reports that are available. Grant Inception to Date Report (FRRGITD) Grant Budget Status Year Report (FRRGBFY) Grant Events Report (FRREVNG) Grant Expenditure Report (FRRINDC) Grant Budget Report (FRRBUDG) Deferred Grant Process (FRRGRNT).

© SunGard 2004-2007 Research Accounting Page 115
Section D: Reference
Lesson: Overview
Introduction The purpose of this section is to provide reference materials related to the workbook.
Section contents Overview ..............................................................................................................................115 Setup Forms and Where Used ..............................................................................................116 Day-to-Day Forms and Setup Needed..................................................................................118 Forms Job Aid ......................................................................................................................121

© SunGard 2004-2007 Research Accounting Page 116
Section D: Reference
Lesson: Setup Forms and Where Used
Guide Use this table as a guide to the setup forms and the day-to-day forms that use them.
Setup Form Day-to-Day Form(s) Form Name Code Form Name Code
Proposal Maintenance Form
FRAPROP
Proposal Budget Form FRABUDP Grant Maintenance Form FRAGRNT Proposal Budget Totals Form
FRIBUDT
Proposal Budget Distribution Inquiry Form
FRIBDSP
Proposal/Budget Codes Inquiry Form
FRIBUDP
Proposal Title Search Form
FRIKPRO
System Control Maintenance Form FOASYSC
Proposal Code Inquiry Form
FRIPROP
System Data Maintenance Form FTMSDAT See above Basis Definition Code Maintenance Form
FTMBASI See above
Indirect Cost Rate Code Maintenance Form
FTMINDR See above
Indirect Cost Charge Code Maintenance Form
FTMINDA See above
Indirect Cost Distribution Maintenance Form
FTMINDD See above
Cost Share Rate Code Maintenance Form
FTMCSTR See above
Cost Share Credit Account Code Maintenance Form
FTMCSTA See above
Cost Share Distribution Maintenance Form
FTMCSTD See above
Agency Code Maintenance Form FTMAGCY See above Person Identification Form FOAIDEN See above

© SunGard 2004-2007 Research Accounting Page 117
Section D: Reference
Lesson: Setup Forms and Where Used (Continued)
Guide, continued
Setup Form Day-to-Day Form(s) Form Name Code Form Name Code
Proposal Maintenance Form
FRAPROP
Proposal Budget Form FRABUDP Grant Maintenance Form FRAGRNT Proposal Budget Totals Form
FRIBUDT
Proposal Budget Distribution Inquiry Form
FRIBDSP
Proposal/Budget Codes Inquiry Form
FRIBUDP
Proposal Title Search Form
FRIKPRO
Sponsor Account Code Maintenance Form
FRVSACT
Proposal Code Inquiry Form
FRIPROP
Institution/Sponsor Account Maintenance Form
FRVISAC See above
Proposal Event Action Form
FRAEVNP
Grant Events Assignment Form
FRAEVGA
Event Code Validation Form FRVEVNT
Grant Event Action Form FRAEVNG Proposal Event Action Form
FRAEVNP
Grant Events Assignment Form
FRAEVGA
Event Group Validation Form FRVEGRP
Grant Event Action Form FRAEVNG

© SunGard 2004-2007 Research Accounting Page 118
Section D: Reference
Lesson: Day-to-Day Forms and Setup Needed
Guide Use this table as a guide to the day-to-day forms and the setup forms needed for each.
Day-to-Day Form Setup Forms Needed Proposal Maintenance Form (FRAPROP) • Agency Code Maintenance Form
(FTMAGCY) • Person Identification Form (FOAIDEN) • System Control Maintenance Form
(FOASYSC) • System Data Maintenance Form
(FTMSDAT) • Basis Definition Code Maintenance Form
(FTMBASI) • Indirect Cost Rate Code Maintenance Form
(FTMINDR) • Indirect Cost Charge Code Maintenance
Form (FTMINDA) • Indirect Cost Distribution Maintenance
Form (FTMINDD) • Cost Share Rate Code Maintenance Form
(FTMCSTR) • Cost Share Credit Account Code
Maintenance Form (FTMCSTA) • Cost Share Distribution Maintenance Form
(FTMCSTD) • Sponsor Account Code Maintenance Form
(FRVSACT) • Institution/Sponsor Account Maintenance
Form (FRVISAC) Grant Maintenance Form (FRAGRNT) • See above Proposal Budget Form (FRABUDP) • See above Proposal Budget Totals Form (FRIBUDT) • See above Proposal Budget Distribution Inquiry Form (FRIBDSP)
• See above

© SunGard 2004-2007 Research Accounting Page 119
Section D: Reference
Lesson: Day-to-Day Forms and Setup Needed (Continued)
Guide, continued
Day-to-Day Form Setup Forms Needed Proposal/Budget Codes Inquiry Form (FRIBUDP)
• See above, previous page
Proposal Title Search Form (FRIKPRO) • See above Proposal Code Inquiry Form (FRIPROP) • See above Proposal Status History Query Form (FRIPRST)
• Proposal Maintenance Form (FRAPROP)
Proposal Personnel Query Form (FRIPSTP) • Proposal Maintenance Form (FRAPROP) Proposal Agency Inquiry Form (FRIASTP) • Proposal Maintenance Form (FRAPROP) Proposal Event Action Form (FRAEVNP) • Event Code Validation Form (FRVEVNT)
• Event Group Validation Form (FRVEGRP) Grant Events Assignment Form (FRAEVGA)
• See above
Grant Event Action Form (FRAEVNG) • See above Fund Code Maintenance Form (FTMFUND) • Grant Maintenance Form (FRAGRNT) Grant Budget Form (FRABUDG) • See above Entity Text Form (FOAETXT) • See above Grant Agency Inquiry Form (FRIASTG) • See above Grant Budget Distribution Inquiry Form (FRIBDSG)
• See above
Grant Budget Totals Form (FRIBUTG) • See above Grant Budget Codes Inquiry Form (FRIBUDG)
• See above
Grant Events Inquiry Form (FRIEVNG) • See above Grant Codes Inquiry Form (FRIGRNT) • See above Grant Status History Inquiry Form (FRIGRST)
• See above
Grant Transaction Detail Form (FRIGTRD) • See above Grant Title Search Form (FRIKGNT) • See above
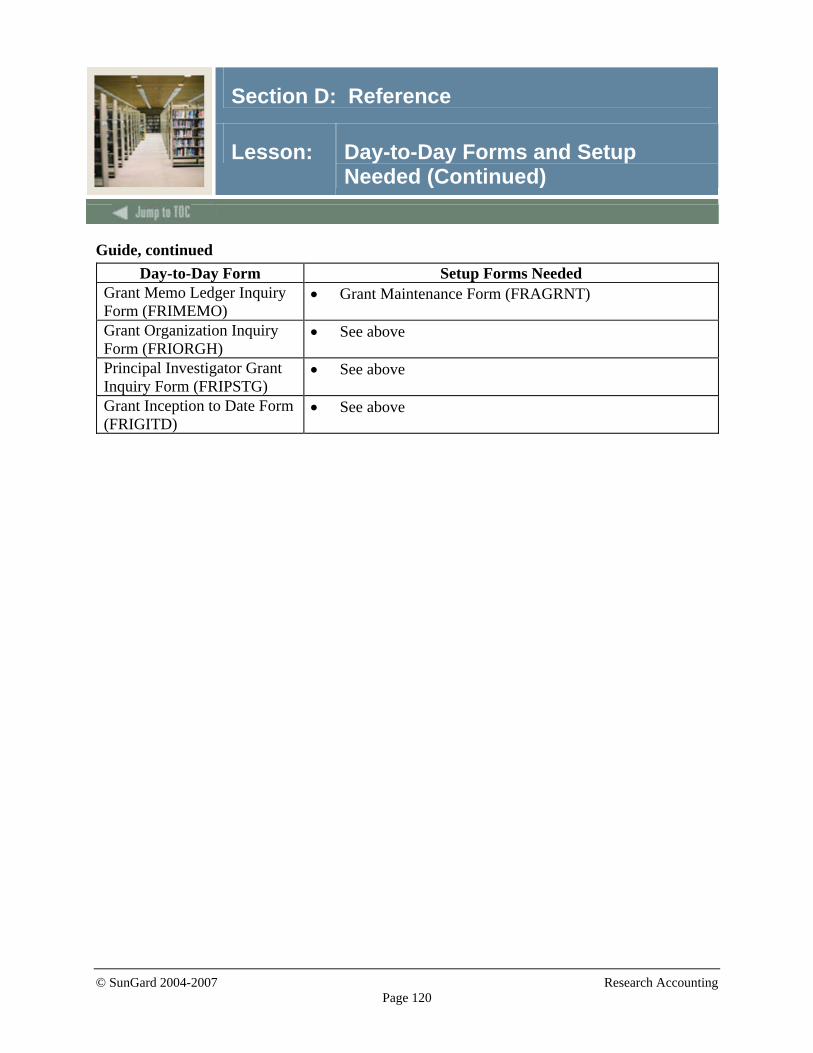
© SunGard 2004-2007 Research Accounting Page 120
Section D: Reference
Lesson: Day-to-Day Forms and Setup Needed (Continued)
Guide, continued Day-to-Day Form Setup Forms Needed
Grant Memo Ledger Inquiry Form (FRIMEMO)
• Grant Maintenance Form (FRAGRNT)
Grant Organization Inquiry Form (FRIORGH)
• See above
Principal Investigator Grant Inquiry Form (FRIPSTG)
• See above
Grant Inception to Date Form (FRIGITD)
• See above

© SunGard 2004-2007 Research Accounting Page 121
Section D: Reference
Lesson: Forms Job Aid
Guide Use this table as a guide to the forms used in this workbook. The Owner column may be used as a way to designate the individual(s) responsible for maintaining a form.
Form Name Form Description Owner FOASYSC System Control Maintenance Form FTMSDAT System Data Maintenance Form FTMBASI Basis Definition Code Maintenance
Form
FTMINDR Indirect Cost Rate Code Maintenance Form
FTMINDA Indirect Cost Charge Code Maintenance Form
FTMINDD Indirect Cost Distribution Maintenance Form
FTMCSTR Cost Share Rate Code Maintenance Form
FTMCSTA Cost Share Credit Account Code Maintenance Form
FTMCSTD Cost Share Distribution Maintenance Form
FTMAGCY Agency Code Maintenance Form FOAIDEN Person Identification Form FRVSACT Sponsor Account Code Maintenance
Form
FRVISAC Institution/Sponsor Account Maintenance Form
FRVEVNT Event Code Validation Form FRVEGRP Event Group Validation Form

Release Date
This workbook was last updated on 01/12/2007.