Banner Finance Chart of Accounts Training Workbook · Banner Finance Chart of Accounts Training...
214
Banner Finance Chart of Accounts Training Workbook January 2007 Release 7.3 What can we help you achieve? HIGHER EDUCATION
Transcript of Banner Finance Chart of Accounts Training Workbook · Banner Finance Chart of Accounts Training...

Banner FinanceChart of Accounts Training Workbook
January 2007 Release 7.3
What can we help you achieve? HIGHER EDUCATION
Confidential Business Information ------------------------------------------------------------------------------------------------------------------------------------------------------------------------------- This documentation is proprietary information of SunGard Higher Education and is not to be copied, reproduced, lent or disposed of, nor used for any purpose other than that for which it is specifically provided without the written permission of SunGard Higher Education. Prepared By: SunGard Higher Education
4 Country View Road Malvern, Pennsylvania 19355 United States of America
© 2006 SunGard. All rights reserved. The unauthorized possession, use, reproduction, distribution, display or disclosure of this material or the information contained herein is prohibited. In preparing and providing this publication, SunGard Higher Education is not rendering legal, accounting, or other similar professional services. SunGard Higher Education makes no claims that an institution's use of this publication or the software for which it is provided will insure compliance with applicable federal or state laws, rules, or regulations. Each organization should seek legal, accounting and other similar professional services from competent providers of the organization’s own choosing. Without limitation, SunGard, the SunGard logo, Banner, Campus Pipeline, Luminis, PowerCAMPUS, Matrix, and Plus are trademarks or registered trademarks of SunGard Data Systems Inc. or its subsidiaries in the U.S. and other countries. Third-party names and marks referenced herein are trademarks or registered trademarks of their respective owners.
Table of Contents
Section A: Introduction ..............................................................................................................5 Overview ..................................................................................................................................5 Process Introduction .................................................................................................................6 Chart of Accounts Overview....................................................................................................8 Chart of Accounts Features ....................................................................................................10 Banner Finance System Ledgers ............................................................................................11 Other Finance Features...........................................................................................................13 Banner Finance Reports .........................................................................................................14 Rules and Security..................................................................................................................17
Section B: Set Up.......................................................................................................................18 Overview ................................................................................................................................18 Creating a New Chart of Accounts.........................................................................................21 Establishing Fiscal Year Parameters ......................................................................................32 Defining Internal Fund and Account Type Codes..................................................................35 Creating Level 1 Account Type Codes ..................................................................................44 Creating Account Codes.........................................................................................................50 Defining Control Accounts ....................................................................................................60 Creating Level 1 and Level 2 Fund Types .............................................................................66 Developing Fund Codes .........................................................................................................70 Defining a Fund Balance Account for a Multiple Fund Balance Institution..........................75 Creating a Bank ID.................................................................................................................78 Defining Bank Codes for the Chart of Accounts ...................................................................80 Establishing Program Codes ..................................................................................................83 Establishing an Activity Code................................................................................................86 Establishing a Location Code.................................................................................................87 Establishing Organization Codes ...........................................................................................89 Creating an Agency Code.......................................................................................................92 Creating Account Index Codes...............................................................................................94 Assigning a Financial Manager to the Chart of Accounts......................................................96 Reviewing the Currency Code Maintenance Form ................................................................99 Maintaining Overall System Information for the Installation ..............................................101 Completing the Chart of Accounts Maintenance Form........................................................103 Creating Attribute Set, Type, and Value Codes ...................................................................105 Summary of Set Up Procedures ...........................................................................................118
Table of Contents (Continued)
Section C: Day-to-Day Operations ........................................................................................119 Overview ..............................................................................................................................119 General Accounting Transaction Processing .......................................................................121 General Encumbrance Processing ........................................................................................122 Journal Voucher Processing .................................................................................................126 Journal Voucher Processing – Quick Form..........................................................................133 Journal Voucher Processing – Mass Entry Form .................................................................134 Automatic Journal Voucher Processing ...............................................................................135 Direct Cash Receipts Processing, FGADCSR .....................................................................139 General Accounting and Budget Query Forms ....................................................................143 Querying the Budget Availability Status Form, FGIBAVL.................................................144 Querying the Organizational Budget Status Form, FGIBDST.............................................146 Querying the Organizational Budget Summary Form, FGIBSUM......................................149 Querying the Executive Summary Form, FGIBDSR...........................................................151 Querying the General Ledger Trial Balance Form, FGITBAL............................................154 Querying the Trial Balance Summary Form, FGITBSR......................................................156 Querying the Detail Transaction Activity Form, FGITRND ...............................................158 Querying the General Ledger Activity Form, FGIGLAC....................................................160 Querying the Journal Voucher Summary Form, FGIJSUM.................................................162 Querying the List of Suspended Journal Vouchers Form, FGIJVCD..................................164 Querying the List of Automatic Journal Vouchers Form, FGIAUTO .................................165 Querying the Detail Encumbrance Activity Form, FGIENCD ............................................166 Querying the Organizational Encumbrance List Form, FGIOENC .....................................167 Querying the Encumbrance List Form, FGIENCB ..............................................................169 Querying the Document Retrieval Inquiry Form, FGIDOCR..............................................170 Querying Direct Cash Receipts Form, FGIDCSR................................................................172 Running the Account Hierarchy Report ...............................................................................173 Running the Fund Hierarchy Report ....................................................................................176 Running the Program Hierarchy Report...............................................................................179 Running the Location Hierarchy Report ..............................................................................181 Running the Organization Hierarchy Report........................................................................183 Summary ..............................................................................................................................186 Self Check ............................................................................................................................187 Self Check – Answer Key ....................................................................................................196
Section D: Reference...............................................................................................................207 Overview ..............................................................................................................................207 Setup Forms and Where Used ..............................................................................................208 Day-to-Day Forms and Setup Needed..................................................................................210 Forms Job Aid ......................................................................................................................212
© SunGard 2004-2007 Workbook Title Page 5
Section A: Introduction
Lesson: Overview
Workbook goal The Chart of Accounts is a systematic classification of accounts and an essential part of the Banner Finance accounting system. Accounts are developed to be compatible with your organizational structure. The form and content of the Chart of Accounts is arranged to be in agreement with the financial reports that you issue. The fund, organization, account, and program codes are the primary chart of accounts elements used for classification, budgeting, recording, and/or reporting. The activity and location codes are used to provide specific performance-related detail for transactions. This course will introduce you to the Chart of Accounts, and will explain how the Chart of Accounts is related to other parts of Banner’s Finance system.
The workbook is divided into four sections:
• Introduction • Set-up • Day-to-day operations • Reference.
Intended audience Finance Office Administrators and Staff.
Section contents Process Introduction .................................................................................................................6 Chart of Accounts Overview....................................................................................................8 Chart of Accounts Features ....................................................................................................10 Banner Finance System Ledgers ............................................................................................11 Other Finance Features...........................................................................................................13 Banner Finance Reports .........................................................................................................14 Rules and Security..................................................................................................................17
© SunGard 2004-2007 Workbook Title Page 6
Section A: Introduction
Lesson: Process Introduction
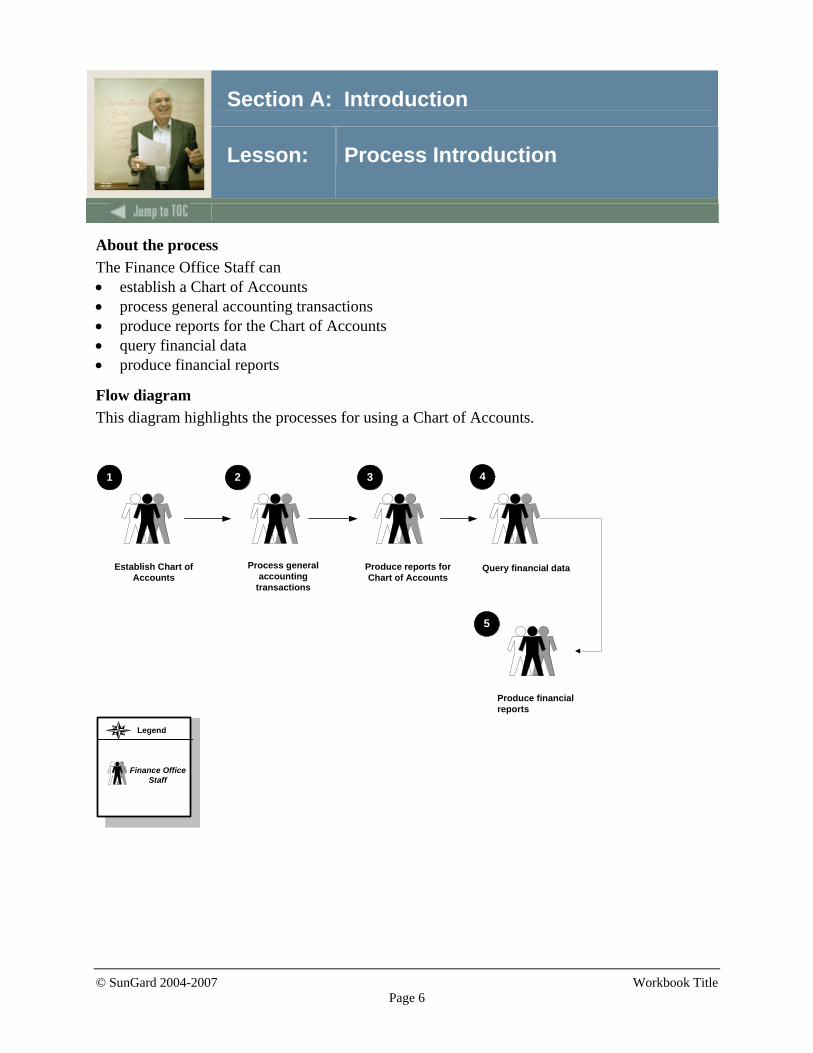
About the process The Finance Office Staff can • establish a Chart of Accounts • process general accounting transactions • produce reports for the Chart of Accounts • query financial data • produce financial reports
Flow diagram This diagram highlights the processes for using a Chart of Accounts.
Establish Chart ofAccounts
Produce reports forChart of Accounts
Process generalaccounting
transactions
1 2 3 4
5
Produce financialreports
Query financial data
Legend
Finance OfficeStaff
© SunGard 2004-2007 Workbook Title Page 7
Section A: Introduction
Lesson: Process Introduction (Continued)
What happens The stages of the process are described in this table. Stage Description
Finance Office Staff 1 Establishes a Chart of Accounts. 2 Processes general accounting transactions. 3 Produces reports for the Chart of Accounts. 4 Queries financial data. 5 Produces financial reports.
© SunGard 2004-2007 Workbook Title Page 8
Section A: Introduction
Lesson: Chart of Accounts Overview
Introduction The Chart of Accounts (COA) is the “key” to Banner Finance. It defines the accounting distribution used on all transactions processed in the Banner Finance module. The Chart of Accounts code is a one character, alpha/numeric field that uniquely identifies a particular chart. Banner Finance will accommodate multiple charts of accounts – each with a different chart code. It consists of seven elements that are defined as follows:
F O A P A L Fund This is a one-to-six-character code that identifies a self-balancing set of accounts and identifies ownership. Balance sheets and revenue/expense reports can be produced for any fund, which can be restricted (permanently or temporarily) or unrestricted. Fund codes may be established in a hierarchy of up to five levels for roll-up and reporting purposes. Examples of fund codes include Current Unrestricted Fund, Sponsored Student Loan Fund, and Fuller Architecture Program Endowment Fund. Organization This is a one-to-six-character code that identifies a unit of budgetary responsibility and/or departments within an institution. It is normally used to define “who” spends the money. Organization codes may be established in a hierarchy of up to eight levels for roll-up and reporting purposes. Examples of organization codes include Dean of Behavioral Sciences, School of Engineering, and Business Office. An institution’s organizational chart is a good guideline in setting up these codes. Account This is a one-to-six-character code that identifies objects, such as the general ledger accounts (assets, liabilities, control, fund balances) and the operating ledger accounts (income, expenditures, transfers). The account is a line item within an institution’s financial structure. Account codes may be established in a hierarchy of up to four levels for roll-up and reporting purposes. Examples of account codes include Petty Cash, Accounts Payable, Fund Balance, Tuition, and Regular Full Time Salaries.
© SunGard 2004-2007 Workbook Title Page 9
Section A: Introduction
Lesson: Chart of Accounts Overview (Continued)
Introduction, continued Program This is a one-to-six-character code that identifies a function and enables the institution to establish a method of classifying transactions across organizations and accounts. Examples of program codes include Instruction, Research, and Plant Operations. Most institutions follow the programs defined by the National Association of College and University Business Offices (NACUBO). Program codes may be established in a hierarchy of up to five levels for roll-up and reporting purposes. Examples of program codes include Academic Support, Student Services, and Research. Activity This is an optional one-to-six-character code that is non-hierarchical and can be used to further define an object of expenditure, such as, temporary units of work, subsidiary functional classifications, or short duration projects. Activity code examples are: Repair to Student Union Lobby Floor, Bookstore Van, and Computer Lab Printer Cartridge Recycling. Location This is an optional one-to-six-character code that identifies physical locations. It is primarily used with, but not limited to, the Fixed Asset module. However, if the Banner Fixed Assets module is used by the institution, then location codes must be defined and are not optional. Location codes may be established in a hierarchy of up to five levels for roll-up and reporting purposes. Examples of location codes are Controller’s Office, Athletic Department Offices, and Human Sciences Building. Account Index This code is another optional chart of accounts feature. It is a user-defined value for a set of FOAPAL elements that acts as a shortcut to speed data entry by the user. An example of an account index code might be a code used by the campus bookstore for certain transactions that defaults the Fund, Organization, Account, and Program code in order to represent book sales revenue. The index code may consist of up to six alphabetic/numeric characters and can define any combination of the FOAPAL elements.
© SunGard 2004-2007 Workbook Title Page 10
Section A: Introduction
Lesson: Chart of Accounts Features
Features Create Once, Use Everywhere The Chart of Accounts needs only to be set up once to drive the following Banner Finance functions: • Accounts Payable • Budget Development • Electronic Approvals • Fixed Assets • General Ledger • Endowment Management • Purchasing • Research Accounting • Security • Stores Inventory The Banner Chart of Accounts can also be set up to drive the following non-Finance functions: Position Control and Position Budgeting • Salary and fringe budgeting • Salary and fringe encumbering Payroll • Salaries and fringe expenditures • Salary and fringe re-distributions/reallocations Accounts Receivable • Student charges and payments • Non-Student charges and payments • Financial Aid disbursements

© SunGard 2004-2007 Workbook Title Page 11
Section A: Introduction
Lesson: Banner Finance System Ledgers
Introduction In order to provide maximum flexibility and information capture, the Banner Finance System maintains these ledgers: • General Ledger • Operating Ledger • Encumbrance Ledger • Grant Ledger.
General Ledger (GL) The General Ledger maintains information relevant to the organization’s “balance sheet.” Required COA elements for valid accounting distribution in the General Ledger are: COA, Fund, and Account codes. Transaction activity includes the sum of both periodic debits and credits. The general ledger contains only balance sheet accounts. These accounts include the following: Assets Expenditure control Liabilities Transfer control Fund balance Budget controls Fund additions Encumbrance control Fund deductions Revenue control General ledger control accounts contain the total debits/credits for their respective expenditure, transfer, budget, encumbrance, and revenue transactions. Detail transaction information for control accounts is maintained in the Banner operating ledger. • Revenue controls (budget, YTD actual for revenue account range) • Expenditure controls (budget, YTD actual for expenditure account range) • Transfer controls (budget, YTD actual for transfer account range) • Encumbrance controls (OPAL reservations or commitments)
© SunGard 2004-2007 Workbook Title Page 12
Section A: Introduction
Lesson: Banner Finance System Ledgers (Continued)
Operating Ledger (OPAL) The operating ledger contains transaction data for departmental operating accounts. Required COA elements for these transactions are fund, organization, account, and program. Optionally, the transactions may also include activity and/or location codes. Examples of operating ledger transactions include: • Revenues (tuition, fees, fines) • Expenditures (labor-related costs, supplies, services) • Transfers (mandatory and non-mandatory). Transactional data that is entered or maintained in the operating ledger can include budget, YTD actual, encumbrance and grant activity. Operating ledger transactions are linked to their corresponding GL control accounts.
© SunGard 2004-2007 Workbook Title Page 13
Section A: Introduction
Lesson: Other Finance Features
Features Listed below are various other features of the Banner Finance Chart of Accounts module: • Purchasing/Receiving • Stores Inventory • Accounts Payable • Accounts Receivable • Budget Development • Fixed Assets • Endowment Management.

© SunGard 2004-2007 Workbook Title Page 14
Section A: Introduction
Lesson: Banner Finance Reports
Reporting structures Internal pre-defined values – these include the following: Fund Types – there are two user-definable levels tied to internally defined fund types. Many reports are available based upon fund type. Account Types – there are two user-definable levels tied to internally defined account types. Many reports are available based upon account type. Fund structure – the hierarchical nature of the fund code aids roll-up reporting. Numerous reports are available based upon the fund structure. Organization structure - the hierarchical nature of the organization code aids roll-up reporting. Various reports are available based upon organizational data. Account structure - the hierarchical nature of the account code aids roll-up reporting. Both detail and summary reporting is available based upon the account code.
Extensive online queries Banner offers users the capability to perform comprehensive online queries. The queries are available for the following areas: • executive level • transaction level • source document • trial balance • ad hoc queries.
© SunGard 2004-2007 Workbook Title Page 15
Section A: Introduction
Lesson: Banner Finance Reports (Continued)
Attribute reporting This feature extends the “ad-hoc” reporting capabilities of the Banner Finance System. It enables you to • create user-defined attributes or categories of financial information • associate attributes to Fund, Organization, Account, Program, Activity, and location codes in
the Chart of Accounts structure • summarize information from multiple levels in a single Chart of Accounts • support reporting across multiple Charts of Accounts • use attributes to retrieve and organize financial information in the institution-developed
reports. You can define up to three different levels of attributes. Basic level consists of • attribute types are the building blocks of this enhancement • attribute values are an additional, optional level of attributes – they are linked to Attribute
types much in the same way that Fund codes are linked to Fund types in the Banner Finance System
• attribute set codes enable you to create pre-defined groups of Attribute types – you can use them either to create an additional hierarchical level of attributes or to simplify data entry (set codes are optional)
• depending on your needs, these levels can have a flat or a hierarchical structure. After you define Attribute set codes, Attribute types, and/or Attribute values, you associate them to FOAPAL element codes in your Banner Finance System. Then, you can use a reporting tool in conjunction with Banner Object: Access (an additional Banner reporting tool) to create customized reports for your organization. (Refer to the GASB Reporting workbook for more details.) Attribute set codes, Attribute types, and Attribute values enable you to easily retrieve financial information from the Banner database without having to remember complicated Charts of Accounts structures.

© SunGard 2004-2007 Workbook Title Page 16
Section A: Introduction
Lesson: Banner Finance Reports (Continued)
Banner user defaults Each Banner Finance user has a record on the User Profile Maintenance Form (FOMPROF). This record may be used to assign certain fields to be automatically populated for the user. One of these fields is for the Chart of Accounts code. When a chart code is entered on the user’s profile record, the COA field on a form will always be populated with that chart code. The user will never need to enter the chart code on a form unless he/she desires to change to a different chart.
Budgeting options Banner’s budgeting options allow users to use various combinations of these methods: Hierarchical budgeting Pooled budgeting Line item budgeting Hierarchical budgeting This method of budgeting is used on fund and organization chart of account elements. It allows for the control of budgets at higher levels in the fund and organization hierarchies. Budget checking (NSF) edits the sum of the budgets entered at levels below the control level. Pooled budgeting Pooled budgeting is used on the account chart of accounts element. It allows for the control or pooling of budgets at higher levels in the account hierarchy. Budget checking (NSF) edits the sum of the budgets entered at levels below the pooled level. Line item budgeting Line item budgeting can be used in combination with the methods listed above or it may be used alone.
© SunGard 2004-2007 Workbook Title Page 17
Section A: Introduction
Lesson: Rules and Security
Rule codes In the Banner system, rule-based processing guides the system in accomplishing its tasks and objectives. Rule codes delivered with Banner Finance are designed to accomplish the following: • define transactions • specify edits by transaction • customize error messages • specify posting actions. Although it is not necessary, Banner users can also create their own rule codes in order to achieve unique organizational objectives.
Security options Banner Finance incorporates extensive security options from which users may select. The security options include these items: • Form level – controls access to individual forms and processes • Rule class – determines which users may work with specific rule codes and groups of rule
codes • Organization code – limits users to query, update, and/or no access to specific organizational
data • Fund type/fund – limits users to query, update, and/or no access to specific fund types and/or
funds.
Tips and tricks This document generally indicates that you are to use the Tab key to navigate from field to field. However, if you completely fill a field, in many cases the cursor will automatically skip to the next field. Always check to ensure that you are in the correct field before entering data! You may also use your mouse for navigation.
©SunGard 2004-2007 Finance-Chart of Accounts
Page 18
Section B: Set Up
Lesson: Overview
Introduction The purpose of this section is to outline the set-up process and detail the procedures to set-up your Banner Chart of Accounts.
Intended audience Finance Office Administrators and Staff.
Objectives At the end of this section, you will be able to • create a Chart Code • create Accounts and Account Type Codes • create Funds and Fund Type Codes • create Organizations Codes • create Program Codes • create Activity Codes • create Location Codes • create a bank ID and defined bank codes • complete the Chart of Accounts Maintenance Form (FTMCOAS) • create attribute set, type, and value codes.
Prerequisites To complete this section, you should have
• completed the Banner Navigation tutorial, or have equivalent experience navigating in the Banner System
©SunGard 2004-2007 Finance-Chart of Accounts
Page 19
Section B: Set Up
Lesson: Overview (Continued)
Before you begin Setting up your Chart of Accounts is critical to using the Banner Finance system. You will only have to create your Chart of Accounts once. To ensure accuracy and ease of set up, you should have an up-to-date, printed copy of your institution’s current chart of accounts on hand as reference while completing this workbook. Many people find it easiest to highlight each code as they create it in Banner. The Banner forms are simple to fill out. This section will walk you through each step in detail. If you are taking this course in a classroom, sample data is provided throughout the workbook for you to use.
©SunGard 2004-2007 Finance-Chart of Accounts
Page 20
Section B: Set Up
Lesson: Overview (Continued)
Section contents Creating a New Chart of Accounts.........................................................................................21 Establishing Fiscal Year Parameters ......................................................................................32 Defining Internal Fund and Account Type Codes..................................................................35 Creating Level 1 Account Type Codes ..................................................................................44 Creating Account Codes.........................................................................................................50 Defining Control Accounts ....................................................................................................60 Creating Level 1 and Level 2 Fund Types .............................................................................66 Developing Fund Codes .........................................................................................................70 Defining a Fund Balance Account for a Multiple Fund Balance Institution..........................75 Creating a Bank ID.................................................................................................................78 Defining Bank Codes for the Chart of Accounts ...................................................................80 Establishing Program Codes ..................................................................................................83 Establishing an Activity Code................................................................................................86 Establishing a Location Code.................................................................................................87 Establishing Organization Codes ...........................................................................................89 Creating an Agency Code.......................................................................................................92 Creating Account Index Codes...............................................................................................94 Assigning a Financial Manager to the Chart of Accounts......................................................96 Reviewing the Currency Code Maintenance Form ................................................................99 Maintaining Overall System Information for the Installation ..............................................101 Completing the Chart of Accounts Maintenance Form........................................................103 Creating Attribute Set, Type, and Value Codes ...................................................................105 Summary of Set Up Procedures ...........................................................................................118
©SunGard 2004-2007 Finance-Chart of Accounts
Page 21
Section B: Set Up
Lesson: Creating a New Chart of Accounts
Purpose You can use the Chart of Accounts Code Maintenance Form (FTMCOAS) set up a new Chart of Accounts for your institution and define FOAPAL elements, encumbrance, and budget carry forward information for this new Chart of Accounts code.
Effective date processing All maintenance forms are in update mode when you enter the form. The third letter of the form name is M indicating it is a maintenance form. Each time you enter or change information on these forms, you must tell the system the date you want it to go into effect. Existing records cannot be deleted. You can terminate an existing record by entering a Termination date in that field. To change a record, you must make a copy of the original record, make the changes, and update the effective date field with the current date. If a record has been updated, the Next Change Date field will be valued. To find existing information, you execute queries. The original records are maintained as an audit trail. The software is delivered with a seed chart of accounts - Chart B. The recommended practice for setting up test charts in a training database environment is to copy the seed data, keeping its effective date and making changes as necessary. It is very important to pay attention to the effective date as it can cause problems when filling out other forms. For example, if you make your effective date Feb 1, 2005, you will not be able to create a fiscal year that has a start date of July 1, 2004, because the chart was not in effect until Feb 1 of the following year (2005). We assign a unique, one-character identification number or letter to our new chart of accounts. This permits the creation of multiple charts within the Finance system. The use of multiple charts is usually found in academic institutions that have a Foundation. All queries and reports are driven by the chart code. One problem with multiple chart processing is that the system cannot distinguish 1099’s by chart code. The vendor ID number stores the 1099 information. Requisitions, PO’s, Invoices, and JV’s are other document types that store data by the document number rather than the chart. During the process of setting up your chart, we will set up a user profile for each Finance user and define the chart they will be using on transaction forms on the User Profile Maintenance Form (FOMPROF). This will populate the chart ID into the transaction forms for each user.
©SunGard 2004-2007 Finance-Chart of Accounts
Page 22
Section B: Set Up
Lesson: Creating a New Chart of Accounts (Continued)
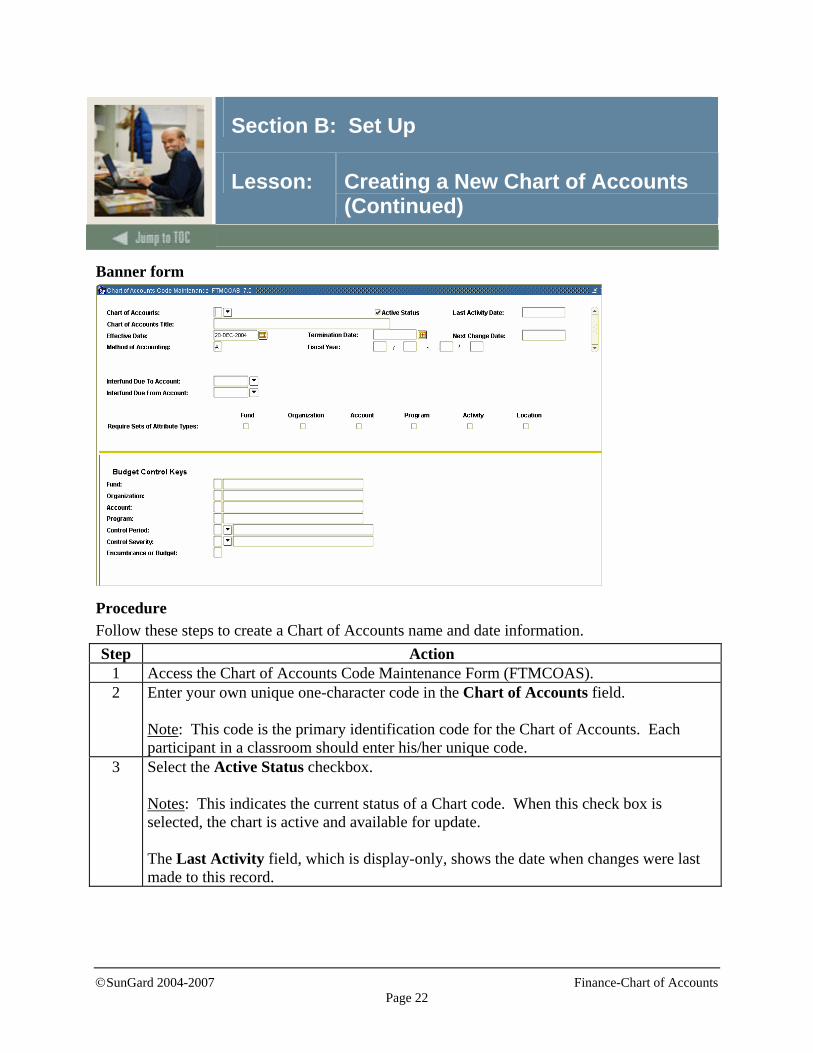
Banner form
Procedure Follow these steps to create a Chart of Accounts name and date information. Step Action
1 Access the Chart of Accounts Code Maintenance Form (FTMCOAS). 2 Enter your own unique one-character code in the Chart of Accounts field.
Note: This code is the primary identification code for the Chart of Accounts. Each participant in a classroom should enter his/her unique code.
3 Select the Active Status checkbox. Notes: This indicates the current status of a Chart code. When this check box is selected, the chart is active and available for update. The Last Activity field, which is display-only, shows the date when changes were last made to this record.
©SunGard 2004-2007 Finance-Chart of Accounts
Page 23
Section B: Set Up
Lesson: Creating a New Chart of Accounts (Continued)
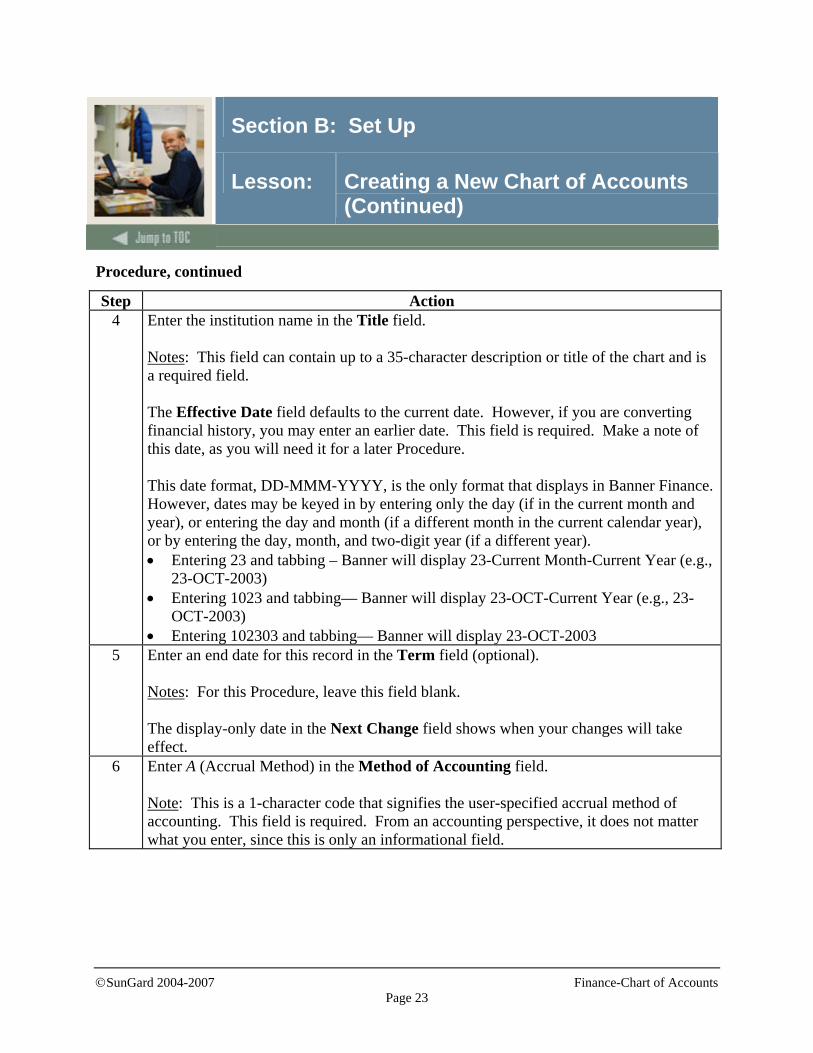
Procedure, continued
Step Action 4 Enter the institution name in the Title field.
Notes: This field can contain up to a 35-character description or title of the chart and is a required field. The Effective Date field defaults to the current date. However, if you are converting financial history, you may enter an earlier date. This field is required. Make a note of this date, as you will need it for a later Procedure. This date format, DD-MMM-YYYY, is the only format that displays in Banner Finance. However, dates may be keyed in by entering only the day (if in the current month and year), or entering the day and month (if a different month in the current calendar year), or by entering the day, month, and two-digit year (if a different year). • Entering 23 and tabbing – Banner will display 23-Current Month-Current Year (e.g.,
23-OCT-2003) • Entering 1023 and tabbing— Banner will display 23-OCT-Current Year (e.g., 23-
OCT-2003) • Entering 102303 and tabbing— Banner will display 23-OCT-2003
5 Enter an end date for this record in the Term field (optional). Notes: For this Procedure, leave this field blank. The display-only date in the Next Change field shows when your changes will take effect.
6 Enter A (Accrual Method) in the Method of Accounting field. Note: This is a 1-character code that signifies the user-specified accrual method of accounting. This field is required. From an accounting perspective, it does not matter what you enter, since this is only an informational field.
©SunGard 2004-2007 Finance-Chart of Accounts
Page 24
Section B: Set Up
Lesson: Creating a New Chart of Accounts (Continued)
Procedure, continued
Step Action 7 Enter the beginning and ending month and day for the fiscal year in the Fiscal Year
field. Example: If your fiscal year begins July 1, enter 07/01 and 06/30. This field is required. Notes: You cannot enter values in the Interfund Due/To Acct or Interfund Due/From Acct fields until you have defined account codes. You will define account codes in a later procedure. The Require Sets of Attribute Types check boxes, when selected, indicate that you wish to associate the selected codes to set codes in this Chart of Accounts. This is used in Attribute Reporting.
Procedure The budget control block fields will be used in available balance checking and tells the system how to handle transactions that exceed budget. Budgets are typically controlled at the Fund, Org., and Account level. In the following procedure, we will use these three fields for available budget checking. Step Action
1 Access the Budget Control block of FTMCOAS. Note: The check boxes in this block are used in Available Budget Checking.
2 Enter Y in the Fund field. 3 Enter Y in the Organization field. 4 Enter Y in the Account field. 5 Enter N in the Program field.
©SunGard 2004-2007 Finance-Chart of Accounts
Page 25
Section B: Set Up
Lesson: Creating a New Chart of Accounts (Continued)
Procedure, continued
Step Action 6 Enter A in the Control Period field.
Notes: This determines the time period of the budget you will be working with. • A(nnual) - Checks the availability of funds annually, regardless of the fiscal period
specified on an accounting entry. • Q(uarterly) - Budgeted funds within a quarter are available at the beginning of that
fiscal quarter. • Y(ear-to-date) - Accumulates the budget for all the fiscal periods up to the
transaction date of the entry and checks for availability on that basis. All of these budget control parameters may be changed for individual fund types or funds. Here we are setting up system-wide defaults only. The BAVL (Budget Availability) records are built based on the control periods specified in the Chart of Accounts, Fund Type, and Fund Code tables. Therefore, an Annual control period creates only one BAVL record and provides the greatest performance. The Control Period is defined on three forms: • FTMCOAS – If you have not specified a control period value at the fund code and/or
fund type level, the control period value here is used. • FTMFTYP – Overrides the control period value entered on FTMCOAS • FTMFUND – Overrides the control period value entered on FTMFTYP
©SunGard 2004-2007 Finance-Chart of Accounts
Page 26
Section B: Set Up
Lesson: Creating a New Chart of Accounts (Continued)
Procedure, continued
Step Action 7 Enter W (Warning) in the Control Severity field.
Note: This identifies the degree of severity allowed for a particular transaction.
IF you enter…
THEN…
W a warning is issued, and the transaction is allowed. E an error message is displayed and the transaction is
not permitted if there is no Budget available. 8 Check the Enc/Bud box to access the Encumbrance/Budget parameter window. You
may also tab through this block into the next block. Note: What this means is that when the system checks budget; it will look at Fund, Org., and Account, but not at Program. Hence, in the following scenario:
Fund Org. Acct. Prog. Budget 1000 120 6100 100 $100 1000 120 6100 200 50 1000 120 6225 100 75 1000 300 6225 20 200 Fund 1000, Org. 120, Acct 6100 will have $150 budget, regardless of program. If instead, we were checking by Fund and Org., but not by Account or Program, the same combination would have $225 total budget. If we were only checking by Fund, it would have $425 budget.
©SunGard 2004-2007 Finance-Chart of Accounts
Page 27
Section B: Set Up
Lesson: Creating a New Chart of Accounts (Continued)
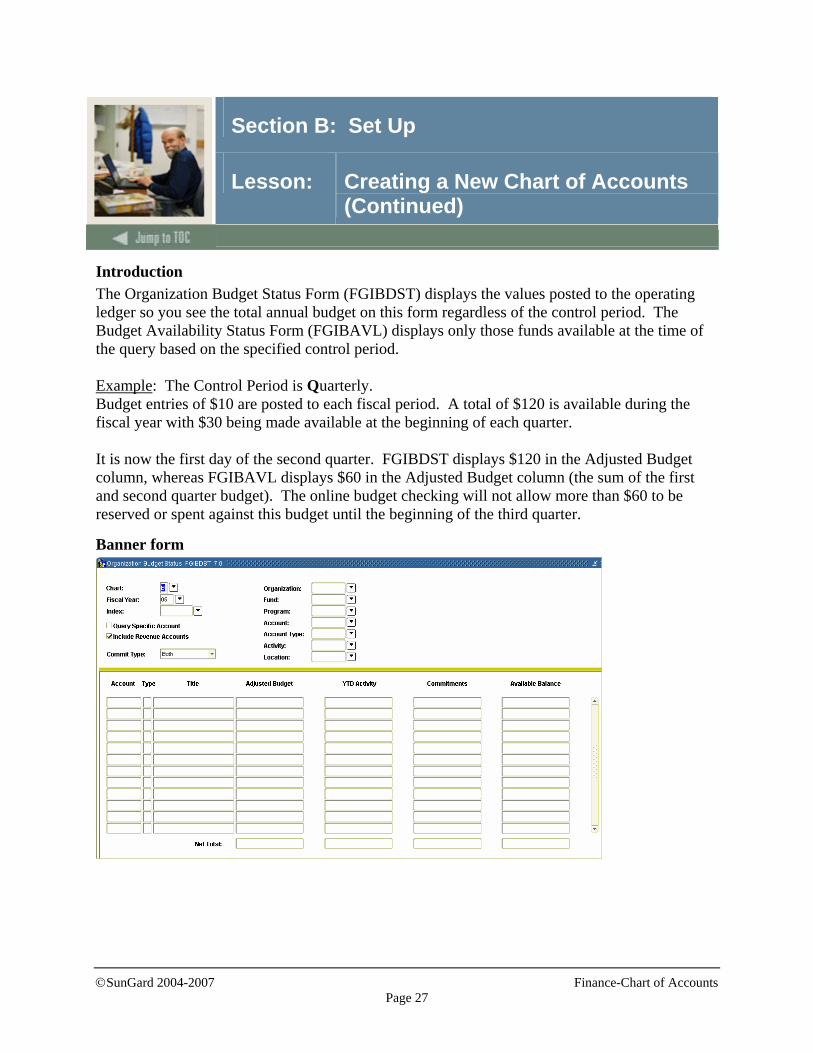
Introduction The Organization Budget Status Form (FGIBDST) displays the values posted to the operating ledger so you see the total annual budget on this form regardless of the control period. The Budget Availability Status Form (FGIBAVL) displays only those funds available at the time of the query based on the specified control period. Example: The Control Period is Quarterly. Budget entries of $10 are posted to each fiscal period. A total of $120 is available during the fiscal year with $30 being made available at the beginning of each quarter. It is now the first day of the second quarter. FGIBDST displays $120 in the Adjusted Budget column, whereas FGIBAVL displays $60 in the Adjusted Budget column (the sum of the first and second quarter budget). The online budget checking will not allow more than $60 to be reserved or spent against this budget until the beginning of the third quarter.
Banner form
©SunGard 2004-2007 Finance-Chart of Accounts
Page 28
Section B: Set Up
Lesson: Creating a New Chart of Accounts (Continued)
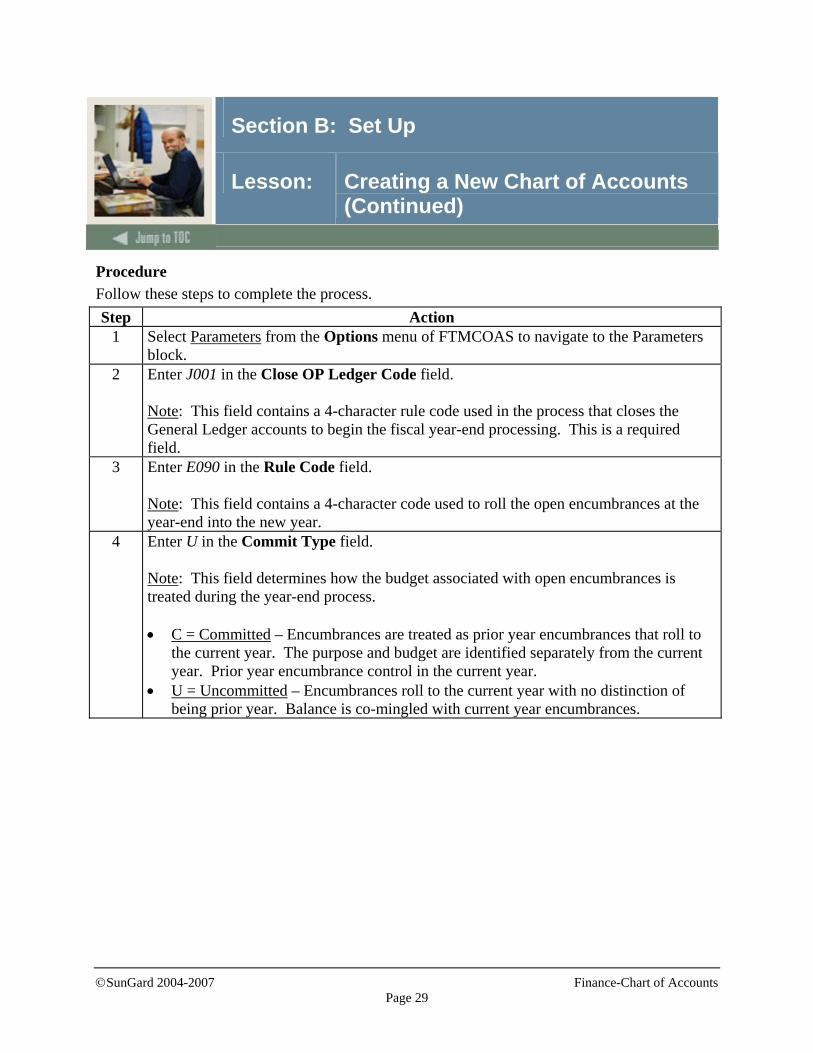
Parameters of FTMCOAS The fields on this form are related to year-end processing. The specifics and details are covered in the Year-End Processing training session.
• The Fund Balance Account field references a user-specified Fund Balance account used for
posting year-end closing entries. This field cannot be entered until account codes are created. This field will be revisited and completed in a later procedure.
• The A/P Accrual Account field references a user-specified Accounts Payable account to be used for accruals. This field cannot be entered until account codes are created. This field will be revisited and completed in a later procedure.
• The A/R Accrual Account field references a user-specified Accounts Receivable account to be used for accruals. This field cannot be entered until account codes are created. This field will be revisited and completed in a later procedure.
©SunGard 2004-2007 Finance-Chart of Accounts
Page 29
Section B: Set Up
Lesson: Creating a New Chart of Accounts (Continued)
Procedure Follow these steps to complete the process. Step Action
1 Select Parameters from the Options menu of FTMCOAS to navigate to the Parameters block.
2 Enter J001 in the Close OP Ledger Code field. Note: This field contains a 4-character rule code used in the process that closes the General Ledger accounts to begin the fiscal year-end processing. This is a required field.
3 Enter E090 in the Rule Code field. Note: This field contains a 4-character code used to roll the open encumbrances at the year-end into the new year.
4 Enter U in the Commit Type field. Note: This field determines how the budget associated with open encumbrances is treated during the year-end process. • C = Committed – Encumbrances are treated as prior year encumbrances that roll to
the current year. The purpose and budget are identified separately from the current year. Prior year encumbrance control in the current year.
• U = Uncommitted – Encumbrances roll to the current year with no distinction of being prior year. Balance is co-mingled with current year encumbrances.
©SunGard 2004-2007 Finance-Chart of Accounts
Page 30
Section B: Set Up
Lesson: Creating a New Chart of Accounts (Continued)
Procedure, continued
Step Action 5 Enter Y in the Budget Roll field.
Note: This field determines the year-end processing treatment for budgeted funds associated with encumbered values.
IF… THEN… yes the budget rolls forward. N for no the budget does not roll forward. prior year encumbrances are committed
it must be Yes.
prior year encumbrances are uncommitted
it can be Yes or No
No the budget does not roll with the prior year encumbrances
6 Enter U in the Budget Disposition field. Note: This field determines how remaining budgeted funds are to be treated at the end of the fiscal year if a rolled encumbrance is liquidated in the current year for an amount less than the encumbrance account. The possible values for this field are U (Unrestricted), R (Restricted), and N (No Action). • Unrestricted – For uncommitted encumbrances, if liquidated for less than the
encumbrance, the available amount becomes available in the current year. If prior year encumbrances are uncommitted, must be Unrestricted.
• Restricted – Any remaining amount after a committed encumbrance is liquidated is not available for use in the current year. It is reclassified to an appropriate account (that would need to be established in step 5).
• No Action – Any remaining amount after a committed encumbrance is liquidated is not available for use in the current year. The dollars remain as restricted budget for that line item rather than be reclassified
Committed Encumbrances Uncommitted Encumbrances Budget Roll – must be Y Budget roll can be Y or N Budget disposition- R, U, or N Budget disposition must be U
©SunGard 2004-2007 Finance-Chart of Accounts
Page 31
Section B: Set Up
Lesson: Creating a New Chart of Accounts (Continued)
Procedure, continued
Step Action 7 Enter 100 if 100 is not already the default in the Percent field.
Note: The value in this field determines the percentage of the budget to carry forward to the new fiscal year with encumbrances. This must be 100% when encumbrances are being rolled as committed.
8 Enter J020 in the Rule Code field in the Budget Carry Forward Parameters block. Note: This field determines the accounting treatment of the budget roll process.
9 Enter P in the Budget Type field. Note: This field defines the budget as Temporary or Permanent.
10 Enter O in the Budget Class field. Note: This field defines whether the rolled budget is to be recorded in the new fiscal year as O for Original Budget or A for Adjusted Budget.
11 Enter 100 in the Percent field. Notes: This field defines the percentage of the budget to be carried forward. The Document Roll Parameters block is used to define the entity’s year and document roll policies, and includes settings for encumbrances, purchase orders, memo reserve, requisitions, labor encumbrances, and work orders. This is the only form that contains this definition. The Spending Formula Hierarchy window is used with the Investment Management process and is not covered in this course.
12 Click the Save icon. 13 Click the Exit icon.

©SunGard 2004-2007 Finance-Chart of Accounts
Page 32
Section B: Set Up
Lesson: Establishing Fiscal Year Parameters
Introduction Use the Fiscal Year Maintenance Form (FTMFSYR) to establish the fiscal year accounting period parameters for systems operations within Community College’s previously created Chart of Accounts.
Banner form
Procedure Follow these steps to complete the process. Step Action
1 Access the Fiscal Year Maintenance Form (FTMFSYR). 2 Enter the unique Chart of Accounts code you created in the previous lesson in the COA
field. 3 Note: The display-only Last Activity field shows the last date that any changes were
made to this record. 4 Enter the last two digits of the fiscal year you are setting up in the Fiscal Year field. 5 Enter the day, month, and year that marks the beginning of the fiscal year in the
unlabeled Fiscal Year Start Date field. Notes: Use the standard DD-MMM-YYYY format. When you enter a fiscal year start date, Banner automatically calculates a fiscal year end date and displays it in the unlabeled Fiscal Year End date field. The fiscal year start and end dates must match the month and days you entered in the Fiscal Year fields on FTMCOAS.
©SunGard 2004-2007 Finance-Chart of Accounts
Page 33
Section B: Set Up
Lesson: Establishing Fiscal Year Parameters (Continued)
Procedure, continued
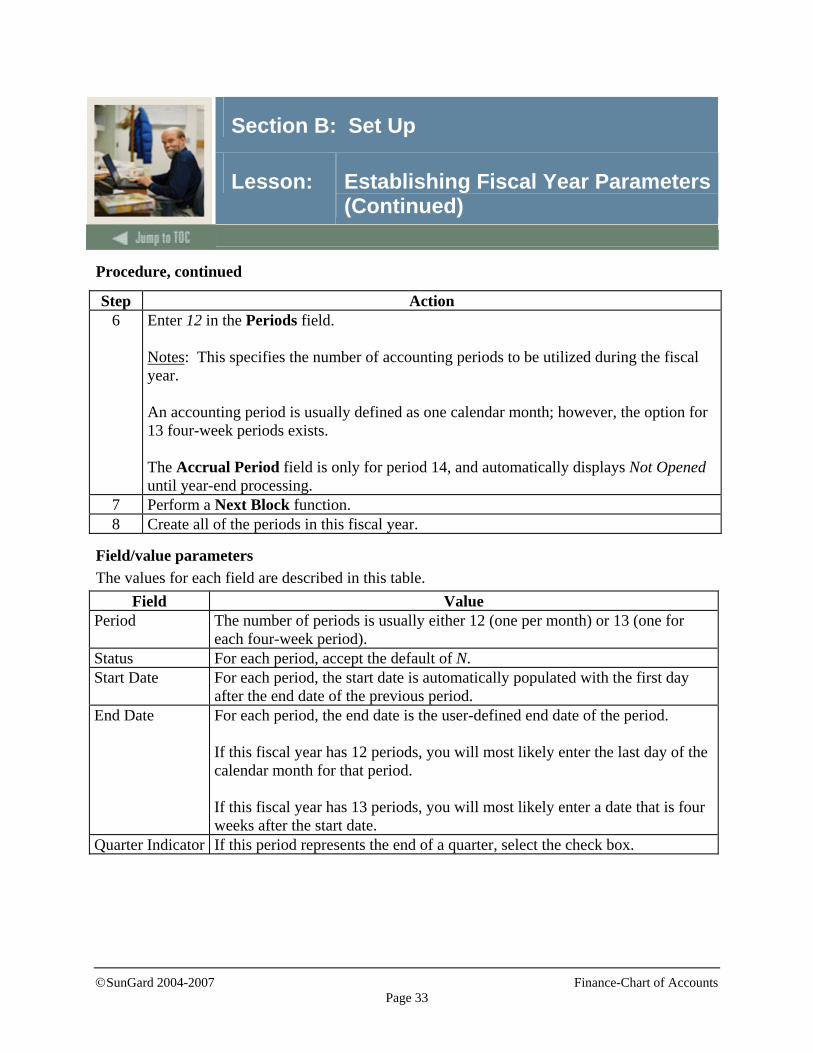
Step Action 6 Enter 12 in the Periods field.
Notes: This specifies the number of accounting periods to be utilized during the fiscal year. An accounting period is usually defined as one calendar month; however, the option for 13 four-week periods exists. The Accrual Period field is only for period 14, and automatically displays Not Opened until year-end processing.
7 Perform a Next Block function. 8 Create all of the periods in this fiscal year.
Field/value parameters The values for each field are described in this table.
Field Value Period The number of periods is usually either 12 (one per month) or 13 (one for
each four-week period). Status For each period, accept the default of N. Start Date For each period, the start date is automatically populated with the first day
after the end date of the previous period. End Date For each period, the end date is the user-defined end date of the period.
If this fiscal year has 12 periods, you will most likely enter the last day of the calendar month for that period. If this fiscal year has 13 periods, you will most likely enter a date that is four weeks after the start date.
Quarter Indicator If this period represents the end of a quarter, select the check box.
©SunGard 2004-2007 Finance-Chart of Accounts
Page 34
Section B: Set Up
Lesson: Establishing Fiscal Year Parameters (Continued)
Procedure, continued
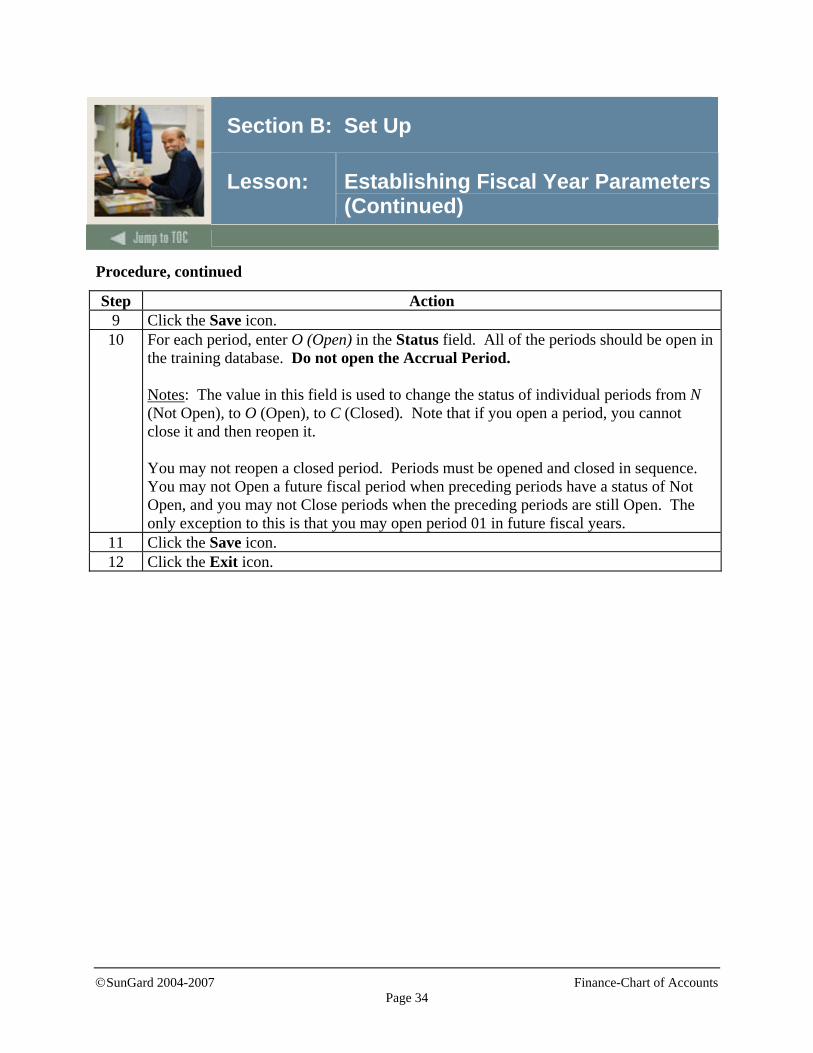
Step Action 9 Click the Save icon. 10 For each period, enter O (Open) in the Status field. All of the periods should be open in
the training database. Do not open the Accrual Period. Notes: The value in this field is used to change the status of individual periods from N (Not Open), to O (Open), to C (Closed). Note that if you open a period, you cannot close it and then reopen it. You may not reopen a closed period. Periods must be opened and closed in sequence. You may not Open a future fiscal period when preceding periods have a status of Not Open, and you may not Close periods when the preceding periods are still Open. The only exception to this is that you may open period 01 in future fiscal years.
11 Click the Save icon. 12 Click the Exit icon.
©SunGard 2004-2007 Finance-Chart of Accounts
Page 35
Section B: Set Up
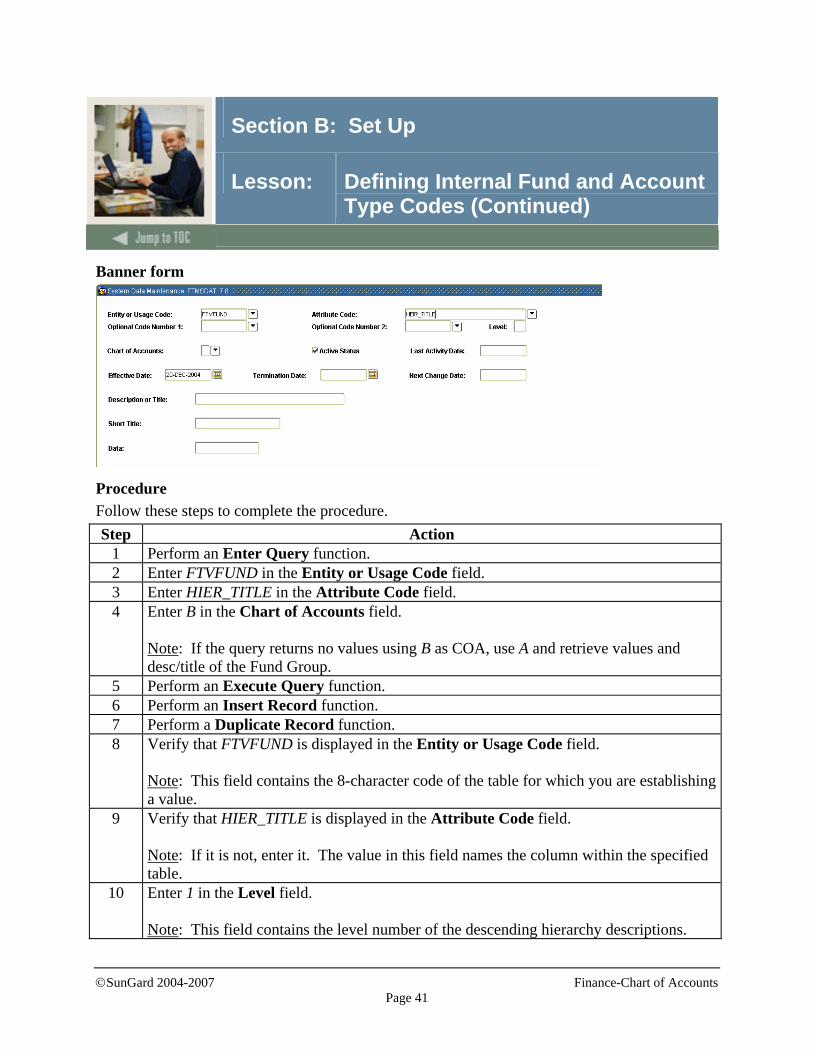
Lesson: Defining Internal Fund and Account Type Codes
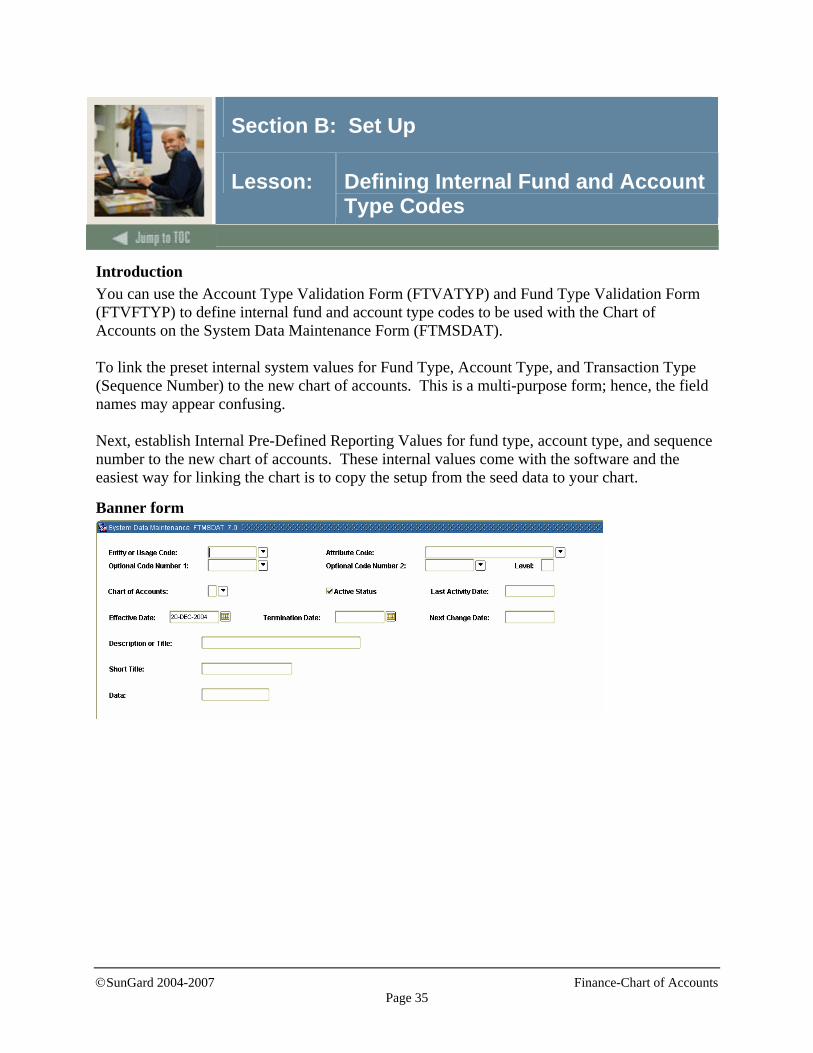
Introduction You can use the Account Type Validation Form (FTVATYP) and Fund Type Validation Form (FTVFTYP) to define internal fund and account type codes to be used with the Chart of Accounts on the System Data Maintenance Form (FTMSDAT). To link the preset internal system values for Fund Type, Account Type, and Transaction Type (Sequence Number) to the new chart of accounts. This is a multi-purpose form; hence, the field names may appear confusing. Next, establish Internal Pre-Defined Reporting Values for fund type, account type, and sequence number to the new chart of accounts. These internal values come with the software and the easiest way for linking the chart is to copy the setup from the seed data to your chart.
Banner form
©SunGard 2004-2007 Finance-Chart of Accounts
Page 36
Section B: Set Up
Lesson: Defining Internal Fund and Account Type Codes (Continued)
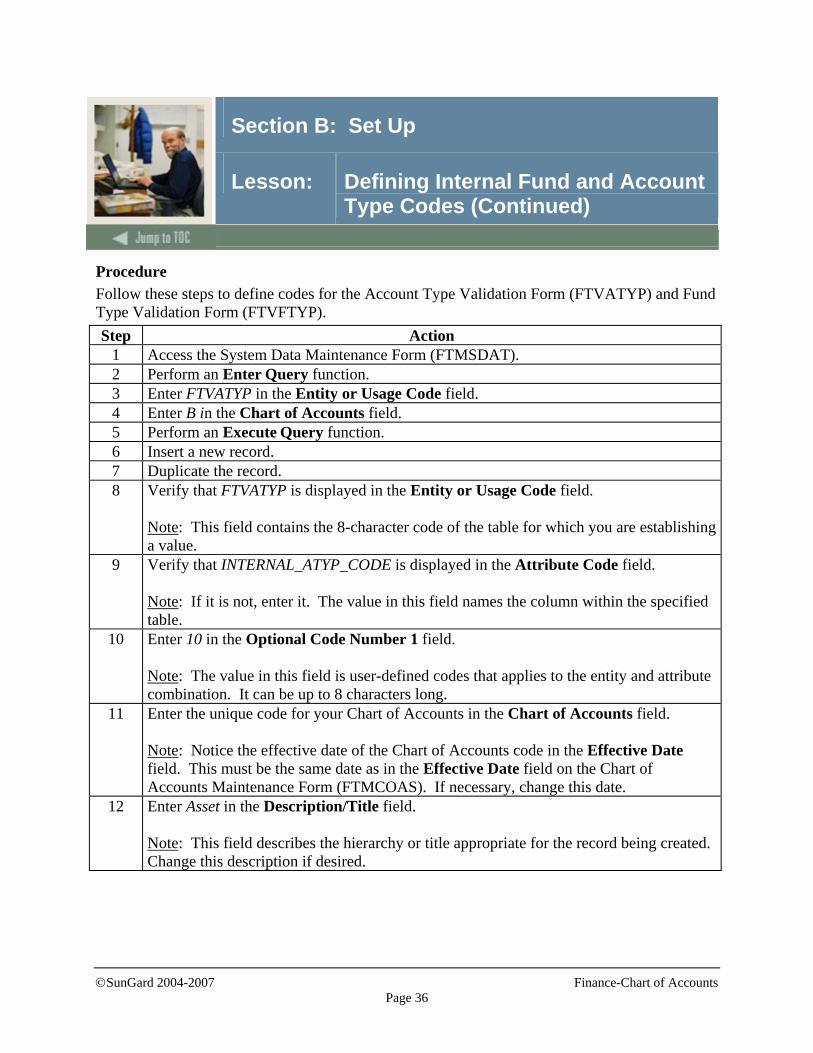
Procedure Follow these steps to define codes for the Account Type Validation Form (FTVATYP) and Fund Type Validation Form (FTVFTYP). Step Action
1 Access the System Data Maintenance Form (FTMSDAT). 2 Perform an Enter Query function. 3 Enter FTVATYP in the Entity or Usage Code field. 4 Enter B in the Chart of Accounts field. 5 Perform an Execute Query function. 6 Insert a new record. 7 Duplicate the record. 8 Verify that FTVATYP is displayed in the Entity or Usage Code field.
Note: This field contains the 8-character code of the table for which you are establishing a value.
9 Verify that INTERNAL_ATYP_CODE is displayed in the Attribute Code field. Note: If it is not, enter it. The value in this field names the column within the specified table.
10 Enter 10 in the Optional Code Number 1 field. Note: The value in this field is user-defined codes that applies to the entity and attribute combination. It can be up to 8 characters long.
11 Enter the unique code for your Chart of Accounts in the Chart of Accounts field. Note: Notice the effective date of the Chart of Accounts code in the Effective Date field. This must be the same date as in the Effective Date field on the Chart of Accounts Maintenance Form (FTMCOAS). If necessary, change this date.
12 Enter Asset in the Description/Title field. Note: This field describes the hierarchy or title appropriate for the record being created. Change this description if desired.
©SunGard 2004-2007 Finance-Chart of Accounts
Page 37
Section B: Set Up
Lesson: Defining Internal Fund and Account Type Codes (Continued)
Procedure, continued
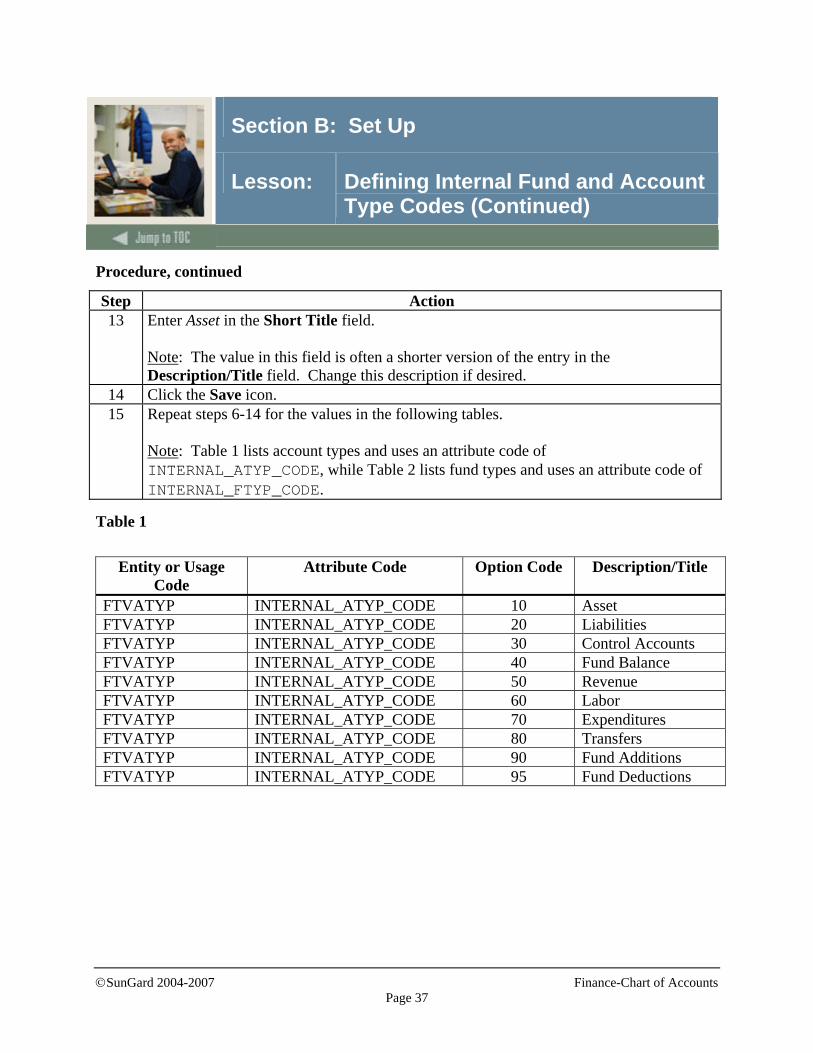
Step Action 13 Enter Asset in the Short Title field.
Note: The value in this field is often a shorter version of the entry in the Description/Title field. Change this description if desired.
14 Click the Save icon. 15 Repeat steps 6-14 for the values in the following tables.
Note: Table 1 lists account types and uses an attribute code of INTERNAL_ATYP_CODE, while Table 2 lists fund types and uses an attribute code of INTERNAL_FTYP_CODE.
Table 1
Entity or Usage Code
Attribute Code Option Code Description/Title
FTVATYP INTERNAL_ATYP_CODE 10 Asset FTVATYP INTERNAL_ATYP_CODE 20 Liabilities FTVATYP INTERNAL_ATYP_CODE 30 Control Accounts FTVATYP INTERNAL_ATYP_CODE 40 Fund Balance FTVATYP INTERNAL_ATYP_CODE 50 Revenue FTVATYP INTERNAL_ATYP_CODE 60 Labor FTVATYP INTERNAL_ATYP_CODE 70 Expenditures FTVATYP INTERNAL_ATYP_CODE 80 Transfers FTVATYP INTERNAL_ATYP_CODE 90 Fund Additions FTVATYP INTERNAL_ATYP_CODE 95 Fund Deductions
©SunGard 2004-2007 Finance-Chart of Accounts
Page 38
Section B: Set Up
Lesson: Defining Internal Fund and Account Type Codes (Continued)
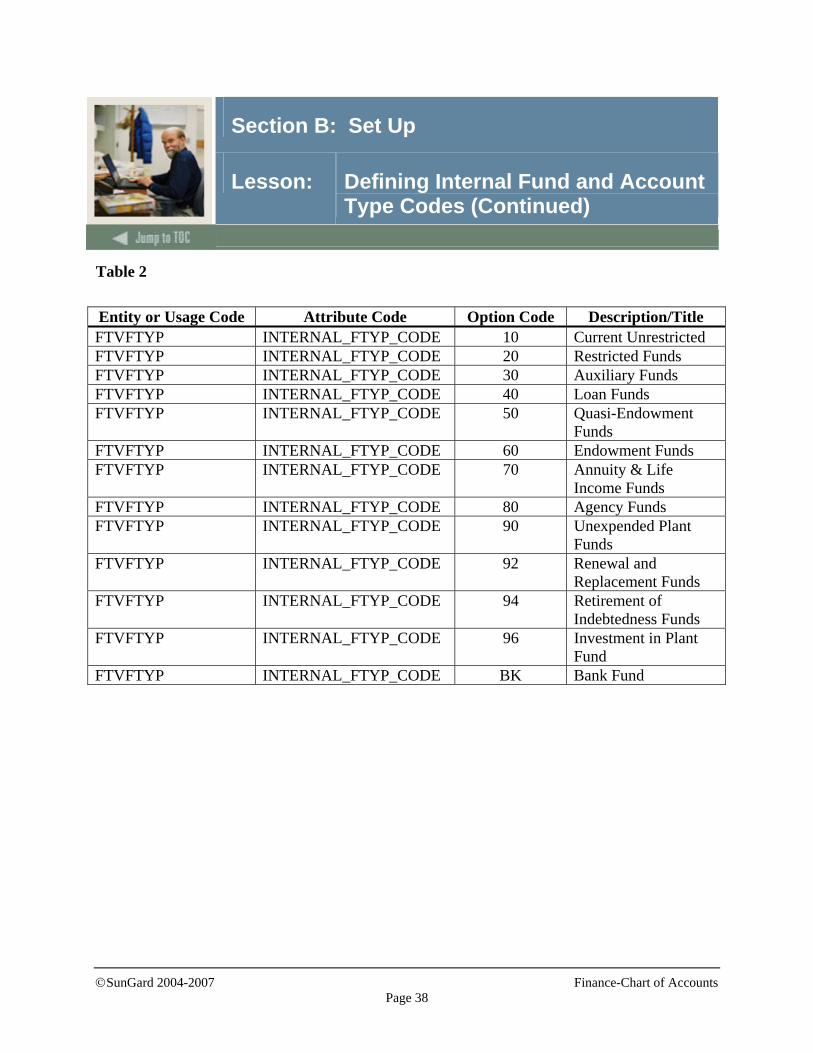
Table 2 Entity or Usage Code Attribute Code Option Code Description/Title FTVFTYP INTERNAL_FTYP_CODE 10 Current Unrestricted FTVFTYP INTERNAL_FTYP_CODE 20 Restricted Funds FTVFTYP INTERNAL_FTYP_CODE 30 Auxiliary Funds FTVFTYP INTERNAL_FTYP_CODE 40 Loan Funds FTVFTYP INTERNAL_FTYP_CODE 50 Quasi-Endowment
Funds FTVFTYP INTERNAL_FTYP_CODE 60 Endowment Funds FTVFTYP INTERNAL_FTYP_CODE 70 Annuity & Life
Income Funds FTVFTYP INTERNAL_FTYP_CODE 80 Agency Funds FTVFTYP INTERNAL_FTYP_CODE 90 Unexpended Plant
Funds FTVFTYP INTERNAL_FTYP_CODE 92 Renewal and
Replacement Funds FTVFTYP INTERNAL_FTYP_CODE 94 Retirement of
Indebtedness Funds FTVFTYP INTERNAL_FTYP_CODE 96 Investment in Plant
Fund FTVFTYP INTERNAL_FTYP_CODE BK Bank Fund
©SunGard 2004-2007 Finance-Chart of Accounts
Page 39
Section B: Set Up
Lesson: Defining Internal Fund and Account Type Codes (Continued)
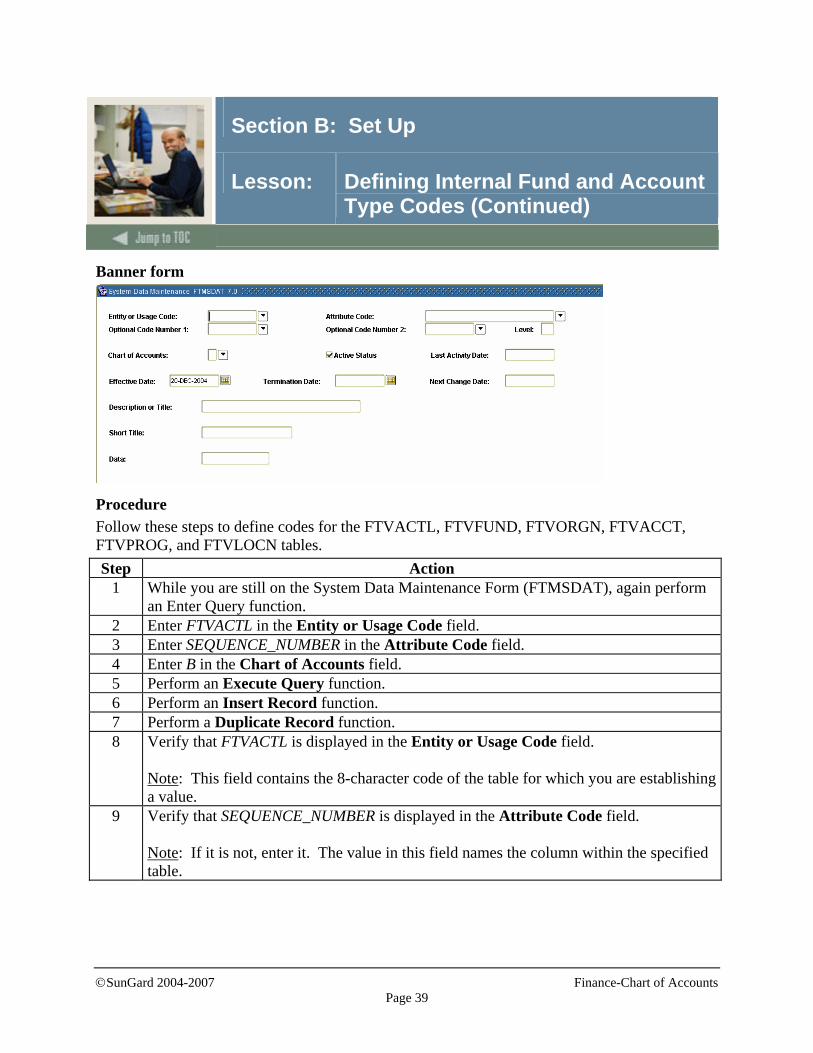
Banner form
Procedure Follow these steps to define codes for the FTVACTL, FTVFUND, FTVORGN, FTVACCT, FTVPROG, and FTVLOCN tables. Step Action
1 While you are still on the System Data Maintenance Form (FTMSDAT), again perform an Enter Query function.
2 Enter FTVACTL in the Entity or Usage Code field. 3 Enter SEQUENCE_NUMBER in the Attribute Code field. 4 Enter B in the Chart of Accounts field. 5 Perform an Execute Query function. 6 Perform an Insert Record function. 7 Perform a Duplicate Record function. 8 Verify that FTVACTL is displayed in the Entity or Usage Code field.
Note: This field contains the 8-character code of the table for which you are establishing a value.
9 Verify that SEQUENCE_NUMBER is displayed in the Attribute Code field. Note: If it is not, enter it. The value in this field names the column within the specified table.
©SunGard 2004-2007 Finance-Chart of Accounts
Page 40
Section B: Set Up
Lesson: Defining Internal Fund and Account Type Codes (Continued)
Procedure, continued
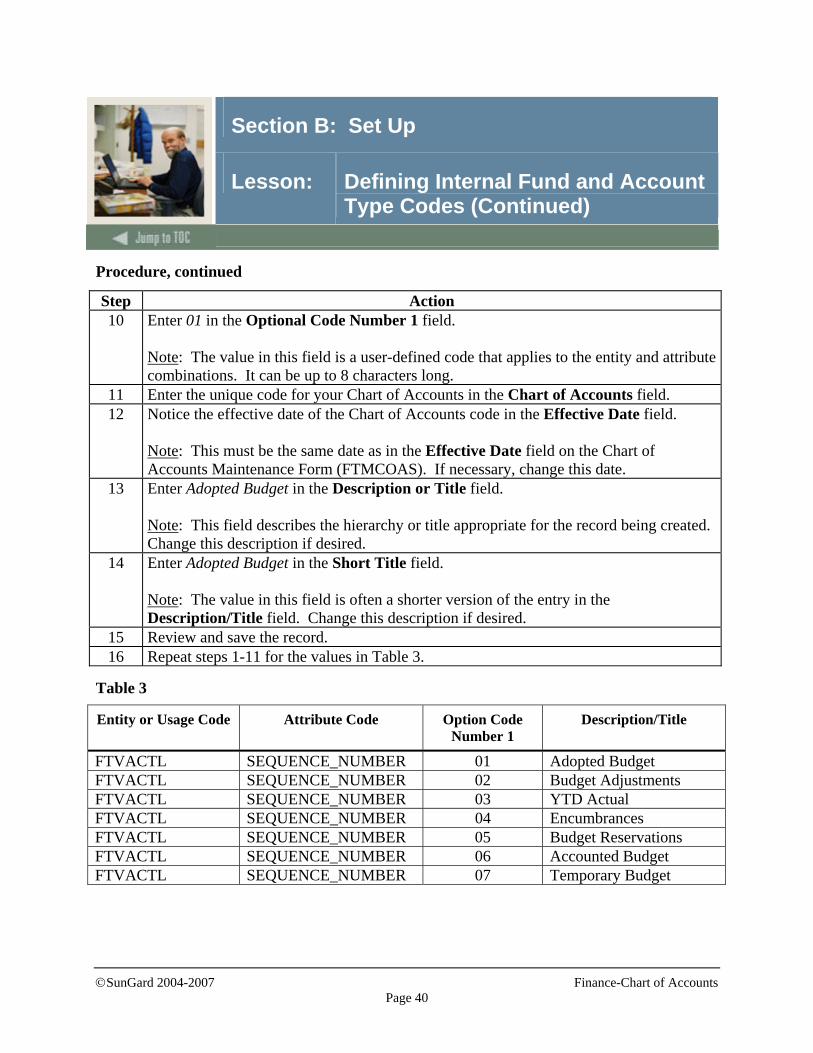
Step Action 10 Enter 01 in the Optional Code Number 1 field.
Note: The value in this field is a user-defined code that applies to the entity and attribute combinations. It can be up to 8 characters long.
11 Enter the unique code for your Chart of Accounts in the Chart of Accounts field. 12 Notice the effective date of the Chart of Accounts code in the Effective Date field.
Note: This must be the same date as in the Effective Date field on the Chart of Accounts Maintenance Form (FTMCOAS). If necessary, change this date.
13 Enter Adopted Budget in the Description or Title field. Note: This field describes the hierarchy or title appropriate for the record being created. Change this description if desired.
14 Enter Adopted Budget in the Short Title field. Note: The value in this field is often a shorter version of the entry in the Description/Title field. Change this description if desired.
15 Review and save the record. 16 Repeat steps 1-11 for the values in Table 3.
Table 3
Entity or Usage Code Attribute Code Option Code Number 1
Description/Title
FTVACTL SEQUENCE_NUMBER 01 Adopted Budget FTVACTL SEQUENCE_NUMBER 02 Budget Adjustments FTVACTL SEQUENCE_NUMBER 03 YTD Actual FTVACTL SEQUENCE_NUMBER 04 Encumbrances FTVACTL SEQUENCE_NUMBER 05 Budget Reservations FTVACTL SEQUENCE_NUMBER 06 Accounted Budget FTVACTL SEQUENCE_NUMBER 07 Temporary Budget
©SunGard 2004-2007 Finance-Chart of Accounts
Page 41
Section B: Set Up
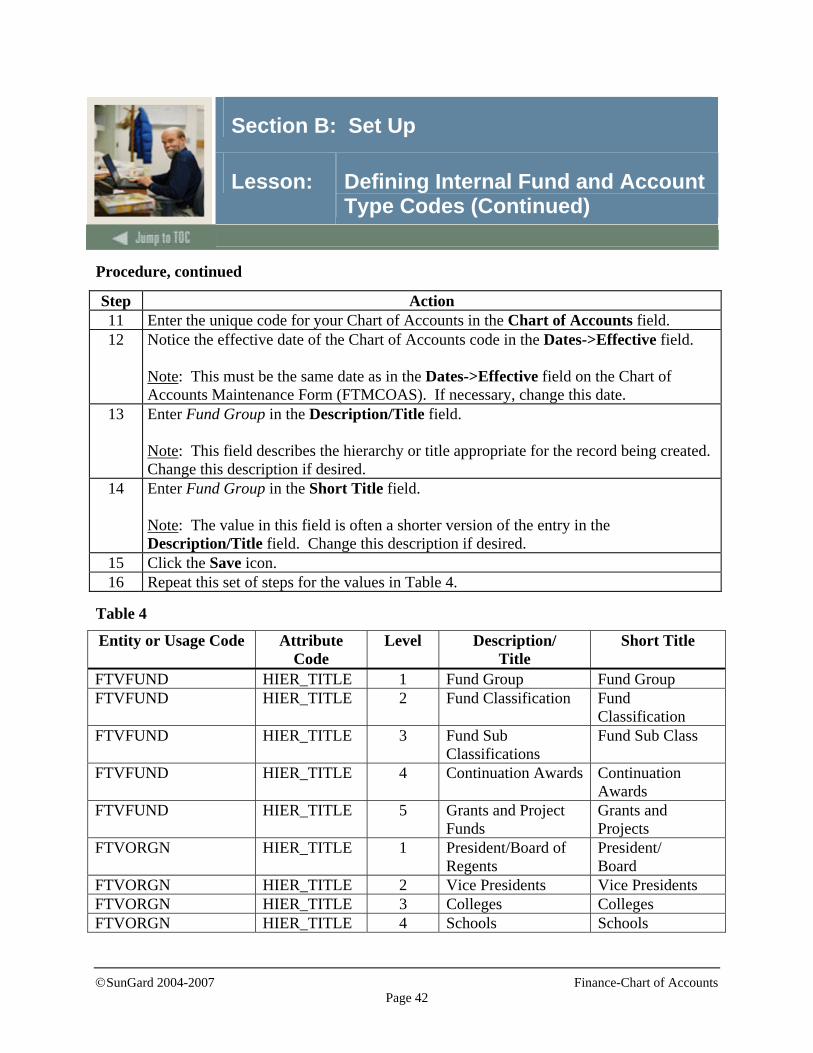
Lesson: Defining Internal Fund and Account Type Codes (Continued)
Banner form
Procedure Follow these steps to complete the procedure. Step Action
1 Perform an Enter Query function. 2 Enter FTVFUND in the Entity or Usage Code field. 3 Enter HIER_TITLE in the Attribute Code field. 4 Enter B in the Chart of Accounts field.
Note: If the query returns no values using B as COA, use A and retrieve values and desc/title of the Fund Group.
5 Perform an Execute Query function. 6 Perform an Insert Record function. 7 Perform a Duplicate Record function. 8 Verify that FTVFUND is displayed in the Entity or Usage Code field.
Note: This field contains the 8-character code of the table for which you are establishing a value.
9 Verify that HIER_TITLE is displayed in the Attribute Code field. Note: If it is not, enter it. The value in this field names the column within the specified table.
10 Enter 1 in the Level field. Note: This field contains the level number of the descending hierarchy descriptions.
©SunGard 2004-2007 Finance-Chart of Accounts
Page 42
Section B: Set Up
Lesson: Defining Internal Fund and Account Type Codes (Continued)
Procedure, continued
Step Action 11 Enter the unique code for your Chart of Accounts in the Chart of Accounts field. 12 Notice the effective date of the Chart of Accounts code in the Dates->Effective field.
Note: This must be the same date as in the Dates->Effective field on the Chart of Accounts Maintenance Form (FTMCOAS). If necessary, change this date.
13 Enter Fund Group in the Description/Title field. Note: This field describes the hierarchy or title appropriate for the record being created. Change this description if desired.
14 Enter Fund Group in the Short Title field. Note: The value in this field is often a shorter version of the entry in the Description/Title field. Change this description if desired.
15 Click the Save icon. 16 Repeat this set of steps for the values in Table 4.
Table 4
Entity or Usage Code Attribute Code
Level Description/ Title
Short Title
FTVFUND HIER_TITLE 1 Fund Group Fund Group FTVFUND HIER_TITLE 2 Fund Classification Fund
Classification FTVFUND HIER_TITLE 3 Fund Sub
Classifications Fund Sub Class
FTVFUND HIER_TITLE 4 Continuation Awards Continuation Awards
FTVFUND HIER_TITLE 5 Grants and Project Funds
Grants and Projects
FTVORGN HIER_TITLE 1 President/Board of Regents
President/ Board
FTVORGN HIER_TITLE 2 Vice Presidents Vice Presidents FTVORGN HIER_TITLE 3 Colleges Colleges FTVORGN HIER_TITLE 4 Schools Schools
©SunGard 2004-2007 Finance-Chart of Accounts
Page 43
Section B: Set Up
Lesson: Defining Internal Fund and Account Type Codes (Continued)
Table 4, continued Entity or Usage
Code Attribute Code Level Description/
Title Short Title
FTVORGN HIER_TITLE 5 Departmental Divisions
Department Divisions
FTVORGN HIER_TITLE 6 Special Departmental Programs
Special Dept. Progs.
FTVORGN HIER_TITLE 7 Unclassified Organizations
Unclassified Orgs.
FTVORGN HIER_TITLE 8 Reserved Future Use Reserved Future Use
FTVACCT HIER_TITLE 1 Account Classification
Account Class
FTVACCT HIER_TITLE 2 Account Object Account Object FTVACCT HIER_TITLE 3 Primary Account Primary Account FTVACCT HIER_TITLE 4 Sub-Account Sub-Account FTVPROG HIER_TITLE 1 Prime Program
Classification Prime Program Class
FTVPROG HIER_TITLE 2 Functional Programmatic Areas
Functional Programs
FTVPROG HIER_TITLE 3 Departmental Programs
Departmental Programs
FTVPROG HIER_TITLE 4 Special Programs Special Programs FTVPROG HIER_TITLE 5 For Future Use For Future Use FTVLOCN HIER_TITLE 1 Main Campus Main Campus FTVLOCN HIER_TITLE 2 Building Location Building Location FTVLOCN HIER_TITLE 3 Building Floor
Location Floor Location
FTVLOCN HIER_TITLE 4 Classroom Classroom FTVLOCN HIER_TITLE 5 Closets and Storage
Areas Closets and Storage Areas

©SunGard 2004-2007 Finance-Chart of Accounts
Page 44
Section B: Set Up
Lesson: Creating Level 1 Account Type Codes
Discussion Create Level 1 and Level 2 account type codes using the Account Type Code Maintenance Form (FTMATYP) in order to organize the numerous accounts. Only Level 1 account types may be linked to the internal system value. An unlimited number of Level 2 account types may be linked to Level 1 account types. This is a user-defined scheme. You may use any scheme you like when setting up your own chart; however, Level 1 types and Level 2 types may not duplicate numbers. Many of the Banner reports allow you to specify through the parameters what level you wish for your report. Some of the query forms may also be done on the level. The significance of the fund and account levels is the reporting, not the general ledger postings (which do not break down by level). Level 1 Account Types Represent headings and grand totals. Example: Assets prints as the heading on the balance sheet and as a grand total at the end of the asset section of the report. Level 2 Account Types Represent sub-totals and print on the balance sheet as subordinate to Level 1 account types. Example: Assets prints with its total below Accts. Receivable.
©SunGard 2004-2007 Finance-Chart of Accounts
Page 45
Section B: Set Up
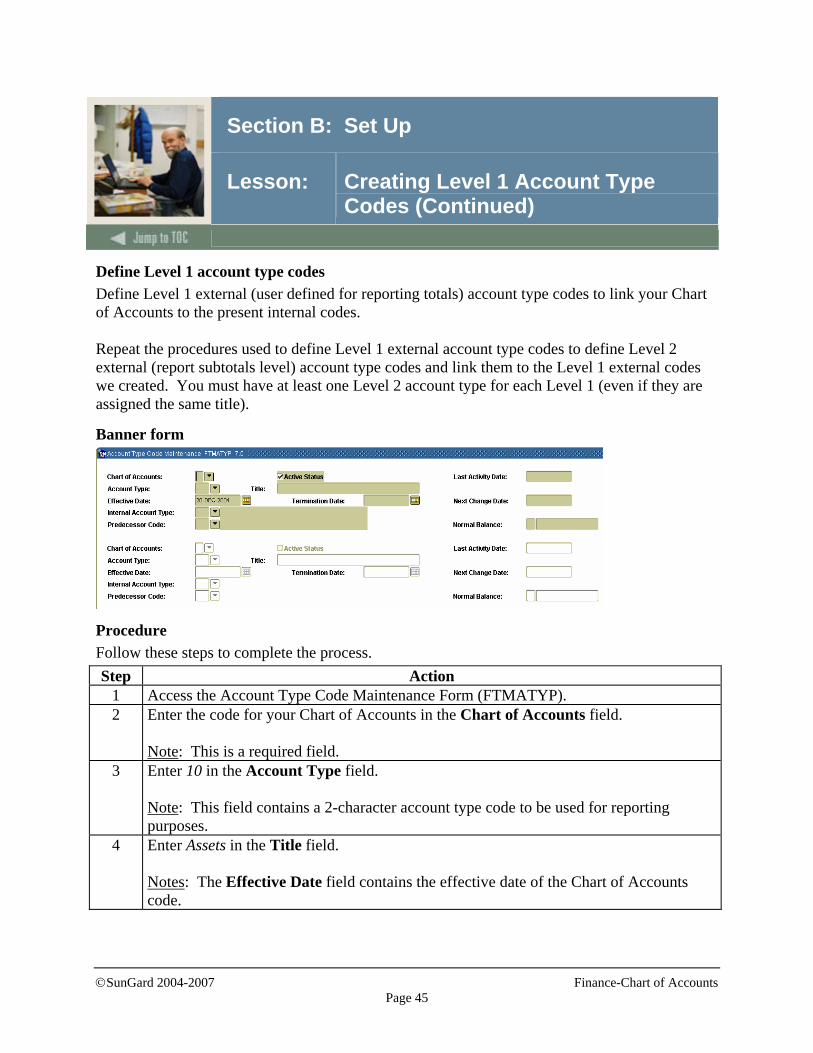
Lesson: Creating Level 1 Account Type Codes (Continued)
Define Level 1 account type codes Define Level 1 external (user defined for reporting totals) account type codes to link your Chart of Accounts to the present internal codes. Repeat the procedures used to define Level 1 external account type codes to define Level 2 external (report subtotals level) account type codes and link them to the Level 1 external codes we created. You must have at least one Level 2 account type for each Level 1 (even if they are assigned the same title).
Banner form
Procedure Follow these steps to complete the process. Step Action
1 Access the Account Type Code Maintenance Form (FTMATYP). 2 Enter the code for your Chart of Accounts in the Chart of Accounts field.
Note: This is a required field.
3 Enter 10 in the Account Type field. Note: This field contains a 2-character account type code to be used for reporting purposes.
4 Enter Assets in the Title field. Notes: The Effective Date field contains the effective date of the Chart of Accounts code.
©SunGard 2004-2007 Finance-Chart of Accounts
Page 46
Section B: Set Up
Lesson: Creating Level 1 Account Type Codes (Continued)
Procedure, continued
Step Action 5 Enter 10 in the Internal Account Type field.
Note: This field contains the internal system value used to let Banner Finance know how and where to process and report transactions.
6 Enter D in the Normal Balance field. Notes: This indicates the typical balance in an account. Valid options are D (Debit), C (Credit), or 0 (Zero Balance). Although 0 is an option for the Normal Balance, it can cause issues with some reports and internal processing. When in doubt, use Debit.
7 Click the Save icon. 8 After entering the above record, use the following Level 1 account type table to enter the
remaining Level 1 account type records. Level 1 account types Account Type Title Internal Account Type Normal Balance10 Assets 10 D 20 Liabilities 20 C 30 Control Accounts 30 C 40 Fund Balances 40 C 50 Revenues 50 C 60 Salaries & Wages 60 D 70 Expenditures 70 D 80 Transfers 80 D 90 Fund Additions 90 C 95 Fund Deductions 95 D
©SunGard 2004-2007 Finance-Chart of Accounts
Page 47
Section B: Set Up
Lesson: Creating Level 1 Account Type Codes (Continued)
Define Level 2 account type codes After entering the Level 1 account type codes, perform a Rollback function and enter Level 2 account type codes, linking them to the Level 1 codes via the Predecessor field.
Procedure Follow these steps to complete the process. Step Action
1 Enter your Chart of Accounts code in the Chart of Accounts field. 2 Enter 11 in the Account Type field.
Note: This selects an account type to be used for reporting purposes. This is a required field.
3 Enter Cash and Cash Equivalents in the Title field. Notes: This determines the name of the account type. This is a required field. The Effective Date field contains the effective date of the Chart of Accounts code.
4 Enter 10 in the Internal Account Type field. Notes: This field selects the internal system value used to let Banner Finance know how and where to process and report transactions. To define a Level 2 account, the Predecessor Code field is needed to link the Level 2 codes to the Level 1 codes.
5 Enter 10 in the Predecessor Code field. Note: This field determines which Level 1 account this account will be tied to. This is required for creating hierarchies.
6 Enter D in the Normal Balance field. Note: This indicates the usual balance in an account. Valid options are D (Debit), C (Credit), or 0 (Zero Balance).
7 Click the Save icon. 8 Use the Level 2 account type table to enter the remaining account type records. 9 Click the Save icon. 10 Click the Exit icon.

©SunGard 2004-2007 Finance-Chart of Accounts
Page 48
Section B: Set Up
Lesson: Creating Level 1 Account Type Codes (Continued)
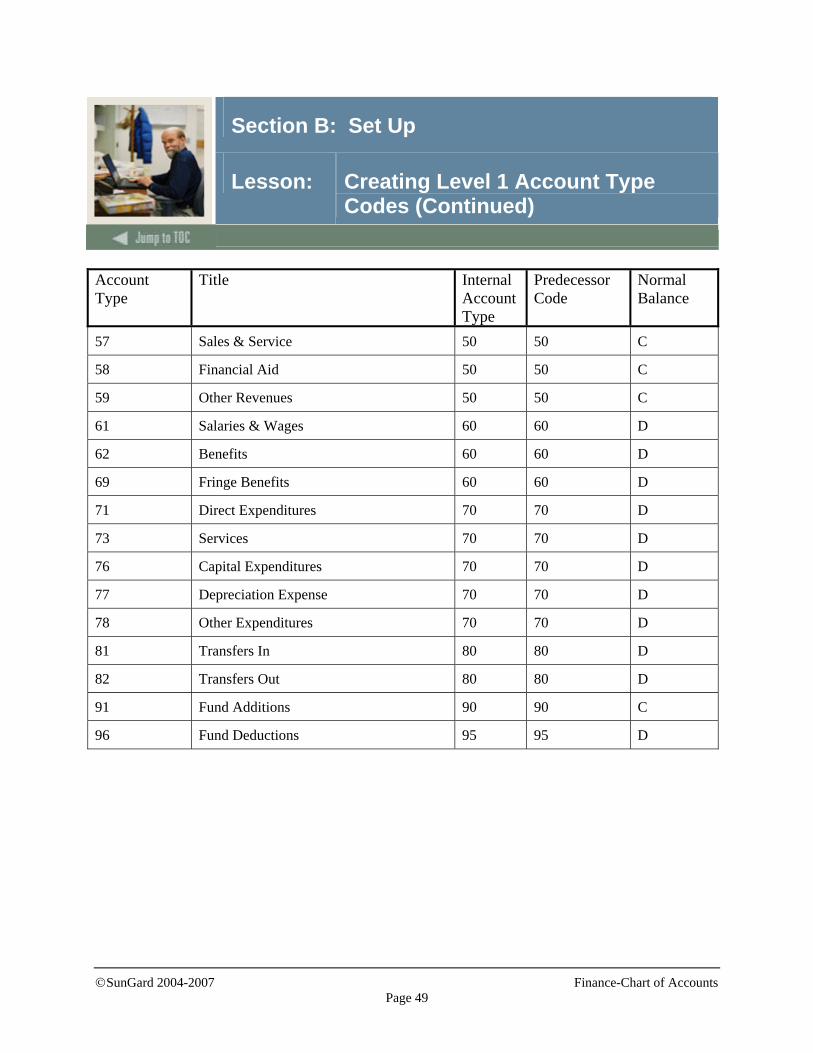
Level 2 account types [Sample] Account Type
Title Internal Account Type
Predecessor Code
Normal Balance
11 Cash and Cash Equivalents 10 10 D 12 Accounts Receivable 10 10 D 13 Inventory 10 10 D 14 Investments 10 10 D 15 Plant & Equipment 10 10 D 16 Prepaid Items & Deferred Charges 10 10 D 17 Due from Other Funds 10 10 D 1Z Other Assets 10 10 D 21 Accounts Payable 20 20 C 22 Accrued Liabilities 20 20 C 23 Deposits Payable 20 20 C 24 Bond Payable 20 20 C 25 Due to Other Funds 20 20 C 26 Other Liabilities 20 20 C 31 Control Accounts 30 30 C 41 Fund Balance 40 40 C 51 General Income 50 50 C 52 Tuition & Fees 50 50 C 53 Gifts 50 50 C 54 Grants & Contracts 50 50 C 55 Other Revenue 50 50 C 56 Endowment Income 50 50 C
©SunGard 2004-2007 Finance-Chart of Accounts
Page 49
Section B: Set Up
Lesson: Creating Level 1 Account Type Codes (Continued)
Account Type
Title Internal Account Type
Predecessor Code
Normal Balance
57 Sales & Service 50 50 C
58 Financial Aid 50 50 C
59 Other Revenues 50 50 C
61 Salaries & Wages 60 60 D
62 Benefits 60 60 D
69 Fringe Benefits 60 60 D
71 Direct Expenditures 70 70 D
73 Services 70 70 D
76 Capital Expenditures 70 70 D
77 Depreciation Expense 70 70 D
78 Other Expenditures 70 70 D
81 Transfers In 80 80 D
82 Transfers Out 80 80 D
91 Fund Additions 90 90 C
96 Fund Deductions 95 95 D
©SunGard 2004-2007 Finance-Chart of Accounts
Page 50
Section B: Set Up
Lesson: Creating Account Codes
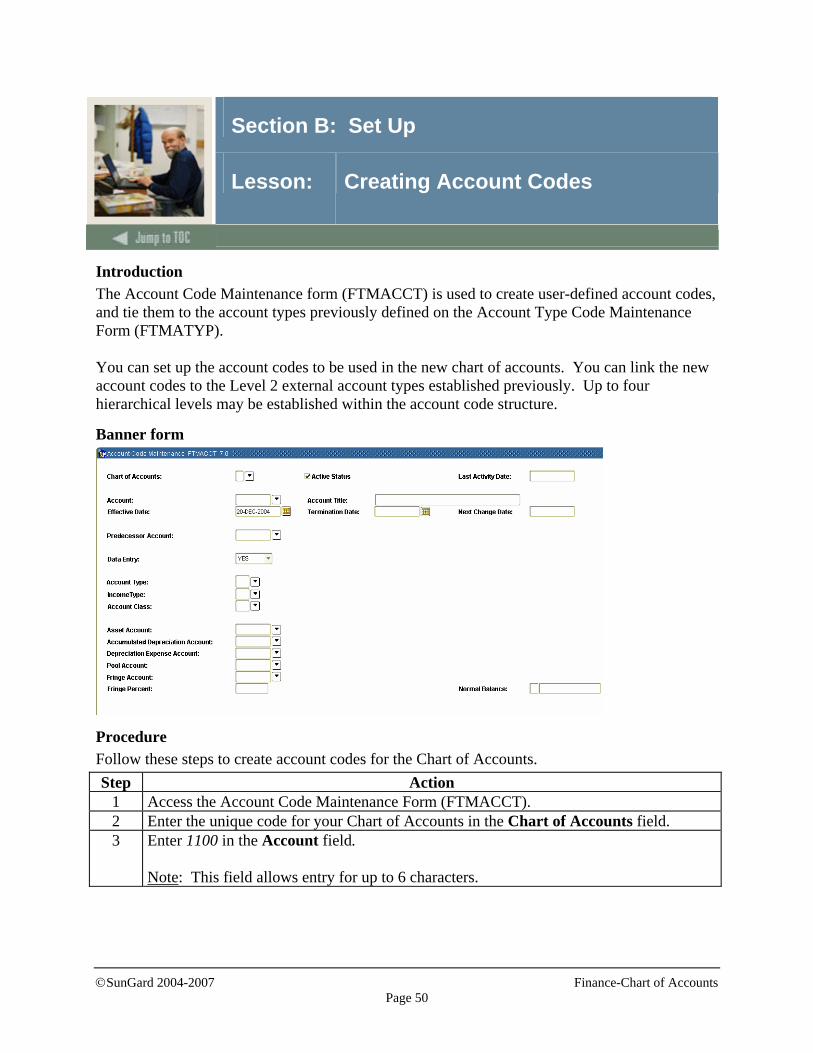
Introduction The Account Code Maintenance form (FTMACCT) is used to create user-defined account codes, and tie them to the account types previously defined on the Account Type Code Maintenance Form (FTMATYP). You can set up the account codes to be used in the new chart of accounts. You can link the new account codes to the Level 2 external account types established previously. Up to four hierarchical levels may be established within the account code structure.
Banner form
Procedure Follow these steps to create account codes for the Chart of Accounts. Step Action
1 Access the Account Code Maintenance Form (FTMACCT). 2 Enter the unique code for your Chart of Accounts in the Chart of Accounts field. 3 Enter 1100 in the Account field.
Note: This field allows entry for up to 6 characters.
©SunGard 2004-2007 Finance-Chart of Accounts
Page 51
Section B: Set Up
Lesson: Creating Account Codes (Continued)
Procedure, continued
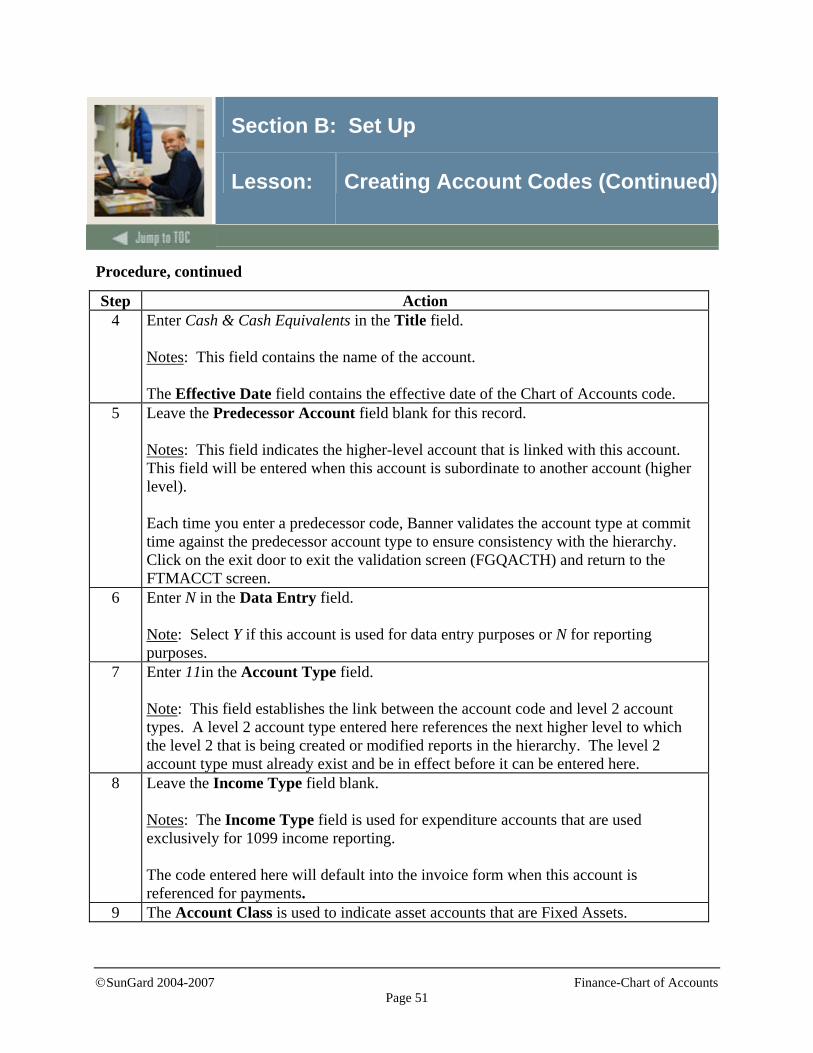
Step Action 4 Enter Cash & Cash Equivalents in the Title field.
Notes: This field contains the name of the account. The Effective Date field contains the effective date of the Chart of Accounts code.
5 Leave the Predecessor Account field blank for this record. Notes: This field indicates the higher-level account that is linked with this account. This field will be entered when this account is subordinate to another account (higher level). Each time you enter a predecessor code, Banner validates the account type at commit time against the predecessor account type to ensure consistency with the hierarchy. Click on the exit door to exit the validation screen (FGQACTH) and return to the FTMACCT screen.
6 Enter N in the Data Entry field. Note: Select Y if this account is used for data entry purposes or N for reporting purposes.
7 Enter 11in the Account Type field. Note: This field establishes the link between the account code and level 2 account types. A level 2 account type entered here references the next higher level to which the level 2 that is being created or modified reports in the hierarchy. The level 2 account type must already exist and be in effect before it can be entered here.
8 Leave the Income Type field blank. Notes: The Income Type field is used for expenditure accounts that are used exclusively for 1099 income reporting. The code entered here will default into the invoice form when this account is referenced for payments.
9 The Account Class is used to indicate asset accounts that are Fixed Assets.
©SunGard 2004-2007 Finance-Chart of Accounts
Page 52
Section B: Set Up
Lesson: Creating Account Codes (Continued)
Procedure, continued
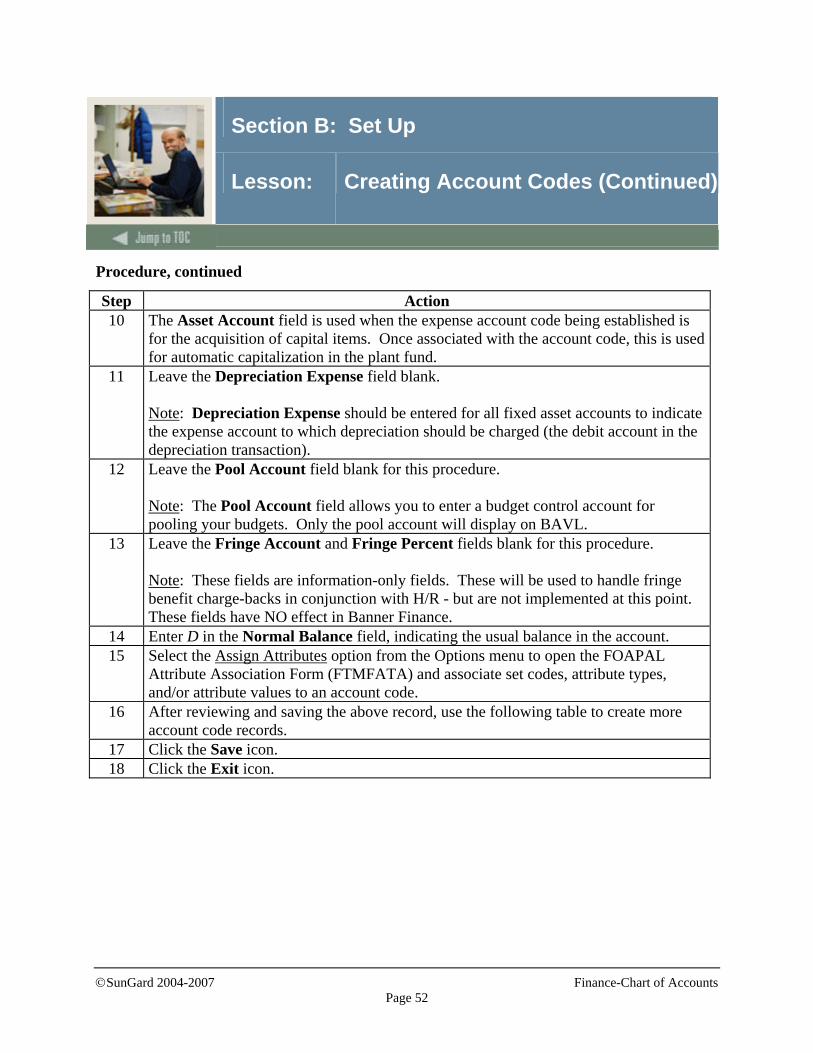
Step Action 10 The Asset Account field is used when the expense account code being established is
for the acquisition of capital items. Once associated with the account code, this is used for automatic capitalization in the plant fund.
11 Leave the Depreciation Expense field blank. Note: Depreciation Expense should be entered for all fixed asset accounts to indicate the expense account to which depreciation should be charged (the debit account in the depreciation transaction).
12 Leave the Pool Account field blank for this procedure. Note: The Pool Account field allows you to enter a budget control account for pooling your budgets. Only the pool account will display on BAVL.
13 Leave the Fringe Account and Fringe Percent fields blank for this procedure. Note: These fields are information-only fields. These will be used to handle fringe benefit charge-backs in conjunction with H/R - but are not implemented at this point. These fields have NO effect in Banner Finance.
14 Enter D in the Normal Balance field, indicating the usual balance in the account. 15 Select the Assign Attributes option from the Options menu to open the FOAPAL
Attribute Association Form (FTMFATA) and associate set codes, attribute types, and/or attribute values to an account code.
16 After reviewing and saving the above record, use the following table to create more account code records.
17 Click the Save icon. 18 Click the Exit icon.
©SunGard 2004-2007 Finance-Chart of Accounts
Page 53
Section B: Set Up
Lesson: Creating Account Codes (Continued)
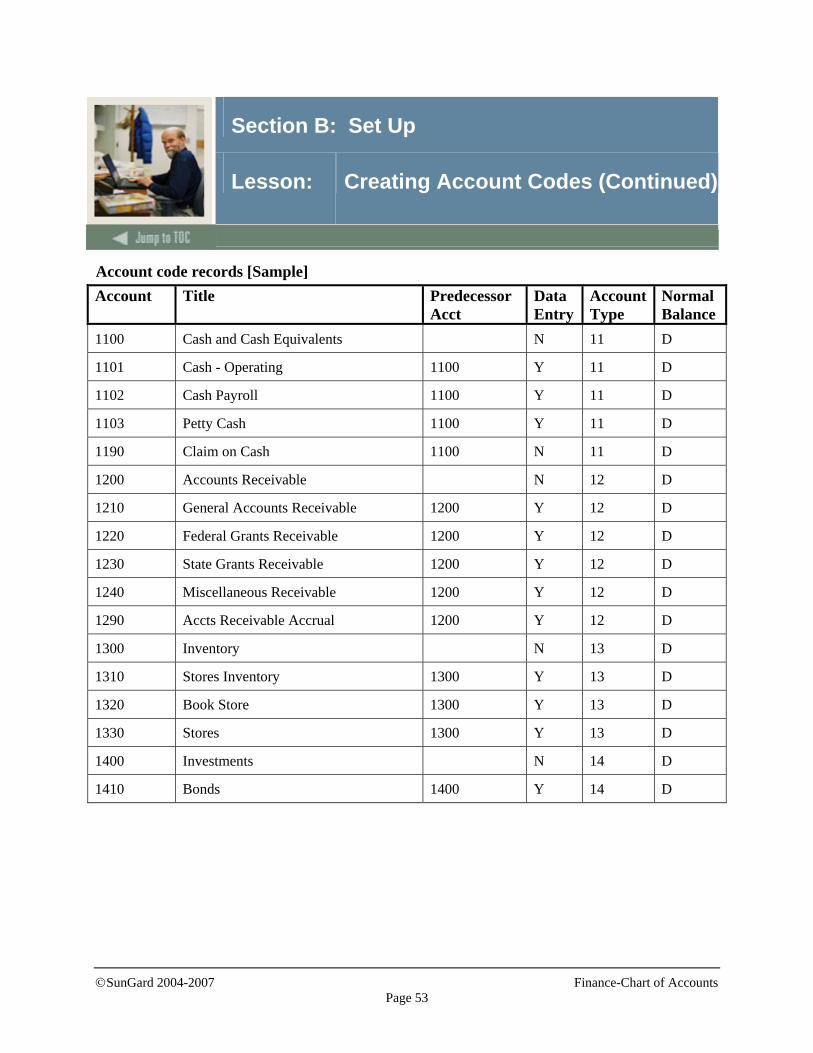
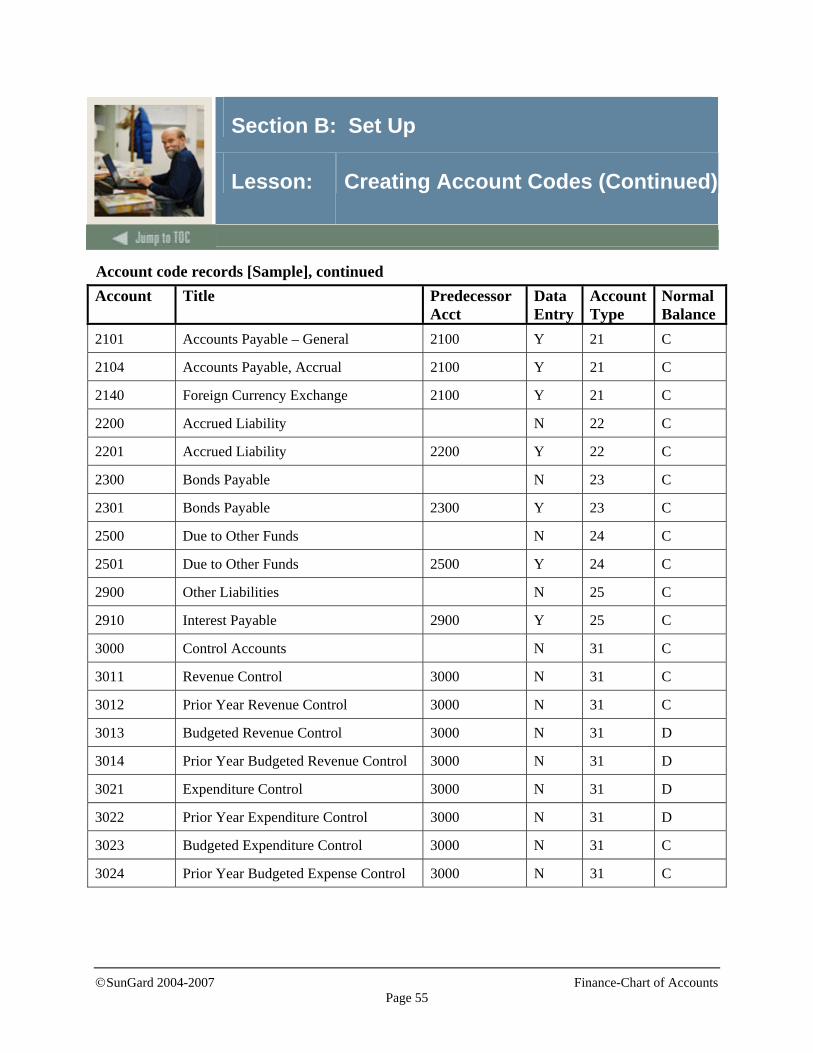
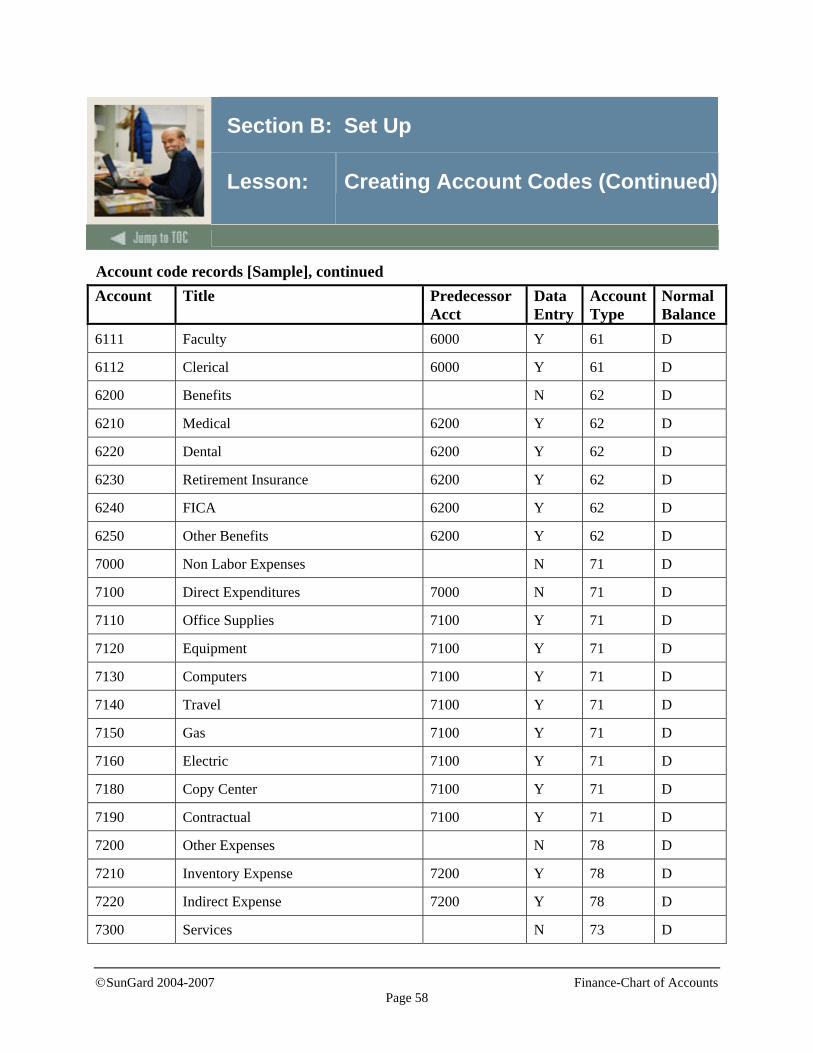
Account code records [Sample] Account Title Predecessor
Acct Data Entry
Account Type
Normal Balance
1100 Cash and Cash Equivalents N 11 D
1101 Cash - Operating 1100 Y 11 D
1102 Cash Payroll 1100 Y 11 D
1103 Petty Cash 1100 Y 11 D
1190 Claim on Cash 1100 N 11 D
1200 Accounts Receivable N 12 D
1210 General Accounts Receivable 1200 Y 12 D
1220 Federal Grants Receivable 1200 Y 12 D
1230 State Grants Receivable 1200 Y 12 D
1240 Miscellaneous Receivable 1200 Y 12 D
1290 Accts Receivable Accrual 1200 Y 12 D
1300 Inventory N 13 D
1310 Stores Inventory 1300 Y 13 D
1320 Book Store 1300 Y 13 D
1330 Stores 1300 Y 13 D
1400 Investments N 14 D
1410 Bonds 1400 Y 14 D
©SunGard 2004-2007 Finance-Chart of Accounts
Page 54
Section B: Set Up
Lesson: Creating Account Codes (Continued)
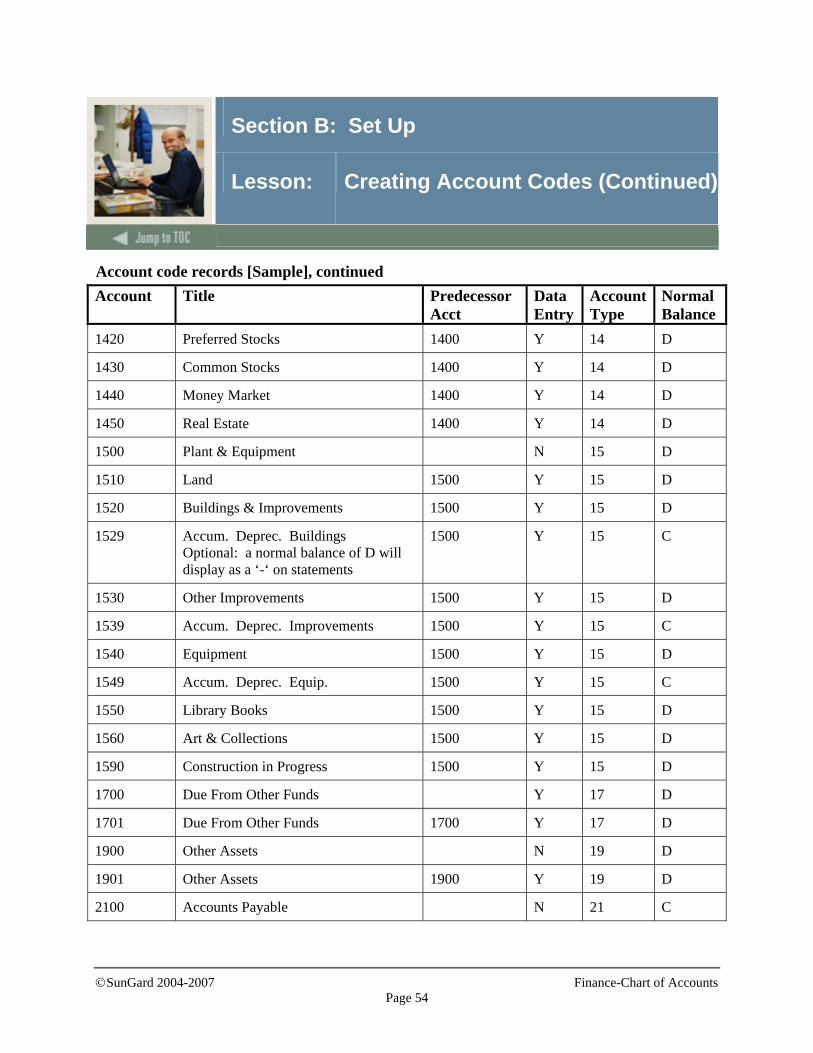
Account code records [Sample], continued Account Title Predecessor
Acct Data Entry
Account Type
Normal Balance
1420 Preferred Stocks 1400 Y 14 D
1430 Common Stocks 1400 Y 14 D
1440 Money Market 1400 Y 14 D
1450 Real Estate 1400 Y 14 D
1500 Plant & Equipment N 15 D
1510 Land 1500 Y 15 D
1520 Buildings & Improvements 1500 Y 15 D
1529 Accum. Deprec. Buildings Optional: a normal balance of D will display as a ‘-‘ on statements
1500 Y 15 C
1530 Other Improvements 1500 Y 15 D
1539 Accum. Deprec. Improvements 1500 Y 15 C
1540 Equipment 1500 Y 15 D
1549 Accum. Deprec. Equip. 1500 Y 15 C
1550 Library Books 1500 Y 15 D
1560 Art & Collections 1500 Y 15 D
1590 Construction in Progress 1500 Y 15 D
1700 Due From Other Funds Y 17 D
1701 Due From Other Funds 1700 Y 17 D
1900 Other Assets N 19 D
1901 Other Assets 1900 Y 19 D
2100 Accounts Payable N 21 C
©SunGard 2004-2007 Finance-Chart of Accounts
Page 55
Section B: Set Up
Lesson: Creating Account Codes (Continued)
Account code records [Sample], continued Account Title Predecessor
Acct Data Entry
Account Type
Normal Balance
2101 Accounts Payable – General 2100 Y 21 C
2104 Accounts Payable, Accrual 2100 Y 21 C
2140 Foreign Currency Exchange 2100 Y 21 C
2200 Accrued Liability N 22 C
2201 Accrued Liability 2200 Y 22 C
2300 Bonds Payable N 23 C
2301 Bonds Payable 2300 Y 23 C
2500 Due to Other Funds N 24 C
2501 Due to Other Funds 2500 Y 24 C
2900 Other Liabilities N 25 C
2910 Interest Payable 2900 Y 25 C
3000 Control Accounts N 31 C
3011 Revenue Control 3000 N 31 C
3012 Prior Year Revenue Control 3000 N 31 C
3013 Budgeted Revenue Control 3000 N 31 D
3014 Prior Year Budgeted Revenue Control 3000 N 31 D
3021 Expenditure Control 3000 N 31 D
3022 Prior Year Expenditure Control 3000 N 31 D
3023 Budgeted Expenditure Control 3000 N 31 C
3024 Prior Year Budgeted Expense Control 3000 N 31 C
©SunGard 2004-2007 Finance-Chart of Accounts
Page 56
Section B: Set Up
Lesson: Creating Account Codes (Continued)
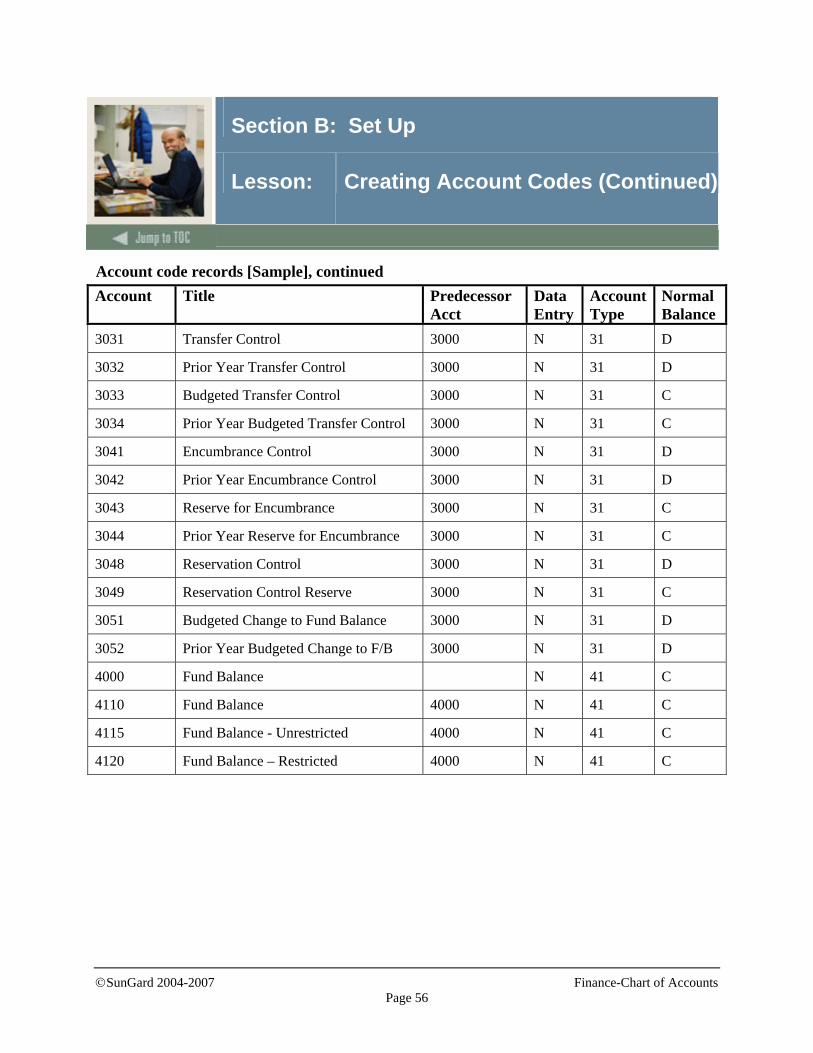
Account code records [Sample], continued Account Title Predecessor
Acct Data Entry
Account Type
Normal Balance
3031 Transfer Control 3000 N 31 D
3032 Prior Year Transfer Control 3000 N 31 D
3033 Budgeted Transfer Control 3000 N 31 C
3034 Prior Year Budgeted Transfer Control 3000 N 31 C
3041 Encumbrance Control 3000 N 31 D
3042 Prior Year Encumbrance Control 3000 N 31 D
3043 Reserve for Encumbrance 3000 N 31 C
3044 Prior Year Reserve for Encumbrance 3000 N 31 C
3048 Reservation Control 3000 N 31 D
3049 Reservation Control Reserve 3000 N 31 C
3051 Budgeted Change to Fund Balance 3000 N 31 D
3052 Prior Year Budgeted Change to F/B 3000 N 31 D
4000 Fund Balance N 41 C
4110 Fund Balance 4000 N 41 C
4115 Fund Balance - Unrestricted 4000 N 41 C
4120 Fund Balance – Restricted 4000 N 41 C
©SunGard 2004-2007 Finance-Chart of Accounts
Page 57
Section B: Set Up
Lesson: Creating Account Codes (Continued)
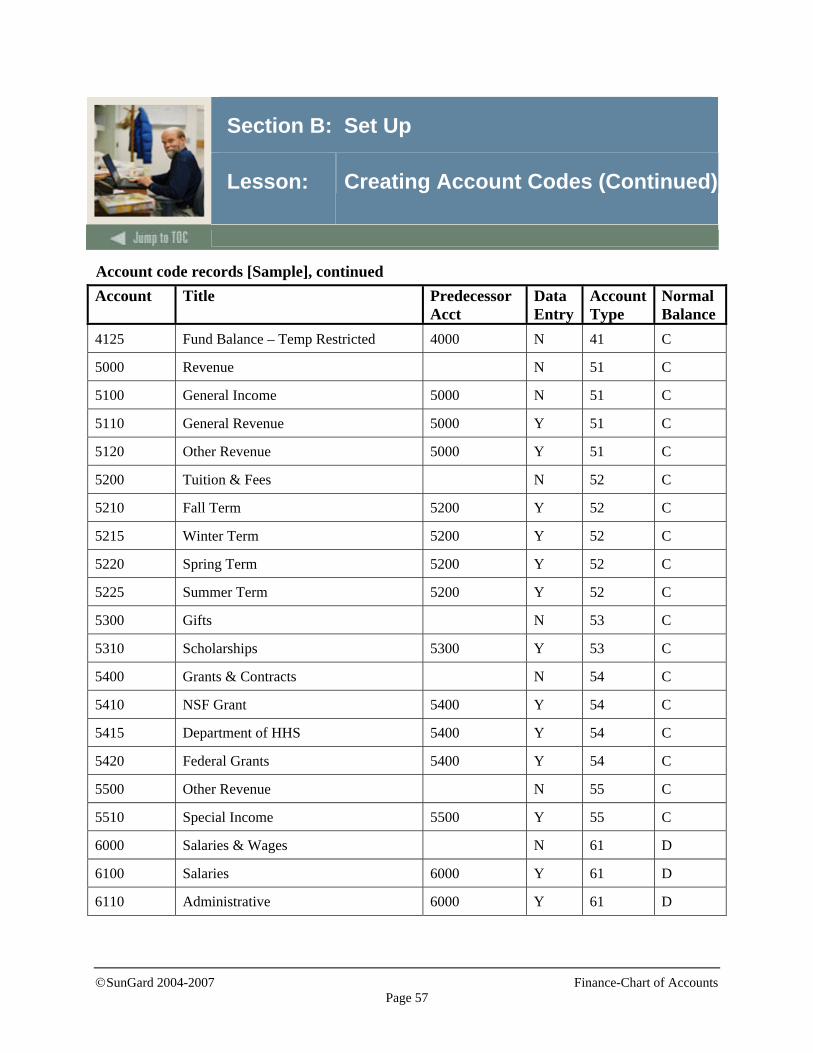
Account code records [Sample], continued Account Title Predecessor
Acct Data Entry
Account Type
Normal Balance
4125 Fund Balance – Temp Restricted 4000 N 41 C
5000 Revenue N 51 C
5100 General Income 5000 N 51 C
5110 General Revenue 5000 Y 51 C
5120 Other Revenue 5000 Y 51 C
5200 Tuition & Fees N 52 C
5210 Fall Term 5200 Y 52 C
5215 Winter Term 5200 Y 52 C
5220 Spring Term 5200 Y 52 C
5225 Summer Term 5200 Y 52 C
5300 Gifts N 53 C
5310 Scholarships 5300 Y 53 C
5400 Grants & Contracts N 54 C
5410 NSF Grant 5400 Y 54 C
5415 Department of HHS 5400 Y 54 C
5420 Federal Grants 5400 Y 54 C
5500 Other Revenue N 55 C
5510 Special Income 5500 Y 55 C
6000 Salaries & Wages N 61 D
6100 Salaries 6000 Y 61 D
6110 Administrative 6000 Y 61 D
©SunGard 2004-2007 Finance-Chart of Accounts
Page 58
Section B: Set Up
Lesson: Creating Account Codes (Continued)
Account code records [Sample], continued Account Title Predecessor
Acct Data Entry
Account Type
Normal Balance
6111 Faculty 6000 Y 61 D
6112 Clerical 6000 Y 61 D
6200 Benefits N 62 D
6210 Medical 6200 Y 62 D
6220 Dental 6200 Y 62 D
6230 Retirement Insurance 6200 Y 62 D
6240 FICA 6200 Y 62 D
6250 Other Benefits 6200 Y 62 D
7000 Non Labor Expenses N 71 D
7100 Direct Expenditures 7000 N 71 D
7110 Office Supplies 7100 Y 71 D
7120 Equipment 7100 Y 71 D
7130 Computers 7100 Y 71 D
7140 Travel 7100 Y 71 D
7150 Gas 7100 Y 71 D
7160 Electric 7100 Y 71 D
7180 Copy Center 7100 Y 71 D
7190 Contractual 7100 Y 71 D
7200 Other Expenses N 78 D
7210 Inventory Expense 7200 Y 78 D
7220 Indirect Expense 7200 Y 78 D
7300 Services N 73 D
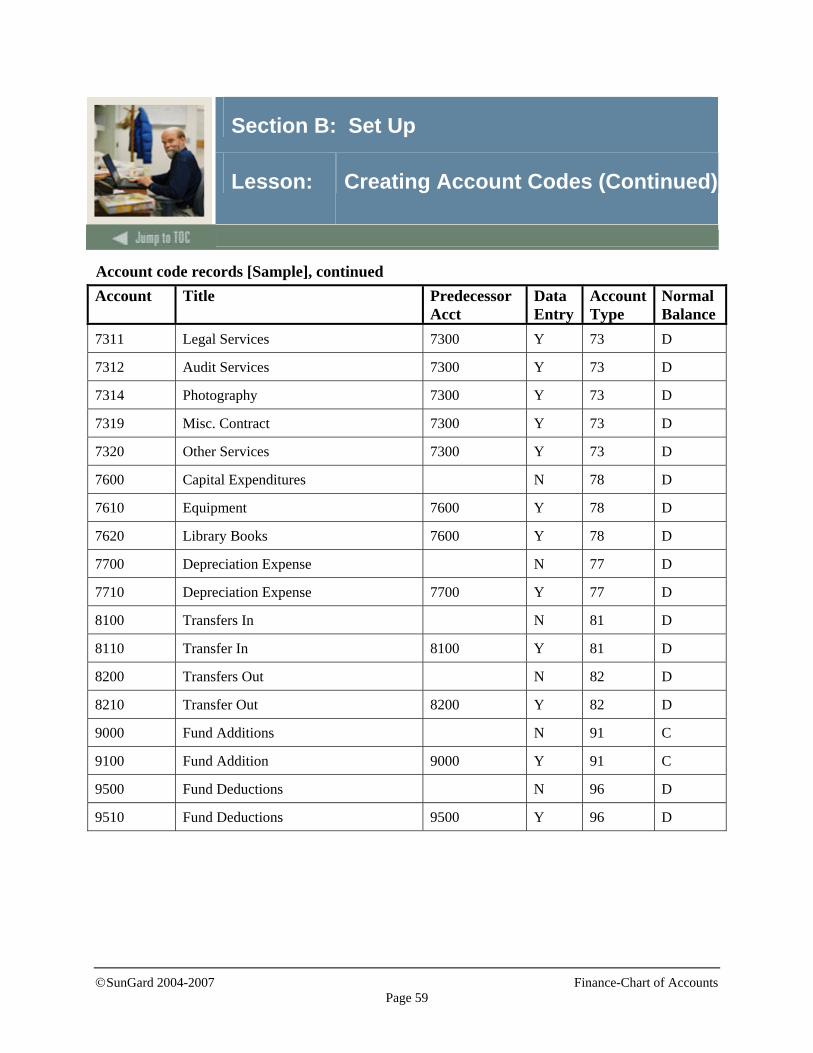
©SunGard 2004-2007 Finance-Chart of Accounts
Page 59
Section B: Set Up
Lesson: Creating Account Codes (Continued)
Account code records [Sample], continued Account Title Predecessor
Acct Data Entry
Account Type
Normal Balance
7311 Legal Services 7300 Y 73 D
7312 Audit Services 7300 Y 73 D
7314 Photography 7300 Y 73 D
7319 Misc. Contract 7300 Y 73 D
7320 Other Services 7300 Y 73 D
7600 Capital Expenditures N 78 D
7610 Equipment 7600 Y 78 D
7620 Library Books 7600 Y 78 D
7700 Depreciation Expense N 77 D
7710 Depreciation Expense 7700 Y 77 D
8100 Transfers In N 81 D
8110 Transfer In 8100 Y 81 D
8200 Transfers Out N 82 D
8210 Transfer Out 8200 Y 82 D
9000 Fund Additions N 91 C
9100 Fund Addition 9000 Y 91 C
9500 Fund Deductions N 96 D
9510 Fund Deductions 9500 Y 96 D
©SunGard 2004-2007 Finance-Chart of Accounts
Page 60
Section B: Set Up
Lesson: Defining Control Accounts
Introduction You will create and define current and prior year control and offset accounts for the Chart of Accounts. Link your level 1 account types and the internal sequence numbers (transaction codes) with the appropriate control accounts in the new chart of accounts. The linkages created here will specify the relationship of Revenue, Labor, Expense, and Transfer transactions in the Operating Ledger to the General Ledger (Balance Sheet). Example: Adopted Budget transactions for Revenue accounts (in the Operating Ledger) will post two entries in the G/L, Budgeted Revenue Control (D) and an offset to Budgeted Change to Fund Balance to balance the entry in the G/L. The purpose of the control account processing in Banner is to mirror the operating ledger transactions for the Balance sheet. The Control Accounts represent the current fiscal year activity while the Fund Balance Accounts would represent prior year. Each year, when balances are carried forward, Banner wraps up all the control accounts for each specific fund and totals them to the new years fund balance accounts. Then in the new fiscal year, the control accounts begin with a "Zero" balance.
©SunGard 2004-2007 Finance-Chart of Accounts
Page 61
Section B: Set Up
Lesson: Defining Control Accounts (Continued)
Year-To-Date Actual Control Accounts Revenue Control - Every year-to-date actual transaction affecting a Revenue account in the Operating Ledger (internal account type of 50) generates an equivalent entry in this General Ledger account. Expenditure Control - Every year-to-date actual transaction affecting an Expenditure account in the Operating Ledger (internal account type of 60 or 70) generates an equivalent entry in this General Ledger account. Transfer Control - Every year-to-date actual transaction affecting a Transfer account in the Operating Ledger (internal account type of 80) generates an equivalent entry in this General Ledger account. Note: The NET of these accounts represents the actual year-to-date change to Fund Balance resulting from operations. Encumbrance Control - Every encumbrance transaction or Budget Reservation (Sequence #5) in the Operating Ledger generates an equivalent entry in this General Ledger account and an offsetting entry to Reserve for Encumbrances.
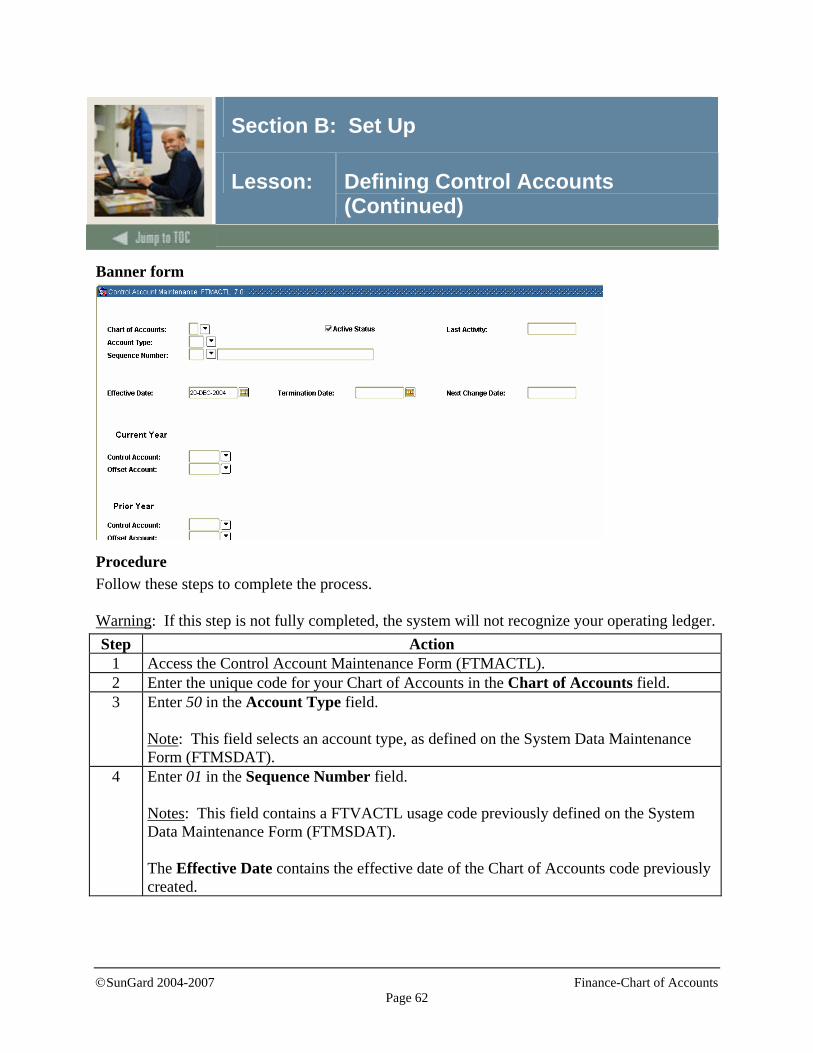
©SunGard 2004-2007 Finance-Chart of Accounts
Page 62
Section B: Set Up
Lesson: Defining Control Accounts (Continued)
Banner form
Procedure Follow these steps to complete the process. Warning: If this step is not fully completed, the system will not recognize your operating ledger. Step Action
1 Access the Control Account Maintenance Form (FTMACTL). 2 Enter the unique code for your Chart of Accounts in the Chart of Accounts field. 3 Enter 50 in the Account Type field.
Note: This field selects an account type, as defined on the System Data Maintenance Form (FTMSDAT).
4 Enter 01 in the Sequence Number field. Notes: This field contains a FTVACTL usage code previously defined on the System Data Maintenance Form (FTMSDAT). The Effective Date contains the effective date of the Chart of Accounts code previously created.
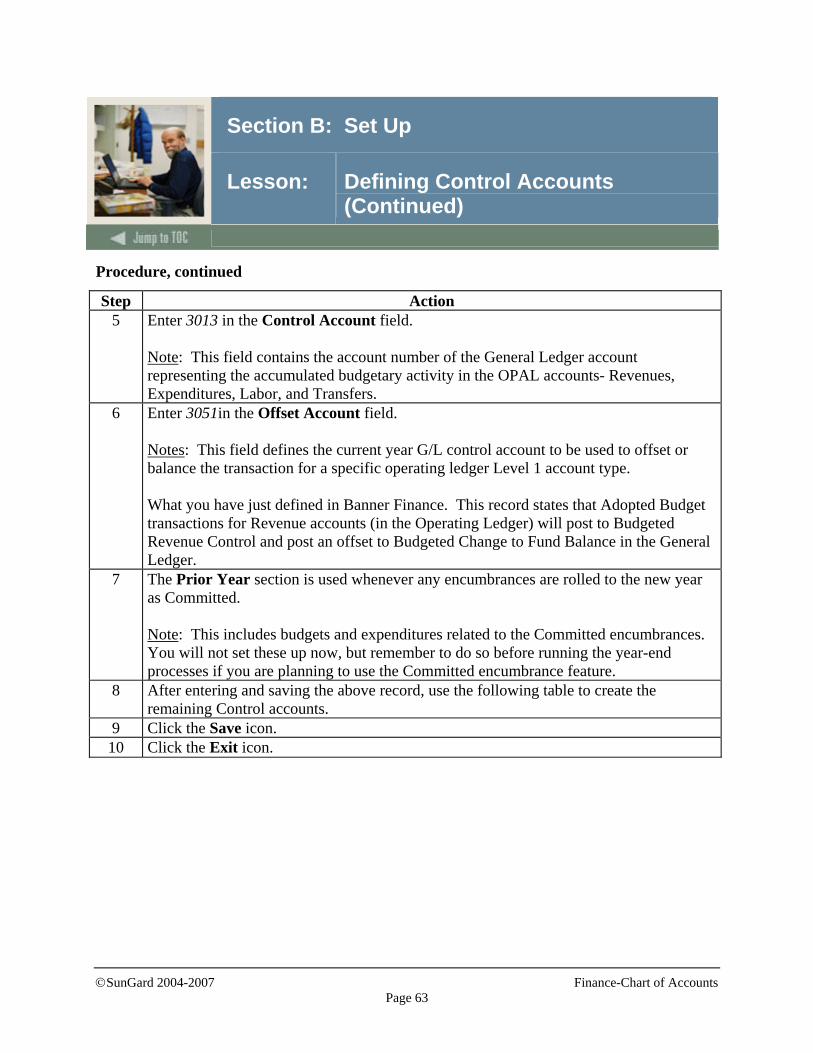
©SunGard 2004-2007 Finance-Chart of Accounts
Page 63
Section B: Set Up
Lesson: Defining Control Accounts (Continued)
Procedure, continued
Step Action 5 Enter 3013 in the Control Account field.
Note: This field contains the account number of the General Ledger account representing the accumulated budgetary activity in the OPAL accounts- Revenues, Expenditures, Labor, and Transfers.
6 Enter 3051in the Offset Account field. Notes: This field defines the current year G/L control account to be used to offset or balance the transaction for a specific operating ledger Level 1 account type. What you have just defined in Banner Finance. This record states that Adopted Budget transactions for Revenue accounts (in the Operating Ledger) will post to Budgeted Revenue Control and post an offset to Budgeted Change to Fund Balance in the General Ledger.
7 The Prior Year section is used whenever any encumbrances are rolled to the new year as Committed. Note: This includes budgets and expenditures related to the Committed encumbrances. You will not set these up now, but remember to do so before running the year-end processes if you are planning to use the Committed encumbrance feature.
8 After entering and saving the above record, use the following table to create the remaining Control accounts.
9 Click the Save icon. 10 Click the Exit icon.
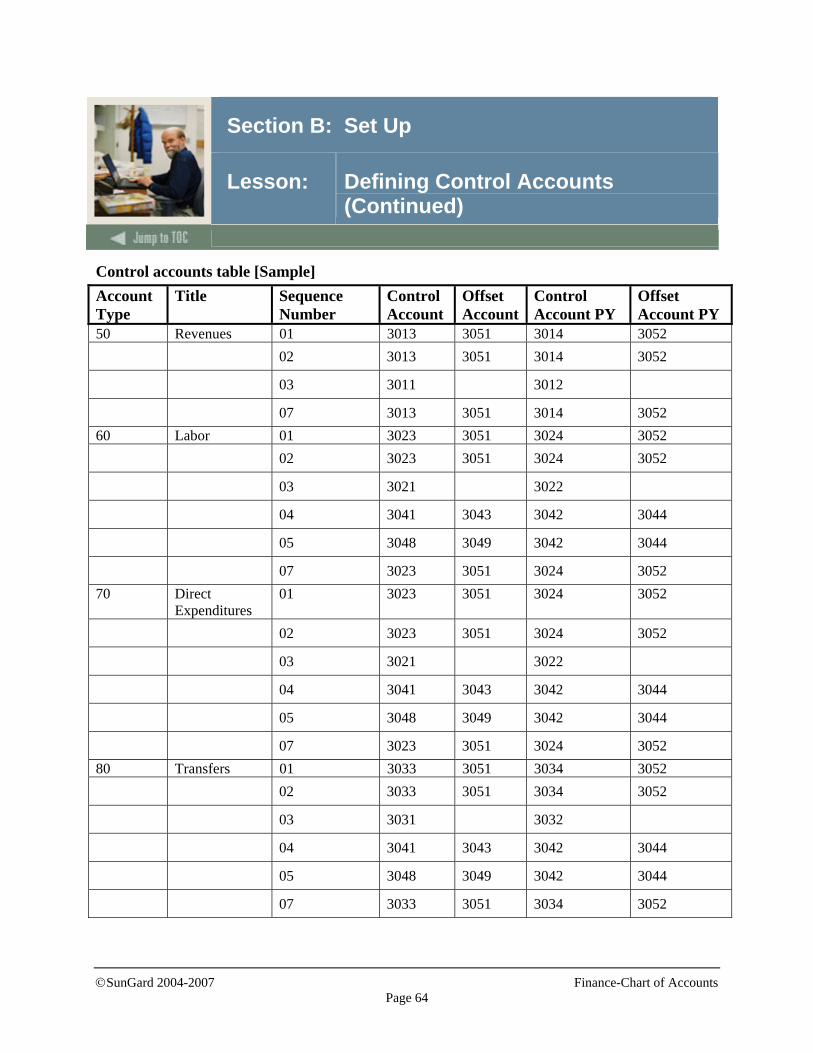
©SunGard 2004-2007 Finance-Chart of Accounts
Page 64
Section B: Set Up
Lesson: Defining Control Accounts (Continued)
Control accounts table [Sample] Account Type
Title Sequence Number
Control Account
Offset Account
Control Account PY
Offset Account PY
50 Revenues 01 3013 3051 3014 3052 02 3013 3051 3014 3052
03 3011 3012
07 3013 3051 3014 3052 60 Labor 01 3023 3051 3024 3052 02 3023 3051 3024 3052
03 3021 3022
04 3041 3043 3042 3044
05 3048 3049 3042 3044
07 3023 3051 3024 3052 70 Direct
Expenditures 01 3023 3051 3024 3052
02 3023 3051 3024 3052
03 3021 3022
04 3041 3043 3042 3044
05 3048 3049 3042 3044
07 3023 3051 3024 3052 80 Transfers 01 3033 3051 3034 3052 02 3033 3051 3034 3052
03 3031 3032
04 3041 3043 3042 3044
05 3048 3049 3042 3044
07 3033 3051 3034 3052
©SunGard 2004-2007 Finance-Chart of Accounts
Page 65
Section B: Set Up
Lesson: Defining Control Accounts (Continued)
Verify your control accounts To verify that your control accounts in the G/L equal the transactions in the Operating Ledger, use FGIBDST, FGIBDSR, or FGIBSUM and query on the fund code. The query form will display all of the accounts with a total at the bottom. Compare this total to the control account in the General Ledger. *SDAT Internal Sequence numbers: 01 – Adopted Budget (offset) 02 – Budget Adjustment (offset) 03 – YTD Actual 04 – Encumbrances (offset) 05 – Reservations (offset) 06 – Accounted Budget (offset) 07 – Temporary Budget (offset)
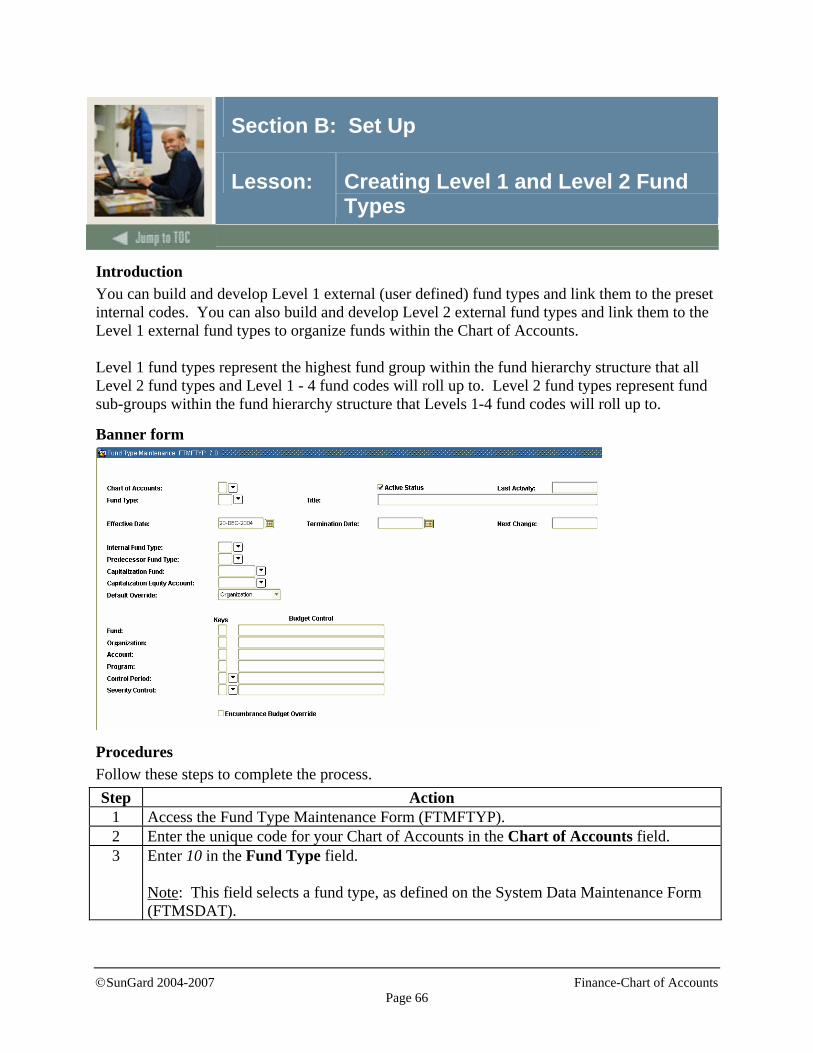
©SunGard 2004-2007 Finance-Chart of Accounts
Page 66
Section B: Set Up
Lesson: Creating Level 1 and Level 2 Fund Types
Introduction You can build and develop Level 1 external (user defined) fund types and link them to the preset internal codes. You can also build and develop Level 2 external fund types and link them to the Level 1 external fund types to organize funds within the Chart of Accounts. Level 1 fund types represent the highest fund group within the fund hierarchy structure that all Level 2 fund types and Level 1 - 4 fund codes will roll up to. Level 2 fund types represent fund sub-groups within the fund hierarchy structure that Levels 1-4 fund codes will roll up to.
Banner form
Procedures Follow these steps to complete the process. Step Action
1 Access the Fund Type Maintenance Form (FTMFTYP). 2 Enter the unique code for your Chart of Accounts in the Chart of Accounts field. 3 Enter 10 in the Fund Type field.
Note: This field selects a fund type, as defined on the System Data Maintenance Form (FTMSDAT).
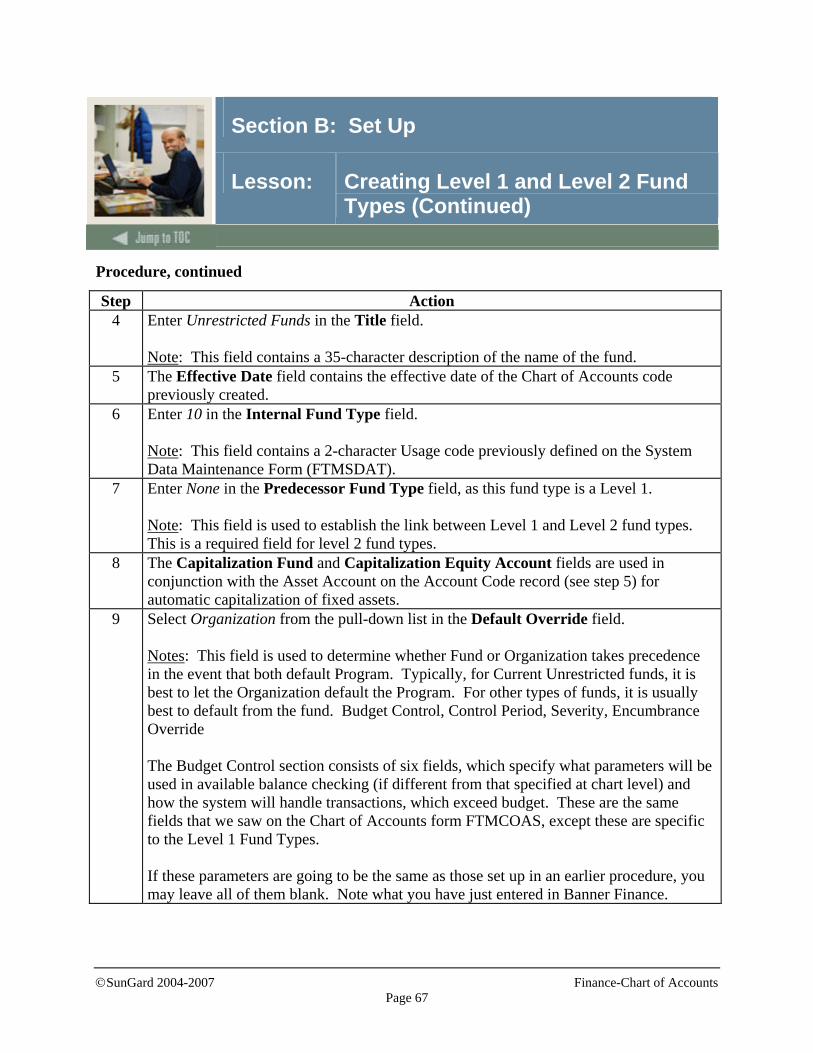
©SunGard 2004-2007 Finance-Chart of Accounts
Page 67
Section B: Set Up
Lesson: Creating Level 1 and Level 2 Fund Types (Continued)
Procedure, continued
Step Action 4 Enter Unrestricted Funds in the Title field.
Note: This field contains a 35-character description of the name of the fund.
5 The Effective Date field contains the effective date of the Chart of Accounts code previously created.
6 Enter 10 in the Internal Fund Type field. Note: This field contains a 2-character Usage code previously defined on the System Data Maintenance Form (FTMSDAT).
7 Enter None in the Predecessor Fund Type field, as this fund type is a Level 1. Note: This field is used to establish the link between Level 1 and Level 2 fund types. This is a required field for level 2 fund types.
8 The Capitalization Fund and Capitalization Equity Account fields are used in conjunction with the Asset Account on the Account Code record (see step 5) for automatic capitalization of fixed assets.
9 Select Organization from the pull-down list in the Default Override field. Notes: This field is used to determine whether Fund or Organization takes precedence in the event that both default Program. Typically, for Current Unrestricted funds, it is best to let the Organization default the Program. For other types of funds, it is usually best to default from the fund. Budget Control, Control Period, Severity, Encumbrance Override The Budget Control section consists of six fields, which specify what parameters will be used in available balance checking (if different from that specified at chart level) and how the system will handle transactions, which exceed budget. These are the same fields that we saw on the Chart of Accounts form FTMCOAS, except these are specific to the Level 1 Fund Types. If these parameters are going to be the same as those set up in an earlier procedure, you may leave all of them blank. Note what you have just entered in Banner Finance.
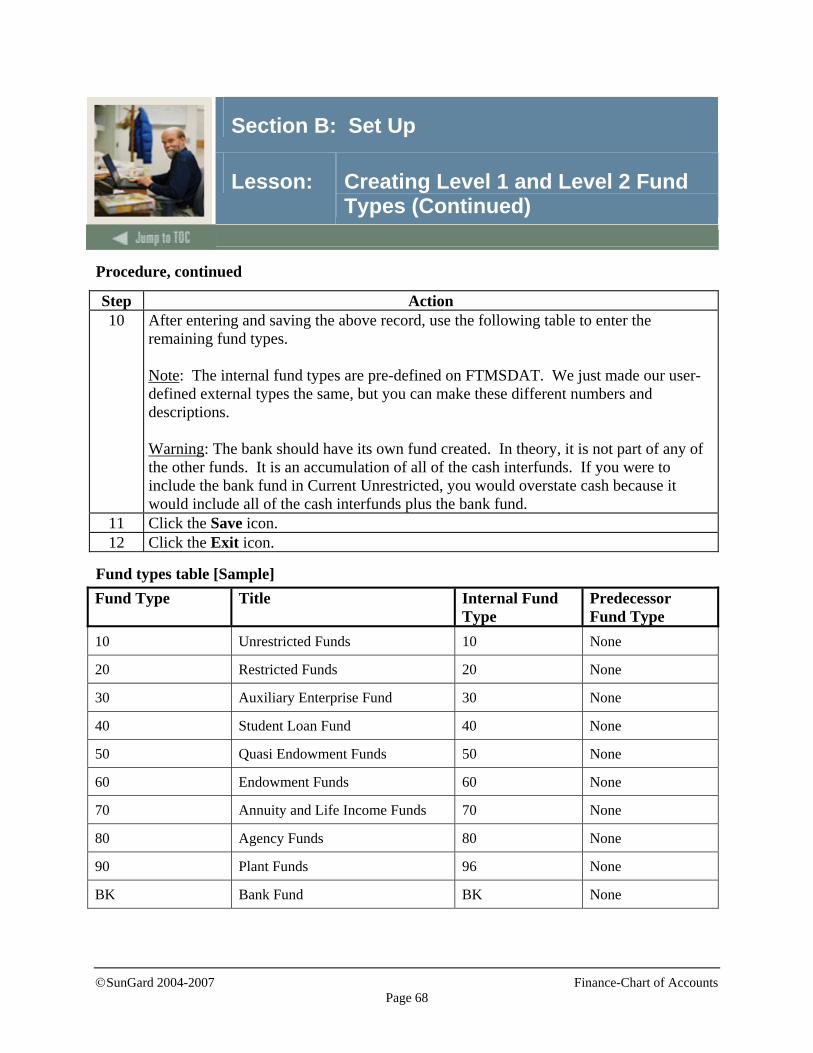
©SunGard 2004-2007 Finance-Chart of Accounts
Page 68
Section B: Set Up
Lesson: Creating Level 1 and Level 2 Fund Types (Continued)
Procedure, continued
Step Action 10 After entering and saving the above record, use the following table to enter the
remaining fund types. Note: The internal fund types are pre-defined on FTMSDAT. We just made our user-defined external types the same, but you can make these different numbers and descriptions. Warning: The bank should have its own fund created. In theory, it is not part of any of the other funds. It is an accumulation of all of the cash interfunds. If you were to include the bank fund in Current Unrestricted, you would overstate cash because it would include all of the cash interfunds plus the bank fund.
11 Click the Save icon. 12 Click the Exit icon.
Fund types table [Sample] Fund Type Title Internal Fund
Type Predecessor Fund Type
10 Unrestricted Funds 10 None
20 Restricted Funds 20 None
30 Auxiliary Enterprise Fund 30 None
40 Student Loan Fund 40 None
50 Quasi Endowment Funds 50 None
60 Endowment Funds 60 None
70 Annuity and Life Income Funds 70 None
80 Agency Funds 80 None
90 Plant Funds 96 None
BK Bank Fund BK None
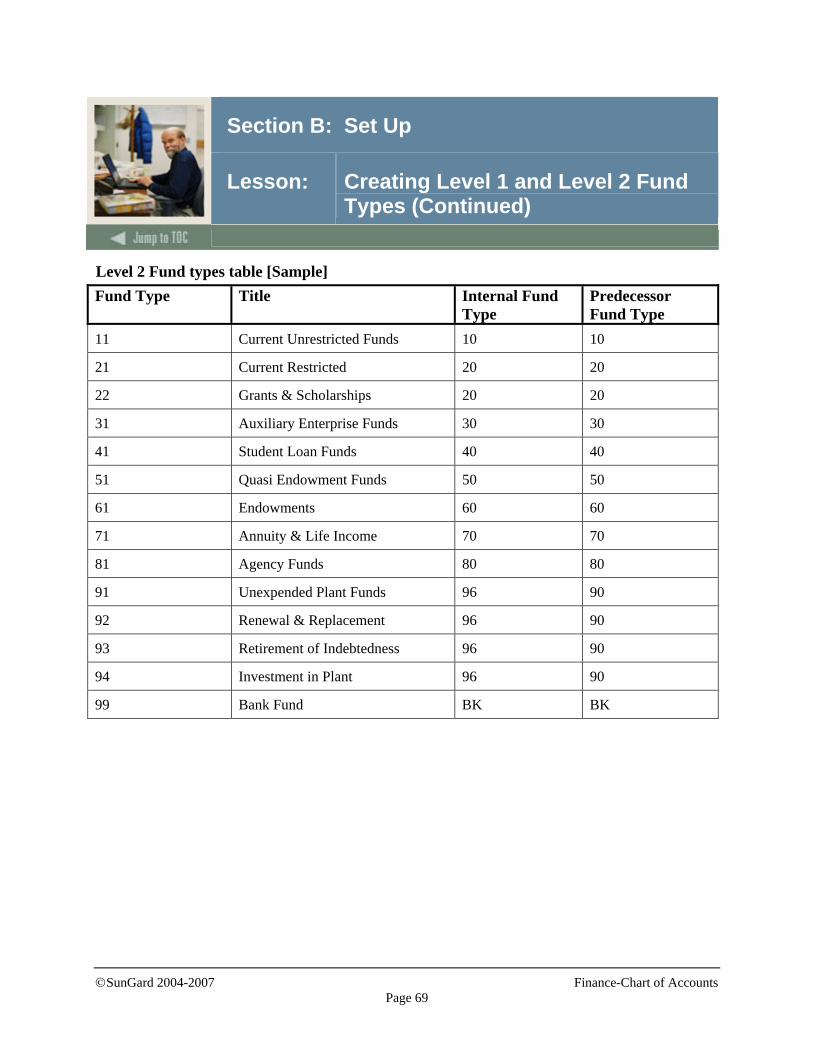
©SunGard 2004-2007 Finance-Chart of Accounts
Page 69
Section B: Set Up
Lesson: Creating Level 1 and Level 2 Fund Types (Continued)
Level 2 Fund types table [Sample] Fund Type Title Internal Fund
Type Predecessor Fund Type
11 Current Unrestricted Funds 10 10
21 Current Restricted 20 20
22 Grants & Scholarships 20 20
31 Auxiliary Enterprise Funds 30 30
41 Student Loan Funds 40 40
51 Quasi Endowment Funds 50 50
61 Endowments 60 60
71 Annuity & Life Income 70 70
81 Agency Funds 80 80
91 Unexpended Plant Funds 96 90
92 Renewal & Replacement 96 90
93 Retirement of Indebtedness 96 90
94 Investment in Plant 96 90
99 Bank Fund BK BK
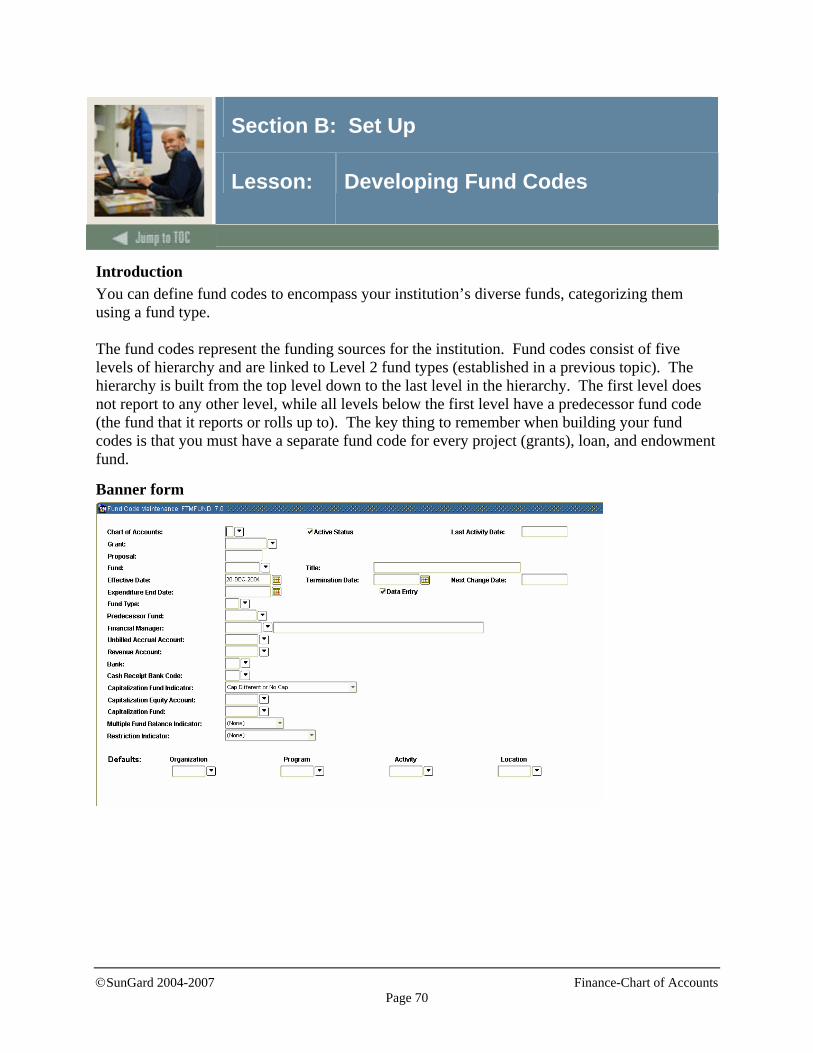
©SunGard 2004-2007 Finance-Chart of Accounts
Page 70
Section B: Set Up
Lesson: Developing Fund Codes
Introduction You can define fund codes to encompass your institution’s diverse funds, categorizing them using a fund type. The fund codes represent the funding sources for the institution. Fund codes consist of five levels of hierarchy and are linked to Level 2 fund types (established in a previous topic). The hierarchy is built from the top level down to the last level in the hierarchy. The first level does not report to any other level, while all levels below the first level have a predecessor fund code (the fund that it reports or rolls up to). The key thing to remember when building your fund codes is that you must have a separate fund code for every project (grants), loan, and endowment fund.
Banner form
©SunGard 2004-2007 Finance-Chart of Accounts
Page 71
Section B: Set Up
Lesson: Developing Fund Codes (Continued)
Procedure Follow these steps to define fund codes for your Chart of Accounts and assign them to a previously created fund type. Step Action
1 Access the Fund Code Maintenance Form (FTMFUND). 2 Enter the unique code for your Chart of Accounts in the Chart of Accounts field.
Note: This is a required field.
3 The Grant and Proposal fields are used in grant accounting and are left blank for this Procedure.
4 Enter 9900 in the Fund field. Note: This field contains a code to uniquely identify a fund.
5 Enter Bank Fund in the Title field. Note: This field contains the name of the fund.
6 The Effective Date field contains the effective date of the Chart of Accounts code previously created.
7 Uncheck the box to signify that this account will be used for reporting in the Data Entry field. Note: Leaving it checked signifies that this account will be used for data entry.
8 Enter 99 in the Fund Type field. Note: This field represents a Fund type previously defined and establishes the link between the fund code and the Level 2 fund types (step 7).
9 Leave the Predecessor Fund field blank for this record. Notes: This field identifies the higher-level fund that this fund is linked to. In later procedures when the Predecessor Fund field is entered, the Fund Hierarchy Form (FGQFNDH) appears on the screen.
©SunGard 2004-2007 Finance-Chart of Accounts
Page 72
Section B: Set Up
Lesson: Developing Fund Codes (Continued)
Procedure, continued
Step Action 10 Select Continue in the left navigation pane to return to the previous screen once the
displayed fund hierarchy is confirmed. 11 Click Save to commit the record and select the Assign Attributes option from the
Options menu to open the FOAPAL Attribute Association Form (FTMFATA) and associate set codes, attribute types, and/or attribute values to a fund code if you’re assigning attributes.
12 After entering and saving the above record, use the following table to enter the remaining fund codes.
13 Click the Save icon. 14 Click the Exit icon.
Note: For this procedure, we will not be entering data in the remaining fields. What follows is an explanation of each field.
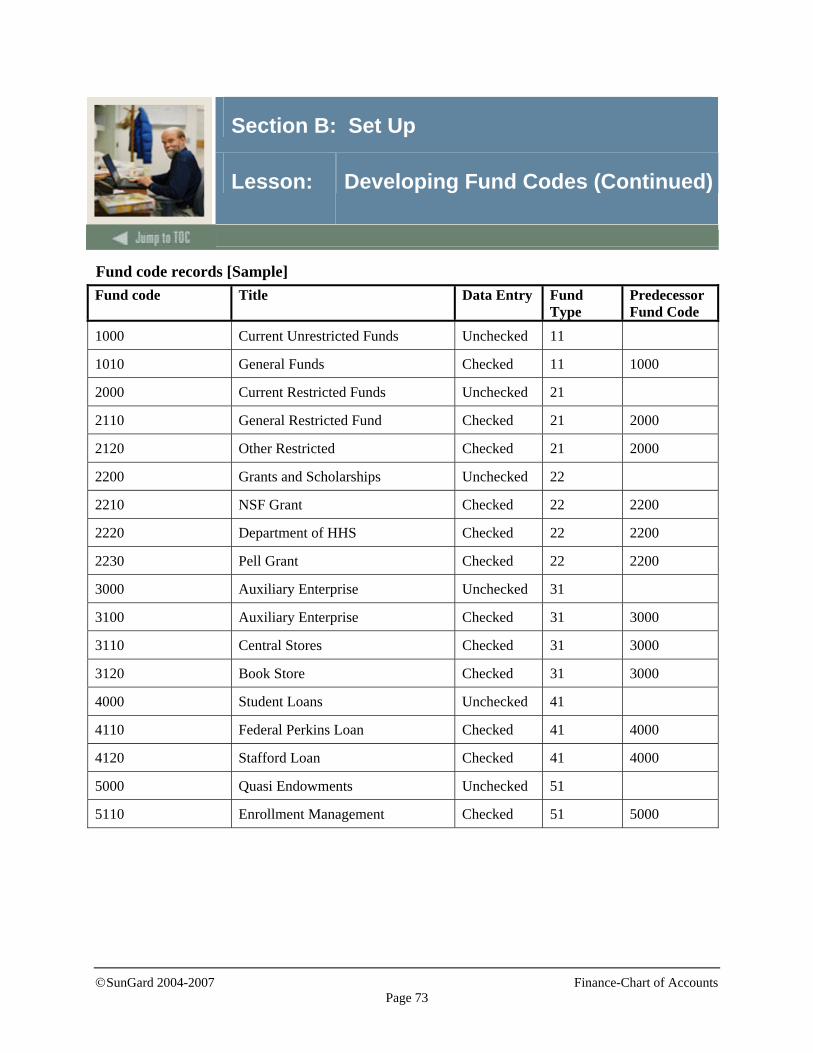
©SunGard 2004-2007 Finance-Chart of Accounts
Page 73
Section B: Set Up
Lesson: Developing Fund Codes (Continued)
Fund code records [Sample] Fund code Title Data Entry Fund
Type Predecessor Fund Code
1000 Current Unrestricted Funds Unchecked 11
1010 General Funds Checked 11 1000
2000 Current Restricted Funds Unchecked 21
2110 General Restricted Fund Checked 21 2000
2120 Other Restricted Checked 21 2000
2200 Grants and Scholarships Unchecked 22
2210 NSF Grant Checked 22 2200
2220 Department of HHS Checked 22 2200
2230 Pell Grant Checked 22 2200
3000 Auxiliary Enterprise Unchecked 31
3100 Auxiliary Enterprise Checked 31 3000
3110 Central Stores Checked 31 3000
3120 Book Store Checked 31 3000
4000 Student Loans Unchecked 41
4110 Federal Perkins Loan Checked 41 4000
4120 Stafford Loan Checked 41 4000
5000 Quasi Endowments Unchecked 51
5110 Enrollment Management Checked 51 5000
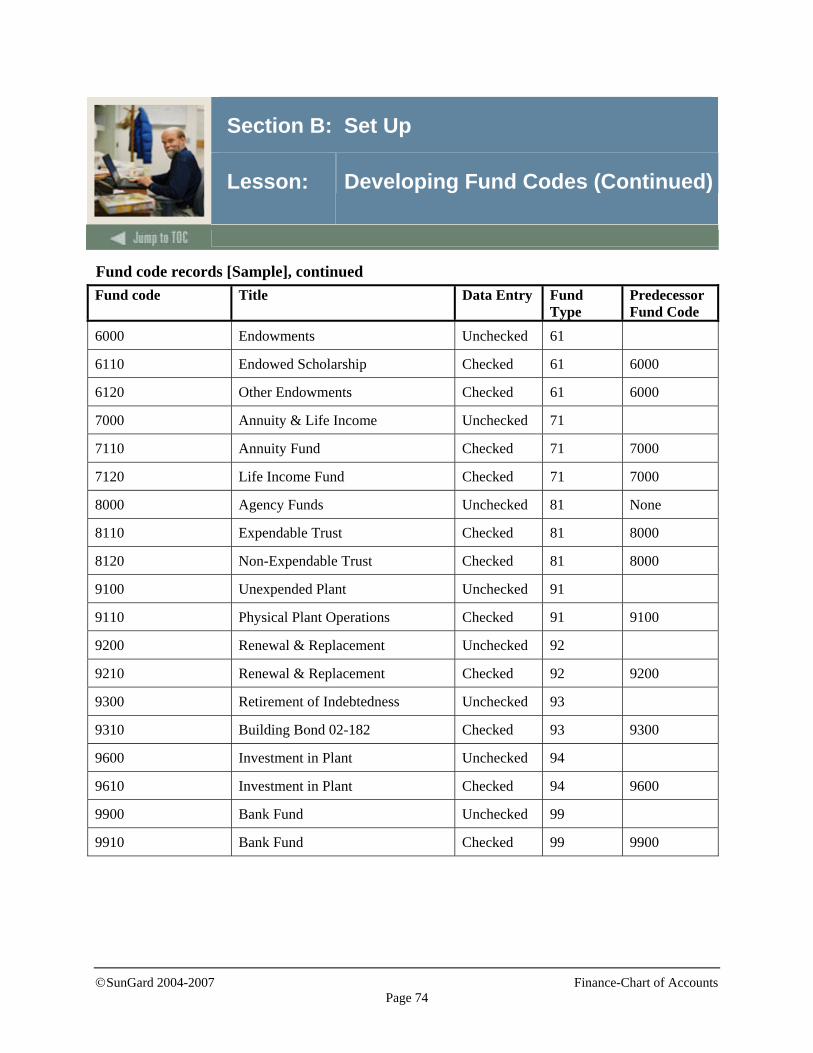
©SunGard 2004-2007 Finance-Chart of Accounts
Page 74
Section B: Set Up
Lesson: Developing Fund Codes (Continued)
Fund code records [Sample], continued Fund code Title Data Entry Fund
Type Predecessor Fund Code
6000 Endowments Unchecked 61
6110 Endowed Scholarship Checked 61 6000
6120 Other Endowments Checked 61 6000
7000 Annuity & Life Income Unchecked 71
7110 Annuity Fund Checked 71 7000
7120 Life Income Fund Checked 71 7000
8000 Agency Funds Unchecked 81 None
8110 Expendable Trust Checked 81 8000
8120 Non-Expendable Trust Checked 81 8000
9100 Unexpended Plant Unchecked 91
9110 Physical Plant Operations Checked 91 9100
9200 Renewal & Replacement Unchecked 92
9210 Renewal & Replacement Checked 92 9200
9300 Retirement of Indebtedness Unchecked 93
9310 Building Bond 02-182 Checked 93 9300
9600 Investment in Plant Unchecked 94
9610 Investment in Plant Checked 94 9600
9900 Bank Fund Unchecked 99
9910 Bank Fund Checked 99 9900
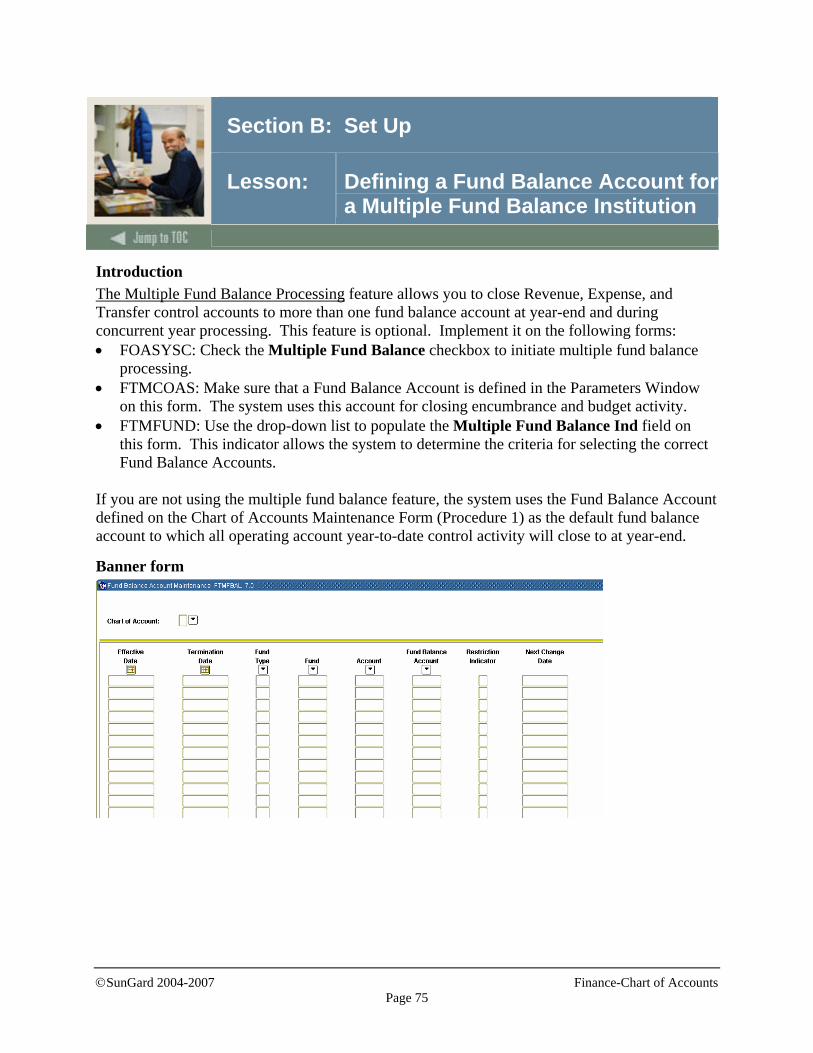
©SunGard 2004-2007 Finance-Chart of Accounts
Page 75
Section B: Set Up
Lesson: Defining a Fund Balance Account for a Multiple Fund Balance Institution
Introduction The Multiple Fund Balance Processing feature allows you to close Revenue, Expense, and Transfer control accounts to more than one fund balance account at year-end and during concurrent year processing. This feature is optional. Implement it on the following forms: • FOASYSC: Check the Multiple Fund Balance checkbox to initiate multiple fund balance
processing. • FTMCOAS: Make sure that a Fund Balance Account is defined in the Parameters Window
on this form. The system uses this account for closing encumbrance and budget activity. • FTMFUND: Use the drop-down list to populate the Multiple Fund Balance Ind field on
this form. This indicator allows the system to determine the criteria for selecting the correct Fund Balance Accounts.
If you are not using the multiple fund balance feature, the system uses the Fund Balance Account defined on the Chart of Accounts Maintenance Form (Procedure 1) as the default fund balance account to which all operating account year-to-date control activity will close to at year-end.
Banner form

©SunGard 2004-2007 Finance-Chart of Accounts
Page 76
Section B: Set Up
Lesson: Defining a Fund Balance Account for a Multiple Fund Balance Institution (Continued)
Procedure Follow these steps to complete the process. Step Action
1 Access the Fund Balance Account Maintenance Form (FTMFBAL). 2 Enter your Chart of Accounts code in the Chart of Accounts field. 3 Enter the effective date of this record in the Effective Date field. 4 Enter a termination date, if appropriate in the Termination Date field. For this
Procedure, leave this field blank. 5 Enter 21 in the Fund Type field.
Note: This field selects a fund type defined on the Fund Type Maintenance Form (FTMFTYP). Funds with this multiple fund balance indicator will look to their fund type Level 2, or, if this is not specified, fund type level 1 to determine the fund balance account into which the operating ledger will be closed.
6 Enter 4120 in the Fund Balance Account field. Note: This field contains a one-to-six-character Fund Balance account code.
7 Enter T in the Restriction Indicator field. Note: This field is a restriction indicator that determines what type of Fund/Account combination you want to report on FASB 117 reports. Valid options include T (Temporary Restricted), U (Unrestricted), and P (Permanently Restricted). On any one line in FTMFBAL, you may either enter the Fund Type (#5) or the Fund and the Account (#8 and #9). To identify both for multiple fund balance processing requires the addition of two separate line items.
8 Enter 2000 in the Fund field. Note: This field selects the fund code name. Funds with this multiple fund balance indicator will look to their fund code to determine the fund balance account into which the operating ledger will be closed.
©SunGard 2004-2007 Finance-Chart of Accounts
Page 77
Section B: Set Up
Lesson: Defining a Fund Balance Account for a Multiple Fund Balance Institution (Continued)
Procedure, continued
Step Action 9 The Account field contains a one-to-six-character account code.
Note: For this Procedure, use 6100. Funds with this multiple fund balance indicator will look to the individual account code to determine the fund balance into which the operating ledger will be closed. This option allows you to use multiple fund balance accounts for a single fund.
10 Enter 4125 in the Fund Balance Account field. Note: This field contains a one-to-six-character Fund Balance account code.
11 Enter T in the Restriction Indicator field. Notes: This field is a restriction indicator that determines what type of Fund/Account combination you want to report on FASB 117 reports. Valid options include T (Temporary Restricted), U (Unrestricted), and P (Permanently Restricted).
12 Click the Save icon. 13 Click the Exit icon.
Note: The Fund Balance Account Report (FGRFBAL) provides a hard copy listing of information entered through the Fund Balance Account Maintenance form. Execute this report through a particular “As of” date. The Balance Forward Processing Report (FGRGLRL) and the Close Operating Accounts Report (FGRCLOP) stop processing if you have not defined fund balance accounts on FTMFBAL for the indicator referenced on each Fund record. The system stops processing if it finds that the total of the Fund Balance accounts to which it is attempting to close do not equal the amounts in the Operating ledger Control Accounts.
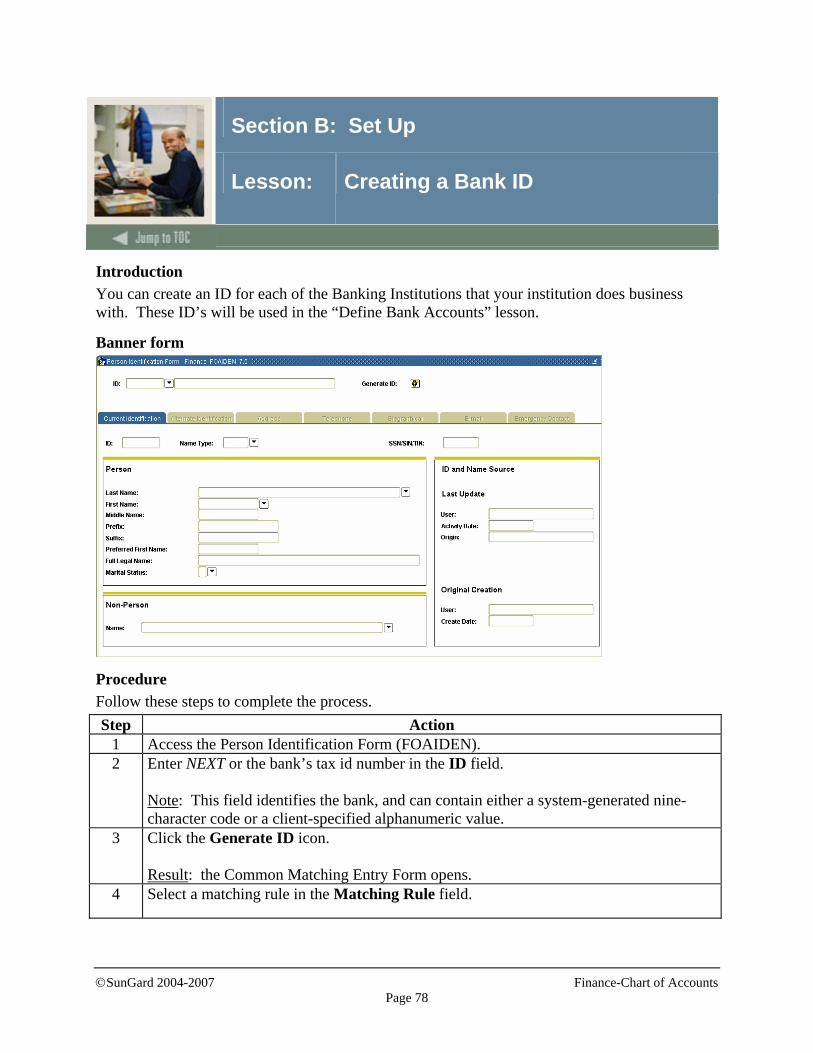
©SunGard 2004-2007 Finance-Chart of Accounts
Page 78
Section B: Set Up
Lesson: Creating a Bank ID
Introduction You can create an ID for each of the Banking Institutions that your institution does business with. These ID’s will be used in the “Define Bank Accounts” lesson.
Banner form
Procedure Follow these steps to complete the process. Step Action
1 Access the Person Identification Form (FOAIDEN). 2 Enter NEXT or the bank’s tax id number in the ID field.
Note: This field identifies the bank, and can contain either a system-generated nine-character code or a client-specified alphanumeric value.
3 Click the Generate ID icon. Result: the Common Matching Entry Form opens.
4 Select a matching rule in the Matching Rule field.
©SunGard 2004-2007 Finance-Chart of Accounts
Page 79
Section B: Set Up
Lesson: Creating a Bank ID (Continued)
Procedure, continued Step Action
5 Enter the name of the bank in the Non-Person field. Note: This is a 60-character description field (Organization-specific value). The name fields are available for an individual represented as a person instead of a corporation.
6 Enter the bank’s tax id number in the SSN/SIN/TIN field. 7 Enter BU in the Address Type Code field.
Note: This field contains a 30-character address type code already defined on (STVATYP)
8 Enter the address, city, state, zip code, and phone information in the appropriate fields. 9 Click the Save icon 10 Click the Yes button. 11 Click the OK button.
Result: The Person Identification Form (FOAIDEN) re-opens with the data you entered displayed. Record the ID number for future use.
12 Click the Exit icon.

©SunGard 2004-2007 Finance-Chart of Accounts
Page 80
Section B: Set Up
Lesson: Defining Bank Codes for the Chart of Accounts
Introduction You can set up the bank codes used by the new chart of accounts and to link each bank code to a cash account and cash interfund account. In a previous procedure, you established a Bank fund. This is a special fund unique to cash processing to facilitate cash management. It is designed to provide a trial balance showing the total cash balance for your institution and the breakdown of where the cash is deposited. It also facilitates the bank reconciliation process. The bank code must be entered on all invoices, cash receipts, and cash interfund transactions. As mentioned previously, it is recommended that you default the bank code on the fund for more efficient processing and error reduction. We will set up one “Cash Interfund” Account and multiple cash accounts. It is this account residing in the Bank fund that shows the total cash for the institution. We will also set up multiple cash accounts, which are the individual fund’s claim on that total cash. For example, you may use one cash account for accounts payable disbursements and another for deposits. Alternatively, you may have different actual bank accounts that need to be kept separate.
Banner form
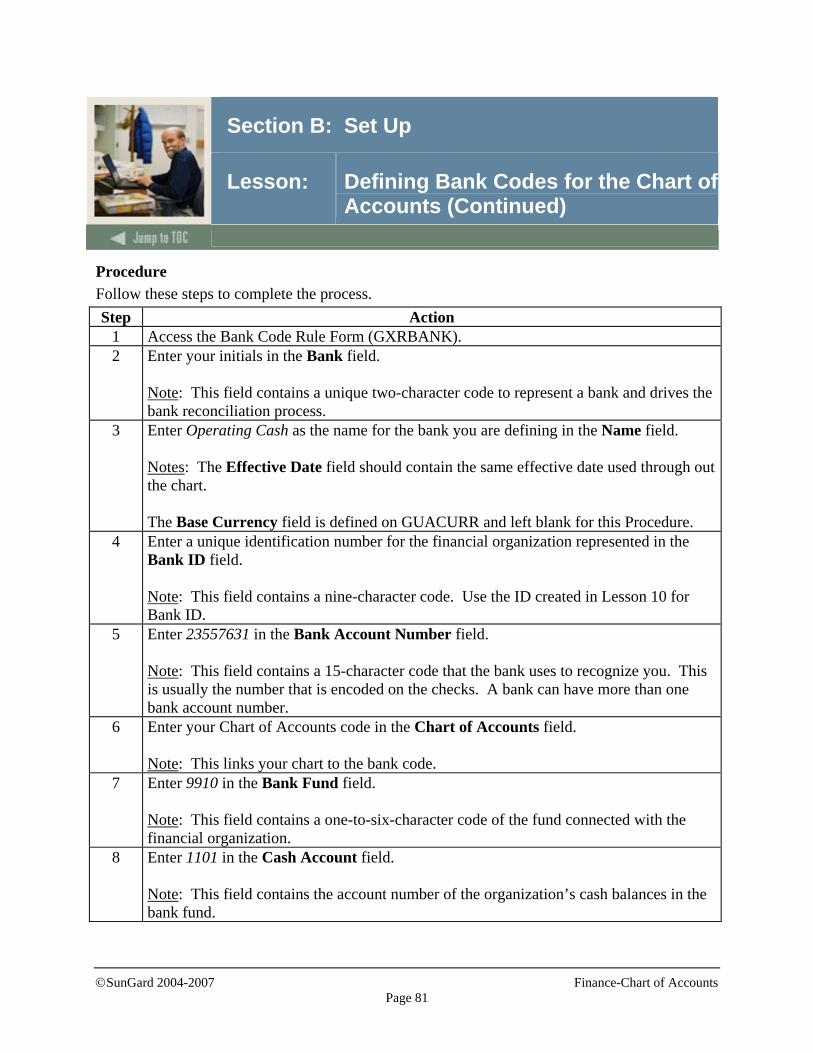
©SunGard 2004-2007 Finance-Chart of Accounts
Page 81
Section B: Set Up
Lesson: Defining Bank Codes for the Chart of Accounts (Continued)
Procedure Follow these steps to complete the process. Step Action
1 Access the Bank Code Rule Form (GXRBANK). 2 Enter your initials in the Bank field.
Note: This field contains a unique two-character code to represent a bank and drives the bank reconciliation process.
3 Enter Operating Cash as the name for the bank you are defining in the Name field. Notes: The Effective Date field should contain the same effective date used through out the chart. The Base Currency field is defined on GUACURR and left blank for this Procedure.
4 Enter a unique identification number for the financial organization represented in the Bank ID field. Note: This field contains a nine-character code. Use the ID created in Lesson 10 for Bank ID.
5 Enter 23557631 in the Bank Account Number field. Note: This field contains a 15-character code that the bank uses to recognize you. This is usually the number that is encoded on the checks. A bank can have more than one bank account number.
6 Enter your Chart of Accounts code in the Chart of Accounts field. Note: This links your chart to the bank code.
7 Enter 9910 in the Bank Fund field. Note: This field contains a one-to-six-character code of the fund connected with the financial organization.
8 Enter 1101 in the Cash Account field. Note: This field contains the account number of the organization’s cash balances in the bank fund.
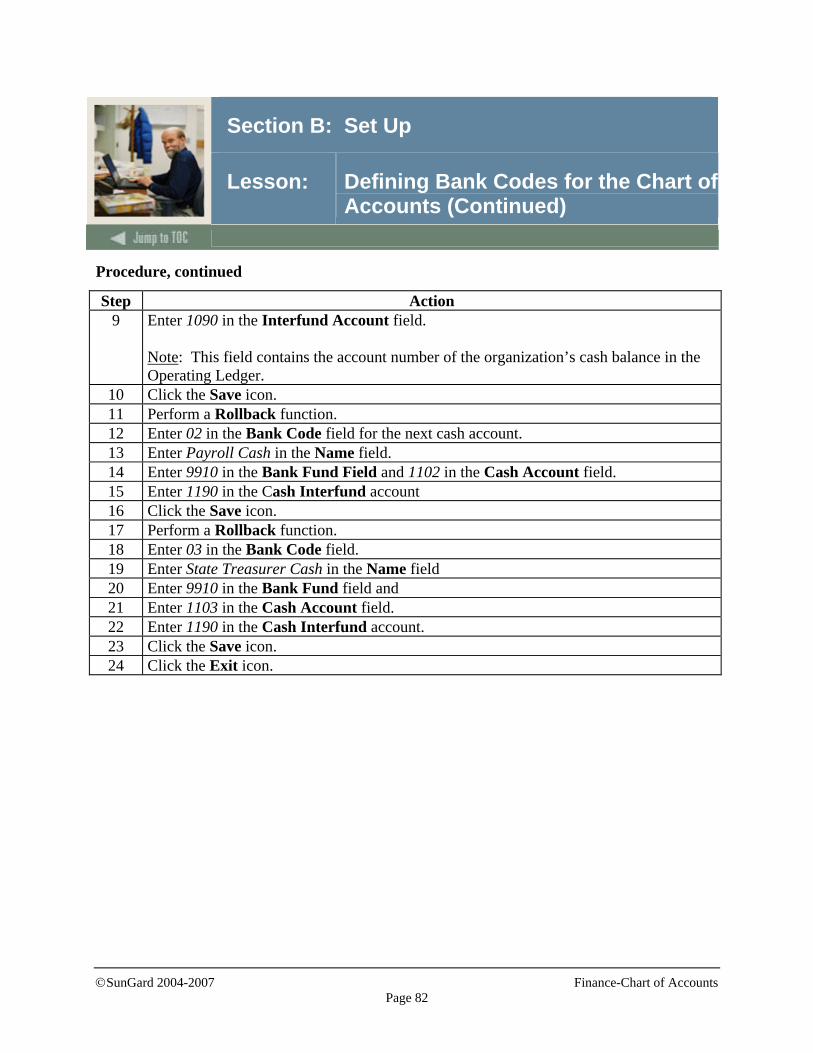
©SunGard 2004-2007 Finance-Chart of Accounts
Page 82
Section B: Set Up
Lesson: Defining Bank Codes for the Chart of Accounts (Continued)
Procedure, continued
Step Action 9 Enter 1090 in the Interfund Account field.
Note: This field contains the account number of the organization’s cash balance in the Operating Ledger.
10 Click the Save icon. 11 Perform a Rollback function. 12 Enter 02 in the Bank Code field for the next cash account. 13 Enter Payroll Cash in the Name field. 14 Enter 9910 in the Bank Fund Field and 1102 in the Cash Account field. 15 Enter 1190 in the Cash Interfund account 16 Click the Save icon. 17 Perform a Rollback function. 18 Enter 03 in the Bank Code field. 19 Enter State Treasurer Cash in the Name field 20 Enter 9910 in the Bank Fund field and 21 Enter 1103 in the Cash Account field. 22 Enter 1190 in the Cash Interfund account. 23 Click the Save icon. 24 Click the Exit icon.
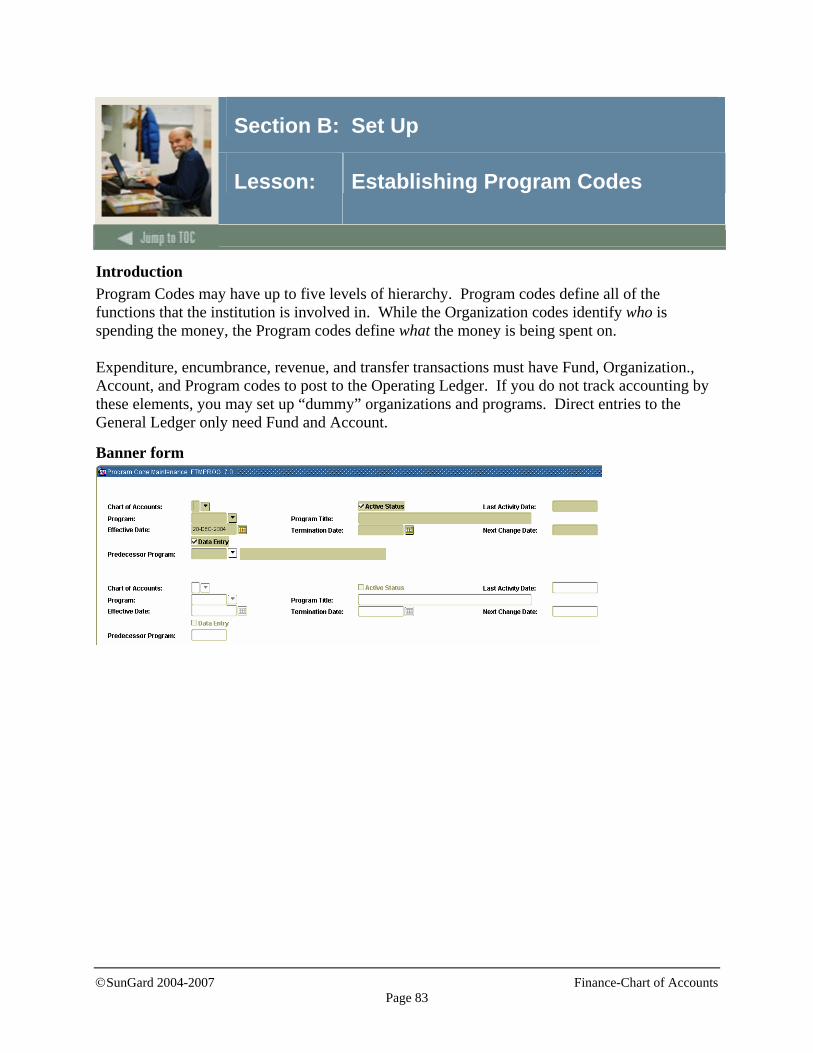
©SunGard 2004-2007 Finance-Chart of Accounts
Page 83
Section B: Set Up
Lesson: Establishing Program Codes
Introduction Program Codes may have up to five levels of hierarchy. Program codes define all of the functions that the institution is involved in. While the Organization codes identify who is spending the money, the Program codes define what the money is being spent on. Expenditure, encumbrance, revenue, and transfer transactions must have Fund, Organization., Account, and Program codes to post to the Operating Ledger. If you do not track accounting by these elements, you may set up “dummy” organizations and programs. Direct entries to the General Ledger only need Fund and Account.
Banner form
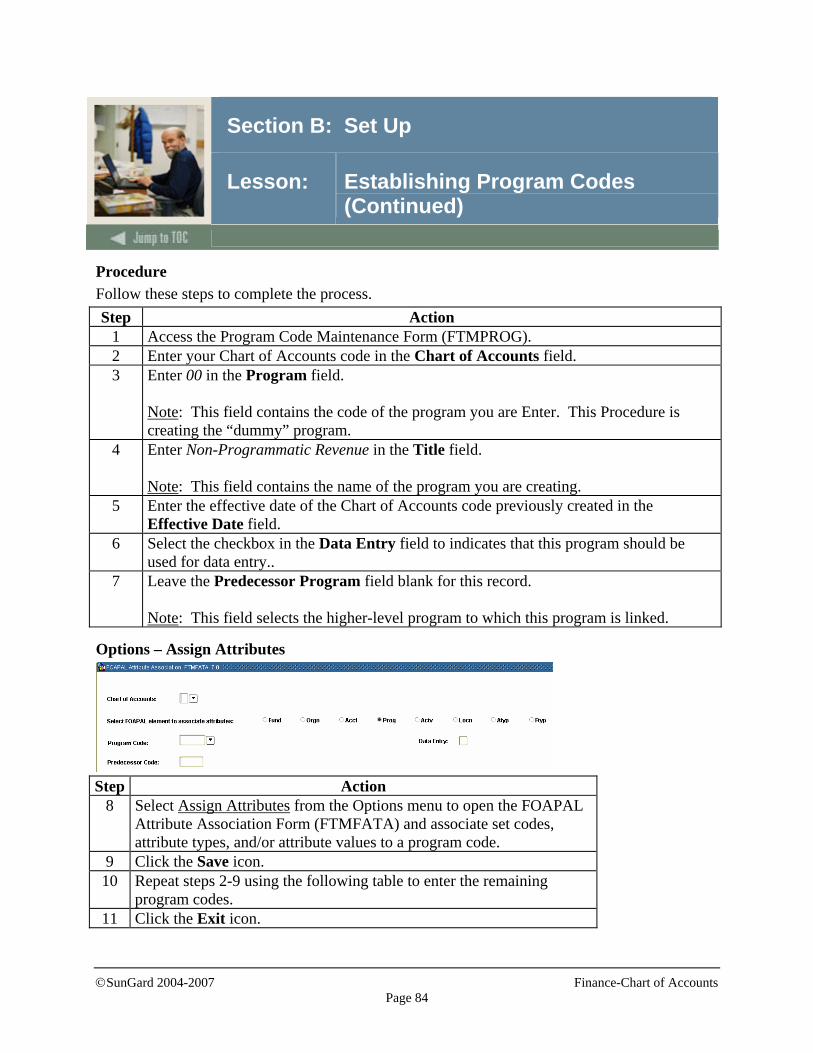
©SunGard 2004-2007 Finance-Chart of Accounts
Page 84
Section B: Set Up
Lesson: Establishing Program Codes (Continued)
Procedure Follow these steps to complete the process. Step Action
1 Access the Program Code Maintenance Form (FTMPROG). 2 Enter your Chart of Accounts code in the Chart of Accounts field. 3 Enter 00 in the Program field.
Note: This field contains the code of the program you are Enter. This Procedure is creating the “dummy” program.
4 Enter Non-Programmatic Revenue in the Title field. Note: This field contains the name of the program you are creating.
5 Enter the effective date of the Chart of Accounts code previously created in the Effective Date field.
6 Select the checkbox in the Data Entry field to indicates that this program should be used for data entry..
7 Leave the Predecessor Program field blank for this record. Note: This field selects the higher-level program to which this program is linked.
Options – Assign Attributes
Step Action
8 Select Assign Attributes from the Options menu to open the FOAPAL Attribute Association Form (FTMFATA) and associate set codes, attribute types, and/or attribute values to a program code.
9 Click the Save icon. 10 Repeat steps 2-9 using the following table to enter the remaining
program codes. 11 Click the Exit icon.
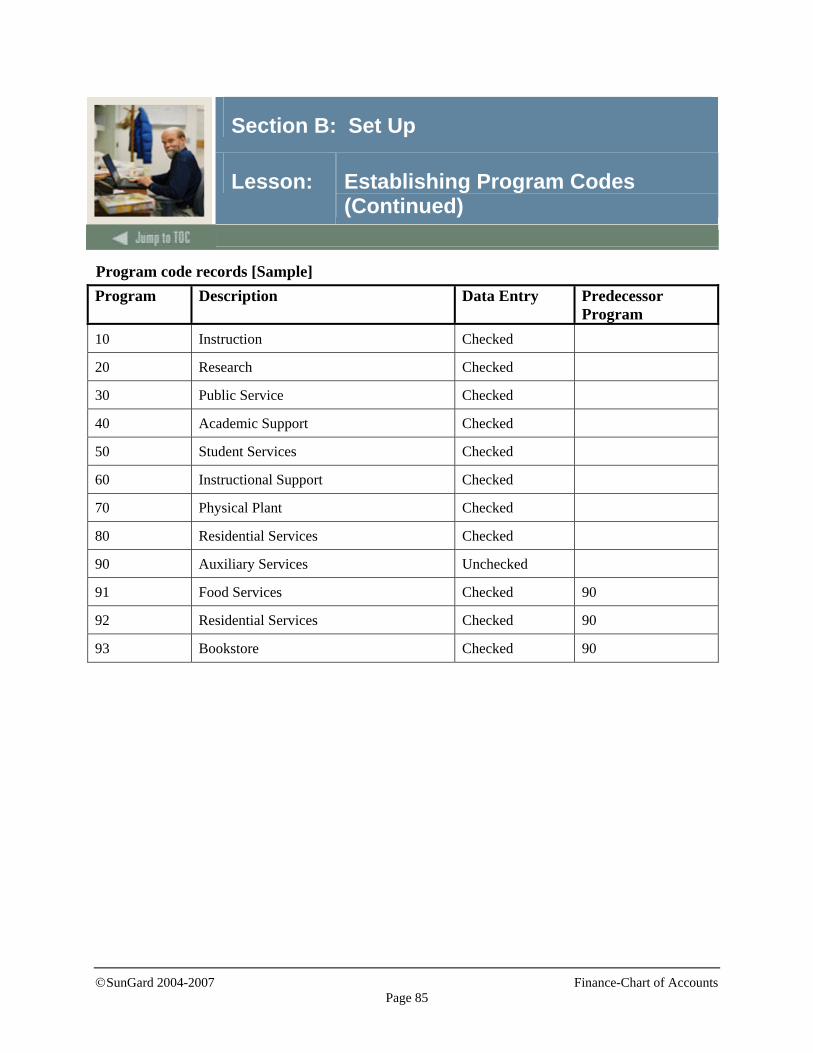
©SunGard 2004-2007 Finance-Chart of Accounts
Page 85
Section B: Set Up
Lesson: Establishing Program Codes (Continued)
Program code records [Sample] Program Description Data Entry Predecessor
Program 10 Instruction Checked
20 Research Checked
30 Public Service Checked
40 Academic Support Checked
50 Student Services Checked
60 Instructional Support Checked
70 Physical Plant Checked
80 Residential Services Checked
90 Auxiliary Services Unchecked
91 Food Services Checked 90
92 Residential Services Checked 90
93 Bookstore Checked 90
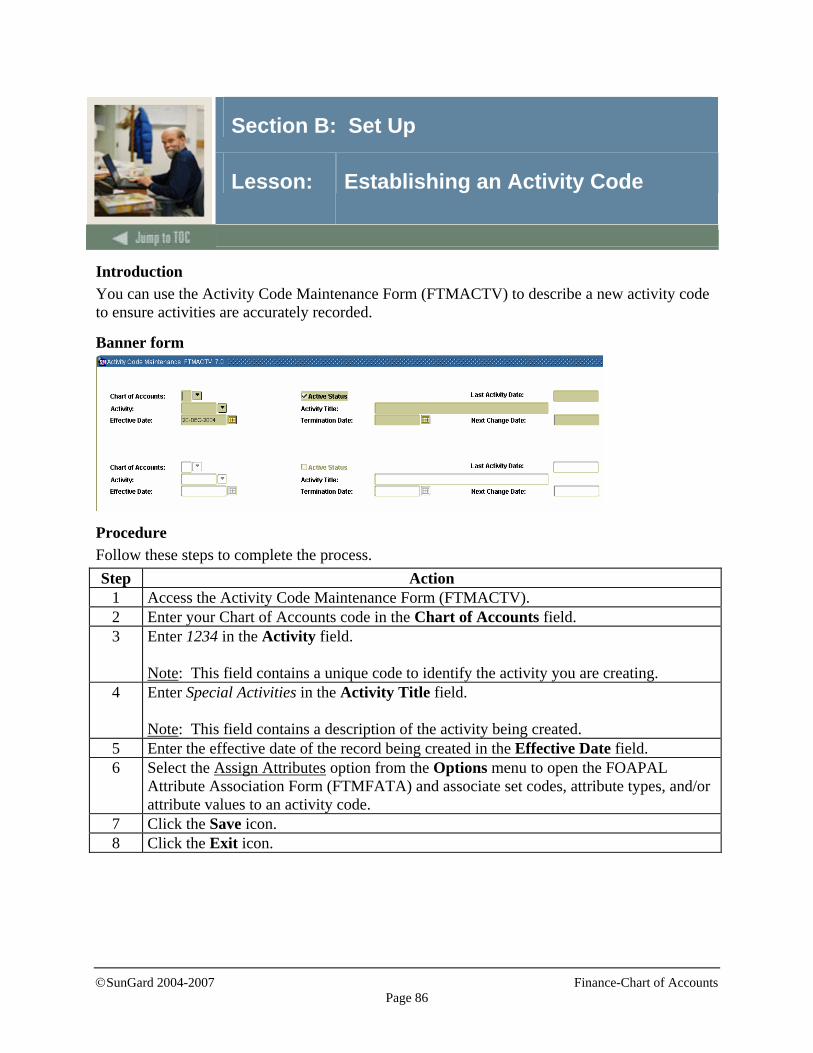
©SunGard 2004-2007 Finance-Chart of Accounts
Page 86
Section B: Set Up
Lesson: Establishing an Activity Code
Introduction You can use the Activity Code Maintenance Form (FTMACTV) to describe a new activity code to ensure activities are accurately recorded.
Banner form
Procedure Follow these steps to complete the process. Step Action
1 Access the Activity Code Maintenance Form (FTMACTV). 2 Enter your Chart of Accounts code in the Chart of Accounts field. 3 Enter 1234 in the Activity field.
Note: This field contains a unique code to identify the activity you are creating.
4 Enter Special Activities in the Activity Title field. Note: This field contains a description of the activity being created.
5 Enter the effective date of the record being created in the Effective Date field. 6 Select the Assign Attributes option from the Options menu to open the FOAPAL
Attribute Association Form (FTMFATA) and associate set codes, attribute types, and/or attribute values to an activity code.
7 Click the Save icon. 8 Click the Exit icon.
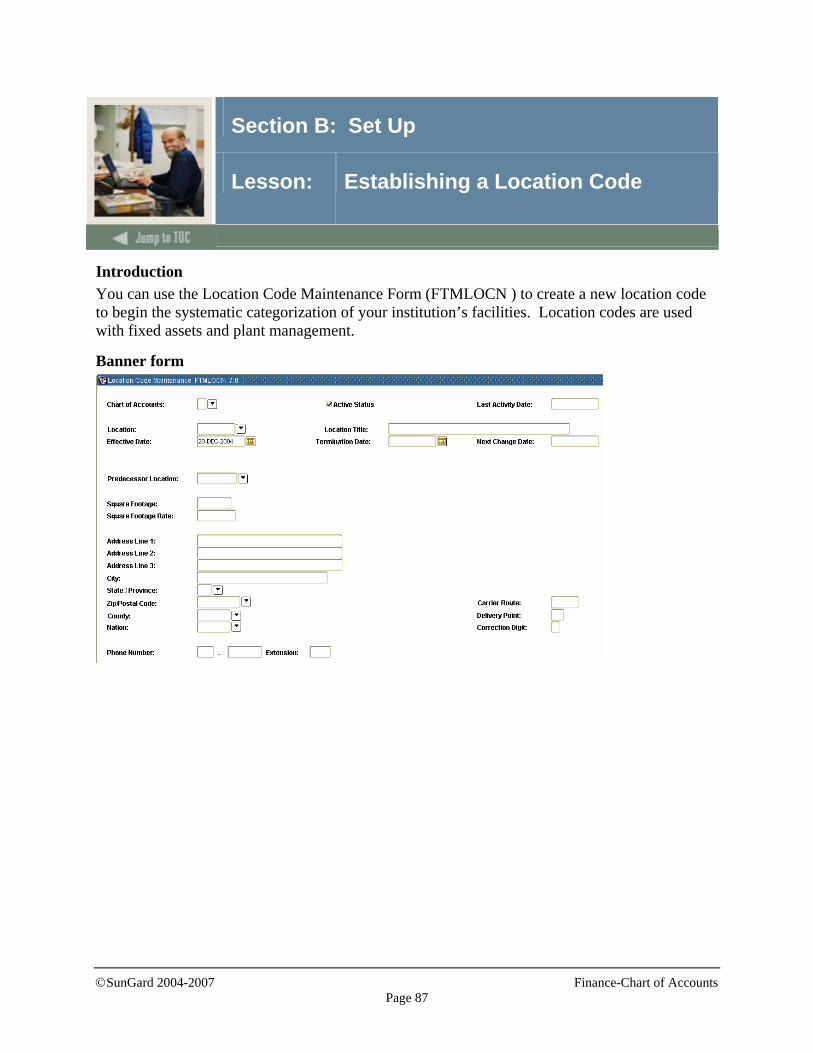
©SunGard 2004-2007 Finance-Chart of Accounts
Page 87
Section B: Set Up
Lesson: Establishing a Location Code
Introduction You can use the Location Code Maintenance Form (FTMLOCN ) to create a new location code to begin the systematic categorization of your institution’s facilities. Location codes are used with fixed assets and plant management.
Banner form
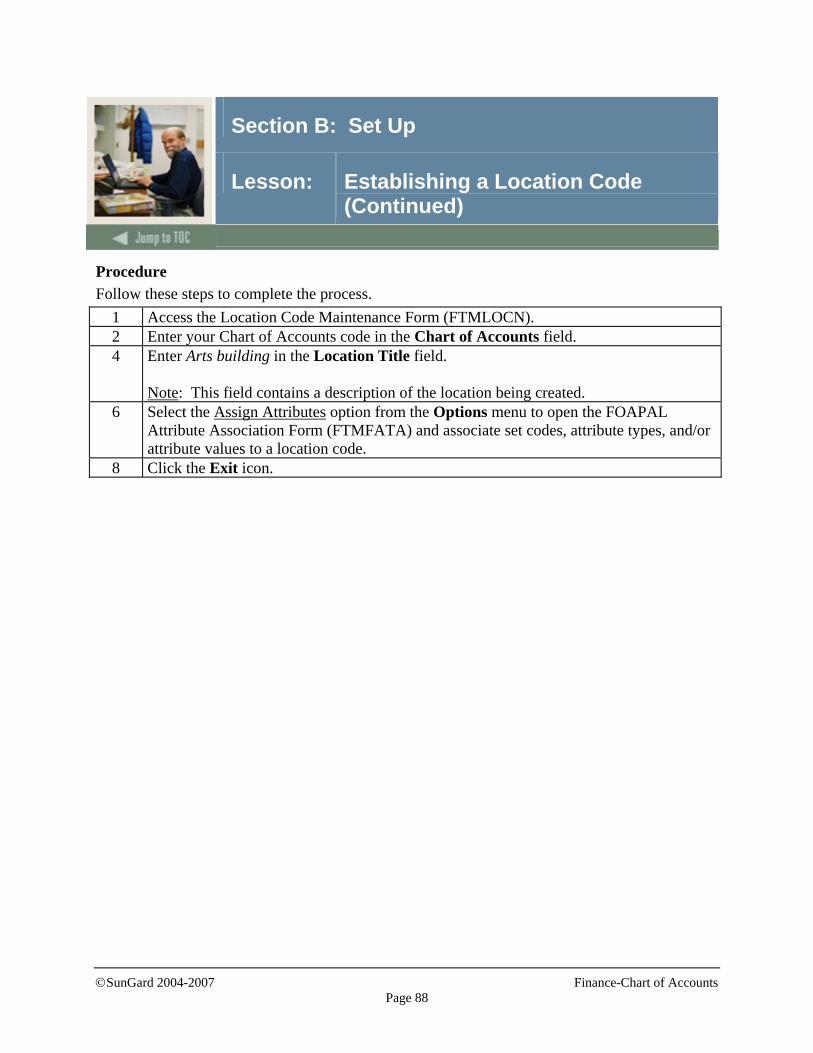
©SunGard 2004-2007 Finance-Chart of Accounts
Page 88
Section B: Set Up
Lesson: Establishing a Location Code (Continued)
Procedure Follow these steps to complete the process.
1 Access the Location Code Maintenance Form (FTMLOCN). 2 Enter your Chart of Accounts code in the Chart of Accounts field. 4 Enter Arts building in the Location Title field.
Note: This field contains a description of the location being created.
6 Select the Assign Attributes option from the Options menu to open the FOAPAL Attribute Association Form (FTMFATA) and associate set codes, attribute types, and/or attribute values to a location code.
8 Click the Exit icon.
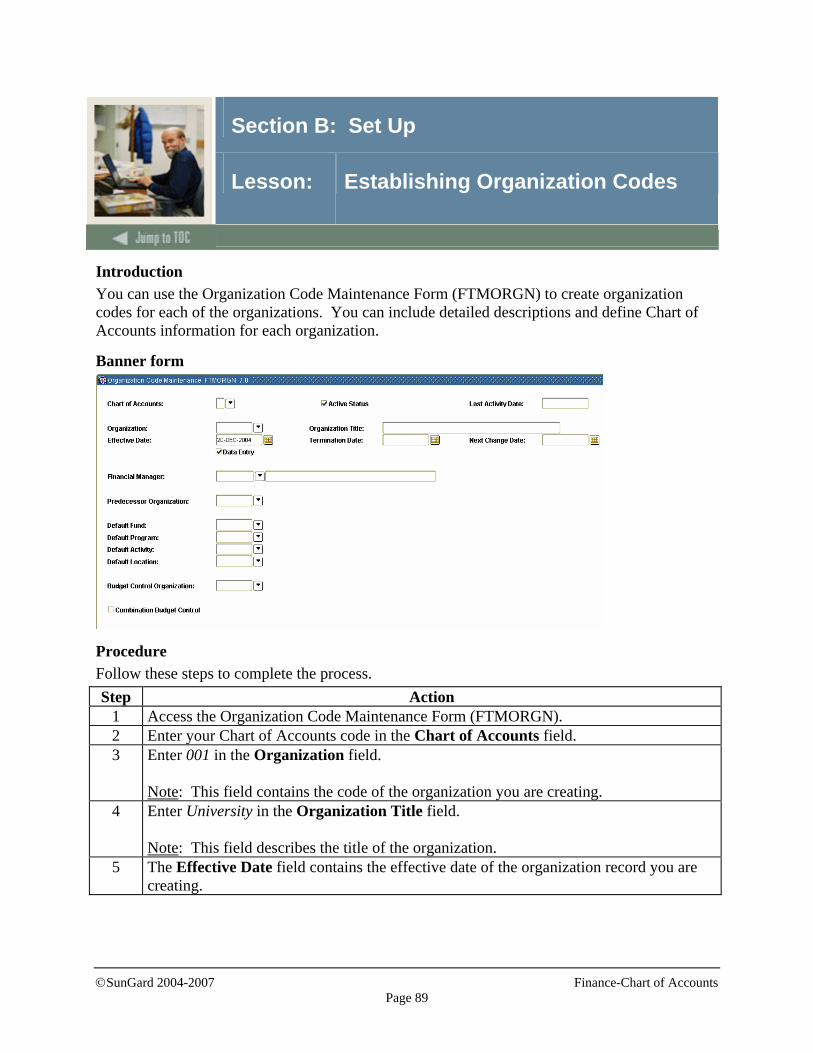
©SunGard 2004-2007 Finance-Chart of Accounts
Page 89
Section B: Set Up
Lesson: Establishing Organization Codes
Introduction You can use the Organization Code Maintenance Form (FTMORGN) to create organization codes for each of the organizations. You can include detailed descriptions and define Chart of Accounts information for each organization.
Banner form
Procedure Follow these steps to complete the process. Step Action
1 Access the Organization Code Maintenance Form (FTMORGN). 2 Enter your Chart of Accounts code in the Chart of Accounts field. 3 Enter 001 in the Organization field.
Note: This field contains the code of the organization you are creating.
4 Enter University in the Organization Title field. Note: This field describes the title of the organization.
5 The Effective Date field contains the effective date of the organization record you are creating.
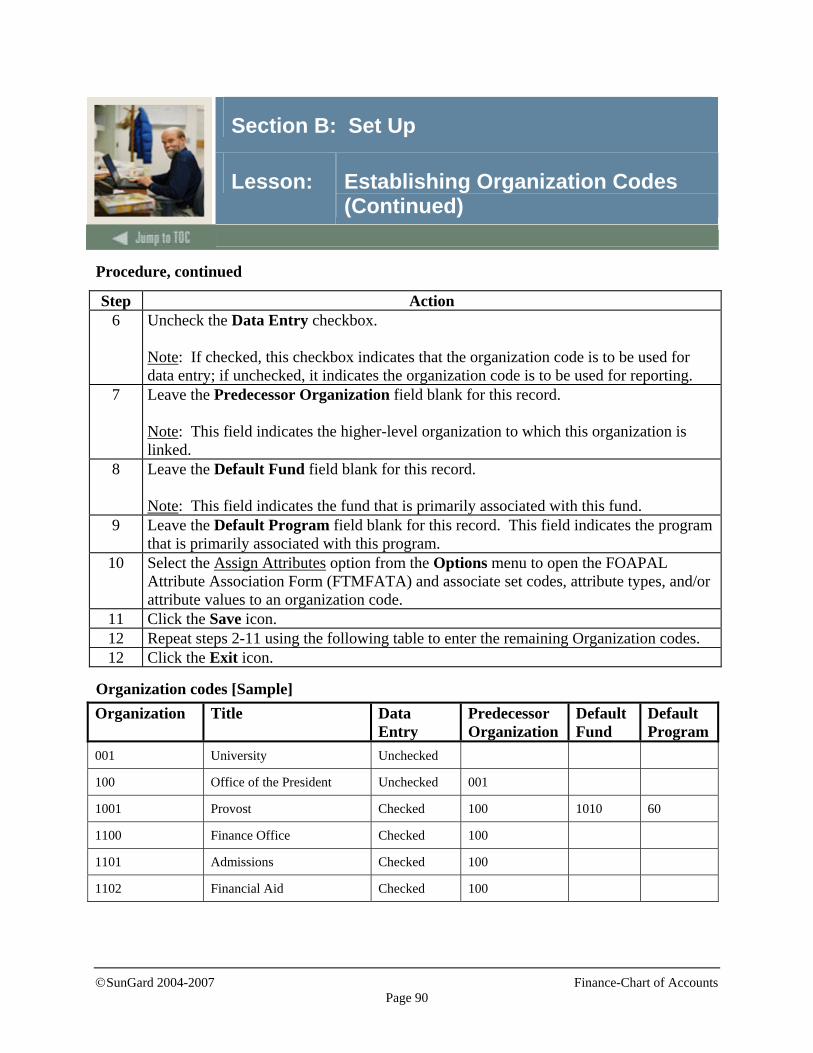
©SunGard 2004-2007 Finance-Chart of Accounts
Page 90
Section B: Set Up
Lesson: Establishing Organization Codes (Continued)
Procedure, continued
Step Action 6 Uncheck the Data Entry checkbox.
Note: If checked, this checkbox indicates that the organization code is to be used for data entry; if unchecked, it indicates the organization code is to be used for reporting.
7 Leave the Predecessor Organization field blank for this record. Note: This field indicates the higher-level organization to which this organization is linked.
8 Leave the Default Fund field blank for this record. Note: This field indicates the fund that is primarily associated with this fund.
9 Leave the Default Program field blank for this record. This field indicates the program that is primarily associated with this program.
10 Select the Assign Attributes option from the Options menu to open the FOAPAL Attribute Association Form (FTMFATA) and associate set codes, attribute types, and/or attribute values to an organization code.
11 Click the Save icon. 12 Repeat steps 2-11 using the following table to enter the remaining Organization codes. 12 Click the Exit icon.
Organization codes [Sample] Organization Title Data
Entry Predecessor Organization
Default Fund
Default Program
001 University Unchecked
100 Office of the President Unchecked 001
1001 Provost Checked 100 1010 60
1100 Finance Office Checked 100
1101 Admissions Checked 100
1102 Financial Aid Checked 100

©SunGard 2004-2007 Finance-Chart of Accounts
Page 91
Section B: Set Up
Lesson: Establishing Organization Codes (Continued)
Organization codes [Sample], continued Organization Title Data
Entry Predecessor Organization
Default Fund
Default Program
20 Dean of Arts and Sciences Unchecked 1001
2100 Art Checked 20 1010 10
2110 Biology Checked 20 1010 10
2115 Chemistry Checked 20 1010 10
30 Dean of Humanities Unchecked 1001
3101 Sociology Checked 30 1010 10
3102 Psychology Checked 30 1010 10
3103 History Checked 30 1010 10
3104 Speech Checked 30 1010 10
40 Support Staff Unchecked 001
4010 Custodial Checked 40 1010 60
50 Auxiliary Enterprises Unchecked 001
5010 Book Store Checked 50 3120
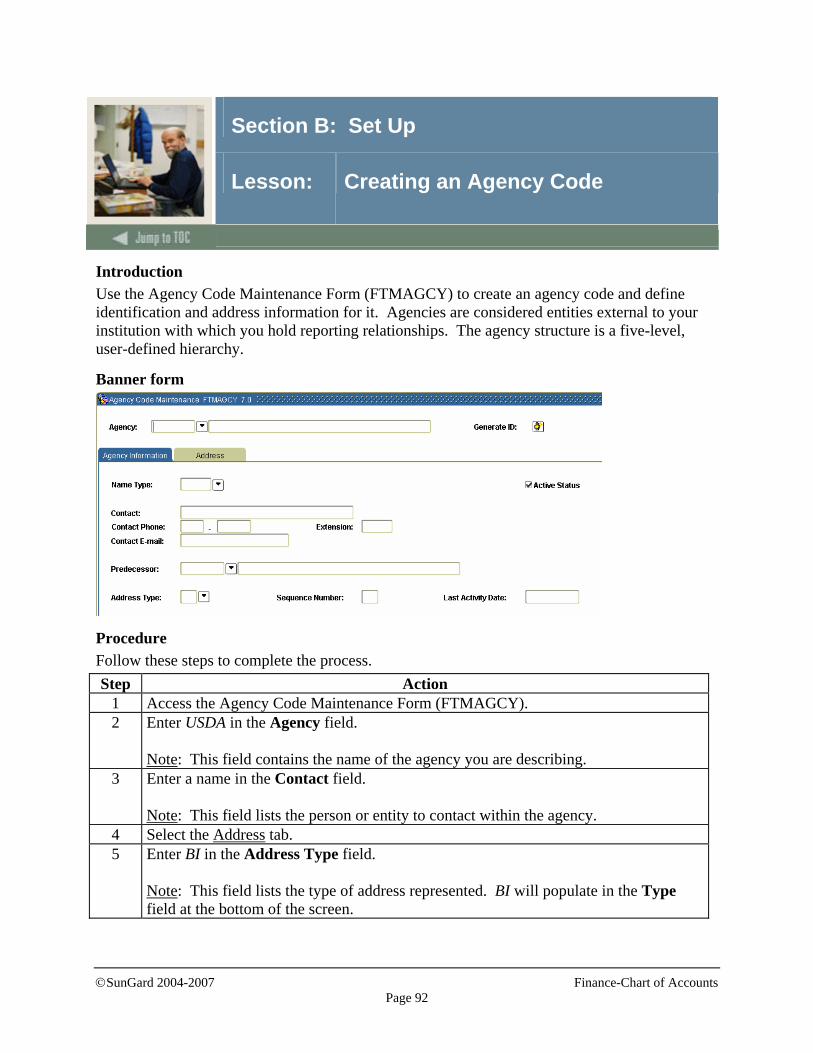
©SunGard 2004-2007 Finance-Chart of Accounts
Page 92
Section B: Set Up
Lesson: Creating an Agency Code
Introduction Use the Agency Code Maintenance Form (FTMAGCY) to create an agency code and define identification and address information for it. Agencies are considered entities external to your institution with which you hold reporting relationships. The agency structure is a five-level, user-defined hierarchy.
Banner form
Procedure Follow these steps to complete the process. Step Action
1 Access the Agency Code Maintenance Form (FTMAGCY). 2 Enter USDA in the Agency field.
Note: This field contains the name of the agency you are describing.
3 Enter a name in the Contact field. Note: This field lists the person or entity to contact within the agency.
4 Select the Address tab. 5 Enter BI in the Address Type field.
Note: This field lists the type of address represented. BI will populate in the Type field at the bottom of the screen.

©SunGard 2004-2007 Finance-Chart of Accounts
Page 93
Section B: Set Up
Lesson: Creating an Agency Code (Continued)
Procedure, continued
Step Action 6 Enter 01 in the Sequence Number field.
Note: This field contains a user-defined sequence of the addresses of the contact.
7 Select the Address tab. 8 Enter an address in the Address field.
Note: This field contains the address of the agency.
9 Enter a city in the City field. Note: This field contains the city in which the agency resides.
10 Enter a state in the State/Prov field. Note: This field contains the state (or province) in which the agency resides.
11 Enter a zip code in the ZIP/PC field. Note: This field contains the ZIP code of the agency.
12 Click the Save icon.

©SunGard 2004-2007 Finance-Chart of Accounts
Page 94
Section B: Set Up
Lesson: Creating Account Index Codes
Introduction Use the Account Index Code Maintenance Form (FTMACCI) to construct an Account Index to better facilitate FOAPAL entries into Banner.
Banner form
Procedure Follow these steps to complete the process. Step Action
1 Access the Account Index Code Maintenance Form (FTMACCI). 2 Enter your Chart of Accounts code in the Chart of Accounts field. 3 Enter BOOKS in the Account Index field.
Note: This field contains a user-defined name for this account.
4 Enter Bookstore Revenue in the Account Index Title field. Note: This field contains a description of the Account Index previously entered.
5 Enter the 9-character code (DD-MON-YYYY) in the Effective Date field for the effective date.
6 Enter 3120 in the Fund field. Note: This field specifies the fund code to be used in Available Budget Checking.
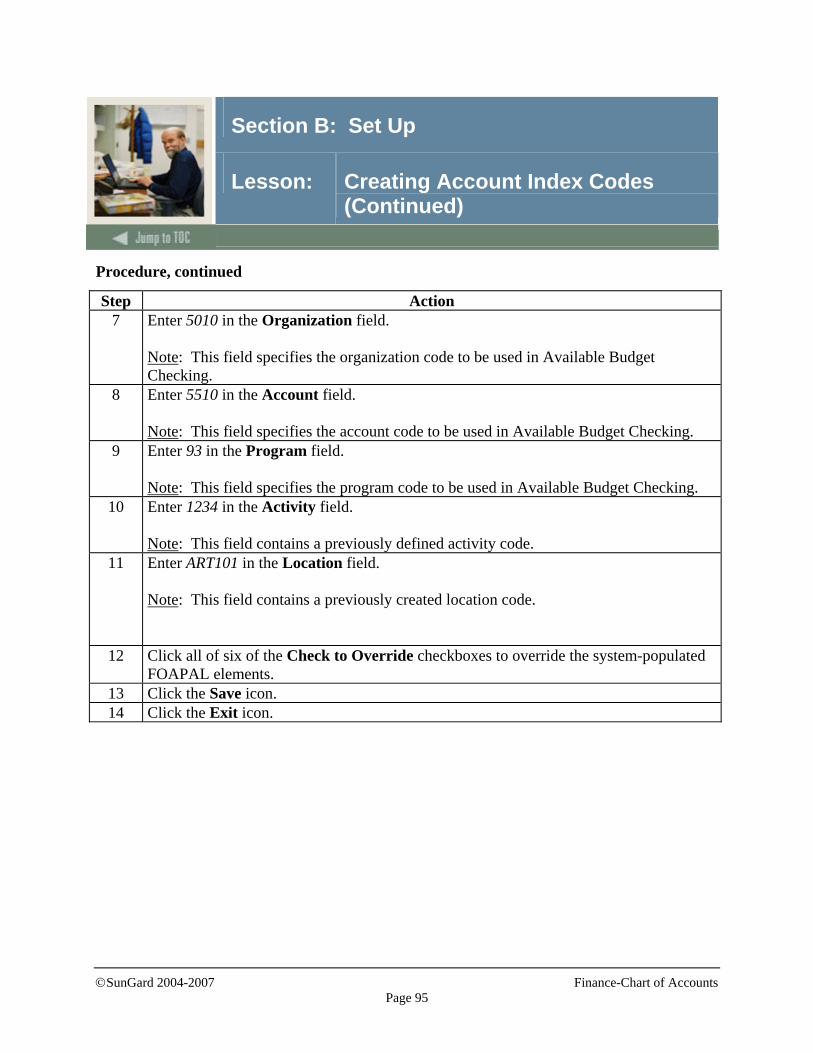
©SunGard 2004-2007 Finance-Chart of Accounts
Page 95
Section B: Set Up
Lesson: Creating Account Index Codes (Continued)
Procedure, continued
Step Action 7 Enter 5010 in the Organization field.
Note: This field specifies the organization code to be used in Available Budget Checking.
8 Enter 5510 in the Account field. Note: This field specifies the account code to be used in Available Budget Checking.
9 Enter 93 in the Program field. Note: This field specifies the program code to be used in Available Budget Checking.
10 Enter 1234 in the Activity field. Note: This field contains a previously defined activity code.
11 Enter ART101 in the Location field. Note: This field contains a previously created location code.
12 Click all of six of the Check to Override checkboxes to override the system-populated FOAPAL elements.
13 Click the Save icon. 14 Click the Exit icon.

©SunGard 2004-2007 Finance-Chart of Accounts
Page 96
Section B: Set Up
Lesson: Assigning a Financial Manager to the Chart of Accounts
Introduction You can use the Financial Manager Maintenance Form (FTMFMGR) to define a financial manager in the Banner Finance System to oversee the newly completed Chart of Accounts.
Banner form
Procedure Follow these steps to assign a financial manager to maintain your Chart of Accounts. Step Action
1 Access the Financial Manager Maintenance Form (FTMFMGR). 2 Enter NEXT in the Financial Manager field.
Note: This field identifies the financial manager.
3 Enter a last name in the Last Name field. Note: This field contains the last name of the financial manager you are describing.
4 Enter a name in the First Name field. 5 Enter an initial in the Middle Name field. 6 Enter a title of the financial manager in the Title field. 7 Check the Active Status checkbox to signify that the financial manager’s record you are
creating is active. Note: The Effective Date field contains the effective date of the record you are creating.

©SunGard 2004-2007 Finance-Chart of Accounts
Page 97
Section B: Set Up
Lesson: Assigning a Financial Manager to the Chart of Accounts (Continued)
Procedure, continued
Step Action 8 Enter your Chart of Accounts code in the Chart of Accounts field. 9 Enter 1100 in the Assigned Organization field.
Note: This field specifies the organization to which the financial manager is assigned.
10 Enter ART101 in the Assigned Location field. Note: This field specifies the physical location of the organization’s financial manager.
11 Enter BU in the Default Address Type field. Note: This field contains the address type of the financial manager.
12 Enter 01 in the Sequence Number field. Note: This field specifies a user-defined sequence number edited with the address.
13 Click the Save icon.
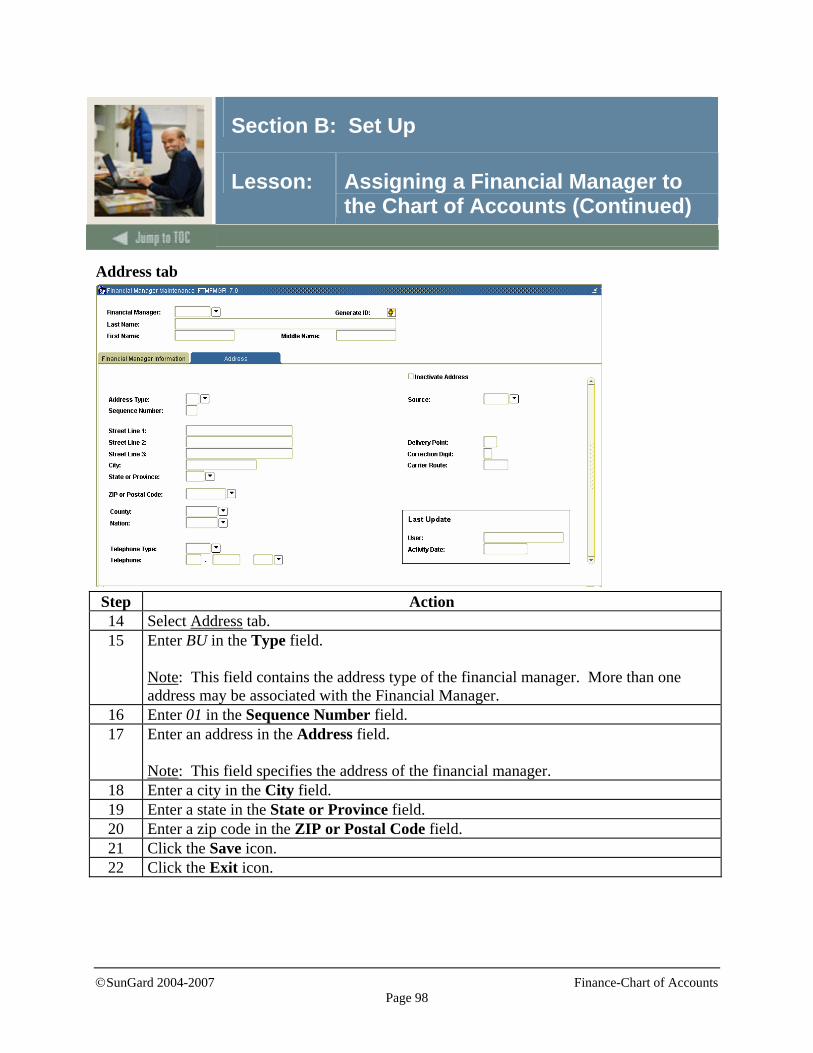
©SunGard 2004-2007 Finance-Chart of Accounts
Page 98
Section B: Set Up
Lesson: Assigning a Financial Manager to the Chart of Accounts (Continued)
Address tab
Step Action 14 Select Address tab. 15 Enter BU in the Type field.
Note: This field contains the address type of the financial manager. More than one address may be associated with the Financial Manager.
16 Enter 01 in the Sequence Number field. 17 Enter an address in the Address field.
Note: This field specifies the address of the financial manager.
18 Enter a city in the City field. 19 Enter a state in the State or Province field. 20 Enter a zip code in the ZIP or Postal Code field. 21 Click the Save icon. 22 Click the Exit icon.
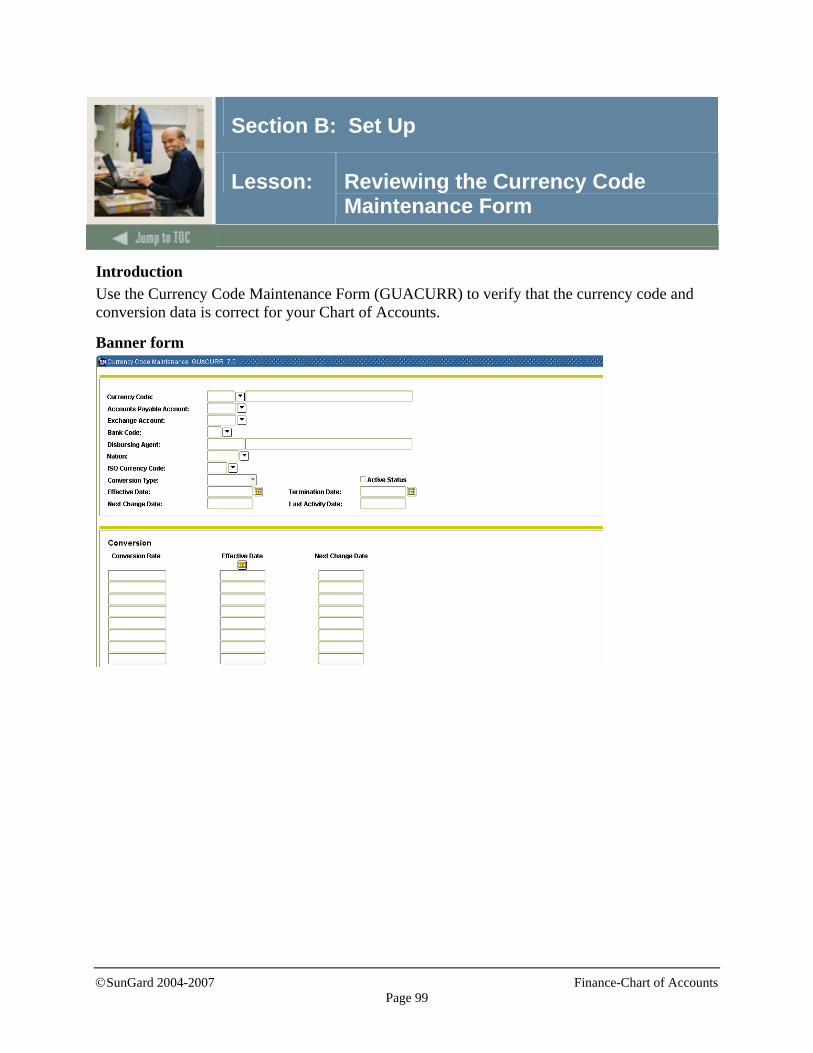
©SunGard 2004-2007 Finance-Chart of Accounts
Page 99
Section B: Set Up
Lesson: Reviewing the Currency Code Maintenance Form
Introduction Use the Currency Code Maintenance Form (GUACURR) to verify that the currency code and conversion data is correct for your Chart of Accounts.
Banner form
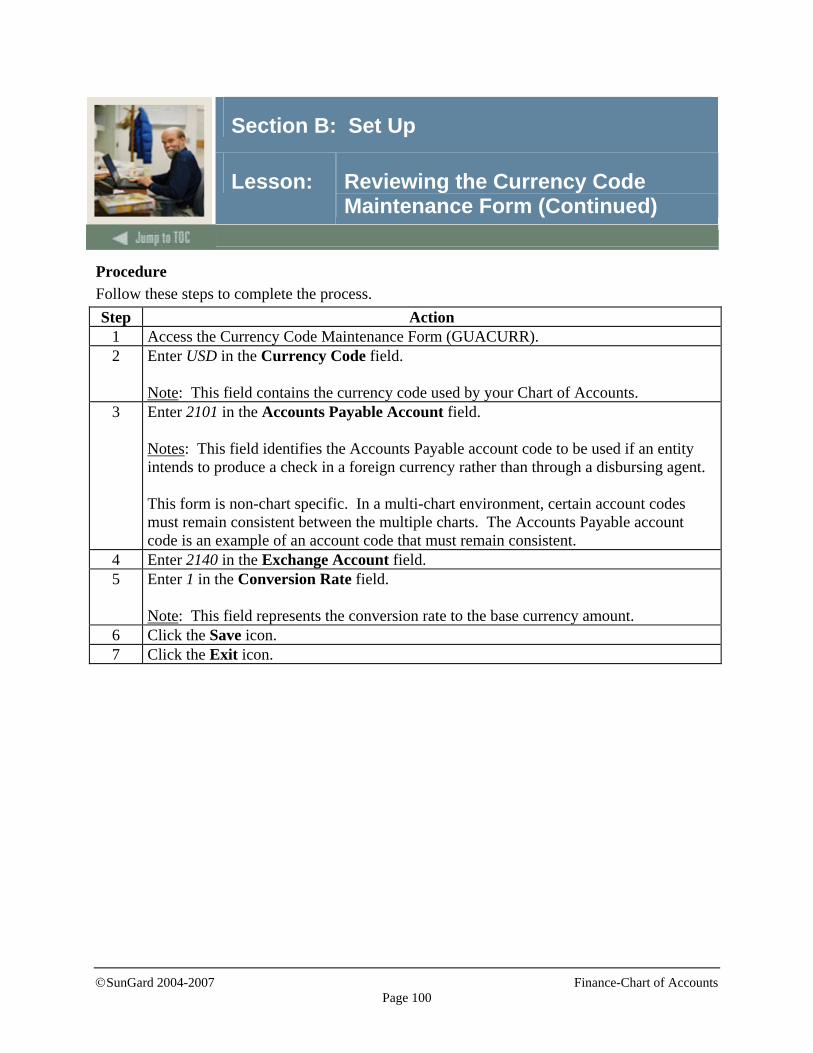
©SunGard 2004-2007 Finance-Chart of Accounts
Page 100
Section B: Set Up
Lesson: Reviewing the Currency Code Maintenance Form (Continued)
Procedure Follow these steps to complete the process. Step Action
1 Access the Currency Code Maintenance Form (GUACURR). 2 Enter USD in the Currency Code field.
Note: This field contains the currency code used by your Chart of Accounts.
3 Enter 2101 in the Accounts Payable Account field. Notes: This field identifies the Accounts Payable account code to be used if an entity intends to produce a check in a foreign currency rather than through a disbursing agent. This form is non-chart specific. In a multi-chart environment, certain account codes must remain consistent between the multiple charts. The Accounts Payable account code is an example of an account code that must remain consistent.
4 Enter 2140 in the Exchange Account field. 5 Enter 1 in the Conversion Rate field.
Note: This field represents the conversion rate to the base currency amount.
6 Click the Save icon. 7 Click the Exit icon.
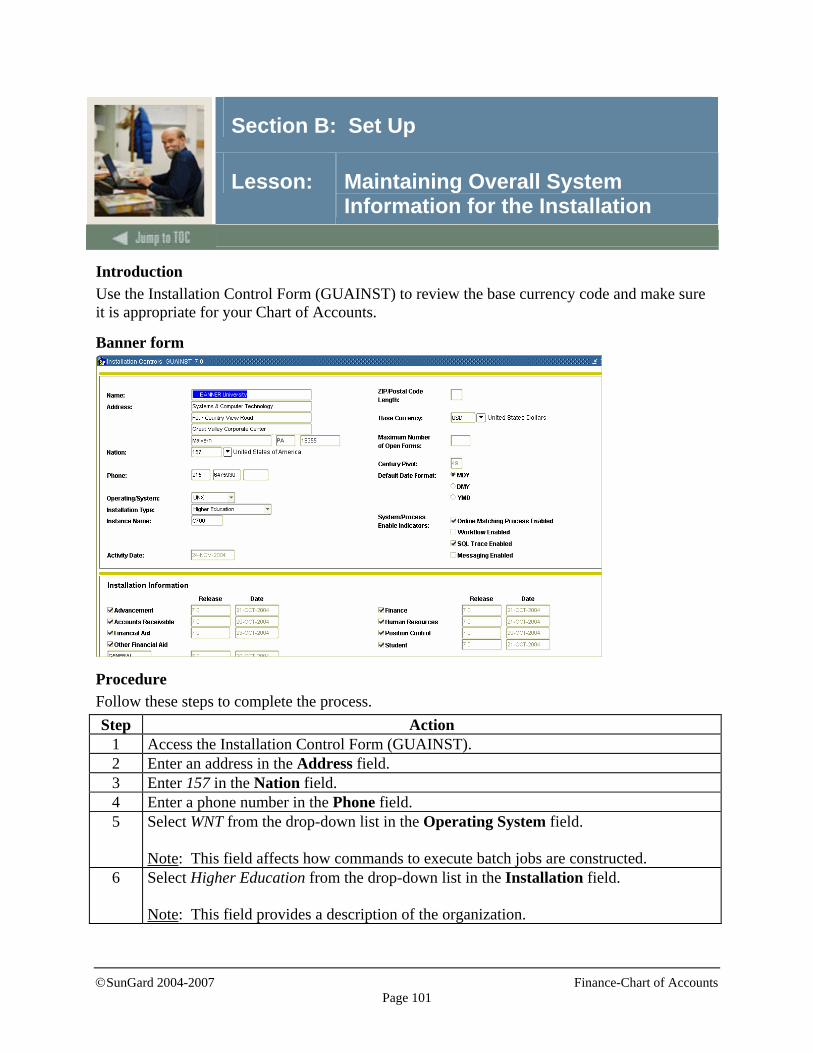
©SunGard 2004-2007 Finance-Chart of Accounts
Page 101
Section B: Set Up
Lesson: Maintaining Overall System Information for the Installation
Introduction Use the Installation Control Form (GUAINST) to review the base currency code and make sure it is appropriate for your Chart of Accounts.
Banner form
Procedure Follow these steps to complete the process. Step Action
1 Access the Installation Control Form (GUAINST). 2 Enter an address in the Address field. 3 Enter 157 in the Nation field. 4 Enter a phone number in the Phone field. 5 Select WNT from the drop-down list in the Operating System field.
Note: This field affects how commands to execute batch jobs are constructed.
6 Select Higher Education from the drop-down list in the Installation field. Note: This field provides a description of the organization.
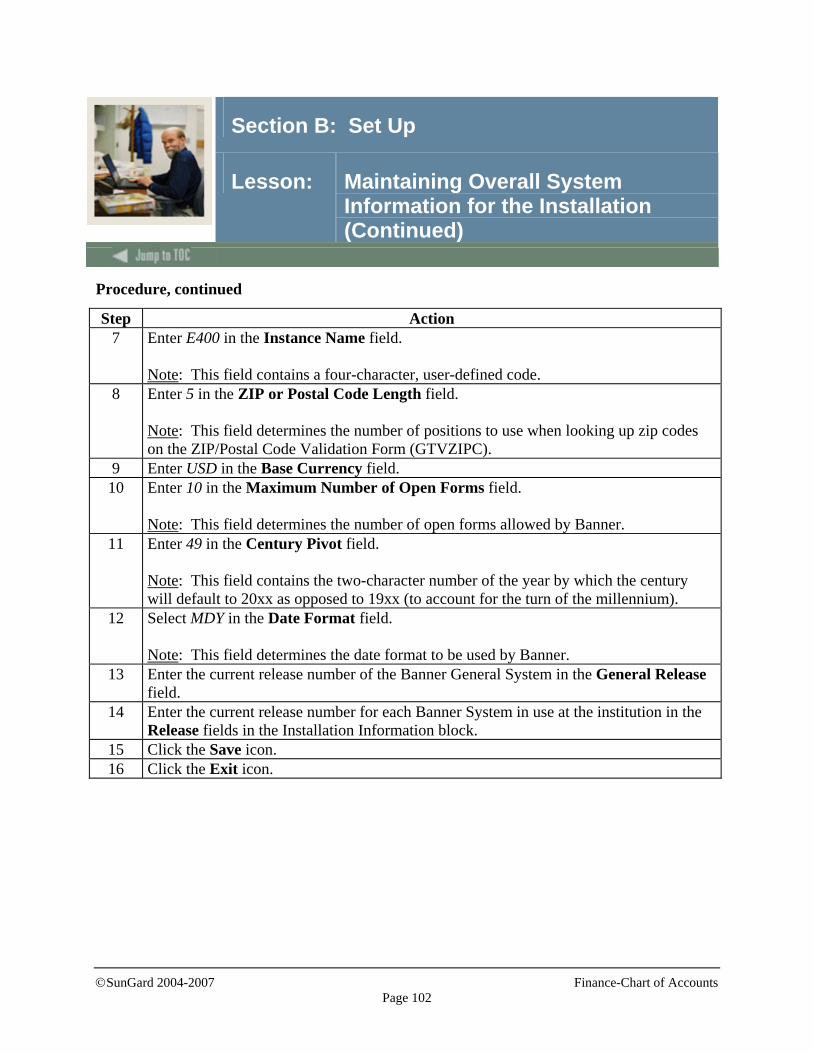
©SunGard 2004-2007 Finance-Chart of Accounts
Page 102
Section B: Set Up
Lesson: Maintaining Overall System Information for the Installation (Continued)
Procedure, continued
Step Action 7 Enter E400 in the Instance Name field.
Note: This field contains a four-character, user-defined code.
8 Enter 5 in the ZIP or Postal Code Length field. Note: This field determines the number of positions to use when looking up zip codes on the ZIP/Postal Code Validation Form (GTVZIPC).
9 Enter USD in the Base Currency field. 10 Enter 10 in the Maximum Number of Open Forms field.
Note: This field determines the number of open forms allowed by Banner.
11 Enter 49 in the Century Pivot field. Note: This field contains the two-character number of the year by which the century will default to 20xx as opposed to 19xx (to account for the turn of the millennium).
12 Select MDY in the Date Format field. Note: This field determines the date format to be used by Banner.
13 Enter the current release number of the Banner General System in the General Release field.
14 Enter the current release number for each Banner System in use at the institution in the Release fields in the Installation Information block.
15 Click the Save icon. 16 Click the Exit icon.
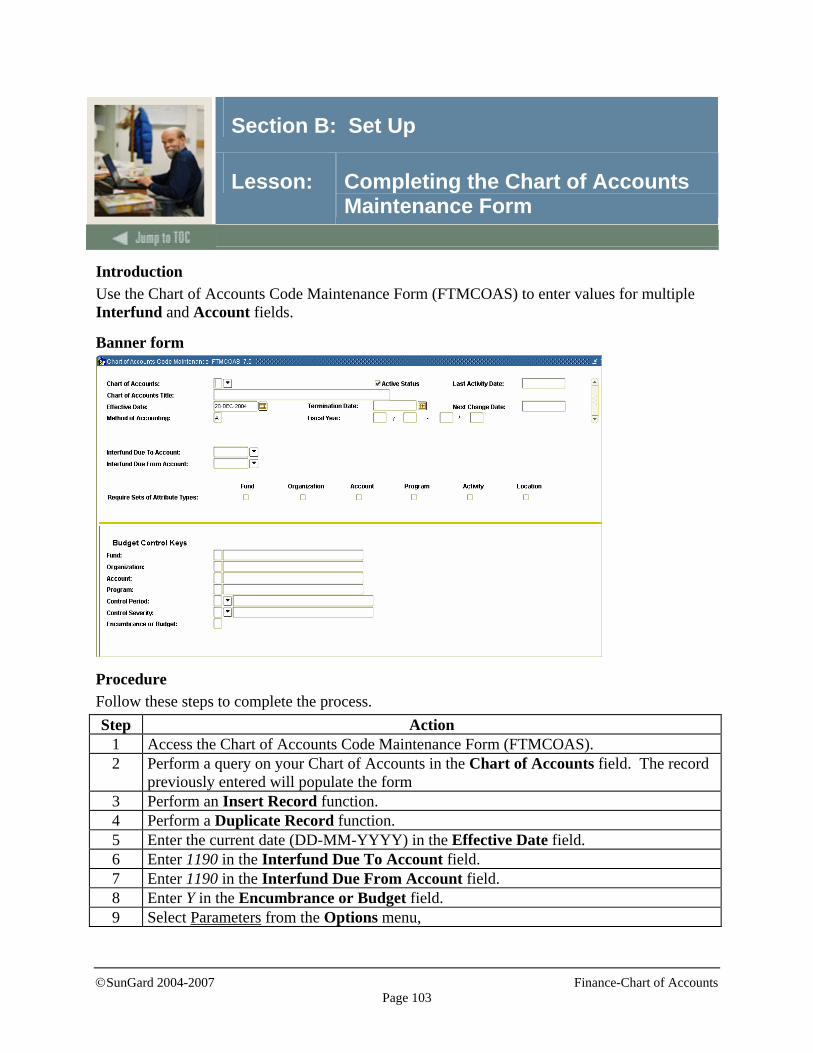
©SunGard 2004-2007 Finance-Chart of Accounts
Page 103
Section B: Set Up
Lesson: Completing the Chart of Accounts Maintenance Form
Introduction Use the Chart of Accounts Code Maintenance Form (FTMCOAS) to enter values for multiple Interfund and Account fields.
Banner form
Procedure Follow these steps to complete the process. Step Action
1 Access the Chart of Accounts Code Maintenance Form (FTMCOAS). 2 Perform a query on your Chart of Accounts in the Chart of Accounts field. The record
previously entered will populate the form 3 Perform an Insert Record function. 4 Perform a Duplicate Record function. 5 Enter the current date (DD-MM-YYYY) in the Effective Date field. 6 Enter 1190 in the Interfund Due To Account field. 7 Enter 1190 in the Interfund Due From Account field. 8 Enter Y in the Encumbrance or Budget field. 9 Select Parameters from the Options menu,
©SunGard 2004-2007 Finance-Chart of Accounts
Page 104
Section B: Set Up
Lesson: Completing the Chart of Accounts Maintenance Form (Continued)
Procedure, continued
Step Action 10 Enter 4110 in the Fund Balance Account field.
Note: This field contains a user-specified Fund Balance account used for posting year-end closing entries.
11 Enter 2104 in the Accounts Payable Accrual Account field. Note: This field contains a user-specified Accounts Payable account to be used for accruals.
12 Enter 1290 in the Accounts Receivable Accrual Account field. Note: This field contains a user-specified Accounts Receivable account to be used for accruals.
13 Click the Save icon. 14 Click the Exit icon.
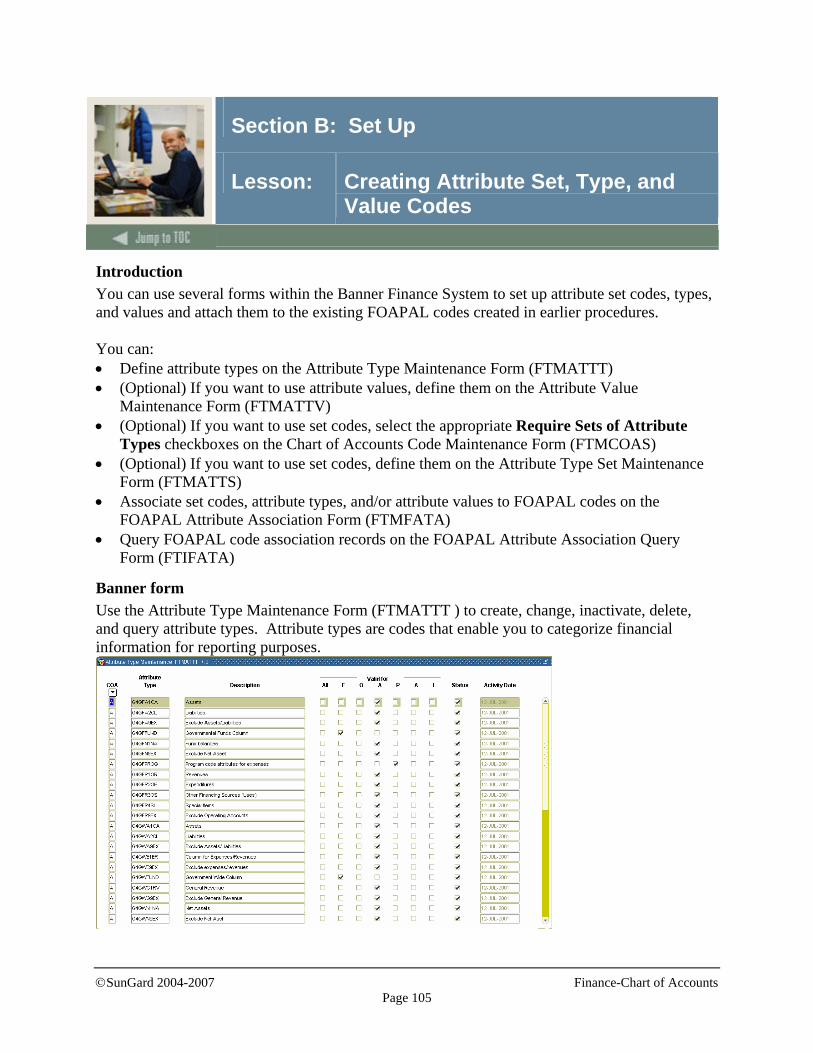
©SunGard 2004-2007 Finance-Chart of Accounts
Page 105
Section B: Set Up
Lesson: Creating Attribute Set, Type, and Value Codes
Introduction You can use several forms within the Banner Finance System to set up attribute set codes, types, and values and attach them to the existing FOAPAL codes created in earlier procedures. You can: • Define attribute types on the Attribute Type Maintenance Form (FTMATTT) • (Optional) If you want to use attribute values, define them on the Attribute Value
Maintenance Form (FTMATTV) • (Optional) If you want to use set codes, select the appropriate Require Sets of Attribute
Types checkboxes on the Chart of Accounts Code Maintenance Form (FTMCOAS) • (Optional) If you want to use set codes, define them on the Attribute Type Set Maintenance
Form (FTMATTS) • Associate set codes, attribute types, and/or attribute values to FOAPAL codes on the
FOAPAL Attribute Association Form (FTMFATA) • Query FOAPAL code association records on the FOAPAL Attribute Association Query
Form (FTIFATA)
Banner form Use the Attribute Type Maintenance Form (FTMATTT ) to create, change, inactivate, delete, and query attribute types. Attribute types are codes that enable you to categorize financial information for reporting purposes.
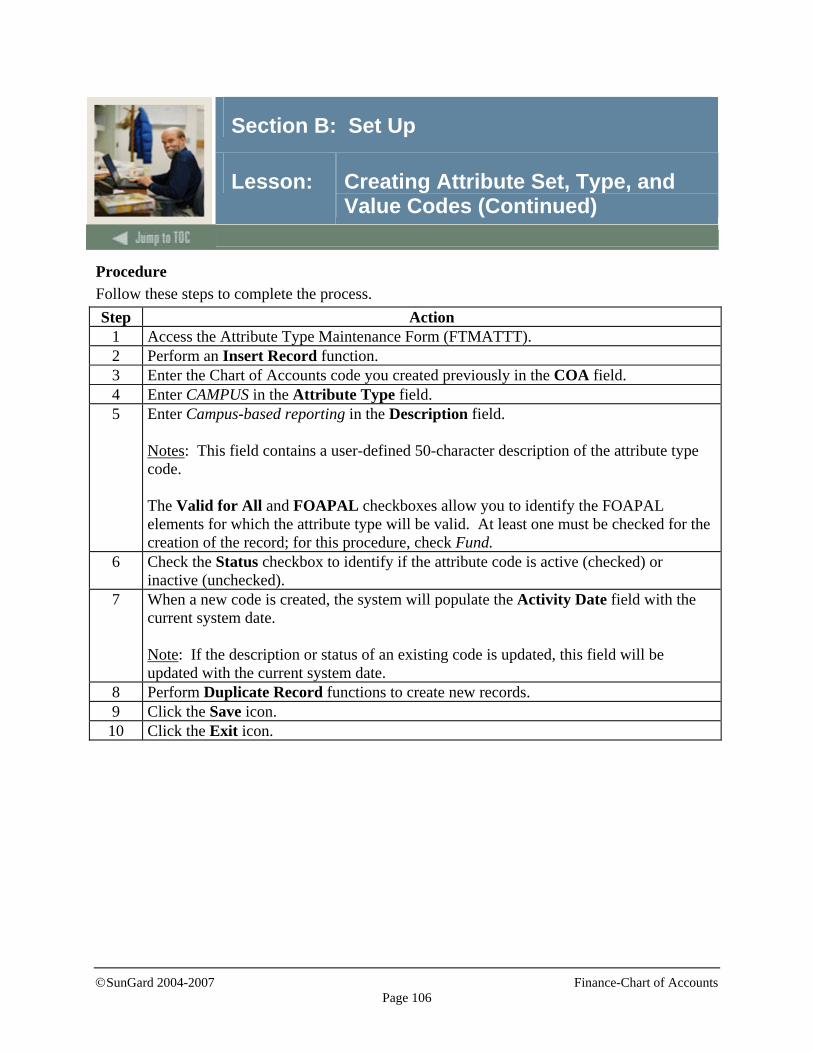
©SunGard 2004-2007 Finance-Chart of Accounts
Page 106
Section B: Set Up
Lesson: Creating Attribute Set, Type, and Value Codes (Continued)
Procedure Follow these steps to complete the process. Step Action
1 Access the Attribute Type Maintenance Form (FTMATTT). 2 Perform an Insert Record function. 3 Enter the Chart of Accounts code you created previously in the COA field. 4 Enter CAMPUS in the Attribute Type field. 5 Enter Campus-based reporting in the Description field.
Notes: This field contains a user-defined 50-character description of the attribute type code. The Valid for All and FOAPAL checkboxes allow you to identify the FOAPAL elements for which the attribute type will be valid. At least one must be checked for the creation of the record; for this procedure, check Fund.
6 Check the Status checkbox to identify if the attribute code is active (checked) or inactive (unchecked).
7 When a new code is created, the system will populate the Activity Date field with the current system date. Note: If the description or status of an existing code is updated, this field will be updated with the current system date.
8 Perform Duplicate Record functions to create new records. 9 Click the Save icon. 10 Click the Exit icon.
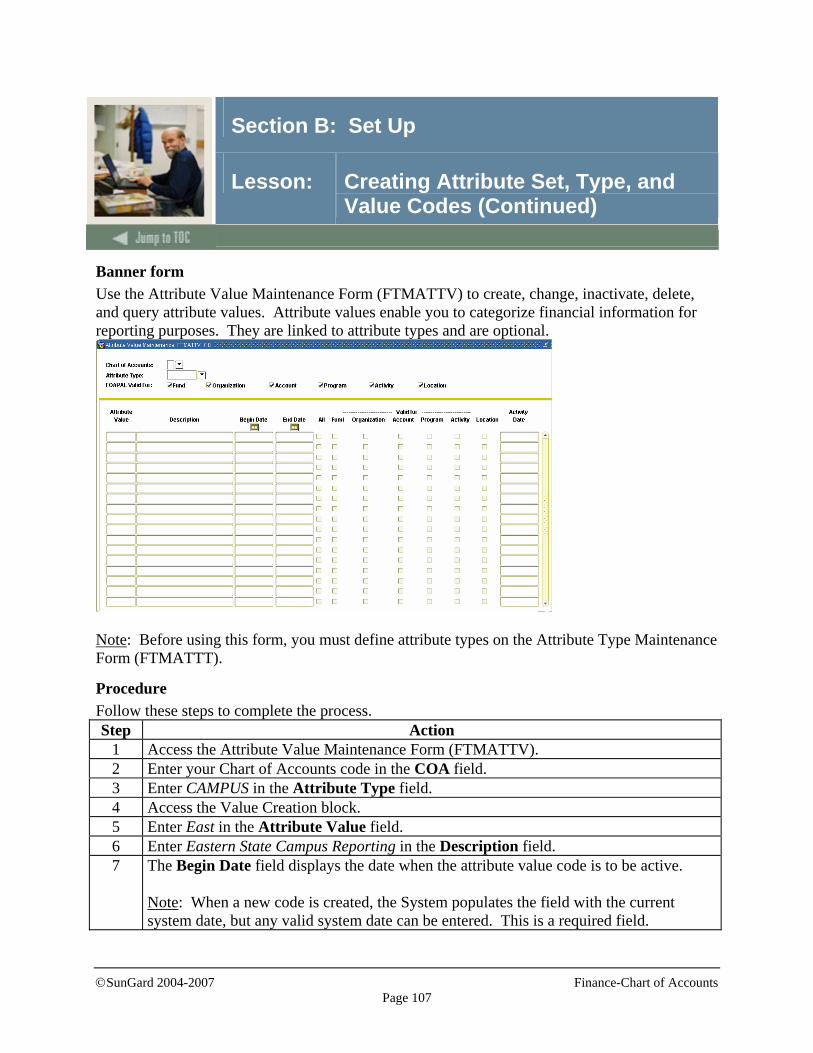
©SunGard 2004-2007 Finance-Chart of Accounts
Page 107
Section B: Set Up
Lesson: Creating Attribute Set, Type, and Value Codes (Continued)
Banner form Use the Attribute Value Maintenance Form (FTMATTV) to create, change, inactivate, delete, and query attribute values. Attribute values enable you to categorize financial information for reporting purposes. They are linked to attribute types and are optional.
Note: Before using this form, you must define attribute types on the Attribute Type Maintenance Form (FTMATTT).
Procedure Follow these steps to complete the process. Step Action
1 Access the Attribute Value Maintenance Form (FTMATTV). 2 Enter your Chart of Accounts code in the COA field. 3 Enter CAMPUS in the Attribute Type field. 4 Access the Value Creation block. 5 Enter East in the Attribute Value field. 6 Enter Eastern State Campus Reporting in the Description field. 7 The Begin Date field displays the date when the attribute value code is to be active.
Note: When a new code is created, the System populates the field with the current system date, but any valid system date can be entered. This is a required field.
©SunGard 2004-2007 Finance-Chart of Accounts
Page 108
Section B: Set Up
Lesson: Creating Attribute Set, Type, and Value Codes (Continued)
Procedure, continued
Step Action 8 The End Date field displays the date when the attribute value code is no longer active.
Notes: It must be greater than or equal to the begin date. The Valid for All, FOAPAL checkboxes allow you to identify the FOAPAL elements for which the attribute value code will be valid. At least one must be checked for the creation of a record. For this Procedure, F (Fund) is already checked. When creating a new record, the settings will be identical to the FOAPAL codes identified as valid for the attribute type code. When a new code is created, the System will populate the Activity Date field with the current system date. If the description, beginning date, or end date of an existing code is updated, this field will be updated with the current system date.
9 Use the Record Duplicate function to create new records. 10 Click the Save icon. 11 Click the Exit icon.
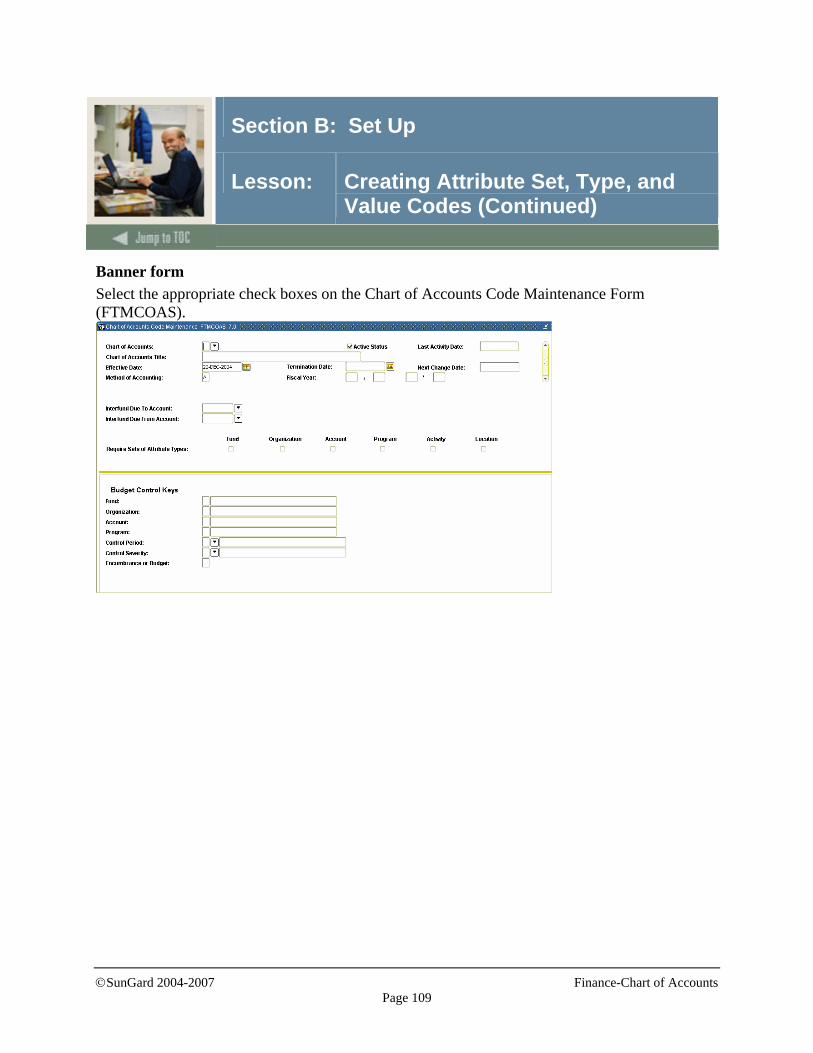
©SunGard 2004-2007 Finance-Chart of Accounts
Page 109
Section B: Set Up
Lesson: Creating Attribute Set, Type, and Value Codes (Continued)
Banner form Select the appropriate check boxes on the Chart of Accounts Code Maintenance Form (FTMCOAS).
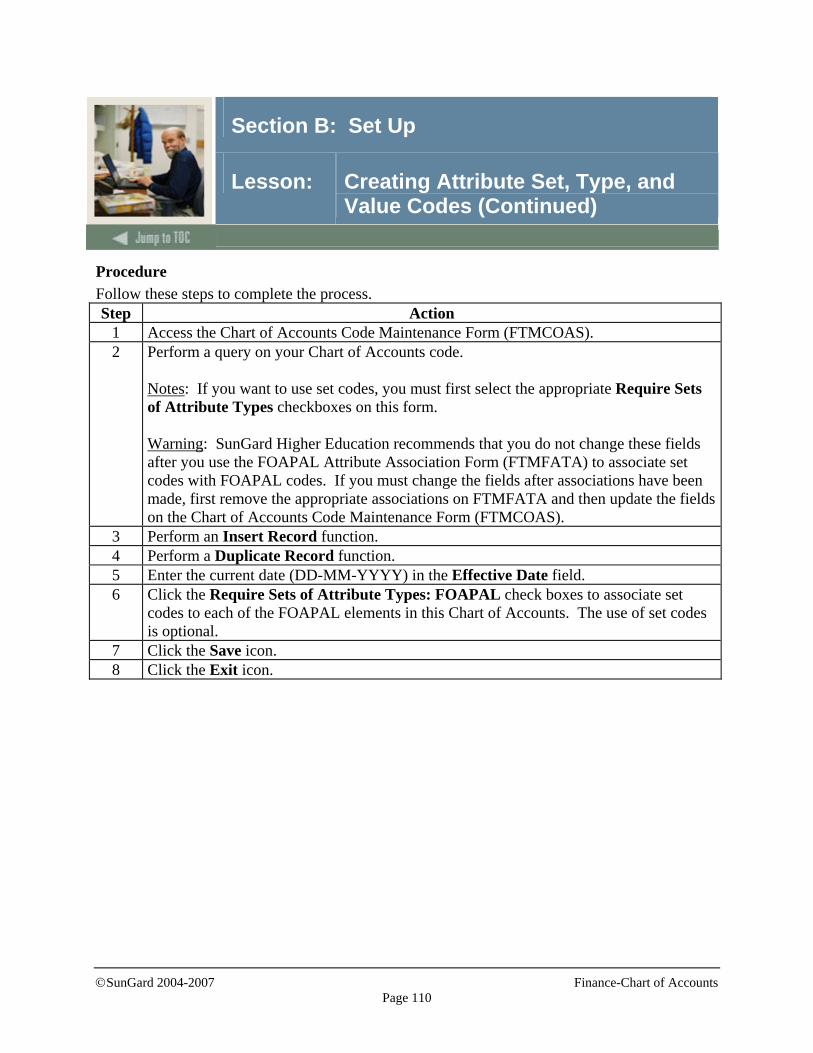
©SunGard 2004-2007 Finance-Chart of Accounts
Page 110
Section B: Set Up
Lesson: Creating Attribute Set, Type, and Value Codes (Continued)
Procedure Follow these steps to complete the process. Step Action
1 Access the Chart of Accounts Code Maintenance Form (FTMCOAS). 2 Perform a query on your Chart of Accounts code.
Notes: If you want to use set codes, you must first select the appropriate Require Sets of Attribute Types checkboxes on this form. Warning: SunGard Higher Education recommends that you do not change these fields after you use the FOAPAL Attribute Association Form (FTMFATA) to associate set codes with FOAPAL codes. If you must change the fields after associations have been made, first remove the appropriate associations on FTMFATA and then update the fields on the Chart of Accounts Code Maintenance Form (FTMCOAS).
3 Perform an Insert Record function. 4 Perform a Duplicate Record function. 5 Enter the current date (DD-MM-YYYY) in the Effective Date field. 6 Click the Require Sets of Attribute Types: FOAPAL check boxes to associate set
codes to each of the FOAPAL elements in this Chart of Accounts. The use of set codes is optional.
7 Click the Save icon. 8 Click the Exit icon.

©SunGard 2004-2007 Finance-Chart of Accounts
Page 111
Section B: Set Up
Lesson: Creating Attribute Set, Type, and Value Codes (Continued)
Banner form Define set codes on the Attribute Type Set Maintenance Form (FTMATTS).
Procedure Follow these steps to complete the process. Step Action
1 Access the Attribute Type Set Maintenance Form (FTMATTS). 2 Enter your Chart of Accounts code in the COA field. 3 Enter BASIC in the Set Code field. 4 Enter Basic Reporting Set in the Description field.
Notes: This field contains a user-defined description of the set code. The Valid for: radio buttons allow you to identify the FOAPAL element (or all FOAPAL elements) for which the set code will be valid. The FOAPAL element or elements selected match the ones checked on FTMCOAS. When a new code is created, the system will populate the Activity Date field with the current system date. If the description or definition of an existing code is updated, this field will be updated with the current system date.
5 Select the Select Attribute Types to Associate with Set option in the Navigation Form to access the Attribute Type Selection Form (FTQATTS). Notes: You cannot access this form (FTQATTS) from Direct Access. It must be called from the FTMATTS form. The Attribute Type field displays the attribute type code (CAMPUS, in this Procedure) to be included in the set being defined. This code cannot be entered here but must come from the Attribute Type Selection Form (FTQATTS). This code was selected because it met the FOAPAL requirement for sets of attribute types on FTMCOAS.
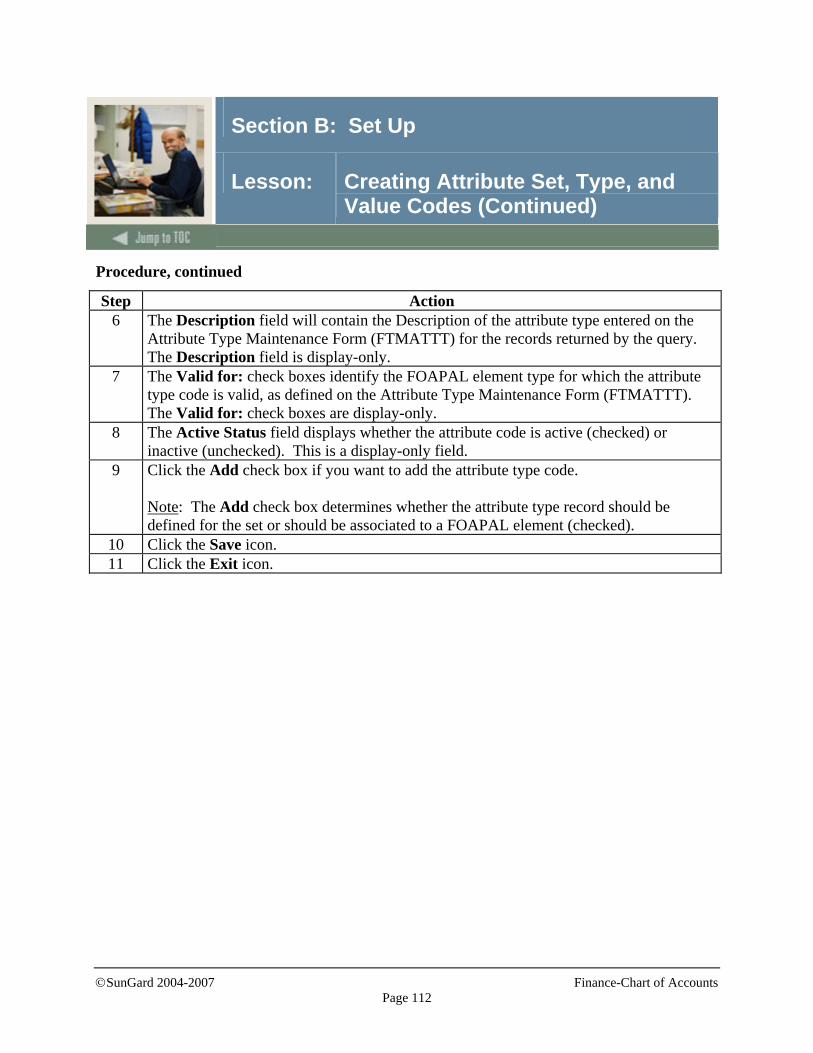
©SunGard 2004-2007 Finance-Chart of Accounts
Page 112
Section B: Set Up
Lesson: Creating Attribute Set, Type, and Value Codes (Continued)
Procedure, continued
Step Action 6 The Description field will contain the Description of the attribute type entered on the
Attribute Type Maintenance Form (FTMATTT) for the records returned by the query. The Description field is display-only.
7 The Valid for: check boxes identify the FOAPAL element type for which the attribute type code is valid, as defined on the Attribute Type Maintenance Form (FTMATTT). The Valid for: check boxes are display-only.
8 The Active Status field displays whether the attribute code is active (checked) or inactive (unchecked). This is a display-only field.
9 Click the Add check box if you want to add the attribute type code. Note: The Add check box determines whether the attribute type record should be defined for the set or should be associated to a FOAPAL element (checked).
10 Click the Save icon. 11 Click the Exit icon.

©SunGard 2004-2007 Finance-Chart of Accounts
Page 113
Section B: Set Up
Lesson: Creating Attribute Set, Type, and Value Codes (Continued)
Banner form Use this form to associate FOAPAL element codes to attribute types, attribute values, and set codes. You can also use this form to update, remove, and query FOAPAL element association records. Before using this form, the following steps must be completed: • define attribute types on the Attribute Type Maintenance Form (FTMATTT). • optional -- if you want to use attribute values, define them on the Attribute Value
Maintenance Form (FTMATTV). • optional - if you want to use set codes, select the appropriate Require Sets of Attribute
Types check boxes on the Chart of Accounts Code Maintenance Form (FTMCOAS). • optional - if you want to use set codes, define them on the Attribute Type Set Maintenance
Form (FTMATTS). Note: These forms were completed in previous procedures.
Procedure Follow these steps to complete the process. Step Action
1 Access the FOAPAL Attribute Association Form (FTMFATA). 2 Enter the code for the Chart of Accounts in which the FOAPAL element being
associated exists in the Chart of Accounts field. 3 Select Fund from the Select FOAPAL element to associate attributes radio buttons.
This allows you to associate a FOAPAL element to one or more attributes. 4 Enter 1010 in the Fund Code field.
Note: This code is used to identify the FOAPAL code that is being associated.
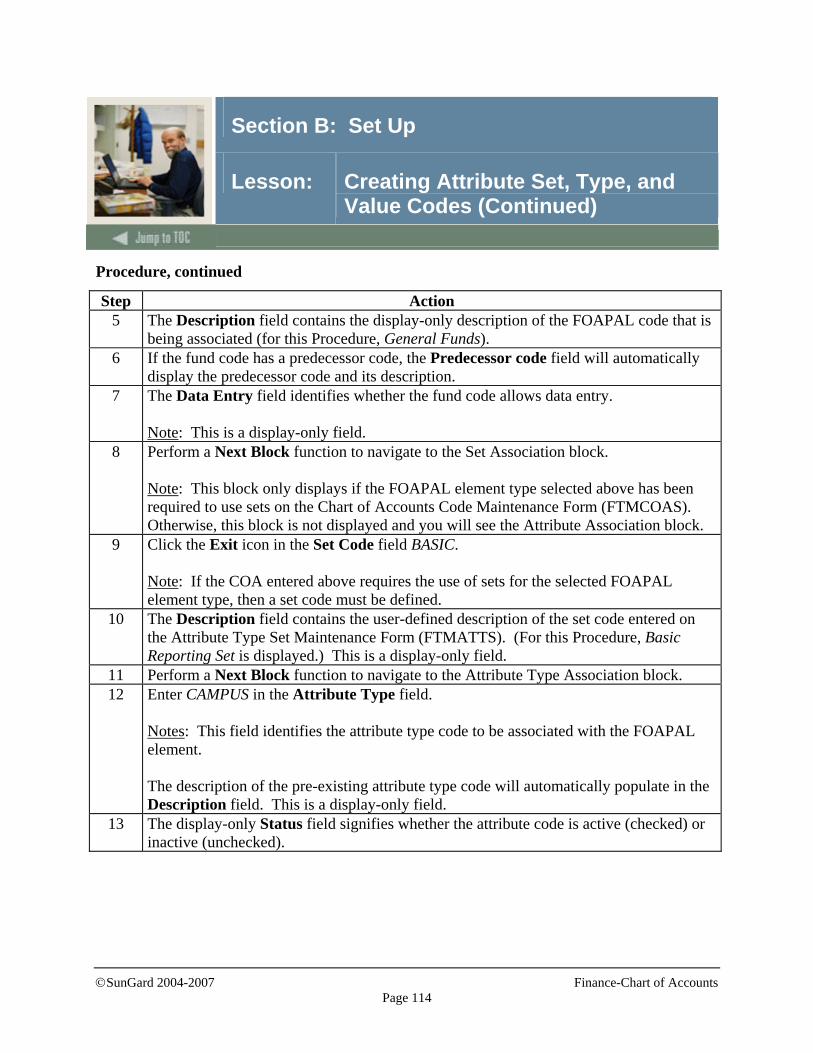
©SunGard 2004-2007 Finance-Chart of Accounts
Page 114
Section B: Set Up
Lesson: Creating Attribute Set, Type, and Value Codes (Continued)
Procedure, continued
Step Action 5 The Description field contains the display-only description of the FOAPAL code that is
being associated (for this Procedure, General Funds). 6 If the fund code has a predecessor code, the Predecessor code field will automatically
display the predecessor code and its description. 7 The Data Entry field identifies whether the fund code allows data entry.
Note: This is a display-only field.
8 Perform a Next Block function to navigate to the Set Association block. Note: This block only displays if the FOAPAL element type selected above has been required to use sets on the Chart of Accounts Code Maintenance Form (FTMCOAS). Otherwise, this block is not displayed and you will see the Attribute Association block.
9 Click the Exit icon in the Set Code field BASIC. Note: If the COA entered above requires the use of sets for the selected FOAPAL element type, then a set code must be defined.
10 The Description field contains the user-defined description of the set code entered on the Attribute Type Set Maintenance Form (FTMATTS). (For this Procedure, Basic Reporting Set is displayed.) This is a display-only field.
11 Perform a Next Block function to navigate to the Attribute Type Association block. 12 Enter CAMPUS in the Attribute Type field.
Notes: This field identifies the attribute type code to be associated with the FOAPAL element. The description of the pre-existing attribute type code will automatically populate in the Description field. This is a display-only field.
13 The display-only Status field signifies whether the attribute code is active (checked) or inactive (unchecked).
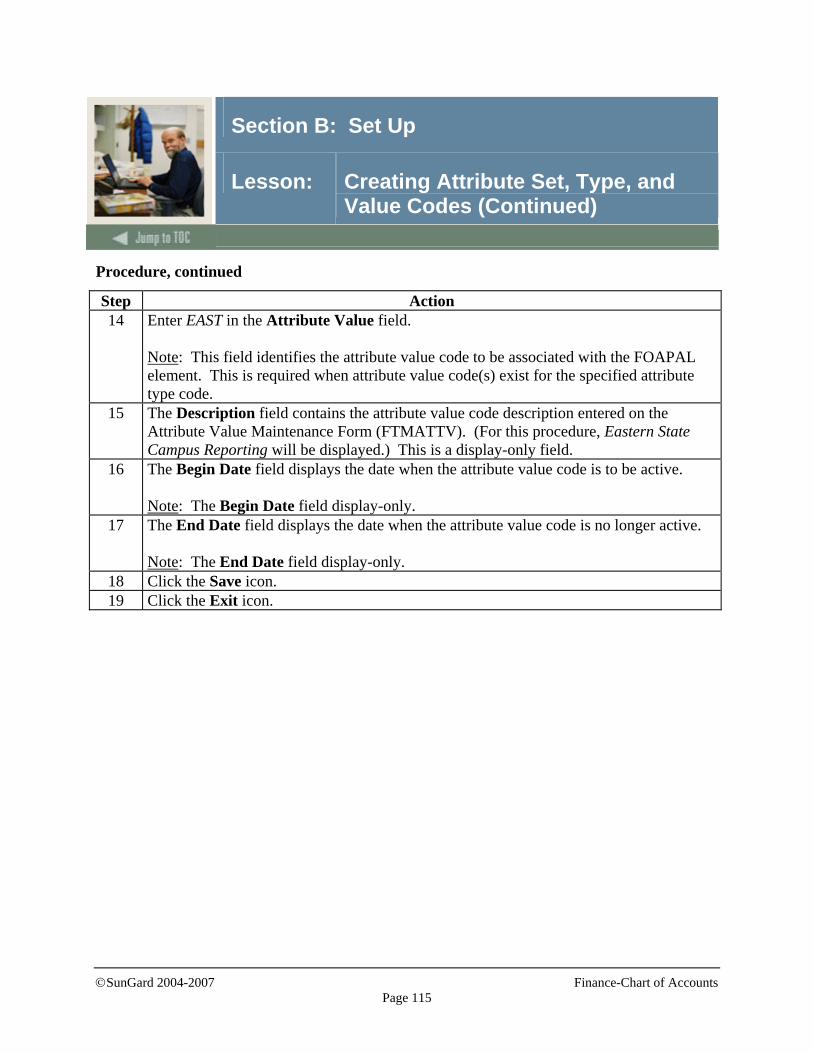
©SunGard 2004-2007 Finance-Chart of Accounts
Page 115
Section B: Set Up
Lesson: Creating Attribute Set, Type, and Value Codes (Continued)
Procedure, continued
Step Action 14 Enter EAST in the Attribute Value field.
Note: This field identifies the attribute value code to be associated with the FOAPAL element. This is required when attribute value code(s) exist for the specified attribute type code.
15 The Description field contains the attribute value code description entered on the Attribute Value Maintenance Form (FTMATTV). (For this procedure, Eastern State Campus Reporting will be displayed.) This is a display-only field.
16 The Begin Date field displays the date when the attribute value code is to be active. Note: The Begin Date field display-only.
17 The End Date field displays the date when the attribute value code is no longer active. Note: The End Date field display-only.
18 Click the Save icon. 19 Click the Exit icon.
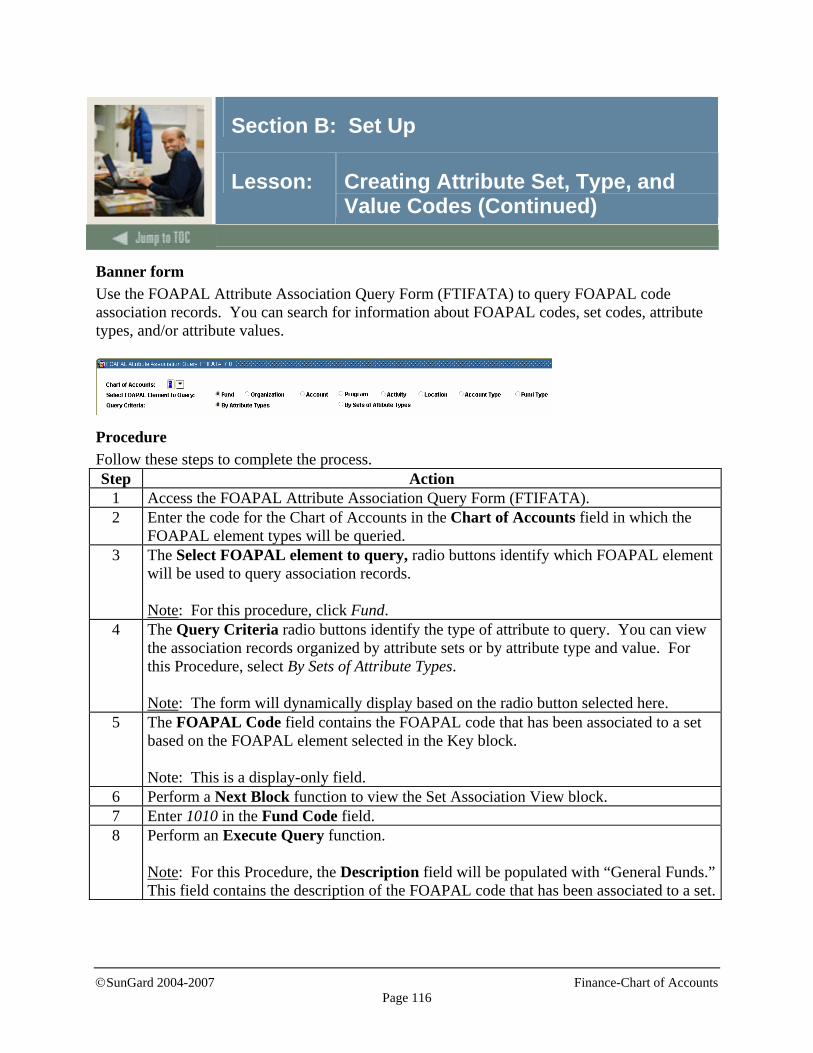
©SunGard 2004-2007 Finance-Chart of Accounts
Page 116
Section B: Set Up
Lesson: Creating Attribute Set, Type, and Value Codes (Continued)
Banner form Use the FOAPAL Attribute Association Query Form (FTIFATA) to query FOAPAL code association records. You can search for information about FOAPAL codes, set codes, attribute types, and/or attribute values.
Procedure Follow these steps to complete the process. Step Action
1 Access the FOAPAL Attribute Association Query Form (FTIFATA). 2 Enter the code for the Chart of Accounts in the Chart of Accounts field in which the
FOAPAL element types will be queried. 3 The Select FOAPAL element to query, radio buttons identify which FOAPAL element
will be used to query association records. Note: For this procedure, click Fund.
4 The Query Criteria radio buttons identify the type of attribute to query. You can view the association records organized by attribute sets or by attribute type and value. For this Procedure, select By Sets of Attribute Types. Note: The form will dynamically display based on the radio button selected here.
5 The FOAPAL Code field contains the FOAPAL code that has been associated to a set based on the FOAPAL element selected in the Key block. Note: This is a display-only field.
6 Perform a Next Block function to view the Set Association View block. 7 Enter 1010 in the Fund Code field. 8 Perform an Execute Query function.
Note: For this Procedure, the Description field will be populated with “General Funds.” This field contains the description of the FOAPAL code that has been associated to a set.
©SunGard 2004-2007 Finance-Chart of Accounts
Page 117
Section B: Set Up
Lesson: Creating Attribute Set, Type, and Value Codes (Continued)
Procedure, continued
Step Action 9 The Set Code field contains the set code that has been associated to the FOAPAL
element selected in the Key block. Note: This is a display-only field. (For this procedure, BASIC should be displayed.)
10 The Description field contains the description of the set code entered on the Attribute Type Set Maintenance Form (FTMATTS). Note: This is a display-only field.
11 Perform a Rollback function and select the By Attribute Types Query Criteria radio button.
12 Perform a Next Block function to view the Attribute Type Association Detail View block.
13 The Attribute Type field contains the attribute type that has been associated to the FOAPAL element selected in the Set Association View block. This is a display-only field. (For this Procedure, CAMPUS should be displayed.)
14 The Description field contains the description of the attribute type entered on the Attribute Type Maintenance Form (FTMATTT). This is a display-only field.
15 The Attribute Value field contains the attribute value code that has been associated with the attribute type code. This is a display-only field. (For this Procedure, EAST should be displayed.)
16 The Description field contains the attribute value code description entered on the Attribute Value Maintenance Form (FTMATTV). This is a display-only field.
17 Click the Exit icon.
©SunGard 2004-2007 Finance-Chart of Accounts
Page 118
Section B: Set Up
Lesson: Summary of Set Up Procedures
Summary • As a result of completing this section, you have • created a Chart of Accounts • created a Chart Code • created Accounts and Account Type Codes • created Funds and Fund Type Codes • created Organizations Codes • created Program Codes • created Activity Codes • created Location Codes • created a bank ID and defined bank codes • completed the Chart of Accounts Maintenance Form (FTMCOAS) • created attribute set, type, and value codes.
Other functions The Chart of Accounts needs only to be set up once to drive the following Banner Finance functions: • Accounts Payable • Budget Development • Electronic Approvals • Fixed Assets • General Ledger • Endowment Management • Purchasing • Research Accounting • Security • Stores Inventory

©SunGard 2004-2007 Finance-Chart of Accounts
Page 119
Section C: Day-to-Day Operations
Lesson: Overview
Introduction The purpose of this section is to explain the day-to-day or operational procedures to create, modify, and query the Chart of Accounts at your institution.
Intended audience Finance Office Staff
Objectives At the end of this section, you will be able to
• process General Accounting Transactions • produce reports for the Chart of Accounts • query financial data • produce financial reports.
Prerequisites To complete this section, you should have
• completed the Banner Navigation tutorial, or have equivalent experience navigating in the Banner System.
You will also need to ensure that the rules and validation codes in Banner needed for disbursement have been set up for you.
©SunGard 2004-2007 Finance-Chart of Accounts
Page 120
Section C: Day-to-Day Operations
Lesson: Overview (Continued)
Section contents Overview ..............................................................................................................................119 General Accounting Transaction Processing .......................................................................121 General Encumbrance Processing ........................................................................................122 Journal Voucher Processing .................................................................................................126 Journal Voucher Processing – Quick Form..........................................................................133 Journal Voucher Processing – Mass Entry Form .................................................................134 Automatic Journal Voucher Processing ...............................................................................135 Direct Cash Receipts Processing, FGADCSR .....................................................................139 General Accounting and Budget Query Forms ....................................................................143 Querying the Budget Availability Status Form, FGIBAVL.................................................144 Querying the Organizational Budget Status Form, FGIBDST.............................................146 Querying the Organizational Budget Summary Form, FGIBSUM......................................149 Querying the Executive Summary Form, FGIBDSR...........................................................151 Querying the General Ledger Trial Balance Form, FGITBAL............................................154 Querying the Trial Balance Summary Form, FGITBSR......................................................156 Querying the Detail Transaction Activity Form, FGITRND ...............................................158 Querying the General Ledger Activity Form, FGIGLAC....................................................160 Querying the Journal Voucher Summary Form, FGIJSUM.................................................162 Querying the List of Suspended Journal Vouchers Form, FGIJVCD..................................164 Querying the List of Automatic Journal Vouchers Form, FGIAUTO .................................165 Querying the Detail Encumbrance Activity Form, FGIENCD ............................................166 Querying the Organizational Encumbrance List Form, FGIOENC .....................................167 Querying the Encumbrance List Form, FGIENCB ..............................................................169 Querying the Document Retrieval Inquiry Form, FGIDOCR..............................................170 Querying Direct Cash Receipts Form, FGIDCSR................................................................172 Running the Account Hierarchy Report ...............................................................................173 Running the Fund Hierarchy Report ....................................................................................176 Running the Program Hierarchy Report...............................................................................179 Running the Location Hierarchy Report ..............................................................................181 Running the Organization Hierarchy Report........................................................................183 Summary ..............................................................................................................................186 Self Check ............................................................................................................................187 Self Check – Answer Key ....................................................................................................196
©SunGard 2004-2007 Finance-Chart of Accounts
Page 121
Section C: Day-to-Day Operations
Lesson: General Accounting Transaction Processing
Introduction The purpose of the general accounting transaction processing is to provide you with the ability to input the necessary transactions according to the user’s needs within the financial environment. These are transactions other than those related to purchase requisitions, purchase orders, invoices, or check processing. The general accounting transaction forms are as follow: • Encumbrance
o Encumbrance/Reservation Maintenance Form (FGAENCB). Used to establish non-purchase order fund reserve, that is, to encumber or reserve funds for future commitments.
• Journal voucher o Journal Voucher Entry Form (FGAJVCD). Used to enter journal voucher
transactions. o Journal Voucher Quick Form (FGAJVCQ). Used to enter journal voucher
transactions. • Automatic journal voucher
o Automatic Journal Voucher Form (FGAAUTO). Create recurring journal voucher transactions.
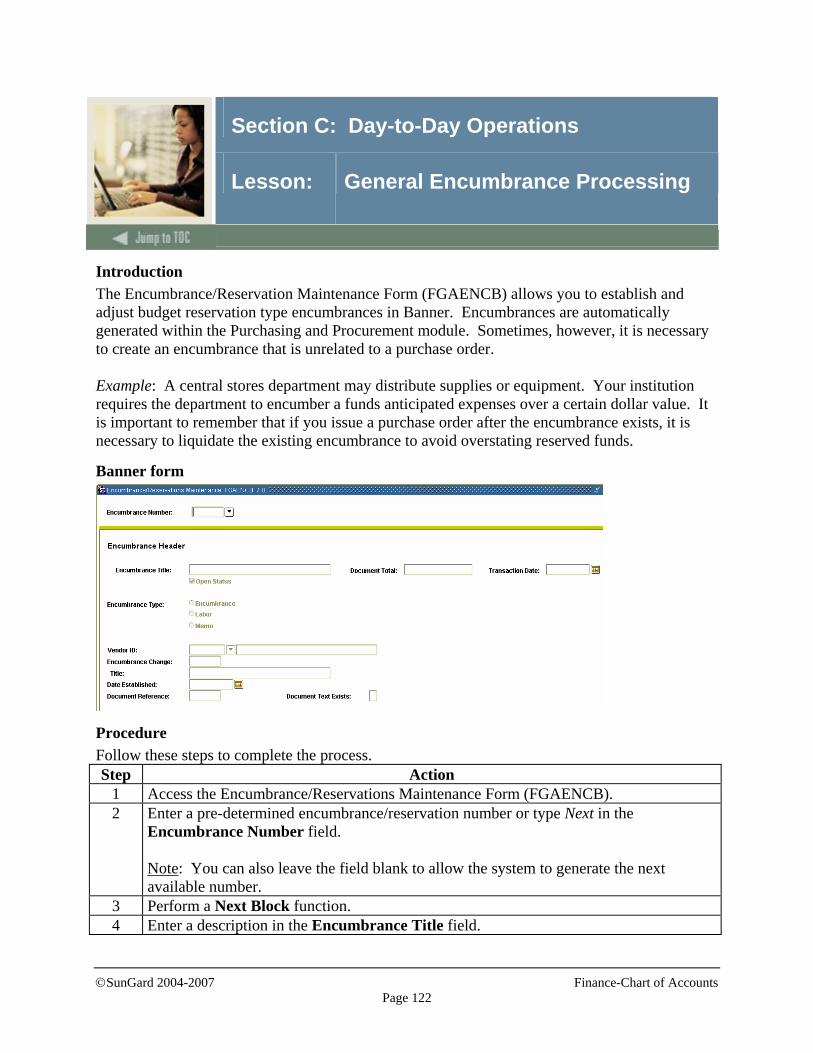
©SunGard 2004-2007 Finance-Chart of Accounts
Page 122
Section C: Day-to-Day Operations
Lesson: General Encumbrance Processing
Introduction The Encumbrance/Reservation Maintenance Form (FGAENCB) allows you to establish and adjust budget reservation type encumbrances in Banner. Encumbrances are automatically generated within the Purchasing and Procurement module. Sometimes, however, it is necessary to create an encumbrance that is unrelated to a purchase order. Example: A central stores department may distribute supplies or equipment. Your institution requires the department to encumber a funds anticipated expenses over a certain dollar value. It is important to remember that if you issue a purchase order after the encumbrance exists, it is necessary to liquidate the existing encumbrance to avoid overstating reserved funds.
Banner form
Procedure Follow these steps to complete the process. Step Action
1 Access the Encumbrance/Reservations Maintenance Form (FGAENCB). 2 Enter a pre-determined encumbrance/reservation number or type Next in the
Encumbrance Number field. Note: You can also leave the field blank to allow the system to generate the next available number.
3 Perform a Next Block function. 4 Enter a description in the Encumbrance Title field.
©SunGard 2004-2007 Finance-Chart of Accounts
Page 123
Section C: Day-to-Day Operations
Lesson: General Encumbrance Processing (Continued)
Procedure, continued
Step Action 5 Enter the total value of the encumbrance in the Document Total field. 6 Enter the date (DD-MM-YYYY) the encumbrance will take effect in the Transaction
Date field. 7 The Open Status check box will be checked for all open encumbrances. 8 Click the radio button for one of the following Encumbrance Type values:
Encumbrance- Standard General Encumbrance. Labor - Encumbrance related to payroll. Memo - Memorandum posting.
9 If possible, identify the Vendor ID for whom you are encumbering or reserving funds in the Vendor ID field.
10 Leave the Encumbrance Change field blank for this procedure. Note: This must be a unique change sequence number.
11 Enter the description of the encumbrance change in the Title field. Note: Leave blank for this example.
12 Enter the date you created the encumbrance in the Date Established field. 13 Enter a document reference number in the Document Reference Number field is
optional and may be used to establish additional identification. This may be used for reporting purposes.
14 Perform a Next Block function. 15 Tab through the Sequence Number field.
Note: Banner will automatically assign a one up number.
16 Enter a Journal Type (Rule Code) for this accounting entry in the Journal Type field. Examples: E100 for Original Encumbrance, E020 for Encumbrance Adjustment, E032 for Encumbrance Liquidation
17 Leave the Project Code field blank for this example. Note: The Project Code is used only when encumbrance is related to a Project or Work Order from Cost Accounting.
18 The Fiscal Year field will default from date entered on Header Page.
©SunGard 2004-2007 Finance-Chart of Accounts
Page 124
Section C: Day-to-Day Operations
Lesson: General Encumbrance Processing (Continued)
Procedure, continued
Step Action 19 The Current Encumbrance Amount field is used to inform the user of the current
amount of the encumbrance. Note: The field shows no value when the encumbrance is entered.
20 Enter a valid COA value in the COA field. 21 Enter a valid index code in the Index field.
Note: This is an optional value.
22 Enter a valid fund code in the Fund field. 23 Enter a valid organization code in the Orgn field. 24 Enter a valid account code in the Acct field. 25 Enter a valid program code in the Prog field. 26 Enter a valid activity code in the Actv field. 27 Enter a valid location code in the Locn field. 28 Enter a percent to be charged to the accounting distribution in the Percent field.
Note: This is optional and will default a dollar amount.
29 Enter a dollar amount of the accounting distribution to be charged in the Amount field. Note: You may overwrite what defaults from the use of a Percent.
30 Enter C or U in the Commit Type field. Note: This determines how an encumbrance that is open at year end will be rolled in terms of the user’s ability to distinguish it from a current year encumbrance. • C - Committed. The encumbrance will be treated as a prior year encumbrance that
has been rolled to the current year whose purpose and budget have been set aside from the current year’s operating budget. Its balance is reflected in the Prior Year Encumbrance Control account in the current year.
• U - Uncommitted. The encumbrance rolls into the current year with no distinction of being from a prior year. Its balance is reflected in the Encumbrance Control Account in the current year. When the commit type is Uncommitted, The budget Disposition must be Unrestricted
31 Click the NSF Override check box to override the Budget Checking processing. 32 Perform a Next Record function.
©SunGard 2004-2007 Finance-Chart of Accounts
Page 125
Section C: Day-to-Day Operations
Lesson: General Encumbrance Processing (Continued)
Procedure, continued
Step Action 33 Repeat Steps 16-32 as required to enter all Accounting Distributions.
Note: The total of all Sequences must equal the Document total entered on the Header page.
34 Perform a Next Block function. 35 Click the Complete checkbox to process Encumbrance Transaction or click the In
Process checkbox to save Encumbrance information for future processing.

©SunGard 2004-2007 Finance-Chart of Accounts
Page 126
Section C: Day-to-Day Operations
Lesson: Journal Voucher Processing
Introduction Banner provides three Journal Voucher Forms, the Journal Voucher Entry Form (FGAJVCD), the Journal Voucher Quick Form (FGAJVCQ) and the Journal Voucher Mass Entry Form (FGAJVCM). Use the Journal Voucher forms to enter various transactions such as cash, receipts, budget entries, accruals, correcting/adjusting entries. The rule codes used on these forms specify the transaction type and the proper accounting activity associated with the entry. The form you choose depends on your preference; however there are differences. Form Description Journal Voucher Entry Form (FGAJVCD)
Structured horizontally, with unlimited entries per document. This form can be used to process all transaction types.
Journal Voucher Quick Form (FGAJVCQ)
Structured vertically, with unlimited entries per document. You cannot use this form to enter encumbrance activities, bank deposits, reference other documents, or accrual entries, because these fields do not exist on the form.
Journal Voucher Mass Entry Form (FGAJVCM)
Structured vertically, listing twelve entries per page, unlimited entries per document. You cannot use this form to enter encumbrance activities, reference other documents, or accrual entries because these fields do not exist on the form.
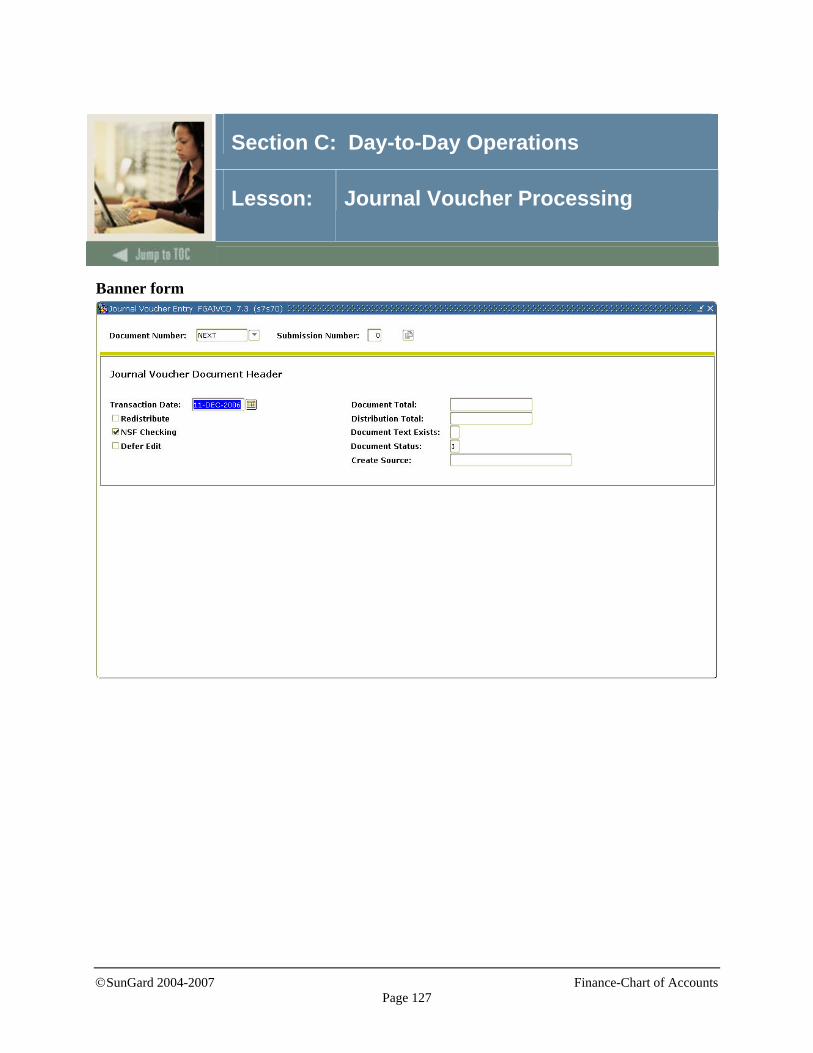
©SunGard 2004-2007 Finance-Chart of Accounts
Page 127
Section C: Day-to-Day Operations
Lesson: Journal Voucher Processing
Banner form
©SunGard 2004-2007 Finance-Chart of Accounts
Page 128
Section C: Day-to-Day Operations
Lesson: Journal Voucher Processing (Continued)
Procedure Follow these steps to complete the process. Step Action
1 Access the Journal Voucher Entry Form (FGAJVCD). 2 Enter a pre-determined Journal Voucher number in the Document Number field, type
NEXT, or leave the field blank to allow the system to generate the next available number.
3 Banner will automatically assign a number in the Submission Number field. 4 Perform a Next Block function. 5 Verify the date in the Transaction Date field.
Notes: The Transaction Date will default to the system date, but it may be overridden. This is the date when the transaction will post to the ledgers and must be in an open fiscal period.
6 Enter the total in the Document Total field. Note: This total represents the sum of the absolute values of the accounting sequences entered. (Required)
7 Click the Redistribute checkbox if you want to distribute the dollar amounts on a percentage basis.
8 Enter an amount in the Distribution Total field. Note: This is used in redistributing detail totals by percentages. If left blank, Banner applies the distribution percentages to the Document Total.
9 The NSF Checking checkbox will be checked when turned on. Note: Banner controls the checkbox on the System Maintenance Form (FOASYSC). If checked on FOASYSC, then you cannot override NSF at transaction entry time.
10 The Defer Edit checkbox indicates when editing will occur. Note: The system default is valued on the System Control Maintenance Form (FOASYSC).
©SunGard 2004-2007 Finance-Chart of Accounts
Page 129
Section C: Day-to-Day Operations
Lesson: Journal Voucher Processing (Continued)
Procedure, continued
Step Action 11 View the Document Text Exists field.
Note: A Y (Yes) in this box indicates that text exists for this document; an N (No) indicates that it does not. To enter text for this document, select Document Text (FOATEXT) from the Options menu.
12 Perform a Next Block function. Result: Banner updates the status of the document after you commit each transaction record in the Document Status field. Note: If the Defer Edit checkbox in the Journal Voucher Document Header area is checked, this field remains blank.
13 Tab through the Sequence Number field. Note: Banner will automatically assign the next number. If the Sequence field contains a sequence number, you can access the Journal Voucher Summary Query (FGIJSUM) through the Options menu.
14 Enter a Journal Type (Rule Code) for this accounting entry in the Journal Type field. Examples: JE16 Interfund Transfer, JE15 Intrafund Transfer, CR05 Cash Receipts, BD01 Original Budget, BD02 Budget Adjustment). The transaction type will determine the fields in which you enter data. A cash transaction will require a bank code to be entered; a budget entry requires a budget period. When you respond to the required fields, save the data. Unless the Defer Edit indicator is checked, the system will perform the editing and the available balance processing.
15 Enter a valid COA value in the COA field. 16 Enter a valid index code in the Index field.
Note: This is an optional value.
17 Enter a valid fund code in the Fund field. 18 Enter a valid organization code in the Orgn field. 19 Enter a valid account code in the Acct field.
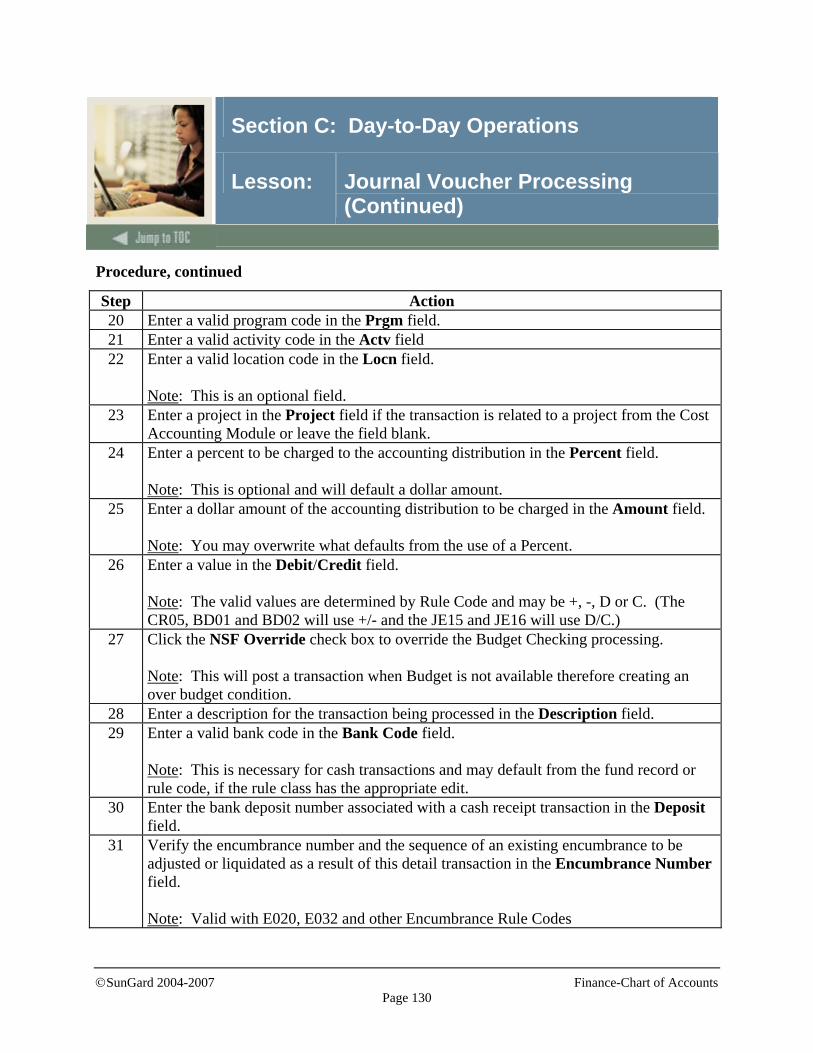
©SunGard 2004-2007 Finance-Chart of Accounts
Page 130
Section C: Day-to-Day Operations
Lesson: Journal Voucher Processing (Continued)
Procedure, continued
Step Action 20 Enter a valid program code in the Prgm field. 21 Enter a valid activity code in the Actv field 22 Enter a valid location code in the Locn field.
Note: This is an optional field.
23 Enter a project in the Project field if the transaction is related to a project from the Cost Accounting Module or leave the field blank.
24 Enter a percent to be charged to the accounting distribution in the Percent field. Note: This is optional and will default a dollar amount.
25 Enter a dollar amount of the accounting distribution to be charged in the Amount field. Note: You may overwrite what defaults from the use of a Percent.
26 Enter a value in the Debit/Credit field. Note: The valid values are determined by Rule Code and may be +, -, D or C. (The CR05, BD01 and BD02 will use +/- and the JE15 and JE16 will use D/C.)
27 Click the NSF Override check box to override the Budget Checking processing. Note: This will post a transaction when Budget is not available therefore creating an over budget condition.
28 Enter a description for the transaction being processed in the Description field. 29 Enter a valid bank code in the Bank Code field.
Note: This is necessary for cash transactions and may default from the fund record or rule code, if the rule class has the appropriate edit.
30 Enter the bank deposit number associated with a cash receipt transaction in the Deposit field.
31 Verify the encumbrance number and the sequence of an existing encumbrance to be adjusted or liquidated as a result of this detail transaction in the Encumbrance Number field. Note: Valid with E020, E032 and other Encumbrance Rule Codes
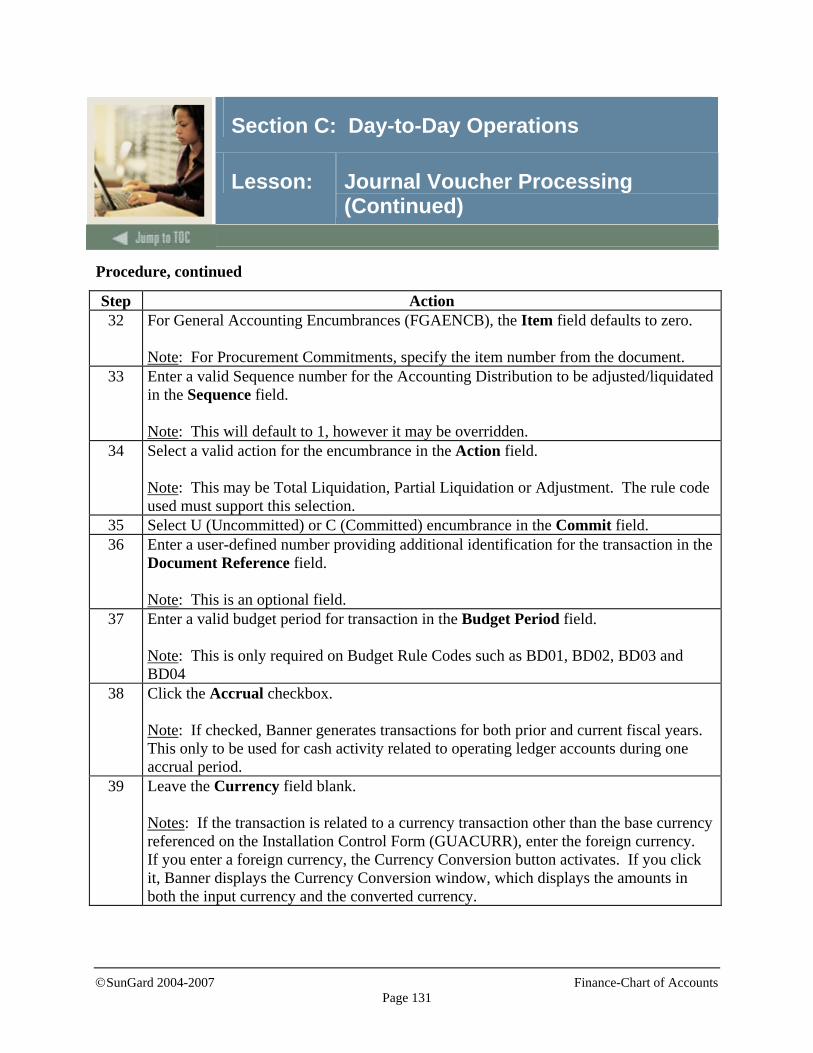
©SunGard 2004-2007 Finance-Chart of Accounts
Page 131
Section C: Day-to-Day Operations
Lesson: Journal Voucher Processing (Continued)
Procedure, continued
Step Action 32 For General Accounting Encumbrances (FGAENCB), the Item field defaults to zero.
Note: For Procurement Commitments, specify the item number from the document.
33 Enter a valid Sequence number for the Accounting Distribution to be adjusted/liquidated in the Sequence field. Note: This will default to 1, however it may be overridden.
34 Select a valid action for the encumbrance in the Action field. Note: This may be Total Liquidation, Partial Liquidation or Adjustment. The rule code used must support this selection.
35 Select U (Uncommitted) or C (Committed) encumbrance in the Commit field. 36 Enter a user-defined number providing additional identification for the transaction in the
Document Reference field. Note: This is an optional field.
37 Enter a valid budget period for transaction in the Budget Period field. Note: This is only required on Budget Rule Codes such as BD01, BD02, BD03 and BD04
38 Click the Accrual checkbox. Note: If checked, Banner generates transactions for both prior and current fiscal years. This only to be used for cash activity related to operating ledger accounts during one accrual period.
39 Leave the Currency field blank. Notes: If the transaction is related to a currency transaction other than the base currency referenced on the Installation Control Form (GUACURR), enter the foreign currency. If you enter a foreign currency, the Currency Conversion button activates. If you click it, Banner displays the Currency Conversion window, which displays the amounts in both the input currency and the converted currency.
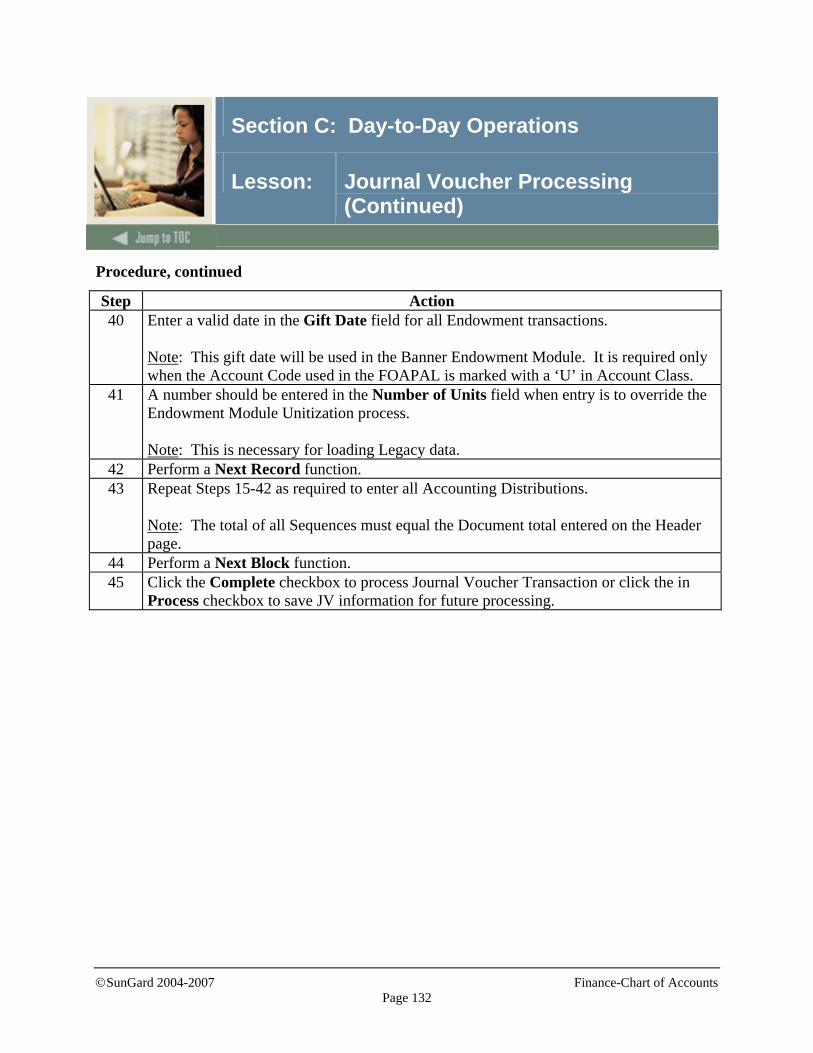
©SunGard 2004-2007 Finance-Chart of Accounts
Page 132
Section C: Day-to-Day Operations
Lesson: Journal Voucher Processing (Continued)
Procedure, continued
Step Action 40 Enter a valid date in the Gift Date field for all Endowment transactions.
Note: This gift date will be used in the Banner Endowment Module. It is required only when the Account Code used in the FOAPAL is marked with a ‘U’ in Account Class.
41 A number should be entered in the Number of Units field when entry is to override the Endowment Module Unitization process. Note: This is necessary for loading Legacy data.
42 Perform a Next Record function. 43 Repeat Steps 15-42 as required to enter all Accounting Distributions.
Note: The total of all Sequences must equal the Document total entered on the Header page.
44 Perform a Next Block function. 45 Click the Complete checkbox to process Journal Voucher Transaction or click the in
Process checkbox to save JV information for future processing.
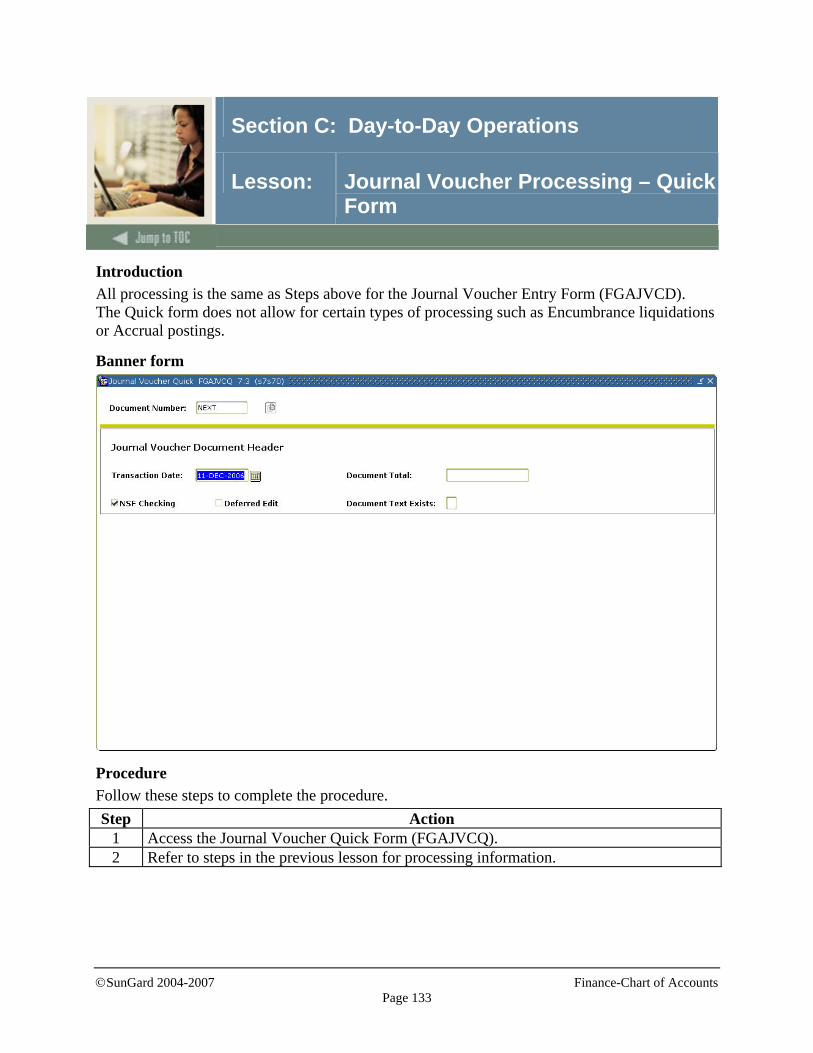
©SunGard 2004-2007 Finance-Chart of Accounts
Page 133
Section C: Day-to-Day Operations
Lesson: Journal Voucher Processing – Quick Form
Introduction All processing is the same as Steps above for the Journal Voucher Entry Form (FGAJVCD). The Quick form does not allow for certain types of processing such as Encumbrance liquidations or Accrual postings.
Banner form
Procedure Follow these steps to complete the procedure. Step Action
1 Access the Journal Voucher Quick Form (FGAJVCQ). 2 Refer to steps in the previous lesson for processing information.
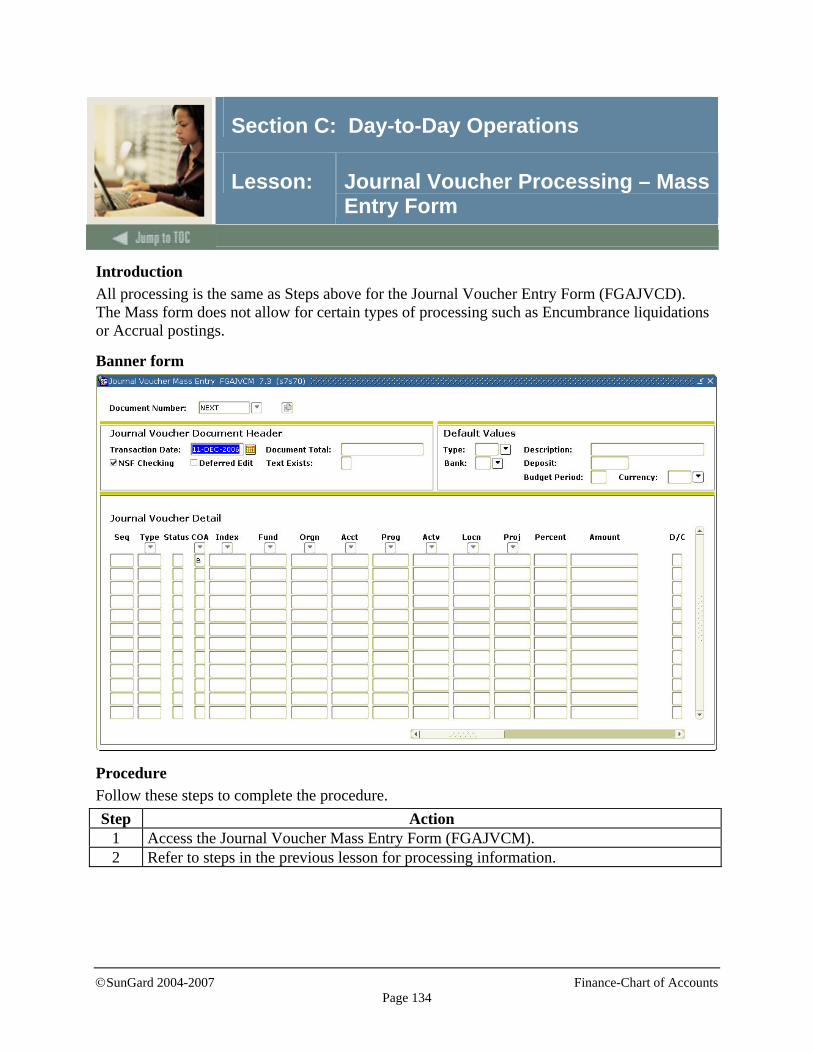
©SunGard 2004-2007 Finance-Chart of Accounts
Page 134
Section C: Day-to-Day Operations
Lesson: Journal Voucher Processing – Mass Entry Form
Introduction All processing is the same as Steps above for the Journal Voucher Entry Form (FGAJVCD). The Mass form does not allow for certain types of processing such as Encumbrance liquidations or Accrual postings.
Banner form
Procedure Follow these steps to complete the procedure. Step Action
1 Access the Journal Voucher Mass Entry Form (FGAJVCM). 2 Refer to steps in the previous lesson for processing information.
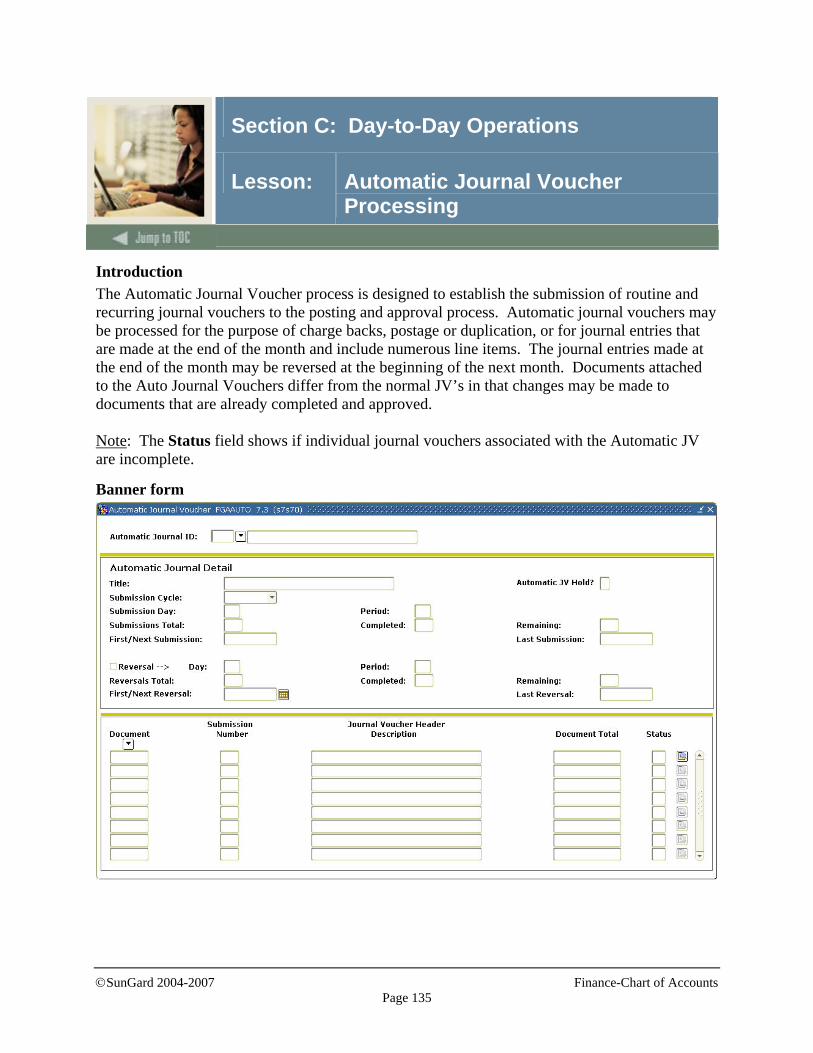
©SunGard 2004-2007 Finance-Chart of Accounts
Page 135
Section C: Day-to-Day Operations
Lesson: Automatic Journal Voucher Processing
Introduction The Automatic Journal Voucher process is designed to establish the submission of routine and recurring journal vouchers to the posting and approval process. Automatic journal vouchers may be processed for the purpose of charge backs, postage or duplication, or for journal entries that are made at the end of the month and include numerous line items. The journal entries made at the end of the month may be reversed at the beginning of the next month. Documents attached to the Auto Journal Vouchers differ from the normal JV’s in that changes may be made to documents that are already completed and approved. Note: The Status field shows if individual journal vouchers associated with the Automatic JV are incomplete.
Banner form
©SunGard 2004-2007 Finance-Chart of Accounts
Page 136
Section C: Day-to-Day Operations
Lesson: Automatic Journal Voucher Processing (Continued)
Procedure Follow these steps to create and process an Automatic Journal Voucher. Step Action
1 Access the Automatic Journal Voucher Form (FGAAUTO). 2 Enter an automatic journal ID in the Automatic Journal ID field.
Note: This is a three-character field tied to document numbers listed below in the Journal Voucher Header area.
3 Perform a Next Block function. 4 Enter a title of the automatic journal in the Title field. 5 Enter an (H) in the Automatic JV Hold? Field to put the transaction on Hold or leave
blank. Note: Leave blank for this example.
6 Select the frequency of document submissions in the Submission Cycle field. Note: Valid options are: • Monthly • Quarterly • Annual • On Demand Enter Monthly for this example.
7 Enter the Day the Auto JV is to be processed in the Submission Day field. Note: This is used to designate a specific day of the month or the last day of the month. Valid days are 1-31 and L for last day of the month. (For Submission Cycle of Monthly, Annually or On Demand, enter Day only. For Quarterly, day and Period are required)
8 Enter the period to begin Auto JV submission in the Period field. Note: This is required for Monthly and Quarterly.
©SunGard 2004-2007 Finance-Chart of Accounts
Page 137
Section C: Day-to-Day Operations
Lesson: Automatic Journal Voucher Processing (Continued)
Procedure, continued Step Action
9 Identify the number of times the Journal Voucher should be submitted in the Submissions Total field. Example: If you wanted a monthly submission for one year, the Submission Cycle would be Monthly and the Submission Total would be 12. Note: This may be changed after submission process has begun.
10 The Completed field shows the number of prior submissions processed. Note: This is updated by Banner.
11 The Remaining field displays the number of remaining submissions. Note: This is updated by Banner.
12 The First/Next Submission field displays the date when the submission is to be performed. Note: Banner will update this automatically for all Monthly, Quarterly and Annually submissions.
13 The Last Submission field is populated by the system after the last submission is processed.
14 The Last Reversal checkbox indicates whether the original transaction needs to be reversed. Note: If the box is checked, Banner generates an exact reversal of the original posting according to the following reversal posting schedule.
15 Enter the Day the Auto JV is to be reversed in the Reversal Day field. Note: This is used to designate a specific day of the month or the last day of the month. Valid days are 1-31 and L for last day of the month. (For Submission Cycle of Monthly, Annually or On Demand, enter Day only. For Quarterly, day and Period are required)
16 Enter the period to begin Auto JV reversal in the Period field. Note: This is required for Monthly and Quarterly.
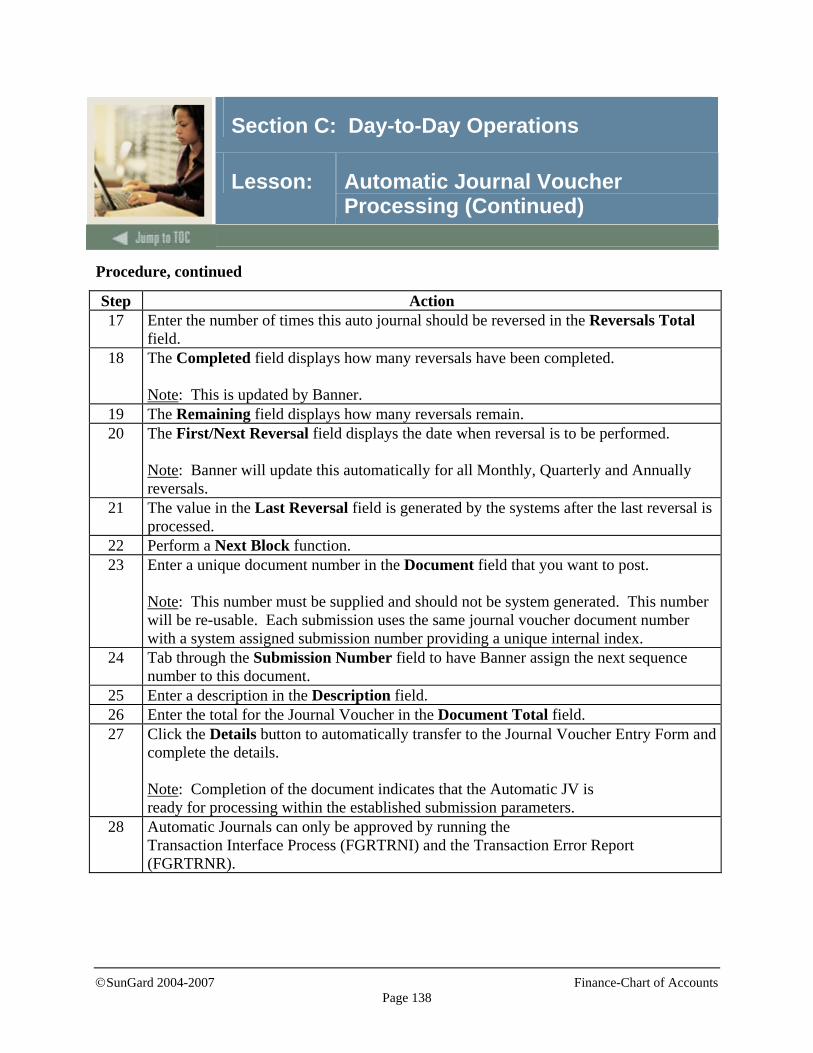
©SunGard 2004-2007 Finance-Chart of Accounts
Page 138
Section C: Day-to-Day Operations
Lesson: Automatic Journal Voucher Processing (Continued)
Procedure, continued
Step Action 17 Enter the number of times this auto journal should be reversed in the Reversals Total
field. 18 The Completed field displays how many reversals have been completed.
Note: This is updated by Banner.
19 The Remaining field displays how many reversals remain. 20 The First/Next Reversal field displays the date when reversal is to be performed.
Note: Banner will update this automatically for all Monthly, Quarterly and Annually reversals.
21 The value in the Last Reversal field is generated by the systems after the last reversal is processed.
22 Perform a Next Block function. 23 Enter a unique document number in the Document field that you want to post.
Note: This number must be supplied and should not be system generated. This number will be re-usable. Each submission uses the same journal voucher document number with a system assigned submission number providing a unique internal index.
24 Tab through the Submission Number field to have Banner assign the next sequence number to this document.
25 Enter a description in the Description field. 26 Enter the total for the Journal Voucher in the Document Total field. 27 Click the Details button to automatically transfer to the Journal Voucher Entry Form and
complete the details. Note: Completion of the document indicates that the Automatic JV is ready for processing within the established submission parameters.
28 Automatic Journals can only be approved by running the Transaction Interface Process (FGRTRNI) and the Transaction Error Report (FGRTRNR).
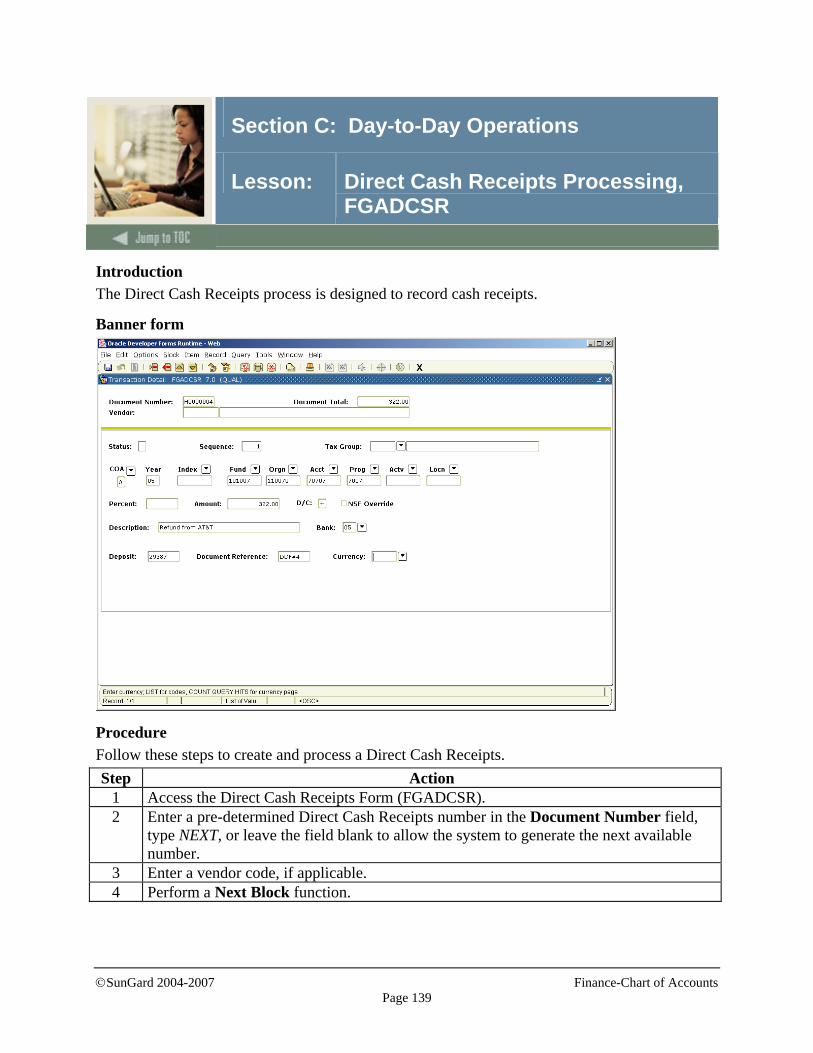
©SunGard 2004-2007 Finance-Chart of Accounts
Page 139
Section C: Day-to-Day Operations
Lesson: Direct Cash Receipts Processing, FGADCSR
Introduction The Direct Cash Receipts process is designed to record cash receipts.
Banner form
Procedure Follow these steps to create and process a Direct Cash Receipts. Step Action
1 Access the Direct Cash Receipts Form (FGADCSR). 2 Enter a pre-determined Direct Cash Receipts number in the Document Number field,
type NEXT, or leave the field blank to allow the system to generate the next available number.
3 Enter a vendor code, if applicable. 4 Perform a Next Block function.

©SunGard 2004-2007 Finance-Chart of Accounts
Page 140
Section C: Day-to-Day Operations
Lesson: Direct Cash Receipts Processing, FGADCSR (Continued)
Procedure, continued
Step Action 5 Verify the date in the Transaction Date field.
Notes: The Transaction Date will default to the system date, but it may be overridden. This is the date when the transaction will post to the ledgers and must be in an open fiscal period.
6 Enter the total in the Document Total field. Note: This total represents the sum of the absolute values of the accounting sequences entered. (Required)
7 A value defaults into the Collects Tax field if applicable to a selected vendor. 8 Click the NSF Override check box to override the Budget Checking processing. 9 View the Document Text Exists field.
Note: A Y (Yes) in this box indicates that text exists for this document; an N (No) indicates that it does not. To enter text for this document, select Document Text (FOATEXT) from the Options menu.
10 Enter NEXT field. Result: Banner updates the status of the document after you commit each transaction record in the Document Status field.
11 Tab through the Sequence Number field. Note: Banner will automatically assign the next number.
12 Enter a valid COA value in the COA field. 13 Enter a valid index code in the Index field.
Note: This is an optional value.
14 Enter a valid fund code in the Fund field. 15 Enter a valid organization code in the Orgn field. 16 Enter a valid account code in the Acct field. 17 Enter a valid program code in the Prgm field. 18 Enter a valid activity code in the Actv field.
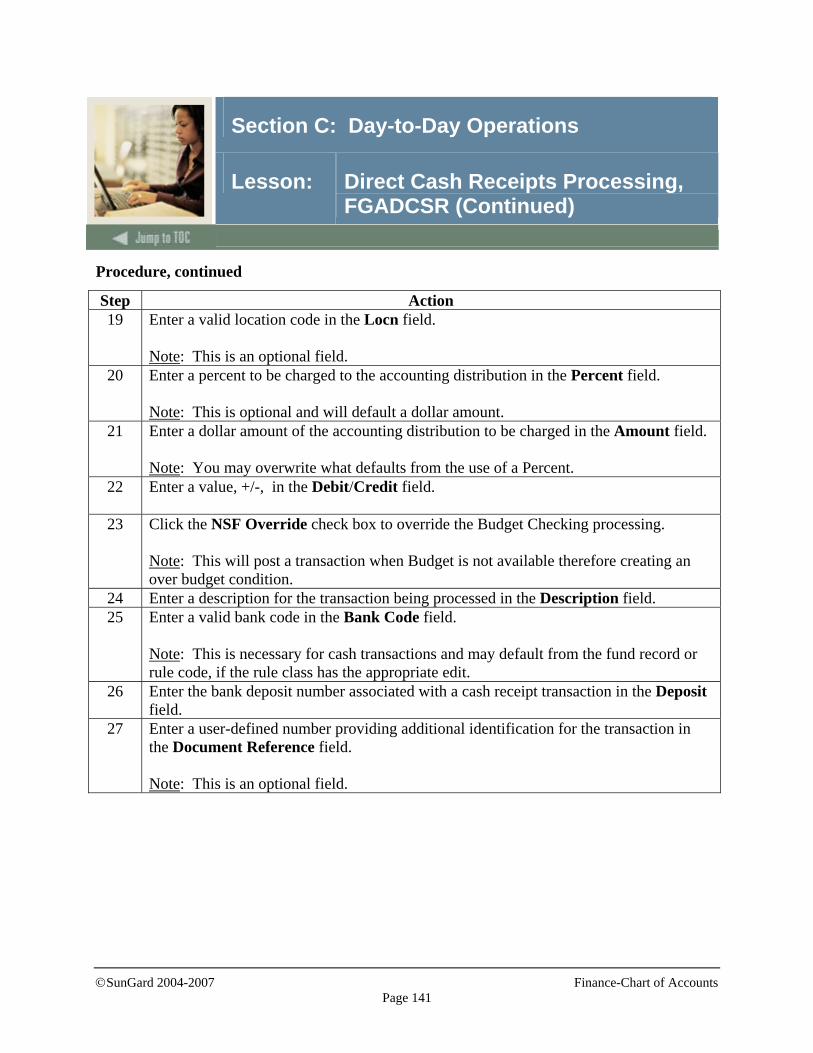
©SunGard 2004-2007 Finance-Chart of Accounts
Page 141
Section C: Day-to-Day Operations
Lesson: Direct Cash Receipts Processing, FGADCSR (Continued)
Procedure, continued
Step Action 19 Enter a valid location code in the Locn field.
Note: This is an optional field.
20 Enter a percent to be charged to the accounting distribution in the Percent field. Note: This is optional and will default a dollar amount.
21 Enter a dollar amount of the accounting distribution to be charged in the Amount field. Note: You may overwrite what defaults from the use of a Percent.
22 Enter a value, +/-, in the Debit/Credit field.
23 Click the NSF Override check box to override the Budget Checking processing. Note: This will post a transaction when Budget is not available therefore creating an over budget condition.
24 Enter a description for the transaction being processed in the Description field. 25 Enter a valid bank code in the Bank Code field.
Note: This is necessary for cash transactions and may default from the fund record or rule code, if the rule class has the appropriate edit.
26 Enter the bank deposit number associated with a cash receipt transaction in the Deposit field.
27 Enter a user-defined number providing additional identification for the transaction in the Document Reference field. Note: This is an optional field.
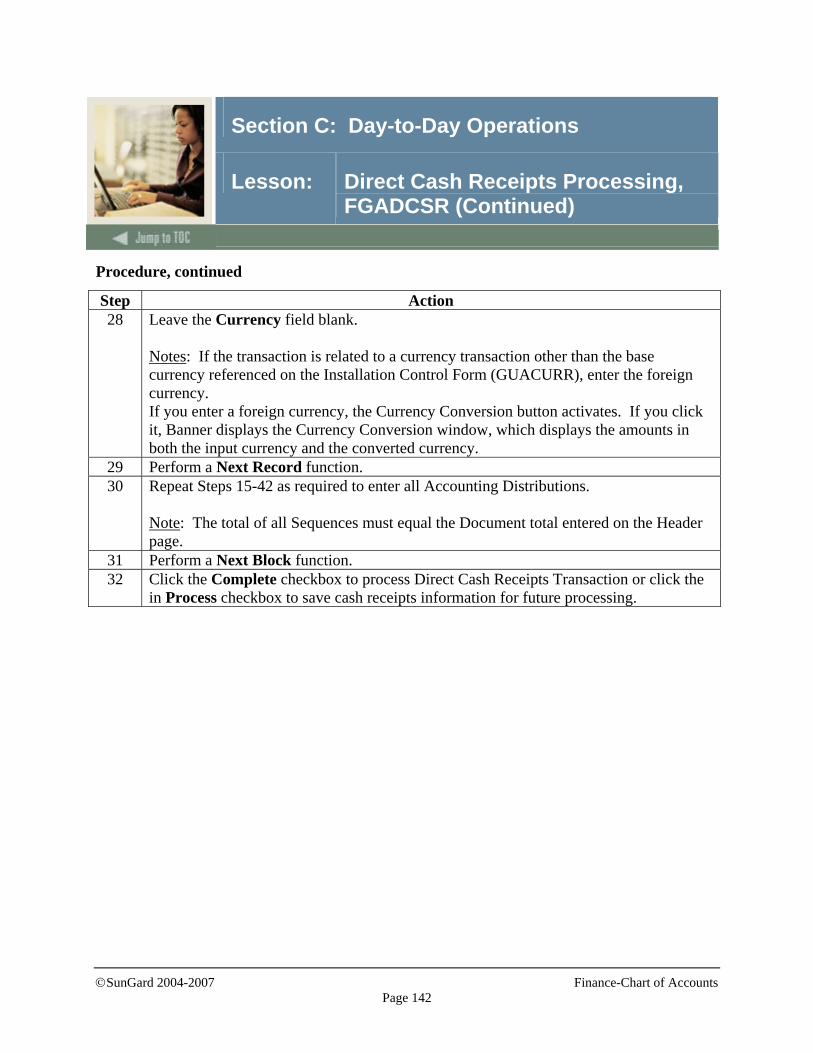
©SunGard 2004-2007 Finance-Chart of Accounts
Page 142
Section C: Day-to-Day Operations
Lesson: Direct Cash Receipts Processing, FGADCSR (Continued)
Procedure, continued
Step Action 28 Leave the Currency field blank.
Notes: If the transaction is related to a currency transaction other than the base currency referenced on the Installation Control Form (GUACURR), enter the foreign currency. If you enter a foreign currency, the Currency Conversion button activates. If you click it, Banner displays the Currency Conversion window, which displays the amounts in both the input currency and the converted currency.
29 Perform a Next Record function. 30 Repeat Steps 15-42 as required to enter all Accounting Distributions.
Note: The total of all Sequences must equal the Document total entered on the Header page.
31 Perform a Next Block function. 32 Click the Complete checkbox to process Direct Cash Receipts Transaction or click the
in Process checkbox to save cash receipts information for future processing.

©SunGard 2004-2007 Finance-Chart of Accounts
Page 143
Section C: Day-to-Day Operations
Lesson: General Accounting and Budget Query Forms
Introduction The purpose of the General Accounting and Budget query forms is to review how end users can query transactions in Banner. You can use budget query, transaction inquiry, encumbrance inquiry, or document inquiry forms.
Budget query forms • Budget Availability Status Form (FGIBAVL) • Organizational Budget Status Form (FGIBDST) • Organizational Budget Summary Form (FGIBSUM) • Executive Summary Form (FGIBDSR)
General Ledger inquiry forms • General Ledger Trail Balance Form (FGITBAL) • Trial Balance Summary Form (FGITBSR)
Transaction inquiry forms • Operating Accounts Transaction Detail Form (FGITRND) • General Ledger Transaction Detail Transaction Form (FGIGLAC) • Journal Voucher Summary Form (FGIJSUM) • List of Suspended Journal Vouchers Form (FGIJVCD) • List of Automatic Journal Vouchers Form (FGIAUTO)
Encumbrance inquiry forms • Detail Encumbrance Activity Form (FGIENCD • Organizational Encumbrance List Form (FGIOENC) • Encumbrance List Form (FGIENCB)
Document inquiry forms • Document Retrieval Inquiry Form (FGIDOCR)
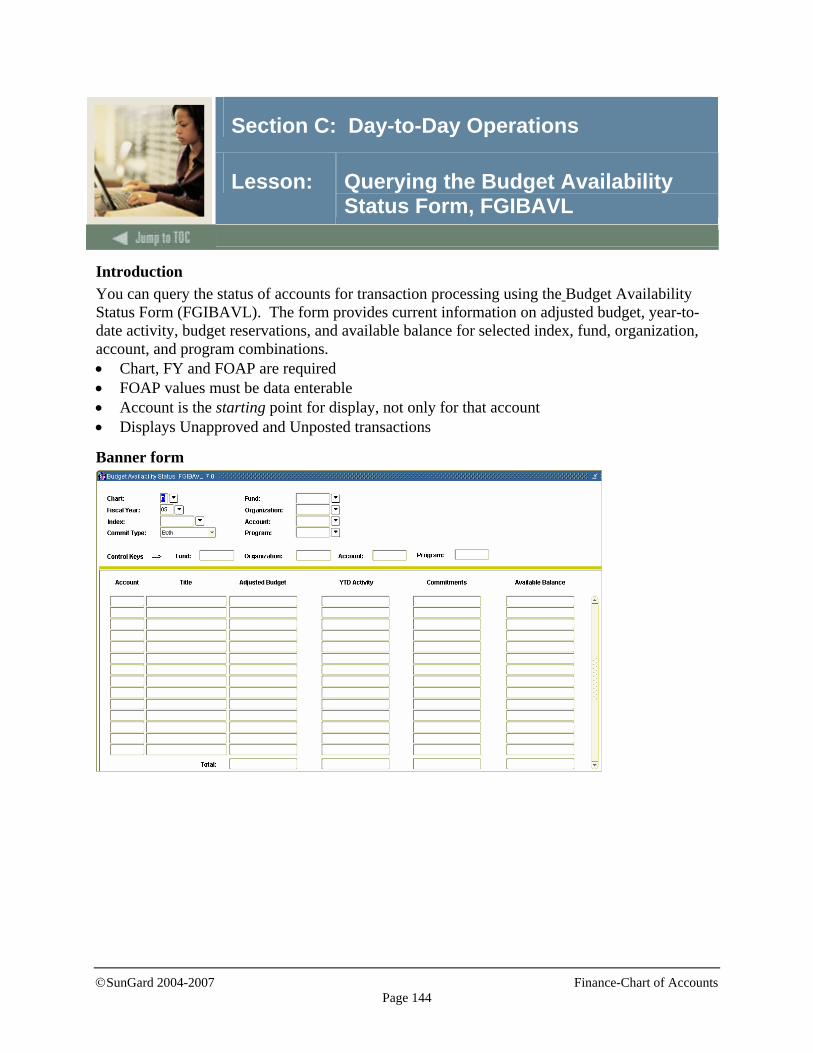
©SunGard 2004-2007 Finance-Chart of Accounts
Page 144
Section C: Day-to-Day Operations
Lesson: Querying the Budget Availability Status Form, FGIBAVL
Introduction You can query the status of accounts for transaction processing using the Budget Availability Status Form (FGIBAVL). The form provides current information on adjusted budget, year-to-date activity, budget reservations, and available balance for selected index, fund, organization, account, and program combinations. • Chart, FY and FOAP are required • FOAP values must be data enterable • Account is the starting point for display, not only for that account • Displays Unapproved and Unposted transactions
Banner form
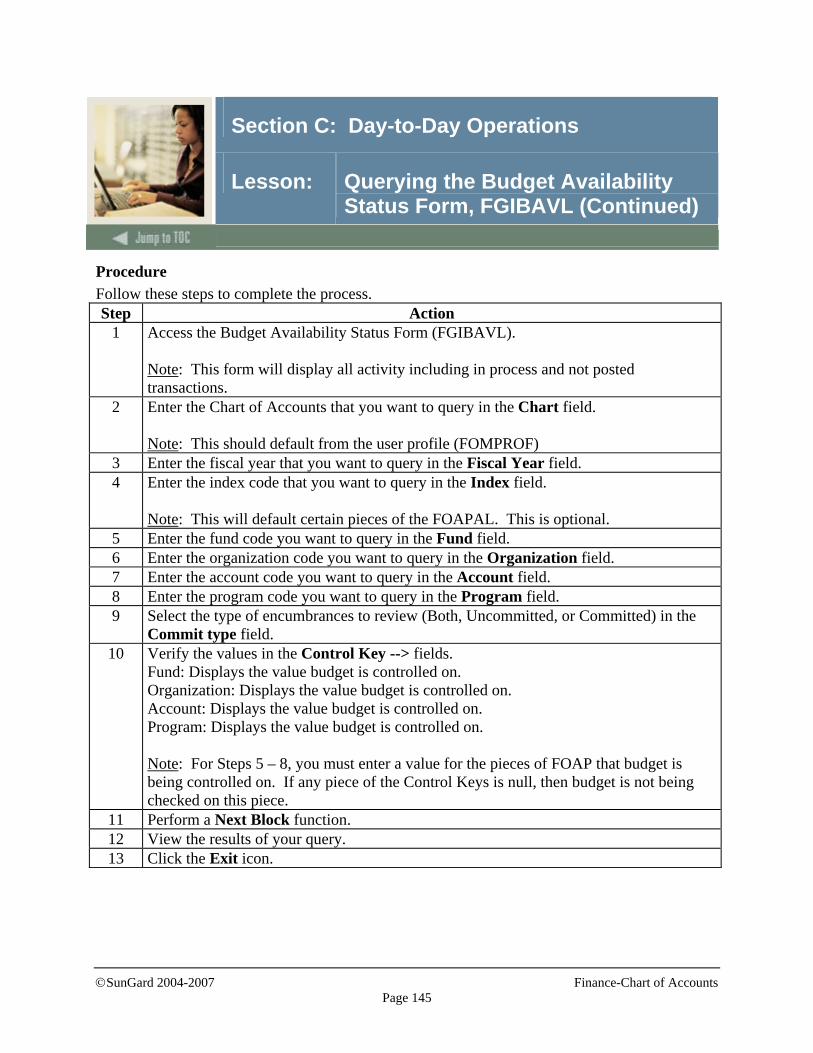
©SunGard 2004-2007 Finance-Chart of Accounts
Page 145
Section C: Day-to-Day Operations
Lesson: Querying the Budget Availability Status Form, FGIBAVL (Continued)
Procedure Follow these steps to complete the process. Step Action
1 Access the Budget Availability Status Form (FGIBAVL). Note: This form will display all activity including in process and not posted transactions.
2 Enter the Chart of Accounts that you want to query in the Chart field. Note: This should default from the user profile (FOMPROF)
3 Enter the fiscal year that you want to query in the Fiscal Year field. 4 Enter the index code that you want to query in the Index field.
Note: This will default certain pieces of the FOAPAL. This is optional.
5 Enter the fund code you want to query in the Fund field. 6 Enter the organization code you want to query in the Organization field. 7 Enter the account code you want to query in the Account field. 8 Enter the program code you want to query in the Program field. 9 Select the type of encumbrances to review (Both, Uncommitted, or Committed) in the
Commit type field. 10 Verify the values in the Control Key --> fields.
Fund: Displays the value budget is controlled on. Organization: Displays the value budget is controlled on. Account: Displays the value budget is controlled on. Program: Displays the value budget is controlled on. Note: For Steps 5 – 8, you must enter a value for the pieces of FOAP that budget is being controlled on. If any piece of the Control Keys is null, then budget is not being checked on this piece.
11 Perform a Next Block function. 12 View the results of your query. 13 Click the Exit icon.

©SunGard 2004-2007 Finance-Chart of Accounts
Page 146
Section C: Day-to-Day Operations
Lesson: Querying the Organizational Budget Status Form, FGIBDST
Introduction You can use the Organizational Budget Status Form (FGIBDST) to query the organizational status of accounts on adjusted budget, year-to-date activity, budget commitments, and available balance for selected index, fund, organization, account, program, activity, and location combinations. • Chart and FY are required • Any FOAPAL selection must be data enterable • Account Type is level 2 only • Displays Approved and Posted transactions
Banner form
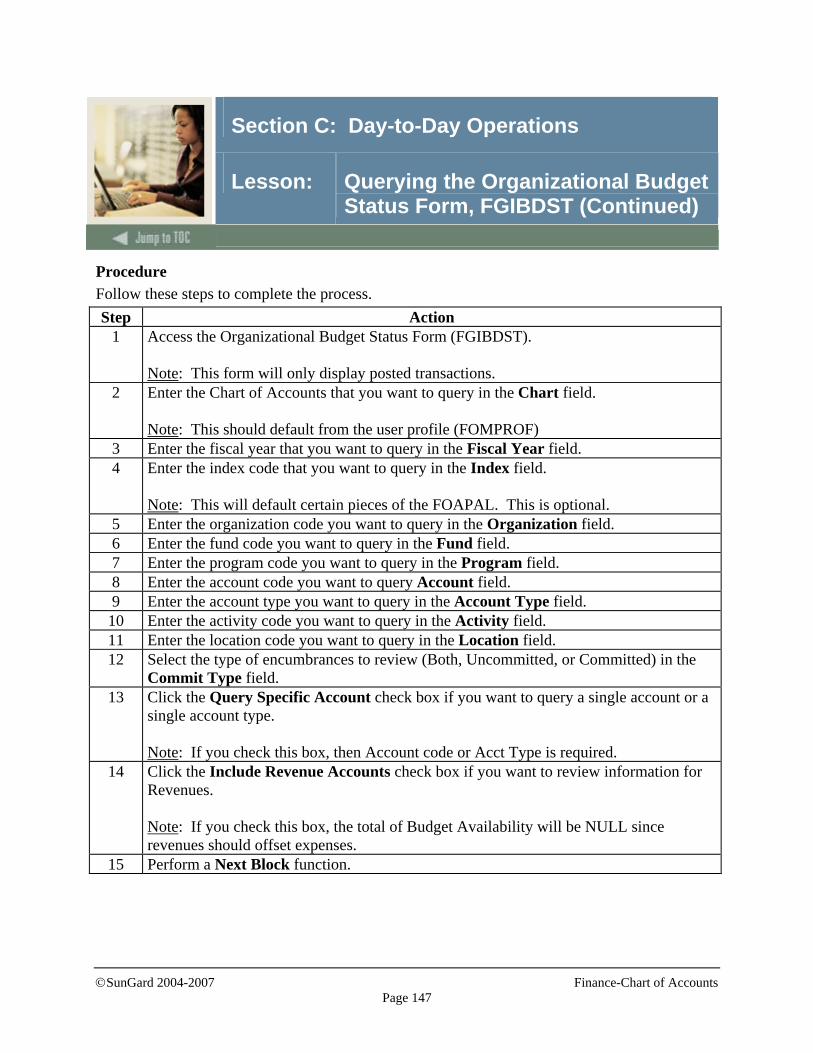
©SunGard 2004-2007 Finance-Chart of Accounts
Page 147
Section C: Day-to-Day Operations
Lesson: Querying the Organizational Budget Status Form, FGIBDST (Continued)
Procedure Follow these steps to complete the process. Step Action
1 Access the Organizational Budget Status Form (FGIBDST). Note: This form will only display posted transactions.
2 Enter the Chart of Accounts that you want to query in the Chart field. Note: This should default from the user profile (FOMPROF)
3 Enter the fiscal year that you want to query in the Fiscal Year field. 4 Enter the index code that you want to query in the Index field.
Note: This will default certain pieces of the FOAPAL. This is optional.
5 Enter the organization code you want to query in the Organization field. 6 Enter the fund code you want to query in the Fund field. 7 Enter the program code you want to query in the Program field. 8 Enter the account code you want to query Account field. 9 Enter the account type you want to query in the Account Type field. 10 Enter the activity code you want to query in the Activity field. 11 Enter the location code you want to query in the Location field. 12 Select the type of encumbrances to review (Both, Uncommitted, or Committed) in the
Commit Type field. 13 Click the Query Specific Account check box if you want to query a single account or a
single account type. Note: If you check this box, then Account code or Acct Type is required.
14 Click the Include Revenue Accounts check box if you want to review information for Revenues. Note: If you check this box, the total of Budget Availability will be NULL since revenues should offset expenses.
15 Perform a Next Block function.

©SunGard 2004-2007 Finance-Chart of Accounts
Page 148
Section C: Day-to-Day Operations
Lesson: Querying the Organizational Budget Status Form, FGIBDST (Continued)
Procedure, continued
Step Action 16 View the results of your query.
Note: Use the Options menu to access additional query forms supporting the detail on this form.
17 Click the Exit icon.
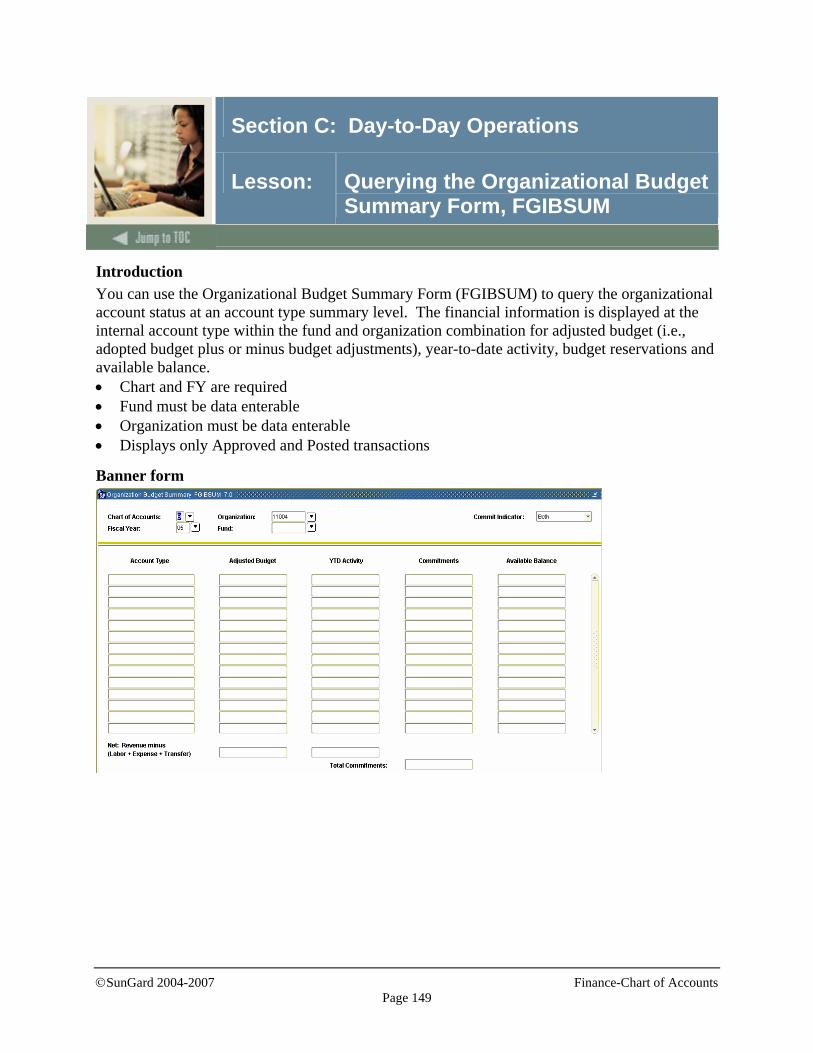
©SunGard 2004-2007 Finance-Chart of Accounts
Page 149
Section C: Day-to-Day Operations
Lesson: Querying the Organizational Budget Summary Form, FGIBSUM
Introduction You can use the Organizational Budget Summary Form (FGIBSUM) to query the organizational account status at an account type summary level. The financial information is displayed at the internal account type within the fund and organization combination for adjusted budget (i.e., adopted budget plus or minus budget adjustments), year-to-date activity, budget reservations and available balance. • Chart and FY are required • Fund must be data enterable • Organization must be data enterable • Displays only Approved and Posted transactions
Banner form
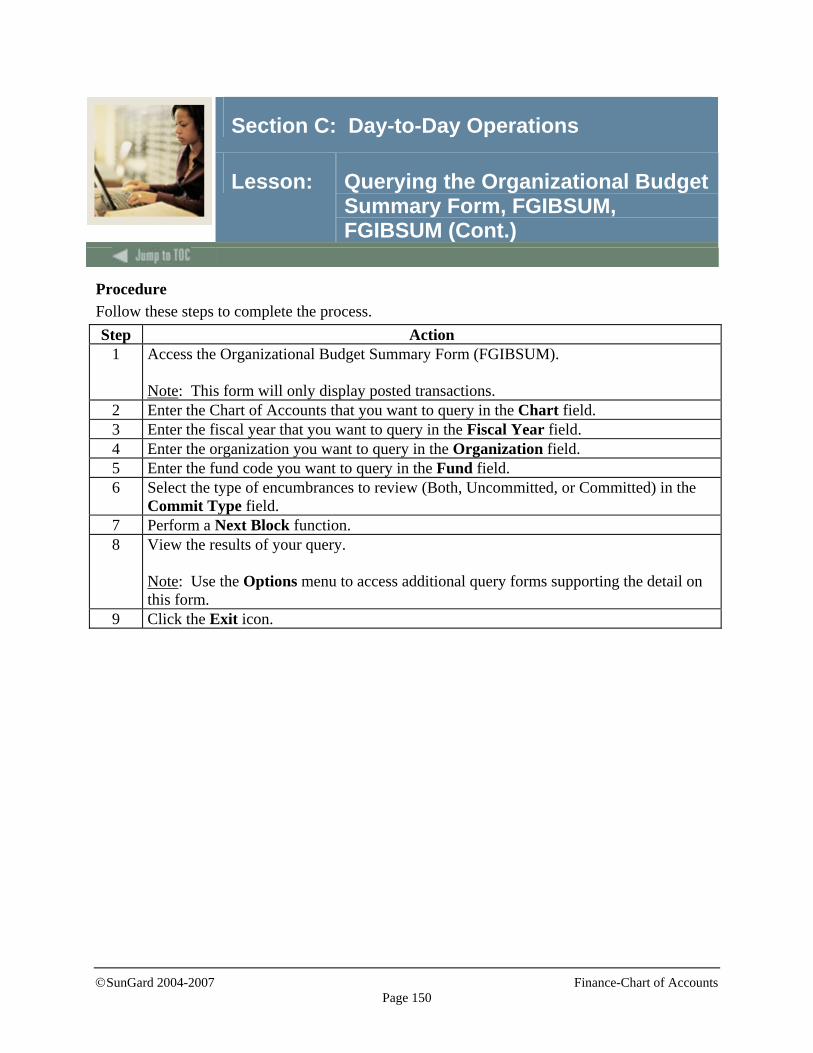
©SunGard 2004-2007 Finance-Chart of Accounts
Page 150
Section C: Day-to-Day Operations
Lesson: Querying the Organizational Budget Summary Form, FGIBSUM, FGIBSUM (Cont.)
Procedure Follow these steps to complete the process. Step Action
1 Access the Organizational Budget Summary Form (FGIBSUM). Note: This form will only display posted transactions.
2 Enter the Chart of Accounts that you want to query in the Chart field. 3 Enter the fiscal year that you want to query in the Fiscal Year field. 4 Enter the organization you want to query in the Organization field. 5 Enter the fund code you want to query in the Fund field. 6 Select the type of encumbrances to review (Both, Uncommitted, or Committed) in the
Commit Type field. 7 Perform a Next Block function. 8 View the results of your query.
Note: Use the Options menu to access additional query forms supporting the detail on this form.
9 Click the Exit icon.
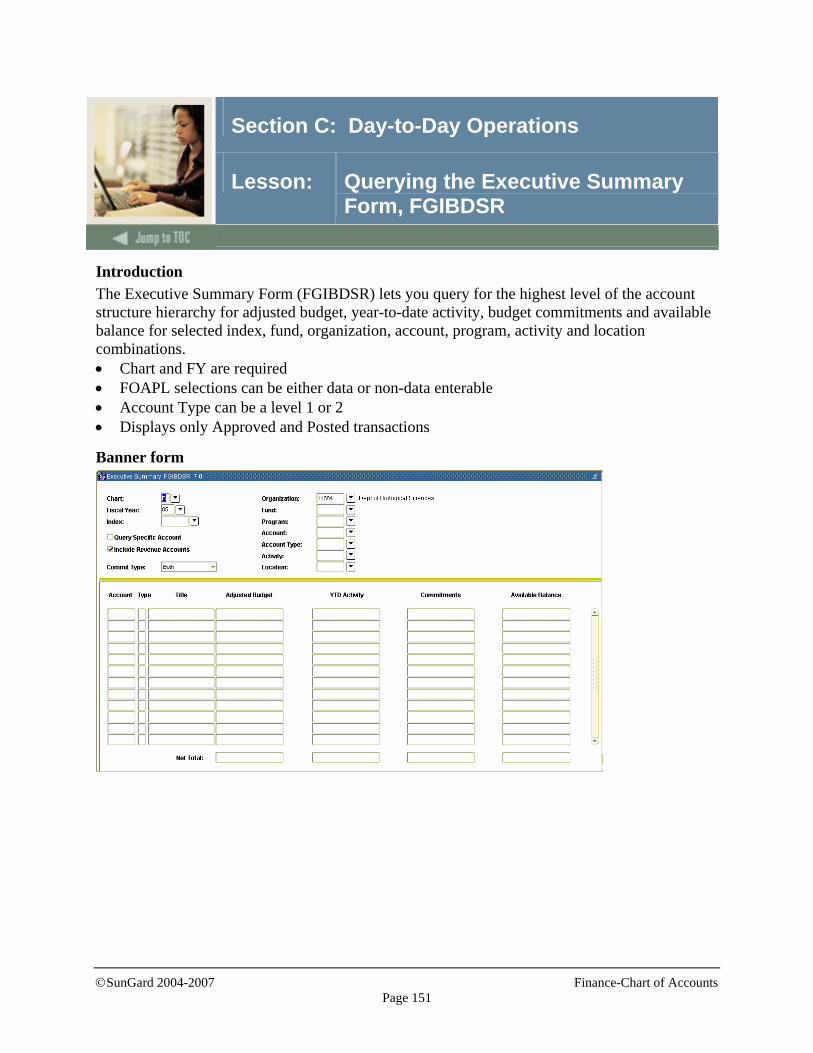
©SunGard 2004-2007 Finance-Chart of Accounts
Page 151
Section C: Day-to-Day Operations
Lesson: Querying the Executive Summary Form, FGIBDSR
Introduction The Executive Summary Form (FGIBDSR) lets you query for the highest level of the account structure hierarchy for adjusted budget, year-to-date activity, budget commitments and available balance for selected index, fund, organization, account, program, activity and location combinations. • Chart and FY are required • FOAPL selections can be either data or non-data enterable • Account Type can be a level 1 or 2 • Displays only Approved and Posted transactions
Banner form
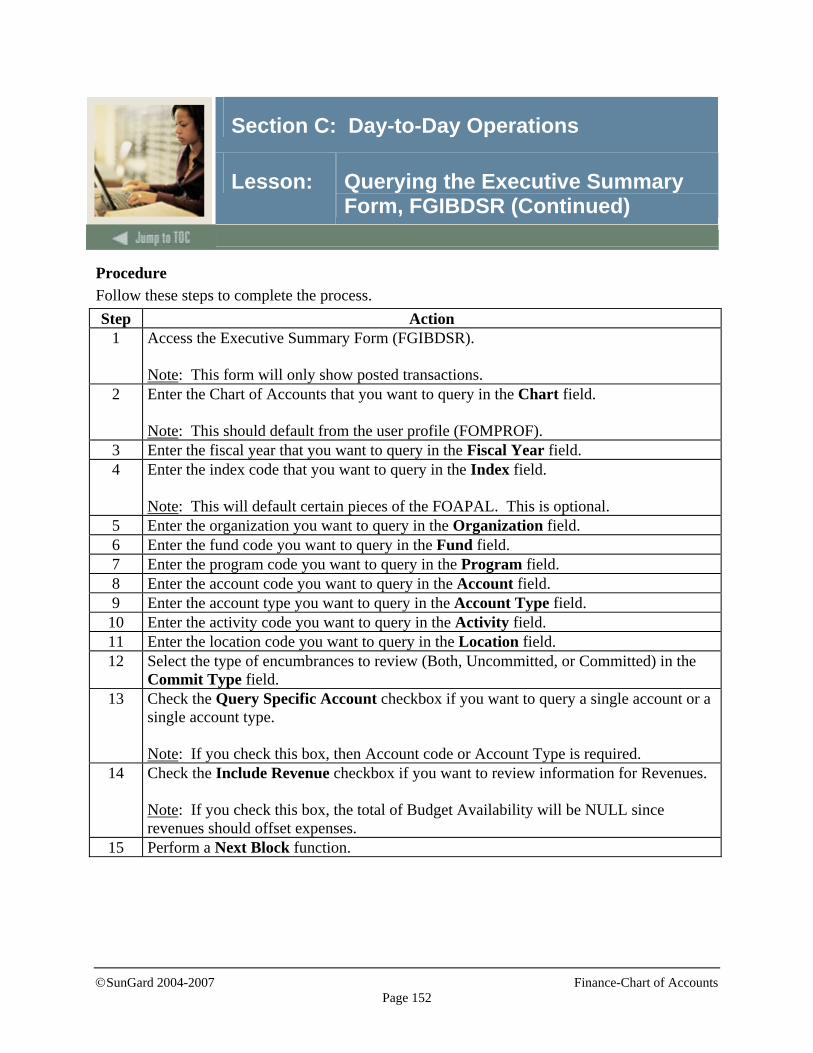
©SunGard 2004-2007 Finance-Chart of Accounts
Page 152
Section C: Day-to-Day Operations
Lesson: Querying the Executive Summary Form, FGIBDSR (Continued)
Procedure Follow these steps to complete the process. Step Action
1 Access the Executive Summary Form (FGIBDSR). Note: This form will only show posted transactions.
2 Enter the Chart of Accounts that you want to query in the Chart field. Note: This should default from the user profile (FOMPROF).
3 Enter the fiscal year that you want to query in the Fiscal Year field. 4 Enter the index code that you want to query in the Index field.
Note: This will default certain pieces of the FOAPAL. This is optional.
5 Enter the organization you want to query in the Organization field. 6 Enter the fund code you want to query in the Fund field. 7 Enter the program code you want to query in the Program field. 8 Enter the account code you want to query in the Account field. 9 Enter the account type you want to query in the Account Type field. 10 Enter the activity code you want to query in the Activity field. 11 Enter the location code you want to query in the Location field. 12 Select the type of encumbrances to review (Both, Uncommitted, or Committed) in the
Commit Type field. 13 Check the Query Specific Account checkbox if you want to query a single account or a
single account type. Note: If you check this box, then Account code or Account Type is required.
14 Check the Include Revenue checkbox if you want to review information for Revenues. Note: If you check this box, the total of Budget Availability will be NULL since revenues should offset expenses.
15 Perform a Next Block function.
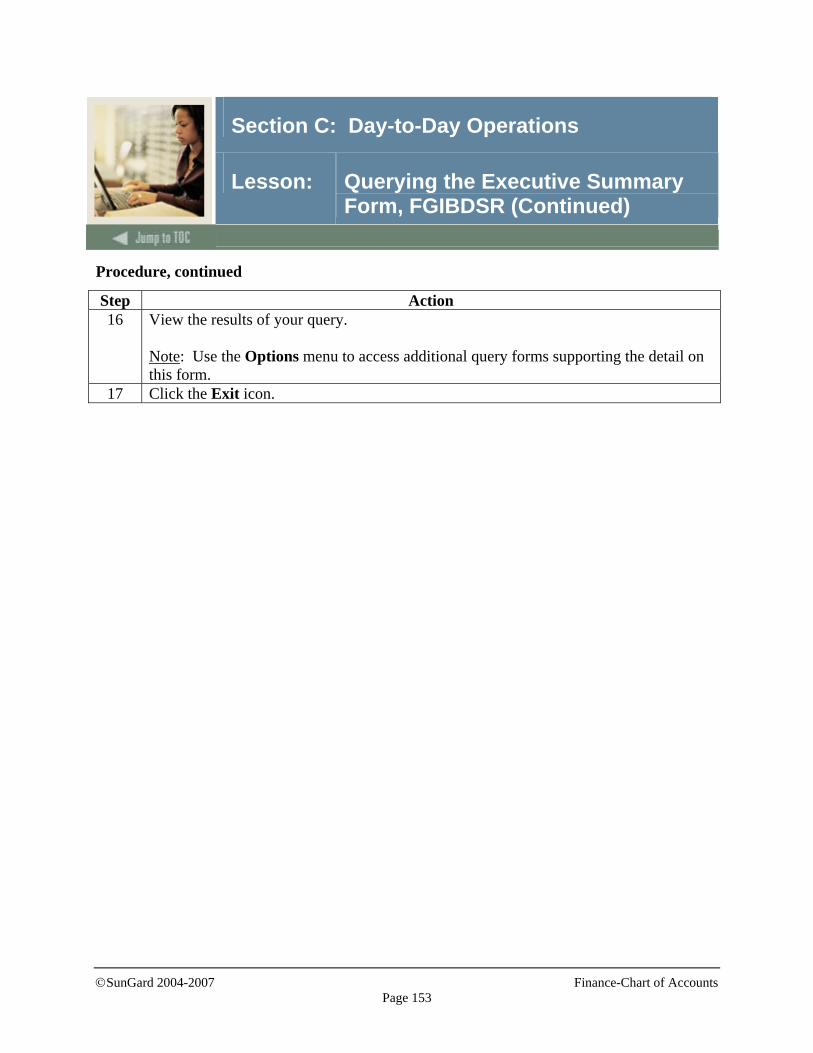
©SunGard 2004-2007 Finance-Chart of Accounts
Page 153
Section C: Day-to-Day Operations
Lesson: Querying the Executive Summary Form, FGIBDSR (Continued)
Procedure, continued
Step Action 16 View the results of your query.
Note: Use the Options menu to access additional query forms supporting the detail on this form.
17 Click the Exit icon.
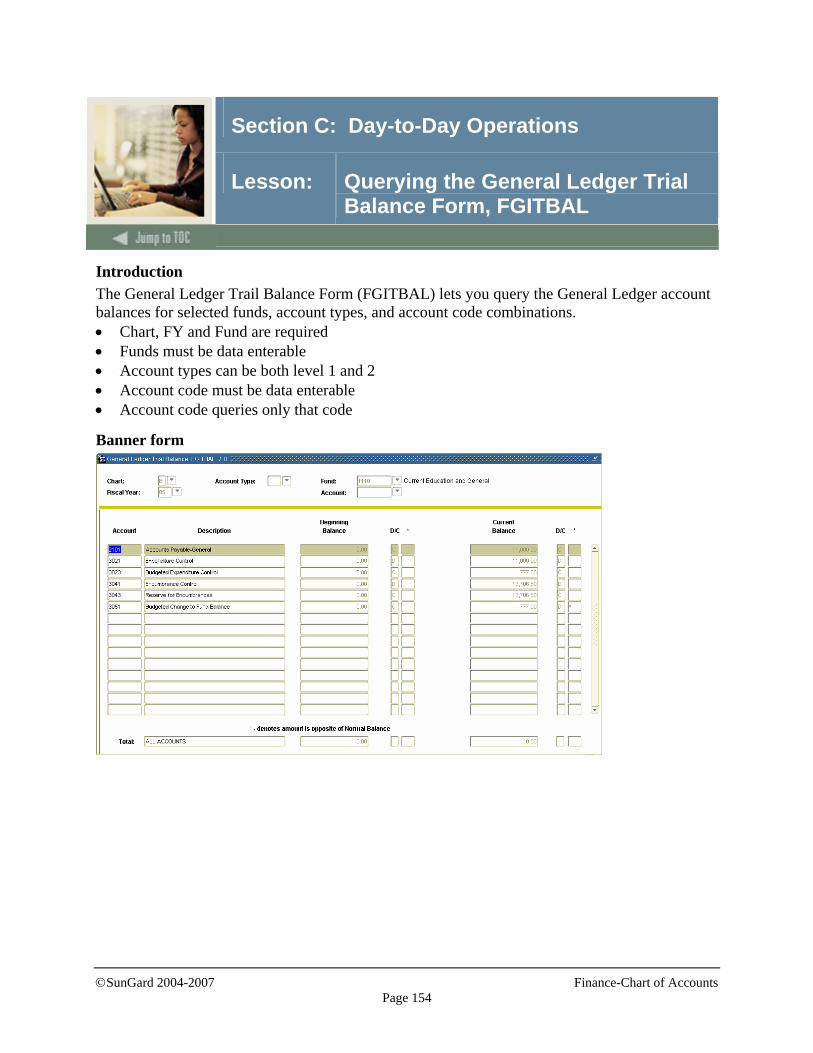
©SunGard 2004-2007 Finance-Chart of Accounts
Page 154
Section C: Day-to-Day Operations
Lesson: Querying the General Ledger Trial Balance Form, FGITBAL
Introduction The General Ledger Trail Balance Form (FGITBAL) lets you query the General Ledger account balances for selected funds, account types, and account code combinations. • Chart, FY and Fund are required • Funds must be data enterable • Account types can be both level 1 and 2 • Account code must be data enterable • Account code queries only that code
Banner form
©SunGard 2004-2007 Finance-Chart of Accounts
Page 155
Section C: Day-to-Day Operations
Lesson: Querying the General Ledger Trial Balance Form, FGITBAL, FGITBAL (Continued)
Procedure Follow these steps to complete the process. Step Action
1 Access the General Ledger Trial Balance Form (FGITBAL). Note: This form will only display posted transaction.
2 Enter the Chart of Accounts that you want to query in the Chart field. Note: This should default from the user profile (FOMPROF).
3 Enter the fiscal year that you want to query in the Fiscal Year field. 4 Enter the fund code you want to query in the Fund field. 5 Enter the account type you want to query in the Account Type field. 6 Enter the account code you want to query in the Account field. 7 Perform the Next Block Function 8 View the results of your query.
Note: Use the Options menu to access additional query forms supporting the detail on this form.
9 Click the Exit icon.
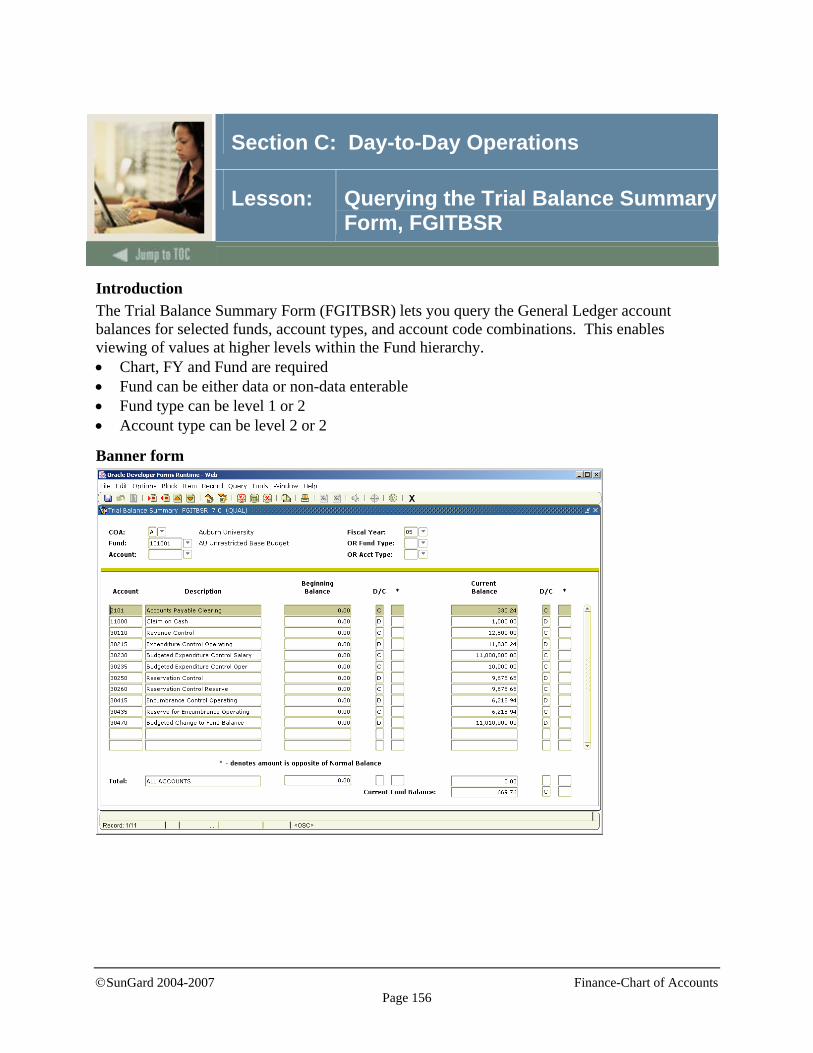
©SunGard 2004-2007 Finance-Chart of Accounts
Page 156
Section C: Day-to-Day Operations
Lesson: Querying the Trial Balance Summary Form, FGITBSR
Introduction The Trial Balance Summary Form (FGITBSR) lets you query the General Ledger account balances for selected funds, account types, and account code combinations. This enables viewing of values at higher levels within the Fund hierarchy. • Chart, FY and Fund are required • Fund can be either data or non-data enterable • Fund type can be level 1 or 2 • Account type can be level 2 or 2
Banner form

©SunGard 2004-2007 Finance-Chart of Accounts
Page 157
Section C: Day-to-Day Operations
Lesson: Querying the Trial Balance Summary Form, FGITBSR (continued)
Procedure Follow these steps to complete the process. Step Action
1 Access the Trial Balance Summary Form (FGITBSR). Note: This form will only display posted transaction.
2 Enter the Chart of Accounts that you want to query in the Chart field. Note: This should default from the user profile (FOMPROF).
3 Enter the fiscal year that you want to query in the Fiscal Year field. 4 Enter the fund code you want to query in the Fund field. 5 Enter the account type you want to query in the Account Type field. 6 Enter the account code you want to query in the Account field. 7 Perform the Next Block Function 8 View the results of your query.
Note: Use the Options menu to access additional query forms supporting the detail on this form.
9 Click the Exit icon.
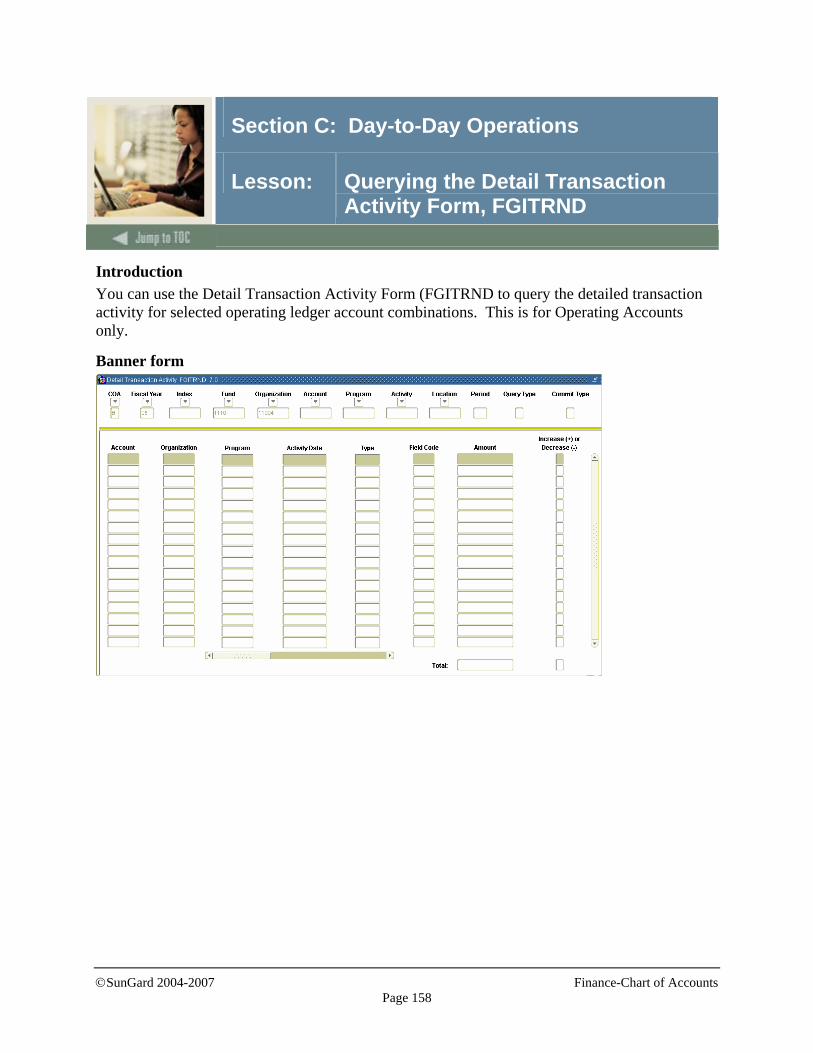
©SunGard 2004-2007 Finance-Chart of Accounts
Page 158
Section C: Day-to-Day Operations
Lesson: Querying the Detail Transaction Activity Form, FGITRND
Introduction You can use the Detail Transaction Activity Form (FGITRND to query the detailed transaction activity for selected operating ledger account combinations. This is for Operating Accounts only.
Banner form

©SunGard 2004-2007 Finance-Chart of Accounts
Page 159
Section C: Day-to-Day Operations
Lesson: Querying the Detail Transaction Activity Form, FGITRND, FGITRND (Continued)
Procedure Follow these steps to complete the process. Step Action
1 Access the Detail Transaction Activity Form (FGITRND). Note: This form will only display posted transactions.
2 Enter the Chart of Accounts that you want to query in the Chart field. Note: This should default from the user profile (FOMPROF)
3 Enter the fiscal year that you want to query in the Fiscal Year field. 4 Enter the index code that you want to query in the Index field.
Note: This will default certain pieces of the FOAPAL. This is optional.
5 Enter the fund code you want to query in the Fund field. 6 Enter the organization you want to query in the Organization field. 7 Enter the account code you want to query in the Account field. 8 Enter the program code you want to query in the Program field. 9 Enter the activity code you want to query in the Activity field. 10 Enter the location code you want to query in the Location field. 11 Enter the period you want to query in the Period field. 12 Enter an ‘S’ in the Query Type field to query a specific account.
Note: When selecting a specific account, the Account must be entered. Banner will populate an ‘R’ for all accounts if nothing is entered.
13 Enter the type of encumbrances to review Null (for Both), ‘U’ for Uncommitted, or ‘C’ for Committed) in the Commit Type field.
14 Perform a Next Block function. 15 Perform a Query Execute to retrieve data. 16 View the results of your query.
Note: Use the Options menu to access additional query forms supporting the detail on this form.
17 Click the Exit icon.

©SunGard 2004-2007 Finance-Chart of Accounts
Page 160
Section C: Day-to-Day Operations
Lesson: Querying the General Ledger Activity Form, FGIGLAC
Introduction You can use the General Ledger Activity Form (FGIGLAC) to query the detail transaction activity for selected general ledger account combinations. This is for Balance Sheet Accounts only. • Chart, FY and Fund are required • Fund must be data enterable • Account (optional) must be data enterable
Banner form
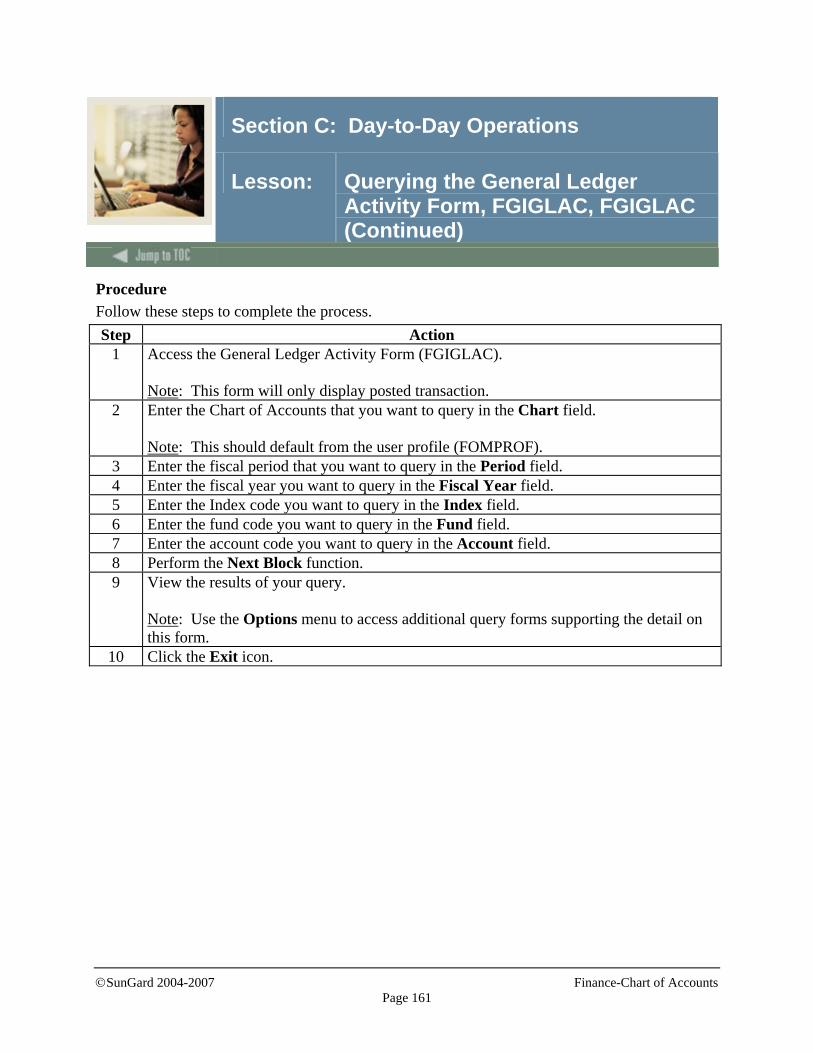
©SunGard 2004-2007 Finance-Chart of Accounts
Page 161
Section C: Day-to-Day Operations
Lesson: Querying the General Ledger Activity Form, FGIGLAC, FGIGLAC (Continued)
Procedure Follow these steps to complete the process. Step Action
1 Access the General Ledger Activity Form (FGIGLAC). Note: This form will only display posted transaction.
2 Enter the Chart of Accounts that you want to query in the Chart field. Note: This should default from the user profile (FOMPROF).
3 Enter the fiscal period that you want to query in the Period field. 4 Enter the fiscal year you want to query in the Fiscal Year field. 5 Enter the Index code you want to query in the Index field. 6 Enter the fund code you want to query in the Fund field. 7 Enter the account code you want to query in the Account field. 8 Perform the Next Block function. 9 View the results of your query.
Note: Use the Options menu to access additional query forms supporting the detail on this form.
10 Click the Exit icon.
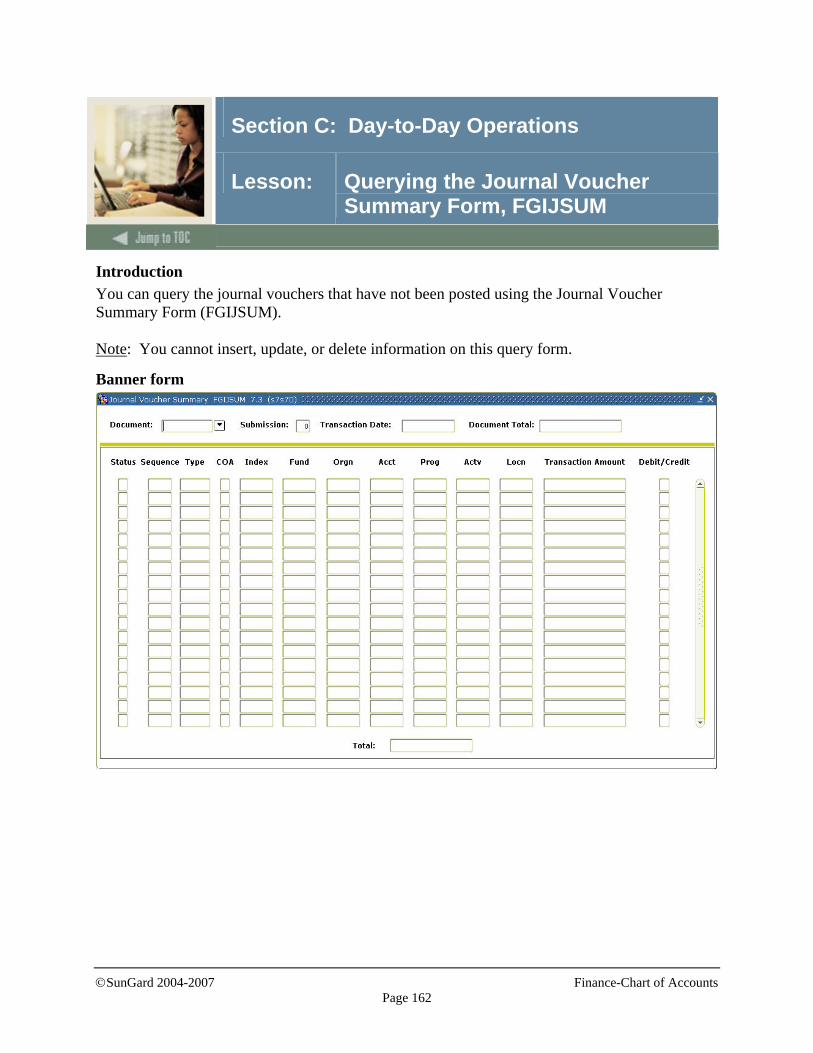
©SunGard 2004-2007 Finance-Chart of Accounts
Page 162
Section C: Day-to-Day Operations
Lesson: Querying the Journal Voucher Summary Form, FGIJSUM
Introduction You can query the journal vouchers that have not been posted using the Journal Voucher Summary Form (FGIJSUM). Note: You cannot insert, update, or delete information on this query form.
Banner form

©SunGard 2004-2007 Finance-Chart of Accounts
Page 163
Section C: Day-to-Day Operations
Lesson: Querying the Journal Voucher Summary Form, FGIJSUM
Procedure Follow the steps to complete the process. Step Action
1 Access the Journal Voucher Summary Form (FGIJSUM). Note: This form will only include Journal Vouchers that are not completed.
2 Enter a valid journal voucher number in the Document field. 3 Enter a valid submission number in the Submission field.
Note: This will automatically populate by Banner when Zero.
4 Perform a Next Block function 5 View the results of your query.
Note: Use the Options menu to access additional query forms supporting the detail on this form.
6 Click the Exit icon.
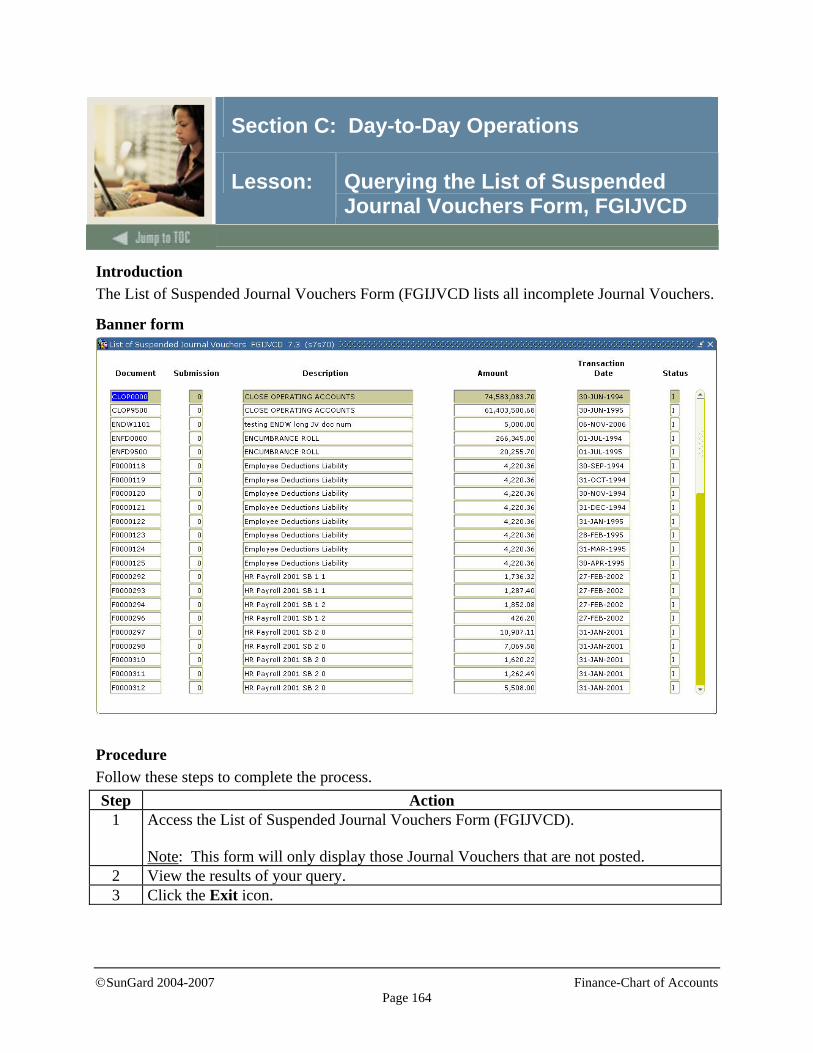
©SunGard 2004-2007 Finance-Chart of Accounts
Page 164
Section C: Day-to-Day Operations
Lesson: Querying the List of Suspended Journal Vouchers Form, FGIJVCD
Introduction The List of Suspended Journal Vouchers Form (FGIJVCD lists all incomplete Journal Vouchers.
Banner form
Procedure Follow these steps to complete the process. Step Action
1 Access the List of Suspended Journal Vouchers Form (FGIJVCD). Note: This form will only display those Journal Vouchers that are not posted.
2 View the results of your query. 3 Click the Exit icon.
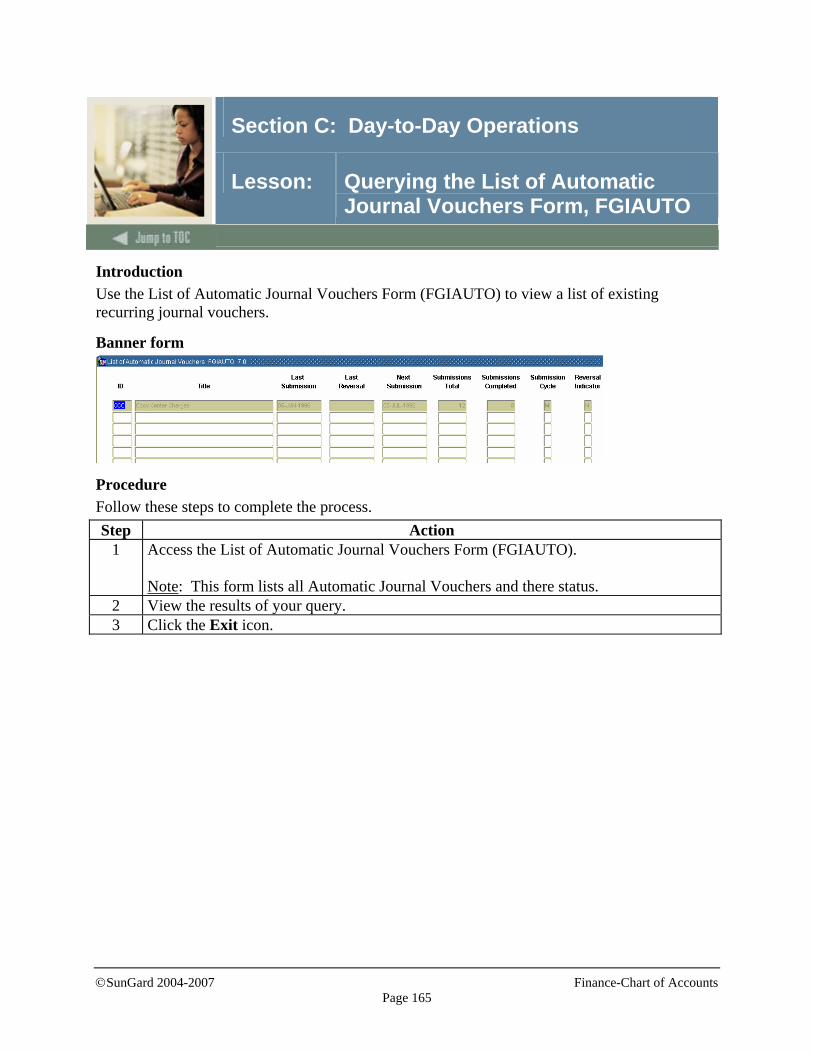
©SunGard 2004-2007 Finance-Chart of Accounts
Page 165
Section C: Day-to-Day Operations
Lesson: Querying the List of Automatic Journal Vouchers Form, FGIAUTO
Introduction Use the List of Automatic Journal Vouchers Form (FGIAUTO) to view a list of existing recurring journal vouchers.
Banner form
Procedure Follow these steps to complete the process. Step Action
1 Access the List of Automatic Journal Vouchers Form (FGIAUTO). Note: This form lists all Automatic Journal Vouchers and there status.
2 View the results of your query. 3 Click the Exit icon.
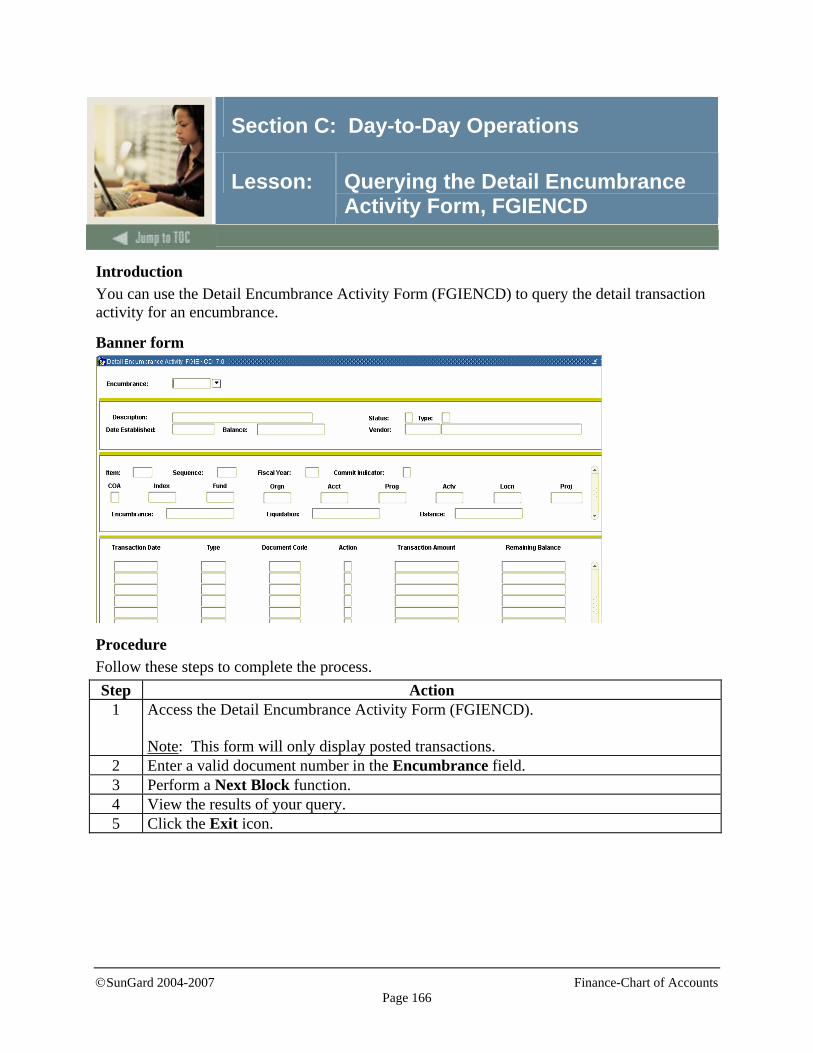
©SunGard 2004-2007 Finance-Chart of Accounts
Page 166
Section C: Day-to-Day Operations
Lesson: Querying the Detail Encumbrance Activity Form, FGIENCD
Introduction You can use the Detail Encumbrance Activity Form (FGIENCD) to query the detail transaction activity for an encumbrance.
Banner form
Procedure Follow these steps to complete the process. Step Action
1 Access the Detail Encumbrance Activity Form (FGIENCD). Note: This form will only display posted transactions.
2 Enter a valid document number in the Encumbrance field. 3 Perform a Next Block function. 4 View the results of your query. 5 Click the Exit icon.
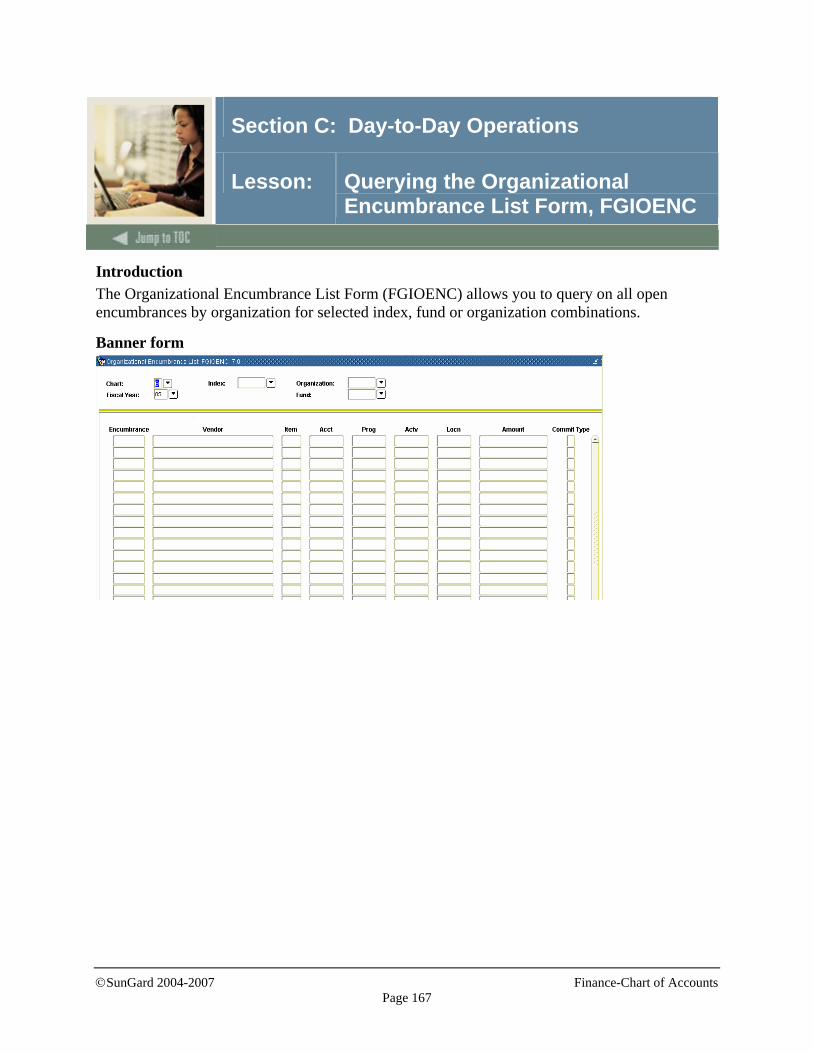
©SunGard 2004-2007 Finance-Chart of Accounts
Page 167
Section C: Day-to-Day Operations
Lesson: Querying the Organizational Encumbrance List Form, FGIOENC
Introduction The Organizational Encumbrance List Form (FGIOENC) allows you to query on all open encumbrances by organization for selected index, fund or organization combinations.
Banner form

©SunGard 2004-2007 Finance-Chart of Accounts
Page 168
Section C: Day-to-Day Operations
Lesson: Querying the Organizational Encumbrance List Form, FGIOENC, FGIOENC (Continued)
Procedure Follow these steps to complete the process. Step Action
1 Access the Organizational Encumbrance List Form (FGIOENC). Note: This form will only display posted transactions.
2 Enter the Chart of Accounts that you want to query in the Chart field. Note: This should default from the user profile (FOMPROF).
3 Enter the fiscal year that you want to query in the Fiscal Year field. 4 Enter the index code that you want to query in the Index field.
Note: This will default certain pieces of the FOAPAL. This is optional.
5 Enter the organization you want to query in the Organization field. 6 Enter the fund code you want to query in the Fund field. 7 Perform the Next Block function. 8 View the results of your query.
Note: Use the Options menu to access additional query forms supporting the detail on this form.
9 Click the Exit icon.
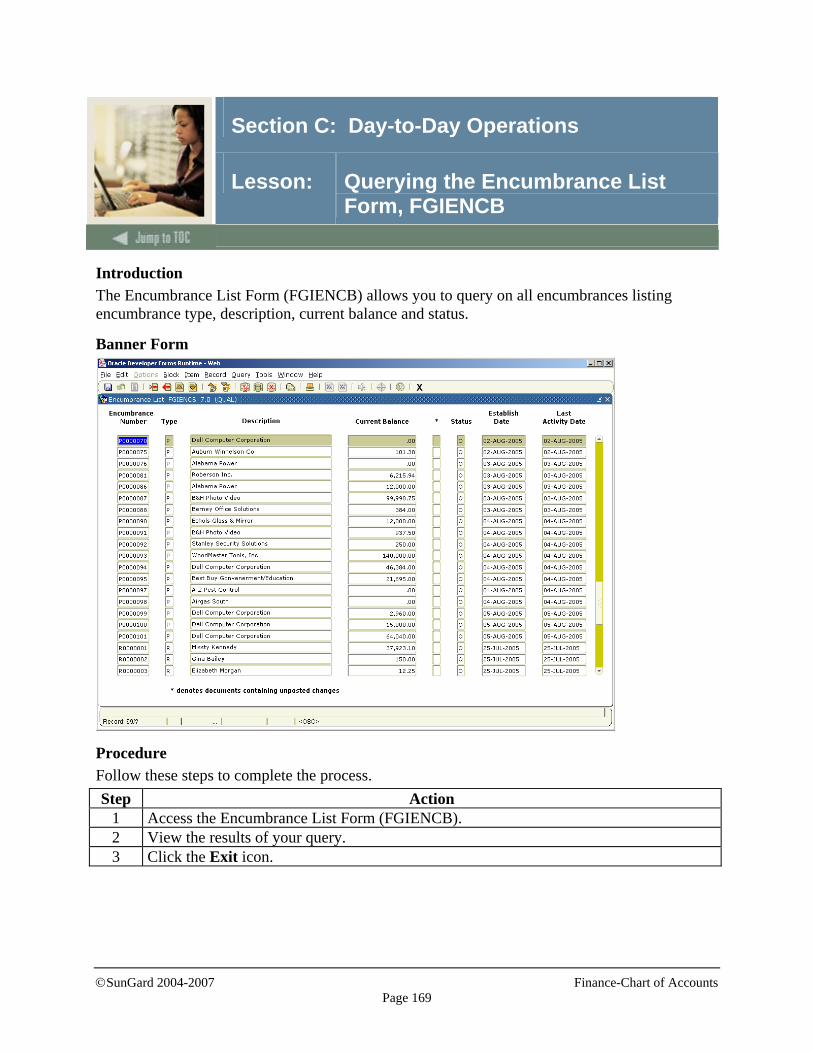
©SunGard 2004-2007 Finance-Chart of Accounts
Page 169
Section C: Day-to-Day Operations
Lesson: Querying the Encumbrance List Form, FGIENCB
Introduction The Encumbrance List Form (FGIENCB) allows you to query on all encumbrances listing encumbrance type, description, current balance and status.
Banner Form
Procedure Follow these steps to complete the process. Step Action
1 Access the Encumbrance List Form (FGIENCB). 2 View the results of your query. 3 Click the Exit icon.
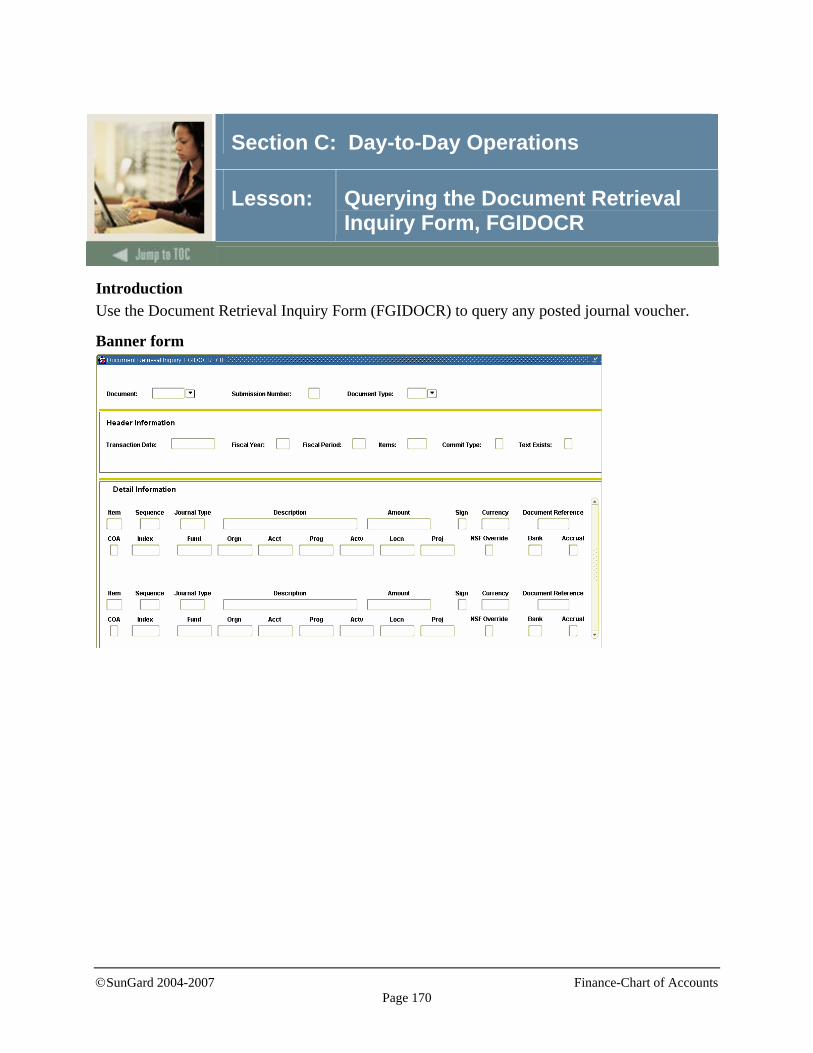
©SunGard 2004-2007 Finance-Chart of Accounts
Page 170
Section C: Day-to-Day Operations
Lesson: Querying the Document Retrieval Inquiry Form, FGIDOCR
Introduction Use the Document Retrieval Inquiry Form (FGIDOCR) to query any posted journal voucher.
Banner form
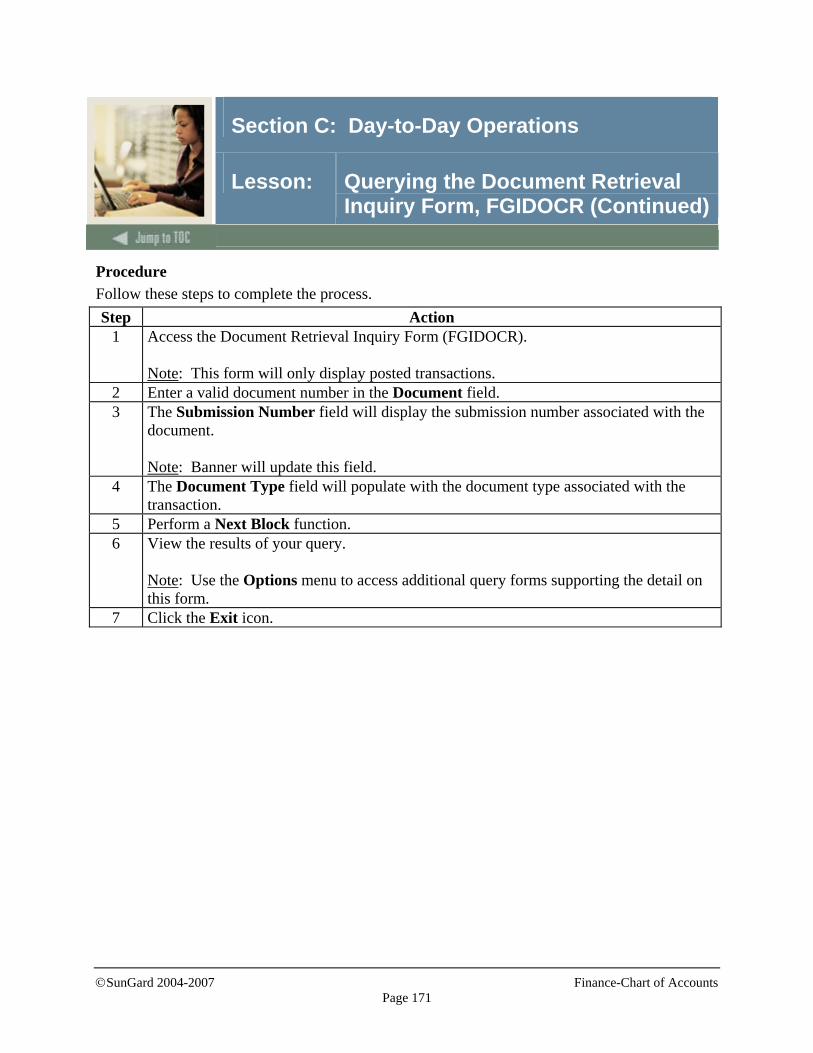
©SunGard 2004-2007 Finance-Chart of Accounts
Page 171
Section C: Day-to-Day Operations
Lesson: Querying the Document Retrieval Inquiry Form, FGIDOCR (Continued)
Procedure Follow these steps to complete the process. Step Action
1 Access the Document Retrieval Inquiry Form (FGIDOCR). Note: This form will only display posted transactions.
2 Enter a valid document number in the Document field. 3 The Submission Number field will display the submission number associated with the
document. Note: Banner will update this field.
4 The Document Type field will populate with the document type associated with the transaction.
5 Perform a Next Block function. 6 View the results of your query.
Note: Use the Options menu to access additional query forms supporting the detail on this form.
7 Click the Exit icon.

©SunGard 2004-2007 Finance-Chart of Accounts
Page 172
Section C: Day-to-Day Operations
Lesson: Querying Direct Cash Receipts Form, FGIDCSR
Introduction Use the Direct Cash Receipts Inquiry Form (FGIDCSR) to query any posted cash receipts.
Banner form
Procedure Follow these steps to complete the process. Step Action
1 Access the Direct Cash Receipts Form (FGIDCSR).
2 View the results of your query. 3 Click the Exit icon.
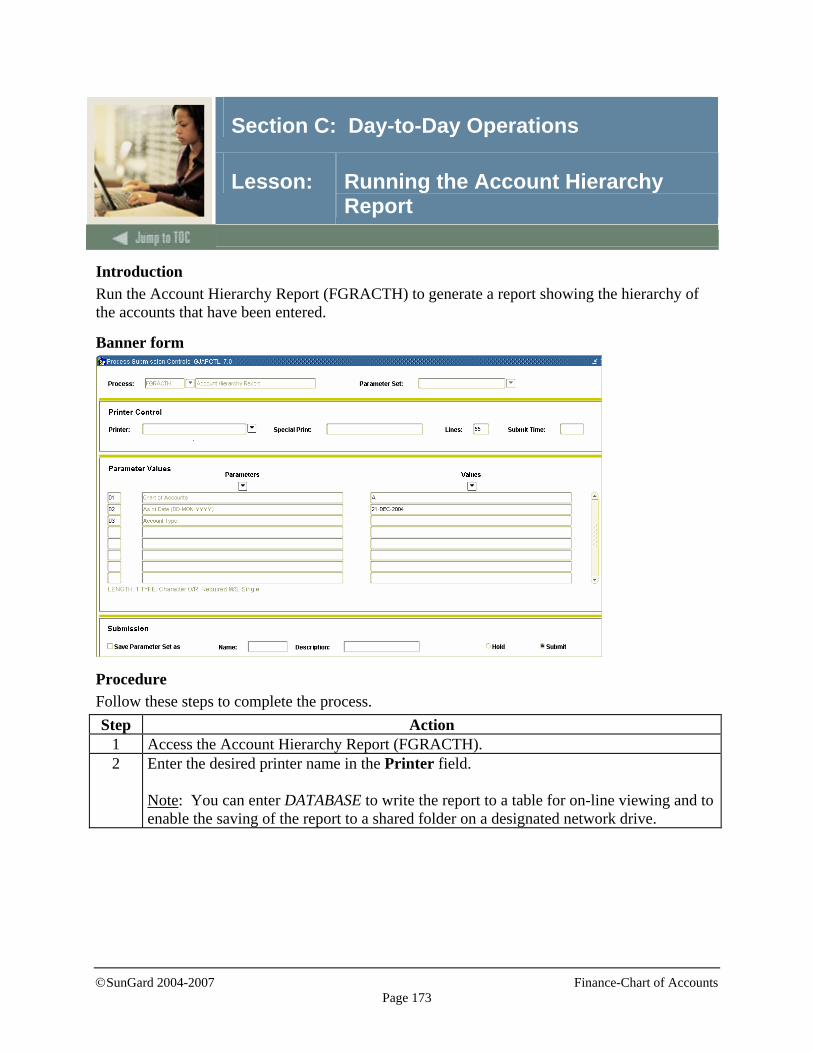
©SunGard 2004-2007 Finance-Chart of Accounts
Page 173
Section C: Day-to-Day Operations
Lesson: Running the Account Hierarchy Report
Introduction Run the Account Hierarchy Report (FGRACTH) to generate a report showing the hierarchy of the accounts that have been entered.
Banner form
Procedure Follow these steps to complete the process. Step Action
1 Access the Account Hierarchy Report (FGRACTH). 2 Enter the desired printer name in the Printer field.
Note: You can enter DATABASE to write the report to a table for on-line viewing and to enable the saving of the report to a shared folder on a designated network drive.

©SunGard 2004-2007 Finance-Chart of Accounts
Page 174
Section C: Day-to-Day Operations
Lesson: Running the Account Hierarchy Report (Continued)
Procedure, continued
Step Action 3 Enter these parameter values.
Required? Parameter Description
yes Chart of Accounts
Enter the one-character code of the Chart of Accounts that you previously created.
As of Date Date from which information to run the report will be gathered.
Account Type
Enter 11. This parameter contains a 30-character code for the account type reported. Note: Entering 11 will generate a hierarchy report for the Cash and Cash Equivalent accounts only. If you wanted the entire account hierarchy, you would leave this parameter field blank.
4 Click the Save Parameter Set as checkbox. 5 Enter a name and description in the Name and Description fields. 6 Click the Submit radio button. 7 Click the Save icon to execute the report.
Result: The Auto hint line displays the job submission number for the report log and list file.
8 Once the process has run, check the Auto Hint line. Note: It should indicate that two files were created: a Log file and a List file. The filenames are in the format process_number.type, where: • process is the name of the report run (for this Procedure, FGRACTH) • number is the process number of the report run • type is the type of file created (.log for Log, .lis for List)
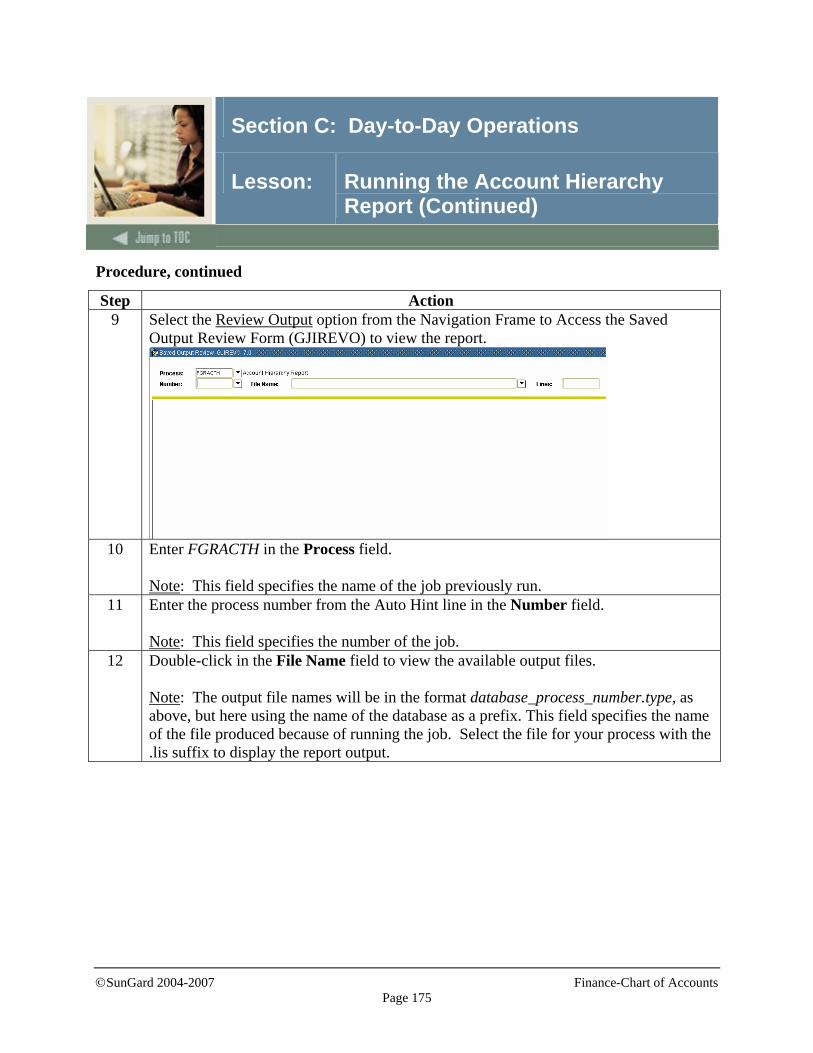
©SunGard 2004-2007 Finance-Chart of Accounts
Page 175
Section C: Day-to-Day Operations
Lesson: Running the Account Hierarchy Report (Continued)
Procedure, continued
Step Action 9 Select the Review Output option from the Navigation Frame to Access the Saved
Output Review Form (GJIREVO) to view the report.
10 Enter FGRACTH in the Process field.
Note: This field specifies the name of the job previously run.
11 Enter the process number from the Auto Hint line in the Number field. Note: This field specifies the number of the job.
12 Double-click in the File Name field to view the available output files. Note: The output file names will be in the format database_process_number.type, as above, but here using the name of the database as a prefix. This field specifies the name of the file produced because of running the job. Select the file for your process with the .lis suffix to display the report output.
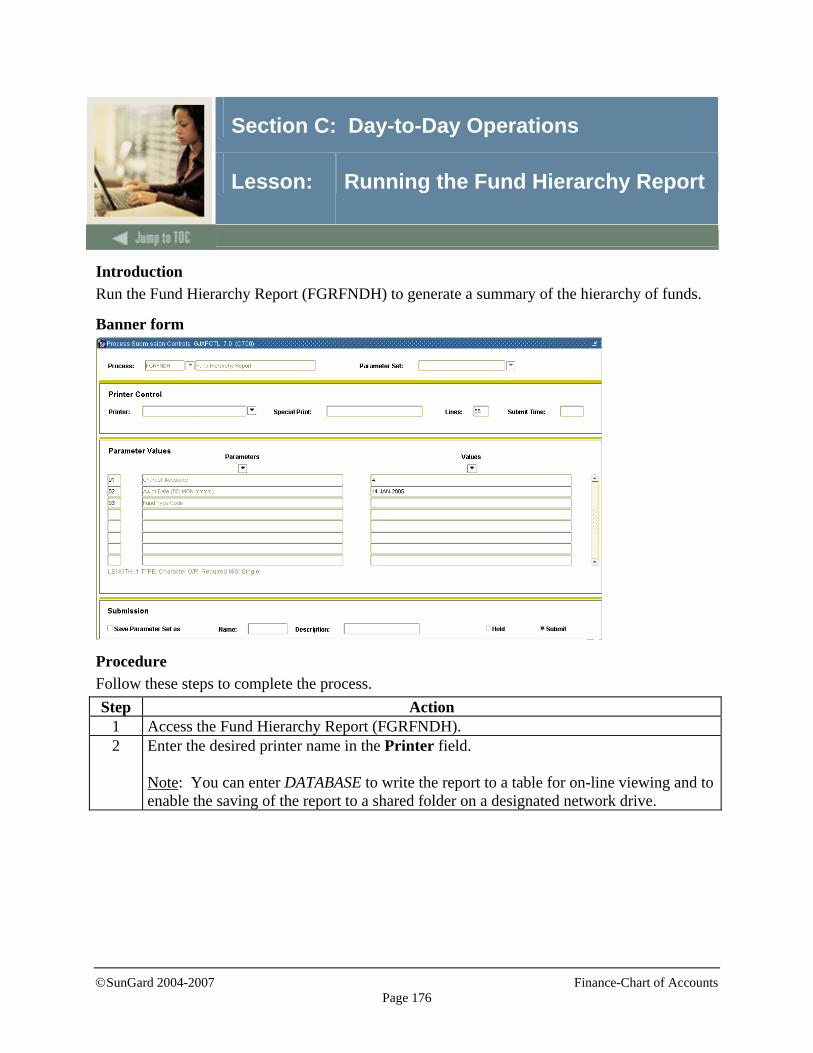
©SunGard 2004-2007 Finance-Chart of Accounts
Page 176
Section C: Day-to-Day Operations
Lesson: Running the Fund Hierarchy Report
Introduction Run the Fund Hierarchy Report (FGRFNDH) to generate a summary of the hierarchy of funds.
Banner form
Procedure Follow these steps to complete the process. Step Action
1 Access the Fund Hierarchy Report (FGRFNDH). 2 Enter the desired printer name in the Printer field.
Note: You can enter DATABASE to write the report to a table for on-line viewing and to enable the saving of the report to a shared folder on a designated network drive.
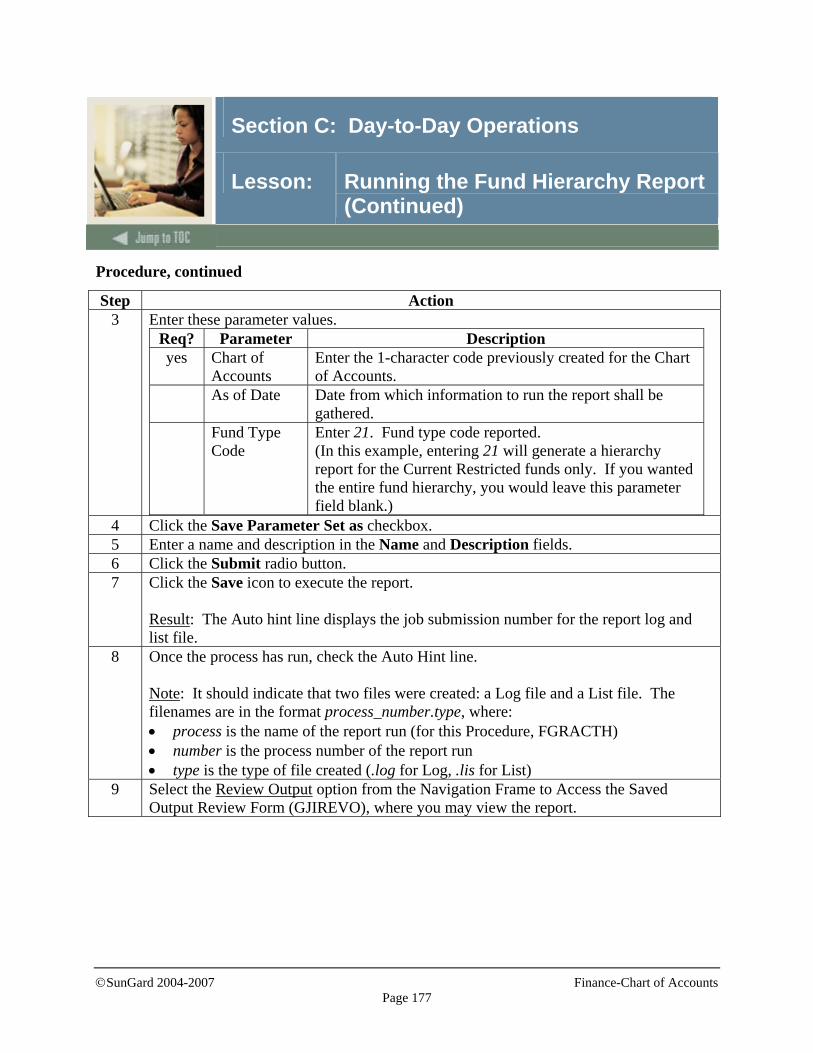
©SunGard 2004-2007 Finance-Chart of Accounts
Page 177
Section C: Day-to-Day Operations
Lesson: Running the Fund Hierarchy Report (Continued)
Procedure, continued
Step Action 3 Enter these parameter values.
Req? Parameter Description yes Chart of
Accounts Enter the 1-character code previously created for the Chart of Accounts.
As of Date Date from which information to run the report shall be gathered.
Fund Type Code
Enter 21. Fund type code reported. (In this example, entering 21 will generate a hierarchy report for the Current Restricted funds only. If you wanted the entire fund hierarchy, you would leave this parameter field blank.)
4 Click the Save Parameter Set as checkbox. 5 Enter a name and description in the Name and Description fields. 6 Click the Submit radio button. 7 Click the Save icon to execute the report.
Result: The Auto hint line displays the job submission number for the report log and list file.
8 Once the process has run, check the Auto Hint line. Note: It should indicate that two files were created: a Log file and a List file. The filenames are in the format process_number.type, where: • process is the name of the report run (for this Procedure, FGRACTH) • number is the process number of the report run • type is the type of file created (.log for Log, .lis for List)
9 Select the Review Output option from the Navigation Frame to Access the Saved Output Review Form (GJIREVO), where you may view the report.
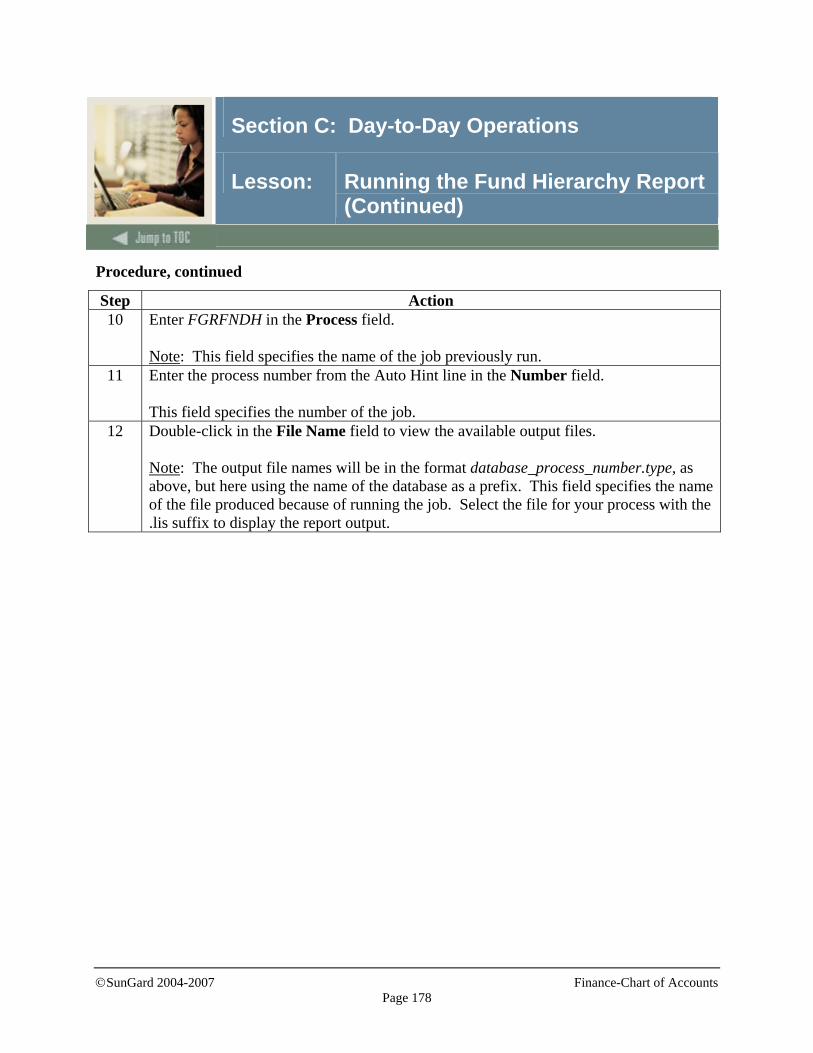
©SunGard 2004-2007 Finance-Chart of Accounts
Page 178
Section C: Day-to-Day Operations
Lesson: Running the Fund Hierarchy Report (Continued)
Procedure, continued
Step Action 10 Enter FGRFNDH in the Process field.
Note: This field specifies the name of the job previously run.
11 Enter the process number from the Auto Hint line in the Number field. This field specifies the number of the job.
12 Double-click in the File Name field to view the available output files. Note: The output file names will be in the format database_process_number.type, as above, but here using the name of the database as a prefix. This field specifies the name of the file produced because of running the job. Select the file for your process with the .lis suffix to display the report output.

©SunGard 2004-2007 Finance-Chart of Accounts
Page 179
Section C: Day-to-Day Operations
Lesson: Running the Program Hierarchy Report
Introduction The Program Hierarchy Report (FGRPRGH) lets you run a report listing the program codes in the Chart of Accounts.
Banner form
Procedure Follow these steps to complete the process. Step Action
1 Access the Program Hierarchy Report (FGRPRGH). 2 Enter the desired printer name in the Printer field.
Note: You can enter DATABASE to write the report to a table for on-line viewing and to enable the saving of the report to a shared folder on a designated network drive.
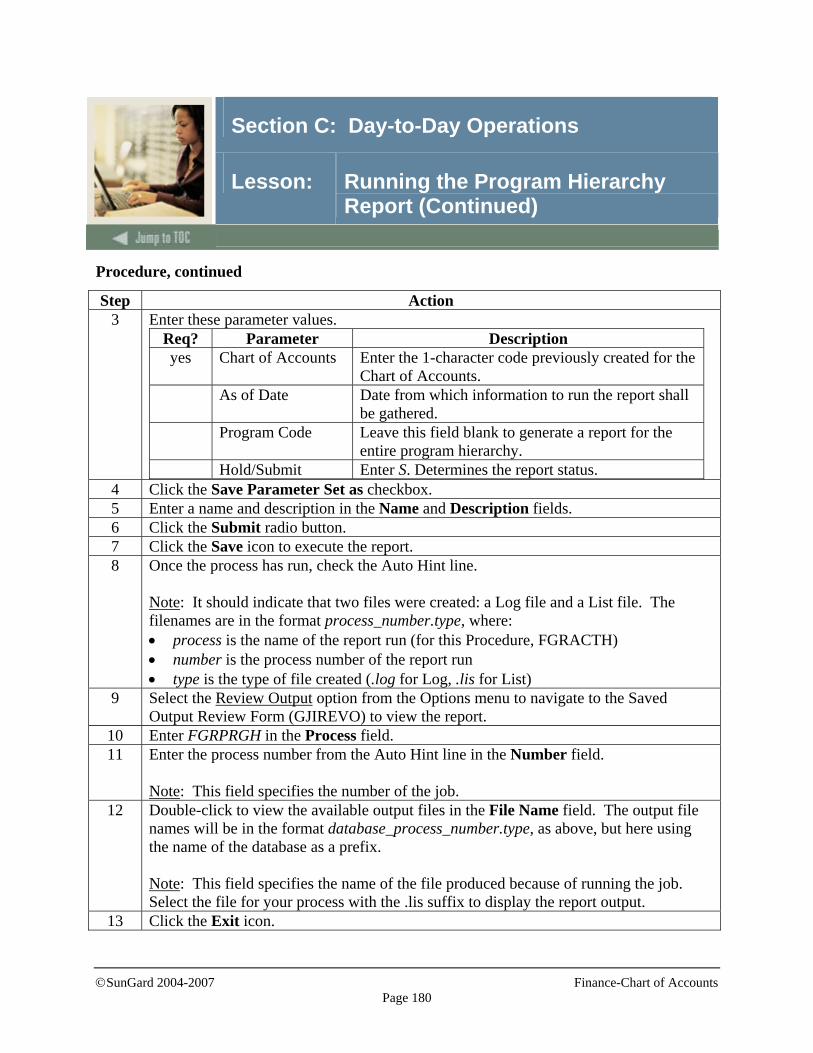
©SunGard 2004-2007 Finance-Chart of Accounts
Page 180
Section C: Day-to-Day Operations
Lesson: Running the Program Hierarchy Report (Continued)
Procedure, continued
Step Action 3 Enter these parameter values.
Req? Parameter Description yes Chart of Accounts Enter the 1-character code previously created for the
Chart of Accounts. As of Date Date from which information to run the report shall
be gathered. Program Code Leave this field blank to generate a report for the
entire program hierarchy. Hold/Submit Enter S. Determines the report status.
4 Click the Save Parameter Set as checkbox. 5 Enter a name and description in the Name and Description fields. 6 Click the Submit radio button. 7 Click the Save icon to execute the report. 8 Once the process has run, check the Auto Hint line.
Note: It should indicate that two files were created: a Log file and a List file. The filenames are in the format process_number.type, where: • process is the name of the report run (for this Procedure, FGRACTH) • number is the process number of the report run • type is the type of file created (.log for Log, .lis for List)
9 Select the Review Output option from the Options menu to navigate to the Saved Output Review Form (GJIREVO) to view the report.
10 Enter FGRPRGH in the Process field. 11 Enter the process number from the Auto Hint line in the Number field.
Note: This field specifies the number of the job.
12 Double-click to view the available output files in the File Name field. The output file names will be in the format database_process_number.type, as above, but here using the name of the database as a prefix. Note: This field specifies the name of the file produced because of running the job. Select the file for your process with the .lis suffix to display the report output.
13 Click the Exit icon.
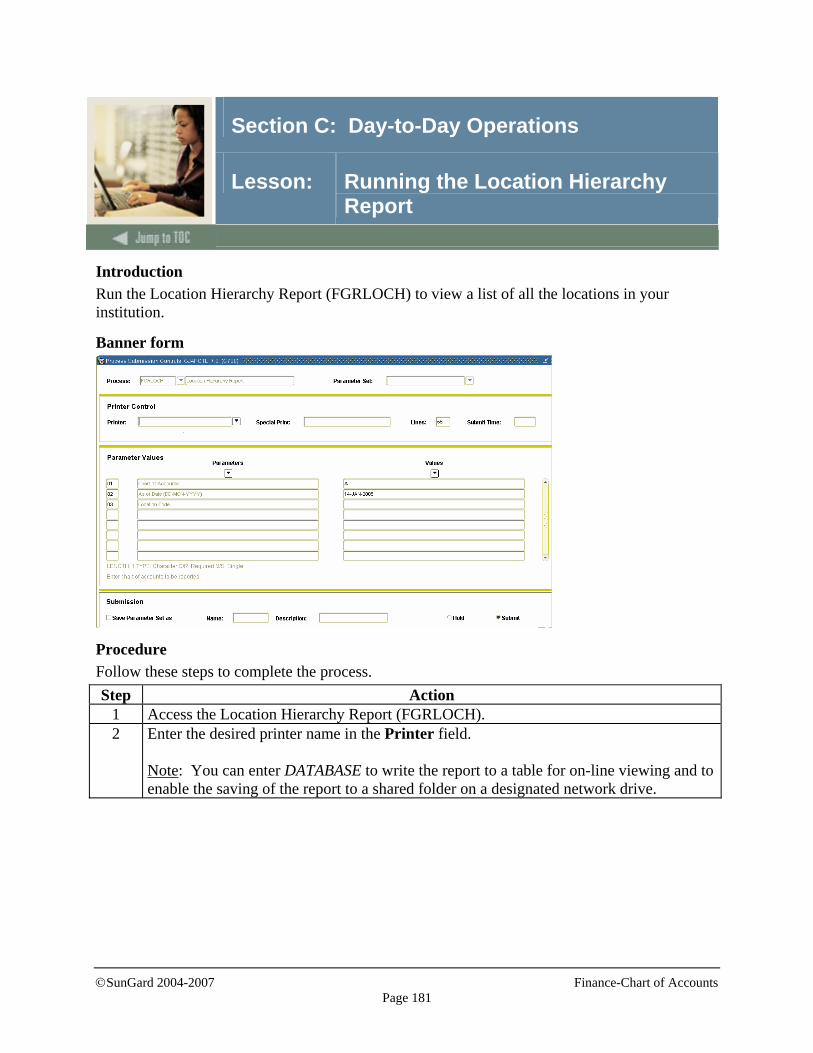
©SunGard 2004-2007 Finance-Chart of Accounts
Page 181
Section C: Day-to-Day Operations
Lesson: Running the Location Hierarchy Report
Introduction Run the Location Hierarchy Report (FGRLOCH) to view a list of all the locations in your institution.
Banner form
Procedure Follow these steps to complete the process. Step Action
1 Access the Location Hierarchy Report (FGRLOCH). 2 Enter the desired printer name in the Printer field.
Note: You can enter DATABASE to write the report to a table for on-line viewing and to enable the saving of the report to a shared folder on a designated network drive.

©SunGard 2004-2007 Finance-Chart of Accounts
Page 182
Section C: Day-to-Day Operations
Lesson: Running the Location Hierarchy Report (Continued)
Procedure, continued
Step Action 3 Enter these parameter values.
Req? Parameter Description yes Chart of
Accounts Enter the 1-character code previously created for the Chart of Accounts.
Effective Date Date from which information to run the report shall be gathered.
Location Code Enter ART101. Location code reported. If you leave this field blank, you would generate a report for the entire location hierarchy.
Hold/Submit Enter S. Determines the report status. 4 Click the Save Parameter Set as checkbox. 5 Enter a name and description in the Name and Description fields. 6 Click the Submit radio button. 7 Click the Save icon to execute the report. 8 Once the process has run, check the Auto Hint line.
Note: It should indicate that two files were created: a Log file and a List file. The filenames are in the format process_number.type, where: • process is the name of the report run (for this Procedure, FGRACTH) • number is the process number of the report run • type is the type of file created (.log for Log, .lis for List)
9 Select the Review Output option from the Options menu to navigate to the Saved Output Review Form (GJIREVO) to view the report.
10 Enter FGRLOCH in the Process field. 11 Enter the process number from the Auto Hint line in the Number field.
Note: This field specifies the number of the job.
12 Double-click in the File Name field to view the available output files. 13 Click the Exit icon.
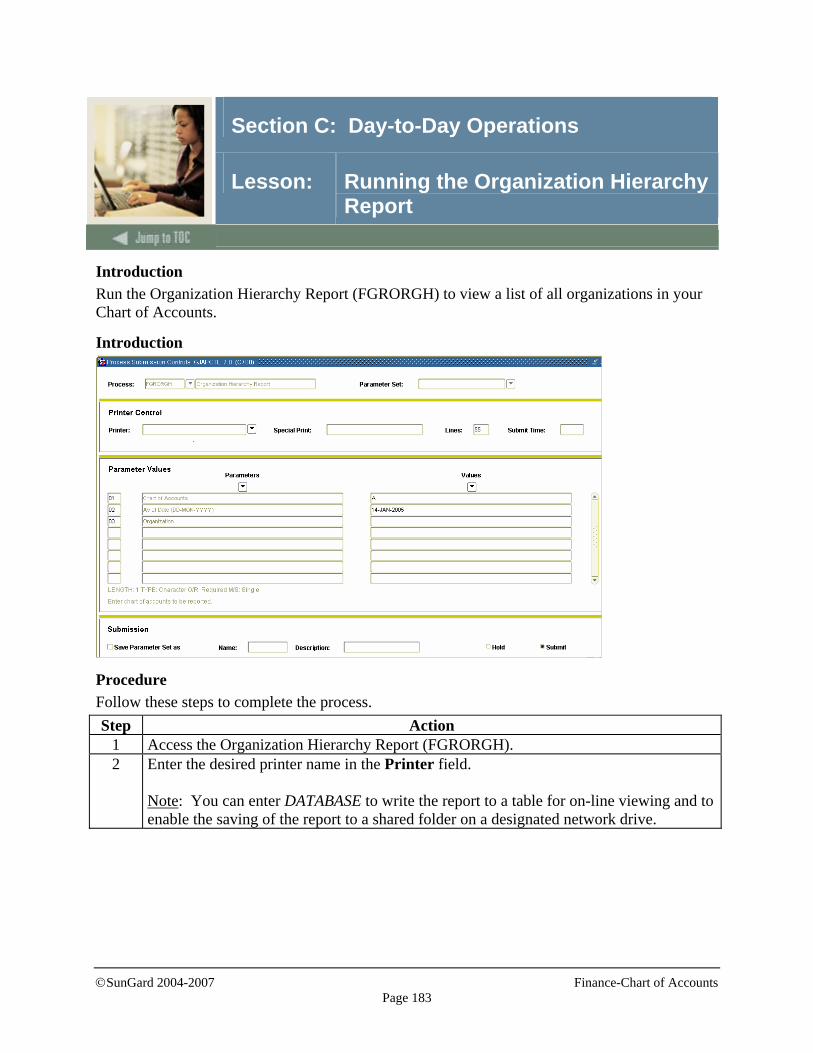
©SunGard 2004-2007 Finance-Chart of Accounts
Page 183
Section C: Day-to-Day Operations
Lesson: Running the Organization Hierarchy Report
Introduction Run the Organization Hierarchy Report (FGRORGH) to view a list of all organizations in your Chart of Accounts.
Introduction
Procedure Follow these steps to complete the process. Step Action
1 Access the Organization Hierarchy Report (FGRORGH). 2 Enter the desired printer name in the Printer field.
Note: You can enter DATABASE to write the report to a table for on-line viewing and to enable the saving of the report to a shared folder on a designated network drive.
©SunGard 2004-2007 Finance-Chart of Accounts
Page 184
Section C: Day-to-Day Operations
Lesson: Running the Organization Hierarchy Report (Continued)
Procedure, continued
Step Action 3 Enter these parameter values.
Req? Parameter Description yes Chart of
Accounts Enter the 1-character code previously created for the Chart of Accounts.
Effective Date Date from which information to run the report shall be gathered.
Organization Enter 001. This report will return all the organization codes that are associated with organization 001. If you leave this field blank, you would obtain an organization hierarchy for all organizations in the College.
Hold/Submit Enter S. Determines the report status. 4 Click the Save Parameter Set as checkbox. 5 Enter a name and description in the Name and Description fields. 6 Click the Submit radio button. 7 Click the Save icon to execute the report. 8 Once the process has run, check the Auto Hint line.
Note: It should indicate that two files were created: a Log file and a List file. The filenames are in the format process_number.type, where: • process is the name of the report run (for this Procedure, FGRACTH) • number is the process number of the report run • type is the type of file created (.log for Log, .lis for List)
9 Select the Review Output option from the Options menu to navigate to the Saved Output Review Form (GJIREVO) to view the report.
10 Enter FGRORGH in the Process field. Note: This field contains the name of the job previously run.
11 Enter the process number from the Auto Hint line in the Number field. Note: This field specifies the number of the job.
©SunGard 2004-2007 Finance-Chart of Accounts
Page 185
Section C: Day-to-Day Operations
Lesson: Running the Organization Hierarchy Report (Continued)
Procedure, continued
Step Action 10 Double-click in the File Name field to view the available output files.
Note: The output file names will be in the format database_process_number.type, as above, but here using the name of the database as a prefix. This field specifies the name of the file produced because of running the job. Select the file for your process with the .lis suffix to display the report output.
11 Click the Exit icon.
©SunGard 2004-2007 Finance-Chart of Accounts
Page 186
Section C: Day-to-Day Operations
Lesson: Summary
Summary By completing this section you have • processed General Accounting transactions • produced reports for the Chart of Accounts • queried financial data • produced financial reports.
©SunGard 2004-2007 Finance-Chart of Accounts
Page 187
Section C: Day-to-Day Operations
Lesson: Self Check
Directions Use the information you have learned in this workbook to complete this self check activity.
Question 1 What is the function of the Chart of Accounts Maintenance Form (FTMCOAS)?
Question 2 What are the “Keys” which are established in the Budget Control block of the Chart of Accounts Maintenance Form (FTMCOAS), and what does entering a Y or N indicate?
Question 3 The Close Operating Ledger Rule Class field in the Parameters block on the Chart of Accounts Maintenance Form (FTMCOAS) is a required field. What does this code represent?
Question 4 What does the Encumbrance Parameters block define?
Question 5 The Budget Carry Forward Parameters block allows the definition of the following rules. What does each rule indicate? Budget Type: Budget Class:
Question 6 What are the six things defined on the Fiscal Year Maintenance Form (FTMFSYR)?
©SunGard 2004-2007 Finance-Chart of Accounts
Page 188
Section C: Day-to-Day Operations
Lesson: Self Check (Continued)
Question 7 The Chart of Accounts code must exist and be in effect before it can be used on the Account Type Validation Form (FTVATYP). True or False
Question 8 What is entered in the Entity/Usage Code field?
Question 9 Where on the System Data Maintenance Form (FTMSDAT) do you identify the name of the column within the specified table?
Question 10 What is defined in the Optional Code #1 field?
Question 11 The Account Type Code Maintenance Form (FTMATYP) requires that what three things must be established and in effect?
Question 12 What is needed to define a Level 2 account?
Question 13 User-defined account codes are created on the Account Code Maintenance Form (FTMACCT), and are tied to account types defined on what form?
©SunGard 2004-2007 Finance-Chart of Accounts
Page 189
Section C: Day-to-Day Operations
Lesson: Self Check (Continued)
Question 14 How do you access the FOAPAL Attribute Association Form (FTMFATA)?
Question 15 The Control Account Maintenance Form (FTMACTS) allows you to establish what?
Question 16 If a particular amount (which is identified by the Sequence Number) requires an offset account, how is this indicated?
Question 17 Fund Codes must be established and in effect before any Fund Types may be established in the system. True or False
Question 18 List three features supported on the Fund Type Maintenance Form (FTMFTYP).
Question 19 Why is it important to establish Fund codes?
Question 20 List the five features supported on the Fund Code Maintenance Form.
©SunGard 2004-2007 Finance-Chart of Accounts
Page 190
Section C: Day-to-Day Operations
Lesson: Self Check (Continued)
Question 21 The Fund Balance Account Maintenance Form (FTMFBAL) provides you with the ability to cross reference fund balance accounts to what three things for a single chart of accounts?
Question 22 Where on the Fund Balance Account Maintenance Form (FTMFBAL) do you indicate what type of Fund/Account combination you want to report on FASB 117 reports?
Question 23 A Bank ID must exist on the General Person table before being entered on the Person Identification Form (FOAIDEN). True or False
Question 24 If the Bank ID code already exists in the General Person table, the name will be displayed but will not be updateable. True or False
Question 25 What is the purpose of the Bank Account Number field?
©SunGard 2004-2007 Finance-Chart of Accounts
Page 191
Section C: Day-to-Day Operations
Lesson: Self Check (Continued)
Question 26 Define the following: Bank Fund: Cash Account: Interfund Account:
Question 27 What do program codes represent?
Question 28 What are the three required fields on the Program Code Maintenance Form (FTMPROG)?
Question 29 How are Activity codes used?
Question 30 Location codes are maintained in a ___ level hierarchy structure.
Question 31 All levels of the hierarchy must be used? True or False
Question 32 Entering the Square Footage/Square Footage Rate fields provides additional information to the system for what subsequent use?
©SunGard 2004-2007 Finance-Chart of Accounts
Page 192
Section C: Day-to-Day Operations
Lesson: Self Check (Continued)
Question 33 What is the maximum number of levels in an organization?
Question 34 The Financial Manager ID must be in the General Person Identification Table (SPAIDEN). True or False
Question 35 If Fund, Predecessor Organization, Program, Location, or Budget Control Organization code(s) are entered, they must ____ and ____.
Question 36 What is the function of the Agency Code Maintenance Form (FTMAGCY)?
Question 37 The Agency structure is a maximum ___ level user defined hierarchy.
Question 38 What do Account Index codes represent?
Question 39 What designation are you providing by entering one or all of the values in the Accounting Distribution block of the Account Index Code Maintenance Form (FTMACCI)?
©SunGard 2004-2007 Finance-Chart of Accounts
Page 193
Section C: Day-to-Day Operations
Lesson: Self Check (Continued)
Question 40 What do the Interfund DueTo/Due From fields indicate?
Question 41 The Fund Balance Account (entered in the Parameters block) used for what?
Question 42 What do the attribute types that are set up on the Attribute Type Maintenance Form (FTMATTT) enable you to do?
Question 43 Attribute values, which are linked to attribute types and are optional, are set up on the Attribute Value Maintenance Form (FTMATTV). True or False
Question 44 Set codes, attribute types, and/or attribute values are associated to FOAPAL codes on what form?
Question 45 Where can you search for information about FOAPAL codes, set codes, attribute types, and/or attribute values?
©SunGard 2004-2007 Finance-Chart of Accounts
Page 194
Section C: Day-to-Day Operations
Lesson: Self Check (Continued)
Question 46 The Currency code table contains many attributes that describe each currency code and allow the system to know how to treat each currency code. True or False
Question 47 The Currency Code Maintenance Form (GUACRR) is non-chart specific. In a multi-chart environnent, certain codes must remain consistent. This form contains two such code fields. What are they?
Question 48 The Financial Manager Maintenance Form (FTMFMGR) is used to identify financial managers and principal investigators in the system. They must be established using this form before what can happen?
Question 49 A manager is assigned to what three things on the Financial Manager Maintenance Form (FTMFMGR)?

©SunGard 2004-2007 Finance-Chart of Accounts
Page 195
Section C: Day-to-Day Operations
Lesson: Self Check (Continued)
Question 50 What is the function of the Installation Control Form (GUAINST)?
Question 51 Where will the name entered in the Name field appear?
Question 52 Where do you enter the current release number for each Banner System at the institution?
©SunGard 2004-2007 Finance-Chart of Accounts
Page 196
Section C: Day-to-Day Operations
Lesson: Self Check – Answer Key
Question 1 What is the function of the Chart of Accounts Maintenance Form (FTMCOAS)? The Chart of Accounts Maintenance Form allows the establishment and maintenance of the Charts of Accounts for the institution. It is also used to define the institution policies and system control rules for the operation of the financial system.
Question 2 What are the “Keys” which are established in the Budget Control block of the Chart of Accounts Maintenance Form (FTMCOAS), and what does entering a Y or N indicate? The Budget Control “Keys” are Funds, Organization, Account, and Program. By entering a value of Y- Yes, or N – No, the user indicates what level of budget control is to be enforced for all budgets within the chart of accounts.
Question 3 The Close Operating Ledger Rule Class field in the Parameters block on the Chart of Accounts Maintenance Form (FTMCOAS) is a required field. What does this code represent? This four-character alpha/numeric code represents the rule used in the process that closes the operating ledger at the end of the year.
Question 4 What does the Encumbrance Parameters block define? Encumbrance Parameters are entered to define to the system how encumbrance values recorded during the year are to be treated in the year-end process.
©SunGard 2004-2007 Finance-Chart of Accounts
Page 197
Section C: Day-to-Day Operations
Lesson: Self Check – Answer Key (Continued)
Question 5 The Budget Carry Forward Parameters block allows the definition of the following rules. What does each rule indicate? Budget Type: indicates whether the budget is treated as a temporary or a permanent budget. Budget Class: indicates whether the budget is to be recorded in the new fiscal year as an Original Budget or an Adjusted Budget.
Question 6 What are the six things defined on the Fiscal Year Maintenance Form (FTMFSYR)? Fiscal Year dates Number of periods Period status Start and end dates Fiscal Quarter indicators Accrual period
Question 7 The Chart of Accounts code must exist and be in effect before it can be used on the Account Type Validation Form (FTVATYP). False. The Account Type Validation Form is used to set up the account type codes. They will be linked to the Chart of Accounts code later.
Question 8 What is entered in the Entity/Usage Code field? The form or table that identifies the entity.
©SunGard 2004-2007 Finance-Chart of Accounts
Page 198
Section C: Day-to-Day Operations
Lesson: Self Check – Answer Key (Continued)
Question 9 Where on the System Data Maintenance Form (FTMSDAT) do you identify the name of the column within the specified table? The Attribute Code field identifies the column name.
Question 10 What is defined in the Optional Code #1 field? The Optional Code #1 field contains a user-defined, eight-character code, which applies to the entity and attribute combination.
Question 11 The Account Type Code Maintenance Form (FTMATYP) requires that what three things must be established and in effect? Chart of Accounts Internal Account Type Predecessor Code
Question 12 What is needed to define a Level 2 account? The Predecessor Code.
Question 13 User-defined account codes are created on the Account Code Maintenance Form (FTMACCT), and are tied to account types defined on what form? The Account Type Code Maintenance Form (FTMATYP).
Question 14 How do you access the FOAPAL Attribute Association Form (FTMFATA)? Select Assign Attributes from the Options menu.
©SunGard 2004-2007 Finance-Chart of Accounts
Page 199
Section C: Day-to-Day Operations
Lesson: Self Check – Answer Key (Continued)
Question 15 The Control Account Maintenance Form (FTMACTS) allows you to establish what? The Control Account Maintenance Form (FTMACTS) allows you to establish a relationship among various budget, actual, and encumbrance amounts found on the Operating Ledger and the control accounts found on the General Ledger.
Question 16 If a particular amount (which is identified by the Sequence Number) requires an offset account, how is this indicated? A value of OFFSET is entered in the Data field on the System Data Table (accessed via the System Data Maintenance Form (FTMSDAT).
Question 17 Fund Codes must be established and in effect before any Fund Types may be established in the system. False. Fund Types must be established and in effect before any Fund Codes may be established in the system.
Question 18 List three features supported on the Fund Type Maintenance Form (FTMFTYP). Budget Control definitions Fixed Asset Capitalization Fiscal Year End Processing
Question 19 Why is it important to establish Fund codes? The Fund code is a primary component of the overall accounting structure and is required on all accounting transactions.
©SunGard 2004-2007 Finance-Chart of Accounts
Page 200
Section C: Day-to-Day Operations
Lesson: Self Check – Answer Key (Continued)
Question 20 List the five features supported on the Fund Code Maintenance Form. Budget Control definitions Fixed Asset Capitalization Grant Accounting Multiple Fund Balance definition Defaulting of Organization, Program, Activity and Location codes
Question 21 The Fund Balance Account Maintenance Form (FTMFBAL) provides you with the ability to cross reference fund balance accounts to what three things for a single chart of accounts? Fund types Fund codes Account codes
Question 22 Where on the Fund Balance Account Maintenance Form (FTMFBAL) do you indicate what type of Fund/Account combination you want to report on FASB 117 reports? The Rest(riction) Ind.
Question 23 A Bank ID must exist on the General Person table before being entered on the Person Identification Form (FOAIDEN). False. If a new ID code is entered on the Person Identification Form (FOAIDEN) that does not exit on the General Person table, a General Person record will be created, assigning a new PIDM to the vendor.
©SunGard 2004-2007 Finance-Chart of Accounts
Page 201
Section C: Day-to-Day Operations
Lesson: Self Check – Answer Key (Continued)
Question 24 If the Bank ID code already exists in the General Person table, the name will be displayed but will not be updateable. True.
Question 25 What is the purpose of the Bank Account Number field? This field contains a 15-character code that the bank uses to recognize you. This is the number that is encoded on checks.
Question 26 Define the following: Bank Fund: A code which uniquely identifies a fiscal entity Cash Account: The account number and title of the installments cash balances in the bank fund Interfund Account: The account number and title of the installments cash balance in each operating ledger
Question 27 What do program codes represent? Program codes represent functional classifications of financial activity such as Instruction, Research, and Public Support.
Question 28 What are the three required fields on the Program Code Maintenance Form (FTMPROG)? Chart of Accounts Program code Program title
©SunGard 2004-2007 Finance-Chart of Accounts
Page 202
Section C: Day-to-Day Operations
Lesson: Self Check – Answer Key (Continued)
Question 29 How are Activity codes used? An Activity code is an optional code in the accounting distribution and may be used to further delineate financial activity of the institution.
Question 30 Location codes are maintained in a ___ level hierarchy structure. Five
Question 31 All levels of the hierarchy must be used? False.
Question 32 Entering the Square Footage/Square Footage Rate fields provides additional information to the system for what subsequent use? This information is used in cost studies.
Question 33 What is the maximum number of levels in an organization? Eight.
Question 34 The Financial Manager ID must be in the General Person Identification Table (SPAIDEN). True.
©SunGard 2004-2007 Finance-Chart of Accounts
Page 203
Section C: Day-to-Day Operations
Lesson: Self Check – Answer Key (Continued)
Question 35 If Fund, Predecessor Organization, Program, Location, or Budget Control Organization code(s) are entered, they must ____ and ____. If Fund, Predecessor Organization, Program, Location, or Budget Control Organization code(s) are entered, they must exist and be in effect.
Question 36 What is the function of the Agency Code Maintenance Form (FTMAGCY)? The Agency Code Maintenance Form (FTMAGCY) to create and maintain a list of agencies external to your installation for reporting purposes.
Question 37 The Agency structure is a maximum ___ level user defined hierarchy. Five.
Question 38 What do Account Index codes represent? Index codes represent “short hand” codes, which may be used to reduce the keystrokes necessary to enter an accounting distribution in the system.
©SunGard 2004-2007 Finance-Chart of Accounts
Page 204
Section C: Day-to-Day Operations
Lesson: Self Check – Answer Key (Continued)
Question 39 What designation are you providing by entering one or all of the values in the Accounting Distribution block of the Account Index Code Maintenance Form (FTMACCI)? By entering one or all of the values in the Accounting Distribution block, you are providing a designation of the default accounting distributions that will be automatically brought to the transaction entry when the Account Index code is entered.
Question 40 What do the Interfund DueTo/Due From fields indicate? The Chart Due To/Due From accounts are entered to indicate to the system which accounts are to be used when the automatic posting of due to/due from accounts is to occur. This allows the user to debit one fund and credit another fund without having to enter the offsetting due to/due from accounts.
Question 41 The Fund Balance Account (entered in the Parameters block) used for what? The Fund Balance Account may be used for journal entry and for the posting account when the operating account ledger is closed at year-end.
Question 42 What do the attribute types that are set up on the Attribute Type Maintenance Form (FTMATTT) enable you to do? Attribute types enable you to categorize financial information for reporting purposes.
Question 43 Attribute values, which are linked to attribute types and are optional, are set up on the Attribute Value Maintenance Form (FTMATTV). True.
©SunGard 2004-2007 Finance-Chart of Accounts
Page 205
Section C: Day-to-Day Operations
Lesson: Self Check – Answer Key (Continued)
Question 44 Set codes, attribute types, and/or attribute values are associated to FOAPAL codes on what form? FOAPAL Attribute Association Form (FTMFATA).
Question 45 Where can you search for information about FOAPAL codes, set codes, attribute types, and/or attribute values? FOAPAL Attribute Association Query Form (FTIFATA).
Question 46 The Currency code table contains many attributes that describe each currency code and allow the system to know how to treat each currency code. True.
Question 47 The Currency Code Maintenance Form (GUACRR) is non-chart specific. In a multi-chart environnent, certain codes must remain consistent. This form contains two such code fields. What are they? A/P Account Exchange Rate
Question 48 The Financial Manager Maintenance Form (FTMFMGR) is used to identify financial managers and principal investigators in the system. They must be established using this form before what can happen? A financial manager must be established using the Financial Manager Maintenance Form (FTMFMGR) before assigning a manager to an organization or fund/grant.
©SunGard 2004-2007 Finance-Chart of Accounts
Page 206
Section C: Day-to-Day Operations
Lesson: Self Check – Answer Key (Continued)
Question 49 A manager is assigned to what three things on the Financial Manager Maintenance Form (FTMFMGR)? Chart of Accounts A home organization A home location
Question 50 What is the function of the Installation Control Form (GUAINST)? The Installation Control Form (GUAINST) maintains overall system information for the installation.
Question 51 Where will the name entered in the Name field appear? The name entered in the Name field will be used in all standard form headings and standard report headings.
Question 52 Where do you enter the current release number for each Banner System at the institution? The current release number for each Banner System at the institution is entered on the Installation Control block, which is accessed by selecting Installation Control from the Options menu.
©SunGard 2004-2007 Finance-Chart of Accounts
Page 207
Section D: Reference
Lesson: Overview
Introduction The purpose of this section is to provide reference materials related to the workbook.
Section contents Overview ..............................................................................................................................207 Setup Forms and Where Used ..............................................................................................208 Day-to-Day Forms and Setup Needed..................................................................................210 Forms Job Aid ......................................................................................................................212
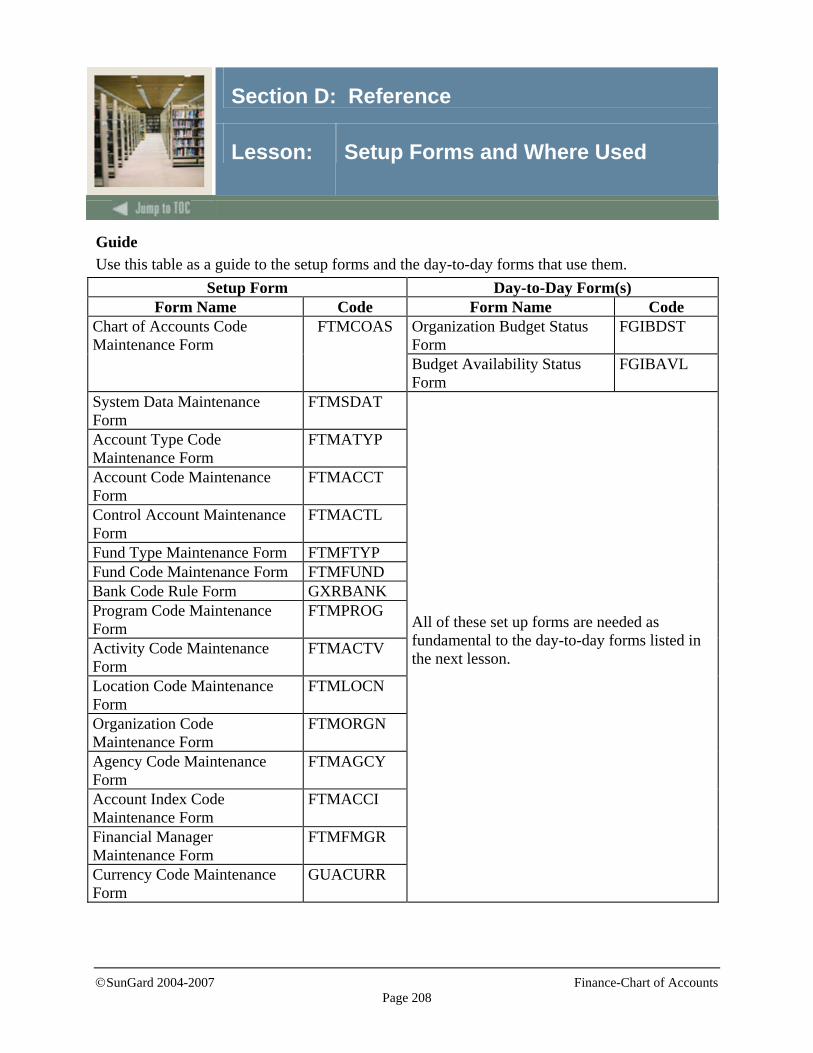
©SunGard 2004-2007 Finance-Chart of Accounts
Page 208
Section D: Reference
Lesson: Setup Forms and Where Used
Guide Use this table as a guide to the setup forms and the day-to-day forms that use them.
Setup Form Day-to-Day Form(s) Form Name Code Form Name Code
Organization Budget Status Form
FGIBDST Chart of Accounts Code Maintenance Form
FTMCOAS
Budget Availability Status Form
FGIBAVL
System Data Maintenance Form
FTMSDAT
Account Type Code Maintenance Form
FTMATYP
Account Code Maintenance Form
FTMACCT
Control Account Maintenance Form
FTMACTL
Fund Type Maintenance Form FTMFTYP Fund Code Maintenance Form FTMFUND Bank Code Rule Form GXRBANK Program Code Maintenance Form
FTMPROG
Activity Code Maintenance Form
FTMACTV
Location Code Maintenance Form
FTMLOCN
Organization Code Maintenance Form
FTMORGN
Agency Code Maintenance Form
FTMAGCY
Account Index Code Maintenance Form
FTMACCI
Financial Manager Maintenance Form
FTMFMGR
Currency Code Maintenance Form
GUACURR
All of these set up forms are needed as fundamental to the day-to-day forms listed in the next lesson.
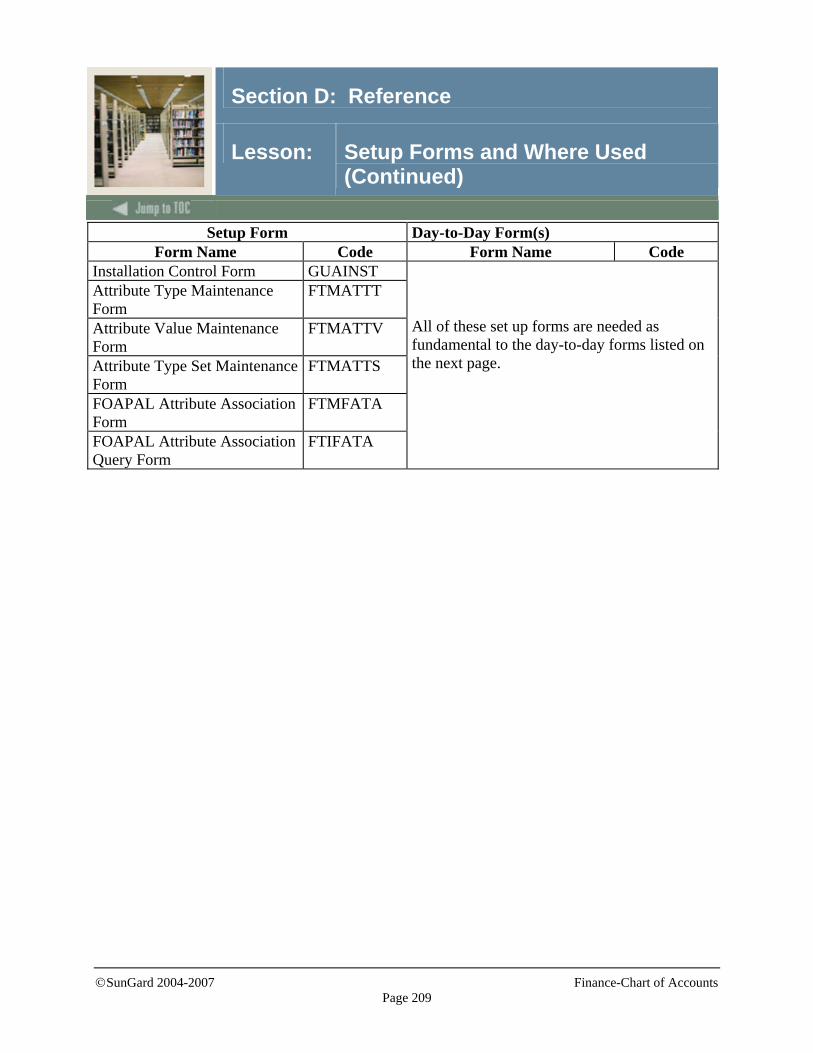
©SunGard 2004-2007 Finance-Chart of Accounts
Page 209
Section D: Reference
Lesson: Setup Forms and Where Used (Continued)
Setup Form Day-to-Day Form(s) Form Name Code Form Name Code
Installation Control Form GUAINST Attribute Type Maintenance Form
FTMATTT
Attribute Value Maintenance Form
FTMATTV
Attribute Type Set Maintenance Form
FTMATTS
FOAPAL Attribute Association Form
FTMFATA
FOAPAL Attribute Association Query Form
FTIFATA
All of these set up forms are needed as fundamental to the day-to-day forms listed on the next page.

©SunGard 2004-2007 Finance-Chart of Accounts
Page 210
Section D: Reference
Lesson: Day-to-Day Forms and Setup Needed
Guide Use this table as a guide to the day-to-day forms and the setup forms needed for each.
Day-to-Day Form Setup Forms Needed Organization Budget Status Form (FGIBDST)
• Chart of Accounts Code Maintenance Form (FTMCOAS)
Budget Availability Status Form (FGIBAVL)
• Chart of Accounts Code Maintenance Form (FTMCOAS)
Encumbrance/Reservations Maintenance Form (FGAENCB)
• Chart of Accounts Code Maintenance Form (FTMCOAS)
• System Data Maintenance Form (FTMSDAT) • Account Type Code Maintenance Form (FTMATYP) • Account Code Maintenance Form (FTMACCT) • Control Account Maintenance Form (FTMACTL) • Fund Type Maintenance Form (FTMFTYP) • Fund Code Maintenance Form (FTMFUND) • Bank Code Rule Form (GXRBANK) • Program Code Maintenance Form (FTMPROG) • Activity Code Maintenance Form (FTMACTV) • Location Code Maintenance Form (FTMLOCN) • Organization Code Maintenance Form (FTMORGN) • Agency Code Maintenance Form (FTMAGCY) • Account Index Code Maintenance Form (FTMACCI) • Financial Manager Maintenance Form (FTMFMGR) • Currency Code Maintenance Form (GUACURR) • Installation Control Form (GUAINST) • Attribute Type Maintenance Form (FTMATTT) • Attribute Value Maintenance Form (FTMATTV) • Attribute Type Set Maintenance Form (FTMATTS) • FOAPAL Attribute Association Form (FTMFATA) • FOAPAL Attribute Association Query Form
(FTIFATA) Journal Voucher Entry Form (FGAJVCD)
• See above
Journal Voucher Quick Form (FGAJVCQ)
• See above
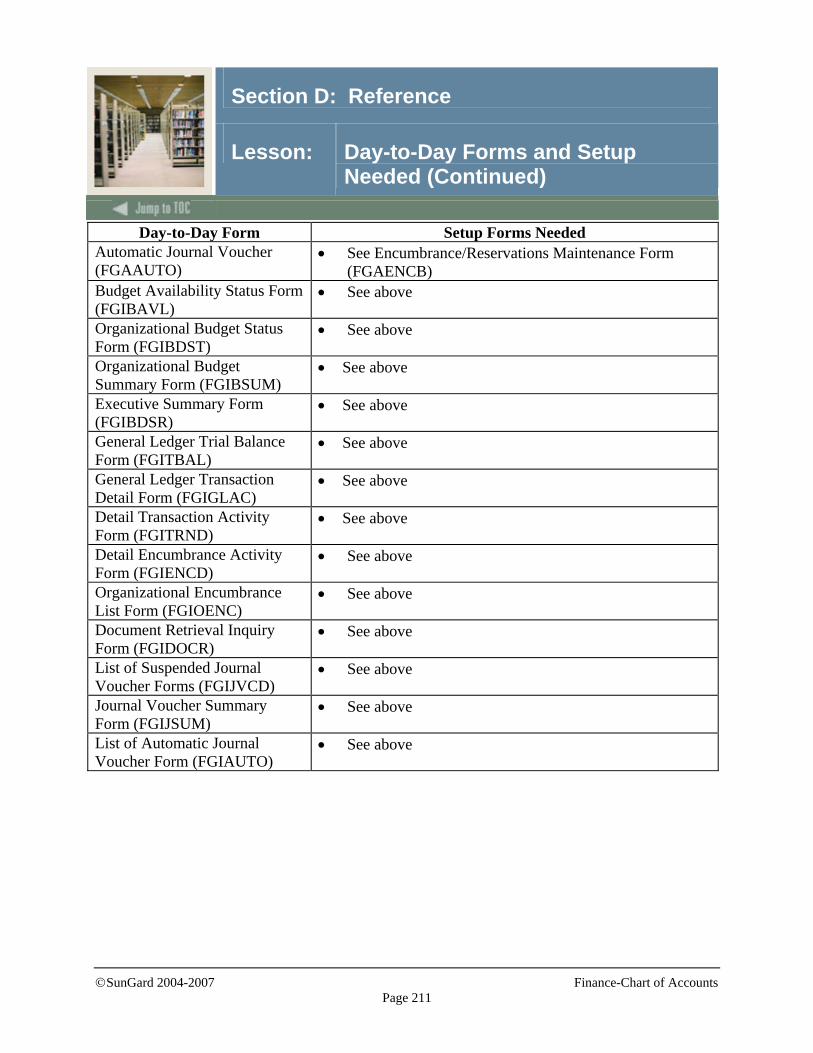
©SunGard 2004-2007 Finance-Chart of Accounts
Page 211
Section D: Reference
Lesson: Day-to-Day Forms and Setup Needed (Continued)
Day-to-Day Form Setup Forms Needed Automatic Journal Voucher (FGAAUTO)
• See Encumbrance/Reservations Maintenance Form (FGAENCB)
Budget Availability Status Form (FGIBAVL)
• See above
Organizational Budget Status Form (FGIBDST)
• See above
Organizational Budget Summary Form (FGIBSUM)
• See above
Executive Summary Form (FGIBDSR)
• See above
General Ledger Trial Balance Form (FGITBAL)
• See above
General Ledger Transaction Detail Form (FGIGLAC)
• See above
Detail Transaction Activity Form (FGITRND)
• See above
Detail Encumbrance Activity Form (FGIENCD)
• See above
Organizational Encumbrance List Form (FGIOENC)
• See above
Document Retrieval Inquiry Form (FGIDOCR)
• See above
List of Suspended Journal Voucher Forms (FGIJVCD)
• See above
Journal Voucher Summary Form (FGIJSUM)
• See above
List of Automatic Journal Voucher Form (FGIAUTO)
• See above
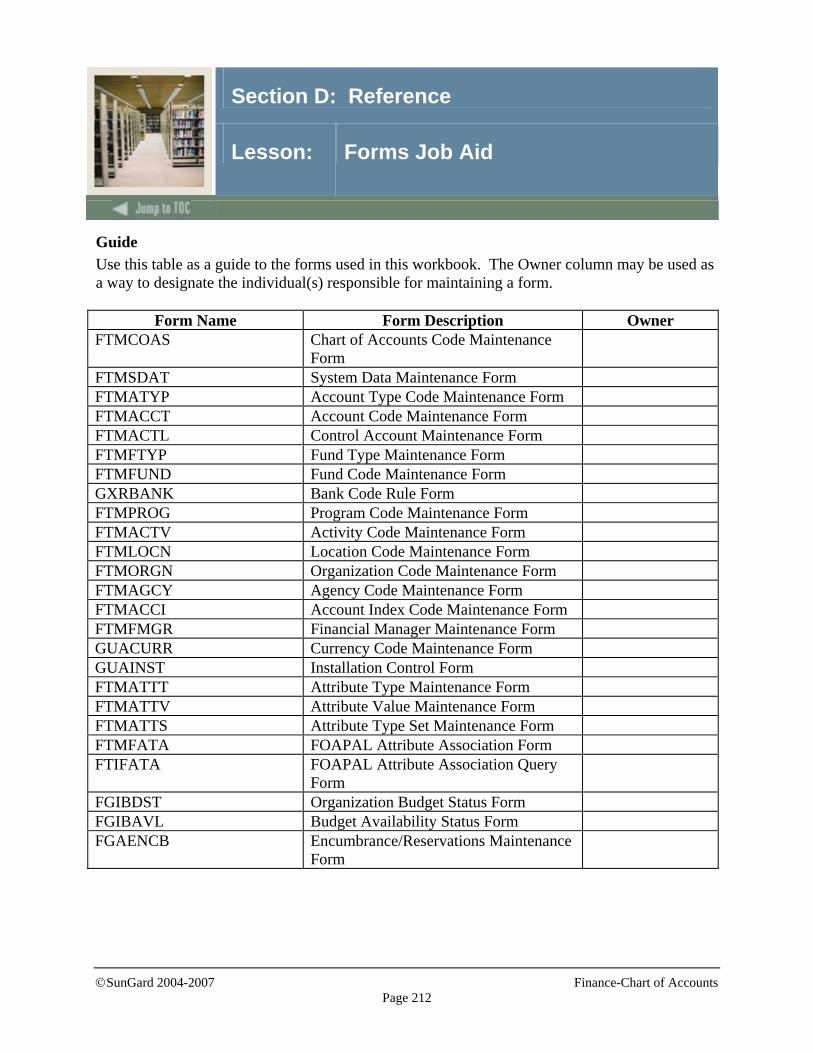
©SunGard 2004-2007 Finance-Chart of Accounts
Page 212
Section D: Reference
Lesson: Forms Job Aid
Guide Use this table as a guide to the forms used in this workbook. The Owner column may be used as a way to designate the individual(s) responsible for maintaining a form.
Form Name Form Description Owner FTMCOAS Chart of Accounts Code Maintenance
Form
FTMSDAT System Data Maintenance Form FTMATYP Account Type Code Maintenance Form FTMACCT Account Code Maintenance Form FTMACTL Control Account Maintenance Form FTMFTYP Fund Type Maintenance Form FTMFUND Fund Code Maintenance Form GXRBANK Bank Code Rule Form FTMPROG Program Code Maintenance Form FTMACTV Activity Code Maintenance Form FTMLOCN Location Code Maintenance Form FTMORGN Organization Code Maintenance Form FTMAGCY Agency Code Maintenance Form FTMACCI Account Index Code Maintenance Form FTMFMGR Financial Manager Maintenance Form GUACURR Currency Code Maintenance Form GUAINST Installation Control Form FTMATTT Attribute Type Maintenance Form FTMATTV Attribute Value Maintenance Form FTMATTS Attribute Type Set Maintenance Form FTMFATA FOAPAL Attribute Association Form FTIFATA FOAPAL Attribute Association Query
Form
FGIBDST Organization Budget Status Form FGIBAVL Budget Availability Status Form FGAENCB Encumbrance/Reservations Maintenance
Form
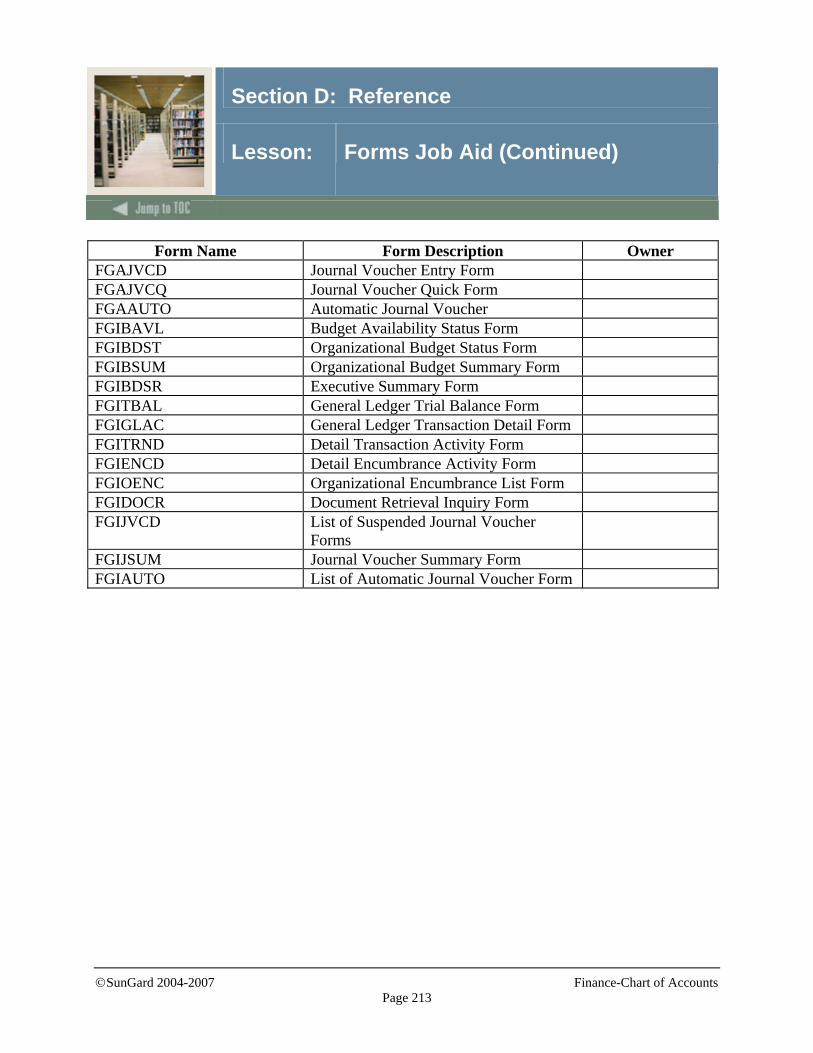
©SunGard 2004-2007 Finance-Chart of Accounts
Page 213
Section D: Reference
Lesson: Forms Job Aid (Continued)
Form Name Form Description Owner
FGAJVCD Journal Voucher Entry Form FGAJVCQ Journal Voucher Quick Form FGAAUTO Automatic Journal Voucher FGIBAVL Budget Availability Status Form FGIBDST Organizational Budget Status Form FGIBSUM Organizational Budget Summary Form FGIBDSR Executive Summary Form FGITBAL General Ledger Trial Balance Form FGIGLAC General Ledger Transaction Detail Form FGITRND Detail Transaction Activity Form FGIENCD Detail Encumbrance Activity Form FGIOENC Organizational Encumbrance List Form FGIDOCR Document Retrieval Inquiry Form FGIJVCD List of Suspended Journal Voucher
Forms
FGIJSUM Journal Voucher Summary Form FGIAUTO List of Automatic Journal Voucher Form
Release Date
This workbook was last updated on 11/15/2007.