Banner 8’s Supplemental Data Engine Capabilities SDE...
14
SunGard Higher Education Confidential and Proprietary 1 Banner 8’s Supplemental Data Engine Capabilities Part I – Introduction SDE stands for “Supplemental Data Engine” It is a means for the user to functionally add fields to forms. - You can give certain users in your organization authority access to the SDE forms, so they can have the ability to add fields to forms. The security access to the SDE forms is granted via Banner Application security (GSASECR) What do SDE fields look like? - Appear on Banner INB forms in popup boxes. - The popup boxes don’t open automatically when you open the form, but you will know they exist, that SDE fields exist, by the appearance of the SDE icon at the top, right hand part of the screen: - If you click on the “illuminated” icon, the SDE popups will open. How SDE works: - The user associates additional fields to a table. - These additional fields will be displayable on any form that displays fields from that associated table. - The actual supplemental fields are stored in a separate, supplemental table. o GOVSDAV is the view, GORSDAV is the table
Transcript of Banner 8’s Supplemental Data Engine Capabilities SDE...

SunGard Higher Education Confidential and Proprietary
1
Banner 8’s Supplemental Data Engine Capabilities
Part I – Introduction SDE stands for “Supplemental Data Engine” It is a means for the user to functionally add fields to forms.
- You can give certain users in your organization authority access to the SDE forms, so they can have the ability to add fields to forms. The security access to the SDE forms is granted via Banner Application security (GSASECR)
What do SDE fields look like?
- Appear on Banner INB forms in popup boxes. - The popup boxes don’t open automatically when you open the form, but you will know they
exist, that SDE fields exist, by the appearance of the SDE icon at the top, right hand part of the screen:
- If you click on the “illuminated” icon, the SDE popups will open.
How SDE works:
- The user associates additional fields to a table. - These additional fields will be displayable on any form that displays fields from that associated
table. - The actual supplemental fields are stored in a separate, supplemental table.
o GOVSDAV is the view, GORSDAV is the table

SunGard Higher Education Confidential and Proprietary
2
How SDE is set up:
- In the Banner INB menu, you can see the SDE forms under General > System Functions / Administration / Supplemental Data Engine
-
The forms involved with SDE setup are:
- GTVSDTB – form for setting up tables you will attach supplemental fields to. This is the “Supplemental Data Attributes” form..
- GOADISC – to enter “discriminators”, or the supplemental fields. - GOASDMD– defines display characteristics of the supplemental field, or “Data Attribute”.
The three different ways SDE can be set up are:
- ‘User-Defined’ method – supplemental fields are defined by the user as either a single value or multiple set of values
- ‘Select’ method – supplemental fields are defined using a select statement - ‘Index’ method – supplemental fields can be a growing array of values

SunGard Higher Education Confidential and Proprietary
3
Part II – Basic Setup Example – using the ‘User-Defined’ method Step 1: Go to the GTVSDTB form and ensure that the table you want is displayed. If it is not, enter it. (example: find the entry for PEBEMPL. If it’s not there, enter it by inserting a record. The primary key should be “TO_CHAR(PEBEMPL_PIDM)”)
SunGard Higher Education Confidential and Proprietary
4
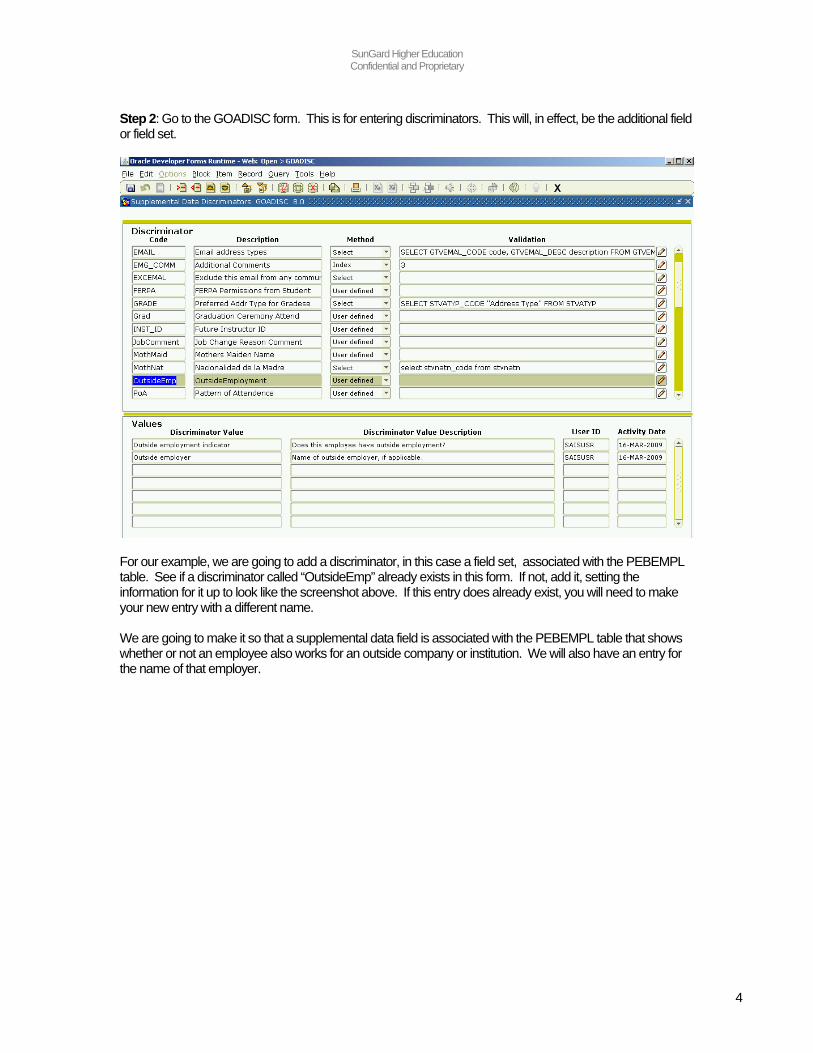
Step 2: Go to the GOADISC form. This is for entering discriminators. This will, in effect, be the additional field or field set.
For our example, we are going to add a discriminator, in this case a field set, associated with the PEBEMPL table. See if a discriminator called “OutsideEmp” already exists in this form. If not, add it, setting the information for it up to look like the screenshot above. If this entry does already exist, you will need to make your new entry with a different name. We are going to make it so that a supplemental data field is associated with the PEBEMPL table that shows whether or not an employee also works for an outside company or institution. We will also have an entry for the name of that employer.

SunGard Higher Education Confidential and Proprietary
5
Step 3: Next, go to GOASDMD. Fill out the GOASDMD form as show below. First, however, ensure that someone has not already done the same thing – ensure that this entry is not already there. If it is already there, with the same attribute name, verify its correctness or modify it to look like the screenshot below. Note that we are entering a new attribute named “OUTSIDE_EMPLOYER”. We will link this entry to that discriminator we had just created by specifying the discriminator name using the dropdown next to the label “Discriminator” (please see below). Please also note the Prompt “%DISC%”. This is our way of saying that the labels we set up in the discriminator will be used for display. Please also make good use of the Hint line and always be sure and put the valid allowable values in the hint line.
We could use the bottom of the form to associate this discriminator/attribute combination to another table. We will not do this for this example. Save and exit the form.
SunGard Higher Education Confidential and Proprietary
6
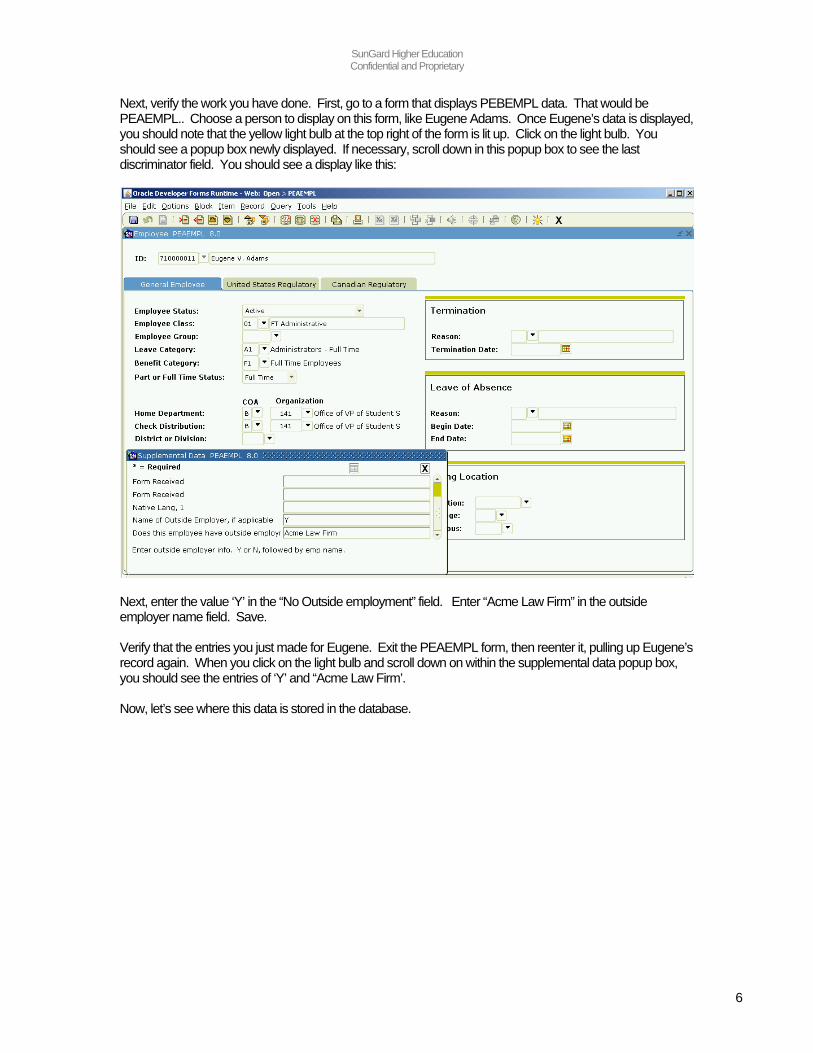
Next, verify the work you have done. First, go to a form that displays PEBEMPL data. That would be PEAEMPL.. Choose a person to display on this form, like Eugene Adams. Once Eugene’s data is displayed, you should note that the yellow light bulb at the top right of the form is lit up. Click on the light bulb. You should see a popup box newly displayed. If necessary, scroll down in this popup box to see the last discriminator field. You should see a display like this:
Next, enter the value ‘Y’ in the “No Outside employment” field. Enter “Acme Law Firm” in the outside employer name field. Save. Verify that the entries you just made for Eugene. Exit the PEAEMPL form, then reenter it, pulling up Eugene’s record again. When you click on the light bulb and scroll down on within the supplemental data popup box, you should see the entries of ‘Y’ and “Acme Law Firm’. Now, let’s see where this data is stored in the database.

SunGard Higher Education Confidential and Proprietary
7
Part III: Viewing the data in the database For this, sign on to a SQL tool like SQL Developer. Enter the following sql statement: select x.gorsdav_table_name, x.gorsdav_attr_name, x.gorsdav_pk_parenttab, decode(x.gorsdav_value.gettypeName(), 'SYS.VARCHAR2', x.gorsdav_value.accessVARCHAR2(), 'SYS.DATE', x.gorsdav_value.accessDATE(), 'SYS.NUMBER', x.gorsdav_value.accessNUMBER(), '*ERROR* Unknown SYS.ANYDATA data type ***') from gorsdav x where x.gorsdav_table_name = 'PEBEMPL' and x.gorsdav_attr_name = 'OUTSIDE_EMPLOYER' order by x.gorsdav_pk_parenttab; Examine the above statement. The data is viewable using the GOVSDAV view. Describe this view and note the field names used in the query above. This query can be used as a template for including SDE fields in views and in reports. Part IV: Using ‘Select’ for discriminators Example: Let’s say that we wish to add fields for email alert addresses to the emergency contact form. We would want to have room for multiple addresses, so can create these multiple entries to correspond to the different email types (ex: personal, business, etc) We want to use the “Select” option in the discriminator form, GOADISC. The steps for this would be: Step 1: ensure that an entry exists for SPREMRG, the emergency contact table, is listed in the GTVSDTB form, as below:

SunGard Higher Education Confidential and Proprietary
8
Step 2: Go to the GOADISC form. Create a new record for “EmgEmail” entry like below:
Next, enter ‘GTVEMAL’ in the validation field, then click on the pencil icon for that row. Fill out the resultant popup like so:
Click OK in the popup, then save the form. When you save the form, you should see another popup telling you that your query is correct and telling you how many values the query would retrieve.

SunGard Higher Education Confidential and Proprietary
9
Step 3: Go to GOASDMD. Choose the SPREMRG form at the top of this form, then go to the next block to populate the body of the form. Enter a new record for the form, giving your new Attribute a unique name, like ‘EMERG_EMAILS’. (Note: the sequence number will automatically filled in later for you). Fill in the rest of the record as displayed below:
Save the record and close the form. Step 4: Test. Go to either the SPAIDEN or PPAIDEN form and populate this form by choosing a valid test subject (ex: Eugene Adams in the TRNG instance). Click on the emergency contact tab. In order to test this successfully, there must be at least one emergency contact record. If there isn’t one, add one and save. Then, click on the light bulb icon, which should be illuminated, or colored in. The SDE display should show entry fields for multiple email addresses, one for each email type.

SunGard Higher Education Confidential and Proprietary
10
Part V: Using ‘Index’ for discriminators Step 1: In this example, we want to have supplemental fields for what languages a person speaks, with the idea of listing them in order of fluency. We will use a discriminator attached to SPBPERS. So, we know that our Step 1 is already taken care of, since this table is already listed in GTVSDTB. Step 2: Set up the GOADISC form, like so:
Step 3: Go to the GOASDMD form. Choose the SPBPERS table from the top of the form, then go to the next block to populate the body of the form. Fill out the form as shown below:
Save and exit.

SunGard Higher Education Confidential and Proprietary
11
Step 4: You can test by going to the PPAIDEN form. Find a valid person and populate this form with data (like Eugene Adams). Click on the SDE lightbulb icon.
You will see one entry for languages. You can enter the first one, and then can enter subsequent ones, up to 5, by choosing Record > Duplicate from the top of the form. Part VI: Functional and Technical Notes:
- Within an SDE box and within an individual field, if the user runs out of room during data entry, press F4.
- The underlying tables that contain the SDE data are: o GOBSDCT stores views to be generated o GOBSDDC stores Discriminators o GOBSDTB stores the SDE enabled Banner table names o GORSDAM stores Metadata (rules for data being extended) o GORSDAV stores the data value o GORSDDV stores user defined Discriminator values
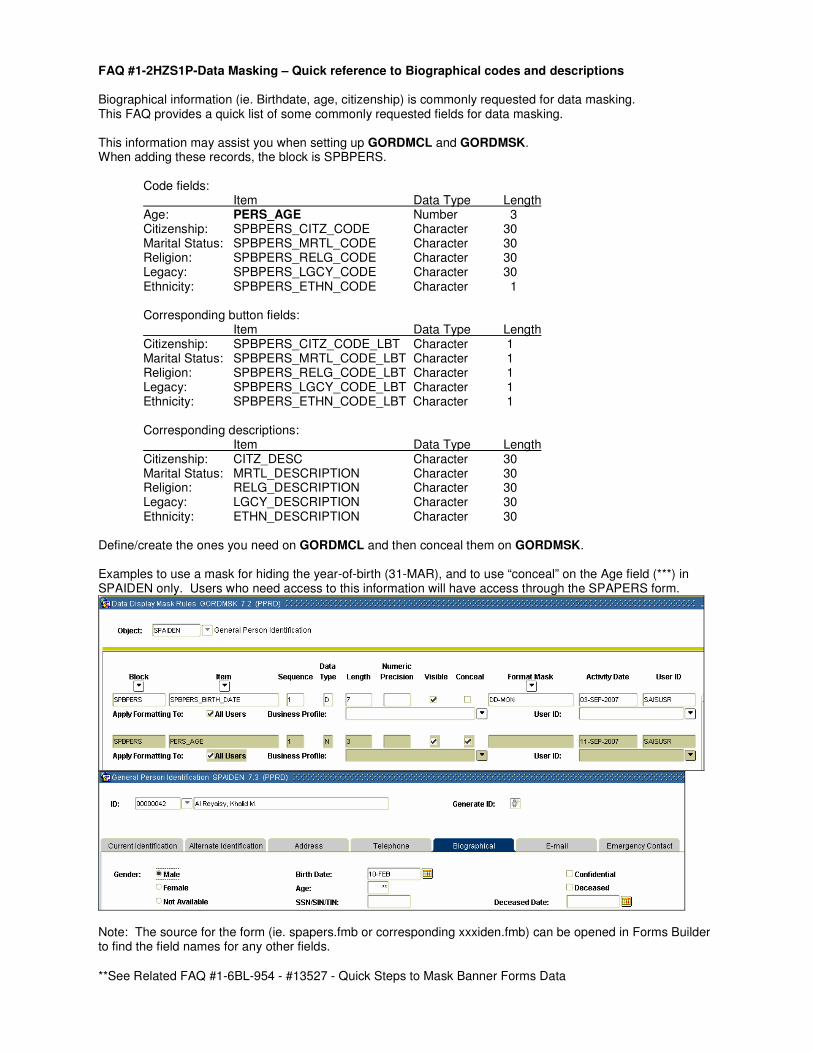
FAQ #1-2HZS1P-Data Masking – Quick reference to Biographical codes and descriptions Biographical information (ie. Birthdate, age, citizenship) is commonly requested for data masking. This FAQ provides a quick list of some commonly requested fields for data masking. This information may assist you when setting up GORDMCL and GORDMSK. When adding these records, the block is SPBPERS.
Code fields: Item Data Type Length Age: PERS_AGE Number 3 Citizenship: SPBPERS_CITZ_CODE Character 30 Marital Status: SPBPERS_MRTL_CODE Character 30 Religion: SPBPERS_RELG_CODE Character 30 Legacy: SPBPERS_LGCY_CODE Character 30 Ethnicity: SPBPERS_ETHN_CODE Character 1 Corresponding button fields: Item Data Type Length Citizenship: SPBPERS_CITZ_CODE_LBT Character 1 Marital Status: SPBPERS_MRTL_CODE_LBT Character 1 Religion: SPBPERS_RELG_CODE_LBT Character 1 Legacy: SPBPERS_LGCY_CODE_LBT Character 1 Ethnicity: SPBPERS_ETHN_CODE_LBT Character 1 Corresponding descriptions: Item Data Type Length Citizenship: CITZ_DESC Character 30 Marital Status: MRTL_DESCRIPTION Character 30 Religion: RELG_DESCRIPTION Character 30 Legacy: LGCY_DESCRIPTION Character 30 Ethnicity: ETHN_DESCRIPTION Character 30
Define/create the ones you need on GORDMCL and then conceal them on GORDMSK. Examples to use a mask for hiding the year-of-birth (31-MAR), and to use “conceal” on the Age field (***) in SPAIDEN only. Users who need access to this information will have access through the SPAPERS form.
Note: The source for the form (ie. spapers.fmb or corresponding xxxiden.fmb) can be opened in Forms Builder to find the field names for any other fields.
**See Related FAQ #1-6BL-954 - #13527 - Quick Steps to Mask Banner Forms Data

Navigation Exercises
4-Oct-10
Quiz A. System Overview 1. Name the five core Banner Products. 2. What is the current version of each product in you Banner instance? How did you find out this information? 3. What does the acronym PIDM stand for? 4. What are the benefits of an integrated system? 5. What are some consequences of an integrated system? B. Basic Navigation 1. Define Key block and Information block? 2. Describe 3 different ways of moving from the key block to an information block. 3. Describe 3 different ways of moving from the information block back to the key block. 4. What are the 2 wild card symbols? 5. Describe the location of the Hint Line and name at least two functions it performs. 6. There are many different ways of entering a date value into a date field. Name at least 2. 7. Which menu has features that are different on every form? Why? 8. Match the following functions with their shortcut keys: Save F7 Exit Shift tab Next Block F10 Rollback F8 List (of Values) F9 Previous Field Shift F7 Enter Query Ctrl Page Down Execute Query Ctrl Q

Navigation Exercises
4-Oct-10
C. Help 1. Where can you find online help and what does it describe? 2. Where can you find dynamic help about a particular field, block, or form? 3. Can dynamic help be edited? How? 4. How can you find out how many characters a particular field will hold? 5. How can you find the keystroke for different functions (shortcuts)? 6. How can you find the Banner Bookshelf and what types of documents does it contain? D. Exercises 1. Log in to Banner and access the File menu (challenge: open the file menu without using the mouse). 2. Select the Preferences feature (what form does this open?) 3. Change some of the color settings on the right hand side of the first tab (note that the right hand side has a scroll bar). If you save after each color change, you should notice the change reflected on your form. 4. Discover what each color field relates to (you may need to exit the form). 5. Return to the main menu. 6. Perform the List function on the Go To box (what form does this access?) 7. Enter “%Password%” (no quotes) into the description field. 8. Execute your query 9. Write down your answers 10. Exit the form 11. Access the My Banner folder 12. Open the Organize My Banner form 13. Add the results of your query to the Object list and save 14. Log out of Banner 15. Log back in to Banner 16. Open the My Banner folder 17. Exit back to the main menu 18. Open the Student folder, and Schedule subfolder 19. Open the Schedule Section Query form 20. Perform a query to find any crn that has enrollment 21. Use Help/Data Extract to export the information (you may need to hold down the control key to override pop up blocker). 22. Find the table and field name of the Enrollment: Actual field.


![[XLS] · Web viewUPE/SDE(T)/MRZ/07/118 • Kamala Pati UPW/SDE 25%/2007/190 Raj Kishan Juneja APT/SDE(Ty2007/0270 G, Anantha Sayan KNT/SDE(TV2007/211 ...](https://static.fdocuments.net/doc/165x107/5b1ba2fd7f8b9a19258ee8c8/xls-web-viewupesdetmrz07118-kamala-pati-upwsde-252007190-raj.jpg)