Bamboo House - Auroville Earth Institute - earth- · PDF fileBamboo House Auroville Bamboo...
12
Bamboo House Auroville Bamboo Research Center and the Auroville Earth Institute Introduction The Bamboo House project was built at the Auroville Earth Institute premises in 2009, as a demonstration of earth and bamboo construction that can be used as a temporary housing unit in tropical regions. The 18.5m 2 house was created to take advantage of natural ventilation and lightning. General Information 1. Techniques/Materials The basic techniques used were wattle and daub on a bamboo frame and woven bamboo for the pivoting doors. The structure rests on a 4 pier foundation, 85cm above ground level. The floor is made of bison panels and the roof is composed of 3 layers. A thin plastic sheet for waterproofing, a mixture of earth, coconut fiber and coconut coir and finally a 1.5 cm thick layer of lime stabilized earth. 2. Design Process 3. Material Procurement and Treatment Eucalyptus and both species of bamboo (Dendrocalamus Strictus and Pseudoxytenanthera ritcheyi) were sourced locally. Culms and nodes had to be treated against insect attack. Nodes were sanded, 3mm diameter holes were drilled by every 2 nodes and culms were soaked in a solution of borax and boric acid. Fifty grams of each chemical were added for every liter of water. Soaking time was typically 3 days. Later in the production process, another method was used: culms were soaked in an alum solution for 30 minutes to preserve them for 15 years. Note: 2.5 kg of alum were used for 150 liters of water. Bamboo (which species?) culms tend to be arched. To straighten them, the nodes were heated with a hand-held kerosene burner. The average maximum straightening achieved was 5-8 degrees. To minimize heat absorption and solar radiation, wide eaves (60-80cm), several apertures on vertical surfaces and an open ridge were designed. The thickness of the wattle and daub walls was limited to about 5cm. The characteristics of the local bamboo were analysed and doubts on its load carrying capacity arose. Therefore, timber (eucalyptus) was chosen for the main beams and the floor structure. The main posts were composed of 3 large trunks bound together. The roof beams were doubled. Fig. 1- Model of the structure
Transcript of Bamboo House - Auroville Earth Institute - earth- · PDF fileBamboo House Auroville Bamboo...

Bamboo House Auroville Bamboo Research Center and the Auroville Earth Institute
Introduction The Bamboo House project was built at the Auroville Earth Institute premises in 2009, as a demonstration of earth and bamboo construction that can be used as a temporary housing unit in tropical regions. The 18.5m2 house was created to take advantage of natural ventilation and lightning.
General Information 1. Techniques/Materials The basic techniques used were wattle and daub on a bamboo frame and woven bamboo for the pivoting doors. The structure rests on a 4 pier foundation, 85cm above ground level. The floor is made of bison panels and the roof is composed of 3 layers. A thin plastic sheet for waterproofing, a mixture of earth, coconut fiber and coconut coir and finally a 1.5 cm thick layer of lime stabilized earth.
2. Design Process
3. Material Procurement and Treatment Eucalyptus and both species of bamboo (Dendrocalamus Strictus and Pseudoxytenanthera ritcheyi) were sourced locally. Culms and nodes had to be treated against insect attack. Nodes were sanded, 3mm diameter holes were drilled by every 2 nodes and culms were soaked in a solution of borax and boric acid. Fifty grams of each chemical were added for every liter of water. Soaking time was typically 3 days. Later in the production process, another method was used: culms were soaked in an alum solution for 30 minutes to preserve them for 15 years. Note: 2.5 kg of alum were used for 150 liters of water. Bamboo (which species?) culms tend to be arched. To straighten them, the nodes were heated with a hand-held kerosene burner. The average maximum straightening achieved was 5-8 degrees.
To minimize heat absorption and solar radiation, wide eaves (60-80cm), several apertures on vertical surfaces and an open ridge were designed. The thickness of the wattle and daub walls was limited to about 5cm. The characteristics of the local bamboo were analysed and doubts on its load carrying capacity arose. Therefore, timber (eucalyptus) was chosen for the main beams and the floor structure. The main posts were composed of 3 large trunks bound together. The roof beams were doubled.
Fig. 1- Model of the structure

Figure 2- Dendrocalamus strictus - upper and lower section of the
same culm. Notice variance in wall thickness
Figure 3- Treatment against insects
Prefabrication of Construction Elements
1. Wall Panels Walls panels were made using fish mouth joints for the main frame and simple holes with bamboo pegs for bracing members. To the left is a sketch illustrating the fish mouth joint and its construction. Note: bamboo should be positioned in the direction of its growth, with the wide ends pointing down.
Figure 4- Sketch of a finished fish mouth joint
To form the wattle (a matrix for the daub), a panel of split bamboo was created.
- The smooth side of the bamboo panel was roughly sanded to create a surface that daub could easily adhere to. - Horizontal components were attached to 2 verticals pieces by drilling small holes where steel nails were
hammered and bent over. - Slots were cut in the bottom horizontal member of the wall frame and the vertical members of the panel were
inserted. - The panel was first nailed only to the centre brace of the wall frame and then it was nailed to the diagonals as
well. - Additional horizontal supports were nailed to the braces, including one small piece at 0.5 cm distance from the
wall frame’s central piece and another at the same distance from the wall frame’s bottom horizontal piece. These small pieces were used to fix rope.
- Rope was tied and woven through the horizontal bamboo. - The horizontal bamboo was nailed to the diagonal braces.

Figure 5 - Finished wattle and window panel
2. Trusses Trusses were put together and a very liquid mix of concrete (1:1 sand: cement) was poured into holes at the nodes where joints were made. Note: After the first layer of plaster was laid on the ridge, the northeast corner sank down towards the main roof. To prevent movement, the top section of the truss (ridge crown) was modified to include vertical and horizontal supports.
Figure 6 - Truss
Figure 7 - Truss ridge crown modification
3. Preparation of Daub 3 coats were prepared using different ratios of earth, sand, coconut fibres and fresh cow dung to obtain varying thicknesses. For structural purposes, more binder was used in the first 2 layers. Also, less fibre made the final coat smoother. The cow dung in the final coat further increased the smoothness and acted as an insect repellent. Table 1. Earth Mix Proportions for Walls Coat (thickness) Earth Sand Coconut Fibre
(compacted) Cow Dung
1st (3-4cm) 4 1 1 0 2nd (1cm) 6 (12) 1.5 (3) 1 (2) 0 3rd (1cm) 8 1 1 1
Mixes were covered and left for one week before being applied to wattle. This allowed fermentation of the coconut fibres and dung.
Figure 8 - Coconut fibre density – Fibres are firmly hand
compacted and left to rise to level. During prefabrication, only the first layer of daub was applied. Adding more would make the panels too heavy and difficult to assemble into walls later. And with all the movement during assembly, cracking was inevitable. However, these cracks are usually inconsequential if only located in the first later of daub. Weight of a 1m2, 3cm thick section of earth was approximately 30 - 35kg.
Figure 9 - Applying the first layer of daub
Construction Process - Principal elements
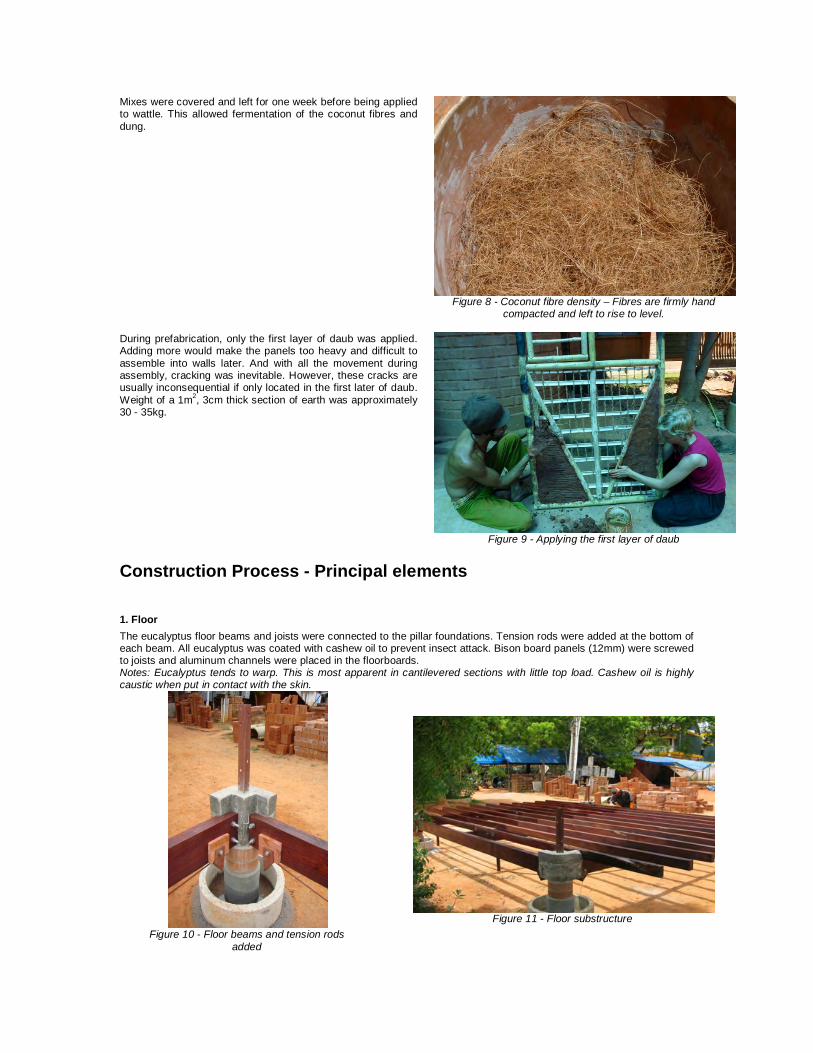
1. Floor The eucalyptus floor beams and joists were connected to the pillar foundations. Tension rods were added at the bottom of each beam. All eucalyptus was coated with cashew oil to prevent insect attack. Bison board panels (12mm) were screwed to joists and aluminum channels were placed in the floorboards. Notes: Eucalyptus tends to warp. This is most apparent in cantilevered sections with little top load. Cashew oil is highly caustic when put in contact with the skin.
Figure 10 - Floor beams and tension rods
added
Figure 11 - Floor substructure

2. Posts Large diameter (7 - 9cm) bamboo culms were joined (in groups of three) to metal fixings at each corner. Additionally, they were tied together at tops. Note: Splitting can occur at the base of the culms with axial load. To avoid this, culms can be tied with rope and glued, or thin metal sheet clamps can be used. Also, here long drill bits are necessary (20 cm) to penetrate at least 2 culms fastened together.
Figure 12 - Posts fixed with bolts
Figure 13 - Post tops tied to align
3. Beams 2 culms were joined with metal fasteners to form beams and then tied to the tops of the posts. Notes: Although not implemented in this house, it is advisable to fix beams to the posts by means of metal bolts inserted vertically from the last node of the post into the beam.
Figure 14 - Posts and beams
4. Trusses and purlins The trusses were raised and tied in place. Three people were necessary to lift, hold and tie them. The weight was roughly ~40kg per truss. Purlins were tied to trusses. Note: Beams should be sanded or chiseled to provide a flat surface upon which the trusses can rest.
Figure 15 - The purlins in place

5. Rafters and Mezzanine Joists Rafters of pakamaran (beetle nut wood) were fixed to the purlins with coconut rope at every joint. Mezzanine joists were tied to the trusses Note: Concerning the rafters, as the spacing was only 5cm, this was time intensive. In the future, rather than tying each intersection, one continuous rope could be used to wrap around the purlins and hold the rafters.
Figure 16 - Roof substructure nearly complete
6. Panels The panels were fixed with small metal plates at the top and bottom of each panel. Note: It was very difficult to fit the panels into the structure. This was due to curving members in panel frames and the main beams above them. Often substantial material had to be chiseled of sanded off.
Figure 17 - Panels with one layer of daub placed in the structure
7. Cement in posts Holes of 10mm for the cement, and 3mm for air were drilled. Cement (mix 1:1) was poured by funnel into the bottom section of each post. Note: Due to cracks along the grain of the bamboo, some culms would splay at the base. Here again, culms should be tied and glued or fixed with metal to hold the bottom together.
Figure 18 - Cement poured into post. A larger funnel
than pictured is recommended

8. Inter-panel earth plaster There were many gaps between the panels. Plaster (Mix #2) was applied to fill the gaps. This gave lateral structural support to the house while the roof was being done. Note: As the size of the gaps could be large (up to 15cm wide and 5 cm thick), care had to be taken to avoid cracking. In spaces larger than 7cm, a piece of split bamboo was placed in the center to divide the gap. Moreover, the plaster mix used contained very little moisture (only enough to keep it plastic) and was compacted as much as possible in the gaps.
Figure 19 - Filling the gaps
9. Roof Above the pakamaran (beetle nut wood), a thin (less than 1 mm) plastic sheet was laid. This plastic sheet was supposed to be the waterproofing layer of the roof. Then, a lattice of split bamboo and coconut rope was placed to stop the next layer (earth mix) from sliding down the roof. The composition of this layer was as follows: 8 coconut fibre, 8 coconut coir dust, 3 earth and 3 water (3 water as a starting reference only). Moisture content here was important to ensure cohesion. As a test, moisture should pool around fingers when the mix is compressed. The purpose of this layer of earth-coconut layer was to weigh the plastic sheet and avoid getting damages by the UV of the sun. The roof mix was cohesive and formed a mat on which to walk when dry. The dry weight (26 kg/m2, 5cm thickness) was slightly heavy for the structure and caused around 7 cm deflection in the purlins. One extra purlin was added on each side, just above the originals. Due to the 33° angle of the roof, most water should run off, however ~15% absorption may be expected and the structure must be capable of handling this additional weight.
Figure 20 - Plastic sheet and lattice of bamboo and coconut
rope
Figure 21 - Mud plaster layer (5cm thick)
Finally this roof was not successful as it became too heavy with the first rains. The water absorption was more than projected. The roof, gaining weight with the rain, it sacked even more and cracked some trusses. The latter had to be reinforced. Another problem was that the plastic sheet was punched by the workers, when the walked on it. Therefore the roof was finally not waterproof and leaked. It had to be covered with a tarpaulin, which avoided the roof to leak and to sack more. The roof remained like that, covered with a tarpaulin, until May 2012. During these 3 years the roof went on deforming and the trusses got much damaged. It was not possible to repair anymore these trusses and finally they were replaced by steel trusses and the roof changed for a composite system made of PVC corrugated sheets, polystyrene for insulation and plywood cladding inside. The roof was finally the critical part of this research and totally failed.

10. Wall plaster Layer 2 was applied to wall panels. Cracks usually formed within 48 hours and were subsequently filled once or twice. The mix for filling cracks had a slightly higher sand content eg: 12:5:2 rather than 12:3:2 (Earth, sand, fibre). Note: Here too, wet mixes (with obvious water content without even squeezing) usually caused more cracking. Panels receiving direct sunlight seemed to crack more than those in the shade.
Figure 22 - Cracks appeared and could be filled
11. Filling culm ends with glue and straw As insects and small rodents tend to nest in small spaces, the ends of all open culms were sealed with fevicol and straw.
Figure 23 - Ends filled to prevent rodent habitation
12. Mezzanine Beetle nut wood was planed to a consistent thickness and tied to the mezzanine joists with continuous ropes down each joist. Note: As joist diameters vary, the surface can be inconsistent. To remedy this, split bamboo can be placed between the beetle nut wood and smaller diameter joists.
Figure 24 - Mezzanine view
Figure 25 - Mezzanine view

13. Eaves Bamboo was split by hand and tied with continuous ropes to beams.
Figure 26 - Eave exterior view
Figure 27 - Eave interior view
14. Final layers of wall plaster Layer 3 was applied, and when dry and crack-free, 2 coats of lime wash were applied (mix 1 lime, 1 water, 125 grams fevicol DDL for 4 kg of lime). Note: Both the final layer of earth plaster and the lime cracked after first application. Both could however be remedied with simple touch ups.
Figure 28 - Finished wall
15. Doors Pivoting-sliding doors were hung, in accordance with the center of mass after all fixings and closing mechanisms were added.
Figure 29 – View of the door
Figure 30 – View of the door from outside

MATERIAL QUANTITIES Earth mixes Roof - Insulating earth mix 1 mix (8 8 3 3) gives 3m2. at 5cm thickness Roof area 62 m2 20 full mixes with 15 litre buckets: 2400 litres coco fibre loosely packed 2400 litres coir dust loosely packed 900 litres earth, Walls Layer 1 (estimate - as records were not kept during this period) 2160 litres earth 540 litres sand 360 litres coconut fibre Layer 2 (including gap filling between panels) 4 full mixes with 15 litre buckets: 720 litres earth 180 litres sand 120 litres fibre Layer 3 - ¼ bucket for 1 panel 2 full mixes with 15 litre buckets: 240 litres earth 30 litres sand 30 litres coconut fibre Total Quantities (Not including last roof layer) Earth - 4020 litres Sand - 750 litres Coconut fibre - 2910 litres (note: majority of quantity is based on loosely packed material). Coconut coir dust - 2400 litres Lime for interior wash - 12 kg Cement for joint filling - 30kg Bamboo Panels Total bamboo for panels 8 window panels total - 136m regular diameter (~5cm), 64m small diameter (~2cm) 4 full panels - 56m Doors Total for 4 Doors 76m Main Structure Purlins - 78m Beams - 47m Braces on Façade - 5m Main structural braces (in roof assembly) - 35m Eave - 28m Posts - 42m Terrace - 44m Trusses - 58m Roof supports - 9m Total Bamboo for house (excluding mats for doors and mezzanine): 678m Note: Quantities include dowels
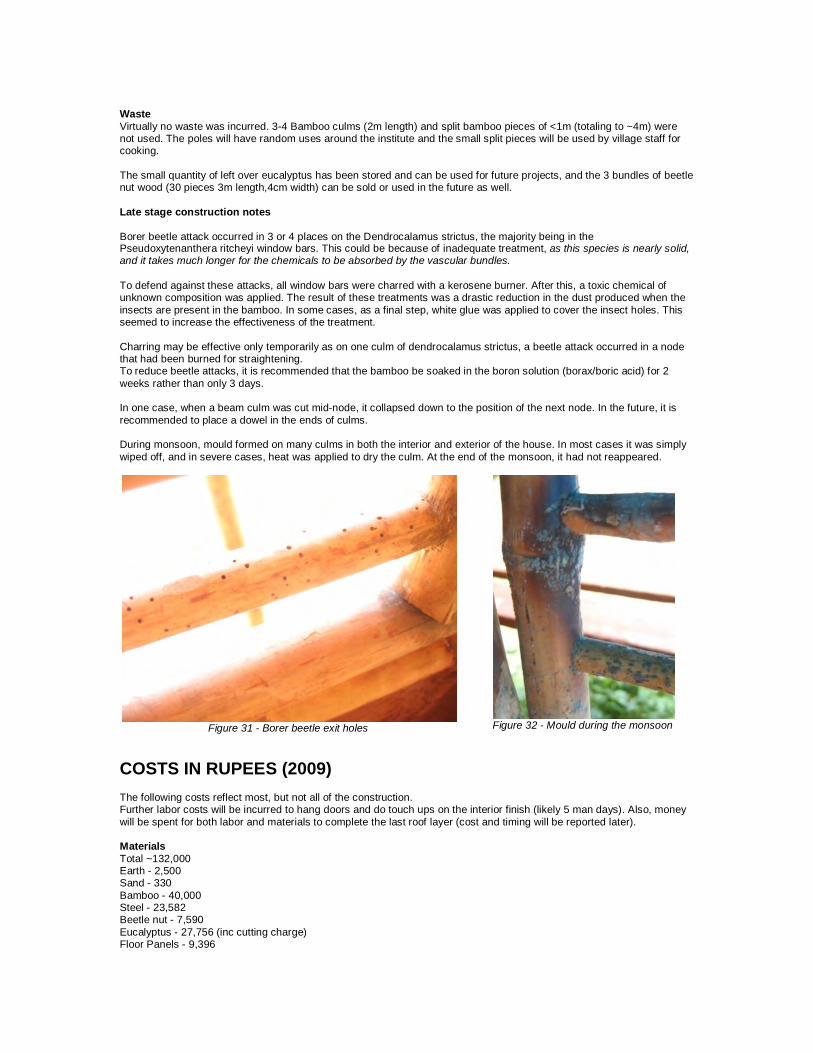
Waste Virtually no waste was incurred. 3-4 Bamboo culms (2m length) and split bamboo pieces of <1m (totaling to ~4m) were not used. The poles will have random uses around the institute and the small split pieces will be used by village staff for cooking. The small quantity of left over eucalyptus has been stored and can be used for future projects, and the 3 bundles of beetle nut wood (30 pieces 3m length,4cm width) can be sold or used in the future as well. Late stage construction notes Borer beetle attack occurred in 3 or 4 places on the Dendrocalamus strictus, the majority being in the Pseudoxytenanthera ritcheyi window bars. This could be because of inadequate treatment, as this species is nearly solid, and it takes much longer for the chemicals to be absorbed by the vascular bundles. To defend against these attacks, all window bars were charred with a kerosene burner. After this, a toxic chemical of unknown composition was applied. The result of these treatments was a drastic reduction in the dust produced when the insects are present in the bamboo. In some cases, as a final step, white glue was applied to cover the insect holes. This seemed to increase the effectiveness of the treatment. Charring may be effective only temporarily as on one culm of dendrocalamus strictus, a beetle attack occurred in a node that had been burned for straightening. To reduce beetle attacks, it is recommended that the bamboo be soaked in the boron solution (borax/boric acid) for 2 weeks rather than only 3 days. In one case, when a beam culm was cut mid-node, it collapsed down to the position of the next node. In the future, it is recommended to place a dowel in the ends of culms. During monsoon, mould formed on many culms in both the interior and exterior of the house. In most cases it was simply wiped off, and in severe cases, heat was applied to dry the culm. At the end of the monsoon, it had not reappeared.
Figure 31 - Borer beetle exit holes
Figure 32 - Mould during the monsoon
COSTS IN RUPEES (2009) The following costs reflect most, but not all of the construction. Further labor costs will be incurred to hang doors and do touch ups on the interior finish (likely 5 man days). Also, money will be spent for both labor and materials to complete the last roof layer (cost and timing will be reported later). Materials Total ~132,000 Earth - 2,500 Sand - 330 Bamboo - 40,000 Steel - 23,582 Beetle nut - 7,590 Eucalyptus - 27,756 (inc cutting charge) Floor Panels - 9,396

Labor Project Management team - 39,079 Earth Institute workers - 33,112 Bamboo workers - 24,540 Grand total to present - 229,478