Backing Up your BellHawk Database for Problem Diagnosis ... · Backing Up your BellHawk Database...
12
9 January 2017 Page 1 of 12 © BellHawk Systems Corporation Backing Up your BellHawk Database for Problem Diagnosis Introduction If you report a problem with your BellHawk system then we may request that you take a zipped backup of your BellHawk database and copy it to your organization's private folder on our FTP site. This is so we can load the database onto our test server and replicate the problem that you reported. This enables us to diagnose the source of the problem, by examining the contents of your database. We recommend that, if you run into a problem with BellHawk, that you take a backup of the database as soon as possible after the event. Like any good CSI "Crime Scene" investigation, it is important that we get a "snapshot" of the "crime scene" as soon as possible after the problem occurs. Otherwise data gets overwritten by new transactions and imports and it may be impossible to replicate the problems. It is also important to document exactly sequence of events led up to the problem, with screen shots if possible. We need to know what happened and how it happened. Simply sending us a screen shot of an error message from BellHawk often does not provide us with enough information to replicate the problem. Or, even worse, sending us a picture of a report or a screen with a suspected bad number circled, without any context in which to understand the problem, makes it nearly impossible to diagnose what went wrong, or even whether there is an error in the first place. To facilitate our diagnostic process, we need you to take a backup in a certain way. This document details how we would like you to take the backup that you will transfer to our FTP site. Please note that: 1. We do charge for the time taken by our technical staff for all diagnostic work so it is important to make it as quick and easy as possible for our staff to perform the diagnosis. 2. We do not charge for fixing any bugs found in the code provided that the client is covered by a rental or subscription agreement, or a maintenance agreement if they purchased a perpetual license. 3. We do charge for installing any resultant upgrades onto your BellHawk server. 4. A backup taken for diagnostic purposes will probably be different from a backup taken as part of your routine system backup. We cannot handle backups made by some third party backup program as we do not have the software to convert the backup back into an installed database. The backup process that we request that you use, is to use the SQL Server Management Studio, which is provided by Microsoft as part of SQL Server Standard edition. If you are using SQL Server Express edition then you may need to download and install the management studio for this edition separately from the Microsoft software download site before you can do the backup.
Transcript of Backing Up your BellHawk Database for Problem Diagnosis ... · Backing Up your BellHawk Database...

9 January 2017 Page 1 of 12 © BellHawk Systems Corporation
Backing Up your BellHawk Database for Problem Diagnosis
Introduction
If you report a problem with your BellHawk system then we may request that you take a zipped
backup of your BellHawk database and copy it to your organization's private folder on our FTP
site. This is so we can load the database onto our test server and replicate the problem that you
reported. This enables us to diagnose the source of the problem, by examining the contents of
your database.
We recommend that, if you run into a problem with BellHawk, that you take a backup of the
database as soon as possible after the event. Like any good CSI "Crime Scene" investigation, it is
important that we get a "snapshot" of the "crime scene" as soon as possible after the problem
occurs. Otherwise data gets overwritten by new transactions and imports and it may be
impossible to replicate the problems.
It is also important to document exactly sequence of events led up to the problem, with screen
shots if possible. We need to know what happened and how it happened. Simply sending us a
screen shot of an error message from BellHawk often does not provide us with enough
information to replicate the problem. Or, even worse, sending us a picture of a report or a screen
with a suspected bad number circled, without any context in which to understand the problem,
makes it nearly impossible to diagnose what went wrong, or even whether there is an error in the
first place.
To facilitate our diagnostic process, we need you to take a backup in a certain way. This
document details how we would like you to take the backup that you will transfer to our FTP
site.
Please note that:
1. We do charge for the time taken by our technical staff for all diagnostic work so it is
important to make it as quick and easy as possible for our staff to perform the diagnosis.
2. We do not charge for fixing any bugs found in the code provided that the client is
covered by a rental or subscription agreement, or a maintenance agreement if they
purchased a perpetual license.
3. We do charge for installing any resultant upgrades onto your BellHawk server.
4. A backup taken for diagnostic purposes will probably be different from a backup taken
as part of your routine system backup. We cannot handle backups made by some third
party backup program as we do not have the software to convert the backup back into an
installed database.
The backup process that we request that you use, is to use the SQL Server Management Studio,
which is provided by Microsoft as part of SQL Server Standard edition. If you are using SQL
Server Express edition then you may need to download and install the management studio for
this edition separately from the Microsoft software download site before you can do the backup.
9 January 2017 Page 2 of 12 © BellHawk Systems Corporation
Backup Process
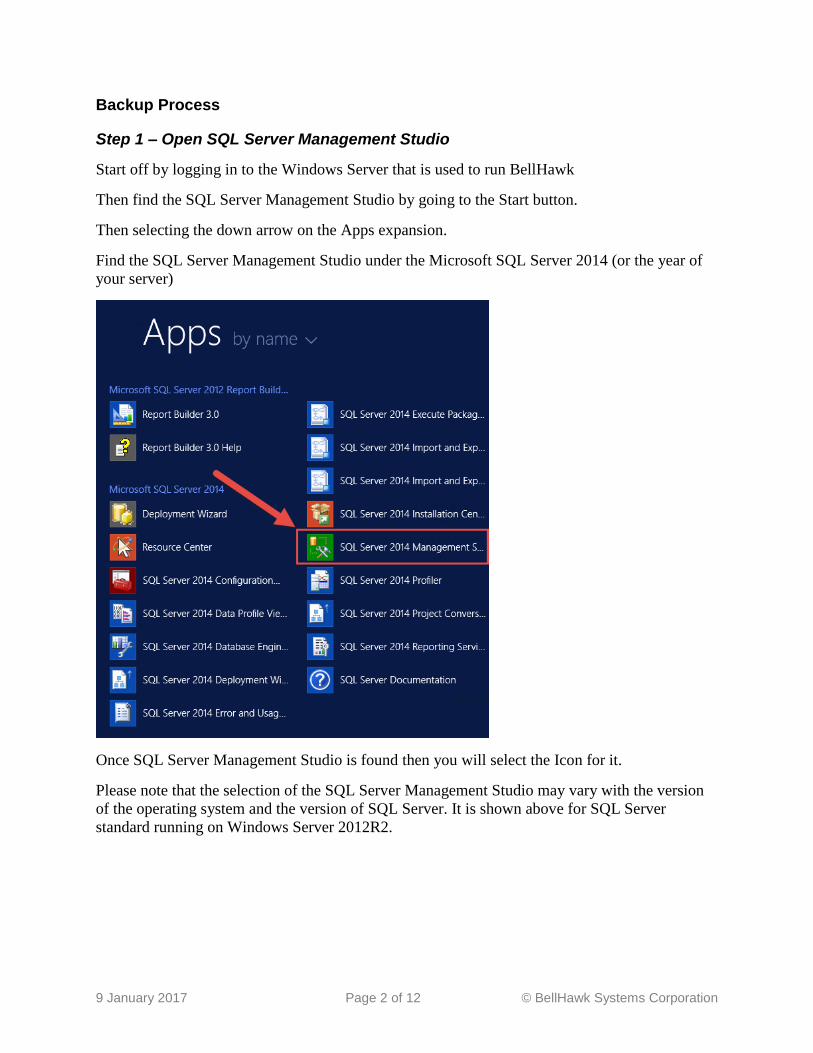
Step 1 – Open SQL Server Management Studio
Start off by logging in to the Windows Server that is used to run BellHawk
Then find the SQL Server Management Studio by going to the Start button.
Then selecting the down arrow on the Apps expansion.
Find the SQL Server Management Studio under the Microsoft SQL Server 2014 (or the year of
your server)
Once SQL Server Management Studio is found then you will select the Icon for it.
Please note that the selection of the SQL Server Management Studio may vary with the version
of the operating system and the version of SQL Server. It is shown above for SQL Server
standard running on Windows Server 2012R2.
9 January 2017 Page 3 of 12 © BellHawk Systems Corporation
Step 2 Login to Management Studio
The user will then be requested to log into their SQL Server Management Studio through a
screen similar to that shown below
The data entry sequence for this login is:
1. Server Type => Database Engine
2. Server Name => Select Name of Database Server Instance
3. Authentication => Normally use SQL Server Authentication with the SQL Server system
administrator login (as shown here) or the BellHawk database login - but you can use
Windows Authentication if you are a systems administrator for the Windows Server or
the Database Server.
4. Login => Authorized SQL Server Login Name for BellHawk database - only needed if
SQL Server authentication is used
5. Password => Authorized SQL Server Password for BellHawk database
6. Connect - will give error if credentials are not correct for database server.

9 January 2017 Page 4 of 12 © BellHawk Systems Corporation
Step 3: Backup Database
Once successfully logged in. You will the see the screen below.
In order to take a backup you will select the [+] button next to “Databases"
This will expand and give you the full list of Databases on the Server.
You will go down until you find the BellHawk Server
Name.
9 January 2017 Page 5 of 12 © BellHawk Systems Corporation
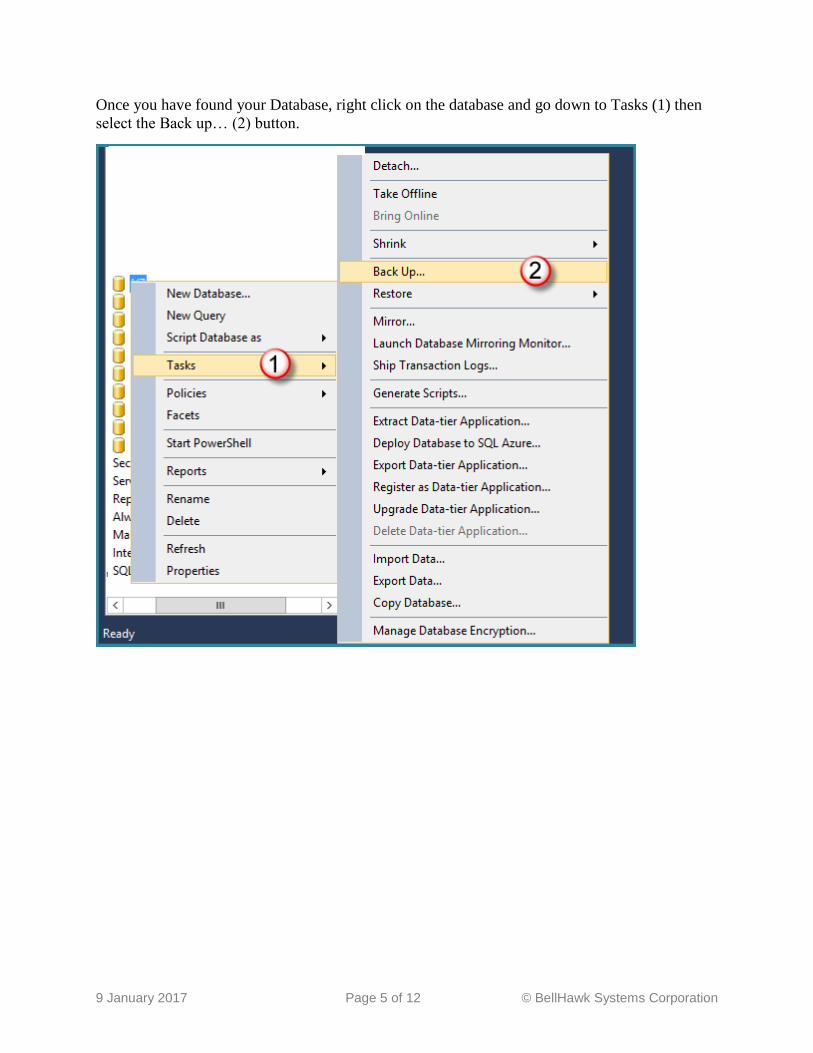
Once you have found your Database, right click on the database and go down to Tasks (1) then
select the Back up… (2) button.

9 January 2017 Page 6 of 12 © BellHawk Systems Corporation
This will bring the user to the screen below:
You will want to Remove the folder destination that SQL Server Management Studio gives you
as default by selecting the destination and then the [Remove] button
Once removed you can Add back your own destination for the Backup.
9 January 2017 Page 7 of 12 © BellHawk Systems Corporation
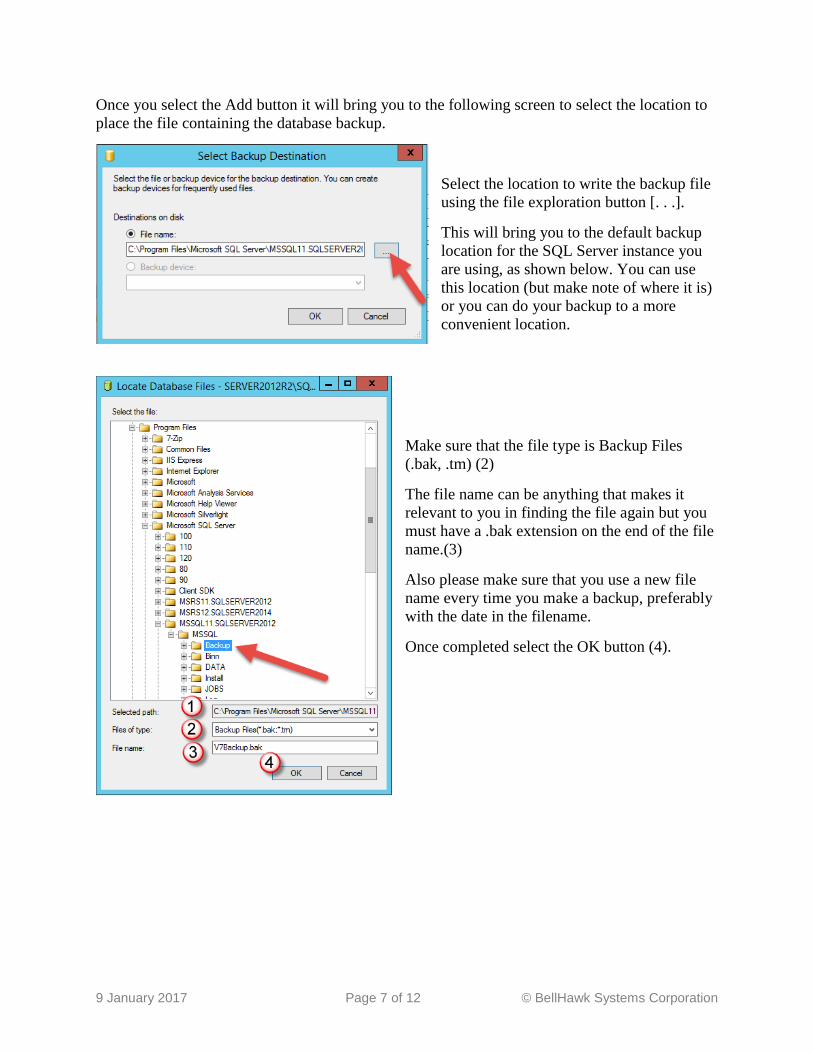
Once you select the Add button it will bring you to the following screen to select the location to
place the file containing the database backup.
Select the location to write the backup file
using the file exploration button [. . .].
This will bring you to the default backup
location for the SQL Server instance you
are using, as shown below. You can use
this location (but make note of where it is)
or you can do your backup to a more
convenient location.
Make sure that the file type is Backup Files
(.bak, .tm) (2)
The file name can be anything that makes it
relevant to you in finding the file again but you
must have a .bak extension on the end of the file
name.(3)
Also please make sure that you use a new file
name every time you make a backup, preferably
with the date in the filename.
Once completed select the OK button (4).
9 January 2017 Page 8 of 12 © BellHawk Systems Corporation
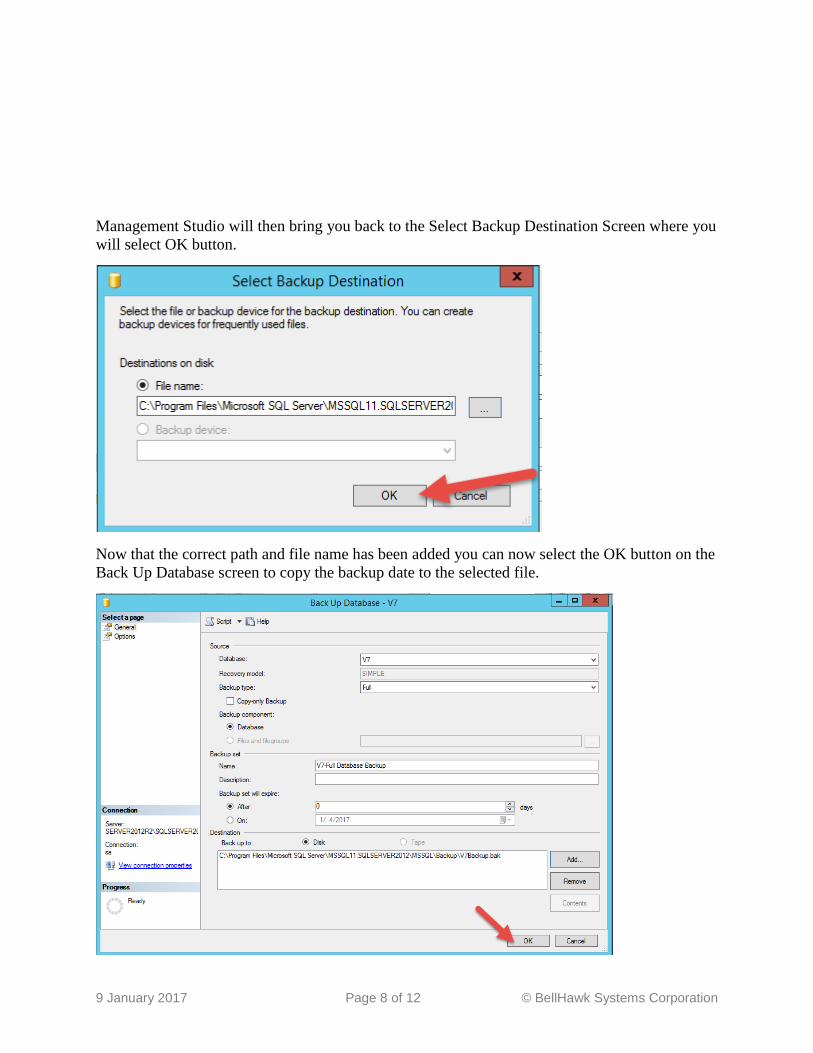
Management Studio will then bring you back to the Select Backup Destination Screen where you
will select OK button.
Now that the correct path and file name has been added you can now select the OK button on the
Back Up Database screen to copy the backup date to the selected file.
9 January 2017 Page 9 of 12 © BellHawk Systems Corporation
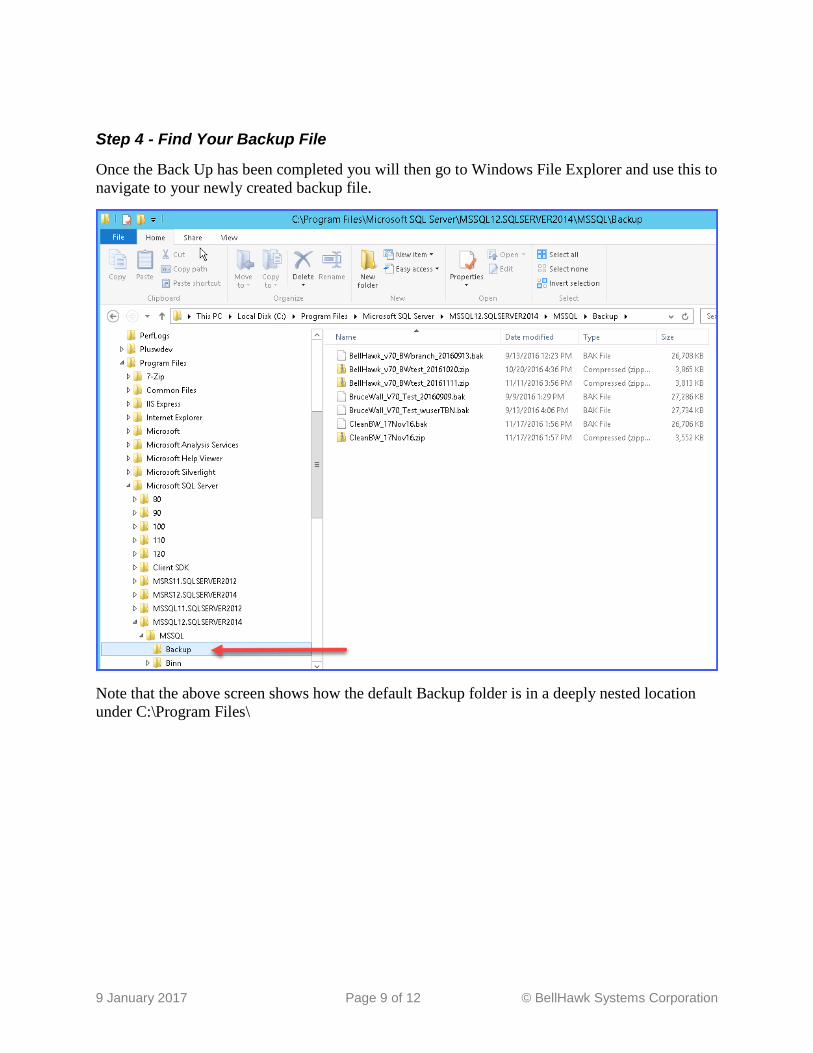
Step 4 - Find Your Backup File
Once the Back Up has been completed you will then go to Windows File Explorer and use this to
navigate to your newly created backup file.
Note that the above screen shows how the default Backup folder is in a deeply nested location
under C:\Program Files\

9 January 2017 Page 10 of 12 © BellHawk Systems Corporation
Step 5 – Zipping up the File
Once you find the file right click on the file. (1)
Go down to the Send to button. (2)
Select the Compressed (zipped) folder button. (3)
The file is now zipped up and ready to placed on the FTP site.
9 January 2017 Page 11 of 12 © BellHawk Systems Corporation
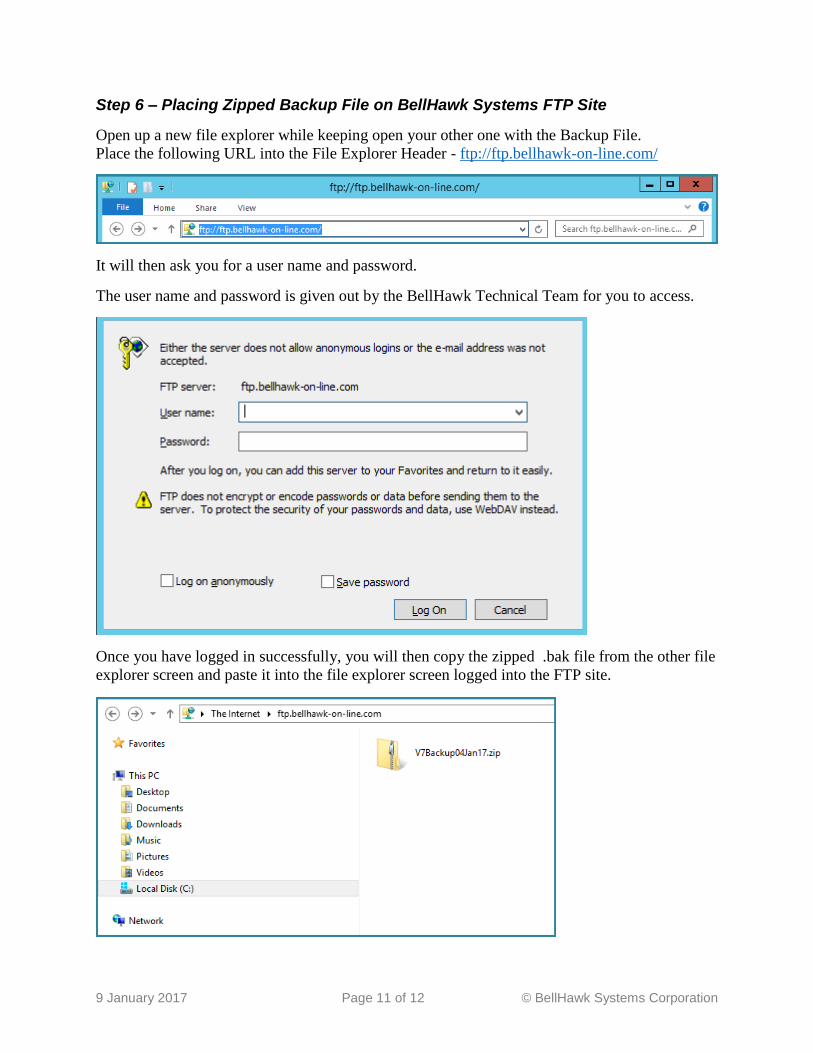
Step 6 – Placing Zipped Backup File on BellHawk Systems FTP Site
Open up a new file explorer while keeping open your other one with the Backup File.
Place the following URL into the File Explorer Header - ftp://ftp.bellhawk-on-line.com/
It will then ask you for a user name and password.
The user name and password is given out by the BellHawk Technical Team for you to access.
Once you have logged in successfully, you will then copy the zipped .bak file from the other file
explorer screen and paste it into the file explorer screen logged into the FTP site.
9 January 2017 Page 12 of 12 © BellHawk Systems Corporation
This will cause the zipped backup file to be uploaded to your organizations private folder on our
FTP site.
Step 6 Notify BellHawk Support
Once you have uploaded your backup to our FTP site, please send an Email to
[email protected] telling us the name of the zipped backup file. Also please include
details of the circumstances under which the problem occurred, along with screen shots.
Commentary
Please make sure that you compress the database into a zipped file before uploading it. This can
result in a 10:1 compression in file size and make uploads and downloads much quicker.
You may need IT support from whoever did the installation of your SQL Server database server,
especially to get appropriate SQL Server access user names and passwords.
If you need assistance from BellHawk in performing this backup, or if you wish BellHawk
Systems to remotely do this backup for you, please send a request to [email protected].
But, please be aware, that we do charge for the support time needed to gain remote access to
your server and to make the backup.
The above document shows how to zip compress and upload a backup file using standard tools
available with a Windows Server operating system. Other third party zip and FTP tools can be
used, if preferred.