BabyWare v0 - Paradox Security 2 Quick Start Introduction BabyWare is the first software program...
40
BabyWare v0.X Getting Started
Transcript of BabyWare v0 - Paradox Security 2 Quick Start Introduction BabyWare is the first software program...

BabyWare v0.X
Getting Started

Table Of Contents
Introduction ........................................................................................2
Setting up the Imperial System ..........................................................3Step 1: Set up all hardware .......................................................................................3Step 2: Create control panel connection ....................................................................3Step 3: Run BabyWare installation program ..............................................................3Step 4: Log Into BabyWare ........................................................................................3Step 5: Create a User Account ..................................................................................5Step 6: Connect to the control panel .........................................................................7Step 7: Program the Imperial system ........................................................................9
BabyWare Main Window ..................................................................11Main Window Elements ...........................................................................................11Legend .....................................................................................................................11
Programming the Security System ...................................................12Control Panel and Modules .....................................................................................12Areas and Zones .....................................................................................................15Door Groups and Doors ...........................................................................................17User Groups and Users ...........................................................................................18Schedules ................................................................................................................20
Programming Home Automation ......................................................21Outputs ....................................................................................................................21Switches ..................................................................................................................22Macros .....................................................................................................................25
Administering the Imperial System ...................................................30Monitoring Security Events ......................................................................................30Monitoring Home Automation ..................................................................................31The Events List ........................................................................................................32Backing up BabyWare programming .......................................................................33
Appendix A: BabyWare Menus and Commands ..............................35Main Menu ...............................................................................................................35BabyWare Toolbar ...................................................................................................37

IntroductionBabyWare is the first software program designed for both installers and end-users of Paradox products. This innovative software simplifies operations and allows you to program all system parameters on site or remotely. BabyWare removes the burden of complex keypad programming by allowing you to configure settings and monitor system events from a single point of control. The new Paradox Imperial control panel supports programming for security systems as well as for the home automation system known as MAMA.Getting Started with BabyWare outlines the steps for setting up your Imperial system and then provides information about its features and functions. This guide has the following sections:• Setting up the Imperial System• BabyWare Main Window• Programming Security Settings• Programming Home Automation• Administering the Imperial SystemBefore you begin working with BabyWare, you must ensure that you have the proper system requirements.
System requirements• Intel® Pentium® 4, 1.4GHz processor or faster• Microsoft® Windows® XP, Vista, 2000• 512MB of RAM (1GB Recommended)• 150 MB of available hard-disk space for installation (additional 150 MB recommended for
multi-accounts and events) • 1,280x1,024 video display with 32-bit color adapter
BabyWare 2 Quick Start
Setting up the Imperial SystemThis section of the BabyWare Getting Started guide describes each step in the process of setting up your Imperial system. Once you have successfully installed BabyWare, you can begin programming security settings or home automation.
Process overviewTo get started with BabyWare, you must perform the following steps:1. Set up all hardware2. Create control panel connection3. Run BabyWare installation program4. Log into BabyWare5. Create a user account6. Connect to the control panel7. Program the Imperial system
Step 1: Set up all hardwareBefore you can begin working with BabyWare, you must set up your security system hardware. Refer to the installation manuals for all system components.
Step 2: Create control panel connectionFor this version of BabyWare, there are two ways to a communication link between the control panel and your PC:• Use an ethernet cable to connect your PC to the control panel• Use a wireless router to connect your PC to the control panelIf you are using a wireless router, you must first connect the control panel to your network, and then connect your PC to the network. For more information about configuring a wireless network connection, see the section “Step 1: Setting up the Router” in the installation guide for the Paradox IP100. This guide is located on the Paradox Web site at the following address :http://www.paradox.com/Documentation/manuals/archives_installationprogramming/ip100-ei02.pdf
Note that the IP100 module is already build into the Imperial control panel.
Step 3: Run BabyWare installation programDownload the installation program from the Paradox Web site. Follow the instructions on your screen to install BabyWare.
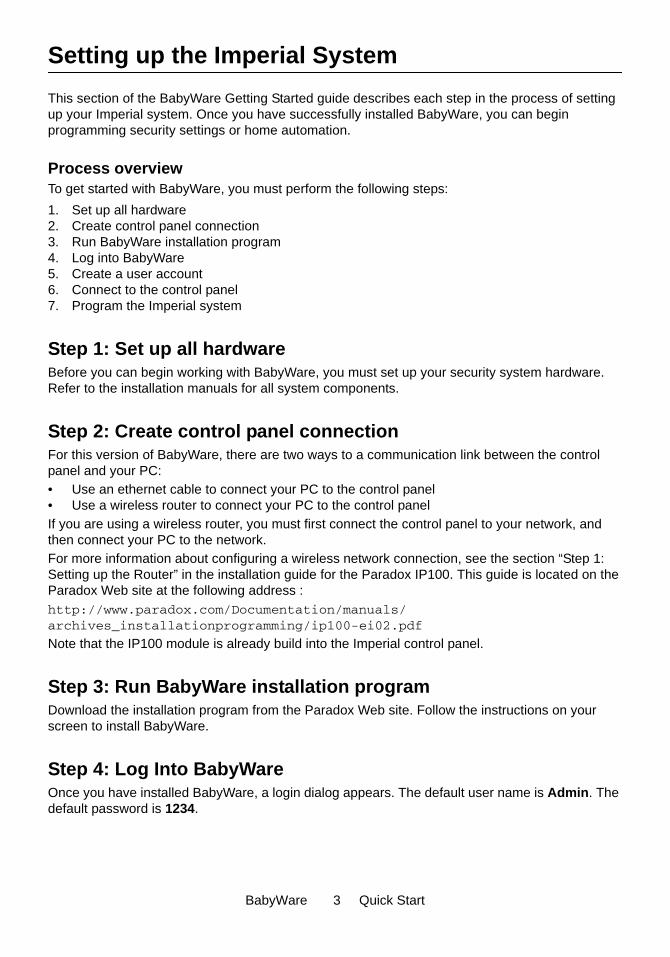
Step 4: Log Into BabyWareOnce you have installed BabyWare, a login dialog appears. The default user name is Admin. The default password is 1234.
BabyWare 3 Quick Start

Figure 1 - Login Screen
To log into BabyWare, enter the default login information and then click Ok. The Accounts window appears. It is recommended that you change your password once you log into BabyWare.
Figure 2 - Accounts Window
To change your login passwordWhen the Accounts window appears, do the following:1. In the Accounts window, click My Profile. The Admin operator profile appears.
BabyWare 4 Quick Start

Figure 3 - Admin Operator Window
2. In the Login Password field, type a meaningful password. Then, in the Confirm Password field, retype your password.
3. Type any other relevant personal information for the primary administrator in the fields provided. Then click Ok.
Step 5: Create a User AccountOnce you have logged into BabyWare, the Accounts window appears, and a default user account is displayed. Before you connect to the control panel you must verify the information in the Accounts window.
Figure 4 - Accounts Window
BabyWare 5 Quick Start

To verify account informationThe information in the Accounts window can be sorted by clicking on any of the account headings. The following table describes each heading in the Accounts window and provides instructions for verifying the information in its field.
When you have finished creating an account or verifying the information in the Accounts window, be sure to click Save on the toolbar to save any changes before connecting to the control panel.
Heading Description Instruction
No Displays the number assigned to the account. Double-click this area to open an account.
Label
Displays the name of the account. Allows you to search for a particular account. For example, “Paradox Headquarters”.
Click inside the field to type a new name for the user account.
Click the in the heading to search for a user.
Group Allows you to create account groups for sorting.
Click the drop-down button to select a group for the account.
Click the button to add a new group.
Panel type Displays the type of control panel used for the security system.
Ensure that the correct control panel type is displayed. Click the drop-down button to select a different panel type.
Version Displays the version type of the control panel.
Ensure that the correct version type is displayed. Click the drop-down button to select a different version.
Connection typeDisplays the type of connection that links BabyWare to the control panel.
(1) Ensure that the correct connection type is displayed. Click the drop-down to select a different connection.
(2) Click the button to view and/or change connection settings.For more information about connecting to the control panel, see the section “Step 6: Connect to the control panel” on page 7.
Contacts
Provides an address book where you can keep track of important contacts. For example, “owner”, “security”, “upper management”, etc.
Click the button to open the contacts address book. Enter the relevant information. To add a new contact, click Add.
System Name Displays the user name programmed in the control panel
Ensure that the correct system name appears in this field. By default, the administrator’s system ID is Admin and the System Master’s system ID is Guest.
System PasswordThe designated field for the password that connects BabyWare to the control panel.
Ensure that the password appears in this field when you log into BabyWare.
BabyWare 6 Quick Start

Step 6: Connect to the control panelOnce you have created an account, you can connect to the control panel to begin configuring security system parameters. Alternatively, you can pre-program security system parameters and then connect to the control panel. Before attempting connection, be sure that the System Name and System Password fields of the Accounts window show the correct information. To connect to the control panel you must first verify your connection settings. This version of BabyWare supports the following types of connection:• Static/IP - a fixed IP network connection to the control panel• DNS/IP - a dynamic IP network connection to the control panelNote that this version of BabyWare does not support Serial connections to the control panel.For more information on connecting the control panel, see the installation guide for the Paradox IP100. This guide is located on the Paradox Web site at the following address :http://www.paradox.com/Documentation/manuals/archives_installationprogramming/ip100-ei02.pdf
Note that the IP100 module is already build into the Imperial control panel.
To connect to the control panelTo verify your connection settings and connect to the control panel, do the following:1. Under the Connection Type heading, from the drop-down menu, select the appropriate
connection type. Then click the button. The connection Settings window appears.Note that Serial connections are not supported in this version of BabyWare.
Figure 5 - Connection Settings Window
2. Do one of the following:• To connect to the control panel using a fixed IP network connection, click the TCP-IP radio
button. Then click the IP Address radio button. Enter the IP address assigned to the control panel and verify the port number. The default address in the control panel is 192.168.0.1. The default port number is 10000. Click Ok.
BabyWare 7 Quick Start

Alternatively, you can select an existing control panel on your network by clicking the button. The Locate IP Device on Network window appears with a list of control panels. Select the control panel you want to connect to and then click Ok.
• To connect to the control panel using a dynamic IP network connection using our ParadoxMyHome service, click the TCP-IP radio button. Then click the Site ID radio button and enter the site ID, for example, “John’s Home” . Click Ok.
A system progress window appears and displays BabyWare connection tasks. If the connection is successful, you can open the account and begin programming the security system. Continue to the section “Step 7: Program the Imperial system” on page 9.If the connection is halted, see the procedure “To correct a halted connection” on page 8 of this section.
To pre-program security settingsIf you want to configure your security system before connecting to the control panel, do the following:1. Highlight the account you want to open by clicking the account number.2. From the menu at the top of the window, click Open. The Main Window appears.
Figure 6 - Opening an Account
3. Follow the instructions in the section “Step 7: Program the Imperial system” on page 9. Then follow the instructions in this section for connecting to the control panel.
To correct a halted connectionIf BabyWare detects a mismatch of programmed modules to physical modules, you must manually assign the new modules. To correct a halted connection, do the following:1. In the System Progress window, click the Module tab. A list of devices appears.
BabyWare 8 Quick Start

Figure 7 - System Progress Window
2. Under the Assign-to heading, do one of the following:• To add a new device to the system, select New from the drop-down menu.• To connect an existing device, select Connect from the drop-down menu.
3. Click Ok. Then you can begin programming the security system.
Step 7: Program the Imperial systemOnce you have connected to the control panel, you can open the Main Window of an account to program security settings or home automation. From this window you can configure the parameters of areas, zones, doors, users, and schedules. You can also configure switches and macros to perform functions in your home.For more detailed information about programming security settings, see the section “Programming the Security System” on page 12 of this guide.For more detailed information about programming home automation, see the section “Programming Home Automation” on page 21.
To open the Main Window of an account1. Highlight the account you want to open by clicking the account number.2. From the menu at the top of the window, click Open. The Main Window appears.
Figure 8 - Opening an Account
BabyWare 9 Quick Start

You may go back to the Accounts window at any time by clicking the Accounts button on the BabyWare toolbar in the Main Window.
Figure 9 - BabyWare Main Window
When you have finished programming the system, you must apply the settings to the control panel. Every time you make a system modification in BabyWare, save your changes by clicking the Save button on the BabyWare toolbar in the Main Window.
BabyWare 10 Quick Start

BabyWare Main WindowWhen you open an account, the BabyWare Main Window appears. The sections of the Main Window are automatically populated with the modules that are connected to the control panel.This section outlines the elements of the BabyWare user interface.
Main Window Elements
Legend
A Main menu F System elements
B Toolbar G Events List headings
C Toggle menu H Events List
D System element headings I Status bar
E Manual controls
BabyWare 11 Quick Start

Programming the Security SystemConfiguring the parameters of your security system with BabyWare is a simple process. You can configure all of the items in the Main Window by accessing the Properties window of any system element. This section briefly describes how to modify the settings for the following elements: • Control panel and modules• Areas and zones• Door groups and doors• User groups and users• Schedules You configure settings by accessing the Properties menu of a system element.You can add new elements to the security system either from a Properties window, or by clicking the Add Item button on the BabyWare toolbar. The Add Item button opens the Items Selection window where you can add modules, doors, areas, zones, users, and schedules to your system.
Figure 10 - Items Selection Window
You can also add zones to areas, doors to door groups, and users to user groups in the Main Window by using the right-click button. For example, to add a zone to an area, right-click the area and select Add Zone.
Control Panel and ModulesThe procedures in this section describe how to modify the settings for your control panel and the modules connected to that control panel.
To configure the control panel1. Right-click the control panel and select Properties. The control panel System Options window
appears. The tabs in this window allow you to program different features of the control panel, for example, Timings, Reporting Codes, and PGMs.
BabyWare 12 Quick Start

Figure 11 - Control Panel System Options
2. Program the control panel and then click Ok.3. Once you have configured system modules you must apply the changes to the control panel.
To apply these changes, click the Send button on the BabyWare toolbar in the Main Window.
To configure modules1. In the BabyWare toolbar, click Add Items. The Items Selection window appears. From this
window, click the modules you want to add to the system and use the arrow buttons to define the quantity. The example below shows Keypad selection in the Items Selection window.
BabyWare 13 Quick Start

Figure 12 - Items Selection Window (Select Keypads)
2. Select the item(s) you want to add and then click Ok. The new module appears in the Modules section of the Main Window.
3. To program the new module, right-click the module and select Properties. The Properties window of the module appears.The example in the figure below shows the Properties window of the recently added Keypad module.
BabyWare 14 Quick Start

Figure 13 - Keypad Properties
4. Configure the module and then click Ok. You must then save your changes and update the control panel by clicking the Send button on the BabyWare toolbar in the Main Window.
Areas and ZonesYou can divide your security system into multiple areas (partitions). Each area is a separate “mini system” containing a series of zones. Users are permitted access to their assigned areas only. From the areas Properties window you can arm and disarm the system, set alarm options, and set arming schedules. Your security system may have several zones within an area. A zone is usually defined by a single detection device. When you open BabyWare, the Main Window displays 8 zones by default. You can link a zone to an area from the zone Properties window.
To configure areas1. Right-click the area and select Properties. The Partitions window appears. You can add new
areas by clicking the Add button in the left pane.
BabyWare 15 Quick Start

Figure 14 - Partitions Window
2. Program the area and then click Ok.3. Once you have configured areas you must save your changes by clicking the Save button on
the BabyWare toolbar in the Main Window.
To configure zones1. Right-click a zone and select Properties. The Zones window appears. In this window, you can
link a zone to an area that you configured.
BabyWare 16 Quick Start

Figure 15 - Zones Window
2. Program the zone and then click Ok.3. Once you have configured zones you must save your changes by clicking the Save button on
the BabyWare toolbar in the Main Window.
Door Groups and DoorsYou can create a new door group and then add doors, or you can add doors to an exisiting door group. From the Properties window of a door you can program door settings such as lock schedules and alarm types. You can also specify access information.
To create new door groups1. Right-click a door group in the Main Window and select Properties. The Door Groups window
appears.
Figure 16 - Door Groups Window
2. Click the Add button to create a new door group, configure the door group, then click Ok. The door group appears in the Main Window.
3. Save your changes by clicking the Save button on the BabyWare toolbar in the Main Window.
To configure doors1. Add a door to a door group by right-clicking a door group and selecting Add Door. A new door
appears in the door group.2. Right-click a door in a door group and select Properties. The Doors window appears.
BabyWare 17 Quick Start

Figure 17 - Doors Window
3. In the General Options tab you can assign schedules and alarm types to doors.4. To configure other settings such as time-delays and lockout options, click the Advanced
Options tab. Then click Ok.5. Once you have configured doors you must save your changes by clicking the Save button on
the BabyWare toolbar in the Main Window.
User Groups and UsersBabyWare removes the burden of configuring each individual user by allowing you to configure user groups. You configure rights and settings for user groups and then assign individual users to those groups. You can also assign door groups and schedules to user groups.When you open an account BabyWare provides two user groups by default: a System Master group and a Master Group.To add users to user groups, right-click a user group and select Add user.
To create a new user groupIn order to assign new users to the rights defined in user groups, you must create a new user group by doing the following:1. Right-click the Master Group and select Properties. The User Group window appears.
BabyWare 18 Quick Start

Figure 18 - User Groups
2. Add a new user group by clicking the Add button. A new user group appears in the list. 3. Change the name of the group and then configure user group settings and access rights. Then
click Ok. You must save your changes by clicking the Save button on the BabyWare toolbar in the Main Window.
To configure usersTo configure user information, do the following:1. To add a new user, right-click a user group and select Add User. A new user appears under
the user group section in the Main Window.2. Right-click a user in the Main Window and select Properties. The Users window appears.
From this window you can configure access codes and access rights. The drop-down menu in the Rights column displays the user groups that you configured. You can also add pictures for users in this window.
Figure 19 - Users Window
3. Program users and then click Ok.4. Once you have configured users you must save your changes by clicking the Send button on
the BabyWare toolbar in the Main Window.
BabyWare 19 Quick Start

SchedulesA schedule determines the hours, days, and holidays that an access code is valid. By default the Admin has 24-hour access to all doors everyday. You configure schedules and then assign those schedules to areas, user groups, and doors.
To configure schedules1. Right click a schedule in the Main Window and select Properties. The Schedules window
appears.
Figure 20 - Schedules Window
2. Add a new schedule by clicking the Add button. Then click in the area under the Label heading and type a meaningful name for the new access schedule.
3. Configure the schedule for a time interval. To configure a schedule for a different time interval within the same week, click the Interval button.
4. Repeat this procedure for every schedule you want to create. Then click Ok.
BabyWare 20 Quick Start

Programming Home AutomationBabyWare allows you to control the functions of various outputs (such as lights, shutters, and sprinklers) in your MAMA home automation system. You can activate the functions of these outputs directly from the BabyWare interface as well as from configurable buttons in your home. You can also customize the activation and deactivation behavior of your outputs by creating macros.This section of the BabyWare Getting Started guide shows you the basics of programming outputs, switches, and macros.
OutputsThe modules of your MAMA system control the outputs that you configure. To add MAMA modules, click the Add Item button on the BabyWare toolbar. The Add Item button opens the Items Selection window. Expand the Mama Modules section, select the items you want to add, and then click Ok. The new modules appear in the Main Window.
Figure 21 - Items Selection (Mama Modules)
To configure the programming of outputs, do the following:1. In the BabyWare Main Window, under Mama Modules, expand a MAMA controller module.2. Right-click one of the outputs under the controller and click Properties. The Relay Controller
Properties window appears.3. Program the output and then click Ok.4. Once you have configured outputs you must save your changes by clicking the Save button
on the BabyWare toolbar in the Main Window. The new outputs can now be linked to switches or macros.
BabyWare 21 Quick Start

SwitchesConfiguring switches allows you to link outputs, security options, or macros to buttons in your home. You can then activate any of these options from the physical buttons in your home as well as from the BabyWare interface.A switch module may include buttons, a dial, or both. Buttons can control security events or home automation outputs. Dials allow you to adjust the degree of an output’s action. For example, a dial can act as a dimmer for lights. Dials can be local (adjusting one output area at a time) or global (adjusting many output areas at once). Just as with buttons, you can control an output from the physical dial as well as from the BabyWare interface.
To configure switches1. If there are not already switches in the Main Window, click the Add Item button. The Items
Selction window appears.
Figure 22 - Items Selection Window (Switches)
2. Expand the Mama Modules section, select the item(s) you want to add and then click Ok. The new modules appear in the Switches section of the Main Window.
3. In the Main Window, by the switch you want to configure, click Configure. This opens the Switch programming window.
BabyWare 22 Quick Start

Figure 23 - Switch Programming Window
4. In the fields under the Button Name heading, type meaningful names for each of the buttons. The button names correspond to the buttons in the image of the module as well as the to the buttons on the physical device.
5. If you want the same button to activate and deactivate the same output, set the Button Action to ON/OFF. If you want one button to activate the output and another button to deactivate the output, set the Button Action to ON and the Button Action for the next button will automatically change to OFF.
6. To program the output activation behavior for the highlighted button, click Add Action in the Button ON section. Then do one of the following:• To select and configure outputs for the ON button, click Control Output. The Select
Outputs window appears. This window displays all of the outputs in your system and their configurable settings. Click the check box beside each output you want the button to control. Click Ok.
• To configure a button to trigger security functions such as panic, arm/disarm or stay arm, click Control Alarm System. Select the security function(s) you want the button to control. Click Ok. <<i have not seen this>>
• To configure a button to trigger a macro sequence, click Start/Stop Macro Sequence. The Select Macro Sequence to Start window appears. Click the check box beside the macro you want the button to control. Click Ok. For more information about programming macros, see the section “Macros” on page 25.
• To copy the programming from one button to another, click Copy Button Programming. <<this does not yet exist>>
7. To program the output deactivation behavior for the highlighted button, click Add Action in the Button OFF section. Then do one of the following:• To select and configure outputs for the OFF button, click Control Output. The Select
Outputs window appears. This window displays all of the outputs in your system and their
BabyWare 23 Quick Start

configurable settings. Click the check box beside each output you want the button to control. Click Ok.
• To configure a button to trigger security functions such as panic, arm/disarm or stay arm, click Control Alarm System. Select the security function(s) you want the button to control. Click Ok. <<i have not seen this>>
• To configure a button to trigger a macro sequence, click Start/Stop Macro Sequence. The Select Macro Sequence to Start window appears. For more information about programming macros, see the section “Macros” on page 25.
• To configure a button to stop a macro sequence, click Stop Macro Sequence. The Select Macro Sequence to Stop window appears. Click the check box beside the macro you want the button to stop. Click Ok.
• To copy the programming from one button to another, click Copy Button Programming. <<this does not yet exist>>
8. To program a dial on your switch module, highlight either the local or global dial and click Add Action in the Button ON section. Then do one of the following:• To select and configure outputs for Button ON, click Control Output. The Select Outputs
window appears. This window displays all of the outputs in your system and their configurable settings. Click the check box beside each output you want the button to control. Click Ok.
• To configure a dial to trigger a macro sequence, click Start/Stop Macro Sequence. The Select Macro Sequence to Start window appears. Click the check box beside the macro you want the dial to control. Click Ok. For more information about programming macros, see the section “Macros” on page 25.
• To configure a dial to stop a macro sequence, click Stop Macro Sequence. The Select Macro Sequence to Stop window appears. Click the check box beside the macro you want the dial to stop. Click Ok.
• To copy the programming from one button to another, click Copy Button Programming. <<this does not yet exist>>
The switches you configure appear in the Main Window with icons and sliders in the manual controls and status column. At any time, you can activate a switch function from this column. You can also activate switch functions from the image of the switch module in its programming window.
Switch LabelsTo create a name for the label of a switch, right-click the controller in the Switch section of the Main Window and then click Rename. Type a meaningful name for the switch and then click Ok.You can slide labels into the illuminated label window on the switch module. To print lables, right-click the controller and then click Print Labels. The Print Switch Label Selection window appears. From this window you can select the label you want to print as well as the font and size of its text.
BabyWare 24 Quick Start

Figure 24 - Print Labels
You can adjust the intensity of the backlight for the switch label from the Switch Programming window. Do do this, right-click the module and then click Properties. Click the Backlight Levels button. The Backlight Properties window appears. Adjust the light levels and then click Ok.
Figure 25 - Backlight Properties
MacrosA BabyWare macro is a pair or a group of devices that work together to perform a specific function in your home. You create macros by assigning trigger devices to output devices. A trigger is the device that determines how and when an output will be activated. An output is the device that turns on or off when activated by its trigger. For example, if you want the lights to turn on automatically when you walk into your kitchen, you can create a macro that links a motion detector (the trigger) to the lights in your kitchen (the output). When the motion detector senses a presence in the kitchen, it then triggers the lights to turn on. Outputs can be triggered by events or schedules that you configure.
BabyWare 25 Quick Start

To configure macros1. From the BabyWare Main Window, click the Add Item button. The Items Selection menu
appears.
Figure 26 - Items Selection Window (Macros)
2. Expand the Macros heading, select the macros you wish to add, and click Ok. The new macros appear in the Macros section of the Main Window.
3. In the Main Window, by the macro you want to configure, click Configure. This opens the macro programming window.
BabyWare 26 Quick Start
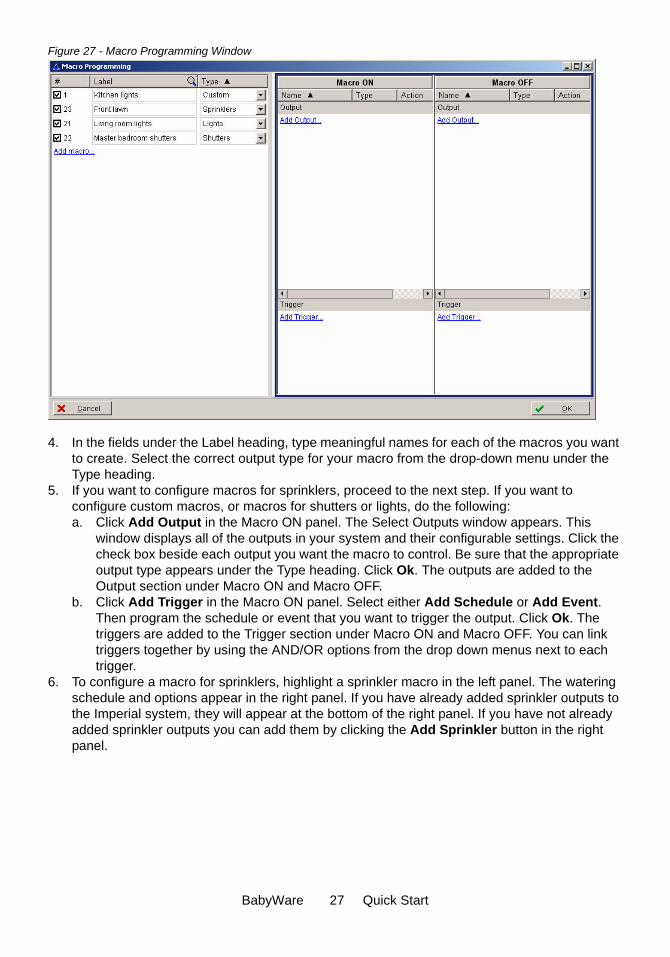
Figure 27 - Macro Programming Window
4. In the fields under the Label heading, type meaningful names for each of the macros you want to create. Select the correct output type for your macro from the drop-down menu under the Type heading.
5. If you want to configure macros for sprinklers, proceed to the next step. If you want to configure custom macros, or macros for shutters or lights, do the following:a. Click Add Output in the Macro ON panel. The Select Outputs window appears. This
window displays all of the outputs in your system and their configurable settings. Click the check box beside each output you want the macro to control. Be sure that the appropriate output type appears under the Type heading. Click Ok. The outputs are added to the Output section under Macro ON and Macro OFF.
b. Click Add Trigger in the Macro ON panel. Select either Add Schedule or Add Event. Then program the schedule or event that you want to trigger the output. Click Ok. The triggers are added to the Trigger section under Macro ON and Macro OFF. You can link triggers together by using the AND/OR options from the drop down menus next to each trigger.
6. To configure a macro for sprinklers, highlight a sprinkler macro in the left panel. The watering schedule and options appear in the right panel. If you have already added sprinkler outputs to the Imperial system, they will appear at the bottom of the right panel. If you have not already added sprinkler outputs you can add them by clicking the Add Sprinkler button in the right panel.
BabyWare 27 Quick Start

Figure 28 - Sprinkler Macro Programming
7. Click the check box of a sprinkler output to display its adjustable watering timeline. Program the schedule, options, and duration for watering. Click Ok.
The macros you program appear in the Main Window under the Macros heading. You can change the name of a macro at any time by clicking its label. You can automatically trigger a macro by clicking the icons in the Manual Controls and Satus column.
BabyWare 28 Quick Start

Figure 29 - Programmed Macros in Main Window

Administering the Imperial SystemOnce you have programmed security setttings or home automation, BabyWare provides several ways to administer the Imperial system.You can control system functions directly from the BabyWare Main Window. You can also view the Events List to monitor system activity. At any time, you can back up or restore security and home automation programming using the BabyWare backup Wizard. These basic administration options are explained in the following sections:• Monitoring Security Events• Monitoring Home Automation• The Events List• Back up BabyWare Programming
Monitoring Security EventsIcons in the Manual Controls and Status column allow you to view the current status of a system component from the BabyWare Main Window. You can view the status of a system component by hovering over any icon in the Manual Controls and Status column.
Figure 30 - Manual Controls and Status Column
From the Manual Controls and Status column, you can also manually arm and disarm system components as well as lock and unlock doors with a simple point and click.The following figure shows the commands that appear when you click the lock icon of an area in the Main Window.
BabyWare 30 Quick Start

Figure 31 - Lock Icon Commands
Icons in the Manual Controls and Status column change color according to their status. The following figure shows the legend for monitoring manual controls in your security system.
Figure 32 - Manual Controls Legend
Monitoring Home AutomationIcons in the BabyWare Main Window allow you to manually activate or deactivate outputs or macros in the MAMA system. You can click an icon to activate an output. Right-clicking an icon provides you with a menu of options for activating the output.
Figure 33 - MAMA Manual Controls
Icons in the Manual Controls and Status column change color according to their status. The following figure shows the legend for monitoring manual controls in your MAMA system.
BabyWare 31 Quick Start

Figure 34 - MAMA Manual Controls Legend
The Events ListEvents are reportable occurrences within your Imperial system. The Events List appears at the bottom of the Main Window and displays both live and stored events.
Figure 35 - Events List
Sorting EventsYou can sort information in the Events List by clicking any of the heading buttons. You can also
search for information by clicking the button in any of the headings and typing the information you want to find.
Filtering EventsBabyWare allows you to filter the information that appears in the Events List. You can view, for example, the door events or zone events that occurred between specified dates and times.To filter events, do the following:1. From the main menu, click Events, then select Apply Filters. The Custom Filters window
appears.
Figure 36 - Custom Filters Window
2. Do one or all of the following
BabyWare 32 Quick Start

• To filter by date, click the check boxes by Start Date and End Date. Then, from the drop-down menus, select a start date and end date.
• To filter by time, click the check boxes by Start Time and End Time. Then, use the buttons to set a time range.
• To filter by event type, click the check box by Event Type. Then, from the drop-down menu, select the event type you want to view.
3. Create as many filter views as you like by clicking Add Filter and repeating this procedure. Then click Ok. The Events List displays only the events within the parameters you defined.
Backing up BabyWare programmingYou can use the BabyWare Backup Wizard to back up and restore your security system programming and safegaurd against a data loss or corruption incident.
To back up BabyWare programming1. From the main menu, click File, then select Backup Wizard. The BabyWare Backup Wizard
appears.2. Click Backup. The Backup Task Window appears. Select an account in the left pane by
clicking the check box next to an account name. Then use the radio buttons and check boxes in the right pane to specify the content you want to protect.
Figure 37 - BabyWare Backup Task Window
3. In the Select destination path field, type a destination folder for your data. You can also click
the button to browse for a folder.4. Enter a password that you will use to restore saved data. Then reenter the password. Then
click Ok. A progress window appears as the data is backed up to your destination folder.
BabyWare 33 Quick Start

To restore backed-up data1. From the main menu, click File, the select Backup Wizard. The BabyWare Backup Wizard
appears.
2. Click Restore. The Restore window appears. Browse for your backup file by clicking the button and selecting your backup destination folder.
Figure 38 - BabyWare Restore Window
3. Enter the password you specified when backing up BabyWare programming. Then click Ok. A progress window appears as data is restored to the system.
BabyWare 34 Quick Start

Appendix A: BabyWare Menus and CommandsThis appendix provides an overview of BabyWare menus and commands.
Main MenuThe following tables describe the commands in the main menu of the Main Window.
File
View
Command Description
New Account Not yet implemented
Open Account Opens the Accounts window
Save Account Saves the current open account
Close Account Not yet implemented
Print Opens the Print window
Log Off Not yet implemented
Backup Wizard Opens backup and restore Wizard
Exit Closes BabyWare
Command Description
Modules Adds or removes view of Modules from the Main Window
Users Adds or removes view of Users from the Main Window
Areas Adds or removes the view of Areas from the Main Window
Zones Adds or removes the view of Zones from the Main Window
Doors Adds or removes the view of Doors from the Main Window
Output Adds or removes view of Outputs from the Main Window
Macro Adds or removes view of Macros from the Main Window
Schedules Adds or removes view of Schedules from the Main Window
Preferences Not yet implemented
BabyWare 35 Quick Start
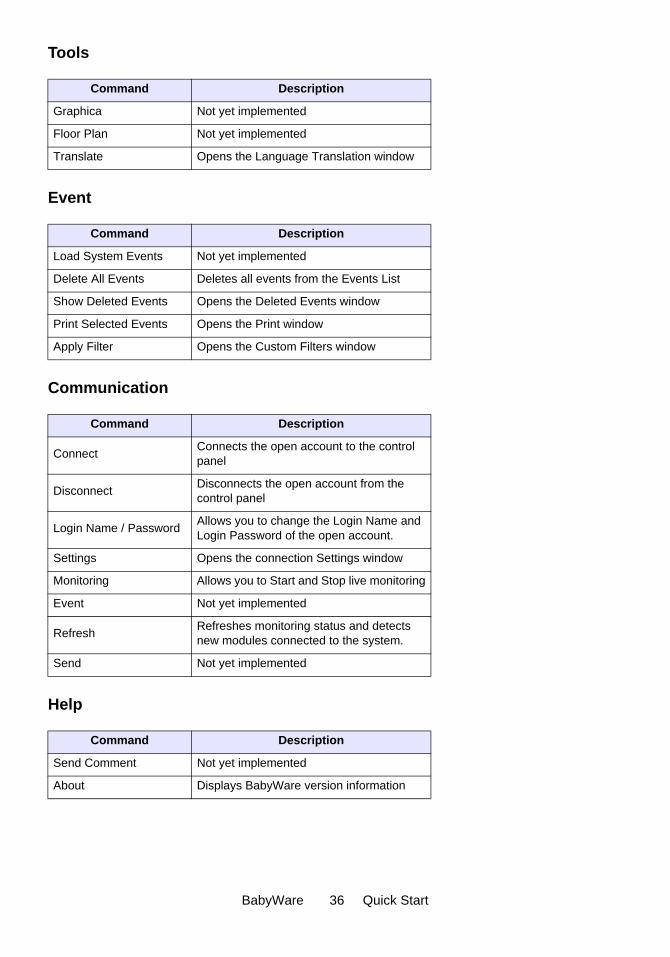
Tools
Event
Communication
Help
Command Description
Graphica Not yet implemented
Floor Plan Not yet implemented
Translate Opens the Language Translation window
Command Description
Load System Events Not yet implemented
Delete All Events Deletes all events from the Events List
Show Deleted Events Opens the Deleted Events window
Print Selected Events Opens the Print window
Apply Filter Opens the Custom Filters window
Command Description
Connect Connects the open account to the control panel
Disconnect Disconnects the open account from the control panel
Login Name / Password Allows you to change the Login Name and Login Password of the open account.
Settings Opens the connection Settings window
Monitoring Allows you to Start and Stop live monitoring
Event Not yet implemented
Refresh Refreshes monitoring status and detects new modules connected to the system.
Send Not yet implemented
Command Description
Send Comment Not yet implemented
About Displays BabyWare version information
BabyWare 36 Quick Start
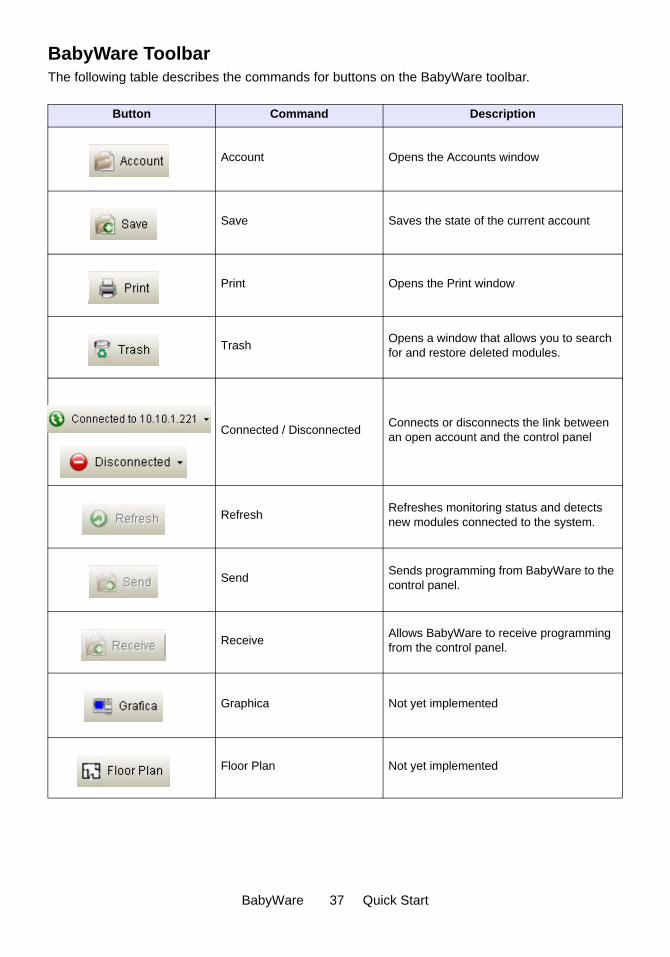
BabyWare ToolbarThe following table describes the commands for buttons on the BabyWare toolbar.
Button Command Description
Account Opens the Accounts window
Save Saves the state of the current account
Print Opens the Print window
Trash Opens a window that allows you to search for and restore deleted modules.
Connected / Disconnected Connects or disconnects the link between an open account and the control panel
Refresh Refreshes monitoring status and detects new modules connected to the system.
Send Sends programming from BabyWare to the control panel.
Receive Allows BabyWare to receive programming from the control panel.
Graphica Not yet implemented
Floor Plan Not yet implemented
BabyWare 37 Quick Start
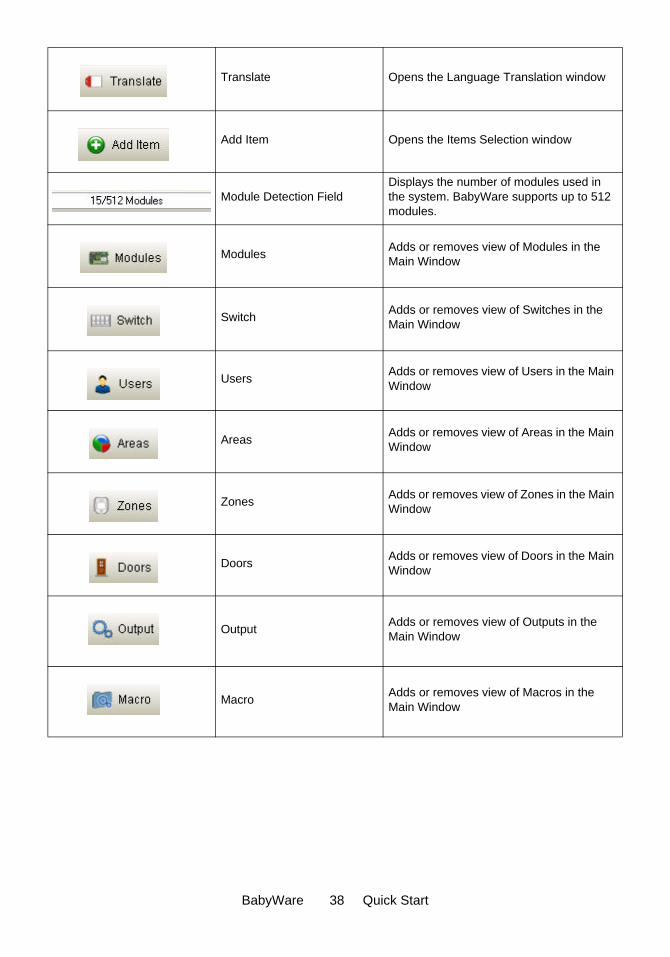
Translate Opens the Language Translation window
Add Item Opens the Items Selection window
Module Detection FieldDisplays the number of modules used in the system. BabyWare supports up to 512 modules.
Modules Adds or removes view of Modules in the Main Window
Switch Adds or removes view of Switches in the Main Window
Users Adds or removes view of Users in the Main Window
Areas Adds or removes view of Areas in the Main Window
Zones Adds or removes view of Zones in the Main Window
Doors Adds or removes view of Doors in the Main Window
Output Adds or removes view of Outputs in the Main Window
Macro Adds or removes view of Macros in the Main Window
BabyWare 38 Quick Start

Printed in Canada - 10/2008 PARADOX.COM BABYWARE-EQ00