
B-pure Pressure Cartridge System - Thermo Fisher … Thermo Scientific B-pure Pressure Cartridge...
42
B-pure Pressure Cartridge System Series 583 Operating Manual and Parts List LT583X1 Rev. 0 _________________________________________________________________________________ Part of Thermo Fisher Scientific
-
Upload
trannguyet -
Category
Documents
-
view
214 -
download
0
Transcript of B-pure Pressure Cartridge System - Thermo Fisher … Thermo Scientific B-pure Pressure Cartridge...

B-pure Pressure Cartridge SystemSeries 583Operating Manual and Parts List LT583X1 Rev. 0
_________________________________________________________________________________Part of Thermo Fisher Scientific
Thermo Scientific
MANUAL NUMBER LT583X1 (7007112)
0 -- 5/26/10 Transfer to Marietta (was LT583X1 4/5/05) ccs
REV ECR/ECN DATE DESCRIPTION By
Preface
B-pure Pressure Cartridge i
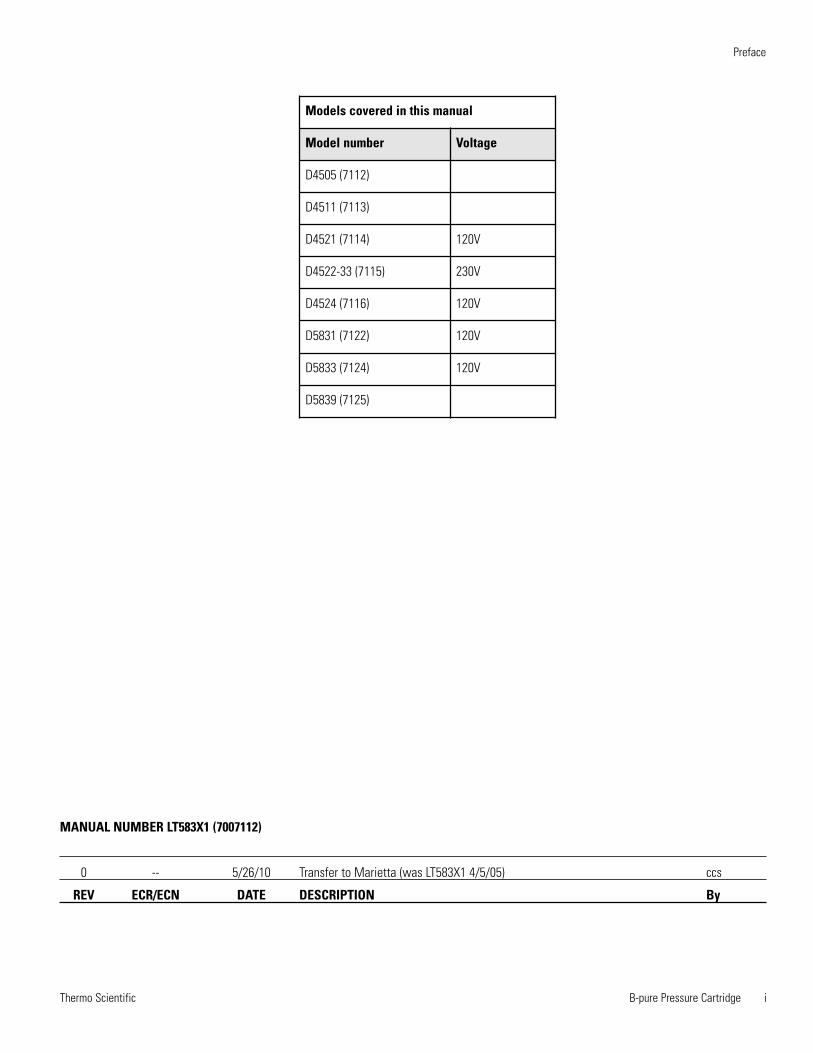
Models covered in this manual
Model number Voltage
D4505 (7112)
D4511 (7113)
D4521 (7114) 120V
D4522-33 (7115) 230V
D4524 (7116) 120V
D5831 (7122) 120V
D5833 (7124) 120V
D5839 (7125)

Thermo Scientificii B-pure Pressure Cartridge
Preface
Important Read this instruction manual. Failure to read, understand and follow the instructions in this manualmay result in damage to the unit, injury to operating personnel, and poor equipment performance. s
Caution All internal adjustments and maintenance must be performed by qualified service personnel. s
Material in this manual is for information purposes only. The contents and the product it describes are subject tochange without notice. Thermo Fisher Scientific makes no representations or warranties with respect to thismanual. In no event shall Thermo be held liable for any damages, direct or incidental, arising out of or related tothe use of this manual.
©2010 Thermo Fisher Scientific. All rights reserved.

Thermo Scientific B-pure Pressure Cartridge iii
Preface
Important operating and/or maintenance instructions. Read the accompanying text carefully.
Potential electrical hazards. Only qualified persons should perform procedures associated with thissymbol.
Equipment being maintained or serviced must be turned off and locked off to prevent possible injury.
Hot surface(s) present which may cause burns to unprotected skin, or to materials which may bedamaged by elevated temperatures.
Marking of electrical and electronic equipment, which applies to electrical and electronic equipmentfalling under the Directive 2002/96/EC (WEEE) and the equipment that has been put on the marketafter 13 August 2005.
This product is required to comply with the European Union’s Waste Electrical & ElectronicEquipment (WEEE) Directive 2002/96/EC. It is marked with the WEEE symbol. Thermo FisherScientific has contracted with one or more recycling/disposal companies in each EU Member StateEuropean Country, and this product should be disposed of or recycled through them. Furtherinformation on Thermo’s compliance with this directive, the recyclers in your country andinformation on Thermo products will be available at www.thermofisher.com.
4 Always use the proper protective equipment (clothing, gloves, goggles, etc.)
4 Always dissipate extreme cold or heat and wear protective clothing.
4 Always follow good hygiene practices.
4 Each individual is responsible for his or her own safety.

Thermo Scientificiv B-pure Pressure Cartridge
Preface
Do You Need Information or Assistance on
Thermo Scientific Products?
If you do, please contact us 8:00 a.m. to 6:00 p.m. (Eastern Time) at:
1-740-373-4763 Direct
1-800-438-4851 Toll Free, U.S. and Canada
1-877-213-8051 FAX
http://www.thermofisher.com Internet Worldwide Web Home Page
Service E-Mail Address
Thermo Fisher Scientific
401 Millcreek Road, Box 649
Marietta, OH 45750
Our staff can provide information on pricing and give you quotations. We can
take your order and provide delivery information on major equipment items or make
arrangements to have your local sales representative contact you. Our products are listed on the
Internet and we can be contacted through our Internet home page.
Our staff can supply technical information about proper setup, operation or
troubleshooting of your equipment. We can fill your needs for spare or replacement parts or
provide you with on-site service. We can also provide you with a quotation on our Extended
Warranty for your Thermo Scientific products.
Whatever Thermo Scientific products you need or use, we will be happy to discuss your
applications. If you are experiencing technical problems, working together, we will help you
locate the problem and, chances are, correct it yourself...over the telephone without a service
call.
When more extensive service is necessary, we will assist you with direct factory trained
technicians or a qualified service organization for on-the-spot repair. If your service need is
covered by the warranty, we will arrange for the unit to be repaired at our expense and to your
satisfaction.
Regardless of your needs, our professional telephone technicians are available to assist you
Monday through Friday from 8:00 a.m. to 6:00 p.m. Eastern Time. Please contact us by
telephone or fax. If you wish to write, our mailing address is:
International customers, please contact your local Thermo Scientific distributor.
Sales Support
Service Support

B-pure Pressure Cartridge vThermo Scientific
Table of Contents
Safety Information . . . . . . . . . . . . . . . . . . . . . . . . . . . . . . . . . . . . . . . . . . . .1-1
Technical Specifications . . . . . . . . . . . . . . . . . . . . . . . . . . . . . . . . . . . . . .2-1Installation . . . . . . . . . . . . . . . . . . . . . . . . . . . . . . . . . . . . . . . . . . . . .3-1
Unpacking and Installation . . . . . . . . . . . . . . . . . . . . . . . . . . . . . . . . . . . .3-1System Location . . . . . . . . . . . . . . . . . . . . . . . . . . . . . . . . . . . . . . . . .3-2Mounting and Utility Connections . . . . . . . . . . . . . . . . . . . . . . . . . .3-2
Initial Operation . . . . . . . . . . . . . . . . . . . . . . . . . . . . . . . . . . . . . . . . . . . . . .4-1Installing Water Treatment Cartridges . . . . . . . . . . . . . . . . . . . . . . . .4-1Installing Particulate Filters . . . . . . . . . . . . . . . . . . . . . . . . . . . . . . . .4-2
Final Filters . . . . . . . . . . . . . . . . . . . . . . . . . . . . . . . . . . . . . . . . . . .4-2Prefilters . . . . . . . . . . . . . . . . . . . . . . . . . . . . . . . . . . . . . . . . . . . . .4-2
Filling Procedure . . . . . . . . . . . . . . . . . . . . . . . . . . . . . . . . . . . . . . . .4-3
Operation . . . . . . . . . . . . . . . . . . . . . . . . . . . . . . . . . . . . . . . . . . . . . . . . . . . .5-1Resistivity Meter/Puralite . . . . . . . . . . . . . . . . . . . . . . . . . . . . . . . . . .5-1
Maintenance and Servicing . . . . . . . . . . . . . . . . . . . . . . . . . . . . . . . . . . .6-1Cartridge and Filter Replacement . . . . . . . . . . . . . . . . . . . . . . . . . . . .6-1System Sanitizing . . . . . . . . . . . . . . . . . . . . . . . . . . . . . . . . . . . . . . . .6-2Storage . . . . . . . . . . . . . . . . . . . . . . . . . . . . . . . . . . . . . . . . . . . . . . . .6-3General Cleaning Instructions . . . . . . . . . . . . . . . . . . . . . . . . . . . . . .6-3Cleaning the Resistivity Cell . . . . . . . . . . . . . . . . . . . . . . . . . . . . . . .6-3Mix and Match . . . . . . . . . . . . . . . . . . . . . . . . . . . . . . . . . . . . . . . . .6-4
General Procedure . . . . . . . . . . . . . . . . . . . . . . . . . . . . . . . . . . . . . .6-4Tools and Accessories . . . . . . . . . . . . . . . . . . . . . . . . . . . . . . . . . . .6-4
Three Holder B-pure Unit . . . . . . . . . . . . . . . . . . . . . . . . . . . . . . . . .6-5Three Holder B-pure System . . . . . . . . . . . . . . . . . . . . . . . . . . . . . . .6-6Cartridges . . . . . . . . . . . . . . . . . . . . . . . . . . . . . . . . . . . . . . . . . . . . . .6-7
Section 1
Section 2
Section 3
Section 4
Section 5
Section 6
vi B-pure Pressure Cartridge Thermo Scientific
Troubleshooting . . . . . . . . . . . . . . . . . . . . . . . . . . . . . . . . . . . . . . . . . . . . . .7-1
Exploded Views . . . . . . . . . . . . . . . . . . . . . . . . . . . . . . . . . . . . . . . . . . . . . .8-1
Replacement Parts . . . . . . . . . . . . . . . . . . . . . . . . . . . . . . . . . . . . . . . . . . .9-1Recommended Spares . . . . . . . . . . . . . . . . . . . . . . . . . . . . . . . . . . . .9-1Consumable List . . . . . . . . . . . . . . . . . . . . . . . . . . . . . . . . . . . . . . . .9-1General Maintenance Parts . . . . . . . . . . . . . . . . . . . . . . . . . . . . . . . . .9-2Safety Stock . . . . . . . . . . . . . . . . . . . . . . . . . . . . . . . . . . . . . . . . . . . .9-2Ordering Procedures . . . . . . . . . . . . . . . . . . . . . . . . . . . . . . . . . . . . .9-3
Table of Contents
Section 8
Section 7
Section 9

B-pure Pressure Cartridge 1-1Thermo Scientific
Section 1 Safety Information
Your Thermo Scientific B-pure Pressure Cartridge System has beendesigned with function, reliability, and safety in mind. It is the user’sresponsibility to install it in conformance with local electrical codes. Forsafe operation, pay attention to Notes, Cautions, and Warningsthroughout the manual.
This manual contains important operating and safety information. Theuser must carefully read and understand the contents of this manual priorto the use of this equipment.
Note Do not use this product for anything other than its intended usage.
Warnings
To avoid electrical shock, always:
1. Use a properly grounded electrical outlet of correct voltage and currenthandling capacity.
2. Do not mount your B-pure directly over equipment that requireselectrical service. Routine maintenance of this unit may involve waterspillage and subsequent electrical shock hazard, if improperly located.
3. Disconnect from the power supply prior to servicing.

1-2 B-pure Pressure Cartridge Thermo Scientific
Section 1Safety Information
To avoid personal injury:
1. Depressurize system prior to attempting to remove canisters, or meterand cell assembly.
2. Avoid splashing disinfecting solutions on clothing or skin.
3. Ensure all piping connections are tight to avoid leakage of chemicals.
4. Always depressurize chemical lines before disassembly.
5. Follow carefully the manufacturers' safety instructions on labels ofchemical containers and Material Safety Data Sheets (M.S.D.S.).
6. Refer servicing to qualified personnel.

B-pure Pressure Cartridge 2-1Thermo Scientific
Section 2 Technical Specifications
Feedwater RequirementsTypes . . . . . . . . . . . . . . . . . .Tap, RO, DI, distilledMaximum pressure 7 kg/cm2 (100 psig) maximumTemperature . . . . . . . . . . . . . . .4-49°C (40-120°F)
Installation
Resistivity MeasurementRange . . . . .0.1 - 18.3 megohm-cm (temp compensated to 25°C/77°F)Accuracy . . . . . . . . . . . . . . . . . . . . . . .3% Full ScaleCell . . . . . . . . . . . . . . . . . . . . . . . . . . . .0.1 constant
Electrical Requirements120 VAC, 50/60 Hz 108-132 VAC, 47-63 Hz, 5 Watts240 VAC, 50/60 Hz 216-264 VAC, 47-63 Hz, 5 Watts
Mounting Wall mount, with bracket provided
Dimensions, mm (in.) Dual B-pure Single B-pure 1/2 size Holder
Width 381 (15) 178 (7) 178 (7)
Depth 171.5 (6.75) 171.5 (6.75) 171.5 (6.75)
Height 673 (26.5) 591 (23.25) 368 (14.5)
Op. weight, kg (lb) 12.7 (28) 5.9 (13) 5 (11)
Plumbing Connections
Inlet 1/2” NPTF 1/2” NPTF 1/2” NPTF
Outlet 1/2” NPTF 1/2” NPTF 1/2” NPTF
1/4” NPTF
5/16” OD
Hose barb

2-2 B-pure Pressure Cartridge Thermo Scientific
Section 2Technical Specifications
Declaration of ConformityWe hereby declare under our sole responsibility that this product conformswith the technical requirements of the following standards (230 voltmodels only):
EMC: EN 50081-1 . . . . . . . .Generic Emission StandardEN 50082-1 . . . . . . .Generic Immunity Standard
Safety: IEC 1010-1-92 . . . . . Safety Requirements for Electrical Equipment forMeasurement, Control and Laboratory Use; Part I: GeneralRequirements
per the provisions of the Electromagnetic Compatibility Directive89/336/EEC as amended by 92/31/EEC and 93/68/EEC, and per theprovisions of the Low Voltage Directive 73/23/EEC, as amended by93/68/EEC.
Copies of the Declaration of Conformity are available upon request.
Environmental ConditionsOperating:
4°C - 49°C; 20% - 80% RH, non-condensingInstallation Category II (over-voltage) in accordance with IEC 664Pollution Degree 2 in accordance with IEC 664Altitude limit: 2,000 meters
Storage: -25°C - 65°C; 10% to 85% RH
B-pure Pressure Cartridge 3-1Thermo Scientific
Section 3 Unpacking and Installation
Unpack the B-pure carefully. B-pure units come completely assembled. Aspare head interconnector (P/N 15853) is supplied as a loose part with thesingle B-pure D4511 and the 1/2 size B-pure D4505 and D5839. Retainthis item for possible later use in expansion.
The cartridge holders that make up the B-pure family are designed for awide range of applications and configurations. It is not possible to includespecifics in this manual for the broad application range. We recommendthat you contact your local representative or Technical Services forguidance. Knowing the correct cartridges or filters for your specificapplication will assure you of the most efficient and economical use ofyour B-pure System.
All individual members of the B-pure family can be interconnected toform custom water treatment systems. If you are constructing a customsystem, be sure to read the Mix & Match section before mounting thesystem. The mounting hole patterns will vary depending on the particularconfiguration that you choose.
The B-pure system requires expendable pretreatment, prefilters,deionization cartridges and final filters which are not supplied with theunit. They must be purchased separately. Descriptions, applications andcatalog numbers of filters and cartridges are located in the “Maintenanceand Servicing” section of this manual. When ordering, please state catalognumber, description and quantity required. Screws and fasteners requiredfor wall mounting are not supplied with the unit.
Installation

3-2 B-pure Pressure Cartridge Thermo Scientific
Section 3Installation
Mounting and UtilityConnections
Warning Do not mount B-pure directly over equipment that requireselectrical service. Routine maintenance of this unit may involve waterspillage and subsequent electrical shock hazard if improperly located. s
Caution Wall and mounting hardware must be capable of supporting thefull operational weights as outlined in the technical specifications section ofthis manual. Inadequate support or fasteners may result in damage tomounting surface and/or equipment. Use adequate hardware for the job. Ifyou are unsure of the hardware, consult your building maintenance groupor contractor. s
The B-pure should be mounted at a convenient height for routineoperation. Adequate front access will be required for cartridge or filterexchange and reading of the resistivity meter, if used. The followingclearances are necessary:
Left and right side clearance - 4” minimum
Free space below canisters - 4” minimum
Free space above center of wall bracket:
• B-pure products without meter, 4” minimum
• B-pure products with meter, 8” minimum
The recommended dimensions for mounting hardware to support yourequipment are:
• Body Diameter, 1/4” maximum
• Head Diameter, 3/8” maximum
• Length, 1” typical
Note If you are constructing a custom water treatment system using B-purecomponents, read the Mix and Match section of this manual beforeproceeding further. s
All B-pure installations require a user supplied shutoff valve in theincoming water service line. In some installations, it may be desirable toprovide an outlet shutoff valve. A draw-off valve assembly is provided onthe Dual Holders as a standard and may be ordered as an optional extra forother B-pure products (see exploded view drawing for part numbers).
System Location

Mounting and UtilityConnections (cont.)
B-pure Pressure Cartridge 3-3Thermo Scientific
Section 3Section title
Mount the B-pure unit using the following steps:
1. Remove the wall bracket from the unit by removing the two securingscrews on the left and the right bottom portion of the bracket. Slidebracket downward to release.
2. Using the wall bracket as a template, mark the hole locations on thewall.
3. Drill holes in wall suitable for the selected fasteners.
4. Mount wall bracket and secure with fasteners.
5. Re-secure B-pure on bracket and refasten securing screws.
Caution Do not overtighten this connection; excessive tightening will crackthe adapter. Do not thread a metal fitting into inlet or outlet adapter. s
6. Connect feedwater service to the left side of the head assembly usingadapter provided. Use PTFE tape on threads to ensure a leak-freeconnection.
7. Make outlet connections as required by your specific application.


B-pure Pressure Cartridge 4-1Thermo Scientific
Section 4 Initial Operation
Various types of filters and cartridges are used in B-pure systems; 10”nominal particulate filters and cartridges are used in the halfsize canistersand nominal 17” water treatment cartridges used in the full size canisters.
Warning Depressurize system prior to attempting to remove canisters. s
Note An extra set of head-to-canister o-rings are supplied to replace anyo-rings that may have been damaged or deformed in shipment. s
1. Remove the cartridge from the bag.
2. Remove the canister from the head by depressing the thumb lever androtating the hand ring 1/4 turn to the left.
3. Check to ensure that the small o-ring inside the head is in place. Thisis important because water will bypass the cartridge if this o-ring is notin place.
4. Place cartridge(s) in canister with the large opening down.
5. Wet canister o-ring before installation. Install canister by depressingthumb lever and rotating 1/4 turn to the right, until the locking pin isin the appropriate position (see Figure 4-1).
Caution Secure locking pin before operating. Locking pin on canister mustbe fully released into hole in head before system is operated. s
Figure 4-1. Locking Pin
Installing WaterTreatment Cartridges

4-2 B-pure Pressure Cartridge Thermo Scientific
Section 4Initial Operation
Installing ParticulateFilters
Two types of particulate filters are used in the half-size canisters.
Warning Depressurize system prior to attempting to remove canisters. s
These devices are string-wound filters designed to prevent large particulatesfrom entering a water treatment system.
These devices are pleated membrane filters designed to remove particulatesas small as 0.2 micron. These filters are supplied with gaskets which are notused for B-pure installations. Install filters as follows:
1. Remove filter and adapters from package.
2. Remove canister from head by pressing the thumb lever and rotatingthe ring 1/4 turn to the left.
3. Lubricate the o-rings on the adapters using pure water, then installadapters into filters by turning the adapter as you push it into thefilter’s open end.
4. Lubricate the o-rings on the head with pure water, then secure the filter(including adapter) onto the head by gently pushing and turning thefilter.
5. Insert the canister vertically upward over the filter and tighten 1/4 turnto the right.
Caution Secure locking pin before operating; locking pin must be fullyreleased into hole on head before the system is operated. s
Prefilters
Final Filters

B-pure Pressure Cartridge 4-3Thermo Scientific
Section 4Initial Operation
After every cartridge exchange, some air will be trapped in the system. Airshould be purged before routine use by the following procedure:
1. Place a container or suitable drain under the outlet valve.
2. Open all inlet valves and the outlet valve.
3. Depress vent button on top of head to remove air.
4. When there is a steady flow from the outlet valve, close the outletvalve.
5. If using a resistivity meter, plug into electrical service.
6. Open the outlet valve and allow water to flow through the system untildesired purity is reached.
Note When using a submicron filter, hold purge button (red button onholder head) down until a steady flow of water is observed. Check allfittings for leaks and tighten as necessary. s
Filling Procedure


B-pure Pressure Cartridge 5-1Thermo Scientific
Section 5 Operation
Prior to withdrawing water for use, it is recommended that you allow somewater to run to drain to rinse up the system. If using a resistivity meter, thedisplay will register a gradual improvement of water quality.
The resistivity measurement in the dual holder B-pure is accomplishedwith an in-line digital readout meter and integral cell. The resistivity metermeasures the specific resistance of the water on a scale of 0.1 to 18.3megohm-cm. The resistivity measurement is automatically temperaturecompensated to 25°C regardless of system water temperature.
Other systems may include a Puralite. These lights are go/no-go indicators.The light will illuminate green when the purity of the water exiting thesystem is above the value of the individual light. When the purity dropsbelow that value, it will illuminate red, indicating the need for cartridgereplacement.
ResistivityMeter/Puralite


Section 6 Maintenance and Servicing
Warning Disconnect from power supply before servicing. Refer servicingto qualified personnel. s
Warning Depressurize system prior to attempting to remove canisters. s
Depending on your particular usage, cartridges must be periodicallyreplaced. The need for replacement of water treatment cartridges designedto remove ionized impurities can be determined by a drop in resistivity ofthe water. For 10” particulate filters, replacement can be determined by asignificant drop in pressure or a decrease in flow rate. Change all cartridgesas follows:
1. Close the customer-supplied shutoff valve on the inlet side of thesystem.
2. Place a suitable container under the outlet and open the outlet valve todepressurize the system.
3. Press vent button on top of B-pure head.
4. Place a container under the cartridge canister to collect any spillage.
5. Remove the canister from the head and drain into container.
6. Remove old cartridge and discard.
7. Inspect the o-rings in the canister and replace if worn.
8. Install a new cartridge or filter as explained in “Initial Operation.”
B-pure Pressure Cartridge 6-1Thermo Scientific
Cartridge and FilterReplacement

Frequency of cleaning is difficult to determine because of the wide varietyof feedwater supplies, however the need for cleaning can be easilydetermined. Whenever a cartridge is replaced, always examine the inside ofthe canister for any residual deposits. If any are observed, clean the systemas follows:
1. Disconnect power to system where appropriate.
2. Close the shutoff valve on the inlet side of the system.
3. Relieve pressure by opening the outlet valve.
4. With the cartridge(s) out of the canister(s), wash the inside of thehead(s) and canister(s) with soap or detergent, using a sponge or cleancloth. Rinse out the canister(s) and head(s) with clean water severaltimes to remove the detergent residues.
5. Make up the following disinfecting solution: add 230 milliliters ofhousehold bleach (5.25% sodium hypochlorite) to 3.8 liters of water tomake a 0.3% solution.
Note The sanitizing solution noted in Step 5 is sufficient for one largecanister. Prepare a sufficient amount of solution to fill all of the canisters inyour system. s
6. Fill the canister to within 2” of the top with the above disinfectingsolution, and reassemble the canister(s) on the unit.
7. Open the shutoff valve on the inlet side of the system.
8. Open the outlet valve, draw off approximately 200 ml of solution anddiscard it.
9. Close inlet and outlet valves.
10. Allow the disinfecting solution to stand for one half hour.
11. Open the inlet and outlet valves and flush the system for 10 minutes.
12. Close the shutoff valve on the inlet side of the system and open theoutlet valve to depressurize the system.
13. Carefully remove the canister(s) from the system, and discard thesolution remaining from the canister(s). Do not rinse the canister(s).
14. Install fresh cartridge(s) in the system as explained in Initial Operation.
15. Turn to the Operation section of this manual for filling procedure andnormal operation.
6-2 B-pure Pressure Cartridge Thermo Scientific
Section 6Maintenance and Servicing
System Sanitizing

B-pure Pressure Cartridge 6-3Thermo Scientific
Section 6Maintenance and Servicing
Warning Depressurize system prior to attempting to remove meter and cellassembly. s
Caution The cell electrodes are etched to improve wetting characteristics.Do not mechanically abrade or damage this surface. s
Caution Do not immerse the entire cell assembly in the cleaning solution,only the electrode portion. s
Caution Do not overtighten cell. Excessive tightening will crack head. s
Clean the resistivity cell as follows:
1. Disconnect power to the system.
2. Close the shutoff valve on the inlet side of the system.
3. Open the outlet valve.
4. Remove meter and cell assembly from the head.
5. Wash the cell in a mild detergent solution or a 10% inorganic acidsolution (follow chemical manufacturer’s recommended handlingprocedure). This may be done in an ultrasonic cleaner or with a softbrush. The cell must be thoroughly rinsed in deionized water followingthe detergent or acid cleaning.
After cleaning, remove old PTFE tape from the head and cell threads andapply a new wrap of PTFE tape to cell body threads. Install the meterassembly in the B-pure System.
Wipe exterior surfaces with a lightly dampened cloth containing a mildsoap solution.
If the B-pure System is to be shut down for an extended period of time,the system should be completely drained and the cartridges removed toprevent the growth of bacteria. If the system has remained inactive and fullof water, then the system should be drained, cleaned, and sanitized beforenew cartridges are installed.
Cleaning theResistivity Cell
General CleaningInstructions
Storage

All B-pure products are designed for interconnection to form a variety ofwater systems. Individual applications will determine the correct sequenceof B-pure components. After the sequence is determined, the various partscan be easily arranged and connected. In this section, we describe thegeneral procedure for constructing a custom system and detail theprocedures for constructing two commonly used configurations. Werecommend you read the entire section before proceeding.
Constructing a custom system will require the following tools:
• Small screwdriver for drive pin removal.
• A small mallet or hammer for re-seating the drive pins.
After carefully unpacking B-pure components, place them on a table in thedesired order. As a general rule, if you are using a dual holder B-pure, itshould be located as far to the right as possible. This will reduce thenumber of changes that need to be made.
Next, remove all of the fastener pins in the canister heads where two headstouch each other and remove the adapters or assemblies retained by thefastener pins. Fastener pins are removed by gently tapping them up with ascrewdriver. Set the fastener pins and other parts aside. If you have a dualholder B-pure, it is not necessary to remove the factory installed fastenerpins that join the heads.
Locate the head interconnectors (BR550X4), supplied as loose parts, andinstall these wherever heads need to be joined. Make sure that the o-ringsare still in the recesses of the heads. Re-install fastener pins and tap gentlywith a hammer until they are seated. You should now have a rigid assemblyof heads and wall brackets in your desired sequence. Inlet and outletadapters or assemblies can now be installed to suit your particularrequirements. Turn to the “Mounting and Utility Connections” section ofthis manual for mounting instructions.
6-4 B-pure Pressure Cartridge Thermo Scientific
Section 6Maintenance and Servicing
Mix and Match
Tools and Accessories
General Procedure

A common configuration built from B-pure components is the threeholder unit. This unit allows the use of two water treatment cartridges anda final filter at the outlet. This will require one dual B-pure and a 1/2 sizeB-pure filter holder (D5839). Disassemble the units as follows:
1. Position the dual holder on the left and the 1/2 size filter holder to itsright.
2. Remove all the canisters.
3. Remove the draw-off valve assembly from the dual holder by drivingup the fastener pins.
4. Remove the end fitting on the inlet and outlet of the 1/2 size filterholder.
Reassemble the units as follows:
1. Install the head interconnector into the outlet port of the dual holder.Be sure o-ring is in place. Install and seat fastener pins.
2. Connect the 1/2 size filter holder head into the dual holder head sothat the interconnector from the Dual Holder is in the inlet port of the1/2 size filter holder. Be sure o-ring is in place. Install and seat fastenerpins.
3. Install draw-off valve assembly, including meter, into the 1/2 size filterholder outlet port. Be sure the o-ring is in place. Install and seatfastener pins.
Turn to the Mounting and Utility Connections section of this manual formounting instructions.
B-pure Pressure Cartridge 6-5Thermo Scientific
Section 6Maintenance and Servicing
Three Holder B-pureUnit

A common configuration built from B-pure components is a Three-HolderSystem. This system will utilize three water treatment cartridges in series.This will require a Dual Holder and a single holder B-pure (D4511).
Disassemble the unit as follows:
1. Position Dual Holder on right and single holder on left on top of table.
2. Remove the canisters from all units.
3. Drive up fastener pins from the outlet of the single holder and the inletof the dual holder and remove end fittings. This is accomplished bygently tapping from the bottom with a small screwdriver and ahammer - excessive force will damage the pins.
4. Connect the two units together using the head interconnectorsupplied. Ensure that the o-ring is present in both openings. Install andseat fastener pins.
Note Refer to Figure 6-1 for assembly order. s
5. Turn to the “Mounting and Utility Connections” section of thismanual for mounting instructions.
6-6 B-pure Pressure Cartridge Thermo Scientific
Section 6Maintenance and Servicing
Three Holder B-pureSystem
Figure 6-1. Three Holder System (3 Water Treatment Cartridges)

B-pure Pressure Cartridge 6-7Thermo Scientific
Section 6Maintenance and Servicing
Cartridges Description Half Size Catalog no. Full Size Catalog no. Application
Macropure N.A. D0836
Effectively removescolloids, bacteria,chlorine and organics,increases filter life.
Pretreatment N.A. D0835 Effectively removescolloids, bacteriaorganics and chlorine.
Still Pretreatment D50217 D0832
Removes ionizedimpurities and has alayer of activated car-bon to remove chlorineand organics.
Organic Removal D50215 D0813 Removes organics andchlorine.
Cation N.A. D0815
Converts ionized saltsto the acid form result-ing in a product waterthat is low in pH, idealfor precious metal orisotope recovery.
Anion N.A. D0760
Effective removal ofanion impurities, rais-es the pH of solutions,recovers preciousmetal complexes.
High Capacity N.A. D0803
Removes ionizedimpurities, produces alarger quantity ofwater than that of theUltrapure, however ata lower resistivity.
Ultrapure D50213 D0809
Removes ionizedimpurities to producehigh resistivity waterwith a neutral pH.
Oxygen Removal D50214 D0811
Maintains low oxygencontent to prevent cor-rosion in cooling waterloops, etc. The feed-water should containless than 10 ppm ofionized solids.

Prefilters
15 micron FL583X3
10 micron FL583X2
5 micron FL583X1
Final Filters
0.45 micron FL583X5
0.2 micron FL583X6
6-8 B-pure Pressure Cartridge Thermo Scientific
Section 6Maintenance and Servicing

Section 7 Troubleshooting
B-pure Pressure Cartridge 7-1Thermo Scientific
Problem Possible Causes Solutions
Water will not rinseup to purity. Exhausted cartridges. Replace all cartridges as explained in “Maintenance & Servicing”
section.
Cartridges upside down. Install right-side up as explained in “Initial Operation” section.
Cartridges out of order. Verify cartridge order is correct for your specific application.
Feedwater bypassing cartridge(s). Be sure o-ring is not damaged and is properly installed.
Excessive flow rate. Reduce flow to a specified maximum or less.
Reduced or no waterflow. Particulate filter clogged. Replace the filter as explained in the “Maintenance & Servicing”
section.
Air trapped in filter. Purge air in the system as explained in “Purging Air From theSystem.”
Leaking canisters. O-ring missing, damaged or not seatedproperly in the groove of canister. Replace or position correctly.
Excessive particulatepassage.
One or both filter adapters missing orinstalled improperly.
Check that the adapters are installed on the filters properly and that their o-rings are in place.
Short cartridge life. Cartridges being used beyond expiration date.
Check the expiration date; cartridges begin to lose capacity afterbeing stored 2 years from date of manufacture. Replace with freshcartridges.
Change in feedwater characteristics.
If tap water is the feedwater source, check the quality of the water.In some cases, the quality of the water will change with the sea-sons; changing the source (city water to well water and vice versa)will result in a water quality change. If feedwater is from a centralpurification source, verify water quality and proper functioning ofthe system.


Section 8 Exploded Views
B-pure Pressure Cartridge 8-1Thermo Scientific
Figure 8-1. Three Holder E-pure (Three Water treatment Cartridges

8-2 B-pure Pressure Cartridge Thermo Scientific
Section 8Exploded Views
Figure 8-2. B-pure (D4511)

B-pure Pressure Cartridge 8-3Thermo Scientific
Section 8Exploded Views
Figure 8-3. B-pure (D4505)

8-4 B-pure Pressure Cartridge Thermo Scientific
Section 8Exploded Views
Figure 8-4. B-pure (D5839)

B-pure Pressure Cartridge 8-5Thermo Scientific
Section 8Exploded Views
Figure 8-5. Dual Holder B-pure


Section 9 Replacement Parts
Warning To avoid electrical shock, always disconnect from power supplybefore maintenance and servicing. Refer servicing to qualified personnel.
Consumable parts are those required to support the day-to-day operationof this equipment. We’ve established two types of consumables:
• Those items that must periodically be replaced to maintainperformance (filters, resin cartridges, etc.)
• Other items of limited life (indicator lights, fuses. etc.) that the usercan expect to replace on a more or less random basis.
The replacement of consumable parts is discussed in the Maintenance andServicing section of this manual to assist the user in accomplishing his ownservice.
The only consumables used in the B-pure products are user selected. Thefollowing chart is provided for the user as a means of recording thecartridges, part numbers (catalog numbers), and their location in thesystem.
B-pure Pressure Cartridge 9-1Thermo Scientific
RecommendedSpares
Consumable List
Location Part# (Qty) Description
1
2
3
4
5
6

9-2 B-pure Pressure Cartridge Thermo Scientific
Section 9Replacement Parts
General maintenance parts are defined as laboratory level repair parts whichdo not require great expertise or special tools for installation. We recommendthat the user stock the general maintenance parts as an aid to ensuring thecontinued operation of this equipment.
For critical applications where performance with minimum downtime isrequired, we recommend that the user maintain a local stock of those partslisted under “General Maintenance” and “Safety Stock.” In the event ofcomponent failure, the safety stock can be drawn upon by the user orqualified technicians, thereby, avoiding unnecessary delays in delivery ofreplacement parts.
General MaintenanceParts
Recommended Quantity
Part # Description 1/2 size B-pure Single B-pure Dual B-pure
GSX27 O-ring, cartridge head seal 1 1 2
GSX28 O-ring, large head seal 1 1 2
06440 O-ring (between heads) 1 1 4
FP550X1 Fastener pin 4 4 8
BR550X4 Head interconnector N.R. N.R. 1
15852 Connector (inlet/outlet) 1 1 1
Safety Stock
Recommended Quantity
Part # Description 1/2 size B-pure Single B-pure Dual B-pure
BK583X4 Cartridge canister head N.R. 1 2
BK583X2 Filter canister head 1 N.R. N.R.
CS550X1 Full-size cartridge canister N.R. 1 1
CS583X1 1/2-size filter canister 1 N.R. N.R.
D2770 Resistivity meter, 115 VAC N.R. N.R. 1
D2769 Resistivity meter, 230 VAC N.R. N.R. 1
HN550X1A Cartridge canister handle 1 1 1

Please refer to the Specification Plate for the complete model number,serial number, and series number when requesting service, replacementparts or in any correspondence concerning this unit.
All parts listed herein may be ordered from the Thermo Scientific dealerfrom whom you purchased this unit or can be obtained promptly from thefactory. When service or replacement parts are needed, check first withyour dealer. If the dealer cannot process your request, then contact ourTechnical Services Department.
Prior to returning any materials to the manufacturer, please contact ourTechnical Services Department for a “Return Goods Authorization”number (RGA). Material returned without a RGA number will be refused.
B-pure Pressure Cartridge 9-3Thermo Scientific
Section 9Replacement Parts
Ordering Procedures


Thermo Scientific401 Millcreek RoadMarietta, Ohio 45750United States
www.thermofisher.com