B Copyright © 2009, Oracle. All rights reserved. Configuring Warehouse Builder in RAC Environments.
50
B Copyright © 2009, Oracle. All rights reserved. Configuring Warehouse Builder in RAC Environments
-
Upload
rosalyn-welch -
Category
Documents
-
view
217 -
download
0
Transcript of B Copyright © 2009, Oracle. All rights reserved. Configuring Warehouse Builder in RAC Environments.

BCopyright © 2009, Oracle. All rights reserved.
Configuring Warehouse Builder in RAC Environments
Copyright © 2009, Oracle. All rights reserved.B - 2
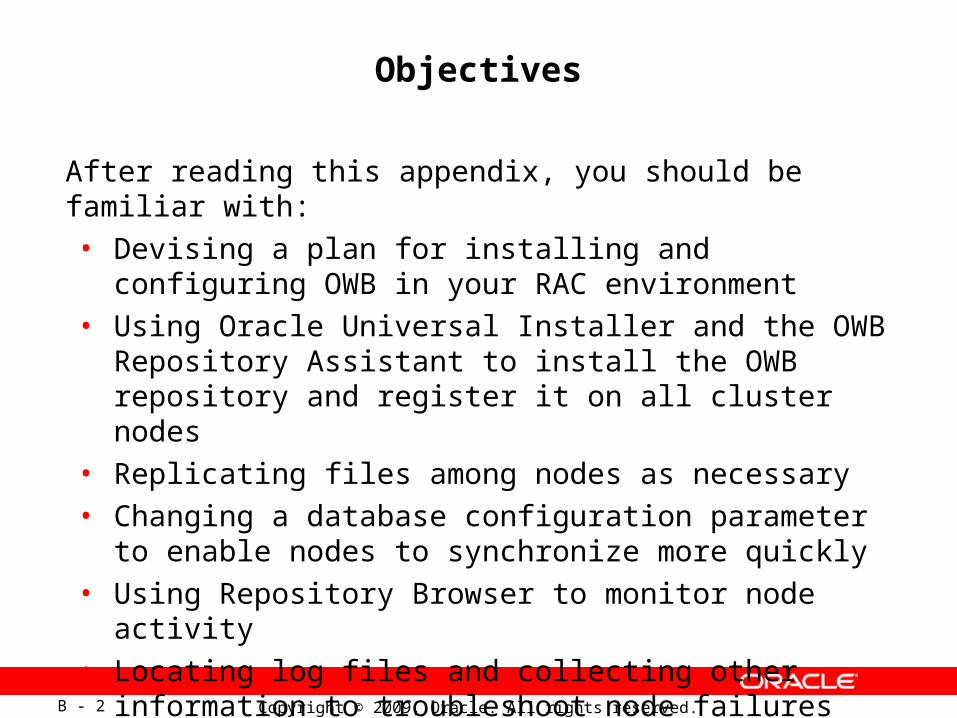
Objectives
After reading this appendix, you should be familiar with:
• Devising a plan for installing and configuring OWB in your RAC environment
• Using Oracle Universal Installer and the OWB Repository Assistant to install the OWB repository and register it on all cluster nodes
• Replicating files among nodes as necessary
• Changing a database configuration parameter to enable nodes to synchronize more quickly
• Using Repository Browser to monitor node activity
• Locating log files and collecting other information to troubleshoot node failures and monitor recovery
Copyright © 2009, Oracle. All rights reserved.B - 3
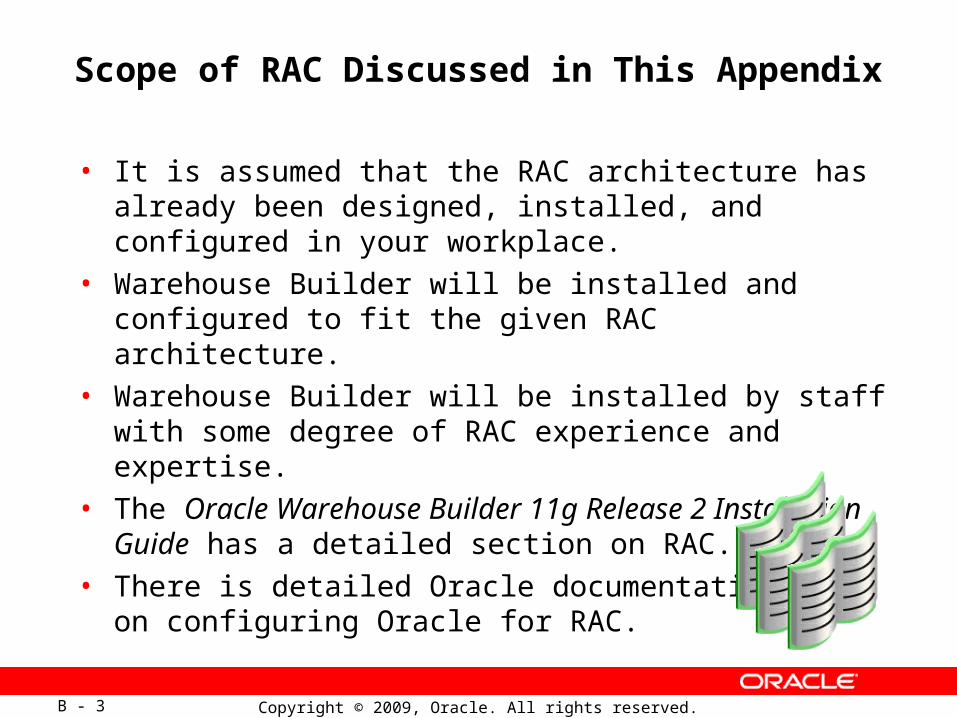
Scope of RAC Discussed in This Appendix
• It is assumed that the RAC architecture has already been designed, installed, and configured in your workplace.
• Warehouse Builder will be installed and configured to fit the given RAC architecture.
• Warehouse Builder will be installed by staff with some degree of RAC experience and expertise.
• The Oracle Warehouse Builder 11g Release 2 Installation Guide has a detailed section on RAC.
• There is detailed Oracle documentation on configuring Oracle for RAC.

Copyright © 2009, Oracle. All rights reserved.B - 4
Clusters
• An Oracle RAC system is composed of a group of independent servers, or nodes.
• Interconnected nodesact as a single server.
• Cluster software hides the structure.
• Disks are availablefor read and write by all nodes.
• The operating systemis the same on each machine.
Disks
Interconnect
Clusterwareon each node
NodeNode Node Node

Copyright © 2009, Oracle. All rights reserved.B - 5
Oracle Real Application Clusters (RAC)
• Multiple instancesaccessing the samedatabase
• Instances spread oneach node
• Physical orlogical accessto each database file
• Software-controlleddata access
Instancesspread
across nodes
Databasefiles
Interconnect
SharedCache
NodeNode Node Node
Copyright © 2009, Oracle. All rights reserved.B - 6
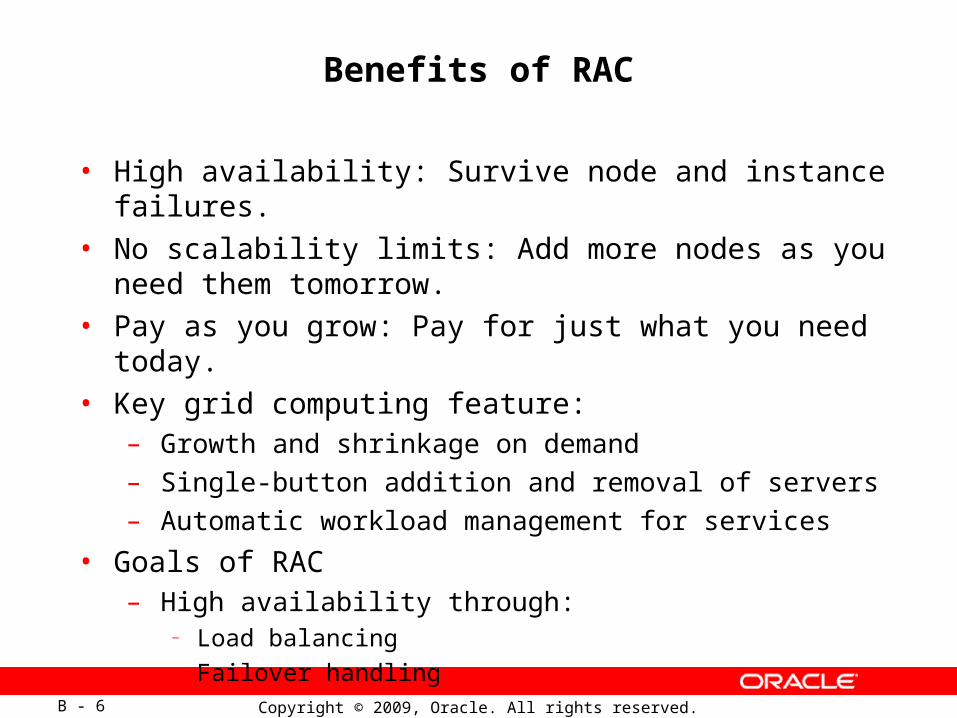
Benefits of RAC
• High availability: Survive node and instance failures.
• No scalability limits: Add more nodes as you need them tomorrow.
• Pay as you grow: Pay for just what you need today.
• Key grid computing feature:– Growth and shrinkage on demand– Single-button addition and removal of servers– Automatic workload management for services
• Goals of RAC– High availability through:
— Load balancing— Failover handling
Copyright © 2009, Oracle. All rights reserved.B - 7
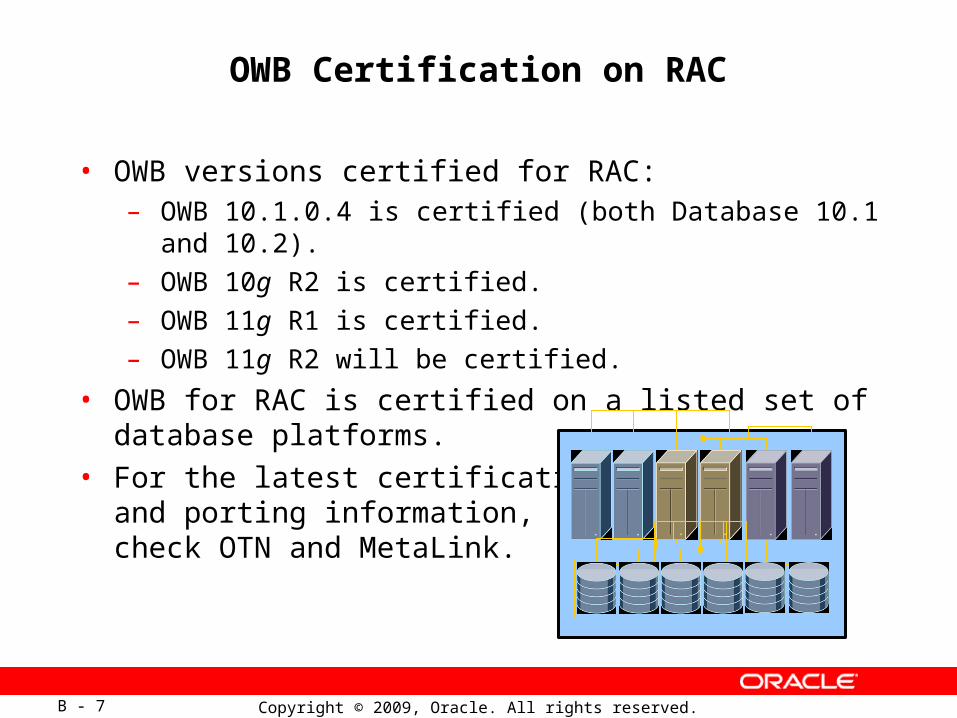
OWB Certification on RAC
• OWB versions certified for RAC:– OWB 10.1.0.4 is certified (both Database 10.1 and 10.2).– OWB 10g R2 is certified.– OWB 11g R1 is certified.– OWB 11g R2 will be certified.
• OWB for RAC is certified on a listed set of database platforms.
• For the latest certification and porting information, check OTN and MetaLink.
Copyright © 2009, Oracle. All rights reserved.B - 8
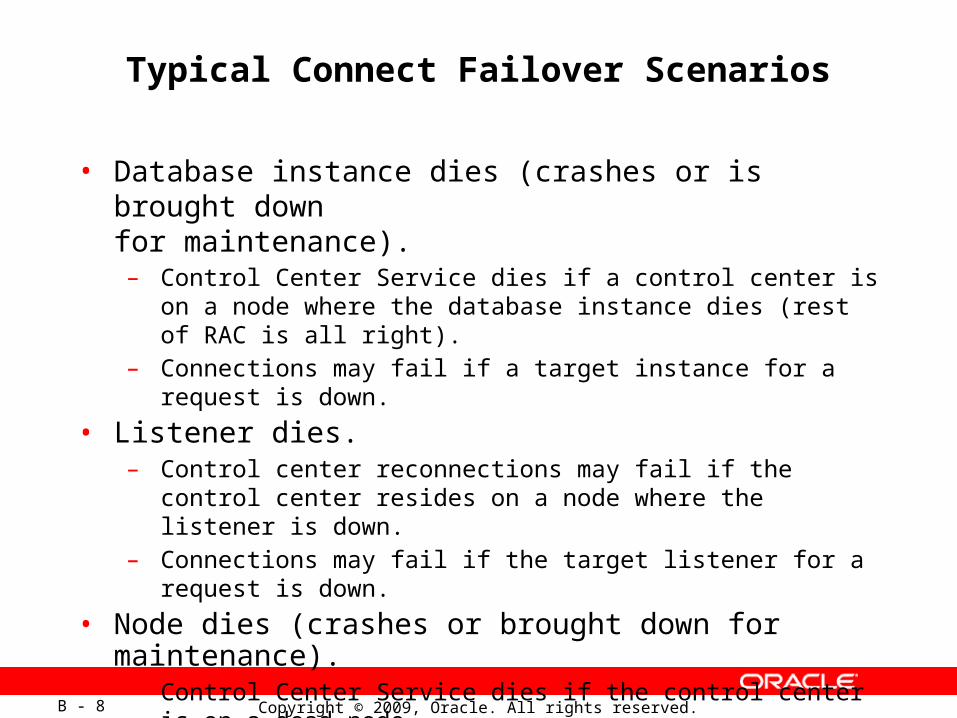
Typical Connect Failover Scenarios
• Database instance dies (crashes or is brought down for maintenance).– Control Center Service dies if a control center is on a node where the
database instance dies (rest of RAC is all right).– Connections may fail if a target instance for a request is down.
• Listener dies.– Control center reconnections may fail if the control center resides on
a node where the listener is down.– Connections may fail if the target listener for a request is down.
• Node dies (crashes or brought down for maintenance).– Control Center Service dies if the control center is on a dead node.– Connection may fail if the target node for a request is down.
• Session death must be handled by client.

Copyright © 2009, Oracle. All rights reserved.B - 9
Control CenterService
Control Center Service Failover on RAC
1. Control Center Service (CCS) node fails.
2. CCS goes down.
3. CCS comes up on a different node of the RAC.
4. CCS resumes activities.
Control center
Single logical
instance

Copyright © 2009, Oracle. All rights reserved.B - 10
Supported and Unsupported RAC Features
• Load balancing– Connection load balancing based on server (supported)– Client-side load balancing (not supported)
• Failover types– Connect failover: node, listener, instance down (supported
with properly configured tnsnames.ora)– Transparent Application Failover (not supported)– Multiple concurrent Control Center Services (not supported)

Copyright © 2009, Oracle. All rights reserved.B - 11
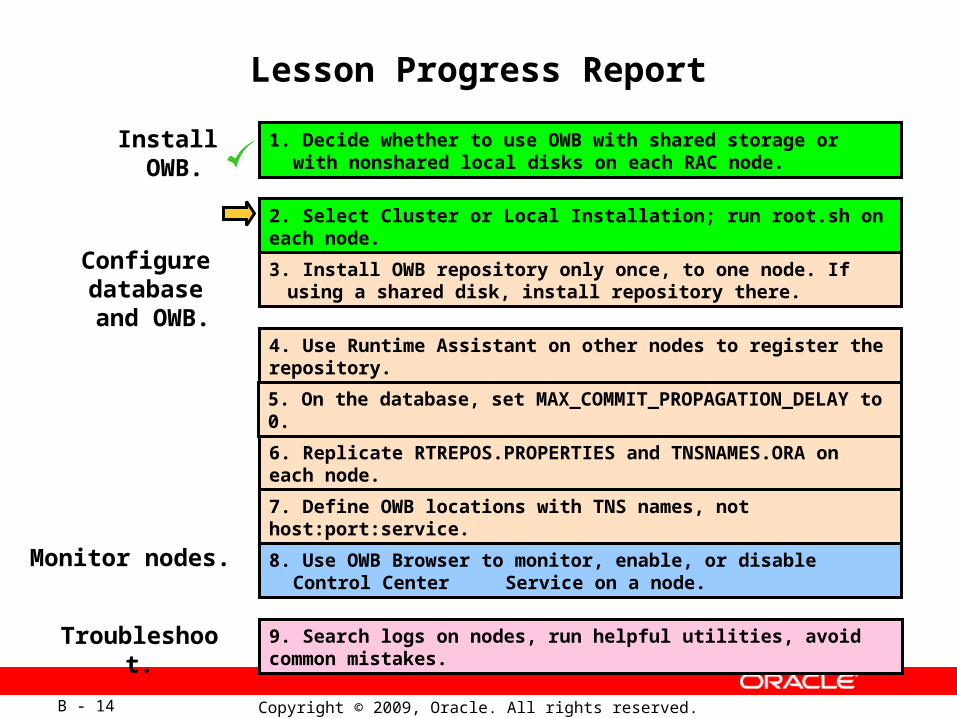
Lesson Progress Report
Install OWB.
Configure database and OWB.
Monitor nodes.
Troubleshoot.
1. Decide whether to use OWB with shared storage or with nonshared local disks on each RAC node.
2. Select Cluster or Local Installation; run root.sh on each node.
4. Use Runtime Assistant on other nodes to register the repository.
3. Install OWB repository only once, to one node. If using a shared disk, install repository there.
6. Replicate RTREPOS.PROPERTIES and TNSNAMES.ORA on each node.
7. Define OWB locations with TNS names, not host:port:service.
8. Use OWB Browser to monitor, enable, or disable Control Center Service on a node.
9. Search logs on nodes, run helpful utilities, avoid common mistakes.
5. On the database, set MAX_COMMIT_PROPAGATION_DELAY to 0.

Copyright © 2009, Oracle. All rights reserved.B - 12
Single Shared Disk Versus Local Disk Per Node
• This decision is usually made before OWB is considered; it is not an OWB decision.
• Usually, most of the RAC architecture has been decided; OWB only needs to fit.
• Advantages of shared disk: – Centralized product installation and maintenance– No need to replicate files among nodes– No need to find and collect log files among nodes
Single shared disk or local disk on each node?
Shared disk Local disks
Copyright © 2009, Oracle. All rights reserved.B - 13
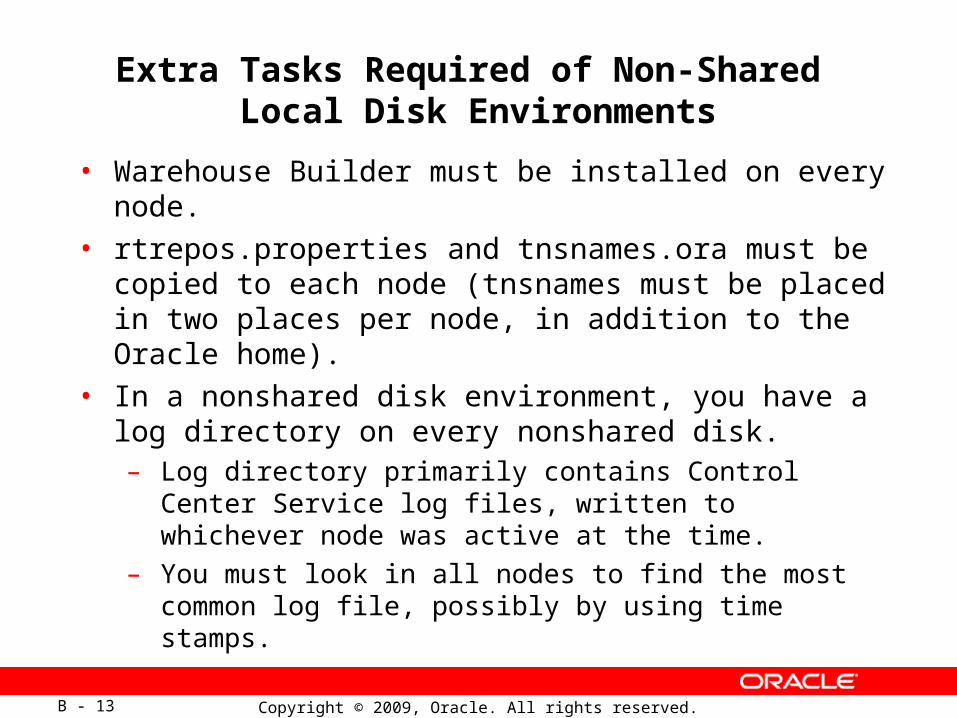
Extra Tasks Required of Non-Shared Local Disk Environments
• Warehouse Builder must be installed on every node.
• rtrepos.properties and tnsnames.ora must be copied to each node (tnsnames must be placed in two places per node, in addition to the Oracle home).
• In a nonshared disk environment, you have a log directory on every nonshared disk. – Log directory primarily contains Control Center Service log
files, written to whichever node was active at the time.– You must look in all nodes to find the most common log file,
possibly by using time stamps.
Copyright © 2009, Oracle. All rights reserved.B - 14
Lesson Progress Report
Install OWB.
Configure database and OWB.
Monitor nodes.
Troubleshoot. 9. Search logs on nodes, run helpful utilities, avoid common mistakes.
1. Decide whether to use OWB with shared storage or with nonshared local disks on each RAC node.
2. Select Cluster or Local Installation; run root.sh on each node.
4. Use Runtime Assistant on other nodes to register the repository.
3. Install OWB repository only once, to one node. If using a shared disk, install repository there.
6. Replicate RTREPOS.PROPERTIES and TNSNAMES.ORA on each node.
7. Define OWB locations with TNS names, not host:port:service.
8. Use OWB Browser to monitor, enable, or disable Control Center Service on a node.
9. Search logs on nodes, run helpful utilities, avoid common mistakes.
5. On the database, set MAX_COMMIT_PROPAGATION_DELAY to 0.

Copyright © 2009, Oracle. All rights reserved.B - 15
Installing OWB on Real Application Clusters
• OWB server software must be present on every node of the RAC cluster.– OWB Control Center Service
requires this.
• The Control Center browser enables you to nominate one node and register all other nodes.
• You need to install OWBonly on the nodes that you want OWB to run on.
• Only one Control Center Service is running at a time.
OWB run-time software

Copyright © 2009, Oracle. All rights reserved.B - 16
Cluster Installation
Local Installation
OWB Installation Decisions for RAC
Shared disk or local disk on each node?
Select “LocalInstallation”
(install to shared disk;not to nodes).
Cluster or LocalInstallation?
Shared disk
“Cluster Installation”installs OWB locallyto all chosen nodes
simultaneously.
Local disks
“Local Installation”installs OWB one
node at a time.
This lesson shows acluster installation to two nodes.
Copyright © 2009, Oracle. All rights reserved.B - 17
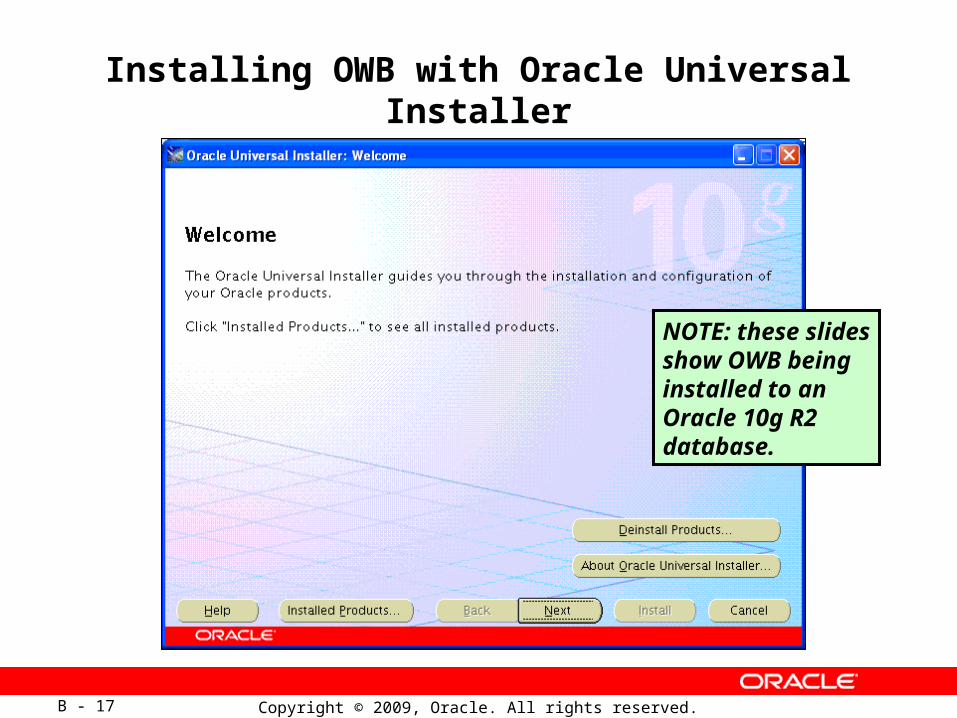
Installing OWB with Oracle Universal Installer
NOTE: these slidesshow OWB beinginstalled to anOracle 10g R2database.

Copyright © 2009, Oracle. All rights reserved.B - 18
Specifying Oracle Home for All Nodes

Copyright © 2009, Oracle. All rights reserved.B - 19
Selecting Cluster or Local Installation
Cluster or LocalInstallation?
“Cluster Installation”installs OWB locallyto all chosen nodes
simultaneously.
“Local Installation”installs OWB one
node at a time.
Install once Install Install
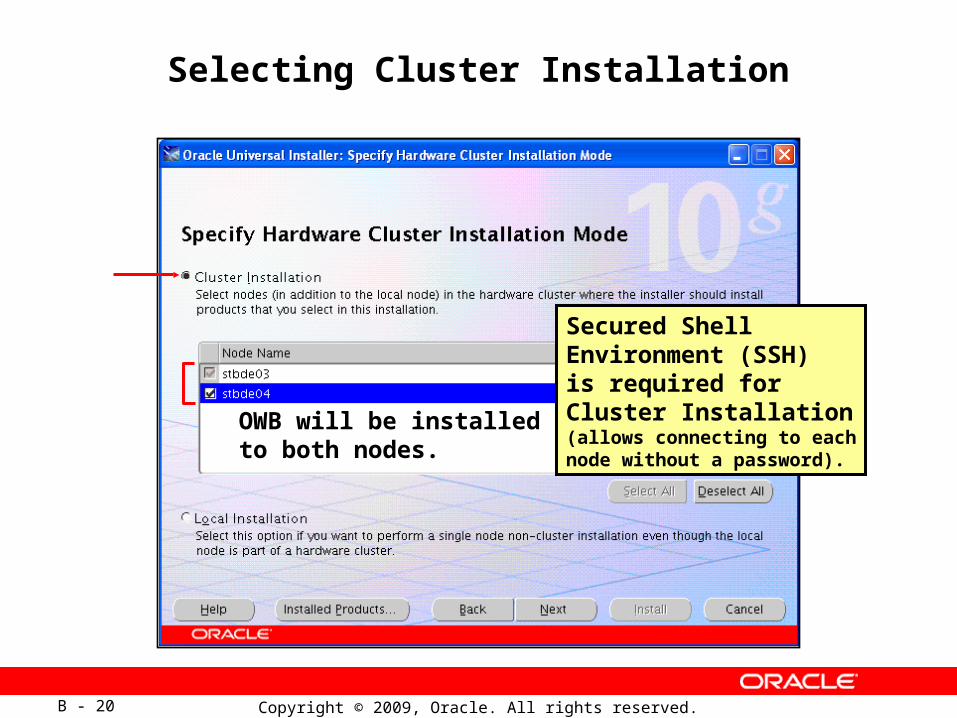
When installing to a local disk on each node, rather than to a shared disk, there are two choices:
• Cluster Installation• Local Installation
Copyright © 2009, Oracle. All rights reserved.B - 20
Selecting Cluster Installation
OWB will be installedto both nodes.
Secured Shell Environment (SSH) is required for Cluster Installation(allows connecting to eachnode without a password).
Copyright © 2009, Oracle. All rights reserved.B - 21
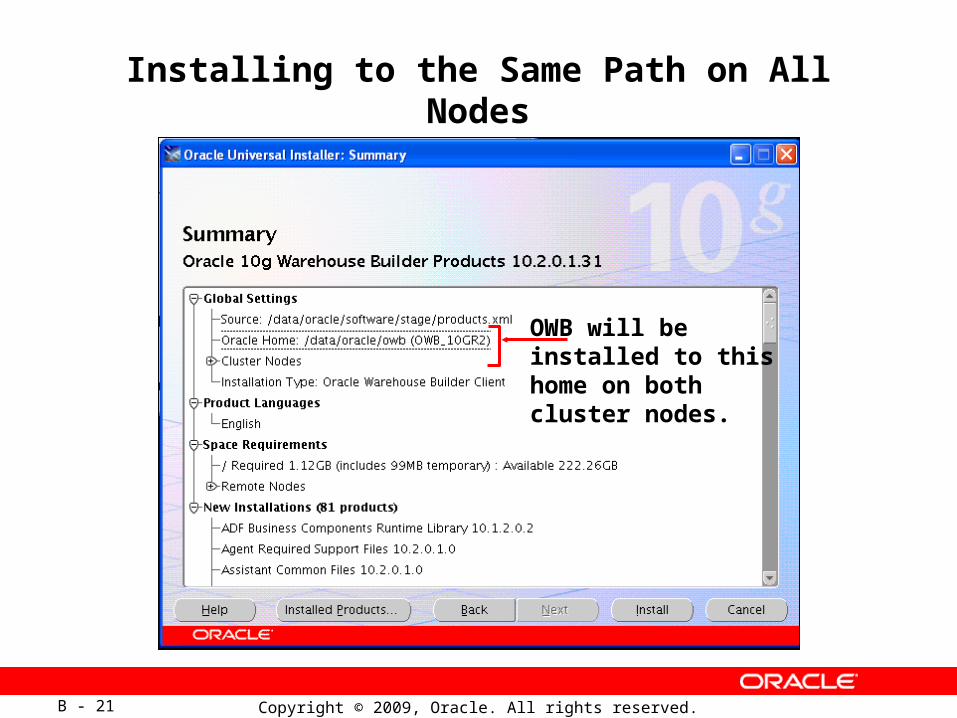
Installing to the Same Path on All Nodes
OWB will be installed to this home on both cluster nodes.

Copyright © 2009, Oracle. All rights reserved.B - 22
Installation Includes Copying to Remote Nodes
In this example, OWB is firstinstalled locally to the OWB home of node stbde03.
Because Cluster Installationwas selected, that OWB home is then copied to node stbde04.

Copyright © 2009, Oracle. All rights reserved.B - 23
Executing the root.sh Configuration Script in Each Cluster Node
This dialog box is merely a reminder to run theroot.sh script on eachnode as “root.” You cannot use it to execute the script.

Copyright © 2009, Oracle. All rights reserved.B - 24
Lesson Progress Report
Install OWB.
Configure database and OWB.
Monitor nodes.
Troubleshoot.
1. Decide whether to use OWB with shared storage or with nonshared local disks on each RAC node.
2. Select Cluster or Local Installation; run root.sh on each node.
4. Use Runtime Assistant on other nodes to register the repository.
3. Install OWB repository only once, to one node. If using a shared disk, install repository there.
6. Replicate RTREPOS.PROPERTIES and TNSNAMES.ORA on each node.
7. Define OWB locations with TNS names, not host:port:service.
8. Use OWB Browser to monitor, enable, or disable Control Center Service on a node.
9. Search logs on nodes, run helpful utilities, avoid common mistakes.
5. On the database, set MAX_COMMIT_PROPAGATION_DELAY to 0.
Copyright © 2009, Oracle. All rights reserved.B - 25
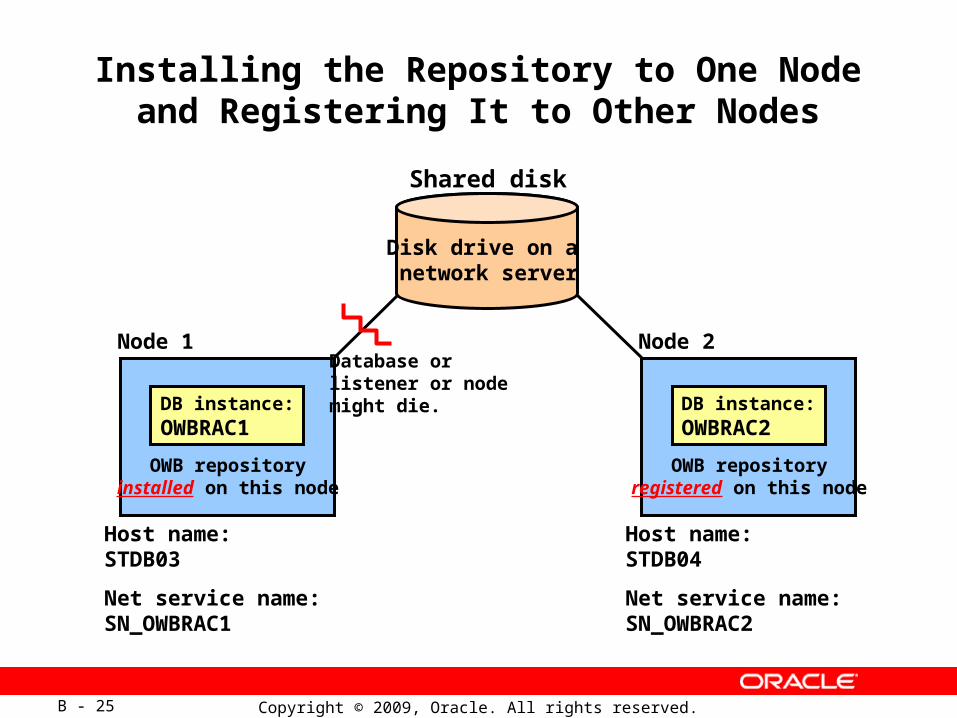
Installing the Repository to One Node and Registering It to Other Nodes
Shared disk
Disk drive on a network server
DB instance:OWBRAC1
OWB repositoryinstalled on this node
Node 1
Host name: STDB03
Net service name:SN_OWBRAC1
DB instance:OWBRAC2
OWB repositoryregistered on this node
Node 2
Host name: STDB04
Net service name:SN_OWBRAC2
Database or listener or node might die.

Copyright © 2009, Oracle. All rights reserved.B - 26
Installing the OWB Repository with the Repository Assistant
Install OWB repository only once,to one node.
Then register the repository onall other nodes.

Copyright © 2009, Oracle. All rights reserved.B - 27
Connection Information for the Node
Physical machine namefor STBDE03 node
Database instance nameon STBDE03 node
Net service name must be usedfor RAC; stored in tnsnames.ora.
Installing OWB repository to node 1, STBDE03
OWB on RAC requires multiple service names, one for the cluster as a whole, plus service names for each node on the cluster. The OWB 10g R2 Installation Guide has a RAC section detailing this.

Copyright © 2009, Oracle. All rights reserved.B - 28
Finishing Installation of the Repository to a Node
Net Service Nameof node 1
Use the Repository Assistant as you normally would in a non-RAC setup.

Copyright © 2009, Oracle. All rights reserved.B - 29
Rerunning the Repository Assistant to Register the Repository on All Other Nodes

Copyright © 2009, Oracle. All rights reserved.B - 30
Finishing OWB Repository Registration

Copyright © 2009, Oracle. All rights reserved.B - 31
Only One Database Parameter Specifically Recommended for RAC
• MAX_COMMIT_PROPAGATION_DELAY – Change default of 99 to 0.– A value of 0 aligns the nodes for faster synchronization.
• This change is recommended, not required.
• For details, see MetaLink note 341963.1, Part 1, Page 51, item 13.
Copyright © 2009, Oracle. All rights reserved.B - 32
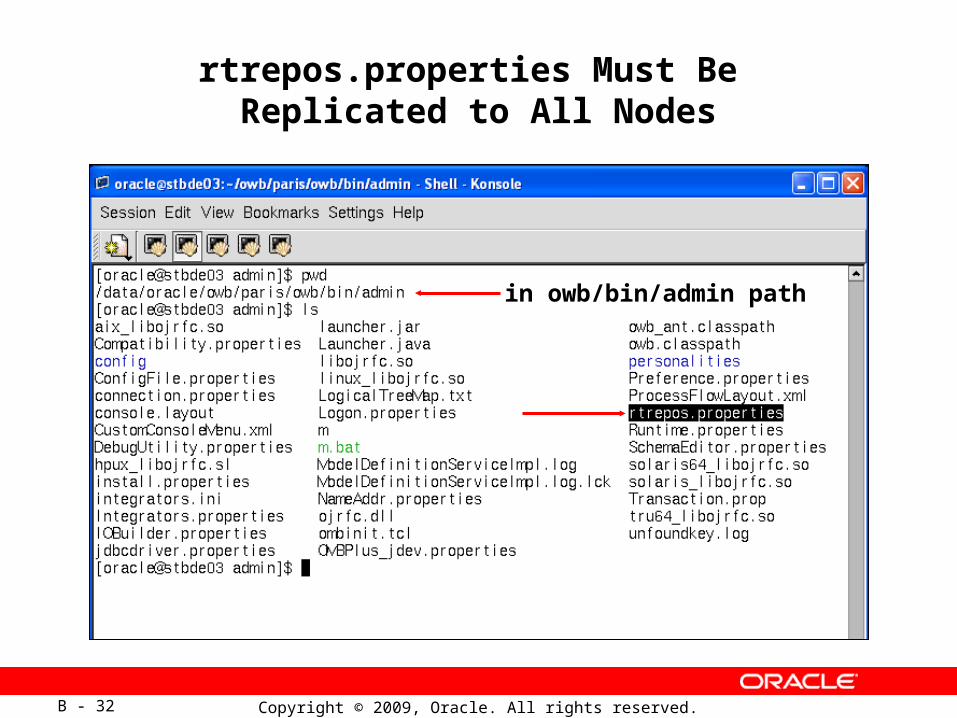
rtrepos.properties Must Be Replicated to All Nodes
in owb/bin/admin path

Copyright © 2009, Oracle. All rights reserved.B - 33
Moving a Copy of rtrepos.properties to Each Node
Connecting from node 1 tonode 2 to copy the file
Copying the file to node 2
Copyright © 2009, Oracle. All rights reserved.B - 34
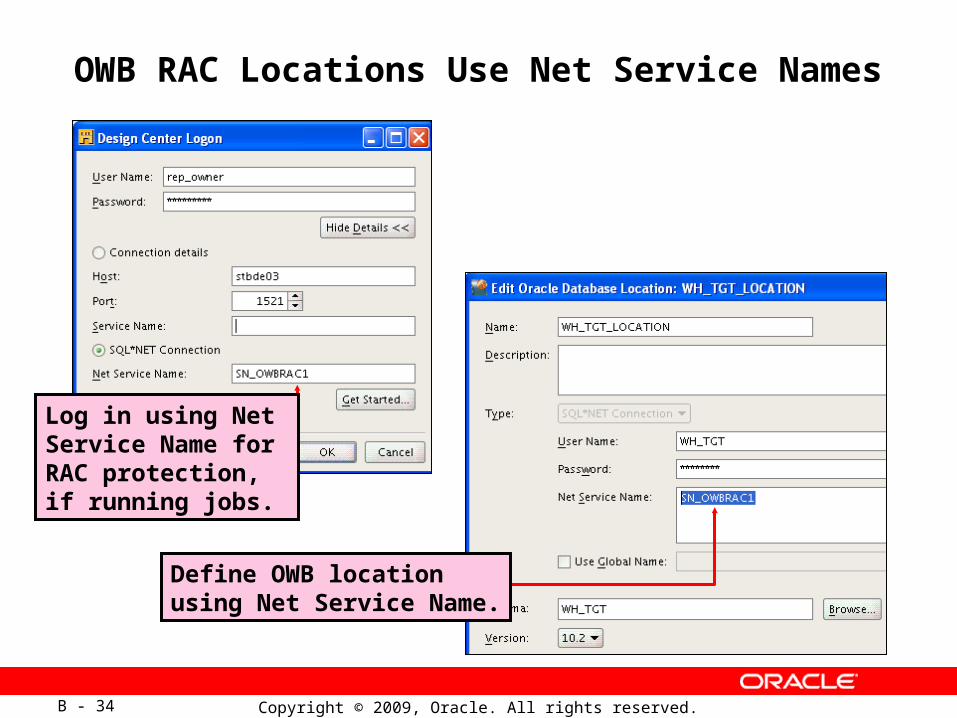
OWB RAC Locations Use Net Service Names
Log in using Net Service Name forRAC protection,if running jobs.
Define OWB location using Net Service Name.
Copyright © 2009, Oracle. All rights reserved.B - 35
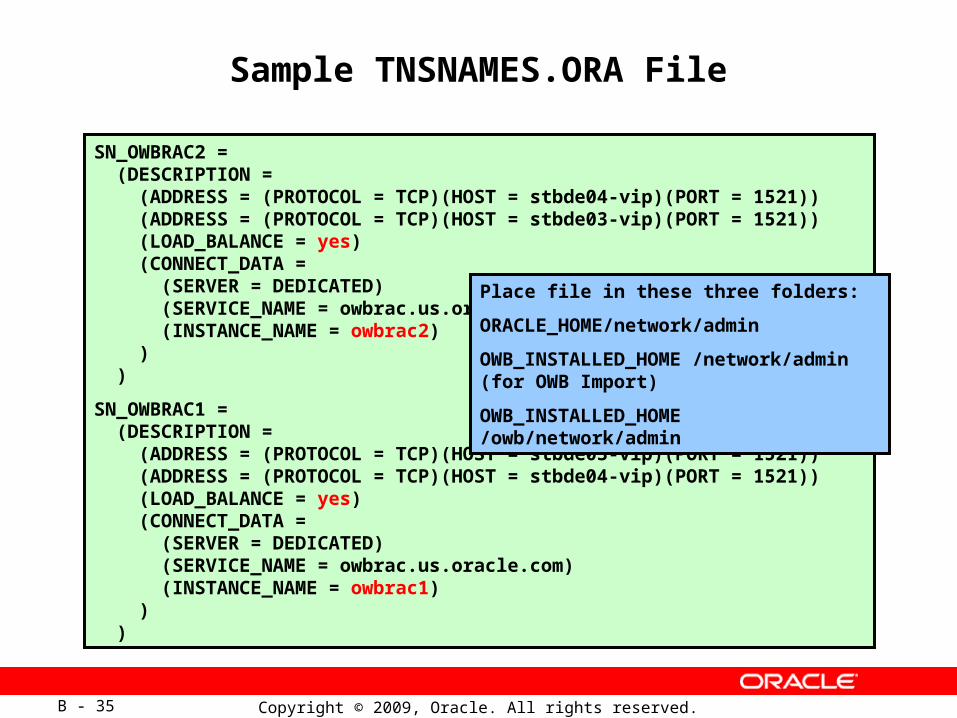
Sample TNSNAMES.ORA File
SN_OWBRAC2 = (DESCRIPTION = (ADDRESS = (PROTOCOL = TCP)(HOST = stbde04-vip)(PORT = 1521)) (ADDRESS = (PROTOCOL = TCP)(HOST = stbde03-vip)(PORT = 1521)) (LOAD_BALANCE = yes) (CONNECT_DATA = (SERVER = DEDICATED) (SERVICE_NAME = owbrac.us.oracle.com) (INSTANCE_NAME = owbrac2) ) )
SN_OWBRAC1 = (DESCRIPTION = (ADDRESS = (PROTOCOL = TCP)(HOST = stbde03-vip)(PORT = 1521)) (ADDRESS = (PROTOCOL = TCP)(HOST = stbde04-vip)(PORT = 1521)) (LOAD_BALANCE = yes) (CONNECT_DATA = (SERVER = DEDICATED) (SERVICE_NAME = owbrac.us.oracle.com) (INSTANCE_NAME = owbrac1) ) )
Place file in these three folders:
ORACLE_HOME/network/admin
OWB_INSTALLED_HOME /network/admin (for OWB Import)
OWB_INSTALLED_HOME /owb/network/admin
Copyright © 2009, Oracle. All rights reserved.B - 36
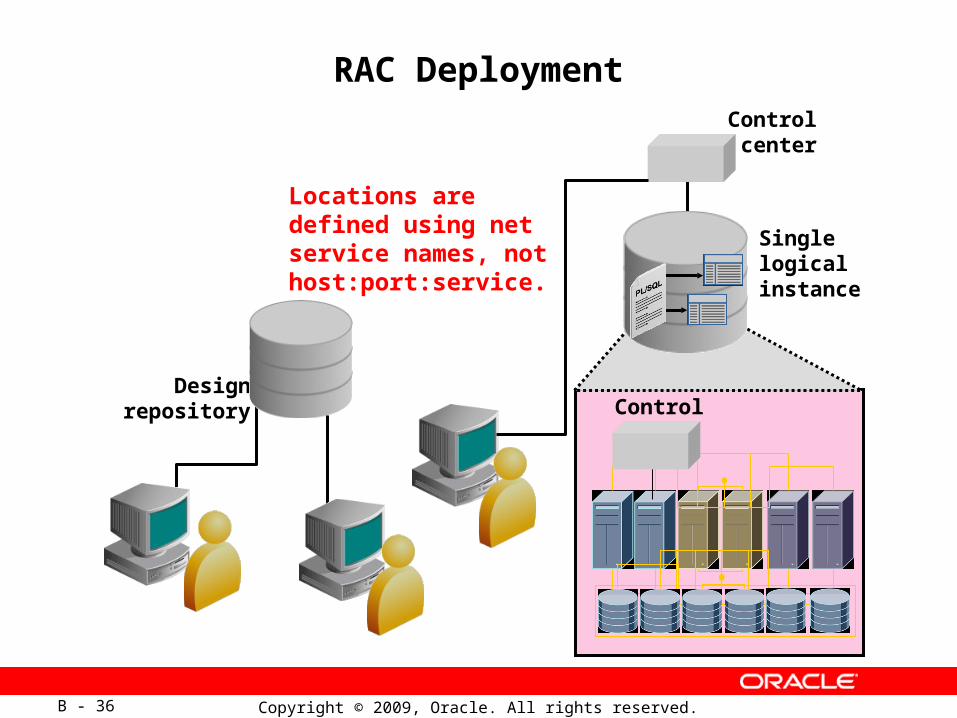
RAC Deployment
Designrepository Control center
Control center
Single logical instance
Locations are defined using net service names, not host:port:service.

Copyright © 2009, Oracle. All rights reserved.B - 37
Designrepository Control center
Control center
Single logical instance
RAC Deployment: Alternate Node

Copyright © 2009, Oracle. All rights reserved.B - 38
Lesson Progress Report
Install OWB.
Configure database and OWB.
Monitor nodes.
Troubleshoot.
1. Decide whether to use OWB with shared storage or with nonshared local disks on each RAC node.
2. Select Cluster or Local Installation; run root.sh on each node.
4. Use Runtime Assistant on other nodes to register the repository.
3. Install OWB repository only once, to one node. If using a shared disk, install repository there.
6. Replicate RTREPOS.PROPERTIES and TNSNAMES.ORA on each node.
7. Define OWB locations with TNS names, not host:port:service.
8. Use OWB Browser to monitor, enable, or disable Control Center Service on a node.
9. Search logs on nodes, run helpful utilities, avoid common mistakes.
5. On the database, set MAX_COMMIT_PROPAGATION_DELAY to 0.

Copyright © 2009, Oracle. All rights reserved.B - 39
Logging In to OWB Browser

Copyright © 2009, Oracle. All rights reserved.B - 40
Select the Service Node Report

Copyright © 2009, Oracle. All rights reserved.B - 41
Service Node Report Shows the Status of Nodes
Node 1Node 2
Copyright © 2009, Oracle. All rights reserved.B - 42
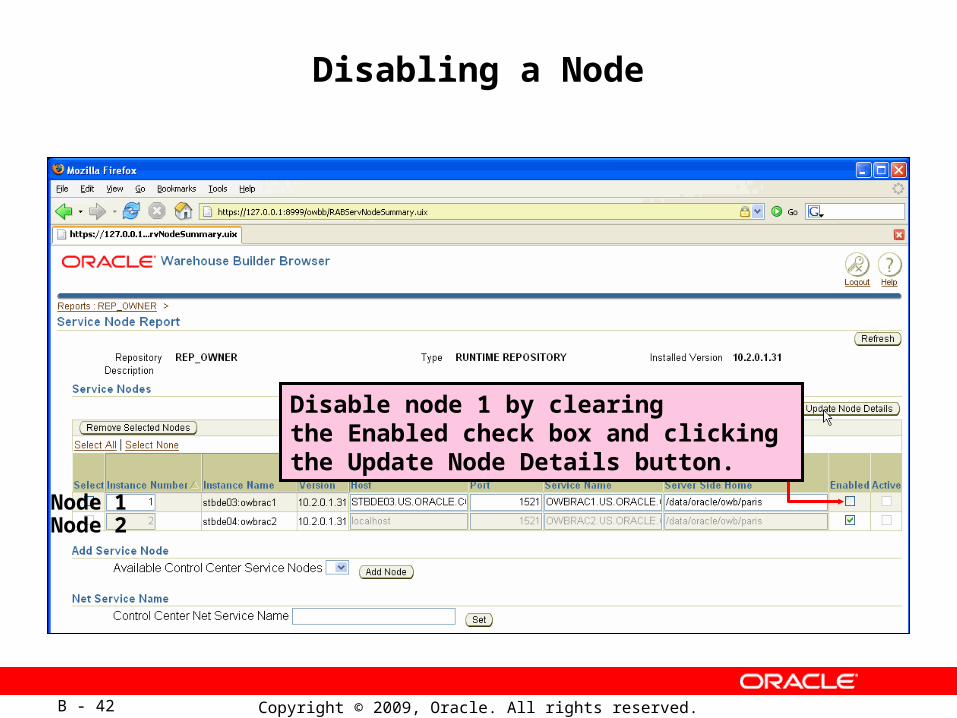
Disabling a Node
Node 1Node 2
Disable node 1 by clearing the Enabled check box and clicking the Update Node Details button.

Copyright © 2009, Oracle. All rights reserved.B - 43
Enabling a Node
Click Refresh. Node 2 is now the active node.
Node 1Node 2

Copyright © 2009, Oracle. All rights reserved.B - 44
Lesson Progress Report
Install OWB.
Configure database and OWB.
Monitor nodes.
Troubleshoot.
1. Decide whether to use OWB with shared storage or with nonshared local disks on each RAC node.
2. Select Cluster or Local Installation; run root.sh on each node.
4. Use Runtime Assistant on other nodes to register the repository.
3. Install OWB repository only once, to one node. If using a shared disk, install repository there.
6. Replicate RTREPOS.PROPERTIES and TNSNAMES.ORA on each node.
7. Define OWB locations with TNS names, not host:port:service.
8. Use OWB Browser to monitor, enable, or disable Control Center Service on a node.
9. Search logs on nodes, run helpful utilities, avoid common mistakes.
5. On the database, set MAX_COMMIT_PROPAGATION_DELAY to 0.
Copyright © 2009, Oracle. All rights reserved.B - 45
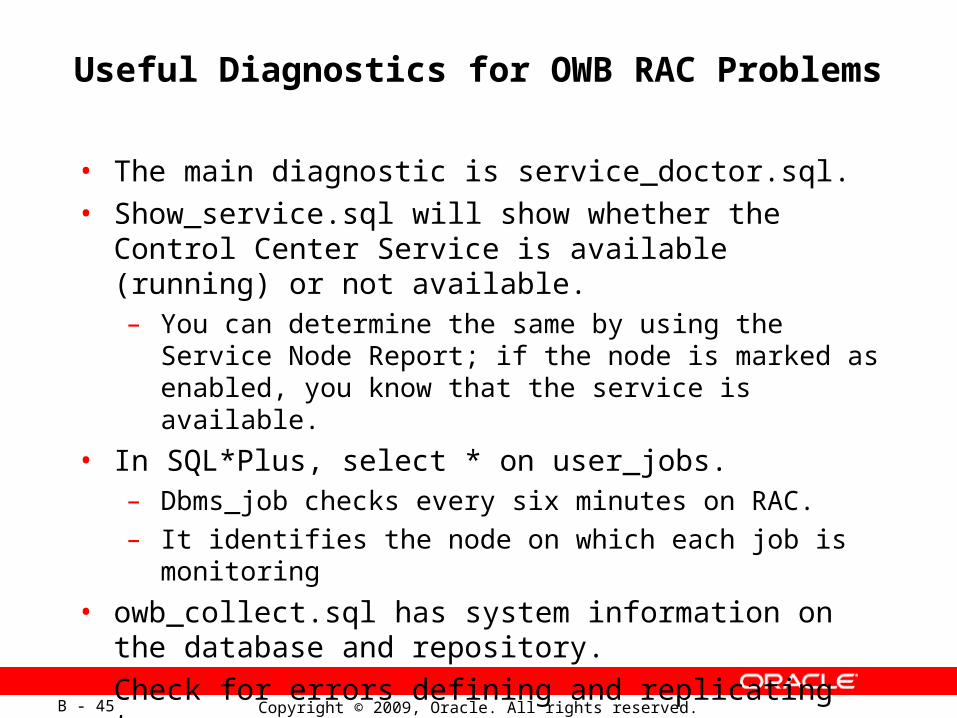
Useful Diagnostics for OWB RAC Problems
• The main diagnostic is service_doctor.sql.
• Show_service.sql will show whether the Control Center Service is available (running) or not available. – You can determine the same by using the Service Node
Report; if the node is marked as enabled, you know that the service is available.
• In SQL*Plus, select * on user_jobs.– Dbms_job checks every six minutes on RAC.– It identifies the node on which each job is monitoring
• owb_collect.sql has system information on the database and repository.
• Check for errors defining and replicating tnsnames.ora.

Copyright © 2009, Oracle. All rights reserved.B - 46
Using SQL*Plus Scripts to Test Availability of Control Center Service
Host name of node 2
Stop service > not available
Start service > available
Copyright © 2009, Oracle. All rights reserved.B - 47
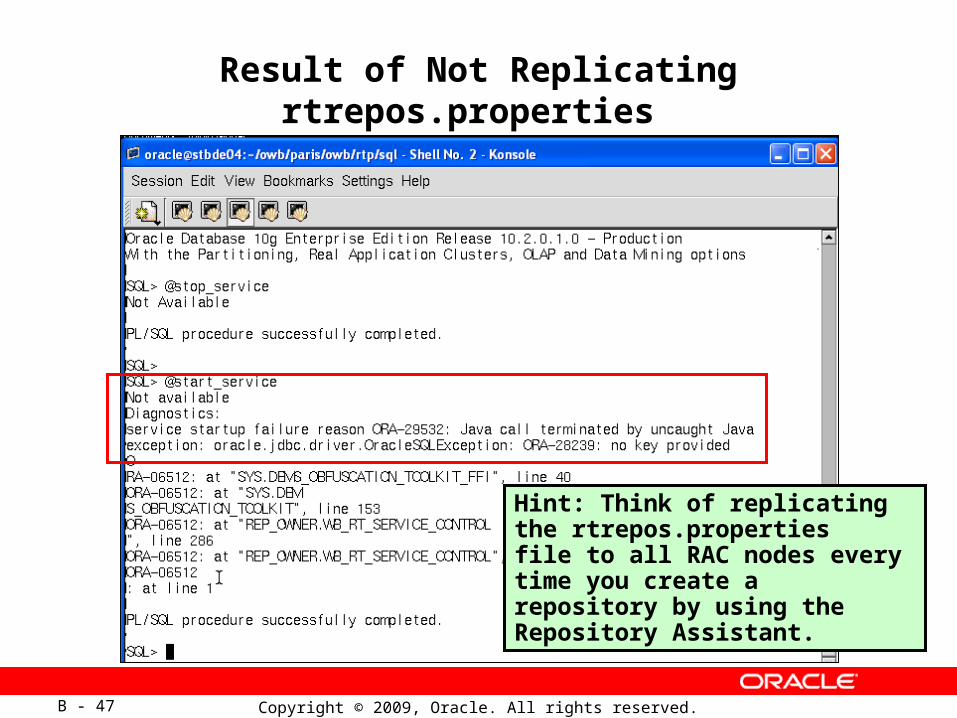
Result of Not Replicating rtrepos.properties to a Node
Hint: Think of replicating the rtrepos.properties file to all RAC nodes every time you create a repository by using the Repository Assistant.
Copyright © 2009, Oracle. All rights reserved.B - 48
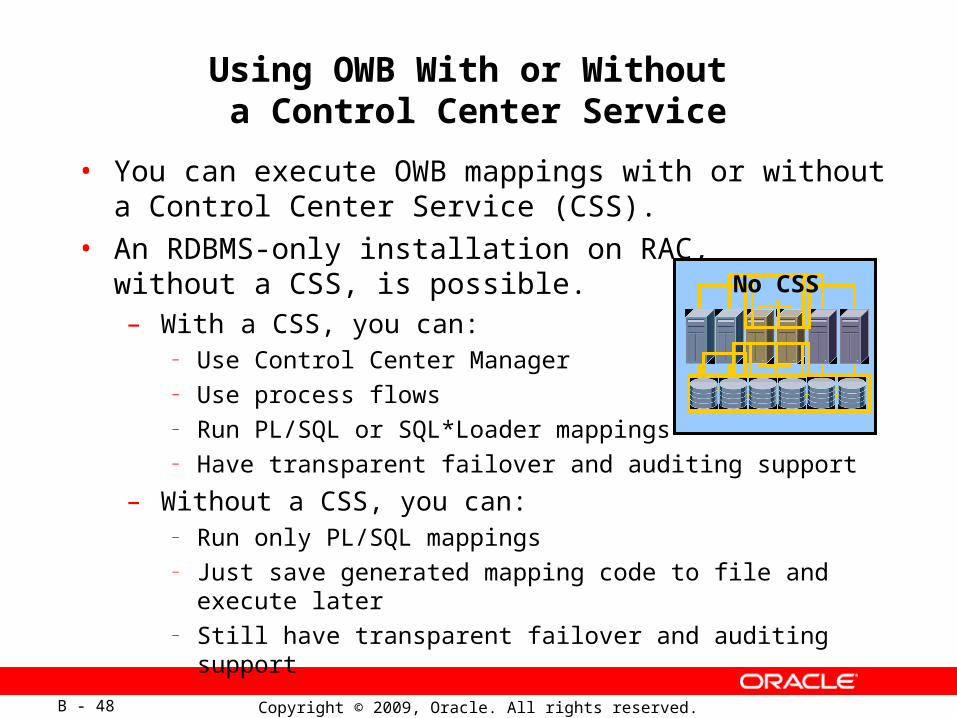
Using OWB With or Without a Control Center Service
• You can execute OWB mappings with or without a Control Center Service (CSS).
• An RDBMS-only installation on RAC, without a CSS, is possible.– With a CSS, you can:
— Use Control Center Manager — Use process flows — Run PL/SQL or SQL*Loader mappings— Have transparent failover and auditing support
– Without a CSS, you can:— Run only PL/SQL mappings— Just save generated mapping code to file and execute later— Still have transparent failover and auditing support
No CSS
Copyright © 2009, Oracle. All rights reserved.B - 49
Further Study of RAC
For in-depth study of RAC, consider these Oracle University courses:• Oracle Database 10g: Real Application Clusters
(D17276GC10)• Oracle 10g Database: RAC Deployment Workshop
(D44424GC10)• Oracle Database 10g: RAC Basic Concepts and
Architecture Seminar (D44422GC10), an in-class one-day course
• Oracle Database 11g: RAC Administration (D50311GC11)• Oracle Database 11g: RAC Overview and Architecture
Seminar (D53954GC10)
Copyright © 2009, Oracle. All rights reserved.B - 50
Summary
In this appendix, you should have become familiar with:
• Devising a plan for installing and configuring OWB in your RAC environment
• Using Oracle Universal Installer and the OWB Repository Assistant to install the OWB repository and register it on all cluster nodes
• Replicating files among nodes as necessary
• Changing a database configuration parameter to enable nodes to synchronize more quickly
• Using Repository Browser to monitor node activity and enable or disable nodes
• Locating log files and collecting other information to troubleshoot node failures and monitor recovery