B. Braun Sutures Knotting & Suturing Techniques · B. Braun Sutures Knotting & Suturing Techniques...
120
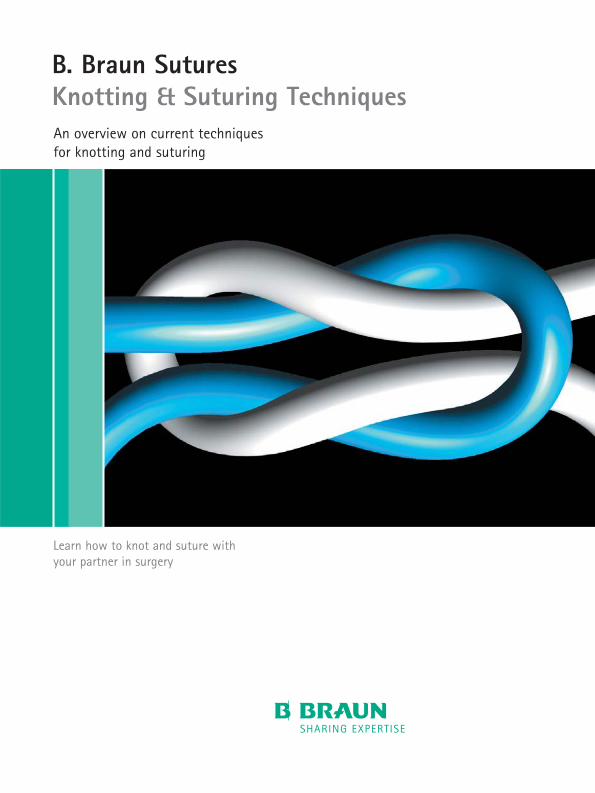
B. Braun Sutures Knotting & Suturing Techniques An overview on current techniques for knotting and suturing Learn how to knot and suture with your partner in surgery
Transcript of B. Braun Sutures Knotting & Suturing Techniques · B. Braun Sutures Knotting & Suturing Techniques...
B. Braun SuturesKnotting & Suturing TechniquesAn overview on current techniquesfor knotting and suturing
Learn how to knot and suture withyour partner in surgery
A. IntroductionIntroduction . . . . . . . . . . . . . . . . . .A1
Surgical instruments . . . . . . . . . .A2
ScalpelDissecting forceps
ScissorsNeedle holderHaemostats (artery forceps)
Haemostats’ & needle holder’s lock
Sutures . . . . . . . . . . . . . . . . . . . . . .A3
Thread variability
Needle variability
Holding the needle
B. Knotting techniquesKnots at a glance . . . . . . . . . . . . .B1
Square knot (Two-hand technique)
First throw . . . . . . . . . . . . . . . . . . .B2
Second throw . . . . . . . . . . . . . . . . .B3
Square knot (One-hand technique)
First throw (index-finger tech.) . .B4
Second throw (middle-finger tech.) .B5
Granny knot . . . . . . . . . . . . . . . . . .B6
Surgeon’s knotFirst throw . . . . . . . . . . . . . . . . . . .B7
Second throw . . . . . . . . . . . . . . . . .B8
Surgeon’s knot (Alternate technique)
First throw . . . . . . . . . . . . . . . . . . .B9
Second throw . . . . . . . . . . . . . . . .B10
Square knot with instrument . . . .B11
Surgeon’s knot with instrument . . .B12
Deep tie . . . . . . . . . . . . . . . . . . . .B13
Sliding knot . . . . . . . . . . . . . . . . .B14
Ligation around haemostatic clampCommon technique . . . . . . . . . . .B15
Alternate technique . . . . . . . . . . .B16
C. Suturing techniquesSubcutaneous suturesSimple . . . . . . . . . . . . . . . . . . . . . . .C1
Continuous . . . . . . . . . . . . . . . . . . .C23C. . . . . . . . . . decalretni suounitnoC
Skin suturesSimple . . . . . . . . . . . . . . . . . . . . . . .C4
Continuous . . . . . . . . . . . . . . . . . . .C5
Intracutaneous suturesNon-absorbable . . . . . . . . . . . . . . .C6
Absorbable . . . . . . . . . . . . . . . . . . .C7
Special sutures8C. . . . . . . . . . . . . . . . . . . . . rewögllA
Donati . . . . . . . . . . . . . . . . . . . . . . .C9
Mattress . . . . . . . . . . . . . . . . . . . .C1011C. . . . . . . . . . . . . . . . . . . . . . renroC
Contents
Self Locking Knot . . . . . . . . . . . .B17
A. IntroductionIntroduction . . . . . . . . . . . . . . . . . .A1Surgical instruments . . . . . . . . . .A2ScalpelDissecting forcepsScissorsNeedle holderHaemostats (artery forceps)Haemostats’ & needle holder’s lockSutures . . . . . . . . . . . . . . . . . . . . . .A3Thread variabilityNeedle variabilityHolding the needle
B. Knotting techniquesKnots at a glance . . . . . . . . . . . . .B1Square knot (Two-hand technique)First throw . . . . . . . . . . . . . . . . . . .B2Second throw . . . . . . . . . . . . . . . . .B3Square knot (One-hand technique)First throw (index-finger tech.) . .B4Second throw (middle-finger tech.) .B5Granny knot . . . . . . . . . . . . . . . . . .B6Surgeon’s knotFirst throw . . . . . . . . . . . . . . . . . . .B7Second throw . . . . . . . . . . . . . . . . .B8
Surgeon’s knot (Alternate technique)First throw . . . . . . . . . . . . . . . . . . .B9Second throw . . . . . . . . . . . . . . . .B10Square knot with instrument . . . .B11Surgeon’s knot with instrument . . .B12Deep tie . . . . . . . . . . . . . . . . . . . .B13Sliding knot . . . . . . . . . . . . . . . . .B14Ligation around haemostatic clampCommon technique . . . . . . . . . . .B15Alternate technique . . . . . . . . . . .B16
C. Suturing techniquesSubcutaneous suturesSimple . . . . . . . . . . . . . . . . . . . . . . .C1Continuous . . . . . . . . . . . . . . . . . . .C2Continuous interlaced . . . . . . . . . .C3Skin suturesSimple . . . . . . . . . . . . . . . . . . . . . . .C4Continuous . . . . . . . . . . . . . . . . . . .C5Intracutaneous suturesNon-absorbable . . . . . . . . . . . . . . .C6Absorbable . . . . . . . . . . . . . . . . . . .C7Special suturesAllgöwer . . . . . . . . . . . . . . . . . . . . .C8Donati . . . . . . . . . . . . . . . . . . . . . . .C9Mattress . . . . . . . . . . . . . . . . . . . .C10Corner . . . . . . . . . . . . . . . . . . . . . .C11
Contents
Self Locking Knot . . . . . . . . . . . .B17
Introduction Intr
oduc
tion
Introduction
The tissue or organ to be sutured.
The depth of the wound: When thewound is located in a place of limitedaccess, we might need a knottingtechnique that requires a finger or aninstrument.
The amount of tension that the woundwill receive postoperatively.
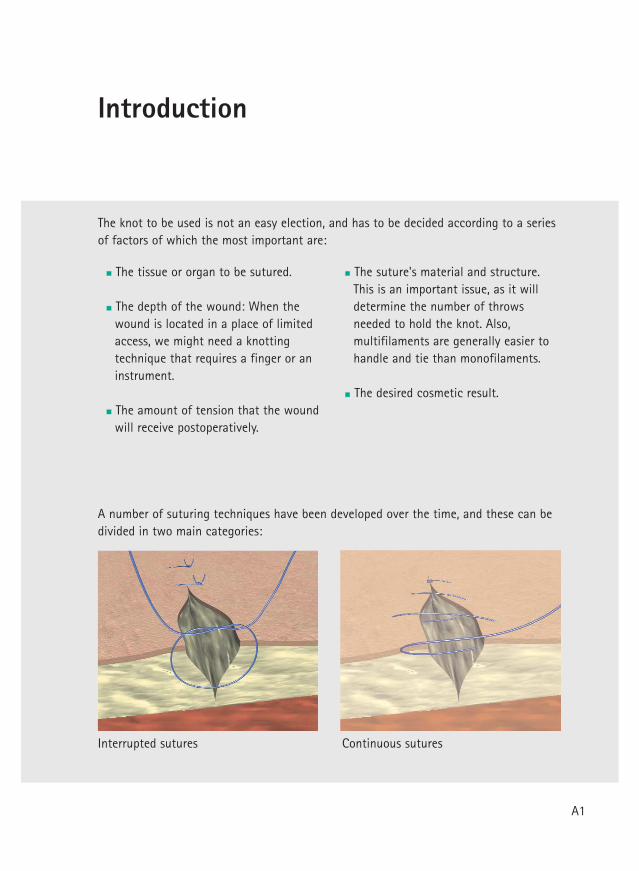
serutus suounitnoCserutus detpurretnI
The suture's material and structure.This is an important issue, as it willdetermine the number of throwsneeded to hold the knot. Also,multifilaments are generally easier tohandle and tie than monofilaments.
The desired cosmetic result.
A number of suturing techniques have been developed over the time, and these can bedivided in two main categories:
The knot to be used is not an easy election, and has to be decided according to a seriesof factors of which the most important are:
A1
Introduction
Depending on the tissue, the healingprocess, and the surgical technique andobjective, the surgeon will have to choosea suture whose biological and physicalcharacteristics are most compatible with it.
Sutures have to guarantee a firmapproximation of the wound edgeswithout an excess of tension. Only if thisbalance is achieved we can ensure anoptimal blood circulation that will makepossible an optimal healing process.
When tying, the surgeon should follow a number of basic principles:
The knot has to be firm in order not to slip.
Knots should be as small as possible inorder to minimize the reaction toforeign body material in case of non-absorbable sutures, or to prevent anexcessive amount of tissue reactionwhen absorbable sutures are used.
Avoid sawing (friction betweenstrands) of threads when tying in ordernot to weaken the suture.
Avoid damage to the suture materialwhen handling. Avoid the crushing orcrimping application of surgicalinstruments to the strand except whengrasping the free end of the sutureduring an instrument tie.
The knot should not be too tight inorder to allow post-operational edemaand inflammation.
Avoid excessive tension as it couldbreak the suture or cut the tissue.
After the first throw, enough tractionshould remain on one end of thestrand to prevent it to loosen whentying the second throw.
Extra knots do not add to the strength ofa properly tied knot. They only contributeto its bulk.
Surgical instruments
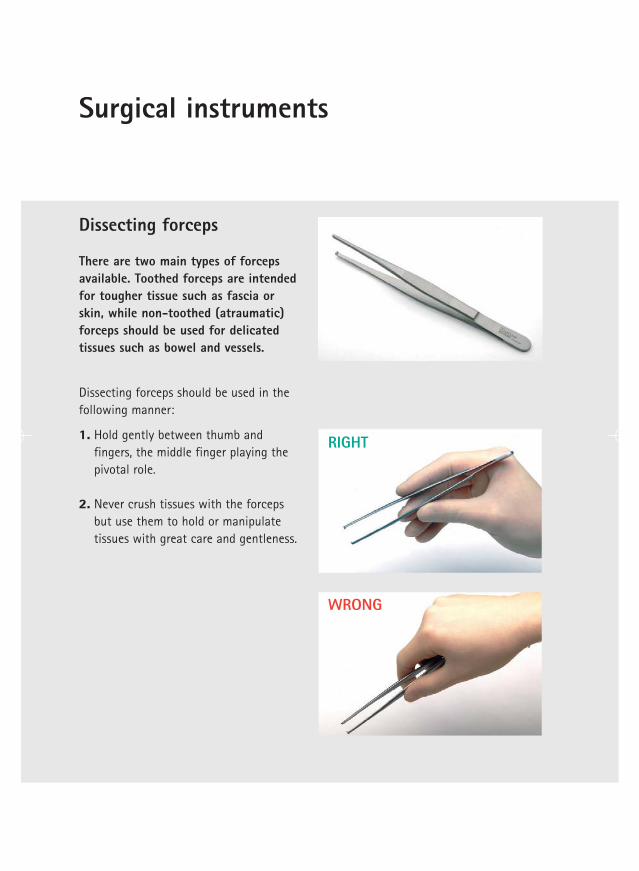
Dissecting forceps
There are two main types of forcepsavailable. Toothed forceps are intendedfor tougher tissue such as fascia orskin, while non-toothed (atraumatic)forceps should be used for delicatedtissues such as bowel and vessels.
1. Hold gently between thumb andfingers, the middle finger playing thepivotal role.
2. Never crush tissues with the forcepsbut use them to hold or manipulatetissues with great care and gentleness.
Dissecting forceps should be used in thefollowing manner:
RIGHT
WRONG

Surgical Instruments
Scalpel
Scalpels are used for incising the skin,and a wide range of blade shapes andtypes is available depending on thetissue to be incised.
1. Hold gently between index finger andthumb.
2. Incise the skin by holding the scalpelat an angle of 90º to the skin.
Scalpel should be used in the followingmanner:
RIGHT
WRONG
A2
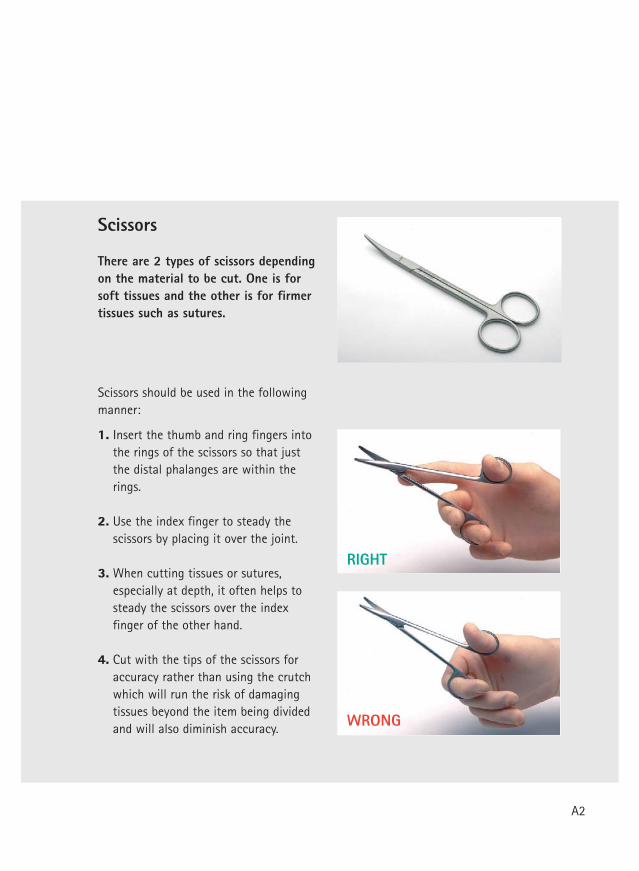
1. Insert the thumb and ring fingers intothe rings of the scissors so that justthe distal phalanges are within therings.
2. Use the index finger to steady thescissors by placing it over the joint.
3. When cutting tissues or sutures,especially at depth, it often helps tosteady the scissors over the indexfinger of the other hand.
4. Cut with the tips of the scissors foraccuracy rather than using the crutchwhich will run the risk of damagingtissues beyond the item being dividedand will also diminish accuracy.
Scissors
There are 2 types of scissors dependingon the material to be cut. One is forsoft tissues and the other is for firmertissues such as sutures.
Scissors should be used in the followingmanner:
RIGHT
WRONG
A2
Surgical instruments
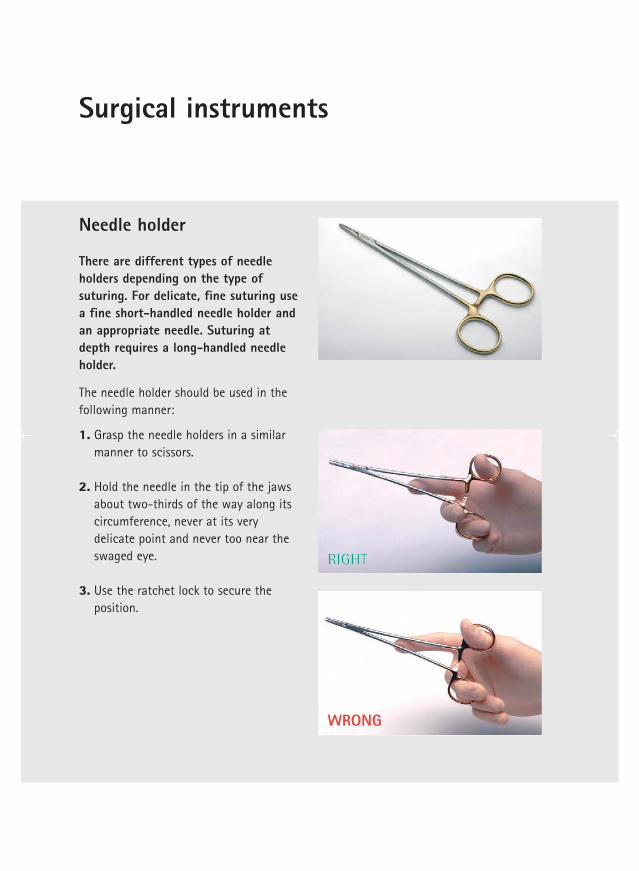
Needle holder
There are different types of needleholders depending on the type ofsuturing. For delicate, fine suturing usea fine short-handled needle holder andan appropriate needle. Suturing atdepth requires a long-handled needleholder.
1. Grasp the needle holders in a similarmanner to scissors.
2. Hold the needle in the tip of the jawsabout two-thirds of the way along itscircumference, never at its verydelicate point and never too near theswaged eye.
3. Use the ratchet lock to secure theposition.
The needle holder should be used in thefollowing manner:
RIGHT
WRONG
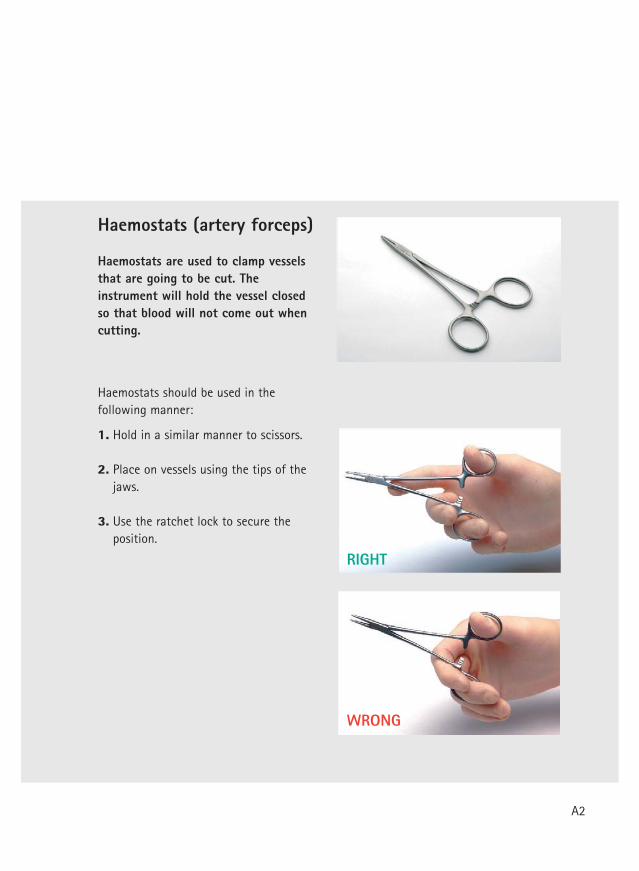
Haemostats (artery forceps)
Haemostats are used to clamp vesselsthat are going to be cut. Theinstrument will hold the vessel closedso that blood will not come out whencutting.
1. Hold in a similar manner to scissors.
2. Place on vessels using the tips of thejaws.
3. Use the ratchet lock to secure theposition.
Haemostats should be used in thefollowing manner:
RIGHT
WRONG
A2
Surgical instruments
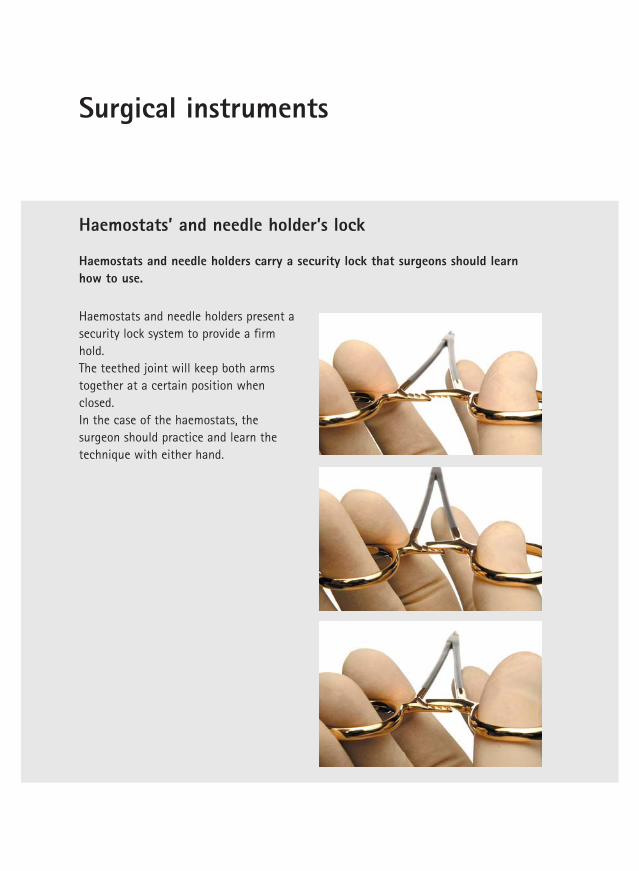
Haemostats and needle holders carry a security lock that surgeons should learnhow to use.
Haemostats and needle holders present asecurity lock system to provide a firmhold. The teethed joint will keep both armstogether at a certain position whenclosed. In the case of the haemostats, thesurgeon should practice and learn thetechnique with either hand.
Haemostats’ and needle holder’s lock
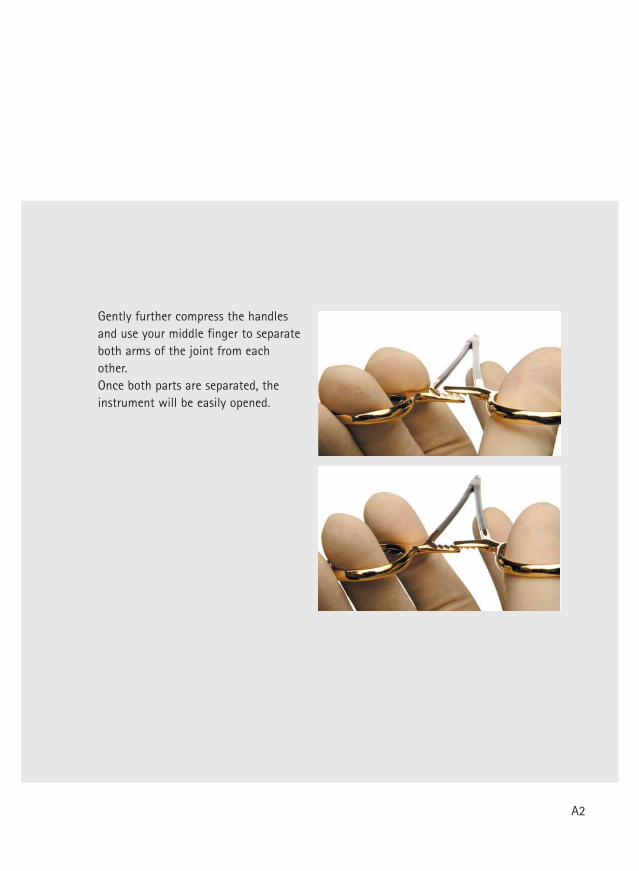
Gently further compress the handlesand use your middle finger to separateboth arms of the joint from eachother. Once both parts are separated, theinstrument will be easily opened.
A2
Sutures
Depending on the tissue to be sutured, a wide variety of sutures is available to choosefrom.It is important for the surgeon to know what is available in the market regardingmaterials, structure, degradation profile, needle type, etc, in order to make an accuratedecision.
Thread variability
OriginAccording to its origin, sutures can be classified as:- Natural origin: collagen, linen, silk.- Metallic origin- Synthetic origin (polypropilene, polyester, polyamide, polyglycolic acid, polyglactin,
polygliconate, polydioxanone...)
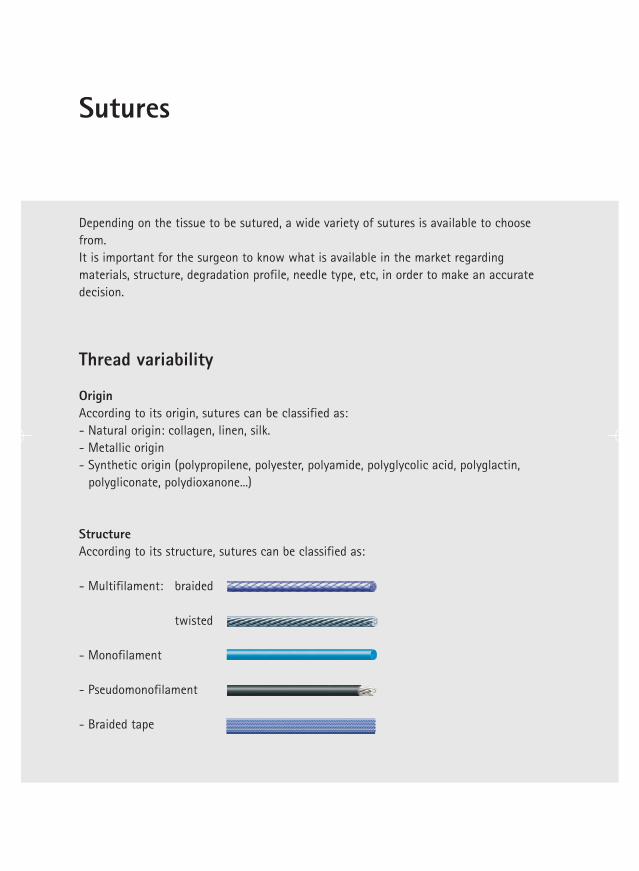
StructureAccording to its structure, sutures can be classified as:
- Multifilament: braided
twisted
- Monofilament
- Pseudomonofilament
- Braided tape
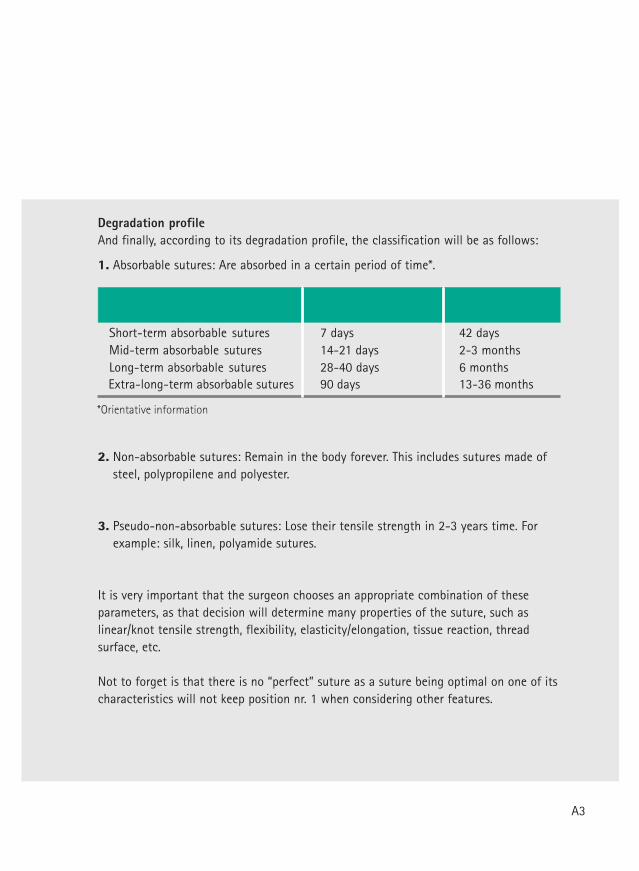
Short-term absorbable sutures 7 days 42 daysMid-term absorbable sutures 14-21 days 2-3 monthsLong-term absorbable sutures 28-40 days 6 months
Degradation profile And finally, according to its degradation profile, the classification will be as follows:
1. Absorbable sutures: Are absorbed in a certain period of time*.
2. Non-absorbable sutures: Remain in the body forever. This includes sutures made ofsteel, polypropilene and polyester.
3. Pseudo-non-absorbable sutures: Lose their tensile strength in 2-3 years time. Forexample: silk, linen, polyamide sutures.
It is very important that the surgeon chooses an appropriate combination of theseparameters, as that decision will determine many properties of the suture, such aslinear/knot tensile strength, flexibility, elasticity/elongation, tissue reaction, threadsurface, etc.
Not to forget is that there is no “perfect” suture as a suture being optimal on one of itscharacteristics will not keep position nr. 1 when considering other features.
A3
*Orientative information
Extra-long-term absorbable sutures 90 days 13-36 months
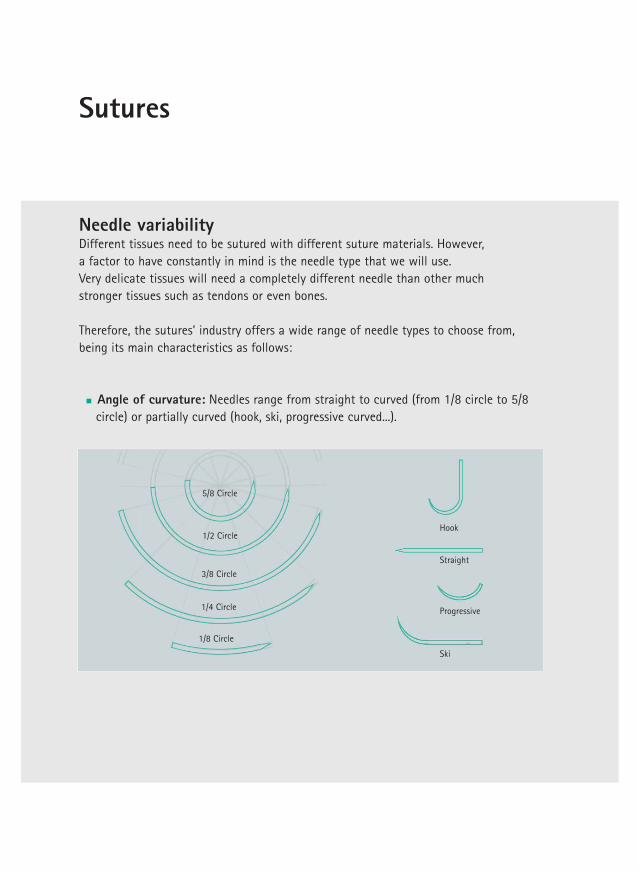
Needle variability Different tissues need to be sutured with different suture materials. However, a factor to have constantly in mind is the needle type that we will use.Very delicate tissues will need a completely different needle than other much stronger tissues such as tendons or even bones.
Therefore, the sutures’ industry offers a wide range of needle types to choose from, being its main characteristics as follows:
Angle of curvature: Needles range from straight to curved (from 1/8 circle to 5/8circle) or partially curved (hook, ski, progressive curved...).
Sutures
1/8 Circle
1/4 Circle
3/8 Circle
1/2 Circle
5/8 Circle
Hook
Straight
Progressive
Ski
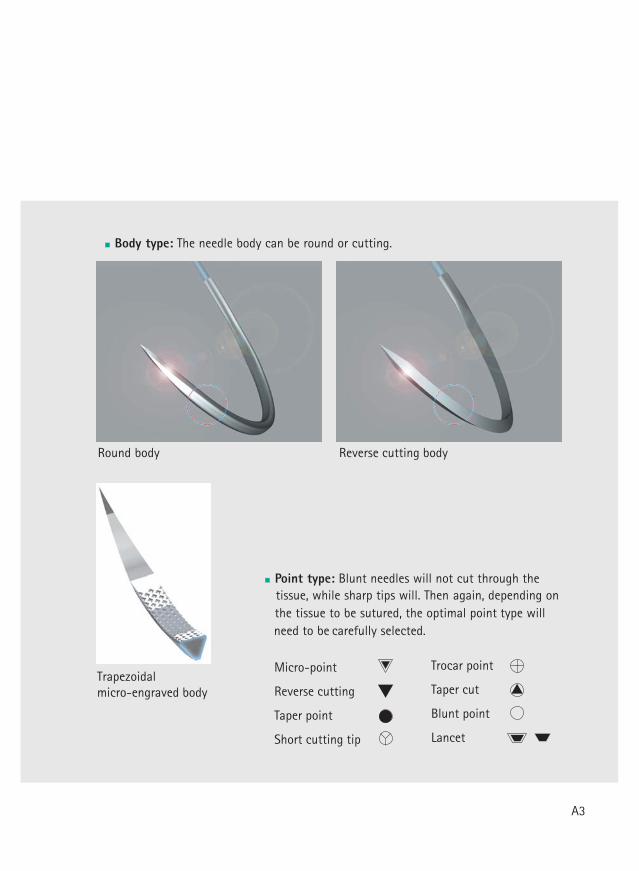
Body type: The needle body can be round or cutting.
Reverse cutting bodyydob dnuoR
Point type: Blunt needles will not cut through the tissue, while sharp tips will. Then again, depending on the tissue to be sutured, the optimal point type
willneed to be carefully selected.
Micro-point
Reverse cutting
Taper point
Short cutting tip
Trocar point
Taper cut
Blunt point
Lancet
A3
Trapezoidal micro-engraved body
Sutures
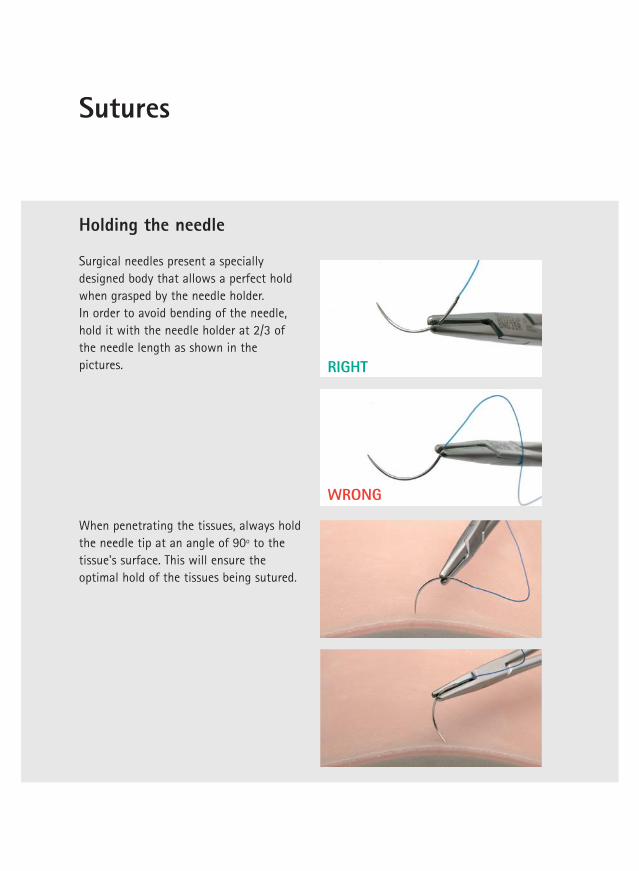
Holding the needle
Surgical needles present a speciallydesigned body that allows a perfect holdwhen grasped by the needle holder. In order to avoid bending of the needle,hold it with the needle holder at 2/3 ofthe needle length as shown in thepictures. RIGHT
WRONG
When penetrating the tissues, always holdthe needle tip at an angle of 90º to thetissue's surface. This will ensure theoptimal hold of the tissues being sutured.
Knotting techniques
Knot
ting
tec
hniq
ues
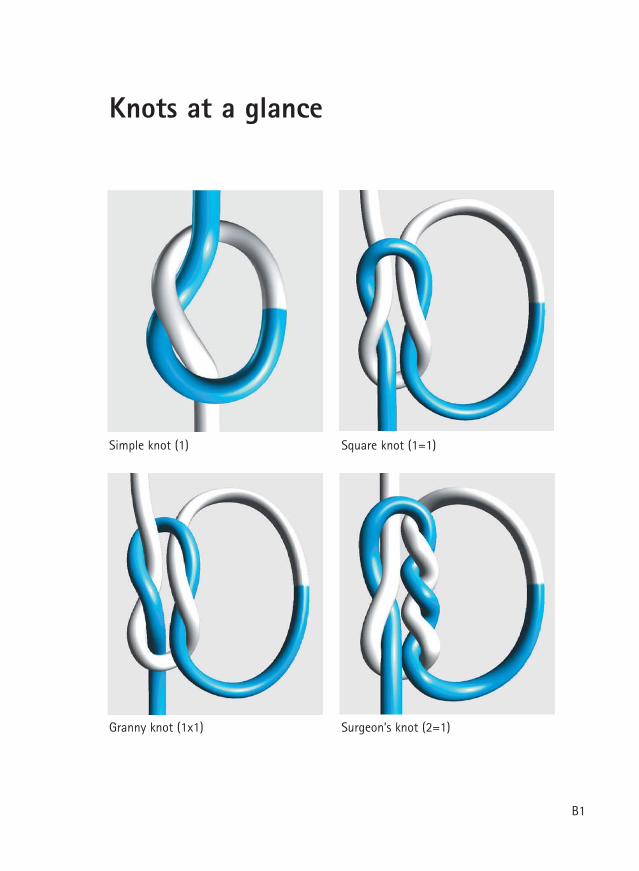
)1=1( tonk erauqS)1( tonk elpmiS
)1=2( tonk s’noegruS)1x1( tonk ynnarG
Knots at a glance
B1
Overview
1 2
3 4
5 6
7 8
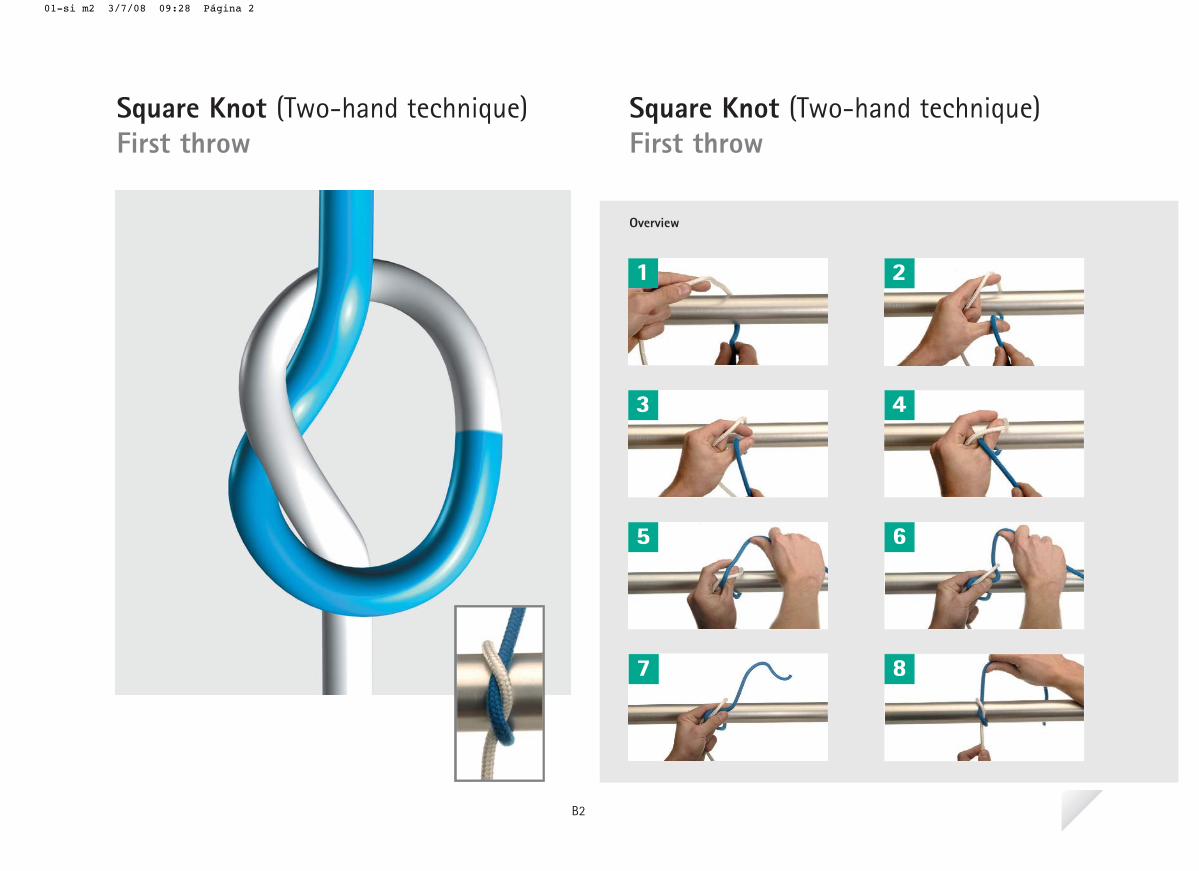
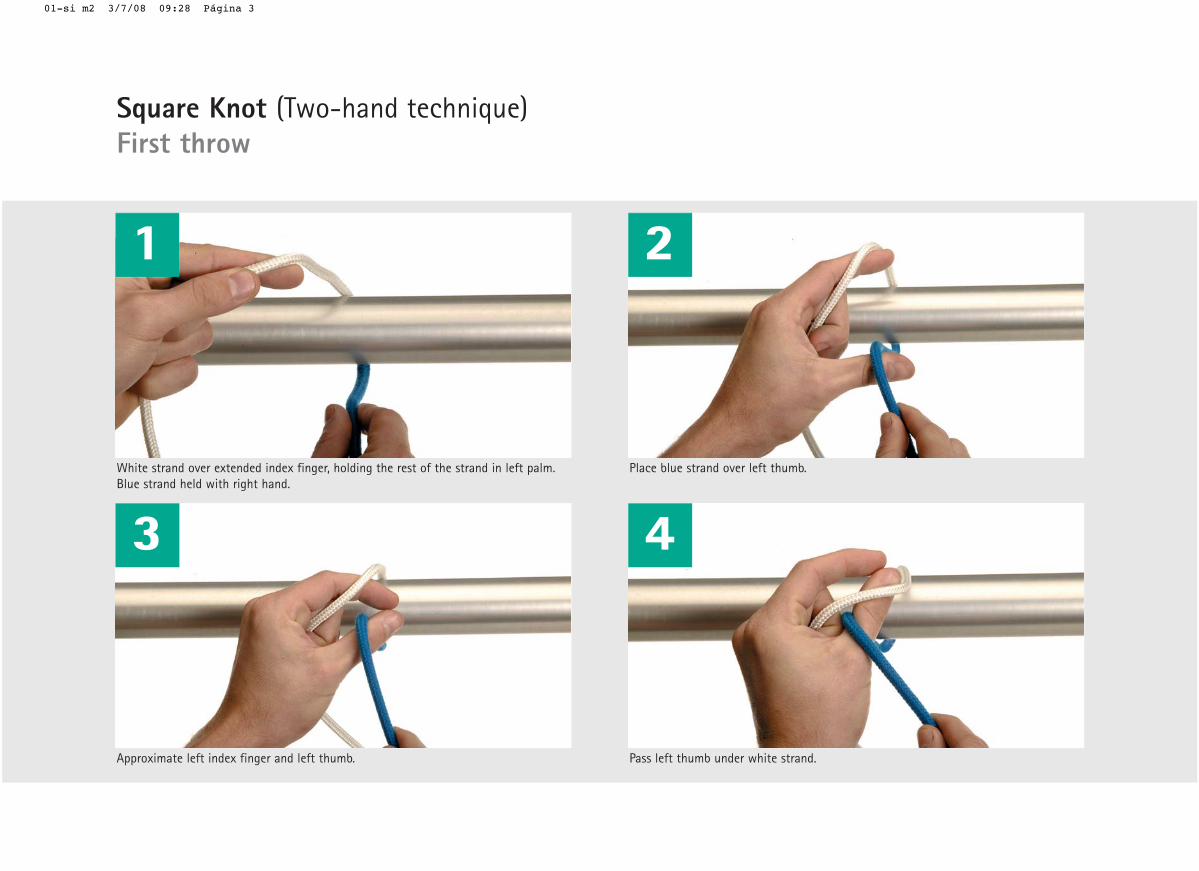
Square Knot (Two-hand technique)First throw
Square Knot (Two-hand technique)First throw
B2
01-si m2 3/7/08 09:28 Página 2
1
White strand over extended index finger, holding the rest of the strand in left palm. Blue strand held with right hand.
Approximate left index finger and left thumb.
2
Place blue strand over left thumb.
Pass left thumb under white strand.
3 4
Square Knot (Two-hand technique)First throw
01-si m2 3/7/08 09:28 Página 3
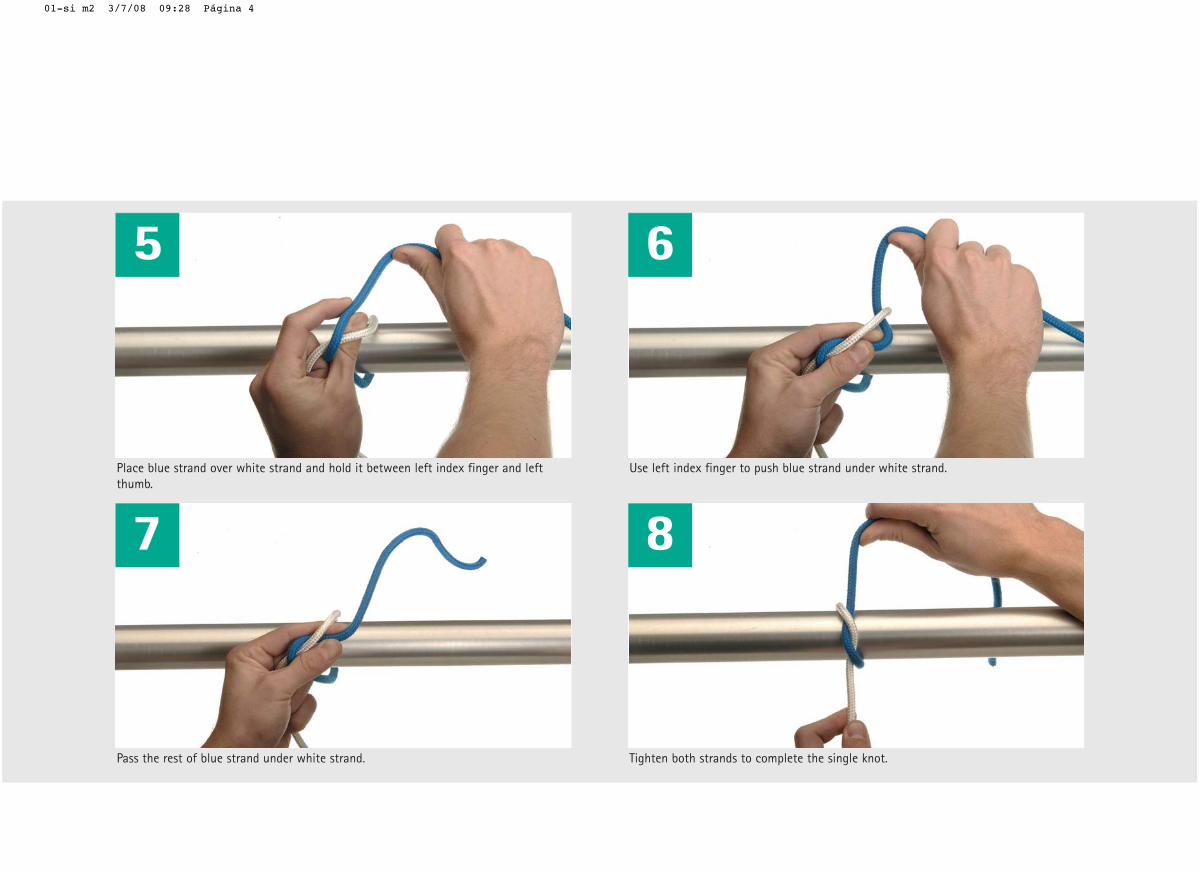
5 6
Place blue strand over white strand and hold it between left index finger and leftthumb.
7
Pass the rest of blue strand under white strand.
Use left index finger to push blue strand under white strand.
8
Tighten both strands to complete the single knot.
01-si m2 3/7/08 09:28 Página 4
A square knot (1=1) is performed ontissues that are not under tension,and is composed of 2 simple knots.Attention should be given not toobtain a so-called "granny" knot(1x1). This is very important, as a
granny knot does not securely holdand can slip off. In this section you will learn how toobtain the first simple knot of thesquare knot.
My notes:
B2
01-si m2 3/7/08 09:27 Página 1
Overview
1 2
3 4
5 6
7 8
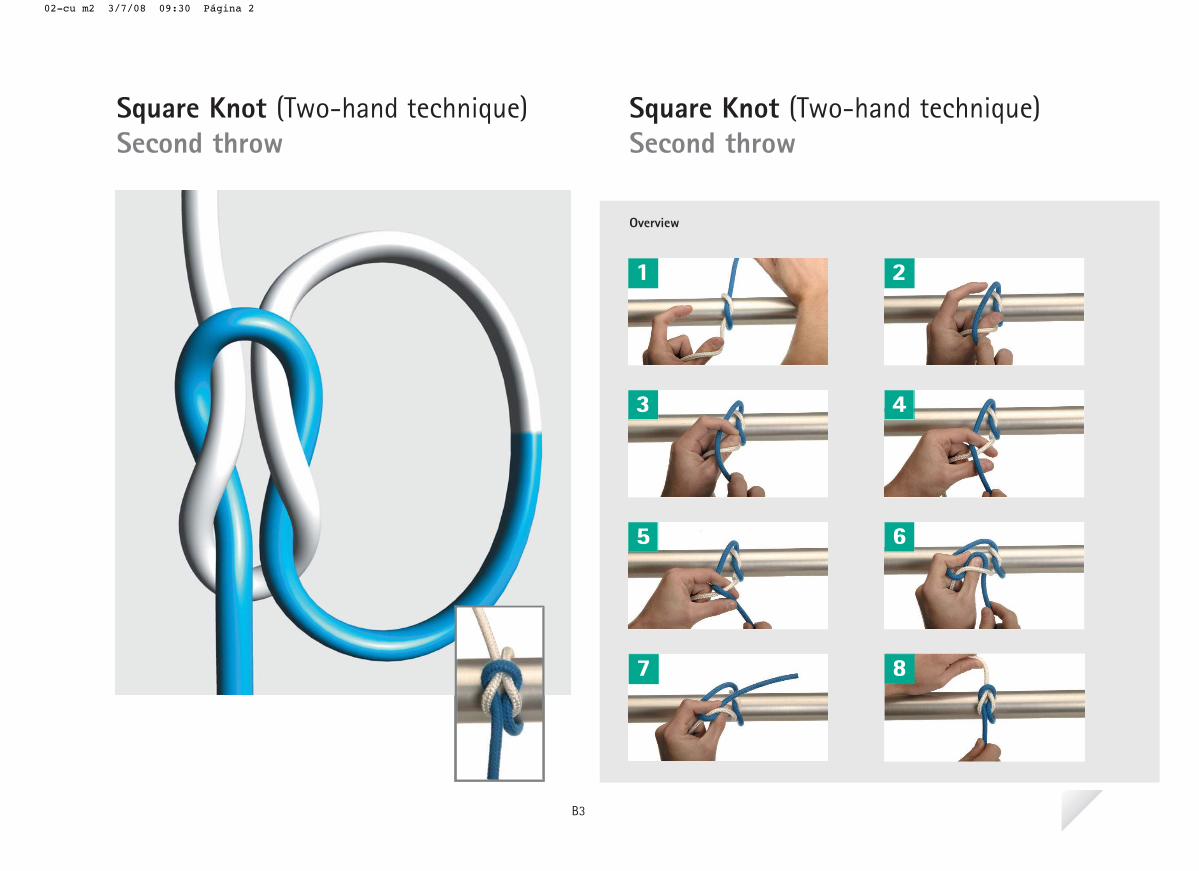
Square Knot (Two-hand technique)Second throw
Square Knot (Two-hand technique)Second throw
B3
02-cu m2 3/7/08 09:30 Página 2

Approximate left index finger and left thumb.
1 2
Place blue strand over white strand.
Pass left index finger and thumb under white strand.
3 4Starting from a single knot, place thumb over white strand while holding the rest onthe strand in left palm. Blue strand held in right hand.
Square Knot (Two-hand technique)Second throw
02-cu m2 3/7/08 09:30 Página 3
5 6
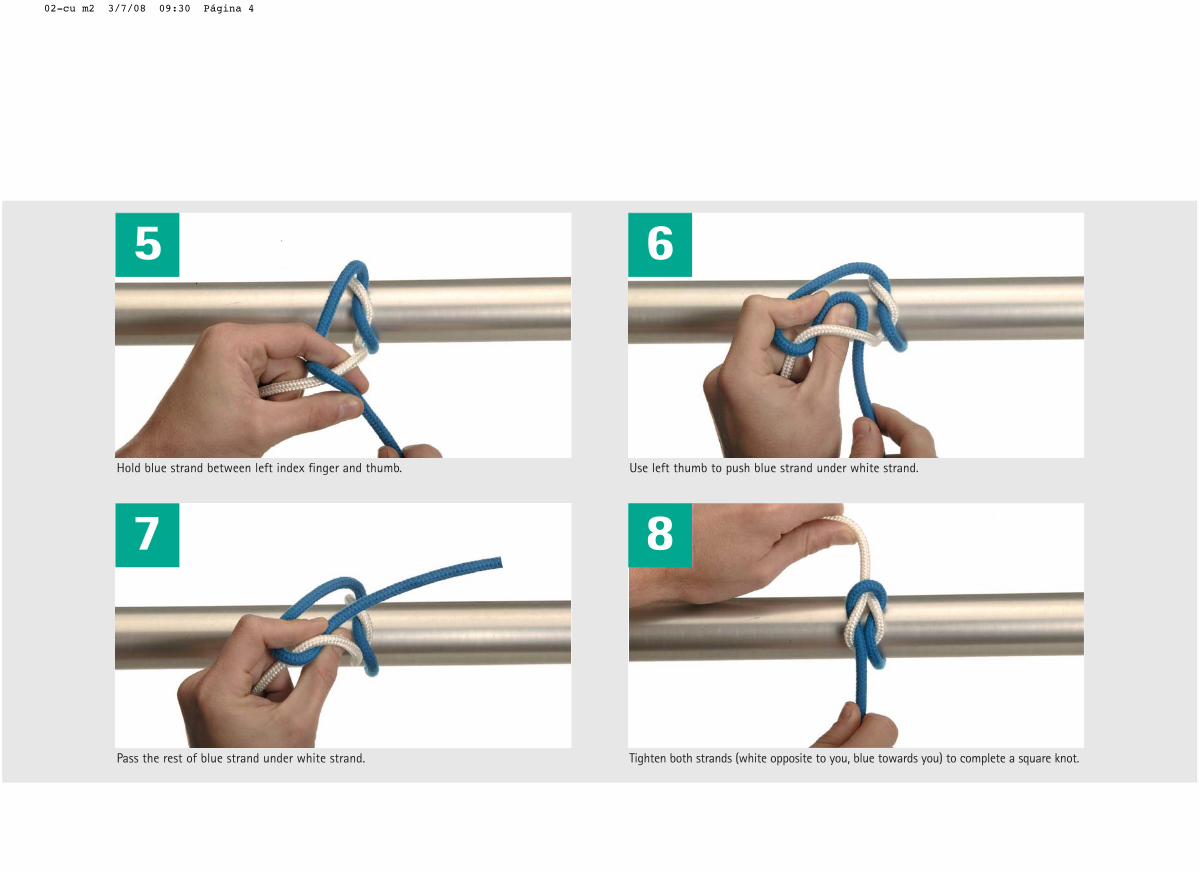
Hold blue strand between left index finger and thumb.
7
Pass the rest of blue strand under white strand.
Use left thumb to push blue strand under white strand.
8
Tighten both strands (white opposite to you, blue towards you) to complete a square knot.
02-cu m2 3/7/08 09:30 Página 4
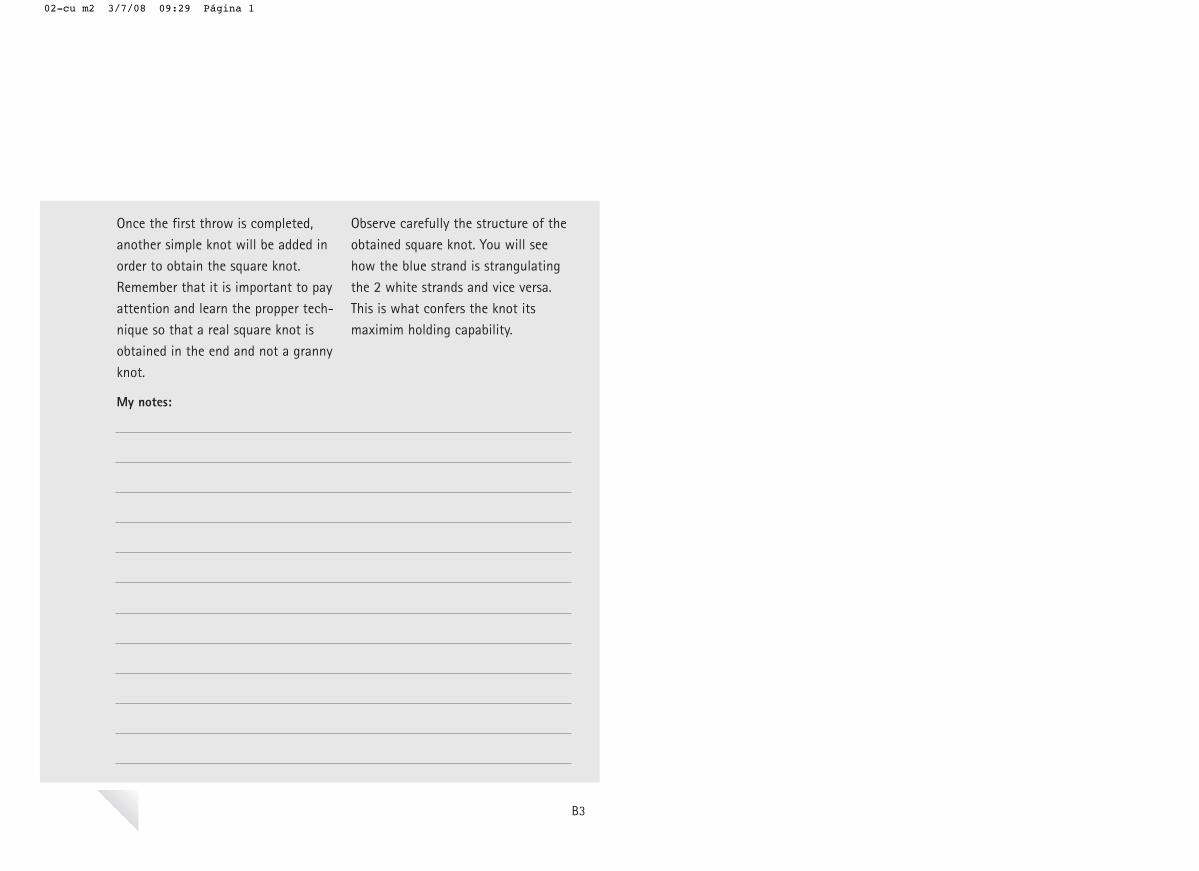
Once the first throw is completed,another simple knot will be added inorder to obtain the square knot. Remember that it is important to payattention and learn the propper tech-nique so that a real square knot isobtained in the end and not a grannyknot.
Observe carefully the structure of theobtained square knot. You will seehow the blue strand is strangulatingthe 2 white strands and vice versa.This is what confers the knot itsmaximim holding capability.
My notes:
B3
02-cu m2 3/7/08 09:29 Página 1
Overview
1 2
3 4
5 6
7
Square Knot (One-hand technique)First throw (index-finger)
Square Knot (One-hand technique)First throw (index-finger)
B4
03-si m1 3/7/08 09:31 Página 2
1
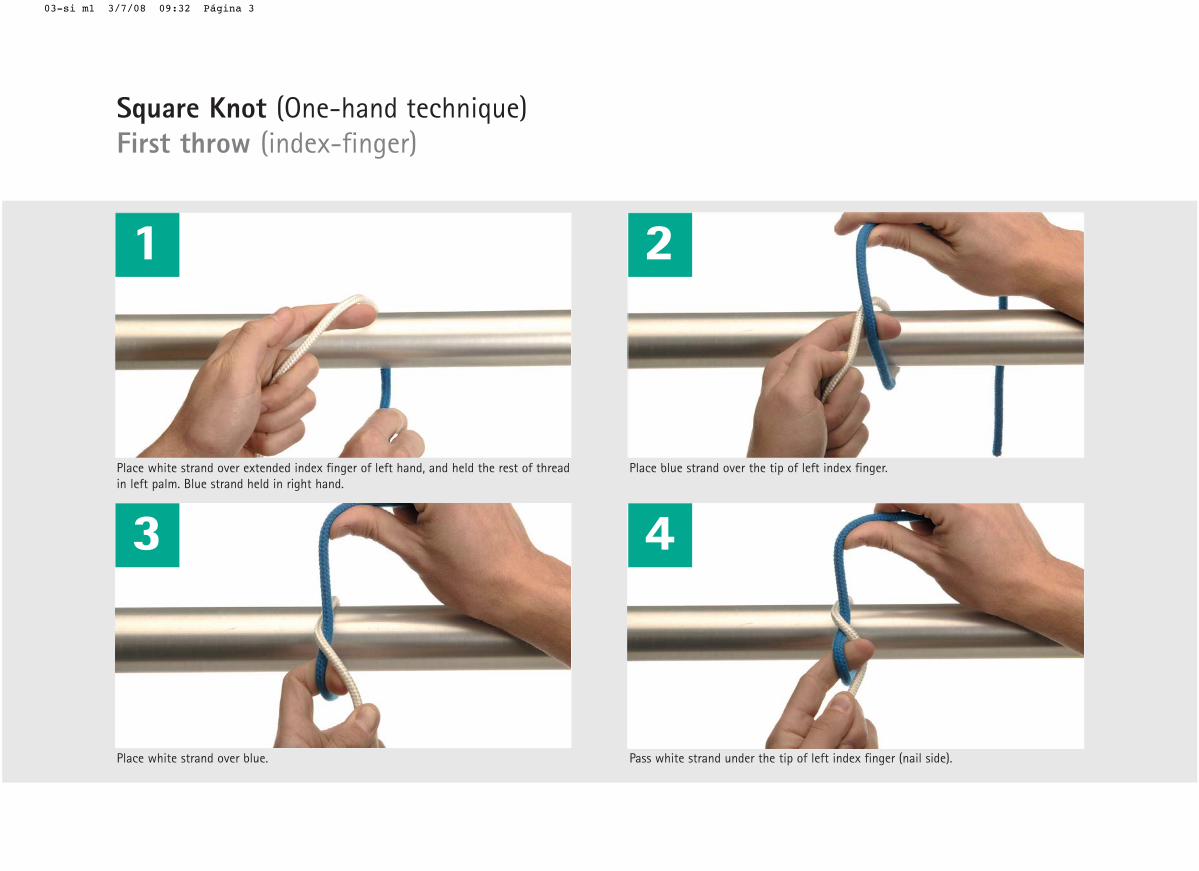
Place white strand over extended index finger of left hand, and held the rest of threadin left palm. Blue strand held in right hand.
Place white strand over blue.
2
Place blue strand over the tip of left index finger.
Pass white strand under the tip of left index finger (nail side).
3 4
Square Knot (One-hand technique)First throw (index-finger)
03-si m1 3/7/08 09:32 Página 3
5 6
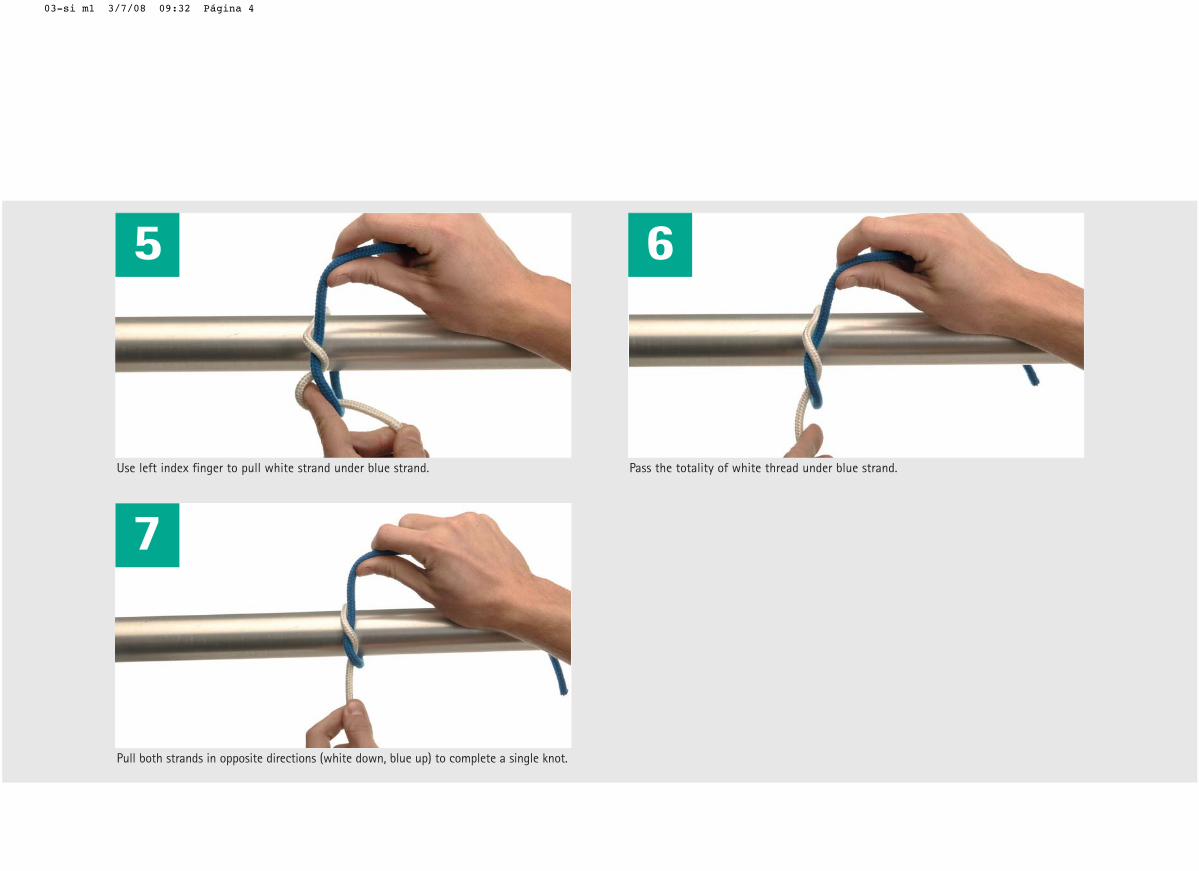
Use left index finger to pull white strand under blue strand.
7
Pull both strands in opposite directions (white down, blue up) to complete a single knot.
Pass the totality of white thread under blue strand.
03-si m1 3/7/08 09:32 Página 4

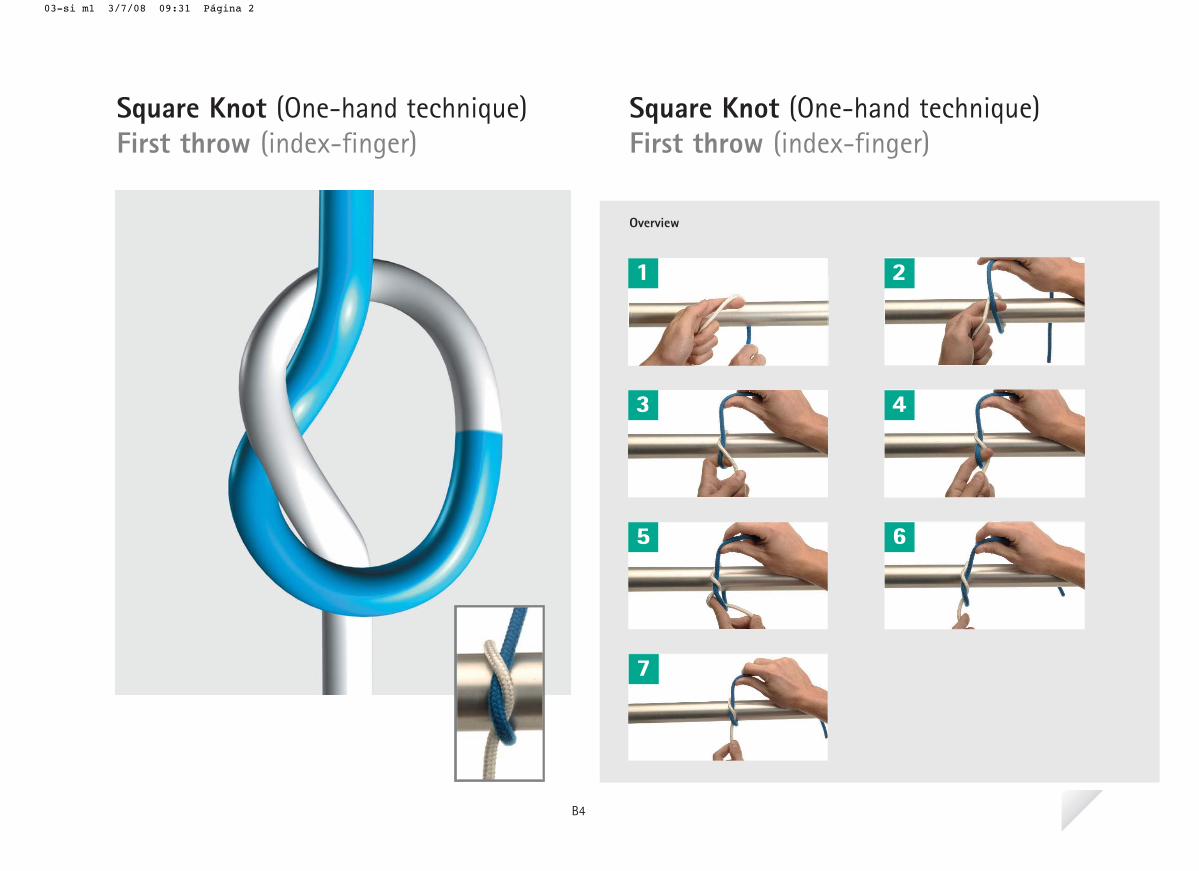
Sometimes one of the surgeon'shands is busy holding an instrumentor the suture's needle. In those casesa "one-hand technique" will be used.Its advantage is that only one hand isused to tie the knot and the otherhand never loses contact with thethread.
The technique is composed of 2 basicsteps called "index-finger" and"middle-finger" techniques. Either ofthem can be chosen to perform thefirst throw of the knot. The index-finger technique will beused here to perform the first throw.
My notes:
B4
03-si m1 3/7/08 09:31 Página 1
Overview
1 2
3 4
5 6
7 8
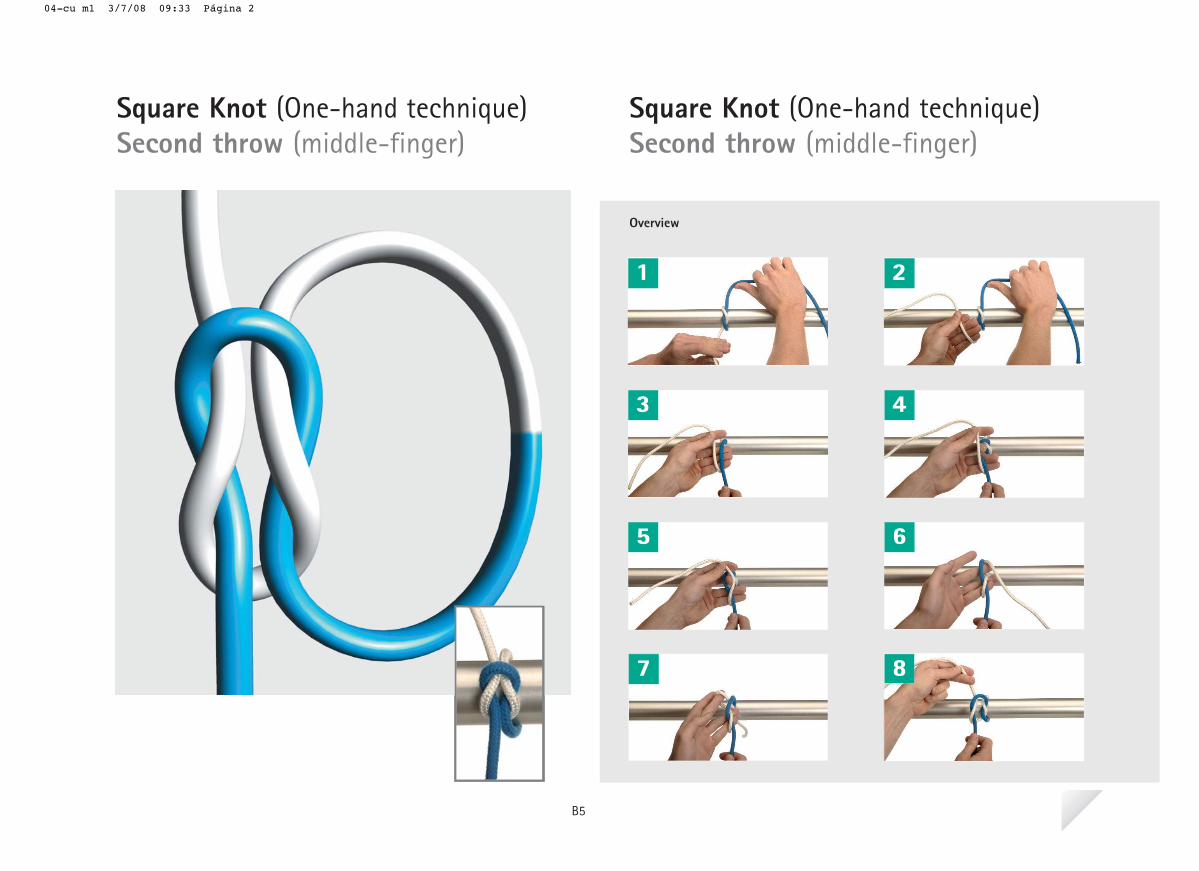
Square Knot (One-hand technique)Second throw (middle-finger)
Square Knot (One-hand technique)Second throw (middle-finger)
B5
04-cu m1 3/7/08 09:33 Página 2
1
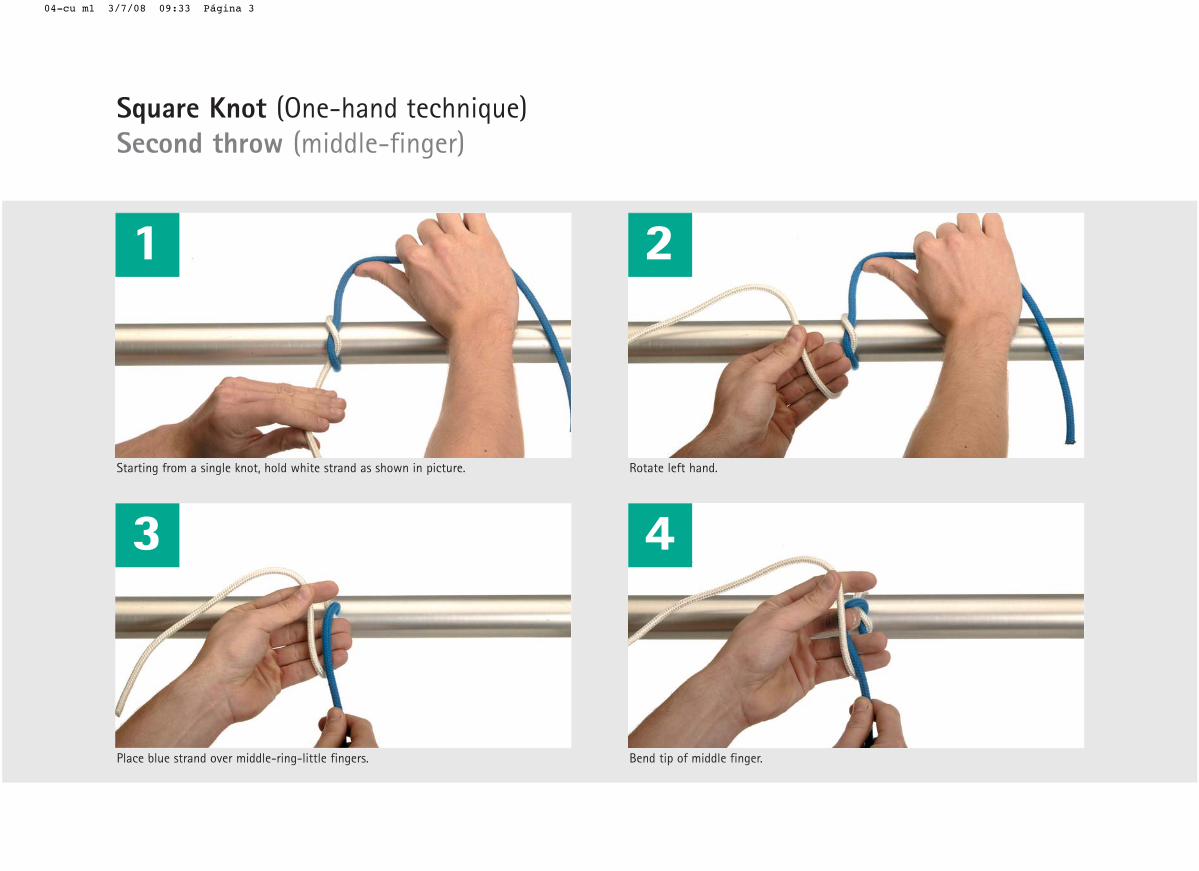
Starting from a single knot, hold white strand as shown in picture.
Place blue strand over middle-ring-little fingers.
2
Rotate left hand.
Bend tip of middle finger.
3 4
Square Knot (One-hand technique)Second throw (middle-finger)
04-cu m1 3/7/08 09:33 Página 3
5 6
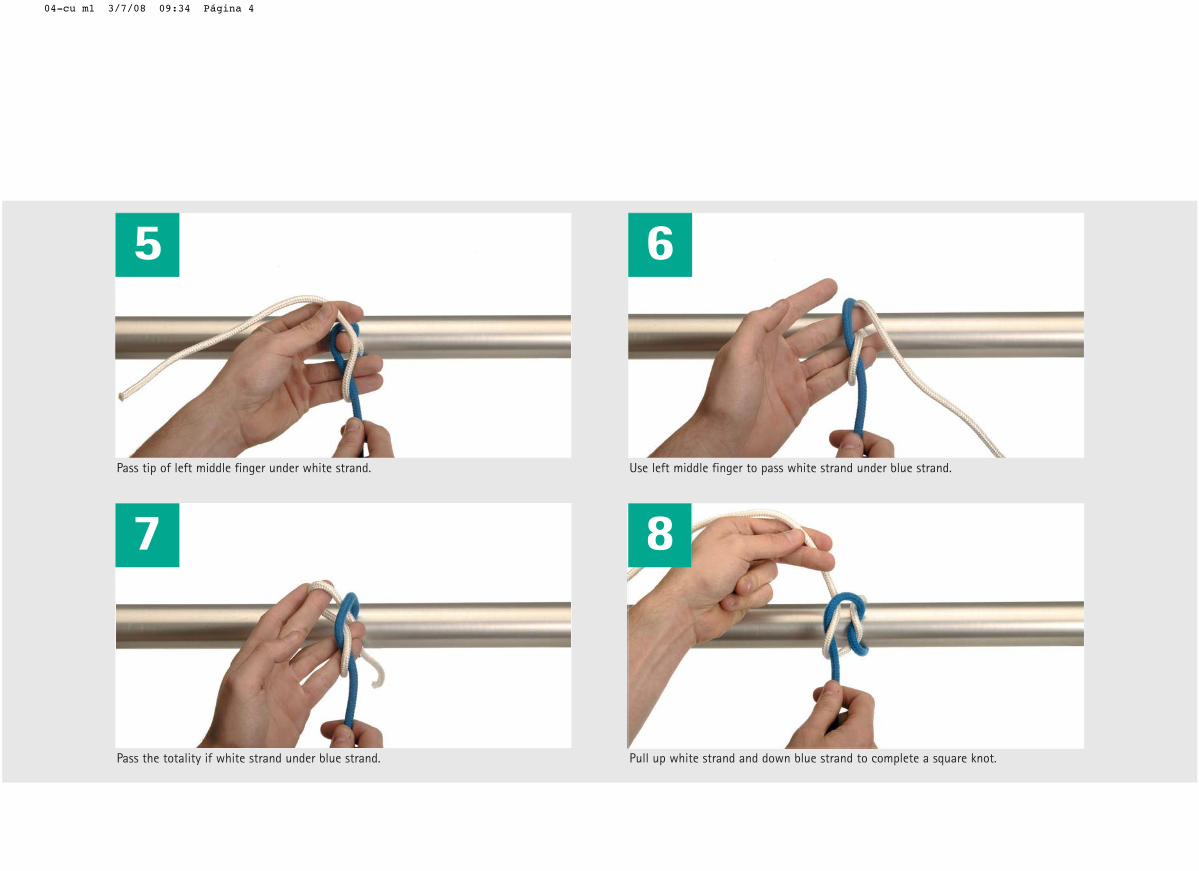
Pass tip of left middle finger under white strand.
7
Pass the totality if white strand under blue strand.
Use left middle finger to pass white strand under blue strand.
8
Pull up white strand and down blue strand to complete a square knot.
04-cu m1 3/7/08 09:34 Página 4
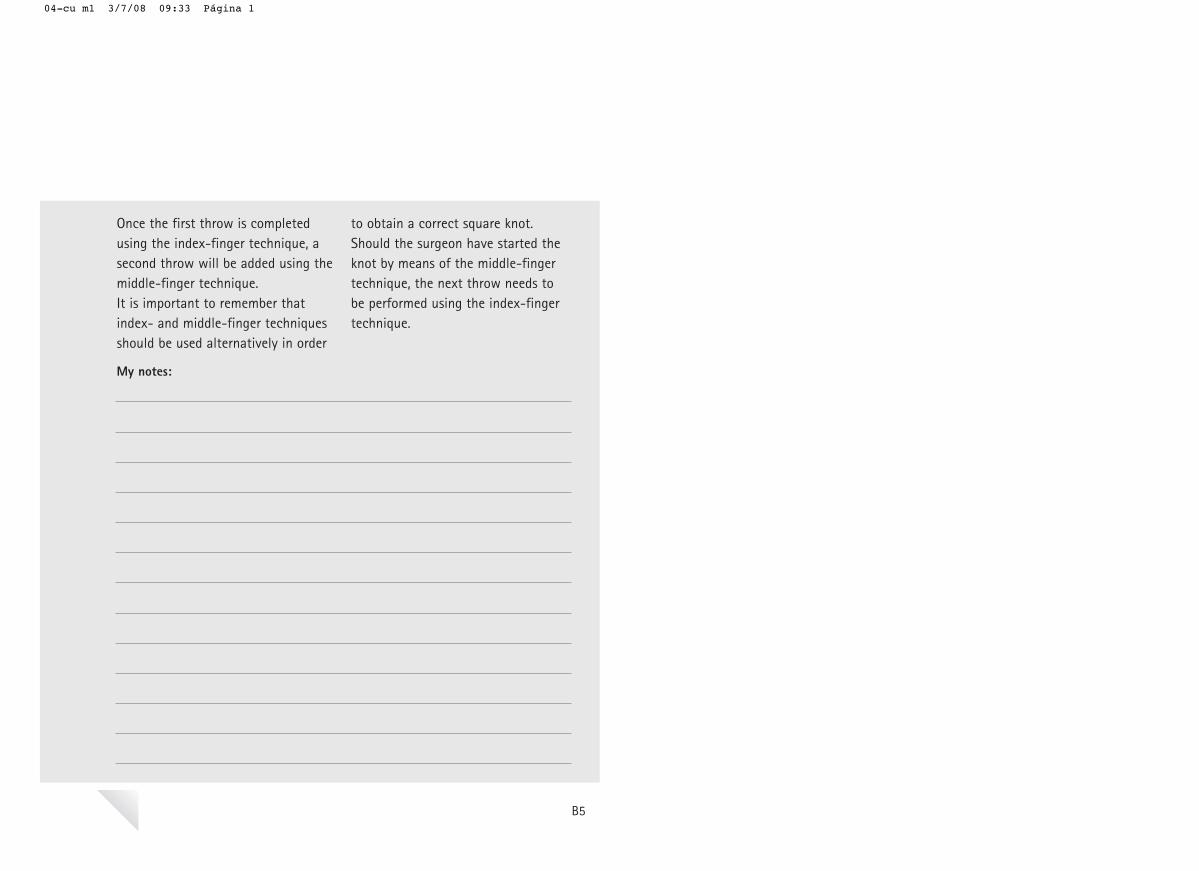
Once the first throw is completedusing the index-finger technique, asecond throw will be added using themiddle-finger technique. It is important to remember thatindex- and middle-finger techniquesshould be used alternatively in order
to obtain a correct square knot.Should the surgeon have started theknot by means of the middle-fingertechnique, the next throw needs tobe performed using the index-fingertechnique.
My notes:
B5
04-cu m1 3/7/08 09:33 Página 1
Granny Knot
B6
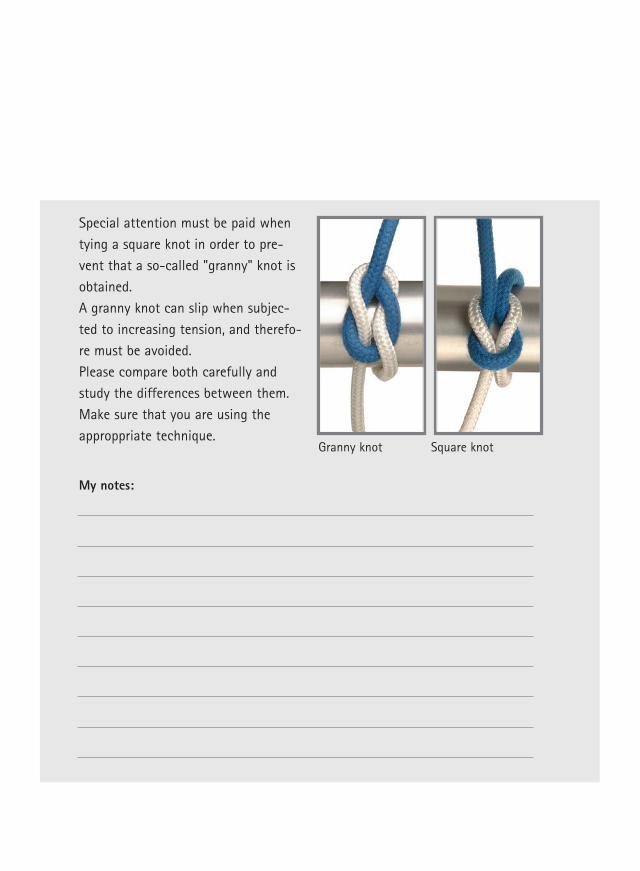
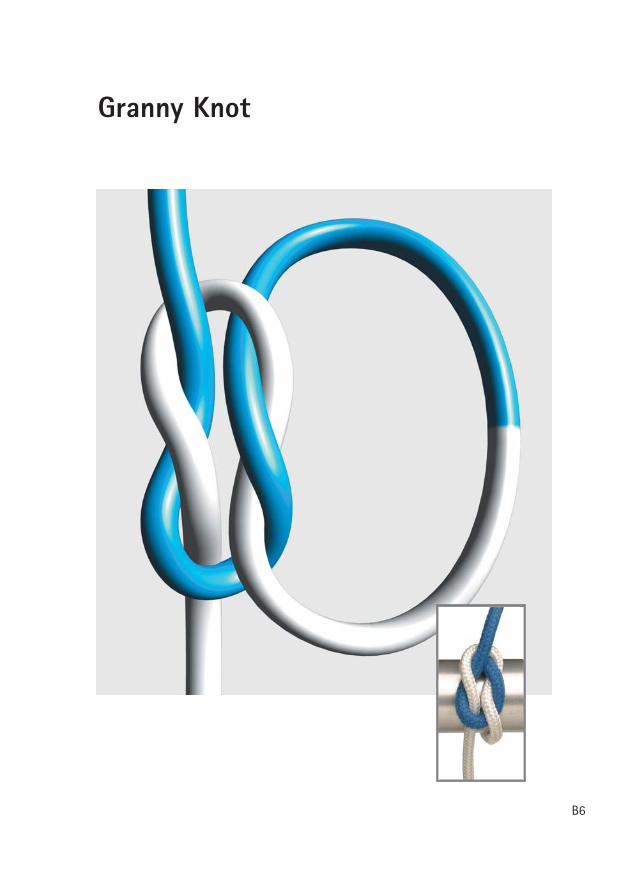
Special attention must be paid whentying a square knot in order to pre-vent that a so-called "granny" knot isobtained. A granny knot can slip when subjec-ted to increasing tension, and therefo-re must be avoided. Please compare both carefully andstudy the differences between them.Make sure that you are using theapproppriate technique.
My notes:
Granny knot Square knot
Overview
Surgeon’s KnotFirst throw
Surgeon’s KnotFirst throw
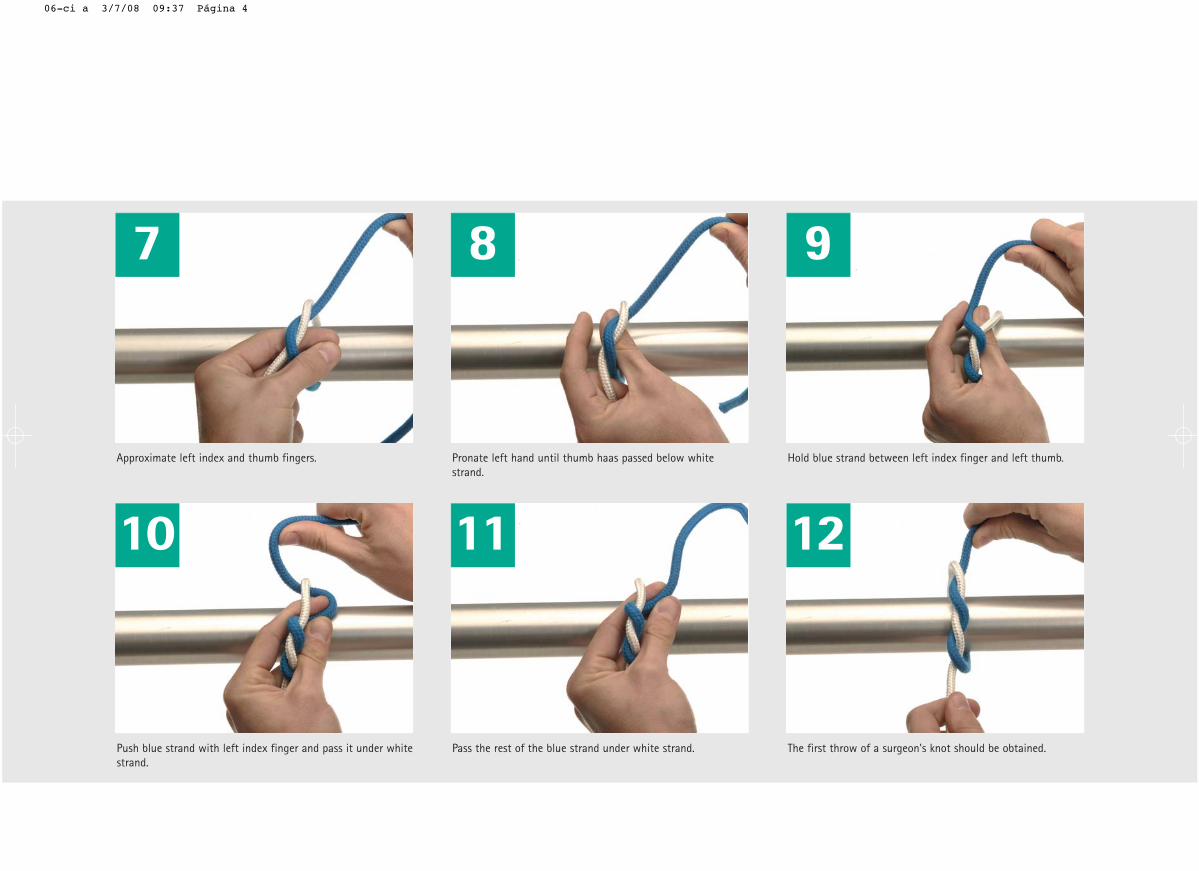
1 2 3
4 5 6
7 8 9
10 11 12
B7
06-ci a 3/7/08 09:37 Página 2
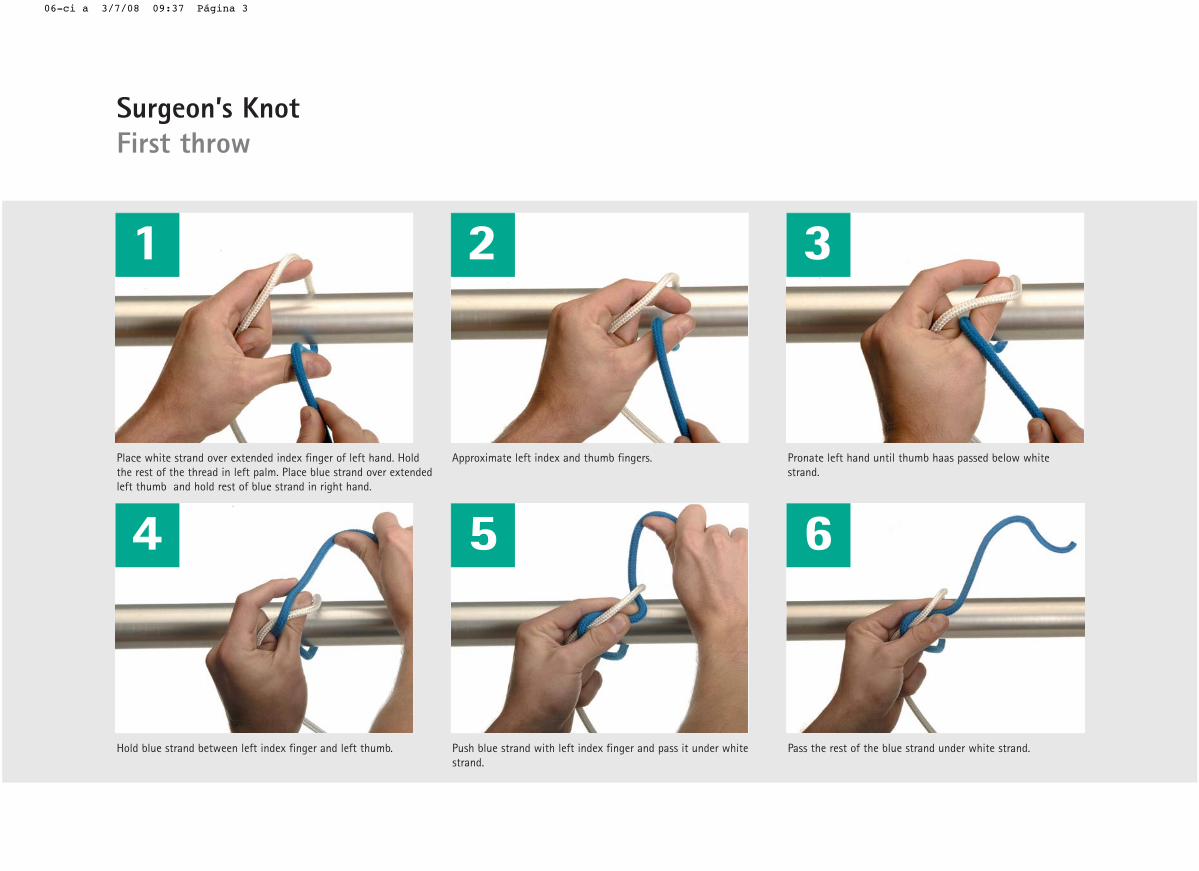
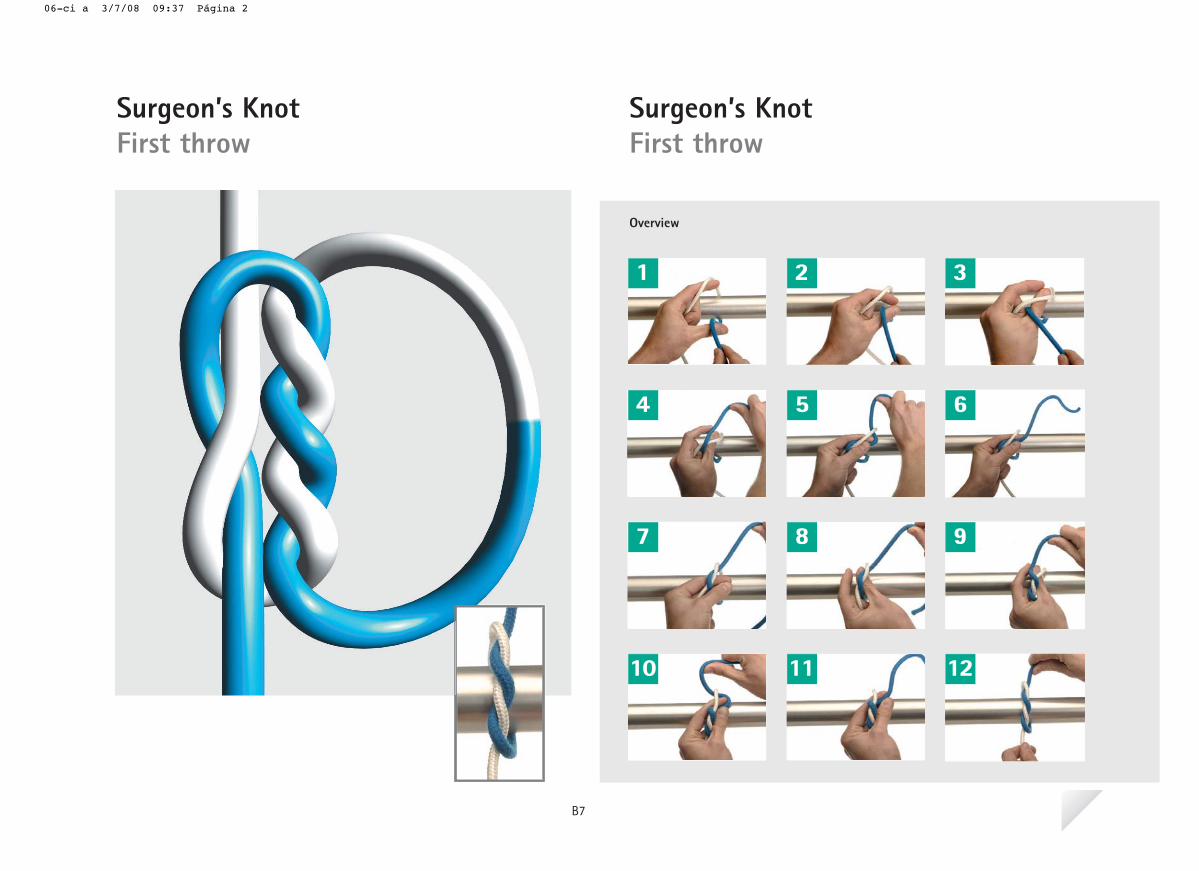
Place white strand over extended index finger of left hand. Holdthe rest of the thread in left palm. Place blue strand over extendedleft thumb and hold rest of blue strand in right hand.
etihw woleb dessap saah bmuht litnu dnah tfel etanorP .sregnif bmuht dna xedni tfel etamixorppAstrand.
1 2 3
Hold blue strand between left index finger and left thumb. Push blue strand with left index finger and pass it under whitestrand.
Pass the rest of the blue strand under white strand.
4 5 6
Surgeon’s KnotFirst throw
06-ci a 3/7/08 09:37 Página 3
etihw woleb dessap saah bmuht litnu dnah tfel etanorP .sregnif bmuht dna xedni tfel etamixorppAstrand.
Hold blue strand between left index finger and left thumb.
7 8 9
Push blue strand with left index finger and pass it under whitestrand.
Pass the rest of the blue strand under white strand. The first throw of a surgeon's knot should be obtained.
10 11 12
06-ci a 3/7/08 09:37 Página 4

In cases when tissues are under sometension, extra strength is needed sothat the knot does not slide. Thisextra strength is accomplished bylooping a thread twice around theother. This increases the friction bet-ween both strands and therefore a
stronger knot is obtained.This knot will never be performed onskin, as there should never be tensionon this layer. In cases where a certaintension is present, subcutaneouslayers have to be sutured first torelease the tension on the surface.
My notes:
B7
06-ci a 3/7/08 09:36 Página 1
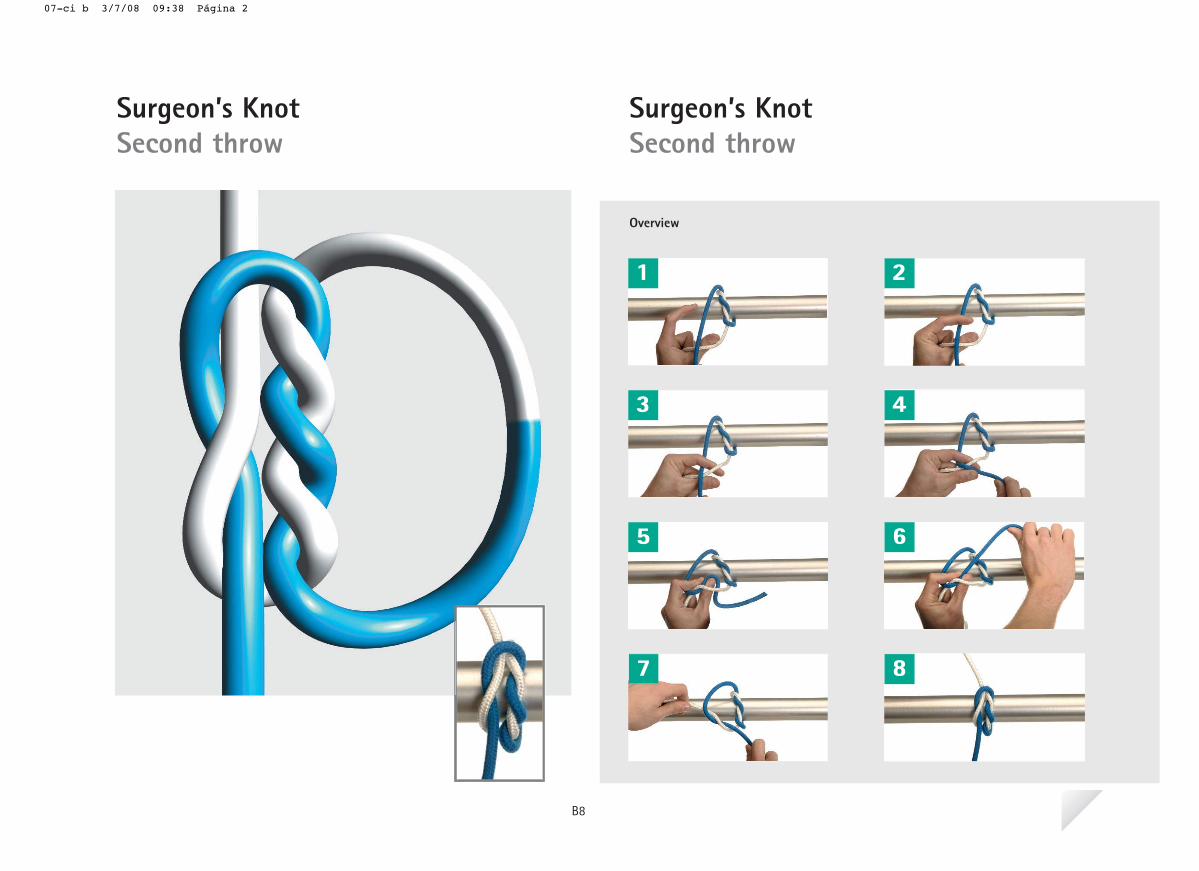
Overview
1 2
3 4
5 6
7 8
Surgeon’s KnotSecond throw
Surgeon’s KnotSecond throw
B8
07-ci b 3/7/08 09:38 Página 2

1
Place left thumb over white strand and then place blue strand over white strand.
Pass left index finger and thumb under white strand.
2
Approximate left index finger and left thumb.
Hold blue strand between left index finger and thumb.
3 4
Surgeon’s KnotSecond throw
07-ci b 3/7/08 09:38 Página 3
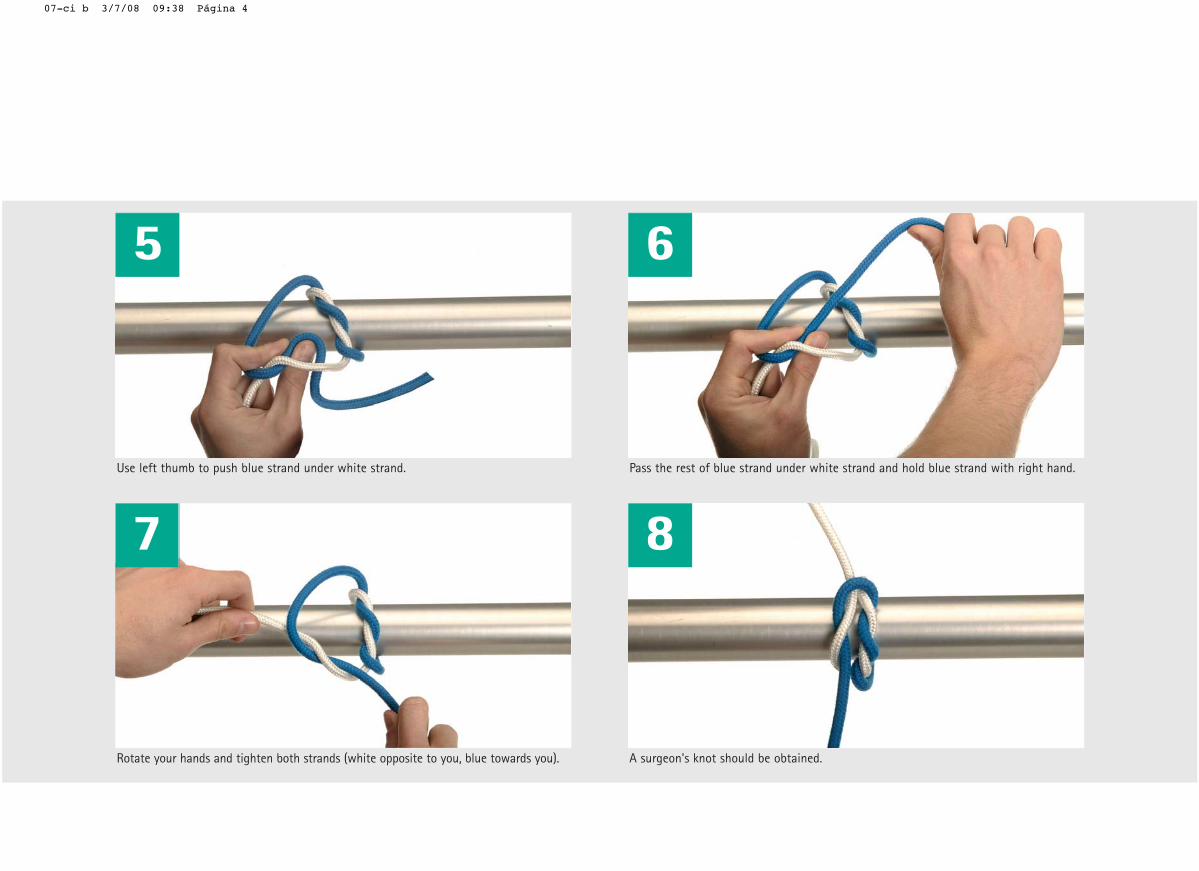
5 6
Use left thumb to push blue strand under white strand.
7
Rotate your hands and tighten both strands (white opposite to you, blue towards you).
Pass the rest of blue strand under white strand and hold blue strand with right hand.
8
A surgeon's knot should be obtained.
07-ci b 3/7/08 09:38 Página 4
Once the first throw of the Surgeon’sknot is completed, a simple knot willbe added to complete a Surgeon’sknot.
Surgeons will normally add a total of2-3 simple knots (depending on sutu-re’s material/USP) to achieve a satis-factory level of security.
My notes:
B8
07-ci b 3/7/08 09:38 Página 1
Overview
Surgeon’s Knot (Alternate technique)First throw
Surgeon’s Knot (Alternate technique)First throw
1 2 3
4 5 6
7 8 9
10 11 12
B9
08-cita a 3/7/08 09:39 Página 2
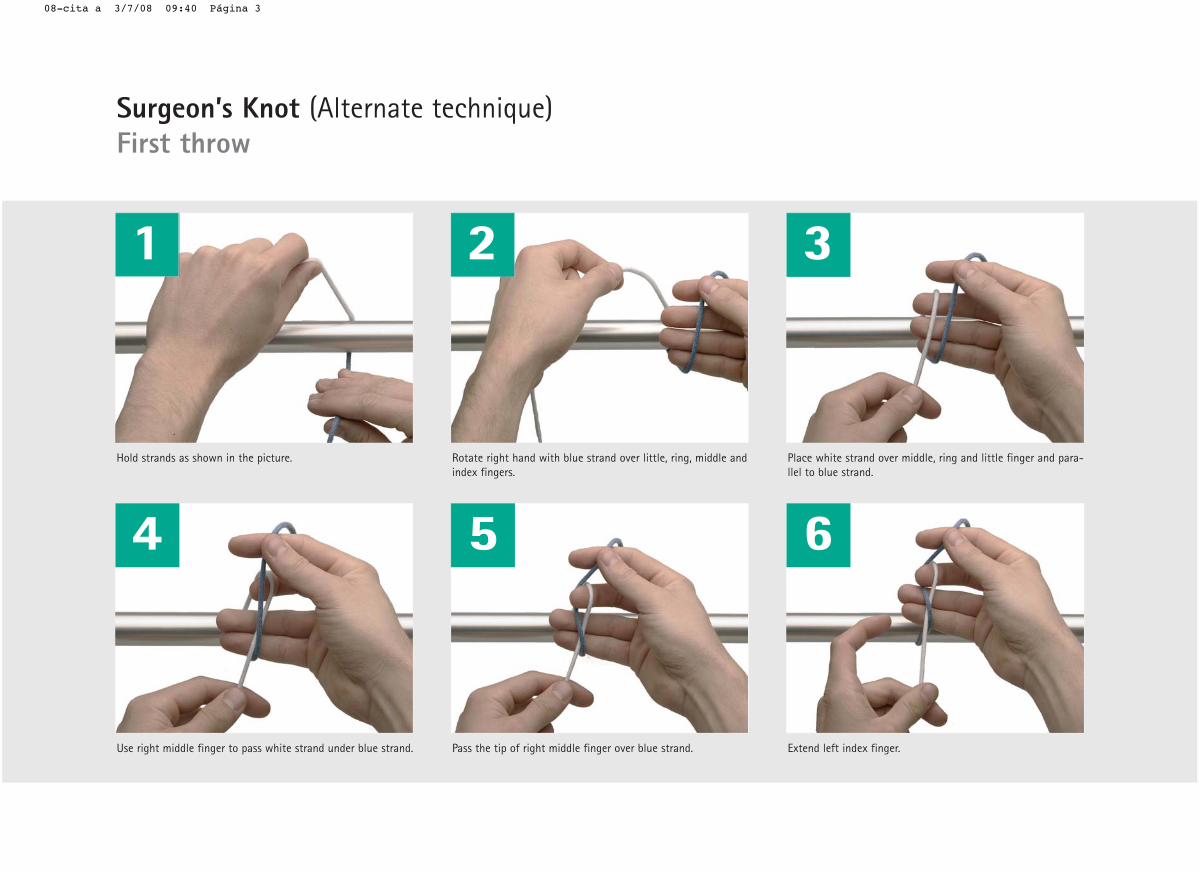
dna elddim ,gnir ,elttil revo dnarts eulb htiw dnah thgir etatoR.erutcip eht ni nwohs sa sdnarts dloHindex fingers.
Place white strand over middle, ring and little finger and para-llel to blue strand.
1 2 3
Use right middle finger to pass white strand under blue strand. Pass the tip of right middle finger over blue strand. Extend left index finger.
4 5 6
Surgeon’s Knot (Alternate technique)First throw
08-cita a 3/7/08 09:40 Página 3

elddim thgir dna regnif xedni tfel dnetxE.dnarts etihw revo regnif xedni tfel fo pit ssaP.tonk eht rednu regnif xedni tfel ssaP finger.
7 8 9
Pass both strands through the loop as shown in the picture. Tighten the knot by pulling blue thread away from you andwhite thread towards you.
The first throw on the surgeon’s knot should be obtained.
10 11 12
08-cita a 3/7/08 09:40 Página 4

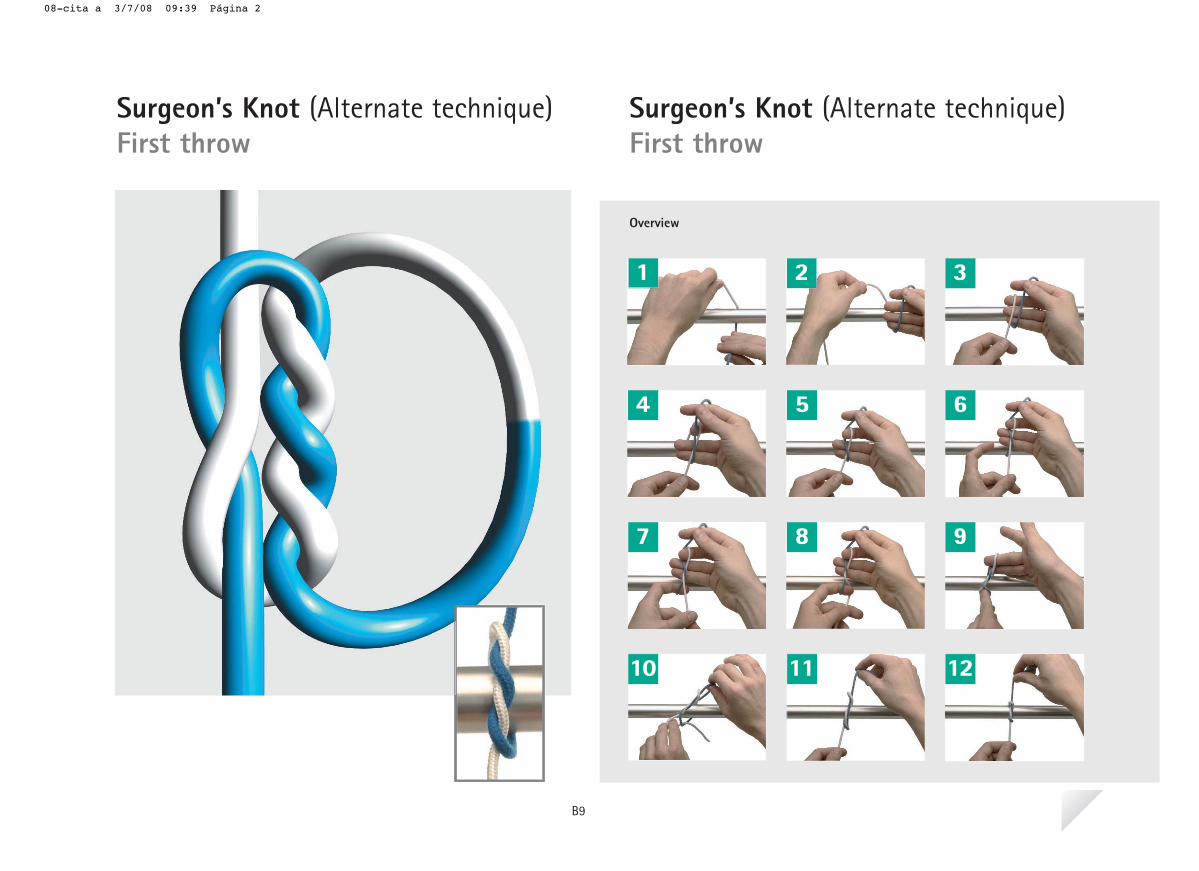
Some surgeons prefer to use thistechnique to obtain the Surgeon’sknot as they consider it faster thanthe one shown in previous chapter.
Both techniques are equivalent andthe same knot is obtained by eitherof them.
My notes:
B9
08-cita a 3/7/08 09:39 Página 1

Overview
1 2
3 4
5 6
7 8
Surgeon’s Knot (Alternate technique)Second throw
Surgeon’s Knot (Alternate technique)Second throw
B10
09-cita b 3/7/08 09:41 Página 2
1
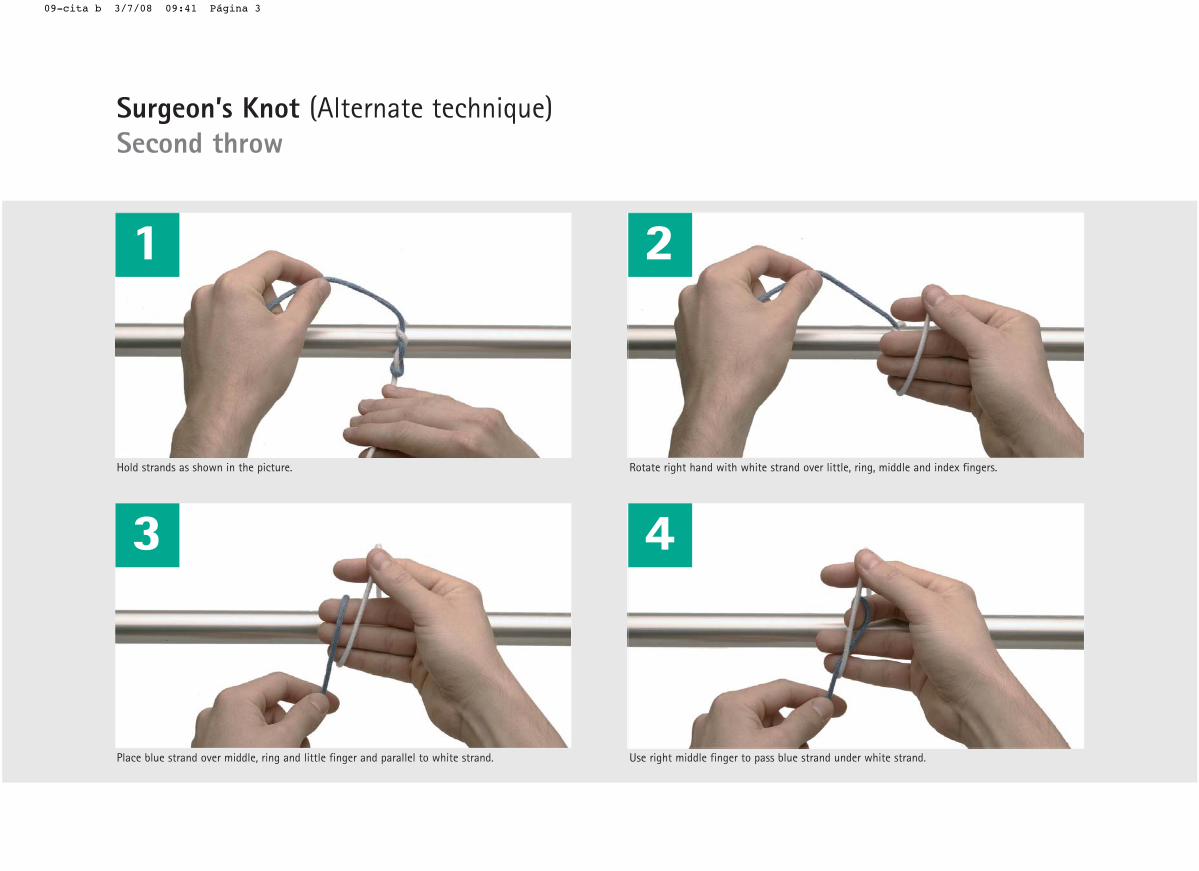
Hold strands as shown in the picture.
Place blue strand over middle, ring and little finger and parallel to white strand.
2
Rotate right hand with white strand over little, ring, middle and index fingers.
Use right middle finger to pass blue strand under white strand.
3 4
Surgeon’s Knot (Alternate technique)Second throw
09-cita b 3/7/08 09:41 Página 3
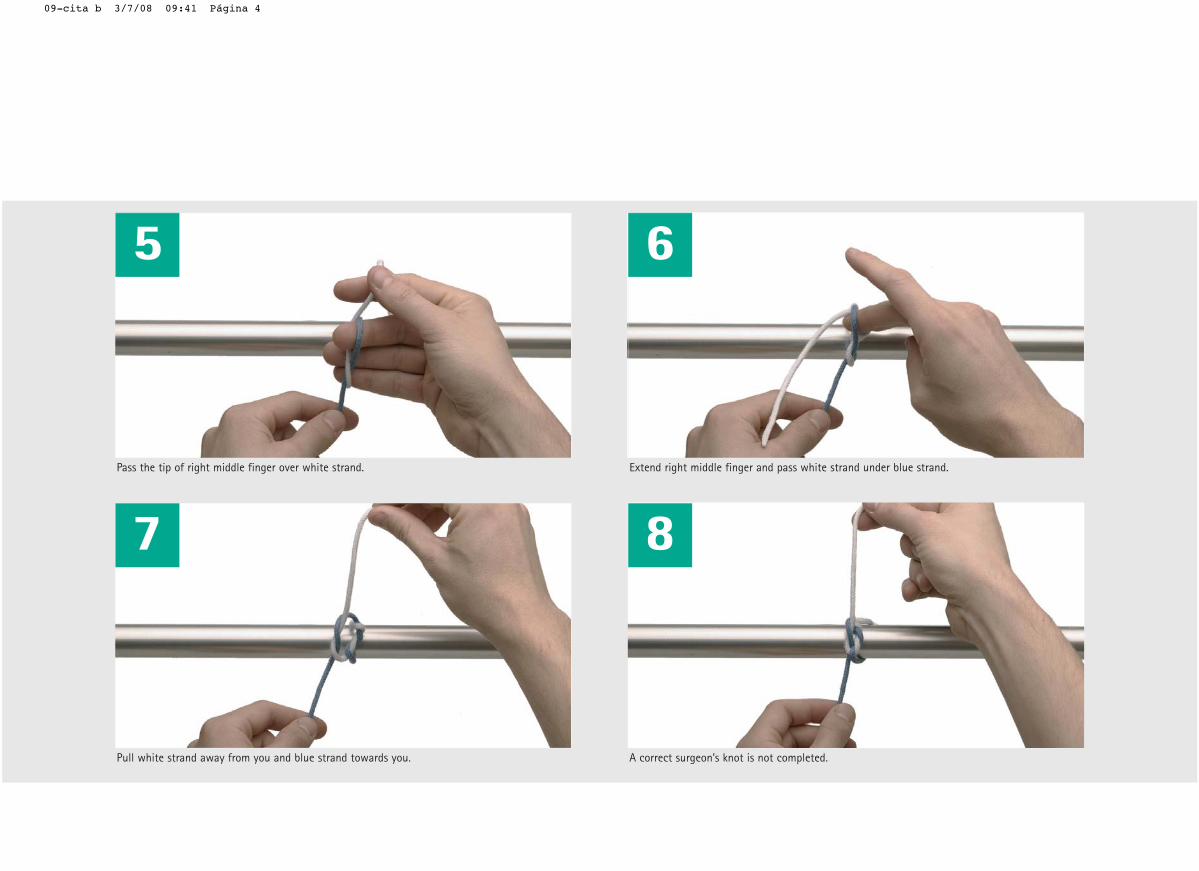
5 6
Pass the tip of right middle finger over white strand.
7
Pull white strand away from you and blue strand towards you.
Extend right middle finger and pass white strand under blue strand.
8
A correct surgeon’s knot is not completed.
09-cita b 3/7/08 09:41 Página 4

The technique tu build the secondthrow of the surgeon’s knot is descri-bed in this chapter. Please make sure
that the correct 2=1 surgeon’s knot isobtained and not a 2x1 knot.
My notes:
B10
09-cita b 3/7/08 09:41 Página 1
Overview
1 2 3
4 5 6
7 8 9
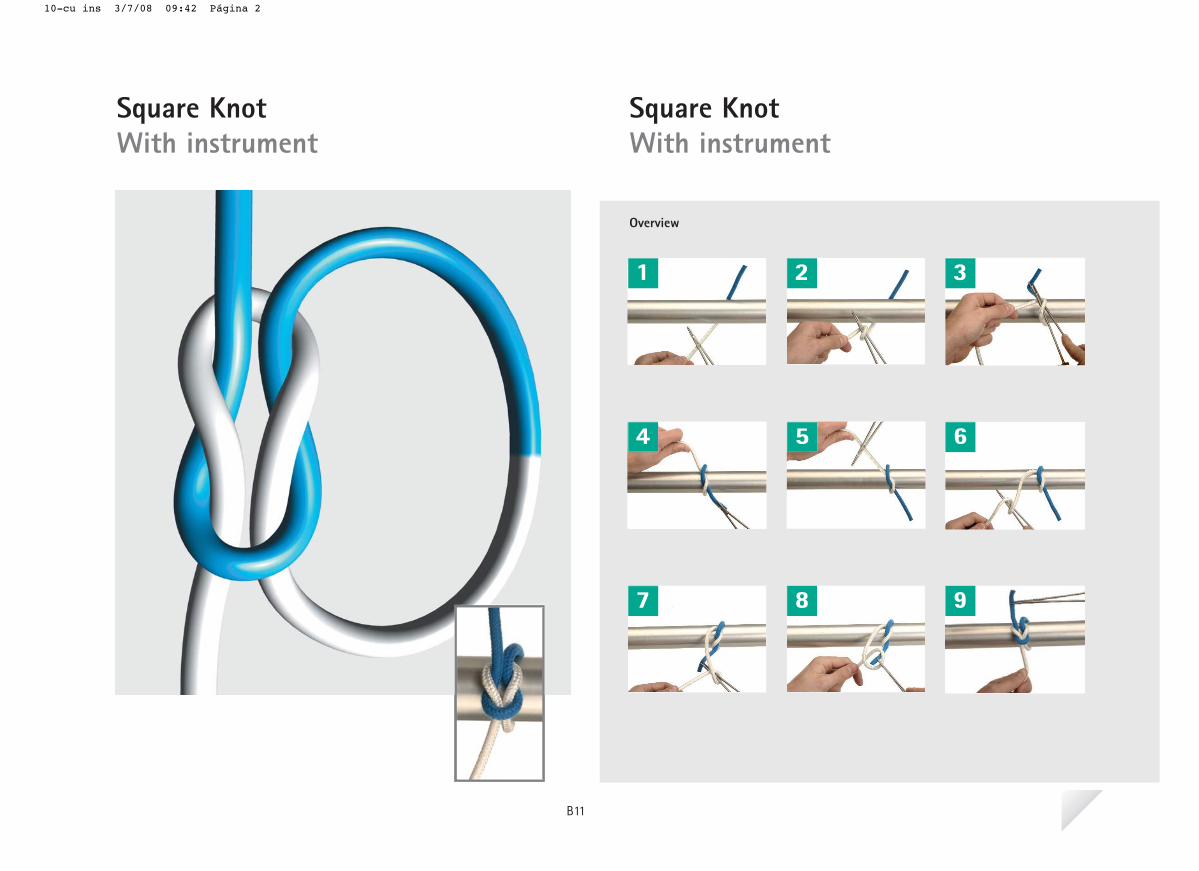
Square KnotWith instrument
Square KnotWith instrument
B11
10-cu ins 3/7/08 09:42 Página 2
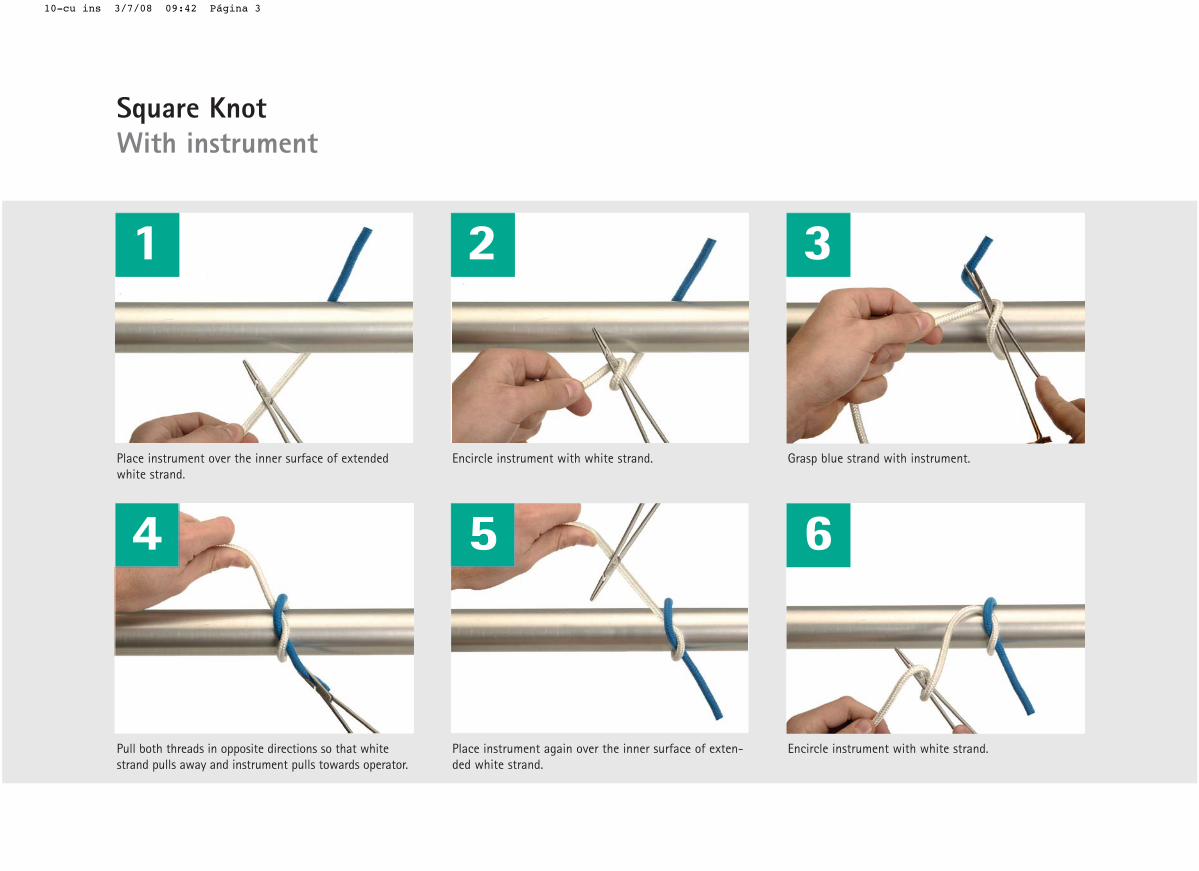
Place instrument over the inner surface of extendedwhite strand.
Encircle instrument with white strand. Grasp blue strand with instrument.
1 2 3
Pull both threads in opposite directions so that whitestrand pulls away and instrument pulls towards operator.
Place instrument again over the inner surface of exten-ded white strand.
Encircle instrument with white strand.
4 5 6
Square KnotWith instrument
10-cu ins 3/7/08 09:42 Página 3
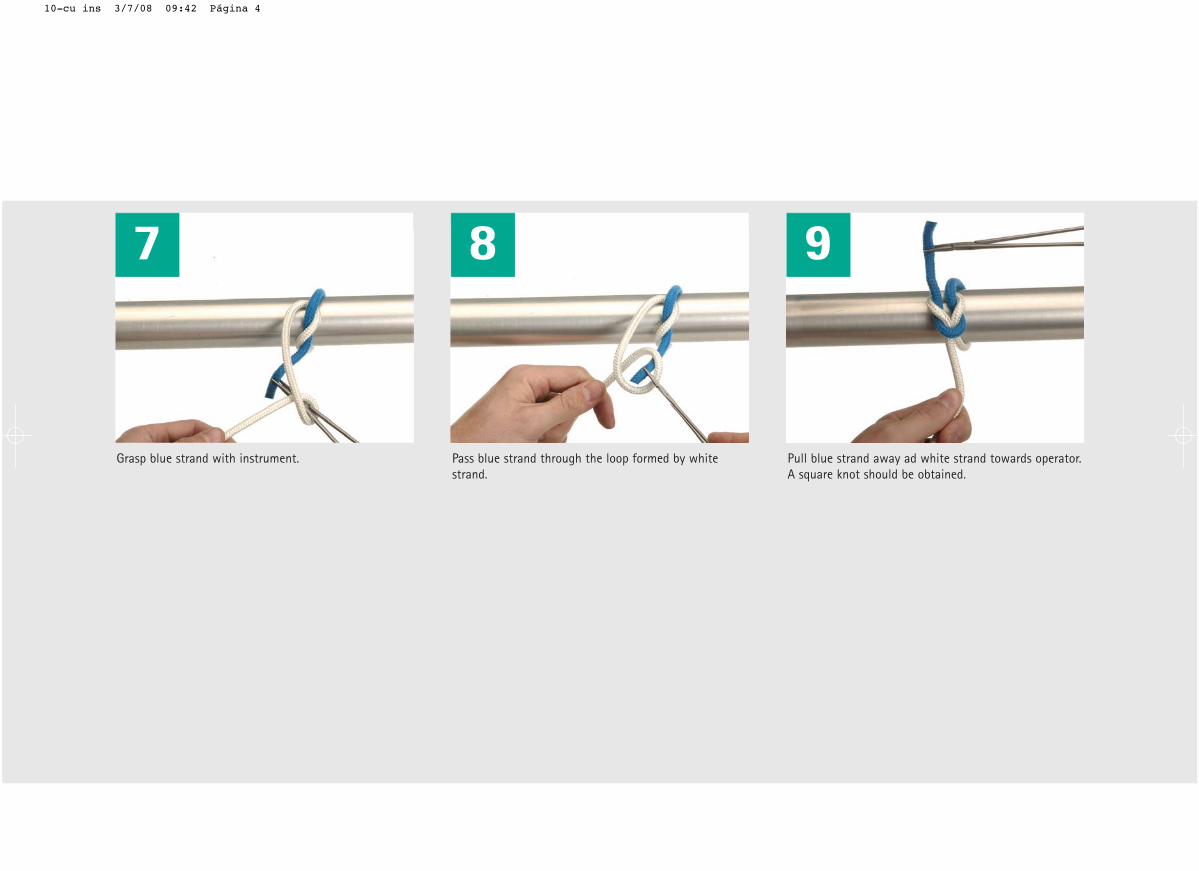
etihw yb demrof pool eht hguorht dnarts eulb ssaP .tnemurtsni htiw dnarts eulb psarGstrand.
Pull blue strand away ad white strand towards operator.A square knot should be obtained.
7 8 9
10-cu ins 3/7/08 09:42 Página 4
This technique is very useful to knotwhen having a needle-holder in oneof our hands. You will see that it isindeed a quite simple technique. Still,
some important details need to betaken into account to obtain secureknots.
My notes:
B11
10-cu ins 3/7/08 09:42 Página 1
Overview
1 2
3 4
5 6
7 8
Surgeon’s KnotWith instrument
Surgeon’s KnotWith instrument
B12
11-ci ins 3/7/08 09:44 Página 2
1
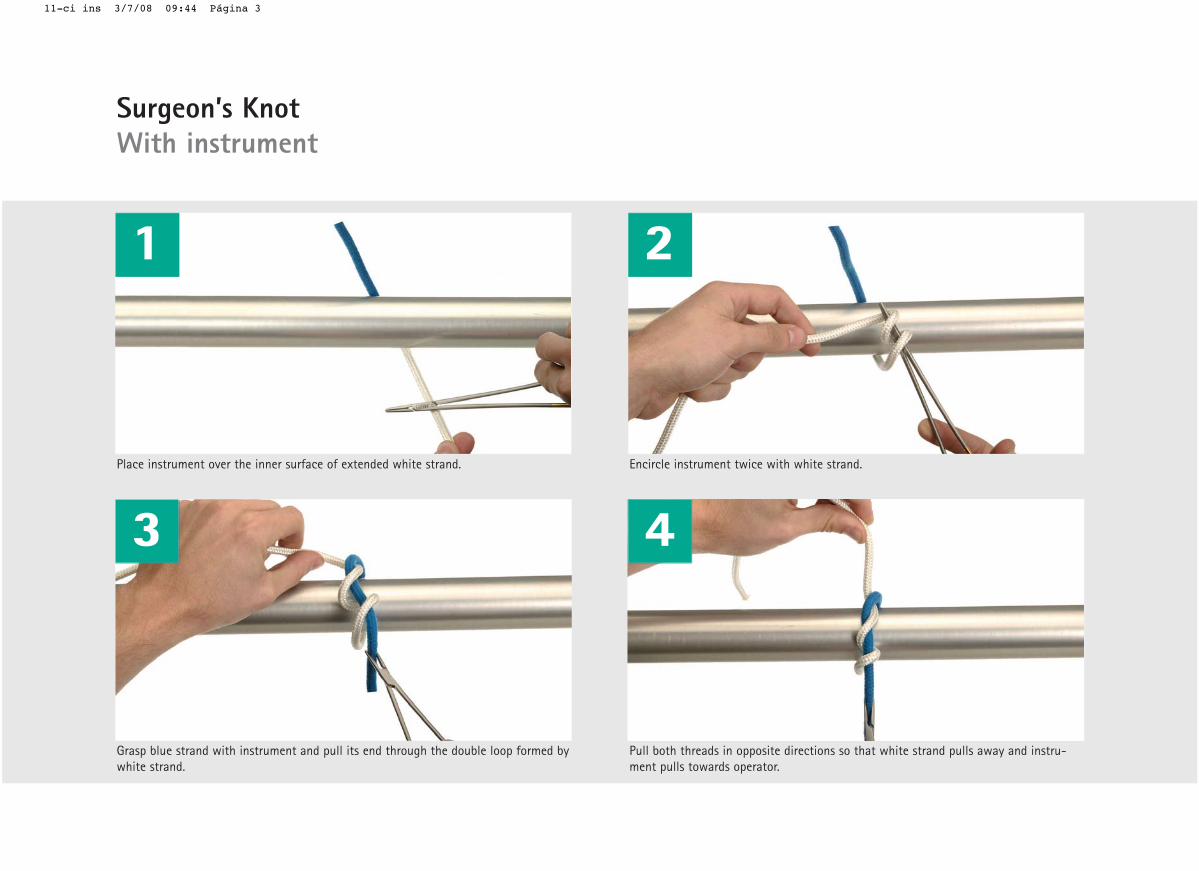
Place instrument over the inner surface of extended white strand.
Grasp blue strand with instrument and pull its end through the double loop formed bywhite strand.
2
Encircle instrument twice with white strand.
Pull both threads in opposite directions so that white strand pulls away and instru-ment pulls towards operator.
3 4
Surgeon’s KnotWith instrument
11-ci ins 3/7/08 09:44 Página 3
5 6
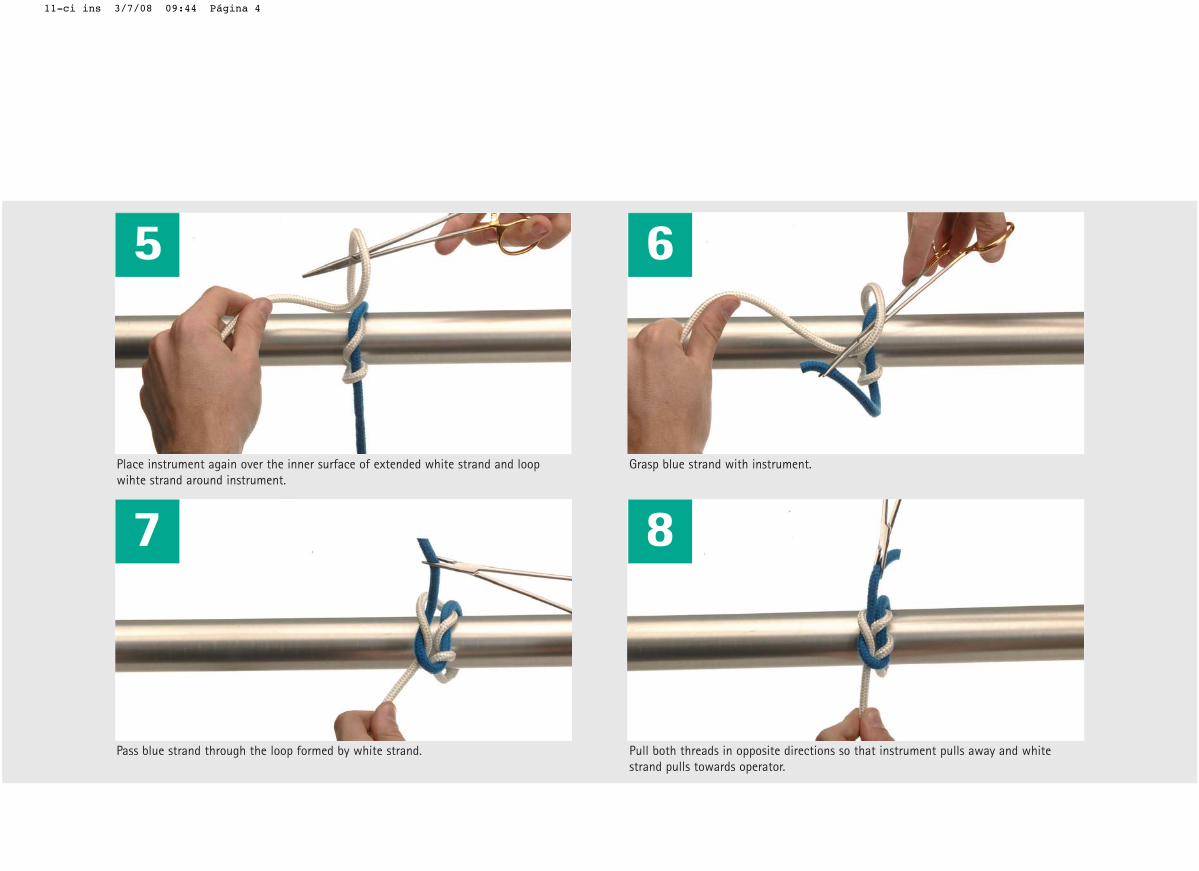
Place instrument again over the inner surface of extended white strand and loopwihte strand around instrument.
7 8
awa sllup tnemurtsni taht os snoitcerid etisoppo ni sdaerht htob lluP .dnarts etihw yb demrof pool eht hguorht dnarts eulb ssaP y and whitestrand pulls towards operator.
Grasp blue strand with instrument.
11-ci ins 3/7/08 09:44 Página 4
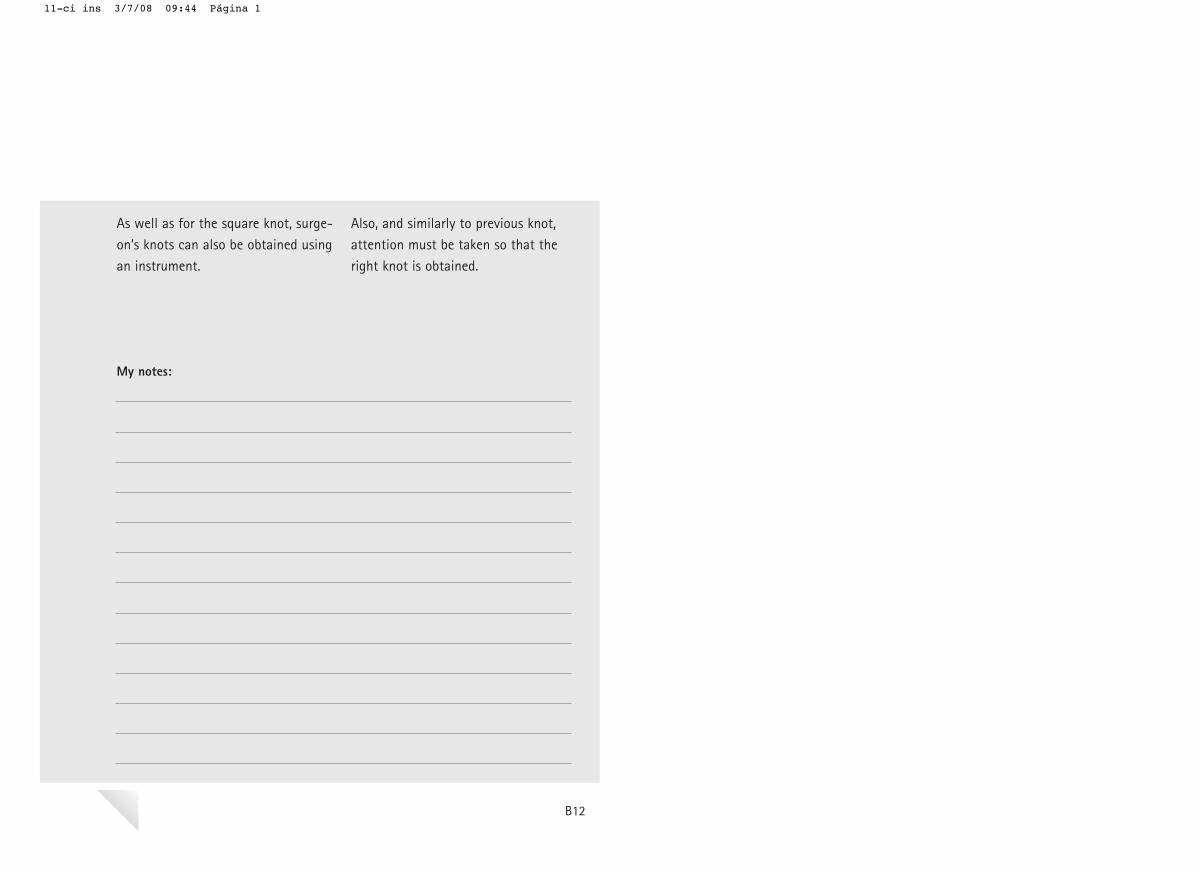
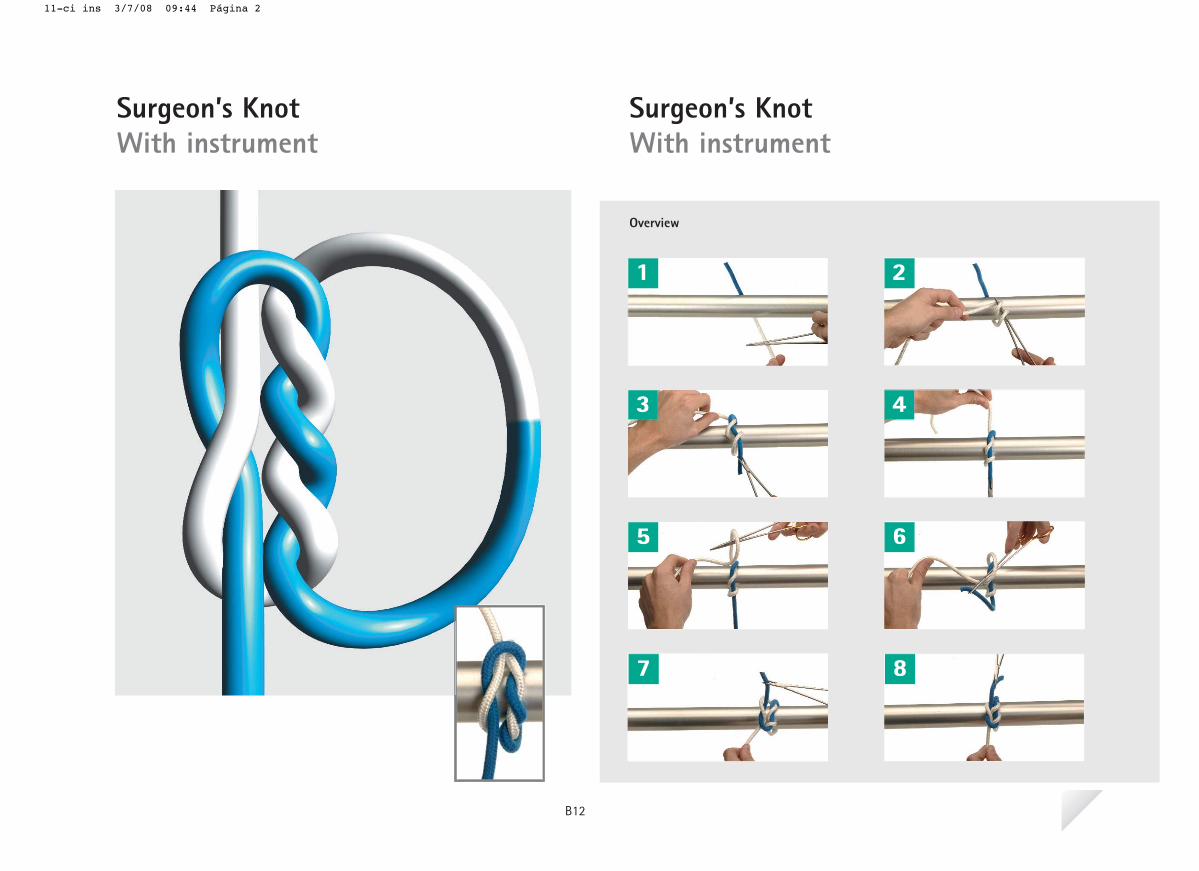
As well as for the square knot, surge-on’s knots can also be obtained usingan instrument.
Also, and similarly to previous knot,attention must be taken so that theright knot is obtained.
My notes:
B12
11-ci ins 3/7/08 09:44 Página 1
Overview
1 2 3
4 5 6
7
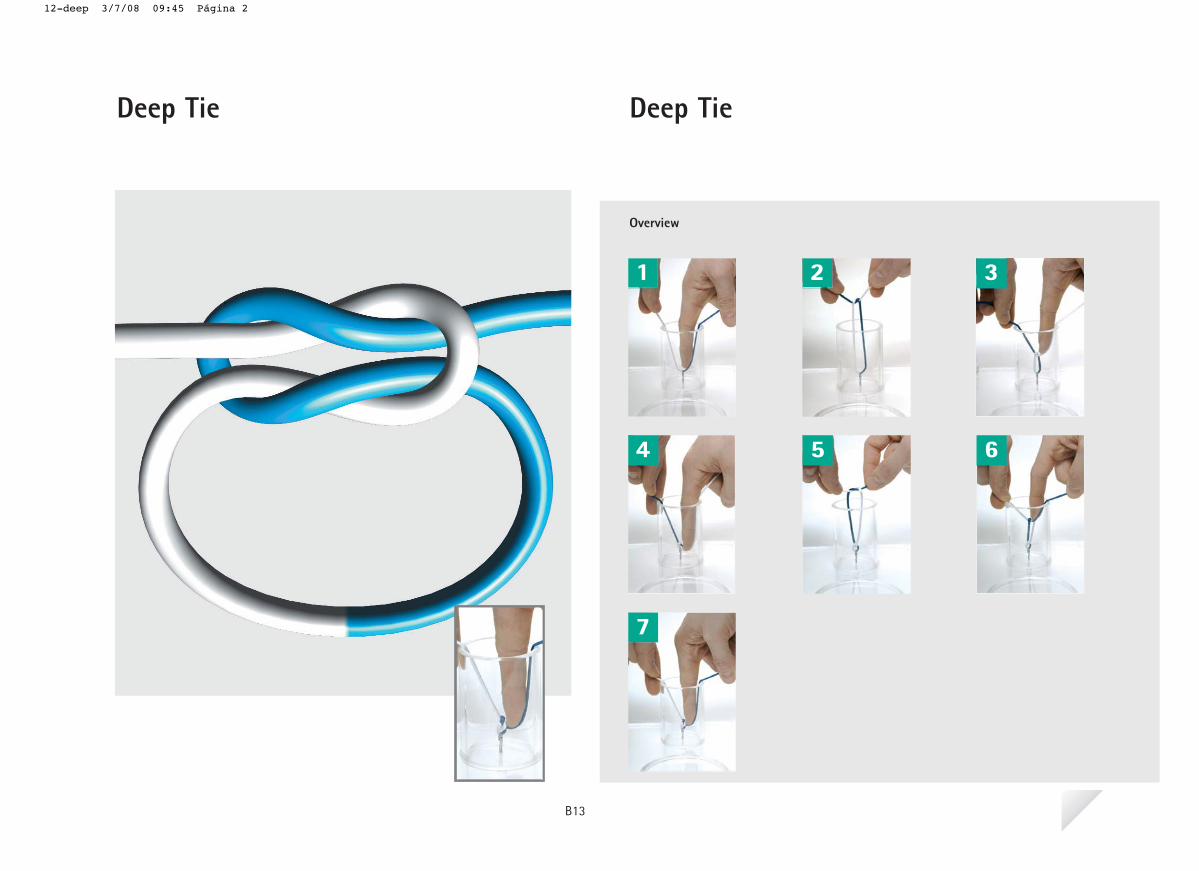
eiT peeDeiT peeD
B13
12-deep 3/7/08 09:45 Página 2
1
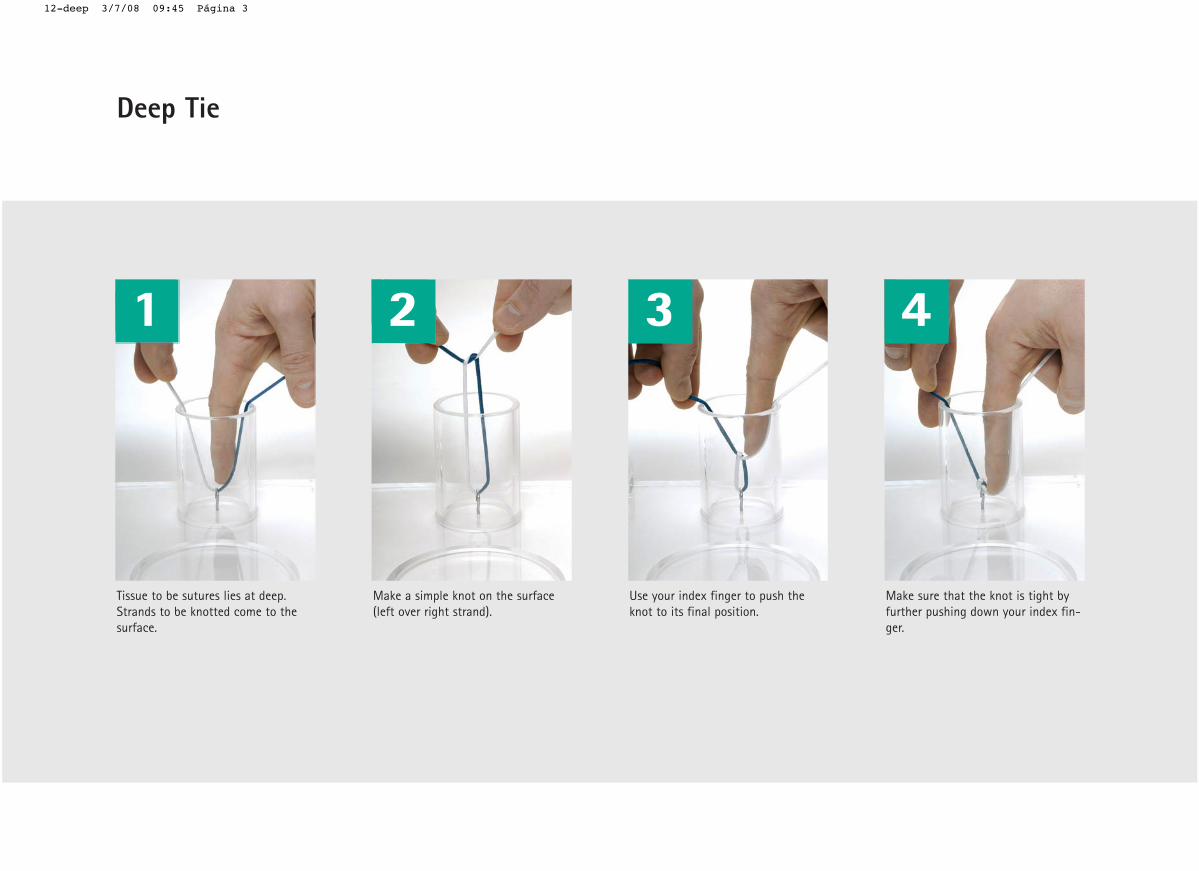
Tissue to be sutures lies at deep.Strands to be knotted come to thesurface.
2
Make a simple knot on the surface(left over right strand).
3
Use your index finger to push theknot to its final position.
4
Make sure that the knot is tight byfurther pushing down your index fin-ger.
Deep Tie
12-deep 3/7/08 09:45 Página 3
5
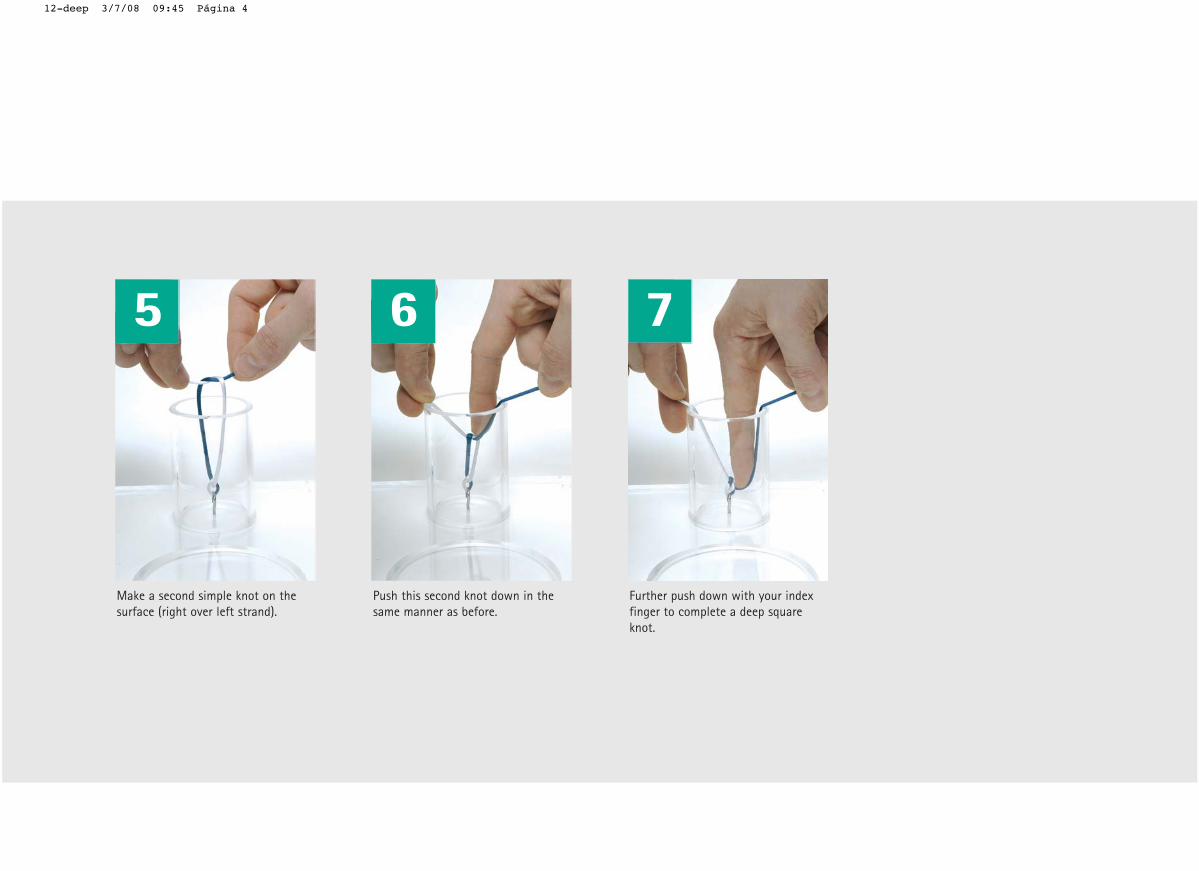
Make a second simple knot on thesurface (right over left strand).
6
Push this second knot down in thesame manner as before.
7
Further push down with your indexfinger to complete a deep squareknot.
12-deep 3/7/08 09:45 Página 4

Sometimes, the tissues to be suturedare not on the surface and therefore,they are quite difficult to access andto perform a knot with comfortabilityusing the previously described techniques.
In these cases, the knot will have tobe done on the surface and then slip-ped down to the desired position.
My notes:
B13
12-deep 3/7/08 09:45 Página 1
Overview
1 2 3
4 5 6
7 8
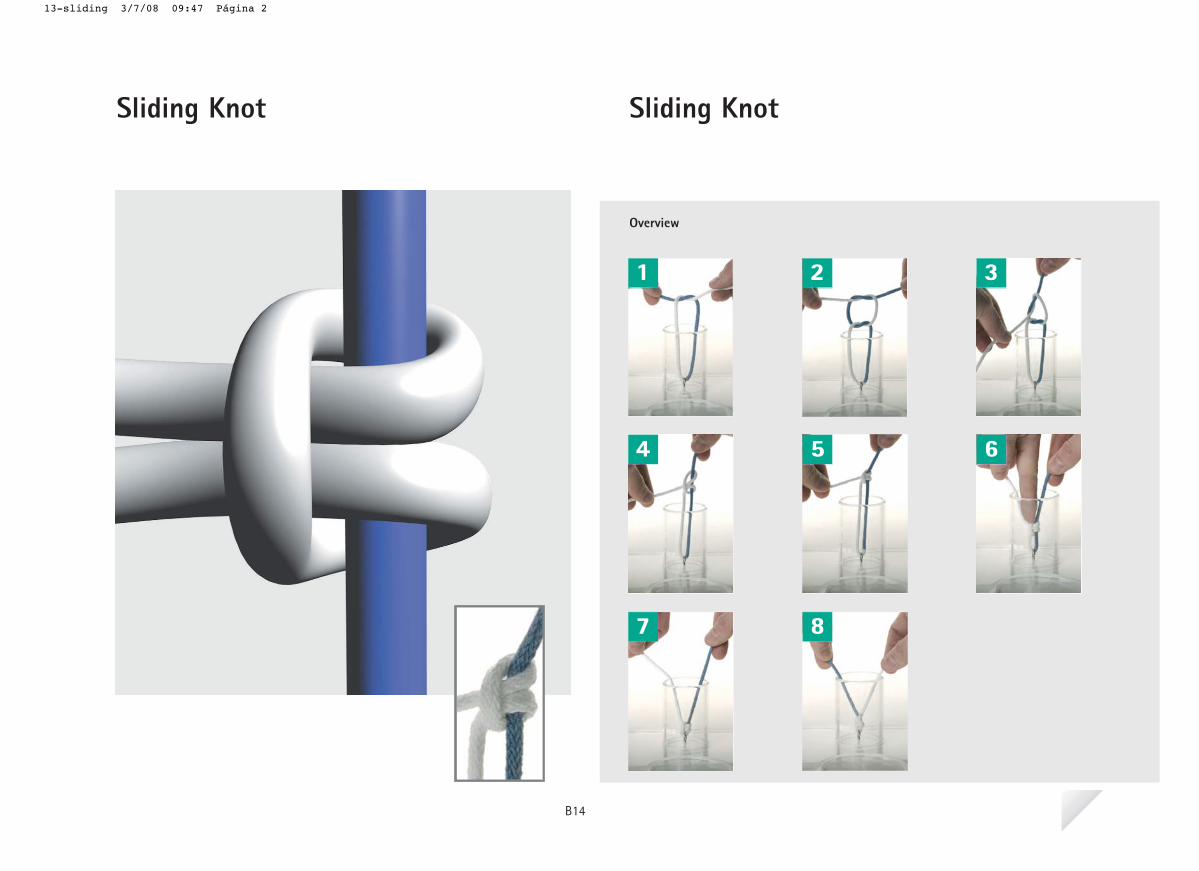
tonK gnidilStonK gnidilS
B14
13-sliding 3/7/08 09:47 Página 2
1
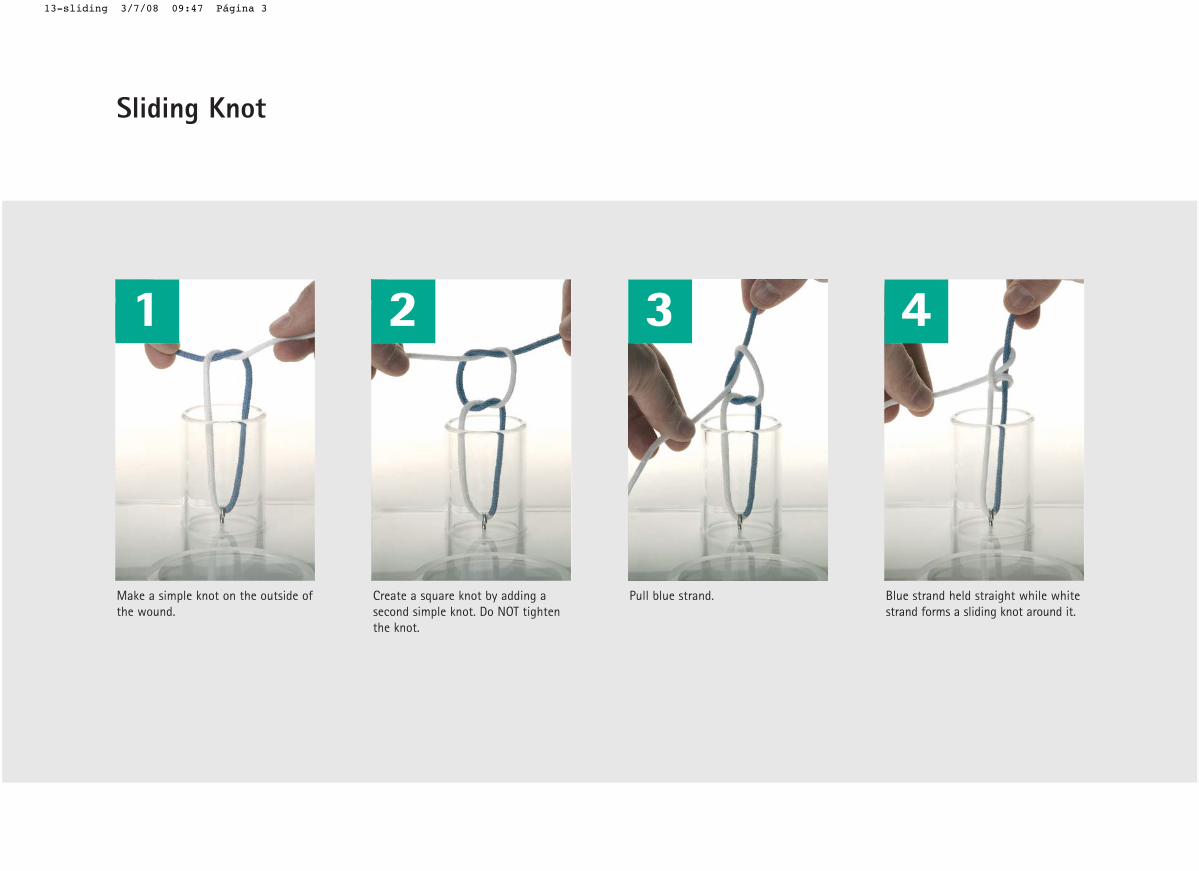
Make a simple knot on the outside ofthe wound.
2
Create a square knot by adding asecond simple knot. Do NOT tightenthe knot.
3
Pull blue strand.
4
Blue strand held straight while whitestrand forms a sliding knot around it.
Sliding Knot
13-sliding 3/7/08 09:47 Página 3
5
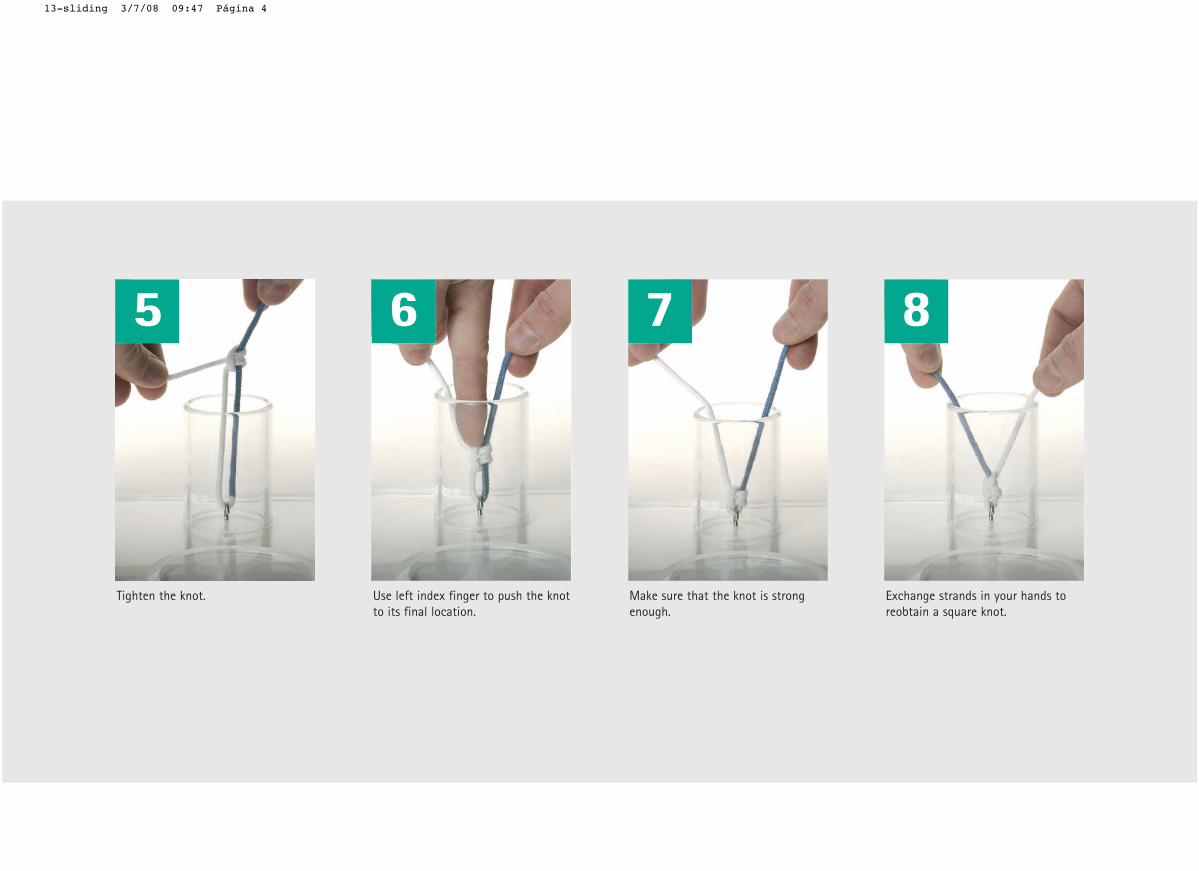
Tighten the knot.
6
Use left index finger to push the knotto its final location.
7
Make sure that the knot is strongenough.
8
Exchange strands in your hands toreobtain a square knot.
13-sliding 3/7/08 09:47 Página 4
This knot is used when suturing tis-sues in deep areas. In this technique,the knot is built first on the outside,
and then it is pushed to is final posi-tion.
My notes:
B14
13-sliding 3/7/08 09:47 Página 1
Overview
1 2
3 4
5 6
7 8
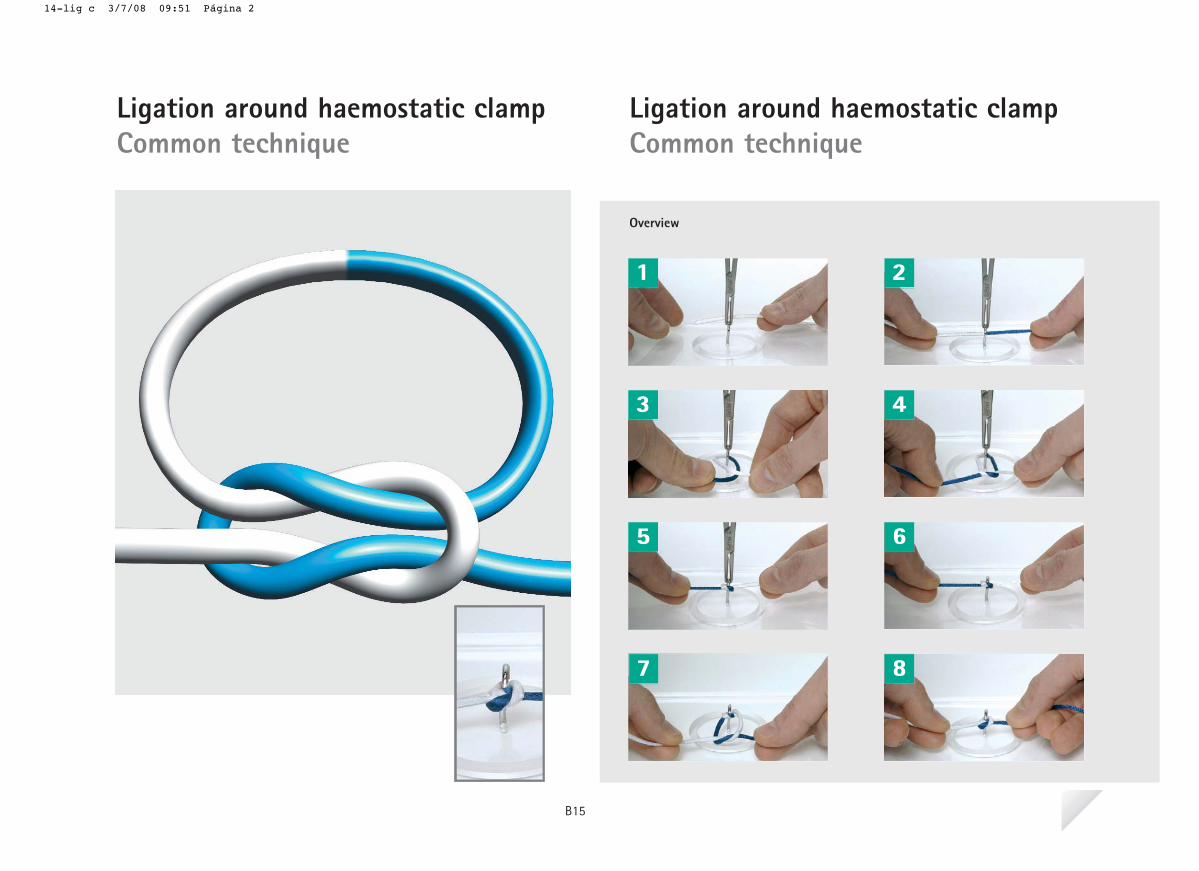
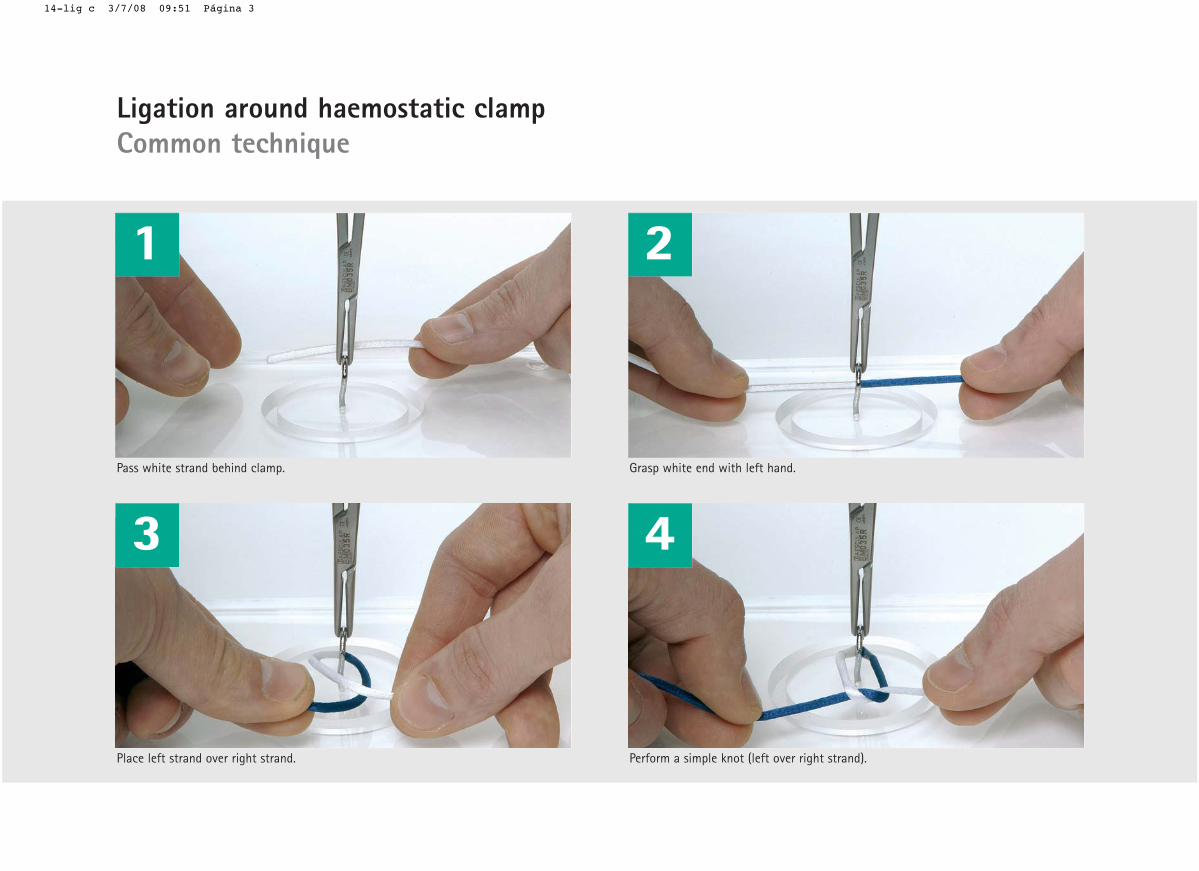
Ligation around haemostatic clampCommon technique
Ligation around haemostatic clampCommon technique
B15
14-lig c 3/7/08 09:51 Página 2
1
Pass white strand behind clamp.
Place left strand over right strand.
2
Grasp white end with left hand.
Perform a simple knot (left over right strand).
3 4
Ligation around haemostatic clampCommon technique
14-lig c 3/7/08 09:51 Página 3

5 6
Tighten the knot.
7
Perform a secon simple knot (right over left strand).
Remove haemostatic clamp.
8
Thighten the knot to obtain a square knot.
14-lig c 3/7/08 09:51 Página 4
The technique to perform ligatures isquite simple, but needs also to belearn carefully in order to obtainsecure knots.
Only if you feel confident with themost simple techniques, you can besure that the best results will beobtained.
My notes:
B15
14-lig c 3/7/08 09:51 Página 1

Overview
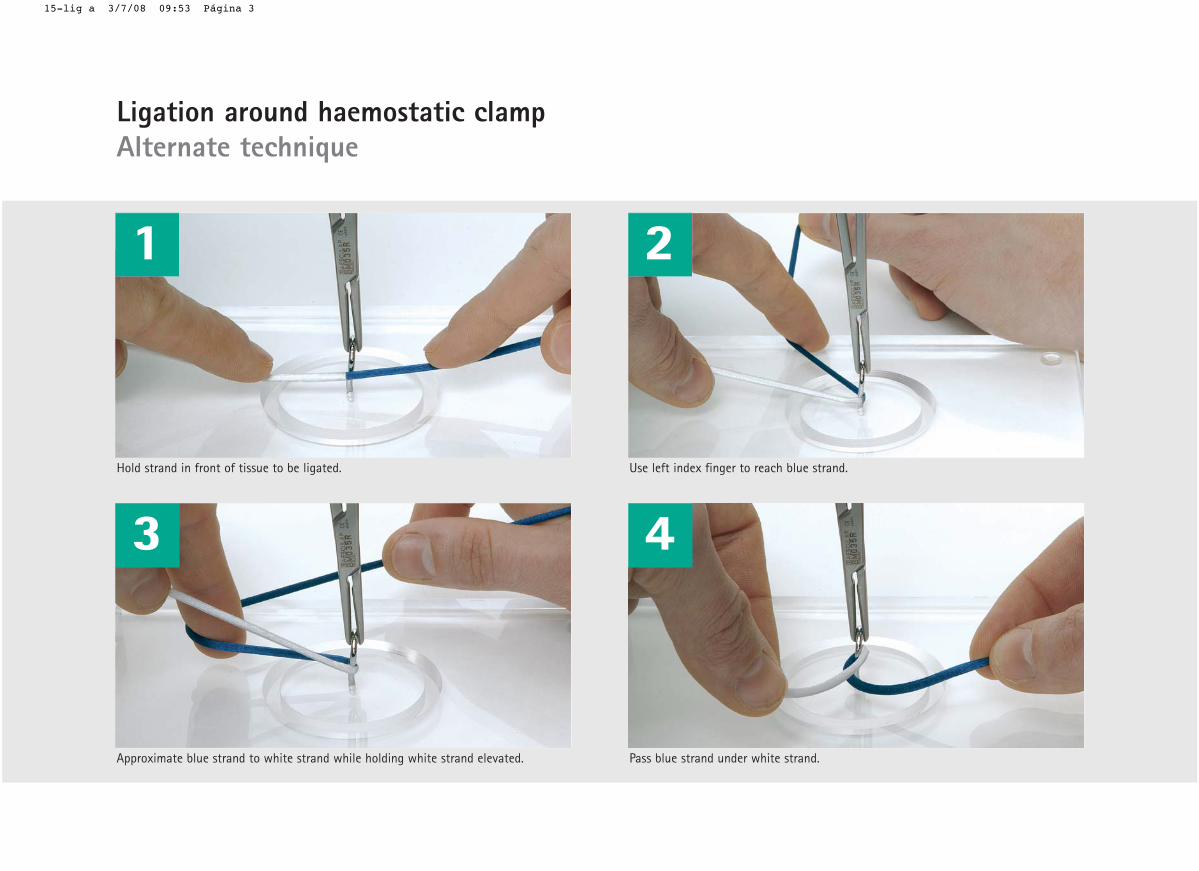
Ligation around haemostatic clampAlternate technique
Ligation around haemostatic clampAlternate technique
1 2
3 4
5 6
7 8
B16
15-lig a 3/7/08 09:53 Página 2
1
Hold strand in front of tissue to be ligated.
Approximate blue strand to white strand while holding white strand elevated.
2
Use left index finger to reach blue strand.
Pass blue strand under white strand.
3 4
Ligation around haemostatic clampAlternate technique
15-lig a 3/7/08 09:53 Página 3

5 6
Perform a simple knot (right over left strand).
7
Perform a second simple knot (left over right strand).
Thighten the knot.
8
Tighten the knot to obtain a square knot.
15-lig a 3/7/08 09:53 Página 4
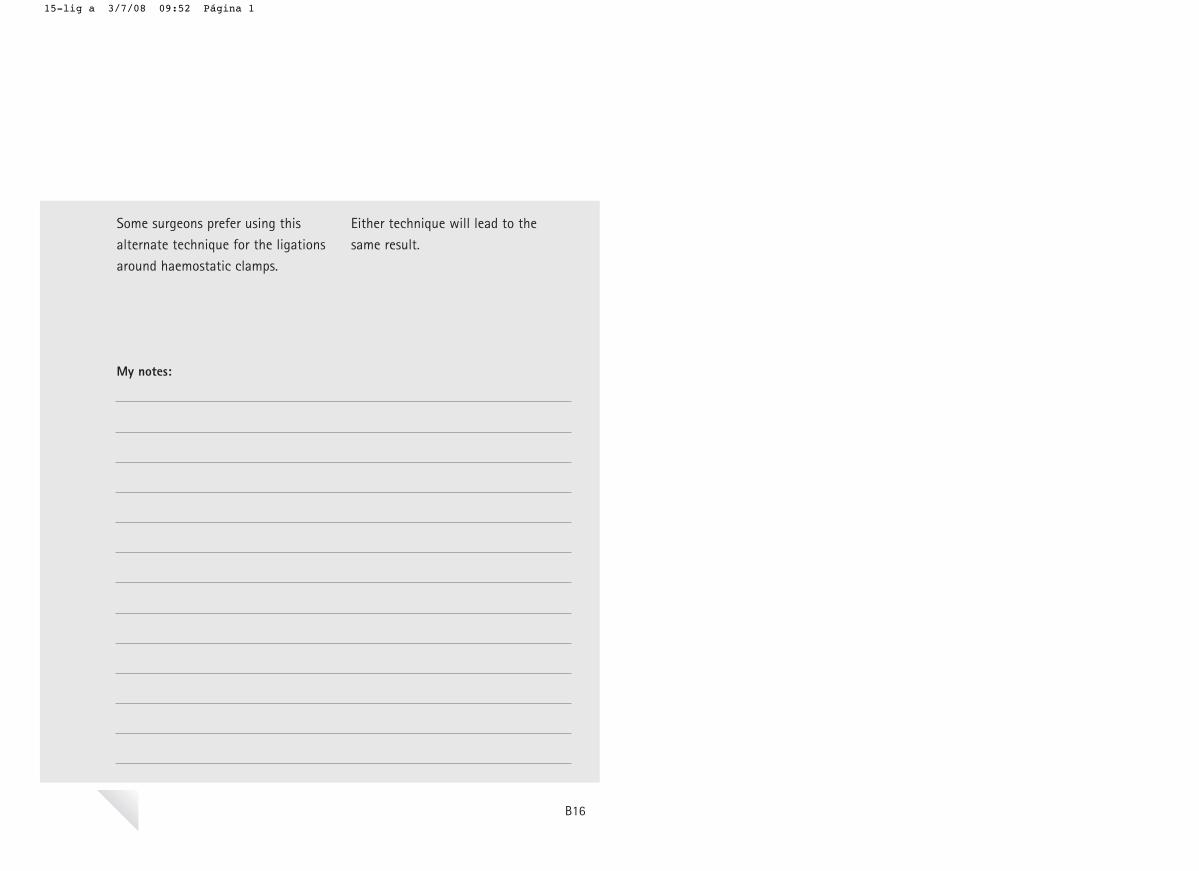
Some surgeons prefer using thisalternate technique for the ligationsaround haemostatic clamps.
Either technique will lead to thesame result.
My notes:
B16
15-lig a 3/7/08 09:52 Página 1
Overview
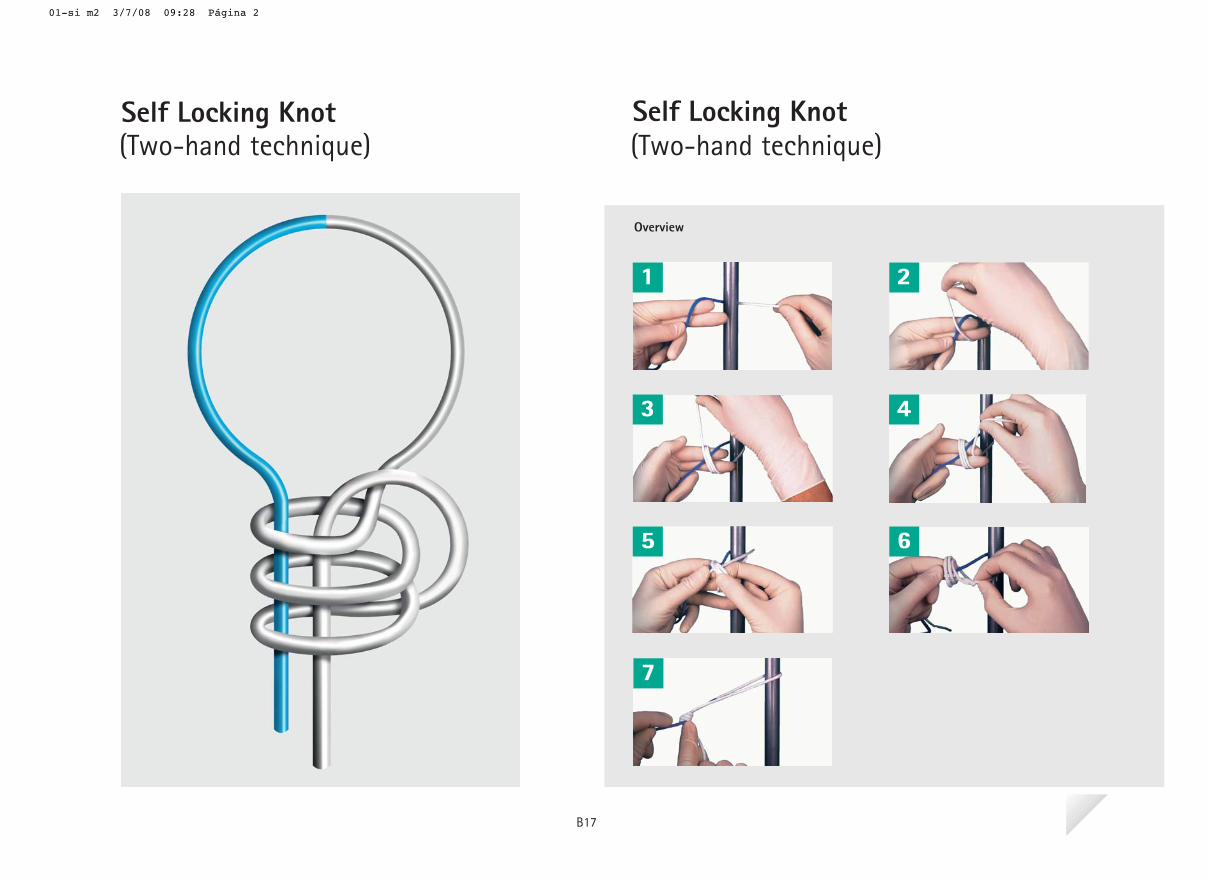
Self Locking Knot (Two-hand technique)
01-si m2 3/7/08 09:28 Página 2
1 2
3 4
5 6
7
Self Locking Knot
B17
(Two-hand technique)
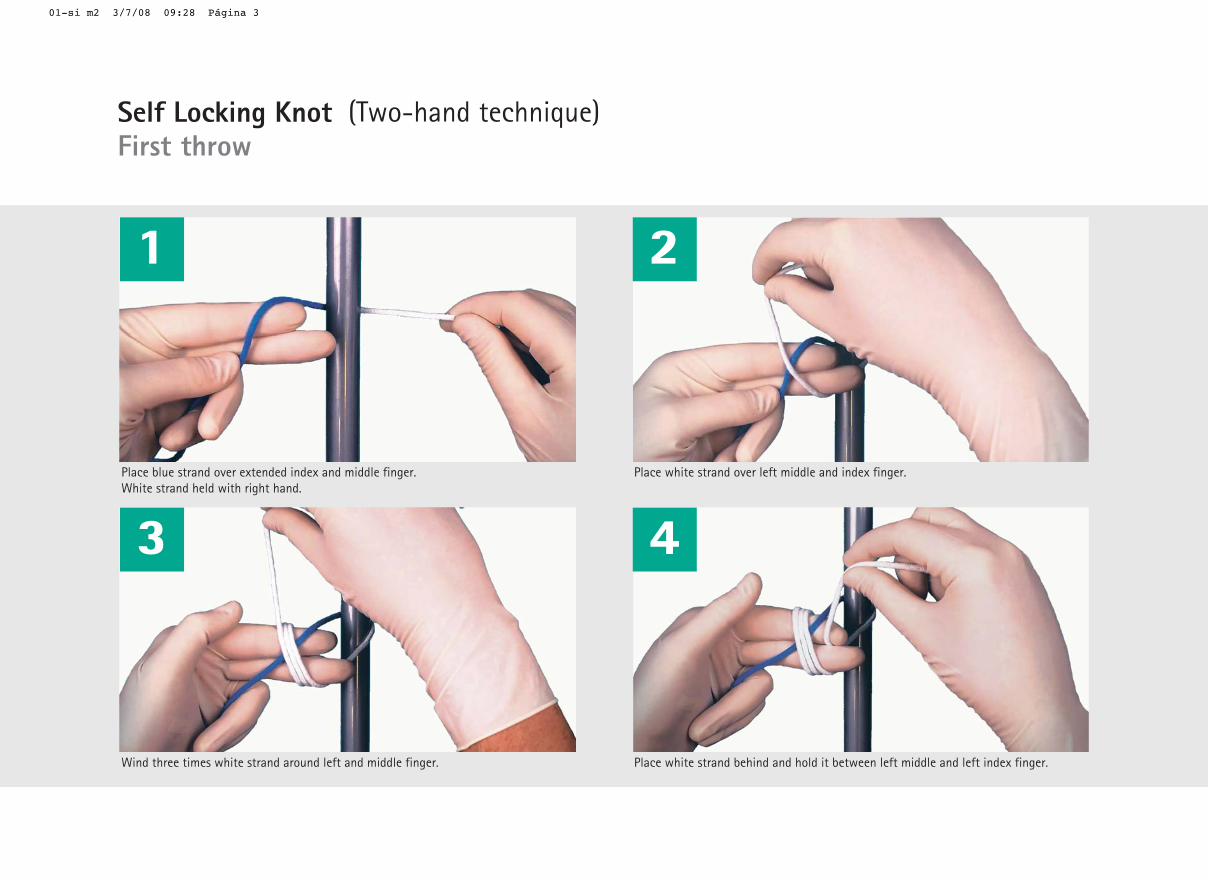
Place blue strand over extended index and middle finger. White strand held with right hand.
Wind three times white strand around left and middle finger.
Place white strand over left middle and index finger.
Place white strand behind and hold it between left middle and left index finger.
01-si m2 3/7/08 09:28 Página 3
1 2
3 4
Self Locking Knot (Two-hand technique)First throw
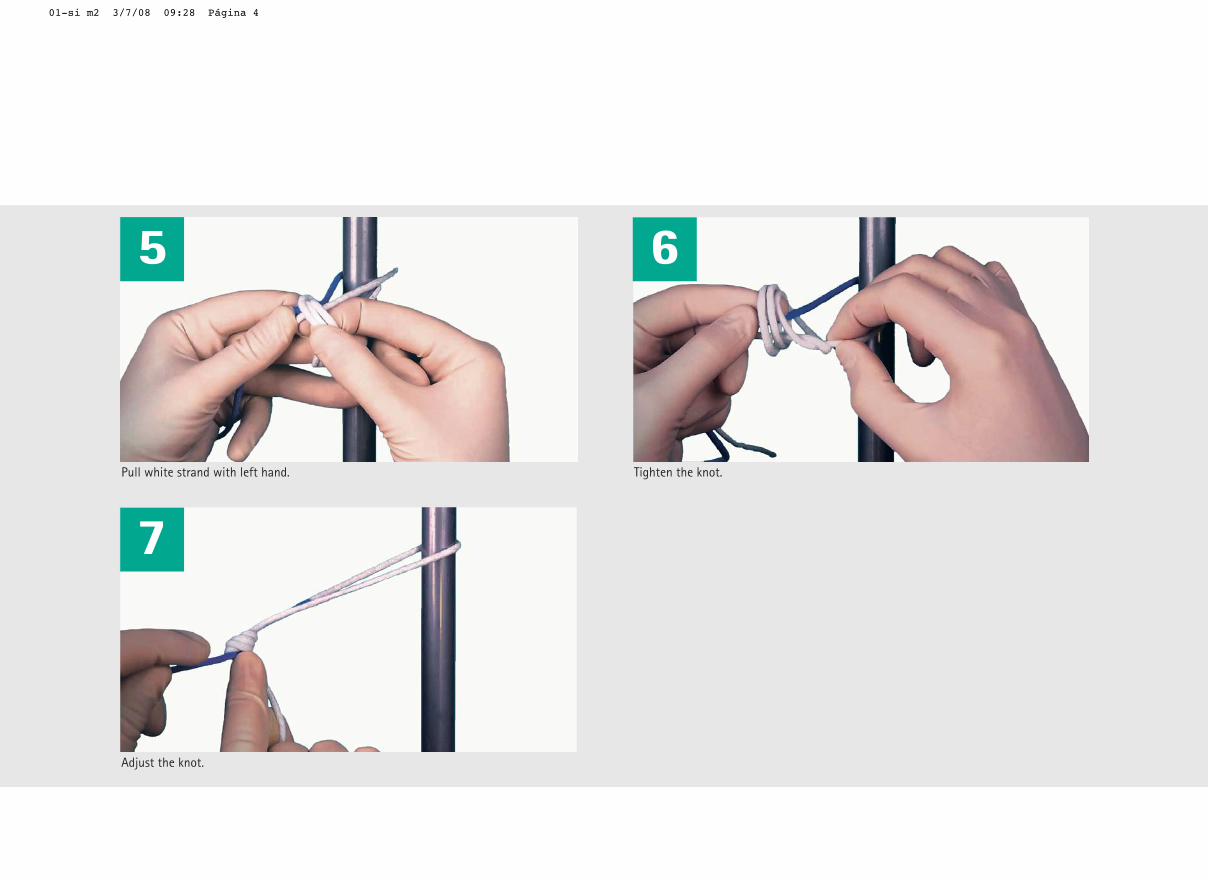
Pull white strand with left hand.
Adjust the knot.
Tighten the knot.
01-si m2 3/7/08 09:28 Página 4
5 6
7
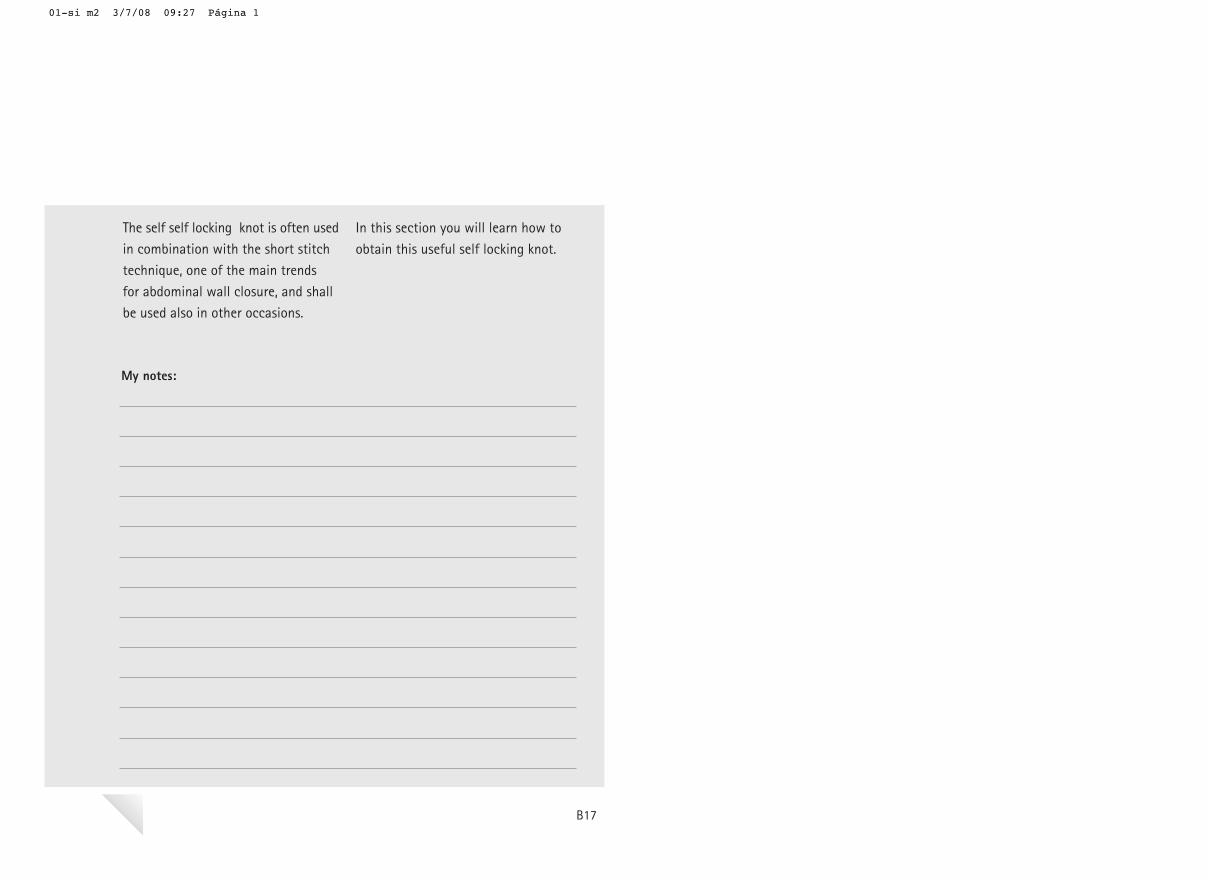
The self self locking knot is often used in combination with the short stitch technique, one of the main trends for abdominal wall closure, and shall be used also in other occasions.
In this section you will learn how to obtain this useful self locking knot.
My notes:
01-si m2 3/7/08 09:27 Página 1
B17

Suturing techniques
Sutu
ring
tech
niqu
es
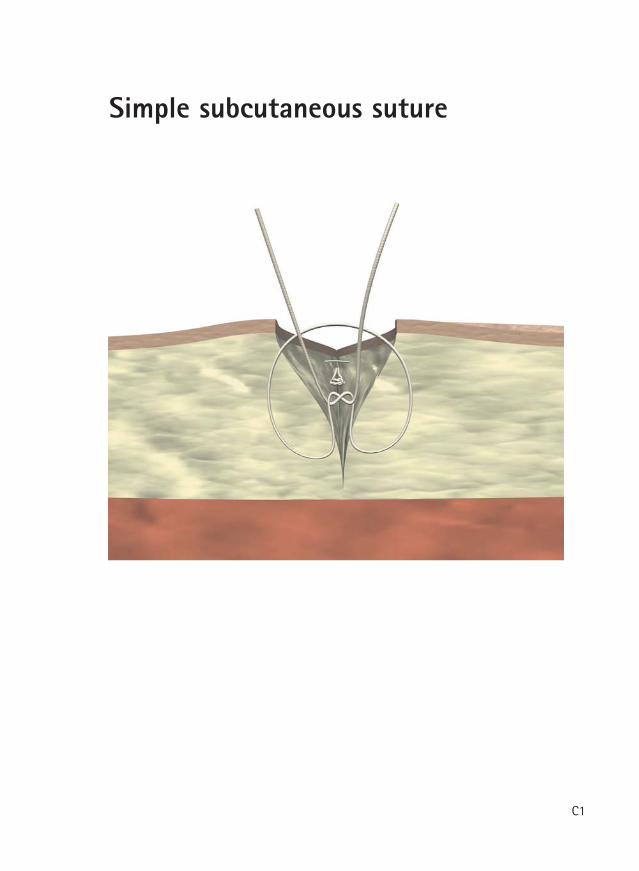
Simple subcutaneous suture
C1
Simple subcutaneous suture
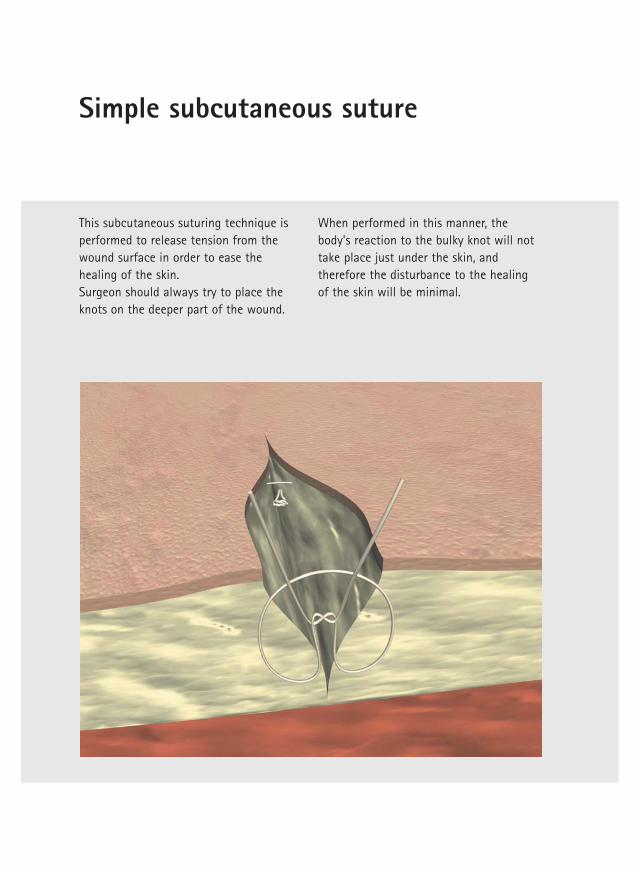
This subcutaneous suturing technique isperformed to release tension from thewound surface in order to ease thehealing of the skin. Surgeon should always try to place theknots on the deeper part of the wound.
When performed in this manner, thebody's reaction to the bulky knot will nottake place just under the skin, andtherefore the disturbance to the healingof the skin will be minimal.
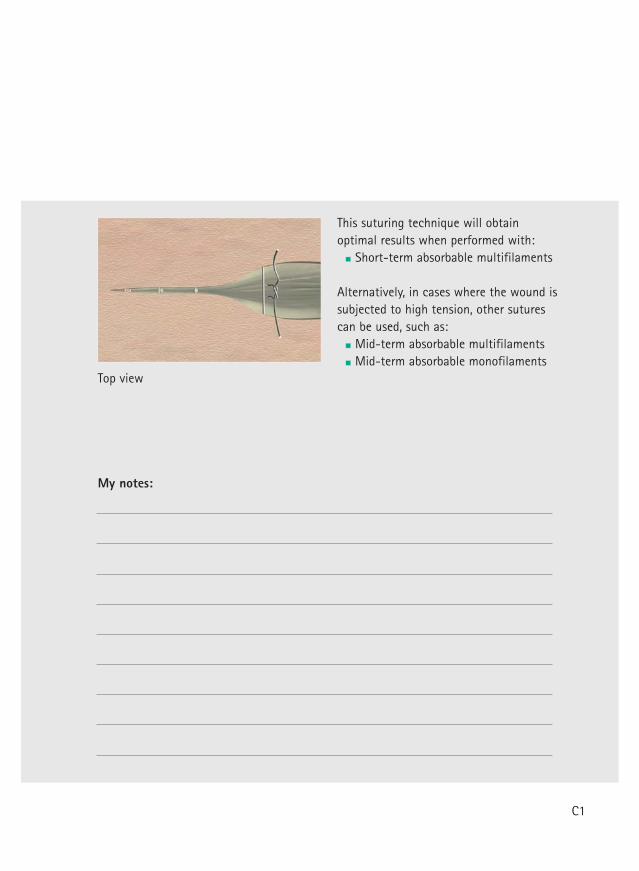
Top view
This suturing technique will obtainoptimal results when performed with:
Short-term absorbable multifilaments
Alternatively, in cases where the wound issubjected to high tension, other suturescan be used, such as:
Mid-term absorbable multifilamentsMid-term absorbable monofilaments
My notes:
C1
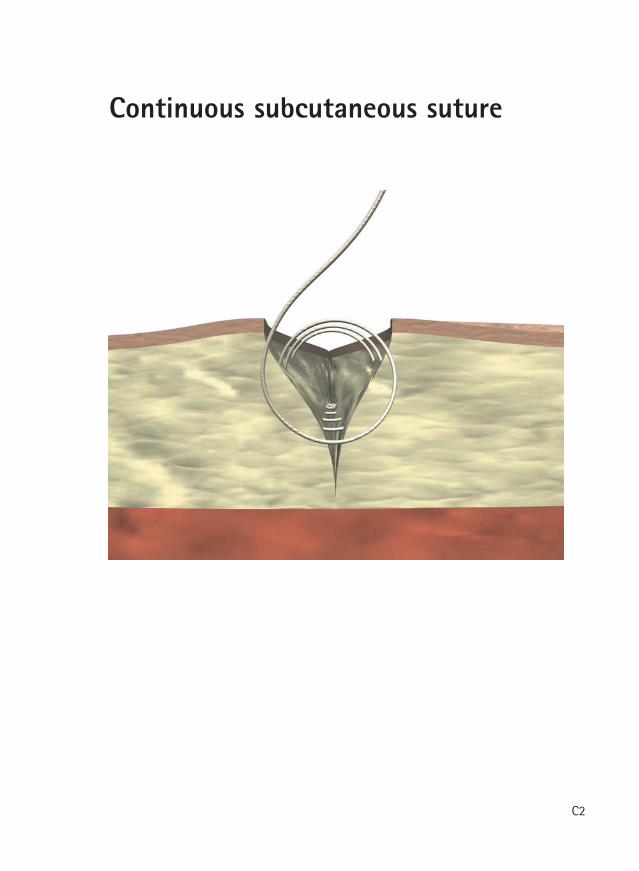
Continuous subcutaneous suture
C2
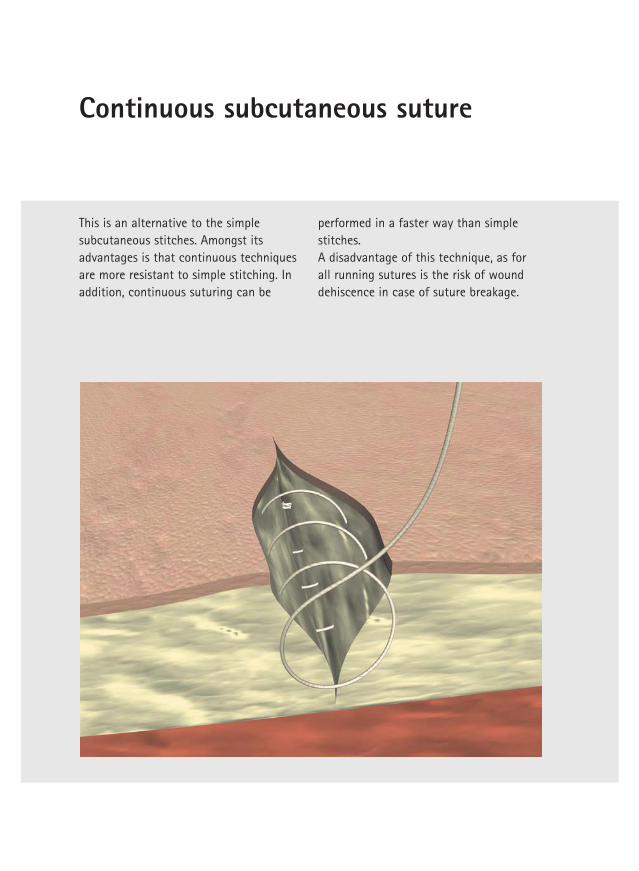
Continuous subcutaneous suture
This is an alternative to the simplesubcutaneous stitches. Amongst itsadvantages is that continuous techniquesare more resistant to simple stitching. Inaddition, continuous suturing can be
performed in a faster way than simplestitches.A disadvantage of this technique, as forall running sutures is the risk of wounddehiscence in case of suture breakage.

Top view
This suturing technique will obtainoptimal results when performed with:
Short-term absorbable multifilaments
Alternatively, in cases where the wound issubjected to high tension, other suturescan be used, such as:
Mid-term absorbable multifilamentsMid-term absorbable monofilaments
My notes:
C2
Continuous subcutaneous interlaced suture
C3
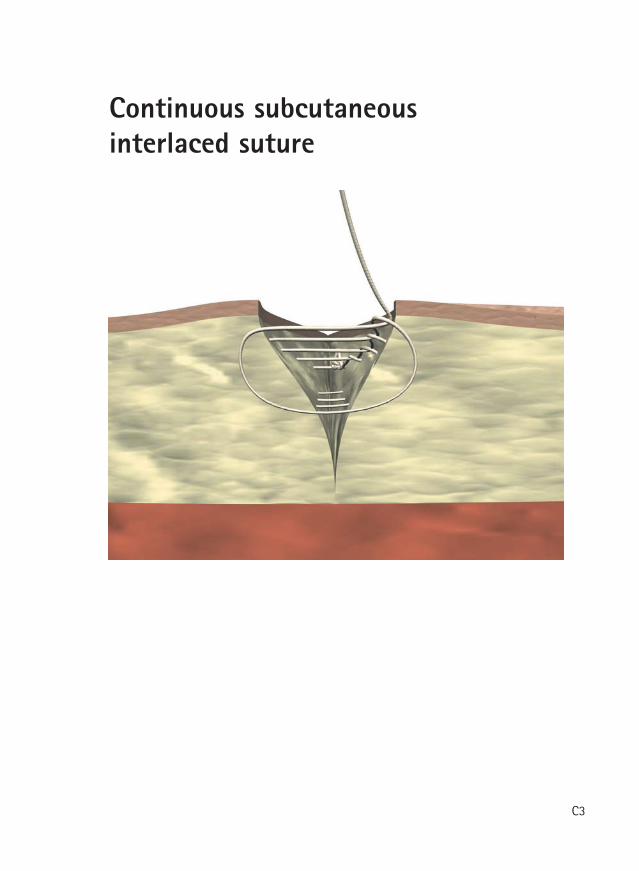
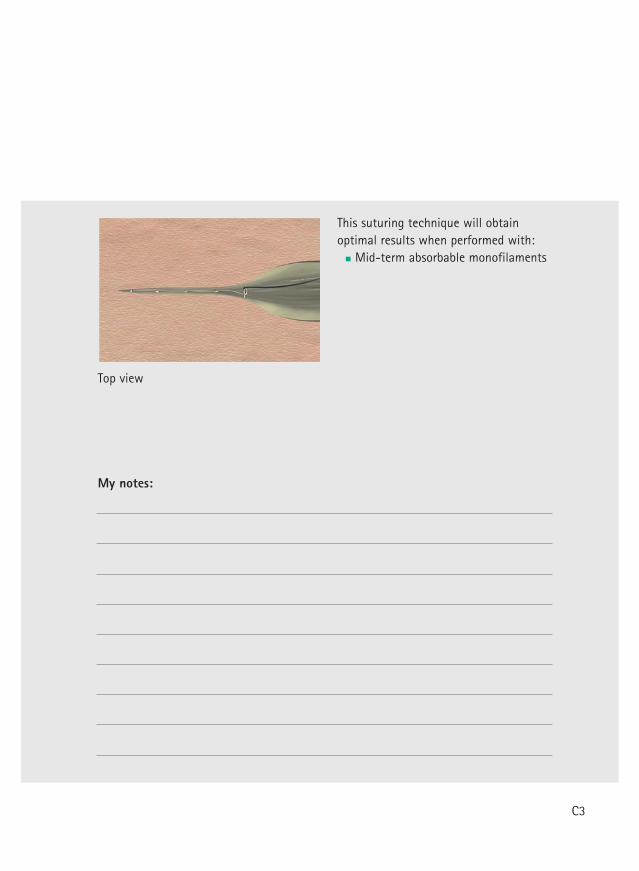
Continuous subcutaneous interlaced suture
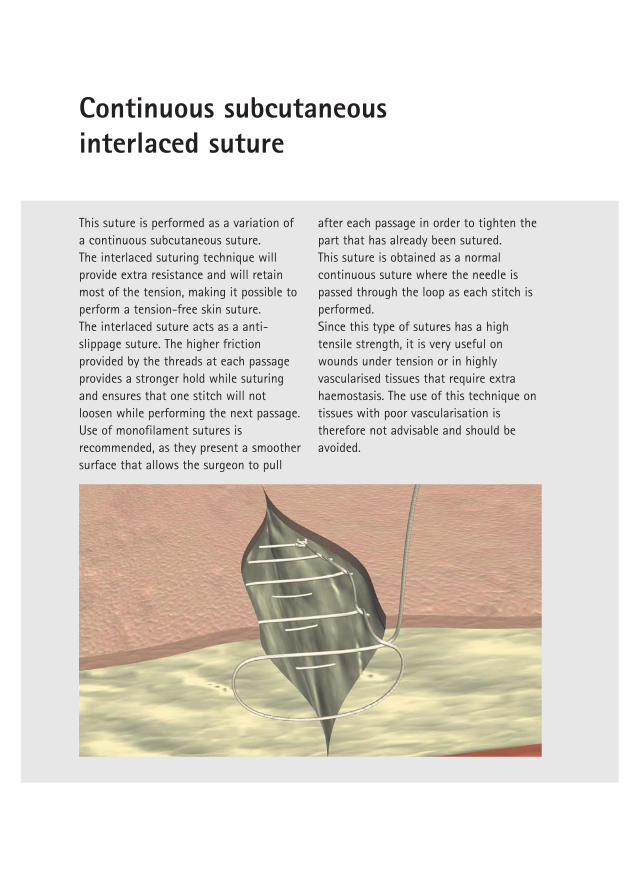
This suture is performed as a variation ofa continuous subcutaneous suture. The interlaced suturing technique willprovide extra resistance and will retainmost of the tension, making it possible toperform a tension-free skin suture.The interlaced suture acts as a anti-slippage suture. The higher frictionprovided by the threads at each passageprovides a stronger hold while suturingand ensures that one stitch will notloosen while performing the next passage.Use of monofilament sutures isrecommended, as they present a smoothersurface that allows the surgeon to pull
after each passage in order to tighten thepart that has already been sutured.This suture is obtained as a normalcontinuous suture where the needle ispassed through the loop as each stitch isperformed. Since this type of sutures has a hightensile strength, it is very useful onwounds under tension or in highlyvascularised tissues that require extrahaemostasis. The use of this technique ontissues with poor vascularisation istherefore not advisable and should beavoided.
Top view
This suturing technique will obtainoptimal results when performed with:
Mid-term absorbable monofilaments
My notes:
C3
Simple skin suture
C4
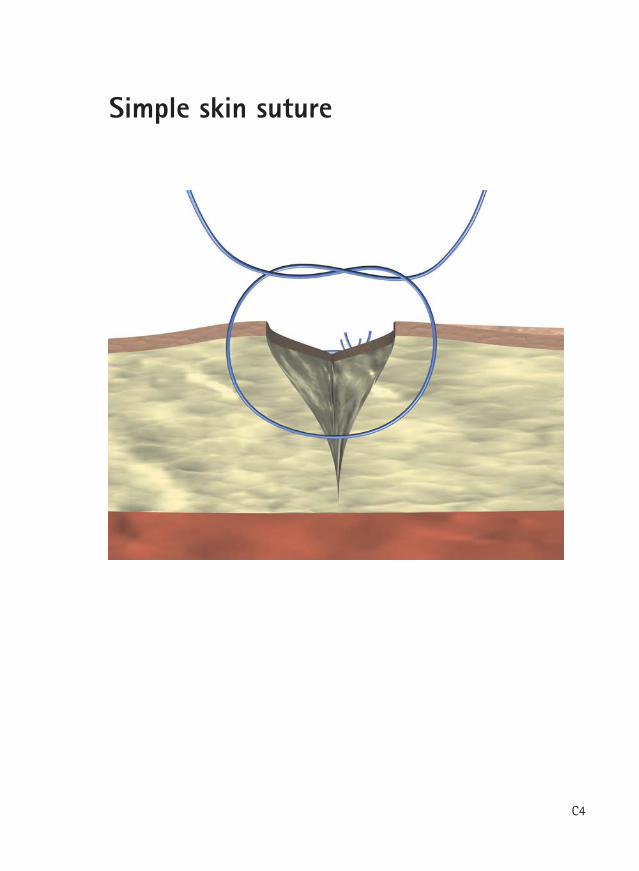
Simple skin suture
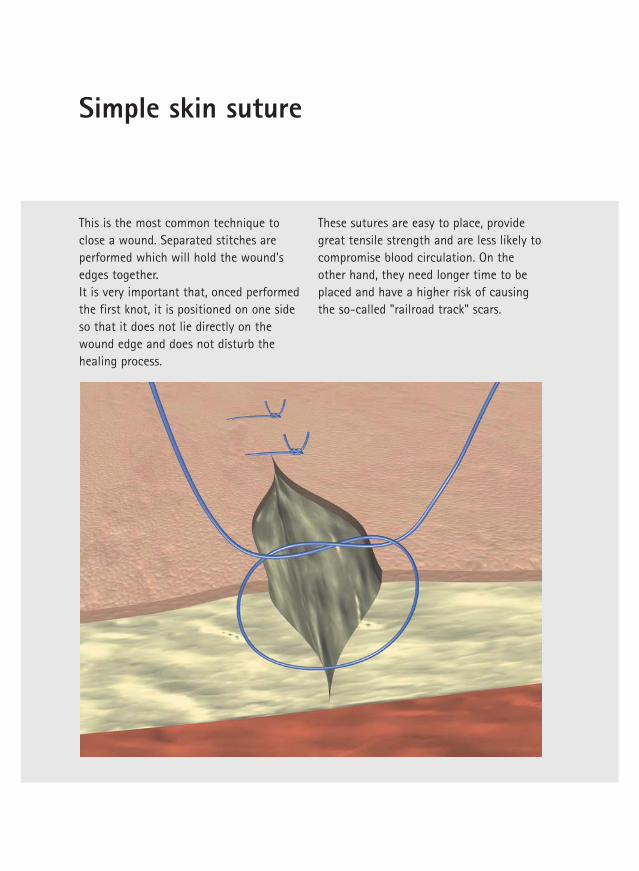
This is the most common technique toclose a wound. Separated stitches areperformed which will hold the wound'sedges together. It is very important that, onced performedthe first knot, it is positioned on one sideso that it does not lie directly on thewound edge and does not disturb thehealing process.
These sutures are easy to place, providegreat tensile strength and are less likely tocompromise blood circulation. On theother hand, they need longer time to beplaced and have a higher risk of causingthe so-called "railroad track" scars.

Top view
This suturing technique will obtainoptimal results when performed with:
Non-absorbable monofilaments
Alternatively other sutures can be used,such as:
Mid-term absorbable monofilaments
My notes:
C4
Continuous skin suture
C5
Continuous skin suture
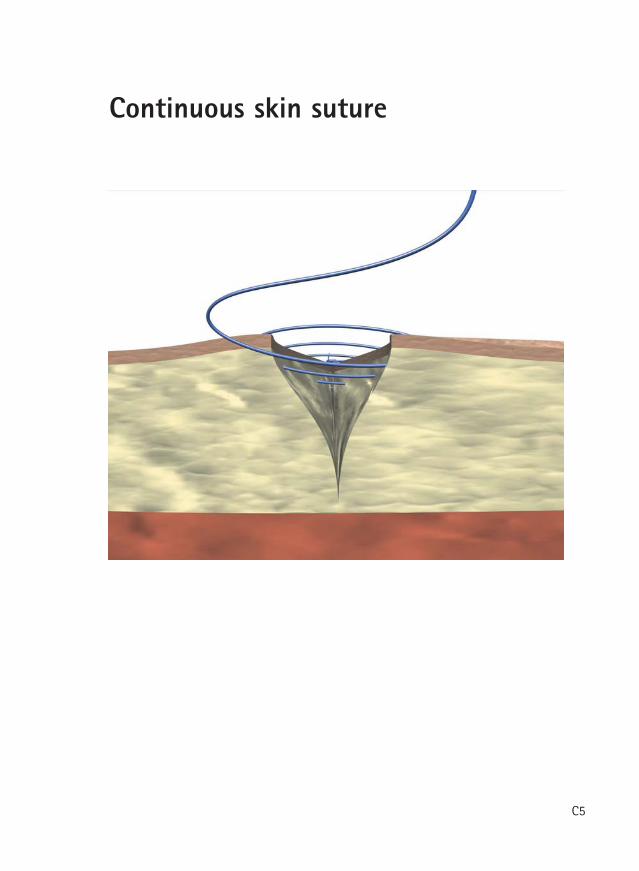
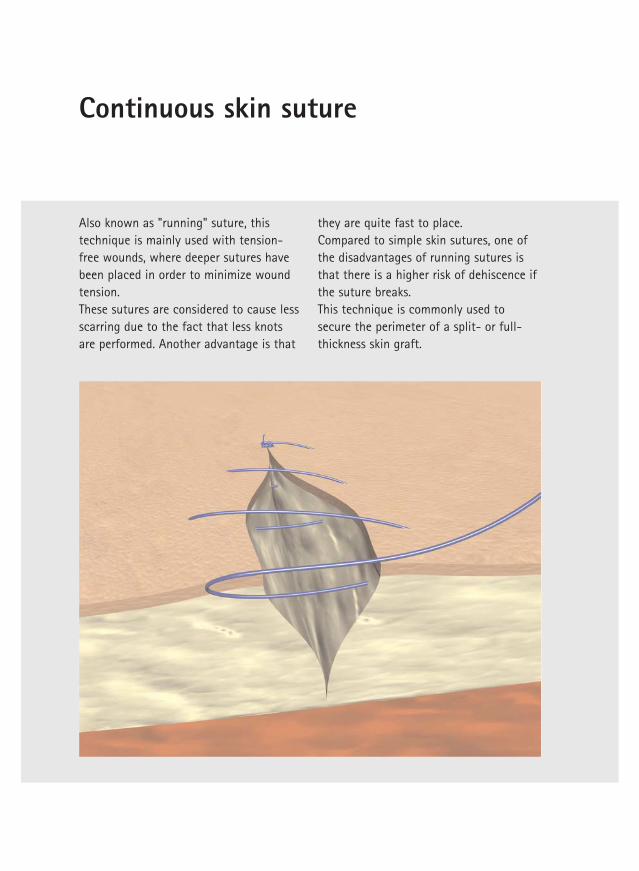
Also known as "running" suture, thistechnique is mainly used with tension-free wounds, where deeper sutures havebeen placed in order to minimize woundtension. These sutures are considered to cause lessscarring due to the fact that less knotsare performed. Another advantage is that
they are quite fast to place. Compared to simple skin sutures, one ofthe disadvantages of running sutures isthat there is a higher risk of dehiscence ifthe suture breaks. This technique is commonly used tosecure the perimeter of a split- or full-thickness skin graft.

Top view
This suturing technique will obtainoptimal results when performed with:
Non-absorbable monofilaments
Alternatively other sutures can be used,such as:
Mid-term absorbable monofilaments
My notes:
C5
Continuous intracutaneous non-absorbable suture
C6
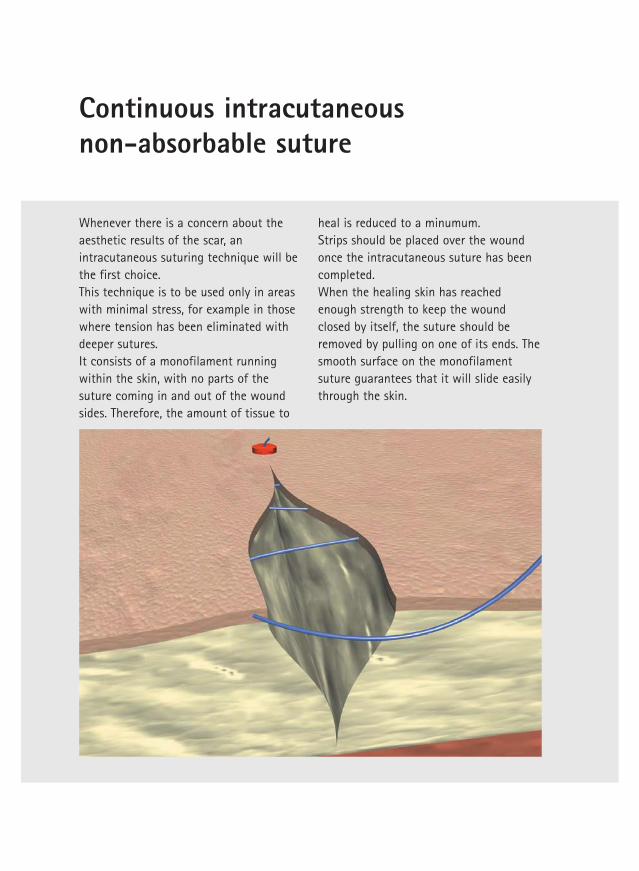
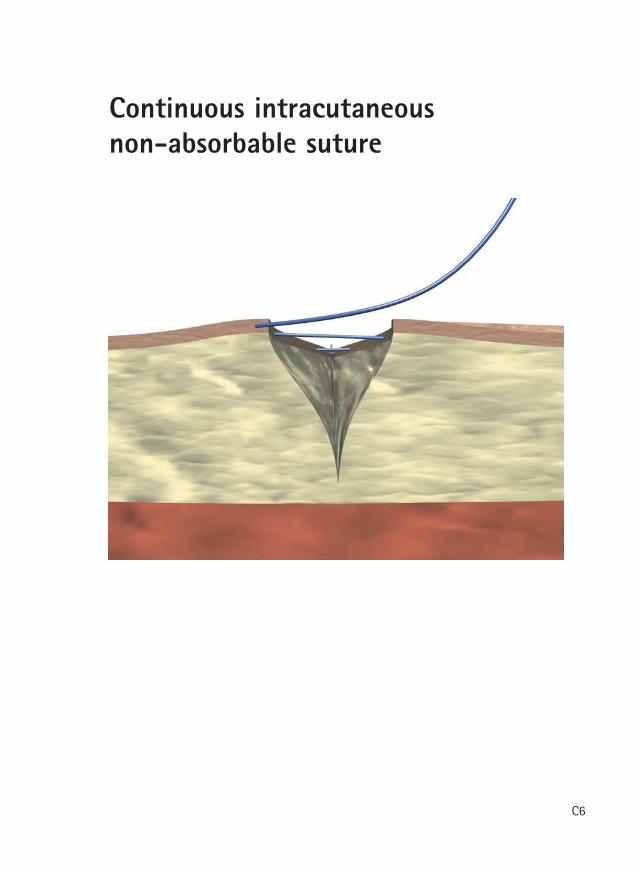
Continuous intracutaneous non-absorbable suture
Whenever there is a concern about theaesthetic results of the scar, anintracutaneous suturing technique will bethe first choice. This technique is to be used only in areaswith minimal stress, for example in thosewhere tension has been eliminated withdeeper sutures. It consists of a monofilament runningwithin the skin, with no parts of thesuture coming in and out of the woundsides. Therefore, the amount of tissue to
heal is reduced to a minumum. Strips should be placed over the woundonce the intracutaneous suture has beencompleted.When the healing skin has reachedenough strength to keep the woundclosed by itself, the suture should beremoved by pulling on one of its ends. Thesmooth surface on the monofilamentsuture guarantees that it will slide easilythrough the skin.
Top view
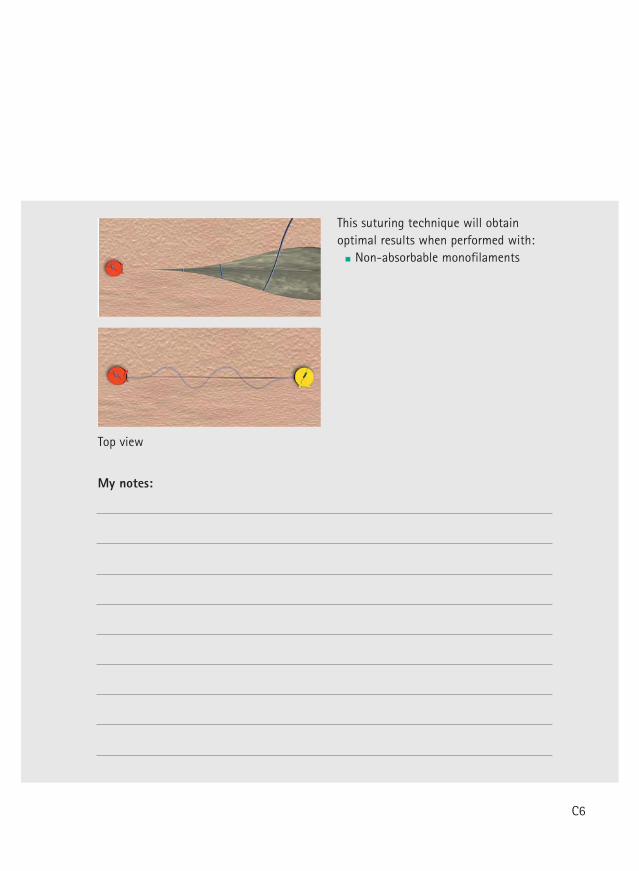
This suturing technique will obtainoptimal results when performed with:
Non-absorbable monofilaments
My notes:
C6

Continuous intracutaneous absorbable suture
C7
Continuous intracutaneousabsorbable suture
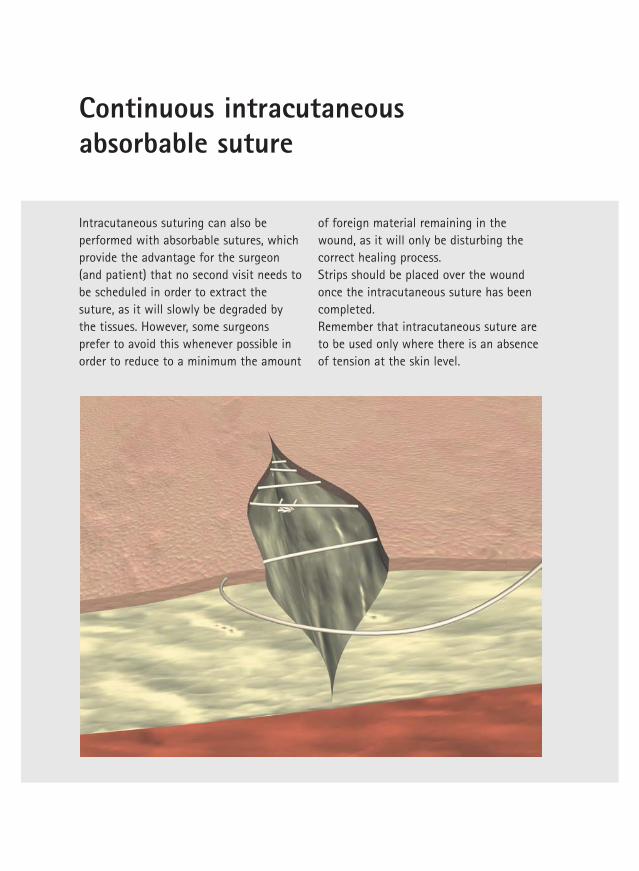
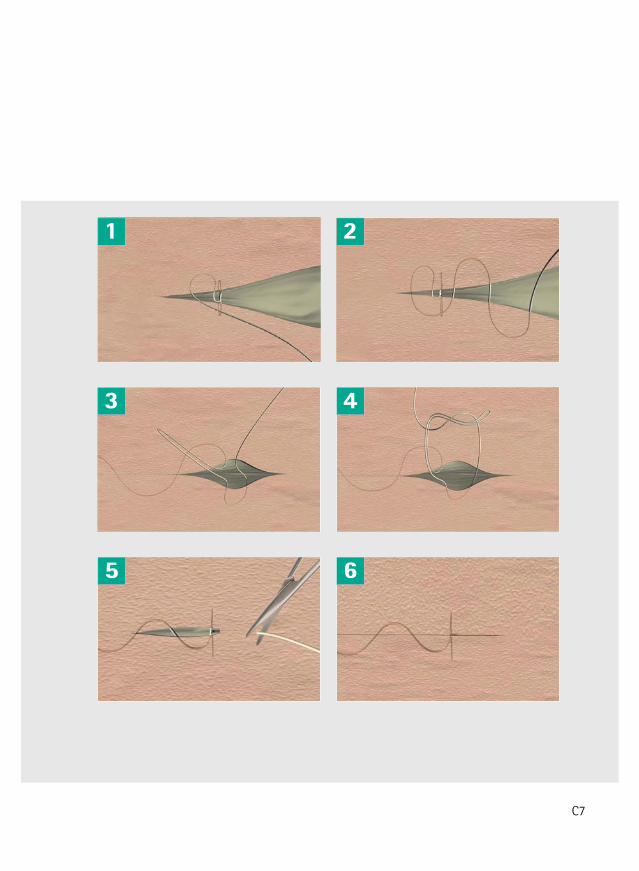
Intracutaneous suturing can also beperformed with absorbable sutures, whichprovide the advantage for the surgeon(and patient) that no second visit needs tobe scheduled in order to extract thesuture, as it will slowly be degraded bythe tissues. However, some surgeonsprefer to avoid this whenever possible inorder to reduce to a minimum the amount
of foreign material remaining in thewound, as it will only be disturbing thecorrect healing process. Strips should be placed over the woundonce the intracutaneous suture has beencompleted.Remember that intracutaneous suture areto be used only where there is an absenceof tension at the skin level.
1 2
3 4
5 6
C7

Continuous intracutaneous absorbable suture
Top view
This suturing technique will obtainoptimal results when performed with:
Mid-term absorbable monofilaments
My notes:
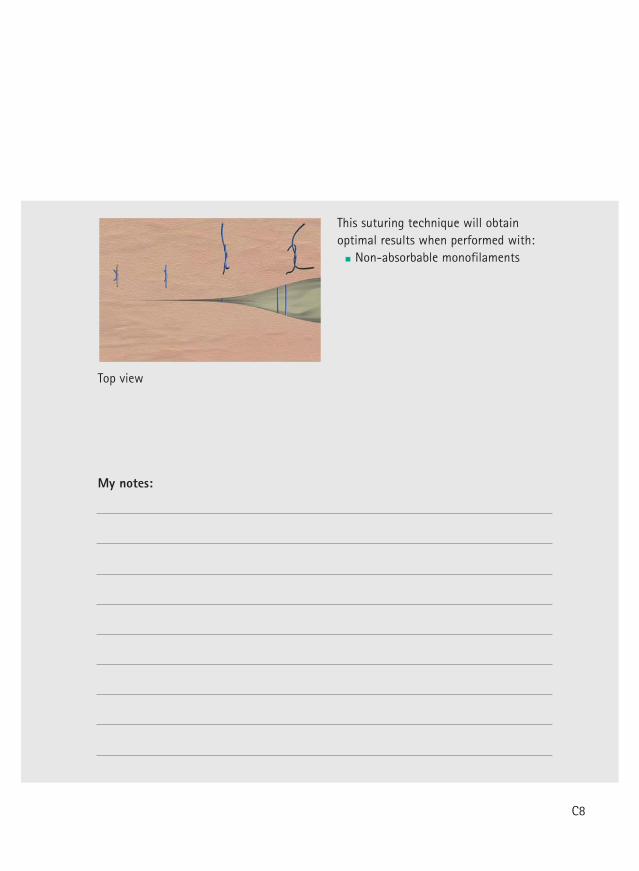
Allgöwer suture
C8
Allgöwer suture
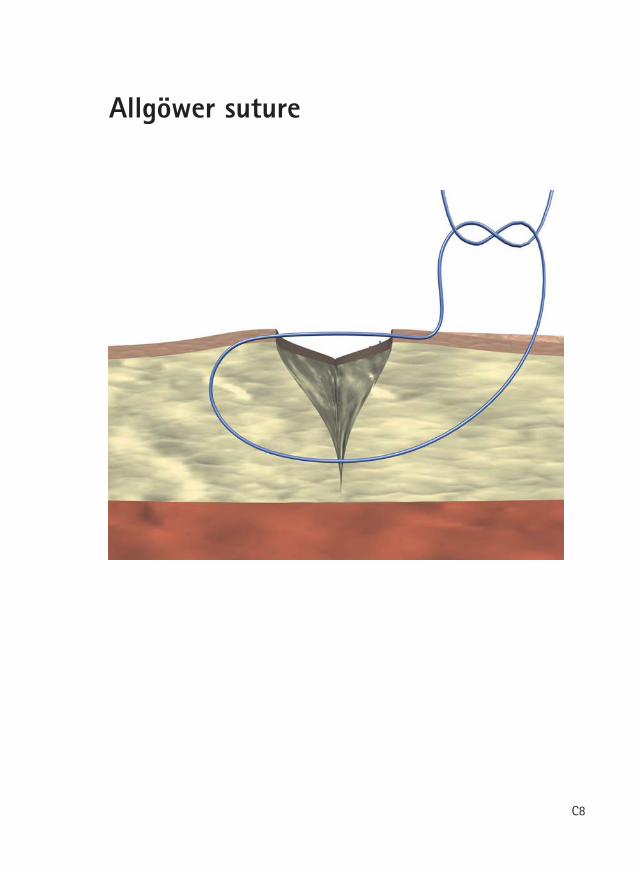
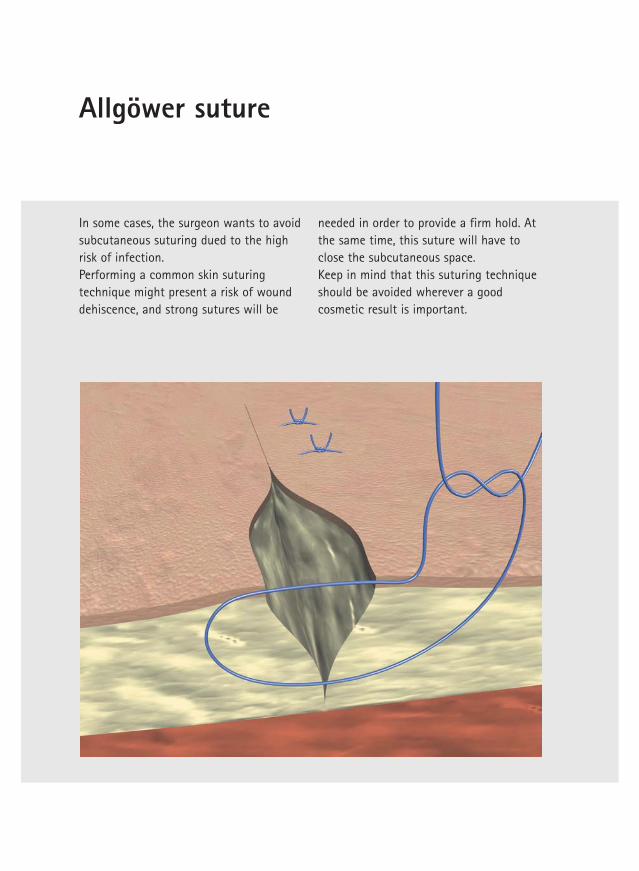
In some cases, the surgeon wants to avoidsubcutaneous suturing dued to the highrisk of infection. Performing a common skin suturingtechnique might present a risk of wounddehiscence, and strong sutures will be
needed in order to provide a firm hold. Atthe same time, this suture will have toclose the subcutaneous space. Keep in mind that this suturing techniqueshould be avoided wherever a goodcosmetic result is important.
Top view
This suturing technique will obtainoptimal results when performed with:
Non-absorbable monofilaments
My notes:
C8

Donati suture
C9
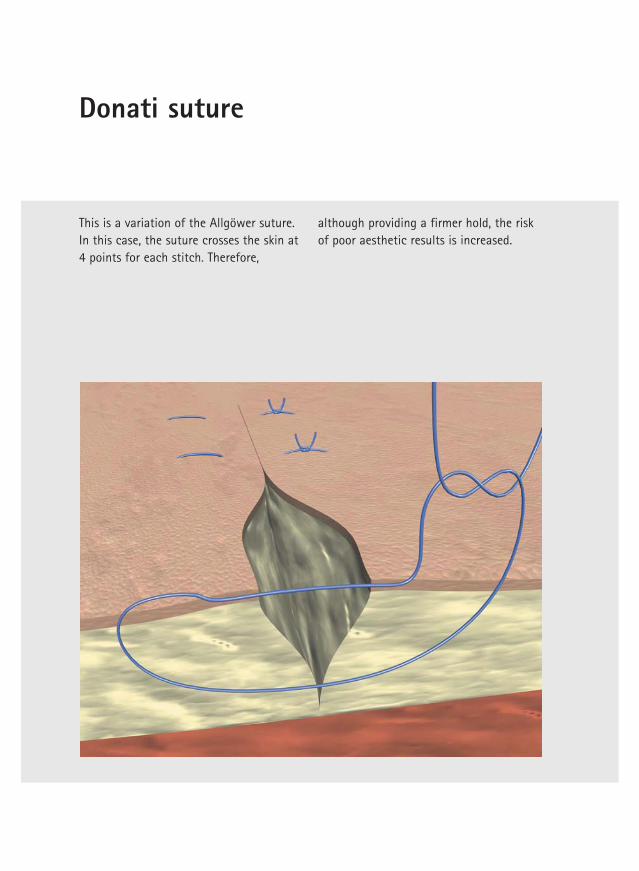
Donati suture
This is a variation of the Allgöwer suture. In this case, the suture crosses the skin at4 points for each stitch. Therefore,
although providing a firmer hold, the riskof poor aesthetic results is increased.

Top view
This suturing technique will obtainoptimal results when performed with:
Non-absorbable monofilaments
My notes:
C9

Mattress suture
C10
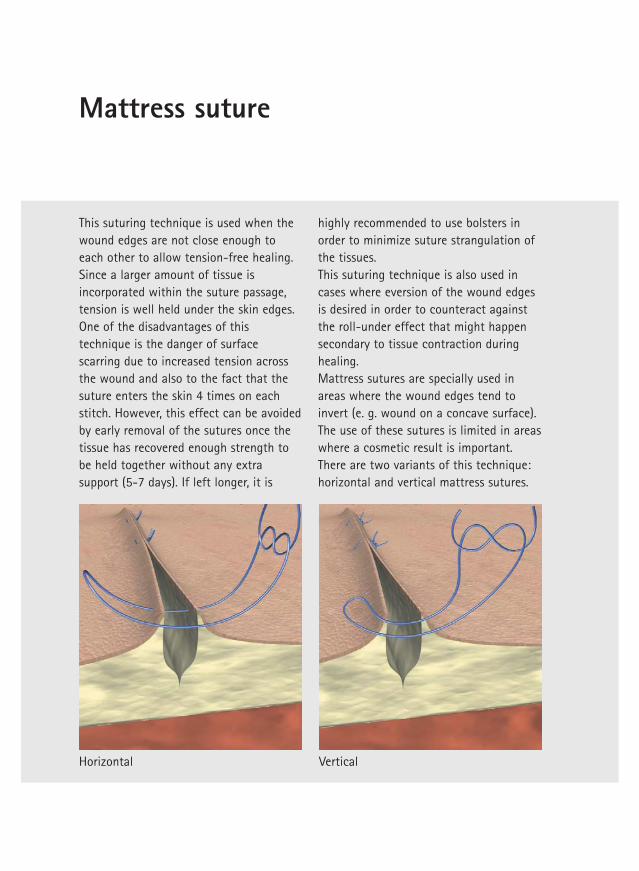
Mattress suture
This suturing technique is used when thewound edges are not close enough toeach other to allow tension-free healing.Since a larger amount of tissue isincorporated within the suture passage,tension is well held under the skin edges. One of the disadvantages of thistechnique is the danger of surfacescarring due to increased tension acrossthe wound and also to the fact that thesuture enters the skin 4 times on eachstitch. However, this effect can be avoidedby early removal of the sutures once thetissue has recovered enough strength tobe held together without any extrasupport (5-7 days). If left longer, it is
highly recommended to use bolsters inorder to minimize suture strangulation ofthe tissues. This suturing technique is also used incases where eversion of the wound edgesis desired in order to counteract againstthe roll-under effect that might happensecondary to tissue contraction duringhealing. Mattress sutures are specially used inareas where the wound edges tend toinvert (e. g. wound on a concave surface). The use of these sutures is limited in areaswhere a cosmetic result is important. There are two variants of this technique:horizontal and vertical mattress sutures.
lacitreVlatnoziroH
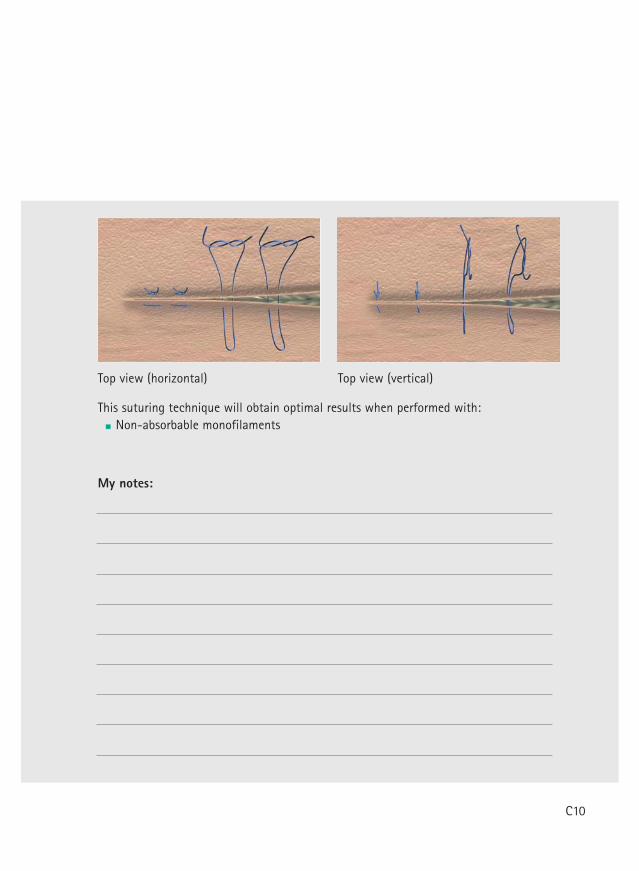
Top view (horizontal) Top view (vertical)
This suturing technique will obtain optimal results when performed with: Non-absorbable monofilaments
My notes:
C10
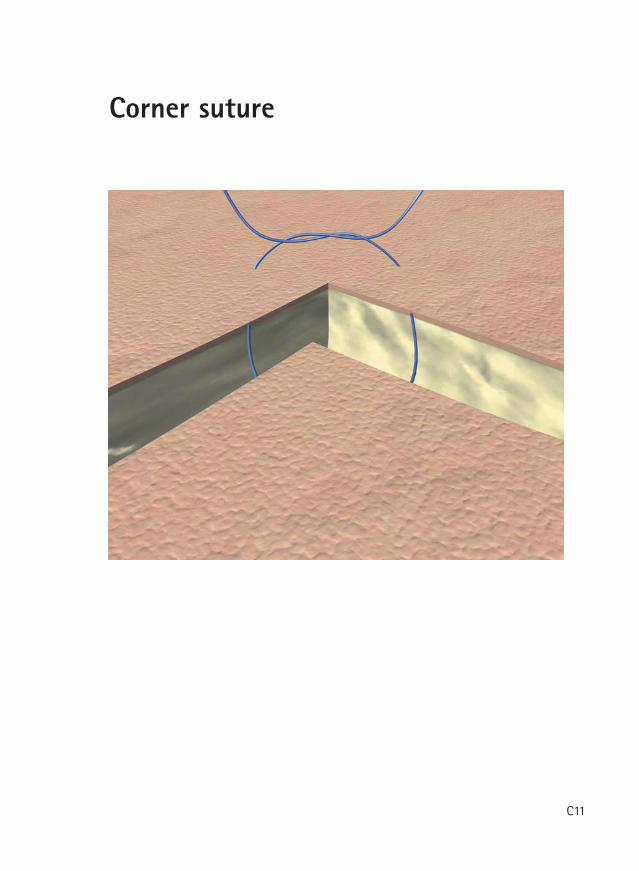
Corner suture
C11
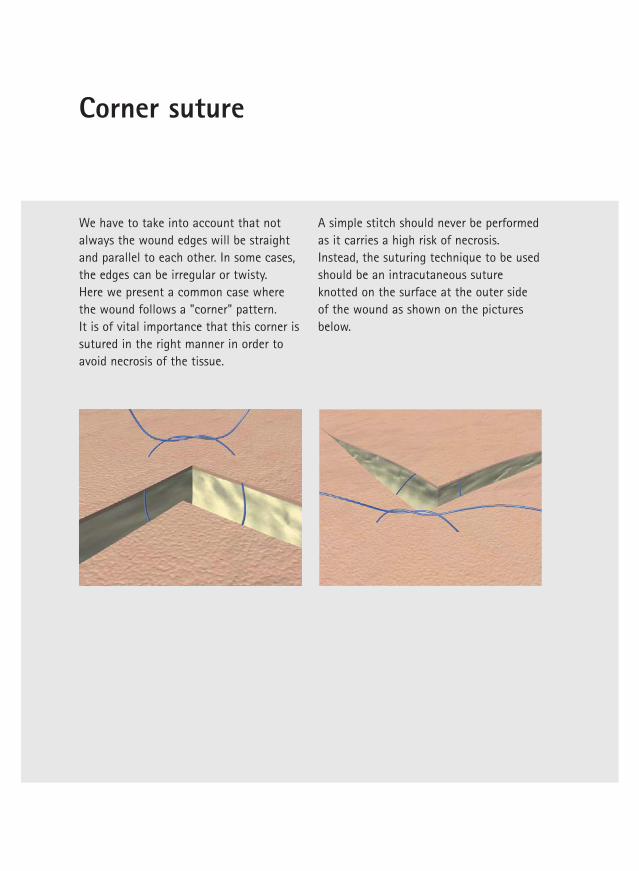
Corner suture
We have to take into account that notalways the wound edges will be straightand parallel to each other. In some cases,the edges can be irregular or twisty. Here we present a common case wherethe wound follows a "corner" pattern. It is of vital importance that this corner issutured in the right manner in order toavoid necrosis of the tissue.
A simple stitch should never be performedas it carries a high risk of necrosis.Instead, the suturing technique to be usedshould be an intracutaneous sutureknotted on the surface at the outer sideof the wound as shown on the picturesbelow.
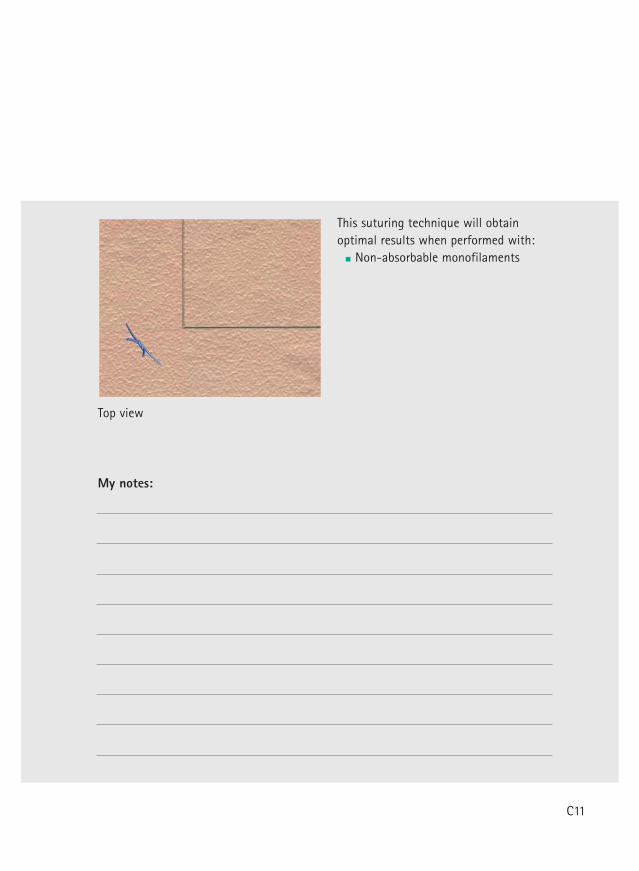
Top view
This suturing technique will obtainoptimal results when performed with:
Non-absorbable monofilaments
My notes:
C11

Non-absorbable suture material
B. Braun Surgical, S.A. | Carretera de Terrassa, 121 | 08191 Rubí | Spain
Phone +34 93 5 86 62 00 | Fax +34 93 6 99 63 30 | www.bbraun.com
Aesculap AG | Am Aesculap-Platz | 78532 Tuttlingen | Germany
Phone +49 7461 95-0 | Fax +49 7461 95-26 00 | www.aesculap.com
Aesculap – a B. Braun companyBrochure No. B20102 0914/1/4
Complete suture range
trademarks of B. Braun Melsungen AG.
The product trademarks ‘Optilene, Trelon, MonoPlus,
Monomax and Novosyn’ are registered trademarks of
Aesculap AG.
Mono-
Advantage
Mono-
Advantage
Braided
Mono-
Advantage
Braided
Pseudo-
mono-
Advantage
Braided Braided
Optilene® Premilene® PremiCron® Steelex® ® Trelon® Supramid ® Silkam®
Polypropylene and polyethylenenon-absorbable
Polypropylene, non-absorbable
Polyester, non-absorbable
Stainless steel, non-absorbable
Polyamide 6/6.6 (dyed blue or undyed), Polyam-ide 6.6 (dyed black), non-absorbable
Polyamide 6/6,non-absorbable
Polyamide 6/6.6,non-absorbable
Polyester, non-absorbable
Natural silk,non-absorbable
Coating: none
Coating: none
Coating: silicone
Coating: none or polyethylene*
Coating: none
Coating: silicone
Coating: none
Coating: none
Coating:
Structure: Structure: Structure: braided
Structure: Structure: Structure: braided
Structure: Structure: braided
Structure: braided
Colour: blue
Colour: blue
Colour: green, white
Colour: metallic
Colour: blue, undyed, black
Colour: black
Colour: black, white
Colour: green, white
Colour: black, white
USP 10/0 to 0metric 0.2 to 3.5
USP 10/0 to 2metric 0.2 to 5
USP 6/0 to 5metric 0.7 to 7
USP 5/0 to 7metric 1 to 9
USP 11/0 to 2metric 0.1 to 5
USP 6/0 to 3metric 0.7 to 6
USP 6/0 to 3metric 0.7 to 6
USP 6/0 to 6metric 0.7 to 8
USP 8/0 to 6metric 0.4 to 8
* Steelex Electrode Set
Mono-
Advantage
Mono-
Advantage
Mono-
Advantage
Braided Braided Braided
Monosyn® MonoPlus® Monomax ® Quick ® Novosyn®
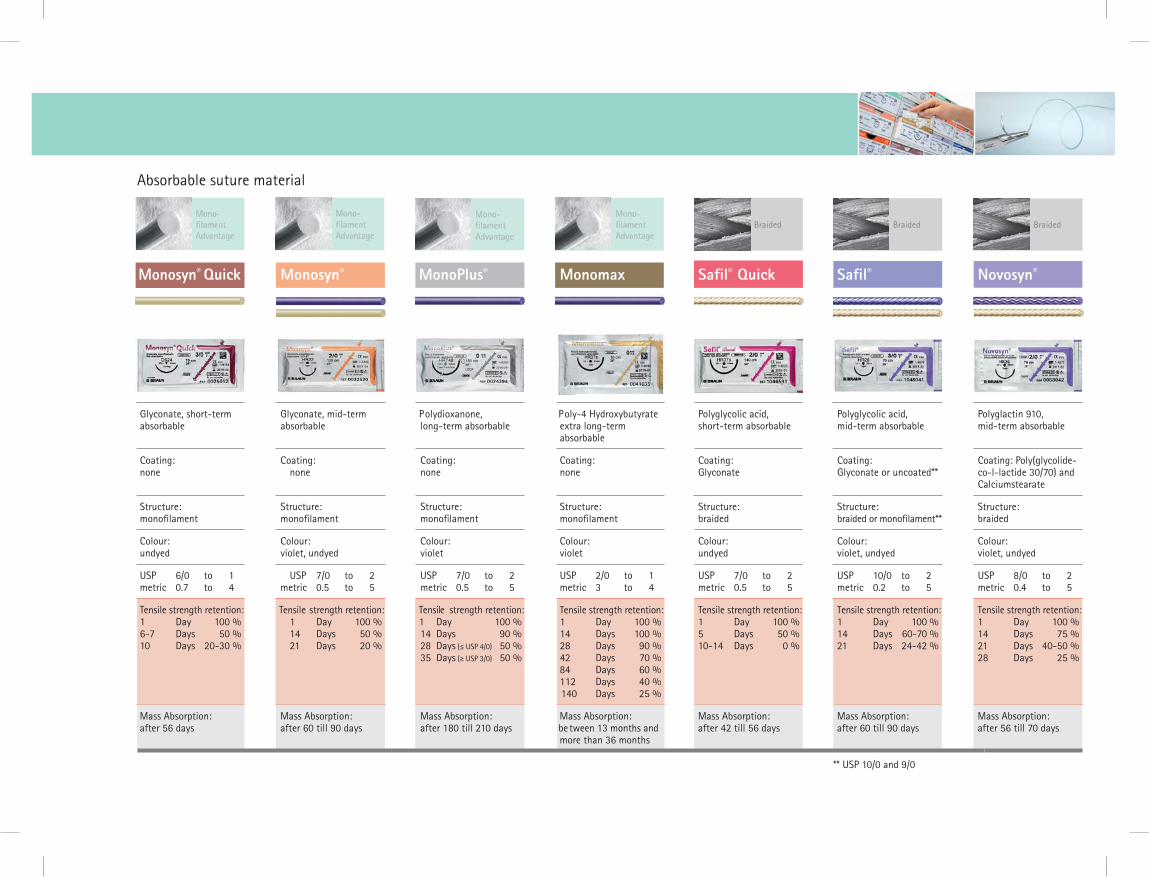
Glyconate, short-term absorbable
Glyconate, mid-term absorbable
Polydioxanone, long-term absorbable
Poly-4 Hydroxybutyrate extra long-term absorbable
Polyglycolic acid, short-term absorbable
Polyglycolic acid, mid-term absorbable
Polyglactin 910, mid-term absorbable
Coating: none
Coating: none
Coating: none
Coating: none
Coating: Glyconate
Coating: Glyconate or uncoated**
Coating: Poly(glycolide-co-l-lactide 30/70) and Calciumstearate
Structure: Structure: Structure: Structure: Structure: braided
Structure: Structure: braided
Colour: undyed
Colour: violet, undyed
Colour: violet
Colour: violet
Colour: undyed
Colour: violet, undyed
Colour: violet, undyed
USP 6/0 to 1metric 0.7 to 4
USP 7/0 to 2metric 0.5 to 5
USP 7/0 to 2metric 0.5 to 5
USP 2/0 to 1metric 3 to 4
USP 7/0 to 2metric 0.5 to 5
USP 10/0 to 2metric 0.2 to 5
USP 8/0 to 2metric 0.4 to 5
Tensile strength retention:1 Day 100 % 6-7 Days 50 %10 Days 20-30 %
Tensile strength retention:1 Day 100 % 14 Days 50 %21 Days 20 %
Tensile strength retention:1 Day 100 % 14 Days 90 %28 Days (≤ USP 4/0) 50 %35 Days (≥ USP 3/0) 50 %
Tensile strength retention:1 Day 100 %14 Days 100 %28 Days 90 %42 Days 70 %84 Days 60 %112 Days 40 %140 Days 25 %
Tensile strength retention:1 Day 100 %5 Days 50 %10-14 Days 0 %
Tensile strength retention:1 Day 100 % 14 Days 60-70 %21 Days 24-42 %
Tensile strength retention:1 Day 100 % 14 Days 75 %21 Days 40-50 % 28 Days 25 %
Mass Absorption: after 56 days
Mass Absorption: after 60 till 90 days
Mass Absorption: after 180 till 210 days
Mass Absorption:be tween 13 months and more than 36 months
Mass Absorption:after 42 till 56 days
Mass Absorption:after 60 till 90 days
Mass Absorption:after 56 till 70 days
Absorbable suture material
** USP 10/0 and 9/0
Monosyn® Quick
Mono-
Advantage
t**

All rights reserved. Technical alterations are possible.This book may be used for no other purposes thaneducation. No part may be copied or reproduced in any form. In case of misuse we retain the rights to take legal actions.
BBSE-125-0210/15
B. Braun Surgical, S.A. | Aesculap | Carretera de Terrassa, 121
08191 Rubí (Barcelona) | Tel. 93 586 62 00 | Fax 93 588 10 96
www.bbraun.es