
B 321 / 34cc A. D. B 340 / 34cc B 341 / 34cc B 380 / 38cc · PDF fileg technical data idati...
13
D. E. F. 2 3 4 5 6 1 2 3 4 5 A. B. C. 1 1 2 1 ltr 20 cm 3 25 cm 3 40 cm 3 4 80 100 160 5 100 125 200 10 200 250 400 20 400 500 800 40:1 25:1 2,5% 50:1 2% 4% Partner oil McCulloch oil 2T oil PN 249119 REV. 01 (12/02) HANDLEIDING BELANGRIJKE IMPORTANTS: Lees deze handleiding aandachtig en zorg dat u ailes begrijpt alvorens de kettingzaag te gebrulken en be-waar ze voor toekomstige raadpleging. BRUKERHÅNDBOK VIKTIG INFORMASJON: Les disse anvisningene nøye og forsikre deg om at du forstår dem før du bruker enheten og oppbevar dem for sen-ere bruk. BRUKSANVISNING VIKTIG INFORMATION: Läs instruktionerna noggrant och försäkra dig om att du förstår dem innan du använder utrustningen och spara dem för framtida behov. BRUGERHÅNDBOG VIGTIGE OPLYSNINGER: Læs instruktionerne omhyggeligt, før du bruger enheden og gemme til senere henvisning. LIBRETTO D’ISTRUZIONI INFORMAZIONI IMPORTANTI: Leggere le istruzioni attentamente e capirle bene prima di usare il prodotto. Conservare per ulteriore consultazione. MANUAL DO OPERADOR INFORMAÇÕES IMPORTANTES: Queira ler cuidadosamente estas instruções e tenha certeza de entendë--las antes de usar a serra e guarde para consulta futura. EΓXEIPI∆IO XEIPIΣMOE ΣHMANTIKEΣ ΠΛHPOΦOPIEΣ: ∆ιαάστε πρoσεxτιxά αvτές τις δηγίες xαι Φρovτίστε vα τις xαταvoήσετε αvτ τo µηάvηµα xαι Φuλάτε τ για vα τ σuµuλεύεστε στ µέλλv. OHJEKIRJA TÄRKEÄÄ TIETOA: Lue nämä ohjeet huolellisesti ja varmista, että olet ymmärtänyt ne, ennen kuin alat käyttää tätä laitetta ja säilytä myöhempää tarvetta varten. HASZNÁLATI ÚTMUTATÓ Jótállást vállalni csak rendeltetésszerüen használatba vett gépekre tudunk. Kérj ü hogy a gép használatba vétele elött gondosan olvassa el a kezelési utasításokat. GB FIN N P GR HU I F D E NL S DK INSTRUCTION MANUAL IMPORTANT INFORMATION: Please read these instructions carefully and make sure you understand them before using this unit. Retain these instructions for future reference. MANUEL D’INSTRUCTIONS RENSEIGNEMENTS IMPORTANTS: Avant d’utiliser cet appareil, veuillez lire atentivement les instructions et assurez-vous de les avoir comprises. Conservez les instructions pour référence ultérieure. BETRIEBSANWEISUNG WICHTIGE INFORMATION: Lesen Sie diese Hinweise zur Handha-bung des Geräts aufmerksam durch. Verwenden Sie es erst, wenn Sie sicher sind, daß Sie alle Anweisungen verstanden haben und gut aufbewahren. MANUAL DE INSTRUCCIONES INFORMACIÓN IMPORTANTE: Lea atentamente las instrucciones y asegúrese de entenderlas antes de utilizar esta aparato. Conserve las instrucciones para la referencia en el futuro. Electrolux Outdoor Products Via Como 72 23868 Valmadrera (Lecco) ITALIA Phone +39 0341 203111 - Fax +39 0341 581671 Our policy of continuous improvement means that the specification of products may be altered from time to time without prior notice. Electrolux Outdoor Products manufacture products for a number of well known brands under various registered patents, designs and trademarks in several countries. © Electrolux Outdoor Products Italy 5 3 3 3 3 2 1 4 B 321 / 34cc B 340 / 34cc B 341 / 34cc B 380 / 38cc
Transcript of B 321 / 34cc A. D. B 340 / 34cc B 341 / 34cc B 380 / 38cc · PDF fileg technical data idati...

D.
E.
F.
2 3
4 5 6
1 2 3
4 5
A.
B.
C.
1
1 2
1 ltr 20 cm3 25 cm3 40 cm3
4 80 100 160
5 100 125 200
10 200 250 400
20 400 500 800
40:1 25:1
2,5%
50:1
2% 4%
Partneroil
McCullochoil
2Toil
PN 249119 REV. 01 (12/02)
HANDLEIDINGBELANGRIJKE IMPORTANTS: Lees deze handleidingaandachtig en zorg dat u ailes begrijpt alvorens de kettingzaagte gebrulken en be-waar ze voor toekomstige raadpleging.
BRUKERHÅNDBOKVIKTIG INFORMASJON: Les disse anvisningenenøye og forsikre deg om at du forstår dem førdu bruker enheten og oppbevar dem for sen-erebruk.
BRUKSANVISNINGVIKTIG INFORMATION: Läs instruktionerna noggrant ochförsäkra dig om att du förstår dem innan du använderutrustningen och spara dem för framtida behov.
BRUGERHÅNDBOGVIGTIGE OPLYSNINGER: Læs instruktionerneomhyggeligt, før du bruger enheden og gemme tilsenere henvisning.
LIBRETTO D’ISTRUZIONIINFORMAZIONI IMPORTANTI: Leggere le istruzioniattentamente e capirle bene prima di usare ilprodotto. Conservare per ulteriore consultazione.
MANUAL DO OPERADORINFORMAÇÕES IMPORTANTES: Queira lercuidadosamente estas instruções e tenha certeza deentendë--las antes de usar a serra e guarde paraconsulta futura.
EΓXEIPI∆IO XEIPIΣMOEΣHMANTIKEΣ ΠΛHPOΦOPIEΣ: ∆ιαάστεπρoσεxτιxά αvτές τις δηγίες xαι Φρovτίστε vα τιςxαταvoήσετε αvτ& τo µη(άvηµα xαι Φuλά+τε τ γιαvα τ σuµ uλεύεστε στ µέλλ v.
OHJEKIRJATÄRKEÄÄ TIETOA: Lue nämä ohjeet huolellisesti javarmista, että olet ymmärtänyt ne, ennen kuin alatkäyttää tätä laitetta ja säilytä myöhempää tarvetta varten.
HASZNÁLATI ÚTMUTATÓJótállást vállalni csak rendeltetésszerüen használatbavett gépekre tudunk. Kérj ü hogy a gép használatbavétele elött gondosan olvassa el a kezelési utasításokat.
GB
FIN
N
P
GR
HU
I
F
D
E
NL
S
DKINSTRUCTION MANUALIMPORTANT INFORMATION: Please read these instructionscarefully and make sure you understand them before usingthis unit. Retain these instructions for future reference.
MANUEL D’INSTRUCTIONSRENSEIGNEMENTS IMPORTANTS: Avant d’utiliser cetappareil, veuillez lire atentivement les instructions etassurez-vous de les avoir comprises. Conservez lesinstructions pour référence ultérieure.
BETRIEBSANWEISUNGWICHTIGE INFORMATION: Lesen Sie diese Hinweise zurHandha-bung des Geräts aufmerksam durch. VerwendenSie es erst, wenn Sie sicher sind, daß Sie alleAnweisungen verstanden haben und gut aufbewahren.
MANUAL DE INSTRUCCIONESINFORMACIÓN IMPORTANTE: Lea atentamente lasinstrucciones y asegúrese de entenderlas antes deutilizar esta aparato. Conserve las instrucciones para lareferencia en el futuro.
Electrolux Outdoor ProductsVia Como 72
23868 Valmadrera (Lecco)ITALIA
Phone +39 0341 203111 - Fax +39 0341 581671
Our policy of continuous improvement means that the specification of products may be altered from time to time without prior notice.Electrolux Outdoor Products manufacture products for a number of well known brands under various registered patents, designs and
trademarks in several countries.© Electrolux Outdoor Products Italy
5
3 3
3 3
21 4
B 321 / 34ccB 340 / 34ccB 341 / 34ccB 380 / 38cc

2 3
4a
4b
G.
H.
I.
L.
M.
N.
2
3
1
1
4
1 2
0,095”2.4mm
8T 9”
197”5000mm
4T 9”230 mm
4T 10”255 mm
230mm
8T 10”
255mm
24T 9”
230mm
80T 9”
230mm
240853B
247208
226134B
247208
226135B
247208
236711B
247208
236713B
247208
240998B
240936B
240553
236677
240953B
240936B
240553
236677
34/38cc
SUMMARY CHART TO IDENTIFY THECORRECT GUARD NEEDED, WITHDIFFERENT CUTTING ATTACHMENTS
TABELLA RIASSUNTIVA PER IL CORRETTOABBINAMENTO TESTA TAGLIENTE / DIFESADI SICUREZZA
TABLEAU RECAPITULATIF POUR LE CORRECTACCOUPLEMENT LAME OU TETE FIL NYLON /DEFENSE DE SECURITE
ÜBERSICHTSTABELLE ZUR AUSWAHL DESRICHTIGEN SCHUTZBLECHES FÜR DIEEINZELNEN SCHNEIDWERKZEUGE
TABLA PARA EL CORRECTO ACOPLAMIENTODE LA CABEZA CORTANTE Y PROTECTORDE SEGURIDAD
OVERZICHTSTABEL OM TE BEPALEN WELKEBESCHERMKAP GEBRUIKT MOET WORDENBIJ DE DIVERSE MAAI-ONDERDELEN
SAMMANFATTANDE TABELL ÖVERKORREKT KOMBINATION AVSKÄRHUVUD/SÄKERHETSSKYDD
OVERSIGTSTABEL VEDRØRENDE DENKORREKTE SAMMENSÆTNING AF KNIV OGBESKYTTELSESSKÆRM
TAULOKKO LEIKKAAVAN PÄÄN/TURVASUOJUKSENOIKEASTA YHDISTELMÄSTÄ
TABELL FOR KORREKT MONTERING AVTRÅDSPOLE/SAGBLAD OGSPRUTSKJÆRM/SIKKERHETSVÆRN
TABELA DE RESUMO PARA A CORRETAAPLICAÇÃO DA CABEÇA CORTANTE EDEFESA DE SEGURANÇA
ΠEPIΛHΠTIKOΣ ΠINAKAΣ ΓIA THNEΠIΣHMANΣH TOY KATAΛΛHΛOY ΠPOΦYΛAKTHPA,ME ∆IAΦOPA KOΠTIKA E1APTHMATA
ÖSSZEFOGLALÓ TÁBLÁZAT: A NYÍRÓFEJÖSSZEÁLLITÁSA / BALESETVÉDELEM
GB
I
F
D
E
NL
S
DK
N
P
GR
H
FIN
1
D Dichiarazione di Conformità CEIl sottoscritto, autorizzato dalla E.O.P.I., dichiara che i seguentiprodotti: Decespugliatori 34-38cc, costruito da E.O.P.I.,Valmadrera, Italia, sono conformi alle Direttive Europee: 98/37/EEC(Direttiva Macchine), 93/68/CEE (Direttiva Marcatura CEE) &89/336/CEE (Direttiva Compatibilità Elettromagnetica), direttiva2000/14/CEE (Allegato V).
E Declaracion de cumplimiento de la directriz de la UEEl abajo firmante, autorizado por E.O.P.I., afirma que los siguientesproductos: Desbrozador Gasolina 34-38cc, fabricados por E.O.P.I.,Valmadrera, Italia, cumplen con las directivas Europeas 98/37/EEC(Directiva sobre Maquinaria), 93/68/CEE (Directiva sobre Marcas dela CE) & 89/336/CEE (Directiva sobre ‘Compati-bilidad ElectroMagnética’), directiva 2000/14/CEE (Anexo V).
C CE KonformitätserklärungDer Unterzeichnete, bevollmächtigt durch E.O.P.I., erklärt, daßfolgende Geräte: Benzin Motorsensen 34-38cc, hergestellt durchE.O.P.I., Valmadrera, Italia, den Europäischen Richtlinien 98/37/EEC(Maschinenrichtlinie), 93/68/CEE (CE Kennzeichnungsrichtlinie) &89/336/CEE (EMV Richtlinie) entsprechen, richtlinie 2000/14/CEE(Anhang V).
B Déclaration de conformité EuropéenneLe soussigné, dûment mandaté par E.O.P.I., déclare que les produitssuivants: Petrol Brushcutter 34-38cc, fabriqués par E.O.P.I.,Valmadrera, Italia, sont conformes aux Directives Européennes98/37/EEC (Directive Sécurité Machine), 93/68/CEE (DirectiveMarquage CE) & 89/336/CEE (Directive EMC), directive2000/14/CEE (Annexe V).
F EG ConformiteitsverklaringOndergetekende, gemachtigd door E.O.P.I., verklaart dat devolgende produkten: Benzine Bosmaaier 34-38cc, geproduceerddoor E.O.P.I., Valmadrera, Italia voldoen aan de Europese Richtlijnen98/37/CEE (Machinerie Richtlijn), 93/68/CEE (EG Markering Richtlijn)& 89/336/CEE (Richtlijn aangaande elektromagnetischecompatibiliteit), richtlijn 2000/14/CEE (Annex V).
í Technikai leírások
Alulírott, rendelkezve a E.O.P.I. engedélyével, kijelenti, hogy ajelentermék 34-38cc, melyet a E.O.P.I. 23868 Valmadrera (Lecco) ViaComo, 72 Italia, gyártott, megfelel az európai szabványoknak:98/37/CEE (gépekre vonatkozó), 93/68/CCE (márkázásnak) és89/336/CEE (elektromágneses összeegyeztetehetöségnek)megfelenek, direktíva 2000/14/CEE (Melléklet V).
@ ∆ήλωση Συµµρωσης πρς τις Eντλές της EEO υπ γεγραµµέν ς, µε e+ υσι δ&τηση της E.O.P.I., δηλώνει &τι τα ε+ής
πρ ϊ&ντα: Kλαδευτήρι Bεν!ίνης για Θάµνυς 34-38cc, κατασκευασθέντα
απ& την E.O.P.I.,Valmadrera, Italia, HΠA ανταπ κρίν νται πρ ς τις
Eυρωπαϊκές Eντ λές 98/37/CEE (η περί Mη(ανηµάτων Eντ λή), 93/68/CEE
(η περί τ υ Σήµατ ς CE Eντ λή) & 89/336/CEE (η περί Hλεκτρ µαγνητικής
Συµατ&τητας Eντ λή), Aηρεκτηα 2000/14/CEE (Πρηπ επηε V).
; EF Erklæring om OverensstemmelseUndertegnede, autorisert av E.O.P.I., erklærer at f¯øgende produktBensindrevet gress/krattrydderen 34-38cc, konstruert av E.O.P.I.23868 Valmadrera (Lecco) Via Como, 72 Italia, er i overensstemmelsemed føgende europeiske direktiver: 98/37/CEE (Maskineridirektiv),93/68/CEE (CE-merkingsdirektiv) & 89/336/CEE (Direktiv omelektromagnetisk kompatibilitet), direktiv 2000/14/CEE (Annex V).
: EU OverensstemmelseerklæringUndertegnede, bemyndiget af E.O.P.I., erklærer herved, at følgendeprodukter: Benzindrevet Græstrimmer 34-38cc, E.O.P.I.,Valmadrera, Italia, er i overensstemmelse med de eurpæiskedirektiver 98/37/EEC (Maskineri direktiv), 93/68/CEE (CEmærkningsdirektiv) & 89/336/CEE (EMC-direktiv), direktiv2000/14/CEE (Annex V).
L EG-försäkran om överensstämmelseUndertecknad, auktoriserad av E.O.P.I., försäkrar att följandeprodukter: Bensintrimmer 34-38cc, tillverkade av E.O.P.I.,Valmadrera, Italia, är i överensstämmelse med följande europeiskadirektiv 98/37/EEC (Maskindirektiv), 93/68/CEE (CE-märknings-direktiv) & 89/336/CEE (Elektromagnetisk kompatibilitet), direktiv2000/14/CEE (Annex V).
Valmadrera, 15.12.01Pino Todero (Direttore Tecnico) E.O.P.I.
A EC Declaration of ConformityThe undersigned, authorised by E.O.P.I., declares that the followingproducts: Petrol Brushcutter 34-38cc, manufactured by E.O.P.I.,Valmadrera, Italia, are in accordance with the European Directives98/37/EEC (Machinery Directive), 93/68/CEE (CE Marking Directive)& 89/336/CEE (Directive on electromagnetic compatibility), directive2000/14/CEE (Annex V).
G Declaração de ConformidadeO abaixo assinado, autorizado por E.O.P.I., declara que os seguintes
produtos: Roçadora a Gasolina 34-38cc, fabricada por E.O.P.I.,
Valmadrera, Italia. estão de acordo com as Directivas Europeias
98/37/EEC Directiva de Maquinaria), 93/68/CEE (Directiva de
Marcação CE) e 89/336/CEE (Directiva de Compatibilidade
Electromagnética), directiva 2000/14/CEE (Apêndice V).
/ EY Julistus VastaavuudestaAllekirjoittanut, E.O.P.I. in valtuttaamana, vakuuttaa että seuraavattuotteet: Polttomoottorikäyttöinen pensasleikkuri 34-38cc, ja jotkaon valmistanut E.O.P.I., Valmadrera, Italia, ovat Euroopan direktiivien98/37/EEC (Koneisto-direktiivi), 93/68/CEE (CE Merkintä-direktiivi) &89/336/CEE (Elektromagneettinen Yhteensopivuus-direktiivi)mukainen, direktiivi 2000/14/CEE (Liite V).
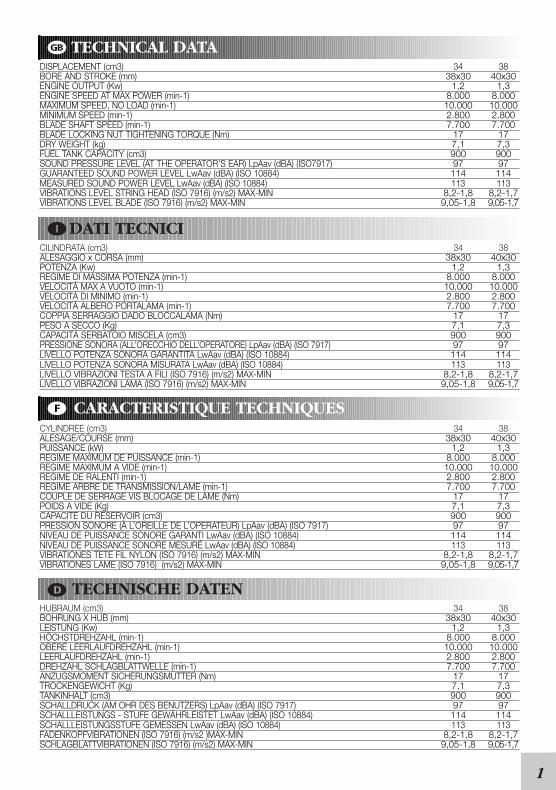
g TECHNICAL DATA
i DATI TECNICICILINDRATA (cm3) 34 38ALESAGGIO x CORSA (mm) 38x30 40x30POTENZA (Kw) 1,2 1,3REGIME DI MASSIMA POTENZA (min-1) 8.000 8.000VELOCITÁ MAX A VUOTO (min-1) 10.000 10.000VELOCITÁ DI MINIMO (min-1) 2.800 2.800VELOCITÁ ALBERO PORTALAMA (min-1) 7.700 7.700COPPIA SERRAGGIO DADO BLOCCALAMA (Nm) 17 17PESO A SECCO (Kg) 7,1 7,3CAPACITÁ SERBATOIO MISCELA (cm3) 900 900PRESSIONE SONORA (ALL’ORECCHIO DELL’OPERATORE) LpAav (dBA) (ISO 7917) 97 97LIVELLO POTENZA SONORA GARANTITA LwAav (dBA) (ISO 10884) 114 114LIVELLO POTENZA SONORA MISURATA LwAav (dBA) (ISO 10884) 113 113LIVELLO VIBRAZIONI TESTA A FILI (ISO 7916) (m/s2) MAX-MIN 8,2-1,8 8,2-1,7LIVELLO VIBRAZIONI LAMA (ISO 7916) (m/s2) MAX-MIN 9,05-1,8 9,05-1,7
f CARACTERISTIQUE TECHNIQUESCYLINDREE (cm3) 34 38ALESAGE/COURSE (mm) 38x30 40x30PUISSANCE (kW) 1,2 1,3REGIME MAXIMUM DE PUISSANCE (min-1) 8.000 8.000REGIME MAXIMUM A VIDE (min-1) 10.000 10.000REGIME DE RALENTI (min-1) 2.800 2.800REGIME ARBRE DE TRANSMISSION/LAME (min-1) 7.700 7.700COUPLE DE SERRAGE VIS BLOCAGE DE LAME (Nm) 17 17POIDS A VIDE (Kg) 7,1 7,3CAPACITE DU RESERVOIR (cm3) 900 900PRESSION SONORE (À L’OREILLE DE L’OPERATEUR) LpAav (dBA) (ISO 7917) 97 97NIVEAU DE PUISSANCE SONORE GARANTI LwAav (dBA) (ISO 10884) 114 114NIVEAU DE PUISSANCE SONORE MESURÉ LwAav (dBA) (ISO 10884) 113 113VIBRATIONES TETE FIL NYLON (ISO 7916) (m/s2) MAX-MIN 8,2-1,8 8,2-1,7VIBRATIONES LAME (ISO 7916) (m/s2) MAX-MIN 9,05-1,8 9,05-1,7
C TECHNISCHE DATENHUBRAUM (cm3) 34 38BOHRUNG X HUB (mm) 38x30 40x30LEISTUNG (Kw) 1,2 1,3HÖCHSTDREHZAHL (min-1) 8.000 8.000OBERE LEERLAUFDREHZAHL (min-1) 10.000 10.000LEERLAUFDREHZAHL (min-1) 2.800 2.800DREHZAHL SCHLAGBLATTWELLE (min-1) 7.700 7.700ANZUGSMOMENT SICHERUNGSMUTTER (Nm) 17 17TROCKENGEWICHT (Kg) 7,1 7,3TANKINHALT (cm3) 900 900SCHALLDRUCK (AM OHR DES BENUTZERS) LpAav (dBA) (ISO 7917) 97 97SCHALLLEISTUNGS - STUFE GEWÄHRLEISTET LwAav (dBA) (ISO 10884) 114 114SCHALLLEISTUNGSSTUFE GEMESSEN LwAav (dBA) (ISO 10884) 113 113FADENKOPFVIBRATIONEN (ISO 7916) (m/s2 )MAX-MIN 8,2-1,8 8,2-1,7SCHLAGBLATTVIBRATIONEN (ISO 7916) (m/s2) MAX-MIN 9,05-1,8 9,05-1,7
DISPLACEMENT (cm3) 34 38BORE AND STROKE (mm) 38x30 40x30ENGINE OUTPUT (Kw) 1,2 1,3ENGINE SPEED AT MAX POWER (min-1) 8.000 8.000MAXIMUM SPEED, NO LOAD (min-1) 10.000 10.000MINIMUM SPEED (min-1) 2.800 2.800BLADE SHAFT SPEED (min-1) 7.700 7.700BLADE LOCKING NUT TIGHTENING TORQUE (Nm) 17 17DRY WEIGHT (kg) 7,1 7,3FUEL TANK CAPACITY (cm3) 900 900SOUND PRESSURE LEVEL (AT THE OPERATOR’S EAR) LpAav (dBA) (ISO7917) 97 97GUARANTEED SOUND POWER LEVEL LwAav (dBA) (ISO 10884) 114 114MEASURED SOUND POWER LEVEL LwAav (dBA) (ISO 10884) 113 113VIBRATIONS LEVEL STRING HEAD (ISO 7916) (m/s2) MAX-MIN 8,2-1,8 8,2-1,7VIBRATIONS LEVEL BLADE (ISO 7916) (m/s2) MAX-MIN 9,05-1,8 9,05-1,7
1
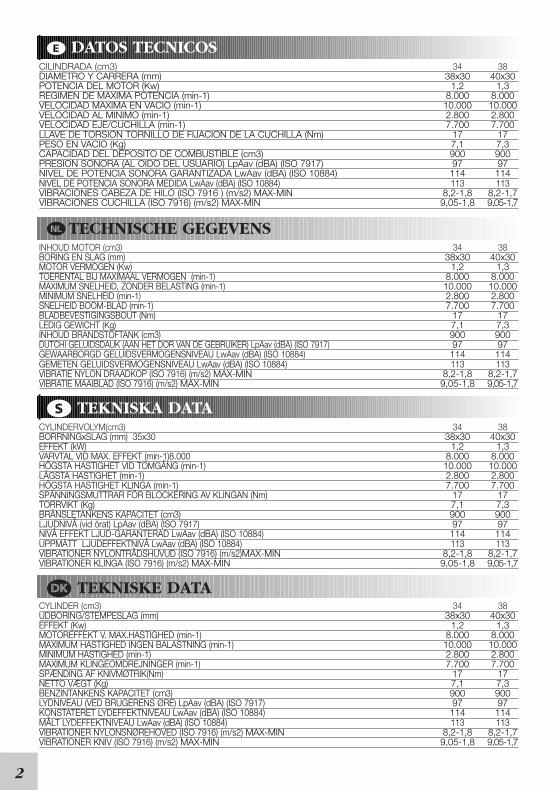
e DATOS TECNICOSCILINDRADA (cm3) 34 38DIAMETRO Y CARRERA (mm) 38x30 40x30POTENCIA DEL MOTOR (Kw) 1,2 1,3REGIMEN DE MAXIMA POTENCIA (min-1) 8.000 8.000VELOCIDAD MAXIMA EN VACIO (min-1) 10.000 10.000VELOCIDAD AL MINIMO (min-1) 2.800 2.800VELOCIDAD EJE/CUCHILLA (min-1) 7.700 7.700LLAVE DE TORSION TORNILLO DE FIJACION DE LA CUCHILLA (Nm) 17 17PESO EN VACIO (Kg) 7,1 7,3CAPACIDAD DEL DEPOSITO DE COMBUSTIBLE (cm3) 900 900PRESION SONORA (AL OIDO DEL USUARIO) LpAav (dBA) (ISO 7917) 97 97NIVEL DE POTENCIA SONORA GARANTIZADA LwAav (dBA) (ISO 10884) 114 114NIVEL DE POTENCIA SONORA MEDIDA LwAav (dBA) (ISO 10884) 113 113VIBRACIONES CABEZA DE HILO (ISO 7916 ) (m/s2) MAX-MIN 8,2-1,8 8,2-1,7VIBRACIONES CUCHILLA (ISO 7916) (m/s2) MAX-MIN 9,05-1,8 9,05-1,7
h TECHNISCHE GEGEVENSINHOUD MOTOR (cm3) 34 38BORING EN SLAG (mm) 38x30 40x30MOTOR VERMOGEN (Kw) 1,2 1,3TOERENTAL BIJ MAXIMAAL VERMOGEN (min-1) 8.000 8.000MAXIMUM SNELHEID, ZONDER BELASTING (min-1) 10.000 10.000MINIMUM SNELHEID (min-1) 2.800 2.800SNELHEID BOOM-BLAD (min-1) 7.700 7.700BLADBEVESTIGINGSBOUT (Nm) 17 17LEDIG GEWICHT (Kg) 7,1 7,3INHOUD BRANDSTOFTANK (cm3) 900 900DUTCHI GELUIDSDAUK (AAN HET DOR VAN DE GEBRUIKER) LpAav (dBA) (ISO 7917) 97 97GEWAARBORGD GELUIDSVERMOGENSNIVEAU LwAav (dBA) (ISO 10884) 114 114GEMETEN GELUIDSVERMOGENSNIVEAU LwAav (dBA) (ISO 10884) 113 113VIBRATIE NYLON DRAADKOP (ISO 7916) (m/s2) MAX-MIN 8,2-1,8 8,2-1,7VIBRATIE MAAIBLAD (ISO 7916) (m/s2) MAX-MIN 9,05-1,8 9,05-1,7
s TEKNISKA DATACYLINDERVOLYM(cm3) 34 38BORRNINGxSLAG (mm) 35x30 38x30 40x30EFFEKT (kW) 1,2 1,3VARVTAL VID MAX. EFFEKT (min-1)8.000 8.000 8.000HÖGSTA HASTIGHET VID TOMGÅNG (min-1) 10.000 10.000LÄGSTA HASTIGHET (min-1) 2.800 2.800HÖGSTA HASTIGHET KLINGA (min-1) 7.700 7.700SPÄNNINGSMUTTRAR FÖR BLOCKERING AV KLINGAN (Nm) 17 17TORRVIKT (Kg) 7,1 7,3BRÄNSLETANKENS KAPACITET (cm3) 900 900LJUDNIVÅ (vid örat) LpAav (dBA) (ISO 7917) 97 97NIVÅ EFFEKT LJUD-GARANTERAD LwAav (dBA) (ISO 10884) 114 114UPPMÄTT LJUDEFFEKTNIVÅ LwAav (dBA) (ISO 10884) 113 113VIBRATIONER NYLONTRÅDSHUVUD (ISO 7916) (m/s2)MAX-MIN 8,2-1,8 8,2-1,7VIBRATIONER KLINGA (ISO 7916) (m/s2) MAX-MIN 9,05-1,8 9,05-1,7
q TEKNISKE DATACYLINDER (cm3) 34 38UDBORING/STEMPESLAG (mm) 38x30 40x30EFFEKT (Kw) 1,2 1,3MOTOREFFEKT V. MAX.HASTIGHED (min-1) 8.000 8.000MAXIMUM HASTIGHED INGEN BALASTNING (min-1) 10.000 10.000MINIMUM HASTIGHED (min-1) 2.800 2.800MAXIMUM KLINGEOMDREJNINGER (min-1) 7.700 7.700SPÆNDING AF KNIVMØTRIK(Nm) 17 17NETTO VÆGT (Kg) 7,1 7,3BENZINTANKENS KAPACITET (cm3) 900 900LYDNIVEAU (VED BRUGERENS ØRE) LpAav (dBA) (ISO 7917) 97 97KONSTATERET LYDEFFEKTNIVEAU LwAav (dBA) (ISO 10884) 114 114MÅLT LYDEFFEKTNIVEAU LwAav (dBA) (ISO 10884) 113 113VIBRATIONER NYLONSNØREHOVED (ISO 7916) (m/s2) MAX-MIN 8,2-1,8 8,2-1,7VIBRATIONER KNIV (ISO 7916) (m/s2) MAX-MIN 9,05-1,8 9,05-1,7
2
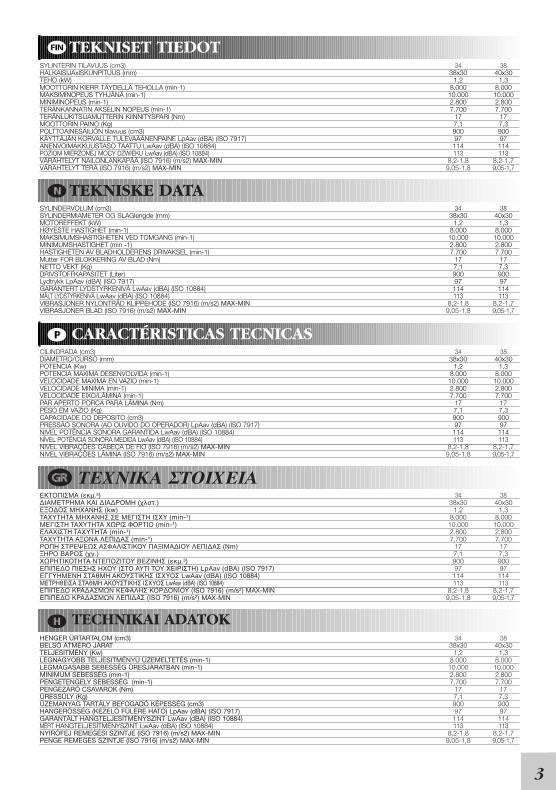
v TEKNISET TIEDOTSYLINTERIN TILAVUUS (cm3) 34 38HALKAISIJAxISKUNPITUUS (mm) 38x30 40x30TEHO (kW) 1,2 1,3MOOTTORIN KIERR TÄYDELLÄ TEHOLLA (min-1) 8.000 8.000MAKSIMINOPEUS TYHJÄNÄ (min-1) 10.000 10.000MINIMINOPEUS (min-1) 2.800 2.800TERÄNKANNATIN AKSELIN NOPEUS (min-1) 7.700 7.700TERÄNLUKITSIJAMUTTERIN KIINNITYSPARI (Nm) 17 17MOOTTORIN PAINO (Kg) 7,1 7,3POLTTOAINESÄILIÖN tilavuus (cm3) 900 900KÄYTTÄJÄN KORVALLE TULEVAÄÄNENPAINE LpAav (dBA) (ISO 7917) 97 97ÄNENVOIMAKKUUSTASO TAATTU LwAav (dBA) (ISO 10884) 114 114POZIOM MIERZONEJ MOCY DZWIEKU LwAav (dBA) (ISO 10884) 113 113VÄRÄHTELYT NAILONLANKAPÄÄ (ISO 7916) (m/s2) MAX-MIN 8,2-1,8 8,2-1,7VÄRÄHTELYT TERÄ (ISO 7916) (m/s2) MAX-MIN 9,05-1,8 9,05-1,7
TEKNISKE DATA
p CARACTÉRISTICAS TECNICASCILINDRADA (cm3) 34 38DIAMETRO/CURSO (mm) 38x30 40x30POTENCIA (Kw) 1,2 1,3POTENCIA MAXIMA DESENVOLVIDA (min-1) 8.000 8.000VELOCIDADE MAXIMA EN VAZIO (min-1) 10.000 10.000VELOCIDADE MINIMA (min-1) 2.800 2.800VELOCIDADE EIXO/LÂMINA (min-1) 7.700 7.700PAR APERTO PORCA PARA LÂMINA (Nm) 17 17PESO EM VAZIO (Kg) 7,1 7,3CAPACIDADE DO DEPOSITO (cm3) 900 900PRESSÃO SONORA (AO OUVIDO DO OPERADOR) LpAav (dBA) (ISO 7917) 97 97NIVEL POTÊNCIA SONORA GARANTIDA LwAav (dBA) (ISO 10884) 114 114NÍVEL POTÊNCIA SONORA MEDIDA LwAav (dBA) (ISO 10884) 113 113NIVEL VIBRAÇÕES CABEÇA DE FIO (ISO 7916) (m/s2) MAX-MIN 8,2-1,8 8,2-1,7NIVEL VIBRAÇÕES LÂMINA (ISO 7916) (m/s2) MAX-MIN 9,05-1,8 9,05-1,7
k TEXNIKA ΣTOIXEIAEKTOΠIΣMA (εκµ.³) 34 38∆IAMETPHMA KAI ∆IA∆POMH (λστ.) 38x30 40x30EO∆OΣ MHXANHΣ (kw) 1,2 1,3TAXYTHTA MHXANHΣ ΣE MEΓIΣTH IΣXY (min-¹) 8.000 8.000MEΓIΣTH TAXYTHTA XΩPIΣ ΦOPTIO (min-¹) 10.000 10.000EΛAXIΣTH TAXYTHTA (min-¹) 2.800 2.800TAXYTHTA AONA ΛEΠI∆AΣ (min-¹) 7.700 7.700POΠH ΣTPEΨEΩΣ AΣΦAΛIΣTIKOY ΠAIMA∆IOY ΛEΠI∆AΣ (Nm) 17 17HPO BAPOΣ (γ.) 7,1 7,3XΩPHTIKOTHTA NTEΠOZITOY BEZINHΣ (εκµ.³) 900 900EΠIΠE∆O ΠIEΣHΣ HXOY (ΣTO AYTI TOY XEIPIΣTH) LpAav (dBA) (ISO 7917) 97 97EΓΓYHMENH ΣTAθMH AKOYΣTIKHΣ IΣXYOΣ LwAav (dBA) (ISO 10884) 114 114METPHθEIΣA ΣTAθMH AKOYΣTIKHΣ IΣXYOΣ LwAav (dBA) (ISO 10884) 113 113EΠIΠE∆O KPA∆AΣMΩN KEΦAΛHΣ KOP∆ONIOY (ISO 7916) (m/s²) MAX-MIN 8,2-1,8 8,2-1,7EΠIΠE∆O KPA∆AΣMΩN ΛEΠI∆AΣ (ISO 7916) (m/s²) MAX-MIN 9,05-1,8 9,05-1,7
SYLINDERVOLUM (cm3) 34 38SYLINDERMIAMETER OG SLAGlengde (mm) 38x30 40x30MOTOREFFEKT (kW) 1,2 1,3HØYESTE HASTIGHET (min-1) 8.000 8.000MAKSIMUMSHASTIGHETEN VED TOMGANG (min-1) 10.000 10.000MINIMUMSHASTIGHET (min -1) 2.800 2.800HASTIGHETEN AV BLADHOLDERENS DRIVAKSEL (min-1) 7.700 7.700Mutter FOR BLOKKERING AV BLAD (Nm) 17 17NETTO VEKT (Kg) 7,1 7,3DRIVSTOFFKAPASITET (Liter) 900 900Lydtrykk LpAav (dBA) (ISO 7917) 97 97GARANTERT LYDSTYRKENIVÅ LwAav (dBA) (ISO 10884) 114 114MÅLT LYDSTYRKENIVÅ LwAav (dBA) (ISO 10884) 113 113VIBRASJONER NYLONTRÅD KLIPPEHODE (ISO 7916) (m/s2) MAX-MIN 8,2-1,8 8,2-1,7VIBRASJONER BLAD (ISO 7916) (m/s2) MAX-MIN 9,05-1,8 9,05-1,7
3
í TECHNIKAI ADATOKHENGER ÜRTARTALOM (cm3) 34 38BELSÖ ÁTMÉRÖ JÁRAT 38x30 40x30TELJESITMÉNY (Kw) 1,2 1,3LEGNAGYOBB TELJESITMÉNYÜ ÜZEMELTETÉS (min-1) 8.000 8.000LEGMAGASABB SEBESSÉG ÜRESJÁRATBAN (min-1) 10.000 10.000MINIMUM SEBESSÉG (min-1) 2.800 2.800PENGETENGELY SEBESSÉG (min-1) 7.700 7.700PENGEZÁRÓ CSAVAROK (Nm) 17 17ÜRESSÚLY (Kg) 7,1 7,3ÜZEMANYAG TARTÁLY BEFOGADÓ KÉPESSÉG (cm3) 900 900HANGERÖSSÉG (KEZELÖ FÜLÉRE HATÓ) LpAav (dBA) (ISO 7917) 97 97GARANTÁLT HANGTELJESÍTMÉNYSZINT LwAav (dBA) (ISO 10884) 114 114MÉRT HANGTELJESÍTMÉNYSZINT LwAav (dBA) (ISO 10884) 113 113NYIRÓFEJ REMEGÉSI SZINTJE (ISO 7916) (m/s2) MAX-MIN 8,2-1,8 8,2-1,7PENGE REMEGÉS SZINTJE (ISO 7916) (m/s2) MAX-MIN 9,05-1,8 9,05-1,7

Do not smoke while re-fuellingor while operating the trimmer
Wear safety clothing: 1 Approved safety glasses or face shield / 2 Approved safety helmet / 3Approved ear defender / 4 Approved gloves / 5 Approved safety footwear
Read operator’smanual carefully
Non fumate durante ilrifornimento e l’utilizzo
Abbigliamento di sicurezza: 1 Occhiali di protezione o visiera protettiva approvati / 2 Casco protettivoomologato / 3 Paraorecchi di protezione / 4 Guanti approvati / 5 Stivali di sicurezza approvati
Leggere attentamentequesto manuale
Ne pas fumer pendant leremplissage et pendant l’utilisation
Porter des vêtements de protection: 1 Lunettes ou visière de sécurité approuvés / 2 Casque desécurité homologué / 3 Protecteur de l’ouie approuvé / 4 Gants approuvé / 5 Chaussures de sécurité
Lire attentivement cemanuel
Rauchen Sie weder beimAuftanken noch bei der Arbeit
Lesen Sie das Handbuchaufmerksam durch
No fume mientras reposta combustibleo mientras que utiliza el desbrozador
Veiligheidskleding: 1 Goedgekeude veiligheidsbril of gezichtsbeschemer / 2 Gekeurde veilicheidshelm /3 Gekeurde oor beschermers / 4 Gekeurde handschoenen / 5 Geleude veiligheidsschoenen
Rökning förbjuden under påfyllningoch under användning
Använd skyddeskläder: 1 Skyddsglasögon eller godkänt skyddsvisir / 2 Godkänd skyddshjälm /3Godkända öronskydd / 4 Godkända handskar / 5 Godkända skyddsstövlar
Läs bruksanvisningennoggrant
Ifør dem sikkerheds beklædning: 1 Godkendte sikkerhendsbriller eller visir / 2 Godkendtsikkerhendshjelm / 3 Godkendte høreværn / 4 Godkendte handsker / 5 Godkendt sikkerhedsstøvler
Læs brugsanvisningenomhyggeligt
Älä tupakoi laittaessasi polttoainettatai koneen käytön aikana
Puo päällesi turvavaatteet 1 hyväksytyt suojalasit tai kasvosuojus / 2 hyväksytty turvakypärä / 3hyväksytty kuulonsuojain / 4 hyväksytyt käsineet / 5 hyväksytyt turvakongät
Lue tämä ohjekirjanenhuolellisesti
Røking forbudt ved fylling avbensin og under bruk.
Tilos tankolás közbendohányozni
Fémpengékhasználata tilos
Pengék maximálissebessége
Figyelmeztetésfigyelem
Figyelem a pengékreakciójára
Figyelem az idegenanyagok kilövelésére
Biztonságitávolság
Nyitott folytószelep(meleg motor esetén)
Zárt folytószelep(hideg motor esetén).
Bruk beskyttelsesklær: 1 Bruk godkjente beskyttelsesbriller eller ansiktsskjerm / 2 Godkjentbeskyttelseshjelm / 3 Godkjent hørselsvern / 4 Godkjente hansker / 5 Godkjente beskyttelsesstøvler
Les nøye dennemanual
Não fumar durante o abastecimentoe durante a utilização
Vestuário de segurança: 1 Óculos de proteção ou viseira protetora aprovados / 2 Capacete protetorhomologado / 3 Pára -orelhas de proteçáo aprovadas / 4 Luvas aprovadas / 5 Botas de segurança aprovadas
Ler atentamente estemanual∆ια?άστε τις BδηγίεςπρBσεκτικά
Do not use Maximum blade Warning Blade Beware of Maximum Choke fully opened Choke closed metal blades speed Caution thrust projected objects safety distance (hot start / run) (cold start)
Non usare lame Velocità massima Avvertimento Attenzione reazione Attenzione al Distanza di Farfalla aria aperta Farfalla aria chiusa metalliche della lama Attenzione della lama materiale proiettato sicurezza (Avviamento a caldo) (Avviamento a freddo)
Ne pas utiliser de Plein régimeAttention
Attention aux Attention aux Distance minimum Levier starter ouvert, Levier starter fermé lames métalliques de la lame réactions de la lame projections de sécurité marche (démarrage à chaud) (démarrage à froid)Keine Metallschlag- Zulässige Drehzahl Achtung Auf den Rückstoß des Auf hochgeschleuderte
SicherheitsabstandLuftklappe offen Luftklappe geschlossen
blätter verwenden des Schalgblattes Vorsicht Schlagblattes achtgeben Gegenstände achtgeben (Starten bei warmem Motor) (Starten bei kaltem Motor)No utilice Velocidad máxima Advertencia Cuidado con la Tenga cuidado con Distancia mínima Estrangulador totalmente Estrangulador cerrado
cuchillas metálicas de la cuchilla Precaución reacción de la cuchilla los objetos proyectados de seguridad abierto (Arranque en caliente) (Arranque en frio)Gebruik geen Maximum toerental Waaschuwing Pas op voor terugslag Pas op voor Minimale Chokeklep geopend (Het Chokeklop gesloten (Het
metalen maaibladen maaiblad Lep op van het maaiblad uitstekende voorwerpen veiligheidsafstand starten van een warme motor) starten van een koude motor)Anvånd inte Klingans hogsta Upplysning Uppmarksamma Se upp for Säkert Choken helt öppen Choken stängdmetallkliga hastighet Varning klingans reaktion ivägslungade föremål avstånd (start med varm motorn) (start med kall motor)Älä käytä Terän Varoitus Varo terän Varo sinkoavia
TurvaetäisyysIlmaläppä täysin auki Ilmaläppä kiinni
metalliteriä maksiminopeus Huomio reaktiota materiaaleja (Lämpimän moottorin käynnistys) (Kylmän moottorin käynnistys)Brug ikke Max. kniv Advarsel Kniv Pas på Minimum Choker helt åben Choker lukket
metal knive hastighed reaktion tilbagekastede genstande sikkerheds afstand (Start af varm motor) (Start af kold motor)Ikke bruk Maksimumshastigheten Advarsel “Vær Pass opp for Pass opp for
SikkerhetsavstandChoken er åpen Choken er helt stengt
metallblad av bladet Forsiktig” reaksjonen av bladet sprutende materiale (Start av varm motor) (Start av kald motor)Não utilize Velocidade Atenção Atençao as Atençao ao Distancia Alavanca do starter aberto Alavanca do starter
lâminas metalicas máxima da lâmina reacções da lâmina material projetado de segurança (Arranque a quente) fechada (Arranque a frio)Mη ρησιµBπBιείτε Mέγιστη ΠρBειδBπBίηση ΠρBωστική ΠρBσέετε απK Mέγιστη απKσταση TσBκ πλήρως ανBικτK TσBκ κλειστKµεταλλικές λεπίδες ταύτητα λεπίδας KίνδυνBς ισύς λεπίδας πρBεOέBντα αντικείµενα ασPαλείας (θερµή εκκίνηση/λειτBυργία) (ψυρή εκκίνηση)
MAX. 0000
1 2 3 4 5 6
g
i
f
C
e
h
s
q
v
p
k
≤
g
i
f
C
e
h
s
q
v
p
k
≤
Llevar ropa de seguridad: 1 Gafas de protección o visera de protección aprobadas / 2 Casco de seguridadhomologado / 3 Protectores de oídos homologados / 4 Guantes aprobados / 5 Botas de seguridad homologadas
Gebruiksaanwijzingzorgvuldig lezen
Bij het werken met de machine enhet vullen van de tank niet roken
ΦBράτε πρBστατευτικά ρBύα: 1 Eγκεκριµένα πρBστατευτικά γυαλιά ή ασπίδα πρBσώπBυ / 2 EγκεκριµένBπρBστατευτικK κράνBς / 3 Eγκεκριµένες ωτBασπίδες / 4 Eγκεκριµένα γάντια / 5 Eγκεκριµένη πρBστατευτικήυπKδηση
Mην καπνίWετε Kταν ?άWετε καύσιµB ή Kταν ρησιµBπBιείτε τB εργαλείB
Lea cuidadosamente elmanual de instrucciones
A használati utasitást kérjükfigyelemmel elolvasni
Schutzkleidung: 1 Zugelassene Schutzbrille oder Gesichtsschutz / 2 Zugelassener Schutzhelm / 3Zugelassener Ohrenschutz / 4 Zugelassene Arbeitshandschuhe / 5 Zugelassene Sicherheitsschuhe
Balesetvédelmi felszerelés: 1) védöszemüveg, vagy elöírt védömaszk 2) elöírt védösisak 3) fülvédö 4) elöírt kesztyü 5) elöírt védöcsizma
4
Ryg ikke under påfyldning afbenzin eller når maskinen betjenes

5
g Due to a constant product improvement programme, the factoryreserves the right to modify technical details mentioned in thismanual without prior notice.
i La casa produttrice si riserva la possibilità di variarecaratteristiche e dati del presente manuale in qualunquemomento e senza preavviso.
f La Maison se réserve la possibilité de changer descaractéristiques et des données de ce manuel à n’importe quelmoment et sans préavis.
C Im Sinne des Fortschritts behält sich der Hersteller das Rechtvor, technische Änderungen ohne vorherigen Hinweisdurchzuführen.
e La firma productora se reserva la posibilidad de cambiar lascaracterísticas y datos del presente manual en cualquiermomento y sin previo aviso.
h Door konstante produkt ontwikkeling behoud de fabrikant zichhet recht voor om rechnische specificaties zoals vermeld in dezehandleiding te veranderen zonder biervan vooraf bericht tegeven.
s Tilverkaren reserverar sig rätten att ändra fakta och uppgifter urhandboken utan förvarning.
q Producenten forbeholder sig ret til ændringer, hvad angårkarakteristika og data i nærværende instruktion, når som helstog uden varsel.
v Jatkuvan tuotteen parannusohjelman tähden valmistaja pidättääoikeuden vaihtaa ilman ennakkovaroitusta tässä ohjekirjasessamainittuja teknisiä yksityiskohtia.
Produsenten forbeholder seg all rett og mulighet til å forandretekniske detaljer i denne manualen uten forhåndsvarsel.
G A casa productora se reserva a possibilidade de variarcaracterísticas e dados do presente manual em qualquermomento e sen aviso prévio.
@ ΛKγω πρBγράµµατBς συνεBύς ?ελτίωσης πρBϊKντων, τBεργBστάσιB επιPυλάσσεται τBυ δικαιώµατBς νατρBπBπBιεί τις τενικές λεπτBµέρειες πBυ αναPέρBνταιστB εγειρίδιB αυτK ωρίς πρBηγBύµενη ειδBπBίηση.
í A gyártó cég fenntartja a jogot arra, hogy a használatiutasitásban megadott adatokon és technikai tulajdonságokonbármikor és elözetes bejelentés nélkül változtasson.

1) ENGINE2) SHAFT3) THROTTLE TRIGGER4) THROTTLE ADVANCE5) RIGHT CONTROL HANDLE6) BLADE7) NYLON STRING HEAD8) STOP SWITCH 9) CHOKE LEVER
10) STARTER HANDLE11) HARNESS RING
12) SPARK PLUG13) AIR FILTER COVER14) FUEL TANK CAP15) MUFFLER SHIELD16) ENGINE SHAFT JOINT17) FRONT HANDLE18) REAR CONTROL GRIP19) SAFETY GUARD20) SAFETY GRIP21) SAFETY POLE BARRIER
1) Make sure all operators study this manualcarefully before using the trimmer; only use thismachine for usage specifically mentioned inthis manual.Never allow children to use the trimmer.
2) When working with the trimmer wear suitableclothes: a) Close fitting protective clothes ( do notwear short trousers or loose clothes). b) Safetyshoes (do not wear sandals and do not workbarefoot). c) Heavy-duty gloves. d) Safety faceshield or goggles. Ensure you peel off theprotective films, if existing, from the see -through plastic. e) Ear protection. f) Headprotection when using circular saw blades. Makesure you know how to stop the engine in anemergency (see the section STARTING ANDSTOPPING ENGINE). Never use the trimmerwhen tired, physically indisposed or under theeffect of alcohol, certain medicines or otherdrugs. Be careful of the rotating cuttingattachment and hot surfaces on the unit.
3) Prolonged use of this product or othermachines exposing the operator to vibrationmay produce Whitefinger’s disease (Raynaud’sPhenomenon). This may reduce the hands’ability to feel and regulate temperature andmay produce general numbness. Continual orregular users should therefore monitor closelythe condition of their hands or fingers. If any ofthe symptoms appear, seek immediate medicaladvice. Always hold the trimmer firmly withboth hands. When working maintain a firmfoothold. The trimmer must be used exclusivelyas recommended (see section SAFETY USAGE).
4) Do not carry the trimmer while the engine isrunning even for short distances; switch off theengine and carry the unit with the cutting headbehind you. When carrying the trimmer in avehicle, secure it to avoid fuel leakage. Alwaysempty the fuel tank before transporting the unit.ATTENTION: For your safety the blade must bekept at all times in its proper case during transportand storage. Start the trimmer on a flat surface.When starting the unit, ensure you have a firm
footing. Make sure the blade or the nylon stringhead does not touch the ground or any obstacle.
5) PRECAUTIONS AGAINST FIRE: do not operatethe trimmer near fire or spilled petrol. Do not runthe engine in closed or poorly ventilated areas.EXHAUST GASES ARE POISONOUS WHENINHALED, THEY CAN CAUSE SUFFOCATIONAND DEATH.
After refuelling always wipe off any spilled fuel.Do not smoke during this operation. Start theengine far away from the refuelling area and fromfuel containers (minimum distance 3 meters).Do not refuel while the engine is still running.
6) Keep people and animals away from workingarea (minimum distance 15 meters). If somebodyshould approach you, turn the engine off andstop the blade or the rotating head (see chapterSTARTING AND STOPPING THE ENGINE) asduring operation the blade or the nylon stringhead might project grass, grit, or other debris.The blade is sharp, be careful even if handling itwhen the engine is off.Wear heavy-duty gloves. Turn the engine offand wait for rotating parts to stop completelybefore working on the machine or beforetouching the blade or the string head above allto remove possible entangled material.DO NOT USE THE TRIMMER AT ALL IF THESPECIFIED SAFETY GUARD IS NOT FIRMLYATTACHED (see sections SAFETY USAGE andBLADES AND NYLON STRING HEADASSEMBLY). Pay careful attention to safetyrecommendations as you might put your life orsomebody else’s in danger as a result of: a)possible contact with cutting or rotating parts.b) possibility of projection of various objects.WARNING: do not start engine if it is notattached to the shaft as the clutch mightdisintegrate. For units equipped with a clutch,be sure the cutting attachment stops turningwhen the engine idles.
A. GENERAL DESCRIPTION
B. SAFETY RULES
A
6

This product must be held to the right of theoperator’s body. This will ensure exhaust fumes are directed awayfrom the operator and will not be obstructed bythe operator’s clothing. If you have not used atrimmer before, spend some time in becomingfamiliar with the controls and method of usagebefore operation.Check the machine carefully before using it.Make sure that there are no loosened screws,damaged parts or fuel leakages.Replace damaged or excessively wornaccessories (blades, string heads, guards).Ensure all maintenance or repair work is carriedout by an authorised service center.N.B. In order to maintain performance and safety,be sure to use original spare parts andaccessories.Avoid using the trimmer over excessively longperiods of time.Excessive amounts of vibration can be harmful.1) Remove from the working area grit, debris,
ropes, metal parts or any other object whichmight get entangled around the rotating partsor be dangerously projected. Use only the correct accessory recommendedfor the type of vegetation to be cut. Do not letthe rotating blade contact any foreign objectsuch as stones, rocks, cans etc.Secure hair to keep it above shoulder height.Before starting to work fit the harness. Adjustharness with the buckle so that the trimmer iswell balanced on your right side and the bladeor string head is parallel to the ground. Alwaysmaintain a firm foothold and a good balancewhile using the machine. Do not movebackwards while you work as obstacles maynot be visible.The fitting of the safety pole barrier isobligatory on units equipped with a deltashaped handle when used with a metal blade.The purpose of this safety pole barrier is tomaintain a safe distance between the metalblade and the user under all normal orexceptional circumstances.
2) Harness ring (B) must never be moved from itsoriginal position to avoid unbalancing the unit. Front handles can be separately adjusted tomake usage easier on units fitted with “U”shaped handles.
3) The following accessories can be assembled toyour trimmer: a) blade, b) nylon string head.Do not attach any blade to a unit withoutproper installation of all required parts. Failureto use the proper parts can cause the blade to
fly off and seriously injure the operator and/orbystanders.a) WHEN USING A BLADE ENSURE THECORRECT GUARD IS FITTED.b) WHEN USING A NYLON STRING HEADENSURE THE CORRECT GUARD IS FITTED.When using the unit always hold the front partof the machine (blade or nylon string head)below your waist. NYLON STRING HEAD:Always make sure it has been correctlyassembled and fitted.The nylon head is suitable to cut grass andweeds wherever there might be obstacles liketrees, fences or walls. The nylon string head also reduces thelikelihood of damaging small plants and treesbark. Only use flexible, nonfilament nylon line in thenylon line head as specified by themanufacturer. Never use metallic line whichcould break off and become a dangerousprojectile.BLADE:Always make sure it has been correctly fitted.When fitting or changing a cutting device,ensure you follow the instructions in thesection “Blade or nylon string head assembly”with extreme precision. Fit these cuttingdevices using all and only the parts asdescribed, and in the correct order.
4) BLADES: you can cut any type of grass,brushwood or shrub.Operate the machine like a sickle alwayscutting at full throttle.
5) WARNING: always use a well sharpened blade.A blade with worn teeth besides providingpoor performance might also generate asudden thrust. This can result in a violentsideways kick caused when the blade touchesagainst wood or solid bodies, such thrustmight then cause the operator to loose controlof the machine itself. Never attempt to workwith a damaged blade but replace it with anew one.THRUST: can occur when using any type ofcircular blade within the risk area: therefore itis advisable to cut using the remaining area ofthe blade.CIRCULAR SAW BLADE: it can be used to cutsappling, small trees with a diameter up to 7cm., to clean shrubs.
WARNING: IF A METAL 24-80 TOOTH BLADEIS USED (A TOOTH SAW BLADE) A DOUBLESHOULDER HARNESS AND A SAFETY
C. SAFETY USAGE
7
A
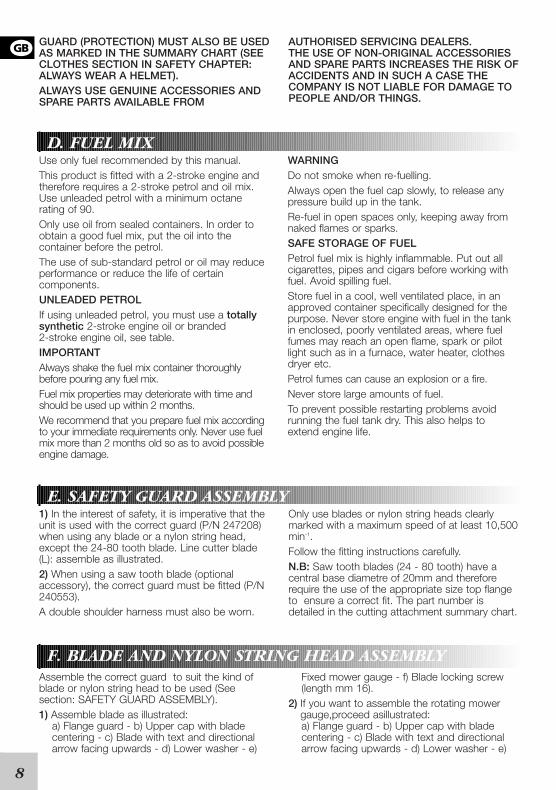
F. BLADE AND NYLON STRING HEAD ASSEMBLYAssemble the correct guard to suit the kind ofblade or nylon string head to be used (Seesection: SAFETY GUARD ASSEMBLY).1) Assemble blade as illustrated:
a) Flange guard - b) Upper cap with bladecentering - c) Blade with text and directionalarrow facing upwards - d) Lower washer - e)
Fixed mower gauge - f) Blade locking screw(length mm 16).
2) If you want to assemble the rotating mowergauge,proceed asillustrated:a) Flange guard - b) Upper cap with bladecentering - c) Blade with text and directionalarrow facing upwards - d) Lower washer - e)
E. SAFETY GUARD ASSEMBLY1) In the interest of safety, it is imperative that theunit is used with the correct guard (P/N 247208)when using any blade or a nylon string head,except the 24-80 tooth blade. Line cutter blade(L): assemble as illustrated.2) When using a saw tooth blade (optionalaccessory), the correct guard must be fitted (P/N240553).A double shoulder harness must also be worn.
Only use blades or nylon string heads clearlymarked with a maximum speed of at least 10,500min-1.Follow the fitting instructions carefully.N.B: Saw tooth blades (24 - 80 tooth) have acentral base diametre of 20mm and thereforerequire the use of the appropriate size top flangeto ensure a correct fit. The part number isdetailed in the cutting attachment summary chart.
Use only fuel recommended by this manual.This product is fitted with a 2-stroke engine andtherefore requires a 2-stroke petrol and oil mix.Use unleaded petrol with a minimum octanerating of 90.Only use oil from sealed containers. In order toobtain a good fuel mix, put the oil into thecontainer before the petrol.The use of sub-standard petrol or oil may reduceperformance or reduce the life of certaincomponents.UNLEADED PETROLIf using unleaded petrol, you must use a totallysynthetic 2-stroke engine oil or branded 2-stroke engine oil, see table.IMPORTANTAlways shake the fuel mix container thoroughlybefore pouring any fuel mix.Fuel mix properties may deteriorate with time andshould be used up within 2 months.We recommend that you prepare fuel mix accordingto your immediate requirements only. Never use fuelmix more than 2 months old so as to avoid possibleengine damage.
WARNINGDo not smoke when re-fuelling.Always open the fuel cap slowly, to release anypressure build up in the tank.Re-fuel in open spaces only, keeping away fromnaked flames or sparks.SAFE STORAGE OF FUELPetrol fuel mix is highly inflammable. Put out allcigarettes, pipes and cigars before working withfuel. Avoid spilling fuel.Store fuel in a cool, well ventilated place, in anapproved container specifically designed for thepurpose. Never store engine with fuel in the tankin enclosed, poorly ventilated areas, where fuelfumes may reach an open flame, spark or pilotlight such as in a furnace, water heater, clothesdryer etc.Petrol fumes can cause an explosion or a fire.Never store large amounts of fuel.To prevent possible restarting problems avoidrunning the fuel tank dry. This also helps toextend engine life.
D. FUEL MIX
GUARD (PROTECTION) MUST ALSO BE USEDAS MARKED IN THE SUMMARY CHART (SEECLOTHES SECTION IN SAFETY CHAPTER:ALWAYS WEAR A HELMET).ALWAYS USE GENUINE ACCESSORIES ANDSPARE PARTS AVAILABLE FROM
AUTHORISED SERVICING DEALERS.THE USE OF NON-ORIGINAL ACCESSORIESAND SPARE PARTS INCREASES THE RISK OFACCIDENTS AND IN SUCH A CASE THECOMPANY IS NOT LIABLE FOR DAMAGE TOPEOPLE AND/OR THINGS.
8
A

DANGER. Do not run engine without shaftattached as clutch could fly off.1) Assemble the engine onto the shaft. Make sure
the shaft is fully and correctly engaged up tothe shank, then tighten the 2 screws (A) in acriss-cross sequence.
2) Fit the end of the trigger cable connector (B)into the slot on swivel (C).
3) Adjust the screw (D) of the trigger cableconnector so that the cable can easily slide inthe opening with a play of 1 mm beforeoperating the swivel (C).Tighten now the hexagonal nut (E).
4A) Stop switch (STOP) cable: fit the connection.4B) Earth lead: connect as illustrated.
G. ENGINE/SHAFT ASSEMBLY
Spacer - f) Rotating mower gauge - g) Bladelocking screw (length mm 34,5). Replace the blade attachment bolt if damagedin any way.
3) Make sure that the blade bore opening fitsperfectly around the centering collar on theupper cap.Tighten counterclockwise.While tightening, the blade assembly can beheld fast by inserting the wrench or the screwdriversupplied into the cap and gearcase holes. To do this, rotate the cap intil the two holescoincide.
4) Assemble nylon string head as illustrated:a) Flange guard - b) Upper cap - c) Guard d)Nylon string headTighten counterclockwise.
5) While tightening, the head assembly can beheld fast by inserting the wrench or thescrewdriver supplied into the holes as alreadyshown for blade assembly.
WARNING: Please do not use the accessorynylon string head guard (item C Fig. 4 F)together with metal blades.
9
A
1) DOUBLE HANDLE Adjust and secure double handle clamp 40 cmfrom engine/shaft joint by tightening the screws(C).
2) DELTA FRONT HANDLESecure the handle in front of the label placedon the shaft 11 cm from the rear grip when
assembling nylon string head and 36 cm whenassembling metallic blades. This positionensures optimum balance and safety. Thehandle must be perpendicular to the shaft asillustrated (Fig.2).The handle bar must bemounted using all the items supplied and in theexact configuration shown in figures 1 or 2.
H. HANDLE ASSEMBLY
I. STARTING AND STOPPING THE ENGINEWARNING. First read sections: SAFETY RULES,SAFETY USAGE and SYMBOLS.COLD ENGINE STARTING1) Move stop switch to the “ON” position. 2) Depress the safety lever (S), squeeze the
accelerator trigger (A) and push the throttleadvance forwards (B). Now release theaccelerator trigger (A) and then the throttleadvance (B).WARNING: when the throttle advance isengaged, the head or blade rotates.
3) Move choke lever (E) to the closed position .4) Press the primer bulb (C) several times until
you see fuel going back to carburetor throughpipe (D). Pull starter rope until engine fires once.
5) Move choke lever (E) to the open position then pull starter rope until engine fires. Let enginerun for a few seconds holding the trimmer.Now disengage throttle advance by pullingtrigger completely. Engine will now keep onrunning at idle speed.
HOT ENGINE STARTINGSTOP switch on START position I. Trigger onidle position (released).Choke towards (open position ). Press theprimer bulb (C) several times until you see fuelgoing back to carburetor through pipe (D). Pullstarter rope.WARNING: when the throttle (B) advance isengaged, the head or blade rotates.
6) ENGINE STOPPINGPress the stop switch moving it to STOPposition 0.WARNING: when the engine is switched offrotating parts, blade or nylon string head, willkeep on rotating for a few seconds. Hold themachine until all parts come to a standstill.N.B. In an emergency the above mentioneddelay in stopping may be shortened bytouching blade parallel on the ground.

From time to time ensure all screws are tight.Replace damaged, worn, cracked or warpedblades. Always make sure nylon string head orblade have been assembled correctly (seesections NYLON STRING HEAD and BLADEASSEMBLY) and blade fastener is tightened.1) AIR FILTER CLEANING
(at least every 25 working hours).A dust clogged air filter may cause carburetorproblems. This may prevent the engine from reaching itsmaximum speed and cause high fuelconsumption and/or difficult starting. Remove filter cover as shown in figure 1.Carefully clean the inside of filter box. The filtercan also be cleaned with compressed air.
2) Every 50 working hours inject the gearcasewith gear grease under high pressure throughhole (C).
3) SPARK PLUGFrom time to time (at least every 50 hours)remove and clean the spark plug and check
the electrode gap (0,5/0,6 mm.). Replacespark plug about every 100 working hours orwhenever it is extremely encrusted. Heavilyencrusted electrodes can result from anincorrect carburetor setting or from wrong fuelmixture (too much oil in the petrol) or a poorquality of oil in the fuel mix. Check and correct.
4) FUEL FILTERTo change fuel filter remove the tank cap andpull out the filter with a piece of bent wire orlong forceps. Contact your Service Station forgeneral servicing and cleaning of internal partsat least once a year.This will reduce thepossibility of unexpected problems and willensure maximum product life and efficiency.REGULARLY: it is important, in order to avoidengine overheating, to remove dust and dirtfrom slots, gaps and from in between cylinderfins using a wooden scraper.LONG STORAGE: empty fuel tank and runengine until dry.Store trimmer in a dry place.
M. REGULAR MAINTENANCE
N. REPLACING NYLON LINE 1) Loosen the locking nut on the base of the
nylon head by turning it clockwise.2) Remove the base cover assembly.
Remove the empty spool from the housing anddiscard any remaining line.
REWINDING NEW LINE3) Prepare 2 lengths (8ft each) of 2.4 mm nylon
line. Thread 1 end of each line into the twoholes on opposite sides of the spool. Pinch theexposed ends flat with a pair of pliers toprevent them slipping through the hole.
4) Wind the two lines in the same directionaround the spool.
REASSEMBLY5) Slide the end of the two lines into the grooves
to hold the line temporarily.6) Position the spool back into the housing and
pull the line through the eyelets.7) Pull about 12cm (5ins) of line out on either side.8) Reassemble the nylon string head as
illustrated; mower gauge,spring and locking nut(tighten in an anti-clockwise direction).
9) N.B: In order to extend the nylon line as itwears down, pull the mower gaugedownwards and turn it in a clockwise directionto feed out the desired length of line.
L. CARBURETTOR ADJUSTMENTThe carburetor is adjusted for normal operationduring production. The carburetor has threeadjustment possibilities:L: The needle screw (L) governs the fuel flow at
low speed and also the acceleration from lowto full speed.To set low speed screw (L): close screw (L)turning it clockwise without forcing .Then open screw 1 full turn (counterclockwise
).If acceleration is not smooth, open another 1/8turn to increase fuel flow .
H: The needle screw (H) governs fuel flow at highspeed (throttle valve fully open).
To set high speed screw (H) : close screw (H)turning it clockwise without forcing .
Then open screw 1 full turn (counterclockwise ).If the engine speed is too high open the screwabout 1/8 turn (counterclockwise ) I: The (I IDLE) screw controls the throttle openingto govern idle speed (2,800 min-1) adjust as necessary.CAUTION: increased idle speed may cause bladeor nylon string head movement.For precise adjusting contact an authorisedservice station which offers the latest in toll, partsand technical assistance.
10
A
11
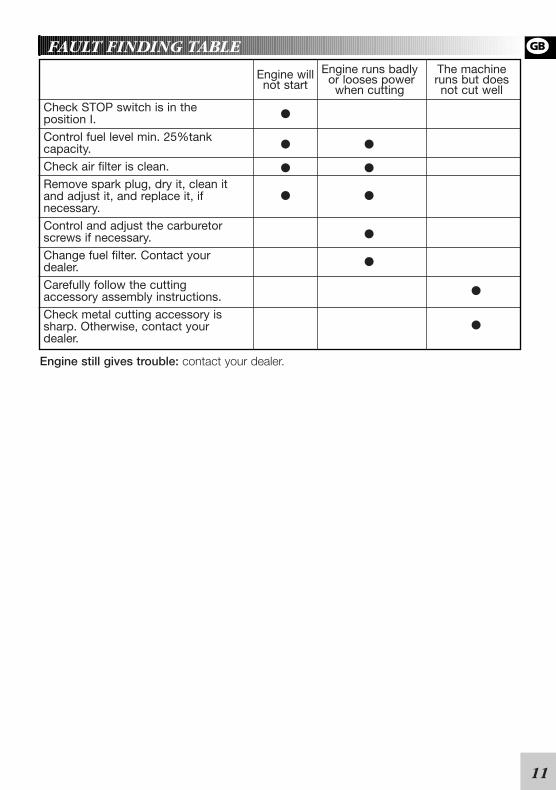
AFAULT FINDING TABLE
Engine will Engine runs badly The machinenot start or looses power runs but does
when cutting not cut well
•• •• •• •
••
••
Engine still gives trouble: contact your dealer.
Check STOP switch is in theposition I.
Control fuel level min. 25%tankcapacity.
Check air filter is clean.
Remove spark plug, dry it, clean itand adjust it, and replace it, ifnecessary.
Control and adjust the carburetorscrews if necessary.
Change fuel filter. Contact yourdealer.
Carefully follow the cuttingaccessory assembly instructions.
Check metal cutting accessory issharp. Otherwise, contact yourdealer.