
Axxium Pro UPS - lit.powerware.comlit.powerware.com/...file=m_axxiumpro_installowner_jun00.pdf · 5...
65
Axxium ™ Pro UPS MODEL SERIES 0650 3 kVA – 18 kVA, 50 and 60 Hz Uninterruptible Power System User / Installation Manual CONTAINS IMPORTANT SAFETY INSTRUCTIONS. SAVE THESE INSTRUCTIONS. Also refer to the Axxium, Axxium Pro, Fortress, and UNITY/I Safety Information manual, ILS-1081. LTM-1327B © Copyright 2000, Best Power. All rights reserved.
Transcript of Axxium Pro UPS - lit.powerware.comlit.powerware.com/...file=m_axxiumpro_installowner_jun00.pdf · 5...

Axxium™ Pro UPSMODEL SERIES 0650
3 kVA – 18 kVA, 50 and 60 Hz
Uninterruptible Power System
User / Installation Manual
CONTAINS IMPORTANT SAFETY INSTRUCTIONS.SAVE THESE INSTRUCTIONS.
Also refer to the Axxium, Axxium Pro, Fortress, and UNITY/I Safety Information manual, ILS-1081.
LTM-1327B© Copyright 2000, Best Power. All rights reserved.

2
Best Power Offices
Best PowerP.O. Box 280Necedah, WI 54646 U.S.A.Telephone: 1-608-565-7200Toll-free: 1-800-356-5794 (in U.S.A. and Canada)Fax: 1-608-565-2221International FAX: 1-608-565-7675E-mail: [email protected]
Best Power Technology Mexico, S.A. de C.V.Golfo de Riga, 34Colonia TacubaMexico D.F. 11410MEXICOTelephone: (52) 5-527-8009Toll-free: 1-800-711-8978 (in Mexico)Fax: (52) 5-399-1320E-mail: [email protected]
Invensys Energy Systems, Pte. Ltd.19 Neythal RoadSINGAPORE 628584Telephone: (65) 265-6866Fax: (65) 265-6636E-mail: [email protected]
Sola Australia Ltd.13 Healey RoadDandenong, Victoria 3175AUSTRALIATelephone: (61) 3-9706-5022Fax: (61) 3-9794-9150E-mail: [email protected]
Best Power Technology LimitedBEST HouseWykeham Industrial EstateMoorside RoadWinchester, HampshireS023 7RXENGLANDTelephone: (44) 1962-844414Toll-free: 0800 378444 (in England)Fax: (44) 1962-841846E-mail: [email protected]
Best Power Technology (Germany) GmbHAm Weichselgarten 23D-91058 ErlangenGERMANYTelephone: (49) 9131-77700Toll-free: 0130-84-7712 (in Germany)Fax: (49) 9131-7770-444E-mail: [email protected]
Borri Elettronica Industriale SrlVia dei Lavoratori, 12420092 Cinisello Balsamo (Mi)Milan, ITALYTelephone: (39) 02-6600661-2Fax: (39) 02-6122481

3
PART I
USER INSTRUCTIONS
Contents
PART I USER INSTRUCTIONS . . . . . . . . . . . . . . . . . . . . . . . . . . . . . . . . . . . . . . . . . . . . . . . . . . . . . . .3
100 Introduction . . . . . . . . . . . . . . . . . . . . . . . . . . . . . . . . . . . . . . . . . . . . . . . . . . . . . . . . . . . . . . . . . . . . . .5101 Notices . . . . . . . . . . . . . . . . . . . . . . . . . . . . . . . . . . . . . . . . . . . . . . . . . . . . . . . . . . . . . . . . . . .5102 Safety Warnings . . . . . . . . . . . . . . . . . . . . . . . . . . . . . . . . . . . . . . . . . . . . . . . . . . . . . . . . . . . .6
200 UPS Description . . . . . . . . . . . . . . . . . . . . . . . . . . . . . . . . . . . . . . . . . . . . . . . . . . . . . . . . . . . . . . . . . .6201 Physical Features . . . . . . . . . . . . . . . . . . . . . . . . . . . . . . . . . . . . . . . . . . . . . . . . . . . . . . . . . . . .7202 Functional Features . . . . . . . . . . . . . . . . . . . . . . . . . . . . . . . . . . . . . . . . . . . . . . . . . . . . . . . . . .8203 Operator Control Panel . . . . . . . . . . . . . . . . . . . . . . . . . . . . . . . . . . . . . . . . . . . . . . . . . . . . . . .9204 Power Connections . . . . . . . . . . . . . . . . . . . . . . . . . . . . . . . . . . . . . . . . . . . . . . . . . . . . . . . . . .9
300 Starting the UPS . . . . . . . . . . . . . . . . . . . . . . . . . . . . . . . . . . . . . . . . . . . . . . . . . . . . . . . . . . . . . . . . .10301 Initial Startup Parameters . . . . . . . . . . . . . . . . . . . . . . . . . . . . . . . . . . . . . . . . . . . . . . . . . . . . .12
400 Using the Front Panel Display . . . . . . . . . . . . . . . . . . . . . . . . . . . . . . . . . . . . . . . . . . . . . . . . . . . . . . .14401 Parameters . . . . . . . . . . . . . . . . . . . . . . . . . . . . . . . . . . . . . . . . . . . . . . . . . . . . . . . . . . . . . . . .15402 Changing Parameter Settings . . . . . . . . . . . . . . . . . . . . . . . . . . . . . . . . . . . . . . . . . . . . . . . . . .15403 Reading the Axxium Pro System Logs . . . . . . . . . . . . . . . . . . . . . . . . . . . . . . . . . . . . . . . . . . .15404 Menu Map . . . . . . . . . . . . . . . . . . . . . . . . . . . . . . . . . . . . . . . . . . . . . . . . . . . . . . . . . . . . . . . .16
500 Alarms . . . . . . . . . . . . . . . . . . . . . . . . . . . . . . . . . . . . . . . . . . . . . . . . . . . . . . . . . . . . . . . . . . . . . . . . .18501 Alarm Reason Codes . . . . . . . . . . . . . . . . . . . . . . . . . . . . . . . . . . . . . . . . . . . . . . . . . . . . . . . .20
600 Communication . . . . . . . . . . . . . . . . . . . . . . . . . . . . . . . . . . . . . . . . . . . . . . . . . . . . . . . . . . . . . . . . . .21601 Communication Options . . . . . . . . . . . . . . . . . . . . . . . . . . . . . . . . . . . . . . . . . . . . . . . . . . . . .21602 DB9 Port Pin Functions . . . . . . . . . . . . . . . . . . . . . . . . . . . . . . . . . . . . . . . . . . . . . . . . . . . . . .22
700 Maintenance and Service . . . . . . . . . . . . . . . . . . . . . . . . . . . . . . . . . . . . . . . . . . . . . . . . . . . . . . . . . . .23701 External Bypass Switch (MBB only) Operation . . . . . . . . . . . . . . . . . . . . . . . . . . . . . . . . . . . .23702 Routine Maintenance . . . . . . . . . . . . . . . . . . . . . . . . . . . . . . . . . . . . . . . . . . . . . . . . . . . . . . . .23703 Battery Replacement . . . . . . . . . . . . . . . . . . . . . . . . . . . . . . . . . . . . . . . . . . . . . . . . . . . . . . . .23704 Power Module Replacement . . . . . . . . . . . . . . . . . . . . . . . . . . . . . . . . . . . . . . . . . . . . . . . . . .24705 Service and Support . . . . . . . . . . . . . . . . . . . . . . . . . . . . . . . . . . . . . . . . . . . . . . . . . . . . . . . . .24
800 Specifications . . . . . . . . . . . . . . . . . . . . . . . . . . . . . . . . . . . . . . . . . . . . . . . . . . . . . . . . . . . . . . . . . . . .25900 Warranty . . . . . . . . . . . . . . . . . . . . . . . . . . . . . . . . . . . . . . . . . . . . . . . . . . . . . . . . . . . . . . . . . . . . . . .28
901 Limited Two-year Warranty . . . . . . . . . . . . . . . . . . . . . . . . . . . . . . . . . . . . . . . . . . . . . . . . . . .28902 Limited Warranty . . . . . . . . . . . . . . . . . . . . . . . . . . . . . . . . . . . . . . . . . . . . . . . . . . . . . . . . . . .29903 Warranty Registration . . . . . . . . . . . . . . . . . . . . . . . . . . . . . . . . . . . . . . . . . . . . . . . . . . . . . . .30
1000 How Do I... . . . . . . . . . . . . . . . . . . . . . . . . . . . . . . . . . . . . . . . . . . . . . . . . . . . . . . . . . . . . . . . . . . . .31
PART II INSTALL ATIO N INSTRUCTIONS . . . . . . . . . . . . . . . . . . . . . . . . . . . . . . . . . . . . . . . . . . . . .33
INDEX . . . . . . . . . . . . . . . . . . . . . . . . . . . . . . . . . . . . . . . . . . . . . . . . . . . . . . . . . . . . . . . . . . . . . . . . . . . .65

4
Figures
1. Axxium Pro System External Physical Features. . . . . . . . . . . . . . . . . . . . . 72. Axxium Pro UPS Operating Modes. . . . . . . . . . . . . . . . . . . . . . . . . . . . . . 83. Axxium Pro UPS Functional Block Diagram. . . . . . . . . . . . . . . . . . . . . . . 84. Operator Control Panel . . . . . . . . . . . . . . . . . . . . . . . . . . . . . . . . . . . . . . . 95. Communications Connector . . . . . . . . . . . . . . . . . . . . . . . . . . . . . . . . . . . 106. Installing Modules. . . . . . . . . . . . . . . . . . . . . . . . . . . . . . . . . . . . . . . . . . 117. Axxium Pro System Menu Map. . . . . . . . . . . . . . . . . . . . . . . . . . . . . . . . 178. Typical Active Alarm Display . . . . . . . . . . . . . . . . . . . . . . . . . . . . . . . . . 19
Tables
1. Control Panel Details. . . . . . . . . . . . . . . . . . . . . . . . . . . . . . . . . . . . . . . . . 92. Inverter Log Reason Codes . . . . . . . . . . . . . . . . . . . . . . . . . . . . . . . . . . . 163. Critical Alarm Messages . . . . . . . . . . . . . . . . . . . . . . . . . . . . . . . . . . . . . 184. Non-critical Alarm Messages. . . . . . . . . . . . . . . . . . . . . . . . . . . . . . . . . . 195. Alarm Reason Codes. . . . . . . . . . . . . . . . . . . . . . . . . . . . . . . . . . . . . . . . 206. DB9 Port Signals. . . . . . . . . . . . . . . . . . . . . . . . . . . . . . . . . . . . . . . . . . . 227. Axxium Pro UPS Operating Specifications . . . . . . . . . . . . . . . . . . . . . . . 26

5
100 Introduction
This manual explains how to install, start, and operate your Axxium™ Pro uninterruptible power system (UPS). Italso has information to help you solve Axxium Pro UPS problems. The manual contains specifications and warranty information. If your Axxium Pro UPS is a hard-wired model (without a mains plug-in powercord), your electrician should install the Axxium Pro system using the Installation Instructions in Part IIof this manual. If your UPS has one or more separate battery cabinets, follow the instructions in the InstallationInstructions to connect the cabinet(s) to the Axxium Pro UPS.
To find information in this manual, refer to the table of contents at the beginning of Part I and Part II.
Best Power is committed to outstanding customer service. If you have a problem or question, our WorldwideService center is ready to help you. Simply refer to the list of Best Power offices at the beginning of this manualto contact the office nearest you. Please have the model and serial numbers of the chassis and power modulesavailable when you contact Best Power. (In the United States and Canada, you can call Worldwide Service toll-free at 1-800-356-5737. Outside North America, contact your local sales office listed on the inside front cover ofthis manual.)
You can also get more information about Best Power products using Best Power’s Fax-on-Demand service(U.S.A. and Canada only) or World Wide Web site:
Service Fax on Demand: 1-608-565-9499, ext 9000 (U.S.A. and Canada)World Wide Web Site: http://www.bestpower.com
101 Notices
• SAVE THESE INSTRUCTIONS. This manual contains important instructions for installation and maintenance of the Best Power Axxium Pro Model Series 0650 UPS and batteries.
• Universal power modules (model ASY-0528, with white labels on the front) produce a single output voltage:200, 208, 220, 230, or 240 VAC. Split-phase power modules (model ASY-0567, blue labels on the front) produce two output voltages: 100/100, 120/120, 120/208 or 127/220 VAC. Do not mix the two types ofpower modules in the same Axxium Pro cabinet.
• Battery modules to be used in the Axxium Pro system are model ASY-0529. Each battery module weighs 30 lb (14 kg). Use care in lifting and moving battery modules.
• All input and output wiring must be copper and adequate to carrying currents as listed in Table 7.
• Torque all bolts holding input and output power conductors to values specified in Table 12.
• Axxium™ Pro, BestLink™, and BestDock™ are trademarks of Best Power. CheckUPS® II is a registered trademark of Best Power. Windows is a registered trademark of Microsoft Corporation.
6
102 Safety Warnings
• Read and obey CAUTION statements regarding electrical wiring, battery modules, and external battery cabinets. See Sections 300 and 1400.
• The user is required to provide power input (mains) and output disconnect devices for the UPS. These mustbe within sight of the UPS, and easily accessible. For a mains plug-in power cord input, the plug serves asthe power input disconnect device, which must also be readily accessible.
200 UPS DescriptionThe Axxium Pro UPS is a modular uninterruptible power system that contains battery modules and power control (referred to as “power”) modules. These modules plug into a rack structure containing additional communication, control, and display functions that enable integrated control of all power modules. The UPS ishoused in a single cabinet, with extra battery capacity housed in adjacent battery cabinets.
The pluggable power modules can be removed and replaced (hot swapped) without powering the UPS down ifthe UPS has sufficient redundant capacity. Battery modules may also be hot swapped for maintenance. Powercontrol circuitry in the cabinet senses problems in power modules, and automatically transfers control to redundant modules.
All power modules share the load requirements equally. For example, three power modules are capable of supplying a total of 9 kVA. If a load requires only 4.5 kVA, each power module supplies 1.5 kVA to the output.If one power module is removed or for some reason fails, each of the two remaining power modules would supply half of the load, or 2.25 kVA. (In other words, redundancy exists when the load can be supplied by lessthan all of the installed power modules.)
The UPS can be programmed for any level of redundancy; its output is limited such that an excess number ofpower modules allow the failure of one or more modules without causing the UPS to lose any functionality.
An external bypass switch is required to be installed to remove the UPS completely from a power path. Thisswitch is optional but recommended for system servicability.
This section provides a brief overview of the cabinets and modules, and describes how the UPS operates as itswitches between various operating modes. These descriptions will help you understand how to turn the systemon and off, and when to switch it into various manual modes. The descriptions will also help in interpreting displayed parameters and alarm messages.

7
201 Physical Features
The Axxium Pro UPS is available in several cabinet sizes. Figure 1, showing the 3-slot and 9-slot configurations, identifies basic Axxium Pro system features. (6-slot and 12-slot cabinets are also available.)External battery cabinets are available in 6-, 9-, and 12-slot sizes.
Figure 1. Axxium Pro System External Physical Features
Front and Rear Views (3-slot cabinet)
4
5
3
7
6
6
8
10
13
1112
9
2
41
Battery Cabinet Rear ViewPower Module(ASY-0528 and ASY-0567)
Battery Module(ASY-0529)
Front and Rear Views (9-slot cabinet)
Legend1 Operator Control Panel 5 Input Power (Mains) Cable (optional) 9 Secondary Stop Release2 Front Cover Bezel 6 Battery Cabinet Cable (optional) 10 Latch Release3 BestDock™ Ports 7 Cabinet Base 11 Handle/Latch Release4 Power Outlets (optional) 8 Additional Battery Cabinet Cable 12 Handle Thumbscrew
(optional) 13 Insertion/Extraction Cams

8
6
35
11
79
1 10
8
2 4
Functional Elements
1 Input (mains) power2 Input power (boost) converter3 Internal DC power bus4 DC/AC power inverter5 Output relay6 Bypass relay7 Capacitor bank8 Battery charger9 Battery modules (parallel)10 Line/battery relay11 Isolation transformer (optional)
202 Functional Features
The Axxium Pro UPS operates in several different modes. Normally it operates under internal control, calledAuto Mode, to automatically protect loads connected to it. It also functions under operator control to enablemanual override should servicing or testing be required.
Figure 2 is an illustration of the operating modes. In AutoMode, the UPS automatically switches between modesdepending on line and load conditions.
Double Conversionmode produces output power fromthe internal DC bus. The input AC power is rectified andboosted to supply this DC bus. The UPS switches automatically to and from Battery mode with no interruption (0 ms transfer time) as AC input power dropsand returns. Batteries are charged in this mode.
Battery mode produces power from the batteries to supply the internal DC bus.
Internal Bypass (Bypass) mode shunts power flow around the DC/AC internal circuitry to keep the output powered with no line conditioning. Electromagnetic interference (EMI) and surge circuitry still protect the loadsfrom voltage spikes and noise.
The High Efficiency (H.F.) mode is a user-programmable automatic mode of operation. This mode allowspower to flow through the internal UPS bypass path for as long as AC input stays within the user setpoints. Ifthe input voltage or frequency deviates beyond the user setpoints, the Axxium Pro system transfers to theDouble Conversion mode of operation. Complete loss of input voltage causes the UPS to transfer to Batterymode. While in High Efficiency mode, the Axxium Pro system provides passive EMI filtering in the power path.
Figure 3. Axxium Pro UPS Functional Block Diagram
Figure 2. Axxium Pro UPS Operating Modes(under Auto Mode control)
Double Conversion(Line Conditioning)
Battery Off
InternalBypass

9
Off mode turns off the output and most internal circuitry. Within this mode, another mode (Sleep) turns off allinternal circuitry when AC line is not present and battery voltage drops to a low threshold. If the BatteryProtect (BP) function is selected and input AC voltage is not present, the UPS goes into Sleep mode immediately when the UPS is turned off. When input AC voltage returns, the UPS automatically recovers fromSleep mode and, if the Autorestart parameter is enabled, switches to Double Conversion. Autorestart is enabledas a factory default.
Figure 3 shows the basic functional elements of the UPS.
203 Operator Control Panel
The operator control panel has an alphanumeric display, three LED indicators, and six pushbuttons as describedin Figure 4 and in Table 1.
204 Power Connections
See Section 1300 of this manual for details about connecting power to the UPS and how to connect load equipment to the UPS.
For information about installing or replacing batteries, refer to Section 700, Maintenance and Service.
For information about connecting/disconnecting external battery cabinets, refer to Section 1400.
(1)(2)
(3)
(4)
(A) (B) (C)
4 24 USER #3Wout `watts 2.37 KWSlot Top ESC
Item Description
1Alphanumeric display of unit function and operating parameters. Also displays alarm/data logs.
2 Alarm LED (red). Lights to signal that the unit has detected an alarm condition.
3 Battery LED (yellow). Lights to signal that the unit is operating on battery power.
4Line LED (green). Lights to signal that the unit is operating on AC line power and producing output voltage.
A and B Multi-function buttons, as labeled by the bottom line of the alphanumeric display.
CMenu/Escape button, for moving into and out of display menus. Also, for avoiding achange to a parameter value.
s and t Menu scroll up and down buttons. Also, for increasing/decreasing parameter value digits.
¿ Enter button, to activate/accept displayed parameter or operating mode.
Figure 4. Operator Control Panel
Table 1. Control Panel Details

10
300 Starting the UPSThis section provides step-by-step instructions for starting your Axxium Pro system. Follow these proceduresclosely to avoid potential damage to your equipment or the UPS and to protect yourself and others from hazardous operating conditions.
Before starting the UPS, make sure that the temperature of the unit and all modules is within the range 0 to +40 ºC (+32 to +104 ºF), and that relative humidity is between 5 and 95% (with no condensation).
1. CHECK INPUT POWER CONNECTIONS
1.a. If the unit is hardwired, make sure that an electrician has completed and tested the connection to theproper power source. Check the connection of any power cables between the UPS and external batterycabinets.
1.b. If the unit is not hardwired, plug the power cable of the unit into an approved, functional power outlet.
2. CONNECT COMMUNICATIONS CABLE (if required)
If the Axxium Pro UPS will be monitored and controlled by a computer system, follow this procedure toconnect the cable to the computer and UPS.
2.a. Locate the interface cable shipped with the UPS.
2.b. Plug the cable connector marked “UPS” into theconnector on the back of the UPS. Plug the otherconnector into the connector on the computer. Forinstructions about installing the CheckUPS software, refer to the information accompanyingthe CheckUPS CD-ROM and Section 601 of thismanual.
3. INSTALL MODULES
NOTE: Place battery modules below all power modulesin the UPS cabinet to maintain a low center of gravity.
CAUTION
To avoid potential equipment damage or personal injury, assume that the Axxium Pro system power connections (outlets and distribution wiring) may have AC voltage present whenever AC input voltage orDC battery voltage is applied. The UPS can create output voltage from its batteries even when there is noAC input voltage. When AC input voltage is present, the Axxium Pro system can provide output voltageeven though its batteries are disconnected. To make sure there is no UPS output voltage, always disconnectall of the AC input sources and unplug all strings of internal battery modules; if the UPS has one or moreseparate battery cabinets, open the DC disconnect switch in each battery cabinet or unplug all battery stringsin each battery cabinet.
To reduce the risk of electrical shock, install the UPS in a temperature-controlled indoor area free of conductive contaminants.
DB9 Connector forComputer Cable
Figure 5. Communications Connector

11
NOTE: REMOVING INPUT POWER
Always put the Axxium Pro UPS into the Off mode before removing input power. Axxium Pro system batterieswill discharge if the input line voltage is disconnected or turned off without first turning off the Axxium Pro UPS.
If the input power source will be disconnected or turned off for more than a day or two, you should put the UPSinto Sleep mode. (Sleep mode allows the UPS to remain unpowered for up to 6 months without having to removeor recharge batteries.)
Failure to properly power down the Axxium Pro UPS could permanently damage any installed batteries. Also, ifbatteries become severely discharged, the UPS might not start immediately when input power is restored.
3.a. Remove the front bezel(s) covering the chassis rack.The bezels have spring latches on the left and rightsides that hold them in place.
3.b. Insert battery modules into the chassis rack as shown.Push each module in firmly until the front latch snaps tohold it securely. Two battery modules (side-by-side) arerequired to complete each battery string.
NOTE: All power modules in the Axxium Pro UPScabinet must be of the same type: Single-phase (universal) modules have white labels; split-phasemodules have blue labels. Do not mix blue and whitemodules in the same UPS cabinet
3.c. Insert all power modules into upper slots of the chassisrack as shown in this drawing. To insert a module, tip thefront down slightly and lift the rear edge over a safetystop on the center support rail. NOTE: Keep the module handle extended until the module is fully inserted.Push the module in firmly. The powermodule has a cam-latch at the base of the handle; raising the handle pulls the module into the rack. Alatch and thumbscrew at the top of the handle secure the handle. Record all power module serial numbers on the warranty registration form (see Section 903).
3.d. Insert and latch battery modules into the chassis rack of all optional external battery cabinets. Makesure that the DC disconnect switch on the back of the battery cabinet is closed (pulled out).
3.e. Reinstall cabinet front bezels.
4. TURN THE UPS ON
4.a. When AC line voltage is present on the input and at least one power module is installed, the UPS display is automatically on. See Section 301 for setting initial operating parameters.Use the properoperating panel buttons next to the display to put the UPS into the Auto mode or manually set it tooperate in Bypass mode or Battery mode. (NOTE: The unit has no physical On/Off switch.)
4.b. If the UPS has been turned off, press the On button (as labeled by the operating panel display) to turnthe UPS on again.NOTE: The UPS will not turn on if AC line input is not present.
4.c. If the UPS has been manually set to operate in Bypass or Battery mode, change the System Modemenu selection (menu 3 2) to Auto to return to normal Auto mode operation.
4.d. Verify the proper output voltage on the front panel display.
NOTE: The first time you turn the UPS on, you must set or verify certain operating parameters beforeputting it into operation. See Section 301 for details on configuring these parameters at initial start-up.
(3.c)
(3.b)
Figure 6. Installing Modules

12
5. CHECK UPS CONTROL
Test proper operation of optional external control signals and computer communication before connectingloads. (See Section 602 for details.)
6. CONNECT EQUIPMENT TO UPS
6.a. Axxium Pro units with receptacles on the back:Plug the equipment into the UPS receptacles. Switchon each piece of equipment. NOTE: The total volt-ampere load must not exceed the volt-ampererating of the entire cabinet. See Section 1310 for additional information.
6.b. Axxium Pro units without receptacles on the back:If there is an external bypass switch, turn it to“UPS.” Otherwise, close the load distribution circuit breaker(s).
301 Initial Startup Parameters
The first time the UPS is turned on, you must set or verify certain operating parameters before putting it intooperation. Follow the procedure below to set these initial configuration parameters.
1. Enter the correct user security password: 0377. Moveto the digit you wish to change by pressing the buttonsbelow the <- and -> on the display. To change thevalue of the selected digit, press the up-arrow (s) anddown-arrow (t) buttons. When the password shows0377, press the Enter (¿) button.
2. On the next screen, select the desired language for the display. Again, use the up- and down-arrow buttons to scroll between English, French, German, and Spanish. Make your selection by pressing theEnter button.
3. The next two screens enable you to verify and adjust the internal clock for the correct local time. If thetime or the date is correct as displayed, press the Enter button to advance to the next configuration setting.
To set the correct time and date, press the <- and ->buttons to move to the digits you wish to change.Press the up- and down-arrow buttons to increase ordecrease the value of each selected digit. When thedisplayed value is correct, press the Enter button.
4. The output voltage is the most important operatingparameter you must set as part of the initial configuration screens. After setting the time and date, select the desired UPS output voltage using the up-and down-arrow buttons. Possible selections are 200, 208, 220, 230, and 240 VAC. Press the Enter buttonwhen the desired output value is displayed.
5. If the system includes any external battery cabinets,record the ampere-hour capacity of batteries installedin these cabinets. Count the number of battery strings(two battery modules, side-by-side, make up onestring). Each battery string contains 7.2 ampere-hours.Enter the total value in the next startup screen.
External Capacityextamphr 0028.8<- -> ESC
Set Timetime 14:51:38<- -> ESC
ENTER PASSWORDPassword - 0000<- -> ESC

13
6. If you want the system to contain one (or more) redundant power modules, as protection against the failure of a power module, you must enter the redundancy level. Each increment above 0 indicates thenumber of modules that can be removed from operationwithout affecting overall UPS capability.
7. Decide whether to protect the UPS on/off function frombeing changed by anyone other than qualified personnel.Press the up- or down-arrow button to make your selection; then press Enter. If a password is required,the On and Off functions are accessible only after firstentering the correct password value (0377).
8. The UPS is now ready to operate, and displays the normal On/Off function screen.
These configuration parameters are accessible duringnormal UPS operation by pressing the button labeledConfig by the front panel display.
Set RedundancyRSetting 0<- -> ESC
ON OFF Password?No `
ESC

14
400 Using the Front Panel DisplayThe front panel display, below, shows several important things. The numbers in the upper left corner (for example, 3 19 ) are the display location within the operating menu structure. The word in the top center (forexample, USER ) is the security level, which allows various operating parameters to be changed.
The number in the upper right corner (for example, #2) signifies one of the slots (numbered from the top down)in the cabinet rack. The number tells which power module slot that parameters are being displayed from. #0 isdefined as System, enabling you to observe overall system operation.
One or two triangles at the right of the display tells you which arrow buttons are active, for moving to variousparameters within a menu level. See Section 404 for the complete system menu.
The words or symbols in the bottom line of the display define the function of the three buttons below the display. In the example above, Slot (button A) enables you to observe the operation of a specific power module(the module in slot #2, in this case) or the overall system (selected as slot #0). Top (button B) takes you to thetop item in the current menu level (in this case, 3 1). And ESC (button C) enables you to move out of the cur-rent menu level (in this case, to menu 3).
During normal operation, the display appears as shown below. Md: indicates the current UPS operating modeand St: indicates the operational state. The number of power modules (M) and number of battery module strings(B) that are currently on line, and the total number of module slots in the chassis—for example, M4-B7-12—isshown in the upper right corner of the display. (The count of battery strings does not include additional batterystrings contained in connected external battery cabinets.)
Operating parameters shown on the third line of the display vary depending on the operating mode. As shownbelow, the UPS output voltage is displayed while the Axxium Pro UPS operational state is On Line.
(A) (B) (C)
3 19 USER #2Wout `watts 2.37 KWSlot Top ESC
Md: AUTO M4-B7-12St: ON LINEacvout 232 VConfig OFF Menu

15
401 Parameters
A parameter is a factor describing how the Axxium Pro system is operating or will operate. Some useful parameters are input and output voltage, input and output current, and battery voltage. The UPS measures orrecords many other parameters. Some are operator-adjustable, such as the local date and time and various operating limits. All parameters are password-protected. Although every operating condition and parameter isaccessible through the display panel, you may change a value only if you have entered the correct password toallow you to change it.
After making any parameter changes, delete the password level to protect the UPS against unauthorized parameter changes. Press the Top or ESC buttons to return to the Enter Password screen. Press Enter to view thedefault value (0000), and press the Enter button again to enter 0000, which invalidates the previous level.
NOTE: After 10 minutes of no button presses, the UPS automatically deletes any active password level andreturns to the normal running display.
402 Changing Parameter Settings
The method of changing any operating parameter follows the same procedure as setting initial parameters, asdescribed in Section 301. Begin by entering the correct password to allow the change. Use the Menu Map(Figure 7) to find the parameter you need to change, and move through the menu structure until the parametername appears on the display. Press Enter to access the parameter value and, when you have changed the value,press Enter again to save the change. To avoid making a change, press ESC instead of Enter.
403 Reading the Axxium Pro System Logs
The Axxium Pro system makes an entry in its logs each time it sounds an alarm or runs on battery power. Thisinformation can help in diagnosing power problems. You can display the UPS Inverter and Alarm logs on theunit’s display panel; these logs are in menu 9.
Inverter Log
The inverter (battery mode) log is in menu 9, submenu 1. Move through the menu structure by pressing the“Menu” button and pressing t to move down to menu 9. Press ¿ to move to submenu 1 and press ¿ again toview the most recent entry in the inverter log.
The log stores up to 16 entries, in chronological order. You can use the s and t buttons to scroll up and downthrough the log entries. Each entry shows the date and time the unit switched to battery operation (in 24-hourformat), and the duration of battery operation (in hours and minutes).
A typical entry might look like this:
In this example, the most recent inverter log (9 1 1) is being displayed. If the unit is still running on inverter(battery power), an asterisk (*) is displayed beside the date. “09/29” is the date of the battery mode operation:September 29. “13:56” means that battery mode operation started at 1:56 p.m. And “01:04” means the batteries supplied power for 1 hour and 4 minutes. For further information about the entry, hold down ¿. Thebottom display line indicates a slot (drawer) number and a reason code associated with the entry.
Table 2 contains a description of all inverter reason codes.
9 1 1 #0Inverter Log 1
09/29 13:56 01:04Slot Top ESC

16
Table 2. Inverter Log Reason Codes
Alarm Log
The alarm log is in menu 9, submenu 2. Move through the menu structure by pressing the “Menu” button andpressing t to move down to menu 9. Press ¿, and press t to move down to submenu 2. The display shows themost recent entry in the alarm log.
The log stores up to 16 entries, in chronological order. You can use the s and t buttons to scroll up and downthrough the log entries. Each entry shows the alarm code, the alarm date and time (in 24-hour format), and theduration (in hours and minutes.)
A typical entry might look like this:
In this example, the sixth most-recent alarm (9 2 6) is being displayed. “ A ” means the Axxium Pro systemsounded alarm A (Low Battery). If the alarm is still active, an asterisk (*) is displayed beside the letter alarmcode. “02/05” is the date the alarm occurred: February 5. “1751” means the alarm sounded at 5:51 p.m. And“04:35” means the alarm was active for 4 hours and 35 minutes.
Section 500 contains three tables explaining the alarm codes.
404 Menu Map
Figure 7 is an illustration of how to access all Axxium Pro system parameters. The menu structure has 11 primary-level menus, named Password (1) through Parameters (11). Under each primary menu are secondaryitems, each numbered by its location under the primary menu. Use the various buttons as shown in the map tonavigate to the desired parameter. If you need to change the value of a parameter, you must begin by enteringthe correct password value first. Parameter values can be observed, but most can not be changed, even thoughyou have entered the correct user password.
ReasonCode
Meaning Explanation
1 Line Was Lost Input voltage was lost.
2 Battery Test Battery test initiated inverter operation.
3 Manual Operator initiated inverter operation.
4 Open Cell Battery failure caused by open cell.
5 Weak Battery Battery failure caused by load test.
12
11
10
9
8
7
6
Incompatible Module
Insufficient Modules
Insufficient Batteries
Precharge Failure
Excessive Transfers
Module Failure
Phase Error
Wrong type of power module for intended system configuration.
Too few power modules; decrease load or add power modules.
Too few battery modules; decrease load or add battery modules.
Internal error – phone Best Power Worldwide Service or your nearest Best Power office.
Internal error – phone Best Power Worldwide Service or your nearest Best Power office.
Internal error – phone Best Power Worldwide Service or your nearest Best Power office.
Internal error – phone Best Power Worldwide Service or your nearest Best Power office.
9 2 6 #0Alarm Log 1A 02/05 17:51 04:35Slot Top ESC

17
9 1 Inverter Log(Logs 1 - 16)
9 2 Alarm Log(Logs 1 - 16)
9 3 Clear Logs
2 System Mode Preference
1 Password Enter Password(ESC)(ESC)
(Menu)
10 System Tests 10 1 Battery Test10 2 Fan Test
3 System Info
(Top)
3 1 Unit Time3 2 Unit Date3 3 Input Frequency3 4 Output Frequency3 5 Battery Volts3 6 Run Time3 7 Seconds on Batt.3 8 AC Vin Ph. 1 -- N3 9 AC Vin Ph. 2 -- N
3 10 AC Vout Ph. 1 -- N3 11 AC Vout Ph. 2 -- N3 12 AC Iin Ph. 1 -- N3 13 AC Iin Ph. 2 -- N3 14 AC Iout Ph. 1 -- N3 15 AC Iout Ph. 2 -- N3 16 VAout3 17 VAout Ph. 1 -- N 3 18 VAout Ph. 2 -- N
3 19 Wout3 20 Wout Ph. 1 -- N3 21 Wout Ph. 2 -- N3 22 % Full Load3 23 % Load 13 24 % Load 23 25 Power Factor L13 26 Power Factor L2
(ESC)
7 System ControlConfiguration
7 1 Config
7 2 Battery Config
7 3 System Config
Communication
7 1 1 Del. Before Restart7 1 2 Del. Before Shtdwn7 1 3 Auto Restart7 1 4 Sleep Time7 1 5 Config. BestDock
7 1 6 Relay Mask (1)7 1 7 Relay Mask (2)7 1 8 Inv. Relay Delay7 1 9 EPO Mode7 1 10Ext. Bypass Mode
(Top)
(ESC)(ESC)
(ESC)
(ESC)
6 SystemDiagnostics
6 1 RO Value6 2 Battery Results
6 3 Runtime at EOT6 4 DC Volts at EOT
7 2 1 Const. I Duration7 2 2 Const. V Duration7 2 3 Eqlz. Chrg Duration7 2 4 Eqlz. Chrg Interval7 2 5 Inst. Eqlz. Duration
7 3 1 System VA Limit7 3 2 Number Phases7 3 3 Nominal Frequency
7 3 4 Nominal AC Vout7 3 5 Redundancy Level
7 2 6 Test Interval7 2 7 Test Time7 2 8 Maint. Chrg. Volts7 2 9 Eqlz. Chrg. Volts7 2 10External Capacity
(ESC)
5 GeneratorSensitivity
5 1 Low Frequency5 2 High Frequency5 3 Slew Rate5 4 Phase Lock
5 5 Freq Glitch Count5 6 Line Delta5 7 Transfer Delay5 8 Low AC Out Delay
5 9 Auto Freq Mode5 10 Max Delta(ESC)
4 System Identification
4 1 Model Name4 2 Model Number
4 3 Serial Number4 4 Date Manufactured
4 5 Software Version
(Top)
(ESC)
8 AlarmSet Points
8 1 Low Vout Alarm8 2 High Vout Alarm
8 3 Low Vbatt Alarm8 4 Near Low Vbatt Alarm
8 5 High Vbatt Alarm8 6 Low Run Time Alarm(ESC)
9 Logs & History
(Top)
(Top)
(Top)
(ESC)
(ESC)
11 Parameters Parameter No.(ESC)
Figure 7. Axxium Pro System Menu Map

18
500 Alarms
When the Axxium Pro UPS detects an alarm condition, it creates the following messages:• lights the red LED next to the front panel display,• sounds an audible alarm, and• displays an alarm message.
When this happens, follow these steps:
1. Observe the display to find which alarm the Axxium Pro UPS is displaying. The parameters shown below thealarm message give you more information about the alarm condition. Use thes and t buttons to scroll up anddown through these parameters.To find out if more than one alarm is active, press ¿¿. This switches the displaybetween alarm messages. To silence the audible alarm, press button “A” below the display.
2. Find the alarm message in the tables below, and follow the instructions to resolve the problem. To clear an alarmafter resolving the problem, press button “B” below the display. If the problem is still present, the alarm will soundagain after a short delay.
Table 3 contains descriptions of critical alarm codes. Critical alarms require immediate operator attention and corrective action. (Table 4 contains descriptions of, and corrective actions for, non-critical alarm messages.)
Table 3. Critical Alarm Messages
Alarm Message What It Means What to Do
Low Battery(A)
The UPS has shut down after running on batteryand discharging the batteries.
Wait for AC input power to be restored. When input ACreturns, the UPS begins recharging batteries and appliespower to the load.
High Battery(C)
The battery voltage is too high because of acharger problem, battery problem, or incorrectparameter setting.
Phone Best Power Worldwide Service or your nearestBest Power office.
Low AC Out(E)
The UPS has shut down because the output ACvoltage is too low to provide power to the load.
Phone Best Power Worldwide Service or your nearestBest Power office.
High AC In(S)
High AC Out(F)
The AC input voltage is too high; any furtherincrease to the voltage may damage the UPS.
The UPS has shut down because the output ACvoltage is too high.
This alarm automatically clears when input voltage returnsto normal limits. The UPS will continue to support theprotected loads until the batteries are depleted.
Phone Best Power Worldwide Service or your nearestBest Power office.
Call Service(5)
Call Service(T)
E P O(P)
High HeatsinkTemperature
(H)
OverloadShutdown (I)
Output Overload(G)
The UPS has detected a module fan problem thatrequires service.
The UPS has detected a problem that requires service.
The Emergency Power Off (EPO) function hasbeen activiated.
The inverter temperature is too high. If the temperature reaches a preset limit, the unit willshut down.
The UPS has shut down due to excessive load.
The load is requiring more power than the UPSpower modules are capable of supplying, and theUPS has switched to Bypass mode.
Phone Best Power Worldwide Service or your nearestBest Power office.
Phone Best Power Worldwide Service or your nearestBest Power office.
Deactivate the external EPO switch and press the ONbutton below the display to restart the UPS.
If the UPS has not shut down, bypass the UPS or shutdown your equipment, and turn the UPS off. Phone BestPower Worldwide Service or your nearest Best Poweroffice.
Remove excess load(s) from the UPS output and pressthe operator ON button to restart the unit.
Switch off loads one at a time until the alarm stops.

19
Alarm Message What It Means What to Do
Low Redundancy(U)
Check Battery(M)
Low Runtime(D)
Check Memory(O)
Near Low Battery(B)
The number of active power modules is too lowto provide the programmed redundancy level toprotect the current load.
The batteries have failed an automatic systemtest.
Batteries in the unit are nearly discharged.
The configuration as stored in the system memory may have been corrupted.
The battery voltage has reached the Near LowBattery setpoint.
The unit is able to protect the loads, but will not be faulttolerant. To regain the desired redundancy, either addpower modules or reduce the load.
Phone Best Power Worldwide Service or your nearest BestPower office.
Perform an orderly shutdown of all loads and wait for ACinput power to return. When input AC returns, the UPSbegins recharging batteries and automatically restarts.
Look in the alarm log for the slot number of the failedmodule. Phone Best Power Worldwide Service or yournearest Best Power office.
If the voltage increases, the alarm clears automatically. If itdrops further, it will cause a Low Battery alarm.
S High AC Inputacvin 300 Vminacvin 9999 Vmaxacvin 0 V
Table 4. Non-critical Alarm Messages
The drawing above shows a typical alarm display. Critical alarms are annunciated by a constant Alarm LED anda constant beep. Non-critical alarms are annunciated by a blinking Alarm LED and an intermittent beep. Duringalarm display, button (A) silences the audible alarm, button (B) clears the alarm display, and button (C) performsthe normal Escape function to exit from the alarm display. The Enter button enables you to scroll through allalarms, and the up- and down-arrow buttons scroll through any other parameters related to the displayed alarm.
Table 4 contains descriptions of non-critical alarm messages. Non-critical alarms are not as urgent as criticalalarms, but should be attended to as soon as convenient to avoid the problem becoming critical.
(A)
(Silence) (Clear) (ESC)
(B) (C)
Figure 8. Typical Active Alarm Display

501 Alarm Reason Codes
Some alarms have a reason code as well as the alarm code. These reason codes may help you to interpret andisolate the cause of an alarm. Table 5 contains a listing of all reason codes along with the associated alarmcodes. It also gives an interpretation of the reason, and a suggested corrective action.
Table 5. Alarm Reason Codes
20
Alarm Code and Reason Code
What it means What to do
M Check BatteryOpen Cell
A battery (pair of modules) has failed anopen cell test.
Look in the alarm log for the slot numberof the failed modules. Make sure that bothbattery modules are properly installed. Ifproperly installed, replace both batterymodules.
M Check BatteryWeak Battery
The system batteries have degraded to thepoint where system runtime is less thanthe designed rating.
Replace all battery modules.
T Call ServicePhase Error
The UPS has detected the input phaserotation to be incompatible with its outputwiring and will not start up.
Correct the input wiring problem andrestart the UPS.
T Call ServiceModule Failure
A power module has detected an internalfault and has shut down.
Look in the alarm log for the slot numberof the power module and replace thedefective module.
T Call ServiceExcessive Transfers
The UPS has detected an excessively highnumber of automatic transfers from HighEfficiency mode, and has switched toDouble Conversion (Auto) mode.
Phone Best Power Worldwide Service oryour nearest Best Power office.
T Call ServicePrecharge Failure
A power module has detected an initialization sequence problem and willnot start up.
Look in the alarm log for the slot numberof the affected module. Phone Best PowerWorldwide Service or your nearest BestPower office.
U Low RedundancyInsufficient Batteries
The UPS load exceeds 2800 watts per battery string. The system will protect theload during short power outages, but battery degradation or damage may result.
Reduce the load or install additional battery modules (two modules per string).
U Low RedundancyInsufficient Modules
The number of active power modules istoo few to provide the programmed redundancy level while protecting theload. The UPS will protect the load, butwill not be fault tolerant.
Reduce the load or install additionalpower modules.

21
600 Communication601 Communication Options
Best Power offers several methods of communicating with your Axxium Pro system in addition to the operator controlpanel:
CheckUPS® II Each Axxium Pro UPS ships with CheckUPS II power monitoring and unattended-shutdown Software: software and an interface cable. To begin installing CheckUPS software, see the instructions
accompanying the CheckUPS software CD-ROM.
CheckUPS software uses an RS-232 serial link to communicate with the UPS, and (using Windows)it provides you with up-to-date graphics of UPS power and system data and power flow. It also givesyou a complete record of critical power events, and it notifies you of important UPS or power infor-mation. If there is a power outage and the Axxium Pro system battery power becomes low,CheckUPS software can automatically shut down your computer system to protect your data beforethe UPS Low Battery shutdown occurs. NOTE: For the latest software revision, download it fromwww.bestpower.com.
RS232 You can connect the Axxium Pro system to a computer running special terminal emulation Communication: software available from Best Power. The Axxium Pro system communicates with your
computer using an advanced binary protocol. For more information, contact your nearest BestPower office.
Optional For computer systems that already have UPS monitoring software, Best Power offers interface Interface Kits: cable kits for connecting the Axxium Pro system to your computer system. The kit includes the
cable, adapters, and instructions.
Relay Card: This interface provides true relay contact outputs to peripheral devices. Outputs are user-selectable as normally open (N.O.) or normally closed (N.C.).
BestLink™ This interface provides remote monitoring and control of the UPS through a customer-supplied Telecom Modem modem. This unit also, in the event of an alarm condition, provides automatic notification via Controller: phone, pager, e-mail, or fax.
Optional Internal This adapter provides the Axxium Pro system with its own ethernet network connection, allowing BestLink™ it to be remotely monitored and controlled via industry-standard internet browsers. The HTML SNMP/WEB interface enables UPS monitoring and management from anywhere on the internet or within your Adapter: intranet. In addition, third-party Simple Network Management Protocol (SNMP) software packages
may also be used to communicate remotely with the Axxium Pro system. The BestLinkSNMP/WEB Adapter also allows UPS-dependent computer systems to be automatically shut downduring extended power outages. BestLink-compatible software providing this function is availableon the CheckUPS software CD as well as on the Best Power web site.
BestDock™ The Axxium Pro UPS has two communication slots that allow quick installation of the optional Communication BestLink SNMP/WEB adapter or other similar communication interfaces. These interface adapters Slots: extend the capabilities of the Axxium Pro system to provide compatibility with network and remote
monitoring/management systems.
Dedicated Input Emergency Power Off (EPO): Connection to a facility Emergency Shutdown switch provides Signals: a method for emergency Axxium Pro system shutdown. Opening this connection creates an
immediate shutdown of the Axxium Pro UPS output.Bypass: The signal from an external bypass switch, to isolate the Axxium Pro system for maintenance purposes, tells the UPS to go into Internal Bypass mode.On-Generator: An external signal that the input power is being supplied by a generator tells theUPS to accept wider input power frequency limits and limit battery charging.
See Section 1307 to make the connection for all dedicated input signals.

22
602 DB9 Port Pin Functions
The table below explains the functions of the pins on the Axxium Pro DB9 port. This port is on the Axxium Pro UPS back panel, as shown in Figure 5.
Table 6. DB9 Port Signals
* Contacts consist of open-collector circuits capable of switching up to +40 VDC, 50 mA resistive load.
Pin Function
1 RS-232 Receive Data. Receives incoming RS-232 communication data. The data protocol is 9600 baud, 8 bits, no parity, 1 stop bit, no handshaking.NOTE: In battery operation, a 5-second +VDC (RS-232 low) signal applied to this pin causes the UPS to shut
down after a delay of X minutes, regardless of the return of AC input power. This time is defined bythe External Shutdown Mode parameter n, where n and X are related as follows:
n X n X n X0 2 3 3 6 201* 2 4 52 1 5 10
* For n=1, the UPS stays off when AC input power returns. For all other values of n, the UPS restarts 12 seconds after AC input power returns.
2 RS-232 Transmit Data. Sends outgoing RS-232 communication data. The data protocol is 9600 baud, 8 bits, no parity, 1 stop bit, no handshaking.
3 Normally-Open On-Battery Contact*. A normally open contact that closes (pulls to Common) 15 seconds after the UPS switches to battery power.
4 Common. The ground reference for all input and output signals.
5 Normally-Open Low-Battery-Alarm Contact*. A normally open contact that closes (pulls to Common) to signal a Near Low Battery or Low Runtime alarm. Values that affect this contact closure may be user-programmed.
6 Reserved.
7 Immediate Shutdown Mode (set by External Shutdown parameter, n = 0):Grounding this pin for 5 seconds causes the UPS to switch immediately to the Off mode. When AC input power returns, the UPS will not restart without user intervention.
Remote Shutdown Mode (set by External Shutdown parameter, n = 1 or greater):In battery operation, grounding this pin for 5 seconds causes the UPS to shut down after a delay of X minutes, regardless of the return of AC input power. This time is defined by the External Shutdown Mode parameter n, where n and X are related as follows:
n X n X1 2 4 52 1 5 103 3 6 20
8 Normally-Closed On-Battery Contact*. A normally closed contact that opens (releases from Common) 15 seconds after the UPS switches to battery power.
9 Normally-Open Bypass-Switch-Status Contact*. A normally open contact that closes (pulls to Common) whenever the UPS is in internal bypass mode or is being externally bypassed and is being signalled of the external bypass.

23
700 Maintenance and Service701 External Bypass Switch (MBB only) Operation
Before turning the switch handle on the Best Power Make-Before-Break (MBB) bypass switch, you must pressthe red button located next to the handle. This button serves two purposes. It sends an electrical signal to theUPS to switch to the internal Bypass mode (if it is not already operating in that mode). The button also operatesa mechanical interlock, to prevent the switch from being turned without first signalling the UPS.
NOTE: When the red button is released, the UPS remains in its internal Bypass mode and must be manuallyreturned to the Auto mode by selecting that mode on the operator display panel.
702 Routine Maintenance
Best Power designed your Axxium Pro system to provide years of trouble-free operation. Its internal control system checks the batteries and inverter periodically to ensure reliable operation. In fact, you’ll probably findthat your Axxium Pro system requires less maintenance than any of your other computer peripherals.
Nevertheless, the Axxium Pro UPS and optional external battery cabinets do require some attention to assurecontinued reliable service. Best Power recommends that you schedule preventive maintenance checks at leastevery six months. At these checks, the service technician should follow Best Power’s RecommendedMaintenance Schedule, which includes the following items:
• Check operating environment for clean, cool, dry conditions.• Inspect and clean the unit.• Check operation of fans (power modules).• Check and tighten all connections.• View and record the alarm and inverter logs.• Check the batteries.• Check the displayed UPS readings against actual measurements and recalibrate if necessary.• Perform a system test.• Check and record the values of the parameters in menu 3 on line and on batteries. • Check the MOV surge suppression pack.
Details of these tests and procedures are contained in the Axxium Pro UPS Service Manual.
Technicians must observe important safety precautions while performing these checks.For more information on what your technician should do in a Preventive Maintenance check, or to schedule PreventiveMaintenance with a Best Power-authorized field service representative, call Best Power’s Worldwide Service.We’ll be happy to help you.
703 Battery Replacement
Axxium Pro system batteries may be removed and replaced while the UPS is operating under load (“hot-swapped”) with no loss of power to the load or damage to the batteries. NOTE: The Axxium Pro UPS willoperate with uncharged (or no) batteries, but will have limited (or no) battery backup capability. Backupprotection requires at least three battery strings for every four power modules.
Replace battery modules in pairs, as described below.
1. Remove the front panel bezel(s) covering the battery modules you need to replace. Label the originalmodule with masking tape or some other identifier.
24
2. Grasp the battery module handle and press down on the latch release.
3. Pull the module out approximately 7 inches (170 mm) to the secondary stop on top of the module.
4. Press down on the secondary stop release, pull the module out further, and support the module weightwith your second hand as you remove the module from the chassis rack. Remove the battery modulebeside the first in a similar manner.
5. After removing a pair (one string) of battery modules, install a replacement pair. Replacements may beinstalled in empty rack slots before removing original battery modules.
6. When all desired battery modules have been replaced, reinstall the front panel bezel(s).
704 Power Module Replacement
Axxium Pro system power modules may be removed and replaced while the UPS is operating under load (“hot-swapped”) with no loss of power to the load or damage to the UPS. NOTE: The Axxium Pro systemmay drop the load if the remaining power modules (with assigned redundancy) are insufficient to supplythe required power. If empty slots exist, install replacement modules before removing original ones.
Use care in removing and installing power modules. To remove a power module, turn the thumbscrew on themodule handle counter clockwise and press down on the latch release at the center of the module handle and pullthe handle down. As the handle fully extends, the movementoperates a cam to pull the module out of its connectors and also turns off logic and power circuitry before the module disconnects from the connectors. Slidethe module slowly out of the chassis rack.
Use two hands to support the module. When fully extended, lower the module front slightly and lift the rearedge over a safety stop on the center support rail.
Treat the original module and its replacement with care to avoid damaging connectors or internal circuitry. Labelthe original module with masking tape or some other identifier. Record the serial number of the replacementmodule in Section 903.
Insert a replacement module by sliding it carefully into the chassis rack. Tip the module front down slightly andlift the rear edge over the safety stop on the center support rail.NOTE: Keep the module handle extended untilthe module is fully inserted. Push the module in firmly. The power module has a cam-latch at the base of thehandle; raising the handle pulls the module into the rack. Make sure the latch at the top of the handle snaps intoplace, then turn the thumbscrew in the handle clockwise to hold the handle up.
705 Service and Support
The Best Power customer service department stands ready to help you. Please feel free to call, write, e-mail, orfax the nearest Best Power office if you have a problem or question about your Axxium Pro system. Please have your model number and serial number when you call.This information appears on a label on theAxxium Pro UPS back panel. You can also get this information by displaying the serial number on the frontpanel display (menu items 4 2 and 4 3). Record all serial numbers in Section 903 of this manual.
If you are requesting repair under warranty, please include proof of purchase and purchase date in your correspondence. Call Best Power for instructions before returning a unit or component. (See the beginning ofthis manual for a list of Best Power offices.)

25
800 Specifications
AC Output with Nominal Input Power and Loads (Protected Equipment)
Voltage Regulation: ±3.0% load regulation. Total voltage regulation under any line, load, or battery condition to within ±3.0% of nominal.
Nominal Input Voltage:208-240 VAC or 200/100, 208/120, 220/127, 220/110, 240/120 VAC
Input Voltage Range: 176-276 VAC.
Nominal Output Voltage:208-240 VAC or 200/100, 208/120, 220/127, 220/110, 240/120 VAC
Overload Capability: 150% for 10 seconds; 300% for 12 cycles.
Sine-wave Power: Sine-wave, computer-grade power with less than 3% total harmonic distortion atrated linear loads.
Operating Frequency: On line: 50/60 Hz (autodetecting).Output frequency tracks input frequency to selectable limit, ±0.1 to ±5.0 Hz, programmable (±3.0 Hz factory default); switchesto battery operation outside this tolerance.On battery: 50 HZ or 60 Hz ±0.1 Hz.
Lightning and Surge Protection
ANSI/IEEE C62.41 (1991); ANSI IEEE C62.45 (1987) Category B. Meets IEC 61000-4-5.
Isolation
Model 0650C Output Neutral-to-Ground Bonding:Neutral is carried through from input to output. (A separate neutral-to-ground bond is not required.)Model 0650I Isolation, Including Output Neutral-to-Ground Bonding: True, separately derived powersource as defined by National Electrical Code Article 250-5d, with output neutral bonded to ground. Nodirect connection between input and output. Therefore neutral-to-ground bond is required. Other local codesmay take precedence. NOTE: 200–240, 200, and 200/100 VAC outputs are not available with isolation.
Environment
Operating Temperature: Operating: 0 to +40 °C (32 to 104 °F).
Storage Temperature: UPS containing battery modules: –20 to +40 °C (–4 to 104 °F).UPS without batteries: –40 to +60 °C (–40 to 140 °F).
Relative Humidity: 5-95% without condensation.
High Altitude Operation: The maximum operating ambient temperature drops 1° C per 300 m above 1525 m (2°F per 1000 ft. above 5000 ft.). Maximum operating elevation is 3050 m (10,000 ft). Maximum non-operating is 12,200 m (40,000 ft).
Ventilation: The air around the UPS must be clean and free of dust, corrosive chemicals, andother contaminants. The Axxium Pro UPS uses internal fans to circulate the airfor cooling. The air must be free to circulate around the UPS and battery cabinet(s).
26
Rated Capacity3 KVA/2100 W
6 KVA/4200 W
9 KVA/6300 W
12 KVA/8400 W
15 KVA/10.5 KW
18 KVA/12.6 KW
Recommended InputService (Amp)
Typical InputVoltage and Current(VAC — Amp AC)
25
200* 18208 17220 16230 15240 15
50
200* 36208 34220 32230 31240 30
70
200* 54208 51220 49230 47240 45
100
200* 71208 69220 65230 62240 59
125
200* 89208 86220 81230 78240 74
150
200* 107208 103220 97230 93240 89
Output Voltage andMax. Current(VAC — Amp AC)
100/200* 30/15208 14.4220 13.6110/220 27/14230 13240 12.5120/240 25/12.5
100/200* 60/30208 28.8220 27.2110/220 54/28230 26240 25120/240 50/25
100/200* 90/45208 43.2220 40.8110/220 81/42230 39240 37.5120/240 75/37.5
100/200*120/60208 57.6220 54.4110/220 108/56230 52240 50120/240 100/50
100/200*150/75208 72220 68110/220 135/70230 65240 62.5120/240 125/62
100/200*180/90208 86.4220 81.6110/220 162/84230 78240 12.5120/240 150/75
Heat Dissipation(in Double Conv.)Watts (kBtu/hr)
Efficiency in Bypass Mode(Isolated Output)
Efficiency in Double Conversion(Isolated Output)
Efficiency in Double Conversion
285(0.98)
570(1.95)
860(2.93)
1145(3.90)
1430(4.88)
1720(5.85)
> 96%
> 84%
> 88%
Audible Noise (dBA) < 53
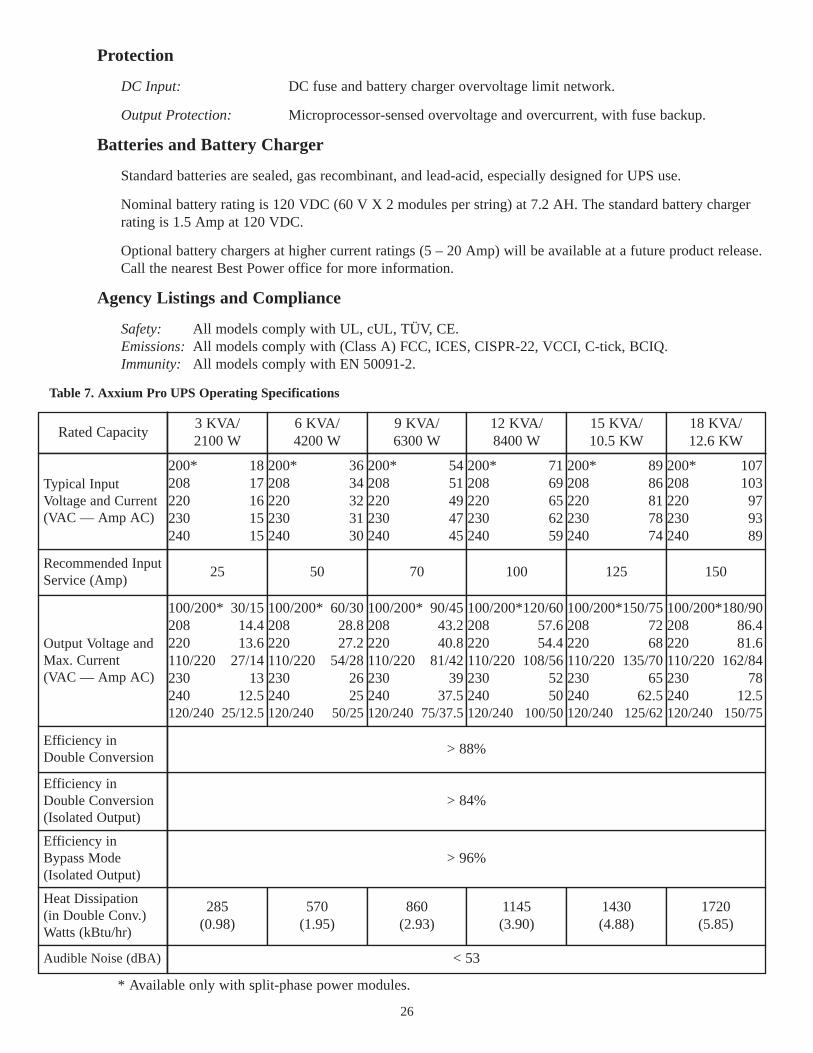
Protection
DC Input: DC fuse and battery charger overvoltage limit network.
Output Protection: Microprocessor-sensed overvoltage and overcurrent, with fuse backup.
Batteries and Battery Charger
Standard batteries are sealed, gas recombinant, and lead-acid, especially designed for UPS use.
Nominal battery rating is 120 VDC (60 V X 2 modules per string) at 7.2 AH. The standard battery chargerrating is 1.5 Amp at 120 VDC.
Optional battery chargers at higher current ratings (5 – 20 Amp) will be available at a future product release.Call the nearest Best Power office for more information.
Agency Listings and Compliance
Safety: All models comply with UL, cUL, TÜV, CE.Emissions:All models comply with (Class A) FCC, ICES, CISPR-22, VCCI, C-tick, BCIQ.Immunity: All models comply with EN 50091-2.
Table 7. Axxium Pro UPS Operating Specifications
* Available only with split-phase power modules.
27
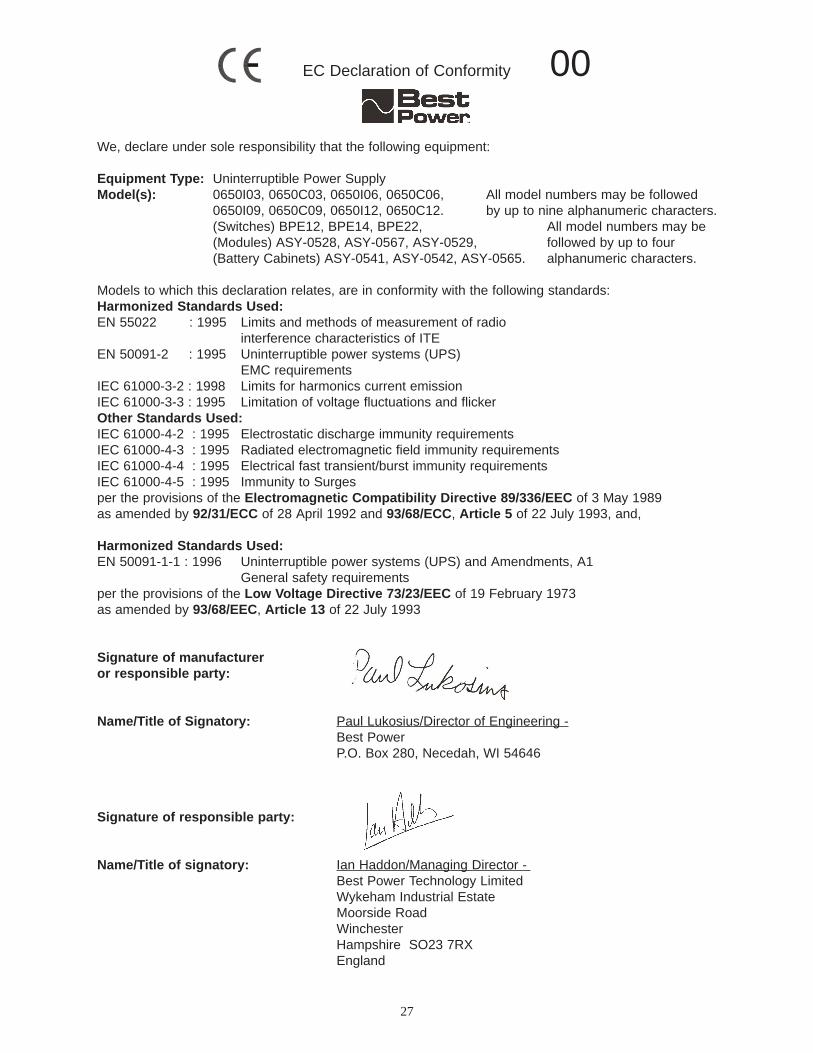
EC Declaration of Conformity 00
We, declare under sole responsibility that the following equipment:
Equipment Type: Uninterruptible Power SupplyModel(s): 0650I03, 0650C03, 0650I06, 0650C06, All model numbers may be followed
0650I09, 0650C09, 0650I12, 0650C12. by up to nine alphanumeric characters.(Switches) BPE12, BPE14, BPE22, All model numbers may be (Modules) ASY-0528, ASY-0567, ASY-0529, followed by up to four (Battery Cabinets) ASY-0541, ASY-0542, ASY-0565. alphanumeric characters.
Models to which this declaration relates, are in conformity with the following standards:Harmonized Standards Used:EN 55022 : 1995 Limits and methods of measurement of radio
interference characteristics of ITEEN 50091-2 : 1995 Uninterruptible power systems (UPS)
EMC requirementsIEC 61000-3-2 : 1998 Limits for harmonics current emissionIEC 61000-3-3 : 1995 Limitation of voltage fluctuations and flickerOther Standards Used:IEC 61000-4-2 : 1995 Electrostatic discharge immunity requirementsIEC 61000-4-3 : 1995 Radiated electromagnetic field immunity requirementsIEC 61000-4-4 : 1995 Electrical fast transient/burst immunity requirementsIEC 61000-4-5 : 1995 Immunity to Surgesper the provisions of the Electromagnetic Compatibility Directive 89/336/EEC of 3 May 1989 as amended by 92/31/ECC of 28 April 1992 and 93/68/ECC, Article 5 of 22 July 1993, and,
Harmonized Standards Used:EN 50091-1-1 : 1996 Uninterruptible power systems (UPS) and Amendments, A1
General safety requirementsper the provisions of the Low Voltage Directive 73/23/EEC of 19 February 1973as amended by 93/68/EEC, Article 13 of 22 July 1993
Signature of manufactureror responsible party:
Name/Title of Signatory: Paul Lukosius/Director of Engineering -Best PowerP.O. Box 280, Necedah, WI 54646
Signature of responsible party:
Name/Title of signatory: Ian Haddon/Managing Director - Best Power Technology LimitedWykeham Industrial EstateMoorside RoadWinchesterHampshire SO23 7RXEngland

28
900 Warranty
901 LIMITED TWO YEAR WARRANTYStandard Warranty For All Purchases
BEST POWER warrants that each product sold by BEST POWER is compatible with existing commerciallyavailable computer equipment with enclosed power supplies and is free from defects in materials and workmanship under normal use and service. This warranty is applicable only to the initial retail purchaser (PURCHASER), and is not transferable. The duration of this warranty is two (2) years from the date of the firstretail sale or the date of delivery to the PURCHASER, whichever occurs first, subject to the following conditions.
If the PURCHASER discovers within the duration of this warranty a failure of the product to perform compatibly with presently existing computer equipment or a defect in material or workmanship, the PURCHASER must promptly notify BEST POWER in writing within the duration of the warranty or not laterthan one month after expiration of the warranty. BEST POWER’s obligation under this warranty is limited to thereplacement or repair, subject to the conditions specified below, of such product returned intact to BESTPOWER which shall appear to BEST POWER, upon inspection, to have been either incompatible or defective.Replacement or repair will be made at BEST POWER’s Worldwide Service, Highway 80, Necedah, Wisconsin54646, U.S.A. Such repair or replacement shall be at BEST POWER’s expense. This warranty does not coverany taxes which may be due in connection with replacement or repair, nor any installation, removal, transportation or postage costs. These expenses will be paid by PURCHASER. If BEST POWER is unable torepair or replace the product to conform to this warranty after a reasonable number of attempts, BEST POWERwill refund the purchase price. Remedies under this warranty are expressly limited to those specified above.
TO THE EXTENT ALLOWED BY LAW, BEST POWER DISCLAIMS ALL OTHER WARRANTIES,EXPRESS OR IMPLIED, INCLUDING, BUT NOT LIMITED TO, ANY IMPLIED WARRANTIES OF MERCHANTABILITY OR FITNESS FOR A PARTICULAR PURPOSE, AND ANY IMPLIED WARRANTYOF MERCHANTABILITY OR FITNESS FOR A PARTICULAR PURPOSE ON THIS PRODUCT IS LIMITED IN DURATION TO THE DURATION OF THIS WARRANTY. TO THE EXTENT ALLOWED BYLAW, BEST POWER SHALL NOT BE LIABLE FOR ANY SPECIAL, INCIDENTAL, OR CONSEQUENTIAL DAMAGES INCLUDING, BUT NOT LIMITED TO, LOSS OF PROFITS, INJURIES TOPROPERTY, LOSS OF USE OF THE PRODUCT OR ANY ASSOCIATED EQUIPMENT.
Some states do not allow limitations on how long an implied warranty lasts, so that the above limitation on duration of implied warranties may not apply to you. Some states do not allow the exclusion or limitation ofincidental or consequential damages, so the above limitation or exclusion may not apply to you. This warrantygives you specific legal rights, and you may also have other rights which vary from state to state. You areadvised to consult applicable state laws.
No warranty is made with respect to other products sold by BEST POWER which do not bear the name BESTPOWER, and no recommendation of such other product shall imply or constitute any warranty with respect tothem. This warranty does not cover repair or replacement because of damage from unreasonable use (for example only, damage from road hazard, accident, fire or other casualty, misuse, negligence, or incorrect wiring)and any use or installation not in conformance with instructions furnished by BEST POWER, or repairs orreplacements needed because of modifications or parts not authorized or supplied by BEST POWER.

29
902 LIMITED WARRANTYTransient Voltage Surge Suppression Circuitry(For U.S. and Canadian Purchasers Only)
BEST POWER hereby warrants the transient voltage surge suppression circuitry in each Axxium™ Pro, FERRUPS®, FORTRESS®, PATRIOT®, UNITY/I®, CITADEL®, or SPIKEFREE™ product (hereinaftercalled “Product”) sold by it for installation in the United States of America and Canada to be free from defectsin material and workmanship under normal use and service for the lifetime of the Product, beginning with thedate of sale to the initial retail purchaser, subject to the following conditions. This warranty is applicable only tothe initial retail purchaser (hereinafter called PURCHASER), is not transferable, and is limited to the followingremedies:
1. The replacement or repair of the transient voltage surge suppression circuitry in each Product that is returnedintact to BEST POWER and which shall appear to BEST POWER upon inspection to have been defective inmaterial or workmanship or to have been damaged through normal use;
2. The reimbursement to the PURCHASER of up to $25,000 per occurrence of documented physical damage tospecified computer equipment connected to a Product where such damage could have been prevented by transient voltage surge suppression circuitry as detailed in BEST POWER’s specification for the Product sold.
This warranty is made in addition to BEST POWER’s Limited Two Year Warranty.
This warranty does not include any taxes which may be due in connection with replacement or repair nor anyinstallation, transportation or postage costs. These expenses will be paid by PURCHASER. Replacement orrepair will be made at BEST POWER’s Worldwide Service, Highway 80, Necedah, Wisconsin 54646, U.S.A.
This warranty does not cover repair or replacement because of damage from unreasonable use (damage fromroad hazards, accident, fire or other casualty, misuse, negligence, incorrect wiring) and any use or installationnot in conformance with instructions furnished by BEST POWER, or repairs or replacements needed because ofmodifications or parts not authorized or supplied by BEST POWER.
This warranty is operable only upon the written acceptance by BEST POWER of an application by the PURCHASER on BEST POWER’s standard form for the above warranty coverage for the Product sold. In suchapplication, the PURCHASER shall represent that the Product sold has been properly installed and grounded inaccordance with instructions received from BEST POWER, and the PURCHASER shall also specify the computer equipment to which the Product sold has been connected and the location of thecomputer equipment.This warranty will not apply to any equipment not specified in the application by the PURCHASER as protectedequipment.
EXCEPT AS EXPRESSLY SET FORTH IN THIS WARRANTY AND BEST POWER’s LIMITED TWOYEAR WARRANTY, BEST POWER MAKES NO OTHER WARRANTIES, AND TO THE EXTENTALLOWED BY LAW, BEST DISCLAIMS ALL OTHER WARRANTIES, EXPRESS OR IMPLIED, INCLUDING, BUT NOT LIMITED TO, ANY IMPLIED WARRANTIES OF MERCHANTABILITY OR FITNESS FOR A PARTICULAR PURPOSE.
REMEDIES UNDER THIS WARRANTY ARE EXPRESSLY LIMITED TO THE REPAIR OR REPLACEMENT OF PRODUCTS AND THE REIMBURSEMENT SPECIFIED ABOVE, AND TO THEEXTENT ALLOWED BY LAW ANY CLAIMS FOR LOSS ARISING OUT OF THE FAILURE OF PRODUCTS TO PERFORM FOR ANY PERIOD OF TIME, OR SPECIAL, INDIRECT, INCIDENTAL ORCONSEQUENTIAL DAMAGES OR OTHER ECONOMIC LOSS ARE EXPRESSLY EXCLUDED.
Some states do not allow limitations on how long an implied warranty lasts, so that the above limitation on duration of implied warranties may not apply to you. Some states do not allow the exclusion or limitation ofincidental or consequential damages, so the above limitation or exclusion may not apply to you. This warrantygives you specific legal rights, and you may also have other rights which vary from state to state. You areadvised to consult applicable state laws.

30
903 WARRANTY REGISTRATION
Please fill out the information listed below for your records. Send a photocopy of this page by mail or by fax toyour nearest Best Power office if you can’t register your warranty information online.
We recommend that you register your product by using the online registration form. To enter the informationonline, go to http://www.bestpower.com and select “Warranty Registration” in the Service section. Use the information you have recorded below to complete the online registration.
Best Power Model Number 0650 (15 characters, total)
Best Power Serial Number
I acknowledge that the above product has been properly installed and grounded in accordance with instructions supplied by Best Power.
_____________________________ ______________________(signature) (installation date)
Please print the Power Modulefollowing information: Serial Numbers*
Contact Person _____________________________________ P/Q 650
Title _____________________________________ P/Q 650
Company _____________________________________ P/Q 650
Street Address _____________________________________ P/Q 650
_____________________________________ P/Q 650
City _____________________________________ P/Q 650
State/Country _____________________________________ P/Q 650
Postal/Zip Code _____________________________________ P/Q 650
Telephone _____________________________________ *P prefix: Universal
Fax _____________________________________ Q prefix: Split-phase
E-mail Address _____________________________________ (circle either P or Q)

31
1000 How Do I. . .The following questions provide a few quick-to-find answers to commonly asked questions. Use this information after you are completely familiar with Axxium Pro system operation and all other parts of this manual.
Turn the UPS on?
Make sure all power modules are securely plugged into the rack, and each module handle is latched. Also makesure the DC disconnect button on the back of the external battery cabinet is closed (pulled out). Turn the optional external bypass switch to the Line or UPS position. Refer to the operator control panel and press thebutton labeled ON. (If On/Off control is password-protected, you’ll be requested to enter the User password:0377.) Confirm the selection by pressing the button labeled Yes. After a few seconds, the green LED lights tosignal the UPS is operating and producing power.
Turn the UPS off?
Refer to the operator control panel and press the button labeled OFF. Confirm the selection by pressing thebutton labeled Yes. (If On/Off control is password-protected, you’ll first be requested to enter the User pass-word: 0377.) In the event of a control panel failure, you can turn the unit on or off using a computer connectedto the Communication Port. In an emergency or when the above two methods fail to turn the unit off, remove thefront cover bezels, and unlatch and pull the handles of all power modules out at least one inch (20 mm) to turnoff the power control circuitry. If your UPS has external battery cabinets, press the large, red DC disconnectbutton on the back of the battery cabinet nearest to the UPS cabinet.
Turn off the alarm beeps?
Press the lower left button. Note the alarm message and refer to the Alarm Messages table to correct the problem. After the problem has been resolved, press the lower center button to clear the alarm.
View the alarm log?
Go to menu 9 2. Press the enter button to view the most recent alarm. Press the down-arrow button to scrolldown through the log to view older alarms.
Install the CheckUPS software?
See the instructions accompanying the CheckUPS software CD-ROM. You may also download the latest software revision from www.bestpower.com.
Check the input or output voltage?
Go to menus 3 8 and 3 9 for the input voltage; go to menus 3 10 and 3 11 for the output voltage.
Check the battery voltage?
Go to menu 3 5. To view other system status parameters, refer to the Menu Map.
Check the condition of the batteries?
The results of the most recent battery test are stored at menu 6 2. To run a test of battery condition, go to menu10 1 and press the Enter button. When the test is complete, the results are again stored in menu 6 parameters.

32
Change the battery low-voltage alarm threshold? (or any other alarm or operating limit?)
This is one of the parameters that requires a trained person, knowing the correct password, to perform. Withoutthe proper password, you are only able to view operating limits, not change them. These limits should bechanged only by authorized personnel. For information about making this or other password-protected adjustments, contact Best Power's Worldwide Service or your nearest Best Power office.
Apply power to the loads if the unit won’t operate?
Turn the optional external bypass switch to either the Service or the Line position. In these two positions, linepower flows directly to the loads. In the Service position, the UPS does not receive line power and may beworked on for maintenance purposes.
Turn the external bypass switch?
If the bypass switch is a Make-Before-Break type, you must press the interlocking red button next to the switchbefore turning the switch.
Set the UPS to turn on in High Efficiency mode?
Go to menu 2. Select the system mode desired at power-on by pressing the up- or down-arrow button. When thedisplay shows Auto High Efficiency, press the Enter button.
Set the UPS to operate in High Efficiency mode on weekends?
The Axxium Pro system will not change operating modes as a timed event. But, if you wish to conserve energy,before leaving for the weekend, go to menu 2. Select High Efficiency and press the Enter button. After theweekend, return to the Automatic mode by going to menu 2 again, and selecting Auto followed by pressing theEnter button.
Change the level of system redundancy?
To view or change the redundancy level, go through the Config dialog on the operator control panel.
Change the batteries?
Each side-by-side pair of battery modules forms one series string on the DC bus. Refer to Section 703 for thebattery replacement procedure.
Add/delete one or more strings of batteries?
Physically install or remove battery modules as described in Step 3 of Section 300. Record capacity of externalbattery strings (in all external battery cabinets) by going through the Config dialog on the operator control panel.
Add/delete one or more power modules?
Physically install or remove power modules as described in Step 3 of Section 300. The system operating software senses the number and location of all power modules in the chassis rack. If you want to change thenumber of redundant power modules, go to menu 7 3 5 and change the level of system redundancy.

33
PART II
INSTALL ATION INSTRUCTIONS
Contents
PART I USER INSTRUCTIONS . . . . . . . . . . . . . . . . . . . . . . . . . . . . . . . . . . . . . . . . . . . . . . . . . . . . . . .3
PART II INS TALL ATIO N INSTRUCTIONS . . . . . . . . . . . . . . . . . . . . . . . . . . . . . . . . . . . . . . . . . . . .33
1100 Installation Planning . . . . . . . . . . . . . . . . . . . . . . . . . . . . . . . . . . . . . . . . . . . . . . . . . . . . . . . . . . . . . .351101 Dimensions . . . . . . . . . . . . . . . . . . . . . . . . . . . . . . . . . . . . . . . . . . . . . . . . . . . . . . . . . . . . . .351102 Equipment Clearances . . . . . . . . . . . . . . . . . . . . . . . . . . . . . . . . . . . . . . . . . . . . . . . . . . . . . .351103 Rack Mounting Guidelines . . . . . . . . . . . . . . . . . . . . . . . . . . . . . . . . . . . . . . . . . . . . . . . . . . .361104 Floor Anchor Kit Requirements . . . . . . . . . . . . . . . . . . . . . . . . . . . . . . . . . . . . . . . . . . . . . . .371105 Caster Cart Requirements . . . . . . . . . . . . . . . . . . . . . . . . . . . . . . . . . . . . . . . . . . . . . . . . . . .371106 Stabilizer Bracket Requirements . . . . . . . . . . . . . . . . . . . . . . . . . . . . . . . . . . . . . . . . . . . . . .381107 Location Requirements . . . . . . . . . . . . . . . . . . . . . . . . . . . . . . . . . . . . . . . . . . . . . . . . . . . . .391108 Moving the Axxium Pro UPS and Battery Cabinets . . . . . . . . . . . . . . . . . . . . . . . . . . . . . . . .391109 Storage and Operation Environments . . . . . . . . . . . . . . . . . . . . . . . . . . . . . . . . . . . . . . . . . . .401110 Bypass Switches . . . . . . . . . . . . . . . . . . . . . . . . . . . . . . . . . . . . . . . . . . . . . . . . . . . . . . . . . .40
1200 UPS Unpacking and Setup . . . . . . . . . . . . . . . . . . . . . . . . . . . . . . . . . . . . . . . . . . . . . . . . . . . . . . . . .421300 UPS and Bypass Switch Installation (for Qualified Personnel Only) . . . . . . . . . . . . . . . . . . . . . . . . . .43
1301 Input Current Ratings . . . . . . . . . . . . . . . . . . . . . . . . . . . . . . . . . . . . . . . . . . . . . . . . . . . . . .431302 Installing External Bypass Switches . . . . . . . . . . . . . . . . . . . . . . . . . . . . . . . . . . . . . . . . . . . .441303 Installation Overview . . . . . . . . . . . . . . . . . . . . . . . . . . . . . . . . . . . . . . . . . . . . . . . . . . . . . . .451304 Determining Input/Output Voltage and Selecting Power Module Type . . . . . . . . . . . . . . . . . .461305 UPS Input Wiring Connections . . . . . . . . . . . . . . . . . . . . . . . . . . . . . . . . . . . . . . . . . . . . . . .471306 Neutral-to-Ground Bonding for Isolated Outputs . . . . . . . . . . . . . . . . . . . . . . . . . . . . . . . . . .471307 Installation with an External Bypass Switch . . . . . . . . . . . . . . . . . . . . . . . . . . . . . . . . . . . . . .481308 UPS Output Wiring Connections . . . . . . . . . . . . . . . . . . . . . . . . . . . . . . . . . . . . . . . . . . . . . .501309 Voltage and Phase Check . . . . . . . . . . . . . . . . . . . . . . . . . . . . . . . . . . . . . . . . . . . . . . . . . . . .601310 Balancing Receptacle Loads . . . . . . . . . . . . . . . . . . . . . . . . . . . . . . . . . . . . . . . . . . . . . . . . .62
1400 Connecting the External Battery Cabinets . . . . . . . . . . . . . . . . . . . . . . . . . . . . . . . . . . . . . . . . . . . . .63
INDEX . . . . . . . . . . . . . . . . . . . . . . . . . . . . . . . . . . . . . . . . . . . . . . . . . . . . . . . . . . . . . . . . . . . . . . . . . . . .65
Figures
9. UPS Dimensions . . . . . . . . . . . . . . . . . . . . . . . . . . . . . . . . . . . . . . . . . . . 3510a. Metal Clip-nut and Tab Slot Locations. . . . . . . . . . . . . . . . . . . . . . . . . . . 3610b. Rack-mount Ear Installed. . . . . . . . . . . . . . . . . . . . . . . . . . . . . . . . . . . . . 3610c. Rails Holding UPS . . . . . . . . . . . . . . . . . . . . . . . . . . . . . . . . . . . . . . . . . 3611. Floor Anchor Brackets Bolted to UPS Cabinet. . . . . . . . . . . . . . . . . . . . . 3712. 3-slot Cabinet Being Lowered onto Caster Cart . . . . . . . . . . . . . . . . . . . . 3713. Stabilizer Bracket Installation . . . . . . . . . . . . . . . . . . . . . . . . . . . . . . . . . 3814. Typical Installation with a Bypass Switch . . . . . . . . . . . . . . . . . . . . . . . . 4515. Typical Installation with No Bypass Switch. . . . . . . . . . . . . . . . . . . . . . . 4516. Input Wiring of Axxium Pro UPS . . . . . . . . . . . . . . . . . . . . . . . . . . . . . . 4717. N-G Bond Wire. . . . . . . . . . . . . . . . . . . . . . . . . . . . . . . . . . . . . . . . . . . . 4718. UPS Power Entrance Panel . . . . . . . . . . . . . . . . . . . . . . . . . . . . . . . . . . . 48

34
Figures (continued)
19. Bypass Switch Wiring Label . . . . . . . . . . . . . . . . . . . . . . . . . . . . . . . . . . 4820. UPS Input and Output Terminals . . . . . . . . . . . . . . . . . . . . . . . . . . . . . . . 4921. Input Control Signal Wiring. . . . . . . . . . . . . . . . . . . . . . . . . . . . . . . . . . . 4922a. Universal Modules with Non-isolated Output. . . . . . . . . . . . . . . . . . . . . . 5022b. Split-phase Modules with Non-isolated Output . . . . . . . . . . . . . . . . . . . . 5022c. Universal Modules With 2-wire Plus Ground Isolated Output . . . . . . . . . 5022d. Universal Modules With 3-wire Plus Ground Isolated Output . . . . . . . . . 5022e. Universal Modules With 2-wire Plus Ground Isolated Output . . . . . . . . . 5123. Installation Wiring Diagram for Axxium Pro Systems with External
Bypass Switch (L1, N), Isolated Output, and Universal Power Modules. . 5224. Installation Wiring Diagram for Axxium Pro Systems with External
Bypass Switch (L1, L2), Isolated Output, and Universal Power Modules. 5225. Installation Wiring Diagram for Axxium Pro Systems with External Bypass
Switch (L1, L2, N), Isolated Output, and Universal Power Modules . . . . 5326. Installation Wiring Diagram for Axxium Pro Systems with External Bypass
Switch (L1, N), Non-isolated Output, and Universal Power Modules. . . . 5427. Installation Wiring Diagram for Axxium Pro Systems with External Bypass
Switch (L1, L2), Non-isolated Output, and Universal Power Modules . . . 5428. Installation Wiring Diagram for Axxium Pro Systems with External Bypass
Switch (L1, L2, N), Non-isolated Output, and Split-phase Power Modules5529. Installation Wiring Diagram for Axxium Pro Systems with No External
Bypass (L1, N), Isolated Output, and Universal Power Modules . . . . . . . 5630. Installation Wiring Diagram for Axxium Pro Systems with No External
Bypass (L1, L2), Isolated Output, and Universal Power Modules. . . . . . . 5631. Installation Wiring Diagram for Axxium Pro Systems with No External
Bypass (L1, L2, N), Isolated Output, and Universal Power Modules . . . . 5732. Installation Wiring Diagram for Axxium Pro Systems with No External
Bypass (L1, N), Non-isolated Output, and Universal Power Modules. . . . 5833. Installation Wiring Diagram for Axxium Pro Systems with No External
Bypass (L1, L2), Non-isolated Output, and Universal Power Modules. . . 5834. Installation Wiring Diagram for Axxium Pro Systems with No External
Bypass (L1, L2, N), Non-isolated Output, and Universal Power Modules 5935. Balancing Recptacle Loads . . . . . . . . . . . . . . . . . . . . . . . . . . . . . . . . . . . 6236. Breakaway Panel Links . . . . . . . . . . . . . . . . . . . . . . . . . . . . . . . . . . . . . . 6337. Bus-bar Extension Installation . . . . . . . . . . . . . . . . . . . . . . . . . . . . . . . . . 6338. Battery Cable Assembly Installation . . . . . . . . . . . . . . . . . . . . . . . . . . . . 6439. Battery Cable Installed in Battery Cabinet . . . . . . . . . . . . . . . . . . . . . . . . 64
Tables
8. UPS Dimensions . . . . . . . . . . . . . . . . . . . . . . . . . . . . . . . . . . . . . . . . . . . 359. Bypass Switch Positions . . . . . . . . . . . . . . . . . . . . . . . . . . . . . . . . . . . . . 4010. Bypass Switch Specifications. . . . . . . . . . . . . . . . . . . . . . . . . . . . . . . . . . 4111. Required Input Circuit Breaker Sizes (200–240 VAC, 50/60 Hz) . . . . . . . 4312. United States Recommended AWG and mm2 Wire Sizes . . . . . . . . . . . . . 4413. Choosing an Installation Wiring Diagram . . . . . . . . . . . . . . . . . . . . . . . . 46
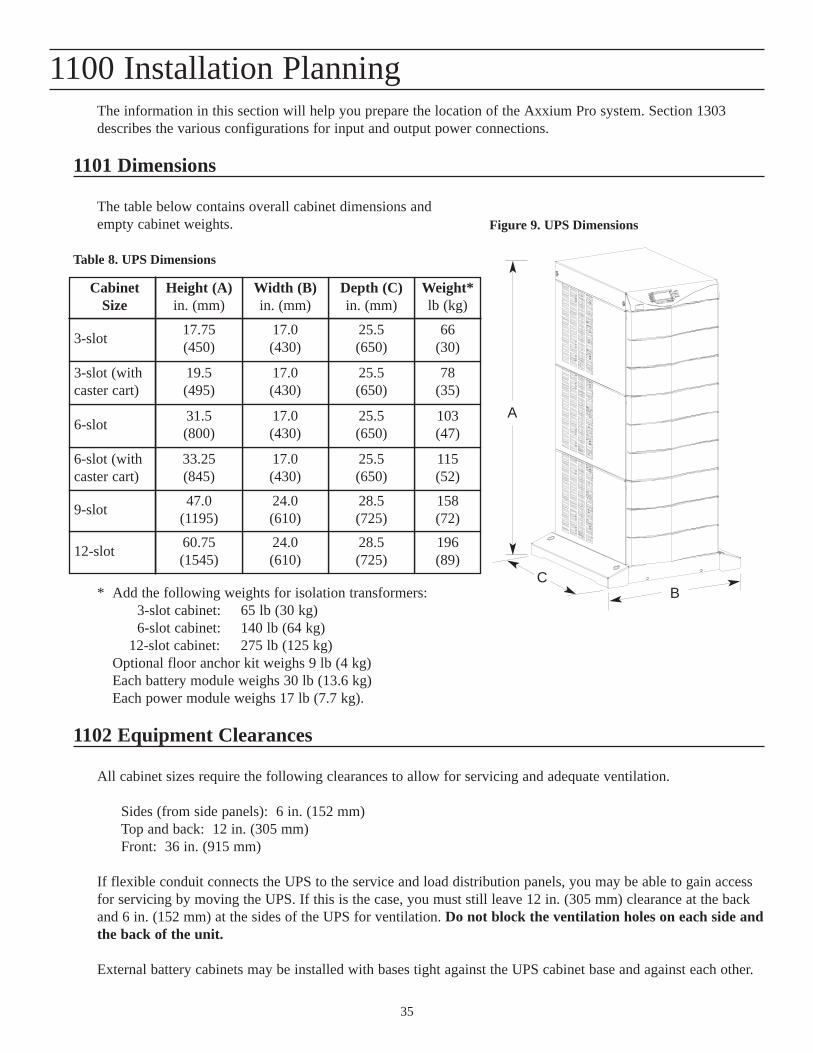
35
1100 Installation PlanningThe information in this section will help you prepare the location of the Axxium Pro system. Section 1303describes the various configurations for input and output power connections.
1101 Dimensions
The table below contains overall cabinet dimensions and empty cabinet weights.
Table 8. UPS Dimensions
* Add the following weights for isolation transformers:3-slot cabinet: 65 lb (30 kg)6-slot cabinet: 140 lb (64 kg)
12-slot cabinet: 275 lb (125 kg)Optional floor anchor kit weighs 9 lb (4 kg)Each battery module weighs 30 lb (13.6 kg)Each power module weighs 17 lb (7.7 kg).
1102 Equipment Clearances
All cabinet sizes require the following clearances to allow for servicing and adequate ventilation.
Sides (from side panels): 6 in. (152 mm)Top and back: 12 in. (305 mm)Front: 36 in. (915 mm)
If flexible conduit connects the UPS to the service and load distribution panels, you may be able to gain accessfor servicing by moving the UPS. If this is the case, you must still leave 12 in. (305 mm) clearance at the backand 6 in. (152 mm) at the sides of the UPS for ventilation. Do not block the ventilation holes on each side andthe back of the unit.
External battery cabinets may be installed with bases tight against the UPS cabinet base and against each other.
A
BC
115(52)
25.5(650)
17.0(430)
33.25(845)
6-slot (withcaster cart)
196(89)
28.5(725)
24.0(610)
60.75(1545)
12-slot
78(35)
25.5(650)
158(72)
28.5(725)
24.0(610)
47.0(1195)
9-slot
17.0(430)
103(47)
25.5(650)
17.0(430)
31.5(800)
6-slot
19.5(495)
66(30)
25.5(650)
17.0(430)
17.75(450)
3-slot
3-slot (withcaster cart)
Weight*lb (kg)
Depth (C)in. (mm)
Width (B)in. (mm)
Height (A)in. (mm)
Cabinet Size
Figure 9. UPS Dimensions

36
1103 Rack Mounting Guidelines
The 3-slot and 6-slot UPS cabinets may be installed in an EIA-standard19-in. (483-mm) equipment rack. An optional rack mounting kit, containing brackets and required hardware, is available for such aninstallation. For each 3-slot bay, use the following mounting procedureto convert the UPS cabinet and install it in the equipment rack:
NOTE: The UPS chassis is heavy. This procedure requires two people to lift and position the chassis into the equipmentrack. Install the cabinet in the rack before installing powermodules and battery modules, and before plugging the UPSinto the intended power outlet.
1. Remove the four screws (two on either side) securing the top coverof the UPS. Carefully lift the cover straight up and off, to avoidstressing the operator control panel. Set the cover aside.
2. Remove each of the two cabinet side panels (4 panels in 6-slot cabinets) by lifting the top edge. No other hardware must be detached. Store or discard the side panels.
3. Carefully replace the UPS top cover and secure with the four screwsremoved in Step 1.
4. Refer to Figure 10a and install three metal clip-nuts onto each sideflange (6 clip-nuts on 6-slot cabinets) along the front of the UPSchassis at location “A” as shown.
5. Install a rack-mount ear (2 for 6-slot cabinets) on each side of theUPS chassis as shown in Figure 10b.
5.a. Insert the two offset tabs on the rear edge of the ear into matching slots (“B”) on the chassis side frame.
5.b.Pivot the ear forward, until it is flush against the UPS chassisside frame.
5.c. Secure each ear with three 1/4-20 X 1/2-in. Philips-head bolts,screwed into the metal clip-nuts installed in Step 4.
6. Select the desired location (vertical position) for the UPS in the equipment rack.
7. Install one equipment rail on each side of the rack, at the desiredlocation, using four 10-32 X 1/2-in. flat-head screws per rail. Selectthe proper holes in the rail that position the UPS at the desired location in the rack.
8. With one person lifting each side of the UPS cabinet, position thecabinet onto the two equipment rails. Carefully slide the UPS intothe equipment rack until the rack-mount ears of the chassis are flushwith the front vertical rails of the rack. Make sure the holes in theears align with the holes in the rack.
9. Secure the UPS in the rack using eight 10-32 X 1/2-in. torx screws(16 for 6-slot cabinets) or other appropriate customer-specifiedscrews.
Figure 10a. Metal Clip-nut andTab Slot Locations
Figure 10b. Rack-mount Ear Installed
Figure 10c. Rails Holding UPS

37
1104 Floor Anchor Kit Requirements
An optional floor anchor kit is available for all sizes ofthe Axxium Pro UPS. The kit helps to stabilize the UPSor battery cabinet in the event of accidental bumps orsmall floor movements. Any testing to specific seismicrequirements is the responsibility of the customer.
The floor anchor brackets, shipped separately from theUPS and battery cabinet, should be attached inside thelower front and rear edges of the cabinet before installingpower modules and battery modules, and before makingconnections to the intended power source. The drawingof a 3-slot cabinet shows how the two brackets areattached to the cabinet.
Use mounting hardware supplied with the floor anchorkit to attach the brackets to the UPS or external batterycabinet, as shown in Figure 11. The customer is responsible for specifying and supplying floor mounting bolts.
Mounting centers for 5/16-in. (8-mm) floor bolts as shown in Figure 11 are as follows:“A”: 14.5 in. (368 mm)“B” (3- and 6-slot): 30.25 in. (768 mm)
(9- and 12-slot): 34.25 in. (870 mm)
1105 Caster Cart Requirements
An optional caster cart (refer to Figure 12) is available for 3-slot and 6-slot cabinets. It increases the mobility ofthe UPS, if required.
NOTE: The UPS chassis is heavy. This procedure requires two people to lift and position the chassis intothe caster cart. Lift the cabinet using four lifting straps shipped with the cabinet; do not attemptto lift the cabinet by the module shelves or other convenient edges or panels.
The caster cart, shipped separate from the UPS cabinet, must beplaced under the cabinet before installing power modules and battery modules, and before plugging the UPS into the intendedpower outlet.
The cart requires no bolts or other hardware to fasten it to theUPS cabinet. It is shaped to fit securely under the cabinet, ensuring proper alignment after placing the cabinet on the cart.
Four foot pads under the cart keep the cart from rolling when it isin its intended location. Turn each threaded foot to lower it to thefloor. When the foot is tight against the floor, turn the lock nut onthe threaded foot up tight against the bottom of the cart to keepthe foot from rotating.
If leveling of the UPS is required, use the foot pads to raise a sideor corner before locking them with their lock nuts.
BA
Figure 11. Floor Anchor BracketsBolted to UPS Cabinet
Figure 12. 3-slot Cabinet Being Loweredonto Caster Cart

38
1106 Stabilizer Bracket Requirements
The 12-slot Axxium Pro UPS cabinet with non-isolated outputs is shipped with two stabilizer brackets. Thesebrackets must be attached to the wall or the floor behind the UPS cabinet. Under all module-loading conditions,they act as a protective stop to prevent the cabinet from falling forward if it is unintentionally pushed away fromthe wall.
As shown in Figure 13, each bracket has holes that enable it to be attached by screws to either the wall or thefloor (or both) behind the intended cabinet installation. The brackets are not attached to the cabinet base itself.Install the brackets as follows.
1. Select the location for the brackets, approximately 12-16 in. (30-41 cm) apart, at the floor/wall intersectionbehind the intended cabinet location.
2. Using the proper type of customer-supplied screws for the intended mounting surface, attach each bracket asshown in Figure 13. Make sure that all screws are driven into structural material such as wall studs.
3. Roll the UPS cabinet to its intended location, positioning the rear section of the cabinet base under the openends of the stabilizer brackets, as far as the cabinet will go.
4. Turn all four caster bolts counter-clockwise. When fully lowered, the UPS weight is removed from the casters and the base should rest in a level position on the floor.
NOTE: If the floor is uneven and the cabinet is tilted or unstable, you may need to place a thin steel plateunder a corner to make the cabinet stand vertical. Do not use caster bolts to level the cabinet.
Figure 13. Stabilizer Bracket Installation

39
1107 Location Requirements
Install the Axxium Pro UPS as close as possible to the equipment or the load distribution panel it will protect. Ifthis distance is more than 25 feet (7.6 m), transient noise can reappear in the electrical distribution system.
If additional Axxium Pro system batteries are in a separate cabinet, the battery cabinet should be located as closeas possible to the Axxium Pro UPS. If the batteries will be further from the unit than the standard cables allow,contact your nearest Best Power office for assistance.
1108 Moving the Axxium Pro UPS and Battery Cabinets
Refer to Section 1200 for information about initial equipment unpacking.
The Axxium Pro UPS and the battery cabinet are very heavy with battery modules and power modules installed.Before moving the cabinets, remove the battery modules and power modules and move these modules separatelyfrom the cabinets.
The smaller (3-slot and 6-slot) cabinets may be ordered with a caster cart, to enable moving the cabinet. Section 1105 describes how to set the four foot pads on this cart to keep the cabinet from rolling when properlypositioned.
The larger (9-slot and 12-slot) cabinets have casters built into the cabinet base. Use the procedure below to raisethe cabinet before rolling it on its casters. For 12-slot cabinets that do not have output isolation, refer to Section1106, for details about mounting stabilizer brackets before rolling the cabinet into place.
1. Ensure that the cabinet contains no battery modules and power modules.
2. Locate the four plastic caps covering the caster bolts. They are at the corners of the cabinet base.
3. Pry the caps out of the bolt access holes.
4. Use a 1/2-in. hex-style socket wrench to turn each of the four bolts clockwise. Doing so lowers the casters toallow the cabinet to roll on the casters.
5. After rolling the cabinet to its intended position, turn the four bolts counter-clockwise. When fully lowered,the UPS weight is removed from the casters and the base should rest in a level position on the floor.
NOTE: If the floor is uneven and the cabinet is tilted or unstable, you may need to place a thin steel plateunder a corner to make the cabinet stand vertical. Do not use caster bolts to level the cabinet.
After properly positioning and leveling the cabinet, insert battery modules and power modules into the rack asdescribed in Section 300.

40
1109 Storage and Operation Environments
Storage Temperature: Store the Axxium Pro battery modules (in the unit or battery cabinet) at –20 to +40 ºC (–4 to +104 ºF). Batteries will have a longer shelf life if they are kept below+25 ºC (+77 ºF). The Axxium Pro UPS or battery cabinet without batteries may bestored at –40 to +60 ºC (–40 to +140 ºF).
Operating Temperature: Operate the Axxium Pro UPS within the range of 0 to +40 ºC (32 to +104 ºF), up to 95% relative humidity without condensation. The batteries last longer if theoperating temperature is kept below +25 ºC (+77 ºF).
Ventilation: The air around the UPS must be clean, dust-free, and free of corrosive chemicals orother contaminants. The air must be free to circulate around the UPS and batterycabinets. Do not operate the UPS or charge/discharge batteries in a sealed room orcontainer.
High-altitude Operation: The maximum UPS operating temperature decreases 1 ºC per 300 meters above1525 meters (2 ºF per 1000 ft above 5000 ft). Maximum operating elevation is 3000 meters (10,000 ft).
1110 Bypass Switches
If your Axxium Pro UPS does not have a power cord and plug, it is recommended that you install a Best Powerbypass switch to enable power transfer during maintenance or UPS downtime. Mount the bypass switch on thewall, within sight of the UPS or the load distribution panel.
The bypass switch has four positions as described in Table 9. In the UPS or LINE position, AC input power isstill connected to the input terminals inside the UPS.To disconnect AC input power during maintenance orservice, turn the bypass switch to the SERVICE position. For Make-Before-Break switches, you must press thered button beside the switch before you can change the switch position.
Table 9: Bypass Switch Positions
Bypass switches are available in two types: Make-Before-Break (MBB) and Break-Before-Make (BBM).
A Make-Before-Break switch makes a new connection before it breaks the original connection. For example, ifyou turn an MBB switch from “UPS” to “LINE,” the bypass switch connects your protected equipment to ACline power before disconnecting the equipment from UPS output power. (As noted in Figure 25, MBB switchesmay not be used in certain system configurations.)
Switch Position Description
LINEConnects the loads (protected equipment) directly to AC line and disconnects UPSoutput. AC line is still connected to the UPS input.
OFFDisconnects the loads from the UPS output power and AC input power, as well asAC line power from the UPS input.
UPS Connects the UPS outputs to the loads.
SERVICELike the LINE position, SERVICE connects the loads directly to AC line input anddisconnects UPS output. However, because SERVICE also disconnects AC inputfrom the UPS, this is the appropriate position for UPS maintenance or repair.

41
A Break-Before-Make switch breaks the original connection before it makes a new one. If you turn a BBMswitch from “UPS” to “LINE,” the switch disconnects your protected equipment from UPS output power beforeconnecting the equipment to AC input power.
Best Power bypass switches that may be used for the Axxium Pro UPS are available in six models, as specifiedin Table 10.
Table 10: Bypass Switch Specifications
53(24.1)
6.6(168)
18.4(467)
26.5(673)
150A/300VACBPE22BBM1A
(break before make)BPE22MBB1A
(make before break)
31(14.1)
6.8(172)
14.0(356)
21.0(534)
80A/300VACBPE14BBM1A
(break before make)BPE14MBB1A
(make before break)
27(12.3)
6.8(172)
14.0(356)
21.0(534)
40A/300VAC (CSA)50A/300VAC (UL, TÜV)
BPE12BBM1A(break before make)
BPE12MBB1A(make before break)
Weight lb (kg)
Depth in. (mm)
Width in. (mm)
Height in. (mm)
Rating, ContinuousBypass Switch Models
42
1200 UPS Unpacking and SetupThe Axxium Pro UPS is shipped in a carton on a shipping pallet. Power and battey modules are shipped in separate boxes on another pallet. NOTE: As they are unpacked, check to make sure all Axxium Pro UPSpower modules are the proper type for the UPS cabinet: Single-phase (universal) modules have whitelabels; split-phase modules have blue labels.
To open the UPS carton and remove the UPS from its shipping pallet, use one of the following procedures. Alsorefer to the unpacking instruction sheet LTS-1724, packed inside the UPS shipping carton.
Three- and six-slot cabinets
1. Open the top of the carton by cutting the banding straps that hold the carton to the pallet. Open the carton flaps or lift the cover off.
2. Remove any packing material inside the carton. Also remove cartons containing front panel bezels, electrical or mechanical hardware, and printed material.
3. The cabinet weight requires two people to lift it. At the base of the cabinet are four lifting straps. Oneperson must lift the two front straps, and one person must lift the two rear straps. NOTE: Do notattempt to lift the cabinet by the module shelves or other convenient edges or panels.
4. If an optional caster cart is included for cabinet mobility, refer to Section 1105 for information aboutmounting the cabinet on the cart and stabilizing it using the cart foot pads.
5. After placing the cabinet in its intended operating location, cut the lifting straps or slip them off the cabinet base tabs.
6. If the cabinet does not have a line (mains) power cord, install the input power conduit or cablingbetween the UPS and the installation service and distribution panels. See Figures 14 and 15 and Section 1303.
7. If the cabinet has a line (mains) power cord, plug the cord into a mains power outlet.
8. Refer to Section 300 for instructions to install power and battery modules.
9. Test proper operation of external control signals and computer communication before connecting loads.
Nine- and twelve-slot cabinets
1. Open the top of the carton by cutting straps that hold the cover to the carton. Lift the cover off.
2. Remove the pallet ramp packed on top of the cabinet. Locate the ramp-mounting hardware (supplied inthe accessory kit) and attach the ramp to the pallet as shown in LTS-1724, accompanying the hardware.
3. Remove any packing material inside the carton. Also remove cartons containing front panel bezels, electrical or mechanical hardware, and printed material.
4. Lower the four cabinet casters (one at each corner of the cabinet base) by using a 1/2-in. hex-style socket wrench to turn each bolt clockwise.

43
5. With all casters fully extended, carefully roll the cabinet down the ramp and to its intended operatinglocation.
6. To stabilize the cabinet in its operating location, turn the four caster bolts counter-clockwise until thecabinet rests on the floor. Place a plastic cap into each bolt access hole.
NOTE: If the floor is uneven and the cabinet is tilted or unstable, you may need to place a thin steelplate under a corner to make the cabinet stand vertical. Do not use caster bolts to level the cabinet.
7. If the cabinet does not have a line (mains) power cord, install the input power conduit or cablingbetween the UPS and the installation service and distribution panels. See Figures 14 and 15 and Section 1303.
8. If the cabinet has a line (mains) power cord, plug the cord into a mains power outlet.
9. Refer to Section 300 for instructions to install power and battery modules.
10. Test proper operation of external control signals and computer communication before connecting loads.
1300 UPS and Bypass Switch Installation(for Qualified Personnel Only)
1301 Input Current Ratings
Table 11 contains the required circuit breaker ratings for hard-wired installations. Circuit breaker ratings forunits having an input line cord are determined by the current capacity of the line cord.
Table 11. Required Input Circuit Breaker Sizes (200-240 VAC, 50/60 Hz)
For redundant power module operation (N+X), increase the input current rating by 3 A for each additional levelof redundancy (3X amperes).
UPS Capacity Circuit Breaker Rating
3 kVA 25 A
6 kVA 50 A
9 kVA 70 A
12 kVA 100 A
15 kVA 125 A
18 kVA 150 A

44
1302 Installing External Bypass Switches
For hardwired UPS installations, the bypass switch must be incorporated in the fixed wiring and be readilyaccessible.
Table 12 contains information for selecting the proper size conductor to carry power from the service distribution panel to the external bypass switch, and from the external bypass switch to the load distributionpanel.
For installations in the U.S., select the conductor size based upon the input circuit breaker rating, as listed inTable 12. In other locations, refer to local wiring code requirements to determine conductor sizes. Always usewiring rated at 75 ºC, minimum.
Refer to the wiring diagrams in Figures 23 through 34, based upon the intended UPS input and output voltages,to determine the maximum input and output current and required circuit breaker sizes.
After installing all input and output wiring on the bypass switch, secure all connections by tightening all screwsto the torque values specified in Table 12.
Table 12. United States Recommended AWG and mm2 Wire Sizes
For U.S. installations, read this Important Note!
This table lists the AWG and mm2 wire size for eachcircuit breaker size shown on the wiring diagrams.The minimum recommended circuit breaker sizes foreach model and voltage application are listed on thewiring diagrams.
Conductor sizes shall be no smaller than the 75º Cwire size based on the ampacities given in Tables 310-316 of the National Electrical Code, ANSI/NFPA70-1993, and article 220. All circuit conductors,including the neutral and equipment grounding conductors, must be the same size (ampacity) wire.Code may require a larger AWG size than shown inthis table because of temperature, number of conductors in the conduit, or long service runs. Followlocal code requirements.
For thisInput
CircuitBreakerSize...
Use this Size 75º C Copper Wire
Conductor ScrewTorque
AWG mm2 in-lb(Nm)
25 A 10 5.320
(2.3)
50 A 8 8.425
(2.8)
100 A
70 A
3
4
26.7
21.2
45(5.1)
35(4.0)
125 A 155
(6.2)
150 A 1/0 53.5
42.1
65(7.3)

45
1303 Installation Overview
The Axxium Pro UPS may be installed with the input (mains) connection hard wired through conduit to either asupply (mains) circuit breaker or an optional external bypass switch. If a bypass switch is used, both UPS inputand UPS output must be hard wired–through separate conduits–to the bypass switch, as shown in Figure 14.
If a bypass switch is not used, the UPS input may be hard wired (through conduit) to a mains circuit breaker,and the UPS output may either be hard wired to a circuit breaker in a distribution panel (as shown in Figure 15)or supplied to loads through receptacles on the back of the UPS. Without a bypass switch, power to the load cannot be maintained if the UPS is taken completely offline.
The UPS input (mains) connection may also be made through a power cord plugged into a mains receptacle. Insuch an installation, the UPS must be installed near the mains (input power) receptacle and the plug must bereadily accessible. In this case, the UPS output must be supplied through receptacles on the back of the UPS.
Figure 14: Typical Installation with a Bypass Switch
Figure 15: Typical Installation with No Bypass Switch
BuildingServicePanel
External Bypass Switch
LoadDistribution
PanelUPS
UPS
OFF
OFF
SERVICE
SERVICE
LINE
LINE
UPS
OFF
SERVICE
LINE
BuildingServicePanel
LoadDistribution
Panel

46
Input – OutputUPS Voltage
Output WiresExternalBypass
OutputIsolation System OutputInputSystemOutputInput
Wiring Diagrams (Figure No.)OutputIsolation
Wiring Diagrams (Figure No.)
220 – 220 L – N Yes No 26 22c16a23Yes22a16a
230 – 230 L – N Yes No 26 22c16a23Yes22a16a
240 – 240 L – N Yes No 26 22c16a23Yes22a16a
208 – 208 L1 – L2 Yes No 27 22e16a24Yes22a16a
220 – 220 L1 – L2 Yes No 27 22e16a24Yes22a16a
230 – 230 L1 – L2 Yes No 27 22e16a24Yes22a16a
240 – 240 L1 – L2 Yes No 27 22e16a24Yes22a16a
110/220 – 110/220 L1, L2, N* Yes No 28 – – –– – –– – –– – –22b16b
120/208 – 120/208 L1, L2, N* Yes No 28 – – –– – –– – –– – –22b16b
120/240 – 120/240 L1, L2, N* Yes No 28 – – –– – –– – –– – –22b16b
100/200 – 100/200 L1, L2, N* Yes No 28 – – –– – –– – –– – –22b16b
127/220 – 127/220 L1, L2, N* Yes No 28 – – –– – –– – –– – –22b16b
220 – 110/220 L1, L2, N Yes – – – – – – 22d16a25Yes– – –– – –
230 – 115/230 L1, L2, N Yes – – – – – – 22d16a25Yes– – –– – –
240 – 120/240
230 – 115/230
220 – 110/220
127/220 – 127/220
100/200 – 100/200
120/240 – 120/240
120/208 – 120/208
110/220 – 110/220
240 – 240
230 – 230
220 – 220
208 – 208
240 – 240
230 – 230
220 – 220
240 – 120/240
L1, L2, N
L1, L2, N
L1, L2, N
L1, L2, N*
L1, L2, N*
L1, L2, N*
L1, L2, N*
L1, L2, N*
L1 – L2
L1 – L2
L1 – L2
L1 – L2
L – N
L – N
L – N
L1, L2, N
No
No
No
No
No
No
No
No
No
No
No
No
No
No
No
Yes
– – –
– – –
– – –
No
No
No
No
No
No
No
No
No
No
No
No
– – –
– – –
– – –
– – –
34
34
34
34
34
33
33
33
33
32
32
32
– – –
22d16a
22d16a
22d16a
– – –– – –
– – –– – –
– – –– – –
– – –– – –
– – –– – –
22e16a
22e16a
22e16a
22e16a
22c16a
22c16a
22c16a
22d16a
31
31
31
– – –
– – –
– – –
– – –
– – –
30
30
30
30
29
29
29
25
Yes
Yes
Yes
– – –
– – –
– – –
– – –
– – –
Yes
Yes
Yes
Yes
Yes
Yes
Yes
Yes
– – –– – –
– – –– – –
– – –– – –
22b16b
22b16b
22b16b
22b16b
22b16b
22a16a
22a16a
22a16a
22a16a
22a16a
22a16a
22a16a
– – –– – –
1304 Determining Input/Output Voltage and Selecting Power Module Type
Sections 1305 through 1308 contain the various input and output connections for all possible Axxium Pro UPSconfigurations. Table 13 relates input and output configurations to the wiring diagrams specific to your particularsystem requirements. Select the correct wiring diagrams that apply to your installation, based upon whether yoursite has an external bypass switch and whether the UPS has an output isolation transformer. Select the requiredpower module type based upon the voltage and wiring configuration; aside from those marked (*), all powermodules are universal type.
Table 13. Choosing an Installation Wiring Diagram
* Split-phase power modules required.

47
1305 UPS Input Wiring Connections
The Axxium Pro UPS with universal power modules (model ASY-0528, with white labels on the front) is capable of supplying a single-phase output voltage: 208, 220, 230, or 240 VAC, as selected on the operator control panel. The Axxium Pro UPS with split-phase power modules (model ASY-0567, with blue labels on thefront) is capable of supplying two output voltages: 100/100 (for 200), 110/110 (for 220), 120/120 (for 240),120/120 (for 208), or 127/127 (for 220) VAC, as selected on the operator control panel.
Make sure that the UPS is wired for the proper output voltages as shown in Figure 22 and Figures 23-34, andthat the proper power modules (either universal or split-phase) are installed to produce the desired output voltage. Do not mix the two types of power modules in the same UPS cabinet. Also, make sure the inputwiring, as shown in Figure 16, is correct for the intended type of power module.
Figure 16. Input Wiring of Axxium Pro UPS
1306 Neutral-to-Ground Bonding for Isolated Outputs
As required under safety regulations issued by various regulatory agencies, the UPS cabinet must have a ground-bond connection for theneutral terminal of an isolated-output system. In such a system, thecustomer must make the neutral-to-ground (also referred to as N-G orneutral-to-earth) connection after selecting the desired output configuration.
In isolated-output systems, a green and yellow neutral-to-ground bonding wire is supplied, with one end attached to UPS chassis groundas shown in Figure 17. The other end of the wire (*) must be attachedto the proper output neutral terminal, as specified in Figure 22.
If there is any question as to the need for this bond wire, contact yourlocal regulatory agency or Best Power Worldwide Service.
Universal Power Modules(2-wire Plus Ground Input)
208, 220, 230, and 240 VAC
3 2 1
L2/N
L1
GND
Split-phase Power Modules(3-wire Plus Ground Input) (2 PEN)
100/200, 120/208, 110/220, 127/220, and 120/240 VAC
3 2 1
N
L1
L2
GND
X1 X3 X0 X2
N-G BondWire
Figure 17. N-G Bond Wire
(a) (b)
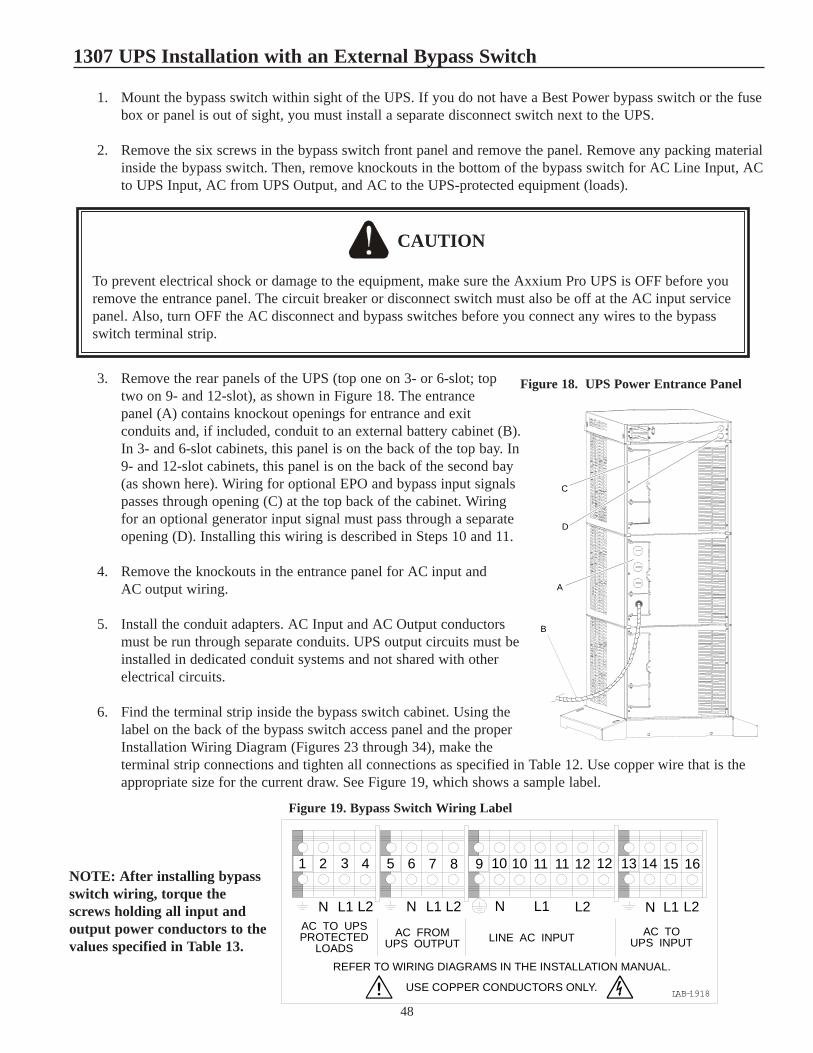
48
1307 UPS Installation with an External Bypass Switch
1. Mount the bypass switch within sight of the UPS. If you do not have a Best Power bypass switch or the fusebox or panel is out of sight, you must install a separate disconnect switch next to the UPS.
2. Remove the six screws in the bypass switch front panel and remove the panel. Remove any packing materialinside the bypass switch. Then, remove knockouts in the bottom of the bypass switch for AC Line Input, ACto UPS Input, AC from UPS Output, and AC to the UPS-protected equipment (loads).
3. Remove the rear panels of the UPS (top one on 3- or 6-slot; toptwo on 9- and 12-slot), as shown in Figure 18. The entrancepanel (A) contains knockout openings for entrance and exit conduits and, if included, conduit to an external battery cabinet (B).In 3- and 6-slot cabinets, this panel is on the back of the top bay. In9- and 12-slot cabinets, this panel is on the back of the second bay(as shown here). Wiring for optional EPO and bypass input signalspasses through opening (C) at the top back of the cabinet. Wiringfor an optional generator input signal must pass through a separateopening (D). Installing this wiring is described in Steps 10 and 11.
4. Remove the knockouts in the entrance panel for AC input and AC output wiring.
5. Install the conduit adapters. AC Input and AC Output conductorsmust be run through separate conduits. UPS output circuits must beinstalled in dedicated conduit systems and not shared with otherelectrical circuits.
6. Find the terminal strip inside the bypass switch cabinet. Using thelabel on the back of the bypass switch access panel and the properInstallation Wiring Diagram (Figures 23 through 34), make the terminal strip connections and tighten all connections as specified in Table 12. Use copper wire that is theappropriate size for the current draw. See Figure 19, which shows a sample label.
Figure 19. Bypass Switch Wiring Label
CAUTION
To prevent electrical shock or damage to the equipment, make sure the Axxium Pro UPS is OFF before youremove the entrance panel. The circuit breaker or disconnect switch must also be off at the AC input servicepanel. Also, turn OFF the AC disconnect and bypass switches before you connect any wires to the bypassswitch terminal strip.
A
D
C
B
Figure 18. UPS Power Entrance Panel
1 2 3 5 7 11 11 12 12 13 15 16
N
4
N
6 8 9 10 10
N N L2L1 L2 L2 L2L1 L1 L1
14
AC TO UPSPROTECTED
LOADSAC FROM
UPS OUTPUT LINE AC INPUT AC TOUPS INPUT
USE COPPER CONDUCTORS ONLY.! LAB-1918
REFER TO WIRING DIAGRAMS IN THE INSTALLATION MANUAL.
NOTE: After installing bypassswitch wiring, torque thescrews holding all input andoutput power conductors to thevalues specified in Table 13.

49
7. If your UPS has an isolated output, find the proper output neutral-to-ground connection in Figure 22. At theUPS terminals, connect the neutral-to-ground (neutral-to-earth) wire to the proper terminal beforemaking any other connections to the UPS. The neutral-to-ground wire is a green and yellow wire. Oneend of this wire is already connected to the ground (earth) UPS terminal. Ground terminations, inside theUPS back panel, are located directly below the line input terminals, as shown in Figure 20. Figure 20 showsinput and output wiring terminals inside the Axxium Pro UPS cabinet.
8. Refer to Figures 23 through 34, which show output configurations for various voltages and isolation options.Make UPS output connections on the backplane board terminating studs. Compression lugs (supplied in the accessory kit) may be installed on the proper terminatingstuds. Wires may also be terminated with ring terminals,which are attached to the output terminating studs.
9. If the bypass switch is an MBB style, notice the cable routedout of the left side of the bypass switch cabinet. The red andblack pair of wires (N.O.) in this cable must be connected toterminals 3 and 4 in Steps 10 and 11 below. (Do not connectthe white and black pair of wires in this cable.)
10. If any external, hardwired control signals are required,remove the rear panel on the upper bay and locate the terminal block, as shown in Figure 21. CAUTION: EPO andexternal bypass circuits are not isolated from line voltage,and wiring must be installed per local codes using conduitor suitable primary supply cables.
The Generator On signal is isolated from line voltage and can be treated as NEC Class 2 wiring.
Use 14–20 AWG, 600-V wire (UL) or 14–26 AWG, 300-V wire (CSA) for all input control signals.
11. Place the signal wires through theproper conduit or grommet above theterminal block and attach to appropriate terminals. Secure eachconnection by torquing terminalscrews to a maximum 3.5 in-lb (0.4 N-m). Provide strain relief forcables by installing plastic cable tiesas shown in the drawing. NOTE: Donot strain relieve EPO or externalbypass wiring with the same cabletie used for On Generator wires.
12. Remove the jumper between terminals5 and 6 only if you are connecting anormally-closed EPO switch.
13. When all connections have been made and checked, replace the bypass switch front panel and UPS cabinetback panels. After installing power and battery modules, install all front cover bezels.
X2 X1
3
X1+DC
+DC
X2 N
-DC
N-DC
INPUT
POWER
OUTPUTPOWER
2 1
INPUT CONNECTIONS(SEE INSTALLATION MANUAL)
Figure 20. UPS Input and Output Terminals
Figure 21. Input Control Signal Wiring
1 2 3 4 5 6
Emergency Power Off (normally closed)
External Bypass *(short to common when active)
Generator Set
SignalCommon
Generator On (N.O.)
*
Backplane boardterminating studs

50
1308 UPS Output Wiring Connections
Figures on this and the next page describe output wiring configurations for various output voltages. Find thedesired output voltage and single- or split-phase configuration below, and connect the output AC wiring to theproper Axxium Pro system power terminals. You must also set the operating menu parameter 7-3-4 for therequired output voltage as shown in the wiring configuration drawings.
NOTE: All power modules in the Axxium Pro UPS cabinet must be of the same type: Single-phase (universal) modules have white labels; split-phase modules have blue labels. Outputs for each type ofmodule must be wired differently.
X2 X1 N/-DC
50 or 60 Hz208, 220, 230 or 240 V Out *
Parameter 7-3-4 set to 208, 220, 230, or 240, as required.
X X
*
L1 L2/N
X2 X1 N/-DC
50 or 60 Hz100/200, 110/220, 127/220,120/208, or 120/240 V Out
Parameter 7-3-4 set to 200, 220, 208, or 240, as required.
X X X
200, 220 100, 110, 127,208, or 240 or 120
100, 110, 127, or 120L2 L1 N
X1 X3 X0 X2
50 or 60 Hz208, 220, 230 or 240 V Out *with Isolated Output Option
Parameter 7-3-4 set to 208, 220, 230, or 240, as required.
Note: If required, provide N-G bond to create voltage to earth reference.
X XN-G Bond
*
L1 N
X1 X3 X0 X2
50 or 60 Hz110/220 or 120/240 V Out
with Isolated Output OptionParameter 7-3-4 set to 220 or 240,
as required.
Note: If required, provide N-G bond to create voltage to earth reference.
X X XN-G Bond
110 or 120 110 or 120
220 or 240
L1 N L2
Note 1: X3 is for cabinets with isolation options, used for special voltage with receptacle options only.
Note 2 Connect UPS green and yellow neutral-to-earth wire (N-G bond) to UPS output terminal as indicatedabove and as illustrated in Figure 17.
Figure 22a. Universal Modules with Non-isolated Output
Figure 22c. Universal Modules With 2-wire Plus GroundIsolated Output
Figure 22d. Universal Modules With 3-wire Plus GroundIsolated Output
Figure 22b. Split-phase Modules with Non-isolated Output

51
X1 X3 X0 X2
50 or 60 Hz208, 220, 230 or 240 V Out *with Isolated Output Option
Parameter 7-3-4 set to 208, 220, 230, or 240, as required.
X X
*
L1 L2
Figure 22e. Universal Modules With 2-wire Plus GroundIsolated Output

52
Figure 23: Installation Wiring Diagram for Axxium Pro Systems withExternal Bypass Switch (L1, N), Isolated Output, and Universal Power Modules
• 220 Input, 220 Output • 240 Input, 240 Output• 230 Input, 230 Output
Figure 24: Installation Wiring Diagram for Axxium Pro Systems withExternal Bypass Switch (L1, L2), Isolated Output, and Universal Power Modules
• 208 Input, 208 Output • 230 Input, 230 Output• 220 Input, 220 Output • 240 Input, 240 Output
BUILDING GROUNDINGELECTRODE OR
PROTECTIVE EARTHSYSTEM
N L1
N N
N
AC LINE INPUT
AC TOUPS INPUT
AC FROMUPS OUTPUT
AC TO LOADS
Note 2
Note 3
Per Local Code
Note 2
Note 1 Note 4 Note 4
TOLOADS
Note 5
Note 4 Note 9
LINE INPUT
OUTPUT POWER
2
Note 8
Note 6Note 9
N
L1 L2
L1 L2
N L1 L2
L1 L2
L110 11 12 13 14 15 16
Note 7
2 3 419 6 7 85
13
Note 4
X1 X3 X0 X2
BUILDING GROUNDINGELECTRODE OR
PROTECTIVE EARTHSYSTEM
L2
N N
N
X1 X3 X0 X2
AC LINE INPUT
AC TOUPS INPUT
AC FROMUPS OUTPUT
AC TO LOADS
Note 2
Note 3
Per Local Code
Note 2
Note 1 Note 4 Note 4
TOLOADS
Note 5
Note 4 Note 9
13LINE INPUT
OUTPUTPOWER
2
Note 8
Note 6Note 9
L2
L1 L2
L1 L2
N L1 L2
L1 L2
L110 11 12 13 14 15 16
Note 7
2 3 419 6 7 85
L1N
N
Note 4

53
Figure 25: Installation Wiring Diagram for Axxium Pro Systems withExternal Bypass Switch (L1, L2, N), Isolated Output, and Universal Power Modules
• 220 Input, 110/220 Output • 240 Input, 120/240 Output• 230 Input, 115/230 Output
(Other voltages require the bypass switch to be Break-Before-Make; contact Best Power Worldwide Service for details.)
BUILDING GROUNDINGELECTRODE OR
PROTECTIVE EARTHSYSTEM
N L1 L2
N
N
N
N
X1 X3 X0 X2
AC LINE INPUT
AC TOUPS INPUT
AC FROMUPS OUTPUT
AC TO LOADS
Note 2
Note 3
Note 2
Note 1 Note 4 Note 4
TOLOADS
Note 5
Note 4 Note 9
1LINE INPUT
OUTPUTPOWER
Note 8
Note 6Note 9
N
L1 L2
L1L2
L1 L2
L110 11 12
Note 7
2 3 419 6 7 85L1 L2
13 14 15 16
23
Note 4
L2
NOTES for Figures 23, 24, and 25:
NOTE 1: The customer must provide input overcurrent protection as stated in NEC Section 240-21 or local codes. Size the protection device according to local code requirements. (See Table 11.)
NOTE 2: The UPS bypass switch must be installed within sight of the UPS. To properly install, complete the voltage and phasecheck procedure in Section 1309. The wires coming from the side of the switch must be connected as described in step 9 ofSection 1307.
NOTE 3: The Customer must provide and install this ground (earth) connection per NEC Sections 250-20, 250-30, 250-62, and250-64, or local code requirements.
NOTE 4: All AC circuit conductors, including the neutral and equipment grounding conductors, must be the same size (ampacity), have the same rating (75 ºC) copper wire, and be sized according to the input circuit breaker. The UPS input and output conductors must be run through separate conduits.
NOTE 5: The customer must provide output overcurrent protection. See NEC Section 240-21 or local requirements. See Table 7for maximum output overcurrent protection device ratings.
NOTE 6: For maximum protection against electrical noise, use isolated ground receptacles. See NEC Section 250-146(d).
NOTE 7: See Section 1102 for installation and service clearances before installing the UPS. Use flexible conduit on the UPS orthe external battery cabinet if either must be moved.
NOTE 8: External UPS battery cabinets are optional. See Section 1400 for installation instructions.
NOTE 9: UPS output circuits shall be installed in dedicated conduit systems and not shared with other electrical circuits.

54
Figure 27: Installation Wiring Diagram for Axxium Pro Systems withExternal Bypass Switch (L1, L2), Non-isolated Output, and Universal Power Modules
• 208 Input, 208 Output • 230 Input, 230 Output• 220 Input, 220 Output • 240 Input, 240 Output
L1
N N
N
AC LINE INPUT
AC TOUPS INPUT
AC FROMUPS OUTPUT
AC TO LOADS
Note 2
Per Local Code
Note 2
Note 1 Note 4 Note 4
TOLOADS
Note 5
Note 4 Note 9
13LINE INPUT
X1+DC X2 N-DC
OUTPUT POWER
2
Note 8
Note 9
L1 L2
L1 L2
N L1 L2
L1L2
L110 1112 13 14 15 16
Note 7
2 3 419 6 7 85
L2N
NL2
Note 4
Figure 26: Installation Wiring Diagram for Axxium Pro Systems withExternal Bypass Switch (L1, N), Non-isolated Output, and Universal Power Modules
• 220 Input, 220 Output • 240 Input, 240 Output• 230 Input, 230 Output
N L1
N N
N
AC LINE INPUT
AC TOUPS INPUT
AC FROMUPS OUTPUT
AC TO LOADS
Note 2
Per Local Code
Note 2
Note 1 Note 4 Note 4
TOLOADS
Note 5
Note 4 Note 9
13LINE INPUT
X1+DC X2 N-DC
OUTPUT POWER
2
Note 8
Note 9
N
L1
L1 L2
N L1 L2L2
L1 L2
L110 11 12 13 14 15
Note 7
2 3 419 6 7 816 5
Note 4

55
Figure 28: Installation Wiring Diagram for Axxium Pro Systems withExternal Bypass Switch (L1, L2, N), Non-isolated Output, and Split-phase Power Modules
• 110/220 Input, 110/220 Output • 100/200 Input, 100/200 Output• 120/208 Input, 120/208 Output • 127/220 Input, 127/220 Output• 120/240 Input, 120/240 Output
X1+DC X2 N-DC
N L2L1
N N
N
AC LINE INPUT
AC TOUPS INPUT
AC FROMUPS OUTPUT
AC TO LOADS
Note 2
Note 2
Note 1 Note 4 Note 4
TOLOADS
Note 5
Note 4 Note 9
2LINE INPUT
OUTPUT POWER
3 1
Note 8
Note 9
N
L2
L2N L2
L2
L2
L1
L1 L1
L1
L110 11 12 13 1514 16
Note 7
2 3 419 6 7 85
Note 4
NOTES for Figures 26, 27, and 28:
NOTE 1: The customer must provide input overcurrent protection as stated in NEC Section 240-21 or local codes. Size the protection device according to local code requirements. (See Table 11.)
NOTE 2: The UPS bypass switch must be installed within sight of the UPS. To properly install, complete the voltage and phasecheck procedure in Section 1309. The wires coming from the side of the switch must be connected as described in step 9 ofSection 1307.
NOTE 4: All AC circuit conductors, including the neutral and equipment grounding conductors, must be the same size (ampacity), have the same rating (75 ºC) copper wire, and be sized according to the input circuit breaker. The UPS input and output conductors must be run through separate conduits.
NOTE 5: The customer must provide output overcurrent protection. See NEC Section 240-21 or local requirements. See Table 7for maximum output overcurrent protection device ratings.
NOTE 7: See Section 1102 for installation and service clearances before installing the UPS. Use flexible conduit on the UPS orthe external battery cabinet if either must be moved.
NOTE 8: External UPS battery cabinets are optional. See Section 1400 for installation instructions.
NOTE 9: UPS output circuits shall be installed in dedicated conduit systems and not shared with other electrical circuits.

56
Figure 29: Installation Wiring Diagram for Axxium Pro Systems withNo External Bypass (L1, N), Isolated Output, and Universal Power Modules
• 220 Input, 220 Output • 240 Input, 240 Output• 230 Input, 230 Output
BUILDING GROUNDINGELECTRODE OR
PROTECTIVE EARTHSYSTEM
N
Note 3
Per Local Code
Note 1 Note 4
TOLOADS
Note 4
Note 9
LINE INPUT
OUTPUT POWER
2
Note 8
Note 6Note 9
NL1
Note 7
L1
13
X1 X3 X0 X2
Figure 30: Installation Wiring Diagram for Axxium Pro Systems withNo External Bypass (L1, L2), Isolated Output, and Universal Power Modules
• 208 Input, 208 Output • 230 Input, 230 Output• 220 Input, 220 Output • 240 Input, 240 Output
BUILDING GROUNDINGELECTRODE OR
PROTECTIVE EARTHSYSTEM
L2N L1
X1 X3 X0 X2
Note 3
Per Local Code
Note 1 Note 4
TOLOADS
Note 4
Note 9
13LINE INPUT
OUTPUTPOWER
2
Note 8
Note 6Note 9
L2 NL1
Note 7

57
Figure 31: Installation Wiring Diagram for Axxium Pro Systems withNo External Bypass (L1, L2, N), Isolated Output, and Universal Power Modules
• 220 Input, 110/220 Output • 240 Input, 120/240 Output• 230 Input, 115/230 Output
BUILDING GROUNDINGELECTRODE OR
PROTECTIVE EARTHSYSTEM
L2N L1
X1 X3 X0 X2
Note 3
Per Local Code
Note 1 Note 4
TOLOADS
Note 4
Note 9
13LINE INPUT
OUTPUTPOWER
2
Note 8
Note 6Note 9
L2 NL1
Note 7
NOTES for Figures 29, 30, and 31:
NOTE 1: The customer must provide input overcurrent protection as stated in NEC Section 240-21 or local codes. Size the protection device according to local code requirements. (See Table 11.)
NOTE 3: The Customer must provide and install this ground (earth) connection per NEC Sections 250-20, 250-30, 250-62, and250-64, or local code requirements.
NOTE 4: All AC circuit conductors, including the neutral and equipment grounding conductors, must be the same size (ampacity), have the same rating (75 ºC) copper wire, and be sized according to the input circuit breaker. The UPS input and output conductors must be run through separate conduits.
NOTE 6: For maximum protection against electrical noise, use isolated ground receptacles. See NEC Section 250-146(d).
NOTE 7: See Section 1102 for installation and service clearances before installing the UPS. Use flexible conduit on the UPS orthe external battery cabinet if either must be moved.
NOTE 8: External UPS battery cabinets are optional. See Section 1400 for installation instructions.
NOTE 9: UPS output circuits shall be installed in dedicated conduit systems and not shared with other electrical circuits.

58
Figure 32: Installation Wiring Diagram for Axxium Pro Systems withNo External Bypass (L1, N), Non-isolated Output, and Universal Power Modules
• 220 Input, 220 Output • 240 Input, 240 Output• 230 Input, 230 Output
N L1
Per Local Code
Note 1 Note 4
TOLOADS
Note 4
Note 9
13LINE INPUT
X1+DC X2 N-DC
OUTPUT POWER
2
Note 8
Note 9
NL1
Note 7
Figure 33: Installation Wiring Diagram for Axxium Pro Systems withNo External Bypass (L1, L2), Non-isolated Output, and Universal Power Modules
• 208 Input, 208 Output • 230 Input, 230 Output• 220 Input, 220 Output • 240 Input, 240 Output
Per Local Code
Note 1 Note 4
TOLOADS
Note 4
Note 9
13LINE INPUT
X1+DC X2 N-DC
OUTPUT POWER
2
Note 8
Note 9
Note 7
L1 L2
L1L2

59
Figure 34: Installation Wiring Diagram for Axxium Pro Systems withNo External Bypass (L1, L2, N), Non-isolated Output, and Split-phase Power Modules
• 110/220 Input, 110/220 Output • 100/200 Input, 100/200 Output• 120/208 Input, 120/208 Output • 127/220 Input, 127/220 Output• 120/240 Input, 120/240 Output
X1+DC X2 N-DC
N L2L1
Note 1 Note 4
TOLOADS
Note 4
Note 9
2LINE INPUT
OUTPUT POWER
3 1
Note 8
Note 9
NL2 L1
Note 7
NOTES for Figures 32, 33, and 34:
NOTE 1: The customer must provide input overcurrent protection as stated in NEC Section 240-21 or local codes. Size the protection device according to local code requirements. (See Table 11.)
NOTE 4: All AC circuit conductors, including the neutral and equipment grounding conductors, must be the same size (ampacity), have the same rating (75 ºC) copper wire, and be sized according to the input circuit breaker. The UPS input and output conductors must be run through separate conduits.
NOTE 7: See Section 1102 for installation and service clearances before installing the UPS. Use flexible conduit on the UPS orthe external battery cabinet if either must be moved.
NOTE 8: External UPS battery cabinets are optional. See Section 1400 for installation instructions.
NOTE 9: UPS output circuits shall be installed in dedicated conduit systems and not shared with other electrical circuits.

60
1309 Voltage and Phase Check
This section explains how to start the Axxium Pro system, and perform a voltage and phase check. (This procedure is only required for units that have a hardwired input and output.)
Starting the UPS
1. At the bypass switch, press the red button and turn the switch to “UPS.” Also, remove the cover panel on thebypass switch to gain access to the terminal block for voltage measurements.
2. Install all power modules and battery modules as described in Section 300 of this manual.
3. Make sure the DC disconnect switch on the back of each external battery cabinet is closed (pulled out).
Measuring Input and Output Voltages
4. Use an AC voltmeter to measure voltages on the terminal block inside the bypass switch cabinet. Refer toFigure 19, which shows the terminal numbering for input and output UPS connections. Record your measurements in the spaces below. The voltages in the first column should be nearly equal to the voltages inthe second column. If the values differ by more than a few volts, check the terminal block connections andcorrect any wiring problems.
AC line input AC from UPS output
L1 to L2 (11 to 12*) _________ 7 to 8* _________
N to L1 (10 to 11*) _________ 6 to 7* _________
N to L2 (10 to 12*) _________ 6 to 8* _________
* For some installations, there is no connection at terminals 6, 8, 10, or 12.
5. If the bypass switch is a Break-Before-Make (BBM) type, skip this step and proceed to step 6.
If the bypass switch is a Make-Before-Break (MBB) type, make sure the AC voltages from the UPS and theAC line input are in phase. Do this by meausring the voltage between the following points on the terminalblock. These measurements must be no more than 20 VAC; if they are, call Best Power Worldwide Service oryour nearest Best Power office.
terminal 7 to terminal 11 _________
terminal 8 to terminal 12 _________
6. Measure the AC voltage between the following points on the terminal block. This reading must be no morethan 1 VAC; if it is, call Best Power Worldwide Service or your nearest Best Power office.
terminal 6 to terminal 10 _________
CAUTION
Before operating the bypass switch, follow the steps below to check the wiring for correctinstallation. To prevent damage to the loads, make sure the main circuit breaker in the loadservice panel is off, or make sure that the loads cannot receive power from the UPS.

61
7. Switch the bypass switch to “LINE.” Measure the voltage to the protected equipment, at the load distributionpanel, and verify that it is correct.
8. Switch the bypass switch to “UPS” and verify the voltage to the protected equipment is still correct.
Completing the Check
9. After performing these voltage and phase check measurements, follow these steps:
a. Reinstall the cover on the bypass switch, and tighten all cover screws.
b. If the UPS will not be operated immediately, switch the bypass switch to “SERVICE,” and push in theDC disconnect switch on the back panel of the external battery cabinet closest to the UPS.
c. Reinstall all UPS cover panels.
At this point, the Axxium Pro UPS installation is complete. To restart the UPS, refer to the User Instructionssection of this manual.
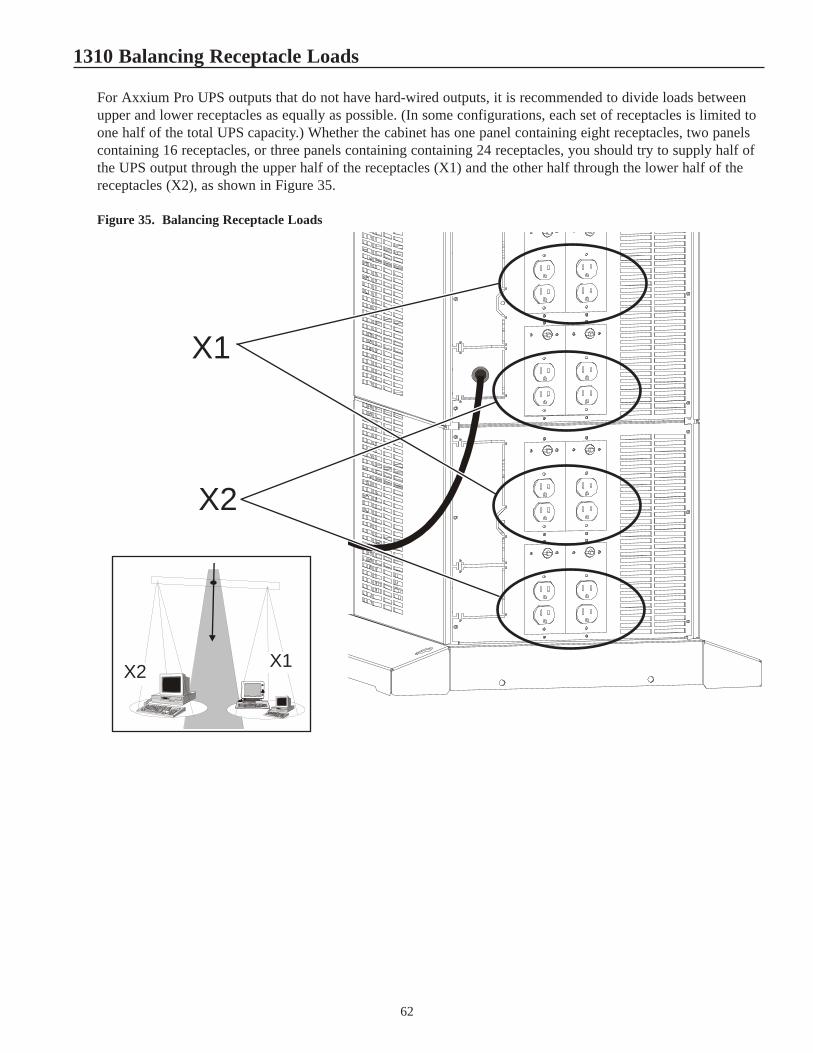
62
1310 Balancing Receptacle Loads
For Axxium Pro UPS outputs that do not have hard-wired outputs, it is recommended to divide loads betweenupper and lower receptacles as equally as possible. (In some configurations, each set of receptacles is limited toone half of the total UPS capacity.) Whether the cabinet has one panel containing eight receptacles, two panelscontaining 16 receptacles, or three panels containing containing 24 receptacles, you should try to supply half ofthe UPS output through the upper half of the receptacles (X1) and the other half through the lower half of thereceptacles (X2), as shown in Figure 35.
Figure 35. Balancing Receptacle Loads
X1
X2
X1X2

63
1400 Connecting External Battery Cabinets
1. Open the carton containing the external battery cabinet cableassembly, and check that all required parts have been shippedwith it.
2. Remove the screws holding the UPS cabinet back panel containing the power entrance panel, as shown in Figure 18.
3. Use a pliers to bend back and forth the narrow links (1 and 2 indrawing) between the outer edge of the lower (square) breakawaypanel and the back panel, as shown in Figure 36. After breakingthese links, use the pliers to bend back and forth the entire breakaway panel (at 3 and 4 in drawing) until it breaks away.
4. Verify all hazardous voltages have been removed from the backplane by testing with a voltmeter or othertest device. (Always test before touching.)
5. Remove the nuts holding the +DC and the –DC bus bars to the backplane as shown in Figure 37. Removethe ring terminal and the compression lug from the –DC bolt.
6. Position the bus-bar extension assembly onto the +DCand –DC bolts as shown in Figure 37. Replace the compression lug onto the –DC bolt of the bus-bar extension assembly. Secure the assembly by replacing thetwo nuts removed in the previous step.
7. Use the bolt and nut supplied with the cable assembly toattach the ring terminal to the empty hole in the –DC busbar.
8. Torque all three bolts to 75–85 in-lb (8.5–9.6 Nm).
9. Loosen the three large nuts on the end of the cable assembly, shown in Figure 37.
10. Slip the terminals of the cable assembly onto the tabs of the bus-bar extension, putting the tabs between thestud block and the fuse end and between the other stud block and the cable terminal.
Figure 36. Breakaway Panel Links
Figure 37. Bus-bar Extension Installation
CAUTION!
Before making connections between the UPS and an external battery cabinet or between series-connected(daisy-chained) battery cabinets, remove all input AC power to the UPS. Do this by opening the inputservice circuit breaker or by turning the external bypass switch to the Service position.
Also, disconnect all battery strings in the UPS and in the external battery cabinet, to ensure DC voltage isremoved from the internal DC buses. Do this by either removing all battery modules from the cabinets or,at least, unplugging one of every pair of battery modules plugged into each cabinet backplane.
1
4
3
2
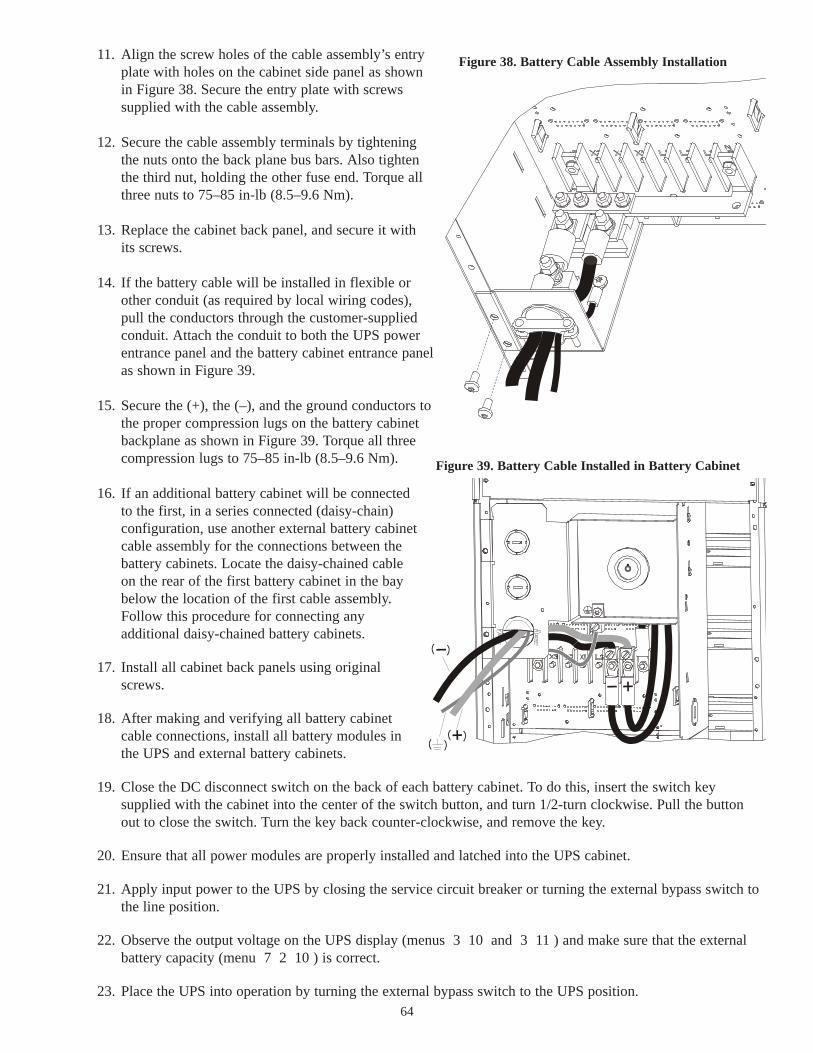
64
11. Align the screw holes of the cable assembly’s entryplate with holes on the cabinet side panel as shownin Figure 38. Secure the entry plate with screws supplied with the cable assembly.
12. Secure the cable assembly terminals by tighteningthe nuts onto the back plane bus bars. Also tightenthe third nut, holding the other fuse end. Torque allthree nuts to 75–85 in-lb (8.5–9.6 Nm).
13. Replace the cabinet back panel, and secure it withits screws.
14. If the battery cable will be installed in flexible orother conduit (as required by local wiring codes),pull the conductors through the customer-suppliedconduit. Attach the conduit to both the UPS powerentrance panel and the battery cabinet entrance panelas shown in Figure 39.
15. Secure the (+), the (–), and the ground conductors tothe proper compression lugs on the battery cabinetbackplane as shown in Figure 39. Torque all threecompression lugs to 75–85 in-lb (8.5–9.6 Nm).
16. If an additional battery cabinet will be connectedto the first, in a series connected (daisy-chain)configuration, use another external battery cabinetcable assembly for the connections between thebattery cabinets. Locate the daisy-chained cableon the rear of the first battery cabinet in the baybelow the location of the first cable assembly.Follow this procedure for connecting any additional daisy-chained battery cabinets.
17. Install all cabinet back panels using originalscrews.
18. After making and verifying all battery cabinetcable connections, install all battery modules inthe UPS and external battery cabinets.
19. Close the DC disconnect switch on the back of each battery cabinet. To do this, insert the switch key supplied with the cabinet into the center of the switch button, and turn 1/2-turn clockwise. Pull the buttonout to close the switch. Turn the key back counter-clockwise, and remove the key.
20. Ensure that all power modules are properly installed and latched into the UPS cabinet.
21. Apply input power to the UPS by closing the service circuit breaker or turning the external bypass switch tothe line position.
22. Observe the output voltage on the UPS display (menus 3 10 and 3 11 ) and make sure that the externalbattery capacity (menu 7 2 10 ) is correct.
23. Place the UPS into operation by turning the external bypass switch to the UPS position.
Figure 38. Battery Cable Assembly Installation
Figure 39. Battery Cable Installed in Battery Cabinet

65
INDEXBattery protect 9Bypass 8Double conversion 8High efficiency 8Off 9, 11Sleep 9, 11
ModulesBattery 6Installing 10Power 6
Split-phase 5, 42, 47Universal 5, 42, 47
Mounting, equipmentCaster installation 37Floor anchor installation 37Rack installation 36Stabilizer brackets 38
PPanel, control (see also Display,
front panel) 9Parameters
Configuration, initial 12Display of 14Protection 15Values, changing 15
Phase check 60Physical features 7Pushbuttons 9Password, user 12
On/off protection 13
RRedundancy 6, 13, 19, 20Replacement
Battery modules 23Power modules 24
SSecurity (see password)Service 23-24State, operational 14
TTemperature 10, 25Turn-on procedure 11
WWarranty
Registration form 11, 30Statements 28, 29
Weights and dimensions 35Wiring diagrams 50-59
Input 47Output 49, 50Selection of 46
AAlarms
Critical 18Display of 19Non-critical 19Reason codes 20
BBattery cabinet, external 63Bypass switches 40
Installation diagram 45, 48Specifications 41, 43-44
CCheckUPS II 21Clearances, equipment 35Circuit breaker rating, input 43Communications
Cable 10DB9 port 10, 22RS-232 21SNMP/WEB adapter 21
Control panel (see also Frontpanel display) 7, 9
DDate and time, setting 12Dimensions and weights (see weights
and dimensions)Display, alphanumeric 9, 14
FFax-on-Demand 5Front panel display (see also
Control panel) 14
GGround bonding 47
HHot-swap 6, 24Humidity 10, 25
LLoad balancing 62Log, displaying
Alarm 16Inverter 15
MMaintenance 23Map, menu 16-17Mode operating 8, 14Modes
Auto 8Battery 8


