Axiom Pro User Guide - Realizator.pl · Axiom Pro User Guide | 8 Product Features and...
75
User Guide Axiom Pro English
Transcript of Axiom Pro User Guide - Realizator.pl · Axiom Pro User Guide | 8 Product Features and...

User Guide
Axiom Pro
English

| 2Axiom Pro User Guide
“How To:” Quick Reference 4
Introduction 6
What’s in the Box 7
Product Features and Specifications 8
Minimum System Requirements 9
Driver Installation 10
Windows XP/Vista Users 10
Mac OS X users 10
Connection Diagram 12
Hosted Mode 12
Standalone Mode 13
Controls and Connectors 14
Top Panel Overview 14
Rear Panel Overview 16
Using Axiom Pro 17
Overview and Basic Operation 17
Function Buttons and Soft Keys 18
F-Keys 20
Saving and Loading Axiom Pro Patches 20
Using Axiom Pro with a Computer 22
Edit Mode (Main Menu) 25
Edit Mode > Global 26
Edit Mode > Control 30
Edit Mode > Group (Pad) 35
Edit Mode > Group (Encoder) 39
Edit Mode > Group (Slider) 41
Edit Mode > Group (Numerical Keypad) 43
Edit Mode > Zones 44
Edit Mode > Zones > Data 45
Edit Mode > MIDI 47

| 3Axiom Pro User Guide
Troubleshooting 50
Appendices 52
Appendix A: Axiom Pro Factory Patch settings 52
Appendix B: Keyboard Velocity Curves 57
Appendix C: Drum Pad Velocity Curves 60
Appendix D: MIDI Implementation 63
Appendix E: Useful MIDI Data Tables 64
Appendix F: General MIDI Continuous Controller (CC) Numbers 67
Appendix G: Hexadecimal Conversion Chart 68
Technical Info 69
Warranty 70

| 4Axiom Pro User Guide
“How To:” Quick Reference:
This section provides a quick reference to help you accomplish specific Axiom Pro-related tasks These tasks are grouped together in a logical fashion and provide shortcuts to the specific page (and parameter) within the “Edit Mode” section of this guide
To use this quick reference:
1 Locate the task you would like to accomplish from the left column
2 For your desired task, press the Axiom Pro buttons listed in the middle column
3 Finally, refer to the User Guide page number and parameter listed in the right column
Note that the “Edit Mode” section of this User Guide describes every parameter and setting on a menu-by-menu basis and describes the internal features of Axiom Pro in complete detail For a complete feature reference, please see the “Edit Mode” section of this User Guide
✓ TIP: To learn how to navigate through the Edit Mode menus and change settings, refer to the note on Edit Mode navigation on page 23
“Global” Options – How do I… On Axiom Pro, press: … and refer to User Guide Page
Set the global MIDI Channel? “Edit” → “1” (Global) “Channel” parameter on pg 25
Shift the octave range of the keyboard? “Edit” → “1” (Global) “Octave” parameter on pg 25
Transpose the keyboard? “Edit” → “1” (Global) “Transp ” parameter on pg 25
Set the Velocity Curve of the keyboard? “Edit” → “1” (Global) “VelCurve” parameter on pg 25
Engage or disengage MIDI release velocities? “Edit” → “1” (Global) “VelCurve” parameter on pg 27
Invert the colors of the display? “Edit” “Inverse” parameter on pg 24
Program and Bank Change messages – How do I… On Axiom Pro, press: … and refer to User Guide Page
Send a program change MIDI message? “Edit” → “1” (Global) “Program” parameter on pg 28
Send a Bank LSB MIDI message? “Edit” → “1” (Global) “BankLSB” parameter on pg 28
Send a Bank MSB MIDI message? “Edit” → “1” (Global) “BankMSB” parameter on pg 28
Configuring Individual Controls
(buttons, knobs, sliders, etc.) – How do I…
On Axiom Pro, press: … and refer to User Guide Page
Assign the Data buttons? “Edit” → “1” (Global) “Data” parameter on pg 27
Rename a control? “Edit” → “2” (Control) “Name” parameter on pg 29
Set the type of message sent by a control? “Edit” → “2” (Control) “Type” parameter on pg 30
Set a MIDI channel for a specific control? “Edit” → “2” (Control) “Channel” parameter on pg 31
Display parameters as decimal or hexadecimal values? “Edit” → “2” (Control) “Entry” parameter on pg 32

| 5Axiom Pro User Guide
Group Controls – How do I… On Axiom Pro, press: … and refer to User Guide Page
Name the group of drum pads? “Edit” → “3” (Group) → “P” (slider button) “Name” parameter on pg 34
Name the group of encoders? “Edit” → “3” (Group) → “E” (slider button) “Name” parameter on pg 38
Name the group of sliders? “Edit” → “3” (Group) → “S” (slider button) “Name” parameter on pg 40
Name the numerical keypad group? “Edit” → “3” (Group) → “N” (slider button) “Name” parameter on pg 42
Select the MIDI channel for the drum pad group? “Edit” → “3” (Group) → “P” (slider button) “Channel” parameter on pg 34
Select the MIDI channel for the encoder group? “Edit” → “3” (Group) → “E” (slider button) “Channel” parameter on pg 39
Select the MIDI channel for the slider group? “Edit” → “3” (Group) → “S” (slider button) “Channel” parameter on pg 40
Select the MIDI channel for the numerical keypad group? “Edit” → “3” (Group) → “N” (slider button) “Channel” parameter on pg 42
Lock the velocity of drum pads? “Edit” → “3” (Group) → “P” (slider button) “Vel Lock” parameter on pg 35
Set the velocity curve of the drum pads? “Edit” → “3” (Group) → “P” (slider button) “Curve” parameter on pg 35
Name one of the drum pad profiles? “Edit” → “3” (Group) → “P” (slider button) “1-4” parameter on pg 37
Set the sensitivity of the encoder knobs? “Edit” → “3” (Group) → “E” (slider button) “Acccel Max” parameter on pg 39
Name one of the encoder knob profiles? “Edit” → “3” (Group) → “E” (slider button) “1-4” parameter on pg 39
Toggle “drawbar” mode for the slider group? “Edit” → “3” (Group) → “S” (slider button) “Drawbar” parameter on pg 41
Toggle “Null Mode” for the slider group? “Edit” → “3” (Group) → “S” (slider button) “NullMode” parameter on pg 41
Zones – How do I… On Axiom Pro, press: … and refer to User Guide Page
Set the range of a zone? “Edit” → “4” (Zone) See pg 43
Activate or deactivate a zone? “Edit” → “4” (Zone) See pg 43
Set the MIDI output channel of a specific zone? “Edit” → “4” (Zone) → Soft-Key 4 (Data) “Channel” parameter on pg 44
Set the octave shift range of a specific zone? “Edit” → “4” (Zone) → Soft-Key 4 (Data) “Octave” parameter on pg 44
Set the transposition of a specific zone? “Edit” → “4” (Zone) → Soft-Key 4 (Data) “Transp ” parameter on pg 44
Set the MIDI output port of a specific zone? “Edit” → “4” (Zone) → Soft-Key 4 (Data) “MIDI Port” parameter on pg 45
Send a program change message for a specific zone? “Edit” → “4” (Zone) → Soft-Key 4 (Data) “Program” parameter on pg 45
Send a Bank LSB change message for a specific zone? “Edit” → “4” (Zone) → Soft-Key 4 (Data) “BankLSB” parameter on pg 45
Send a Bank MSB change message for a specific zone? “Edit” → “4” (Zone) → Soft-Key 4 (Data) “BankMSB” parameter on pg 45
SysEx (System Exclusive) Commands – How do I… On Axiom Pro, press: … and refer to User Guide Page
Select the MIDI output port for SysEx commands? “Edit” → “5” (MIDI) “SysEx” parameter on pg 46
Select the “Device ID” SysEx code? “Edit” → “5” (MIDI) “DevID” parameter on pg 46
Toggle whether a “Patch ID” SysEx code is issued on Patch
changes?“Edit” → “5” (MIDI) “PatchID” parameter on pg 47
Select the source of the data for the MIDI Output port on the
Axiom Pro back panel?“Edit” → “5” (MIDI) “MIDI Out” parameter on pg 47
Perform a complete SysEx dump of Axiom Pro memory? “Edit” → “5” (MIDI) “Send All” parameter on pg 47
Perform a SysEx dump of a specific patch? “Edit” → “5” (MIDI) “Send Patch” parameter on pg 48
Send a “Snapshot” of all current controls (knobs, sliders, etc )? “Edit” → “5” (MIDI) “Snapshot” parameter on pg 48
Send a “Panic” (all notes off) message? “Edit” → “5” (MIDI) “Panic” parameter on pg 48

| 6Axiom Pro User Guide
Introduction
Thank you for purchasing the M-Audio Axiom Pro MIDI controller Axiom Pro premium keyboards are designed to meet the needs of the most demanding musicians and can be used to control your MIDI hardware and audio software
Axiom Pro 25, 49, and 61 controllers feature 25, 49, or 61 semi-weighted keys, respectively These keyboards include eight velocity or pressure sensitive drum pads, eight “endless” encoders, six transport control buttons, aftertouch, and a high-resolution LCD display to make programming easy In addition, the 49- and 61-key versions feature nine sliders, and a numerical keypad making it even easier to control your hardware synthesizers or software applications Nearly all of the buttons, knobs, sliders, pads, and wheels of the Axiom Pro line are programmable, allowing the controller to adapt to your specific needs
Another important new feature in the Axiom Pro line of controllers is the support for M-Audio’s HyperControlTM system HyperControl allows for bi-directional communication between Axiom Pro and your audio software, keeping your keyboard and software synchronized at all times Furthermore, HyperControl gives you “out of the box” control over many host applications (including Pro Tools, Reason, Cubase and Logic Pro) and automatically configures knobs, buttons, and other controls to your software This system is covered in the “HyperControl Mode” section of this user guide as well as in individual HyperControl User Guides for each supported application (these guides can be found at www m-audio com)
Please note that your Axiom Pro controller has many powerful features not commonly found on other controller keyboards Even if you are familiar with MIDI controllers, please read this User Guide to ensure you get the most out of your new purchase
Differences between Axiom Pro 25/49/61:
The 25, 49, and 61-note versions of Axiom Pro are identical except that the 25-note version does not have sliders, slider buttons, function keys F5-F7, or the numerical keypad These features are not available due to the space limitations of the smaller 25-note controller Axiom Pro 25 users should note that this User Guide will make occasional references to these sliders and buttons that are not available on their controllers
1

| 7Axiom Pro User Guide
What’s in the Box
• AxiomProKeyboard
• PrintedQuickStartGuide
• AxiomProInstallationCD-ROM
• SoftwareBundleDisc
• USBCable
2

| 8Axiom Pro User Guide
Product Features and Specifications
• 25-,49-,or61semi-weightedkeyswithaftertouchandmultipleselectablevelocityresponsecurves.
• Eightprogrammable“endless”knobsfeaturingnon-détentedencoderswithcustomizableaccelerationcurves.Theseknobscanbe configured to use any of seven popular increment/decrement methods to ensure compatibility with virtually any application that supports “endless” encoders The knobs can also function as standard MIDI controllers with a range of 0 to 127
• EightVelocityorpressuresensitivetriggerpadsthatcanbeprogrammedtosendMIDInote,ContinuousController(CC),andother useful messages Additionally, these pads feature multiple selectable velocity response curves
• SixTransportcontrolbuttons
• Nine40mmsliders
• 128x64GraphicLCD
• 50MemoryLocationstostorecustomizedpatches
• Quickrecallof4“profiles”ofknobsandpads,effectivelyprovidingfastaccessto32knobsand32pads.
• HyperControlModeforbi-directionalcommunicationallowingsynchronizedcontrolovermajorDAWapplications,virtualinstruments, and plug-ins
• ASCIIkeystrokemessagescanbesentfromthecontrollerforextendedcontrolofyourapplications
• SustainandExpressionPedalinputs
• Fouruserdefinablekeyboardzones
• MIDIinputandoutputportsonrearpanelforconnectinghardwareMIDIdevices
• USB2.0compatible(alsosupportsUSB1.1and1.0)
• Bus-orDC-poweredoperation
3

| 9Axiom Pro User Guide
Minimum System Requirements
Minimum system requirements can be found on the Axiom Pro product packaging as well as the M-Audio website
✓ A Note about Operating System Updates:
Please check the M-Audio driver download page at http://www.m-audio.com/drivers for the availability of an updated driver before you decide to install operating system updates.
Before new M-Audio device drivers are released, they are tested for use with the operating system versions that are available at that time. When updates for an operating system are released by Microsoft or Apple, all M-Audio device drivers have to be tested and possibly updated to ensure proper operation.
M-Audio recommends refraining from installing operating system updates until a driver has been posted to the M-Audio website for that specific operating system.
4

| 10Axiom Pro User Guide
Driver Installation
Windows XP/Vista Users: Axiom Pro is a class-compliant device that offers basic functionality on Windows XP and Vista systems without having to install additional drivers You can simply connect Axiom Pro to your computer, switch on the computer and the controller, and be ready to go
However, M-Audio strongly recommends that Windows users install the Axiom Pro drivers from the included CD-ROM or (if Internet access if available) the most recent drivers from the M-Audio website These drivers add functionality and allow you to: 1. Use Axiom Pro with more than one application at the same time 2. Use long system exclusive (SysEx) commands 3. Simultaneously use other class-compliant USB devices with audio capabilities
TheinstallationprocedureisdescribedintheprintedQuickStartGuidethatcomeswithAxiomPro.
Mac OS X users: The class-compliant drivers built into Mac OS X provide full support for all features of Axiom Pro This means that no additional M-Audio drivers are necessary (or available) when using Axiom Pro on Mac OS X — simply connect the controller keyboard to the computerusingthesuppliedUSBcable,configureyouraudiosoftware(thisisdescribedintheprintedQuickStartGuide),andstart making music
5

| 11Axiom Pro User Guide
Windows XP, Vista and Mac OS X 10.4 (Tiger) users: When using Axiom Pro class-compliant (i.e. without installing the M-Audio driver) in Windows XP/Vista or in
Mac OS X 10.4 (Tiger), the Axiom Pro MIDI ports will not be displayed with their proper port names.
Windows XP or Vista users: Please follow the driver installation instructions found in the printed Quick Start Guide.
Mac OS X 10.4 (Tiger) users:
No Mac drivers are available, since the class-compliant MIDI driver built into Mac OS X supports all features of Axiom Pro. Please see the table below for more information on port naming.
Axiom Pro Class-Compliant Port Names per Operating System
Macintosh
Axiom Pro MIDI Input Ports Mac OS X 10.4 MIDI Input Ports Mac OS X 10.5 MIDI Input Ports
Axiom Pro 611 USB A In Axiom Pro 61 Port 1 Axiom Pro 61 USB A In
Axiom Pro 611 HyperControl In Axiom Pro 61 Port 2 Axiom Pro 61 HyperControl In
Axiom Pro 611 MIDI In Axiom Pro 61 Port 3 Axiom Pro 61 MIDI In
Axiom Pro 611 USB B In Axiom Pro 61 Port 4 Axiom Pro 61 USB B In
Axiom Pro MIDI Output Ports Mac OS X MIDI Output Ports Mac OS X 10.5 MIDI Output Ports
Axiom Pro 611 MIDI Out Axiom Pro 61 Port 1 Axiom Pro 61 MIDI Out
Axiom Pro 611 HyperControl Out Axiom Pro 61 Port 2 Axiom Pro 61 HyperControl Out
Windows
Axiom Pro MIDI Input Ports Windows XP MIDI Input Ports Windows Vista MIDI Input Ports
Axiom Pro 611 USB A In USB Audio Device Axiom Pro 61
Axiom Pro 611 HyperControl In USB Audio Device [2] MIDIIN2 Axiom Pro 61
Axiom Pro 611 MIDI In USB Audio Device [3] MIDIIN3 Axiom Pro 61
Axiom Pro 611 USB B In USB Audio Device [4] MIDIIN4 Axiom Pro 61
Axiom Pro MIDI Output Ports Windows XP MIDI Output Ports Windows Vista MIDI Output Ports
Axiom Pro 611 MIDI Out USB Audio Device Axiom Pro 61
Axiom Pro 611 HyperControl Out USB Audio Device [2] MIDIOUT2 Axiom Pro 61
1 These MIDI port names will display the corresponding number of keys, based on the Axiom Pro model you use: 25, 49 or 61.

| 12Axiom Pro User Guide
Connection Diagram
Hosted Mode:
Rear of Axiom Pro
Axiom Pro
Synthesizer, Sound Module, etc.
sustain or expression pedals
Computer
USB
MIDI
MIDI
When using Axiom Pro with a computer:
• ConnectAxiomProtoyourcomputerusingthesuppliedUSBcable.
• Ifyouownsustainorexpressionpedals,connectthemtothe“Sustain”and“Expr”inputsonthebackofthekeyboard.
• IfyouwouldliketoconnectAxiomProtoanexternalMIDI-capabledevice(suchasasynthesizer,soundmodule,etc.),connect the MIDI output port to the external device’s MIDI input, while connecting the MIDI input port of Axiom Pro to the external device’s MIDI output port
6

| 13Axiom Pro User Guide
Standalone Mode:
Rear of Axiom Pro
Synthesizer, Sound Module, etc.
sustain or expression pedals
MIDI
MIDI
Axiom Pro
9V DC, 500mA
sustain or expression pedals
MIDI
When using Axiom Pro without a computer:
• Connecta9VDC,500mApowersupplytothePowerSocketontherearpanelofthekeyboard.Thispowersupplyisoptional and can be purchased from the M-Audio webstore (store m-audio com) Alternatively, a USB-type power supply can be connected to the USB port instead of the standard 9V power supply
• Ifyouownsustainorexpressionpedals,connectthemtothe“Sustain”and“Expr”inputsonthebackofthekeyboard.
• ConnecttheMIDIoutputportofyourAxiomPrototheMIDIInputportofyoursoundmodule,synthesizer,orotherMIDI-capable device

| 14Axiom Pro User Guide
Controls and Connectors
Top Panel Overview
2
57
3
8
641
9
10
11
12
1. LCD Display: This 128x64 pixel display indicates the current status of the Axiom Pro controller This display changes depending on the currently selected mode of the controller The “Edit Mode” section of this User Guide covers the various menus and pages of Axiom Pro in detail
2. Sliders: The Axiom Pro 49/61 controller has nine fully assignable sliders that provide real time control over your MIDI hardware and software through MIDI messages Each slider is assignable and can be configured to send out many kinds of control data, including MIDI Continuous Controller (CC) messages See the “Edit Mode > Control“ and “Edit Mode > Group (Slider)” sections of this guide to learn how to program these sliders
3. Encoders: Like the Sliders, these knobs can be configured to control your MIDI-capable hardware and software by sending out many kinds of MIDI commands See the “Edit Mode” > “Control and Edit Mode > Group (Encoder)” sections of this guide to learn how to program these knobs
4. Transport Buttons: These buttons allow you to control your DAW application or hardware sequencer through the use of ASCII keystrokes and MIDI Machine Control (MMC) messages These buttons are customizable and can be reprogrammed to send out other kinds of commands to suit your particular needs See the “Edit Mode > Control” section of this manual to learn how to set these buttons
5. Slider Buttons: These illuminated buttons can be configured to control your MIDI hardware and virtual instruments by sending out many kinds of MIDI commands See the “Edit Mode > Control” and “Edit Mode > Group (Slider)” sections of this guide to learn how to program these buttons
ThesebuttonscanalsobeprogrammedtosendASCIIkeystrokesjustlikeacomputerkeyboard.TheseASCIIkeystrokescan correspond to your audio application’s “keyboard shortcuts” allowing you to access various features of your software straight from Axiom Pro (i e , without having to touch your computer keyboard)
7

| 15Axiom Pro User Guide
6. Trigger Pads: These eight velocity sensitive pads transmit MIDI note and velocity information The pads can be used to drumrhythmicelementsofasongortotriggersamples,butcanalsobeusedtoplaynotesjustlikethepianokeysof Axiom Pro
Alternatively, the pads can be configured to be pressure-sensitive Pressure-sensitive pads will transmit MIDI CC informationbasedonhowhardyoupressdownonthepads,justliketheaftertouchfunctionalityofthekeyboard.
Finally,thesepadscanalsobeprogrammedtosendASCIIkeystrokesjustlikeacomputerkeyboard.TheseASCIIkeystrokes can correspond to your audio application’s “keyboard shortcuts” allowing you to access various features of your software straight from Axiom Pro (i e , without having to touch your computer keyboard)
See the “Edit Mode > Control” and “Edit Mode > Group (Pad)” sections of this guide to learn how to program these pads
✓ NOTE: Each drum pad can be programmed to send either MIDI note data or MIDI CC data at one time; it cannot send both note and CC data at the same time.
7. Function Buttons: These buttons allow you to access various features and menu pages of the keyboard These buttons are covered in greater detail in the “Function Buttons, F-Keys, and LCD Screen” section of this guide
8. Numerical Keypad: When Axiom Pro is in Performance Mode, the numerical keypad buttons can be used to send MIDIcommandsandASCIIkeystrokesjustlikeacomputerkeyboard.ASCIIkeystrokescancorrespondtoyouraudioapplication’s “keyboard shortcuts” allowing you to access various features of your software straight from Axiom Pro (i e , without having to touch your computer keyboard)
When Axiom Pro is in Edit Mode, these buttons allow Axiom Pro 49/61 users to enter numerical values quickly Axiom Pro 25 users can enter values by using the black piano keys (the keys range from 0-9 as you move from left to right on the keyboard)
See the “Edit Mode” > “Control and Edit Mode > Group (Numerical Keypad)” sections of this guide to learn how to program these pads
9. Data buttons: These buttons can operate in two modes: Octave shift or a user-defined mode, in which you can assign these buttons to control a specific function of your choosing By default, these buttons are set to control the octave range of the keyboard The right data button shifts the octave range of the keyboard “upward” while the left buttons shifts the keyboard “downward ” Pressing the left and right data buttons simultaneously toggles their operation and activates their user-defined function
See the “Data” parameter in the “Edit Mode > Global” section of this guide to learn how to program and use these buttons
10. Pitch Bend Wheel: This wheel lets you create expressive changes in your performances by raising and lowering pitch Rolling the Pitch Bend wheel upward will raise an instrument’s pitch whereas rolling it downward will lower the pitch The upper and lower pitch bend limit is determined by settings on your hardware or software synthesizer, not by the Pitch Bend wheel on the Axiom Pro keyboard itself Typically, this can be either a half note or an octave up/down This wheel is spring-mounted and will return to the center detent position when released
11. Modulation Wheel: This wheel is used to add expressivity to your performance by changing the intensity of certain effects By default, most synthesizers assign this wheel to control vibrato (change in intonation) or tremolo (change in volume) although it is usually possible to reassign the function of this wheel through the instrument’s control panel
The MIDI data range of the Modulation wheel is 0 to 127, with 0 being the note-unchanged position Like the Pitch Bend wheel, the amount of actual modulation that takes place depends on your instrument’s settings, not the Axiom Pro keyboard
12. Keyboard: Axiom Pro 25, 49, and 61 have two-, four-, and five-octave keyboards, respectively All units feature velocity-sensitive keys with aftertouch

| 16Axiom Pro User Guide
Rear Panel Overview
20
13
17 18 19
14 15 16
13. Expression Pedal Input (Expr):Connectyourexpressionpedal’s1/4”connectortothisjack.
14. Sustain Pedal Input:Connectyoursustainpedal’s1⁄4”connectortothisjack.TheAxiomProkeyboardsupportsallsustain pedal polarities by auto-sensing the pedal’s orientation during startup
15. MIDI Out Port: This standard 5-pin MIDI connector transmits signals to any MIDI compatible device such as a synthesizer, sound module, or drum machine
16. MIDI In Port: This standard 5-pin MIDI connector accepts signals from any MIDI compatible device such as a synthesizer or drum machine
17. USB Port:TheUSBporthandlesallcommunicationbetweenAxiomProandyourcomputer.Connectthisjacktoanavailable USB port on your computer
✓ NOTE: When using the USB connection, the controller is powered via the host computer and a power adapter is not required. Also note that USB hubs (particularly USB hubs that do not have a dedicated external power supply) may result in inadequate power being sent to Axiom Pro and are not recommended for use with M-Audio products.
18. Power Socket: Connect an optional 9V DC, 500mA power supply here Note that a power supply is not necessary if Axiom Pro is connected to a computer through a USB connection
19. Power Switch: This switch turns the controller on and off
20. Kensington® Lock Connector: Connect a standard laptop-style locking security cable here to protect your Axiom Pro from theft

| 17Axiom Pro User Guide
Using Axiom ProAxiom Pro operates in one of two primary modes: Performance Mode and Edit Mode Most of the time, the keyboard will be in Performance Mode so that you can play your synthesizers and control your audio software This section covers the operation of the keyboard when it is in Performance Mode Please see the “Edit Mode” section of this guide to learn how Axiom Pro functions when the keyboard is in Edit mode
Overview and Basic Operation:
The LCD Screen
When Axiom Pro is in Performance Mode, the LCD screen (shown below) gives you a quick overview of the keyboard The contents of the screen may change slightly depending on what type of control (i e , knob, slider, pad, etc ) was used most recently, but the basic layout remains the same
The top-left of the screen displays the Axiom Pro patch that is
currently loaded
The top-right displays the control group that is
currently active
The output value of the active control is displayed in large letters on the right
side of the display
The encoder knobs and drum pads can have up to four “profiles ” When encoders and pads are being displayed, their profiles are listed along the bottom of the screen The active profile is highlighted Use
soft-button 1-4 to select the group that you would like to control
A lock appears if the “Hold” functionality is engaged See
the “Function Buttons and LCD Screen” section of this guide to learn more about this function
The center of the screen shows a visual
representation of active controls (this can be knobs,
sliders, drum pads, etc ) The active control (i e ,
the last control that was manipulated) is highlighted
and its name is listed justbelowthegraphical
representation of the controls
8

| 18Axiom Pro User Guide
Function Buttons and Soft KeysThe Function Buttons and Soft Keys of Axiom Pro are located directly below the LCD screen These buttons allow you to access various important features of the keyboard (such as loading and saving customized patches, accessing Edit mode, etc ) as well as navigating through menus displayed on the LCD screen
While the 25, 49, and 61-key version of Axiom Pro feature nearly identical functionality, the layout of the Function Buttons and Soft Keys vary slightly between Axiom Pro 49/61 and Axiom Pro 25 due to the space limitations of the smallest keyboard
Axiom Pro 49/61:
Axiom Pro 25:
Mode
F 1-4
These buttons function as follows:
Load This button brings up a prompt allowing you to load a stored Axiom Pro patch Loading of patches is covered in detail later in this chapter
Save This button brings up a prompt allowing you to save the current settings of your Axiom Pro Saving of patches is covered in detail later in this chapter
Soft Keys 1-4 These buttons allow you to select various options that are displayed at the bottom of the LCD screen These options differ from one page to another For example, certain menus and pages may provide functionality on all four Soft Keys whereas other pages will not have any Soft Key options at all
Edit This button lets you enter and exit Edit Mode Please see the “Edit Mode” section to learn more about this mode
Zone/Grp This button switches the functionality of the buttons beneath the Sliders (on Axiom Pro 49/61) or Transport Control (on Axiom Pro 25) to allow selection of Performance Groups and Zones When the button is not illuminated (i e , not pressed), the associated buttons send out MIDI commands When the button is pressed, it becomes illuminated, and the associated buttons can then be used toselectZonesandGroups.The“EditMode>Zones”sectioncoversthissubjectingreaterdetail.

| 19Axiom Pro User Guide
F1-4 This button is only available on Axiom Pro 25 When the “F1-4” button is pressed, the button becomes illuminated, and the Soft Keys mimic the first four F-Keys of Axiom Pro 49/61
Load+Save Whenever Axiom Pro is in Performance Mode, the LCD screen displays the status of the last used (Hold) control and its group For example, if the screen is displaying the status of the pad group and you
turn an encoder knob, the LCD will immediately switch to the encoder group, highlight the encoder that was turned, and display that encoder’s MIDI CC value to the right of the screen
In certain cases, you may wish to “Hold” the LCD so that the display remains locked on a specific page (for example, the pad group remains on-screen even if an encoder knob is turned) To do this, simultaneously press and hold the Save and Load buttons A lock icon ( ) will appear directly beneath the group name any time a display is being held
Edit+Zone/Grp When you manipulate one of the controls of Axiom Pro (i e , turn an encoder knob, tap a drum pad, (Peek) etc ), the keyboard immediately sends out MIDI data generated by that knob, slider, or other control
In certain scenarios, you may wish to view the names of a group of controls at once without generating any MIDI data To do this, simultaneously press and hold both the Edit and Zone/Grp buttons to enter “Peek” Mode:
Axiom Pro 49/61 users can press the N, S, E, and P group buttons to view the Numerical Keypad, Slider, Encoder Knob, or Pad groups Axiom Pro 25 users can press the Play and Record buttons to access the Encoder Knob and Pad groups
To exit Peek Mode, press both the Edit and Zone/Grp buttons again or move any of the controls
✓ TIP: This page can be “held” by simultaneously pressing the Load and Save buttons This is useful as it allows you to always see the names of the parameters that are assigned to the Encoder Knobs, even if a knob is turned

| 20Axiom Pro User Guide
F-KeysThese are assignable buttons that can be used to control your audio applications and virtual instruments By default (when the first Axiom Pro patch is active), these buttons are configured to send ASCII keystrokes and Axiom Pro patch change messages but can be re-configured to control many other functions within your audio application or a connected synthesizer Like many of the other assignable controls on Axiom Pro, these buttons can send either MIDI commands or ASCII commands (i e , keystrokes liketheonesgeneratedbyyourcomputer’s“QWERTY”keyboard).
The default mapping of these buttons is shown below:
F-Key Message F-Key Message
F1 Enter F5 Down
F2 Left F6 Patch –
F3 Right F7 Patch +
F4 Up
Note that Axiom Pro 25 features F-Keys 1-4 only. To access these buttons, users must press the “F-Keys” button in the top row to convert the Soft Keys (i.e., the buttons on the bottom row) into F-Keys.
Saving and Loading Axiom Pro PatchesAxiom Pro can store up to 50 patches in memory containing all your controller assignments (i e , button, knob, drum pad settings, etc ) This allows you to configure Axiom Pro for various scenarios (i e , studio, live performance, portable studio setup, etc ) and quickly recall these patches when necessary
Saving Patches:
To save your current settings:
1 Press the Save button The button becomes illuminated and the Save page is displayed on the LCD
2 Turn Encoder knob E5 to select the patch number that you would like to use to store your patch
✓ TIP: Axiom Pro 49/61 users can also use the +/- buttons or enter the patch number using the numerical keypad
3 By default, all of the Axiom Pro controller groups (i e , the encoder knobs, drum pads, etc ) will be saved with the patch If you would like any of the groups to not overwrite the settings of the patch:
a Axiom Pro 49/61 users: Press the “N,” “S,” “E,” and “P” buttons 2 to uncheck the Number, Slider, Encoder, and Pad groups Axiom Pro 25 users: Press the Record and Play buttons to uncheck the encoder and pad groups, respectively
b Use Soft Keys 2-3 to uncheck the Keyboard and Transport Control groups, respectively
4 Press Soft Key 4 (Save) to bring up a prompt allowing you to name your patch The “Editing Name Parameters” section in the “Edit Mode > Control” section of this guide details how to create patch names
5 Once a name has been entered into the prompt, press Soft Key 4 (Enter) to confirm the entry, save the patch, and return to Performance mode Press Soft Key 1 (Exit) to cancel the new name and to return to the Save page
Soft Key 1 (Exit) can be pressed at any time to exit this page without saving a patch
2 NOTE: Since Axiom Pro 25 does not feature sliders (“S”) or a numerical keypad (“N”), these groups will not appear on the Save Page.

| 21Axiom Pro User Guide
Loading Patches:
To load a saved patch:
1 Press the Load button The button becomes illuminated and the Load page is displayed on the LCD
2 Turn Encoder knob E5 to select the patch that you would like to load
✓ TIP: Axiom Pro 49/61 users can also use the +/- buttons or enter the patch number using the numerical keypad
3 By default, all of the controller groups of Axiom Pro (i e , the encoder knobs, drum pads, etc ) will be loaded from the saved patch If you would like to load a new patch but keep the current settings of a group:
a Axiom Pro 49/61 users: Press the “N,” “S,” “E,” and “P” buttons 3 to uncheck the Number, Slider, Encoder, and Pad groups Axiom Pro 25 users: Press the Record and Play buttons to uncheck the encoder and pad groups, respectively
b Use Soft Keys 2-3 to uncheck the Keyboard and Transport Control groups, respectively
4 Press Soft Key 4 (Load) to load the patch and return to Performance mode
Soft Key 1 (Exit) can be pressed at any time to exit this page without loading a patch
3 NOTE: Since Axiom Pro 25 does not feature sliders (“S”) or a numerical keypad (“N”), these groups will not appear on the Load Page.
When a new Axiom Pro patch is recalled, the Program change and Bank LSB/MSB settings of the newly loaded patch are also recalled. If you would like to load a new Axiom Pro patch without transmitting Program Change and Bank LSB/MSB messages, use Soft-Key 2 to ensure that the keyboard group is not checked.

| 22Axiom Pro User Guide
Using Axiom Pro with a Computer:
Software Configuration
When using Axiom Pro in “hosted” mode (i e , with a computer), you may need to set up your music software to send and receive MIDI data from Axiom Pro This process varies from application to application, but is usually done through a “Preferences” or “Setup” menu Refer to your software’s documentation to learn how to do this
You may also need to configure the application’s MIDI tracks and/or HyperControl functionality to send and receive signals from the correct input and output ports of Axiom Pro The controller will appear as four input ports and two output ports:
MIDI Input sources (as seen in your music software)
•Axiom Pro 61 4 USB A In The various controls (keys, pads, buttons, knobs, etc ) of Axiom Pro generate MIDI data on this port by
default, and selecting this port within your music software will allow you to record this data In most cases, this port should be selected to record your performances
• Axiom Pro 61 4 HyperControl In This port is reserved for HyperControl input data only To learn more about HyperControl, please refer to the
individual HyperControl User Guide that was created for your specific audio application (these guides can be found on the M-Audio website )
• Axiom Pro 61 4 MIDI In This corresponds to the hardware MIDI Input port on the back of the keyboard
•Axiom Pro 61 4 USB B In This corresponds to USB MIDI port B within the Axiom Pro keyboard If you have configured any of the
Axiom Pro controls to transmit data on this port, you will need to select “Axiom Pro 61 USB B In” within your music software to record the data generated by these controls Please see the Axiom Pro User Guide to learn how this port can be selected and when it can be used
MIDI Output destinations (as seen in your music software)
•Axiom Pro 614 MIDI Out This corresponds to the hardware MIDI Output port on the back of the keyboard
•Axiom Pro 614 HyperControl Out This port is reserved for HyperControl output data only To learn more about HyperControl, please refer to
the individual HyperControl User Guide that was created for your specific audio application (these guides can be found on the M-Audio website )
4 The 25 and 49-note versions of Axiom Pro will appear as “Axiom Pro 25” and “Axiom Pro 49” respectively.

| 23Axiom Pro User Guide
HyperControl Mode
About HyperControl Mode
HyperControl Mode is a two-way communication protocol that allows your Axiom Pro controls (i e , knobs, buttons, sliders, etc ) to automatically map and remain synchronized with all supported audio applications (including many popular programs such as Pro Tools, Reason, Cubase, and Logic Pro) This means that the controls of your Axiom Pro are automatically assigned within the audio application (or specific virtual instrument within the application) and the buttons, knobs, and other controls of Axiom Pro can be used to control the software without any further configuration For example, once HyperControl is activated within Pro Tools, the transport controls, knobs, sliders, and other Axiom Pro controls automatically map to the selected virtual instrument while the Axiom Pro LCD display always shows what track/instrument is selected along with the current position of the knobs or sliders
Furthermore, HyperControl mode allows your Axiom Pro hardware and recording software to remain synchronized at all times For example, if a knob is turned on Axiom Pro, its corresponding on-screen knob will update as well Alternatively, if a knob is turned on-screen (using the mouse), the corresponding knob position of Axiom Pro (as shown on the LCD display) is updated as well If a new virtual instrument is selected, the name and various controller positions automatically update on the Axiom Pro display
In short, HyperControl mode allows Axiom Pro to be tightly integrated with your audio software and makes the keyboard controller feel like a “dedicated” control surface that was custom built for that software It saves you from the tedious task of having to manually assign MIDI controllers to software functions and from having to save/load stored Axiom Pro patches each time you switch instruments This lets you work more quickly and creatively
✓ TIP: Most applications that do not directly support HyperControl technology can still be controlled by Axiom Pro through a “MIDI Learn” function or by manual assignment of MIDI CC numbers Refer to your application’s documentation to see if you can use these (or other) methods to control your software through MIDI
HyperControl Installation and Usage
Since HyperControl integration varies from one application to another, the installation and usage of HyperControl Mode is covered in separate User Guides for each supported application Please see the Axiom Pro support pages on www m-audio com/manuals to learn more about how to use HyperControl with your specific application

| 24Axiom Pro User Guide
Edit Mode
! IMPORTANT: If you are using Axiom Pro in HyperControl Mode, nearly all of the configuration that would normally take place using Edit Mode (described in this chapter) happens automatically However, if your application does not support HyperControl or if you are using Axiom Pro to control a hardware MIDI device, this section will cover all of the inner workings of the controller
Axiom Pro has two primary modes of operation: Edit Mode and Performance Mode Most of the time, the controller stays in Performance Mode so you can use the keyboard to control your MIDI compatible hardware and software; Edit Mode is only used when you need to configure various parameters such as button, knob, or pad assignments or to change keyboard-specific parameters such as the global MIDI output channel or the velocity response curve of the keys and pads
Pressing the Edit button illuminates the button and places the Axiom Pro keyboard into Edit Mode Pressing the button again exits Edit mode and the Edit button will no longer be illuminated
Edit Mode contains a main menu and six sub-menus This chapter explains each of these six pages in detail
✓ TIP: This section of the User Guide is written as a “reference” manual and describes every parameter and setting on a menu-by-menu basis This is useful if you are on a specific page within Edit Mode and want to know more about an individual parameter or setting However, if you would like to learn how to accomplish a specific task (e g , “How do I change the MIDI assignment of an encoder knob?” or “How do I change the global MIDI channel?”) please see the “How To:” section earlier in this User Guide The “How To:” section presents tasks in a logical fashion and provides shortcuts to the page (and parameter within that page) to help you quickly accomplish your tasks
A note on Edit Mode navigation: There are a number of ways to select and modify the parameters contained within Edit Mode:
< To select a parameter for editing:
•PressSoftKeys2or3
OR
•TurnencoderknobE1
< To change a parameter’s setting:
•TurnencoderknobE5
OR
•Usethe“+”and“-“buttonsonthenumericalkeypad(AxiomPro49/61only)
Certain pages and parameters will require you to use additional encoder knobs or other controls These pages and parameters will be discussed individually throughout the rest of this section

| 25Axiom Pro User Guide
Edit Mode (Main Menu)
This top-level menu appears when Axiom Pro enters Edit mode.
To navigate this menu, use the numerical keypad on Axiom Pro 49/61 or the black keys of Axiom Pro 25 (each black key on Axiom 25 corresponds to the number that is silk-screened above the note)
•Options 1-5 (Global, Control, Group, Zones, MIDI): These items are sub-menus pertaining to specific features of Axiom Pro Each sub-menu is described in detail in the following pages
•Option 6: This “LCD” option allows you to invert the colors of the display as this may increase visibility under certain lighting conditions
•Option 0: The HyperControl Mode parameter can be toggled between “Normal” and “Transport ” When this parameter is left in the default “Normal” setting, HyperControl functionality spans across most controls on the keyboard (i e knobs, F-Keys, sliders, etc ) When the parameter is set to “Transport,” HyperControl functionality only applies to the transport controls while the remainder of the controls (knobs, F-Keys, sliders, etc ) function like a typical MIDI controller This is useful for users who wish to create their own Axiom Pro patches, but still require transport controls that automatically map to the software within your computer
✓ NOTE: If HyperControl is active and you would like to do any of the following, set this parameter to “Transport”: •ControlexternalMIDIhardwareviaaselectedMIDItrackinyourDAW •Createandusecustomizedcontrollerassignmentsforyoursoftwareorplug-in •Runadditionalaudioapplicationsalongsideyour“main”HyperControlsequencingapplicationand
control both from Axiom Pro

| 26Axiom Pro User Guide
Edit Mode > GlobalThe Edit Mode > Global page contains common parameters that affect all areas of Axiom Pro
press 1
Parameter: Channel
Value Range: 1-16
This parameter sets the global MIDI output channel of Axiom Pro
If the “Channel” parameter on any other page of Edit mode is set to “Global,” that parameter will be set to the value selected here
Parameter: Octave
Value Range: -4 through +5 (Axiom Pro 25)
-3 through +4 (Axiom Pro 49)
-3 through +3 (Axiom Pro 61)
This parameter shifts the octave range of the keyboard either up or down Setting this parameter to “0” leaves the keyboard in its default (unaltered) key range
Parameter: Transp
Value Range: -12 through +12
This parameter simultaneously shifts all keys up to 12 semitones in either direction Setting this parameter to “0” leaves the keyboard in its default “centered” position
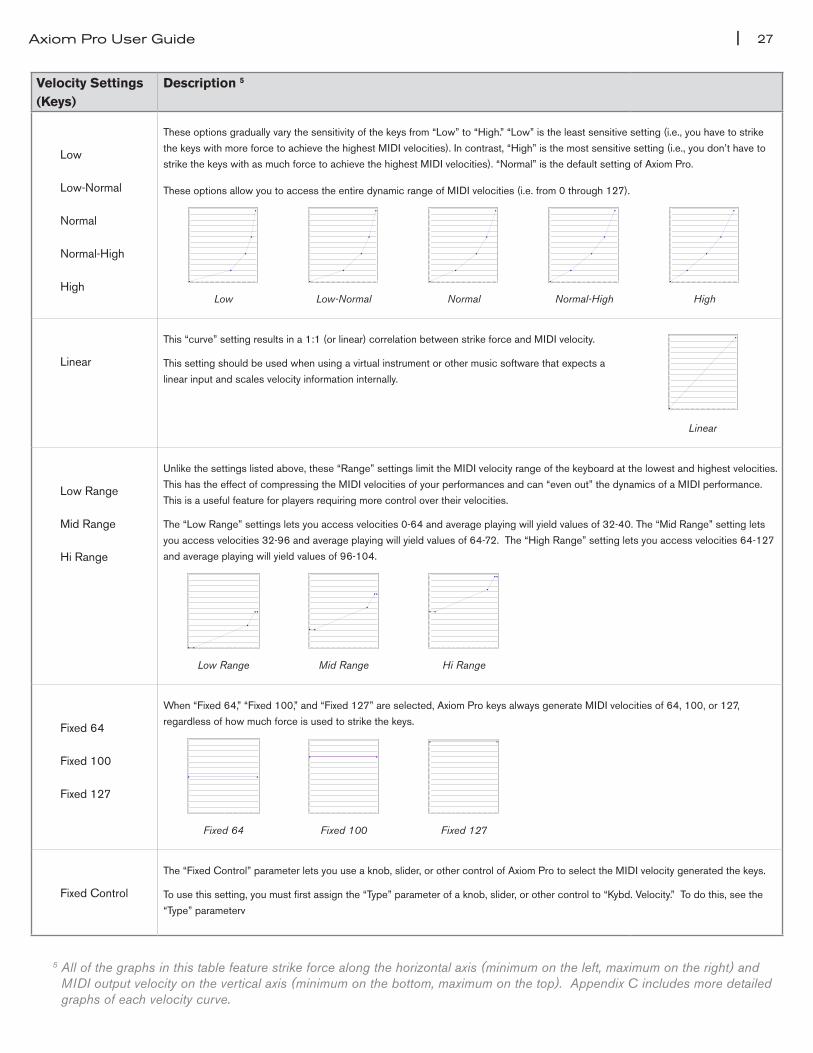
Parameter: VelCurve Value Range: Low, Low-Normal, Normal, Normal-High, High, Low Range, Mid Range, Hi Range, Fixed 64,
Fixed 100, Fixed 127, Fixed Control
ThisparameteradjuststhesensitivityoftheAxiomProkeysbychangingthekeyboard’svelocityresponse curve This allows keyboard players to fine-tune the “feel” of Axiom Pro to suit their playing style
The velocity curve settings break down into four categories as described in the table below Appendix B includes detailed graphs of each velocity curve:
| 27Axiom Pro User Guide
Velocity Settings (Keys)
Description 5
Low
Low-Normal
Normal
Normal-High
High
These options gradually vary the sensitivity of the keys from “Low” to “High ” “Low” is the least sensitive setting (i e , you have to strike
the keys with more force to achieve the highest MIDI velocities) In contrast, “High” is the most sensitive setting (i e , you don’t have to
strike the keys with as much force to achieve the highest MIDI velocities) “Normal” is the default setting of Axiom Pro
These options allow you to access the entire dynamic range of MIDI velocities (i e from 0 through 127)
Low Low-Normal Normal Normal-High High
Linear
This “curve” setting results in a 1:1 (or linear) correlation between strike force and MIDI velocity
This setting should be used when using a virtual instrument or other music software that expects a
linear input and scales velocity information internally
Linear
Low Range
Mid Range
Hi Range
Unlike the settings listed above, these “Range” settings limit the MIDI velocity range of the keyboard at the lowest and highest velocities
This has the effect of compressing the MIDI velocities of your performances and can “even out” the dynamics of a MIDI performance
This is a useful feature for players requiring more control over their velocities
The “Low Range” settings lets you access velocities 0-64 and average playing will yield values of 32-40 The “Mid Range” setting lets
you access velocities 32-96 and average playing will yield values of 64-72 The “High Range” setting lets you access velocities 64-127
and average playing will yield values of 96-104
LowRange MidRange HiRange
Fixed 64
Fixed 100
Fixed 127
When “Fixed 64,” “Fixed 100,” and “Fixed 127” are selected, Axiom Pro keys always generate MIDI velocities of 64, 100, or 127,
regardless of how much force is used to strike the keys
Fixed 64 Fixed 100 Fixed 127
Fixed Control
The “Fixed Control” parameter lets you use a knob, slider, or other control of Axiom Pro to select the MIDI velocity generated the keys
To use this setting, you must first assign the “Type” parameter of a knob, slider, or other control to “Kybd Velocity ” To do this, see the
“Type” parameterv
5Allofthegraphsinthistablefeaturestrikeforcealongthehorizontalaxis(minimumontheleft,maximumontheright)andMIDI output velocity on the vertical axis (minimum on the bottom, maximum on the top). Appendix C includes more detailed graphs of each velocity curve.

| 28Axiom Pro User Guide
✓ Advanced MIDI users: Release Velocity When the VelCurve parameter is selected, Soft-Key 4 displays a note-off logo ( -Off ) that can be checked and unchecked. When this option is unchecked, each time you release an Axiom Pro note, a basic MIDI “note off” command is transmitted. However, if this option is checked, each time you release a note, Axiom Pro transmits a note off message containing release velocity information (i.e., the speed at which you release the note). Note that notallapplicationsorsynthesizersmakeuseof“releasevelocity”data.Iftheapplicationorsynthdoesnotsupportthis data, leave this box unchecked.
Parameter: Data
Value Range: Octave, Transpose, Channel, Program, Bank LSB, Bank MSB, Load Patch
The Data Buttons 9 can perform two functions: Octave shift and a user-defined mode The functionality of the buttons is toggled by pressing both buttons at the same time This parameter determines the user-defined functionality of the Data Buttons and can be set to the following:
•Octave Data buttons shift the keyboard up or down in one octave increments The right button shifts the keyboard upward (i e , note C3 becomes C4) while the left button shifts the keyboard downward Note that octave shift is already the primary mode of operation for the Data Buttons If you set the Data parameter to “Octave”, both the primary and user-defined operation of the Data Buttons will be octave shift This means the Data Buttons cannot be used for a secondary function Some users may find this to be useful since it will prevent them from accidently switching to another mode during a performance
•Transpose Data buttons transpose the keyboard up or down in semi-tone steps The right button shifts the keyboard upward (i e , note C3 becomes C#3) while the left button shifts the keyboard downward
•Channel Data buttons select the global MIDI output channel of the keyboard The right button increases the current selection by one whereas the left button decreases the selection
•Program Data buttons send program change messages The right button increments the current program number by one (i e , if program 32 is currently selected, and the right data button is pressed, program change number 33 will be transmitted) while the left button decrements the current program number by one
•Bank LSB Data buttons send Bank LSB messages The right button increments the current Bank LSB value by one whereas the left button decreases the current value
•Bank MSB Data buttons send Bank MSB messages The right button increments the current Bank MSB value by one whereas the left button decreases the current value
✓ NOTE: Bank LSB and MSB messages must be followed by a “Program Change” message for them to take effect.
•Load Patch Data buttons can be used to load patches stored within Axiom Pro Axiom Pro can store up to 50 patches in its internal memory containing button, pad, knob, zone assignments as well as other parameters relating to the controller’s operation The right data button increments your current patch by one whereas the left button decrements the current value

| 29Axiom Pro User Guide
Parameter: Program
Value Range: 0-127
This parameter sends Program Change MIDI messages on your selected Global channel and can be used to select the different sounds contained within your sound module (or virtual instrument) For example, if you set this parameter to “20,” your connected software or sound module will immediately load program number 20
Parameter: BankLSB
Value Range: 0-127
This parameter sends Bank LSB messages on your selected Global channel In other words, a Bank LSB message is transmitted as soon as you set this parameter to the desired number Note that Bank LSB messages will not have any effect until a Program Change message is sent
Parameter: BankMSB
Value Range: 0 - 127
This parameter sends Bank MSB messages on your selected Global channel In other words, a Bank MSB message is transmitted as soon as you set this parameter to the desired number Note that Bank MSB messages will not have any effect until a Program Change message is sent
✓ Why are BankLSB/BankMSB messages needed?
The MIDI protocol generally uses 7-bit messages to exchange data, giving parameters a numerical data range from 0 to 127. This explains why MIDI CC values usually range from 0-127, or why many early MIDI modules have 128 sounds (i.e., sounds 1 through 127, plus sound number “0”).
Nowadays, many MIDI devices contain hundreds (or even thousands) of sounds and a simple 7-bit “Program Change” message cannot address any instruments beyond number 127. If this is the case, the sounds are usually separated into “banks” of 128 instruments that are accessed using “Bank LSB” and “Bank MSB” messages.
Axiom Pro can generate Program Change as well as Bank LSB/MSB messages. However, your device must be capable of receiving and interpreting these messages for bank changes to take place. Please consult the user manual of your MIDI device to see how the bank change numbers relate to the sounds on your device.
✓ NOTE: Program change commands, as well as Bank LSB/MSB messages are senttoallactivekeyboardzones.Forexample,iftwozonesareselectedandset to transmit on different channels, any Program or Bank LSB/MSB messages you generate will be sent on both channels. This means you mayinadvertentlyoverrideonezone’scurrent program or Bank LSB/MSB setting when trying to change the other zone’sprogram. IfyouwouldlikeazonenottoreceiveaBankLSBmessage,disablethatzonebefore sending the message (disablingofzonesisdescribedinthe “Edit Mode > Zones” section of this guide).

| 30Axiom Pro User Guide
Edit Mode > Control
press 2
The Edit Mode > Control page contains parameters relating to the operation of a specific control on Axiom Pro (i e , an individual pad, encoder knob, button, etc )
The Control page is automatically set to modify the last item that was manipulated before entering Edit mode For example, if you adjustedthemodulationwheelpriortoenteringtheEditMode>Controlpage,themodulationwheelwillbeselectedforediting.
Alternatively, different groups of controllers (pads, encoders, etc ) can be selected by turning encoder knob E2 Encoder knob E3 can then be used to select the specific control (i e , the individual pad, encoder, etc ) that you would like to modify Finally, the Axiom Pro controls (encoder knobs, pads, etc ) that can be programmed in “profiles” can be accessed by using encoder knob E4
Parameter: Name
Value Range: (varies)
This parameter lets you name the control that is currently selected for editing
Editing Name Parameters:
To edit the name parameter found on any of the Edit Mode pages:
< Select the Name parameter and Press Soft Key 4 (Enter)
< Use the lower row of Encoder Knobs to select letter, numbers, and characters:
•TurnEncoderknobE5toselectcapitalletters
•TurnEncoderknobE6toselectlower-caseletters
•TurnEncoderknobE7toselectnumbers
•TurnEncoderknobE8toselectadditionalcharacters(suchasspaces,parentheses,exclamation points, etc )
< “Use Encoder knob E1 or Soft Keys 2 and 3 to move the editing prompt left and right
Once you have finished editing a Name parameter, press Soft Key 4 (Enter) to confirm your change To cancel any changes you have made, press Soft Key 1 (Exit)

| 31Axiom Pro User Guide
Parameter: Type
Value Range: (varies; see table below)
This parameter sets the type of message that will be generated by the selected controller Your selection for this parameter determines what sub-parameters are displayed on the lower half of the page For example, certain Type selections (such as “MIDI CC”) will have “Min” and “Max” sub-parameters displayed (as shown in the picture above) whereas other Type selections (such as “Feedback”) will result in the Min parameter being changed to “Level” and the Max parameter being removed from the page (since it is not required) The table below lists every “Type” parameter that is available on Axiom Pro as well as what sub-parameters are available for each type
✓ NOTE: The description column in the table below only provides additional information for non-standard “Type” parameters along with their associated sub-parameters(suchas“NoteOnOffToggle”or“Rel.BinOffset”).StandardizedMIDIparameters(suchasContinuousControllers“CC”or“Master Volume”) are not described in this guide. Detailed information about standard parameters is beyond the scope of this guide and is commonly available on the Internet as well as in books about the MIDI protocol. To learn more about standard parameters, please refer to one of these books or websites.

Type Control Type MIDI Ch. Param. A Param B Param C Param D Description*OFF - - - - - Selecting this parameter disables its associated controller.
MIDI CC 1-16, Zone 1-4, Group, Global Min (0-127) Max (0-127) CC# (0-127) Entry (DEC, HEX)
MIDI CC 1-16, Zone 1-4, Group, Global Release (0-127) Press (0-127) CC# (0-127) Entry (DEC, HEX)
Pitch Bend Range 1-16, Zone 1-4, Group, Global Min (0-127) Max (0-127) - Entry (DEC, HEX)
Pitch Bend Range 1-16, Zone 1-4, Group, Global Value (0-127) - - Entry (DEC, HEX)
Chan Fine Tune 1-16, Zone 1-4, Group, Global Min (0-127) Max (0-127) - Entry (DEC, HEX)
Chan Fine Tune 1-16, Zone 1-4, Group, Global Value (0-127) - - Entry (DEC, HEX)
Chan Coarse Tune 1-16, Zone 1-4, Group, Global Min (0-127) Max (0-127) - Entry (DEC, HEX)
Chan Coarse Tune 1-16, Zone 1-4, Group, Global Value (0-127) - - Entry (DEC, HEX)
Channel Pressure 1-16, Zone 1-4, Group, Global Min (0-127) Max (0-127) - Entry (DEC, HEX)
Channel Pressure 1-16, Zone 1-4, Group, Global Value (0-127) - - Entry (DEC, HEX)
RPN coarse 1-16, Zone 1-4, Group, Global RPN LSB (0-127) RPN MSB (0-127) - Entry (DEC, HEX)
RPN coarse 1-16, Zone 1-4, Group, Global RPN LSB (0-127) RPN MSB (0-127) Value (0-127) Entry (DEC, HEX)
RPN fine 1-16, Zone 1-4, Group, Global RPN LSB (0-127) RPN MSB (0-127) - Entry (DEC, HEX)
RPN fine 1-16, Zone 1-4, Group, Global RPN LSB (0-127) RPN MSB (0-127) Value (0-127) Entry (DEC, HEX)
NRPN coarse 1-16, Zone 1-4, Group, Global NRPN LSB (0-127) NRPN MSB (0-127) - Entry (DEC, HEX)
NRPN coarse 1-16, Zone 1-4, Group, Global NRPN LSB (0-127) NRPN MSB (0-127) Value (0-127) Entry (DEC, HEX)
NRPN fine 1-16, Zone 1-4, Group, Global NRPN LSB (0-127) NRPN MSB (0-127) - Entry (DEC, HEX)
NRPN fine 1-16, Zone 1-4, Group, Global NRPN LSB (0-127) NRPN MSB (0-127) Value (0-127) Entry (DEC, HEX)
Master Volume - Min (0-127) Max (0-127) - Entry (DEC, HEX)
Master Volume - LSB (0-127) MSB (0-127) - Entry (DEC, HEX)
Control Assignment List | page 1
* NOTE: This column only describes the “non-standard” parameters and their associated sub-parameters within Axiom Pro (such as “Note OnOff Toggle” or “Rel. Bin Offset”). Standardized MIDI parameters (such as Continuous Controllers “CC” or “Master Volume”) are not described in this guide. If you require more information, please note that standard MIDI parameters are well documented on the Internet as well as in a number books about the MIDI protocol. To learn more about these standard parameters, please refer to one of these books or websites.
Control Type Key
= Pads Group = Encoders Group
= Numerical Keypad Group, Sustain Pedal, Function Keys,
Transport Controls = Slider Group, Pitch Bend, Keyboard Aftertouch, Modulation
Wheel, Expression Input

Type Control Type MIDI Ch. Param. A Param B Param C Param D Description*Master Pan - Min (0-127) Max (0-127) - Entry (DEC, HEX)
Master Pan - LSB (0-127) MSB (0-127) - Entry (DEC, HEX)
Coarse Tune - Min (0-127) Max (0-127) - Entry (DEC, HEX)
Coarse Tune - LSB (0-127) MSB (0-127) - Entry (DEC, HEX)
Fine Tune - Min (0-127) Max (0-127) - Entry (DEC, HEX)
Fine Tune - LSB (0-127) MSB (0-127) - Entry (DEC, HEX)
Chorus Mod rate - Value (0-127) - - Entry (DEC, HEX)
Chorus Mod Depth - Value (0-127) - - Entry (DEC, HEX)
Feedback - Level (0-127) - - Entry (DEC, HEX)
Send to Reverb - Level (0-127) - - Entry (DEC, HEX)
Pitch Bend 1-16, Zone 1-4, Group, Global Min (0-127) Max (0-127) - Entry (DEC, HEX)
Pitch Bend 1-16, Zone 1-4, Group, Global LSB (0-127) MSB (0-127) - Entry (DEC, HEX)
Kybd. Velocity - Min (0-127) Max (0-127) - Entry (DEC, HEX) This parameter functions similarly to the fixed velocity setting found on the Edit Mode > Global page. However, this parameter lets your selected control determine the velocity of the keys in real-time (e.g. during a performance).
Kybd. Velocity - Velocity (0-127) - - Entry (DEC, HEX) This parameter functions similarly to the fixed velocity setting found on the Edit Mode > Global page. However, this parameter lets your selected control determine the velocity of the keys in real-time (e.g. during a performance).
Pad Velocity - Min (0-127) Max (0-127) - Entry (DEC, HEX) This parameter functions similarly to the fixed velocity setting found on the Edit Mode > Group (Pads) page. However, this parameter lets your selected control determine the velocity of the drum pads in real-time (e.g. during a performance).
Pad Velocity - Velocity (0-127) - - Entry (DEC, HEX) This parameter functions similarly to the fixed velocity setting found on the Edit Mode > Group (Pads) page. However, this parameter lets your selected control determine the velocity of the drum pads in real-time (e.g. during a performance).
Control Assignment List | page 2
* NOTE: This column only describes the “non-standard” parameters and their associated sub-parameters within Axiom Pro (such as “Note OnOff Toggle” or “Rel. Bin Offset”). Standardized MIDI parameters (such as Continuous Controllers “CC” or “Master Volume”) are not described in this guide. If you require more information, please note that standard MIDI parameters are well documented on the Internet as well as in a number books about the MIDI protocol. To learn more about these standard parameters, please refer to one of these books or websites.
Control Type Key
= Pads Group = Encoders Group
= Numerical Keypad Group, Sustain Pedal, Function Keys,
Transport Controls = Slider Group, Pitch Bend, Keyboard Aftertouch, Modulation
Wheel, Expression Input

Type Control Type
MIDI Ch. Param. A Param B Param C Param D Description*
Global Param Set - Octave - Value (-4 through +4) - This parameter lets you use a button or drum pad to quickly change the Octave shift setting on the Edit Mode > Global page to a specific value.
Transpose Value (-12 through +12 - This parameter lets you use a button or drum pad to quickly change the Transpose setting on the Edit Mode > Global page to a specific value.
Channel Value (1-16) - This parameter lets you use a button or drum pad to quickly change the Global MIDI Channel setting on the Edit Mode > Global page to a specific value.
Program Value (0-127) Entry (DEC, HEX) This parameter lets you use a button or drum pad to quickly change the Program setting on the Edit Mode > Global page and transmit that Program change message.
Bank LSB Value (0-127) Entry (DEC, HEX) This parameter lets you use a button or drum pad to quickly change the Bank LSB setting on the Edit Mode > Global page and transmit that Bank LSB change message.
Bank MSB Value (0-127) Entry (DEC, HEX) This parameter lets you use a button or drum pad to quickly change the Bank MSB setting on the Edit Mode > Global page and transmit that Bank MSB change message.
Patch Value (0-50) - This parameter lets you use a button or drum pad to quickly change the Patch setting on the Edit Mode > Global page and load that Axiom Pro patch.
Vel. Curve Value (Low, Low-Normal, Normal, Normal-High, High, Linear, Low Range, Mid Range, High Range, Fixed 64, Fixed 100, Fixed 127, Fixed Control)
- This parameter lets you use a button or drum pad to quickly change the Vel Curve (Keys) setting on the Edit Mode > Global page.
Voice recall 1-16, Zone 1-4, Group, Global
Bank LSB (0-127) Bank MSB (0-127) Program (0-127) Entry (DEC, HEX) This parameter lets you use a button or drum pad to recall a specific preset within your virtual instrument or sound module
Toggle MIDI CC 1-16, Zone 1-4, Group, Global
Press 2 (0-127) Press 1 (0-127) CC# (0-127) Entry (DEC, HEX) This parameter lets your selected button or drum pad toggle between two CC values. For example, if the “MIDI CC” parameter is assigned to “64” (Sustain), and the Press 1 is assigned to “127” whereas the “Press 2” parameter is set to “0”, your button or drum pad can be used to simulate the functionality of a sustain pedal. One press will engage, while pressing the button again will disengage MIDI sustain.
MIDI Note 1-16, Zone 1-4, Group, Global
Off Vel (0-127) On Vel (0-127) Note (C-2 through G8) Entry (DEC, HEX) This parameter lets your selected button or drum pad generate a MIDI note. The “On Vel” number determines the velocity of the note whereas the “Off Vel” determines the release velocity when the button or drum pad is released. In many cases, the “Off Vel” parameter should be set to “0” to generate a regular “note off” command.
Note OnOff toggle 1-16, Zone 1-4, Group, Global
Off Vel (0-127) On Vel (0-127) Note (C-2 through G8) Entry (DEC, HEX) This parameter lets your selected button or drum pad toggle between two MIDI note values. For example, if the “Note” parameter is set to “C-1,” while “Press 1” is set to “127” and “Press 2” is set to “0”, you can tap the pad once to trigger the note and tap it a second time to stop the note.
MMC Command - Type (0-127) - - Entry (DEC, HEX) This parameter lets your selected control generate a MIDI Machine Control (MMC) command
1=Stop; 2=Play3=Deferred Play4=Forward5=Rewind6=Record Strobe7=Record Exit8=Record Pause9=Pause; 10=Eject11=Chase12= Command Error Reset13=MMC Reset
Reverb type GM2 - Type (0-127) - - Entry (DEC, HEX) This parameter lets your selected controller adjust the reverb type of your GM2-compatible software or sound module. This parameter may not function properly if your MIDI device does not support the GM2 (General MIDI 2) specification.
Reverb time GM2 - Time (0-127) - - Entry (DEC, HEX) This parameter lets your selected controller adjust the reverb time on your GM2-compatible software or sound module. This parameter may not function properly if your MIDI device does not support the GM2 (General MIDI 2) specification.
Chorus type GM2 - Type (0-127) - - Entry (DEC, HEX) This parameter lets your selected controller adjust the chorus type of your GM2-compatible software or sound module. This parameter may not function properly if your MIDI device does not support the GM2 (General MIDI 2) specification.
MIDI CC Value - 1-16, Zone 1-4, Group, Global
Start (0-127) End (0-127) CC# (0-127) Entry (DEC, HEX) This parameter lets you use a button or drum pad to decrement your selected MIDI CC each time that button or drum pad is tapped.
MIDI CC Value + 1-16, Zone 1-4, Group, Global
Start (0-127) End (0-127) CC# (0-127) Entry (DEC, HEX) This parameter lets you use a button or drum pad to increment your selected MIDI CC each time that button or drum pad is tapped.
Global Param - - Octave, Transpose, Channel, Program, Bank LSB, Bank MSB, Patch, Vel. Curve
- - - This parameter lets your selected control decrement the selected global parameter each time that button or drum pad is tapped.
Global Param + - Octave, Transpose, Channel, Program, Bank LSB, Bank MSB, Patch, Vel. Curve
- - - This parameter lets your selected control increment the selected global parameter by each time that button or drum pad is tapped.
Control Assignment List | page 3
* NOTE: This column only describes the “non-standard” parameters and their associated sub-parameters within Axiom Pro (such as “Note OnOff Toggle” or “Rel. Bin Offset”). Standardized MIDI parameters (such as Continuous Controllers “CC” or “Master Volume”) are not described in this guide. If you require more information, please note that standard MIDI parameters are well documented on the Internet as well as in a number books about the MIDI protocol. To learn more about these standard parameters, please refer to one of these books or websites.
Control Type Key
= Pads Group = Encoders Group
= Numerical Keypad Group, Sustain Pedal, Function Keys,
Transport Controls = Slider Group, Pitch Bend, Keyboard Aftertouch, Modulation
Wheel, Expression Input
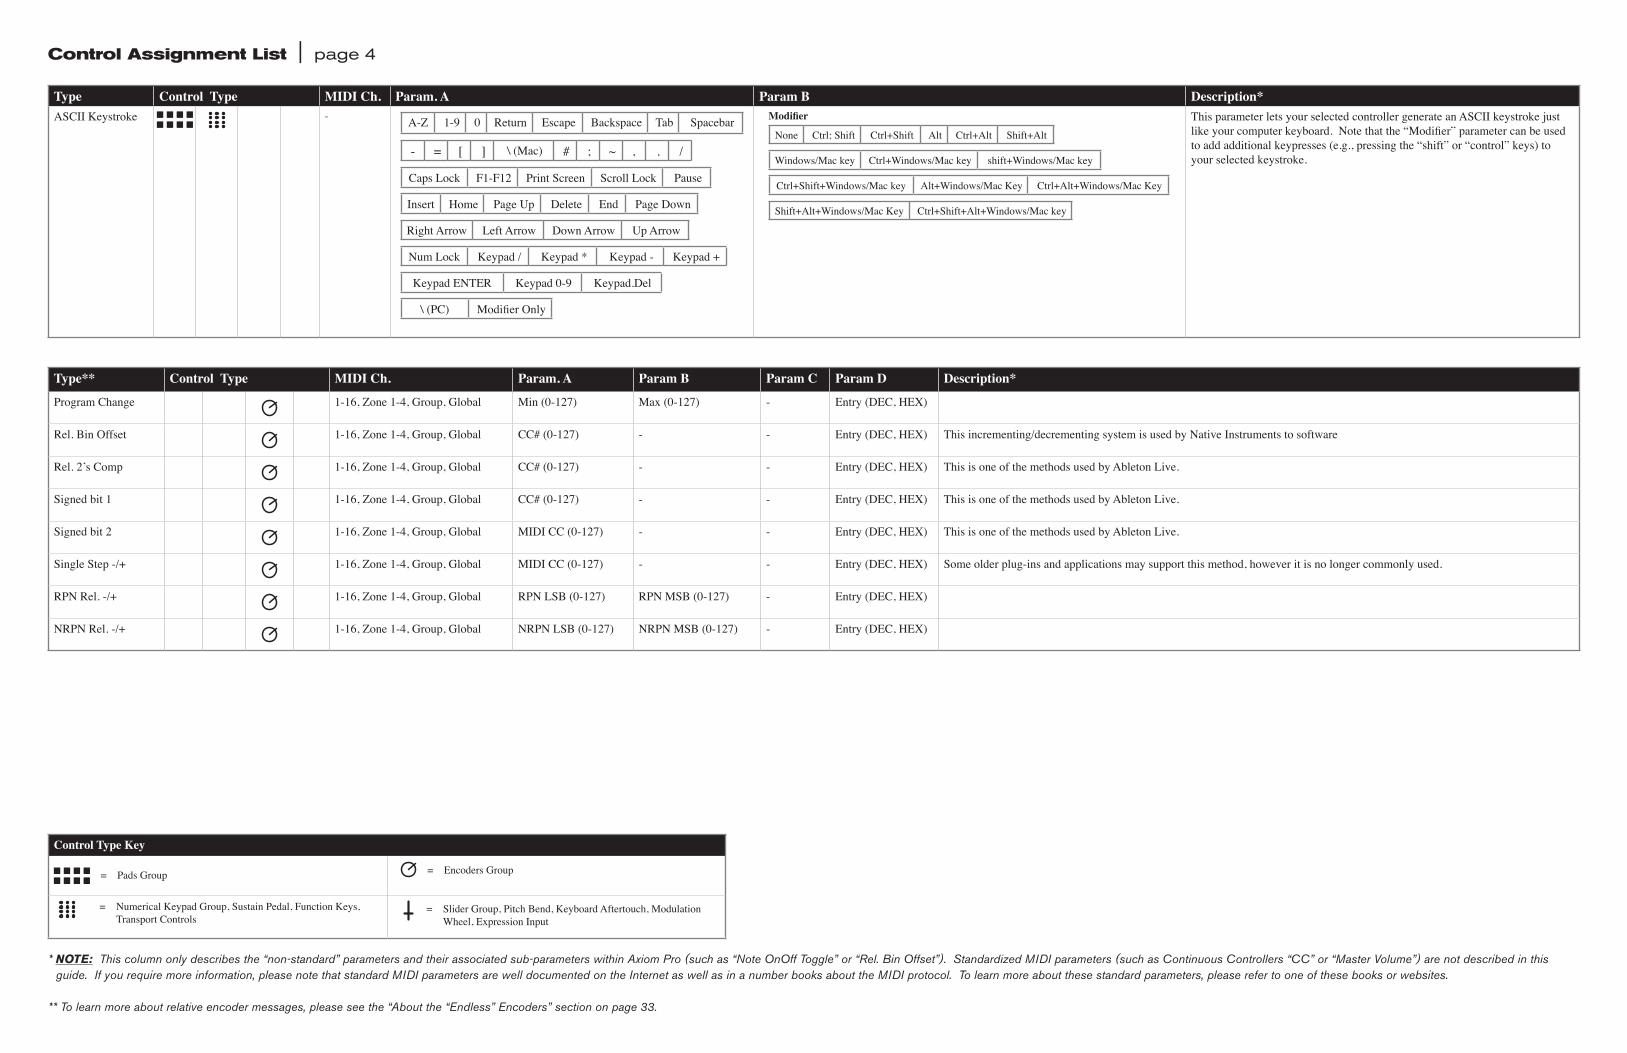
Type Control Type MIDI Ch. Param. A Param B Description*ASCII Keystroke - A-Z 1-9 0 Return Escape Backspace Tab Spacebar
- = [ ] \ (Mac) # ; ~ , . /
Caps Lock F1-F12 Print Screen Scroll Lock Pause
Insert Home Page Up Delete End Page Down
Right Arrow Left Arrow Down Arrow Up Arrow
Num Lock Keypad / Keypad * Keypad - Keypad +
Keypad ENTER Keypad 0-9 Keypad.Del
\ (PC) Modifier Only
Modifier
None Ctrl; Shift Ctrl+Shift Alt Ctrl+Alt Shift+Alt
Windows/Mac key Ctrl+Windows/Mac key shift+Windows/Mac key
Ctrl+Shift+Windows/Mac key Alt+Windows/Mac Key Ctrl+Alt+Windows/Mac Key
Shift+Alt+Windows/Mac Key Ctrl+Shift+Alt+Windows/Mac key
This parameter lets your selected controller generate an ASCII keystroke just like your computer keyboard. Note that the “Modifier” parameter can be used to add additional keypresses (e.g., pressing the “shift” or “control” keys) to your selected keystroke.
Control Assignment List | page 4
Type** Control Type MIDI Ch. Param. A Param B Param C Param D Description*
Program Change 1-16, Zone 1-4, Group, Global Min (0-127) Max (0-127) - Entry (DEC, HEX)
Rel. Bin Offset 1-16, Zone 1-4, Group, Global CC# (0-127) - - Entry (DEC, HEX) This incrementing/decrementing system is used by Native Instruments to software
Rel. 2’s Comp 1-16, Zone 1-4, Group, Global CC# (0-127) - - Entry (DEC, HEX) This is one of the methods used by Ableton Live.
Signed bit 1 1-16, Zone 1-4, Group, Global CC# (0-127) - - Entry (DEC, HEX) This is one of the methods used by Ableton Live.
Signed bit 2 1-16, Zone 1-4, Group, Global MIDI CC (0-127) - - Entry (DEC, HEX) This is one of the methods used by Ableton Live.
Single Step -/+ 1-16, Zone 1-4, Group, Global MIDI CC (0-127) - - Entry (DEC, HEX) Some older plug-ins and applications may support this method, however it is no longer commonly used.
RPN Rel. -/+ 1-16, Zone 1-4, Group, Global RPN LSB (0-127) RPN MSB (0-127) - Entry (DEC, HEX)
NRPN Rel. -/+ 1-16, Zone 1-4, Group, Global NRPN LSB (0-127) NRPN MSB (0-127) - Entry (DEC, HEX)
Control Type Key
= Pads Group = Encoders Group
= Numerical Keypad Group, Sustain Pedal, Function Keys,
Transport Controls = Slider Group, Pitch Bend, Keyboard Aftertouch, Modulation
Wheel, Expression Input
* NOTE: This column only describes the “non-standard” parameters and their associated sub-parameters within Axiom Pro (such as “Note OnOff Toggle” or “Rel. Bin Offset”). Standardized MIDI parameters (such as Continuous Controllers “CC” or “Master Volume”) are not described in this guide. If you require more information, please note that standard MIDI parameters are well documented on the Internet as well as in a number books about the MIDI protocol. To learn more about these standard parameters, please refer to one of these books or websites.
** To learn more about relative encoder messages, please see the “About the “Endless” Encoders” section on page 33.

| 32Axiom Pro User Guide
About the “Channel” sub-parameter:
This parameter sets the MIDI output channel of the selected control The parameter can be set in the following ways:
•Global Your selected control will transmit on the global MIDI channel as specified on the Edit > Global page
•1-16 Your selected control will transmit on a MIDI channel between 1 and 16
•Zone 1-4 Your selected control will transmit on the same MIDI channel used by the chosen keyboard zone (1 through 4) (see Edit Mode > Zones > Data to learn how to set these output channels)
•Group Your selected control will transmit on the same MIDI channel as set for its associated group of controls (e g encoder group) See Edit > Group to learn how to set a MIDI channel for a group of controls
✓ NOTE: Axiom Pro allows you to assign any control to any MIDI channel through the Edit Mode > Control menu. However, please note that certain MIDI devices reserve channel 10 for drums and percussion. Appendix E6 features a General MIDI drum map table to show you how drum sounds are commonly assigned to the keys of controllers.Pleaserefertoyourdevice’sdocumentationtolearnmoreaboutthis.

| 33Axiom Pro User Guide
About the “Entry” sub-parameter:
This parameter determines how the Min, Max, and CC# parameters will be displayed on screen When this parameter is set to “DEC” all values will be displayed in decimal format whereas setting this parameter to “HEX” will display the same information in hexidecimal format A decimal to hexadecimal conversion chart can be found in Appendix G
Note that this parameter only changes the formatting of the displayed Min, Max, and CC# parameters--it does not actually change the type of numerical information contained within those parameters
✓ NOTE: When this parameter is set to “HEX,” it is possible to enter HEX values when editing other parameters on the page, however, it is not possible to directly select A-F values using the numerical keypad (on Axiom Pro 49/61) or the keys (Axiom Pro 25). To select these values, users must select “0” or “9” and use the “-“ or “+” buttons (Axiom Pro 25 users must use the “-” and “+” keys on the keyboard) to access values in the A-F (10-15) range.
✓ TIP: Many of the controls on Axiom Pro allow you to set a minimum and maximum limit via the Edit Mode > Control menu This makes it possible to reduce the data range within which the selected control operates When configuring sliders, the expression pedal or the aftertouch strip this way, the entire “physical range” will become available for the reduced data range, essentially enabling you to make more precise edits If you set the minimum and maximum limits of a slider, expression pedal, or aftertouch strip in the Edit Mode > Control menu, you can use the entire “physical range” of the slider, pedal, or aftertouch strip to send out MIDI data for your restricted range This makes it easier to create precise edits For example, if you limit the range of a slider between 32 and 64, you can use the entire “travel” of the slider to select values between 32 and 64 (the bottom of the slider is value 32 whereas the top is 64) Note that this does not make the actual MIDI CC data more precise—it simply means that the physical slider can travel more distance to reach the next MIDI CC “step ”

| 34Axiom Pro User Guide
About the “Endless” Encoders:
TheEncoderknobscanfunctionjustlikethe“fixed”knobsfoundonmanysynthesizersorMIDIcontrollers(i.e.,fixedknobsstop rotating and sending MIDI data once you reach the minimum or maximum “ends” of the knob) This is how the Axiom Pro encoders behave if the “Type” parameter of an encoder is set to “MIDI CC ” In this case, when the minimum or maximum limit is reached, no more data is sent, even if you continue to turn the knob in the same direction (data is only sent again once the knob is turned in the other direction)
This method means that the knobs send “absolute” MIDI values For example, if the knob is set to value “64,” turning the knob clockwise will send values “65, 66, 67” and so on If you change presets (or virtual instruments) while you’re playing, and the new preset contains different controller values, you run the risk of having your keyboard’s knobs to be “out-of-sync” with what the MIDI hardware or software is expecting (i e , your physical knob may be in position “64” whereas the new preset/virtual instrumentexpectsposition“0.”)Thismaycauseyoursynthesizersettingstojumpor“snap”from0to65whenyouturntheencoder—thiscanbeajarringexperienceiftheparameterisassignedtomastervolumeorfilter!
To resolve this common problem, Axiom Pro encoders can also send “relative” MIDI messages This means that when an Axiom Pro encoder is turned, a message is sent to your software (or connected MIDI device) stating “Take the current value—whatever it may be—and increase/decrease it by one ” This method is preferable to the traditional “absolute” value method since there is no risk of having your controller knobs and music hardware/software to be “out-of-sync” since Axiom Pro does not need to know the “expected” position of a knob
Please note that not all hardware/software supports relative MIDI messages If your software does not support relative MIDI data, you must use absolute MIDI CC messages
Furthermore, applications that do support relative MIDI messages can differ in the way encoder support is implemented For that reason, Axiom Pro encoders can be configured to send out many different kinds of relative MIDI message types to ensure support with nearly all popular applications Check your hardware/software’s user guide to see what message type is supported (and to activate the feature, if necessary) Next, take a look at page 4 of the Control Assignment list found earlier in this guide and select the appropriate “Type” parameter for your Axiom Pro encoder assignments

| 35Axiom Pro User Guide
✓ Tip:
You can directly
access this page by
first tapping any of
the pads, pressing
the Edit Mode button
and selecting option
number 3
Edit Mode > Group (Pad)
press P Axiom Pro 49/61
press 3
or
press record Axiom Pro 25
Axiom Pro 49/61
Axiom Pro 25
Press the Edit Mode button, select option number 3 and then press “P” (Axiom Pro 25: press the “Record” button) to open the Pad Group page
The Edit Mode > Group (Pad) page displays parameters relating to the drum pads
You can select one of the other groups of controls for editing by pressing the “N” “S” “E” and “P” group buttons on Axiom Pro 49/61 On Axiom Pro 25, use the “Play” and “Record” buttons to select the encoder and pad groups, respectively 6
Note that this section of the User Guide covers the Pad group (the other groups are covered in the following sections of this guide)
Parameter: Name
Value Range: (varies)
This parameter lets you name the group of pads Note that this name only appears within the Axiom Pro controller and does not affect your audio application in any way
To learn more about entering or changing Name parameters, see the box titled “Editing Name Parameters” in the “Edit Mode > Control” section
Parameter: Channel
Value Range: Global, 1-16, Zone 1-4
This parameter sets the MIDI output channel of the drum pads group The parameter can be set in the following ways:
•Global This sets the “group” MIDI channel for the drum pads to the same channel as specified on the Edit > Global page
•1-16 This sets the “group” MIDI channel for the drum pads to a channel between 1 and 16
•Zone 1-4 This sets the “group” MIDI channel for the drum pads to the same channel as used by the selected keyboard zone (1 through 4) See Edit Mode > Zones > Data to learn how to set these output channels
6 Axiom Pro 25 does not have sliders or a numerical keypad, and therefore does not feature slider or numerical keypad groups.

| 36Axiom Pro User Guide
Parameter: Vel Lock
Value Range: Off, On
This parameter engages and disengages velocity locking for the pads
When this parameter is set to “Off,” pads are velocity sensitive If this parameter is set to “On,” each pad will always transmit at the velocity specified on its Edit > Control page
Note that this feature is only available on pads that are configured to send MIDI note data Velocity locking is automatically disabled if the pad is not configured to send MIDI note data
Parameter: Curve
Value Range: Low, Normal, High, 4Steps, 3Steps, 2Steps, Low Range, Mid Range, High Range, Fixed 64, Fixed 100, Fixed 127
Thisparametersetsthevelocitycurveoftheeightdrumpadsandallowsyoutoadjustthesensitivityof the pads to suit your playing style
The velocity curve settings break down into four categories as described in the table below Appendix C includes detailed graphs of each velocity curve:

| 37Axiom Pro User Guide
Velocity Settings (Pads)
Description 7
Low
Normal
High
These options gradually vary the sensitivity of the pads from “Low” to “High ” “Low” is the least sensitive setting (i e , you have to strike
the keys with more force to achieve the highest MIDI velocities) In contrast, “High” is the most sensitive setting (i e , you don’t have to
strike the keys with as much force to achieve the highest MIDI velocities) “Normal” is the default setting of Axiom Pro
These three settings allow you to access the entire dynamic range of MIDI velocities
(i e from 0 through 127)
Low Normal High
4 Steps
3 Steps
2 Steps
The “4 steps,” “3 steps,” and “2 steps” settings give the pads four, three, and two discreet velocity levels respectively (as shown below)
These settings allow you to play rhythmic parts in “levels” (i e , this makes it easier to perform with a consistent velocity level, while giving
the option to add louder or softer accents)
4 Steps 3 Steps 2 Steps
Low Range
Mid Range
High Range
These “Range” settings limit the MIDI velocity range of the pads at the lowest and/or highest velocities This has the effect of
compressing the MIDI velocities of your performances and can “even out” the dynamics of a MIDI performance This is a useful feature
for players requiring more control over their velocities
The “Low Range” setting lets you access velocities 0-64 and average playing will yield values of 32-40 The “Mid Range” setting lets
you access velocities 32-96 and average playing will yield values of 64-72 The “High Range” setting lets you access velocities 64-127
and average playing will yield values of 96-104
LowRange MidRange HiRange
Fixed 64
Fixed 100
Fixed 127
When “Fixed 64,” “Fixed 100,” and “Fixed 127” are selected, Axiom Pro keys always generate MIDI velocities of 64, 100, or 127,
regardless of how much force is used to strike the keys
Fixed 64 Fixed 100 Fixed 127
7Allofthegraphsinthistablefeaturestrikeforcealongthehorizontalaxis(minimumontheleft,maximumontheright)andMIDI output velocity on the vertical axis (minimum on the bottom, maximum on the top). Appendix C includes more detailed graphs of each velocity curve.

| 38Axiom Pro User Guide
Parameter: 1-4
Value Range: (varies)
The Encoder knobs and drum pads can have up to four profiles allowing you to quickly and easily control up to 32 parameters When viewing this page in Edit Mode, a selected profile can be enabled and disabled using the “+” and “-“ buttons Pressing Soft-Key 4 (Edit) lets you edit the name of the selected profile
To learn more about entering or changing Name parameters, see the box titled “Editing Name Parameters” in the “Edit Mode > Control” section

| 39Axiom Pro User Guide
Edit Mode > Group (Encoder)
press E Axiom Pro 49/61
press 3
or
press play Axiom Pro 25
Axiom Pro 49/61
Axiom Pro 25
Press the Edit Mode button, select option number 3 and then press “E” (Axiom Pro 25: press the “Play” button) to open the Encoder Group page
The Edit Mode > Group (Encoder) page displays parameters relating to Encoder knobs
You can select one of the other groups of controls for editing by pressing the “N” “S” “E” and “P” group buttons on Axiom Pro 49/61 or the “Play” and “Record” buttons to select the encoder and pad groups on Axiom Pro 25 8
Note that this section of the User Guide covers the Encoder group (the other groups are covered in the preceding and following sections of this guide)
Parameter: Name
Value Range: (varies)
This parameter lets you name the encoder group Note that this name only appears within the Axiom Pro controller and does not affect your audio application in any way
To learn more about entering or changing Name parameters, see the box titled “Editing Name Parameters” in the “Edit Mode > Control” section
8 Axiom Pro 25 does not have sliders or a numerical keypad, and therefore does not feature groups for these controls.
✓ Tip:
You can directly
access this page by
first turning any of
the encoder knobs,
pressing the Edit
Mode button and
selecting option
number 3

| 40Axiom Pro User Guide
Parameter: Channel
Value Range: Global, 1-16, Zone 1-4
This parameter sets the MIDI output channel of the encoder group The parameter can be set in the following ways:
•Global This sets the “group” MIDI channel for the encoder knobs to the same channel as specified on the Edit > Global page
•1-16 This sets the “group” MIDI channel for the encoder knobs to a channel between 1 and 16
•Zone 1-4 This sets the “group” MIDI channel for the encoder knobs to the same channel as used by the selected keyboard zone (1 through 4) (see Edit Mode > Zones > Data to learn how to set these output channels)
Parameter: Accel Max
Value Range: 0-10
When the Axiom Pro encoders are turned slowly, their associated parameters update in single-step increments However, as the encoders are turned quickly the parameters update in multi-step increments and let you make large changes with only one or two fast turns of an encoder
The Accel Max setting determines the maximum speed at which parameters will update as an encoder is turned quickly The default setting is “5” To make encoders more precise (but less sensitive) at high speed, reduce this setting Conversely, to make encoders more sensitive (but less precise) at high speeds, increase this setting
Parameter: 1-4
Value Range: (varies)
Encoder knob and drum pad groups can up to four profiles allowing you to quickly and easily control up to 32 parameters When viewing this page in Edit Mode, a selected profile can be enabled and disabled using the “+” and “-“ buttons Pressing Soft-Key 4 (Edit) lets you edit the name of the selected profile
To learn more about entering or changing Name parameters, see the box titled “Editing Name Parameters” in the “Edit Mode > Control” section

| 41Axiom Pro User Guide
Edit Mode > Group (Slider)
press Spress 3
Axiom Pro 49/61
Press the Edit Mode button, select option number 3 and then press “S” to open the Slider Group page
The Edit Mode > Group (Slider) page displays parameters relating to the Sliders
You can select one of the other groups of controls for editing by pressing the “N” “S” “E” and “P” group buttons on Axiom Pro 49/61 or the “Play” and “Record” buttons to select the encoder and pad groups on Axiom Pro 25
Note that this section of the User Guide covers the Slider group (the other groups are covered in the preceding and following sections of this guide)
Parameter: Name
Value Range: (varies)
This parameter lets you name the slider group Note that this name only appears within the Axiom Pro controller and does not affect your audio application in any way
To learn more about entering or changing Name parameters, see the box titled “Editing Name Parameters” in the “Edit Mode > Control” section
Parameter: Channel
Value Range: Global, 1-16, Zone 1-4
This parameter sets the MIDI output channel of the slider group The parameter can be set in the following ways:
• Global This sets the “group” MIDI channel for the sliders to the same channel as specified on the Edit > Global page
• 1-16 This sets the “group” MIDI channel for the sliders to a channel between 1 and 16
• Zone 1-4 This sets the “group” MIDI channel for the sliders to the same channel as used by the selected keyboard zone (1 through 4) See Edit Mode > Zones > Data to learn how to set these output channels
✓ Tip:
You can directly
access this page by
first moving any of
the sliders, pressing
the Edit Mode button
and selecting option
number 3

| 42Axiom Pro User Guide
Parameter: Drawbar
Value Range: Off, On
This parameter engages Drawbar Mode When this mode is engaged, the operation of the sliders is reversed and the maximum MIDI CC value (127) is reached when the slider is at the bottom whereas the minimum CC value (0) is reached when the slider is pushed to the top This operation mimics the behavior of typical organs with draw bars
Parameter: NullMode
Value Range: Off, On
When this parameter is set to its default “on” position, the MIDI output of the sliders is muted if the physical slider is out-of-sync with the “expected” position of the slider shown on the LCD display Thispreventsassociatedparameterswithinyouraudioapplicationsfrompotentially“jumping”or“snapping” to a different MIDI CC value as soon as a slider is moved
Unsynchronized sliders feature a horizontal line across the LCD display’s on-screen fader 1 that represents its expected position A square represents the location of the physical slider 2 Once the square moves over the line, the physical and on-screen sliders are synchronized 3 and that slider begins to output MIDI data once again
1 Your DAW (or Virtual Instrument) is expecting
the slider to be in this position
2 This is the actual position of the
hardware slider on Axiom Pro
3 Once the hardware slider passes over
the “expected” slider position, the slider
becomes synchronized and linked
An Unsynchronized Slider
A Synchronized Slider
When this parameter is set to “off,” the horizontal line representing the “expected” slider position does not appear
Note that the values of the Sliders are remembered each time a patch change occurs When that patch next becomes active, the values are restored

| 43Axiom Pro User Guide
Edit Mode > Group (Numerical Keypad)
press 3 press N
Axiom Pro 49/61
Press the Edit Mode button, select option number 3 and then press “N” to open the Numerical Keypad Group page
The Edit Mode > Group (Numerical Keypad) page displays parameters relating to the Numerical Keypad
You can select one of the other groups of controls for editing by pressing the “N” 9 “S” 9 “E” and “P” group buttons on Axiom Pro 49/61 or the “Play” and “Record” buttons to select the encoder and pad groups on Axiom Pro 25
Note that this section of the User Guide covers the Numerical Keypad group (the other groups are covered in the preceding sections of this guide)
Parameter: Name
Value Range: (varies)
This parameter lets you name the keypad group Note that this name only appears within the Axiom Pro controller and does not affect your audio application in any way
To learn more about entering or changing Name parameters, see the box titled “Editing Name Parameters” in the “Edit Mode > Control” section
Parameter: Channel
Value Range: Global, 1-16, Zone 1-4
This parameter sets the MIDI output channel of the numerical keypad group The parameter can be set in the following ways:
•Global This sets the “group” MIDI channel for the numerical keypad to the same channel as specified on the Edit > Global page
•1-16 This sets the “group” MIDI channel for the numerical keypad to a channel between 1 and 16
•Zone 1-4 This sets the “group” MIDI channel for the numerical keypad to the same channel as used by the selected keyboard zone (1 through 4) (see Edit Mode > Zones > Data to learn how to set these output channels)
9 Only available on Axiom Pro 49/61
✓ Tip: You can directly access this page by first pressing a button on the keypad group, pressing the Edit Mode button and selecting option number 3
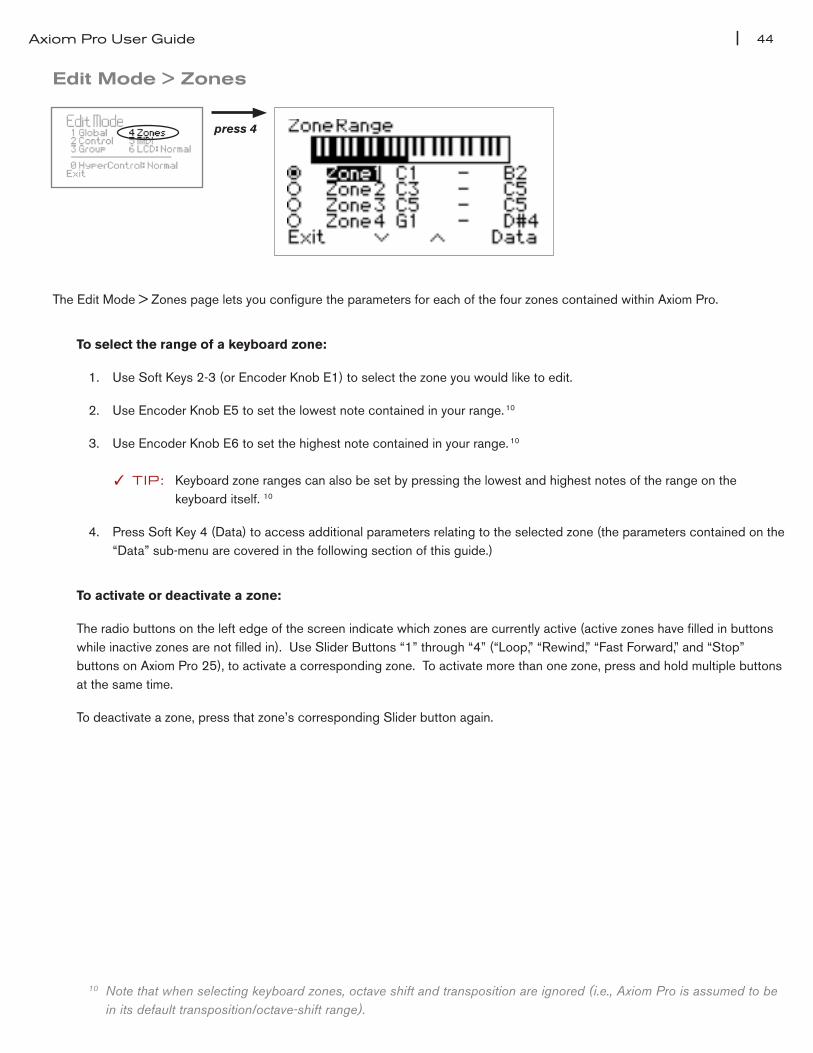
| 44Axiom Pro User Guide
Edit Mode > Zones
press 4
The Edit Mode > Zones page lets you configure the parameters for each of the four zones contained within Axiom Pro
To select the range of a keyboard zone:
1 Use Soft Keys 2-3 (or Encoder Knob E1) to select the zone you would like to edit
2 Use Encoder Knob E5 to set the lowest note contained in your range 10
3 Use Encoder Knob E6 to set the highest note contained in your range 10
✓ TIP: Keyboard zone ranges can also be set by pressing the lowest and highest notes of the range on the keyboard itself 10
4 Press Soft Key 4 (Data) to access additional parameters relating to the selected zone (the parameters contained on the “Data” sub-menu are covered in the following section of this guide )
To activate or deactivate a zone:
The radio buttons on the left edge of the screen indicate which zones are currently active (active zones have filled in buttons while inactive zones are not filled in) Use Slider Buttons “1” through “4” (“Loop,” “Rewind,” “Fast Forward,” and “Stop” buttons on Axiom Pro 25), to activate a corresponding zone To activate more than one zone, press and hold multiple buttons at the same time
To deactivate a zone, press that zone’s corresponding Slider button again
10Notethatwhenselectingkeyboardzones,octaveshiftandtranspositionareignored(i.e.,AxiomProisassumedtobein its default transposition/octave-shift range).

| 45Axiom Pro User Guide
Edit Mode > Zones > Data
press 4 press soft-key 4, “DATA”
You can open the Data page for a Zone by entering Edit Mode, selecting the Zone for editing, and then pressing soft-key 4 (Data) This gives access to additional parameters relating to the operation of an individual zone
Parameter: Channel
Value Range: Global, 1-16
This parameter sets the MIDI output channel of the selected zone The parameter can be set in the following ways:
•Global This sets the MIDI channel for the selected zone to the same channel as specified on the Edit > Global page
•1-16 This sets the MIDI channel for the selected zone to a channel between 1 and 16
Parameter: Octave
Value Range: -4 through +4
This parameter shifts the octave range of the selected keyboard zone either up or down Note
thatthisparameterworksinconjunctionwithanyglobalshiftyoumayhavesetusingthe“Octave”
parameter on the Edit Mode > Global page For example, if you have set the global octave shift to
“+1” and set this parameter to “+2” your selected zone will be shifted upward by three octaves
Parameter: Transp
Value Range: - 12 through +12
This parameter simultaneously shifts all keys in the selected keyboard zone up to 12 semitones in eitherdirection.Notethatthisparameterworksinconjunctionwithanyglobaltranspositionyoumayhave set using the “Transp ” parameter on the Edit Mode > Global page In other words, if you have set the global transposition shift to “+1” and set this parameter to “+2”, your selected zone will be transposed upward by three semitones
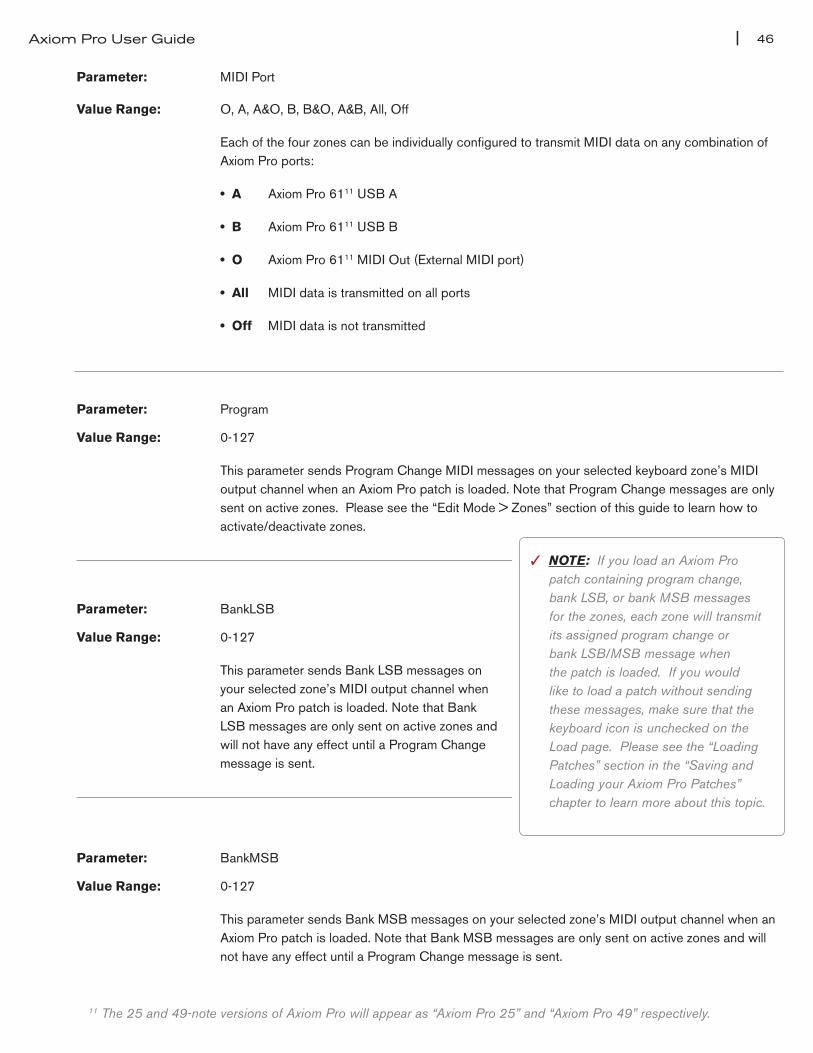
| 46Axiom Pro User Guide
Parameter: MIDI Port
Value Range: O, A, A&O, B, B&O, A&B, All, Off
Each of the four zones can be individually configured to transmit MIDI data on any combination of Axiom Pro ports:
• A Axiom Pro 6111 USB A
• B Axiom Pro 6111 USB B
• O Axiom Pro 6111 MIDI Out (External MIDI port)
• All MIDI data is transmitted on all ports
• Off MIDI data is not transmitted
Parameter: Program
Value Range: 0-127
This parameter sends Program Change MIDI messages on your selected keyboard zone’s MIDI output channel when an Axiom Pro patch is loaded Note that Program Change messages are only sent on active zones Please see the “Edit Mode > Zones” section of this guide to learn how to activate/deactivate zones
Parameter: BankLSB
Value Range: 0-127
This parameter sends Bank LSB messages on your selected zone’s MIDI output channel when an Axiom Pro patch is loaded Note that Bank LSB messages are only sent on active zones and will not have any effect until a Program Change message is sent
Parameter: BankMSB
Value Range: 0-127
This parameter sends Bank MSB messages on your selected zone’s MIDI output channel when an Axiom Pro patch is loaded Note that Bank MSB messages are only sent on active zones and will not have any effect until a Program Change message is sent
11 The 25 and 49-note versions of Axiom Pro will appear as “Axiom Pro 25” and “Axiom Pro 49” respectively.
✓ NOTE: If you load an Axiom Pro patch containing program change, bank LSB, or bank MSB messages forthezones,eachzonewilltransmitits assigned program change or bank LSB/MSB message when the patch is loaded. If you would like to load a patch without sending these messages, make sure that the keyboard icon is unchecked on the Load page. Please see the “Loading Patches” section in the “Saving and Loading your Axiom Pro Patches” chapter to learn more about this topic.
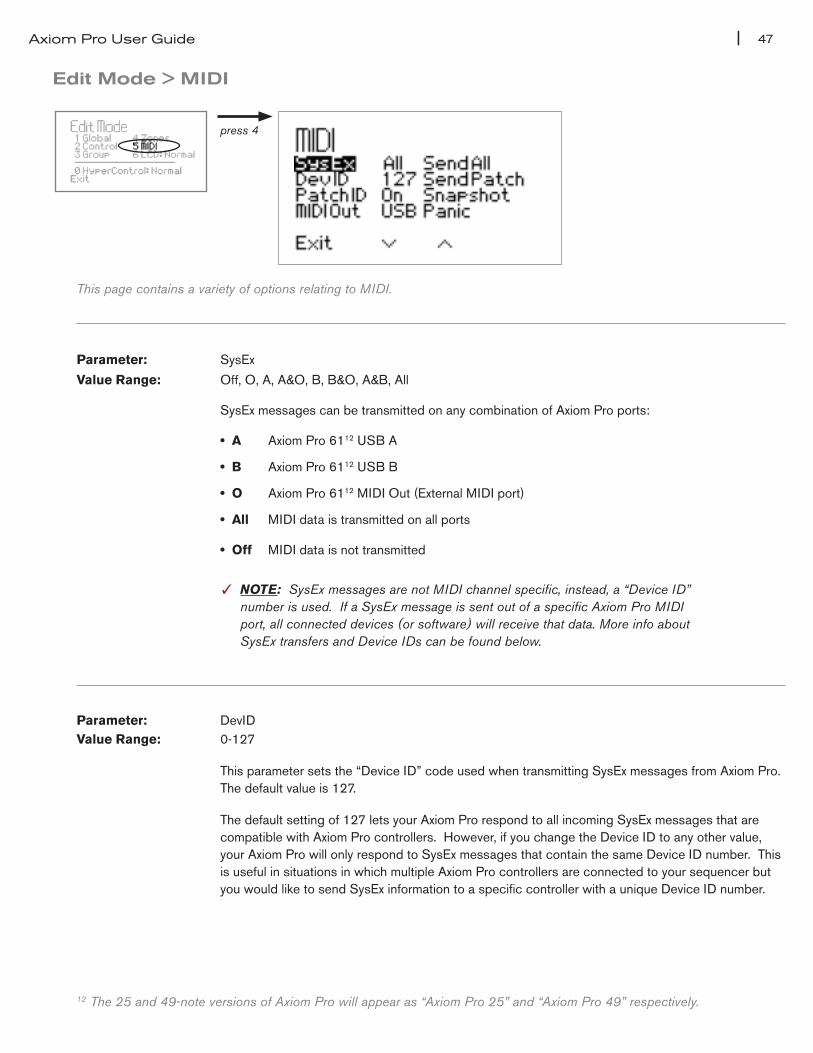
| 47Axiom Pro User Guide
Edit Mode > MIDI
press 4
This page contains a variety of options relating to MIDI.
Parameter: SysEx
Value Range: Off, O, A, A&O, B, B&O, A&B, All
SysEx messages can be transmitted on any combination of Axiom Pro ports:
• A Axiom Pro 6112 USB A
• B Axiom Pro 6112 USB B
• O Axiom Pro 6112 MIDI Out (External MIDI port)
• All MIDI data is transmitted on all ports
• Off MIDI data is not transmitted
✓ NOTE: SysEx messages are not MIDI channel specific, instead, a “Device ID” number is used. If a SysEx message is sent out of a specific Axiom Pro MIDI port, all connected devices (or software) will receive that data. More info about SysEx transfers and Device IDs can be found below.
Parameter: DevID Value Range: 0-127
This parameter sets the “Device ID” code used when transmitting SysEx messages from Axiom Pro The default value is 127
The default setting of 127 lets your Axiom Pro respond to all incoming SysEx messages that are compatible with Axiom Pro controllers However, if you change the Device ID to any other value, your Axiom Pro will only respond to SysEx messages that contain the same Device ID number This is useful in situations in which multiple Axiom Pro controllers are connected to your sequencer but you would like to send SysEx information to a specific controller with a unique Device ID number
12 The 25 and 49-note versions of Axiom Pro will appear as “Axiom Pro 25” and “Axiom Pro 49” respectively.
| 48Axiom Pro User Guide
Parameter: PatchID
Value Range: On, Off
When this option is enabled, a “system exclusive” (SysEx) MIDI message that contains all the settings of the selected Axiom Pro patch is sent out whenever a patch is recalled from the Load Page
Parameter: MIDI Out
Value Range: USB, Keyboard
The MIDI Out port on the back of Axiom Pro can be configured to transmit MIDI data generated by the Axiom Pro keyboard or from the computer via the USB connection:
•USB TheMIDIoutputporttransmitsdatareceivedfromyouraudioapplicationviatheUSB connection When this parameter is set to “USB,” the MIDI output port will not transmit any data generated by the controls of the keyboard (i e , buttons, knobs, keys, etc )
•Keyboard TheMIDIoutputportwilltransmitthedatageneratedbythecontrolsofthekeyboard (i e, keys, buttons, knobs, etc ) When this parameter is set to “Keyboard,” any data sent to Axiom Pro through the USB connection will not be transmitted through the MIDI output port
✓ NOTE: MIDI data that is generated by the controls of Axiom Pro is always sent to your computer through the USB connection, regardless of how this parameter is configured. This parameter only affects the MIDI output port on the rear of the keyboard and determines what data is transmitted through the port.
Parameter: Send All
Value Range: Send
When this parameter is selected, a “Send” option appears for Soft Key 4 Pressing this button will send a SysEx dump of the entire memory contents of Axiom Pro out of the selected SysEx port (see the SysEx parameter above to select a SysEx output port)
✓ TIP FOR ADvANCeD MIDI USeRS: It is also possible to trigger this function externally This is done by sending the following SysEx message to Axiom Pro:
F0 00 01 05 20 7F 01 7F F7

| 49Axiom Pro User Guide
Parameter: Send Patch
Value Range: Send
When this parameter is selected, a “Send” option appears for Soft Key 4 Pressing this button will send a SysEx dump of the memory contents of the currently loaded Axiom Pro patch out of the selected SysEx port (see the SysEx parameter above to select a SysEx output port)
✓ TIP FOR ADvANCeD MIDI USeRS: It is also possible to trigger this function externally using a SysEx message requesting the data To request the contents of the currently loaded patch, the following SysEx messsage must be sent to Axiom Pro:
F0 00 01 05 20 7F 01 00 F7
If you would like to transfer the contents of a patch that is not currently loaded, the following SysEx message must be sent to Axiom Pro:
F0 00 01 05 20 7F 05 xx F7
The placeholder “xx” represents the number of the patch you would like to request Note that this number must be entered as a hexadecimal value (i e , 01-32 in hexadecimal instead of 0-50 as a decimal) Please see Appendix G for a decimal-to-hexidecimal conversion chart
Parameter: Snapshot
Value Range: Send
When this parameter is selected, a “Send” option appears for Soft Key 4 Pressing this button will send the current values of all encoder knobs and sliders (Axiom Pro 49/61 only) This data is sent out of the MIDI ports that have been selected for the Encoder and Slider groups See the “Edit Mode > Group (Encoder)” and “Edit Mode > Group (Slider)” sections of this guide to learn how to set the output ports of a group
Parameter: Panic
Value Range: Send
When this parameter is selected, a “Send” option appears for Soft Key 4 Pressing this button will send an “All Notes Off” (or “Panic”) message on all 16 MIDI channels
This feature should be used to stop any “stuck” notes (i e , notes that continue to play even after the key has been released) on your virtual instrument or connected MIDI module
✓ About Sysex and Snapshot data:
The “Send All,” “Send Patch,” and “Snapshot,” options sends MIDI data that can be recorded into a sequencer This information can then be played back to Axiom Pro to quickly set all of the controller assignments or positions to your preferred positions For example, if you’ve created customized control assignments or would like controls to be set in a certain way before you begin playing a song, record the “patch” and “snapshot” information at the beginning of a sequence This way, when the sequencer begins playing back, the assignments and positions will always be in the correct position
| 50Axiom Pro User Guide
Troubleshooting
Axiom Pro is a professional keyboard controller that has been tested under a wide variety of conditions to ensure trouble-free performance However, in the event that you do experience difficulty while using Axiom Pro, this section provides tips to help resolve some basic issues that you may encounter
1. My Axiom Pro keyboard suddenly stopped working after having performed well since installation.
Close any music applications you are using, switch Axiom Pro off, and restart your computer Once your computer has completely restarted, switch Axiom Pro back on and try again to see if the problem resolves
2. I have connected a sustain pedal to my Axiom Pro, but its operation is reversed (i.e., the notes sustain when the pedal isn’t pressed, but the notes stop sustaining once the pedal is pressed).
The polarity of the sustain pedal is determined by the keyboard upon startup When Axiom Pro is powering up, the sustain pedal is assumed to be in the “up” (i e , off) position It is important that the sustain pedal is not pressed down during startup, otherwise its operation may be reversed
3. I have connected the keyboard to my computer with the USB cable, but I cannot locate the Axiom Pro USB keyboard in my software’s MIDI devices dialog box.
Solution 1: Axiom Pro may not be receiving enough USB bus power to function correctly Try plugging Axiom Pro into a different USB port or use an optional 9V, 500mA power supply to see if the problem resolves ”
Solution 2: In Windows XP, Axiom Pro will appear as “USB Audio Device” if the optional drivers have not been installed Select “USB Audio Device” as your audio and MIDI input and output device See the printed Axiom Pro QuickStartGuideforinstructionsonhowtoinstalltheAxiomProdrivers.
4. My virtual instrument software (or hardware MIDI module) always recalls the sound next to the program change number that I have sent to it from Axiom Pro. For example, if I send a program change number 40 (Violin), my MIDI module or software loads sound number 41 (Viola).
This behavior is normal Some MIDI devices count their sound presets from 1 – 128 instead of 0-127 As a result, there may be an offset of +/-1 between the program change number sent from the keyboard and the recalled sound preset on your module
9

| 51Axiom Pro User Guide
5. When I press the keys or use any of the MIDI controls (wheel, knob, data buttons, etc.), no data is transmitted from the MIDI output port on the rear of the Axiom Pro.
This may be the result of the Axiom Pro “MIDI Out” parameter being set to “USB ” The MIDI Out port can be configured to transmit MIDI data from either the Axiom Pro keyboard or from the computer via the USB connection If the MIDI Out mode is set to USB, the controls on the keyboard will not send any data to the MIDI Out port
See the “Edit Mode > MIDI” section of this User Guide to learn how to toggle the MIDI Out parameter back to transmit MIDI events generated by the Axiom Pro keyboard
6. Windows XP/Vista users: I connected Axiom Pro to my computer and noticed that a question mark appears in the Windows Device Manager under Other Devices > M-Audio DFU. Does this indicate that there is a problem with Axiom Pro?
This behavior is normal and your Axiom Pro will function normally as a class-compliant device (i e , without any drivers) Installing the Axiom Pro drivers extends the keyboard’s functionality in various ways (i e , multi-client support, support for qualified versions of the Pro Tools M-Powered software, and allowing large SysEx transfers), resolves any “DFU” related messages that may otherwise appear when drivers are not present, and should also resolve the question mark that appears next to the product in the Windows Device Manager
7. When playing a virtual instrument loaded in my music software, there is a noticeable delay before I hear any sound.
This delay is known as latency, and it may be possible to reduce it through the Control Panel of your audio interface Please refer to your audio interface’s User Guide to see if this is possible
8. The Axiom Pro LCD setting has changed and I can no longer see the contents of the screen.
It is possible to bring the LCD to its viewable default settings without having to see the actual contents of the display To do this, press the Edit Mode button, press “6” on the numerical keypad (Axiom Pro 49/61) or the “6 MNO” D# key (Axiom Pro 25) to step through the various LCD screen settings
9. I have changed many parameters and would like to go back to the keyboard’s default settings.
Axiom Pro 49/61 can be reset to its “factory” settings by holding down the “+” and “-” numerical keypad buttons as the unit is switched on; Axiom Pro 25 can be reset to its default settings by simultaneously pressing the “+” and “-” Data buttons as the unit is switched on
Notethatallassignmentsandmodifiedpatcheswillbelostonceyouperformthisaction—usethisfunctionwithcaution!

| 52Axiom Pro User Guide
Appendices
Appendix A: Axiom Pro Factory Patch settingsAxiom Pro comes preconfigured with a variety of factory patches:
Patch # Name Encoders Sliders
Profile 1 Profile 2 Profile 3 Profile 4
1 GM Patch
2 Pro Tools (Mac)
3 Pro Tools (PC)
4 Xpand 2 Part A Part B Part C Part D Global parameters, FX sends (Part A)
5 DB-33 (Various Controls)
N/A N/A N/A Nine drawbars
6 Vacuum (Various Controls)
N/A N/A N/A Two envelopes
7 Hybrid A (Part A) Oscillators Filters Modulation FX Global controls
8 Hybrid B (Part B) Oscillators Filters Modulation FX Global controls
9 Velvet EQ/Tube Delay Wah/Distortion
Modulation Velocity curve (timbre and amplitude), reverb, chorus
10 Strike 13 Mics & Timbre Pan Inserts Solo Drum levels (first eight)
11 ImpOSCar Oscillators Filters Modulation Velocity VCA and VCF envelopes
12 Oddity VCO 1 VCO 2 VCF LFO/S&H Main ADSR, three mixer sources
13 MiniMonsta Oscillator Filter (Various Controls)
N/A Mixer inputs, ADSR envelope
14 Logic
15 Cubase (Mac)
16 Cubase (PC)
17 Reason (Mac)
18 Reason (PC)
19 Ableton Live
20 Numbers
13 When using Strike, the mapping of Axiom Pro drum pads varies depending on your selected profile.
Profile 1 (Mics & Timbre): Pads play individual instruments
Profile 2 (Pan): Pads mute individual parts of a drum kit (or loop)
Profile 3 (Inserts): Pads trigger Part A loops
Profile 4 (Solo): Pads trigger Part B loops
About the F-Keys:
All Axiom Pro factory patch settings contain the same F-Key assignments:
F1 Enter
F2 Left arrow
F3 Right arrow
F4 Up arrow
F5 Down arrow
F6 Decrement selected Axiom Pro patch
F7 Increment selected Axiom Pro patch
10
See below for more information
See below for more information

| 53Axiom Pro User Guide
DAW Patches
The DAW patches can be used to control various audio applications (Pro Tools, Reason, Cubase, etc ) These patches mainly vary in terms of Numerical Keypad assignments
Note that in all of the DAW patches (1-3 and 14-20) the Axiom Pro Transport Controls transmit ASCII keystrokes that correspond to the transport of your DAW software
Patch 1: GM Patch
Axiom Pro Numerical Keypad MIDI Message
1 Program Change: “1”
2 Program Change: “2”
3 Program Change: “3”
4 Program Change: “4”
5 Program Change: “5”
6 Program Change: “6”
7 Program Change: “7”
8 Program Change: “8”
9 Program Change: “9”
— Program Change: Decrement by one
0 Program Change: “0”
+ Program Change: Increment by one
Encoders and Sliders Sliders and Encoders generate the following MIDI CC numbers.
Axiom Pro Control MIDI CC#
Encoder Knob E1 10
Encoder Knob E2 02
Encoder Knob E3 12
Encoder Knob E4 13
Encoder Knob E5 75
Encoder Knob E6 76
Encoder Knob E7 92
Encoder Knob E8 95
Slider S1 74
Slider S2 71
Slider S3 91
Slider S4 93
Slider S5 73
Slider S6 72
Slider S7 05
Slider S8 84
Slider S9 07

| 54Axiom Pro User Guide
Patch 2: Pro Tools (Mac) and Patch 3: Pro Tools (PC)
Axiom Pro Numerical Keypad Pro Tools Shortcut
1 Save session
2 Toggle click on/off
3 Toggle between Edit and Mix windows
4 Duplicate selected region
5 Set loop “in” point (during playback)
6 Set loop “out” point (during playback)
7 Ctrl
8 Cmd (Mac) / Start (PC)
9 Opt (Mac) / Alt (PC)
— Zoom out (horizontal)
0 Shift
+ Zoom in (horizontal)
Encoders and Sliders TheSlidersandEncodersarepreconfiguredtocontrolthemostusefulparametersintheDigidesignAIRvirtual
instruments. The default mappings are also compatible with common General MIDI assignments.
Patch 14: Logic Pro
Axiom Pro Numerical Keypad Logic Pro Shortcut
1 Saveproject
2 Undo
3 Toggle mixer view
4 Toggle plug-in view
5 Toggle click on/off
6 Quantize
7 Set marker during playback
8 Go to previous marker
9 Go to next marker
— Previous plug-in setting
0 Loop selection
+ Next plug-in setting
Encoders and Sliders Sliders and Encoders mirror the General MIDI assignments used in Axiom Pro Patch 1. Use the “Control Surfaces”
module in Logic Pro to map Axiom Pro to parameters within the software, or HyperControl for complete two-way integration.

| 55Axiom Pro User Guide
Patch 15: Cubase (Mac) or Patch 16: Cubase (PC)
Axiom Pro Numerical Keypad Cubase Shortcut
1 Saveproject
2 Undo
3 Toggle Mixer View
4 Duplicate selection
5 Go to song start
6 Loop selection
7 Hold while pressing Axiom Pro keypad “8” and “9” to set the L and R locator points, respectively
8 Go to L
9 Go to R
— Zoom out (horizontal)
0 Toggle click on/off
+ Zoom in (horizontal)
Encoders and Sliders To use the Axiom Pro Cubase patches, you must create a “generic” remote device in Cubase. Once Axiom Pro is
configured as a generic remote device, the sliders and encoder knobs can be re-assigned to control Cubase in any way that suits your personal preference. Please refer to the Cubase user guide to learn how to do this.
By default, the Sliders and Encoders mirror the General MIDI assignments used in Axiom Pro Patch 1. For full two-way integration of Axiom Pro with Cubase, please use HyperControl.
Patch 17: Reason (Mac) or Patch 18: Reason (PC)
Axiom Pro Numerical Keypad Reason Shortcut
1 Save song
2 Undo
3 Toggle click on/off
4 Toggle quantize on/off
5 Zoom out (horizontal)
6 Zoom in (horizontal)
7 Expand sequencer
8 Go to L locator
9 Go to R locator
— Decrease tempo
0 Go to song start
+ Increase tempo
Encoders and Sliders Patches17and18aredesignedtobeusedwithReasononMacintoshandPCcomputers,respectively.Inthis
patch,theAxiomProSlidersandEncodersaremappedtotheMixerparametersforReason.Inordertomakeuseofthese,youmustsetupAxiomProasa‘remotedevice’andusetheMIDIChannelmappingatthetopofthevirtualrack to assign channel 1 to the Mixer.
TheDrumPadsareassignedtocontrolRedrum.Profiles1,2,and3containactiveassignments.Profile1willplaydrums 1-8, while profiles 2 and 3 provide mute and solo control over drums 1-8 respectively.

| 56Axiom Pro User Guide
Patch 19: Ableton Live
Axiom Pro Numerical Keypad Ableton Live Shortcut
1 Trigger 1
2 Trigger 2
3 Trigger 3
4 Trigger 4
5 Trigger 5
6 Trigger 6
7 Trigger 7
8 Trigger 8
9 Set Triggers to changes Encoder Pages
— Bank mixer down
0 Set Triggers to engage Clips in bank
+ Bank mixer up
TheAbletonLivepatchisdesignedtotakeadvantageoftheapplication’sexistingsupportforM-AudioAxiomcontrollers (i.e. the standard Axiom controller, not the “Pro” version).
When configuring Ableton Live, select “Axiom Classic” as your control surface.
Patch 20: Numbers
Axiom Pro Numerical Keypad ASCII Character
1 1
2 2
3 3
4 4
5 5
6 6
7 7
8 8
9 9
— Enter
0 0
+ Esc
Encoders and Sliders Sliders and Encoders mirror the General MIDI assignments used in Axiom Pro Patch 1.

| 57Axiom Pro User Guide
Appendix B: Keyboard Velocity Curves
Axiom Pro Keyboard
Velocity Curve: Low
0
10
20
30
40
50
60
70
80
90
100
110
120
130
(Minimum) Strike Force (Maximum)
MID
I V
elo
cit
y
Axiom Pro Keyboard
Velocity Curve: Low-Normal
0
10
20
30
40
50
60
70
80
90
100
110
120
130
(Minimum) Strike Force (Maximum)
MID
I V
elo
cit
y
Axiom Pro Keyboard
Velocity Curve: Normal
0
10
20
30
40
50
60
70
80
90
100
110
120
130
(Minimum) Strike Force (Maximum)
MID
I V
elo
cit
y
Axiom Pro Keyboard
Velocity Curve: Normal-High
0
10
20
30
40
50
60
70
80
90
100
110
120
130
(Minimum) Strike Force (Maximum)
MID
I V
elo
cit
y

| 58Axiom Pro User Guide
Appendix B: Keyboard Velocity Curves (continued)
Axiom Pro Keyboard
Velocity Curve: High
0
10
20
30
40
50
60
70
80
90
100
110
120
130
(Minimum) Strike Force (Maximum)
MID
I V
elo
cit
y
Axiom Pro Keyboard
Velocity Curve: Linear
0
10
20
30
40
50
60
70
80
90
100
110
120
130
(Minimum) Strike Force (Maximum)M
IDI
Ve
loc
ity
Axiom Pro Keyboard
Velocity Curve: Low Range
0
10
20
30
40
50
60
70
80
90
100
110
120
130
(Minimum) Strike Force (Maximum)
MID
I V
elo
cit
y
Axiom Pro Keyboard
Velocity Curve: Mid Range
0
10
20
30
40
50
60
70
80
90
100
110
120
130
(Minimum) Strike Force (Maximum)
MID
I V
elo
cit
y
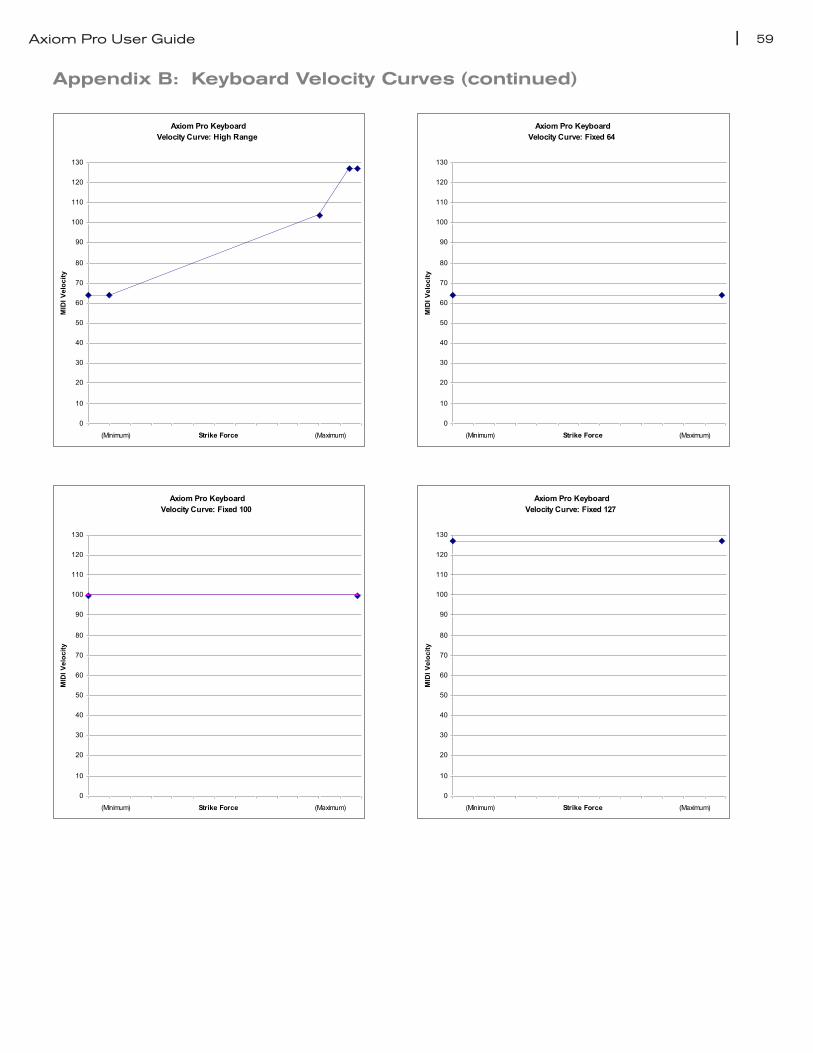
| 59Axiom Pro User Guide
Appendix B: Keyboard Velocity Curves (continued)
Axiom Pro Keyboard
Velocity Curve: High Range
0
10
20
30
40
50
60
70
80
90
100
110
120
130
(Minimum) Strike Force (Maximum)
MID
I V
elo
cit
y
Axiom Pro Keyboard
Velocity Curve: Fixed 64
0
10
20
30
40
50
60
70
80
90
100
110
120
130
(Minimum) Strike Force (Maximum)M
IDI
Ve
loc
ity
Axiom Pro Keyboard
Velocity Curve: Fixed 100
0
10
20
30
40
50
60
70
80
90
100
110
120
130
(Minimum) Strike Force (Maximum)
MID
I V
elo
cit
y
Axiom Pro Keyboard
Velocity Curve: Fixed 127
0
10
20
30
40
50
60
70
80
90
100
110
120
130
(Minimum) Strike Force (Maximum)
MID
I V
elo
cit
y

| 60Axiom Pro User Guide
Appendix C: Drum Pad Velocity Curves
Axiom Pro Drum Pads
Velocity Curve: Low
0
10
20
30
40
50
60
70
80
90
100
110
120
130
(Minimum) Strike Force (Maximum)
MID
I V
elo
cit
y
Axiom Pro Drum Pads
Velocity Curve: Normal
0
10
20
30
40
50
60
70
80
90
100
110
120
130
(Minimum) Strike Force (Maximum)
MID
I V
elo
cit
y
Axiom Pro Drum Pads
Velocity Curve: High
0
10
20
30
40
50
60
70
80
90
100
110
120
130
(Minimum) Strike Force (Maximum)
MID
I V
elo
cit
y
Axiom Pro Drum Pads
Velocity Curve: 4 Steps
0
10
20
30
40
50
60
70
80
90
100
110
120
130
(Minimum) Strike Force (Maximum)
MID
I V
elo
cit
y

| 61Axiom Pro User Guide
Appendix C: Drum Pad Velocity Curves (continued)
Axiom Pro Drum Pads
Velocity Curve: 3 Steps
0
10
20
30
40
50
60
70
80
90
100
110
120
130
(Minimum) Strike Force (Maximum)
MID
I V
elo
cit
y
Axiom Pro Drum Pads
Velocity Curve: 2 Steps
0
10
20
30
40
50
60
70
80
90
100
110
120
130
(Minimum) Strike Force (Maximum)M
IDI
Ve
loc
ity
Axiom Pro Drum Pads
Velocity Curve: Low Range
0
20
40
60
80
100
120
140
(Minimum) Strike Force (Maximum)
MID
I V
elo
cit
y
Axiom Pro Drum Pads
Velocity Curve: Mid Range
0
20
40
60
80
100
120
140
(Minimum) Strike Force (Maximum)
MID
I V
elo
cit
y

| 62Axiom Pro User Guide
Appendix C: Drum Pad Velocity Curves (continued)
Axiom Pro Keyboard
Velocity Curve: High Range
0
10
20
30
40
50
60
70
80
90
100
110
120
130
(Minimum) Strike Force (Maximum)
MID
I V
elo
cit
y
Axiom Pro Drum Pads
Velocity Curve: Fixed 64
0
10
20
30
40
50
60
70
80
90
100
110
120
130
(Minimum) Strike Force (Maximum)M
IDI
Ve
loc
ity
Axiom Pro Drum Pads
Velocity Curve: Fixed 100
0
10
20
30
40
50
60
70
80
90
100
110
120
130
(Minimum) Strike Force (Maximum)
MID
I V
elo
cit
y
Axiom Pro Drum Pads
Velocity Curve: Fixed 127
0
10
20
30
40
50
60
70
80
90
100
110
120
130
(Minimum) Strike Force (Maximum)
MID
I V
elo
cit
y

| 63Axiom Pro User Guide
Appendix D: MIDI Implementation
Function Transmitted Recognized Remarks
Basic Default Channel Changed
1-16 1-16
X X
Mode Default Messages Altered
Mode 3 0 *****
X
Note Number True Voice
0-127 *****
X
Velocity Note ON Note OFF
0 X
X X
After Key’s Touch Channel
X 0
X X
Pitch Bend 0 X
Control 0-119 Change 120-127
0 0
X X
Program Change True #
0-127 *****
X
System Exclusive 0* 0*
*GM, GM2, MMC, M-Audio:
Dev ID Req Mem Dump
System Song Position Pointer Common Song Sel Tune Request
X X X
X X X
System Clock Real Time Commands
X X
X X
Aux All Sounds Off Messages Reset All Controllers Local ON/OFF All Notes OFF Active Sensing System Reset
0 0 0 0 X X
X X X X X X
Notes
Mode 1: OMNI ON, POLY Mode 2: OMNI ON, MONO 0: Yes
Mode 3: OMNI OFF, POLY Mode 4: OMNI OFF, MONO X: No

| 64Axiom Pro User Guide
Appendix E: Useful MIDI Data Tables
E1 - General MIDI Instruments – Program Numbers 14
Piano Bass Reed Synth Effects
0 Acoustic Grand Piano
1 Bright Acoustic Piano
2 Electric grand Piano
3 Honky Tonk Piano
4 Electric Piano 1
5 Electric Piano 2
6 Harpsichord
7 Clavinet
32 Acoustic Bass
33 Fingered Bass
34 Electric Picked Bass
35 Fretless Bass
36 Slap Bass 1
37 Slap Bass 2
38 Syn Bass 1
39 Syn Bass 2
64 Soprano Sax
65 Alto Sax
66 Tenor Sax
67 Baritone Sax
68 Oboe
69 English Horn
70 Bassoon
71 Clarinet
96 SFX Rain
97 SFX Soundtrack
98 SFX Crystal
99 SFX Atmosphere
100 SFX Brightness
101 SFX Goblins
102 SFX Echoes
103 SFX Sci-Fi
Chromatic Percussion Strings/Orchestra Pipe Ethnic
8 Celesta
9 Glockenspiel
10 Music Box
11 Vibraphone
12 Marimba
13 Xylophone
14 Tubular bells
15 Dulcimer
40 Violin
41 Viola
42 Cello
43 Contrabass
44 Tremolo Strings
45 Pizzicato Strings
46 Orchestral Harp
47 Timpani
72 Piccolo
73 Flute
74 Recorder
75 Pan Flute
76 Bottle Blow
77 Shakuhachi
78 Whistle
79 Ocarina
104 Sitar
105 Banjo
106 Shamisen
107 Koto
108 Kalimba
109 Bag Pipe
110 Fiddle
111 Shanai
Organ Ensemble Synth Lead Percussive
16 Drawbar Organ
17 Percussive Organ
18 Rock Organ
19 Church Organ
20 Reed Organ
21 Accordion
22 Harmonica
23 Tango Accordion
48 String Ensemble 1
49 String Ensemble 2
50 Syn Strings 1
51 Syn Strings 2
52 Choir Aahs
53 Voice Oohs
54 Syn Choir
55 Orchestral Hit
80 Syn Square Wave
81 Syn Sawtooth Wave
82 Syn Calliope
83 Syn Chiff
84 Syn Charang
85 Syn Voice
86 Syn Sawtooth Wave
87 Syn Brass & Lead
112 Tinkle Bell
113 Agogo
114 Steel Drums
115 Woodblock
116 Taiko Drum
117 Melodic Tom
118 Syn Drum
119 Reverse Cymbal
Guitar Brass Synth Pad Sound Effects
24 Nylon Acoustic
25 Steel Acoustic
26 Jazz Electric
27 Clean Electric
28 Muted Electric
29 Overdrive
30 Distorted
31 Harmonics
56 Trumpet
57 Trombone
58 Tuba
59 Muted Trumpet
60 French Horn
61 Brass Section
61 Syn Brass 1
62 Syn Brass 2
88 New Age Syn Pad
89 Warm Syn Pad
90 Polysynth Syn Pad
91 Choir Syn Pad
92 Bowed Syn Pad
93 Metal Syn Pad
94 Halo Syn Pad
95 Sweep Syn Pad
120 Guitar Fret Noise
121 Breath Noise
122 Seashore
123 Bird Tweet
124 Telephone Ring
125 Helicopter
126 Applause
127 Gun Shot
14 Some MIDI devices count preset sounds from 1 – 128 instead of 0-127. As a result, there may be an offset of +/-1 between the program change number sent from the keyboard and the recalled sound preset on your module.

| 65Axiom Pro User Guide
E2 - General MIDI Note Numbers
Octave Note Numbers
C C# D D# E F F# G G# A A# B
-2 0 1 2 3 4 5 6 7 8 9 10 11
-1 12 13 14 15 16 17 18 19 20 21 22 23
0 24 25 26 27 28 29 30 31 32 33 34 35
1 36 37 38 39 40 41 42 43 44 45 46 47
2 48 49 50 51 52 53 54 55 56 57 58 59
3 60 61 62 63 64 65 66 67 68 69 70 71
4 72 73 74 75 76 77 78 79 80 81 82 83
5 84 85 86 87 88 89 90 91 92 93 94 95
6 96 97 98 99 100 101 102 103 104 105 106 107
7 108 109 110 111 112 113 114 115 116 117 118 119
8 120 121 122 123 124 125 126 127
E3 - Roland GS And Yamaha XG NRPN Messages
NRPN NRPN Data Data
MSB LSB MSB LSB
CC99 CC98 CC06 CC38
01 08 00-7F n/a (-64 - 0 - +63) Vibrato Rate (relative change)
01 09 00-7F n/a (-64 - 0 - +63) Vibrato Depth (relative change)
01 0A 00-7F n/a (-64 - 0 - +63) Vibrato Delay (relative change)
01 20 00-7F n/a (-64 - 0 - +63) Filter Cutoff Freq. (relative change)
01 21 00-7F n/a (-64 - 0 - +63) Filter Resonance (relative change)
01 63 00-7F n/a (-64 - 0 - +63) EG (TVF&TVA) Attack Time (relative change)
01 64 00-7F n/a (-64 - 0 - +63) EG (TVF&TVA) Decay Time (relative change)
01 66 00-7F n/a (-64 - 0 - +63) EG (TVF&TVA) Release Time (relative change)
14 15 00-7F 00-7F n/a (-64 - 0 - +63) Drum Filter Cutoff Freq. (relative change)
15 15 00-7F 00-7F n/a (-64 - 0 - +63) Drum Filter Resonance (relative change)
16 15 00-7F 00-7F n/a (-64 - 0 - +63) Drum EG Attack Rate (relative change)
17 15 00-7F 00-7F n/a (-64 - 0 - +63) Drum EG Decay Rate (relative change)
18 15 00-7F 00-7F n/a (-64 - 0 - +63) Drum Instrument Pitch Coarse (relative change)
19 15 00-7F 00-7F n/a (-64 - 0 - +63) Drum Instrument Pitch Fine (relative change)
1A 00-7F 00-7F n/a (0 to Max) Drum Instrument Level (absolute change)
1C 00-7F 00-7F n/a (Random, L>C>R) Drum Instrument Panpot (absolute change)
1D 00-7F 00-7F n/a (0 to Max) Drum Instrument Reverb Send Level (absolute change)
1E 00-7F 00-7F n/a (0 to Max) Drum Instrument Chorus Send Level (absolute change)
%1F 00-7F 00-7F n/a (0 to Max) Drum Instrument Variation Send Level (absolute change)
15 Added by Yamaha XG; % changed from Delay to Variation by Yamaha XG

| 66Axiom Pro User Guide
E4 - GM2 Reverb Types
0: Small Room
1: Medium Room
2: Large Room
3: Medium Hall
4: Large Hall
5: Plate
E5 - GM2 Chorus Types
0: Chorus 1
1: Chorus 2
2: Chorus 3
3: Chorus 4
4: FB Chorus
5: Flanger
E6 – General MIDI Drums – Note assignments
MIDI Note Drum Sound MIDI Note Drum Sound MIDI Note Drum Sound
35 Acoustic Bass Drum 52 Chinese Cymbal 69 Cabasa
36 Bass Drum 1 53 Ride Bell 70 Maracas
37 Side Stick 54 Tambourine 71 Short Whistle
38 Acoustic Snare 55 Splash Cymbal 72 Long Whistle
39 Hand Clap 56 Cowbell 73 Short Guiro
40 Electric Snare 57 Crash Cymbal 2 74 Long Guiro
41 Low Floor Tom 58 Vibraslap 75 Claves
42 Closed Hi-Hat 59 Ride Cymbal 2 76 Hi Wood Block
43 High Floor Tom 60 Hi Bongo 77 Low Wood Block
44 Pedal Hi-Hat 61 Low Bongo 78 Mute Cuica
45 Low Tom 62 Mute Hi Conga 79 Open Cuica
46 Open Hi-Hat 63 Open Hi Conga 80 Mute Triangle
47 Low-Mid Tom 64 Low Conga 81 Open Triangle
48 Hi-Mid Tom 65 High Timbale
49 Crash Cymbal 1 66 Low Timbale
50 High Tom 67 High Agogo
51 Ride Cymbal 1 68 Low Agogo

| 67Axiom Pro User Guide
Appendix F: General MIDI Continuous Controller (CC) Numbers
00 Bank Select 49 Gen Purpose 2 LSB 98 Non-Reg Param LSB
01 Modulation 50 Gen Purpose 3 LSB 99 Non-Reg Param MSB
02 Breath Control 51 Gen Purpose 4 LSB 100 Reg Param LSB
03 Controller 3 52 Controller 52 101 Reg Param MSB
04 Foot Control 53 Controller 53 102 Controller 102
05 Porta Time 54 Controller 54 103 Controller 103
06 Data Entry 55 Controller 55 104 Controller 104
07 Channel Volume 56 Controller 56 105 Controller 105
08 Balance 57 Controller 57 106 Controller 106
09 Controller 9 58 Controller 58 107 Controller 107
10 Pan 59 Controller 59 108 Controller 108
11 Expression 60 Controller 60 109 Controller 109
12 Effects Controller 1 61 Controller 61 110 Controller 110
13 Effects Controller 2 62 Controller 62 111 Controller 111
14 Controller 14 63 Controller 63 112 Controller 112
15 Controller 15 64 Sustain Pedal 113 Controller 113
16 Gen Purpose 1 65 Portamento 114 Controller 114
17 Gen Purpose 2 66 Sostenuto 115 Controller 115
18 Gen Purpose 3 67 Soft Pedal 116 Controller 116
19 Gen Purpose 4 68 Legato Pedal 117 Controller 117
20 Controller 20 69 Hold 2 118 Controller 118
21 Controller 21 70 Sound Variation 119 Controller 119
25 Controller 25 74 Cut-off Frequency Channel Mode Messages
26 Controller 26 75 Controller 75 120 All Sound Off
27 Controller 27 76 Controller 76 121 Reset all Controllers
28 Controller 28 77 Controller 77 122 Local Control
29 Controller 29 78 Controller 78 123 All Notes Off
30 Controller 30 79 Controller 79 124 Omni Off
31 Controller 31 80 Gen Purpose 5 125 Omni On
32 Bank Select LSB 81 Gen Purpose 6 126 Mono On (Poly Off)
33 Modulation LSB 82 Gen Purpose 7 127 Poly On (Mono Off)
34 Breath Control LSB 83 Gen Purpose 8
35 Controller 35 84 Portamento Control
36 Foot Control LSB 85 Controller 85
37 Porta Time LSB 86 Controller 86
38 Data Entry LSB 87 Controller 87
39 Channel Volume LSB 88 Controller 88
40 Balance LSB 89 Controller 89
41 Controller 41 90 Controller 90
42 Pan LSB 91 Reverb Depth
43 Expression LSB 92 Tremelo Depth
44 Controller 44 93 Chorus Depth
45 Controller 45 94 Celeste (De-tune)
46 Controller 46 95 Phaser Depth
47 Controller 47 96 Data Increment
48 Gen Purpose 1 LSB 97 Data Decrement

| 68Axiom Pro User Guide
Appendix G: Hexadecimal Conversion Chart
Hexadecimal value Decimal value Hexadecimal value Decimal value Hexadecimal value Decimal value
0 0 2B 43 56 86
1 1 2C 44 57 87
2 2 2D 45 58 88
3 3 2E 46 59 89
4 4 2F 47 5A 90
5 5 30 48 5B 91
6 6 31 49 5C 92
7 7 32 50 5D 93
8 8 33 51 5E 94
9 9 34 52 5F 95
0A 10 35 53 60 96
0B 11 36 54 61 97
0C 12 37 55 62 98
0D 13 38 56 63 99
0E 14 39 57 64 100
0F 15 3A 58 65 101
10 16 3B 59 66 102
11 17 3C 60 67 103
12 18 3D 61 68 104
13 19 3E 62 69 105
14 20 3F 63 6A 106
15 21 40 64 6B 107
16 22 41 65 6C 108
17 23 42 66 6D 109
18 24 43 67 6E 110
19 25 44 68 6F 111
1A 26 45 69 70 112
1B 27 46 70 71 113
1C 28 47 71 72 114
1D 29 48 72 73 115
1E 30 49 73 74 116
1F 31 4A 74 75 117
20 32 4B 75 76 118
21 33 4C 76 77 119
22 34 4D 77 78 120
23 35 4E 78 79 121
24 36 4F 79 7A 122
25 37 50 80 7B 123
26 38 51 81 7C 124
27 39 52 82 7D 125
28 40 53 83 7E 126
29 41 54 84 7F 127
2A 42 55 85

| 69Axiom Pro User Guide
Technical Info
Caution: Electro Static Discharge, Electrical Fast Transient and Conducted RF interference may cause the unit malfunctioning. In such case, unplug the unit and plug it in again to restore normal operation.
Note: Your M-Audio product has been tested to comply with FCC Standards FOR HOME OR OFFICE USE. Modifications not authorized by the manufacturer may void users authority to operate this device.
Note: This equipment has been tested and found to comply with the limits for a Class B digital device, pursuant to Part 15 of the FCC Rules. These limits are designed to provide reasonable protection against harmful interference in a residential installation. This equipment generates, uses and can radiate radio frequency energy and, if not installed and used in accordance with the instructions, may cause harmful interference to radio communications. However, there is no guarantee that interference will not occur in a particular installation. If this equipment does cause harmful interference to radio or television reception, which can be determined by turning the equipment off and on, the user is encouraged to try to correct the interference by one or more of the following measures:
< Re-orient or relocate the receiving antenna
< Increase the separation between the equipment and receiver
< Connect the equipment to an outlet on a circuit different from that to which the receiver is connected
< Consult the dealer or an experienced radio/ TV technician for help
ASIO is a trademark of Steinberg Soft– und Hardware GmbH.
VST is a trademark of Steinberg Soft– und Hardware GmbH
11

| 70Axiom Pro User Guide
12
Warranty
Warranty TermsM-Audio warrants products to be free from defects in materials and workmanship, under normal use and provided that the product is owned by the original, registered user Visit www m-audio com/warranty for terms and limitations applying to your specific product
Warranty RegistrationImmediately registering your new M-Audio product entitles you to full warranty coverage and helps M-Audio develop and manufacture the finest quality products available Register online at www m-audio com/register to receive FREE product updates and for the chance to win M-Audio giveaways
Documentation Feedback At M-Audio, we’re always looking for ways to improve our documentation If you have comments, corrections, or suggestions regarding our documentation, email us at publications@m-audio com
Axiom Pro
Tested to comply withFCC standards
FOR HOME OR STUDIO USE
WARNING: This product contains chemicals, including lead, known to the State of California to cause cancer, and birth defects or other reproductive harm Wash hands after handling.
© 2009 Avid Technology, Inc. All rights reserved. Product features, specifications, system requirements and availability are subject to change without notice. Avid, M-Audio, HyperControl and Axiom Pro are either trademarks or registered trademarks of Avid Technology, Inc. All other trademarks contained herein are the property of their respective owners.

M-Audio USA | Avid Technology • M-Audio | www.m-audio.com 5795 Martin Rd., Irwindale, CA 91706
Technical Support
web www.m-audio.com/techtel (pro products) (626) 633-9055
fax (shipping) (626) 633-9032tel (consumer products) (626) 633-9066
Sales e-mail [email protected] (866) 657-6434fax (626) 633-9070
M-Audio UK | Avid Technology • M-Audio | www.maudio.co.ukPinewood Studios, Pinewood Road, Iver Heath, Bucks, SL0 0NH, United Kingdom
Technical Support
e-mail [email protected] tel (Mac/PC support) +44 (0)1753 658630
Sales tel +44 (0) 1753 659590
M-Audio Benelux | Avid Technology • M-Audio | www.m-audio.comVreelandseweg 42 A, 1216 CH Hilversum, The Netherlands
Technical Support
Belgium / Luxemburg tel +32 22 54 88 93 Netherlands tel +31 35 625 0097
Sales e-mail [email protected] +31 (0)35 625 0093fax +31 (0)35 625 0090
M-Audio France | Avid Technology • M-Audio | www.m-audio.fr44 Avenue Georges Pompidou, 92300 Levallois-Perret, France
Renseignements Commerciaux
email [email protected] tel 0 810 001 105
Assistance Technique
e-mail (PC) [email protected] (Mac) [email protected]
PC 0 820 000 731Mac 0 820 391 191fax +33 (0)1 72 72 90 52
M-Audio Germany | Avid Technology • M-Audio | www.m-audio.de Zeppelinstr. 1, D-85399 Hallbergmoos, Germany
Technical Support
email [email protected] tel +49 (0)7941 - 9870030
Sales e-mail [email protected] +49 (0)811 5520 555fax +49 (0)811 5520 599
M-Audio Canada | Avid Technology • M-Audio | www.m-audio.ca1400 St-Jean Baptiste Ave. #150, Quebec City, Quebec G2E 5B7, Canada
Technical Support
e-mail [email protected] (418) 872-0444fax (418) 872-0034
Sales e-mail [email protected] (866) 872-0444fax (418) 872-0034
M-Audio Japan | エムオーディオ/アビッドテクノロジー株式会社 | www m-audio jp 〒107-0052 東京都港区赤坂2-11-7 ATT新館ビル4F(4F ATT Bldg 2-11-7 Akasaka, Minato-ku Tokyo 107-0052 Japan)
テクニカル・サポート(Technical Support) e-mail [email protected] tel 03-3505-4034
fax 03-3505-3417
セールス(Sales) e-mail [email protected] tel 03-3505-7963fax 03-3505-3417