Avaya IP Office Contact Center Task Based Guide Email ...
227
Avaya IP Office Contact Center Task Based Guide – Email & Chat Services Release 10.1.1 Issue 1.1 October 2017
Transcript of Avaya IP Office Contact Center Task Based Guide Email ...

Avaya IP Office Contact Center Task Based Guide – Email & Chat Services
Release 10.1.1
Issue 1.1
October 2017


Avaya IP Office Contact Center Task Based Guide- Email & Chat Services
October 2017 3
Legal
© 2014-2017, Avaya, Inc.
All Rights Reserved.
Notice
While reasonable efforts have been made to ensure that the information in this document is complete
and accurate at the time of printing, Avaya assumes no liability for any errors. Avaya reserves the right
to make changes and corrections to the information in this document without the obligation to notify
any person or organization of such changes.
Documentation disclaimer
“Documentation” means information published in varying mediums which may include product
information, operating instructions and performance specifications that are generally made available to
users of products. Documentation does not include marketing materials. Avaya shall not be responsible
for any modifications, additions, or deletions to the original published version of Documentation unless
such modifications, additions, or deletions were performed by or on the express behalf of Avaya. End
User agrees to indemnify and hold harmless Avaya, Avaya's agents, servants and employees against all
claims, lawsuits, demands and judgments arising out of, or in connection with, subsequent
modifications, additions or deletions to this documentation, to the extent made by End User.
Link disclaimer
Avaya is not responsible for the contents or reliability of any linked websites referenced within this site
or Documentation provided by Avaya. Avaya is not responsible for the accuracy of any information,
statement or content provided on these sites and does not necessarily endorse the products, services,
or information described or offered within them. Avaya does not guarantee that these links will work all
the time and has no control over the availability of the linked pages.
Warranty
Avaya provides a limited warranty on Avaya hardware and software. Refer to your sales agreement to
establish the terms of the limited warranty. In addition, Avaya’s standard warranty language, as well as
information regarding support for this product while under warranty is available to Avaya customers
and other parties through the Avaya Support website:
https://support.avaya.com/helpcenter/getGenericDetails?detailId=C20091120112456651010 under the

Avaya IP Office Contact Center Task Based Guide - Email & Chat Services
October 2017 4
link “Warranty & Product Lifecycle” or such successor site as designated by Avaya. Please note that if
You acquired the product(s) from an authorized Avaya Channel Partner outside of the United States and
Canada, the warranty is provided to You by said Avaya Channel Partner and not by Avaya.
“Hosted Service” means an Avaya hosted service subscription that You acquire from either Avaya or an
authorized Avaya Channel Partner (as applicable) and which is described further in Hosted SAS or other
service description documentation regarding the applicable hosted service. If You purchase a Hosted
Service subscription, the foregoing limited warranty may not apply but You may be entitled to support
services in connection with the Hosted Service as describe further in your service description documents
for the applicable Hosted Service. Contact Avaya or Avaya Channel Partner (as applicable) for more
information.
Hosted Service
THE FOLLOWING APPLIES ONLY IF YOU PURCHASE AN AVAYA HOSTED SERVICE SUBSCRIPTION FROM
AVAYA OR AN AVAYA CHANNEL PARTNER (AS APPLICABLE), THE TERMS OF USE FOR HOSTED SERVICES
ARE AVAILABLE ON THE AVAYA WEBSITE, HTTPS://SUPPORT.AVAYA.COM/LICENSEINFO UNDER THE LINK
“Avaya Terms of Use for Hosted Services” OR SUCH SUCCESSOR SITE AS DESIGNATED BY AVAYA, AND
ARE APPLICABLE TO ANYONE WHO ACCESSES OR USES THE HOSTED SERVICE. BY ACCESSING OR USING
THE HOSTED SERVICE, OR AUTHORIZING OTHERS TO DO SO, YOU, ON BEHALF OF YOURSELF AND THE
ENTITY FOR WHOM YOU ARE DOING SO (HEREINAFTER REFERRED TO INTERCHANGEABLY AS “YOU”
AND “END USER”), AGREE TO THE TERMS OF USE. IF YOU ARE ACCEPTING THE TERMS OF USE ON
BEHALF A COMPANY OR OTHER LEGAL ENTITY, YOU REPRESENT THAT YOU HAVE THE AUTHORITY TO
BIND SUCH ENTITY TO THESE TERMS OF USE. IF YOU DO NOT HAVE SUCH AUTHORITY, OR IF YOU DO
NOT WISH TO ACCEPT THESE TERMS OF USE, YOU MUST NOT ACCESS OR USE THE HOSTED SERVICE OR
AUTHORIZE ANYONE TO ACCESS OR USE THE HOSTED SERVICE.
Licenses
THE SOFTWARE LICENSE TERMS AVAILABLE ON THE AVAYA WEBSITE,
HTTPS://SUPPORT.AVAYA.COM/LICENSEINFO,UNDER THE LINK “AVAYA SOFTWARE LICENSE TERMS
(Avaya Products)” OR SUCH SUCCESSOR SITE AS DESIGNATED BY AVAYA, ARE APPLICABLE TO ANYONE
WHO DOWNLOADS, USES AND/OR INSTALLS AVAYA SOFTWARE, PURCHASED FROM AVAYA INC., ANY
AVAYA AFFILIATE, OR AN AVAYA CHANNEL PARTNER (AS APPLICABLE) UNDER A COMMERCIAL
AGREEMENT WITH AVAYA OR AN AVAYA CHANNEL PARTNER. UNLESS OTHERWISE AGREED TO BY
AVAYA IN WRITING, AVAYA DOES NOT EXTEND THIS LICENSE IF THE SOFTWARE WAS OBTAINED FROM
ANYONE OTHER THAN AVAYA, AN AVAYA AFFILIATE OR AN AVAYA CHANNEL PARTNER; AVAYA
RESERVES THE RIGHT TO TAKE LEGAL ACTION AGAINST YOU AND ANYONE ELSE USING OR SELLING THE

Avaya IP Office Contact Center Task Based Guide- Email & Chat Services
October 2017 5
SOFTWARE WITHOUT A LICENSE. BY INSTALLING, DOWNLOADING OR USING THE SOFTWARE, OR
AUTHORIZING OTHERS TO DO SO, YOU, ON BEHALF OF YOURSELF AND THE ENTITY FOR WHOM YOU
ARE INSTALLING, DOWNLOADING OR USING THE SOFTWARE (HEREINAFTER REFERRED TO
INTERCHANGEABLY AS “YOU” AND “END USER”), AGREE TO THESE TERMS AND CONDITIONS AND
CREATE A BINDING CONTRACT BETWEEN YOU AND AVAYA INC. OR THE APPLICABLE AVAYA AFFILIATE
(“AVAYA”).
Avaya grants You a license within the scope of the license types described below, with the exception of
Heritage Nortel Software, for which the scope of the license is detailed below. Where the order
documentation does not expressly identify a license type, the applicable license will be a Designated
System License. The applicable number of licenses and units of capacity for which the license is granted
will be one (1), unless a different number of licenses or units of capacity is specified in the
documentation or other materials available to You. “Software” means computer programs in object
code, provided by Avaya or an Avaya Channel Partner, whether as stand-alone products, pre-installed
on hardware products, and any upgrades, updates, patches, bug fixes, or modified versions thereto.
“Designated Processor” means a single stand-alone computing device. “Server” means a Designated
Processor that hosts a software application to be accessed by multiple users. “Instance” means a single
copy of the Software executing at a particular time: (i) on one physical machine; or (ii) on one deployed
software virtual machine (“VM”) or similar deployment.
License types
Concurrent User License (CU). End User may install and use the Software on multiple Designated
Processors or one or more Servers, so long as only the licensed number of Units are accessing and using
the Software at any given time. A “Unit” means the unit on which Avaya, at its sole discretion, bases the
pricing of its licenses and can be, without limitation, an agent, port or user, an e-mail or voice mail
account in the name of a person or corporate function (e.g., webmaster or helpdesk), or a directory
entry in the administrative database utilized by the Software that permits one user to interface with the
Software. Units may be linked to a specific, identified Server or an Instance of the Software.
Heritage Nortel Software
“Heritage Nortel Software” means the software that was acquired by Avaya as part of its purchase of
the Nortel Enterprise Solutions Business in December 2009. The Heritage Nortel Software is the
software contained within the list of Heritage Nortel Products located at
https://support.avaya.com/LicenseInfo under the link “Heritage Nortel Products” or such successor site
as designated by Avaya. For Heritage Nortel Software, Avaya grants Customer a license to use Heritage
Nortel Software provided hereunder solely to the extent of the authorized activation or authorized

Avaya IP Office Contact Center Task Based Guide - Email & Chat Services
October 2017 6
usage level, solely for the purpose specified in the Documentation, and solely as embedded in, for
execution on, or for communication with Avaya equipment. Charges for Heritage Nortel Software may
be based on extent of activation or use authorized as specified in an order or invoice.
Copyright
Except where expressly stated otherwise, no use should be made of materials on this site, the
Documentation, Software, Hosted Service, or hardware provided by Avaya. All content on this site, the
documentation, Hosted Service, and the product provided by Avaya including the selection,
arrangement and design of the content is owned either by Avaya or its licensors and is protected by
copyright and other intellectual property laws including the sui generis rights relating to the protection
of databases. You may not modify, copy, reproduce, republish, upload, post, transmit or distribute in
any way any content, in whole or in part, including any code and software unless expressly authorized
by Avaya. Unauthorized reproduction, transmission, dissemination, storage, and or use without the
express written consent of Avaya can be a criminal, as well as a civil offense under the applicable law.
Virtualization
The following applies if the product is deployed on a virtual machine. Each product has its own ordering
code and license types. Note that each Instance of a product must be separately licensed and ordered.
For example, if the end user customer or Avaya Channel Partner would like to install two Instances of
the same type of products, then two products of that type must be ordered.
Third Party Components
“Third Party Components” mean certain software programs or portions thereof included in the Software
or Hosted Service may contain software (including open source software) distributed under third party
agreements (“Third Party Components”), which contain terms regarding the rights to use certain
portions of the Software (“Third Party Terms”). As required, information regarding distributed Linux OS
source code (for those products that have distributed Linux OS source code) and identifying the
copyright holders of the Third Party Components and the Third Party Terms that apply is available in the
products, Documentation or on Avaya’s website at: https:// support.avaya.com/Copyright or such
successor site as designated by Avaya. The open source software license terms provided as Third Party
Terms are consistent with the license rights granted in these Software License Terms, and may contain
additional rights benefiting You, such as modification and distribution of the open source software. The
Third Party Terms shall take precedence over these Software License Terms, solely with respect to the
applicable Third Party Components to the extent that these Software License Terms impose greater
restrictions on You than the applicable Third Party Terms.

Avaya IP Office Contact Center Task Based Guide- Email & Chat Services
October 2017 7
The following applies only if the H.264 (AVC) codec is distributed with the product. THIS PRODUCT IS
LICENSED UNDER THE AVC PATENT PORTFOLIO LICENSE FOR THE PERSONAL USE OF A CONSUMER OR
OTHER USES IN WHICH IT DOES NOT RECEIVE REMUNERATION TO (i) ENCODE VIDEO IN COMPLIANCE
WITH THE AVC STANDARD (“AVC VIDEO”) AND/OR (ii) DECODE AVC VIDEO THAT WAS ENCODED BY A
CONSUMER ENGAGED IN A PERSONAL ACTIVITY AND/OR WAS OBTAINED FROM A VIDEO PROVIDER
LICENSED TO PROVIDE AVC VIDEO. NO LICENSE IS GRANTED OR SHALL BE IMPLIED FOR ANY OTHER USE.
ADDITIONAL INFORMATION MAY BE OBTAINED FROM MPEG LA, L.L.C. SEE
HTTP://WWW.MPEGLA.COM.
Service Provider
THE FOLLOWING APPLIES TO AVAYA CHANNEL PARTNER’S HOSTING OF AVAYA PRODUCTS OR SERVICES.
THE PRODUCT OR HOSTED SERVICE MAY USE THIRD PARTY COMPONENTS SUBJECT TO THIRD PARTY
TERMS AND REQUIRE A SERVICE PROVIDER TO BE INDEPENDENTLY LICENSED DIRECTLY FROM THE
THIRD PARTY SUPPLIER. AN AVAYA CHANNEL PARTNER’S HOSTING OF AVAYA PRODUCTS MUST BE
AUTHORIZED IN WRITING BY AVAYA AND IF THOSE HOSTED PRODUCTS USE OR EMBED CERTAIN THIRD
PARTY SOFTWARE, INCLUDING BUT NOT LIMITED TO MICROSOFT SOFTWARE OR CODECS, THE AVAYA
CHANNEL PARTNER IS REQUIRED TO INDEPENDENTLY OBTAIN ANY APPLICABLE LICENSE AGREEMENTS,
AT THE AVAYA CHANNEL PARTNER’S EXPENSE, DIRECTLY FROM THE APPLICABLE THIRD PARTY
SUPPLIER.
WITH RESPECT TO CODECS, IF THE AVAYA CHANNEL PARTNER IS HOSTING ANY PRODUCTS THAT USE OR
EMBED THE G.729 CODEC, H.264 CODEC, OR H.265 CODEC, THE AVAYA CHANNEL PARTNER
ACKNOWLEDGES AND AGREES THE AVAYA CHANNEL PARTNER IS RESPONSIBLE FOR ANY AND ALL
RELATED FEES AND/OR ROYALTIES. THE G.729 CODEC IS LICENSED BY SIPRO LAB TELECOM INC. SEE
WWW.SIPRO.COM/CONTACT.HTML. THE H.264 (AVC) CODEC IS LICENSED UNDER THE AVC PATENT
PORTFOLIO LICENSE FOR THE PERSONAL USE OF A CONSUMER OR OTHER USES IN WHICH IT DOES NOT
RECEIVE REMUNERATION TO: (I) ENCODE VIDEO IN COMPLIANCE WITH THE AVC STANDARD (“AVC
VIDEO”) AND/OR (II) DECODE AVC VIDEO THAT WAS ENCODED BY A CONSUMER ENGAGED IN A
PERSONAL ACTIVITY AND/OR WAS OBTAINED FROM A VIDEO PROVIDER LICENSED TO PROVIDE AVC
VIDEO. NO LICENSE IS GRANTED OR SHALL BE IMPLIED FOR ANY OTHER USE. ADDITIONAL
INFORMATION FOR H.264 (AVC) AND H.265 (HEVC) CODECS MAY BE OBTAINED FROM MPEG LA, L.L.C.
SEE HTTP:// WWW.MPEGLA.COM.
Compliance with Laws
You acknowledge and agree that it is Your responsibility for complying with any applicable laws and
regulations, including, but not limited to laws and regulations related to call recording, data privacy,

Avaya IP Office Contact Center Task Based Guide - Email & Chat Services
October 2017 8
intellectual property, trade secret, fraud, and music performance rights, in the country or territory
where the Avaya product is used.
Preventing Toll Fraud
“Toll Fraud” is the unauthorized use of your telecommunications system by an unauthorized party (for
example, a person who is not a corporate employee, agent, subcontractor, or is not working on your
company's behalf). Be aware that there can be a risk of Toll Fraud associated with your system and that,
if Toll Fraud occurs, it can result in substantial additional charges for your telecommunications services.
Avaya Toll Fraud intervention
If You suspect that You are being victimized by Toll Fraud and You need technical assistance or support,
call Technical Service Center Toll Fraud Intervention Hotline at +1-800-643-2353 for the United States
and Canada. For additional support telephone numbers, see the Avaya Support website:
https://support.avaya.com or such successor site as designated by Avaya.
Security Vulnerabilities
Information about Avaya’s security support policies can be found in the Security Policies and Support
section of https:// support.avaya.com/security.
Suspected Avaya product security vulnerabilities are handled per the Avaya Product Security Support
Flow (https:// support.avaya.com/css/P8/documents/100161515).
Downloading Documentation
For the most current versions of Documentation, see the Avaya Support website:
https://support.avaya.com, or such successor site as designated by Avaya.
Contact Avaya Support
See the Avaya Support website: https://support.avaya.com for product or Hosted Service notices and
articles, or to report a problem with your Avaya product or Hosted Service. For a list of support
telephone numbers and contact addresses, go to the Avaya Support website: https://support.avaya.com
(or such successor site as designated by Avaya), scroll to the bottom of the page, and select Contact
Avaya Support.
Trademarks
The trademarks, logos and service marks (“Marks”) displayed in this site, the Documentation, Hosted
Service(s), and product(s) provided by Avaya are the registered or unregistered Marks of Avaya, its
affiliates, its licensors, its suppliers, or other third parties. Users are not permitted to use such Marks
without prior written consent from Avaya or such third party which may own the Mark. Nothing

Avaya IP Office Contact Center Task Based Guide- Email & Chat Services
October 2017 9
contained in this site, the Documentation, Hosted Service(s) and product(s) should be construed as
granting, by implication, estoppel, or otherwise, any license or right in and to the Marks without the
express written permission of Avaya or the applicable third party.
Avaya is a registered trademark of Avaya Inc. All non-Avaya trademarks are the property of their
respective owners. Linux® is the registered trademark of Linus Torvalds in the U.S. and other countries.

Avaya IP Office Contact Center Task Based Guide - Email & Chat Services
October 2017 10
Table of Contents
Legal ............................................................................................................................... 3
Table of Contents .................................................................................................................................... 10
Change History ....................................................................................................................................... 12
IP Office Contact Center Email & Chat Services ....................................................... 13
Overview ................................................................................................................................................. 13 Availability for Tasks ...................................................................................................................................... 14
Time to accept ............................................................................................................................................... 16
IP Office Contact Center Email Service ..................................................................... 18
Required Information .............................................................................................................................. 18 Email Considerations ..................................................................................................................................... 18
Secure Email Certificate requirements for IMAP4 and POP3 configurations ................................................ 20
Licensing ................................................................................................................................................. 21
SMTP Email Configuration...................................................................................................................... 22
IP Office Contact Center Email Configuration ............................................................................... 35
Creating an E-mail Flow................................................................................................................. 47
Text Blocks/Autoreply ............................................................................................................................. 71
Textblocks ............................................................................................................................................... 78
How to use a textblock ................................................................................................................... 88
Archiving / Deleting the Email Database ................................................................................................ 92
Archiving Emails process ............................................................................................................... 93
Deleting Emails process ................................................................................................................ 97
Mail Exporter. ........................................................................................................................................ 100
Email Personal Signature ..................................................................................................................... 104
Show search filter ........................................................................................................................ 106
Recycle Bin .................................................................................................................................. 107
Email Security ....................................................................................................................................... 109
McAfee firewall settings ........................................................................................................................ 115
IP Office Contact Center Chat Service ..................................................................... 116
Required Information ............................................................................................................................ 116 Chat Considerations..................................................................................................................................... 116
Configuring an existing Topic to Use CHAT ......................................................................................... 120
Configuring an existing Agent Group to Use CHAT ............................................................................. 126
Building a Chat Flow ............................................................................................................................. 132
Setting Chat scripts against Chat topics ...................................................................................... 161

Avaya IP Office Contact Center Task Based Guide- Email & Chat Services
October 2017 11
Configuring the one-X Portal XMPP service ......................................................................................... 171
One-X Portal ................................................................................................................................ 171
IP Office Web Manager................................................................................................................ 177
Verifying Web Chat Integration before customer implementation. ....................................................... 183
Creating the HTML to be used for the customer’s web page. .............................................................. 189
Using the ‘CHAT web Java’ example ................................................................................................... 192
Installing and configuring the Open fire XMPP Service ........................................................................ 201
Determining the Server’s Hostname ............................................................................................ 201
Installing Openfire ........................................................................................................................ 203
Installing Openfire as a Service ................................................................................................... 215
Avaya IP Office Contact Center Task Based Guide - Email & Chat Services
October 2017 12
Change History
This section describes the major changes in this document as of Release 10.1.1.
Issue Date Summary of Changes
Release 10.1.1, Issue 1.0 October 2017 Information added stating the
“Maximum size for incoming
messages" field should have a
maximum value limit

Avaya IP Office Contact Center Task Based Guide- Email & Chat Services
October 2017 13
IP Office Contact Center Email & Chat
Services
Overview
The IP Office Contact Center system can be configured with Email and Chat Utilities that
enhance the way customers interact with IP Office Contact Center Agents.

Avaya IP Office Contact Center Task Based Guide - Email & Chat Services
October 2017 14
Availability for Tasks
There are extra settings that have to be taken into consideration when introducing Email and
Chat.
Most common contact centers will distribute one phone call at a time to Agents. As IP Office
Contact Center is a multi-channel environment Voice, Email and Chat have to be configured to
suit the customer’s requirements. It is possible to deliver emails and chat sessions while on a
Voice call.
To check your current settings:
1. Choose Administration > Configuration > System > Availability for Task (default)…

Avaya IP Office Contact Center Task Based Guide- Email & Chat Services
October 2017 15
2. Here you can set the settings for each task (for example the default with allow only one
telephony call but will allow 3 emails and 3 chat sessions to be sent to each Agent).
When configured, click the OK button.

Avaya IP Office Contact Center Task Based Guide - Email & Chat Services
October 2017 16
Time to accept
When using Email and Chat, the Agent can be sent a task to which they have a set time to
respond. If the Agent does not respond, the Agent will be signed off from all agent groups. If the
default time needs to be changed, this is done on a per Topic basis. To change choose a Topic
and the select the Edit button.
Under the Email Tab (Default is 00:00 hh:mm)

Avaya IP Office Contact Center Task Based Guide- Email & Chat Services
October 2017 17
Under the Chat Tab (Default is 3:00 mm:ss)

Avaya IP Office Contact Center Task Based Guide - Email & Chat Services
October 2017 18
IP Office Contact Center Email Service
The IP Office Contact Center has a built in Unified Mail Routing system server that can be used
to Queue and filter emails to Agents. The email service types that can be utilized are:
SMTP (Encryption None, TLS)
POP3 (Encryption None, SSL/TLS, Start TLS)
IMAP4 (Encryption None, SSL,TLS, Start TLS)
Required Information
To successfully utilize the IP Office Contact Center’s Email service there are a number of
factors that should be considered. Some of these details should be checked and discussed with
the customer:
Email Considerations
Are there adequate Multichannel Licenses available for the agents who will use IP Office
Contact Center’s Email Services?
Will the customer be utilizing POP3 or IMAP4 as their mail utility?
Does the customer have an existing SMTP service that can be used?
What relay host authentication account will be used?
What is the relay host authentication account’s user name and password?
What is the mail server’s (relay host) domain name?
Have you ensured that all the email ports for example, SMTP Port 25 are not blocked by
Antivirus software or a Firewall?

Avaya IP Office Contact Center Task Based Guide- Email & Chat Services
October 2017 19
Have Agent Privileges been assigned for Email?
The available Privileges include:
E-mail Administrator - The agent can configure email settings.
Keyword based Email Routing - This privilege allows the agent to configure email
scripts that allow emails to be searched for specific text.
Email Supervisor - Assigns email supervisory privileges to the agent.
Use Textblocks - Allows the agent to use configured Text Blocks
Agent Queue View - Allows the agent to view any emails in the queue, for the Topics
that he/she is assigned.
Delete Emails - Allows the agent to delete any active emails. Note: Once an email
has been deleted it cannot be retrieved.
Email Archive - Allows the agent to view archived emails. Only completed emails can
be archived.
Textblock administrator - This allows the agent to create text blocks for commonly
used text and phrases that can be included in email messages
Defer Emails - Allows the agents to store email messages in a “held” folder for later
use
Print Emails - Allows the agent to print emails.
Automatic Sign On - Allows the agent to be automatically signed on to the agent
groups to which they are assigned.
Reply as agent - Allows the agent to select whether they reply to emails as an agent
or from the topic. The email address used in the message will be changed to the
agent’s email address or the topic’s email address depending on their selection.
Please refer to the Avaya IP Office Contact Center Task Based Guide - Telephony User
Interface Configuration for further details relating to Agent Privileges and Authorization.
The following section will illustrate the configuration of IP Office Contact Center’s Email Service
and is split into a number of sections:

Avaya IP Office Contact Center Task Based Guide - Email & Chat Services
October 2017 20
Licensing
Setting up Email (SMTP used, POP3 and IMAP details at end of section)
IP Office Contact Center Email Configuration
E-mail Flow
Text blocks/Auto reply
Archive email database
Secure Email Certificate requirements for IMAP4 and POP3 configurations
No certificates are required to be installed on the IP Office Contact Center server for IMAP4 or
POP3 configurations. The server certificate will be sent by the POP3 or IMAP4 server, for
example from a Microsoft Exchange Server. This occurs at runtime during the TLS handshake
process. Therefore the certificate must not be stored in any local certificate store on the client
i.e. the IP Office Contact Center server.
Note: When using email connections that require the function “Verify Server Certificate”, you will
need to import the security certificate in the Certificate Store “Trusted Root Certification
Authorities” of the IP Office Contact Center server.

Avaya IP Office Contact Center Task Based Guide- Email & Chat Services
October 2017 21
Licensing
To provide Agents with the capability to receive Emails within the IP Office Contact Center,
Multichannel Agent licenses are required.
A. Email Users
B. Chat Users

Avaya IP Office Contact Center Task Based Guide - Email & Chat Services
October 2017 22
SMTP Email Configuration
(POP3 and IMAP details at end of section)
The SMTP Settings below can be utilized by a customer with their own SMTP Service. 3rd party
SMTP systems like Google Mail may also be used. For details of the settings required for
Google Mail SMTP, please see the end of this section.
1. Click Service followed by E-mail settings.

Avaya IP Office Contact Center Task Based Guide- Email & Chat Services
October 2017 23
2. In the E-Mail Domain field, enter the fully qualified domain name of the customer’s
SMTP mail service. For example, mail.abccompany.com (hostname.domainname) and
then click the OK button.
3. Click Configuration and then select Topic.

Avaya IP Office Contact Center Task Based Guide - Email & Chat Services
October 2017 24
4. Select the required Topic, for example Topic 1 and then click the Edit button.
5. Select the Task Type E-mail and then click the E-mail tab.

Avaya IP Office Contact Center Task Based Guide- Email & Chat Services
October 2017 25
6. Click the Details… button.
7. In the e-mail field type the email address to be used for the topic. For example,

Avaya IP Office Contact Center Task Based Guide - Email & Chat Services
October 2017 26
8. In the Reply to field type the email address to be used for the topic. For example,
9. In the From field type the email address to be used for the topic. For example,

Avaya IP Office Contact Center Task Based Guide- Email & Chat Services
October 2017 27
10. Click the OK button.
11. The Topic is displayed with Email selected.

Avaya IP Office Contact Center Task Based Guide - Email & Chat Services
October 2017 28
12. Click Configuration and then select Agent group.
13. Select the required group, for example Group1 and then click the Edit button.
14. Click the E-mail Task type and then click the OK button.

Avaya IP Office Contact Center Task Based Guide- Email & Chat Services
October 2017 29
15. Click Configuration and then select Agent profile.
16. Click the Agent profile that the agents in Group 1 are assigned to and then click the
Edit… button.
17. Click the E-mail Task Type and then select the E-mail tab.

Avaya IP Office Contact Center Task Based Guide - Email & Chat Services
October 2017 30
18. Click the Add… button.
19. Click Group1 and then select the OK button.
20. Group1 has now been assigned, click the OK button.

Avaya IP Office Contact Center Task Based Guide- Email & Chat Services
October 2017 31
21. The Agent Profile is displayed with Email selected.
22. The mailbox details of each Email configured agent in Group 1 can now be defined.
Click Configuration and then select Agent.
23. Click the required agent, in this example Agent1 and then click the Edit… button.

Avaya IP Office Contact Center Task Based Guide - Email & Chat Services
October 2017 32
24. Under Task types choose E-mail and then Click the Email Tab.
25. Click the Details… button.

Avaya IP Office Contact Center Task Based Guide- Email & Chat Services
October 2017 33
26. In the E-mail field type the required email address for the agent for example,
27. In the Reply to field enter the required email address for example,
28. In the From field enter the required email address for example
[email protected] and then click the OK button.

Avaya IP Office Contact Center Task Based Guide - Email & Chat Services
October 2017 34
29. Click the OK button.
30. Repeat the above process to assign E-mail settings to all agents in E-mail topics /Tasks.

Avaya IP Office Contact Center Task Based Guide- Email & Chat Services
October 2017 35
IP Office Contact Center Email Configuration
1. Click Go to and then select E-Mail configuration.
2. Click the Components button.

Avaya IP Office Contact Center Task Based Guide - Email & Chat Services
October 2017 36
3. Expand the menu using the + button.
4. Click the C3000 SMTP Connector SMTP link.
Avaya IP Office Contact Center Task Based Guide- Email & Chat Services
October 2017 37
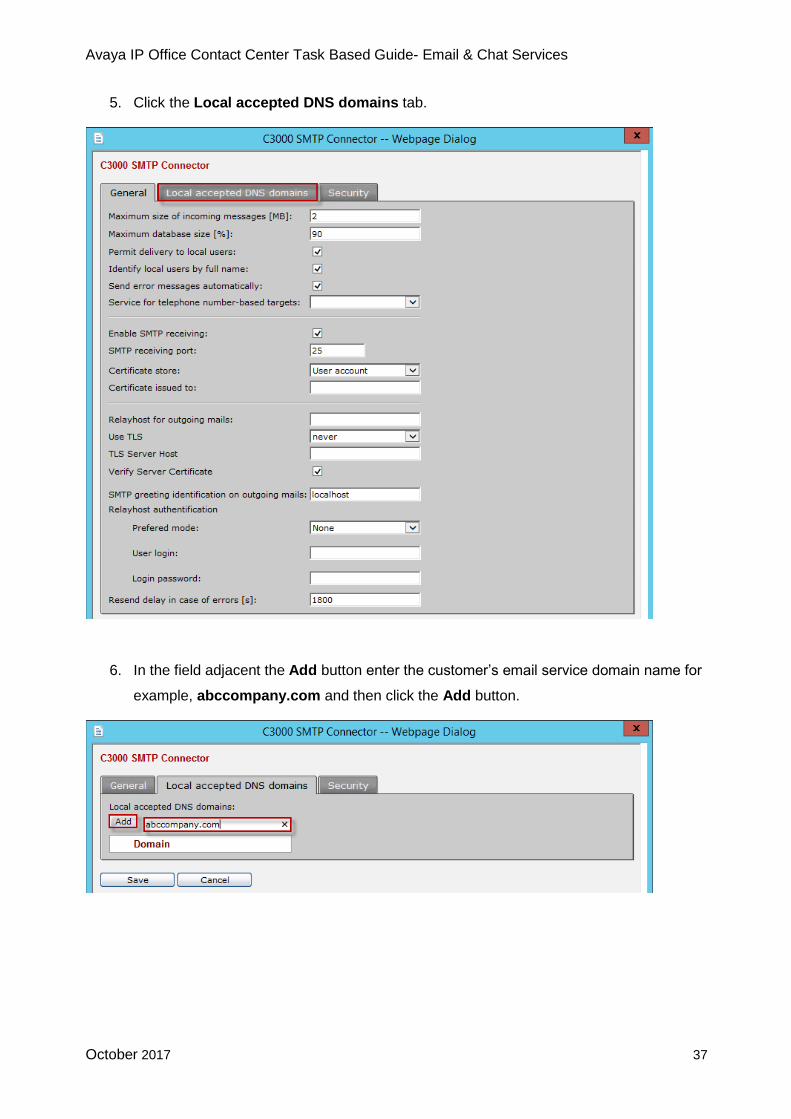
5. Click the Local accepted DNS domains tab.
6. In the field adjacent the Add button enter the customer’s email service domain name for
example, abccompany.com and then click the Add button.

Avaya IP Office Contact Center Task Based Guide - Email & Chat Services
October 2017 38
7. The configured Domain is displayed. Click the Save button.
8. Click the General tab.

Avaya IP Office Contact Center Task Based Guide- Email & Chat Services
October 2017 39
9. In the Relayhost for outgoing mails field, enter the IP Address of the customer’s relay
host mail server.

Avaya IP Office Contact Center Task Based Guide - Email & Chat Services
October 2017 40
10. Change the Relayhost authentication as required for the customer.
A. The maximum size of incoming messages can be changed if required. It is
recommended that the maximum size is not configured beyond 10MB.
This is also the case for POP3-IMAP4 configurations where the maximum size of
incoming messages should not be configured beyond 10MB

Avaya IP Office Contact Center Task Based Guide- Email & Chat Services
October 2017 41
Note: For outgoing emails, attachments are only supported up to 10MB in size. Depending on
the network quality between the client PC and the IP Office Contact Center server, the
sending/uploading of an email can take several minutes. Poor network quality/speeds can
cause a disconnection between the User Interface and the IP Office Contact Center server and
consequently the agent may be logged off from E-Mail.

Avaya IP Office Contact Center Task Based Guide - Email & Chat Services
October 2017 42
11. Once all settings have been configured click the Save button and then select the X
button to close the window.
12. Click the grey box to stop the C3000 SMTP Connector SMTP Service.

Avaya IP Office Contact Center Task Based Guide- Email & Chat Services
October 2017 43
13. Click the grey arrow to start the C3000 SMTP connector SMTP service.
14. If the customer is using a 3rd party SMTP service such as Google Mail, the following
settings will be required to replace the previous settings.
A. Relayhost for outgoing mails: smtp.googlemail.com
B. Use TLS: If available
C. TLS Server Host: smtp.googlemail.com
D. Select Verify Server Certificate: Select
E. Prefered mode: Login
F. User login: googlemail user account.
G. Login password: googlemail user account password
H. Local accepted DNS domains: gmail.com

Avaya IP Office Contact Center Task Based Guide - Email & Chat Services
October 2017 44

Avaya IP Office Contact Center Task Based Guide- Email & Chat Services
October 2017 45
15. If the customer is using a POP3/IMAP email system (Google Mail use SSL/TLS), alter
the details of the topic’s email account.
Note: With some external email accounts for example Google mail, you need to allow “Access
for less secure apps” within the email settings of your email account. These settings have to be
completed before the account can be used by IP Office Contact Center

Avaya IP Office Contact Center Task Based Guide - Email & Chat Services
October 2017 46
16. If an IMAP4 email system is to be used (for Google Mail use SSL/TLS), alter the details
of the Topic’s email account.
17. TTrace – Email – C3000 POP3-IMAP Client can be used to check for any connection
issues.

Avaya IP Office Contact Center Task Based Guide- Email & Chat Services
October 2017 47
Creating an E-mail Flow
The IP Office Contact Center Email services can be configured to scan email content for
keywords and distribute the email accordingly to an appropriate Email configured agent. If a
keyword is not matched the email can be distributed for example, to an agent group.
In this example, an Email flow will be configured that will scan the email for the keyword
“Desktop” and if found in the email, the email will be distributed to agent ‘Karen’. If the email
does not contain the keyword, it will be directed to the email Group Sales.
18. From the Go to menu click Task Flow Editor.

Avaya IP Office Contact Center Task Based Guide - Email & Chat Services
October 2017 48
19. Click Task flow set and then select Open.
20. Click the required Task flow and then select the OK button.
21. Choose the OK button.
22. Choose the Yes button to take a copy of the default task flow set.
23. Type the name of the task flow set and then choose the OK button.

Avaya IP Office Contact Center Task Based Guide- Email & Chat Services
October 2017 49
24. Choose Edit – New and then select Group
25. .Type the name of the new group and then select the OK button
26. Click Edit – New and then select Email flow….

Avaya IP Office Contact Center Task Based Guide - Email & Chat Services
October 2017 50
27. In the Name field enter a name for the Email flow and choose the OK button. The new
group should be selected as default.
28. The Email Flow is displayed.
29. Click List of symbols tab.

Avaya IP Office Contact Center Task Based Guide- Email & Chat Services
October 2017 51
30. To start an Email flow an E-mail element can be used. Drag the Email element into the
Email flow working area.
31. Click Topic1 and then select the OK button.
32. The configured element is displayed.

Avaya IP Office Contact Center Task Based Guide - Email & Chat Services
October 2017 52
33. The email will now be scanned for a keyword. This can be achieved using an Email
script element. To use an Email script element, the keyword text that will be used to
search the email contents must be defined. Click the Go to menu and then select E-Mail
configuration.
34. Click the E-Mail textsearch tab.
35. Click the Add button.

Avaya IP Office Contact Center Task Based Guide- Email & Chat Services
October 2017 53
36. In the Configuration name field type Email Scan and then select the pencil button.
37. In the Keyword field, type the required word that will be searched in emails. In this
example a keyword of desktop has been added. Click the Apply button.

Avaya IP Office Contact Center Task Based Guide - Email & Chat Services
October 2017 54
38. The configured Keyword is displayed.
39. The Keyword can be tested. Click the Test button.
Avaya IP Office Contact Center Task Based Guide- Email & Chat Services
October 2017 55
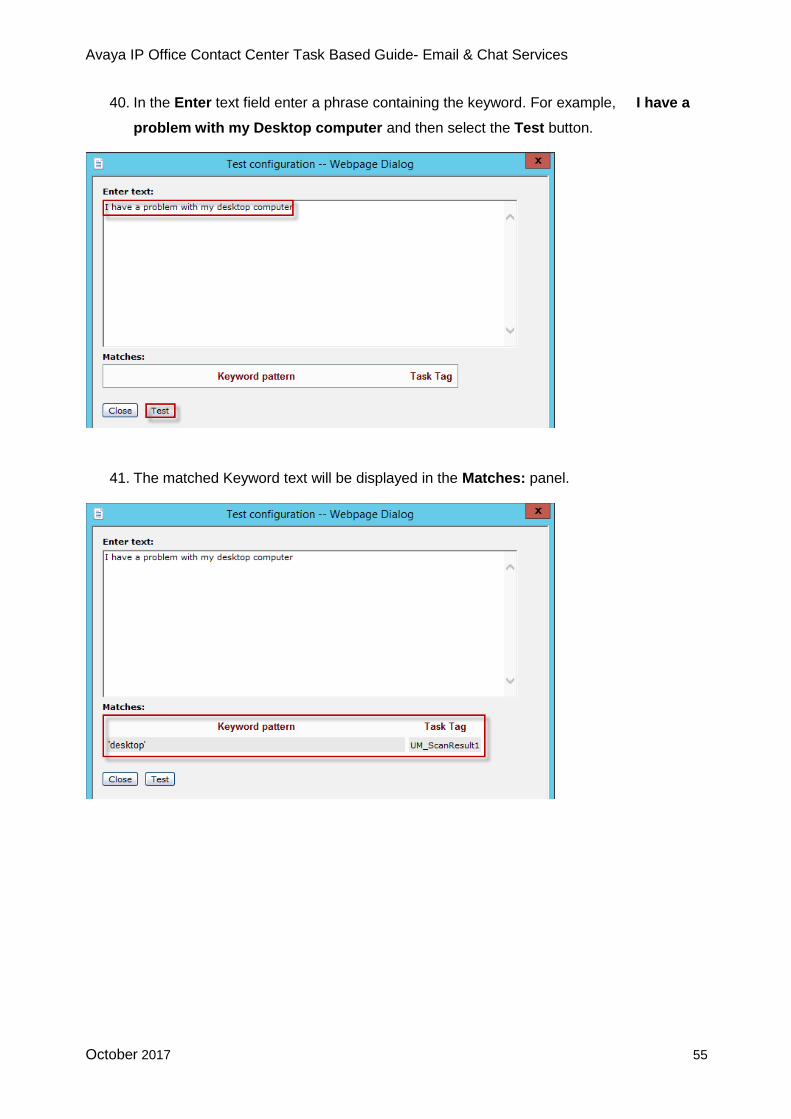
40. In the Enter text field enter a phrase containing the keyword. For example, I have a
problem with my Desktop computer and then select the Test button.
41. The matched Keyword text will be displayed in the Matches: panel.

Avaya IP Office Contact Center Task Based Guide - Email & Chat Services
October 2017 56
42. A notification box will be displayed if the text does not match the keyword. In this case
the test text is “I have a problem with my laptop computer”. So when looking for the
keyword “desktop” no match is found.
43. Click the Close button.

Avaya IP Office Contact Center Task Based Guide- Email & Chat Services
October 2017 57
44. The configured Keyword is displayed. Click the Apply button.
45. Additional keywords can be added as required.

Avaya IP Office Contact Center Task Based Guide - Email & Chat Services
October 2017 58
Partial words and phrases can also be added ending with a *. For example, mem* will
recognize abbreviations relating to the word memory.
46. Click the Save button.

Avaya IP Office Contact Center Task Based Guide- Email & Chat Services
October 2017 59
47. Return to the Email Flow. Click the Go to menu and then select the Task Flow Editor.
48. Drag the E-mail script into the Email flow working area.
49. Select Email Scan and then select the OK button.

Avaya IP Office Contact Center Task Based Guide - Email & Chat Services
October 2017 60
50. The configured element is displayed.
51. After the email has been checked for Keywords, we need to split the email path if any of
the keywords were found. This can be achieved using a Task Tag element. Drag a Task
Tag into the email flow working area.

Avaya IP Office Contact Center Task Based Guide- Email & Chat Services
October 2017 61
52. Click the browser button … adjacent to Task tag field.
53. Click UM_ScanResult1 and then click the OK button.

Avaya IP Office Contact Center Task Based Guide - Email & Chat Services
October 2017 62
54. In the Comparison field type true and then select the OK button
55. The configured element is displayed.
56. In this example, if the email contains a keyword it should be directed to Agent1 . This
can be achieved using an Agent element. Drag the element into the Email flow working
area.

Avaya IP Office Contact Center Task Based Guide- Email & Chat Services
October 2017 63
57. Click agent Agent1 and then select the OK button.
58. The configured element is displayed.
59. If the email does not contain a keyword, the system is required to check that an Agent is
free before the email is distributed to the agent. This can be achieved using a Logic
element. Drag the element into the Email flow working area.

Avaya IP Office Contact Center Task Based Guide - Email & Chat Services
October 2017 64
60. In the Name field type Topic1 Free Email Agents ? and then select the Keywords
button.
61. Click Number of free agents and then choose e-mail under Task-type and then select
the OK button.

Avaya IP Office Contact Center Task Based Guide- Email & Chat Services
October 2017 65
62. Click the Operators button.
63. Select the greater operator and then select the OK button.

Avaya IP Office Contact Center Task Based Guide - Email & Chat Services
October 2017 66
64. Change the ? to OT
65. Place a 0 at the end of the Condition and then click the OK button.

Avaya IP Office Contact Center Task Based Guide- Email & Chat Services
October 2017 67
66. The configured element is displayed.
67. In this example, if there are free email agents available to receive the email it will be
directed to the Agent group Group1. This can be achieved using an Agent group
element. Drag the element into the E-mail flow working area.
68. Select Group1 and then click the OK button.

Avaya IP Office Contact Center Task Based Guide - Email & Chat Services
October 2017 68
69. The configured element is displayed.
70. Connect the elements as illustrated below.
71. Choose Tools and then select Configuration check.

Avaya IP Office Contact Center Task Based Guide- Email & Chat Services
October 2017 69
72. Click the OK button.
73. Click Task flow set and then click Save.
74. Click Task flow set and then click Activate.

Avaya IP Office Contact Center Task Based Guide - Email & Chat Services
October 2017 70
75. When prompted click the OK button.

Avaya IP Office Contact Center Task Based Guide- Email & Chat Services
October 2017 71
Text Blocks/Autoreply
Text blocks can be used to automate standard responses given by E-Mail, Topics & Agents in
the course of answering customer emails. Text Blocks can be added to the response email or
customized per email as required.
Auto reply templates can be used when an Incoming email arrives at a topic or when the email
arrives at the Agent.
To configure a Text Block with an Auto Reply:
1. Click Go to from the menu and then select Textblock admin.
2. The first time Textblock admin is used the following message is seen. Choose the OK
button.

Avaya IP Office Contact Center Task Based Guide - Email & Chat Services
October 2017 72
3. Click the Autoreply templates button.
4. Click the New template button.
Avaya IP Office Contact Center Task Based Guide- Email & Chat Services
October 2017 73
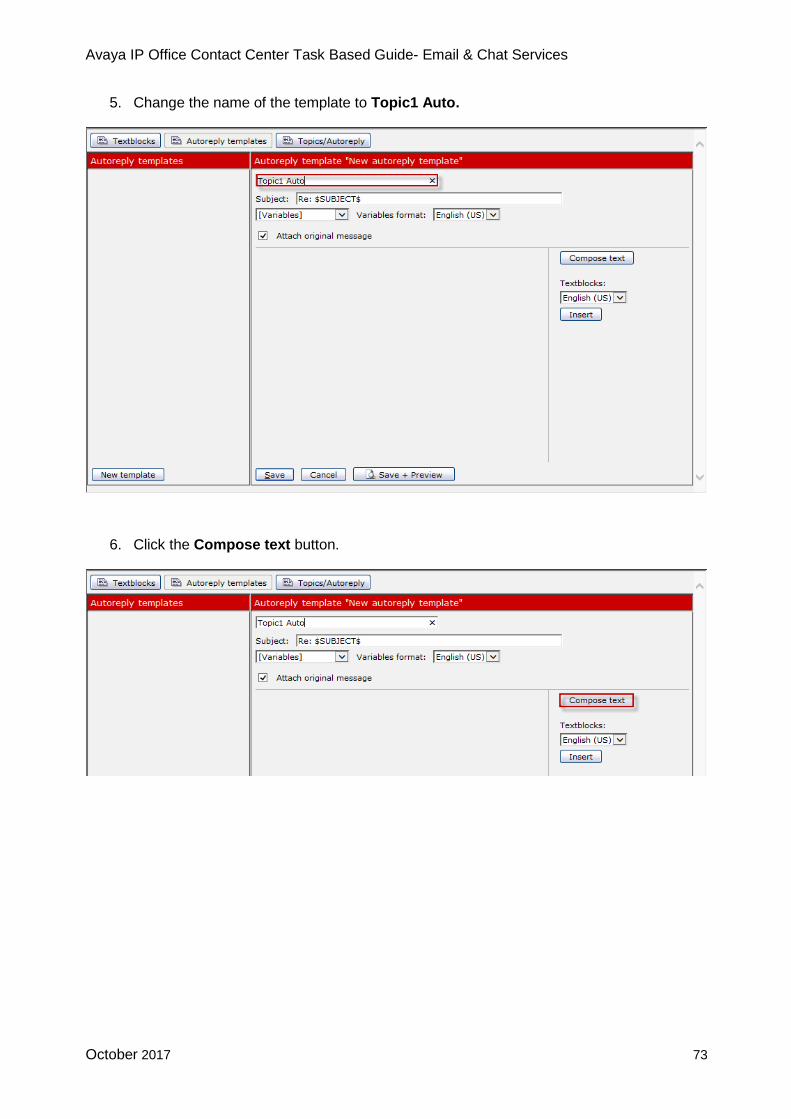
5. Change the name of the template to Topic1 Auto.
6. Click the Compose text button.

Avaya IP Office Contact Center Task Based Guide - Email & Chat Services
October 2017 74
7. In the text field type Thank you for emailing the Support department. Your email
reference is
8. Click the Variables drop down box and select TICKETID.

Avaya IP Office Contact Center Task Based Guide- Email & Chat Services
October 2017 75
9. This will place a reference ID into the email, which can be searched in the Archive.
10. Click the Save button.

Avaya IP Office Contact Center Task Based Guide - Email & Chat Services
October 2017 76
11. Click the Topic/Autoreply button.
12. Click Topic1
13. Click the Autoreply template drop down arrow and select Topic1 Auto.

Avaya IP Office Contact Center Task Based Guide- Email & Chat Services
October 2017 77
14. Click the Save button.
When an email is now sent to Topic1, the sender will automatically receive an email as
illustrated below.

Avaya IP Office Contact Center Task Based Guide - Email & Chat Services
October 2017 78
Textblocks
Textblock templates can be used to create standard blocks of text that can be added to email
replies sent to customers. Templates can be used with Variables that can be altered by the
Agent or entered automatically, before sending an email response.
1. Click Go to and select Textblock admin.

Avaya IP Office Contact Center Task Based Guide- Email & Chat Services
October 2017 79
2. Click the Textblocks button.
3. Right click on the Active link and select Create new textblock…
4. Enter a name for the Textblock in the New textblock field. For example, Topic1 Std.

Avaya IP Office Contact Center Task Based Guide - Email & Chat Services
October 2017 80
5. From the Language selection drop down box select the required language. In this
example, English (UK) has been selected.
6. Choose the en_uk tab.

Avaya IP Office Contact Center Task Based Guide- Email & Chat Services
October 2017 81
In this example, a text block will be added that will include a number of variables. The text block
to be configured is as follows:
Thank you for emailing the support desk with your query relating to $SUBJECT$ received on
$RECEIVEDATE$.
Your email response was from $AGENTNAME$ sent on $CURRENTDATE$
1. In the text window enter the standard text that can be added to email replies. For
example, Thank you for emailing the support desk with your query relating to
2. In this example, a variable will be added to reference a “Subject”. Click after the text
block text, and then click the Variables drop down list. Select Subject.

Avaya IP Office Contact Center Task Based Guide - Email & Chat Services
October 2017 82
3. Continue the text block with any additional text. In this example, the words received on
have been added.
4. Click the Variables drop down box and select RECEIVEDDATE.

Avaya IP Office Contact Center Task Based Guide- Email & Chat Services
October 2017 83
5. Continue the text with Your email response was from
6. Click the Variables drop down box and select AGENTNAME.

Avaya IP Office Contact Center Task Based Guide - Email & Chat Services
October 2017 84
7. Continue the text with the words sent on.
8. Click the Variables drop down list and select CURRENTDATE.

Avaya IP Office Contact Center Task Based Guide- Email & Chat Services
October 2017 85
9. In this example, addition text has been added to state: If you have any feedback
please send an email to [email protected]
10. Now we can assign this Textblock to be used with a Topic. Choose Topic1 under Non-
associated topics.

Avaya IP Office Contact Center Task Based Guide - Email & Chat Services
October 2017 86
11. Choose the Associate topic arrow.
12. Click the Save in “Active” button.

Avaya IP Office Contact Center Task Based Guide- Email & Chat Services
October 2017 87
13. The new Textblock is displayed.

Avaya IP Office Contact Center Task Based Guide - Email & Chat Services
October 2017 88
How to use a textblock
1. When an Agent receives an email and marks it as active, they press the reply button on
their user interface.

Avaya IP Office Contact Center Task Based Guide- Email & Chat Services
October 2017 89
2. The Textblocks are displayed on the right hand side of the screen.
Note: The agent will require the Use textblocks privilege to use this feature

Avaya IP Office Contact Center Task Based Guide - Email & Chat Services
October 2017 90
3. The agent can fill out the response before using the textblock or use a textblock for the
response. Click the required Textblock and click the Add button.
4. The Textblock is now inserted into the email response. Select the Send button to send
the email to the customer.

Avaya IP Office Contact Center Task Based Guide- Email & Chat Services
October 2017 91
5. The Agent will then be prompted with the Spellchecker if an error is found. When the
spell checking is complete choose the Close button. If the spell checker was used the
Agent will need to choose the Send button again.
Note: This is valid only if automatic spell check is enabled on system, profile or agent. By
default, spell check is disabled.
6. The Agent can now mark the email as Complete.
7. The customer receives the email containing the text block.

Avaya IP Office Contact Center Task Based Guide - Email & Chat Services
October 2017 92
Archiving / Deleting the Email Database
Emails can be archived to the umarchive database and removed from the c3000 database by
using an archive schedule.
When using the archive function only emails that are in the completed state will be moved into
the umarchive database. This will decrease the size of the c3000 database but increase the
size of the umarchive database. From release 9.1.6 a new feature called Mail Exporter can now
be used for archiving emails and is explained in its own section in this guide.
The following kinds of emails are not considered by archiving function:
emails sent to recycle bin
emails directly sent by an agent (replies to normally routed mails are taken into account by
archiving)

Avaya IP Office Contact Center Task Based Guide- Email & Chat Services
October 2017 93
Archiving Emails process
1. Click the Go to menu and then select E-Mail configuration.
2. Click the Archive/Delete tab.
3. Click the Add button.

Avaya IP Office Contact Center Task Based Guide - Email & Chat Services
October 2017 94
4. You can now create a single or reoccurring archive that will run after a defined period of
minutes/hours/days/weeks or months.
5. Enter the required time and date for the archive and click the Add button. In this
example, an archive has been created that will repeat daily at 1 am from the 1st May
2017 and will move all documents older than 30 days to the archive database.

Avaya IP Office Contact Center Task Based Guide- Email & Chat Services
October 2017 95
6. Click the green tick to add the schedule.
7. The archive schedule is displayed.
8. When logged in as that User, to view the E-Mail Archive, click E-Mail client followed by
View and then select Visible folders.

Avaya IP Office Contact Center Task Based Guide - Email & Chat Services
October 2017 96
9. The default Visible folders are displayed.
10. Select the Archive folder and Click the >>> button to move the folder to the Selected
folders view window and then click the OK button.
11. The Archive view will now be visible.

Avaya IP Office Contact Center Task Based Guide- Email & Chat Services
October 2017 97
Deleting Emails process
WARNING! DELETED EMAILS CANNOT BE RESTORED
Delete Job
Automatic deletion of emails only consider emails in database c3000. It has no impact on emails
that have already been archived.
Therefore, in the email’s Archive tab, an email will never disappear even when a deletion job is
executed. In addition, emails in the recycle bin are not considered by ‘delete document’ tasks.
When an email is deleted by a delete job, it is removed from database c3000 (not moved to
recycle bin) and there is no possibility to restore it.
Note: You cannot run a delete documents task, if you currently have an active archive task.
Make sure your archive task is deactivated.

Avaya IP Office Contact Center Task Based Guide - Email & Chat Services
October 2017 98
1. Click the Go to menu and then select E-Mail configuration.
2. Click the Archive/Delete tab.
3. Choose the Delete documents tab. Then select the Add button.
Avaya IP Office Contact Center Task Based Guide- Email & Chat Services
October 2017 99
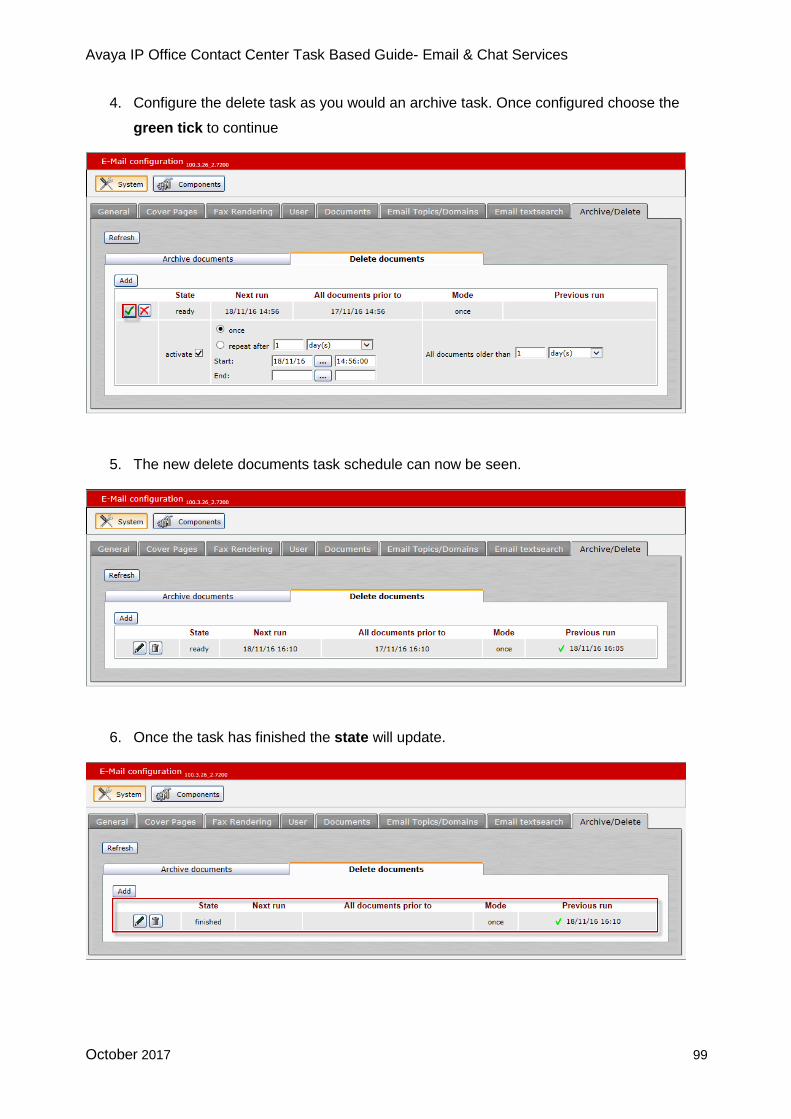
4. Configure the delete task as you would an archive task. Once configured choose the
green tick to continue
5. The new delete documents task schedule can now be seen.
6. Once the task has finished the state will update.

Avaya IP Office Contact Center Task Based Guide - Email & Chat Services
October 2017 100
Mail Exporter.
There is a new feature called Mail Exporter that automatically archives your emails into files that
can be viewed offline in a 3rd party e-mail program such as Outlook, or Thunderbird.
Once an email has resided in the IP Office Contact Center archive database and is older than
100 days (timestamp from initial email arrival), they will be zipped into files (Maximum 250MB
each) and moved from the archive database. The customer then has 100 days to obtain the
zipped file before it is deleted from the server.
This schedule is processed automatically on the archive database, but the schedule to move
the file to the archive database must first be configured manually.

Avaya IP Office Contact Center Task Based Guide- Email & Chat Services
October 2017 101
Access to the zipped email files:
1. Using a browser enter https:\\XXX.XXX.XXX.XXX:28433\Administration (Where
XXX.XXX.XXX.XXX is the IP address of the IP Office Contact Center server).Then login
with the User name Administrator.
2. Choose the Download option.

Avaya IP Office Contact Center Task Based Guide - Email & Chat Services
October 2017 102
3. Choose Archived E-Mails.
4. All of the archived E-Mails will now be shown and can be downloaded from the server.
5. Then extract the contents of the zipped file and copy into your 3rd party email program.

Avaya IP Office Contact Center Task Based Guide- Email & Chat Services
October 2017 103
6. The archive can now be viewed using an email program.

Avaya IP Office Contact Center Task Based Guide - Email & Chat Services
October 2017 104
Email Personal Signature
Each individual agent can have a personal email signature.
1. From agents Email User Interface, select Email Client and click Additional Options
followed by Signature.
2. The agent’s personal signature can be created. Enter the required text, choose Use
signature and the click the OK button.

Avaya IP Office Contact Center Task Based Guide- Email & Chat Services
October 2017 105
3. Additional Email options are available. Select Email Client, then Additional options
followed by Options.
4. A number of options are available for selection.

Avaya IP Office Contact Center Task Based Guide - Email & Chat Services
October 2017 106
Show search filter
Agent search filters allow the Agent to filter the components folders to find a specific email.
1. Select Email Client, then Additional Options followed by Show search filter.
2. The search parameters are then available for use by the agent.

Avaya IP Office Contact Center Task Based Guide- Email & Chat Services
October 2017 107
Recycle Bin
Manually deleted emails (deleted by agent) are sent to the recycle bin. Each agent has their
own recycle bin. Each recycle bin is never purged or deleted automatically.
Because emails in recycle bin are not taken into account by archive/delete jobs it is in the
agents responsibility to delete them on a regular base. Otherwise they will never get deleted
and waste space on disk.
To empty the email recycle bin, select Email Client, then Additional Options followed by
Empty recycle bin.
Or each email can be deleted from the recycle bin manually, while the Agent is viewing the
recycle bin.
Avaya IP Office Contact Center Task Based Guide - Email & Chat Services
October 2017 108
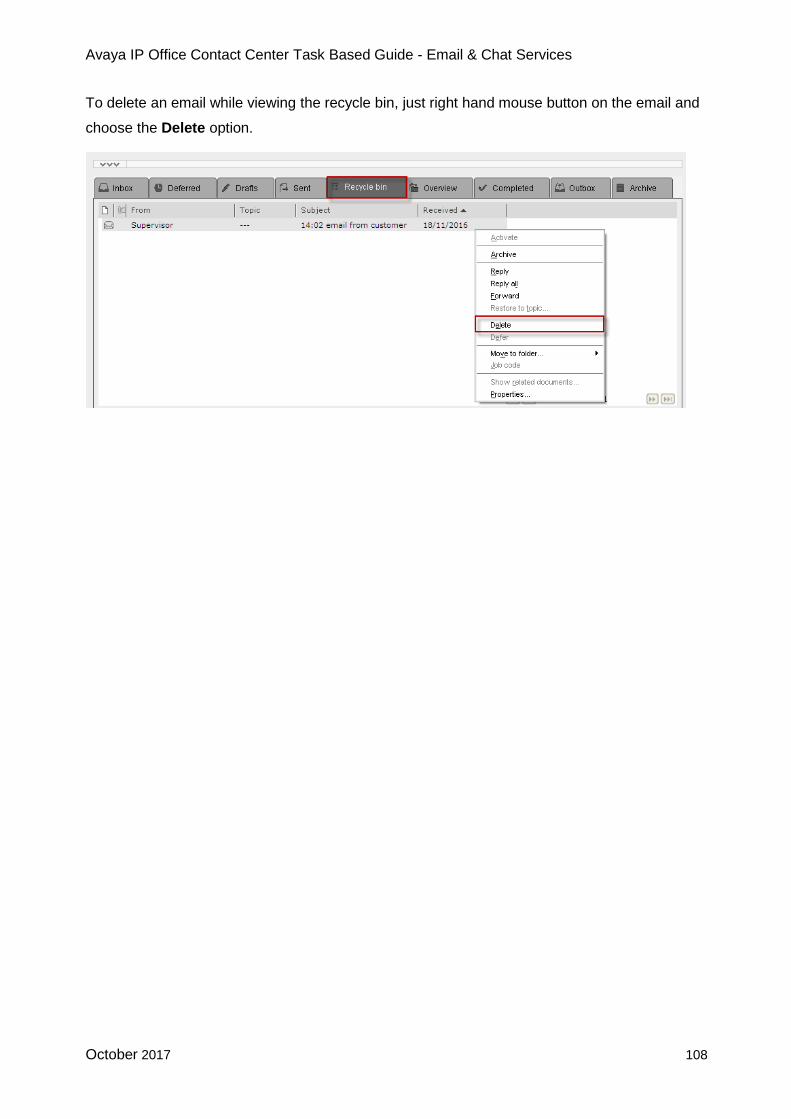
To delete an email while viewing the recycle bin, just right hand mouse button on the email and
choose the Delete option.

Avaya IP Office Contact Center Task Based Guide- Email & Chat Services
October 2017 109
Email Security
To increase security and help prevent SPAM emails, it is recommended that you do not allow
your own specific domains or IP addresses to send E-mails into the IP Office Contact Center.
To allow this, you can block domains and IP addresses. As an alternate to this you can activate
valid sender domains and this will only allow traffic for the entered valid domain.
To enhance security, you can configure the rules. Proceed as follows:
1. Under Administration choose E-mail configuration.

Avaya IP Office Contact Center Task Based Guide - Email & Chat Services
October 2017 110
2. Choose the Components button.
3. Choose your Server (This will be shown as the IP address of your IP Office Contact
Center server) to expand the options.
4. Choose the C3000 SMTP Connector.

Avaya IP Office Contact Center Task Based Guide- Email & Chat Services
October 2017 111
5. Choose the Security tab.
6. In the Security tab, you can add or remove the necessary Domains, IP addresses or
Valid sender domains to secure up your IP Office Contact Center E-mail.
A. To add a Domain from which emails will be rejected, type the domain name in the
field above Domain and click the Add button.

Avaya IP Office Contact Center Task Based Guide - Email & Chat Services
October 2017 112
Any emails sent from this domain, will now be rejected. You may repeat the process and add
more Domains to be rejected.
If required, the Bin icon can be used to delete the entry
B. To add an IP address from which emails will be rejected, type the IP address in the
field above IP addresses and click the Add button.
Any emails sent from this IP Address, will now be rejected. You may repeat the process and
add more IP Addresses to be rejected.

Avaya IP Office Contact Center Task Based Guide- Email & Chat Services
October 2017 113
If required, the Bin icon can be used to delete the entry
C. To add a Valid sender domain from which emails will be accepted, choose the
Active tick box and then type the domain name in the field above Domain and click
the Add button.
All emails will be blocked except for emails sent from this domain. You may repeat the process
and add more Valid sender domains to be accepted.
If required, the Bin icon can be used to delete the entry

Avaya IP Office Contact Center Task Based Guide - Email & Chat Services
October 2017 114
7. Click Save to confirm your security settings.
Note: You should not have Valid sender domains marked as Active, if you are using Domains to
reject or IP addresses to reject entered.
8. You now need to stop and start the C3000 SMTP Connector to activate the changes.
Click the Stop button
9. Click the Start button to start the service.

Avaya IP Office Contact Center Task Based Guide- Email & Chat Services
October 2017 115
McAfee firewall settings
If you are using McAfree firewall, a number of steps are required to allow the email component
to function.
1. Right-click McAfee on the task bar.
2. Select VirusScan Console.
3. Double-click Access Protection.
4. Select for left menu, Categories>Anti-virus Standard Protection
5. Select Prevent mass mailing worms from sending email.
6. Click Edit.
7. Add SMTPConnector.exe. Within the “processes to exclude” textbox, scroll to the
bottom, separated with a comma, Add the required processes: SMTPConnector.exe,
IVR.exe, Scheduler.exe, Mailsend.exe
Possible required processes for email configuration:
• IVR.exe: for voice mail
• Scheduler.exe: for sending automatically generated reports
• Mailsend.exe: for sending emails about alarm events using TTrace
• SMTPConnector.exe: for email routing through SMTP

Avaya IP Office Contact Center Task Based Guide - Email & Chat Services
October 2017 116
IP Office Contact Center Chat Service
Required Information
To successfully utilize the IP Office Contact Center’s Chat service there are a number of factors
that should be considered. Some of these details should be checked and discussed with the
customer:
Chat Considerations
Are there adequate Multichannel Licenses available for the agents who will use IP Office
Contact Center’s Chat Services?
Will the customer be using the one-X Portal service or their own XMPP (Jabber) service
can be utilized with IP Office Contact Center’s Chat Service to supply the XMPP
service?
Have the following Ports been configured
5222/TCP (Client-to-Server)
5269/TCP (Server-to-Server)
5223/TCP Legacy-SSL: (SSL)
Have Agent Privileges been assigned for Chat?
The available Privileges include:
Agent Tab – Chat Section
Automatic Sign On - The agent will be automatically signed on to all Chat Agent
Groups to which they have been assigned
Advanced Archive View - The agent has the option to use the chat archive.
Configuration Tab
Chat Server - Allows the agent to configure Chat Server settings.
Chat Settings - Allows the agent to configure Chat settings.

Avaya IP Office Contact Center Task Based Guide- Email & Chat Services
October 2017 117
An example, of the structure of an IP Office Contact Center XMPP address/ identifier is as
follows:
If the customer is using one-X Portal to provide the XMPP service
If the customer is using their own server to provide the XMPP service
In this example Openfire has been used to provide an XMPP service when one-X Portal is not
available. How to install and configured Openfire is document at the end of the Chat section.
XMPP - Extensible Messaging and Presence Protocol

Avaya IP Office Contact Center Task Based Guide - Email & Chat Services
October 2017 118
How to setup and Use the CHAT on IP Office Contact Center
NOTE: Making any changes to any Chat flow will require a restart of the service IPOCC Chat
Taskserver. It is highly recommended that changes made to the IP Office Contact Center Chat
or Web services are carried out in a maintenance window, which is outside of normal business
hours. This will allow any required testing and restarting of services to take place without
interruption of business operations.
The following areas of configuration will be examined:
1. The installation and configuration of the XMPP Service.*
2. The configuration of existing Topics and Agents to Use CHAT.*
3. Building a Chat flow to facilitate a CHAT session.*
a. Querying a CHAT message and responding automatically to customer.
b. Configuring a 5 minute queue limit for the CHAT session.
c. Providing a Welcome message to the customer.
d. Providing an End of session message to the customer.
4. Configuring Chat scripts against the Chat topic.
5. Testing a Chat Session with XMPP client (Pidgin).
6. Using the CHAT web Java example provided in the install DVD, to link a Web page to
the IP Office Contact Center CHAT topics.
*Not required if already set via the Configuration wizard or Configuration spreadsheet.
NOTE: Changes to any Chat flow will require a restart of the IPOCC Chat TaskServer
before testing.

Avaya IP Office Contact Center Task Based Guide- Email & Chat Services
October 2017 119

Avaya IP Office Contact Center Task Based Guide - Email & Chat Services
October 2017 120
Configuring an existing Topic to Use CHAT
If all the CHAT settings are known and can be entered into the excel configuration spreadsheet
as part of the initial installation of IP Office Contact Center, additional configuration is not
required.
However, in the following example for demonstration purposes, the entire manual CHAT
configuration process will be illustrated. Settings for using both the Openfire and one-X Portal
will be shown.
1. Login to IP Office Contact Center with Administrative access.
2. Click Service and then select Chat server.

Avaya IP Office Contact Center Task Based Guide- Email & Chat Services
October 2017 121
3. Click the Create… button.
4. Now add the details of the XMPP link
A. Enter the name ChatServer
B. Enter the hostname of the IP Office Server Edition or application server that
contains the one-X Portal service or the host name of the Openfire server.
C. Enter port 5222.
D. Enter the Domain name. (For a Cloud based installation, this must be the Public
IP Address of the Chat Server (one-X portal)
E. Choose Automatic negotiation.
5. Now click the Edit button.
Non Cloud Installation Cloud Installation

Avaya IP Office Contact Center Task Based Guide - Email & Chat Services
October 2017 122
6. In the Hostname field, enter the host name of the IP Office Contact Center server and
click the OK button.
Note: We can use the command prompt on the IP Office Contact Center server to determine
the host name. Just open a cmd prompt and type hostname and enter and the host name will
be displayed
7. Click the OK button to confirm the settings.

Avaya IP Office Contact Center Task Based Guide- Email & Chat Services
October 2017 123
8. The new Chat server is displayed.
9. We will now configure Topic 1 to facilitate Chat. Click the Topic tab.
10. Select Topic 1 and then select the Edit button.
11. Select the Chat Task Type.

Avaya IP Office Contact Center Task Based Guide - Email & Chat Services
October 2017 124
12. Click the Chat Tab.
13. In the Jabber Identifier field enter the XMPP name. For example Topic1.
14. In the Password field enter the XMPP password for the Topic1 account and then select
the OK Button.

Avaya IP Office Contact Center Task Based Guide- Email & Chat Services
October 2017 125
15. Topic 1 is now configured for Chat.
NOTE: Making any changes to any Chat setting for a Topic will require a restart of the services
IPOCC Chat Taskserver & IPOCC Tomcat WWW. It is highly recommended that changes made
to the IP Office Contact Center Chat or Web services are carried out in a maintenance window,
which is outside of normal business hours. This will allow any required testing and restarting of
services to take place without interruption of business operations.

Avaya IP Office Contact Center Task Based Guide - Email & Chat Services
October 2017 126
Configuring an existing Agent Group to Use CHAT
1. Click the Agent group tab.
2. Select an Agent Group that is to be used for Chat for example, Support and then click
the Edit button.
3. Select the Task Type Chat and the select the OK button.
4. We now need to configure the Agent profiles to use the IP Office Contact Center’s Chat
feature. It is recommended to use Profiles for your Agents. In this example, Agents 1-10
were added to the Agent profile within the configuration wizard, as part of IP Office
Contact Center’s initial installation.

Avaya IP Office Contact Center Task Based Guide- Email & Chat Services
October 2017 127
5. Click the Profile Tab.
6. Select the Agents Profile that will be used and then select the Edit… button.
7. Select the Chat Task Type and then select the Chat tab.

Avaya IP Office Contact Center Task Based Guide - Email & Chat Services
October 2017 128
8. Click the Add button.
9. Click Support and then select the OK button.
10. Click the OK button.

Avaya IP Office Contact Center Task Based Guide- Email & Chat Services
October 2017 129
11. The Profile has now been changed.
12. Click the Agents tab.
13. Select an Agent who is going to use Chat and click the Edit button.

Avaya IP Office Contact Center Task Based Guide - Email & Chat Services
October 2017 130
14. Click the Chat Task Type and then select the Chat tab.
15. Check that you can see the Agent group Support within the Group assignment field that
was added under Profiles.

Avaya IP Office Contact Center Task Based Guide- Email & Chat Services
October 2017 131
16. The Chat Task Type has now been assigned to Agent 1. Repeat the above steps until all
the Agents in Agent Group Support have been assigned with the Chat Task Type.
The next step in the Chat configuration process is to build a Chat Flow that will facilitate the
Chat feature.

Avaya IP Office Contact Center Task Based Guide - Email & Chat Services
October 2017 132
Building a Chat Flow
1. Click the Go to menu and then select Task Flow Editor.
2. Click Task flow set and then select Open.
3. Select the Active task flow set as required and then click the OK button.

Avaya IP Office Contact Center Task Based Guide- Email & Chat Services
October 2017 133
4. Enter the password (if required) and then select the OK button.
5. If the task flow set is currently in use click Yes to open a copy of this task flow set.
6. In the Name field enter a name for the task flow set and then click the OK button.
7. Choose Edit – New – Group
Avaya IP Office Contact Center Task Based Guide - Email & Chat Services
October 2017 134
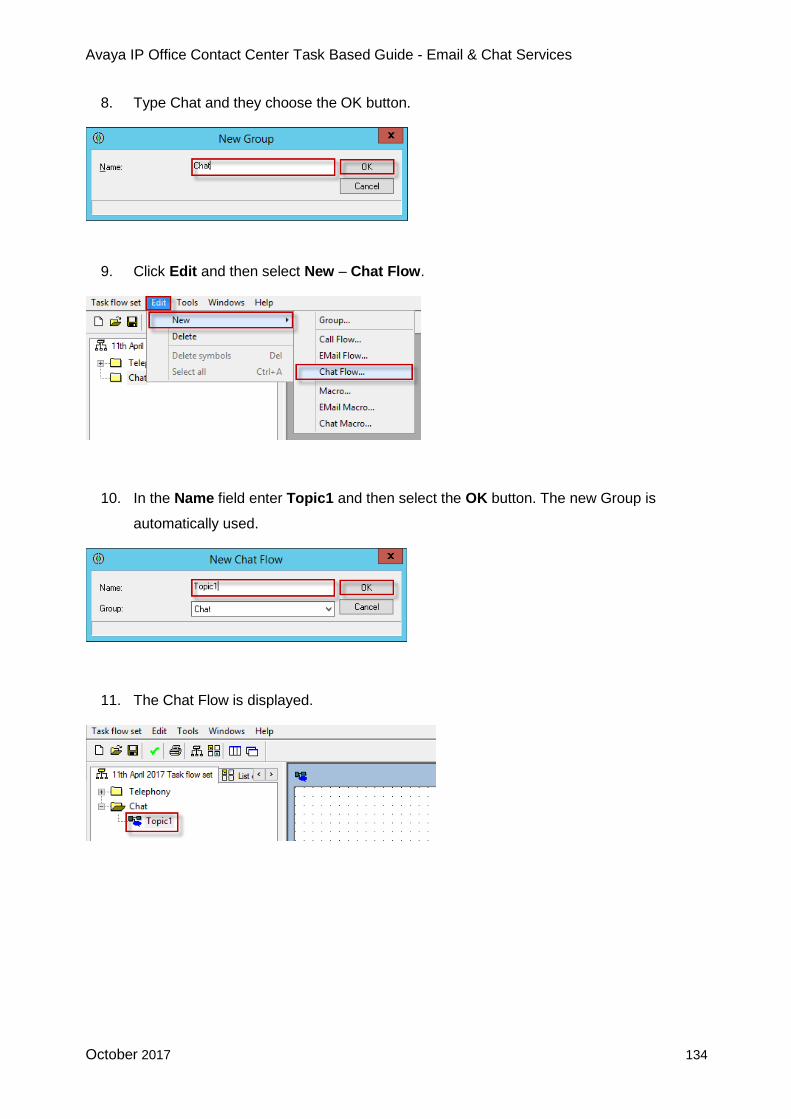
8. Type Chat and they choose the OK button.
9. Click Edit and then select New – Chat Flow.
10. In the Name field enter Topic1 and then select the OK button. The new Group is
automatically used.
11. The Chat Flow is displayed.
Avaya IP Office Contact Center Task Based Guide- Email & Chat Services
October 2017 135
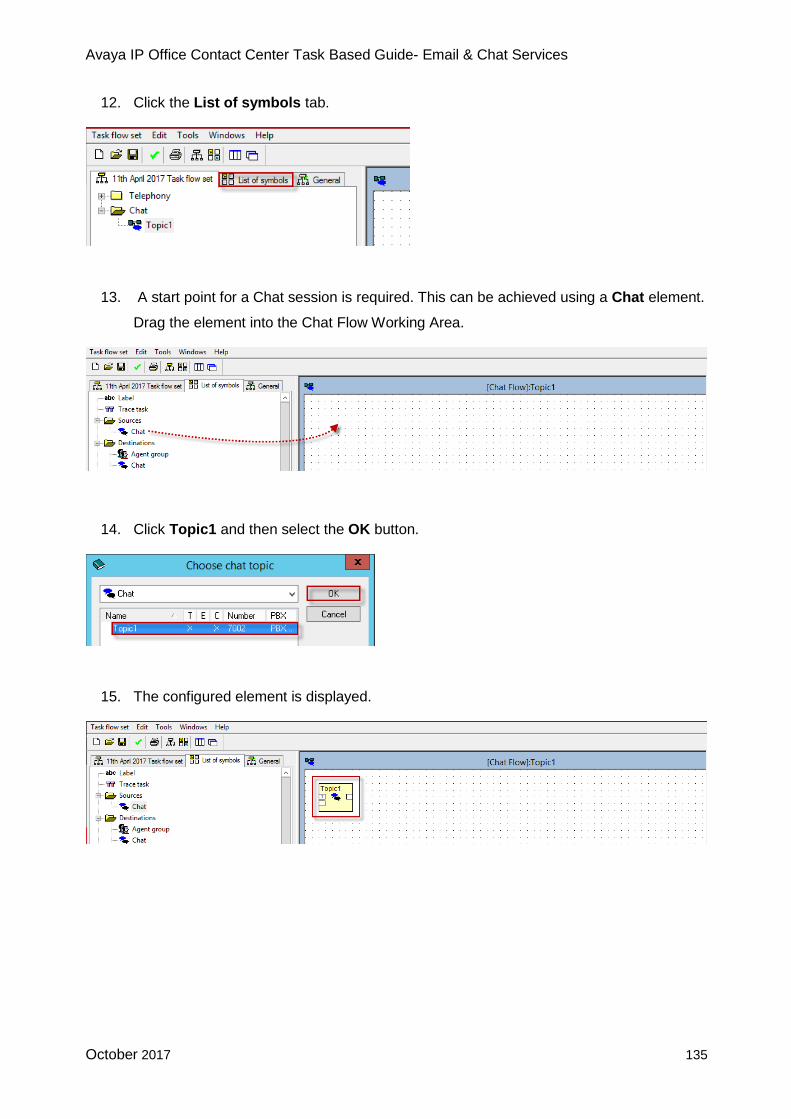
12. Click the List of symbols tab.
13. A start point for a Chat session is required. This can be achieved using a Chat element.
Drag the element into the Chat Flow Working Area.
14. Click Topic1 and then select the OK button.
15. The configured element is displayed.

Avaya IP Office Contact Center Task Based Guide - Email & Chat Services
October 2017 136
16. As Chat is only text based, if we wish to provide a Welcome greeting to the Chat
customer a Chat script can be utilized. To create Chat scripts, click the Go to menu
and then select Configuration.
17. Click Configuration and then select Chat script.
18. Click the Create button.

Avaya IP Office Contact Center Task Based Guide- Email & Chat Services
October 2017 137
19. In the Name field type Topic 1 Welcome Message.
20. In the Text field type You have entered a Chat session for Topic 1 and then select the
OK button.
21. The Chat script is displayed.

Avaya IP Office Contact Center Task Based Guide - Email & Chat Services
October 2017 138
22. Repeat this process to create the following Chat scripts.
23. Create a Chat script to inform the chat customer that all of the Agents are busy.
24. Create a Chat script to inform the customer that the chat session has ended. It is
possible to provide additional information to the Chat customer by using a call Tag. For
example, %CCK_AgentName% within the Chat Script text. This will display the Agents
name to the customer within the Chat script. The call tags are available under the Tag…
button.
25. Create a Chat script to inform the chat customer that additional information is required to
progress their chat request.

Avaya IP Office Contact Center Task Based Guide- Email & Chat Services
October 2017 139
26. Create a Chat script to inform the chat customer, they have waited too long for a Chat
session.
27. Create a Chat script to inform the chat customer that the chat session could not be
connected and include additional information on how to call or email their request. If the
Reject Chat script already exists then use edit to change.
28. Create a Chat script to inform the chat customer which Agent they are connected to.
Avaya IP Office Contact Center Task Based Guide - Email & Chat Services
October 2017 140
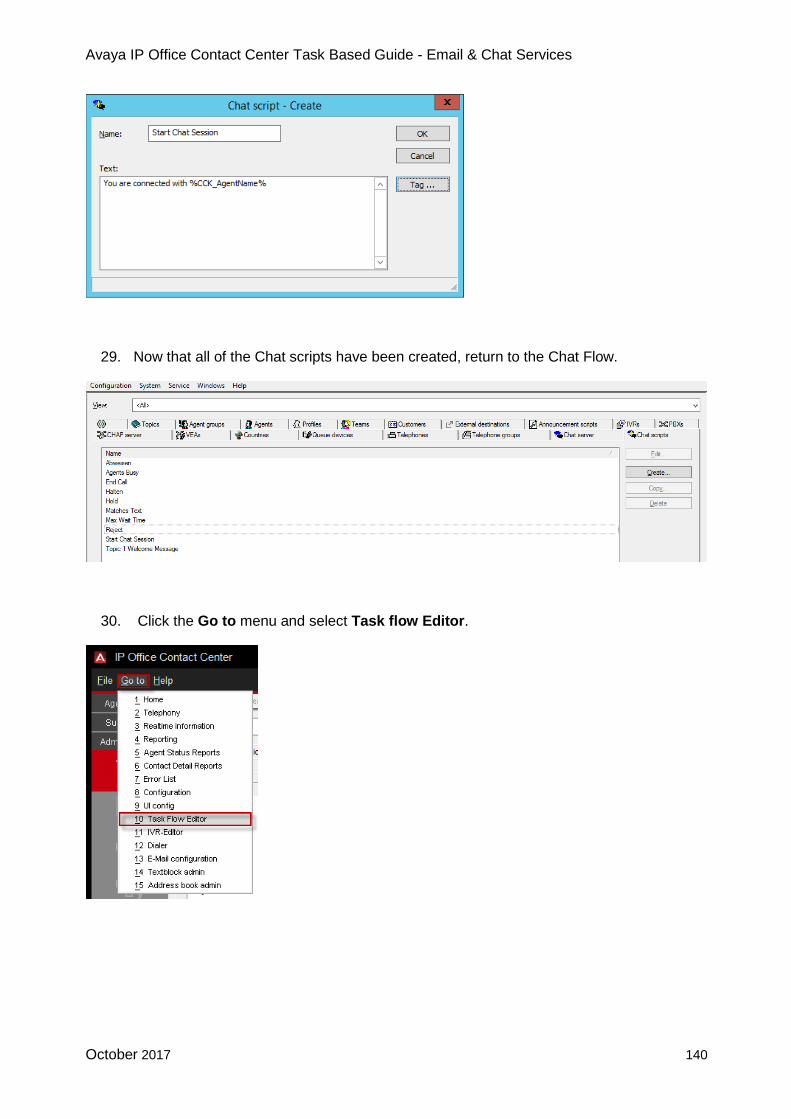
29. Now that all of the Chat scripts have been created, return to the Chat Flow.
30. Click the Go to menu and select Task flow Editor.

Avaya IP Office Contact Center Task Based Guide- Email & Chat Services
October 2017 141
31. The Chat Flow created earlier should still be displayed.
32. A Chat script (1 script) element will be used to provide information back to the Chat
customers. Click the List of Symbols tab and then drag the Chat script (1 script)
element to the Chat Flow working area.
33. Select Topic 1 Welcome Message and then select the OK button.

Avaya IP Office Contact Center Task Based Guide - Email & Chat Services
October 2017 142
34. The configured element is displayed.
35. As the Chat customer requests the Chat session, they can enter text. This text can be
checked for a key word(s). If a match is found with a keyword, the customer can be
prompted to provide additional information. In this example we will prompt the Chat
customer for their serial number, if they use the keywords “Desktop” or “Laptop”.
36. To query the Chat text, a Logic element can be used. Drag the Logic element into the
Chat flow working area.
37. In the Name field type Chat Text.

Avaya IP Office Contact Center Task Based Guide- Email & Chat Services
October 2017 143
38. In the Condition field type containsString_i(c."CTS_Initial_Message", "Desktop")
39. Another text search is required for the word “Laptop” that will utilize a OR Operator. Click
after the text and click the Operators button.

Avaya IP Office Contact Center Task Based Guide - Email & Chat Services
October 2017 144
40. Select the logical or operator and then click the OK button.
41. In the Condition field type
containsString_i(c."CTS_Initial_Message","Laptop" )
42. Then click the OK button.

Avaya IP Office Contact Center Task Based Guide- Email & Chat Services
October 2017 145
43. The configured element is displayed.
44. The customer will be prompted if their text matches the text defined in the Logic
element.
45. A Chat script (1 script) element will be used to reference the “Matches Text” Chat
script created earlier. Drag the Chat script (1 script) element into the Chat Flow
working area.

Avaya IP Office Contact Center Task Based Guide - Email & Chat Services
October 2017 146
46. Click Matches Text and the select the OK button.
47. The configured element is displayed.

Avaya IP Office Contact Center Task Based Guide- Email & Chat Services
October 2017 147
48. After sending the text back into the customer’s chat session, there should be a pause of
a few seconds before the customer is connected to the Agent. This pause will allow the
customer to obtain any information requested during the chat session, for example a
serial number, order number etc. This pause can be configured using a Logic element.
Drag a logic element into the Chat flow working area.
49. In the Name field type Wait for 3 Seconds.

Avaya IP Office Contact Center Task Based Guide - Email & Chat Services
October 2017 148
50. In the Condition field type (c.waitTotal%3)<1 and then select the OK button.
51. The configured element is displayed.
52. A Collector – Equal element will be used to link the two routes back together. Drag the
element in to the Chat flow working area.

Avaya IP Office Contact Center Task Based Guide- Email & Chat Services
October 2017 149
53. In the Name field type Collector and the select the OK button.
54. The configured element is displayed.
55. A Logic element will be used to check if there are any Agents available to take a Chat
session. Drag the element into the Chat flow working area.

Avaya IP Office Contact Center Task Based Guide - Email & Chat Services
October 2017 150
56. In the Name field type Available Agents.
57. Click the Keywords… button.
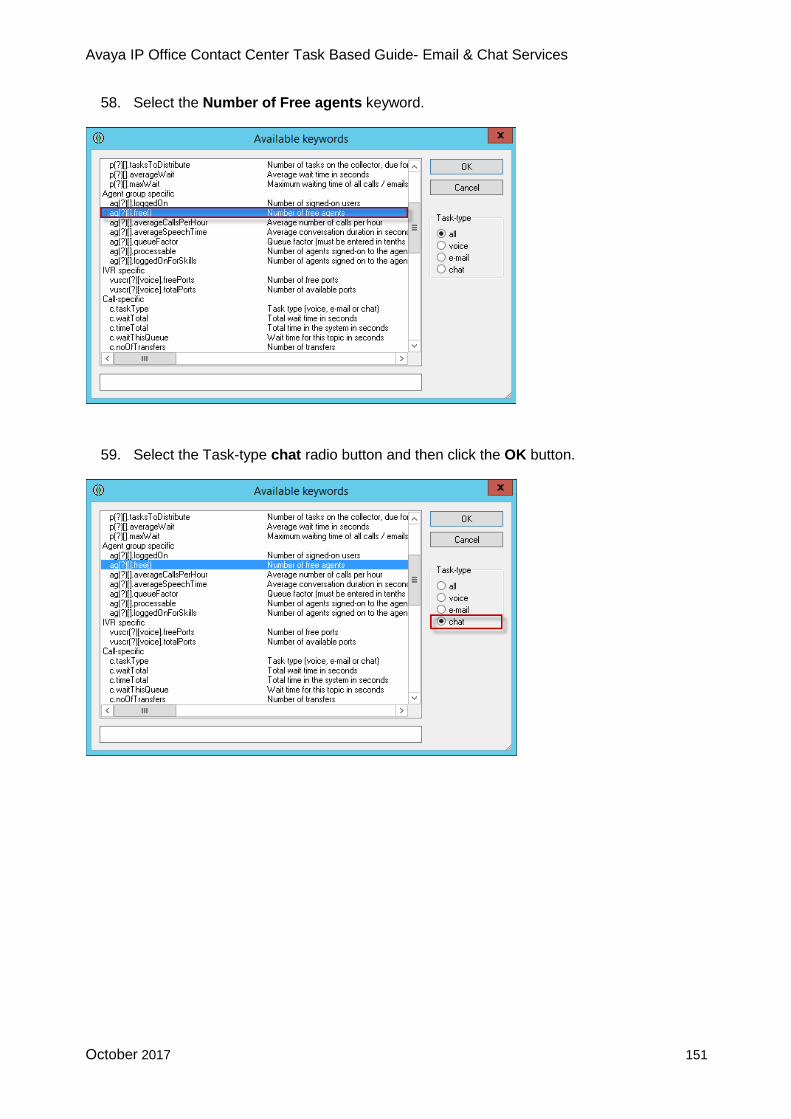
Avaya IP Office Contact Center Task Based Guide- Email & Chat Services
October 2017 151
58. Select the Number of Free agents keyword.
59. Select the Task-type chat radio button and then click the OK button.

Avaya IP Office Contact Center Task Based Guide - Email & Chat Services
October 2017 152
60. Click after the Condition text and then click the Operators button.
61. Click the greater operator and then select the OK button.

Avaya IP Office Contact Center Task Based Guide- Email & Chat Services
October 2017 153
62. At the end of Condition type a 0
63. Change the ? to a OT then click the OK button.

Avaya IP Office Contact Center Task Based Guide - Email & Chat Services
October 2017 154
64. The configured element is displayed.
65. If Agents are available to Chat, the customer should be directed to the correct Agent
Group destination. This can be achieved with an Agent Group element. Drag the
element into the Chat flow window.
66. Click Support and then select the OK button.

Avaya IP Office Contact Center Task Based Guide- Email & Chat Services
October 2017 155
67. The configured element is displayed.
68. A message will be distributed to the chat customer informing them that all of the Agents
are busy. This will be configured using a Chat script (1 script) element. Drag the
element into the Chat flow working area.
69. Click the Agent Busy chat script and then select the OK button.

Avaya IP Office Contact Center Task Based Guide - Email & Chat Services
October 2017 156
70. The configured element is displayed.
71. In this example, if all the agents are busy, the customer should not queue beyond five
minutes for a Chat session. A Wait time exceeded element will be used to set the time
period. Drag the element into the Chat Flow working area.
72. Enter a time of 5:00 and then select the OK button.

Avaya IP Office Contact Center Task Based Guide- Email & Chat Services
October 2017 157
73. The configured element is displayed.
74. If the Chat customer waits over five minutes to be connected to an agent, they should
receive a message to alert them that they will be disconnected and provide them with
additional contact details. This can be achieved using a Chat script (1 script) element.
75. Select Max wait time and then click the OK button.

Avaya IP Office Contact Center Task Based Guide - Email & Chat Services
October 2017 158
76. The configured element is displayed.
77. After the Max wait time Chat script, the Chat session should be disconnected. This can
be completed using a Drop element. Drag the element into the Chat Flow working area.
78. The configured element is displayed.

Avaya IP Office Contact Center Task Based Guide- Email & Chat Services
October 2017 159
79. Link the elements together as illustrated below
80. Choose Tools and then select Configuration check.
81. Click the OK button.
82. Select Task flow set and then click Save.

Avaya IP Office Contact Center Task Based Guide - Email & Chat Services
October 2017 160
83. Click the Activate button.
84. When prompted click the OK button.

Avaya IP Office Contact Center Task Based Guide- Email & Chat Services
October 2017 161
Setting Chat scripts against Chat topics
Chat scripts can now be assigned against the Chat Topics to inform the customer that their
session has been rejected or ended. The required chat scripts were configured earlier in this
guide, as illustrated below.

Avaya IP Office Contact Center Task Based Guide - Email & Chat Services
October 2017 162
85. In this example, Topic 1 will be configured to provide a Chat scripts when the chat
session has ended. Click the Go to menu and select Configuration.
86. Click the Topics tab.
87. Click Topic1 and then select the Edit button.

Avaya IP Office Contact Center Task Based Guide- Email & Chat Services
October 2017 163
88. Click the Chat tab.
89. Click the reject … browser button.

Avaya IP Office Contact Center Task Based Guide - Email & Chat Services
October 2017 164
90. Select the Reject chat script and click the OK button.
91. Click the end … browser button.

Avaya IP Office Contact Center Task Based Guide- Email & Chat Services
October 2017 165
92. Click the End Call chat script and then click the OK button.
93. Click the OK button.

Avaya IP Office Contact Center Task Based Guide - Email & Chat Services
October 2017 166
94. A Welcome script can now be added for each Agent. This will inform the customer which
chat agent they are connected to. The chat script was configured earlier in this guide.
95. In this example, a Profile will be used. Click Configuration and then select Agent
profile.
96. Click the required Agent Profile and then select the Edit button.

Avaya IP Office Contact Center Task Based Guide- Email & Chat Services
October 2017 167
97. Click the Chat tab.
98. Click the Welcome Text … browser button.

Avaya IP Office Contact Center Task Based Guide - Email & Chat Services
October 2017 168
99. Click the Start Chat Session and select the OK button.
100. Click the OK button.

Avaya IP Office Contact Center Task Based Guide- Email & Chat Services
October 2017 169
101. It is now necessary to restart two services. The IPOCC Chat Taskserver & the IPOCC
Tomcat WWW must now be restarted (IPOCC Tomcat WWW restart is only required, if
you are using the WebChat). Using the right mouse button click the windows icon and
select Run.
102. Type services.msc and then click the OK button.
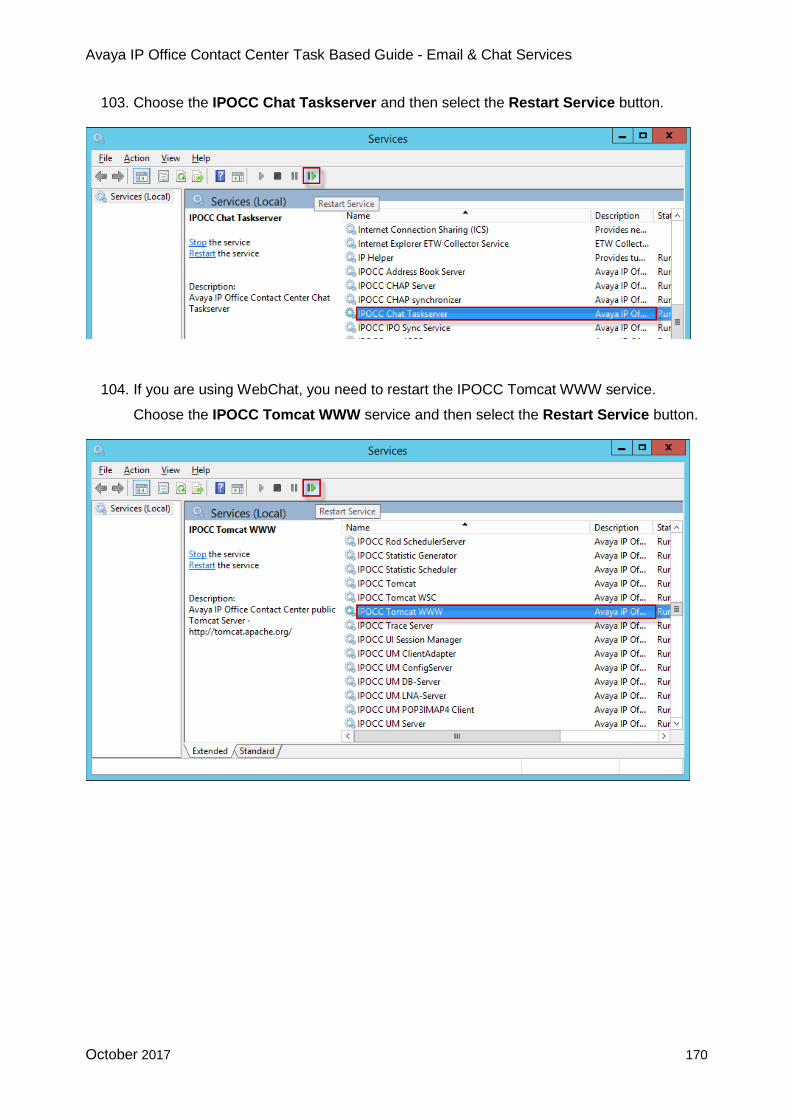
Avaya IP Office Contact Center Task Based Guide - Email & Chat Services
October 2017 170
103. Choose the IPOCC Chat Taskserver and then select the Restart Service button.
104. If you are using WebChat, you need to restart the IPOCC Tomcat WWW service.
Choose the IPOCC Tomcat WWW service and then select the Restart Service button.

Avaya IP Office Contact Center Task Based Guide- Email & Chat Services
October 2017 171
Configuring the one-X Portal XMPP service
As the one-X Portal service is installed as default onto the IP Office Server Edition and
application server, it can be utilized to provide the XMPP service for Chat functionality.
When following the instructions in this guide, it is assumed that the IP Office Contact Center, the
IP Office and the One-X Portal service have been correctly configured.
To use the One-X Portal’s XMPP service for the IP Office Contact Center, changes are required
in all three components.
i. one-X Portal
ii. IP Office Manager
iii. IP Office Contact Center (Use sections Configuration an existing Topic to use
Chat and Configuring an existing Agent group to use Chat)
One-X Portal
1. Using a web browser, open https://XXX.XXX.XXX.XXX:7070 (where XXX.XXX.XXX.XXX
is the IP address of the IP Office Server Edition or application server).

Avaya IP Office Contact Center Task Based Guide - Email & Chat Services
October 2017 172
2. Enter the Username Administrator and the required Password and then select the
Login button.
3. Click Applications and then select one-X Portal.

Avaya IP Office Contact Center Task Based Guide- Email & Chat Services
October 2017 173
4. Click Configuration.
5. Click IM Presence.

Avaya IP Office Contact Center Task Based Guide - Email & Chat Services
October 2017 174
6. In the XMPP Domain Name field, enter the Customer’s XMPP Domain Name and then
select the Save button.
7. A message is displayed stating that the one-X Portal service will require a restart. Click
the Yes button (This will not restart one-X Portal).
8. A Save IM/Presence Configuration message will appear.
9. Click the Close button.

Avaya IP Office Contact Center Task Based Guide- Email & Chat Services
October 2017 175
10. Click Yes to restart the one-X Portal service.
11. Click the Solution button.
12. Click the button.

Avaya IP Office Contact Center Task Based Guide - Email & Chat Services
October 2017 176
13. Click Platform View.
14. Check that the one-X Portal light returns to green.

Avaya IP Office Contact Center Task Based Guide- Email & Chat Services
October 2017 177
IP Office Web Manager
1. Open the Web Manager and click Applications followed by IP Office Manager.
2. Click Configuration.
3. Expand the Primary Server menu.

Avaya IP Office Contact Center Task Based Guide - Email & Chat Services
October 2017 178
4. Using the Right mouse button select User
5. Click New.
6. In the New User record enter the below and then choose the OK button:
A. Name = Jabber Identifier in IP Office Contact Center for the Topic
B. Password = password In IP Office Contact Center for the Topic
C. Confirm Password = password In IP Office Contact Center for the Topic
D. Extension = If the topic is not configured for telephony it will not have an
extension in IP Office Contact Center. The extension entered for the new IP
Office user has to be unique from other extensions in IP Office and from
telephony topics extension range from IP Office Contact Center. If the topic also
has telephony in IPOCC, the extension entered for the IPO user doesn't have to
be the same.
E. Profile = Choose Basic user. (If you want to test the Chat topic using a one-X
Portal user, it will only work if you select a Power User. If Basic users are used,
the Chat option is not available).

Avaya IP Office Contact Center Task Based Guide- Email & Chat Services
October 2017 179
7. Choose the default None and the click the OK button.

Avaya IP Office Contact Center Task Based Guide - Email & Chat Services
October 2017 180
IP Office Contact Center Chat Topic details
8. Repeat the process for each topic that is to be used for Chat.
Step 9-12 should only be used if you require the inbuilt IP Office Contact Center
WebChatDialog.
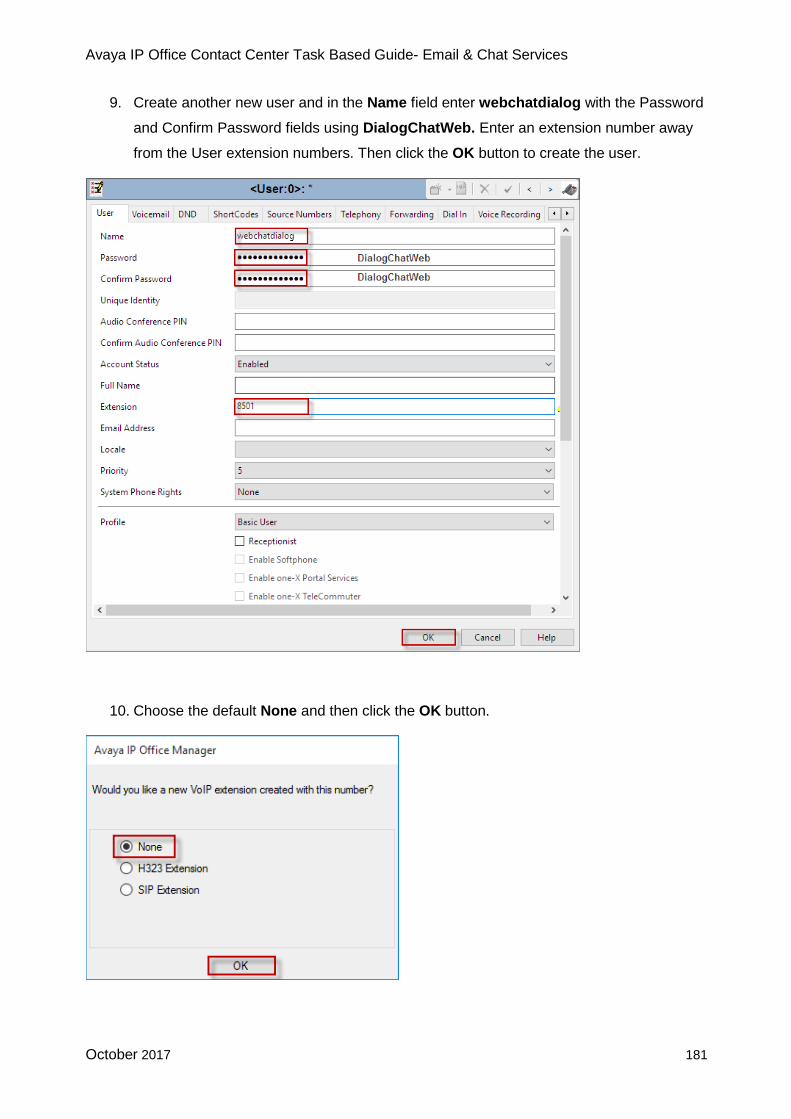
Avaya IP Office Contact Center Task Based Guide- Email & Chat Services
October 2017 181
9. Create another new user and in the Name field enter webchatdialog with the Password
and Confirm Password fields using DialogChatWeb. Enter an extension number away
from the User extension numbers. Then click the OK button to create the user.
10. Choose the default None and then click the OK button.

Avaya IP Office Contact Center Task Based Guide - Email & Chat Services
October 2017 182
11. Click the Save icon.
12. Click the OK button.

Avaya IP Office Contact Center Task Based Guide- Email & Chat Services
October 2017 183
Verifying Web Chat Integration before customer
implementation.
The following process allows the customer to insert a Chat session link into their webpage.
Before asking the customers web developer to insert the new content, a test page can first be
used to validate the process.
Default Test page
1. On the IP Office Contact Center server, browse to the location C:\Program files (x86)\
Avaya \ IP Office Contact Center \ Tomcat WWW \ webapps \ WebChatDialog
.
2. Select and edit the testCertificate.html file.
NOTE: If the server does not have an html editor installed, then you are advised to copy the file
and edit on the technician’s laptop/desktop where an html editor is installed.

Avaya IP Office Contact Center Task Based Guide - Email & Chat Services
October 2017 184
3. The default IP address of 192.168.1.143 needs to be updated to the IP address of the
IP Office Contact Center server.
4. Now we need to update the name of the Topic to be tested. Change Topic1 to the
Topic name (Not the Jabber Identifier) to be used by the customer. When finished Save
the changes and if necessary copy the file back to the IP Office Contact Center server.

Avaya IP Office Contact Center Task Based Guide- Email & Chat Services
October 2017 185
5. Using an Internet browser, browse to
https://XXX.XXX.XXX.XXX:28443/WebChatDialog/testCertificate.html
Where XXX.XXX.XXX.XXX is the IP address of your IP Office Contact Center server
6. Click the Start Chat button.
7. Type in a Name for example. Customer01 and then click the Start chat! button.

Avaya IP Office Contact Center Task Based Guide - Email & Chat Services
October 2017 186
8. In the bottom field, type the text to be sent to the topic and select the Send button.
9. The text is sent to the Topic as illustrated below.

Avaya IP Office Contact Center Task Based Guide- Email & Chat Services
October 2017 187
10. The Chat request, can now been seen in the Agent’s Chat Window.
11. To assist any support queries, the TTConsole – WebChat – WebChatDialog can be
used to view information.

Avaya IP Office Contact Center Task Based Guide - Email & Chat Services
October 2017 188
12. The TTrace logs can be found in ProgramData \ Avaya \ TTLogfiles \ WebChat.

Avaya IP Office Contact Center Task Based Guide- Email & Chat Services
October 2017 189
Creating the HTML to be used for the customer’s web
page.
For each customer web page where a Chat link is required, the customer must add information
in the head and the body of the html web page.
A copy of this text can be found in the file testCertificate.html at the IP Office Contact Center
server location: C:\Program Files (x86)\Avaya\IP Office Contact Center\Tomcat
WWW\webapps\WebChatDialog
After copying the file from the IP Office Contact Center server, you can edit the file before
adding the content to the relevant webpages.
To customize this for your installation, the location of your IP Office Contact Center server must
be defined in the html script.
Change the details in the html as detailed below;

Avaya IP Office Contact Center Task Based Guide - Email & Chat Services
October 2017 190
https://192.168.1.143:28443/WebChatDialog/chat2.html?topicName=Topic1
Change 192.168.1.143 to the IP address of the IP Office Contact Center server and Topic1
to the Topic name (Not the Jabber Identifier) to be used by the customer.
The details of the Start Chat button can also be changed. For example, Text, colors and size.

Avaya IP Office Contact Center Task Based Guide- Email & Chat Services
October 2017 191
This can then match the look and feel of the customer’s own webpages. (See example below).

Avaya IP Office Contact Center Task Based Guide - Email & Chat Services
October 2017 192
Using the ‘CHAT web Java’ example
The IP Office Contact Center installation DVD image contains web page examples that can be
used to create custom webpages that will interact with the Chat topics.
1. Open the Examples folder on the IP Office Contact Center ISO DVD.

Avaya IP Office Contact Center Task Based Guide- Email & Chat Services
October 2017 193
2. Open the Chat folder.
3. Extract the ChatExamples.zip.
4. There are three Chat examples. In this example, the WebChatApp.java files will be
used. Extract the WebChatApp.java files.

Avaya IP Office Contact Center Task Based Guide - Email & Chat Services
October 2017 194
5. Here you will find an Eclipse project file and a build script that can be used by the
customer developer to create a custom Web interface that will link back to the IP Office
Contact Center for Chat from their Web site.
6. To use the default Avaya compiled Java webpage with TomCat, open the dist folder.

Avaya IP Office Contact Center Task Based Guide- Email & Chat Services
October 2017 195
7. Edit the WebChatApp.properites file.

Avaya IP Office Contact Center Task Based Guide - Email & Chat Services
October 2017 196
8. Change the topic names to match those on your IP Office Contact Center system. For
example [email protected]
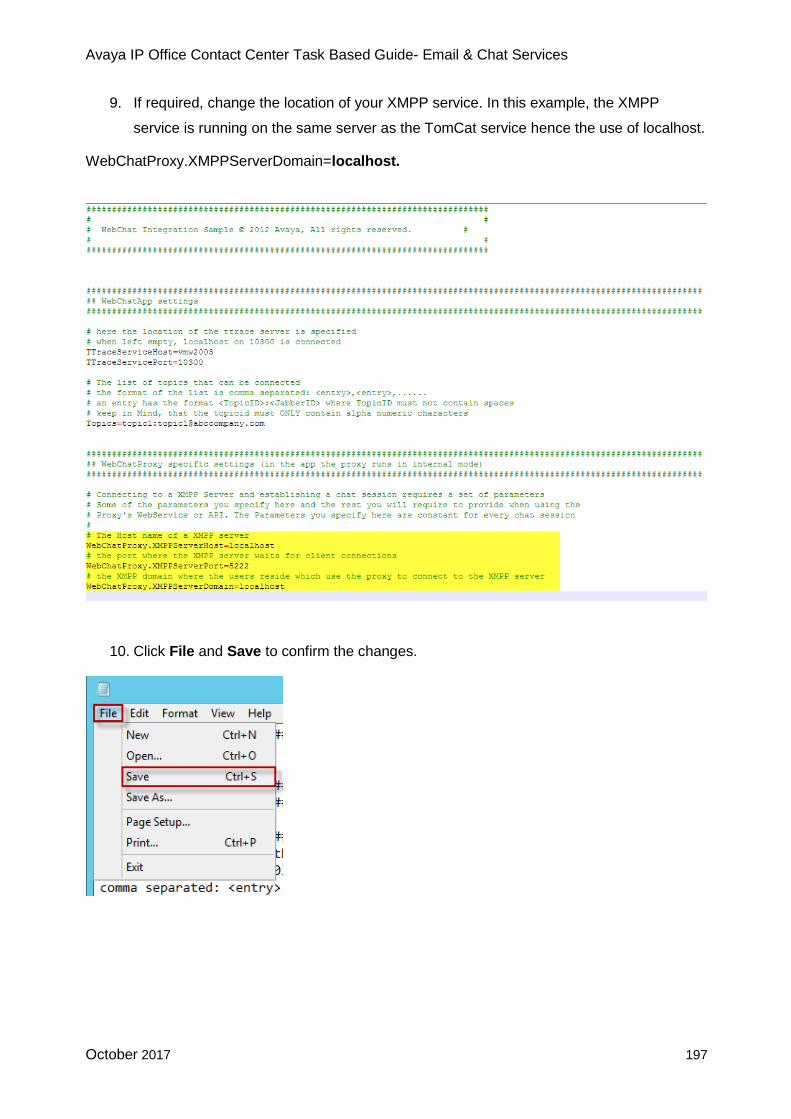
Avaya IP Office Contact Center Task Based Guide- Email & Chat Services
October 2017 197
9. If required, change the location of your XMPP service. In this example, the XMPP
service is running on the same server as the TomCat service hence the use of localhost.
WebChatProxy.XMPPServerDomain=localhost.
10. Click File and Save to confirm the changes.

Avaya IP Office Contact Center Task Based Guide - Email & Chat Services
October 2017 198
11. From R10.0 onwards, IPOffice XMPP server (OnexPortal XMPP Server) will not allow to
connect anonymously. Username and password are mandatory to make XMPP
connection with IP Office XMPP server. To use IP Office XMPP server with
WebChatApp, the following configuration steps are required.
A. Create XMPP user on IP Office XMPP Server e.g. Username: TestUser and Password:
TestPassword.
B. Provide the same username and password in the WebChatApp code. Open
\java\sample\src\java\com\comergo\cc\webchatapp\servlet\WebChatBackendServlet.jav
a in the Eclipse
C. Go to line number 263 and provide username and password which is created on XMPP
Server, as below,
String sessionIDString = a_Issue.m_Backend.createSession("TestUser",
"TestPassword");
D. Recompile the code and create war file and deploy it on tomcat.
12. .Copy the WebChatApp.war file into the C:\Program Files (x86)\Avaya\IP Office
Contact Center\Tomcat\webapps folder.

Avaya IP Office Contact Center Task Based Guide- Email & Chat Services
October 2017 199
13. Copy the WebChatApp.properties file into the C:\Program Files (x86)\Avaya\IP
Office Contact Center\Tomcat\conf folder. Click Yes to overwrite when prompted.
14. Restart the Tomcat service. Click the Windows Icon and choose Run.
15. Type services.msc and then choose the OK button.

Avaya IP Office Contact Center Task Based Guide - Email & Chat Services
October 2017 200
16. Select the IPOCC Tomcat Service and click the Restart icon.
17. The Chat Web page can now be accessed with the following link:
https://server name:8443/WebChatApp/

Avaya IP Office Contact Center Task Based Guide- Email & Chat Services
October 2017 201
Installing and configuring the Open fire XMPP Service
If one-X is not to be used for the XMPP service, the Open fire XMPP Service is freely available
for use. However before the software is installed onto the Server, the FQDN (Fully Qualified
Domain Name) of the server being used for the XMPP Service should be determined.
Determining the Server’s Hostname
1. Open a command prompt on the Server by using the Start – Run option.
2. In the Open field enter cmd and then click the OK button.

Avaya IP Office Contact Center Task Based Guide - Email & Chat Services
October 2017 202
3. Type hostname and press Enter.
4. To close down the command prompt, type exit at the prompt and press the keyboards
enter key.

Avaya IP Office Contact Center Task Based Guide- Email & Chat Services
October 2017 203
Installing Openfire
1. A copy of Openfire can be obtained from the following web site
http://www.igniterealtime.org/downloads/index.jsp
Save a copy on the desktop of the server to be used.
2. Right click on the Openfire installation file and click Run as administrator.

Avaya IP Office Contact Center Task Based Guide - Email & Chat Services
October 2017 204
3. The software installation process will commence.
4. When prompted, click English and then select the OK button.
5. Click Next to continue.

Avaya IP Office Contact Center Task Based Guide- Email & Chat Services
October 2017 205
6. Read then license agreement and click I accept the agreement and then click the Next
button.
7. Click the Next button to install Openfire in the default directory.
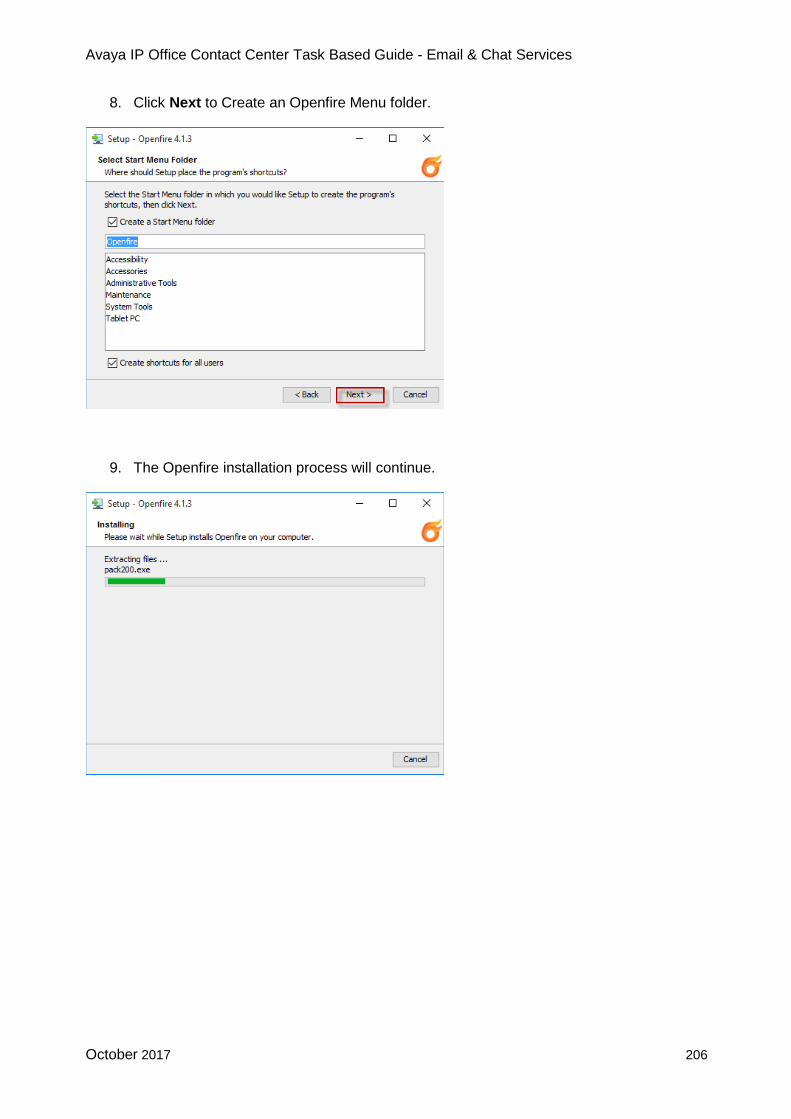
Avaya IP Office Contact Center Task Based Guide - Email & Chat Services
October 2017 206
8. Click Next to Create an Openfire Menu folder.
9. The Openfire installation process will continue.

Avaya IP Office Contact Center Task Based Guide- Email & Chat Services
October 2017 207
10. Click the Finish button to complete installation and run the Openfire software.
11. Click the Launch Admin button.

Avaya IP Office Contact Center Task Based Guide - Email & Chat Services
October 2017 208
12. We will now go through a setup wizard. Select the required language. In this example
English has been selected. Click the Continue button.
13. In the Domain field type the Host Name.Domain Name of the customer and then click
the Continue button. The Console Ports can be left as default.

Avaya IP Office Contact Center Task Based Guide- Email & Chat Services
October 2017 209
14. Change from Standard Database Connection to Embedded Database. Click the
Continue button.
15. On the Profile Settings screen, click Default and then select the Continue button.

Avaya IP Office Contact Center Task Based Guide - Email & Chat Services
October 2017 210
16. When prompted for the Administrator Account, change the Admin email Address to the
customer Administrators email address. For example:
[email protected]. Enter and confirm a system administrator
password to be used with the administrator account on the Openfire software and then
press the Continue button.
17. The setup is now complete, click the Login to the admin console button.

Avaya IP Office Contact Center Task Based Guide- Email & Chat Services
October 2017 211
18. In the username field enter admin and in the password field enter the Admin
password that was created earlier. Then click the Login button.
19. We will now add the account(s) to be used for the IP Office Contact Center CHAT
topic(s). Click the Users/Group tab.

Avaya IP Office Contact Center Task Based Guide - Email & Chat Services
October 2017 212
20. Click the Create New User option.
Note: Only CHAT topics require adding to the XMPP service, Agents do not need to be
added.
21. Enter the following and select the Create User button.
a. Enter a Username for the topic as required. For example topic1.
b. In this example, an email address is not required.
c. Enter and confirm a Password for the topic and then select the Create User
button.

Avaya IP Office Contact Center Task Based Guide- Email & Chat Services
October 2017 213
This password is initially set for the individually topic from the Chat tab in the IP Office Contact
Center.
22. The new XMPP topic account is created.
23. Click the User Summary link.

Avaya IP Office Contact Center Task Based Guide - Email & Chat Services
October 2017 214
24. The Online presence will change to green when the setup has taken place in IP Office
Contact Center. If the icon does not change to green, you can use tt_console – Chat –
ChatTaskserver to look for error messages.
25. Once the icon is green. The configuration of Openfire is complete.
26. (OPTIONAL) You may wish to create another account on the Openfire that can be used
to test the system internally e.g. ‘customer’. Note that the ‘customer’ will only display as
online when configured in IP Office Contact Center (as a topic) or connected with a chat
client (For example. Pidgin).

Avaya IP Office Contact Center Task Based Guide- Email & Chat Services
October 2017 215
Installing Openfire as a Service
Openfire can also be installed as a service. The openfire-service.exe is located in the bin
directory of the installation.
1. Open a command prompt.
2. Navigate to the folder of Openfire / bin.
3. Enter the following command.
openfire-service / install
4. Openfire is registered as a service.
5. The startup type is set to Automatic.

Avaya IP Office Contact Center Task Based Guide - Email & Chat Services
October 2017 216
Testing a Chat Session using Pidgin XMPP client
It would be good practice to test the Chat topics before they go live. This can be achieved using
an XMPP client for example Pidgin. The account to be used would be the customer account
which was previously created in Openfire.
1. The Pidgin software can be obtained from the following website https://pidgin.im/
2. Download the Pidgin software and install it on the required PC. Select the Language and
then click the OK button.

Avaya IP Office Contact Center Task Based Guide- Email & Chat Services
October 2017 217
3. Click the Next button.
4. Read and agree to the License agreement and then select the Next button.

Avaya IP Office Contact Center Task Based Guide - Email & Chat Services
October 2017 218
5. Click the Next button to install the defaults.
6. Click the Install button to install in the default location.

Avaya IP Office Contact Center Task Based Guide- Email & Chat Services
October 2017 219
7. Click the Next button.
8. Click the Finish button to complete the installation.
9. Start the Pidgin application.

Avaya IP Office Contact Center Task Based Guide - Email & Chat Services
October 2017 220
10. Click the Add button to add an account.
11. Enter the details for the customer account.
A. Change the Protocol to XMPP.
B. In the Username field type customer.
C. In the Domain field type xmpp.abccompany.com. (The domain referenced is
for illustrative purposes only and should be replaced with Domain to be utilized
by the customer).
D. In the Password field type in the password for the customer test account.
E. Click the option to Remember password and then select the Add button.

Avaya IP Office Contact Center Task Based Guide- Email & Chat Services
October 2017 221
12. Make sure the account is Enabled and then select the Close button.
13. Choose Buddies and then select Add Buddy.

Avaya IP Office Contact Center Task Based Guide - Email & Chat Services
October 2017 222
14. Type in the topics details under Buddy’s username and then choose the Add button.
15. To create a Chat session right mouse click on the Topic and then select IM.

Avaya IP Office Contact Center Task Based Guide- Email & Chat Services
October 2017 223
16. Enter text into the Chat window and press Enter on your keyboard.
17. The Chat session can now be answered by the Agent.

Avaya IP Office Contact Center Task Based Guide - Email & Chat Services
October 2017 224
Avaya Documentation
http://support.avaya.com/
Avaya IP Office Contact Center Task Based Guides
Avaya IP Office Contact Center Start Here First
Avaya IP Office Contact Center Task Based Guide - Core Installation
Avaya IP Office Contact Center Task Based Guide - Advanced Installation
Avaya IP Office Contact Center Task Based Guide - IVR Editor Scenarios
Avaya IP Office Contact Center Task Based Guide - Task-Flow Editor Telephony
Avaya IP Office Contact Center Task Based Guide - Telephony User Interface
Avaya IP Office Contact Center Task Based Guide - Reporting
Avaya IP Office Contact Center Task Based Guide - Dialer
Avaya Task Based Guide Configuring Call Recording with Avaya IP Office Contact Center
Avaya IP Office Contact Center Task Based Guide - Email and Chat Services
Avaya IP Office Contact Center Task Based Guide -Maintenance
Please note, only the Avaya IP Office Contact Center Task Based Guides listed above are
available from Avaya. Further IP Office Task Based Guide documentation as listed below is
available directly from ITEL. http://www.iteluk.com/

Avaya IP Office Contact Center Task Based Guide- Email & Chat Services
October 2017 225
ITEL IP Office Task Based Guides
Initial Installation
1. IP Office Configuration Maps
2. IP Office Hardware Installation
3. IP Office Initialisation
4. IP Office Manager
5. IP Office Voicemail Pro Initial Installation Guide
6. IP Office Small Community Networking
7. IP Office Customer Call Reporter Initial Installation Guide
8. IP Office Server Edition Configuration
9. IP Office Security Policies
UCM
10. IP Office Unified Communications Module
Core Telephony
11. IP Office Telephony and Call Routing
12. IP Office Short Codes Summary
13. IP Office Hunt Group Setup and Operation
14. IP Office Conferencing
15. IP Office IP Telephony Guide
16. IP Office Computer Telephony Integration – 1st Party
Users, Telephone & Softphone Configuration
17. IP Office Configuring IP Office Phones and User Accounts
18. IP Office Call Handling
19. IP Office Configuring the IP Office Softphone
Auto Attendant & Voicemail
20. IP Office Embedded Voicemail (Intuity Mode) Flowchart
21. IP Office Auto-Attendant Setup and Operation
Avaya IP Office Contact Center Task Based Guide - Email & Chat Services
October 2017 226
22. IP Office Embedded Voicemail
23. IP Office Embedded Voicemail Flowchart
Voicemail Pro
24. IP Office Voicemail Pro Summary Guide
25. IP Office Voicemail Pro – Voicemail User Guide
One X Portal & IP Office Applications
26. IP Office One X Portal Guide
27. IP Office One X Mobile Preferred Implementation
28. IP Office Plug-in for Microsoft® Outlook®
29. IP Office MS Lync Plugin
30. IP Office Avaya Flare
31. IP Office One X Mobile Essential
Customer Call Reporter – CCR
32. IP Office Customer Call Reporter Configuration Guide
33. IP Office Customer Call Reporter Wallboard Guide
Contact Store & Receptionist Console
34. IP Office Contact Store
35. IP Office Receptionist Console
Maintenance
36. IP Office Backup and Restore
37. IP Office System Status Application
38. IP Office Upgrade Guide

Avaya IP Office Contact Center Task Based Guide- Email & Chat Services
October 2017 227