
Automatic Plant Watering System - GrowWorks
16
Automatic Plant Watering System OWNER’S MANUAL GrowWorks TM Oasis Automatic Plant Watering System US Patent Reg. No. 5,546,700 Model 25R OWNER’S MANUAL 3rd Edition– December 2005 Product No. GWK-OAPW-25RND UPC #8-27912-02119-6 © 2001-2005 GrowWorks Corporation. All Rights Reserved. This beautiful Dendrobium Orchid has been a “test plant” at GrowWorks since October 2002. For most of this time it was used as a “control” plant- watered manually (top down) and compared against the same type plant being watered automatically by a GrowWorks Oasis. On April 14th, 2005, we moved this plant into a GrowWorks Oasis unit and within 3 weeks, it began producing the flower bloom that you see in the photo. This was a surprise since it had already bloomed in December and has always bloomed only once per year at that same time. Now it is producing another bloom (left side). What is most amazing is that the bloom you see above is over 3 months old ! Water consumption was only 2 gallons in 14 weeks. This plant is true living testimony to the benefits of the GrowWorks Oasis. Photo of Dendrobium Hybrid Orchid Taken 01Sep05 Notice This manual and any examples contained herein are provided “as is” and are subject to change without notice. GrowWorks Corp. makes no warranty of any kind with regard to this manual, including, but not limited to, the implied warranties of merchantability and fitness for a particular purpose. GrowWorks Corp. shall not be liable for any errors or for incidental or consequential damages in connection with the furnishing, performance, or use of this manual or the examples herein.
Transcript of Automatic Plant Watering System - GrowWorks
Automatic Plant Watering System
OWNER’S MANUAL
GrowWorksTM Oasis Automatic Plant Watering System US Patent Reg. No. 5,546,700
Model 25R OWNER’S MANUAL 3rd Edition– December 2005 Product No. GWK-OAPW-25RND UPC #8-27912-02119-6
© 2001-2005 GrowWorks Corporation. All Rights Reserved.
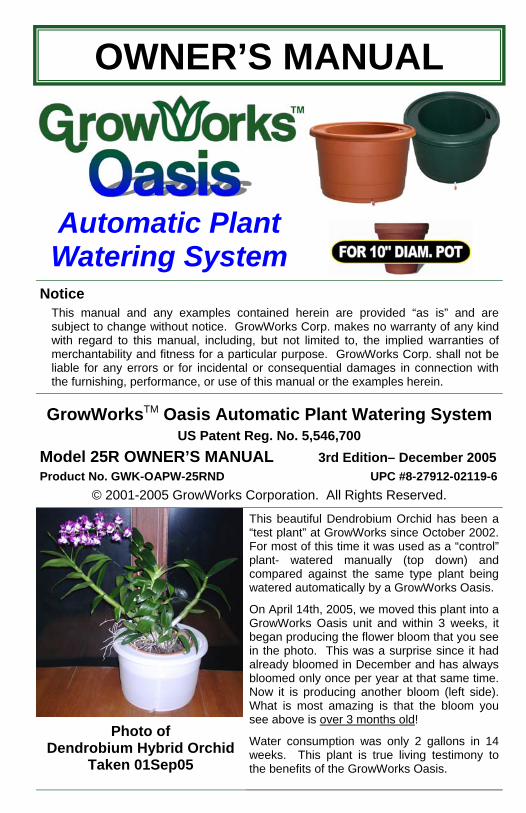
This beautiful Dendrobium Orchid has been a “test plant” at GrowWorks since October 2002. For most of this time it was used as a “control” plant- watered manually (top down) and compared against the same type plant being watered automatically by a GrowWorks Oasis.
On April 14th, 2005, we moved this plant into a GrowWorks Oasis unit and within 3 weeks, it began producing the flower bloom that you see in the photo. This was a surprise since it had already bloomed in December and has always bloomed only once per year at that same time. Now it is producing another bloom (left side). What is most amazing is that the bloom you see above is over 3 months old!
Water consumption was only 2 gallons in 14 weeks. This plant is true living testimony to the benefits of the GrowWorks Oasis.
Photo of Dendrobium Hybrid Orchid
Taken 01Sep05
Notice This manual and any examples contained herein are provided “as is” and are subject to change without notice. GrowWorks Corp. makes no warranty of any kind with regard to this manual, including, but not limited to, the implied warranties of merchantability and fitness for a particular purpose. GrowWorks Corp. shall not be liable for any errors or for incidental or consequential damages in connection with the furnishing, performance, or use of this manual or the examples herein.

GrowWorks Oasis
1. Start Here
1. Start Here Congratulations on your purchase of our GrowWorksTM Oasis Automatic Plant Watering System. The GrowWorks Oasis will provide your plants with the right amount of water at just the right time- when they ask for it. Now you can go on a long vacation and not worry whether the person who promised to water your plants will do their job.
About this Owner’s Manual This Owner’s Manual is designed to both show you how to use your new GrowWorks Oasis and to let you learn a little bit about the “bottom-up” method of plant watering. If you are like most people, you have been pouring water on top of the soil (“top-down” or “drench and drain”) and have done this watering chore about once per week. In contrast, the GrowWorks Oasis waters your plants from the bottom up (also called “sub-irrigation”) and does so automatically, but only when the plant has consumed the water it was given. There are important differences between “bottom-up” and the typical “top-down” watering methods that you should be aware of, and we strongly recommend that you please read this entire Owner’s Manual completely and thoroughly. We know that no one likes to read the instructions. But if you want to experience the same kind of joy that our lovely Dendrobium on the front page has given us, you’ve got to do your homework! If you insist on jumping right in without knowing how deep the water is, please at least read our Quick Start Guide to get going. Otherwise, start with Chapter 2 to learn how it all works. In any case, your plants will love you for giving them their new GrowWorks Oasis, and you will love the time you save by not having to water them every week.
2. Understanding the GrowWorks Oasis Planter Components of the System
In Diagram A on the facing page we’ve labeled the names of most components of the GrowWorks Oasis Automatic Plant Watering System. All parts are described in the list below:
• Air Baffle Chamber- Allows trapped air to escape from the top of the Water Reservoir as water fills the Reservoir cavity.
• Air-Tight Water Reservoir- 2 gallons (7.6 L) of water for the plant is stored here. If the Reservoir loses its air-tight seal (due to a crack or pin hole air leak), the unit will fail and flood the Pot Chamber.
• Drain Tube & Cap (not shown)- The Drain Tube connects to the Overflow Spout and, if the Cap is off, allows excess water to drain so the Pot Chamber stays at a fixed water level. Remove the Cap for outdoor use to let rain water escape. (Check it periodically to make sure it is not plugged with debris.) For indoor use, temporarily remove the Cap when refilling the unit and catch the excess water runoff (if any) in a dish or small pail.
• Fill Tube- Pour water in here with a fast non-stop manner to fill the Reservoir. If you pour slowly or pause while filling, an air lock will occur and the unit will not fill properly. Do not let dirt or other debris fall into the Fill Tube. It will clog water flow.

Model 25 Owner’s Manual
2. Understanding GrowWorks Oasis- 1
Components of the System (continued) • Flow Gate- Controls the water level in the Pot Chamber. • Overflow Spout (not shown)- This is a backup water level control that allows
excess water (i.e.- rain) to run off when used outdoors. • Plant Pot- This should be a 10” (25.4 cm) standard clay pot in the Model 25.
Plastic and glazed ceramic pots do not “breathe” well. You must use a plant pot. • Pot Chamber- Your potted plant sits in this area in a pool of water that is
automatically maintained at a constant 1/2” depth. Do Not put soil directly into the GrowWorks Oasis Pot Chamber. Your plant must first be potted in a plant pot.
• Pot Liner- Synthetic Fleece or other water-absorbent material that won’t rot covering hole in the plant pot to keep dirt in place.
• Potting Soil- The growth medium matched to your plant type. • Water Refill Indicator- A float that shows a 1/2” green tip above the rim of the Fill
Tube when the Reservoir has sufficient water, but drops to indicate that the Reservoir requires refilling.
• Wicking Material (not shown)- Water absorbing material added to lower layer of potting soil to help draw water up towards the top of the soil. Type of material is dependent upon plant type and its water needs. (Refer to Chapter 4- Potting Tips.)
How It Works The cross-sectional Diagram A at right i l l u s t r a t e s w h a t happens when you first begin to fill the GrowWorks Oasis. Water flows from the Fill Tube into the Air-T i g h t W a t e r Reservoir, then into the Pot Chamber through the Air Baffle Chamber and Flow Gate where it is absorbed by the Potting Soil and Wicking Material in the plant pot. While filling the unit, you will hear lots of bubbling as the water displaces air from the Reservoir and pushes it out through the Flow Gate. If you fill too slowly or pause in pouring all 2 gallons (7.6 liters) of water into the unit, the Air Baffle Chamber will flood and block the air from escaping. This trapped air will prevent the Reservoir from filling to the top and shorten the time to the next refill.
DIAGRAM A -Filling the Reservoir

GrowWorks Oasis
2. Understanding GrowWorks Oasis- 2
How It Works (cont.) Diagram B shows a full Reservoir with the system in equilibrium. The water level in the bottom of the Pot Chamber, controlled by the Flow Gate (and the Overflow Spout if outdoors), is kept at a maximum level of 1/2” deep. The Potting Soil and Wicking Material absorb water from the bottom and provide moisture to the plant. The F low Ga te replaces water as it is used. The Potting Soil and the amount, depth, and distribution of Wicking Material in the soil must match the plant’s water needs to ensure the correct soil moisture level. Diagram C shows how the Flow Gate lets air into and water out of the Reservoir. The soil begins to dry out as the plant consumes water. In time, the soil dries enough to absorb more water and the water level in the Pot Chamber drops. Water tension causes a meniscus to form over the Flow Gate, keeping the water from coming in, and allowing the
water level to go quite low before the meniscus breaks. This permits water to flow in and air to gurgle out until the Flow Gate is covered and air can no longer flow into the Reservoir. This happens in a cyclical fashion and gives plants the “wet-then-dry” environment they prefer. It is normal for the top layer of soil in the plant pot to be dry. (Refer to Chapter 3- What to Expect.)
DIAGRAM B- Reservoir Is Full
DIAGRAM C- Plant Controls the Water Flow

Model 25 Owner’s Manual
3. Using GrowWorks Oasis- 3
3. Using the GrowWorks Oasis Planter Filling the Reservoir for the First Time
In the first picture, two 1 gallon (3.8 liter) jugs are full and ready for filling the Reservoir. The GrowWorks Oasis is sitting in a sink; something to consider when you are practicing filling for the first time. Some people use a very large metal funnel with the spout bent to fit in the Fill Tube.
In the next picture, the water is being poured into the Fill Tube as fast as possible. It is beginning to slowly trickle through the Flow Gate into the Pot Chamber. As the Reservoir fills, the trapped air increases in pressure and the rate of water flow increases accordingly.
In the third picture, the last of the second gallon of water is poured into the Fill Spout. As the Reservoir is filled to the top, the last of the air will bubble into the Pot Chamber as it is forced out through the Flow Gate. The water will stabilize at about 1/2” deep. (At this point, the Drain Cap should be on the end of the Drain Tube if the plant is indoors.)
For the first filling, we suggest you let the unit sit for an hour before placing the potted plant in the Pot Chamber. If the water level continues to rise, please refer to Chapter 6- If You Have Problems.
Placing Your Plant You don’t have to repot your plant to use the GrowWorks Oasis if it meets the criteria outlined in the Quick Start Guide or detailed in Chapter 4- Potting Tips. But take note. Since it is now going to be watered from the bottom-up instead of from the top-down, you need to make sure that your plant is potted correctly. [CAUTION: Do not put soil directly into the Pot Chamber. It will plug the Flow Gate and the unit will not work.] If your plant is all set for bottom-up (sub-irrigation) watering, then gently place it into Pot Chamber, making sure that your plant pot sits flat on the bottom and does not get caught on the Overflow Spout.

GrowWorks Oasis
3. Using GrowWorks Oasis- 4
Placing Your Plant (continued) The GrowWorks Oasis is designed to fit a 10” (25.4 cm) standard clay pot, but a smaller pot will work. When the plant pot is sitting in the water on the bottom of the Pot Chamber, the soil will begin to absorb water and, if your soil is dry, you will hear a “gurgling” sound as the GrowWorks Oasis replaces water that the soil has absorbed.
Place the GrowWorks Oasis with potted plant near a light source appropriate for your type of plant. Lift the unit by the outer rim and try to keep it level as you move it. Take care in lifting the unit as it will be heavy. The GrowWorks Oasis with 2 gallons of water weighs over 19 lbs. (8.6 kg) and a 10” potted plant can easily weigh 10 lbs. (4.5 kg) or more. You may want to place the filled GrowWorks Oasis first and add the potted plant after the unit has been placed where you want it.
The bottom of the GrowWorks Oasis measures 12” (30.5 cm) in diameter, so you will need a shelf or small table big enough (and strong enough) to hold the unit. You may also want to place the unit on the floor, but it makes it difficult to drain off any excess water if it is not elevated at least a few inches so you can fit a dish underneath the Drain Tube when you are refilling the Reservoir. The African Violet at right is in a GrowWorks Oasis sitting on a wrought iron plant stand.
Checking Your Planting When you use the GrowWorks Oasis for the first time, it is normal to be nervous about how it will work for your plant. Please relax. We have tested the GrowWorks Oasis since 1995 and had great success with plants ranging from Cactus to Orchid. Even if you have a “black thumb” instead of a green one, you too will have success if you follow the instructions in this Owner’s Manual. To help put your mind at ease, here are some things to check after you’ve placed your potted plant in the GrowWorks Oasis: • During the First 1 to 2 Hours- If the soil in the plant pot was dry when
you put it in the GrowWorks Oasis, you will occasionally hear a “gurgle” as water is released from the Reservoir. This indicates that the soil is drawing water and the unit is working to reach and stabilize at the proper moisture level. This is determined by the type of potting soil and amount of wicking material in the plant pot.
• After 24 Hours- Lift the plant pot out of the GrowWorks Oasis and examine the sides of the clay pot. The clay pot will be darker and damp to the touch part way up the side. This indicates the level to which the pot is drawing water. Refer to Chapter 4- Potting Tips to help you see if this level of moisture is correct for your plant type.

Model 25 Owner’s Manual
3. Using GrowWorks Oasis- 5
Checking Your Planting (continued) • After Two Days- Stick your finger into the soil in a place where you won’t
damage the plant’s roots and feel the moisture in the soil. For most plants, the top 1” (2.54 cm) or so will be dry, and beyond that you will feel moisture. Taking into account the type of plant and how you potted it, if the top of the soil is damp or the soil is dry to 4” (10 cm) or more, refer to Chapter 6- If You Have Problems right away.
• After 1 Month- Check the Water Refill Indicator every week or so. Note that it will not drop until there is less than 1/2” of water left in the Reservoir. To make sure it is working, press down on the green tip. It should bob back up into position upon release.
• Water Level in Fill Tube Not Related to Reservoir- The water you see at the bottom of the Fill Tube is always at the same level as the water in the Pot Chamber and not related to the Reservoir.
Refilling the Reservoir When the Reservoir has more than 1/2” of water, the green tip of the Water Refill Indicator will stick up above the top of the Fill Tube approximately 1/2” (1.25 cm).
The top picture at left shows what the Water Refill Indicator looks like when there is more than 1/2” of water left in the Reservoir. To make sure that it is working correctly, push down on it. Since it is a float, it will bob back up into position when you let go of it and will continue to do this as long as there is sufficient water to keep it floating off of the bottom of the Reservoir.
As the water in the Reservoir reaches a level of 1/2”, the Water Refill Indicator will start to drop. Within a week or so, the Reservoir will be empty, and the Water Refill Indicator will look like the bottom left picture. If you push down on the tip, it will not bob since it is touching the bottom of the Reservoir. You should refill the Reservoir at this point.
You do not have to remove the plant or move the unit in order to refill the GrowWorks Oasis. Just pour in 2 gallons (7.6 liters) of water as fast as possible without stopping. If you prefer, use a large metal funnel with a spout bent to fit into the Fill Tube to fill without spilling.
If you have to leave home but think the Reservoir will empty before you return, you can add water to the Reservoir at any time. The Pot Chamber will flood and trapped air will stop the Reservoir from filling to the top. Make sure to take the Cap off the Drain Tube and let all the excess water drain (using a dish or pail) after you’ve finished adding the water.

GrowWorks Oasis
3. Using GrowWorks Oasis- 6
Fertilizing Your Plant Here are a few Rules about fertilizing with the GrowWorks Oasis:
1. Do Not put Fertilizer in the Reservoir- It will clog up the water passageways and stop the unit from working.
2. Use Liquid Fertilizer Poured Over the Soil- Stake type fertilizers that go in the soil do not work well unless they are put down really deep into the soil where there is enough water to dissolve them. It is better to use a liquid or crystal fertilizer mixed in water and pour it over the soil. Dilute the fertilizer with water by at least two times greater than the package directions to avoid root damage.
3. Don’t Over Fertilize- In our testing experience, plants in a GrowWorks Oasis did not need to be fertilized as often as top-down watered plants of the same type. Start by fertilizing half as much, half as often, and diluted by water twice as much as the directions state for a few months and see how your plant responds.
What to Expect The hardest thing for most people to get used to is that the top layer of soil in the plant pot will typically become dry. Since many plants love to be misted, grab your spray bottle and mist as often as you like. But do not pour water on the soil to make it wet. You will over water.
The average plant will go at least 8 weeks before you need to refill the Reservoir. If you previously watered your plant every week (52 times per year), you will now have to do so only 6 times per year! Of course, this will vary depending upon the type and size of the plant, the humidity in your region and your home, and the time of year (plant growth cycle).
Although we can’t promise this will happen for you, in our experience plants kept in the GrowWorks Oasis grew bigger and bloomed longer and more robustly than the same type of plant watered top-down by hand.
We believe that this is because the GrowWorks Oasis allows the plant to control its own watering.
With the worry of when to water and how much to water handled automatically for you, even novice plant lovers can grow and keep beautiful house plants like the robust Peace Plant shown at right.

Model 25 Owner’s Manual
4. Potting Tips- 7
4. Potting Tips Potting Basics- African Violet To pot a plant for the GrowWorks Oasis, follow these simple steps:
1. Place Synthetic Fleece in Pot Bottom- To keep dirt out of the Pot Chamber, a water-absorbent material that will not rot must cover the hole in the bottom of the clay pot. This will also help to wick water from the Pot Chamber into the soil. In the upper right picture, we have taken a standard 10” (25.4 cm) clay pot, traced the bottom onto a sheet of synthetic fleece (about 1/4” thick), and cut out the tracing. Then we put the cut out into the bottom of the pot as shown in the second picture. Note that almost any inorganic fabric that absorbs (wicks) water will work well for this purpose.
2. Select Correct Potting Soil- It is important to use the correct potting soil for your plant. In this example, we are potting an African Violet using Scotts® Potting Soil for African Violets. This soil mix contains large amounts of sphagnum moss, peat, and perlite and does not need additional Wicking Materials to be added. Never put gravel or rock chips in the clay pot bottom as it will inhibit the wicking of water into the soil.
Fill the plant pot to the top with soil but do not pack tightly. Contrary to the directions on most potting soil bags, do not add water to the potting soil at this point. Except with very dry peat moss, your GrowWorks Oasis will take care of this and ensure that the soil contains the correct moisture level. Note that if a plant is over watered, it can start to develop root rot in as little as 36 hours.
3. Pot Plant in Soil- Put the plant in the soil in the same way that you would for any other repotting. For African Violets, the soil should be mounded so that the center of the plant is slightly higher than the surrounding soil. This helps to keep the leaves up out of the dirt and dry.

GrowWorks Oasis
4. Potting Tips- 8
Potting Basics- African Violet (continued) 4. Place in GrowWorks Oasis- Put your newly potted plant gently into the Pot Chamber of the GrowWorks Oasis. Make sure the unit is in a location with the proper lighting and warmth the same way you would with any other house plant.
5. If Peat is Very Dry- African Violet potting soil contains a lot of peat which, if too dry, will resist water absorption. Pour up to 2 cups of water evenly over the top of the soil to fix this issue.
Remember, this potting example is only for an African Violet which requires a high moisture level. The top 1/2” (1.27 cm) of the soil will be dry, but moist to the touch below that. Note in the picture at left that the clay pot is darker (damp) about two-thirds of the way to the top of the soil. This indicates the level to which the pot and the Wicking Materials in the soil (a high content of sphagnum moss, peat, and perlite) are pulling the water. This level of moisture will rise up and down over time as the GrowWorks Oasis creates a “wet-then-dry” cycle of watering.
Potting Basics- Orchid Potting exotic plants such as Orchids for bottom-up watering requires a much different approach from the potting of other plant types. Most Orchids require a tree bark potting medium. Since pieces of bark are not very good at wicking water, you will need to add a lot of whole sphagnum moss.
In this example, we are potting a Phalaeonopsis Orchid in a 10” clay pot for placing in the GrowWorks Oasis. Start with the piece of synthetic fleece to cover the hole in the plant pot as before, and add a 1” (2.54 cm) thick layer of whole (not shredded) sphagnum moss on top of the fleece.
The picture at left shows what it will look like after this step. Soak the moss thoroughly with water to make it easier to work with and to know the true volume it will occupy in the plant pot.
Next add more sphagnum moss to line the sides of the pot, somewhat like you are making a moss nest. Add the moss in this manner all the way around the pot, letting it hang over the sides as shown at left. Remember to thoroughly soak the moss as you place it into the plant pot.

Model 25 Owner’s Manual
4. Potting Tips- 9
Potting Basics- Orchid (continued) Add tree bark potting medium for Orchids, mixing in pieces of moss with each layer of the bark, and making sure to create a continuous path of moss for wicking moisture. Wet the bark as you build the layers up to a point where you can set the plant.
Set the root ball of the Orchid into the pot trying to keep as much of the potting medium it was in as intact as you can. This can be a little tricky. Take care to not hurt any of the Orchid’s roots.
Once you’ve placed the plant into the clay pot, tuck in all of the moss that is hanging over the sides. Finish filling the pot with wet bark and moss and clean off any dirt from the outside of the pot so that it will not contaminate the Pot Chamber. Your potting task is done!
Finally, put the newly potted Orchid into your GrowWorks Oasis in a properly lit location where it will be warm, but not dried out by heat vents.
The Phalaeonopsis shown below left is actually in an October 2002 GrowWorks Oasis prototype and was bought specifically for testing this prototype.
When we purchased this Orchid, it was in poor shape. It had only two leaves that were yellowing (you can see the one of these two that is left in the photo) and one stalk with a single sickly bloom. The poor thing was not in great shape.
In the photo at left it has been in the GrowWorks Oasis for about 6 months, has grown several new leaves, and is blooming like crazy! In all, it produced 3 sets of blooms in this time period.
In case you were wondering, we went through repotting this Orchid just to shoot this photo sequence in April 2003.
GrowWorks Oasis
4. Potting Tips- 10
Plant Moisture Requirements Different plant types have different water needs. If you water a plant too much, it can drown and die from root rot. With bottom-up watering, Wicking Materials in the potting soil pull the water from the Pot Chamber up into the soil where plant roots can get at it. Therefore it is very important that the amount, placement, and distribution of Wicking Materials in your plant pot correspond to the plant’s watering level needs.
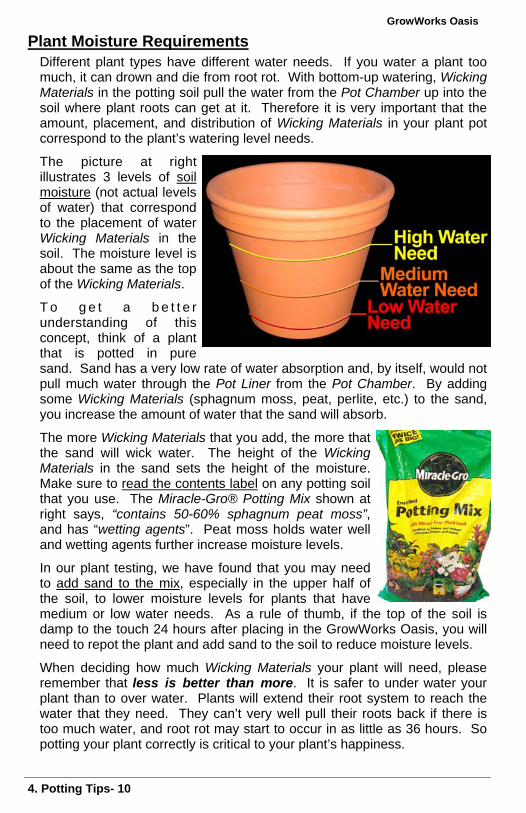
The picture at right illustrates 3 levels of soil moisture (not actual levels of water) that correspond to the placement of water Wicking Materials in the soil. The moisture level is about the same as the top of the Wicking Materials.
T o g e t a b e t t e r understanding of this concept, think of a plant that is potted in pure sand. Sand has a very low rate of water absorption and, by itself, would not pull much water through the Pot Liner from the Pot Chamber. By adding some Wicking Materials (sphagnum moss, peat, perlite, etc.) to the sand, you increase the amount of water that the sand will absorb.
The more Wicking Materials that you add, the more that the sand will wick water. The height of the Wicking Materials in the sand sets the height of the moisture. Make sure to read the contents label on any potting soil that you use. The Miracle-Gro® Potting Mix shown at right says, “contains 50-60% sphagnum peat moss”, and has “wetting agents”. Peat moss holds water well and wetting agents further increase moisture levels.
In our plant testing, we have found that you may need to add sand to the mix, especially in the upper half of the soil, to lower moisture levels for plants that have medium or low water needs. As a rule of thumb, if the top of the soil is damp to the touch 24 hours after placing in the GrowWorks Oasis, you will need to repot the plant and add sand to the soil to reduce moisture levels.
When deciding how much Wicking Materials your plant will need, please remember that less is better than more. It is safer to under water your plant than to over water. Plants will extend their root system to reach the water that they need. They can’t very well pull their roots back if there is too much water, and root rot may start to occur in as little as 36 hours. So potting your plant correctly is critical to your plant’s happiness.

Model 25 Owner’s Manual
5. Continuing Ed for Plant Lovers- 11
Placing GrowWorks Oasis in a Decorative Container The GrowWorks Oasis Automatic Plant Watering System is designed so that the upper rim lip will support the weight of the entire unit and a potted plant. This allows it to be placed inside of another decorative planter. The picture below right shows a GrowWorks Oasis placed inside of a decorative and attractive Topiary Urn.
The outside upper rim lip of the GrowWorks Oasis measures 15” (38.1 cm) in diameter and the outer wall of the upper side under the rim (the diameter of a hole it would fit in) measures 14” (35.6 cm). If a decorative planter meets these size requirements, the GrowWorks Oasis will fit like shown at right.
Alternatively, if the opening in the top of a decorative planter is larger than 15” in diameter, then the GrowWorks Oasis can sit inside of the other plant pot. Either way, this shows that you can make the GrowWorks unit match to any décor.
5. Continuing Education for Plant Lovers Learning More about Bottom-Up Watering
If you’d like to learn more about “bottom-up watering” (also called “sub-irrigation”), we suggest searching the Internet for either term to read more. There are too many good sites to list them here, but you may be surprised at the growing support for this watering method.
Other Types of Self-Watering Planters There are dozens of different plant watering devices on the market, but none of them will work long term the way that GrowWorks Oasis works. We have tested almost every type of competitive product and, in our personal opinion, there is no comparison.
We invite you to purchase any other self-watering planter and use it next to the GrowWorks Oasis with the same type of plant for one year. If you are happier with the other product for any reason, please contact us. If you tell us why you like the other product better and we can’t correct the situation, we will purchase your GrowWorks Oasis back for a full refund.

GrowWorks Oasis
6. Maintenance & Troubleshooting- 12
6. Maintenance and Troubleshooting Standard Maintenance
The GrowWorks Oasis is designed to be as maintenance free as possible. Except for the Water Refill Indicator, there are no moving parts to break. Standard maintenance means keeping the unit clean and free of debris.
Mineral Buildup: If you have water with high mineral content (calcium, etc.), you may encounter a buildup of such minerals in the small hole that lets the water into the Air Baffle from the Reservoir. Over time (a year or more in most cases), this could stop water from flowing out the Flow Gate and cause unit failure. To remedy this problem, do the following:
1. Use Pipe Cleaner to Clean Air Baffle Hole- In the back wall of the Air Baffle behind the Flow Gate, there is a small hole that lets water in from the Reservoir. Use a pipe cleaner to clean this hole if it is plugged. It can be a little tricky to find this hole. Use a dental mirror to help you guide the pipe cleaner.
2. Use White Vinegar to Dissolve Mineral Buildup- Empty the GrowWorks Oasis completely, plug the Flow Gate (a piece of chewed bubble gum works well), and pour a large bottle of white vinegar into the Fill Spout. Shake the unit well and then let it sit overnight. Shake the unit once more, remove the Flow Gate “plug”, and dump the vinegar. Make sure that you rinse the unit well by filling and emptying at least twice to remove the loosened sediments and vinegar.
Plugged Overflow: Periodically check the Overflow Spout and Drain Tube to ensure they aren’t plugged with debris. This is especially important to do after a heavy rain if the unit is used outdoors.
Salt Buildup in Soil: Over time, salts from fertilizer and tap water may build up in the soil. (You will see a “white crust” on top of the soil and on the sides of the clay pot.) Remove the plant pot from the GrowWorks Oasis and take the plant outdoors. Pour a lot of water on the soil, let the water completely drain out, and let the soil dry back to normal (24 hours or so) before returning to your GrowWorks Oasis. This drenching process should adequately flush most salts out of the soil.
If You Have Problems Pot Chamber Flooding: In the unlikely event that the water level fills the Pot Chamber to more than 1/4th of its depth (with the Cap on the Drain Tube), this indicates that your GrowWorks Oasis has a problem. When it occurs is an indicator of what is wrong. Review the list on the facing page to find your problem’s cause.

Model 25 Owner’s Manual
6. Maintenance & Troubleshooting- 13
If You Have Problems (continued) • Water level continues to rise on first filling. If this is the first time you are
filling your GrowWorks Oasis, and you have poured only 2 Gallons (7.6 liters) of water into the Reservoir, but the water level continues to rise in the Pot Chamber way past the Overflow Spout (1/2 the depth of the Pot Chamber like in the picture at right), this may mean that the hermetic seal on the Air-Tight Water Reservoir has an air leak. This cannot be fixed. Since these units are tested at our factory, it may have been damaged during transit (dropped or kicked forcefully). Please contact GrowWorks to arrange a return and replacement.
• Water level continues to rise on subsequent fillings. If you are refilling your GrowWorks Oasis and the water floods the Pot Chamber like shown above when 2 Gallons (7.6 liters) are added, there are only two possible reasons for this problem: 1. The Reservoir was not empty when you refilled the unit. To fix this
problem, remove the Cap on the Drain Tube and let all of the excess water drain into a pail. You don’t have to remove the potted plant while draining the excess water, but let it drain overnight so the plant pot also drains completely.
2. The unit has been damaged (hit, dropped, etc.) somehow. Misuse is not covered by our warranty. If no one in your household confesses after your intensive interrogations, contact us and we will see what we can do to help.
Top of Potting Soil is Damp to Touch: Check these causes- • Pot Chamber is Flooded. Review the Pot Chamber Flooding section of
Chapter 6 for a possible cause and remedy for this situation. • Incorrect Potting Soil or Wicking Material. Review Chapter 4- Potting Tips
to make sure that your plant is potted correctly. • Outdoor Plant Got Too Much Rain. If you are experiencing a period of
constant rain and the potting soil has a high peat content, the Overflow Spout may not drain the pot fast enough to let it dry out. Move the unit out of the rain.
Potting Soil Very Dry to 4” (10 cm) or More: For other than low moisture plants such as a cactus, check these causes- • Hole from Reservoir Plugged. Refer to the start of Chapter 6 for the
solution to this problem. • Reservoir is Empty. If it is in the “up” position, push down on the Water
Refill Indicator to see if it is stuck. Then refill the unit.

GrowWorks Oasis
7. Product Warranty- 14
7. Product Warranty Limited Lifetime Guarantee For as long as you own your GrowWorksTM Oasis Automatic Plant Watering System, GrowWorks Corporation guarantees this product to be free from defects in materials and workmanship. GrowWorks will replace such product which, upon inspection by GrowWorks, is found to be defective in materials or workmanship. As a condition to the obligation of GrowWorks to replace such product, the product must be returned to GrowWorks together with a proof-of-purchase satisfactory to GrowWorks. A Proper Return Authorization Number must be obtained from GrowWorks in advance of return with such number to be clearly displayed on the outside of your shipping container. All returns must be accompanied by a written statement setting forth the name, address, and daytime telephone number of the owner, together with a brief description of any claimed defects. Product for which replacement is made shall become the property of GrowWorks. GrowWorks reserves the right to replace any product which has been discontinued from its product line with a new product of comparable value and function. This guarantee shall be void and of no force of effect in the event a covered product has been modified in design or function, or subjected to abuse, misuse, mishandling, or unauthorized repair. Further, product malfunction or deterioration due to lack of maintenance as set forth in the Owner’s Manual is not covered by this warranty. GrowWorks DISCLAIMS ANY WARRANTIES, EXPRESS OR IMPLIED, WHETHER OF MERCHANTABILITY OF FITNESS FOR A PARTICULAR USE, EXCEPT AS EXPRESSLY SET FORTH HEREIN. THE SOLE OBLIGATION OF GrowWorks UNDER THIS LIMITED WARRANTY SHALL BE TO REPLACE THE COVERED PRODUCT, IN ACCORDANCE WITH THE TERMS SET FORTH HEREIN. GrowWorks EXPRESSLY DISCLAIMS ANY LOST PROFITS, GENERAL, SPECIAL, INDIRECT OR CONSEQUENTIAL DAMAGES WHICH MAY RESULT FROM BREACH OF ANY WARRANTY, OR ARISING OUT OF THE USE OR INABILITY TO USE ANY GrowWorks PRODUCT. ANY WARRANTIES WHICH ARE IMPLIED AND WHICH CANNOT BE DISCLAIMED SHALL BE LIMITED IN DURATION TO A TERM OF ONE YEAR FROM THE DATE OF ORIGINAL RETAIL PURCHASE.
GrowWorks Corporation 332 Broad Street Hollis, New Hampshire USA 03049-6037 Tel: 800.897.3310 or 603.579.0576 http://www.growworks.com/
Trademarks shown herein are the property of their respective owners.
Scotts® is a Registered Trademark of The Scotts Company. Miracle-Gro® is a Registered Trademark of Scotts Miracle-Gro Products, Inc. DILL’S® Pipe Cleaners is a Registered Trademark of Lane Limited Corporation.


