AUTODOME Bubble Replacementresource.boschsecurity.com/documents/AUTODOME...AUTODOME Bubble...
20
AUTODOME Bubble Replace- ment (VG4, VG5, or 7000 Ser- ies) VGA-BUBBLE│VGA-BUBHD
Transcript of AUTODOME Bubble Replacementresource.boschsecurity.com/documents/AUTODOME...AUTODOME Bubble...

AUTODOME Bubble Replace-ment (VG4, VG5, or 7000 Ser-ies)VGA-BUBBLE│VGA-BUBHD

en Installation Manual
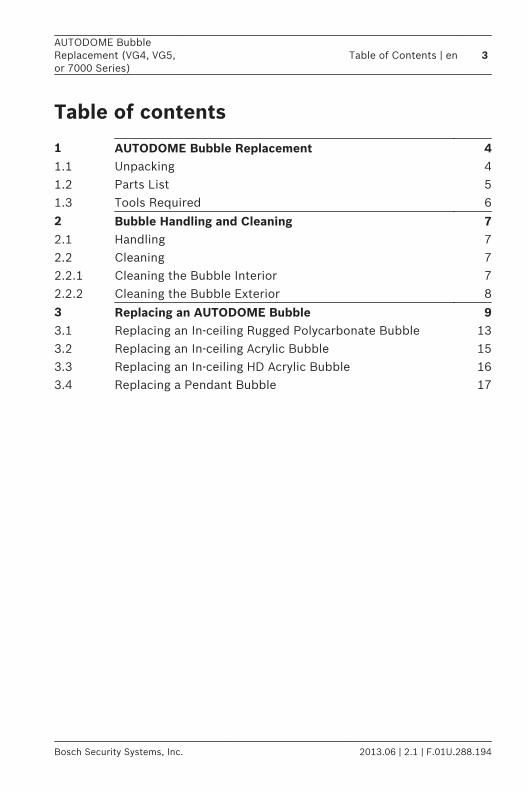
Table of contents
1 AUTODOME Bubble Replacement 41.1 Unpacking 41.2 Parts List 51.3 Tools Required 6
2 Bubble Handling and Cleaning 72.1 Handling 72.2 Cleaning 72.2.1 Cleaning the Bubble Interior 72.2.2 Cleaning the Bubble Exterior 8
3 Replacing an AUTODOME Bubble 93.1 Replacing an In-ceiling Rugged Polycarbonate Bubble 133.2 Replacing an In-ceiling Acrylic Bubble 153.3 Replacing an In-ceiling HD Acrylic Bubble 163.4 Replacing a Pendant Bubble 17
AUTODOME BubbleReplacement (VG4, VG5,or 7000 Series)
Table of Contents | en 3
Bosch Security Systems, Inc. 2013.06 | 2.1 | F.01U.288.194
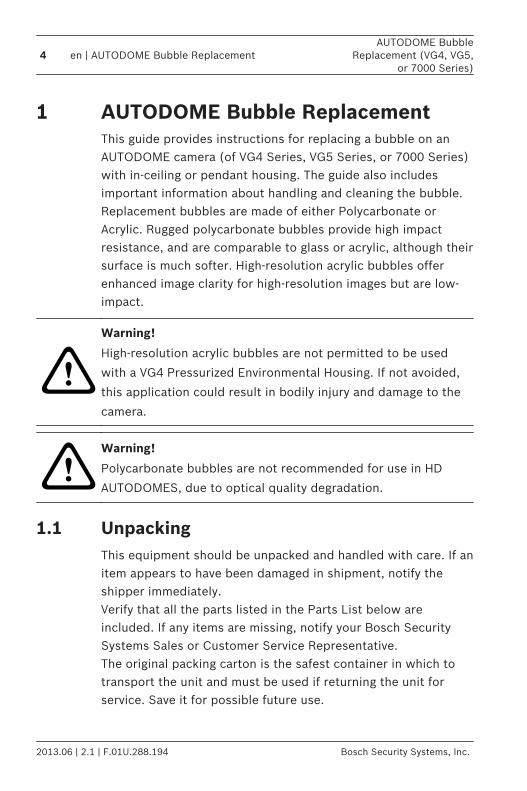
AUTODOME Bubble ReplacementThis guide provides instructions for replacing a bubble on anAUTODOME camera (of VG4 Series, VG5 Series, or 7000 Series)with in-ceiling or pendant housing. The guide also includesimportant information about handling and cleaning the bubble.Replacement bubbles are made of either Polycarbonate orAcrylic. Rugged polycarbonate bubbles provide high impactresistance, and are comparable to glass or acrylic, although theirsurface is much softer. High-resolution acrylic bubbles offerenhanced image clarity for high-resolution images but are low-impact.
!
Warning!
High-resolution acrylic bubbles are not permitted to be used
with a VG4 Pressurized Environmental Housing. If not avoided,
this application could result in bodily injury and damage to the
camera.
!Warning!
Polycarbonate bubbles are not recommended for use in HD
AUTODOMES, due to optical quality degradation.
UnpackingThis equipment should be unpacked and handled with care. If anitem appears to have been damaged in shipment, notify theshipper immediately.Verify that all the parts listed in the Parts List below areincluded. If any items are missing, notify your Bosch SecuritySystems Sales or Customer Service Representative.The original packing carton is the safest container in which totransport the unit and must be used if returning the unit forservice. Save it for possible future use.
1
1.1
4 en | AUTODOME Bubble ReplacementAUTODOME Bubble
Replacement (VG4, VG5,or 7000 Series)
2013.06 | 2.1 | F.01U.288.194 Bosch Security Systems, Inc.
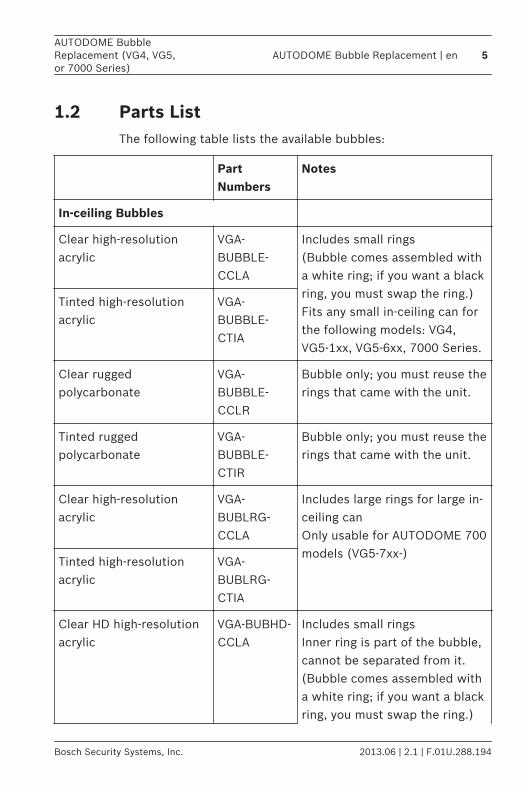
Parts ListThe following table lists the available bubbles:
PartNumbers
Notes
In-ceiling Bubbles
Clear high-resolutionacrylic
VGA-BUBBLE-CCLA
Includes small rings(Bubble comes assembled witha white ring; if you want a blackring, you must swap the ring.)Fits any small in-ceiling can forthe following models: VG4,VG5-1xx, VG5-6xx, 7000 Series.
Tinted high-resolutionacrylic
VGA-BUBBLE-CTIA
Clear ruggedpolycarbonate
VGA-BUBBLE-CCLR
Bubble only; you must reuse therings that came with the unit.
Tinted ruggedpolycarbonate
VGA-BUBBLE-CTIR
Bubble only; you must reuse therings that came with the unit.
Clear high-resolutionacrylic
VGA-BUBLRG-CCLA
Includes large rings for large in-ceiling canOnly usable for AUTODOME 700models (VG5-7xx-)
Tinted high-resolutionacrylic
VGA-BUBLRG-CTIA
Clear HD high-resolutionacrylic
VGA-BUBHD-CCLA
Includes small ringsInner ring is part of the bubble,cannot be separated from it.(Bubble comes assembled witha white ring; if you want a blackring, you must swap the ring.)
1.2
AUTODOME BubbleReplacement (VG4, VG5,or 7000 Series)
AUTODOME Bubble Replacement | en 5
Bosch Security Systems, Inc. 2013.06 | 2.1 | F.01U.288.194
PartNumbers
Notes
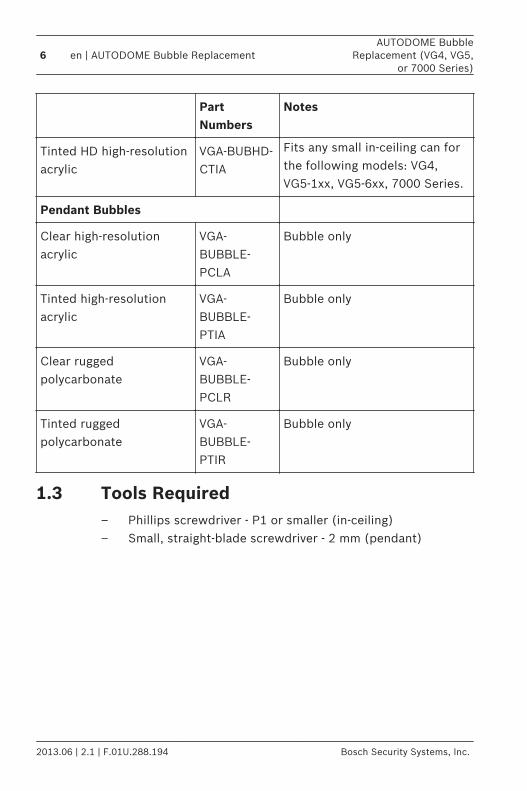
Tinted HD high-resolutionacrylic
VGA-BUBHD-CTIA
Fits any small in-ceiling can forthe following models: VG4,VG5-1xx, VG5-6xx, 7000 Series.
Pendant Bubbles
Clear high-resolutionacrylic
VGA-BUBBLE-PCLA
Bubble only
Tinted high-resolutionacrylic
VGA-BUBBLE-PTIA
Bubble only
Clear ruggedpolycarbonate
VGA-BUBBLE-PCLR
Bubble only
Tinted ruggedpolycarbonate
VGA-BUBBLE-PTIR
Bubble only
Tools Required– Phillips screwdriver - P1 or smaller (in-ceiling)– Small, straight-blade screwdriver - 2 mm (pendant)
1.3
6 en | AUTODOME Bubble ReplacementAUTODOME Bubble
Replacement (VG4, VG5,or 7000 Series)
2013.06 | 2.1 | F.01U.288.194 Bosch Security Systems, Inc.
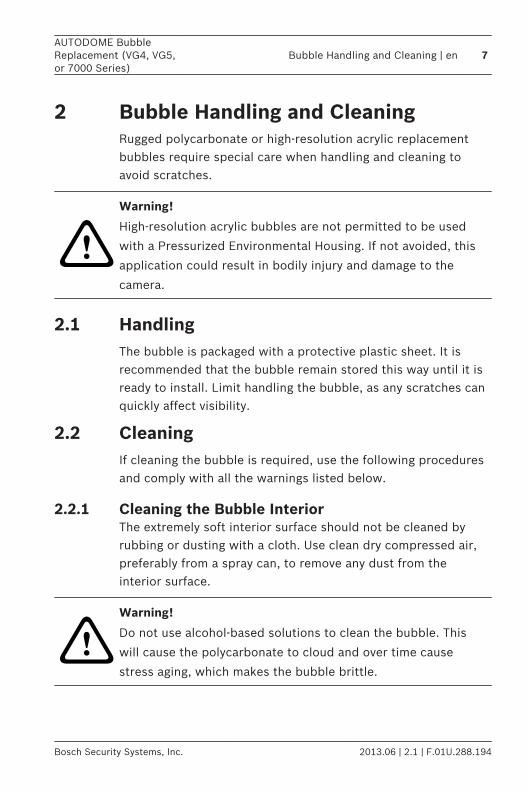
Bubble Handling and CleaningRugged polycarbonate or high-resolution acrylic replacementbubbles require special care when handling and cleaning toavoid scratches.
!
Warning!
High-resolution acrylic bubbles are not permitted to be used
with a Pressurized Environmental Housing. If not avoided, this
application could result in bodily injury and damage to the
camera.
HandlingThe bubble is packaged with a protective plastic sheet. It isrecommended that the bubble remain stored this way until it isready to install. Limit handling the bubble, as any scratches canquickly affect visibility.
CleaningIf cleaning the bubble is required, use the following proceduresand comply with all the warnings listed below.
Cleaning the Bubble InteriorThe extremely soft interior surface should not be cleaned byrubbing or dusting with a cloth. Use clean dry compressed air,preferably from a spray can, to remove any dust from theinterior surface.
!
Warning!
Do not use alcohol-based solutions to clean the bubble. This
will cause the polycarbonate to cloud and over time cause
stress aging, which makes the bubble brittle.
2
2.1
2.2
2.2.1
AUTODOME BubbleReplacement (VG4, VG5,or 7000 Series)
Bubble Handling and Cleaning | en 7
Bosch Security Systems, Inc. 2013.06 | 2.1 | F.01U.288.194
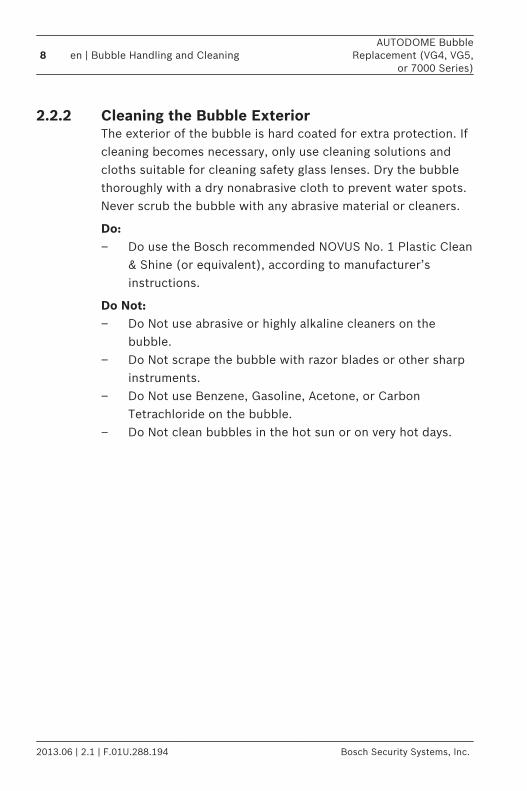
Cleaning the Bubble ExteriorThe exterior of the bubble is hard coated for extra protection. Ifcleaning becomes necessary, only use cleaning solutions andcloths suitable for cleaning safety glass lenses. Dry the bubblethoroughly with a dry nonabrasive cloth to prevent water spots.Never scrub the bubble with any abrasive material or cleaners.
Do:– Do use the Bosch recommended NOVUS No. 1 Plastic Clean
& Shine (or equivalent), according to manufacturer’sinstructions.
Do Not:– Do Not use abrasive or highly alkaline cleaners on the
bubble.– Do Not scrape the bubble with razor blades or other sharp
instruments.– Do Not use Benzene, Gasoline, Acetone, or Carbon
Tetrachloride on the bubble.– Do Not clean bubbles in the hot sun or on very hot days.
2.2.2
8 en | Bubble Handling and CleaningAUTODOME Bubble
Replacement (VG4, VG5,or 7000 Series)
2013.06 | 2.1 | F.01U.288.194 Bosch Security Systems, Inc.
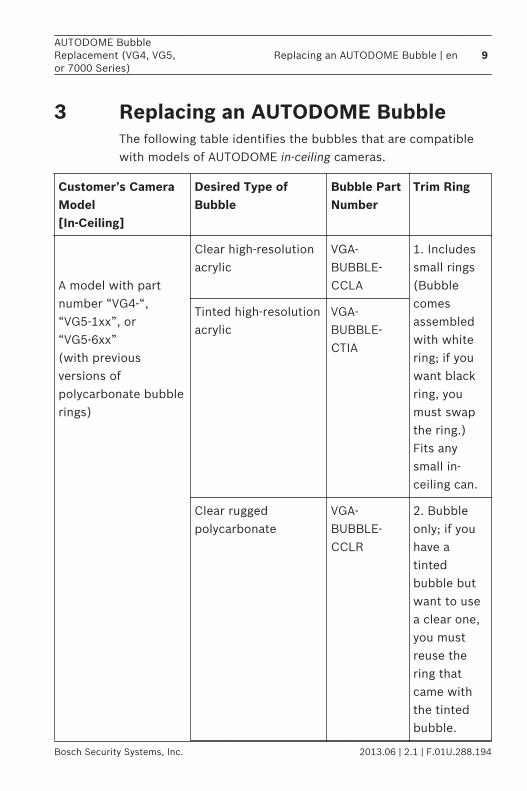
Replacing an AUTODOME BubbleThe following table identifies the bubbles that are compatiblewith models of AUTODOME in-ceiling cameras.
Customer’s CameraModel[In-Ceiling]
Desired Type ofBubble
Bubble PartNumber
Trim Ring
A model with partnumber “VG4-“,“VG5-1xx”, or“VG5-6xx”(with previousversions ofpolycarbonate bubblerings)
Clear high-resolutionacrylic
VGA-BUBBLE-CCLA
1. Includessmall rings(Bubblecomesassembledwith whitering; if youwant blackring, youmust swapthe ring.)Fits anysmall in-ceiling can.
Tinted high-resolutionacrylic
VGA-BUBBLE-CTIA
Clear ruggedpolycarbonate
VGA-BUBBLE-CCLR
2. Bubbleonly; if youhave atintedbubble butwant to usea clear one,you mustreuse thering thatcame withthe tintedbubble.
3
AUTODOME BubbleReplacement (VG4, VG5,or 7000 Series)
Replacing an AUTODOME Bubble | en 9
Bosch Security Systems, Inc. 2013.06 | 2.1 | F.01U.288.194
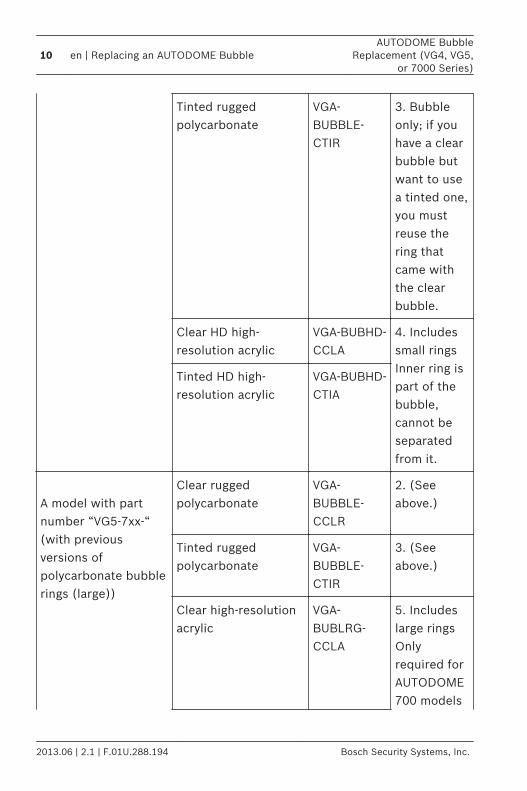
Tinted ruggedpolycarbonate
VGA-BUBBLE-CTIR
3. Bubbleonly; if youhave a clearbubble butwant to usea tinted one,you mustreuse thering thatcame withthe clearbubble.
Clear HD high-resolution acrylic
VGA-BUBHD-CCLA
4. Includessmall ringsInner ring ispart of thebubble,cannot beseparatedfrom it.
Tinted HD high-resolution acrylic
VGA-BUBHD-CTIA
A model with partnumber “VG5-7xx-“(with previousversions ofpolycarbonate bubblerings (large))
Clear ruggedpolycarbonate
VGA-BUBBLE-CCLR
2. (Seeabove.)
Tinted ruggedpolycarbonate
VGA-BUBBLE-CTIR
3. (Seeabove.)
Clear high-resolutionacrylic
VGA-BUBLRG-CCLA
5. Includeslarge ringsOnlyrequired forAUTODOME700 models
10 en | Replacing an AUTODOME BubbleAUTODOME Bubble
Replacement (VG4, VG5,or 7000 Series)
2013.06 | 2.1 | F.01U.288.194 Bosch Security Systems, Inc.
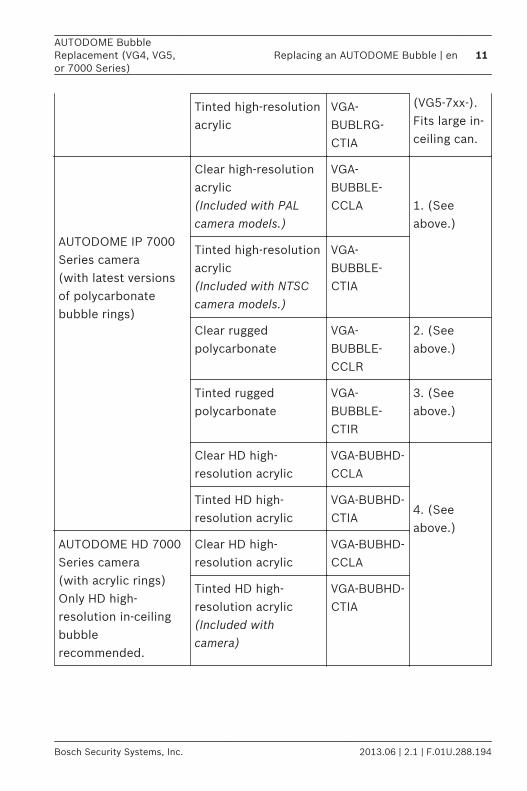
Tinted high-resolutionacrylic
VGA-BUBLRG-CTIA
(VG5-7xx-).Fits large in-ceiling can.
AUTODOME IP 7000Series camera(with latest versionsof polycarbonatebubble rings)
Clear high-resolutionacrylic(Included with PALcamera models.)
VGA-BUBBLE-CCLA 1. (See
above.)
Tinted high-resolutionacrylic(Included with NTSCcamera models.)
VGA-BUBBLE-CTIA
Clear ruggedpolycarbonate
VGA-BUBBLE-CCLR
2. (Seeabove.)
Tinted ruggedpolycarbonate
VGA-BUBBLE-CTIR
3. (Seeabove.)
Clear HD high-resolution acrylic
VGA-BUBHD-CCLA
4. (Seeabove.)
Tinted HD high-resolution acrylic
VGA-BUBHD-CTIA
AUTODOME HD 7000Series camera(with acrylic rings)Only HD high-resolution in-ceilingbubblerecommended.
Clear HD high-resolution acrylic
VGA-BUBHD-CCLA
Tinted HD high-resolution acrylic(Included withcamera)
VGA-BUBHD-CTIA
AUTODOME BubbleReplacement (VG4, VG5,or 7000 Series)
Replacing an AUTODOME Bubble | en 11
Bosch Security Systems, Inc. 2013.06 | 2.1 | F.01U.288.194
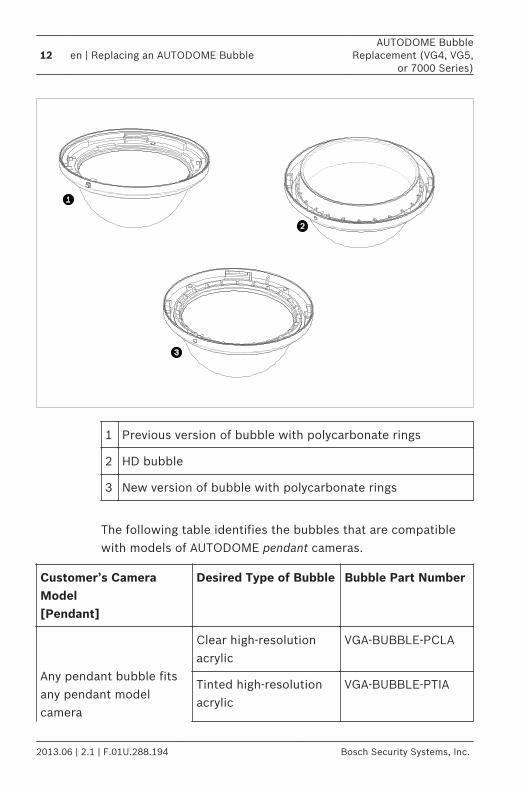
1 Previous version of bubble with polycarbonate rings
2 HD bubble
3 New version of bubble with polycarbonate rings
The following table identifies the bubbles that are compatiblewith models of AUTODOME pendant cameras.
Customer’s CameraModel[Pendant]
Desired Type of Bubble Bubble Part Number
Any pendant bubble fitsany pendant modelcamera
Clear high-resolutionacrylic
VGA-BUBBLE-PCLA
Tinted high-resolutionacrylic
VGA-BUBBLE-PTIA
12 en | Replacing an AUTODOME BubbleAUTODOME Bubble
Replacement (VG4, VG5,or 7000 Series)
2013.06 | 2.1 | F.01U.288.194 Bosch Security Systems, Inc.
Clear ruggedpolycarbonate
VGA-BUBBLE-PCLR
Tinted ruggedpolycarbonate
VGA-BUBBLE-PTIR
Replacing an In-ceiling RuggedPolycarbonate Bubble
Notice!
The following instructions are for bubbles VGA-BUBBLE-CCLR
and VGA-BUBBLE-CTIR (on AUTODOME models VG4, VG5-1xx,
and VG5-6xx).
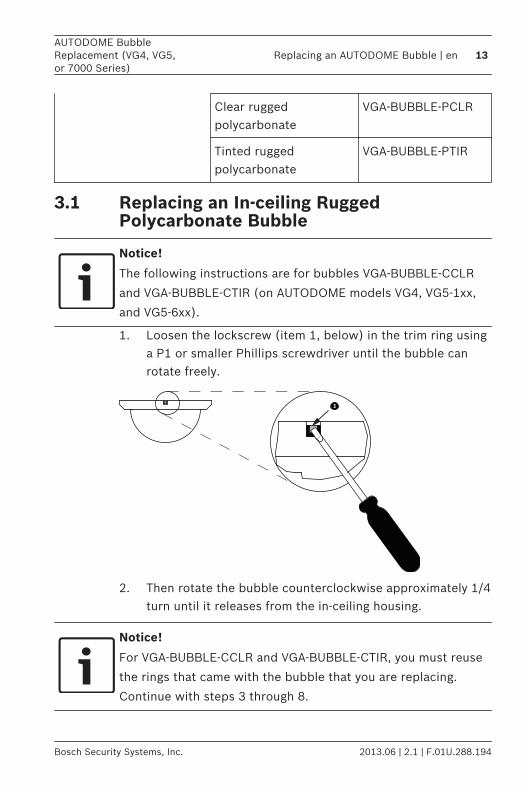
1. Loosen the lockscrew (item 1, below) in the trim ring usinga P1 or smaller Phillips screwdriver until the bubble canrotate freely.
2. Then rotate the bubble counterclockwise approximately 1/4turn until it releases from the in-ceiling housing.
Notice!
For VGA-BUBBLE-CCLR and VGA-BUBBLE-CTIR, you must reuse
the rings that came with the bubble that you are replacing.
Continue with steps 3 through 8.
3.1
AUTODOME BubbleReplacement (VG4, VG5,or 7000 Series)
Replacing an AUTODOME Bubble | en 13
Bosch Security Systems, Inc. 2013.06 | 2.1 | F.01U.288.194
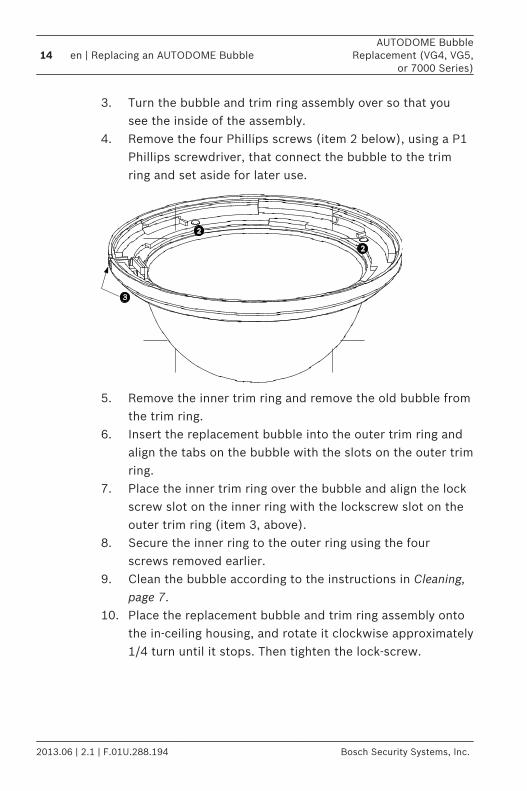
3. Turn the bubble and trim ring assembly over so that yousee the inside of the assembly.
4. Remove the four Phillips screws (item 2 below), using a P1Phillips screwdriver, that connect the bubble to the trimring and set aside for later use.
5. Remove the inner trim ring and remove the old bubble fromthe trim ring.
6. Insert the replacement bubble into the outer trim ring andalign the tabs on the bubble with the slots on the outer trimring.
7. Place the inner trim ring over the bubble and align the lockscrew slot on the inner ring with the lockscrew slot on theouter trim ring (item 3, above).
8. Secure the inner ring to the outer ring using the fourscrews removed earlier.
9. Clean the bubble according to the instructions in Cleaning,page 7.
10. Place the replacement bubble and trim ring assembly ontothe in-ceiling housing, and rotate it clockwise approximately1/4 turn until it stops. Then tighten the lock-screw.
14 en | Replacing an AUTODOME BubbleAUTODOME Bubble
Replacement (VG4, VG5,or 7000 Series)
2013.06 | 2.1 | F.01U.288.194 Bosch Security Systems, Inc.
Replacing an In-ceiling Acrylic Bubble
Notice!
The following instructions are for bubbles VGA-BUBBLE-CCLA
and VGA-BUBBLE-CTIA.
These bubbles come assembled with a white trim ring. An
optional black trim ring is supplied. To replace the white trim
ring, follow steps 3 – 6. Otherwise, skip from step 2 to step 7.
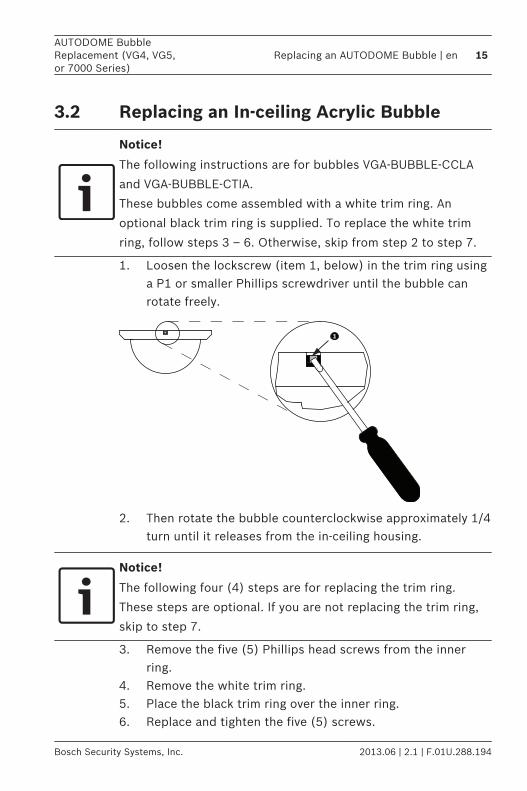
1. Loosen the lockscrew (item 1, below) in the trim ring usinga P1 or smaller Phillips screwdriver until the bubble canrotate freely.
2. Then rotate the bubble counterclockwise approximately 1/4turn until it releases from the in-ceiling housing.
Notice!
The following four (4) steps are for replacing the trim ring.
These steps are optional. If you are not replacing the trim ring,
skip to step 7.
3. Remove the five (5) Phillips head screws from the innerring.
4. Remove the white trim ring.5. Place the black trim ring over the inner ring.6. Replace and tighten the five (5) screws.
3.2
AUTODOME BubbleReplacement (VG4, VG5,or 7000 Series)
Replacing an AUTODOME Bubble | en 15
Bosch Security Systems, Inc. 2013.06 | 2.1 | F.01U.288.194
7. Clean the bubble according to the instructions in Cleaning,page 7.
8. Place the replacement bubble onto the in-ceiling housing,and rotate it clockwise approximately 1/4 turn until itstops. Then tighten the lock-screw.
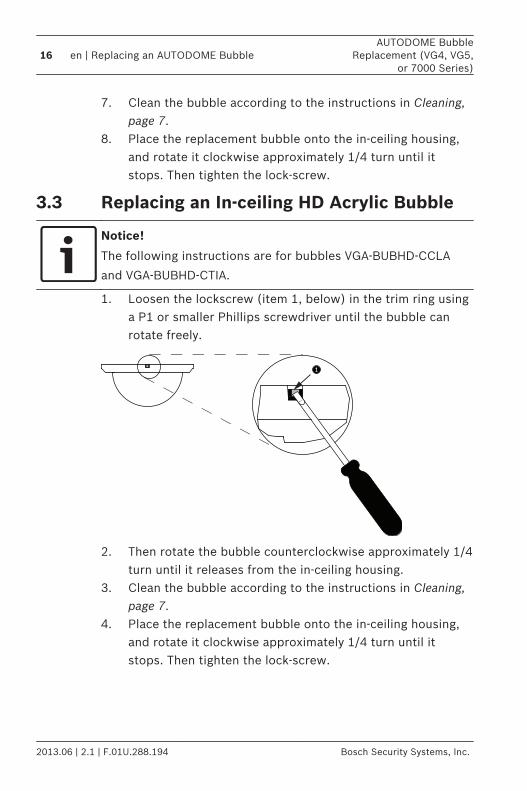
Replacing an In-ceiling HD Acrylic Bubble
Notice!
The following instructions are for bubbles VGA-BUBHD-CCLA
and VGA-BUBHD-CTIA.
1. Loosen the lockscrew (item 1, below) in the trim ring usinga P1 or smaller Phillips screwdriver until the bubble canrotate freely.
2. Then rotate the bubble counterclockwise approximately 1/4turn until it releases from the in-ceiling housing.
3. Clean the bubble according to the instructions in Cleaning,page 7.
4. Place the replacement bubble onto the in-ceiling housing,and rotate it clockwise approximately 1/4 turn until itstops. Then tighten the lock-screw.
3.3
16 en | Replacing an AUTODOME BubbleAUTODOME Bubble
Replacement (VG4, VG5,or 7000 Series)
2013.06 | 2.1 | F.01U.288.194 Bosch Security Systems, Inc.
!
Warning!
Trim ring can become deformed
If the trim ring is not turned completely, the screw slot on the
trim ring will not be aligned with the screw slot in the housing.
You cannot see the screw slot in the housing when you are
turning the screw in the slot in the trim ring. You can turn the
screw in the slot in the trim ring, but miss the screw slot on the
housing. Forcing the screw into the trim ring (without the screw
going into the screw slot in the housing) can deform the ring.
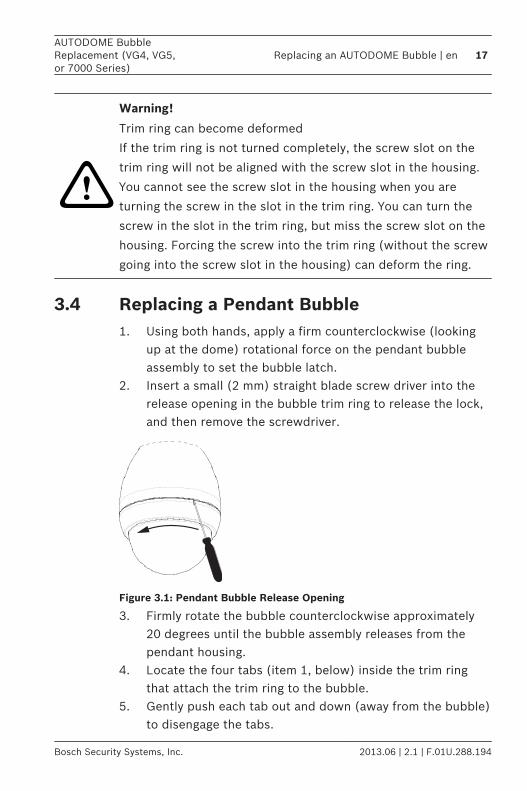
Replacing a Pendant Bubble1. Using both hands, apply a firm counterclockwise (looking
up at the dome) rotational force on the pendant bubbleassembly to set the bubble latch.
2. Insert a small (2 mm) straight blade screw driver into therelease opening in the bubble trim ring to release the lock,and then remove the screwdriver.
Figure 3.1: Pendant Bubble Release Opening
3. Firmly rotate the bubble counterclockwise approximately20 degrees until the bubble assembly releases from thependant housing.
4. Locate the four tabs (item 1, below) inside the trim ringthat attach the trim ring to the bubble.
5. Gently push each tab out and down (away from the bubble)to disengage the tabs.
3.4
AUTODOME BubbleReplacement (VG4, VG5,or 7000 Series)
Replacing an AUTODOME Bubble | en 17
Bosch Security Systems, Inc. 2013.06 | 2.1 | F.01U.288.194
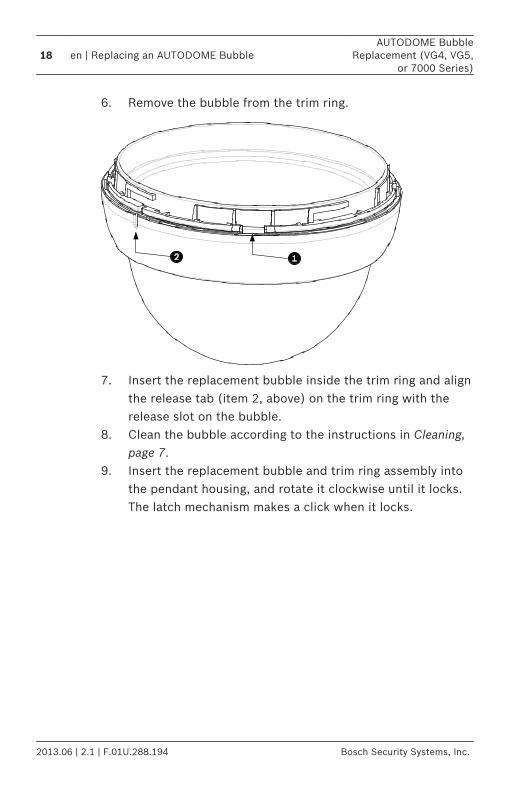
6. Remove the bubble from the trim ring.
7. Insert the replacement bubble inside the trim ring and alignthe release tab (item 2, above) on the trim ring with therelease slot on the bubble.
8. Clean the bubble according to the instructions in Cleaning,page 7.
9. Insert the replacement bubble and trim ring assembly intothe pendant housing, and rotate it clockwise until it locks.The latch mechanism makes a click when it locks.
18 en | Replacing an AUTODOME BubbleAUTODOME Bubble
Replacement (VG4, VG5,or 7000 Series)
2013.06 | 2.1 | F.01U.288.194 Bosch Security Systems, Inc.

Bosch Security Systems, Inc.
850 Greenfield Road
Lancaster, PA, 17601
USA
www.boschsecurity.com
© Bosch Security Systems, Inc., 2013